PP_WebsitePaymentsStandard_IntegrationGuide PP Website Payments Standard Integration Guide
User Manual:
Open the PDF directly: View PDF ![]() .
.
Page Count: 138 [warning: Documents this large are best viewed by clicking the View PDF Link!]
- Website Payments Standard Integration Guide
- Preface
- How Website Payments Standard Works
- Using Your Merchant Account Profile and Tools
- The Account Profile Summary
- Branding PayPal’s Payment Pages
- Streamlining Purchases with Website Payment Preferences
- Blocking Certain Kinds of Payment
- Blocking Payments From U.S. Users Without a Confirmed Address
- Blocking Payments in a Currency You Do Not Hold
- Blocking Payments From Users With Non-U.S. PayPal Accounts
- Blocking Payments From the Pay Anyone Subtab
- Blocking Payments Funded By Credit Cards When Sender Has a Bank Account
- Blocking Payments Funded By eChecks
- Adding Your Credit Card Statement Name
- Getting Customer Contact Telephone Numbers
- Language Encoding Your Data
- Multi-User Access to Your PayPal Account
- PayPal-Supported Currencies
- Accepting or Denying Cross-Currency Payments
- Managing Currency Balances
- Issuing Refunds
- Single-Item Payment: Buy Now and Donations
- Multiple-Item Payment: Shopping Cart
- Using Authorization & Capture with Website Payments Standard
- Encrypted Website Payments
- Testing in the PayPal Sandbox
- Website Payments Standard HTML FORM Basics
- Website Payments Standard HTML Variables
- Country Codes
- Index

Last Updated: May 2006
For Professional Use Only
Currently only available in English.
A usage Professional Uniquement
Disponible en Anglais uniquement pour l'instant.
Website Payments
Standard Integration
Guide
© 2006 PayPal Inc. All rights reserved. PayPal and the PayPal logo are registered trademarks of PayPal Inc. Other trademarks and brands are the
property of their respective owners.
The information in this document belongs to PayPal Inc. It may not be used, reproduced or disclosed without the written approval of PayPal Inc.
PayPal (Europe) Ltd. is authorised and regulated by the Financial Services Authority in the United Kingdom as an electronic money institution.
PayPal FSA Register Number: 226056.
Notice of non-liability:
PayPal Inc. is providing the information in this document to you “AS-IS” with all faults. PayPal Inc. makes no warranties of any kind (whether express,
implied or statutory) with respect to the information contained herein. PayPal Inc. assumes no liability for damages (whether direct or indirect), caused
by errors or omissions, or resulting from the use of this document or the information contained in this document or resulting from the application or use
of the product or service described herein. PayPal Inc. reserves the right to make changes to any information herein without further notice.
PayPal Inc. does not guarantee that the features described in this document will be announced or made available to anyone in the future.
PayPal Website Payments Standard Integration
Guide

Website Payments Standard Integration Guide May 2006 3
Contents
Preface . . . . . . . . . . . . . . . . . . . . . . . . . . . . . . . . . .13
This Document . . . . . . . . . . . . . . . . . . . . . . . . . . . . . . . . . . . . . . . . 13
Intended Audience . . . . . . . . . . . . . . . . . . . . . . . . . . . . . . . . . . . . . . 13
Notational Conventions . . . . . . . . . . . . . . . . . . . . . . . . . . . . . . . . . . . 13
Documentation Problems . . . . . . . . . . . . . . . . . . . . . . . . . . . . . . . . . . 14
Get Started Quickly: Integration Center . . . . . . . . . . . . . . . . . . . . . . . . . . . 14
Revision History . . . . . . . . . . . . . . . . . . . . . . . . . . . . . . . . . . . . . . . 15
Chapter 1 How Website Payments Standard Works . . . . . . . . . .17
Example of the Basic Page Sequence . . . . . . . . . . . . . . . . . . . . . . . . . . . . 18
How You Get Your Money . . . . . . . . . . . . . . . . . . . . . . . . . . . . . . . . . . 23
Notifications You Receive . . . . . . . . . . . . . . . . . . . . . . . . . . . . . . . . . . 23
Email. . . . . . . . . . . . . . . . . . . . . . . . . . . . . . . . . . . . . . . . . . . 23
Transaction History . . . . . . . . . . . . . . . . . . . . . . . . . . . . . . . . . . . 24
Downloadable History Log. . . . . . . . . . . . . . . . . . . . . . . . . . . . . . . . 24
Instant Payment Notification (IPN). . . . . . . . . . . . . . . . . . . . . . . . . . . . 24
How To Use This Guide . . . . . . . . . . . . . . . . . . . . . . . . . . . . . . . . . . . 25
Other Standard Products and Features . . . . . . . . . . . . . . . . . . . . . . . . . 26
Website Payments Pro . . . . . . . . . . . . . . . . . . . . . . . . . . . . . . . . . 26
Get Started Quickly: Integration Center . . . . . . . . . . . . . . . . . . . . . . . . . . . 26
Related Online Information. . . . . . . . . . . . . . . . . . . . . . . . . . . . . . . . . . 26
Complementary Technical Documentation. . . . . . . . . . . . . . . . . . . . . . . . . . 27
Chapter 2 Using Your Merchant Account Profile and Tools . . . . . .31
The Account Profile Summary . . . . . . . . . . . . . . . . . . . . . . . . . . . . . . . . 31
Account Information . . . . . . . . . . . . . . . . . . . . . . . . . . . . . . . . . . . 32
Financial Information . . . . . . . . . . . . . . . . . . . . . . . . . . . . . . . . . . 32
Selling Preferences . . . . . . . . . . . . . . . . . . . . . . . . . . . . . . . . . . . 32
Correspondence Between Profile Settings and HTML Variables . . . . . . . . . . . . 33
Branding PayPal’s Payment Pages . . . . . . . . . . . . . . . . . . . . . . . . . . . . . 33
Working with Custom Payment Pages. . . . . . . . . . . . . . . . . . . . . . . . . . 35
Adding or Editing a Page Style . . . . . . . . . . . . . . . . . . . . . . . . . . . . . 36

Contents
4May 2006 Website Payments Standard Integration Guide
Making a Page Style Primary . . . . . . . . . . . . . . . . . . . . . . . . . . . . . . 37
Overriding Page Style Settings On Individual Transactions . . . . . . . . . . . . . . . 38
Streamlining Purchases with Website Payment Preferences . . . . . . . . . . . . . . . . 38
Account Optional or Website Payments Express . . . . . . . . . . . . . . . . . . . . 39
Auto Return . . . . . . . . . . . . . . . . . . . . . . . . . . . . . . . . . . . . . . . 46
Automatic Calculation of Shipping and Handling Cost and Tax . . . . . . . . . . . . . 48
Blocking Certain Kinds of Payment . . . . . . . . . . . . . . . . . . . . . . . . . . . . . 50
Blocking Payments From U.S. Users Without a Confirmed Address . . . . . . . . . . 50
Blocking Payments in a Currency You Do Not Hold . . . . . . . . . . . . . . . . . . . 51
Blocking Payments From Users With Non-U.S. PayPal Accounts . . . . . . . . . . . 51
Blocking Payments From the Pay Anyone Subtab . . . . . . . . . . . . . . . . . . . 51
Blocking Payments Funded By Credit Cards When Sender Has a Bank Account . . . 52
Blocking Payments Funded By eChecks . . . . . . . . . . . . . . . . . . . . . . . . 52
Adding Your Credit Card Statement Name. . . . . . . . . . . . . . . . . . . . . . . . . . 52
Getting Customer Contact Telephone Numbers . . . . . . . . . . . . . . . . . . . . . . . 53
Activating Customer Contact Telephone. . . . . . . . . . . . . . . . . . . . . . . . . 53
Language Encoding Your Data. . . . . . . . . . . . . . . . . . . . . . . . . . . . . . . . 54
Changing Your Language Encoding . . . . . . . . . . . . . . . . . . . . . . . . . . . 54
Navigating Your Profile: Language Encoding . . . . . . . . . . . . . . . . . . . . . . 54
Changing Your Website Language . . . . . . . . . . . . . . . . . . . . . . . . . . . 55
More Encoding Options . . . . . . . . . . . . . . . . . . . . . . . . . . . . . . . . . 57
Setting Language Encoding On Individual Transactions . . . . . . . . . . . . . . . . 57
Multi-User Access to Your PayPal Account . . . . . . . . . . . . . . . . . . . . . . . . . 58
PayPal-Supported Currencies . . . . . . . . . . . . . . . . . . . . . . . . . . . . . . . . 59
Accepting or Denying Cross-Currency Payments . . . . . . . . . . . . . . . . . . . . . . 60
Managing Currency Balances . . . . . . . . . . . . . . . . . . . . . . . . . . . . . . . . 60
Issuing Refunds . . . . . . . . . . . . . . . . . . . . . . . . . . . . . . . . . . . . . . . 61
Refunding Within 60 Days of Payment . . . . . . . . . . . . . . . . . . . . . . . . . 61
Refunding After 60 Days. . . . . . . . . . . . . . . . . . . . . . . . . . . . . . . . . 61
Chapter 3 Single-Item Payment: Buy Now and Donations . . . . . . .63
Using Buy Now or Donations Button Factory . . . . . . . . . . . . . . . . . . . . . . . . 63
Adding More Details to the Button . . . . . . . . . . . . . . . . . . . . . . . . . . . . 64
Copy and Paste the HTML Code . . . . . . . . . . . . . . . . . . . . . . . . . . . . 66
Sample Buy Now Button HTML and Hyperlink . . . . . . . . . . . . . . . . . . . . . . . 67
Chapter 4 Multiple-Item Payment: Shopping Cart . . . . . . . . . . .69
How the PayPal-Hosted Shopping Cart Works . . . . . . . . . . . . . . . . . . . . . . . 69

Website Payments Standard Integration Guide May 2006 5
Contents
What The Customer Sees . . . . . . . . . . . . . . . . . . . . . . . . . . . . . . . . 70
Button Factory for PayPal-Hosted Shopping Cart . . . . . . . . . . . . . . . . . . . . . . 75
Adding More Details to the Button . . . . . . . . . . . . . . . . . . . . . . . . . . . . 76
Copy and Paste the Shopping Cart HTML. . . . . . . . . . . . . . . . . . . . . . . . 77
Sample HTML for PayPal-Hosted Shopping Cart . . . . . . . . . . . . . . . . . . . . . . 78
How A Third-Party Shopping Cart Works . . . . . . . . . . . . . . . . . . . . . . . . . . 79
What The Customer Sees . . . . . . . . . . . . . . . . . . . . . . . . . . . . . . . . 79
What You See . . . . . . . . . . . . . . . . . . . . . . . . . . . . . . . . . . . . . . 86
Adding PayPal to Your Third-party Shopping Cart . . . . . . . . . . . . . . . . . . . . . 86
Required Third-Party Shopping Cart Variables . . . . . . . . . . . . . . . . . . . . . 86
Passing Individual Item Details to PayPal . . . . . . . . . . . . . . . . . . . . . . . . 87
Setting the Tax for the Entire Cart. . . . . . . . . . . . . . . . . . . . . . . . . . . 88
Passing the Aggregate Shopping Cart Amount to PayPal. . . . . . . . . . . . . . . . 88
Chapter 5 Using Authorization & Capture with Website Payments
Standard91
Basic Authorization Process . . . . . . . . . . . . . . . . . . . . . . . . . . . . . . . . . 92
Honor Period and Authorization Period . . . . . . . . . . . . . . . . . . . . . . . . . 92
Supported PayPal Payment Products . . . . . . . . . . . . . . . . . . . . . . . . . . 93
Basic Authorization & Capture Scenarios . . . . . . . . . . . . . . . . . . . . . . . . . . 94
Capture Within 3 Days. . . . . . . . . . . . . . . . . . . . . . . . . . . . . . . . . . 94
Capture From 4 - 29 Days . . . . . . . . . . . . . . . . . . . . . . . . . . . . . . . . 94
One Authorization, Multiple Captures, and a Refund . . . . . . . . . . . . . . . . . . 95
Lower Capture Amount . . . . . . . . . . . . . . . . . . . . . . . . . . . . . . . . . 96
Capture Up to 115% . . . . . . . . . . . . . . . . . . . . . . . . . . . . . . . . . . . 97
Authorization Expires . . . . . . . . . . . . . . . . . . . . . . . . . . . . . . . . . . 98
Void . . . . . . . . . . . . . . . . . . . . . . . . . . . . . . . . . . . . . . . . . . . 98
Best Practices . . . . . . . . . . . . . . . . . . . . . . . . . . . . . . . . . . . . . . . .100
Capturing Funds on Basic Authorizations . . . . . . . . . . . . . . . . . . . . . . . .100
Buyer Approval for Basic Authorizations. . . . . . . . . . . . . . . . . . . . . . . . .101
Voiding Basic Authorizations. . . . . . . . . . . . . . . . . . . . . . . . . . . . . . .101
Chapter 6 Encrypted Website Payments . . . . . . . . . . . . . . . 103
Prerequisites to Using EWP . . . . . . . . . . . . . . . . . . . . . . . . . . . . . . . . .103
Public Key Encryption Background . . . . . . . . . . . . . . . . . . . . . . . . . . . . .104
Setting Up The Certificates . . . . . . . . . . . . . . . . . . . . . . . . . . . . . . . . .104
Creating Your Private Key Using OpenSSL . . . . . . . . . . . . . . . . . . . . . . .104
Creating Your Public Certificate Using OpenSSL . . . . . . . . . . . . . . . . . . . .105

Contents
6May 2006 Website Payments Standard Integration Guide
Downloading PayPal's Public Certificate . . . . . . . . . . . . . . . . . . . . . . . .105
Removing Your Public Certificate . . . . . . . . . . . . . . . . . . . . . . . . . . . .106
Encrypting Your HTML . . . . . . . . . . . . . . . . . . . . . . . . . . . . . . . . . . . .106
Blocking Unencrypted Website Payments . . . . . . . . . . . . . . . . . . . . . . . . . .108
Chapter 7 Testing in the PayPal Sandbox . . . . . . . . . . . . . . 109
Chapter 8 Website Payments Standard HTML FORM Basics . . . . . 111
FORM Attributes: ACTION and METHOD . . . . . . . . . . . . . . . . . . . . . . . . . . 111
Hidden Input Variables . . . . . . . . . . . . . . . . . . . . . . . . . . . . . . . . . . . . 111
Specifying the Website Payments Standard Product: cmd. . . . . . . . . . . . . . . . . . 111
Variations on Basic Variables . . . . . . . . . . . . . . . . . . . . . . . . . . . . . . . .112
Prompting for Quantity in Buy Now or Donations: undefined_quantity . . . . . . . . .112
Recordkeeping with Passthrough Variables . . . . . . . . . . . . . . . . . . . . . . .112
Setting the Character Set: charset. . . . . . . . . . . . . . . . . . . . . . . . . . . .113
Setting Return URL on Individual Transactions . . . . . . . . . . . . . . . . . . . . .113
Desired Currency on Individual Transactions . . . . . . . . . . . . . . . . . . . . . .113
URL-Encoding Variable Values . . . . . . . . . . . . . . . . . . . . . . . . . . . . .114
Prepopulating FORMs . . . . . . . . . . . . . . . . . . . . . . . . . . . . . . . . . . . .114
Sample HTML for FORM Prepopulation. . . . . . . . . . . . . . . . . . . . . . . . .114
Overriding PayPal-Stored Addresses . . . . . . . . . . . . . . . . . . . . . . . . . . . .115
Sample HTML for Overriding PayPal-Stored Shipping Addresses . . . . . . . . . . .115
Instant Payment Notification: notify_url . . . . . . . . . . . . . . . . . . . . . . . . . . .116
Appendix A Website Payments Standard HTML Variables . . . . . . . 119
Chapter A Country Codes . . . . . . . . . . . . . . . . . . . . . . 129
Index. . . . . . . . . . . . . . . . . . . . . . . . . . . . . . . . . . . 135

May 2006 7
List of Tables
Table P.1 Revision History . . . . . . . . . . . . . . . . . . . . . . . . . . . . . . 15
Table 1.2 How To Use This Guide . . . . . . . . . . . . . . . . . . . . . . . . . . 25
Table 1.3 Hyperlinks for Fees, Security, User Agreement, Policies, Online Help, and
Customer Service 26
Table 1.4 27
Table 2.5 Order of Page Style Customization Variables . . . . . . . . . . . . . . . 38
Table 2.6 PayPal-Supported Currencies, Currency Codes, and Maximum Transaction
Amounts 59
Table 4.7 Required Third-Party Shopping Cart Variables . . . . . . . . . . . . . . 87
Table 5.8 PayPal Products Supporting Authorization & Capture . . . . . . . . . . . 93
Table 6.9 How Encrypted Website Payments Work . . . . . . . . . . . . . . . . .103
Table 6.10 Command Line Syntax for PayPal Encrypted Website Payments Software . .
107
Table 6.11 Description of Arguments for EWP Commands . . . . . . . . . . . . . .107
Table 8.12 Allowed Values for cmd Variable . . . . . . . . . . . . . . . . . . . . . .112
Table 8.13 Character Sets and Encodings Supported by PayPal . . . . . . . . . . .113
Table A.14 Allowed Values for cmd Variable . . . . . . . . . . . . . . . . . . . . . .119
Table A.15 HTML Variables: IPN Control notify_url . . . . . . . . . . . . . . . . . .119
Table A.16 HTML Variables: Item Information . . . . . . . . . . . . . . . . . . . . .119
Table A.17 HTML Variables: Display Information . . . . . . . . . . . . . . . . . . .121
Table A.18 HTML Variables: Transaction Information . . . . . . . . . . . . . . . . .123
Table A.19 HTML Variables Specific to Shopping Carts . . . . . . . . . . . . . . . .124
Table A.20 HTML Variables: Individual Items in Third-Party Shopping Carts . . . . .125
Table A.21 HTML Variables: Prepopulating PayPal FORMs or Address Overriding . .126
Table A.22 HTML Variables: Prepopulating Business Account Sign-up . . . . . . . .127

List of Tables
8May 2006

May 2006 9
List of Figures
Figure 1.1 Basic Website Payments Standard Page Sequence . . . . . . 17
Figure 1.2 Beginning of Basic Page Sequence on Your Website . . . . . . 18
Figure 1.3 Customer Logs In to PayPal . . . . . . . . . . . . . . . . . 19
Figure 1.4 Customer Reviews Payment . . . . . . . . . . . . . . . . . 20
Figure 1.5 Payment Confirmation or “You Made a Payment” Page on PayPal 21
Figure 1.6 Customer Returns to Your Website . . . . . . . . . . . . . . 22
Figure 1.7 Account History: Recent Activity . . . . . . . . . . . . . . . 23
Figure 2.8 Account Profile Summary Page . . . . . . . . . . . . . . . 32
Figure 2.9 Uncustomized Payment Page in Standard PayPal Page Style . . 34
Figure 2.10 Complete Custom Page Style . . . . . . . . . . . . . . . . 35
Figure 2.11 Edit Custom Page Style Page . . . . . . . . . . . . . . . . 36
Figure 2.12 Website Payment Preferences on the Profile Summary Page . 39
Figure 2.13 Page Sequence with PayPal Account Optional . . . . . . . . 40
Figure 2.14 Momentary “You Made a Payment Page” with Auto Return On . 47
Figure 2.15 Payment Receiving Preferences . . . . . . . . . . . . . . . 50
Figure 2.16 Adding a Credit Card Statement Name . . . . . . . . . . . . 52
Figure 2.17 Prompt for Customer Contact Telephone Number . . . . . . . 53
Figure 2.18 Profile Selling Preferences for Language Encoding . . . . . . 55
Figure 2.19 Language Encoding Settings: Basic Choices . . . . . . . . . 56
Figure 2.20 Website Language Preference . . . . . . . . . . . . . . . . 56
Figure 2.21 More Language Encoding Options . . . . . . . . . . . . . . 57
Figure 2.22 Multi-User Access Link in Account Profile Summary . . . . . . 58
Figure 2.23 Multi-User Access: Adding a User . . . . . . . . . . . . . . 59
Figure 2.24 Accepting or Denying a Cross-Currency Payment . . . . . . . 60
Figure 4.25 PayPal-Hosted Shopping Cart Example: Add to Cart . . . . . 70
Figure 4.26 PayPal-Hosted Shopping Cart Example: On the PayPal Website 71
Figure 4.27 PayPal-Hosted Shopping Cart Example: Enter Billing Information .
72
Figure 4.28 PayPal-Hosted Shopping Cart Example: Review Page . . . . . 73
Figure 4.29 PayPal-Hosted Shopping Cart Example: Thank You Page After
Payment 74
Figure 4.30 PayPal-Hosted Shopping Cart Example: Email Transaction Receipt .
75

List of Figures
10 May 2006
Figure 4.31 Third-party Shopping Cart Example: Add to Cart . . . . . . . 80
Figure 4.32 Third-Party Shopping Cart Example: Proceed to Checkout . . 81
Figure 4.33 Third-Party Shopping Cart Example: Entering Billing Information or
Logging In 82
Figure 4.34 Third-Party Shopping Cart Example: Review Page . . . . . . 83
Figure 4.35 Shopping Cart Example: Thank You Page After Payment . . . 84
Figure 4.36 Example: Email Transaction Receipt . . . . . . . . . . . . . 85
Figure 4.37 Example: Seller’s Email Receipt . . . . . . . . . . . . . . . 86
Figure 5.38 Fundamental Authorization & Capture Process . . . . . . . . 92
Figure 5.39 Transaction Details: Completed Transaction . . . . . . . . . 94
Figure 5.40 Transaction Details: Reauthorization, Final Capture . . . . . . 95
Figure 5.41 Transaction Details: Partial Capture, Reauthorization, Refund . 96
Figure 5.42 Transaction Details: Partial Capture, Voided Transaction . . . . 97
Figure 5.43 Transaction Details: Capture up to 115% . . . . . . . . . . . 98
Figure 5.44 Transaction Details: Expired Authorization . . . . . . . . . . 98
Figure 5.45 History: Voided Transaction . . . . . . . . . . . . . . . . . 99
Figure 5.46 A Capture Error . . . . . . . . . . . . . . . . . . . . . . 100
Figure 6.47 Upload Public Certificate for EWP . . . . . . . . . . . . . . 105
Figure 6.48 Download PayPal’s Public Certificate for EWP . . . . . . . . . 106
Figure 8.49 How IPN Works: Three General Steps . . . . . . . . . . . . 116

May 2006 11
List of Examples
Example 2.1 Flat Amount Shipping Calculation . . . . . . . . . . . . . . . . . . . . . 49
Example 2.2 Percentage Shipping Calculation . . . . . . . . . . . . . . . . . . . . . . 49
Example 3.3 HTML for Buy Now Button . . . . . . . . . . . . . . . . . . . . . . . . . 67
Example 4.4 HTML for PayPal-Hosted Shopping Cart “Add to Cart” Button . . . . . . . 78
Example 4.5 HTML for Passing Individual Item Detail to PayPal. . . . . . . . . . . . . 87
Example 4.6 HTML for Aggregate Cart Detail to PayPal . . . . . . . . . . . . . . . . . 88
Example 8.7 HTML for FORM Prepopulation. . . . . . . . . . . . . . . . . . . . . . .114
Example 8.8 HTML for Overriding PayPal-Stored Address. . . . . . . . . . . . . . . .115

List of Examples
12 May 2006

Website Payments Standard Integration Guide May 2006 13
PPreface
This Document
This document, the PayPal Website Payments Standard Integration Guide, is a complete
revision of the version issued in March 2006.
Intended Audience
This document is for merchants whose websites obtain payments using PayPal features.
Notational Conventions
This document uses typefaces to identify the characteristics of text. These typefaces and the
characteristics they imply are described below:
Typeface How Used
serif italics A document title.
A term being discussed or defined.
For example: A file is a readable or writable stream of characters.
Boolean values (not keywords).
For example: The function returns true if it encounters an error.
monospaced Path names or file names that appear in body text frames.
Code-related names that appear in body text frames. Such names are used for
functions, callbacks, arguments, data structures, and fields.
For example: AbstractResponseType is the SOAP response type definition on
which all PayPal API response methods are based.
Components of internet protocol requests and responses, such as HTTPS and FORM
variables.
For example: The PayPal system uses a method=POST request to return IPN status
variables related to subscriptions, such as txn_type.
Serif bold User interface names such as window names or menu selections.
For example: On the Profile page, click Email to confirm your email address.
Preface
Documentation Problems
14 May 2006 Website Payments Standard Integration Guide
To convey additional information, this document may also apply color and underlining to
words or phrases that use the typefaces described above. Such use is described below:
Documentation Problems
If you discover any errors in or have any problems with this documentation, please e-mail us
by following the instructions below. Describe the error or problem as completely as possible
and give us the document title, the date of the document (located at the foot of every page),
and the page number or page range.
To contact Developer Technical Support about documentation problems:
1. Log in to your account at https://developer.paypal.com/ by entering your email address and
password in the Member Log In box
2. Click Help Center at the bottom of the box on the right side of the page.
3. Click Email PayPal Technical Support.
Complete the form.
Get Started Quickly: Integration Center
PayPal’s Integration Center at https://www.paypal.com/integration has step-by-step details for
getting started with the PayPal Software Development Kits (SDKs), Website Payments Pro,
Express Checkout, Website Payments Standard, Authorization & Capture, Instant Payment
Notification, and more.
Visit the Integration Center at:
https://www.paypal.com/integration
San-serif
oblique Placeholders used in the context of a format or programming standard or formal
descriptions of PayPal system syntax. Placeholders indicate values or names that
the reader should provide.
Example: For example, amount is the variable for a single-item shopping cart, but
amount_X is the name of the variable for a multi-item shopping cart. amount_3
is the item amount for the third item in a multiple-item shopping cart.
Text attribute How Used
xxxxxx Hypertext link to a page in the current document or to another document in the set.
xxxxxx Hypertext link to a URL or that initiates a web action, such as sending mail.
Typeface How Used

Website Payments Standard Integration Guide May 2006 15
Preface
Revision History
Revision History
Revision history for PayPal Website Payments Standard Integration Guide.
TABLE P.1 Revision History
Date Description
May 2006 New chapter on using Authorization & Capture with Website Payments Standard.
Miscellaneous updates.
March 2006 Miscellaneous minor corrections.
Expanded description of creating Encrypted Website Payments buttons

Preface
Revision History
16 May 2006 Website Payments Standard Integration Guide
Website Payments Standard Integration Guide May 2006 17
1How Website Payments Standard
Works
The PayPal Website Payments Standard Integration Guide describes how you use Website
Payments Standard. Website Payments Standard consists of HTML FORMs on your website
that direct your customer’s web browser to the PayPal website at http://www.paypal.com in
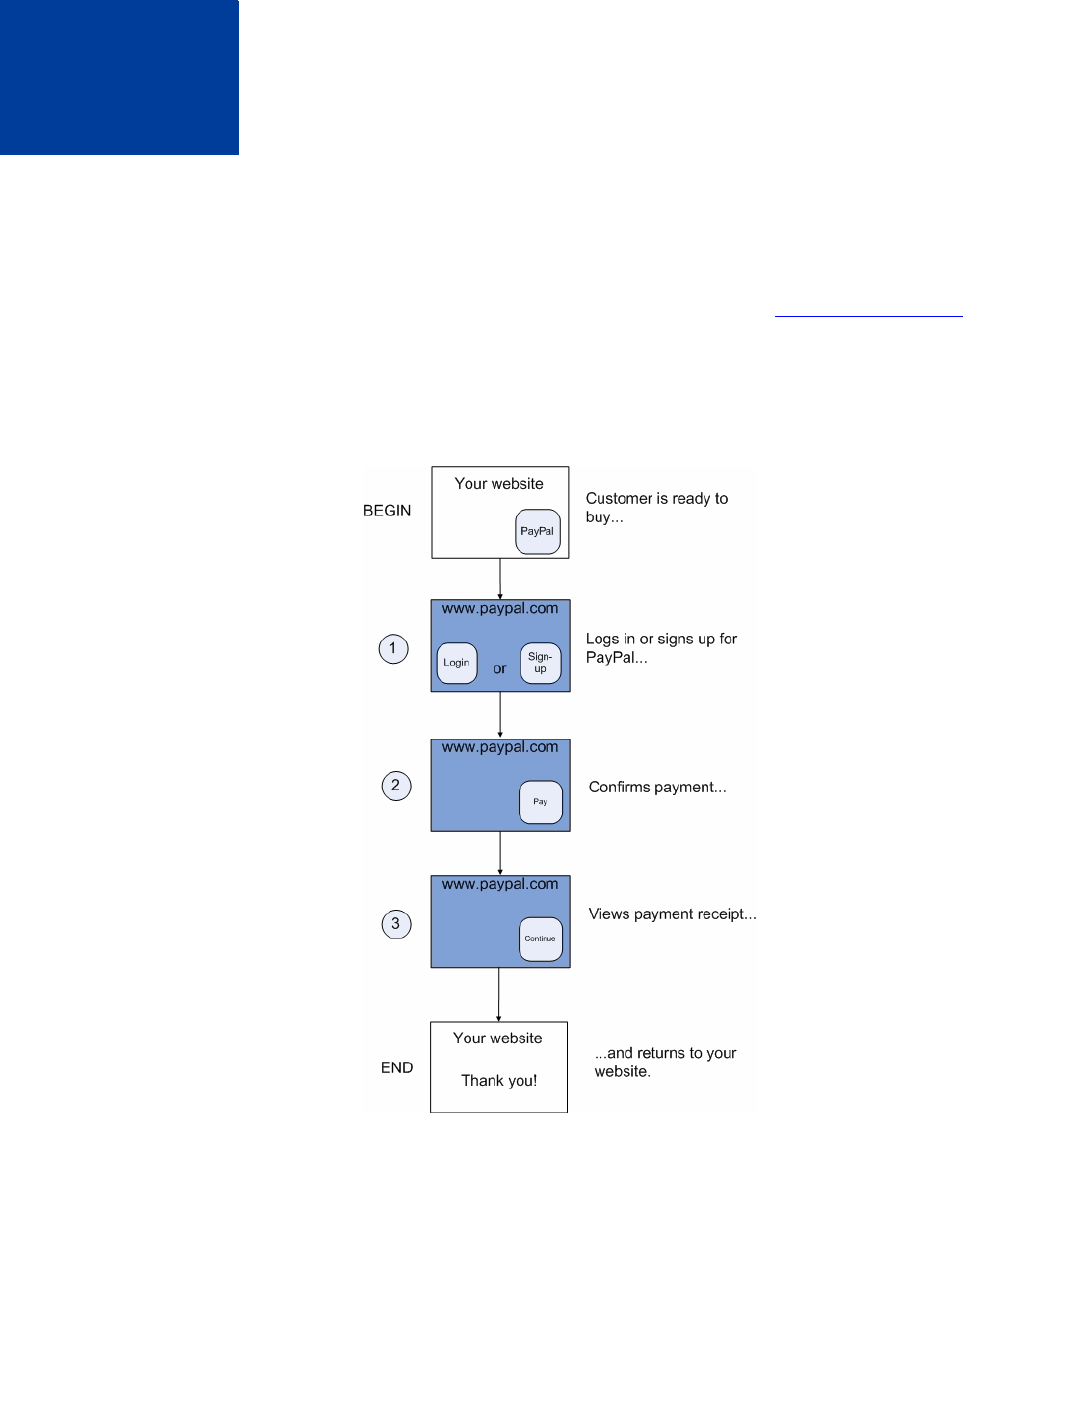
order to pay you and then return the customer to your website. Figure 1.1, “Basic Website
Payments Standard Page Sequence,” shows the basic sequence of web browser pages when a
customer pays you with PayPal Website Payments Standard.
FIGURE 1.1 Basic Website Payments Standard Page Sequence
All features of Website Payments Standard are variations on this basic page sequence. You use
HTML FORM variables and the settings in your PayPal account Profile to affect the behavior
of the basic sequence.
How Website Payments Standard Works
18 May 2006 Website Payments Standard Integration Guide
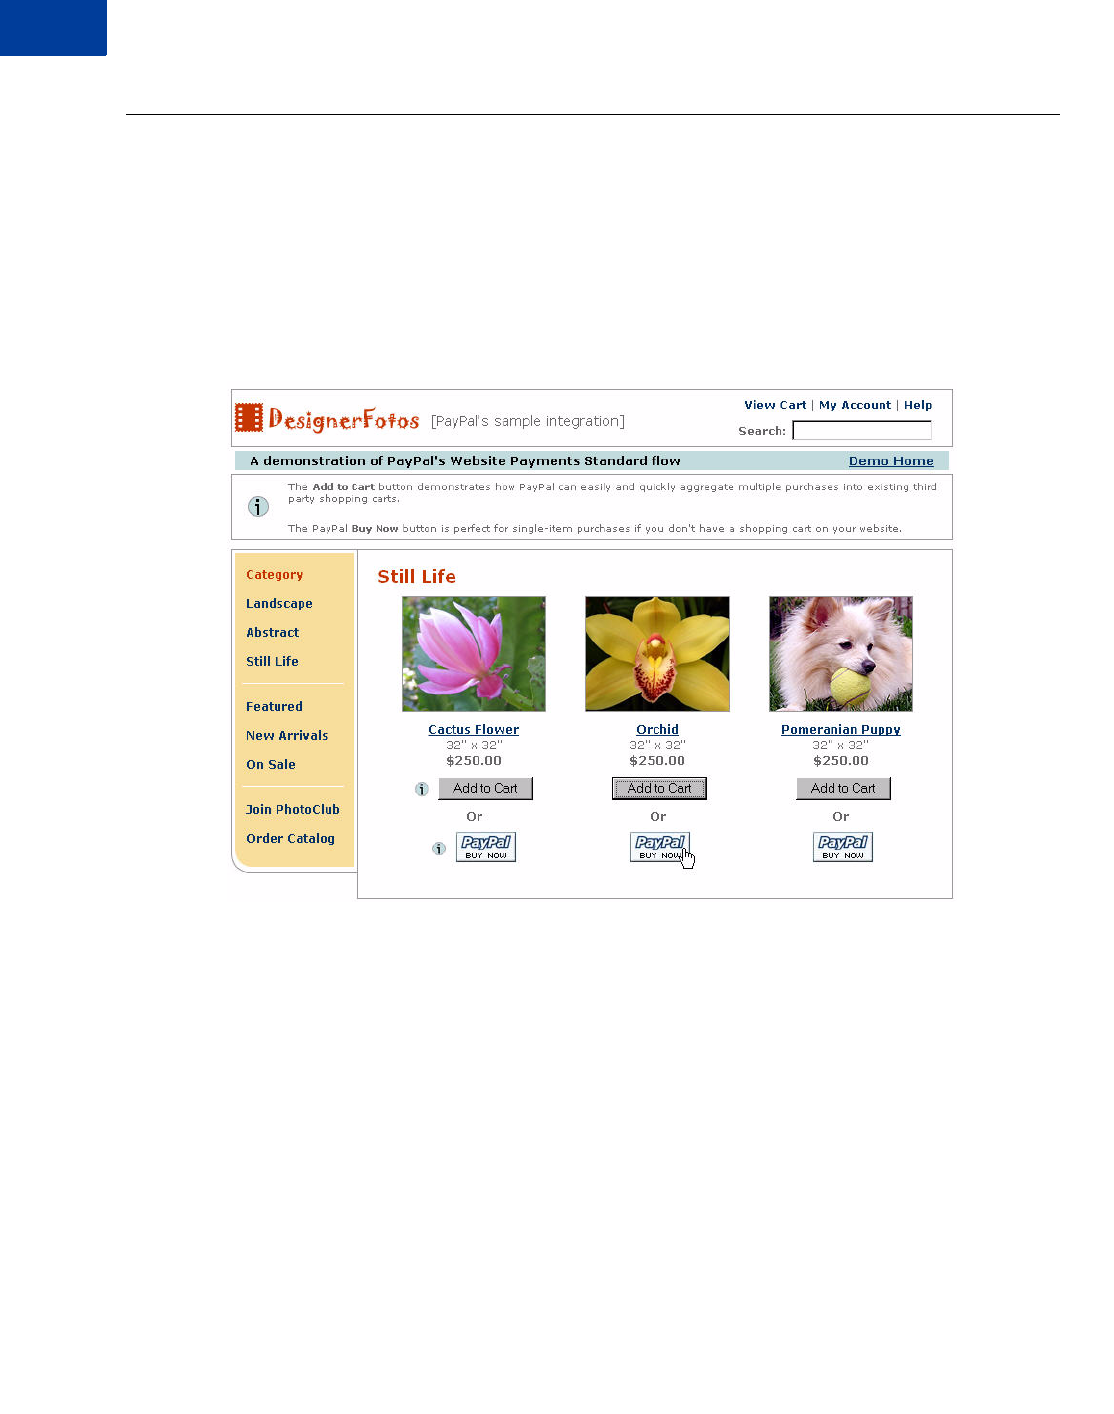
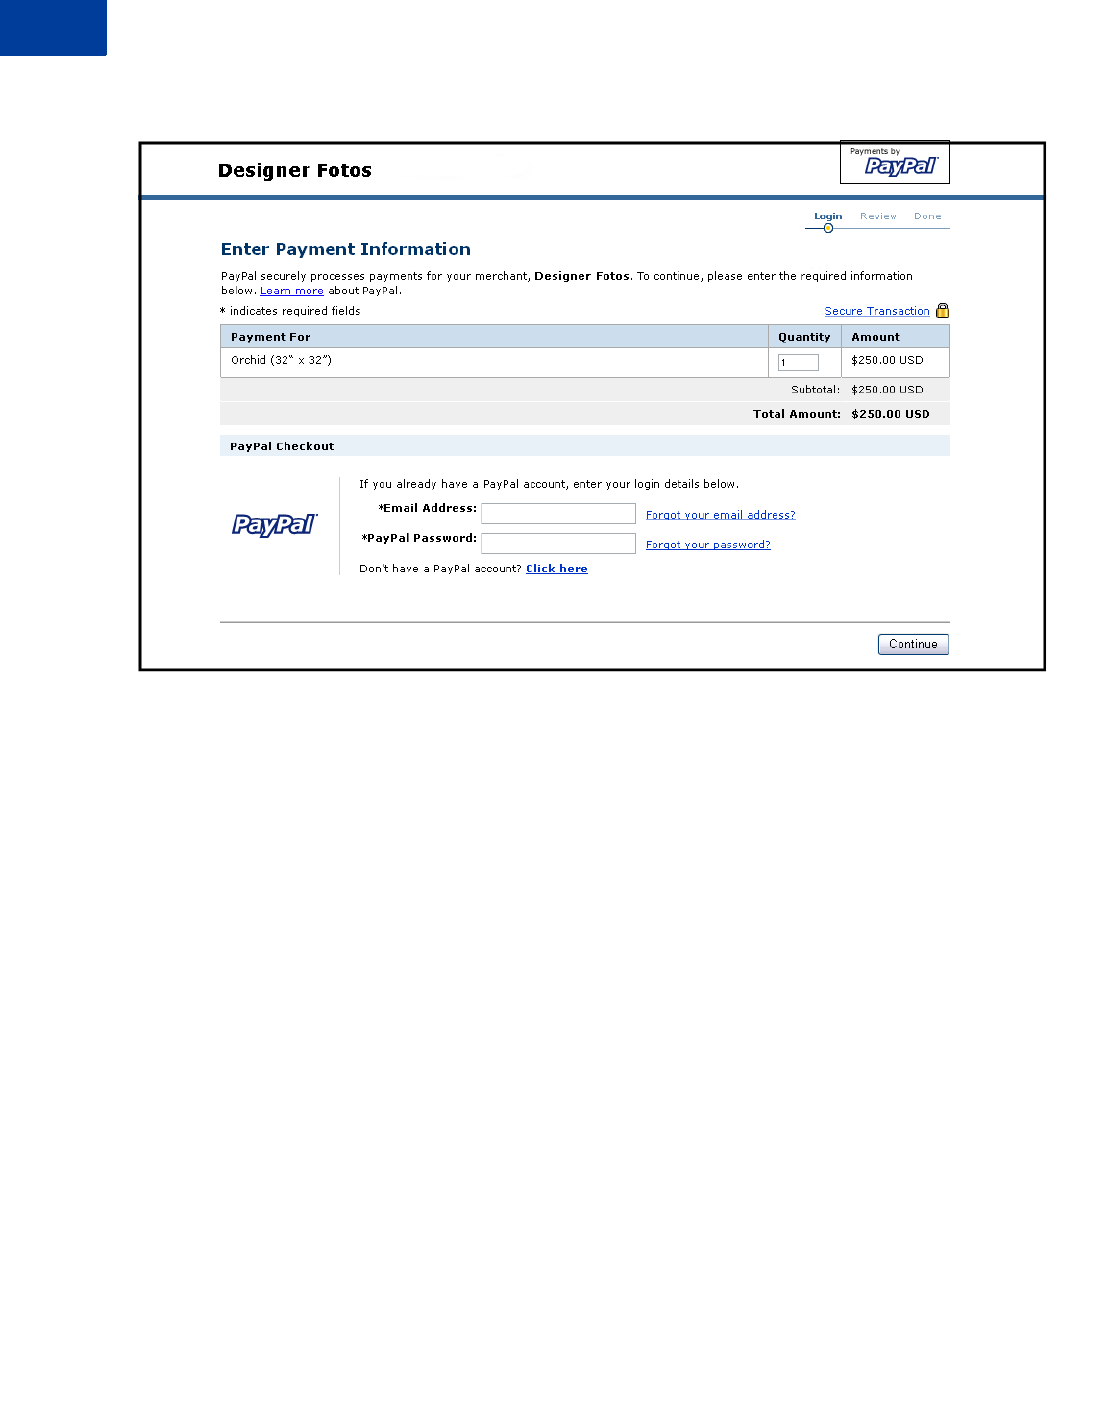
Example of the Basic Page Sequence
Here’s an example of the basic page sequence of Website Payments Standard. Like all
examples of pages in this guide, this example is based on the PayPal sample integration, which
demonstrates how PayPal has been integrated with the fictitious online store called
“DesignerFotos.”
BEGIN. The customer chooses to pay with PayPal on your website.
FIGURE 1.2 Beginning of Basic Page Sequence on Your Website
This example illustrates PayPal Buy Now, which is discussed in Chapter 3, “Single-Item
Payment: Buy Now and Donations.”
Website Payments Standard Integration Guide May 2006 19
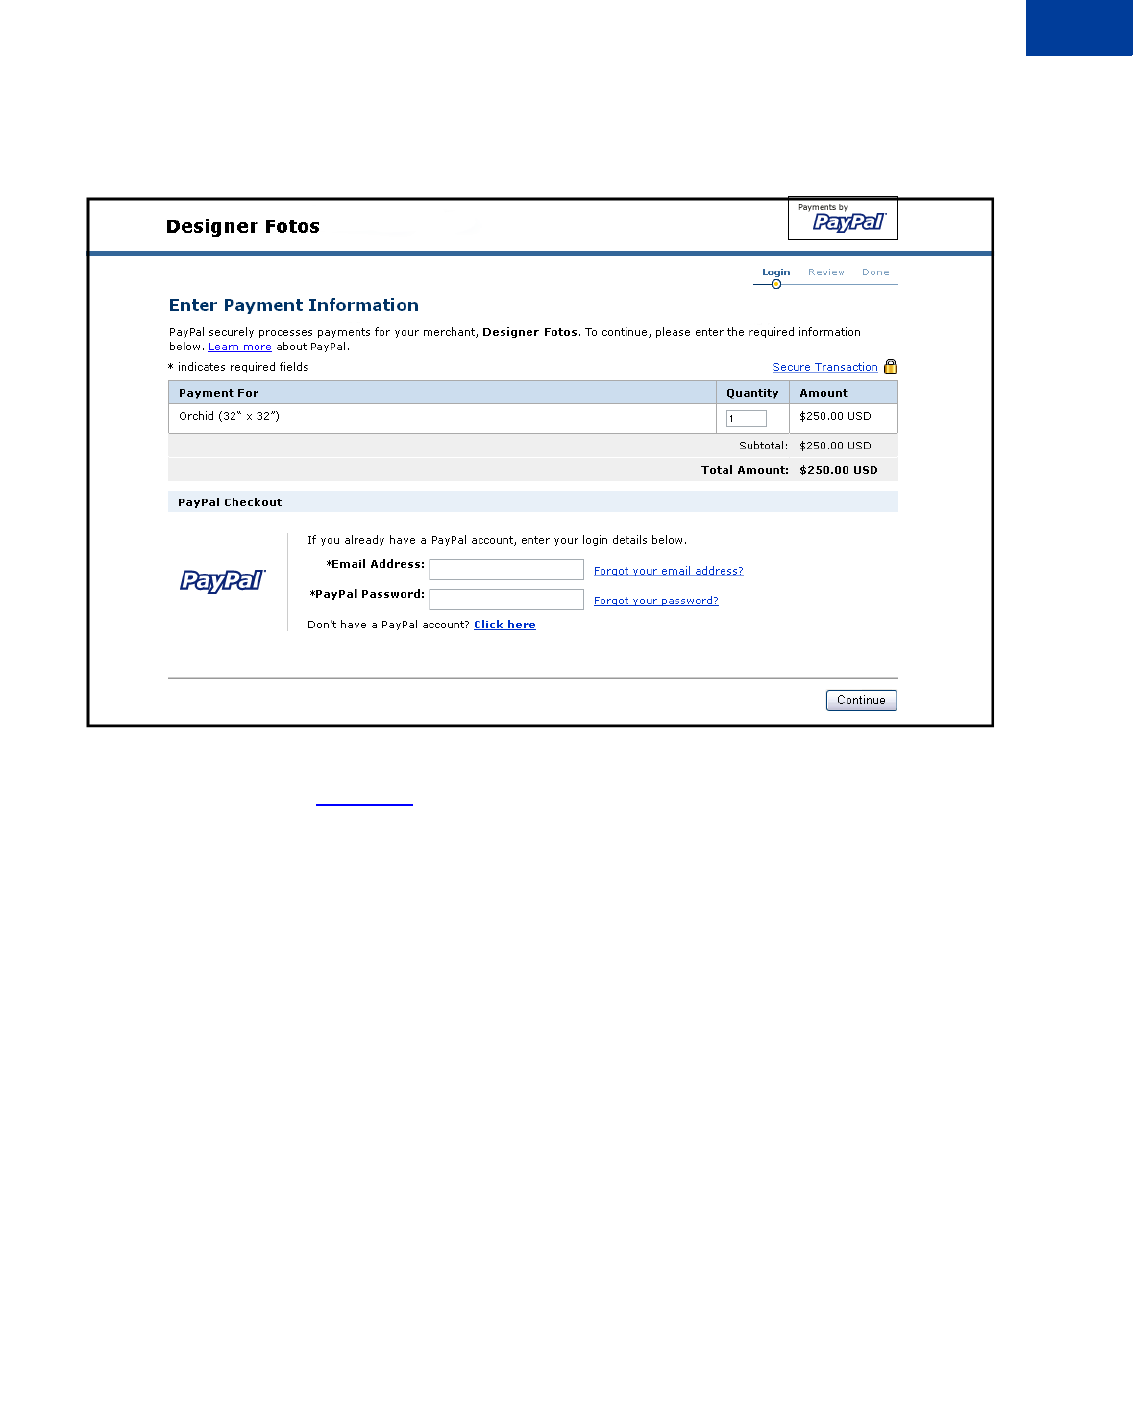
How Website Payments Standard Works
Step 1: The customer logs in to PayPal.
FIGURE 1.3 Customer Logs In to PayPal
If the customer does not have a PayPal account, he or she can still complete the payment by
clicking on the Click here link.
How Website Payments Standard Works
20 May 2006 Website Payments Standard Integration Guide
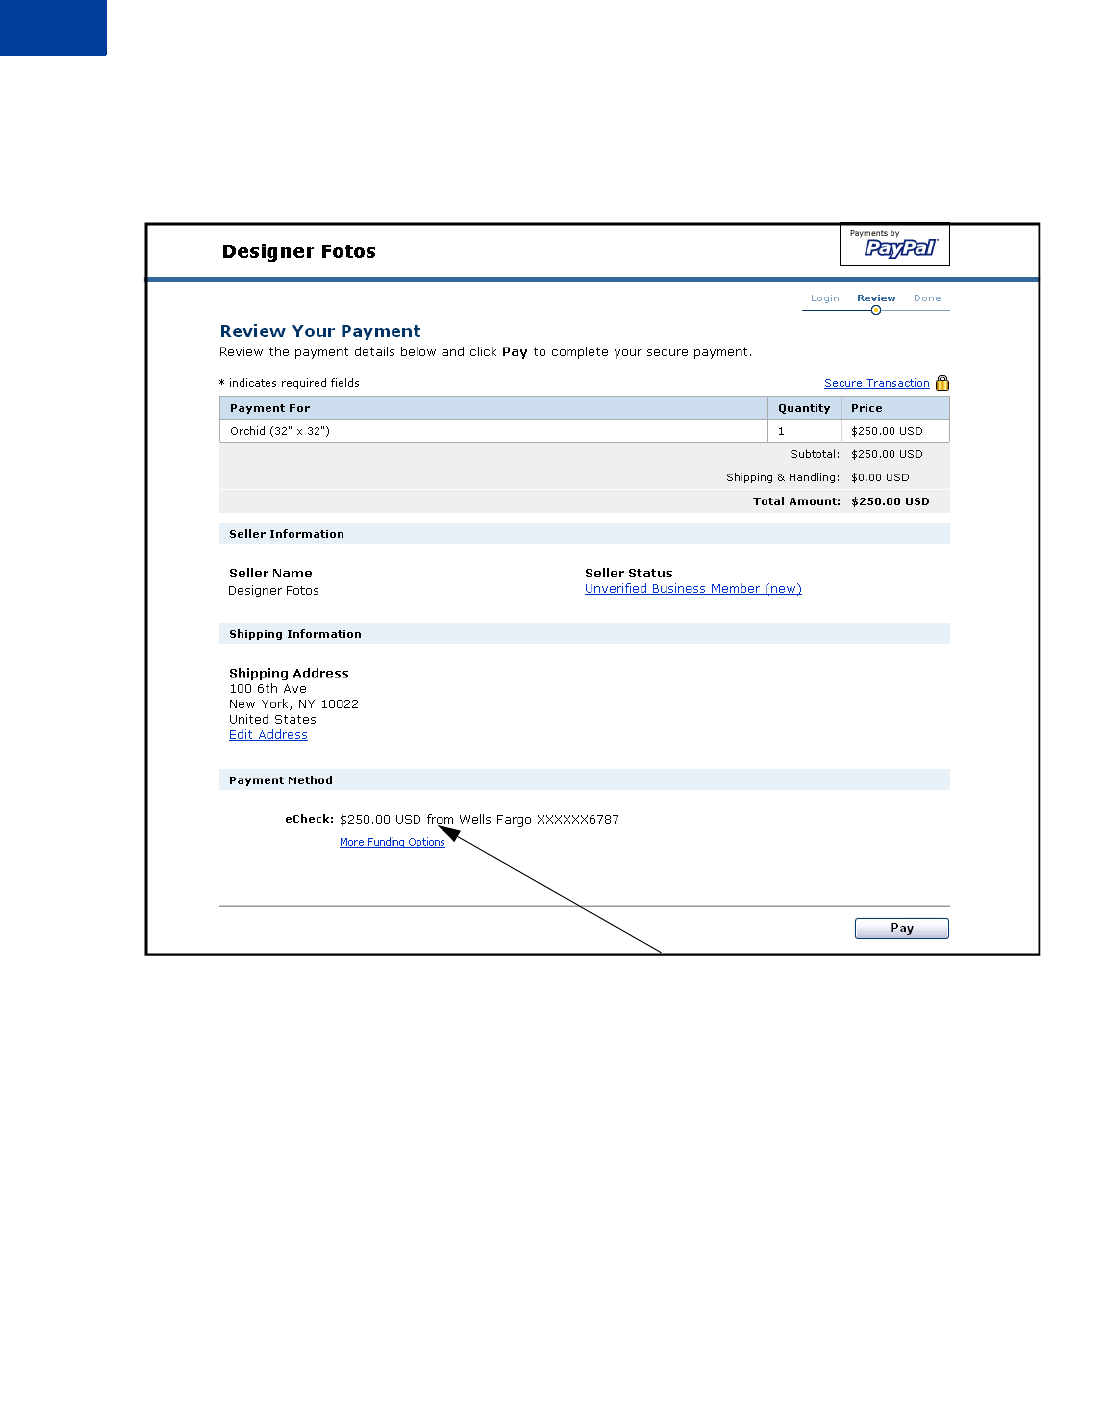
Step 2: On PayPal, the customer reviews the details of the payment and makes the payment
by clicking Pay.
FIGURE 1.4 Customer Reviews Payment
At this point, the customer can choose among funding sources (credit cards, debit cards, or
bank accounts recorded in the PayPal accounts) with which to pay you and can also choose
among shipping addresses stored on PayPal. This example does not show the pages containing
these options.
Website Payments Standard Integration Guide May 2006 21
How Website Payments Standard Works
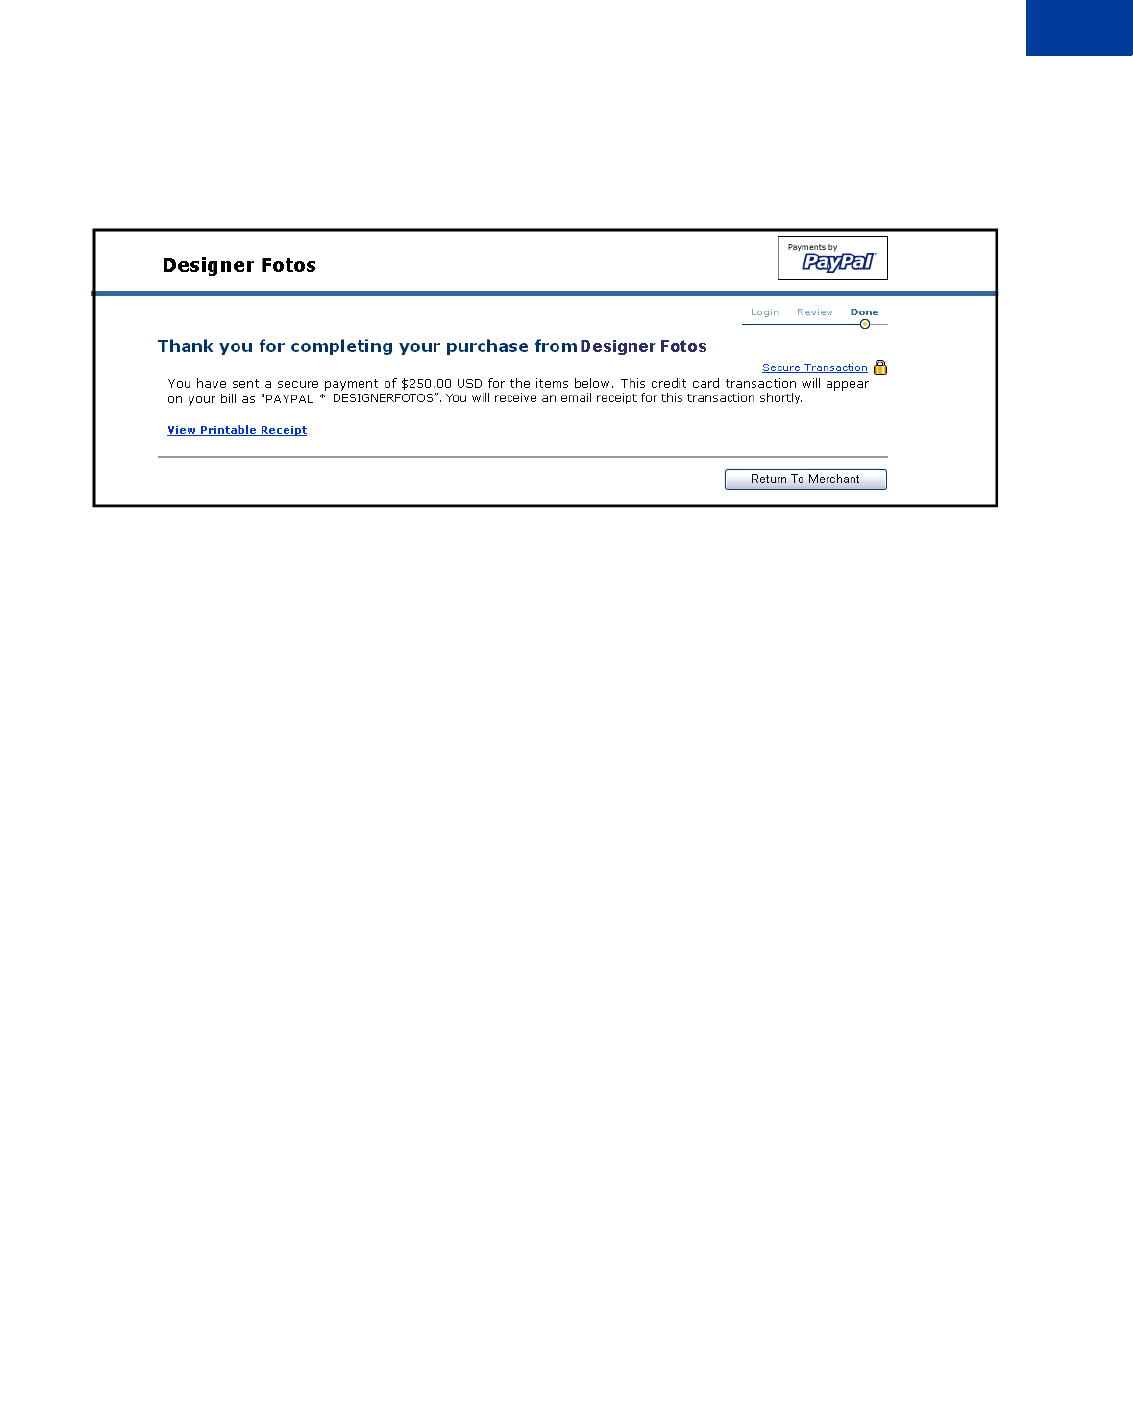
Step 3: The customer sees a payment confirmation page on PayPal and clicks Return to
Merchant.
FIGURE 1.5 Payment Confirmation or “You Made a Payment” Page on PayPal
How Website Payments Standard Works
22 May 2006 Website Payments Standard Integration Guide
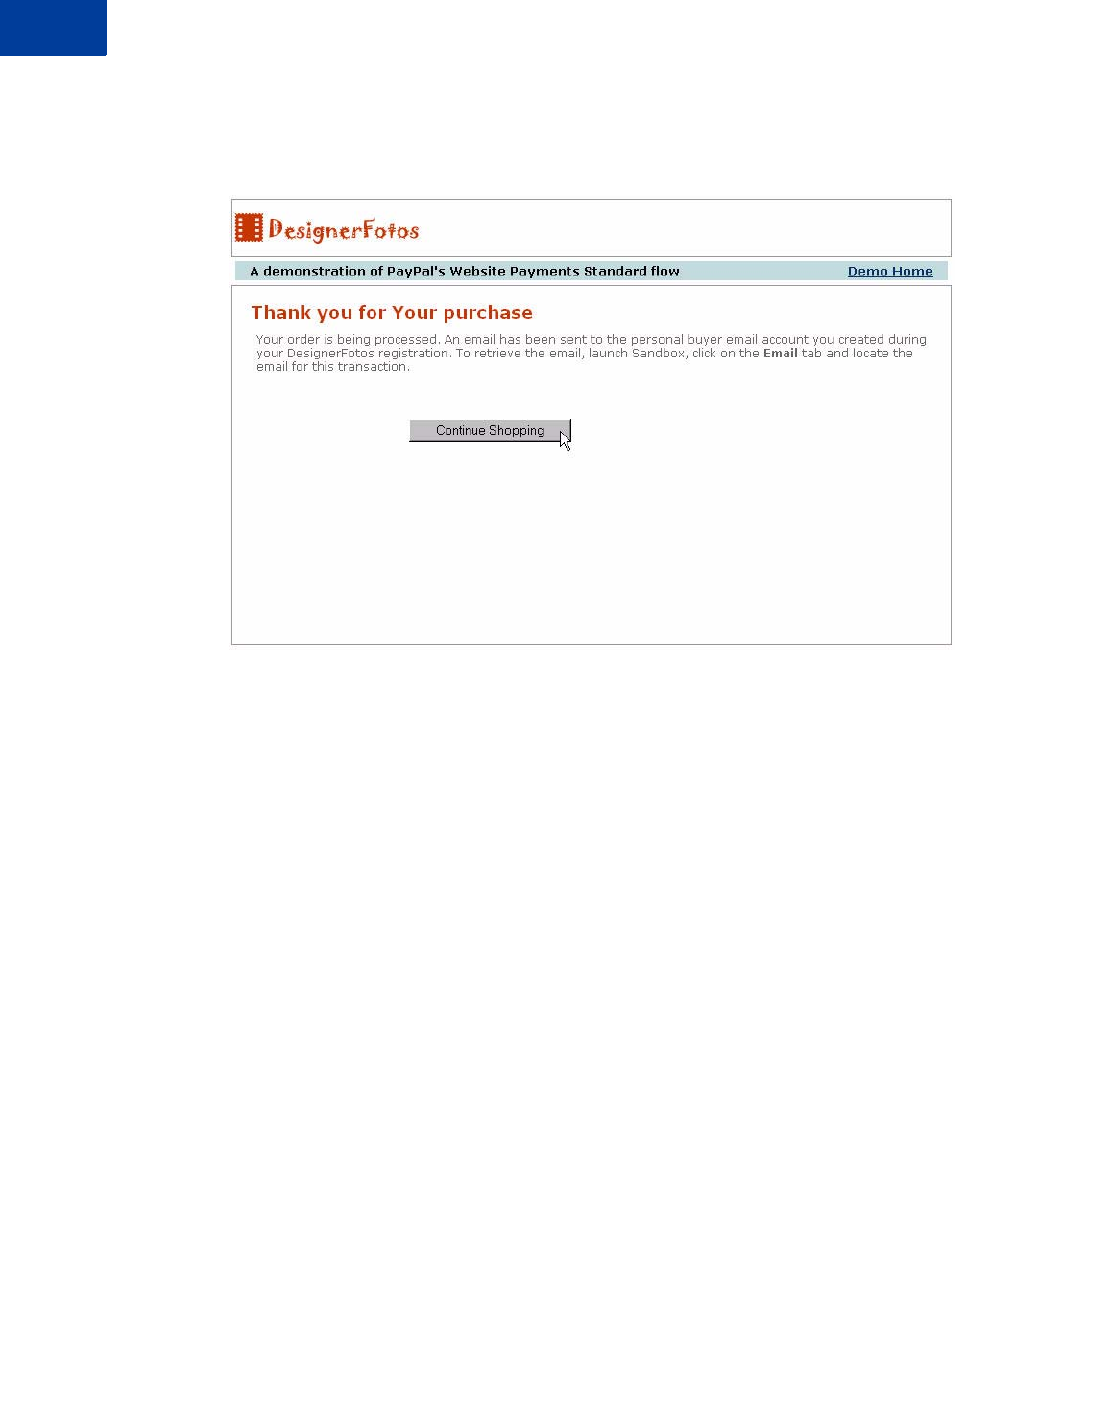
END. The customer is returned to your website.
FIGURE 1.6 Customer Returns to Your Website
Website Payments Standard Integration Guide May 2006 23
How Website Payments Standard Works
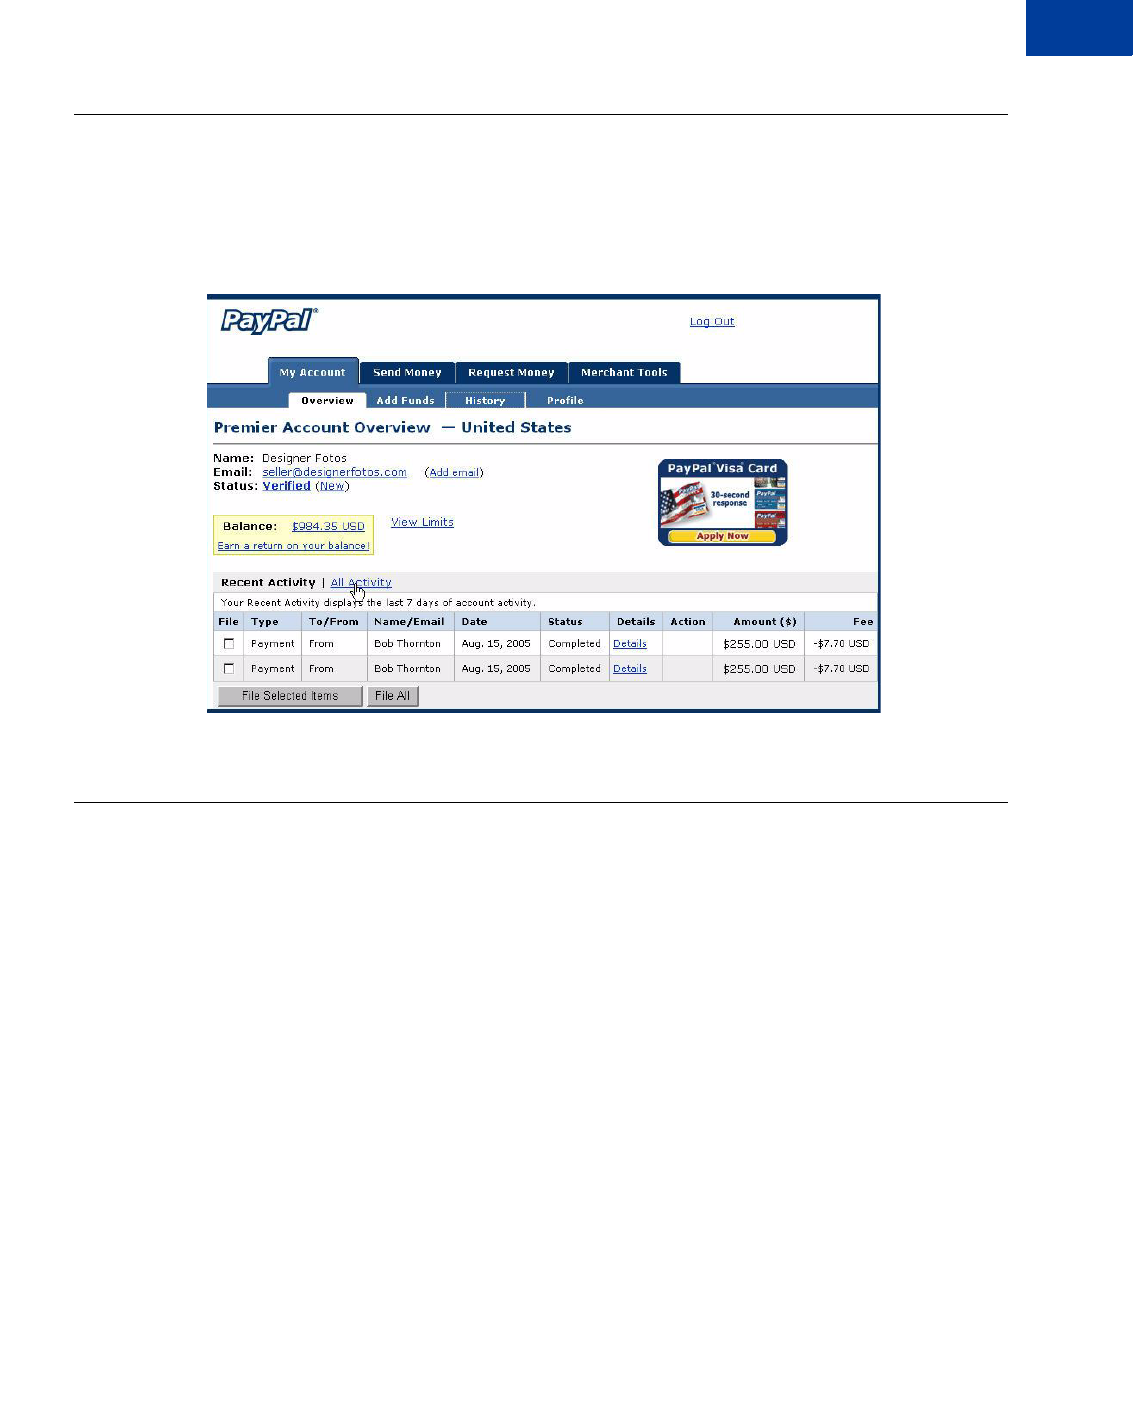
How You Get Your Money
How You Get Your Money
After a customer makes a payment, your PayPal account lists the payment in your Account
History, as shown below.
FIGURE 1.7 Account History: Recent Activity
Notifications You Receive
You can be notified of payments in four ways: email, History Log, Downloadable History
Log, and Instant Payment Notification (IPN).
Email
You receive email notification in the following cases:
zSuccessful payment
zPending payment
zCanceled payment
If you do not want to receive email notification:
1. Click the Profile subtab of the My Account tab.
2. Click the Notifications link in the Account Information column.
3. Under the Payment Notifications heading, clear the I receive PayPal Website Payments
and Instant Purchase checkbox.

How Website Payments Standard Works
Notifications You Receive
24 May 2006 Website Payments Standard Integration Guide
4. Click Save.
Transaction History
Your transaction history (also called your “History”) displays information about your
payments. The status of each payment is one of the following statuses:
zCompleted: The transaction was successful and the money was credited to your account
zCleared: The payment cleared the sender’s account and was credited to your account
zUncleared: The payment has not cleared the sender’s account yet
Downloadable History Log
You can download copies of your transaction history to your computer. You can specify a date
range for the transactions and the format of the downloadable file. The file contains a record of
your transactions.
To learn more about Downloadable History Logs, see the Order Management Integration
Guide.
Instant Payment Notification (IPN)
Instant Payment Notification is a mechanism by which you to receive transaction data. IPN
posts individual transaction information to a URL on your website that you have programmed
to process this incoming data. To use IPN, you must activate it, because it is disabled by
default.
If IPN is activated, you receive a notification in the following cases:
zWhen a payment is first sent, indicating that the status of the payment is Completed or
Pending
zWhen a payment clears, fails, or is denied, if the status was pending
To learn more about IPN, see “Instant Payment Notification: notify_url” on page 116 and the
Order Management Integration Guide.

Website Payments Standard Integration Guide May 2006 25
How Website Payments Standard Works
How To Use This Guide
How To Use This Guide
Website Payments Standard has two primary components: Buy Now or Donations buttons and
Shopping Cart. Both are constructed with the same basic set of HTML FORM variables. You
can affect their behavior and appearance with settings in your account Profile and with
additional FORM variables.
The following table summarizes the contents of this guide.
TABLE 1.2 How To Use This Guide
Feature Description See Also...
Buy Now or Donations Paying for single items from your website. Chapter 3, “Single-Item
Payment: Buy Now and
Donations”
Shopping Cart Paying for multiple items from your website. It
comes in two forms: a shopping cart hosted on
PayPal’s website and as HTML FORM variables for
use in third-party shopping carts.
Chapter 4, “Multiple-Item
Payment: Shopping Cart”
Authorization &
Capture Authorizing a payment and capturing later on the
PayPal website Chapter 5, “Using
Authorization & Capture with
Website Payments Standard
Custom Payment Pages Account Profile settings that brand PayPal’s pages
with your own colors and images. “Branding PayPal’s Payment
Pages” on page 33
“Account Optional” or
Website Payments
Express
Account Profile setting that allows a customer to
pay you with credit or debit cards without having a
PayPal account.
“Account Optional or Website
Payments Express” on
page 39
Auto Return Account Profile settings that eliminate PayPal’s
payment receipt page (step 4 in Figure 1.1, “Basic
Website Payments Standard Page Sequence).
“Auto Return” on page 46
Automatic Calculation
of Shipping, Handling,
and Tax
Account Profile settings that calculate shipping and
handling costs and sales tax for you. “Automatic Calculation of
Shipping and Handling Cost
and Tax” on page 48
Customer Contact
Telephone Account Profile setting that sends you the
customer’s contact telephone number. “Getting Customer Contact
Telephone Numbers” on
page 53
Multi-User Access Account Profile setting that allows up to seven
email addresses to share your Business account. “Multi-User Access to Your
PayPal Account” on page 58
Encrypted Website
Payments Encrypt payment information before it is sent to
PayPal to protect customer data. Chapter 6, “Encrypted
Website Payments”

How Website Payments Standard Works
Get Started Quickly: Integration Center
26 May 2006 Website Payments Standard Integration Guide
Other Standard Products and Features
Website Payments Standard also includes other products and features not detailed in this
guide:
zInstant Payment Notification (IPN) and Payment Data Transfer (PDT) are HTML FORM-
based mechanisms to send information about payments to programs on your website. IPN
and PDT are described in the Order Management Integration Guide.
zSubscriptions and Recurring Payments, which are described in the Subscriptions and
Recurring Payments Guide
Website Payments Pro
Website Payments Pro consists of PayPal Express Checkout and the Direct Payment
Application Programming Interfaces (APIs). Rather than being based solely on HTML FORM
variables (as is Website Payments Standard), these products rely on the PayPal Web Services
API. For more information, see the Website Payments Pro Integration Guide.
Get Started Quickly: Integration Center
PayPal’s Integration Center at https://www.paypal.com/integration has step-by-step details for
getting started with the PayPal Software Development Kits (SDKs), Website Payments Pro,
Express Checkout, Website Payments Standard, Authorization & Capture, Instant Payment
Notification, and more.
Visit the Integration Center at:
https://www.paypal.com/integration
Related Online Information
Consult the following URLs for information about PayPal’s fees, online security, user
agreement and related policies, online help, and customer service.
TABLE 1.3 Hyperlinks for Fees, Security, User Agreement, Policies, Online Help, and
Customer Service
Information URL
Fees https://www.paypal.com/fees
Online Security https://www.paypal.com/security
User Agreement
and Policies https://www.paypal.com/cgi-bin/webscr?cmd=p/gen/ua/ua-outside

Website Payments Standard Integration Guide May 2006 27
How Website Payments Standard Works
Complementary Technical Documentation
Complementary Technical Documentation
All PayPal technical documentation is listed here. The description of each guide indicates its
subject matter and documentation necessary for effective use of the guide.
PayPal Technical Documentation
Online Help https://www.paypal.com/help
Customer Service https://www.paypal.com/wf
TABLE 1.4
Guide Title Description Prerequisites
Website Payments
Standard
Integration Guide
Details basic PayPal payment process for shopping cart and single-item
purchase. Account Profile settings for variations on basic payment process.
Customization of PayPal's payment pages. HTML FORM variables for control
of payment process.
https://www.paypal.com/en_US/pdf/PP_WebsitePaymentsStandard_Integratio
nGuide.pdf
None
Express Checkout
Integration Guide Details use of Express Checkout API. PayPal placement on merchants' websites
and related business rules.
https://www.paypal.com/en_US/pdf/PP_ExpressCheckout_IntegrationGuide.p
df
Website Payments
Standard
Integration Guide
Website Payments
Pro Integration
Guide
Details use of Express Checkout and Direct Payment APIs. PayPal placement
on merchants' websites and related business logic.
https://www.paypal.com/en_US/pdf/PP_WebsitePaymentsPro_IntegrationGui
de.pdf
Website Payments
Standard
Integration Guide
Order Management
Integration Guide Details Instant Payment Notification (IPN) and Payment Data Transfer (PDT)
for automated receipt of payment information after payment completion.
Details IPN HTML FORM variables and their meanings. Also includes
information about Downloadable History Logs.
https://www.paypal.com/en_US/pdf/PP_OrderManagement_IntegrationGuide.
pdf
Website Payments
Standard
Integration Guide
TABLE 1.3 Hyperlinks for Fees, Security, User Agreement, Policies, Online Help, and
Customer Service
Information URL
How Website Payments Standard Works
Complementary Technical Documentation
28 May 2006 Website Payments Standard Integration Guide
Java SDK Guide
.NET SDK Guide
Classic ASP Guide
PHP SDK Guide
Details the use of the PayPal Software Development Kits for Java, Microsoft
.NET, Microsoft Classic ASP, and PHP to simplify use of the PayPal Web
Services API.
https://www.paypal.com/en_US/pdf/PP_SDK_Java_Guide.pdf
https://www.paypal.com/en_US/pdf/PP_SDK_NET_Guide.pdf
https://www.paypal.com/en_US/pdf/PP_SDK_ClassicASP_Guide.pdf
https://www.paypal.com/en_US/pdf/PP_SDK_PHP_Guide.pdf
Website Payments
Standard
Integration Guide
Website Payments
Pro Integration
Guide
Authorization &
Capture Integration
Guide
Sandbox User
Guide
API Reference
Sandbox User
Guide Describes the PayPal Sandbox testing environment for testing website
payments and Web Services APIs. Details how to get PayPal API digital
certificates.
https://www.paypal.com/en_US/pdf/PP_Sandbox_UserGuide.pdf
All other PayPal
guides for an
understanding of
how products work
Web Services API
Reference Field-by-field description of all PayPal Web Services APIs, their SOAP
structures, and error messages. Location of PayPal WSDL and XSD files.
https://www.paypal.com/en_US/pdf/PP_APIReference.pdf
None
Subscriptions and
Recurring
Payments Guide
Describes HTML FORM variables for using PayPal for subscriptions to goods
and services.
https://www.paypal.com/en_US/pdf/subscriptions.pdf
Website Payments
Standard
Integration Guide
Virtual Terminal
User Guide Details how to use the virtual terminal to accept credit card payments.
https://www.paypal.com/en_US/pdf/VT_user_guide.pdf
None
TABLE 1.4
Guide Title Description Prerequisites

Website Payments Standard Integration Guide May 2006 29
How Website Payments Standard Works
Complementary Technical Documentation

How Website Payments Standard Works
Complementary Technical Documentation
30 May 2006 Website Payments Standard Integration Guide

May 2006 31
2Using Your Merchant Account
Profile and Tools
This chapter details how you can use your account Profile settings and other tools on the
PayPal website to affect how payments are processed.
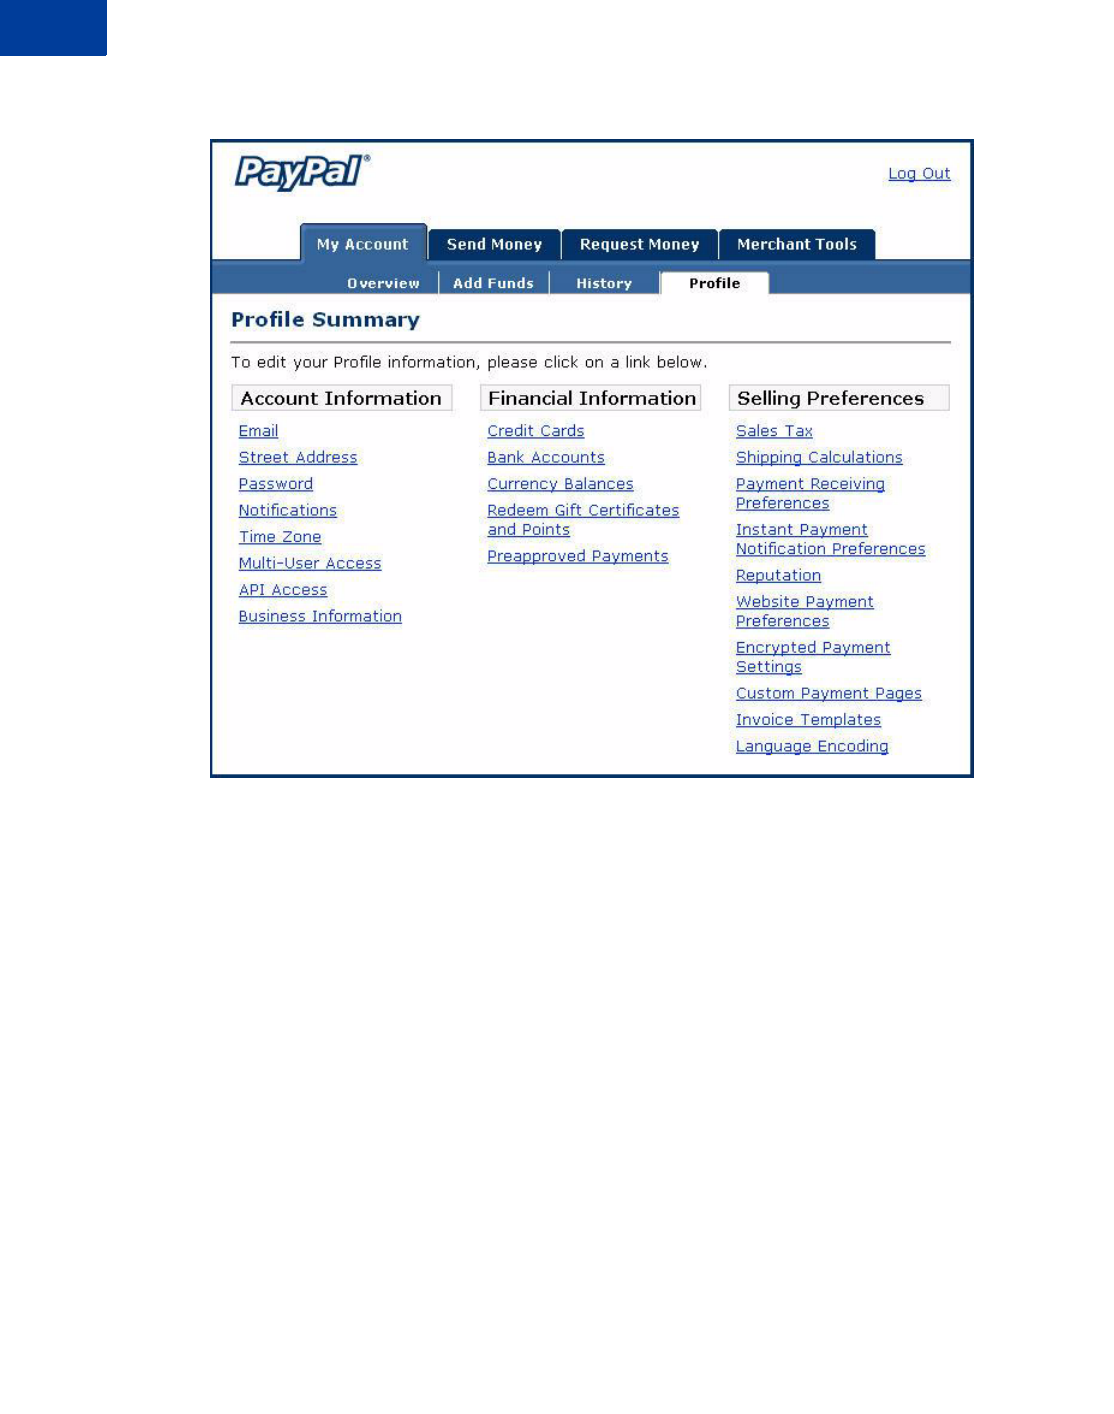
The Account Profile Summary
Use your PayPal account Profile to manage information about your PayPal account. To see
your Profile, log in to your PayPal account, and click the Profile subtab of the My Account
tab. The Profile has three sections: Account Information, Financial Information, and Selling
Preferences.
Using Your Merchant Account Profile and Tools
32 May 2006 Website Payments Standard Integration Guide
FIGURE 2.8 Account Profile Summary Page
Account Information
Use the Account Information column for basic account maintenance, including updating
your password, adding and confirming email addresses, managing your business information,
and (for Premier accounts) configuring multi-user access to your PayPal account.
Financial Information
Use the Financial Information column to organize and maintain the financial instruments
associated with your PayPal account: manage your credit cards and bank accounts, activate
and manage your PayPal Debit Card, maintain multiple currency balances, and view your
monthly account statements.
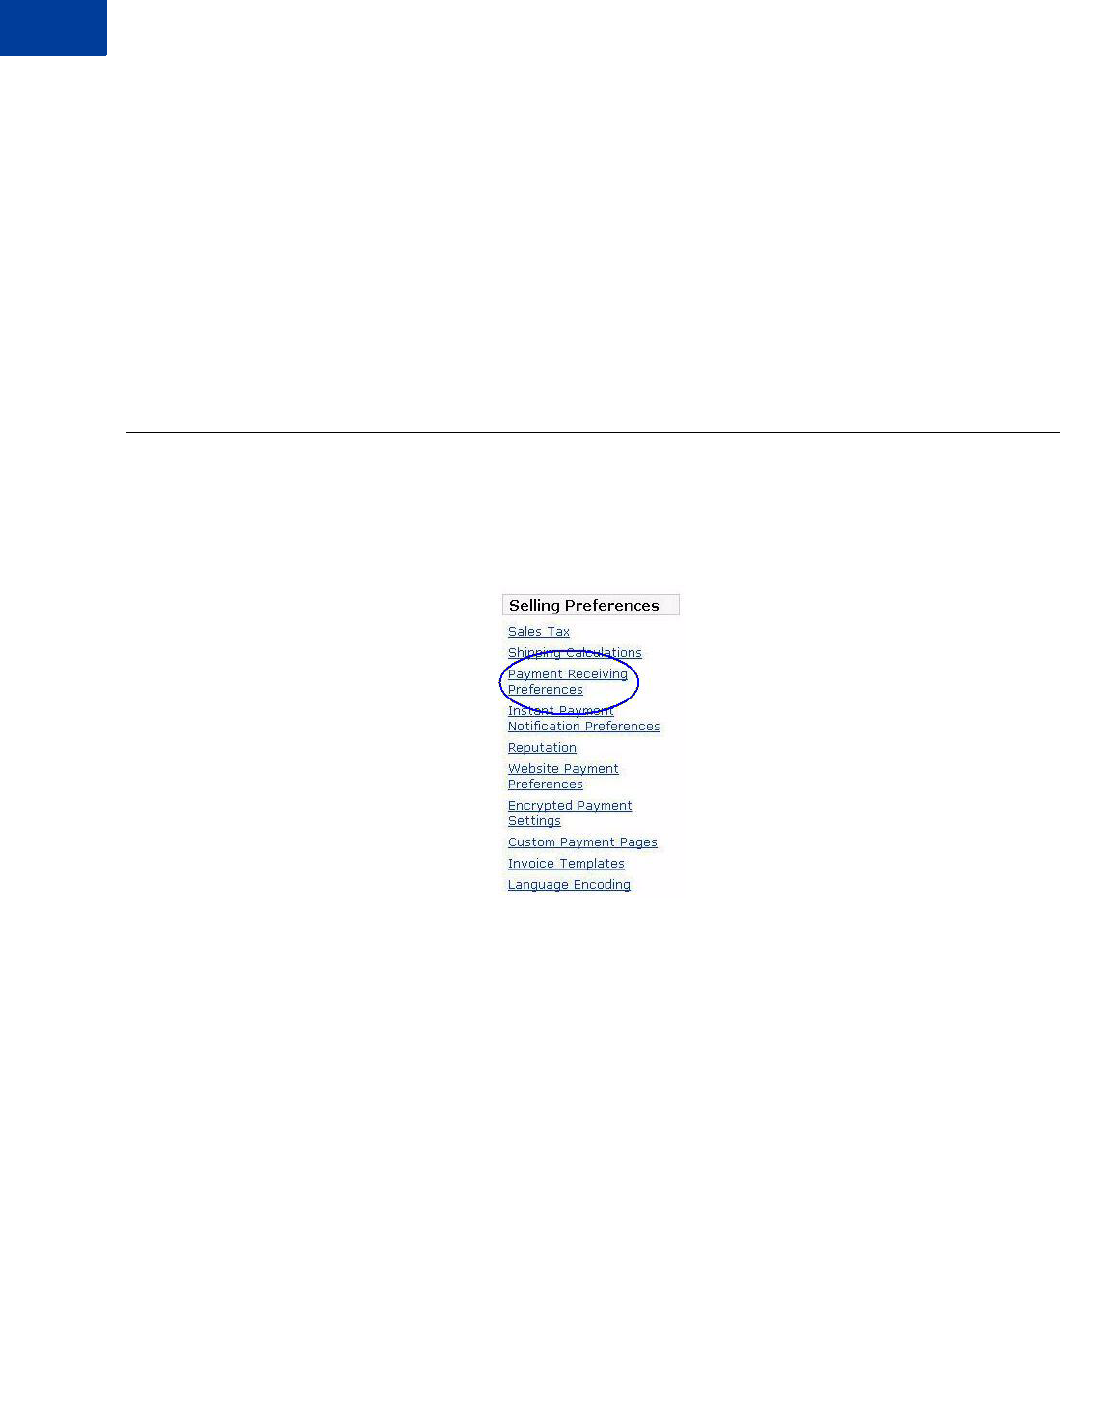
Selling Preferences
Use the Selling Preferences column to organize the way you sell with your PayPal account,
including:

May 2006 33
Using Your Merchant Account Profile and Tools
Branding PayPal’s Payment Pages
zBranding PayPal’s payment pages
zStreamlining purchases with Website Payment Preferences:
– Account Optional
–Auto Return
– Automatic calculation of shipping, handling, and sales tax
zPayment receiving preferences for blocking certain kinds of payments
zGetting customers’ contact telephone numbers
zLanguage encoding your data
The majority of this chapter focuses on using Selling Preferences.
Correspondence Between Profile Settings and HTML Variables
Many Profile settings have equivalent HTML FORM variables that can control the behavior of
individual transactions. After you enable a setting in your Profile, you can include FORM
variables with a transaction to take advantage of that Profile setting. See the following sections
for more information:
z“Overriding Page Style Settings On Individual Transactions” on page 38
z“Overriding Tax Setting on Individual Transactions” on page 49
z“Overriding Shipping Calculation on Individual Transactions” on page 49
z“Setting the Character Set: charset” on page 113
z“Setting Return URL on Individual Transactions” on page 113
z“Desired Currency on Individual Transactions” on page 113
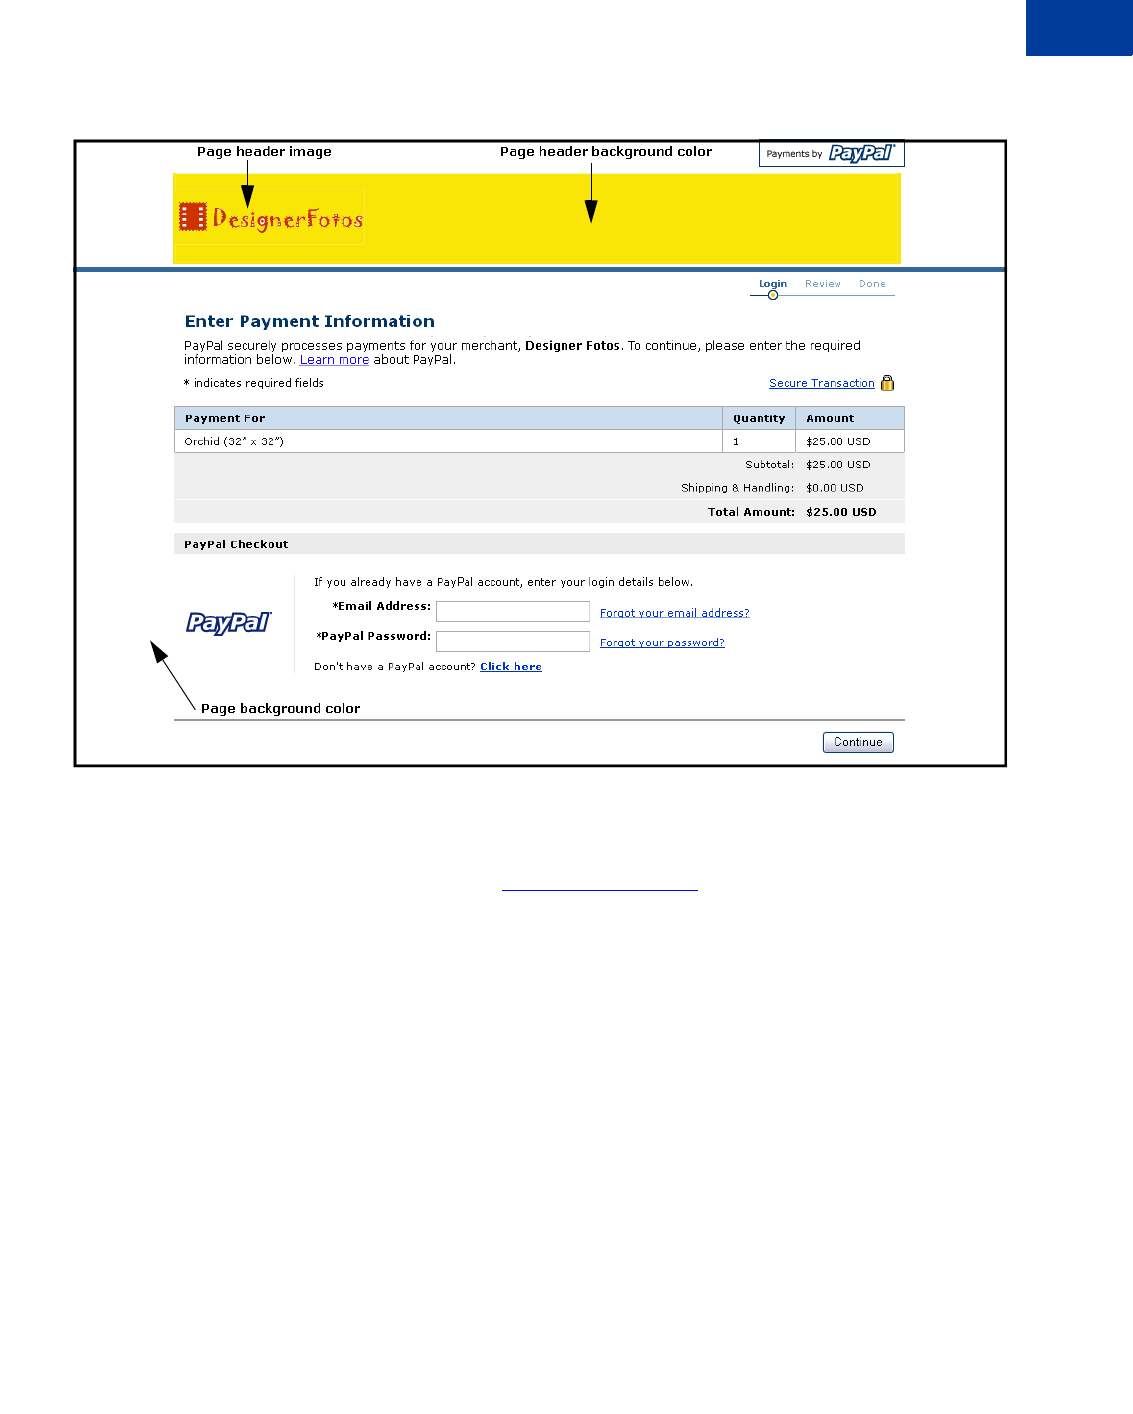
Branding PayPal’s Payment Pages
With our Custom Payment Pages feature, you can tailor PayPal’s payment pages to the style of
your website. Custom Payment Pages work with all PayPal Website Payment buttons and with
the PayPal Account Optional feature.
You can add up to three custom page styles.
The pictures in this section demonstrate the types of customization you can add to your PayPal
Website Payment buttons. Figure 2.9, “Uncustomized Payment Page in Standard PayPal Page
Style,” shows a payment page with no customization.
May 2006 35
Using Your Merchant Account Profile and Tools
Branding PayPal’s Payment Pages
FIGURE 2.10 Complete Custom Page Style
Working with Custom Payment Pages
1. Log in to your PayPal account at https://www.paypal.com.
2. Click the Profile subtab.
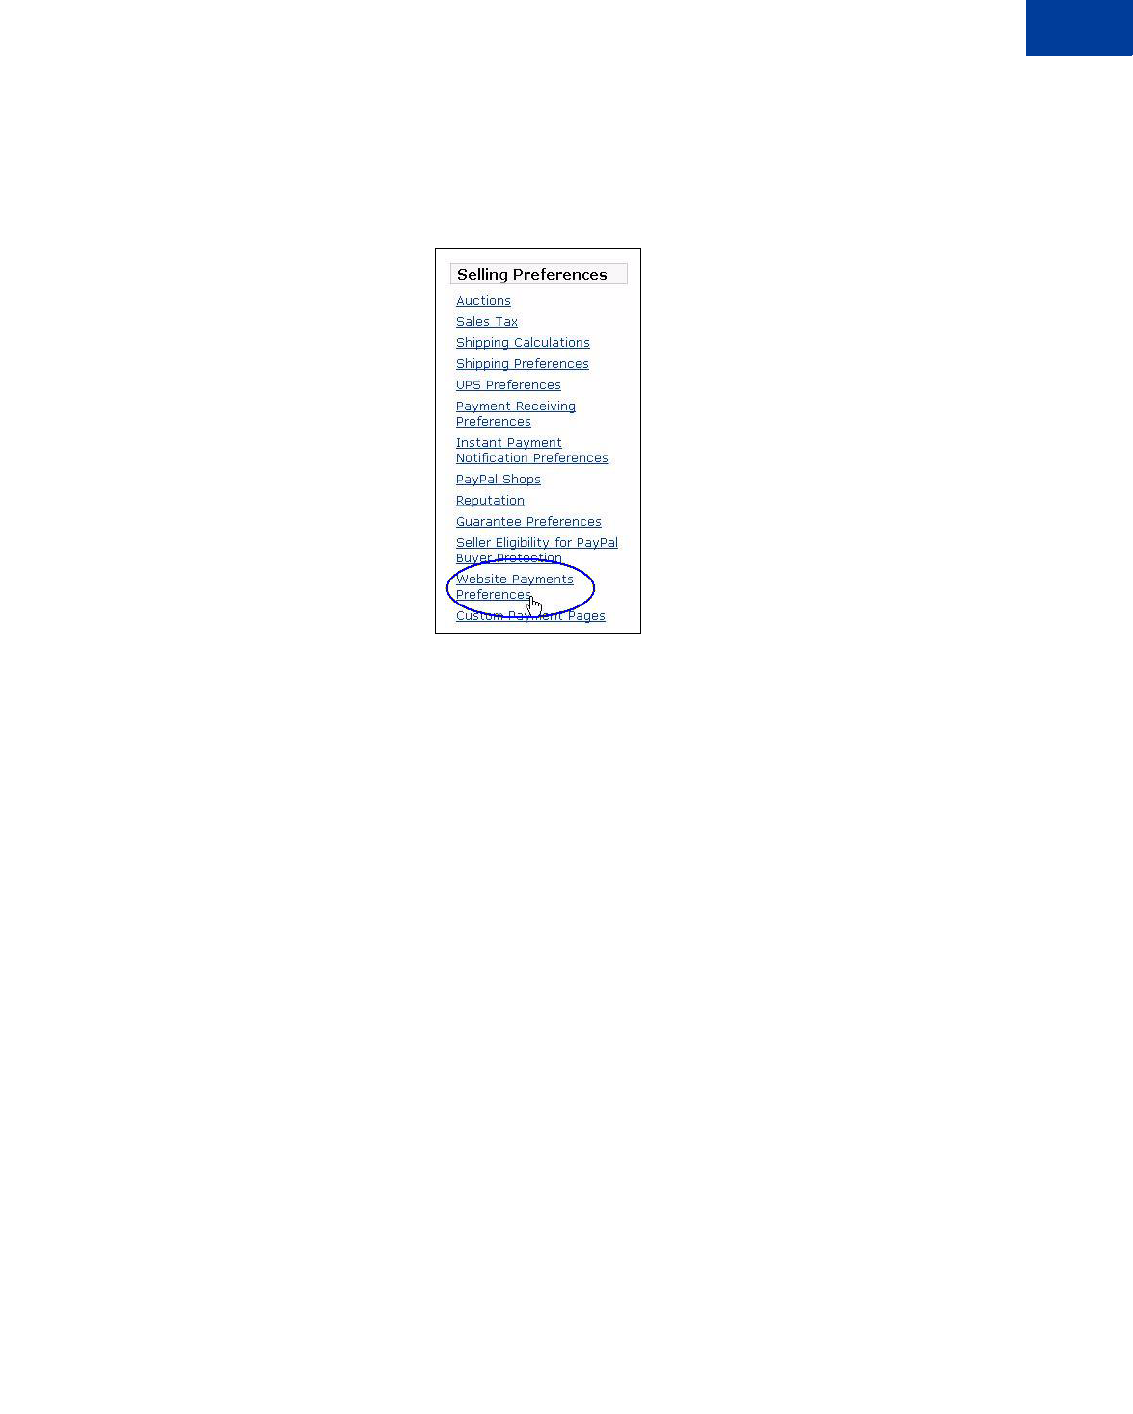
3. In the Selling Preferences column, click Custom Payment Pages.
The customization page shown in Figure 2.11, “Edit Custom Page Style Page,” is displayed.
Using Your Merchant Account Profile and Tools
Branding PayPal’s Payment Pages
36 May 2006 Website Payments Standard Integration Guide
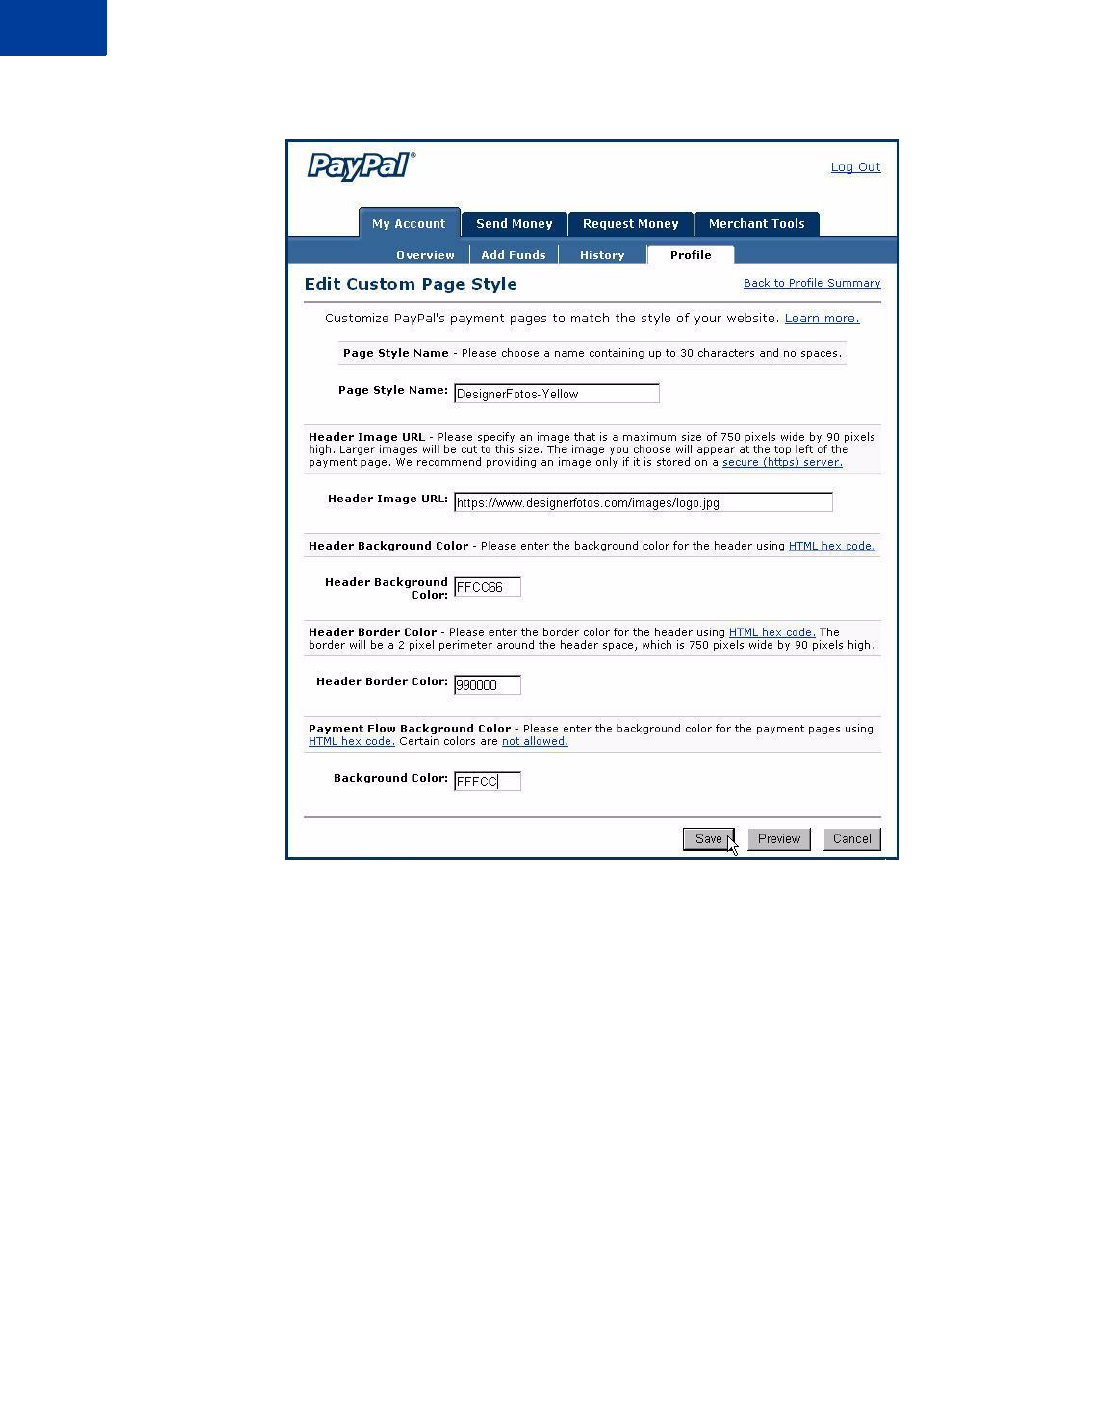
FIGURE 2.11 Edit Custom Page Style Page
From this page, you can add, edit, preview, and remove page styles, and make any defined
page style the primary page style.
Adding or Editing a Page Style
The settings described here can also be specified with HTML FORM input variables set for
individual transactions. For more information, see Table A.17, “HTML Variables: Display
Information” on page 121.
To add a page style:
1. Begin at the Custom Payment Page Styles page.
2. Click Add or Edit.
3. Enter your page style preferences:

May 2006 37
Using Your Merchant Account Profile and Tools
Branding PayPal’s Payment Pages
–Page Style Name (required)
Enter a name up to 30 characters long. The name can contain letters, numbers, and
underscores but no other symbols or spaces. The Page Style Name is used to refer to the
page style in your PayPal account and in the HTML FORM page_style variable for your
Website Payment buttons.
–Header Image URL (optional)
Enter the URL for an image that should appear at the top left of the payment page.
Maximum size of the image is 750 pixels wide by 90 pixels high; larger images are
reduced to this size. The image must be in a valid graphics format such as gif, jpg, or png.
IMPORTANT:PayPal recommends that you enter an image URL only if the image is stored
on a secure (https) server. Otherwise, your customer’s web browser displays
a message that the payment page contains insecure items.
–Header Background Color (optional)
Enter the background color for the header using HTML hex code. The color code must
be six digits long and should not contain the # symbol. If the Header Image URL is
present, the header is a 750 pixel wide by 90 pixel high space at the top of the payment
page. If the Header Image URL is not present, the header height is only 45 pixels high.
–Header Border Color (optional)
Enter the border color for the header using HTML hex code. The color code must be six
digits long and should not contain the # symbol. The header border is a two-pixel
perimeter around the header space.
–Background Color (optional)
Enter the background color for the payment page using HTML hex code. The color code
must be six digits long and should not contain the # symbol.
4. Click Preview to preview your page style, or click Save to save it.
Disallowed Colors
Because PayPal’s error message system highlights errors in red, PayPal does not allow certain
background colors that make these error messages unreadable.
A background color is allowed if you are able to preview the payment page with your chosen
background color. If you receive an error message about the background color, the color is not
allowed.
About Font Colors
PayPal dynamically changes font colors from black to white, depending on the background
color. To confirm that these font changes comply with your font color selections, you should
test your color settings on PayPal.
Making a Page Style Primary
When you make a page style primary, it is applied to all payment pages unless you specify
otherwise on individual transactions.
NOTE:If you do not designate a page style as Primary, the default is the PayPal page style.

Using Your Merchant Account Profile and Tools
Streamlining Purchases with Website Payment Preferences
38 May 2006 Website Payments Standard Integration Guide
To make a page style primary:
1. Begin at the Custom Payment Page Styles page shown in Figure 2.11, “Edit Custom Page
Style Page” on page 36.
2. Click the radio button next to the page style you wish to make your primary style.
3. Click Make Primary.
4. Click Make Primary to confirm your choice.
Overriding Page Style Settings On Individual Transactions
Your primary page style is applied to all payment pages unless you specify otherwise. You can
override this behavior by specifying custom page style variables on individual transactions.
To change the page style for a button you already created, replace the value of the
page_style variable with the page style name you want to use. The next time the button is
clicked, the subsequent payment pages appear in the new style.
When you specify custom payment page variables on individual transactions, the page
variables override page styles set in your Profile or the page_style variable. Customization
variables take precedence in the following order:
Streamlining Purchases with Website Payment Preferences
You can speed up your customers’ purchases with three Profile settings:
zAccount Optional
zAuto Return
TABLE 2.5 Order of Page Style Customization Variables
Custom Option Description
1 Custom Payment Pages
Variables on Individual
Transactions
See Table A.17, “HTML Variables: Display Information”
on page 121.
2 Primary Page Style on
Individual Transactions With the page_style variable, you can specify a page style on
individual transactions that overrides any page styles set in your
Profile.
3 Primary Page Style in
Profile You can create and set the primary style in your Profile.
4 Default PayPal Page
Style in Profile The default page style used when an alternative is not selected and
designated as primary.
May 2006 39
Using Your Merchant Account Profile and Tools
Streamlining Purchases with Website Payment Preferences
zAutomatic calculation of shipping and handling cost and taxes
These settings are part of the Website Payment Preferences of your account Profile Selling
Preferences.
FIGURE 2.12 Website Payment Preferences on the Profile Summary Page
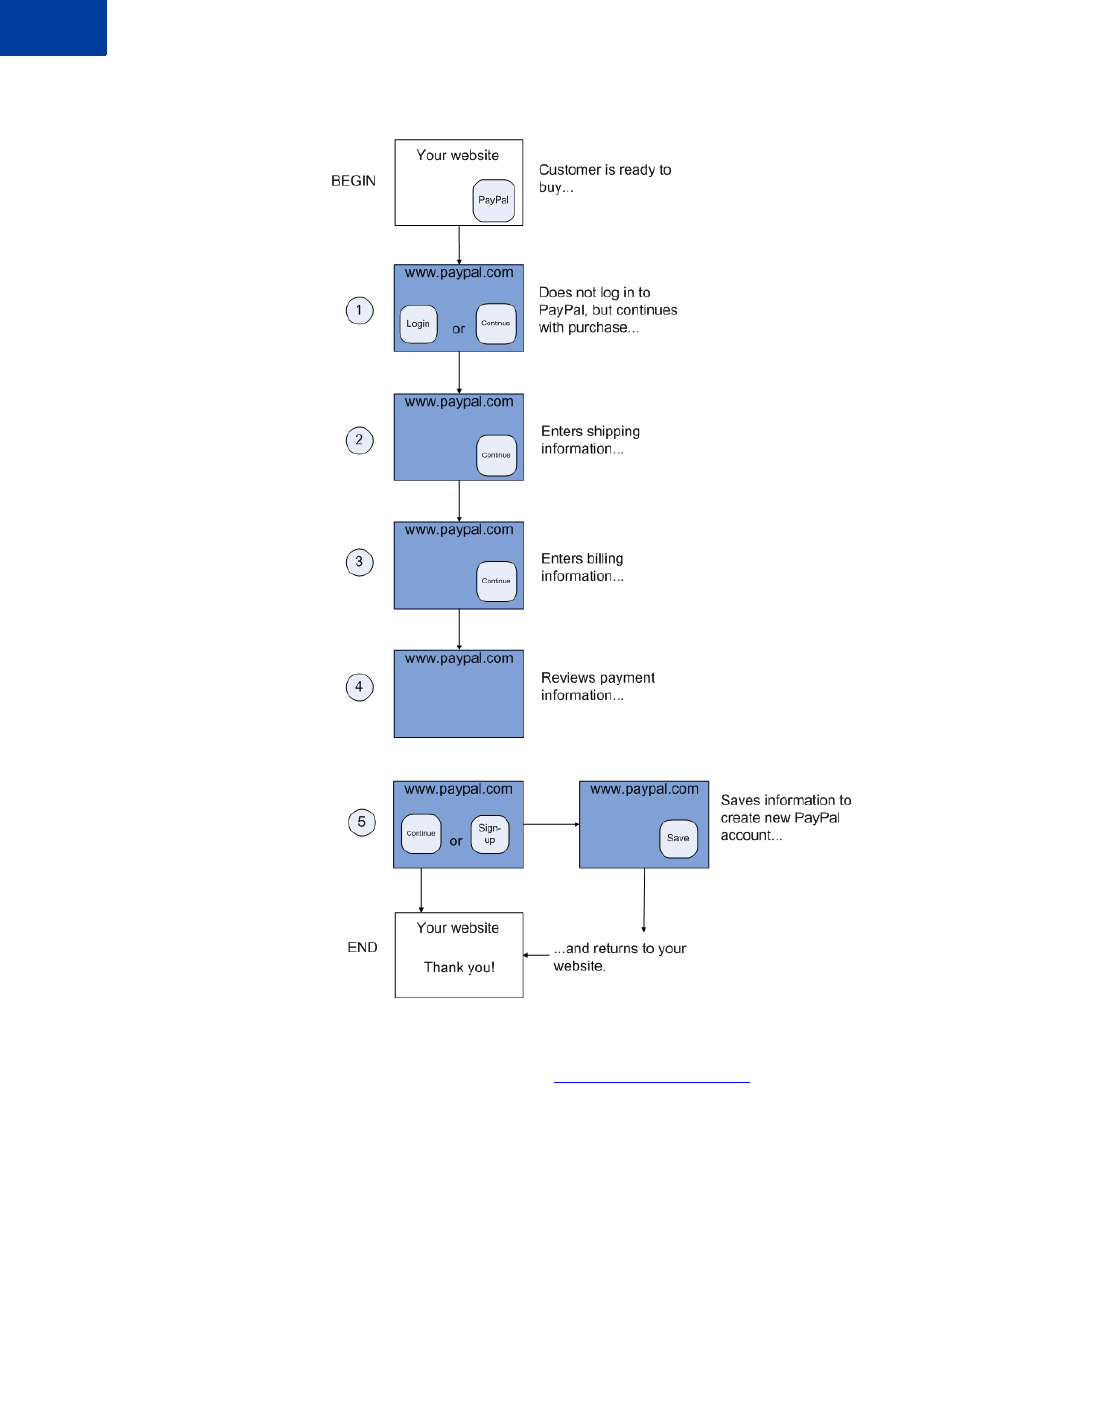
Account Optional or Website Payments Express
Account Optional (also known as Website Payments Express) is a Profile setting that allows
customers new to PayPal to pay you by credit card without signing up for a PayPal account,
thus shortening their time and effort.
Customers who have PayPal accounts go through the same Website Payments page sequence
shown in Figure 1.1, “Basic Website Payments Standard Page Sequence” on page 17.
Customers who are new to PayPal go through a page sequence that does not require PayPal
signup, with the option to sign up after completing the payment.
Using Your Merchant Account Profile and Tools
Streamlining Purchases with Website Payment Preferences
40 May 2006 Website Payments Standard Integration Guide
FIGURE 2.13 Page Sequence with PayPal Account Optional
Turning PayPal Account Optional On or Off
1. Log in to your PayPal account at https://www.paypal.com.
2. Click the Profile subtab.
3. Click the Website Payment Preferences link in the Selling Preferences column. See
Figure 2.12, “Website Payment Preferences on the Profile Summary Page” on page 39.
4. Scroll down to the PayPal Account Optional section of the page.
5. Select On to turn PayPal Account optional on, or Off to turn it off and use the basic
Website Payments flow.

May 2006 41
Using Your Merchant Account Profile and Tools
Streamlining Purchases with Website Payment Preferences
6. Click Save to save your preference.
What Your Customer Sees With Account Optional On
Step 1: Bob goes to the DesignerFotos website and clicks Buy Now.
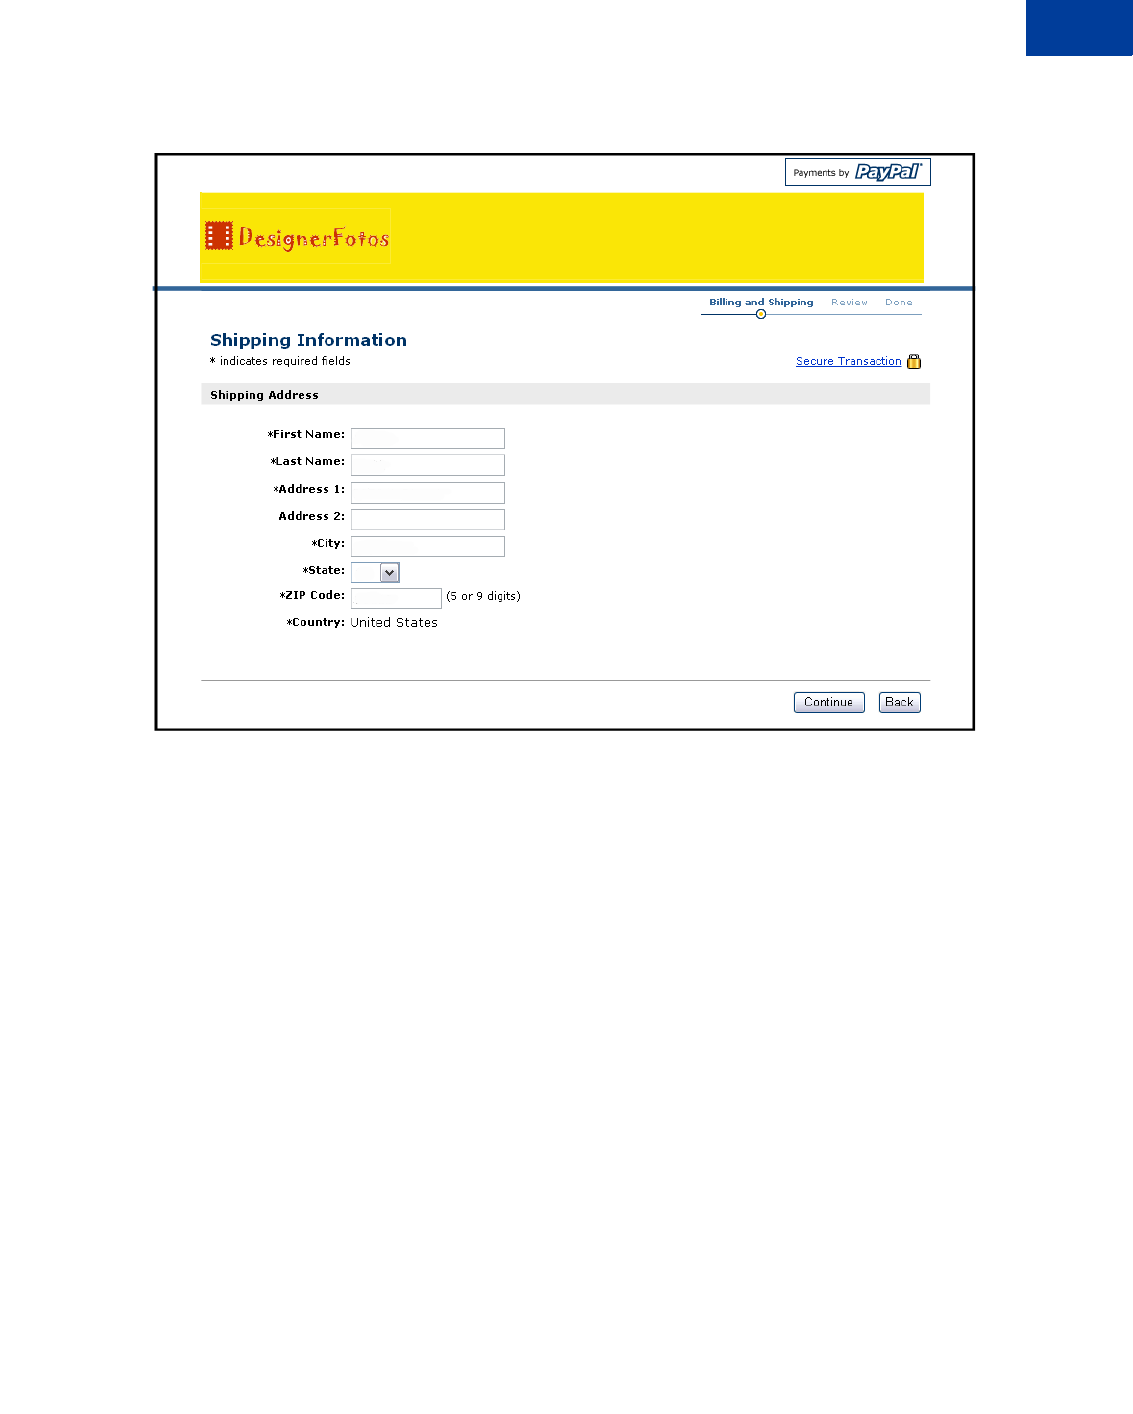
Step 2: Since Bob is new to PayPal, he is taken to a billing information page. If he had a
PayPal account, he could log in here to access his saved information. He is not a PayPal
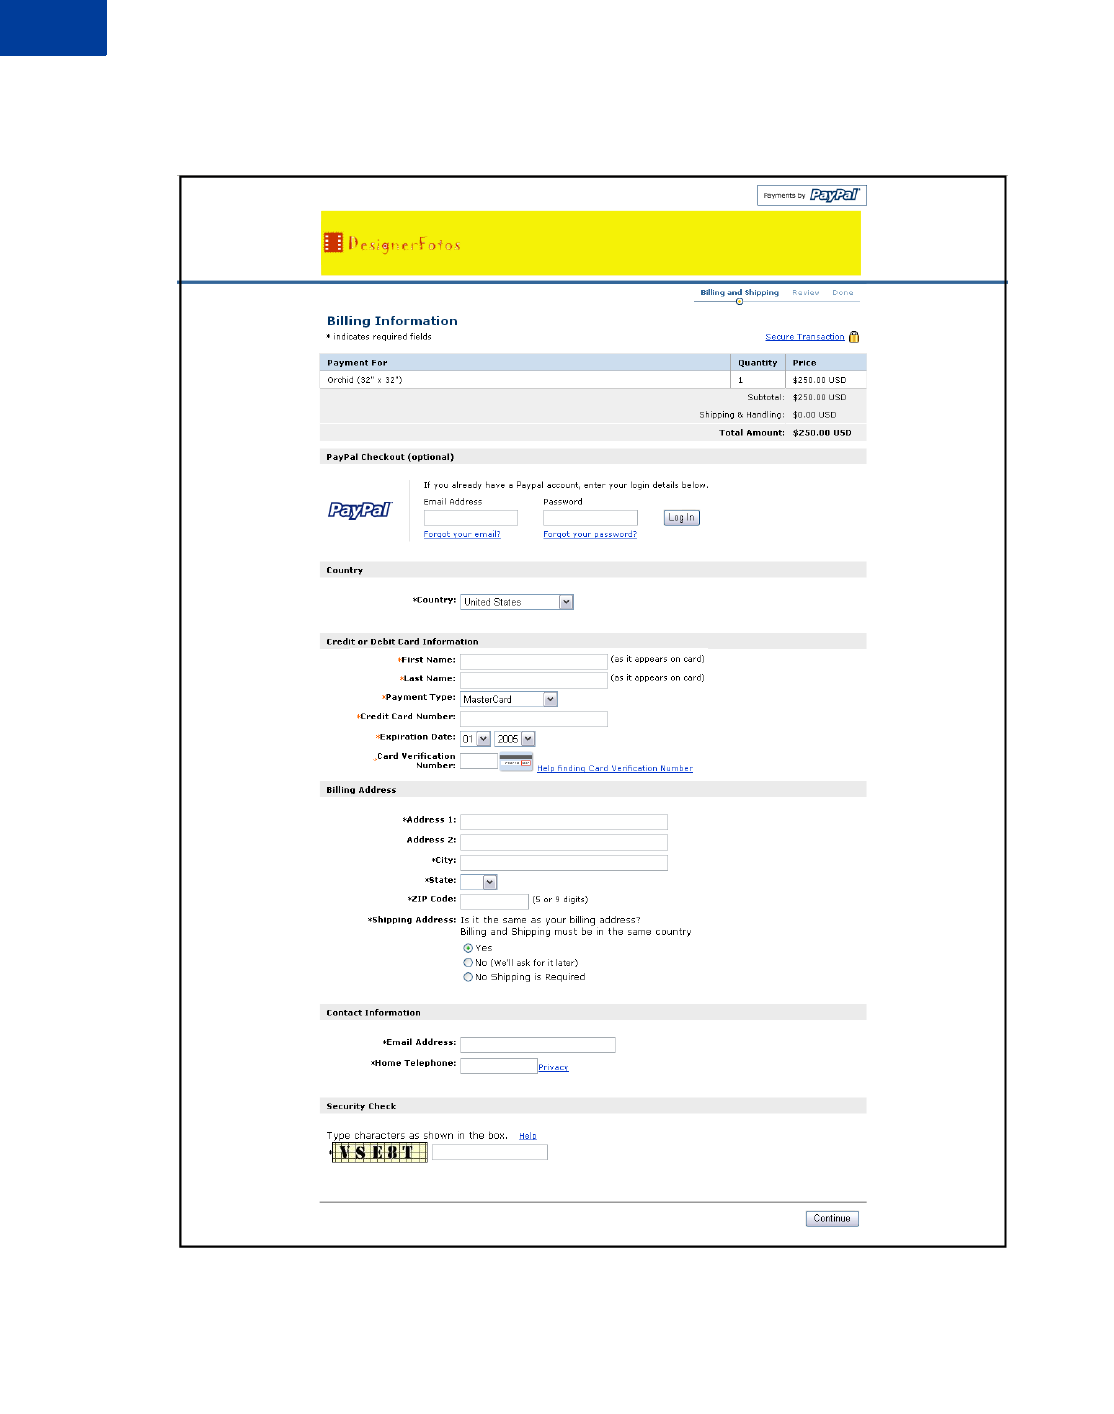
Using Your Merchant Account Profile and Tools
Streamlining Purchases with Website Payment Preferences
42 May 2006 Website Payments Standard Integration Guide
member, so he skips the PayPal Checkout section, enters in his information and clicks
Continue.
May 2006 43
Using Your Merchant Account Profile and Tools
Streamlining Purchases with Website Payment Preferences
Step 3: Bob is prompted to enter the shipping information for the purchase.
Bob clicks Continue and is taken to the page shown in Step 4.
NOTE:If Payment Receiving Preferences are set to accept payments from customers only with
confirmed addresses, the customer skips this shipping information page and goes
directly to billing information in Step 4.
Using Your Merchant Account Profile and Tools
Streamlining Purchases with Website Payment Preferences
44 May 2006 Website Payments Standard Integration Guide
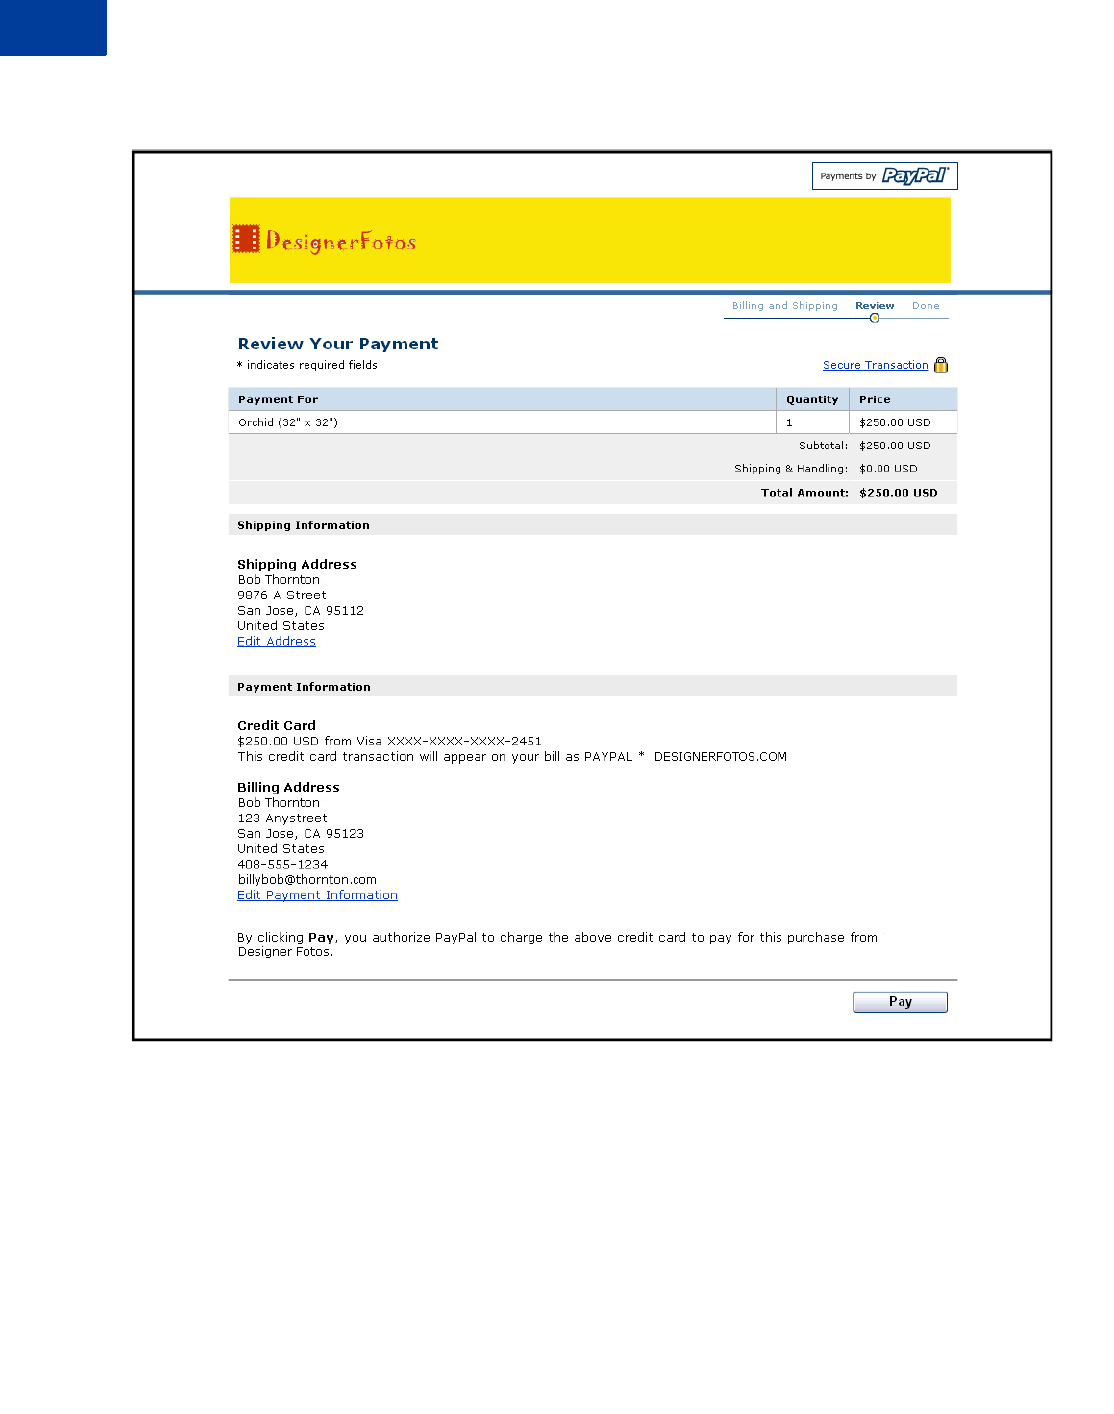
Step 4: Bob is taken to a review page. He clicks Pay to complete his purchase.

May 2006 45
Using Your Merchant Account Profile and Tools
Streamlining Purchases with Website Payment Preferences
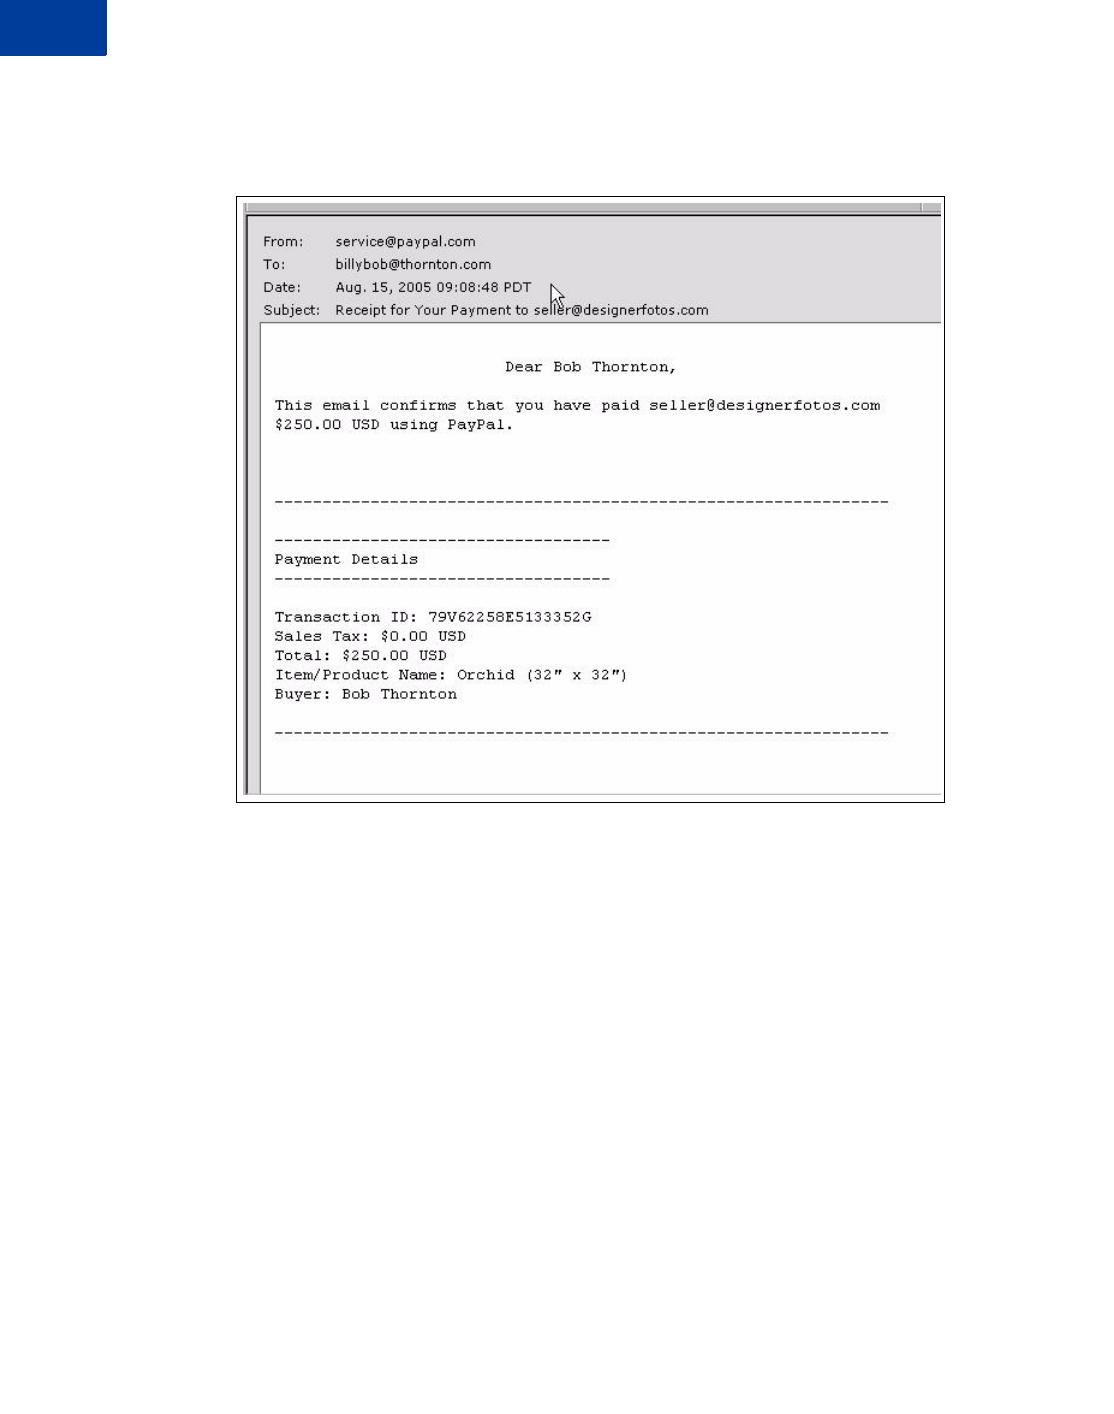
Step 5: Bob is taken to a payment completion page and will receive an email receipt.
Because Bob is not a PayPal member, he can choose to sign up for a PayPal account on this
page by entering his email address, selecting a password, and clicking Sign Up.
Step 6: Bob sees a page that confirms the creation of his account.
Using Your Merchant Account Profile and Tools
Streamlining Purchases with Website Payment Preferences
46 May 2006 Website Payments Standard Integration Guide
If he clicks Return to Merchant, he is redirected back to the merchant’s website.
Step 7: Bob receives an email receipt that confirms his payment and includes a copy of the
payment details for this transaction.
Auto Return
With Auto Return for Website Payments, you can avoid making your customers click an extra
button before returning to your website after completing a payment. Auto Return applies to all
Website Payments, including Buy Now, Donations, Shopping Cart, and Subscriptions.
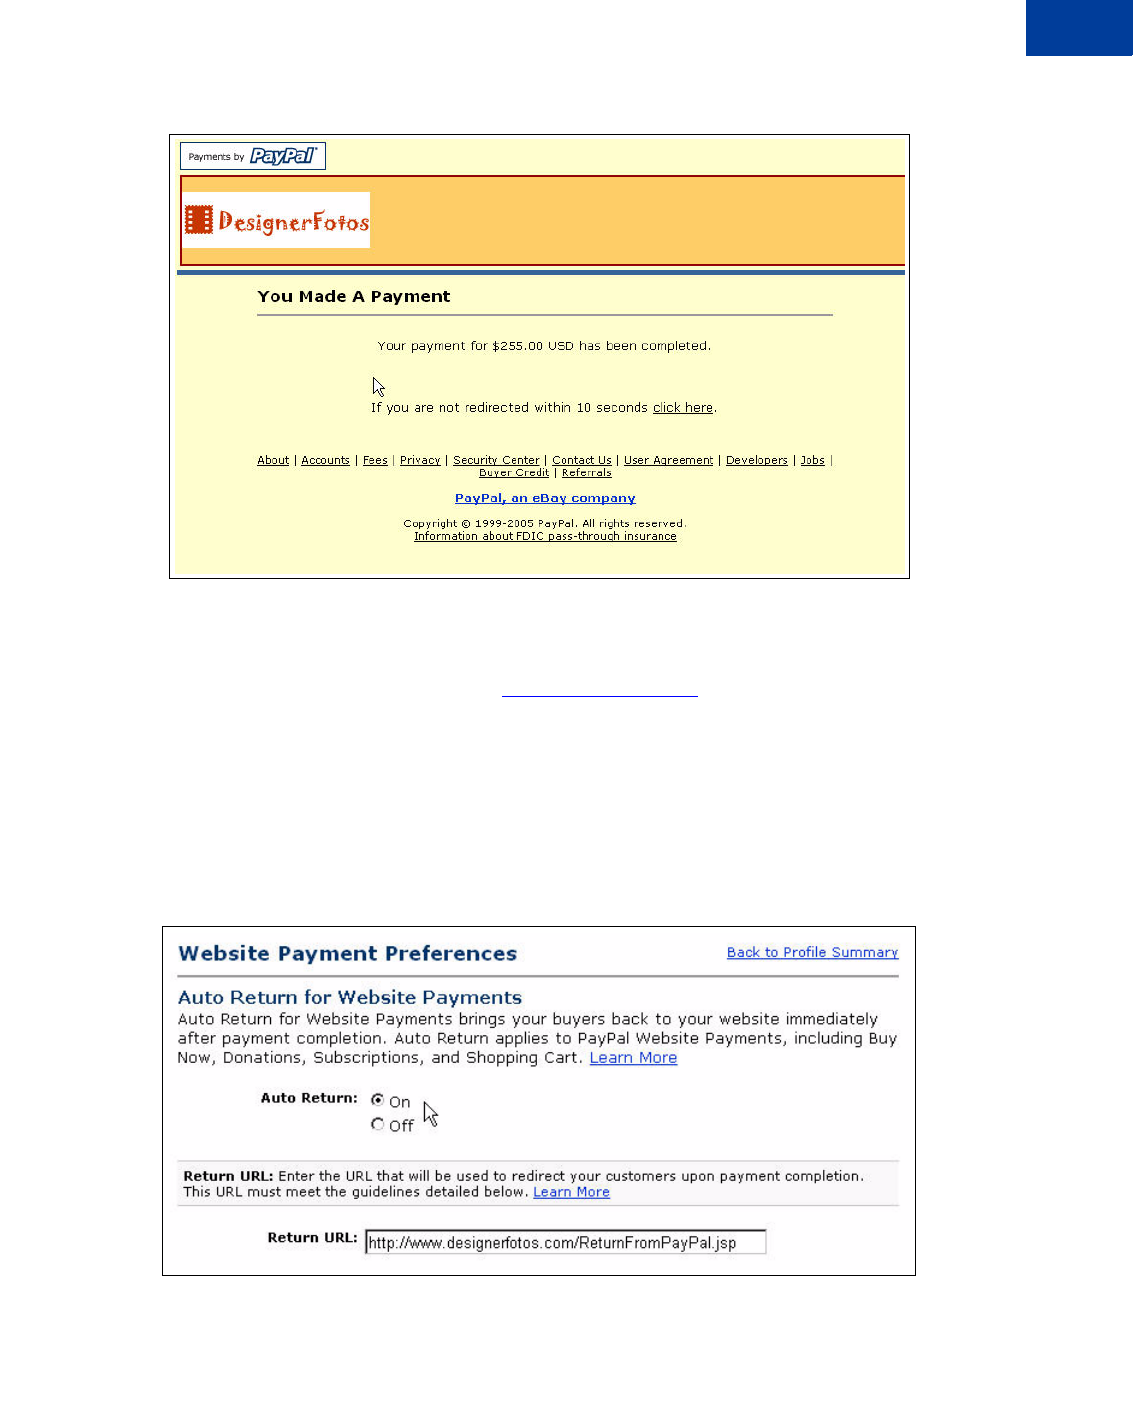
What Your Customer Sees with Auto Return On
With Auto Return on, instead of having to click a button on the You Made a Payment page
(which is annotated as a circled 3 in Figure 1.1 and shown in Figure 1.5), the customer sees a
payment confirmation page for a few seconds before the browser is returned to your website,
as shown in Figure 2.14, “Momentary “You Made a Payment Page” with Auto Return On.”
May 2006 47
Using Your Merchant Account Profile and Tools
Streamlining Purchases with Website Payment Preferences
FIGURE 2.14 Momentary “You Made a Payment Page” with Auto Return On
Turning On Auto Return
To turn Auto Return on:
1. Log in to your PayPal account at https://www.paypal.com.
2. Click the Profile subtab.
3. Under the Selling Preferences column, click Website Payment Preferences. See
Figure 2.12, “Website Payment Preferences on the Profile Summary Page” on page 39.
4. Under Auto Return for Website Payments, click the On radio button to enable Auto
Return.

Using Your Merchant Account Profile and Tools
Streamlining Purchases with Website Payment Preferences
48 May 2006 Website Payments Standard Integration Guide
5. In the Return URL field, enter the URL to which you want your buyers redirected after
payment completion.
NOTE:If the Return URL you supply is not valid, PayPal displays the standard You Made a
Payment page when payment is complete.
6. Click Save.
Setting Return URL on Individual Transactions
With Auto Return turned on in your Profile, you can set the value of the return URL on each
individual transaction, overriding the value you have stored on PayPal. For example, you
might want to return the customer’s browser to a URL on your site that is specific to that
customer, perhaps with a session-id or other transaction-related data included in the URL.
To set the return URL for a transaction, include the return variable in the HTML FORM:
<INPUT TYPE=”hidden” NAME=”return” value=”URLspecificToThisTransaction”>
Subscriptions Password Management and Auto Return
If you use or plan to use Subscriptions Password Management, you must make sure that Auto
Return is turned off in order to display the PayPal-generated username and password to the
buyer.
NOTE:You can use Auto Return with Subscriptions, which is a separate feature from
Subscription Password Management. For more information about Subscriptions, see
the Subscriptions and Recurring Payments Guide, which is available on the PayPal
website.
Automatic Calculation of Shipping and Handling Cost and Tax
You can set up your PayPal account to automatically calculate and charge shipping and sales
tax (also called value added tax or VAT).
You can set up your PayPal account to automatically calculate and charge shipping.
To view or modify your sales tax and shipping charges:
1. Log in to your PayPal account at https://www.paypal.com.
2. Click the Profile subtab of the My Account tab.
3. In the Selling Preferences column, click Sales Tax or Shipping Calculation.
Sales or Value Added Tax Collection
You can charge your customers tax by choosing a country or state from the Country and U.S.
State drop-down menus, and entering your tax rate for that state. All customers who reside in
the country or state you select are automatically charged the tax rate you choose. You can
specify a different tax rate for each U.S. state and any of the listed countries.
IMPORTANT:If you are entering the rate for a U.S. state, ensure that the Country drop-
down menu is set to United States.

May 2006 49
Using Your Merchant Account Profile and Tools
Streamlining Purchases with Website Payment Preferences
With the radio buttons, you can apply tax either to the item itself or to an item and any
shipping and handling costs.
Click Save to save your changes.
Overriding Tax Setting on Individual Transactions
Regardless of a customer’s location, you can set a flat tax amount on an individual transaction
or items in the transaction. For more information, see “Setting the Tax for the Entire Cart” on
page 88.
Shipping Calculation
Determine if you want to charge shipping as a flat amount or a percentage of the total purchase
amount.
Flat Amount. A flat amount is based on the subtotal of a purchase. Choose the Flat Amount
radio button (indicated by $), and enter a flat amount for each currency amount increment.
Click Save to save your changes.
EXAMPLE 2.1 Flat Amount Shipping Calculation
Assume your flat amount settings are as follows:
$0.00 through $49.99 = $3.00
$50.00+ = $6.00
If the subtotal is $36.50, your customer is charged $3.00 for shipping, and the total purchase
$39.50.
If the subtotal is $66.50, your customer is charged $6.00 for shipping, and the total purchase
$72.50.
Percentage. A percentage is based on the subtotal of a purchase. Choose the Percentage
radio button (indicated by %), and enter a percentage for each currency amount increment.
Click Save to save your changes.
EXAMPLE 2.2 Percentage Shipping Calculation
Assume your percentage settings are as follows:
$0.00 through $49.99 = 5%
$50.00+ = 4%
If the subtotal is $36.50, your customer is charged 5% x $36.50 = $1.83 for shipping, and the
total purchase $38.33.
If the subtotal is $66.50, your customer is charged 4% x $66.50 = $2.66 for shipping, and the
total purchase $69.16.
Overriding Shipping Calculation on Individual Transactions
You might want to set a special shipping rate for an item; for example, if the item is especially
heavy and costs more to ship or if it is a service which does not require shipping charges. To
Using Your Merchant Account Profile and Tools
Blocking Certain Kinds of Payment
50 May 2006 Website Payments Standard Integration Guide
charge a different shipping amount for an item, include the shipping cost in the shipping
and handling_cart variables in the HTML FORM for the button.
You must set your Profile to allow individual transactions to override the Profile shipping
calculation settings:
1. Go to the Shipping Calculations page in your Profile.
2. Click the checkbox labeled Click here to allow transaction-based shipping values to
override the profile shipping settings listed above (if profile settings are enabled).
3. Click Save.
Blocking Certain Kinds of Payment
Payment Receiving Preferences let you block the types of payments you receive.
FIGURE 2.15Payment Receiving Preferences
Blocking Payments From U.S. Users Without a Confirmed Address
You can better manage your risk by blocking payments where the buyer chooses not to share
his Confirmed Address with you. PayPal provides Confirmed Addresses to help you make
informed decisions when shipping goods. To be eligible for PayPal's Seller Protection Policy
(SPP), and to help reduce your risk of dealing with fraudulent buyers, ship to a buyer’s
Confirmed Address.
There are three choices for this preference:
zYes: All payments from U.S. buyers without a Confirmed Address are blocked. All U.S.
buyers must provide a Confirmed Address in order to pay you.
zNo: All payments are accepted. To maximize your sales, select No.
zAsk Me: You can choose whether to accept or deny payment without a Confirmed Address
on a case-by-case basis. This option allows you the flexibility to decide whether you want

May 2006 51
Using Your Merchant Account Profile and Tools
Blocking Certain Kinds of Payment
to take on the risk of not having the buyer’s Confirmed Address for each transaction. If you
accept the payment, it becomes a completed transaction. If you deny a particular payment,
the sender of the payment is notified that the payment has been denied and is credited with
the payment amount. PayPal does not charge fees for denied payments.
Blocking Payments in a Currency You Do Not Hold
When you receive a payment in a currency you do not hold, PayPal prompts you to open a
balance for that currency, convert it to your primary balance, or deny the payment. Payments
in currencies for which you hold a balance are applied to the appropriate balance. You see a
summary of each currency balance in your Account Overview page. For more information
about managing your currency balances, see “PayPal-Supported Currencies” on page 56.”
There are three choices for this preference:
zYes: Accept the payment regardless of the currency in which the payment is made.
zNo, accept them and convert them to U.S. Dollars: Accept the payment but
automatically converts to U.S. Dollars.
zAsk Me: Transaction-by-transaction, you can choose to accept or deny a payment in a
currency you do not currently hold. If you accept the payment, it becomes a completed
transaction. If you deny a particular payment, the sender of the payment is notified that the
payment has been denied and is credited with the payment amount. PayPal does not charge
fees for denied payments.
Blocking Payments From Users With Non-U.S. PayPal Accounts
Because many international addresses cannot be confirmed, you may choose to block
payments from users with non-U.S. PayPal accounts in order to qualify for the Seller
Protection Policy.
Blocking Payments From the Pay Anyone Subtab
You can choose whether or not to receive payments initiated via the Pay Anyone subtab of the
Send Money tab on the PayPal website. Selecting this option might help you manage your
account, because the payments you receive will be associated with a specific item or
transaction that you defined.
If you block these payments, you accept only payments initiated from Buy Now buttons,
Donations, Shopping Cart, Subscriptions and Recurring Payments, Winning Buyer
Notification, Mass Payments, Money Requests, Smart Logos, or eBay Checkout Payments.
Using Your Merchant Account Profile and Tools
Adding Your Credit Card Statement Name
52 May 2006 Website Payments Standard Integration Guide
Blocking Payments Funded By Credit Cards When Sender Has a Bank
Account
You can force customers to pay you with a bank account or PayPal funds if they are able to do
so. However, if they cannot pay you using a bank account or PayPal funds, they still have the
option to pay with a credit card.
This preference can also help to reduce your risk of chargebacks. Verified users are users who
have confirmed their bank accounts with PayPal or have been otherwise verified by PayPal.
Because most Verified members have the option of paying with their bank accounts (via
eCheck or Instant Transfer), this preference does not prevent users from sending you money.
When they pay with PayPal’s Instant Transfer, you receive the payment instantly, just as when
they pay with a credit card. Users who have not confirmed their bank accounts with PayPal
can still send you money funded by credit cards.
Blocking Payments Funded By eChecks
You can block eCheck payments. Because eCheck payments take three to four business days
to clear, you might want to block them for your Instant Purchase and Buy Now buttons.
If you choose to block these payments, users who attempt to pay via eCheck are prompted to
add a credit card to their account before completing the transaction.
If you choose not to block these payments, you can receive eCheck payments through PayPal
Website Payments or Auction Logos. eCheck payments are listed as Pending and are not
credited to your PayPal account for three to four business days.
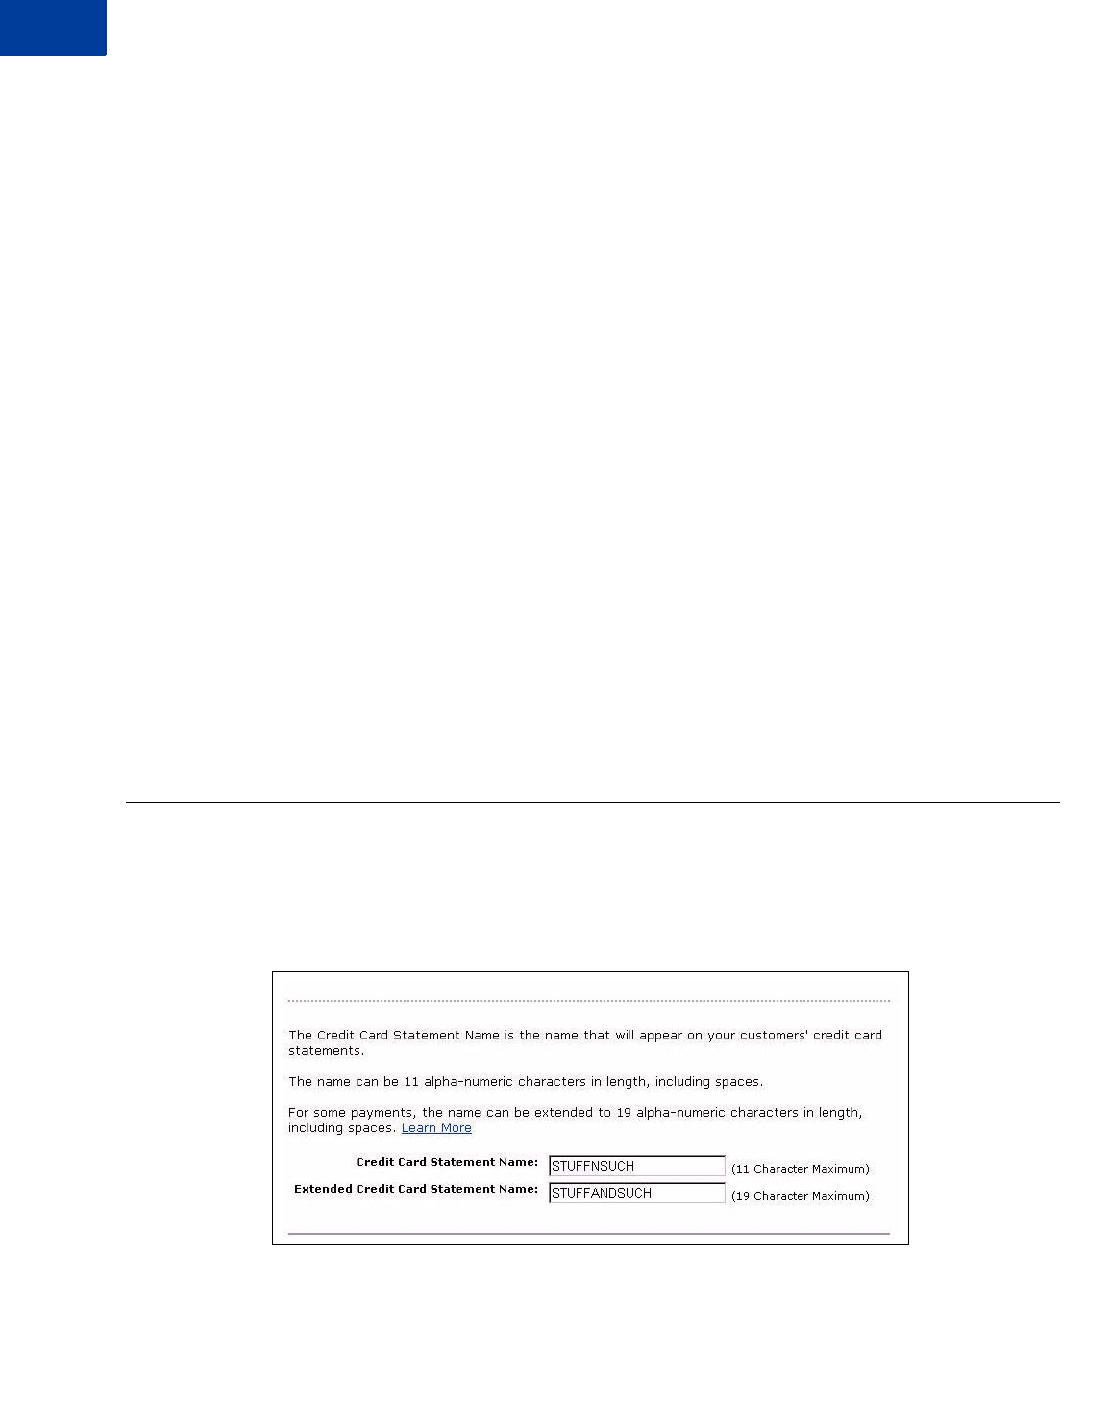
Adding Your Credit Card Statement Name
On the Payment Receiving Preferences page, you can specify the name that appears on your
customers’ credit card statements.
FIGURE 2.16Adding a Credit Card Statement Name
When a buyer pays you by credit card, your credit card statement name appears with the word
PAYPAL* next to the charge on the statement (for example, PAYPAL*MYCCNAME). The Credit
May 2006 53
Using Your Merchant Account Profile and Tools
Getting Customer Contact Telephone Numbers
Card Statement Name can be up to 11 characters long, including spaces, but must not contain
special characters (such as &, #, or _). The name is converted to all capital letters and might be
truncated by some credit card processors.
The Credit Card Statement Name should accurately reflect your business or legal name.
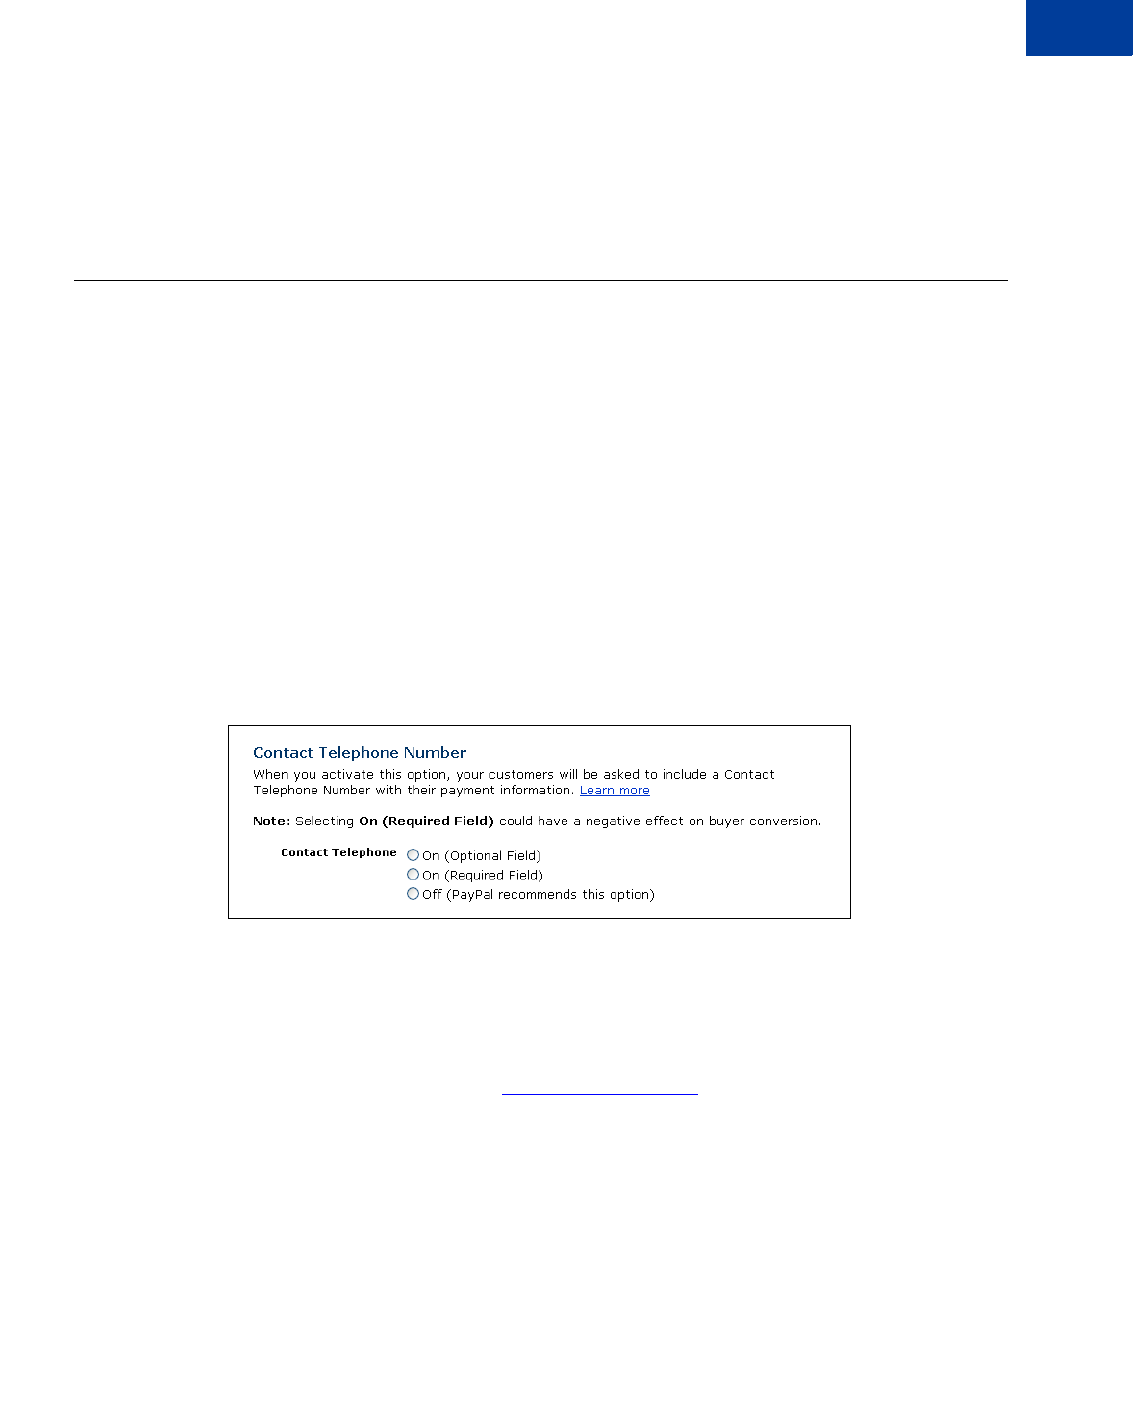
Getting Customer Contact Telephone Numbers
“Customer Contact Information Telephone” is an option that gives you a contact telephone
number for your customer. When you activate this option, customers are prompted to include a
contact telephone number with their payment information.
IMPORTANT:In accordance with PayPal’s User Agreement, you may use this Contact
Telephone Number only to communicate with the buyer about the related
purchase. You may not use this number for unsolicited commercial messages.
You can make the contact telephone number optional or required, or you can turn it off. “Off”
is the recommended default option because customers value their privacy and prefer to
minimize unsolicited communications.
When you require the buyer’s contact telephone number, your buyer sees the prompt during
purchase.
FIGURE 2.17Prompt for Customer Contact Telephone Number
Activating Customer Contact Telephone
Follow these steps to activate the Customer Contact Information Telephone option:
1. Log in to your PayPal account at https://www.paypal.com.
2. Click the My Account tab.
3. Click the Profile link.
4. Click the Website Payment Preferences link.
5. Select the option you prefer: On (Optional Field), On (Required Field), or Off
(Recommended).

Using Your Merchant Account Profile and Tools
Language Encoding Your Data
54 May 2006 Website Payments Standard Integration Guide
6. Complete the rest of the selections on the page.
7. Click Save.
Language Encoding Your Data
Websites that use PayPal in different parts of the world work with different languages. Human
languages are represented in computing by the terms “character set” and “character encoding”.
A character set is a computer representation of all the individual possible letterforms or word
symbols of a language. For instance, ASCII (or American Standard Code for Information
Interchange) is a common character set that has been used for decades to represent the
letterforms, numbers, punctuation, and symbols of American English. Another example of a
character set is Big 5, which is one of the most widely implemented Chinese character sets.
Character encoding, on the other hand, refers to how a particular character set is represented
internally in data processing; that is, how the individual characters are actually stored and
operated on. There many different kinds of character encodings. For example, an encoding
might allow 7, 8, or 16 computer bits for a single character.
PayPal refers to these two terms together as language encoding.
Changing Your Language Encoding
With your Language Encoding preferences, you can precisely control the encoding of the
data that PayPal should expect from your website’s use of any PayPal Website Payment
button, and the encoding of the data that your website expects to receive back from PayPal
When you sign up for a new business account with PayPal, the PayPal system determines your
character set and its encoding based on your country of origin, as specified by you during
signup. For example, if your postal address indicates France, by default your Selling
Preferences language encoding is set to a Western language character set.
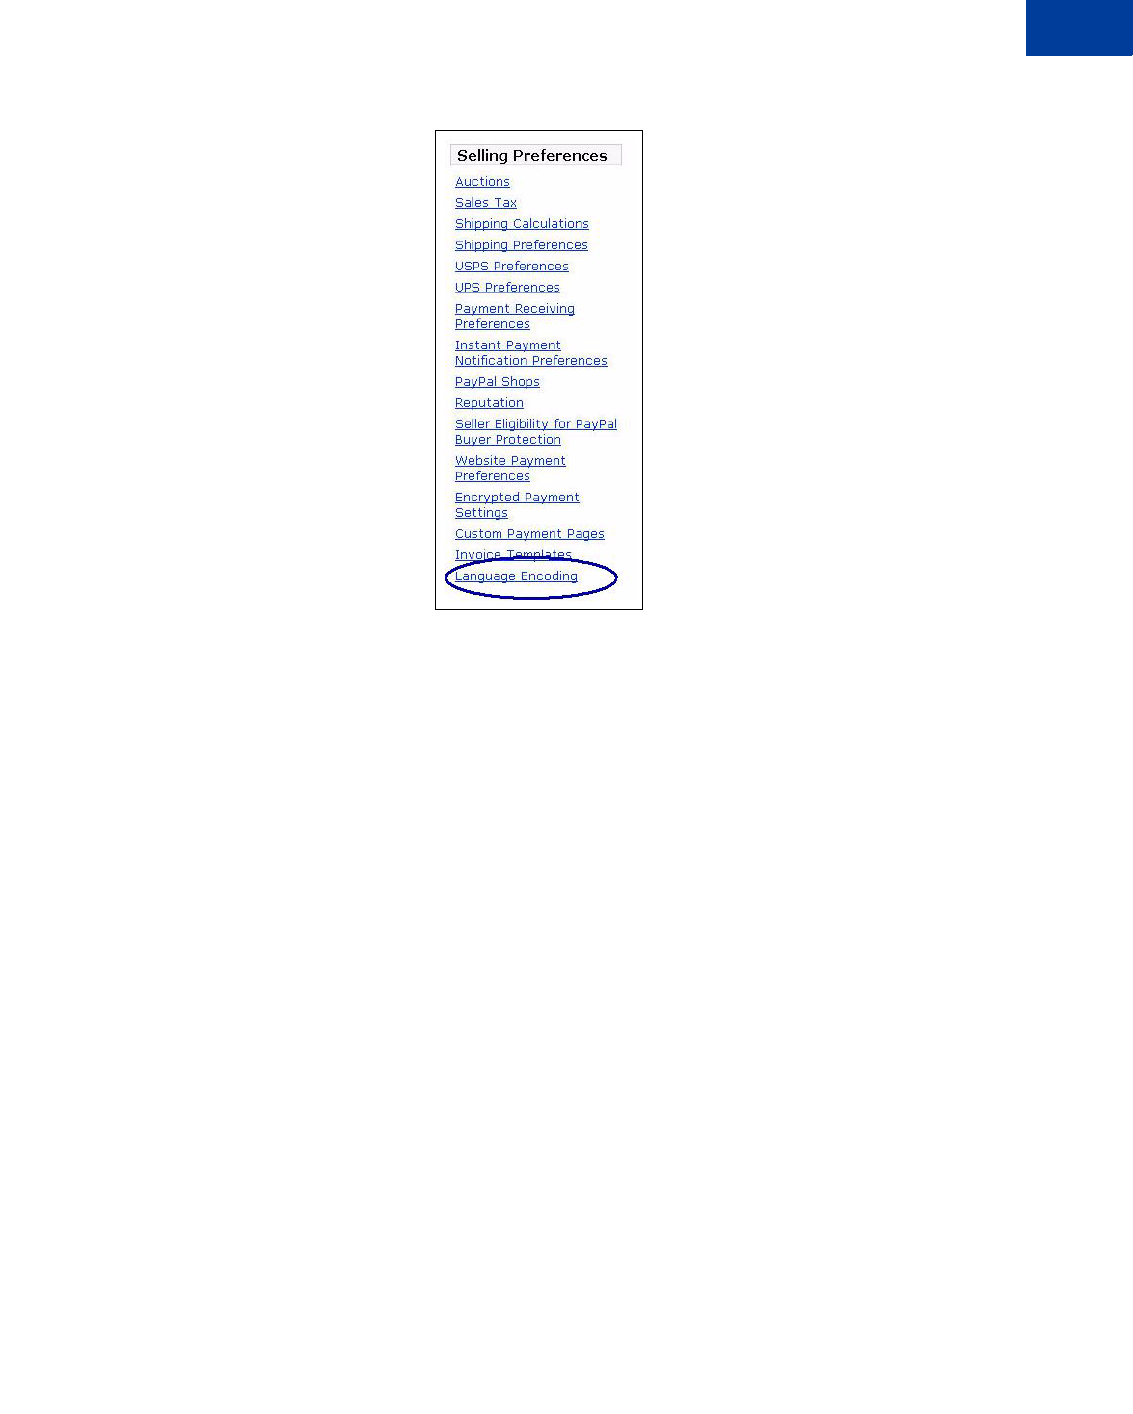
Navigating Your Profile: Language Encoding
To set the default language encoding for your PayPal Business account, log in to your account
and click the Profile tab. In the Selling Preferences column, click Language Encoding.
May 2006 55
Using Your Merchant Account Profile and Tools
Language Encoding Your Data
FIGURE 2.18Profile Selling Preferences for Language Encoding
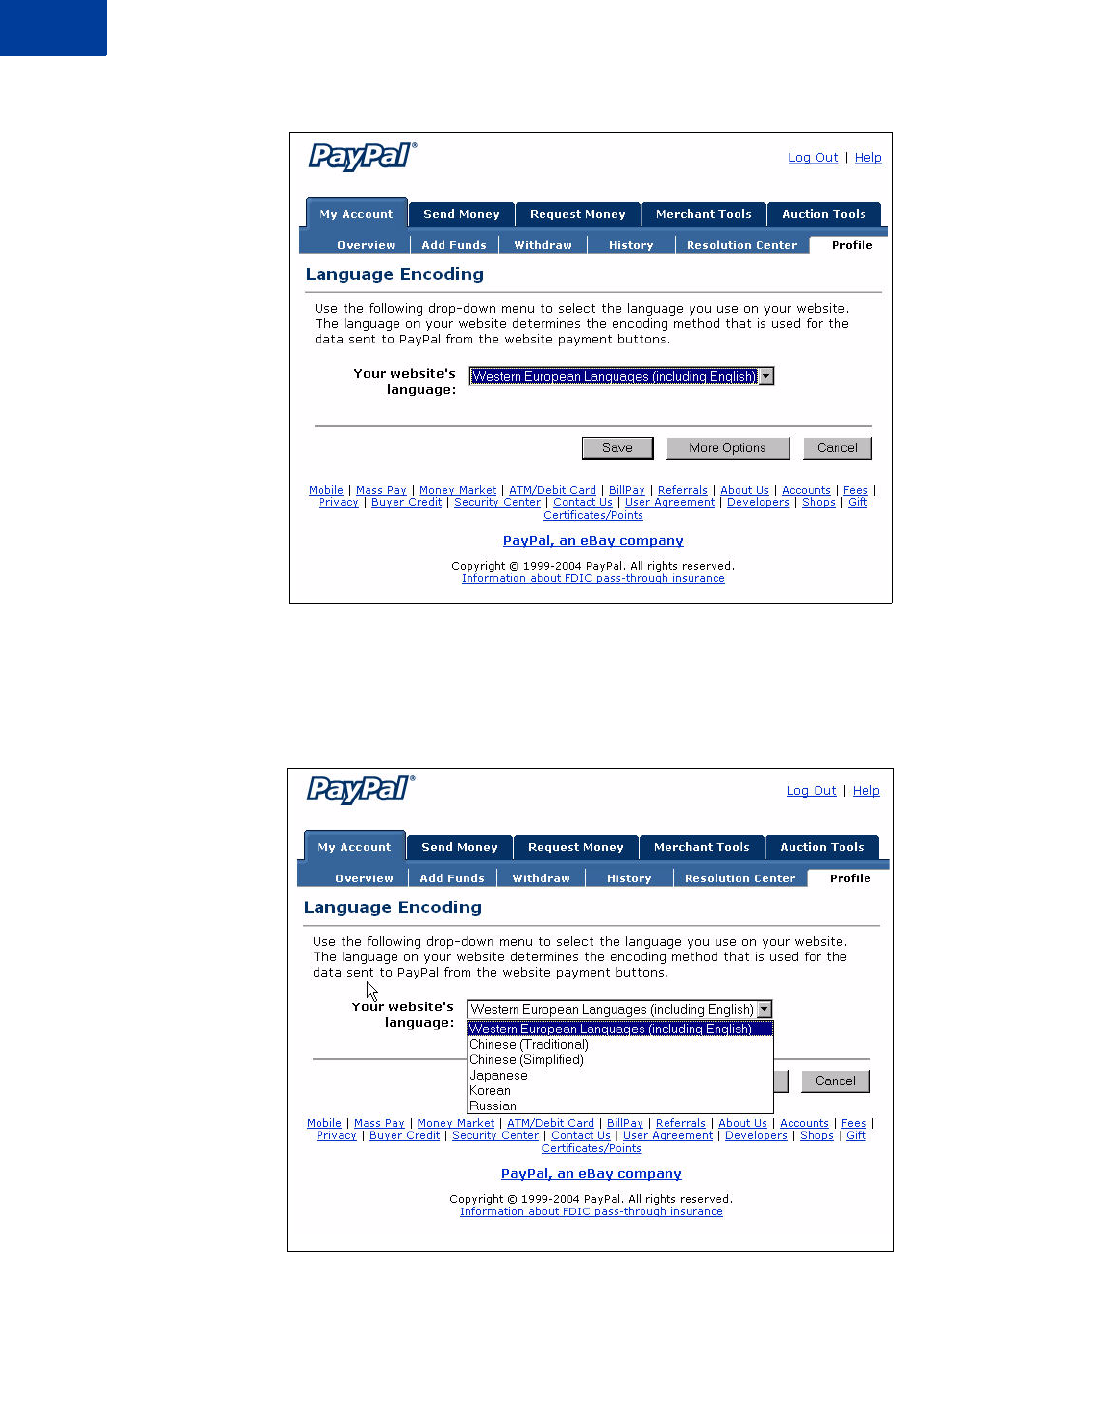
Changing Your Website Language
The Language Encoding page displays the setting for your website’s language, as shown in
the following illustration. With the Your website’s language drop-down menu, you change
the setting.
Using Your Merchant Account Profile and Tools
Language Encoding Your Data
56 May 2006 Website Payments Standard Integration Guide
FIGURE 2.19Language Encoding Settings: Basic Choices
To change the language of data PayPal should expect from your website, click the Your
website’s language drop-down menu and select a different language, as shown in Figure 2.20,
“Website Language Preference.”
FIGURE 2.20Website Language Preference
Click Save to save your selection or Cancel to leave the setting unchanged.
May 2006 57
Using Your Merchant Account Profile and Tools
Language Encoding Your Data
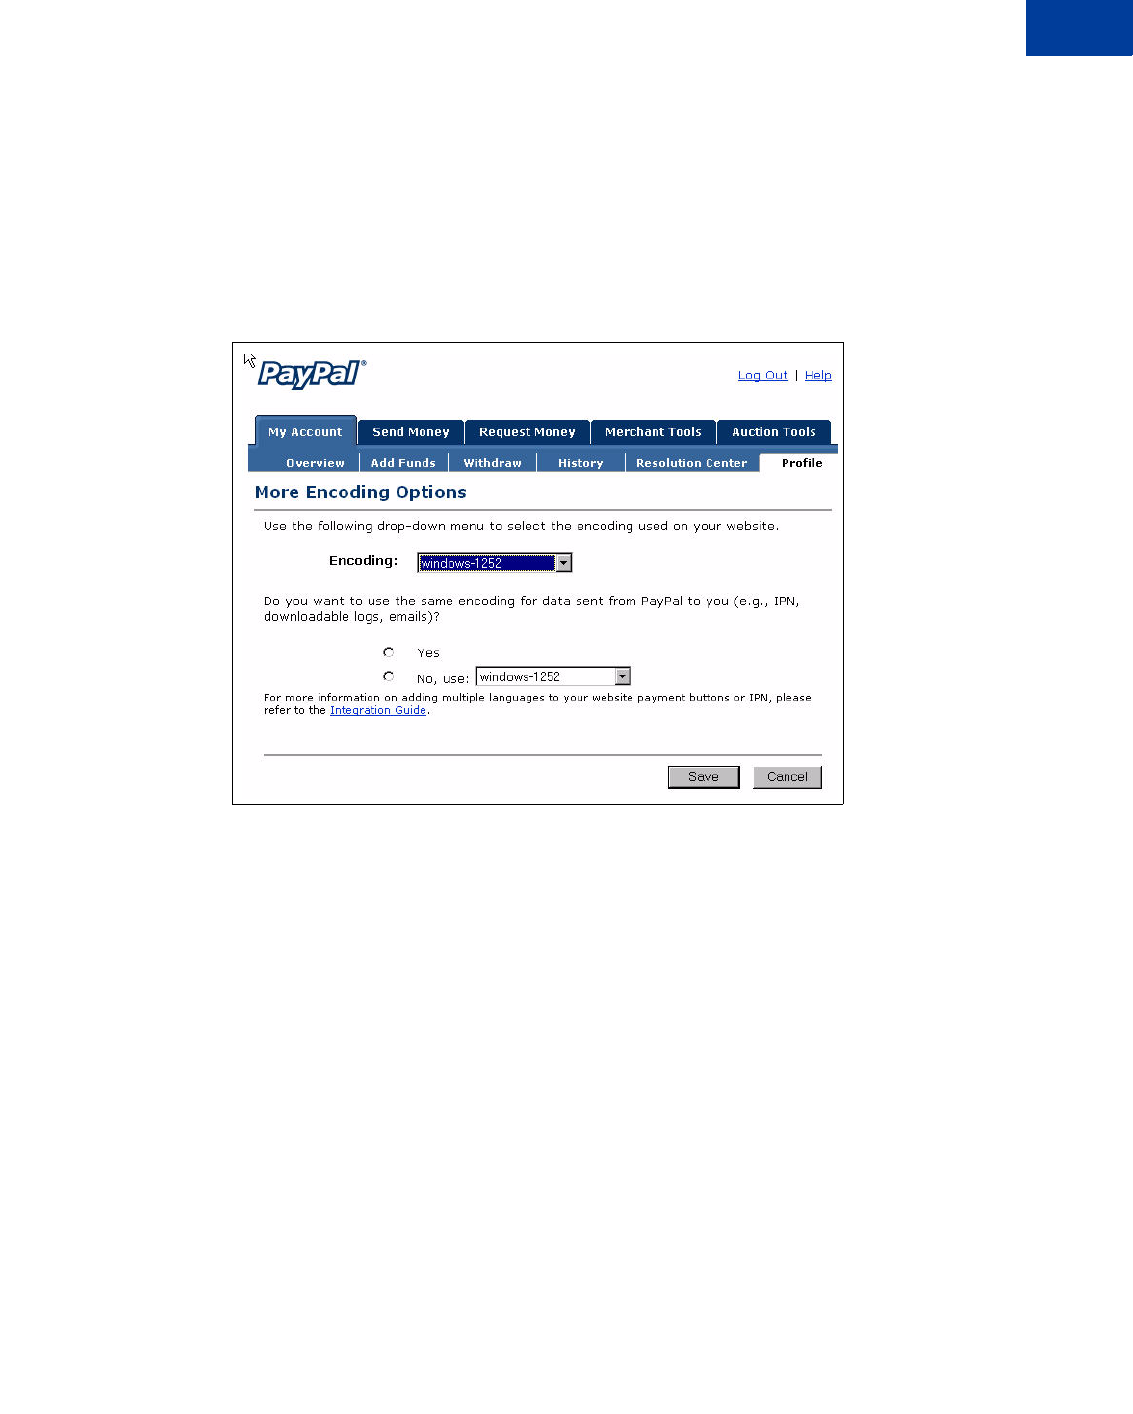
More Encoding Options
If you want to specify the exact standard name of your website’s character encoding, click
More Options on the Language Encoding page to open the More Encoding Options page
shown in Figure 2.21, “More Language Encoding Options.”
The More Encoding Options page allows you to specify the character encoding PayPal
should expect from your website and the encoding of data PayPal sends to your website.
FIGURE 2.21More Language Encoding Options
The encoding selection in the Encoding drop-down menu is based on the country of origin
you specified at signup.
To change the encoding selection, click the Encoding drop-down menu and select one of the
available encodings. For a complete list of supported encodings, see “Table 8.13, “Character
Sets and Encodings Supported by PayPal” on page 113.
For data that PayPal sends to you, you have the option to specify the same or a different
encoding. To use the same encoding as your website, click the Yes radio button. To use a
different encoding, click the No, use radio button and select the desired encoding from the
associated drop-down menu.
Setting Language Encoding On Individual Transactions
You can set the language encoding on each individual transaction with the charset variable.
See “Setting the Character Set: charset” on page 113.
Using Your Merchant Account Profile and Tools
Multi-User Access to Your PayPal Account
58 May 2006 Website Payments Standard Integration Guide
Multi-User Access to Your PayPal Account
With Multi-User Access, you can set up multiple logins with different permissions for
business functions in your PayPal account, so employees have access only to the parts of your
account they need to do their work. For example, you can give your customer service
representatives their own login with limited permissions, so that they have the ability only to
view balances and make refunds but not the ability to edit profiles, send money, or withdraw
funds.
You can add up to seven separate logins to your account. You might want to establish a
separate username and password for each employee, and grant each user the minimum access
necessary. If an employee forgets or loses a password, you can log in and reset it.
NOTE:Remember to revoke the privileges of any employee that leaves your company.
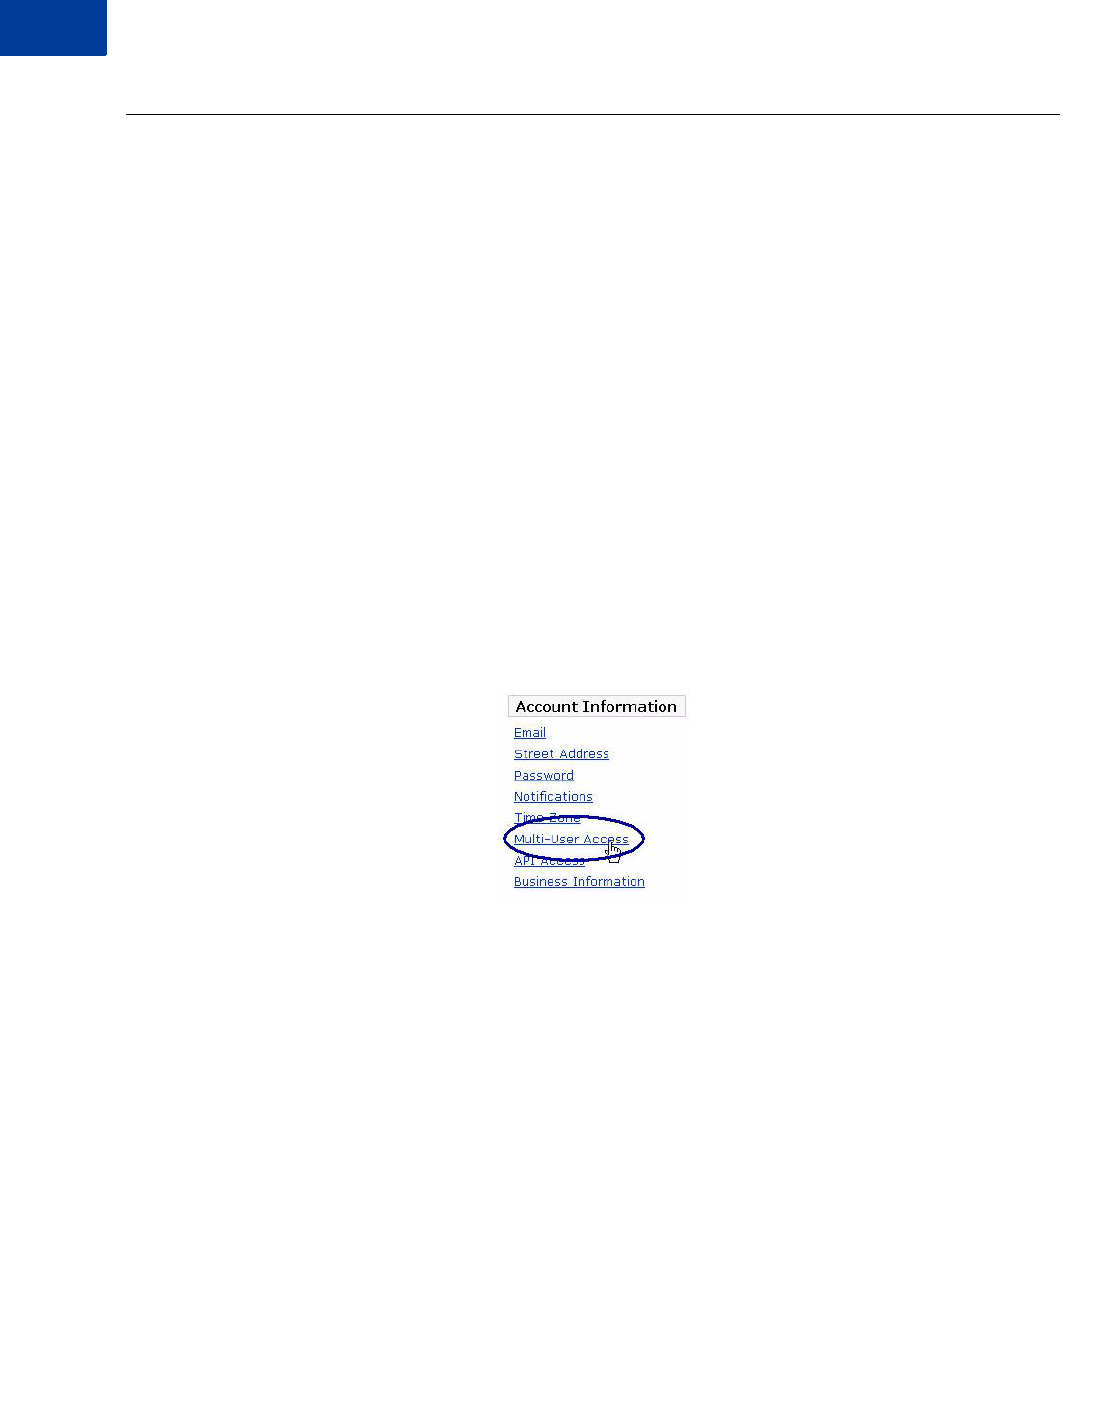
To set up Multi-User Access:
1. Log in to your PayPal Business account.
2. Go to your Profile
3. Click Multi-User Access.
FIGURE 2.22Multi-User Access Link in Account Profile Summary
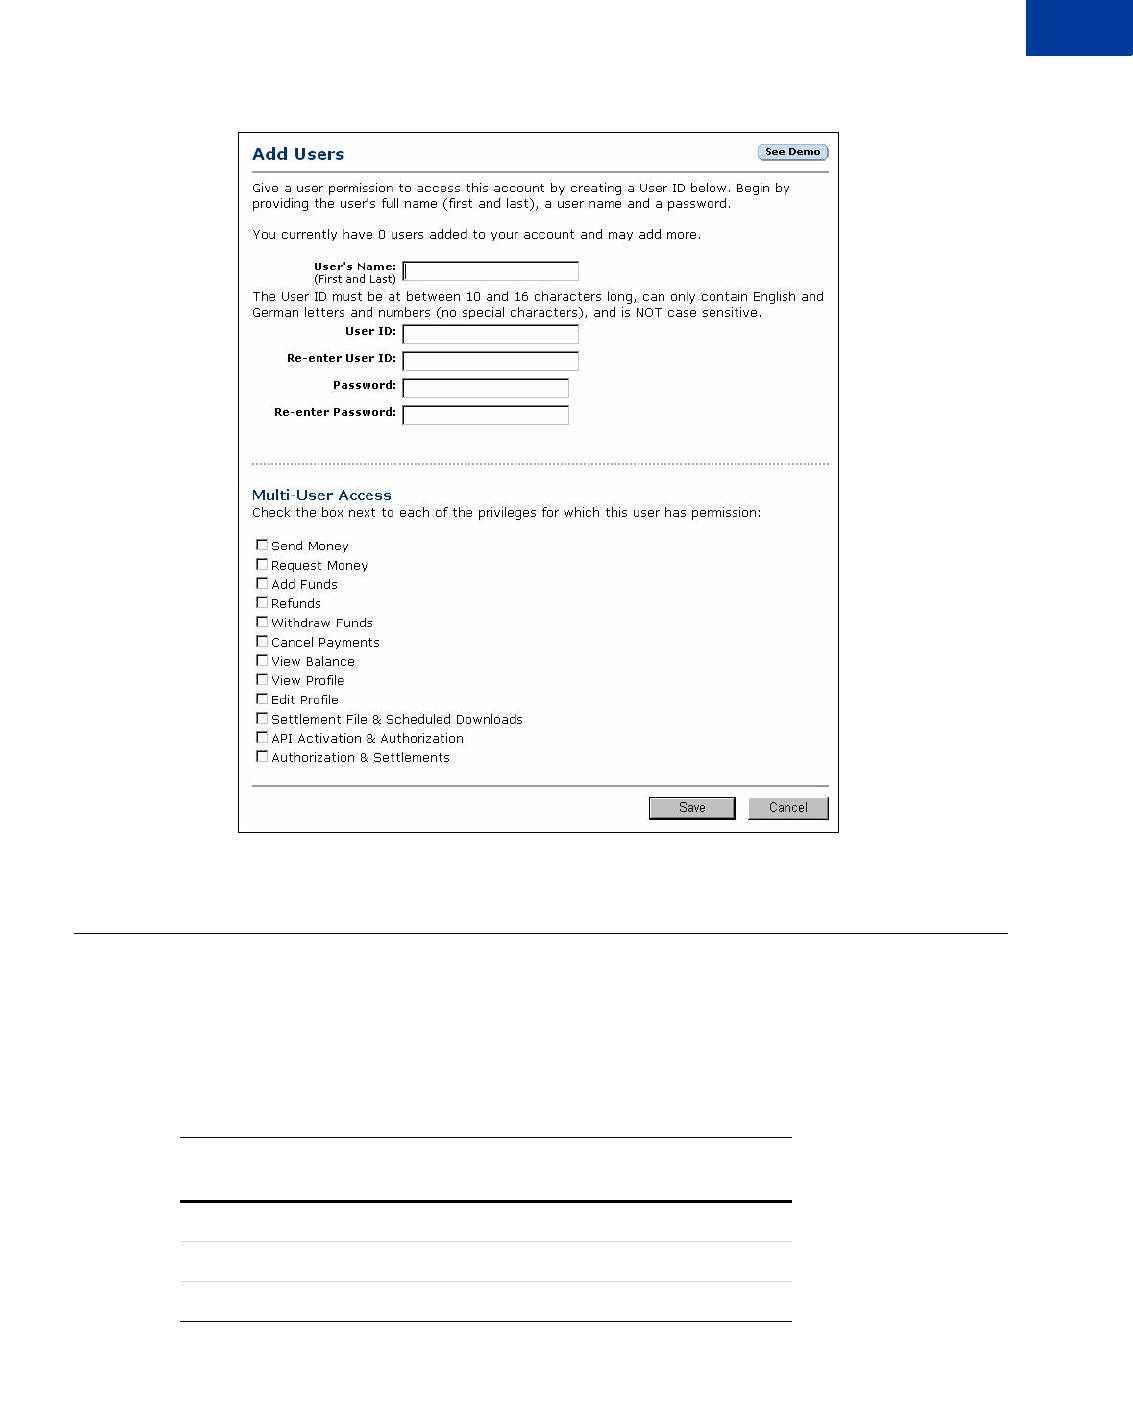
4. Specify your Administrative Contact email address, which is the email address that
receives notifications about your account activity.
NOTE:You must confirm this email address before you can proceed.
5. For each login, specify a User ID, password, and which account privileges the user has
permission to use.
May 2006 59
Using Your Merchant Account Profile and Tools
PayPal-Supported Currencies
FIGURE 2.23Multi-User Access: Adding a User
PayPal-Supported Currencies
The following currencies are supported by PayPal.
TABLE 2.6 PayPal-Supported Currencies, Currency Codes, and Maximum
Transaction Amounts
Code Currency Maximum Transaction
Amount
AUD Australian Dollar 12,500 AUD
CAD Canadian Dollar 12,500 CAD
EUR Euro 8,000 EUR

Using Your Merchant Account Profile and Tools
Accepting or Denying Cross-Currency Payments
60 May 2006 Website Payments Standard Integration Guide
Accepting or Denying Cross-Currency Payments
You choose which currencies you accept and how you would like to accept them. You can set
your Payment Receiving Preferences to handle cross-currency payments. See “Blocking
Certain Kinds of Payment” on page 50.
When a customer sends a payment in a currency you hold, the funds appear in your account in
the balance of that currency. When a customer sends a payment in a currency you do not hold,
you can accept or deny the payment.
FIGURE 2.24Accepting or Denying a Cross-Currency Payment
Receiving fees are assessed in the currency in which the funds were sent. Payments converted
to your primary currency are converted at a competitive exchange rate.
Managing Currency Balances
Use the Currency Balances section of your Profile to manage your currency balances:
GBP Pound Sterling 5,500 GBP
JPY Japanese Yen 1,000,000 JPY
USD U.S. Dollar 10,000 USD
TABLE 2.6 PayPal-Supported Currencies, Currency Codes, and Maximum
Transaction Amounts
Code Currency Maximum Transaction
Amount

May 2006 61
Using Your Merchant Account Profile and Tools
Issuing Refunds
zSelect your primary currency
zOpen or close a currency balance
zTransfer funds between currency balances. Funds transferred from one currency balance to
another are exchanged at a competitive rate.
Issuing Refunds
When you issue a refund, the gross amount of the refund is sent to your customer. The gross
amount equals the net amount of the original transaction plus the refunded fee from PayPal.
Gross Amount = Net Amount + Refunded Fee
Refunding Within 60 Days of Payment
You can refund the entire amount of a transaction or portions of it. If you issue a refund within
60 days, the original transaction fee for receiving the payment is credited to your account. For
partial refunds, you are credited a percentage of the original transaction fee based on the
refunded amount.
To issue a refund within 60 days:
1. Log in to your PayPal account.
2. Click the History subtab.
3. Find the payment transaction you want to refund.
4. Click the Details link for the transaction.
5. Click the Refund Payment link on the Transaction Details page.
6. Enter the refund amount and click Submit.
7. Confirm the refund amount and click Process Refund.
If you refund a pending eCheck payment, no fees are charged because the pending payment is
effectively canceled.
Refunding After 60 Days
When you issue a refund after 60 days, your original transaction fee for receiving the payment
is not credited to your account.
To issue a refund after 60 days:
1. Log in to your PayPal account.
2. Click the Send Money tab.

Using Your Merchant Account Profile and Tools
Issuing Refunds
62 May 2006 Website Payments Standard Integration Guide
3. Enter the required information.
4. Click Continue.
5. Review the information on the confirmation page, and click Send Money to complete the
refund.

May 2006 63
3Single-Item Payment: Buy Now
and Donations
Buy Now or Donations buttons are suitable for single-item payments or purchases. A single
Buy Now button can sell one or more copies of the same item. However, to sell different items
you must create separate Buy Now Buttons for each or use PayPal’s Shopping Cart. You can
use to a Donations button to collect a pre-determined amount, or you can allow your donors to
choose the amounts of their donations. “Example of the Basic Page Sequence” on page 18
shows how Buy Now or Donations work.
You can create a Buy Now or Donation button in two ways:
zUse PayPal’s online Buy Now or Donation button factory to create an HTML FORM you
copy to your website or to an email message.
zUsing the webpage tools of your own choice, construct your own HTML FORM based on
the example in “Sample Buy Now Button HTML and Hyperlink” on page 67 and the
descriptions of variables in Appendix A, “Website Payments Standard HTML Variables.”
Using Buy Now or Donations Button Factory
The button factories for Buy Now and Donations work in exactly the same way, except they
prompt for slightly different information. These differences are noted in the following steps.
To create HTML with the Buy Now or Donations button factory:
1. Log in to your PayPal account at https://www.paypal.com.
2. Click the Merchant Tools tab.
3. Click Buy Now Buttons or Donations.
4. Enter the details of your item. All fields are optional.
Buy Now Button Fields
–Item Name/Service: Enter the name of the item or service you wish to sell. If you do not
enter anything in this field, your customers can complete it at time of purchase. PayPal
recommends entering an item name to make it easier for you to ship the order.
–Item ID/Number: If you have an ID or tracking number for your item, enter it here. This
field is not be displayed to your customers at the time of payment, but they see it in their
transaction details on the PayPal website.
–Item Price: Enter the price of the item you wish to sell. If you do not enter anything in
this field, your customers can complete it. PayPal recommends entering an Item Price to
make it easier for you to collect the correct amount.
Donations Button Fields

Single-Item Payment: Buy Now and Donations
Using Buy Now or Donations Button Factory
64 May 2006 Website Payments Standard Integration Guide
–Donation Name/Service: Enter the reason for payment or the name of your
organization/charity here. If you do not enter anything in this field, your donors can
complete this field.
–Donation ID/Number: You can use this field to differentiate payments (e.g. to enter a
campaign name). This field is not displayed to your donors at the time of payment, but
they see it in their transaction details on the PayPal website.
–Donation Amount: If you would like to collect a pre-determined amount, you can enter
it in the Donation Amount field. If you would like your donors to choose their donation
amounts, do not enter a price in this field. Users are prompted to enter a donation amount
when they make payment.
Common Fields
–Currency: Choose the currency in which you would like this payment to be
denominated. This field defaults to the currency of your primary balance.
–Buyer’s Country: To display the PayPal login or sign-up page in a certain language,
select a country where that language is spoken from the pull-down menu.
5. Choose a image for your button.
If you are going to receive payments or donations from your website, choose the image for
the button you would like your customers to click to make their purchase. To display your
own image, enter the URL of the image’s location in the URL field.
NOTE:PayPal recommends that you enter an image URL only if the image is stored on a
secure (https) server. Otherwise, your customer’s web browser displays a message that
the payment page contains insecure items.
If you are creating an email link, go to “Adding More Details to the Button” on page 64.
6. Security Settings
PayPal offers the option to encrypt your button’s HTML code. Encryption ensures that an
item’s price and other details cannot be altered by a third party, thus increasing the security
of your transactions. Select Yes to encrypt your code, or No to leave it editable.
PayPal highly recommends encrypting your button code. However, there are three
limitations:
– Encrypted button HTML is not editable. If you want to modify your button code
manually, select No for this option.
– You cannot encrypt your button if it has dynamically-generated code from the Add More
Options page, such as drop-down Options fields (see step 5). If you need Option fields
for your products, select No to turn encryption off.
– If you choose to encrypt your button, you cannot create an email link.
Adding More Details to the Button
If you do not have additional details to add to your button (such as sales tax, shipping, or your
logo), click Create Button Now and go to “Copy and Paste the HTML Code” on page 66.
Otherwise, click Add More Options.

May 2006 65
Single-Item Payment: Buy Now and Donations
Using Buy Now or Donations Button Factory
If you have additional details for your button, follow these steps:
1. For Buy Now buttons, Add Shipping and Sales Tax
–Shipping Cost Calculation: If you have specified shipping rates in your Profile, they
are listed here.
–Sales or Value Added Tax Calculation: If you have specified your tax rate in your
Profile, it is listed here. For more information, see “Automatic Calculation of Shipping
and Handling Cost and Tax” on page 48.”
2. For Buy Now buttons, add Option fields to your button
Creating an option field allows your customers to specify information about their
purchases. You can use Option fields to specify options like color, size, or gift-wrapping.
These options must not change the price of an item but let you collect additional
information from your customer without extra email communication. Each Buy Now
Button can have up to two option fields, and you can use a drop-down menu or text box to
collect the information.
Unfortunately, Option fields and button encryption cannot be used if you are creating an
email hyperlink. If you would still like to include Buy Now links in email messages, you
can try either sending HTML emails, providing a link to the Buy Now Button (with Option
fields) on your website, or asking your user to include the optional information in the Note
field.
–Option Field Type: Choose the type of option field: drop-down menu or text box. If you
choose drop-down menu, you must enter the menu choices. If you choose text box, your
customers enter their choice.
–Option Name: Enter the name of your option. The Option Name field has T a 60-
character limit.
–Drop-Down Menu Choices: If you are using a drop-down menu, you must enter your
menu choices. There is a 30-character limit per choice, with a maximum of 10 choices.
Use a carriage return (press ENTER) to separate each choice.
3. Customize your payment pages
–Custom Payment Page Style: Give your customers a seamless payment experience by
customizing PayPal’s payment pages to match your website’s style. If you already added
Custom Payment Page Styles in your Profile, they are listed here. Choose the page style
you would like to appear when your customer clicks your Buy Now button. To learn
more about creating page styles, see “Branding PayPal’s Payment Pages” on page 33.”
4. Customize your customer’s experience
–Successful Payment URL: Enter the URL for the page you want your customers
redirected to after they have completed their payments. Unless you have enabled Auto
Return, your customers see a payment completion page where they click Continue and
return to the Successful Payment URL you have specified. If you do not enter a
Successful Payment URL, customers clicking this link are taken to a PayPal webpage.

Single-Item Payment: Buy Now and Donations
Using Buy Now or Donations Button Factory
66 May 2006 Website Payments Standard Integration Guide
–Cancel Payment URL: Enter the URL where you want to send your customers if they
cancel their payments at any point in the Buy Now payment flow. If you do not enter a
Cancel Payment URL, customers who click this link are taken to a PayPal webpage.
5. Miscellaneous Options
–Quantity: If you want your customers to purchase more than one item or service, choose
Yes to prompt them to enter the quantity they want. If you choose No, the quantity is set
to 1, and your customers can purchase only one item per payment.
–Shipping Address: If you want to prompt customers for a shipping address, choose Yes.
If you choose No, your customers are not asked to provide a shipping address.
6. Collect additional information from your customers
–Note: Select Yes if you want your customers to be able to include a note to you with their
payment. If you select No, your customers cannot include a note.
–Note Title: If you allow your customers to include a note with their payments, you can
specify a title for the note field. By specifying a title, you can prompt your buyers to enter
specific information, such as a User ID or special instructions. There is a 40-character
limit on your note field title. If you do not enter a title, your customers see Special
Instructions (optional) as the note field title.
7. Choose an email address to receive payment
If you have more than one confirmed email address, you can specify the address where you
want to receive your email payment notifications when your customers pay you.
Copy and Paste the HTML Code
When you completed the Buy Now Button Factory form, click Create Button Now.
If your customers pay on your website:
1. Copy the code from the HTML for Websites text box by highlighting all the text and
pressing Ctrl+C, or by highlighting all the text, right-clicking your mouse, and selecting
Copy.
2. Open the webpage where you want to collect payment.
3. Paste the code you just copied into your webpage file wherever you would like the image to
appear, typically next to the description of the item or service, either by pressing Ctrl+V or
by right-clicking your mouse and selecting Paste.
If your customers pay by email:
NOTE:If you use Encrypted Website Payments (EWP), you cannot create an email link.
1. Copy the code from the Link for Emails text box by highlighting all of the text and
pressing Ctrl+C, or by highlighting all of the text, right-clicking your mouse, and choosing
Copy.
2. Open the email you want to send.

May 2006 67
Single-Item Payment: Buy Now and Donations
Sample Buy Now Button HTML and Hyperlink
3. Paste the code you just copied into your email either by pressing Ctrl+V or by right-
clicking on your mouse and selecting the Paste option.
4. When your customers receive the email, the code appears as a link. Clicking the link takes
them to your PayPal payments page.
HTML Tip: Ensure that the HTML code on your webpage exactly matches the code you copy
from PayPal. Some HTML editors might change some characters in the code. In addition, be
sure you paste the code into a field that accepts HTML. If you paste the code into a standard
text field, the code is treated as displayable text.
Sample Buy Now Button HTML and Hyperlink
The HTML for a Buy Now Button looks similar to the following. Several optional fields are
shown.
EXAMPLE 3.3 HTML for Buy Now Button
IMPORTANT:You can change the values for any of the variables, with the exception of the
first two lines.
<form target="paypal" action="https://www.paypal.com/cgi-bin/webscr"
method="post">
<!-- a Buy Now button is specified by the command _xclick -->
<input type=”hidden” name=”cmd” value=”_xclick”>
<input type=”hidden” name=”business” value=”seller@designerfotos.com”>
<!-- Allow customer to enter desired quantity -->
<input type=”hidden” name=”undefined_quantity” value=”1”>
<input type=”hidden” name=”item_name” value=”Baseball Hat”>
<input type=”hidden” name=”item_number” value=”123”>
<!-- No currency_code variable has been specified,
so monetary amount is assumed to be USD -->
<input type=”hidden” name=”amount” value=”5.95”>
<! Passthrough variables for order tracking or other purpose -->
<input type=”hidden” name=”custom” value=”merchant_custom_value”>
<input type=”hidden” name=”invoice” value=”merchant_invoice_12345”>
<input type=”hidden” name=”charset” value=”utf-8”>
<input type=”hidden” name=”no_shipping” value=”1”>
<input type=”hidden” name=”image_url” value=”https://www.designerfotos.com/logo.gif”>
<input type=”hidden” name=”return” value=”http://www.designerfotos.com/thankyou.htm”>
<input type=”hidden” name=”cancel_return”
value=”http://www.designerfotos.com/cancel.htm”>
<!-- Do not prompt customer to include a note with the purchase -->
<input type=”hidden” name=”no_note” value=”1”>
<table>
<tr>
<td>
<!-- Allow customer to choose product options -->
<input type=”hidden” name=”on0” value=”Color?”>Color?

Single-Item Payment: Buy Now and Donations
Sample Buy Now Button HTML and Hyperlink
68 May 2006 Website Payments Standard Integration Guide
<select name=”os0”>
<option value=”Red”>Red
<option value=”Green”>Green
<option value=”Blue”>Blue</select>
</td>
</tr>
</table>
<input type=”image” src=”http://images.paypal.com/images/x-click-but01.gif”
name=”submit” alt=”Make payments with PayPal - it’s fast, free and secure!”>
</form>
The HTML shown above generates the following hyperlink. This example includes several
optional fields, and the text is URL-encoded.
https://www.paypal.com/xclick/business=seller@designerfotos.com&undefined_quantity=1&
item_name=Baseball+Hat&item_number=123&amount=5.95&no_shipping=1&return=http%3A//www.
designerfotos.com/thankyou.htm&cancel_return=http%3A//www.designerfotos.com/cancel.ht
m¤cy_code=USD

May 2006 69
4Multiple-Item Payment: Shopping
Cart
With PayPal’s Shopping Cart, your customers can buy multiple items with a single payment,
browse your entire selection, and view a consolidated list of all their items before purchasing.
The shopping cart comes in two basic forms:
1. A shopping cart hosted on the PayPal website, https://www.paypal.com/.
2. HTML input variables for use in third-party shopping carts.
The key distinction between the PayPal-hosted shopping cart and a third-party shopping cart is
in the following HTML variables:
zadd or display: these variables indicate the PayPal-hosted shopping cart.
zupload: this variable indicates that a third-party shopping cart is in use.
How the PayPal-Hosted Shopping Cart Works
This example shows how the shopping carted hosted by PayPal can work with the following
features:
zAccount Optional is turned off. In this example, to pay with PayPal, the customer must
already have a PayPal account. For more information, see “Account Optional or Website
Payments Express” on page 39.”
zAuto Return is turned on. At the end of the transaction, the customer’s browser is
automatically redirected back to your website. For more information, see “Auto Return” on
page 46.”

Multiple-Item Payment: Shopping Cart
70 May 2006 Website Payments Standard Integration Guide
What The Customer Sees
Bob, who has a PayPal account, is buying from The Stuff Shop. He selects a baseball hat by
clicking Add to Cart.
FIGURE 4.25 PayPal-Hosted Shopping Cart Example: Add to Cart
The Stuff Shop is using a generic Add to Cart button created with the PayPal shopping cart
button factory described in “Button Factory for PayPal-Hosted Shopping Cart” on page 75.
The HTML code for this button is detailed in “Sample HTML for PayPal-Hosted Shopping
Cart” on page 78.
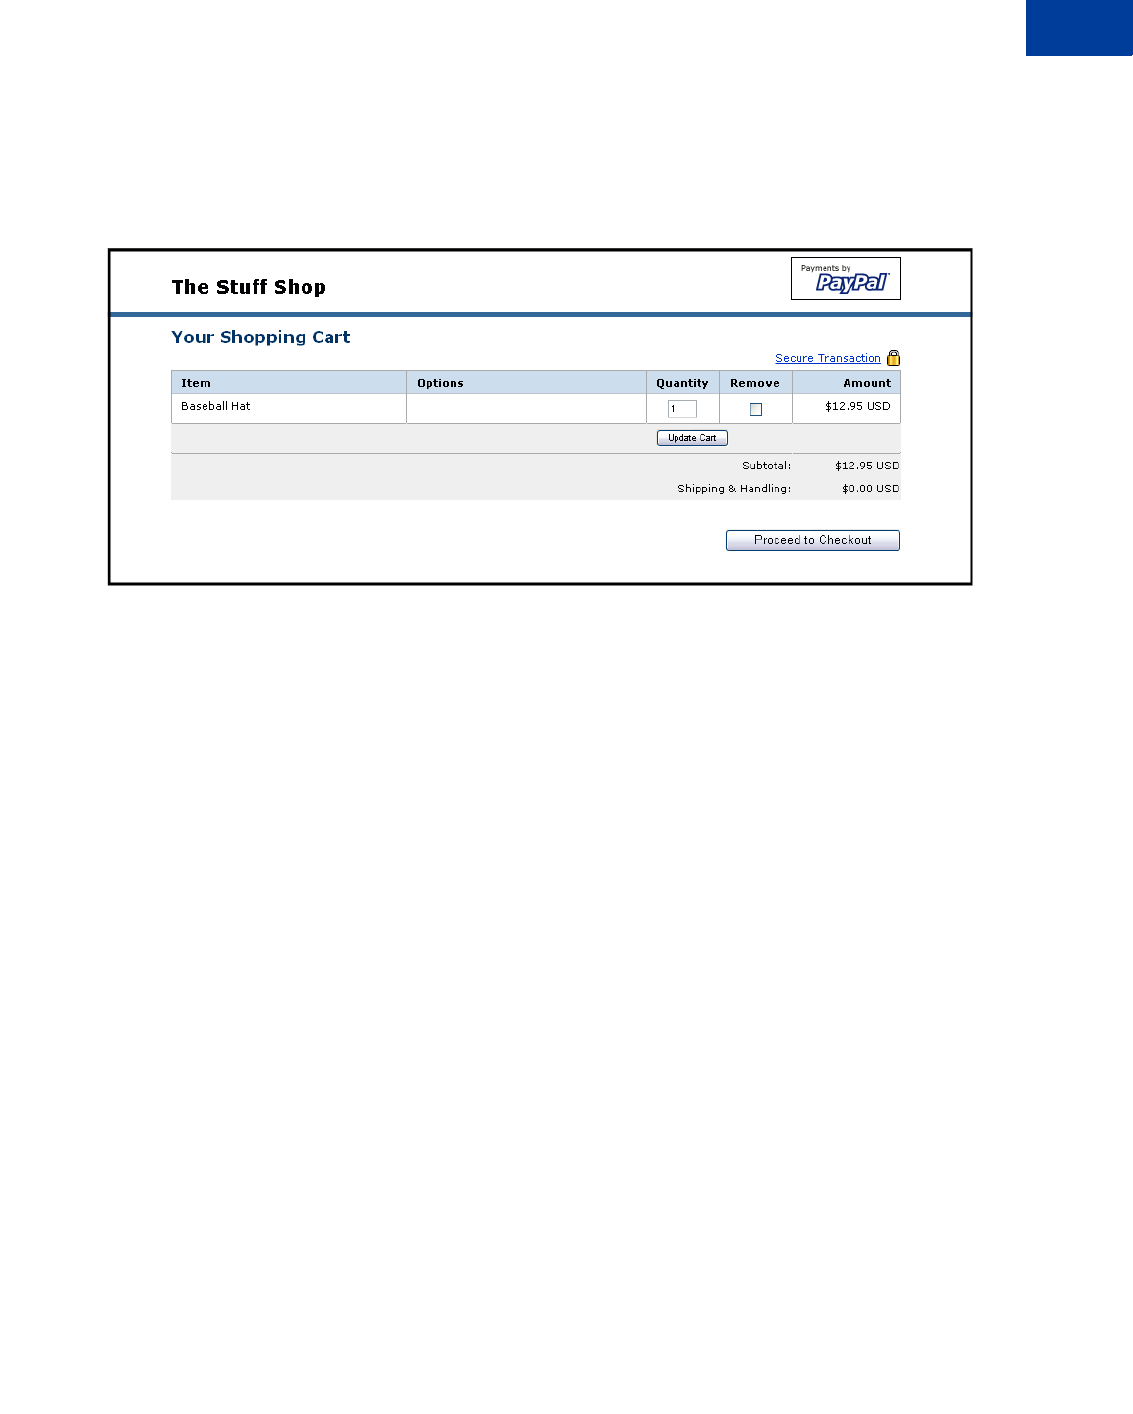
May 2006 71
Multiple-Item Payment: Shopping Cart
Bob is taken to the PayPal website where he can view the items in his shopping cartand and
make changes, if necessary. To proceed to the Billing Information page, Bob clicks on
Proceed to Checkout.
FIGURE 4.26PayPal-Hosted Shopping Cart Example: On the PayPal Website
On the Billing Information page, Bob enters his PayPal username and password and clicks
Log In.
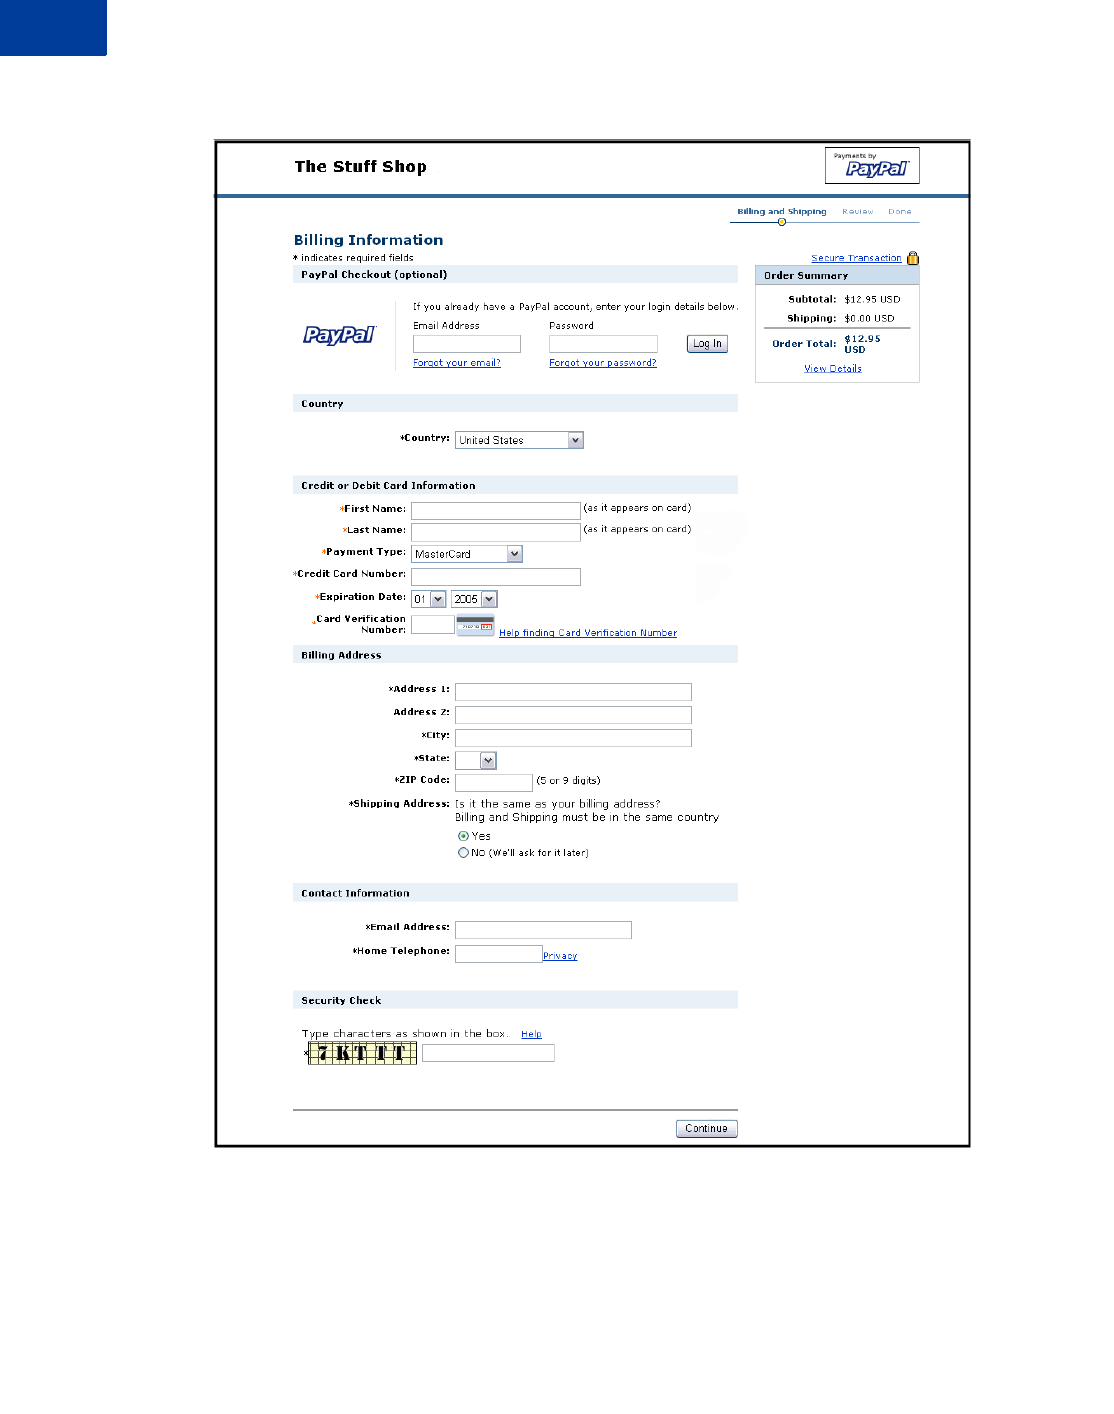
Multiple-Item Payment: Shopping Cart
72 May 2006 Website Payments Standard Integration Guide
FIGURE 4.27 PayPal-Hosted Shopping Cart Example: Enter Billing Information
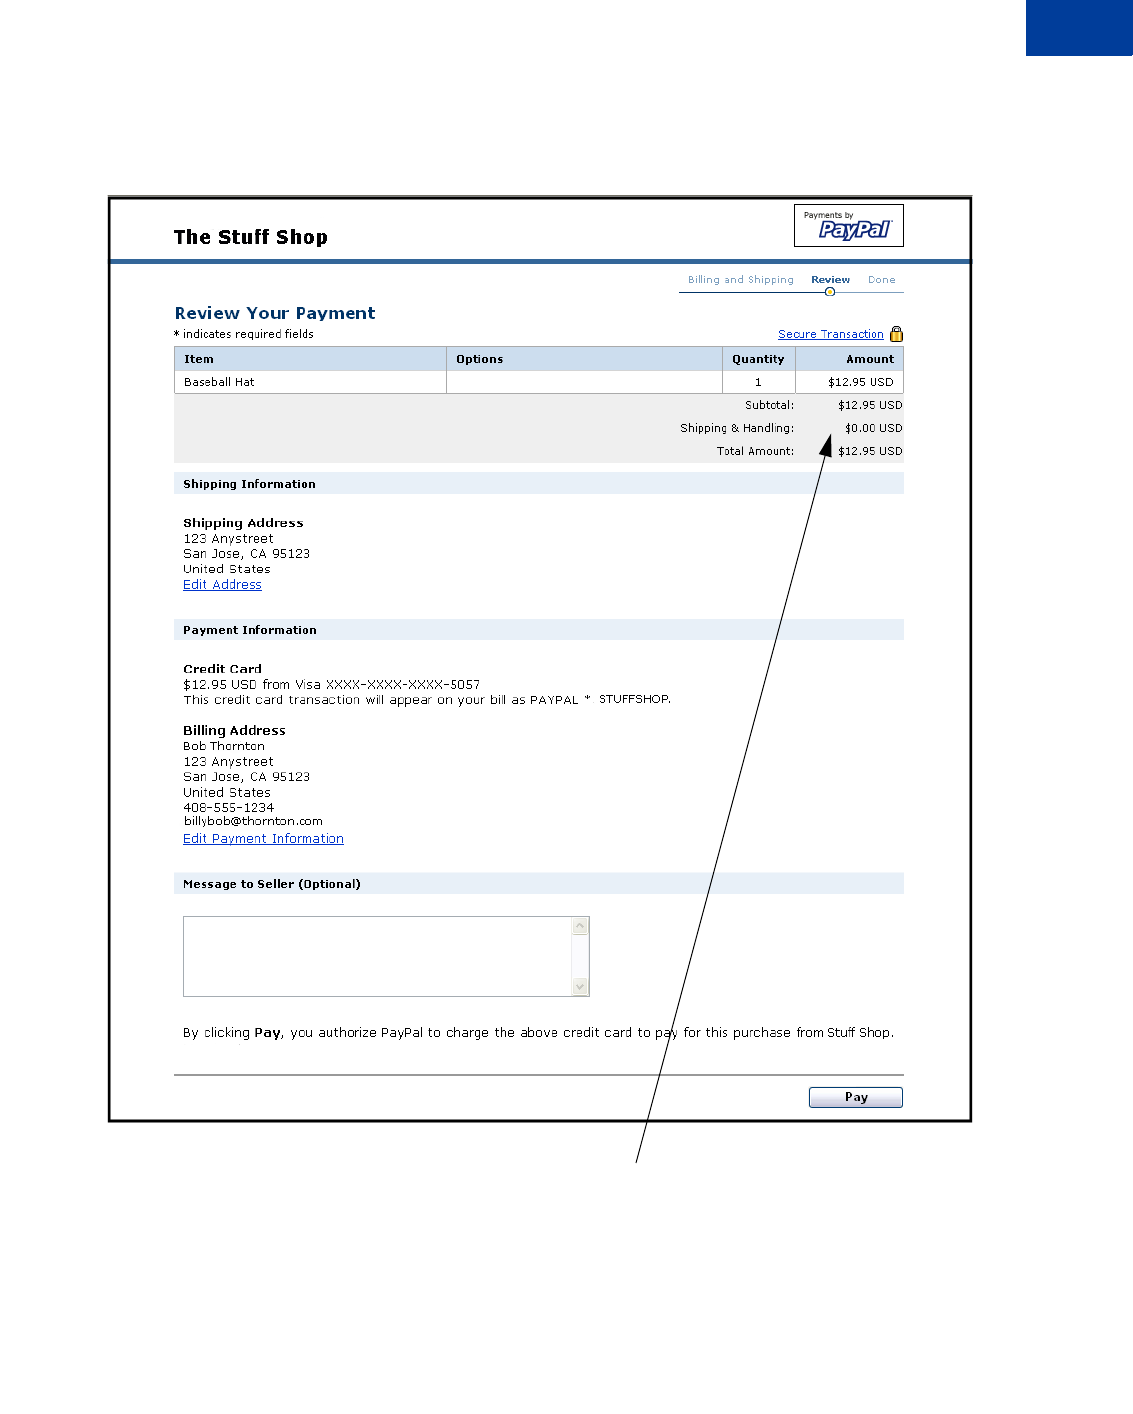
May 2006 73
Multiple-Item Payment: Shopping Cart
Bob is taken to a review page showing the details of his payment.
FIGURE 4.28 PayPal-Hosted Shopping Cart Example: Review Page
Because The Stuff Shop has not activated Profile-based shipping preferences, no shipping
costs are added to the order. For information about automatic shipping calculation, see
“Automatic Calculation of Shipping and Handling Cost and Tax” on page 48.
Bob clicks Pay to complete the payment.
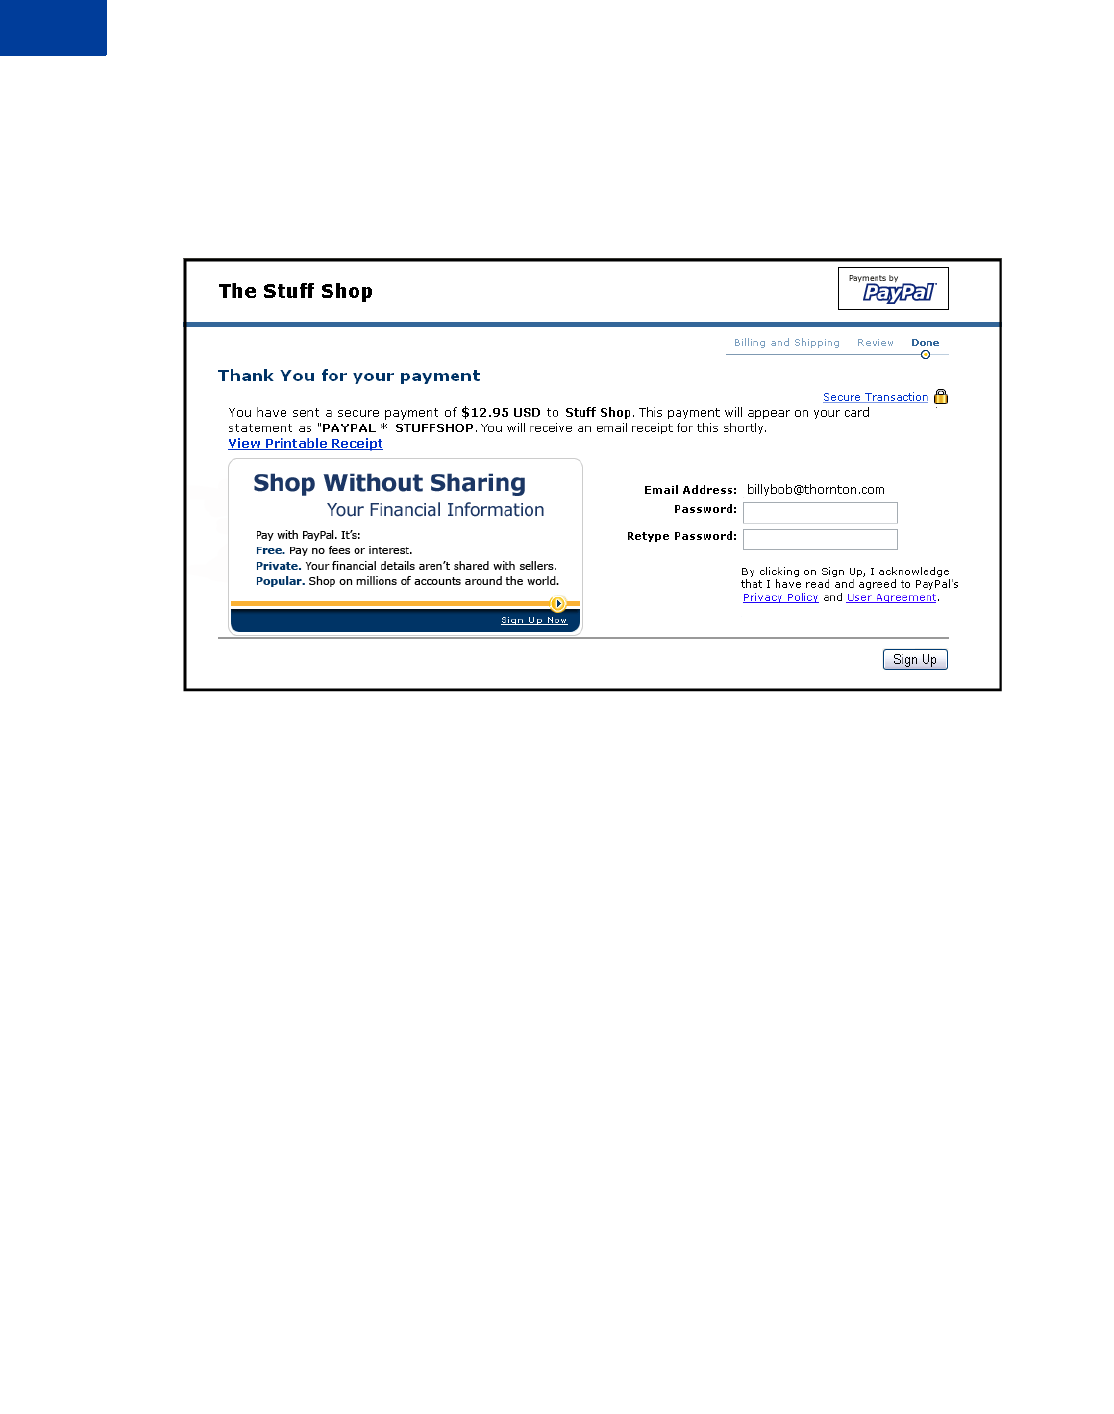
Multiple-Item Payment: Shopping Cart
74 May 2006 Website Payments Standard Integration Guide
Bob is taken to a thank you page upon payment completion.
If he did not yet have a PayPal account, he can choose to sign up for a PayPal account on this
page by selecting a password and clicking Sign Up.
FIGURE 4.29 PayPal-Hosted Shopping Cart Example: Thank You Page After Payment
Bob receives an email receipt for this transaction that confirms the payment and payment
details.
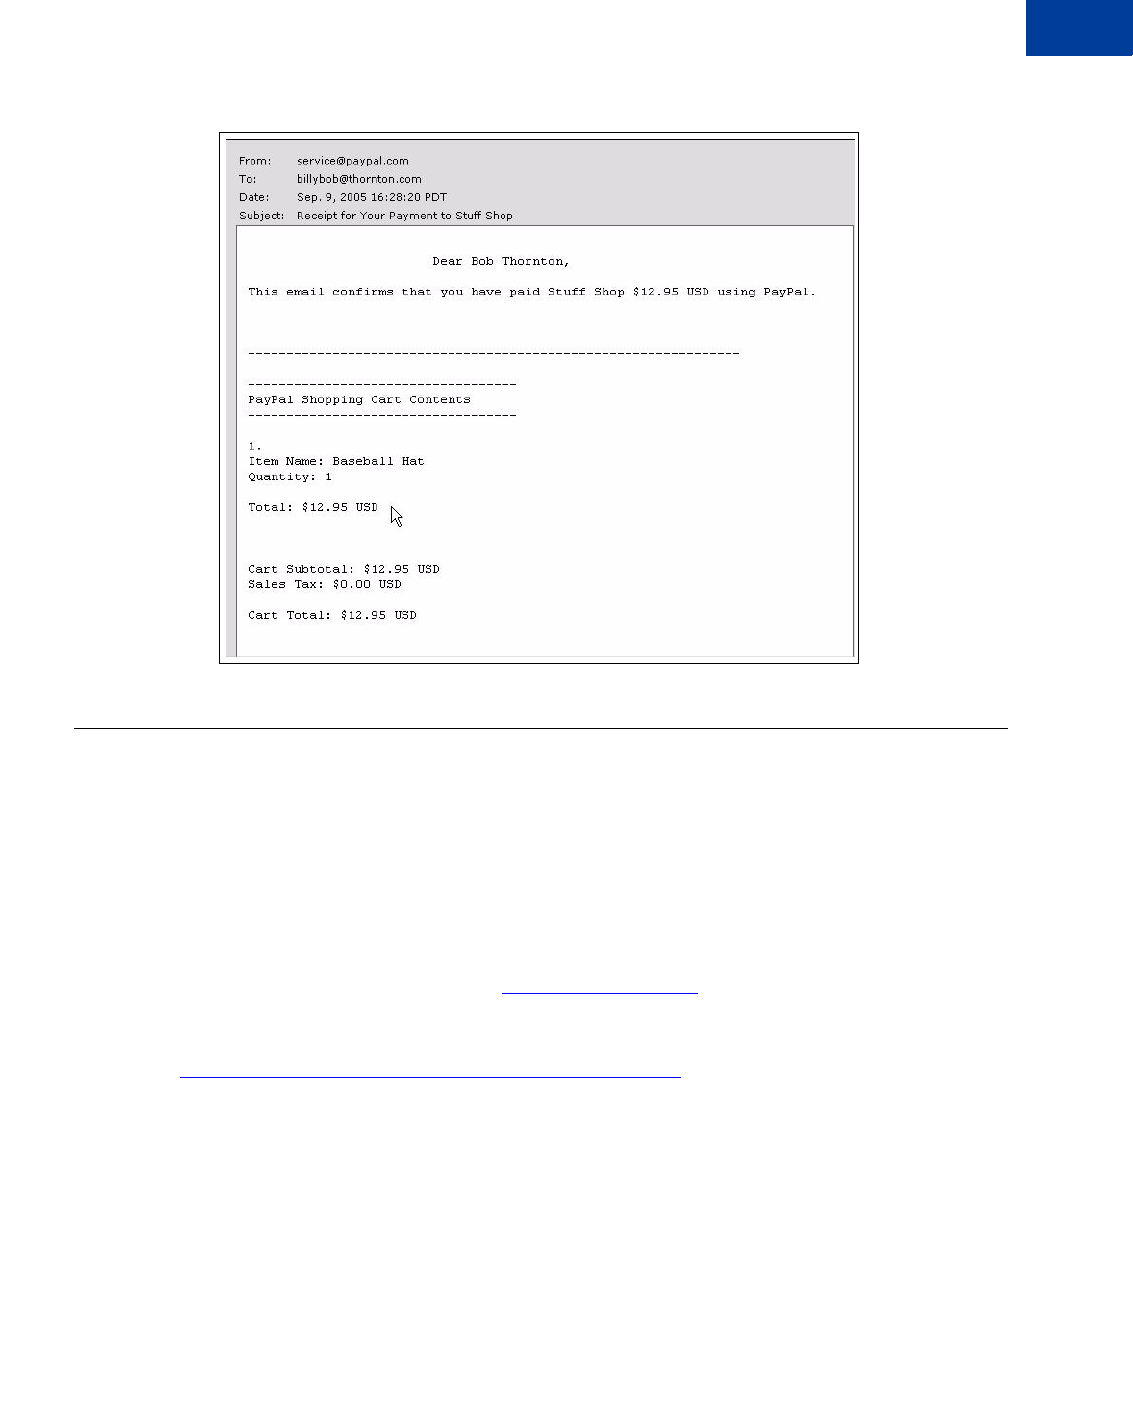
May 2006 75
Multiple-Item Payment: Shopping Cart
Button Factory for PayPal-Hosted Shopping Cart
FIGURE 4.30 PayPal-Hosted Shopping Cart Example: Email Transaction Receipt
Button Factory for PayPal-Hosted Shopping Cart
With the PayPal-hosted shopping cart, customers can make a single payment for multiple
items. With our shopping cart button factory, you can create a separate Add to Cart button for
each item and put the automatically generated HTML code for that button on your website
next to the item.
Use the following steps to create a shopping cart button, or if you are familiar HTML, you can
use the variables in Appendix A to code your own buttons.
1. Log in to your PayPal account at https://www.paypal.com.
2. Enter the following URL:
https://www.paypal.com/us/cgi-bin/webscr?cmd=_cart-factory
3. Enter the details for the item.
–Item Name/Service (required): Enter the name of the item or service you wish to sell
–Item ID/Number: If you have an ID or tracking number for your item, enter it here. This
field will be displayed to your customers at the time of payment, and will be shown in
both the buyer’s and seller’s transaction details on the PayPal website
–Item Price (required): Enter the price of the item you wish to sell

Multiple-Item Payment: Shopping Cart
Button Factory for PayPal-Hosted Shopping Cart
76 May 2006 Website Payments Standard Integration Guide
–Currency (required): Choose the currency in which you would like this payment to be
denominated. This field defaults to the currency of your primary balance.
–Buyer’s Country: If you want the PayPal login or sign-up page to be displayed in a
certain language, select a country from the pull-down menu where that language is
spoken.
4. Choose an image for your button.
If you are going to be receiving payments from your website, choose the image for the
button you would like your customers to click to make their purchase. To display your own
image, enter the URL of the image’s location in the URL field.
NOTE:All items added to a PayPal shopping cart must be denominated in a single currency,
which is determined by the currency specified for the first item added to the Cart or by
the currency_code variable. Once a buyer adds one item to a cart, the buyer is not
allowed to add any items listed in other currencies to that cart. To change the currency,
customers must purchase the items in the first currency or remove all items from the
cart and add the items of the second currency. The best option is to list all of your items
in the same currency.
Adding More Details to the Button
If you do not have additional details to add to your button (such as sales tax, shipping, or your
logo), click Create Button Now and go to “Copy and Paste the Shopping Cart HTML” on
page 77. Otherwise, click Add More Options.
1. Calculate shipping and tax.
If you have specified shipping rates or tax calculations in your Profile, they are listed under
Shipping Cost Calculation and Sales Tax Calculation. For more information, see
“Automatic Calculation of Shipping and Handling Cost and Tax” on page 48.”
2. Add option fields to your button.
Creating an option field lets your customers specify information about their purchases. Option
fields can specify information such as color, size, or gift wrapping. Options must not
change the price of an item. A shopping cart button can have up to two option fields, and
you can use a drop-down menu or a text box to collect the information.
–Option Field Type: Choose the type of option field: drop-down menu or text box. If you
choose drop-down menu, you will enter the different choices. If you choose text box,
your customer will enter his choice.
–Option Name: Enter the name of your option. There is a 60-character limit on option
names.
–Drop-Down Menu Choices: If you are using a drop-down menu, enter your menu
choices. There is a 30-character limit per choice, with a maximum of 10 choices. Use a
carriage return (press Enter) to separate each choice.
3. Select a View Cart button.

May 2006 77
Multiple-Item Payment: Shopping Cart
Button Factory for PayPal-Hosted Shopping Cart
Choose the button image you would like your customers to click when they check out and
complete their purchases. To display your own image, enter the URL of the image’s
location in the URL field.
4. Customize your payment pages.
–Custom Payment Page Style: Give your customers a seamless payment experience by
customizing PayPal's payment pages to match the style of your website. If you have
already added Custom Payment Page Styles in your Profile, they will be listed here.
Choose the page style you would like to appear when your customer clicks your
Shopping Cart button. For more information about adding, selecting, or changing custom
page styles, see “Branding PayPal’s Payment Pages” on page 33.”
5. Customize your customer’s experience.
–Successful Payment URL: Enter the URL where you would like to send your customers
after they have completed payment. Once customer has completes the payment, he sees
a payment confirmation page. From this page, he will click Continue and return to the
Successful Payment URL you have specified. If you do not enter a Successful Payment
URL, customers who click this link will be taken to a PayPal web page.
–Cancel Payment URL: Enter the URL where you would like to send your customers if
they cancel their payment at any point in the PayPal Shopping Cart payment flow. If you
do not enter a Cancel Payment URL, customers who click this link will be taken to a
PayPal web page.
6. Select other options.
–Shipping Address: If you would like your customers to be prompted to provide a
shipping address, choose Yes. If you choose No, your customers will not be asked to
provide a shipping address.
7. Collect additional information from your customers.
–Note: Select Yes if you would like your customers to be able to include a note to you with
their payments. If you select No, your customers will not be given the opportunity to
include a note.
–Note Title: You can choose a title for the note field. By including a title, you can prompt
your buyers to enter specific information (like a User ID) or special instructions. If you
do not enter a title, your customers will see the note field title Optional Instructions.
8. Choose the email address at which you want to receive payment.
If you have more than one confirmed email address attached to your PayPal account, you can
specify the address at which you would like to receive your email payment notifications
when your customers pay you.
Copy and Paste the Shopping Cart HTML
When you have finished filling out the PayPal Shopping Cart Button Factory form, click
Continue.

Multiple-Item Payment: Shopping Cart
Sample HTML for PayPal-Hosted Shopping Cart
78 May 2006 Website Payments Standard Integration Guide
zCopy the code from the HTML for Websites text box by highlighting all of the text and
pressing Ctrl+C, or by highlighting all of the text, right-clicking your mouse, and choosing
Copy.
zOpen the web page file into which you’d like to add your Shopping Cart Button.
zPaste the code you just copied into your web page file wherever you would like the button
to appear (typically, next to the description of the item or service) by either pressing
Ctrl+V or by right-clicking on your mouse and selecting Paste.
HTML Tip: Ensure that the HTML code on your web page exactly matches the code you
copy from PayPal. Some HTML editors might change some characters in the code. In
addition, be sure that you paste the code into a field that accepts HTML. If you paste the code
into a standard text field, the code is treated as displayable text.
Create Add to Cart buttons for all items.
Click Create Another Button to create more Add to Cart buttons the previous steps.
Copy the View Cart button HTML code.
Now that you have placed your Add to Cart buttons on your website, you need to include the
“View Cart” buttons so your customers can quickly proceed to checkout when they are ready.
– Copy the code from the Copy ‘View Cart’ button HTML box by highlighting all of the
text and pressing Ctrl+C, or by highlighting all of the text, right-clicking on your mouse,
and choosing Copy.
– Open each web page from which you would like your customers to be able to get to their
PayPal Shopping Carts.
– Paste the code you just copied into your web page file where you would like your “View
Cart” button to appear, by either pressing Ctrl+V or by right-clicking your mouse and
choosing Paste.
Sample HTML for PayPal-Hosted Shopping Cart
The following HTML is of a generic Add to Cart button created with the PayPal Shopping
Cart button factory. Several optional fields are shown.
EXAMPLE 4.4 HTML for PayPal-Hosted Shopping Cart “Add to Cart” Button
IMPORTANT:You can change the values for any of the variables, with the exception of the
first two lines.
<form target="paypal" action="https://www.paypal.com/cgi-bin/webscr"
method="post">
<!-- The PayPayl-hosted shopping cart is specified with the command _cart -->
<input type="hidden" name="cmd" value="_cart">
<input type="hidden" name="business" value="seller@designerfotos.com”>
<!-- add the item to the PayPal-hosted shopping cart -->
<input type=”hidden” name=”add” value=”1”>
<input type="hidden" name="item_name" value="Baseball Hat">

May 2006 79
Multiple-Item Payment: Shopping Cart
Sample HTML for PayPal-Hosted Shopping Cart
<input type="hidden" name="item_number" value="12345">
<!-- No currency_code variable specified, so monetary amount is assumed to be USD -->
<input type="hidden" name="amount" value="12.95">
<table>
<tr>
<td>
<!-- allow customer to selection product option -->
<input type="hidden" name="on0" value="Color?">Color?
<select name="os0">
<option value="Red">Red
<option value="Green">Green
<option value="Blue">Blue
</select>
</td>
</tr>
</table>
<input type="image" src="https://www.paypal.com/images/x-click-but22.gif" border="0"
name="submit" alt="Make payments with PayPal - it’s fast, free and secure!">
</form>
Rather than creating a separate button for every single item you want to sell with the PayPal-
hosted shopping cart, you can edit the HTML to create different Add to Cart buttons.
How A Third-Party Shopping Cart Works
This example shows how PayPal can work with a third-party shopping cart and with the
following features:
zAccount Optional is turned off. In this example, to pay with PayPal, the customer must
already have a PayPal account. For more information, see “Account Optional or Website
Payments Express” on page 39.”
zAuto Return is enabled. At the end of the transaction, the customer’s browser is
automatically redirected back to the merchant website. For more information, see “Auto
Return” on page 46.
What The Customer Sees
Bob, who has a PayPal account, is buying photos from DesignerFotos. He selects several
photos by clicking Add to Cart.
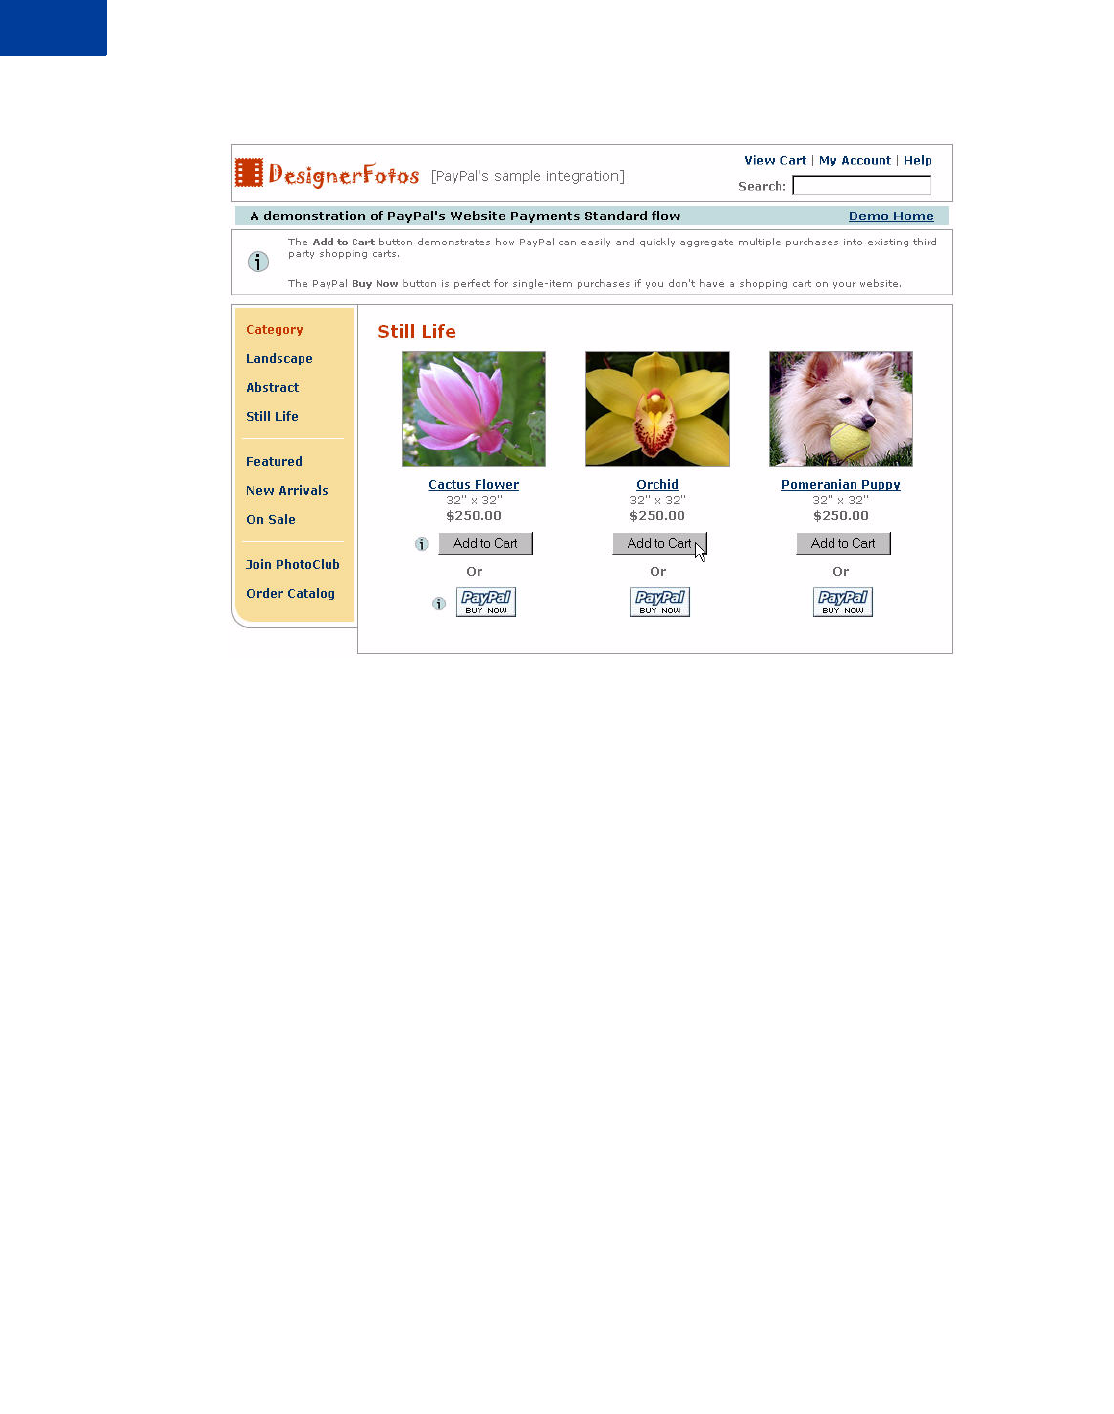
Multiple-Item Payment: Shopping Cart
Sample HTML for PayPal-Hosted Shopping Cart
80 May 2006 Website Payments Standard Integration Guide
FIGURE 4.31Third-party Shopping Cart Example: Add to Cart
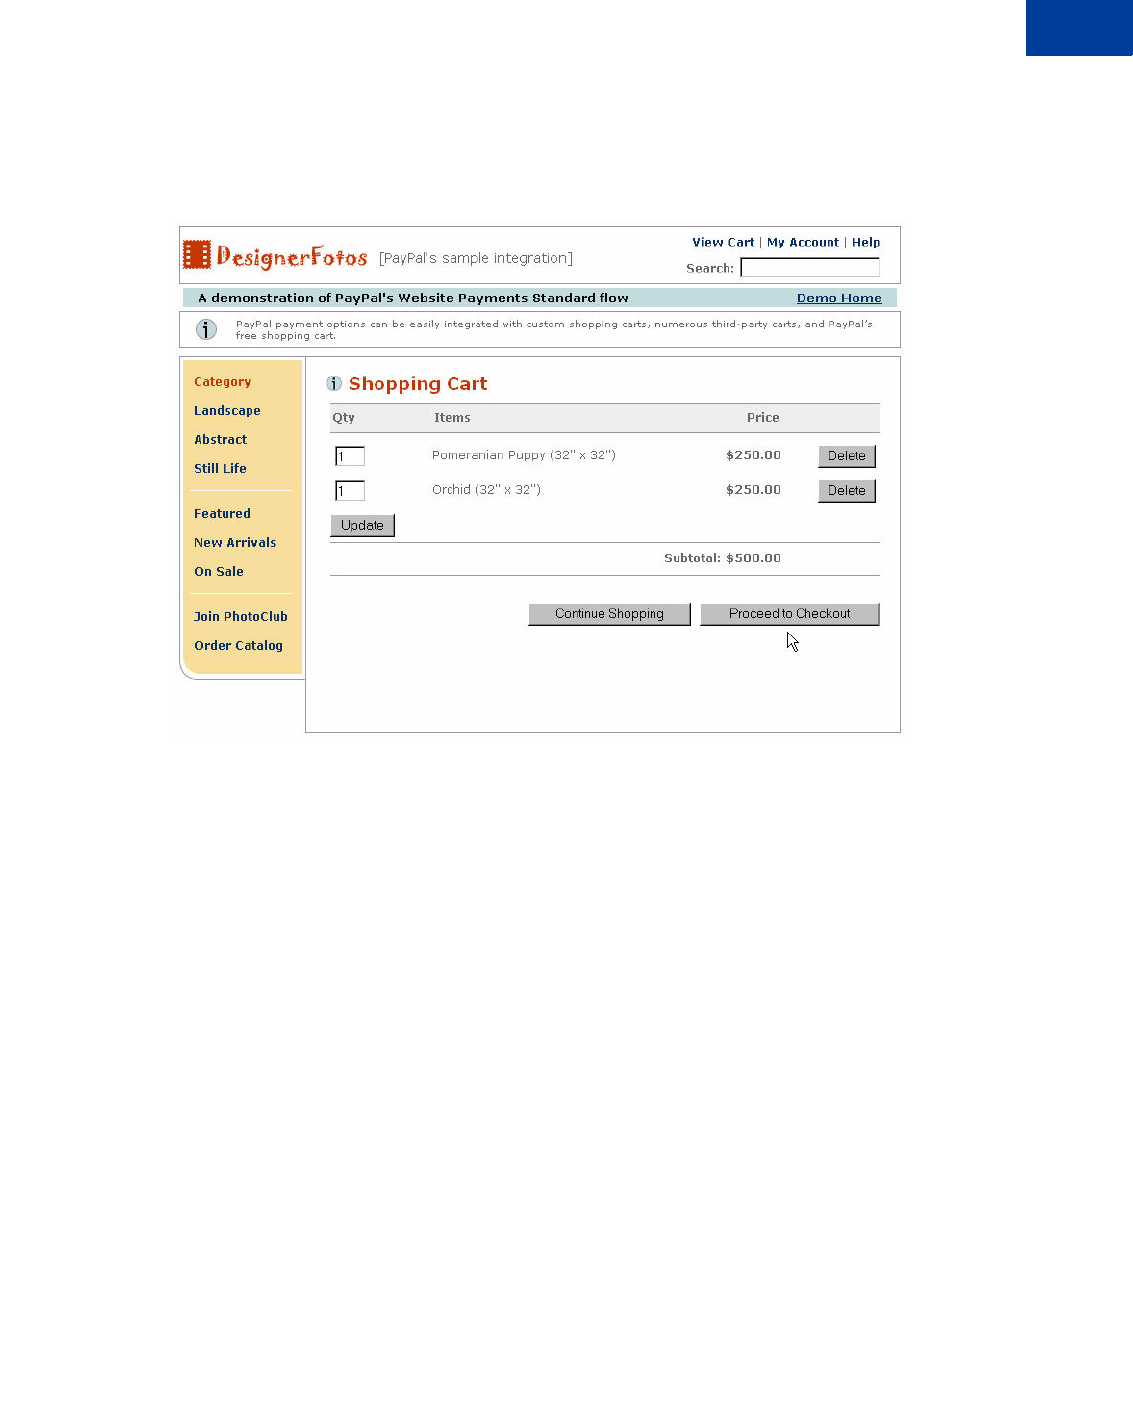
May 2006 81
Multiple-Item Payment: Shopping Cart
Sample HTML for PayPal-Hosted Shopping Cart
In this example integration, the contents of the shopping cart are displayed each time an item is
added to the cart.
FIGURE 4.32 Third-Party Shopping Cart Example: Proceed to Checkout
After selecting all the items he wants, Bob clicks Proceed to Checkout.
Bob’s browser is redirected to the PayPal website. If he has a PayPal account, he enters his
PayPal username and password and clicks Log In to access his saved information. Bob does
not have a PayPal account, so he enters in his billing information and clicks Continue.
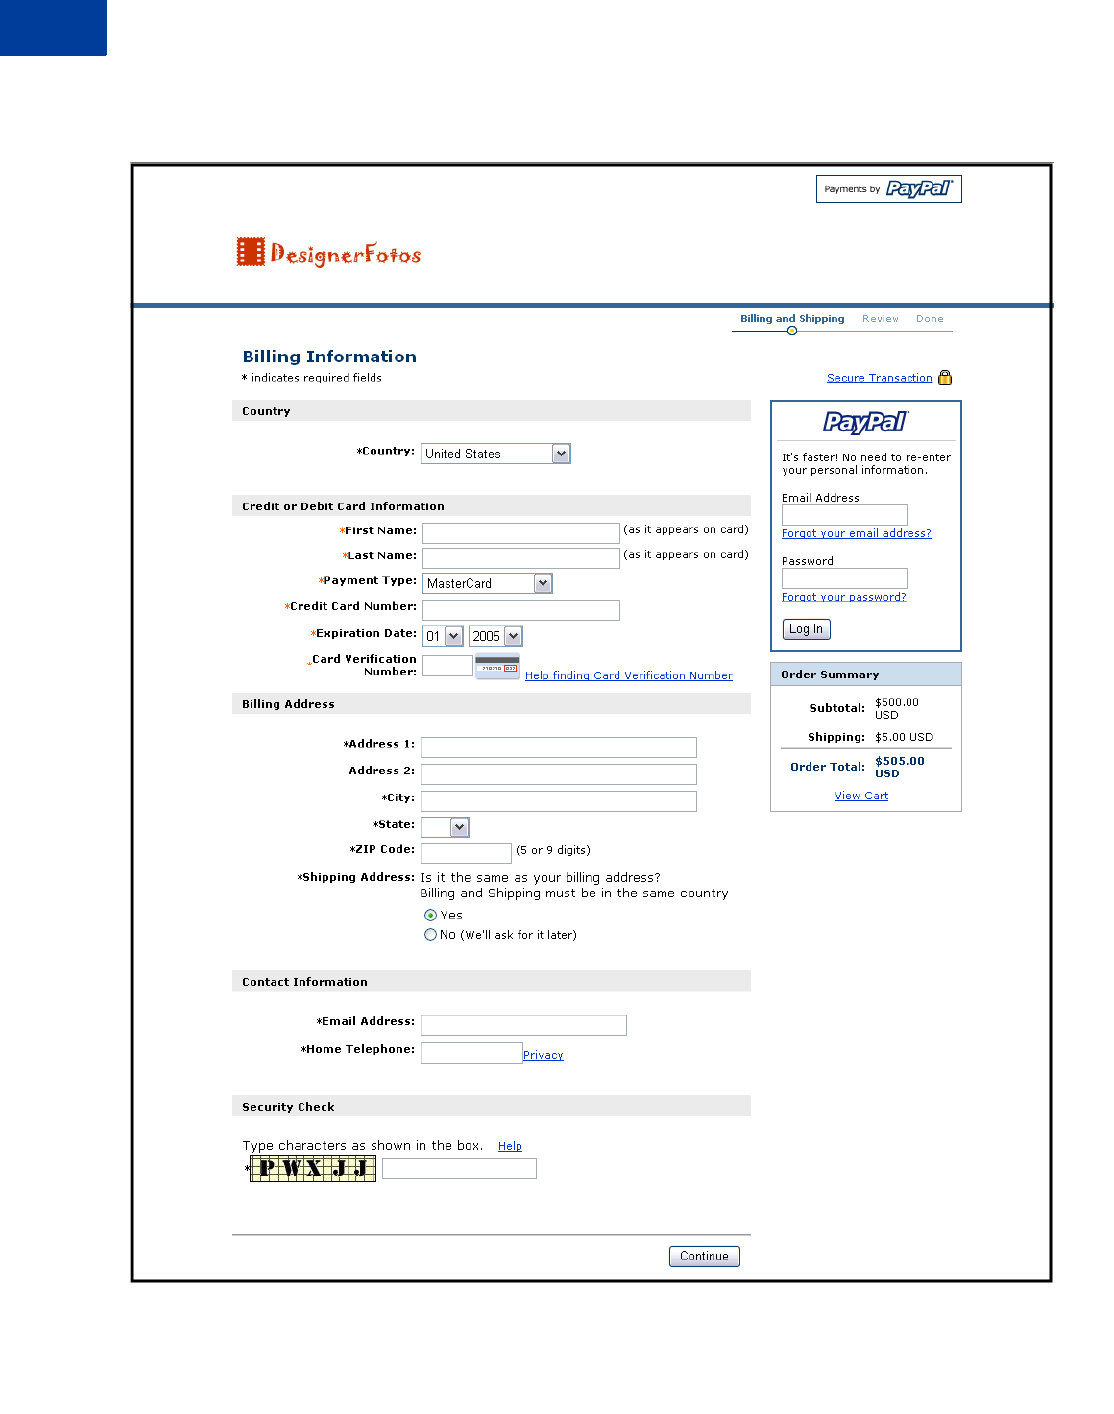
Multiple-Item Payment: Shopping Cart
Sample HTML for PayPal-Hosted Shopping Cart
82 May 2006 Website Payments Standard Integration Guide
FIGURE 4.33 Third-Party Shopping Cart Example: Entering Billing Information or
Logging In
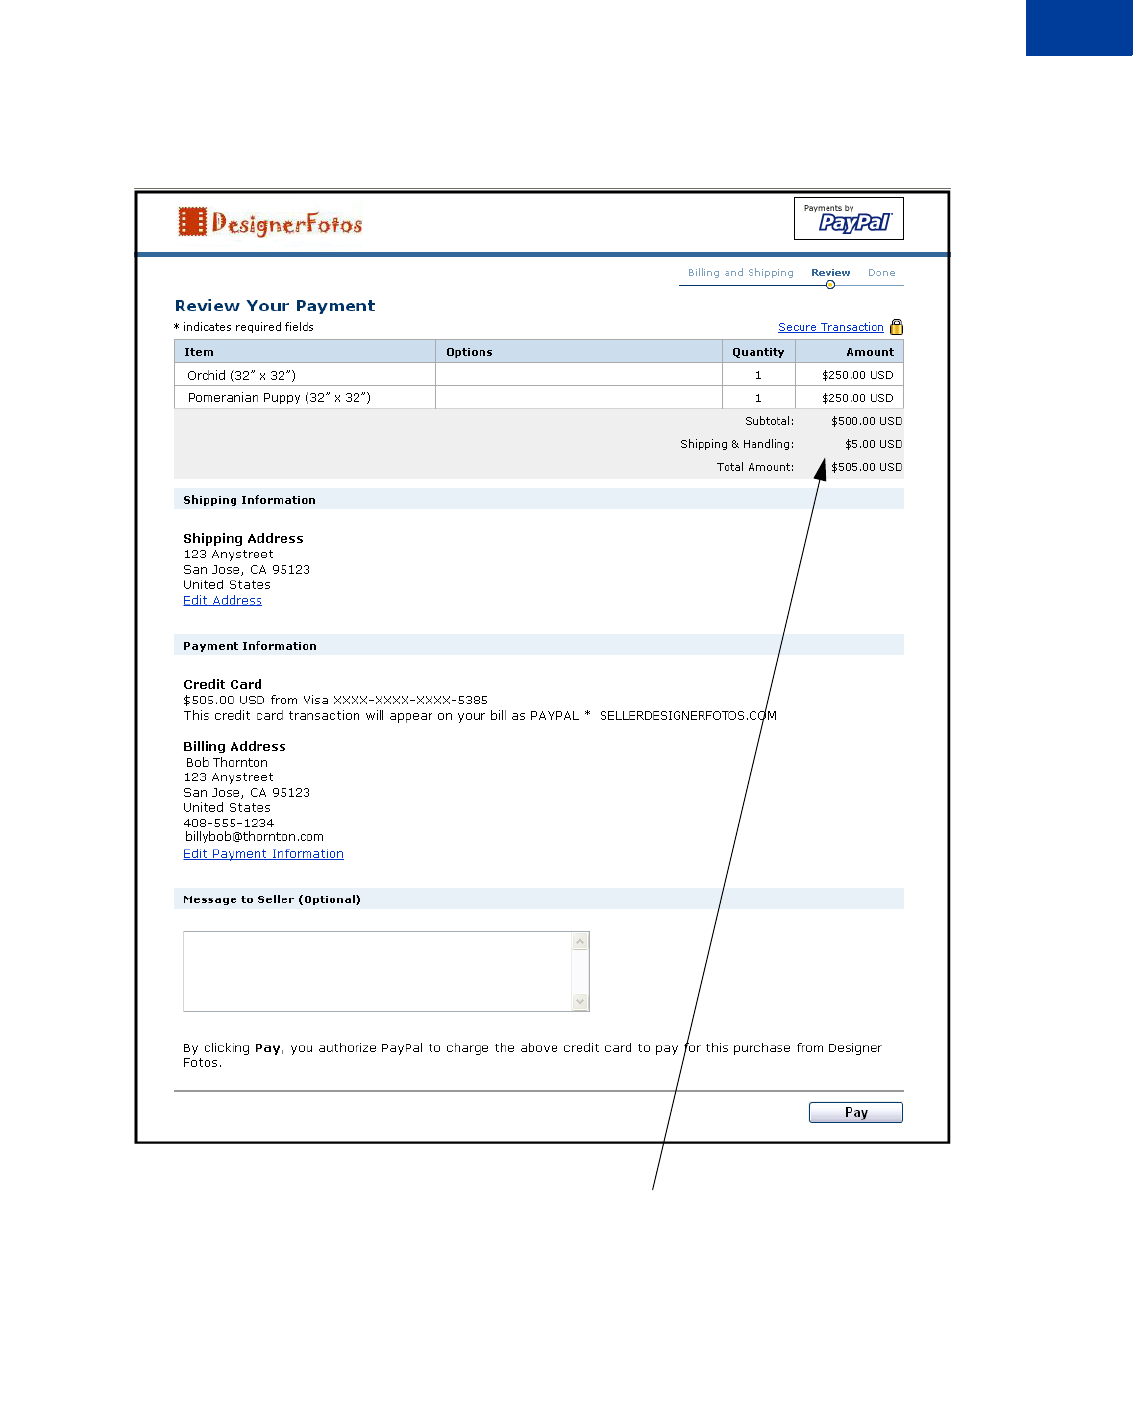
May 2006 83
Multiple-Item Payment: Shopping Cart
Sample HTML for PayPal-Hosted Shopping Cart
Bob is taken to a review page showing the details of his payment.
FIGURE 4.34 Third-Party Shopping Cart Example: Review Page
Because DesignerFotos has activated Profile-based shipping preferences, the shipping costs
are automatically added to the order. For information about automatic shipping calculation,
see “Automatic Calculation of Shipping and Handling Cost and Tax” on page 48.
Bob clicks Pay to complete the payment.

Multiple-Item Payment: Shopping Cart
Sample HTML for PayPal-Hosted Shopping Cart
84 May 2006 Website Payments Standard Integration Guide
Bob is taken to a thank you page.
Since Bob does not yet have a PayPal account, he can choose to open an account on this page
by entering in his email address, selecting a password, and clicking on Sign Up.
FIGURE 4.35 Shopping Cart Example: Thank You Page After Payment
Bob receives an email receipt for this transaction that confirms the payment and includes a
copy of the payment details.
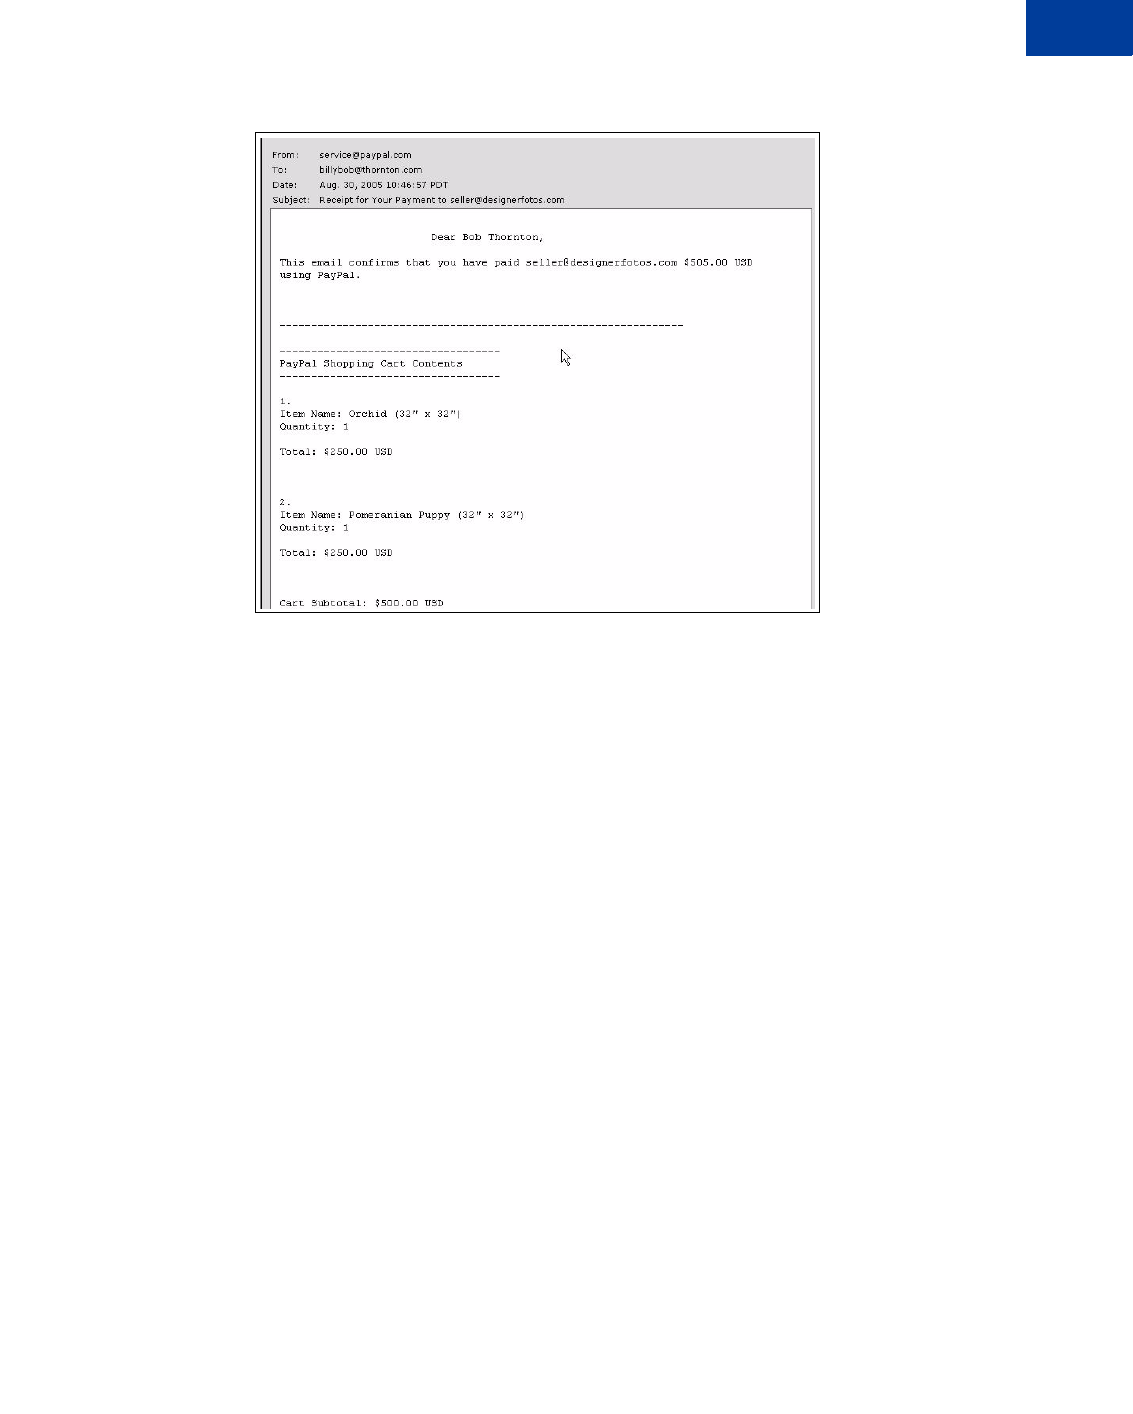
May 2006 85
Multiple-Item Payment: Shopping Cart
Sample HTML for PayPal-Hosted Shopping Cart
FIGURE 4.36 Example: Email Transaction Receipt
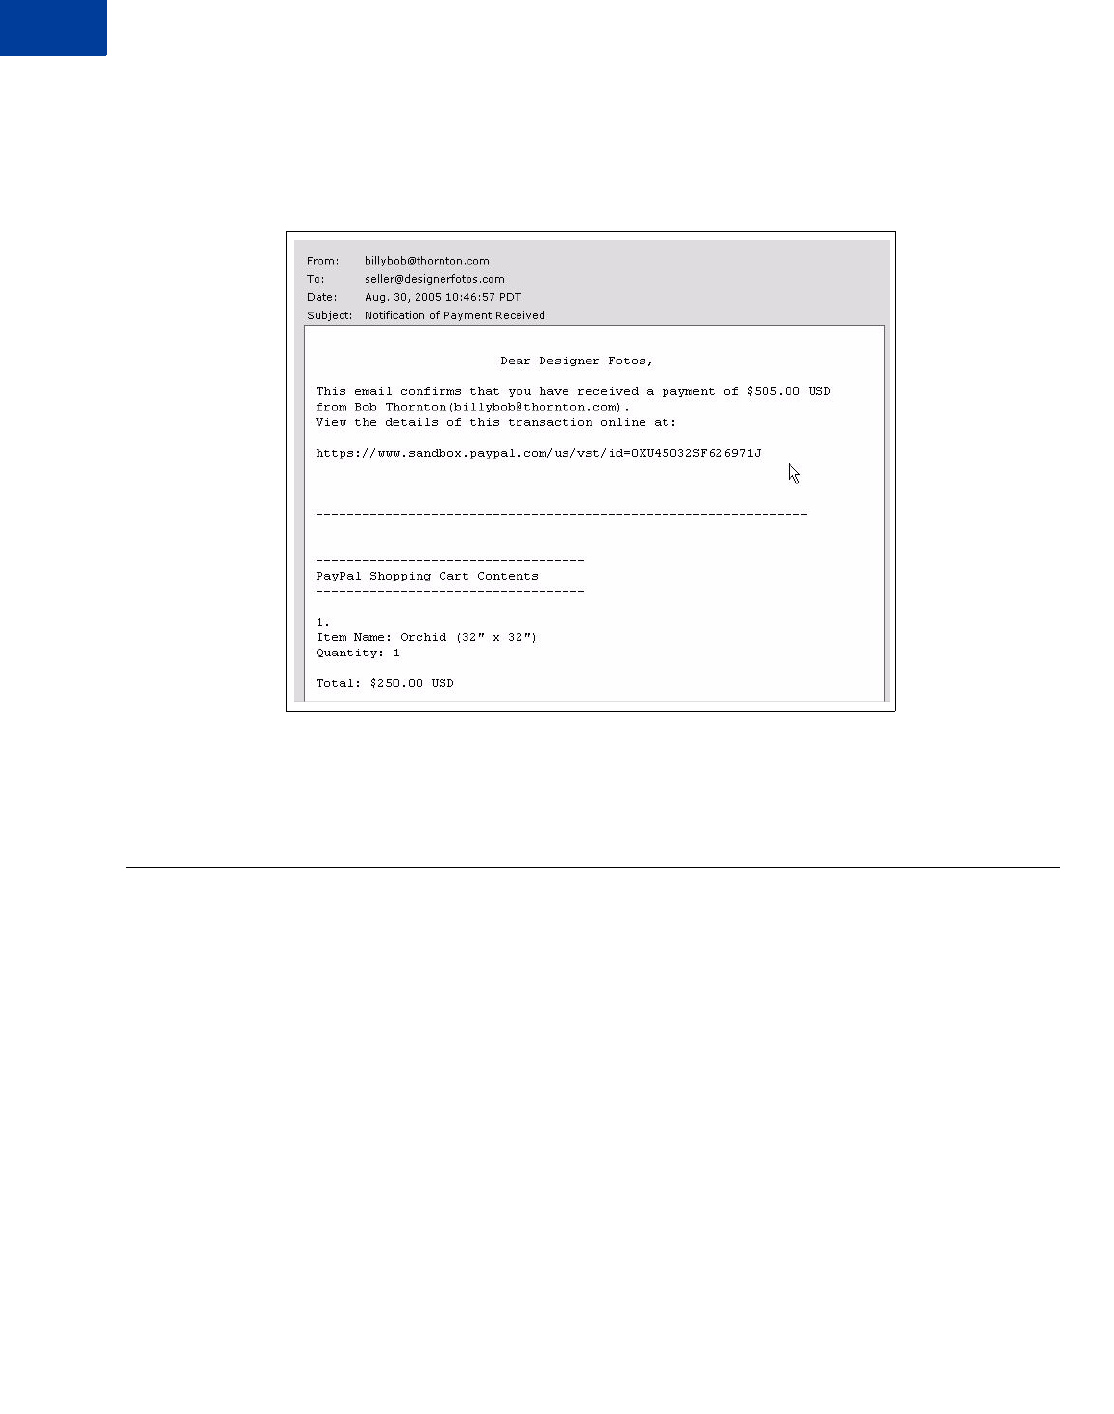
Multiple-Item Payment: Shopping Cart
Adding PayPal to Your Third-party Shopping Cart
86 May 2006 Website Payments Standard Integration Guide
What You See
DesignerFotos receivers an receives an email notification of Bob’s payment.
FIGURE 4.37Example: Seller’s Email Receipt
DesignerFotos (the user seller@designerfotos.com) can also see the payment in the PayPal
account history.
Adding PayPal to Your Third-party Shopping Cart
Instead of relying on the PayPal-hosted Shopping Cart, some web developers want to integrate
PayPal payment processing with their own third-party shopping cart. The details in this section
allow your buyers to pay with PayPal when they are ready to check out after adding all of their
items to your third-party shopping cart.
Required Third-Party Shopping Cart Variables
Your FORM requires at least the following hidden variables. For complete list of variables, see
Appendix I, “Website Payments Standard HTML Variables.”

May 2006 87
Multiple-Item Payment: Shopping Cart
Adding PayPal to Your Third-party Shopping Cart
There are two ways to integrate your third-party shopping cart with the PayPal payment flow:
zPass the details of the individual items.
zPass the aggregate amount of the total cart payment, rather than the individual item details.
Passing Individual Item Details to PayPal
If you can configure your third-party shopping cart to pass individual items to PayPal, the
information about the items is included in the buyer’s and seller’s history transactions and
notifications.
1. Set the cmd variable to _cart.
2. Include the upload variable:
<input type="hidden" name="upload" value="1">
3. Define item details for each item in the cart.
Specify the required variables and any optional variables listed in Table A.6, “” on page 102.
Append _x to the variable name, where x is the item number, starting with 1 and increasing by
one for each item added to the cart. The first item in the cart must be defined with variables
ending in _1, like item_name_1, amount_1, and quantity_1; the second item with
variables like item_name_2, amount_2, and quantity_2; the third item with variables like
item_name_3, amount_3, and quantity_3; and so on.
IMPORTANT:The _x values must increment by one continuously in order to be recognized.
If you skip from item #1 to item #3 without defining an item #2, the third item
will be ignored.
The minimum required HTML for your post to PayPal looks similar to the following.
EXAMPLE 4.5 HTML for Passing Individual Item Detail to PayPal
TABLE 4.7 Required Third-Party Shopping Cart Variables
Name Description
amount_1 Price of a single item or the total price of all items in the
shopping cart
business Email address of your PayPal account
item_name_1 Name of the item or a name for the entire shopping cart
upload Indicates the use of third-party shopping cart

Multiple-Item Payment: Shopping Cart
Adding PayPal to Your Third-party Shopping Cart
88 May 2006 Website Payments Standard Integration Guide
<form action=”https://www.paypal.com/cgi-bin/webscr” method=”post”>
<input type=”hidden” name=”cmd” value=”_cart”>
<input type=”hidden” name=”upload” value=”1”>
<input type=”hidden” name=”business” value=”seller@designerfotos.com”>
<input type=”hidden” name=”item_name_1” value=”Item Name 1”>
<input type=”hidden” name=”amount_1” value=”1.00”>
<input type=”hidden” name=”item_name_2” value=”Item Name 2”>
<input type=”hidden” name=”amount_2” value=”2.00”>
<input type=”submit”” value=”PayPal”>
</form>
Setting Currency in the Cart
All monetary variables (amount_x., shipping_x., shipping2_x, handling_x, tax_x.,
and tax_cart) are interpreted in the currency designated by the currency_code variable
posted with the payment. Because currency_code is not item-specific, there is no need to
append _x to the currency_code variable name. If no currency_code variable is posted,
all monetary values default to U.S. Dollars.
Setting Tax on Individual Items
Use the tax_x variable to specify the tax for a particular item in the cart. For example, the
following line specifies that the tax on item 2 in the cart is 15 cents:
<INPUT TYPE=”hidden” name=”tax_2” value=”.15”>
Setting the Tax for the Entire Cart
Use the tax_cart variable to specify a tax amount that applies to the entire purchase, rather
than to individual items. The tax_cart variable overrides any per-item tax amount specified
with tax_x.
Passing the Aggregate Shopping Cart Amount to PayPal
You can aggregate your entire shopping cart and pass the total amount to PayPal. You must
post a single item_name_1 for the entire cart and the total price of the cart’s contents in
amount_1 as though it were a purchase of a single item.
NOTE:One drawback of this method is that your buyers will not see the individual items in
their carts. In addition, you cannot change our variable names, nor can you add your
own variable names.
The following HTML is identical to “HTML for Passing Individual Item Detail to PayPal” on
page 87 except the individual items’ amounts and item names have been aggregated into a
single item and amount.
EXAMPLE 4.6 HTML for Aggregate Cart Detail to PayPal

May 2006 89
Multiple-Item Payment: Shopping Cart
Adding PayPal to Your Third-party Shopping Cart
<form action=”https://www.paypal.com/cgi-bin/webscr” method=”post”>
<input type=”hidden” name=”cmd” value=”_cart”>
<input type=”hidden” name=”upload” value=”1”>
<input type=”hidden” name=”business” value=”seller@designerfotos.com”>
<input type=”hidden” name=”item_name_1” value=”Aggregated items”>
<input type=”hidden” name=”amount_1” value=”3.00”>
<input type=”submit”” value=”PayPal”>
</form>

Multiple-Item Payment: Shopping Cart
Adding PayPal to Your Third-party Shopping Cart
90 May 2006 Website Payments Standard Integration Guide

May 2006 91
5Using Authorization & Capture
with Website Payments Standard
PayPal Authorization & Capture is a settlement solution that provides merchants increased
flexibility in obtaining payments from their buyers. During a traditional sale at PayPal, the
authorization and capture action is completed simultaneously. PayPal Authorization &
Capture separates the authorization of payment from the capture of the authorized payment.
Authorization & Capture is for merchants who have a delayed order fulfillment process and
who typically make a $1 auth at checkout. It enables merchants to modify the original
authorization amount due to order changes occurring after the initial order is placed (such as
taxes, shipping, or item availability). This chapter discusses the authorization and capture
process and provides steps to help you authorize, capture, reauthorize, and void funds.
There are two ways to use Authorization & Capture:
1. Create an order or authorization with Website Payments Standard HTML and capture or
void the authorization on the PayPal website (https://www.paypal.com/).
2. Use the Authorization & Capture Application Programming Interface (API), which is not
discussed in this book. For more information about the Authorization & Capture API, see
the Website Payments Pro Integration Guide.
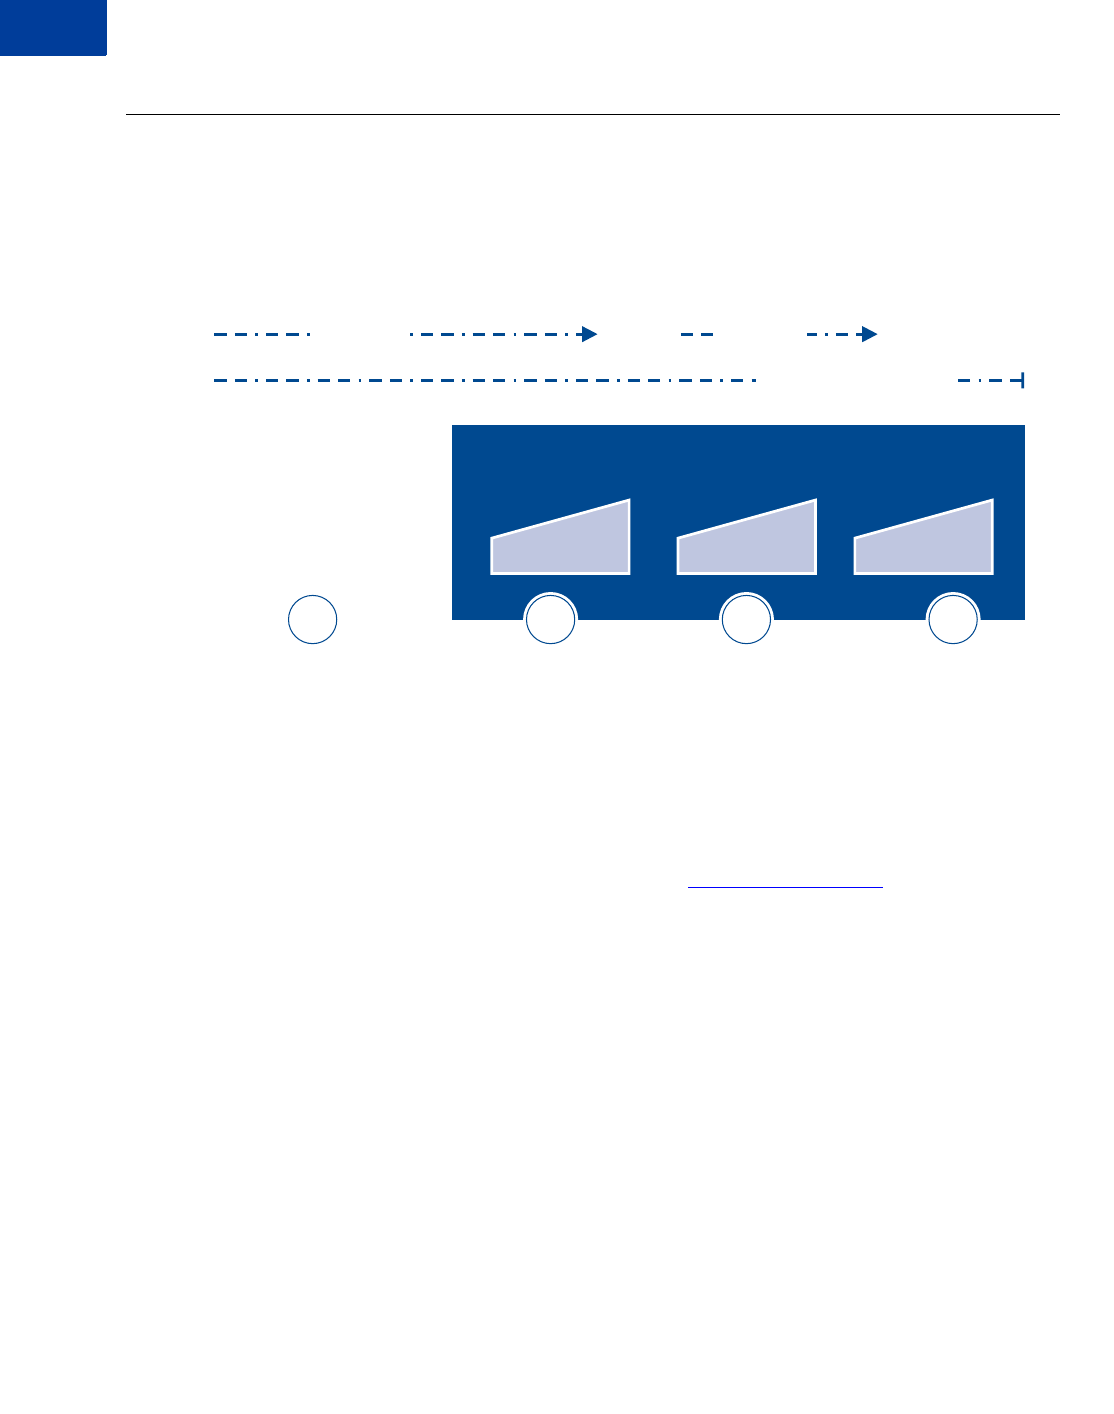
Using Authorization & Capture with Website Payments Standard
Basic Authorization Process
92 May 2006 Website Payments Standard Integration Guide
Basic Authorization Process
The fundamental process for authorizing and capturing is shown below.
FIGURE 5.38Fundamental Authorization & Capture Process
Authorization & Capture starts when your buyer authorizes a payment amount during
checkout.
1. For example, you can send your buyer through the Website Payments payment flow,
passing in the paymentaction variable set to authorization or order.
2. After your buyer completes checkout, you can then use the payment’s transaction ID with
Authorization & Capture in the PayPal website (https://www.paypal.com). You can:
zCapture either a partial amount or the full authorization amount.
zAuthorize a higher amount, up to 115% of the originally authorized amount (not to exceed
an increase of $75 USD).
zVoid a previous authorization.
Honor Period and Authorization Period
When your buyer approves an authorization, the buyer’s balance can be placed on hold for a
29-day period to ensure the availability of the authorization amount for capture. You can
reauthorize a transaction only once, up to 115% of the originally authorized amount (not to
exceed an increase of $75 USD).
After a successful reauthorization, PayPal honors 100% of authorized funds for three days. A
day is defined as the start of the calendar day on which the authorization or reauthorization
was made (from 12AM PST to 11:50PM PST).
Honor
Period 3-day period
29-day authorization period
3-day period
1
Website Payments transactions
with paymentaction=
authorization
or paymentaction=
order
2 3 4
PayPal Website (https://www.paypal.com)
Capture Reauthorization Void
Basic Authorization

May 2006 93
Using Authorization & Capture with Website Payments Standard
Basic Authorization Process
You can settle without a reauthorization from day 4 to day 29 of the authorization period, but
PayPal cannot ensure that 100% of the funds will be available after the three-day honor period.
However, PayPal will not allow you to capture funds if the buyer’s account is restricted,
locked, or a fraudulent case occurs, or if your account has a high restriction level. You can use
Authorization & Capture only when your account has a low restriction level.
The honor period and authorization period for authorizations is described below:
If you attempt to capture funds outside the honor period, PayPal applies best efforts to capture
funds. However, there is a possibility that funds will not be available at that time.
Buyer and seller accounts cannot be closed if there is a pending (unsettled) authorization.
Supported PayPal Payment Products
You can use Authorization & Capture with the PayPal products listed in Table 5.8, “PayPal
Products Supporting Authorization & Capture.”
By default, these products assume that a transaction is a final sale. You must explicitly specify
that a transaction is a basic or order authorization.
NOTE:You must capture and void orders and order authorizations using the Authorization &
Capture APIs. That is, you cannot process order authorizations on the PayPal website
(https://www.paypal.com). The PayPal website supports processing only basic
authorizations, not order authorizations.
PayPal Products Not Supported
Authorization & Capture cannot be used with the following products:
zeBay checkout
zeCheck
zGift Certificates and Coupons
zSubscriptions
zInstant Purchase
zSend Money
zRequest Money
TABLE 5.8 PayPal Products Supporting Authorization & Capture
Product Typical Usage
Website Payments paymentaction=”authorization”
Buy Now paymentaction=”authorization”
Donations paymentaction=”authorization”
Shopping carts paymentaction=”authorization”
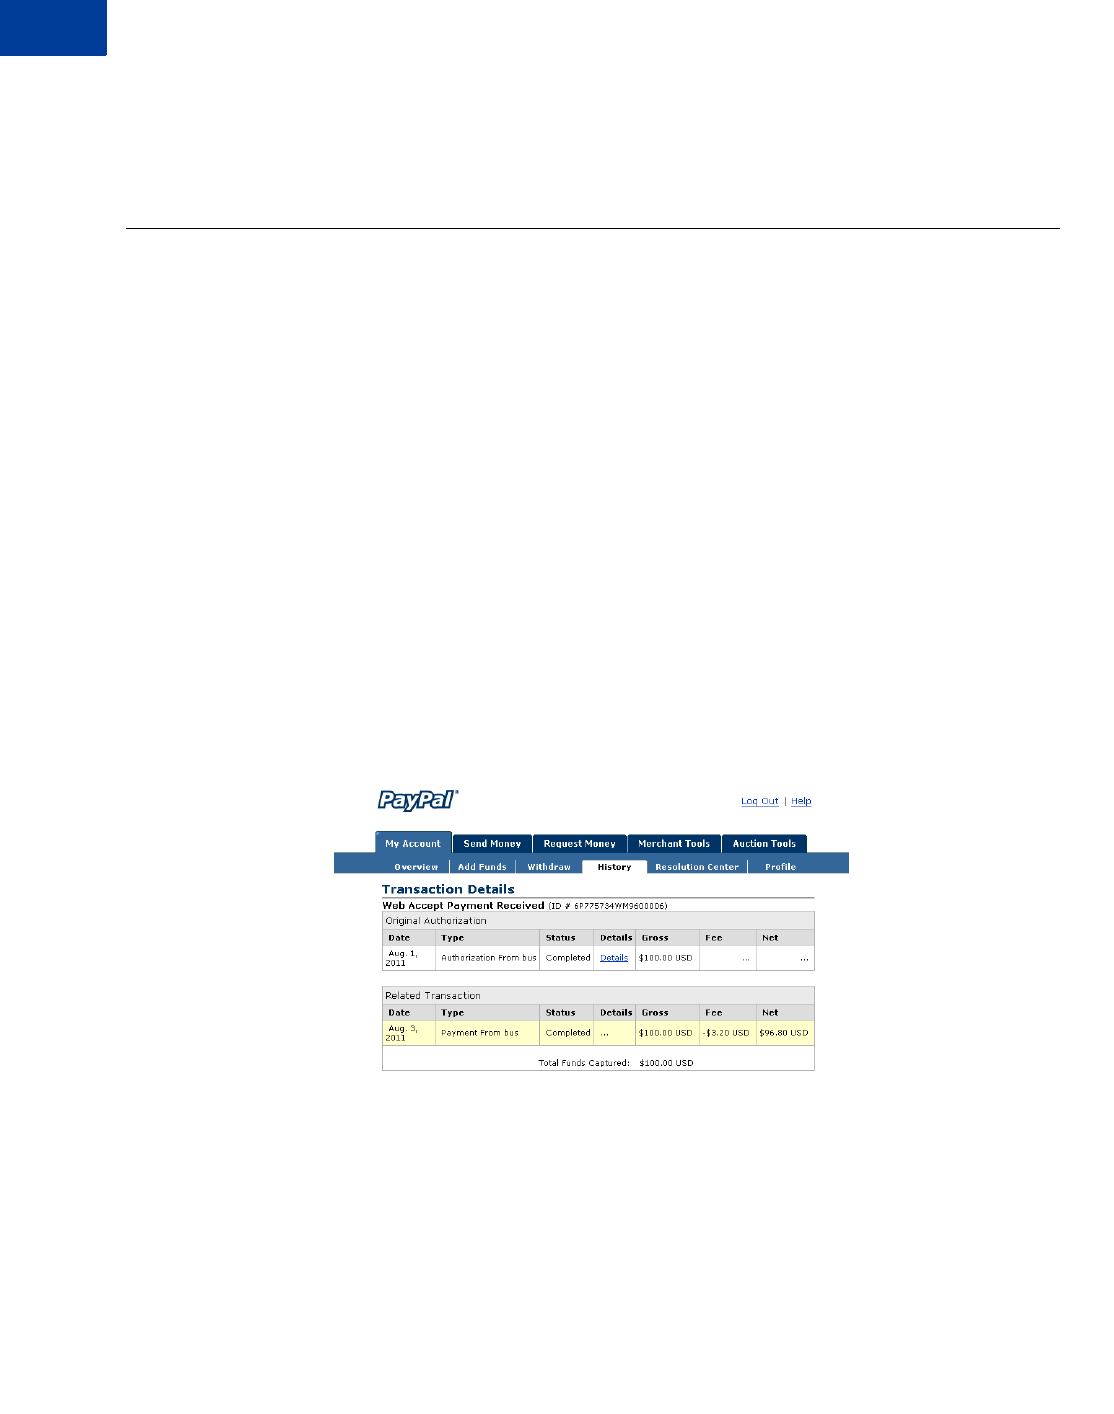
Using Authorization & Capture with Website Payments Standard
Basic Authorization & Capture Scenarios
94 May 2006 Website Payments Standard Integration Guide
zVirtual Terminal
zInvoicing
Basic Authorization & Capture Scenarios
This chapter includes examples of some common scenarios you might encounter when
implementing basic authorizations and captures.
Capture Within 3 Days
1. Your buyer orders a camera from your website.
2. Your buyer enters payment information and authorizes payment.
3. Send your buyer to PayPal using a hosted flow, specifying the variable
paymentaction=authorization
4. PayPal initiates the authorization.
5. On day 3, you ship the camera and capture funds.
After you have captured funds, your Transaction Details shows the transaction with a
Completed status.
FIGURE 5.39Transaction Details: Completed Transaction
Capture From 4 - 29 Days
1. Your buyer orders a DVD player from your website.
2. Send your buyer to PayPal using a hosted flow, specifying the variable
paymentaction=authorization.
3. Your buyer enters payment information and authorizes payment.
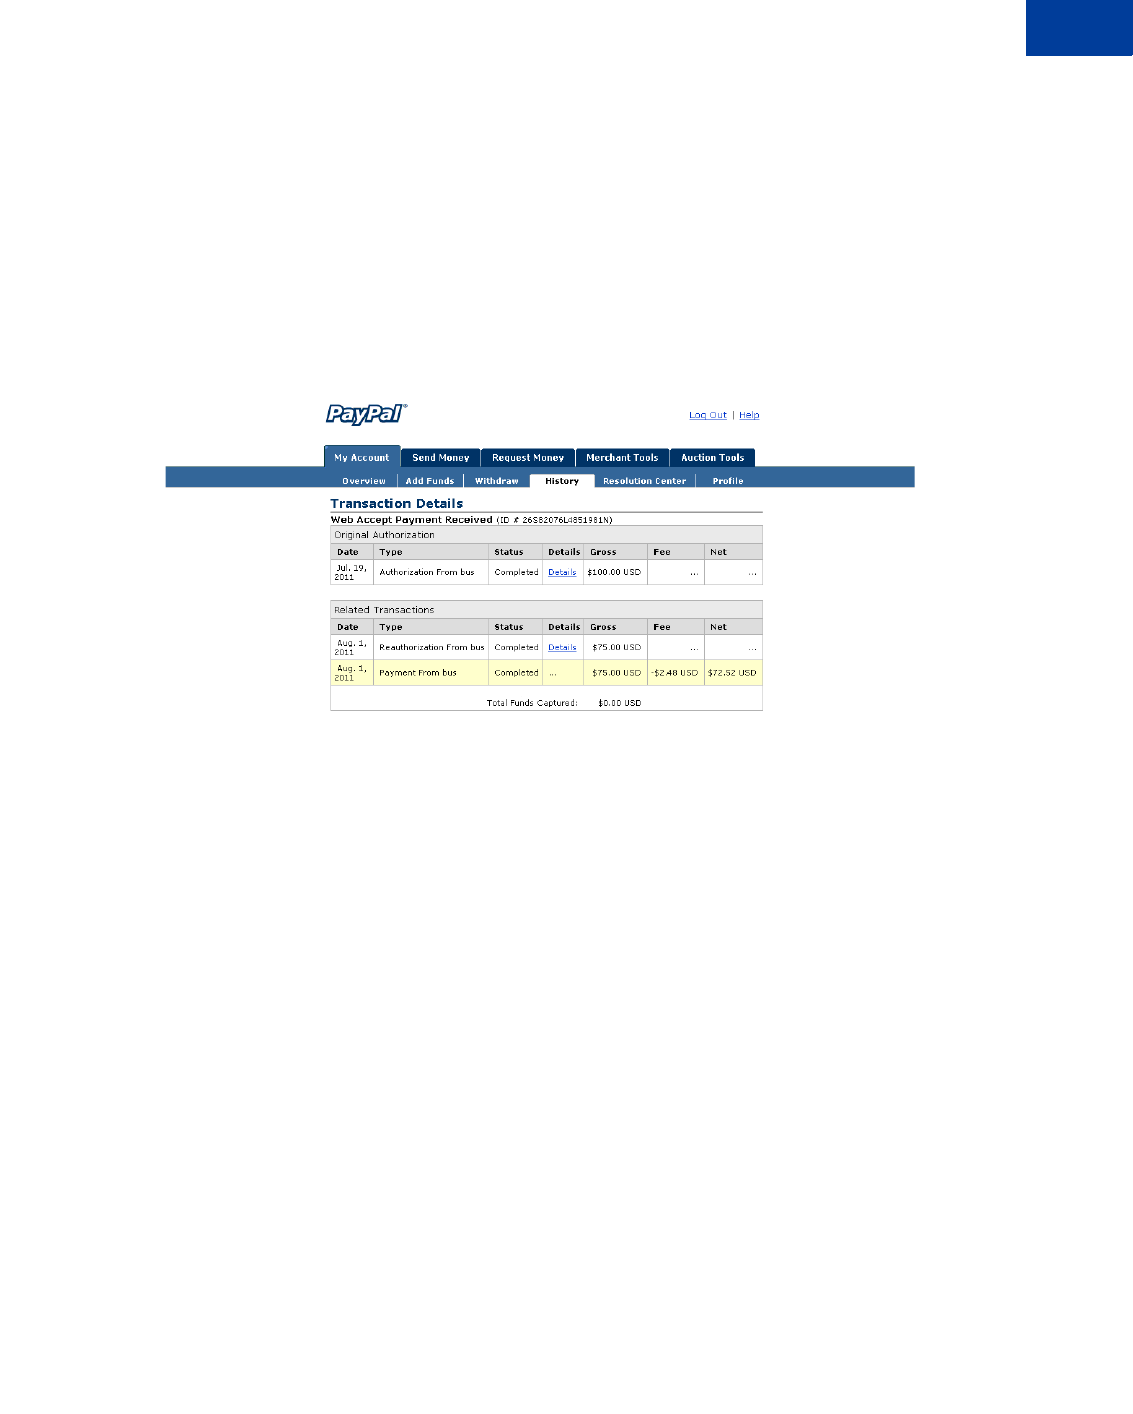
May 2006 95
Using Authorization & Capture with Website Payments Standard
Basic Authorization & Capture Scenarios
4. PayPal initiates the authorization.
5. The DVD player is discontinued. You order a different DVD player from your vendor and
notify your buyer of the change.
6. On day 14, the DVD player arrives from your vendor. Because the honor period has passed,
you complete a reauthorization for payment.You ship the DVD player and complete the
final capture.
Your Transaction Details shows that the transaction has been completed.
FIGURE 5.40Transaction Details: Reauthorization, Final Capture
One Authorization, Multiple Captures, and a Refund
1. Your buyer orders two textbooks and a keyboard from your website.
2. Your buyer enters payment information and authorizes payment.
3. Send your buyer to PayPal using a hosted flow, specifying the variable
paymentaction=authorization.
4. PayPal initiates the authorization.
5. One textbook and the keyboard are out of stock. You order additional inventory from your
vendors. You ship the in-stock textbook and capture the first partial capture on day 6.
6. You receive the second textbook from the vendor. You ship the textbook and capture the
second partial capture on day 11.
7. You receive the keyboard from the vendor. You reauthorize for payment on day 19.
8. Your buyer files a complaint that the textbook from the first shipment is damaged. You
issue a partial refund for the first capture.
Your Transaction Details shows the following:
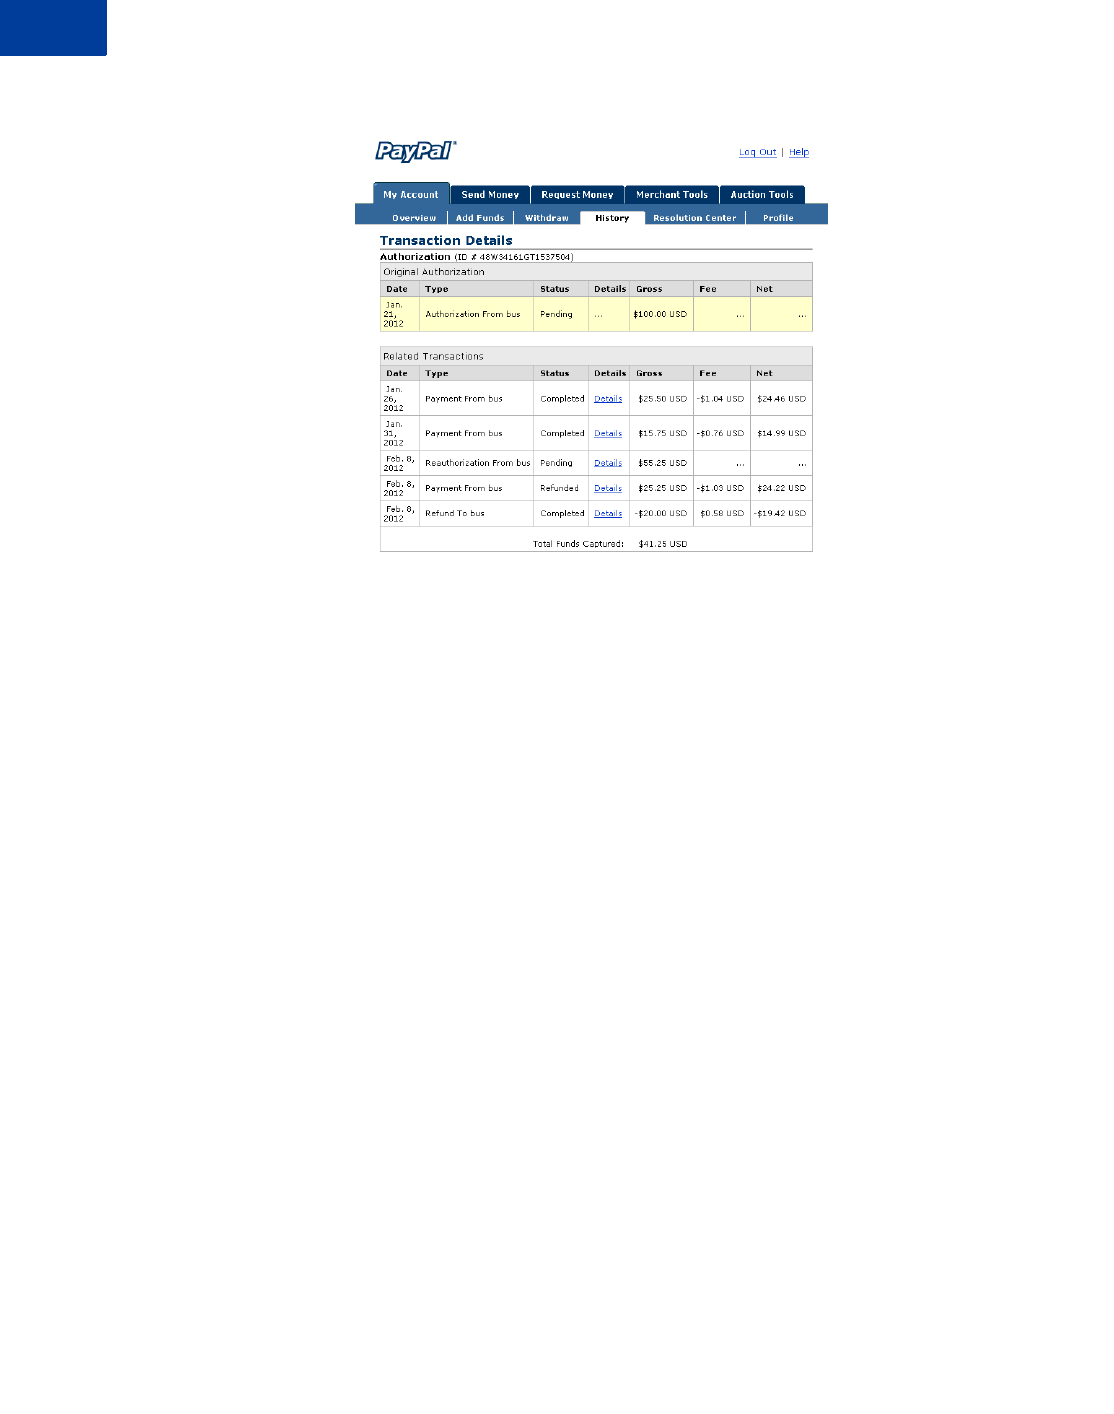
Using Authorization & Capture with Website Payments Standard
Basic Authorization & Capture Scenarios
96 May 2006 Website Payments Standard Integration Guide
FIGURE 5.41Transaction Details: Partial Capture, Reauthorization, Refund
Lower Capture Amount
1. Your buyer orders a laser printer and a USB cable from your website.
2. Your buyer enters payment information and authorizes payment.
3. Send your buyer to PayPal using a hosted flow, specifying the variable
paymentaction=authorization.
4. PayPal initiates the authorization.
5. Before you process the transaction, your buyer contacts you and requests to cancel the USB
cable from the order.
6. On day 6, you ship the laser printer and complete a partial capture for an amount less than
the original authorization amount.
7. You complete a void on the funds remaining on the authorization.
Your Transaction Details shows the following:
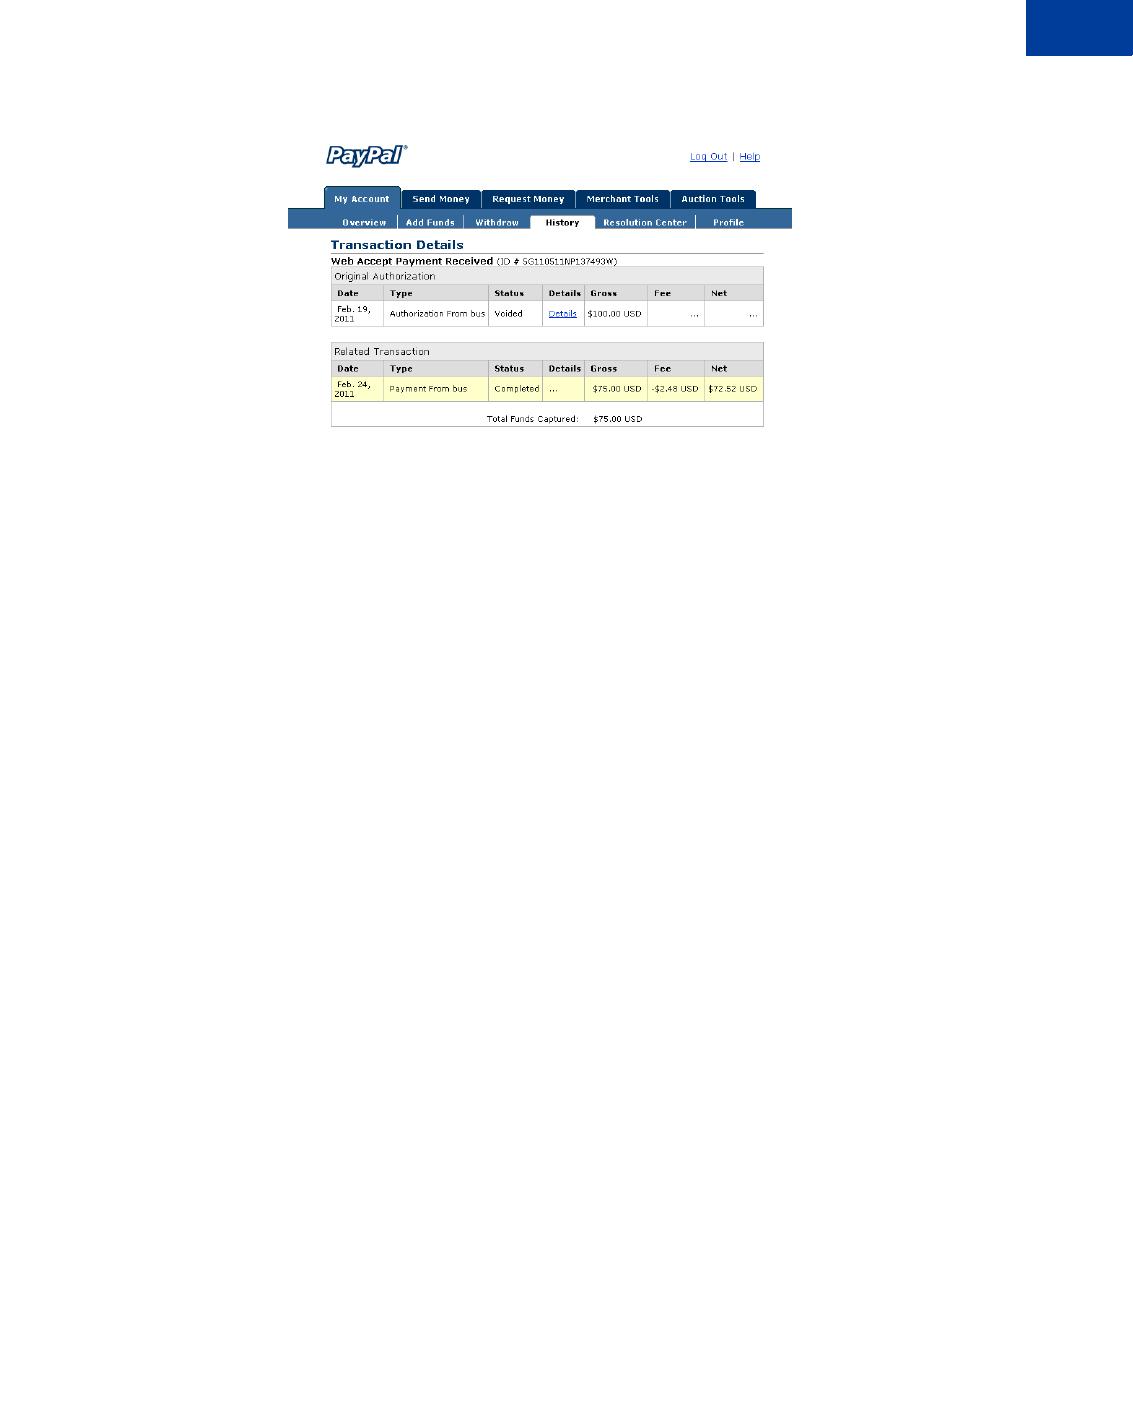
May 2006 97
Using Authorization & Capture with Website Payments Standard
Basic Authorization & Capture Scenarios
FIGURE 5.42Transaction Details: Partial Capture, Voided Transaction
Capture Up to 115%
1. Your buyer places an order from your website.
2. Your buyer enters payment information and authorizes payment.
3. Send your buyer to PayPal using a hosted flow, specifying the variable
paymentaction=authorization.
4. PayPal initiates the authorization.
5. You add shipping charges to the order and capture funds on day 1.
Your Transaction Details shows the completed transaction. The capture results in a total not
greater than 115% of the original authorization.
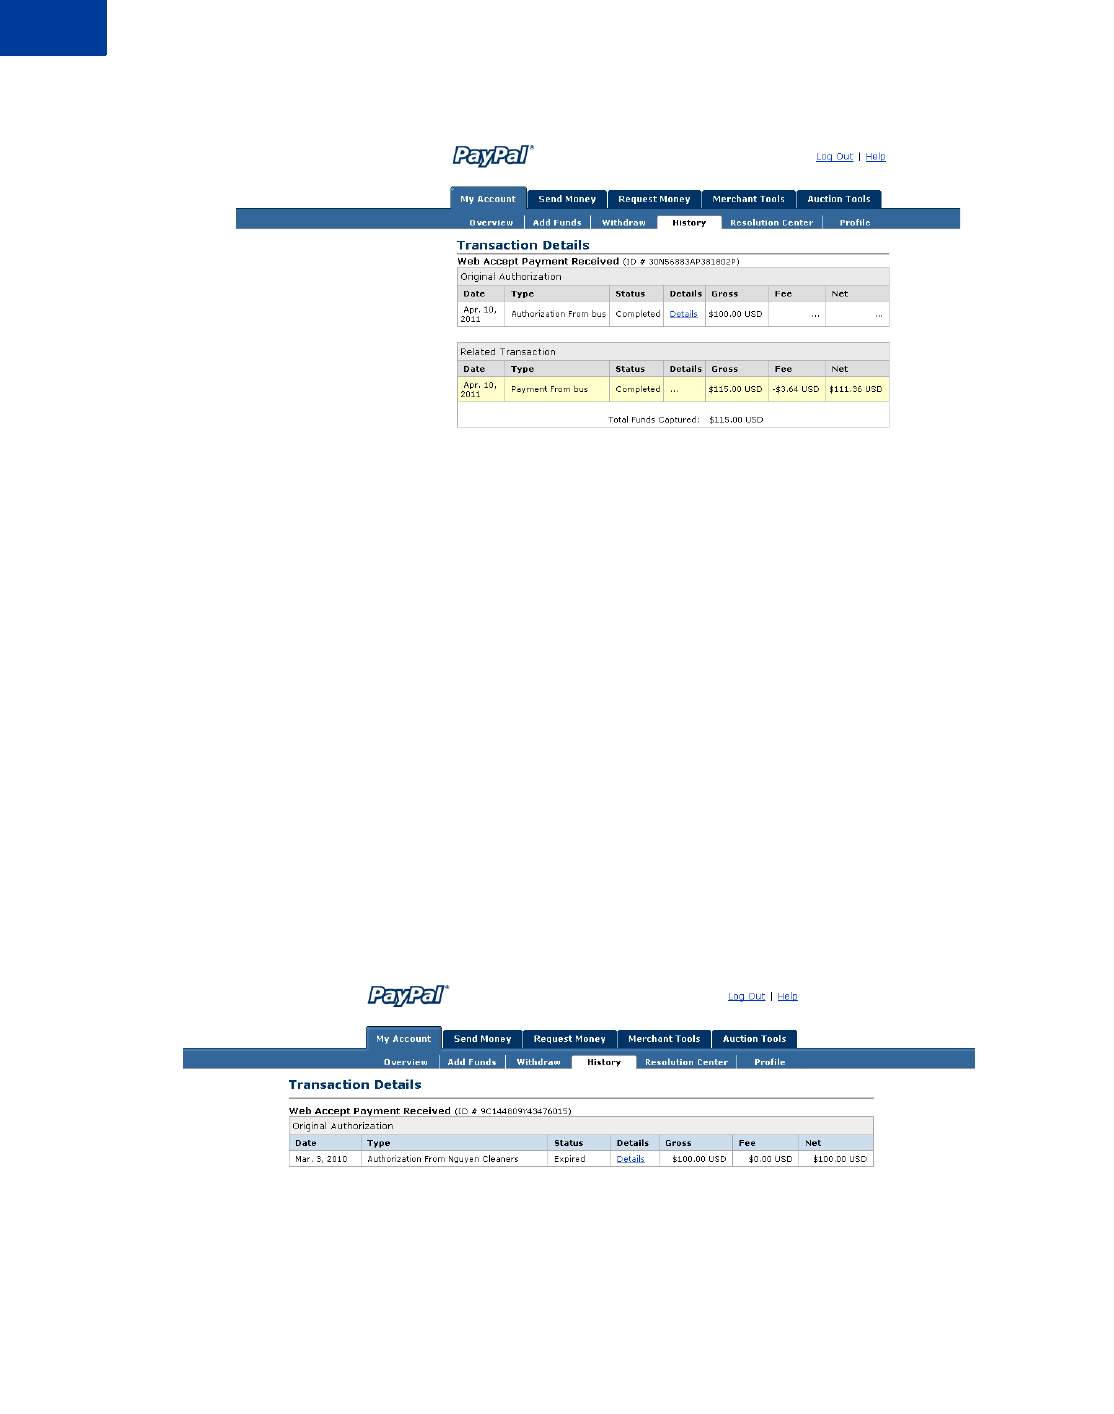
Using Authorization & Capture with Website Payments Standard
Basic Authorization & Capture Scenarios
98 May 2006 Website Payments Standard Integration Guide
FIGURE 5.43Transaction Details: Capture up to 115%
Authorization Expires
1. Your buyer orders a desktop computer from your website.
2. Your buyer enters payment information and authorizes payment.
3. Send your buyer to PayPal using a hosted flow, specifying the variable
paymentaction=authorization.
4. PayPal initiates the authorization.
5. Before you process the transaction, your buyer contacts you to cancel the order.
6. You do not capture funds for the transaction.
7. The authorization expires.
Your Transaction Details shows the authorization with an Expired status.
FIGURE 5.44Transaction Details: Expired Authorization
Void
1. Your buyer orders a stereo system from your website.
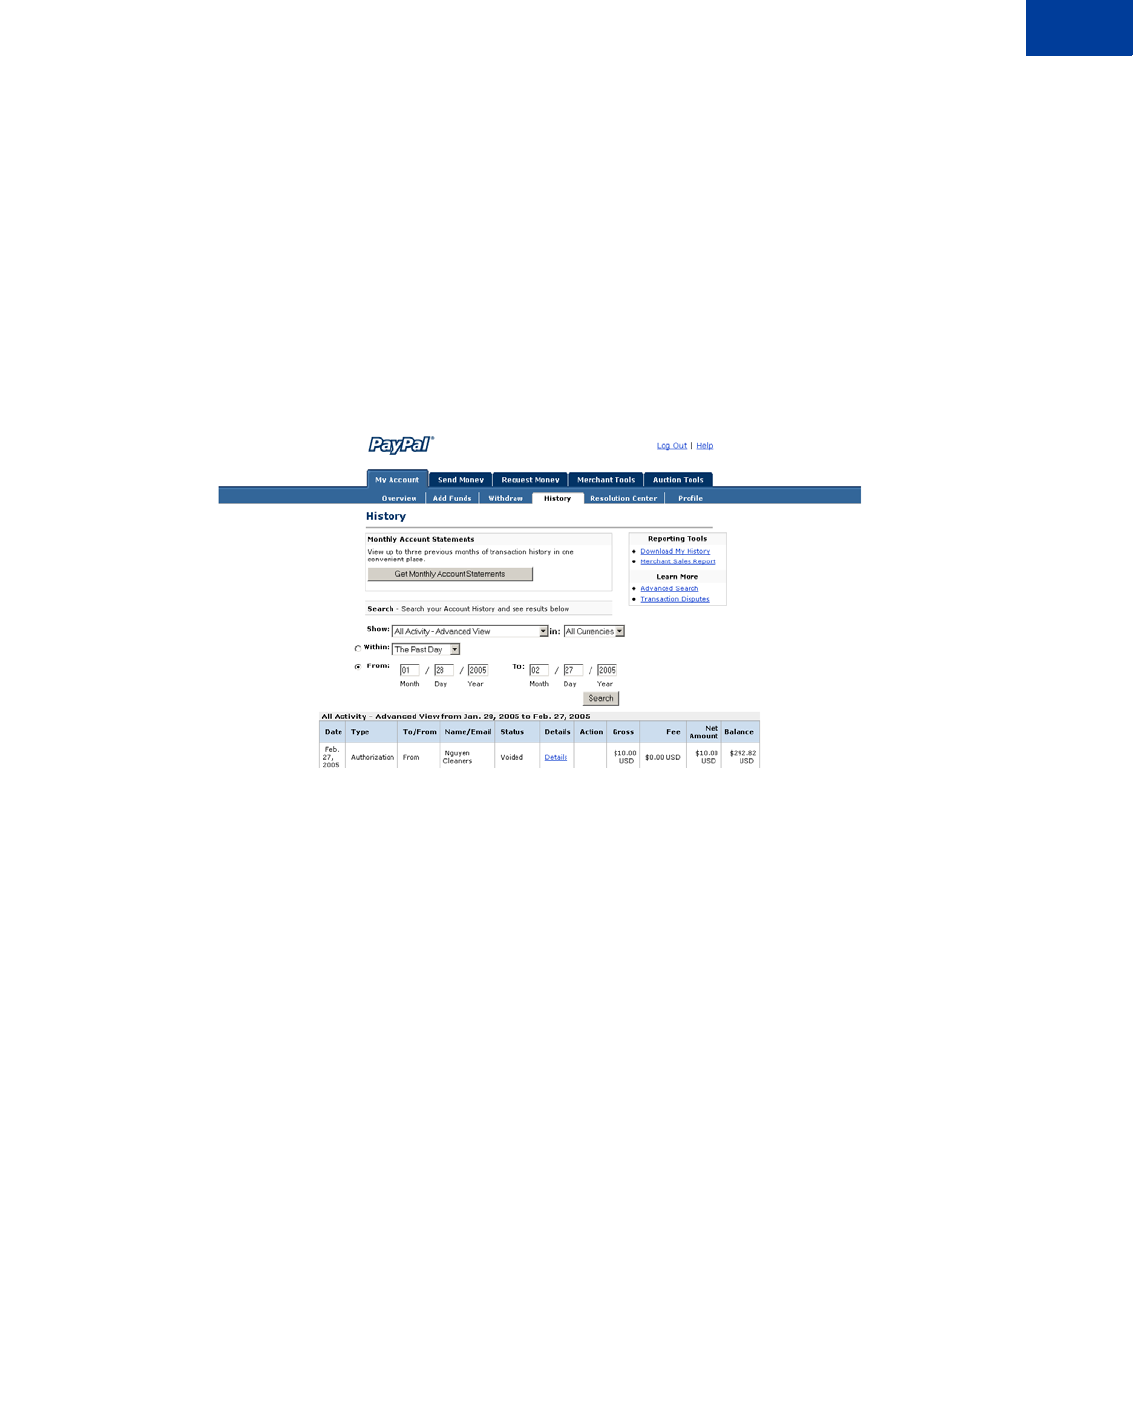
May 2006 99
Using Authorization & Capture with Website Payments Standard
Basic Authorization & Capture Scenarios
2. Your buyer enters payment information and authorizes payment.
3. Send your buyer to PayPal using a hosted flow, specifying the variable
paymentaction=authorization.
4. PayPal initiates the authorization.
5. Before you process the transaction, your buyer contacts you to cancel the order.
6. You void the transaction.
Your History shows the transaction with a Voided status.
FIGURE 5.45History: Voided Transaction
Reattempted Capture
1. Your buyer orders two sweatshirts from your website.
2. Your buyer enters payment information and authorizes payment.
3. Send your buyer to PayPal using a hosted flow, specifying the variable
paymentaction=authorization.
4. PayPal initiates the authorization.
5. On day 3, you attempt to capture funds, but the capture fails. You receive an error message
similar to the following:
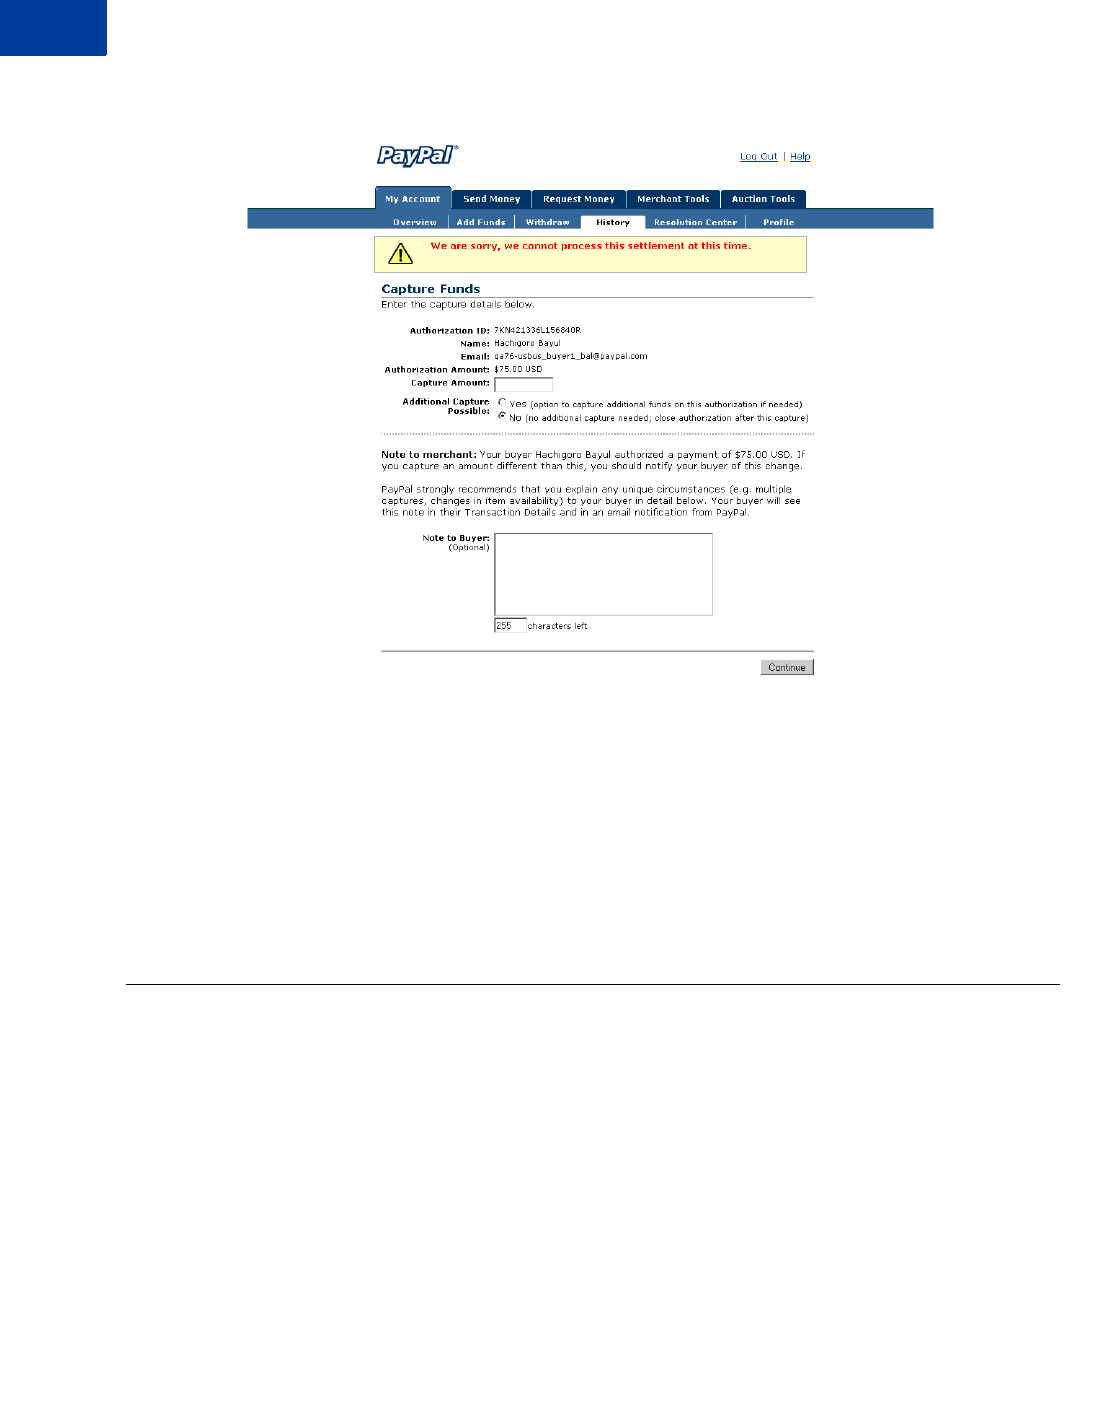
Using Authorization & Capture with Website Payments Standard
Best Practices
100 May 2006 Website Payments Standard Integration Guide
FIGURE 5.46A Capture Error
6. There was a restriction on the buyer’s account. You contact the buyer to resolve the
problem.
7. Your buyer resolves the account problem.
8. You reattempt and successfully capture funds. You ship the order to your buyer.
NOTE:The reauthorization scenario is similar to the Reattempted Capture scenario as detailed
above.
Best Practices
This section details the best practices you should follow in using Authorization & Capture to
ensure the best buying experience for your customers and getting the most from Authorization
& Capture.
Capturing Funds on Basic Authorizations
PayPal recommends that you capture funds within the honor period of three days because
PayPal will honor the funds for a 3-day period after the basic authorization. If you attempt to
capture funds after the three-day period and the authorization fails, your request to capture
funds may be declined.

May 2006 101
Using Authorization & Capture with Website Payments Standard
Best Practices
After day 4 of the authorization period, you can initiate a reauthorization, which will start a
new three-day honor period. However, it will not extend the original authorization period past
29 days. For example, if you successfully complete a reauthorization on day 29 of the
authorization period, funds will only be honored until the end of the 29th day, and a new three-
day honor period will start but not extend beyond day 29.
You should capture funds within 24 hours after you ship your buyer’s order.
Buyer Approval for Basic Authorizations
A buyer-initiated authorization allows you to capture funds from the buyer’s account up to
115% of the originally authorized amount (not to exceed an increase of $75 USD) and up to
$10,000 USD.
IMPORTANT:If you want to update any details of the purchase that change the original
authorization amount, PayPal requires that you obtain consent from the
buyer at the time of purchase or at the time of capture.
Voiding Basic Authorizations
You should void an authorization if the authorization or reauthorization will not be used.
Voiding the authorization unlocks the temporary hold placed on your buyer’s funding sources.

Using Authorization & Capture with Website Payments Standard
Best Practices
102 May 2006 Website Payments Standard Integration Guide

May 2006 103
6Encrypted Website Payments
To add security to online payments, you can create Encrypted Website Payment (EWP) button
code that relies on standard public key encryption. With public and private keys, you can
dynamically encrypt payment information before sending it to PayPal.
Encrypted Website Payments works in the following way.
Prerequisites to Using EWP
This section describes how to create your private and public keys for EWP, upload your public
key to PayPal, and download a copy of PayPal’s public key:
zGenerate a private key
zGenerate a public certificate
zUpload your public certificate to the PayPal website at https://www.paypal.com/us/cgi-
bin/webscr?cmd=_profile-website-cert
TABLE 6.9 How Encrypted Website Payments Work
Merchant Customer PayPal
1. Creates a public key and uploads it to
PayPal. Downloads PayPal’s public
certificate.
2. Creates HTML name/value pairs that
represent the parameters of the HTML
FORM to post to PayPal when a customer
clicks a button on his website
3. Encrypts the button parameters with
PayPal’s public key, and signs the
encrypted data with his own private key
4. Publishes the signed, encrypted FORM to
his website with a “Pay” button Clicks “Pay” button, which
posts the signed, encrypted
FORM data to PayPal’s URL
Checks the authenticity of the data by
using the merchant’s uploaded public
key
Decrypts the data with PayPal’s
private key
Directs the buyer’s browser to the
PayPal payment flow specified in the
button parameters

Encrypted Website Payments
Public Key Encryption Background
104 May 2006 Website Payments Standard Integration Guide
zDownload PayPal's public certificate from https://www.paypal.com/us/cgi-
bin/webscr?cmd=_profile-website-cert
Public Key Encryption Background
Public key encryption (asymmetric encryption) improves security and convenience by
allowing senders and receivers to have separate public and private encryption keys:
zThe public key: The public key is the portion of an asymmetric cryptographic key that
receivers give senders who want to send them encrypted information. I
zThe private key: The private key is the portion of an asymmetric cryptographic key
receivers keep secret and do not send to anyone. The public certificate: The public
certificate consists of the public key and identity information, such as a person's name,
which could be signed by a certificate authority (CA). The CA guarantees that the public
key belongs to the named entity.
zThe encryption process: Sender use both their private key and the receivers’ public key to
encrypt the information. Receiver use their private key and the senders’ public key to
decrypt the information that was encrypted. This encryption process is also used with
digital signatures to verify the origin of the information.
Setting Up The Certificates
For EWP, PayPal requires that you upload your public certificate to its website so that the
authenticity of the encrypted code can be verified.
PayPal accepts only X.509 public certificates, not public keys. The difference between a key
and a certificate is that a certificate includes the public key along with information about the
key, such as when the key expires and who the key belongs to. PayPal accepts public
certificates in OpenSSL PEM format from any established certificate authority, such as
Ver iS ign .
You can also create your own private key and public certificate using open source software
such as OpenSSL (http://www.openssl.org), which is detailed in the following section.
Creating Your Private Key Using OpenSSL
Using the openssl program, enter the following command to create your private key. The
command generates a 1024-bit RSA private key that is stored in the file my-prvkey.pem:
openssl genrsa -out my-prvkey.pem 1024
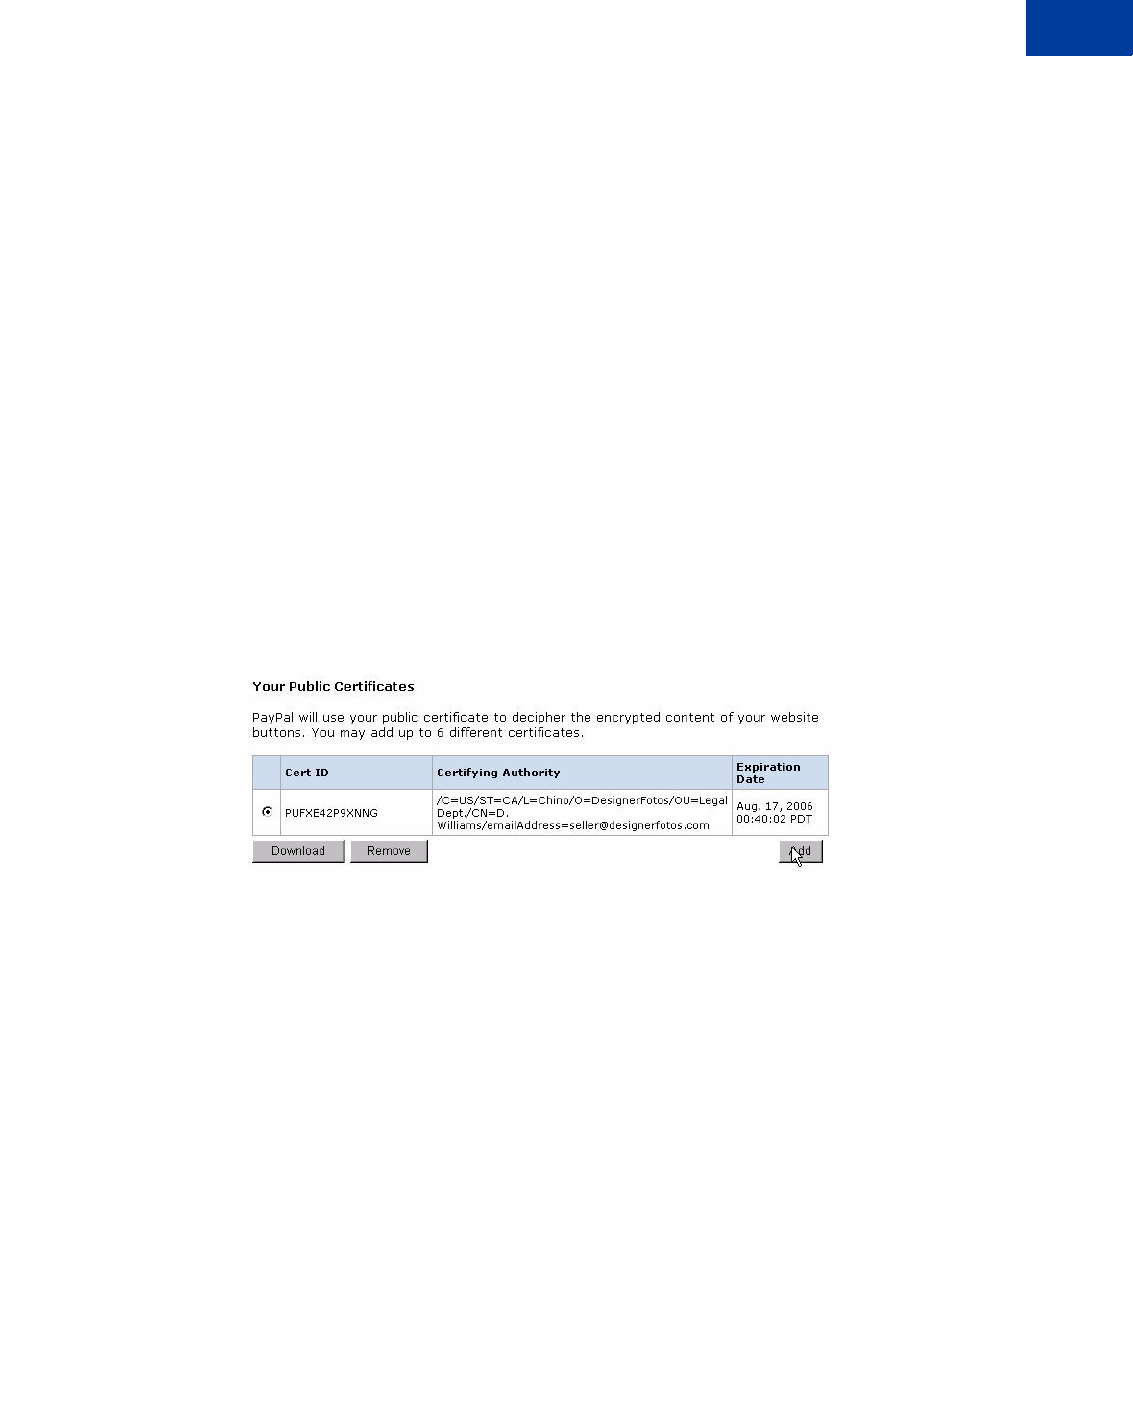
May 2006 105
Encrypted Website Payments
Setting Up The Certificates
Creating Your Public Certificate Using OpenSSL
The public certificate must be in PEM format. To create your certificate, enter the following
openssl command, which generates a public certificate in the file my-pubcert.pem:
openssl req -new -key my-prvkey.pem -x509 -days 365 -out
my-pubcert.pem
Uploading Your Public Certificate
To upload your public certificates to the PayPal website:
1. Log in to your Business or Premier PayPal account.
2. Click the Profile subtab.
3. In the Seller Preferences column, click Encrypted Payment Settings.
4. Click Add.
5. Click Browse, and select the public certificate you want to upload.
When your public certificate is successfully uploaded, it appears on the next screen under
Your Public Certificates.
FIGURE 6.47Upload Public Certificate for EWP
NOTE:After you successfully upload your certificate, PayPal assigns a corresponding
certificate ID. Store the certificate ID in a safe place. You need it to make Encrypted
Website Payments.
Downloading PayPal's Public Certificate
To download PayPal’s public certificate:
1. Log in to your Business or Premier PayPal account.
2. Click the Profile subtab.
3. In the Seller Preferences column, click Encrypted Payment Settings.
4. Under the PayPal Public Certificate section, click Download.
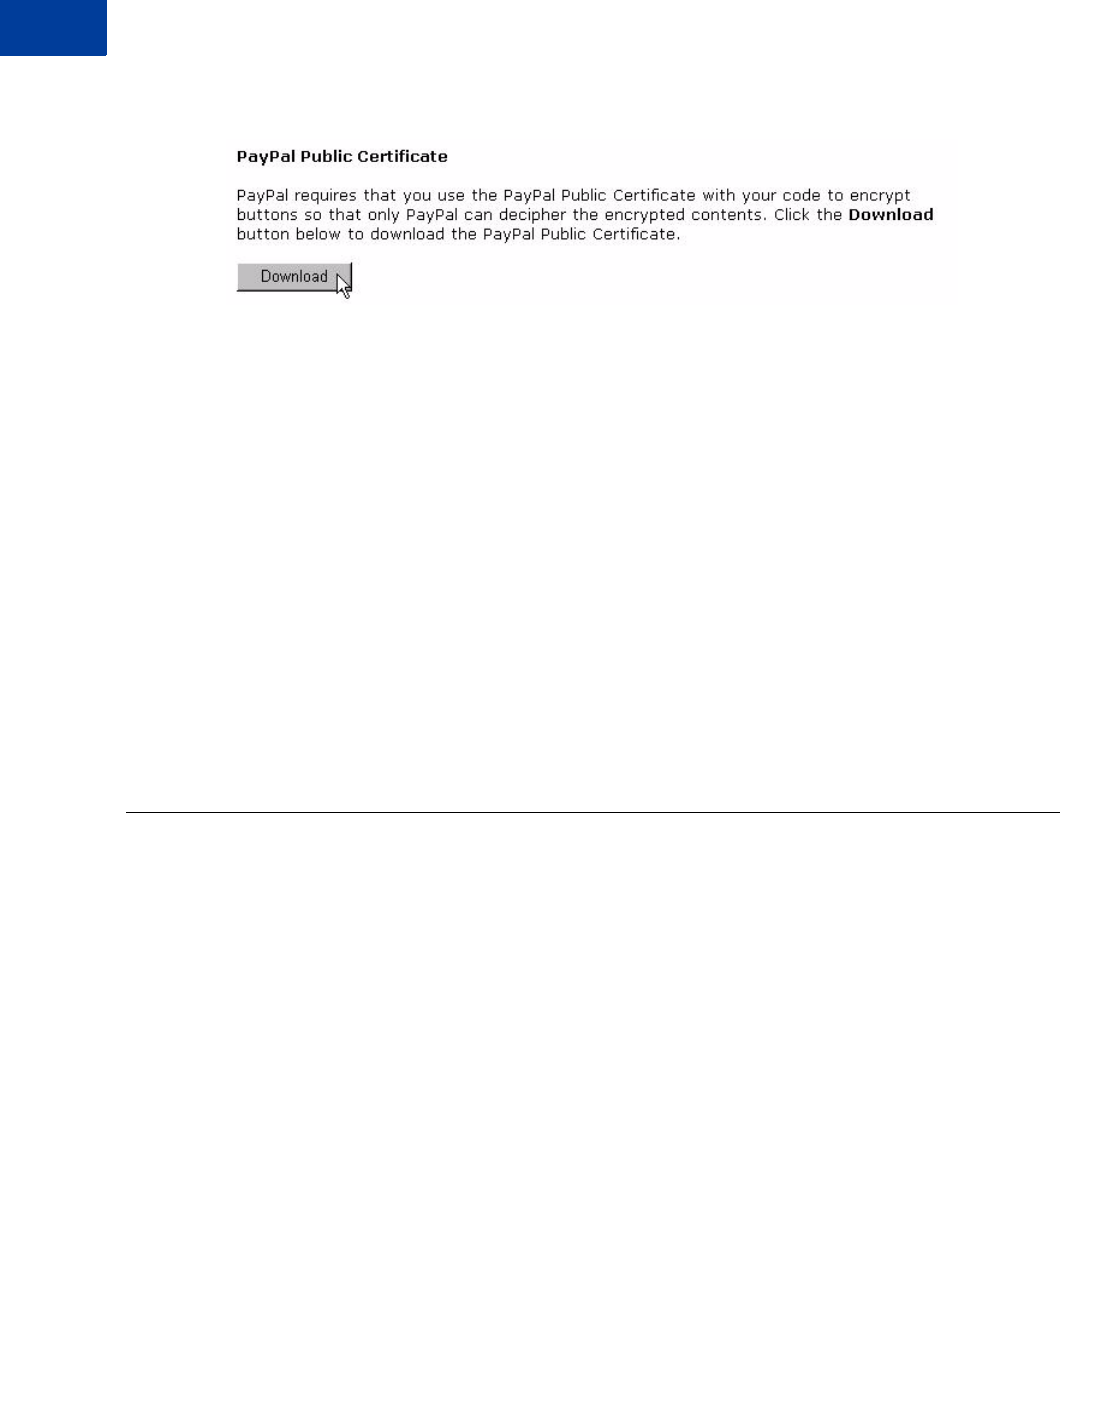
Encrypted Website Payments
Encrypting Your HTML
106 May 2006 Website Payments Standard Integration Guide
FIGURE 6.48Download PayPal’s Public Certificate for EWP
Removing Your Public Certificate
NOTE:If you remove your public certificate, its associated certificate ID is no longer valid for
encrypting buttons, and any buttons generated by your website with that certificate ID
will not function correctly.
To remove one or more of your public certificates:
1. Log in to your Business or Premier PayPal account.
2. Click the Profile subtab.
3. In the Seller Preferences column, click Encrypted Payment Settings.
4. Select one of the listed certificates, and click Remove.
5. On the next screen, click Remove again to remove the selected public certificate.
Encrypting Your HTML
PayPal provides Java and Microsoft Windows software to encrypt your Website Payments
Standard HTML FORM variables. Download a program from the following location:
https://www.paypal.com/us/cgi-bin/webscr?cmd=p/xcl/rec/ewp-code
After you download and extract the software, copy your private key, public certificate, p12 file
and PayPal's public certificate to the folder where the software is located.
1. Prepare an input file of Website Payments Standard variables and values for each encrypted
button you want to create. Each variable and value must be on its own separate line, as in
the following example.
NOTE:The cert_id variable identifies the public certificate you uploaded to PayPal’s website.
cert_id=Z24MFU6DSHBXQ
cmd=_xclick
business=sales@company.com
item_name=Handheld Computer
item_number=1234
custom=sc-id-789
amount=500.00

May 2006 107
Encrypted Website Payments
Encrypting Your HTML
currency_code=USD
tax=41.25
shipping=20.00
address_override=1
address1=123 Main St
city=Austin
state=TX
zip=94085
country=US
no_note=1
cancel_return=http://www.company.com/cancel.htm
2. Run the encryption program. with the appropriate syntax shown in Table 6.10, “Command
Line Syntax for PayPal Encrypted Website Payments Software.”
3. Copy the encrypted code to your website.
where:
TABLE 6.10 Command Line Syntax for PayPal Encrypted Website Payments Software
Software Command Line
Java java ButtonEncryption CertFile PKCS12File PPCertFile Password InputFile OutputFile
[Sandbox]
Microsoft
Windows
PPEncrypt CertFile PrivKeyFile PPCertFile InputFile OutputFile [Sandbox]
TABLE 6.11 Description of Arguments for EWP Commands
Argument Description
CertFile is the pathname to your own public certificate.
PKCS12File is the pathname to the PKCS12-format of your own public certificate.
PPCertFile is the pathname to a copy of PayPal’s public certificate.
Password is the passphrase to the PKCS12-format of your own public
certificate.
InputFile is the pathname to file containing the unencrypted Website Payments
HTML FORM variables.
OutputFile a file name for the encrypted output.
[Sandbox] is the optional word Sandbox if you are creating EWP code for
testing in the PayPal Sandbox.

Encrypted Website Payments
Blocking Unencrypted Website Payments
108 May 2006 Website Payments Standard Integration Guide
Blocking Unencrypted Website Payments
To prevent someone from creating a “spoof” version of your Website Payment buttons, you
can block unencrypted website payments.
To allow only Encrypted Website Payments:
1. Log in to your Business or Premier PayPal account.
2. Click the Profile subtab.
3. Click the Website Payment Preferences link in the right-hand menu.
4. Select On next to Block Non-encrypted Website Payments.

May 2006 109
7Testing in the PayPal Sandbox
The PayPal Sandbox can be used to test the following functionality.
IMPORTANT:The Sandbox does not process real money.
zBuy Now and Donations: Test single-item payments. For more information, see
Chapter 3, “Single-Item Payment: Buy Now and Donations.”
zShopping Carts: Test the purchase of multiple items in a single transaction and making a
single payment. For more information, see Chapter 4, “Multiple-Item Payment: Shopping
Cart.”
zSubscriptions: Create and publish test/prototype webpages and other content to which
only paying members will have access. For more information, see the Subscriptions and
Recurring Payments Guide.
zRefunds: Test Aa providing a refund of money paid by a PayPal user in a transaction.
zSimulated transactions:Test scenarios such as successful and failed eChecks.
To test in the Sandbox, you must first create a Developer Central account. With this account,
you can create multiple PayPal accounts, such as seller and buyer accounts, to simulate
different scenarios.
For complete details about using Developer Central and the Sandbox, see the Sandbox User
Guide.

Testing in the PayPal Sandbox
110 May 2006 Website Payments Standard Integration Guide

May 2006 111
8Website Payments Standard
HTML FORM Basics
This chapter describes the basic functionality of Website Payments Standard HTML FORMs in
technical terms.
Your customers interface with Website Payments Standard through hidden HTML FORM input
variables on your website. These FORMs submit variables and their values to PayPal. You set
these variables to produce the desired effect. Depending on the values of the variables, you can
invoke PayPal’s shopping cart, Buy Now, or Donations and activate or invoke various PayPal
features.
There is a wide variety of HTML creation tools for you to choose from. This guide does not
describe all the possibilities. PayPal offers “button factories” that walk you through the
process of creating HTML for Buy Now or Donations buttons and Shopping Cart buttons. For
more information about these button factories, see Chapter 3 and Chapter 4.
FORM Attributes: ACTION and METHOD
The FORM tag includes two required attributes, ACTION and METHOD, and always looks like
this:
<FORM ACTION=”https://www.paypal.com/cgi-bin/webscr” METHOD=POST>
IMPORTANT:Do not change these values.These attributes are required for any PayPal
Shopping Cart, Buy Now, or Donations button.
Hidden Input Variables
HTML input variables in a PayPal Website Payments Standard FORM are always hidden from
the customer’s view. They have the following general format:
<INPUT TYPE=”hidden” name=”variableName” value=”allowedValue”>
The variableName is any of the variables described in Appendix A, “Website Payments
Standard HTML Variables,” and the allowedValue is any of the values detailed for those
variables.
Specifying the Website Payments Standard Product: cmd
The cmd variable is always required in a FORM. Its value determines which Website Payments
Standard product you are using to obtain payment from the customer:

Website Payments Standard HTML FORM Basics
Variations on Basic Variables
112 May 2006 Website Payments Standard Integration Guide
The input tag looks like one of the following:
zBuy Now or Donations: <INPUT TYPE=”hidden” name=”cmd” value=”_xclick”>
zShopping Cart: <INPUT TYPE=”hidden” name=”cmd” value=”_cart”>
IMPORTANT:These INPUT tags are required exactly as shown above. Do not alter them.
Variations on Basic Variables
This section highlights some useful miscellaneous ideas about Website Payments Standard
FORM variables.
The HTML variables interact in various ways. Sometimes their effect is cumulative,
sometimes they can cancel each other out, sometimes a variable requires that you also set
another variable. These interactions are detailed in the descriptions of the variables in
Appendix A, “Website Payments Standard HTML Variables.”
Prompting for Quantity in Buy Now or Donations: undefined_quantity
With Buy Now and Donations, you can require the customer to specify the desired number of
copies of the single item by using the undefined_quantity variable:
<INPUT TYPE=”hidden” name=”undefined_quantity” value=”1”>
Recordkeeping with Passthrough Variables
Some variables are exclusively for your own use (such as for tracking orders) and are not
recorded or used by PayPal. The values you send to PayPal are returned to you in an Instant
Payment Notification (IPN) exactly as you set them. For this reason, they are called
passthrough variables.
The following are passthrough variables:
zcustom
zitem_number or item_number_x
zinvoice
TABLE 8.12 Allowed Values for cmd Variable
Value of cmd Description
_xclick A Buy Now or Donations button
_cart A shopping cart

May 2006 113
Website Payments Standard HTML FORM Basics
Variations on Basic Variables
Setting the Character Set: charset
You can use the charset FORM variable to specify the character set or character encoding of
the data you collect in your website forms and send to PayPal. PayPal sends data to you in the
same character set or encoding you specify with the charset variable. For example, the
following INPUT tag sets the encoding to UTF-8:
<INPUT TYPE=”hidden” name=”charset” value=”utf-8”>
Setting Return URL on Individual Transactions
With Auto Return turned on in your Profile, you can set the value of the return URL on each
individual transaction, overriding the value you have stored on PayPal. For example, you
might want to return the customer’s browser to a URL on your site that is specific to that
customer, perhaps with a session ID or other transaction-related data included in the URL.
To set the return URL for a transaction, include the return variable in the HTML FORM:
<INPUT TYPE=”hidden” NAME=”return” value=”URLspecificToThisTransaction”>
Desired Currency on Individual Transactions
Use the currency_code variable on individual transactions to specify the currency of the
payment:
<INPUT TYPE=”hidden” NAME=”currency_code”
value=”PayPalSupportedCurrencyCode”>
TABLE 8.13 Character Sets and Encodings Supported by PayPal
Big5 (Traditional
Chinese in Taiwan)
EUC-JP
EUC-KR
EUC-TW
gb2312 (Simplified
Chinese)
gbk
HZ-GB-2312
(Traditional
Chinese in Hong
Kong)
ibm-862 (Hebrew
with European
characters)
ISO-2022-CN
ISO-2022-JP
ISO-2022-KR
ISO-8859-1
(Western
European
Languages)
ISO-8859-2
ISO-8859-3
ISO-8859-4
ISO-8859-5
ISO-8859-6
ISO-8859-7
ISO-8859-8
ISO-8859-9
ISO-8859-13
ISO-8859-15
KOI8-R
(Cyrillic)
Shift_JIS
UTF-7
UTF-8
UTF-16
UTF-16BE
UTF-16LE
UTF16_Platfor
mEndian
UTF16_Oppos
iteEndian
UTF-32
UTF-32BE
UTF-32LE
UTF32_Platfor
mEndian
UTF32_Oppos
iteEndian
US-ASCII
windows-1250
windows-1251
windows-1252
windows-1253
windows-1254
windows-1255
windows-1256
windows-1257
windows-1258
windows-874
(Thai)
windows-949
(Korean)
x-mac-greek
x-mac-turkish
x-mac-
centraleurroman
x-mac-cyrillic
ebcdic-cp-us
ibm-1047

Website Payments Standard HTML FORM Basics
Prepopulating FORMs
114 May 2006 Website Payments Standard Integration Guide
The value of currency_code must be a code from Table 2.6, “PayPal-Supported Currencies,
Currency Codes, and Maximum Transaction Amounts” on page 59.
NOTE:If currency_code is not included, the default currency is USD.
URL-Encoding Variable Values
Variables such as return, cancel_return, image_url require a URL as their values. You
must ensure that these values are URL-encoded before you pass them to PayPal. URL-
encoding is the substitution of characters required in URLs with characters that will not be
misinterpreted by web servers. For example, a colon character is replaced with the characters
%3A.
Prepopulating FORMs
Account Optional (also called Website Payments Express) allows you to accept payments
from customers without a PayPal account. However, checking out with PayPal is often faster
than forcing the customer to reenter information that is already stored on PayPal. For repeat
purchases, it is to your advantage to get your customers to create a PayPal account.
During a payment transaction, you can prepopulate a FORM by including HTML input
variables specifically for this purpose. A complete description of these variables is in
Table A.7, “HTML Variables: Prepopulating PayPal FORMs or Address Overriding” on
page 103.
IMPORTANT:The value of the cmd variable must be _ext-enter, and you must include
the redirect_cmd variable, the value of which must be _xclick.
Sample HTML for FORM Prepopulation
The following sample HTML shows the optional prepopulation fields with the required
variables in payment buttons. The field entries must be dynamically generated by your website
and included in the URL to which your customers are sent when they make a PayPal payment.
EXAMPLE 8.7 HTML for FORM Prepopulation
<form action=”https://www.paypal.com/cgi-bin/webscr” method=”POST”>
<input type=”hidden” name=”cmd” value=”_ext-enter”>
<input type=”hidden” name=”redirect_cmd” value=”_xclick”>
<input type=”hidden” name=”business” value=”seller@designerfotos.com”>
<input type=”hidden” name=”item_name” value=”hat”>
<input type=”hidden” name=”item_number” value=”123”>
<input type=”hidden” name=”amount” value=”15.00”>
<input type=”hidden” name=”first_name” value=”John”>
<input type=”hidden” name=”last_name” value=”Doe”>
<input type=”hidden” name=”address1” value=”9 Elm Street”>

May 2006 115
Website Payments Standard HTML FORM Basics
Overriding PayPal-Stored Addresses
<input type=”hidden” name=”address2” value=”Apt 5”>
<input type=”hidden” name=”city” value=”Berwyn”>
<input type=”hidden” name=”state” value=”PA”>
<input type=”hidden” name=”zip” value=”19312”>
<input type=”hidden” name=”night_phone_a” value=”610”>
<input type=”hidden” name=”night_phone_b” value=”555”>
<input type=”hidden” name=”night_phone_c” value=”1234”>
<input type=”image” SRC=”http://images.paypal.com/images/x-click-but01.gif”
border=”0” name=”submit” alt=”Make payments with PayPal - it’s fast, free and
secure!”>
</form>
Overriding PayPal-Stored Addresses
For customers who already have PayPal accounts and whom you already prompted for a
shipping address before they choose to pay with PayPal, you can use the entered address
instead of the address the customer has on file with PayPal. Set the address_override
variable to 1, as in the following example:
<INPUT TYPE=”hidden” name=”address_override” value=”1”>
You must also include FORM variables that contain the customer’s address information, as
detailed in Table A.21, “HTML Variables: Prepopulating PayPal FORMs or Address
Overriding” on page 126.
The customer is shown the passed-in address but cannot edit it. No address is shown Iif the
address is not valid, such as missing required fields, including country, or if the address is not
included at all.
Sample HTML for Overriding PayPal-Stored Shipping Addresses
The following HTML shows the address_override variable in conjunction with the
prepopulation variables for overriding a customer’s PayPal-stored shipping address.
EXAMPLE 8.8 HTML for Overriding PayPal-Stored Address
<form action="https://www.paypal.com/cgi-bin/webscr" method="post">
<input type="hidden" name="cmd" value="_xclick">
<input type="hidden" name="business" value="seller@designerfotos.com">
<input type="hidden" name="item_name" value="Memorex 256MB Memory Stick">
<input type="hidden" name="item_number" value="MEM32507725">
<input type="hidden" name="amount" value="3">
<input type="hidden" name="tax" value="1">
<input type="hidden" name="quantity" value="1">
<input type="hidden" name="no_note" value="1">
<input type="hidden" name="currency_code" value="USD">
<!--
Override the customer’s stored PayPal address
-->
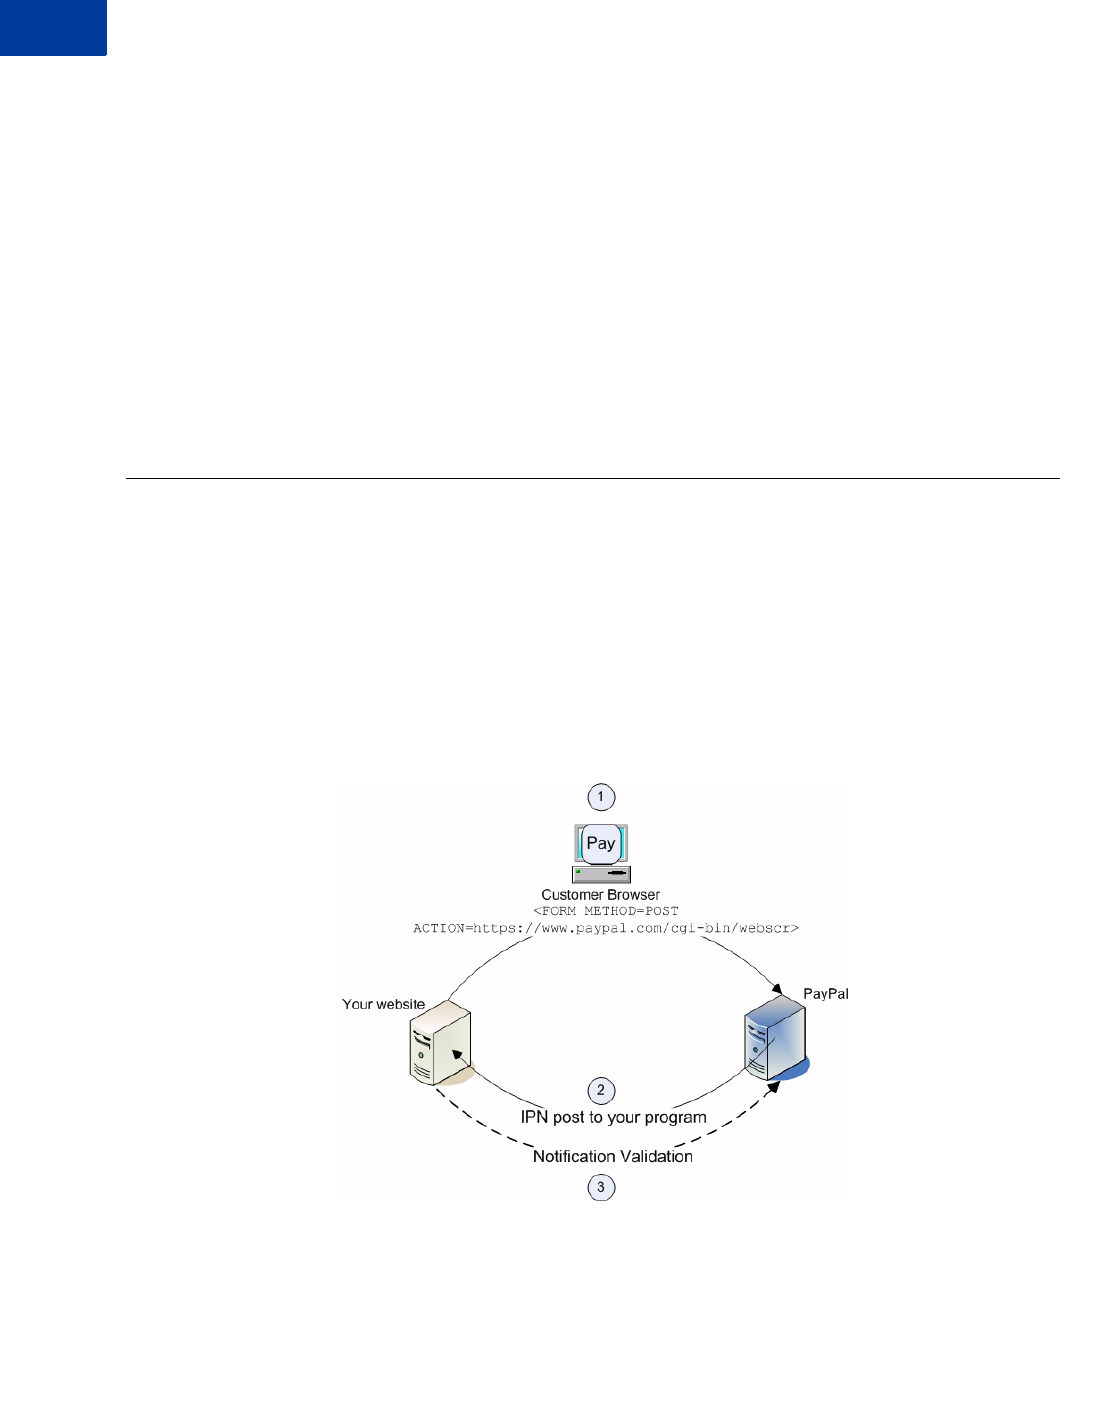
Website Payments Standard HTML FORM Basics
Instant Payment Notification: notify_url
116 May 2006 Website Payments Standard Integration Guide
<input type="hidden" name="address_override" value="1">
<!-- Set the prepopulation variables that override the stored address -->
<input type="hidden" name="first_name" value="John">
<input type="hidden" name="last_name" value="Doe">
<input type="hidden" name="address1" value="345 Lark Ave">
<input type="hidden" name="city" value="San Jose">
<input type="hidden" name="state" value="CA">
<input type="hidden" name="zip" value="95121">
<input type="hidden" name="country" value="US">
<input type="image" src="https://www.paypal.com/en_US/i/btn/x-click-
but01.gif" border="0" name="submit" alt="Make payments with PayPal - it's
fast, free and secure!">
</form>
Instant Payment Notification: notify_url
Instant Payment Notification consists of three parts:
1. A customer pays you.
2. PayPal POSTs FORM variables to a URL you specify that runs a program to process the
variables.
3. You validate the notification.
FIGURE 8.49How IPN Works: Three General Steps
1. A customer payment or a refund triggers IPN. This payment can be via Website Payments
Standard FORMs or via the PayPal Web Services APIs for Express Checkout, MassPay, or
RefundTransaction. If the payment has a “Pending” status, you receive another IPN when
the payment clears, fails, or is denied.

May 2006 117
Website Payments Standard HTML FORM Basics
Instant Payment Notification: notify_url
2. PayPal posts HTML FORM variables to a program at a URL you specify. You can specify
this URL either in your Profile or with the notify_url variable on each transaction. This
post is the heart of IPN. Included in the notification is the customer’s payment information
(such as customer name, payment amount). All possible variables in IPN posts are detailed
in the Order Management Integration Guide. When your server receives a notification, it
must process the incoming data.
3. Your server must then validate the notification to ensure that it is legitimate. For details, see
the Order Management Integration Guide.

Website Payments Standard HTML FORM Basics
Instant Payment Notification: notify_url
118 May 2006 Website Payments Standard Integration Guide

Website Payments Standard Integration Guide May 2006 119
AWebsite Payments Standard HTML
Variables
This appendix details all variables for Buy Now, Donations, Add to Cart buttons and shopping
carts.
TABLE A.14 Allowed Values for cmd Variable
Value of cmd Description
_xclick A Buy Now or Donations button
_cart A shopping cart
_ext-enter For prepopulating PayPal account signup. Requires
redirect_cmd.
TABLE A.15 HTML Variables: IPN Control notify_url
Name Description Required
or
Optional
Character
Length
notify_url The URL to which PayPal posts information about the
transaction. Must be URL-encoded. Optional 255
TABLE A.16 HTML Variables: Item Information
Name Description Required
or
Optional
Character
Length
amount The price or amount of the purchase, not including shipping,
handling, or tax. If omitted in Buy Now or Donations, customers
can enter an amount at time of purchase.
zOptional for Buy Now or Donations
zRequired for Shopping Cart
See
description.

Website Payments Standard HTML Variables
120 May 2006 Website Payments Standard Integration Guide
item_name Description of item. If omitted in Buy Now or Donations,
customers can enter an item name at time of purchase.
zOptional for Buy Now or Donations
zRequired for Shopping Cart
See
description. 127
item_number Passthrough variable for you to track purchases or donations,
passed back to you at payment completion. If omitted in Buy Now
or Donations, no variable is passed back to you.
Optional 127
quantity Number of items. The amount, shipping and tax are multiplied by
the quantity to derive the total payment amount. If this is a
shopping cart transaction, PayPal appends the number of the item
(e.g. quantity1, quantity2).
NOTE:The value for quantity must be a
positive integer. Null, zero, or negative
numbers are not allowed.
Optional
undefined_
quantity
1: allows buyer to specify the quantity.
NOTE:This variable is allowed only in Buy Now
or Donations, and not allowed in shopping
carts.
Optional 1
on0 First option field name. If omitted, no variable is passed back to
you. Optional 64
on1 Second option field name. If omitted, no variable is passed back
to you. Optional 64
os0 First set of option values. If this option is selected through a text
box or radio button, each value should be no more than 64
characters. If this value is entered by the customer in a text field,
there is a 200-character limit. If omitted, no variable is passed
back to you.
NOTE:on0 must also be defined set.
Optional 64 or 200
See
description.
os1 Second set of option values.
NOTE:on1 must also be set.
If this option is selected through a text box or radio button, each
value should be no more than 64 characters. If this value is entered
by the customer in a text field, there is a 200-character limit. If
omitted, no variable is passed back to you.
Optional 64 or 200
See
description.
TABLE A.16 HTML Variables: Item Information
Name Description Required
or
Optional
Character
Length

Website Payments Standard Integration Guide May 2006 121
Website Payments Standard HTML Variables
TABLE A.17 HTML Variables: Display Information
Name Description Required
or
Optional
Character
Length
add Add an item to the PayPal-hosted shopping cart.
This variable must be set as follows:
add=1
The alternative is the display=1 variable, which allows the user
to view the contents of the PayPal-hosted shopping cart.
If both add and display are specified, display takes
precedence.
Required 1
cancel_
return
A URL to which the customer’s browser is returned if payment is
cancelled; for example, a URL on your website that displays a
“Payment Canceled” page.
Default: Browser is directed to the PayPal website.
Optional
cbt Sets the text for the Continue button on the PayPal Payment
Complete page.
NOTE:The return variable must also be set.
Optional 60
cn Label above the note field. This value is not saved and does not
appear in any of your notifications. If omitted, no variable is
passed back to you.
Optional 40
cpp_header_
image
Sets the image at the top left of the payment page. The image’s
maximum size is 750 pixels wide by 90 pixels high must be URL-
encoded. PayPal recommends that you provide an image that is
stored only on a secure (https) server. For more information, see
“Branding PayPal’s Payment Pages” on page 33.
Optional No limit
cpp_
headerback_
color
Sets the background color for the header of the payment page.
Valid value is case-insensitive six-character HTML hexadecimal
color code in ASCII.
Optional
cpp_
headerborder_
color
Sets the border color around the header of the payment page. The
border is a 2-pixel perimeter around the header space, which has
a maximum size of 750 pixels wide by 90 pixels high.
Valid value is case-insensitive six-character HTML hexadecimal
color code in ASCII.
Optional
cpp_payflow_
color
Sets the background color for the payment page below the header.
Valid value is case-insensitive six-character HTML hexadecimal
color code in ASCII.
NOTE:Background colors that conflict with
PayPal’s error messages are not allowed; in
these cases, the default color is white.
Optional

Website Payments Standard HTML Variables
122 May 2006 Website Payments Standard Integration Guide
cs Sets the background color of your payment pages.
Default or 0 = background color is white.
1 = background color is black.
Optional
display Display the contents of the PayPal-hosted shopping cart to the
customer. This variable must be set as follows:
display=1
The alternative is the add=1 variable, which adds an item to the
PayPal-hosted shopping cart.
If both add and display are specified, display takes
precedence.
Required
See
description.
1
image_url The URL of the 150x50-pixel image displayed as your logo in the
upper left corner of PayPal’s pages. Must be URL-encoded.
Default: your business name (if you have a Business account) or
your email address (if you have Premier account).
Optional
no_note Prompt customer to include a note with payment.
Default or 0: customer is prompted to include a note.
1: customer is not prompted to include a note.
Optional 1
no_shipping Prompt customer for shipping address.
Default or 0: customer is prompted to include a shipping address
1: customer is not asked for a shipping address.
2: customer must provide a shipping address.
Optional 1
page_style Sets the Custom Payment Page Style for payment pages
associated with this button/link.
somePageStyleName: The name of a page style you have defined.
primary: always use the page style set as primary.
paypal: use the PayPal default style.
Alphanumeric ASCII lower 7-bit characters only, plus
underscore. No spaces.
Optional 30
return The URL to which the customer’s browser is returned after
completing the payment; for example, a URL on your site that
displays a “Thank you for your payment” page.
Default: customer is taken to the PayPal website.
Optional
TABLE A.17 HTML Variables: Display Information
Name Description Required
or
Optional
Character
Length

Website Payments Standard Integration Guide May 2006 123
Website Payments Standard HTML Variables
rm Return method GET or POST: the FORM METHOD used to send data
to the URL specified by the return variable after payment
completion.
NOTE:The rm variable takes effect only if the
return variable is also set.
Default or 0: GET method is used for all Shopping Cart
transactions.
1: GET. The customer’s browser is redirected to the return URL
by the GET method, and no transaction variables are sent.
2: POST. The customer’s browser is redirected to the return URL
by the POST method, and all transaction variables are also posted.
Optional
TABLE A.18 HTML Variables: Transaction Information
Name Description Required
or
Optional
Character
Length
address_
override
1: The address specified in prepopulation variables overrides the
user’s stored address. See Table A.21, “HTML Variables:
Prepopulating PayPal FORMs or Address Overriding. The
customer is shown the passed-in address but cannot edit it. If the
address is not valid such as missing any required fields, including
country) or not included, no address is shown.
Optional 1
currency_
code
The currency of the payment. Defines the currency in which the
monetary variables (amount, shipping, shipping2, handling, tax)
are denoted.
Default: all monetary fields are interpreted as U.S. Dollars.
Optional
custom Passthrough variable never presented to your customer.
Default: no variable is passed back to you.
Optional 256
handling Handling charges. This is not quantity-specific. The same
handling cost is charged regardless of the number of items
purchased.
Default: no handling charges are included.
Optional
invoice Passthrough variable you can use to identify your invoice number
for this purchase.
Default: no variable is passed back to you.
Optional 127
TABLE A.17 HTML Variables: Display Information
Name Description Required
or
Optional
Character
Length

Website Payments Standard HTML Variables
124 May 2006 Website Payments Standard Integration Guide
redirect_cmd Used only in conjunction with cmd=”_ext-enter” for
prepopulating a PayPal FORM during payment.
The only valid value for redirect_cmd is _xclick.
Optional
shipping The cost of shipping this item if you have enabled item-specific
shipping costs. If shipping is used and shipping2 is not
defined, this flat amount is charged regardless of the quantity of
items purchased.
NOTE:The shipping variable takes effect only
if the override checkbox is checked in your
Profile. See “Overriding Shipping
Calculation on Individual
Transactions” on page 49.
Default: if Profile-based shipping is enabled, customer is charged
the amount or percentage defined in your Profile.
Optional
shipping2 The cost of shipping each additional item. If omitted, and Profile-
based shipping is enabled, your customer is charged the amount
or percentage defined in your Profile.
Optional
tax Transaction-based tax override variable. Set this to a flat tax
amount to apply to the transaction regardless of the buyer’s
location. This value overrides any tax settings set in your Profile.
Default: Profile tax settings (if any) apply.
Optional
tax_cart Cart-wide tax, overriding any individual item tax_x value Optional
TABLE A.19 HTML Variables Specific to Shopping Carts
Name Required
or
Optional
Description Allowable Values
amount Required Price of the item or the total price of all items in the
shopping cart. Any valid currency
amount
business Required Email address for your PayPal account.
NOTE:The value of this variable is
normalized to lowercase
characters.
Your email address
TABLE A.18 HTML Variables: Transaction Information
Name Description Required
or
Optional
Character
Length

Website Payments Standard Integration Guide May 2006 125
Website Payments Standard HTML Variables
handling_
cart
Optional Single handling fee to be charged cart-wide. If
handling_cart is used in multiple Add to Cart
buttons, the handling_cart value of the first item
is used.
Any valid currency
amount
item_name Required Name of the item or a name for the entire Shopping
Cart
paymentaction Optional Indicates whether transaction is an authorization to
be captured later with PayPal Authorization &
Capture on https://www.paypal.com/.
For more information, see the PayPal Authorization
& Capture Integration Guide.
authorization
upload Required Indicates the use of third-party shopping cart 1
TABLE A.20 HTML Variables: Individual Items in Third-Party Shopping Carts
Name Required
or
Optional
Description Character
Length
amount_xRequired Price of item #x.
handling_xOptional The cost of handling for item #x.
item_name_x Required Name of item #x in the cart. Must be alphanumeric. 127
item_number_xOptional Passthrough variable for you to track order or other purchase.
Default: no variable is passed back to you.
127
on0_xOptional First option field name for item #x 64
on1_xOptional Second option field name for item #x. 64
os0_xOptional First set of option value(s) for item #x. Requires that on0_x
also be set. 200
os1_xOptional Second set of option value(s) for item #x. Requires that
on1_x also be set. 200
quantity_xOptional Quantity of the item #x.
NOTE:The value of quantity_x must be a
positive integer. Null, zero, or negative
numbers are not allowed.
shipping_xOptional The cost of shipping the first piece (quantity of 1) of item #x.
TABLE A.19 HTML Variables Specific to Shopping Carts
Name Required
or
Optional
Description Allowable Values

Website Payments Standard HTML Variables
126 May 2006 Website Payments Standard Integration Guide
shipping2_xOptional The cost of shipping each additional piece (quantity of 2 or
more) of item #x.
tax_xOptional The tax amount for item #x.
TABLE A.21 HTML Variables: Prepopulating PayPal FORMs or Address Overriding
Variable Description Requirements Character
Limit
address1 Street (1 of 2 fields) Alphanumeric 100
address2 Street (2 of 2 fields) Alphanumeric 100
city City Alphanumeric 40
country Sets shipping and billing country. See
Appendix C for allowable country codes. Alphabetic 2
first_name First name Alphabetic 32
last_name Last name Alphabetic 64
lc Defines the buyer’s language for the Login
page only.
Allowable values:
AU
DE
FR
IT
GB
ES
US
Alphabetic 2
night_
phone_a
The area code for U.S. phone numbers, or
the country code for phone numbers
outside the U.S. This will prepopulate the
buyer’s home phone number.
Numeric 3
night_
phone_b
The three-digit prefix for U.S. phone
numbers, or the entire phone number for
phone numbers outside the U.S., excluding
country code. This will prepopulate the
buyer’s home phone number.
Numeric 3
TABLE A.20 HTML Variables: Individual Items in Third-Party Shopping Carts
Name Required
or
Optional
Description Character
Length

Website Payments Standard Integration Guide May 2006 127
Website Payments Standard HTML Variables
night_
phone_c
The four-digit phone number for U.S.
phone numbers. This will prepopulate the
buyer’s home phone number.
Numeric 3
state State Must be two-character official
US abbreviation. 2
zip Postal code Numeric 32
TABLE A.22 HTML Variables: Prepopulating Business Account Sign-up
Variable Value Requirements Character
Limit
business_
address1
Business street address Alphanumeric 128
business_
address2
Business street address Alphanumeric 128
business_
city
Business city Alphanumeric 128
business_
state
Business state Alphanumeric 2
business_
zip
Business postal code Numeric 5
business_
country
Business country Alphabetic 2
business_
cs_email
Business’s customer service email address Alphanumeric 128
business_cs
_phone_a
Business’s customer service phone
number area code for U.S. phone numbers,
or the country code for phone numbers
outside the U.S.
Numeric 3
business_
cs_phone_b
Business’s customer service three-digit
prefix for U.S. phone numbers, or the
entire phone number for phone numbers
outside the U.S., excluding country code.
Numeric 3
business_
cs_phone_c
Business’s customer service four-digit
phone number for U.S. phone numbers. Numeric 4
TABLE A.21 HTML Variables: Prepopulating PayPal FORMs or Address Overriding
Variable Description Requirements Character
Limit

Website Payments Standard HTML Variables
128 May 2006 Website Payments Standard Integration Guide
business_
url
URL of the business’s website Alphanumeric. Must be URL-
encoded. 128
business_
night_phone
_a
Business’s area code for U.S. phone
numbers, or the country code for phone
numbers outside the U.S. This
prepopulates the customer’s home phone
number.
Numeric 3
business_
night_phone
_b
Business’s three-digit prefix for U.S.
phone numbers, or the entire phone
number for phone numbers outside the
U.S., excluding country code. This
prepopulates the customer’s home phone
number.
Numeric 3
business_
night_phone
_c
Business’s four-digit phone number for
U.S. phone numbers. This prepopulates the
customer’s home phone number.
Numeric 4
TABLE A.22 HTML Variables: Prepopulating Business Account Sign-up
Variable Value Requirements Character
Limit

129
ACountry Codes
Country Code
AFGHANISTAN AF
ÅLAND ISLANDS AX
ALBANIA AL
ALGERIA DZ
AMERICAN SAMOA AS
ANDORRA AD
ANGOLA AO
ANGUILLA AI
ANTARCTICA AQ
ANTIGUA AND BARBUDA AG
ARGENTINA AR
ARMENIA AM
ARUBA AW
AUSTRALIA AU
AUSTRIA AT
AZERBAIJAN AZ
BAHAMAS BS
BAHRAIN BH
BANGLADESH BD
BARBADOS BB
BELARUS BY
BELGIUM BE
BELIZE BZ
BENIN BJ
BERMUDA BM
BHUTAN BT
BOLIVIA BO
BOSNIA AND
HERZEGOVINA BA
BOTSWANA BW
BOUVET ISLAND BV
BRAZIL BR
BRITISH INDIAN OCEAN
TERRITORY IO
BRUNEI DARUSSALAM BN
BULGARIA BG
BURKINA FASO BF
BURUNDI BI
CAMBODIA KH
CAMEROON CM
CANADA CA
CAPE VERDE CV
CAYMAN ISLANDS KY
CENTRAL AFRICAN
REPUBLIC CF
CHAD TD
CHILE CL
CHINA CN
CHRISTMAS ISLAND CX
COCOS (KEELING) ISLANDS CC
COLOMBIA CO
Country Code

130
COMOROS KM
CONGO CG
CONGO, THE DEMOCRATIC
REPUBLIC OF THE CD
COOK ISLANDS CK
COSTA RICA CR
COTE D'IVOIRE CI
CROATIA HR
CUBA CU
CYPRUS CY
CZECH REPUBLIC CZ
DENMARK DK
DJIBOUTI DJ
DOMINICA DM
DOMINICAN REPUBLIC DO
ECUADOR EC
EGYPT EG
EL SALVADOR SV
EQUATORIAL GUINEA GQ
ERITREA ER
ESTONIA EE
ETHIOPIA ET
FALKLAND ISLANDS
(MALVINAS) FK
FAROE ISLANDS FO
FIJI FJ
FINLAND FI
FRANCE FR
FRENCH GUIANA GF
FRENCH POLYNESIA PF
Country Code
FRENCH SOUTHERN
TERRITORIES TF
GABON GA
GAMBIA GM
GEORGIA GE
GERMANY DE
GHANA GH
GIBRALTAR GI
GREECE GR
GREENLAND GL
GRENADA GD
GUADELOUPE GP
GUAM GU
GUATEMALA GT
GUERNSEY GG
GUINEA GN
GUINEA-BISSAU GW
GUYANA GY
HAITI HT
HEARD ISLAND AND
MCDONALD ISLANDS HM
HOLY SEE (VATICAN CITY
STATE) VA
HONDURAS HN
HONG KONG HK
HUNGARY HU
ICELAND IS
INDIA IN
INDONESIA ID
IRAN, ISLAMIC REPUBLIC
OF IR
Country Code

131
IRAQ IQ
IRELAND IE
ISLE OF MAN IM
ISRAEL IL
ITALY IT
JAMAICA JM
JAPAN JP
JERSEY JE
JORDAN JO
KAZAKHSTAN KZ
KENYA KE
KIRIBATI KI
KOREA, DEMOCRATIC
PEOPLE'S REPUBLIC OF KP
KOREA, REPUBLIC OF KR
KUWAIT KW
KYRGYZSTAN KG
LAO PEOPLE'S
DEMOCRATIC REPUBLIC LA
LATVIA LV
LEBANON LB
LESOTHO LS
LIBERIA LR
LIBYAN ARAB JAMAHIRIYA LY
LIECHTENSTEIN LI
LITHUANIA LT
LUXEMBOURG LU
MACAO MO
MACEDONIA, THE FORMER
YUGOSLAV REPUBLIC OF MK
Country Code
MADAGASCAR MG
MALAWI MW
MALAYSIA MY
MALDIVES MV
MALI ML
MALTA MT
MARSHALL ISLANDS MH
MARTINIQUE MQ
MAURITANIA MR
MAURITIUS MU
MAYOTTE YT
MEXICO MX
MICRONESIA, FEDERATED
STATES OF FM
MOLDOVA, REPUBLIC OF MD
MONACO MC
MONGOLIA MN
MONTSERRAT MS
MOROCCO MA
MOZAMBIQUE MZ
MYANMAR MM
NAMIBIA NA
NAURU NR
NEPAL NP
NETHERLANDS NL
NETHERLANDS ANTILLES AN
NEW CALEDONIA NC
NEW ZEALAND NZ
NICARAGUA NI
NIGER NE
Country Code

132
NIGERIA NG
NIUE NU
NORFOLK ISLAND NF
NORTHERN MARIANA
ISLANDS MP
NORWAY NO
OMAN OM
PAKISTAN PK
PALAU PW
PALESTINIAN TERRITORY,
OCCUPIED PS
PANAMA PA
PAPUA NEW GUINEA PG
PARAGUAY PY
PERU PE
PHILIPPINES PH
PITCAIRN PN
POLAND PL
PORTUGAL PT
PUERTO RICO PR
QATAR QA
REUNION RE
ROMANIA RO
RUSSIAN FEDERATION RU
RWANDA RW
SAINT HELENA SH
SAINT KITTS AND NEVIS KN
SAINT LUCIA LC
SAINT PIERRE AND
MIQUELON PM
Country Code
SAINT VINCENT AND THE
GRENADINES VC
SAMOA WS
SAN MARINO SM
SAO TOME AND PRINCIPE ST
SAUDI ARABIA SA
SENEGAL SN
SERBIA AND MONTENEGRO CS
SEYCHELLES SC
SIERRA LEONE SL
SINGAPORE SG
SLOVAKIA SK
SLOVENIA SI
SOLOMON ISLANDS SB
SOMALIA SO
SOUTH AFRICA ZA
SOUTH GEORGIA AND THE
SOUTH SANDWICH ISLANDS GS
SPAIN ES
SRI LANKA LK
SUDAN SD
SURINAME SR
SVALBARD AND JAN
MAYEN SJ
SWAZILAND SZ
SWEDEN SE
SWITZERLAND CH
SYRIAN ARAB REPUBLIC SY
TAIWAN, PROVINCE OF
CHINA TW
TAJIKISTAN TJ
Country Code

133
TANZANIA, UNITED
REPUBLIC OF TZ
THAILAND TH
TIMOR-LESTE TL
TOGO TG
TOKELAU TK
TONGA TO
TRINIDAD AND TOBAGO TT
TUNISIA TN
TURKEY TR
TURKMENISTAN TM
TURKS AND CAICOS
ISLANDS TC
TUVALU TV
UGANDA UG
UKRAINE UA
UNITED ARAB EMIRATES AE
UNITED KINGDOM GB
UNITED STATES US
UNITED STATES MINOR
OUTLYING ISLANDS UM
URUGUAY UY
UZBEKISTAN UZ
VANUATU VU
VENEZUELA VE
VIET NAM VN
VIRGIN ISLANDS, BRITISH VG
VIRGIN ISLANDS, U.S. VI
WALLIS AND FUTUNA WF
WESTERN SAHARA EH
Country Code
YEMEN YE
ZAMBIA ZM
ZIMBABWE ZW
Country Code

134

Website Payments Standard Integration Guide May 2006 135
Index
Symbols
.NET SDK Guide 28
_cart 78, 87, 88, 89, 112, 119
_ext-enter 114, 119, 124
_xclick 67, 112, 114, 115, 119, 124
A
Account Information 32
Account Optional 39, 114
customer experience 41
account profile summary
see "Profile".
ACTION 111
add 69, 78, 121
adding a credit card statement name 53
address_override 115, 116, 123
address1 114, 116, 126
address2 115, 126
administrative contact email address 58
amount 67, 87, 114, 119, 124
amount_1 88, 89
amount_x 88, 125
API 26
authorization 92
Authorization & Capture 91
Authorization Period 92
Auto Return 46
customer experience 46
enabling 47
B
block unencrypted website payments 108
blocking kinds of payments 50
business 67, 78, 87, 88, 89, 114, 124, 127
business_address1 127
business_address2 127
business_city 127
business_country 127
business_cs_email 127
business_cs_phone_a 127
business_cs_phone_b 127
business_cs_phone_c 127
business_night_phone_a 128
business_night_phone_b 128
business_night_phone_c 128
business_state 127
business_url 128
business_zip 127
button factory
Buy Now or Donations 63
shopping cart 75
Buy Now 25
customer experience 63
customer experience with Account optional 41
example of page sequence 18
C
cancel_return 67, 114, 121
cbt 121
cert_id 106
character set 54
chargebacks 52
charset 57, 67, 113
city 115, 116, 126
Classic ASP Guide 28
cmd 78, 88, 89, 111, 114, 124
cn 121
confirmed addresses 43, 50
contact telephone number 53
country 126
cpp_header_image 121
cpp_headerback_color 121
cpp_headerborder_color 121
cpp_payflow_color 121
credit card statement name 53
cs 122
Currency Balances 60
currency codes 59
currency_code 88, 113, 114, 123

Index
136 May 2006 Website Payments Standard Integration Guide
custom 67, 112, 123
custom page style variables 121
D
DesignerFotos 18
Developer Central 109
Direct Payment API 26
display 69, 122
Donations 25
Downloadable History Log 24
E
eChecks 52
email notification 23
disabling 23
Encrypted Website Payments 64, 66, 103
EWP. See "Encrypted Website Payments."
example
HTML for Add to Cart button 78
HTML for BUY Now 67
HTML for individual items in shopping cart 87
HTML for overriding PayPal-stored shipping
address 115
shopping cart with aggregated item information 88
Express Checkout 26
Express Checkout Integration Guide 27
F
Financial Information 32
first_name 114, 116, 126
FORM ACTION and METHOD definitions 111
funding sources 20
G
GET 123
gif 37
H
handling 123
handling_cart 50, 125
handling_x 88, 125
history 24
Honor Period 92
HTML
Add to Cart button 78
for aggregated shopping cart 88
for Buy Now button 67
shopping cart with individual items 87
https 64
I
image_url 114, 122
INPUT tag 112
Instant Payment Notification 23, 24, 26
Integration Center 14, 26
invoice 67, 112, 123
IPN 26
IPN. See "Instant Payment Notification."
item_name 67, 114, 120, 125
item_name_1 87, 88, 89
item_name_x 125
item_number 67, 112, 114, 120
item_number_x 112, 125
J
Java SDK Guide 28
jpg 37
L
language encoding 54
last_name 114, 116, 126
lc 126
M
METHOD 111, 123
Multi-User Access 58
N
night_phone_a 115, 126
night_phone_b 115, 126
night_phone_c 115, 127
no_note 67, 122
no_shipping 67, 122

Website Payments Standard Integration Guide May 2006 137
Index
notify_url 119
O
on0 79, 120
on0_x 125
on1 120
on1_x 125
OpenSSL 104
order 92
Order Management Integration Guide 24, 26, 27
os0 79, 120
os0_x 125
os1 120
os1_x 125
overriding
page styles 38
PayPal-stored shipping address 115, 123
return URL on individual transactions 48, 113
shipping calculations on individual transactions 50,
124
tax calculations on individual transactions 49
P
page_style 37, 38, 122
partial refund 61
passthrough variables, defined 112
Pay Anyone 51
Payment Data Transfer 26
Payment Receiving Preferences 43, 50, 52
paymentaction 92, 93, 125
PayPal-hosted shopping cart 69
PayPal-supported currencies 59
PDT. See "Payment Data Transfer."
PEM 105
PHP SDK Guide 28
png 37
POST 123
prepopulating PayPal FORMs 114, 119, 124
private key 104
Profile 31
Account Information 32
Account Optional 39, 40
Auto Return 47
Automatic shipping, handling, and tax calculation 48
Custom Payment Pages 35
Financial Information 32
overriding shipping calculation on individual
transactions 50, 124
public certificate 104
Q
quantity 120
allowing customers to specify with Buy Now 66, 120
quantity_x 125
R
redirect_cmd 114, 119, 124
refund 61
required variables for third-party shopping cart 86
return 48, 67, 113, 114, 121, 122
rm 123
S
sales tax
automatic calulation 48
overriding on individual transactions 88
setting for entire shopping cart 88
sample integration 18
Sandbox 109
Sandbox User Guide 28, 109
SDKs 14, 26
Seller Protection Policy 50, 51
Send Money 61
shipping 50, 124
automatic calculation 49
overriding on individual transactions 50, 124
shipping preferences 73, 83
shipping_x 88, 125
shipping2 124
shipping2_x 88, 126
shopping cart 25
PayPal-hosted 69, 75
third-party 69, 86
Software Development Kits 28
SPP. See "Seller Protection Policy."
state 115, 116, 127
statement name, credit card 53
subscriptions 26

Index
138 May 2006 Website Payments Standard Integration Guide
Subscriptions and Recurring Payments Guide 28, 48,
109
T
tax 124
tax. See "sales tax."
tax_cart 88, 124
tax_x 88, 124, 126
third-party shopping cart 69
Transaction Details 61
transaction history 24
U
undefined_quantity 67, 112, 120
upload 69, 87, 125
example of aggregate cart 89
example of individual item detail 88
URL-encoding 68, 114, 119, 121, 122, 128
UTF-8 113
V
variables
display information 121
for shopping carts 124
general format of 111
hidden 111
individual items in shopping carts 125
item information 119
prepopulating PayPal FORMs 126
transaction information 123
VAT 48
verified users, defined 52
Virtual Terminal User Guide 28
W
Web Services API Reference 28
Web Services Application Programming Interface 26
webscr 78, 88, 89, 111, 114, 115
Website Payments Express. See "Account Optional."
Website Payments Pro 26
Website Payments Pro Integration Guide 26, 27, 91
Website Payments Standard Integration Guide 27
X
X.509 104
Y
You Made a Payment page 21, 46
Z
zip 115, 127
