PVi MS User Manual
User Manual:
Open the PDF directly: View PDF ![]() .
.
Page Count: 240 [warning: Documents this large are best viewed by clicking the View PDF Link!]
- 1 Introduction
- 2 PViMS Structure
- 3 Using the System
- 4 Clinical Portal
- 4.1 Patients
- 4.1.1 Search for Patients
- 4.1.2 Return to the Patient Search Page
- 4.1.3 View an Existing Patient
- 4.1.4 Add a New Patient
- 4.1.5 Condition Groups
- 4.1.6 Analytical Reporting
- 4.1.7 Add or Edit Patient Information
- 4.1.8 Add or Edit Additional Information
- 4.2 Encounters
- 4.3 Cohorts
- 4.4 Appointments
- 1
- 2
- 3
- 4
- 4.1
- 4.2
- 4.3
- 4.4
- 4.5 Deleting Records
- 4.6 Log Out of the System
- 4.1 Patients
- 5 Analytical Portal
- 5
- 5.1 Spontaneous Reporting
- 5.2 Active Reporting
- 5.3 Pharmacovigilance Activities
- 5.4 Pharmacovigilance Activities - General
- 5.5 Pharmacovigilance Activities – Confirm Report Data
- 5.6 Pharmacovigilance Activities – Set MedDRA and Causality
- 5.7 Pharmacovigilance Activities – Extract E2B
- 5.8 Analyser
- 6 Reporting Portal
- 7 Information Portal
- 8 Spontaneous Reporting

PViMS
User Manual

PViMS User Manual
2018
2
This report is made possible by the generous support of the American people through the US
Agency for International Development (USAID), under the terms of cooperative agreement
number AID-OAA-A-11-00021. The contents are the responsibility of Management Sciences for
Health and do not necessarily reflect the views of USAID or the United States Government.
About SIAPS
The goal of the Systems for Improved Access to Pharmaceuticals and Services (SIAPS) Program
is to assure the availability of quality pharmaceutical products and effective pharmaceutical
services to achieve desired health outcomes. Toward this end, the SIAPS result areas include
improving governance, building capacity for pharmaceutical management and services,
addressing information needed for decision-making in the pharmaceutical sector, strengthening
financing strategies and mechanisms to improve access to medicines, and increasing quality
pharmaceutical services.
Recommended Citation
This report may be reproduced if credit is given to SIAPS. Please use the following citation.
SIAPS Program. 2017. PViMS User’s Guide. Submitted to the US Agency for International
Development by the Systems for Improved Access to Pharmaceuticals and Services (SIAPS)
Program. Arlington, VA.
Management Sciences for Health.
Systems for Improved Access to Pharmaceuticals and Services
Center for Pharmaceutical Management
Management Sciences for Health
4301 North Fairfax Drive, Suite 400
Arlington, VA 22203 USA
Telephone: 703.524.6575
Fax: 703.524.7898
E-mail: phtmis@msh.org
Website: www.siapsprogram.org

PViMS User Manual
2018
3
Contents
1 Introduction ........................................................................................................................................... 9
1.1 Using the Manual ........................................................................................................................ 10
1.2 Purpose of the Document ............................................................................................................ 10
1.3 Audience ..................................................................................................................................... 10
2 PViMS Structure ................................................................................................................................. 11
3 Using the System ................................................................................................................................ 13
3.1 Launching the Browser ............................................................................................................... 13
3.2 Logging in to PViMS .................................................................................................................. 14
3.3 End User License Agreement ..................................................................................................... 15
3.4 The Home Page ........................................................................................................................... 17
4 Clinical Portal ..................................................................................................................................... 19
4.1 Patients ........................................................................................................................................ 20
4.1.1 Search for Patients .............................................................................................................. 20
4.1.2 Return to the Patient Search Page ....................................................................................... 24
4.1.3 View an Existing Patient ..................................................................................................... 25
4.1.4 Add a New Patient .............................................................................................................. 40
4.1.5 Condition Groups ................................................................................................................ 47
4.1.6 Analytical Reporting ........................................................................................................... 48
4.1.7 Add or Edit Patient Information .......................................................................................... 49
4.1.8 Add or Edit Additional Information .................................................................................... 51
4.2 Encounters ................................................................................................................................... 63
4.2.1 Search for an Encounter ...................................................................................................... 63
4.2.2 View an Existing Encounter ............................................................................................... 69
4.2.3 Add or Edit Encounter Information .................................................................................... 72
4.2.4 Add or Edit Clinical Information ........................................................................................ 79
4.3 Cohorts ........................................................................................................................................ 96
4.3.1 View Cohorts ...................................................................................................................... 96
4.4 Appointments .............................................................................................................................. 99
4.4.1 View Appointments ............................................................................................................ 99

PViMS User Manual
2018
4
4.4.2 View Appointments for a specified day ............................................................................ 101
4.4.3 View Patient Record ......................................................................................................... 101
4.4.4 Mark Appointment as Did Not Arrive .............................................................................. 102
4.5 Deleting Records ....................................................................................................................... 104
4.5.1 Patient View - Additional Information ............................................................................. 104
4.5.2 Encounter View – Clinical Information ............................................................................ 113
4.5.3 Delete an Entire Patient Record ........................................................................................ 117
4.6 Log Out of the System .............................................................................................................. 118
5 Analytical Portal ............................................................................................................................... 121
5.1 Spontaneous Reporting ............................................................................................................. 122
5.2 Active Reporting ....................................................................................................................... 122
5.3 Pharmacovigilance Activities ................................................................................................... 123
5.3.1 Terminology ...................................................................................................................... 123
5.3.2 Process Flow ..................................................................................................................... 124
5.3.3 Identifying New Reports ................................................................................................... 125
5.3.4 Search for a Report ........................................................................................................... 125
5.4 Pharmacovigilance Activities - General ................................................................................... 129
5.4.1 Viewing Activity History for Report ................................................................................ 129
5.4.2 Viewing a Patient Record ................................................................................................. 131
5.4.3 Extracting a Patient Summary ........................................................................................... 131
5.4.4 Updating a Spontaneous Report ........................................................................................ 132
5.5 Pharmacovigilance Activities – Confirm Report Data .............................................................. 133
5.5.1 Deleting a Report .............................................................................................................. 133
5.5.2 Confirming a Report ......................................................................................................... 135
5.6 Pharmacovigilance Activities – Set MedDRA and Causality ................................................... 137
5.6.1 Set MedDRA Terminology ............................................................................................... 137
5.6.2 Causality Assessment using the WHO Scale .................................................................... 143
5.6.3 Causality Assessment using the Naranjo Scale ................................................................. 147
5.6.4 Confirming Causality Set .................................................................................................. 150

PViMS User Manual
2018
5
5.7 Pharmacovigilance Activities – Extract E2B ............................................................................ 151
5.7.1 Create E2B ........................................................................................................................ 151
5.7.2 Adding Information to and Updating an E2B File ............................................................ 180
5.7.3 Preparing a Report for E2B Submission ........................................................................... 181
5.7.4 Viewing the E2B XML File .............................................................................................. 182
5.7.5 Viewing the Clinical Data Associated to the E2B XML File ........................................... 184
5.7.6 Confirming a Report for E2B Submission ........................................................................ 186
5.8 Analyser .................................................................................................................................... 188
5.8.1 Methodology ..................................................................................................................... 188
5.8.2 Generating Unadjusted Relative Risk Ratios .................................................................... 190
5.8.3 Generating Adjusted Relative Risk Ratios ........................................................................ 195
5.8.4 Downloading a Dataset for Further Analysis .................................................................... 202
6 Reporting Portal ................................................................................................................................ 205
6.1 List of Standard System Reports ............................................................................................... 205
6.2 Report Customization ............................................................................................................... 206
6.2.1 Types of Reports ............................................................................................................... 206
6.2.2 Adding a New Report ....................................................................................................... 206
6.2.3 Modifying and Deleting an Existing Report ..................................................................... 210
7 Information Portal ............................................................................................................................. 211
7.1 Viewing the home page............................................................................................................. 211
7.2 Viewing the Reference page ..................................................................................................... 212
7.3 Viewing the Frequently Asked Questions page ........................................................................ 215
7.4 Modifying Content in the Information Portal ........................................................................... 216
7.4.1 Adding a New Page........................................................................................................... 216
7.4.2 Adding a Widget to a Page ............................................................................................... 218
7.4.3 Adding or Changing a Widget’s Content .......................................................................... 222
7.4.4 Publishing a Widget .......................................................................................................... 225
7.4.5 Deleting a Widget ............................................................................................................. 226
7.4.6 Moving a Widget to a New Page ...................................................................................... 228

PViMS User Manual
2018
6
8 Spontaneous Reporting ..................................................................................................................... 229
8.1 Accessing Spontaneous Reporting ............................................................................................ 229
8.1.1 Add a New Report............................................................................................................. 230
8.1.2 Preview Report .................................................................................................................. 239
8.1.3 Confirmation ..................................................................................................................... 240

PViMS User Manual
2018
7
ACRONYMS AND ABBREVIATIONS
AE
Adverse Event
DR-TB
Drug Resistant Tuberculosis
MedDRA
Medical Dictionary for Regulatory Activities
NTP
National Tuberculosis Program
PViMS
Pharmacovigilance Monitoring System
TB
Tuberculosis
WHO
World Health Organization

PViMS User Manual
2018
8

PViMS User Manual
2018
9
1 Introduction
The Challenge
Active surveillance for monitoring the safety and effectiveness of medical products is
increasingly recognized as an approach that complements passive (or spontaneous) reporting,
which is the most common method used by countries’ pharmacovigilance systems. Active
surveillance is particularly important to support the introduction of new medicines in low- and
middle- income countries whose regulatory systems are developing and need support. In
resource-limited settings, active surveillance can help determine the real-life frequency, risk
factors, and impact of clinically significant adverse drug events on treatment outcomes in the
population. However, many of these countries lack the resources and capacity to implement
active surveillance activities. One major resource constraint is the lack of a data collection and
analysis tool to support active safety surveillance.
The Solution
The Pharmacovigilance Monitoring System (PViMS) is a web-based application used by
clinicians, regulatory bodies, and implementing partners to monitor the safety and effectiveness
of medicines.
The application can improve overall clinical documentation. It is designed to ensure completion
of required fields, including clinical stage, concomitant medications, test results, co-morbid
conditions, and treatment regimen initiation date to improve clinical documentation at
participating sites. It provides for the use of common terms, checklists, and adoption of standard
terminologies. Users enter the common terms or choose from pre-coded causality assessment
lists and scales such as the Medical Dictionary for Regulatory Activities (MedDRA), the
National Cancer Institute Common Terminology Criteria for Adverse Events, WHO, and
Naranjo; or users can develop a local dictionary using standard terms.
PViMS provides for detailed description of adverse event (AE) outcomes and for generating
safety signals. Description of AEs, severity and seriousness, laboratory values, AE outcomes,
and AE management can be used to generate signals of increased incidence to inform for action
or further evaluation.
It is interoperable with third-party clinical systems and statistical tools. PViMS can import and
export data from third-party electronic medical record or dispensing tools in XML, CSV, and
Excel. Analyses can be cross-checked by analyzing data with previously validated statistical
tools. Additionally, PViMS has the ability to export case safety data in E2B interface, and is
health level-7 (HL7) compliant.
PViMS User Manual
2018
10
1.1 Using the Manual
This document discusses functional requirements for the electronic pharmacovigilance system
(PViMS) framework.
1.2 Purpose of the Document
A user manual defines the software program’s functionalities. The document aims to ensure that
any reader or user gains complete system knowledge of the product. The document should also
function as a reference guide and training manual for new system users.
This User Manual will outline the system functionality that is currently included in the PViMS
application framework, and will be updated throughout the various incremental development
iterations and any system upgrades.
1.3 Audience
The intended audiences for this document are identified as follows:
● All project stakeholders
● System super users
● General system users
● New system users
For information about the MedDRA dictionary contact your system administrator.
PViMS User Manual
2018
11
2 PViMS Structure
PViMS consists of five portals:
● Clinical
● Analytical
● Reporting
● Publishing
● Administration
The Clinical portal is the centralized hub for all patient and adverse drug event data collection,
patient information and standardized patient care.
The Analytical portal is the centralized hub for causative drug assessment using traditional
internationally recognized rating scales, standardized terminology and risk detection.
The Reporting portal allows the user to generate and print reports.
The Publishing portal is a centralized hub for report and document publication and presentation.
The Administration portal also allows the system administrator to manage the system to
include, remove, and change users and manage the system structure. For information on the
Administration portal, please see the PViMS Administrator Manual.
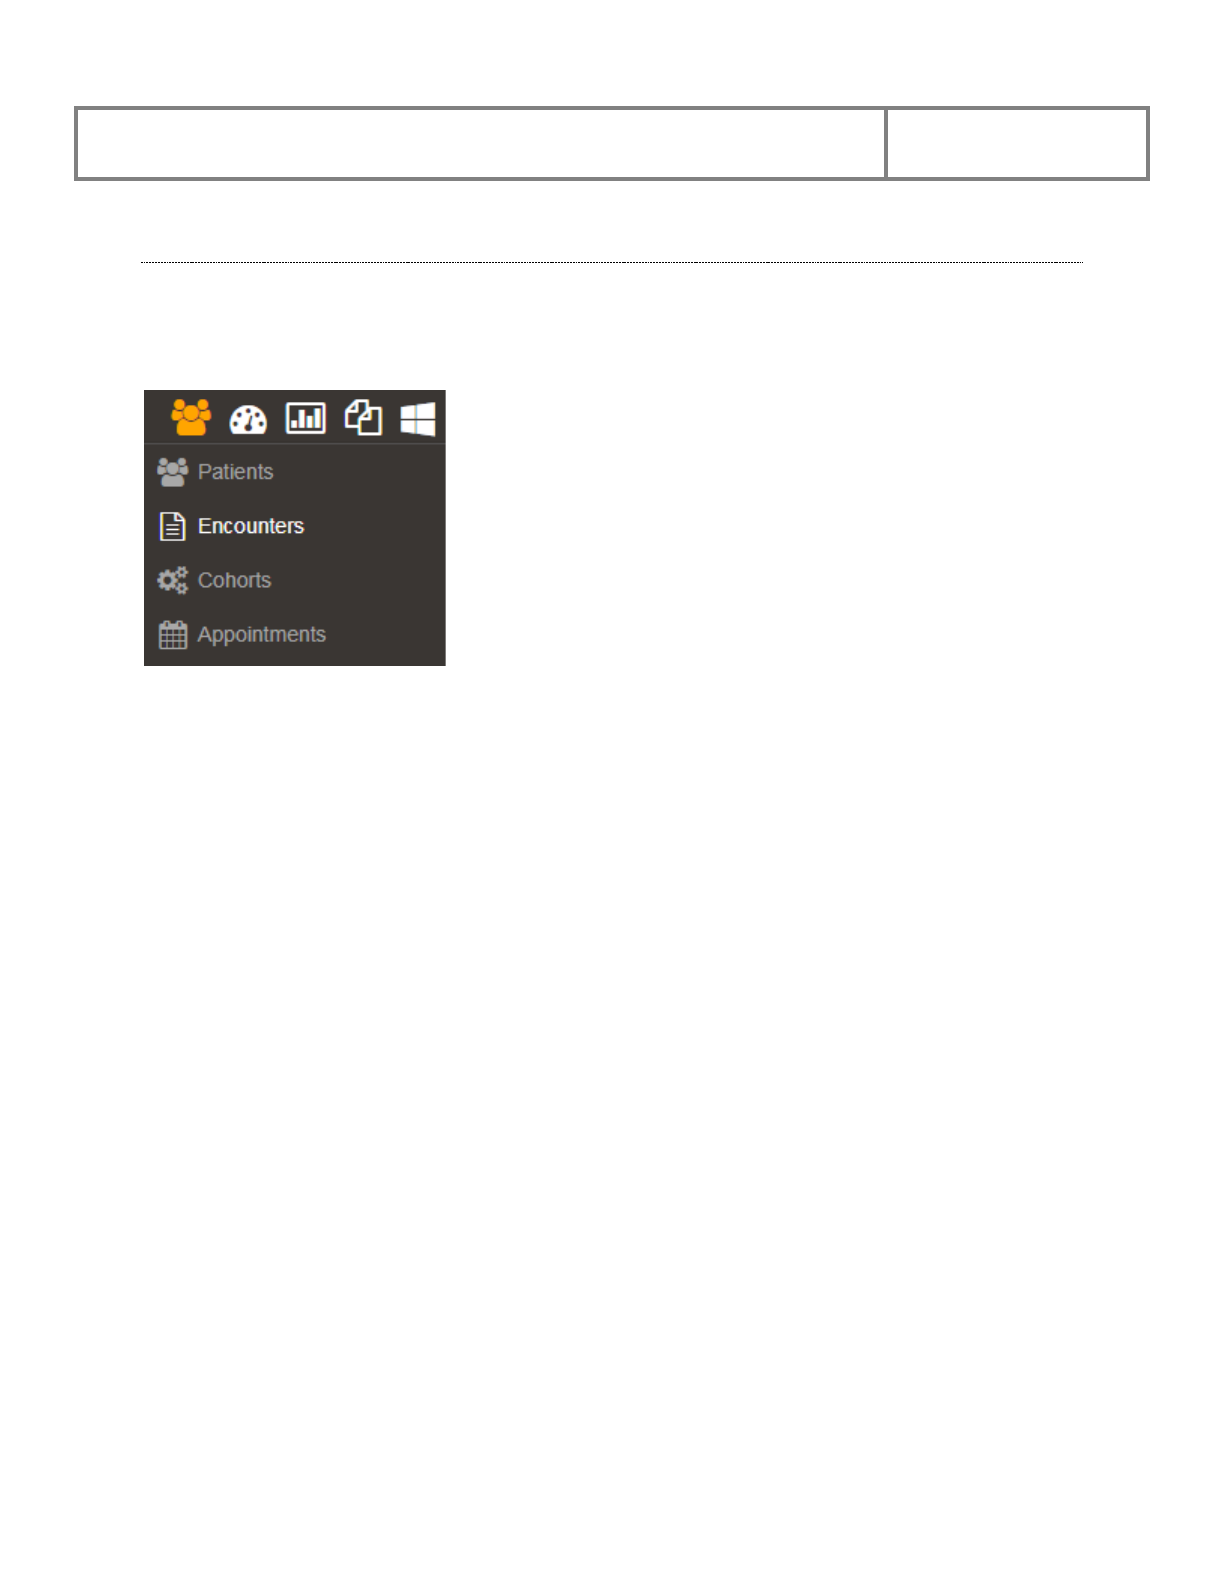
You use the icon bar to select the portal in which you want to work:

PViMS User Manual
2018
12
PViMS User Manual
2018
13
3 Using the System
PViMS is a web-based system, so you will need a web browser to run this application. Several
Internet navigators (browsers) are available, and each one offers specific characteristics and
resources. To have the system working properly, you must enable Java-script in your browser. If
it’s not enabled, please contact your system administrator.
3.1 Launching the Browser
To start the application, open your browser and enter the system URL. If you don’t know the
system URL, contact the NTP representatives for instructions.
Note 1. What is a URL?
URL is the abbreviation for uniform resource locator. It’s a global address
of documents and other resources on the World Wide Web. The URL of
PViMS depends on where it was installed. SIAPS maintains a
demonstration version of the system at the URL http://dc-cpm-
pvimsdemo.msh.org
Check with your technical support for the right URL of the system in use.
PViMS has been tested using Google chrome and it is therefore
recommended that Chrome be used as the preferred browser of choice
when accessing PViMS.
PViMS User Manual
2018
14
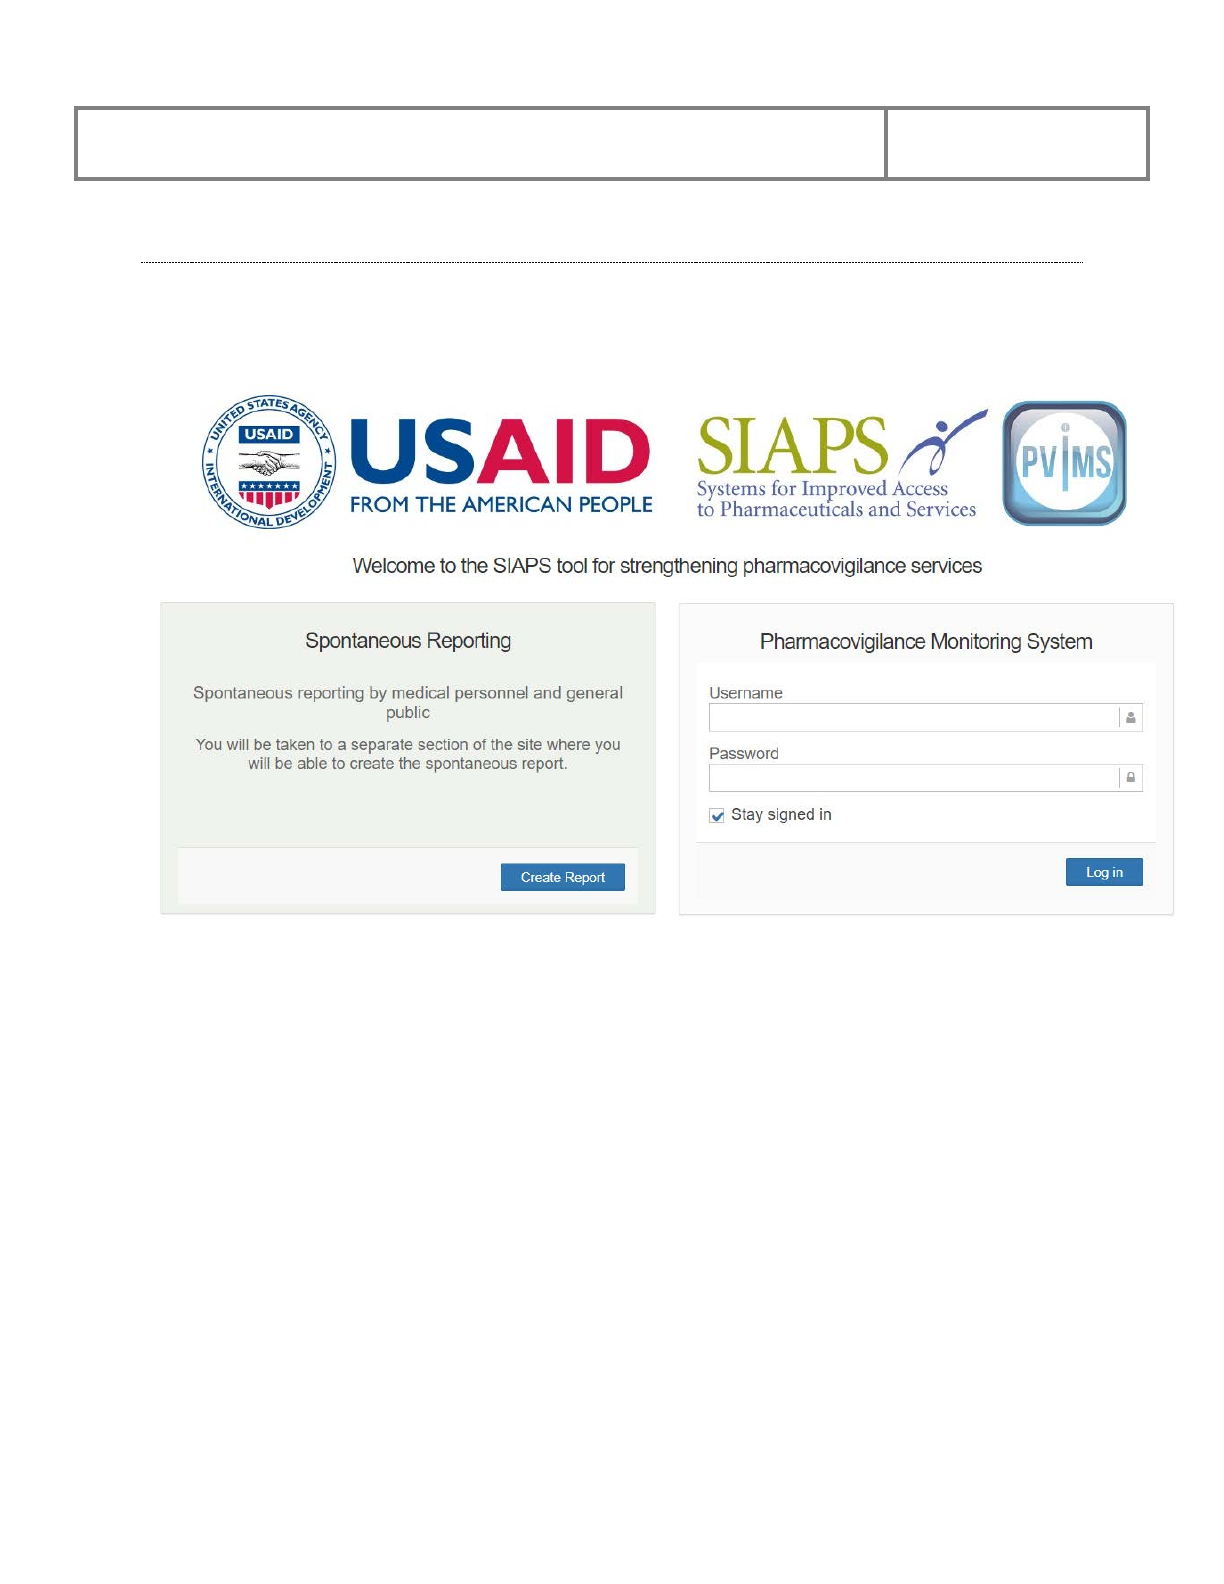
3.2 Logging in to PViMS
When you enter the correct URL, the system shows you the login page. The login page is used to
authenticate the user in the system.
To access the system, you’ll need a user login and password. If you don’t have one, please
contact your system administrator.
• Enter your assigned username and password.
• Check the stay signed in checkbox to automatically log you into PViMS on the next
access of the PViMS online portal.
• Click the log in button.
PViMS User Manual
2018
15
3.3 End User License Agreement
The first time you log on, you will be asked to read the terms and conditions of the PViMS
software license agreement. You will not be able to log into PViMS unless the EULA is
accepted.
PViMS User Manual
2018
16
Click the Accept button to confirm the acceptance of the EULA and continue to access the
system, or click the Do Not Accept button to exit the system.

PViMS User Manual
2018
17
3.4 The Home Page
After you complete the login page, the system will direct you to the system’s Home/Patient
Search page.
Use the portal icons listed above to navigate among the four different portals
(Clinical, Analytical, Reporting, Information, and Administration).

PViMS User Manual
2018
18
PViMS User Manual
2018
19
4 Clinical Portal
At the Home/Patient Search page, you will be presented with the following options:
● Patients
● Encounters
● Cohorts
● Appointments
The clinical portal is the centralized hub for all patient and adverse drug event data
collection, patient information and standardized patient care.
Note: the following roles have access to the clinical portal:
Administrator. The administrator has FULL permissions to the clinical portal.
Registration Clerk. The registration clerk is able to add and amend a patient record
and create appointments.
Data Capturer. A data capturer is able to add and amend a patient record and add
and amend an encounter record.
Clinician. A clinician is able to add and amend a patient record and add and amend
an encounter record.
Click on your user name in the application footer to view roles you currently have
access to.
PViMS User Manual
2018
20
4.1 Patients
In the Patients function you can Search for patients, Add a new patient, and Edit patient
information.
4.1.1 Search for Patients
The Patient Search function can be accessed through the Patients menu.
There are five ways to search for a patient. You can search by:
● Facility
● Patient Unique ID
● First Name and Last Name
● Date of Birth
● Custom Attribute
4.1.1.1 Search by Facility
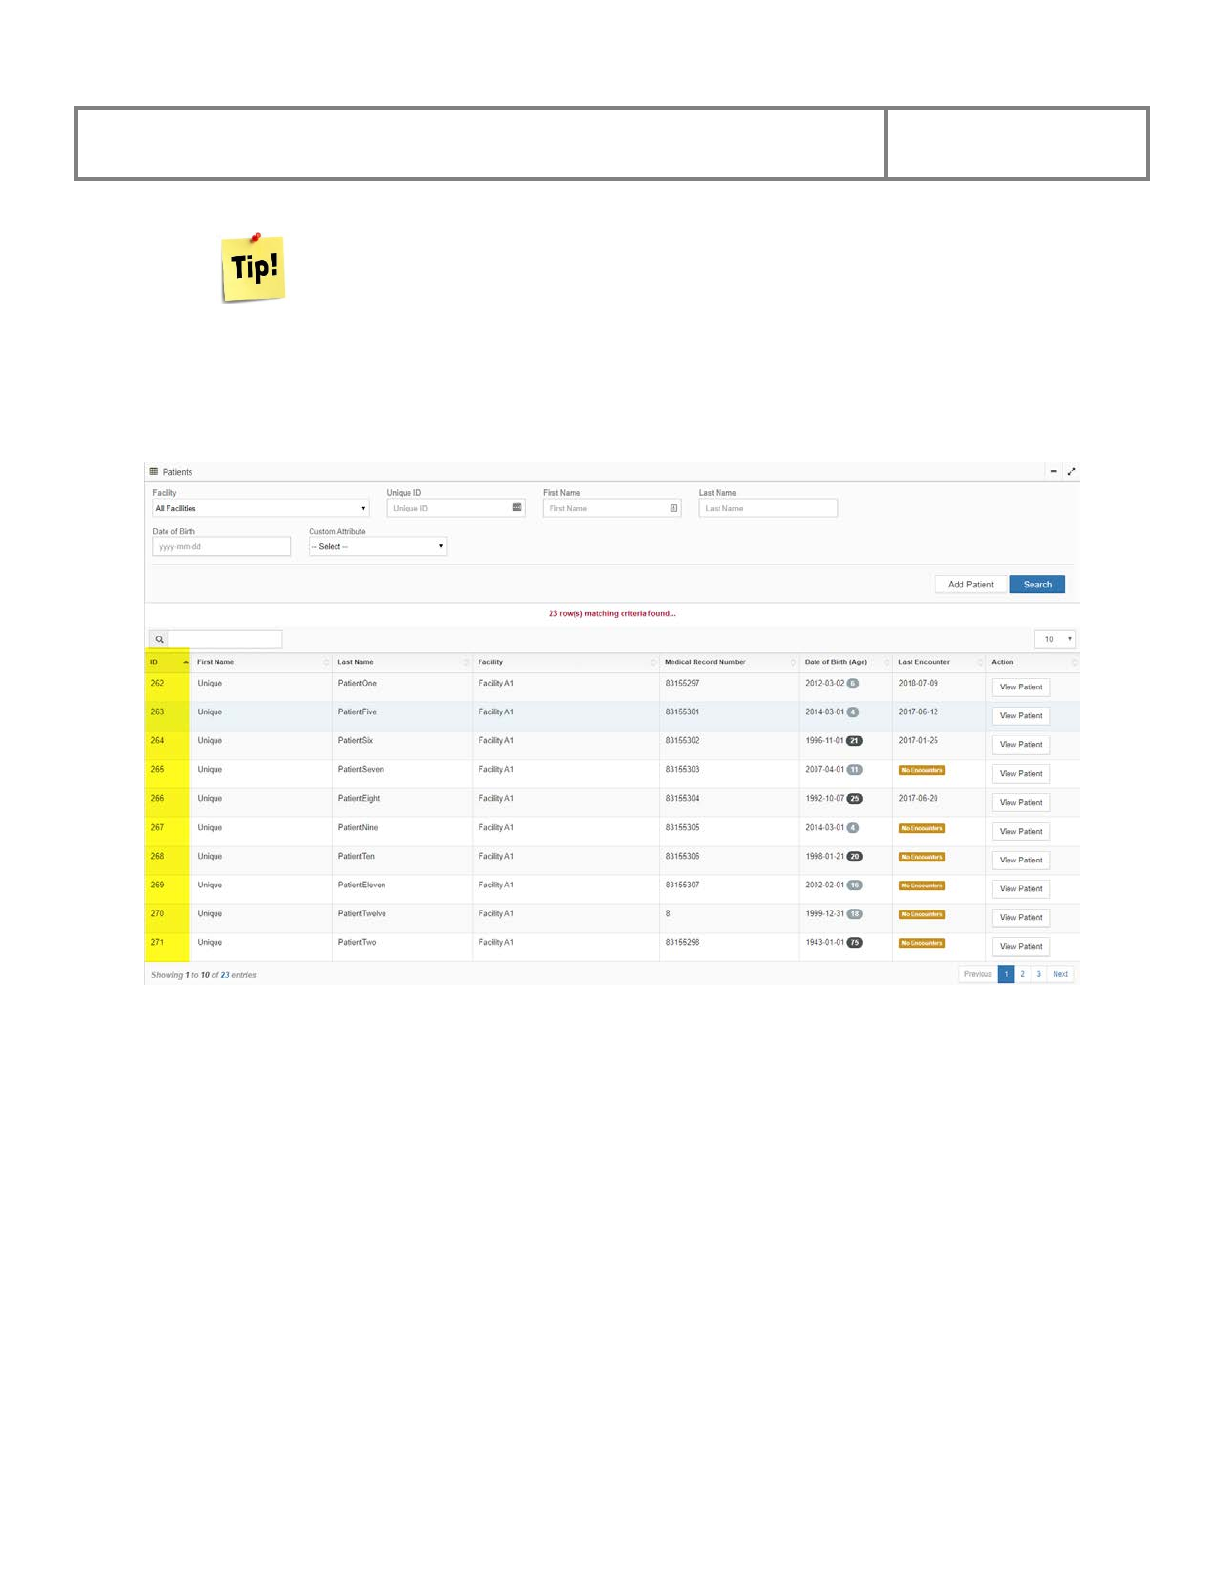
• Click the arrow in the Facility field to select from the facility drop down list
• Select the facility you would like to search against specifically or select All Facilities if
you would like to search against all facilities
• Click the Search button
PViMS User Manual
2018
21
The system will display a list of patients according to the filter selected, please note the Unique
ID of the patient in column 1.
You will only be able to search against facilities that you have been assigned access to.
Please speak to your system administrator if you are unable to search against the
necessary facility
PViMS User Manual
2018
22
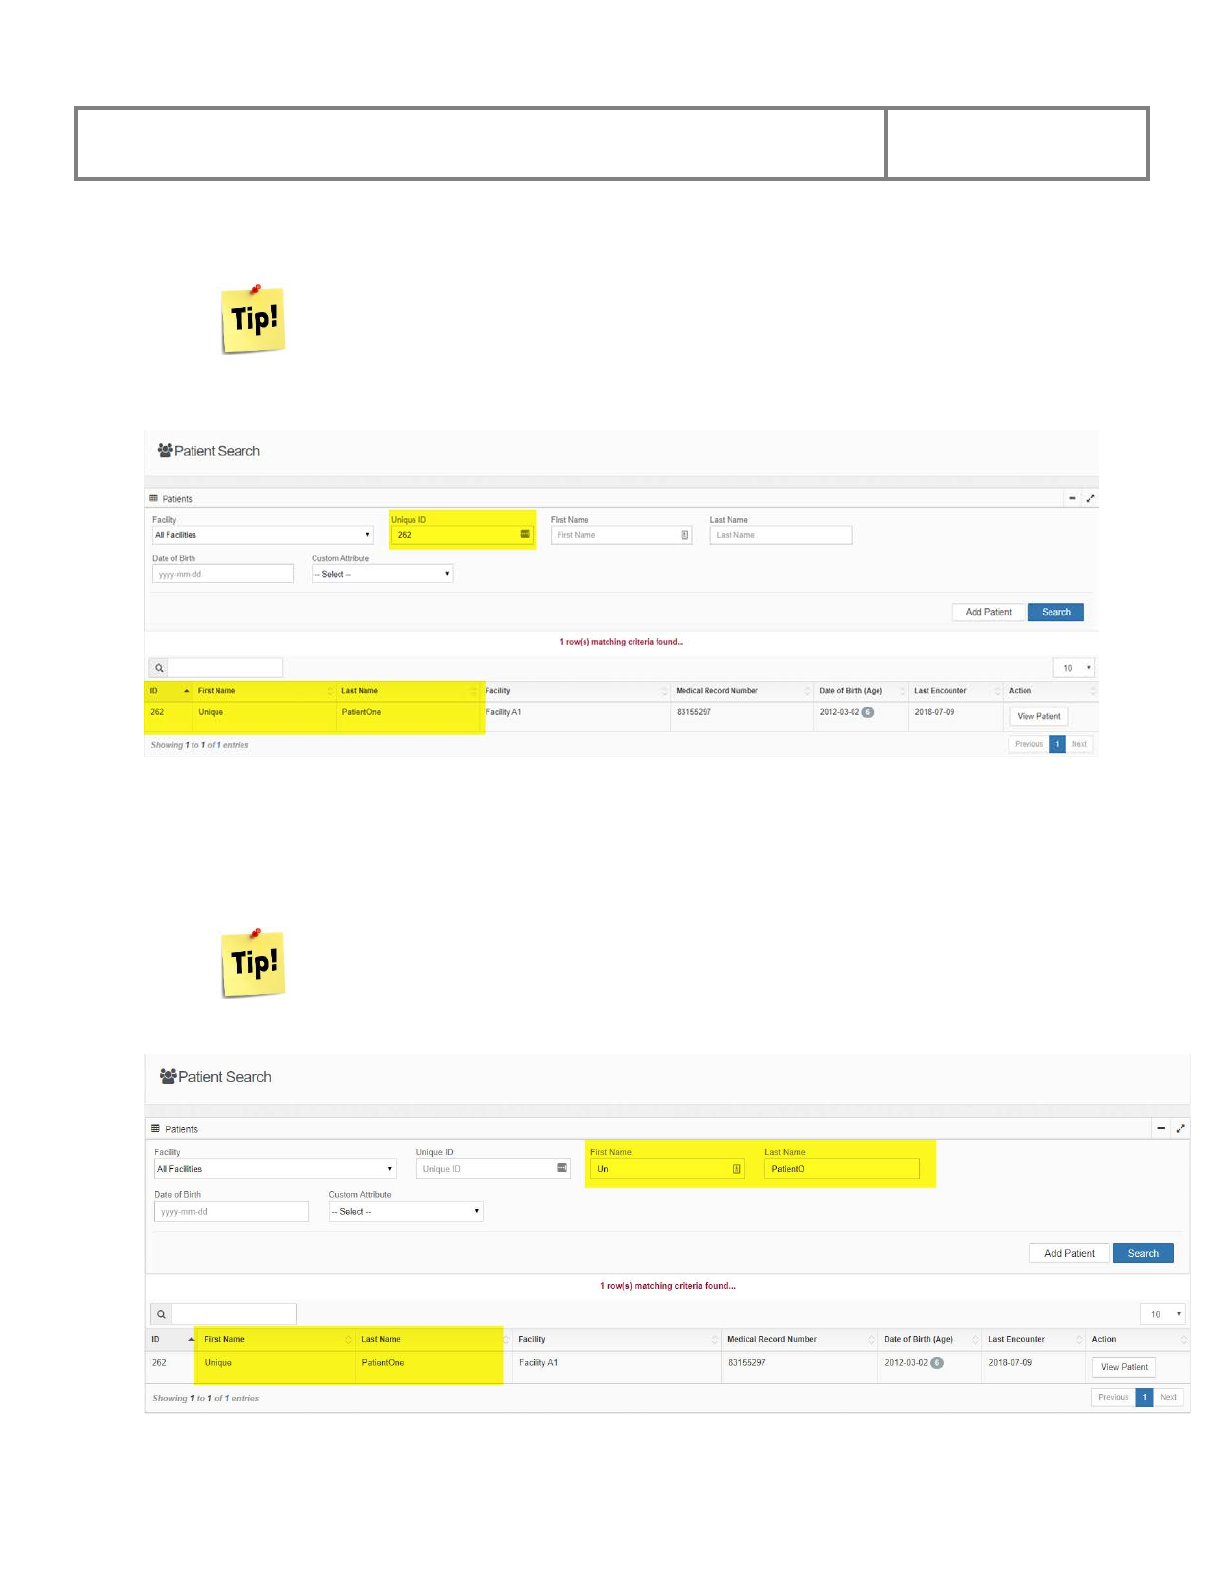
4.1.1.2 Search by Patient Unique ID
If you know the patient’s unique ID, enter it in the Unique ID field and click Search.
4.1.1.3 Search by First Name or Last Name
You can also search by the patient’s First name or Last Name. Enter the name(s) in one or both
of these areas and click the Search button.
Each patient is allocated a unique system id when they are created in the system. It is
possible to search for this patient using this id.
It is possible to do a partial search by entering the first letters of the First or Last
names. The system will return all matching records if a partial search is executed.
PViMS User Manual
2018
23
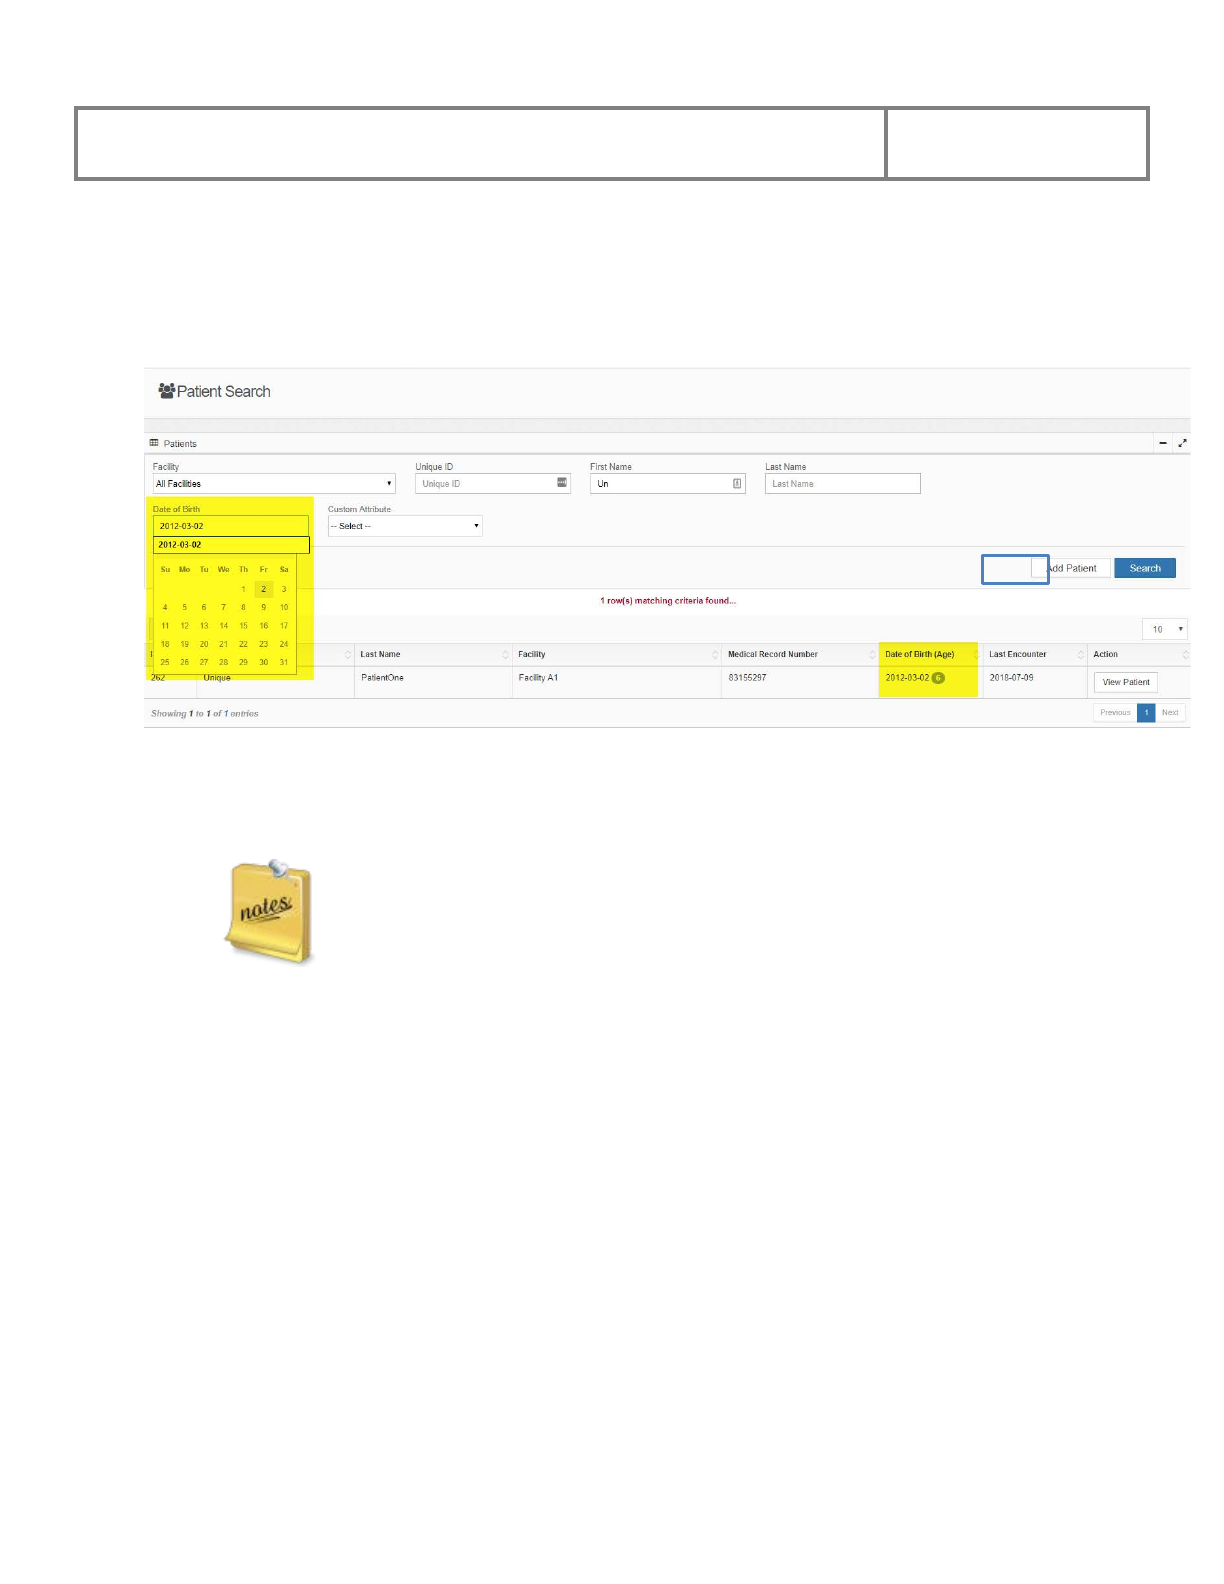
4.1.1.4 Search by Date of Birth
You can also search by the patient’s Date of Birth. Select the date of birth and click the Search
button.
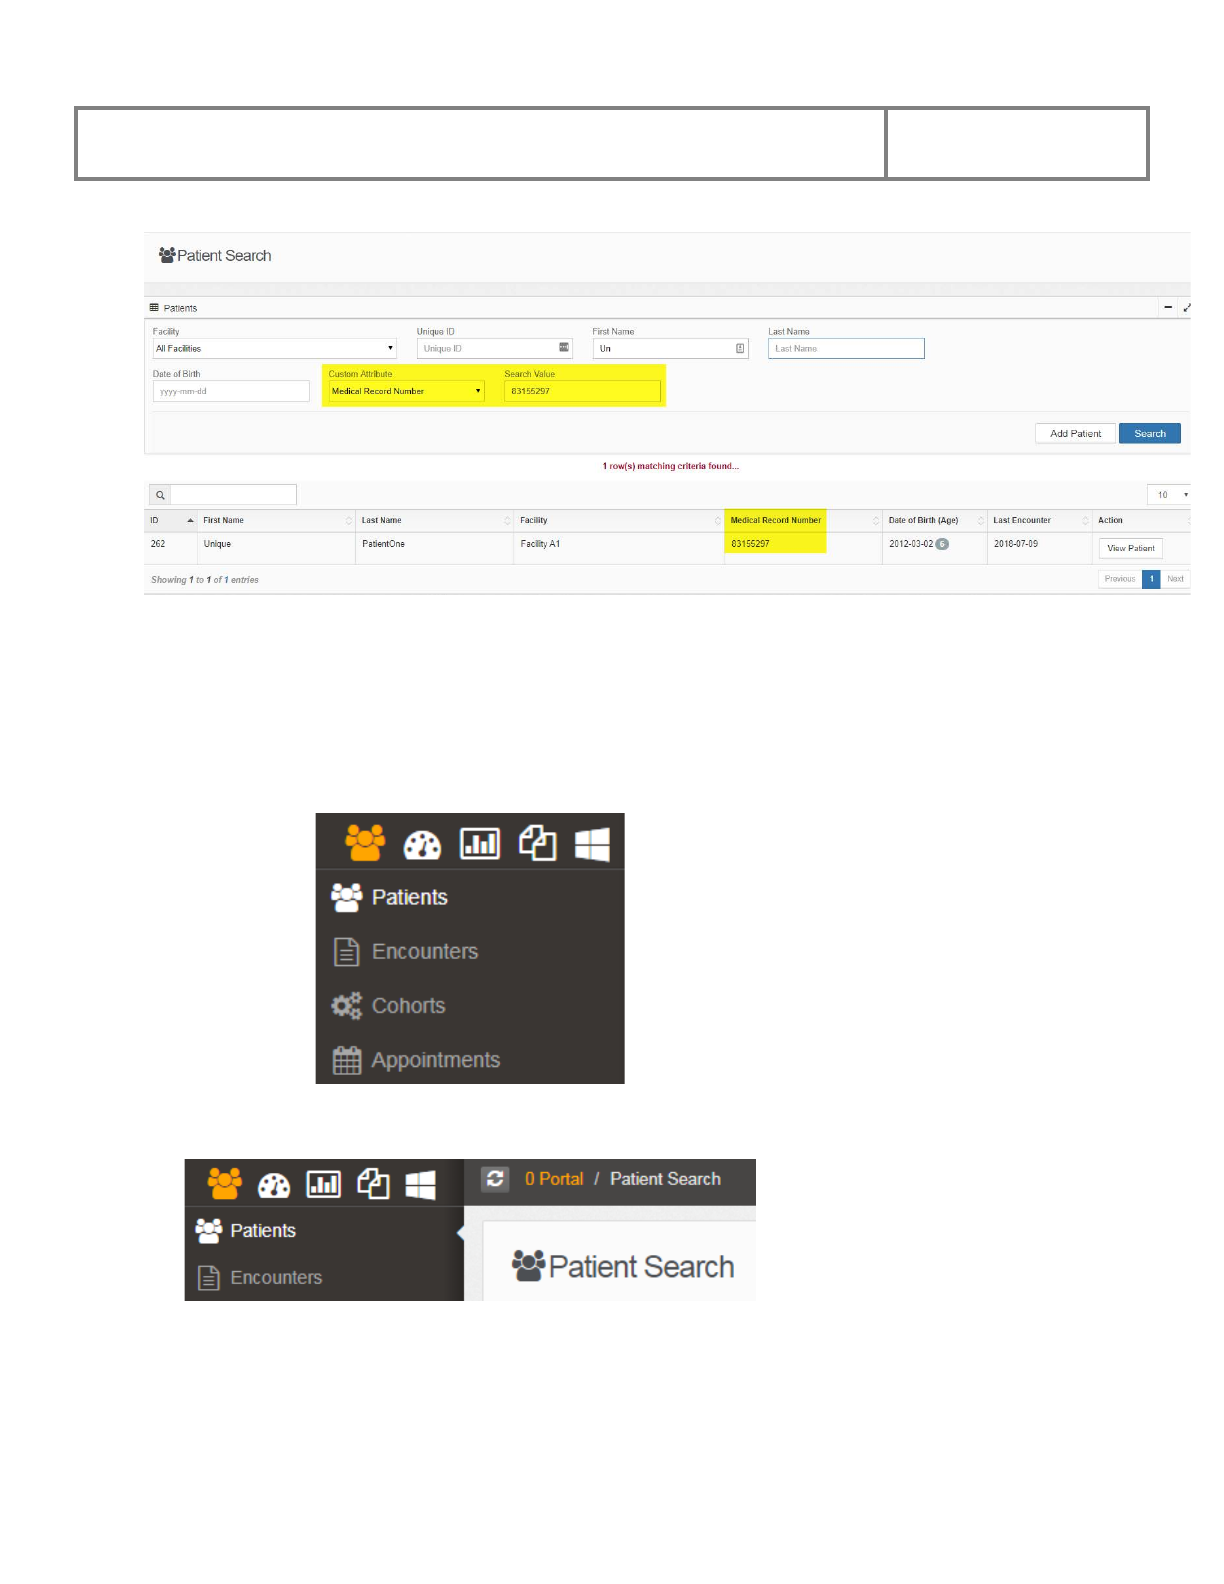
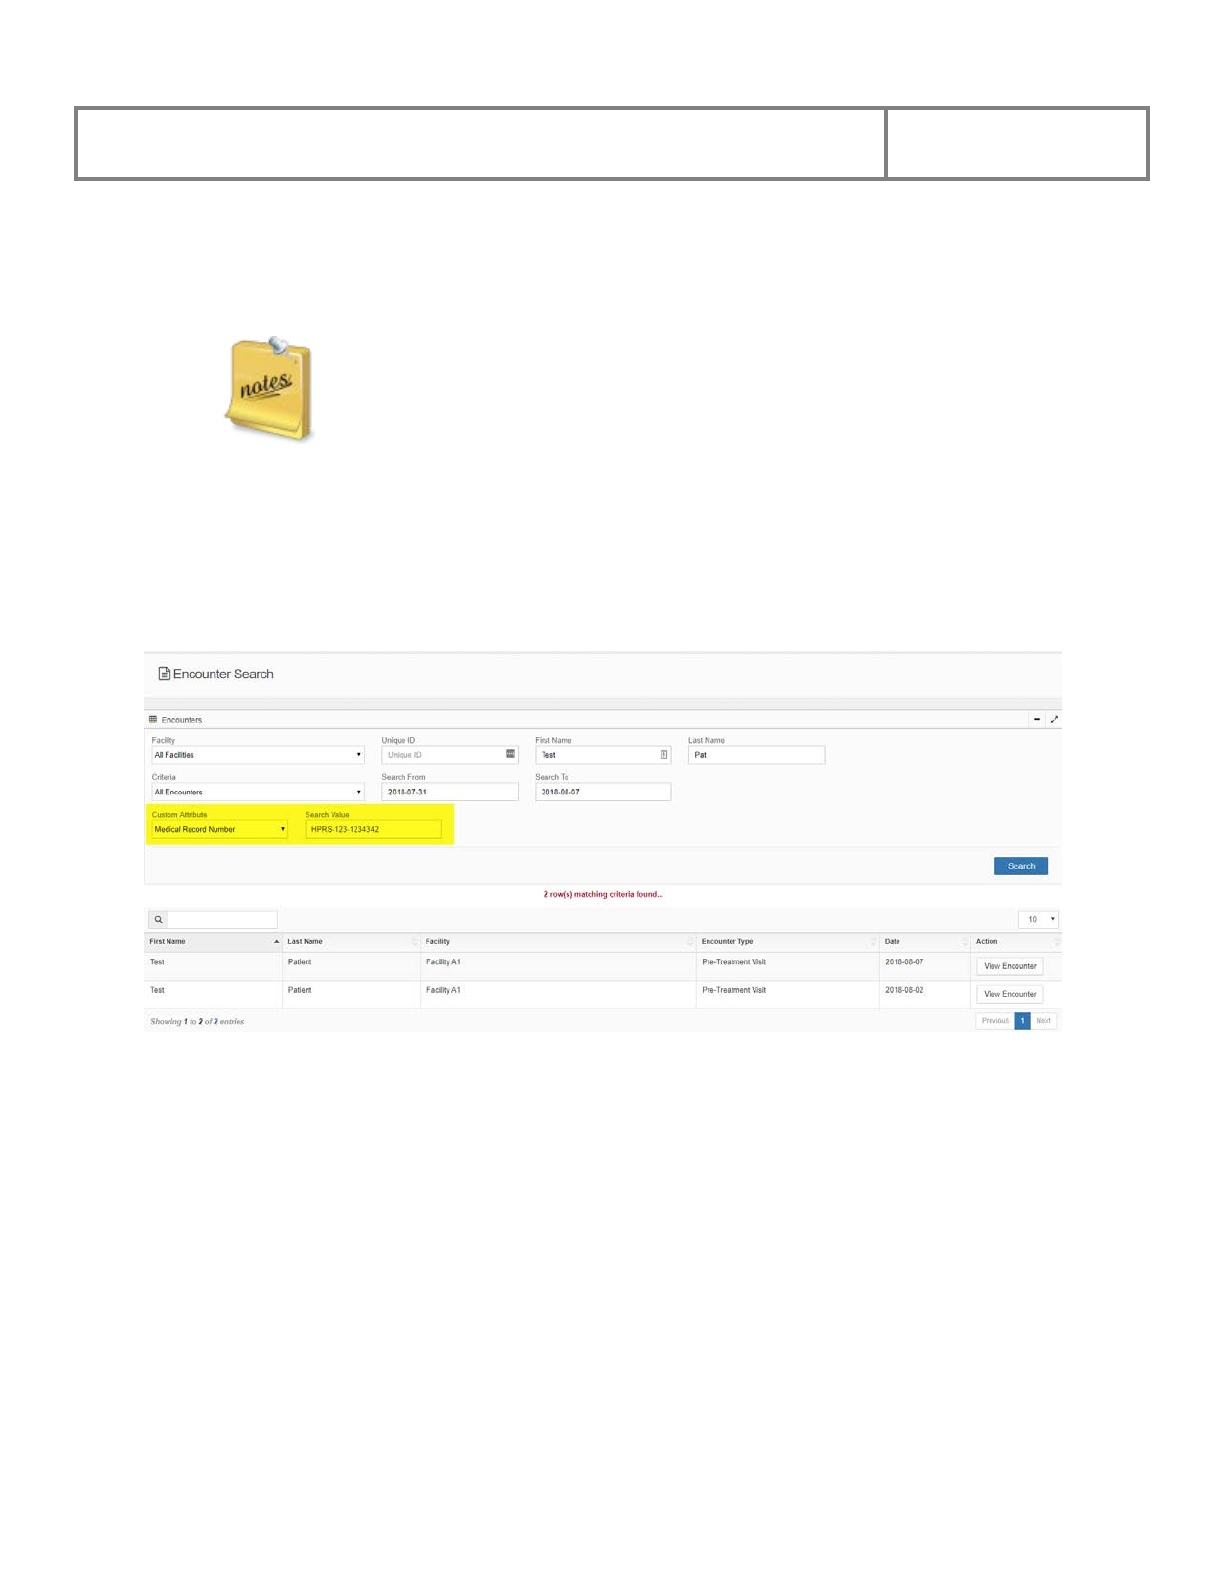
4.1.1.5 Search by Custom Attribute
The final search filter available is the ability to search by a Custom Attribute.
• Select the custom attribute variable that you would like to search against (e.g., Medical
Record Number)
• Enter the search value you would like to filter against and click the Search button.
Custom attributes can be activated for filtering by the system administrator. Please
consult your administrator if you would like to activate the ability to filter by a
specific attribute.
PViMS User Manual
2018
24
4.1.2 Return to the Patient Search Page
You can return to the Patient Search page from any place in the system by using either the
Menu Bar or the Title Bar.
4.1.2.1 Menu Bar
The menu bar is located on
the left-hand side of the
page.
4.1.2.2 Title Bar
The Title Bar is located to
the right of the Portal Icon.
PViMS User Manual
2018
25
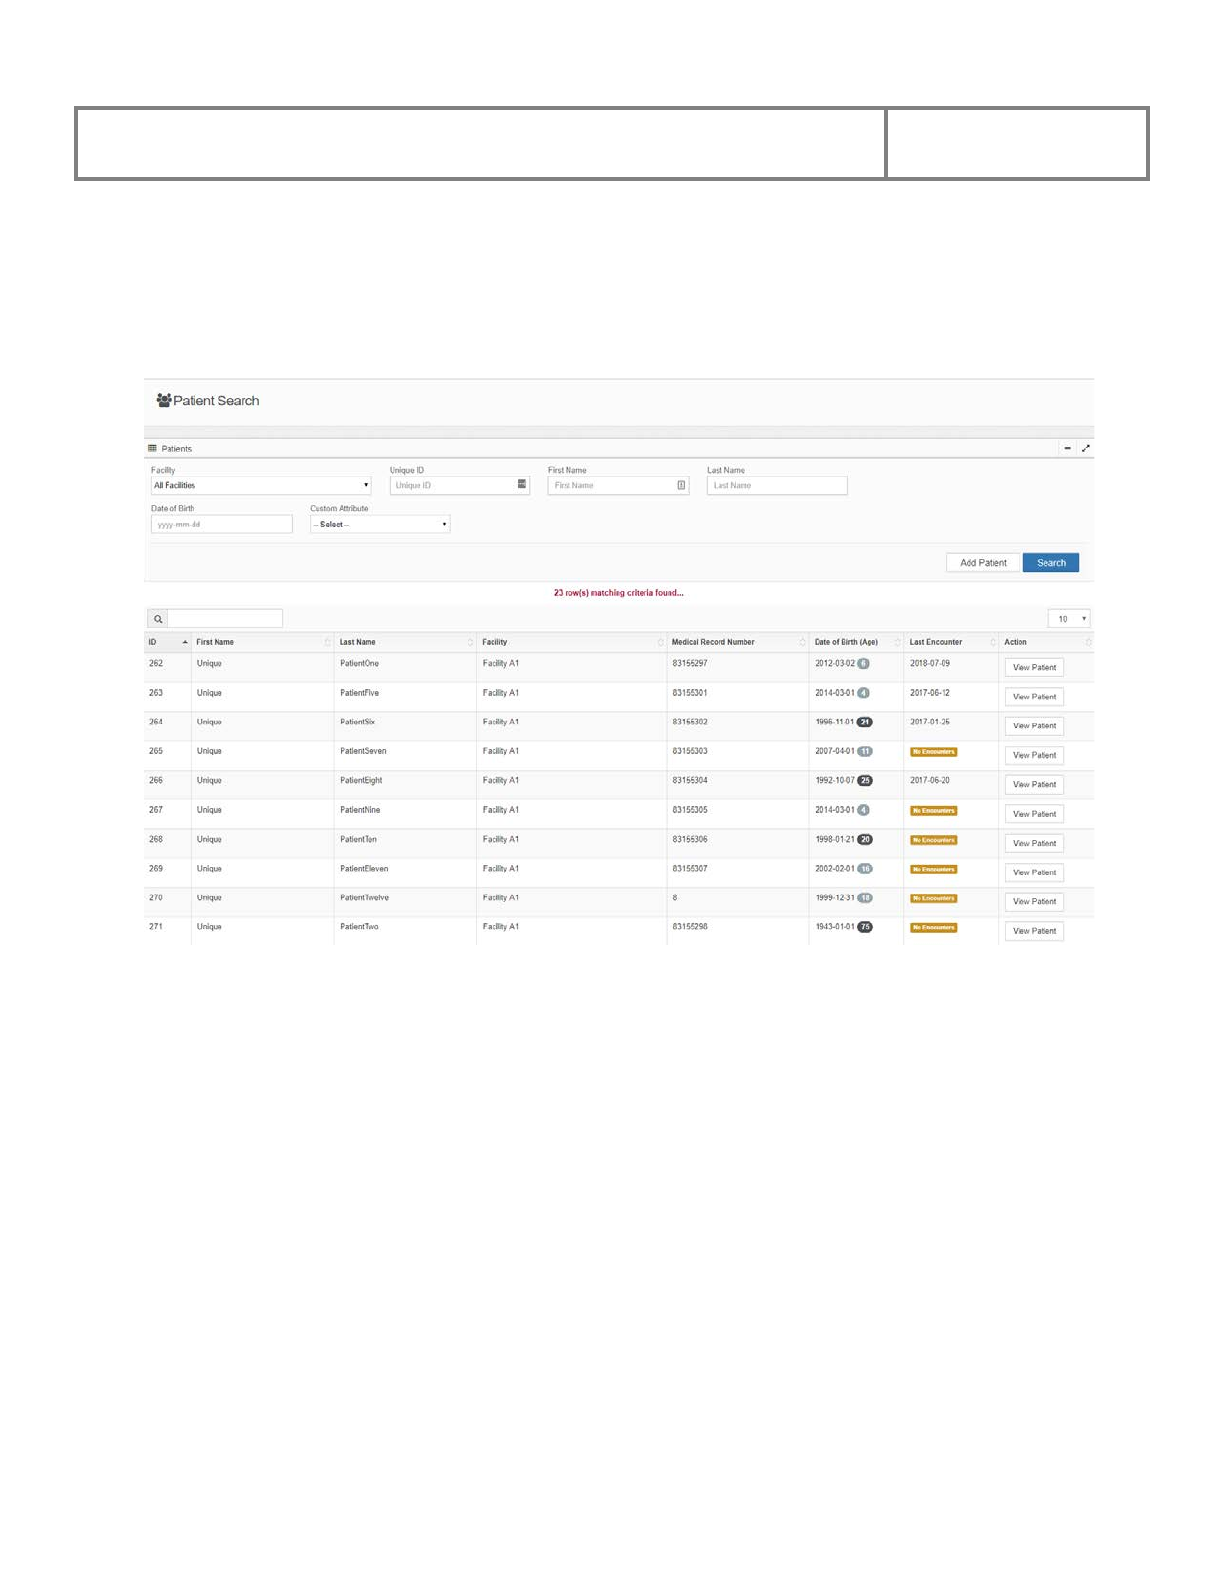
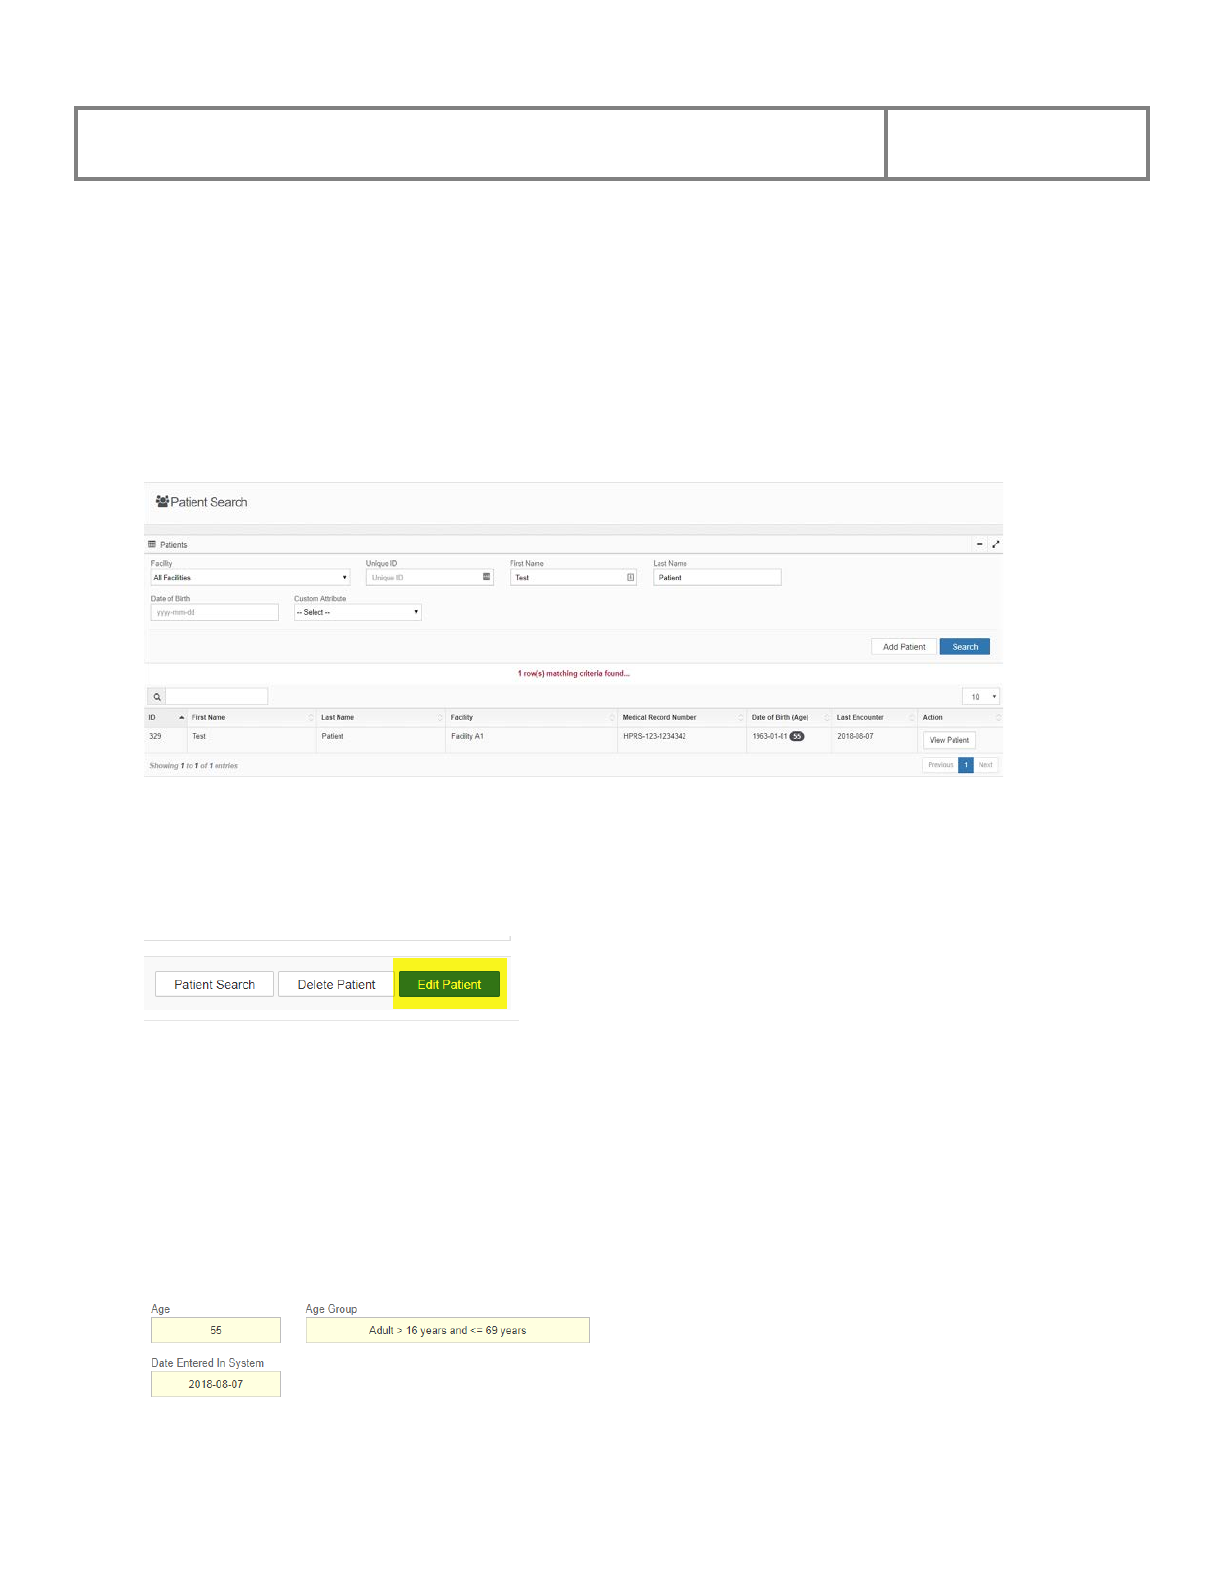
4.1.3 View an Existing Patient
After selecting the appropriate search filter and you have clicked the Search button, the system
will present all matches as displayed in a table.

PViMS User Manual
2018
26
The columns in the table are described below:
ID
Unique identification number assigned by the system
First Name
Patient’s first name as captured in the system
Last Name
Patient’s last name as captured in the system
Facility
Facility associated with the patient
Medical Record Number
ID number associated with the patient
Date of Birth (Age)
Patients date of Birth and Age indicator
• Ages in black ovals are adults
• Ages in grey ovals are children
Last Encounter
Last encounter date, the date the patient last visited the
facility
Action
Ability to view the patient’s information
It is possible to filter the results of a table by entering your additional search
criteria in the search text box at the top of the grid
• To view a patient entered in the system, locate the patient in the patient table.
• Click the View Patient button in the Action column.
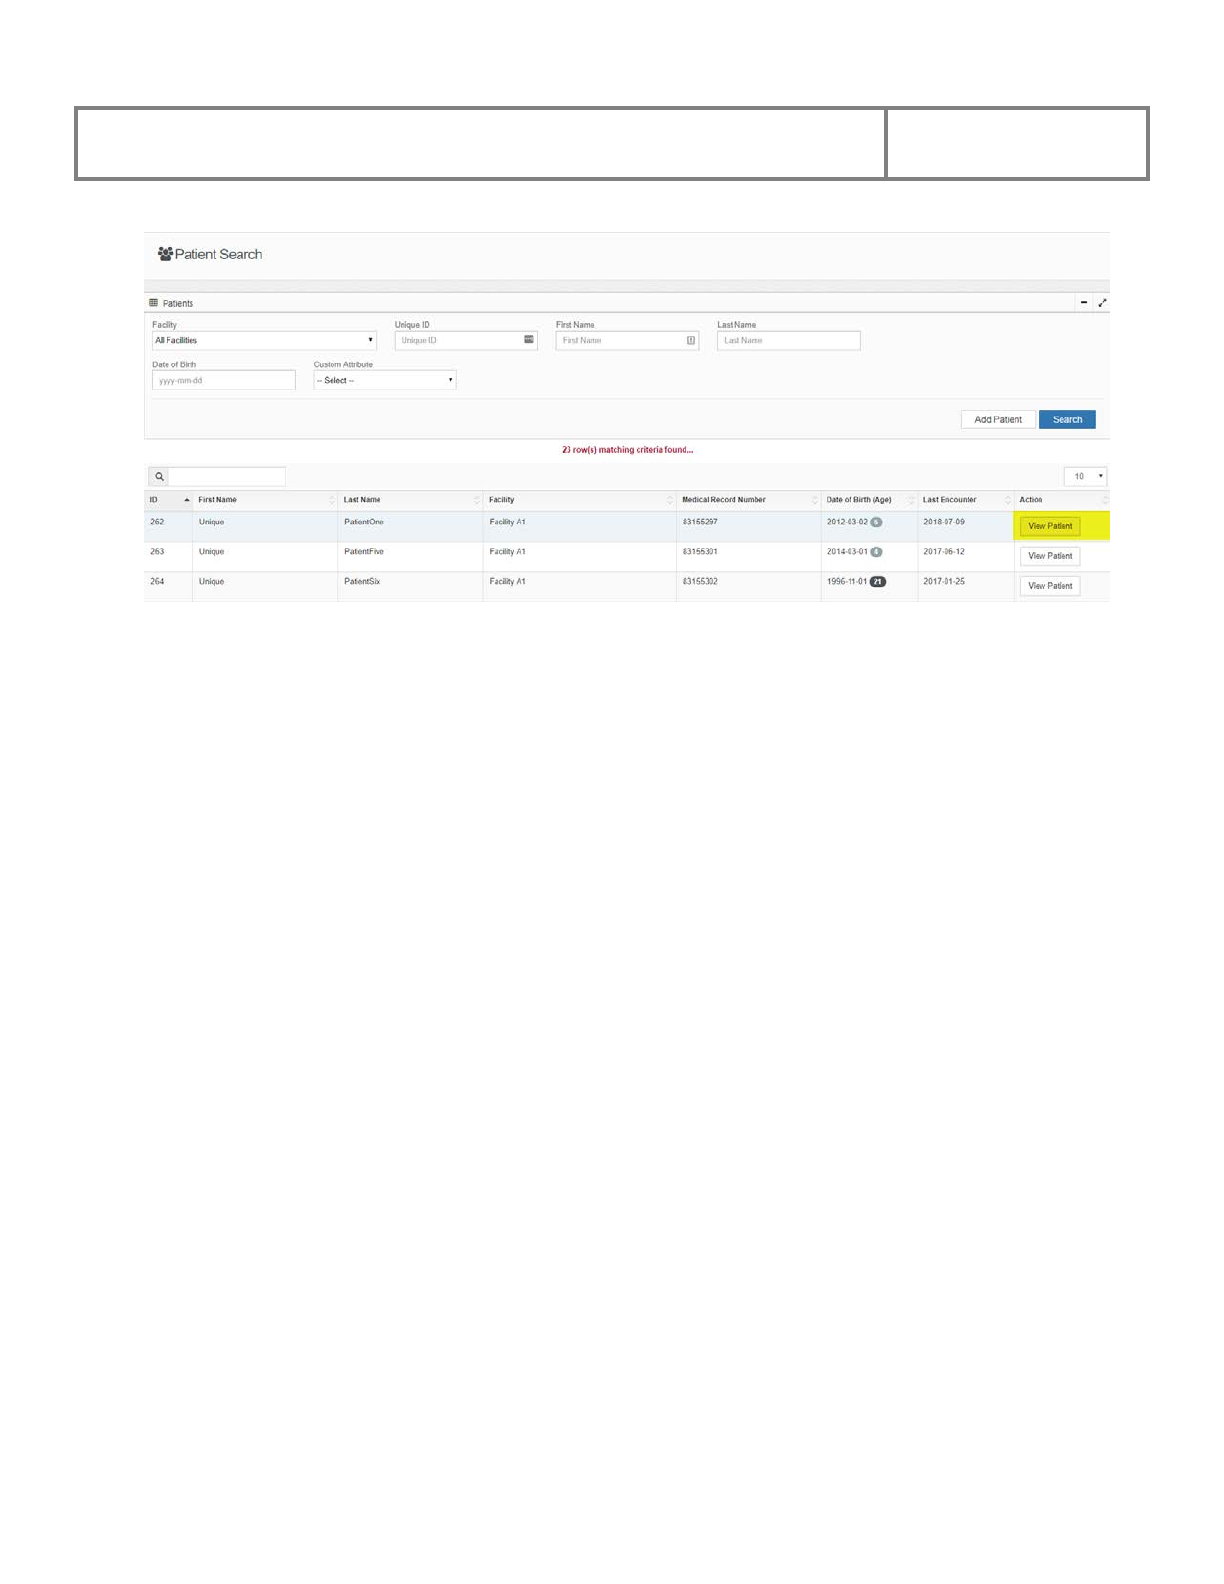
PViMS User Manual
2018
27
• The system will then open the Patient View page and allow you to view the
demographics for this patient.
Patient View has been segregated into the following core sections:
● Patient Information
● Additional Information
● Clinical Information
● Identifiers and Audit Information
● Condition Groups
● Analytical Reporting

PViMS User Manual
2018
28
4.1.3.1 Patient Information - Details
The Details tab is further divided into Basic Information and Patient Demographic
Information.
Patient demographic information will by enlarge remain rather static but should be verified and
updated on a visit by visit basis to reflect up to date information. Various attributes defined as
part of demographic information can be used as risk factors when identifying signals in the
analytical portal and therefore remain critical through the clinical portal data collection process.

PViMS User Manual
2018
29
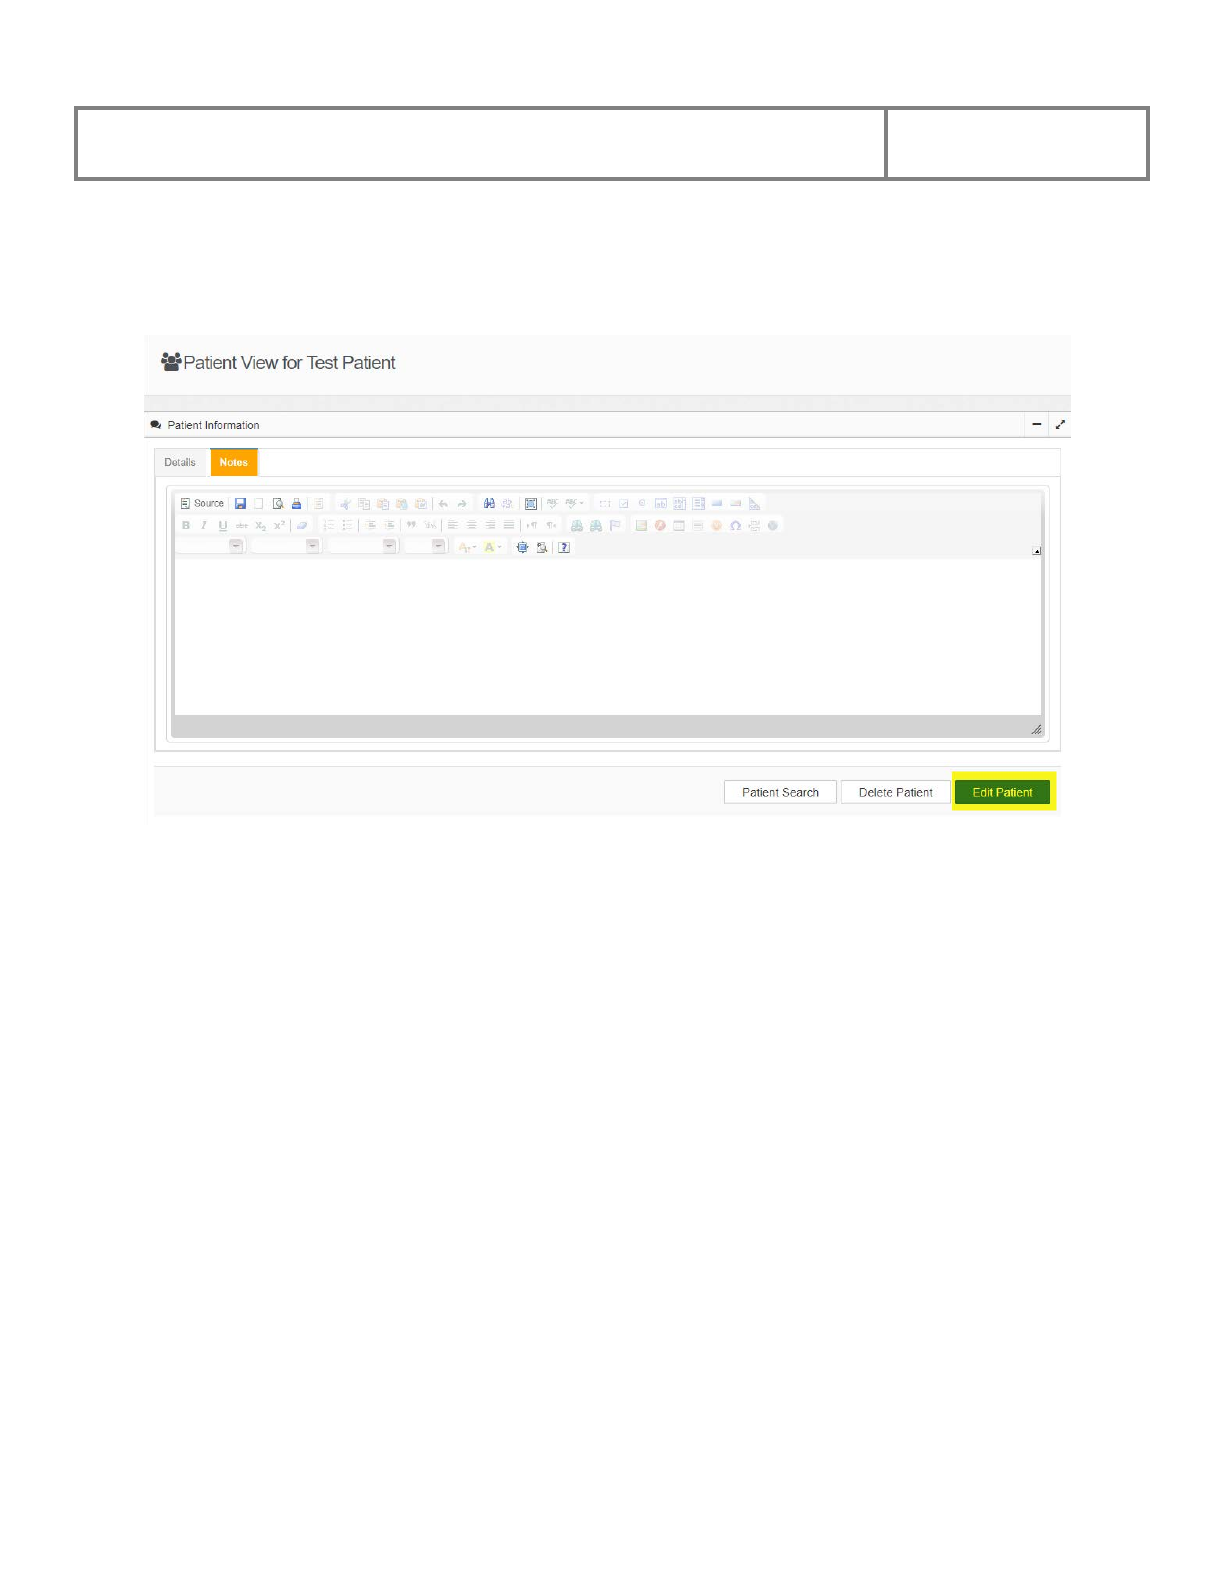
4.1.3.2 Patient Information - Notes
The Notes tab is where you can note generic information relating to the patient at the discretion
of the clinician.
4.1.3.3 Additional information - Appointments
The appointments tab can be used to track upcoming appointments for the patient. This function
can be leveraged to track additional clinical or demographic information if sufficient information
was not collected in any of the patient’s previous encounters.
PViMS User Manual
2018
30
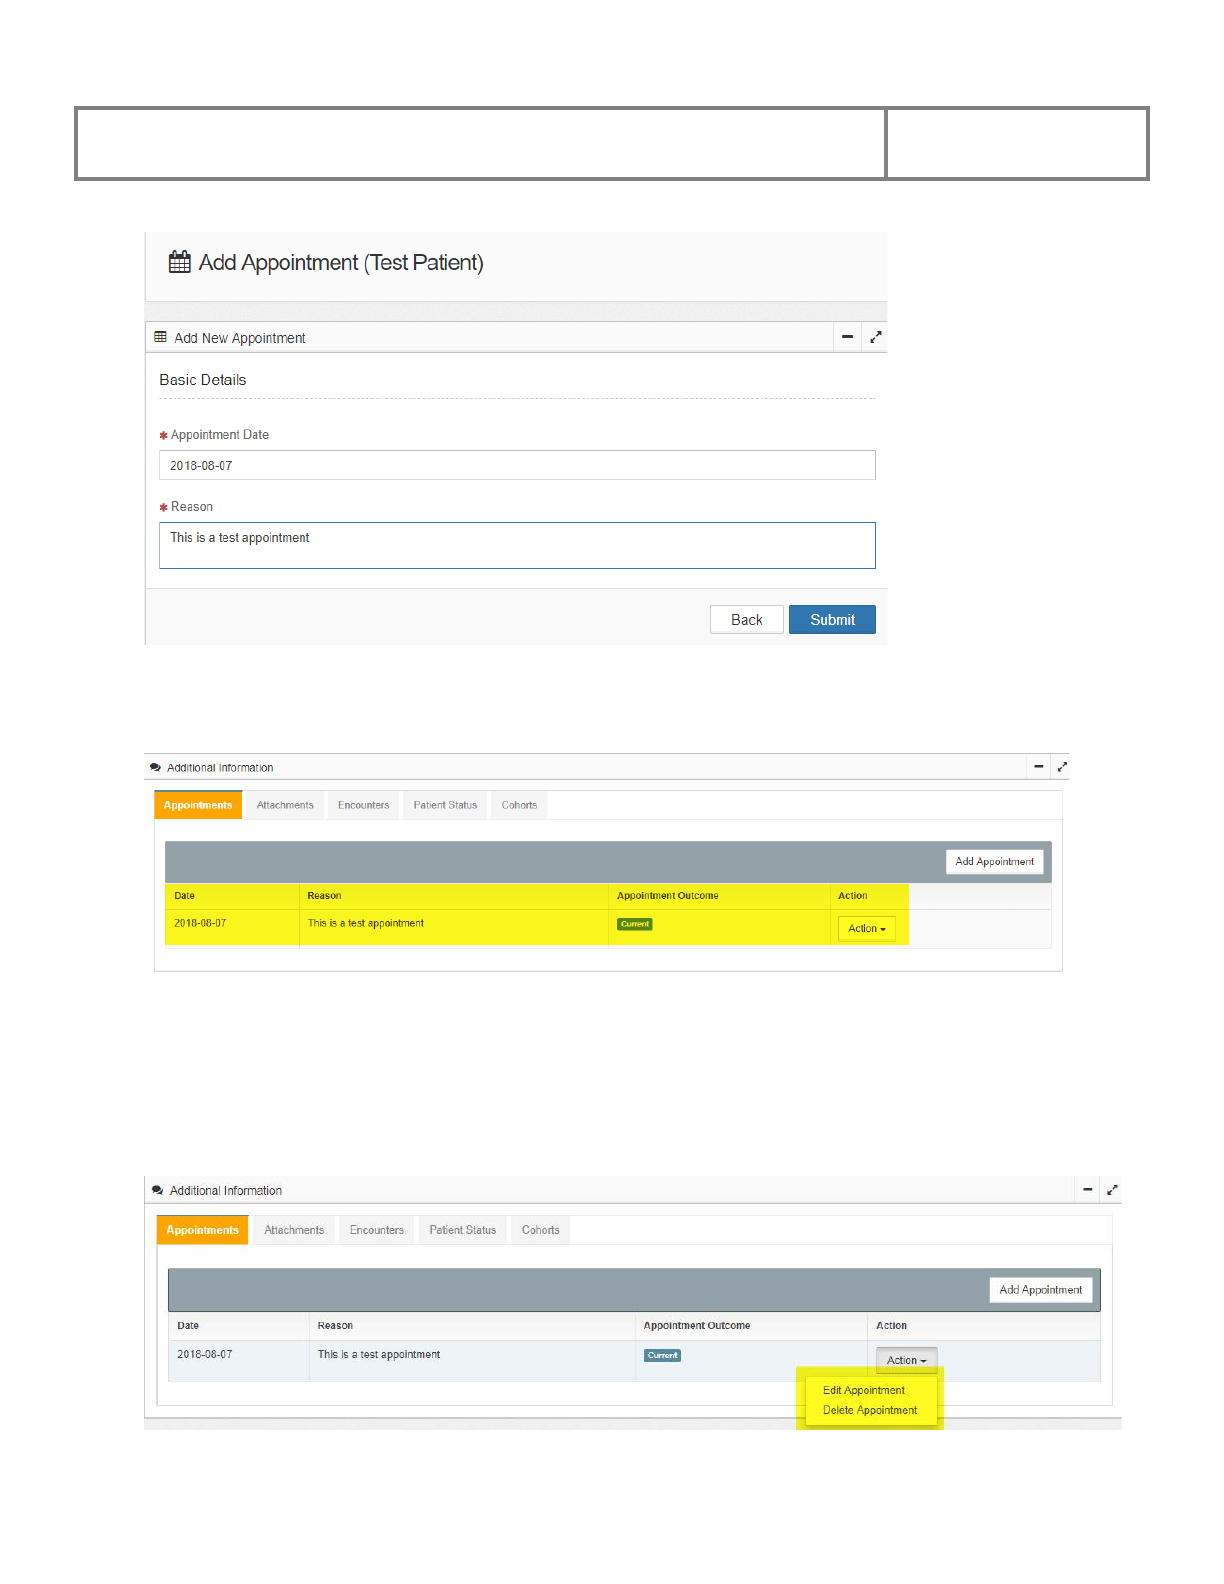
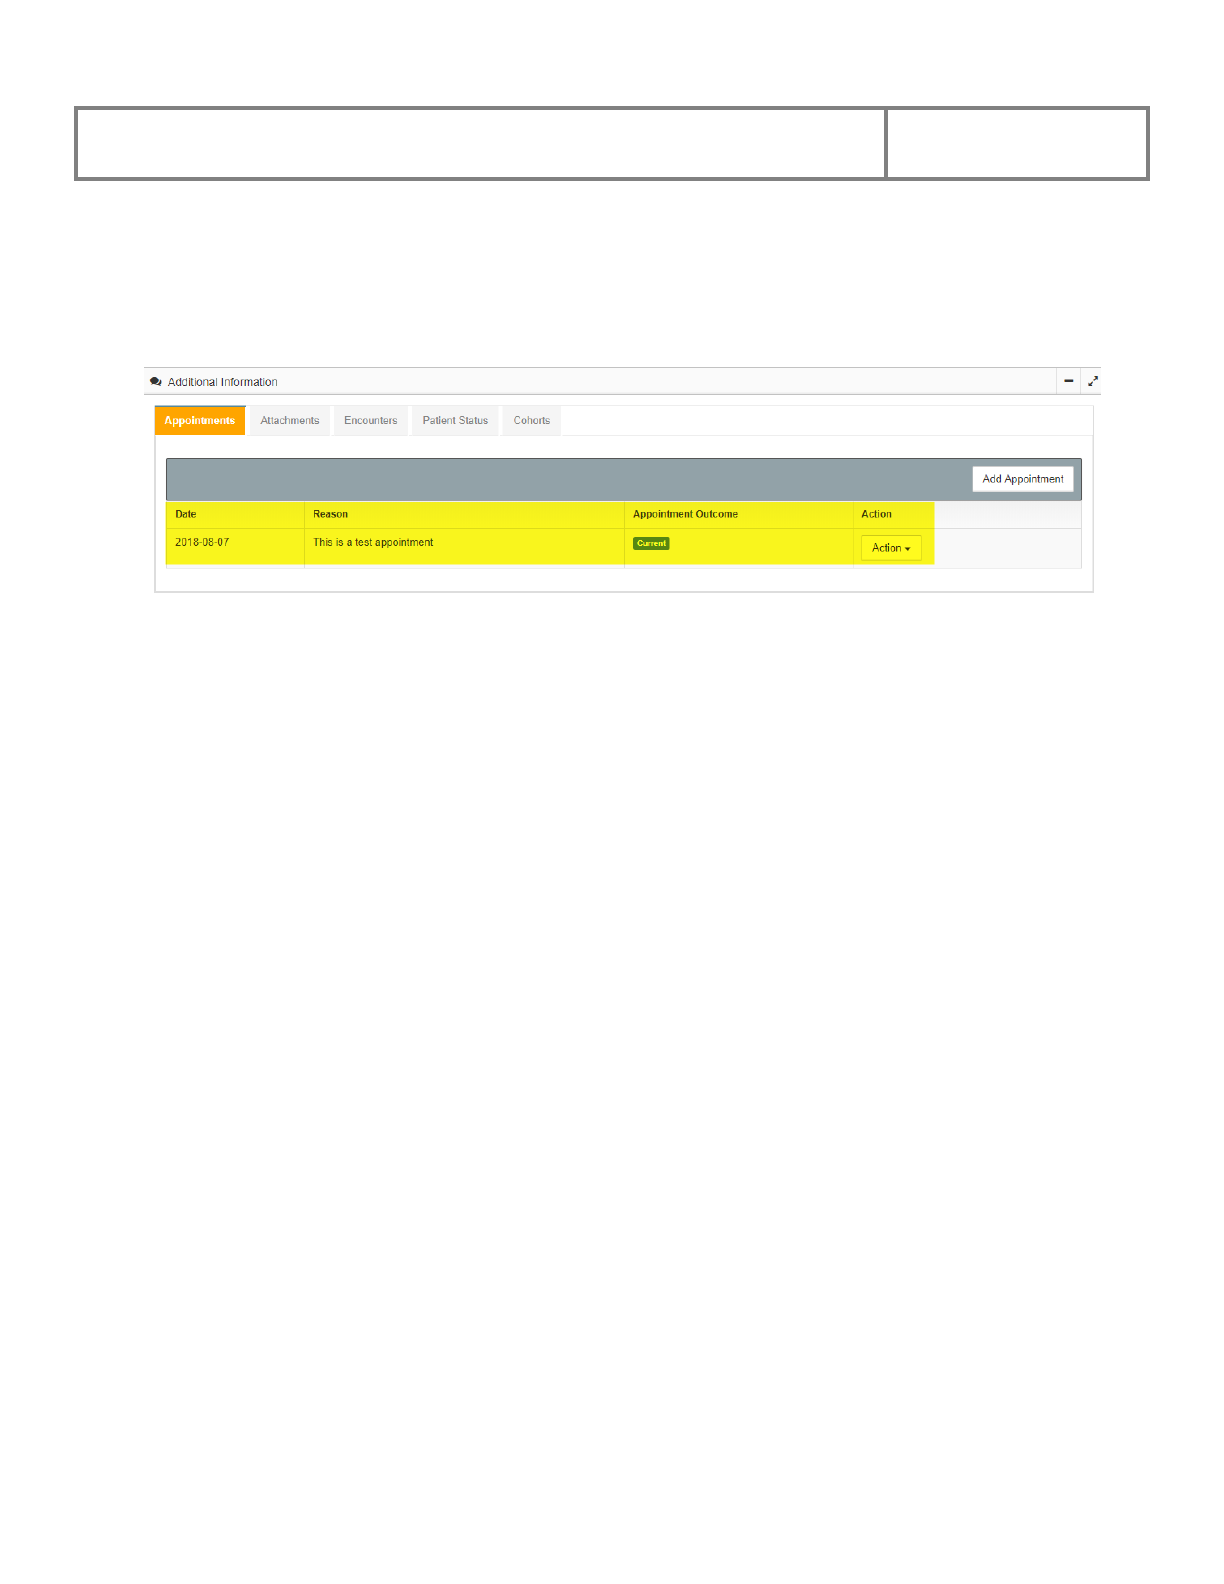
The columns in the appointments table are described below:
Date
Date of the appointment
Reason
Reason for the appointment
Appointment Outcome
Did the patient arrive for their appointment?
Did the patient miss their appointment?
Action
Ability to edit the appointment information or to
delete the appointment from the calendar
It is possible to sort the appointment table by any one of the columns noted above by clicking
on the corresponding column name.
PViMS User Manual
2018
31
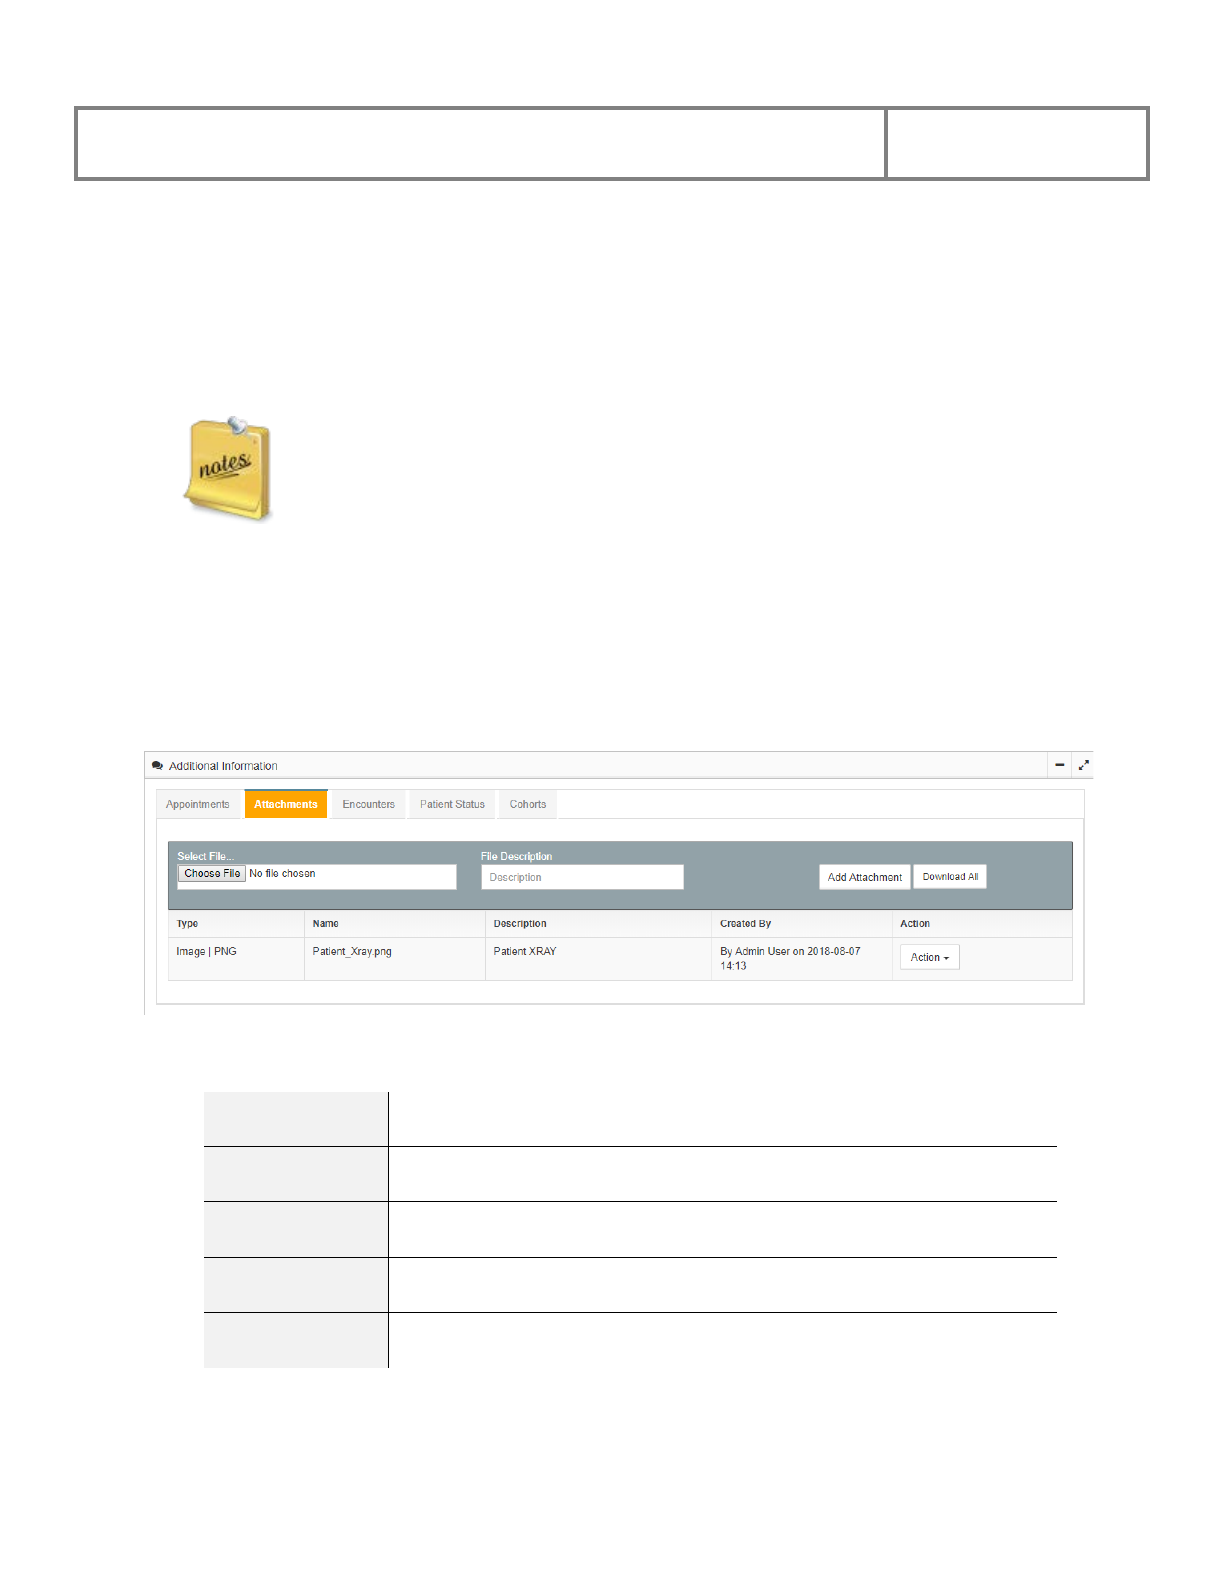
4.1.3.4 Additional Information - Attachments
The attachments tab can be used to store physical file attachments for the associated patient.
The number of attachments and size of attachments are configurable parameters within PViMS
and can be adjusted based on your site’s requirements.
The following file types are supported within PViMS:
• MS Word 2003-2007 Document
• MS Excel 2003-2007 Document
• MS Word Document
• MS Excel Document
• Portable Document Format
• Image | JPEG
• Image | PNG
• Image | BMP
• XML Document
The columns in the attachments table are described below:
Type
Describes the file type (e.g., PDF, Word, Excel)
Name
Name of the file
Description
Description of the file entered
Created by
Name of the person who uploaded the file, and date of upload
Action
Ability to download or delete the file

PViMS User Manual
2018
32
4.1.3.5 Additional Information - Encounters
The encounters tab can be used to track all facility visits by the patient. Encounters effectively
form part of the holistic longitudinal record for the patient and store contextual clinical data
collected during that visit.
The columns in the encounters table are described below:
Date
Date of the encounter
Type
Type of encounter when the encounter was created (e.g., Pre-
treatment Visit, Treatment initiation Visit, Unscheduled Visit)
Encounter Status
Open or Closed, if Open changes can still be made to the
information for the encounter.
Action
Ability to View or Delete and encounter
PViMS User Manual
2018
33
4.1.3.6 Additional Information - Patient Status
The patient status tab can be used to track if the patient is currently active or if the patient is
now deceased. Status change is driven by an effective date for efficient accurate analysis.
The columns in the status table are described below:
Effective Date
Date the person was entered into the system
Status
To indicate if the patient is active or inactive
Created
Name of the person who effected the status change, and date of this
status change
PViMS User Manual
2018
34
4.1.3.7 Additional Information - Cohorts
The cohort tab can be used to track what cohorts a patient has been enrolled in. Analysis can be
subdivided by cohort to target signal detection effectively.
The columns in the Cohorts table are described below:
Cohort
Name of cohort
Cohort Start
Date the cohort started
Enrolled Date
Date the patient was enrolled in the cohort
De-enrolled Date
Date the patient was de-enrolled from the cohort
Action
Ability to enroll, de-enroll, or remove patient from a cohort
PViMS User Manual
2018
35
4.1.3.8 Clinical information – Patient Conditions
The patient condition tab can be used to track a history of concomitant conditions the patient
has experienced. Being exposed to concomitant conditions as well as specific types of
concomitant conditions can be used as risk factors to signal detection within the analytical portal.
The columns in the Patient Conditions table are described below:
Condition Name
Medical term for the patient’s diagnosis (or symptoms if diagnosis is
not available)
Start Date
Date the condition started
Outcome Date
Date the condition ended
Outcome
Outcome of the Condition
Actions
Ability to Edit or Delete the condition
PViMS User Manual
2018
36
4.1.3.9 Clinical information – Adverse Events
The adverse events tab can be used to track a history of adverse events the patient has
experienced. The registration of an adverse event as part of the patient’s longitudinal clinical
record, results in the creation of a new adverse event report within the analytical portal for
consumption by the designated Pharmacovigilance team. Progress against this registration can be
tracked in the Analytical Reporting widget within the patient view.
The columns in the Adverse Events table are described below:
Description
Description of the event from the MedDRA dictionary
Onset Date
Date the event started
Reported Date
Date the event was reported to the facility
Resolution Date
Date the event was resolved or stabilized
Actions
Ability to Edit or Delete the adverse event
PViMS User Manual
2018
37
4.1.3.10 Clinical information – Patient Medications
The patient medications tab can be used to track a history of medications the patient has been
exposed to. A comprehensive medications history is critical to ensure accurate signal detection
within the analytical portal.
The columns in the Patient Medication table are described below:
Drug Name
Name of drug from the country drug dictionary
Dose
Number of units
Dose Unit
Unit of dose (e.g., mg, mEq, IU)
Dose Frequency
Number of times per day the dose is administered
Start Date
Date the patient started taking the medicine
End Date
Date the patient stopped taking the medicine
Indication Type
Purpose of medication (e.g., treat primary condition, treat pre-
existing condition, or to tread and adverse event)
Actions
Ability to Edit or Delete the Patient Medication

PViMS User Manual
2018
38
4.1.3.11 Clinical information – Tests and Procedures
The tests and procedures tab can be used to track a history of tests and procedures the patient
has been exposed to.
The columns in the Tests and Procedures table are described below:
Test
Name of lab test or clinical evaluation
Test Date
Date the test was conducted
Test Result (Coded)
Qualitative test result
Test Result (Value)
Quantitative test result - Number of units
Test Unit
Type of unit
Actions
Ability to Edit or Delete Tests and Procedures

PViMS User Manual
2018
39
4.1.3.12 Identifiers and Audit information - Identifiers
The Identifiers section displays the following unique identifiers stored per patient record:
• The patient’s Unique ID assigned by the system
• A Globally Unique Identifier (GUID) assigned by the system
4.1.3.13 Identifiers and Audit information – Audit Information
The Audit section keeps a user record of any patient information changes.
Created
Gives the User Name of the person who created the file and the
Date it was created
Updated
Gives the User Name of the person who last updated the
information and the Date of the update
PViMS User Manual
2018
40
4.1.4 Add a New Patient
Adding a new patient to the PViMS database requires the completion of a patient search. This is
to mitigate the potential risk of registering a patient more than once. If you are not able to find
the patient in the existing database, you can add a new patient by clicking on Add Patient
button.
The system will open a new Patient View page with two sections Patient Information and
Additional Information needing to be captured.
4.1.4.1 Patient Information – Basic Information
The Basic Information section captures basic patient demographic information.
To enter patient information, enter text in the corresponding fields (e.g., First Name, Last
Name). Or click the arrow in a selected field to display a list of values, and select one value
from the list. Please ensure that all elements with a red asterisk (mandatory) are captured.
Fields in the Basic Information Section are described below:

PViMS User Manual
2018
41
First Name
Text field to enter the patient’s first name
Last Name
Text field to enter the patient’s last name
Middle Name
Text field to enter the patient’s first name
Facility
Dropdown list to select the patient’s facility
Age
Auto-calculated by the system
Age Group
Auto-calculated by the system
Date Entered in System
Auto-calculated by the system
All fields marked with a red star (*) are compulsory fields that must be completed before
proceeding.
Greyed out fields are automatically filled by the system and cannot be edited.
You will only be able to add patients to facilities you have been granted access to. To view
which facilities, you have been granted access to, click on your user name in the footer of the
page.

PViMS User Manual
2018
42
4.1.4.2 Patient Information - Patient Demographics
The Patient Demographic Information section captures comprehensive patient demographic
information.
To enter patient information, enter text in the corresponding fields (e.g., Medical Record
Number, Medical Record Number Type, etc.). Or click the arrow in a selected field to display
a list of values, and select one value from the list (e.g., Gender).
Fields in the Patient Demographic Information section are described below:
Medical Record Number
Text field to enter the patient’s medical record number
Medical Record Number Type
Dropdown menu to select the medical record type
Patient Identity Number
Text field to enter the patient’s identity number
Identity Type
Dropdown menu to select the identity type
Gender
Dropdown menu to select the patient’s gender
Marital Status
Dropdown menu to select the patient’s marital status
Employment Status
Dropdown menu to select the patient’s employment status
Occupation
Text field to enter the patient’s occupation
Language
Dropdown menu to select the patient’s language
Address
Text field to enter the patient’s address
Address Line 2
Text field to enter the patient’s address
City
Text field to enter the patient’s address
State
Text field to enter the patient’s address
Postal Code
Text field to enter the patient’s address
Patient Contact Number
Text field to enter the patient’s contact number
Country of Birth
Dropdown menu to select the patient’s country of birth
PViMS User Manual
2018
43

PViMS User Manual
2018
44
4.1.4.3 Additional Information – Primary Condition Group
The Primary Condition Group section allows you to assign a patient to a patient condition
based on their medical condition (e.g., TB, HIV, and Malaria). The patient must be assigned to a
patient condition group for their data is to be included when using the Analytical Portal.
To assign a Primary Condition Group click the arrow in the Condition Groups field. The
system will display a list of conditions to choose from. Select the appropriate condition by
clicking on the corresponding condition in the list.
The system will then prompt you to select the MedDRA term associated with the condition in the
MedDRA Terms field.
You also have the option to assign a patient to a cohort established by the public health program.
To assign a patient to a cohort, click the arrow in the Cohorts field. The system will display a
list of Cohorts. Click the cohort the patient should belong to in the list and enter the date the
patient was enrolled in the cohort.
You will only be able to allocate patients to cohorts that are assigned to this specific
condition group.
PViMS User Manual
2018
45
4.1.4.4 Additional Information – Condition Information
Enter the Start and Outcome dates (only enter the outcome date if one is applicable) for the
condition and any Comments regarding the condition if appropriate.
Click the arrow in the Condition Ongoing field and select Yes if the condition is ongoing, and
No if the condition has an outcome date.
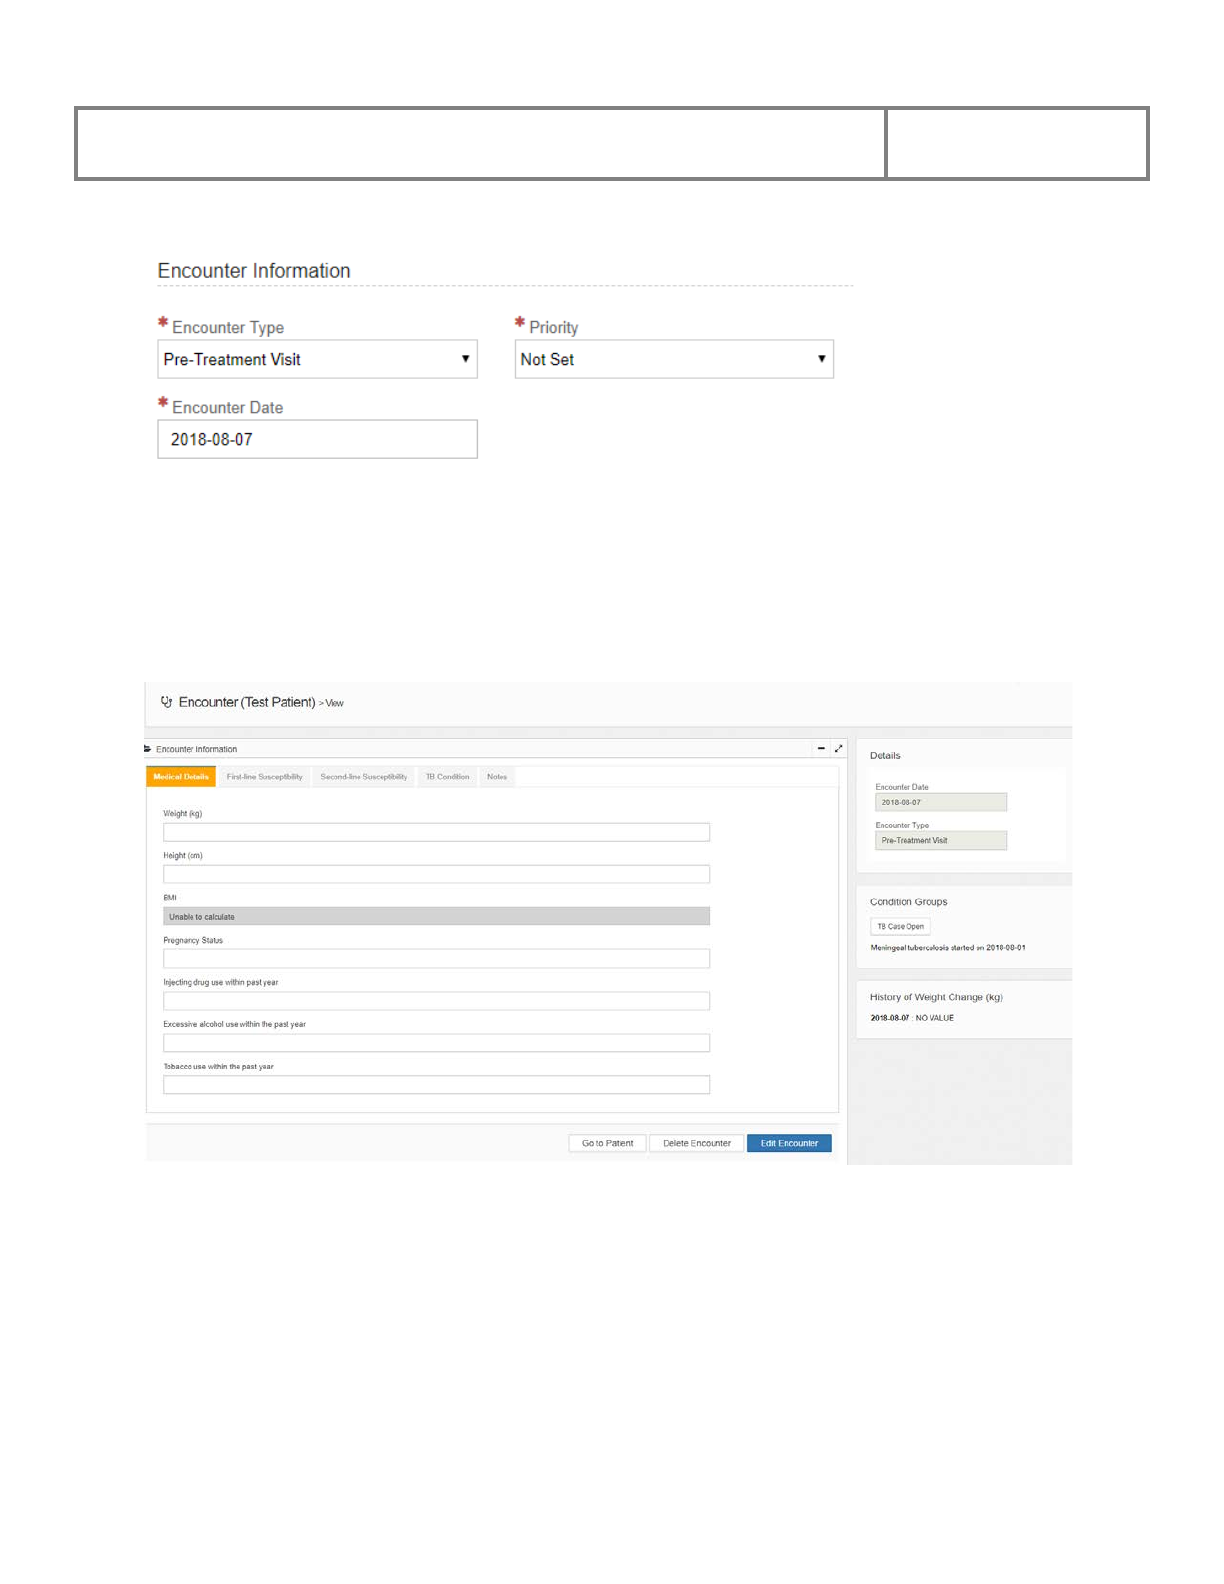
4.1.4.5 Additional Information - Encounter information
PViMS Term - Encounter
A patient’s longitudinal health record is composed of multiple encounters. An
encounter is effectively a signal that a patient has been seen by a health care
provider such as a clinician and clinical data has been collected in context with this
encounter.
Click the arrow in the Encounter Type field. The system will display an Encounter Type list.
Click the appropriate Encounter Type from the list.
Set the priority for the encounter by clicking on the arrow in the Priority field. The system will
display a Priority list. Select a Priority option from the list.
Finally enter the encounter date in the Encounter Date field. The encounter date will be the date
the patient was encountered at the facility.
PViMS User Manual
2018
46
When all information for the page has been entered, click the Save button or click the Cancel
button to cancel the action.
The system will then take you to the patient’s Encounter View page where you can Add or
Edit, encounter information described in Section 4.2.
PViMS User Manual
2018
47
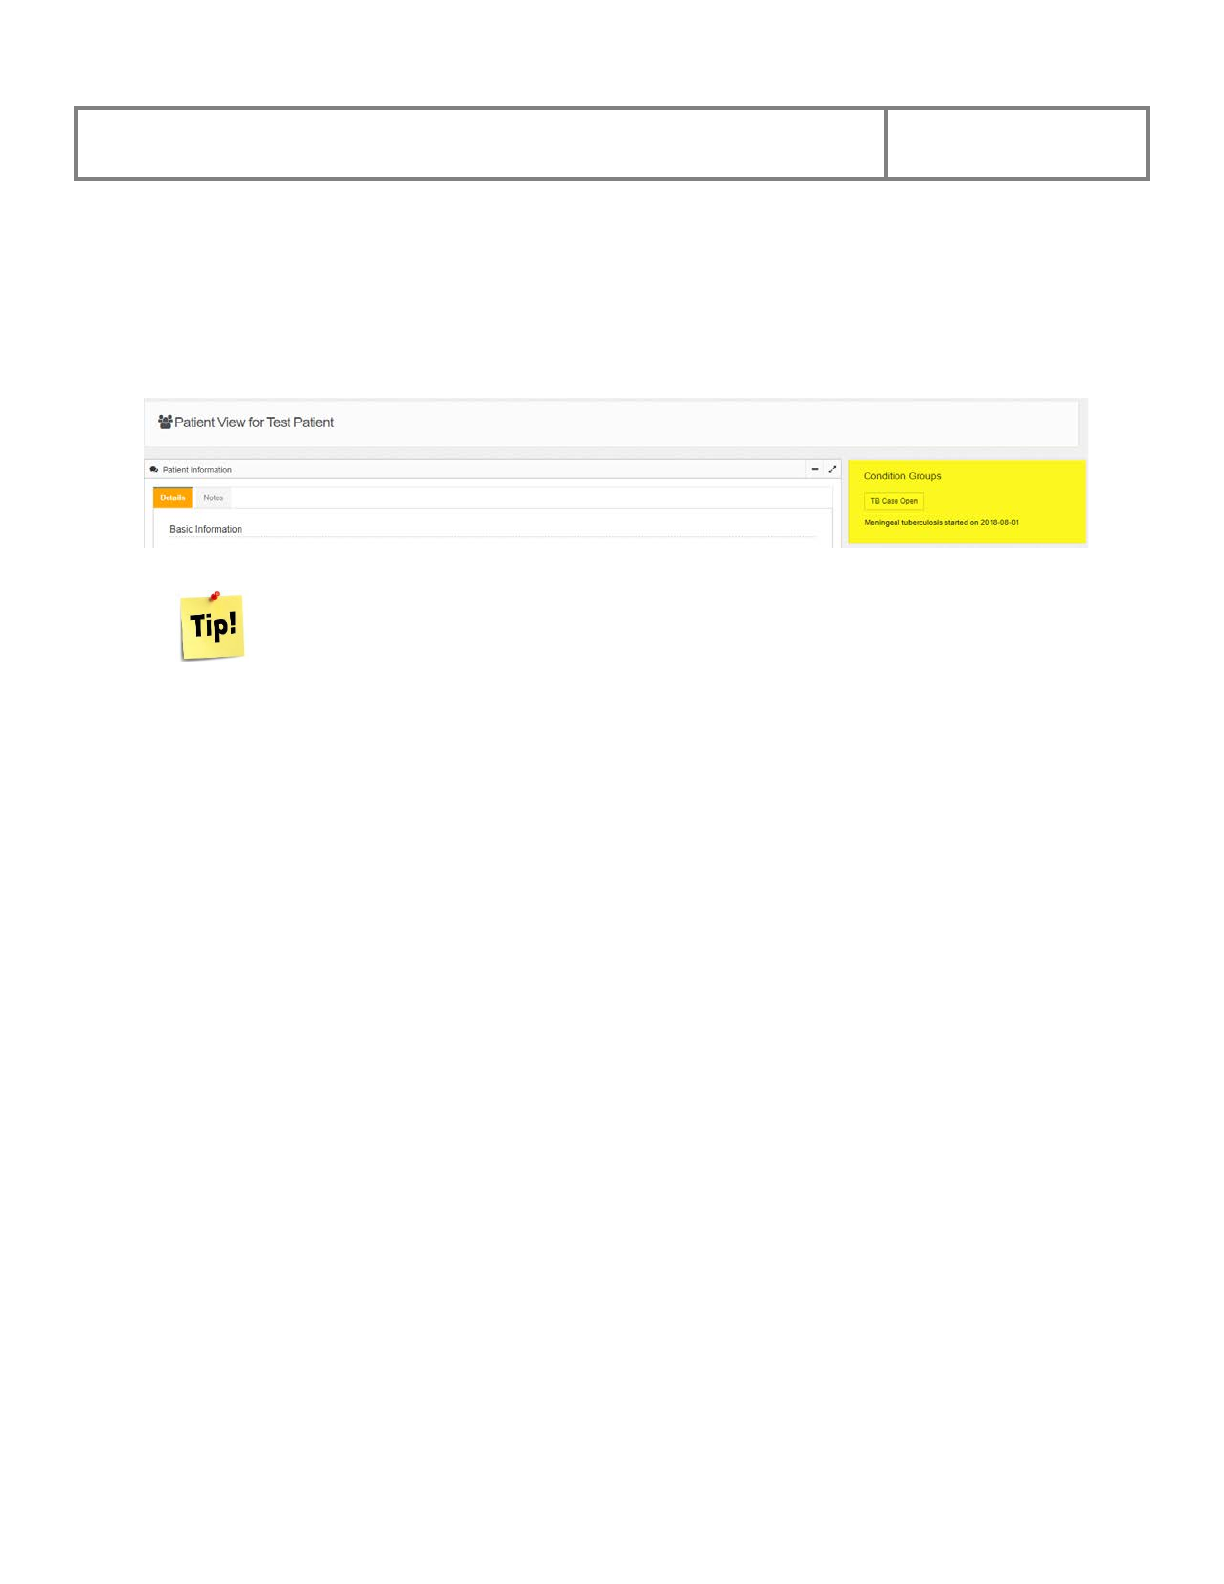
4.1.5 Condition Groups
The Condition Groups widget which is accessible from within the patient view provides the
name of the condition group the patient is assigned to, and the start of the condition. The
condition group Case Button indicates whether the case is Open or Closed.
Only Open conditions will be displayed on the Patient View page.
A patient can be assigned to more than one condition group at the same time (e.g.,
the TB condition group and the HIV condition group).
PViMS User Manual
2018
48
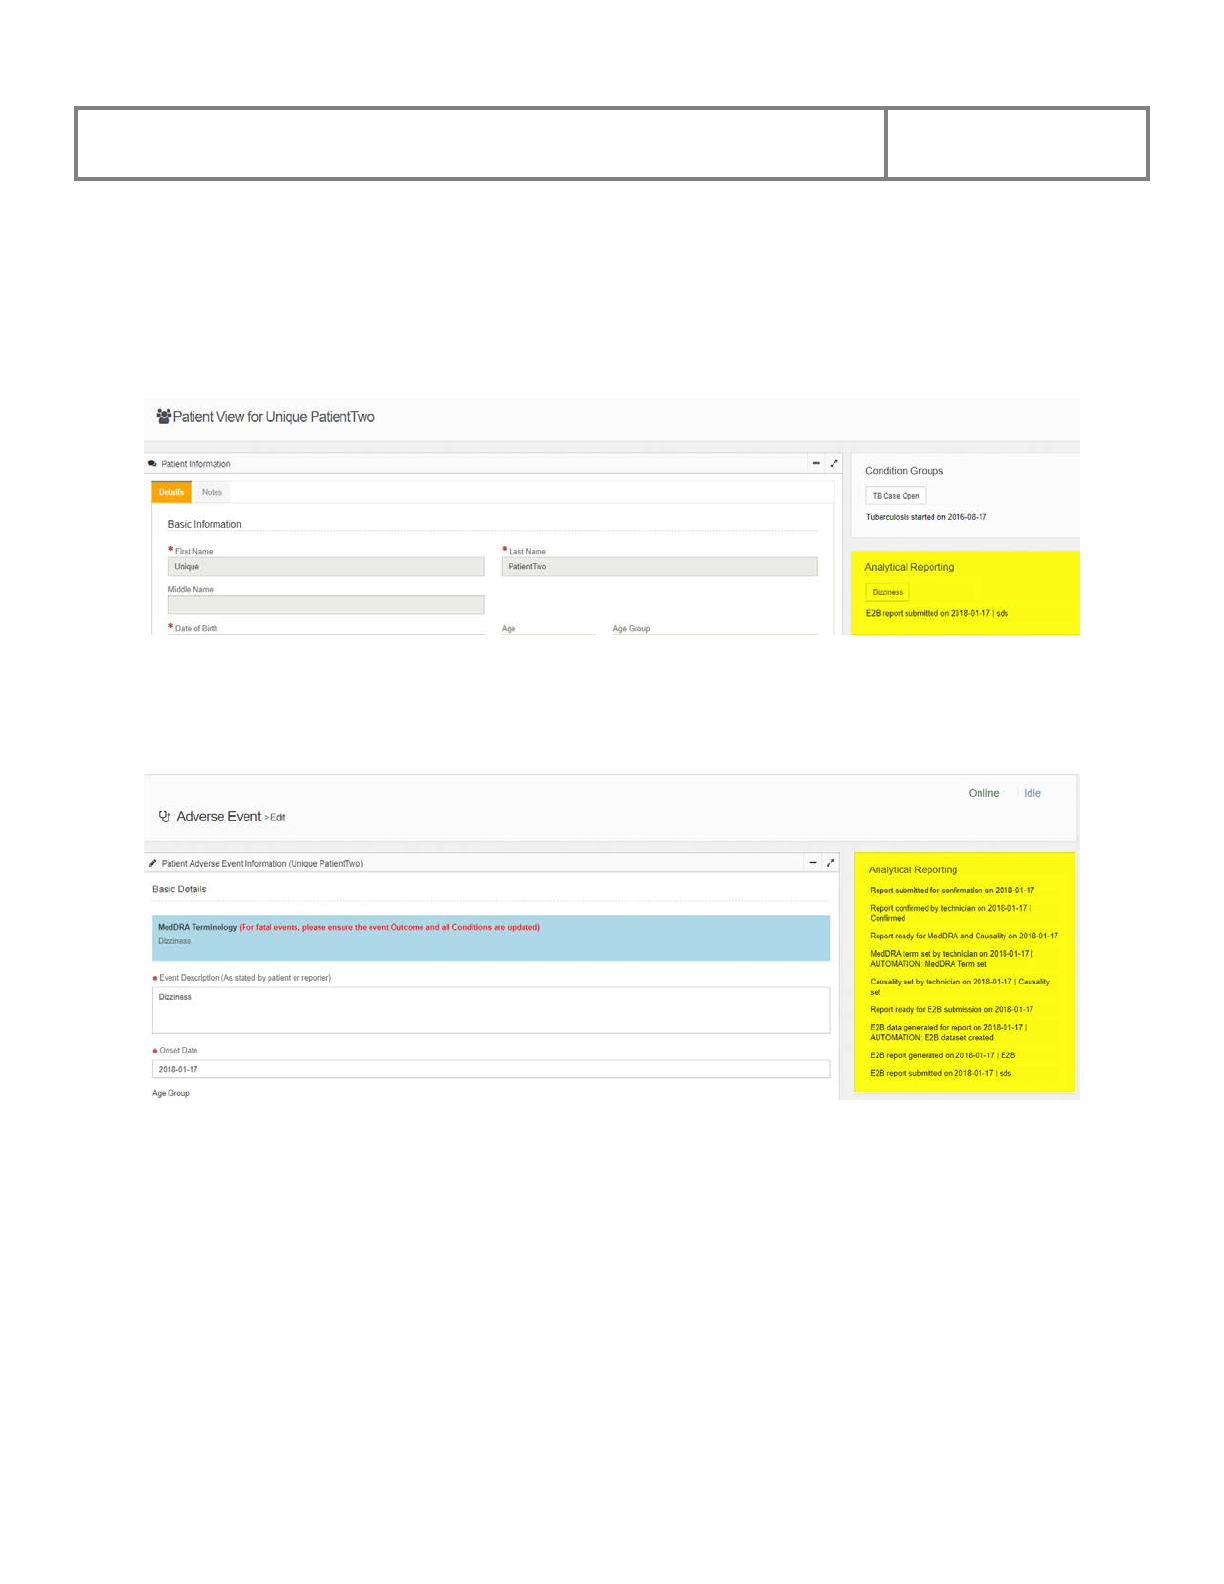
4.1.6 Analytical Reporting
The Analytical Reporting widget accessible from within the patient view provides the current
status of any pharmacovigilance activities that have been conducted within the analytical portal
against adverse events that have been registered against this patient.
By clicking on the adverse event button, the system will navigate you to the adverse event page
for this event where you will be able to view a comprehensive history of pharmacovigilance
activities for this event.
PViMS User Manual
2018
49
4.1.7 Add or Edit Patient Information
You can add or edit patient information at the Patient View page. But first, you need to locate
the patient you would like to amend by searching for the patient using the Patient Search
function. Click on the patient menu to access the Patient Search screen.
Enter the appropriate search criteria and click the search button. You will be presented with a list
of patients that match the search criteria entered.
Click the View Patient button and the system will display the Patient View page for the selected
patient.
Click the Edit button and the system will display a Patient View page that can be edited.
Make changes as appropriate then click the Save button to continue or click the Cancel button to
undo the action and go back to the previous page.
After clicking the Save button the system will update and display the Patient View page with the
updated information and a Patient Saved Successfully confirmation message
Note: The Age, Age Group, and Date Entered in System fields displayed with a yellow
background are auto-filled by the system. They are read-only and cannot be edited by the user.
PViMS User Manual
2018
50
4.1.7.1 Additional Notes
To make changes to the notes, click the Notes tab. The system will display the Notes section.
Click the Edit button and the system will allow you to edit the generic notes for the patient.
Once you have added or edited the notes section click the Save button to continue or click the
Cancel button to undo the action and return to the patient view.
After clicking the Save button the system will display the Patient View.
PViMS User Manual
2018
51
4.1.8 Add or Edit Additional Information
On the Patient View page, you can Add or Edit information in the Additional Information
section.
4.1.8.1 Add Appointments
At the Appointments tab click the Add Appointments button, after which the system will open
the Add Appointment page
• Enter the Appointment Date
• Enter the Reason for the appointment
• Click the Submit button to create the appointment, or click the Back button to cancel the
action and go back to the previous page.
PViMS User Manual
2018
52
• After clicking on Submit the system will display the updated table under the
Appointments tab.
4.1.8.2 Edit an Appointment
To edit an existing appointment, locate the appointment in the table. Click the Edit button in the
action column for the appointment date to be edited. The system will display the Edit
Appointment.
PViMS User Manual
2018
53
Make changes as needed then click the Submit button to complete the edit, or click the Back
button to undo it and return to the previous page.
The system will display the updated Appointment Table.
PViMS User Manual
2018
54
4.1.8.3 Add an Attachment
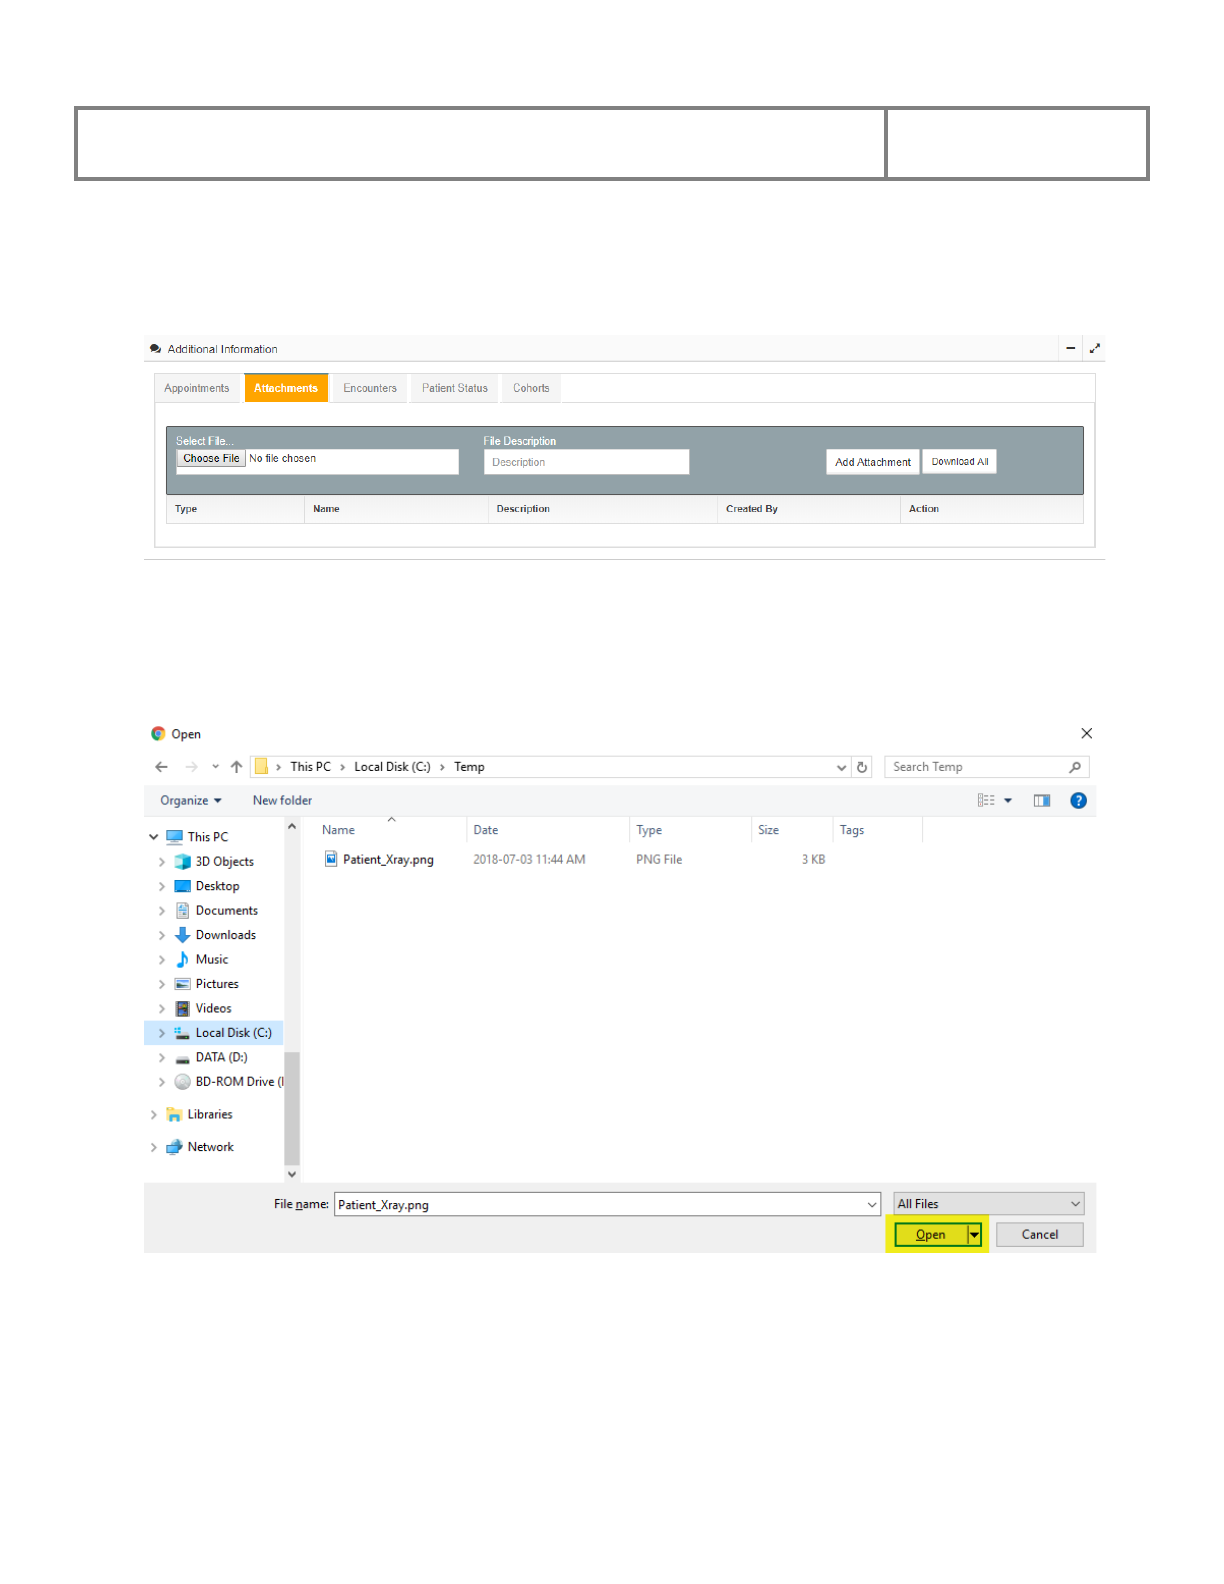
Select the Attachments Tab to view the list of attachments.
To add an attachment, click the Choose File button. The system will allow you then to search for
the file to be attached.
Select the file to upload and click the Open button.
The system will return to the Attachments Table page and will reflect that the file that was
selected. You can add a description in the File Description field.
Click the Add Attachment button to upload the attachment to PViMS.
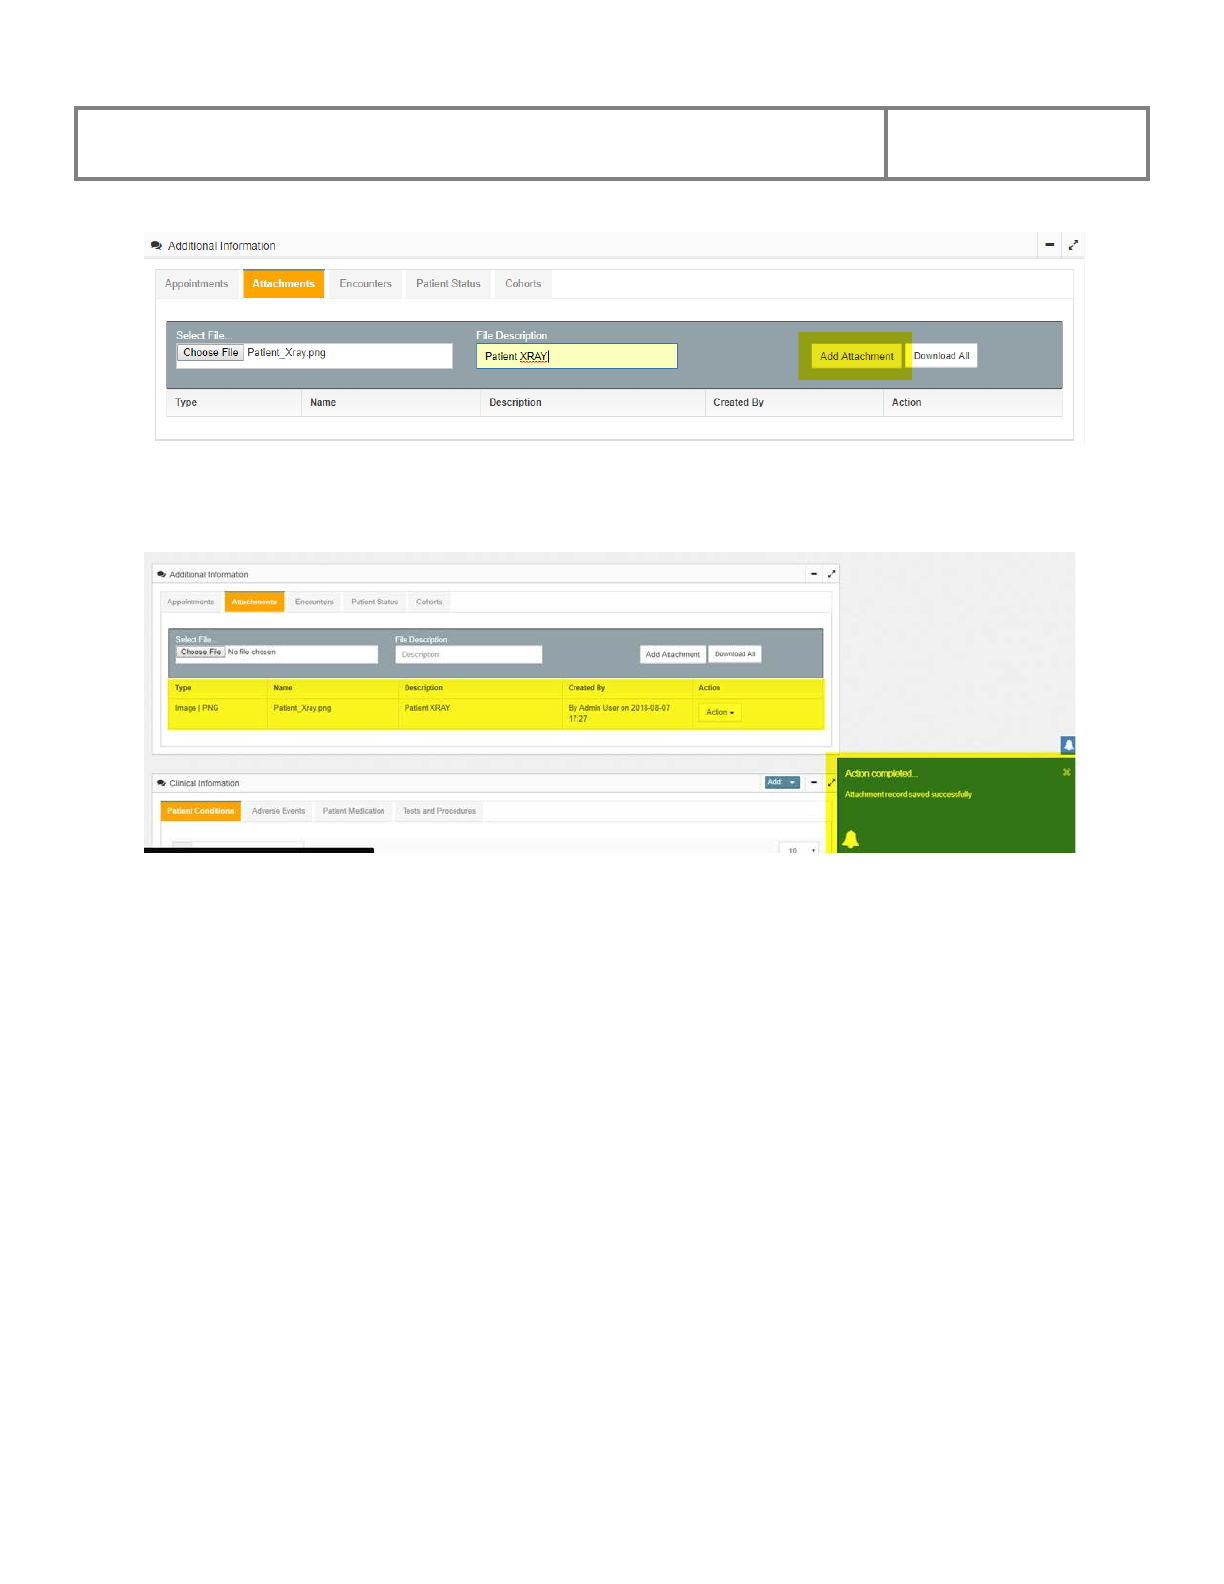
PViMS User Manual
2018
55
The system will show a confirmation message and an updated Attachments Table listing the
newly added attachment.
PViMS User Manual
2018
56
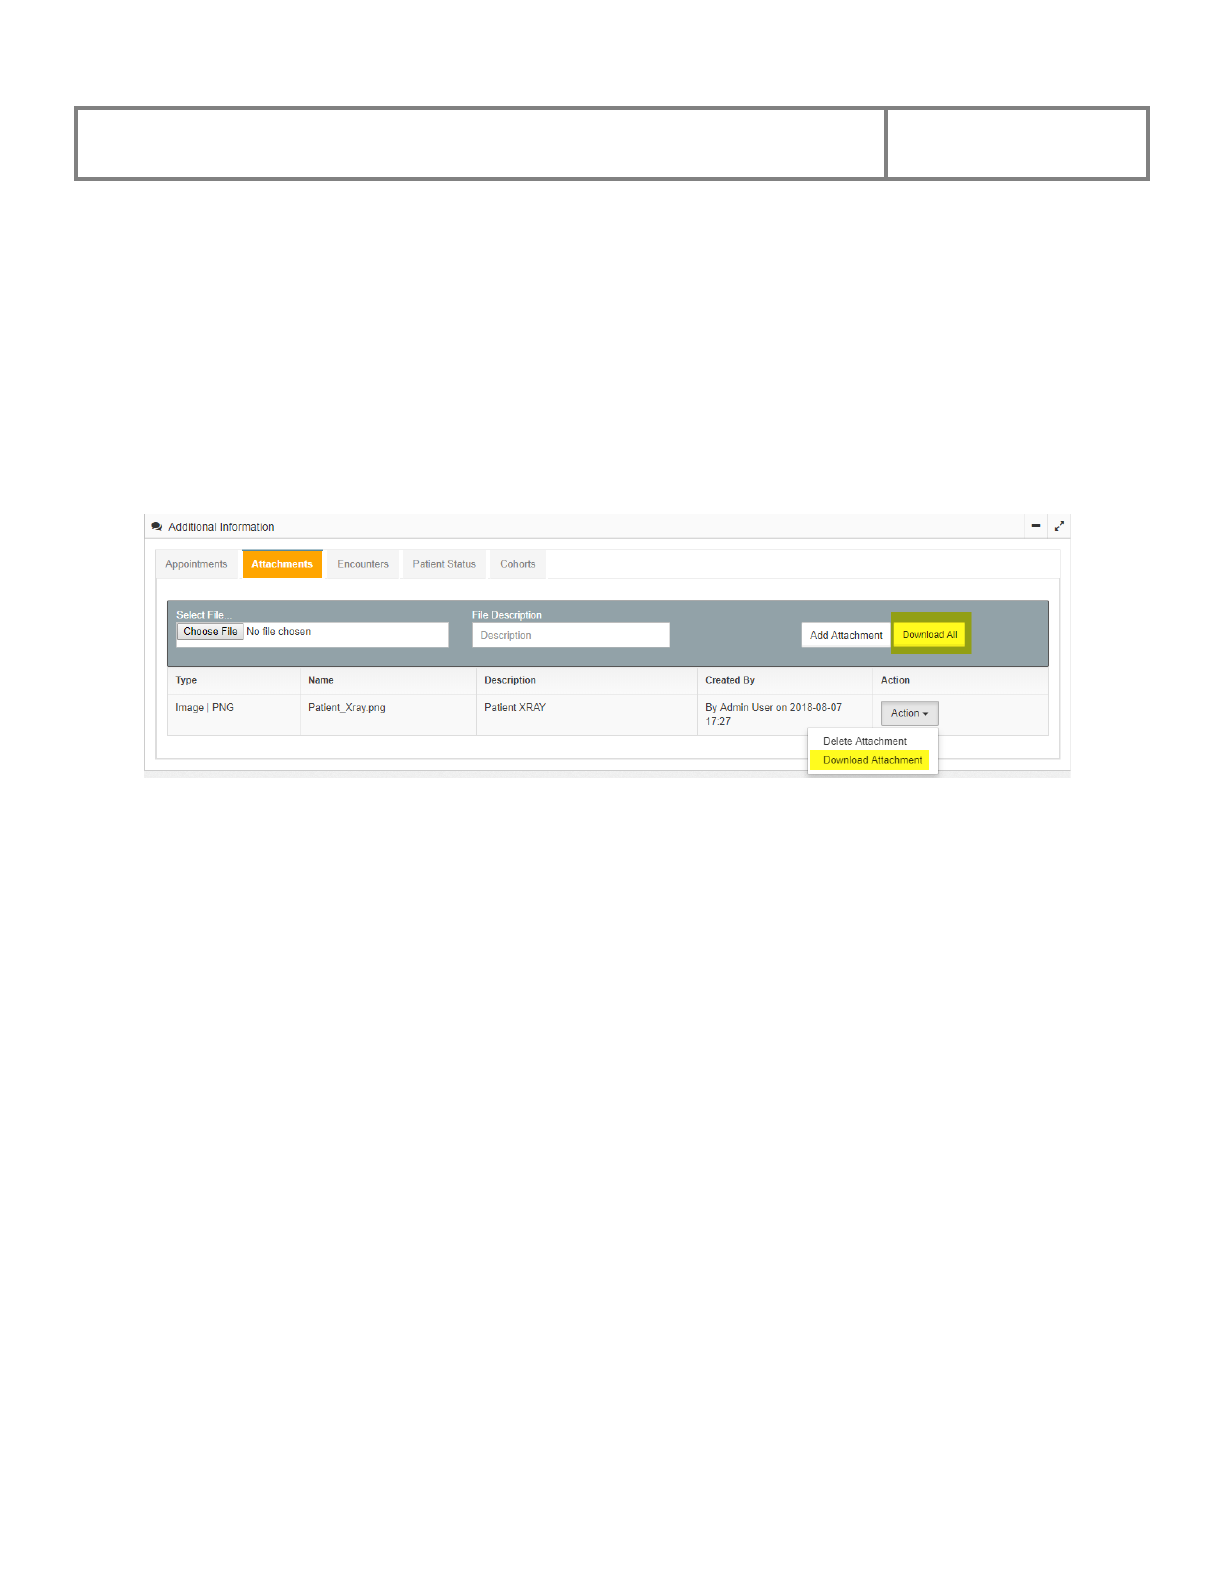
4.1.8.4 Download an Attachment
There are two ways of downloading an attachment to your local computer for viewing. By
clicking on the Download All button, all attachments associated with this patient will be
compressed into a single zip file and downloaded to your local computer.
To download a single attachment, locate the attachment in the table, click the arrow in the action
column next to the attachment to download and click the Download Attachment button
displayed.
The system will show a message that the attachment has been Downloaded Successfully. The
downloaded file will typically appear in your computer’s Downloads or My Documents folder.
PViMS User Manual
2018
57
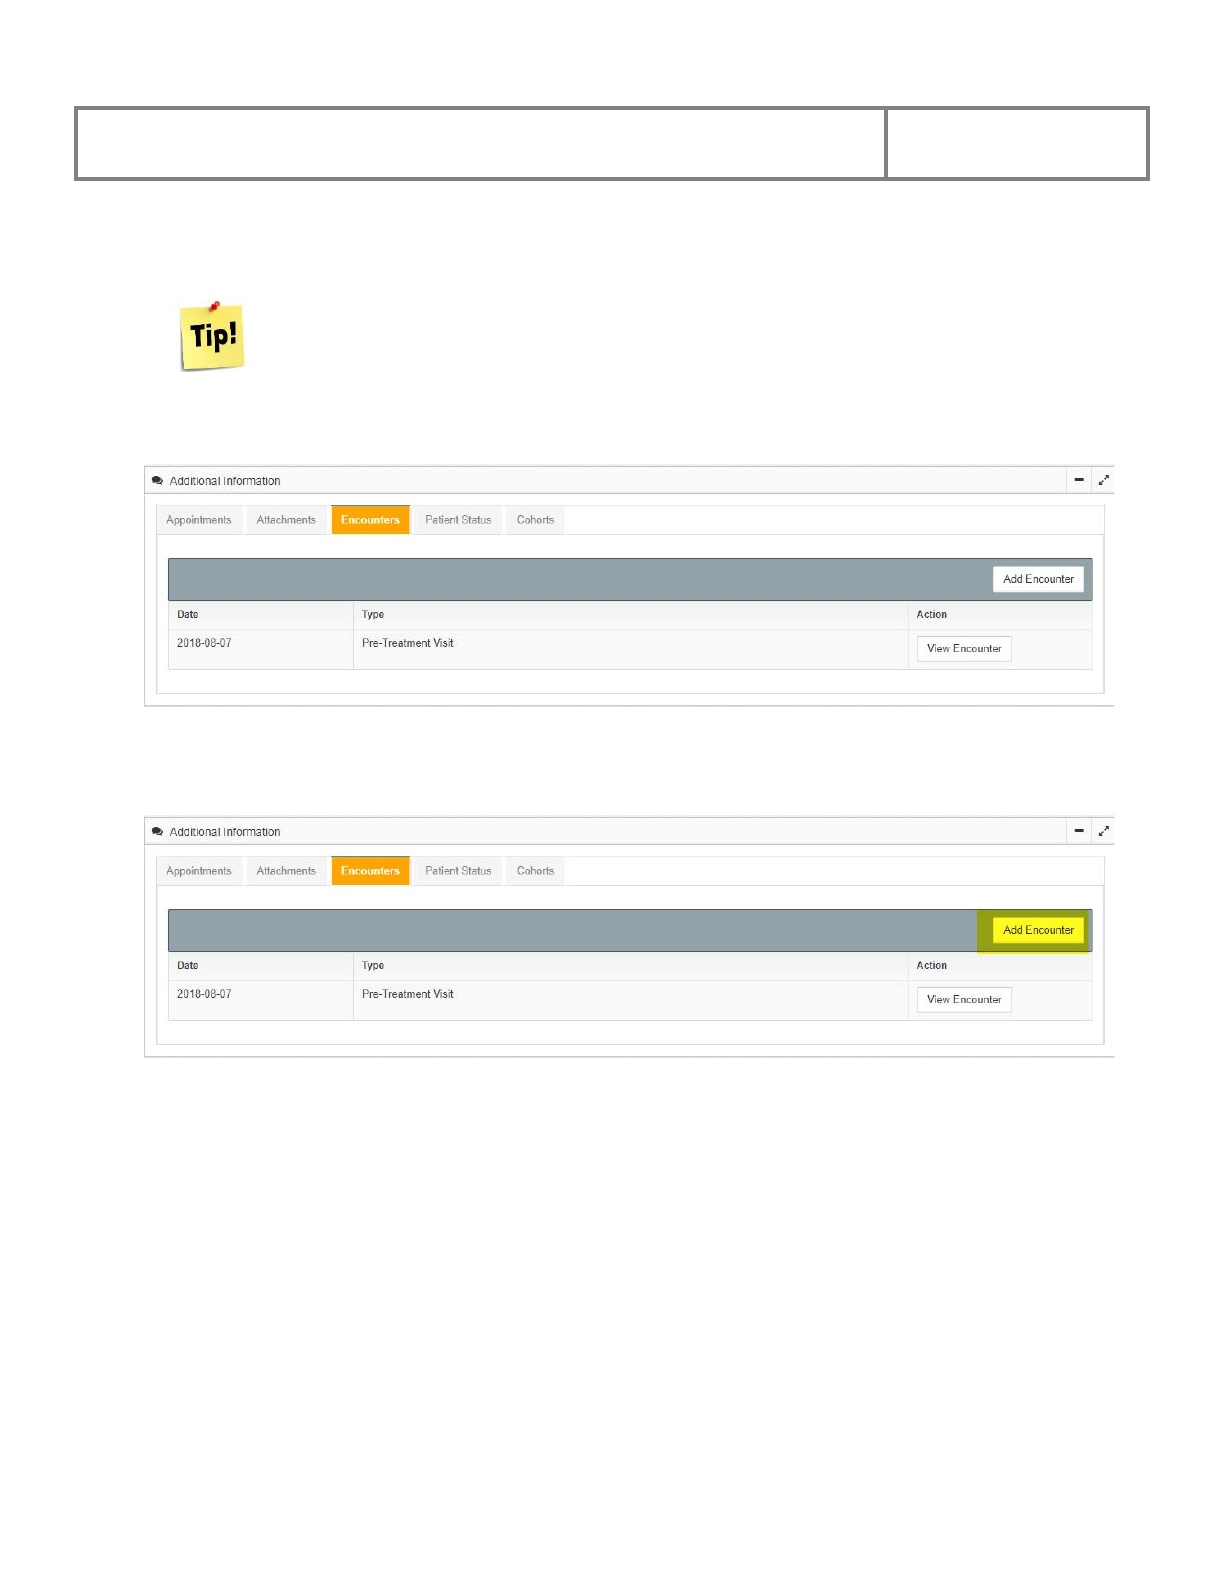
4.1.8.5 Add an Encounter
A patient may only have one encounter per day.
Select the Encounters Tab to view a list of encounters.
Click the Add Encounter button to add a new encounter for this patient after which the system
will open the Add Encounter page.
• At the Add Encounter page click the arrow in the Encounter Type field. The system
will display an Encounter Type list to select from. Select the Encounter Type.
• Click the arrow in the Priority field. The system will display a Priority list to select
from. Select the Priority.
• Enter the Encounter Date as well as any free format Notes regarding the encounter as
appropriate.
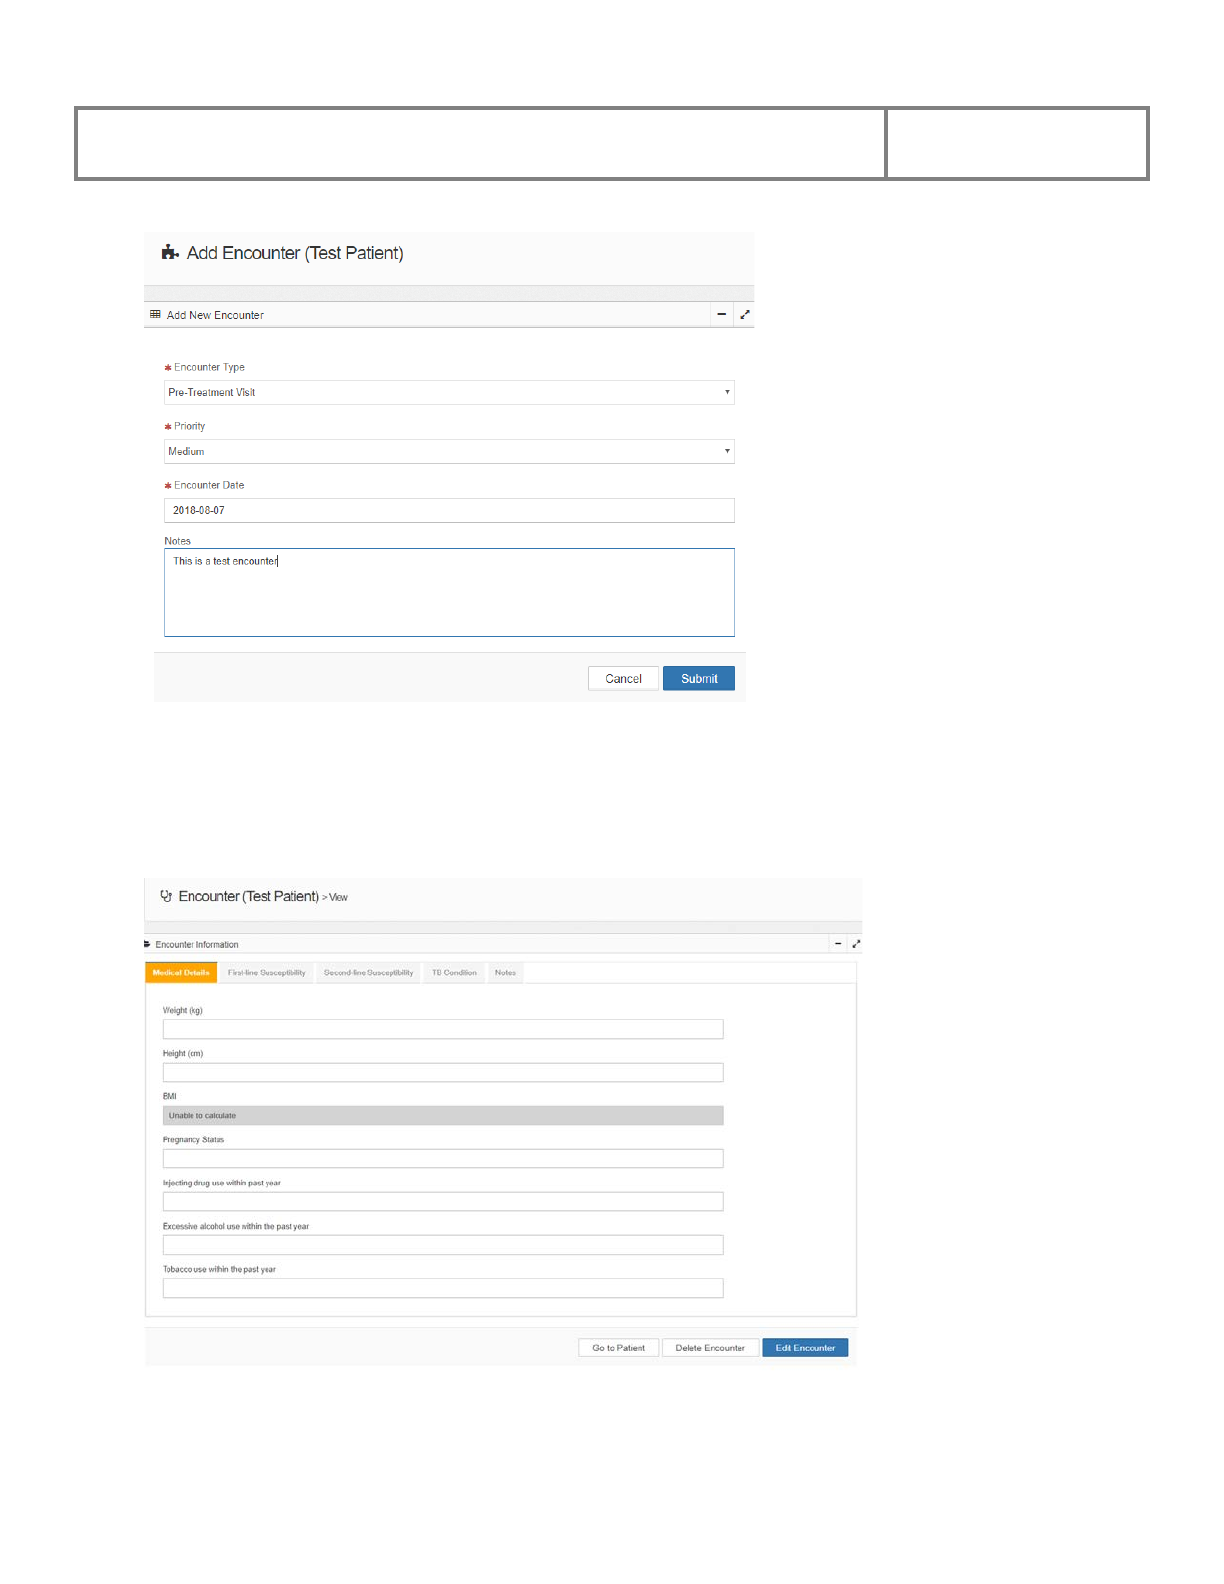
PViMS User Manual
2018
58
• Click the Submit button or click the Cancel button to undo the action and return to the
previous page.
• After clicking the Submit button, the system will display Encounters View page where
you can Add or Edit clinical information obtained during the encounter.

PViMS User Manual
2018
59
Refer to the Encounters Section for details on how to Add or Edit Encounter information. To
return to the Patient View page click the Go to Patient button. The system will display the
Patient View.
4.1.8.6 Patient Status – Read Only
Select the Patient Status Tab to view a history of status changes.
The information in the Status Table is view only, and cannot be updated from this page. A
patient’s status will change from Active to Deceased when the system is updated in the
Condition Group section in the Encounter View (e.g., the patient completed treatment, died, or
lost to follow-up).
PViMS User Manual
2018
60
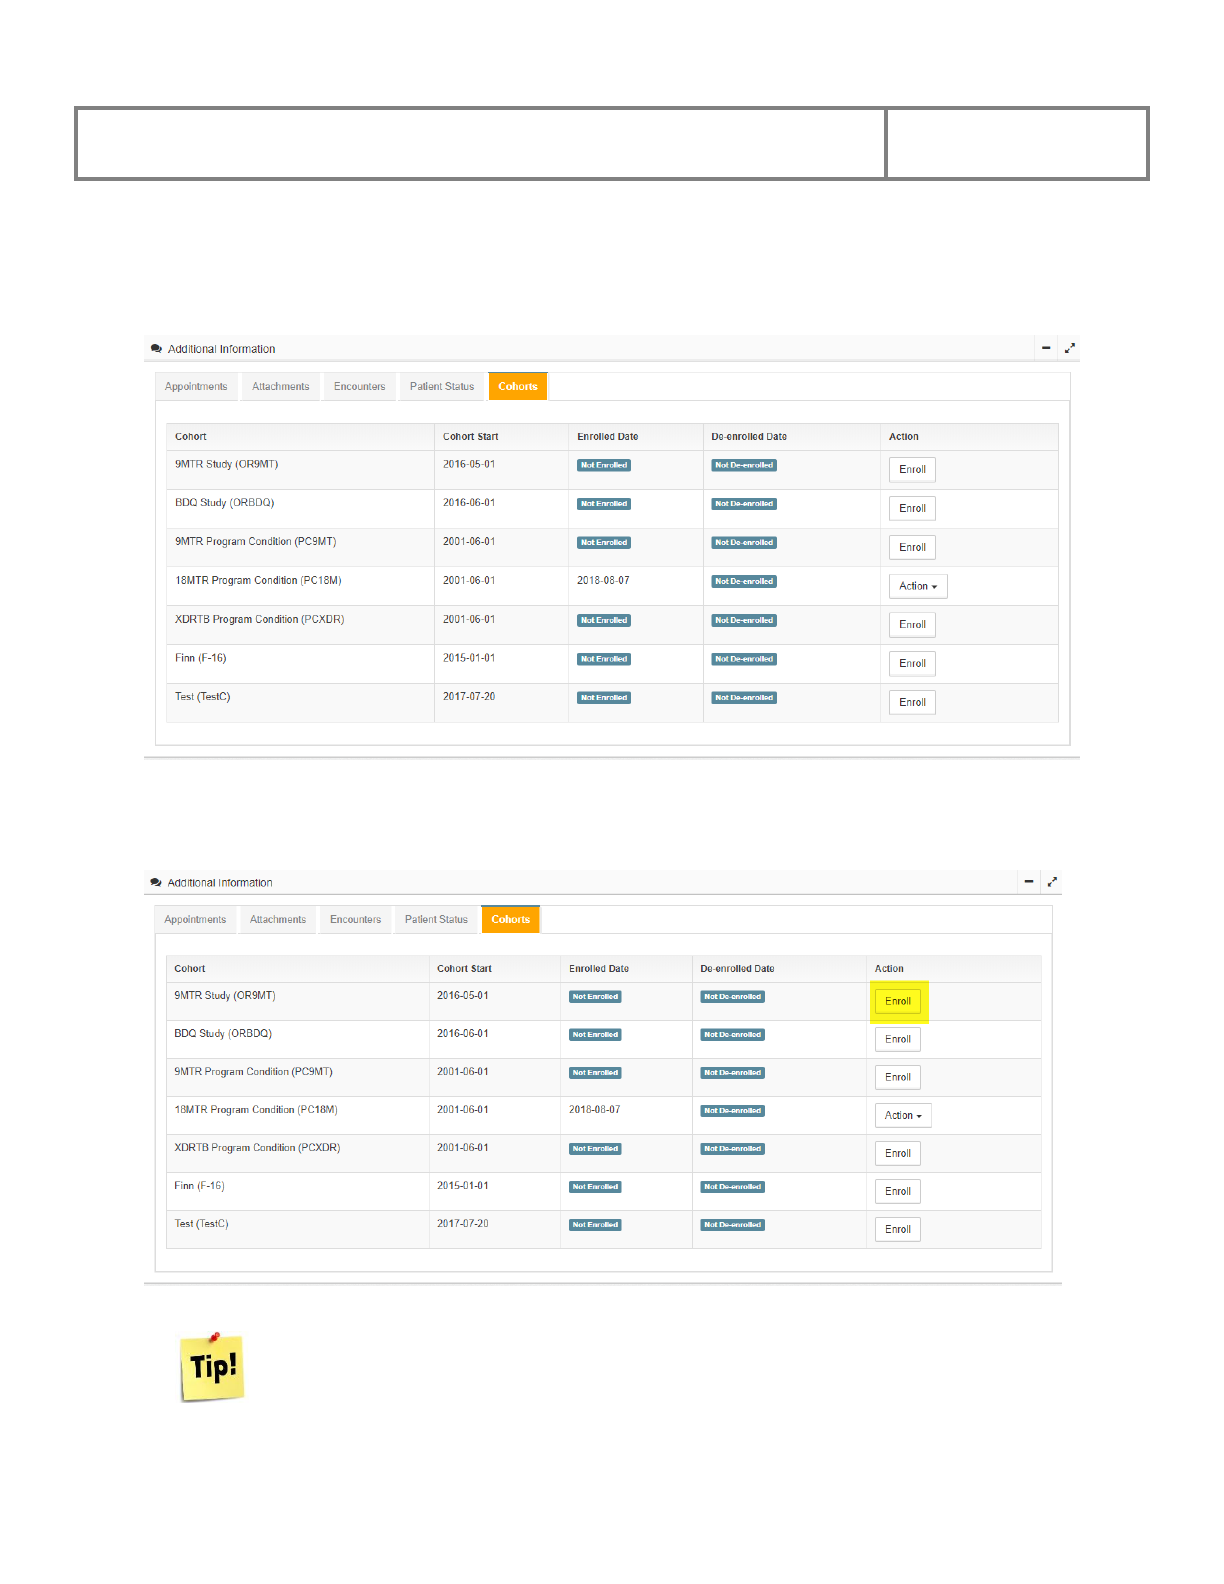
4.1.8.7 Cohort Enrolment
Click the Cohorts tab to a view a list of cohorts that the patient is or can be enrolled into.
To enroll a patient in a cohort, first locate the Cohort in the table. Click the Enroll button in the
action column for the cohort in which to enroll the patient.
You may only enroll the patient into a cohort that is assigned to the same
condition group the patient belongs to. So, for instance, an HIV patient may not
be enrolled into a TB cohort.

PViMS User Manual
2018
61
The system will display a Cohort Enrollment confirmation box (Figure 81).
Enter the date the patient was enrolled in the cohort. Click the Enroll button to confirm or click
the Cancel button to undo the action and return to the previous page.
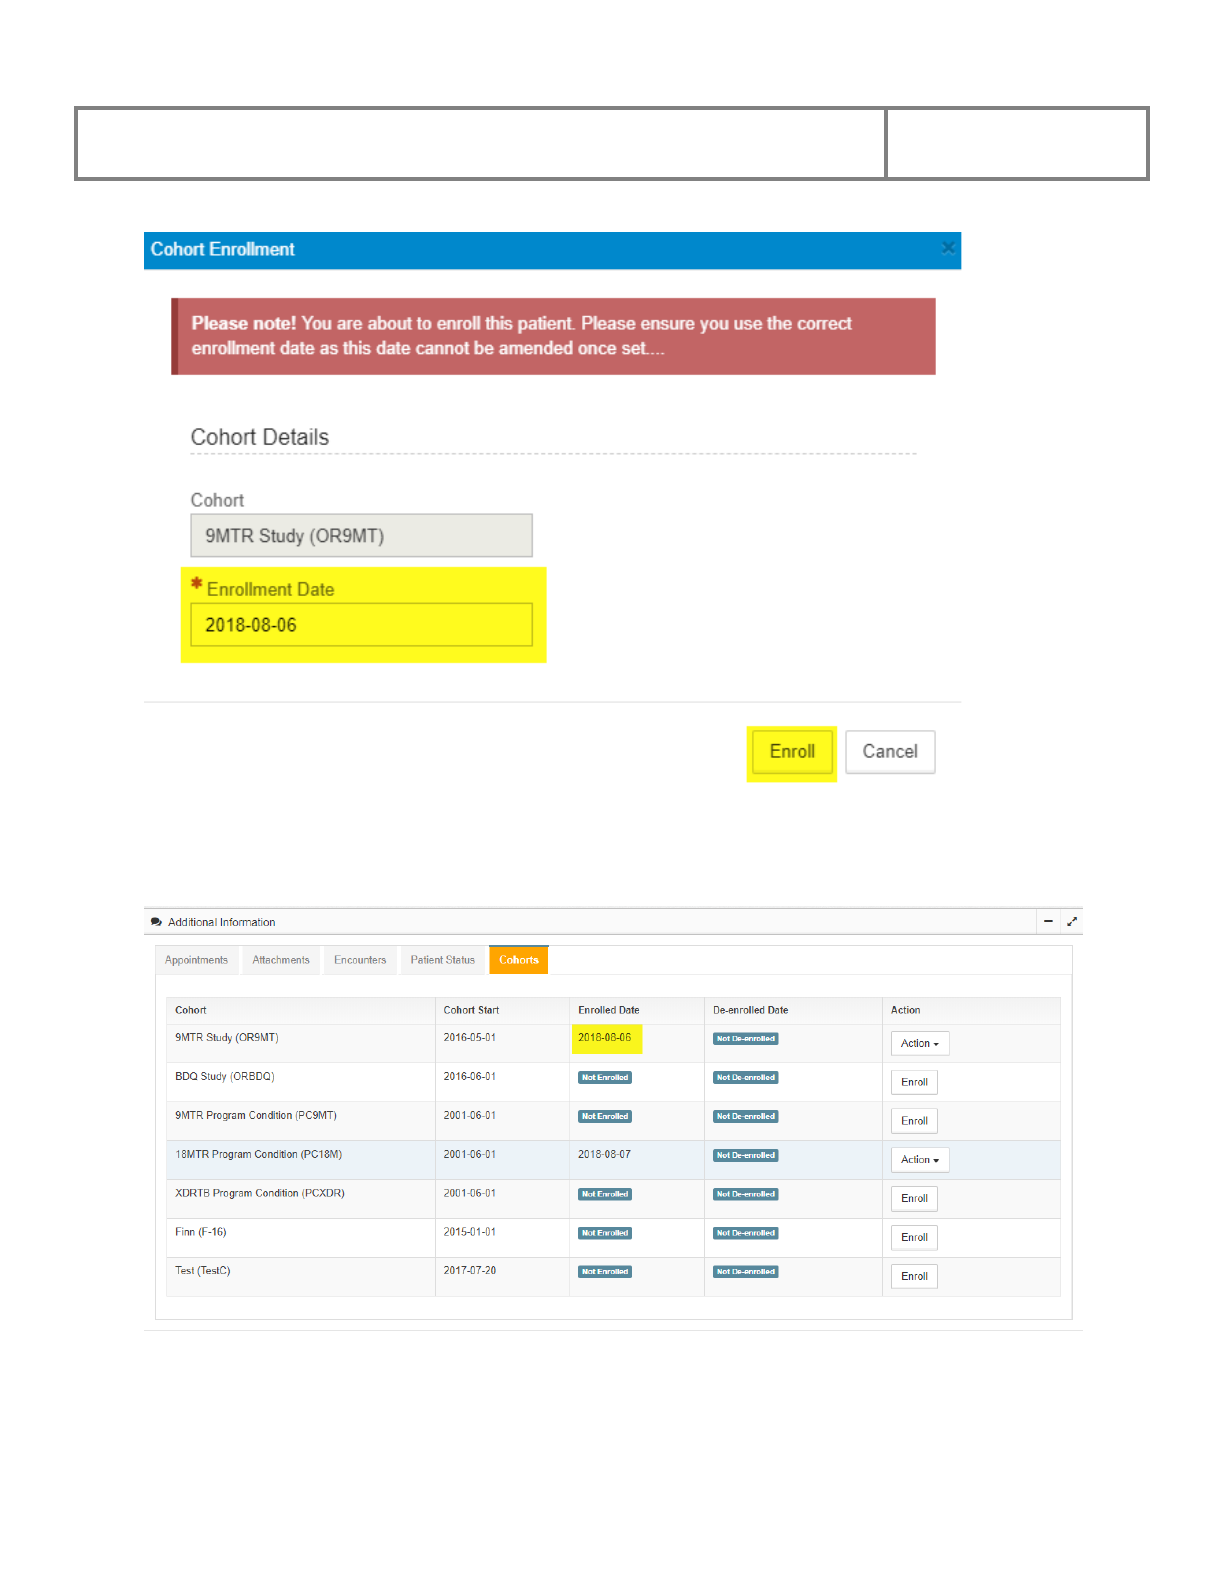
PViMS User Manual
2018
62
After clicking on the enroll button the system will display the updated information in the Cohort
table.
PViMS User Manual
2018
63
4.2 Encounters
4.2.1 Search for an Encounter
The Encounter Search function can be accessed through the Encounters menu.
There are six ways to search for an encounter. You can search by:
● Facility
● Patient Unique ID
● First Name and Last Name
● Criteria
● Date Range
● Custom Attributes
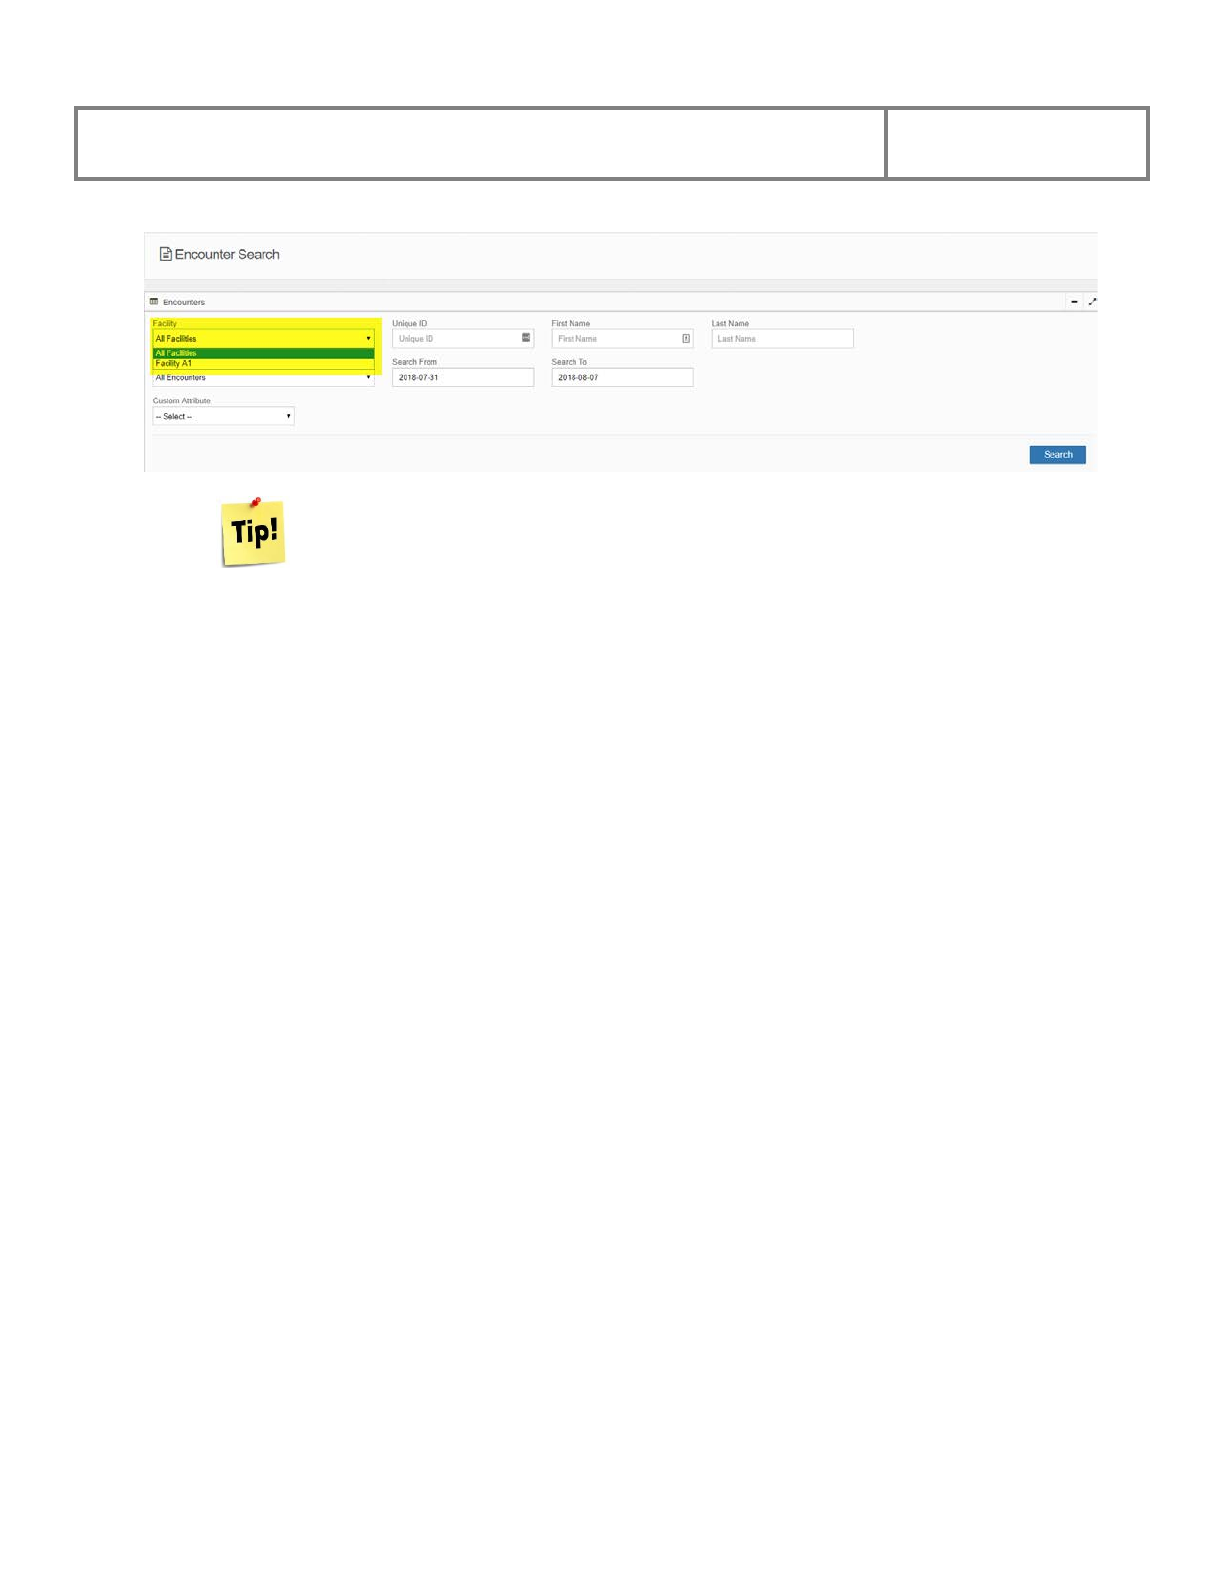
4.2.1.1 Search by Facility
• Click the arrow in the Facility field to select from the facility drop down list.
• Select the facility you would like to search against specifically or select All Facilities if
you would like to search against all facilities.
• Enter the Search From date and the Search To for the date range to search as it is
compulsory to enter a date range.
• Click the Search button.
PViMS User Manual
2018
64
The system will display a list of encounters according to the filter selected.
You will only be able to search facilities that you have been assigned access to.
Please speak to your system administrator if you are unable to search against
the necessary facility.
PViMS User Manual
2018
65
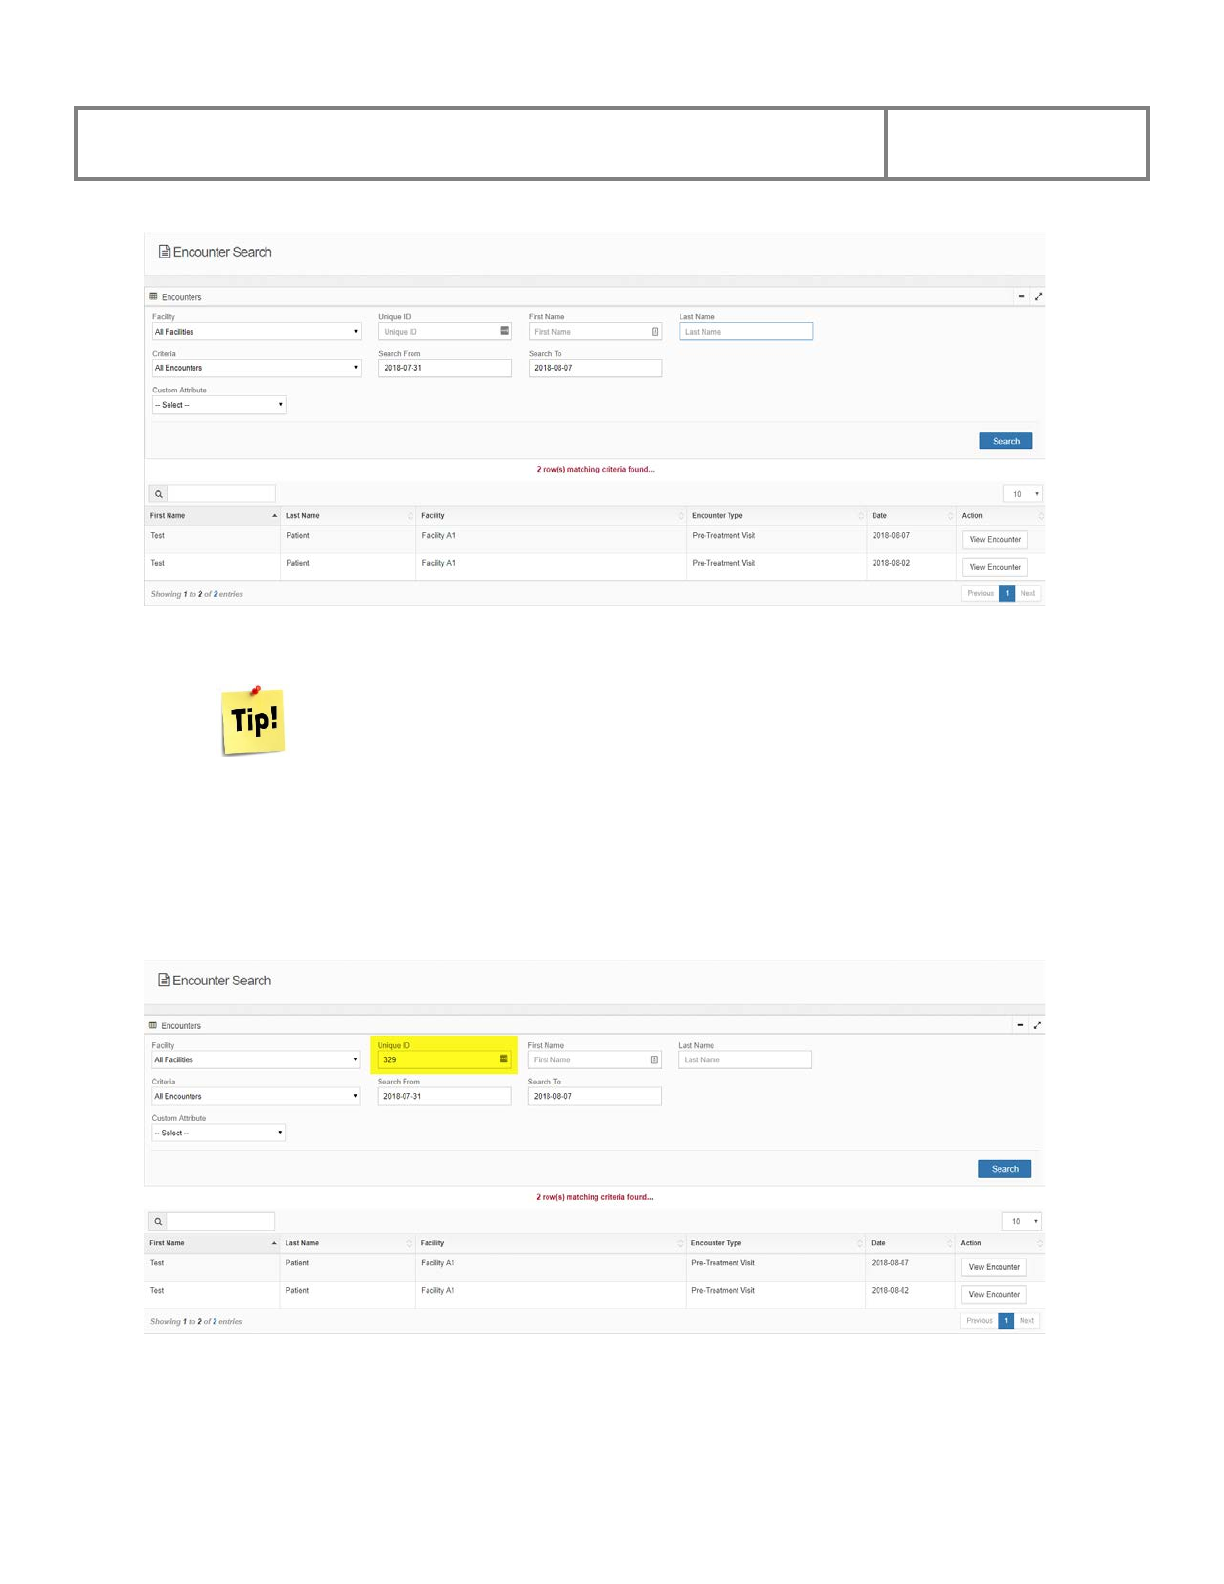
4.2.1.2 Search by Patient Unique ID
• If you know the patient’s unique ID, enter it in the Unique ID field.
• Enter the Search From date and the Search To for the date range to search as it is
compulsory to enter a date range.
• Click the Search button.
Each patient is allocated a unique system ID when they are created in the system.
It is possible to search for any encounters for this patient using this ID.
PViMS User Manual
2018
66
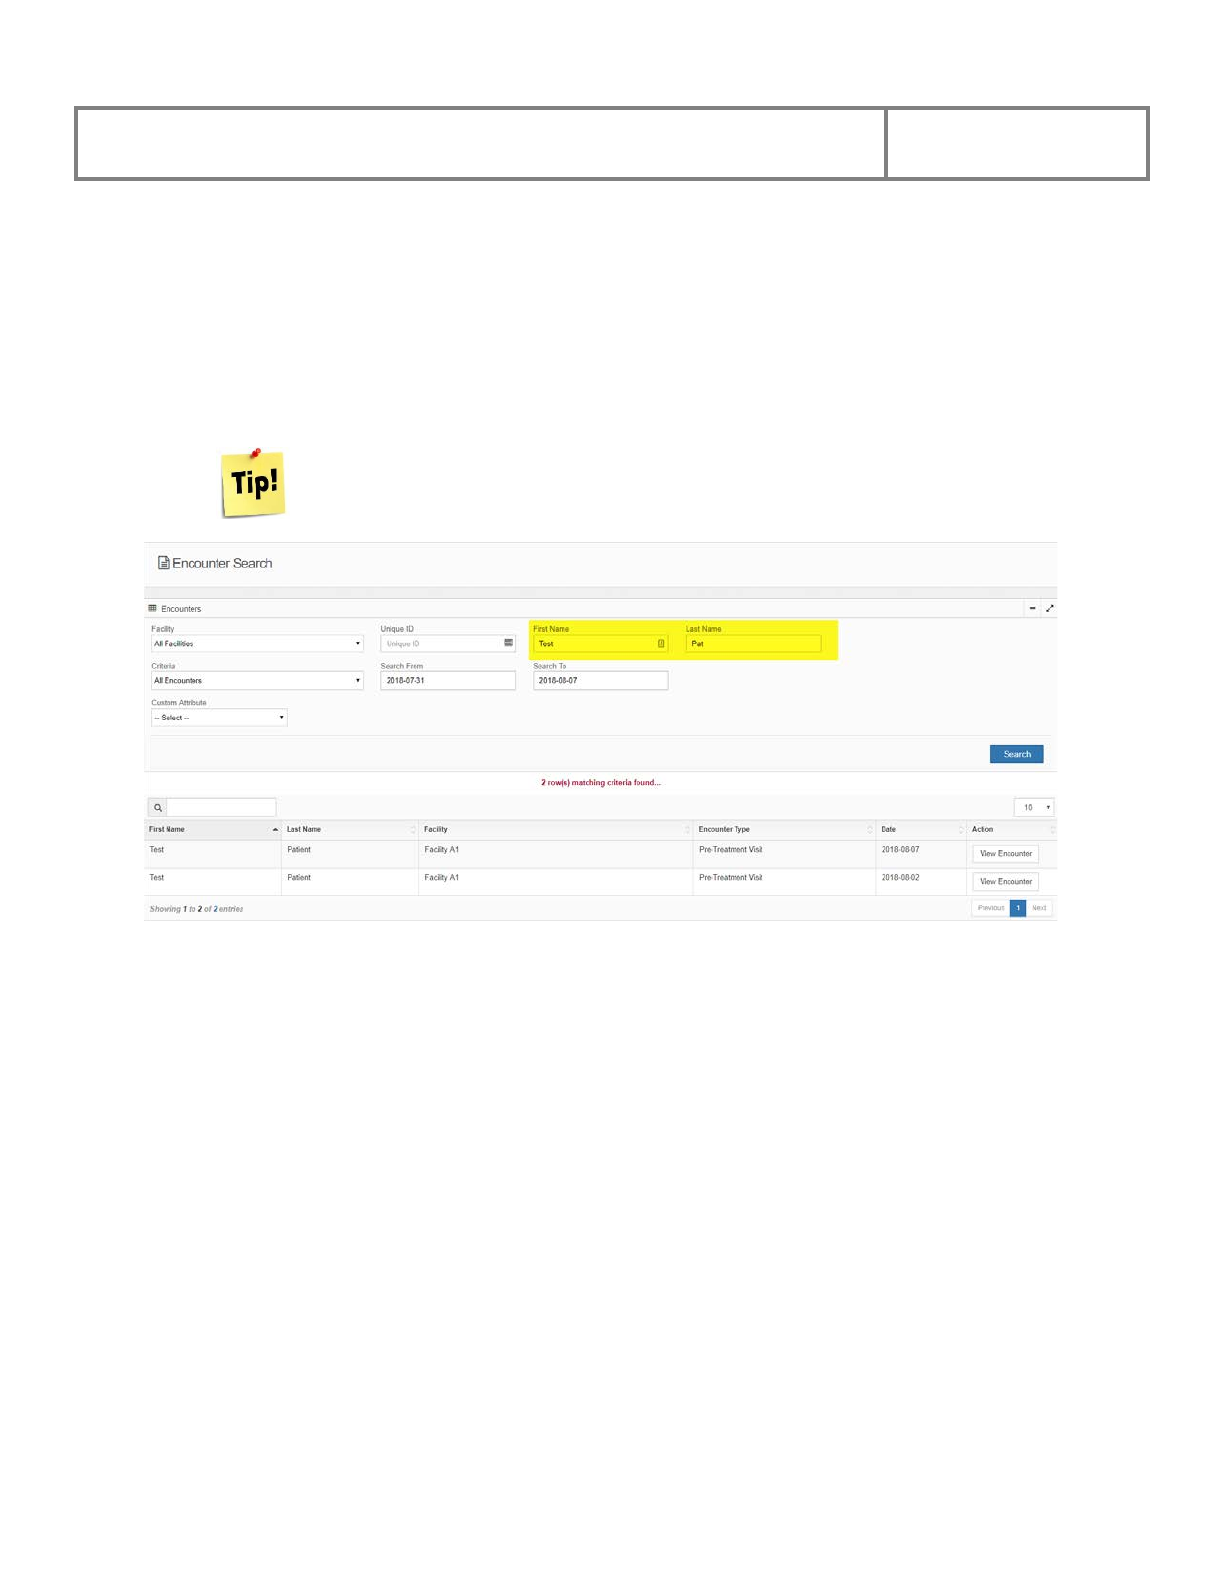
4.2.1.3 Search by First Name or Last Name
• You can also search by the patient’s First name or Last Name. Enter the name(s) in one
or both of these areas.
• Enter the Search From date and the Search To for the date range to search as it is
compulsory to enter a date range.
• Click the Search button.
It is possible to do a partial search by entering the first letters of the First or Last
names. The system will return all matching records if a partial search is executed.
PViMS User Manual
2018
67
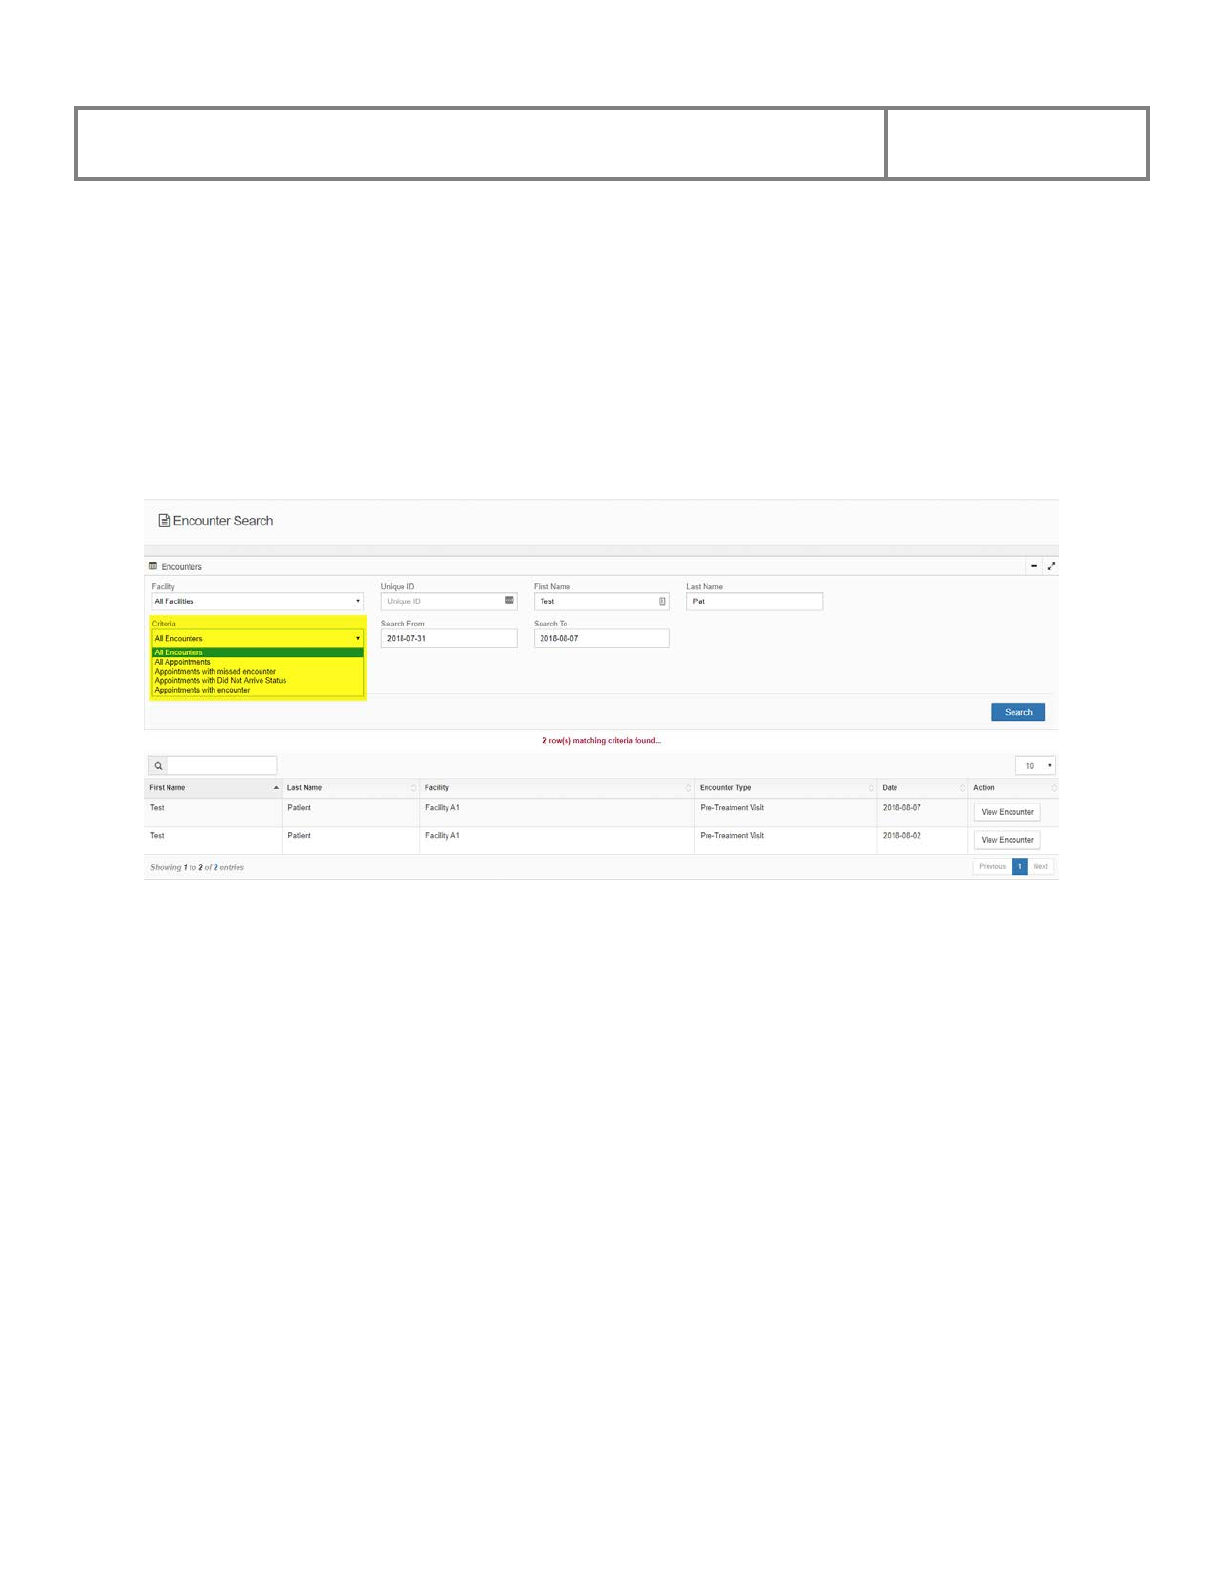
4.2.1.4 Search by Criteria
• You can also search by additional Encounter Criteria. Click the arrow in the Criteria
field. The system will display a list of criteria to choose from. Select the Criteria you
would like to filter on.
• Enter the Search From date and the Search To for the date range to search as it is
compulsory to enter a date range.
• Click the Search button.
PViMS User Manual
2018
68
4.1.4.3 Search by Custom Attribute
The final search filter available is the ability to search by a Custom Attribute.
• Select the custom attribute variable that you would like to search against (e.g., Medical
Record Number).
• Enter the Search From date and the Search To for the date range to search as it is
compulsory to enter a date range.
• Enter the search value you would like to filter against and click the Search button.
Custom attributes can be activated for filtering by the system administrator. Please
consult your administrator if you would like to activate the ability to filter by a
specific attribute.
PViMS User Manual
2018
69
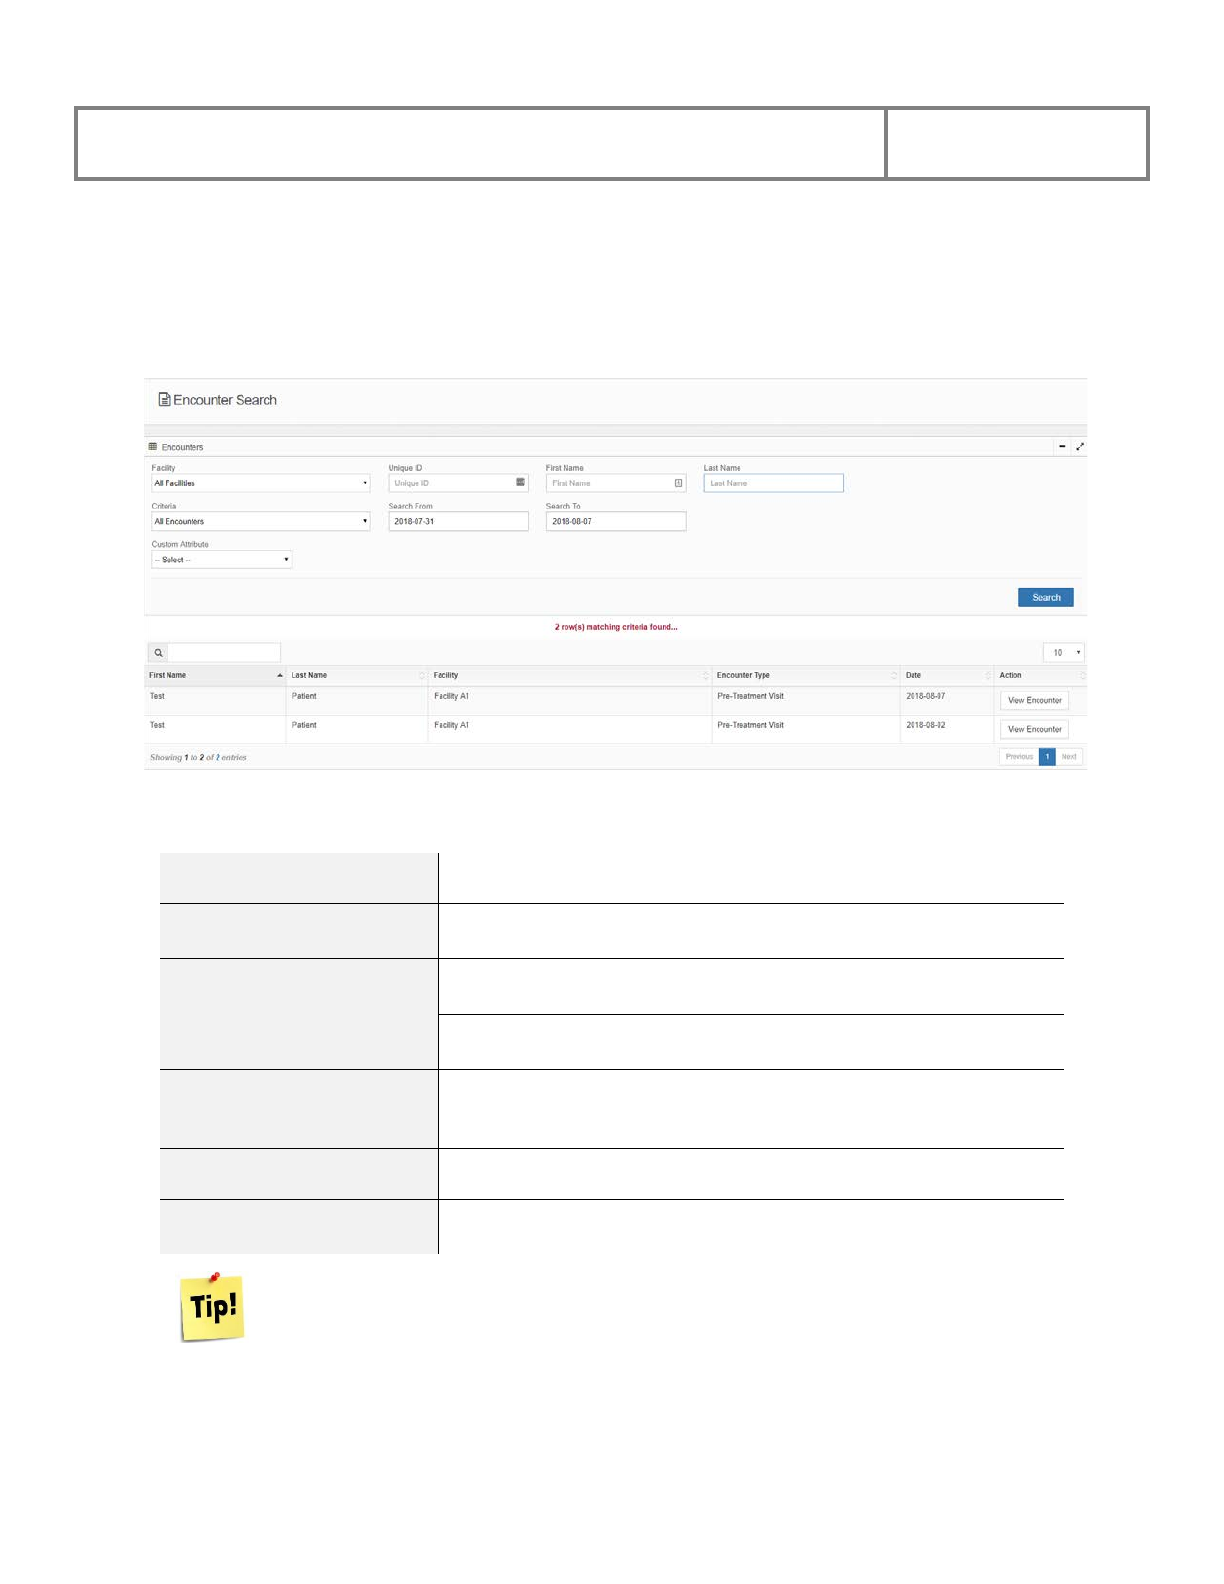
4.2.2 View an Existing Encounter
After selecting the appropriate search filter and clicking the Search button, the system will
present all matches as displayed in a table.
The columns in the encounter table are described below:
ID
Unique encounter ID number assigned by the system
First Name
Patient’s first name
Last Name
Patient’s last name
Facility
Facility where patient is registered
Encounter Type
Type of encounter (e.g., pre-treatment, treatment initiation,
scheduled follow-up or unscheduled visits
Date
Date the encounter occurred
Action
Ability to view the encounter
It is possible to filter the results of a table by entering your additional search criteria in the
search text box at the top of the grid.

PViMS User Manual
2018
70
• To view an encounter entered in the system, locate the encounter in the encounter table.
• Click the View Encounter button in the Action column.
• The system will then open the Encounter View.
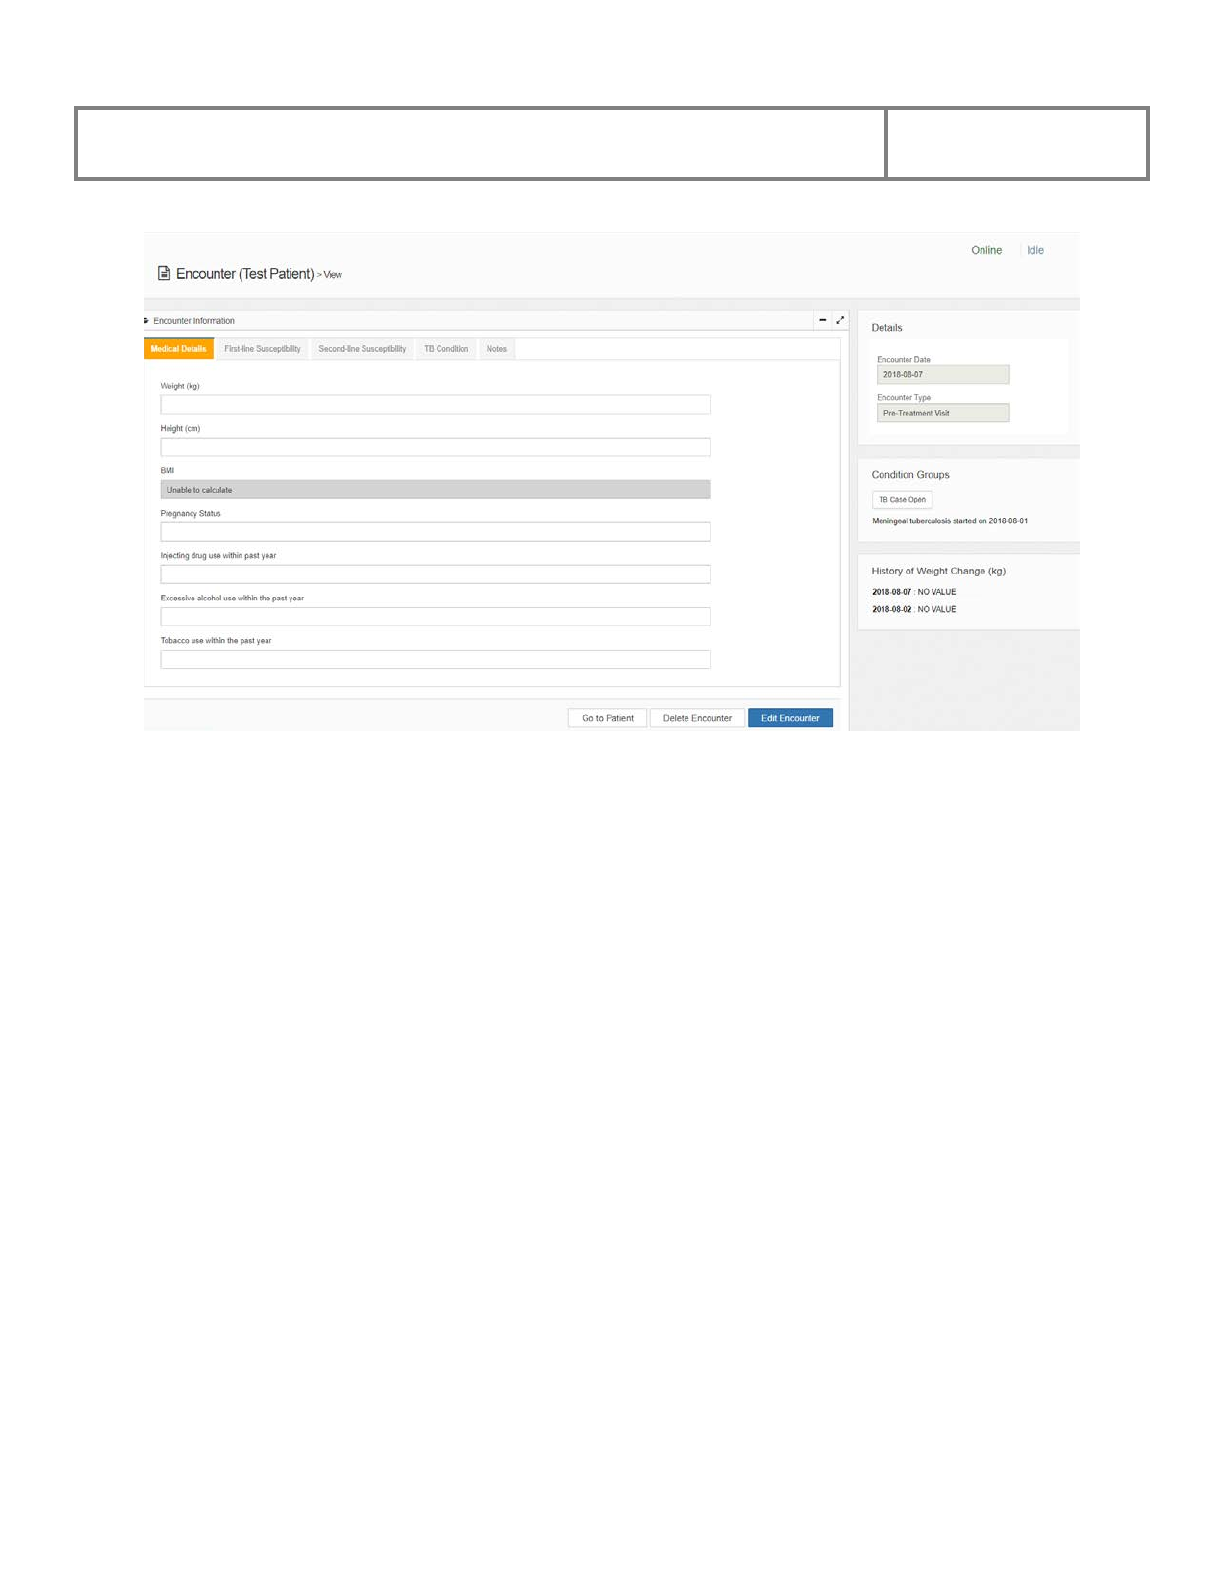
The Encounter View is sub-divided into the following sections:
● Medical Details
● First-Line Susceptibility
● Second-Line Susceptibility
● TB Condition
● Notes
Medical Details and Notes tabs will be displayed for each patient.
TB Condition, First-Line Susceptibility, and Second-Line Susceptibility tabs will only
appear for patients in the TB Condition Group as they are specific to tuberculosis.
The system administrator is responsible for managing the Condition Group specific tabs.
PViMS User Manual
2018
71
PViMS User Manual
2018
72
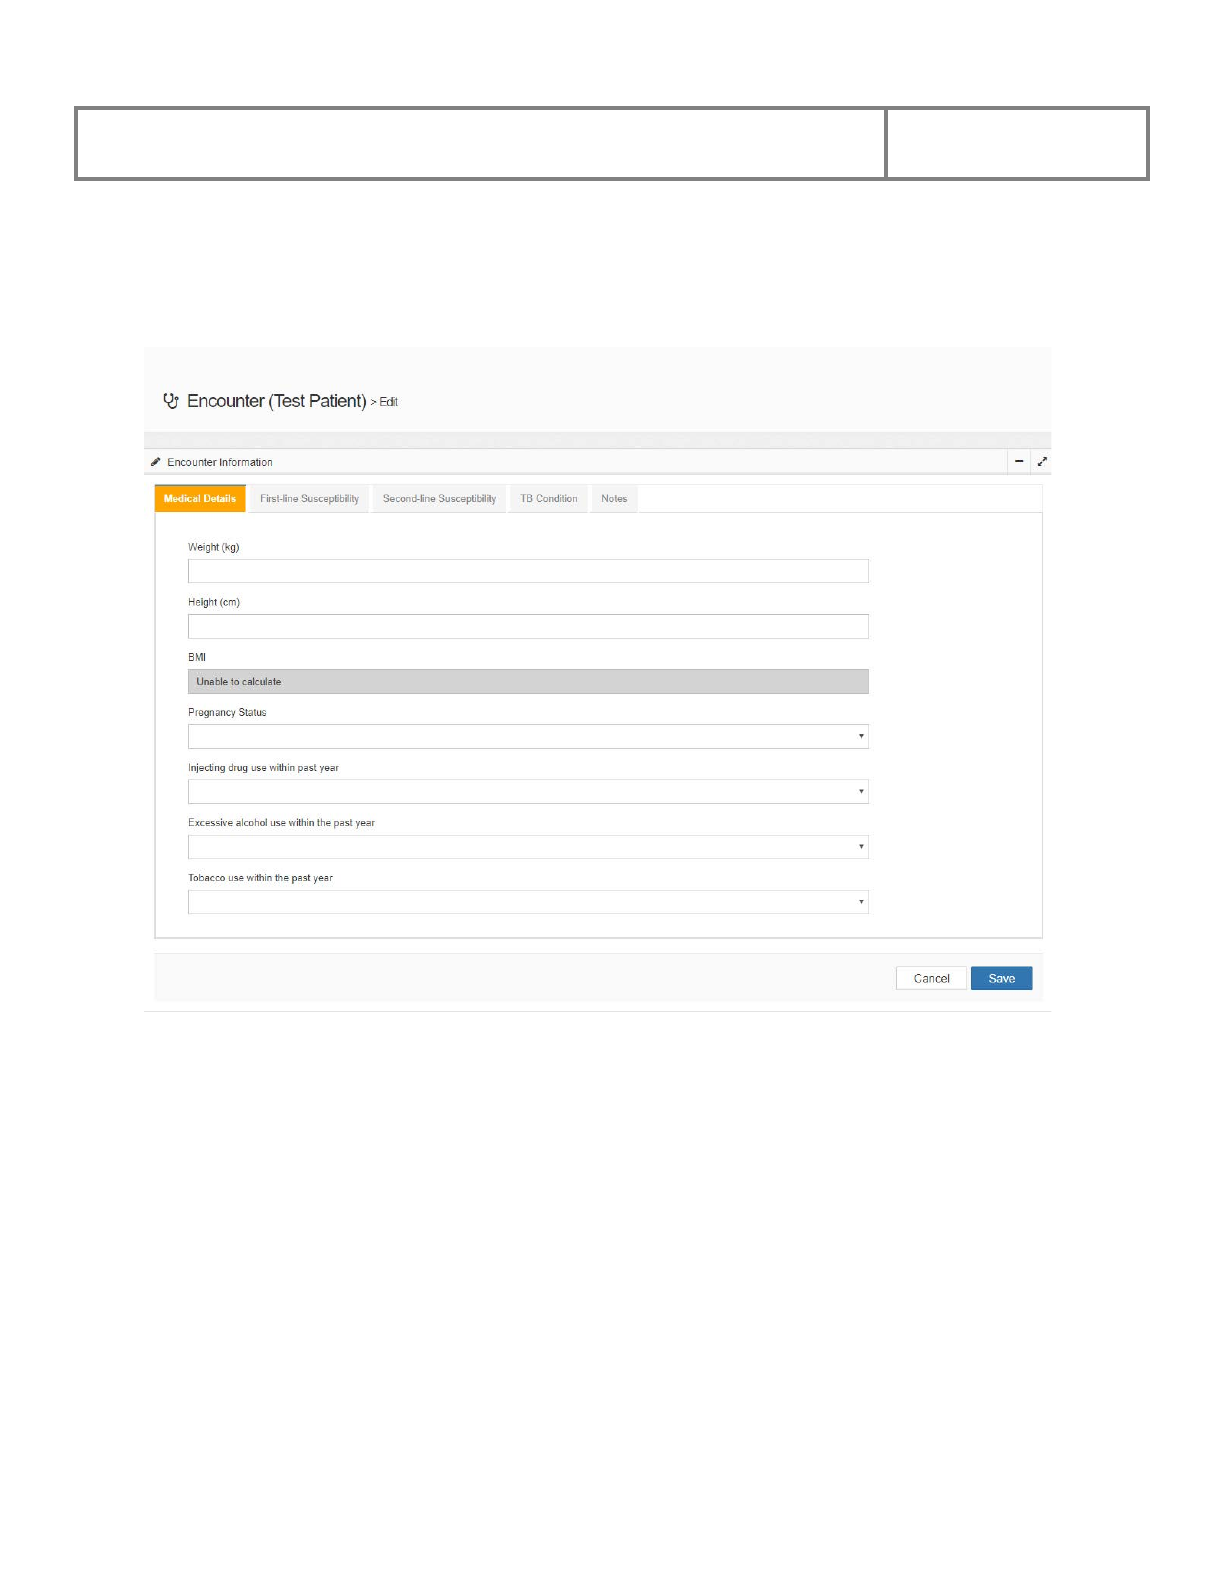
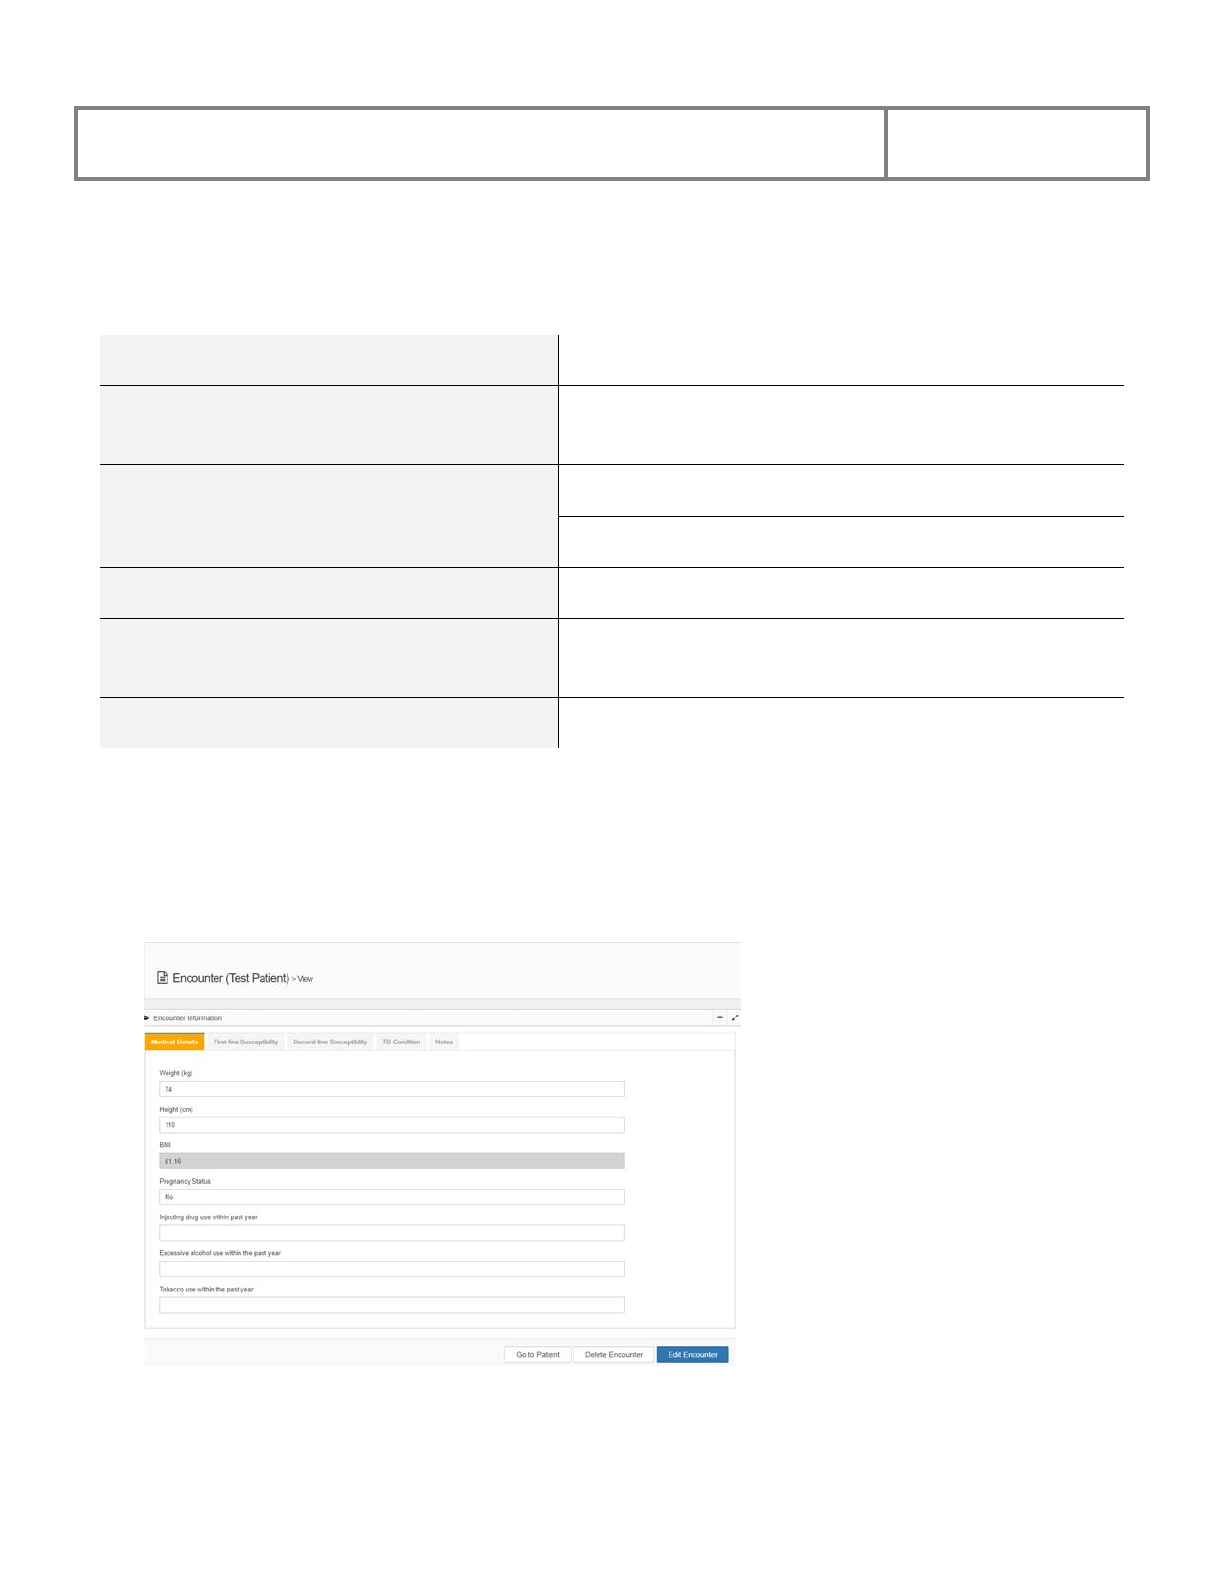
4.2.3 Add or Edit Encounter Information
To edit Encounter Information, click the Edit Encounter button to change this view into edit
mode.
PViMS User Manual
2018
73
4.2.3.1 Medical Details
Fields on the Medical Details page are described below:
Weight
Numeric field to enter the patient’s weight in kilograms
Height
Numeric field to enter the patient’s height in
centimeters
BMI
Auto-calculated by the system
Pregnancy Status
Dropdown list to indicate yes, no, uncertain or NA
Injecting Drug Use Within The Past Year
Dropdown list to indicate yes, no, or unknown
Excessive Alcohol Use Within The Past
Year
Dropdown list to indicate yes, no, or unknown
Tobacco Use Within The Past Year
Dropdown list to indicate yes, no, or unknown
Add or Edit information on the page as appropriate. After all changes have been made, click the
Save button to continue or click the Cancel button to undo the action and go back to the previous
page.
After clicking the Save button, the system will update the Medical Details page.
PViMS User Manual
2018
74
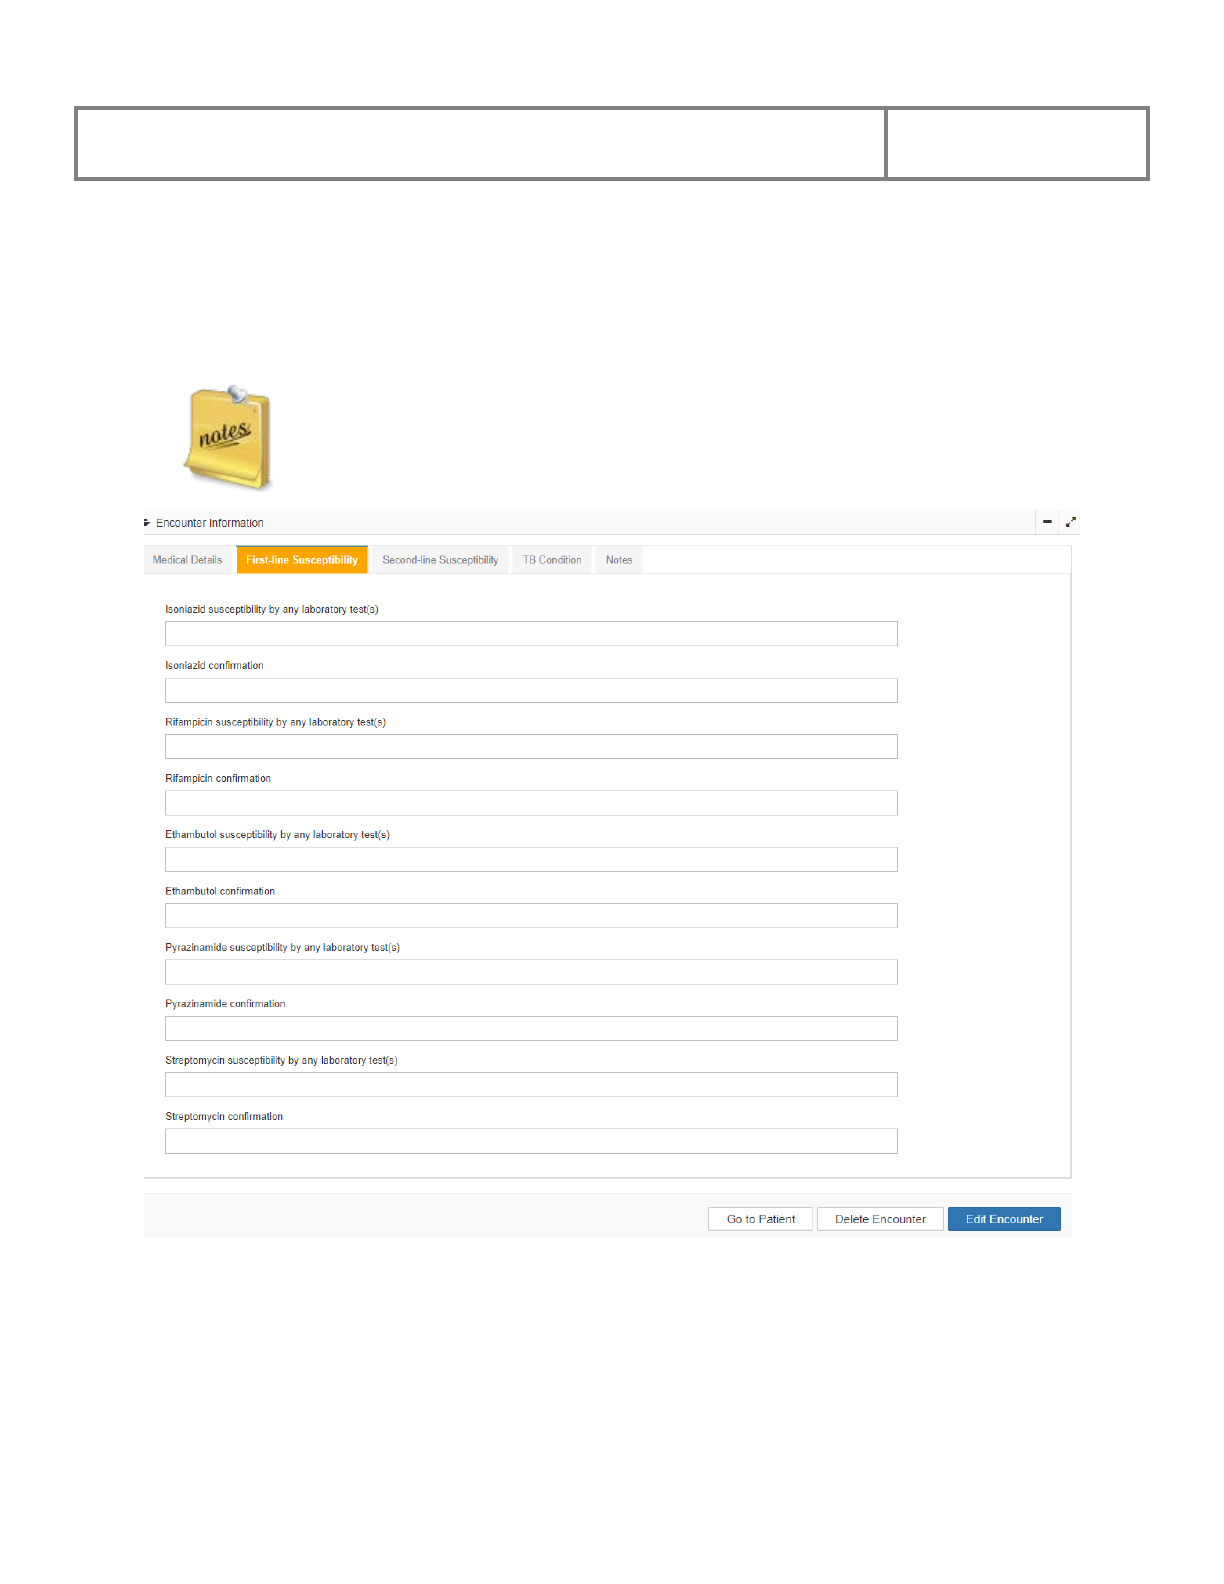
4.2.3.2 First-line Susceptibility
Select the First-line Susceptibility tab, after which the system will display clinical data related
to determining susceptibility for first-line drugs.
TB Condition, First-Line Susceptibility, and Second-Line Susceptibility tabs will only
appear for patients in the TB Condition Group as they are specific to tuberculosis.
Fields on the First-line Susceptibility page for each medicine are described below:

PViMS User Manual
2018
75
Medicine susceptibility by any
laboratory test(s)
Dropdown list of test results; Indeterminate, Resistant,
Susceptible, Unknown
Medicine confirmation
Dropdown list of diagnostic tools; LPA, Unknown,
Xpert, DST
Add information or make changes to the fields on the page as appropriate. Click the Save button
to continue or click the Cancel button to undo the action and return to the previous page.
After clicking the Save button the system will update the First-line Susceptibility page
accordingly.
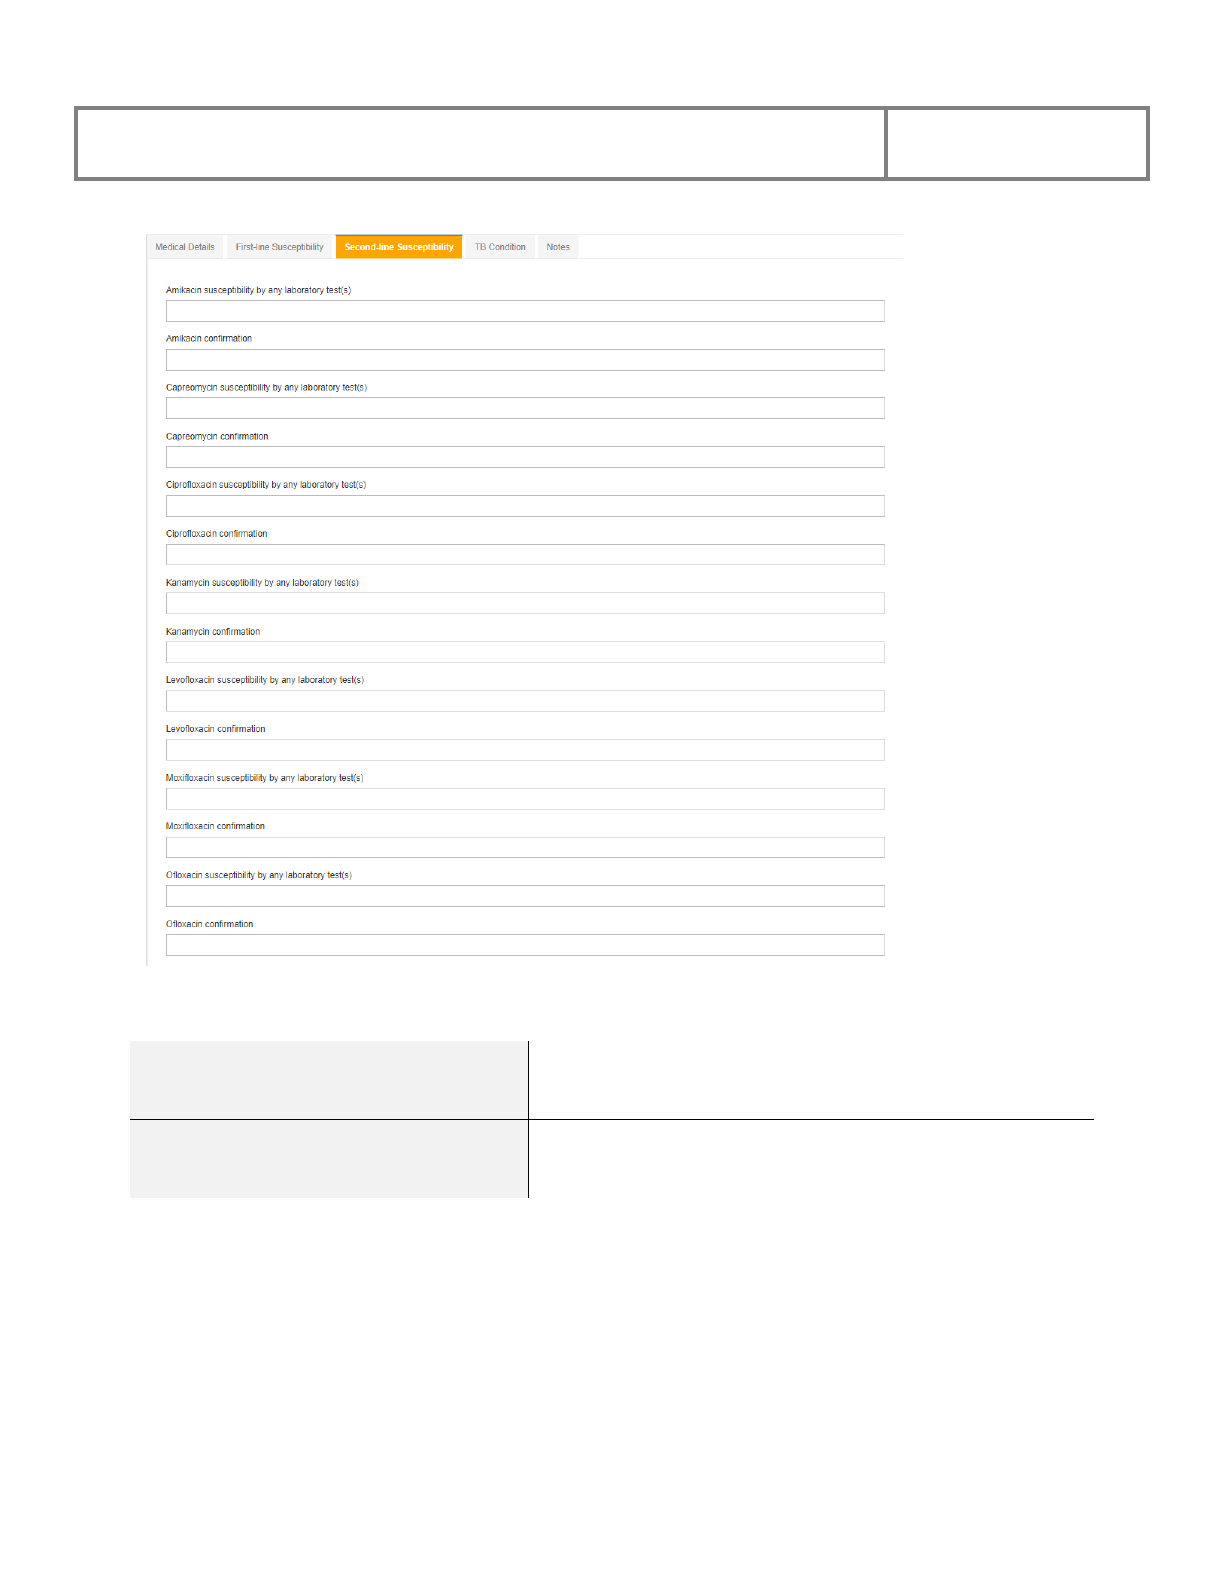
4.2.3.3 Second-line Susceptibility
Select the Second-line Susceptibility tab, after which the system will display clinical data
related to determining susceptibility for second-line drugs.
TB Condition, First-Line Susceptibility, and Second-Line Susceptibility tabs
will only appear for patients in the TB Condition Group as they are specific to
tuberculosis.
PViMS User Manual
2018
76
Fields on the Second-line Susceptibility page for each medicine are described below:
Medicine susceptibility by any
laboratory test(s)
Dropdown list of test results; Indeterminate, Resistant,
Susceptible, Unknown
Medicine confirmation
Dropdown list of diagnostic tools; LPA, Unknown,
Xpert, DST
Add information or make changes to the fields on the page as appropriate. Click the Save button
to continue or click the Cancel button to undo the action and return to the previous page.
After clicking the Save button the system will update the Second-line Susceptibility page
accordingly.

PViMS User Manual
2018
77
4.2.3.4 TB Condition
Select the TB Condition tab, after which the system will display clinical data related to TB.
TB Condition, First-Line Susceptibility, and Second-Line Susceptibility tabs will only
appear for patients in the TB Condition Group as they are specific to tuberculosis.
Fields on the TB Conditions page are described below:
Previous TB treatment?
Dropdown list of responses; No, Unknown, Yes
Site of TB
Dropdown list of anatomical sites
Documented HIV infection
Dropdown list of responses; No, Unknown, Yes
Add information or make changes to the fields on the page as appropriate. Click the Save button
to continue or click the Cancel button to undo the action and return to the previous page.
After clicking the Save button the system will update the TB Conditions page accordingly.
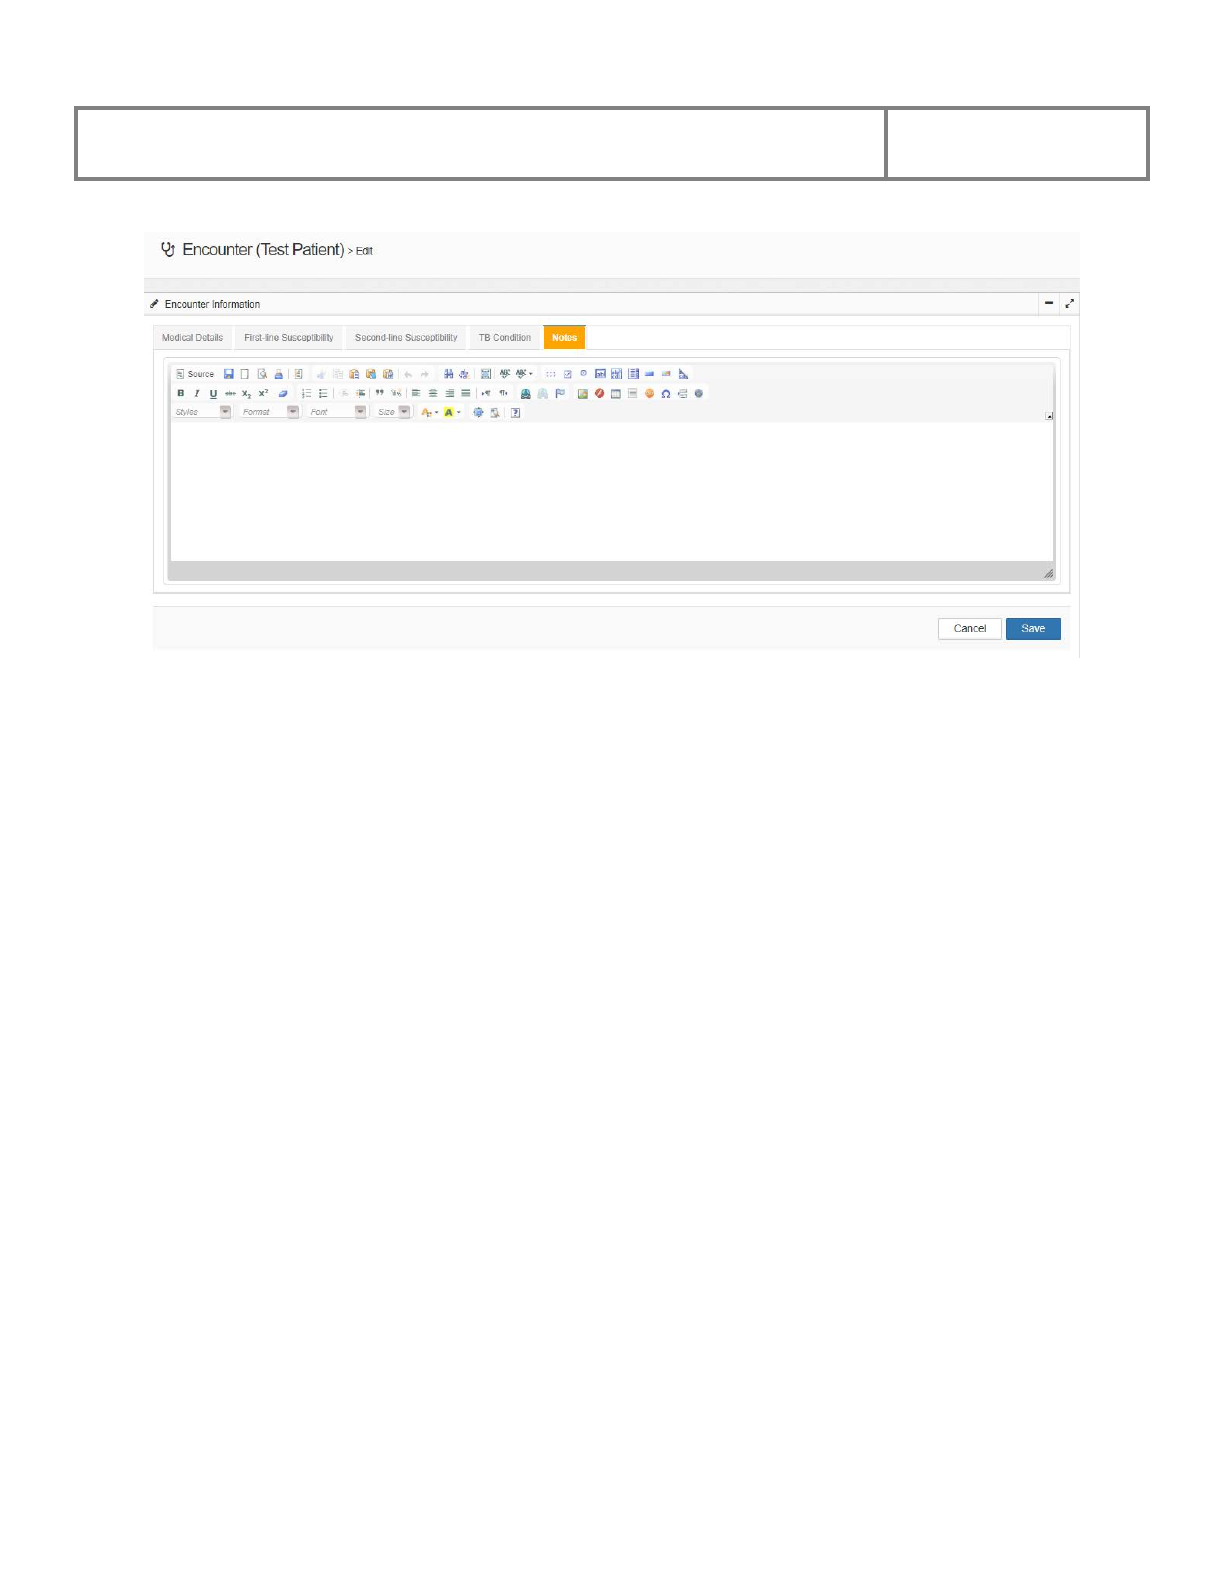
4.2.3.5 Notes
Select the Notes tab, after which the system will display the free format notes field for this
patient’s encounter.
PViMS User Manual
2018
78
Add information or make changes to the notes as appropriate. Click the Save button to continue
or click the Cancel button to undo the action and return to the previous page.
After clicking the Save button the system will update the Notes page accordingly.

PViMS User Manual
2018
79
4.2.4 Add or Edit Clinical Information
The Clinical Information section is divided into four tabs:
● Patient Conditions
● Adverse Events
● Patient Medication
● Tests and Procedures
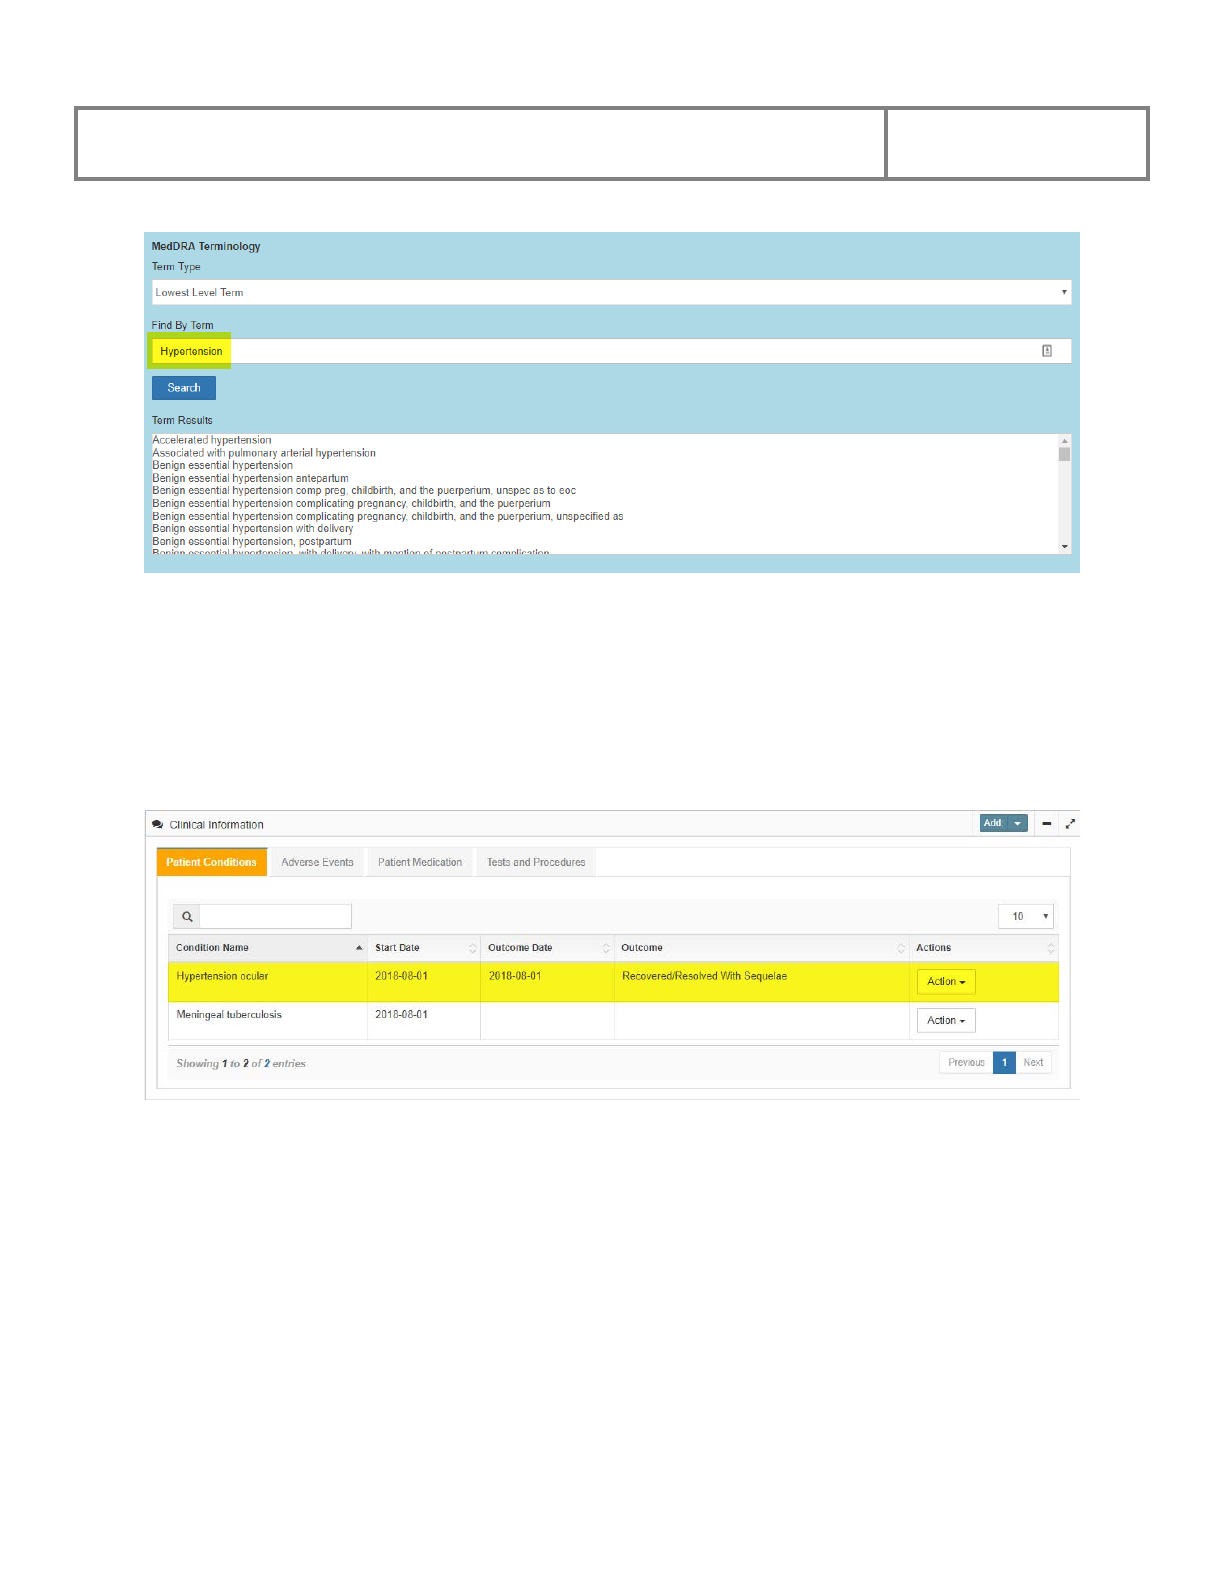
4.2.4.1 Add Patient Condition
At the Patient Conditions tab click the Add Patient Condition button, after which the system
will open the Add Patient Condition page.
Enter the condition name in the Find By Term field. Click the Search button and the system
with then provide a list of Term Results from the MedDRA dictionary that match the term that
you have searched on.
PViMS User Manual
2018
80
● Select the corresponding term.
● Enter the Condition Start Date and complete the remaining fields as appropriate.
● Click the Submit button to create the condition, or click the Back button to cancel the
action and go back to the previous page.
• After clicking on Submit the system will display the updated the table under the Patient
Conditions tab.
PViMS User Manual
2018
81
The fields on the Add Patient Condition page are described below:
Term Type
Dropdown list of MedDRA term hierarchy; Lowest
level term, Preferred term, High level term, High level
group term, or System organ class
Find By Term
Text field; Enter name of condition
Term Results
System generated list; Select appropriate term
Condition Start Date
Text field; Enter date condition started
Condition Outcome
Dropdown list of Outcomes; Select either Fatal, Not
Recovered/Not Resolved, Recovered/Resolved,
Recovered/Recovered with Sequelae,
Recovering/Resolving, or Unknown
Condition Outcome Date
Text field; Enter condition outcome date
Treatment Outcome
Dropdown list of Outcomes; Select either Cured, Died,
Lost to Follow-up, Not evaluated, Treatment
Completed, or Treatment Failed
Comments
Text field; Enter comments about the condition not
captured on the page
Condition Ongoing
Dropdown list of options; Select either No, Unknown,
or Yes
PViMS User Manual
2018
82
The Term Type field displays the level of MedDRA hierarchy terms (from very general to
very specific) to display. The table below describes the five levels.
Level
Example
System Organ Class
Gastrointestinal Disorders
High Level Group
Term
Gastrointestinal Signs and
Symptoms
High Level Term
Nausea and Vomiting Symptoms
Preferred Term
Nausea
Lowest Level Term
Feeling Queasy
At the most specific level, called “Lowest Level Terms” (LLTs), there are more than 70,000
terms that parallel how information is communicated. These LLTs reflect how an observation
might be reported in practice. This level directly supports assigning MedDRA terms within
the PViMS database.
When the new condition is a Condition Group Term, a corresponding Condition Group button
will appear in the encounter view.
PViMS User Manual
2018
83
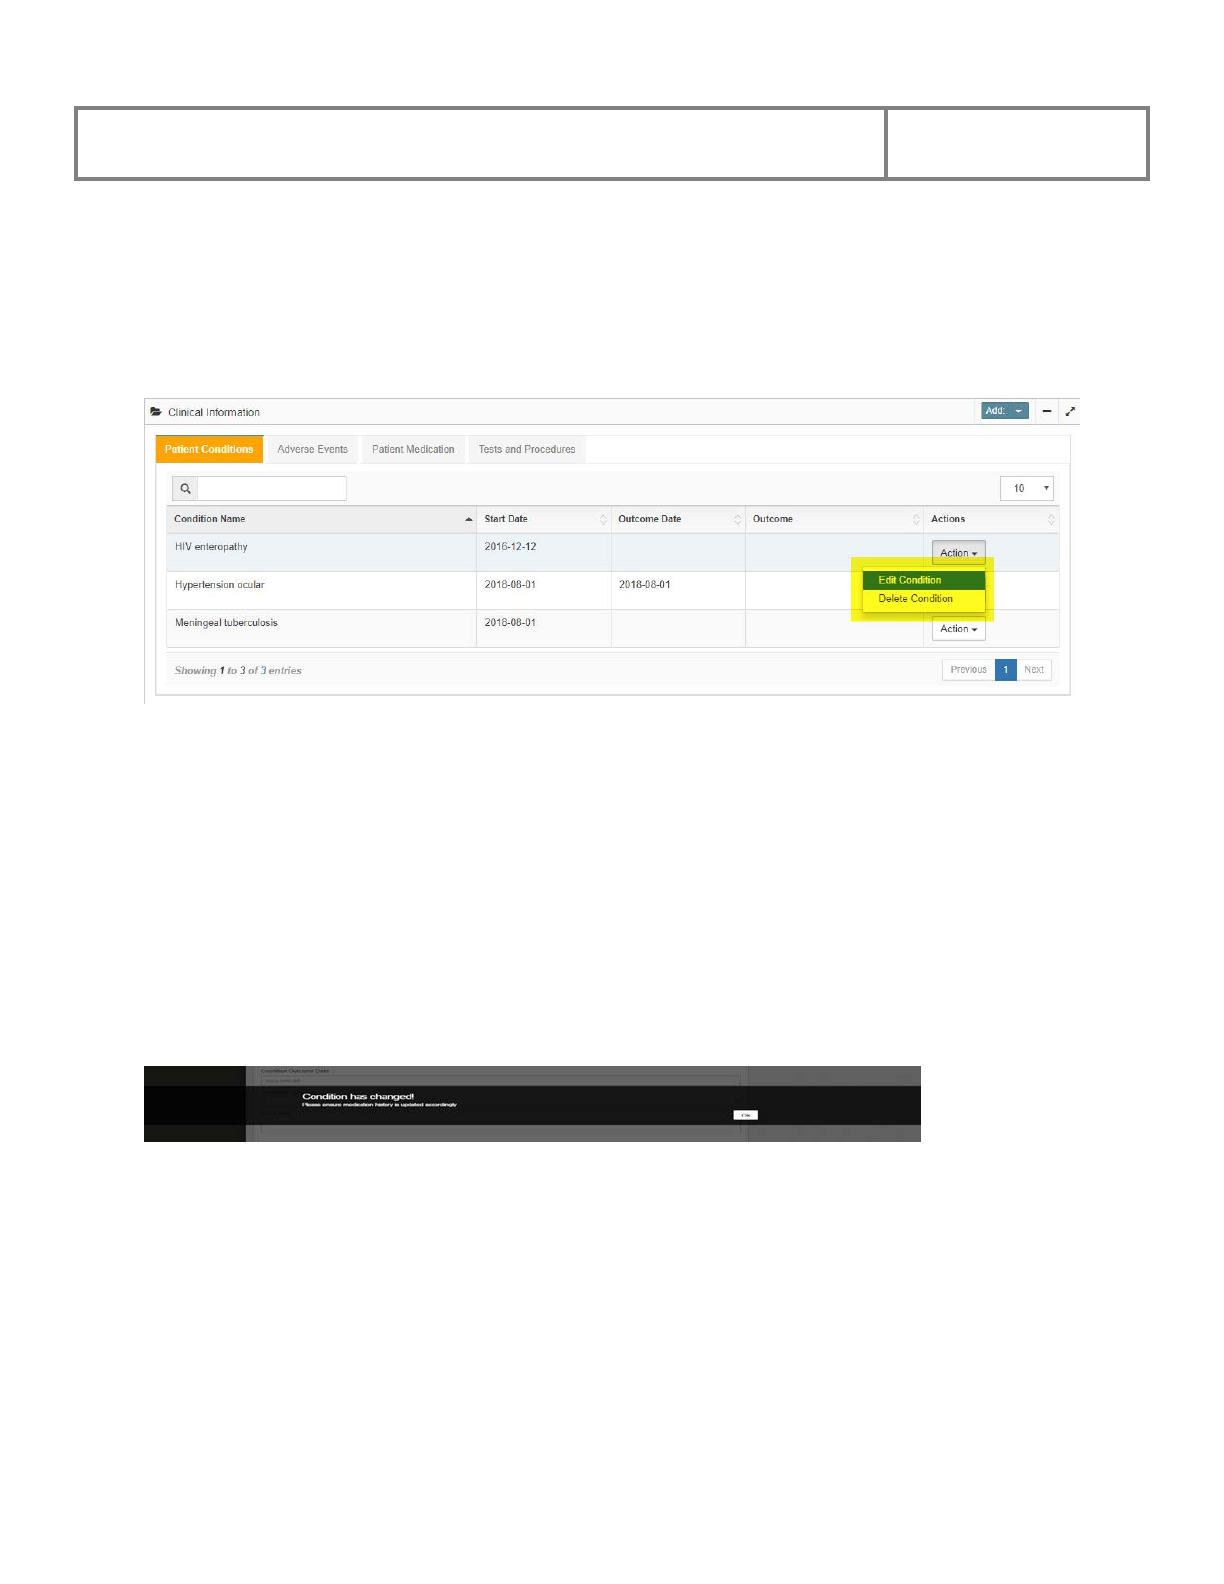
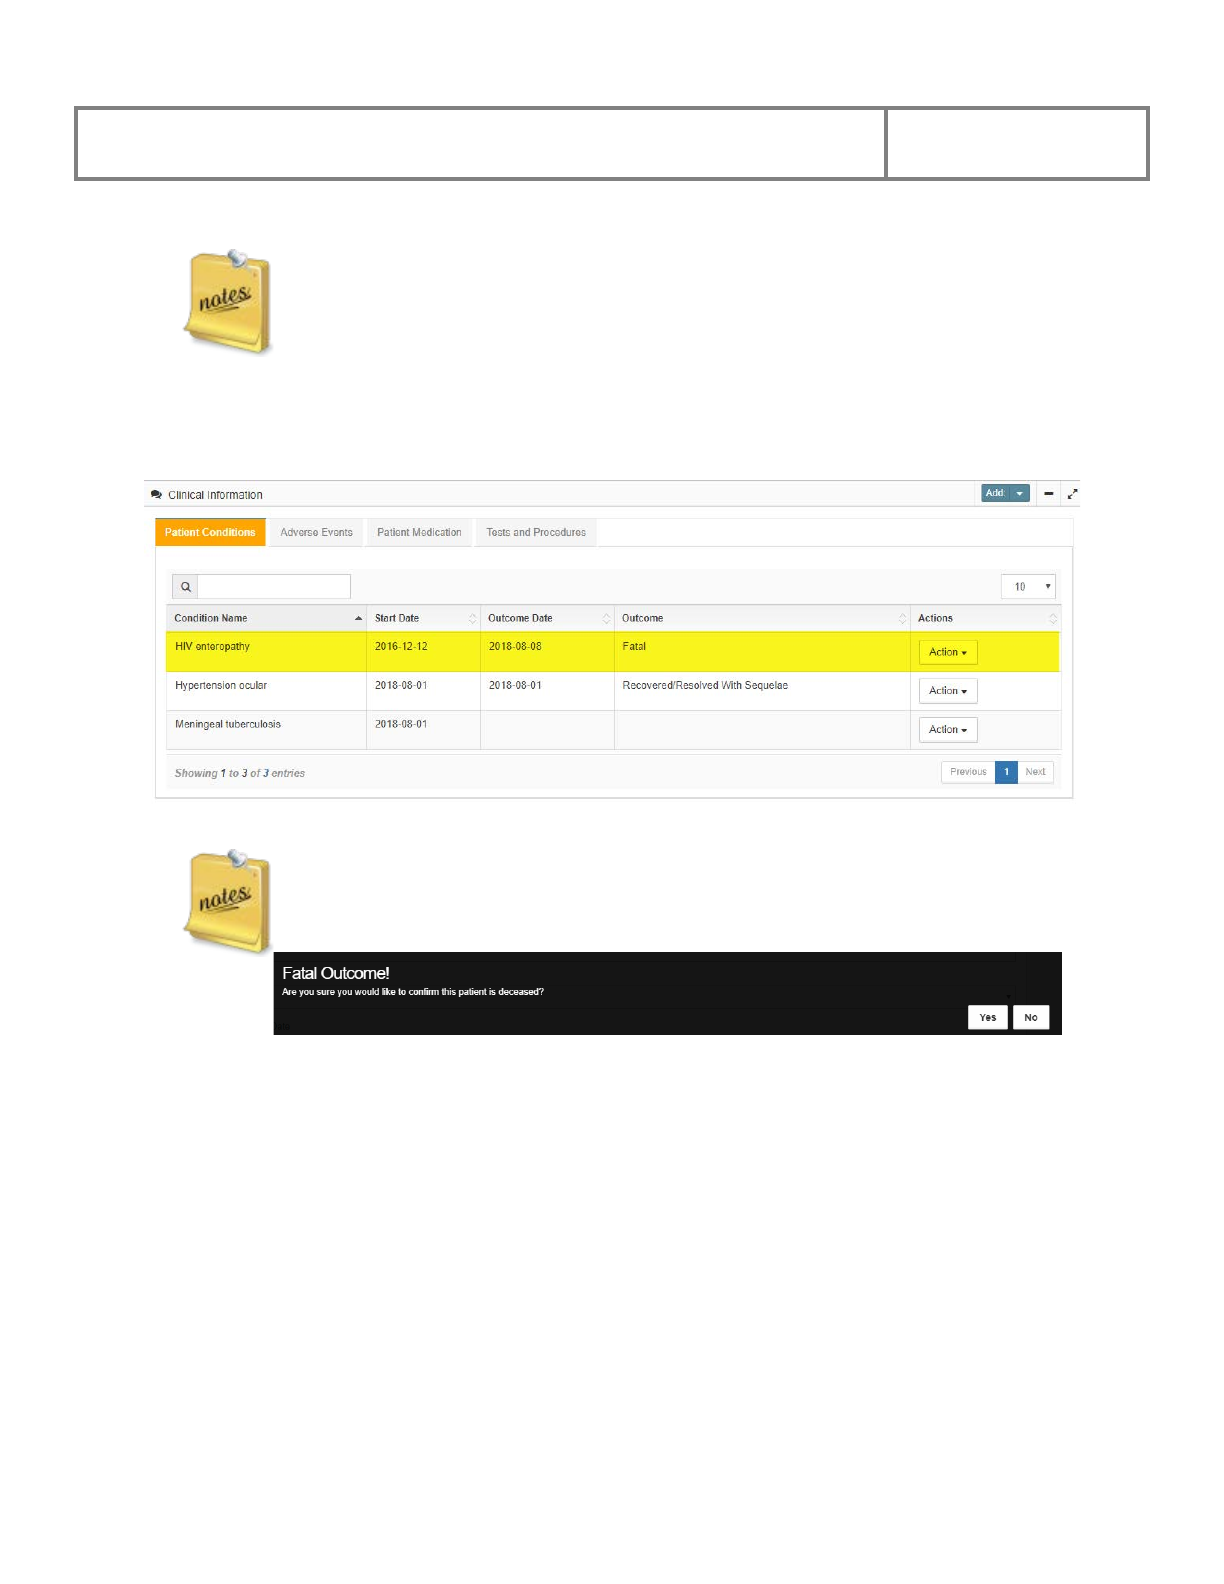
4.2.4.2 Edit a Patient Condition
At the patient’s Encounter View page, start on the Patient Condition tab, find the condition to
edit in the Patient Condition Table and click the Edit button. The system will display the
patient’s Edit Condition page.
Add information or make changes to the page Condition Start Date, Condition Outcome,
Treatment Outcome, Comments, or Condition Ongoing fields as appropriate.
NOTE: The system will not allow you to change the Patient’s Condition MedDRA Term. To
change the MedDRA Term you will need to delete the record and enter the Patient
Condition as a new entry.
Click the Submit button or click the Back button to cancel the action and return to the previous
page.
After clicking the Submit button, the system will display a confirmation message.
Click the OK button.
PViMS User Manual
2018
84
The system will remind you to ensure the patient medication history is updated
accordingly.
The system will take you to the Encounter View Page and will display the updated Conditions
Table.
If the patient’s outcome has been set to fatal, the system will request confirmation of
this status change.
PViMS User Manual
2018
85
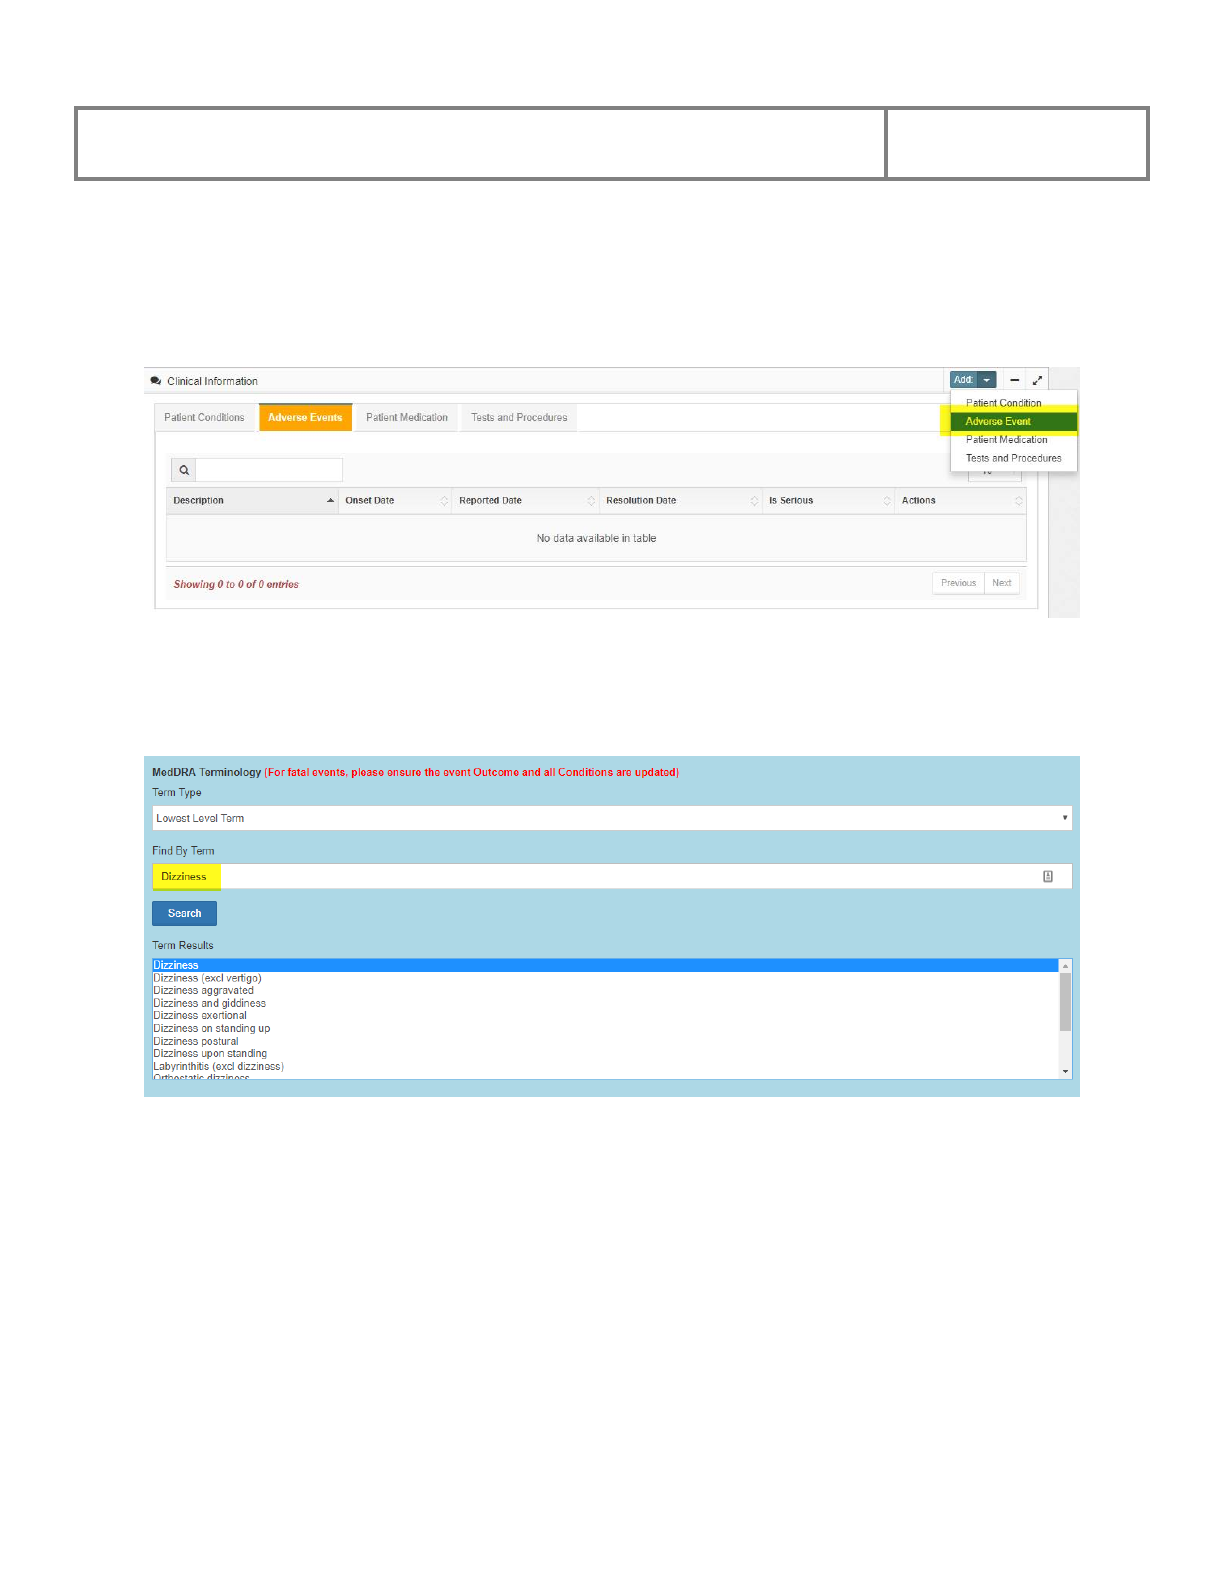
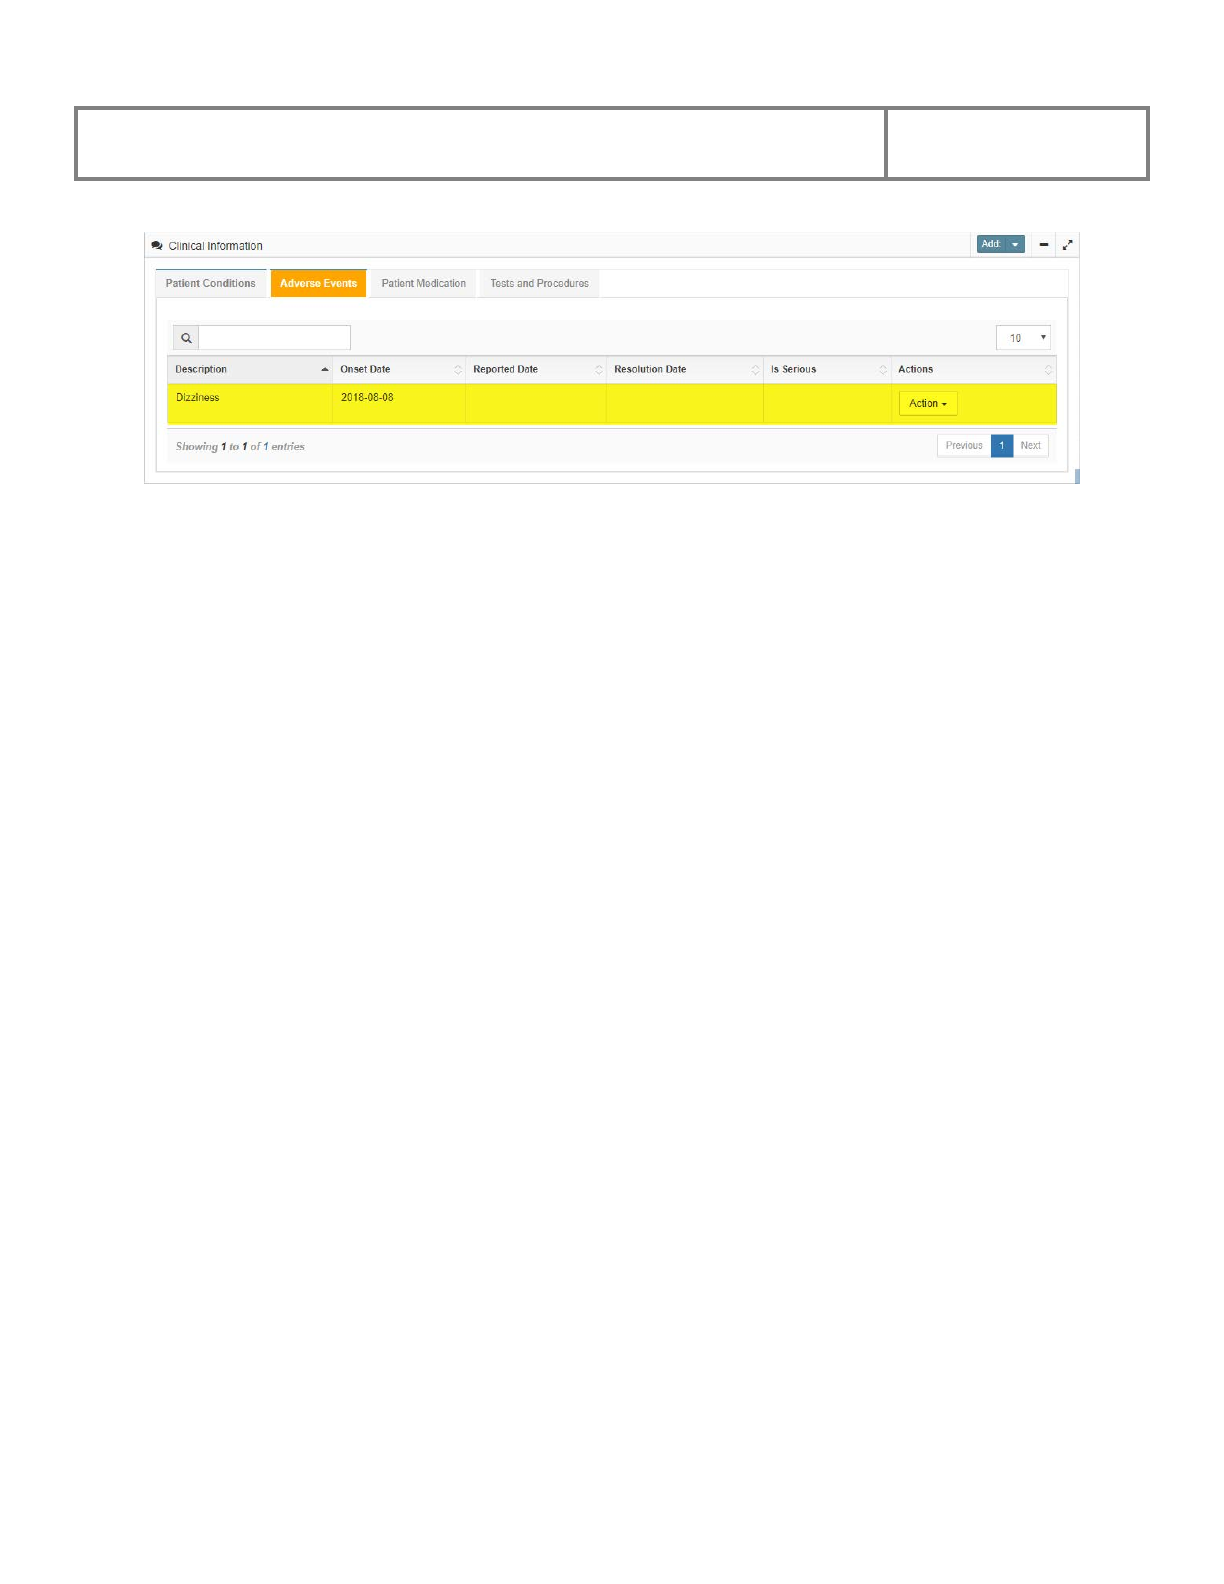
4.2.4.3 Add Adverse Event
At the Adverse Events tab click the Add Adverse Event button, after which the system will
open the Add Adverse Event page.
Enter the Adverse Event name in the Find By Term field. Click the Search button and the
system with then provide a list of Term Results from the MedDRA dictionary that match the
term that you have searched on.
● Select the term that best corresponds to the adverse event.
● Enter the Event Description as stated by the patient or reporter.
● Enter the Adverse Event Onset Date.
● Complete any other fields for which you have data.
● Click the Submit button to create the adverse event, or click the Back button to cancel
the action and go back to the previous page.
• After clicking on Submit the system will display the updated the table under the Adverse
Events tab.
PViMS User Manual
2018
86
The fields on the Add Adverse Event page are described below:
PViMS User Manual
2018
87
Term Type
Dropdown list of MedDRA term hierarchy; Lowest
level term, Preferred term, High level term, High level
group term, or System organ class
Find By Term
Text field; Enter name of condition
Term Results
System generated list; Select appropriate term from the
list
Event Description
(As stated by patient or reporter)
Text field; enter event term as stated in the medical
records
Onset Date
Text field; Enter date condition started
Resolution Date
Text field; Enter condition outcome date
Event Duration
Auto-calculated by the system
Intensity (Severity)
Dropdown list; Select from Mild, Moderate, or Severe
Treatment of Reaction
Dropdown list; Select from No Treatment, Non-Medical
Treatment, Medical Treatment, Dialysis, Surgery, or
Unknown
Was the AE attributed to one or more
drugs?
Dropdown list; Select from Yes, No, or Unknown
Expected or Unexpected AE
Dropdown list; Select from Expected or Unexpected
Outcome
Dropdown list of Outcomes; Select either Fatal, Not
Recovered/Not Resolved, Recovered/Resolved,
Recovered/Recovered with Sequelae,
Recovering/Resolving, or Unknown
Was the event reported to national
PV?
Dropdown list; Select from Yes, No, or Unknown
Is the adverse event serious?
Dropdown list; Select from Yes, No, or Unknown
Seriousness
Dropdown list; Select from Congenital Anomaly or
Birth Defect, Persistent or Significant Disability or
Incapacity, Death, Initial or Prolonged Hospitalization,
Life-threatening, or a Medically Important event
Admission Date
Text field; Enter date patient was admitted
PViMS User Manual
2018
88
(will only appear if Hospitalized)
Discharge Date
(will only appear if Hospitalized)
Text field; Enter date patient was discharged
Date of Death
(will only appear if reason for
Seriousness is Death)
Text field; Enter date patient died
Autopsy Done?
(will only appear if reason for
Seriousness is Death)
Dropdown list; Select from Yes or No
Severity Grade
Dropdown list; Select from Grade 1, Grade 2, Grade 3,
Grade 4, or Grade 5
Severity Grading Scale
Dropdown list; Select the SAE Grading Reference (e.g.,
DAIDS, CTCAE)
Full Name of Reporter
Text field; Enter name of the person who reported the
event
Date of Report
Text field; enter the date the event was first reported by
the facility
Type of Reporter
Dropdown list; Select from Physician, Pharmacist,
Other Health Professional, Lawyer, Consumer or Other
Non-Health Professional
Reporter Contact Number
Text field; Enter a contact number for the reporter
FDA SAE Number
(For use only by FDA officers)
Text field; Enter the SAE file number assigned by the
FDA
PViMS User Manual
2018
89
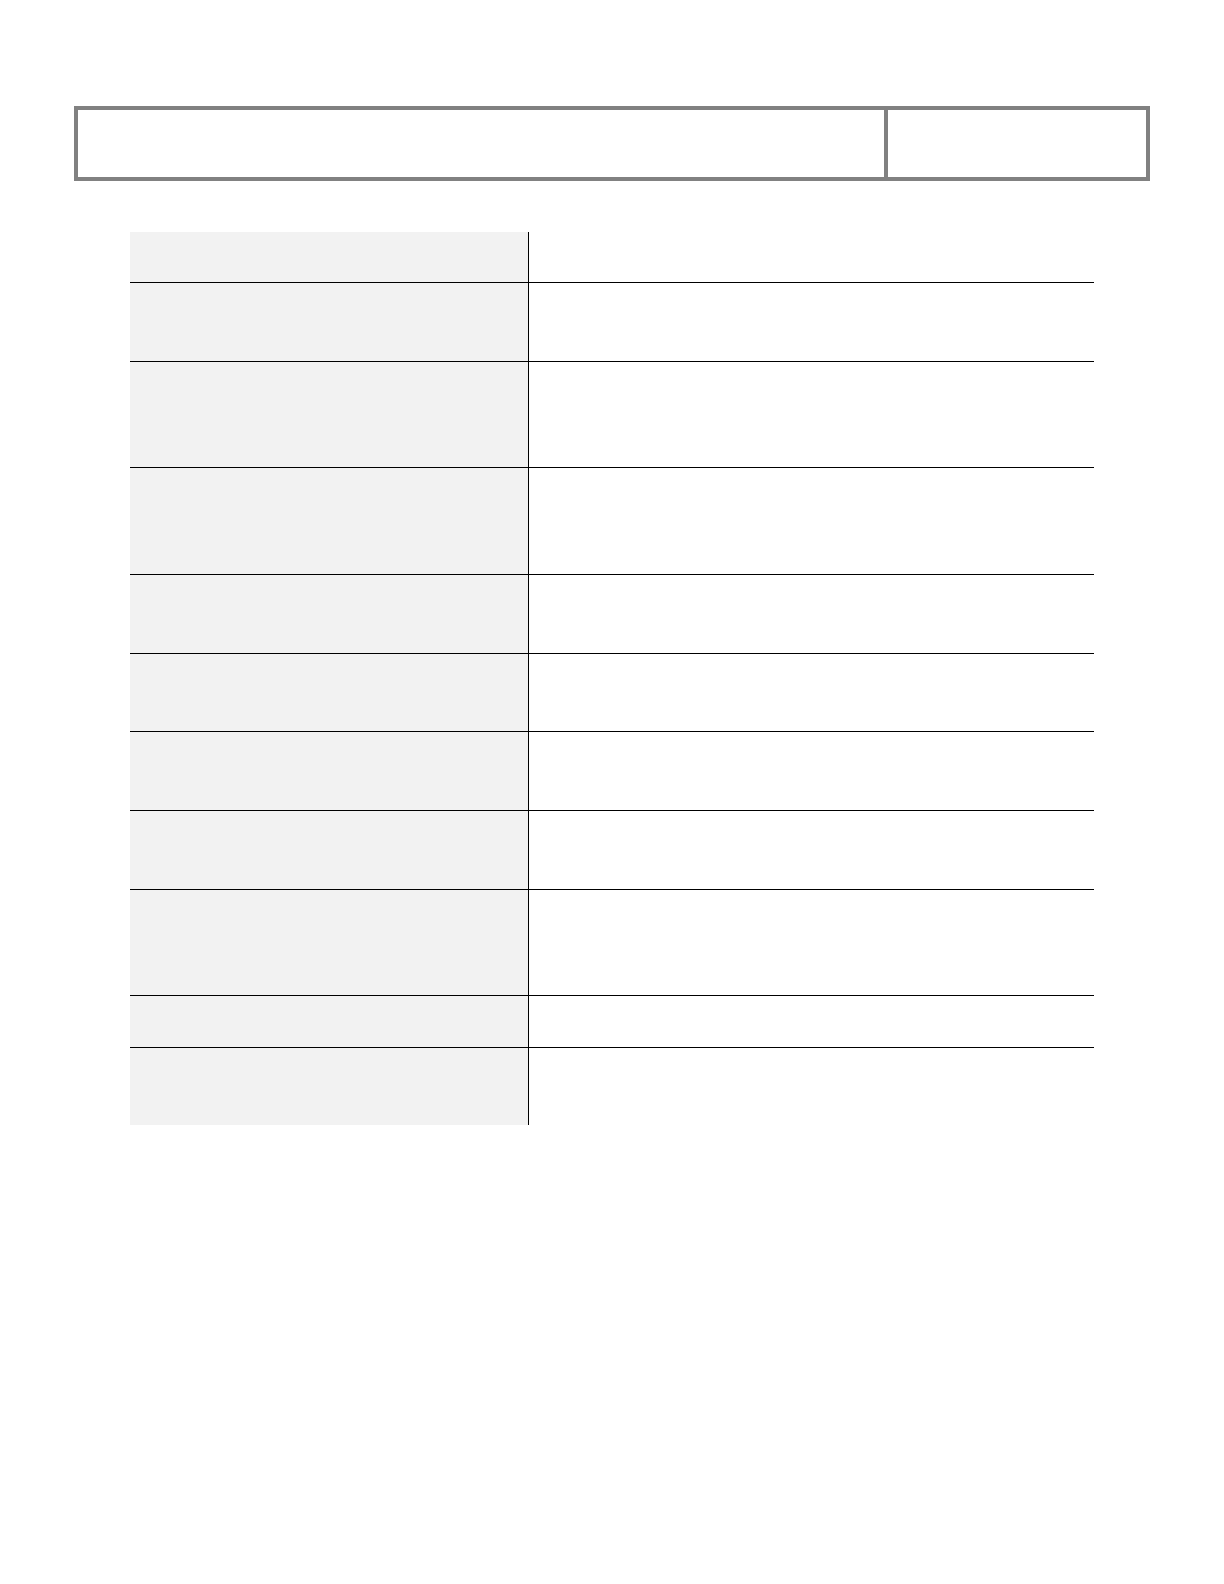
4.2.4.4 Edit an Adverse Event
At the patient’s Encounter View page, start on the Adverse Event tab, find the event to edit in
the Adverse Events Table and click the Edit button. The system will display the patient’s Edit
Adverse Event page.
NOTE: The system will not allow you to change the Patient’s Adverse Event MedDRA Term.
To change the MedDRA Term you will need to delete the record and enter the Patient
Adverse Event as a new entry.
Add information or make changes to the page as appropriate.
Click the Submit button or click the Back button to cancel the action and return to the previous
page.
The system will take you to the Encounter View Page and will display the updated Adverse
Events Table.

PViMS User Manual
2018
90
4.2.4.5 Add a Patient Medication
At the Patient Medications tab click the Add Patient Medication button, after which the
system will open the Add Patient Medication page.
● Select the medication.
● Enter the date the patient started taking the medicine.
● Complete any other fields for which you have data.
● Click the Submit button to create the medication, or click the Back button to cancel the
action and go back to the previous page.
• After clicking on Submit, the system will display the updated table under the Patient
Medication tab.
The fields on the Add Patient Medication page are described below:

PViMS User Manual
2018
91
Medication
Dropdown list; Select medication from a list managed
by the system administrator
Start Date
Text field; Enter date patient started taking the
medication
End Date
Text field; Enter date patient stopped taking the
medication
Dose
Text field; Enter the dose prescribed
Dose Unit
Dropdown list; Select the unit prescribed
Dose Frequency
Text field; Enter the dose frequency prescribed
Route
Dropdown list; Select the route of administration
Frequency in days per week
Dropdown list; Select number of days per week the
medicine is administered
Still On Medication
Dropdown list; Select Yes or No
Indication
Text field; Enter the reason the medicine was prescribed
Type of Indication
Dropdown list; Select Primary, Pre-existing Condition,
or Treat AE
Reason For Stopping
Dropdown list; Select from the list provided (e.g.,
Adverse Event, Cost, Course Completed)
Clinician action taken with regard to
medicine if related to AE
Dropdown list; Select Dose Not Changed, Dose
Reduced, Drug Interrupted, Drug Withdrawn, or Not
Applicable
Batch Number
Text field; Enter the medicine Batch Number
Effect OF Dechallenge (D) &
Rechallenge (R)
Dropdown list; Select from the list provided (e.g., Not
Applicable, D – AE improved/resolved when medicine
dose reduced/interrupted/withdrawn, R – AE Recurred
on medicine re-admission/dose increase)
PViMS User Manual
2018
92
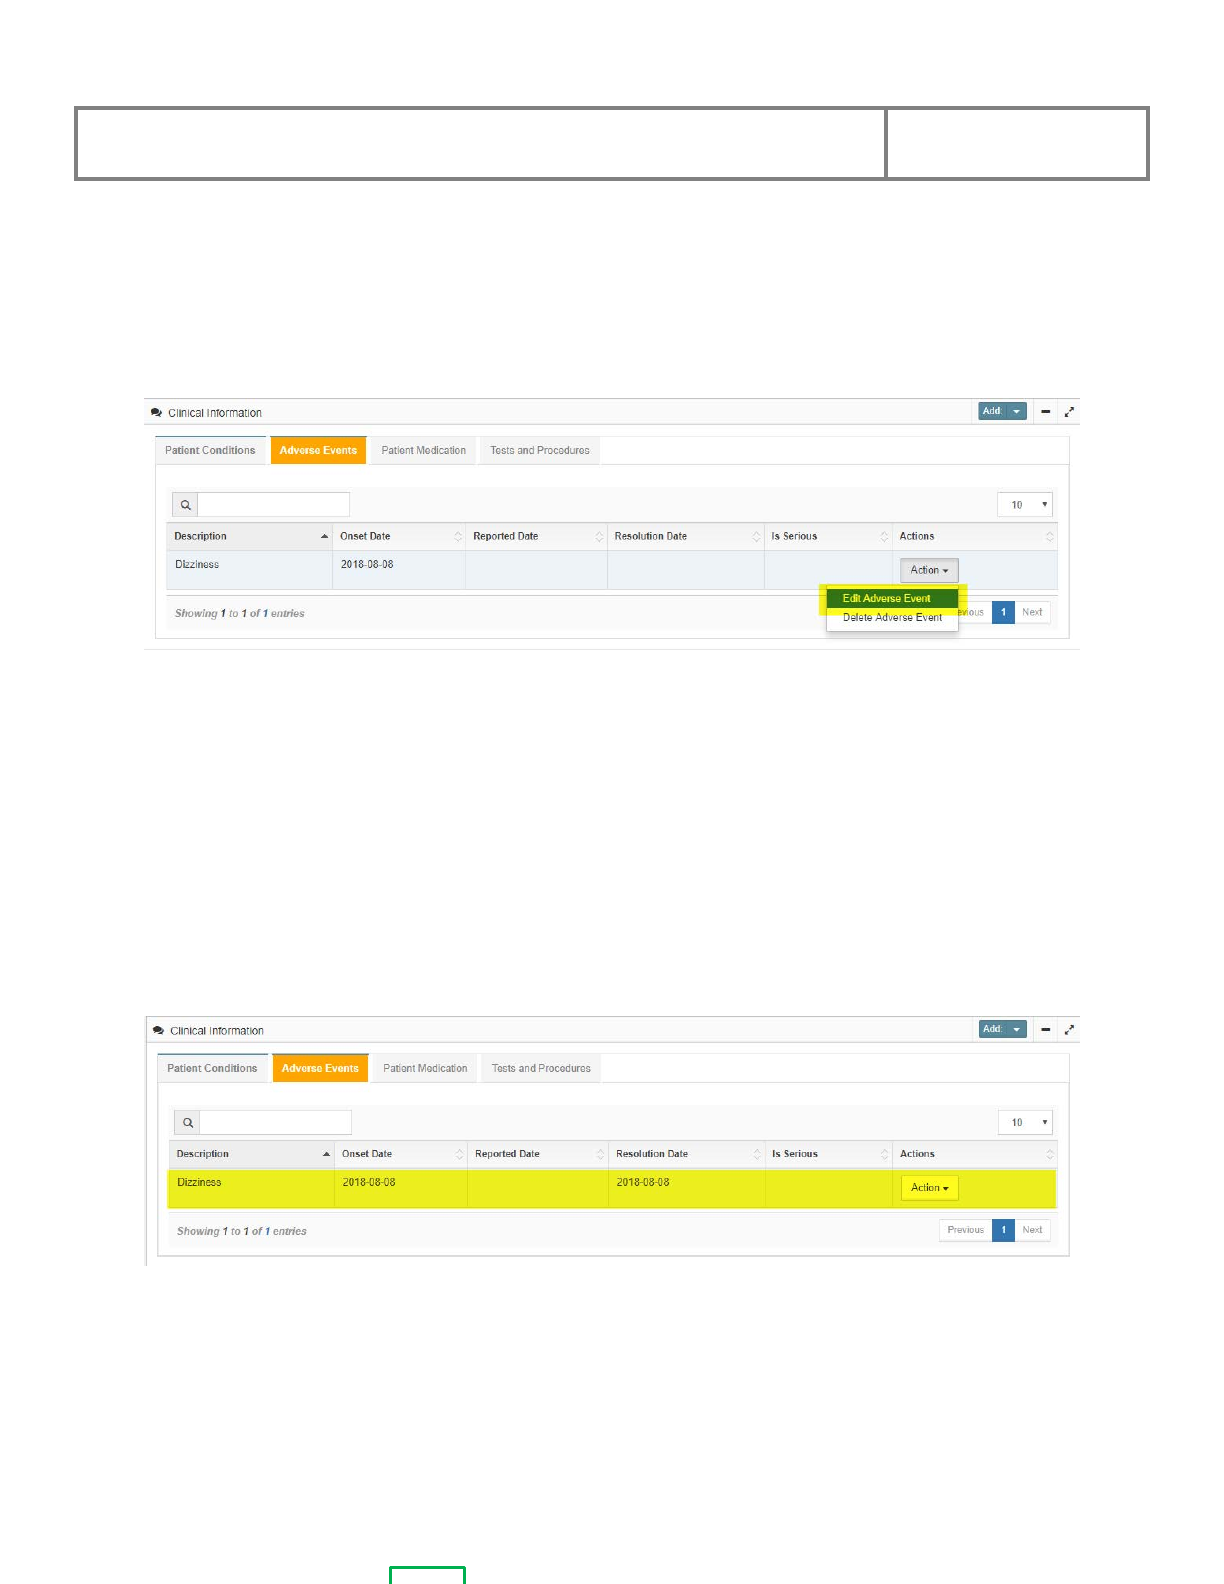
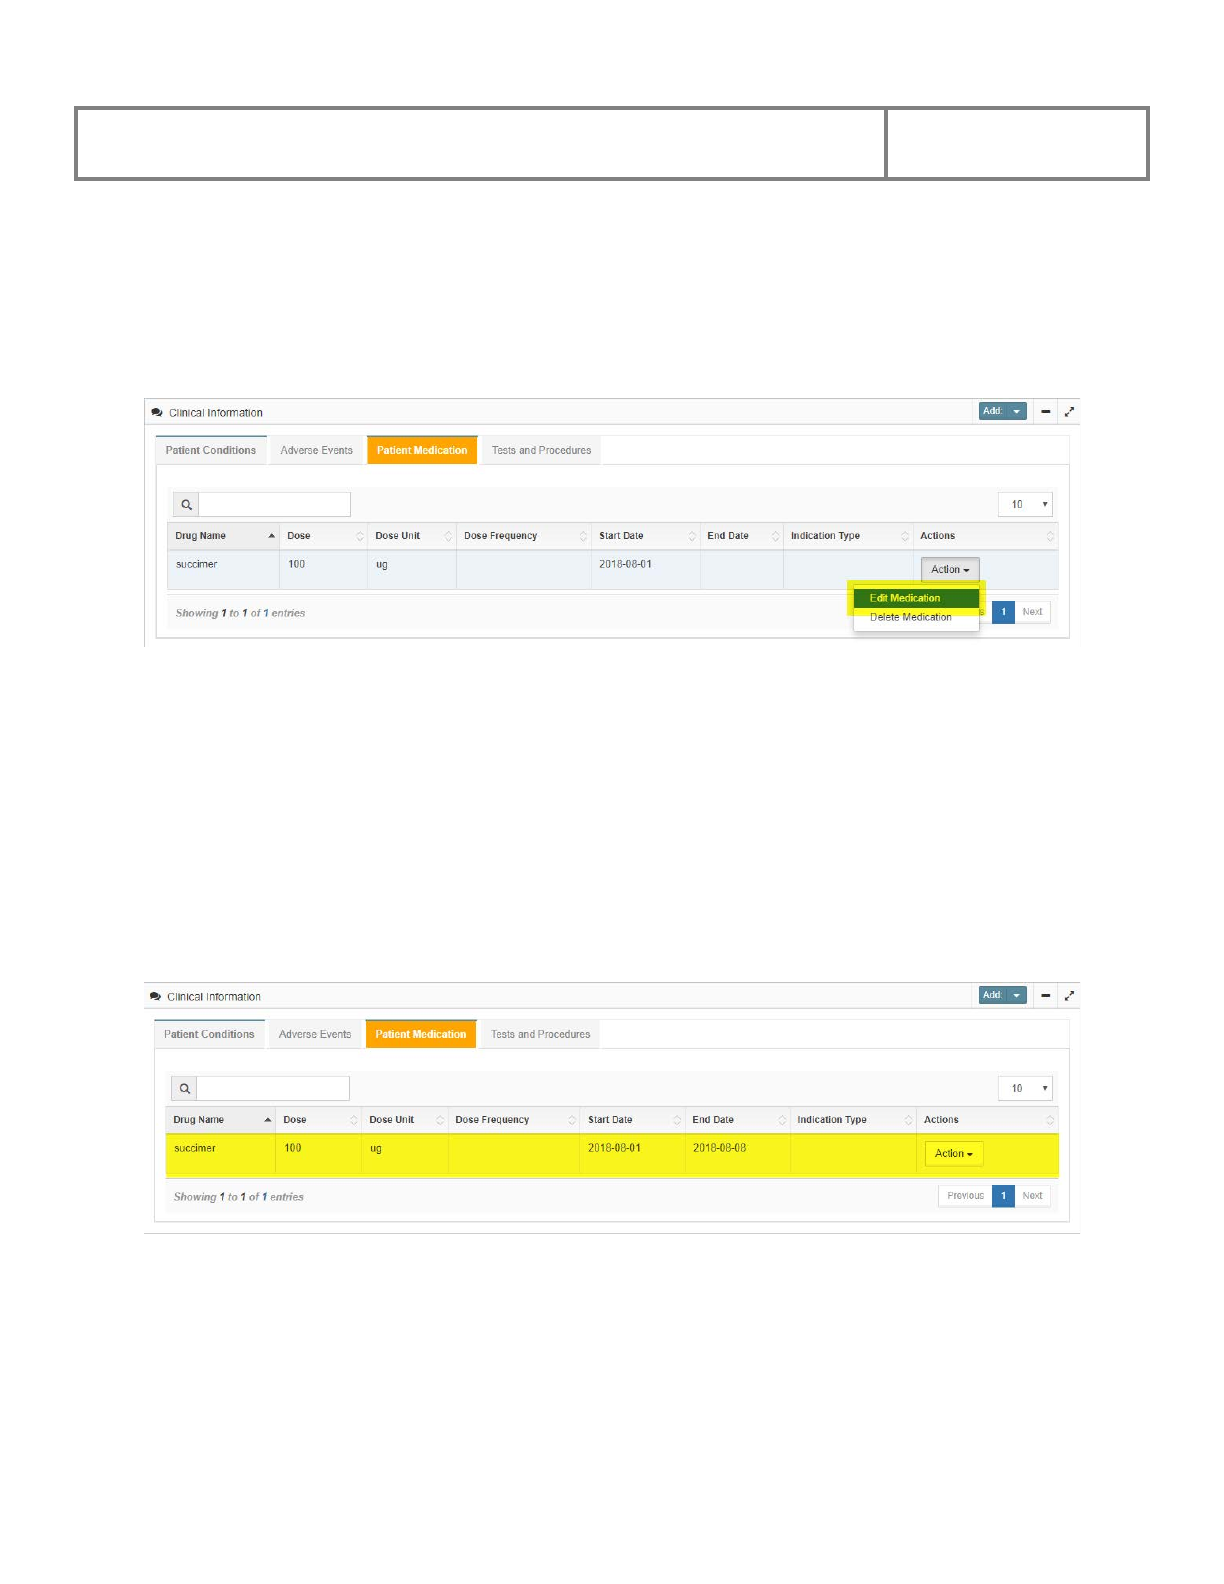
4.2.4.6 Edit an Existing Patient Medication
At the patient’s Encounter View page, start on the Patient Medication tab, find the medication
to edit in the Patient Medications Table and click the Edit button. The system will display the
patient’s Edit Patient Medication page.
NOTE: The system will not allow you to change the Medication name. To change the
Medication, you will need to delete the record and enter the Medication as a new entry.
Add information or make changes to the page as appropriate.
Click the Submit button or click the Back button to cancel the action and return to the previous
page.
The system will take you to the Encounter View Page and will display the updated Patient
Medication Table.
PViMS User Manual
2018
93
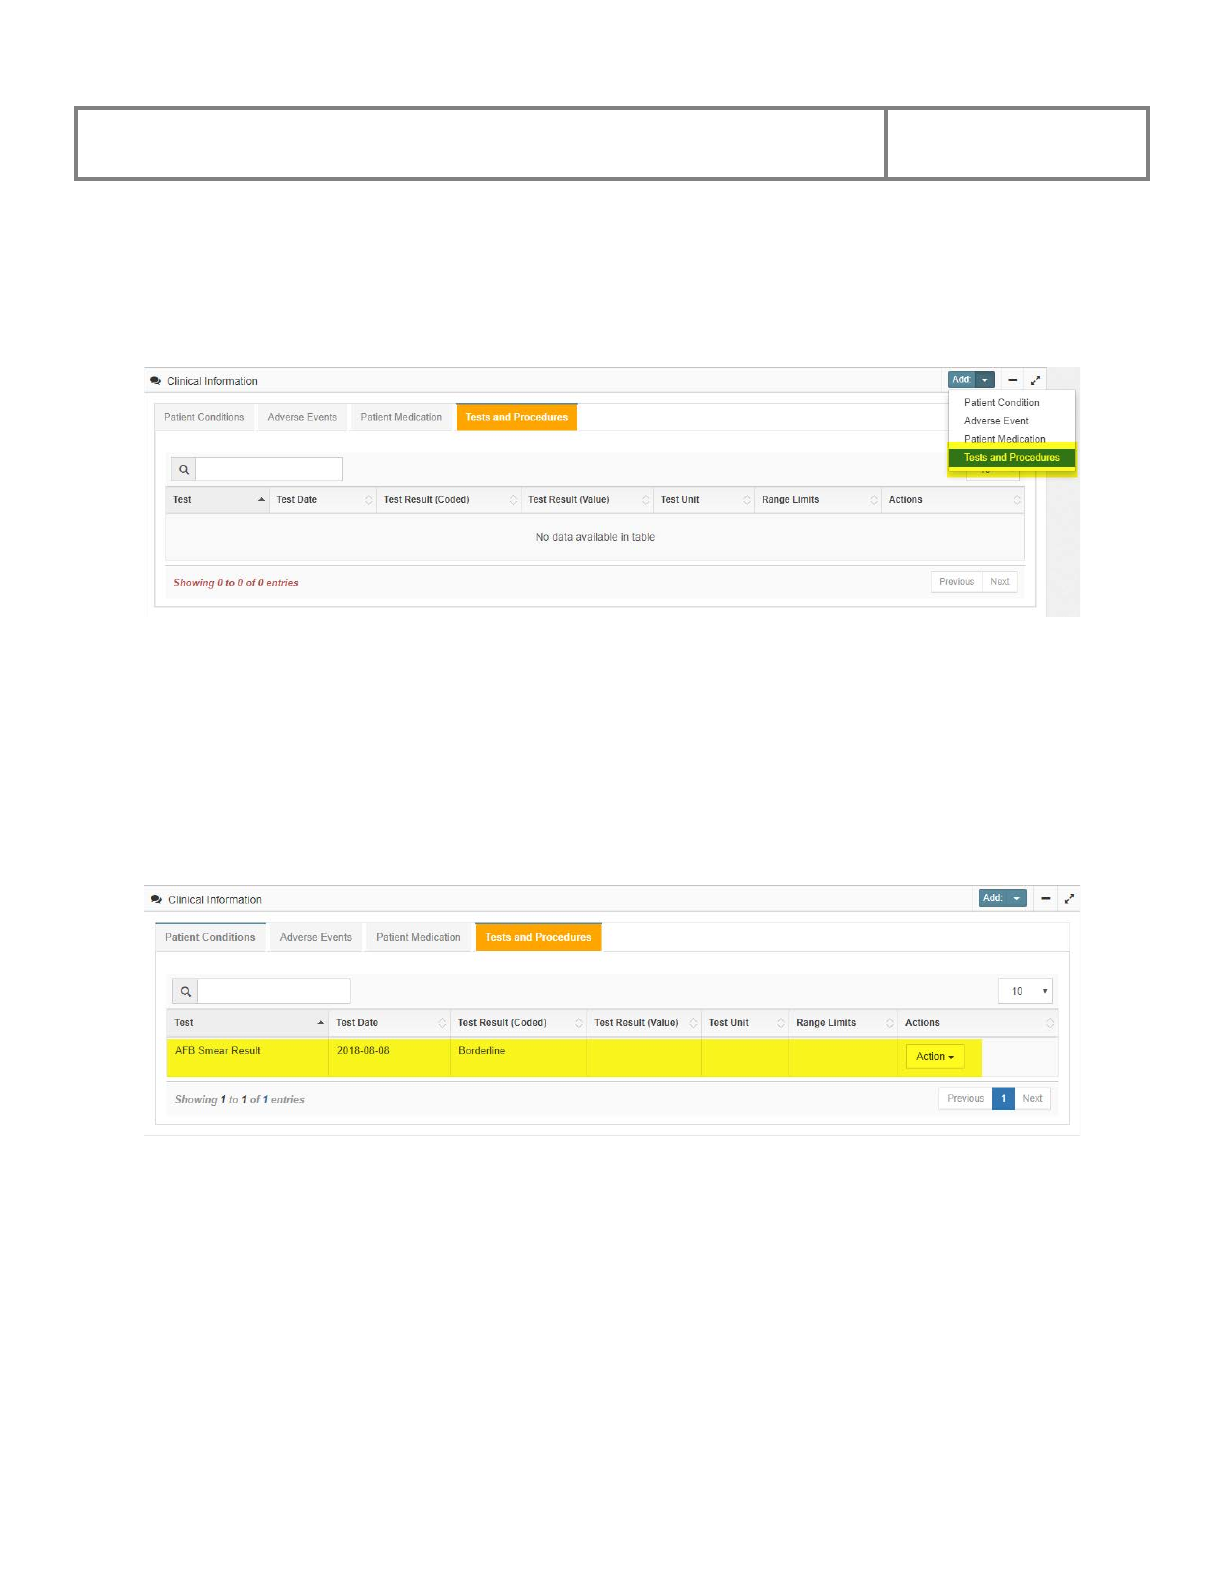
4.2.4.7 Add a Test or Procedure
At the Tests and Procedures tab click the Add Tests and Procedures button, after which the
system will open the Add Tests and Procedures page.
● Select the test or procedure.
● Enter the date the patient had the test completed.
● Complete any other fields for which you have data.
● Click the Submit button to create the test and procedure, or click the Back button to
cancel the action and go back to the previous page.
• After clicking on Submit the system will display the updated the table under the Tests
and Procedures tab.
The fields on the Tests and Procedures page are described below:

PViMS User Manual
2018
94
Test
Dropdown list; Select name of the Test or Procedure (e.g., Blood
Glucose, Chest X-ray)
Test Date
Text field (dates only); Enter date the Test or Procedure was performed
Test Result (coded)
Dropdown list; Select qualitative Test or Procedure result (e.g.,
Positive, Negative, Normal, Abnormal) if appropriate
Test Result (value)
Text field (numbers only); Enter the value for the test result
Reference Range –
Lower Limit
Text field (numbers only); Enter the value for the lower limit of normal
defined by the laboratory
Reference Range –
Upper Limit
Text field (numbers only); Enter the value for the upper limit of normal
defined by the laboratory
Test Unit
Dropdown list; select corresponding unit for the Test or Procedure
Result (e.g., %, mg, millisecond)
Remarks
Text field; Enter additional information about the Test or Procedure if
needed
PViMS User Manual
2018
95
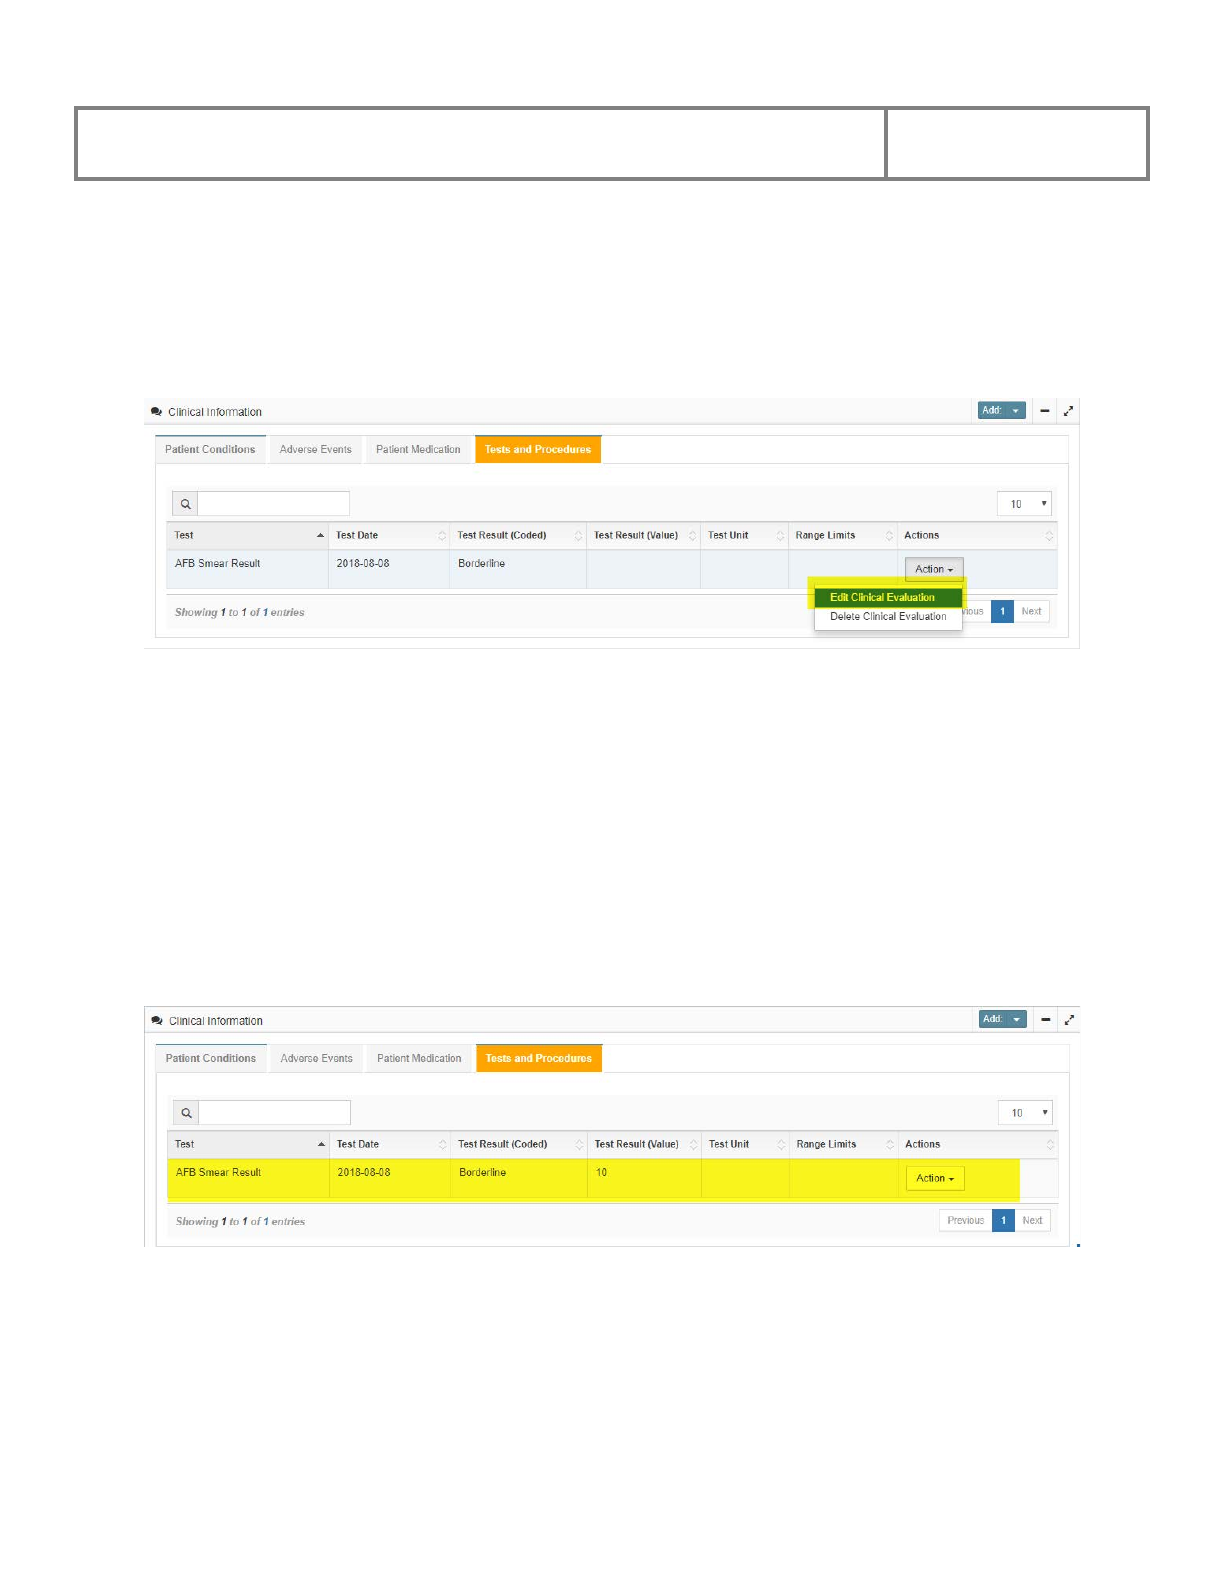
4.2.4.8 Edit an Existing Test or Procedure
At the patient’s Encounter View page, start on the Tests and Procedures tab, find the test to
edit in the Tests and Procedures Table and click the Edit button. The system will display the
patient’s Edit Test and Procedure page.
NOTE: The system will not allow you to change the Test or Procedure name. To change the
Test or Procedure name you will need to delete the record and enter the Test or Procedure as a
new entry.
Add information or make changes to the page as appropriate.
Click the Submit button or click the Back button to cancel the action and return to the previous
page.
The system will take you to the Encounter View Page and will display the updated Tests and
Procedures Table.
PViMS User Manual
2018
96
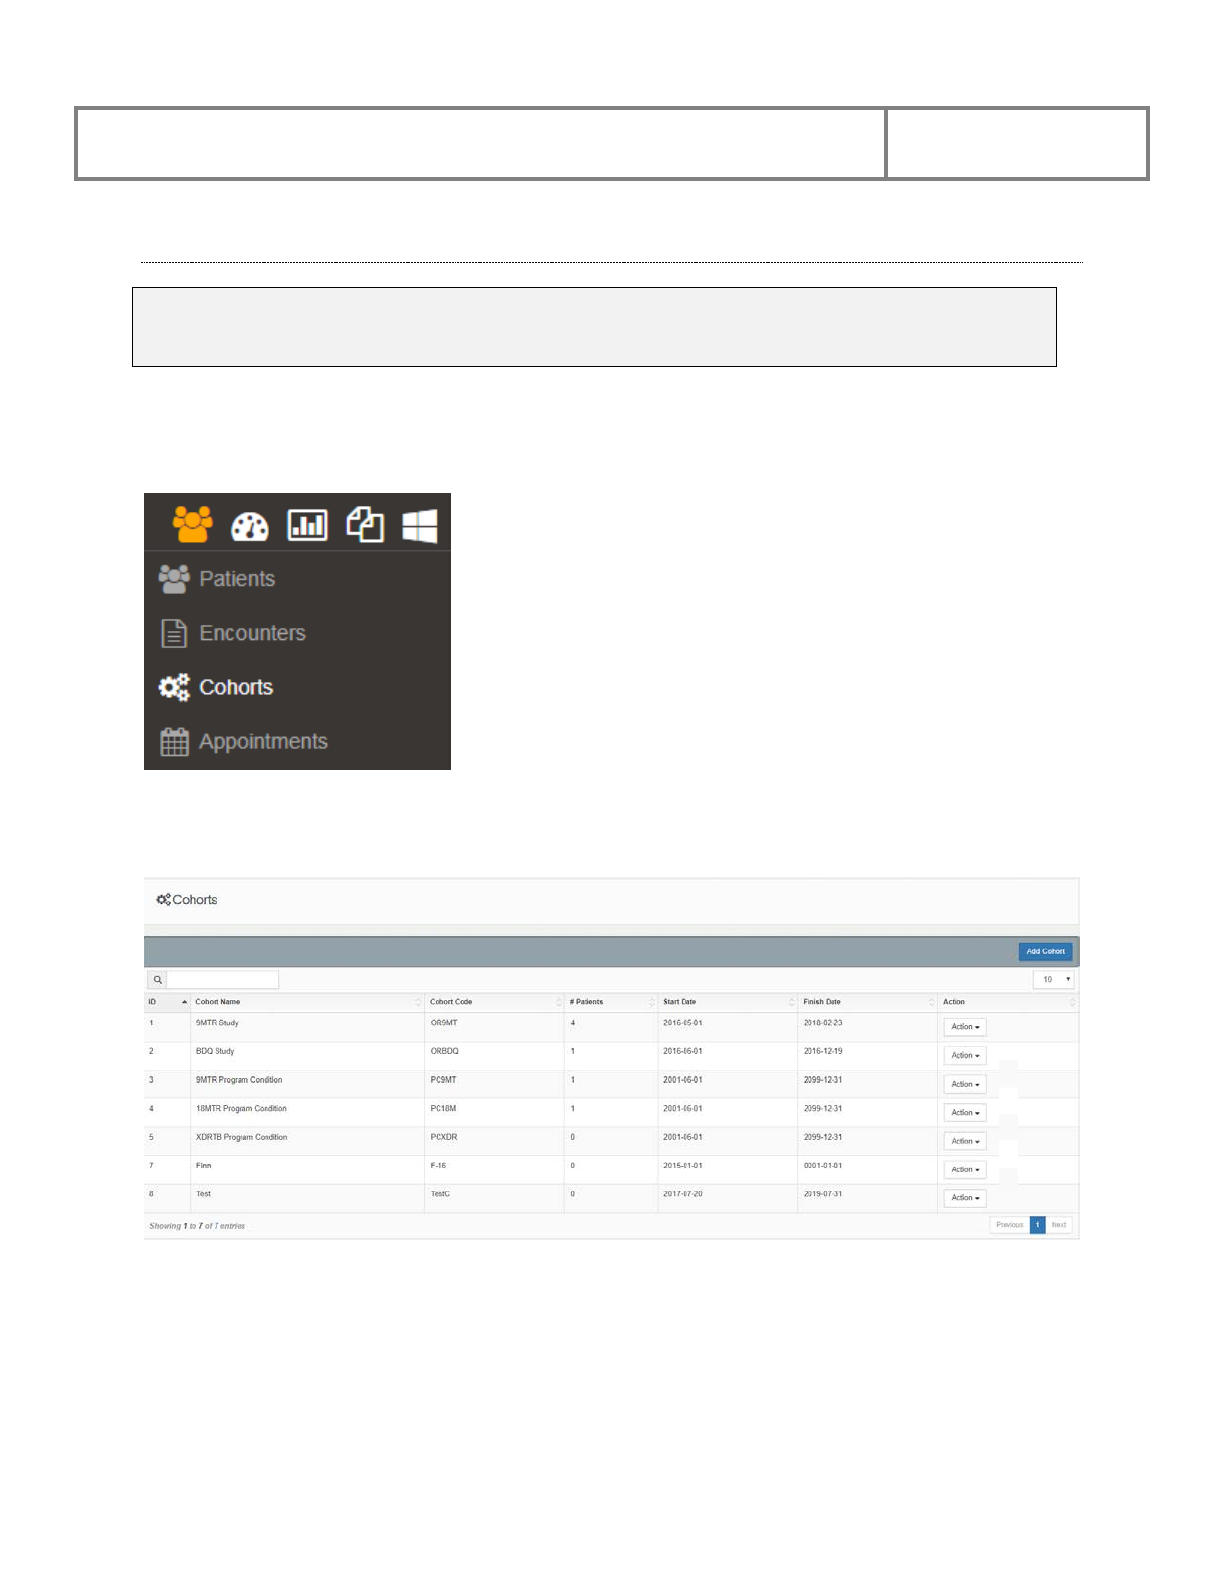
4.3 Cohorts
Cohorts can be used to track a sub-group of patients within a Condition Group. Cohorts in the
system are determined by the Public Health Program or the System Administrator.
4.3.1 View Cohorts
The Cohort function can be accessed through the Cohorts menu.
The system will display the Cohorts View page, which lists all currently registered cohorts in
the system.
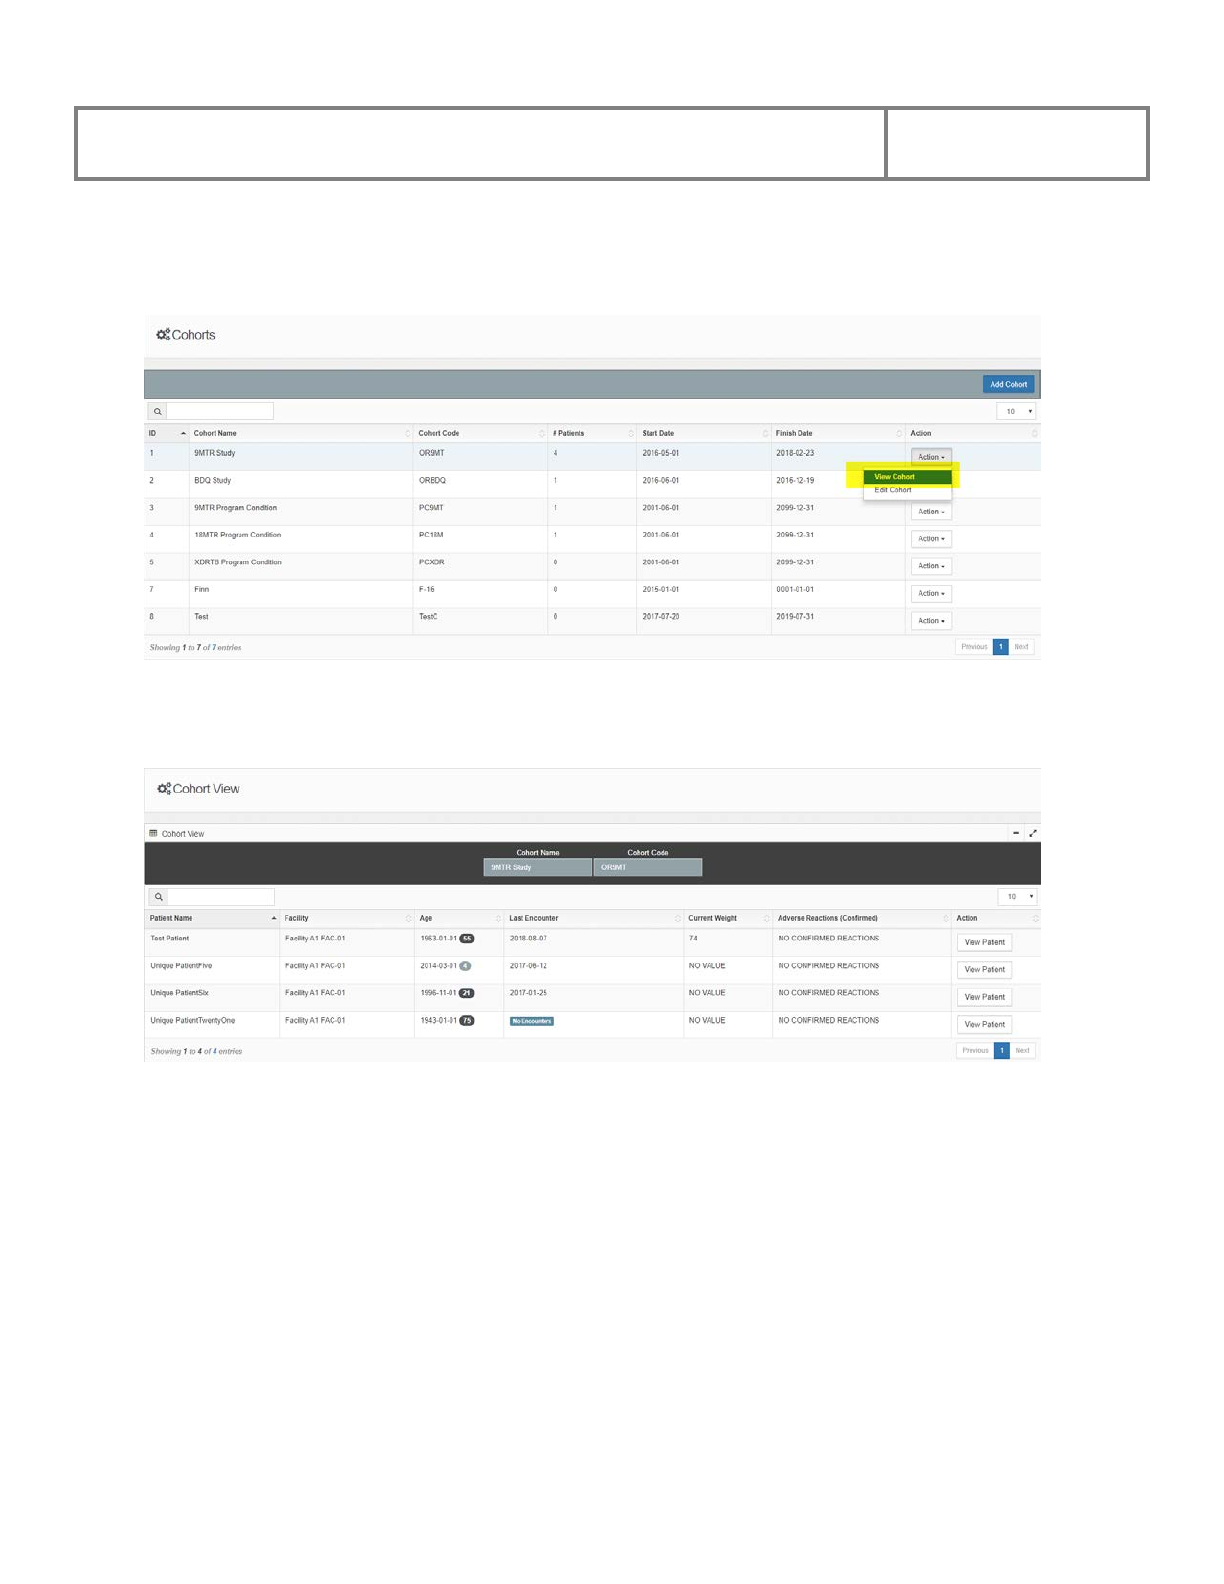
PViMS User Manual
2018
97
Find the Cohort you would like to view in the table. Click the View Cohort button in the Action
Column for the cohort to view.
The system will display the Cohort View page with a table listing all of the patients enrolled in
that cohort.
From the Cohort View page, you are able to view a patient enrolled in the cohort. Find the
patient to view in the table.
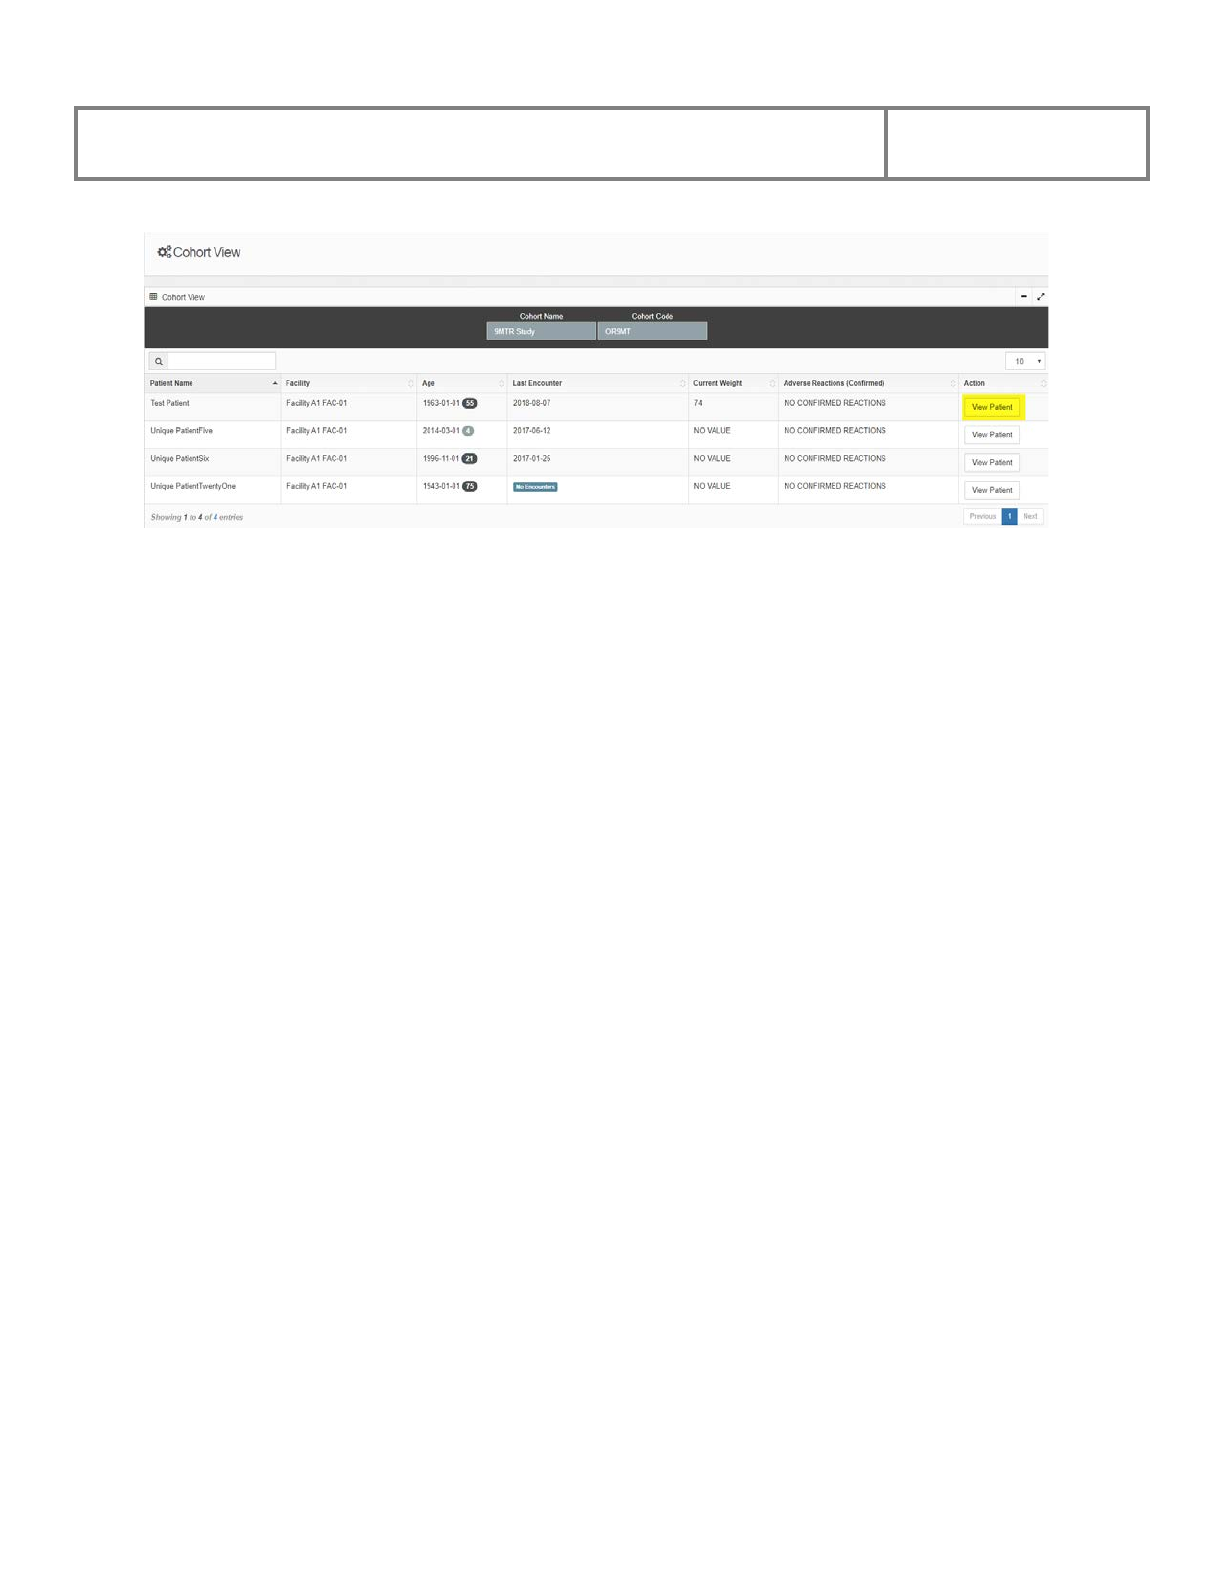
PViMS User Manual
2018
98
Click the View Patient button in the Action column for the patient to view. The system will
display the Patient View page.

PViMS User Manual
2018
99
4.4 Appointments
Appointments can be used to monitor an patient return date to the facility. This is particularly
effective for patients in a cohort where ongoing monitoring for adverse events is expected.
4.4.1 View Appointments
The Appointments function can be accessed through the Appointments menu.
The system will display the Appointments page, which lists all appointments registered within
the system for a given date.
PViMS User Manual
2018
100
The columns in the appointments table are described below:
Patient Name
Reflecting the patient’s name and surname as captured in the
system when the appointment was scheduled.
Details
Reason for the appointment
Activity
Has the patient arrived for their appointment?
Has the patient missed their appointment?
Action
Ability to view patient
Ability to open an encounter
Ability to mark the appointment as Did Not Arrive
PViMS Term - Did Not Arrive
If an appointment is marked as Did Not Arrive, this means the patient has been confirmed as
missing their appointment. This status serves to confirm this scenario in situations where
encounters are retrospectively captured into the system in a delayed data capture mode.

PViMS User Manual
2018
101
4.4.2 View Appointments for a specified day
Enter the specified day in the Show Appointments For field and click the Search button. The
system will display the Appointments page for the specified day.
4.4.3 View Patient Record
Select the patient in the table whose record you wish to view and click the View Patient button.
The system will display the Patient View page for the selected patient.
PViMS User Manual
2018
102
4.4.4 Mark Appointment as Did Not Arrive
Select the patient in the table whose record you wish to confirm as did not arrive and click the
Did Not Arrive Button.
Click the Did Not Arrive button to confirm that the patient did not arrive for their visit.
PViMS User Manual
2018
103
The system will update the appointment with the update reflected in the appointments table.
You will not be able to mark an appointment as DNA until at least 3 days have passed
from the original appointment date.

PViMS User Manual
2018
104
4.5 Deleting Records
User rights assignment policies determine which Users or User Profile groups are able to delete
records from the system. Check with your administrator regarding user right assignments.
After deletion the record is placed in an archive, thus not permanently deleted from
the system.
4.5.1 Patient View - Additional Information
4.5.1.1 Delete an Appointment
Within the Patient View, at the Appointments tab, find the appointment you would like to
delete.
You will only have the opportunity to delete appointments within the future. Existing
appointments will need to be cancelled.
PViMS User Manual
2018
105
Click the Delete Appointment button after which the system will take you to a Delete
Appointment screen.
Enter a reason for the deletion (this is compulsory) and click on the Delete button to delete the
appointment or click the Back button to undo the action.
After confirming the deletion, the system will update the Appointment table.
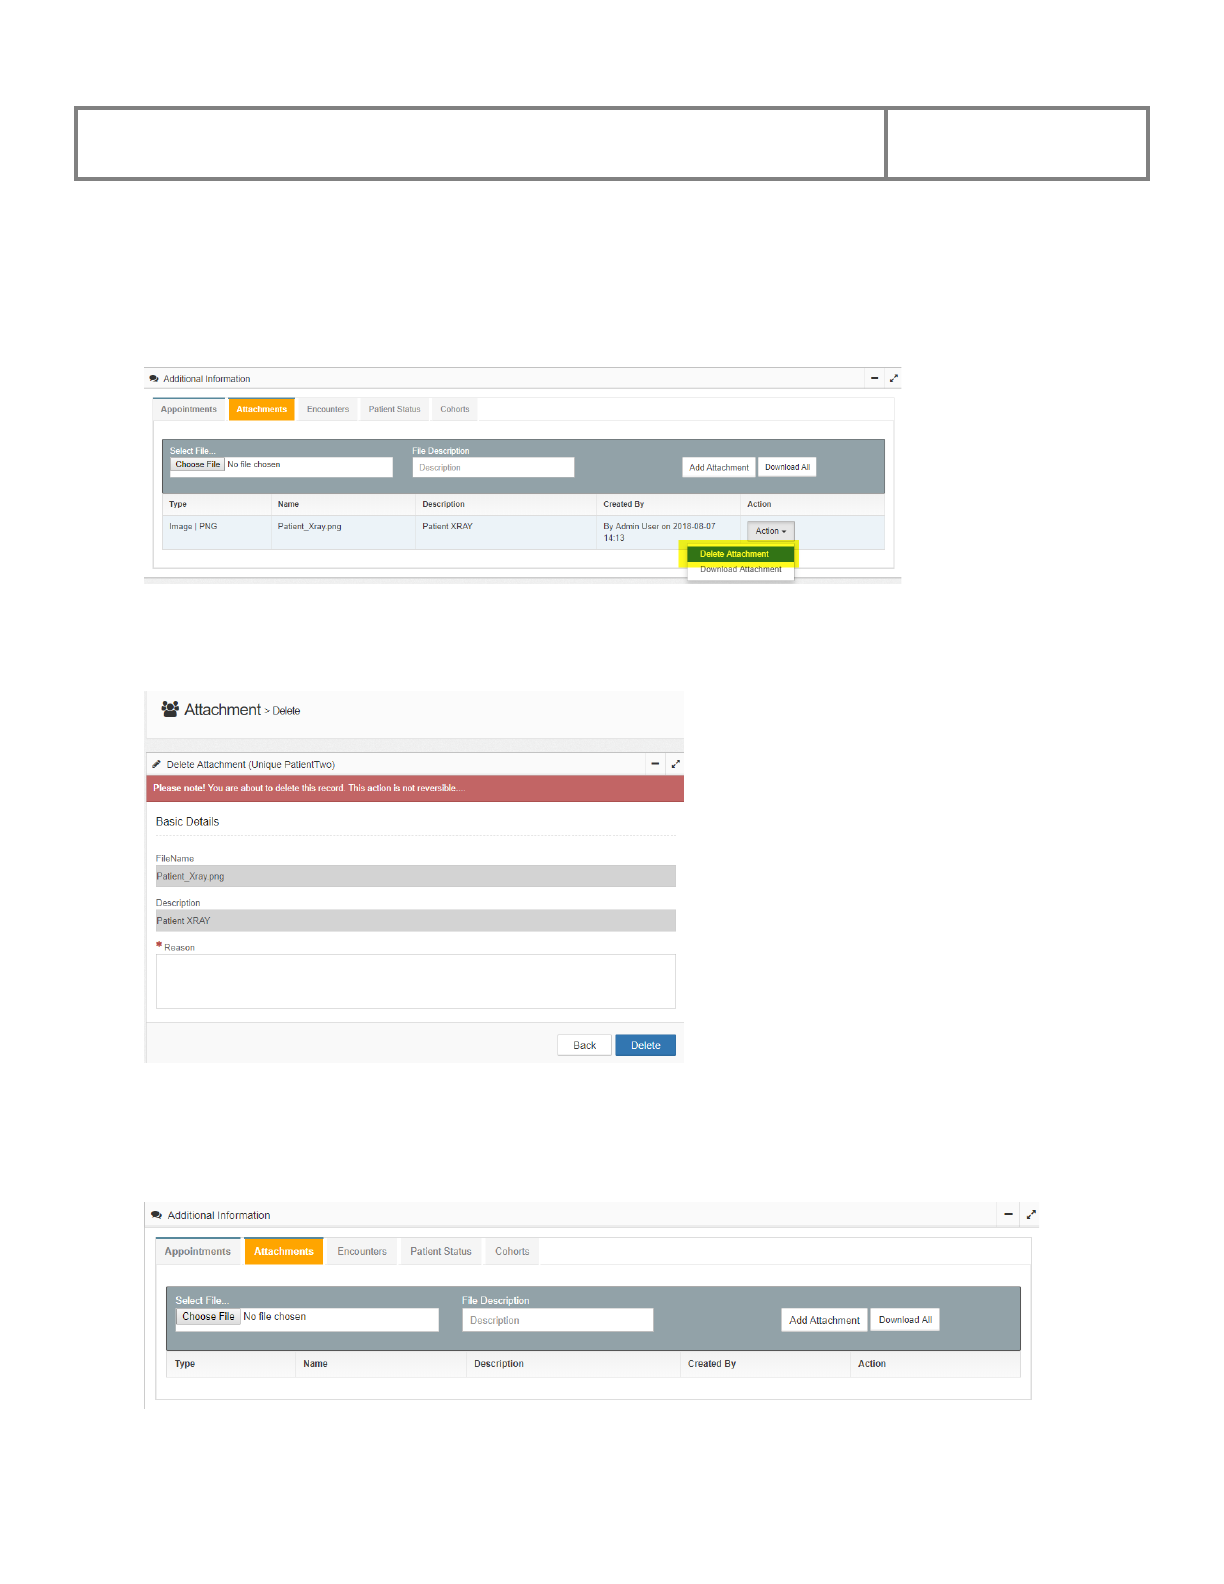
PViMS User Manual
2018
106
4.5.1.2 Delete an attachment
Within the Patient View, at the Attachments tab, once you have uploaded an attachment, the
attachment can easily be removed again.
Click the Delete Attachment button after which the system will take you to a Delete
Attachment screen.
Enter a reason for the deletion (this is compulsory) and click on the Delete button to delete the
attachment or click the Back button to undo the action. After confirming the deletion, the system
will update the Attachment table.
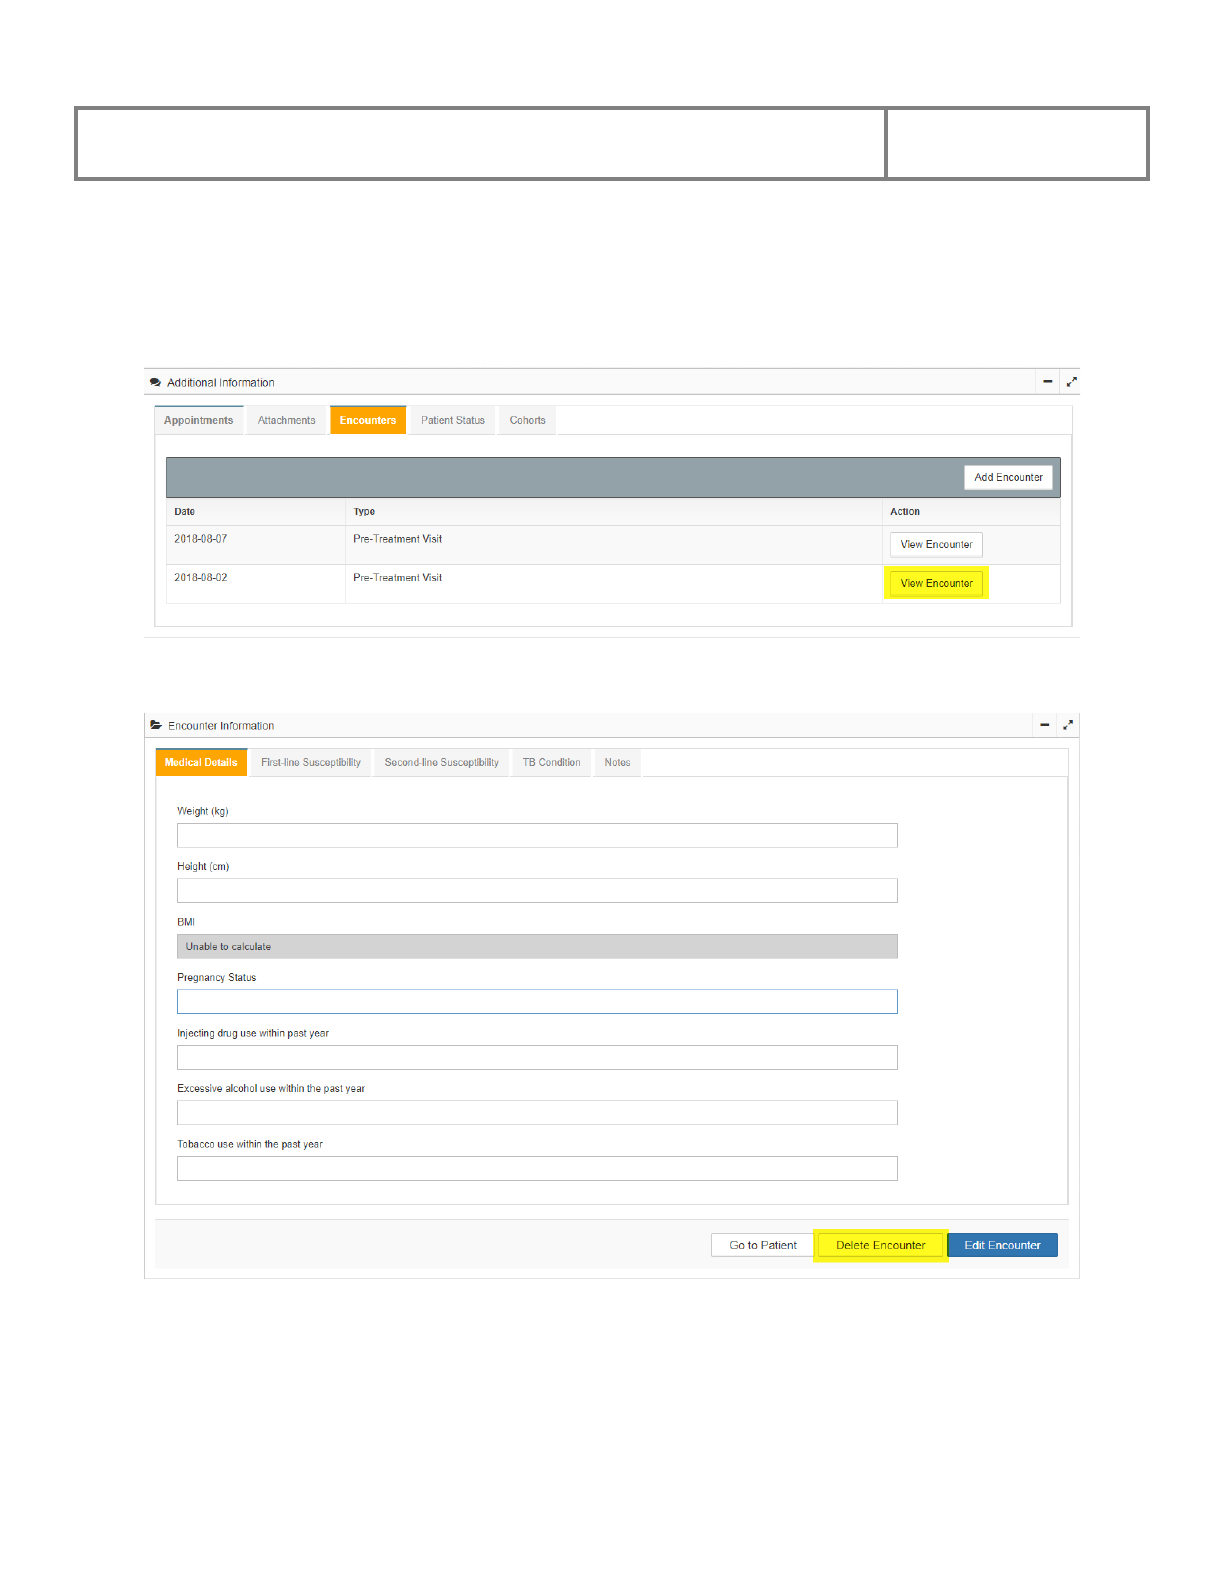
PViMS User Manual
2018
107
4.5.1.3 Delete an Encounter
Within the Patient View, at the Encounters tab, locate the Encounter you would like to remove
and click the View Encounter button.
The system will navigate you to the Encounter View.
Click the Delete Encounter button after which the system will pop up a Delete Encounter box.
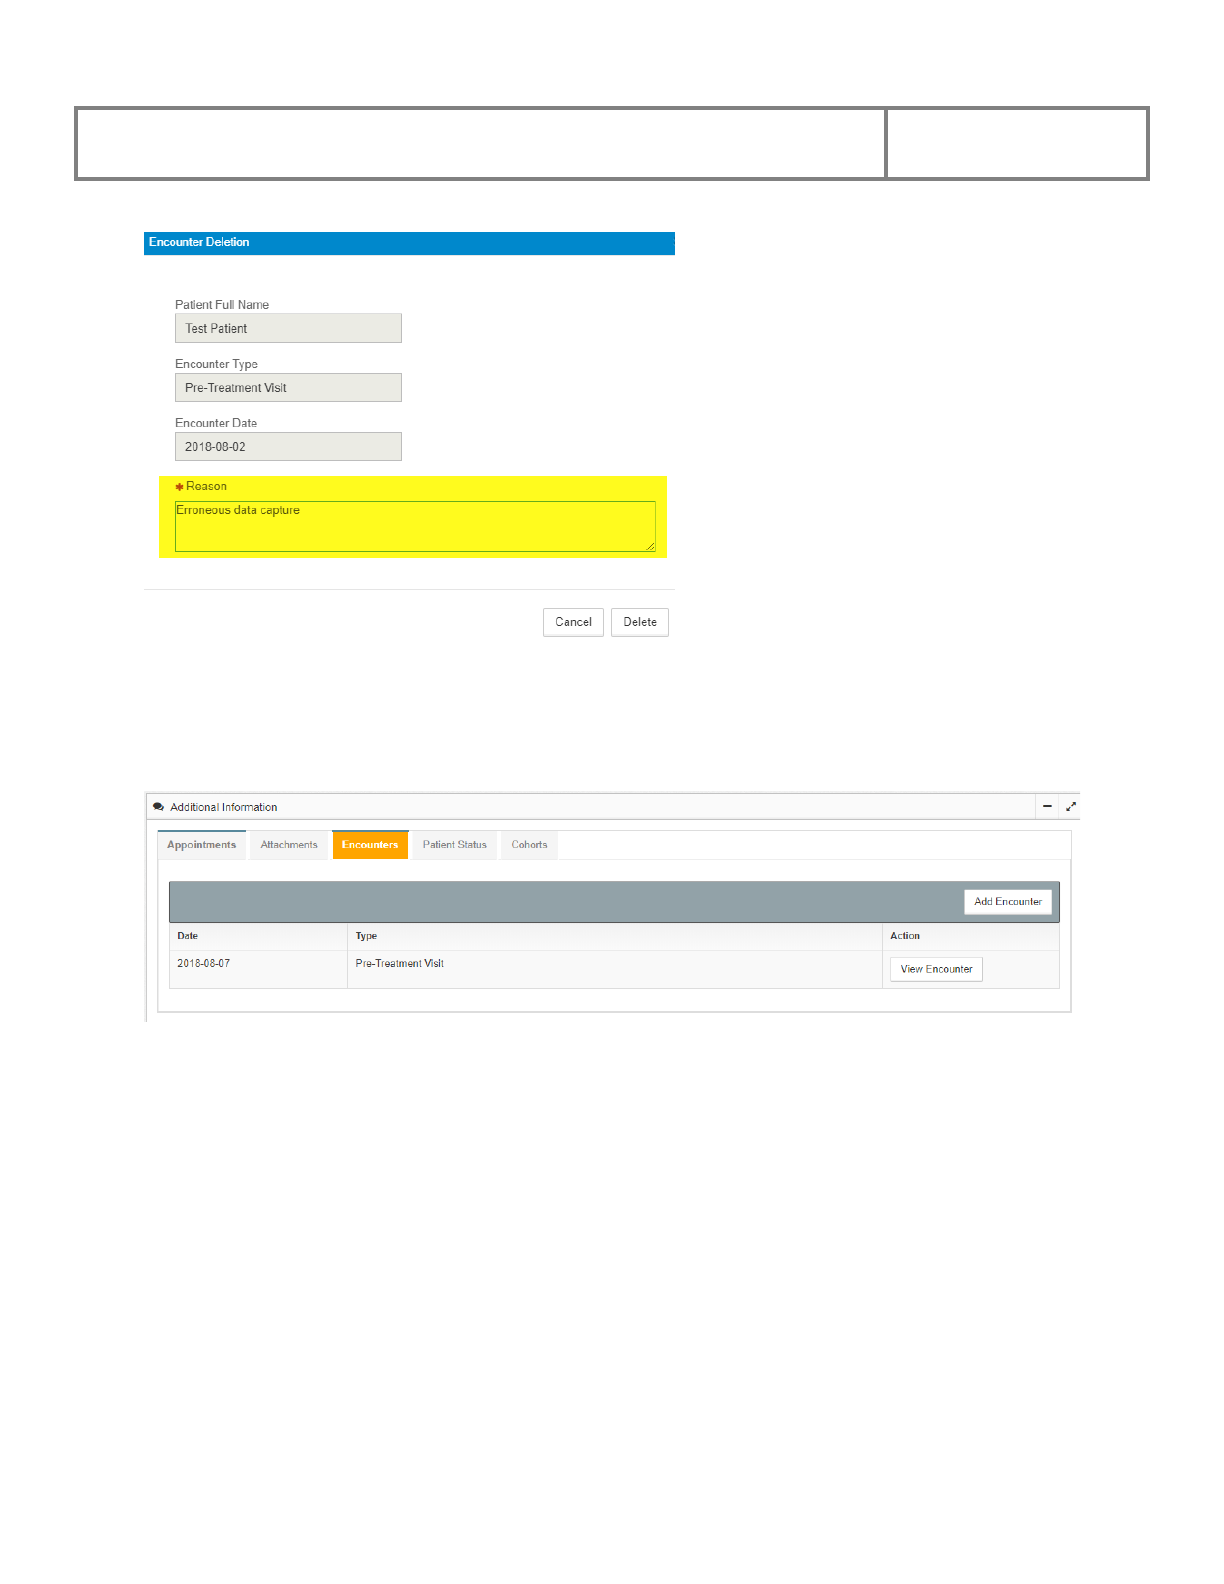
PViMS User Manual
2018
108
Enter a reason for the deletion (this is compulsory) and click on the Delete button to delete the
attachment or click the Cancel button to undo the action. After confirming the deletion, the
system will update the Encounter table.
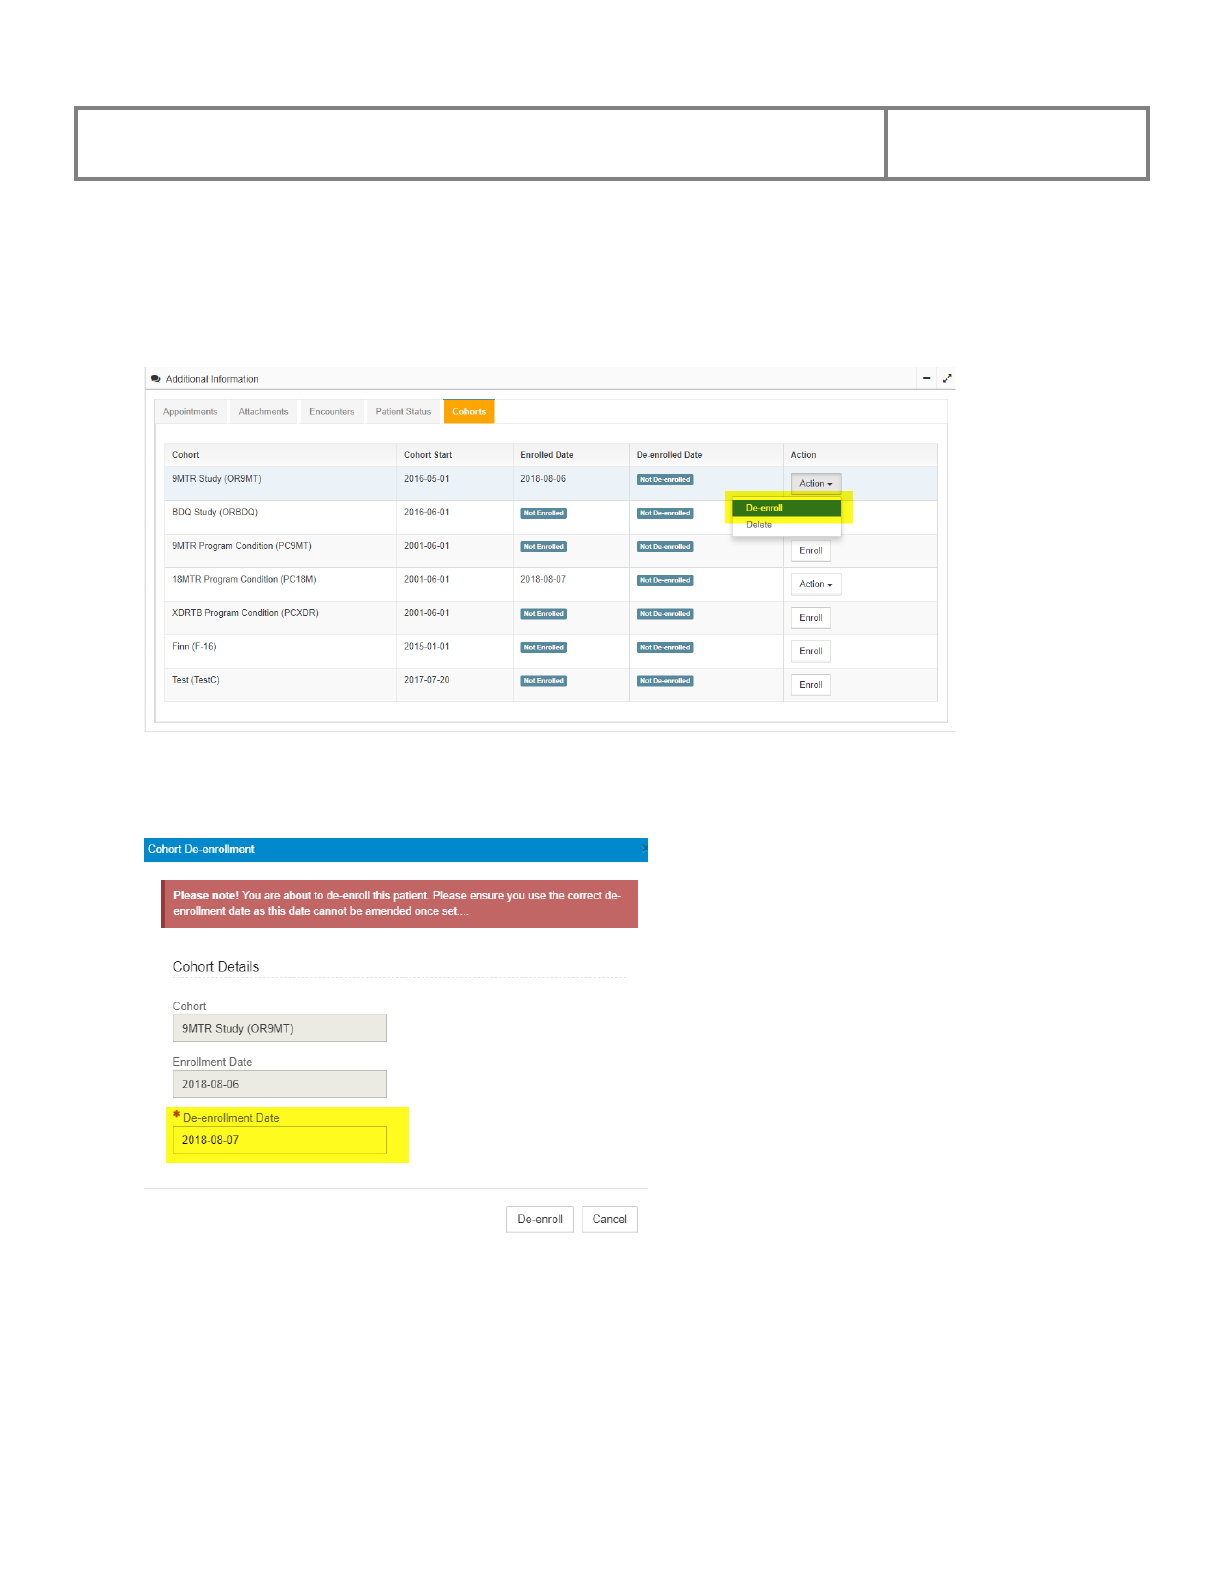
PViMS User Manual
2018
109
4.5.1.4 De-enroll a Patient from a Cohort
Within the Patient View, at the Cohorts tab, find the Cohort you would like to de-enroll the
patient from.
Click the De-enroll button after which the system will display a Cohort Enrollment
confirmation box.
Enter the de-enrollment date and click the De-enroll button. The system will display the updated
Cohorts Table.
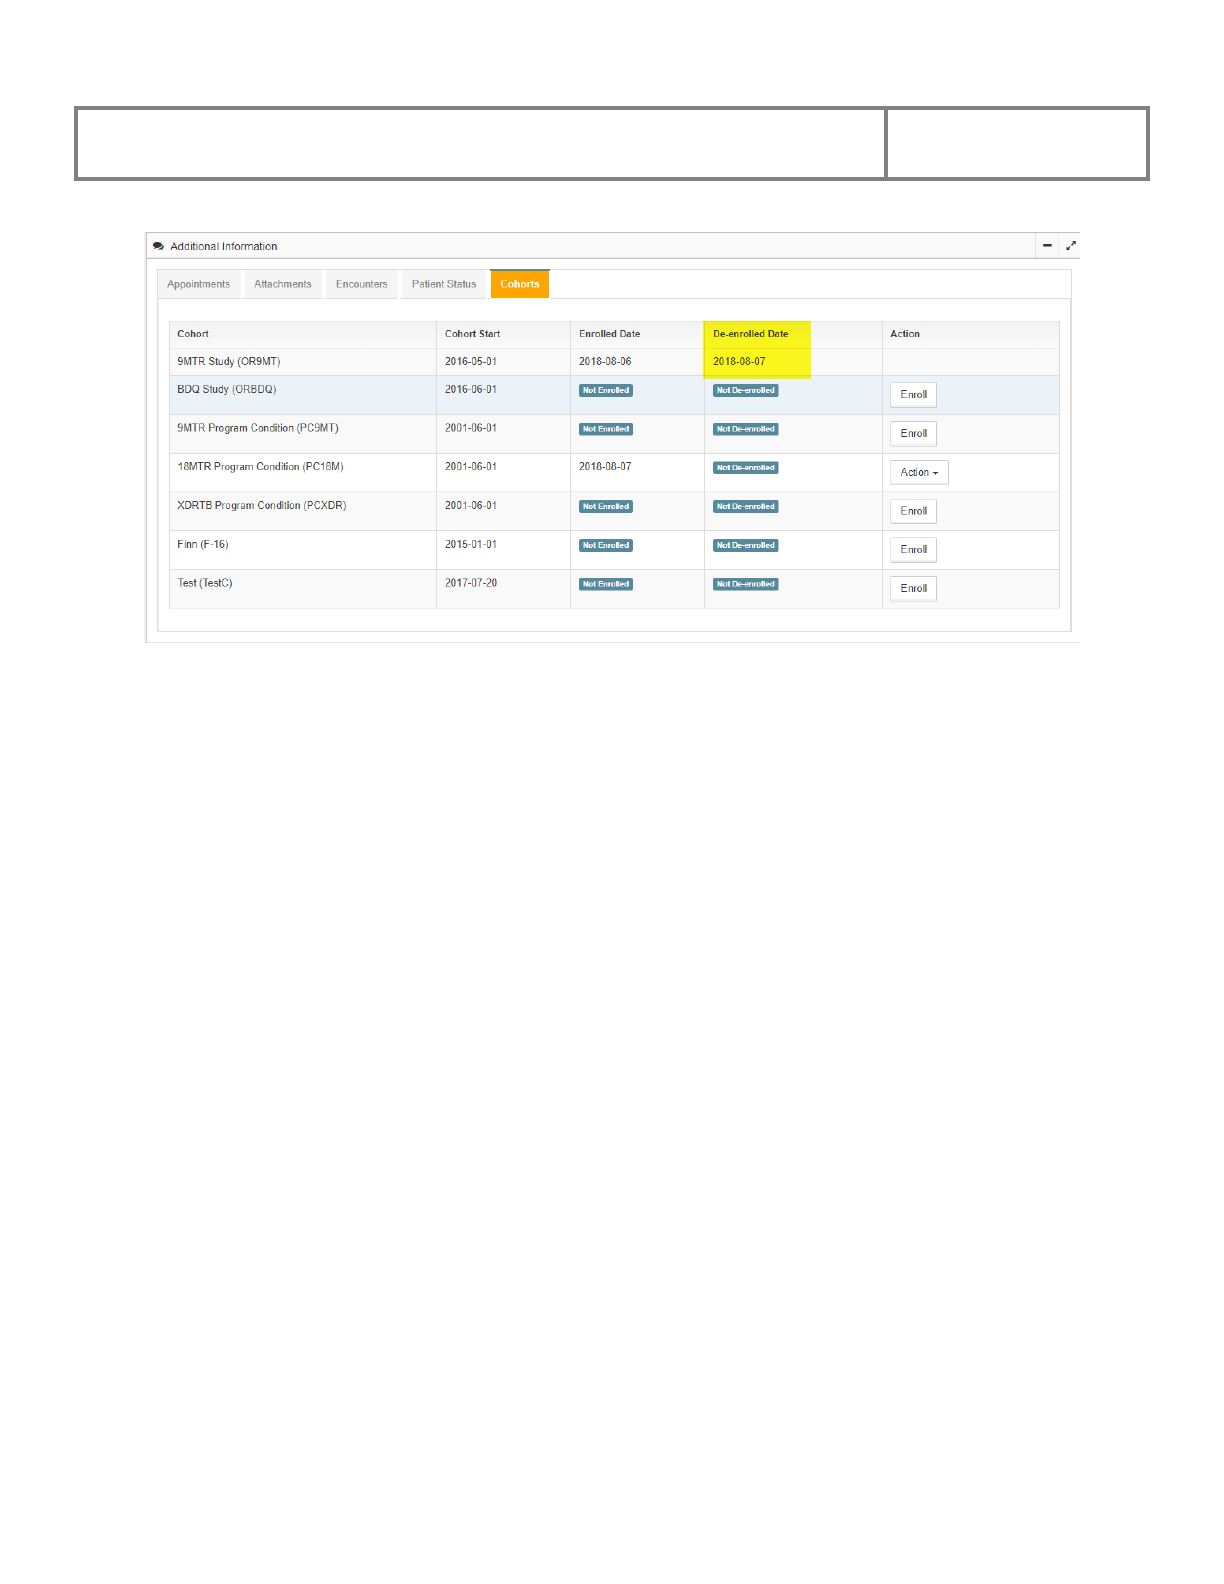
PViMS User Manual
2018
110
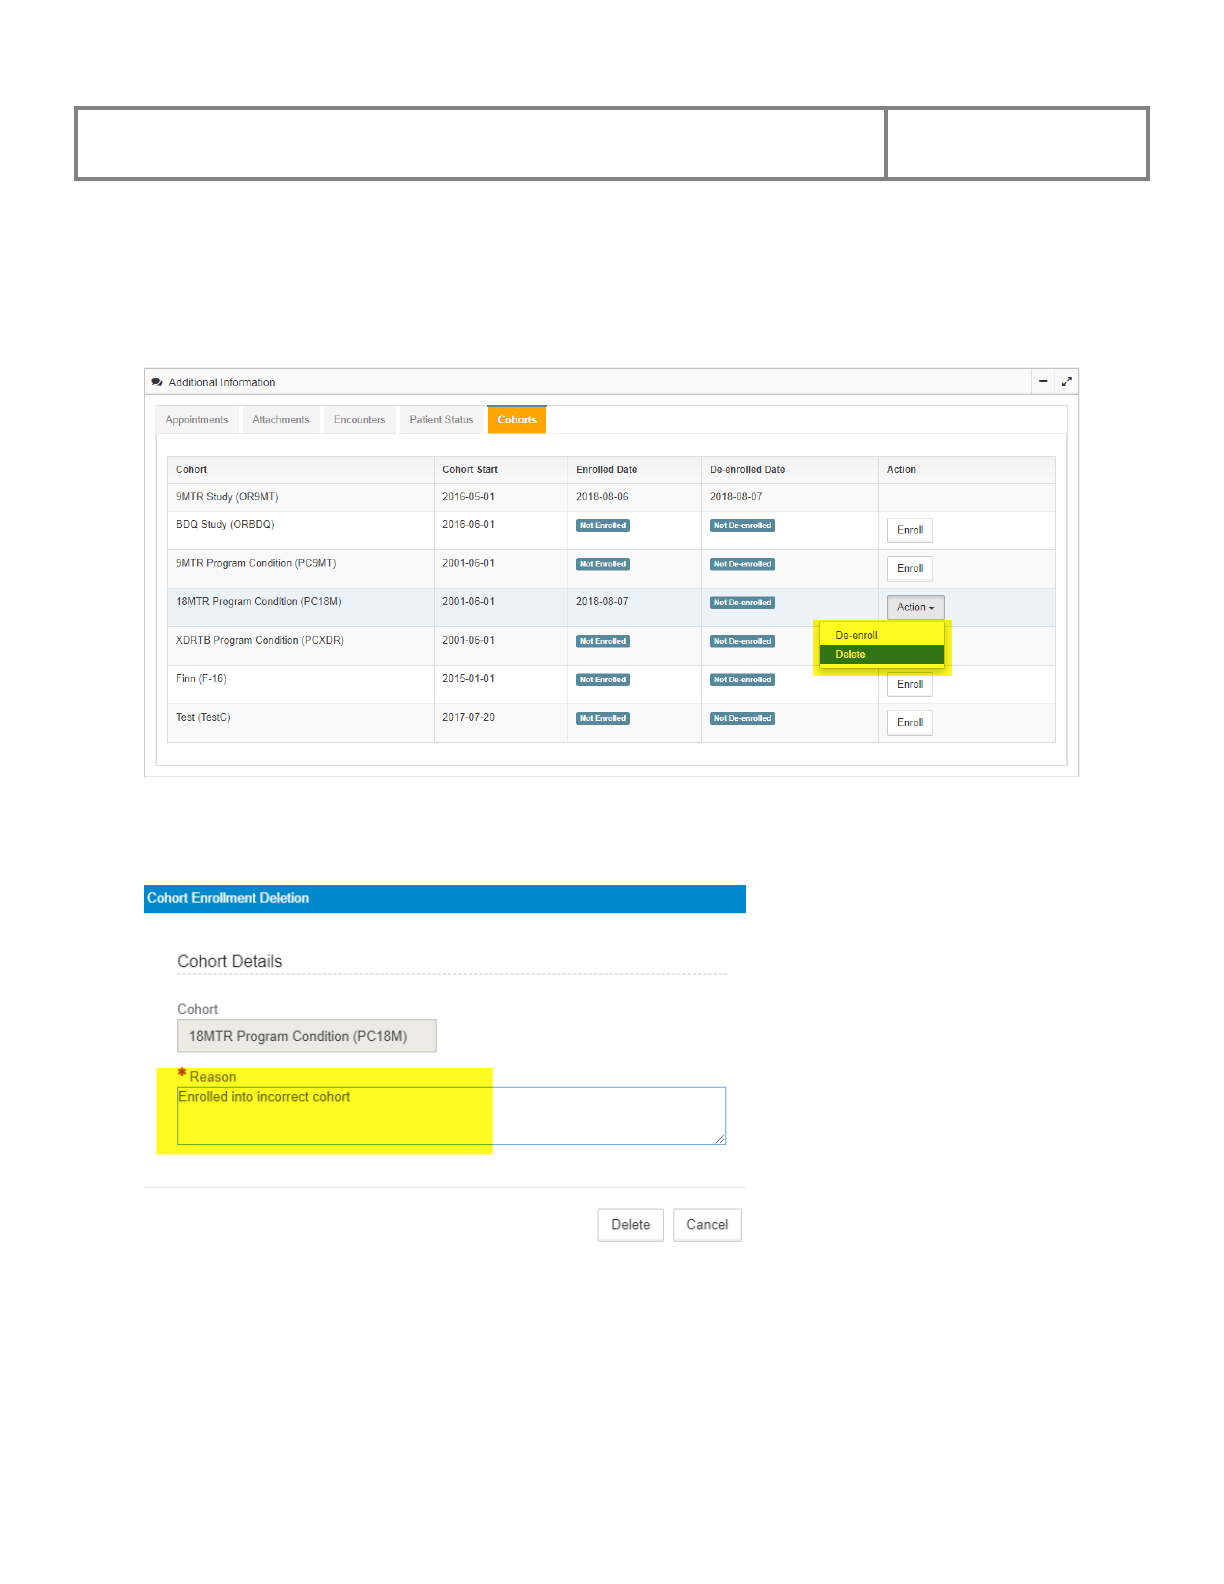
PViMS User Manual
2018
111
4.5.1.5 Deleting A Cohort Enrolment
Within the Patient View, at the Cohorts tab, find the Cohort you would like to de-enroll the
patient from.
Click the Delete button after which the system will display a Cohort Enrollment Deletion
confirmation box.
Enter the reason for deletion and click the Delete button. The system will display the updated
Cohorts Table.

PViMS User Manual
2018
112
Deleting a cohort enrolment allows the patient to be re-enrolled into that cohort. De-
enrollment means the patient cannot be re-enrolled into the same cohort again.
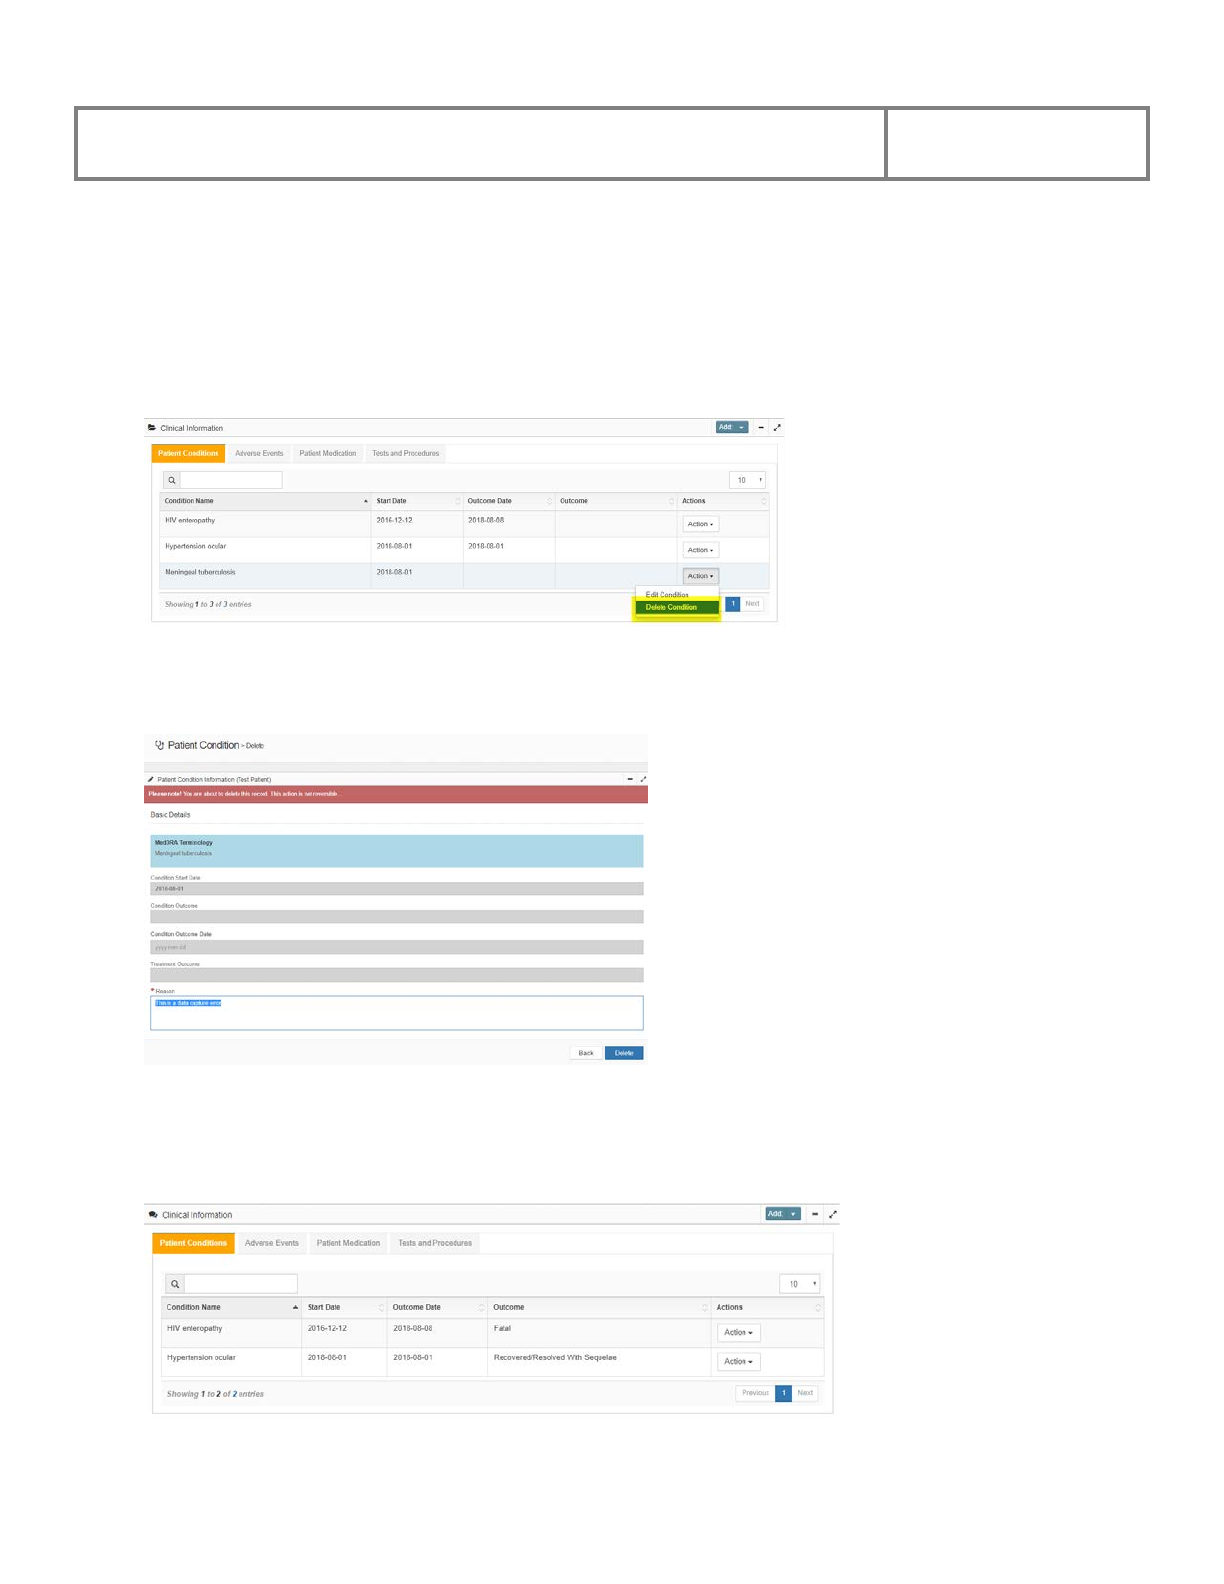
PViMS User Manual
2018
113
4.5.2 Encounter View – Clinical Information
4.5.2.1 Delete A Patient Condition
Within the Encounter or Patient View, at the Patient Conditions tab and locate the condition
you would like to delete.
Click the Delete Condition button after which the system will take you to a Delete Condition
screen.
Enter a reason for the deletion (this is compulsory) and click on the Delete button to delete the
condition or click the Back button to undo the action. After confirming the deletion, the system
will update the Patient Condition table.
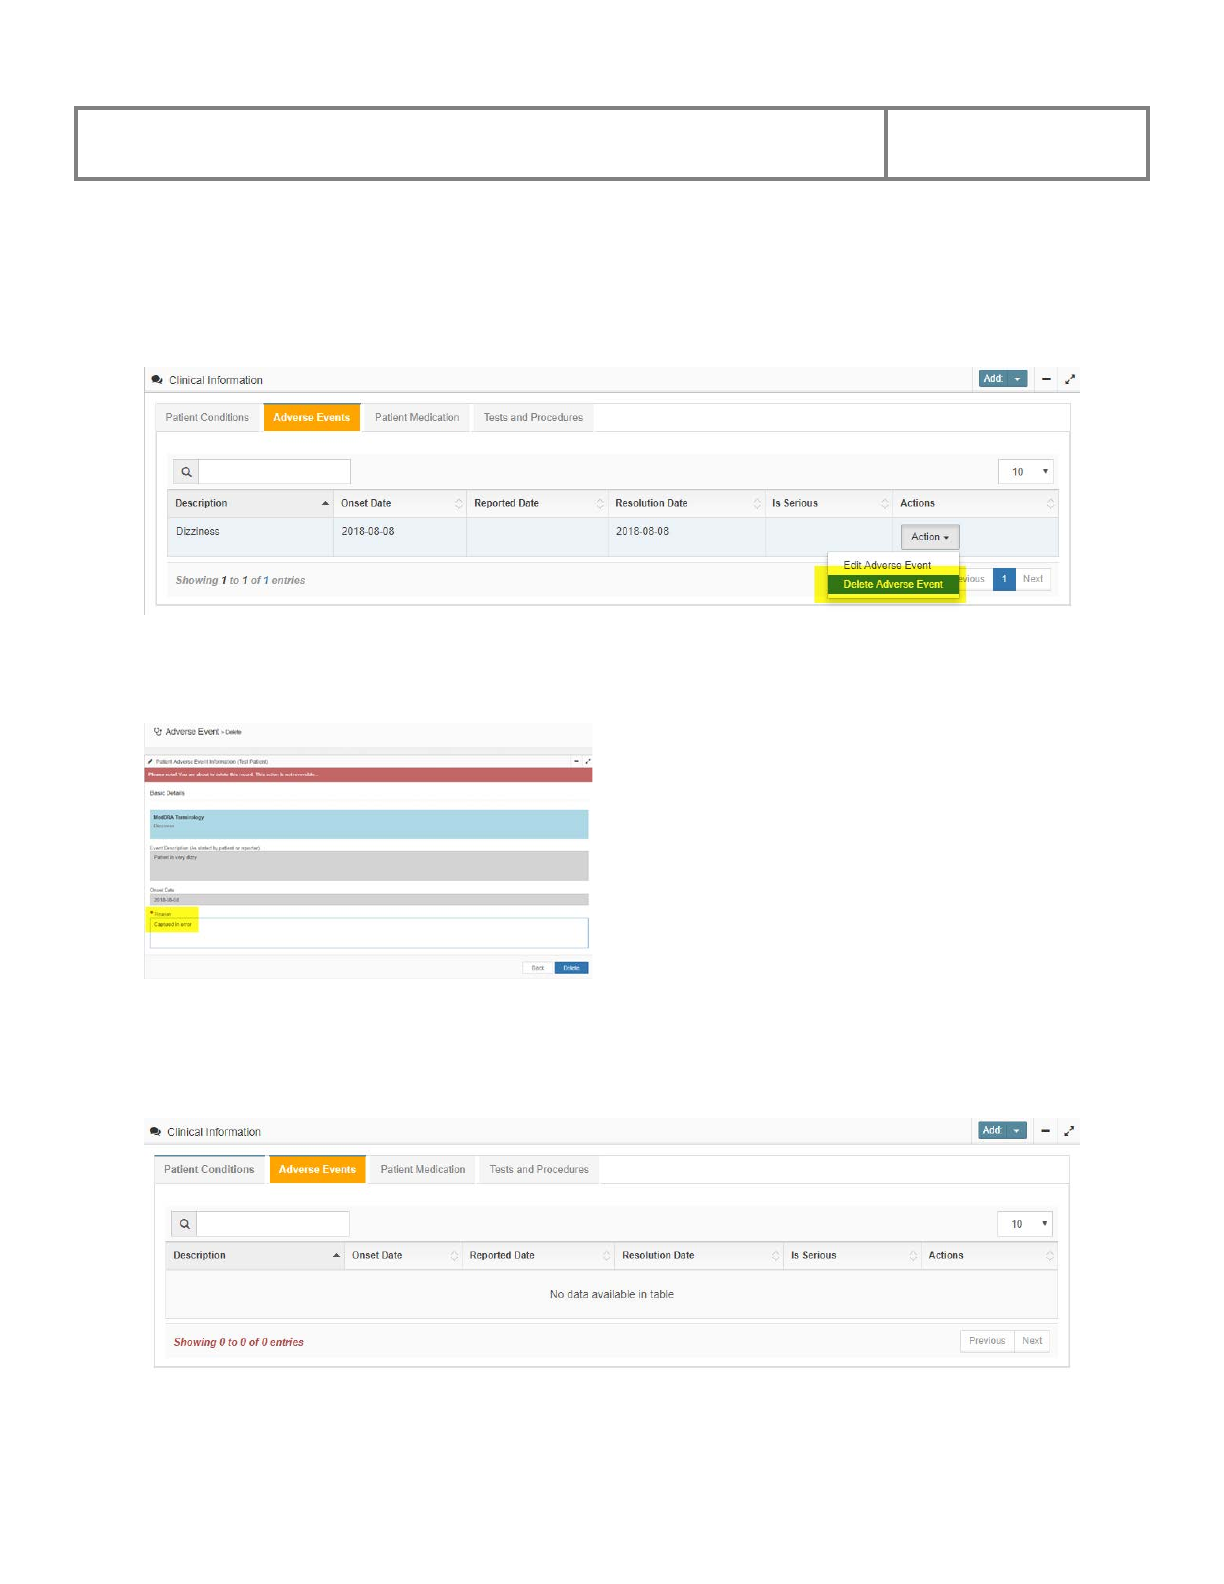
PViMS User Manual
2018
114
4.5.2.2 Delete An Adverse Event
Within the Encounter or Patient View, at the Adverse Events tab and locate the event you
would like to delete.
Click the Delete Adverse Event button after which the system will take you to a Delete Adverse
Event screen.
Enter a reason for the deletion (this is compulsory) and click on the Delete button to delete the
adverse event or click the Back button to undo the action. After confirming the deletion, the
system will update the Adverse Events table.
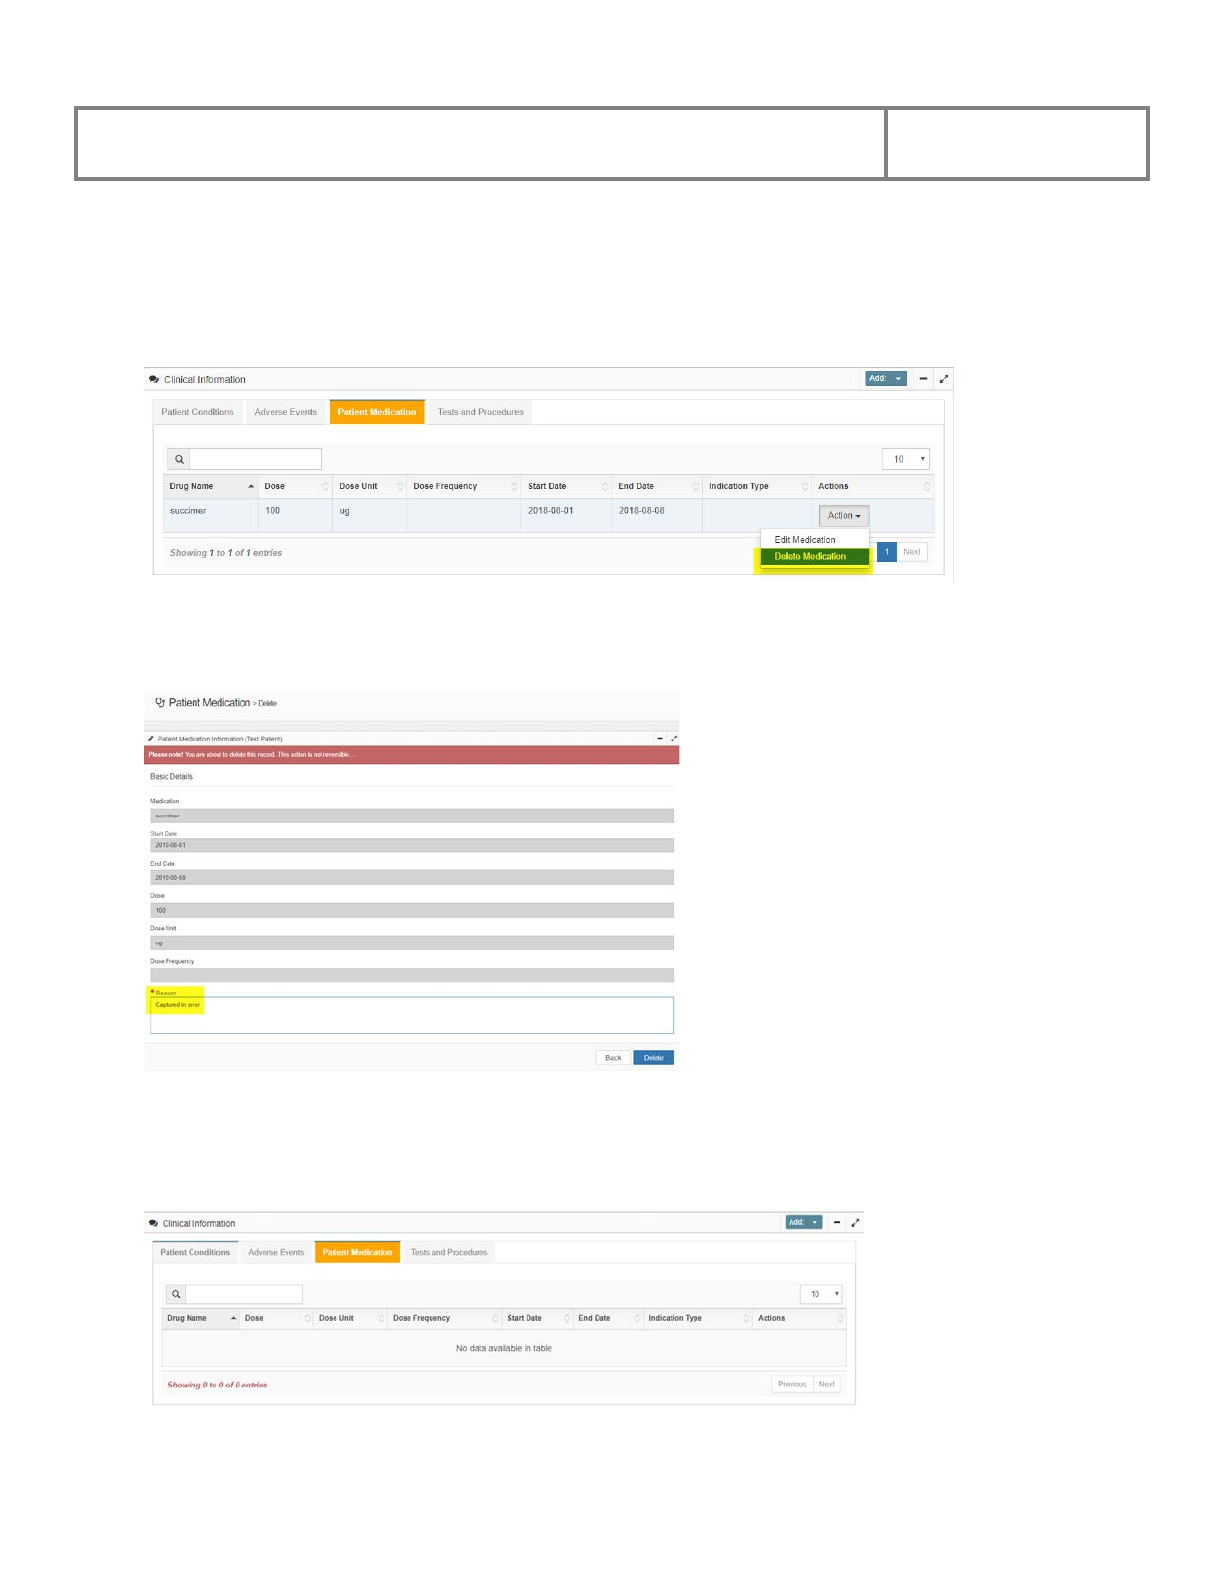
PViMS User Manual
2018
115
4.5.2.3 Delete A Patient Medication
Within the Encounter or Patient View, at the Patient Medications tab and locate the
medication you would like to delete.
Click the Delete Medication button after which the system will take you to a Delete Patient
Medication screen.
Enter a reason for the deletion (this is compulsory) and click on the Delete button to delete the
medication or click the Back button to undo the action. After confirming the deletion, the system
will update the Patient Medications table.
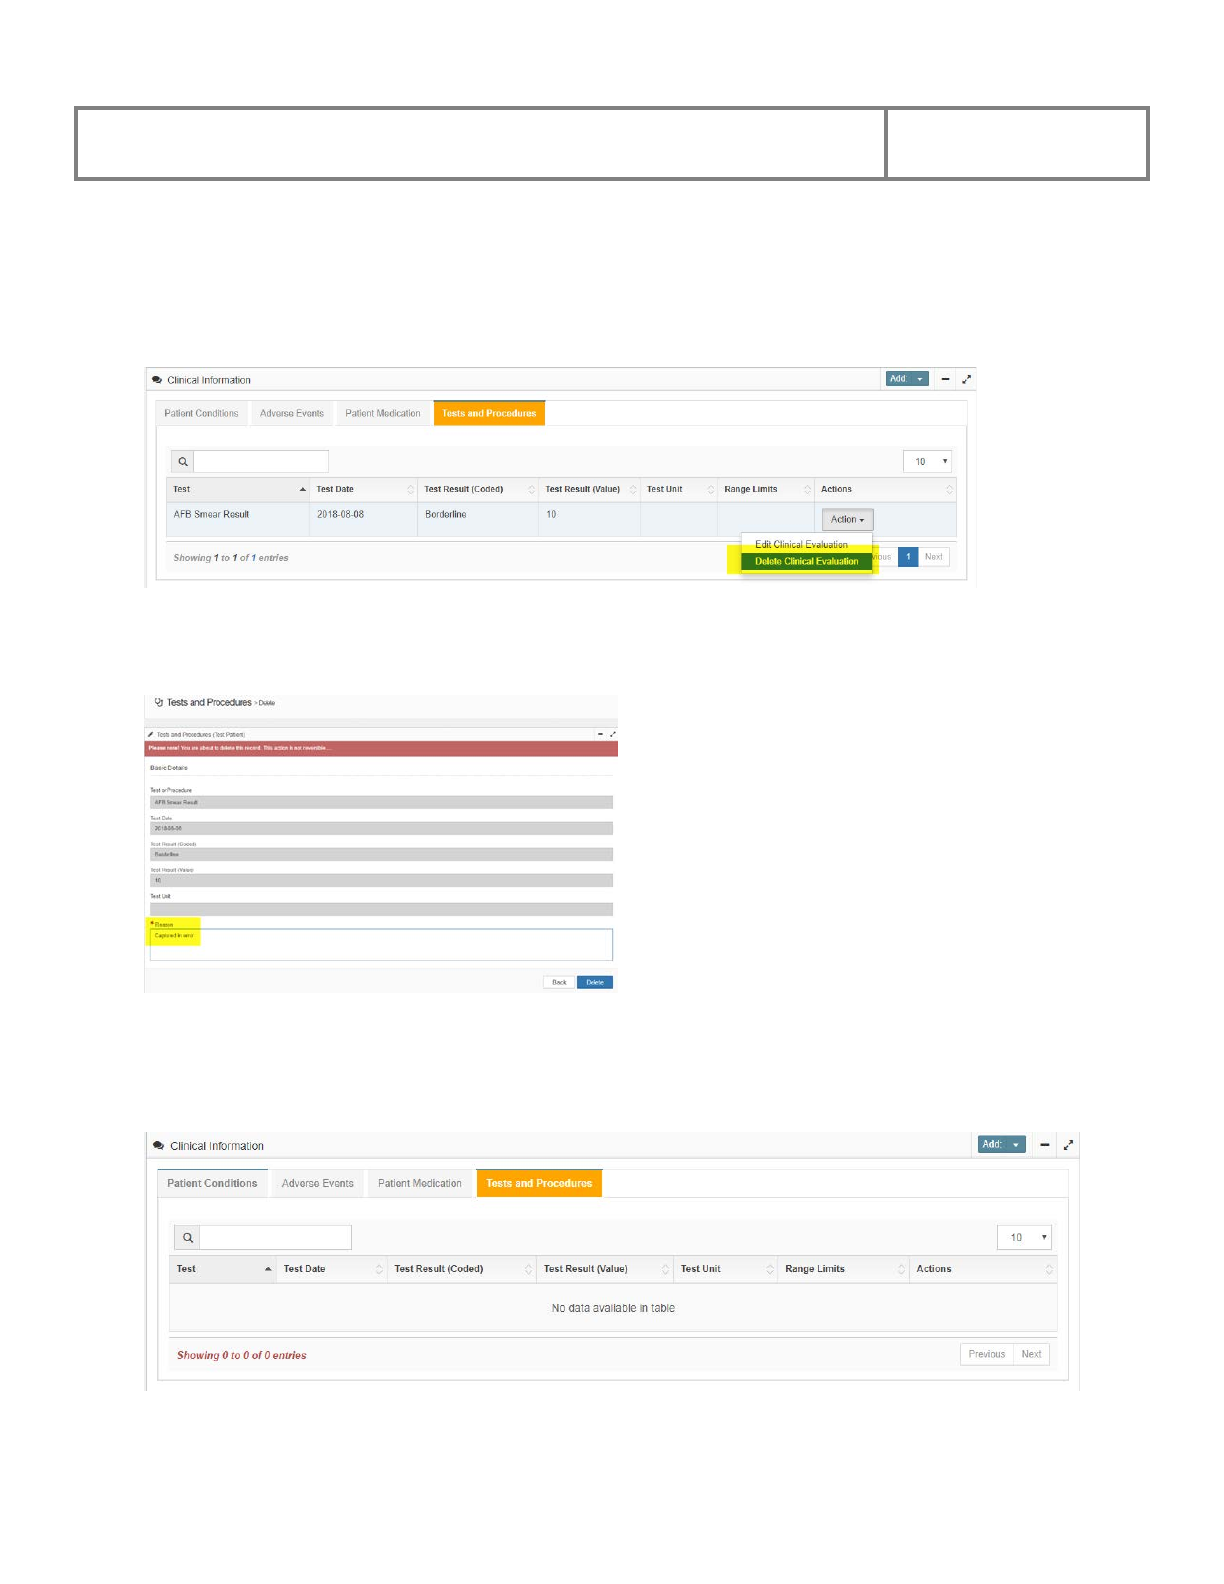
PViMS User Manual
2018
116
4.5.2.4 Delete A Test and Procedure
Within the Encounter or Patient View, at the Tests and Procedures tab and locate the test and
procedure you would like to delete.
Click the Delete Clinical Evaluation button after which the system will take you to a Delete
Test and Procedure screen.
Enter a reason for the deletion (this is compulsory) and click on the Delete button to delete the
test and procedure or click the Back button to undo the action. After confirming the deletion, the
system will update the Tests and Procedures table.
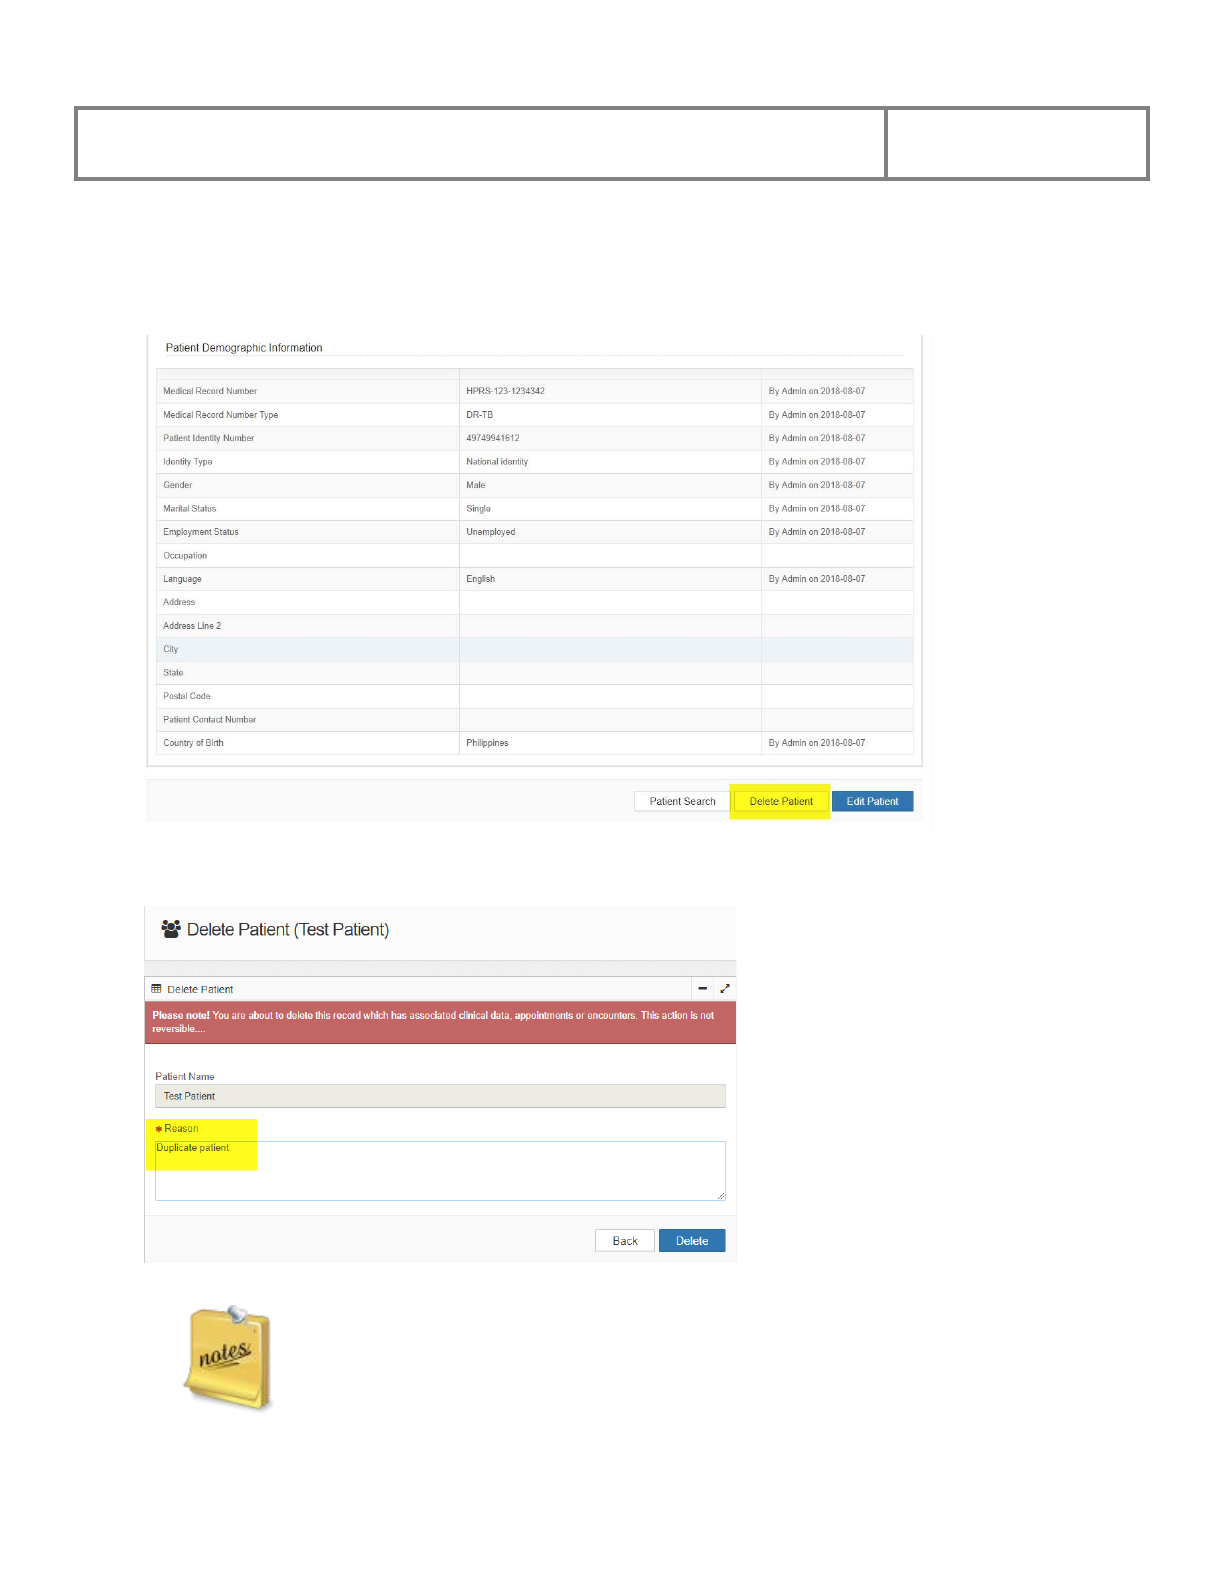
PViMS User Manual
2018
117
4.5.3 Delete an Entire Patient Record
Within the Patient View, click the Delete button to delete an entire patient record.
The system will take you to a Delete Patient screen.
Deleting a patient will archive all patient information and will remove the patient
from any analysis they may have been part of previously.
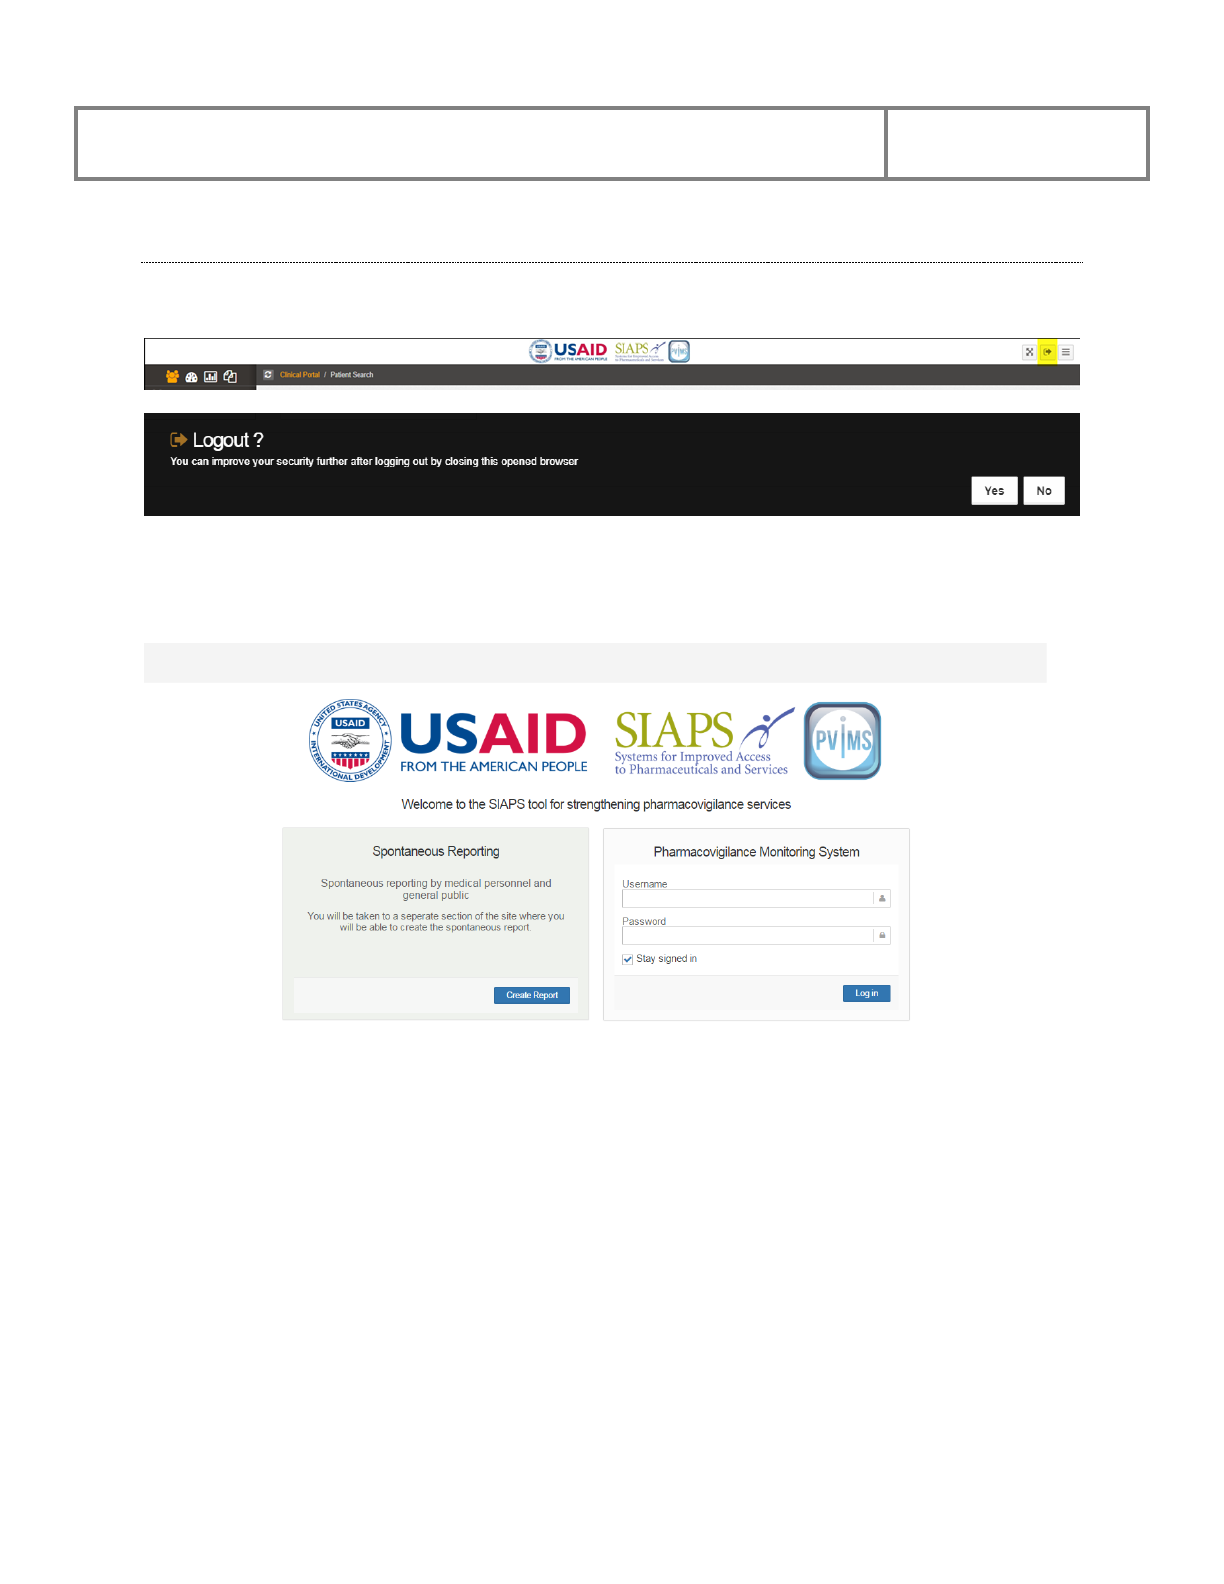
PViMS User Manual
2018
118
4.6 Log Out of the System
At the end of your work on PViMS, to log out of the session, click the logout icon.
Click the Yes button to logout, or click the No button to remain logged in.
After clicking on the Yes button, the system will display the Login page (Figure 189)

PViMS User Manual
2018
119

PViMS User Manual
2018
120
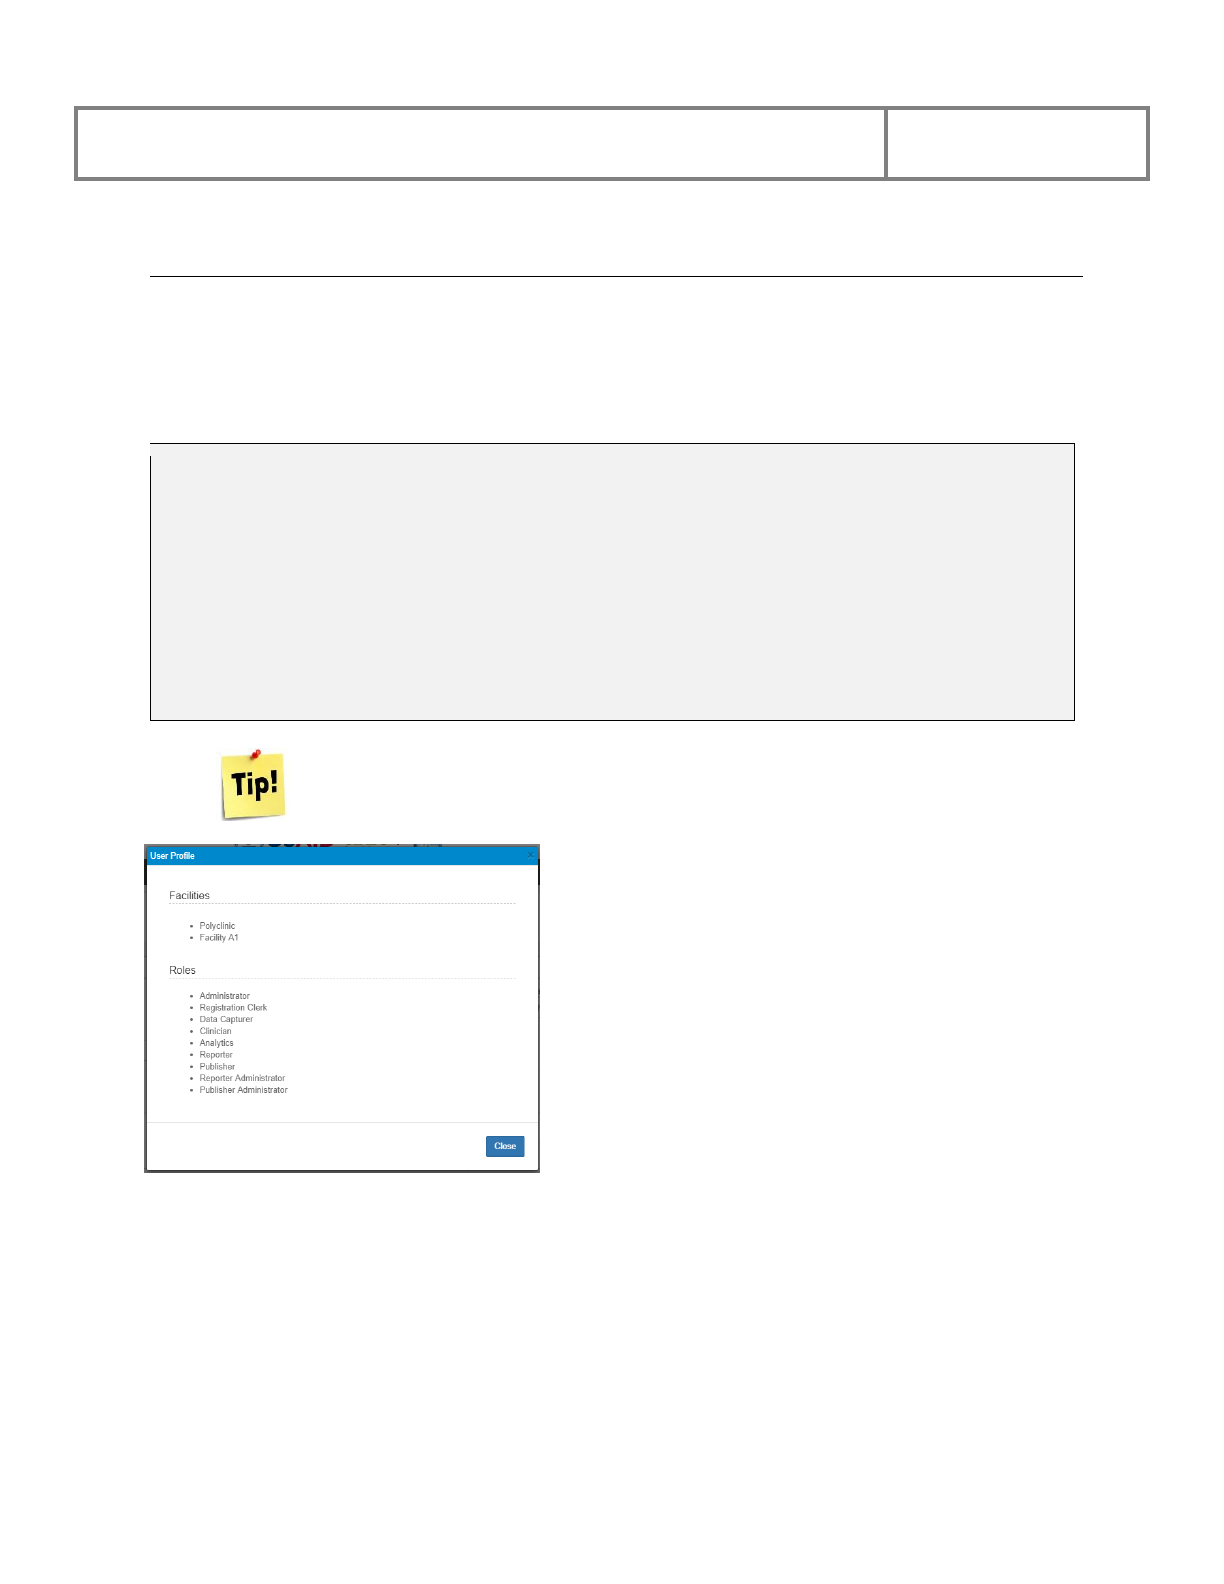
PViMS User Manual
2018
121
5 Analytical Portal
At the Home Page of the Analytical Portal, you will be presented with the following options:
● Spontaneous and Active Reports
● Spontaneous and Active Analyzer
The analytical portal is the centralized hub for causative drug assessment using traditional
recognized rating scales, standardized terminology, and risk detection with exposed versus
non-exposed risk ratios.
Note: the following roles have access to the analytical portal:
• Administrator. The administrator has FULL permissions to the analytical portal.
• Analyst. An analytics user is able to assign terminology, set causality and run
analysis on collected data.
Click on your user name in the application footer to view roles you currently have
access to.
PViMS User Manual
2018
122
5.1 Spontaneous Reporting
Spontaneous reports are termed spontaneous as they take place during the clinician’s normal
diagnostic appraisal of a patient, when the clinician is drawing the conclusion that the drug may
be implicated in the causality of the event.
Spontaneous reporting system relies on vigilant physicians, other healthcare professionals, and
patients who not only generate a suspicion of an ADR, but also report it.
It is an important source of regulatory actions such as taking a drug off the market or a label
change due to safety problems. Spontaneous reporting is the core data-generating system of
international pharmacovigilance, relying on healthcare professionals (and, in some countries,
consumers) to identify and report any adverse events to their national pharmacovigilance center.
Spontaneous reports are, by definition, submitted voluntarily.
PViMS facilitates a public facing interface that allows clinicians or the public itself to
spontaneously report on adverse event related data. See chapter 8 for more information.
5.2 Active Reporting
Active surveillance for monitoring the safety and effectiveness of medical products is
increasingly recognized as a complement to spontaneous reporting commonly used by
pharmacovigilance systems. Integrated mechanisms and processes for monitoring the safety of
medicines are essential to a well-functioning pharmaceutical sector. A positive benefit-to-risk
balance should precede access to market; however, most regulatory decisions take place early in
the product lifecycle and are based on limited data from clinical trials that may be of relatively
short duration with limited numbers and types of subjects.
It is critical, therefore, that medicines continue to be monitored for safety and effectiveness once
they enter the market under real-life conditions. For some medicines, issues will only emerge
under real-world conditions as a result of prolonged use, use in specific subpopulations or in
patients with multiple comorbidities, or use in combination with other medicines. In some cases,
rare adverse effects only emerge after a product is used for many years, by large numbers of
patients, or both.
Active surveillance is particularly important to support the introduction of new essential
medicines in LMICs whose regulatory systems are being developed and are in need of support.
In resource-limited settings, active surveillance can help determine the real-life frequency, risk
factors, and impact of clinically significant adverse medicine events on treatment outcomes.
PViMS User Manual
2018
123
5.3 Pharmacovigilance Activities
This section describes the common processes adopted by the pharmacovigilance unit in
responding to both spontaneous and active reports submitted through PViMS.
PLEASE NOTE: In relation to spontaneous reports, the patient identified in the report does
NOT form part of the active reporting patient dataset. Therefore, spontaneous reports do not
form part of any analysis conducted through the analyzer.
The following activities are facilitated in the Analytical portal:
• Verify quality of report data
• Set terminology for adverse drug reaction (MedDRA)
• Set causality per drug (Naranjo or WHO)
• Create and update E2B files (Export to XML)
• Generate a patient summary
5.3.1 Terminology
Causality Assessment Scale or Terms. The assessment scales or terms were developed to help
standardize assessment of causality for all adverse drug reactions. The result is determined by an
algorithm designed by Naranjo or WHO for determining the likelihood of whether an adverse
drug event is actually due to the drug rather than the result of other factors. Probability is
assigned via a score termed definite, probable, possible or doubtful (Naranjo) or certain,
probable/likely, possible, unlikely, conditional, unassessable or unclassified (WHO). Values
obtained from this algorithm are sometimes used in peer reviews to verify the validity of author's
conclusions regarding adverse drug reactions.
MedDRA Terminology. MedDRA or Medical Dictionary for Regulatory Activities is a
clinically validated international medical terminology dictionary by regulatory authorities in the
pharmaceutical industry during the regulatory process, from pre-marketing to post-marketing
activities, and for data entry, retrieval, evaluation, and presentation. In addition, it is the adverse
event classification dictionary endorsed by the International Conference on Harmonization of
Technical Requirements for Registration of Pharmaceuticals for Human Use (ICH).
E2B. The international standard for transmitting medicine adverse event reports specified by the
ICH.
PViMS User Manual
2018
124
5.3.2 Process Flow
Activity: Start of Process
Clinician adds a new adverse event to the patient
record.
Reporter adds a new spontaneous report.
System generates a new report for the PV unit to
action:
• Report has a unique identifier
• Report has a default activity of Confirm
Report Data
• Report has a sub status of UNCONFIRMED
Confirm Report Data
The purpose of this activity is to facilitate the
checking, vetting, and updating of the clinical data
collected for the adverse event logged. The PV unit
will be unable to perform any causality or
terminology configurations until the data is
confirmed as accurate and comprehensive.
The PV specialist has the following options:
• Delete Report
•
Confirm Report
Activity: Confirm Report Data
Step 1: PV specialist and clinician/reporter update clinical data until there is sufficient information to
perform causality and terminology configurations.
For active reporting the patient record is modified through the clinical portal.
For spontaneous reporting the report is modified directly in the analytical portal.
Step 2: Once data has been confirmed, the PV specialist will confirm the report is ready for assessment by
selecting the Confirm report option.
Step 3: The report is moved into a new activity: Set MedDRA and Causality.
Activity: Set MedDRA and Causality
Step 1: PV specialist sets the terminology for the
adverse event. This will be the terminology used for
analysis purposes.
Step 2: PV specialist then sets the causality per
medication that was in use at the onset date of the
adverse event.
Please note: the specialist is unable to set causality
until the MedDRA term has been selected.
Step 3: On completion, the PV specialist confirms
causality has been set.
Step 4: The report is moved into a new activity:
Extract E2B.
Set MedDRA and Causality
The purpose of this activity is to facilitate the
setting of the MedDRA terminology for the event
and to set causality per medication using either the
Naranjo or WHO causality scales.
The PV specialist has the following options:
• Set Terminology
• WHO Causality
• Naranjo Causality
• Confirm Causality Set
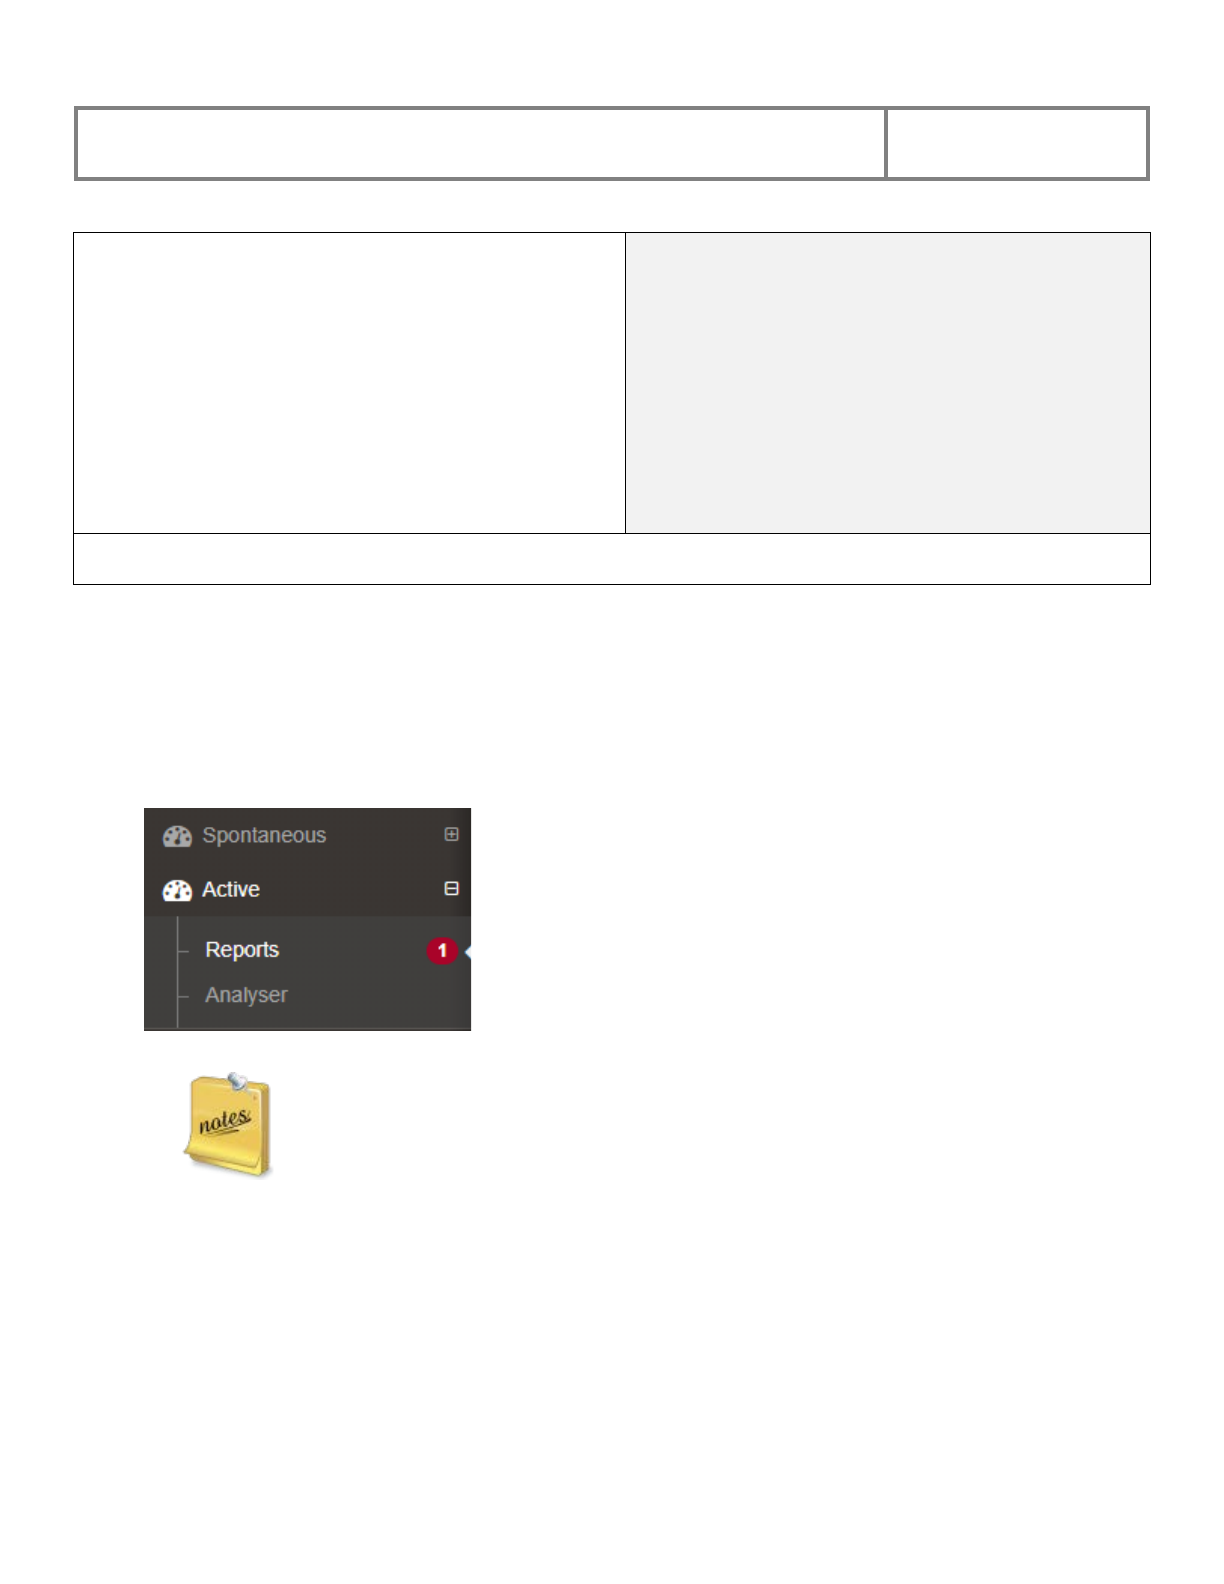
PViMS User Manual
2018
125
Activity: Extract E2B
Step 1: PV technician creates an E2B XML file for
submission.
Please note: a patient summary is stored at the time of
generating the E2B XML to allow for data verification.
Step 2: PV technician then confirms that the E2B
XML file has been submitted to WHO.
• A receipt code and time can be noted here
Please note: submission to WHO UMC is a manual
process.
Extract E2B
The purpose of this activity is to facilitate sharing
of E2B adverse drug reactions with the WHO
Uppsala Monitoring Centre using the ICH ICSR
E2B specification.
The PV specialist has the following options:
• Create E2B
• Confirm E2B submission
PROCESS COMPLETED
5.3.3 Identifying New Reports
It is possible to identify new active or spontaneous reports using the main reporting menu for
either of these report types. The number of new reports registered within a pre-defined period of
time is displayed as an alert value next to the corresponding menu.
This alert will vary in count depending on the ReportInstanceNewAlertCount
configuration. Please speak to your system administrator to confirm what this
value is set to in days.
5.3.4 Search for a Report
In the Reports function for Spontaneous and Active Reporting, you can Search for new reports
that have been created. The Report Search function can be accessed either through the
Spontaneous or Active menu.
PViMS User Manual
2018
126
There are two ways to search for a report. You can search by:
● Criteria (All reports or reports by stage)
● Report date range
5.3.4.1 Search by Criteria
• Click the arrow in the Report Criteria field to select a criteria option
• Select the criteria that you would like to search against.
Confirm Report Data Stage: Search on all reports that are newly submitted and are
not yet VERIFIED.
Set MedDRA and Causality: Search on all reports that have been VERIFIED and
are in the process of being defined through terminology.
Extract E2B: Search on all reports that have all terminology defined and are ready to
extract information for submission to the WHO Uppsala Monitoring Centre.
• Click the Search button.
The system will display a list of reports according to the filter selected, please note the Unique
Identifier of the report in column 2.

PViMS User Manual
2018
127
5.3.4.2 Search for all Reports within a Date Range
• Enter the Report Date From and Report Date To for the date range to search.
• Click the Search button.
The system will display a list of reports according to the filter selected, please note the Unique
Identifier of the report in column 2.

PViMS User Manual
2018
128
The columns in the report table are described below:
Created
The date the report was registered in the analytical portal
Identifier
Unique identifier for the report (system generated)
Patient
Patient name
Medication Summary
Overview of all medications associated with the patient at the time of
the event, including the WHO or Naranjo causality assessment
outcome once that has been set
Adverse Event
The adverse event experienced by the patient
MedDRA
Terminology
The unique and internationally recognized MedDRA term defined for the
event
Status
Current status of the report
Action
Confirm Report Data Stage
View Activity History
Confirm or Delete Report
View Patient (Active Only)
View SAE Report or Patient Summary
Update Report (Spontaneous Only)
Set MedDRA and Causality Stage
View Activity History
Set Terminology (MedDRA), Naranjo or WHO Causality Term

PViMS User Manual
2018
129
Confirm Causality Set
View Patient (Active Only)
View SAE Report or Patient Summary
Update Report (Spontaneous Only)
Extract E2B Stage
View Activity History
Create or Update an E2B file
Prepare or Confirm E2B file for submission
Download XML file
View Patient (Active Only)
View SAE Report or Patient Summary
Update Report (Spontaneous Only)
5.4 Pharmacovigilance Activities - General
5.4.1 Viewing Activity History for Report
Irrespective of the stage the report is currently in, you will be able to view a comprehensive
history for the report detailing all actions that have occurred, who effected the action, and any
additional comments.
Once you have searched for a report, click on the View Activity History menu for the associated
report you would like to view.
The system will navigate you to the View Activity History page.
PViMS User Manual
2018
130
The columns in the activity history table are described below:
Activity
The primary activity stage performed by the analyst
Execution Event
The primary activity performed by the analyst. Activities are
dependent on the stage the report is in.
Executed By
Which user executed the activity
Execution Date
The date and time the user executed the activity
Comments
Any comments noted by the user at the point of completing the
activity
Receipt Date
Particular to the E2B Extract Stage. Confirmation an E2B extract has been
received by UMC and this is the associated receipt date
Receipt Code
Particular to the E2B Extract Stage. Confirmation an E2B extract has
been received by UMC and this is the associated receipt code that may
be supplied by UMC
Action
View Patient Summary
View Patient Extract
View E2B File
PViMS User Manual
2018
131
5.4.2 Viewing a Patient Record
The View Patient button allows the user to navigate to the Patient View for the patient so that
the analyst may gather additional information to the adverse event.
Once you have searched for a report, click on the View Patient menu for the associated report
you would like to view.
The system will navigate you to the Patient View page in the Clinical Portal.
This menu item will only be made available under the following circumstances:
• Active reports only
• If the user has the Registration Clerk, Data Capture or Clinician role
assigned to their user profile
5.4.3 Extracting a Patient Summary
The View Patient Summary menu allows the user to generate an overall summary of the patient
clinical record in MS Word format. This is the preferred method of granting access to the clinical
record for the analyst.
Once you have searched for a report, click on the View Patient Summary menu for the
associated report you would like to view.
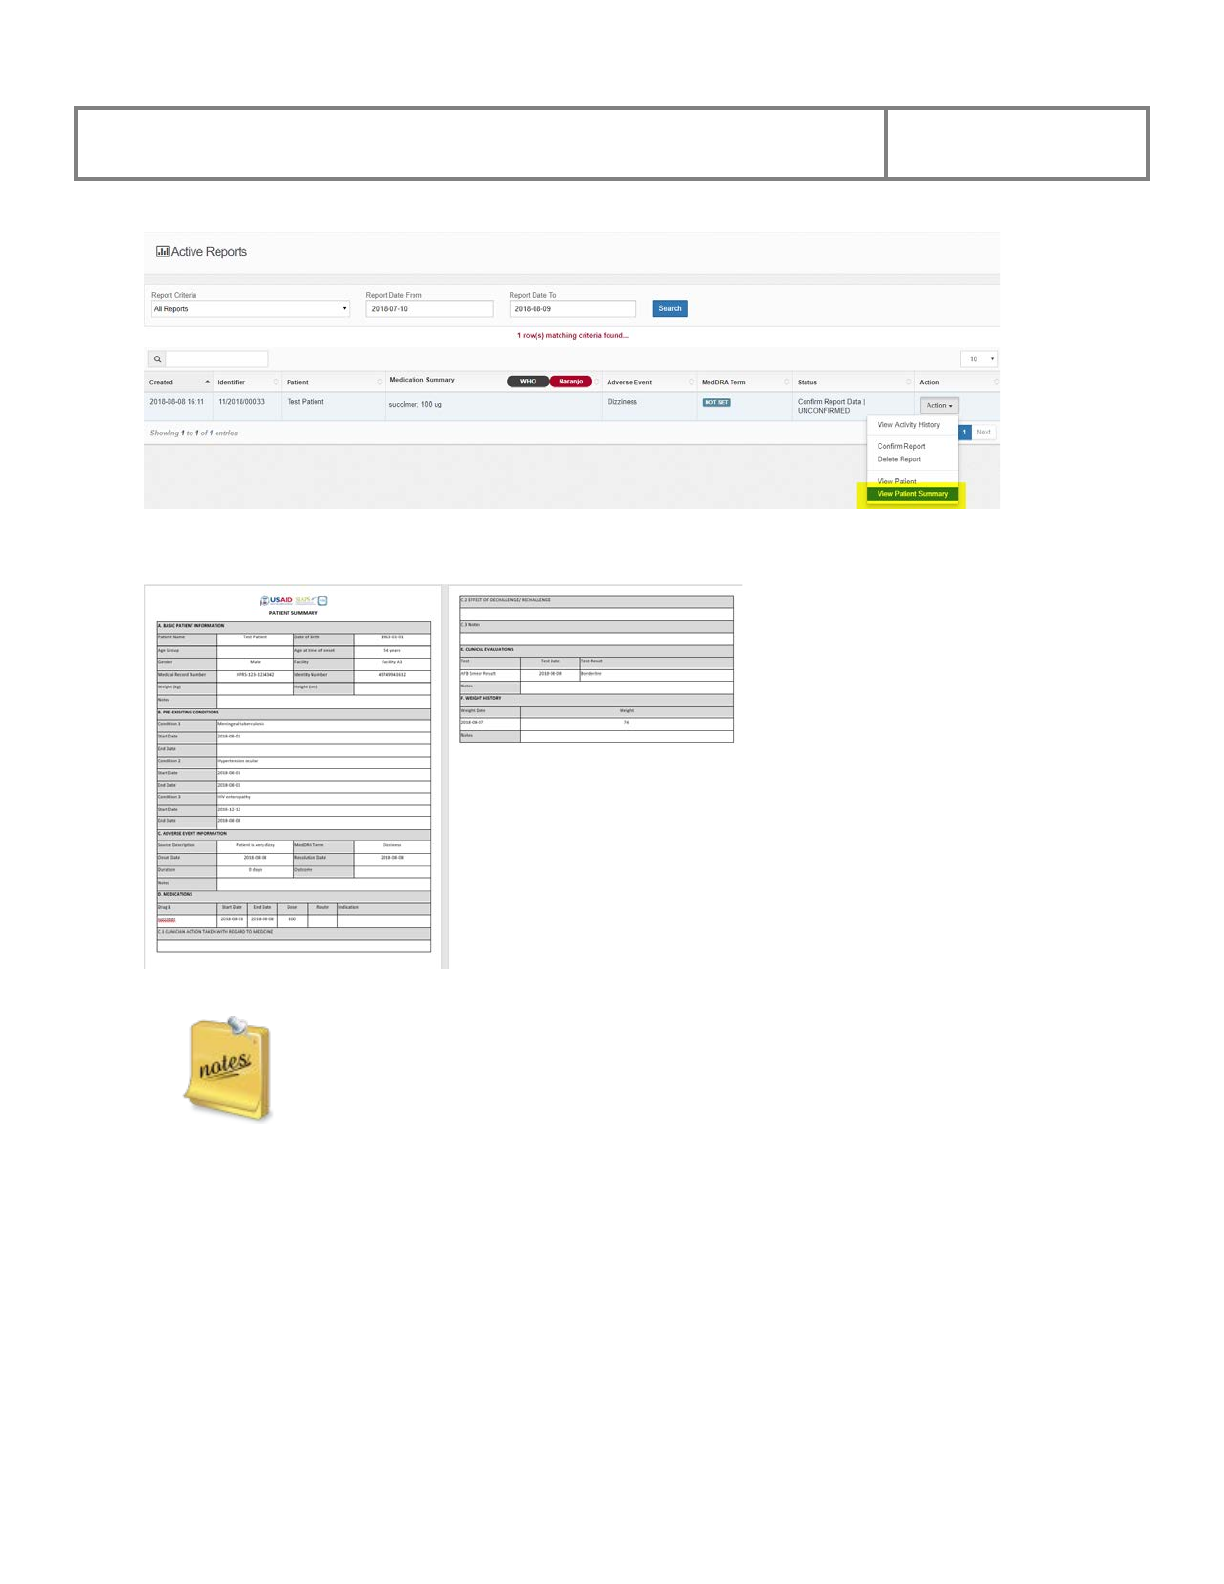
PViMS User Manual
2018
132
The system generates an extract of the patient summary:
.
If the event is defined as serious, the system will include additional information
that explains the seriousness of the report. The menu item for generating the
extract will be changed to View SAE Report.
5.4.4 Updating a Spontaneous Report
The Update Report button allows the user to navigate to the spontaneous report for the patient
and allow the analyst the ability to amend the report.
Once you have searched for a report, click on the Update Report menu for the associated report
you would like to amend.
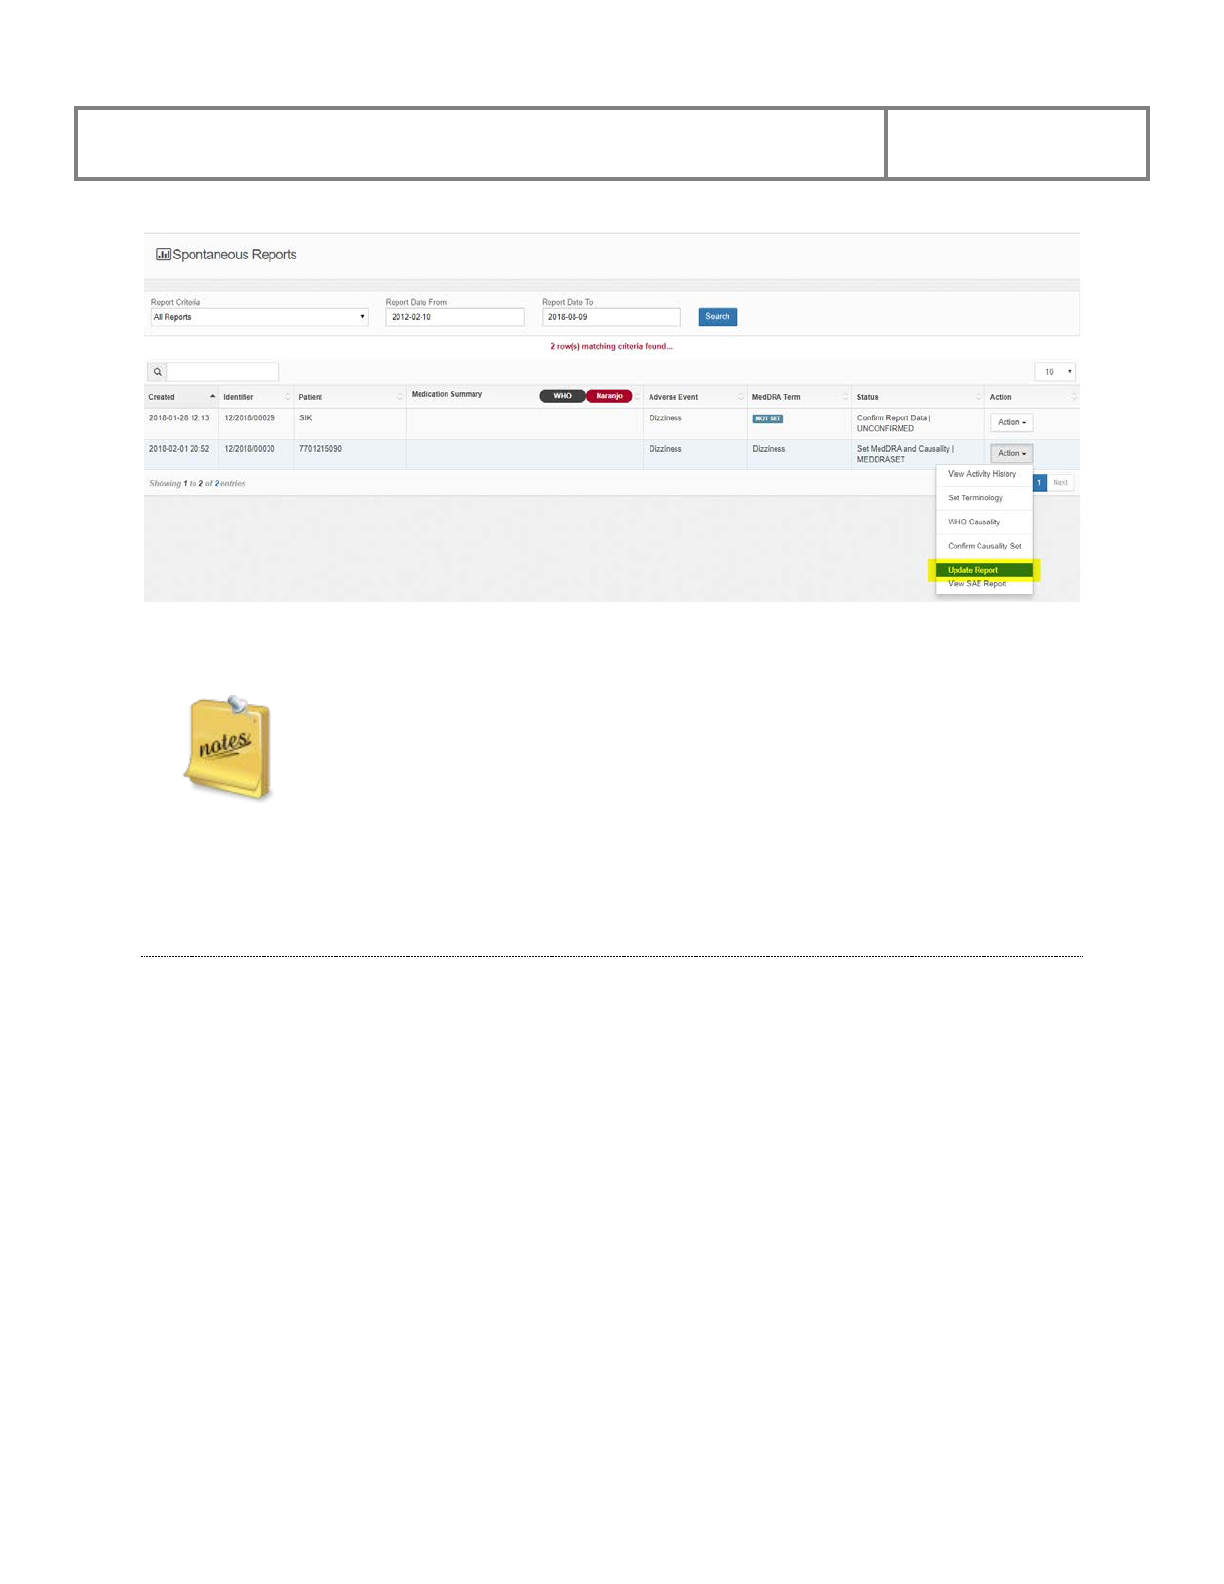
PViMS User Manual
2018
133
The system will navigate you to the Spontaneous View page for the report.
This menu item will only be available for spontaneous reports.
5.5 Pharmacovigilance Activities – Confirm Report Data
5.5.1 Deleting a Report
The Confirm Report Data stage enforces a process whereby the analyst ensures the necessary
clinical data is of sufficient quality to allow terminology and causality to be completed. In the
event a report is deemed to be insufficient, inaccurate, or erroneous, a report may be deleted,
which will effectively remove it from analysis.
Once you have searched for a report, click on the Delete Report menu for the associated report
you would like to delete.
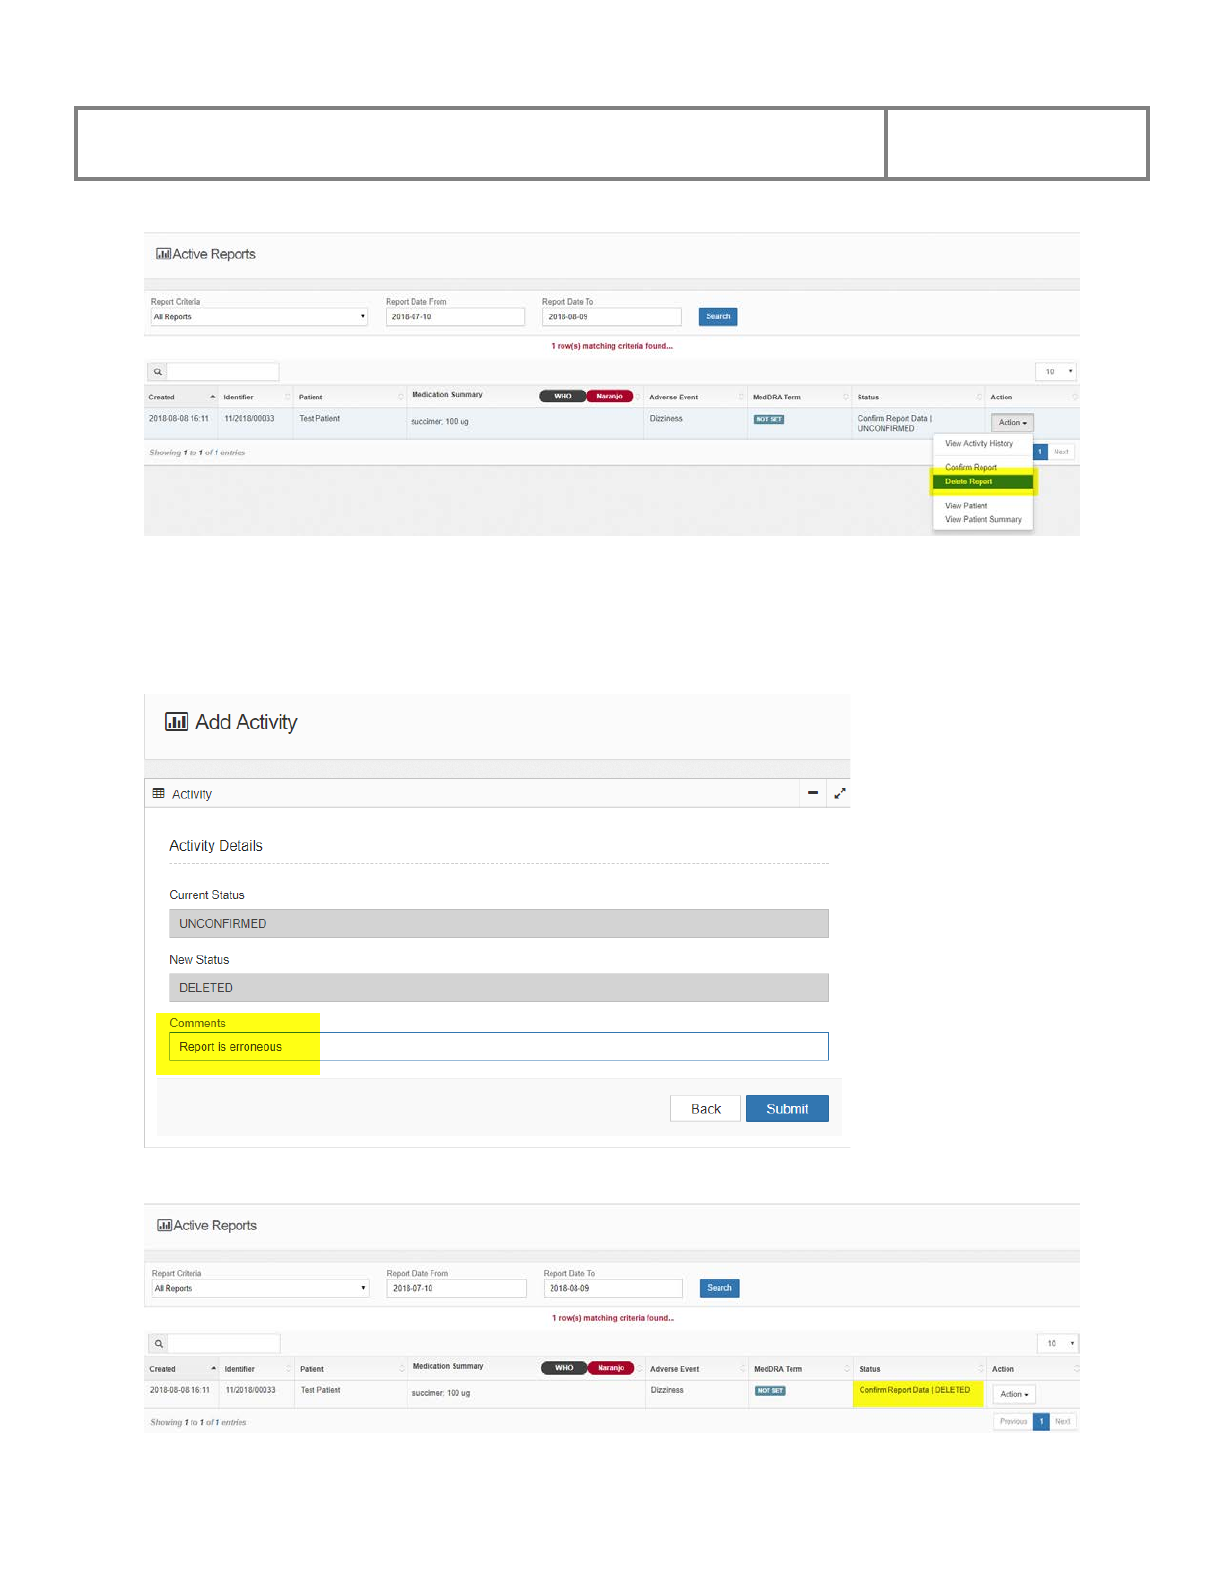
PViMS User Manual
2018
134
The system will navigate you to the Add Activity page.
Specify the reason for deleting the record and click Submit to confirm the deletion or Back to
cancel the action and return to the previous page.
The system will update the status of the report accordingly.
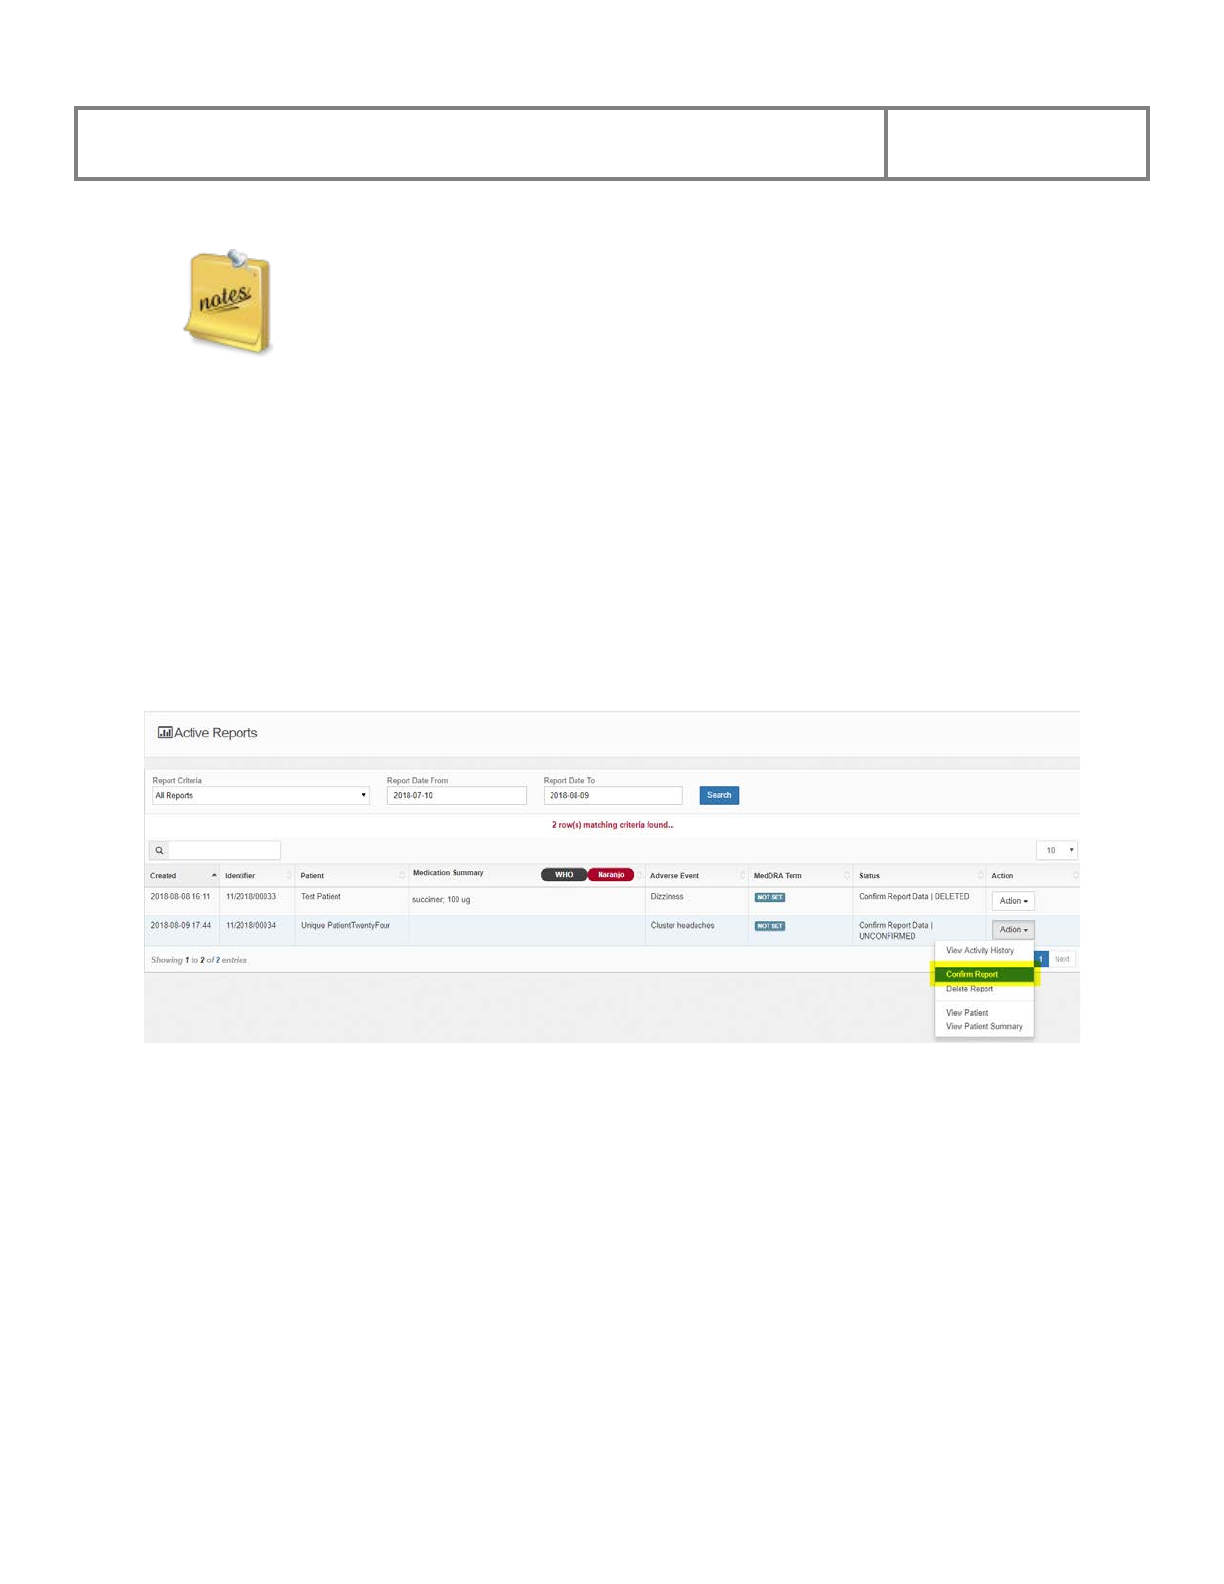
PViMS User Manual
2018
135
Once a report is deleted, it is not possible to re-include the report for analysis.
Please ensure you are correct in deleting the report before committing the action.
5.5.2 Confirming a Report
The Confirm Report Data stage enforces a process whereby the analyst ensures the necessary
clinical data is of sufficient quality to allow terminology and causality to be completed. When a
report is deemed to be sufficient and accurate, the report should be confirmed, which will
effectively allow terminology definition to commence.
Once you have searched for a report, click on the Confirm Report menu for the associated
report you would like to confirm.
The system will navigate you to the Add Activity page.
Specify any additional comments for confirming the record and click Submit to confirm the
deletion or Back to cancel the action and return to the previous page.
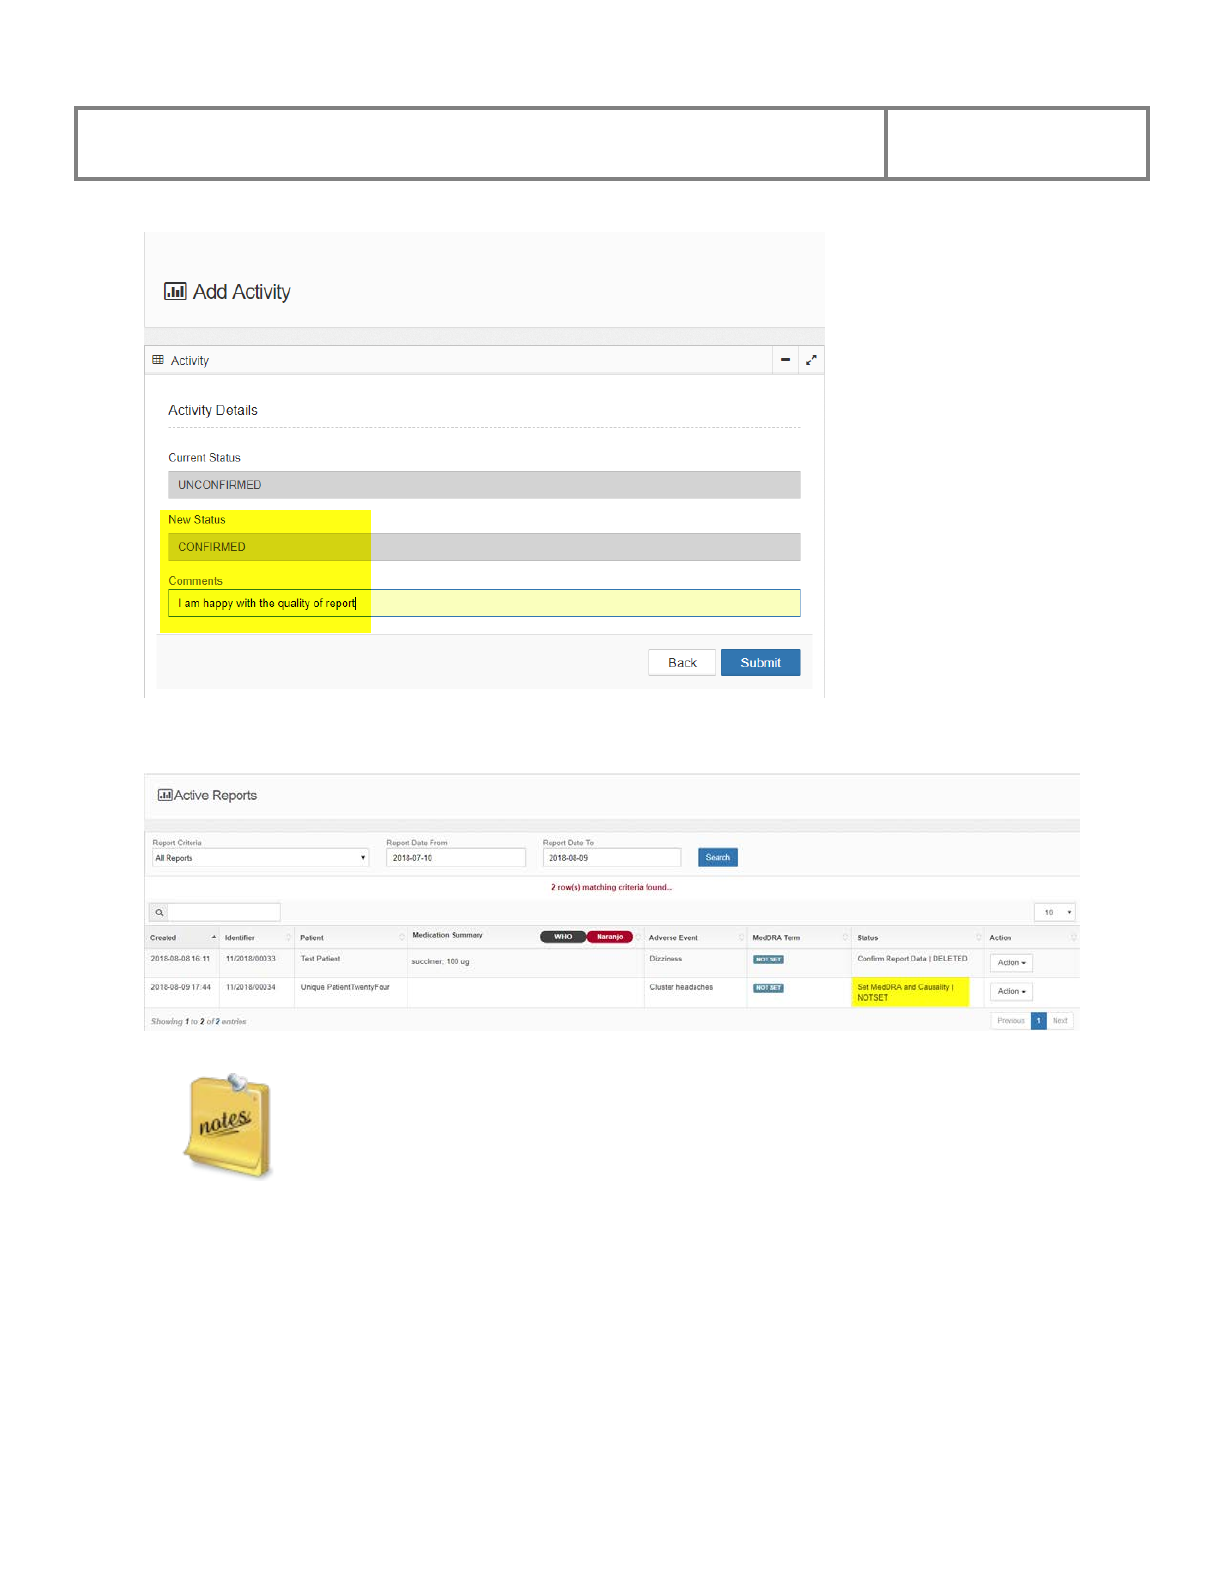
PViMS User Manual
2018
136
The system will update the status of the report accordingly.
Confirming a report will move the report into the next stage: Set MedDRA and
Causality.
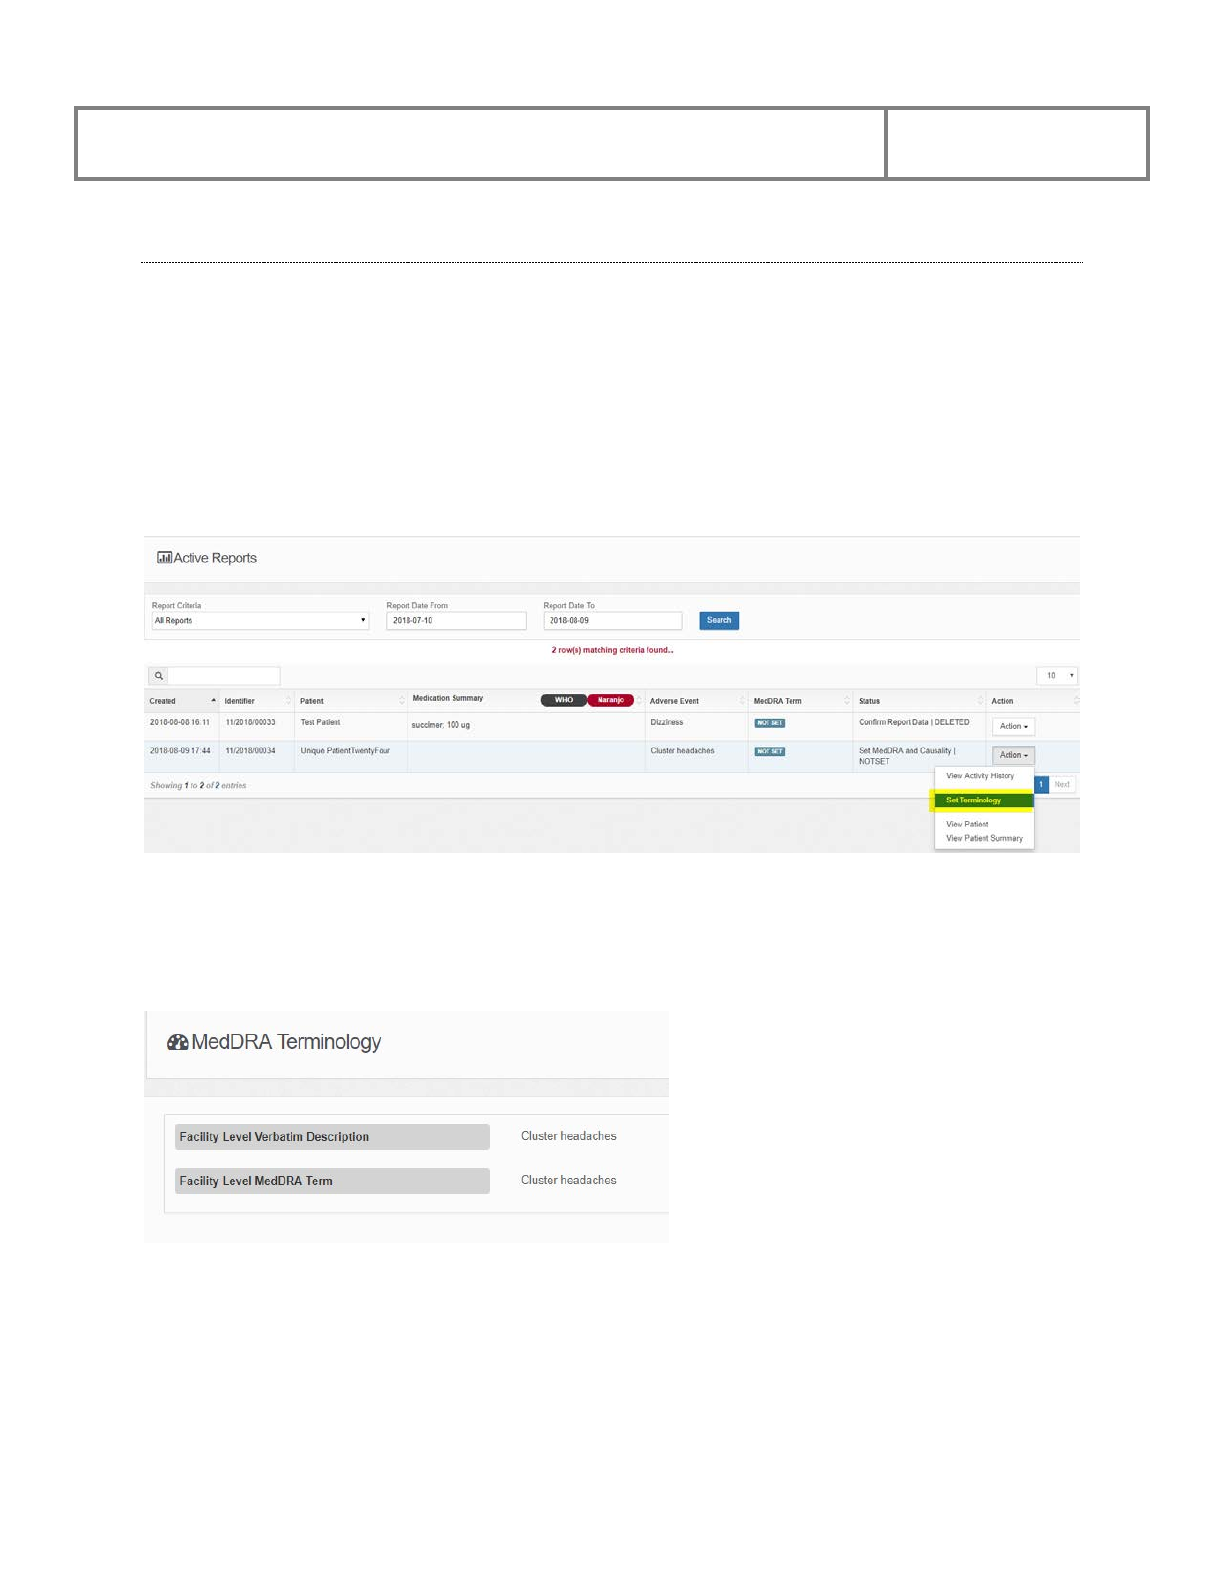
PViMS User Manual
2018
137
5.6 Pharmacovigilance Activities – Set MedDRA and Causality
5.6.1 Set MedDRA Terminology
The Set MedDRA and Causality stage facilitates the process of confirming the final MedDRA
term for the adverse event and allows assignment of causality per relevant medication using
either the World Health Organization or the Naranjo Causality Scale.
Once you have searched for a report, click on the Set Terminology menu for the associated
report you would like to set terminology for.
The system will navigate you to the MedDRA Terminology page.
The MedDRA Terminology page displays the adverse event as reported by the clinician and/or
reporter.
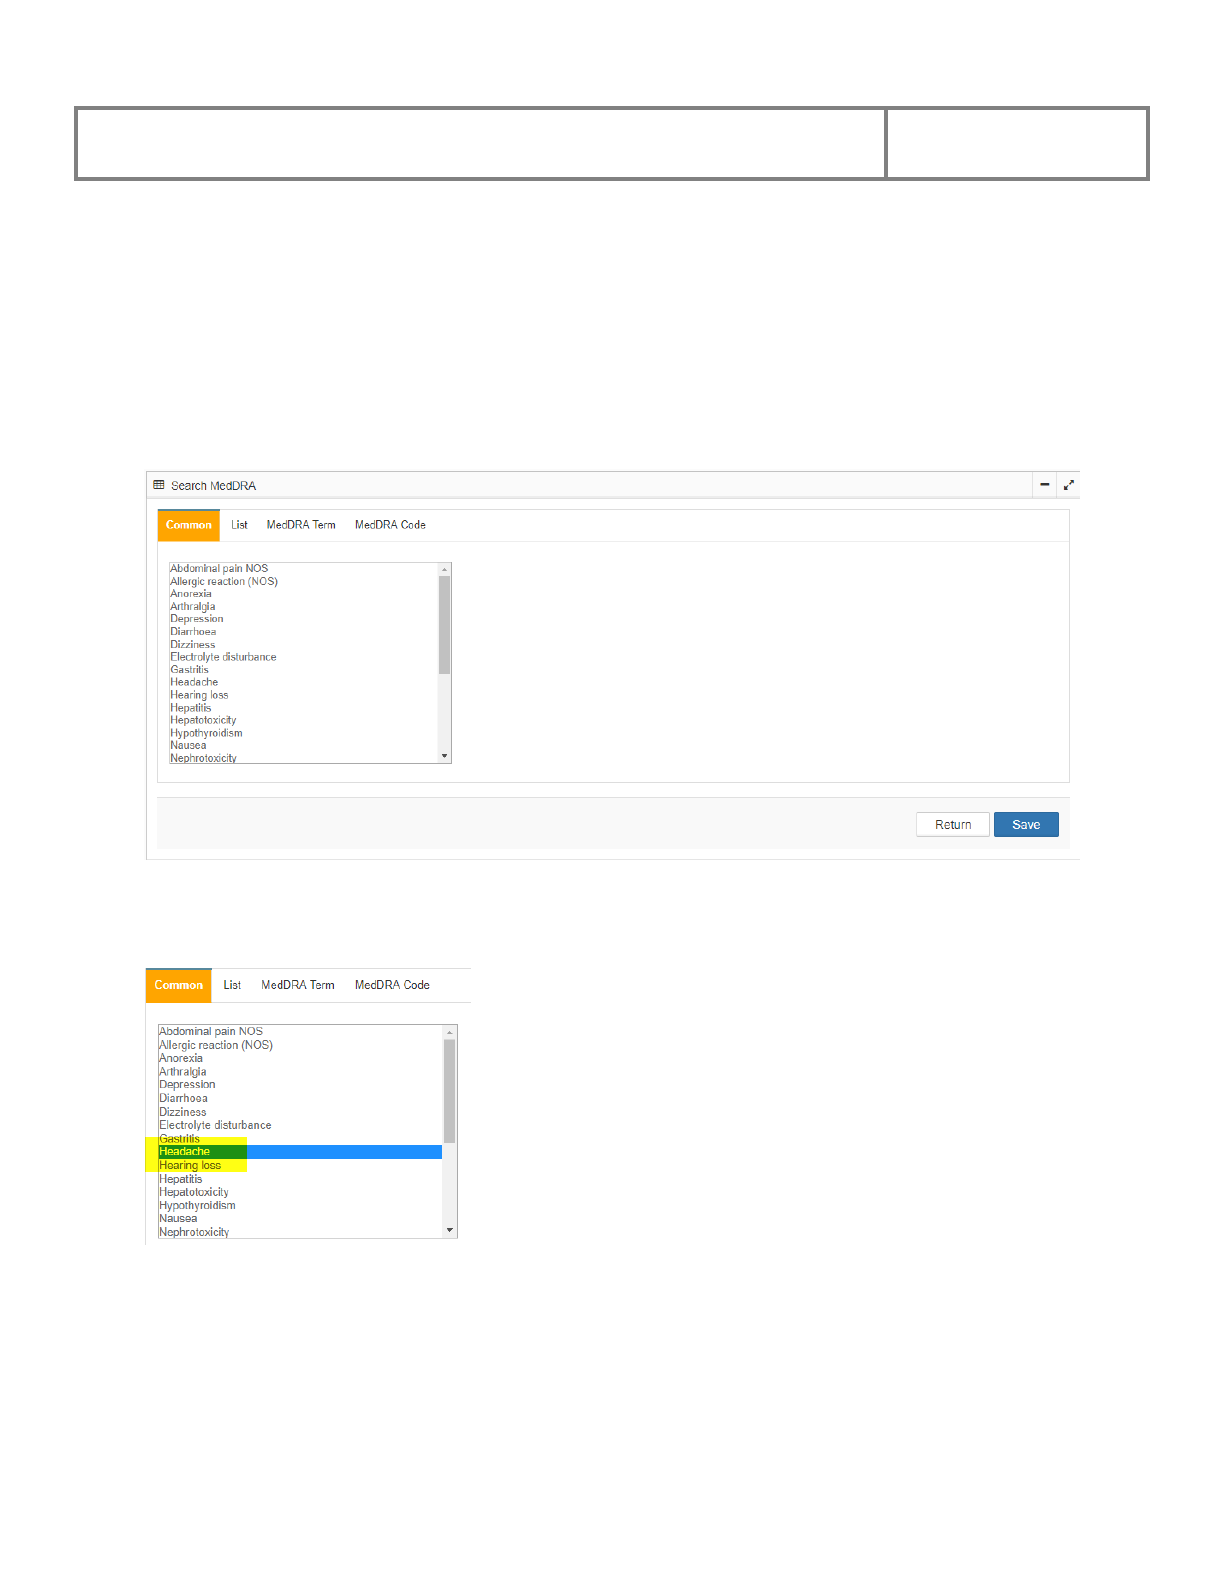
PViMS User Manual
2018
138
MedDRA terms can be searched in the following ways:
• Search by Common Term
• Search by List
• Search by MedDRA Term
• Search by MedDRA Code
5.6.1.1 Search for MedDRA Term by Common Term
Common terms are listed terms for events that occur most frequently in your setting. Select the
term in the list that that most accurately reflects the reported term.
Click the Save button to assign the term, or click the Return button to cancel the action and
return to the previous page. The report will be updated with the new term accordingly.

PViMS User Manual
2018
139
5.6.1.2 Search for MedDRA Term by List
The list search function allows the user to navigate the MedDRA dictionary using the
hierarchical structure of the dictionary. Select the System Organ Class field to select a SOC.
Continue selecting through the hierarchy (HLGT, HLT, PT) until you have selected the Low-
Level Term that matches the adverse event.
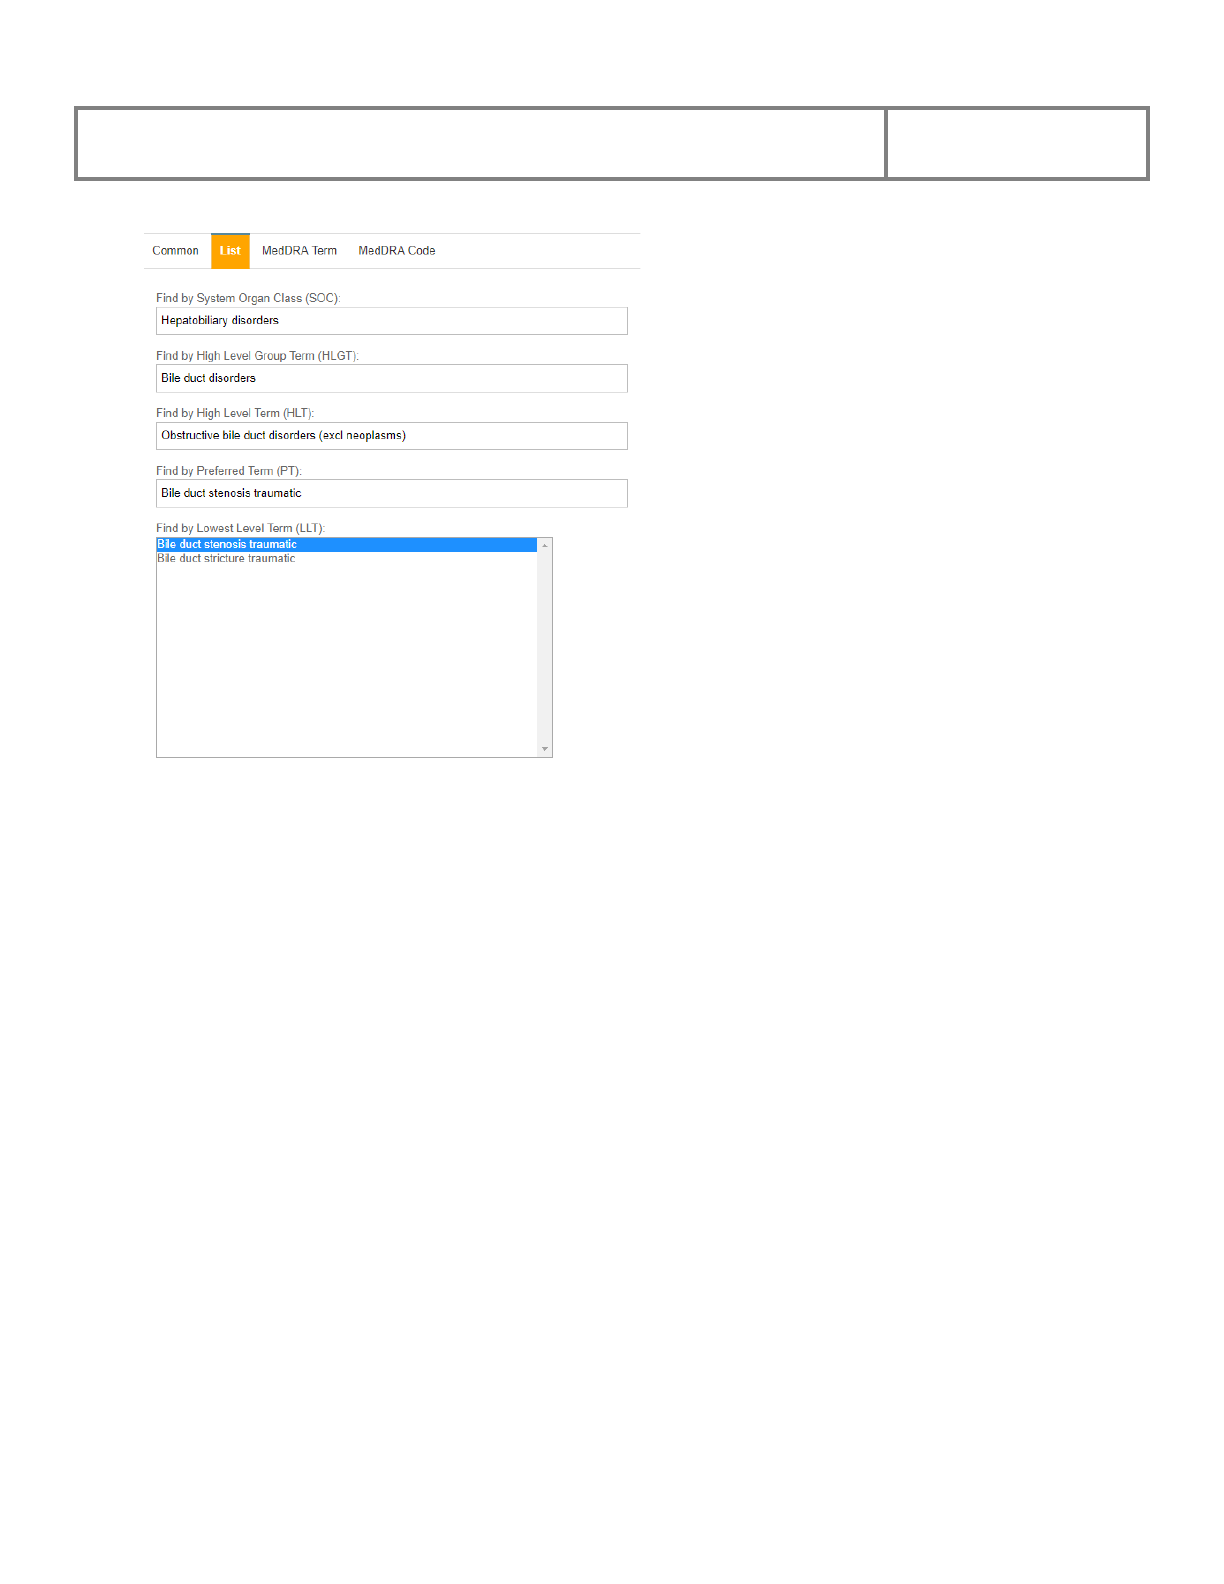
PViMS User Manual
2018
140
Click the Save button to assign the term, or click the Return button to cancel the action and
return to the previous page. The report will be updated with the new term accordingly.
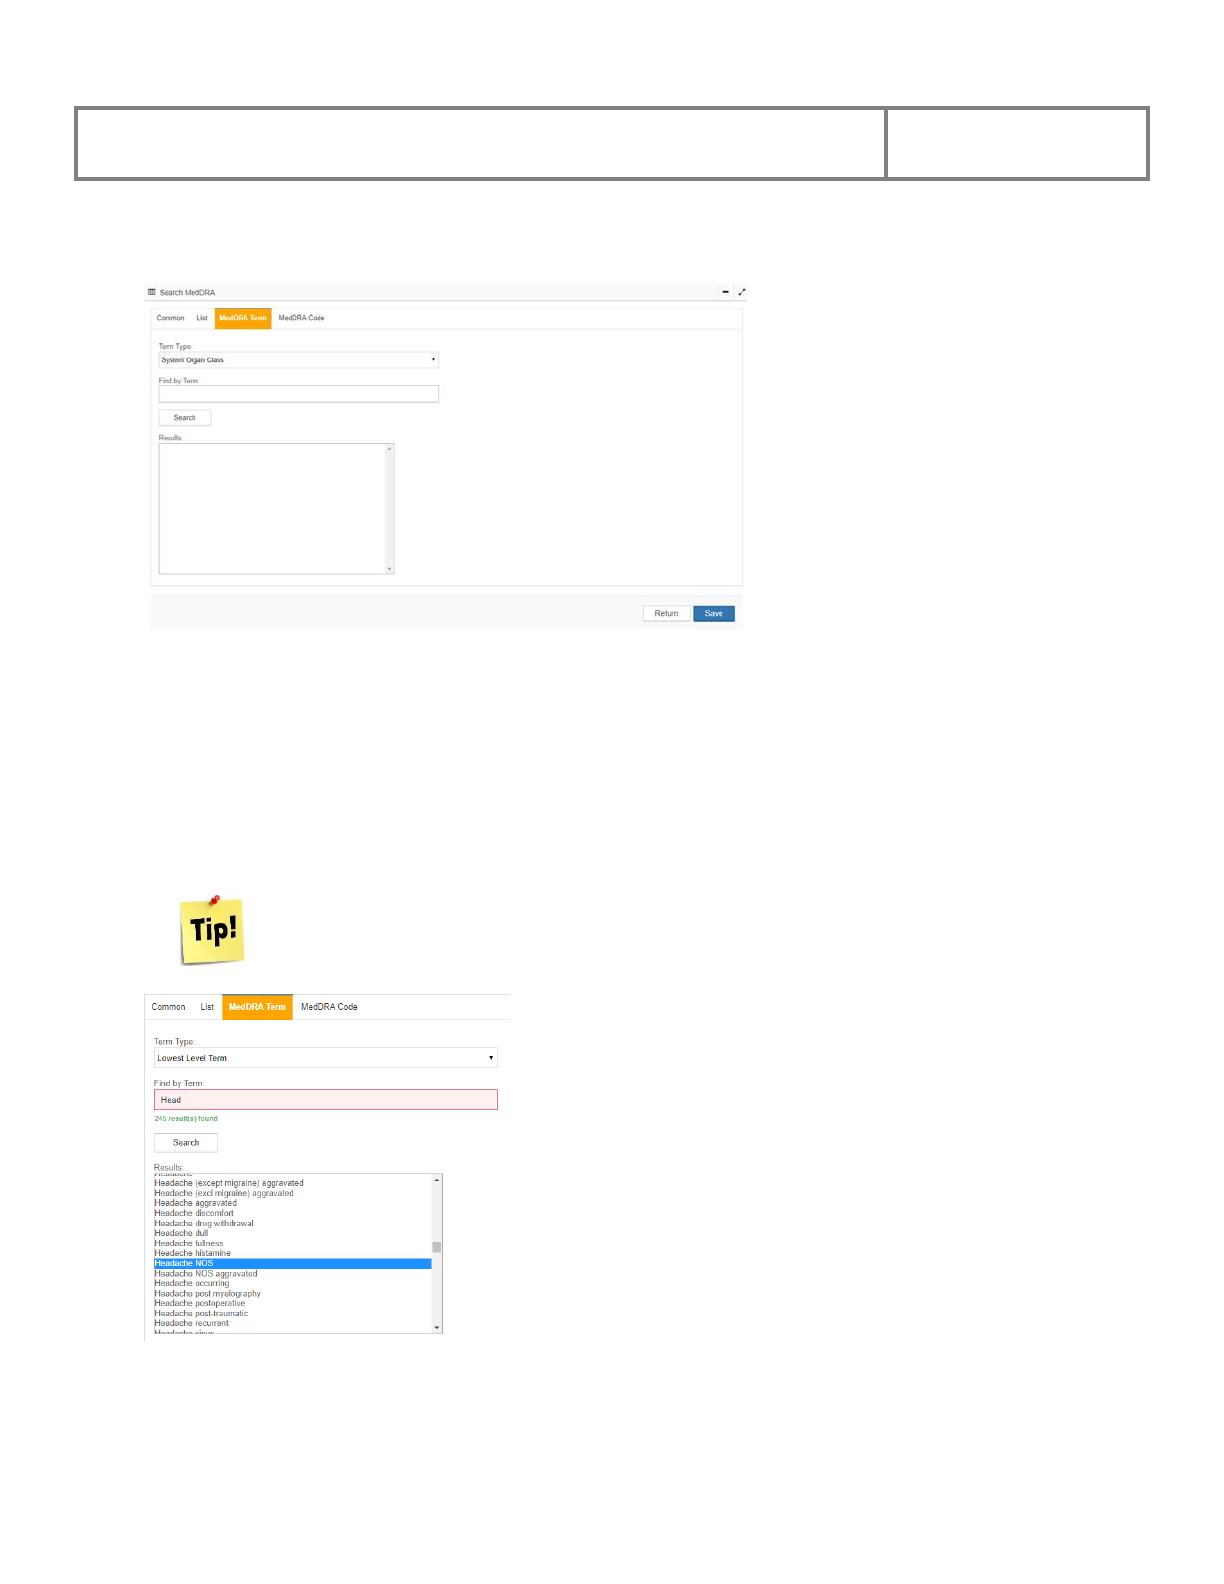
PViMS User Manual
2018
141
5.6.1.3 Search by MedDRA Term
Searching by a MedDRA term allows you the ability to filter through MedDRA using a partial or
fully defined term.
In the Term Type field, select the level of specificity for the search (SOC, HLTG, HLT, PT, or
LLT).
In the Find by Term field, enter the term you are searching for.
It is possible to complete a partial search by entering as few as 3 characters that form part of
the overall term.
Click the Save button to assign the term, or click the Return button to cancel the action and
return to the previous page. The report will be updated with the new term accordingly.
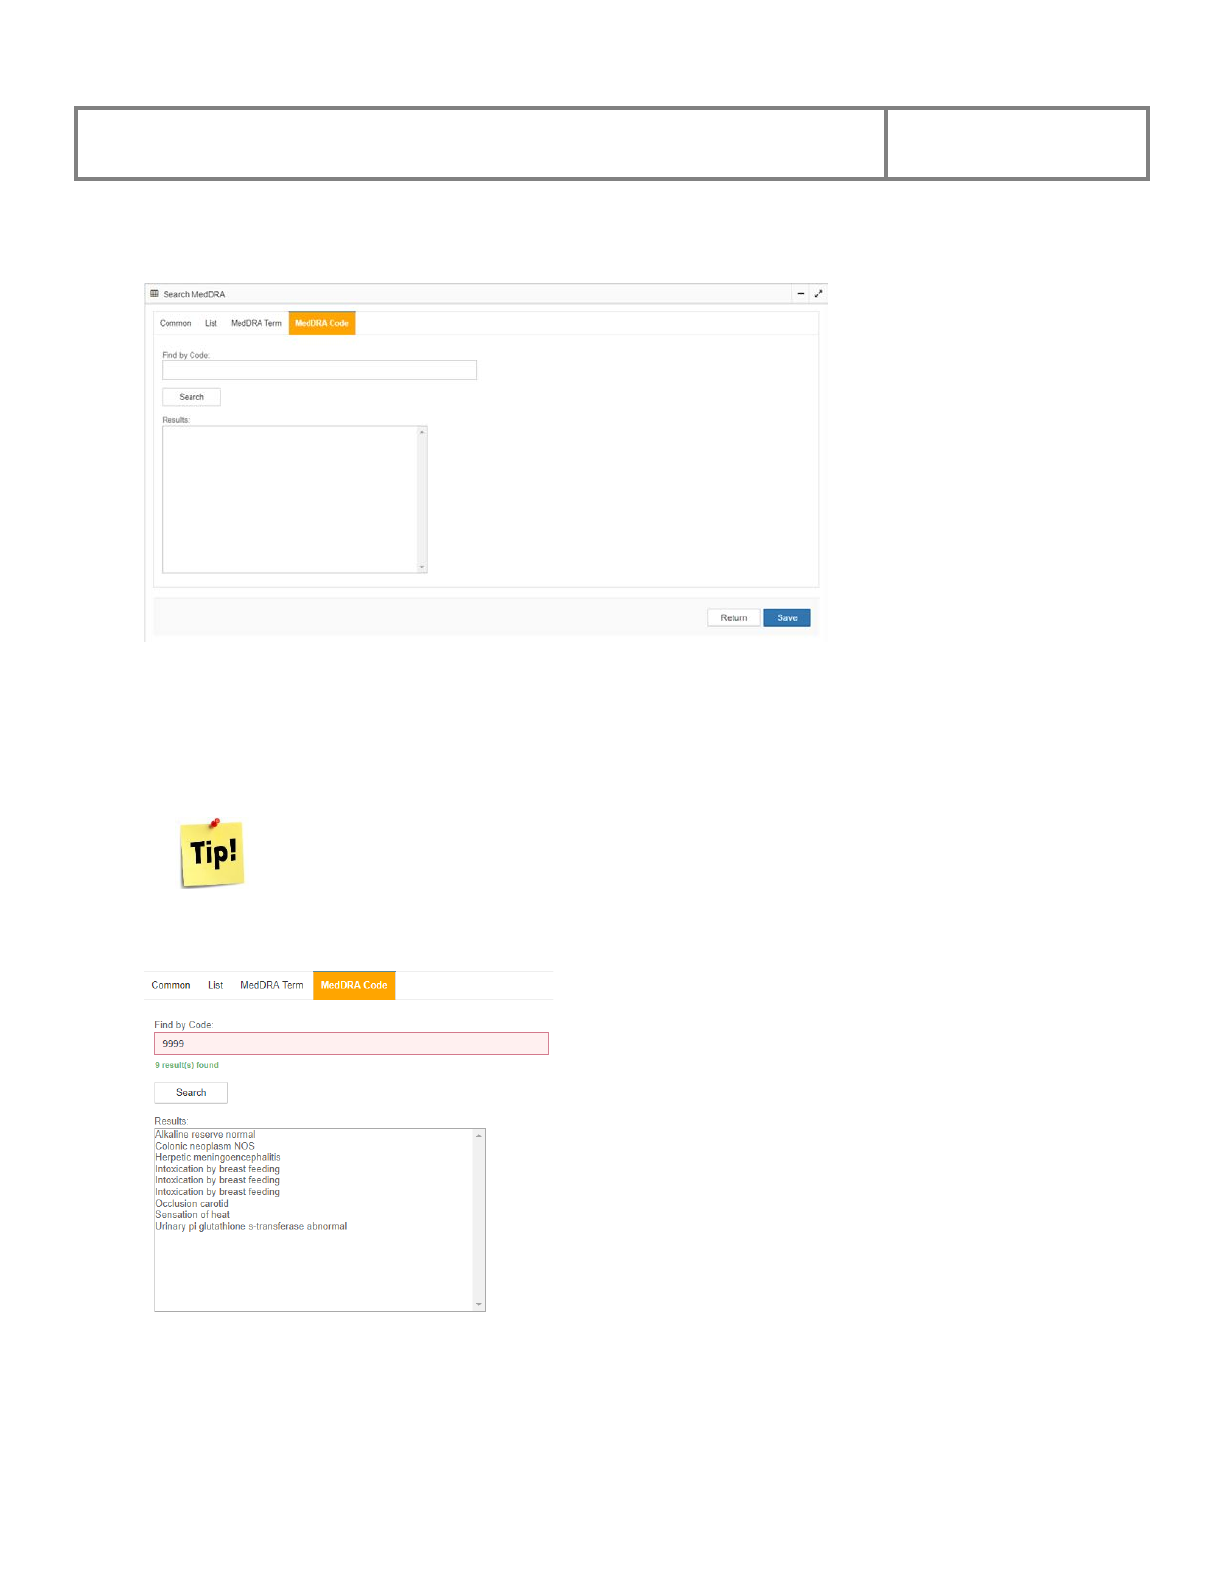
PViMS User Manual
2018
142
5.6.1.4 Search by MedDRA Code
Searching by a MedDRA code allows you the ability to filter through MedDRA using an
associated code which can be fully defined or partial in nature.
In the Find by Code field, enter the code you are searching for.
It is possible to complete a partial search by entering as few as 4 numerical characters that
form part of the overall code.
Click the Save button to assign the term, or click the Return button to cancel the action and
return to the previous page. The report will be updated with the new term accordingly.

PViMS User Manual
2018
143
5.6.2 Causality Assessment using the WHO Scale
The Set MedDRA and Causality stage facilitates the process of confirming the final MedDRA
term for the adverse event and allows assignment of causality per relevant medication using
either the World Health Organization or the Naranjo Causality Scale.
Once the MedDRA terminology for the event has been set, the report will be updated
accordingly.
Setting the terminology will further allow the setting of causality per medication. Click on the
WHO Causality menu option for the associated report you would like to set causality for.
The system will navigate you to the WHO Causality Assessment page.

PViMS User Manual
2018
144
The WHO Causality Assessment page displays the adverse event as reported by the clinician
and/or reporter, the MedDRA Terminology set as well as the onset date of the event.
The WHO Causality Assessment page also displays the list of medications that the patient was
exposed to at the onset of the adverse event.
The analyst can perform the following actions against each medication the patient was exposed
to:
• Ignore the medication (the medication is definitely not responsible for the adverse event)
• Set causality for the medication
5.6.2.1 Ignoring the Medication
Ignoring the medication means that a causality assessment need not be set for that medication.
To ignore assigning a WHO causality assessment for this medication, click the Ignore
Medication menu or click on the Return button to undo the action and return to the previous
page. The system will assign Ignored as the causality term.
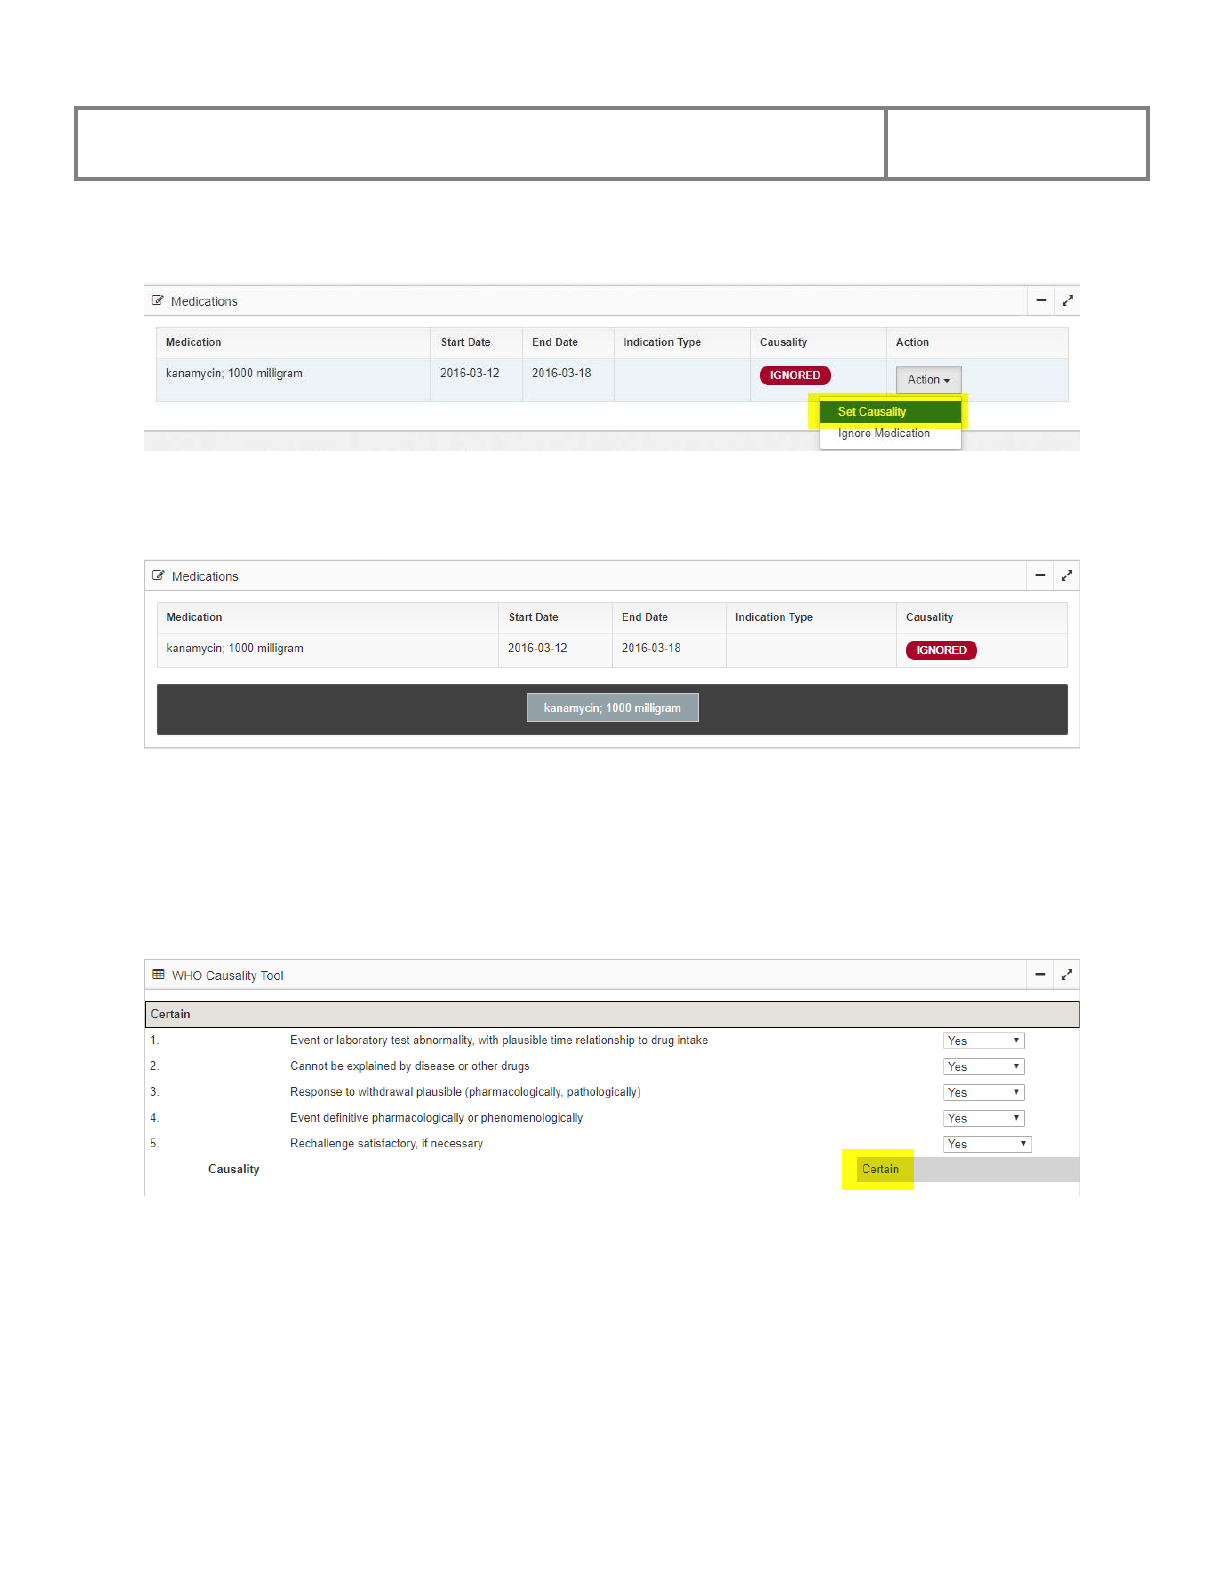
PViMS User Manual
2018
145
5.6.2.2 Set Causality
By clicking the Set Causality link, the system will enable you to set causality for this
medication.
The system displays a series of questions for assigning the WHO causality term.
Click the appropriate response (Yes or No) for question 1 and continue to respond to the first
five questions.
If responses to all five questions are Yes, the system will assign Certain as the causality term.
Click the Save button and the system will assign the term as Certain in the system, or click the
Cancel button to undo the action.
Click the Return button at any time to undo the action and return to the previous page.
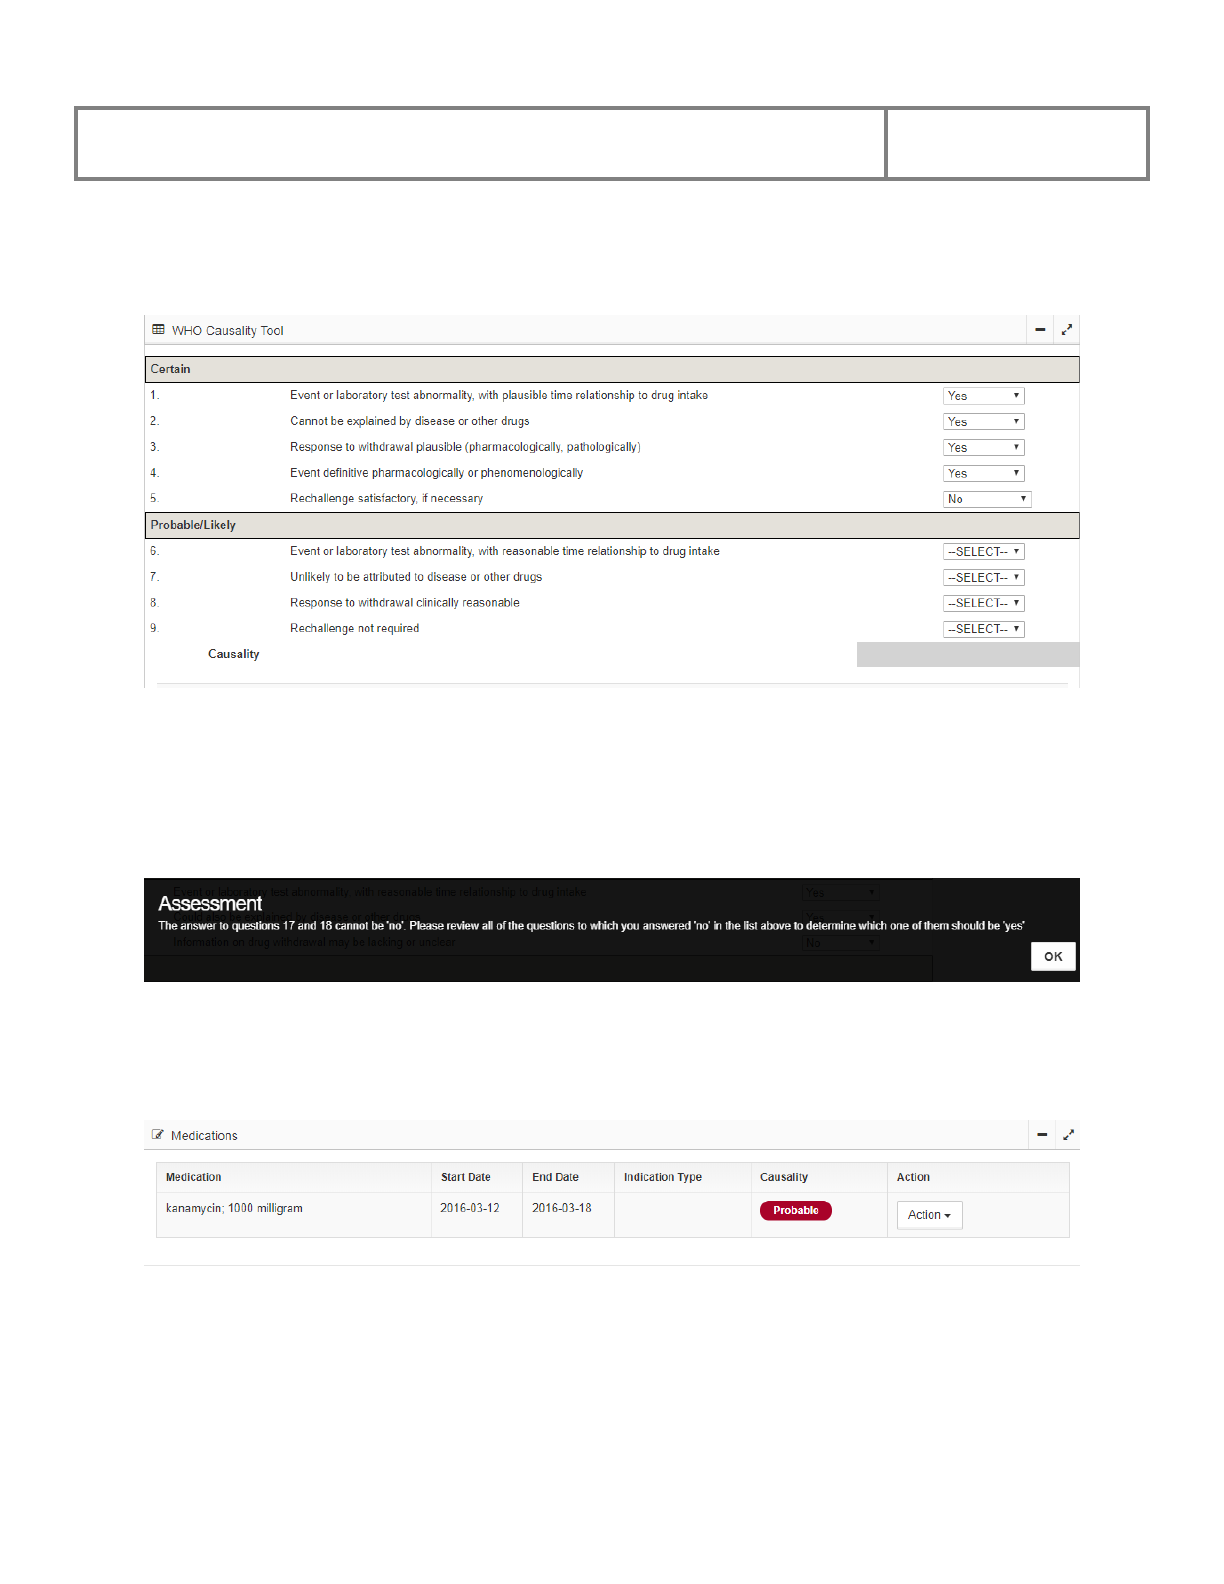
PViMS User Manual
2018
146
If any of the questions in the Certain category have a response of No the system will display
questions for the Probable/Likely category.
Continue this process until you have answered Yes to all questions in a specific category. This
will result in the classification for that medication being set to that category.
In the event you reach the Unassessable/Unclassified category, if one of the two questions asked
in that category is answered as No, the system will trigger an alert.
Once the term has been assigned click the Save button to continue, or click the Cancel button to
undo the action and return to the previous page. The system will update the causality assessment
for that medication accordingly.
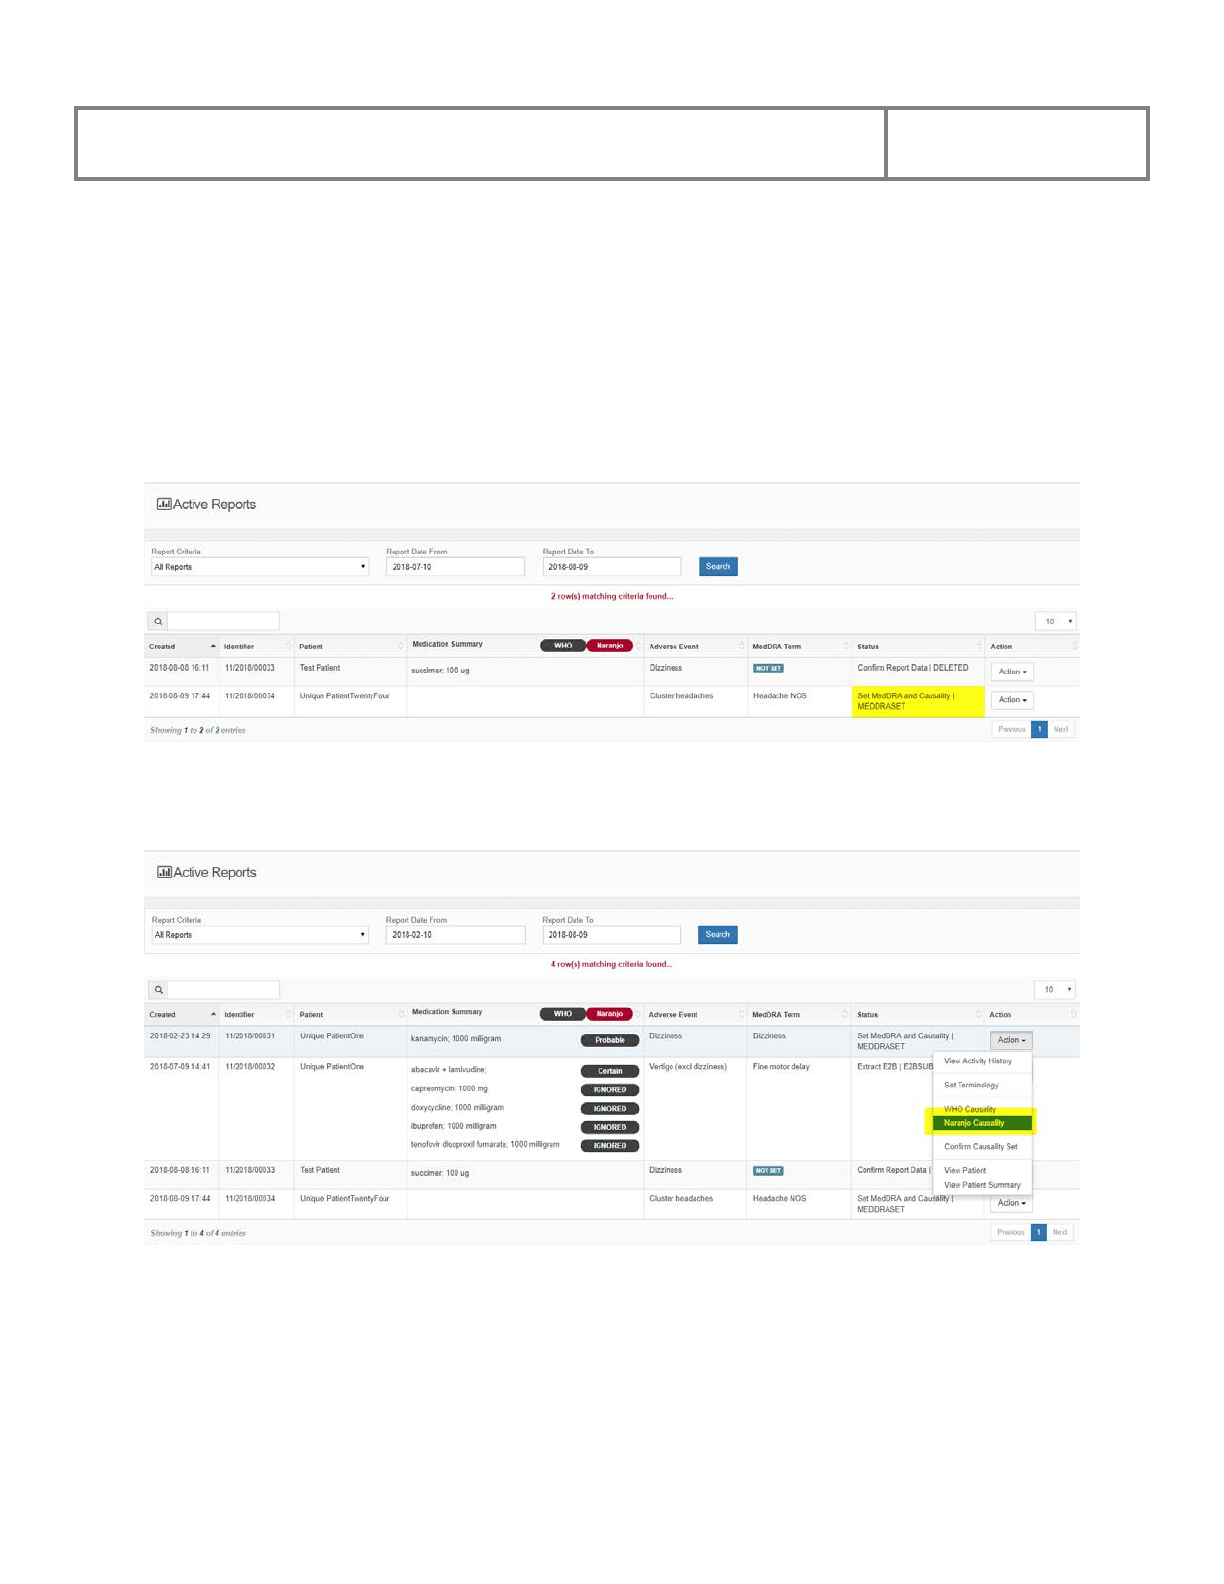
PViMS User Manual
2018
147
5.6.3 Causality Assessment using the Naranjo Scale
The Set MedDRA and Causality stage facilitates the process of confirming the final MedDRA
term for the adverse event and allows assignment of causality per relevant medication using
either the World Health Organization or the Naranjo Causality Scale.
Once the MedDRA terminology for the event has been set, the report will be updated
accordingly.
Setting the terminology will further allow the setting of causality per medication. Click on the
Naranjo Causality menu for the associated report you would like to set causality for.
The system will navigate you to the Naranjo Causality Assessment page.
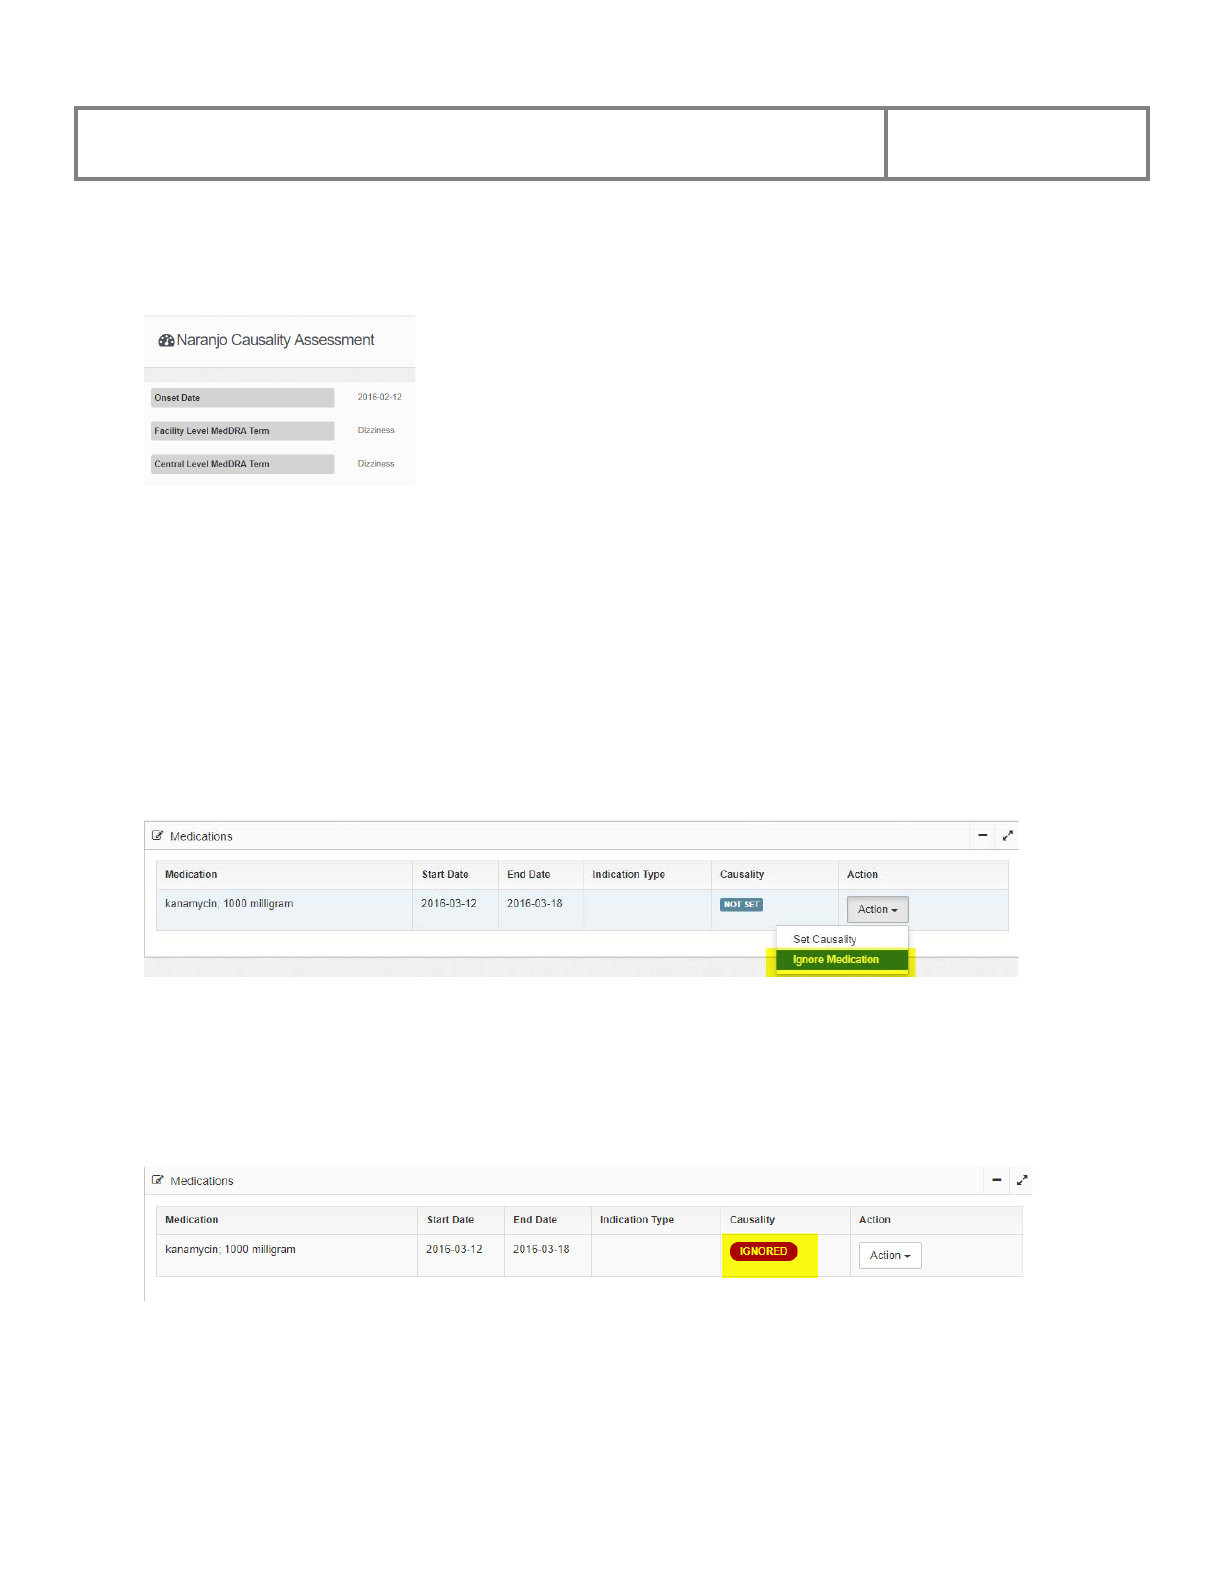
PViMS User Manual
2018
148
The Naranjo Causality Assessment page displays the adverse event as reported by the clinician
and/or reporter, the MedDRA Terminology set as well as the onset date of the event.
The Naranjo Causality Assessment page also displays the list of medications that the patient
was exposed to at the onset of the adverse event.
The analyst can perform the following actions against each medication the patient was exposed
to:
• Ignore the medication (the medication is definitely not responsible for the adverse event)
• Set causality for the medication
5.6.3.1 Ignoring the Medication
Ignoring the medication means that a causality assessment need not be set for that medication.
To ignore assigning a Naranjo causality assessment for this medication, click the Ignore
Medication menu or click on the Return button to undo the action and return to the previous
page. The system will assign Ignored as the causality term.

PViMS User Manual
2018
149
5.6.3.2 Set Causality
By clicking the Set Causality link, the system will enable you to set causality for this
medication.
The system displays a series of questions for calculating the Naranjo causality score.
Click the appropriate response (Yes or No) for question 1 and continue to respond to all
remaining questions. Once all responses have been selected, click the Calculate button.
Click the Save button and the system will assign the term as per the calculation in the system, or
click the Cancel button to undo the action. Click the Return button at any time to undo the
action and return to the previous page.
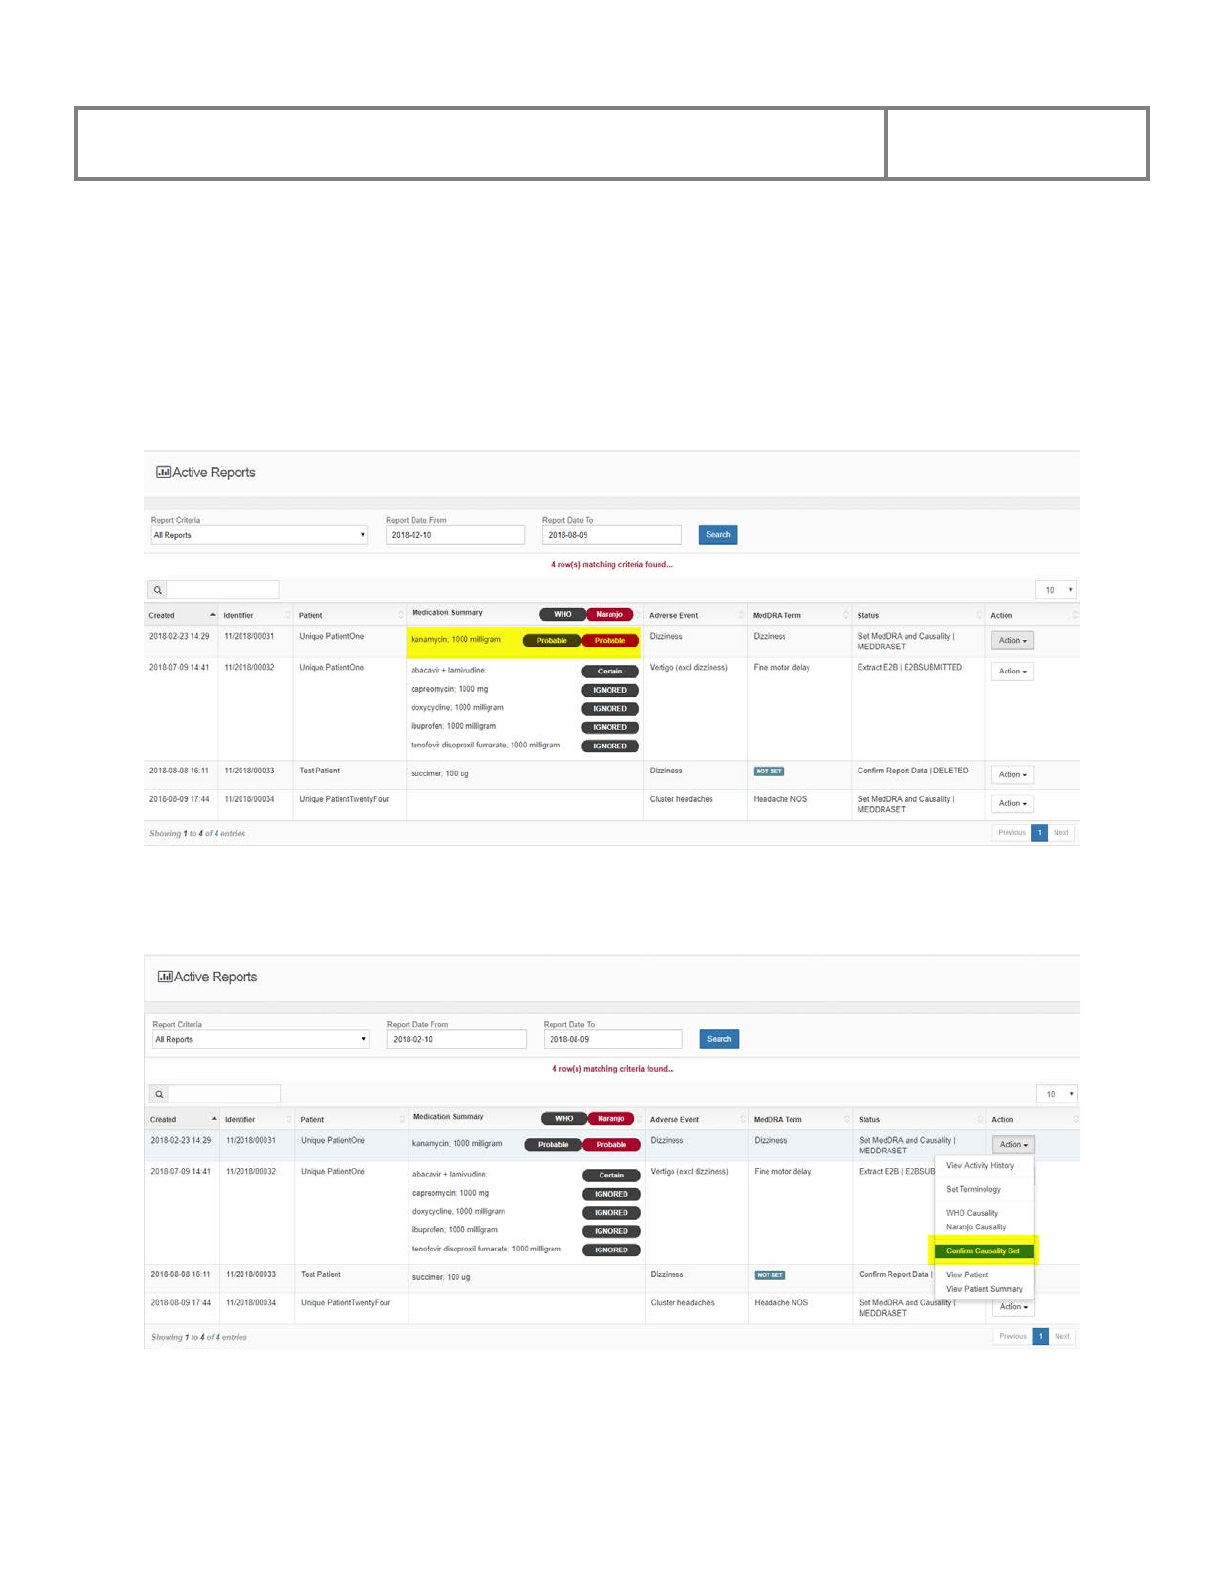
PViMS User Manual
2018
150
5.6.4 Confirming Causality Set
The Set MedDRA and Causality stage facilitates the process of confirming the final MedDRA
term for the adverse event and allows assignment of causality per relevant medication using
either the World Health Organization or the Naranjo Causality Scale.
Once causality for all medications has been set, the report will be updated accordingly.
Click on the Confirm Causality Set menu for the associated report you would like to confirm
causality set for.
The system will navigate you to the Add Activity page.
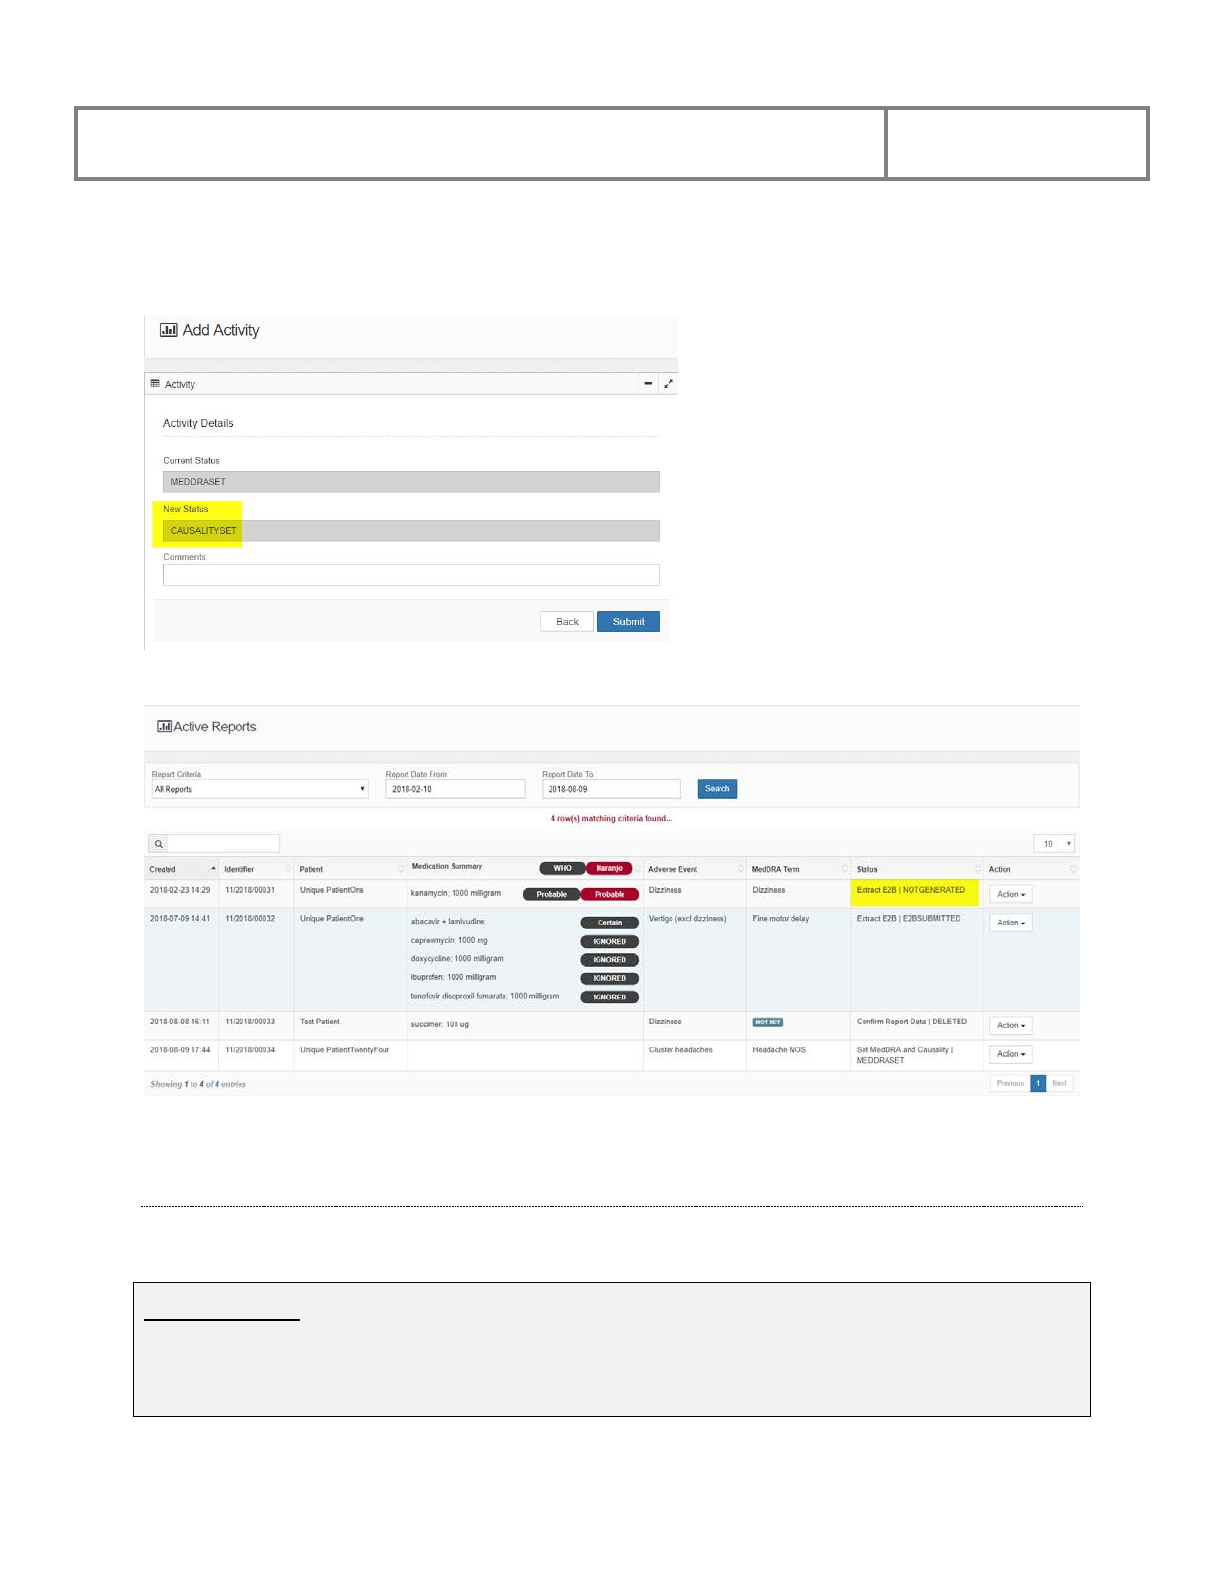
PViMS User Manual
2018
151
Specify any comment if necessary and click Submit to confirm the deletion or Back to cancel
the action and return to the previous page.
The system will update the status of the report accordingly.
5.7 Pharmacovigilance Activities – Extract E2B
5.7.1 Create E2B
BUZZWORDS
ICH E2B: An E2B dataset facilitates the Electronic Transmission of Individual Case Safety
Reports (ICSRs) and can be used to submit such reports to WHO. The E2B dataset within
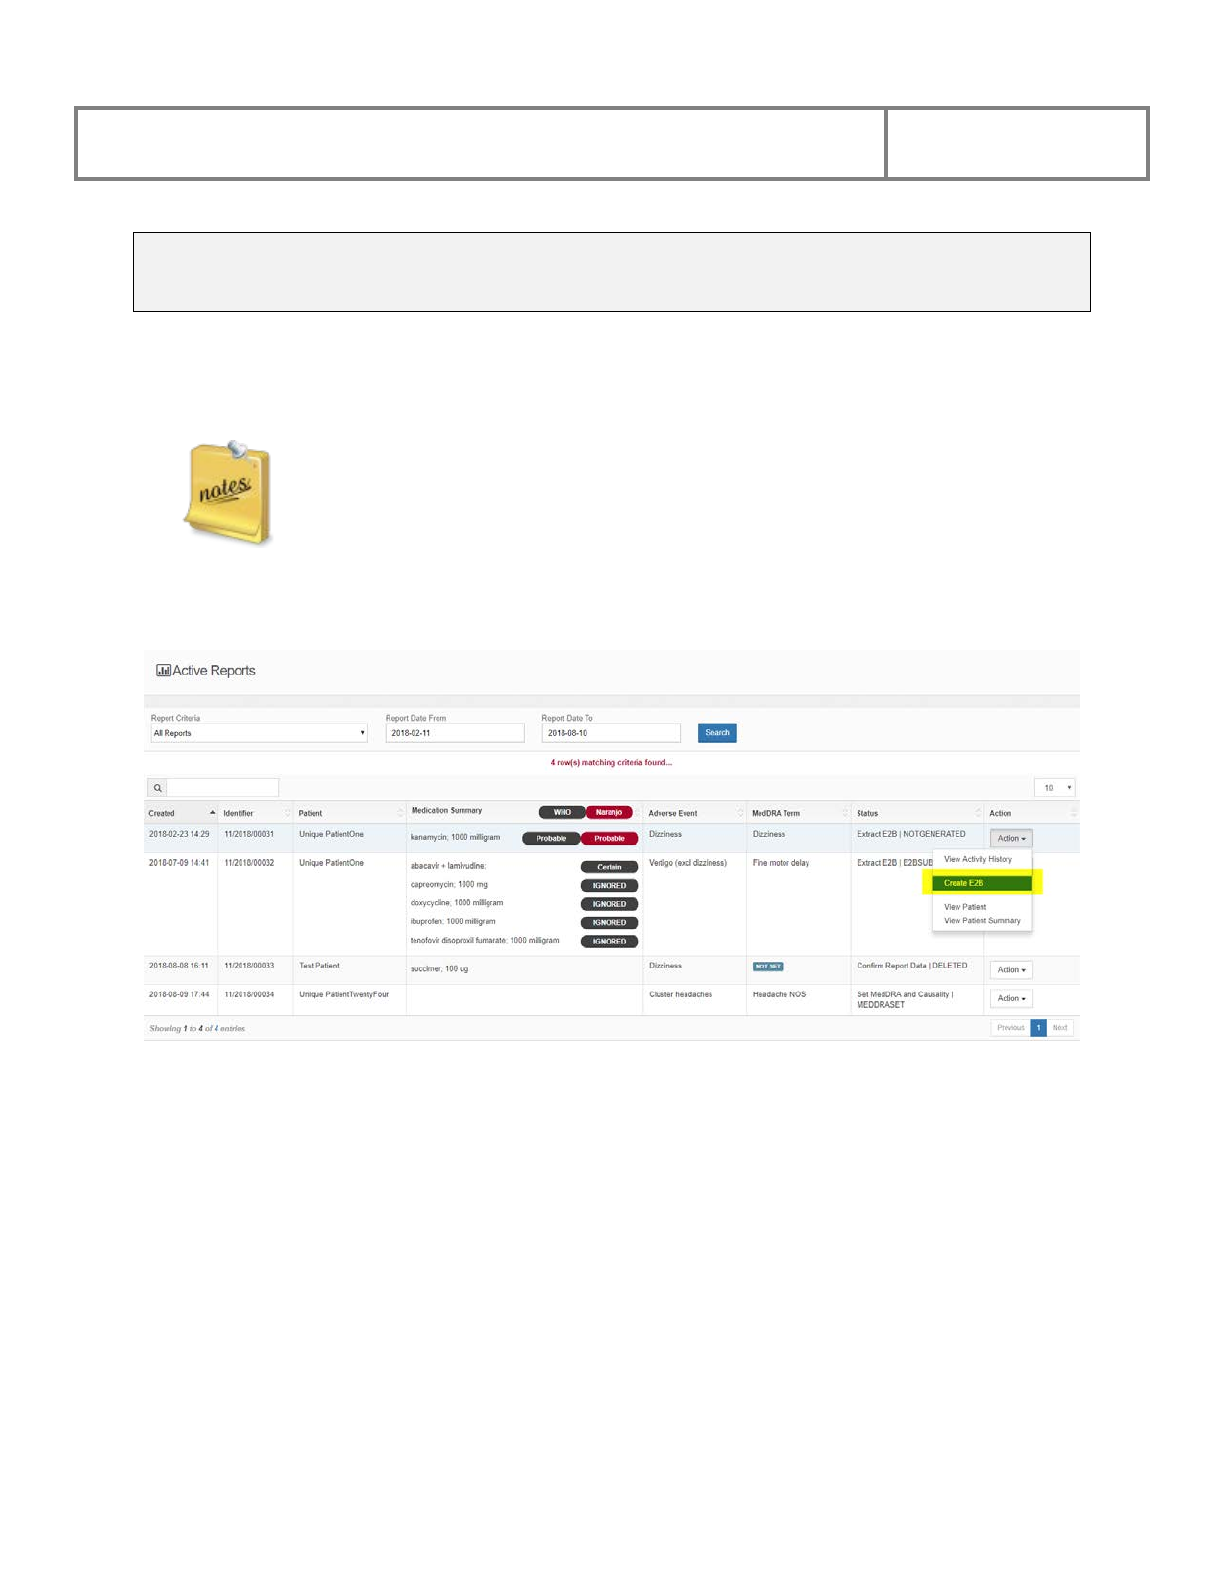
PViMS User Manual
2018
152
PViMS is implemented using the standard adopted by the ICH1 for electronic transmission of
ICSRs according to the ICH E2B(R3) message standard.
The Extract E2B stage generates an E2B extract for submission to the World Health
Organization Uppsala Monitoring Centre.
By clicking this menu item, the system generates an E2B dataset that is populated
with clinical information from the source form. This E2B dataset can be amended
by you to reflect additional clinical information pertinent to WHO.
Once you have searched for a report, click on the Create E2B menu for the associated report you
would like to create E2B for.
The system will navigate you to the E2B ICH Report page which contains the following 13
tabs:
• Message Header
• Safety Report
• Primary Source
• Sender
• Receiver
• Patient
• Medical History Episode
• Past Drug Therapy
• Patient Death
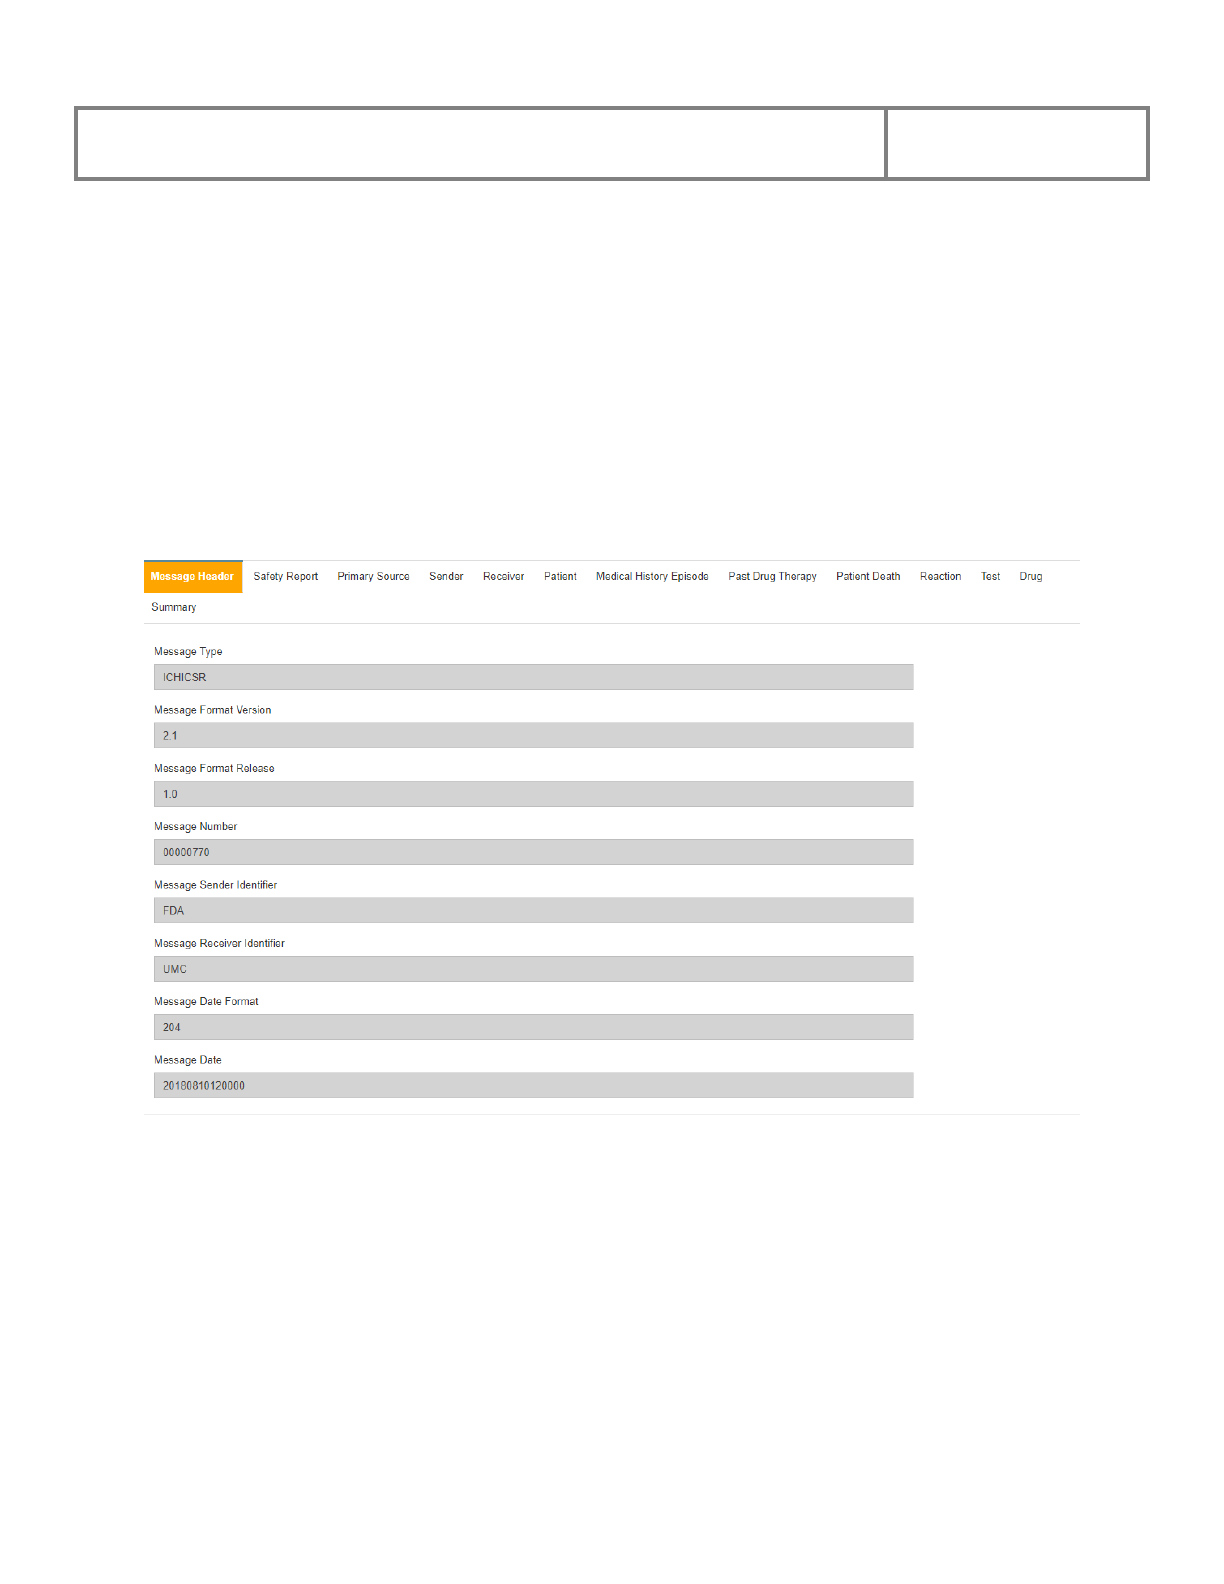
PViMS User Manual
2018
153
• Reaction
• Test
• Drug
• Summary
5.7.1.1 Message Header
The message header section provides administrative and identification information about the
report itself.
All fields are all automatically populated by the system and cannot be edited by the user.
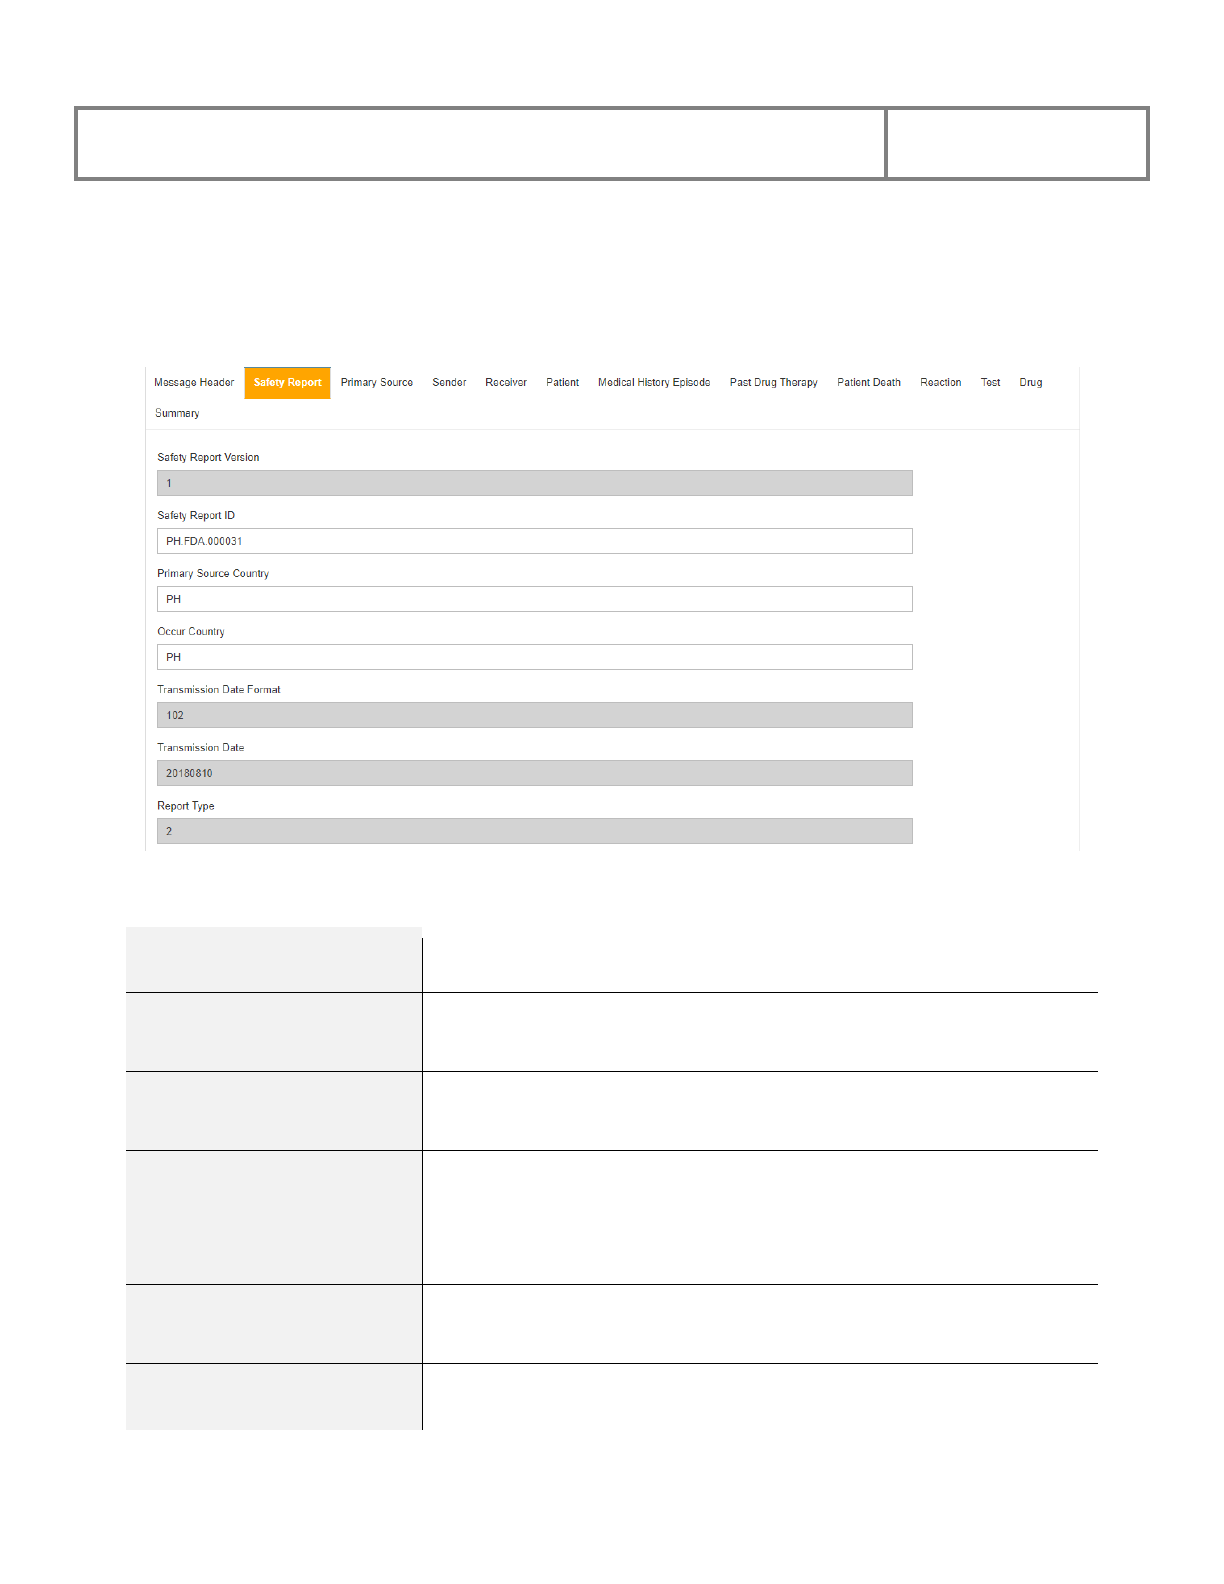
PViMS User Manual
2018
154
5.7.1.2 Safety Report
The Safety Report section provides information about the case (other than patient or clinical
information).
The fields in the Safety Report section are described below:
Safety Report Version Not an E2B data element, used for technical transmission purposes
Safety Report ID
Sender’s (Case) Safety Report Unique Identifier
Text Field
Primary Source Country
Country from where the report was sent
Text Field
Occur Country
For example, this should be the country where the reaction was
detected while the patient was traveling, but the report was made by
a health professional on the patient’s return
Text Field
Transmission Date Format
Date format
CCYYMMDD (e.g., 20171020 for October 20 2017)
Transmission Date Date E2B was sent
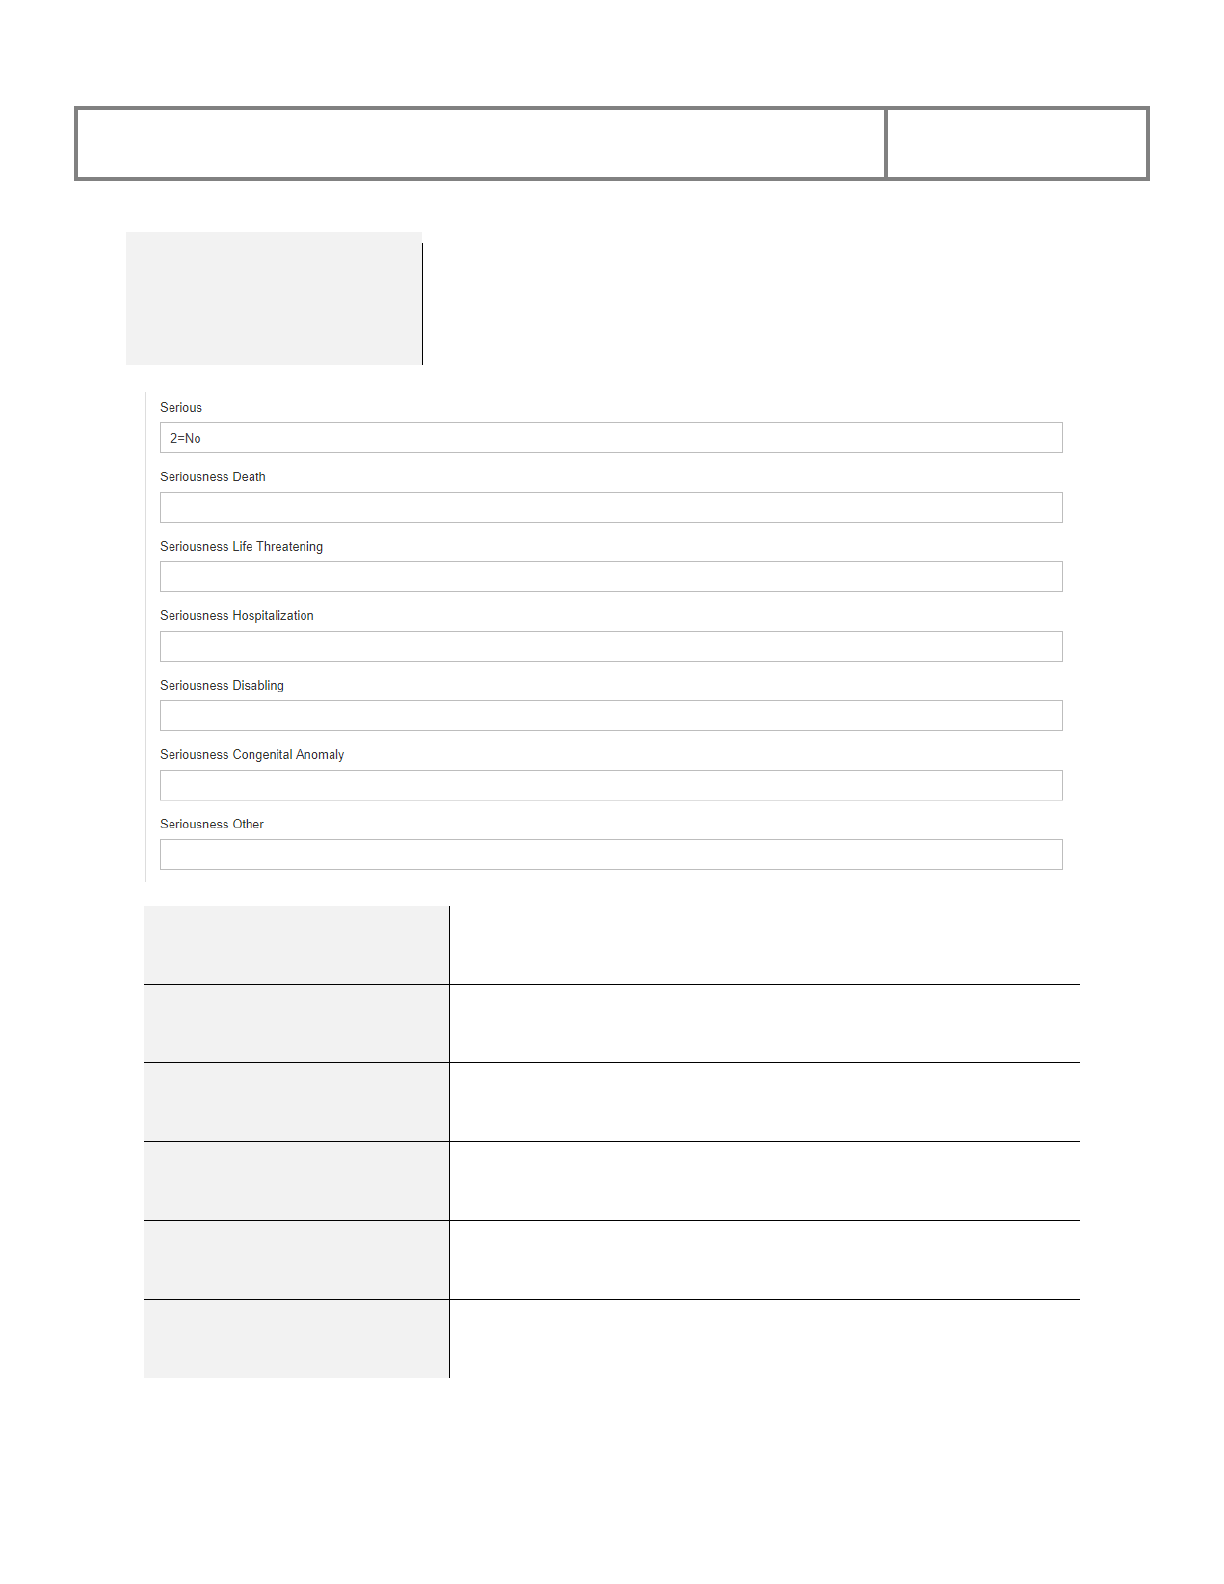
PViMS User Manual
2018
155
Report Type
Spontaneous
Report from study
Other
Not available to sender (unknown)
Serious
Dropdown list
Yes, No
Seriousness Death
Dropdown list
Yes, No
Seriousness Life Threatening
Dropdown list
Yes, No
Seriousness Hospitalization
Dropdown list
Yes, No
Seriousness Disabling
Dropdown list
Yes, No
Seriousness Congenital
Anomaly
Dropdown list
Yes, No
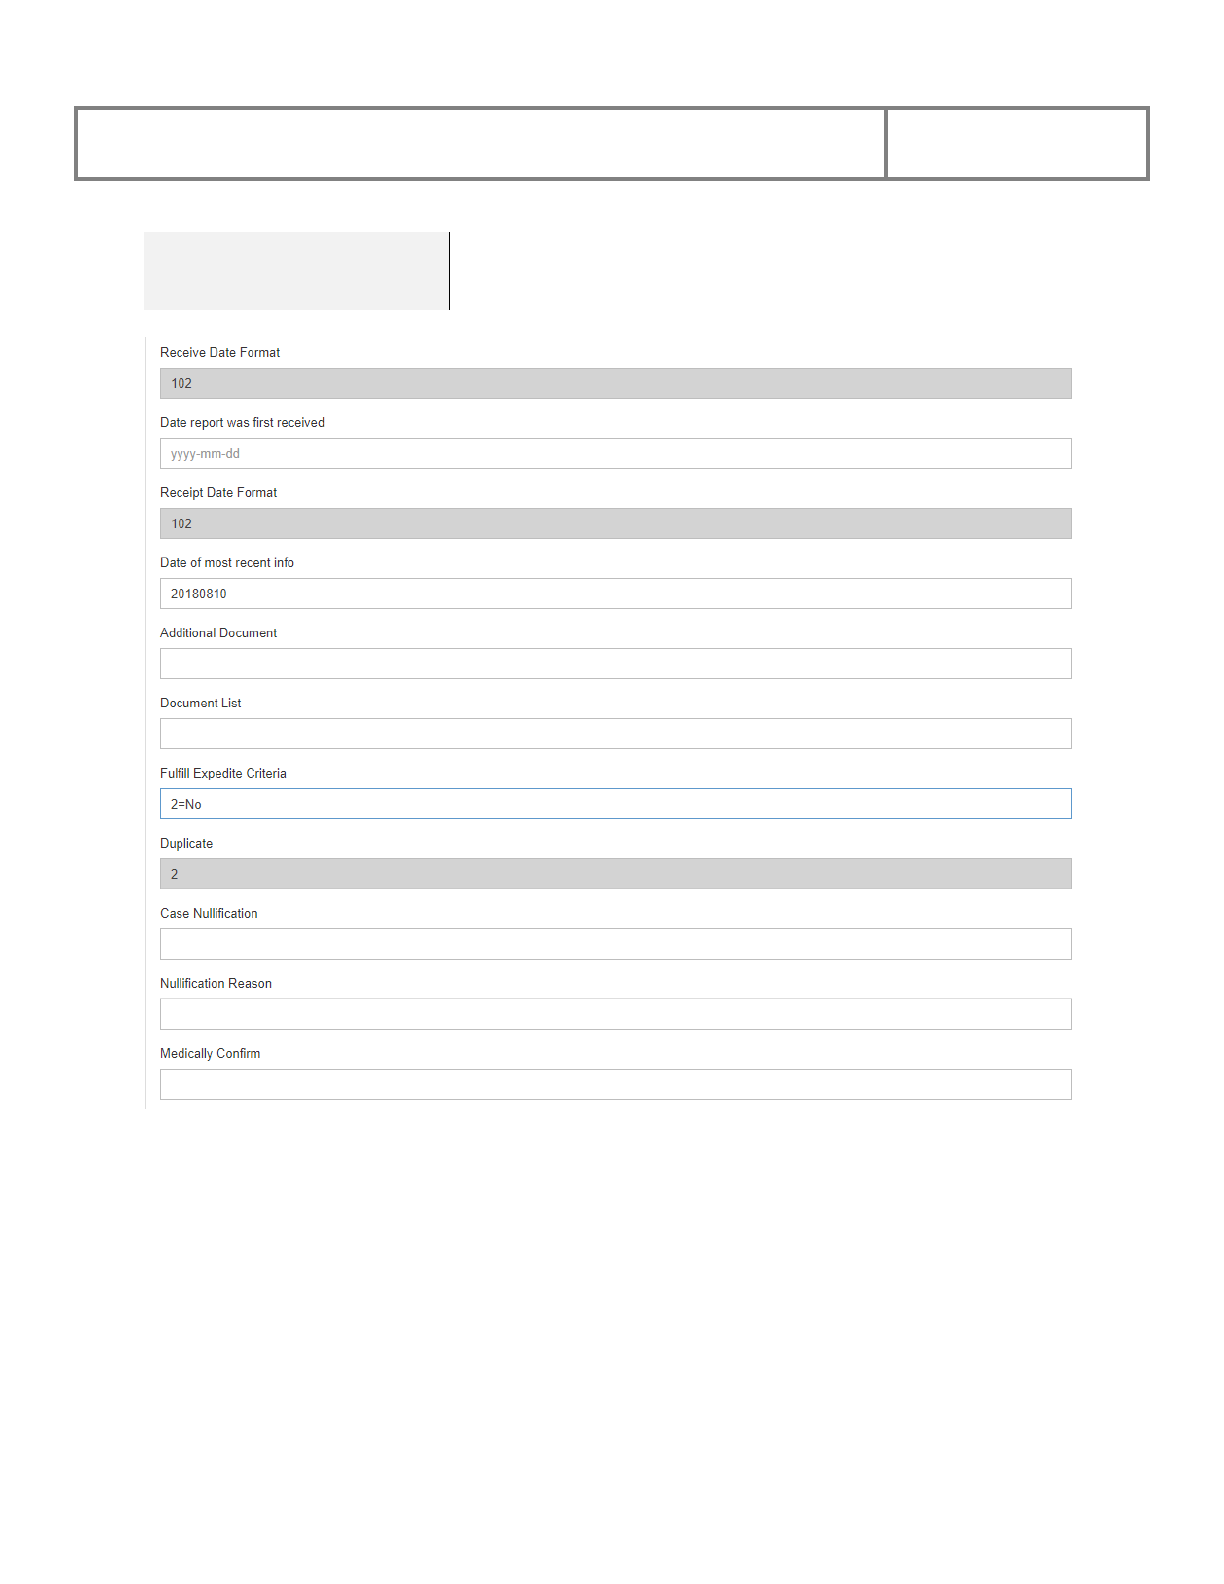
PViMS User Manual
2018
156
Seriousness Other
Dropdown list
Yes, No
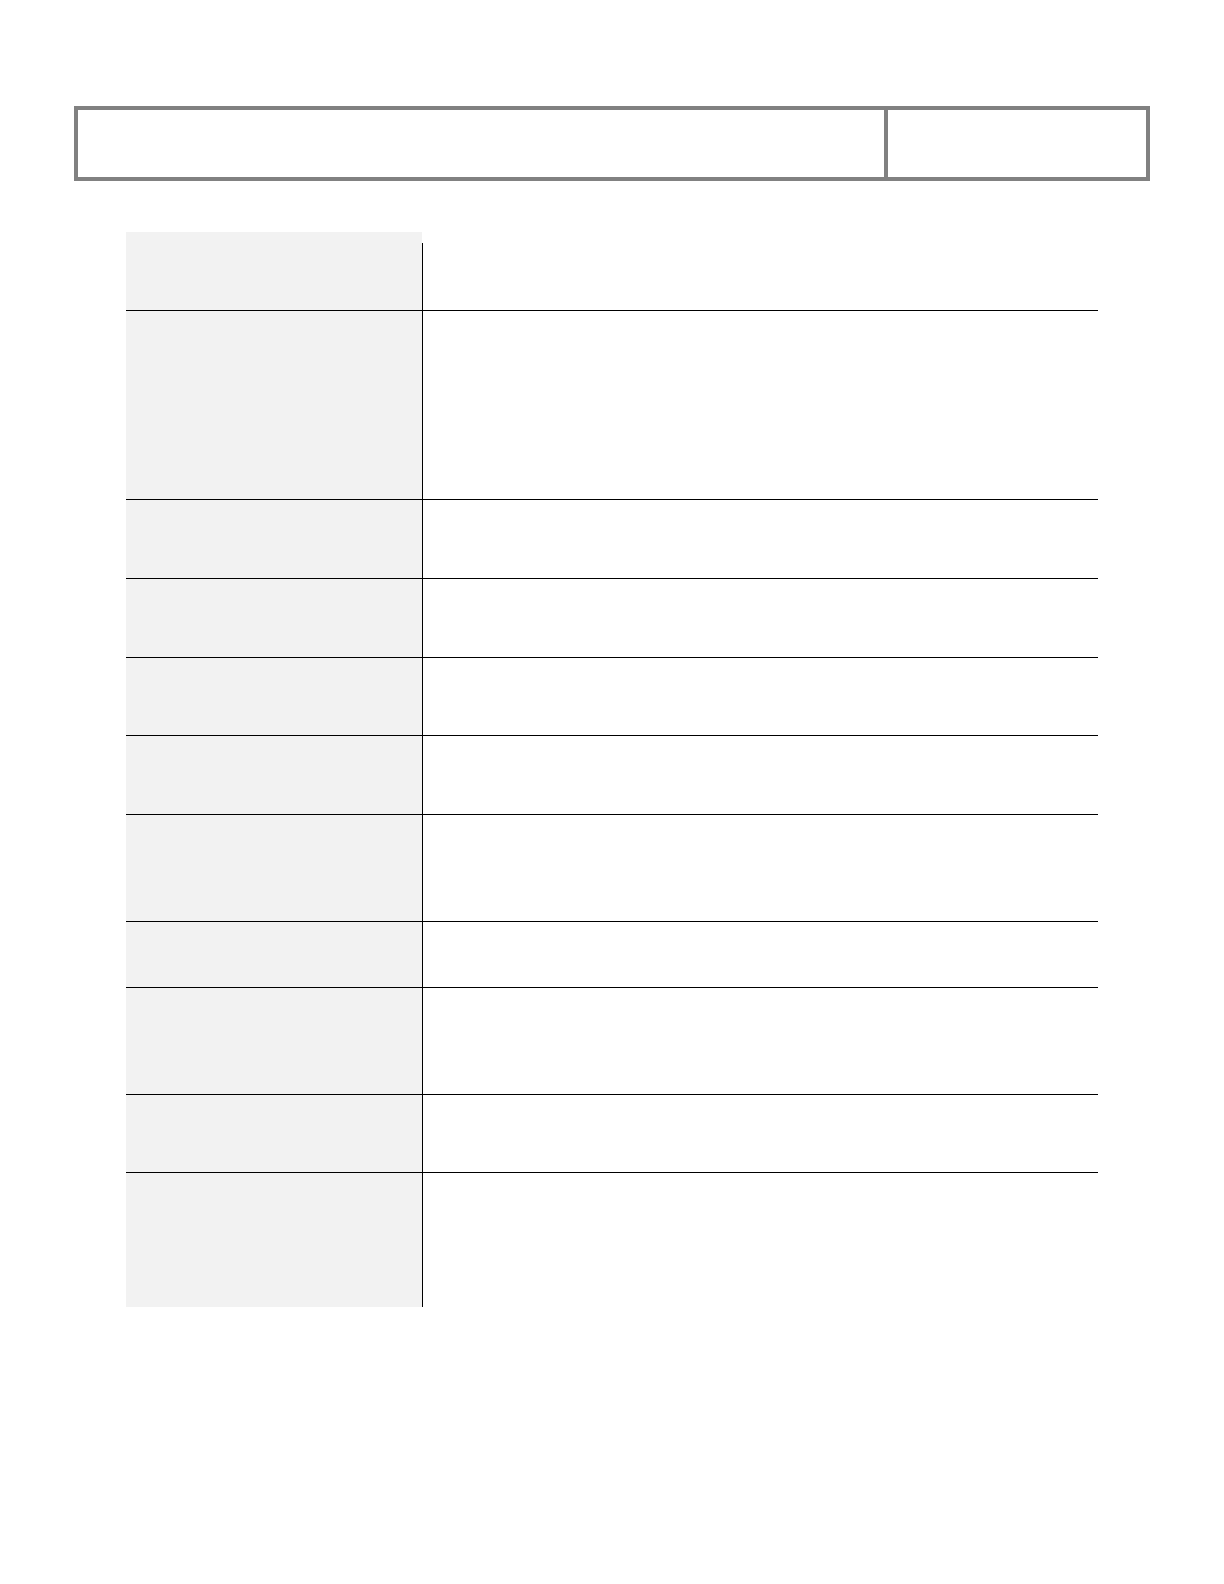
PViMS User Manual
2018
157
Receive Date Format
Date format
CCYYMMDD (e.g., 20171020 for October 20 2017)
Date report was first
received
For senders dealing with initial information, this is always be the
date the information was received from the primary source. When
retransmitting information received from another regulatory agency
or another company or any other secondary source, enter the date
the re-transmitter first received the information.
Date field
Receipt Date Format
Date format
CCYYMMDD (e.g., 20171020 for October 20 2017)
Date of most recent info
Date of receipt of the most recent information for this report
Date field
Additional Document
Dropdown list
Yes, No
Document List
List of documents held by sender
Text field
Fulfill Expedite Criteria
Does this case fulfill the local criteria for an expedited report?
Dropdown list
Yes, No
Duplicate Other case identifiers in previous transmissions
Case Nullification
Cancel this report?
Dropdown
Yes
Nullification Reason
Reason(s) for cancelling the report
Text field
Medically Confirm
Was the case medically confirmed, if not initially from health
professional?
Dropdown list
Yes, No
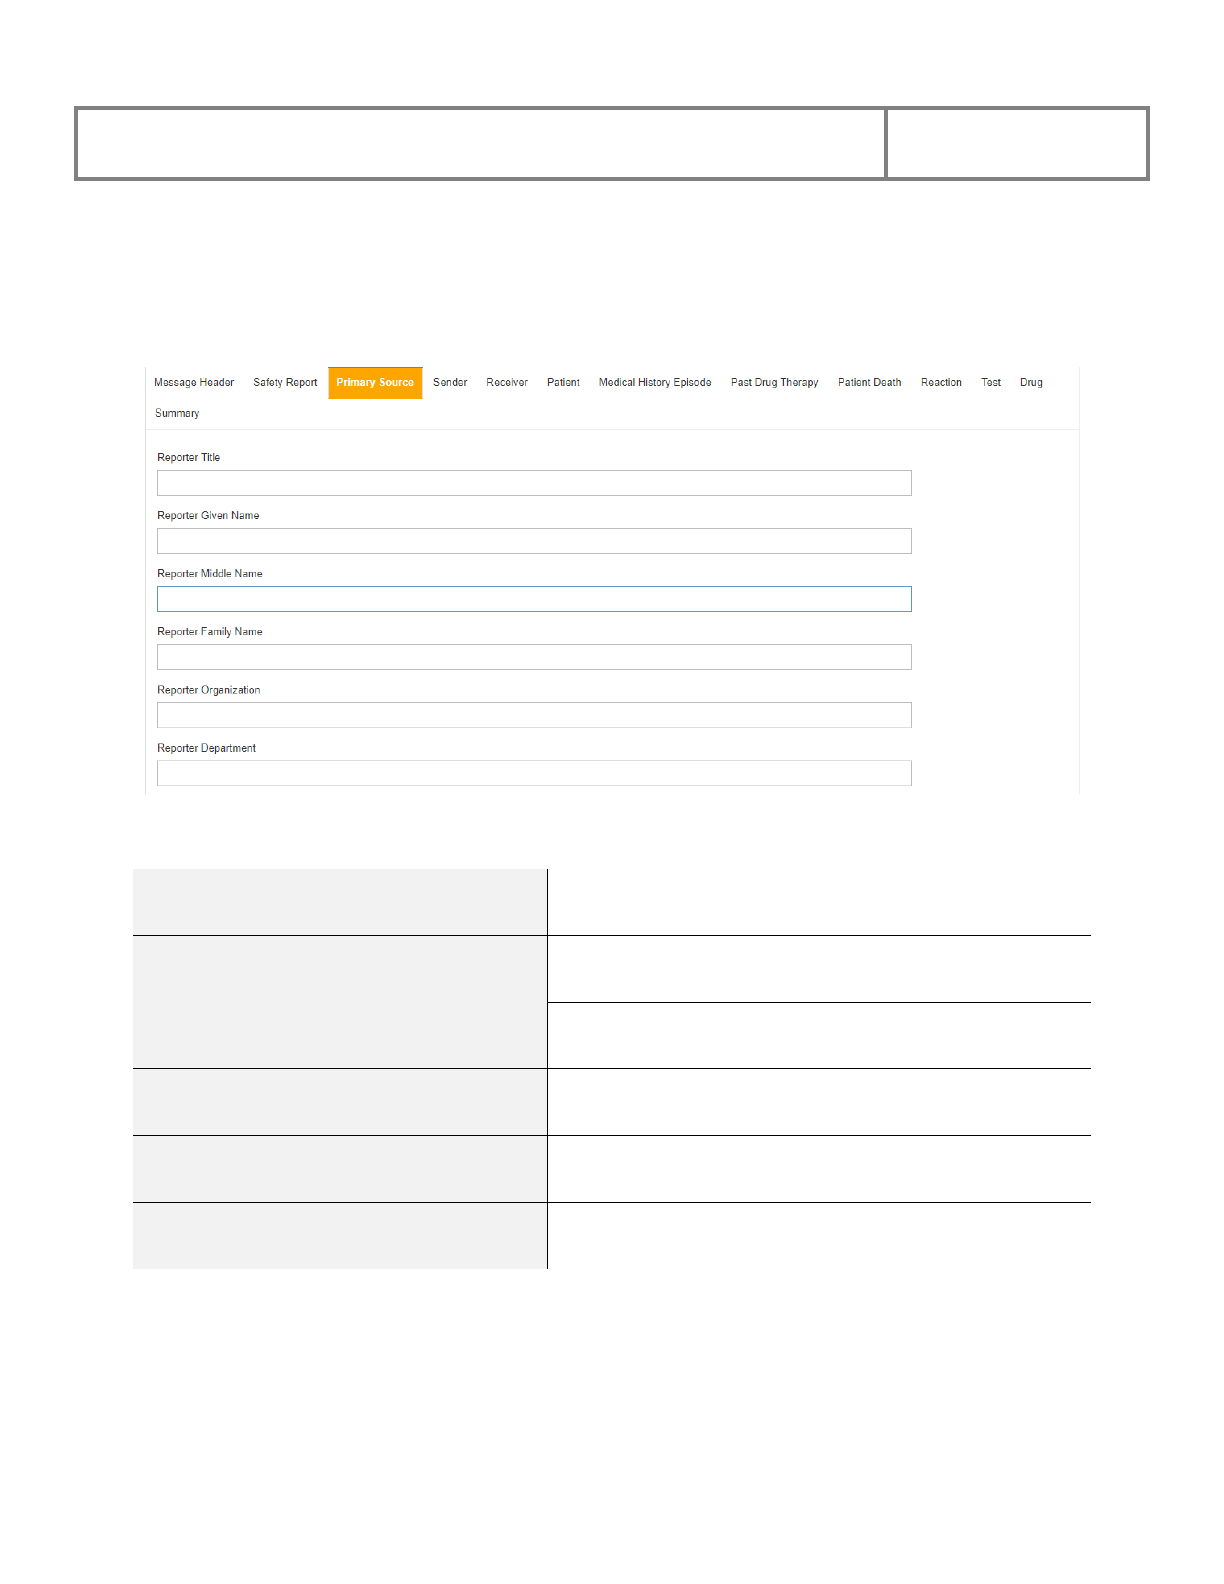
PViMS User Manual
2018
158
5.7.1.3 Primary Source
The Primary Source section provides information about the first person who reported the event to
authorities.
The fields in the Primary Source section are described below:
Reporter Title Text field
Reporter Given Name Text field
Reporter Middle Name Text field
Reporter Family Name Text field
Reporter Organization Text field
Reporter Department Text field
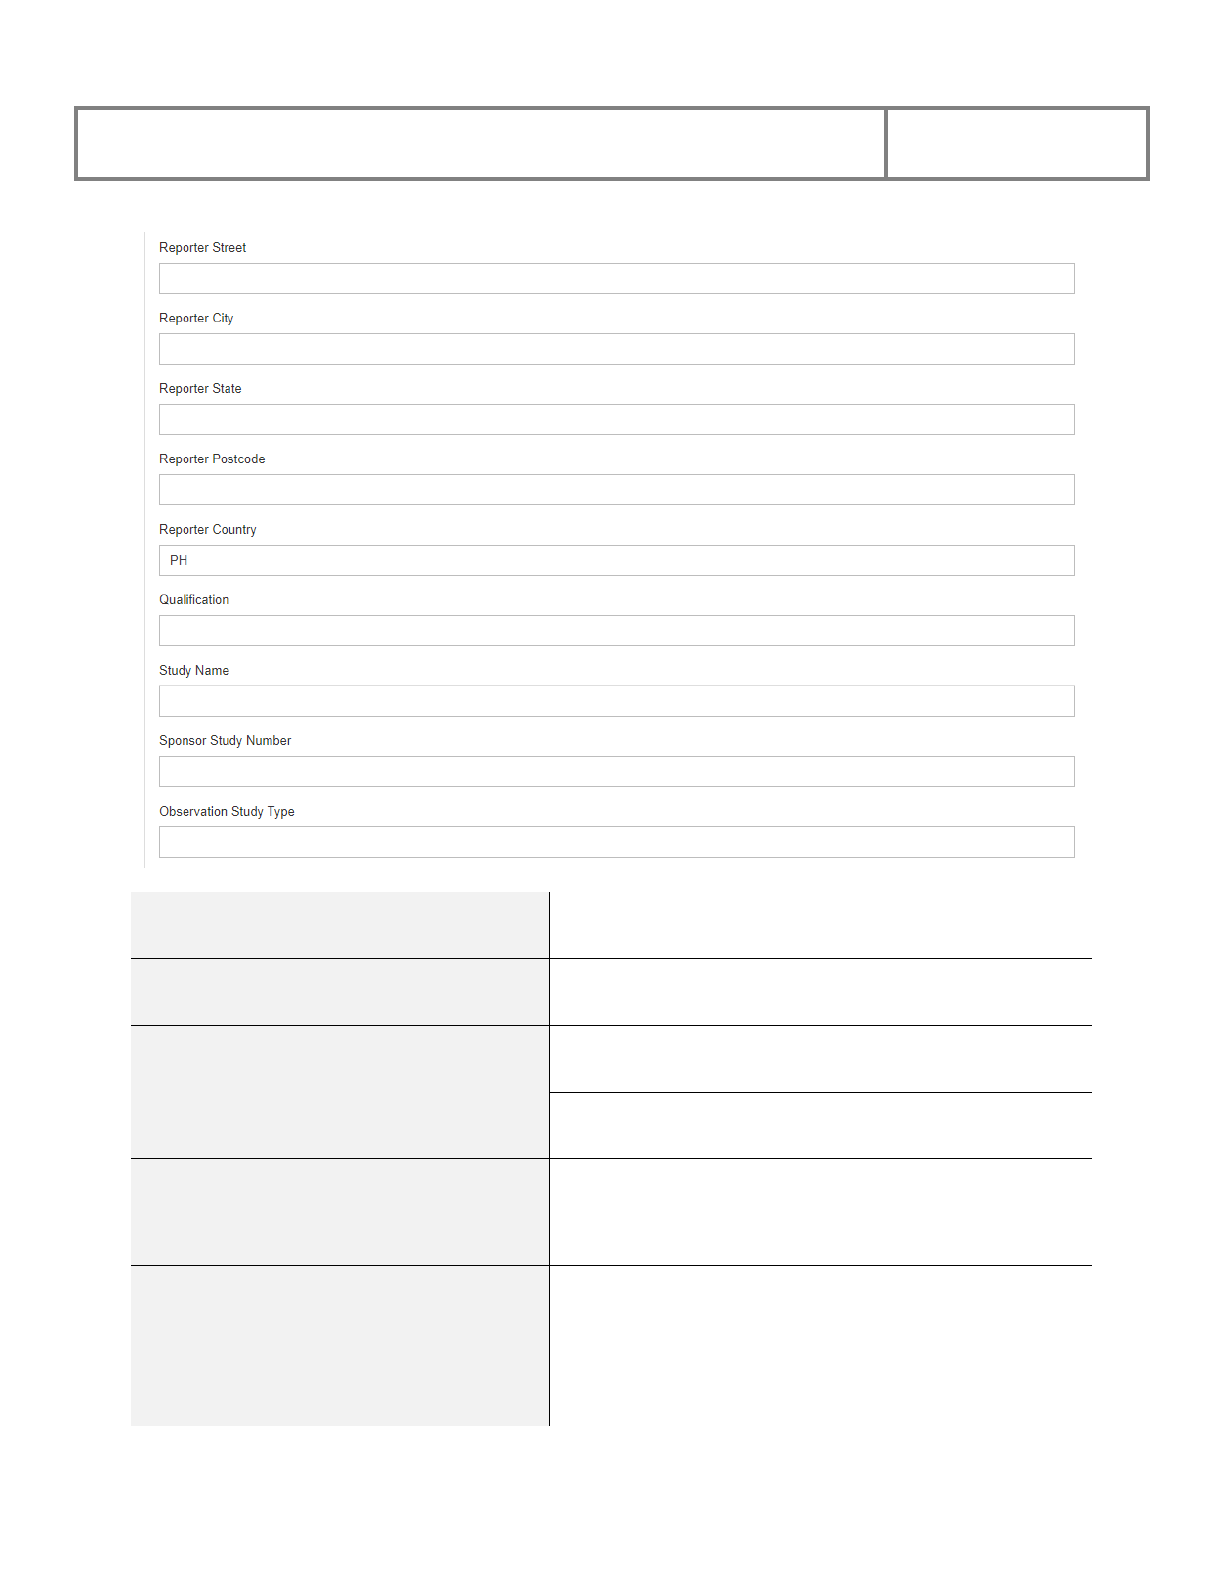
PViMS User Manual
2018
159
Reporter Street Text field
Reporter City Text field
Reporter State Text field
Reporter Postcode Text field
Reporter Country
Text field
ISO3166 Country Code
e.g., Philippines = PH
Qualification
Physician
Pharmacist
Other Health Professional
Lawyer
Consumer or other non-health professional
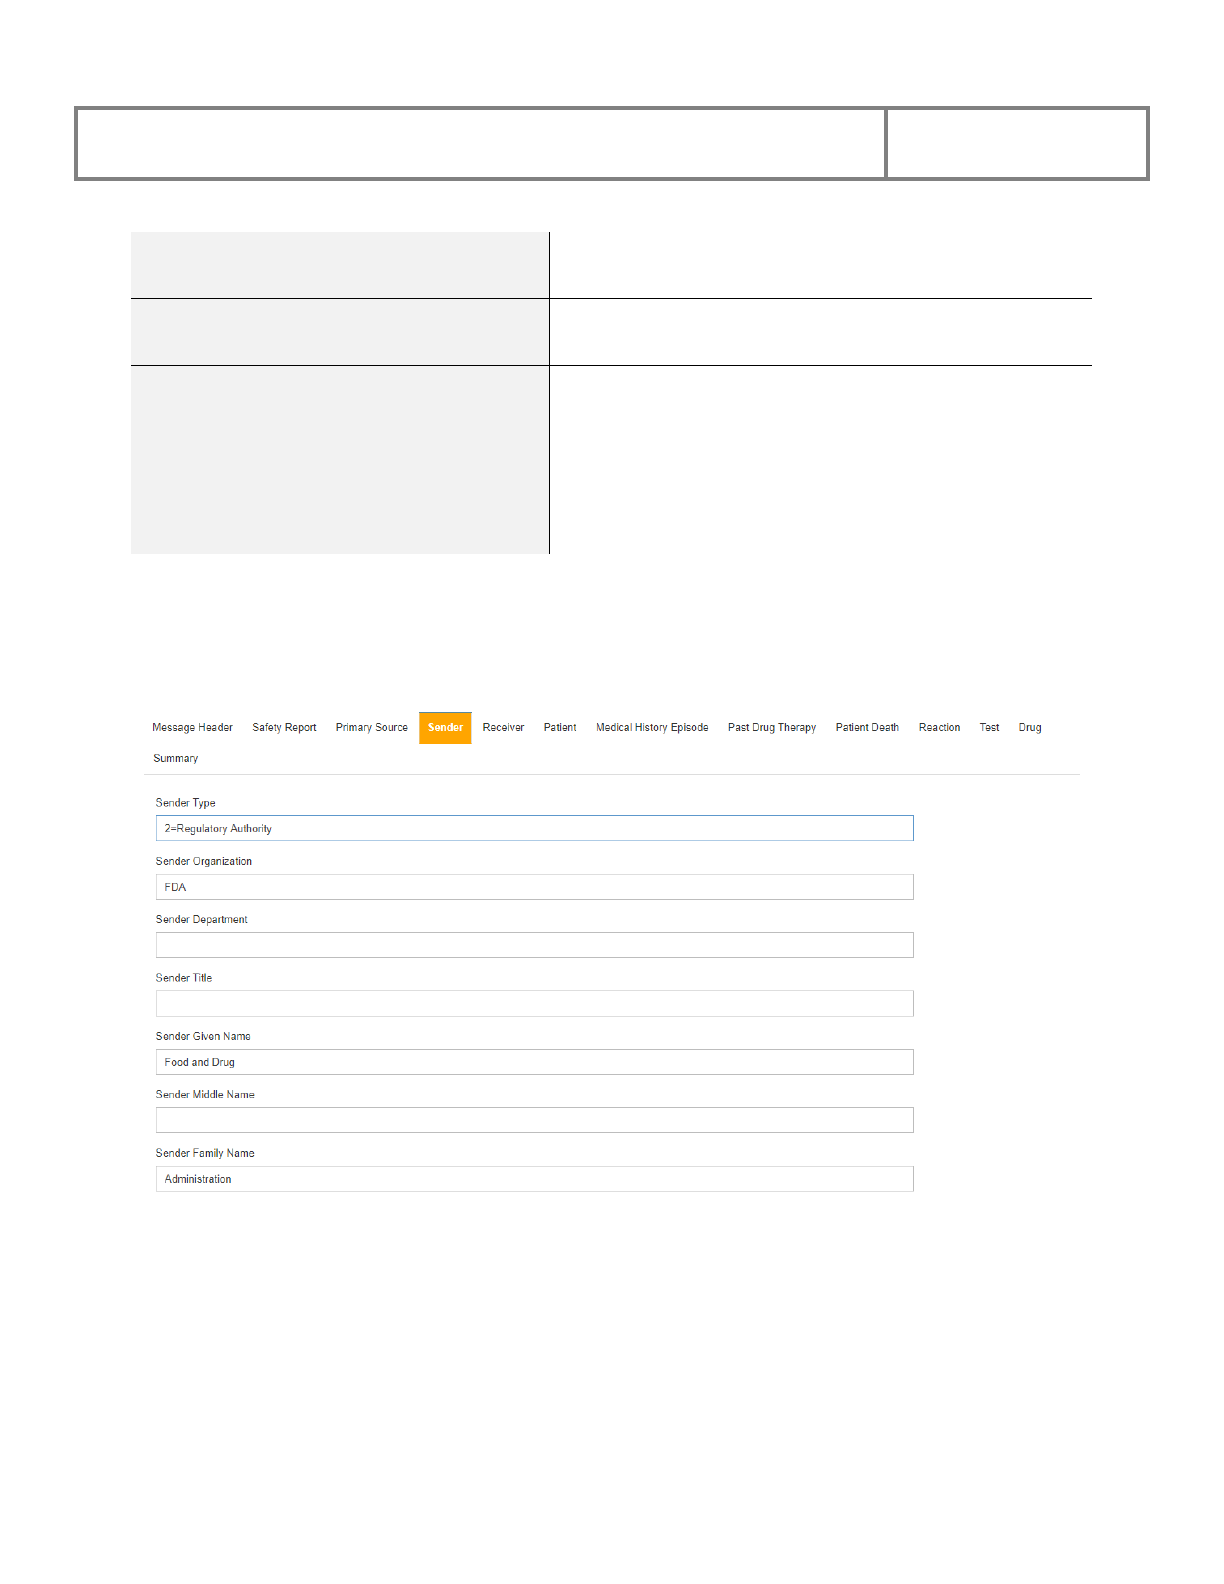
PViMS User Manual
2018
160
Study Name Text field
Sponsor Study Number Text field
Observation Study Type
Study type in which the reaction(s)/event(s) were
observed
Dropdown list
Clinical trials
Individual patient use
Other studies
5.7.1.4 Sender
The Sender section provides information about the first person who reported the event to
authorities.
PViMS User Manual
2018
161
The fields in the Sender section are described below:
Sender Type
Dropdown list
Pharmaceutical Company
Regulatory Authority
Health professional
Regional Pharmacovigilance Center
WHO Collaborating Center for International Drug
Monitoring
Other
Sender Organization Text field
Sender Department Text field
Sender Title Text field
Sender Given Name Text field
Sender Middle Name Text field
Sender Family Name Text field
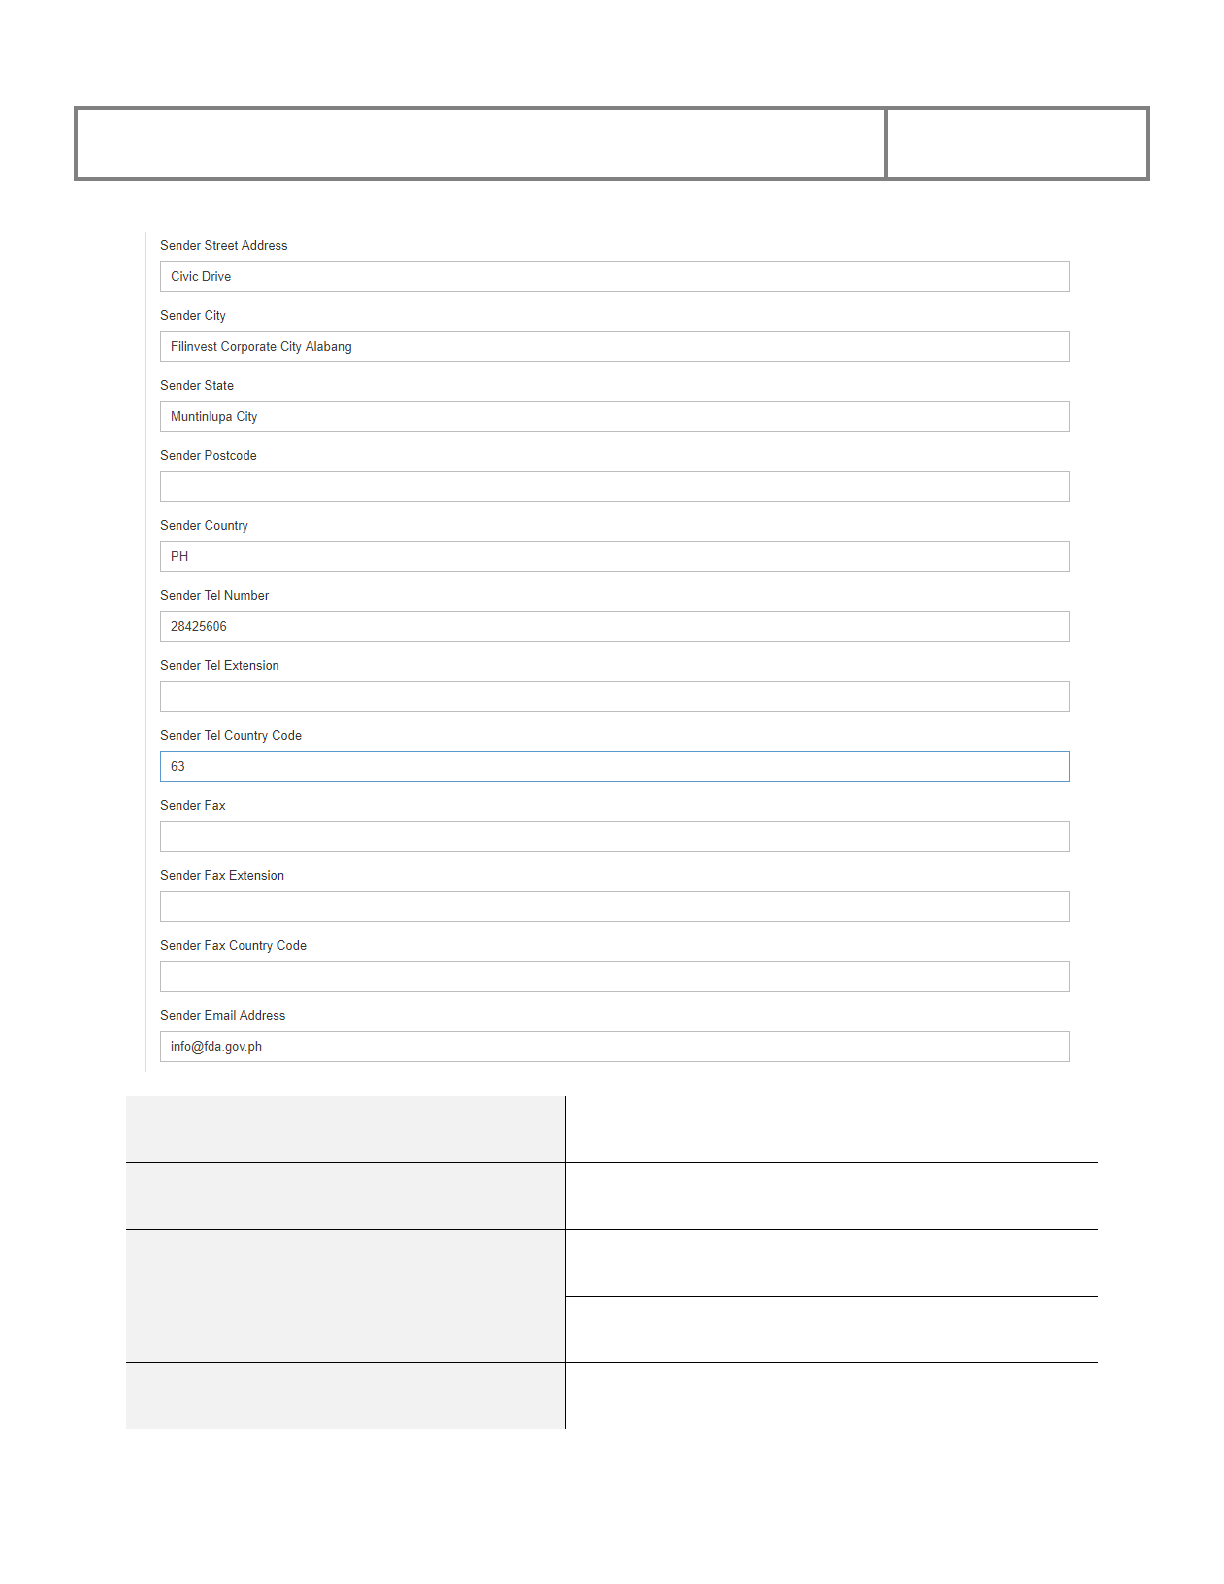
PViMS User Manual
2018
162
Sender Street Address Text field
Sender City Text field
Sender State Text field
Sender Postcode Text field
Sender Country Text field
PViMS User Manual
2018
163
Sender Tel Number Text field
Sender Tel Extension Text field
Sender Fax Text field
Sender Fax Extension Text field
Sender Fax Country Code
ISO3166 Country Code
Text
e.g., Philippines = PH
Sender Email Address Text field
Sender address details can be configured within the administration section of
PViMS. Please consult your system administrator if any of these contact details
need to change.
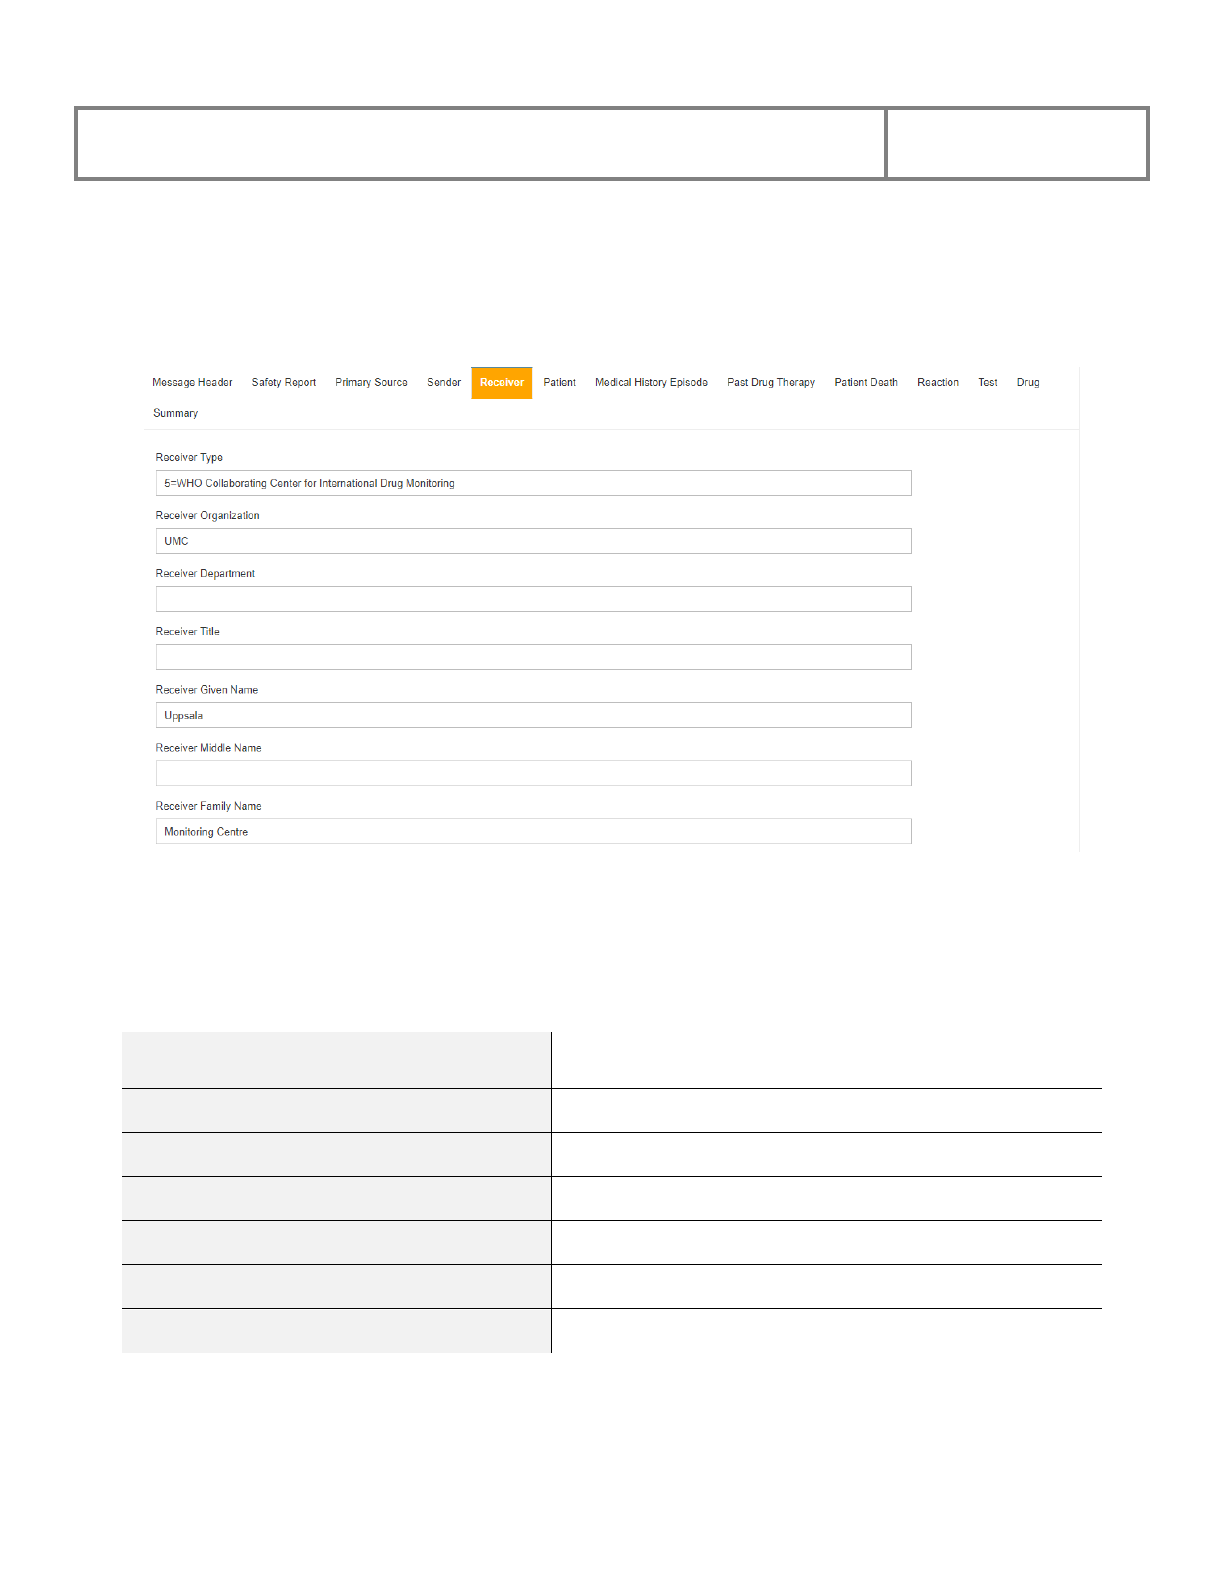
PViMS User Manual
2018
164
5.7.1.5 Receiver
The Receiver section provides information about the person or organization you are sending the
report to.
The fields in the Receiver section are described below:
Receiver Type
Dropdown list (e.g., WHO; Regulatory Authority;
Health Professional)
Receiver Organization Text field
Receiver Department Text field
Receiver Title Text field
Receiver Given Name Text field
Receiver Middle Name Text field
Receiver Family Name Text field
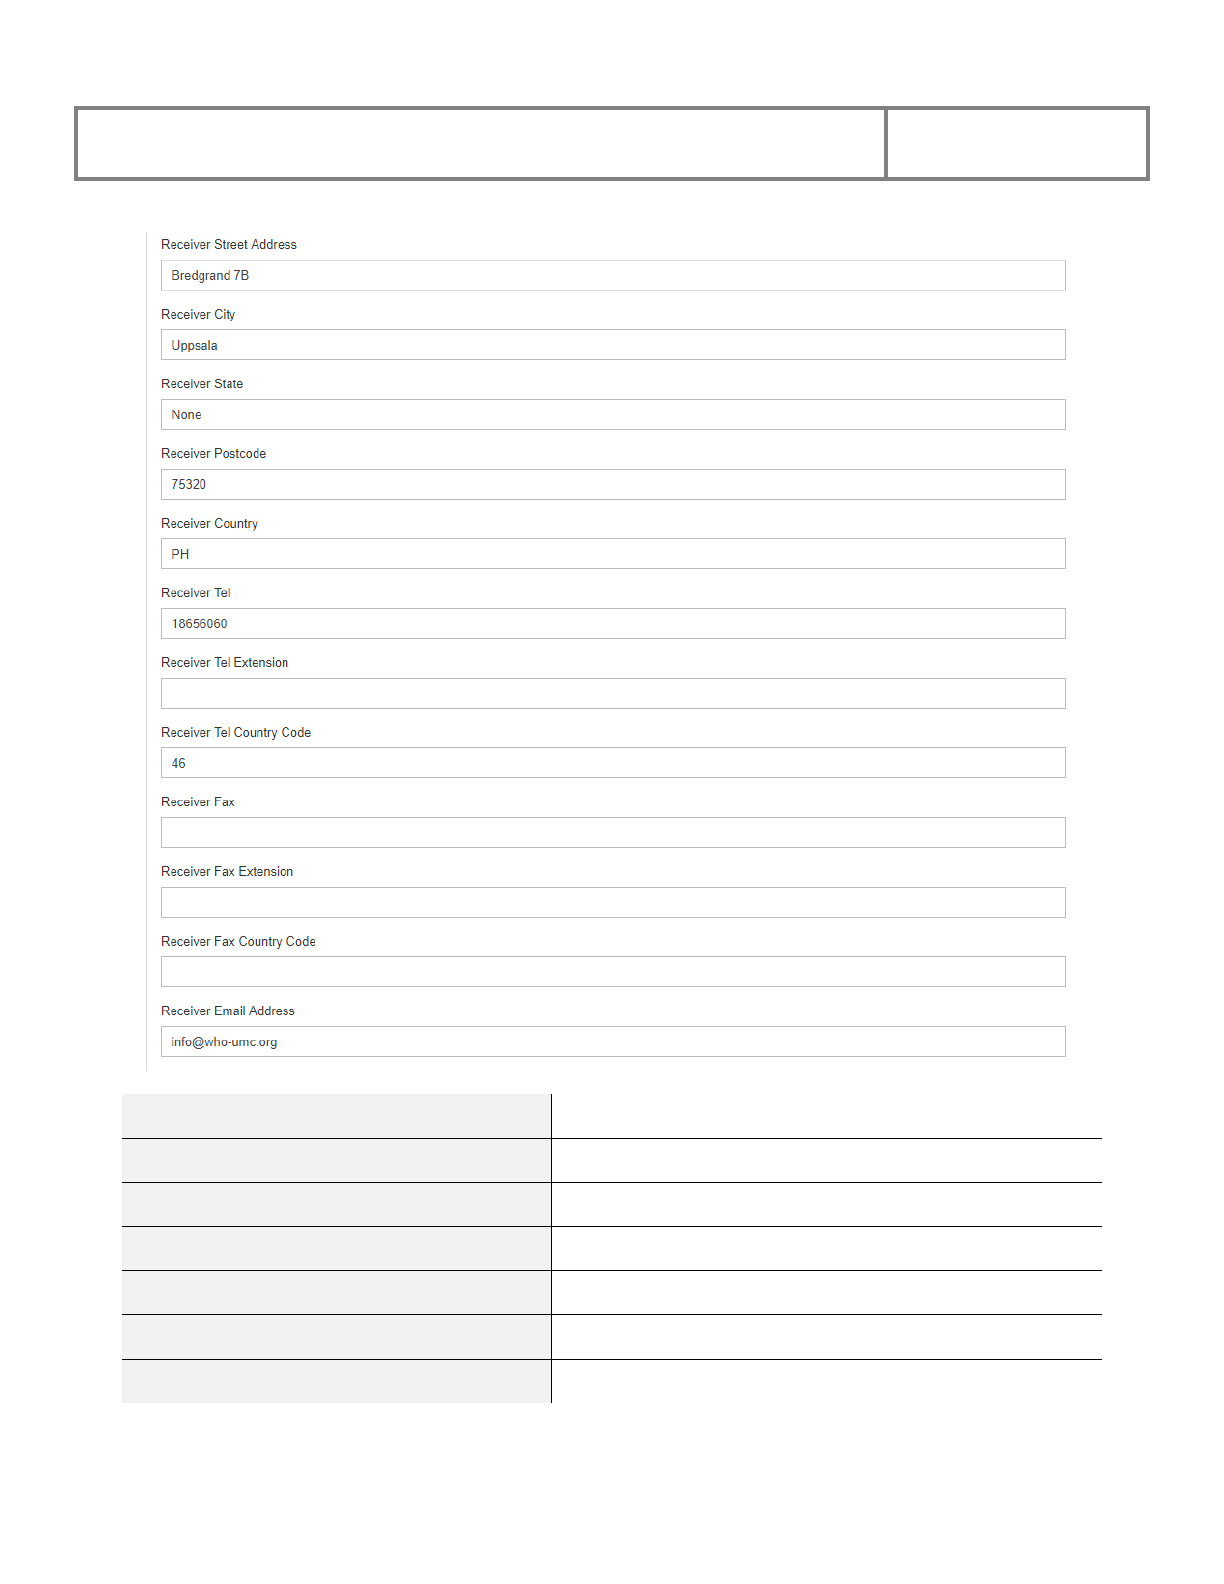
PViMS User Manual
2018
165
Receiver Street Address Text field
Receiver City Text field
Receiver State Text field
Receiver Postcode Text field
Receiver Country Text field
Receiver Tel Text field
Receiver Tel Extension Text field
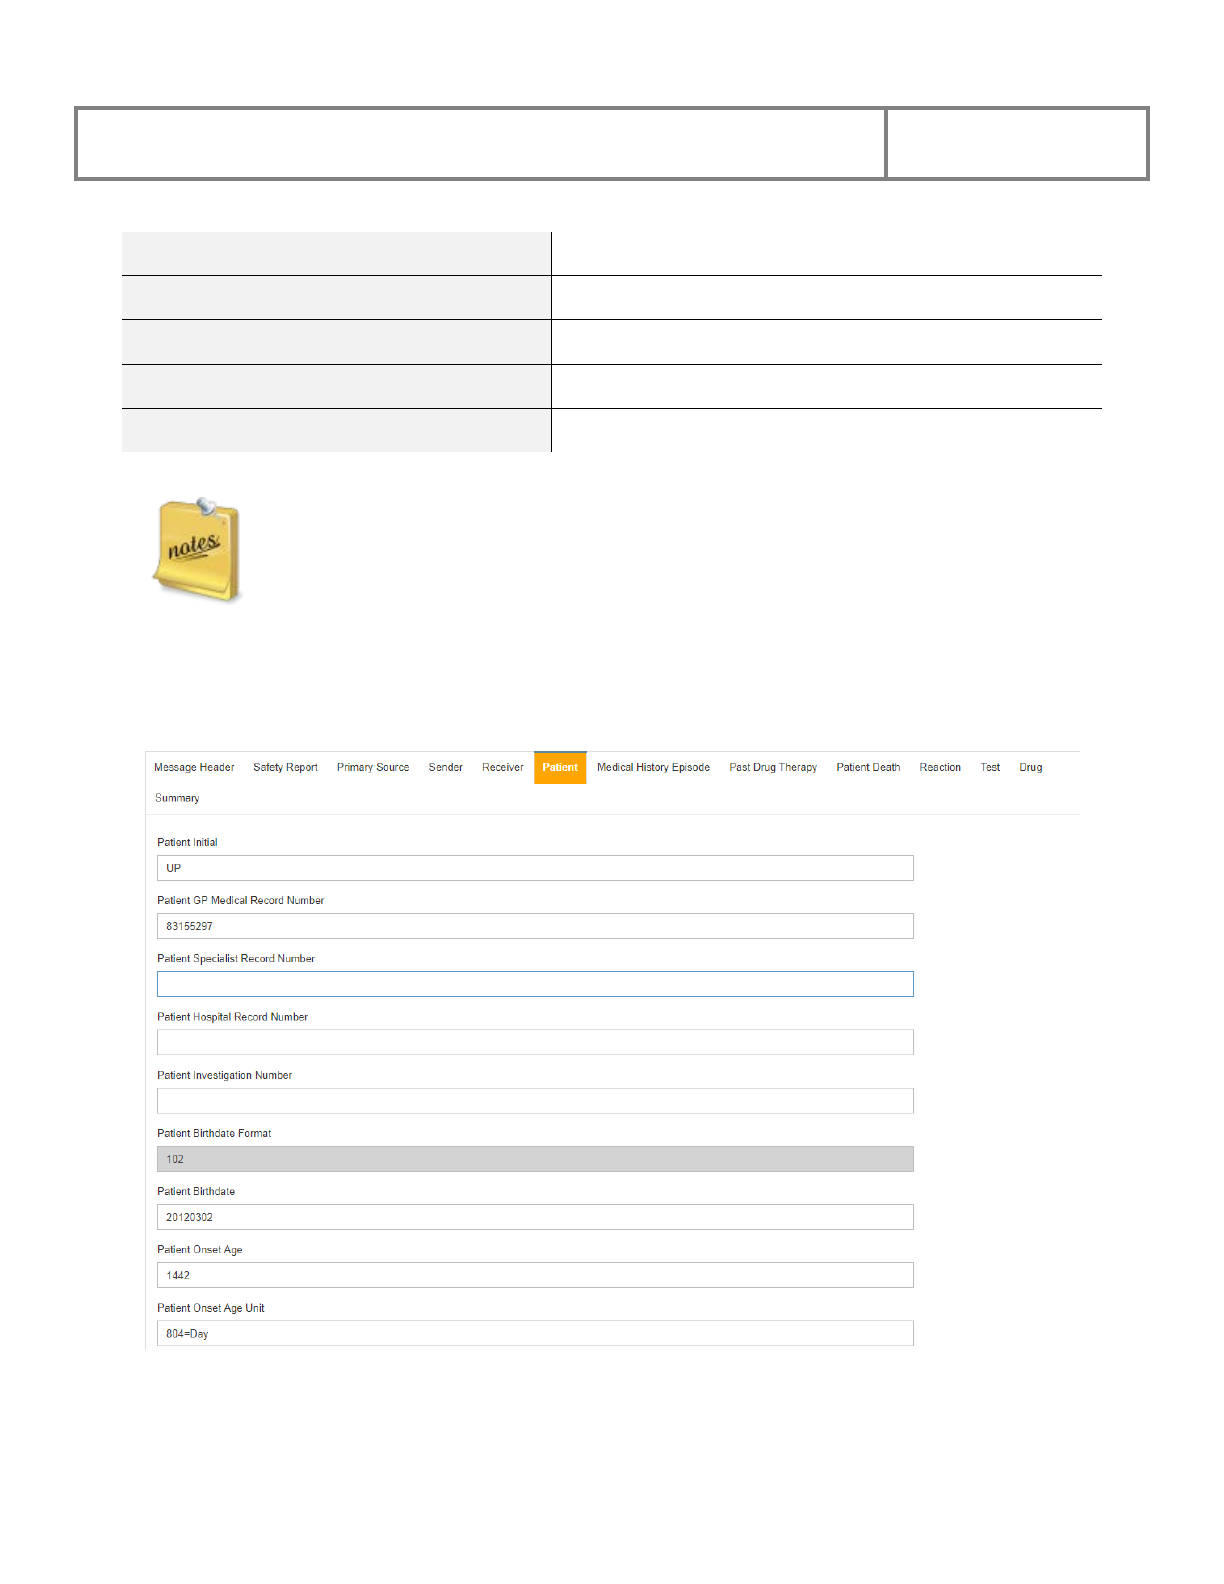
PViMS User Manual
2018
166
Receiver Tel Country Code Text field
Receiver Fax Text field
Receiver Fax Extension Text field
Receiver Fax Country Code Text field
Receiver Email Address Text field
Sender address details can be configured within the administration section of
PViMS. Please consult your system administrator if any of these contact details
need to change.
5.7.1.6 Patient
The Patient section provides details about the person who experienced the event.
PViMS User Manual
2018
167
The fields in the Patient section are described below:
Patient Initial Text field
Patient GP Medical Record Number Text field
Patient Specialist Record Number Text field
Patient Hospital Record Number Text field
Patient Investigation Number Text field
Patient Birthdate Format Auto-filled by system
Patient Birthdate Date field
Patient Onset Age Text field
Patient Onset Age Unit Dropdown list (e.g., Year, Month, Day, Week)
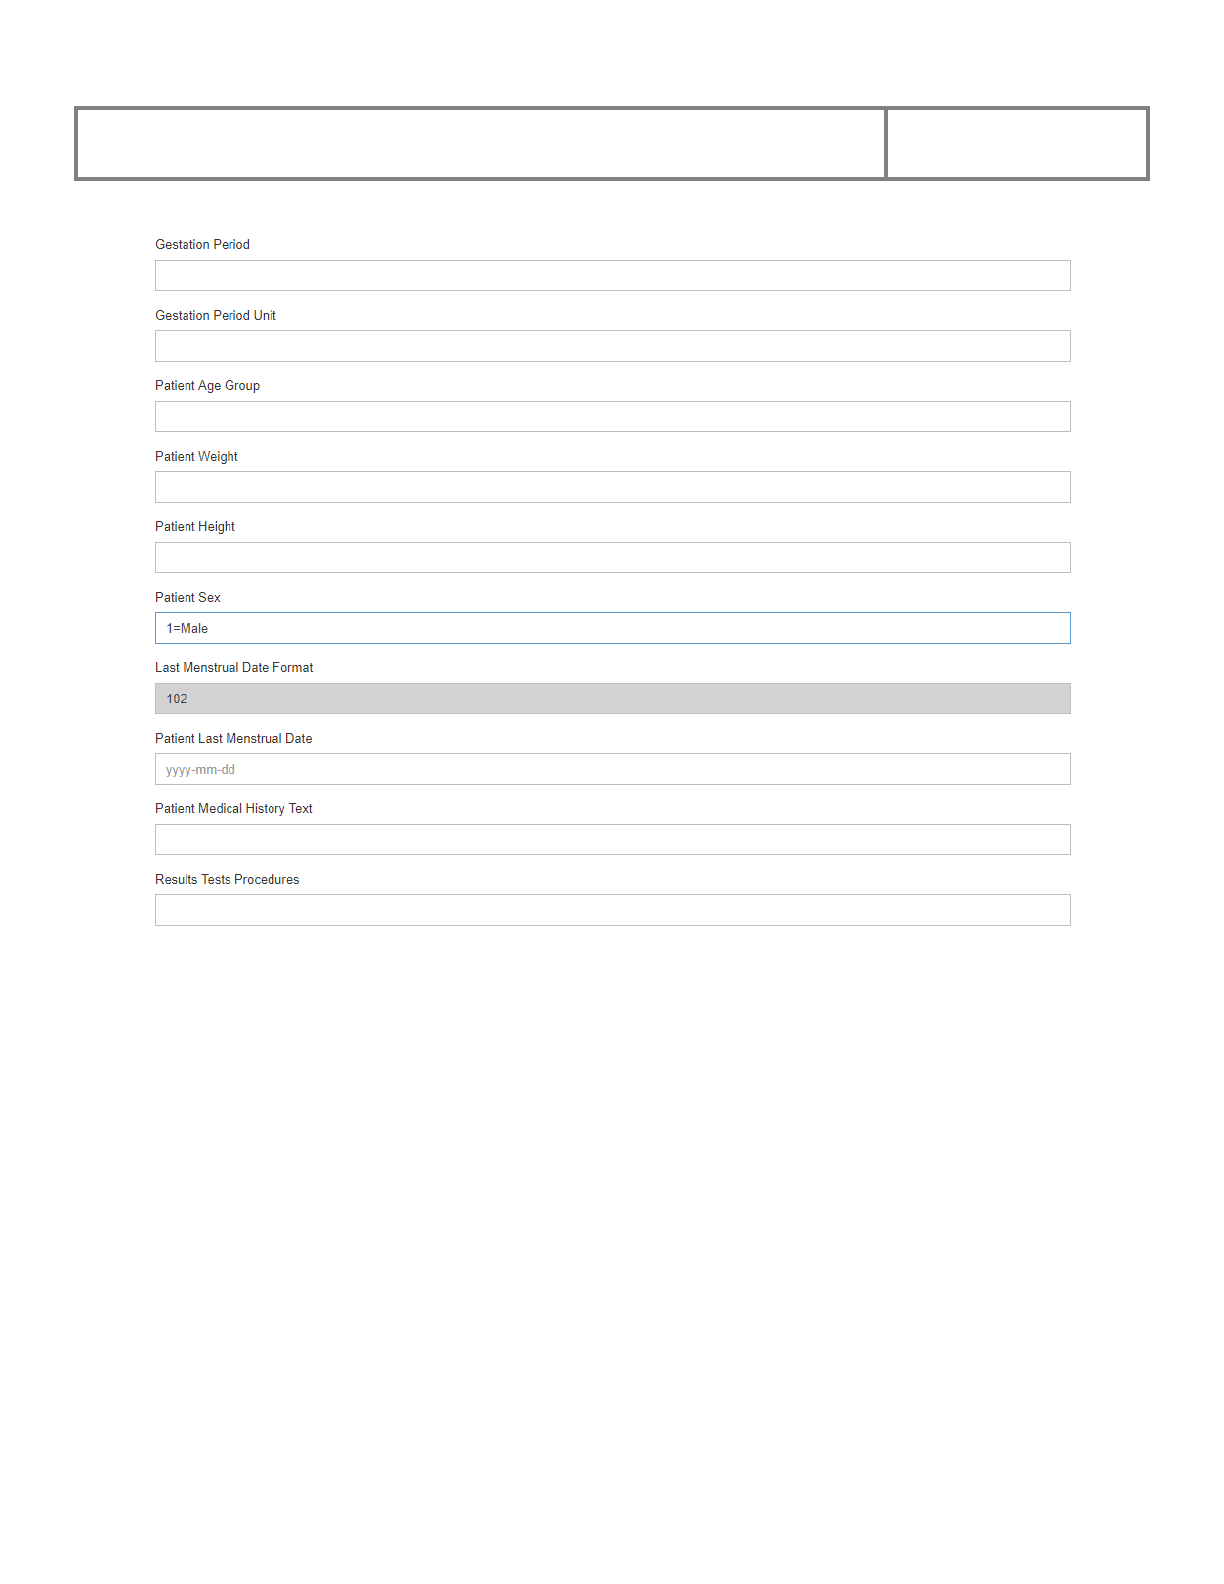
PViMS User Manual
2018
168
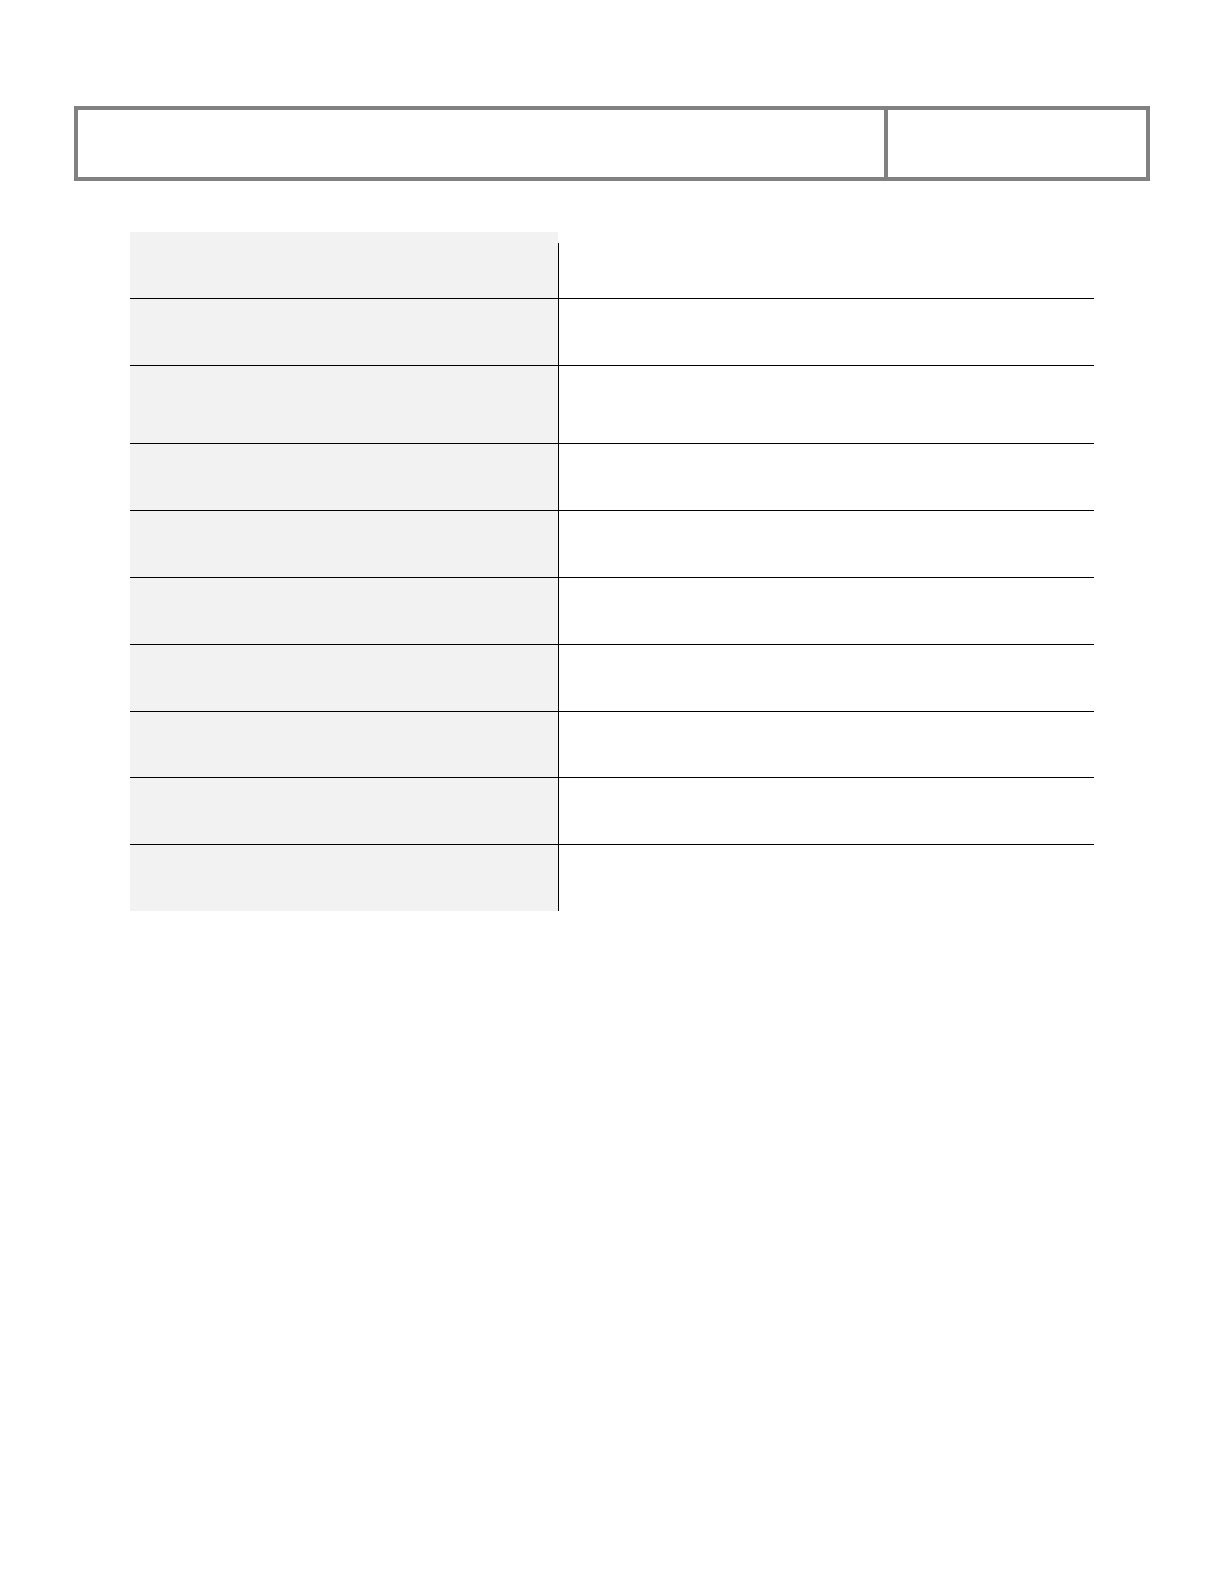
PViMS User Manual
2018
169
Gestation Period Text field
Gestation Period Unit Dropdown list (e.g., Month, Week, Day, Trimester)
Patient Age Group
Dropdown list (e.g., Infant, Child, Adolescent,
Adult)
Patient Weight Number field
Patient Height Number field
Patient Sex Dropdown list (e.g., Male, Female)
Last Menstrual Date Format Auto-filled by system
Patient Last Menstrual Date Date field
Patient Medical History Text Text field
Results Tests Procedures Text field

PViMS User Manual
2018
170
5.7.1.7 Medical History Episode
The Medical History Episode section describes any relevant medical history for the patient.
Multiple history episode records can be created per patient.
The fields in the Medical History Episode section are described below:
Patient Episode Name MedDRA
Version
Auto-filled by the system
Patient Episode Name Text field
Patient Medical Start Date Format Auto-filled by the system
Patient Medical Start Date Date field
Patient Medical Continue Dropdown list (e.g., Yes, No, Unknown)
Patient Medical End Date Format Auto-filled by the system
Patient Medical End Date Date field
Patient Medical Comment Text field
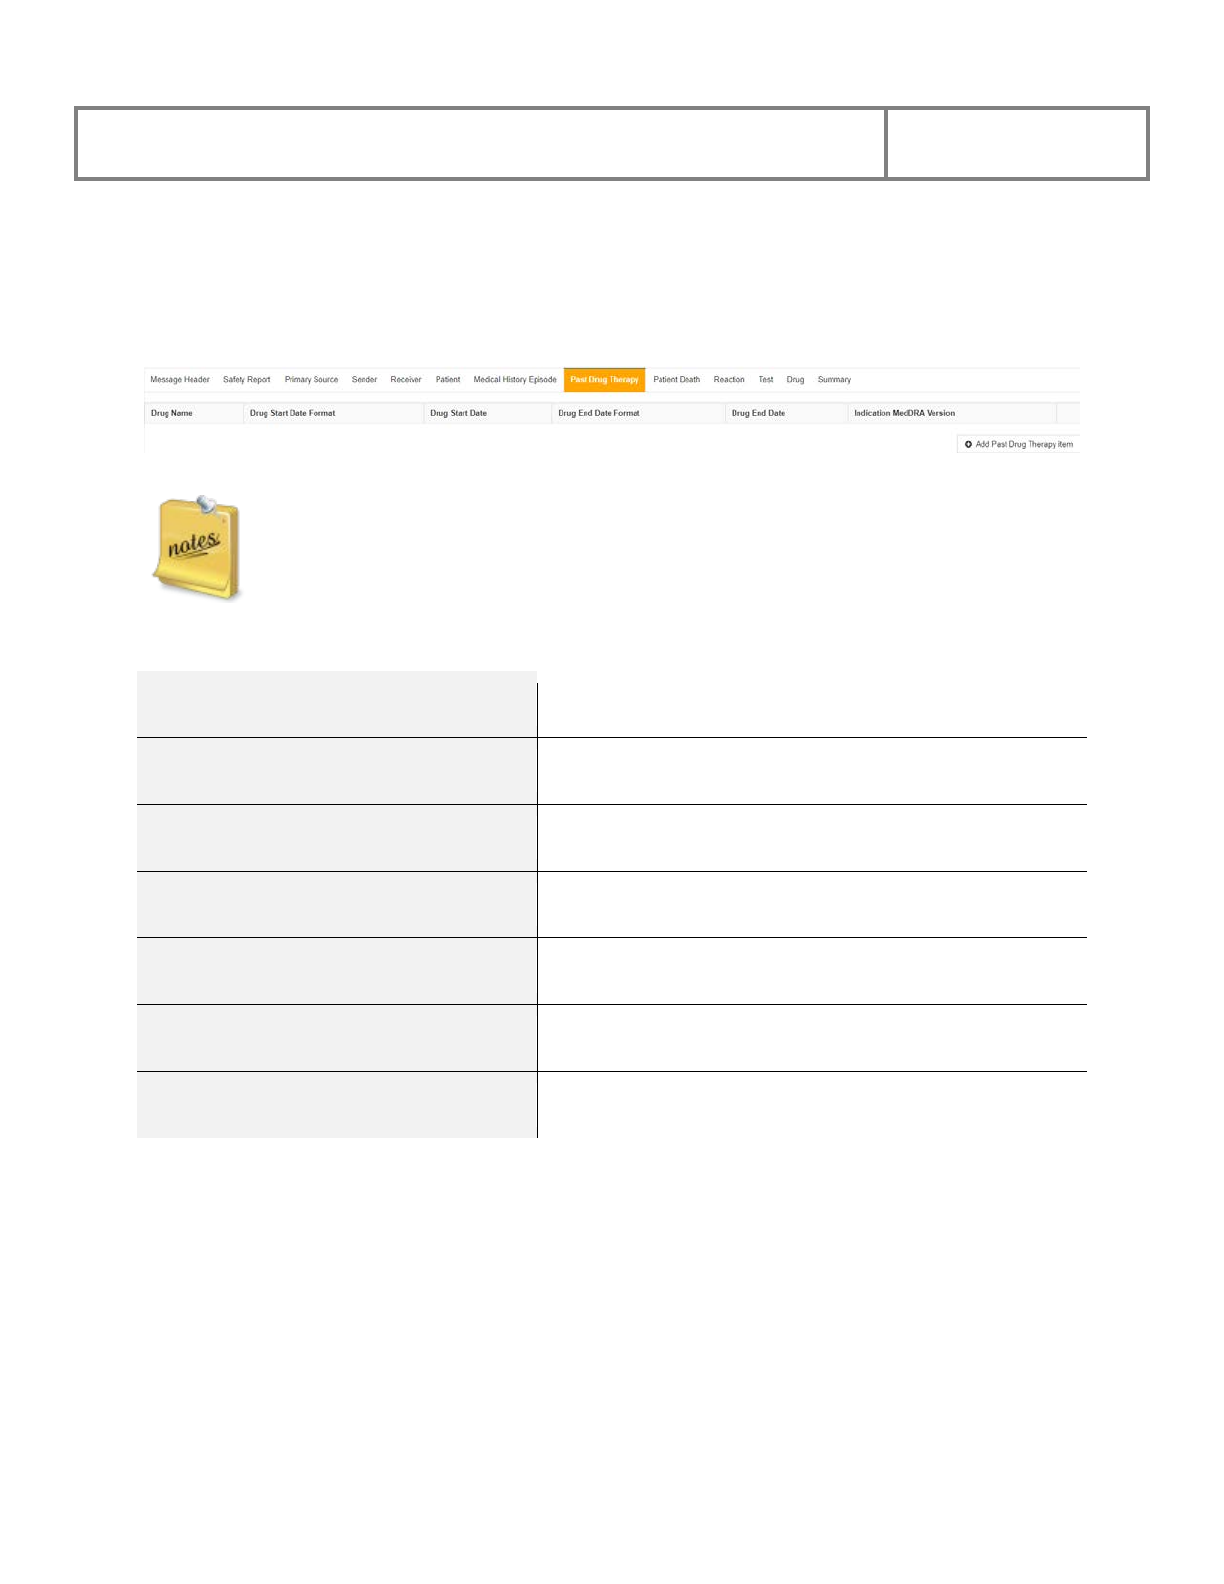
PViMS User Manual
2018
171
5.7.1.8 Past Drug Therapy
The Past Drug Therapy section describes any relevant medicines taken by the patient around the
time of the event.
Multiple therapy records can be created per patient
The fields in the Past Drug Therapy section are described below:
Drug Name Text field
Drug Start Date Format Auto-filled by the system
Drug Start Date Date field
Drug End Date Format Auto-filled by the system
Drug End Date Date field
Indication MedDRA Version Auto-filled by the system
Indication Text field

PViMS User Manual
2018
172
5.7.1.9 Patient Death
The Patient Death section provides information specific to a fatal event.
The fields in the Patient Death section are described below:
Patient Death date Format Auto-filled by the system
Patient Death date Date field
Patient Autopsy
Dropdown list to indicate if an autopsy was
performed (e.g., Yes, No, Unknown)
Patient Death Report MedDRA
Version
Auto-filled by the system
Patient Death Report
Text field to enter the cause of death according to the
autopsy
Patient Determined Autopsy MedDRA
Version
Auto-filled by the system
Patient Determine Autopsy
Text field to enter the cause of death according to the
reporter
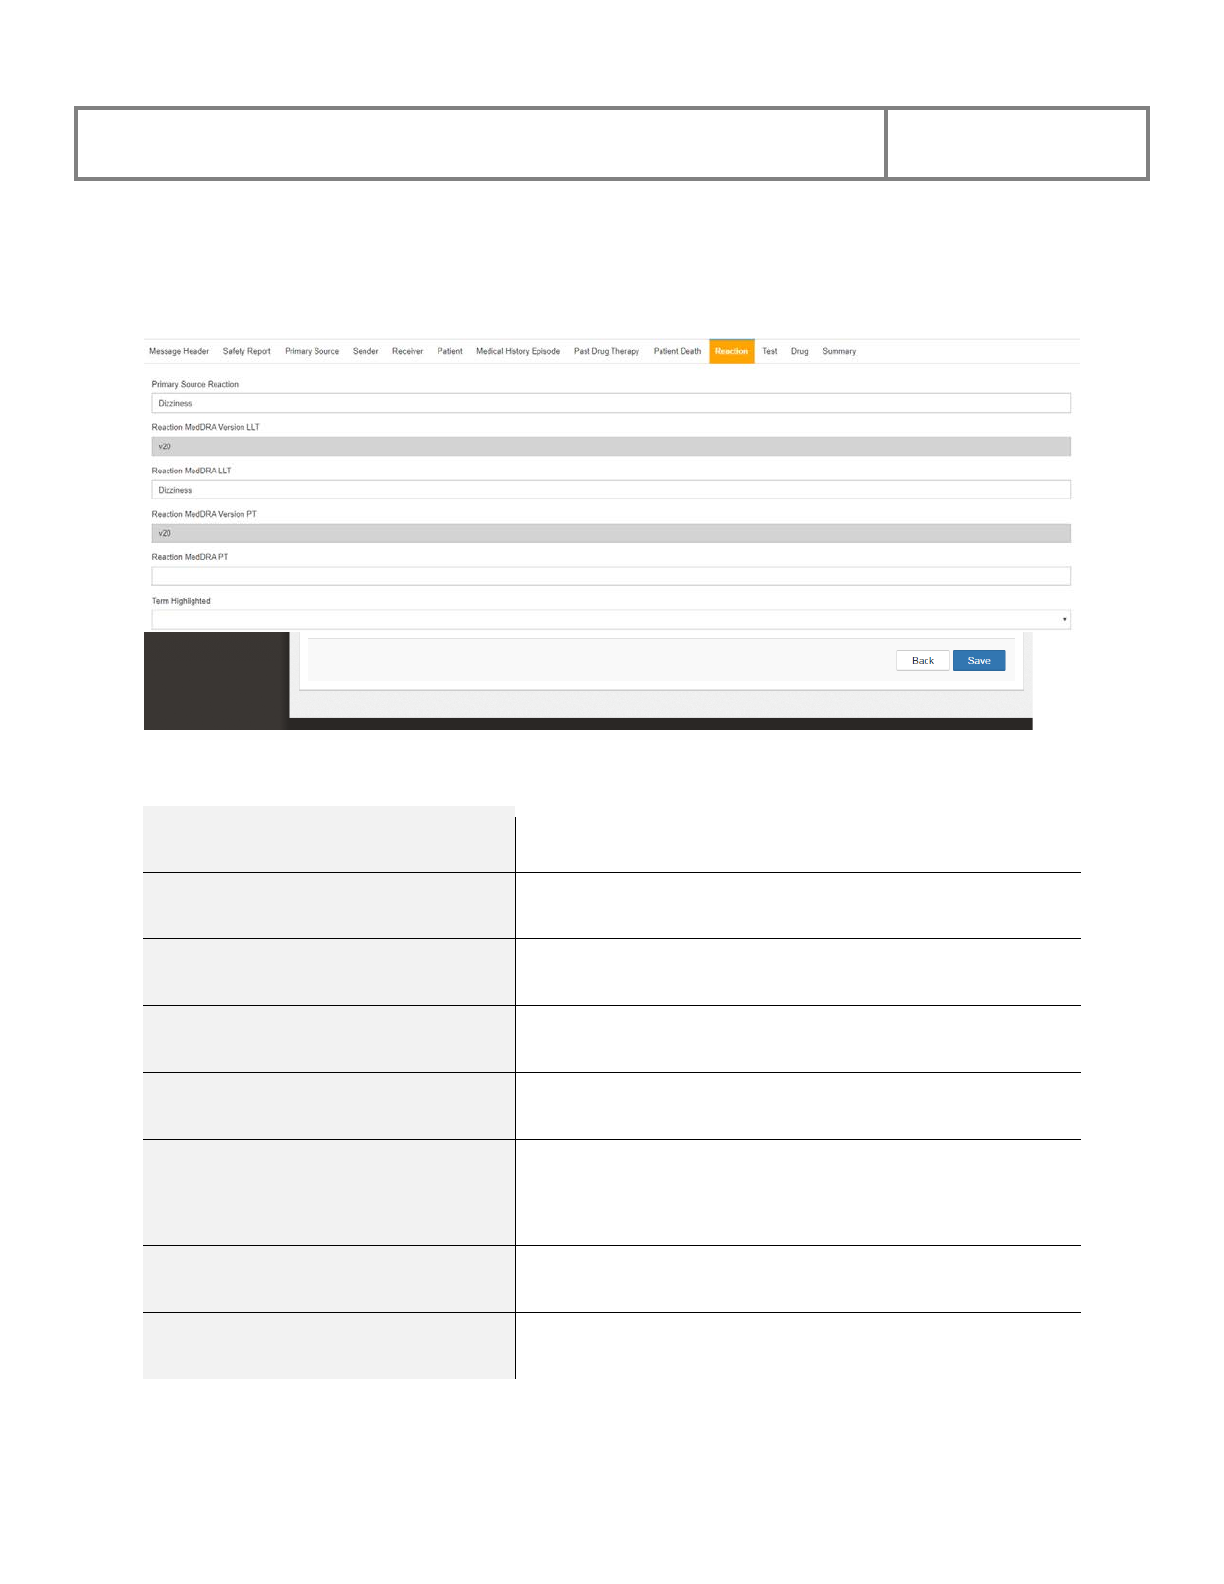
PViMS User Manual
2018
173
5.7.1.10 Reaction
The Reaction section provides information specific to the adverse event.
The fields in the Reaction section are described below:
Primary Source Reaction Text field for term entered by the reporter
Reaction MedDRA Version LLT Auto-filled by the system
Reaction MedDRA LLT Text field to enter the MedDRA LLT
Reaction MedDRA Version PT Auto-filled by the system
Reaction MedDRA PT Text field to enter the MedDRA PT
Term Highlighted
Dropdown list to indicate if the reporter judged the
event as serious (e.g., Yes, highlighted by the reporter
as serious)
Reaction Start Date Format Auto-filled by the system
Reaction Start Date Date field

PViMS User Manual
2018
174
Reaction End Date Format Auto-filled by the system
Reaction End Date Date field
Reaction Duration Number field
Reaction Duration Unit
Dropdown list to indicate the time unit of the duration
(e.g., day, week, month)
Reaction First Time
Number field to indicate the time interval between
beginning of suspect drug administration and start of
reaction/event
Reaction First Time Unit
Dropdown list to indicate the time interval unit between
suspect drug administration and start of reaction/event
(e.g., second, minute, hour, day)
Reaction Last Time
Number field to indicate the time interval between last
dose and start of reaction/event
Reaction Last Time Unit
Dropdown list to indicate the time interval unit between
last dose and start of reaction/event (e.g., second,
minute, hour, day)
Reaction Outcome
Dropdown list to indicate the outcome of reaction/event
at the time of last observation (e.g., recovered/resolved,
fatal, unknown)
PViMS User Manual
2018
175
5.7.1.11 Test
The Test section provides information about clinical tests and procedures that are relevant to the
adverse reaction.
The fields in the Test section are described below:
Test Date Format Auto filled by the system
Test Date Date field
Test Name Text field
Test Result Text field
Test Unit Text field
Low Test Range Text field
High Test Range Text field
More Information
Dropdown list to indicate if more information is
available (e.g., Yes, No)
PViMS User Manual
2018
176
5.7.1.12 Drug
The Drug section provides information about medicines taken around the time of the adverse
event. Depending on your regulatory requirements, this is usually all medicines taken on the day
the event started.
Note that some authorities have additional requirements, e.g., all medicines taken for up to two
weeks before and including the day of the event.
The fields in the Drug section are described below:
Drug Characterization
Dropdown list to indicate if the medicine’s relationship
to the medicine (e.g., suspect, concomitant, interacting)
Medicinal Product Text field to enter the name of the medicine
Obtain Drug Country
Text field to enter the Identification of the country
where the drug was obtained
Batch Number Text field to enter the medicine’s batch number
Authorization Number
Text field to enter the medicine’s authorization or
application number
Authorization Country
Text field to enter the two letter country code Text field
ISO3166 Country Code
e.g., Philippines = PH
Authorization Holder
Text field to enter the name of the authorization holder
or applicant
Structured Dosage Number field to enter the number of doses
Structured Dosage Unit
Dropdown list to enter the dose unit (e.g., mg, mL, Meq,
Mmol)
Number Separate Dosages Number field to indicate the number of separate dosages
PViMS User Manual
2018
177
Number Units In Interval
Number field to indicate the number of units in the
interval
Interval Definition
Dropdown list to define the interval (e.g., day, week,
month)
Cumulative Dose to First Number
Number field to indicate the cumulative dose to first
reaction
Cumulative Dose to First Unit
Dropdown list to indicate the cumulative dose to first
reaction unit (e.g.,
Drug Dosage Text Number field to indicate the medicine dose
Drug Dosage Form Text field to indicate the physical form of the medicine
Drug Administration Route
Dropdown list to indicate the route of administration
(e.g., oral, i.m., topical)
Drug Paradministration
Dropdown list to indicate parent route of administration
(in case of a parent child/fetus report) (e.g., oral, i.m.,
topical)
Reaction Gestation Period
Parent route of administration (in case of a parent
child/fetus report)
Reaction Gestation Period Unit
Number field to indicate gestation period at time of
exposure
Drug Indication MedDRA Version
Dropdown list to indicate gestation period at time of
exposure (e.g., week, month, trimester)
Drug Indication
Text field to indicate why the medicine was
administered
Drug Start Date Format Auto-filled by the system
Drug Start Date Date field
Drug Start Period
Number field to indicate the time interval between
beginning of drug administration and start of reaction
or event
PViMS User Manual
2018
178
Drug Start Period Unit
Dropdown list to indicate the unit of time for the
interval between beginning of drug administration and
start of reaction or event (e.g., day, week, month)
Drug Last Period
Number field to indicate the time interval between last
dose of drug and start of reaction or event
Drug Last Period Unit
Dropdown list to indicate the unit for the time interval
between last dose of drug and start of reaction or event
(e.g., day, week, month)
Drug End Date Format Auto-filled by the system
Drug End Date Date field
Drug Treatment Duration Number field
Drug Treatment Duration Unit
Dropdown list to indicate the unit for the duration unit
(e.g., day, week, month)
Drug Action
Dropdown list to indicate what action was taken with
respect to the medicine (e.g., drug withdrawn, dose
reduced, dose increased, dose not changed, unknown, or
not applicable)
Recurrence Administration
Dropdown list to indicate if reaction recurred on re-
administration (e.g., Yes, no, unknown)
Source of Assessment
Text field to indicate the source of causality assessment
(e.g., WHO or Naranjo)
Assessment Result
Text field to enter the causality assessment term (e.g.,
certain, possible, unrelated)
Additional Information
Text field to enter any additional information about the
medicine.
5.7.1.13 Summary
The Summary section provides the ability to add a narrative about the adverse event.
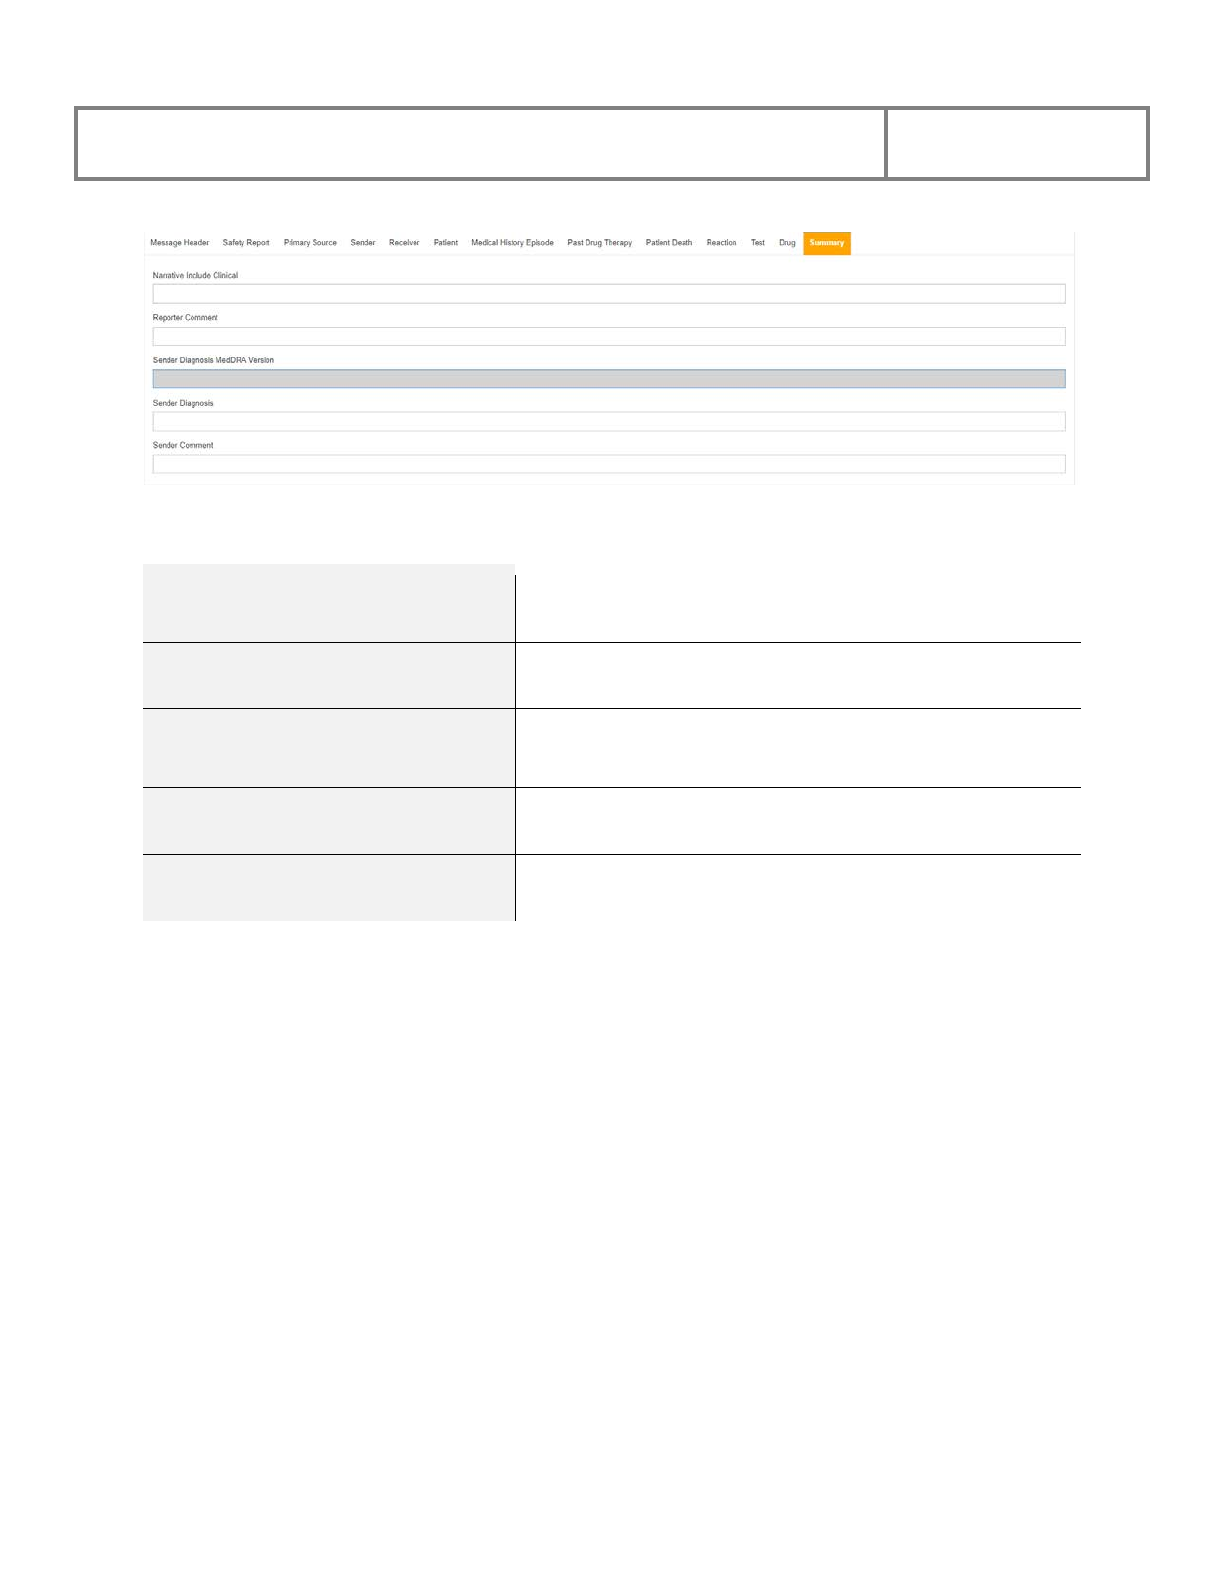
PViMS User Manual
2018
179
The fields in the Summary section are described below:
Narrative Include Clinical
Text field to enter any additional information about the
event
Reporter Comment Text field to enter comments from the reporter
Sender Diagnosis MedDRA
Version
Auto-filled by the system
Sender Diagnosis Text field to enter the diagnosis according to the sender
Sender Comment Text field to enter comments from the sender
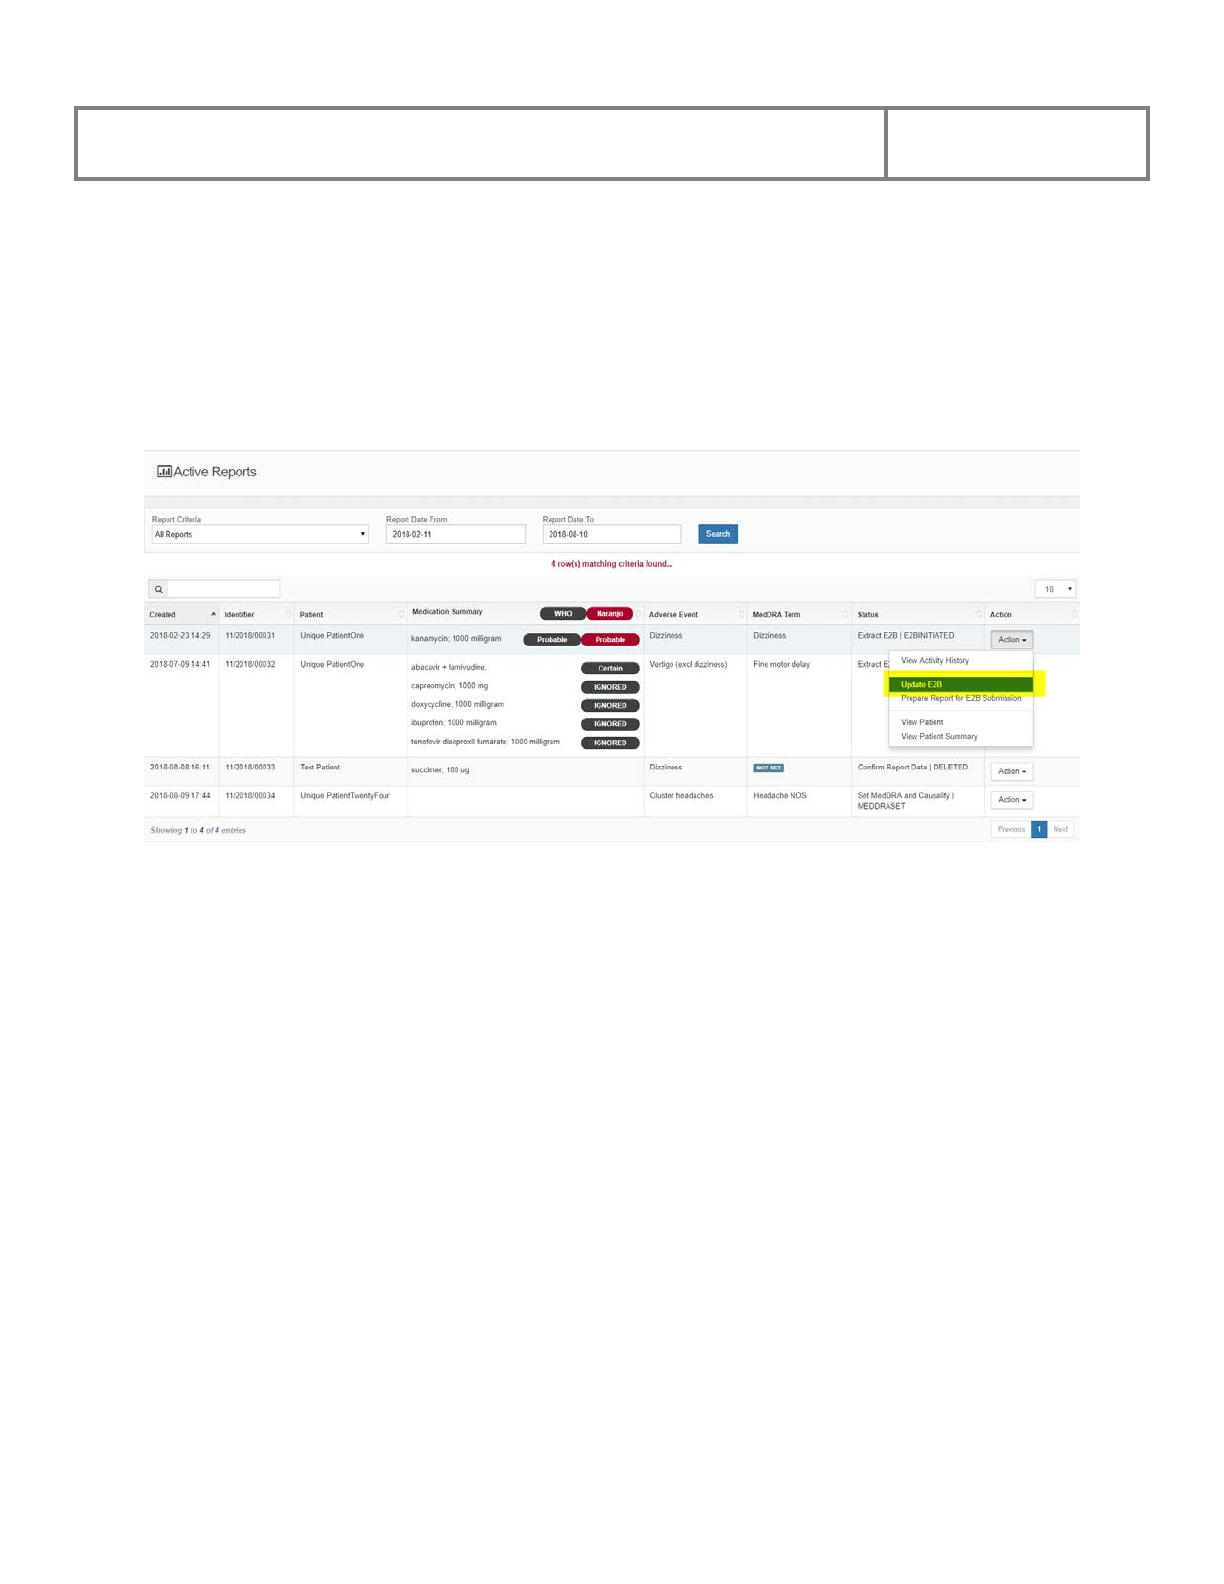
PViMS User Manual
2018
180
5.7.2 Adding Information to and Updating an E2B File
Once an E2B file is created, the Update E2B menu allows the user to add information to or
updating existing information populated in an E2B file.
Once you have searched for a report, click on the Update E2B menu for the associated file you
would like to amend.
The system will navigate you to the E2B ICH Report page for the file.
Once you completed making amendments, click on the Save button to save the changes or the
Back button to cancel the action and return to the previous page.
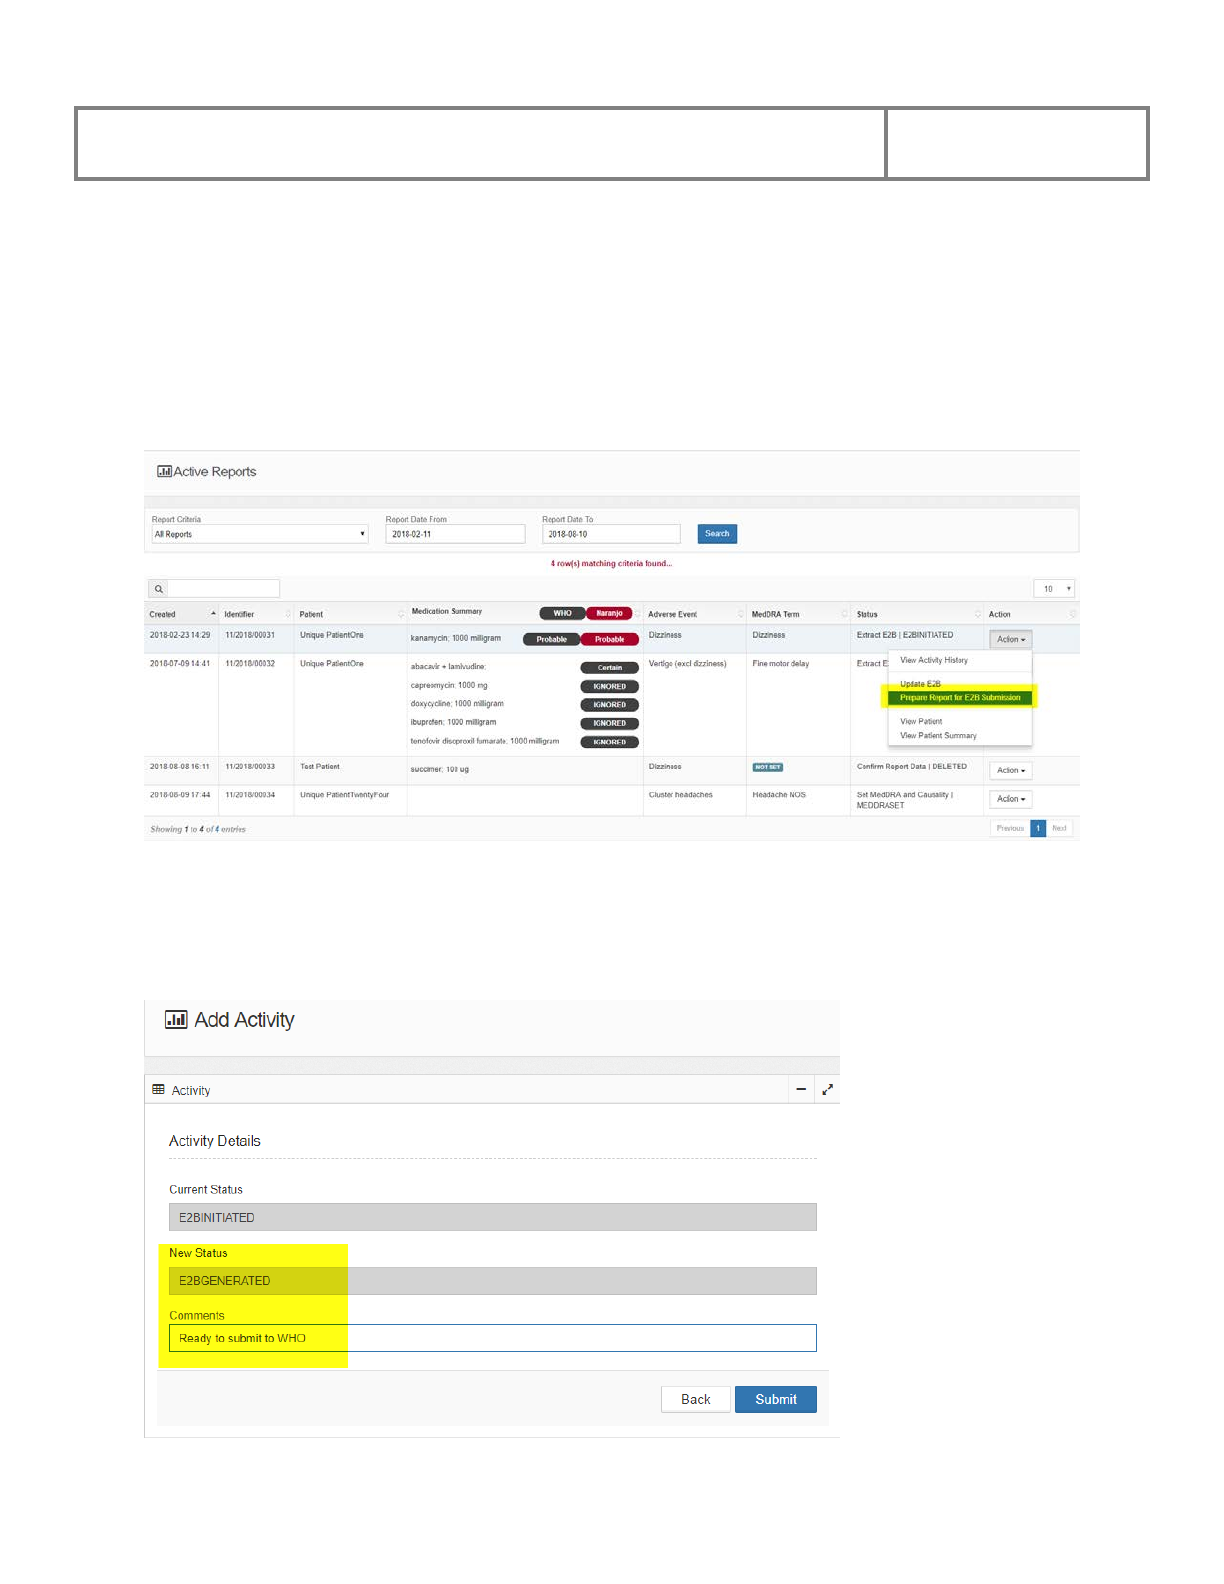
PViMS User Manual
2018
181
5.7.3 Preparing a Report for E2B Submission
The Extract E2B stage facilitates the process of generating an E2B extract for submission to the
World Health Organization Uppsala Monitoring Centre.
Once you have created an E2B file and searched for the report, click on the Prepare Report for
E2B Submission menu for the associated report you would like to prepare.
The system will navigate you to the Add Activity page.
Specify any additional comments for preparing the record and click Submit to confirm the
deletion or Back to cancel the action and return to the previous page.
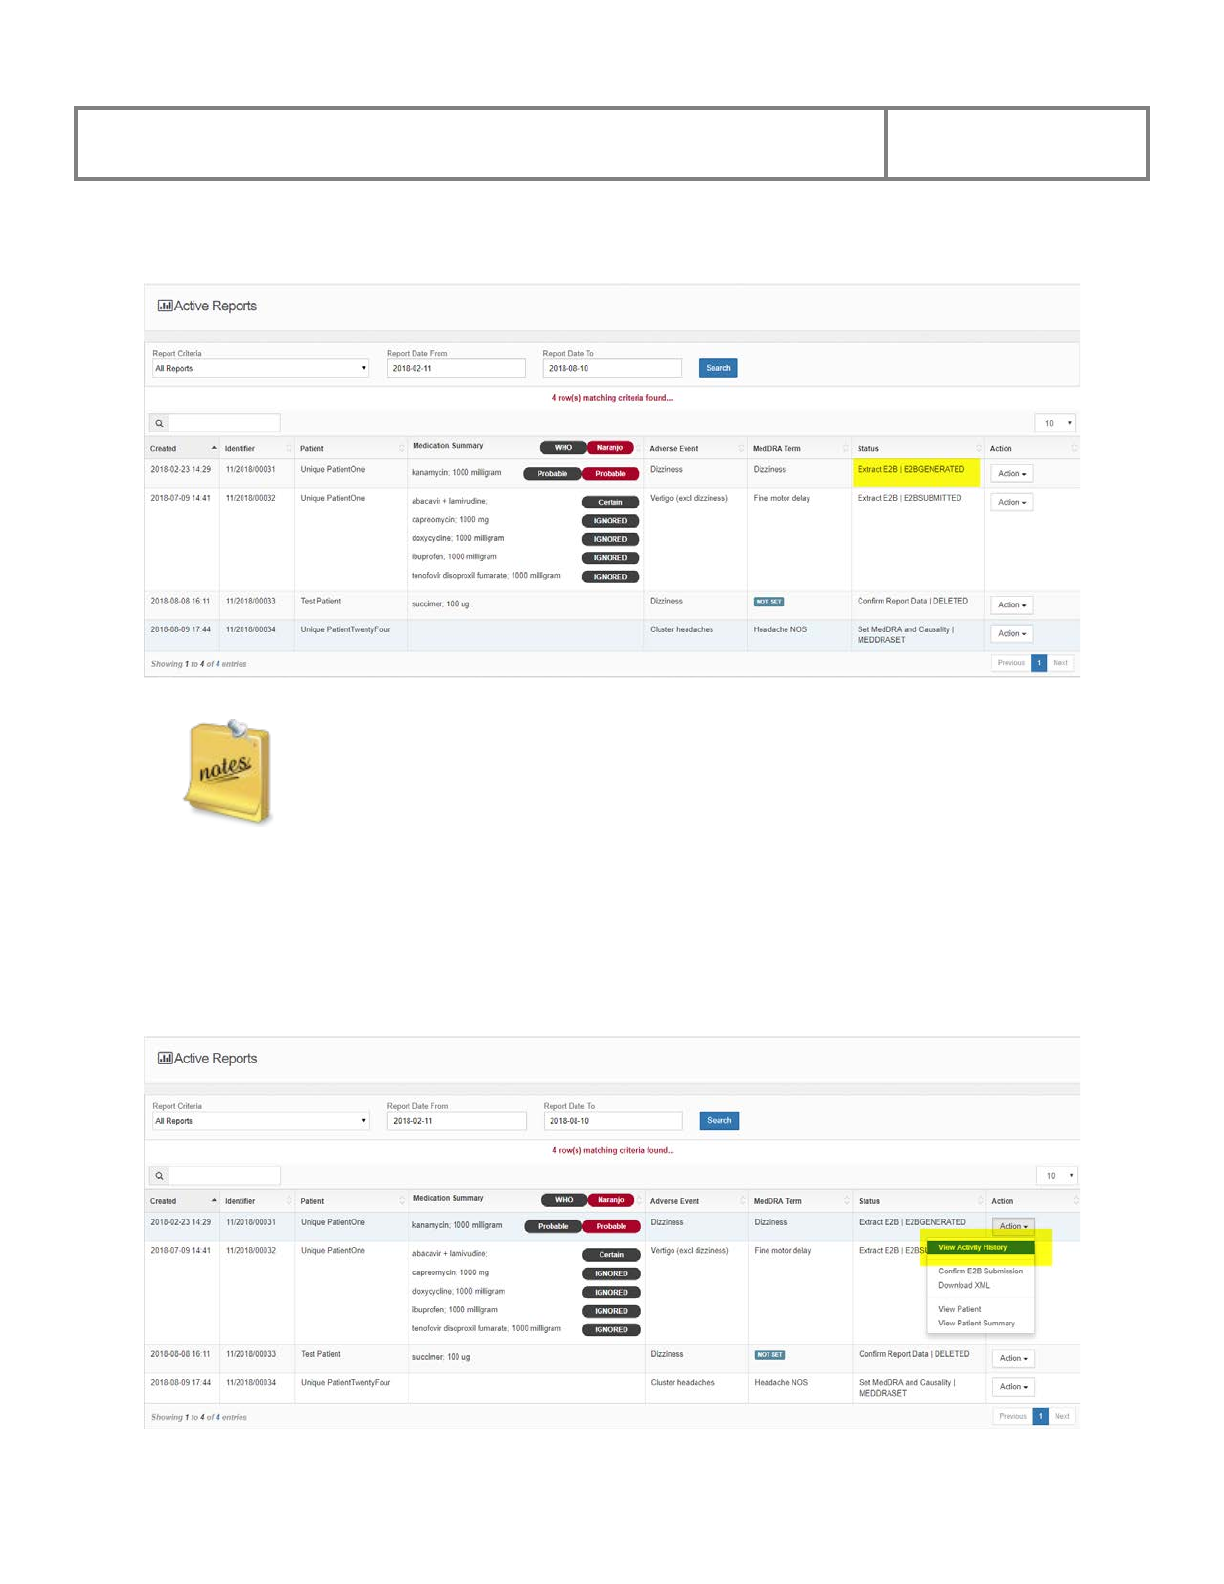
PViMS User Manual
2018
182
The system will update the status of the report accordingly.
It is during this stage that PViMS prepares the XML file for submission. It also
prepares an associated patient summary and patient extract that correspond to the
clinical data at the point of generating the submission.
5.7.4 Viewing the E2B XML File
Once you have prepared the E2B file for submission and searched for the report, click on the
View Activity History menu for the associated report you would like to view the XML file for.
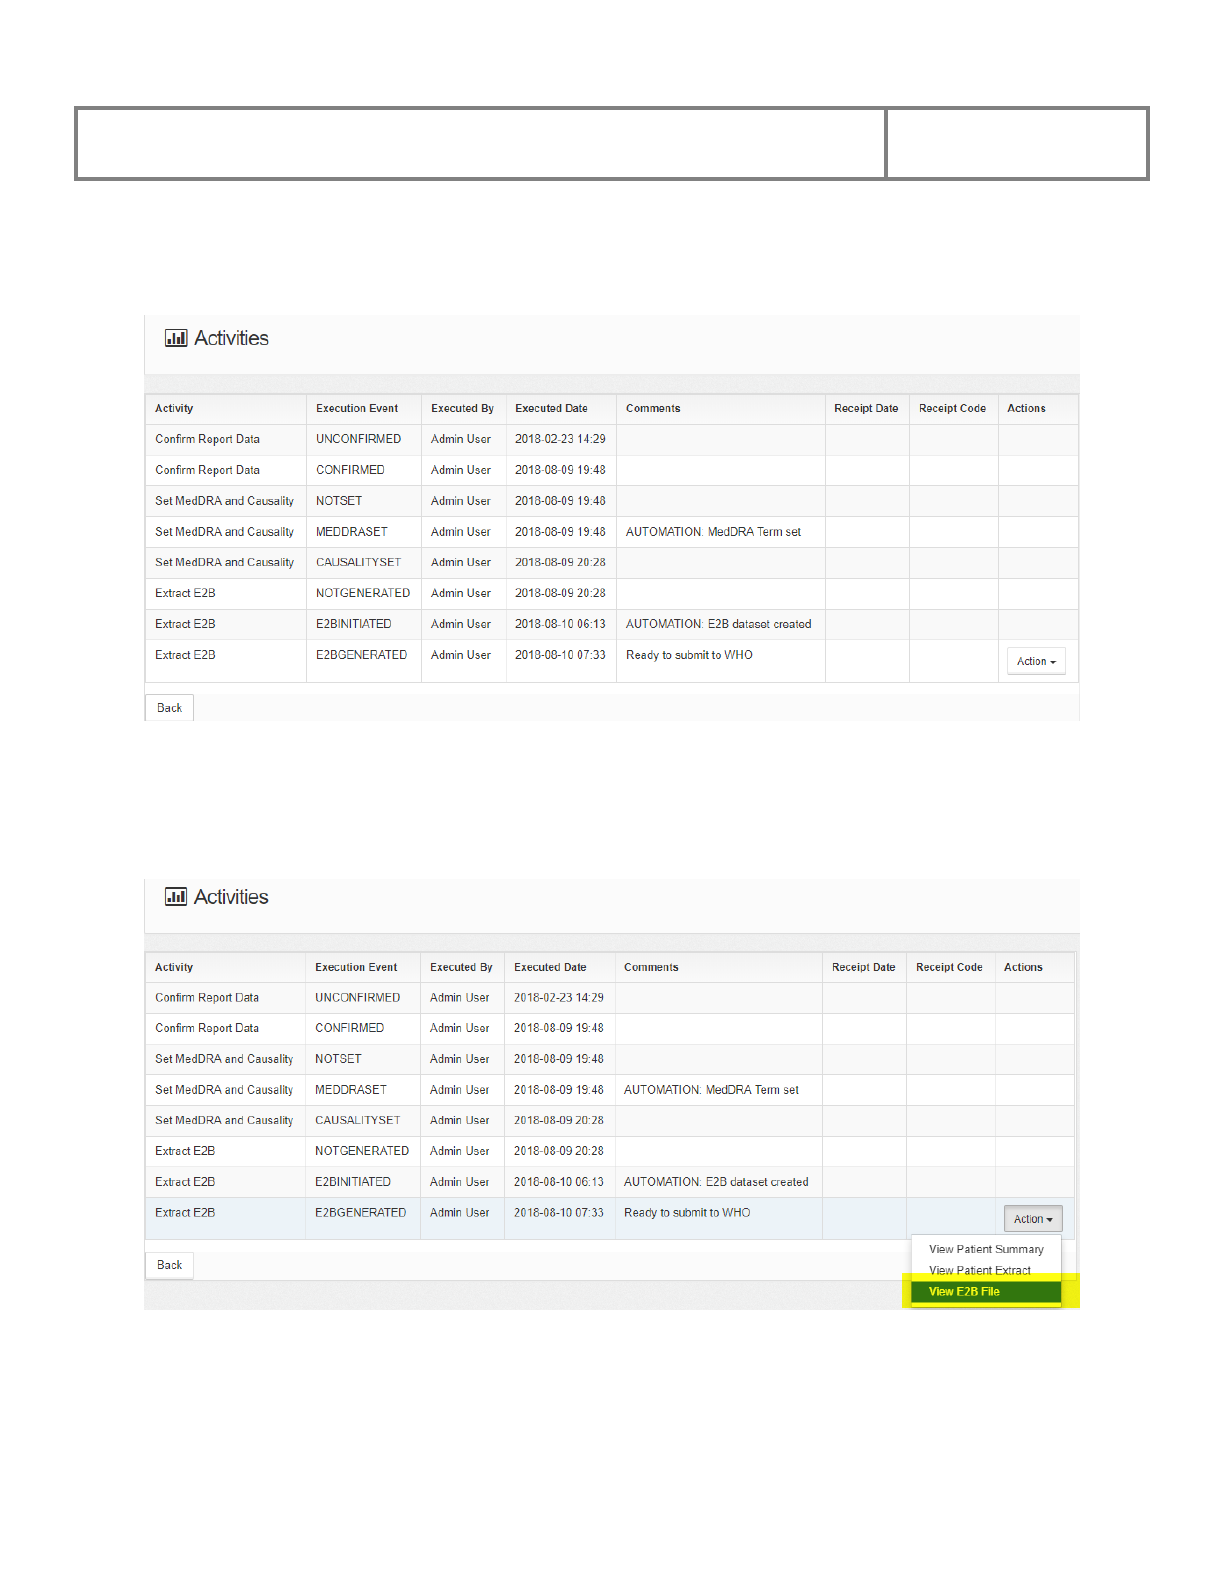
PViMS User Manual
2018
183
The system will navigate you to the Activities page where you will be able to view a
comprehensive history of activities by the analyst against this adverse event.
Locate the E2BGENERATED execution event for the report, click the action menu, and select
the View E2B file menu.
The system will automatically generate the XML file for the E2B submission to WHO. Save the
file on your local computer for referral when sending to WHO.
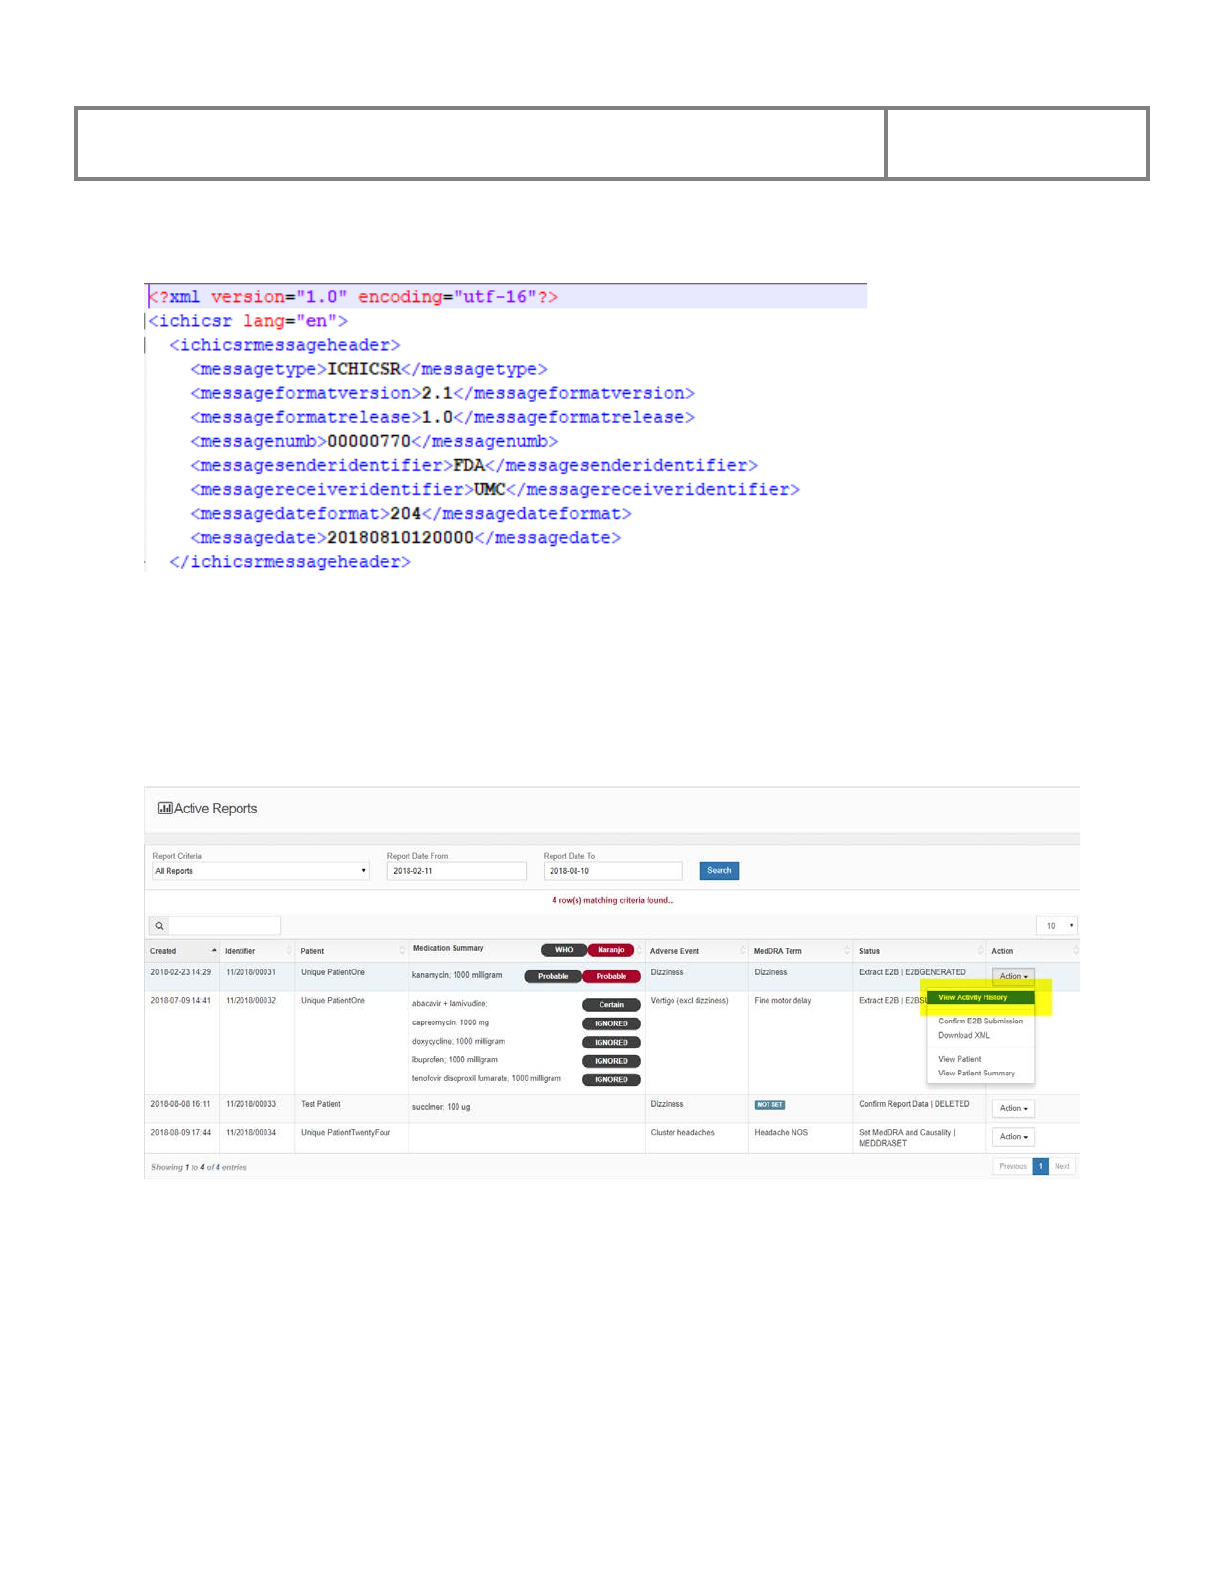
PViMS User Manual
2018
184
The extract below is the XML generated for the Message Header section of the XML file.
5.7.5 Viewing the Clinical Data Associated to the E2B XML File
Once you have prepared the E2B file for submission and searched for the report, click on the
View Activity History menu for the associated report you would like to view the XML file for.
The system will navigate you to the Activities page where you will be able to view a
comprehensive history of activities by the analyst against this adverse event.
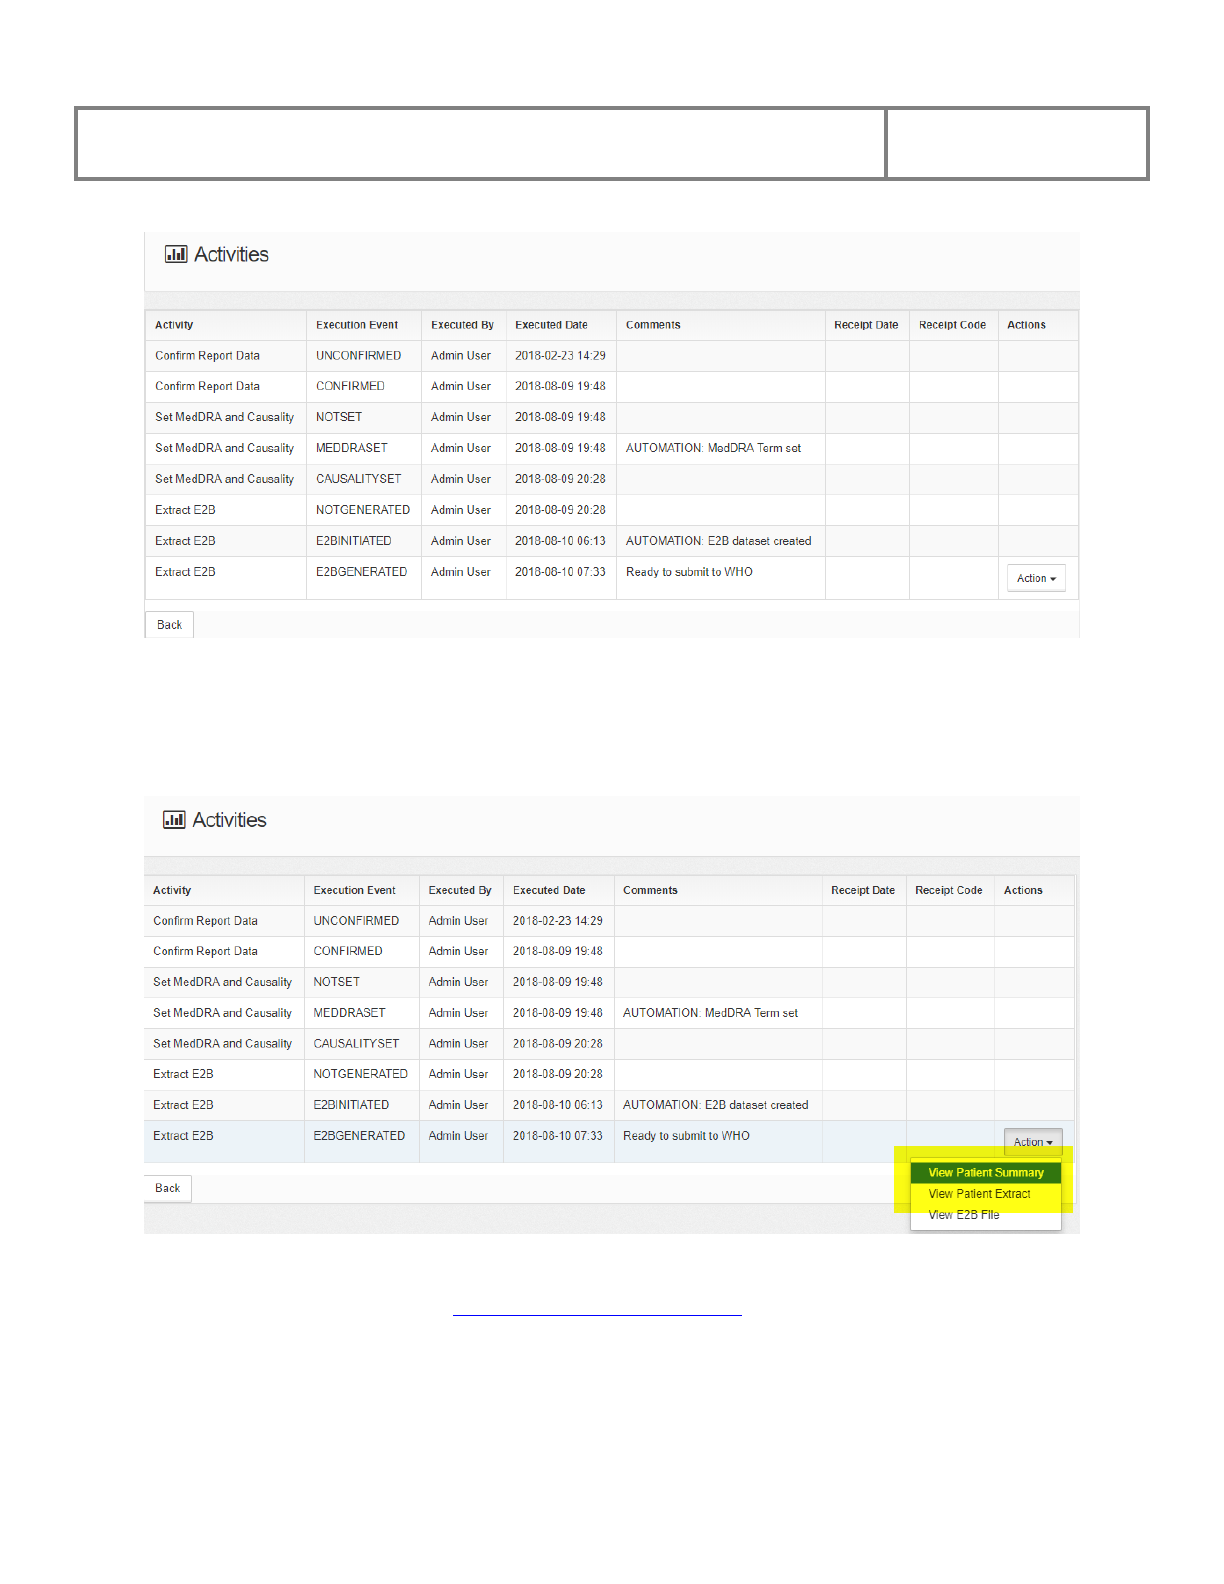
PViMS User Manual
2018
185
Locate the E2BGENERATED execution event for the report, click the action menu, and select
the View Patient Summary or View Patient Extract menu.
If you select the View Patient Summary menu, the system will generate a MS Word extract of
the associated clinical data. See Extracting a Patient Summary.
If you select the View Patient Extract menu, the system will generate an MS Excel extract of
the associated clinical data.

PViMS User Manual
2018
186
In both the Patient Extract and Summary above, these files are stored along with
the XML file as a reference to the clinical data associated with the XML file at the
point the XML file was generated.
5.7.6 Confirming a Report for E2B Submission
Once you have prepared the E2B file for submission and searched for the report, click on the
Confirm E2B Submission menu for the associated report you would like to submit.
The system will navigate you to the Add Activity page.
Specify any additional comments for confirming the submission and click Submit to confirm the
deletion or Back to cancel the action and return to the previous page.
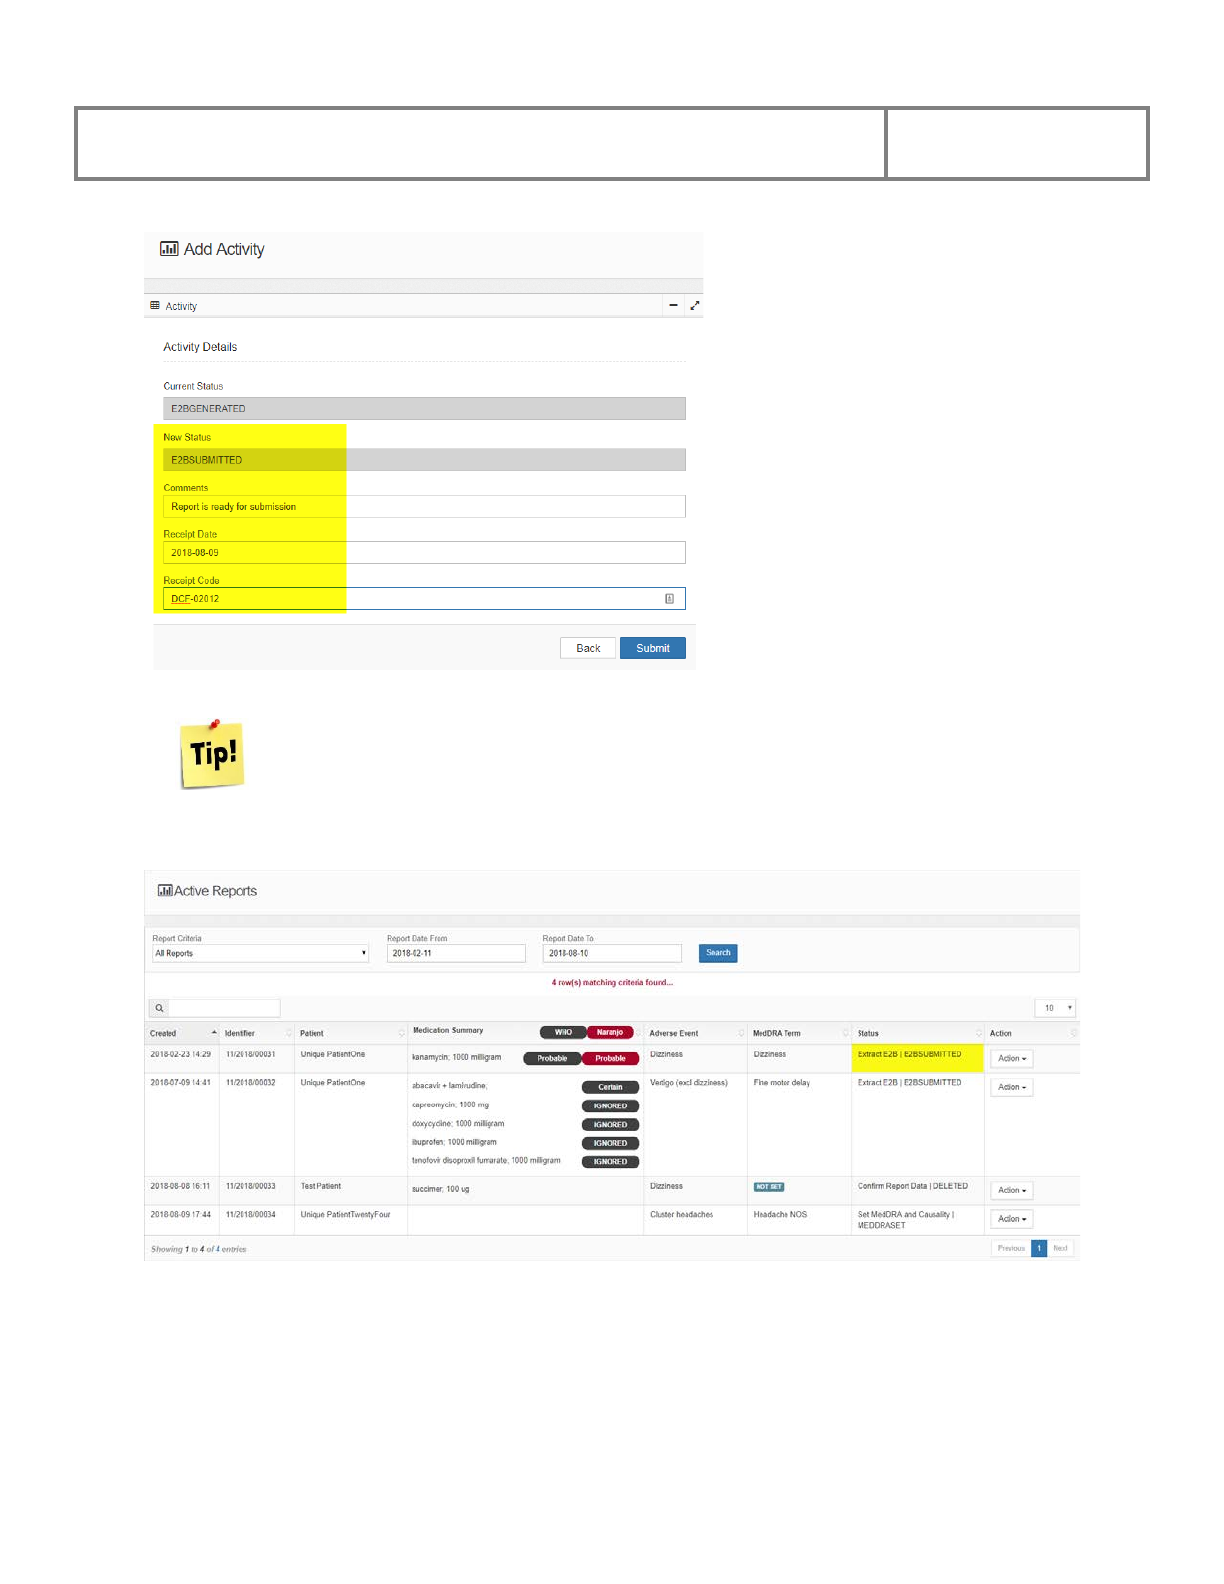
PViMS User Manual
2018
187
The receipt date and code can be used to note correspondence with WHO on the
receipt of the E2B XML submission file.
The system will update the status of the report accordingly.

PViMS User Manual
2018
188
5.8 Analyser
This section is used to generate the relative risk for a specified adverse drug reaction based on an
exposed and non-exposed population set over a defined period of time.
The analyser user can access the following functionality within the analytical portal:
• Define population set (cohort or condition group)
• Define reporting period
• Specify additional risk factors
• View risk ratios per exposed drug
• Download dataset for further analysis
5.8.1 Methodology
The following formulas, calculations and definitions are used in the calculation of the relative
risk for a specific medication and adverse reaction.
5.8.1.1 Incidence Rate
The incidence rate is the number of new cases per population in a given time period
IR = (ADR / Population) * 1000
Where
IR = Incidence Rate
ADR = Number of adverse drug reactions *
Population = Total patient years in reporting period **
Note
* Where causality is set to possible, probably/likely or Certain for WHO assessments and where
causality is set to possible, probable or definite for Naranjo assessments
** Population is represented in patient years. For example, if the reporting period is 30 days, and
10 patients were on treatment for all 30 days, the total patient years is 300 /365.25 which is 0.82.
Example
Cases = 11
Non-Cases = 170
Population = 181 (11 + 170)
Incidence Rate = 11/181 * 1000 = 60.77

PViMS User Manual
2018
189
5.8.1.2 Relative Risk
Relative risk is defined as the incidence in the exposed over incidence in the non-exposed.
RR= IR1 / IR2
Where
RR = Relative Risk
IR1 = Incidence Rate for exposed population. The exposed population is defined as the patient
population that have been exposed to a medication in the reporting period.
IR2 = Incidence Rate for non-exposed population. The exposed population is defined as the
patient population that have NOT been exposed to a medication in the reporting period.
Example
Incidence Rate Exposed = 60.77
Incidence Rate Non-Exposed = 45.12
RR = 1.35
5.8.1.3 Confidence Interval
A confidence interval is a range of values so defined that there is a specified probability that the
value of a parameter lies within it. Most commonly, the 95% confidence interval is used.
Where
zα is the standard score for the chosen level of significance and SE the standard error.
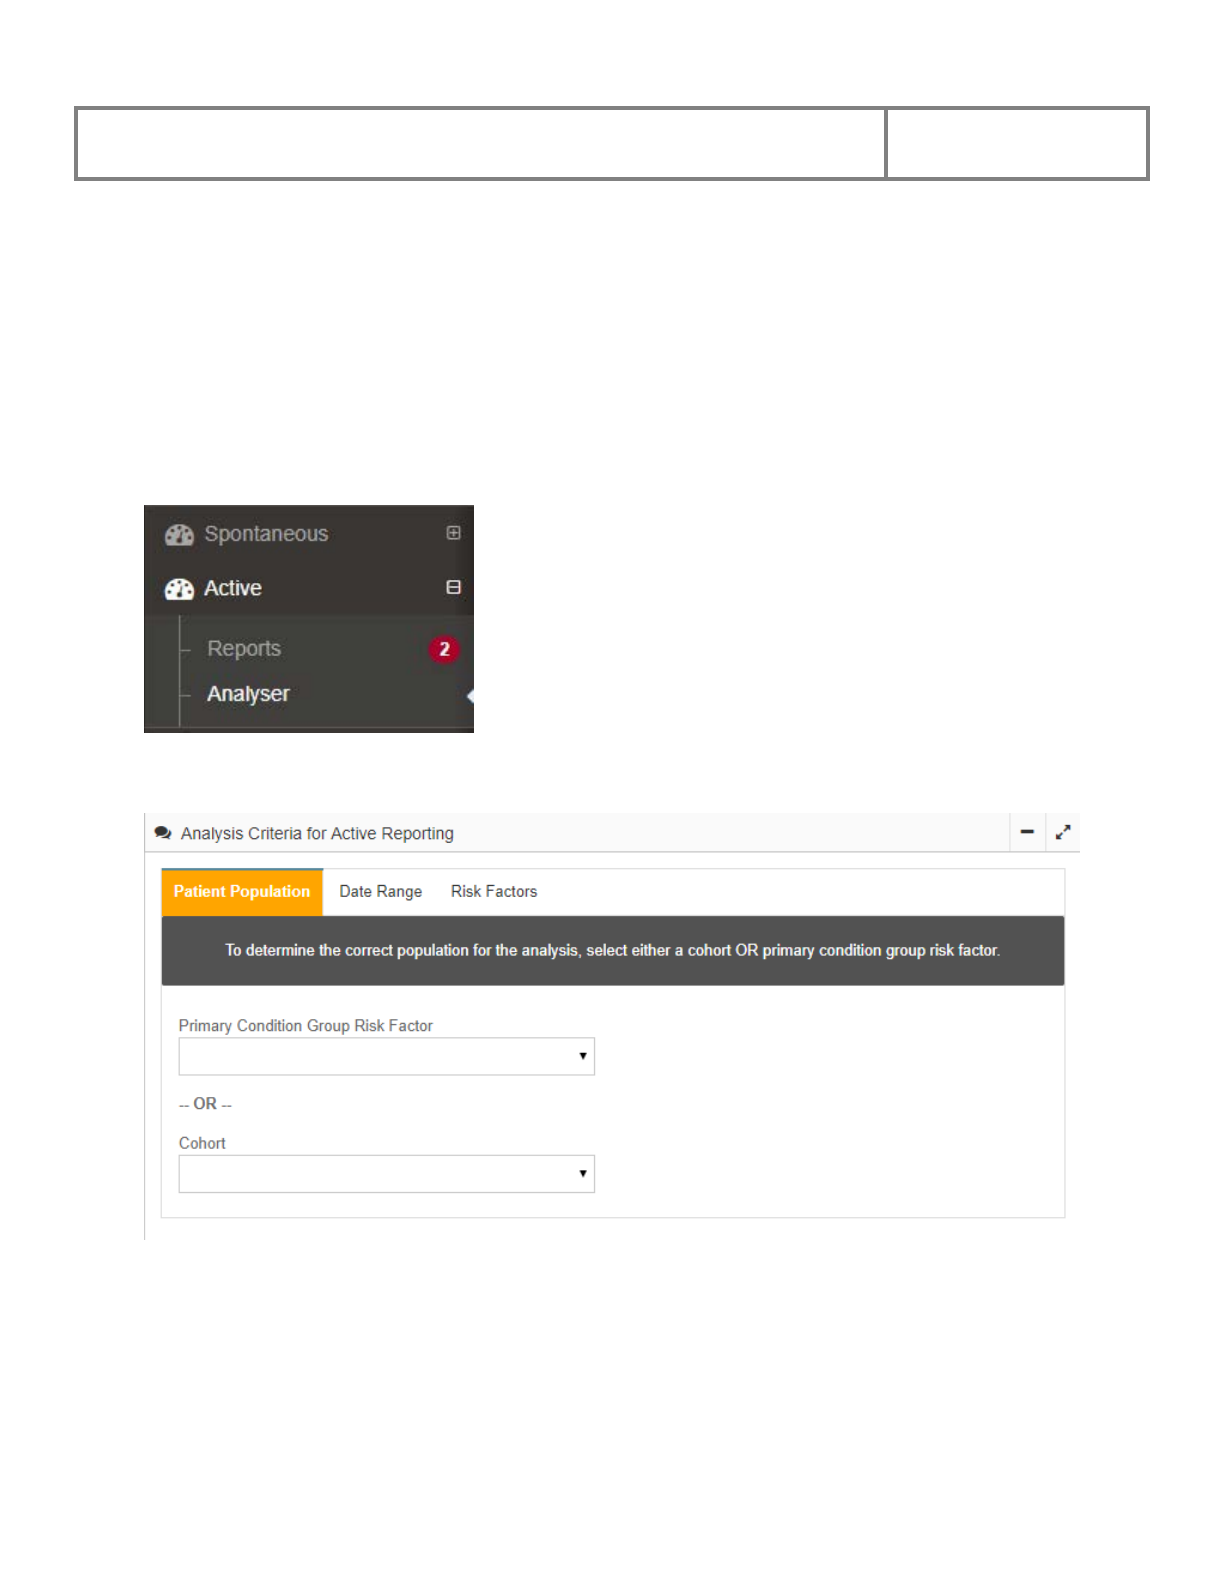
PViMS User Manual
2018
190
5.8.2 Generating Unadjusted Relative Risk Ratios
To implement the methodology for generating an Unadjusted Relative Risk Ratio, the
following parameters will need to be specified:
• The population target (condition group or Cohort)
• The date range for the analysis
The Analyser function can be accessed through the main menu.
5.8.2.1 Specifying the Population Group
By selecting a Condition Group or Cohort, you are effectively able to target a specific set of
patients for analysis.
To specify a Condition Group, click the Primary Condition Group Risk Factor field and select
the primary condition you would like to run analysis against. If this option is selected, all patients
that belong to the corresponding Condition Group will be included in the analysis.
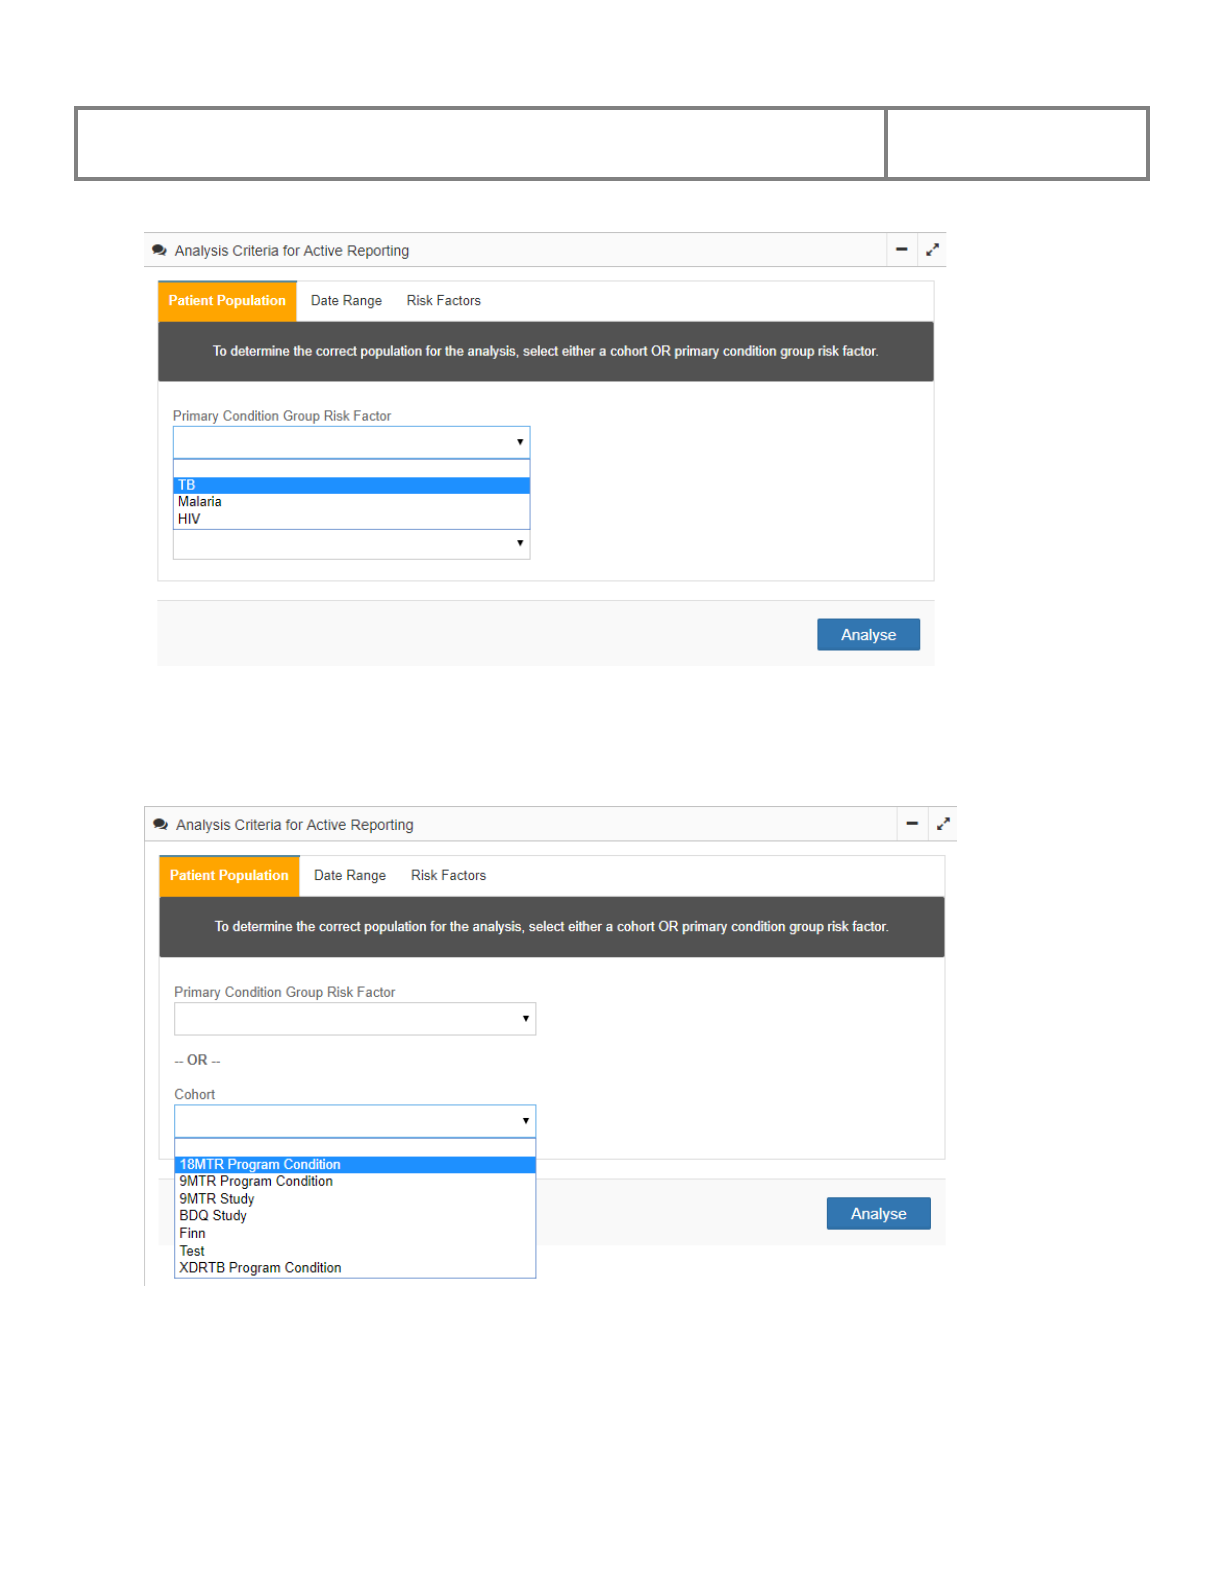
PViMS User Manual
2018
191
To specify a Cohort, click the Cohort field and select the primary cohort you would like to run
analysis against. If this option is selected, all patients that belong to the corresponding Cohort
will be included in the analysis.
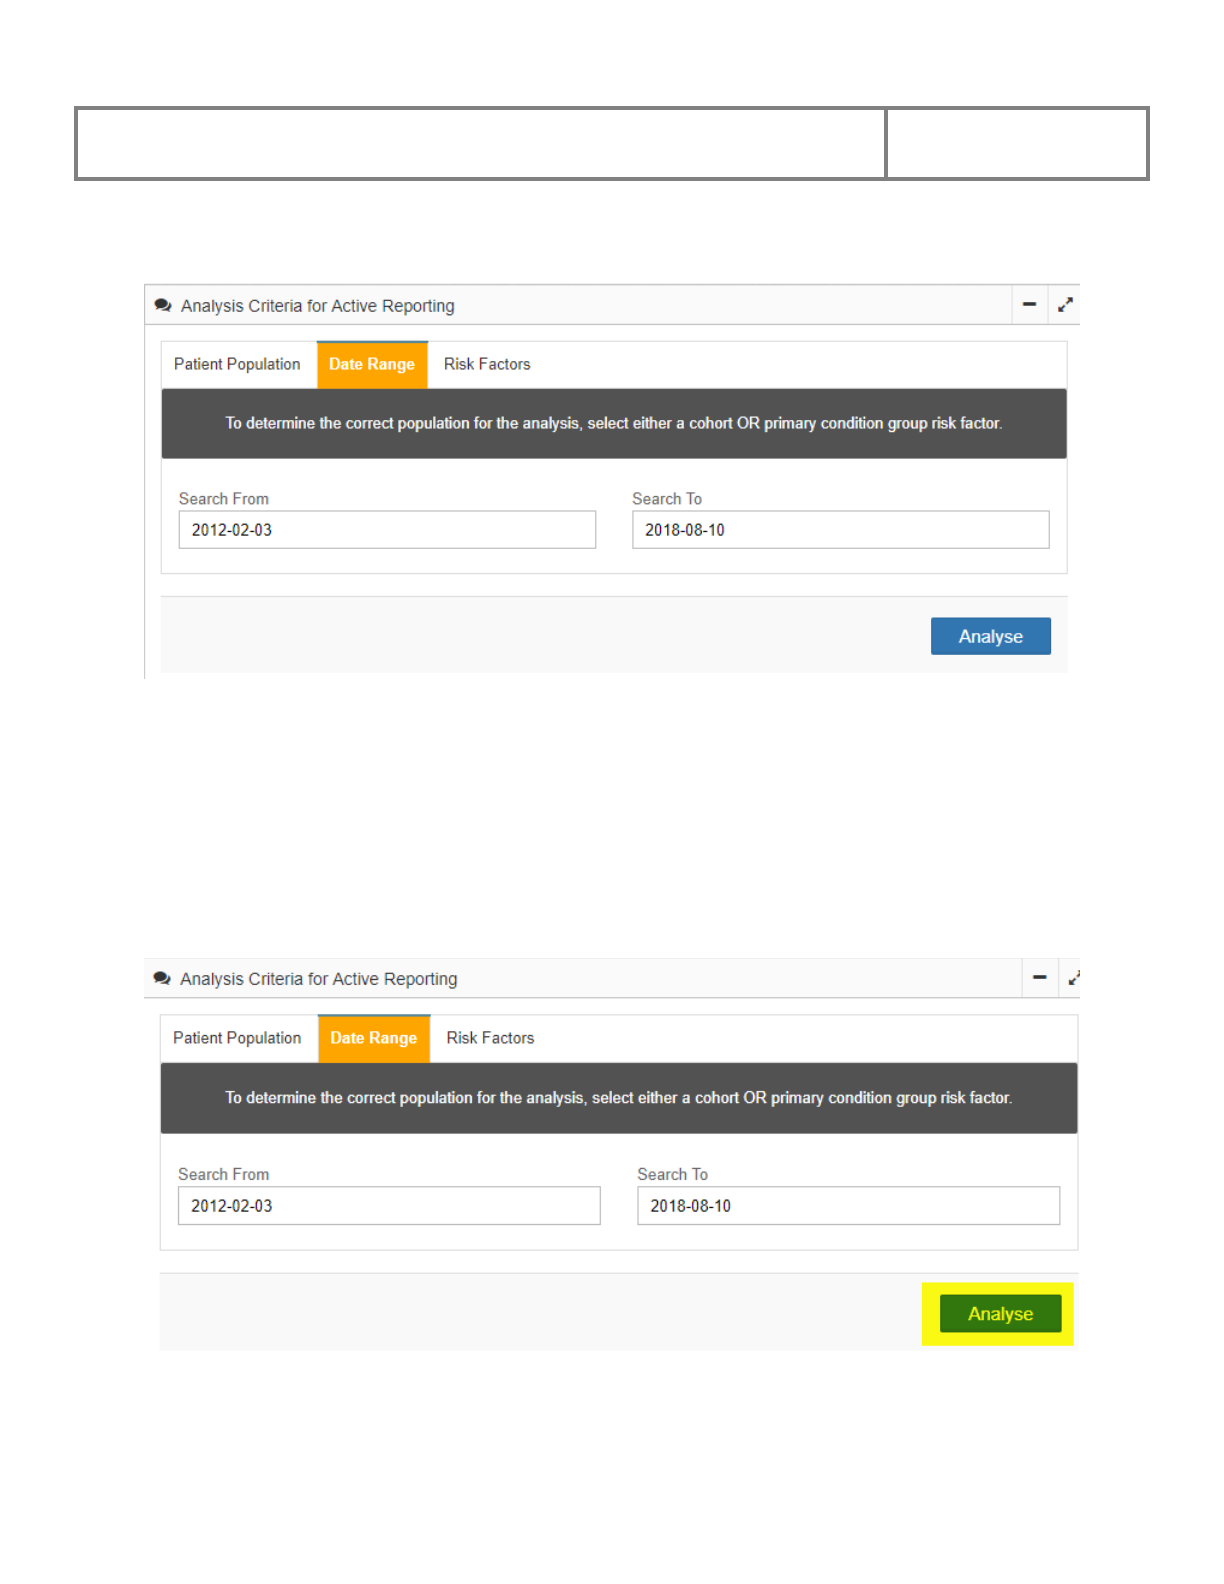
PViMS User Manual
2018
192
5.8.2.2 Specifying the Date Range for the Analysis
By selecting a Date Range, the system will determine which patients should be included into the
analysis from the Patient Population specified in the previous step. Patients that have been
actively exposed to medication within that range will be included.
5.8.2.3 Running the Analysis
Once the Patient Population and Date Range parameters have been selected, click on the
Analyse button to execute the analysis.

PViMS User Manual
2018
193
The system will conduct an initial analysis that will identify what Adverse Drug Reactions have
been identified over the reporting period and will return how many types of Drug Reactions there
were.
Select the Adverse Drug Reaction that you would like to detect signals for.

PViMS User Manual
2018
194
You are able to now view a 2 by 2 table illustrating relative risk and 95% Confidence Interval for
the selected reaction.
• Incidence Rate for exposed group
• Incidence Rate for non-exposed group
• Relative Risk for the associated medication
• 95% Confidence Interval for the associated medication
5.8.2.4 Viewing the Contributing Patient List
Once analysis has been executed, it is possible to view the list of patients that have contributed to
the analysis population set through the Patient List which appears at the end of the analysis
screen.
The columns in the patient list table are described below:
PViMS User Manual
2018
195
Patient Name
The name of the patient contributing to the patient
population
Drug
The drug the patient was exposed to during the period of
analysis
Start Date
The date the patient started the medication
Finish Date
The date the patient finished the medication
Days
The number of days the patient contributed to the patient
population
Reaction
Did the patient suffer a reaction during the period of analysis
Risk Factor
Which risk factor does the patient match
5.8.3 Generating Adjusted Relative Risk Ratios
To implement the methodology for generating an Adjusted Relative Risk Ratio, the following
parameters will need to be specified:
• The population target (condition group or Cohort)
• The date range for the analysis
• The risk factors to be applied
The Analyser function can be accessed through the main menu.
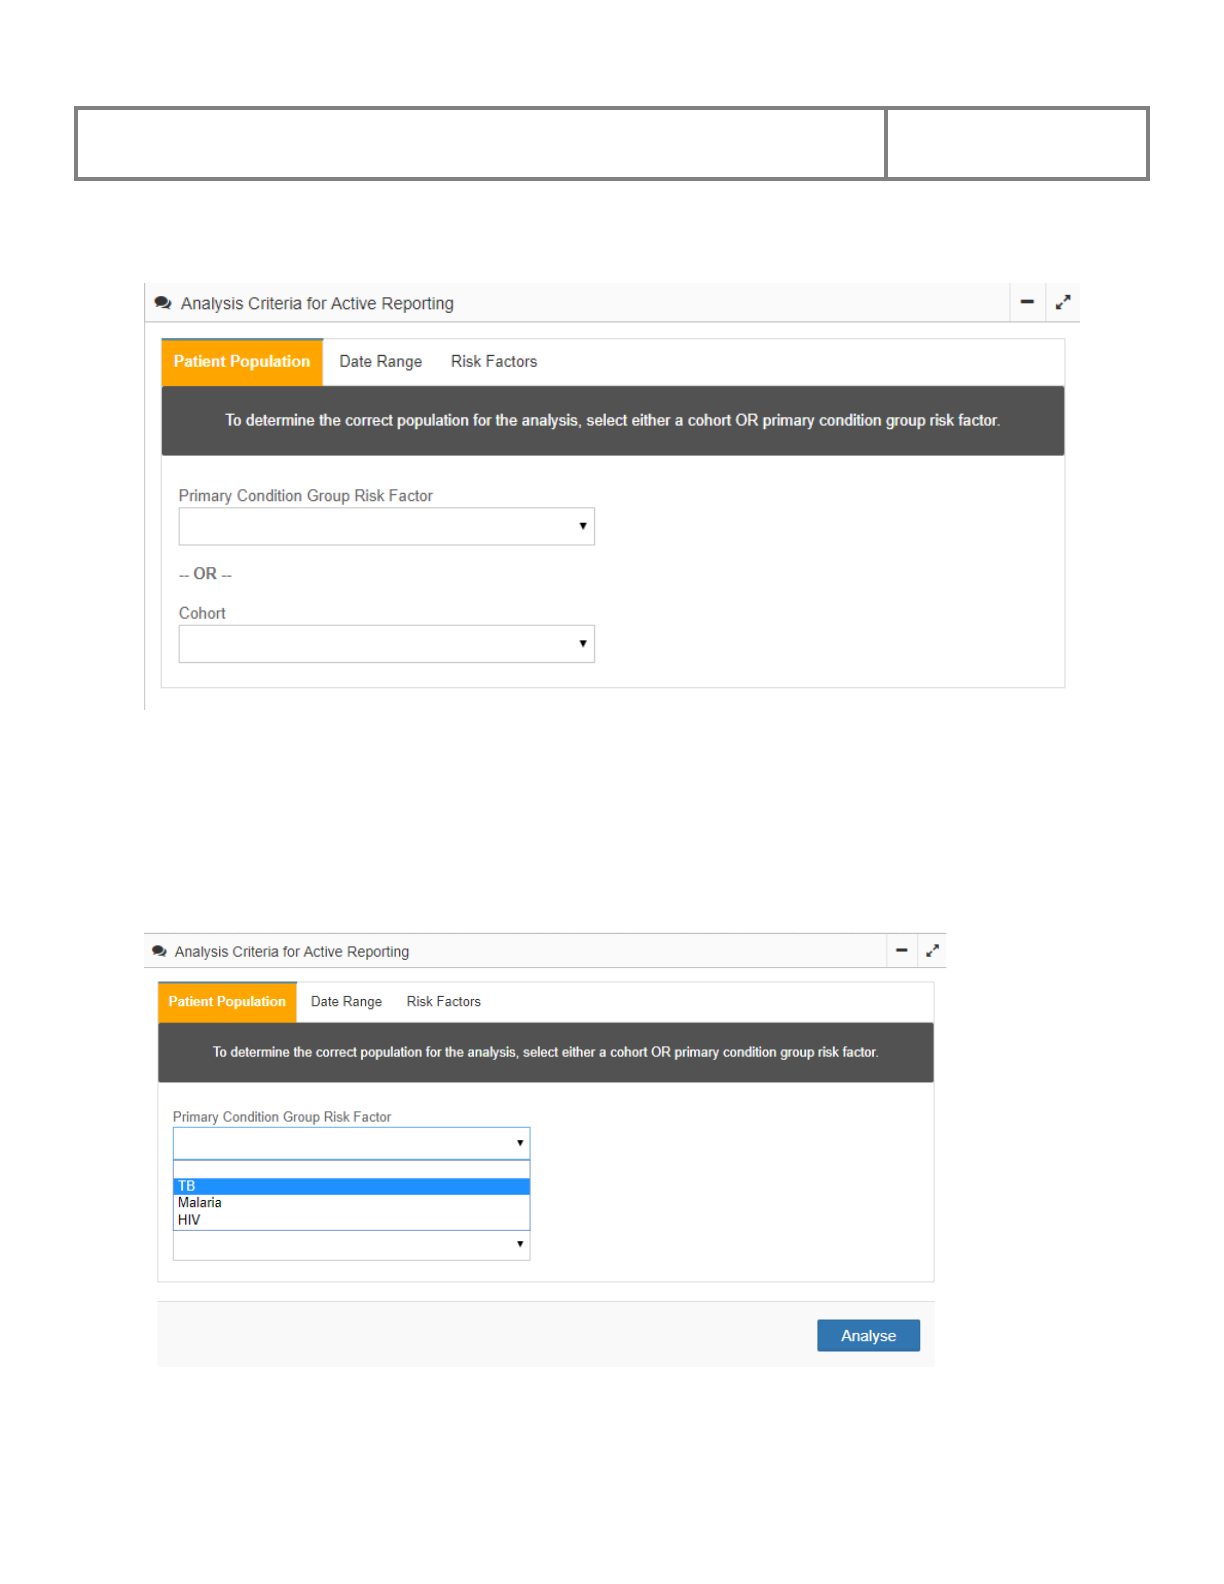
PViMS User Manual
2018
196
5.8.3.1 Specifying the Population Group
By selecting a Condition Group or Cohort, you are able to target a specific set of patients for
analysis.
To specify a Condition Group, click the Primary Condition Group Risk Factor field and select
the primary condition you would like to run analysis against. If this option is selected, all patients
that belong to the corresponding Condition Group will be included in the analysis.
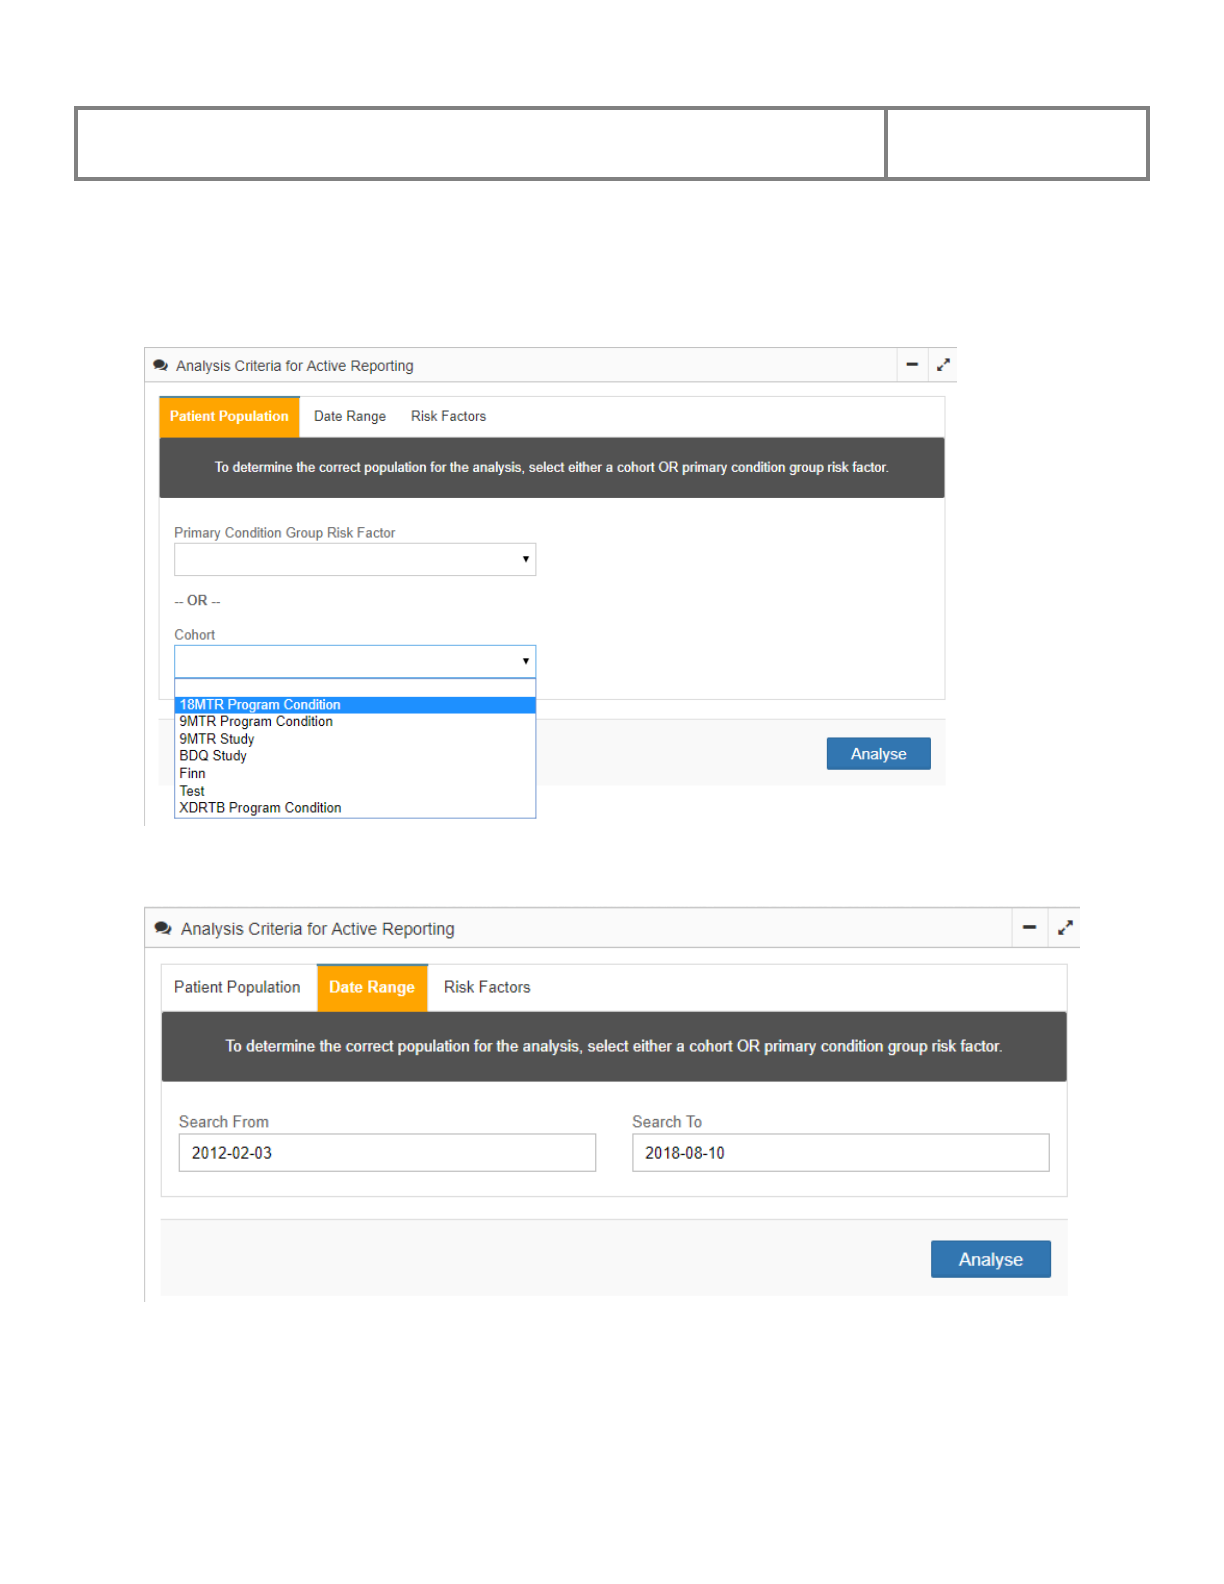
PViMS User Manual
2018
197
To specify a Cohort, click the Cohort field and select the primary cohort you would like to run
analysis against. If this option is selected, all patients that belong to the corresponding Cohort
will be included in the analysis.
5.8.3.2 Specifying the Date Range for the Analysis
By selecting a Date Range, the system will determine which patients should be included into the
analysis from the Patient Population specified in the previous step. Patients that have been
actively exposed to medication within that range will be included.
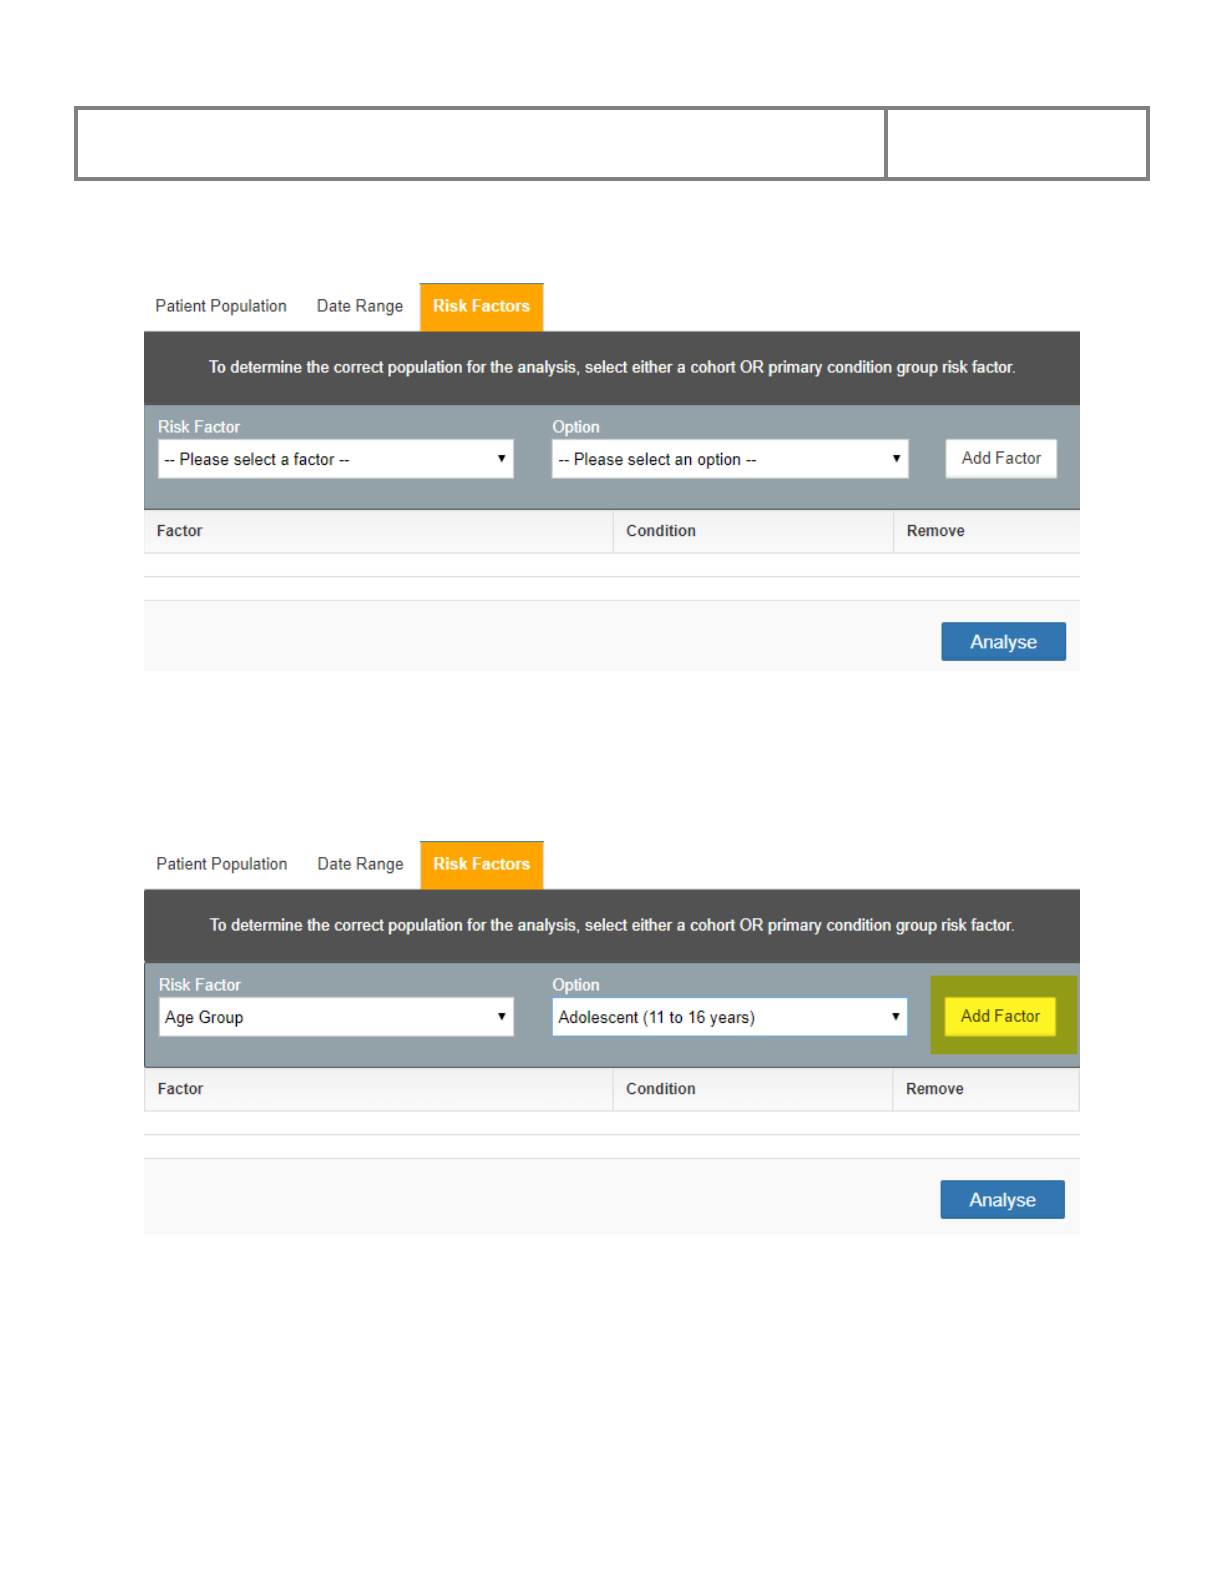
PViMS User Manual
2018
198
5.8.3.3 Specifying Risk Factors for the Analysis
To specify a Risk Factor, click the Risk Factor field and select the risk factor you would like to
include into the analysis. Once you have selected the risk factor, select the appropriate option
associated to that risk factor and click the Add Factor button to add the risk factor to the
selected list.
You are able to add as many risk factors as you would like to include into the analysis by
following the process above.
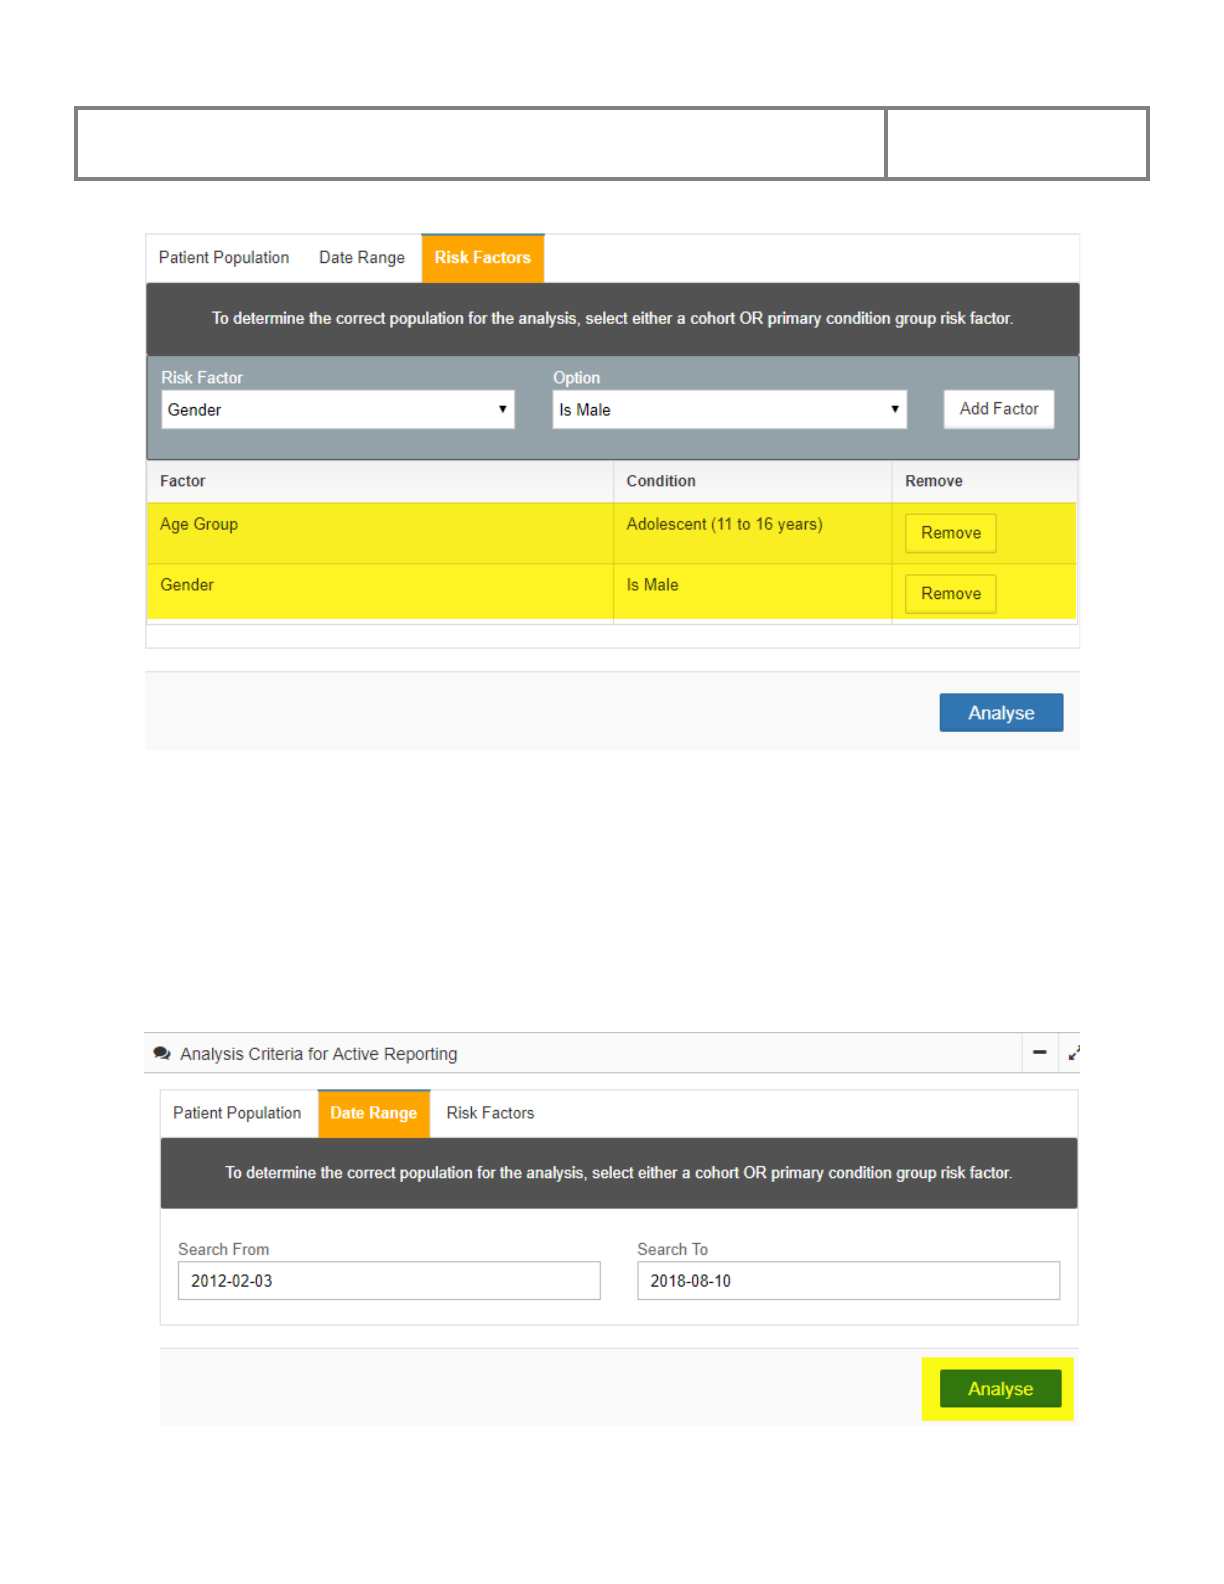
PViMS User Manual
2018
199
By including Risk Factors into the analysis, the system will determine which patients match the
criteria stipulated by the set of risk factors and the corresponding Relative Risk Ratio will be
adjusted based on the new population set.
5.8.3.4 Running the Analysis
Once the Patient Population, Date Range, and Risk Factor parameters have been selected,
click on the Analyse button to execute the analysis.
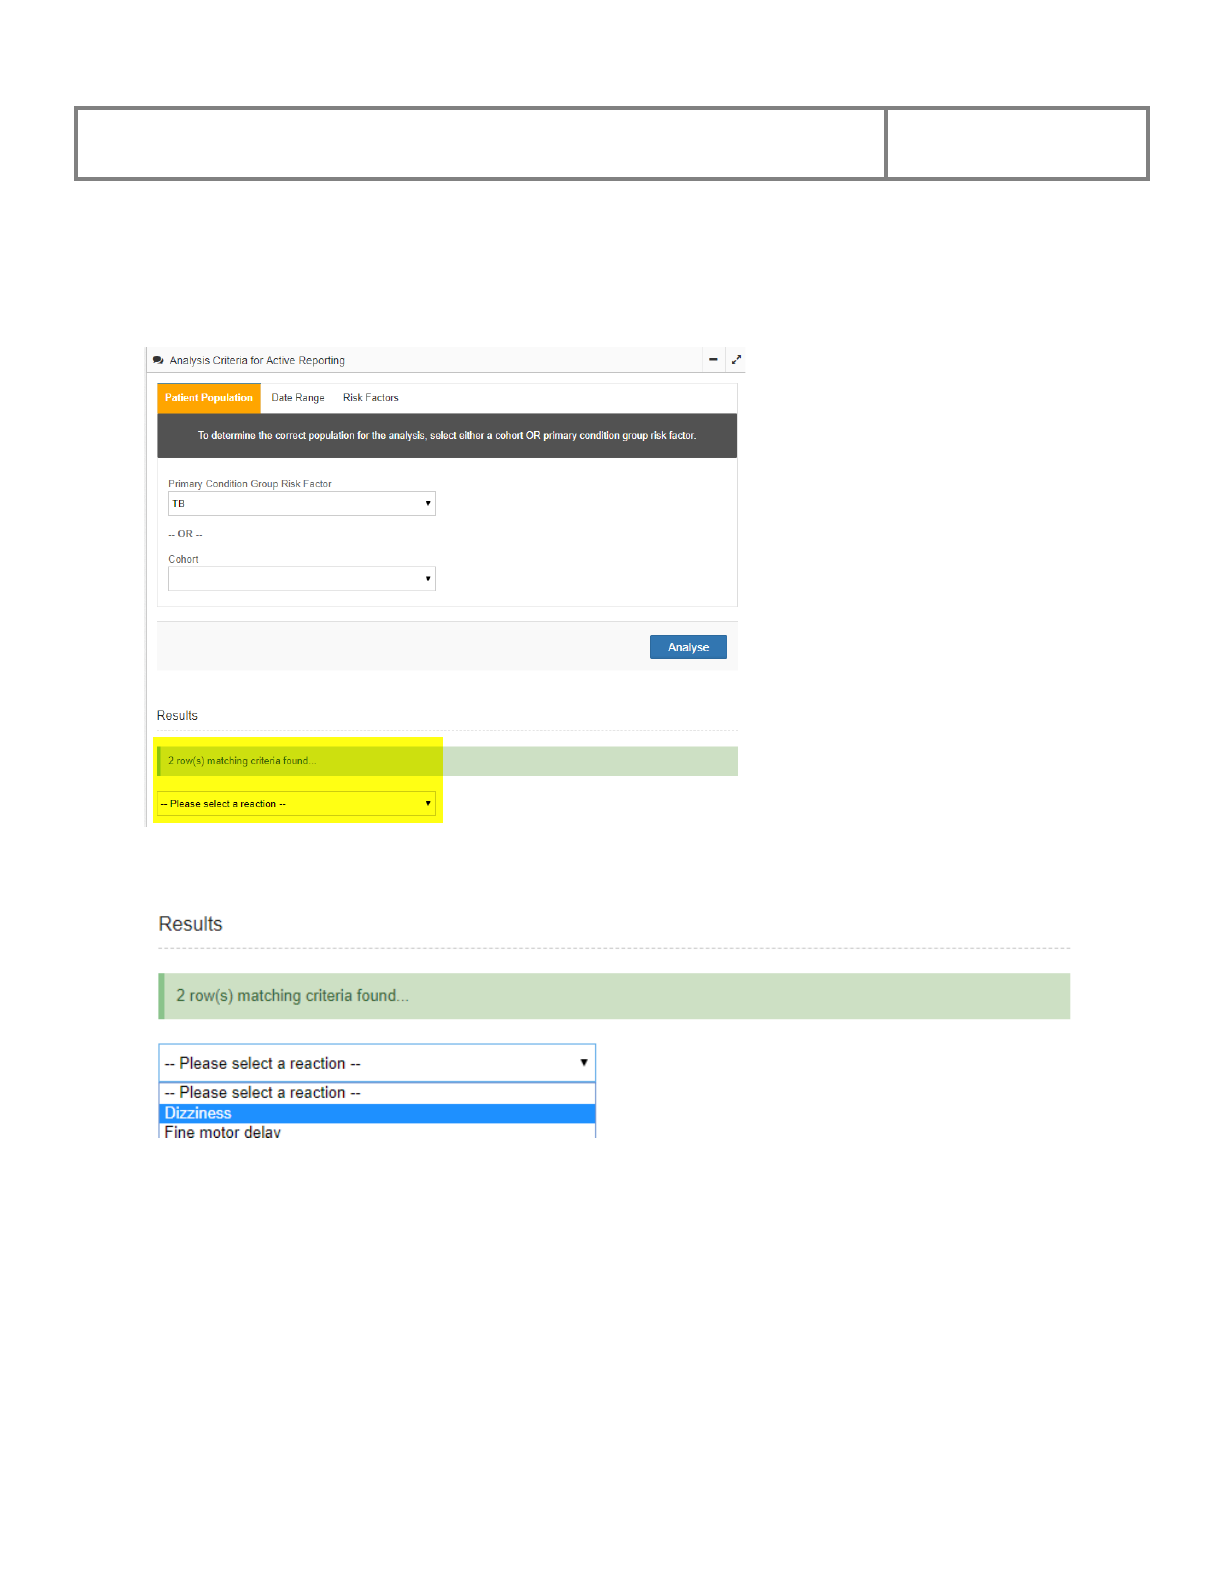
PViMS User Manual
2018
200
The system will conduct an initial analysis that will identify what Adverse Drug Reactions have
been identified over the reporting period and will return how many types of Drug Reactions there
were.
Select the Adverse Drug Reaction that you would like to detect signals for.
You are able to now view a 2 by 2 table illustrating relative risk and 95% Confidence Interval for
the selected reaction.
• Incidence Rate for exposed group
• Incidence Rate for non-exposed group
• Relative Risk for the associated medication
• 95% Confidence Interval for the associated medication
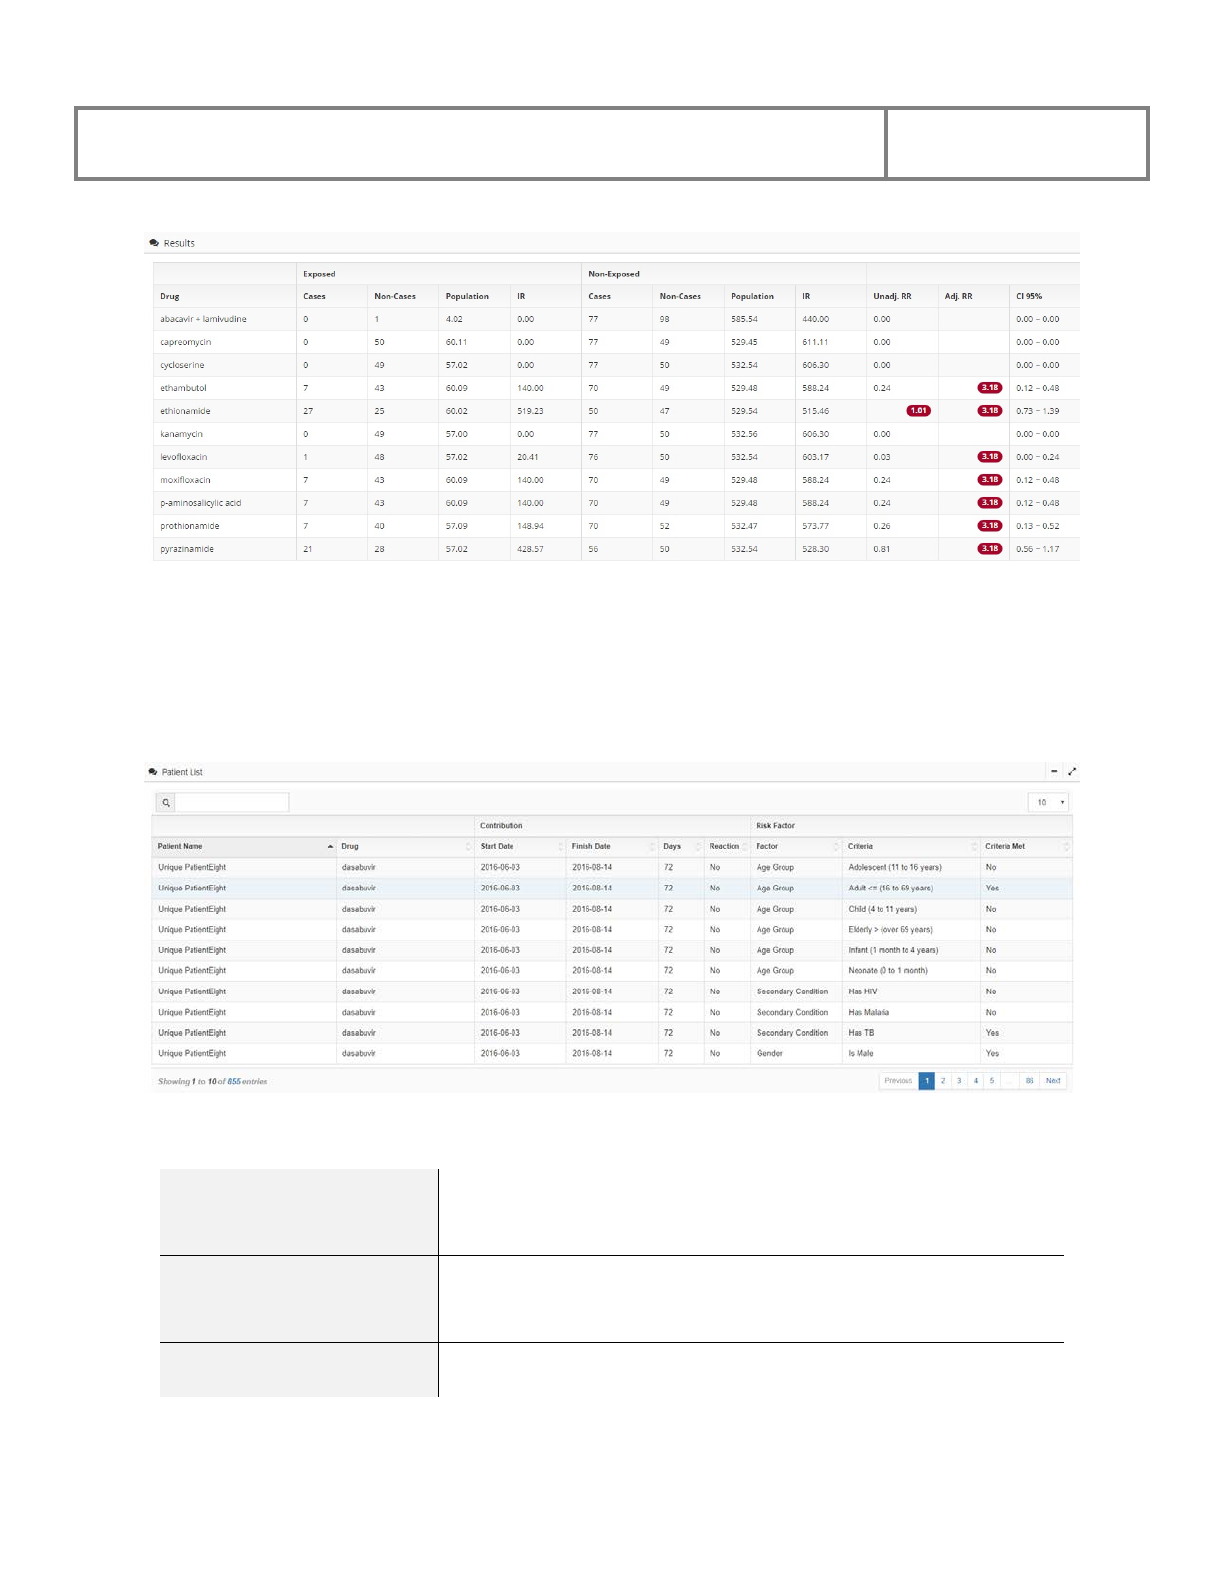
PViMS User Manual
2018
201
5.8.3.5 Viewing the Contributing Patient List
Once analysis has been executed, it is possible to view the list of patients that have contributed to
the analysis population set through the Patient List which appears at the end of the analysis
screen.
The columns in the patient list table are described below:
Patient Name
The name of the patient contributing to the patient
population
Drug
The drug the patient was exposed to during the period of
analysis
Start Date
The date the patient started the medication
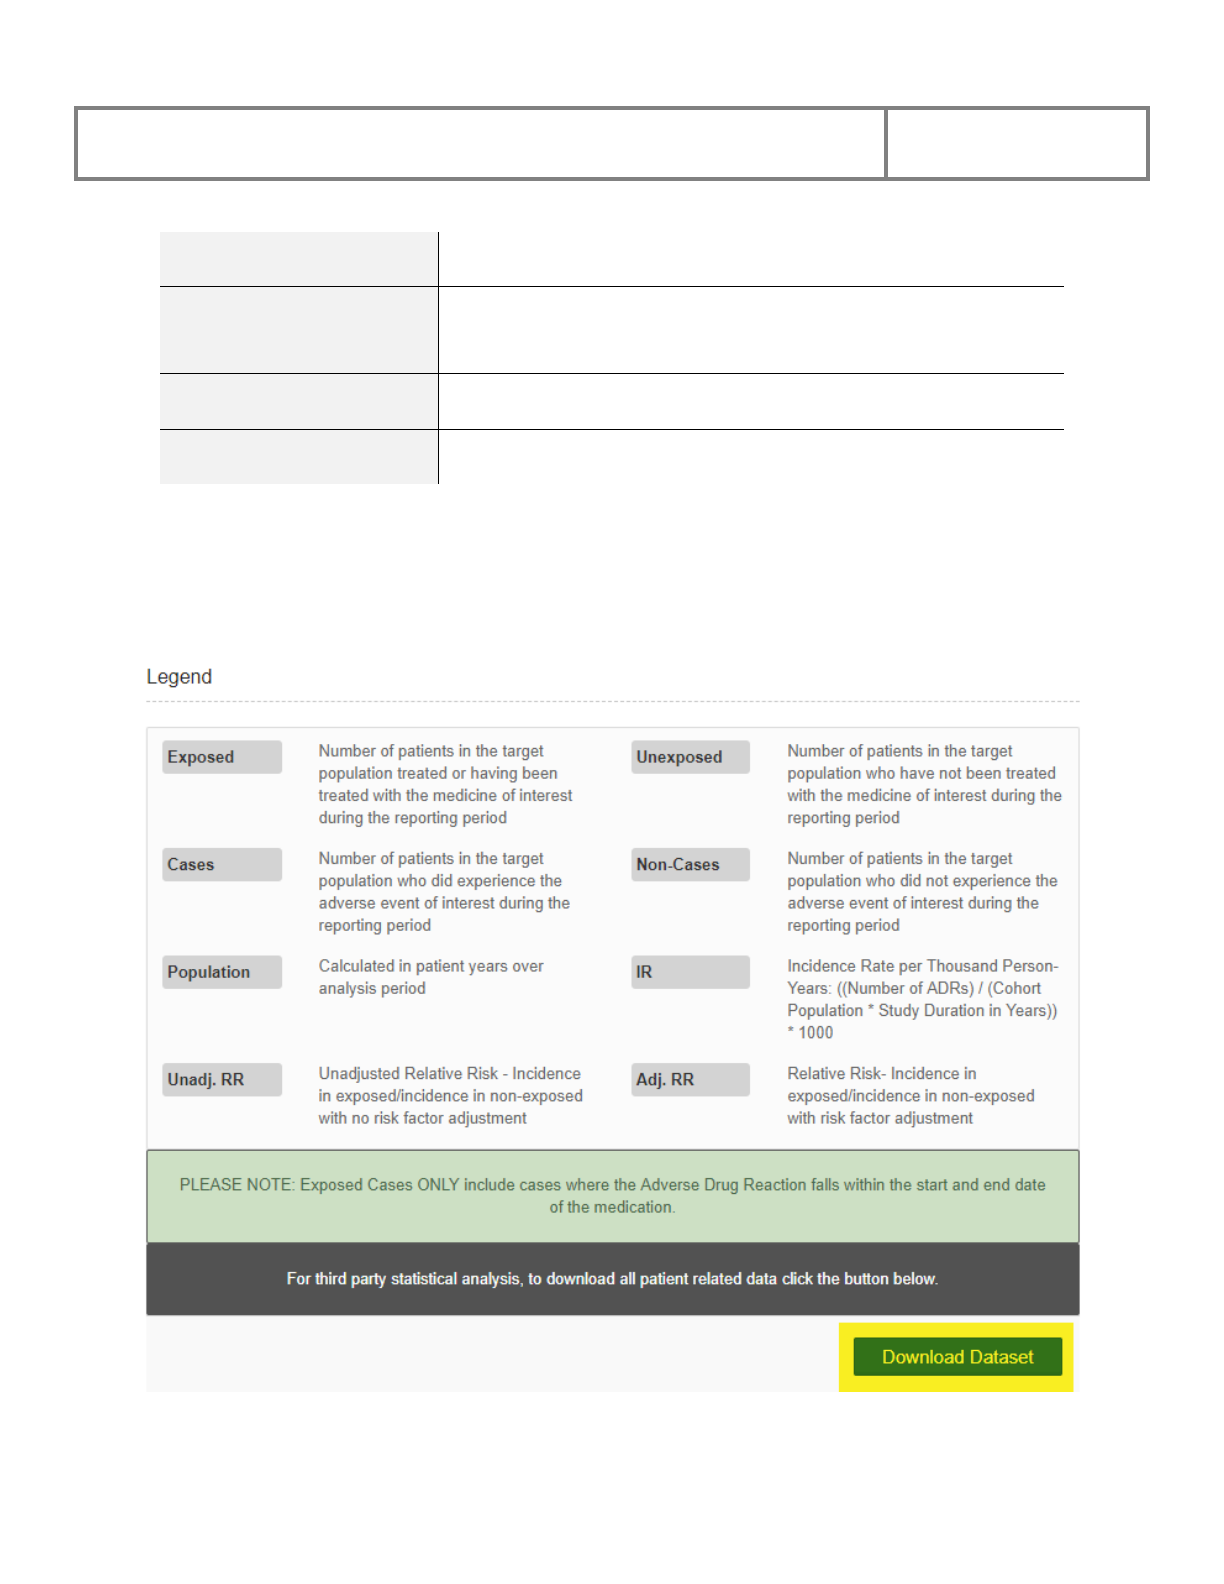
PViMS User Manual
2018
202
Finish Date
The date the patient finished the medication
Days
The number of days the patient contributed to the patient
population
Reaction
Did the patient suffer a reaction during the period of analysis
Risk Factor
Which risk factor does the patient match
5.8.4 Downloading a Dataset for Further Analysis
Click the Download Data button to able to download a comprehensive dataset of patient clinical
data in XLSX format for importation into a third party statistical tool.
PViMS User Manual
2018
203
If you are unable to locate this function, please liaise with your system
administrator as the ability to download a dataset for external consumption will
need to be assigned to your user profile.

PViMS User Manual
2018
204
PViMS User Manual
2018
205
6 Reporting Portal
The reports portal is the centralized hub for system reporting.
Note: the following roles have access to the report’s portal:
• All users. All users have view access to pages defined within the portal.
• Administrator. The administrator has FULL permissions to the information portal.
• Reporter Administrator. The reports administrator has the ability to add and customize
reports.
6.1 List of Standard System Reports
The reports portal includes several reports as part of the base configuration of the system. These
reports are listed below:
Patients on Treatment
Aggregated number of patients per facility that have a
serious event, non-serious event, and the percentage that
have events
Adverse Events
Number of patients with an adverse event by age group,
facility and drug
Adverse Events Quarterly
Number of patients with an adverse event by MedDRA
system organ class per quarter and grade
Adverse Events Annual
Number of patients with an adverse event by MedDRA
system organ class per year and grade
Causality
List adverse events where causality has been set and not set
Patients by Drug
Number of patients on a specific medication
Outstanding Visits
Patients who did not attend an appointment
PViMS User Manual
2018
206
6.2 Report Customization
The Reports Portal gives PViMS report publishers the ability to add new and modify existing
reports within this portal. This provides PViMS analysts with an integrated platform to
customize what reports are available to end users.
6.2.1 Types of Reports
When adding a new report, you first need to specify the type of report to be incorporated. There
are currently two report types that can be customized within PViMS: A summary report that
provides aggregated reporting based on the stratification criteria specified, and a list report that
allows for a line by line rendering of the report in a non-aggregated manner.
6.2.2 Adding a New Report
In order to add a new report to the Reports Portal, you need to have the Reporter Administrator
role assigned to your user profile.
To add a new report, click on the Report List menu.
Then click on the Add Report button so you can define the core characteristics of the report.
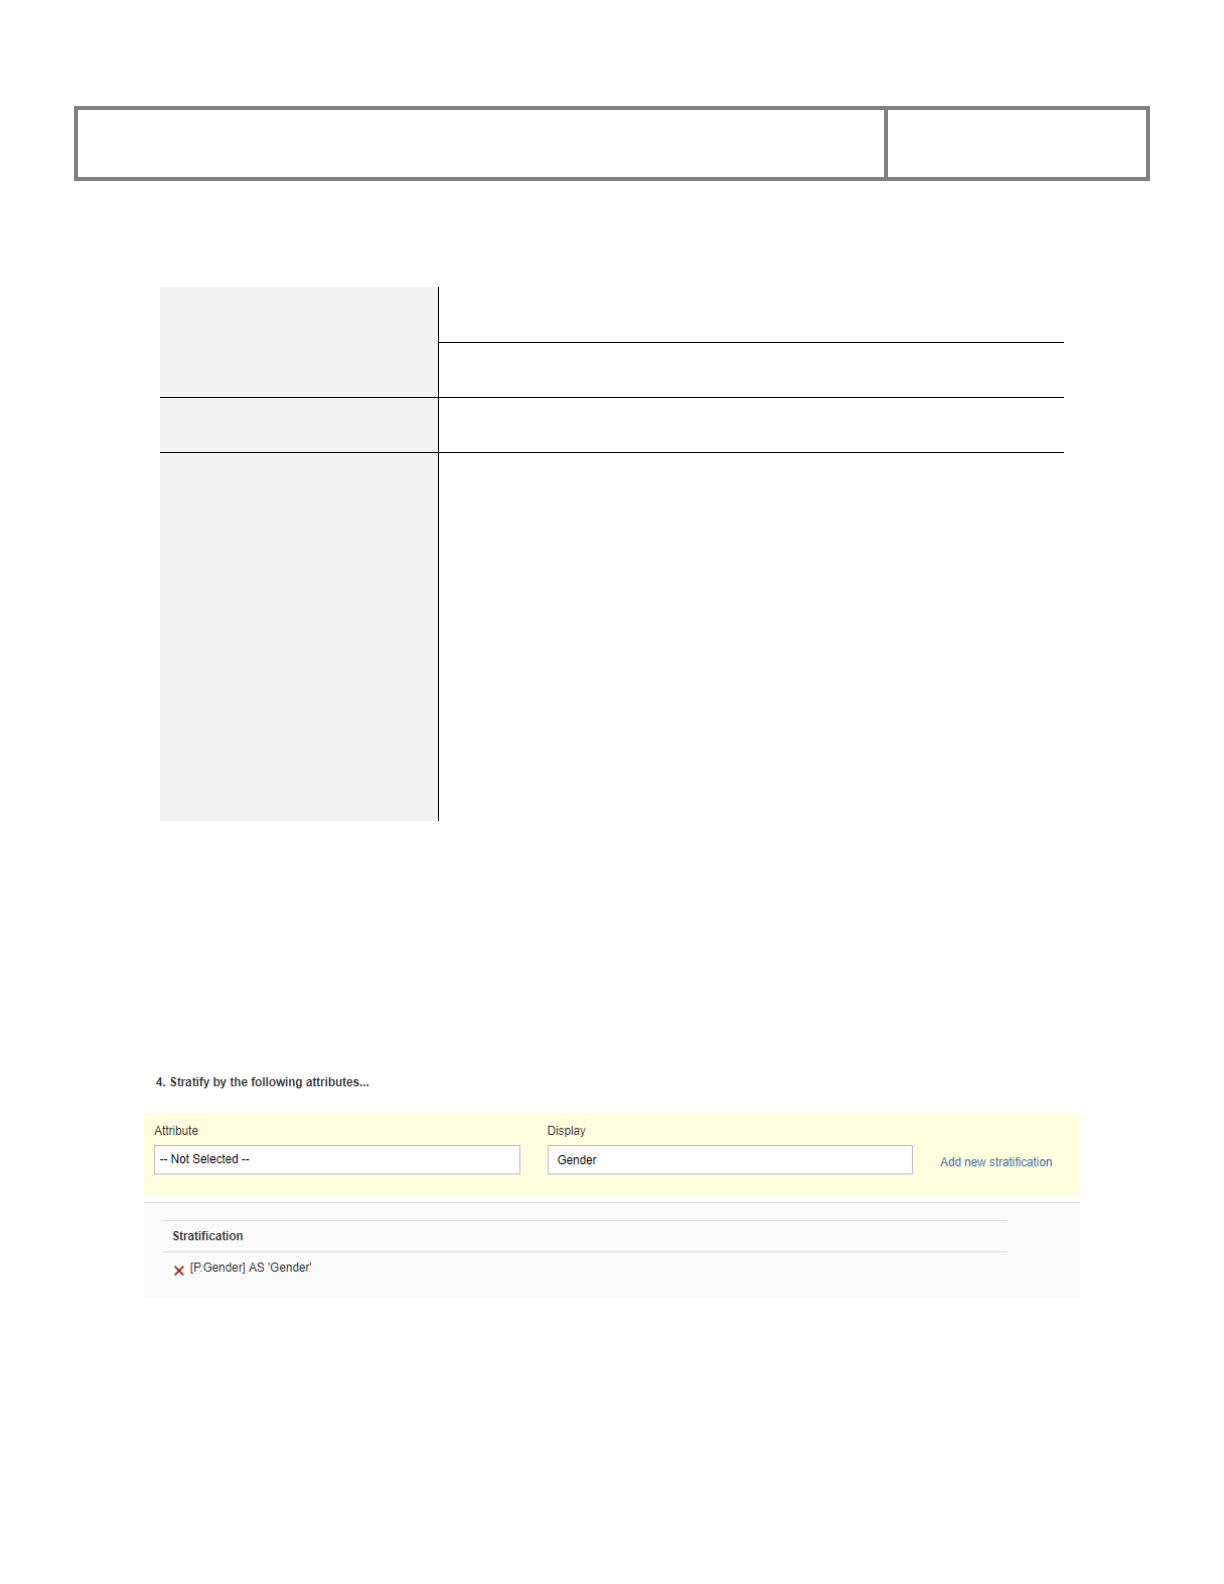
PViMS User Manual
2018
207
The following information must be entered when publishing a new report:
Report Name
The unique name for the report
Definition
Provide additional information that describes the report
Report Type
Is this a summary or a list report?
Core Entity
The primary entity that should be reported on:
• Patient, report on patient specific criteria
• PatientClinicalEvent, report on adverse event
information
• PatientCondition, report on concomitant conditions
• PatientFacility, report on facility and patient
• PatientLabTest, report on lab test information
• PatientMedication, report on medication history
• Encounter, report on clinical data collected per
encounter
• CohortGroupEnrolment, report of cohort enrolment
data
6.2.2.1 Summary Report
Once the base report is configured, stratification-related information may now be specified. All
attributes specified as part of the stratification list will be aggregated based on these attributes.
To add a new stratification item, select the attribute from the list, specify the name of column in
the display field and click the Add new stratification link. The attribute will be added to the
stratification list.
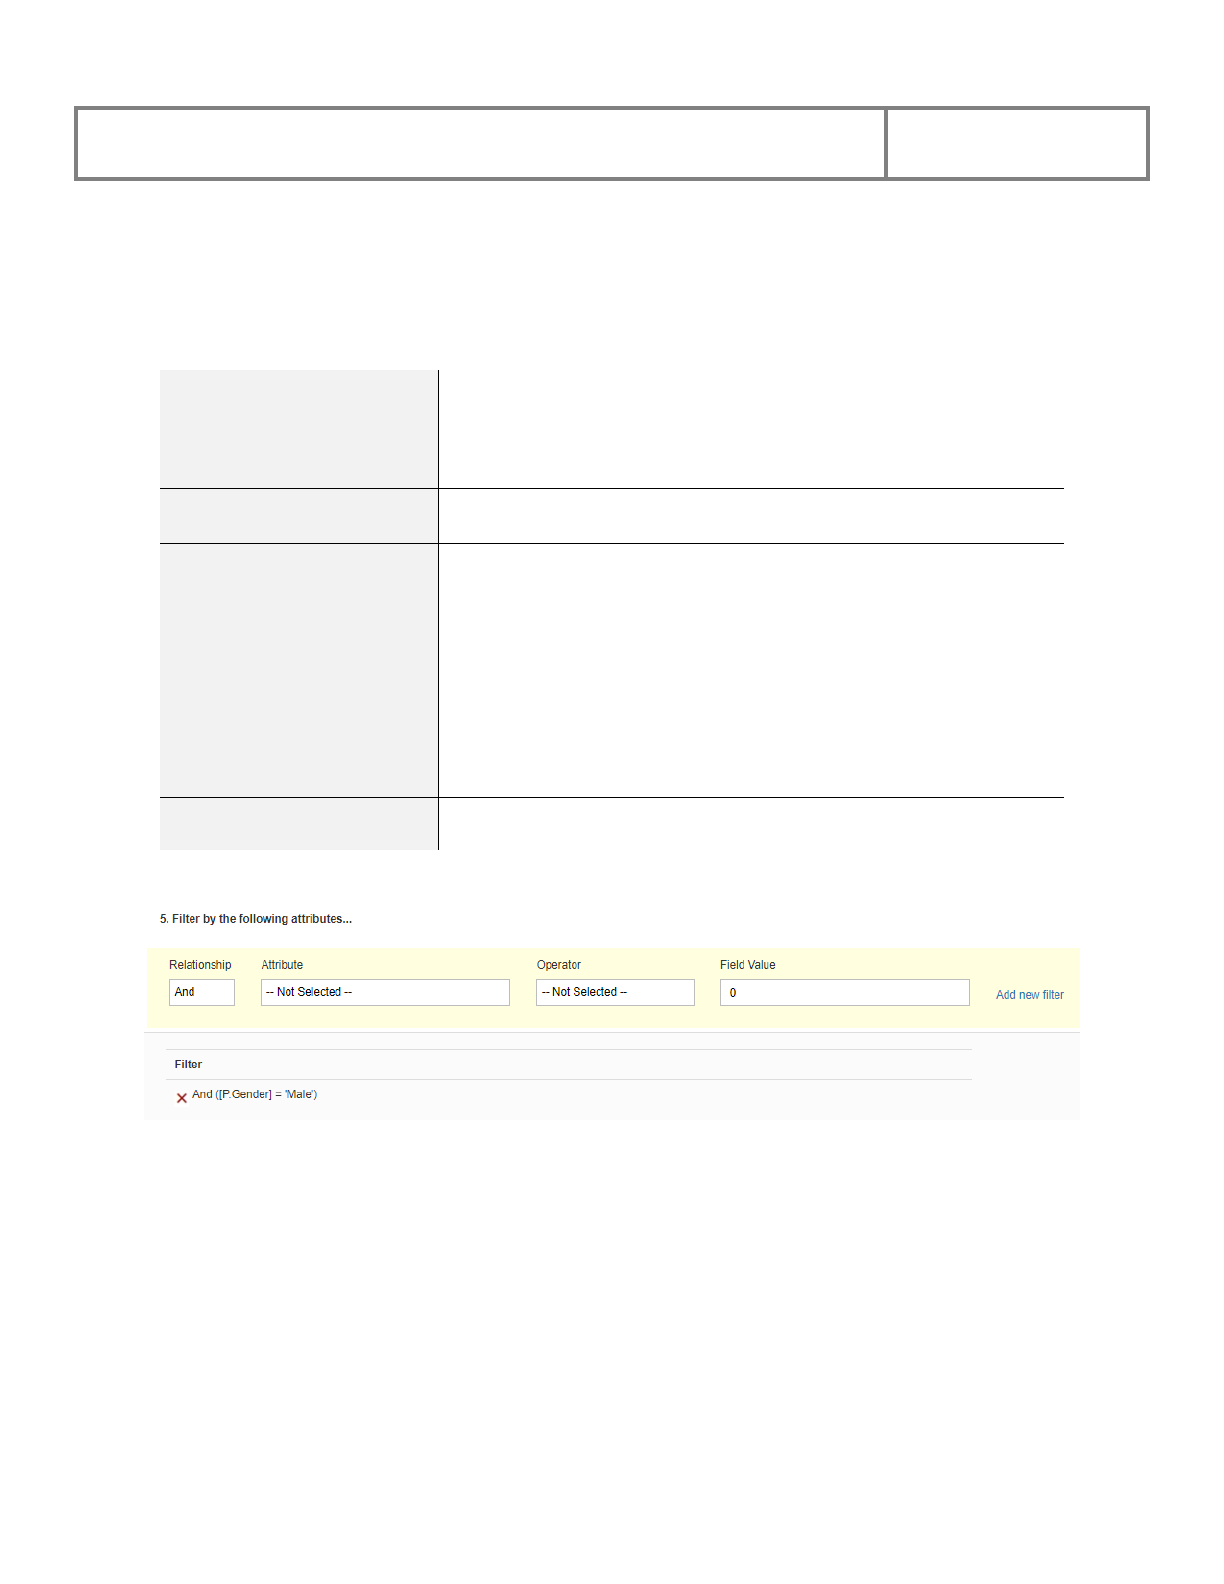
PViMS User Manual
2018
208
Once the stratification list is specified, filter-related information may now be specified. All
attributes specified as part of the filter list will be used to filter the result set by the end user. To
add a new filter item, add the filter item as per the field description below and click the Add new
filter link:
Relationship
Specify AND if this filter criteria must be true in
conjunction with other attributes
Specify OR if this filter criteria or other criteria must be true
Attribute
The attribute that is being filtered on
Operator
The operator that will be applied to the filter:
• Dates and numerics allow the following operators:
Equals, Not Equals, Greater Than, Less Than,
GreaterEqual Than, LessEqual Than, Between
• Text fields allow the following operators: Equals,
Not Equals
• DropDown Lists allow the following operators:
Equals, Not Equals, In
Field Value
• The value that should be compared to
Enter the relevant information as defined above for the report. You can preview the results by
clicking View Results. If you are satisfied with the results, click the Publish button to save your
new report. If you don’t want to save it, use the browser’s back button to navigate away from the
screen.
The system will navigate you to the new report once it has been published and the new report
will appear in the custom report portal menu.
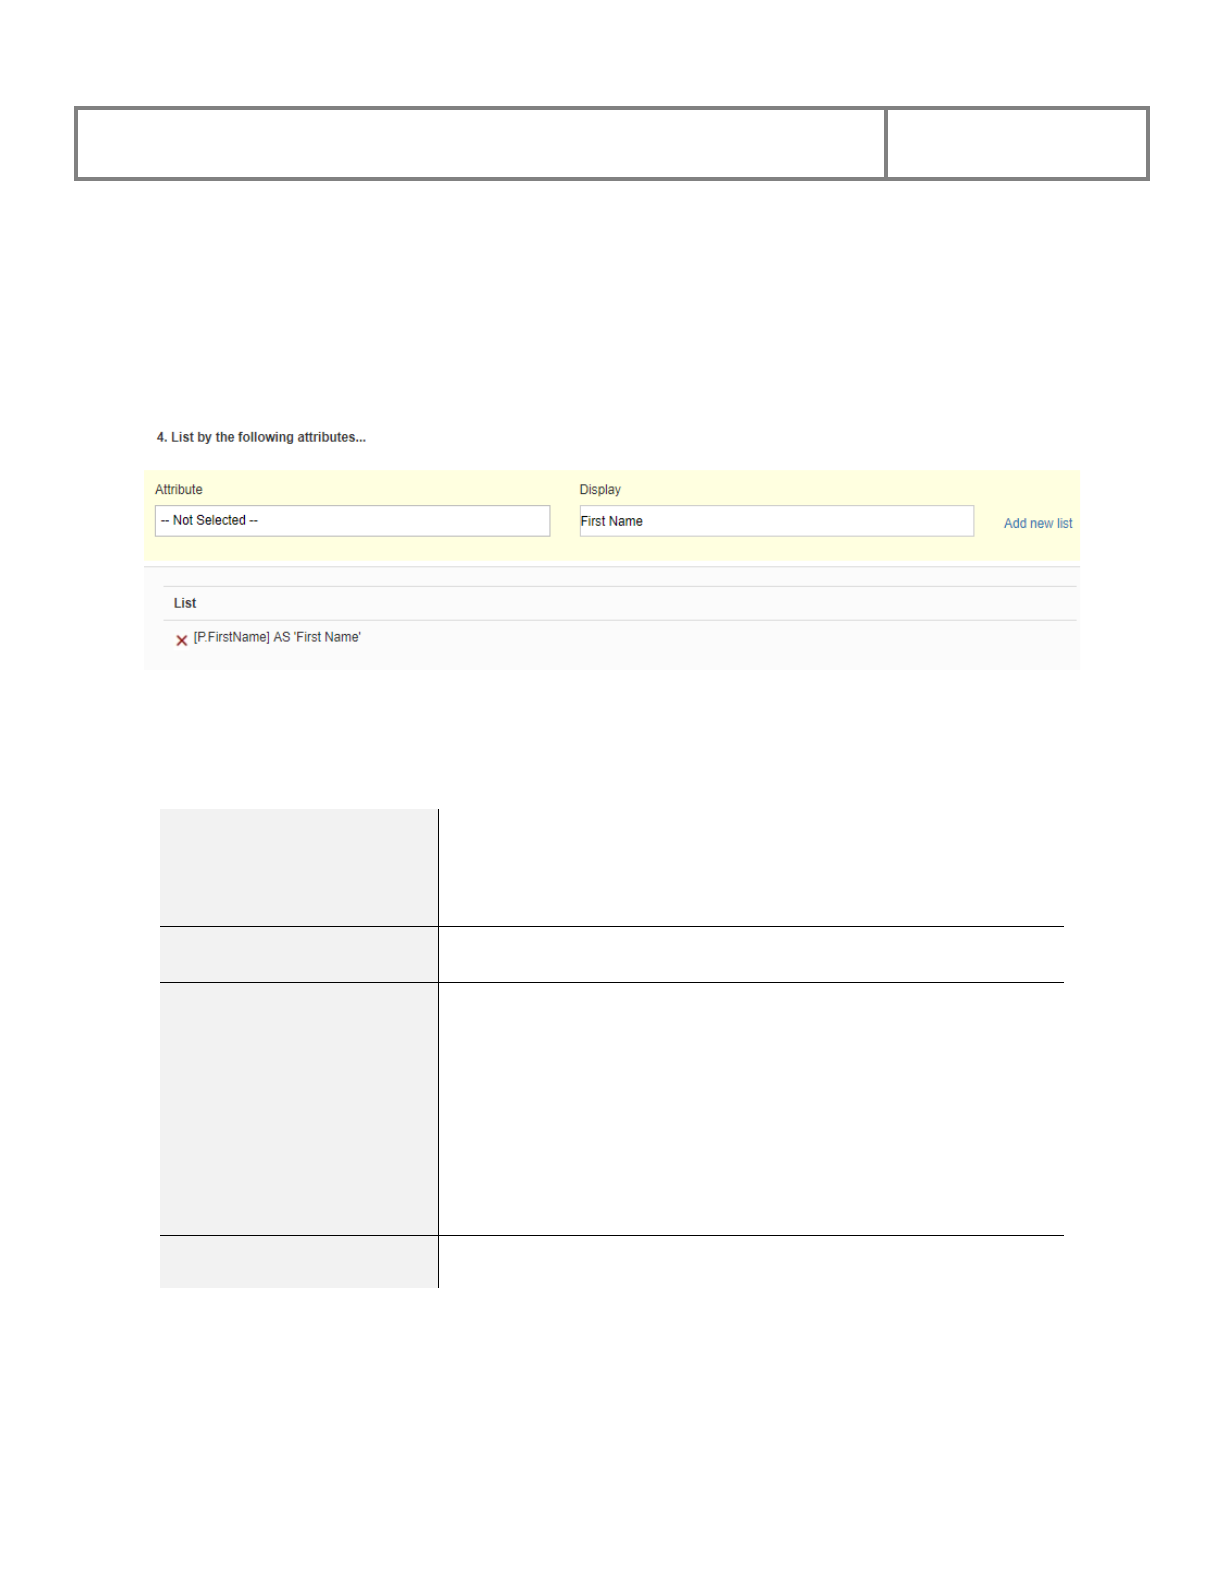
PViMS User Manual
2018
209
6.2.2.2 List Report
Once the base report is configured, list-related information may now be specified. All attributes
specified as part of the list will be included as separate columns in the report. To add a new list
item, select the attribute from the list, specify the name of column in the display field, and click
the Add new list link. The attribute will be added to the list.
Once the list is specified, filter-related information may now be specified. All attributes specified
as part of the filter list will be used to filter the result set by the end user. To add a new filter
item, add the filter item as per the field description below and click the Add new filter link:
Relationship
Specify AND if this filter criteria must be true in
conjunction with other attributes
Specify OR if this filter criteria or other criteria must be true
Attribute
The attribute that is being filtered on
Operator
The operator that will be applied to the filter
• Dates and numerics allow the following operators,
Equals, Not Equals, Greater Than, Less Than,
GreaterEqual Than, LessEqual Than, Between
• Text fields allow the following operators, Equals,
Not Equals
• DropDown Lists allow the following operators,
Equals, Not Equals, In
Field Value
• The value that should be compared to
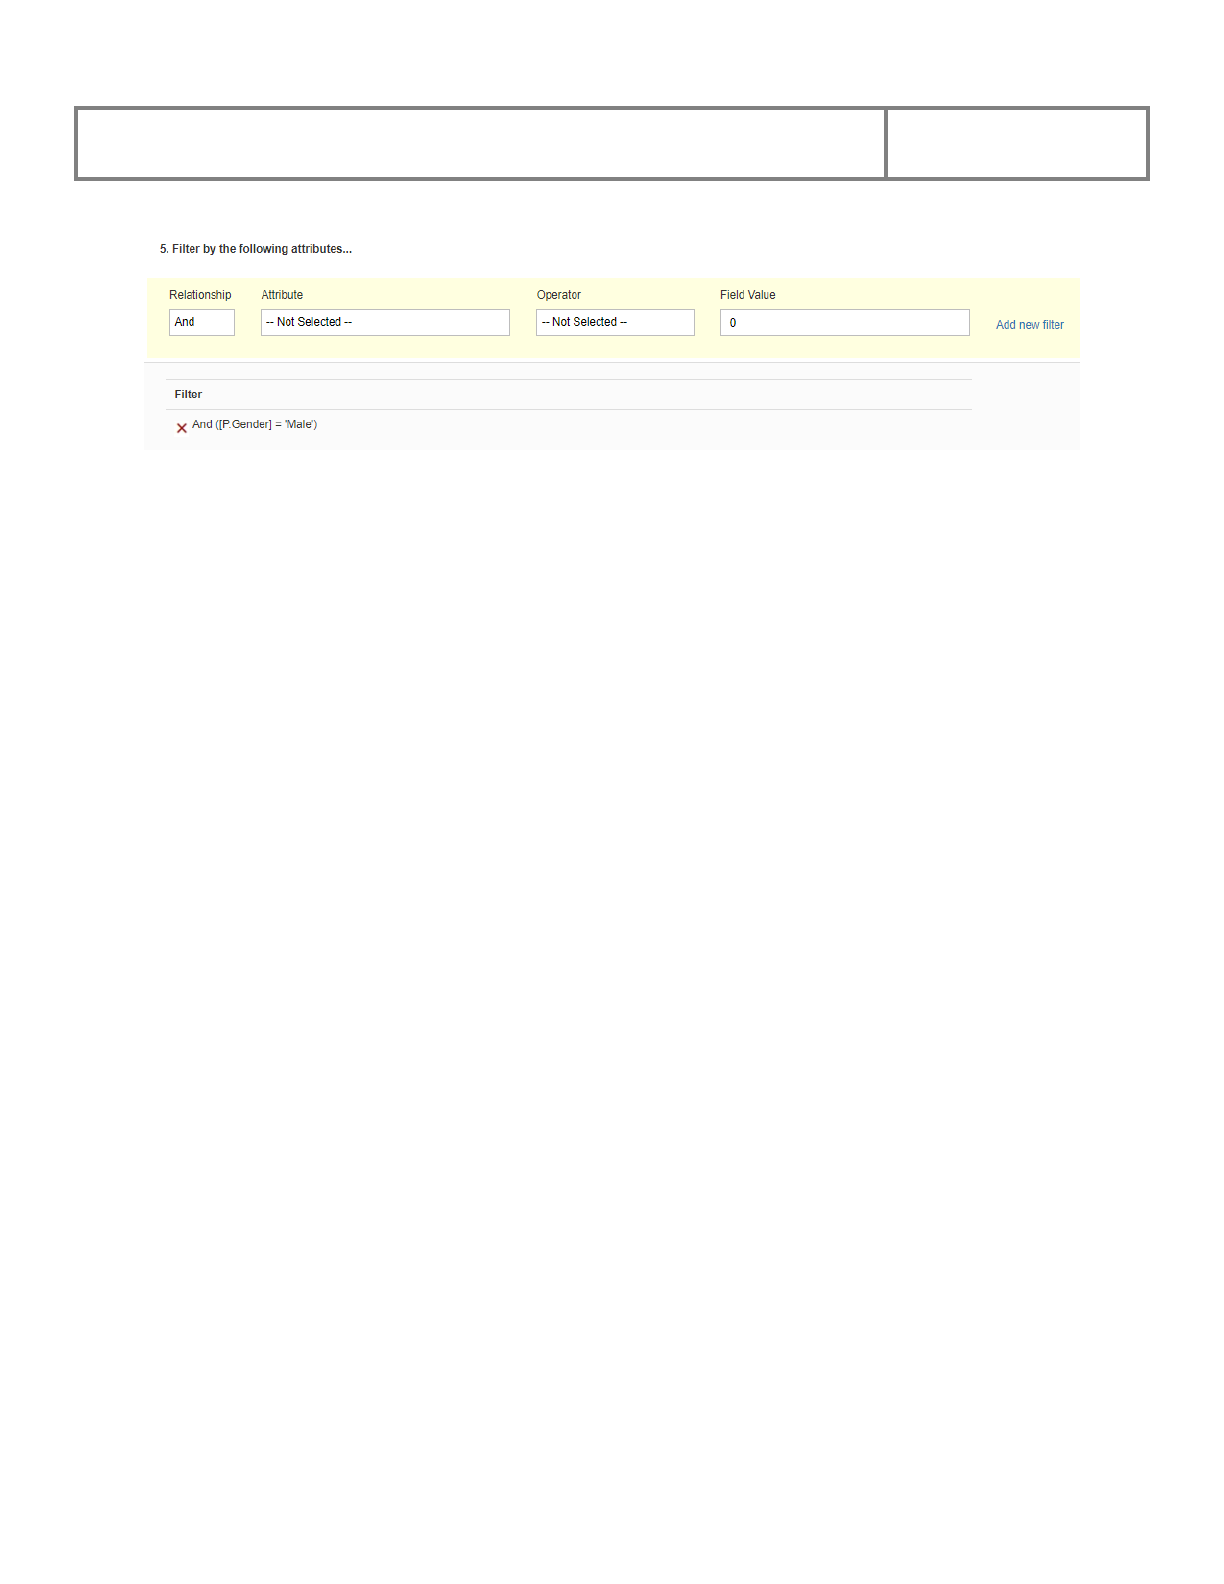
PViMS User Manual
2018
210
Enter the relevant information as defined above for the report. You can preview the results by
clicking View Results. If you are satisfied with the results, click the Publish button to save your
new report. If you don’t want to save it, use the browser’s back button to navigate away from the
screen.
The system will navigate you to the new report once it has been published and the new report
will appear in the custom report portal menu.
6.2.3 Modifying and Deleting an Existing Report
Browse to the report using the custom report menu in the Reports Portal. To modify or delete a
report, you need to have the Reporter Administrator role assigned to your user profile.
To modify a report, click on the Customise Report button. To delete a report, click on the
Delete Report button.
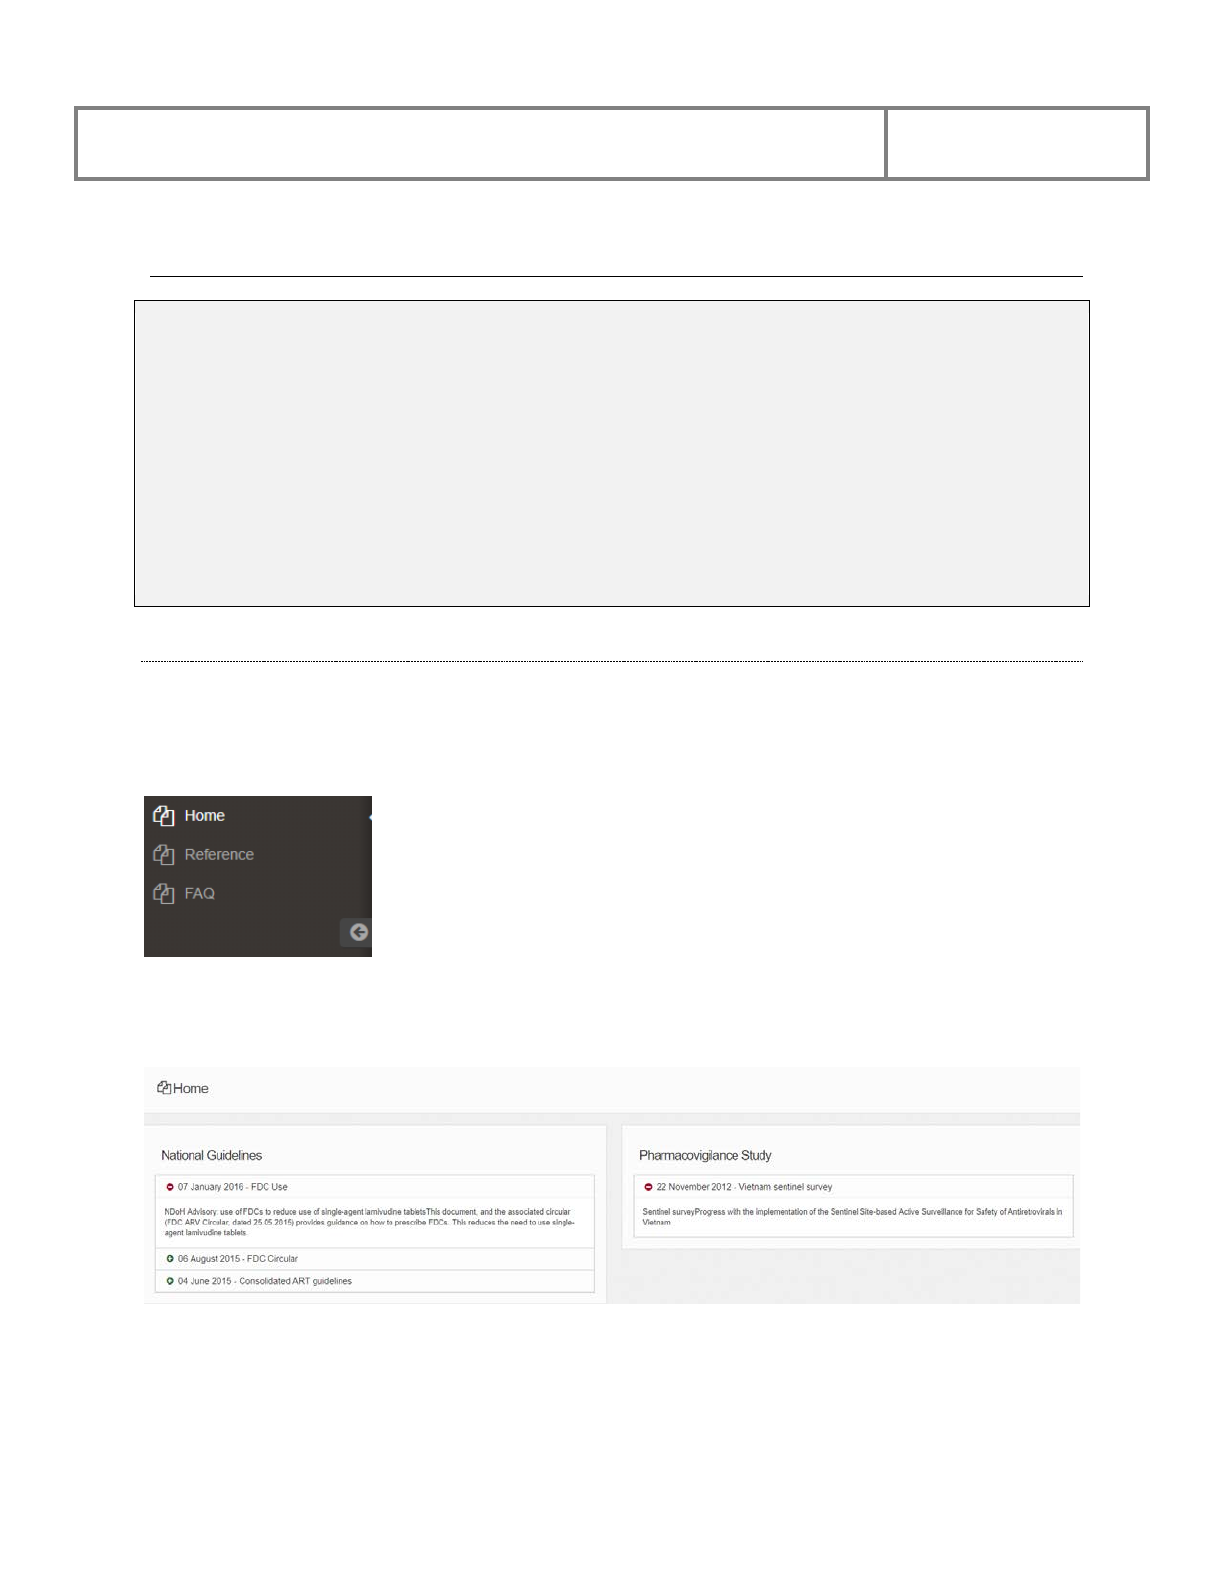
PViMS User Manual
2018
211
7 Information Portal
The information portal is the centralized hub for publication and presentation. PVIMS
information publishers have the ability to share trends, analysis, graphs, and important
information about pharmacovigilance activities.
Note: the following roles have access to the information portal:
• All users. All users have view access to pages defined within the portal.
• Administrator. The administrator has FULL permissions to the information portal.
• Publisher. The publisher has the ability to add new pages and update content of existing
pages
7.1 Viewing the home page
The Information Portal Home Page can be used to show information about upcoming
pharmacovigilance activities as well as outcomes from existing and previous activities and
reports. To access the Home Page, click on the Home menu in the Information Portal.
The system will navigate you to the Home Page where you are able to view, e.g., national
guidelines or other information you post that would be relevant to most PViMS users.
To view information for an existing date, click on the green plus icon to expand that guideline or
the red minus sign to compress that guideline.
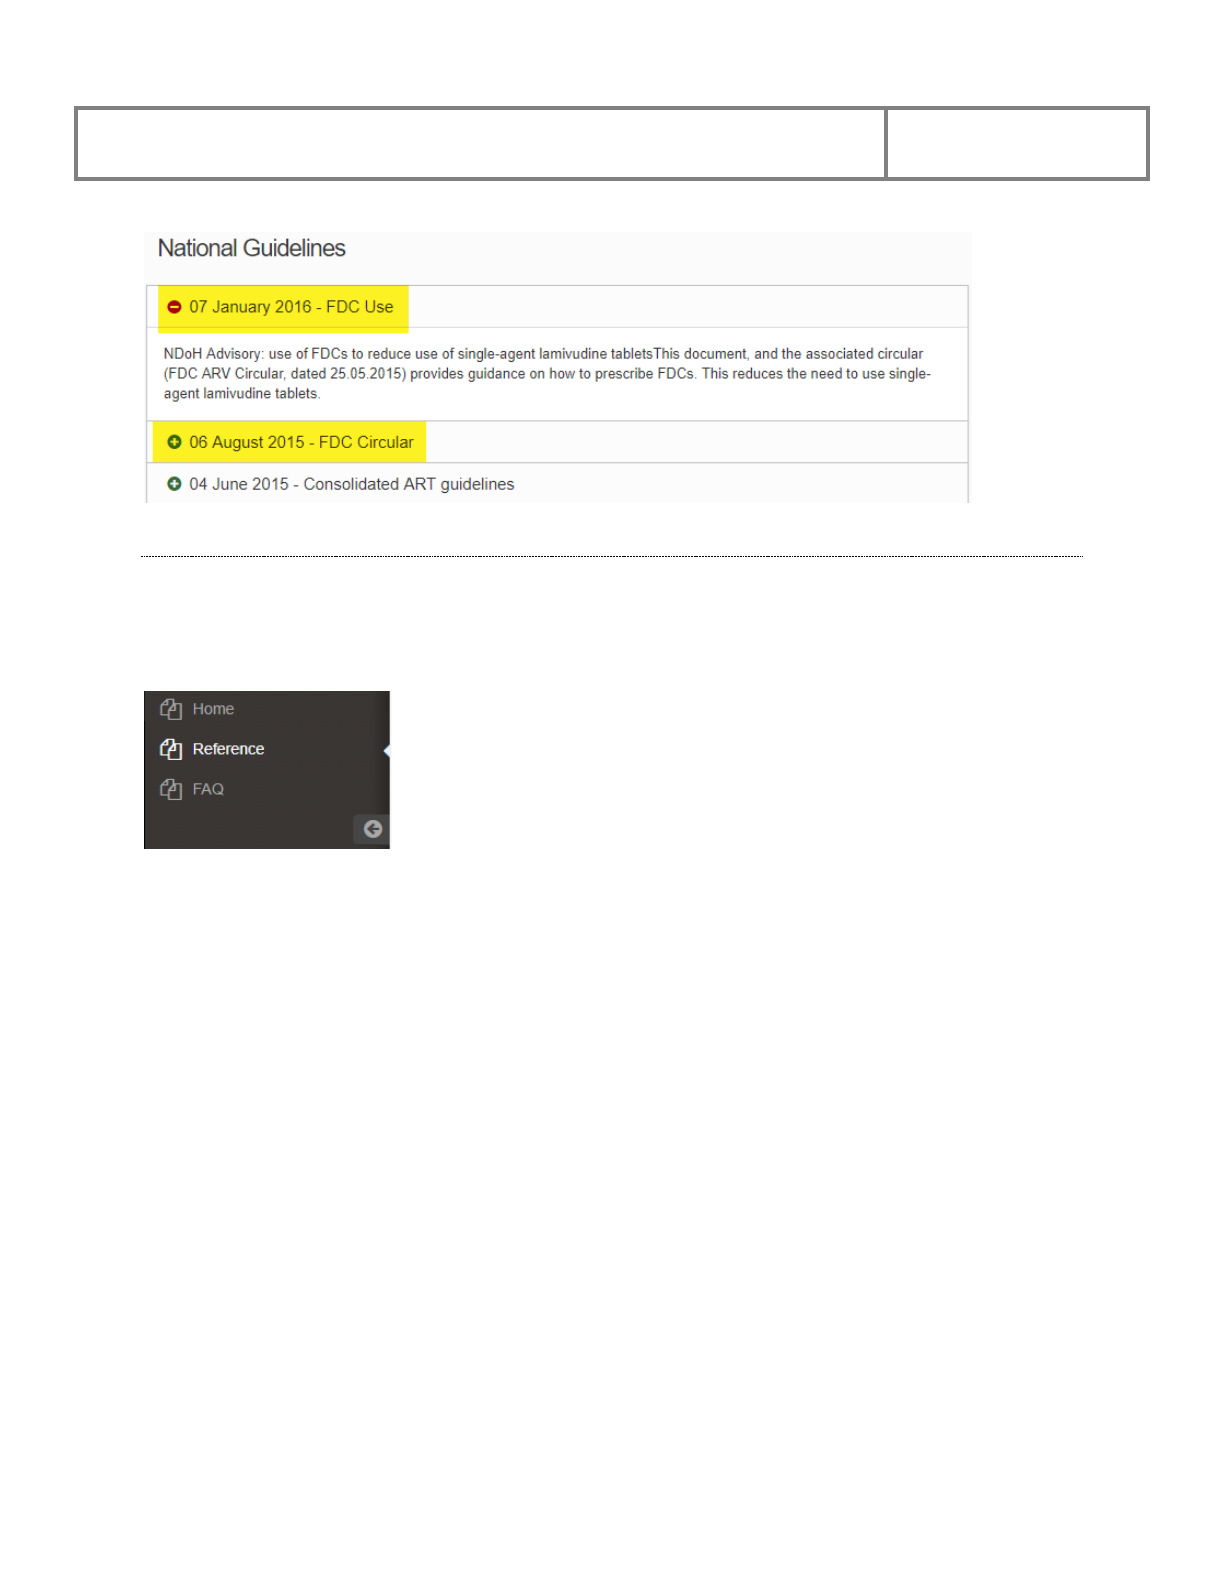
PViMS User Manual
2018
212
7.2 Viewing the Reference page
The Information Portal Reference Page contains a set of reference data particular to the
implementation of PViMS for Pharmacovigilance activities. To access the Reference Page,
click on the Reference menu in the Information Portal.
The system will navigate you to the Reference Page where you are able to view this reference
information.
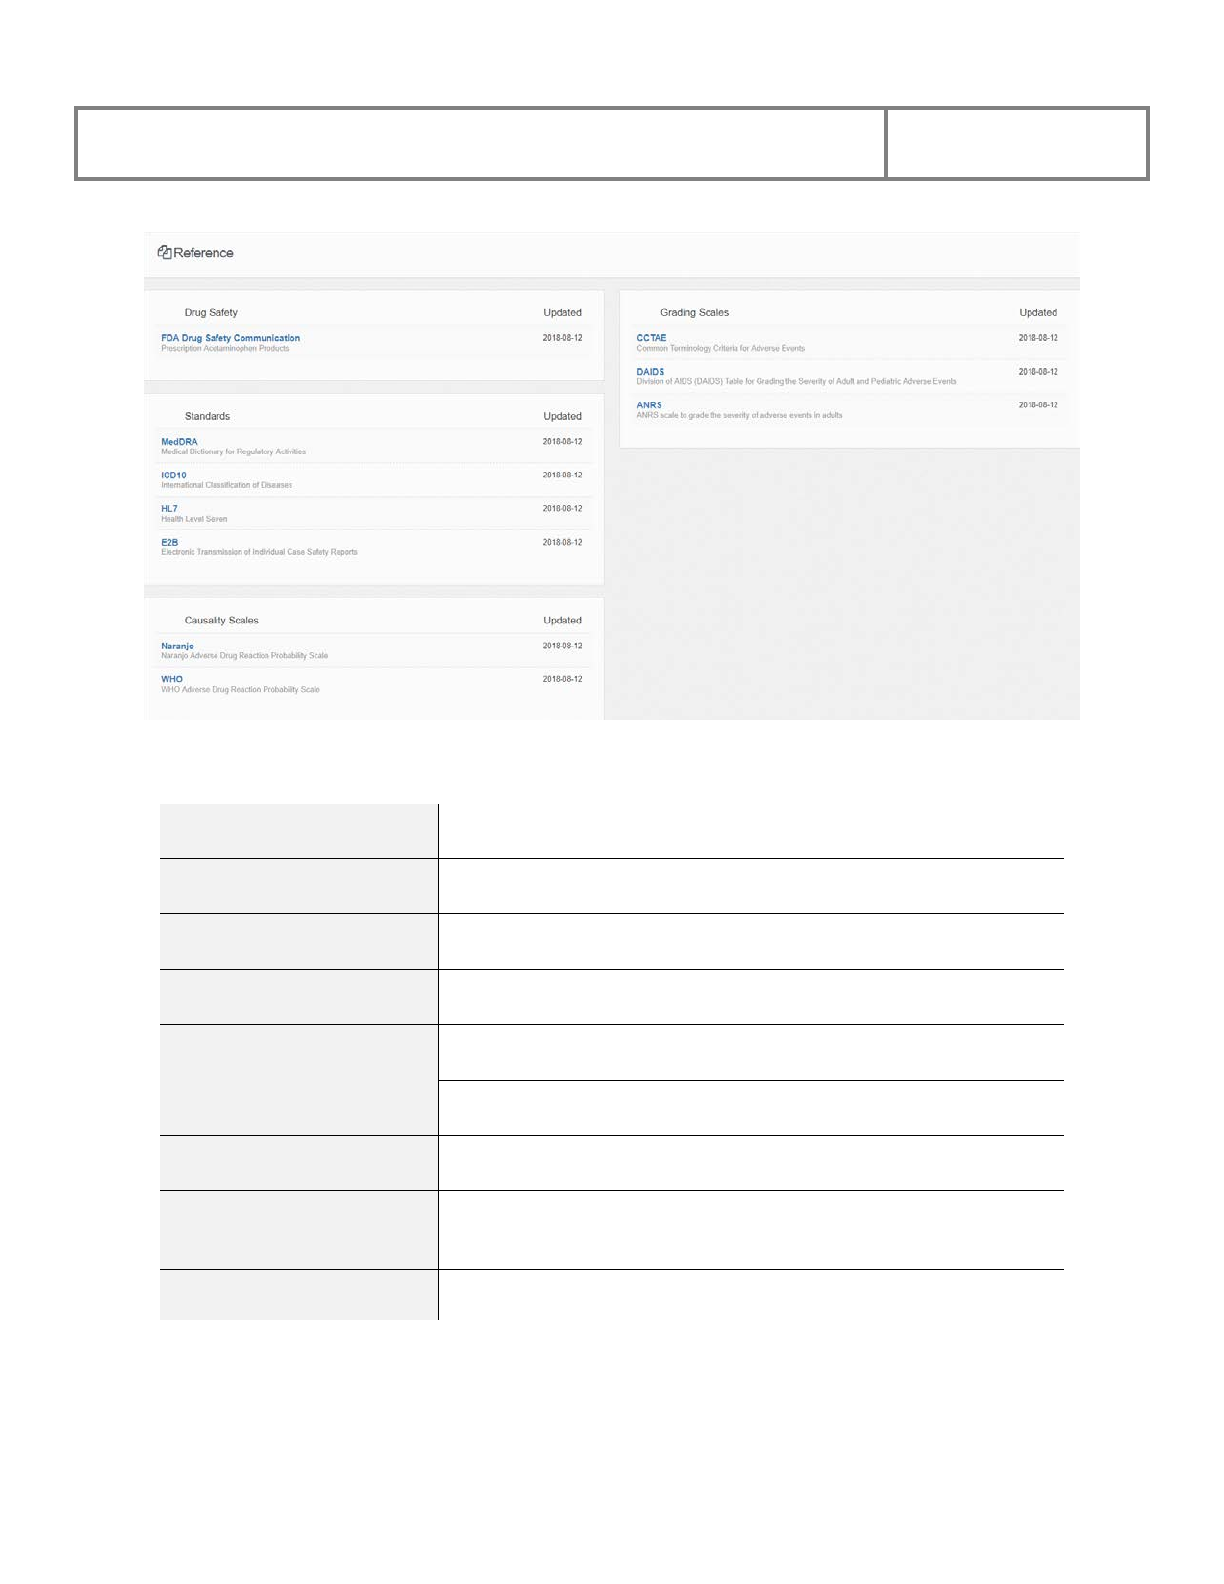
PViMS User Manual
2018
213
The following reference data is available for viewing: -
MedDRA
Medical Dictionary for Regulatory Activities
ICD10
International Classification of Diseases
HL7
Health-Level 7
E2B
Electronic Transmission of Individual Case Safety Reports
Naranjo
Naranjo Adverse Drug Reaction Probability Scale
WHO
WHO Adverse Drug Reaction Probability Scale
CCTAE
Common Terminology Criteria for Adverse Events
DAIDS
Division of AIDS (DAIDS) Table for Grading the Severity
of Adult and Pediatric Adverse Events
ANRS
ANRS scale to grade the severity of adverse events in adults
To view information about the reference, click on the blue header for that specific reference.
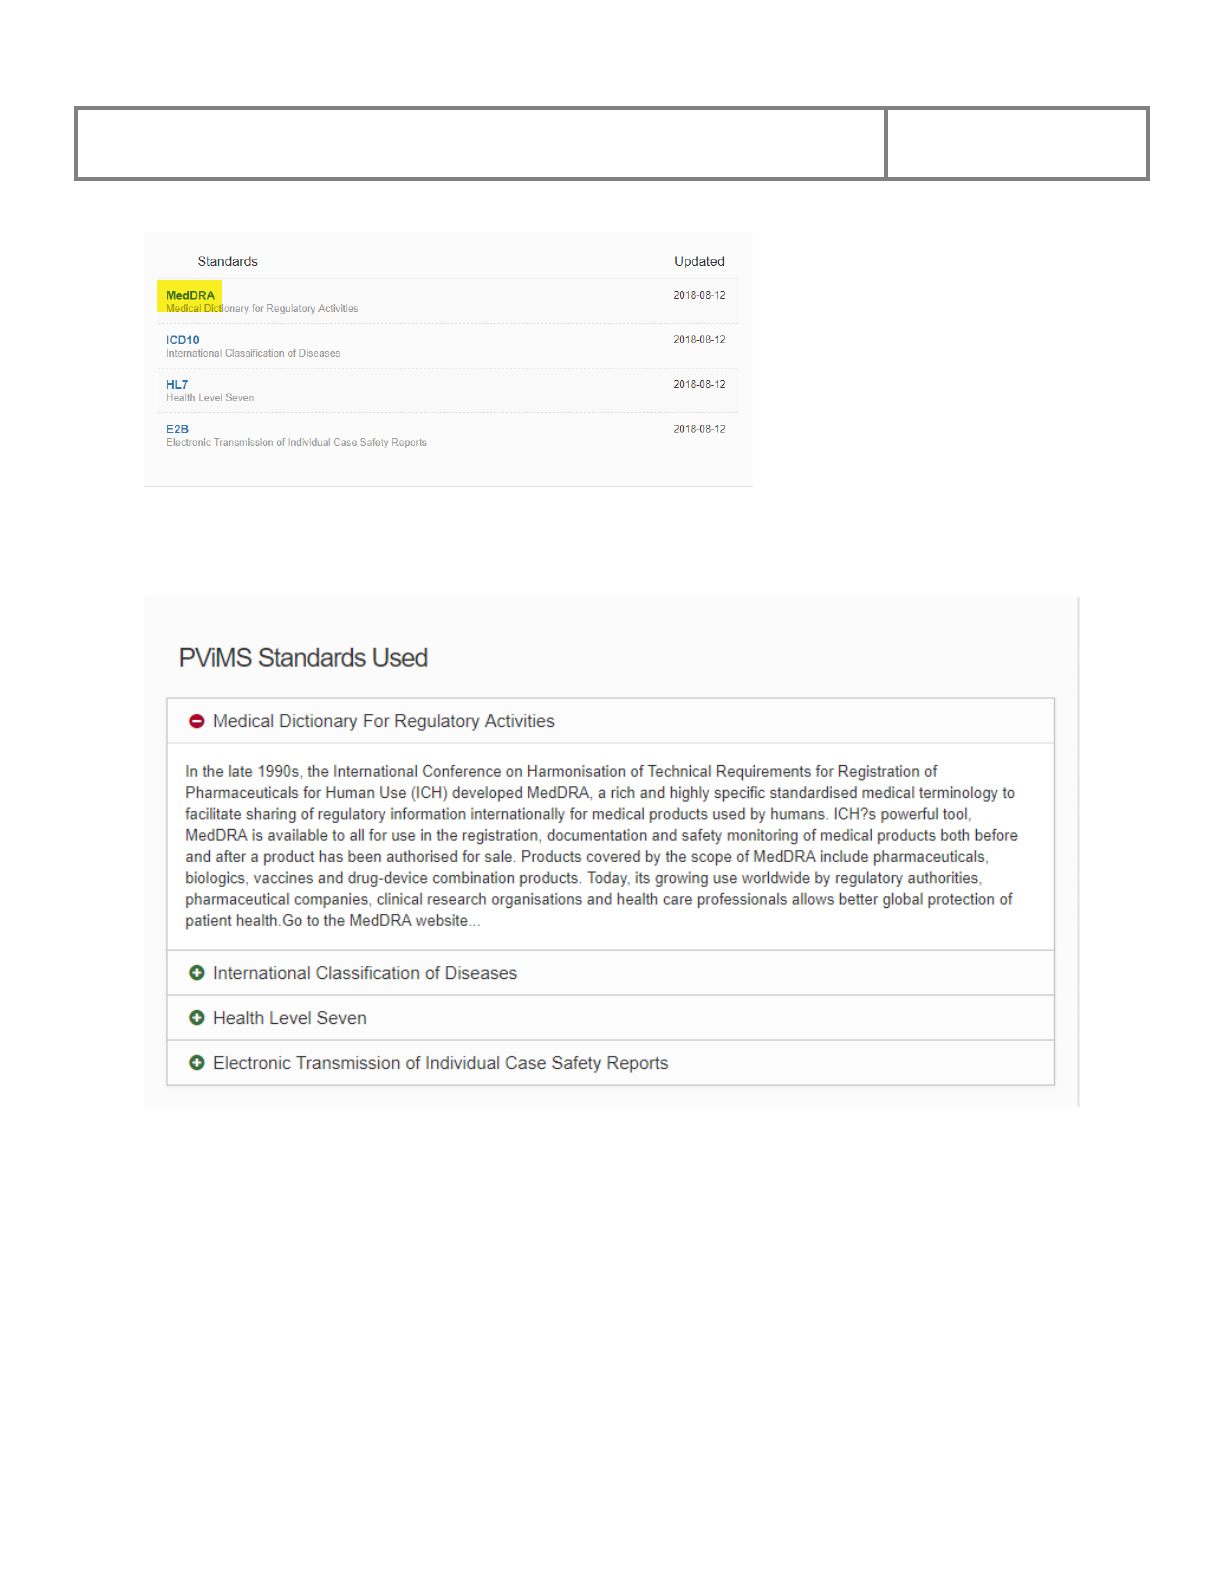
PViMS User Manual
2018
214
The system will navigate you to a reference page which contains additional information to that
reference item.
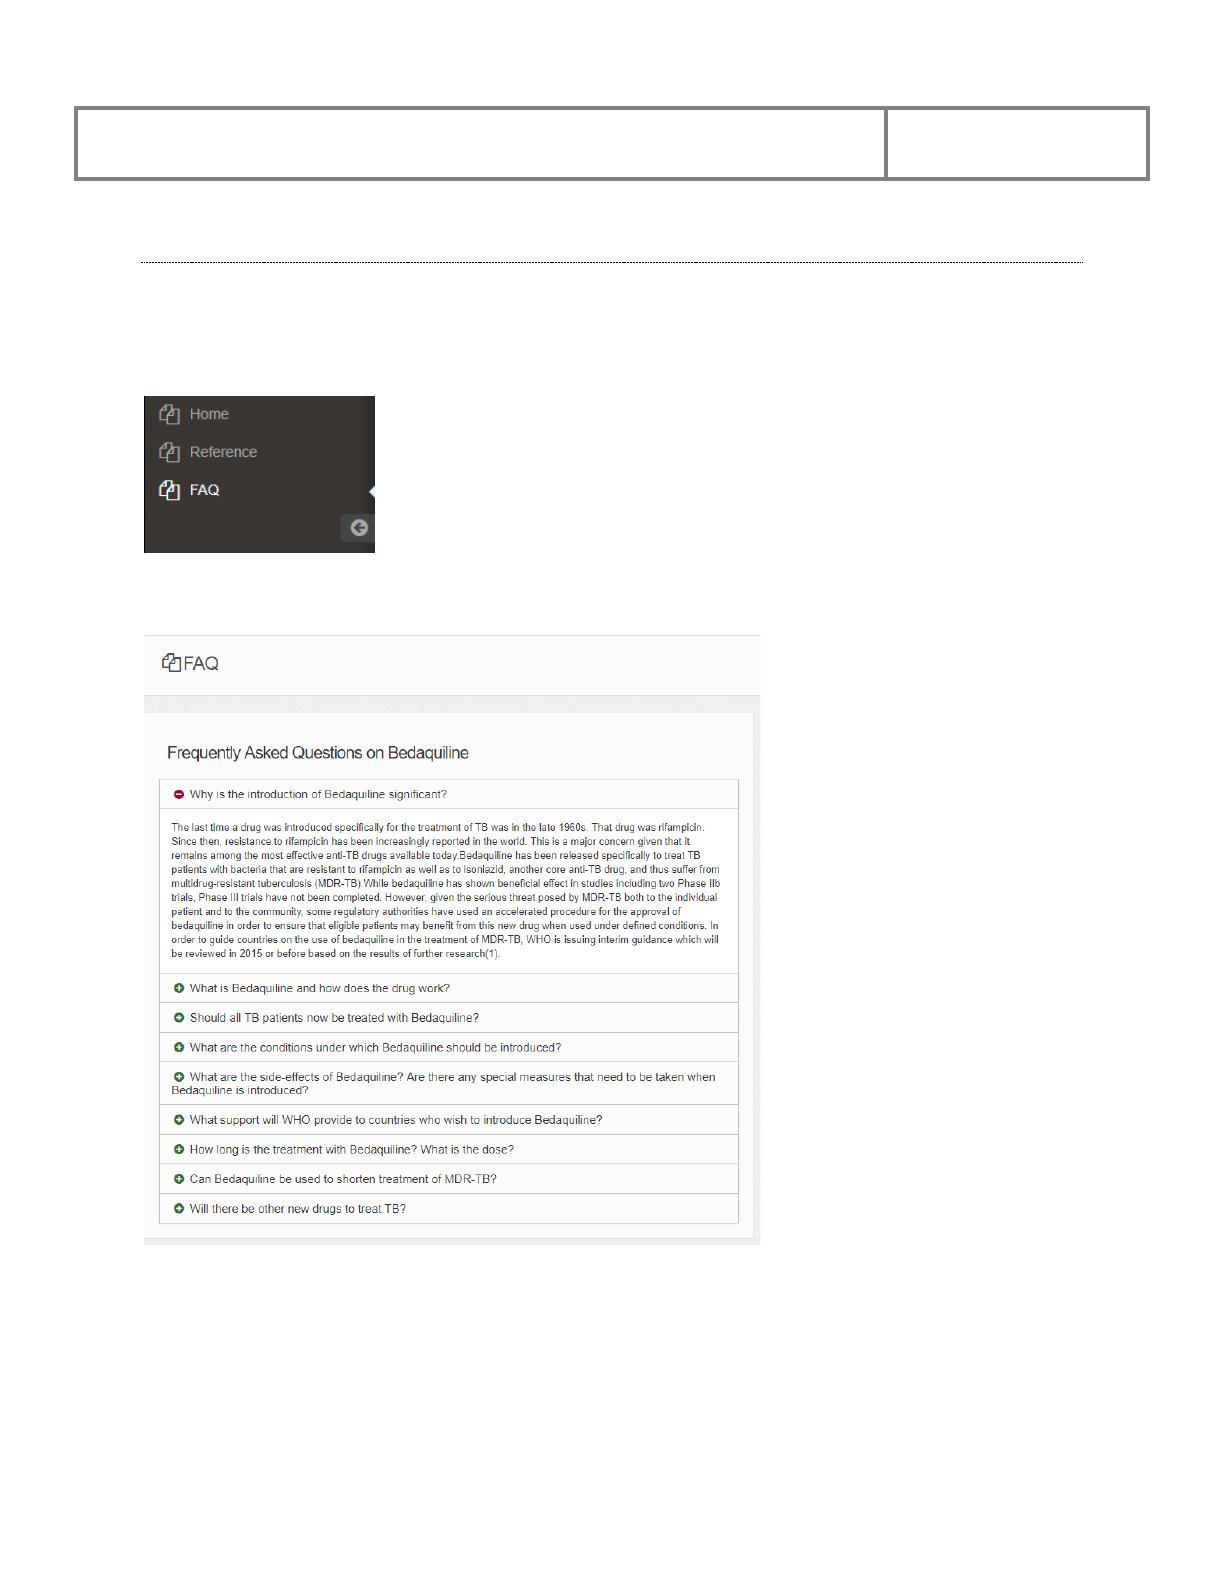
PViMS User Manual
2018
215
7.3 Viewing the Frequently Asked Questions page
The Information Portal FAQ Page contains a list of frequently asked questions particular to the
implementation of PViMS for Pharmacovigilance activities in relation to the use of Bedaquiline.
To access the FAQ Page, click on the FAQ menu in the Information Portal.
The system will navigate you to the FAQ Page where you are able to view these questions.

PViMS User Manual
2018
216
To view the answer for a specific question, click on the green plus icon to expand that question
or the red minus sign to compress that question.
7.4 Modifying Content in the Information Portal
The information Portal is based on a content management platform whereby PViMS publishers
have the ability to add new and modify existing content within this portal in a collaborative
manner. This provides PViMS analysts with an integrated platform to share details of their
ongoing analysis to the health community at large.
7.4.1 Adding a New Page
BUZZWORDS
Page: Consists of 1 to 6 widgets, with each widget containing content that is rendered as part of
the overall page. Each page is accessible either from the main information portal menu or from
within an existing widget.
When adding a new page, you are creating a platform to add content that is specific to the overall
theme of that page. To add a new page to the Information Portal, you need to have the Publisher
role assigned to your user profile.
PViMS User Manual
2018
217
To add a new page, click on the Add new page menu.
The following information must be entered when saving a new page:
Page Name
The unique name of the page. This is also the name of page
header when viewing the page.
Definition
Provide additional information that describes the page
Breadcrumb
The name of the menu option that you can access to view
the page
Visible to Menu
Should this page appear on the main list of menu items in
the Information Portal?
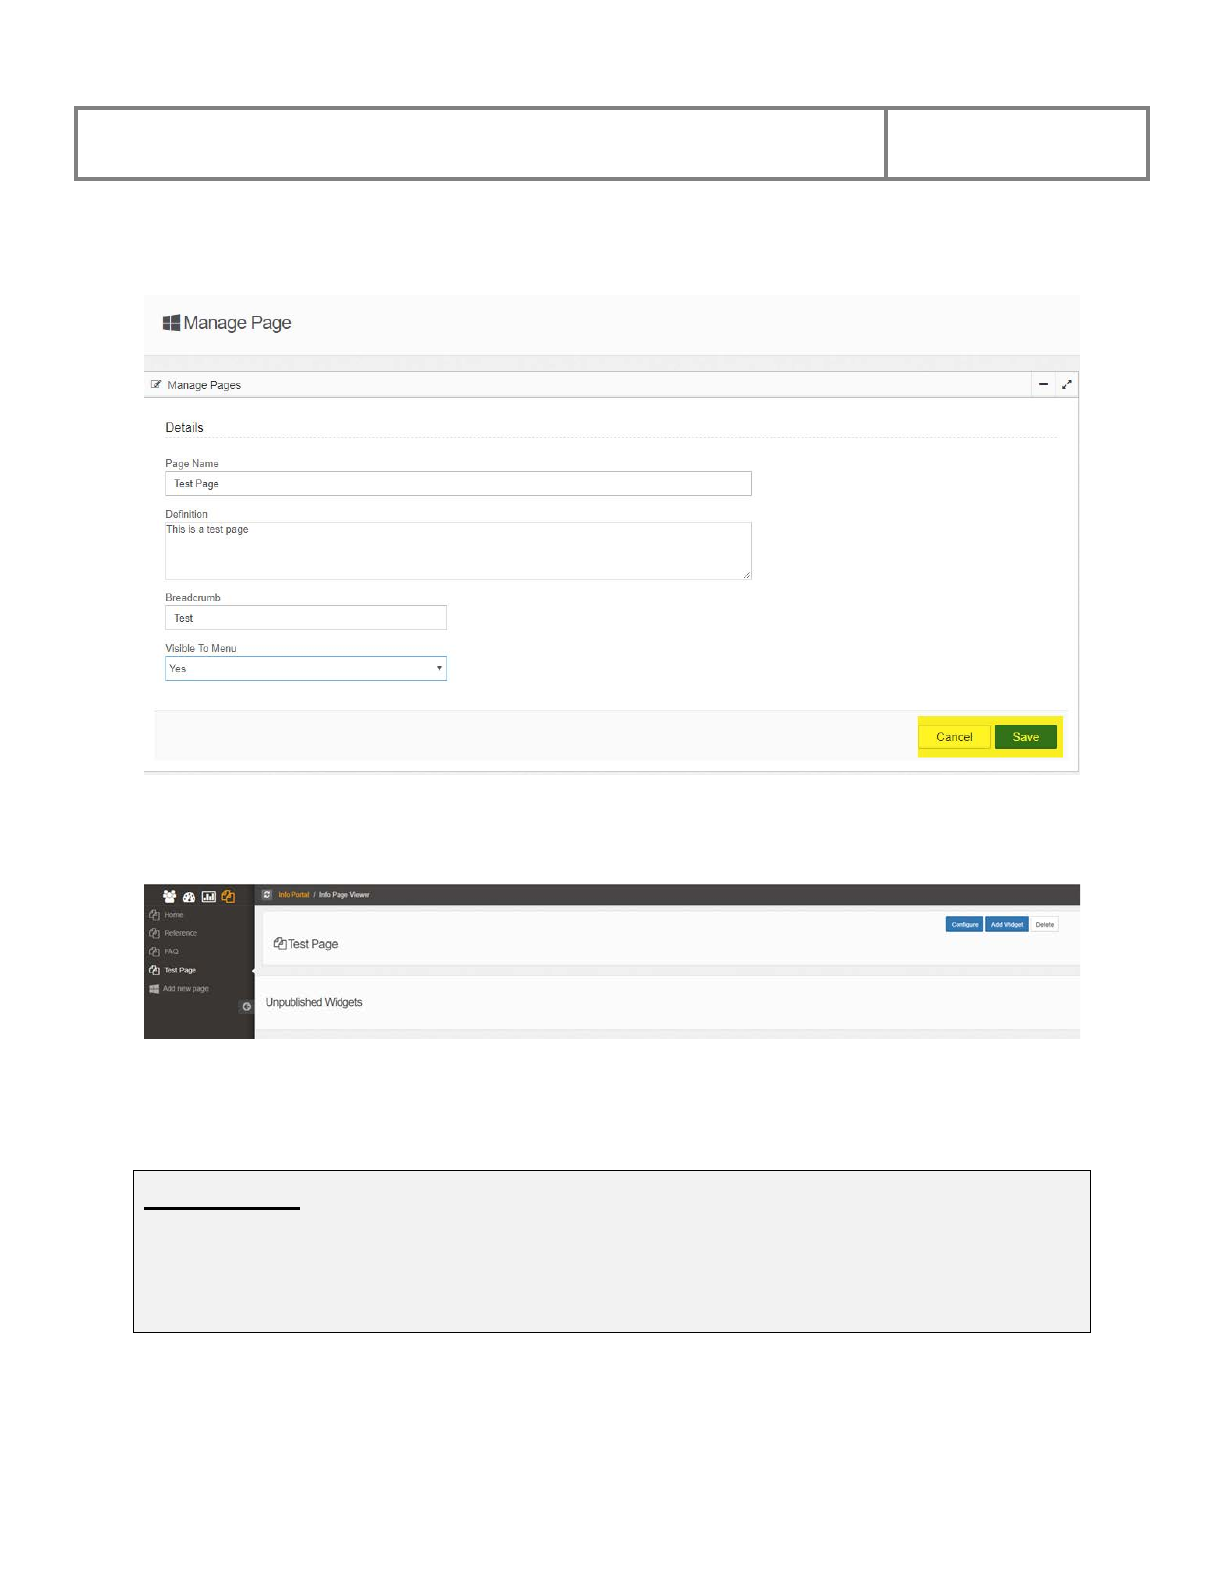
PViMS User Manual
2018
218
Enter the relevant information for the page and either click the Save button to save your new
page or the Cancel button to cancel your action and return to the Home page of the portal.
The system will navigate you to the new blank page once it has been saved and the new page
will appear in the main Information Portal menu if the visible to menu field is set to yes.
See the next section for information about how to add a widget to add content to this page.
7.4.2 Adding a Widget to a Page
BUZZWORDS
Widget: A widget is an individual panel within a page that provides a container for rendering
dynamic content defined by the PViMS publisher. A page within the Information Portal can store
up to 6 widgets per page.
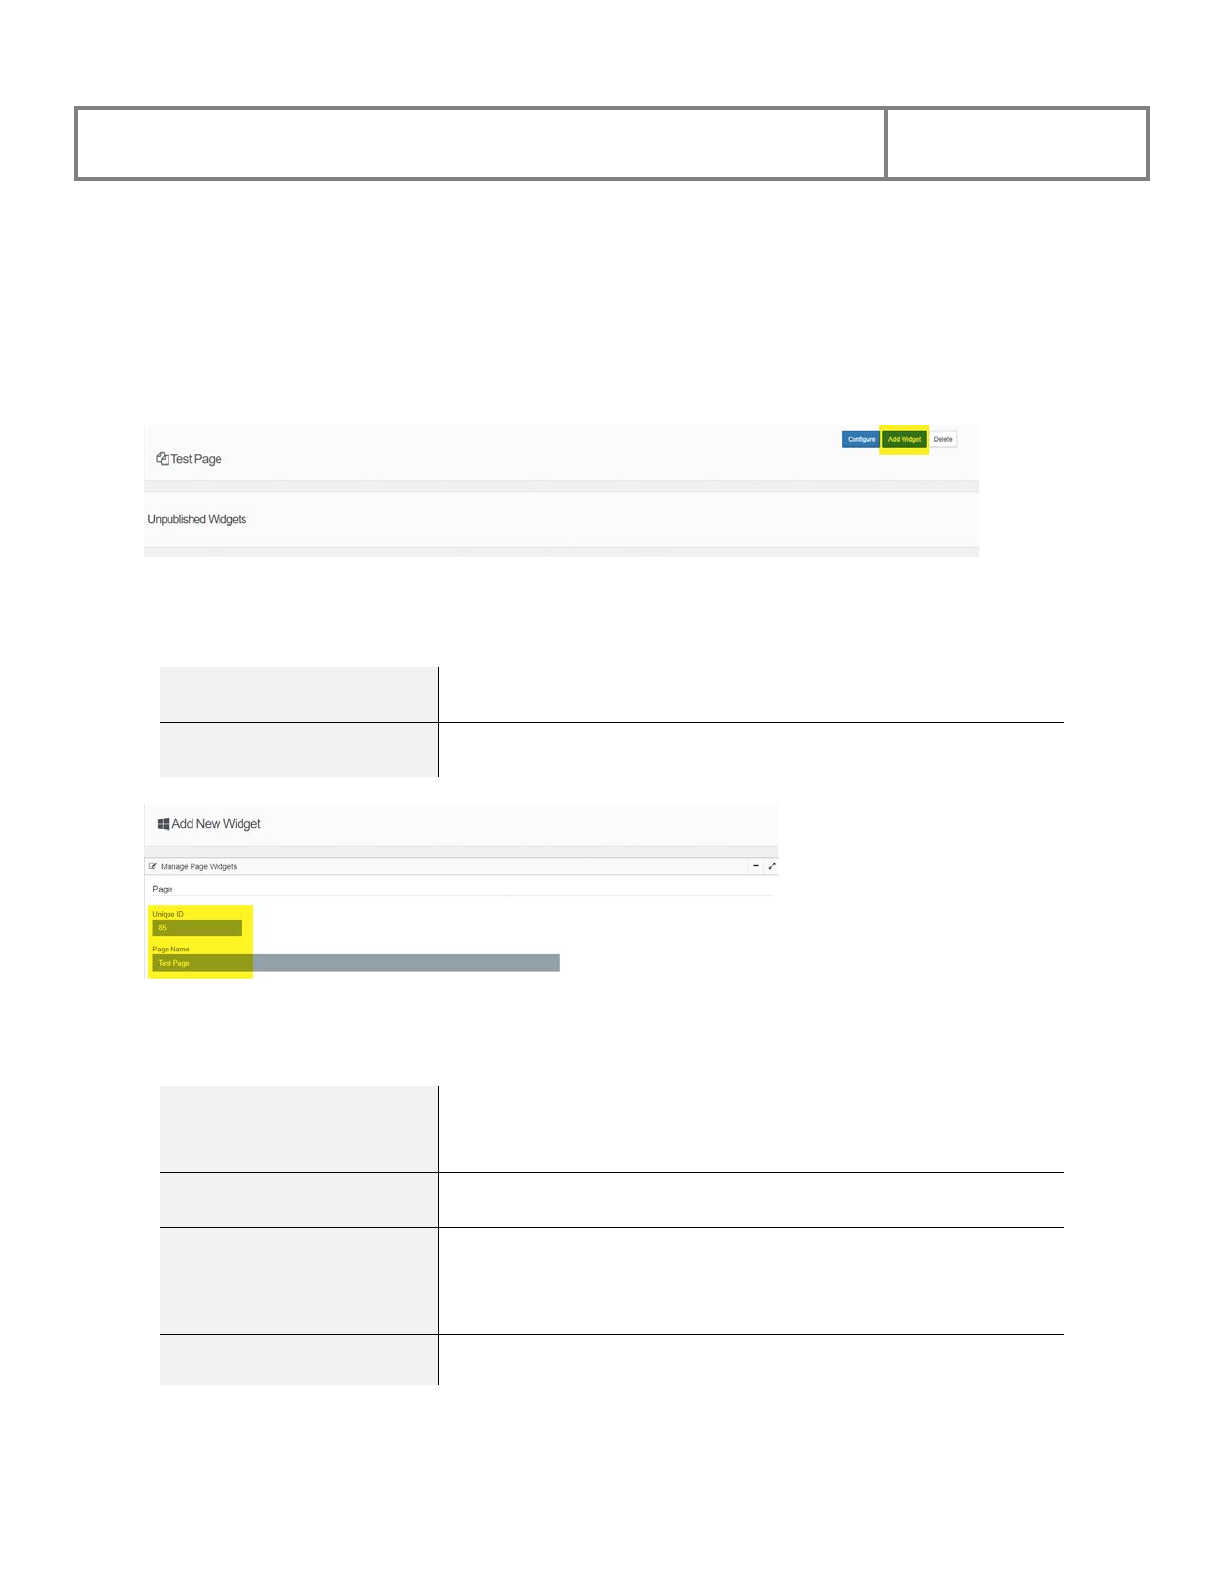
PViMS User Manual
2018
219
When adding a new widget, you are adding a container for new content that is specific to the
overall theme of that page. To add a new widget to a page, you need to have the Publisher role
assigned to your user profile.
To add a new widget, navigate to the page that you would like to add the widget to and click on
the Add Widget button that appears in the page header.
The system will navigate you to an Add New Widget page. The following information is
displayed on this screen:
Unique ID
The unique id of the page that the widget is been added to
Page Name
The name of the page that the widget is been added to
The following information must be entered when adding a new widget:
Widget Name
The unique name for the widget. This name will be
displayed as the title for the content.
Widget Type
The type of widget to be added (General, ItemList, Wiki)
Widget Status
The status of the widget (Published, Unpublished)
Please note: new widgets have to be added in an
unpublished status
Icon
The icon that should accompany the title of the widget
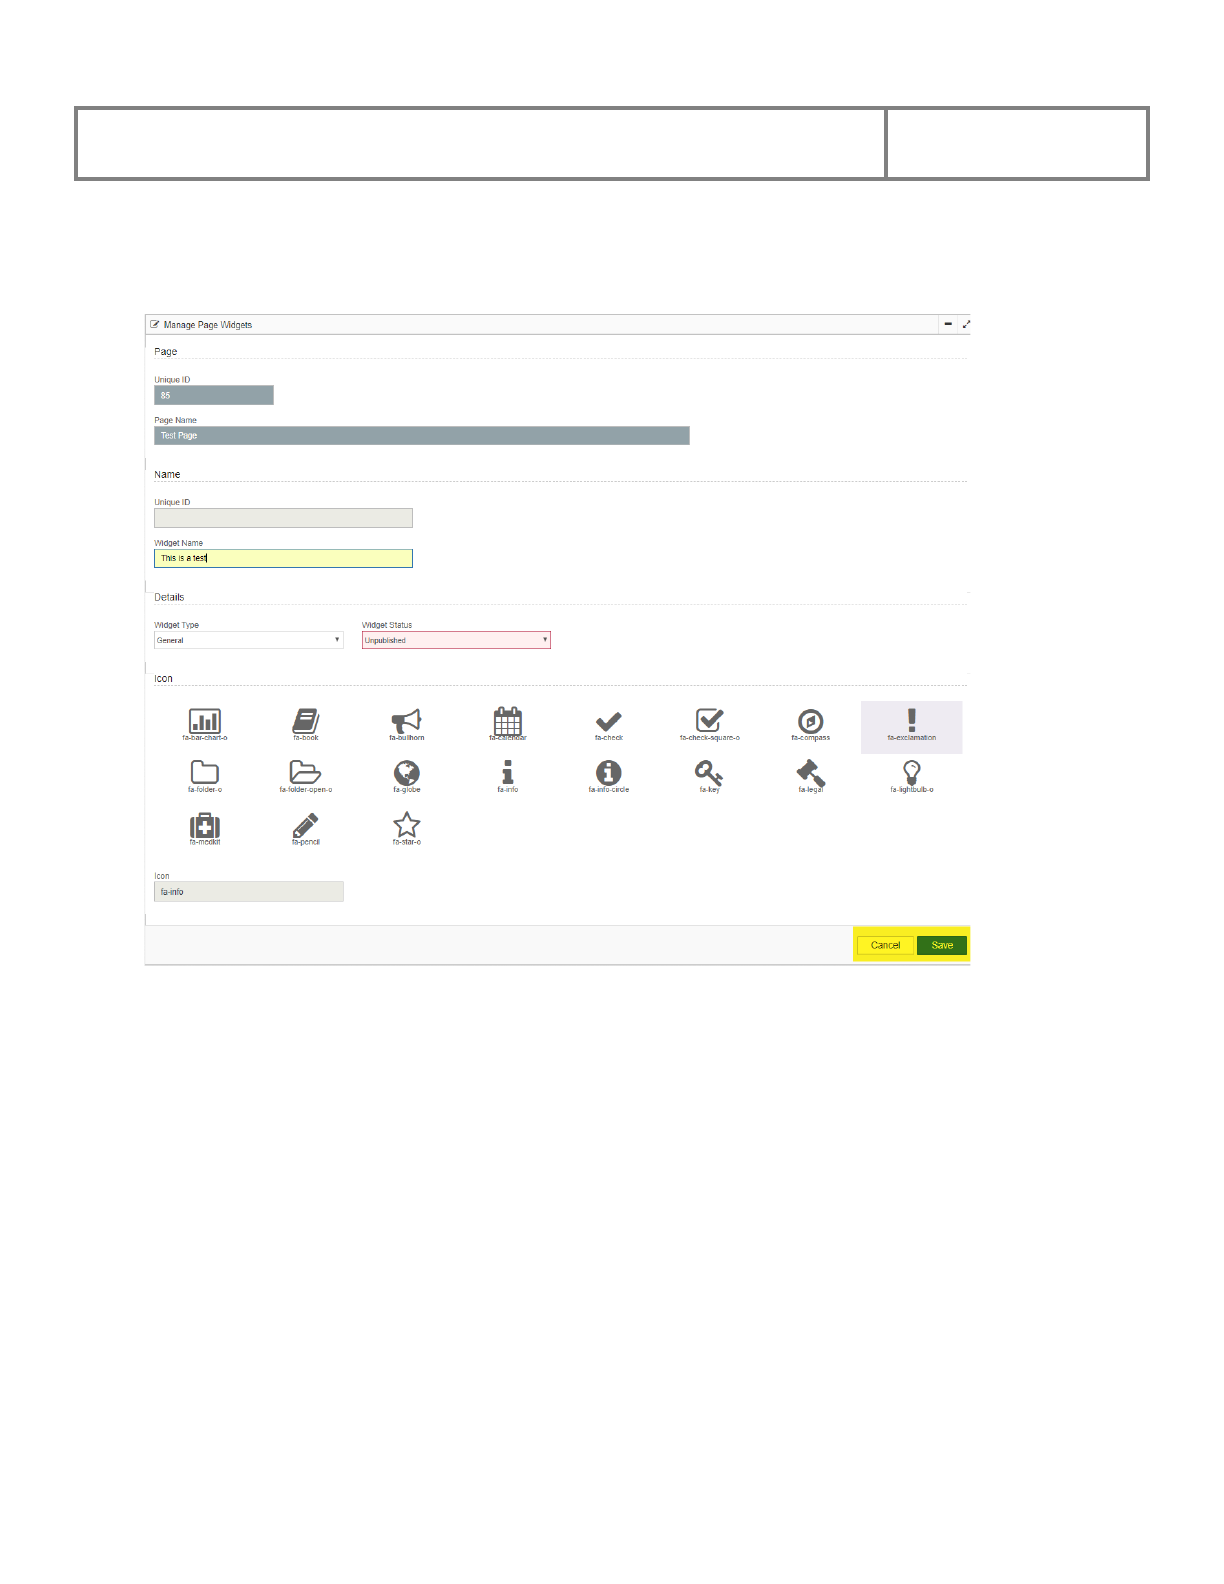
PViMS User Manual
2018
220
Enter the relevant information for the widget and either click the Save button to add your new
widget or the Cancel button to cancel your action and return to the page.

PViMS User Manual
2018
221
The system will add the new widget to the page and will now allow the user the ability to add
content to the widget. Please note that a unique ID has now been allocated to the widget.
Please see the section on adding content to a widget for further information on modifying content
for the new widget.
Please note: the new widget is allocated to the page as an unpublished widget. This widget
therefore cannot be viewed by users who do not have the Published role assigned to their user
profile.

PViMS User Manual
2018
222
7.4.3 Adding or Changing a Widget’s Content
To add content to a new widget or edit content within an existing widget, you need to have the
Publisher role assigned to your user profile.
To add or edit content within a widget, navigate to the page that you would like to modify the
content, locate the widget you would like to modify and click the Configure button for this
widget.
The system will navigate you to the Edit Widget page where you will have the ability to edit
your content.
7.4.3.1 General Widget Content
To change content for the general widget, locate the editor field in the General Content section
for the widget and edit your content as necessary. Click the Save button to save your changes or
the Cancel button to cancel this action and return to the page view.
7.4.3.2 ItemList Widget Content
To change content for the ItemList widget, locate the Item Content section for the widget.
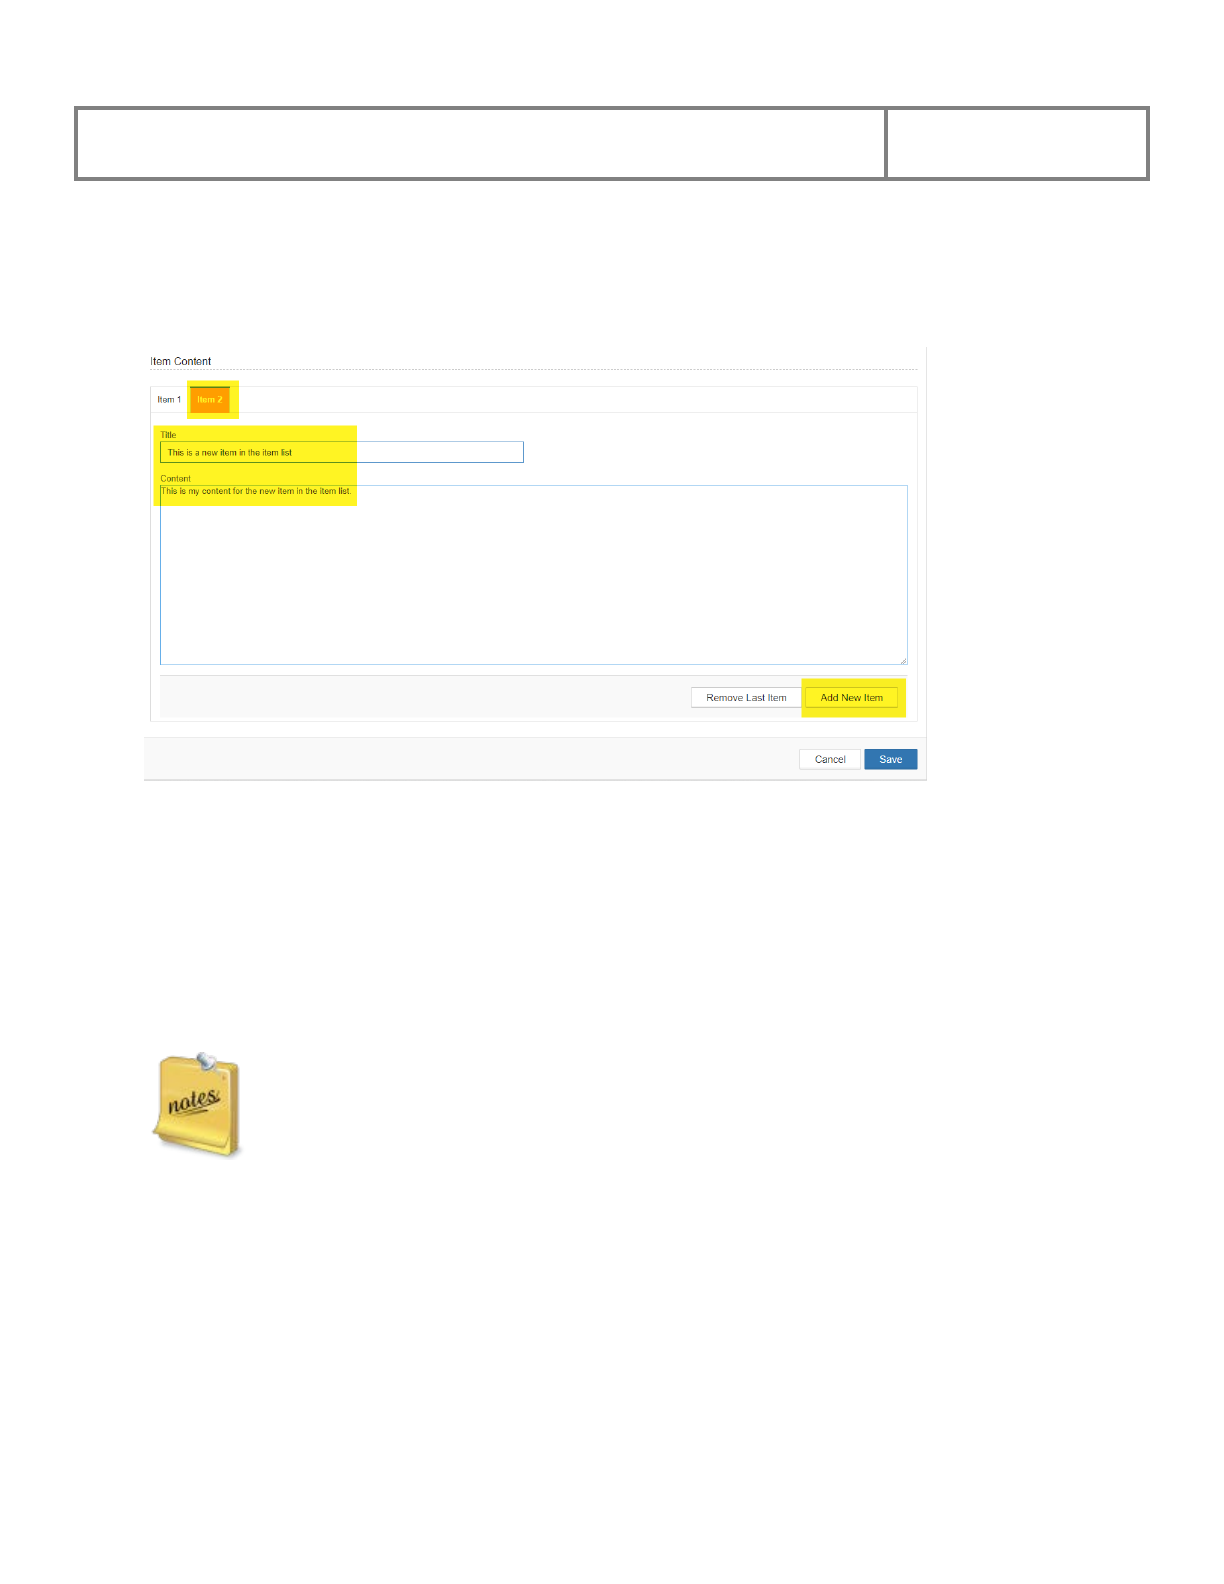
PViMS User Manual
2018
223
To add a new item to the item list, click the Add New Item button. Once you have clicked this
button, you will see that a new item has been added to the tabbed panel at the top of this section.
Enter the title for the new item as well as the content associated to this item.
Click the Save button to save your changes or the Cancel button to cancel this action and return
to the page view.
To remove an item from the list, click the Remove Last Item button. Once you have clicked this
button, you will be able to note that the last item has been removed from the tabbed panel at the
top of this section. Click the Save button to save your changes or the Cancel button to cancel
this action and return to the page view.
It is only possible to remove the last item in the list. Please edit content from
existing items if an item in the middle of the list is no longer valid.
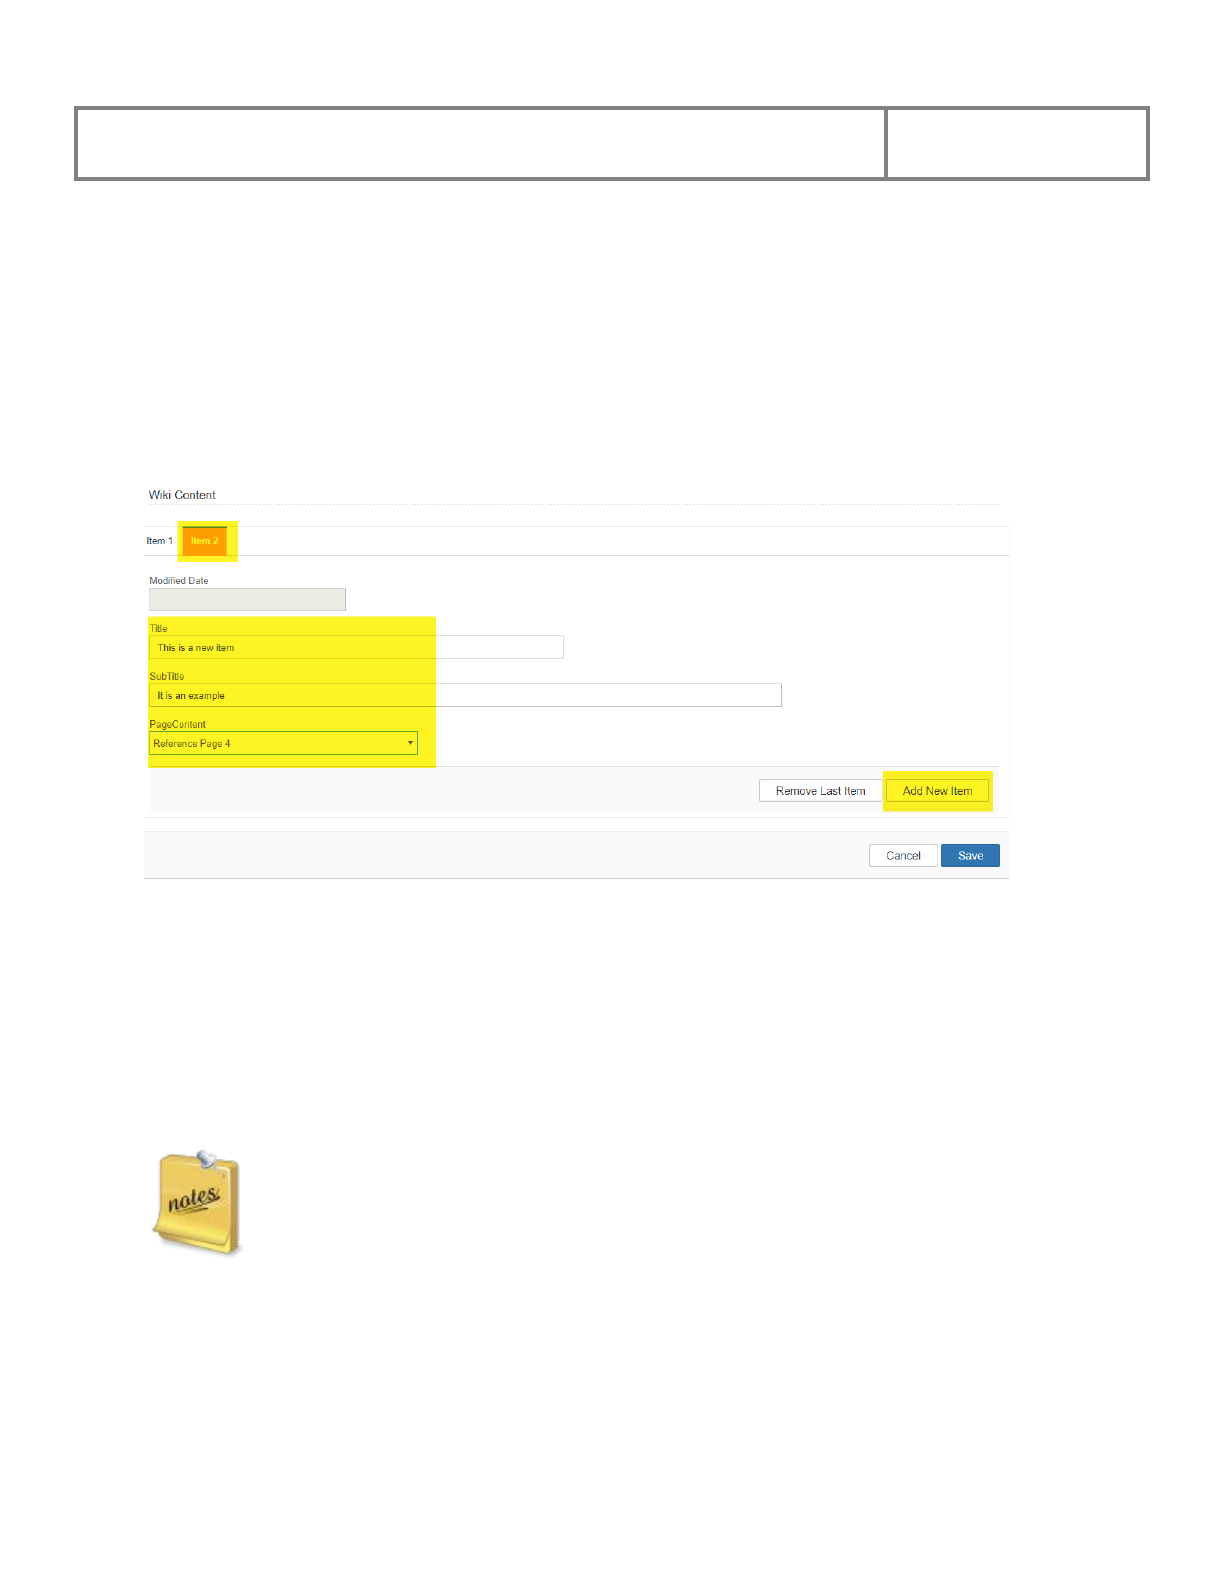
PViMS User Manual
2018
224
7.4.3.3 Wiki Widget Content
To change content for the Wiki widget, locate the Wiki Content section for the widget.
To add a new item to the item list, click the Add New Item button. Once you have clicked this
button, you will be able to note that a new item has been added to the tabbed panel at the top of
this section. Enter the title for the new item as well as the sub-title and the page that the Wiki
item should be routed to when clicked.
Click the Save button to save your changes or the Cancel button to cancel this action and return
to the page view.
To remove an item from the list, click the Remove Last Item button. Once you have clicked this
button, you will be able to note that the last item has been removed from the tabbed panel at the
top of this section. Click the Save button to save your changes or the Cancel button to cancel
this action and return to the page view.
It is only possible to remove the last item in the list. Please edit content from
existing items if an item in the middle of the list is no longer valid.

PViMS User Manual
2018
225
7.4.4 Publishing a Widget
BUZZWORDS
Publish: Widgets in an unpublished status are not viewable by standard users of the Information
Portal (those who do not have the Publisher role assigned to their user profile). Conversely,
widgets in a published status are viewable by all users.
Widgets are only to be published once the publisher is happy with the content submitted.
To publish a widget, navigate to the page that you would like to modify, locate the widget you
would like to publish and click the Configure button for this widget.
The system will navigate you to the Edit Widget page where you will have the ability to publish
the widget.
Change the status of the widget to Published and confirm the location of the widget. Click the
Save button to save your changes or the Cancel button to cancel this action and return to the
page view.
The location determines where on the page the widget will appear. Only one
widget can occur in each of the 6 allocated spaces on a page.
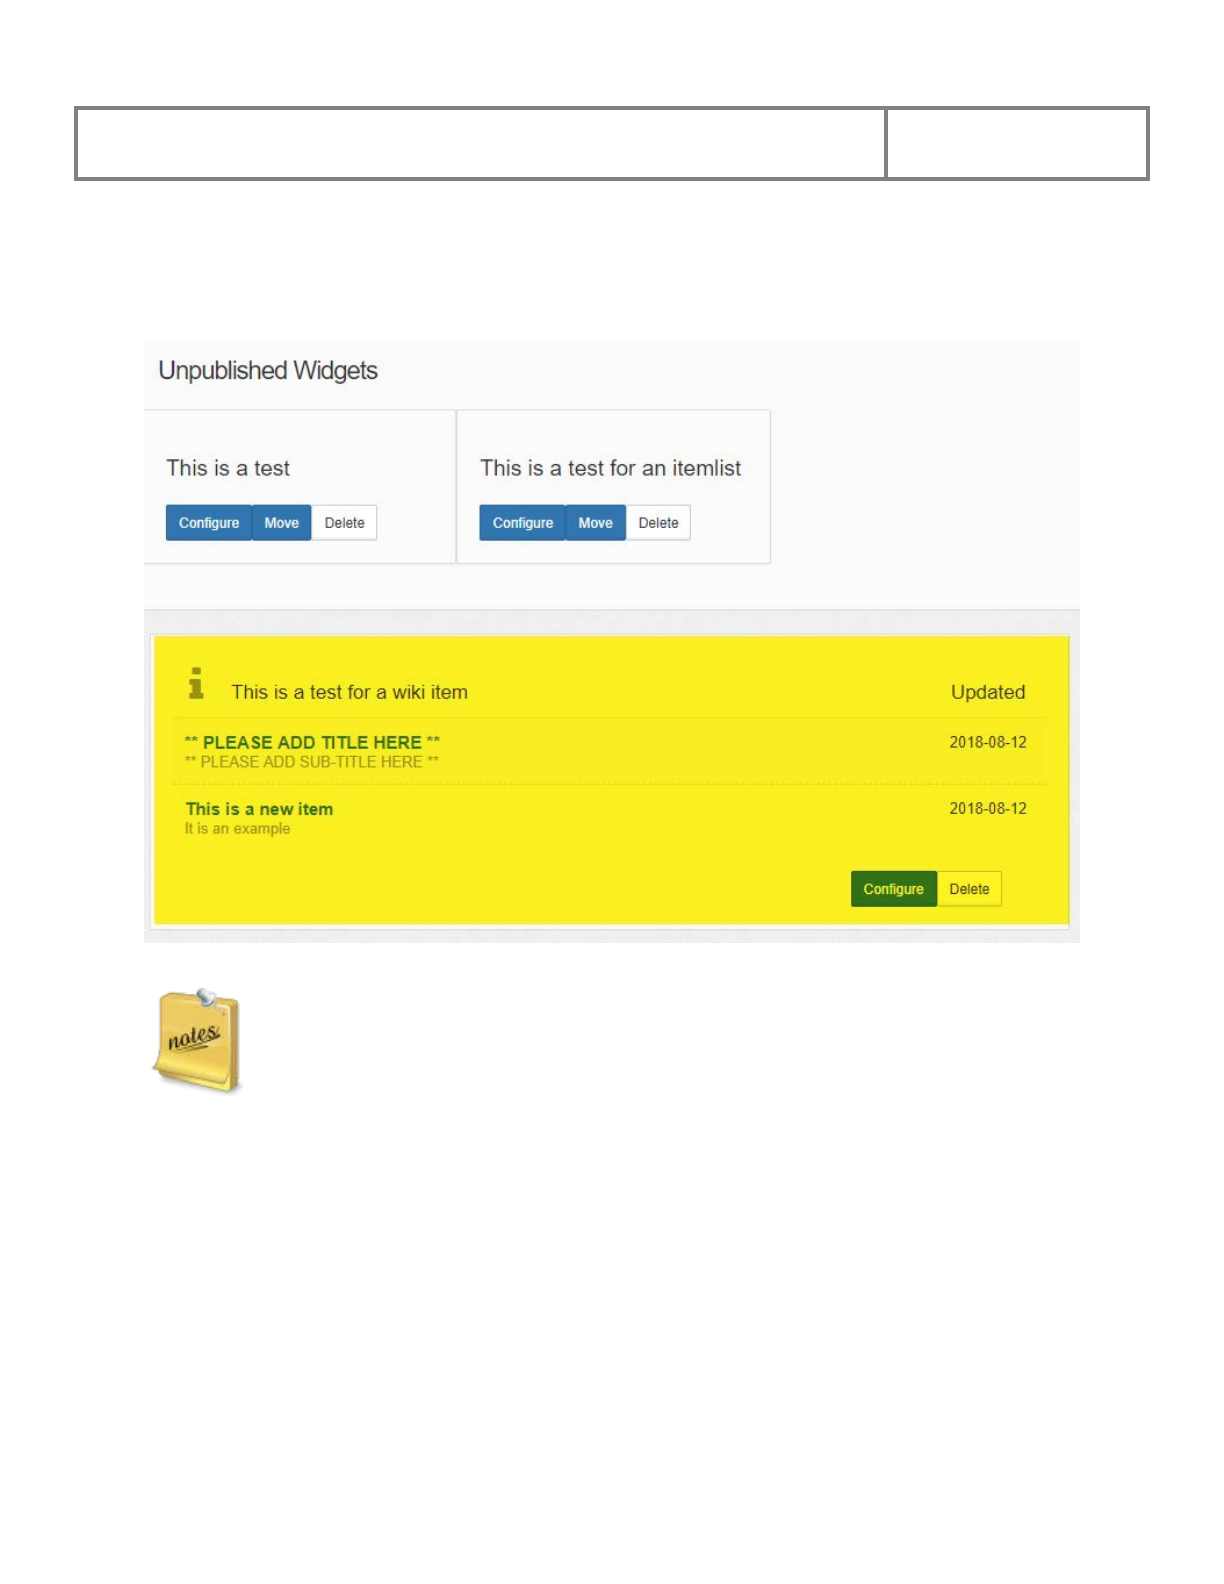
PViMS User Manual
2018
226
The system will navigate you to the page that you have published the widget on. Please note that
the widgets will be removed from the Unpublished Widgets section and the widget will now be
viewable on the page itself.
Saving a widget as unpublished will remove the widget from the page and move it
to the Unpublished Widgets section. Widgets in this section are not viewable by
standard users of the Information Portal.
7.4.5 Deleting a Widget
To delete a widget, navigate to the page that you would like to modify, locate the widget you
would like to delete and click the Delete button for this widget.
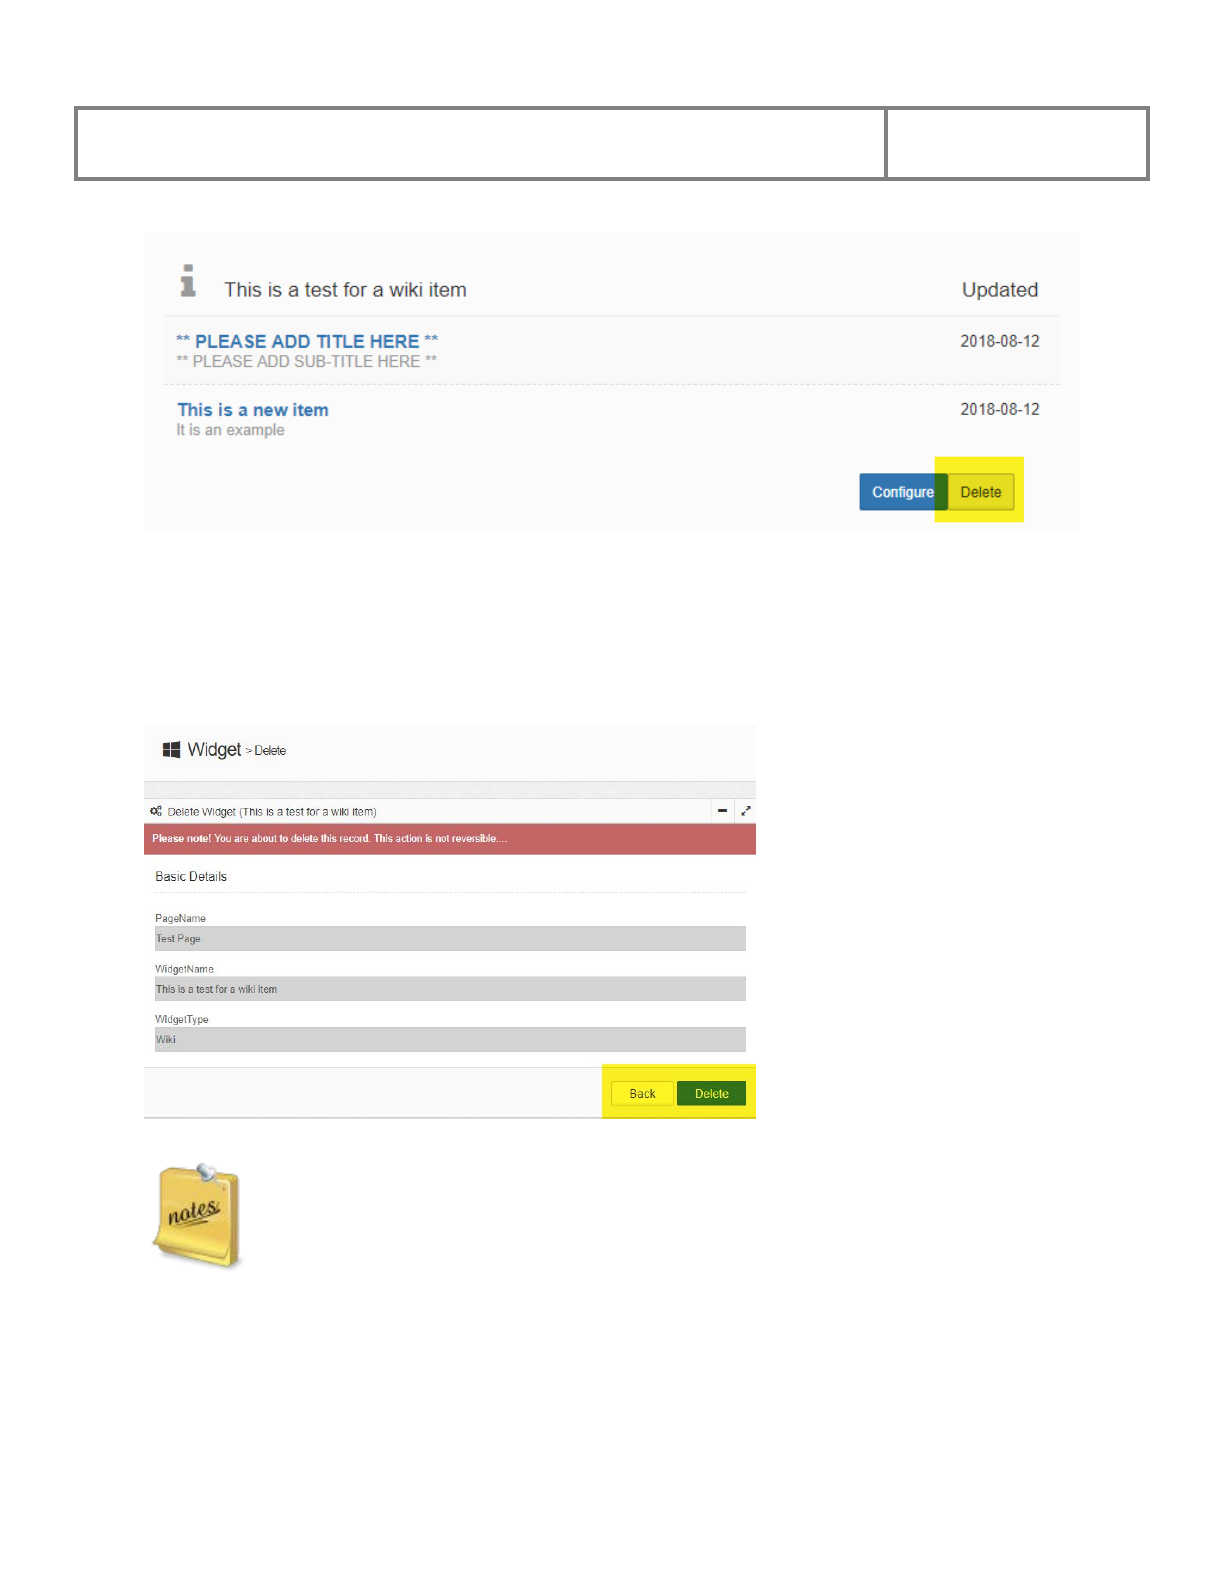
PViMS User Manual
2018
227
The system will navigate you to a Delete Widget page where you will have the ability to delete
the widget.
Click the Delete button to confirm the deletion or the Back button to cancel this action and
return to the page view.
The widget and all related content will be deleted when clicking the Delete button.
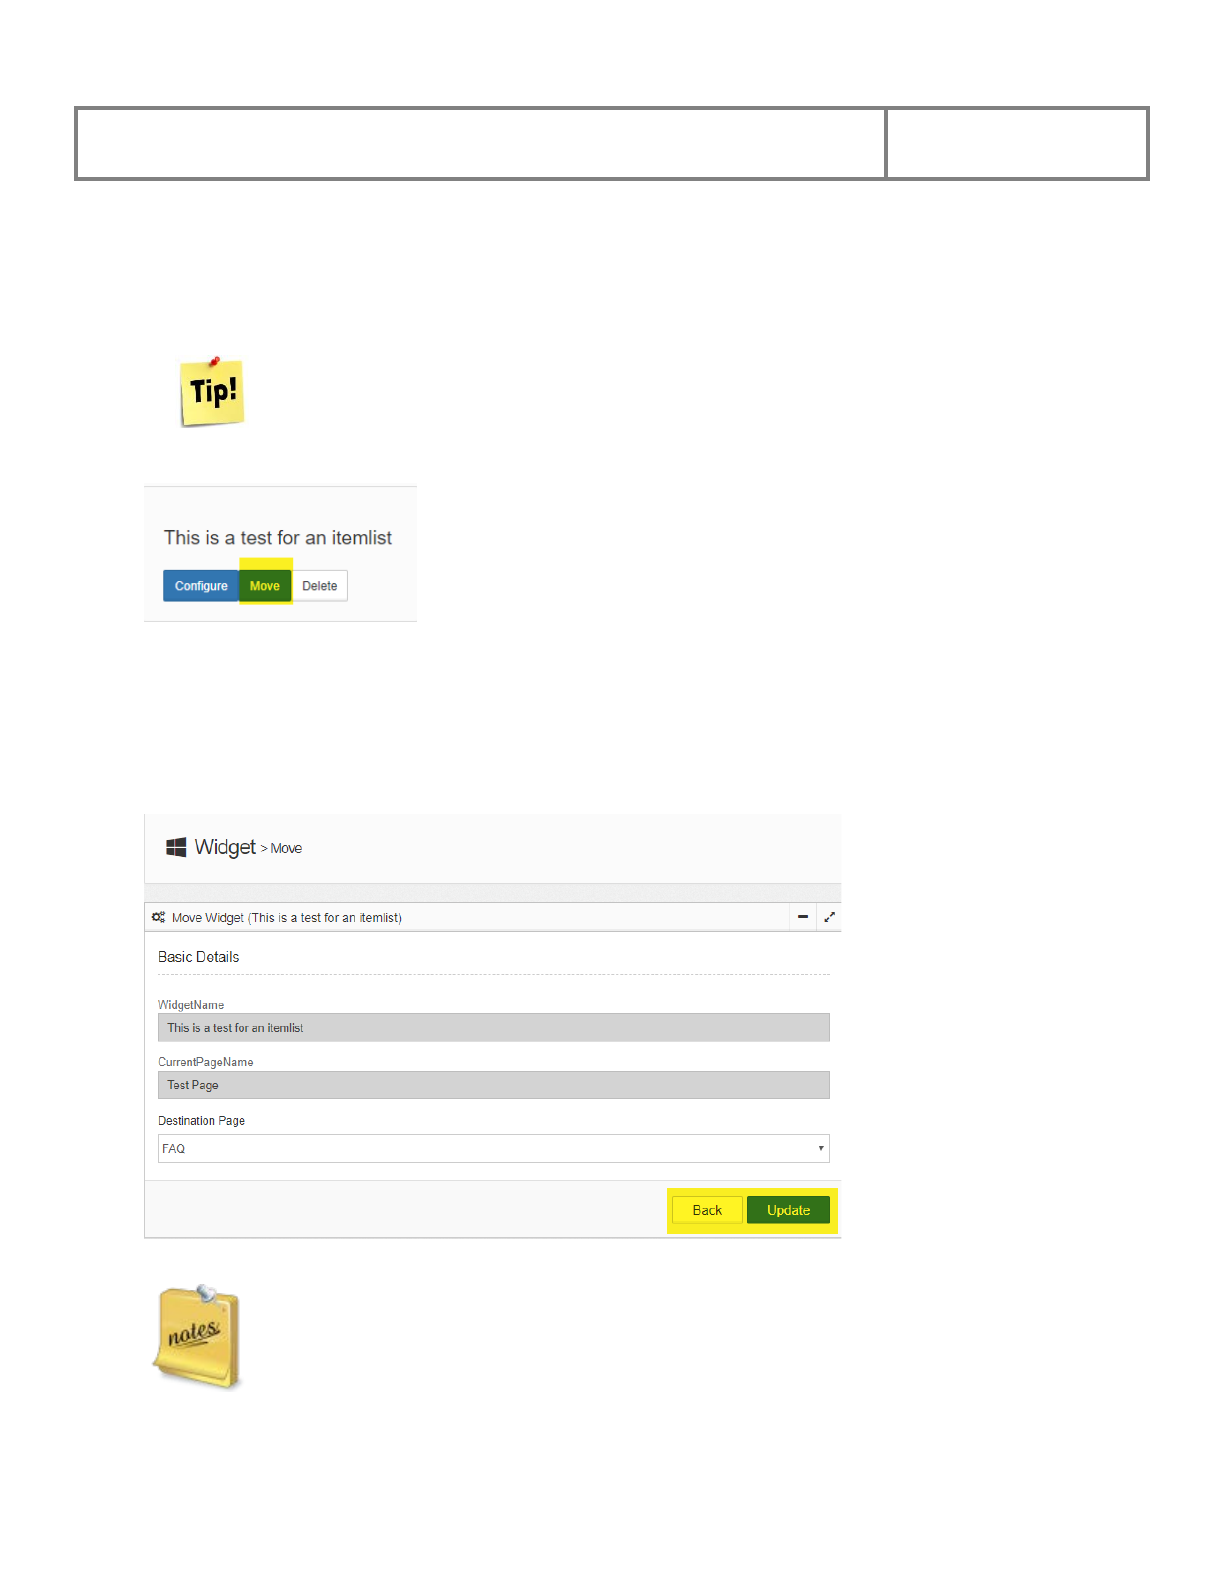
PViMS User Manual
2018
228
7.4.6 Moving a Widget to a New Page
To move a widget, navigate to the page that you would like to modify, locate the widget you
would like to move and click the Move button for this widget.
You are only able to move a widget if it is currently in an Unpublished status on
the page it resides on.
The system will navigate you to a Move Widget page where you will have the ability to select
the destination page for the widget.
Select the destination page and click the Update button to confirm the move or the Back button
to cancel this action and return to the page view.
The widget and all related content will be moved to the new page and will exist in
an Unpublished status on the new page.
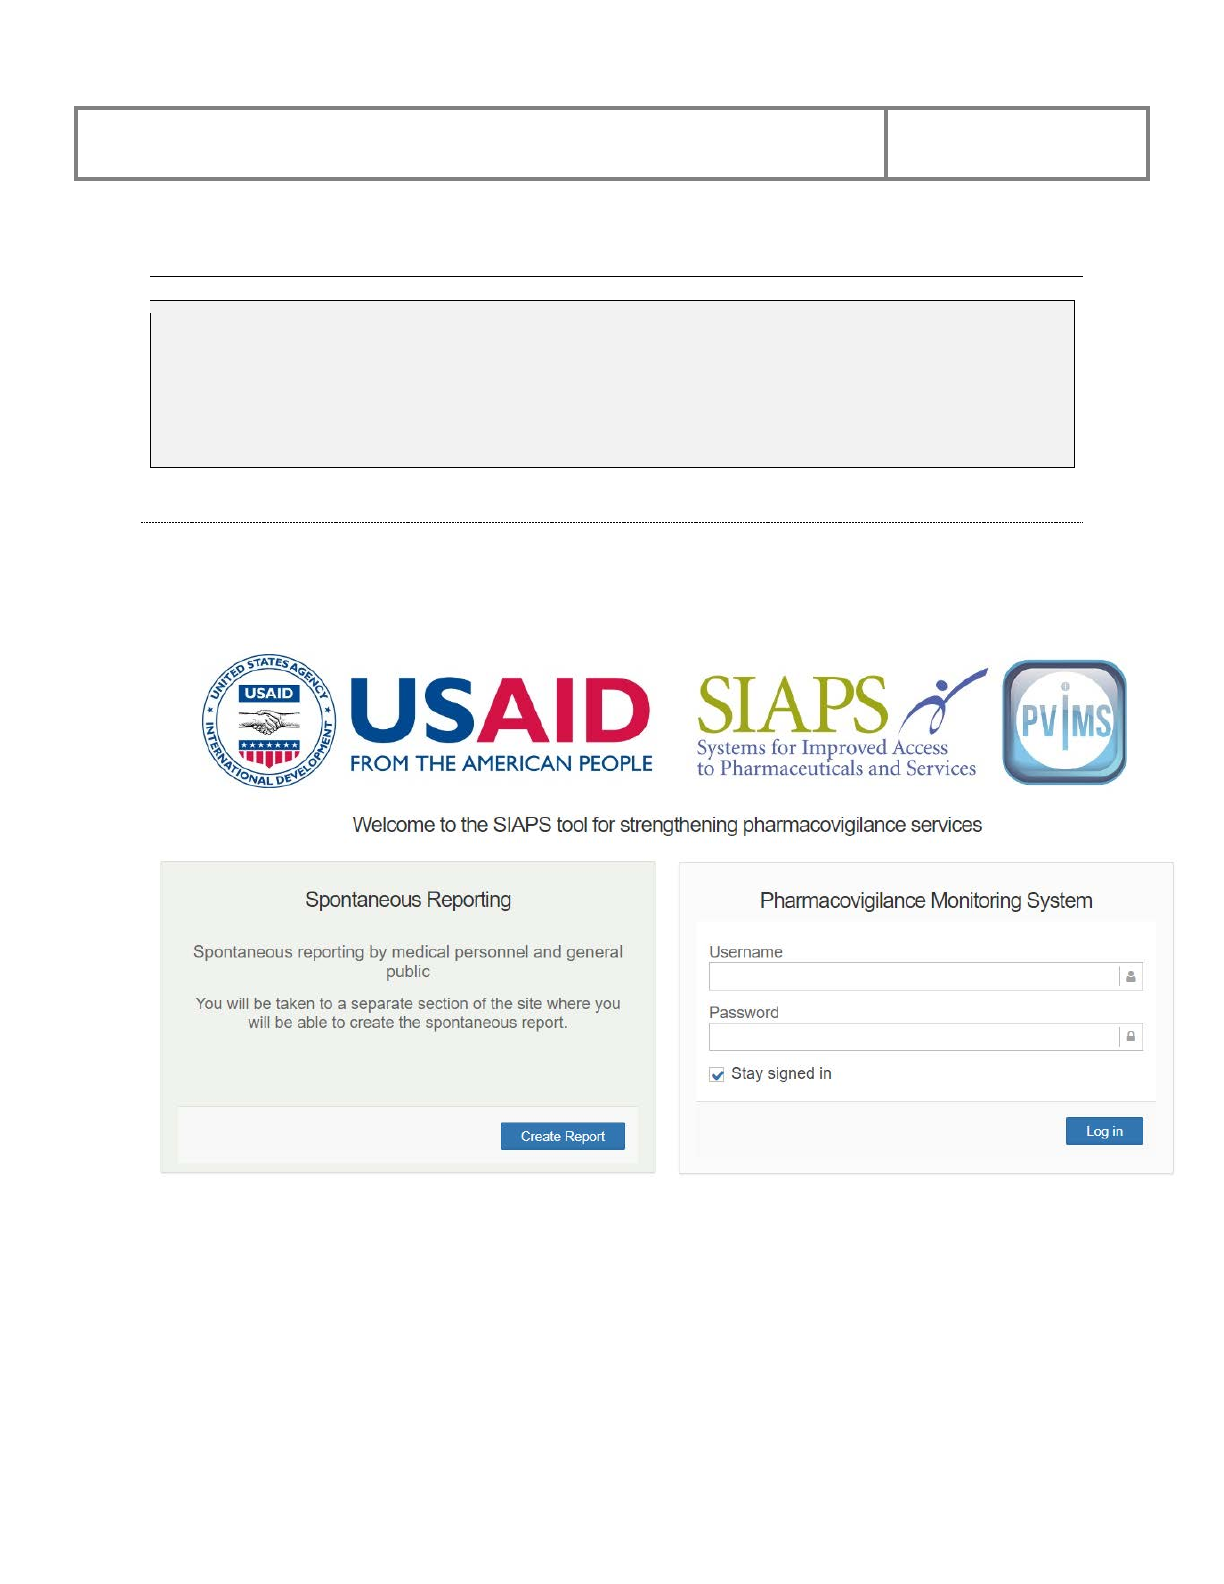
PViMS User Manual
2018
229
8 Spontaneous Reporting
PViMS provides the mechanism to register spontaneous reports by the public. While these
reports form part of the overall PViMS adverse event repository where Pharmacovigilance
activities can be performed against the report, they do not form part of the analysis.
Note: spontaneous reporting is available to the public and no login to PViMS is required.
8.1 Accessing Spontaneous Reporting
When you enter the correct URL to access PViMS, the system navigates you the login page. This
page contains the primary link to register a spontaneous report.
To register a spontaneous report, click on the Create Report button. The system will navigate
you to a page where you can enter the spontaneous report.
PViMS User Manual
2018
230
8.1.1 Add a New Report
Spontaneous reports are composed of the following sections:
Patient Information
Information related to the patient who suffered the adverse
event
Product Information
Information related to the medication that potentially caused
the adverse event
Test Result
Any test results that are relevant to the adverse event
Reaction and Treatment
Details of the adverse event
Reporter Information
Details of the person who has logged the adverse event
8.1.1.1 Patient Information
The Patient Information section captures basic patient demographic information about the
person who suffered the adverse event.
To enter patient information, enter text in the corresponding fields (e.g., Initials of Patient). Or
click the arrow in a selected field to display a list of values, and select one value from the list.
All elements with a red asterisk are mandatory.
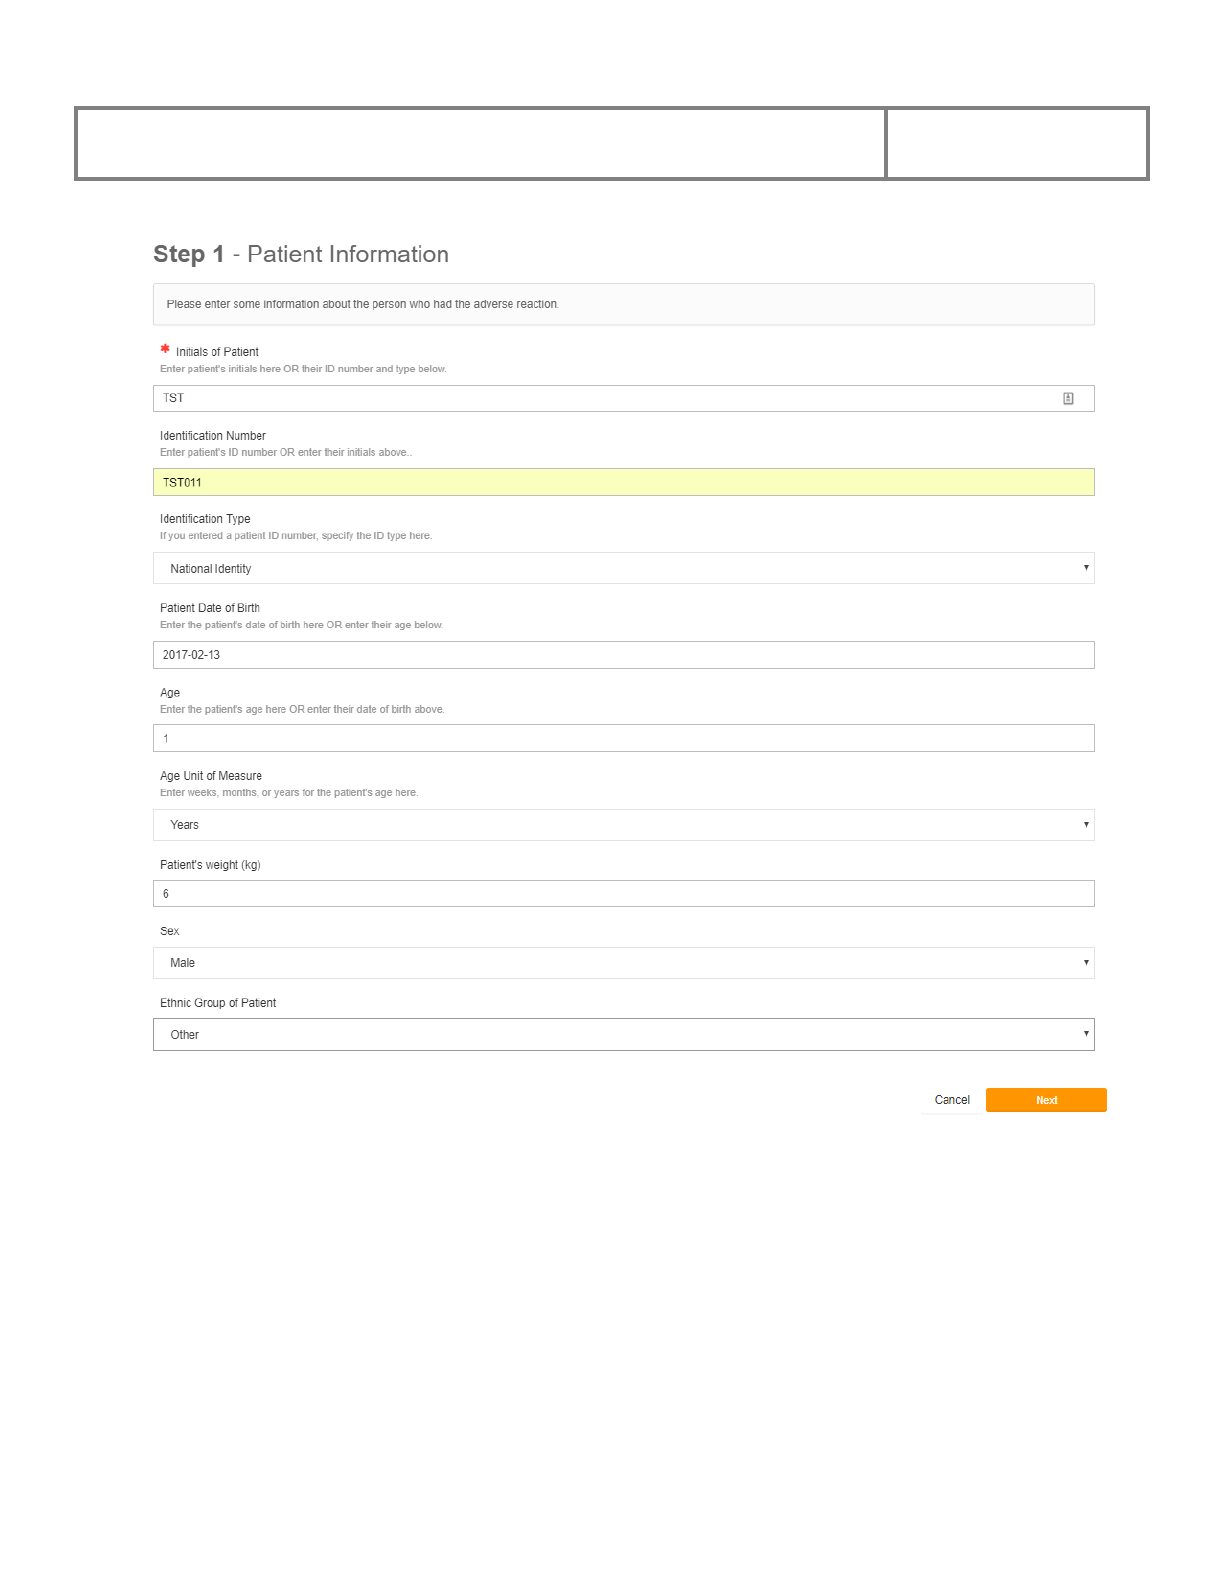
PViMS User Manual
2018
231
PViMS User Manual
2018
232
Fields in the Patient Information section are described below:
Initials of Patient
Identification of the patient is facilitated through the
capturing of their initials in a text field
Identification Number
Identification of the patient is facilitated through the
capturing of their ID Number in a text field
Identification Type
Dropdown list to select the patient’s type of identity number
specified
Patient Date of Birth
Either specify the patient’s date of birth
Age
Or specify the patient’s age
Age Unit of Measure
If age is specified, specify the unit type for the age (e.g.
days, months etc.)
Patient Weight (kg)
The weight of the page at the time of the adverse event, in
kilograms
Sex
Dropdown list to specify the gender of the patient
Ethnic Group of Patient
Dropdown list to specify the ethnic group of the patient
Click the Next button to navigate to the next screen or the Cancel button to cancel the
registration of the spontaneous report and return to the login screen.
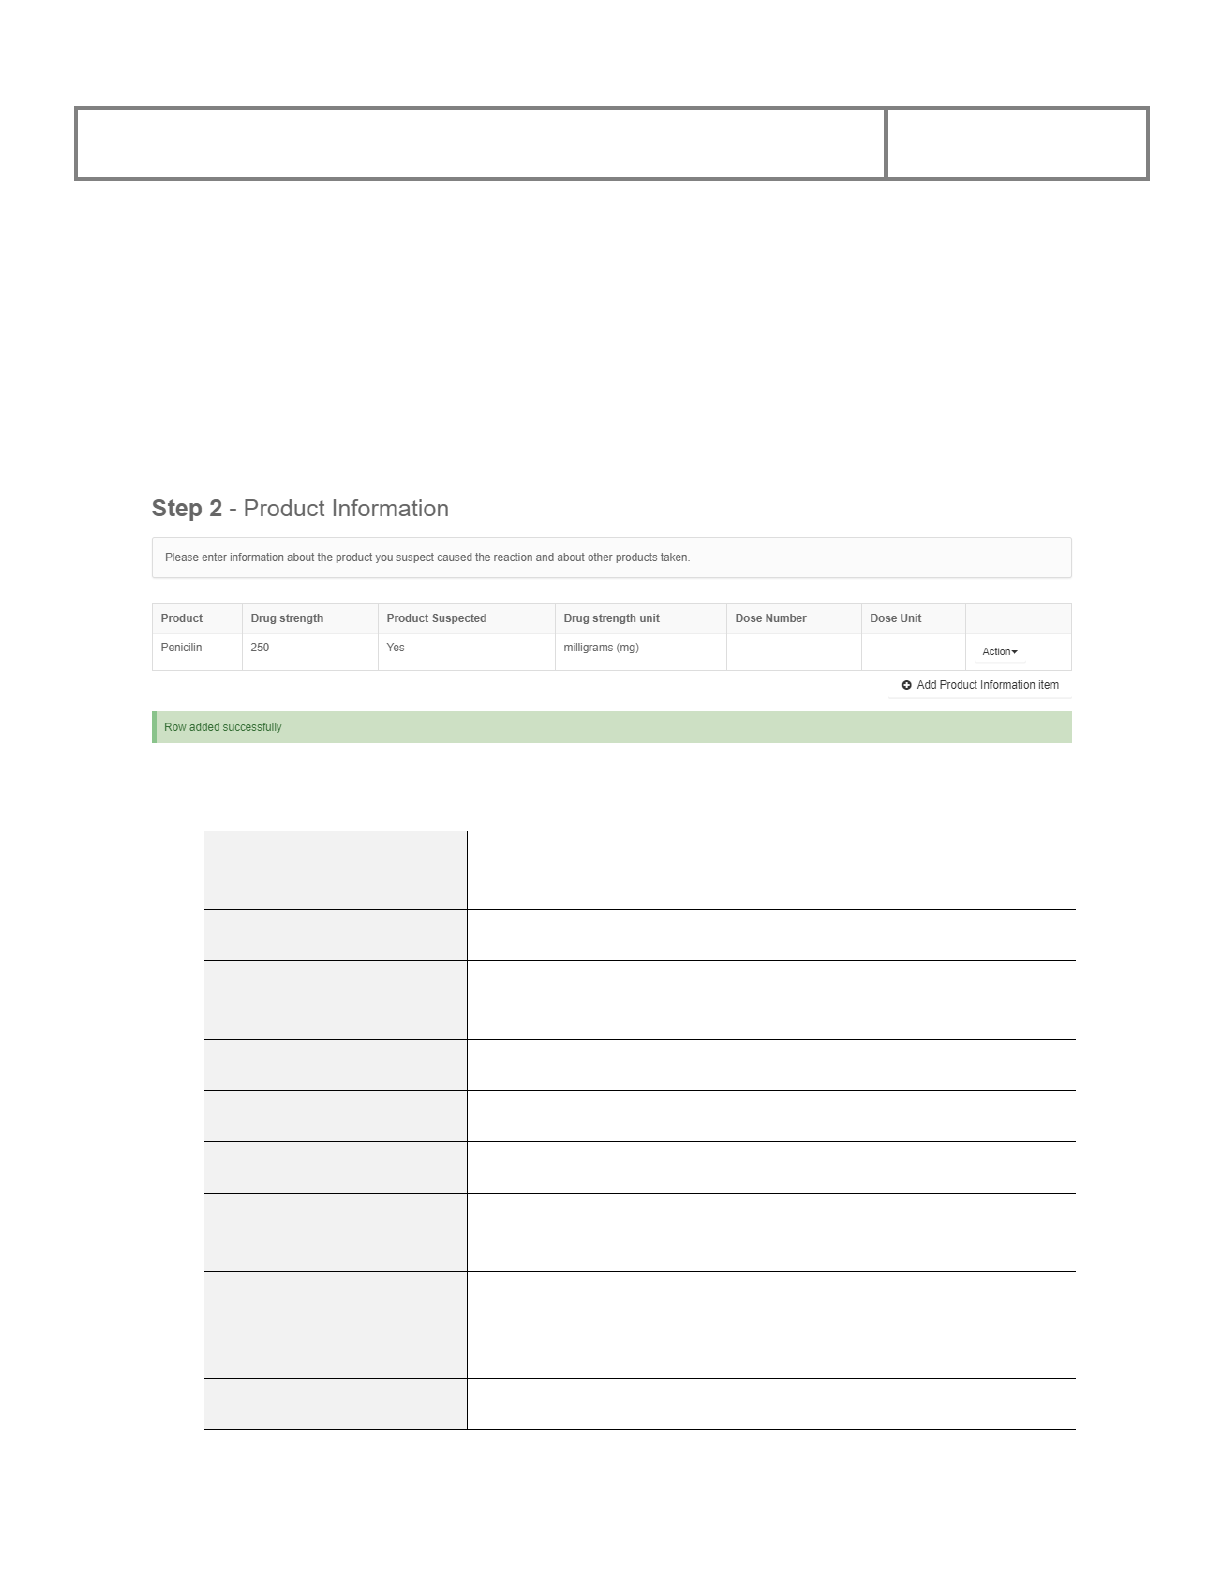
PViMS User Manual
2018
233
8.1.1.2 Product Information
The Product Information section captures a list of medications that the patient was taking at the
time of the adverse event.
To enter medication information, click the Add Product Information item button. Once a
product has been added, you are able to remove or edit the medication using the appropriate
button next to the medication.
Fields in the Product Information Section are described below:
Product
The name of the medication that the patient was taking
(generic or brand name)
Drug Strength
Free format description of the drug strength, e.g. 250
Drug Strength Unit
Dropdown list specifying the unit of the drug strength, e.g.,
mg
Product Suspected
Is this product suspected of causing the adverse event
Dose Number
Drug dosage
Dose Unit
Dropdown list specifying the unit of the drug dosage
Route of Administration
Dropdown list specifying how the drug has been
administered
Start and End Date
When did the patient start the drug and if they have
completed taking the drug, when was the last date of
administration
Treatment Duration
How long has the patient been on the drug
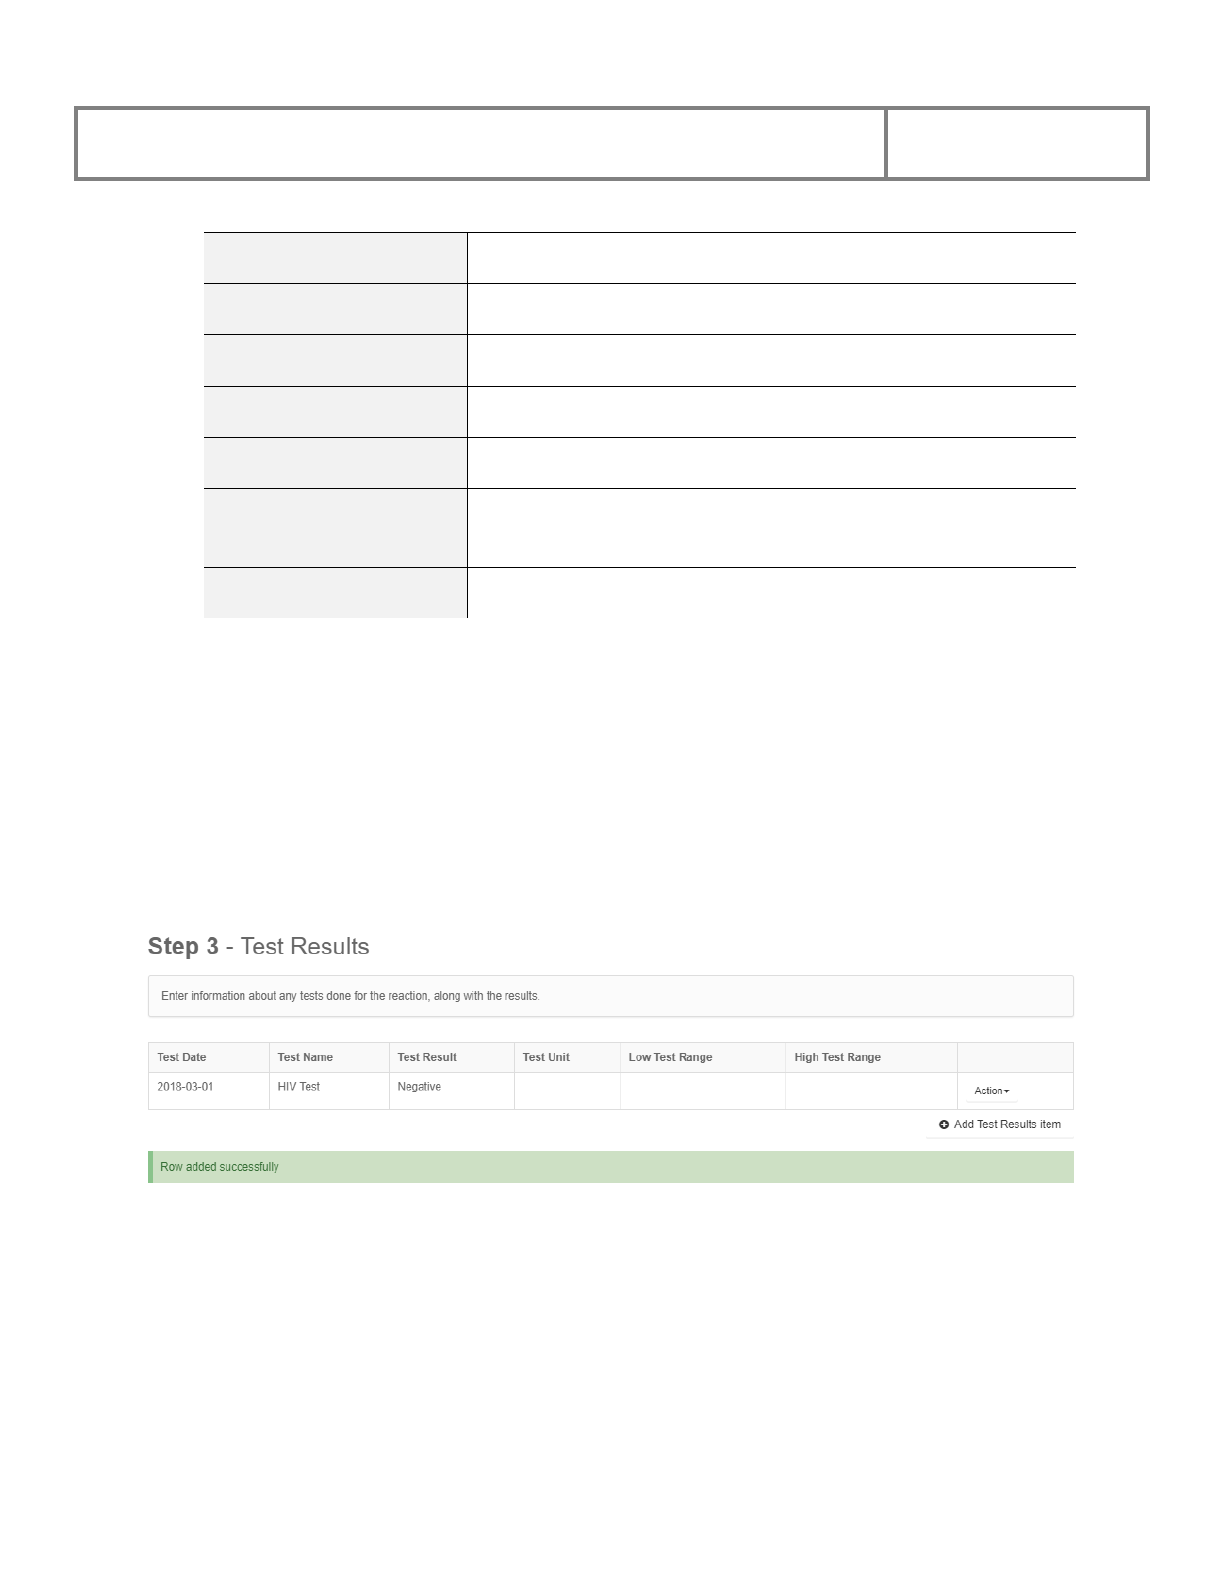
PViMS User Manual
2018
234
Treatment Duration Unit
Dropdown list specifying the unit for the duration
Indication
Indication for why the patient is taking this drug
Frequency
How frequently is the patient taking the drug
Batch Number
The batch number the drug forms part of
Action Taken
What action was taken when the adverse event occurred
Product Challenge
Was a challenge performed on the product when suspected
of the adverse event
Product Rechallenge
Was a rechallenge performed
Click the Next button to navigate to the next screen or the Cancel button to cancel the
registration of the spontaneous report and return to the login screen.
8.1.1.3 Test Results
The Test Results section captures a list of test results that are applicable to the adverse event.
To enter test results, click the Add Test Results item button. Once a test has been added, you
are able to remove the result or edit the test using the appropriate button.
Fields in the Test Results Section are described below:

PViMS User Manual
2018
235
Test Date
The date the test was conducted
Test Name
The name of the test conducted
Test Result
The result of the test conducted
Test Unit
Any unit associated to the test result
Low- and High-Test
Range
Test result range that is considered normal
More Information
More information associated to the test result?
Click the Next button to navigate to the next screen or the Cancel button to cancel the
registration of the spontaneous report and return to the login screen.
8.1.1.4 Reaction and Treatment
The Reaction and Treatment section captures details of the adverse event.
To enter reaction and treatment information, enter text in the corresponding fields (e.g.,
Description of Reaction). Or click the arrow in a selected field (e.g.) to display a list of values,
and select one value from the list. All elements with a red asterisk are mandatory.

PViMS User Manual
2018
236
PViMS User Manual
2018
237
Fields in the Reaction and Treatment Section are described below:
Description of Reaction
A description of the adverse event
Start Date of Reaction
The date the reaction first appeared in the patient
Estimated Start Date of
Reaction
Only specify this date if the exact start date is not known
Reactions
Did the patient experience a reaction
Treatment for Reaction
Was a treatment given for the reaction itself
What Treatment Given
for Reaction
If a treatment was given for the reaction, what treatment was
it
Reaction Outcome
What was the outcome of the reaction
Recovery Date
If the patient has recovered, what is the date of the recovery
Deceased Date
If the patient has died from the adverse event, what was the
date of death
Other Relevant Info
Is there other information relevant to the adverse event
Click the Next button to navigate to the next screen or the Cancel button to cancel the
registration of the spontaneous report and return to the login screen.
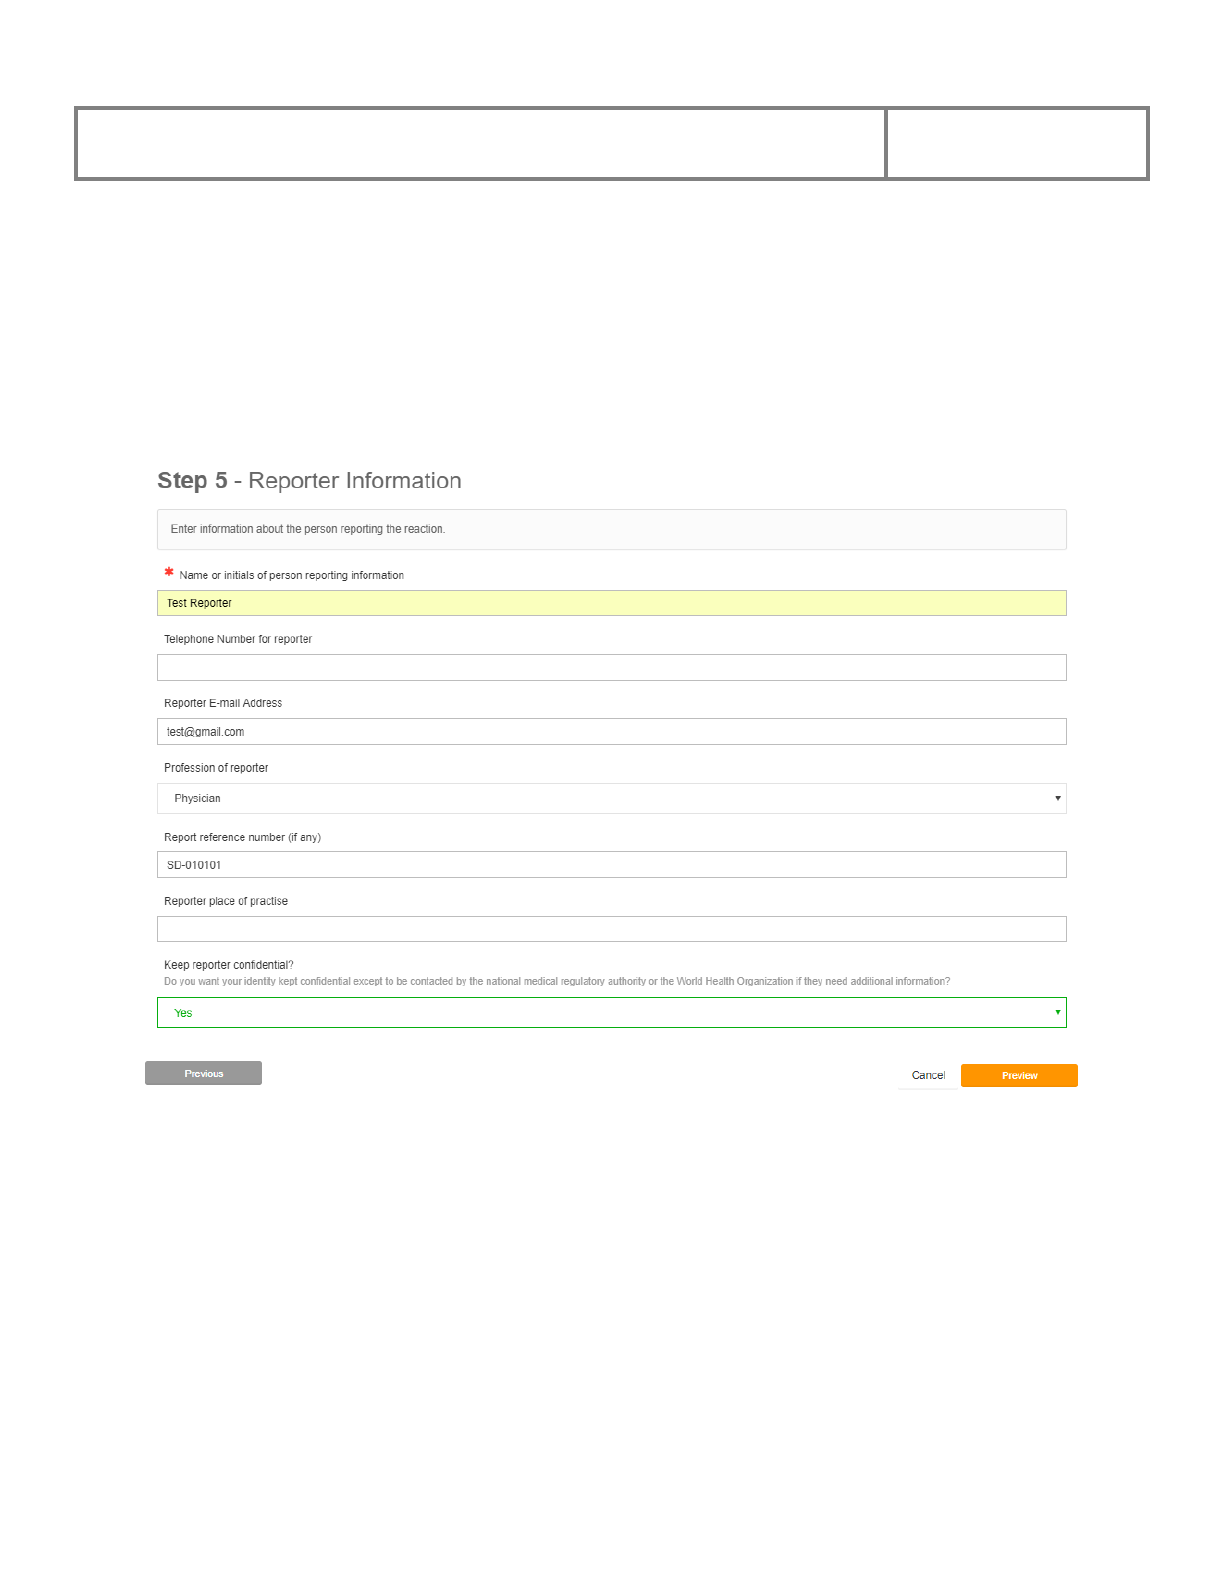
PViMS User Manual
2018
238
8.1.1.5 Reporter Information
The Reporter Information section captures details of the person who has reported the event.
To enter reporter information, enter text in the corresponding fields (e.g. Name or Initials of
person reporting the event). Or click the arrow in a selected field (e.g.) to display a list of
values, and select one value from the list. All elements with a red asterisk are mandatory.
PViMS User Manual
2018
239
Fields in the Reporter Information Section are described below:
Name or Initials
The name or initials of the person reporting the event
Telephone Number
Contact number of the person reporting the event
Email Address
Email address of the person reporting the event
Profession
The profession of the person who has reported the event
Reference Number
Reference number for the event that has been reported
Place of Practice
At which facility does the reporter work
Confidentiality
Should the report remain confidential
Click the Next button to navigate to the next screen or the Cancel button to cancel the
registration of the spontaneous report and return to the login screen.
8.1.2 Preview Report
Once you have completed all sections of the spontaneous report, click on the preview button to
view a summary of the report.
PViMS User Manual
2018
240
Click the Finish button to submit the report or the Cancel button to cancel the registration of
the spontaneous report and return to the login screen.
8.1.3 Confirmation
Once you have clicked the finish button, the report will be saved to the database and you will
receive confirmation of this.
