Paper Vision Capture Admin Guide R74.2
User Manual: PaperVision Capture AdminGuide R74.2
Open the PDF directly: View PDF ![]() .
.
Page Count: 466 [warning: Documents this large are best viewed by clicking the View PDF Link!]
- Table of Contents
- Chapter 1 - Introduction
- Chapter 2 - Global Administration
- Chapter 3 - Entity Administration
- Chapter 4 - Capture Job Configuration
- Chapter 5 – Capture Step Configuration
- Chapter 6 - Indexing Configuration
- Chapter 7 - Barcode Configuration
- Chapter 8 – Zonal OCR
- Chapter 9 – Nuance Full-Text OCR
- Chapter 10 - Open Text Full-Text OCR
- Chapter 11 – Image Processing
- Chapter 12 – Quality Control (QC)
- Chapter 13 - Custom Code
- Chapter 14 – Capture Batches
- Appendix A – Additional Help Resources
- Appendix B – Supported Nuance OCR Spelling Languages
- Appendix C – Modifying the Process Batch Operation
- Appendix D – Maximum Image Sizes
- Appendix E – Terminal Services Configuration
- Appendix F - Supported Open Text Countries and Languages
- Index

PaperVision
®
Capture
Administration Guide
PaperVision Capture Release 74
January 2012

Information in this document is subject to change without notice and does not represent a commitment on the part of
Digitech Systems, Inc. The software described in this document is furnished under a license agreement or
nondisclosure agreement. The software may be used or copied only in accordance with the terms of the agreement.
It is against the law to copy the software on any medium except as specifically allowed in the license or
nondisclosure agreement. No part of this manual may be reproduced or transmitted in any form or by any means,
electronic or mechanical, including photocopying and recording, for any purpose without the express written
permission of Digitech Systems, Inc.
Copyright © 2012 Digitech Systems, Inc. All rights reserved.
Printed in the United States of America.
PaperVision Capture and the Digitech Systems, Inc. logo
are trademarks of Digitech Systems, Inc.
PaperVision Enterprise is a registered trademark of Digitech Systems, Inc.
Microsoft, Windows, Windows XP, and Vista are registered trademarks of Microsoft Corporation.
All other trademarks and registered trademarks are the property of their respective owners.
PaperVision Capture contains portions of OCR code owned and copyrighted
by Nuance Communications, Inc. All rights reserved.
PaperVision Capture ontains portions of OCR code owned and copyrighted
by Open Text Corporation. All rights reserved.
PaperVision Capture contains portions of imaging code owned and copyrighted
by EMC Corporation. All rights reserved.
Digitech Systems, Inc.
8400 E. Crescent Parkway, Suite 500
Greenwood Village, CO 80111
Phone: 303.493.6900 Fax: 303.493.6979
www.digitechsystems.com

Table of Contents
PaperVision® Capture Administration Guide iii
Chapter 1 - Introduction .................................................................................................. 6
PaperVision Capture Terminology ............................................................................................ 6
Supported Users in the Administration Console ....................................................................... 9
System Requirements .............................................................................................................. 10
Supported Scanners ................................................................................................................. 11
Logging In ............................................................................................................................... 11
Logging Out ............................................................................................................................ 11
Obtaining Help in PaperVision Capture .................................................................................. 12
Chapter 2 - Global Administration ............................................................................... 13
Automation Service Status ...................................................................................................... 14
Global Administrators ............................................................................................................. 16
Licensing ................................................................................................................................. 19
Maintenance Queues ............................................................................................................... 23
Maintenance Logs ................................................................................................................... 24
Process Locks .......................................................................................................................... 27
System Settings ....................................................................................................................... 28
Automation Service Scheduling .............................................................................................. 30
Chapter 3 - Entity Administration ................................................................................ 33
General Security ...................................................................................................................... 38
Encryption Keys ...................................................................................................................... 39
Security Policy ........................................................................................................................ 42
System Groups ........................................................................................................................ 44
System Users ........................................................................................................................... 47
Current Sessions ...................................................................................................................... 51
Chapter 4 - Capture Job Configuration ....................................................................... 53
Job Definitions ........................................................................................................................ 57
Job Steps Grid ......................................................................................................................... 61
Job Menu ................................................................................................................................. 64
Detail Sets................................................................................................................................ 69
Job Steps .................................................................................................................................. 72
General Properties ................................................................................................................... 75
Chapter 5 – Capture Step Configuration ..................................................................... 81
Auto Document Break ............................................................................................................. 81
Capture Step Settings .............................................................................................................. 82
Custom Code Events (Step Level)........................................................................................... 85
General Properties ................................................................................................................... 86
Indexes..................................................................................................................................... 87
Manual Barcode and OCR Indexing ....................................................................................... 87
Manual QC .............................................................................................................................. 92
Operator Permissions............................................................................................................... 94
Scanner Requirements ............................................................................................................. 95

Table of Contents
PaperVision® Capture Administration Guide iv
Chapter 6 - Indexing Configuration .............................................................................. 97
Custom Code Events (Step Level)........................................................................................... 97
General Properties ................................................................................................................... 99
Indexes..................................................................................................................................... 99
General (Step Level).............................................................................................................. 114
Index Zones ........................................................................................................................... 119
Predefined Index Values (Job Level) .................................................................................... 121
Scanner Setup Settings .......................................................................................................... 124
Manual Barcode and OCR Indexing ..................................................................................... 127
Manual QC ............................................................................................................................ 127
Operator Permissions............................................................................................................. 129
Chapter 7 - Barcode Configuration............................................................................. 131
Auto Document Break ........................................................................................................... 131
General Properties ................................................................................................................. 131
Indexes................................................................................................................................... 131
Barcode Parsing ..................................................................................................................... 132
Barcode Zones ....................................................................................................................... 135
Barcode Explorer ................................................................................................................... 140
Chapter 8 – Zonal OCR ............................................................................................... 147
Auto Document Break ........................................................................................................... 148
General Properties ................................................................................................................. 148
Indexes................................................................................................................................... 148
OCR Parsing .......................................................................................................................... 149
OCR Zones ............................................................................................................................ 152
General OCR Properties ........................................................................................................ 156
Nuance OCR Page Properties ................................................................................................ 157
Nuance OCR Zone Properties ............................................................................................... 160
Nuance OCR Recognition Modules ...................................................................................... 165
Open Text Zonal OCR........................................................................................................... 176
Chapter 9 – Nuance Full-Text OCR............................................................................ 182
Converter Output Properties .................................................................................................. 184
OCR Page Properties ............................................................................................................. 184
Converter Output Formats ..................................................................................................... 189
Chapter 10 - Open Text Full-Text OCR ..................................................................... 242
Supported Output File Types ................................................................................................. 243
Chapter 11 – Image Processing ................................................................................... 251
General Properties ................................................................................................................. 251
Image Processing Properties .................................................................................................. 251
Configuring Image Processing Filters ................................................................................... 252
Drawing and Configuring IP Zones....................................................................................... 261
Image Processing Filters ........................................................................................................ 267

Table of Contents
PaperVision® Capture Administration Guide v
Chapter 12 – Quality Control (QC) ............................................................................ 299
Automated QC Step ............................................................................................................... 299
Automated QC – Order of Operations ................................................................................... 300
Automated Batch and Document QC .................................................................................... 301
Automated Image QC ............................................................................................................ 303
Indexes................................................................................................................................... 305
Manual QC Step .................................................................................................................... 308
Custom Code Events (Step Level)......................................................................................... 311
General Properties ................................................................................................................. 312
Indexes................................................................................................................................... 312
Manual QC - General Properties ........................................................................................... 313
Operator Permissions............................................................................................................. 315
Chapter 13 - Custom Code ........................................................................................... 317
General Properties ................................................................................................................. 317
Custom Code Generators ....................................................................................................... 318
Digitech Systems' API ........................................................................................................... 321
Debugging Custom Code ...................................................................................................... 344
Script Editor .......................................................................................................................... 346
Match and Merge Wizard ...................................................................................................... 352
Exports................................................................................................................................... 358
Content Types ........................................................................................................................ 419
Chapter 14 – Capture Batches ..................................................................................... 425
Batch Management ................................................................................................................ 425
Batch Statistics ...................................................................................................................... 434
QC Batch Statistics ................................................................................................................ 441
Appendix A – Additional Help Resources .................................................................. 447
Appendix B – Supported Nuance OCR Spelling Languages .................................... 448
Appendix C – Modifying the Process Batch Operation ............................................ 453
Appendix D – Maximum Image Sizes ......................................................................... 455
Appendix E – Terminal Services Configuration ........................................................ 456
Appendix F - Supported Open Text Countries and Languages ............................... 457

Chapter 1 - Introduction
PaperVision® Capture Administration Guide 6
The PaperVision Capture Administration Console provides a single location for
global, system, and job administration. The PaperVision Capture Administration
Console helps you manage Capture jobs, batches, statistics, user and group profiles, and
automation service settings. The Job Definitions screen provides for fine-grained control over
image-capture settings when you define PaperVision Capture jobs and job steps as well as
users and groups who are assigned to these steps.
PaperVision Capture Terminology
Batch
A batch is a collection of documents and their associated index name-value pairs and statistics
that are moved as a logical unit of work through a job.
Batch Priority
Batch priority refers to the order in which (1) batches awaiting ownership are displayed in the
PaperVision Capture Operator Console and (2) batches are processed by the PaperVision
Capture Automation Service. Four values are assigned by administrators to calculate the
overall batch priority.
• Job age priority is a number associated with the job and is multiplied by the number
of elapsed minutes since the batch was created.
• The job step's age priority is a value associated with the current job step and is
multiplied by the number of elapsed minutes the batch has been waiting in the
current step.
• The job step priority is a value associated with the current job step and assigned by
an administrator.
• Administrative priority is a value associated with each specific batch. To have a
significant impact on the overall calculation, administrators can assign a wider
range of values (0-999,999) to this priority.
Administrators assign numbers to indicate batch urgency and assist with scheduling and
resource allocation. The system uses these numbers, which range from 0 (not urgent) to 100
(urgent), to schedule system resources and assign higher-priority batches to users. Batch
priority helps administrators efficiently manage job loads and enables the system to
automatically assign prioritized batches to operators in a round-robin fashion.

Chapter 1 – Introduction
PaperVision® Capture Administration Guide 7
The overall batch priority is calculated as follows:
(Job age priority x elapsed minutes since batch was created) + (step age priority x elapsed
minutes batch has been waiting in current step) + job step priority + administrative priority
Note:
If all priority values are set to zero, the overall calculated priority in the PaperVision
Capture Operator Console’s batch creation screen will remain at zero (regardless of
how long batches await ownership in the Batches Waiting list).
Detail Sets
Detail sets expand on the capabilities of standard index fields because they define "many-to-
one" relationships, which allow multiple sets of field data to reference a single document. In a
many-to-one relationship, an index field contains a value that references another field or set of
fields that contain unique values.
Document
A document is the equivalent of a file folder within a filing cabinet. A document holds all of
the pages for a given set of index values.
Image
An image is a visual representation of a picture or graphic, such as an electronic file with the
extension .bmp, .jpg, or .tif.
Index
An index is a value that users apply to a document for reference and retrieval.
Job
A job is a defined process comprised of one or more job steps through which batches are
processed. At a minimum, each job must contain a start step. Each job is unique by name
within an entity.
Job Step
A job step is an automated or manual operation that is performed on a batch. Manual job steps
are performed by assigned users through the PaperVision Capture Operator Console;
automated job steps are completed by the PaperVision Capture Automation Service, and
require no user intervention.

Chapter 1 – Introduction
PaperVision® Capture Administration Guide 8
Master Batch Repository
The Master Batch Repository is the centralized storage area where PaperVision Capture stores
all captured images. When installing PaperVision Capture in an environment containing
multiple PaperVision Capture Gateways or PaperVision Capture Automation Servers, this
location should be a network accessible location (e.g., \\SERVER\SHARE).
Page
One or more images (files with extensions .bmp, .jpg, or .tif,) comprise a single page within a
document. For example, a page can include the originally captured image and a manipulated
version of the image after noise removal.
PaperVision Capture Administration Console
The PaperVision Capture Administration Console provides administration and job
configuration capabilities.
PaperVision Capture Automation Service
The PaperVision Capture Automation Service is a Microsoft® Windows service that performs
automated tasks and batch processing at specified time intervals. Examples of work
performed by the PaperVision Capture Automation Service include the consumption of
statistics when an operator completes a batch and the processing of automated job steps.
Multiple Automatic Services can be installed on distinct machines or multiple PaperVision
Capture Automation Service processes may be configured to run on the same machine.
PaperVision Capture Data Transfer Agent Service
The PaperVision Capture Data Transfer Agent Service is a Microsoft® Windows service that
moves batches in local temporary batch repositories to/from the Master Batch Repository.
PaperVision Capture Gateway Server
The PaperVision Capture Gateway Server is an application server that enables communication
between PaperVision Capture modules and provides access to databases and the Master Batch
Repository in distributed deployment scenarios.
PaperVision Capture Operator Console
The PaperVision Capture Operator Console provides scanning, indexing, and batch
processing capabilities.

Chapter 1 – Introduction
PaperVision® Capture Administration Guide 9
Supported Users in the Administration Console
The PaperVision Capture Administration Console supports the following types of users:
• Global administrators can configure all settings for all entities.
• System administrators can administrate all settings for a particular entity.
• Capture administrators can administrate an entity's job settings, including the
configuration of jobs and job steps within the entity.
• Workflow administrators can log into the PaperVision Capture Administration Console
but cannot perform any functions. In PaperVision Enterprise, workflow administrators
are able to design and configure workflows within an entity. They can configure
workflow definitions for any project and view workflow history and workflow status
reports, but they have no access to documents or functions in any projects unless a system
administrator explicitly grants them access. If they do have access to view documents
within a project, workflow administrators can create workflow instances for a particular
document and view its workflow status.
• Users, also known as operators, work in the PaperVision Capture Operator Console. If
you assign a user to a job step, that user has access to every function configured for that
job step. You assign job steps to users so they are able to perform scanning, indexing, and
batch processing functions. Users created in PaperVision Capture can be viewed in
PaperVision Enterprise and vice versa.

Chapter 1 – Introduction
PaperVision® Capture Administration Guide 10
System Requirements
The following tables outline the minimum software requirements and recommended hardware
requirements for the PaperVision Capture application.
Minimum Software Requirements
Operating Systems
Windows XP Pro SP3 or later (both 32- and 64-
bit operating systems supported)
.NET Framework
Version 3.5 SP1 or later (included on
installation media)
Windows Installer
Version 3.1 or later (included on installation
media)
Microsoft SQL Server
SQL Server 2005 or later
Note: SQL Server 2008 R2 Express Edition is
included on installation media.
Recommended Hardware Requirements
Processor
Current processor technology is recommended
(typically, not older than four years).
RAM
2 GB
Hard Disk Space
1750 MB
Minimum Screen Resolution
1024 x 768

Chapter 1 – Introduction
PaperVision® Capture Administration Guide 11
Supported Scanners
PaperVision Capture supports more than 300 ISIS-compatible scanners. If you need
additional scanner drivers, please contact Digitech Systems’ Technical Support at
support@digitechsystems.com or by phone at (877)374-3569. If the driver is available, our
support personnel will assist you in obtaining the driver.
PaperVision Capture also offers the ability to use TWAIN scanners. The use of TWAIN
scanners is generally intended for extremely low-volume scanners as ISIS drivers are
available for most scanners on the market.
Logging In
When you log in to the PaperVision Capture Administration Console, the system
authenticates you based on the information you provide. When you launch the PaperVision
Capture Administration Console for the first time, you will be prompted to log into the
system. If this is your first time logging in, the user name is ADMIN and the password is
ADMIN.
Note:
Passwords are case-sensitive.
You can configure the PaperVision Capture Operator Console to support a terminal services
environment so that multiple users can log into a single instance of the PaperVision Capture
Operator Console. For information on how to configure PaperVision Capture for a terminal
services environment, see Appendix E –Terminal Services Configuration.
Logging Out
To log out of the PaperVision Capture Administration Console, select File > Exit. If you have
any unsaved changes, you will be prompted to save those changes before you are logged out
of the system.

Chapter 1 – Introduction
PaperVision® Capture Administration Guide 12
Obtaining Help in PaperVision Capture
To obtain Help from any page within the PaperVision Capture Administration Console, click
the Help button or press the F1 key to open a topic related to the screen you are currently
viewing. Additionally, every screen in PaperVision Capture contains the Help menu, which
contains the following items:
• Help > Help Topics opens the Online Help file.
• Help > User's Manual opens a PDF of the PaperVision Capture Administration
Guide.
• Help > About PaperVision Capture Administration Console displays a splash
screen with the copyright and version information for your version of PaperVision
Capture.
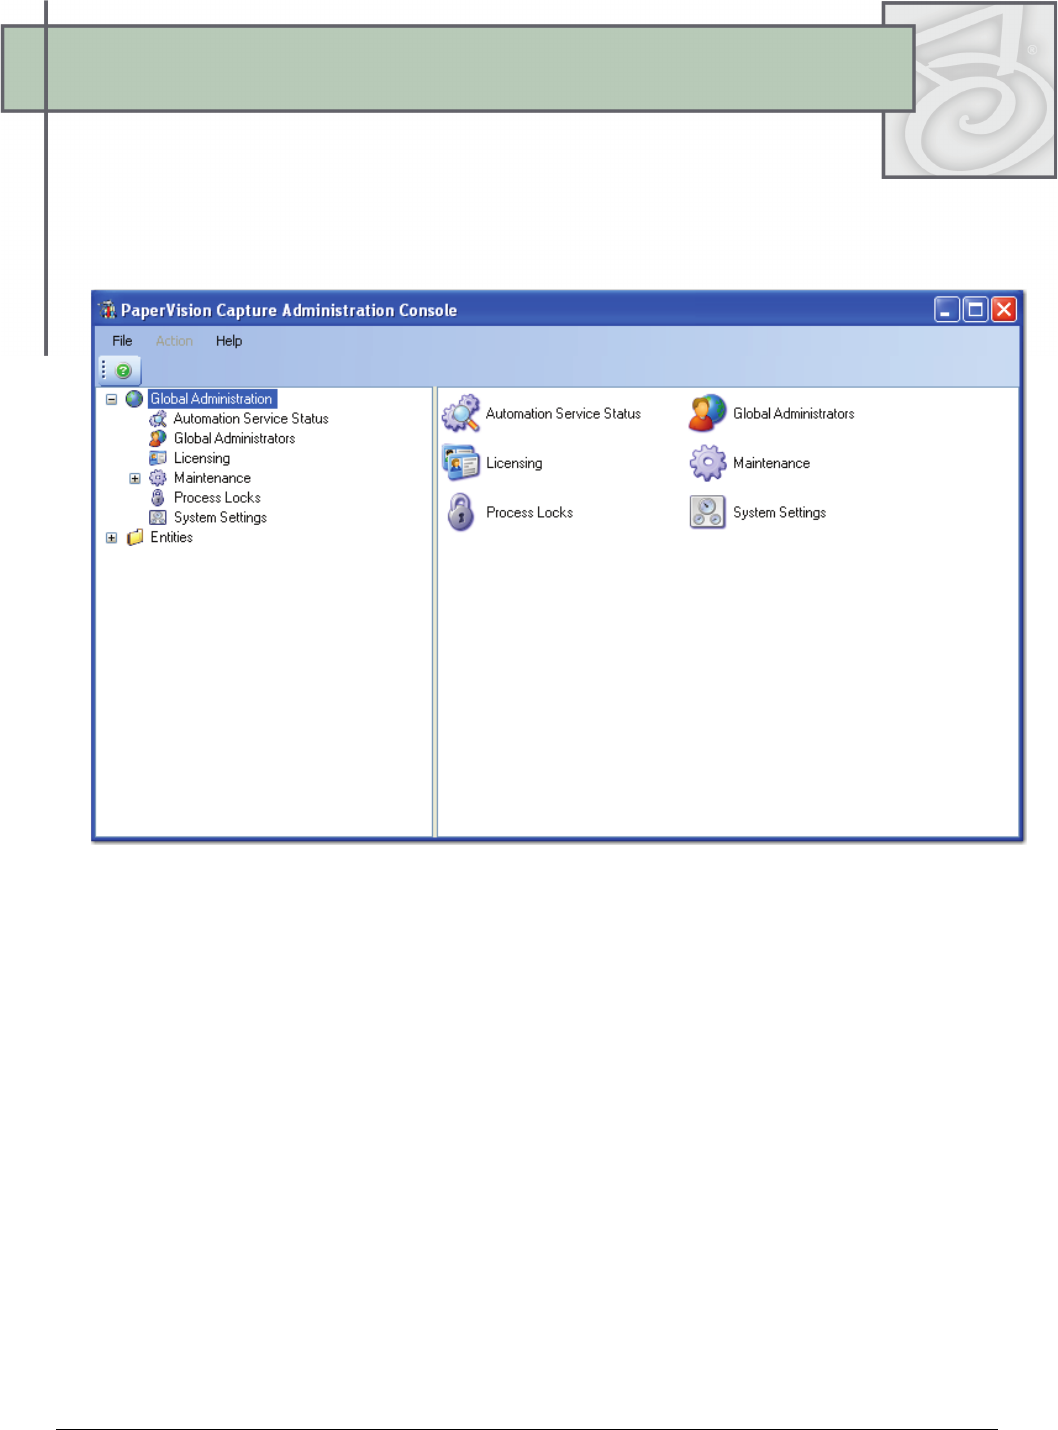
Chapter 2 – Global Administration
PaperVision® Capture Administration Guide 13
Global administration encompasses the overall functionality of PaperVision
Capture that affects all entities. To access global administration settings, log into
the PaperVision Capture Administration Console with the appropriate global administrator
credentials, and select the Global check box. Once logged in as a global administrator, you
can access global administration settings for all entities.
Global Administration Settings
• Automation Service Status displays the current status of all automation servers
connected to the PaperVision Capture database.
• Global Administrators contains PaperVision Capture's global administrators.
• Licensing allows global administrators to manage PaperVision Capture licenses for
each entity.
• Maintenance lists maintenance items to be processed by the PaperVision Capture
Automation Service and logs of completed maintenance items.
• Process Locks contains a list of operations currently locked by the system in order to
prevent attempts to run the same operation simultaneously.
• System Settings contains PaperVision Capture's Automation Service Scheduling that
automates the execution of certain operations on timed intervals. System Settings also
contains the Maximum Global Session Idle Time and Maximum Maintenance Log
Age setting for all entities.
Chapter 2 – Global Administration
PaperVision® Capture Administration Guide 14
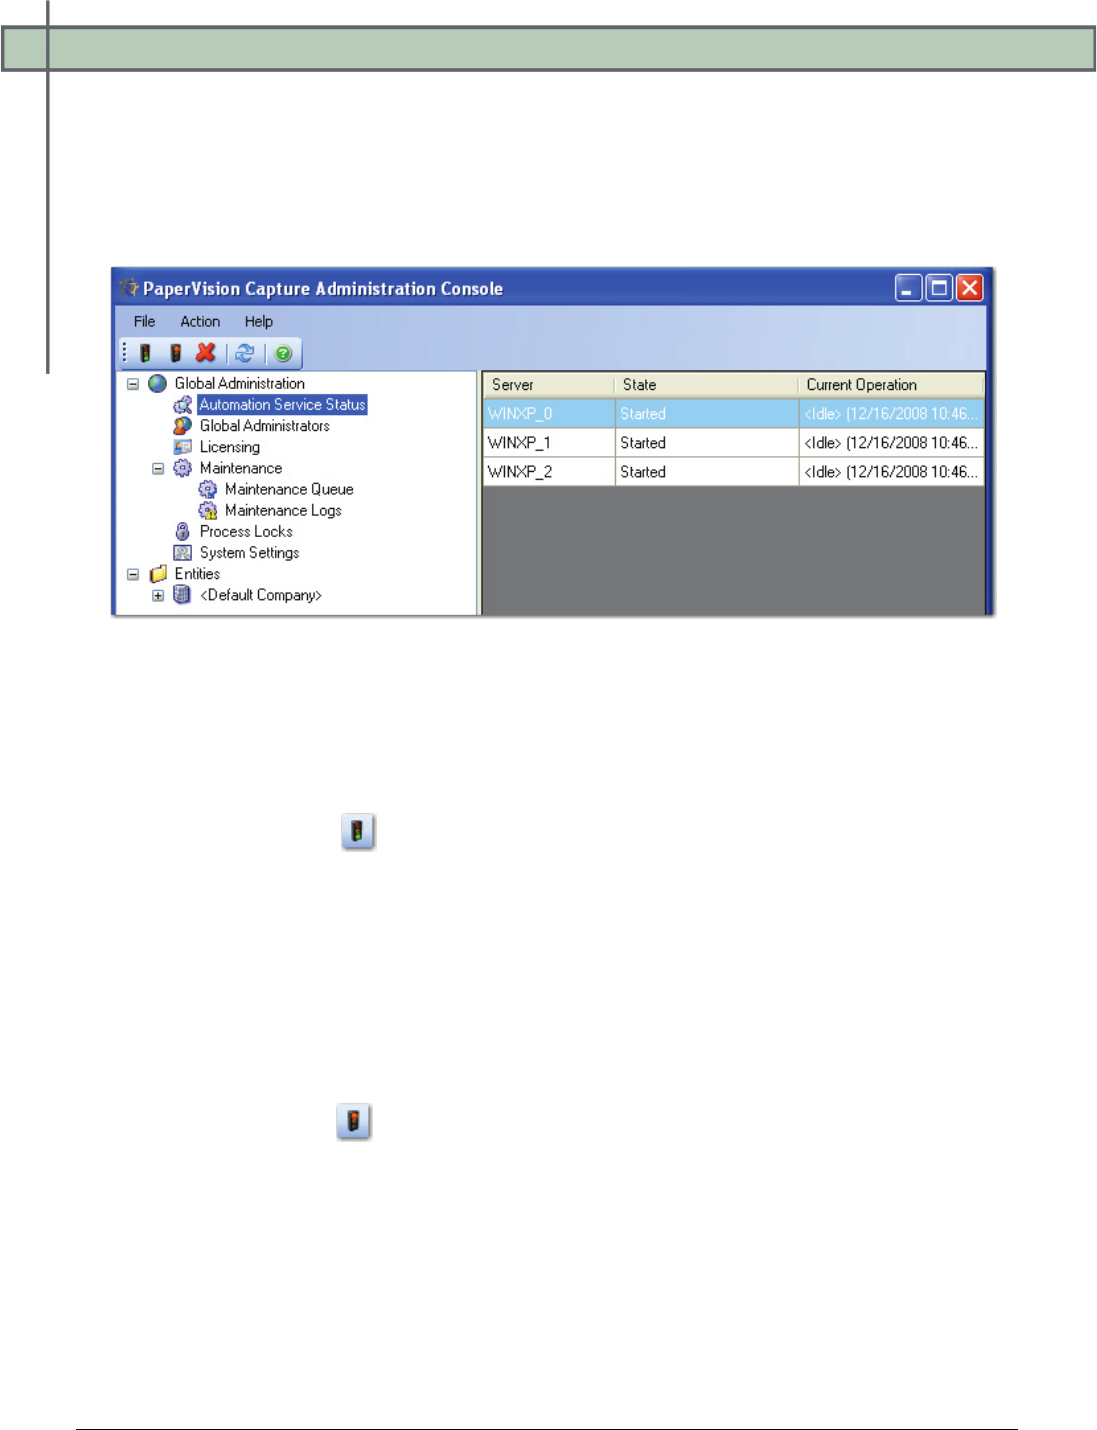
Automation Service Status
Automation Service Status displays the current status of all automation servers connected to
the PaperVision Capture database. More than one automation server process may be running
on a single computer. You can start and stop automation service operations for any process.
To access this screen, open Global Administration > Automation Service Status.
Automation Service Status
Starting an Automation Service Process
To start a service process:
1. Highlight the process in the list.
2. Click the Start icon.
Stopping an Automation Service Process
Stopping the service operations does not stop the process itself; rather, the process receives a
command to not perform further processing after it has finished its current operation.
To stop a service process:
1. Highlight the process in the list.
2. Click the Stop icon.

Chapter 2 – Global Administration
PaperVision® Capture Administration Guide 15
Deleting an Automation Service Process
This command does not delete the process itself; rather, the status of the process is deleted
from the database.
To delete a service process:
1. Highlight the process in the list
2. Click the Delete icon.
Chapter 2 – Global Administration
PaperVision® Capture Administration Guide 16
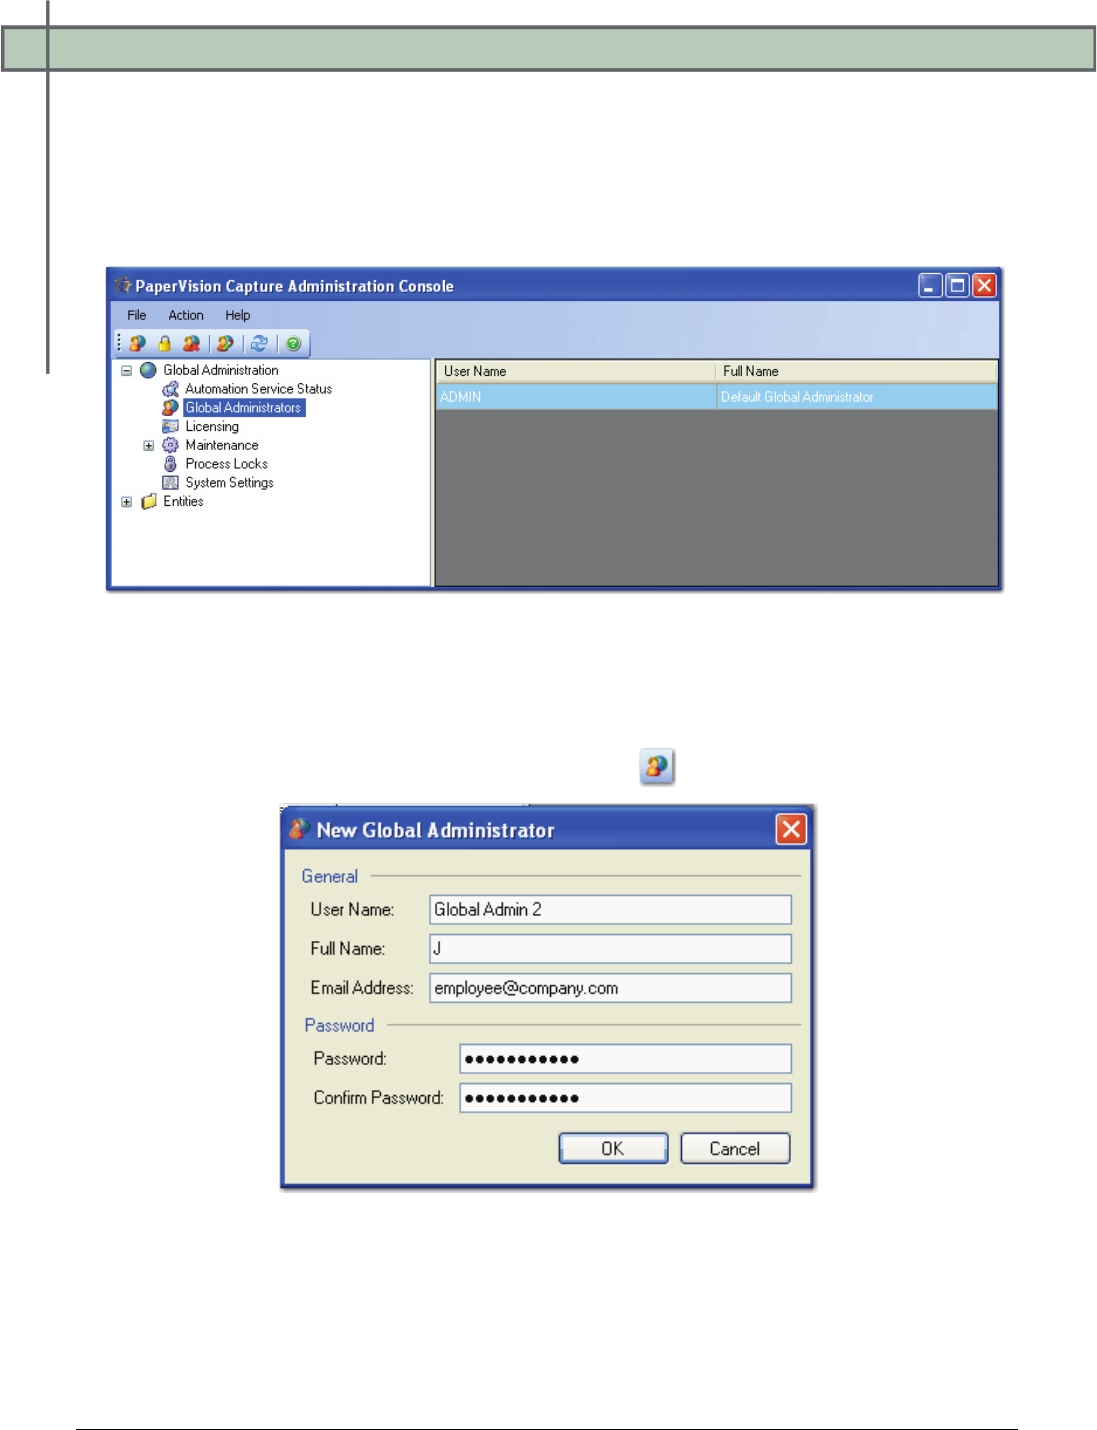
Global Administrators
As a global administrator, you can configure any system setting for all PaperVision Capture
entities. You can also access the settings for each job and job step for all entities. To access
this screen and see the list of global administrators, open Global Administration > Global
Administrators.
Global Administrators
Creating a New Global Administrator
To create a new global administrator:
1. Click the Create New Global Administrator icon.
New Global Administrator
2. Enter the User Name that will be used to log into PaperVision Capture.
3. Enter the user's Full Name (optional). The full name is used for PaperVision Capture
reporting capabilities.
Chapter 2 – Global Administration
PaperVision® Capture Administration Guide 17
4. Enter the user's Email Address (optional). This is used to send notifications via email
to the global administrator.
5. Enter the initial Password to access the system.
6. Enter the password again to confirm it.
7. Click OK.
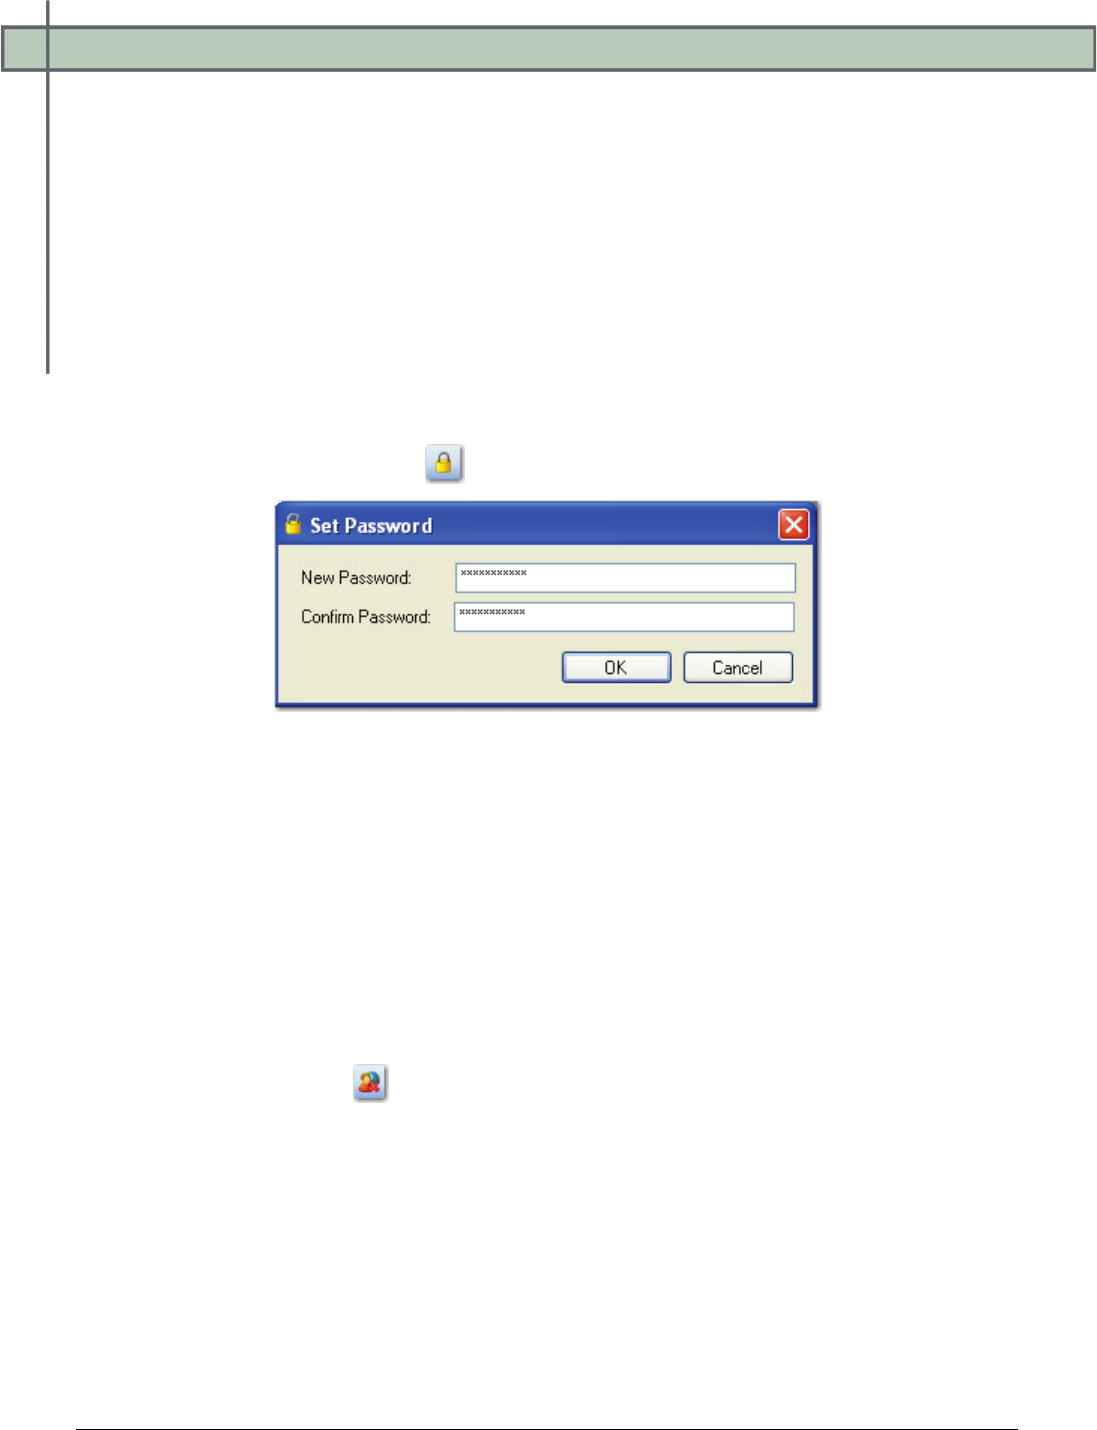
Setting the Global Administrator’s Password
To set a global administrator's password:
1. Highlight the global administrator in the list.
2. Click the Set Password icon.
Set Password
3. Enter the password in the New Password field.
4. Enter the password once again in the Confirm Password field.
5. Click OK.
Deleting a Global Administrator
To delete a global administrator:
1. Highlight the account to delete.
2. Click the Delete icon.
3. Click Yes to proceed with the deletion.
Chapter 2 – Global Administration
PaperVision® Capture Administration Guide 18
Editing Properties of a Global Administrator
To edit the properties of a global administrator:
1. Double-click the global administrator in the list.
2. Make the necessary modifications to the account.
3. Click OK.
Note:
Modifications take effect the next time the global administrator logs into the
PaperVision Capture Administration Console.
Exiting Global Administration
The File menu allows you to exit out of the PaperVision Capture Administration Console.
Select File > Exit to close the PaperVision Capture Administration Console and log out of the
system.

Chapter 2 – Global Administration
PaperVision® Capture Administration Guide 19
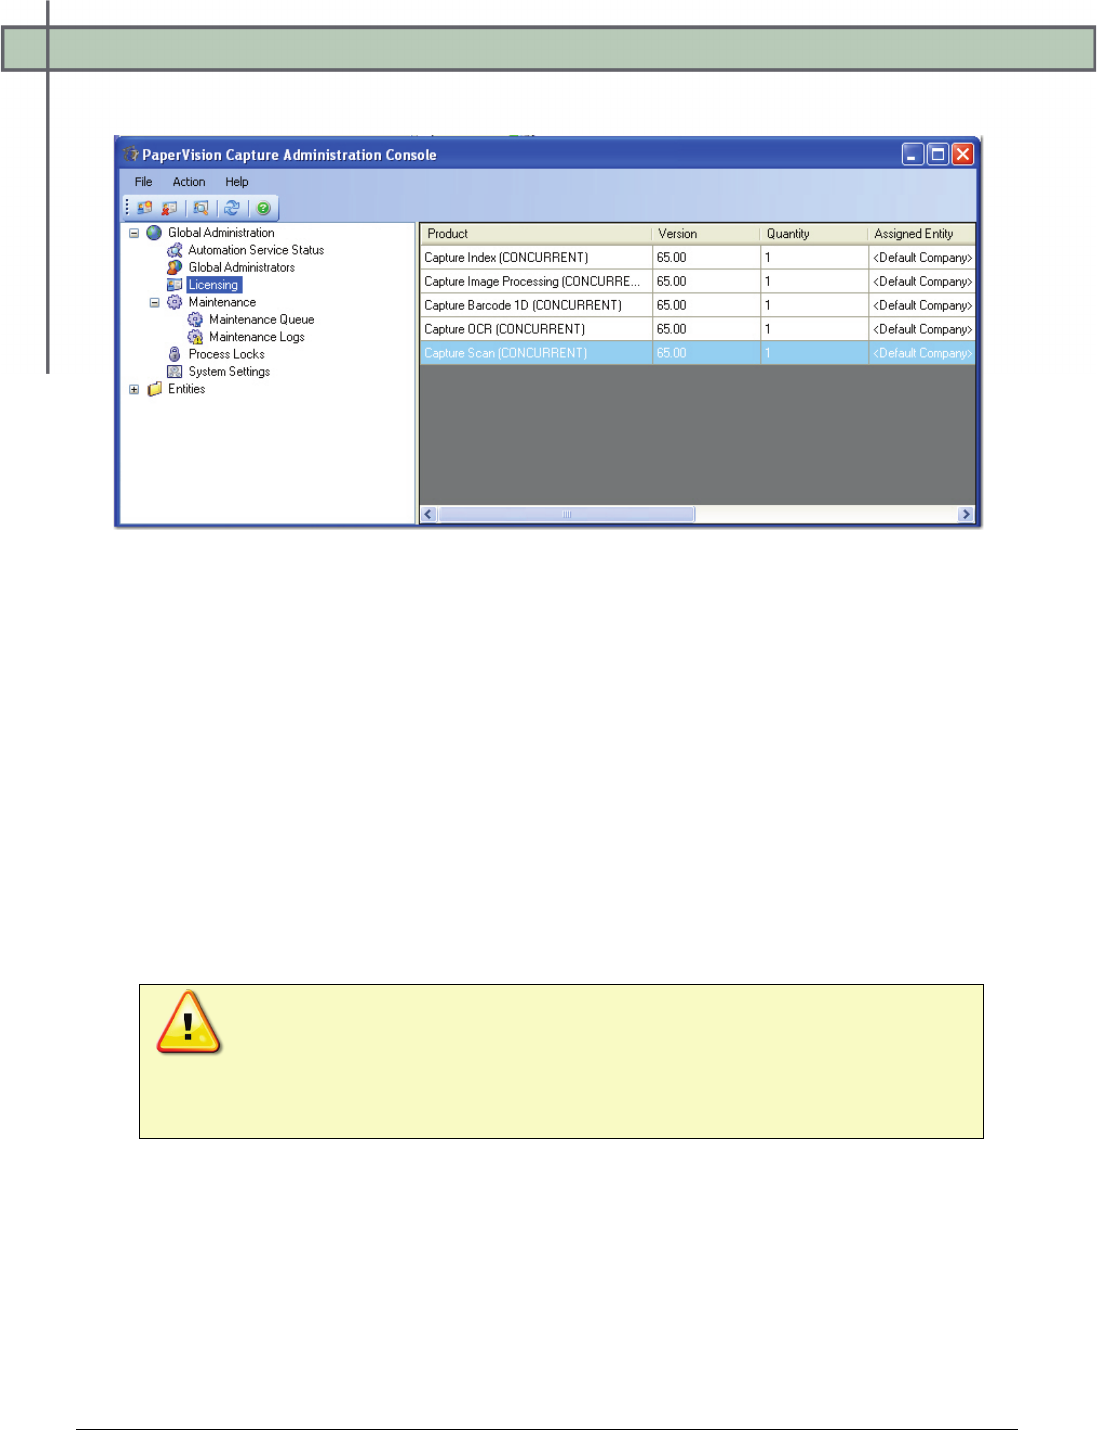
Licensing
PaperVision Capture provides Concurrent and Named licenses. Concurrent licenses are
assigned to a specific entity and are available to any user for that entity. Concurrent licenses
provide the greatest flexibility since a license is only consumed when a user is logged into the
PaperVision Capture Operator Console. If no licenses have been added in the Administration
Console, the user will be prompted that none are available for the session in the Operator
Console.
Named licenses are assigned per machine or per process, not to individual users. Named
licenses may be consumed only by the machine or process to which they are assigned. To
ensure that a specific machine is always available to process automated jobs, a named license
could be assigned to your automation server. In this case, a named license would be required
for each instance of an automation server.
When an automation service process is executing custom code that adds new documents to a
batch, then the process requires the appropriate licenses based on job configuration. You can
configure multiple automation service processes to run on a single physical machine. When
named licenses are used, each automation server process consumes a license. For example, if
three automation service processes were running on a machine named WINXP, you would
need three named licenses as follows:
1. WINXP_0
2. WINXP_1
3. WINXP_2
Conversely, for concurrent licensing, each automation service process still requires a license,
but the naming scheme is not relevant.
In most scenarios, a license is consumed when a user works on a manual step in the Operator
Console. A license is released once a user logs out of the Operator Console. Additionally, a
license is released when a user session has timed out or when a user session is “killed” via
Current Sessions in the Administration Console.
Chapter 2 – Global Administration
PaperVision® Capture Administration Guide 20
To access the Licensing screen, expand Global Administration > Licensing.
Licensing
Demo Licenses
If you want to run PaperVision Capture in demonstration mode, please contact Digitech
Systems’ Technical Support to obtain a Demo license key. The Demo license includes all
functionality within PaperVision Capture, including global administration features. The
Demo license cannot be combined with the Concurrent or Named license types.
If you add the Demo license, a watermark will be applied on all images during the batch
submittal process in the PaperVision Capture Operator Console. Since the application writes
a watermark onto each captured image, non-repudiation is not supported in demo mode.
PaperVision Capture’s Demo license is designed specifically to demonstrate the features and
functionality of the product, and is not designed for high-volume, performance testing. To
access non-repudiation technology and remove watermarks or to perform high-volume
testing, you must purchase a license of PaperVision Capture.
WARNING!
Removing the watermark is a violation of the PaperVision Capture End User License
Agreement (EULA).
Chapter 2 – Global Administration
PaperVision® Capture Administration Guide 21
Creating a New License
If you are integrating with PaperVision Enterprise, a global administrator can also add
licenses in the “thick” PaperVision Enterprise Administration Console.
To create a new license:
1. Click the Create New License icon in the toolbar, and the New License dialog
box appears.
New License
2. Enter the License Code that was included with your product documentation and
media.
3. Click the Web Authorization button to obtain the license key online.
4. Or, click the Phone Authorization button and contact Digitech Systems' Technical
Support toll-free at (877)374-3569 or direct at (402)484-7777 to obtain your license
key.
Note:
You must enter the Serial Number and Identifier Code before the license key
will be provided to you.
5. Enter the license key; then click OK. The new license will appear in the Licensing
screen.
6. To assign an entity to the license, double-click the license to open its properties.
7. Select the entity from the Assigned-To drop-down list.
8. Click OK.

Chapter 2 – Global Administration
PaperVision® Capture Administration Guide 22
Deleting a License
To delete a license:
1. Highlight the license in the list. You can also delete multiple licenses at one time.
2. Click the Delete icon.
3. Click Yes to confirm the deletion.
Editing License Properties
To edit the properties of a license:
1. Highlight the license.
2. Click the Properties icon. Licensing properties include the following
information:
• Product Name
• Version
• Quantity
• Serial Number
• License Date
• License Code
• Authorization Code
• Assigned To
• Named System
3. To assign a license to an entity, click the Assigned To drop-down menu to select
another entity.
4. To assign a license to a specific computer, enter the machine name in the Named
System field. Or, click the Browse button to locate the machine name.
5. Click OK.
Chapter 2 – Global Administration
PaperVision® Capture Administration Guide 23
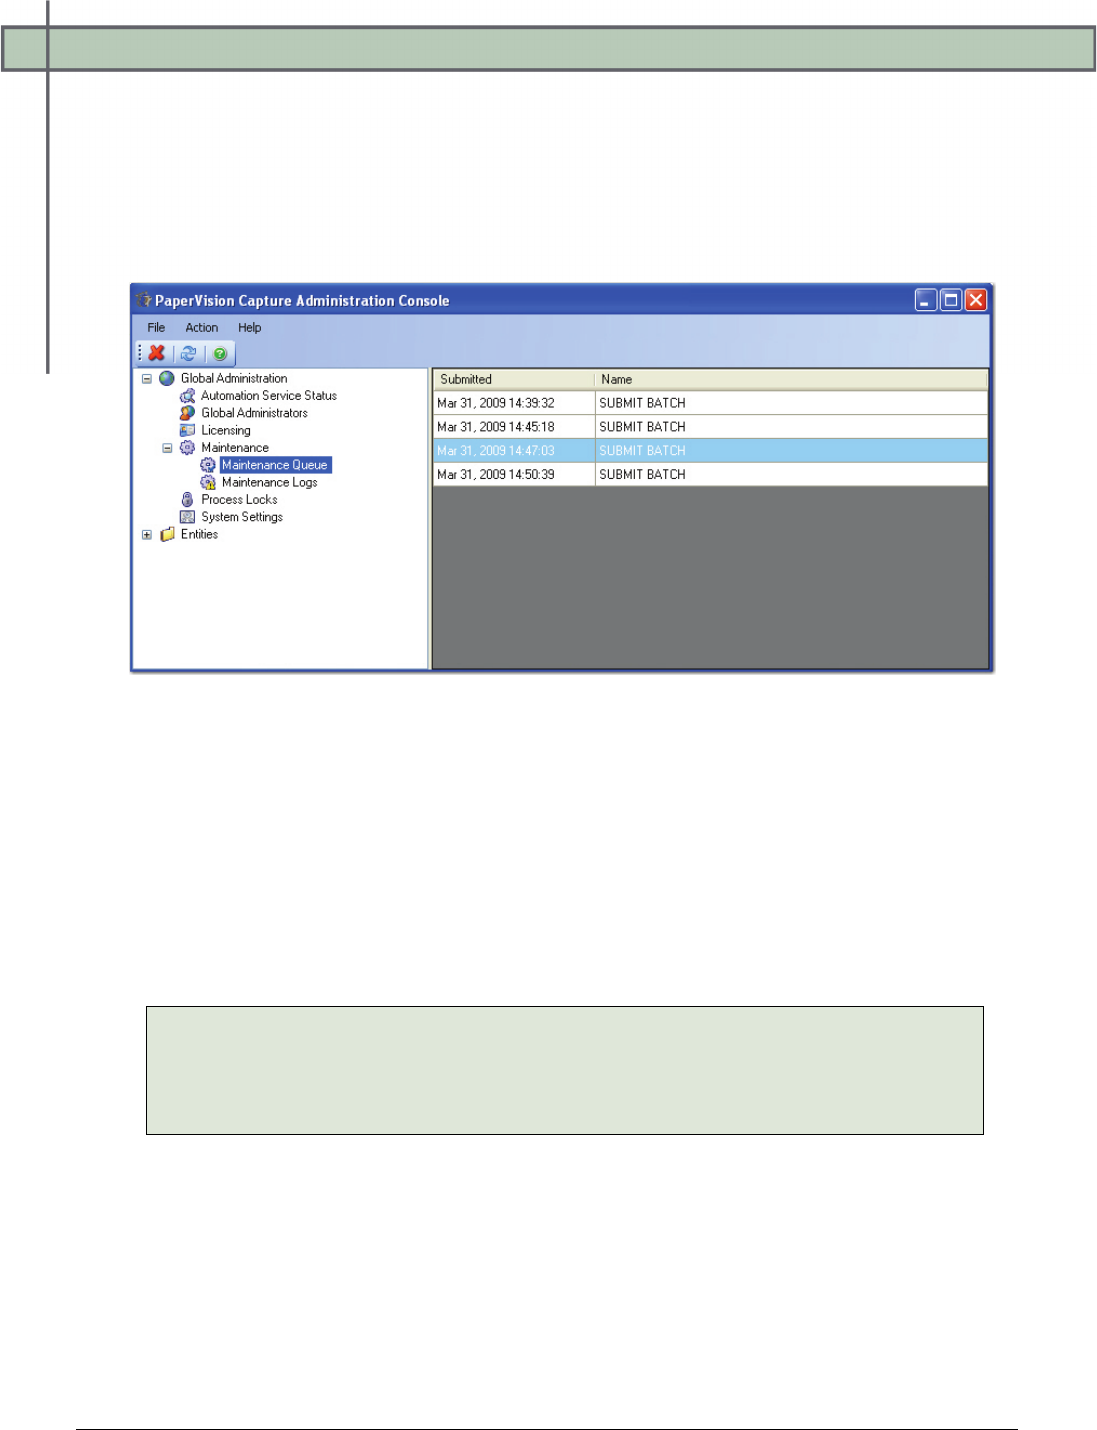
Maintenance Queues
The Maintenance Queue lists batch submittals and other tasks that have been queued to be
processed by the PaperVision Capture Automation Service. Once a task has been completed,
it is automatically removed from the queue. To access maintenance queue items, open
Global Administration > Maintenance > Maintenance Queue.
Maintenance Queue
Deleting Maintenance Queue Items
Only use this command after you have viewed the Maintenance Logs and Windows Event
Viewer to identify and troubleshoot any processing errors.
If you delete a Submit Batch queue item, the batch will remain waiting for automated
processing. To remedy this, access Batch Management to change the status of the batch to
'Not Owned'. Changing the batch status allows another operator to assume ownership of the
batch and to repeat the current job step. For more information, see the section on Batch
Management in Chapter 11.
Note:
When a job step is repeated for a batch, some changes made by the previous
operator may be retained, but batch statistics for the previous operator’s work will
be deleted.
Chapter 2 – Global Administration
PaperVision® Capture Administration Guide 24
To delete a Maintenance Queue item:
1. Highlight the item(s).
2. Click the Delete icon.
WARNING:
Deleting a maintenance queue item can cause unexpected results on data integrity
and should be used only as a last resort. Before proceeding, you may want to
consult with Digitech Systems' Technical Support.
3. To proceed with the deletion, click Yes.
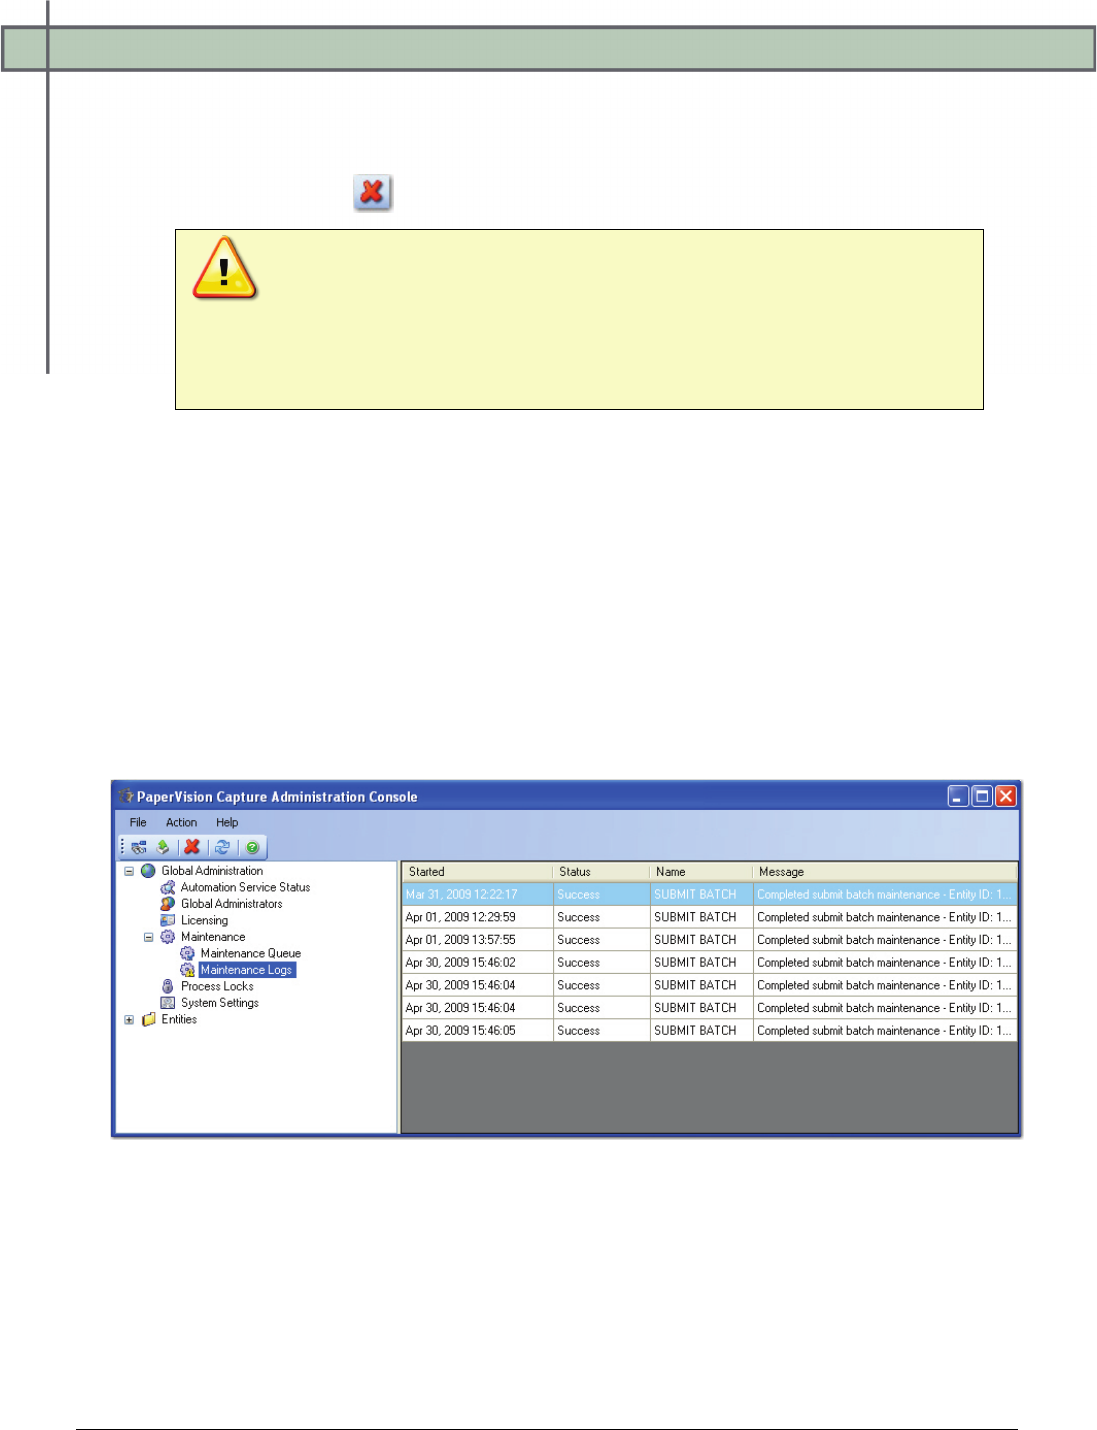
Maintenance Logs
Maintenance Logs provide a recorded history of maintenance jobs performed by the
PaperVision Capture Automation Service.
Viewing a Maintenance Log Entry
To view a log entry:
1. Open Global Administration > Maintenance > Maintenance Logs.
Maintenance Logs
Chapter 2 – Global Administration
PaperVision® Capture Administration Guide 25
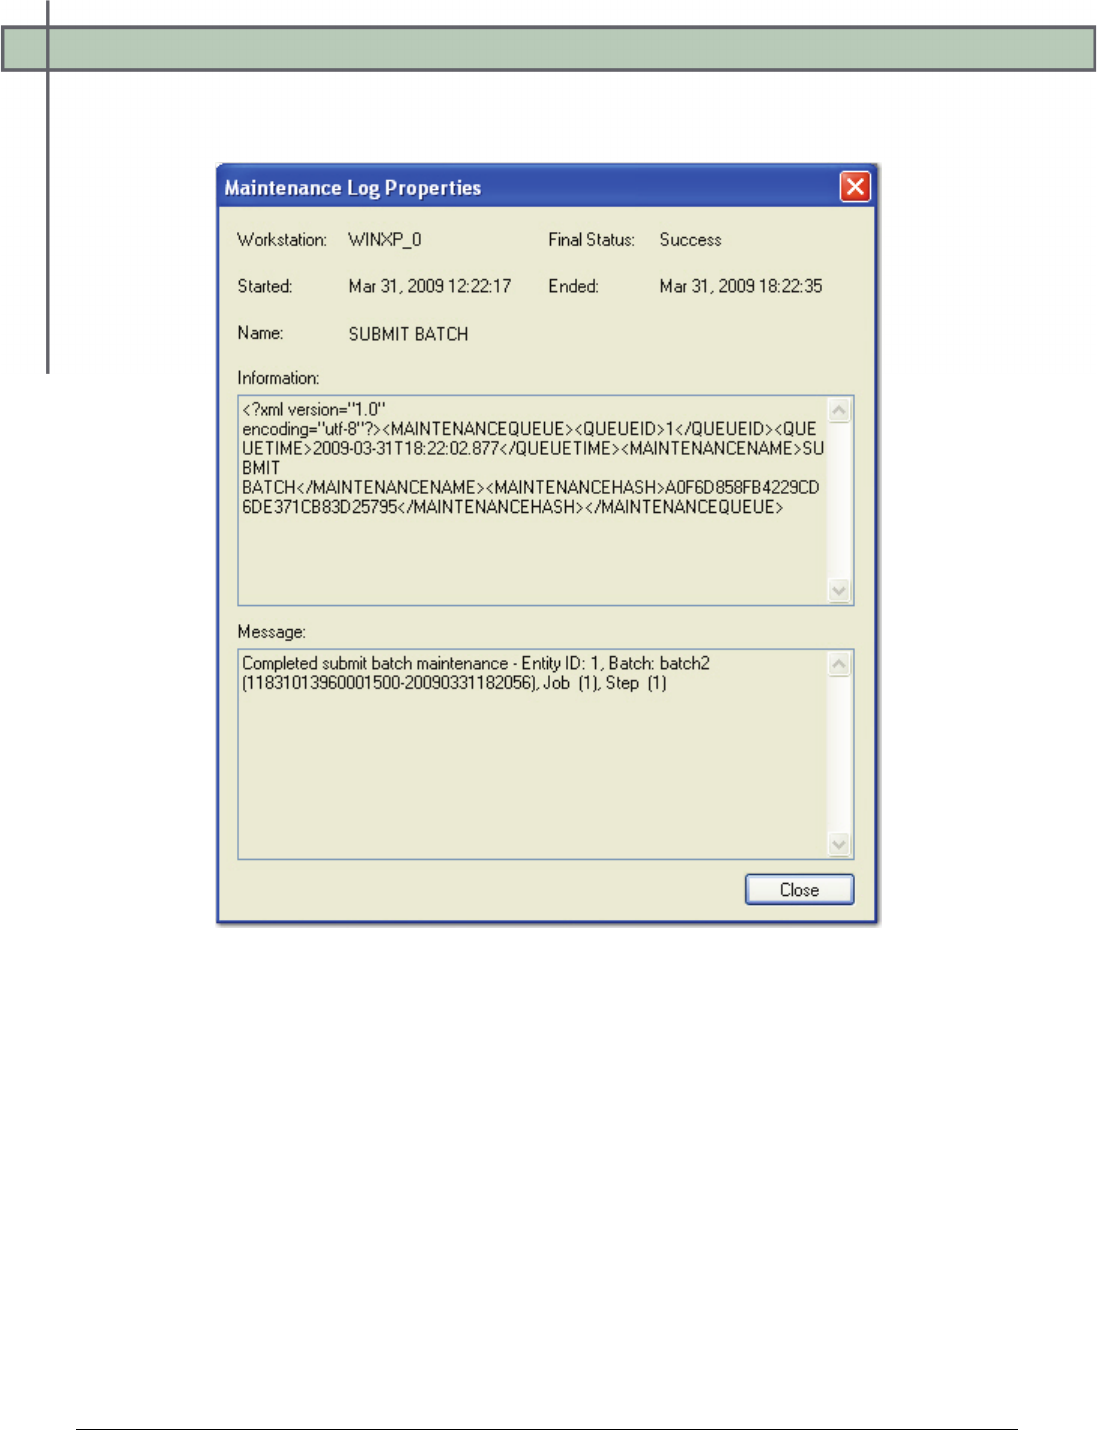
2. In the Maintenance Logs list, double-click the maintenance log entry to view. The
Maintenance Log Properties screen opens.
Maintenance Log Properties
3. Click Close.

Chapter 2 – Global Administration
PaperVision® Capture Administration Guide 26
Filtering Maintenance Logs
The Filter command allows you to specify the maximum number of maintenance log records
to display per page.
To filter maintenance logs:
1. Click the Filter icon. The Maintenance Log Filter dialog box appears.
Maintenance Log Filter
2. Enter the maximum number of log entries to display in the screen.
3. Click OK.
Exporting Maintenance Logs
Maintenance logs can be exported to an XML file.
To export maintenance log(s):
1. Highlight the log(s) to export.
2. Click the Export icon.
3. Locate the export directory.
4. Enter the file name.
5. Click Open.
Deleting Maintenance Logs
To delete a maintenance log:
1. Highlight the log(s) in the list.
2. Click the Delete icon.
3. Click Yes to proceed with the deletion.

Chapter 2 – Global Administration
PaperVision® Capture Administration Guide 27
Process Locks
Process locks prevent multiple systems from simultaneously processing the same task. When
a system attempts to run a process, it creates a "lock" that prevents any other system from
starting the same work. For example, when System A attempts to run a task that System B is
currently processing, System A verifies that a process lock has not been placed before it sets
its own lock.
If a system encounters a failure during processing (e.g. power failure), the process lock may
not be released. In this case, you may have to manually release or delete the lock.
To delete a process lock:
1. Expand Global Administration > Process Locks.
2. In the Process Locks list, highlight the lock to delete.
3. Click the Delete icon.
4. Click Yes to confirm the deletion.
Chapter 2 – Global Administration
PaperVision® Capture Administration Guide 28
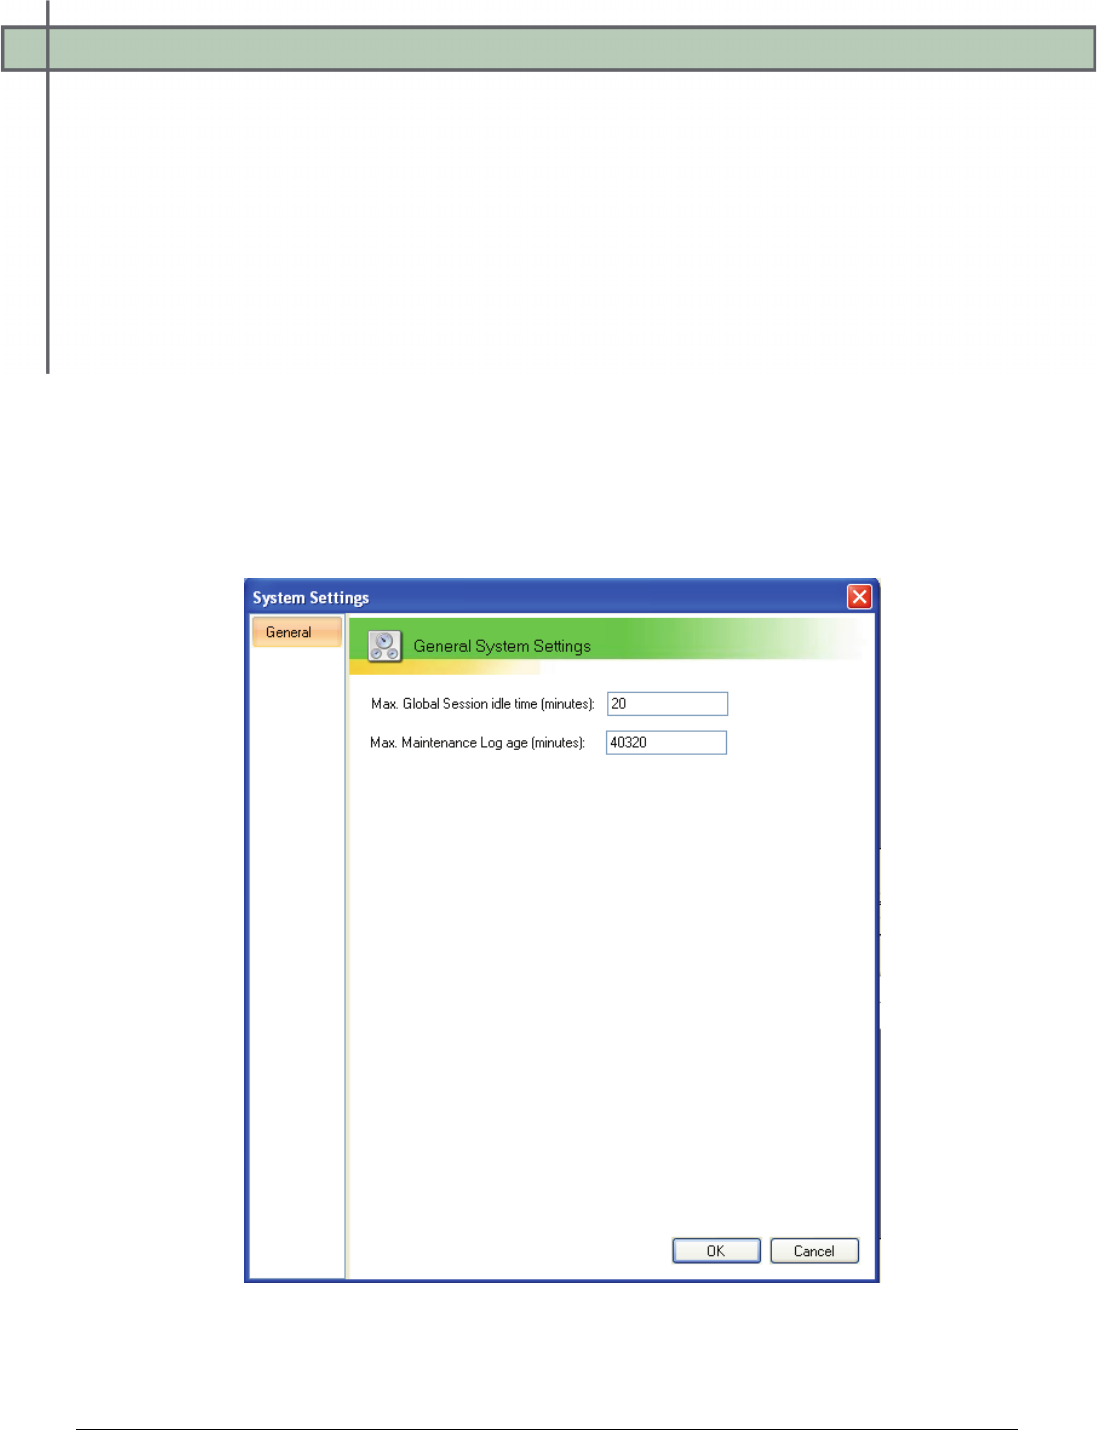
System Settings
System Settings allows you to configure the Max Global Sessions Idle Time (in minutes) and
the Max Maintenance Log age (in minutes). The Max Global Sessions Idle Time specifies the
number of minutes that a user can remain idle before the PaperVision Capture Automation
Service automatically terminates the user session (logs the user out of the system). The Max
Maintenance Log age (minutes) specifies the number of minutes that maintenance logs can
remain in the system before the PaperVision Capture Automation Service automatically
deletes them (provided that the Maintenance Log Cleanup operation has been scheduled for
completion). For sessions, each entity can have a customized setting that is specified in the
entity’s security policy. However, the global value found in System Settings determines the
maximum value that can be configured for each entity.
To configure the general system settings:
1. Expand Global Administration > System Settings.
2. Double-click the Configure System Settings icon. The System Settings screen
appears.
System Settings
3. Enter the Max Global Session Idle Time (in minutes).

Chapter 2 – Global Administration
PaperVision® Capture Administration Guide 29
4. Enter the Max Maintenance Log Age (in minutes).
5. Click OK.

Chapter 2 – Global Administration
PaperVision® Capture Administration Guide 30
Automation Service Scheduling
PaperVision Capture provides automation services that automate the execution of a number of
operations. Without starting an automation service, no automated processes will run and
backend work, such as processing submitted batches, will not be completed.
To open the Automation Service Scheduling Settings:
1. Expand Global Administration > System Settings.
2. Double-click Configure Automation Service Scheduling. For the selected
automation server, each scheduled operation is listed in the grid along with its
schedule, next/last run time, and status.
Automation Service Scheduling
Note:
More than one automation server can be configured to run on a single PC. The
number of automation servers is configured in the PaperVision Capture Setup Tool,
(Start > Programs > Digitech Systems > PaperVision Capture Setup Tool).
Automation servers on the same PC are distinguished by a trailing index (0, 1, 2,
etc.) in the automation server name.
Chapter 2 – Global Administration
PaperVision® Capture Administration Guide 31
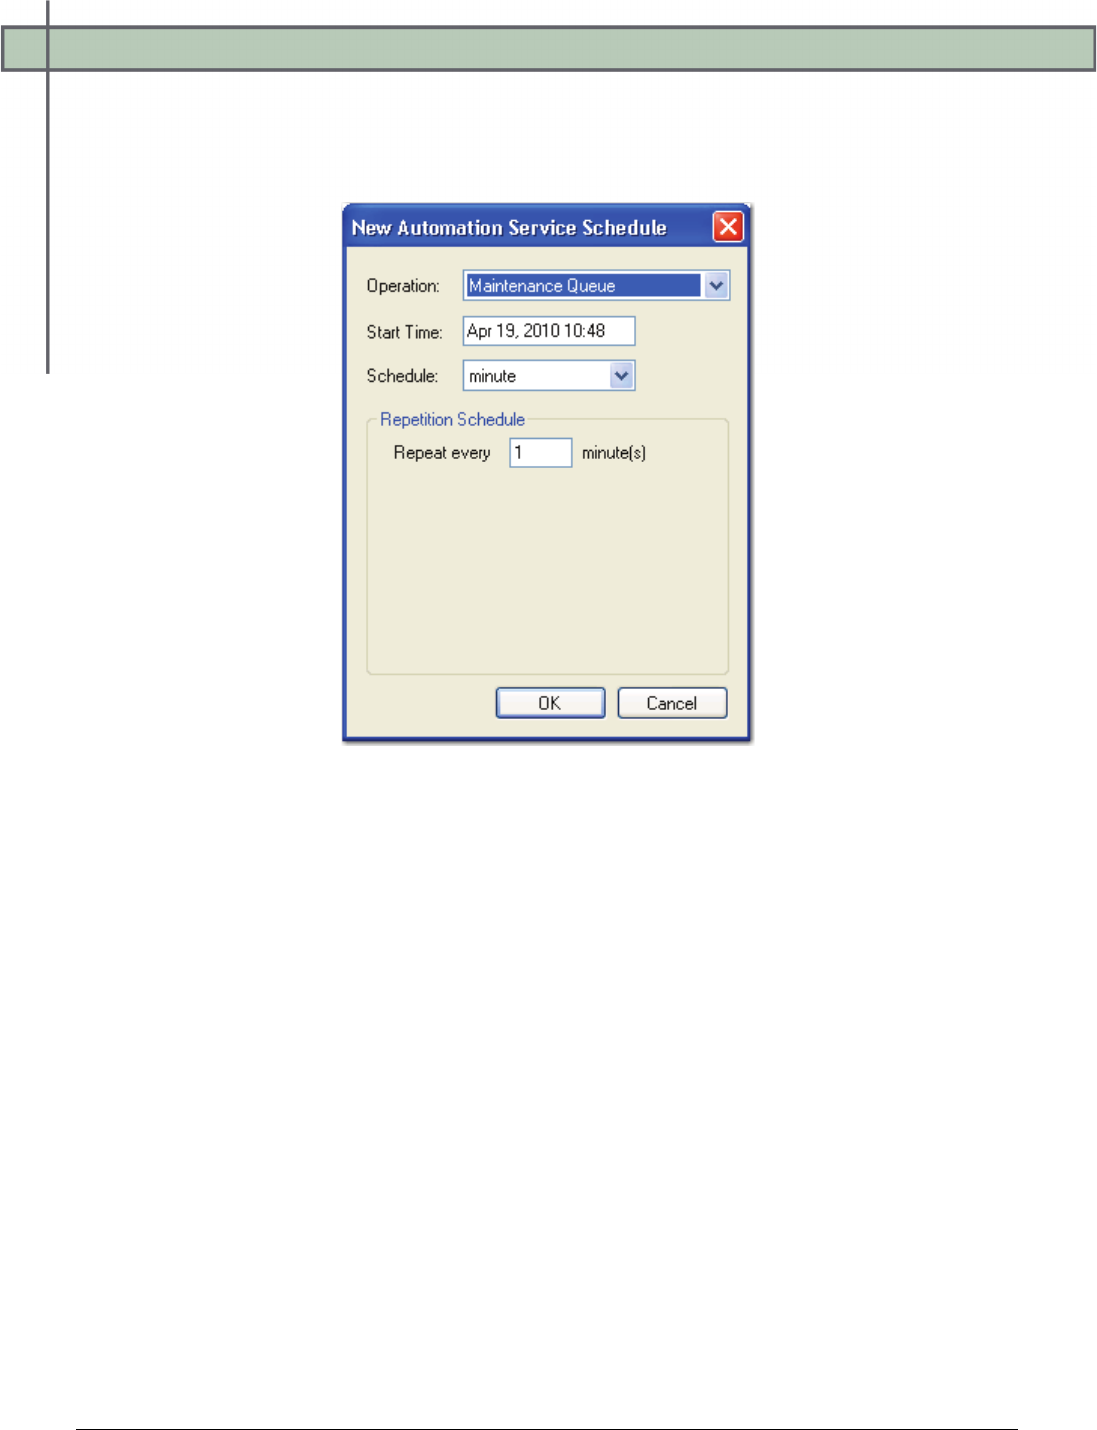
To add a new automation service schedule:
1. Select the Automation Server from the drop-down list, and click the Add button,
which opens the New Automation Service Schedule dialog box.
New Automation Service Schedule
2. Select the Operation type from the drop-down menu. PaperVision Capture provides
automation services that automate the execution of the following operations:
• Maintenance Queue processes any maintenance items listed in the queue.
Maintenance queue items involve one-time operations such as processing
completed batches on the server or updating a specific job step’s list of predefined
index values.
• Maintenance Log Cleanup automatically deletes maintenance logs older than the
entity's specified Max Maintenance Log age setting.
• Process Batch executes automated PaperVision Capture job steps. By default, this
operation executes all associated functions. For information on configuring the
Process Batch operation to perform only specific functions, see Appendix C –
Modifying the Process Batch Operation.
• Destroy Batch automatically deletes batches that have been scheduled for
destruction.
• Session Grant Cleanup removes sessions that have remained idle as specified in
the entity's Max Session Idle Time setting.
3. Enter the Start Time when the operation will commence.

Chapter 2 – Global Administration
PaperVision® Capture Administration Guide 32
4. Select the Schedule, which is the time interval that the service will run.
5. Enter the Repetition Schedule, which is the time interval that the process will repeat.
You can schedule these operations to run at any of the following time intervals:
• Every x minutes
• Every x hours
• Every x days
• Every x weeks on specific days of the week
• On specific days of the month
6. Click OK.
7. In the Automation Service Scheduling dialog box, click Save.
To edit an automation service operation:
1. Highlight the operation in the Automation Service Scheduling list.
2. Click the Edit button.
3. Make changes to the operation.
4. Click OK.
To remove an automation service operation:
1. Highlight the operation in the Automation Service Scheduling list.
2. Click the Remove button.
3. Click Yes to confirm the removal.

Chapter 3 – Entity Administration
PaperVision® Capture Administration Guide 33
An entity is a body (e.g. a corporation or organization) that provides its own
administration. Only global and system administrators can configure an entity's
properties. Each entity contains its own users, groups, and jobs that are not shared among
entities. Entity administration can be performed either remotely or from a direct database
connection.
In general, most PaperVision Capture installations, including large enterprise installations,
will not need more than one entity. However, two entities can be configured for a distributed,
multi-user installation scenario. For example, one office (entity) can be located in Denver,
Colorado, and the other located in Lincoln, Nebraska. Each entity has a separate database, and
manages jobs, users, and batches solely for that entity. Both locations are monitored by a
single global administrator. This scenario can alleviate network congestion since each
location is a separate entity. If the Denver office becomes inundated with work and needs
assistance from Lincoln, Lincoln user accounts can be created for the Denver entity so users
can be assigned to Denver jobs. As a result, Lincoln users can simply log into the Denver
entity and process jobs for Denver.
To open an entity's properties, expand the Entities directory.
Entity Administration
The need for multiple entities can arise in specific circumstances:
• In a hosting environment where an on-demand provider is hosting data for multiple
companies and each company wants to be able to administrate itself and its users
• In a large enterprise that has different departments or cost centers that want the ability
to administrate themselves (separately from other departments) without having to
involve a central IT organization
Chapter 3 – Entity Administration
PaperVision® Capture Administration Guide 34
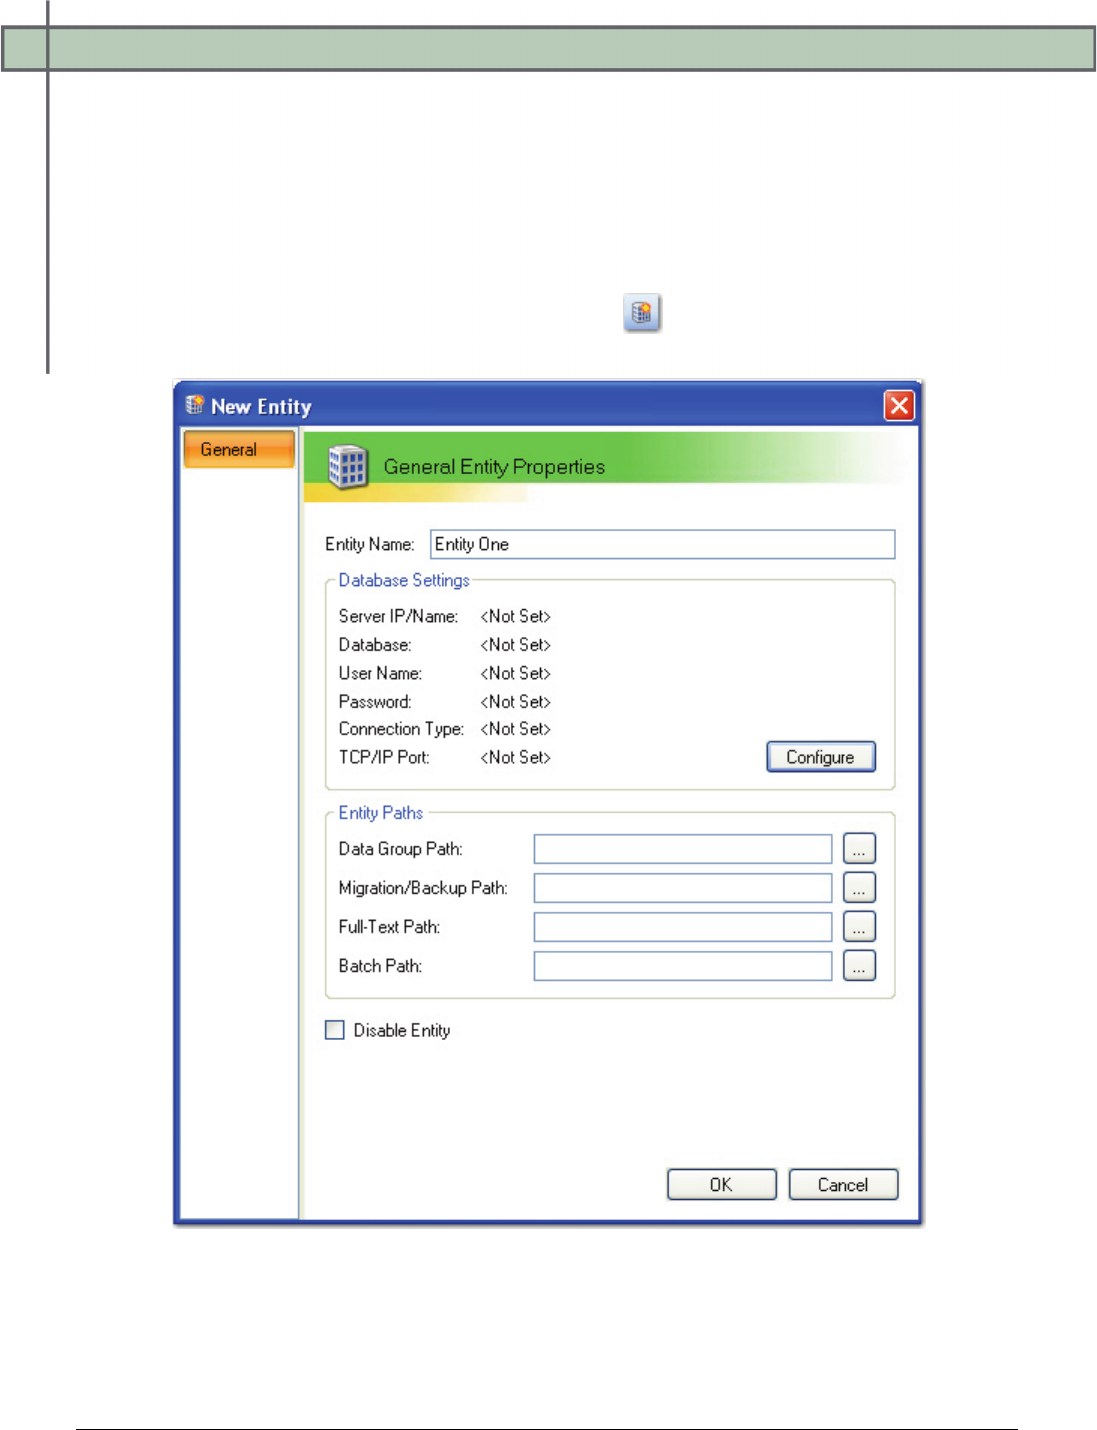
Creating a New Entity
Entity properties dictate how the server will handle system-level functions relating to that
entity. Configuring entity properties, as well as creating, editing, and deleting entities, can be
performed by global and system administrators.
To create a new entity:
1. After logging into PaperVision Capture as a global administrator, highlight the
Entities directory, and click the New Entity icon. The New Entity screen
appears.
New Entity
2. Enter the Entity Name, which is the name of your company or organization.
Chapter 3 – Entity Administration
PaperVision® Capture Administration Guide 35
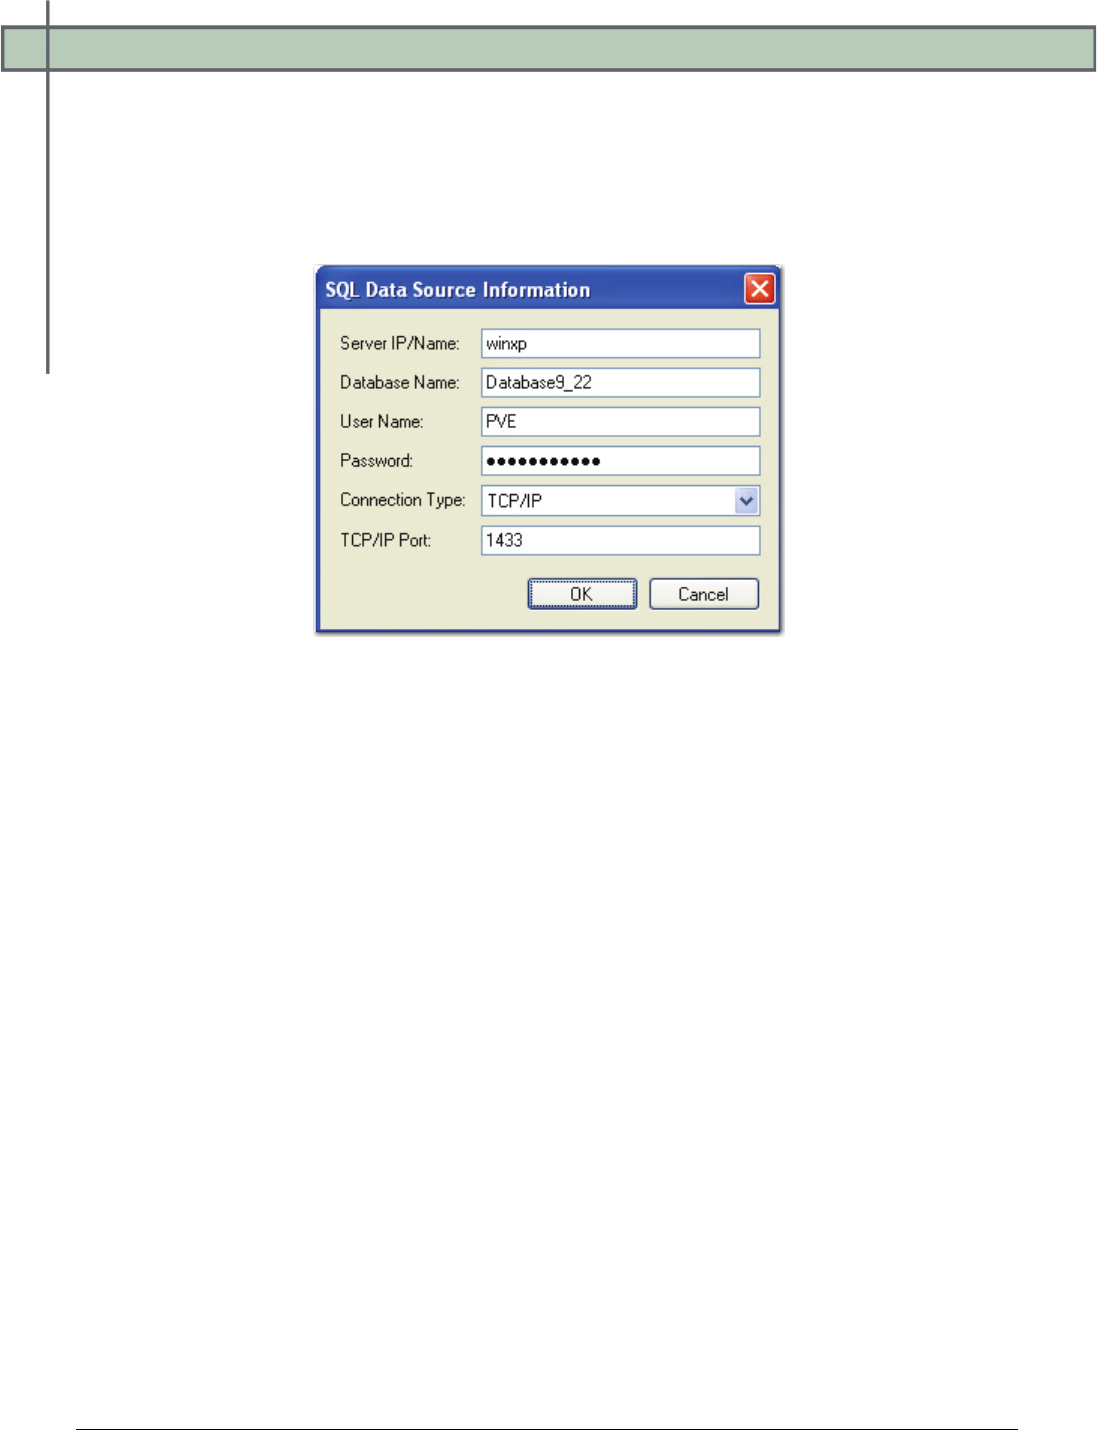
3. In the Database Settings section, click the Configure button to assign the SQL
database information. Database settings include configuration settings for the
database where the entity resides. Only under special circumstances (i.e. moving the
database to a different server), should these settings ever be changed once the entity is
created. Changing these settings to another database or server for an existing entity
will NOT create new entity tables. The server will expect them to already exist.
SQL Data Source Information
4. In the SQL Data Source Information dialog box, enter the following information:
• Server IP/Name
• Database Name
• User Name
• Password
• Connection Type (select from the drop-down list)
• TCP/IP Port
5. Click OK in the SQL Data Source Information dialog box.
6. In the New Entity dialog, click the ellipsis button next to each entity path to enter its
location.

Chapter 3 – Entity Administration
PaperVision® Capture Administration Guide 36
The following paths are also used by PaperVision Capture:
• Data Group Path specifies the location where data groups are to be copied. As
PaperVision Enterprise imports data groups, it can optionally copy the data
groups from their source location to a new location. This path also specifies where
new (attached) documents and new document versions are written to.
• Migration Path specifies the path where migration jobs or backup packages are
processed.
• Full-Text Path specifies the path where full-text database indexes are stored.
• Batch Path specifies the path where batches created by PaperVision Capture are
stored.
7. Select the Disable Entity check box to disable any users, including administrators,
from logging into the system.
8. Click OK in the New Entity screen to save the properties.
Deleting an Entity
Deleting an entity removes it from the database. Additionally, deleting an entity removes any
full-text databases and data groups from PaperVision Enterprise (depending on global system
settings).
To delete an entity:
1. After logging into PaperVision Capture as a global administrator, highlight the
Entities directory, and then select one or more entities in the right pane.
2. Click the Delete icon.
3. Click OK to confirm the deletion.
Chapter 3 – Entity Administration
PaperVision® Capture Administration Guide 37
Editing the Properties of an Entity
Global administrators can edit the properties of all entities; system administrators can edit the
properties of one entity at a time.
To edit the properties of an entity:
1. Select the Entities directory, and then highlight the appropriate entity in the right
pane.
2. Click the Properties icon.
3. Make the modifications in the Entity Properties dialog.
4. Click OK to save the changes.
Note:
Changing database settings to a new or different database does not create entity
tables in the new database. However, creating a new entity creates new entity tables
in the database.
Chapter 3 – Entity Administration
PaperVision® Capture Administration Guide 38
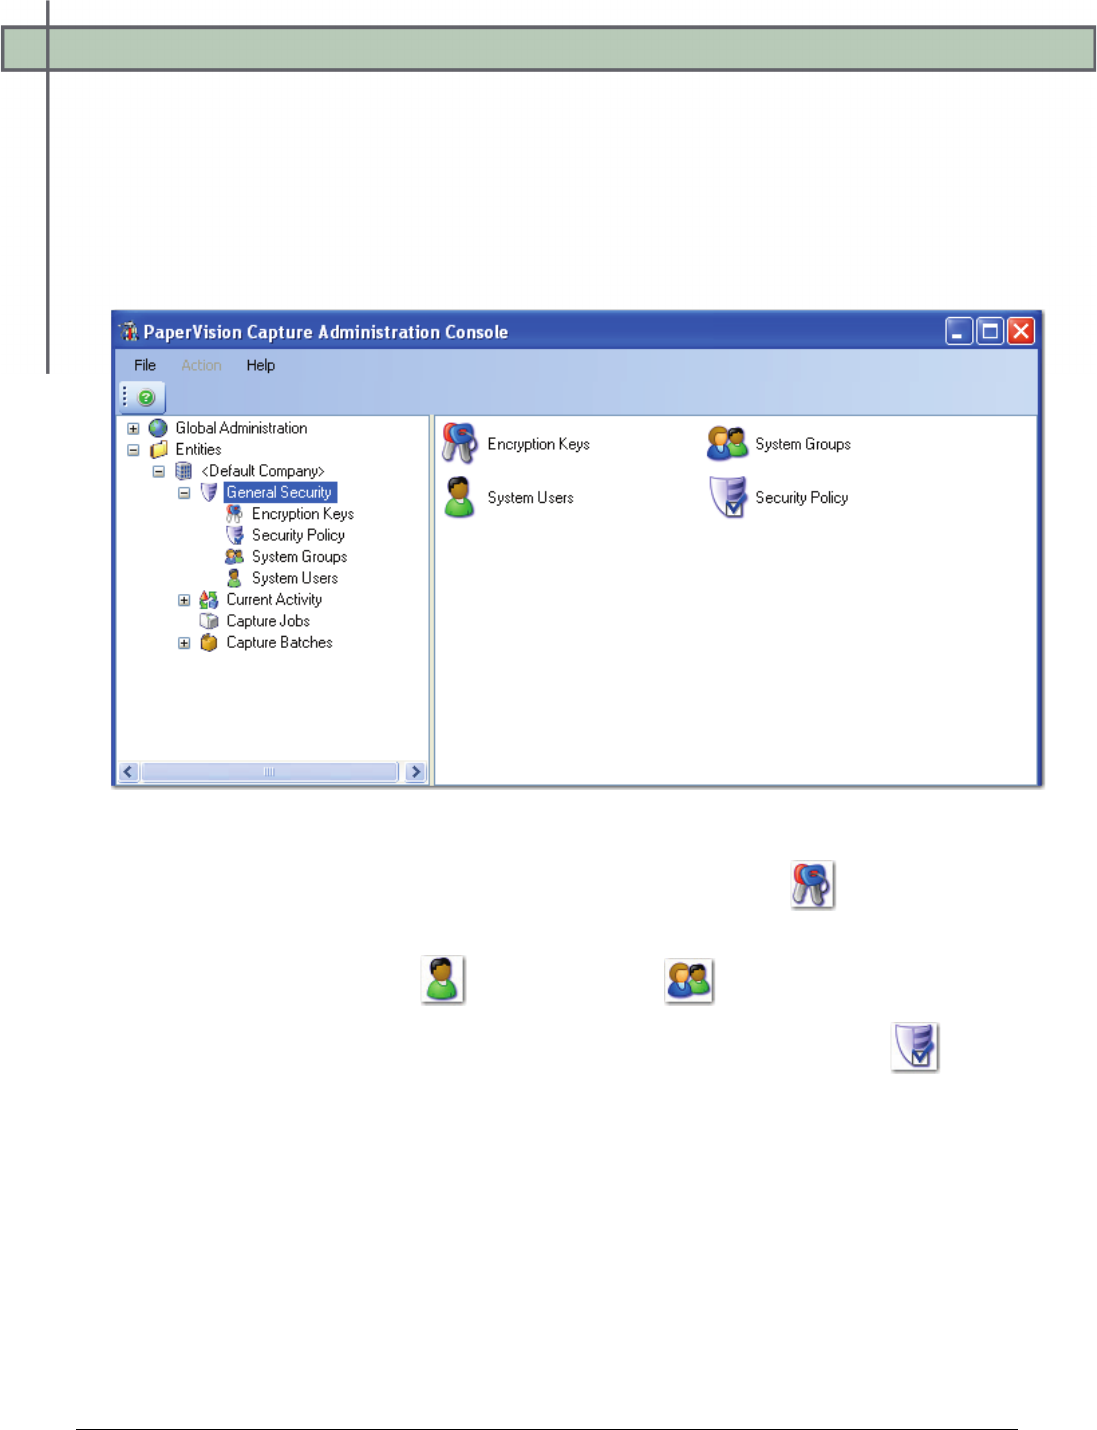
General Security
The General Security screen allows you to manage PaperVision Capture’s encryption keys,
security policy, system groups, and system users.
To view the General Security settings:
1. Select Entity > Company > General Security. The General Security screen
appears.
General Security
2. To create encryption keys, double-click the Encryption Keys icon.
3. To assign users and groups who will have access to PaperVision Capture, double-
click the System Users or System Groups icon.
4. To assign the entity’s security settings, double-click the Security Policy icon.
Chapter 3 – Entity Administration
PaperVision® Capture Administration Guide 39
Encryption Keys
PaperVision Capture provides the ability to configure and manage encryption keys in order to
protect your data while it resides inside the application. Once configured, an encryption key
can then be used for the encryption of batches, images, indices, and full-text OCR data. Once
a batch is encrypted, its data will be accessible from within PaperVision Capture (even when
the encryption key is modified or deleted), but you will not be able to open batch images with
any viewer. When encryption is enabled, images, indices, and full-text OCR data that are
exported from PaperVision Capture are decrypted during the export. Generally, encrypted
batches impact overall system performance.
Note:
Encryption keys created in PaperVision Capture can be used in PaperVision
Enterprise and vice versa.
PaperVision Capture’s encryption process utilizes the following design:
• Algorithm: Rijndael – AES (256-bit)
• Encryption Mode: CBC (Cipher Block Chaining)
• Padding Method: FIPS81 (Federal Information Processing Standards 81) scheme
(ISO10126)
• Secret Key Generation: User-defined pass phrase is passed through the SHA-2
algorithm (Secure Hashing Algorithm) to generate a 256-bit hash
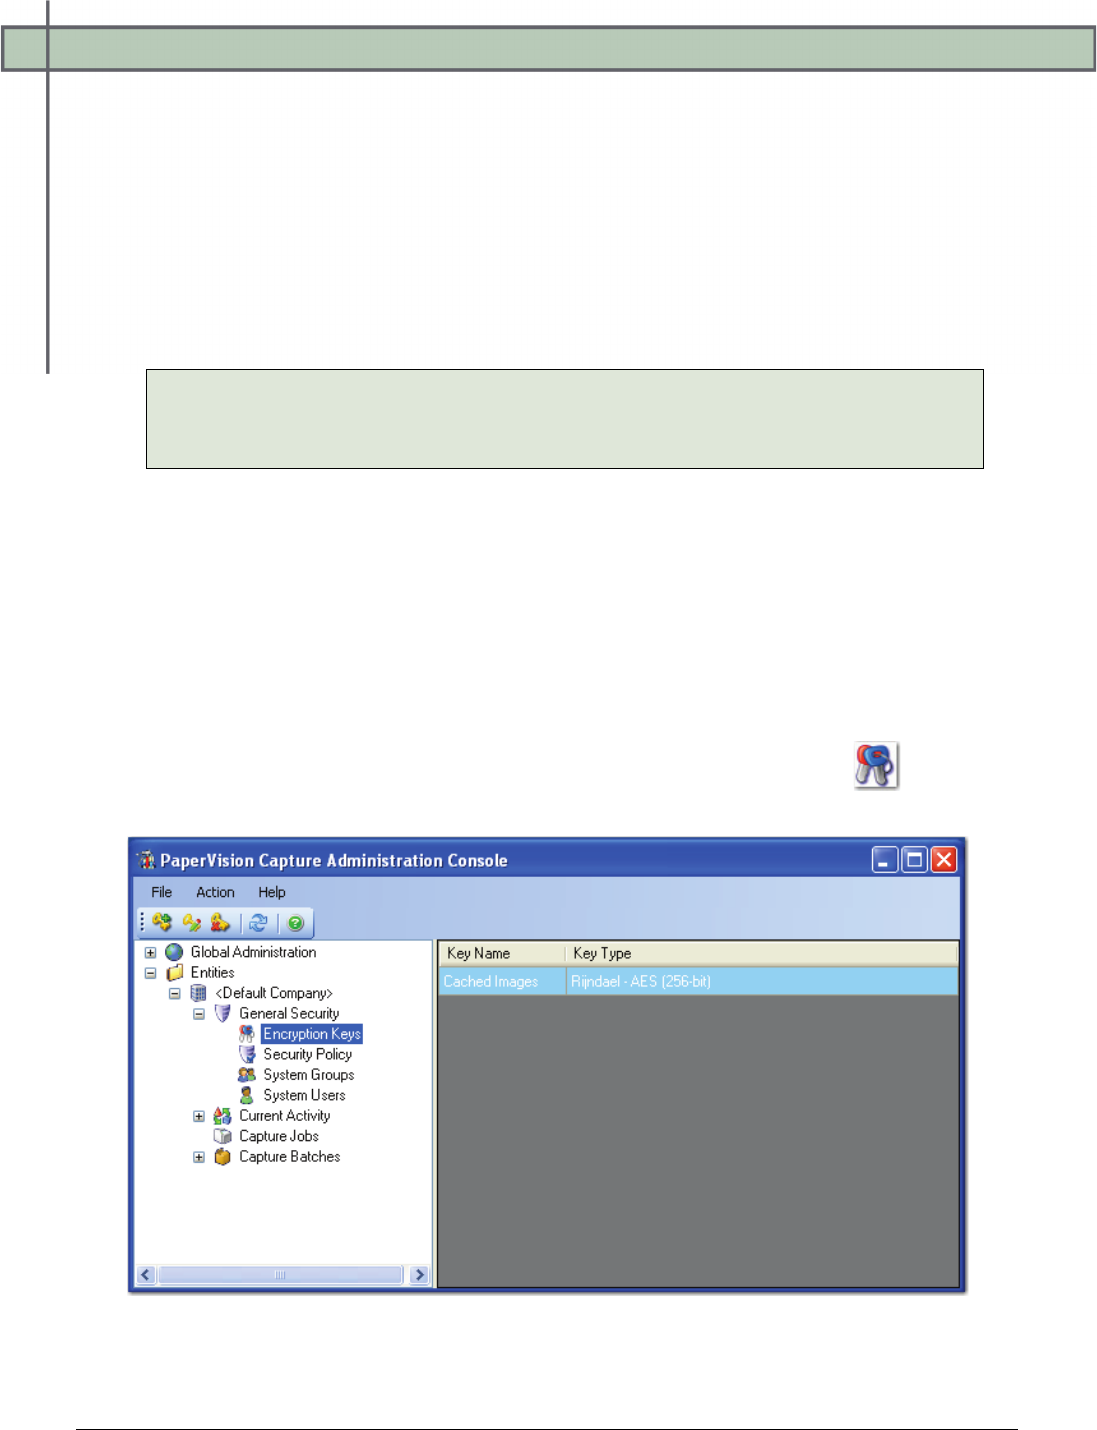
To view all encryption keys for an entity, double-click the Encryption Keys icon in the
General Security screen. The Encryption Keys screen appears.
Encryption Keys
Chapter 3 – Entity Administration
PaperVision® Capture Administration Guide 40
Adding Encryption Keys
Once you add a new encryption key, only its description can be edited.
To add a new encryption key:
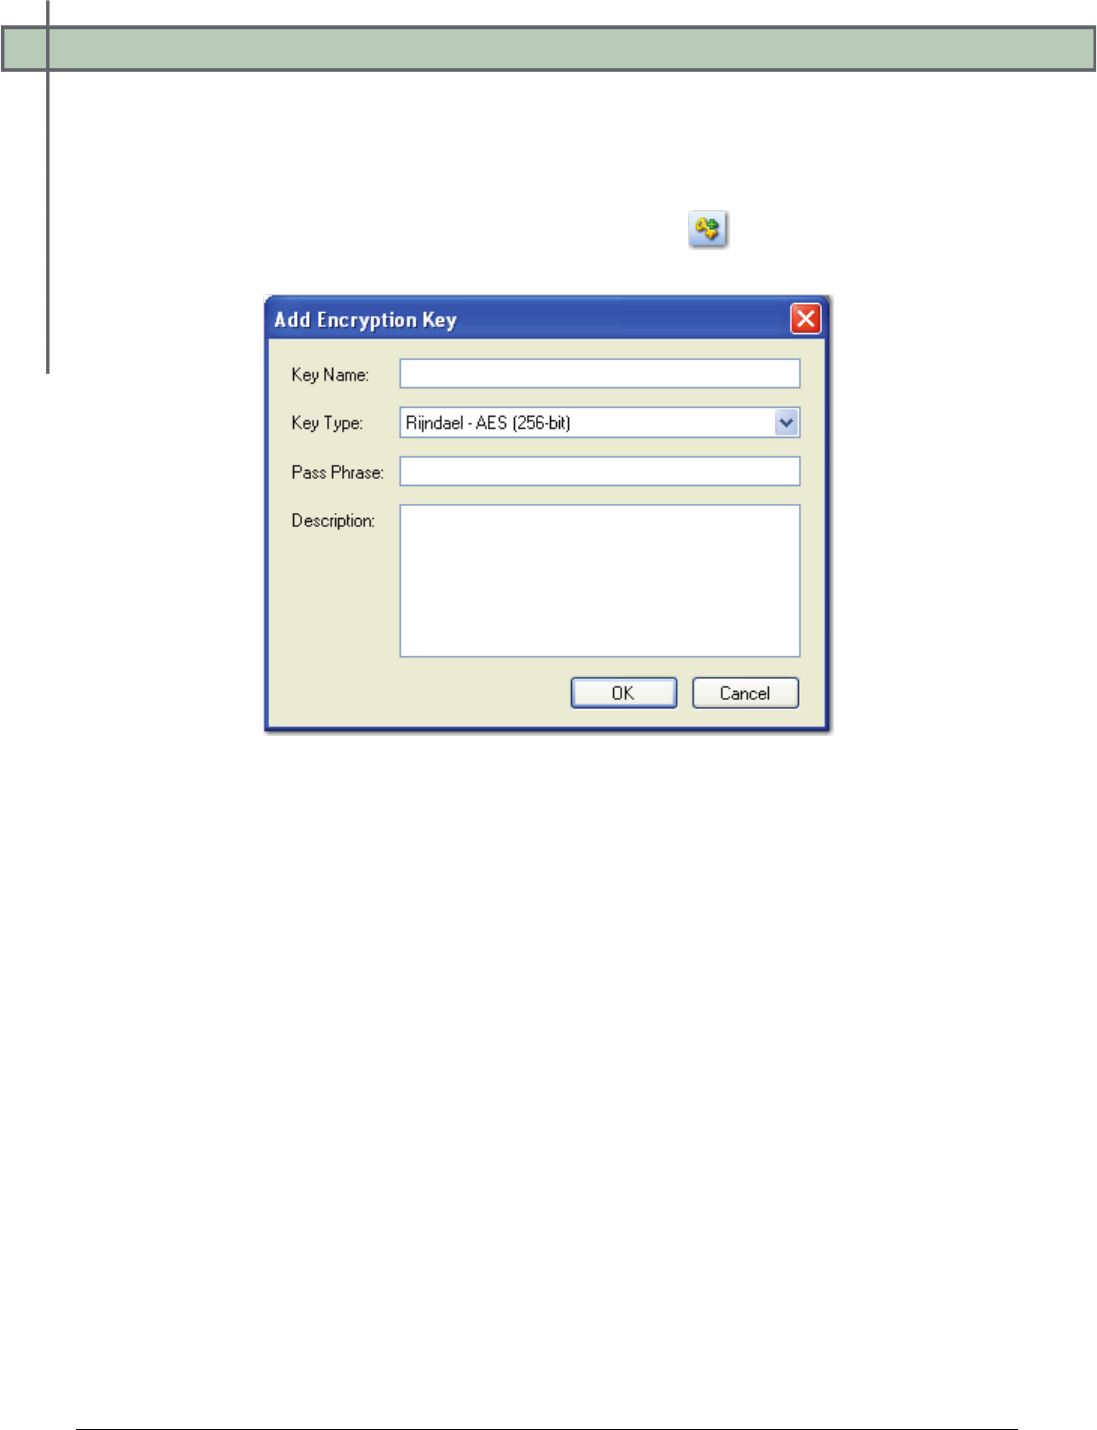
1. In the Encryption Keys screen, click the Add Key icon. The Add Encryption
Key dialog box appears.
New Encryption Key
2. Enter the Key Name that will be used to identify the key.
3. Select the Key Type, which identifies the type of encryption that will be used for this
key.
4. Enter the Pass Phrase that will be used to generate the key.
5. Optionally, provide a general description of the key.
6. Click OK to save the new encryption key.
Chapter 3 – Entity Administration
PaperVision® Capture Administration Guide 41
Editing an Existing Encryption Key
In order to prevent any previously-encrypted data from becoming unreadable, only the
description of the encryption key can be modified.
To edit an existing encryption key:
1. In the Encryption Keys screen, select the appropriate encryption key, and then click
the Edit Key icon.
2. In the Edit Encryption Key dialog box, make the necessary modifications to the
description, and then click OK. The modifications will take effect the next time a
process loads the key values.
Deleting Encryption Keys
Important!
Data that has been encrypted with an encryption key may become unreadable if that
encryption key is deleted.
To delete an encryption key:
1. In the Encryption Keys screen, select an encryption key.
2. Click the Delete Key icon.
3. Click Yes to confirm the deletion.

Chapter 3 – Entity Administration
PaperVision® Capture Administration Guide 42
Security Policy
Windows Authentication allows users of the PaperVision Capture Operator Console to
authenticate using their Windows domain and user name, eliminating the need to type in their
user name and password during each login. This requires that a PaperVision Capture user
account exists in the “Domain\User” format for the Windows user attempting to login.
Windows Authentication can only be used when PaperVision Capture is connected directly to
the client database (in other words, you cannot be redirecting through a PaperVision Capture
application server).
When PaperVision Capture is connected directly to the client database from a remote station,
you must complete the following steps prior to enabling Windows Authentication:
1. Define the Master Batch Path as a UNC path (e.g., \\ServerName\MasterBatchPathFolder)
in the entity’s general properties.
2. Share the Master Batch Path folder with the appropriate users on the network.
3. Ensure that the PaperVision Data Transfer Agent service on the client workstation has
access to both the Master Batch Path and the Local Batch Path. If these paths do not
reside on the same machine, a domain account is recommended.
4. Ensure that the user specified in the previous step has full control (permissions) over the
Master Batch Path folder.
To configure the security policy for an entity:
1. In the General Security screen, double-click the Security Policy icon.
Chapter 3 – Entity Administration
PaperVision® Capture Administration Guide 43
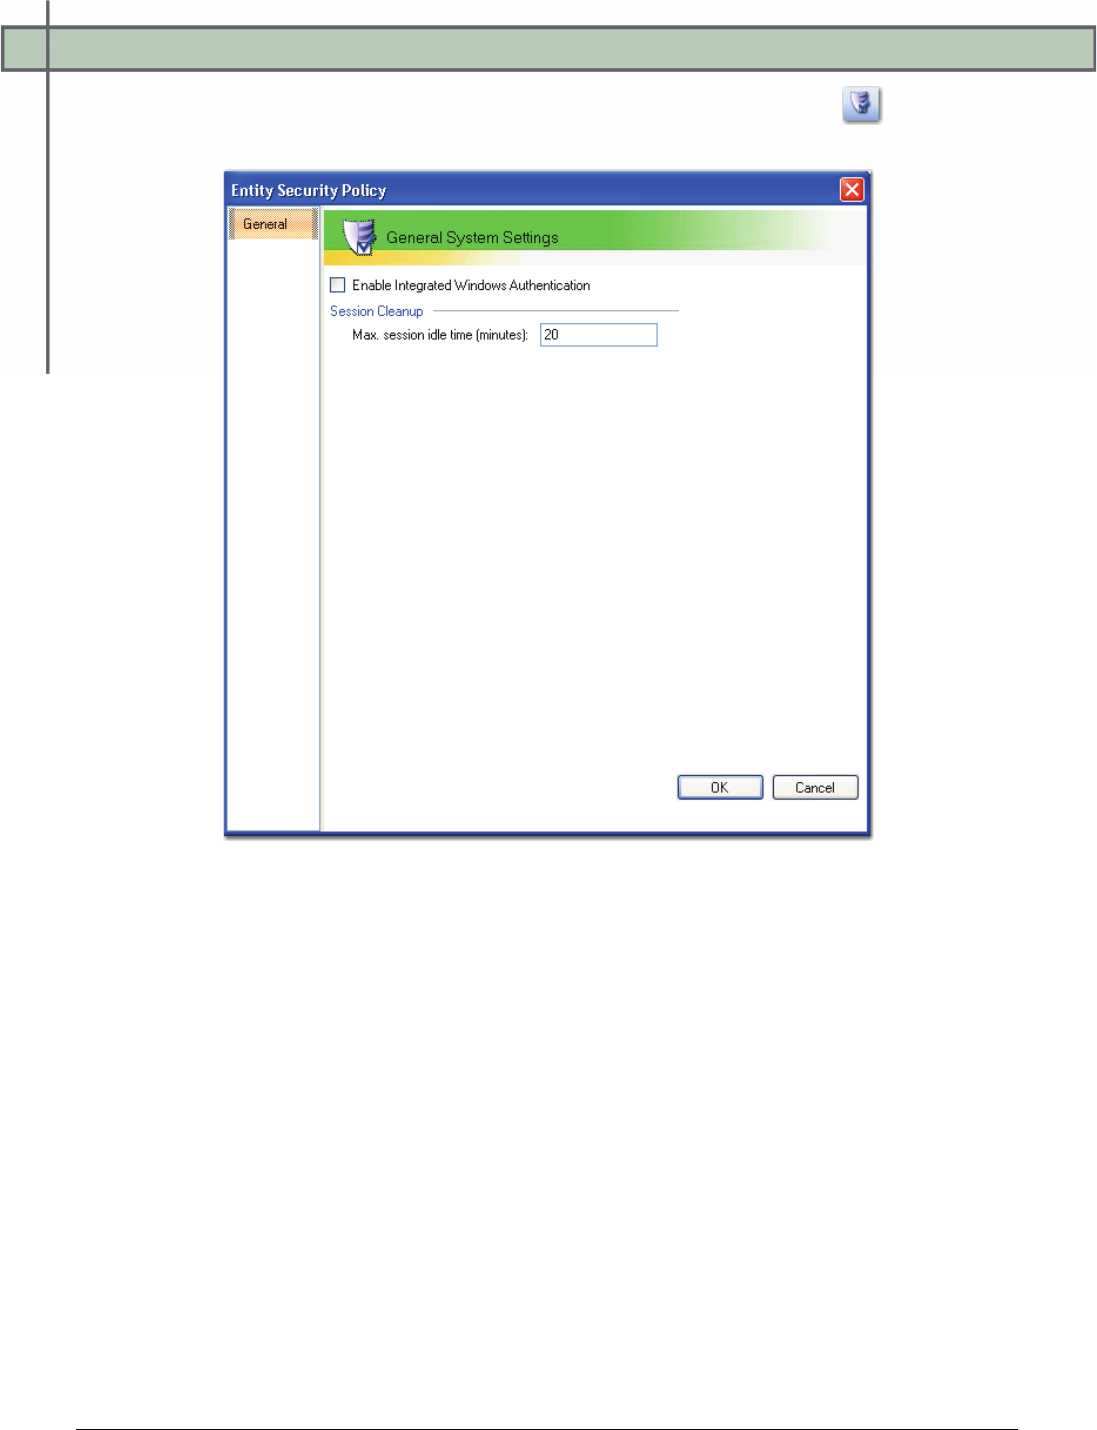
2. In the Security Policy screen, click the Configure Security Policy icon. The
Entity Security Policy screen appears.
Entity Security Policy
3. In the General System Settings section, select Enable Integrated Windows
Authentication to allow users to be authenticated using their Windows domain and
user name.
4. Enter the Max Session Idle Time (minutes) that the user will remain idle before the
automation service automatically terminates the user session (logs the user out of the
system).
5. Click OK.
Chapter 3 – Entity Administration
PaperVision® Capture Administration Guide 44
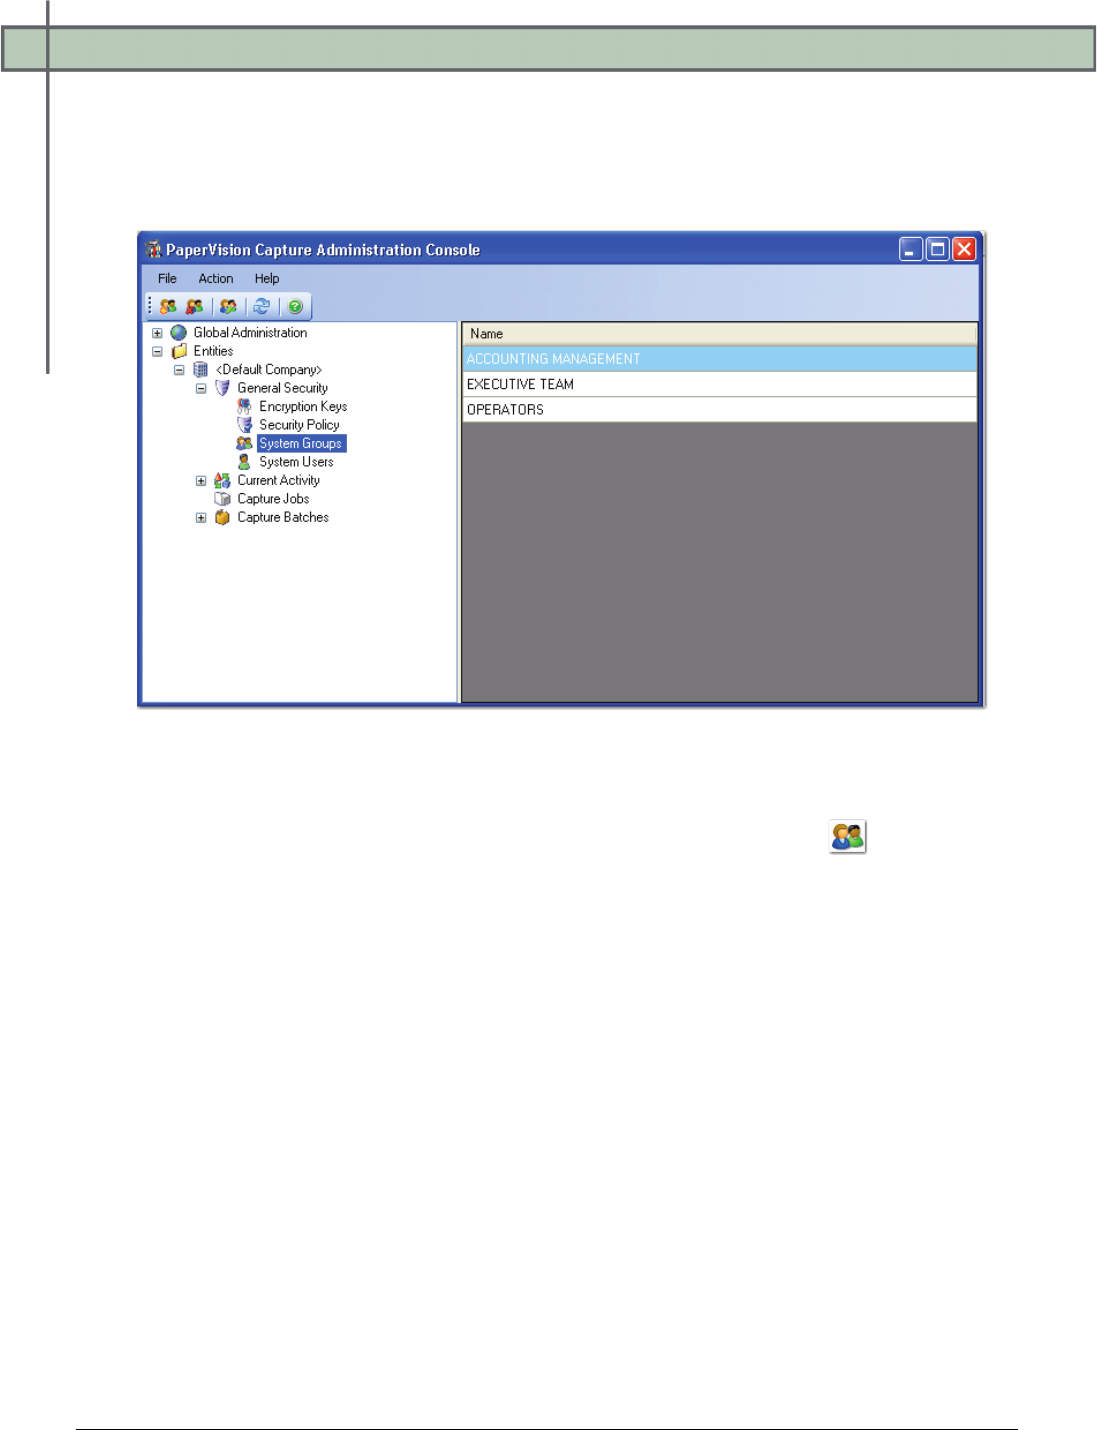
System Groups
Groups allow you to select similar users to assign access and functionality to those users all at
once. In the System Groups screen, you can create, modify, and delete system groups. Groups
created in this screen can be assigned to job steps in the Job Definitions screen.
System Groups
To add a new system group:
1. In the General Security screen, double-click the System Groups icon.
Chapter 3 – Entity Administration
PaperVision® Capture Administration Guide 45
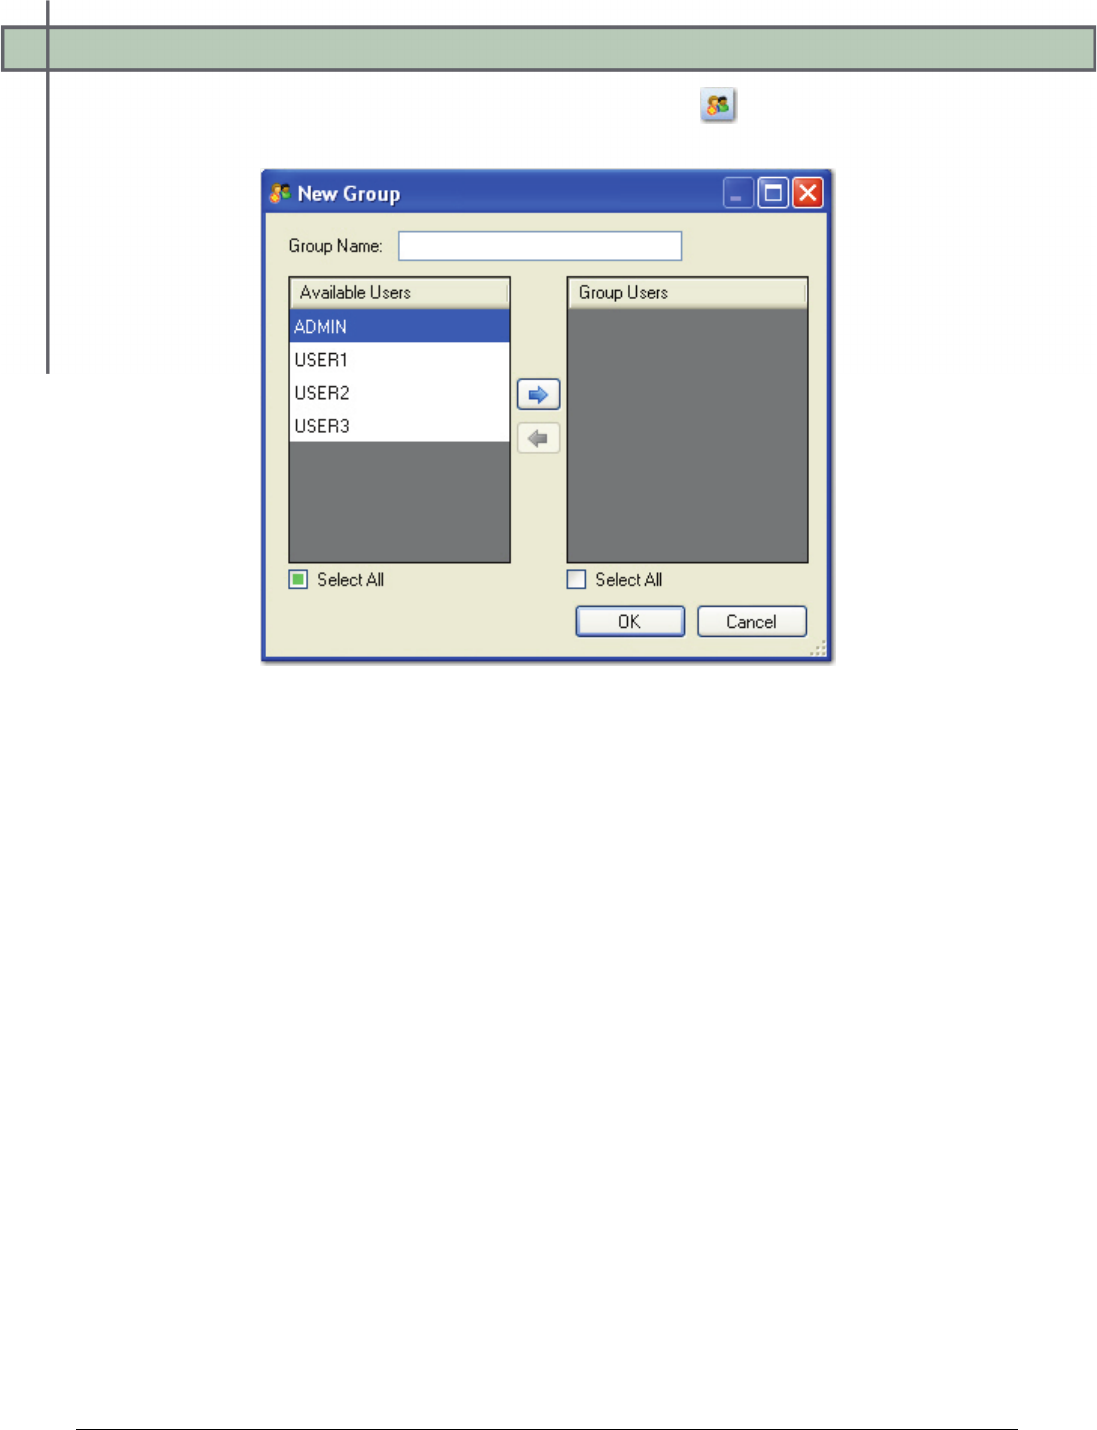
2. In the System Groups screen, click the New Group icon in the toolbar. The
New Group dialog box appears.
New Group
3. In the New Group dialog box, enter the new group name.
4. From the Available Users list, highlight the users who will comprise the group, and
then click the right arrow.
5. To add all available users to the new group, click Select All, and then click the right
arrow.
6. To remove a user from the new group, highlight the user in the Group Users list, and
then click the left arrow.
7. To remove all group users, click Select All in the Group Users list, and then click the
left arrow.
8. Click OK.

Chapter 3 – Entity Administration
PaperVision® Capture Administration Guide 46
Deleting a System Group
To delete a system group:
1. Highlight the group in the list.
2. Click the Delete icon.
3. Click OK to proceed with the deletion.
4. Click Save.
Editing Properties of a Group
To edit properties of a group:
1. Highlight the group.
2. Click the Properties icon.
3. In the Group Properties dialog box, select the members who should comprise the
group.
Note:
Group names cannot be edited; only the members can be edited.
4. Click Save.
Chapter 3 – Entity Administration
PaperVision® Capture Administration Guide 47
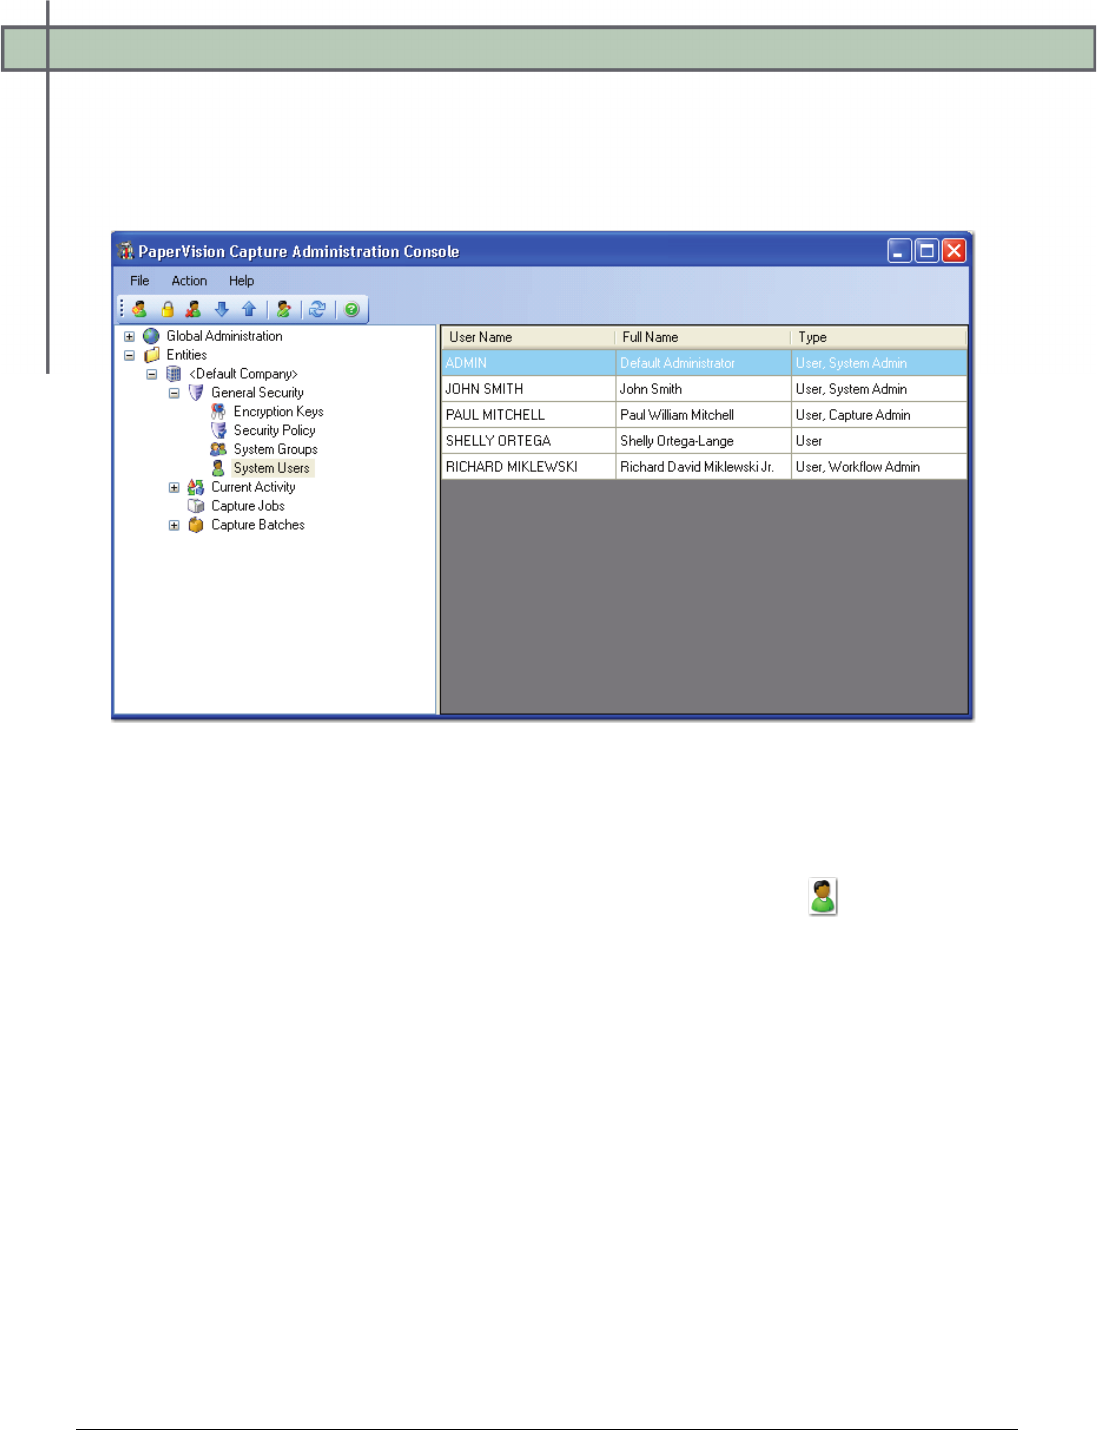
System Users
In the System Users screen, you can create, modify, and delete system users who have access
to PaperVision Capture. Additionally, you can assign and reset users' passwords in this
screen.
System Users
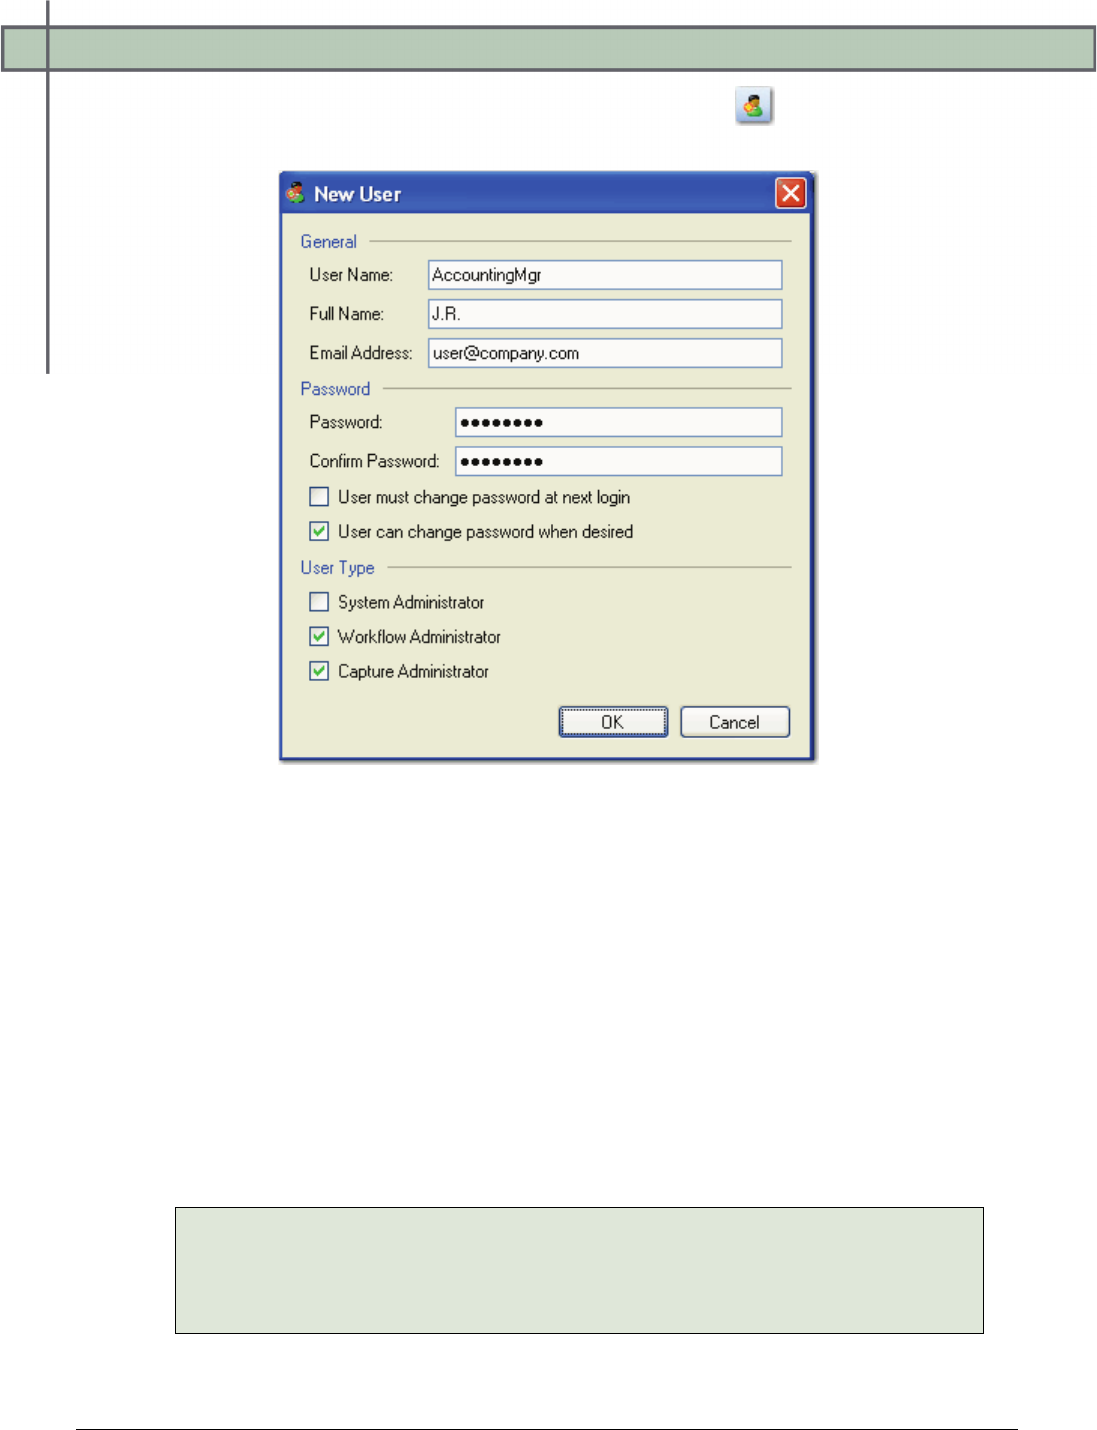
Creating a New System User
To create a new system user:
1. In the General Security screen, double-click the System Users icon.
Chapter 3 – Entity Administration
PaperVision® Capture Administration Guide 48
2. In the System Users screen, click the Create New User icon. The New User
dialog box appears.
New User
3. Enter the user name that will be used to log in to PaperVision Capture.
4. Enter the user’s full name (optional). The user’s full name is used for some of
PaperVision Capture’s reporting capabilities.
5. Enter the user's email address (optional).
6. Enter the user's password.
7. Enter the password once again to confirm it.
8. To force the user to change the password at the next login, select User must change
password at next login.
9. To allow the user to change the password at any time, select User can change
password when desired.
10. Select the appropriate User Type(s).
Note:
If you select System Administrator, the other user types will automatically be
assigned to the user. See the section on Supported Users in the Administration
Console in Chapter 1 for more information.
11. Click OK.

Chapter 3 – Entity Administration
PaperVision® Capture Administration Guide 49
Setting the User Password
To set the user password:
1. Highlight the user in the list.
2. Click the Set Password icon.
3. In the Set Password dialog box, enter the new password for the user.
Note:
Passwords are case-sensitive.
4. Enter the new password once again to confirm it.
5. Select OK to set the new password.
Deleting a User
To delete a user:
1. Highlight the user in the list.
2. Click the Delete icon.
3. Click OK to proceed with the deletion.
Editing the Properties of a User
To edit the properties of a user:
1. Highlight the user in the list.
2. Click the Properties icon.
3. In the User Properties dialog box, make the appropriate changes to the user account.
4. Click OK.
Chapter 3 – Entity Administration
PaperVision® Capture Administration Guide 50
Importing and Exporting Users
User lists can be imported and exported, populating most of the user’s configuration data.
Users can be imported using a pipe-delimited (“|”) or tab-delimited text file. Each line of the
text file can contain the following information (in this specific order):
• User Name
• Password
• Full Name
• Email Address
• System Administrator (if value is 1)
• Other Administrator (if value is 1, 2, or 3)
Note:
In the Other Administrator column, a Workflow Administrator has a value of 1; a
Capture Administrator has a value of 2; a Workflow and Capture Administrator
has a value of 3.
• User must change password at next login (if value is 1)
• User can change password when desired (if value is 1)
Only the first two fields (user name and password) are required on each line of text. If fields
are not specified, the default values are used. Below is a sample of an import file:
user1|password1|Test|test@test.com|0|1|1|1
user2|password2|Test2|test2@test.com|0|3|1|1
To import users:
1. In the System Users screen, click the Import Users icon.
2. Select the text file containing the user information.
Note:
Existing users are not recreated during the import process.
Chapter 3 – Entity Administration
PaperVision® Capture Administration Guide 51
To export all users:
1. In the System Users screen, click the Export Users icon.
2. In the Export Users dialog box, locate the directory where the text file will be saved.
3. Enter the export file name.
4. Click Save.
Note:
User passwords are not exported from PaperVision Capture; rather, passwords are
exported as empty strings in the text file. Consequently, exported users will be
required to change their passwords the next time they log into the Operator Console.
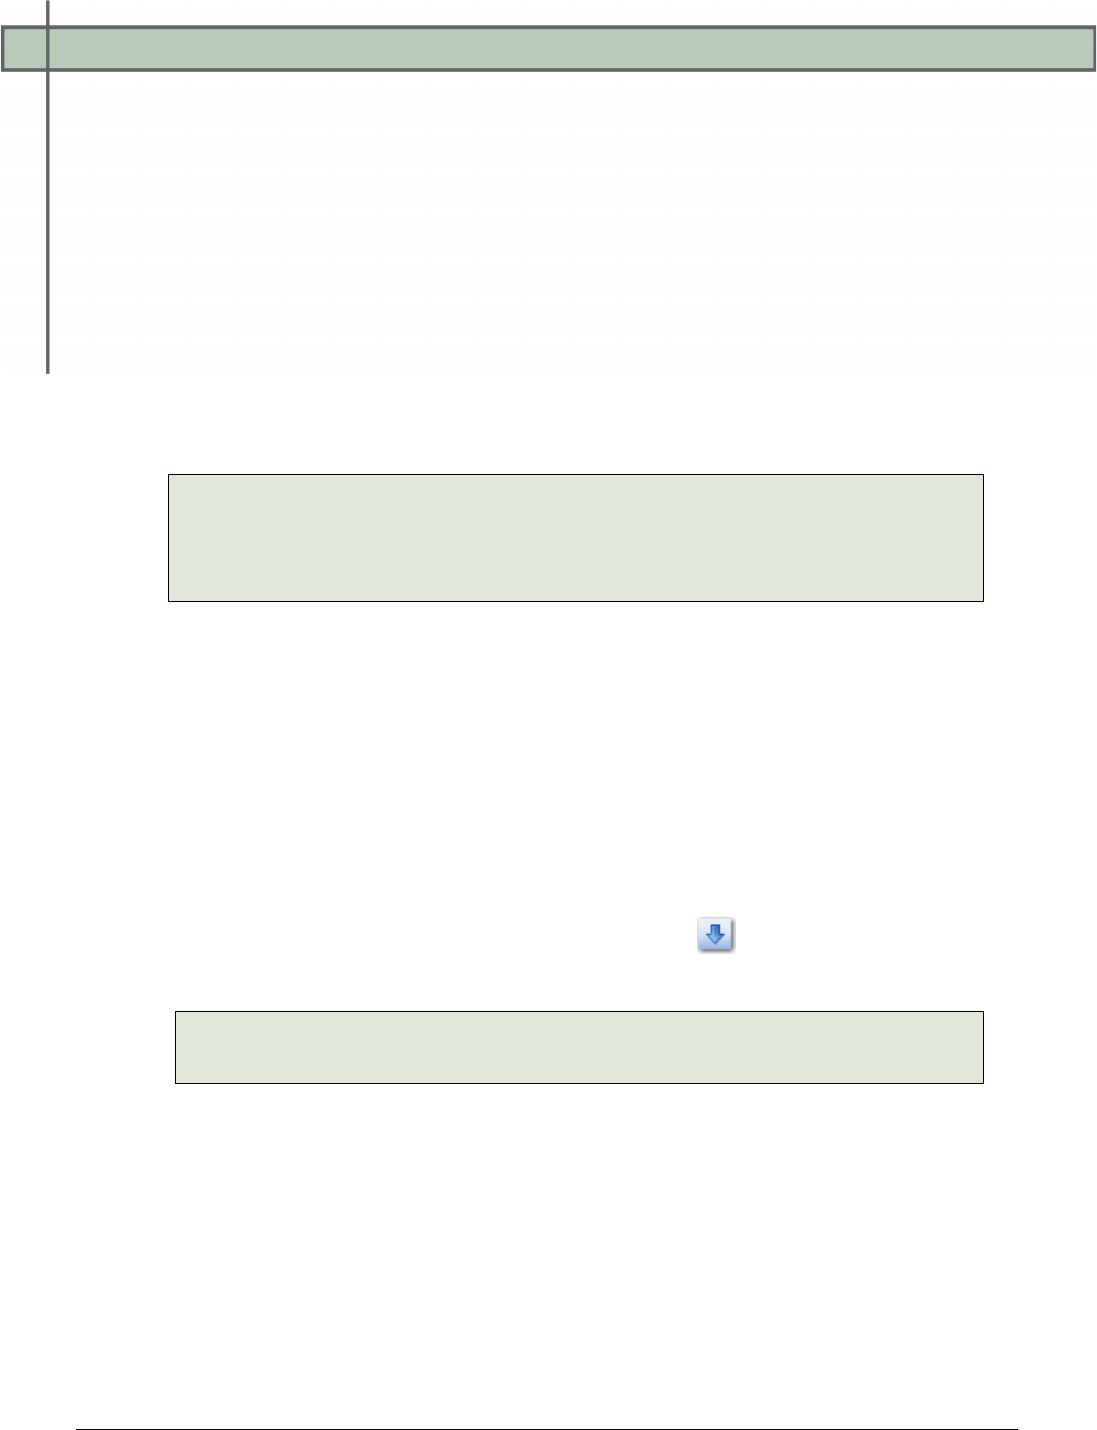
Current Sessions
As users log into the PaperVision Capture Operator Console, a session is started. Every time a
user accesses the server, PaperVision Capture verifies that the session is still valid, performs
the requested operation, and then updates the Last Activity Time column for the user. If a user
sits idle for too long (as specified by the administrator), the user’s session may automatically
be terminated (essentially, logged off). Current Sessions also displays the number of available
and used concurrent licenses in PaperVision Capture. To view the Current Sessions, select
Current Activity > Current Sessions.
Current Sessions

Chapter 3 – Entity Administration
PaperVision® Capture Administration Guide 52
To kill a user session:
1. Highlight the user session.
2. Click the Kill Session icon.
3. Click Yes to confirm session termination.
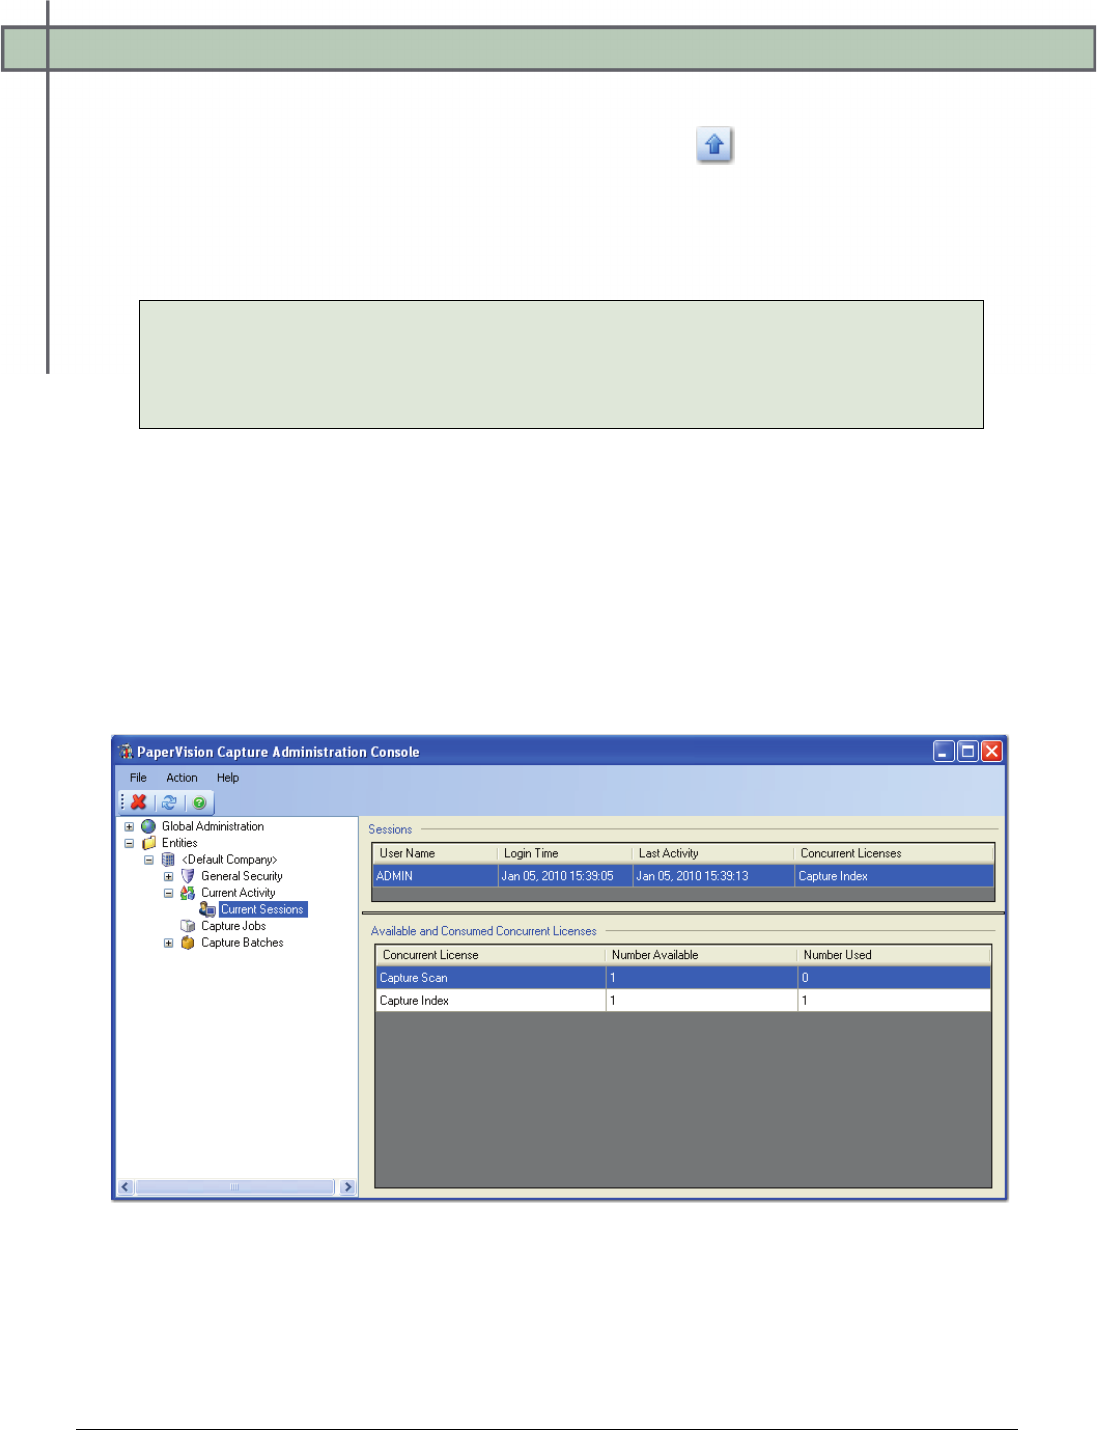
Chapter 4 – Capture Job Configuration
PaperVision® Capture Administration Guide 53
In PaperVision Capture, a job is a defined workflow comprised of one or more
job steps. For example, a job can be configured to scan documents, index
documents automatically, and then export documents. At least one job has to be configured in
the PaperVision Capture Administration Console; otherwise, batches cannot be processed in
the PaperVision Capture Operator Console. Each job must contain, at minimum, a Capture
start step. Job steps are configured in the Job Definitions screen that is launched as you add a
new job. Once you configure all job steps and validate the job, you can activate and check the
job in so it is available for use in the PaperVision Capture Operator Console.
Capture Jobs
Creating a New Job
You can create a new job from the main Capture Jobs screen.
To create a new job:
1. Expand Entities > Company.
2. Highlight Capture Jobs.
3. Click the Create New Job icon.
4. Enter the name for the new job.
5. Click OK. The Job Definitions screen appears where you can add and configure job
steps for each PaperVision Capture job. For more information, see the next section on
Job Definitions.
Chapter 4 – Capture Job Configuration
PaperVision® Capture Administration Guide 54
Editing a Job
To edit an existing job:
1. In the Capture Jobs screen, highlight the job.
2. Click the Edit Job icon.
3. Make the necessary changes in Job Definitions.
4. Save the job.
Note:
For information on configuring jobs, see the section on Job Definitions in this
chapter.
Saving a Job
An unsaved job displays an asterisk (*) next to its name. To save the current job open in the
workspace, click the Save Job icon.
Saving All Jobs
Unsaved jobs display an asterisk (*) next to their names. To save all jobs that are open in the
workspace, click the Save All icon.
Deleting Jobs
You can delete one or more jobs from the Capture Job list.
To delete one or more jobs:
1. Highlight one or more jobs.
2. Click the Delete Job icon.
3. To proceed with the deletion, click OK.
Checking Out a Job
To edit a job, the job has to be checked out of the Capture Jobs screen. Only one administrator
can check out a job at a time. To check out a job, click the Check Out Job icon.
Chapter 4 – Capture Job Configuration
PaperVision® Capture Administration Guide 55
Checking In a Job
After editing a job, it has to be checked in before its new version can be used to process
batches in the PaperVision Capture Operator Console. To check in a job, click the Check In
Job icon.
Undoing a Job Checkout
If you make changes to a job and do not wish to save the changes, use the Undo Checkout
command.
To undo a checkout:
1. Click the Undo Checkout icon.
2. Click OK to the message prompt, and your changes will not be saved.
Importing a Job
Existing jobs can be imported into the Capture Jobs screen for the entity.
To import a job:
1. Click the Import Job icon, and the Open dialog box appears.
2. Select the XML document to import.
3. Click Open.
Note:
If you cannot find the XML file, ensure that the job has already been successfully
exported from the Job Definitions screen.
Exporting a Job
To export a job:
1. Click the Export Job icon.
2. In the Save As dialog box, locate the directory to save the exported XML file.
Note:
Users (in the Assigned To field) are not exported with jobs from the PaperVision
Capture Administration Console. When these jobs are subsequently imported
back into Job Definitions, the Assigned To field will not contain any users.
3. Enter a file name.
4. Click Save.

Chapter 4 – Capture Job Configuration
PaperVision® Capture Administration Guide 56
Cloning a Job
Cloning a job copies the components of the open job including its steps, configurations, and
assigned users into a new job.
To clone a job:
1. Highlight the job to be cloned.
2. Click the Clone Job icon.
3. Enter the name of the new job. Job Definitions opens the new job, its steps,
configurations, and assigned users.
Chapter 4 – Capture Job Configuration
PaperVision® Capture Administration Guide 57
Job Definitions
The Job Definitions screen enables you to create and configure jobs and job steps in a
graphical user interface. The Job Step Toolbox holds the job steps that you can drag and drop
directly into the workspace area. The Properties grid displays the settings for each job and job
step. The Job Steps grid summarizes the selected job step by name, type, assigned user, next
job step, mode, age priority, and step priority. You can customize the appearance of the
workspace by moving the Job Step Toolbox, Properties grid, and Job Steps grid.
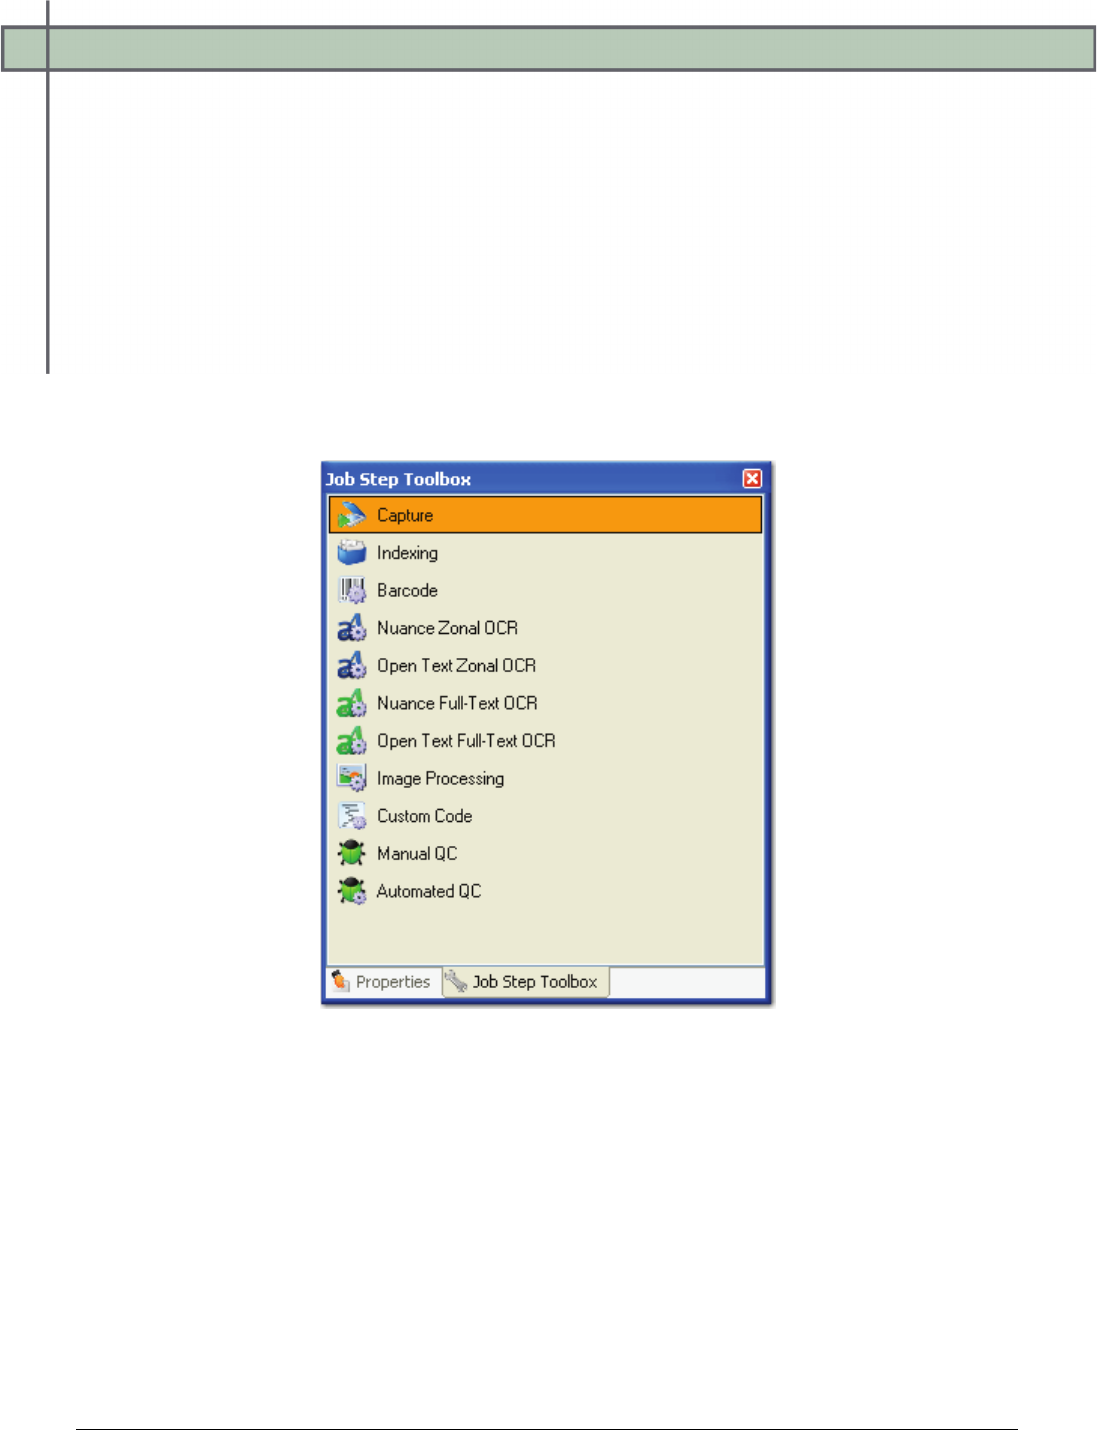
Job Step Toolbox
The Job Step Toolbox contains PaperVision Capture's job steps that you can drag and drop
into the workspace:
Job Step Toolbox
To insert a job step into the workspace:
1. Highlight the job step in the Job Step Toolbox.
2. Hold the left mouse button while you drag the job step into the workspace.
3. To configure a job step’s properties, double-click the job step. For more
information on configuration, see the section on Job Steps in this chapter.
Chapter 4 – Capture Job Configuration
PaperVision® Capture Administration Guide 58
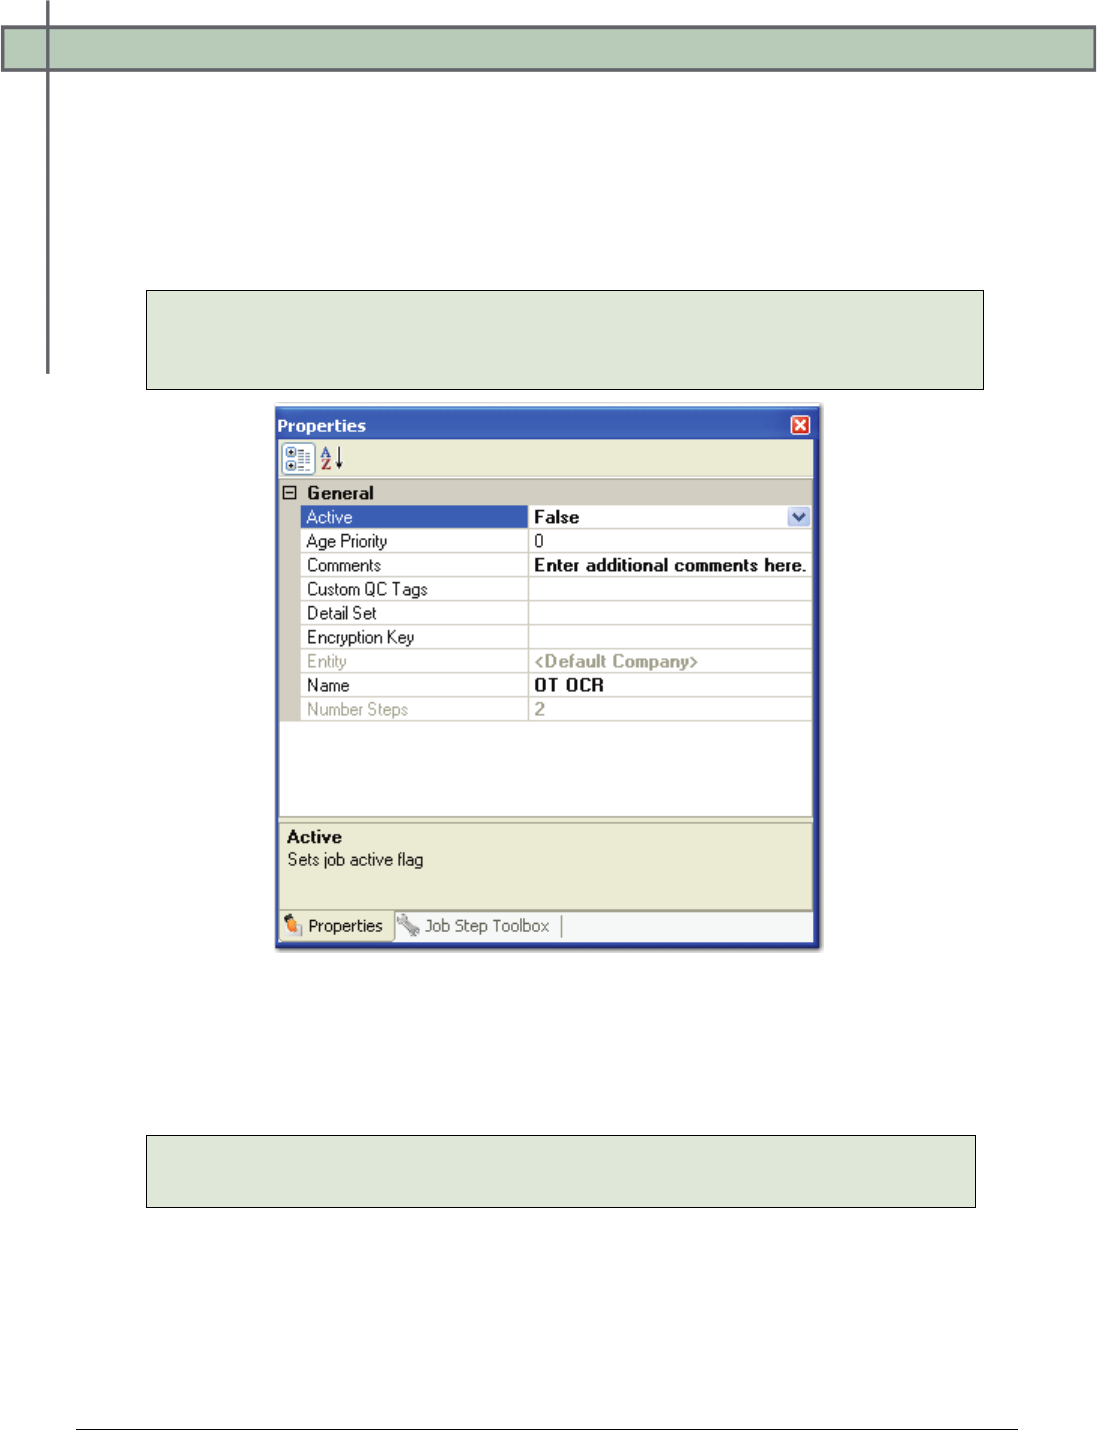
Job Properties
The Job Properties grid contains the settings specific to the open job. Each property name is
listed in the grid's left column; the right column contains editable fields, drop-down menus, or
ellipses buttons where you configure the properties. Properties that are not applicable to the
job, selected job step, or that contain read-only information are disabled. If you select a job
step in the workspace, the grid reveals the properties applicable to the selected job step.
Tip:
To clear a setting that was configured with an ellipsis button, right-click the ellipsis
button and select Reset.
Job Properties
Active
If the Active status is set to True, the job has been activated. If the status is False, the job has
not been activated.
Note:
Batches can only be created for active jobs that have been checked into the server.
Chapter 4 – Capture Job Configuration
PaperVision® Capture Administration Guide 59
Age Priority
The job's Age Priority value is used in the calculation of the overall batch priority assigned in
the PaperVision Capture Operator Console. For details on the batch priority calculation, see
the section on PaperVision Capture Terminology in Chapter 1.
Comments
This editable field contains additional details, comments, etc. about the job.
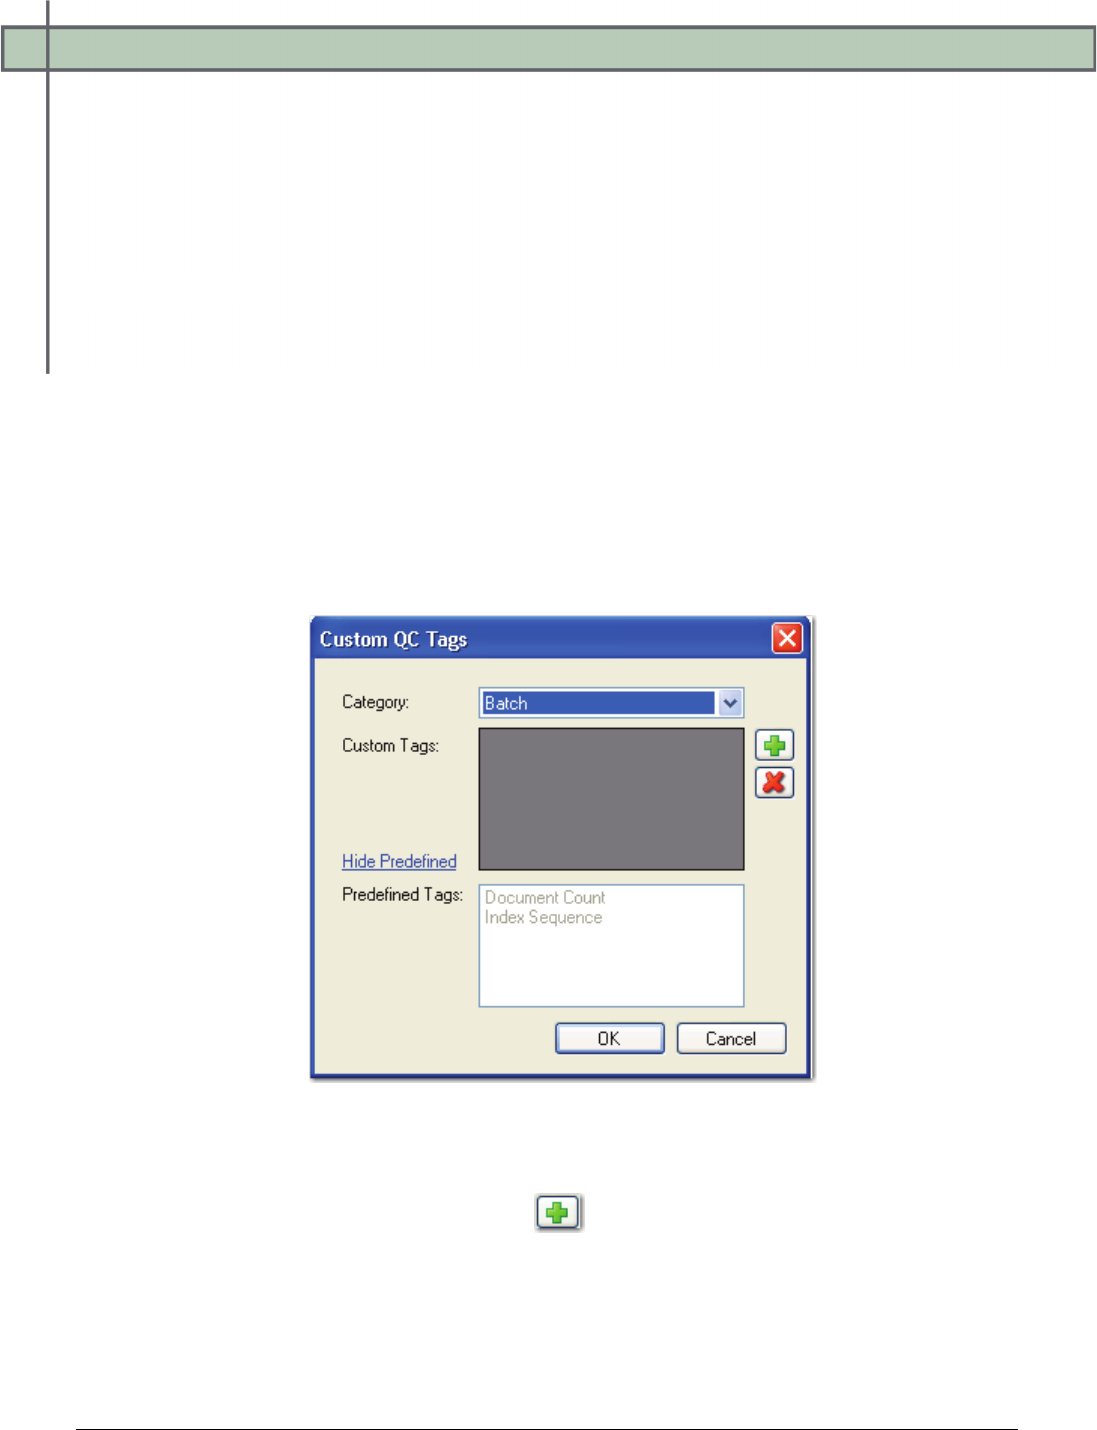
Custom QC Tags
You can define the QC tags available for selection in jobs requiring manual inspections on
batches, documents, pages, and indexes.
To add custom QC tags to a job:
1. Click the ellipsis button next to the Custom QC Tags row. The Custom QC Tags
dialog box appears.
Custom QC Tags
2. Select the appropriate category (Batch, Document, Index, Page).
3. To add a custom tag, click the Add button in the Custom Tags section, and
then enter the tag name.
4. The Predefined Tags are listed for your reference. Click the Hide Predefined link to
hide these tags.
5. When you are finished adding tags, click OK.

Chapter 4 – Capture Job Configuration
PaperVision® Capture Administration Guide 60
Note:
The Predefined Tags are provided for informational purposes only. All predefined
tags will be used in an Automated QC step and will be available for selection in the
Manual QC step.
Detail Set
In PaperVision Capture, detail sets define a collection of indexes that allow multiple sets of
field data to reference a single document. To configure a detail set for the job, click the
ellipsis button in the right column of the Detail Set field. For more information, see the
section on Detail Sets in this chapter.
Entity
This read-only field displays the name of the current entity.
Name
This editable field contains the name of the open job.
Number Steps
This read-only field displays the number of job steps that comprise the job.
Chapter 4 – Capture Job Configuration
PaperVision® Capture Administration Guide 61
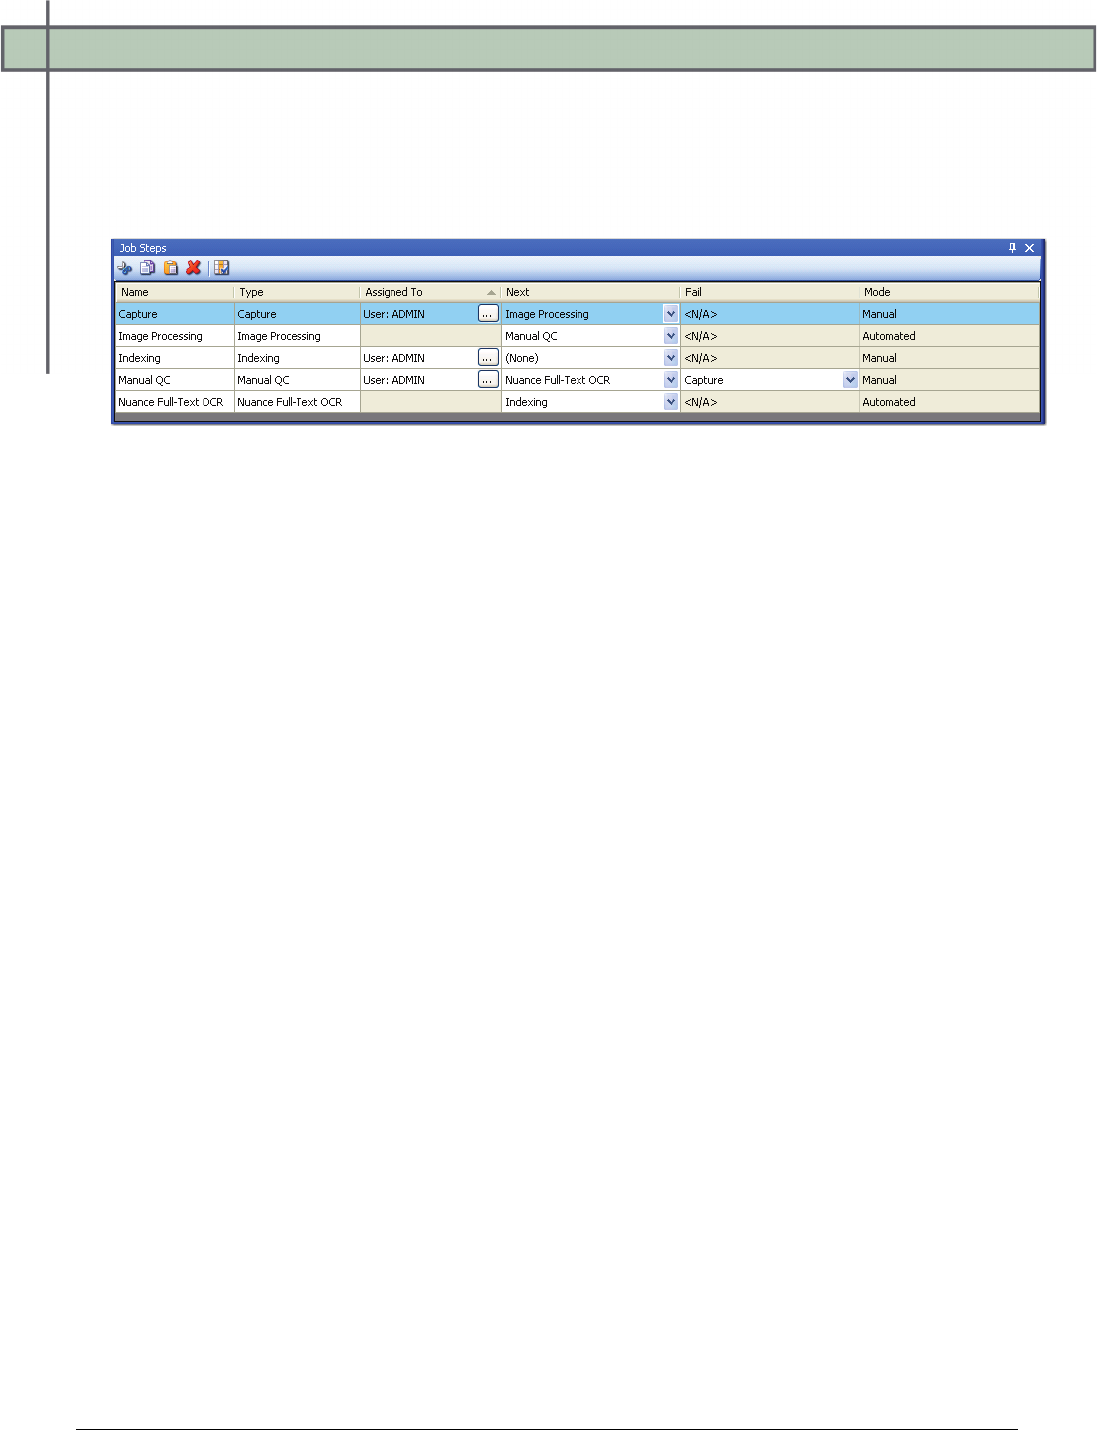
Job Steps Grid
The Job Steps grid allows you to assign the job step to a user or group, connect job steps, and
assign age and step priorities. Additionally, you can view the job step type and mode (manual
or automated) and change the name of the job step.
Job Steps Grid
Name
This editable field contains the name of the job step.
Type
This read-only field displays the type of job step.
Assigned To
This editable field contains the user or group assigned to the job step.
Next
This editable field displays the job step that immediately follows the selected job step.
Fail
This selection is the job step to which a failed QC step returns.
Mode
The Mode indicates whether a user manually completes the job step or if it is completed
automatically without user intervention.
Chapter 4 – Capture Job Configuration
PaperVision® Capture Administration Guide 62
Age Priority
Age Priority is a value that you assign to the job step. This value is used in the calculation of
the overall batch priority that is assigned in the PaperVision Capture Operator Console. Type
the value directly in the field, or click the up and down arrows to select a value between 0 and
100. For details on the batch priority calculation, see the section on PaperVision Capture
Terminology in Chapter 1.
Step Priority
Step Priority is a value that you assign to the job step. This value is used in the calculation of
the overall batch priority that is assigned in the PaperVision Capture Operator Console. Type
the value directly in the field, or click the up and down arrows to select a value between 0 and
100.
Showing and Hiding Columns
To show/hide columns in the grid:
1. Click the Show/Hide Columns icon in the Job Steps grid, and the Select Columns
dialog box appears:
Select Columns
2. Select the columns to display in the grid.
3. Click the Move Up or Move Down buttons to reorder the columns.
4. Click OK.
Chapter 4 – Capture Job Configuration
PaperVision® Capture Administration Guide 63
Aligning Job Steps
You can align job steps by using the Alignment commands described in the table below:
Alignment Commands
Align Left
Aligns all selected steps to the left side of the last
selected step
Align Center
Aligns all selected steps to the center of the last
selected step
Align Right
Aligns all selected steps to the right side of the last
selected step
Align Top
Aligns all selected steps to the top of the last
selected step
Align Middle
Aligns all selected steps to the middle of the last
selected step
Align Bottom
Aligns all selected steps with the bottom of the last
selected step
Make Same
Width
Aligns all selected job steps to match the width of
the last selected step
Make Same
Height
Aligns all selected job steps to match the height of
the last selected step
Make Same
Size
Aligns all selected job steps to match the size of
the last selected step

Chapter 4 – Capture Job Configuration
PaperVision® Capture Administration Guide 64
Job Menu
The Job menu in the Job Definitions screen contains the same commands that are available in
the Capture Jobs screen. Additionally, the Close and Exit commands are accessible in the Job
Definition’s Job menu.
Creating a New Job
To create a new job:
1. Click the New Job icon in the toolbar.
2. Select the appropriate entity in the New Job dialog box.
3. Click OK.
4. Enter the name for the new job.
5. Click OK, and a new job tab appears.
Opening a Job
To open an existing job:
1. Click the Open Job icon.
2. Select the entity.
3. Click OK.
4. In the Select Job dialog box, double-click the job to open, and it will open in the
workspace.
Saving a Job
Unsaved jobs will display an asterisk (*) next to the tab's name. To save the current job
open in the workspace, click the Save Job icon.
Saving All Jobs
Each unsaved job displays an asterisk (*) next to its name in its tab. To save all jobs that
have unsaved changes, click the Save All icon.
Chapter 4 – Capture Job Configuration
PaperVision® Capture Administration Guide 65
Deleting a Job
To delete a job:
1. Click the Delete Job icon.
2. To proceed with the deletion, click OK.
Exporting a Job
To export a job:
1. Click the Export Job icon.
2. In the Save As dialog box, locate the directory to save the exported XML file.
Note:
Users (in the Assigned To field) are not exported with jobs from the
PaperVision Capture Administration Console. When these jobs are
subsequently imported back into Job Definitions, the Assigned To field will
not contain any users.
3. Enter a file name.
4. Click Save.
Importing a Job
To import a job:
1. Click the Import Job icon, and the Open dialog box appears.
2. Locate the XML document, and click Open.
Cloning a Job
Cloning a job copies the components of the open job including its steps, configurations, and
assigned users into a new job.
To clone a job:
1. Open the job to be cloned.
2. Click the Clone Job icon.
3. Enter the name of the new job. Job Definitions opens the new job, its steps,
configurations, and assigned users.
Chapter 4 – Capture Job Configuration
PaperVision® Capture Administration Guide 66
Validating a Job
The Validate operation allows you to ensure that all job steps and job step paths have been
configured correctly. Since a job can contain two or more start steps or a QC step with pass
and fail links, all start steps must end at a single job step in order for the job to be valid.
For example, you may see a message when executing the Validate operation if you did not
correctly configure all paths leading from three start steps:
Job Paths Invalid
To validate a job:
1. After configuring all job steps’ properties and paths, click the Validate Job icon.
If any errors exist, a message notifies you that the job is invalid and describes each
error for your reference. Steps containing errors will be highlighted in the workspace.
Tip:
If you hover the mouse over the step containing the error, the error appears in
a tooltip message.
2. Once you fix any existing errors, repeat the first step once again to validate the job.
3. Once no errors exist, a message notifies you that the job is valid.
4. Click OK. The job is ready to be activated and checked into the server.
Activating a Job
To activate a job:
1. After you finish configuring and validating the job, click the Activate Job icon.
Note:
You must activate and check the job into the server to make it available for
use in the PaperVision Capture Operator Console.
2. A message will appear if a job is invalid and will describe the errors found in each job
step. Click OK after you view the error message.
Chapter 4 – Capture Job Configuration
PaperVision® Capture Administration Guide 67
Deactivating a Job
Only an active job can be deactivated. To deactivate a job, click the Deactivate Job icon.
Checking Out a Job
To edit a job, you have to first check out the job. Only one administrator can check out a job
at a time. To check out a job, click the Check Out Job icon.
Checking In a Job
To check in a job, click the Check In Job icon.
Note:
Checking in a job automatically saves the job.
Undoing a Job Checkout
If you make changes to a job and do not want to save the changes, use the Undo Checkout
command.
To undo a checkout:
1. Click the Undo Checkout icon.
2. Click OK to confirm that edits made during the checkout should be discarded.
Closing a Job
To close the current job window, select Job > Close.
Exiting Job Definitions
To exit Job Definitions and close all open Job windows, select Job > Exit.
Chapter 4 – Capture Job Configuration
PaperVision® Capture Administration Guide 68
Cutting, Copying, and Pasting Job Steps
To cut and paste a job step:
1. Select the job step.
2. Click the Cut Job Step(s) icon to place the job step(s) on the Clipboard. A gray
grid will appear over the job step.
3. In the new location, click the Paste Job Step(s) icon.
To copy and paste a job step:
1. Select the job step.
2. Click the Copy Job Step(s) icon to copy the job step(s) to the Clipboard
3. In the new location, click the Paste Job Step(s) icon.
To delete a job step:
1. Select the job step.
2. Click the Delete Job Step(s) icon.
3. Click Yes to confirm the deletion.
Chapter 4 – Capture Job Configuration
PaperVision® Capture Administration Guide 69
Detail Sets
In PaperVision Capture, detail sets define a collection of indexes that allow multiple sets of
field data to reference a single document. Detail sets are configured at the job level within the
Job Definitions screen and can then be applied at the job step level.
For example, in an accounts payable job, index fields may be set up for check number, check
date, payee, invoice number, and invoice date. If you set up all of these fields as index fields,
a single document may be represented as follows:
Check Number
Check Date
Payee
Invoice Number
Invoice Date
12345
08/19/2008
ABC Corp
A0001
08/01/2008
12345
08/19/2008
ABC Corp
A0002
08/02/2008
12345
08/19/2008
ABC Corp
A0003
08/03/2008
The first three index fields (Check Number, Check Date, and Payee) will be duplicated per
changing invoice number. Rather than duplicating the information in the first three fields, you
can represent the first three fields as index fields and assign the remaining two fields, Invoice
Number and Invoice Date, as detail sets.
Index Fields
Check Number
Check Date
Payee
Document ID (system-generated)*
12345
08/19/2008
ABC Corp
654
* This system Document ID is generated behind the scenes, hidden from your view.
Detail Sets
Invoice Number
Invoice Date
Document ID (system-generated)*
A0001
08/01/2008
654
A0002
08/02/2008
654
A0003
08/03/2008
654
Chapter 4 – Capture Job Configuration
PaperVision® Capture Administration Guide 70
Configuring Detail Sets
To configure detail sets in PaperVision Capture:
1. In the Properties grid for the job, expand the General node.
Note:
Configuring detail sets for the job follows the same general steps as configuring
indexes for the job step.
2. Click the ellipsis button in the right column of the Detail Set property, which
opens the Detail Set Configuration dialog box.
Detail Set Configuration
3. To add an index value, click Add. For more information on configuring the index
properties, see the sections on General (Step Level) and Predefined Index Values
(Job Level) in Chapter 6.
Tip:
To prevent the programming language prompt from appearing each time you
configure custom code events, right-click the ellipsis button, and select Custom
Code Options. Select either the C# or Visual Basic programming language to use
by default, and then choose the option to suppress the dialog when creating new
custom code.

Chapter 4 – Capture Job Configuration
PaperVision® Capture Administration Guide 71
4. After configuring the index properties, click OK.
Tip:
To clear a configured detail set, right-click the ellipsis button in the Properties
grid and select Reset.
Chapter 4 – Capture Job Configuration
PaperVision® Capture Administration Guide 72
Job Steps
A job step is an automated or manual operation that is performed on a batch. Manual job steps
are performed by assigned users through the PaperVision Capture Operator Console;
automated job steps are completed by the PaperVision Capture Automation Service and
require no user intervention. The Job Definitions screen allows you to create and configure
the job steps that comprise each job. You can drag job steps directly from the Job Step
Toolbox and drop them anywhere in the workspace.
Job Step Toolbox
Capture
The Capture job step is a manual step that allows you to define the parameters of the
operator's electronic document capture process such as page rotation, auto document breaks,
maximum documents per batch, etc.
Indexing
The Indexing job step enables you to configure how index value population and validation
will be performed in the PaperVision Capture Operator Console.
Barcode
The Barcode job step allows you to configure a barcode reading process that is executed
automatically by the PaperVision Capture Automation Service.

Chapter 4 – Capture Job Configuration
PaperVision® Capture Administration Guide 73
Nuance Zonal OCR (Optical Character Recognition)
During the OCR process, PaperVision Capture automatically extracts information from
scanned or imported documents. You can configure this step to read textual information from
zonal regions.
Open Text Zonal OCR
During the OCR process, PaperVision Capture automatically extracts information from
scanned or imported documents. You can configure this step to read textual information from
zonal regions.
Nuance Full-Text OCR
During the Nuance Full-Text OCR process, PaperVision Capture automatically extracts pages
of text and converts recognized results to one or multiple file types such as .txt, .rtf, .csv, .pdf,
.doc (and .docx) .htm, .xls (and .xlsx), and others.
Open Text Full-Text OCR
During the Open Text Full-Text OCR process, PaperVision Caputre automatically extracts
pages of text and converts recognized results to one or multiple file types including .pdf, .txt,
PaperVision Enterprise (.txt), and PaperFlow (.txt).
Image Processing
During the automated Image Processing job step, the system removes any unwanted noise,
lines, borders, and other extraneous objects from images as they are scanned or imported.
Additional filters identify color within images and delete or retain colors and pages as your
specified criteria are met.
Custom Code
The flexible and automated custom code capabilities of PaperVision Capture enable you to
define any action (including import, export, match and merge, etc.) through custom code.
Manual QC
The Manual QC step enables operators to visually inspect images and index values in order to
manually tag batches, documents, pages, and index fields for further review or processing in
the Operator Console.
Chapter 4 – Capture Job Configuration
PaperVision® Capture Administration Guide 74
Automated QC
The Automated (QC) job step provides automated functionality for quality control operations
on indexes and images, eliminating the need for user intervention in the Operator Console.
The Automated QC step is designed to greatly enhance QC accuracy and productivity for
PaperVision Capture batches and jobs.
Adding Links
The Add Link command connects two job steps together.
To connect two job steps:
1. Select the two job steps to link together.
2. Click the Add Link icon.
Flipping Link Direction
The Flip Link Direction command reverses the direction of the link that connects two job steps.
To flip a link between job steps:
1. Select the two linked job steps.
2. Click the Flip Link Direction icon.
Removing a Link
The Remove Link command disconnects two linked job steps.
To remove a link between job steps:
1. Select the two linked job steps.
2. Click the Remove Link icon.
Zooming In
To zoom in on the workspace, click the Zoom In icon.
Zooming Out
To zoom out of the workspace, click the Zoom Out icon.
Resetting the Zoom
To reset the view of the workspace, click the Zoom Reset icon.
Chapter 4 – Capture Job Configuration
PaperVision® Capture Administration Guide 75
General Properties
To configure each job step's general properties, select the job step in the workspace, and then
expand the General node in the Properties grid.
General Properties - Indexing Job Step
Age Priority
This value is used to calculate the overall batch priority in the PaperVision Capture Operator
Console. Click the Age Priority drop-down menu to open the slider, and you can rank the job
step on a scale from 0 to 100. For more information on batch priority, see the section on
PaperVision Capture Terminology in Chapter 1.
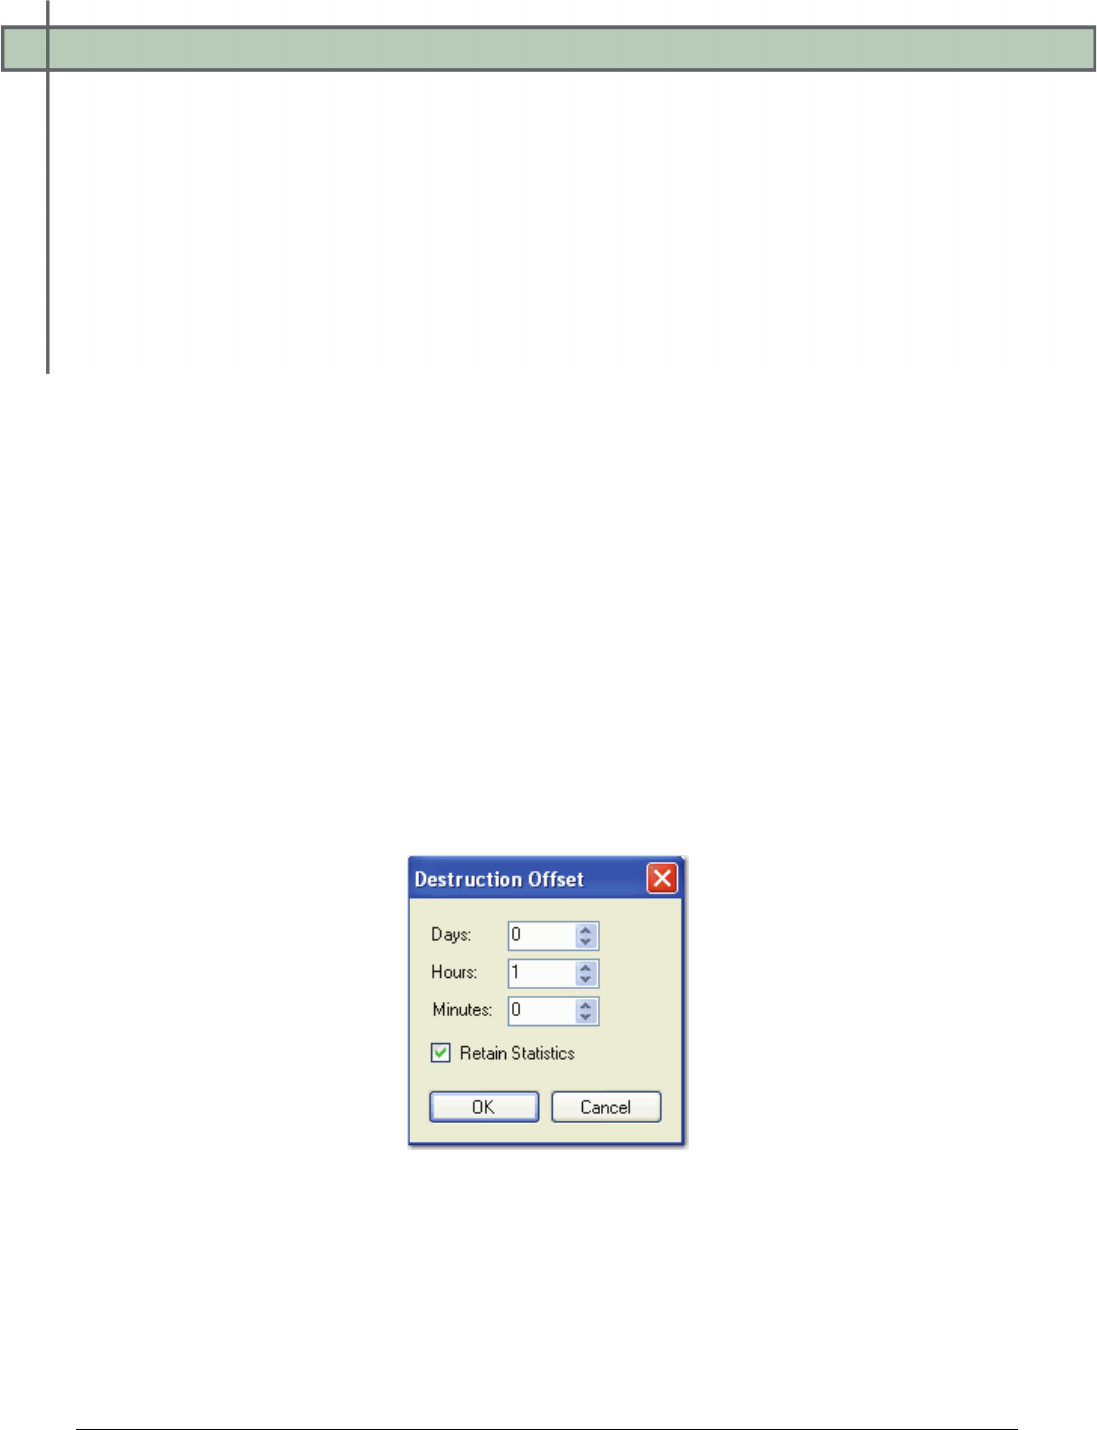
Chapter 4 – Capture Job Configuration
PaperVision® Capture Administration Guide 76
Assigned To
This property is applicable to all manual job steps. You can assign one or more users or
groups who can complete the selected job step.
To assign the user or group to the job step:
1. Click the ellipsis button in the Assigned To field.
2. In the Job Step Assignment dialog box, select the users and/or groups who will be
assigned the job step in the PaperVision Capture Operator Console.
3. Click OK.
Batch Destruction Offset
The Batch Destruction Offset property can be applied to any job step. This setting is initiated
after the operator submits the batch for the job step. For example, if a Capture step has a
Batch Destruction Offset scheduled for one-hour and the operator subsequently creates a new
batch, scans documents, and then submits the batch. The next time the PaperVision Capture
Automation Service runs (provided that one hour has passed and the Batch Destruction
operation has been scheduled to run), the offset will be applied and the applicable batch will
be purged.
To assign the Batch Destruction Offset to the job step:
1. Click the ellipsis button in the Batch Destruction Offset field.
2. In the Destruction Offset dialog box, enter the days, hours, and/or minutes. These
values represent the duration after which any batches that complete the step are to be
destroyed.
Destruction Offset
3. If you want to keep the batch's statistics, select the Retain Statistics check box.
4. Click OK.

Chapter 4 – Capture Job Configuration
PaperVision® Capture Administration Guide 77
Is Start Step
By default, this property is enabled (and editable) for Capture steps. You must assign a
Capture step as the Start Step; select True from the drop-down menu.
License Requirements
This read-only field displays the software licenses required for each job step. For example, the
Capture step requires, at minimum, the Capture Scan license. However, if image processing
will be performed on scanned images, the Capture step will then require both the Capture
Scan and Image Processing licenses. Automated steps, such as the Image Processing and
Custom Code steps, generally do not consume licenses upon execution, so do not require
licenses.
Until you define a Barcode Zone or OCR Zone within the appropriate step, each step’s
License Requirements property will not display the Barcode or OCR license. The Barcode
step requires either the 1-D Barcode or 2-D Barcode license, depending on the type of
barcode you select. If you select both 1D and 2D barcode types to be recognized, both license
requirements will display in the field. The OCR step requires either the Optical Character
Recognition (OCR) or Intelligent Character Recognition (ICR) license. The OCR license is
required if you choose any of the Omnifont modules, Matrix Matching, or Draft Dot-Matrix
module. The ICR license is required if you select the Constrained Handprint (Numeric) or the
Constrained Handprint (Alphanumeric) module.
Merge Like Documents
The Merge Like Documents command merges pages from multiple documents with the same
index values into a single document. Documents that have not been indexed are not included
in the merge process. The Merge Like Documents command is performed on all documents in
the batch.
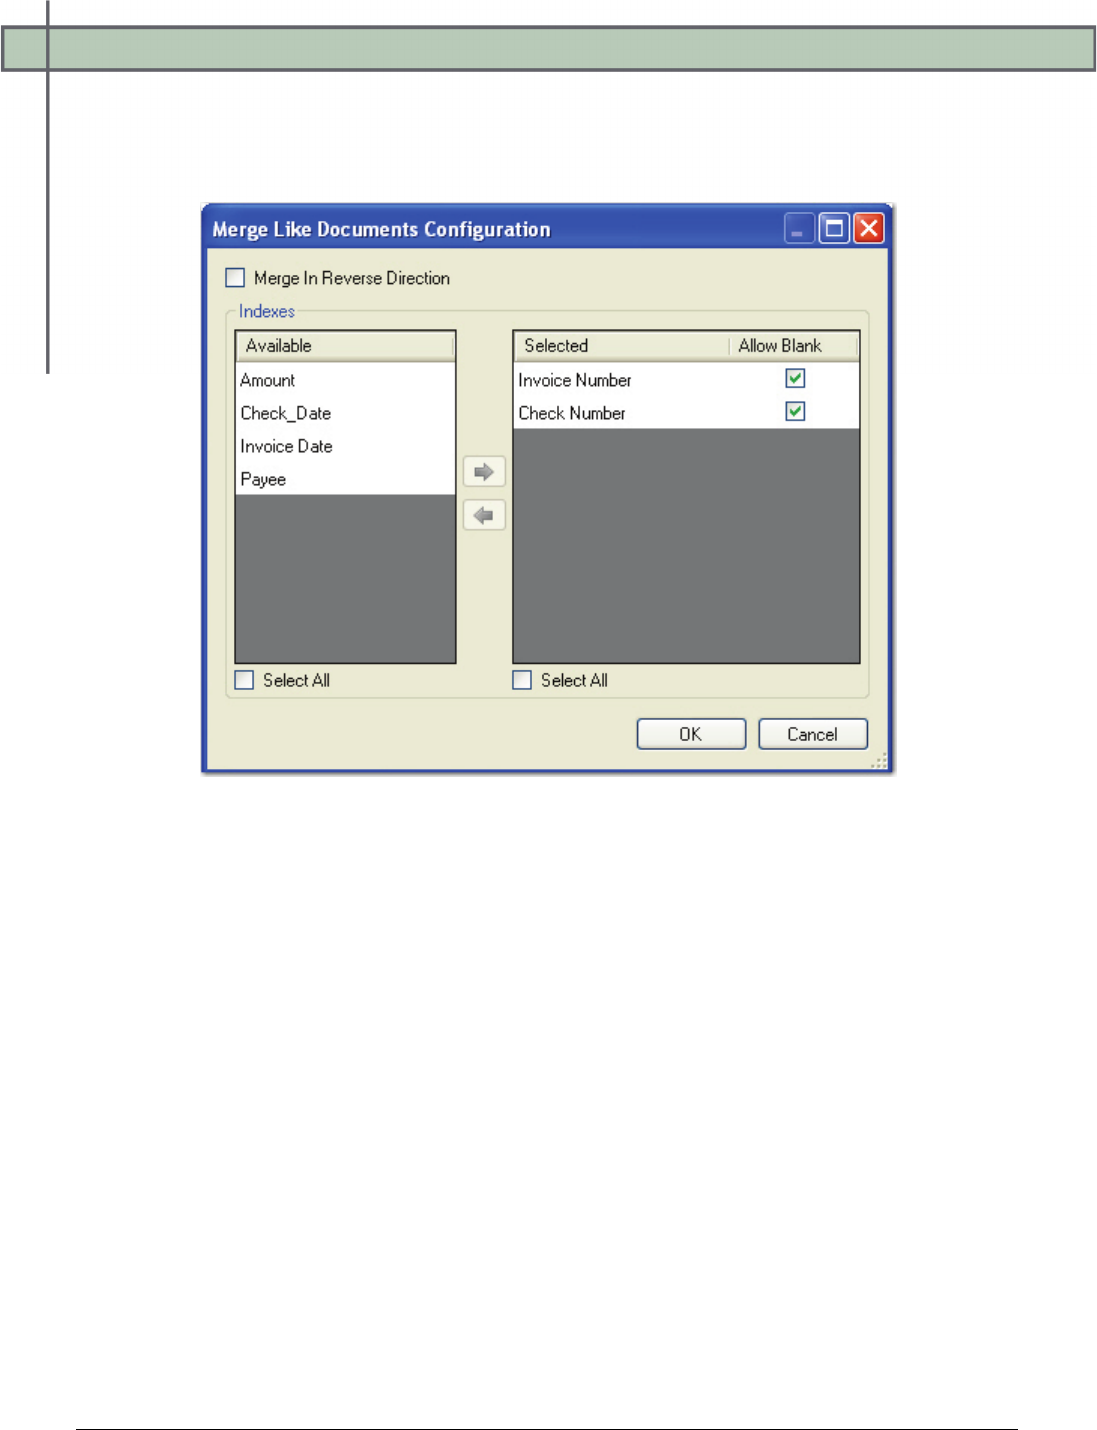
Chapter 4 – Capture Job Configuration
PaperVision® Capture Administration Guide 78
To configure the Merge Like Documents setting:
1. Click the ellipsis button in the Merge Like Documents field. The Merge Like
Documents Configuration dialog box appears.
Merge Like Documents Configuration
2. You can determine the page order of the merged document. Select Merge in Reverse
Direction to place the last page at the beginning of the resulting document. If all pages
should appear in the order in which they are merged, do not select this option.
3. All index values defined for the job appear in the Available list. Highlight the index
values to be included in the Merge Like Document operation, and click the right arrow.
Your selected index values will appear in the Selected list.
4. Or, choose Select All, and then click the right arrow.
5. To remove a selected index value, highlight the index value in the Selected list, and then
click the left arrow.
6. Or, choose Select All to remove all index values from the Selected list, and then click the
left arrow.
Chapter 4 – Capture Job Configuration
PaperVision® Capture Administration Guide 79
7. By default, blank index values are not included in the merged document. If blank index
values should be included in the merged document, select the Allow Blank check box for
the appropriate index value. For example, if you select the Allow Blank check box for
the Invoice Number index value, all documents must contain blank Invoice Number
index values in order to be merged into one document. If at least one Invoice Number
index value is defined and the remaining index values are blank (or vice versa), the
documents will not be merged.
8. Click OK.
Mode
The read-only field indicates that the step is either manual or automated.
Name
This editable field contains the name of the job step.
Pre-Caching
Applicable to manual job steps, this setting maximizes operator productivity by facilitating
faster page downloading in the Operator Console. When this setting is configured, your
specified number of pages is downloaded before the remaining pages are downloaded as
operators take/open batches.
For example, if an operator manually indexes only the first page of every 10-page document,
you can enable the Pre-Caching setting in the Indexing step and set the Number Pages
setting to 1. Therefore, when an operator takes/opens a batch, only the first page is
downloaded from each document (before the remaining pages of each document). Pre-caching
maximizes productivity since operators do not have to wait for an entire batch (or entire
documents) to be downloaded to perform their work.
Note:
Although the first page of every document is not yet downloaded, the operator can
still open the batch to begin indexing the initial documents in the batch.
Source Image Step
To display images for a selected job step in the PaperVision Capture Operator Console, select
the job step from the Source Image Step drop-down menu. For example, you can select the
Capture step's images to display in the Operator Console for the Indexing step. When the
operator opens the Indexing step, images from the Capture step will appear.
Chapter 4 – Capture Job Configuration
PaperVision® Capture Administration Guide 80
Step Priority
This value is associated with the current job step and assigned by an administrator. To edit the
step priority, click the drop-down menu to open the slider. You can rank the job step on a
scale from 0 to 100. For more information on batch priority, see the section on PaperVision
Capture Terminology in Chapter 1.
Type
This read-only field displays the type of job step.
Use Non-Repudiation
This property is applicable to all job steps. When this value is set to True, images are
captured, and the SHA-512 hash value is calculated and stored for each image. The hash can
be exported to content management systems such that when a user retrieves an image, the
hash is recalculated against the retrieved image and verified against the stored hash value to
validate that the image has not been tampered with.
WARNING!
When running a demo license, the application writes a watermark onto each
captured image. Therefore, non-repudiation is not supported in demo mode.
Chapter 5 – Capture Step Configuration
PaperVision® Capture Administration Guide 81
The manual Capture job step contains scanning options so you can customize
PaperVision Capture to the scanning needs for any task. You can also configure
index values within the Capture step so operators can simultaneously hand-key index and scan
documents in the PaperVision Capture Operator Console. Auto Document Break settings
allow you to automatically insert document breaks based on page count, file size, barcode
content, and OCR text. Additionally, you can configure custom code events that the operator
can manually execute while scanning.
Note:
You can have multiple Capture steps in the job, but at least one has to be assigned as
the start step.
To view the properties for the Capture job step:
1. In the Job Definitions screen, select the Capture job step in the workspace.
2. In the Properties grid, expand the Auto Document Break, Capture Step,
Custom Code Events (Step Level), General, and Indexes nodes.
Auto Document Break
While scanning documents, you can determine where one document ends and the next
document begins using the Auto Document Break properties. Although you can separate
documents manually, you can select from options that are described below.
• None: This is the default auto document break type for a newly created step. When set to
None, the system will expect you to manually separate new documents. No options are
available for this setting.
• Number of Pages Per Document: To assign a fixed number of pages per document,
enter the number of pages that PaperVision Capture will scan before starting a new
document. You can set the Prompt Operator property to True to display a message that
asks the operator for a fixed number of pages before breaking to a new document. If you
set this property to False, the operator is not prompted.
• Barcode: If you select the Barcode mode, click the ellipsis button to the right of the
Barcode Zone field to define the zone. For the Save Page property, select True to leave
the page with the barcode in the batch, or select False to remove the barcode from the
batch. See the section on Barcode Zones in Chapter 7 for more information.
• Blank Page: To automatically insert document breaks based on the file size of the image,
select Blank Page. Enter the size (in kilobytes) of images to be considered blank. You can
enter the file size in whole numbers with up to two decimal places. Select True to leave
the blank page in the batch, or select False to remove the blank page from the batch.
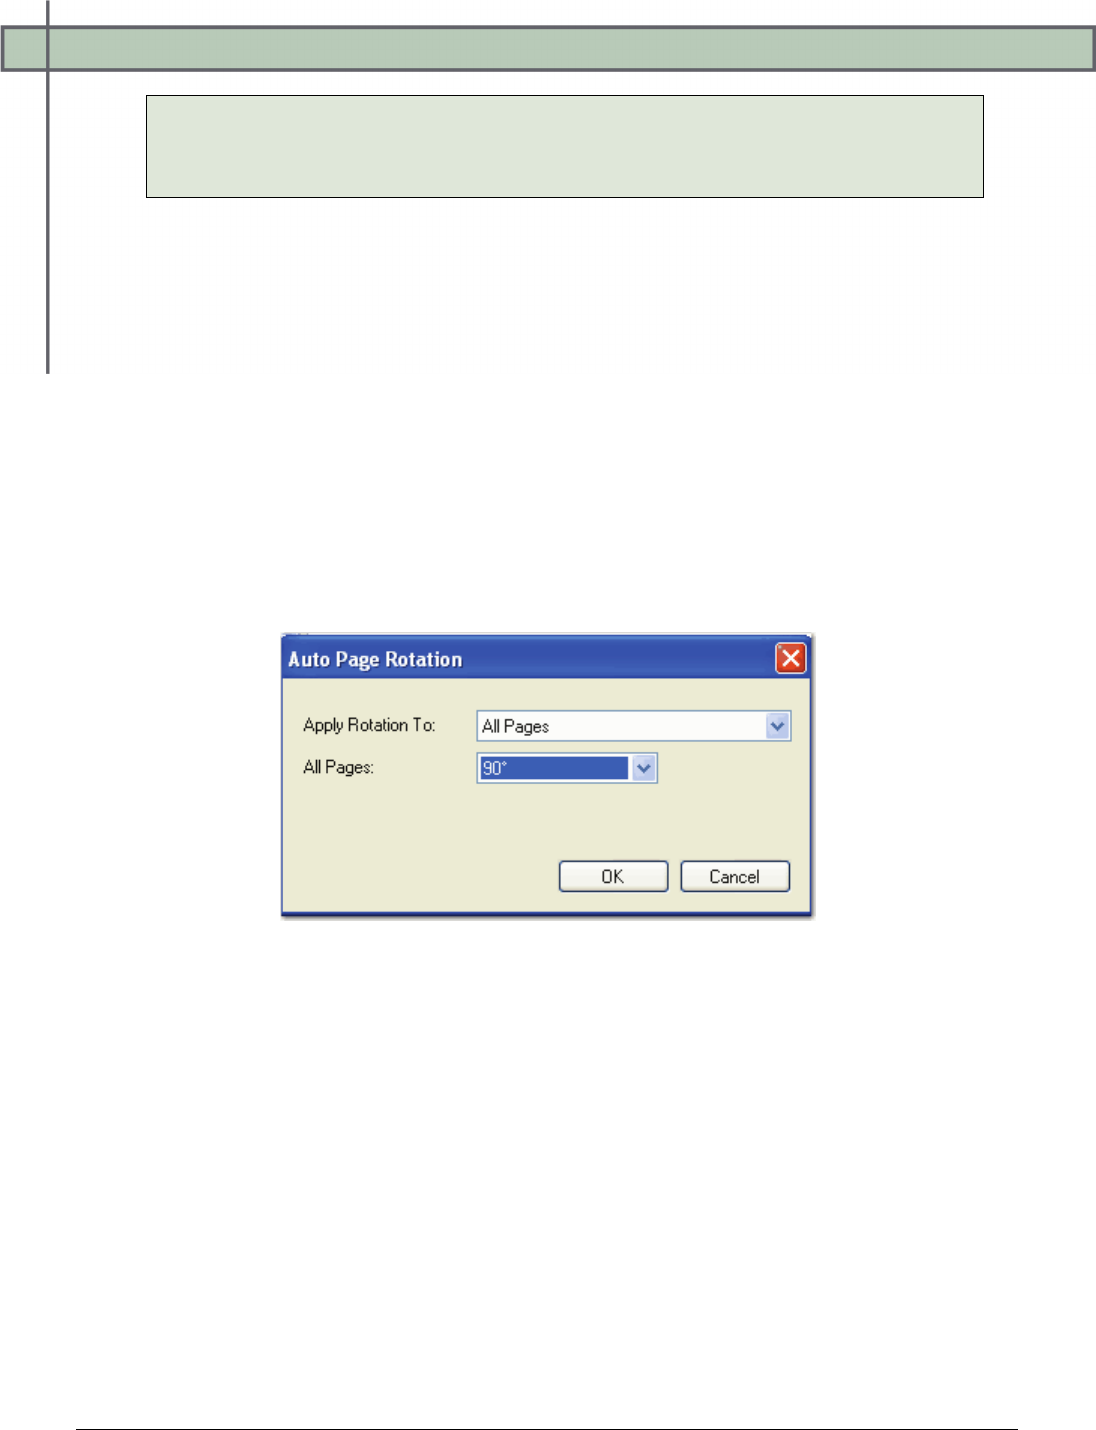
Chapter 5 – Capture Step Configuration
PaperVision® Capture Administration Guide 82
Note:
A job validation error will appear if both the Auto Document Break and Minimum
Page Size Detection properties are enabled.
Capture Step Settings
Properties specific to the Capture step are described in this section, including those for page
rotation, image file type, page, and batch properties.
Auto Page Rotation
The Auto-Page Rotation setting allows you to configure how pages are rotated as images are
scanned.
To assign the page rotation settings:
1. In the Auto Page Rotation field, click the ellipsis button in the right column, which
opens the Auto Page Rotation dialog box.
Auto Page Rotation
2. Select the page rotation setting from the Apply Rotation To drop down menu.
• None disables the automatic page rotation feature.
• All Pages automatically rotates all pages in a document by the specified rotation
value as the documents are scanned.
• Even Pages automatically rotates only the even numbered pages in a document
by the specified rotation value as the documents are scanned.
• Odd Pages automatically rotates only the odd numbered pages in a document by
the specified rotation value as the documents are scanned.
• Even Pages/Odd Pages automatically rotates the odd and even numbered pages
in a document by the specified rotation values as the documents are scanned.
Even pages and odd pages can be assigned different rotation values.

Chapter 5 – Capture Step Configuration
PaperVision® Capture Administration Guide 83
• First Page Only automatically rotates the first page of a document by the
specified rotation value as the documents are scanned.
• All Pages Except First automatically rotates all pages except the first page of a
document by the specified rotation value as the documents are scanned.
• First Page Only/All Pages Except First automatically rotates the first page of a
document by the specified rotation value as the documents are scanned. The
remaining pages can be assigned a different rotation value.
3. Select the rotation value from the All Pages drop-down list, including 90°, 180°, or
270°.
4. Click OK.
Color Image File Type
You can specify the file type when storing scanned images that are not black and white. Click
the Color Image File Type drop-down menu in the right column to make the selection. If you
change this property after images have already been scanned into the batch, the file type will
change for only those images subsequently scanned into the batch. For example, you change
the Color Image File Type property from .bmp to .jpg after scanning ten out of twenty images
in the batch. Images 1-10 will be .bmp file types; images 11-20 will be .jpg file types.
• BMP files are not compressed and can be large. These files contain pixels and can
degrade when you increase resolution.
• JPG images are compressed, so they contain less data and smaller file sizes than other
image types.
Display Saved Images Only
If you select True, PaperVision Capture only displays the images that are saved (in the
manner that they are being saved). For example, if images are rotated as they are scanned,
only the correct rotation orientation will display. If you select True and you have specified a
minimum page size detection, blank pages will not display. If you select False, all images will
display, including blank images.
Max Number Documents Per Batch
You can limit the number of documents that comprise a batch. In the Max Number
Documents Per Batch field, enter the maximum number of documents that will comprise a
batch.
Chapter 5 – Capture Step Configuration
PaperVision® Capture Administration Guide 84
Minimum Page Size
Blank pages can be scanned accidentally or as the blank side of a duplex page. The Minimum
Page Size Detection setting allows you to delete blank pages as they are scanned. In the
Minimum Page Size field, enter the minimum page size detection (in Kilobytes) to be
deleted. You can enter the size in whole numbers with up to two decimal places.
Note:
Deleting blank pages as they are scanned could make the Number of Pages Per
Document Auto Document Break setting unusable.
New Batch Name (Regular Expression)
The New Batch Name is a regular expression that you can define that validates the batch
name entered by the operator in the PaperVision Capture Operator Console.
To assign a regular expression to batch names:
1. Click the ellipsis button in the right column next to the New Batch Name field.
2. In the Regular Expression dialog box, enter the regular expression.
3. Enter the text to validate. Your entry will automatically be validated.
• A successful validation displays with a green icon.
• Invalid entries display with a red icon.
Prompt for New Batch Information (Auto)
If you enable this setting, the operator will be prompted for batch information once the
maximum number of documents per batch has been reached when a batch is imported or
scanned.
Rotate Before Barcode
If you enable this setting, the Auto Page Rotation setting is applied to the image before
barcoding is performed to read index values.
Note:
This setting does not apply to the Auto Document Break setting; images are not
rotated before barcode document breaks are inserted.
Chapter 5 – Capture Step Configuration
PaperVision® Capture Administration Guide 85
Custom Code Events (Step Level)
You can configure custom code that operators can execute in the PaperVision Capture
Operator Console. Click the ellipsis button next to the appropriate event to select the
programming language and to configure the custom code.
Add Page
The Add Page event executes custom code just before images are appended to the batch,
including rotation or barcode indexing. When the script is enabled for this option, it will be
executed for all images that the operator scans in or when the operator imports a batch. This
script is not executed if the operator performs the Import Images operation.
Barcode Detected
The Barcode Detected event executes custom code after a barcode's value, location, size,
orientation, and type have been successfully read during scanning. When a script is enabled
for this option, it will be executed every time a barcode is successfully read during scanning
(multiple barcodes can be read per page). This event can also be used to apply a page-level
custom tag. The script is not executed if a barcode cannot be successfully read.
Batch Opened
Batch Opened executes custom code when the operator opens a batch in the Operator
Console. The following sample is a custom code event handler that can be inserted into the
code to display a message box, allowing the user to cancel the open batch operation:
CCustomCodeBatchOpeningEventArgs eventArgs
= (CCustomCodeBatchOpeningEventArgs)Parameter;
if (MessageBox.Show("Open Batch?", "Capture",
MessageBoxButtons.OKCancel,
MessageBoxIcon.Question)== DialogResult.Cancel)
{
eventArgs.CancelOpen = true;
}
Note:
The Batch Opened event will not execute if you have enabled the Max Documents per
Batch property and the user completes the Submit and Create New Batch operation.
Chapter 5 – Capture Step Configuration
PaperVision® Capture Administration Guide 86
Batch Submitted
Batch Submitted executes custom code when the operator submits a batch in the Operator
Console. The following sample is a custom code event handler that can be inserted into the
code to display a message box, allowing the operator to cancel the submit batch operation:
CCustomCodeBatchSubmittingEventArgs eventArgs
=(CCustomCodeBatchSubmittingEventArgs)Parameter;
if (MessageBox.Show("Submit Batch?", "Capture",
MessageBoxButtons.OKCancel,
MessageBoxIcon.Question) == DialogResult.Cancel)
{
eventArgs.CancelSubmit = true;
}
Custom Code Execution
The Custom Code Execution event executes when the operator clicks the Execute Custom
Code button in the PaperVision Capture Operator Console.
Match and Merge
The Match and Merge event executes when the operator clicks the Match and Merge button
in the PaperVision Capture Operator Console.
Saving Indexes
The Saving Indexes event executes prior to the operator saving the index values in the
PaperVision Capture Operator Console.
Tip:
To prevent the programming language prompt from appearing each time you
configure custom code events, right-click the ellipsis button, and select Custom
Code Options. Select either the C# or Visual Basic programming language to
use by default, and then choose the option to suppress the dialog when creating
new custom code.
General Properties
For information on the Capture step’s general properties that are applicable to all job steps,
see the section on General Properties in Chapter 4.
Chapter 5 – Capture Step Configuration
PaperVision® Capture Administration Guide 87
Indexes
You can configure index values in the Capture step if you enable the option, Allow Hand-Key
Indexing. For information on general Indexing settings and configuration, see Chapter 6 –
Indexing Configuration.
Allow Hand-Key Indexing
To maximize scanning and indexing efficiency within one step, you can enable this setting to
allow operators to enter index values while they scan documents in the Capture step. If you
enable this setting, you must define at least one index field.
Note:
Enabling this property will cause the Capture step to also consume a Capture Index
license (in addition to the Capture Scan license).
Manual Barcode and OCR Indexing
You can configure the Capture and Indexing steps so that indexing operators (or scanning
operators tasked with indexing) can apply barcode or OCR zones directly on images in order
to populate index fields. By manually applying barcode or OCR zones, operators can easily
extract and index text or barcode data that may shift across pages and documents. When you
enable the Allow Barcode Indexing property, a Capture Barcode (1D or 2D, depending on
the selected barcode type) is also required in addition to the Capture Scan or Capture Indexing
license. Similarly, when you enable the Allow OCR Indexing property, a Capture Nuance
Zonal OCR, Nuance OCR Handwriting (depending on selected Recognition Module), or
Capture Open Text Zonal OCR license is also required in addition to the Capture Scan or
Capture Indexing license.
During configuration, it is only required to draw one barcode or OCR zone to define the
applicable properties. Operators are only restricted to the properties you define for the zone,
such as supported barcode types and OCR recognition languages, but they can apply an
infinite number of zones on an image. Similar to the configuration of the automated barcode
and OCR steps, you can test the zone to ensure its contents can be read successfully.
Configuring Manual Barcode Indexing
When you enable manual barcode indexing, the operator can apply barcode zones on an
image to populate required index values. During configuration, it is only required to draw one
barcode zone to define the applicable properties. Similar to the automated Barcode step, you
can test the zone to ensure barcodes can be read successfully prior to activating and checking
in the job.
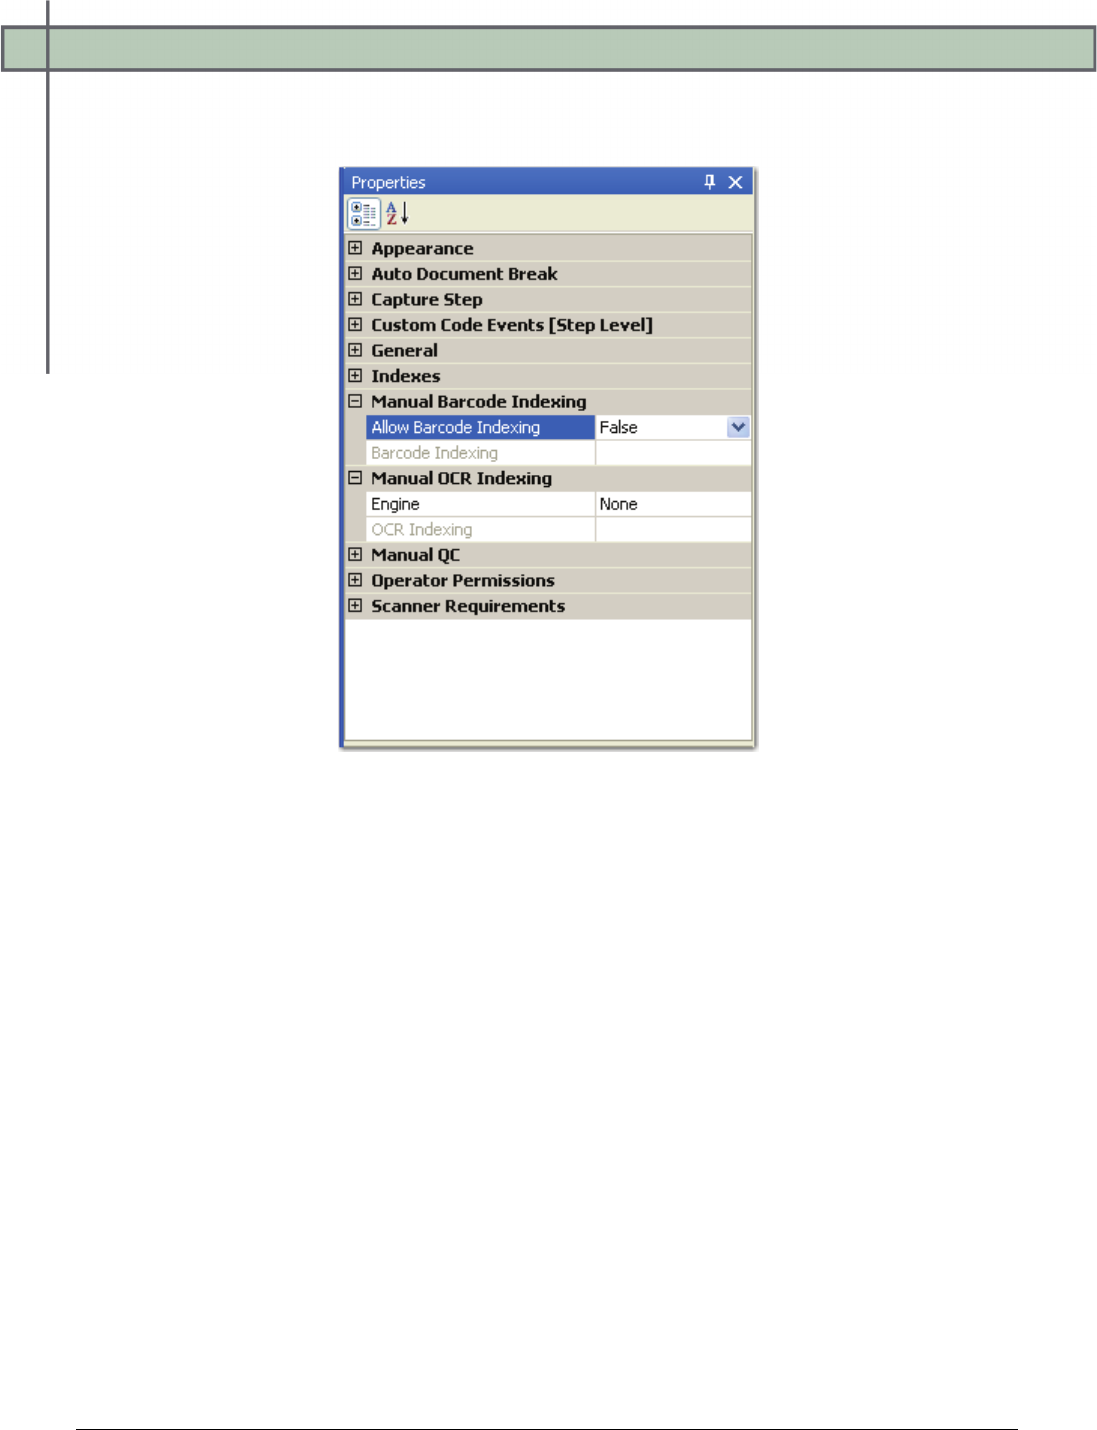
Chapter 5 – Capture Step Configuration
PaperVision® Capture Administration Guide 88
To configure manual barcode indexing in the Capture or Indexing step:
1. Expand the Manual Barcode Indexing node in the Properties grid.
Manual Barcode Indexing Properties
2. Select True in the Allow Barcode Indexing drop-down list.
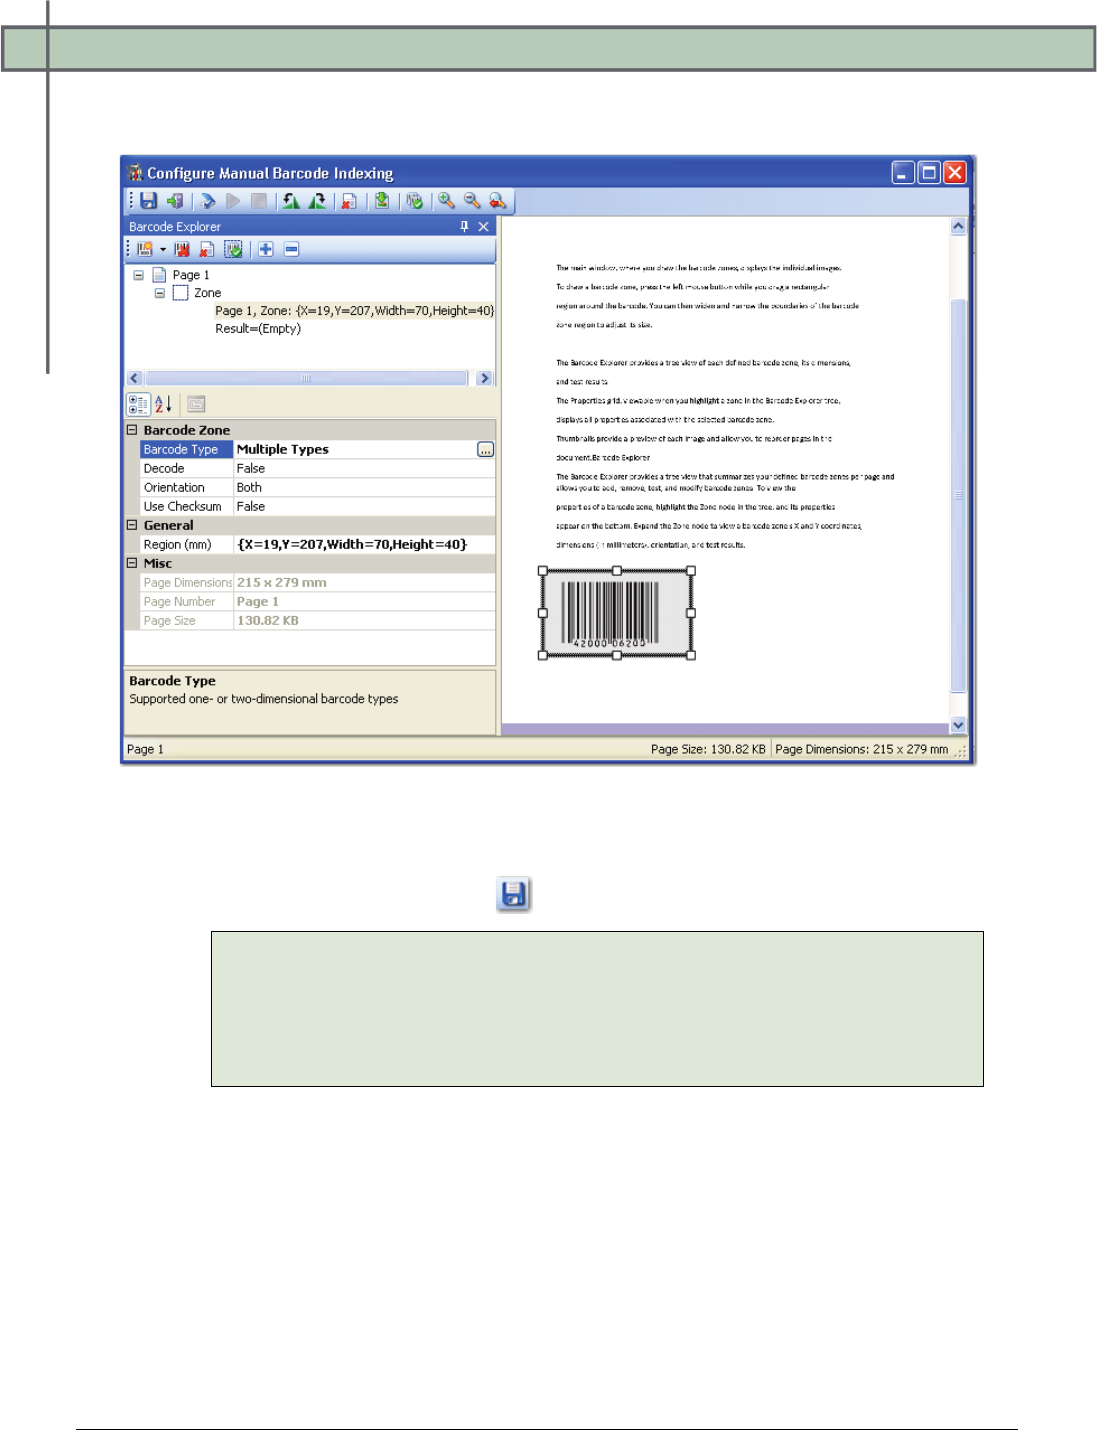
Chapter 5 – Capture Step Configuration
PaperVision® Capture Administration Guide 89
3. Click the ellipsis button in the Barcode Indexing field. The Configure Manual
Barcode Indexing screen appears.
Configure Manual Barcode Indexing
4. Draw the zone, and then configure the applicable barcode zone properties.
5. Click the Save Barcode Zones icon.
Note:
For descriptions of all barcode zone properties, see the section on Barcode
Zone Properties in Chapter 7. For descriptions of each operation in the
Configure Manual Barcode Indexing screen, see the section on Barcode
Explorer in Chapter 7.
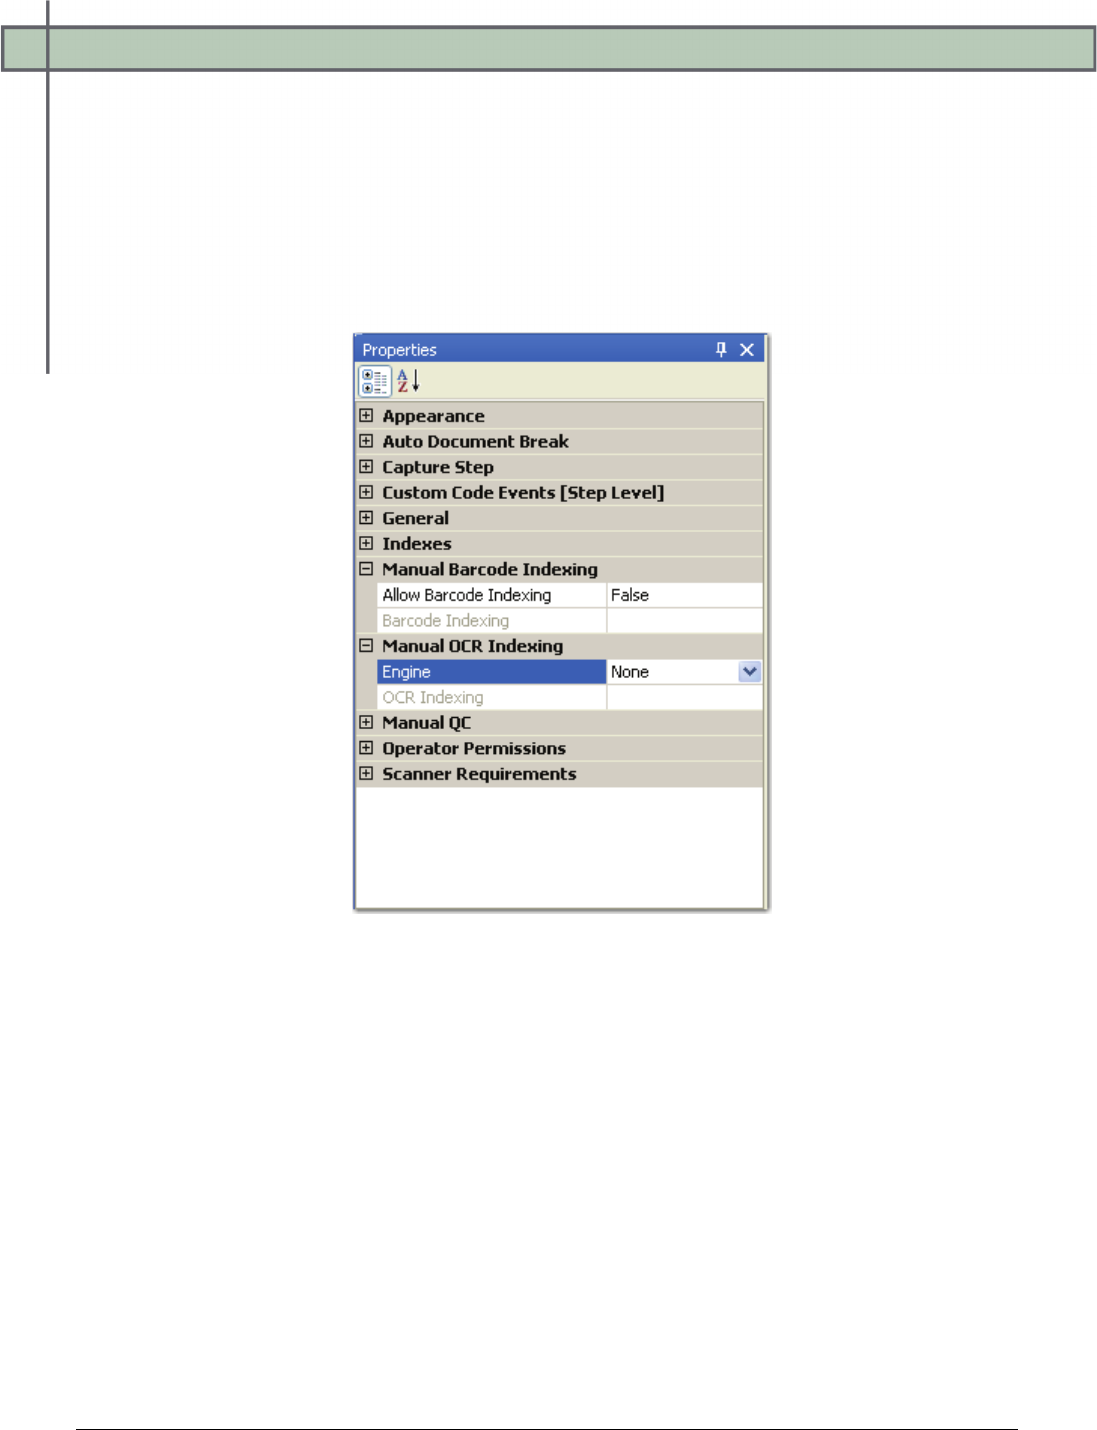
Chapter 5 – Capture Step Configuration
PaperVision® Capture Administration Guide 90
Configuring Manual OCR Indexing
When you enable manual OCR indexing, the operator can apply OCR zones on an image to
populate required index values. During configuration, it is only required to draw one OCR
zone to define the applicable properties. Similar to the automated OCR step, you can test the
zone to ensure text can be read successfully prior to activating and checking in the job.
To configure manual OCR indexing in the Capture or Indexing step:
1. Expand the Manual OCR Indexing node in the Properties grid.
Manual OCR Indexing
2. Select the zonal OCR engine from the Engine drop-down list.
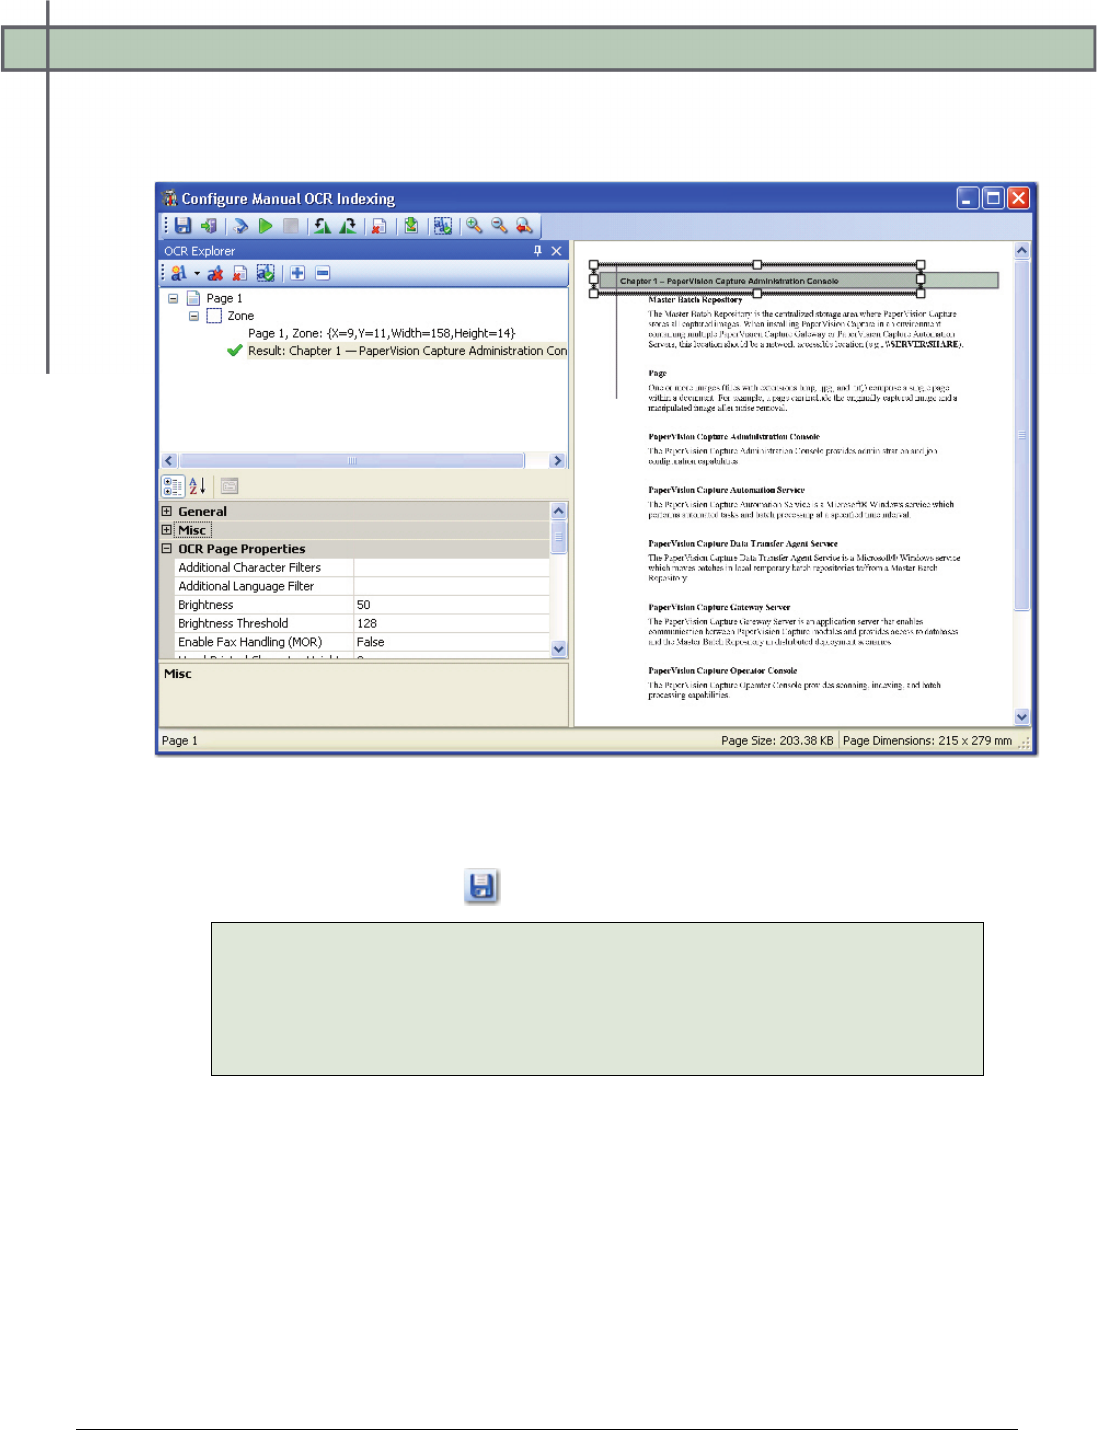
Chapter 5 – Capture Step Configuration
PaperVision® Capture Administration Guide 91
3. Click the ellipsis button in the OCR Indexing field. The Configure Manual OCR
Indexing screen appears. Properties specific to your engine selection will be available
for configuration.
Configure Manual OCR Indexing (Nuance Zonal OCR)
4. Draw the zone, and then configure the applicable OCR properties.
5. Click the Save OCR Zones icon.
Note:
For descriptions of all OCR page and zone properties, see the section on
OCR properties in Chapter 8. For descriptions of each operation in the
Configure Manual OCR Indexing screen, see the section on OCR Zones in
Chapter 8.
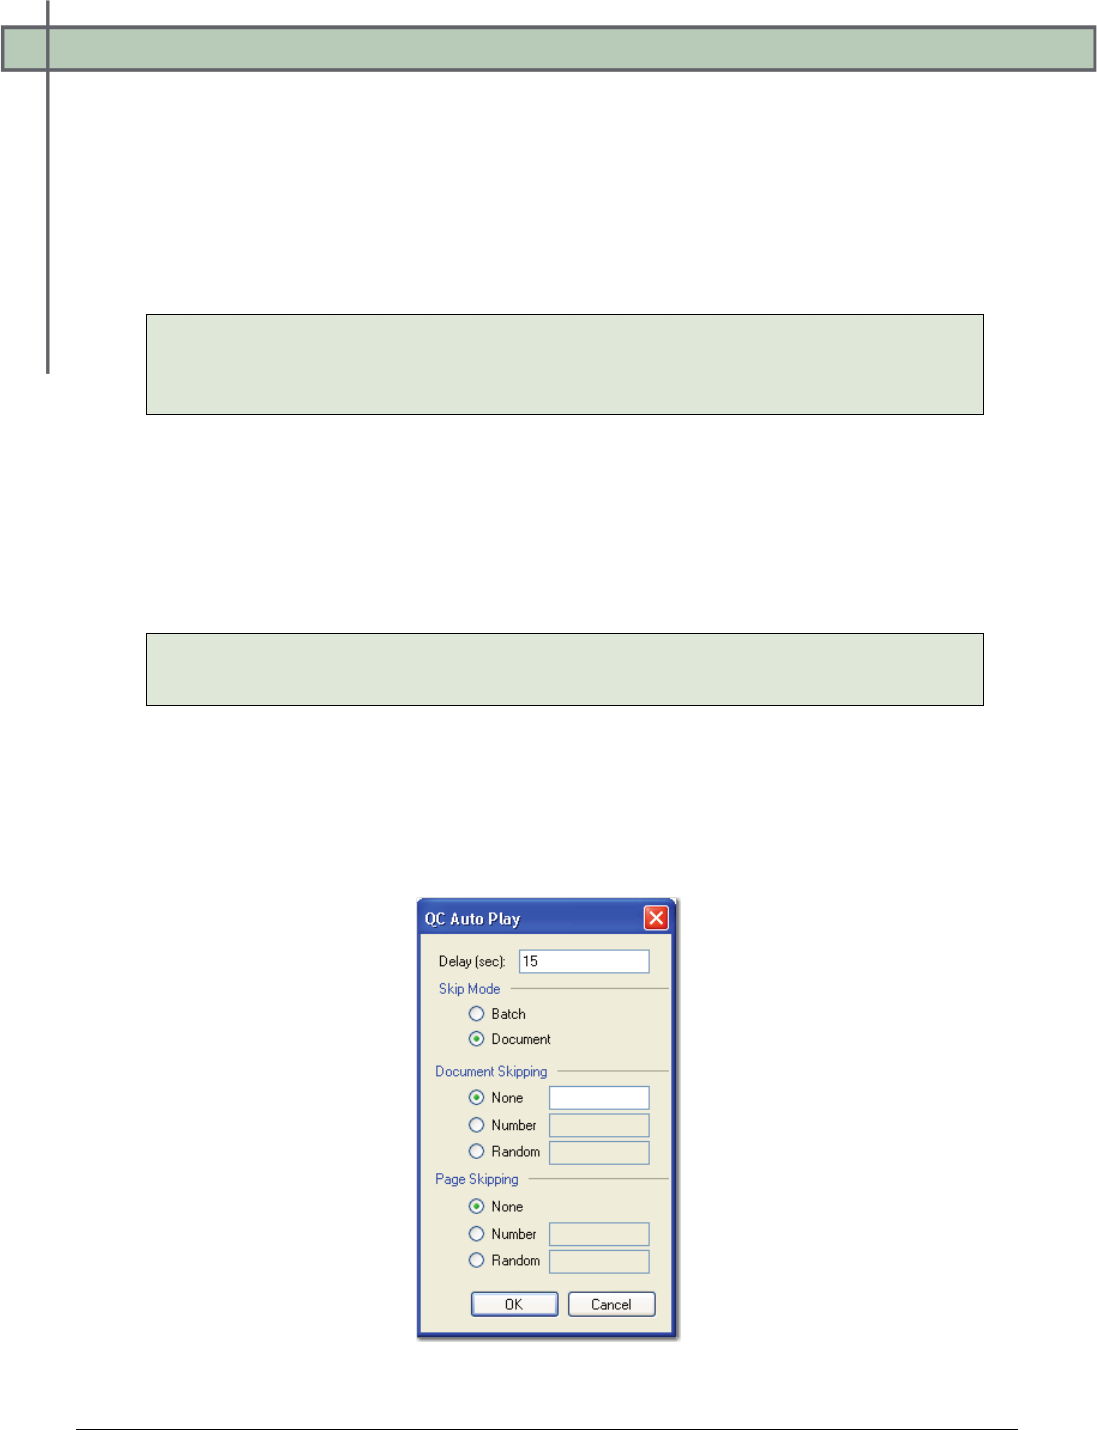
Chapter 5 – Capture Step Configuration
PaperVision® Capture Administration Guide 92
Manual QC
If you require Indexing operators to review and apply QC tags in the Indexing step, the
following Manual QC properties are available for configuration.
Allow Manual QC
You can enable this setting to allow operators to add your selected QC tags within the
Indexing job step.
Note:
When you enable this property, the Indexing step also consumes a Capture QC
Manual license (in addition to the Capture Index license).
Allow Review QC Tags
Applicable to manual job steps, this property allows the operator to view the Browse QC Tags
window in the PaperVision Capture Operator Console. Select True to allow the operator to
view the Browse QC Tags window. Select False to prevent the operator from viewing the
Browse QC Tags window.
Note:
The Capture QC Manual license is not required for the operator to review QC tags.
QC Auto Play
When the Allow Manual QC property is enabled in the Capture step, you can define how
long (in seconds) each image appears on screen so operators can perform visual inspections.
Click the ellipsis button next to the QC Auto Play field to configure the auto play settings.
QC Auto Play

Chapter 5 – Capture Step Configuration
PaperVision® Capture Administration Guide 93
• The Delay (sec) property determines how long each image or group of images remains
on screen at a time in the Manual QC step.
• The Skip Mode determines whether auto play skips batches or documents:
1. If you select the Batch skip mode, then you can define how pages are skipped. For
page skipping, you can require that operators inspect all pages (None), by page
number (Number, such as 1, 5, 10, etc.), or by a random number of pages
(Random).
2. If you select the Document skip mode, you can define how documents and pages
are skipped.
• For document skipping, you can require that operators inspect all documents
(None), by document number (Number, such as 1, 5, 10, etc.), or by a random
number of documents (Random).
• For page skipping, you can require that operators inspect all pages (None), by
page number (Number, such as 1, 5, 10, etc.), or by a random number of pages
(Random).
When you select the Random option, auto play skips an arbitrary number of pages or
documents (between zero and your assigned number). For example, if you enter “10,” then
three pages/documents may be skipped during the first auto play; nine pages/documents
during the second auto play; ten pages/documents during the third auto play; etc.

Chapter 5 – Capture Step Configuration
PaperVision® Capture Administration Guide 94
Operator Permissions
By default, operators can perform most document and page operations while scanning in the
Capture step. You can determine whether operators can import batches and images in the
Capture step. In addition, you can determine whether operators can view the Browse Batch
window in the Operator Console.
Browse Batch
When set to True, the operator can view the Browse Batch window.
Import Batch
When set to True, operators can import batches into the PaperVision Capture Operator
Console.
Import Images
When set to True, the operator can import images into a document.
Note:
When you enable this property, the Indexing step also consumes a Capture Scan
license (in addition to the Capture Index license).
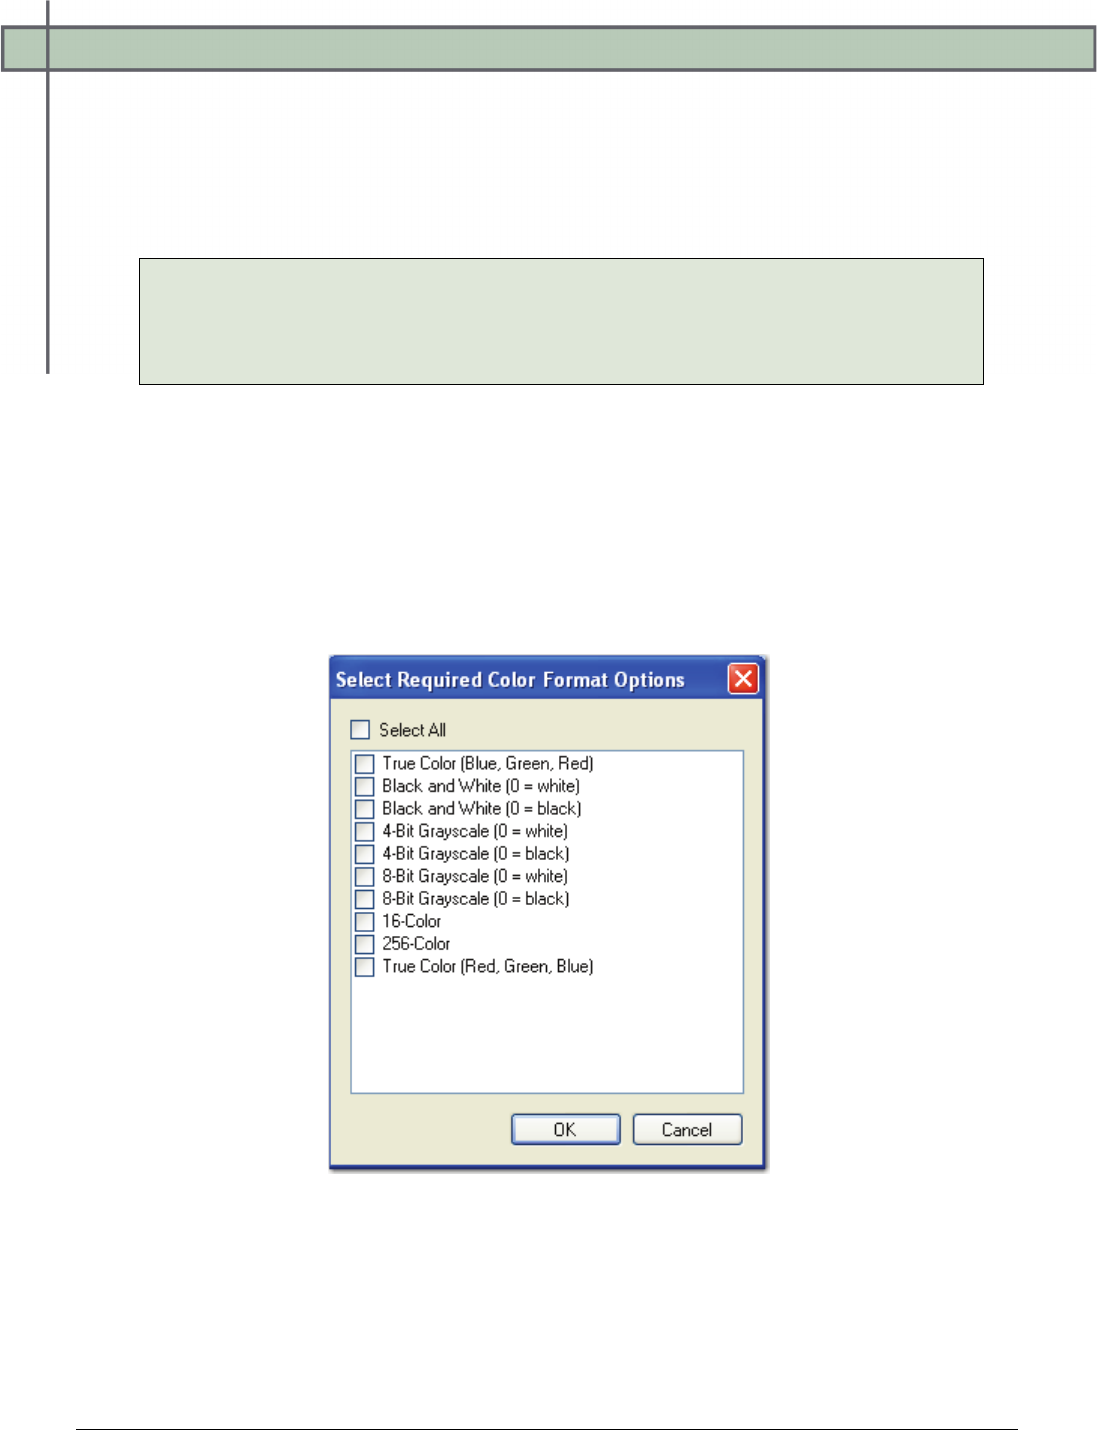
Chapter 5 – Capture Step Configuration
PaperVision® Capture Administration Guide 95
Scanner Requirements
You can assign specific scanner requirements for a Capture step including color format,
minimum and maximum DPI, and scan type settings. As a result, your specified requirements
will be enforced in the Operator Console’s scanner settings and the operator will not be able
to edit these requirements.
Note:
Some settings may not be available for your scanner. If you select an unavailable
option, the property will become disabled and an error will be logged in the
Windows Event Viewer.
Color Format
You can select the scanner’s color format requirements, such as true color, grayscale, and
black and white.
To select the color format:
1. Click the ellipsis button next to the Color Format field. The Select Required Color
Format Options dialog box appears.
Select Required Color Format Options
2. Select the appropriate options from the list, and then click OK.

Chapter 5 – Capture Step Configuration
PaperVision® Capture Administration Guide 96
Vertical and Horizontal Resolution
You can assign the minimum and maximum vertical and horizontal resolution settings for the
scanner, such as 200 DPI, 1200 DPI, etc. As a result, the operator will not be able to assign a
value above or below your specified values.
Scan Type
You can select the scan type, such as duplex, back-only, front-only, and others. The available
scan types include the following:
• Transparency
• Flatbed
• Front-Only
• Duplex
• Back-Front
• Back-Only

Chapter 6 – Indexing Configuration
PaperVision® Capture Administration Guide 97
The Indexing job step allows you to customize PaperVision Capture to the
indexing needs of any task. Configuration properties for the Indexing job step are
designed to enhance productivity in the PaperVision Capture Operator Console, such as
predefined index values, auto-carry/auto-increment, and detail sets. Additional properties can
be configured to monitor and verify operator indexing entries, such as blind index
verification, regular expressions, and re-key verification. Index zones that can be configured
in the Indexing job step will help you define areas on the image that will be zoomed into view
when operators hand-key index values. When you configure individual indexes, four
categories of settings are available, including Custom Code Events (Step Level), General (Job
Level), General (Step Level), and Predefined Index Values (Job Level).
To view the properties for the Indexing job step:
1. In the Job Definitions screen, select the Indexing job step in the workspace.
2. In the Properties grid, expand the Custom Code Events (Step Level), General,
and Indexes nodes.
Custom Code Events (Step Level)
You can configure custom code that operators can execute in the PaperVision Capture
Operator Console. Click the ellipsis button next to the appropriate event to select the
programming language and to configure the custom code. For more information on
configuring custom code, see Chapter 13 - Custom Code.
Add Page
Add Page executes custom code just before images are appended to the batch, including
rotation or barcode indexing. When the script is enabled for this option, it will be executed for
all images that the operator scans in or when the operator imports a batch. This script is not
executed if the operator performs the Import Images operation.
Batch Opened
Batch Opened executes custom code when the operator opens a batch in the Operator
Console. The following sample is a custom code event handler that can be inserted into the
code to display a message box, allowing the user to cancel the open batch operation:
CCustomCodeBatchOpeningEventArgs eventArgs
= (CCustomCodeBatchOpeningEventArgs)Parameter;
if (MessageBox.Show("Open Batch?", "Capture",
MessageBoxButtons.OKCancel,
MessageBoxIcon.Question)== DialogResult.Cancel)
{
eventArgs.CancelOpen = true;
}

Chapter 6 – Indexing Configuration
PaperVision® Capture Administration Guide 98
Note:
The Batch Opened event will not execute if you have enabled the Max Documents per
Batch property and the user completes the Submit and Create New Batch operation.
Batch Submitted
Batch Submitted executes custom code when the operator submits a batch in the Operator
Console. The following sample is a custom code event handler that can be inserted into the
code to display a message box, allowing the operator to cancel the submit batch operation:
CCustomCodeBatchSubmittingEventArgs eventArgs
=(CCustomCodeBatchSubmittingEventArgs)Parameter;
if (MessageBox.Show("Submit Batch?", "Capture",
MessageBoxButtons.OKCancel,
MessageBoxIcon.Question) == DialogResult.Cancel)
{
eventArgs.CancelSubmit = true;
}
Custom Code Execution
Custom Code Execution executes when the operator clicks the Execute Custom Code button
in the PaperVision Capture Operator Console.
Match and Merge
Match and Merge executes when the operator clicks the Match and Merge button in the
PaperVision Capture Operator Console.
Saving Indexes
Saving Indexes executes prior to the operator saving the index values in the PaperVision
Capture Operator Console.
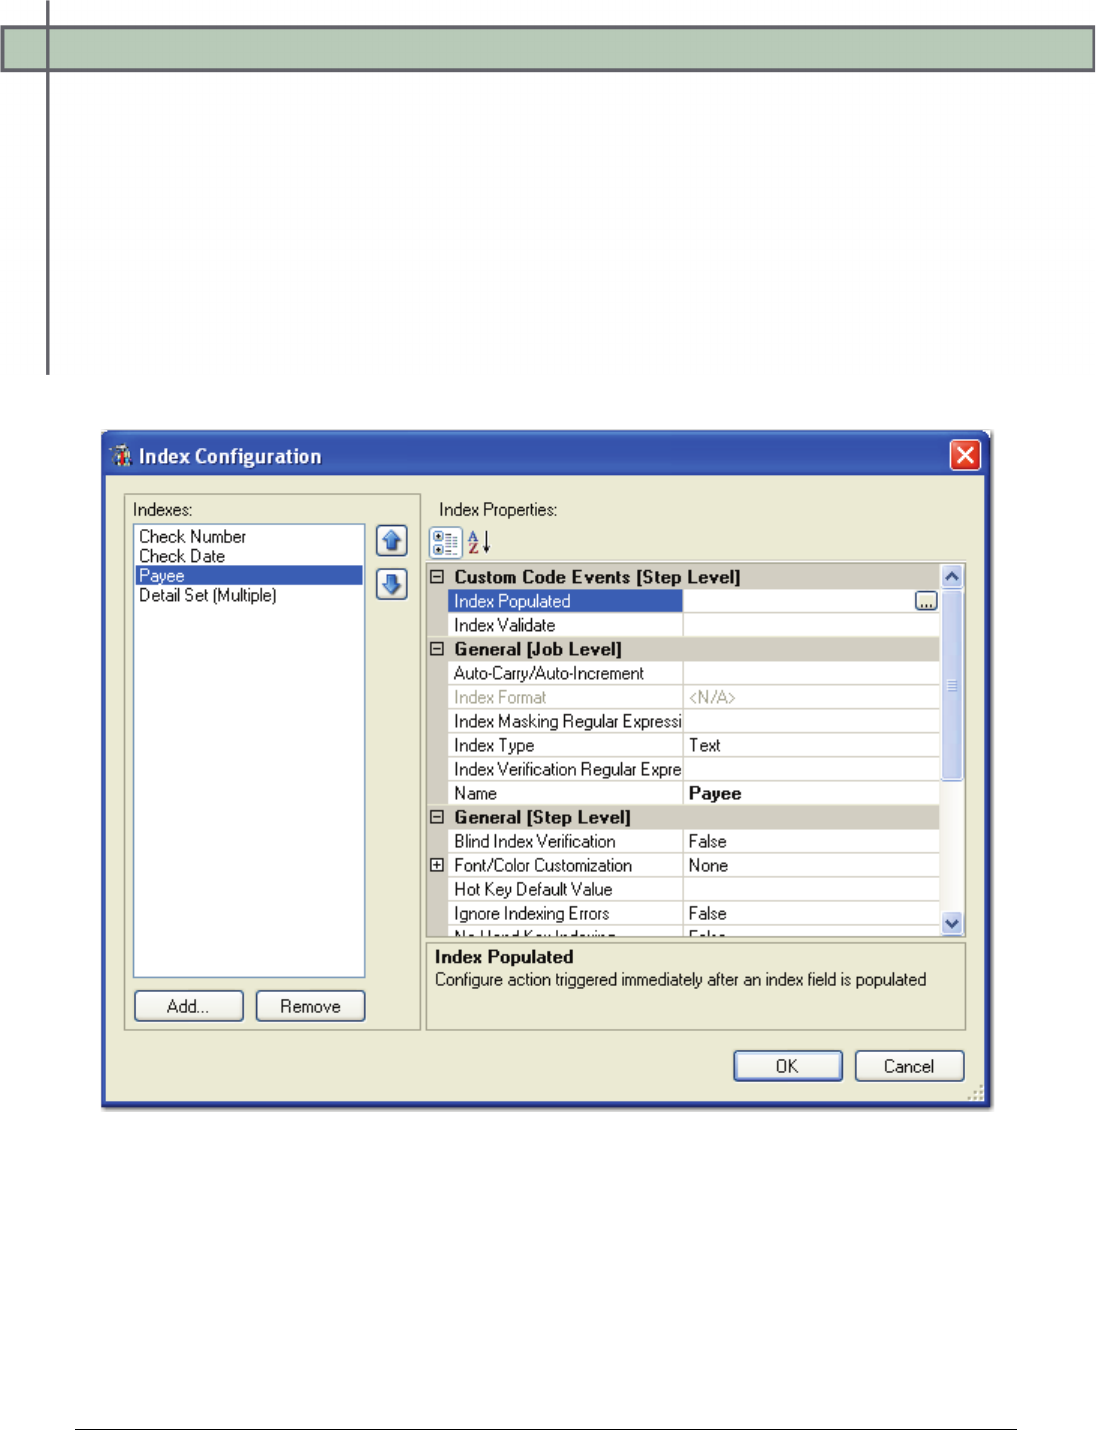
Chapter 6 – Indexing Configuration
PaperVision® Capture Administration Guide 99
General Properties
For information on the Indexing step’s general properties that are applicable to all job steps,
see the section on General Properties in Chapter 4. If Indexing operators are required to
apply QC tags to index fields, the following QC properties are available for configuration.
Indexes
Four groups of properties can be configured for each index value, including Custom Code
Events (Step Level), General (Job Level), General (Step Level), and Predefined Index Values
(Job Level). In the Properties grid, click the ellipsis button in the right column of the Indexes
field, and the Index Configuration dialog box appears.
Index Configuration
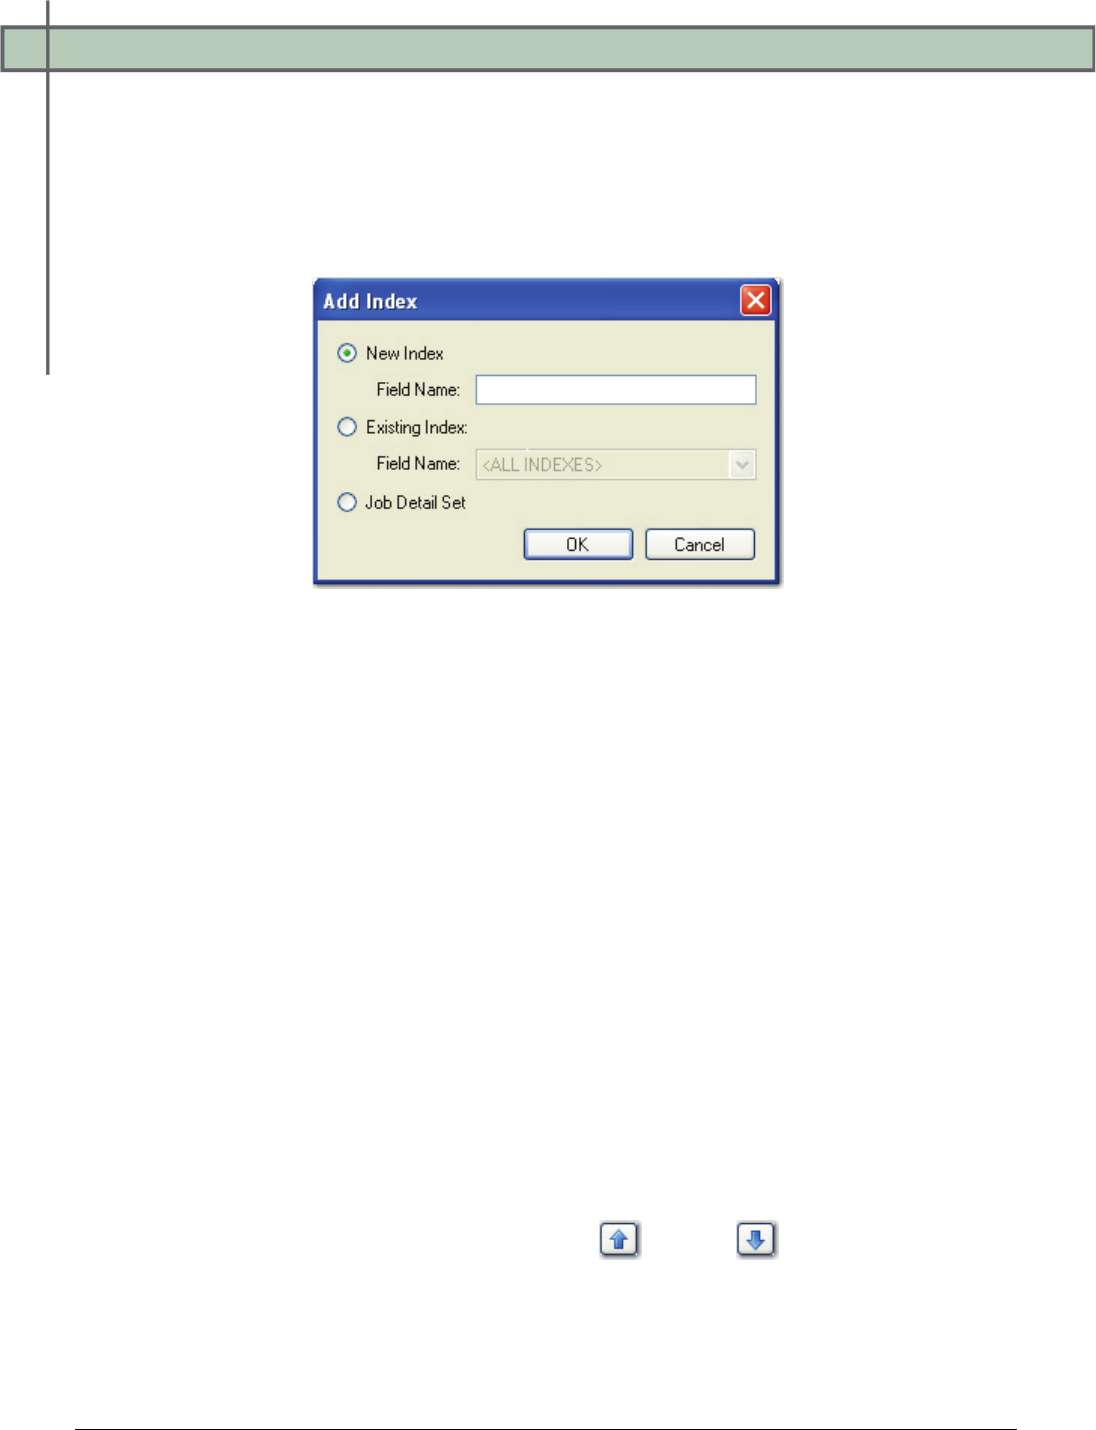
Chapter 6 – Indexing Configuration
PaperVision® Capture Administration Guide 100
Adding, Removing, and Sorting Indexes
You can add an individual or existing index, all indexes (including or excluding those defined
in detail fields), or a job detail set.
To add an index:
1. Click Add, and the Add Index dialog box appears.
Add Index
2. To add a new index, select New Index, and then enter the field name. Proceed to step
5.
3. To add an existing index, select Existing Index. From the drop-down list, you can
select an individual index or all indexes (including or excluding those defined in detail
fields). Proceed to step 5.
4. To add a new detail set for the job, select Job Detail Set. You can then create and
configure each individual index comprising the detail set. For more information, see
the section on Configuring Detail Sets
5. Click OK. The Index Configuration dialog box will display your new index along
with its associated properties that you can configure.
To remove an existing index:
1. Highlight the appropriate index in the Indexes list.
2. Click Remove.
To sort indexes:
To move an index up or down the list, click the up or down arrow to the right of the
list of indexes.
Chapter 6 – Indexing Configuration
PaperVision® Capture Administration Guide 101
Custom Code Events (Step Level)
In the Properties grid for the Indexing job step, the Index Populated and the Index Validate
Events allow you to select either Visual Basic or C# code to configure an action triggered
immediately after an index field is populated (and the operator returns to re-enter the index
value) or validated by the system. The Index Validate event is triggered after the operator
returns to edit an index value, re-enters the index value, and then proceeds to a subsequent
index field (or saves the edited index value).
To configure the code:
1. Click the ellipsis button in the right column of the Index Populated or Index
Validate field.
2. Select either Visual Basic or C# programming language, and the Script Editor opens.
See the section on the Script Editor for more information.
Tip:
To prevent the programming language prompt from appearing each time you
configure custom code events, right-click the ellipsis button, and select Custom
Code Options. Select either the C# or Visual Basic programming language to
use by default, and then choose the option to suppress the dialog when creating
new custom code.

Chapter 6 – Indexing Configuration
PaperVision® Capture Administration Guide 102
General (Job Level)
These settings allow you to configure auto-carry and auto-increment values, index types, and
regular expressions. To view these settings, expand the General (Job Level) node within the
Index Configuration dialog box.
Auto-Carry/Auto-Increment
The Auto-Carry and Auto-Increment settings can greatly increase operator productivity while
hand-keying repetitive or incremental values or characters. Both tools operate during scanning
(optional) and hand-keying. To configure these settings, click the ellipsis button in the Auto-
Carry/Auto-Increment field.
Note:
Auto-Carry settings only apply when the operator saves index values in the Operator
Console.
Auto-Carry/Auto-Increment

Chapter 6 – Indexing Configuration
PaperVision® Capture Administration Guide 103
Auto-Carry Entire Index Value
This setting allows you to carry all characters from an index in one document to the
corresponding index in the next document. You can then enable Overwrite Existing
Values and/or Carry Values to Copied Document.
Auto-Carry Characters Preceding Number
This setting allows you to define the number of characters that precede a number. Your
specified number of characters will carry from an index in one document to the
corresponding index in the next document. For example, if you have an index that is
always (or nearly always) the letters ABC followed by a number, you may not want to
continuously re-enter ABC on each index value. You could set the number of characters to
carry to 3. When the operator is keying the information, ABC would automatically get
carried forward to the next document and they would only have to enter the numeric
portion of the index.
Auto-Carry Characters Following Number
This setting allows you to define the number of characters that follow a number. Your
specified number of characters will carry from an index in one document to the
corresponding index in the next document. For example, if you have an index that is
always (or nearly always) a number followed by the letters ABC, you may not want to
continuously re-enter ABC on each index value. You could set the number of characters to
carry to 3. When the operator is keying the information, ABC would automatically get
carried forward to the next document and they would only have to enter the numeric
portion of the index.
Auto-Increment Number
Auto-Increment takes Auto-Carry one step further. For example, if the numeric portion of
the value was an incremental numeric value, you could set Auto-Carry to 3 and Auto-
Increment to 1. This would increment the numeric value of any characters remaining after
the first three characters by a value of one. The Auto-Increment Number can also be used
without Auto-Carry if the value is completely numeric. The value entered in the Minimum
Number Digits field allows you to pad the new value with zeros. The Preview section
shows you how the carried value will appear.
Overwrite Existing Values
By default, Auto-Carry and Auto-Increment do not fill in an index value if there is already
information in the index. Selecting this check box will force Auto-Carry and Auto-
Increment to update the index regardless of whether information previously existed.
Chapter 6 – Indexing Configuration
PaperVision® Capture Administration Guide 104
Carry Values to Copied Document
By default, when documents are copied, no index values are carried through to the copies.
This allows you to specify that the current index should also be copied, leaving the other
indices blank.
Auto-Fill Cursor Location
If you enable this setting, operators are allowed to append to an existing index value. The
setting places the cursor's focus at the end of the original index value so the original value
is retained.
Note:
This determines whether data will be highlighted or the cursor will be placed at the
end of the data when hand-keying an index that has the Auto-Carry or Auto-Fill
option selected.
Preview
This section displays the original value and displays a preview of the carried value.
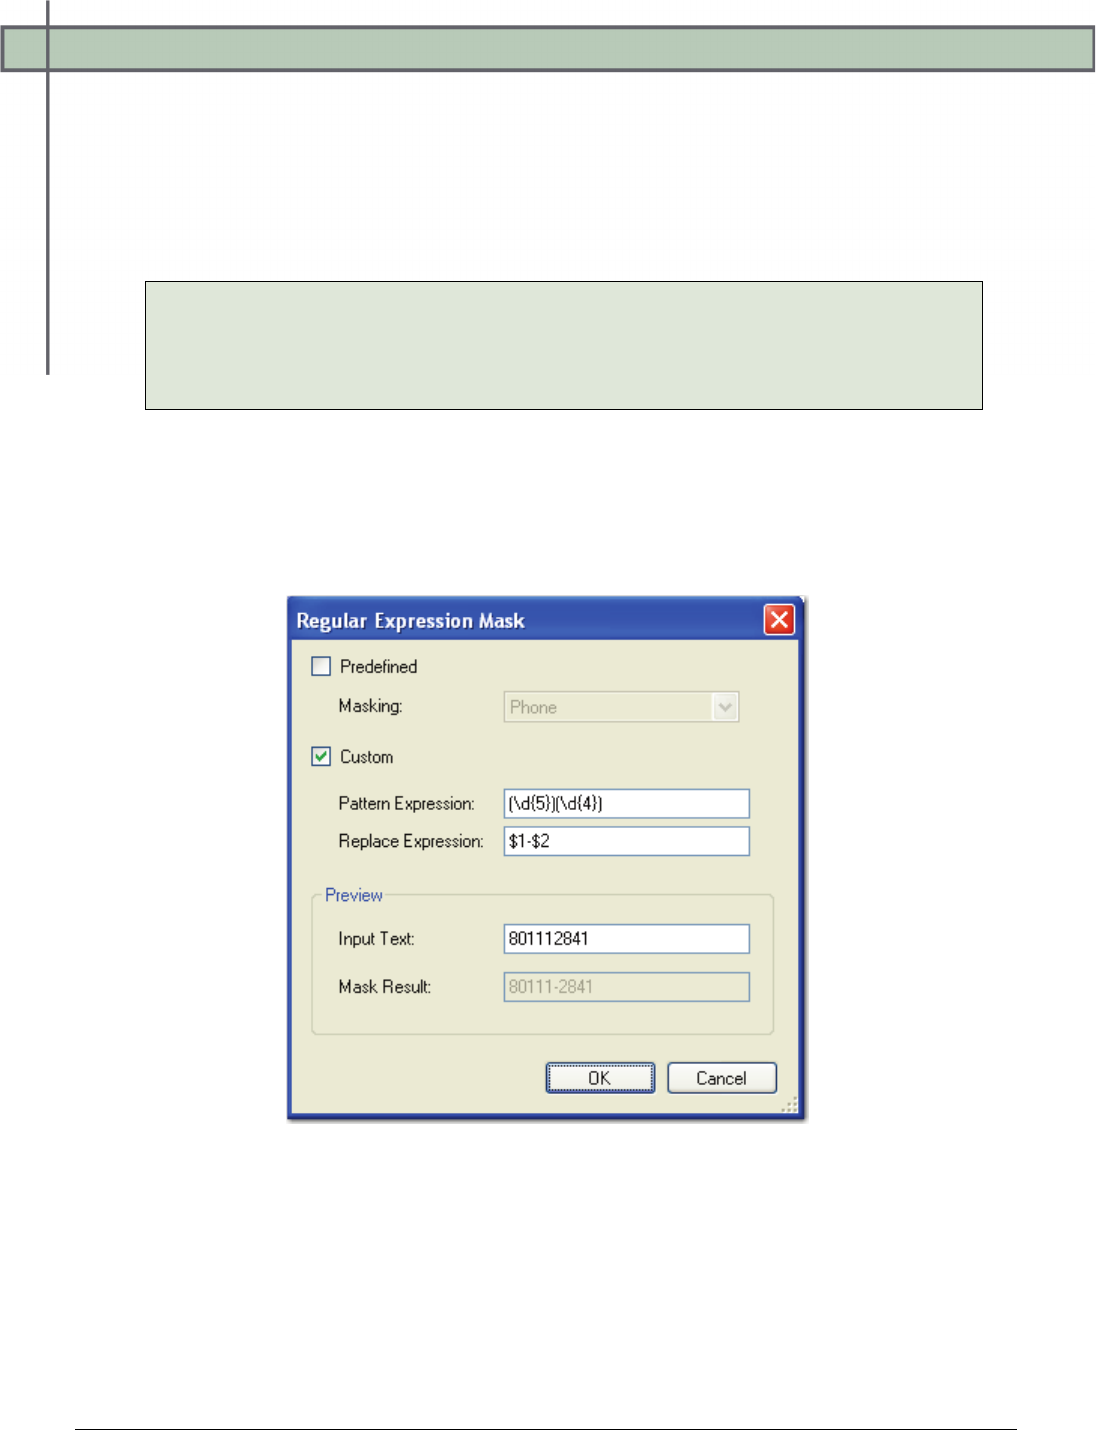
Chapter 6 – Indexing Configuration
PaperVision® Capture Administration Guide 105
Index Masking Regular Expression
The Index Masking Regular Expression property allows you to predefine a specific format for
index values entered during hand-key indexing. As operators enter index values, their entries
will be formatted (masked) automatically. For example, you can predefine social security
numbers to automatically insert dashes; as a result, operators only have to hand-key the 9-
digit social security numbers and not the dashes.
Tip:
Configuring this property does not validate the operator’s index value entries.
Validation is performed as operators enter index values in the Operator Console’s
Index Manager.
To configure index masking:
1. In the Index Configuration dialog box, expand the General (Job Level) node for the
appropriate index value.
2. Click the ellipsis button next to the Index Masking Regular Expression property,
and the Regular Expression Mask dialog box appears.
Regular Expression Mask - 5 + 4-Digit Zip Code
3. If you select a Predefined Value, select from the Masking drop-down list, and then
proceed to step 6.
Chapter 6 – Indexing Configuration
PaperVision® Capture Administration Guide 106
4. If you select a Custom mask, enter the Pattern Expression. The Pattern Expression is
a regular expression that you define for the index mask. For example, for 5 + 4 digit
zip codes such as 80111-2841, type the following:
(\d{5})(\d{4})
5. If necessary, define a Replace Expression that will automatically format the
operator’s entry. To format an operator’s 9-digit entry to appear as 80111-2841, type
the following:
$1-$2
Note:
If you do not define a Replace Expression, the operator’s entry will not be
formatted.
6. To preview how masking formats the number, enter a sample index value that an
operator would hand-key in the Input Text field. The resulting masked index value
appears in the Mask Result field.
7. Click OK.
Note:
Only the Text, Long Text, and Text (900) index types apply to the Index Masking
Regular Expression property.
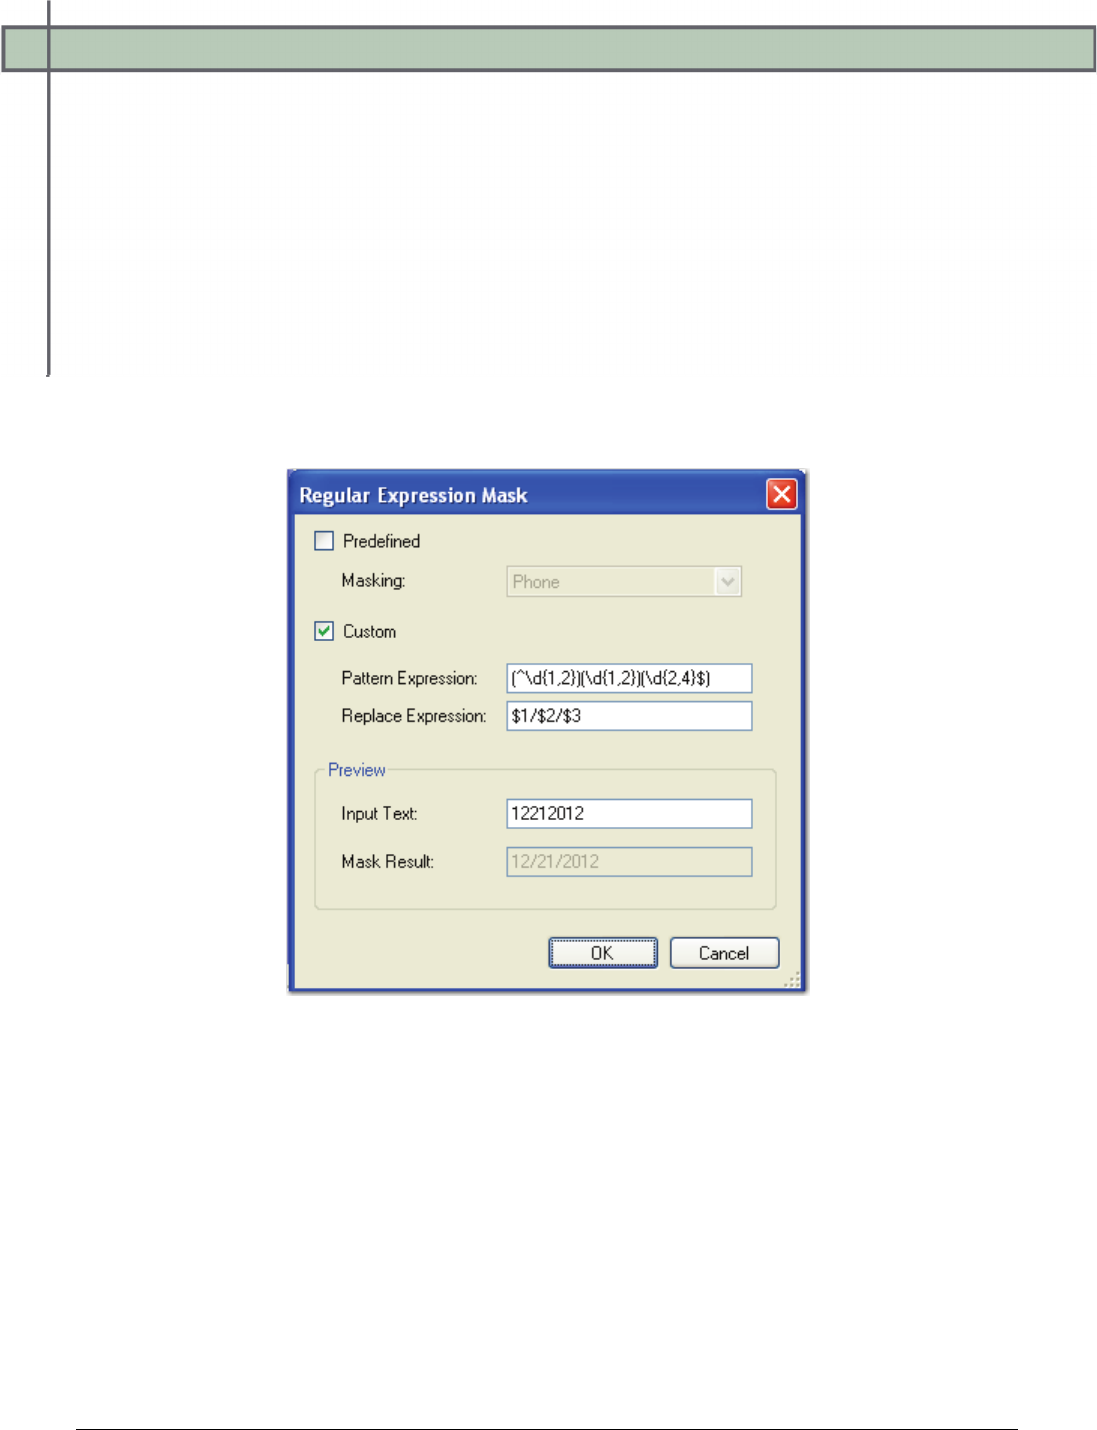
Chapter 6 – Indexing Configuration
PaperVision® Capture Administration Guide 107
Date Regular Expression Mask
The following pattern expression formats either a one- or two-digit month and day followed
by a two- or four-digit year:
(^\d{1,2})(\d{1,2})(\d{2,4}$)
The following replace expression separates the month, day, and year with a dash:
$1-$2-$3
To separate the month, day, and year with a slash mark, you can enter:
$1/$2/$3
Two-Digit Month and Day with Four-Digit Year
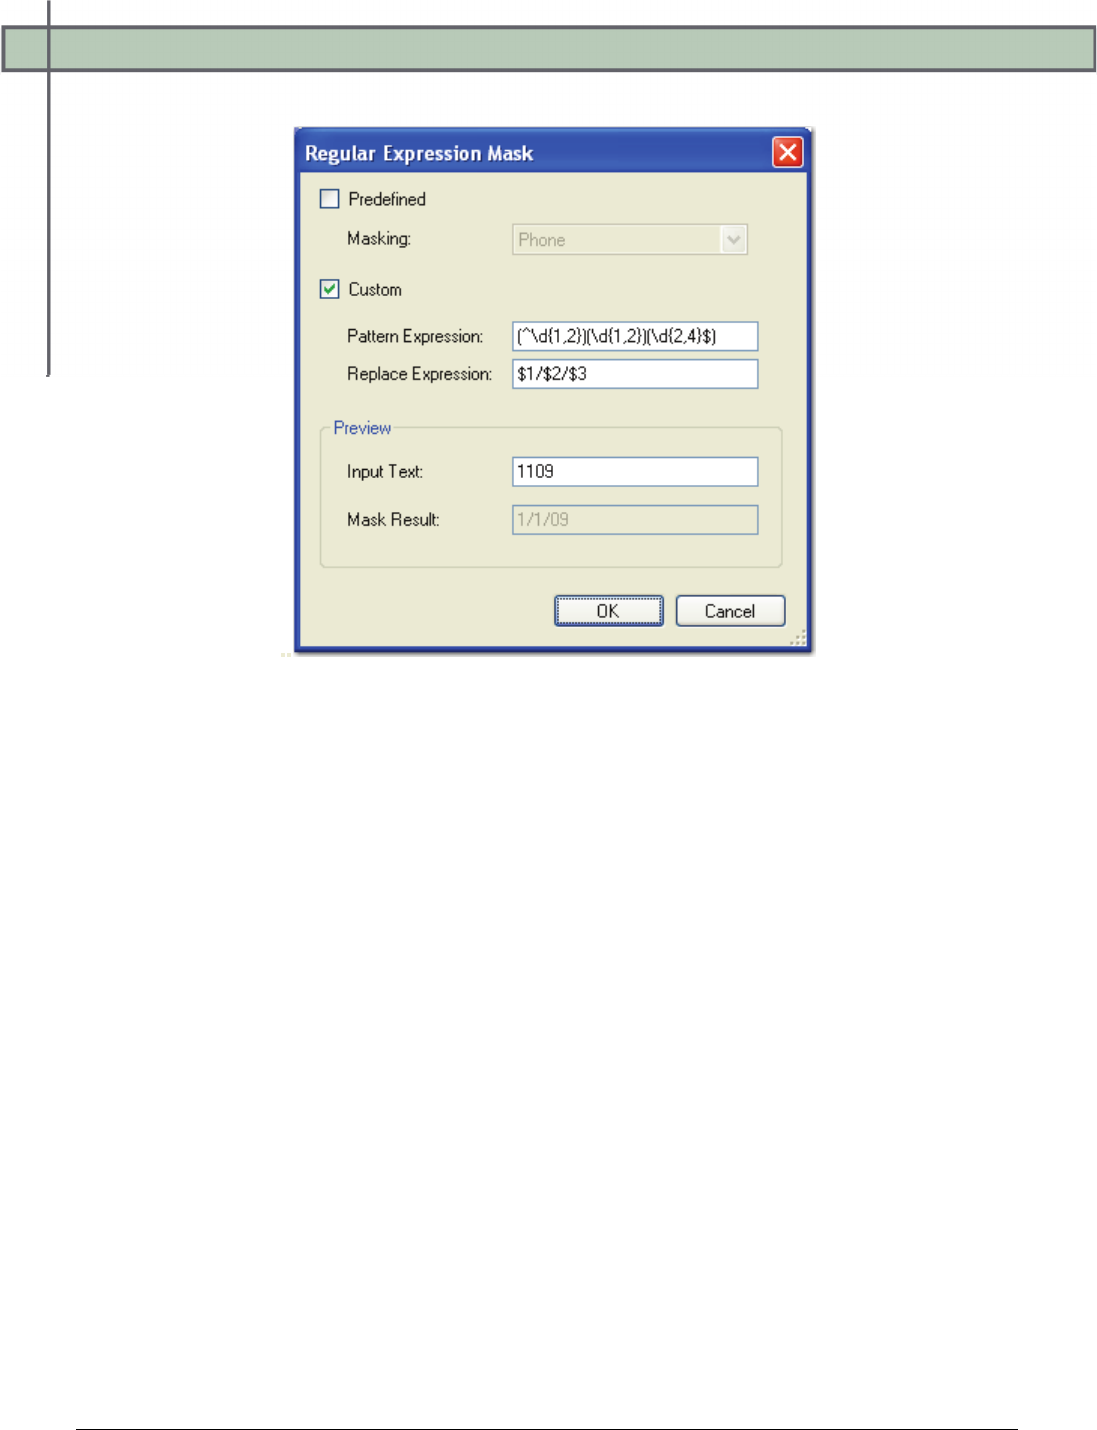
Chapter 6 – Indexing Configuration
PaperVision® Capture Administration Guide 108
The same pattern expression formats a one-digit month and day followed by a two-digit year:
One-Digit Month/Day and Two-Digit Year
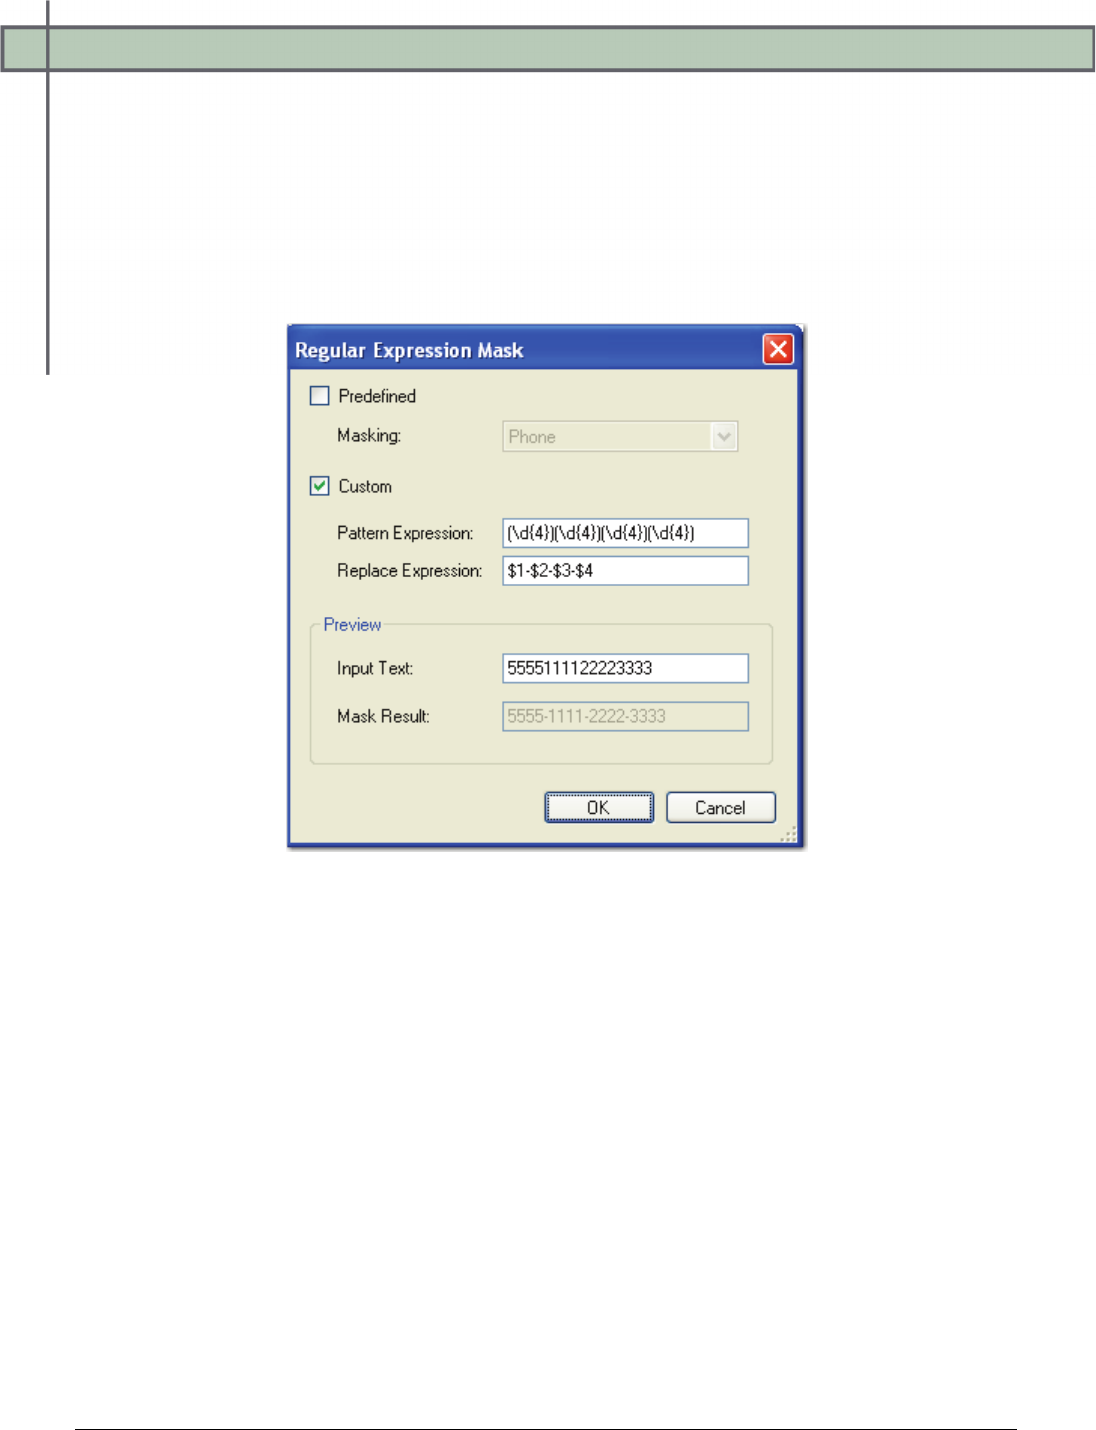
Chapter 6 – Indexing Configuration
PaperVision® Capture Administration Guide 109
Credit Card Regular Expression Mask
The following pattern expression formats a 16-digit credit card number:
(\d{4})(\d{4})(\d{4}$)(\d{4})
Enter the following replace expression to separate the digits with a dash:
$1-$2-$3-$4
16-Digit Credit Card Number

Chapter 6 – Indexing Configuration
PaperVision® Capture Administration Guide 110
Index Formats and Types
Document indices contain values that enable you to identify key elements of documents
within a project during the capture process. Indices contain values that enable you to identify
key elements of documents during the capture process.
PaperVision Capture supports the following types of indices:
• Boolean stores Boolean values such as yes/no, on/off, and true/false.
• Currency stores currency (monetary) values.
• Date stores date/time values ranging from 12:00:00 midnight, January 1, 0001
through 11:59:59 P.M., December 31, 9999 A.D. This index type also supports
searches on date ranges.
• Double Number represents a double-precision 64-bit number with values ranging
from -1.79769E+308 to 1.79769E+308.
• Long Text stores textual data that exceeds 255 characters in length (up to
approximately 64,000 characters in total).
• Number stores whole-number values between -2,147,483,648 and 2,147,483,647.
This index type supports hyphens or dashes at the beginning of the number to indicate
a negative value, but it does not support hyphens or dashes within the number, such as
dashes within a social security number (555-55-5555). This index excludes these
dashes from the number.
• Text stores textual data up to 255 characters in length. This type of index is the most
common.
• Text(900) stores textual data up to 900 characters in length.
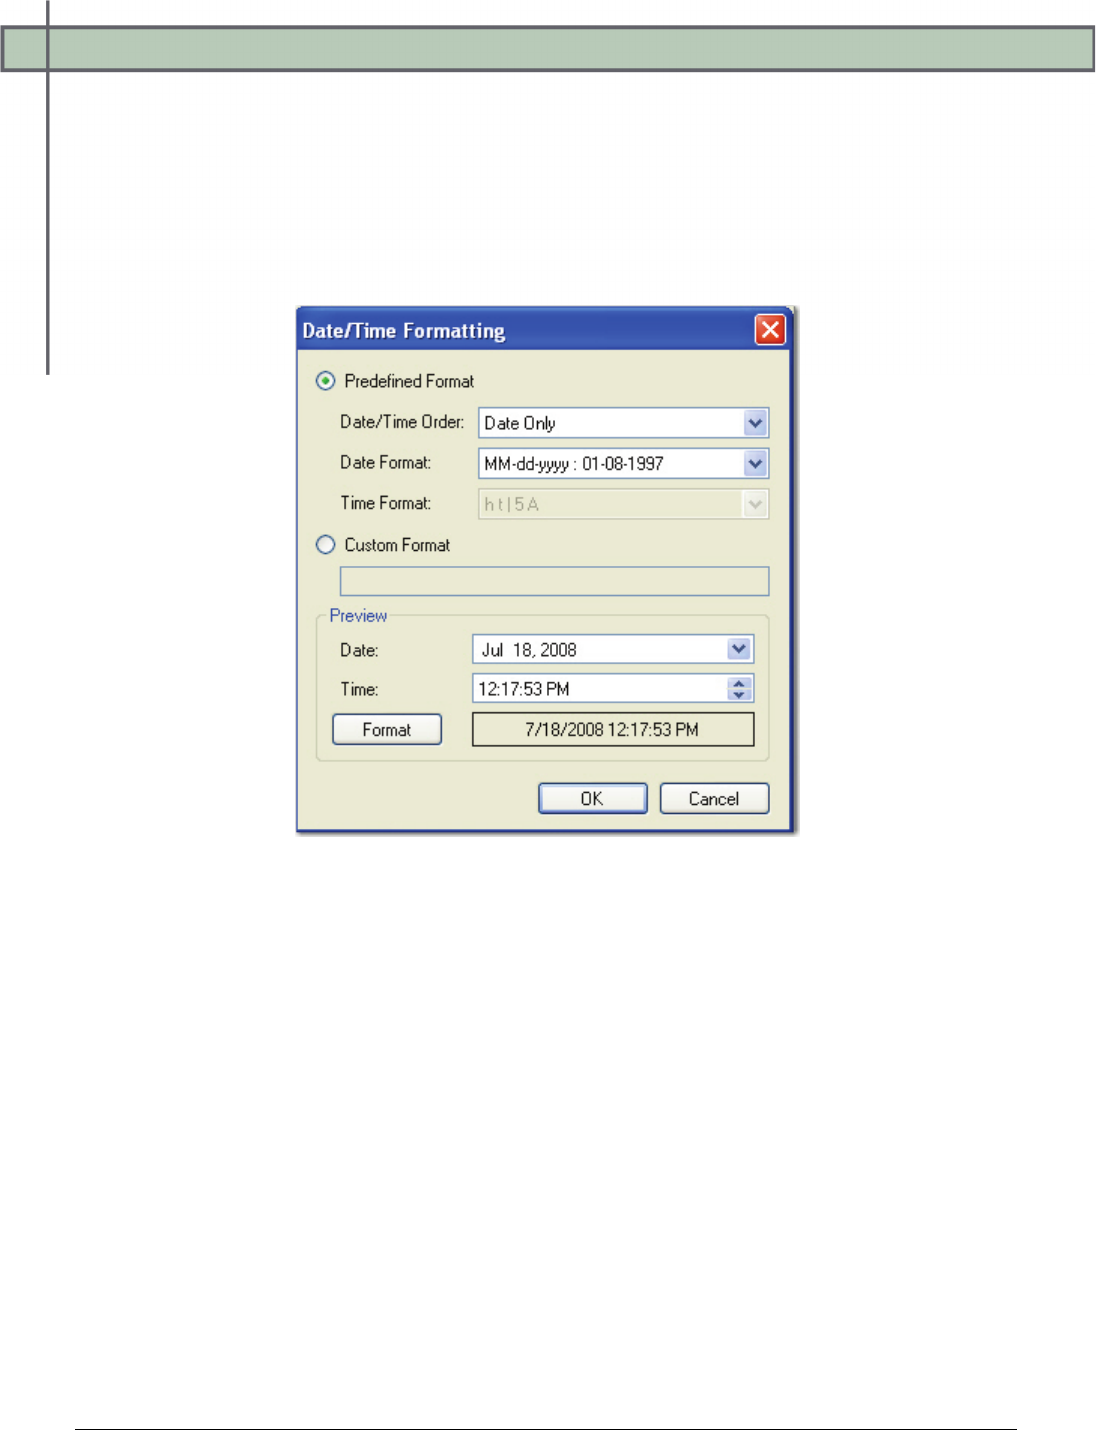
Chapter 6 – Indexing Configuration
PaperVision® Capture Administration Guide 111
Formatting the Date and Time
When you select a date index type, you can select from a predefined date/time format or you
can customize a date/time format.
To define the date/time format:
1. Click the ellipsis button in the right column of the Index Format field, which opens
the Date/Time Formatting dialog box.
Date/Time Formatting
2. Select either a Predefined Format (proceed to the next step) or a Custom Format
(proceed to fifth step).
3. If you select a Predefined Format, select from the following Date/Time Order
options:
• Date Only
• Time Only
• Date/Time
• Time/Date
4. Depending on your Date/Time Order selection, you can choose from the Date/Time
Format drop-down menus.
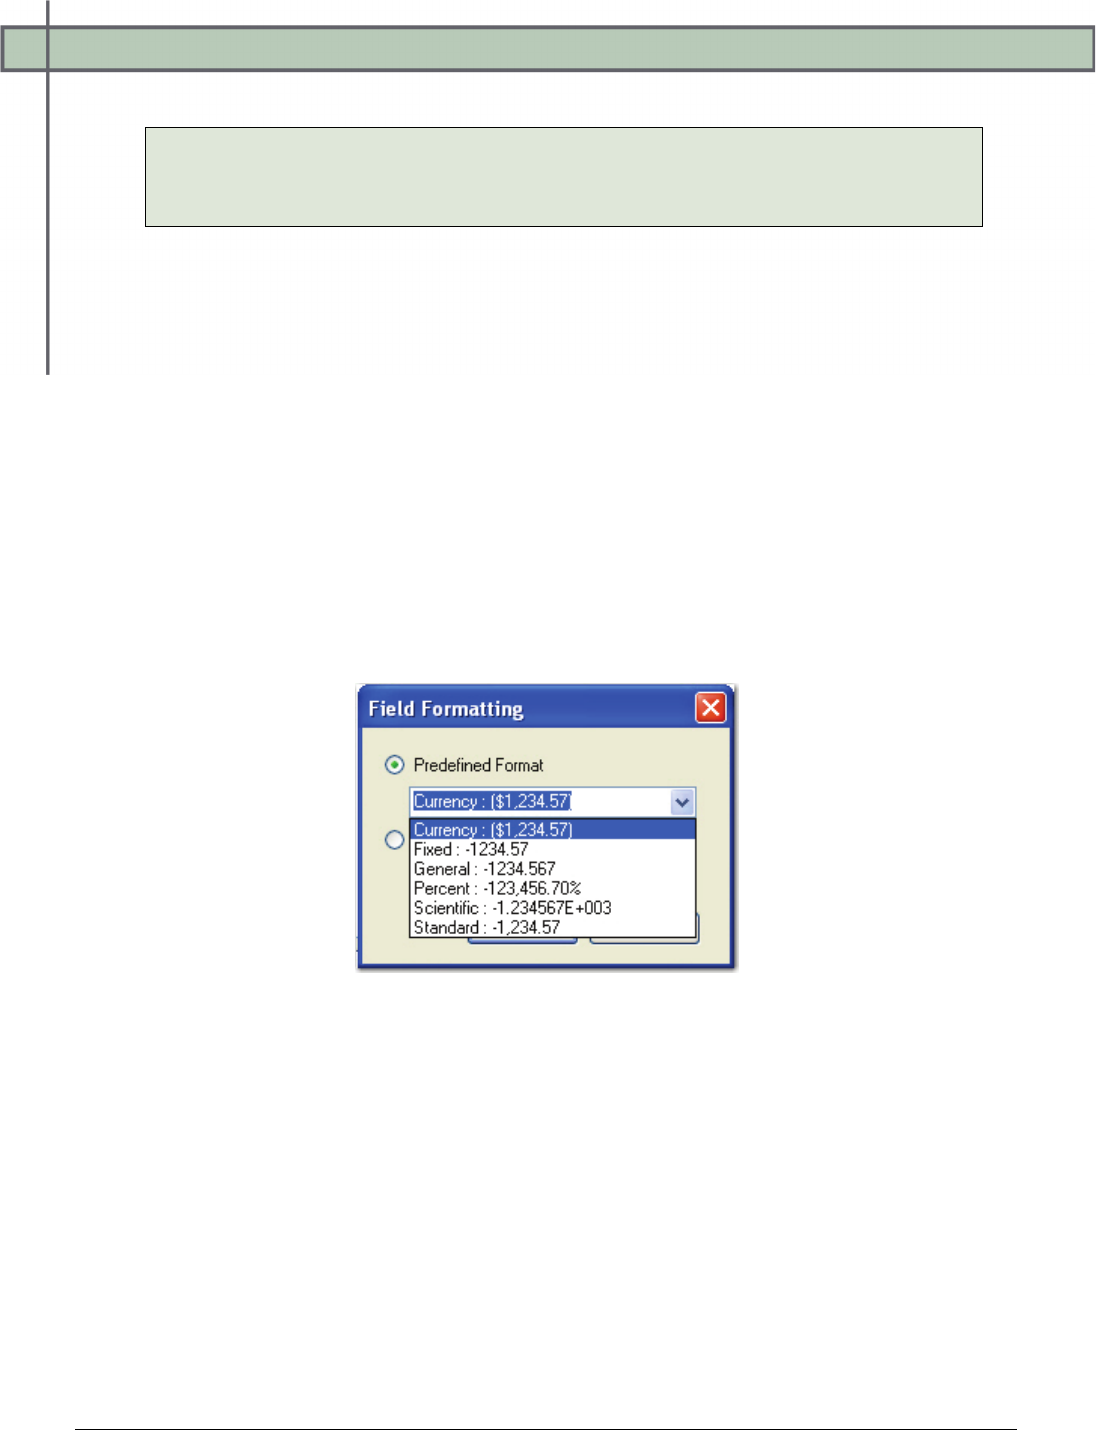
Chapter 6 – Indexing Configuration
PaperVision® Capture Administration Guide 112
5. If you select a Custom Format, enter the format in the blank field.
Note:
Some custom formats may not be supported in PaperVision Enterprise. Custom
formats could be assigned when using Custom Code to export to another format.
6. To preview a Predefined or Custom format, click the Format button in the Preview
section.
7. If you need to preview a calendar, click the Date drop-down menu.
8. If you need to set the time, enter it in the Time field. Or, use the up or down arrows to
set the time.
9. Click OK.
Double Number Formatting
When you select a Double Number index type, you can select a predefined or custom format.
To define the double number format:
1. Click the ellipsis button in the right column of the Index Format field, which opens
the Field Formatting dialog box.
Field Formatting
2. Select either a Predefined Format (proceed to the next step) or a Custom Format
(proceed to the fourth step).
3. If you select a Predefined Format, select from the following format types:
• Currency
• Fixed
• General
• Percent
• Scientific
• Standard

Chapter 6 – Indexing Configuration
PaperVision® Capture Administration Guide 113
4. If you select a Custom Format, enter the format in the blank field.
Note:
Some custom formats may not be supported in PaperVision Enterprise.
5. Click OK.
Index Verification Regular Expression
You can create a regular expression to validate operator data entry. A regular expression is a
pattern of text that consists of ordinary characters (for example, letters A through Z) and
special characters, known as metacharacters. The pattern describes one or more strings to
match when searching a body of text. The regular expression serves as a template for
matching a character pattern to the string being searched.
Name
This editable field contains the name of the index value.
Chapter 6 – Indexing Configuration
PaperVision® Capture Administration Guide 114
General (Step Level)
The General (Step Level) settings for each index value enable you to configure settings for
operators who will index documents within the PaperVision Capture Operator Console.
Blind Index Verification
This setting ensures the index entry of the first operator matches the second entry (or your
specified number of subsequent index entries). If you enable this setting, configure at least
two Indexing job steps.
For example, you assign the following for index field SSN:
1. For the first Indexing step, you select False.
2. Assign True for the second Indexing step.
3. Assign User 1 to the first Indexing step.
4. Assign User 2 to the second Indexing step.
5. User 1 enters 1 in the field and submits the batch.
6. User 2 enters 2 in the field, which differs from the first entry.
• Since Blind Index Verification has been enabled for the second Indexing step, the
original index value for this field is not visible for User 2.
• An error message notifies User 2 that the index values do not match.
Note:
Blind index verification is not an option available with detail fields.
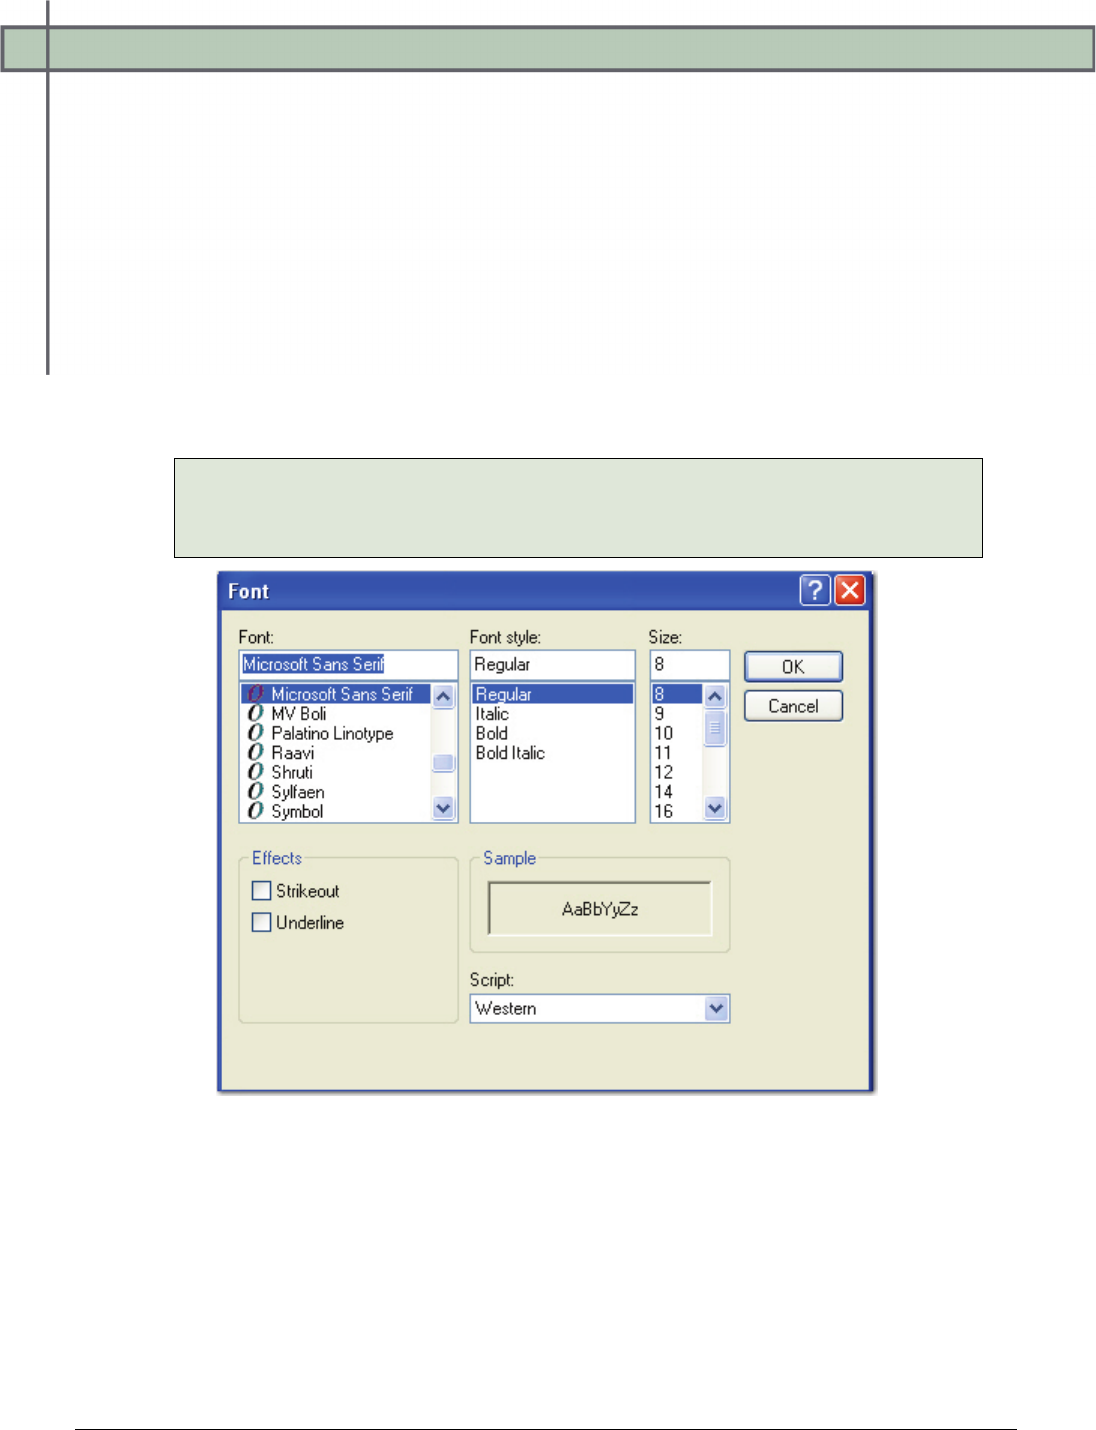
Chapter 6 – Indexing Configuration
PaperVision® Capture Administration Guide 115
Font Color/Customization
You can customize the font characteristics to modify how each index value and label displays
in the Operator Console. You can also change the cell color for each index value to emphasize
certain index values and assist operators who are visually challenged.
To customize the font and cell color:
1. Expand the Font Color/Customization node.
2. By default, each background cell color is white. To select another color, click the
Background Color drop-down list.
3. To change the label font for the index value, expand the Label node.
4. Click the ellipsis button next to the Label property. The Font dialog box appears.
Note:
You can also configure the individual properties directly in the Index
Configuration dialog box.
Font
Chapter 6 – Indexing Configuration
PaperVision® Capture Administration Guide 116
The following font properties can be configured in the Font dialog box or in the Index
Configuration dialog box:
• Font or Name: This property indicates the name of the font, such as Microsoft
Sans Serif (default), Arial, Times New Roman, etc.
• Font Style: The font style defaults to Regular, but you can select from Italic, Bold,
or Bold Italic.
• Size: The font size defaults to 8 point, but you can select a larger font size.
• Effects: To emphasize the font, you can enable the Strikeout and/or the Underline
effect.
• Unit: This is the unit of measurement for the font size, which defaults to Point.
Not all units are available for all fonts.
• Bold: This property is false by default and indicates whether boldface type has
been applied to the font.
• Script: Western script is selected by default, but you can select other scripts such
as Arabic, Baltic, Greek, Vietnamese, etc.
• GDICharSet: Depending on the selected font, this byte value specifies the GDI
character set that the font uses.
• GDIVerticalfont: This property indicates whether the selected font originates
from a GDI vertical font.
• Italic: This property is false by default and indicates whether the font is italic.
• Strikeout: This property is false by default and indicates whether the font displays
with a horizontal line running through it.
• Underline: This property is false by default and indicates whether the font is
underlined.
Note:
For more information on Microsoft's Graphics Device Interface (GDI), see the
Microsoft Software Developer's Network:
http://msdn.microsoft.com/en-us/default.aspx
5. To change the font appearance of the operator’s index value entry, expand the Value
Font node. See the previous step for descriptions of each customizable property.
6. After you have finished configuring the font characteristics, click OK.
Hot Key Default Value
As operators are keying in index fields and press the assigned hot key, the specified default
value will populate the index field.

Chapter 6 – Indexing Configuration
PaperVision® Capture Administration Guide 117
Ignore Indexing Errors
If this setting is True, incorrect operator input will be ignored and no prompt will appear for
the operator. If this setting is False, the operator will be notified of an incorrect indexing
entry.
No Hand Key Indexing
If this setting is True, the operator will not be allowed to enter index values. If this setting is
False, the operator will be allowed to enter index values.
Re-Key Verification Count
To ensure indexing accuracy, this value forces the operator to enter the index value a
specified number of times, which can range from 0 to 99.
Valid Field Required
If this setting is True, the operator will be required to enter a valid index value for the field
type, such as a date-formatted value for a date field. If this setting is False, the operator will
be allowed to continue and keep the invalid value.
Verification Search Strings
The Verification Search Strings setting is used to validate index values when the operator
saves index values, tabs to the next field, submits the batch, or executes the Verify Index
Values operation. To ensure the accuracy of hand-key indexing, you can define multiple
search strings that can be verified when the operator executes the Verify Index Values
command. For example, you can assign individual characters or numbers to search for during
the index verification process. By default, the verification process will highlight the first
document in the batch that contains a blank value. However, you can exclude blank values
from the index verification process by removing <Blank> from the list of search strings.
Depending on the operator’s index verification settings in Tools > Options > Display
Preferences (Verify Starts from Current Document Forward or Verify Starts at the Beginning
of the Batch), the index verification process starts with the appropriate document in the batch
and will highlight the next document that contains your defined search strings.
To assign verification search strings:
1. For the appropriate index, click the ellipsis button to the right of the Verification
Search Strings field.
2. In the Verification Search Strings dialog box, enter a search string in the first row.
3. Enter any subsequent search strings, if necessary.
4. To remove a search string, highlight the string, and then click the Remove icon.
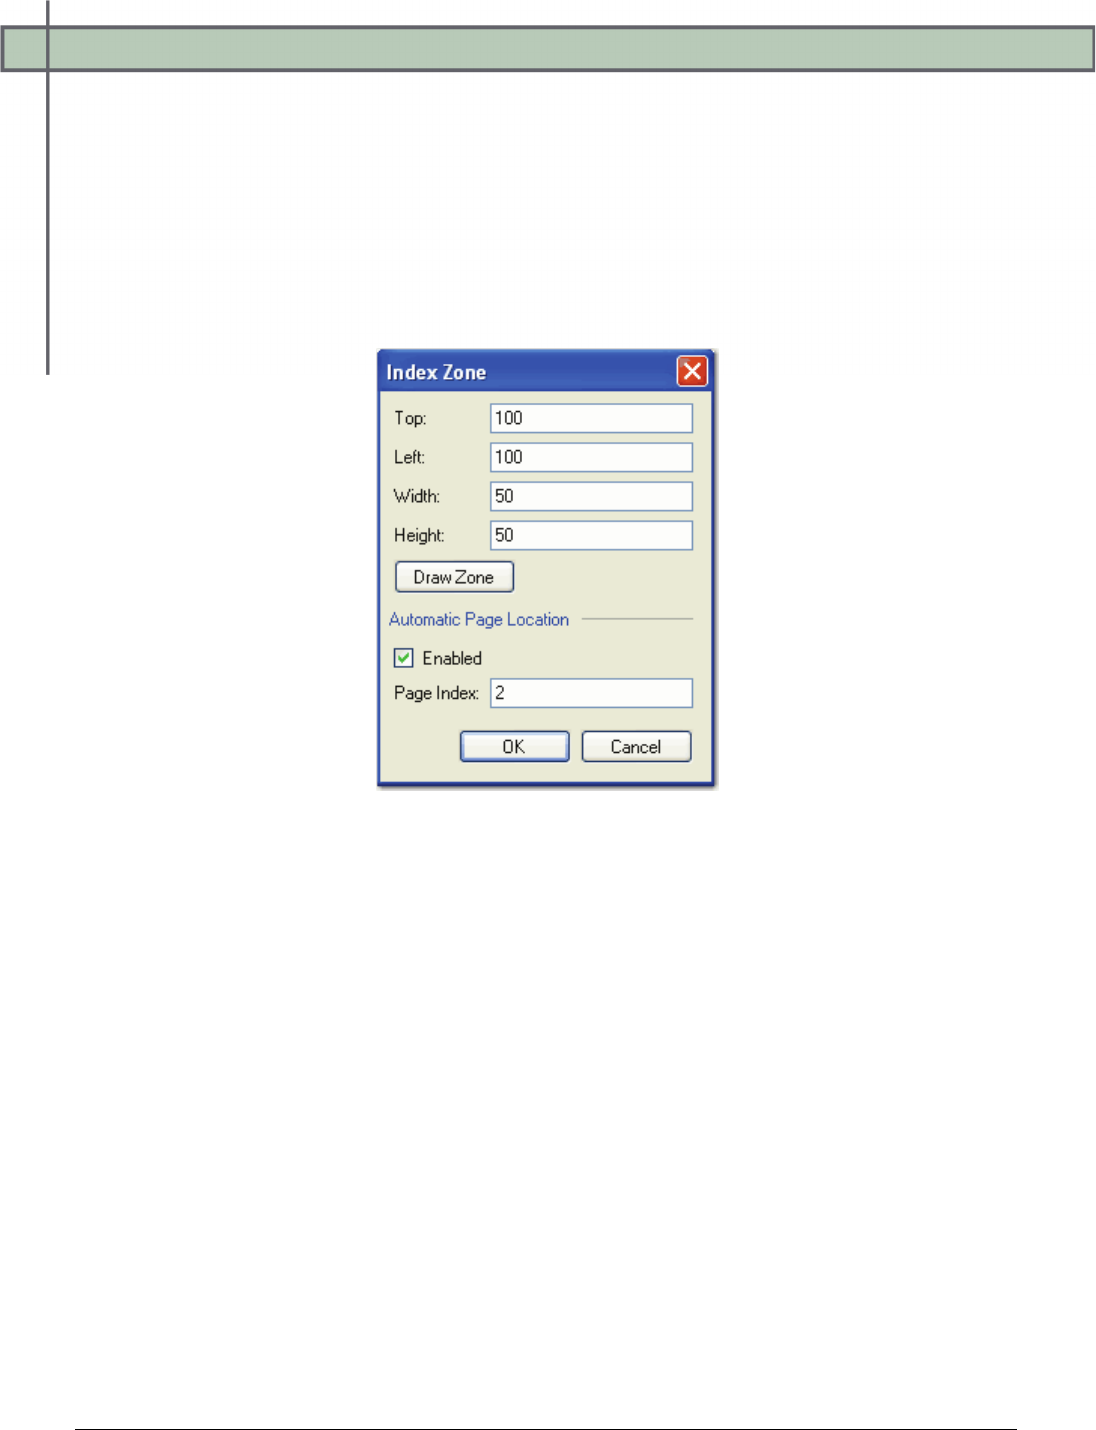
Chapter 6 – Indexing Configuration
PaperVision® Capture Administration Guide 118
Zoom Zone
This setting allows you to assign an area of the image that will be zoomed into view when
operators hand-key this index field.
If the Automatic Page Location setting is enabled, you can specify the page of the document
that is displayed when index values are entered, which is useful if index values are located on
different pages of the document. This value has to be greater than zero. If you enter a page
index value greater than the number of pages in the document, the last page will display. For
details on index zone configuration, see the next section.
Index Zone
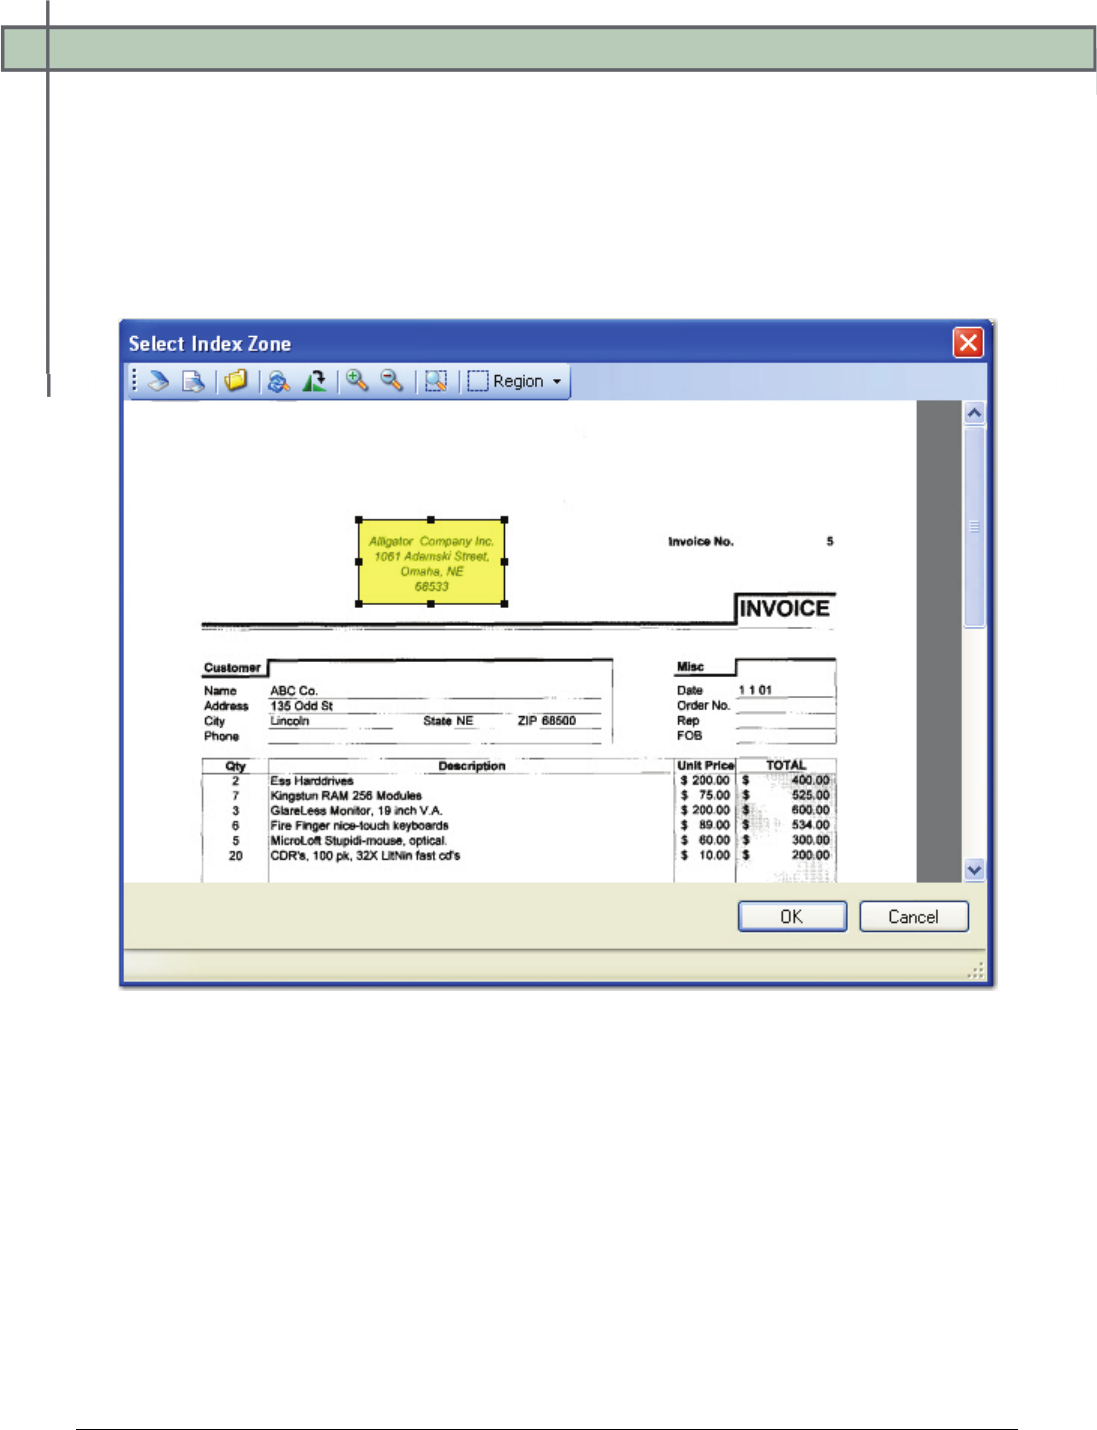
Chapter 6 – Indexing Configuration
PaperVision® Capture Administration Guide 119
Index Zones
Index zones help you define areas on the image that will be zoomed into view when operators
hand-key index values.
To draw an index zone:
1. In the Index Zone dialog box, click the Draw Zone button, and the Select Index
Zone screen opens.
Select Index Zone
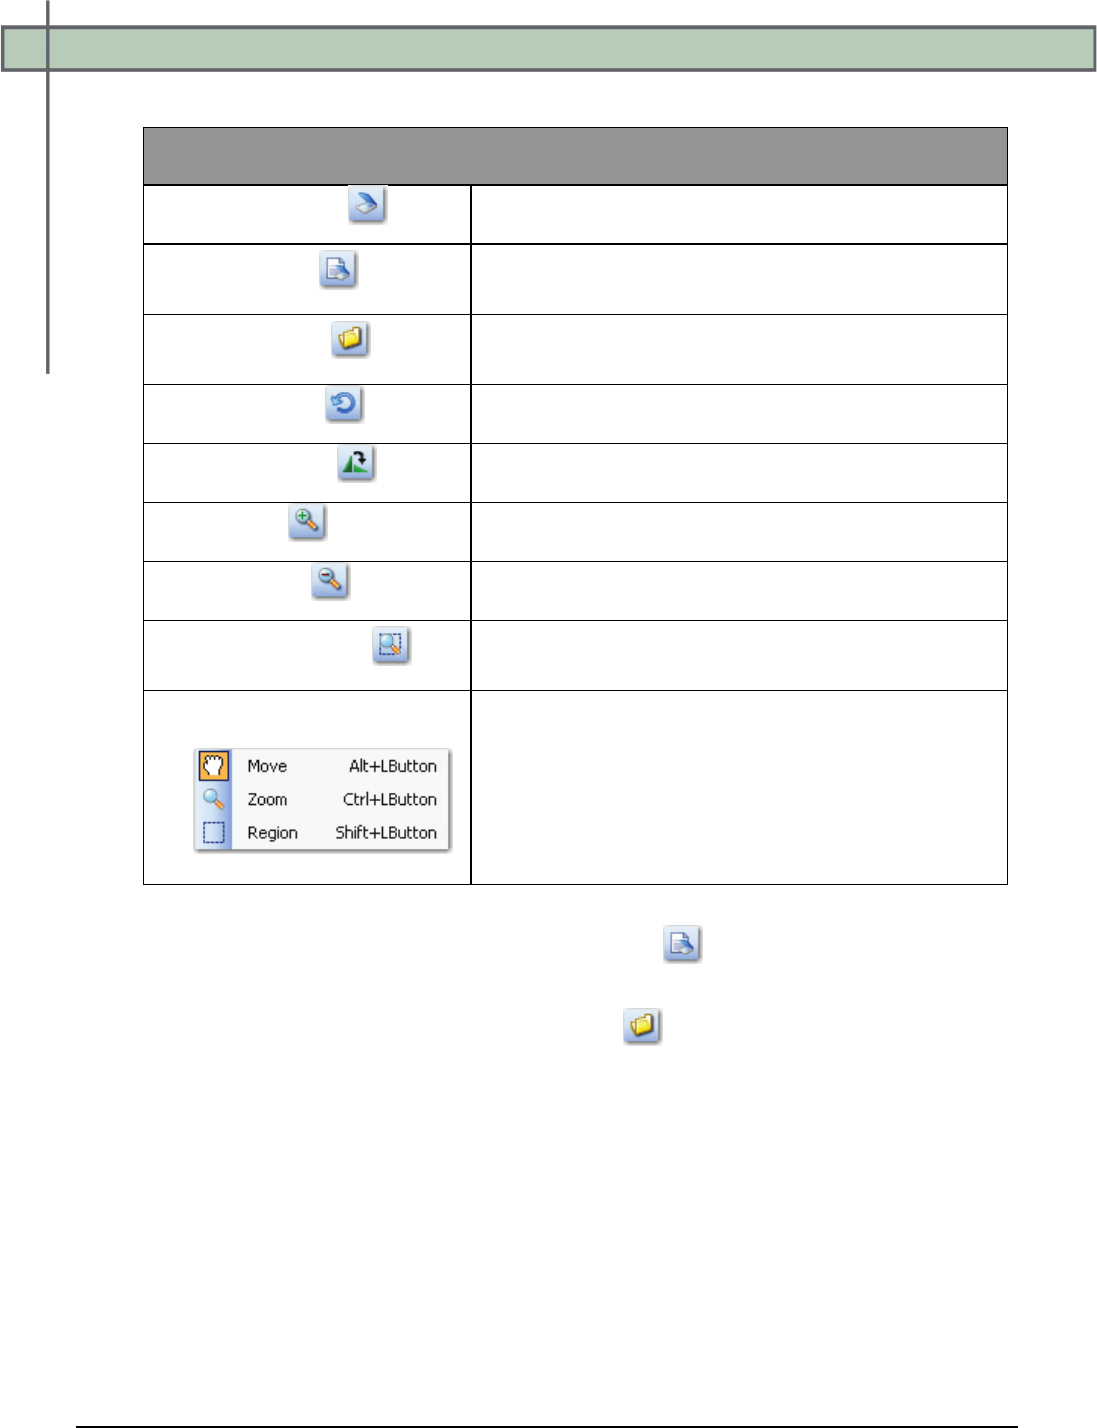
Chapter 6 – Indexing Configuration
PaperVision® Capture Administration Guide 120
The Select Index Zone commands are listed in the table below:
Select Index Zone Commands
Scanner Setup Allows you to set up the scanner's settings
Scan Image
Allows you to scan an image into the Select
Index Zone screen
Open Image
Enables you to select a test image from disk that
will open in the window
Reset Image Reverts to the original view of the image
Rotate Image Rotates the image 90 degrees clockwise
Zoom In Zooms in the view of the image
Zoom Out Zooms out the view of the image
Zoom In Region
Zooms in on the boundary of your specified
region
Move, Zoom, or Region
Equips the left mouse button with the Zoom,
Move or Region command
• Zoom enlarges a specified area
• Move pans around a zoomed area
• Region defines a boundary to process
2. To scan a sample image, click the Scan Image icon. For more information on
scanner settings, see the section on Scanner Setup Settings in this chapter.
3. To open an existing image, click the Open icon.
4. In the toolbar, select the Region drop-down list.
5. Click the left mouse button and drag the cursor around the region.
6. If necessary, widen or narrow the boundaries of the index zone.
7. When you are finished configuring the index zone, click OK.
8. Click OK in the Index Zone dialog box.

Chapter 6 – Indexing Configuration
PaperVision® Capture Administration Guide 121
Predefined Index Values (Job Level)
These settings allow you to predefine index field values at the job level. You can predefine
these values for the job as you configure the index field or you can allow operators' entries to
be added to the predefined values list. Your specified predefined values are used for the Auto-
Complete feature that finishes information as the operator types.
Add New Values
If this setting is True, all new operator-entered values can be added to the Predefined Values
list.
Auto-Complete
If this setting is True, the index field will automatically be completed as the operator types.
Force Predefined Values
If this setting is True, the operator can only select from your predefined index values. If the
entered data is not one of the predefined values, the operator will be alerted. If this setting is
False, the operator will be allowed to enter a value in the index field.
Chapter 6 – Indexing Configuration
PaperVision® Capture Administration Guide 122
Predefined Values
In addition to adding predefined index values, you can also import and export the index
values as text (.txt) files for each index field.
To assign predefined values:
1. Click the ellipsis button in this field to assign predefined index values to the list, and
the Predefined Values dialog box appears.
Predefined Values
2. Enter the values directly in the grid.
3. When you are finished entering all values, click OK.
To import a list of predefined index values:
1. To import an index value, click the Import icon.
2. Select the text document to import.
3. Click Open. A text file is imported that contains any predefined values; each line of
the text file is imported as a separate value.

Chapter 6 – Indexing Configuration
PaperVision® Capture Administration Guide 123
To export a list of predefined values:
1. Click the Export icon.
2. Enter the name of the text file.
3. Click Save. A text file is exported that contains all predefined values; each line of the
text file is exported as a separate value.
To delete a value:
1. Highlight the value.
2. Click the Delete icon.
3. Click OK.
Chapter 6 – Indexing Configuration
PaperVision® Capture Administration Guide 124
Scanner Setup Settings
In the PaperVision Capture Administration Console, you can test and save scanner settings
during index, barcode, and OCR zone configuration. Black and white images are saved in an
industry standard Group IV TIFF file format, while color or grayscale images are saved in a
standard JPG or BMP file format. Settings in the Scanner Settings dialog box can be
accessed during index, barcode, and OCR zone configuration.
PaperVision Capture supports more than 300 ISIS-compatible scanners. The PaperVision
Capture installation media contains most of the currently available ISIS scanner drivers.
However, as this list is ever-growing, some newer drivers may not be available at the time of
distribution. If you need additional drivers, please contact Digitech Systems’ Technical
Support at support@digitechsystems.com or by phone at (877)374-3569. If the driver is
available, our support personnel will assist you in obtaining the driver.
PaperVision Capture also offers the ability to use TWAIN scanners. The use of TWAIN
scanners is generally intended for extremely low-volume scanners as ISIS drivers are
available for most scanners on the market.
Scanner Settings

Chapter 6 – Indexing Configuration
PaperVision® Capture Administration Guide 125
Note:
Depending on the type of scanner that is used, some scanner options may be
disabled, and the number of options available in the drop-down menus may vary.
Saved Settings
This drop-down menu displays any scanner settings that were previously saved.
To save a new scanner setting:
1. Enter the name in the Saved Settings field.
2. Click Apply.
To remove a setting:
1. Select the setting from the Saved Settings drop-down list.
2. Click Delete.
Scanner Name
Click the Scanner Name drop-down menu to select a scanner that has been installed and
detected by PaperVision Capture. Select the Properties menu to configure scanner and file
import devices. Depending on the type of scanner, the menu options will display different
settings.
The Properties menu contains the following options:
• More Settings may contain additional scanner settings that are available for
configuration.
• About displays the driver's version, copyright, and other information specific to the
scanner.
• Area Settings allow you to assign the scanning area.
• Extended Settings may contain additional scanner settings that are available for
configuration.
• Windows Image Acquisition may contain additional settings if your scanner
supports Windows Image Acquisition.
• Calibrate allows you to calibrate the scanner driver.
• Configure allows you to configure the scanner driver settings.
Color Format
Also known as the mode, you can select from options such as black and white, color, etc.

Chapter 6 – Indexing Configuration
PaperVision® Capture Administration Guide 126
Dither
Dithering converts and simulates unavailable colors. When dithering is turned on, the system
combines two or more colors to approximate the unavailable color.
Horizontal Resolution
Select the horizontal dots-per-inch resolution setting to apply during the scanning process.
Vertical Resolution
Select the vertical dots-per-inch resolution setting to apply during the scanning process.
Page Size
This setting determines the default page size of the image as it is scanned.
Scan Type
This setting determines if scanning should be two-sided (duplex), one-sided (simplex), etc.
Brightness
Brightness defines a pixel's lightness value from black (darkest) to white (brightest). Select
the brightness level to be applied during the scanning process and whether it should be
applied manually or automatically. If applying the brightness manually, use the slider to
increase or decrease its amount.
Contrast
Contrast is a measure of the rate of change of brightness in an image. A high-contrast image
contains defined transitions from black to white. Select the contrast level to be applied during
the scanning process and whether it should be applied manually or automatically. If applying
the contrast manually, use the slider to increase or decrease its amount.
Chapter 6 – Indexing Configuration
PaperVision® Capture Administration Guide 127
Manual Barcode and OCR Indexing
You can configure the Capture and Indexing steps so that indexing operators (or scanning
operators tasked with indexing) can apply barcode or OCR zones directly on images in order
to populate index fields. For more information, see the section on Manual Barcode and
OCR Indexing in the previous chapter.
Manual QC
If you require Indexing operators to review and apply QC tags in the Indexing step, the
following Manual QC properties are available for configuration.
Allow Manual QC
You can enable this setting to allow operators to add your selected QC tags within the
Indexing job step.
Note:
When you enable this property, the Indexing step also consumes a Capture QC
Manual license (in addition to the Capture Index license).
Allow Review QC Tags
Applicable to manual job steps, this property allows you to choose whether the operator can
view the Browse QC Tags window in the PaperVision Capture Operator Console. Select True
to allow the operator to view the Browse QC Tags window. Select False to prevent the
operator from viewing the Browse QC Tags window.
Note:
No additional PaperVision Capture license is required for the operator to review QC
tags.
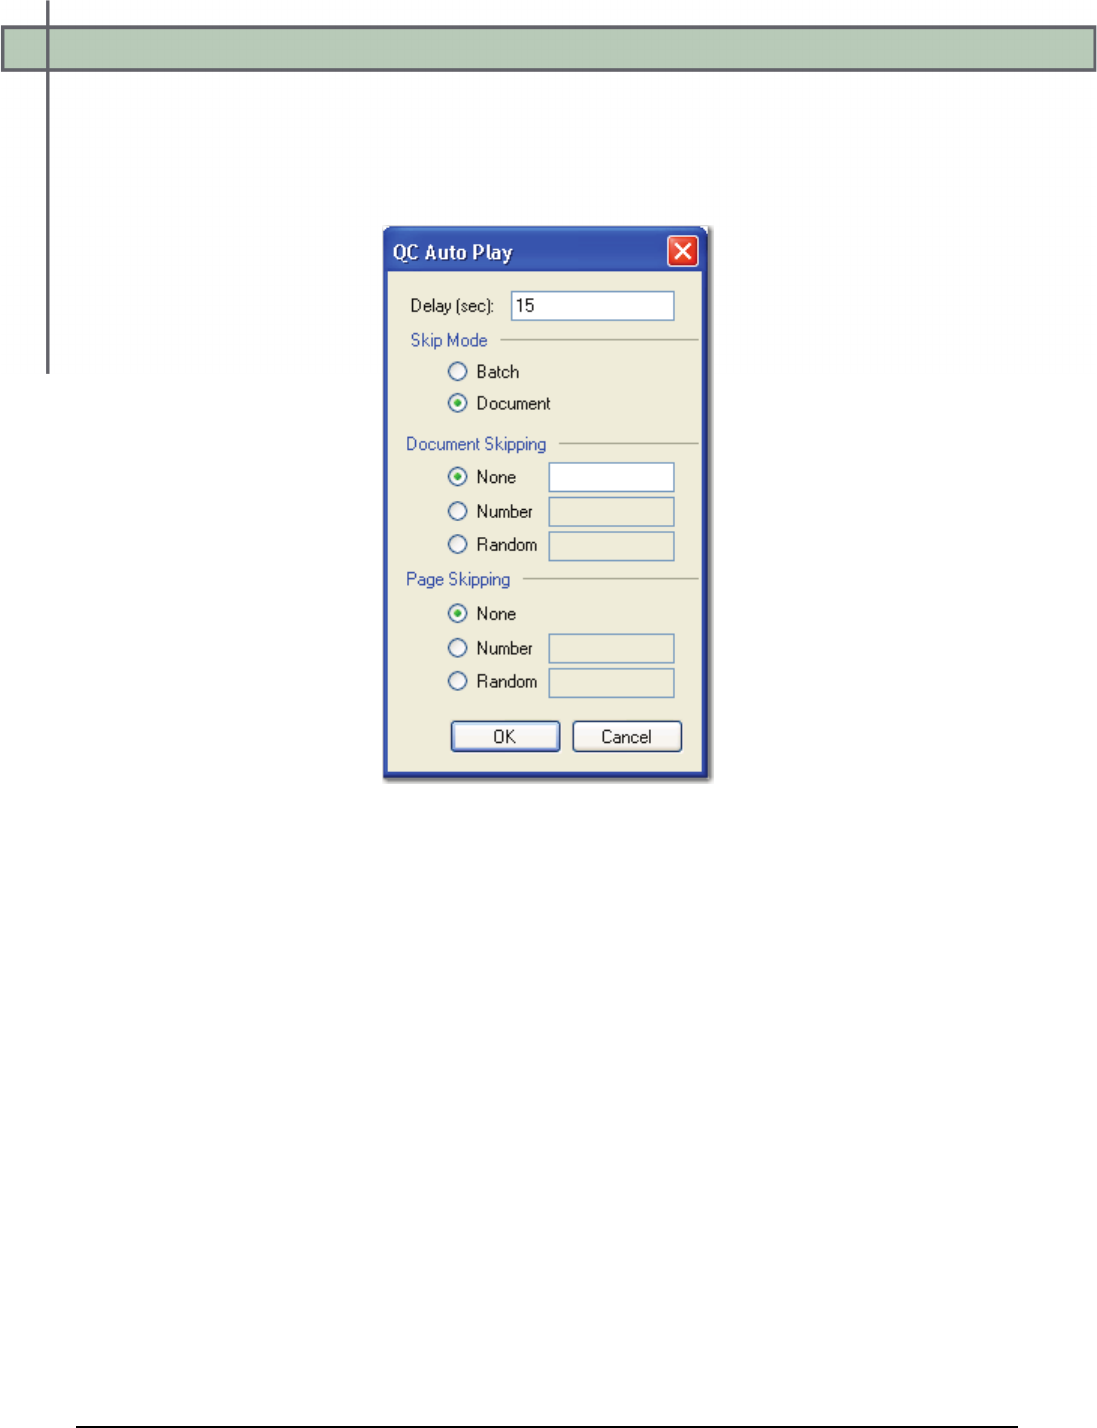
Chapter 6 – Indexing Configuration
PaperVision® Capture Administration Guide 128
QC Auto Play
When the Allow Manual QC property is enabled in the Indexing step, you can define how
long (in seconds) each image appears on screen so operators can perform visual inspections.
Click the ellipsis button on the right to configure the auto play settings.
QC Auto Play
• The Delay (sec) property determines how long each image or group of images remains
on screen at a time in the Manual QC step.
• The Skip Mode determines whether auto play skips batches or documents:
1. If you select the Batch skip mode, then you can define how pages are skipped. For
page skipping, you can require that operators inspect all pages (None), by page
number (Number, such as 1, 5, 10, etc.), or by a random number of pages
(Random).
2. If you select the Document skip mode, you can define how documents and pages
are skipped.
• For document skipping, you can require that operators inspect all documents
(None), by document number (Number, such as 1, 5, 10, etc.), or by a random
number of documents (Random).
• For page skipping, you can require that operators inspect all pages (None), by
page number (Number, such as 1, 5, 10, etc.), or by a random number of pages
(Random).

Chapter 6 – Indexing Configuration
PaperVision® Capture Administration Guide 129
When you select the Random option, auto play skips an arbitrary number of pages or
documents (between zero and your assigned number). For example, if you enter “10,” then
three pages/documents may be skipped during the first auto play; nine pages/documents
during the second auto play; ten pages/documents during the third auto play; etc.
Operator Permissions
You can assign specific permissions that allow operators to perform operations on documents
and pages. In addition, you can determine whether operators can view the Browse Batch
window in the Operator Console. The Import Images operation is the only operation that
requires an additional Capture Scan license (in addition to the Capture Index license). The
remaining permissions do not require an additional license and are enabled by default to
provide operators the flexibility in manipulating documents and pages when indexing in the
Operator Console.
Add Documents
When set to True, the operator can append a blank document to the end of the batch.
Browse Batch
When set to True, the operator can view the Browse Batch window.
Copy Documents
When set to True, the operator can copy all pages and append the new document after the
selected document.
Copy/Move Pages
When set to True, the operator can copy/paste and cut/paste consecutive or non-consecutive
pages in one document or across multiple documents. The operator can also drag and drop
pages from one location to another in the Thumbnails window or multiple-display view.
Delete Documents
When set to True, the operator can delete a document and its associated images.
Delete Pages
When set to True, the operator can delete one or multiple page(s) within one document or
across multiple documents.
Chapter 6 – Indexing Configuration
PaperVision® Capture Administration Guide 130
Extract and Copy Pages
When set to True, the operator can extract a region of an image and copy it to the next page
of the document.
Import Images
When set to True, the operator can import images into a document.
Note:
By default, this property to set to False. When you enable this property, the
Indexing step also consumes a Capture Scan license (in addition to the Capture
Index license).
Insert Document Breaks
When set to True, the operator can insert a document break within a document.
Invert and Save Pages
When set to True, the operator can invert one or multiple pages’ polarity and then save the
pages.
Remove Document Breaks
When set to True, the operator can remove an existing document break within a document.
Re-Save Pages
When set to True, the operator can save a page that has been rotated or whose polarity has
been inverted.
Rotate and Save Pages
When set to True, the operator can rotate one or multiple pages and then save the pages.
Shuffle Documents to Duplex
When set to True, the operator can shuffle documents to duplex.

Chapter 7 – Barcode Configuration
PaperVision® Capture Administration Guide 131
You can use barcodes to populate index values and insert document breaks.
PaperVision Capture recognizes one- and two-dimensional, black and white,
and color barcodes. The Barcode job step allows you to configure a barcode reading
process that executes automatically in the PaperVision Capture Operator Console or by the
PaperVision Capture Automation Service.
Note:
Use of the binary scaling image processing filter can improve the recognition rate of
barcode detection.
To view the properties of the Barcode job step:
1. In the Job Definitions screen, select the Barcode job step in the workspace.
2. In the Properties grid, expand the Auto Document Break, General, and Indexes
nodes.
Auto Document Break
While scanning documents, you can determine where one document ends and the next
document begins using the Auto Document Break properties. Although you can separate
documents manually, you can select from options that are described below:
• By default, no auto-document breaks are inserted. When set to None, the system will
expect you to manually separate new documents. No options are available for this setting.
• If you select the Barcode mode, click the ellipsis button to the right of the Barcode Zone
field to define the zones in the Edit Document Break Barcodes screen. Select True for
the Save Page property to leave the page with the barcode in the batch, or select False to
remove the page with the barcode from the batch. For more information, see the section
on Barcode Zones in this chapter.
General Properties
For information on the Indexing step’s general properties, see the section on General
Properties in Chapter 4.
Indexes
You can configure additional index values and barcode zones for the Barcode job step. For
more information on configuring index values, see the section on Index Configuration in
Chapter 6.

Chapter 7 – Barcode Configuration
PaperVision® Capture Administration Guide 132
Barcode Parsing
During indexing configuration in a Barcode step, you can configure a text delimiter or a
regular expression to parse specific index fields from a barcode. You can then specify which
field’s index is parsed from the barcode (e.g., you can select the third field's index so only the
last four digits of a social security number are parsed). Optionally, you can verify that an
exact number of index fields results from the parse operation (e.g., three index fields
indicative of a social security number in the format xxx-xx-xxxx).
Note:
The Verify Number of Fields setting is intended to verify that an exact number of
index fields (two or more) results from the parse operation.
If errors occur during barcode parsing, such as when the parsed number of index fields differs
from your specified number of fields, you can select one of three subsequent actions. First, the
entire index value can be skipped (therefore, no barcode parsing occurs). In the second option,
the entire barcode value is used (therefore, no barcode parsing occurs). In the last option, you
can specify the text used as the parsed value (e.g., you can enter “unknown value”).
To configure barcode parsing:
1. In the Properties grid for the Barcode step, click the ellipsis button to the right of the
Indexes row.
2. In the Index Configuration dialog box, expand the General (Step Level) node.
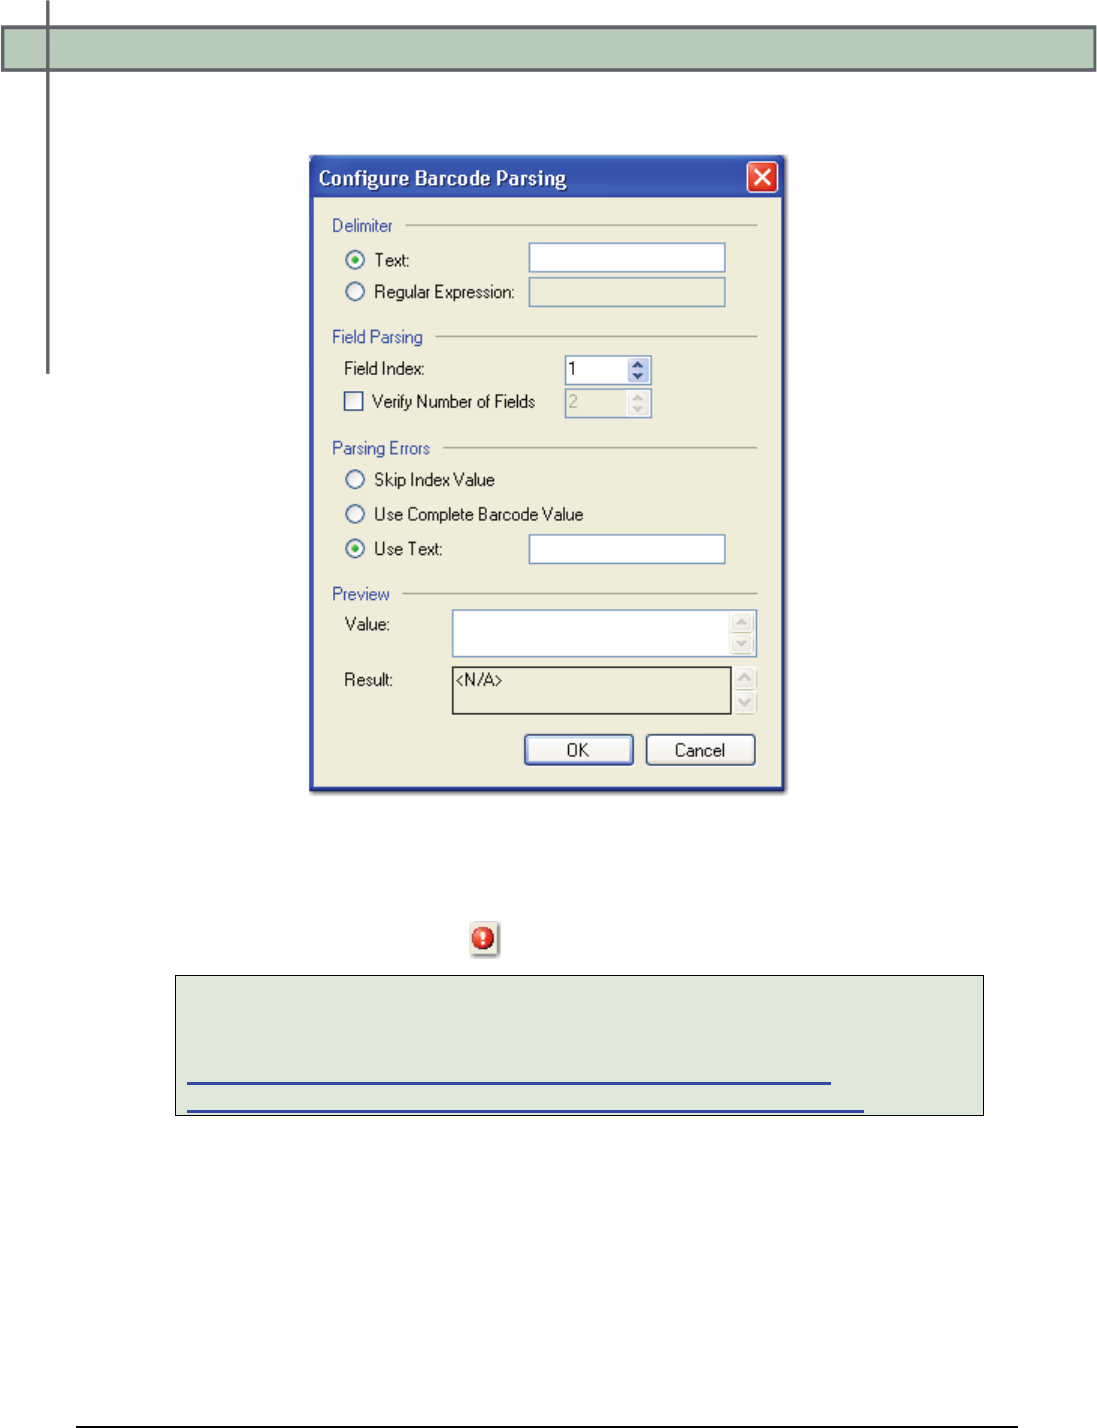
Chapter 7 – Barcode Configuration
PaperVision® Capture Administration Guide 133
3. Click the ellipsis button to the right of the Barcode Parsing row. The Configure
Barcode Parsing dialog box appears.
Configure Barcode Parsing
4. In the Delimiter section, select whether to use a text delimiter or regular expression
to split the original value into fields. If you enter an invalid text delimiter or regular
expression, the error symbol will appear to the right of the field.
Note:
Additional information on regular expressions can be located at:
http://msdn.microsoft.com/library/default.asp?url=/library/en-
us/script56/html/js56reconIntroductionToRegularExpressions.asp
5. In the Field Parsing section, specify the field index position from which to parse
data.
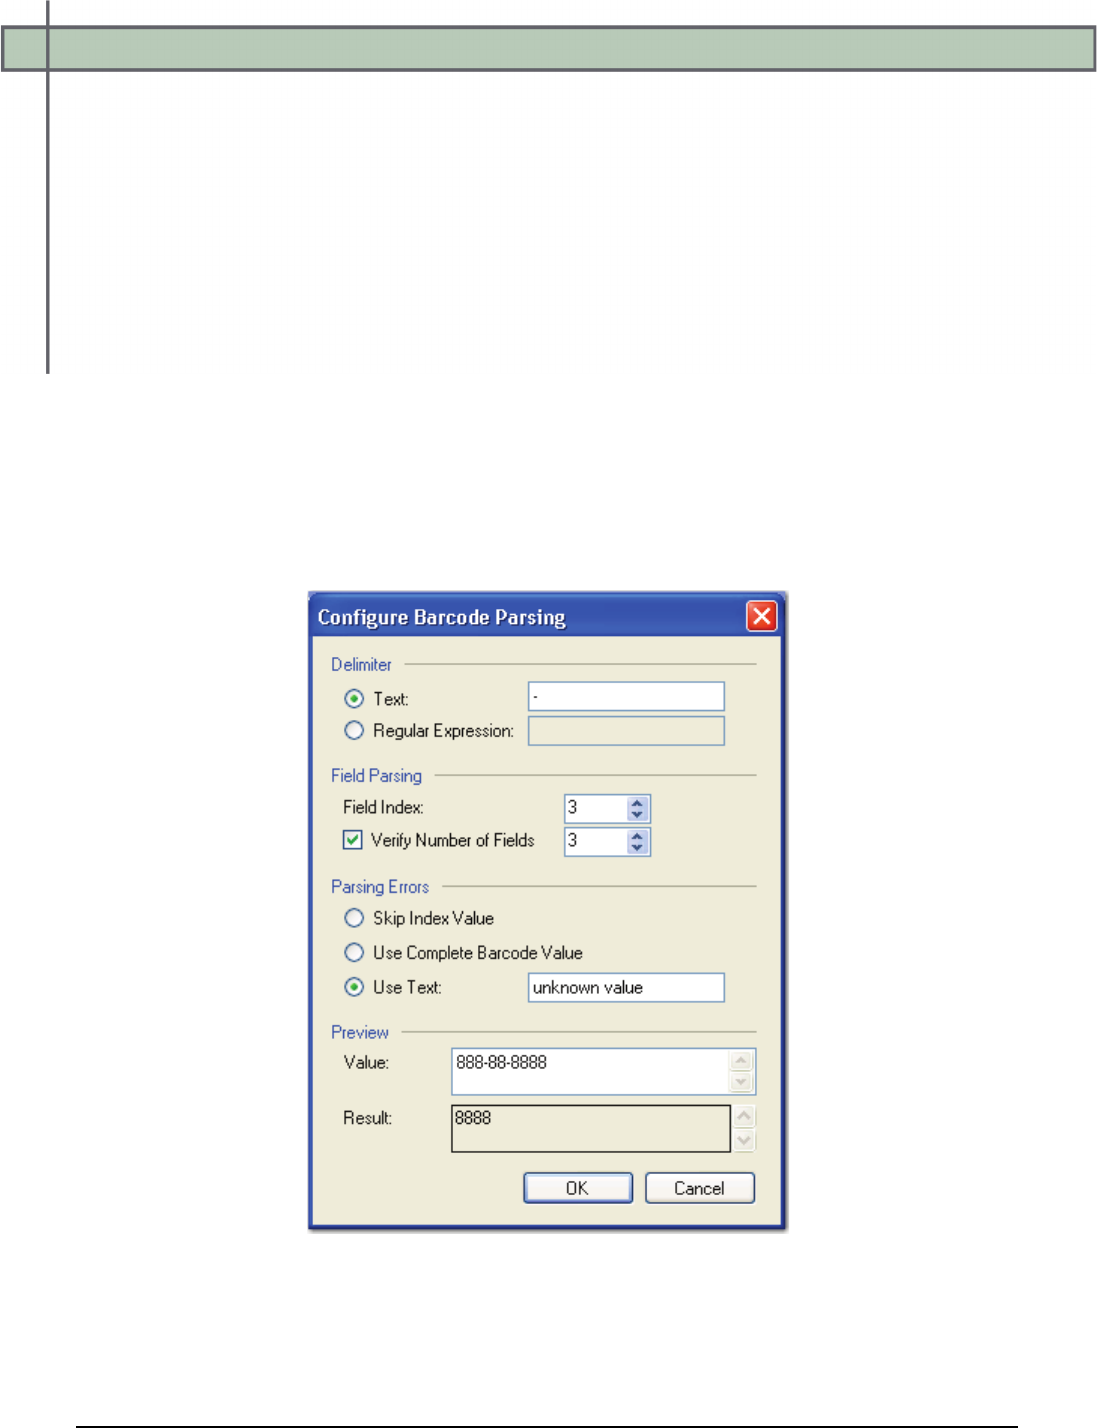
Chapter 7 – Barcode Configuration
PaperVision® Capture Administration Guide 134
6. Optionally, you can verify that an exact number of index fields (two or more) results
from the parse operation.
For example, you can set the Field Index value to “3” to parse only the last four
digits of a social security number that exists in the format xxx xx xxxx. You can
then select the Verify Number of Fields option to verify that three index fields
(indicative of a social security number) result from the parse operation.
7. In the Parsing Errors section, select the action that will be executed if parsing errors
occur:
• Skip Index Value: The entire index value is skipped, so no barcode parsing
occurs.
• Use Complete Barcode Value: The complete barcode value is used, so no
barcode parsing occurs.
• Use Error Text: Your specified text is used as the parsed value.
8. In the Preview section, you can enter a sample index value to ensure the text
delimiter or regular expression parses the value correctly.
Configure Barcode Parsing (Configured)
Chapter 7 – Barcode Configuration
PaperVision® Capture Administration Guide 135
Barcode Zones
During index value configuration for a Capture step, you can configure barcode zones to be
recognized during the scanning process in the PaperVision Capture Operator Console.
To open the barcode zone settings:
1. In the Index Configuration dialog box, expand the General (Step Level) Settings
node for the appropriate index.
2. Click the ellipsis button to the right of the Barcode Zones field. The Edit Barcode
Zones screen opens.
Edit Barcode Zones
Note:
If you define more than one barcode zone in a multi-page document, the last
barcode value that is read on the last page overrides all others and populates the
index. If you define more than one barcode zone in a single-page document, the last
barcode value that passes through the system populates the index.
Chapter 7 – Barcode Configuration
PaperVision® Capture Administration Guide 136
The Edit Barcode Zones screen contains the following components:
• The main window, where you draw the barcode zones, displays the individual images.
To draw a barcode zone, press the left mouse button while you drag a rectangular
region around the barcode. You can then widen and narrow the boundaries of the
barcode zone region to adjust its size.
• The Barcode Explorer provides an expandable view of each defined barcode zone,
its dimensions, and test results.
• The Properties grid, viewable when you highlight a zone in the Barcode Explorer
tree, displays all properties associated with the selected barcode zone.
• Thumbnails windows are found in the Edit Barcode Zones, Edit OCR Zones, Edit
Nuance Full-Text OCR, Edit Open Text Full-Text OCR, and Edit Image Processing
Filters screens. You can right-click within any Thumbnails window to perform basic
operations on images, such as the cut/paste, copy/paste, delete, or select all operations.
The cut, copy, paste, and delete operations can be performed on consecutive or non-
consecutive images. Additionally, you can select multiple images and simultaneously
rotate them. The scrolling capability, displayed with up/down or left/right arrows as you
drag and drop images, allows you to quickly scroll through remaining images not shown
in the current window.
Note:
Images viewed as thumbnails can have maximum dimensions of 32,768 x 32,768
pixels.
• The status bar on the bottom of the screen displays each image’s page number, page
size (in KB), and page dimensions (in mm).
Note:
The page dimensions 215 x 279 mm are approximately equivalent to 8.5 x 11 inches.
Saving Barcodes
To save all defined barcode zones and return to index configuration, click the Save Barcodes
icon.
Configuring a Scanner
The Configure Scanner command allows you to assign scanner settings for barcode zone
recognition. To configure these settings, click the Configure Scanner icon. For more
information on each setting, see the section on Scanner Setup in Chapter 6.
Chapter 7 – Barcode Configuration
PaperVision® Capture Administration Guide 137
Starting the Scanning Process
After loading images, you can scan them to ensure the barcodes zones are being read
successfully. To start the scanning process, click the Start Scanning icon.
Stopping the Scanning Process
To stop the scanning process, click the Stop Scanning icon.
Removing a Single Image
To remove a single image:
1. In the Thumbnails section, select the image to delete.
2. Click the Remove Single Image icon.
3. Click Yes to confirm the removal.
Rotating an Image 90° Counter-Clockwise
To rotate the image 90 degrees counter-clockwise, click the Rotate Image 90° Counter-
Clockwise icon.
Rotating an Image 90° Clockwise
To rotate the image 90 degrees clockwise, click the Rotate Image 90° Clockwise icon.
Removing All Images
This command removes all current images from the main scanning window and from the
Thumbnails section.
To remove all images:
1. Click the Remove All Images icon.
2. Click Yes to confirm the removals. If you have defined barcode zones prior to
clearing all images, these barcode zones are retained.

Chapter 7 – Barcode Configuration
PaperVision® Capture Administration Guide 138
Importing Images
To import images:
1. Click the Import Images icon.
2. Locate the directory of the image(s).
3. Select the image to import.
4. Click Open.
Exiting the Edit Barcode Zones Screen
To close and exit out of the Edit Barcode Zones screen:
1. Click the Exit icon.
2. Click Yes to save all barcode changes.
Testing All Barcode Zones
This operation verifies that all defined barcode zone regions read barcodes successfully.
Note:
If you test multiple barcode zones that exist for the same index, the last barcode read
by the system overrides the others. Results for every barcode will then populate the
Results row in the Barcode Explorer.
To test all barcodes:
1. After you insert all barcode zones and assign properties to each, click the Test All
Barcode Zones icon.
• The Barcode Explorer tree updates the Results row for each zone that contains
your defined barcodes.
• A successful reading, indicated with a green check mark, will populate the
Results row in the Barcode Explorer tree.
2. If you do not receive a successful test result, select more barcode types, enable
decoding, and/or enable checksum reading as appropriate, and run the test once again.
Tip:
Poor image quality might result in an unsuccessful reading. Import a clearer
barcode image if the first reading was unsuccessful.

Chapter 7 – Barcode Configuration
PaperVision® Capture Administration Guide 139
Zooming In, Zooming Out, and Resetting the Zoom
• To zoom in on an area of the image, click the Zoom In icon.
• To zoom out of the current view of the image, click the Zoom Out icon.
• To reset the image to its original view, click the Zoom Reset icon.

Chapter 7 – Barcode Configuration
PaperVision® Capture Administration Guide 140
Barcode Explorer
The Barcode Explorer summarizes your defined barcode zones per page and allows you to
add, remove, test, and modify each barcode zone.
• To view the properties of a barcode zone, highlight the Zone node in the tree, and its
properties appear in the grid below.
• Expand the Zone node to view a barcode zone's X and Y coordinates, dimensions (in
millimeters), orientation, and test results.
Barcode Explorer
Chapter 7 – Barcode Configuration
PaperVision® Capture Administration Guide 141
Adding a Barcode Zone to a Page
You can add a new barcode zone to the current page or a new page. The Barcode Explorer
tree updates with each addition or modification.
To add a new barcode zone to the current page:
1. Click the down arrow in the Add Zone icon, and select Add Zone (Selected
Page).
2. Use the cursor to drag a rectangular region around a barcode.
3. Move and/or edit the barcode zone if necessary.
To add a new barcode zone to a new page:
1. Click the down arrow in the Add Zone icon, and select Add Zone (New Page).
2. In the Page Index dialog box, enter the page number where the new barcode zone
will reside.
Note:
If you enter a page that already exists or if you enter an invalid number, a
reminder message appears.
3. With the left mouse button, drag a rectangular region around a barcode.
4. Move and/or edit the barcode zone if necessary.
Removing a Barcode Zone
To remove a barcode zone:
1. In the tree, highlight the zone(s) to remove.
2. Click the Remove Zone icon.
3. Click OK to the confirmation prompt.
Chapter 7 – Barcode Configuration
PaperVision® Capture Administration Guide 142
Removing All Zones on a Page
To remove all barcode zones on a page:
1. In the Barcode Explorer tree, highlight the page where the zones will be removed.
2. Click the Remove All Zones On This Page icon.
3. Click OK to the confirmation prompt.
Testing a Barcode Zone
This operation verifies that individual barcode zones can be read successfully. If more than
one barcode exists in one zone, the engine returns the value read from the first barcode.
To test a barcode zone:
1. Highlight the zone in the Barcode Explorer.
2. Click the Test Barcode Zone icon. A successful reading, indicated with a green
check mark, populates the Results row in the Barcode Explorer tree.
3. If you do not receive a successful test result, select more barcode types, enable
decoding, and/or enable checksum reading as appropriate, and run the test once again.
Tip:
Poor image quality might result in an unsuccessful reading. Import a clearer
barcode image if the reading was unsuccessful.
Expanding All and Collapsing All Barcode Zones
• To expand all zones, click the Expand All icon.
• To collapse all zones, click the Collapse All icon.

Chapter 7 – Barcode Configuration
PaperVision® Capture Administration Guide 143
Barcode Zone Properties
The properties described in this section can be configured for each barcode zone.
Image Size
This field is read-only; if no barcode zone is defined, the page size appears in this field. If a
barcode zone is defined, the size of the zone and the page size display in this field. All sizes
appear in millimeters.
Barcode Types
The following two-dimensional (2D) barcode types are supported in PaperVision Capture:
• DataMatrix
• PDF417
• QR Code
• Royal Post
• Australian Post
• Intelligent Mail
The following one-dimensional (1D) barcode types are supported in PaperVision Capture:
• Addon 2
• Addon 5
• BCD Matrix
• Codabar
• Code25 Datalogic
• Code25 IATA
• Code25 Industrial
• Code25 Interleaved
• Code25 Invert
• Code25 Matrix
• Code 32
• Code 39
• Code 93
• EAN 13
• EAN 8
• Postnet
• Type 128
• UCC 128
• UPC-A
• UPC-E
Chapter 7 – Barcode Configuration
PaperVision® Capture Administration Guide 144
To select the barcode types:
1. Click the ellipsis button in the Barcode Types field in the Properties grid.
2. Select the barcode types to be recognized.
3. Click the Select All button if you want PaperVision Capture to recognize all types.
4. Click OK.
Decode
Some barcode types, such as Code 128, do not represent their data as ASCII characters. Other
barcode types, such as Code 3 of 9, use special characters to extend the basic character set to
include the entire ASCII set. When this setting is enabled, barcode values are converted into
human-readable ASCII strings. For example, if the barcode uses escape characters, as in
"*%K123%M?*", and the Decode property is True, then "[123]" will be returned. If the
Decode property is False, the raw barcode is returned.
Note:
You should enable this setting unless the barcode results should not be converted
into ASCII strings. For example, this setting should be disabled if you are detecting
Code 3 of 9 barcodes that represent dates using the slash mark “/” character (e.g.
01/01/1999). If this setting is enabled, no results are returned because “/0” and “/1”
are not valid ASCII characters.
Orientation
PaperVision Capture detects horizontal and vertical barcodes with skew angles of no more
than 15 degrees from the horizontal and vertical axes, respectively. Horizontal barcode
detection is slightly faster than vertical barcode detection. If you are unsure of the expected
barcode orientation or if the documents might contain barcodes with different orientations,
select Both from the drop-down menu.
Required for Delete (for Auto Document Breaks)
This property is applicable when you define Auto Document Breaks with barcodes. When
set to True, the break page will be deleted when all defined barcode zones are read
successfully.
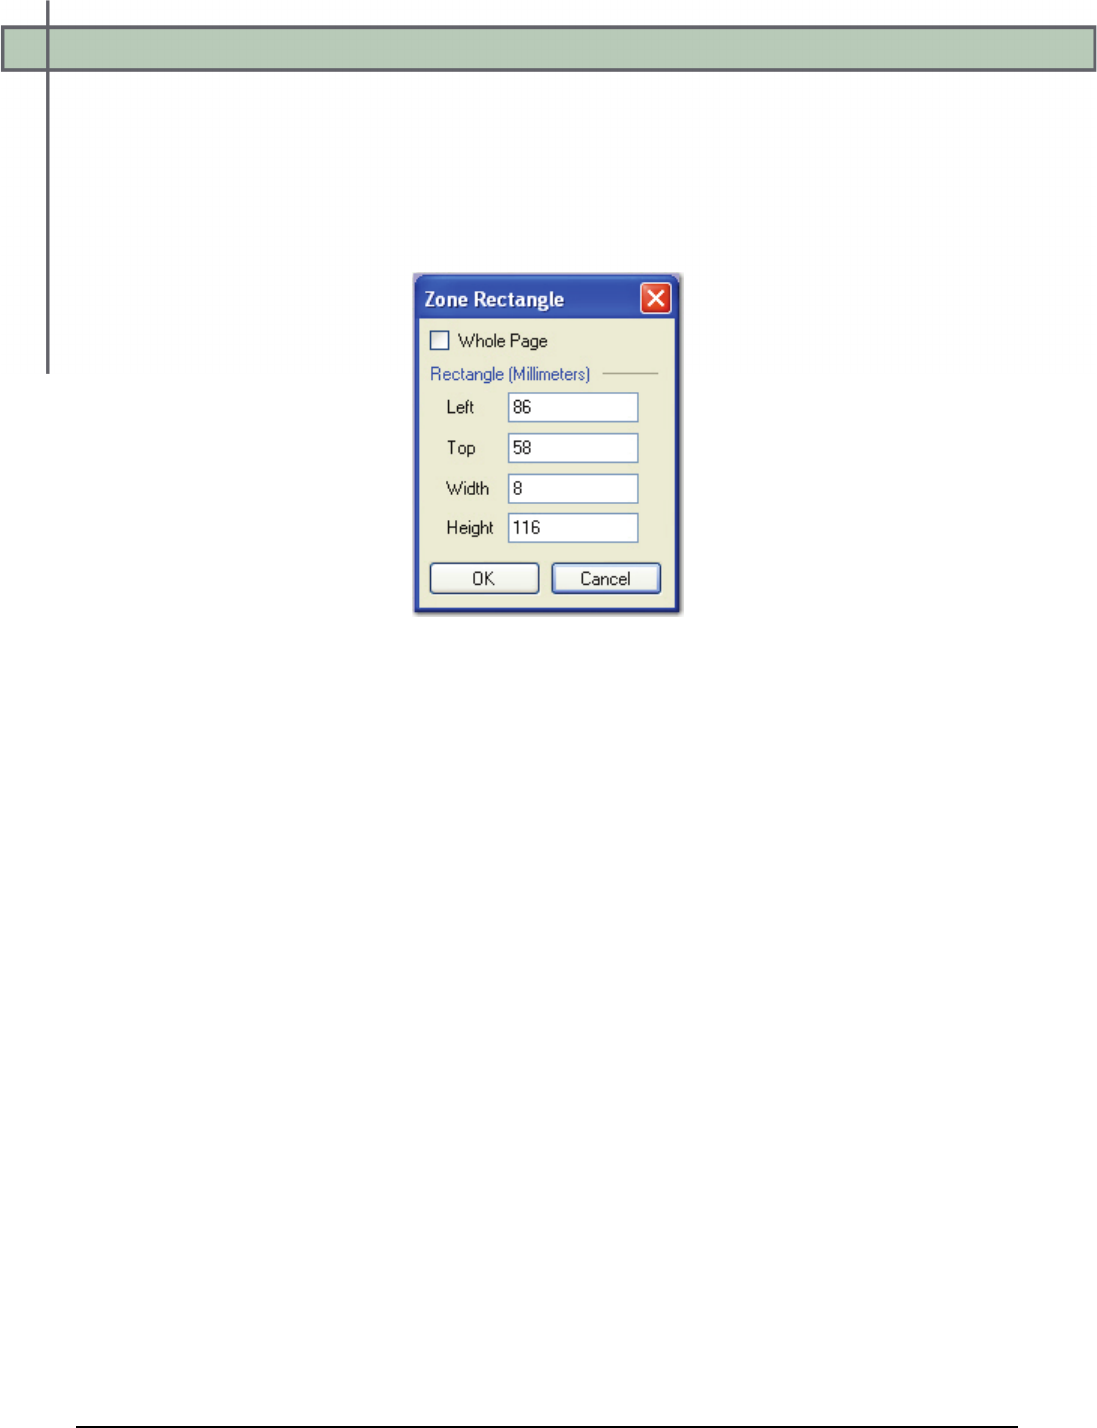
Chapter 7 – Barcode Configuration
PaperVision® Capture Administration Guide 145
Region
The Region property displays a barcode zone's X and Y coordinates and its height and width.
To change the dimensions of the barcode zone:
1. Click the ellipsis button in the right column next to the Region field. The Zone
Rectangle dialog box appears.
Zone Rectangle
2. In the Zone Rectangle dialog box, select Whole Page if you want the barcode zone
to comprise the entire height and width of the page.
3. To specify the dimensions of the barcode zone, enter the left, top, width, and height
(in millimeters) of the zone rectangle.
4. Click OK.
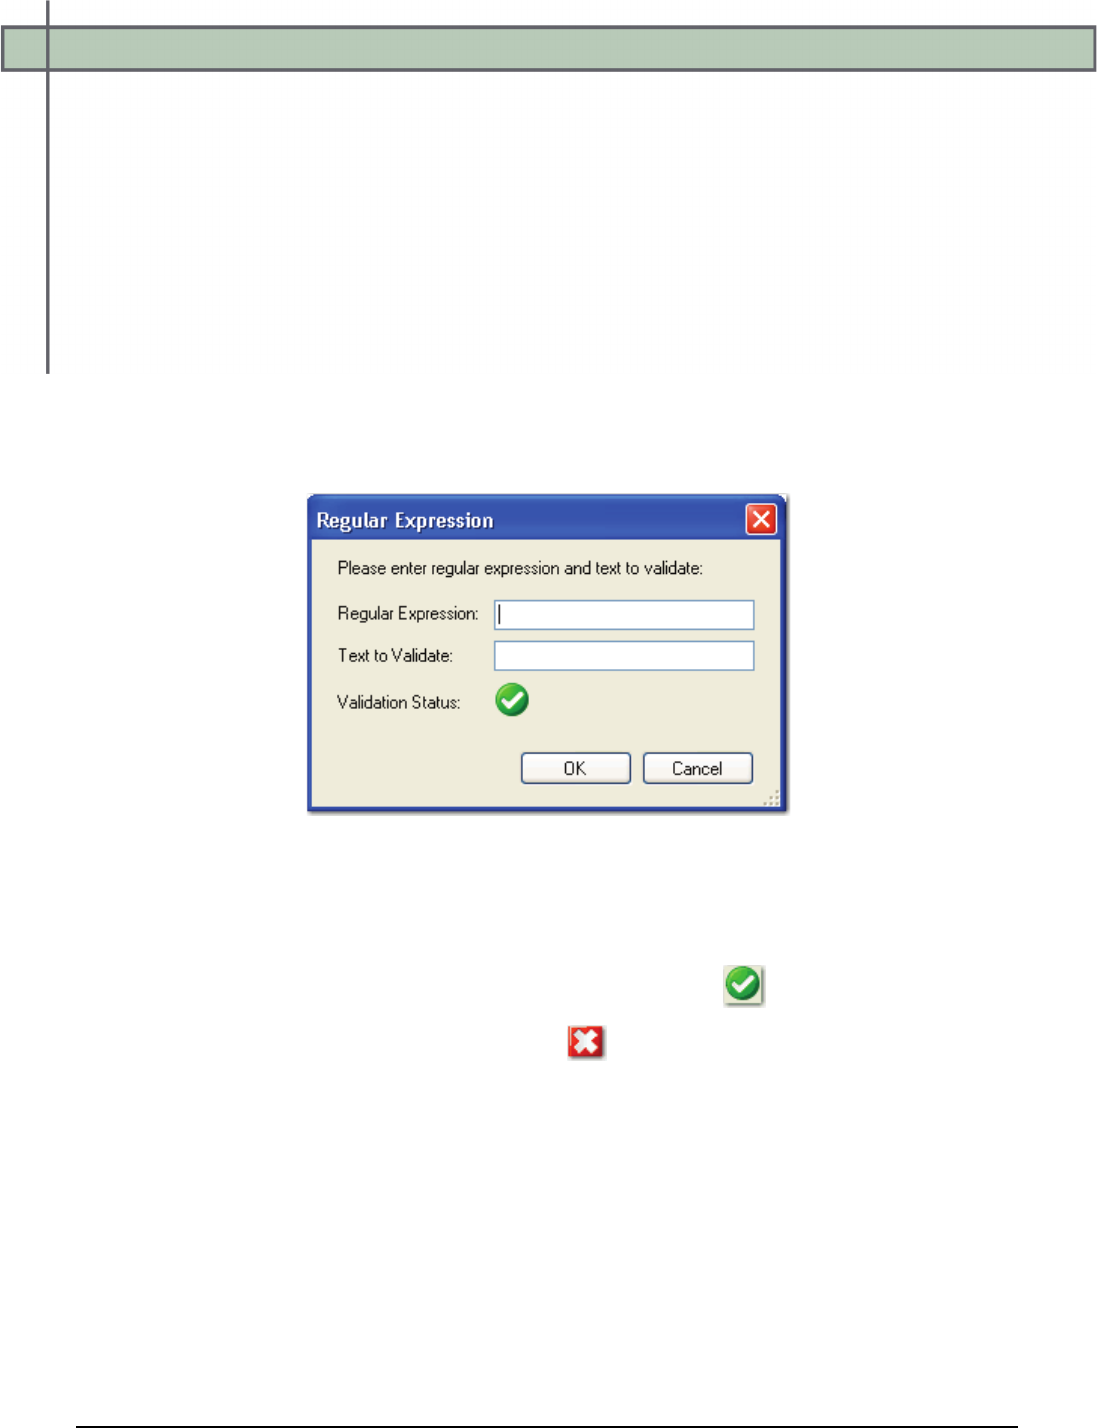
Chapter 7 – Barcode Configuration
PaperVision® Capture Administration Guide 146
Regular Expression Verification (for Auto Document Breaks)
This field is applicable when you define Auto Document Breaks with barcodes. If you enter
an exact value or regular expression into the Regular Expression Verification field, a
document break is only inserted when the system reads barcodes matching your exact value or
regular expression. If you leave this field blank, any barcode read by the system will cause a
document break to be inserted. A regular expression is a pattern of text that consists of
ordinary characters (for example, letters A through Z) and special characters, known as
metacharacters. The pattern describes one or more strings to match when searching a body of
text. The regular expression serves as a template for matching a character pattern to the string
being searched.
To configure a regular expression:
1. Click the ellipsis button in the right column next to the Regular Expression field.
The Regular Expression dialog box appears.
Regular Expression
2. In the Regular Expression dialog box, enter the regular expression.
3. Enter the text to validate.
• A successful validation displays with a check mark icon.
• Invalid entries display with an “X” icon.
Use Checksum
A checksum is an error detection process where additional characters are appended to a
barcode to ensure more accurate readings. Enable this setting if you want the checksum to be
recognized during the scanning process.

Chapter 8 – Zonal OCR
PaperVision® Capture Administration Guide 147
PaperVision Capture enables you to customize Optical Character Recognition
(OCR) settings for individual index fields and pages of text that you define
within zones. The Nuance and Open Text OCR job steps allow you to configure an OCR
process that executes automatically in the PaperVision Capture Operator Console or by the
PaperVision Capture Automation Service. You can also configure OCR zones to insert
document breaks. Character recognition options allow you to customize how values are
recognized by processes such as OCR, Intelligent Character Recognition (ICR), and Magnetic
Ink Character Recognition (MICR).
During index value configuration for the Nuance OCR or Open Text OCR job step, you can
define the OCR zones that will be recognized during OCR processing. Your selected step
determines the properties available for zonal OCR configuration. For more information
specific settings for each step, see the sections on Nuance Zonal OCR or Open Text Zonal
OCR in this chapter.
Maximum Image Sizes
The Nuance OCR engine supports incoming images ranging from 75 to 2400 dots per inch
(DPI). In pixels, this range is 16 x 16 to 8400 x 8400 pixels.
The maximum supported image dimensions that can be processed through the Open Text
engine vary with resolution. The approximate maximum width is approximately 32,000
pixels, and the maximum height is approximately 24,000 pixels. For example, the maximum
supported image dimensions at 300 dpi are approximately 106 inches x 80 inches. Images that
are processed through the Open Text OCR engine must contain matching horizontal and
vertical resolutions.
Note:
Larger images can be ingested into PaperVision Capture provided that:
1. No Full-Text OCR will be performed on the images (unless they are processed
using the Image Fit filter and cropped to meet size requirements)
2. No image processing will be performed on the images (unless they are
processed using the Image Fit filter and cropped to meet size requirements)
3. Images will not be viewed as thumbnails
To view the properties for the Nuance OCR or Open Text OCR job step:
1. In the Job Definitions screen, select the Nuance OCR or Open Text OCR job
step in the workspace.
2. In the Properties grid, expand the Auto Document Break, General, and Indexes
nodes.
Chapter 8 – Zonal OCR
PaperVision® Capture Administration Guide 148
Auto Document Break
While scanning documents, you can determine where one document ends and the next
document begins by inserting an auto document break. Although you can separate documents
manually, you can select from options that are described below. Select an option in the drop-
down list in the right column of the Mode field:
• None: This is the default auto-document break type for a newly created step. When set
to None, the system will expect you to manually separate new documents. No options are
available for this setting.
• OCR: If you select the OCR mode, click the ellipsis button to the right of the OCR Zone
field to define the zones in the Edit OCR Document Breaks screen. For the Save Page
property, select True to leave the page with the auto-document break in the batch, or
select False to remove the auto-document break page from the batch.
General Properties
For more information, see the section on General Properties in Chapter 4.
Indexes
You can configure OCR zones specific to each index. The Line Feed Delimiter property,
specific to OCR zones, allows you to define extra spaces, characters, etc. that will replace
carriage returns located during OCR processing. To configure the settings for an index, click
the ellipsis button next to the Indexes row in the Properties grid. For more information on
assigning index types, see the section on Index Types and Formats in Chapter 6.
Line Feed Delimiter
To define the line feed delimiter for the OCR Zone:
1. In the Properties grid for the OCR step, click the ellipsis button to the right of the
Indexes row.
2. In the Index Configuration dialog box, expand the General (Step Level) node.
3. Click the ellipsis button to the right of the OCR Line Feed row.
OCR Line Feed

Chapter 8 – Zonal OCR
PaperVision® Capture Administration Guide 149
4. In the OCR Line Feed dialog box, select the Replace checkbox.
5. Enter the Delimiter that will be used to replace the OCR line feed.
6. Click OK.
OCR Parsing
During indexing configuration in an OCR step, you can configure a text delimiter or a regular
expression to parse specific index fields from OCR text. You can then specify which field’s
index is parsed (e.g., the fourth field’s index from a credit card number). Optionally, you can
verify that a certain number of index fields results from the parse operation (e.g., four index
fields indicative of a complete credit card number).
Note:
The Verify Number of Fields setting is intended to verify that an exact number of
index fields (two or more) results from the parse operation.
If errors occur during OCR parsing, such as when the parsed number of index fields differs
from your specified number of fields, you can select one of three subsequent actions. First, the
entire index value can be skipped (therefore, no OCR parsing occurs). In the second option,
the entire OCR value is used (therefore, no OCR parsing occurs). In the last option, you can
specify the text used as the parsed value (e.g., you can enter “unknown value”).
To configure OCR parsing:
1. In the Properties grid for the OCR step, click the ellipsis button to the right of the
Indexes row.
2. In the Index Configuration dialog box, expand the General (Step Level) node.

Chapter 8 – Zonal OCR
PaperVision® Capture Administration Guide 150
3. Click the ellipsis button to the right of the OCR Parsing row. The Configure OCR
Parsing dialog box appears.
Configure OCR Parsing
4. In the Delimiter section, select whether to use a text delimiter or regular expression
to split the original value into fields. If you enter an invalid text delimiter or regular
expression, the error symbol will appear to the right of the field.
Note:
Additional information on regular expressions can be located at:
http://msdn.microsoft.com/library/default.asp?url=/library/en-
us/script56/html/js56reconIntroductionToRegularExpressions.asp
5. In the Field Parsing section, specify the field index position from which to parse
data.
Chapter 8 – Zonal OCR
PaperVision® Capture Administration Guide 151
6. Optionally, you can verify that an exact number of index fields (two or more) results
from the parse operation.
For example, you can set the Field Index value to “4” to parse only the last four
digits of a credit card number You can then select the Verify Number of Fields
option to verify that four index fields (indicative of a social security number)
result from the parse operation.
7. In the Parsing Errors section, select the action that will be executed if parsing errors
occur:
• Skip Index Value: The entire index value is skipped, so no OCR parsing
occurs.
• Use Complete OCR Value: The complete OCR value is used, so no OCR
parsing occurs.
• Use Error Text: Your specified text is used as the parsed value.
8. In the Preview section, you can enter a sample index value to ensure the text
delimiter or regular expression parses the value correctly.
Configure OCR Parsing (Configured)
Chapter 8 – Zonal OCR
PaperVision® Capture Administration Guide 152
OCR Zones
PaperVision Capture recognizes OCR zones that you define in Job Definitions. During index
value configuration for the Nuance OCR and Open Text OCR job step, you can define the
OCR zones that will be recognized during OCR processing.
To view OCR zone settings:
1. In the Job Definitions workspace, select the Nuance Zonal OCR or Open Text Zonal
OCR job step.
2. In the Properties grid, expand the Indexes node, and then click the ellipsis button next
to Indexes field.
3. In the Index Configuration dialog box, highlight the index in the Indexes section.
4. Under the Index Properties section, expand the General (Step Level) node.
5. Click the ellipsis button to the right of the OCR Zones field. The Edit OCR Zones
screen appears.
Edit OCR Zones (Nuance Zonal OCR)
Chapter 8 – Zonal OCR
PaperVision® Capture Administration Guide 153
The Edit OCR Zones screen contains the following components:
• The main window, where you draw the OCR zones, displays the individual images.
To draw an OCR zone, press the left mouse button while you drag a rectangular
region around the OCR region. You can widen and narrow the region's boundaries to
adjust its size.
• OCR Explorer provides an expandable view of each defined OCR zone, its
dimensions, and test results.
• The Properties grid, viewable when you highlight a zone in the OCR Explorer tree,
displays all properties associated with the selected OCR zone.
• Thumbnails windows are found in the Edit Barcode Zones, Edit OCR Zones, Edit Full-
Text OCR, and Edit Image Processing Filters screens. You can right-click within any
Thumbnails window to perform basic operations on images, such as the cut/paste,
copy/paste, delete, or select all operations. The cut, copy, paste, and delete operations can
be performed on consecutive or non-consecutive images. Additionally, you can select
multiple images and simultaneously rotate them. The scrolling capability, displayed with
up/down or left/right arrows as you drag and drop images, allows you to quickly scroll
through remaining images not shown in the current window.
Note:
Images viewed as thumbnails can have maximum dimensions of 32,768 x
32,768 pixels.
• The status bar on the bottom of the screen displays each image’s page number, page
size (in KB), and page dimensions (in mm).
Note:
The page dimensions 215 x 279 mm are approximately equivalent to 8.5 x 11
inches.
Saving All OCR Zones
To save all defined OCR zones and return to index configuration, click the Save All OCR
Zones icon.
Configuring the Scanner
To configure the scanner settings, click the Configure Scanner icon. For details on each
setting, see the section on Scanner Setup Settings in Chapter 6.
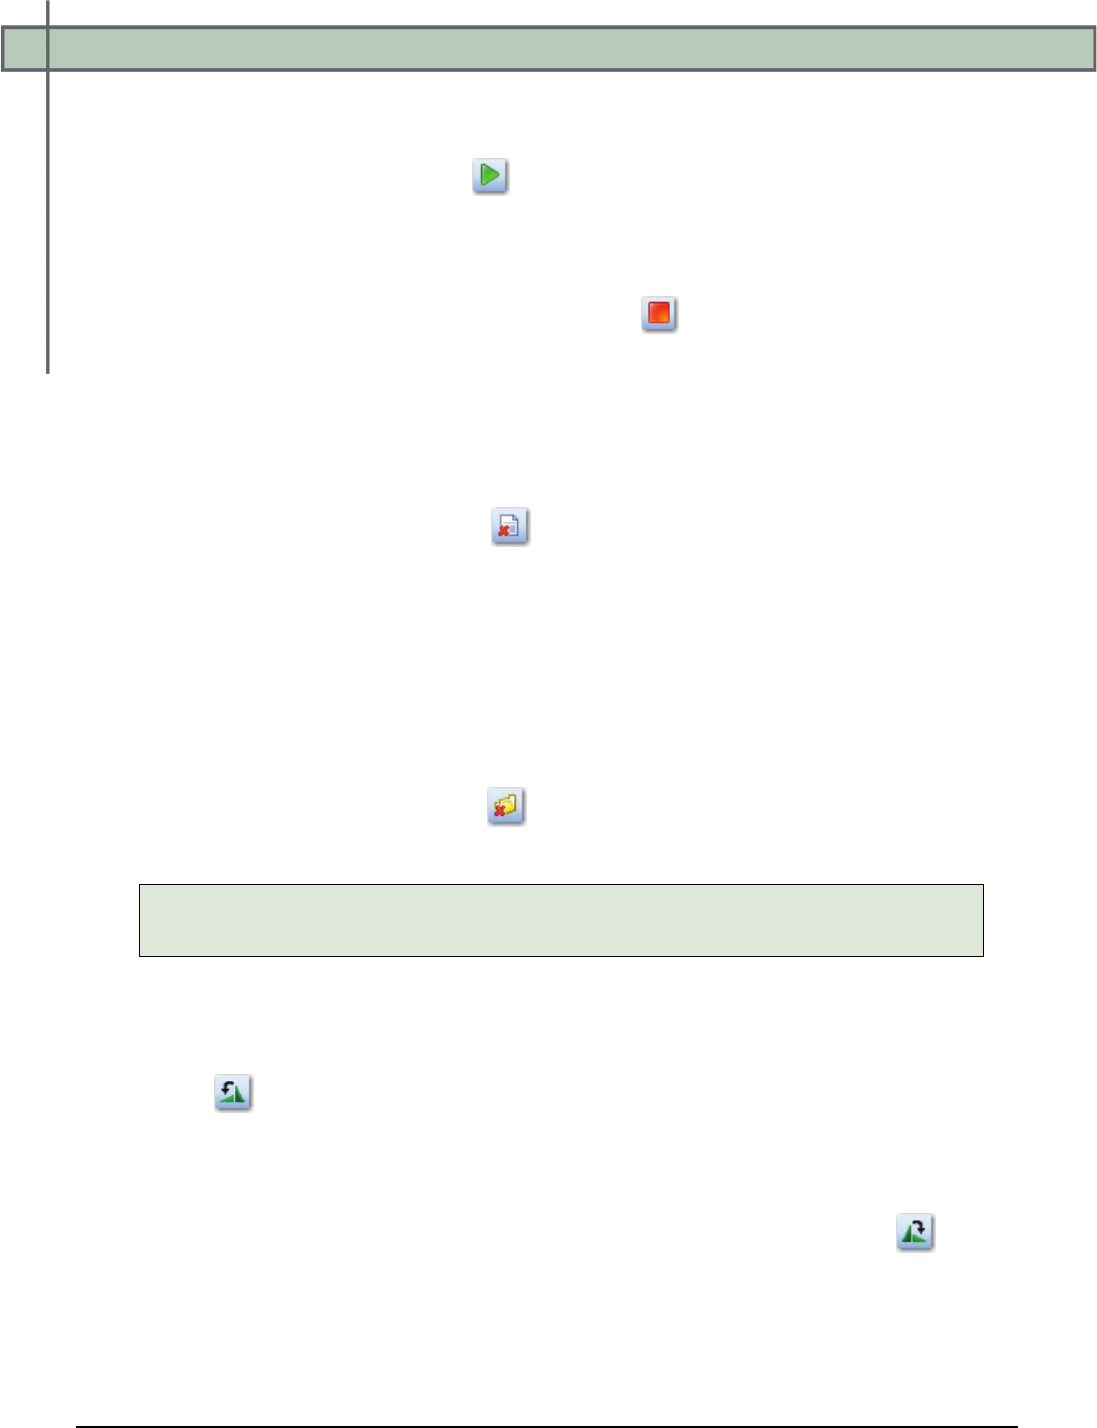
Chapter 8 – Zonal OCR
PaperVision® Capture Administration Guide 154
Starting the Scanning Process
After loading images, scan them to ensure OCR zones are being read successfully. To scan
the images, click the Start Scanning icon.
Stopping the Scanning Process
To stop the scanning process, click the Stop Scanning icon.
Removing a Single Image
To remove a single image:
1. In the Thumbnails section, select the image to delete.
2. Click the Delete Single Image icon.
3. Click Yes to the confirmation message.
Removing All Images
This command removes all current images from the main scanning window and from the
Thumbnails section.
To remove all images:
1. Click the Remove All Images icon.
2. Click Yes to the confirmation message.
Note:
If you have defined OCR zones prior to clearing all images, these zones are retained.
Rotating the Image 90° Counter-Clockwise
To rotate the image 90 degrees counter-clockwise, click the Rotate Image 90° Counter-
Clockwise icon.
Rotating the Image 90° Clockwise
To rotate the image 90 degrees clockwise, click the Rotate Image 90° Clockwise icon.

Chapter 8 – Zonal OCR
PaperVision® Capture Administration Guide 155
Importing Images
To import images:
1. Click the Import Images icon.
2. Locate the directory of the image(s).
3. Click Open, and the image appears in the main OCR window.
Testing All OCR Zones
The Test All OCR Zones command verifies that all defined OCR zone regions will recognize
OCR characters.
To test all OCR zones:
1. After you insert all OCR zones and assign properties to each, click the Test All OCR
Zones icon.
• The OCR Explorer updates the Results row for each page containing your defined
zones.
• A successful reading, indicated with a green check mark, populates the Results
row.
2. If you do not receive a successful test result, adjust one or more properties, and run
the test once again.
Tip:
Poor image quality might result in an unsuccessful reading, so try importing a
clearer image.
Zooming Commands
• To zoom in on an area of the image, click the Zoom In icon.
• To zoom out of the current view of the image, click the Zoom Out icon.
• To reset the image to its original view, click the Zoom Reset icon.
Exiting the OCR Zones Screen
To close and exit out of the Edit OCR Zones screen:
1. Click the Exit icon.
2. Click Yes to save all changes.
Chapter 8 – Zonal OCR
PaperVision® Capture Administration Guide 156
General OCR Properties
You can assign general OCR properties described in this section.
Region Size
This field is read-only; the OCR zone's X and Y coordinates are displayed along with its
height and width in millimeters.
Image Size
This field is read-only; if no OCR zone is defined, the page size appears in this field. If an
OCR zone is defined, the zone and page size display in millimeters.
Regular Expression Verification
A regular expression is a pattern of text that consists of ordinary characters (for example,
letters A through Z) and special characters, known as metacharacters. The pattern describes
one or more strings to match when searching a body of text. The regular expression serves as
a template for matching a character pattern to the string being searched.
Regular expressions are applied on a per-zone basis. When you define Auto Document Breaks
using OCR zones, you can assign an exact value or regular expression, and a document break
will only be inserted when the system reads an OCR zone matching that exact value or regular
expression. If you leave this field blank, any OCR zone recognized by the system will cause a
document break to be inserted.
To assign a search value:
1. Click the ellipsis button next to the Regular Expression Verification field.
2. Enter the regular expression or exact value.
3. Enter the text to validate.
• A successful validation displays with a green icon.
• Invalid entries display with a red icon.
Note:
To clear the field, right-click the ellipsis button and select Reset.

Chapter 8 – Zonal OCR
PaperVision® Capture Administration Guide 157
Nuance OCR Page Properties
The Nuance OCR settings described in this section can be configured for each page. Some of
the settings refer to the temporary black and white image that is created during OCR
processing.
Additional Character Filters
This setting allows you to define additional characters to recognize during OCR processing.
Characters that you define here are processed when you have selected the Plus or Number
Character Filter setting.
Additional Language Filters
You can assign additional characters to increase the number of acceptable characters as
determined by your selected spelling language.
Brightness
You can assign the brightness value (between 0 and 100) for the image. A value of 0 is
lightest; 100 results in the darkest image. The default value is 50.
Brightness Threshold
You can assign a brightness threshold value (between 0 and 255) for the image. The default
value is 128.
Enable Fax-Handling (Omnifont Multi-Lingual)
You should enable this setting if you are processing a scanned image that was faxed in draft
mode (200 x 100 dpi).
Hand-Printed Character Height
You can assign the expected character height (in 1/1200 of an inch) for the Constrained
Handprint Recognition (Numeric) module. The default value is 0.
Note:
1/1200 of an inch is equivalent to approximately 0.021mm.
Chapter 8 – Zonal OCR
PaperVision® Capture Administration Guide 158
Hand-Printed Character Width
You can assign the expected character width (in 1/1200th of an inch) for the Constrained
Handprint Recognition (Numeric) module. The default value is 0.
Hand-Printed Detect Spaces
If this setting is enabled, the Constrained Handprint Recognition (Numeric) module will
detect spaces between characters.
Hand-Printed Leading Spaces
You can assign the expected leading spaces (in 1/1200th of an inch) for the Constrained
Handprint Recognition (Numeric) module. The default value is 0.
Hand-Printed Style
You can select either the European or U.S. writing style of the Constrained Handprint
(Numeric) module. For example, the number seven is crossed in European style and
uncrossed in American style.
Recognition Languages
The default recognition language is English, and any combination of recognition languages
can be selected. You can increase the number of recognized characters by assigning the
Additional Language Filter property, and you can narrow them by selecting from the
Character Filter list.
To select the Recognition Languages:
1. Click the ellipsis button next to the Recognition Language field.
2. Select the languages to include during the OCR process. Characters from your selected
language will be recognized during OCR.
3. Click OK.
Note:
A faster reading will result if you match the Spelling Language to your
selected Recognition Language.
Chapter 8 – Zonal OCR
PaperVision® Capture Administration Guide 159
Recognition Process Setting
The Recognition Process Setting is applied at the page level during OCR and involves a trade-
off between accuracy and speed.
• Accurate, the default setting, results in the most accurate recognition.
• Balanced applies average accuracy and speed recognition.
• Fast results in the fastest recognition, but accuracy may be compromised.
Rejection Symbol
This property represents rejected characters in output documents. A rejected character is not
recognized by the active OCR recognition engine configuration. The default value is the Tilde
character (~). Only a single character can be entered in this field.
Tip:
To prevent unrecognized characters from appearing in output documents, leave this
field blank.
Spelling Language
This property accepts all possible recognition languages. The Auto setting matches the
recognition language with the corresponding spelling language. Only one spelling language
can be selected at a time.
Vertical Dictionaries
By default, Vertical Dictionaries are disabled; however, you can select any combination of
dictionaries to include during OCR processing. PaperVision Capture supports the following
dictionaries:
• Dutch Legal Professional Dictionary
• Dutch Medical Professional Dictionary
• English Financial Professional Dictionary
• English Legal Professional Dictionary
• English Medical Professional Dictionary
• French Legal Professional Dictionary
• French Medical Professional Dictionary
• German Legal Professional Dictionary
• German Medical Professional Dictionary

Chapter 8 – Zonal OCR
PaperVision® Capture Administration Guide 160
Nuance Zonal OCR Properties
The OCR settings described in this section can be configured for each zone.
Capitalize Proper Names
If this setting is enabled, the correction feature of the recognition subsystem will capitalize
names inside recognized text.
Character Filter
Character filters that are defined at the zone level will narrow the search for only your
specified sets of characters. By default, all character filters are selected, but you can select a
specific set of characters that will be recognized during OCR processing.
Your selected recognition module may restrict the character filters recognized during OCR
processing. For example, the Constrained Handprint (Numeric) module only supports
numerals and four other characters, so if you select the Alpha character filter, your character
filters will not be recognized. All character filters are supported by the Omnifont Multi-
Lingual, Constrained Handprint (Alphanumeric), Omnifont Multi-Lingual (FRX), and Draft
Dot-Matrix modules.
Chapter 8 – Zonal OCR
PaperVision® Capture Administration Guide 161
The table below describes each character filter that you can define for the zone:
Character Filter
Description
All
Since all filters are enabled, no filtering is applied
Alpha
Recognizes only upper- and lower-case letters
Default
Causes the zone to be handled globally; do not
combine with any other filter
Digit
Recognizes only numerals
(1, 2, 3, etc.)
Lower-case
Recognizes only lower-case letters
(a, b, c, etc.), including accented letters
Miscellaneous
Only recognizes other miscellaneous characters
(+, -, etc.)
Numbers
Recognizes only the digits and any values defined
in the Additional Character Filters field for the page
Plus
Enables the use of only defined Additional
Character Filters; these characters are added after
all other filters
Punctuation
Recognizes only punctuation signs
(!, @, #, etc.)
Upper-case
Recognizes only upper-case letters
(A, B, C, etc.), including accented letters
Chapter 8 – Zonal OCR
PaperVision® Capture Administration Guide 162
Filling Method
This setting is based on the selected recognition module and contains the filling method for
the specified OCR zone. The filling method corresponds with the zone’s contents. If an
incorrect filling method is chosen for the zone, its contents will not be recognized. The
following table displays the filling methods, their descriptions, and the supported recognition
modules.
Filling Method
Description
Supported
Recognition Modules
Default
This is the filling
method to be used,
acquired from the
recognition
module
N/A
Omnifont
(Default setting)
indicates machine-
printed text with
any typeface
Omnifont Plus (2W)
Omnifont Plus (3W)
Omnifont Multi-Lingual
Omnifont Multi-Lingual
(FRX)
Omnifont Matrix
Draft-Dot 9
9-pin draft dot-
matrix printout
Draft Dot-Matrix
Omnifont Matrix
Hand-Printed
Hand-printing
within the zone
Constrained Handprinted
Recognition (Numeric)
Constrained Handprinted
Recognition
(Alphanumeric)
Draft-Dot 24
24-pin draft dot-
matrix printout
Omnifont Multi-Lingual
Omnifont Matrix
Chapter 8 – Zonal OCR
PaperVision® Capture Administration Guide 163
Filling Method
Description
Supported Recognition
Modules
OCR-A
OCR-A filling method
Omnifont Multi-Lingual
Omnifont Matrix
Matrix Matching Recognition
OCR-B
OCR-B filling method
Omnifont Multi-Lingual
Omnifont Matrix
Matrix Matching Recognition
Magnetic Ink
Character
Recognition
Magnetic ink character
filling method
Matrix Matching Recognition
Dash-digit
Dash-digit zone filling
method
Matrix Matching Recognition
Dot-digit
Indicates the dot-digit
zone filling method
Matrix Matching Recognition
Ignore Blank Spaces
If this setting is enabled, white space characters (including white space created by the
SPACEBAR and TAB keys) will be excluded (ignored) during OCR processing.
Ignore Character Case
If this setting is enabled, upper-and lower-case characters will be ignored during OCR
processing. If this setting is disabled, upper- and lower-case characters will be discerned
during OCR processing.
Include Punctuation
If this setting is enabled, punctuation will be recognized during OCR processing.

Chapter 8 – Zonal OCR
PaperVision® Capture Administration Guide 164
Recognition Module
All zones must have a recognition module assigned before OCR processing can be
successfully completed. See the next section on OCR Recognition Modules for detailed
descriptions of each module.
Verify Complete Lines
If you enable this setting, entire lines of text (instead of individual words) will be processed
through OCR. Select False to pass individual words through OCR processing.
Zone Type
This setting describes the area inside the OCR zone, and whether that area should be
recognized or ignored. You can assign zone types to be treated as text, a table, or a form.
• Auto automatically performs a parsing algorithm, and may create several OCR zone types
including Flow, Table, and Form.
• Flow contains flowed text without a table structure inside the zone.
• Form represents an unfilled form.
• Table contains a table with rows and columns, with or without a grid.

Chapter 8 – Zonal OCR
PaperVision® Capture Administration Guide 165
Nuance OCR Recognition Modules
A Nuance OCR license includes all recognition modules except the Constrained Handprint
Recognition (Numeric) and Constrained Handprint Recognition (Alphanumeric) modules that
require a separate Intelligent Character Recognition (ICR) license.
Omnifont Matrix
The Omnifont Matrix recognition module recognizes machine-printed text from printed
publications, laser and ink-jet printers, and electric typewriters. Mechanical typewriters may
also produce readable output. This module can also be used with Letter Quality (LQ) or Near
Letter Quality (NLQ) output from dot-matrix printers, and can also be used for Draft Quality
(DQ).
Omnifont Matrix detects and transmits bold, italic, and underlined text (including
combinations). This module also detects and transmits character size and classifies font types
into the serif, sans serif, and monospaced categories.
Supported Filling Methods:
• Omnifont
• Draft-Dot 9
• Draft Dot-24
• OCR-A
• OCR-B
Supported Filter Types:
• All
• Digit
• Alphanumeric
Supported Recognition Processing Settings:
• Fast
• Balanced and Accurate merged into one value
Chapter 8 – Zonal OCR
PaperVision® Capture Administration Guide 166
Omnifont Multi-Lingual
The Omnifont Multi-Lingual module recognizes machine printed text from printed
publications, laser and ink jet printers, and electric typewriters. Mechanical typewriters may
produce readable output. Additionally, dot matrix printers with NLQ and LQ output may
produce readable results. Use the DRAFTDOT24 filling method for draft quality 24-pin dot-
matrix documents. NLQ and LQ output can be better recognized without using the filling
method DRAFTDOT24. A maximum of 500 OCR zones can be defined on one image for this
module.
Omnifont Multi-Lingual detects and transmits bold, italic, and underlined text (including
combinations). This module also detects and transmits character size and classifies font types
into serif, sans serif, and monospaced categories.
Character Range:
• Latin, Greek, and Cyrillic alphabets and accented letters
• 500 characters
Character Set:
Characters
Non-Accented
Accented
Latin alphabet upper-case letters
26
89
Latin alphabet lower-case letters
26
91
Digits
10
Punctuation
29
Miscellaneous symbols
55
Cyrillic upper-case letters
33
14
Cyrillic lower-case letters
33
14
Greek upper-case letters
24
9
Greek lower-case letters
25
11
OCR (OCR-A and MICR) characters
3

Chapter 8 – Zonal OCR
PaperVision® Capture Administration Guide 167
Supported Filling Methods:
• Omnifont
• Draft Dot-24
• OCR-A
• OCR-B
Supported Filter Types:
• Default
• Digit
• Upper-Case
• Lower-Case
• Punctuation
• Miscellaneous
• Plus
• All
• Alphanumeric
• Number
Supported Recognition Process Settings:
• Fast
• Balanced
• Accurate
Chapter 8 – Zonal OCR
PaperVision® Capture Administration Guide 168
Draft Dot-Matrix
The Draft Dot-Matrix recognition module is only designed for draft-quality, 9-pin, dot-matrix
text. No recognition process settings are supported, but all filters are supported in the module.
Expanded characters are not recognized, but condensed characters can be recognized
(although their accuracy may be low).
For NLQ or LQ text, the following Omnifont modules produce better results:
• Omnifont Plus (2W)
• Omnifont Plus (3W)
• Omnifont Matrix
• Omnifont Multi-Lingual
Character Range:
Upper- and Lower-Case
Lower-Case Only
A Acute (A’)
A Circumflex (a^)
AE (Ae)
A Macron (a-)
A Ring (Ao)
A Grave (a`)
A Umlaut (A:)
E Umlaut (e:)
A Tilde (A˜)
E Circumflex (e^)
C Cedilla (C,)
E Grave (e`)
E Acute (E')
I Umlaut (I:)
I Acute (I')
I Circumflex (I^)
N Tilde (N~)
I Grave (I`)
O Double Acute (O")
O Circumflex (O^)
O Acute (O')
O Macron (O-)
O Umlaut (O:)
O Grave (O`)
O Tilde (O~)
S Hacek (Sv)
O Slash (O/)
U circumflex (U^)
AE (OE)
U Grave (U`)
U Double Acute (U")
U Acute (U')
U Umlaut (U:)
Chapter 8 – Zonal OCR
PaperVision® Capture Administration Guide 169
Constrained Handprint Recognition (Numeric)
The Constrained Handprint Recognition (Numeric) module recognizes hand-printed numeric
characters and four calculation signs. The Constrained Handprint Recognition
(Alphanumeric) module is included with the ICR license.
• For better recognition, characters should not touch one another, and each character
must be between 30-180 pixels in height.
• Well-formed numbers written in pen are best recognized; pencil and felt-tip pens
result in poorer recognition.
• The maximum number of characters that can be contained in a zone is 3000.
• The maximum number of lines that can be contained in a zone is 40.
• The maximum number of characters that can be contained per line is 600.
• Each OCR zone can contain only one character, or each zone can contain several lines
of characters.
• Optimally, the OCR zone region should be 5x6 mm separated by 3 mm.
Character range:
• Digits (0-9)
• Plus sign (+)
• Minus sign (-)
• Period or full-stop (.)
• Comma (,)
Supported Filter Types:
• All
• Digit
• Punctuation
• Miscellaneous
Note:
You can use the Digit filter to exclude the Plus Sign, Minus Sign, Period, and
Comma during processing.
Supported Recognition Processing Settings:
• Fast
• Balanced and Accurate (merged into one value)
Chapter 8 – Zonal OCR
PaperVision® Capture Administration Guide 170
Constrained Handprint Recognition (Alphanumeric)
The Constrained Handprint Recognition (Alphanumeric) module recognizes hand-printed
alphanumerical characters such as upper- and lower-case letters, digits, and others. The
Constrained Handprint Recognition (Alphanumeric) module is included with the ICR license.
This module can read flowed text, but is applied mainly in hand-printed forms.
The Constrained Handprint Recognition (Alphanumeric) module differentiates over 150
characters, including digits, punctuation marks, miscellaneous characters, English alphabet
letters, and accented characters.
Note:
Cyrillic and Greek languages are not supported in this module.
The only supported Filling Method is Handprint, but all filter types are supported. Hand-
printed text is more difficult to recognize, but enhanced character quality can improve
recognition. Structured forms and zone filters can improve OCR processing for this module.
• For better recognition, characters should not touch one another.
• Each character must be between 30-180 pixels in height.
• Well-formed characters written in pen are best recognized.
• Pencil and felt-tip pens result in poorer recognition.
• The maximum number of characters per line is 200.
• An infinite number of lines can be assigned per zone.

Chapter 8 – Zonal OCR
PaperVision® Capture Administration Guide 171
Recognized Punctuation and Miscellaneous Characters:
• Exclamation Mark (!)
• Question Mark (?)
• Apostrophe or Single Quote (')
• Quotation Mark (")
• Semicolon (;)
• Comma (,)
• Colon (:)
• Period or full-stop (.)
• Hyphen or Minus Sign (-)
• Opening and Closing Parentheses ( )
• Opening and Closing Square Brackets [ ]
• Opening and Closing Curly Brackets { }
• Number Sign (#)
• Percent Sign (%)
• At (@)
• Ampersand (&)
• Vertical Bar ( | )
• Dollar Sign ($)
• Asterisk (*)
• Plus Sign (+)
• Equals Sign (=)
• Underscore (_)
• Slash Mark (/)
• Backslash (\)
• Less Than ( < )
• Greater Than ( > )
Supported Recognition Process Settings:
• Fast
• Balanced
• Accurate
Chapter 8 – Zonal OCR
PaperVision® Capture Administration Guide 172
Matrix Matching Recognition
The Matrix Matching Recognition module reads groups of fixed-font characters designed
specifically for OCR or imaging applications in which no two characters have similar shapes.
Relevant applications include banking, check handling, product distribution, and document
validation, where accuracy is critical. Each character group has its own filling method.
Additionally, some non-fixed print styles are also recognized. No recognition processing
settings are supported, but all filters (except the Lower-Case filter) are supported in the
module.
Character Range:
Character Type
Characters Included
OCR-A*
•
Upper-case English letters
• Digits
• Some punctuation
• OCR symbols (Chair, Hook, and Fork):
OCR-B
•
Upper-case English letters
• Digits
• Some punctuation
Magnetic Ink
Character*
•
Digits
• Some punctuation
• Magnetic Ink Character symbols (OCR
Branch Bank, OCR Amount of Check,
OCR Dash, and OCR Customer Account
Number:
Dot-Digit Zone
•
Ten digits and period
• Commas are read, but converted to periods
Dash-Digit Zone
•
Ten digits and period
• Commas are read, but converted to periods
* Only recognized when selected for the Filling Method

Chapter 8 – Zonal OCR
PaperVision® Capture Administration Guide 173
Supported Filling Methods:
• OCR-A
• OCR-B
• Magnetic Ink Character Recognition
• Dot-Digit
• Dash-Digit
Chapter 8 – Zonal OCR
PaperVision® Capture Administration Guide 174
Omnifont Plus (2W) and (3W)
The Omnifont Plus (2W) and (3W) modules recognize machine-printed text from printed
publications, laser and ink-jet printers, and electric typewriters. Mechanical typewriters may
also produce good output. These modules provide improved recognition results and combine
results from the Omnifont Multi-Lingual and Omnifont Matrix modules (2W) and Omnifont
Multi-Lingual, Omnifont Matrix, and Omnifont Multi-Lingual (FRX) modules (3W). Only
the Omnifont filling method is supported in these modules.
Both modules detect and transmit bold, italic, and underlined text (including combinations).
They also detect and transmit character size and classify font types into serif, sans serif, and
monospaced categories.
Character Set:
Characters
Non-accented
Accented
Latin alphabet upper-case letters
26
89
Latin alphabet lower-case letters
26
91
Digits
10
Punctuation
29
Miscellaneous symbols
55
Cyrillic upper-case letters
33
14
Cyrillic lower-case letters
33
14
Greek upper-case letters
24
9
Greek lower-case letters
25
11
OCR (OCR-A and MICR) characters
3
Supported Filters:
• All
• Digit
• Alphanumeric
Supported Recognition Processing Settings:
• Fast
• Balanced
• Accurate
Chapter 8 – Zonal OCR
PaperVision® Capture Administration Guide 175
Omnifont Multi-Lingual (FRX)
The Omnifont Multi-Lingual (FRX) module recognizes machine-printed text from printed
publications, laser and ink jet printers, and electric typewriters. Mechanical typewriters may
produce readable output. Additionally, dot-matrix printers with NLQ and LQ output may
produce readable results. No recognition process languages are supported, but all filters are
supported in this module. Only the Omnifont filling method is supported in this module.
This module supports Latin, Greek, and Cyrillic alphabets with accented letters. Omnifont
Multi-Lingual (FRX) detects and transmits bold, italic, and underlined text (including
combinations). This module also detects and transmits character size and classifies font types
into serif, sans serif, and monospaced categories.
You can select multiple languages for OCR recognition, but languages are only recognized if
they belong to the same code page. For example, OCR can process English, Spanish, and
French since they belong to the Latin 1 code page. OCR may fail to recognize both English
and Russian since they belong to different code pages.
Supported Languages per Code Page:
Code Page
Supported Languages
Latin 1
English, German, French, Spanish, Italian, Dutch, Swedish,
Norwegian, Finnish, Danish, Portuguese, Portuguese
Brazilian, Catalan, Afrikaans, Aymara, Basque, Breton,
Faroese, Friulian, Gaelic, Galician, Eskimo, Icelandic,
Indonesian, Latin, Malaysian, Pidgin English, Swahili,
Tahitian, Welsh, Frisian, Zulu
Latin 2
Polish, Czech, Hungarian, Romanian, Albanian, Croatian,
Wend (Sorbian), Slovak, Slovenian
Cyrillic
Russian, Ukranian, Byelorussian, Bulgarian, Macedonian,
Serbian
Greek
Greek
Turkish
Turkish, Kurdish (written in Latin alphabet)
Baltic
Estonian, Hawaiian, Latvian, Lithuanian
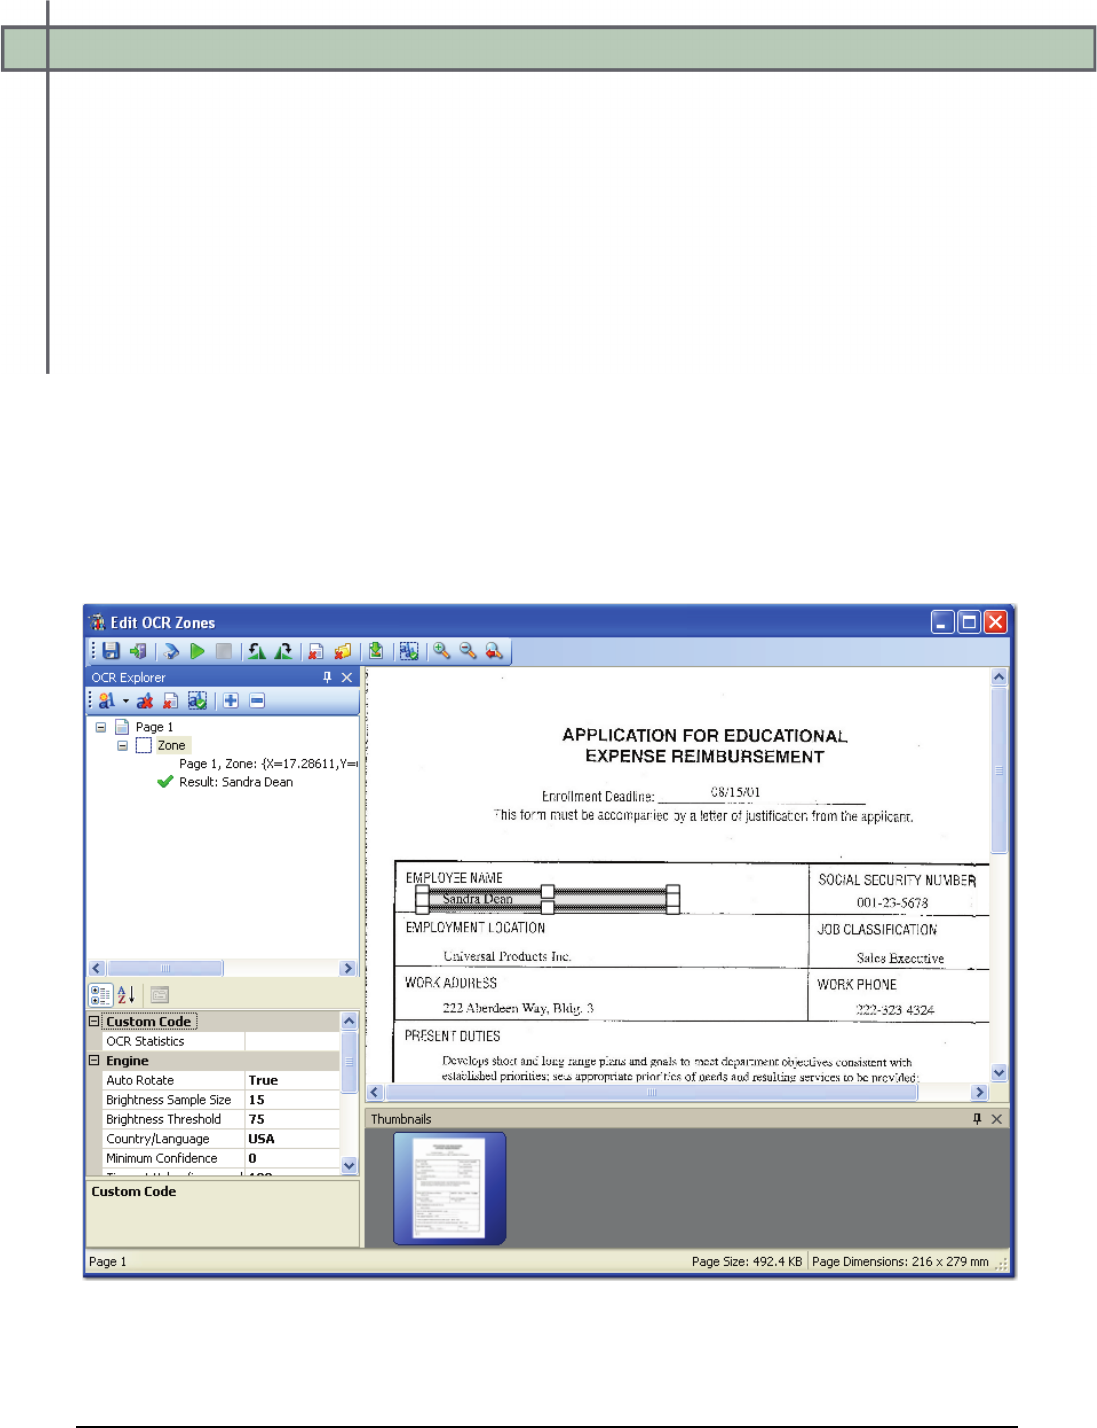
Chapter 8 – Zonal OCR
PaperVision® Capture Administration Guide 176
Open Text Zonal OCR
The Open Text Zonal OCR step contains a disparate set of properties available for configuration.
Open Text® OCR processing recognizes machine-printed text, but handwritten text is not
recognized. Additionally, new line characters are removed during Open Text OCR processing.
The properties described in this section are available for configuration in the Open Text Zonal
OCR step.
To configure Open Text OCR zones:
1. In the Job Definitions workspace, select the Open Text Zonal OCR job step.
2. In the Properties grid, expand the Indexes node, and then click the ellipsis button
next to the Indexes field. Proceed to step 4.
3. Or, expand the Auto Document Break node to configure OCR zones that will
automatically break documents. Proceed to step 7.
4. In the Index Configuration dialog box, click the Add button.
5. Under the Index Properties section, expand the General (Step Level) node.
6. Click the ellipsis button to the right of the OCR Zones field. The Edit OCR Zones
screen appears.
Edit OCR Zones (Open Text Zonal OCR)
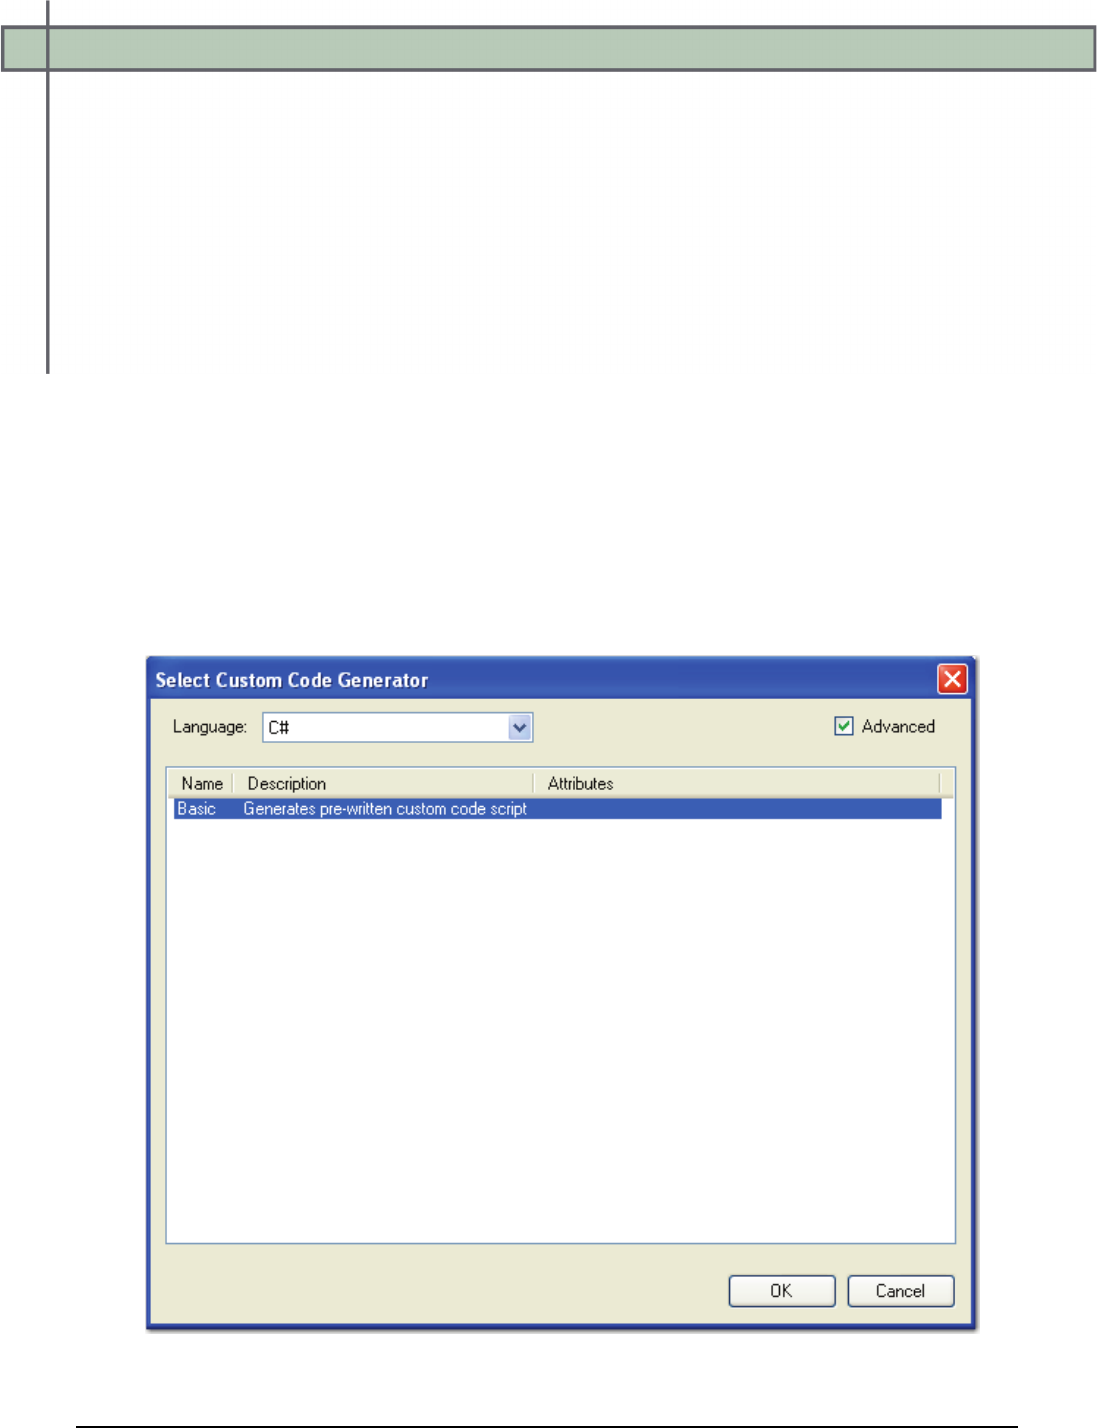
Chapter 8 – Zonal OCR
PaperVision® Capture Administration Guide 177
7. Drag the cursor around the OCR zone on the image, and the properties appear in the
grid. The next section describes the properties available for configuration.
OCR Statistics
You can configure custom code that reports specific OCR statistics when an OCR zone is
processed through the Open Text OCR engine. For example, you can configure custom code
to record statistics when an OCR zone populates an index value by using the
OCRIndexZonesStatistics sample script. Custom code samples are located in the
Library\Samples directory (as text or XML files), where PaperVision Capture was installed.
The following OCR sample scripts are available for configuration:
• OCRFullTextPageStatistics
• OCRIndexZoneStatistics
• OCRMarkSenseZoneStatistics
To configure custom code OCR statistics:
1. In the Edit OCR Zones screen, click the ellipsis button next to the OCR Statistics
field. The Select Custom Code Generator dialog appears.
Select Custom Code Generator - Basic

Chapter 8 – Zonal OCR
PaperVision® Capture Administration Guide 178
2. Select the Basic custom code generator, and then click OK. The Script Editor opens.
Script Editor
3. If desired, you can import code from the OCRIndexZoneStatistics or
OCRMarkSenseZonescript into the Script Editor. Click the Import icon, and
then browse to the Library\Samples directory where PaperVision Capture was
installed.
4. Otherwise, insert your custom code into the Script Editor.
5. Click OK.
Chapter 8 – Zonal OCR
PaperVision® Capture Administration Guide 179
Auto Rotate
By default, this property is set to True, and the Open Text Zonal OCR engine will attempt to
recognize text in all orientations (vertically and horizontally) within the zone. If you do not
want the Open Text Zonal OCR engine to recognize text in all orientations (vertically only)
within the zone, set this property to False.
Brightness Sample Size
This value (indicating both width and height) specifies the rectangle size used to calculate the
brightness threshold. You can specify a value between 1 and 32, and the default value is 15.
Note:
Smaller brightness sample sizes may cause the OCR engine to recognize extraneous
noise on the image.
Brightness Threshold
You can assign a brightness threshold value (between 0 and 255) for the image. The default
value is 75.
Country/Language
When you select from the Country/Language property, your selection may reflect not only a
country or language, but country groups (e.g., Western Europe), language groups (e.g., Latin),
and character sets (e.g., OCR). Each country corresponds to one or more languages, and
countries are automatically expanded into language sets (e.g., German corresponds to the
German language; Switzerland corresponds to the German, French, Italian, and Rhaeto-
Romantic languages). Specific languages are also available for selection under the
Country/Language property (e.g., English, German, Dutch, Italian, etc.). It is recommended to
narrow your selection as much as possible since OCR recognition may become slower with a
greater number of selected countries or languages. It is also recommended to select a country
rather than a language or country group (e.g., Western Europe, South America, Scandinavia)
since the recognition of certain types of addresses and money transfer forms may improve.
Note:
You cannot select the OCR character set individually; it must be selected with
another language, language group, country, or country group. For a complete list of
supported countries, languages, country groups, language groups, and character sets,
see Appendix G.
Chapter 8 – Zonal OCR
PaperVision® Capture Administration Guide 180
Language Groups
If you select a language group, it is recommended to select only one, since they encompass
multiple languages, countries, and code pages:
1. Cyrillic: Code page 1251
2. Greek: Code page 1253
3. Latin: Code pages 1250, 1252, 1254 and 1257 (i.e. Central Europe, Western Europe,
Turkey, Baltic)
4. Azerbaijanian
Note:
For language groups, recognition results are always represented by Unicode
characters. The English character set (A-Z, a-z) is implicitly available with all
country-language selections, even Greek or Cyrillic.
Minimum Confidence
The confidence level reflects the reliability of the OCR recognition results. Values range from
zero (the default setting), the lowest confidence level, to 255, the highest confidence level
indicating the most reliable recognition results. Characters with lower confidence levels than
your specified value will display as the rejection symbol, which is the tilde (~) character by
default.
Timeout Value
This property allows you to define the maximum amount of time that the Open Text OCR
engine processes a single image before it fails. By default, this property is set to 180 seconds
(3 minutes). You can assign a timeout between one second and 3,600 seconds (1 hour).
Note:
Raising the timeout setting may increase the amount of time to process all images.
Reader Engine
Two internal OCR reader engines, RecoStar and AEGReader, are available for selection in the
Open Text Zonal OCR step. Document content may cause one engine to generate more
accurate recognition results, so the Voter option is selected by default. The Voter option
automatically "votes" between both engines' recognition results, and generates results from
the engine with the highest confidence level.

Chapter 8 – Zonal OCR
PaperVision® Capture Administration Guide 181
Rejection Symbol
This property represents rejected characters in output documents. A rejected character is not
recognized by the active OCR recognition engine configuration. The default value is the Tilde
character ( ~ ). Only a single character can be entered in this field.
Tip:
To prevent unrecognized characters from appearing in output documents, leave this
field blank.
Syntax Mode
When you assign the syntax mode to alphanumerical, the default character set is
alphanumeric. If a character is ambiguous, the OCR engine will attempt to process the
character as a letter before a number. For example, the OCR engine will process a "G" before
"6", "S" before "5", etc. When you assign the syntax mode to numerical, the default character
set is numeric. If a character is ambiguous, the OCR engine will attempt to process the
character as a number before a letter. For example, the OCR engine will process a "6" before
"G", "5" before "S", etc.

Chapter 9 – Nuance Full-Text OCR
PaperVision® Capture Administration Guide 182
The Nuance Full-Text OCR job step allows you to configure an automated
process that reads pages of text and converts recognized results to one or multiple
file types. Once configured, this step executes automatically in the PaperVision Capture
Automation Service. To execute the Nuance Full-Text OCR step, a Capture Full-Text OCR
license is required.
The Nuance Full-Text OCR step converts extracted text into various file types such as .txt, .rtf,
.csv, .pdf, .doc (and .docx) .htm, .xls (and .xlsx), and others. Each converter output type
contains unique settings that you can configure to support your full-text OCR requirements.
Prior to activating the job, you can test and preview the full-text OCR results. Once the Nuance
Full-Text OCR step is executed, a maximum of 500 pages will comprise each full-text
document before a subsequent full-text output file is created for that same document.
Note:
The Nuance OCR engine supports incoming images ranging from 75 to 2400 dots per
inch (DPI). In pixels, this range is 16 x 16 to 8400 x 8400 pixels.
Larger images can be ingested into PaperVision Capture provided that:
1. No Full-Text OCR will be performed on the images (unless they are processed
using the Image Fit filter and cropped to meet size requirements)
2. No image processing will be performed on the images (unless they are processed
using the Image Fit filter and cropped to meet size requirements)
3. Images will not be viewed as thumbnails
Additionally, if you process multiple pages containing large amounts of text, testing
and executing the Nuance Full-Text OCR step may take a few minutes.
Auto Image Orientation
By default, this property is set to True, and the Nuance Full-Text OCR engine may
automatically rotate some images in order to recognize text. If you do not want the Nuance
Full-Text OCR engine to automatically rotate images prior to text recognition, set this property
to False.
Note:
Since the engine may automatically rotate some images in order to recognize text, the
resulting output images may also be rotated.
Outputs
By default, no conversion types are selected. To select and configure an output type, click the
ellipsis button in the Outputs field. See the next section on Converter Output Properties for a
list of properties specific to each output type.
Chapter 9 – Nuance Full-Text OCR
PaperVision® Capture Administration Guide 183
Override Invalid Pages
When this property is set to True, the Nuance Full-Text OCR engine processes each image
using the specified Recognition Process Setting (Speed, Balanced, or Accuracy) within the
allotted time specified in the Timeout (sec) setting. If the image cannot be processed with your
selected Recognition Process Setting, then PaperVision Capture attempts to process the image
with the remaining Recognition Process Settings. If the image still cannot be processed after
PaperVision Capture cycles through all Recognition Process Settings, the page is processed as a
picture for image-based outputs or a blank page for text-based outputs (in both cases, these
pages are also tagged with the "Skipped Full Text Processing" QC tag for future review). As a
result, the remaining documents are processed.
When this property is set to True and an error occurs during the conversion to the selected
output format (e.g., PDF Searchable Image), the entire batch will be now be processed as
images and not full-text (therefore, no error will be returned). As a result, all batches will be
processed through the Nuance Full-Text OCR step without requiring any user intervention.
When this property is set to False, the Nuance Full-Text OCR engine processes each image
using the specified Recognition Process Setting (Speed, Balanced, or Accuracy) within the
allotted time specified in the Timeout (sec) setting. If the image cannot be processed with your
selected Recognition Process Setting, then PaperVision Capture attempts to process the image
with the remaining Recognition Process Settings. If the image still cannot be processed after
PaperVision Capture cycles through all Recognition Process Settings, a timeout error appears in
the Administration Console and is logged in the Event Viewer. As a result, the remaining
documents are not processed.
Note:
A batch can potentially stop processing in a full-text OCR step only if this property is
disabled.
Timeout (sec)
This property allows you to define the maximum amount of time that the OCR engine processes
a single image before it fails. By default, this property is set to 180 seconds (3 minutes). You
can assign a timeout between one second and 86,400 seconds (24 hours).
Note:
Raising the timeout setting may increase the amount of time to process all images.
Chapter 9 – Nuance Full-Text OCR
PaperVision® Capture Administration Guide 184
Converter Output Properties
To configure the Nuance Full-Text OCR job step, you must select one or more output types and
configure the properties specific to each output.
To configure the converter output properties:
1. In the Job Definitions screen, select the Nuance Full-Text OCR job step in the
workspace.
2. In the Properties grid, expand the Nuance Full-Text OCR Step node, and click the
ellipsis button next to the Outputs field. The Edit Nuance Full-Text OCR Settings
screen appears.
Edit Nuance Full-Text OCR Settings
OCR Page Properties
Within the Edit Nuance Full-Text OCR Settings screen, you can select one or more full-text
OCR outputs and configure various properties for each output. Within this screen, you can also
scan and test sample images prior to saving the configurations.
Chapter 9 – Nuance Full-Text OCR
PaperVision® Capture Administration Guide 185
Saving Full-Text OCR Configurations
To save the full-text OCR configuration for the job step, click the Save Full-Text OCR
Configuration icon.
Configuring the Scanner
To configure the scanner settings, click the Configure Scanner icon. For details on each
setting, see the section on Scanner Setup Settings in Chapter 6.
Starting the Scanning Process
Prior to configuring properties for one or more output types, you can scan and load images into
the Edit Full-Text OCR screen. To scan the images, click the Start Scanning icon.
Stopping the Scanning Process
To stop the scanning process, click the Stop Scanning icon.
Removing a Single Image
To remove a single image:
1. In the Thumbnails section, select the image to delete.
2. Click the Delete Single Image icon.
3. Click Yes to the confirmation message.
Chapter 9 – Nuance Full-Text OCR
PaperVision® Capture Administration Guide 186
Removing All Images
This command removes all current images from the main scanning window and from the
Thumbnails section.
To remove all images:
1. Click the Remove All Images icon.
2. Click Yes to confirm the removal.
Note:
If you have defined OCR zones prior to clearing all images, these zones are retained.
Importing Images
To import images:
1. Click the Import Images icon.
2. Locate the directory of the image(s).
3. Click Open, and the image appears in the main OCR window.
Rotating the Image 90° Counter-Clockwise
To rotate the image 90 degrees counter-clockwise, click the Rotate Image 90° Counter-
Clockwise icon.
Rotating the Image 90° Clockwise
To rotate the image 90 degrees clockwise, click the Rotate Image 90° Clockwise icon.
Testing Full-Text OCR (Current Page Only)
The Test Full-Text OCR command verifies that the current page’s text can be read successfully
and will open the output file in the selected output’s application.
To test full-text OCR for the current page:
1. Click the Import Images icon to load a test page.
2. Select one or more output configurations.
3. Adjust the appropriate output configuration properties and OCR page properties.
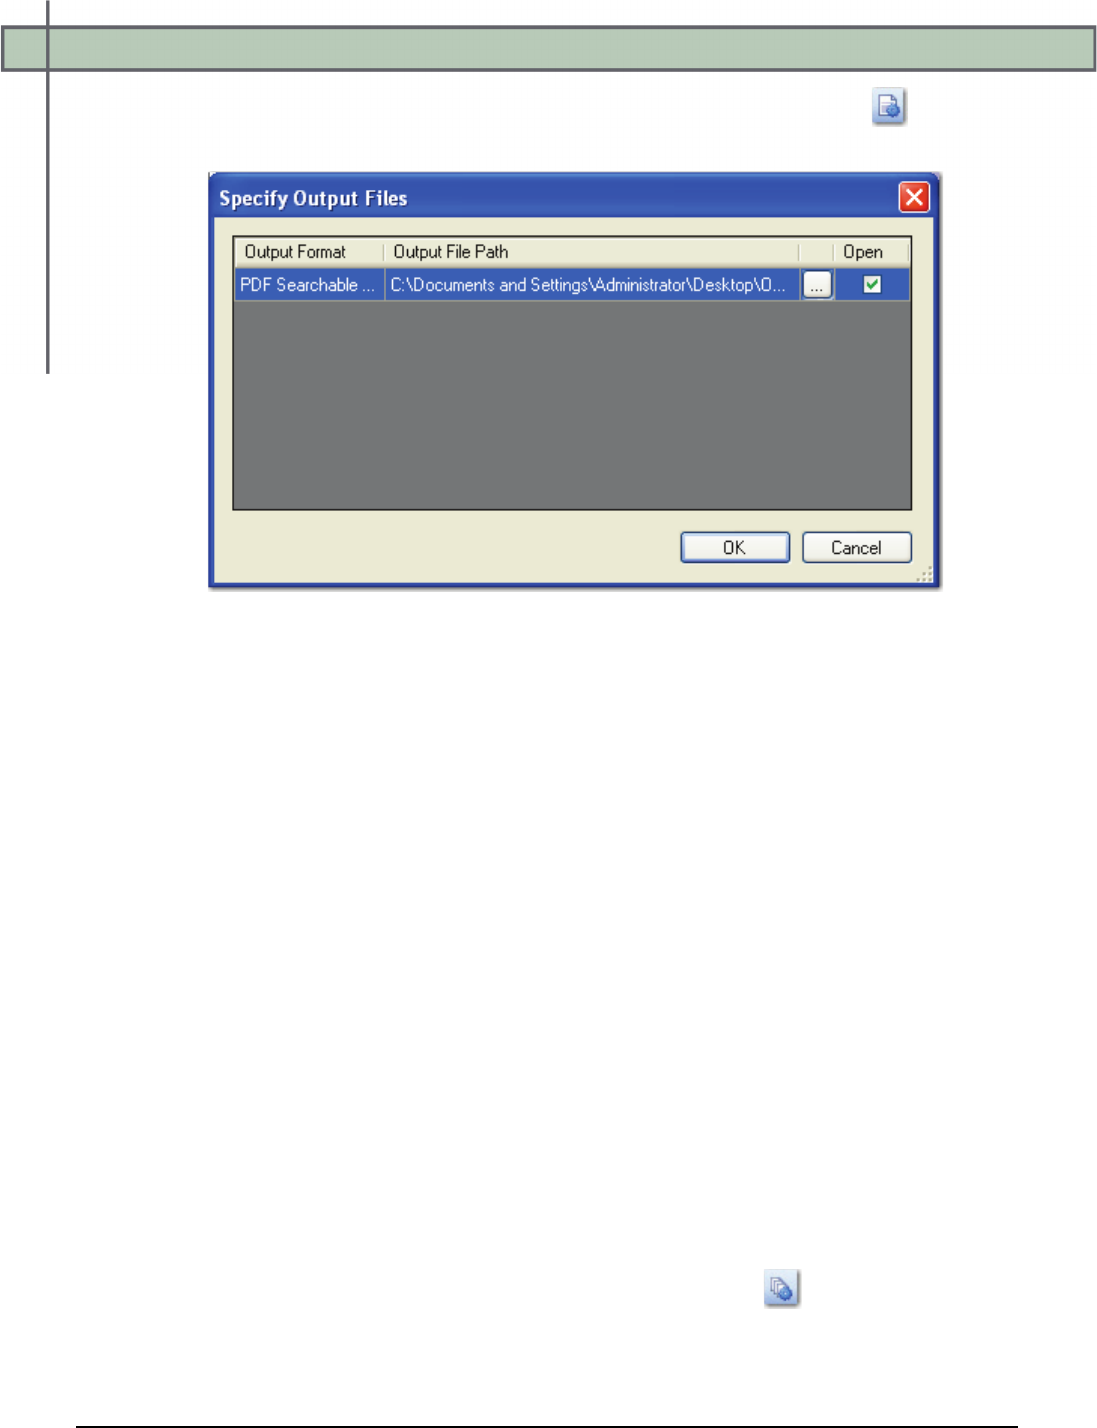
Chapter 9 – Nuance Full-Text OCR
PaperVision® Capture Administration Guide 187
4. Click the Test Full-Text OCR (Selected Filter, Current Page Only) icon. The
Specify Output Files dialog box appears.
Specify Output Files
5. Enter the output file path where the full-text OCR results will reside. Proceed to step 8.
6. Or, click the ellipsis button to browse to the location. Proceed to the next step.
7. If you browsed to the file location, enter the file name in the Save As dialog box, and
then click Save.
8. To view the results, select the Open check box.
9. Click OK. The Nuance Full-Text OCR engine will process the results. If you opted to
open the resulting output file, it will open in its respective application or editor.
10. If the resulting file is not acceptable, adjust the OCR page properties and/or the
converter’s properties, and run the test again.
Testing Full-Text OCR (Selected Filter, All Pages)
This operation verifies that text from all pages can be read successfully.
To test full-text OCR for all pages:
1. Load more than one test page.
2. Select one or more output configurations.
3. Adjust the appropriate output configuration properties and OCR page properties.
4. Click the Test Full-Text OCR (Selected Filter, All Pages) icon, and follow steps
5 through 10 from the previous section.

Chapter 9 – Nuance Full-Text OCR
PaperVision® Capture Administration Guide 188
Zooming Commands
• To zoom in on an area of the image, click the Zoom In icon.
• To zoom out of the current view of the image, click the Zoom Out icon.
• To reset the image to its original view, click the Zoom Reset icon.
Thumbnails
Thumbnails windows are found in the Edit Barcode Zones, Edit OCR Zones, Edit Nuance Full-
Text OCR, and Edit Image Processing Filters screens. You can right-click within any
Thumbnails window to perform basic operations on images, such as the cut/paste, copy/paste,
delete, or select all operations. The cut, copy, paste, and delete operations can be performed on
consecutive or non-consecutive images. Additionally, you can select multiple images and
simultaneously rotate them. The scrolling capability, displayed with up/down or left/right
arrows as you drag and drop images, allows you to quickly scroll through remaining images not
shown in the current window.
Note:
Images viewed as thumbnails can have maximum dimensions of 32,768 x 32,768
pixels.
Exiting the Edit Full-Text OCR Settings Screen
To close and exit out of the Edit OCR Zones screen:
1. Click the Exit icon.
2. Click Yes to save all changes.
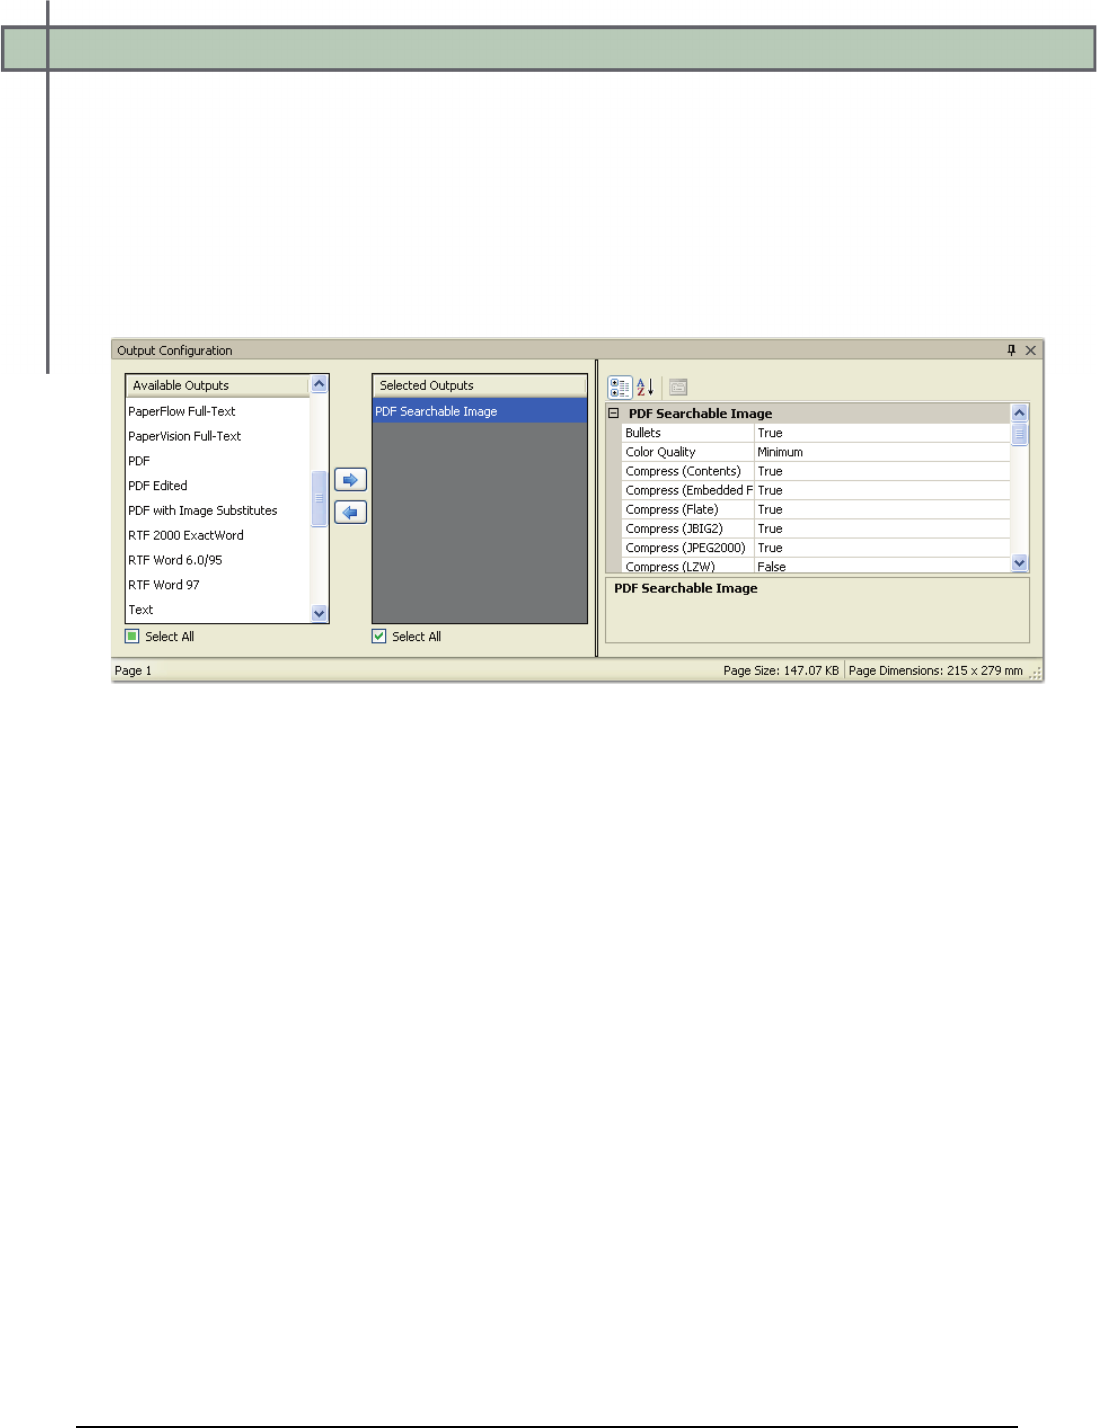
Chapter 9 – Nuance Full-Text OCR
PaperVision® Capture Administration Guide 189
Converter Output Formats
Each full-text OCR converter contains unique properties that you can configure within the
Nuance Full-Text OCR step. Options that are available for specific properties, such as the
Headers/Footers, Output Format, and Tables properties, may differ per converter.
To select a converter’s output configuration:
1. In the Output Configuration section, highlight one or more output types from the
Available Outputs list.
Output Configuration
2. Click the right arrow to move the selection to the Selected Outputs list.
3. To remove one or more selected outputs, highlight the appropriate types in the Selected
Outputs list, and then click the left arrow. Properties specific to each converter
populate the right column.

Chapter 9 – Nuance Full-Text OCR
PaperVision® Capture Administration Guide 190
eBook
This converter generates the eBook .opf output (packaged in a .zip file) that can be uploaded to
hand-held devices.
Bullets: Retains bullets in output file
Cross-References: Retains cross-references (hyperlinks) in output file
Headers/Footers: Specifies handling of headers and footers in output file
• Convert to Plain Text: Converts headers and footers to plain text
• Ignore: Ignores header and footer text from original file
Image Color: Assigns image color in output file
• 24-bit Color (True Color)
• Grayscale
• Black and White
• Original
Image DPI: Specifies dots per inch (DPI) resolution setting for images in output file
• DPI 72
• DPI 100
• DPI 150
• DPI 200
• DPI 300
• None
• Original
Line Numbering Zones: Retains line numbering zones in output file
Output Format: Specifies type of format retention in output file
• Formatted Text: Retains text (without columns); also retains paragraph format, font,
graphics, table styles, highlights, and strikeouts (ignores layout-related formatting)
• Ignore All: Ignores all format styles in original file
Tables: Specifies handling of tables in output file
• Convert to Separated by Tabs: Does not retain tables, but converts tables to
columns separated by tabs
• Retain Tables: Retains all tables from original file

Chapter 9 – Nuance Full-Text OCR
PaperVision® Capture Administration Guide 191
HTML 3.2
The HTML 3.2 converter is supported by many HTML editors and creates a clear, small,
HTML file format. After it is processed, the HTML output is packaged in a .zip file to facilitate
its transmission.
Bullets: Retains bullets in output file
Cross-References: Retains cross-references (hyperlinks) in output file
Headers/Footers: Specifies handling of headers and footers in output file
• Convert to Plain Text: Converts headers/footers to plain text
• Ignore: Ignores header and footer text from original file
Horizontal Rule Line: Places horizontal rule line between sections
Image Color: Assigns image color in output file
• 24-bit Color (True Color)
• Grayscale
• Black and White
• Original
Image DPI: Specifies dots per inch (DPI) resolution setting for images in output file
• DPI 72
• DPI 100
• DPI 150
• DPI 200
• DPI 300
• None
• Original
Index Page: Specifies how index page will be created in output file
• In Frame (index page appears in a separate column on same page as full-text output
file)
• None
• Simple HTML (index page displays thumbnail preview and hyperlink to full-text
output file)
Line Breaks: Inserts line breaks between lines of recognized text
Navigation (Next): Displays "Next" navigation text (for Simple HTML or In Frame index
pages)
Navigation (Previous): Displays "Previous" navigation text (for Simple HTML or In Frame
index pages)
Navigation (TOC): Displays Table of Contents navigation text (Simple HTML or In Frame
index pages)

Chapter 9 – Nuance Full-Text OCR
PaperVision® Capture Administration Guide 192
HTML 3.2 (continued)
Output Format: Specifies type of format retention in output file
• Formatted Text: Retains text (without columns); also retains paragraph format, font,
graphics, table styles, highlights, and strikeouts (ignores layout-related formatting)
• Spreadsheet: Exports results in tabular form (suitable for spreadsheet use) and places
each document in separate worksheet
• Ignore All: Ignores all format styles in original file
Page Breaks: Specifies handling of page breaks in output file

Chapter 9 – Nuance Full-Text OCR
PaperVision® Capture Administration Guide 193
HTML 4.0
The HTML 4.0 converter uses Cascading Style Sheet technology for box-like absolute
positioned objects, styles and manipulating all paragraph and character attributes. After it is
processed, the HTML output is packaged in a .zip file to facilitate its transmission.
Cross-References: Retains cross-references (hyperlinks) in output file
CSS (External): Enables external Cascading Style Sheet (CSS)
File (Subdirectory): Places every file into a subdirectory
Headers/Footers: Specifies handling of headers and footers in output file
• Convert to Plain Text: Converts headers/footers to plain text
• Ignore: Ignores header and footer text from original file
Horizontal Rule Line: Places horizontal rule line between sections
Image Color: Assigns image color in output file
• 24-bit Color (True Color)
• Grayscale
• Black and White
• Original
Image DPI: Specifies dots per inch (DPI) setting for images in output file
• DPI 72
• DPI 100
• DPI 150
• DPI 200
• DPI 300
• None
• Original
Index Page: Specifies how index page will be created in output file
• In Frame (index page appears in a separate column on same page as full-text output
file)
• None
• Simple HTML (index page displays thumbnail preview and hyperlink to full-text
output file)
Line Breaks: Inserts line breaks between lines of recognized text
Line Numbering Zones: Retains line numbering zones in output file
Name (Output File): Displays name of output file
Navigation (Next): Displays "Next" navigation text (for Simple HTML or In Frame index
pages)

Chapter 9 – Nuance Full-Text OCR
PaperVision® Capture Administration Guide 194
HTML 4.0 (continued)
Navigation (Previous): Displays "Previous" navigation text (for Simple HTML or In Frame
index pages)
Navigation (TOC): Displays Table of Contents navigation text (Simple HTML or In Frame
index pages)
Output Format: Specifies type of format retention in output file
• Formatted Text: Retains text (without columns); also retains paragraph format, font,
graphics, table styles, highlights, and strikeouts (ignores layout-related formatting)
• True Page: Retains original page and column layout (involves absolute positioning
of text, pictures, tables, and frames)
• Ignore All: Ignores all format styles in original file
Rule Lines: Retains rule lines in output file
Styles: Retains styles from original document

Chapter 9 – Nuance Full-Text OCR
PaperVision® Capture Administration Guide 195
InfoPath
This converter supports the saving of various form elements such as check boxes and input lines
and generates a Microsoft InfoPath (.xsn) file.
Cross-References: Retains cross-references (hyperlinks) in output file
Headers/Footers: Specifies handling of headers and footers in output file
• Convert to Ordinary Text: Converts headers/footers to plain text
• Ignore: Ignores header and footer text from original file
Image Color: Assigns image color in output file
• 24-bit Color (True Color)
• Grayscale
• Black and White
• Original
Image DPI: Specifies dots per inch (DPI) resolution setting for images in output file
• DPI 72
• DPI 100
• DPI 150
• DPI 200
• DPI 300
• None
• Original
Line Numbering Zones: Retains line numbering zones in output file
Output Format: Specifies type of format retention in output file
• Formatted Text: Retains text (without columns); also retains paragraph format, font,
graphics, table styles, highlights, and strikeouts (ignores layout-related formatting)
• True Page: Retains original page and column layout (involves absolute positioning
of text, pictures, tables, and frames)
• Ignore All: Ignores all format styles in original file
Rule Lines: Retains rule lines in output file

Chapter 9 – Nuance Full-Text OCR
PaperVision® Capture Administration Guide 196
Microsoft Excel 2007
This converter generates a Microsoft Excel 2007 (.xlsx) file using features only supported by
Excel 2007.
Bullets: Retains bullets in output file
Cross-References: Retains cross-references (hyperlinks) in output file
Headers/Footers: Specifies handling of headers and footers in output file
• Auto Format: Automatically formats headers and footers to match original style
• Convert to Ordinary Text: Converts headers/footers to plain text
• Tabulated Form:
Leader Dots: Inserts leaders dots in output file
Line Breaks: Inserts line breaks between lines of recognized text
Line Numbering Zones: Retains line numbering zones in output file
Overview Sheet Name (Include): Includes name of last sheet (in Formatted Text output
format, every table appears in a separate sheet; all other text and images will appear on last
Overview Sheet)
Output Format: Specifies type of format retention in output file
• Formatted Text: Retains text (without columns); also retains paragraph format, font,
graphics, table styles, highlights, and strikeouts (ignores layout-related formatting)
• Spreadsheet: Exports results in tabular form (suitable for spreadsheet use) and
places each document in separate worksheet
• Ignore All: Ignores all format styles in original file
Overview Sheet Name: Specifies name of overview sheet
Page Breaks: Specifies the handling of page breaks in output file
Page Color: Retains page background color in output file
Image Color: Assigns image color in output file
• 24-bit Color (True Color)
• Grayscale
• Black and White
• Original

Chapter 9 – Nuance Full-Text OCR
PaperVision® Capture Administration Guide 197
Microsoft Excel 2007 (continued)
Image DPI: Specifies dots per inch (DPI) resolution setting for images in output file
• DPI 72
• DPI 100
• DPI 150
• DPI 200
• DPI 300
• None
• Original
Tabs: Retains original tab positions in output file

Chapter 9 – Nuance Full-Text OCR
PaperVision® Capture Administration Guide 198
Microsoft Excel 97
This converter generates a Microsoft Excel 97 binary (.xls) file.
Bullets: Retains bullets in output file
Image Color: Assigns image color in output file
• 24-bit Color (True Color)
• Grayscale
• Black and White
• Original
Image DPI: Specifies dots per inch (DPI) resolution setting for images in output file
• DPI 72
• DPI 100
• DPI 150
• DPI 200
• DPI 300
• None
• Original
Headers/Footers: Specifies handling of headers and footers in output file
• Convert to Ordinary Text: Converts headers/footers to plain text
• Ignore: Ignores header and footer text from original file
• Tabulated Form:
Line Numbering Zones: Retains line numbering zones in output file
Output Format: Specifies type of format retention in output file
• Formatted Text: Retains text (without columns); also retains paragraph format, font,
graphics, table styles, highlights, and strikeouts (ignores layout-related formatting)
• Spreadsheet: Exports results in tabular form (suitable for spreadsheet use) and
places each document in separate worksheet
• Ignore All: Ignores all format styles in original file
Page Breaks: Specifies the handling of page breaks in output file
Page Color: Retains page background color in output file

Chapter 9 – Nuance Full-Text OCR
PaperVision® Capture Administration Guide 199
Microsoft Excel XP
This converter generates a Microsoft Excel XP binary (.xls) file.
Bullets: Retains bullets in output file
Headers/Footers: Specifies handling of headers and footers in output file
• Convert to Ordinary Text: Converts headers/footers to plain text
• Ignore: Ignores header and footer text from original file
• Tabulated Form:
Image Color: Assigns image color in output file
• 24-bit Color (True Color)
• Grayscale
• Black and White
• Original
Image DPI: Specifies DPI setting for images in output file
• DPI 72
• DPI 100
• DPI 150
• DPI 200
• DPI 300
• None
• Original
Output Format: Specifies type of format retention in output file
• Formatted Text: Retains text (without columns); also retains paragraph format, font,
graphics, table styles, highlights, and strikeouts (ignores layout-related formatting)
• Spreadsheet: Exports results in tabular form (suitable for spreadsheet use) and
places each document in separate worksheet
• Ignore All: Ignores all format styles in original file
Page Breaks: Specifies the handling of page breaks in output file
Page Color: Retains page background color in output file
Read-Only: Marks output file as read-only
Chapter 9 – Nuance Full-Text OCR
PaperVision® Capture Administration Guide 200
Microsoft PowerPoint 2007
This converter generates a Microsoft PowerPoint 2007 (.pptx) file.
Bullets: Retains bullets in output file
Character Colors: Retains character colors in output file
Character Scaling: Retains character scaling in output file
Character Spacing: Retains character spacing in output file
Note:
If this property is set to True, text characters can be expanded or condensed in output
file. If images contain text with approximately two spaces between words, a single
space will be generated; if four or five spaces exist between words, a tab will be
generated.
Column Breaks: Inserts column breaks in output file
Cross-References: Retains cross-references (hyperlinks) in output file
Drop Caps: Retains drop caps (drop caps display enlarged first letter of paragraph that drops
down two or more lines)
Field Codes: Retains field codes in output file
Headers/Footers: Specifies handling of headers and footers in output file
• Auto Format: Automatically formats headers and footers to match original style
• Formatted Text: Retains text (without columns); also retains paragraph, font,
graphics, and table styles
• Ignore: Ignores header and footer text from original file
• In Boxes:
• Tabulated Form:
• Tabulated Form in Box:
Image Color: Assigns image color in output file
• 24-bit Color (True Color)
• Grayscale
• Black and White
• Original

Chapter 9 – Nuance Full-Text OCR
PaperVision® Capture Administration Guide 201
Microsoft PowerPoint 2007 (continued)
Image DPI: Specifies dots per inch (DPI) resolution setting for images in output file
• DPI 72
• DPI 100
• DPI 150
• DPI 200
• DPI 300
• None
• Original
Line Breaks: Inserts line breaks between lines of recognized text
Line Numbering Zones: Retains line numbering zones in output file
Output Format: Specifies type of format retention in output file
• Formatted Text: Retains text (without columns); also retains paragraph format, font,
graphics, table styles, highlights, and strikeouts (ignores layout-related formatting)
• True Page: Retains original page and column layout (involves absolute positioning
of text, pictures, tables, and frames)
• Ignore All: Ignores all format styles in original file
Page Breaks: Specifies the handling of page breaks in output file
Page Color: Retains page background color in output file
Page Margins: Retains page margins in output file
Rule Lines: Retains rule lines in output file
Tabs: Retains original tab positions in output file
Title: Displays title of output file

Chapter 9 – Nuance Full-Text OCR
PaperVision® Capture Administration Guide 202
Microsoft PowerPoint 97
This converter generates an .rtf file interpreted by Microsoft PowerPoint 97.
Bullets: Retains bullets in output file
Headers/Footers: Specifies handling of headers and footers in output file
• Convert to Ordinary Text: Converts headers/footers to plain text
• Ignore: Ignores header and footer text from original file
Image Color: Assigns image color in output file
• 24-bit Color (True Color)
• Grayscale
• Black and White
• Original
Image DPI: Specifies dots per inch (DPI) resolution setting for images in output file
• DPI 72
• DPI 100
• DPI 150
• DPI 200
• DPI 300
• None
• Original
Line Numbering Zones: Retains line numbering zones in output file
Tabs: Retains original tab positions in output file

Chapter 9 – Nuance Full-Text OCR
PaperVision® Capture Administration Guide 203
Microsoft Publisher
This converter generates an .rtf file interpreted by Microsoft Publisher.
Bullets: Retains bullets in output file
Character Colors: Retains character colors in output file
Character Scaling: Retains character scaling in output file
Character Spacing: Retains character spacing in output file
Note:
If this property is set to True, text characters can be expanded or condensed in output
file. If images contain text with approximately two spaces between words, a single
space will be generated; if four or five spaces exist between words, a tab will be
generated.
Headers/Footers: Specifies handling of headers and footers in output file
• Convert to Ordinary Text: Converts headers/footers to plain text
• Ignore: Ignores header and footer text from original file
Image Color: Assigns image color in output file
• 24-bit Color (True Color)
• Grayscale
• Black and White
• Original
Image DPI: Specifies dots per inch (DPI) resolution setting for images in output file
• DPI 72
• DPI 100
• DPI 150
• DPI 200
• DPI 300
• None
• Original
Line Breaks: Inserts line breaks between lines of recognized text
Line Numbering Zones: Retains line numbering zones in output file
Output Format: Specifies type of format retention in output file
• Formatted Text: Retains text (without columns); also retains paragraph format, font,
graphics, table styles, highlights, and strikeouts (ignores layout-related formatting)
• Ignore All: Ignores all format styles in original file

Chapter 9 – Nuance Full-Text OCR
PaperVision® Capture Administration Guide 204
Microsoft Publisher (continued)
Tables: Specifies handling of tables in output file
• Convert to Separated by Tabs: Does not retain tables, but converts tables to
columns separated by tabs
• Retain Tables: Retains all tables from original file
Tabs: Retains original tab positions from original file

Chapter 9 – Nuance Full-Text OCR
PaperVision® Capture Administration Guide 205
Microsoft Reader
This converter generates a Microsoft Reader (.lit) file that can be uploaded to Windows-based
hand-held devices.
Bullets: Retains bullets in output file
Cross-References: Retains cross-references (hyperlinks) in output file
Headers/Footers: Specifies handling of headers and footers in output file
• Convert to Ordinary Text: Converts headers/footers to plain text
• Ignore: Ignores header and footer text from original file
Image Color: Assigns image color in output file
• 24-bit Color (True Color)
• Grayscale
• Black and White
• Original
Image DPI: Specifies dots per inch (DPI) resolution setting for images in output file
• DPI 72
• DPI 100
• DPI 150
• DPI 200
• DPI 300
• None
• Original
Line Numbering Zones: Retains line numbering zones in output file
Output Format: Specifies type of format retention in output file
• Formatted Text: Retains text (without columns); also retains paragraph format, font,
graphics, table styles, highlights, and strikeouts (ignores layout-related formatting)
• Ignore All: Ignores all format styles in original file
Tables: Specifies handling of tables in output file
• Convert to Separated by Tabs: Does not retain tables, but converts tables to
columns separated by tabs
• Retain Tables: Retains all tables from original file

Chapter 9 – Nuance Full-Text OCR
PaperVision® Capture Administration Guide 206
Microsoft Word 2007
This converter generates a Microsoft Word .docx file that uses features supported by Word
2007.
Note:
Page width and height must be between 0.1 and 22 inches for all Microsoft Word and
RTF converters. Otherwise, an error will appear if you use the Flowing Page or True
Page output formats with .doc(x) and .rtf file extensions.
Bullets: Retains bullets in output file
Character Colors: Retains character colors in output file
Character Scaling: Retains character scaling in output file
Character Spacing: Retains character spacing in output file
Note:
If this property is set to True, text characters can be expanded or condensed in output
file. If images contain text with approximately two spaces between words, a single
space will be generated; if four or five spaces exist between words, a tab will be
generated.
Column Breaks: Inserts column breaks in output file
Columns: Retains columns in output file
Cross-References: Retains cross-references (hyperlinks) in output file
Drop Caps: Retains drop caps (drop caps display enlarged first letter of paragraph that drops
down two or more lines)
Field Codes: Retains field codes in output file
Headers/Footers: Specifies handling of headers and footers in output file
• Auto Format: Automatically formats headers and footers to match original style
• Formatted Text: Retains text (without columns); also retains paragraph, font,
graphics, and table styles
• Ignore: Ignores header and footer text from original file
• In Boxes:
• Tabulated Form:
• Tabulated Form in Box:
Image Color: Assigns image color in output file
• 24-bit Color (True Color)
• Grayscale
• Black and White
• Original

Chapter 9 – Nuance Full-Text OCR
PaperVision® Capture Administration Guide 207
Microsoft Word 2007 (continued)
Image DPI: Specifies dots per inch (DPI) resolution setting for images in output file
• DPI 72
• DPI 100
• DPI 150
• DPI 200
• DPI 300
• None
• Original
Image in Text Box: Surrounds images with text boxes
Line Breaks: Inserts line breaks between lines of recognized text
Line Numbering Zones: Retains line numbering zones in output file
Output Format: Specifies type of format retention in output file
• Flowing Page: Available for applications that handle columns, preserves original
page and column layout so text flows across columns (boxes, frames used only when
necessary)
• Formatted Text: Retains text (without columns); also retains paragraph, font,
graphics, and table styles
• True Page: Retains original page and column layout (involves absolute positioning
of text, pictures, tables, and frames)
• Ignore All: Ignores all format styles in original file
Page Breaks: Specifies handling of page breaks in output file (Auto, Always, or Never)
Page Color: Retains page background color in output file
Page Consolidation: Combines pages in output file
Read-Only: Marks output file as read-only
Rule Lines: Retains rule lines in output file
Styles: Retains styles from original file
Tables: Specifies handling of tables in output file
• Convert to Separated by Tabs: Does not retain tables, but converts tables to
columns separated by tabs
• Retain Tables: Retains tables from original file
Tabs: Retains original tab positions from original file
Chapter 9 – Nuance Full-Text OCR
PaperVision® Capture Administration Guide 208
Microsoft Word 2003 (WordML)
This converter generates an XML file and uses features supported by Microsoft Word 2003.
Note:
Page width and height must be between 0.1 and 22 inches for all Microsoft Word and
RTF converters. Otherwise, an error will appear if you use the Flowing Page or True
Page output formats with .doc(x) and .rtf file extensions.
Bullets: Retains bullets in output file
Character Colors: Retains character colors in output file
Character Scaling: Retains character scaling in output file
Character Spacing: Retains character spacing in output file
Note:
If this property is set to True, text characters can be expanded or condensed in output
file. If images contain text with approximately two spaces between words, a single
space will be generated; if four or five spaces exist between words, a tab will be
generated.
Column Breaks: Inserts column breaks in output file
Cross-References: Retains cross-references (hyperlinks) in output file
Drop Caps: Retains drop caps (drop caps display enlarged first letter of paragraph that drops
down two or more lines)
Field Codes: Retains field codes in output file
Image Color: Assigns image color in output file
• 24-bit Color (True Color)
• Grayscale
• Black and White
• Original
Image DPI: Specifies dots per inch (DPI) resolution setting for images in output file
• DPI 72
• DPI 100
• DPI 150
• DPI 200
• DPI 300
• None
• Original
Line Breaks: Inserts line breaks between lines of recognized text
Line Numbering Zones: Retains line numbering zones in output file

Chapter 9 – Nuance Full-Text OCR
PaperVision® Capture Administration Guide 209
Microsoft Word 2003 (WordML - continued)
Output Format: Specifies type of format retention in output file
• Flowing Page: Available for applications that handle columns, preserves original
page and column layout so text flows across columns (boxes, frames used only when
necessary)
• Formatted Text: Retains text (without columns); also retains paragraph format, font,
graphics, table styles, highlights, and strikeouts (ignores layout-related formatting)
• True Page: Retains original page and column layout (involves absolute positioning
of text, pictures, tables, and frames)
• Ignore All: Ignores all format styles in original file
Page Color: Retains page background color in output file
Page Consolidation: Combines pages in output file
Read-Only: Mark output file as read-only
Rule Lines: Retains rule lines in output file
Tabs: Retains original tab positions from original file
Chapter 9 – Nuance Full-Text OCR
PaperVision® Capture Administration Guide 210
Microsoft Word 2000/XP
This converter generates a .doc file and uses features supported by Microsoft Word 2000 and
later.
Note:
Page width and height must be between 0.1 and 22 inches for all Microsoft Word and
RTF converters. Otherwise, an error will appear if you use the Flowing Page or True
Page output formats with .doc(x) and .rtf file extensions.
Bullets: Retains bullets in output file
Character Colors: Retains character colors in output file
Character Scaling: Retains character scaling in output file
Character Spacing: Retains character spacing in output file
Note:
If this property is set to True, text characters can be expanded or condensed in output
file. If images contain text with approximately two spaces between words, a single
space will be generated; if four or five spaces exist between words, a tab will be
generated.
Column Breaks: Inserts column breaks in output file
Cross-References: Retains cross-references (hyperlinks) in output file
Drop Caps: Retains drop caps (drop caps display enlarged first letter of paragraph that drops
down two or more lines)
Field Codes: Retains field codes in output file
Headers/Footers: Specifies handling of headers and footers in output file
• Auto Format: Automatically formats headers and footers to match original style
• Formatted Text: Retains text (without columns); also retains paragraph, font,
graphics, and table styles
• Ignore: Ignores header and footer text from original file
• In Boxes:
• Tabulated Form:
• Tabulated Form in Box:
Image Color: Assigns image color in output file
• 24-bit Color (True Color)
• Grayscale
• Black and White
• Original

Chapter 9 – Nuance Full-Text OCR
PaperVision® Capture Administration Guide 211
Microsoft Word 2000/XP (continued)
Image DPI: Specifies dots per inch (DPI) resolution setting for images in output file
• DPI 72
• DPI 100
• DPI 150
• DPI 200
• DPI 300
• None
• Original
Line Breaks: Inserts line breaks between lines of recognized text
Line Numbering Zones: Retains line numbering zones in output file
Output Format: Specifies type of format retention in output file
• Flowing Page: Available for applications that handle columns, preserves original
page and column layout so text flows across columns (boxes, frames used only when
necessary)
• Formatted Text: Retains text (without columns); also retains paragraph format, font,
graphics, table styles, highlights, and strikeouts (ignores layout-related formatting)
• True Page: Retains original page and column layout (involves absolute positioning
of text, pictures, tables, and frames)
• Ignore All: Ignores all format styles in original file
Page Consolidation: Combines pages in output file
Rule Lines: Retains rule lines in output file
Tabs: Retains original tab positions from original file
Chapter 9 – Nuance Full-Text OCR
PaperVision® Capture Administration Guide 212
PaperFlow Full-Text
The PaperFlow converter generates a .txt file containing the full-text results that you can
subsequently import into the OCRFlow application. You can configure OCR page properties
that are described in the section on OCR Page Properties in Chapter 8.
PaperVision Enterprise Full-Text
The PaperVision Enterprise converter generates a .txt file containing the full-text results that
you can subsequently import into the PaperVision Enterprise application. You can configure
OCR page properties that are described in the section on OCR Page Properties in Chapter 8.
Note:
To export full-text data using either the PaperFlow or PVE export script, specify the
Nuance Full-Text OCR job step name in the OCR_JOB_STEP_NAME variable
within the script. The following line appears in the script:
private const string OCR_JOB_STEP_NAME = “”;

Chapter 9 – Nuance Full-Text OCR
PaperVision® Capture Administration Guide 213
PDF
This converter supports several PDF features and is dependent upon the positions of recognized
characters. Exported in the True Page output format, the resulting PDF is viewable, searchable
and editable in a PDF viewer.
Color Quality: Specifies color quality in output file
• Good
• Minimum
• Lossless (Best Quality)
Compression Types: Specifies type of compression applied to PDF output file
• Contents: Compresses text content and line art
• Embedded Files: Compresses embedded files
• Flate: Applies flate compression (suitable for use on images with large areas of
single colors or repeating patterns)
• JBIG2: Applies JBIG2 compression (suitable for use on highly-compressed black
and white images or monochrome images)
• JPEG2000: Applies JPEG2000 compression (suitable for photographs or images
with gradual color changes)
• LZW: Applies LZW compression suitable for compressing text files (reduces file
size; suitable for use with .gif images from web sites and TIFF images)
Cross-References: Retains cross-references (hyperlinks) in output file
Encryption Level: Type of encryption applied to PDF output file
• None
• 40-bit RC4 (used in Adobe Acrobat 3.x and 4.x; lowest encryption level)
• 128-bit RC4 (used in Adobe Acrobat 5.x and later; medium encryption level)
• 128-bit AES (used in Adobe Acrobat 7.x and later; highest encryption level)
Headers/Footers: Specifies handling of headers and footers in output file
• Auto Format: Automatically formats headers and footers to match original style
• Ignore: Ignores header and footer text from original file
Image Color: Assigns image color in output file
• 24-bit Color (True Color)
• Grayscale
• Black and White
• Original

Chapter 9 – Nuance Full-Text OCR
PaperVision® Capture Administration Guide 214
PDF (continued)
Image DPI: Specifies dots per inch (DPI) resolution setting for images in output file
• DPI 72
• DPI 100
• DPI 150
• DPI 200
• DPI 300
• None
• Original
Image Substitutes: Covers suspect words with small images
Linearized PDF: If enabled, this setting optimizes PDF files for efficient web display. The
first page will load quickly into a web page, and the remaining pages will load while the
PDF file is being viewed. The browser determines which page elements appear first
(typically, headings and text) and the elements that follow (e.g., larger pictures). This
property also optimizes efficiency when you skip to another page in the PDF file.
Line Numbering Zones: Retains line numbering zones in output file
Mixed Raster Content: Specifies level of Mixed Raster Content (MRC) in output file
(MRC is a process that uses image segmentation methods to improve contrast resolution of
raster images comprised of pixels.)
• No MRC
• Medium Compression
• Lossless Compression (Best Quality)
• Best Compression (Smallest File Size)
Outline Props: Specifies whether to retain bookmarks for pages
Output Format: Specifies type of format retention in output file
• True Page: Retains original page and column layout (involves absolute positioning
of text, pictures, tables, and frames)
Password (Open): Displays password required to open PDF file
Password (Permissions): Displays password required to edit PDF file, such as printing and
copying content
Note:
To apply passwords to PDF files, you must select an appropriate Encryption Level
setting.

Chapter 9 – Nuance Full-Text OCR
PaperVision® Capture Administration Guide 215
PDF (continued)
PDF Compatibility: Specifies compatible PDF version (offers widest usability and designed
to display identically in most environments; excludes audio and video files)
• Optimize for Quality
• Optimize for Size
• PDF 1.0
• PDF 1.1
• PDF 1.2
• PDF 1.3
• PDF 1.4
• PDF-A
• PDF 1.5
• PDF 1.6
PDF Form Visuality: Displays PDF form’s visual components
PDF Form Visuality (User Set):
PDF Thumbnails: Creates thumbnail images in output file
Rule Lines: Retains rule lines in output file
Signature (Certification Description): Description for signature's certificate
Signature (SHA Thumbprint): Signature’s SHA1 thumbprint
Signature Type: Signature’s handler type (a digital signature authenticates PDF documents
to ensure that recipients receive unaltered versions from a trusted source)
URL (Highlight): Highlights URL address in output file
URL (Underline): Underlines URL address in output file

Chapter 9 – Nuance Full-Text OCR
PaperVision® Capture Administration Guide 216
PDF Edited
Unlike the PDF converter, the PDF Edited converter does not rely on recognized characters’
positions, so you can insert sections of text in the editor. This converter is recommended if you
have made significant edits in the recognition results. The resulting PDF file is viewable,
searchable, and editable.
Bullets: Retains bullets in output file
Color Quality: Specifies color quality in output file
• Good
• Minimum
• Lossless (Best Quality)
Compression Types: Specifies type of compression applied to PDF output file
• Contents: Compresses text content and line art
• Embedded Files: Compresses embedded files
• Flate: Applies flate compression (suitable for use on images with large areas of
single colors or repeating patterns)
• JBIG2: Applies JBIG2 compression (suitable for use on highly-compressed black
and white images or monochrome images)
• JPEG2000: Applies JPEG2000 compression (suitable for photographs or images
with gradual color changes)
• LZW: Applies LZW compression suitable for compressing text files (reduces file
size; suitable for use with .gif images from web sites and TIFF images)
Cross-References: Retains cross-references (hyperlinks) in output file
Drop Caps: Retains drop caps (drop caps display enlarged first letter of paragraph that drops
down two or more lines)
Encryption Level: Type of encryption applied to PDF output file
• None
• 40-bit RC4 (used in Adobe Acrobat 3.x and 4.x; lowest encryption level)
• 128-bit RC4 (used in Adobe Acrobat 5.x and later; medium encryption level)
• 128-bit AES (used in Adobe Acrobat 7.x and later; highest encryption level)
Field Codes: Retains field codes in output file
Fonts (External): Includes external fonts in output file

Chapter 9 – Nuance Full-Text OCR
PaperVision® Capture Administration Guide 217
PDF Edited (continued)
Headers/Footers: Specifies handling of headers and footers in output file (e.g., converts
headers and footers to plain text, excludes them, etc.)
• Auto Format: Automatically formats headers and footers to match original style
• Ignore: Ignores header and footer text from original file
Image Color: Assigns image color in output file
• 24-bit Color (True Color)
• Grayscale
• Black and White
• Original
Image DPI: Specifies dots per inch (DPI) resolution setting for images in output file
• DPI 72
• DPI 100
• DPI 150
• DPI 200
• DPI 300
• None
• Original
Linearized PDF: If enabled, this setting optimizes PDF files for efficient web display. The
first page will load quickly into a web page, and the remaining pages will load while the
PDF file is being viewed. The browser determines which page elements appear first
(typically, headings and text) and the elements that follow (e.g., larger pictures). This
property also optimizes efficiency when you skip to another page in the PDF file.
Line Breaks: Inserts line breaks between lines of recognized text
Line Numbering Zones: Retains line numbering zones in output file
Mixed Raster Content: Specifies level of Mixed Raster Content (MRC) in output file
(MRC is a process that uses image segmentation methods to improve contrast resolution of
raster images comprised of pixels.)
• No MRC
• Medium Compression
• Lossless Compression (Best Quality)
• Best Compression (Smallest File Size)
Outline Props: Specifies whether to retain bookmarks for pages
Chapter 9 – Nuance Full-Text OCR
PaperVision® Capture Administration Guide 218
PDF Edited (continued)
Output Format: Specifies type of format retention in output file
• Ignore All: Ignores all format styles in original file
• Formatted Text: Retains text (without columns); also retains paragraph format, font,
graphics, table styles, highlights, and strikeouts (ignores layout-related formatting)
• True Page: Retains original page and column layout (involves absolute positioning
of text, pictures, tables, and frames)
Password (Open): Displays password required to open PDF file
Password (Permissions): Displays password required to edit PDF file, such as printing and
copying content
Note:
To apply passwords to PDF files, you must select an appropriate Encryption Level
setting.
PDF Compatibility: Specifies compatible PDF version
• Optimize for Quality
• Optimize for Size
• PDF 1.0
• PDF 1.1
• PDF 1.2
• PDF 1.3
• PDF 1.4
• PDF-A
• PDF 1.5
• PDF 1.6
PDF Form Visuality: Displays PDF form’s visual components
PDF Form Visuality (User Set):
PDF Forms: Shows form layer in output file
Rule Lines: Retains rule lines in output file
Signature (Certification Description): Description for signature's certificate
Signature (SHA Thumbprint): Signature’s SHA1 thumbprint
Signature Type: Signature’s handler type (a digital signature authenticates PDF documents
to ensure that recipients receive unaltered versions from a trusted source)
Styles: Retains styles from original document
Tabs: Retains original tab positions in output file
Title: Displays title of output file
URL (Highlight): Highlights URL address in output file
URL (Underline): Underlines URL address in output file

Chapter 9 – Nuance Full-Text OCR
PaperVision® Capture Administration Guide 219
PDF Searchable Image
Suitable for archiving and indexing, the PDF Searchable Image converter retains the original
image in the foreground and preserves recognized text in the background. This converter allows
the OCR contents of an image-based PDF to remain searchable without compromising the
original (hidden) text layer. Text is positioned directly behind corresponding image text,
making it searchable and selectable in most PDF viewers. The resulting PDF file is viewable
only and cannot be modified in a PDF editor. Words recognized in a document are highlighted
in the image.
Bullets: Retains bullets in output file
Color Quality: Specifies color quality in output file
• Good
• Minimum
• Lossless (Best Quality)
Compression Types: Specifies type of compression applied to PDF output file
• Contents: Compresses text content and line art
• Embedded Files: Compresses embedded files
• Flate: Applies flate compression (suitable for use on images with large areas of
single colors or repeating patterns)
• JBIG2: Applies JBIG2 compression (suitable for use on highly-compressed black
and white images or monochrome images)
• JPEG2000: Applies JPEG2000 compression (suitable for photographs or images
with gradual color changes)
• LZW: Applies LZW compression suitable for compressing text files (reduces file
size; suitable for use with .gif images from web sites and TIFF images)
Cross-References: Retains cross-references (hyperlinks) in output file
Encryption Level: Type of encryption applied to PDF output file
• None
• 40-bit RC4 (used in Adobe Acrobat 3.x and 4.x; lowest encryption level)
• 128-bit RC4 (used in Adobe Acrobat 5.x and later; medium encryption level)
• 128-bit AES (used in Adobe Acrobat 7.x and later; highest encryption level)
Fonts (External): Includes external fonts in output file

Chapter 9 – Nuance Full-Text OCR
PaperVision® Capture Administration Guide 220
PDF Searchable Image (continued)
Headers/Footers: Specifies handling of headers and footers in output file
• Auto Format: Automatically formats headers and footers to match original style
• Ignore: Ignores header and footer text from original file
Image Color: Assigns image color in output file
• 24-bit Color (True Color)
• Grayscale
• Black and White
• Original
Image DPI: Specifies dots per inch (DPI) resolution setting for images in output file
• DPI 72
• DPI 100
• DPI 150
• DPI 200
• DPI 300
• None
• Original
Linearized PDF: If enabled, this setting optimizes PDF files for efficient web display. The
first page will load quickly into a web page, and the remaining pages will load while the
PDF file is being viewed. The browser determines which page elements appear first
(typically, headings and text) and the elements that follow (e.g., larger pictures). This
property also optimizes efficiency when you skip to another page in the PDF file.
Line Numbering Zones: Retains line numbering zones in output file
Mixed Raster Content: Specifies level of Mixed Raster Content (MRC) in output file
(MRC is a process that uses image segmentation methods to improve contrast resolution of
raster images comprised of pixels.)
• No MRC
• Medium Compression
• Lossless Compression (Best Quality)
• Best Compression (Smallest File Size)
Outline Props: Specifies whether to retain bookmarks for pages
Output Format: Specifies type of format retention in output file
• True Page: Retains original page and column layout (involves absolute positioning
of text, pictures, tables, and frames)

Chapter 9 – Nuance Full-Text OCR
PaperVision® Capture Administration Guide 221
PDF Searchable Image (continued)
Password (Open): Displays password required to open PDF file
Password (Permissions): Displays password required to edit PDF file, such as printing and
copying content
Note:
To apply passwords to PDF files, you must select an appropriate Encryption Level
setting.
PDF Compatibility: Specifies compatible PDF version
• Optimize for Quality
• Optimize for Size
• PDF 1.0
• PDF 1.1
• PDF 1.2
• PDF 1.3
• PDF 1.4
• PDF-A
• PDF 1.5
• PDF 1.6
PDF Thumbnail: Creates thumbnail images in output file
Rule Lines: Retains rule lines in output file
Signature (Certification Description): Description for signature's certificate
Signature (SHA Thumbprint): Signature’s SHA1 thumbprint
Signature Type: Signature’s handler type (a digital signature authenticates PDF documents
to ensure that recipients receive unaltered versions from a trusted source)
Styles: Retains styles from original document
URL (Highlight): Highlights URL address in output file
URL (Underline): Underlines URL address in output file

Chapter 9 – Nuance Full-Text OCR
PaperVision® Capture Administration Guide 222
PDF with Image Substitutes
Reject and suspect characters contain image overlays in the resulting output file, so uncertain
characters display as they appeared in the original document. The resulting PDF file is
viewable, editable, and searchable.
Bullets: Retains bullets in output file
Color Quality: Specifies color quality in output file
• Good
• Minimum
• Lossless (Best Quality)
Compression Types: Specifies type of compression applied to PDF output file
• Contents: Compresses text content and line art
• Embedded Files: Compresses embedded files
• Flate: Applies flate compression (suitable for use on images with large areas of
single colors or repeating patterns)
• JBIG2: Applies JBIG2 compression (suitable for use on highly-compressed black
and white images or monochrome images)
• JPEG2000: Applies JPEG2000 compression (suitable for photographs or images
with gradual color changes)
• LZW: Applies LZW compression suitable for compressing text files (reduces file
size; suitable for use with .gif images from web sites and TIFF images)
Cross-References: Retains cross-references (hyperlinks) in output file
Encryption Level: Type of encryption applied to PDF output file
• None
• 40-bit RC4 (used in Adobe Acrobat 3.x and 4.x; lowest encryption level)
• 128-bit RC4 (used in Adobe Acrobat 5.x and later; medium encryption level)
• 128-bit AES (used in Adobe Acrobat 7.x and later; highest encryption level)
Fonts (External): Includes external fonts in output file
Headers/Footers: Specifies handling of headers and footers in output file
• Auto Format: Automatically formats headers and footers to match original style
• Ignore: Ignores header and footer text from original file

Chapter 9 – Nuance Full-Text OCR
PaperVision® Capture Administration Guide 223
PDF with Image Substitutes (continued)
Image Color: Assigns image color in output file
• 24-bit Color (True Color)
• Grayscale
• Black and White
• Original
Image DPI: Specifies dots per inch (DPI) resolution setting for images in output file
• DPI 72
• DPI 100
• DPI 150i
• DPI 200
• DPI 300
• None
• Original
Image Substitutes: Covers suspect words with small images
Linearized PDF: If enabled, this setting optimizes PDF files for efficient web display. The
first page will load quickly into a web page, and the remaining pages will load while the
PDF file is being viewed. The browser determines which page elements appear first
(typically, headings and text) and the elements that follow (e.g., larger pictures). This
property also optimizes efficiency when you skip to another page in the PDF file.
Line Breaks: Inserts line breaks between lines of recognized text
Line Numbering Zones: Retains line numbering zones in output file
Mixed Raster Content: Specifies level of Mixed Raster Content (MRC) in output file
(MRC is a process that uses image segmentation methods to improve contrast resolution of
raster images comprised of pixels.)
• No MRC
• Medium Compression
• Lossless Compression (Best Quality)
• Best Compression (Smallest File Size)
Outline Props: Specifies whether to retain bookmarks for pages
Output Format: Specifies type of format retention in output file
• True Page: Retains original page and column layout (involves absolute positioning
of text, pictures, tables, and frames)
Page Breaks: Specifies the handling of page breaks in output file

Chapter 9 – Nuance Full-Text OCR
PaperVision® Capture Administration Guide 224
PDF with Image Substitutes (continued)
Password (Open): Displays password required to open PDF file
Password (Permissions): Displays password required to edit PDF file, such as printing and
copying content
Note:
To apply passwords to PDF files, you must select an appropriate Encryption Level
setting.
PDF Compatibility: Specifies compatible PDF version
• Optimize for Quality
• Optimize for Size
• PDF 1.0
• PDF 1.1
• PDF 1.2
• PDF 1.3
• PDF 1.4
• PDF-A
• PDF 1.5
• PDF 1.6
PDF Form Visuality: Displays PDF form’s visual components
PDF Thumbnail: Creates thumbnail images in output file
Rule Lines: Retains rule lines in output file
Signature (Certification Description): Description for signature's certificate
Signature (SHA Thumbprint): Signature’s SHA1 thumbprint
Signature Type: Signature’s handler type (a digital signature authenticates PDF documents
to ensure that recipients receive unaltered versions from a trusted source)
Styles: Retains styles from original document
URL (Highlight): Highlights URL address in output file
URL (Underline): Underlines URL address in output file
Chapter 9 – Nuance Full-Text OCR
PaperVision® Capture Administration Guide 225
RTF 2000 ExactWord
This converter corrects pagination errors by making minor modifications to spacing values.
Note:
Page width and height must be between 0.1 and 22 inches for all Microsoft Word and RTF
converters. Otherwise, an error will appear if you use the Flowing Page or True Page
output formats with .doc(x) and .rtf file extensions.
Bullets: Retains bullets in output file
Character Colors: Retains character colors in output file
Character Scaling: Retains character scaling in output file
Character Spacing: Retains character spacing in output file
Note:
If this property is set to True, text characters can be expanded or condensed in output
file. If images contain text with approximately two spaces between words, a single
space will be generated; if four or five spaces exist between words, a tab will be
generated.
Column Breaks: Inserts column breaks in output file
Cross-References: Retains cross-references (hyperlinks) in output file
Drop Caps: Retains drop caps (drop caps display enlarged first letter of paragraph that drops
down two or more lines)
Field Codes: Retains field codes in output file
Headers/Footers: Specifies handling of headers and footers in output file
• Auto Format: Automatically formats headers and footers to match original style
• Convert to Plain Text: Converts headers/footers to plain text
• Ignore: Ignores header and footer text from original file
• In Boxes:
• Tabulated Form:
• Tabulated Form in Box:
Image Color: Assigns image color in output file
• 24-bit Color (True Color)
• Grayscale
• Black and White
• Original

Chapter 9 – Nuance Full-Text OCR
PaperVision® Capture Administration Guide 226
RTF 2000 ExactWord (continued)
Image DPI: Specifies dots per inch (DPI) resolution setting for images in output file
• DPI 72
• DPI 100
• DPI 150
• DPI 200
• DPI 300
• None
• Original
Line Breaks: Inserts line breaks between lines of recognized text
Line Numbering Zones: Retains line numbering zones in output file
No Textbox: Excludes text boxes from output file
Output Format: Specifies type of format retention in output file
• Flowing Page: Available for applications that handle columns, preserves original
page and column layout so text flows across columns (boxes, frames used only when
necessary)
• Formatted Text: Retains text (without columns); also retains paragraph format, font,
graphics, table styles, highlights, and strikeouts (ignores layout-related formatting)
• True Page: Retains original page and column layout (involves absolute positioning
of text, pictures, tables, and frames)
• Ignore All: Ignores all format styles in original file
Page Breaks: Specifies the handling of page breaks in output file
Page Color: Retains page background color in output file
Page Consolidation: Combines pages in output file
Page Margins: Retains original page margins in output file
Rule Lines: Retains rule lines in output file
Tabs: Retains original tab positions in output file

Chapter 9 – Nuance Full-Text OCR
PaperVision® Capture Administration Guide 227
RTF 6.0/95
Based on Version 1.3 of the RTF Specification, this converter generates a file interpreted by
most RTF editors, but may be significantly larger than more recent RTF converters.
Note:
Page width and height must be between 0.1 and 22 inches for all Microsoft Word and
RTF converters. Otherwise, an error will appear if you use the Flowing Page or True
Page output formats with .doc(x) and .rtf file extensions.
Anchor Paragraphs: Anchors all paragraphs in output file
Bullets: Retains bullets in output file
Character Colors: Retains character colors in output file
Character Scaling: Retains character scaling in output file
Character Spacing: Retains character spacing in output file
Note:
If this property is set to True, text characters can be expanded or condensed in output
file. If images contain text with approximately two spaces between words, a single
space will be generated; if four or five spaces exist between words, a tab will be
generated.
Column Breaks: Inserts column breaks in output file
Consolidate Pages: Combines pages in output file
Cross-References: Retains cross-references (hyperlinks) in output file
Drop Caps: Retains drop caps (drop caps display enlarged first letter of paragraph that drops
down two or more lines)
Field Codes: Retains field codes in output file
Headers/Footers: Specifies handling of headers and footers in output file
• Auto Format: Automatically formats headers and footers to match original style
• Convert to Ordinary Text: Converts headers/footers to plain text
• Ignore: Ignores header and footer text from original file
• In Boxes:
• Tabulated Form:
• Tabulated Form in Box:
Image Color: Assigns image color in output file
• 24-bit Color (True Color)
• Grayscale
• Black and White
• Original

Chapter 9 – Nuance Full-Text OCR
PaperVision® Capture Administration Guide 228
RTF 6.0/95 (continued)
Image DPI: Specifies dots per inch (DPI) resolution setting for images in output file
• DPI 72
• DPI 100
• DPI 150
• DPI 200
• DPI 300
• None
• Original
Image in Text Box: Surrounds images with text boxes
Line Breaks: Inserts line breaks between lines of recognized text
Line Numbering Zones: Retains line numbering zones in output file
Output Format: Specifies type of format retention in output file
• Flowing Page: Available for applications that handle columns, preserves original page
and column layout so text flows across columns (boxes, frames used only when
necessary)
• Formatted Text: Retains text (without columns); also retains paragraph format, font,
graphics, table styles, highlights, and strikeouts (ignores layout-related formatting)
• True Page: Retains original page and column layout (involves absolute positioning of
text, pictures, tables, and frames)
• Ignore All: Ignores all format styles in original file
Page Breaks: Specifies the handling of page breaks in output file
Page Color: Retains page background color in output file
Rule Lines: Retains rule lines in output file
Tabs: Retains original tab positions in output file
Title: Displays title of output file
Word 2000 or Higher: Output file is compatible with Word 2000 and later versions
Chapter 9 – Nuance Full-Text OCR
PaperVision® Capture Administration Guide 229
RTF Word 97
This converter generates a file that uses features interpreted by Microsoft Word 97 and later or
by RTF readers with similar compatibility.
Note:
Page width and height must be between 0.1 and 22 inches for all Microsoft Word and
RTF converters. Otherwise, an error will appear if you use the Flowing Page or True
Page output formats with .doc(x) and .rtf file extensions.
Anchor Paragraphs: Anchors all paragraphs in output file
Bookmark in Every Paragraph: Inserts bookmarks at the beginning of every paragraph
Box Wrapping: Wraps content around text boxes
Boxes: Includes text boxes in output file
Bullets: Retains bullets in output file
Character Colors: Retains character colors in output file
Character Scaling: Retains character scaling in output file
Character Spacing: Retains character spacing in output file
Note:
If this property is set to True, text characters can be expanded or condensed in output
file. If images contain text with approximately two spaces between words, a single
space will be generated; if four or five spaces exist between words, a tab will be
generated.
Column Breaks: Inserts column breaks in output file
Cross-References: Retains cross-references (hyperlinks) in output file
Drop Caps: Retains drop caps (drop caps display enlarged first letter of paragraph that drops
down two or more lines)
Field Codes: Retains field codes in output file
Headers/Footers: Specifies handling of headers and footers in output file
• Auto Format: Automatically formats headers and footers to match original style
• Convert to Ordinary Text: Converts headers/footers to plain text
• Ignore: Ignores header and footer text from original file
• In Boxes:
• Tabulated Form:
• Tabulated Form in Box:

Chapter 9 – Nuance Full-Text OCR
PaperVision® Capture Administration Guide 230
RTF Word 97 (continued)
Image Color: Assigns image color in output file
• 24-bit Color (True Color)
• Grayscale
• Black and White
• Original
Image DPI: Specifies dots per inch (DPI) resolution setting for images in output file
• DPI 72
• DPI 100
• DPI 150
• DPI 200
• DPI 300
• None
• Original
Line Breaks: Inserts line breaks between lines of recognized text
Line Numbering Zones: Retains line numbering zones in output file
Output Format: Specifies type of format retention in output file
• Flowing Page: Available for applications that handle columns, preserves original page
and column layout so text flows across columns (boxes, frames used only when
necessary)
• Formatted Text: Retains text (without columns); also retains paragraph format, font,
graphics, table styles, highlights, and strikeouts (ignores layout-related formatting)
• Ignore All: Ignores all format styles in original file
• True Page: Retains original page and column layout (involves absolute positioning of
text, pictures, tables, and frames)
Page Breaks: Specifies the handling of page breaks in output file
• Always
• Auto
• Never
Page Color: Retains page background color in output file
Page Consolidation: Combines pages in output file
Rule Lines: Retains rule lines in output file
Tabs: Retains original tab positions in output file

Chapter 9 – Nuance Full-Text OCR
PaperVision® Capture Administration Guide 231
RTF Word 2000
This converter generates file interpreted by most .rtf readers and uses features only supported
by Word 2000 and later.
Note:
Page width and height must be between 0.1 and 22 inches for all Microsoft Word and
RTF converters. Otherwise, an error will appear if you use the Flowing Page or True
Page output formats with .doc(x) and .rtf file extensions.
Bullets: Retains bullets in output file
Character Colors: Retains character colors in output file
Character Scaling: Retains character scaling in output file
Column Breaks: Inserts column breaks in output file
Cross-References: Retains cross-references (hyperlinks) in output file
Drop Caps: Retains drop caps (drop caps display enlarged first letter of paragraph that drops
down two or more lines)
Field Codes: Retains field codes in output file
Headers/Footers: Specifies handling of headers and footers in output file
• Auto Format: Automatically formats headers and footers to match original style
• Convert to Plain Text: Converts headers/footers to plain text
• Ignore: Ignores header and footer text from original file
• In Boxes:
• Tabulated Form:
• Tabulated Form in Box:
Image Color: Assigns image color in output file
• 24-bit Color (True Color)
• Grayscale
• Black and White
• Original

Chapter 9 – Nuance Full-Text OCR
PaperVision® Capture Administration Guide 232
RTF Word 2000 (continued)
Image DPI: Specifies dots per inch (DPI) resolution setting for images in output file
• DPI 72
• DPI 100
• DPI 150
• DPI 200
• DPI 300
• None
• Original
Line Breaks: Inserts line breaks between lines of recognized text
Line Numbering Zones: Retains line numbering zones in output file
Output Format: Specifies type of format retention in output file
• Flowing Page: Available for applications that handle columns, preserves original page
and column layout so text flows across columns (boxes, frames used only when
necessary)
• Formatted Text: Retains text (without columns); also retains paragraph format, font,
graphics, table styles, highlights, and strikeouts (ignores layout-related formatting)
• True Page: Retains original page and column layout (involves absolute positioning of
text, pictures, tables, and frames)
• Ignore All: Ignores all format styles in original file
Page Breaks: Specifies the handling of page breaks in output file
Page Color: Retains page background color in output file
Page Consolidation: Combines pages in output file
Rule Lines: Retains rule lines in output file
Tabs: Retains original tab positions in output file

Chapter 9 – Nuance Full-Text OCR
PaperVision® Capture Administration Guide 233
Text
This converter writes recognized text into a simple text (.txt) file that can be interpreted by most
text editors and word processors.
Bullets: Retains bullets in output file
Code Page: Specifies code page (Latin, Greek, Cyrillic, etc.) whose language will be
recognized in output file
Headers/Footers: Specifies handling of headers and footers in output file
• Convert to Ordinary Text: Converts headers/footers to plain text
• Ignore: Ignores header and footer text from original file
Line Breaks: Inserts line breaks between lines of recognized text
Line Numbering Zones: Retains line numbering zones in output file
Output Format: Specifies type of format retention in output file
Page Breaks: Inserts page breaks in output file
Tabs: Retains original tab positions in output file
Tabs (Convert to Spaces): Convert tabs into spaces in output file
Text - Comma Separated
This converter writes the recognized text into a comma-delimited .csv file that can be
interpreted by Microsoft Excel. If you enable the List Separator property, you can configure it
to separate the cells in the output file.
Bullets: Retains bullets in output file
Code Page: Specifies code page (Latin, Greek, Cyrillic, etc.) whose language will be
recognized in output file
Headers/Footers: Specifies the handling of headers and footers in output file
• Convert to Ordinary Text: Converts headers/footers to plain text
• Ignore: Ignores header and footer text from original file
Line Breaks: Inserts line breaks between lines of recognized text
Line Numbering Zones: Retains line numbering zones in output file
List Separator: String that separates cells in a .csv file (e.g., “\t”)
List Separator (Include): Includes the list separator in output file

Chapter 9 – Nuance Full-Text OCR
PaperVision® Capture Administration Guide 234
Text - Formatted
This converter writes the recognized text into a text file while attempting to retain the page
layout by inserting extra spaces.
Code Page: Specifies code page (Latin, Greek, Cyrillic, etc.) whose language will be
recognized in output file
Headers/Footers: Specifies handling of headers and footers in output file
• Convert to Ordinary Text: Converts headers/footers to plain text
• Ignore: Ignores header and footer text from original file
Line Numbering Zones: Retains line numbering zones in output file
Output Format: Specifies type of format retention in output file
Text with Line Breaks
This text converter inserts line breaks at the end of each line, rather than inserting them at the
end of each paragraph.
Bullets: Retains bullets in output file
Code Page: Specifies code page (Latin, Greek, Cyrillic, etc.) whose language will be
recognized in output file
Line Breaks: Inserts line breaks between lines of recognized text
Line Numbering Zones: Retains line numbering zones in output file
Output Format: Specifies type of format retention in output file
Page Breaks: Always, never, or automatically handles page breaks in the output file
Tabs (Convert to Spaces): Converts tabs into spaces in output file

Chapter 9 – Nuance Full-Text OCR
PaperVision® Capture Administration Guide 235
Unicode Text
This converter writes recognized text into a simple text (.txt) file that can be interpreted by most
text editors and word processors. However, the Unicode Text converter uses two-byte Unicode
characters.
Bullets: Retains bullets in output file
Code Page: Specifies code page (Latin, Greek, Cyrillic, etc.) whose language will be
recognized in output file
Headers/Footers: Specifies handling of headers and footers in output file
• Convert to Ordinary Text: Converts headers/footers to plain text
• Ignore: Ignores header and footer text from original file
Line Breaks: Inserts line breaks between lines of recognized text
Line Numbering Zones: Retains line numbering zones in output file
Output Format: Specifies type of format retention in output file
Page Breaks: Always, never, or automatically handles page breaks in the output file
Tabs (Convert to Spaces): Converts tabs into spaces in output file
Unicode Text – Comma Separated
This converter writes the recognized text (using two-byte Unicode characters) into a comma-
delimited .csv file that can be interpreted by Microsoft Excel. If you enable the Use OS List
Separator property, you can configure the List Separator property to separate the cells in the
output file.
Application Extension: Displays the default application extension (e.g., .csv, .txt, etc.) for
output file
Bullets: Retains bullets in output file
Code Page: Specifies code page (Latin, Greek, Cyrillic, etc.) whose language will be
recognized in output file
Line Breaks: Inserts line breaks between lines of recognized text
Line Numbering Zones: Retains line numbering zones in output file
List Separator: String that separates cells in a .csv file (e.g., “\t”)
List Separator (Include): Includes the list separator in output file
Output Format: Specifies type of format retention in output file
Page Breaks: Specifies handling of page breaks in the output file

Chapter 9 – Nuance Full-Text OCR
PaperVision® Capture Administration Guide 236
Unicode Text - Formatted
This converter writes the recognized text (using two-byte Unicode characters) into a text file
while attempting to retain the page layout by inserting extra spaces.
Code Page: Specifies code page (Latin, Greek, Cyrillic, etc.) whose language will be
recognized in output file (defaults to Unicode)
Headers/Footers: Specifies handling of headers and footers in output file
• Convert to Ordinary Text: Converts headers/footers to plain text
• Ignore: Ignores header and footer text from original file
Line Numbering Zones: Retains line numbering zones in output file
Unicode Text with Line Breaks
This text converter inserts line breaks at the end of each line (using two-byte Unicode
characters), rather than inserting them at the end of each paragraph.
Bullets: Retains bullets in output file
Code Page: Specifies code page (Latin, Greek, Cyrillic, etc.) whose language will be
recognized in output file
Headers/Footers: Specifies handling of headers and footers in output file
• Convert to Ordinary Text: Converts headers/footers to plain text
• Ignore: Ignores header and footer text from original file
Line Breaks: Inserts line breaks between lines of recognized text
Line Numbering Zones: Retains line numbering zones in output file
Tabs (Convert to Spaces): Convert tabs into spaces in output file

Chapter 9 – Nuance Full-Text OCR
PaperVision® Capture Administration Guide 237
Wave Audio
This converter generates a Microsoft .wav audio file that reads recognized text aloud with an
English, French, or German speaking voice.
Note:
In addition to the Capture Full-Text OCR license, the Wave Audio converter requires
an additional software license in order to execute in the PaperVision Capture Operator
Console.
Save Mode: Specifies the mode in which output .wav files are saved
Speech Rate: Specifies the speed of speaking voice (Slowest, Slow, Normal, Fast, Fastest)
Selecting the Speaking Voice Language
Four languages are available for the speaking voice, including English-U.S., English-U.K.,
French, and German. The language used in the Wave Audio speaking voice is determined by
the order in which folders appear in the PaperVision Capture\OCR\speech\rssolov4 directory
where PaperVision Capture was installed. Folders residing in this directory include the
following:
1. eng (English-U.K.)
2. enu (English-U.S.)
3. frf (French)
4. ged (German)
Note:
Do not rename any language folders in the PaperVision Capture\OCR\speech\rssolov4
directory; otherwise, the Wave Audio converter may not function properly.

Chapter 9 – Nuance Full-Text OCR
PaperVision® Capture Administration Guide 238
WordPad
This RTF-based converter generates an rtf file that can be interpreted by most Microsoft
WordPad (and other RTF readers).
Bullets: Retains bullets in output file
Character Colors: Retains character colors from original file
Headers/Footers: Specifies handling of headers and footers in output file
• Convert to Ordinary Text: Converts headers/footers to plain text
• Ignore: Ignores header and footer text from original file
Image Color: Assigns image color in output file
• 24-bit Color (True Color)
• Grayscale
• Black and White
• Original
Image DPI: Specifies dots per inch (DPI) resolution setting for images in output file
• DPI 72
• DPI 100
• DPI 150
• DPI 200
• DPI 300
• None
• Original
Line Breaks: Inserts line breaks between lines of recognized text
Line Numbering Zones: Retains line numbering zones in output file
No Text Box: Omits text boxes from output file
Output Format: Specifies type of format retention in output file
• Formatted Text: Retains text (without columns); also retains paragraph format, font,
graphics, table styles, highlights, and strikeouts (ignores layout-related formatting)
• Ignore All: Ignores all format styles in original file
Page Breaks: Specifies handling of page breaks in the output file
Tabs: Retains original tab positions in output file

Chapter 9 – Nuance Full-Text OCR
PaperVision® Capture Administration Guide 239
WordPerfect 12
This converter generates a WordPerfect file format that supports features of WordPerfect 12
and later.
Bullets: Retains bullets in output file
Column Breaks: Inserts column breaks in output file
Cross-References: Retains cross-references (hyperlinks) in output file
Drop Caps: Retains drop caps (drop caps display enlarged first letter of paragraph that drops
down two or more lines)
Field Codes: Retains field codes in output file
Headers/Footers: Specifies handling of headers and footers in output file
• Auto Format: Automatically formats headers and footers to match original style
• Formatted Text: Retains text (without columns); also retains paragraph, font,
graphics, and table styles
• Ignore: Ignores header and footer text from original file
• In Boxes:
• Tabulated Form:
• Tabulated Form in Box:
Image Color: Assigns image color in output file
• 24-bit Color (True Color)
• Grayscale
• Black and White
• Original
Image DPI: Specifies dots per inch (DPI) resolution setting for images in output file
• DPI 72
• DPI 100
• DPI 150
• DPI 200
• DPI 300
• None
• Original
Line Breaks: Inserts line breaks between lines of recognized text
Line Numbering Zones: Retains line numbering zones in output file

Chapter 9 – Nuance Full-Text OCR
PaperVision® Capture Administration Guide 240
WordPerfect 12 (continued)
Output Format: Specifies type of format retention in output file
• Flowing Page: Available for applications that handle columns, preserves original page
and column layout so text flows across columns (boxes, frames used only when
necessary)
• Formatted Text: Retains text (without columns); also retains paragraph format, font,
graphics, table styles, highlights, and strikeouts (ignores layout-related formatting)
• Ignore All: Ignores all format styles in original file
• True Page: Retains original page and column layout (involves absolute positioning of
text, pictures, tables, and frames)
Page Breaks: Specifies handling of page breaks in the output file (always, auto, or never)
Page Consolidation: Combines pages in output file
Rule Lines: Retains rule lines in output file
Tables: Specifies handling of tables in output file
• Convert to Separated by Tabs: Does not retain tables, but converts tables to columns
separated by tabs
• Retain Tables: Retains all tables from original file
Tabs: Retains original tab positions in output file
XML
This converter generates a standard, plain-text .xml file.
Headers/Footers: Specifies handling of headers and footers in output file
• Auto Format: Automatically formats headers and footers to match original style
• Formatted Text: Retains text (without columns); also retains paragraph, font,
graphics, and table styles
• Ignore: Ignores header and footer text from original file and does not include them in
output file
• In Boxes:
• Tabulated Form:
• Tabulated Form in Box:
Line Numbering Zones: Retains line numbering zones in output file
XSD Schema: Uses XML Schema Definition (XSD) in output file

Chapter 9 – Nuance Full-Text OCR
PaperVision® Capture Administration Guide 241
XPS
This converter generates a Microsoft XML-based Paper Specification (XPS) file, yielding the
same appearance on every output device.
Note:
To view an XPS file, the .NET 3.5 Framework must be installed, which is included on the
PaperVision Capture installation media.
Headers/Footers: Specifies handling of headers and footers in output file
• Auto Format: Automatically formats headers and footers to match original style
• Ignore: Ignores headers and footer text from original file
Line Numbering Zones: Retains line numbering zones in output file
Output Format: Specifies type of format retention in output file
• True Page: Retains original page and column layout (involves absolute positioning of
text, pictures, tables, and frames)
Rule Lines: Retains rule lines in output file
XPS Searchable Image
This converter generates a Microsoft XML-based Paper Specification (XPS) file, yielding all
text as searchable.
Note:
To view an XPS file, the .NET 3.5 Framework must be installed, which is included on the
PaperVision Capture installation media.
Headers/Footers: Specifies handling of headers and footers in output file
• Auto Format: Automatically formats headers and footers to match original style
• Ignore: Ignores header and footer text from original file
Line Numbering Zones: Retains line numbering zones in output file
Chapter 10 – Open Text Full-Text OCR
PaperVision® Capture Administration Guide 242
In PaperVision Capture, full-text OCR processing can be performed by the Open
Text® engine that recognizes machine-printed text. Handwritten text will not be
recognized. Additionally, new line characters will be removed during Open Text
OCR processing. Within the Open Text Full-Text OCR step, you can configure an automated
process that reads pages of text and converts recognized results to one or multiple file types.
Each output type contains unique settings that you can configure to support your full-text OCR
requirements. During full-text processing, documents can be converted to several PDF versions,
including those compatible with PDF-A, 1.4, 1.5, 1.6, and 1.7. The engine also converts
documents to PaperVision Enterprise, PaperFlow, and text (.txt) output file types.
When you configure full-text OCR outputs and their associated properties, you can preview the
full-text OCR results before you process the batch of documents. Thumbnail previews display
the document's images and allow you to navigate through the document and perform basic
operations including the cut/paste, copy/paste, and delete operations.
Maximum Supported Image Sizes
The maximum supported image dimensions that can be processed through the Open Text
engine vary with resolution. The approximate maximum width is approximately 32,000 pixels,
and the maximum height is approximately 24,000 pixels. For example, the maximum supported
image dimensions at 300 dpi are approximately 106 inches x 80 inches. Images that are
processed through the Open Text OCR engine must contain matching horizontal and vertical
resolutions.
DISCLAIMER:
These dimensions are provided only as estimates to identify size limits processing images
in PaperVision Capture. Variations in technical environments may cause maximum image
sizes to fluctuate across systems.
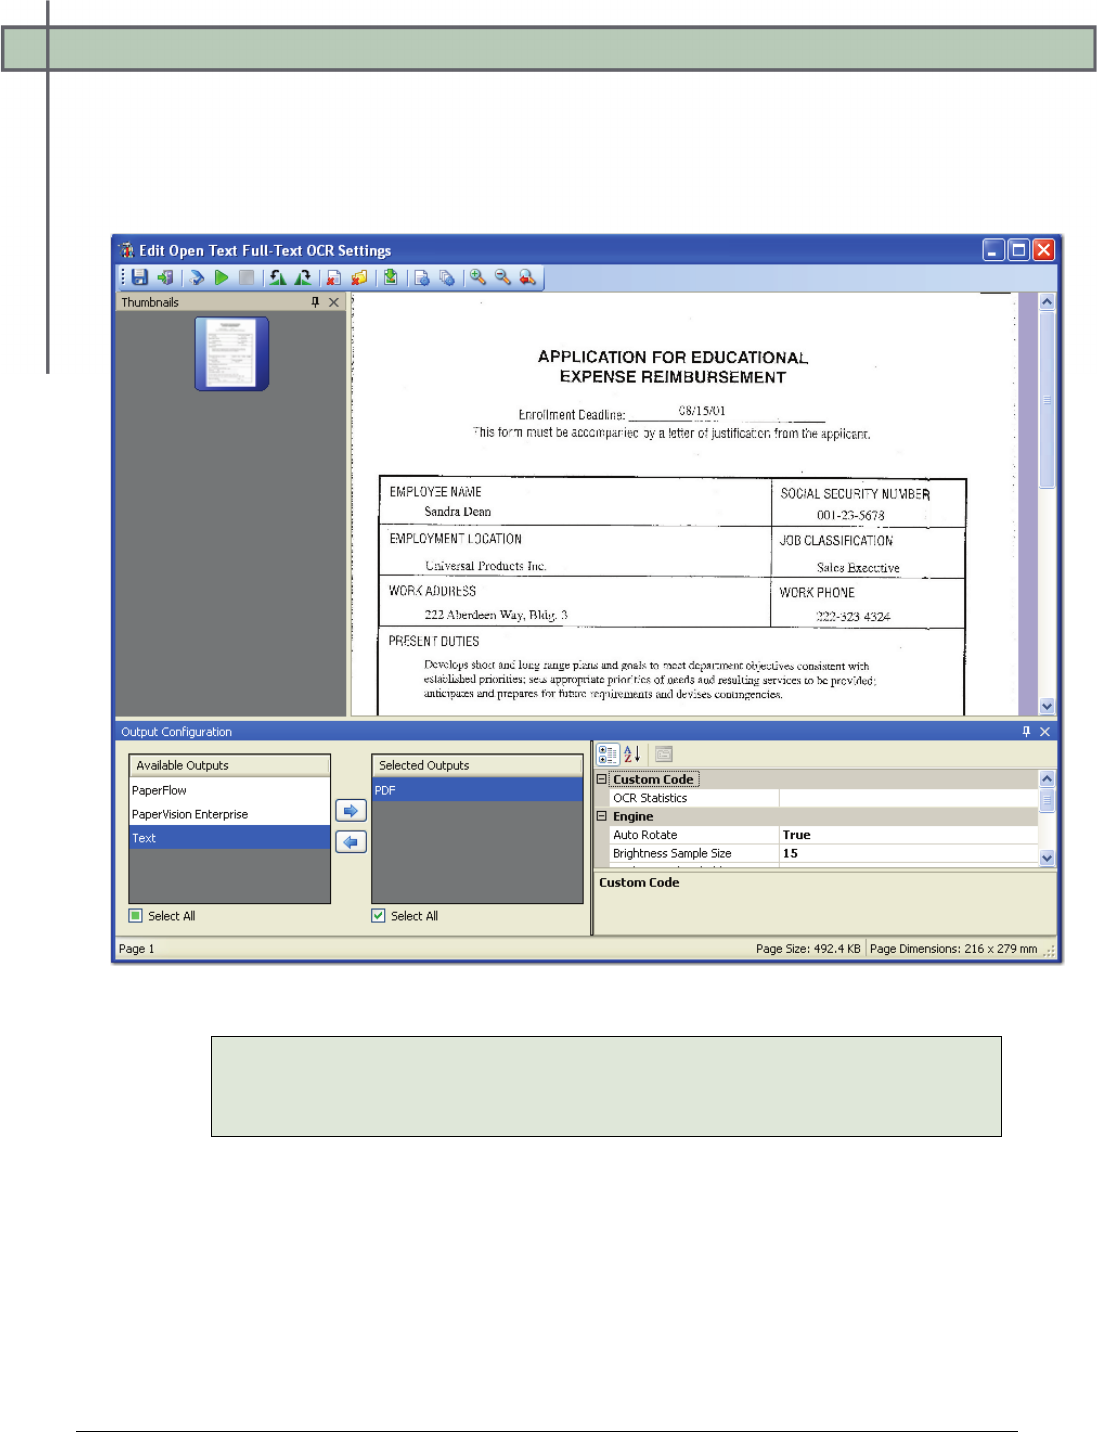
Chapter 10 – Open Text Full-Text OCR
PaperVision® Capture Administration Guide 243
To configure Open Text Full-Text OCR settings:
1. In the Job Definitions workspace, select the Open Text Full-Text OCR job step.
2. In the Properties grid, click the ellipsis button next to the Outputs row. The Edit Open
Text Full-Text OCR Settings screen appears.
Edit Open Text Full-Text OCR Settings
Note:
For a list of all operations available in this screen, see the section beginning
with Saving Full-Text OCR Configurations in Chapter 9.
3. Highlight one or more output types from the Available Outputs list.
4. Click the right arrow to move your selection(s) to the Selected Outputs list. The next
section describes the properties available for configuration.

Chapter 10 – Open Text Full-Text OCR
PaperVision® Capture Administration Guide 244
Supported Output File Types
PaperVision Capture supports the following Open Text full-text OCR output file types:
• PDF: The PDF output produces a searchable PDF (.pdf) file compatible with your
specified PDF version.
• PaperFlow: The PaperFlow output is a text-based full-text output file that you can
subsequently import into OCRFlow.
• PaperVision Enterprise: The PaperVision Enterprise output is a text-based full-text
output file that you can subsequently import into PaperVision Enterprise.
• Text: The Text output produces a text (.txt) file.
OCR Statistics
You can configure custom code that reports OCR statistics when a page is processed through
the Open Text Full-Text OCR engine. For example, you can configure custom code to record
each character's confidence level by using the OCRFullTextPageStatistics sample script. Other
custom code samples are located in the Library\Samples directory (as text or XML files),
where PaperVision Capture was installed.
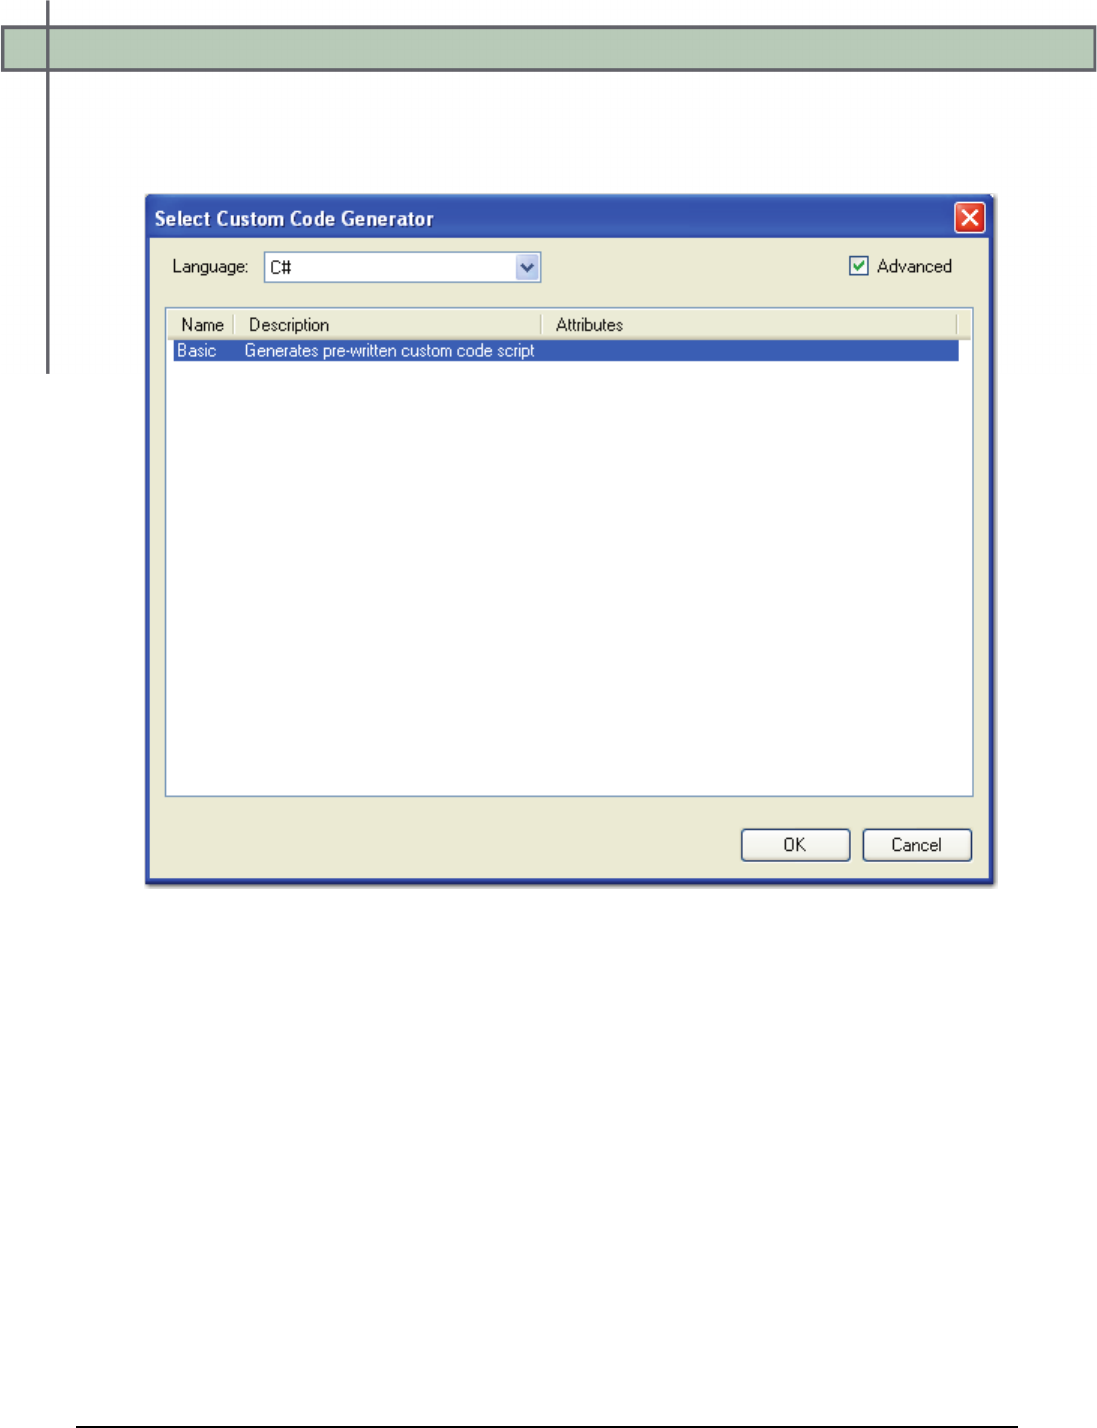
Chapter 10 – Open Text Full-Text OCR
PaperVision® Capture Administration Guide 245
To configure custom code Open Text Full-Text OCR statistics:
1. In the Edit OCR Zones screen, click the ellipsis button next to the OCR Statistics
field. The Select Custom Code Generator dialog appears.
Select Custom Code Generator
2. Select the Basic custom code generator, and then click OK. The Script Editor opens.
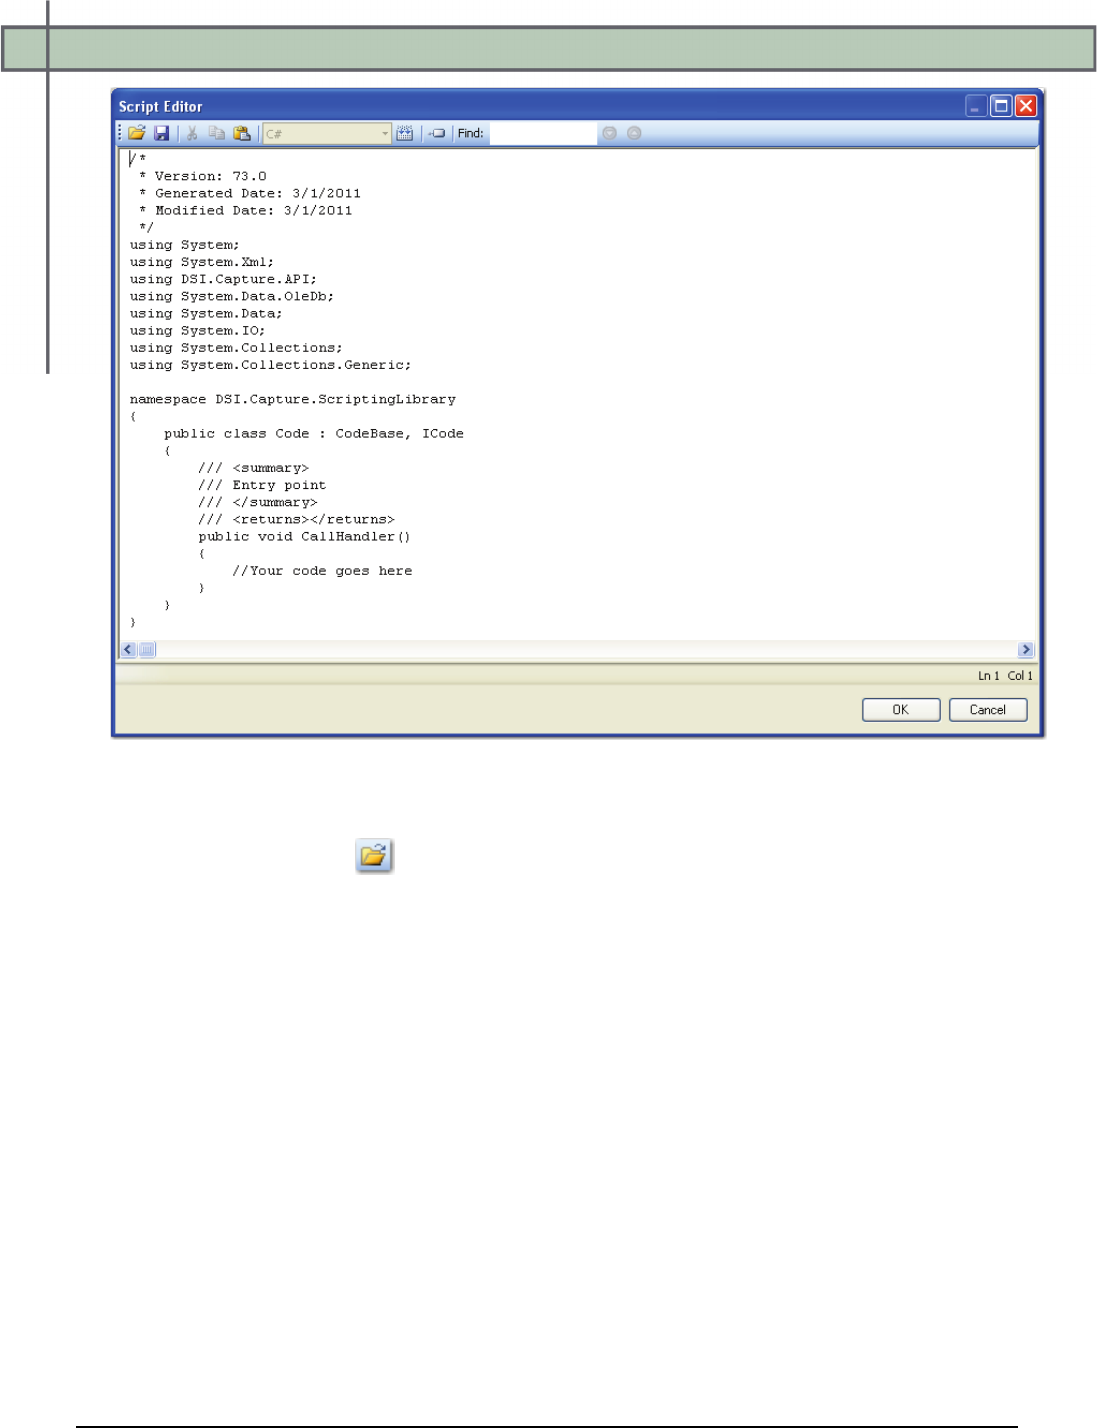
Chapter 10 – Open Text Full-Text OCR
PaperVision® Capture Administration Guide 246
Script Editor
3. If desired, you can import the OCRFullTextPageStatistics script into the Script Editor.
Click the Import icon, and then browse to the Library\Samples directory where
PaperVision Capture was installed.
4. Otherwise, insert your custom code into the Script Editor.
5. Click OK.

Chapter 10 – Open Text Full-Text OCR
PaperVision® Capture Administration Guide 247
Auto Rotate
By default, this property is set to True, and the Open Text Full-Text OCR engine may
automatically rotate some images in order to recognize text. If you do not want the Open Text
Full-Text OCR engine to automatically rotate images prior to text recognition, set this property
to False.
Note:
Since the engine may automatically rotate some images in order to recognize text, the
resulting output images may also be rotated.
Brightness Sample Size
This value (indicating both width and height) specifies the rectangle size used to calculate the
brightness threshold. You can specify a value between 1 and 32, and the default value is 15.
Note:
Smaller brightness sample sizes may cause the OCR engine to recognize extraneous noise
on the image.
Brightness Threshold
You can assign a brightness threshold value (between 0 and 255) for the image. The default
value is 75.
Country/Language
When you select from the Country/Language property, your selection may reflect not only a
country or language, but country groups (e.g., Western Europe), language groups (e.g., Latin),
and character sets (e.g., OCR). Each country corresponds to one or more languages, and
countries are automatically expanded into language sets (e.g., German corresponds to the
German language; Switzerland corresponds to the German, French, Italian, and Rhaeto-
Romantic languages). Specific languages are also available for selection under the
Country/Language property (e.g., English, German, Dutch, Italian, etc.).
It is recommended to narrow your selection as much as possible since OCR recognition may
become slower with a greater number of selected countries or languages. It is also recommended
to select a country rather than a language or country group (e.g., Western Europe, South
America, Scandinavia) since the recognition of certain types of addresses and money transfer
forms may improve.
Note:
You cannot select the OCR character set individually; it must be selected with another
language, language group, country, or country group. For a complete list of supported
countries, languages, country groups, language groups, and character sets, see
Appendix F.
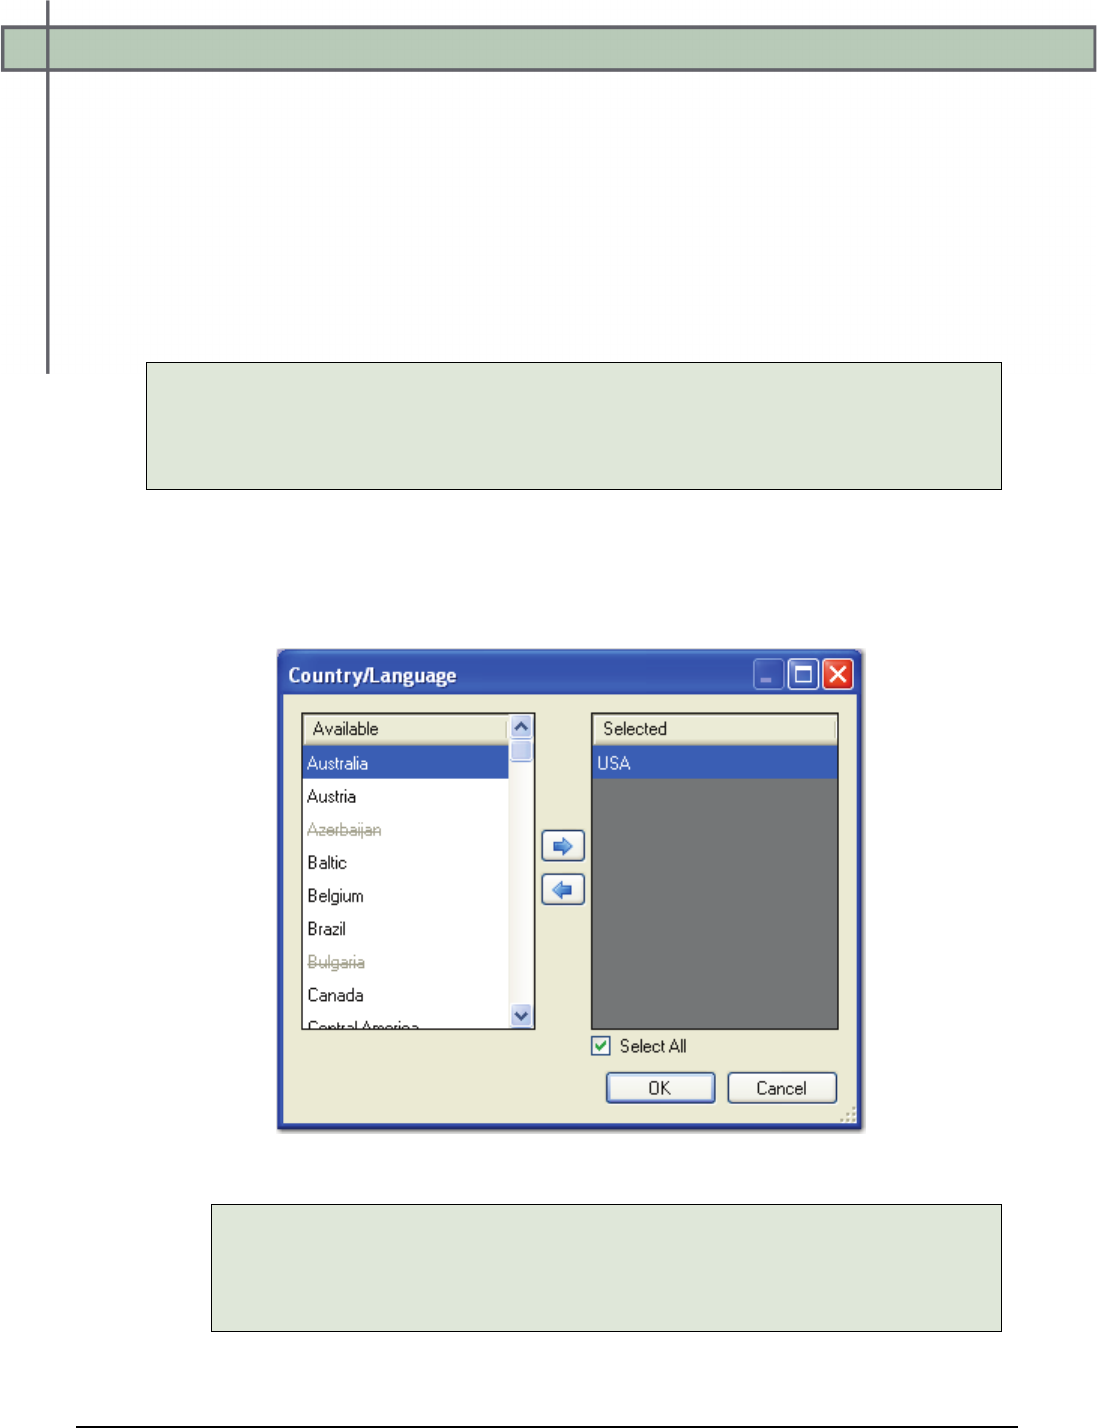
Chapter 10 – Open Text Full-Text OCR
PaperVision® Capture Administration Guide 248
Language Groups
If you select a language group, it is recommended to select only one, since they encompass
multiple languages, countries, and code pages:
1. Cyrillic: Code page 1251
2. Greek: Code page 1253
3. Latin: Code pages 1250, 1252, 1254 and 1257 (i.e. Central Europe, Western Europe,
Turkey, Baltic)
4. Azerbaijanian
Note:
For language groups, recognition results are always represented by Unicode
characters. The English character set (A-Z, a-z) is implicitly available with all
country-language selections, even Greek or Cyrillic.
To select a country or language for full-text OCR output:
1. After selecting an output type, click the ellipsis button to the right of the
Country/Language property. The Country/Language dialog box appears.
Country/Language
Note:
If a country or language appears crossed out, it does not belong to the same
code page as the selected country or language. Therefore, countries or
languages containing strikethroughs cannot be added to the Selected list.

Chapter 10 – Open Text Full-Text OCR
PaperVision® Capture Administration Guide 249
2. Highlight one or more countries/languages from the Available list, and then click the
right arrow.
3. To remove one or more selections from the Selected list, highlight the
countries/languages, and then click the left arrow.
4. When finished with your selections, click OK.
Minimum Confidence
The confidence level reflects the reliability of the OCR recognition results. Values range from
zero (the default setting), the lowest confidence level, to 255, the highest confidence level
indicating the most reliable recognition results. Characters with lower confidence levels than
your specified value will display as the rejection symbol, which is the tilde (~) character by
default. The Rejection Symbol property is available for configuration in text-based outputs
(PaperFlow, PaperVision Enterprise, and Text).
Timeout Value (sec)
This property allows you to define the maximum amount of time that the Open Text OCR
engine processes a single image before it fails. By default, this property is set to 180 seconds (3
minutes). You can assign a timeout between one second and 3,600 seconds (1 hour).
Note:
Raising the timeout setting may increase the amount of time to process all images.
Compression
You can set the level of compression applied to PDF outputs. The higher the compression, the
smaller the output file size. The default level of compression is medium. You can select from
the following compression levels:
• None (no compression will be applied)
• Low (low level of compression is applied)
• Medium (medium level of compression is applied)
• High (highest level of compression is applied)
Chapter 10 – Open Text Full-Text OCR
PaperVision® Capture Administration Guide 250
PDF Version
You can select the compatible PDF version for PDF output files. The following versions are
supported by the full-text OCR engine:
• PDF/A: Format for long-term archiving of electronic documents - with Level B
compliance in Part 1 (1b)
• PDF 1.4: Acrobat 5.0
• PDF 1.5: Acrobat 6.0
• PDF 1.6: Acrobat 7.0
• PDF 1.7: Acrobat 8 and 9
Rejection Symbol
This property represents rejected characters in output documents. A rejected character is not
recognized by the active OCR recognition engine configuration. The default value is the Tilde
character ( ~ ). Only a single character can be entered in this field. The Rejection Symbol
property is available for configuration in text-based outputs (PaperFlow, PaperVision
Enterprise, and Text).
Tip:
To prevent unrecognized characters from appearing in output documents, leave this field
blank.

Chapter 11 – Image Processing
PaperVision® Capture Administration Guide 251
The Image Processing job step allows you to configure image processing filters
that execute automatically. Binary image processing includes filters such as
border removal, crop, dilation, erosion, halftone removal, hole removal, noise removal,
scaling, and others. Page deletion filters allow you to specify certain parameters that
determine whether pages are retained in a batch. Additionally, you can apply color filters as
well as deskew, rotation, and threshold filters. You can configure image processing properties
including the file type for colored images, image processing filters, and whether to save
processed images. The Image Processing job step also provides you the flexibility to apply
image processing filters on the entire image or within specific zones that you define.
When you configure image processing filters, you can view a side-by-side comparison of the
original image alongside the filtered image. Thumbnail previews display the document's
images and allow you to navigate through the document and perform basic operations
including the cut/paste, copy/paste, and delete operations. You can assign the page ranges that
will be applied to each filter in the IP Filter grid, and you can view the results of applying
each filter (e.g. image will be kept or discarded) in the Filter Output grid. The Applicable
column indicates the filter that applies to the currently selected image.
Note:
Incoming color images can have maximum dimensions of 10,000 x 10,000 pixels
when they are processed through the Image Processing step. Bitonal (black and
white) images can have slightly larger dimensions.
Larger images can be ingested into PaperVision Capture provided that:
1. No OCR will be performed on the images
2. No image processing will be performed on the images
3. Images will not be viewed as thumbnails
To view the properties for the Image Processing job step:
1. In the Job Definitions screen, select the Image Processing job step in the
workspace.
2. In the Properties grid, expand the General and Image Processing nodes.
General Properties
For information on the Indexing step’s general properties, see the section on General
Properties in Chapter 4.
Image Processing Properties
You can configure image processing properties including the file type for colored images,
image processing filters, and whether to save processed images.
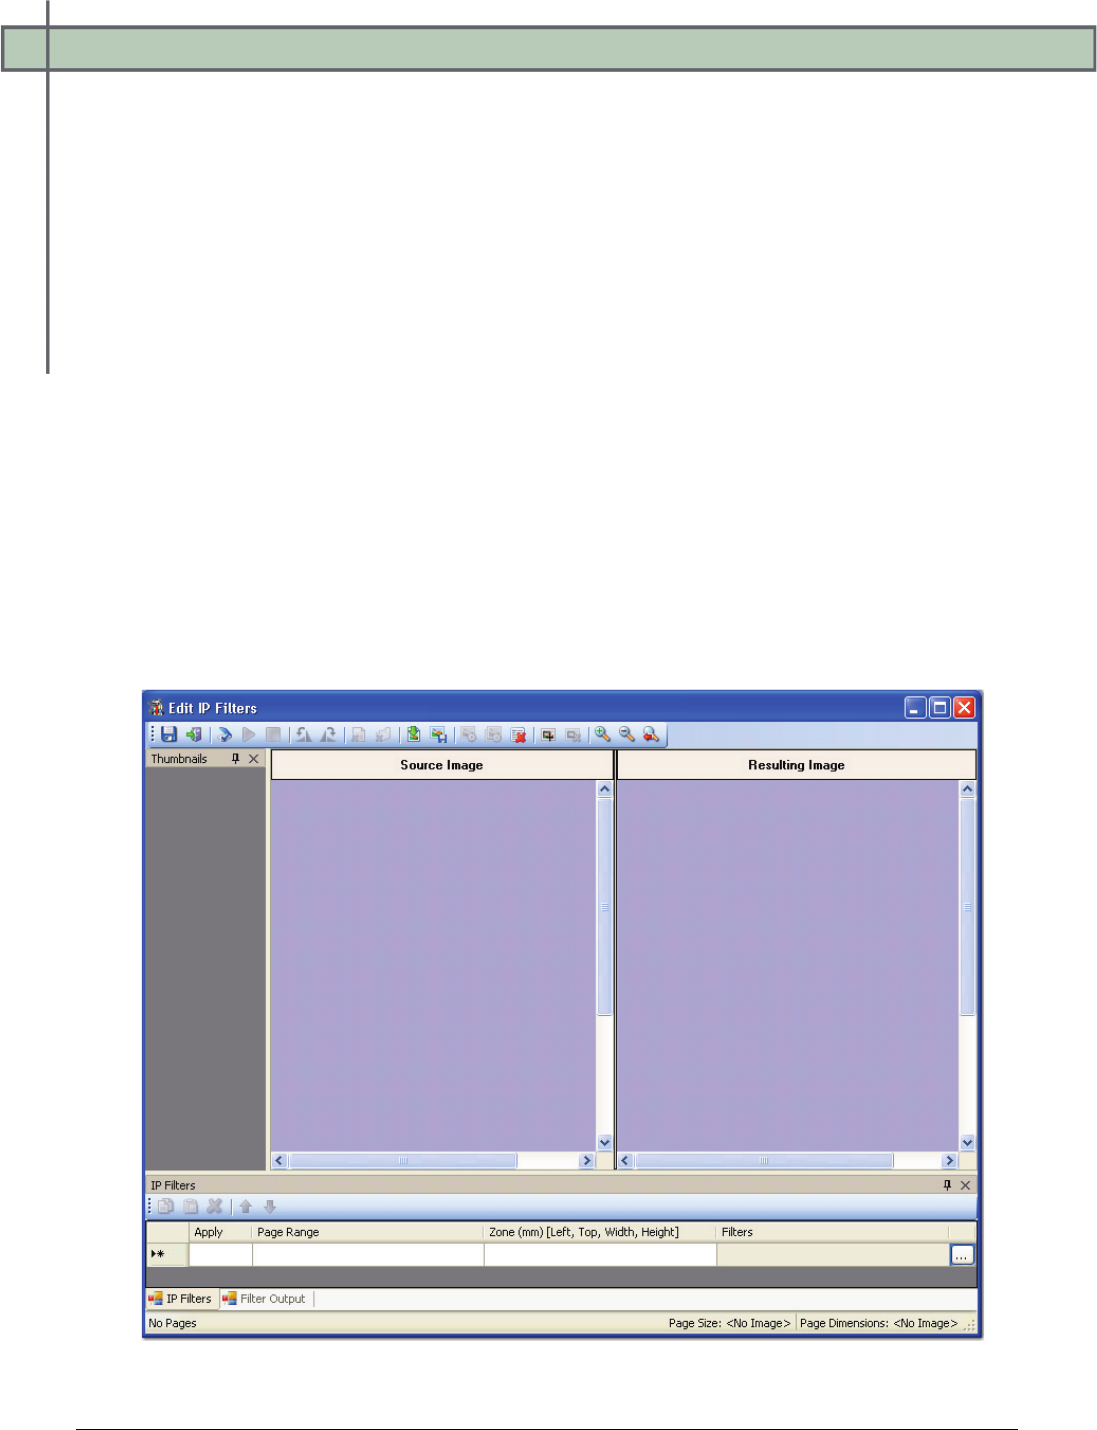
Chapter 11 – Image Processing
PaperVision® Capture Administration Guide 252
Color Image File Type
You can specify the file type when storing images that are not black and white. Open the
Color Image File Type drop-down list in the right column to make the selection.
• BMP files are not compressed and can be large. These files contain pixels and can
degrade when you increase resolution.
• JPG images are compressed, so they contain less data and smaller file sizes than other
image types
Configuring Image Processing Filters
You can configure, preview, and test image processing filters before applying them to the job.
Zooming, rotation, and scanning operations are available, as well as image import and
removal functions. You can also draw and configure IP zones if you only want specific
regions to be processed.
To configure image processing filters:
1. Select the Image Processing step in the Job Definitions workspace.
2. In the Properties grid, click the ellipsis button next to the Filters property, and the
Edit IP Filters screen appears.
Edit IP Filters
Chapter 11 – Image Processing
PaperVision® Capture Administration Guide 253
The Edit IP Filters screen contains the following components:
• The Source Image window displays the original, unfiltered image.
• The Resulting Image window displays the filtered image, after you test the
image.
• The IP Filters grid displays all page ranges and configured filters for each
page range.
• Thumbnails windows are found in the Edit Barcode Zones, Edit OCR Zones,
Edit Nuance Full-Text OCR, and Edit Image Processing Filters screens. You can
right-click within any Thumbnails window to perform basic operations on images,
such as the cut/paste, copy/paste, delete, or select all operations. The cut, copy,
paste, and delete operations can be performed on consecutive or non-consecutive
images. Additionally, you can select multiple images and simultaneously rotate
them. The scrolling capability, displayed with up/down or left/right arrows as you
drag and drop images, allows you to quickly scroll through remaining images not
shown in the current window.
Note:
Images viewed as thumbnails can have maximum dimensions of
32,768 x 32,768 pixels.
• The status bar on the bottom of the screen displays each image’s page number,
page size (in KB), and page dimensions (in mm).
Note:
The page dimensions 215 x 279 mm are approximately equivalent to
8.5 x 11 inches.
3. To import a sample image, click the Import Images icon.
4. Locate the directory of the image(s).
5. Select the image to import.
6. Click Open. The image appears in the Source Image window.
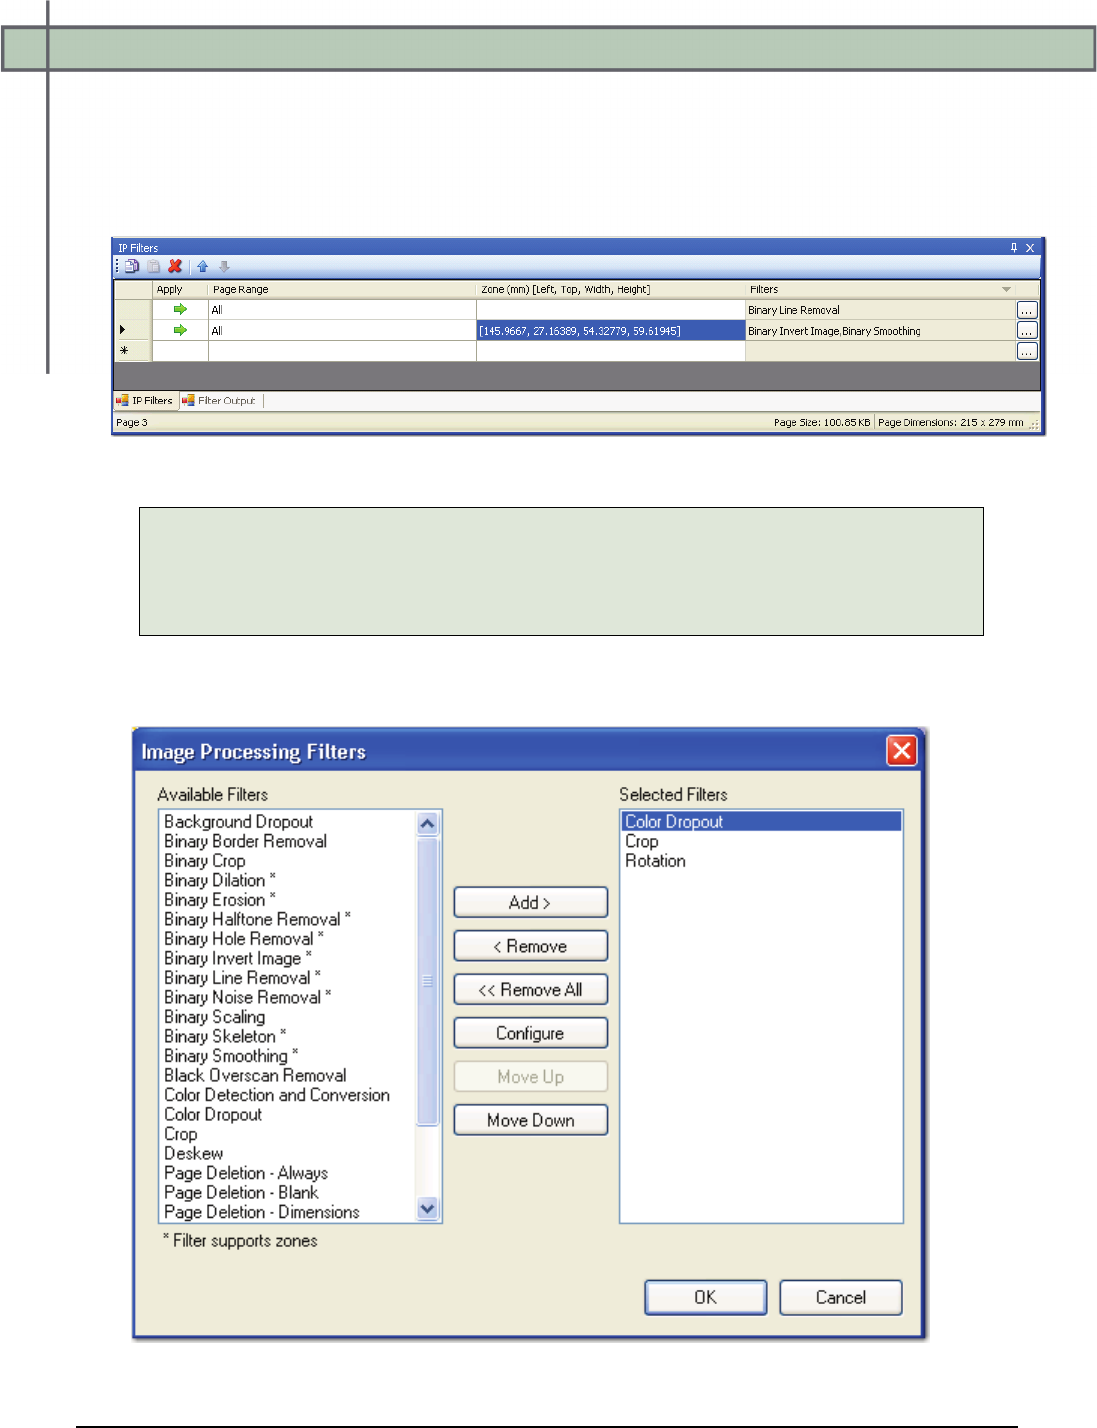
Chapter 11 – Image Processing
PaperVision® Capture Administration Guide 254
7. The dockable IP Filters grid allows you to select the page range and apply image
processing filters to specific pages or zones.
• Select the Page Range from the drop-down list (all, odd, even, or last).
• Or, enter the page range (e.g., 1; 1-5, 4; 1-7, etc.).
IP Filters Grid
Note:
Binary filters can only be applied to bitonal (1 bit per pixel) images; color and
grayscale are ignored. Therefore, you cannot apply both color and binary filters
to the same page range (same row in IP Filters grid).
8. To configure the filters for each page range, click the ellipsis button next to the Filters
column. The Image Processing Filters screen appears.
Image Processing Filters
Chapter 11 – Image Processing
PaperVision® Capture Administration Guide 255
9. Filters supported in zones are marked with asterisks (*). From the Available Filters list,
highlight the filter, and then click Add.
10. To configure a selected filter, highlight the filter in the Selected Filters list, and then
click Configure.
Note:
See the section on Image Processing Filters in this chapter for descriptions
of each filter.
11. Click OK after you have configured all filters. The Edit IP Filters screen appears once
again, where you can perform various operations, such as saving, testing and previewing
image processing filters.
Edit IP Filters (Configured with Preview)
Saving IP Filters
If all configured IP filters appear acceptable, click the Save IP Filter icon.
Chapter 11 – Image Processing
PaperVision® Capture Administration Guide 256
Configuring a Scanner
The Configure Scanner command allows you to assign scanner settings. To configure these
settings, click the Configure Scanner icon. For more information on each setting, see the
section on Scanner Setup in Chapter 6.
Starting the Scanning Process
You can scan images into the IP Filters screen before testing the image processing filters. To
start the scanning process, click the Start Scanning icon.
Stopping the Scanning Process
To stop the scanning process, click the Stop Scanning icon.
Rotating an Image 90° Counter-Clockwise
To rotate the image 90 degrees counter-clockwise, click the Rotate Image 90° Counter-
Clockwise icon.
Rotating an Image 90° Clockwise
To rotate the image 90 degrees clockwise, click the Rotate Image 90° Clockwise icon.
Removing a Single Image
This command removes the selected image from the main scanning window and from the
Thumbnails section.
To remove a single image:
1. In the Thumbnails section, select the image to delete.
2. Click the Remove Single Image icon.
3. Click Yes to confirm the removal.
Chapter 11 – Image Processing
PaperVision® Capture Administration Guide 257
Removing All Images
This command removes all current images from the main scanning window and from the
Thumbnails section.
To remove all images:
1. Click the Remove All Images icon.
2. Click Yes to confirm the removals. If you have defined barcode zones prior to
clearing all images, these barcode zones are retained.
Importing Images
You can import images to test the IP filters.
To import images:
1. Click the Import Images icon.
2. Locate the directory of the image(s).
3. Select the image to import.
4. Click Open.
Saving Filtered Images
You can save filtered images to a specified directory.
To save filtered images:
1. Navigate to the appropriate image in the document.
2. Click the Save Filtered Image icon.
3. Locate the appropriate directory.
4. Enter a name for the filtered image.
5. Select the image type from the Save as type drop-down list.
6. Click Save.
Testing IP Filters
You can test and preview individual or all IP filters that are applied to pages in the document.
To test image processing filters for the current page:
1. After configuring the filters for a page, click the Test Filters (Current Page)
icon. The resulting (filtered) image appears in the Filtered Image window.

Chapter 11 – Image Processing
PaperVision® Capture Administration Guide 258
2. If the filter is acceptable, click the Save IP Filters icon.

Chapter 11 – Image Processing
PaperVision® Capture Administration Guide 259
To test image processing filters for all pages:
1. After configuring the filters for all pages, click the Test Filters (All Pages) icon.
2. Navigate through the document to ensure the filters are acceptable, and adjust them if
necessary.
3. If filters for all pages appear acceptable, click the Save IP Filters icon.
Clearing Filter Output
The Filter Output tab in the IP Filter grid displays a detailed log of all tests performed per
page. A log is generated in the Filter Output tab and indicates whether images are deleted or
retained, along with a summary of filter parameters applied to each page. To clear the IP
Filter log, click the Clear IP Filter Output icon.
Filter Output Log
To remove a filter from the Selected Filter list:
1. Highlight the filter(s).
2. Click Remove.
3. To remove all filters, click Removal All.

Chapter 11 – Image Processing
PaperVision® Capture Administration Guide 260
To reorder the filters:
1. Highlight the filter(s).
2. Click Move Up or Move Down.
3. Click OK.
Image Processing for Duplex Documents
You can execute image processing filters on duplex documents by manipulating the page
range property for the applicable pages. For example, to rotate the last duplex image, you can
create a Rotation filter with the Page Range set to Last, and then create another Rotation
filter with the Page Range set to Last -1.
Image Processing – Duplex Documents
Chapter 11 – Image Processing
PaperVision® Capture Administration Guide 261
Drawing and Configuring IP Zones
You can apply certain binary image processing filters to zones within bitonal images. For
example, you may want to apply the Binary Hole Removal filter only to the left two inches on
a bitonal image or the Binary Invert Image to expose a specific area of a bitonal image.
During IP configuration, you can use the Draw IP Zone operation to draw a zone on the
image. The following binary IP filters can be applied to zones that you define on the image:
• Binary Dilation
• Binary Erosion
• Binary Halftone Removal
• Binary Hole Removal
• Binary Invert Image
• Binary Line Removal
• Binary Noise Removal
• Binary Skeleton
• Binary Smoothing
Note:
Descriptions for each filter can be found in the Image Processing Filters topic.
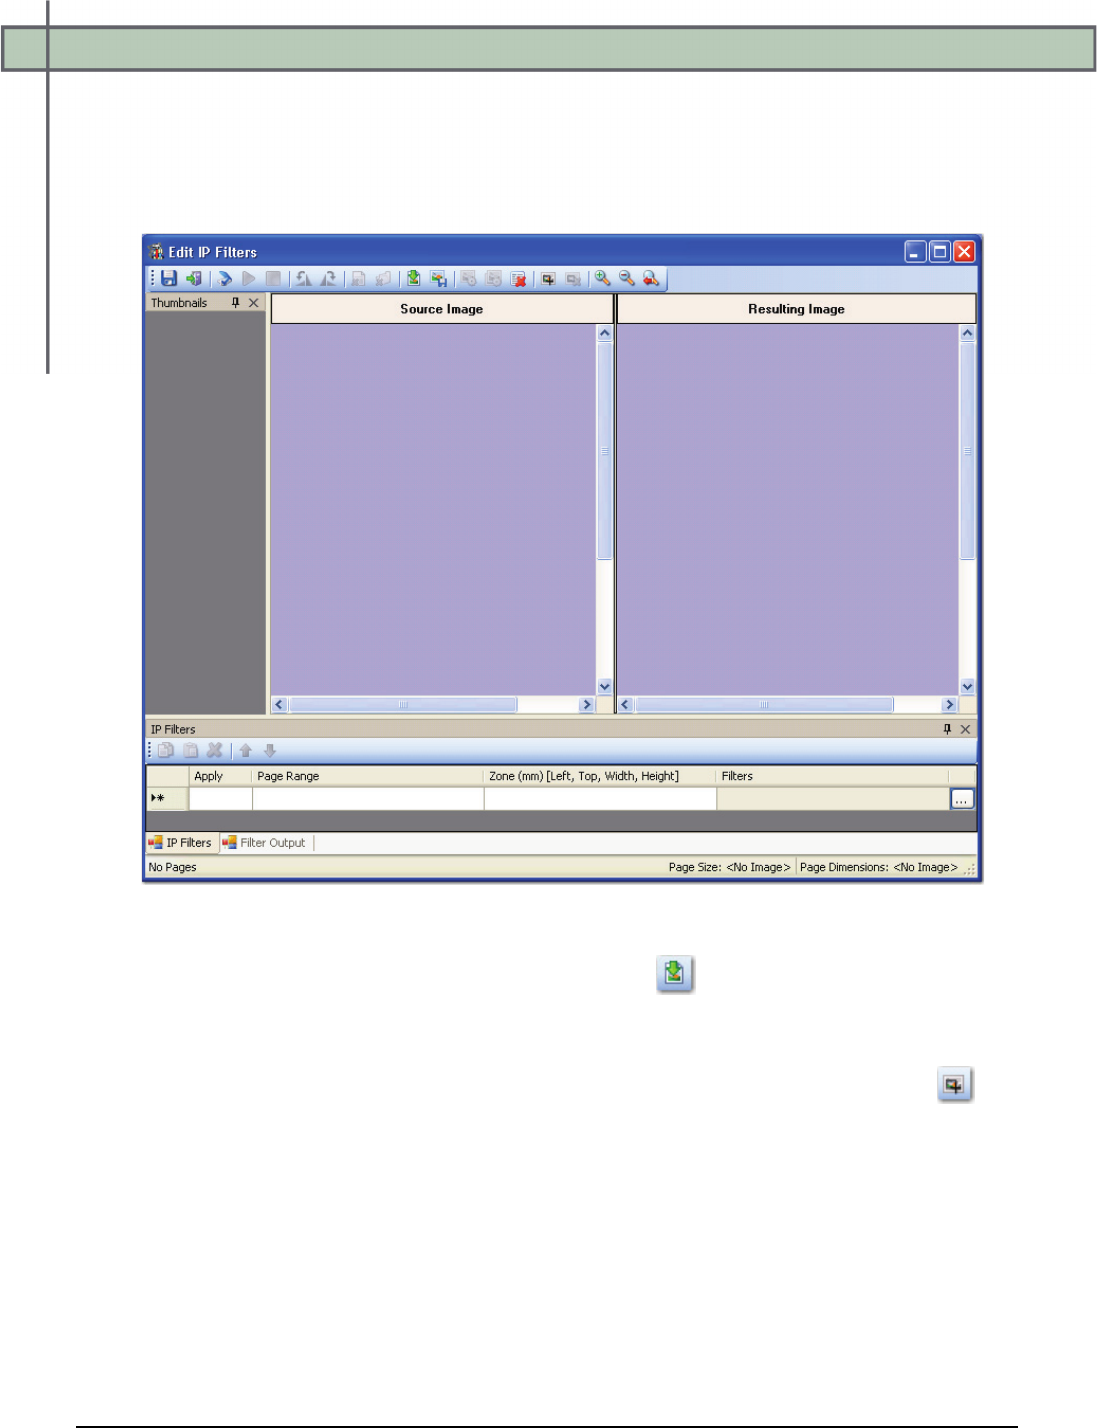
Chapter 11 – Image Processing
PaperVision® Capture Administration Guide 262
To draw an IP zone and configure the filters:
1. Select the Image Processing step in the Job Definitions workspace.
2. In the Properties grid, click the ellipsis button next to the Filters property, and the Edit
IP Filters screen appears.
Edit IP Filters
3. After importing an image using the Import Images operation, you can draw image
processing zones on the image. For descriptions of all operations, such as zooming,
rotation, and testing operations, see the previous section on Configuring IP Filters.
4. To equip the cursor to draw a zone on the source image, click the Draw IP Zone
icon.
5. Drag the cursor around the appropriate area on the image, and then release the cursor.

Chapter 11 – Image Processing
PaperVision® Capture Administration Guide 263
6. The dockable IP Filters grid allows you to select the page range and image processing
filters that will be applied. If an image processing zone is configured, its dimensions (in
mm) appear in the Zone column. Select from the Page Range column drop-down list
(all, odd, even, or last), or enter the page range (e.g., 1; 1-5, 4; 1-7; etc.)
IP Filters Grid
7. To select the filters for each page range, click the ellipsis button next to the Filters
column. The Image Processing Filters dialog box appears.
Image Processing Filters
8. Filters supported in zones are marked with asterisks (*). From the Available Filters list,
highlight the filter, and then click Add.
9. To configure a filter, highlight the filter in the Selected Filters list, and then click
Configure.
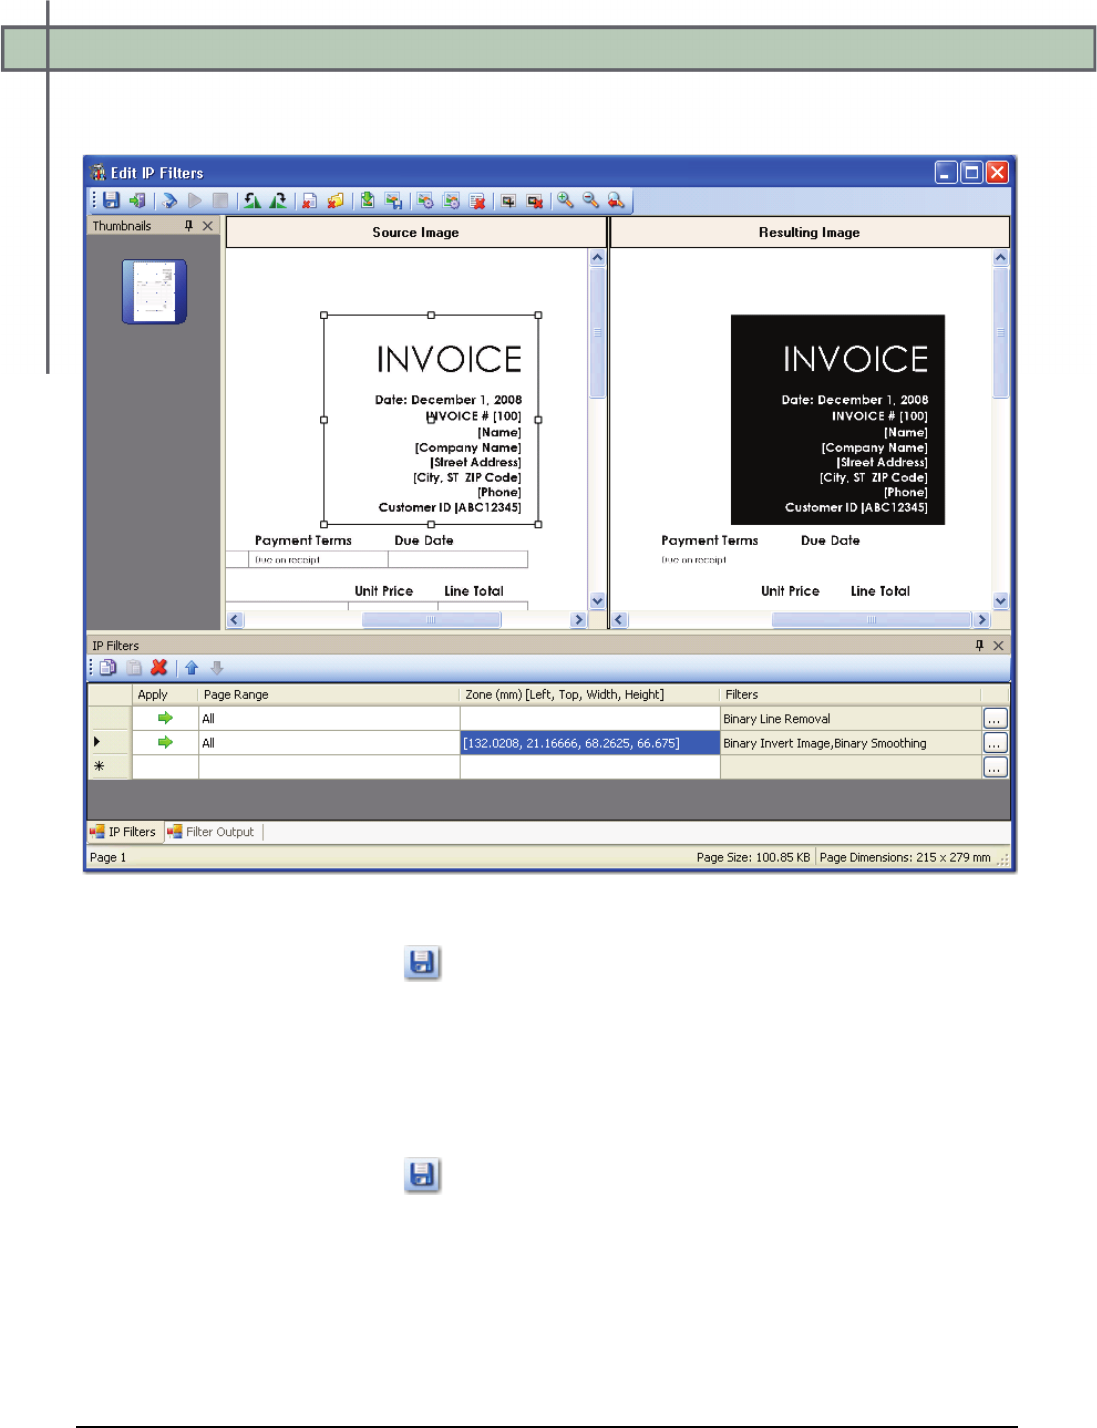
Chapter 11 – Image Processing
PaperVision® Capture Administration Guide 264
10. Click OK after you have configured the filters. The Edit IP Filters screen appears once
again, where you can test the zone to ensure the filters work correctly.
Edit IP Filters (Zone Configured with Preview)
11. Click the Save IP Filters icon.
To edit the IP Zone:
1. Select the zone.
2. Make the appropriate edits to the size of the zone, filters, etc.
3. Click the Save IP Filters icon.

Chapter 11 – Image Processing
PaperVision® Capture Administration Guide 265
To move an IP zone:
1. Select the center of the zone until the cursor turns into a four sided arrow.
2. Move the zone to the appropriate location on the image.
3. Click the Save IP Filters icon.
To remove an IP zone:
1. Select the zone.
2. Click the Remove IP Zone icon.
3. Click the Save IP Filters icon.
Chapter 11 – Image Processing
PaperVision® Capture Administration Guide 266
Exiting the Edit IP Filters Screen
To close and exit out of the Edit IP Filters screen:
1. Click the Exit icon.
2. Click Yes to save all IP filter changes.
Zooming Operations
• To zoom in on the workspace, click the Zoom In icon.
• To zoom out of the workspace, click the Zoom Out icon.
• To reset the view of the workspace, click the Zoom Reset icon.
Save Image
If you want to keep only the original image (before filters are applied), select False. The
processed images will not be added to the batch. For example, select False when you run an
Image Processing step to delete all blank pages. To save the processed image (after the filters
are applied), select True. As a result, two copies of the image will be in the batch: the original
image and the processed image.
Prefer Bitonal
When only using dual stream scanners, set this property to True.
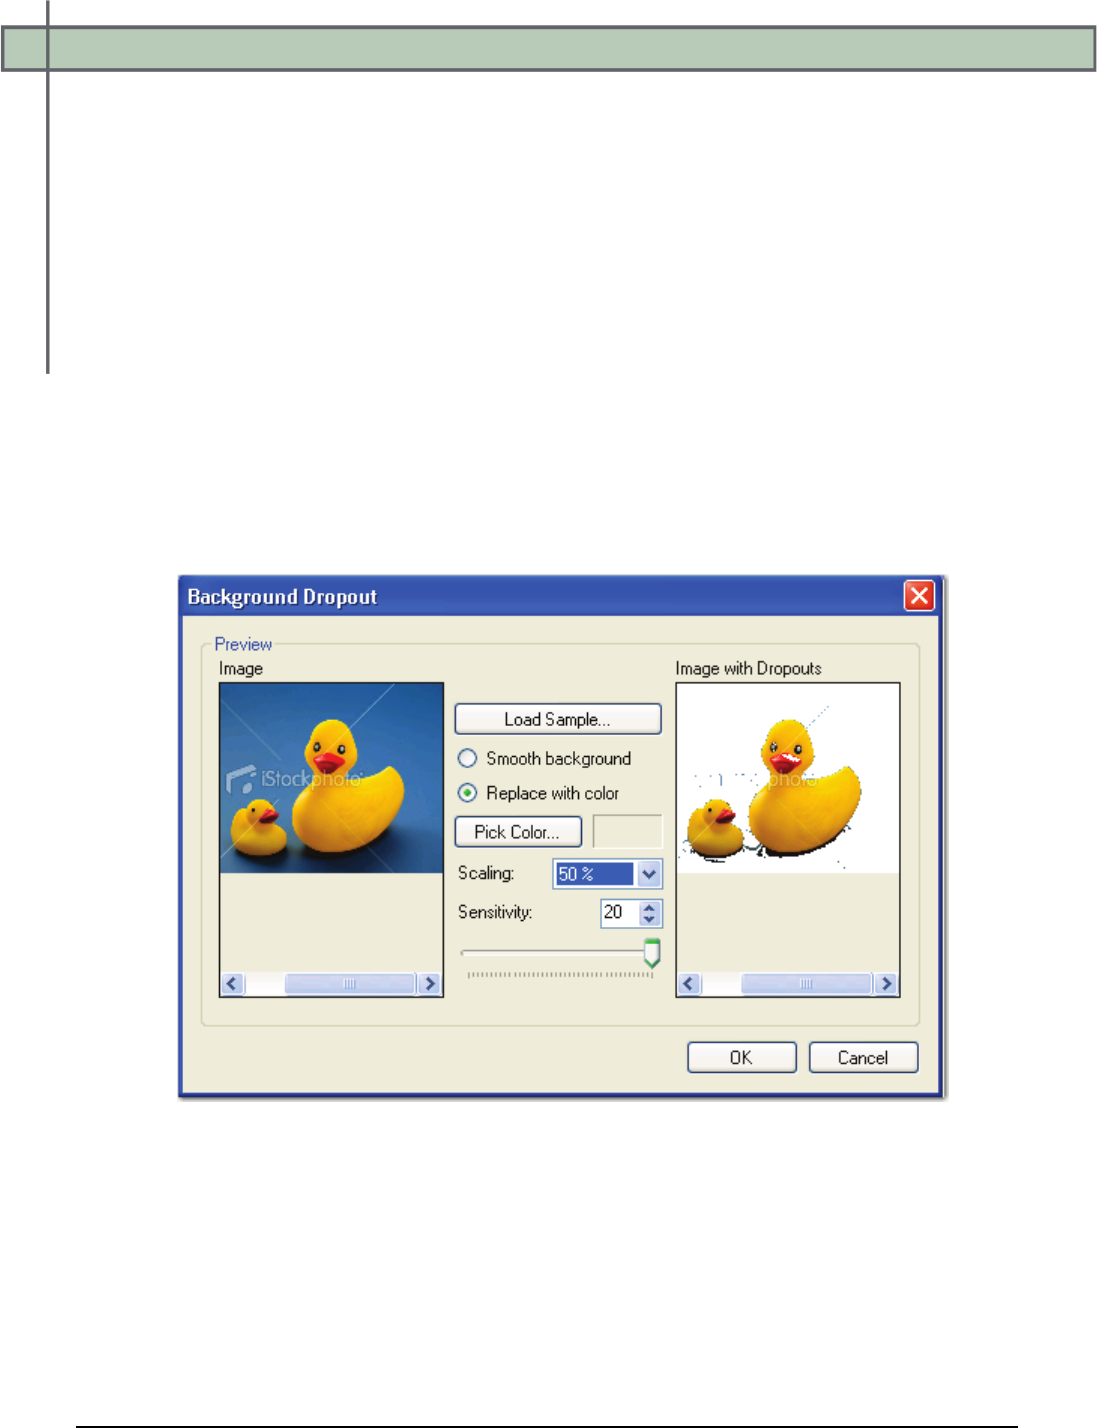
Chapter 11 – Image Processing
PaperVision® Capture Administration Guide 267
Image Processing Filters
Image Processing filters improve image quality by removing unnecessary borders, lines, and
noise; enhancing text readability; and reducing file size. Additional image processing filters
evaluate images, and then keep or discard them based on your defined criteria. Color
detection filters identify your specified colors and convert the image to black and white or
remove the page containing the color image. Binary filters can only be applied to bitonal (1
bit per pixel) images; color and grayscale are ignored.
Background Dropout
This filter is intended to be used on color images with contrasting text or a uniform
background of the same color or similar colors. The background is a set of pixels of the same
or similar color that covers the majority of the image, contrasting with other informative
pixels. Background detection is based on the image histograms of red, green, and blue (RGB)
channels. Only the margins of the image are used for histogram analysis, assuming that
margins are free from any information and clearly represent the background of the image.
Background Dropout
To load a sample image and apply the Color Dropout filter:
1. Click the Load Sample button.
2. Browse to the directory, and then select the image.
3. Click Open. The image appears in the Image window on the left.

Chapter 11 – Image Processing
PaperVision® Capture Administration Guide 268
4. To zoom in/out on the image, select a larger/smaller percentage in the Scaling drop-
down list.
5. To smooth the background color and make it appear more uniform, select Smooth
background. The results appear in the Image with Dropouts window, so proceed to
step 8.
6. Or, select Replace with color to replace the background color your selected color.
Proceed to the next step.
7. Click the Pick Color button. The selected color appears next to the Pick Color button.
8. To apply a more noticeable background dropout, move the Sensitivity slider to the
right, and the value increases.
• Move it to the left to reduce the amount of dropout applied to the image, and the
value decreases.
• Or, enter a value between -20 and 20.
9. When you are satisfied with the results of the background dropout, select OK.

Chapter 11 – Image Processing
PaperVision® Capture Administration Guide 269
Binary Border Removal
The Binary Border Removal filter deletes the black edges that appear around images during
scanning or photocopying. In the Processing Limits section, you can assign the number of
millimeters (in whole or decimal numbers) that are removed from the top, bottom, left, and/or
right borders. The size of the image does not change after this filter is applied; rather, white
pixels replace the border's black pixels.
• Use Same Value for All Sides applies the value of the left border to all sides.
• Process Inverted Images removes the border if images appear inverted.
Before Binary Border Removal
After Binary Border Removal
(also with Deskew)
Chapter 11 – Image Processing
PaperVision® Capture Administration Guide 270
Binary Crop
The Binary Crop filter allows you to assign margins to add and remove white space from the
edge of the image. You can set different values for the top, bottom, left, and right margins.
Image Margins
Positive margin values represent the white space between the edge of the image and the
black pixel closest to that edge. Negative margin values crop the specified amount from the
black pixel closest to the edge towards the center of the image. Enter the margin values in
millimeters (in whole or decimal numbers) for the top, bottom, left, and right margins.
Force Symmetry
This filter assigns the same values to opposite margins. Enter a value in the Top field to
apply the same value to the top/bottom margins. Enter a value in the Left field to apply the
same value to the left/right margins.
Note:
If you enter values for the Bottom or Right fields, they are ignored.
Before Binary Crop
After Binary Crop
Chapter 11 – Image Processing
PaperVision® Capture Administration Guide 271
Binary Dilation
The Binary Dilation filter expands a black area of an image using your specified direction
(horizontal, vertical, and/or diagonal) and number of times (passes) to apply the dilation. This
filter can improve text legibility, but can increase file size.
Before Dilation
After Dilation
Chapter 11 – Image Processing
PaperVision® Capture Administration Guide 272
Binary Erosion
The Binary Erosion filter trims an area of a black image using your specified direction
(horizontal, vertical, and/or diagonal) and number of times (passes) to apply the erosion. This
filter can reduce file size but causes a loss of detail in the image.
Before Erosion
After Horizontal Erosion
Binary Halftone Removal
The Binary Halftone Removal filter removes the background, such as a halftone or dither
pattern, from an image.
Before Binary Halftone Removal
After Binary Halftone Removal
Chapter 11 – Image Processing
PaperVision® Capture Administration Guide 273
Binary Hole Removal
The Binary Hole Removal filter identifies objects that look like binder hole punches near the
edge of the image, and then deletes those objects. Objects that appear like binder hole punches
that are visible in other areas of the image, such as the center, will not be removed.
Before Binary Hole Removal After Binary Hole Removal

Chapter 11 – Image Processing
PaperVision® Capture Administration Guide 274
Binary Invert Image
The Binary Invert Image filter reverses the polarity of the image. Black pixels become white
pixels, and white pixels become black pixels.
Before Binary Invert Image
After Binary Invert Image
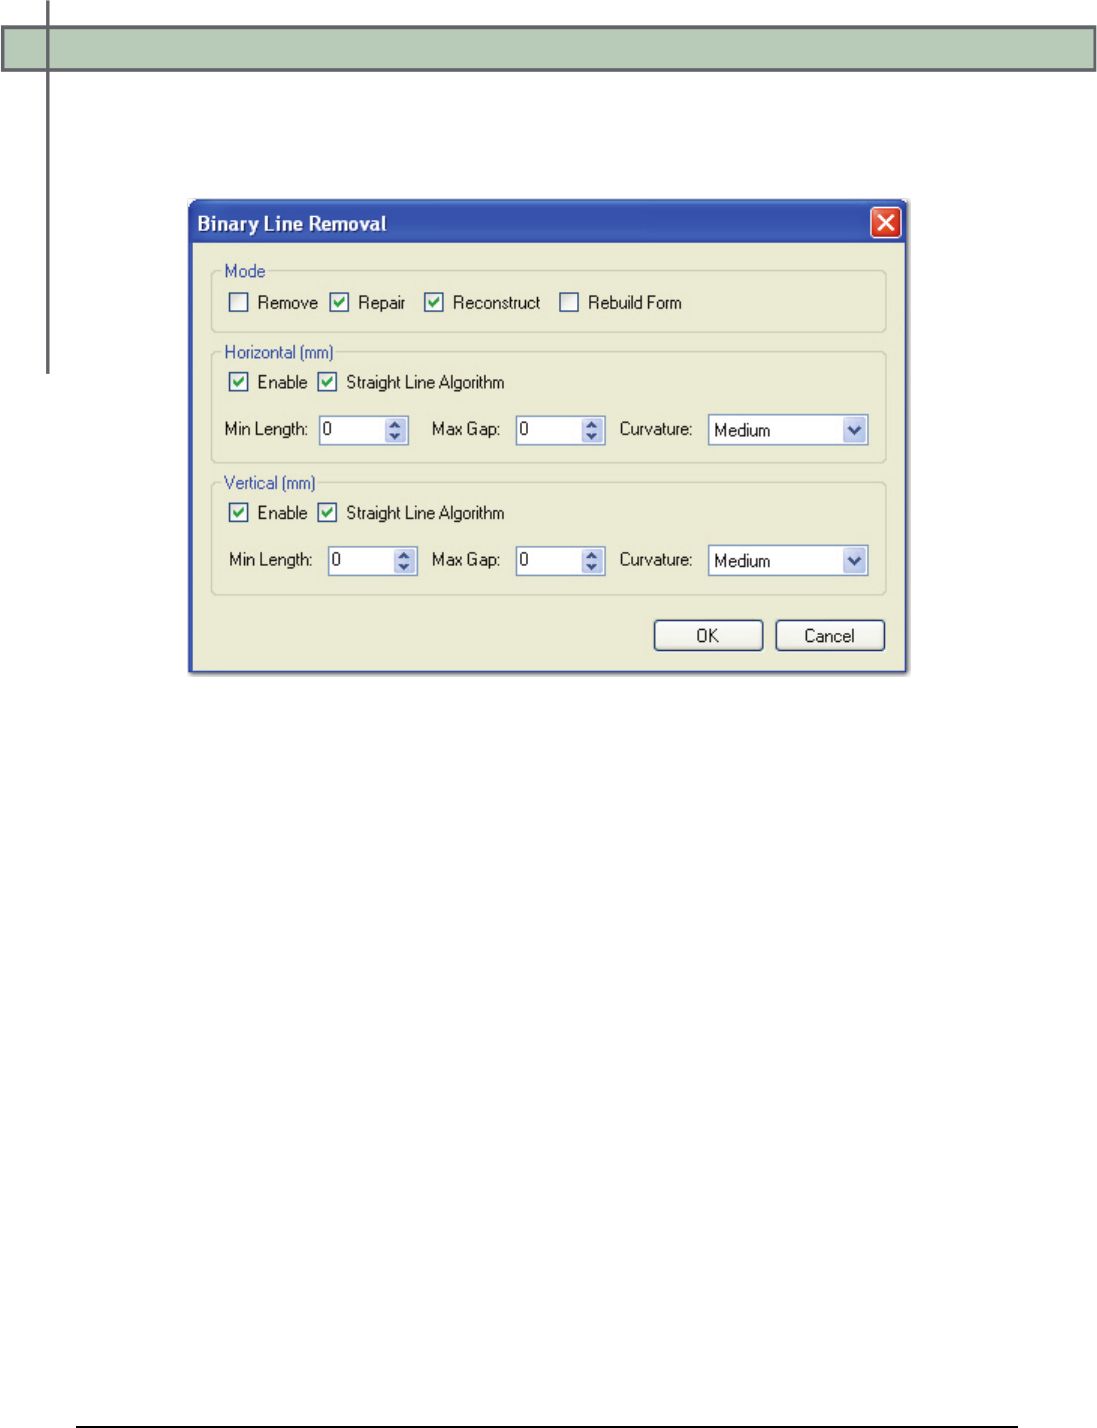
Chapter 11 – Image Processing
PaperVision® Capture Administration Guide 275
Binary Line Removal
The Binary Line Removal filter deletes lines or reconstructs lines on a form-based image.
Removing lines can reduce file size and improve OCR results.
Binary Line Removal
Mode
This setting specifies the type of line correction to perform on the page.
• Remove Lines takes out all objects considered as lines.
• Repair removes lines and repairs all graphics and text overlapped by the removed
lines.
• Reconstruct removes lines, repairs overlapped graphics and text, and redraws straight
lines in place of removed lines.
• Rebuild Form removes lines, redraws straight lines, and reconnects lines that were
previously connected. This type of line correction is commonly used for tables and
forms.
Horizontal Line Removal
Enable this setting to detect horizontal lines that will be taken out during the line removal
process.

Chapter 11 – Image Processing
PaperVision® Capture Administration Guide 276
Straight Line Algorithm
The Straight Line Algorithm setting provides faster processing of straight lines that are
longer than 100 pixels (suitable for forms and light paper). This setting evaluates the height
or width of the bounding rectangles around line-like objects to determine if the object is a
line. If this setting is not enabled, the line-like object is broken into small segments and
uses the minimum length, curvature, and maximum gap to determine whether the segments
comprise a line.
Minimum Length
This setting defines the minimum length in millimeters (in whole or decimal numbers) that
the filter will detect as a horizontal line.
Maximum Gap
This setting defines the maximum amount of allowable white space in millimeters (in
whole or decimal numbers) between two horizontal line-like objects to consider as one
line.
Curvature
This setting defines the maximum allowable amount of deviation from a straight line for a
horizontal line-like object to be considered a line.
• Straight contains a curvature value of 5.
• Low contains a value of 15.
• Medium contains a value of 30.
• High contains a value of 40.
Vertical Line Removal
This setting detects vertical lines that will be taken out during the line removal process.
Minimum Length
This setting defines the minimum length in millimeters (in whole or decimal numbers) that
the filter will detect as a vertical line.
Maximum Gap
This setting defines the maximum amount of allowable white space in millimeters (in
whole or decimal numbers) between two vertical line-like objects to be considered as one
line.
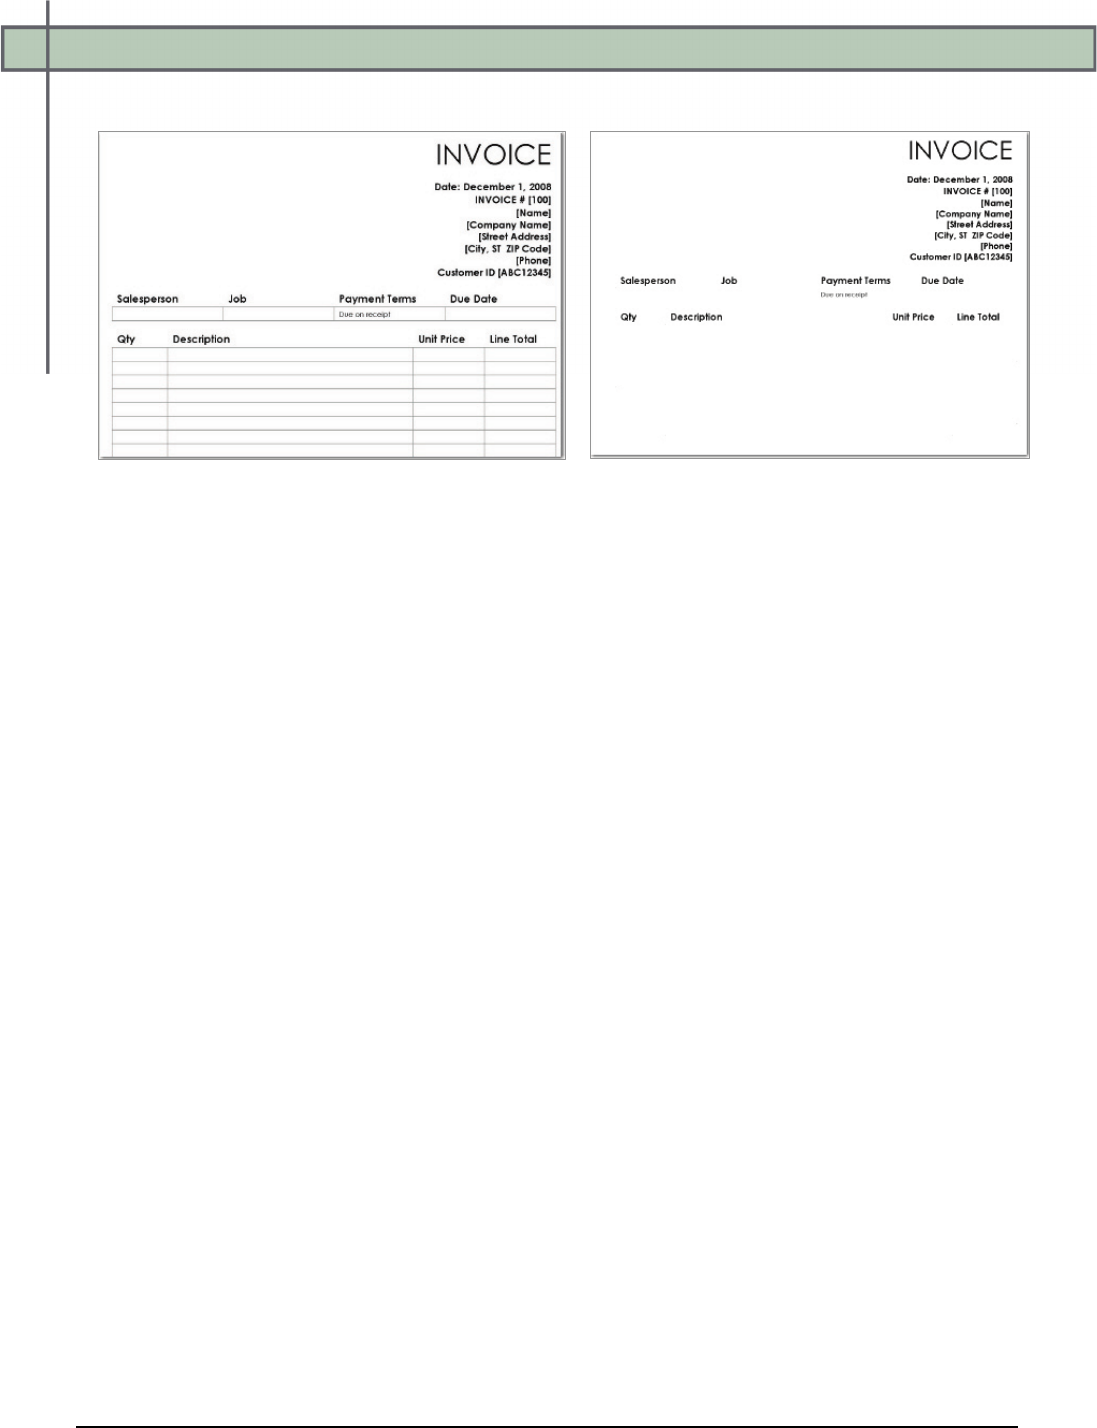
Chapter 11 – Image Processing
PaperVision® Capture Administration Guide 277
Before Binary Line Removal
After Binary Line Removal
Binary Noise Removal
Noise can originate from carbon or dirt particles on scanners, fax machines, or copiers. Noise
removal takes out extraneous specks from an image. If the image contains text, this filter may
remove periods and dots from sentences and letters. To avoid removing essential parts of text
characters, assign the Minimum Separation value to be greater than the distance between dots
and the lower parts of letters. To apply cropping and noise removal to an image, perform the
noise removal first for best results.
Maximum Height and Width
This setting defines the maximum height/width in millimeters (in whole or decimal
numbers) of an object to be considered noise.
Maximum Area Percentage
This value is defined by the specified height/width of an object to be removed as noise.
The Maximum Area Percentage setting detects long narrow objects such as lines,
decorative banners, and highlight areas that may appear both vertically and horizontally on
a page.
For example, to remove colored banners with the dimensions 5" x 1" or 1" x 5", you can
assign the Maximum Height and Maximum Width values to five inches. However, a 5" x
5" picture would also be detected as noise and removed. To avoid this problem, assign
20% so that only the banner area is detected as noise, regardless of its orientation.
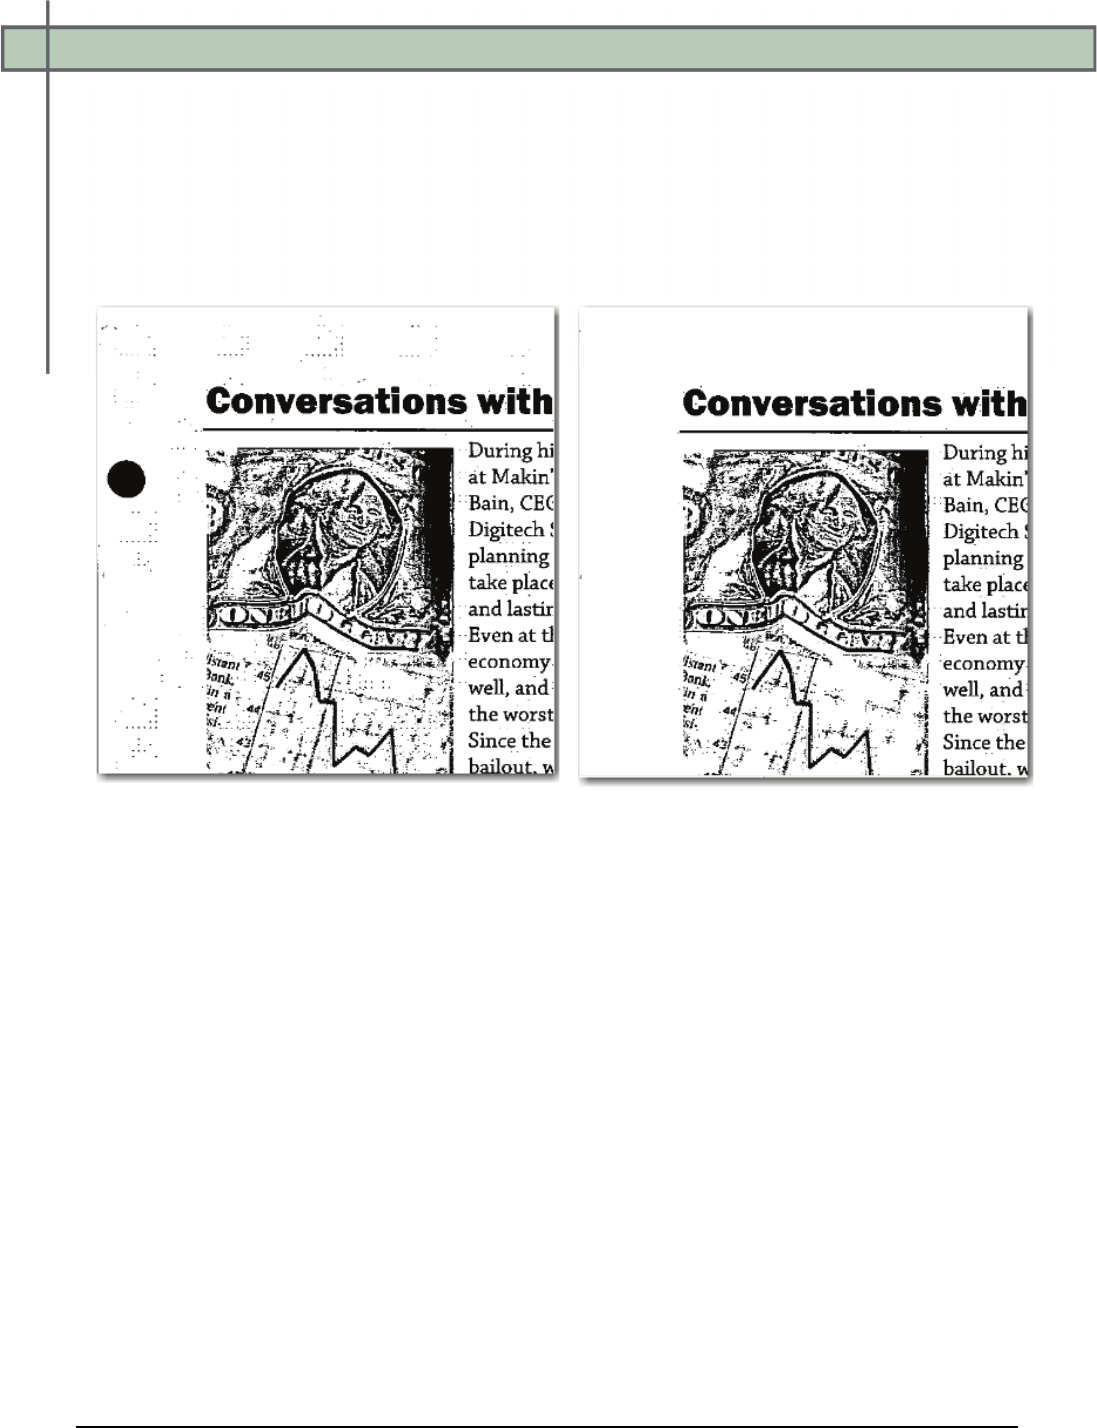
Chapter 11 – Image Processing
PaperVision® Capture Administration Guide 278
Minimum Separation
This setting defines the minimum distance in millimeters (in whole or decimal numbers)
that separates noisy areas from non-noisy areas of the page. A value of zero removes all
noisy objects within your specified values in the Maximum Height, Maximum Width, and
Area Percentage fields. Assigning a zero value may remove text elements, such as broken
characters, periods, and dots above letters. Assigning a value greater than zero preserves
noise-like objects near text characters and may improve OCR accuracy.
Before Binary Noise Removal After Binary Noise Removal (and Binary
Hole Removal)
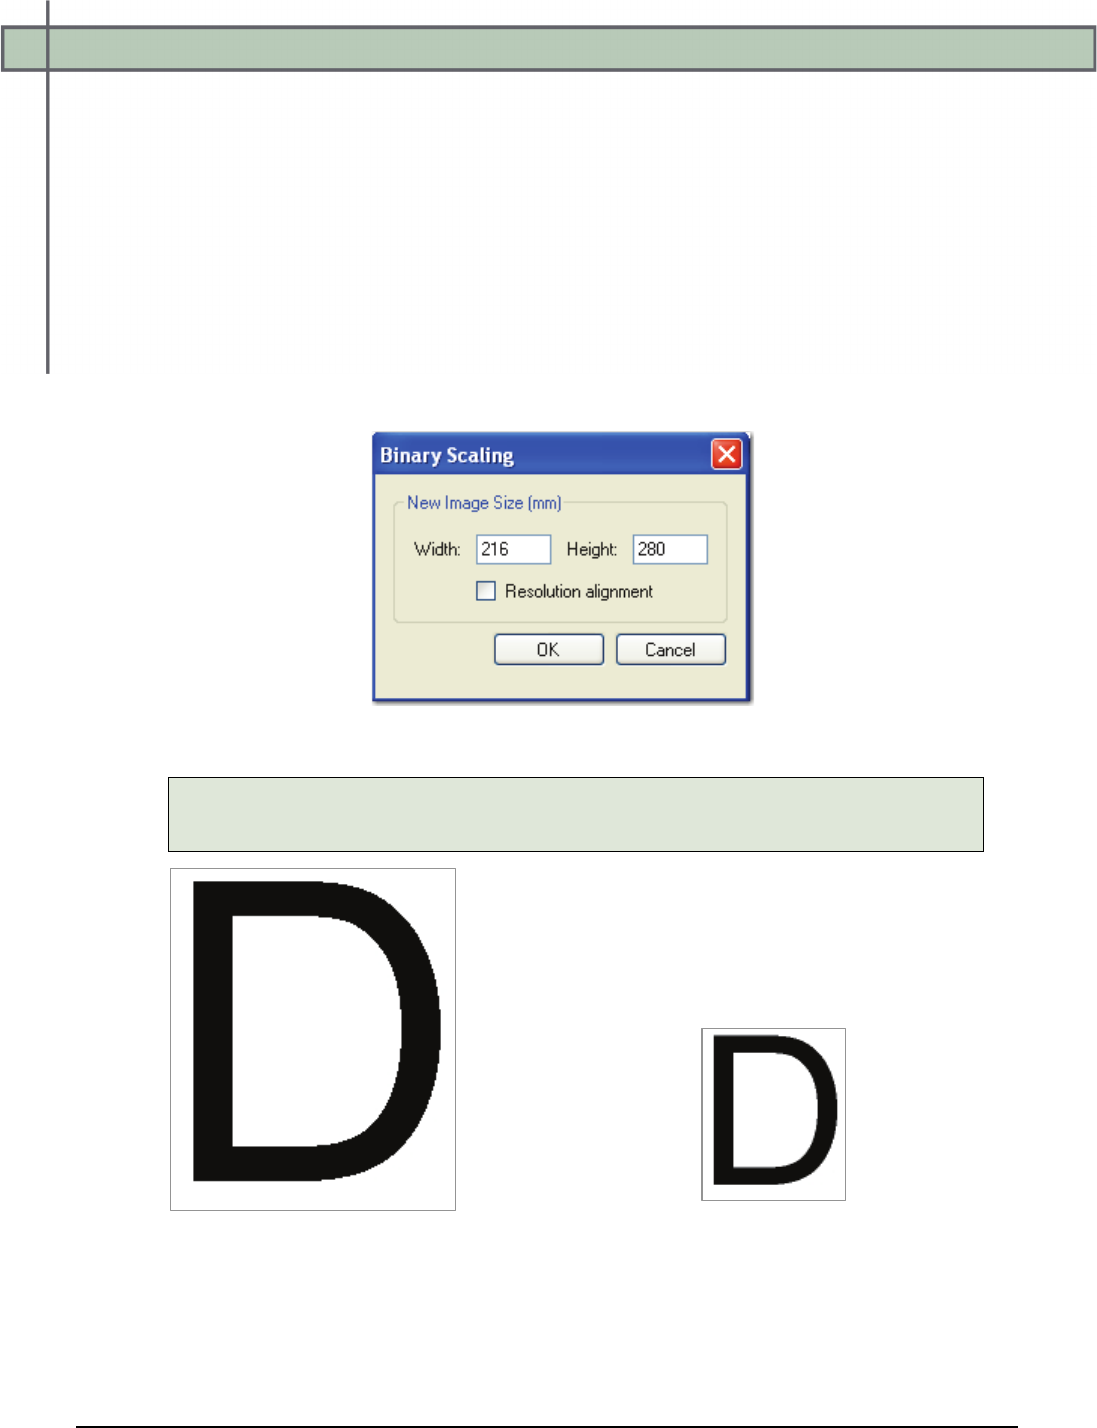
Chapter 11 – Image Processing
PaperVision® Capture Administration Guide 279
Binary Scaling
The Binary Scaling filter resizes an image while preserving the original aspect ratio. After you
specify the width and height to apply to the image after scaling, its area is resized to fit within
those boundaries while maintaining the aspect ratio. You can assign the resulting width and
height in millimeters (in whole or decimal numbers) of the image after it is scaled. If the
specified height or width value is larger than the area of the scaled image, the area is centered
along the specified dimensions, and white margins are added to both sides.
The Resolution Alignment property adjusts the X (horizontal) and Y (vertical) resolutions of
an image so they are equal. If the X and Y resolutions are not equal, the lower resolution is
scaled up to match the higher resolution. When this setting is enabled, you cannot specify the
width and height of the image.
Binary Scaling
Note:
Use of binary scaling can improve the recognition rate of barcode detection.
Before Binary Scaling
After 50% Binary Scaling
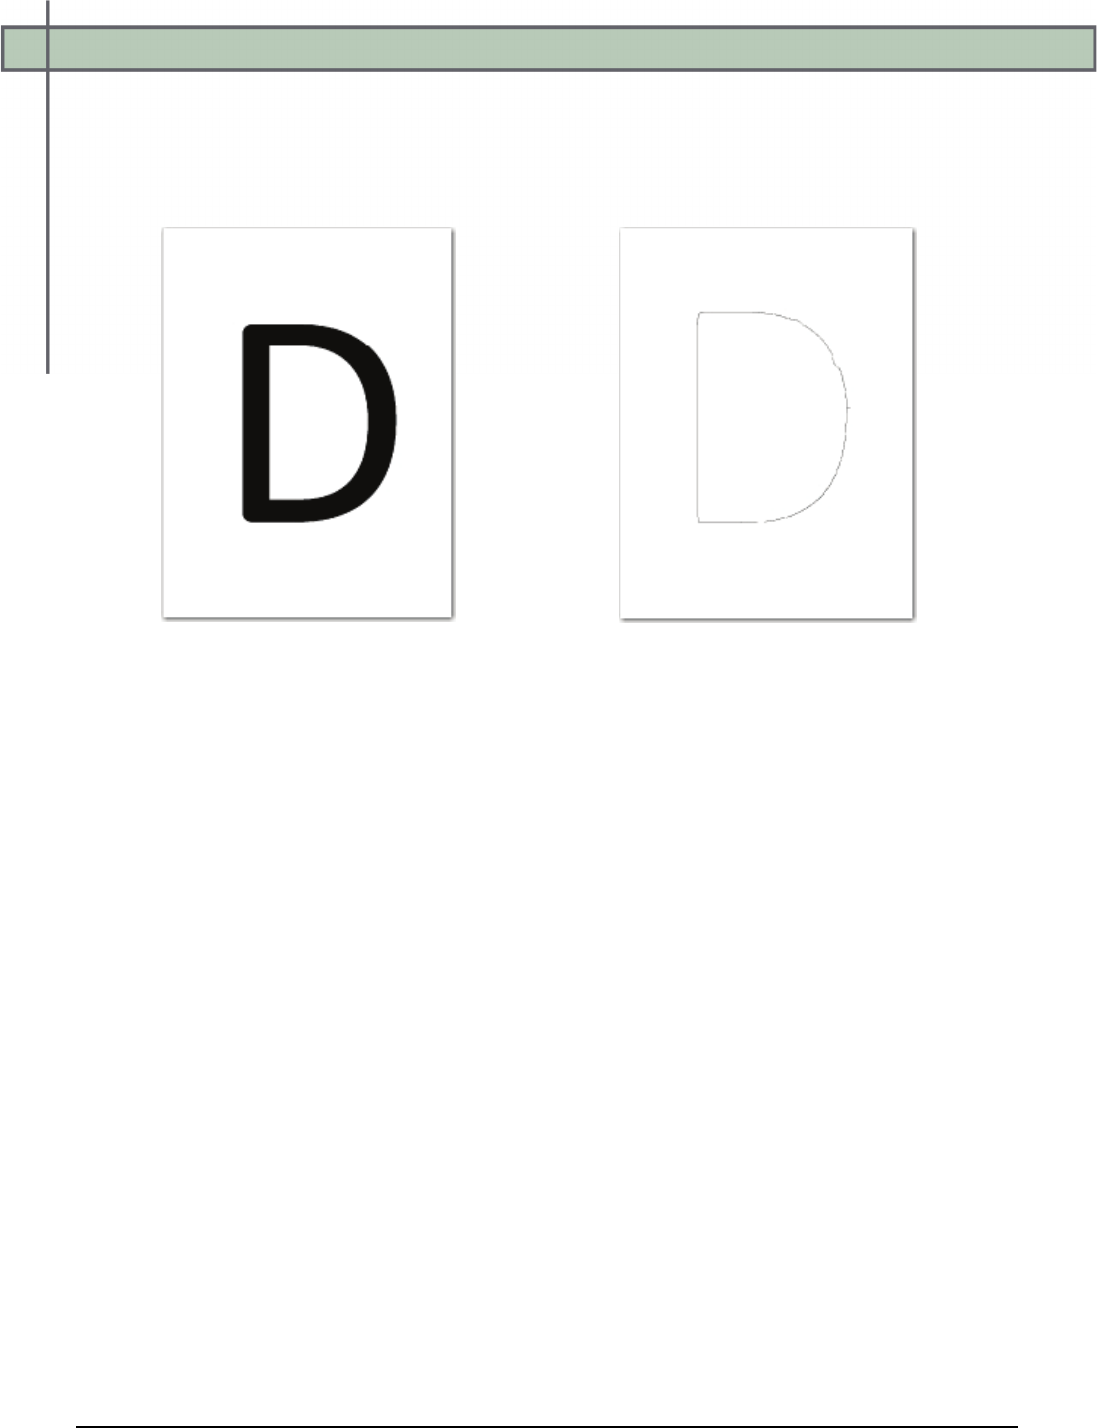
Chapter 11 – Image Processing
PaperVision® Capture Administration Guide 280
Binary Skeleton
The Binary Skeleton filter should be used with caution, since it can significantly distort the
image. This filter can reduce the file size, and should only be used when performing certain
types of OCR.
Before Binary Skeleton
After Binary Skeleton (Zoomed 1x)
Binary Smoothing
The Binary Smoothing filter removes bumps that appear on text characters or graphics in an
image. This filter looks for any pixel surrounded by five or six connected pixels of the
opposite color, and then inverts that center pixel based on the filter's configuration.
Smoothing improves legibility and can reduce file size without compromising detail.
• Trim First removes black noise pixels before white noise pixels. If this option is
disabled, white noise pixels are removed before black noise pixels.
• Corner Black removes black noise pixels from the corners of objects in the image.
• Corner White removes white noise pixels from the corners of objects in the image.
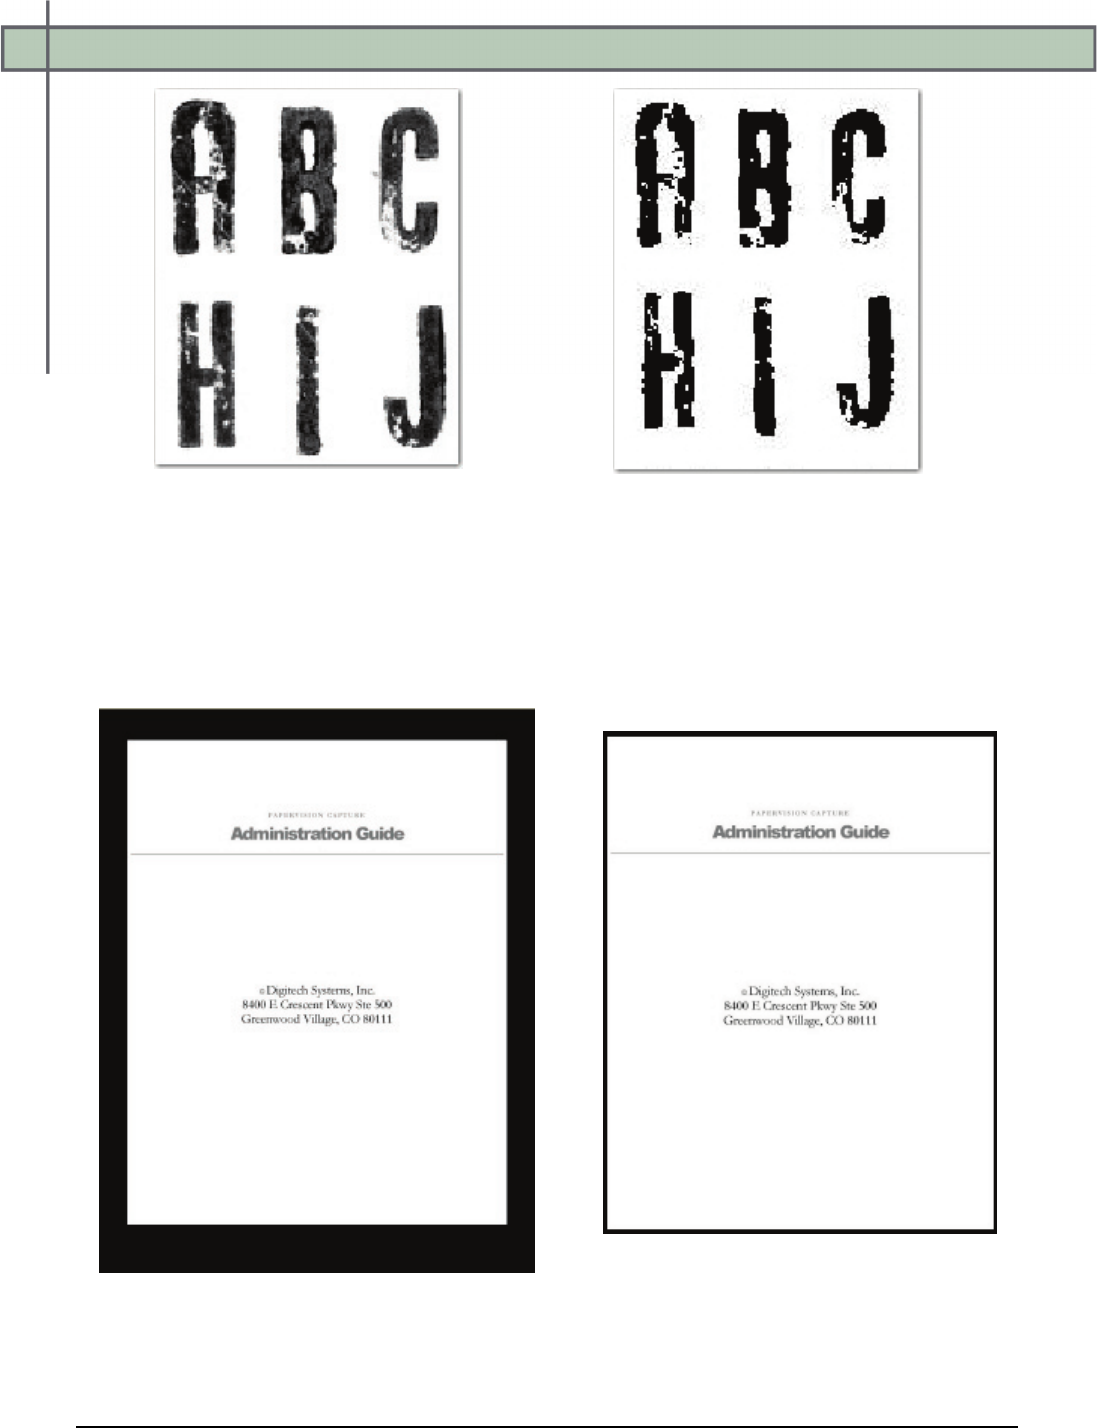
Chapter 11 – Image Processing
PaperVision® Capture Administration Guide 281
Before Binary Smoothing
After Binary Smoothing
Black Overscan Removal
The Black Overscan Removal filter deletes the black overscan area that appears around an
image produced by scanners with black borders. This filter reduces the image file size. To
maximize results, apply the Deskew filter with a black fill color prior to applying the Black
Overscan Removal filter.
Before Black Overscan Removal
After Black Overscan Removal

Chapter 11 – Image Processing
PaperVision® Capture Administration Guide 282
Page Deletion - Always
This filter removes the entire page from the batch.
Page Deletion - Blank
To detect blank pages in a document, one of two methods can be applied. If you apply the
Preset method, select from the following options:
• Dirty White, the default setting, considers pages blank when they contain some noise.
• One Line OK considers pages blank when they contain one specified line of text.
• Pristine White considers pages blank when they contain no noise.
• Two Lines considers pages blank when they contain two specified lines of text.
• Very Dirty White considers pages blank when they contain a lot of noise.
Page Deletion – Blank
If you select Black Area Ratio, move the slider to assign the ratio that determines when a
page is blank. The ratio is calculated by dividing black pixels by the number of All Region
Pixels. Enter margins in millimeters (in whole or decimal numbers) to exclude when this
setting determines whether a page is blank. This filter then deletes pages detected as blank
according to your specified parameters.
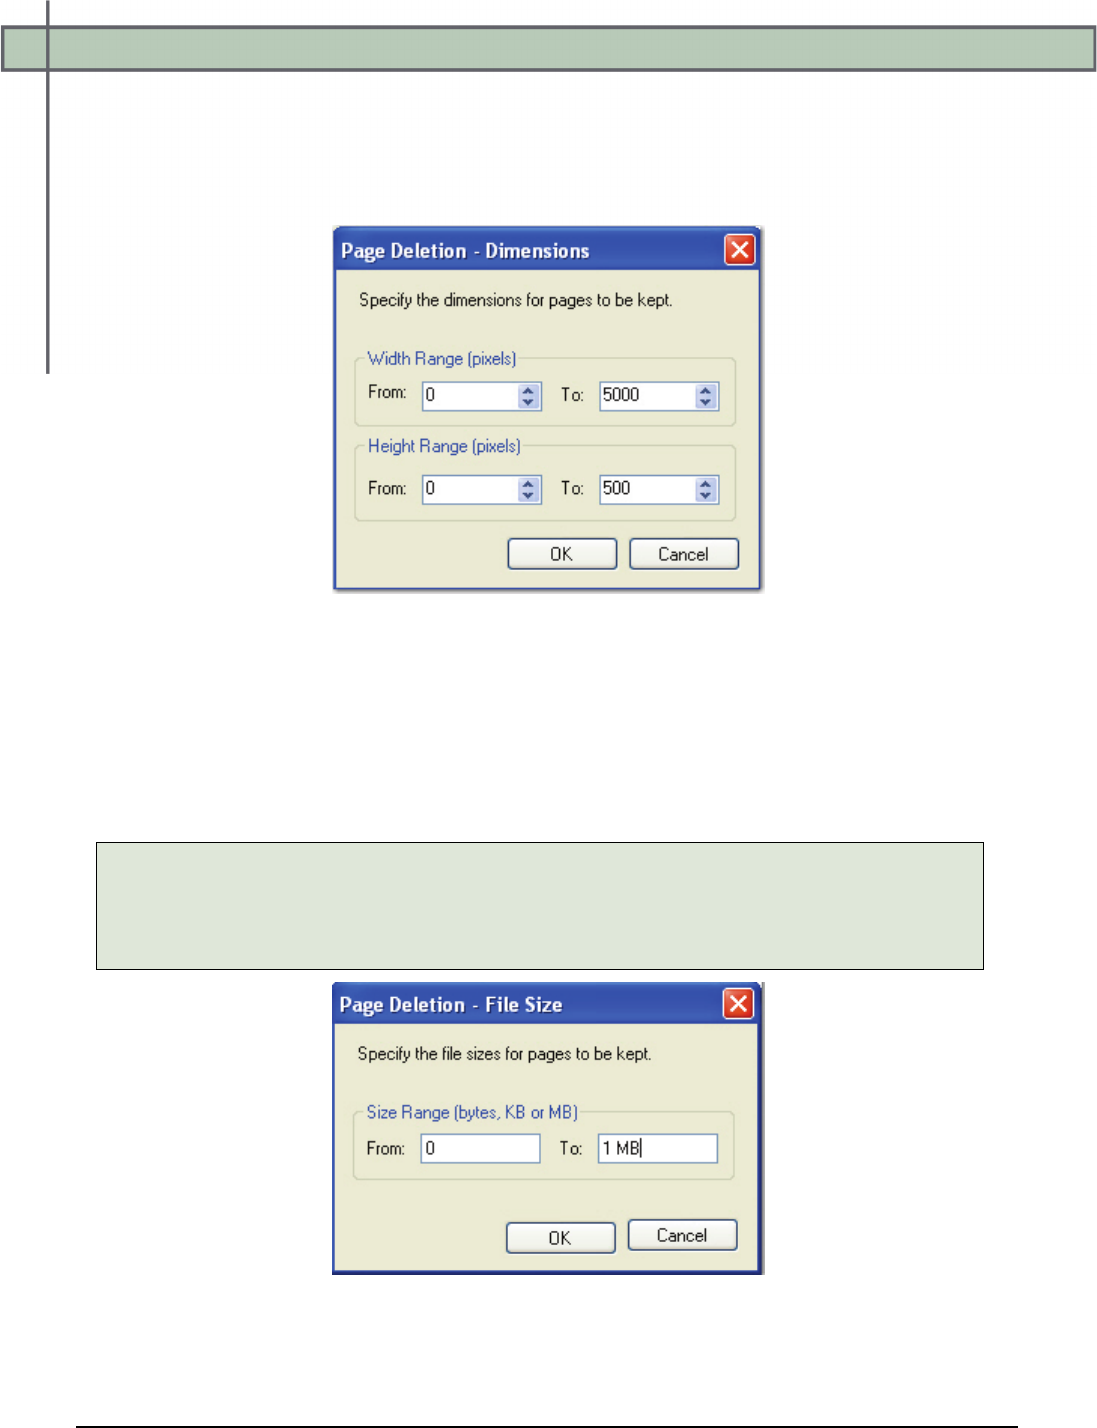
Chapter 11 – Image Processing
PaperVision® Capture Administration Guide 283
Page Deletion - Dimensions
This filter allows you to specify the dimensions (in pixels) of pages that will remain in the
batch. Enter the width and height ranges in the From and To fields, and images with
dimensions that fall outside your specified ranges will be deleted from the batch.
Page Deletion - Dimensions
Page Deletion – File Size
This filter allows you to specify the file size for pages that will remain in the batch. Enter the
size range, including the numeric value and file size unit, in the From and To fields, and
images falling outside your specified size range will be deleted from the batch.
Note:
If you do not enter a specific file size unit (KB, MB, etc) after the numeric value, the unit
defaults to bytes. Therefore, for kilobytes and megabytes, you must enter "KB" and
"MB" after the numeric values.
Page Deletion – File Size
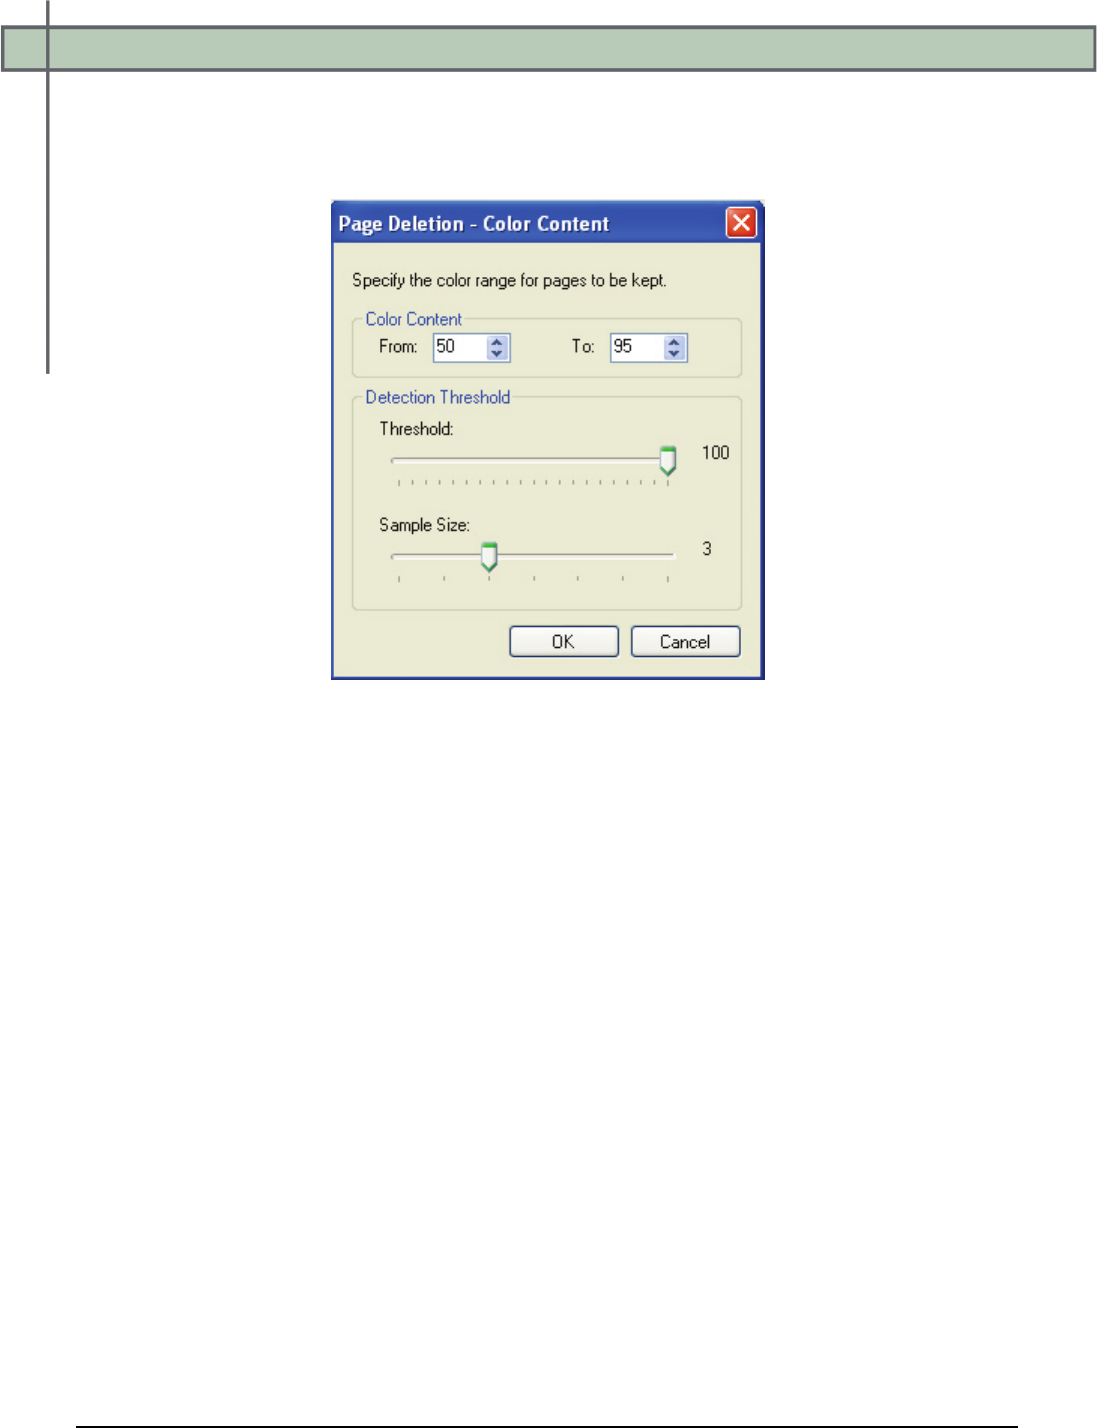
Chapter 11 – Image Processing
PaperVision® Capture Administration Guide 284
Page Deletion - Color Content
This filter allows you to assign color threshold settings that specify whether to delete color
pages or non-colorful pages.
Page Deletion - Color Content
• The Color Content ranges between 1 and 100. Pages detected outside the specified
range will be deleted.
• The Threshold value ranges between 1 and 100.
• The Sample Size value ranges between 1 and 7.
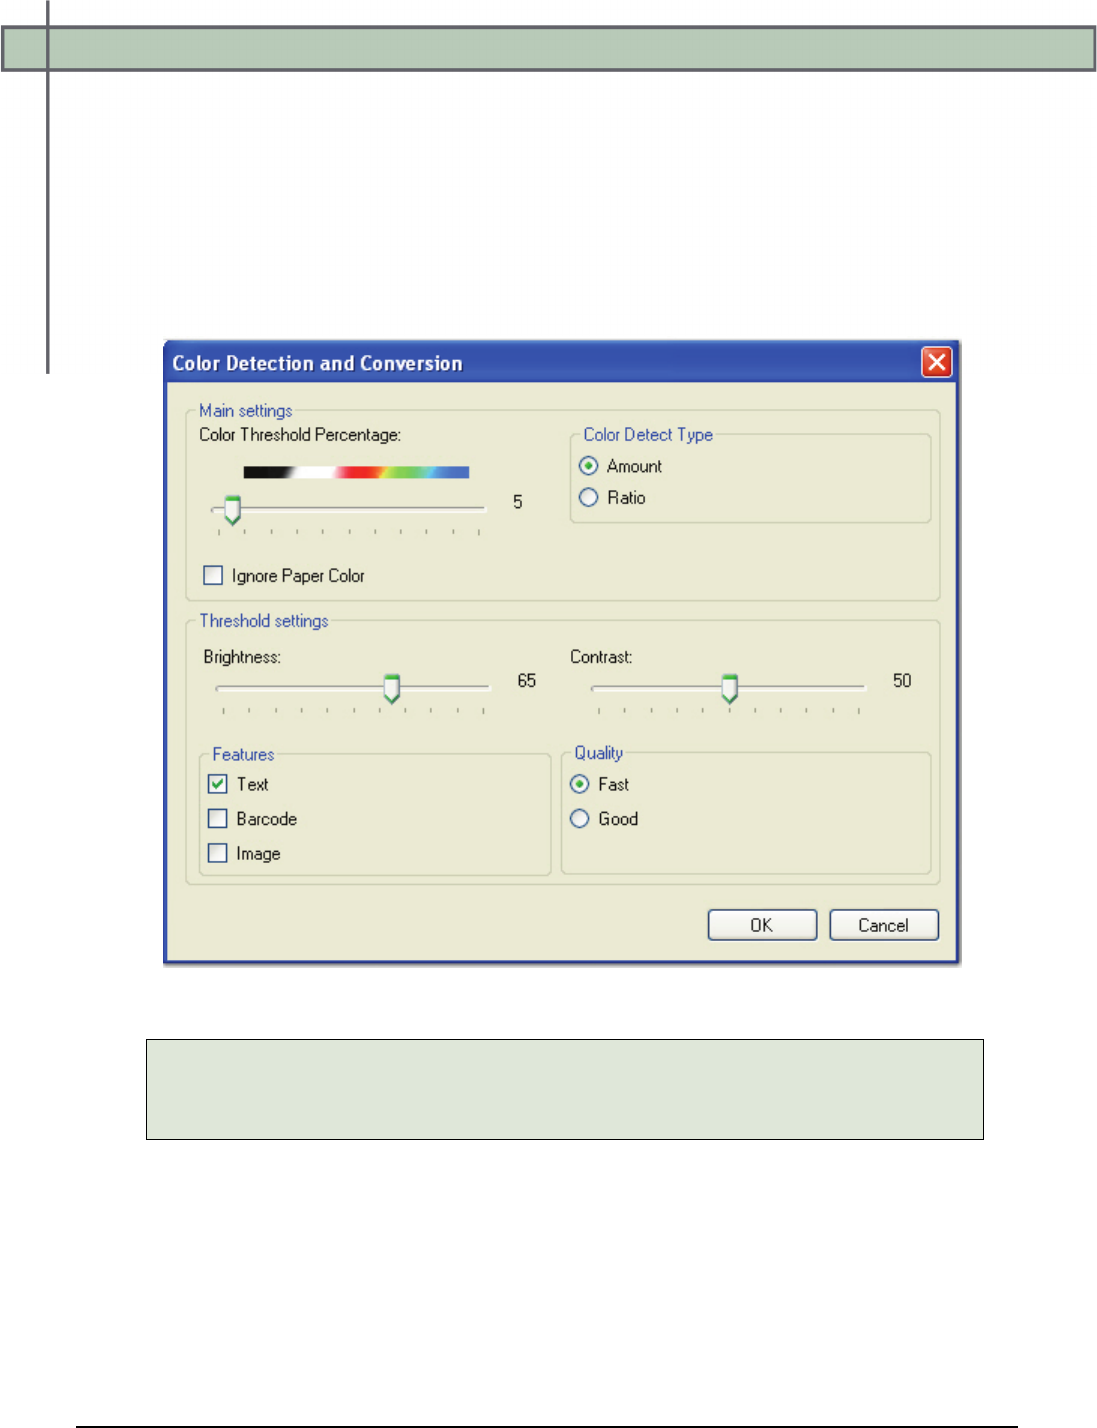
Chapter 11 – Image Processing
PaperVision® Capture Administration Guide 285
Color Detection and Conversion
This filter detects the colorfulness of an image, and then returns either a binary or a color
image based on your assigned threshold settings. If you enable the Ignore Paper Color
setting, the paper's background changes to white. The filter then counts the number of white
(and nearly-white) and black (and nearly-black) pixels and excludes them from the color
count. The colorfulness of the image is then computed according to the selected Color Detect
Type. If the resulting colorfulness value is less than your assigned threshold, the resulting
image displays as binary (black and white).
Color Detection and Conversion
Note:
If the original image is more colorful than your specified threshold, the filter is not
applied.
Color Threshold Percentage
This setting assigns the amount of color that an image must contain in order to be
considered colorful. If you enable the Ignore Paper Color setting, the background color of
the image changes to white before automatic color detection is performed.

Chapter 11 – Image Processing
PaperVision® Capture Administration Guide 286
Color Detect Type
The default setting, Amount, detects the number of color pixels in the image. The Ratio
setting detects the ratio of color and black pixels in the image.
Brightness
Brightness defines a pixel's lightness value from black (darkest) to white (brightest). Move
the slider to assign the amount of brightness to apply to binary images.
Contrast
Contrast is a measure of the rate of change of brightness in an image. A high-contrast
image contains defined transitions from black to white. Move the slider to assign the
amount of contrast for binary images.
Features
To preserve a specific feature in the binary image, you can select Text, Barcode, and/or
Image.
Quality
This setting specifies the quality and speed of the thresholding process.
• Fast causes thresholding to process quickly, and results in quality images.
• Good causes thresholding to process more slowly, but results in better quality
images.

Chapter 11 – Image Processing
PaperVision® Capture Administration Guide 287
Color Dropout
The Color Dropout filter removes your specified colors from the image, and then displays the
scanned image without your specified colors.
Color Dropout
To load a sample image and apply the Color Dropout filter:
1. Click Load Sample Image.
2. Browse to the directory.
3. Select the image.
4. Click Open.
5. To select the color to delete from the image, click the Pick Color button.
6. To undo the most recent color selections (since the last time you clicked OK), click
the Undo button.
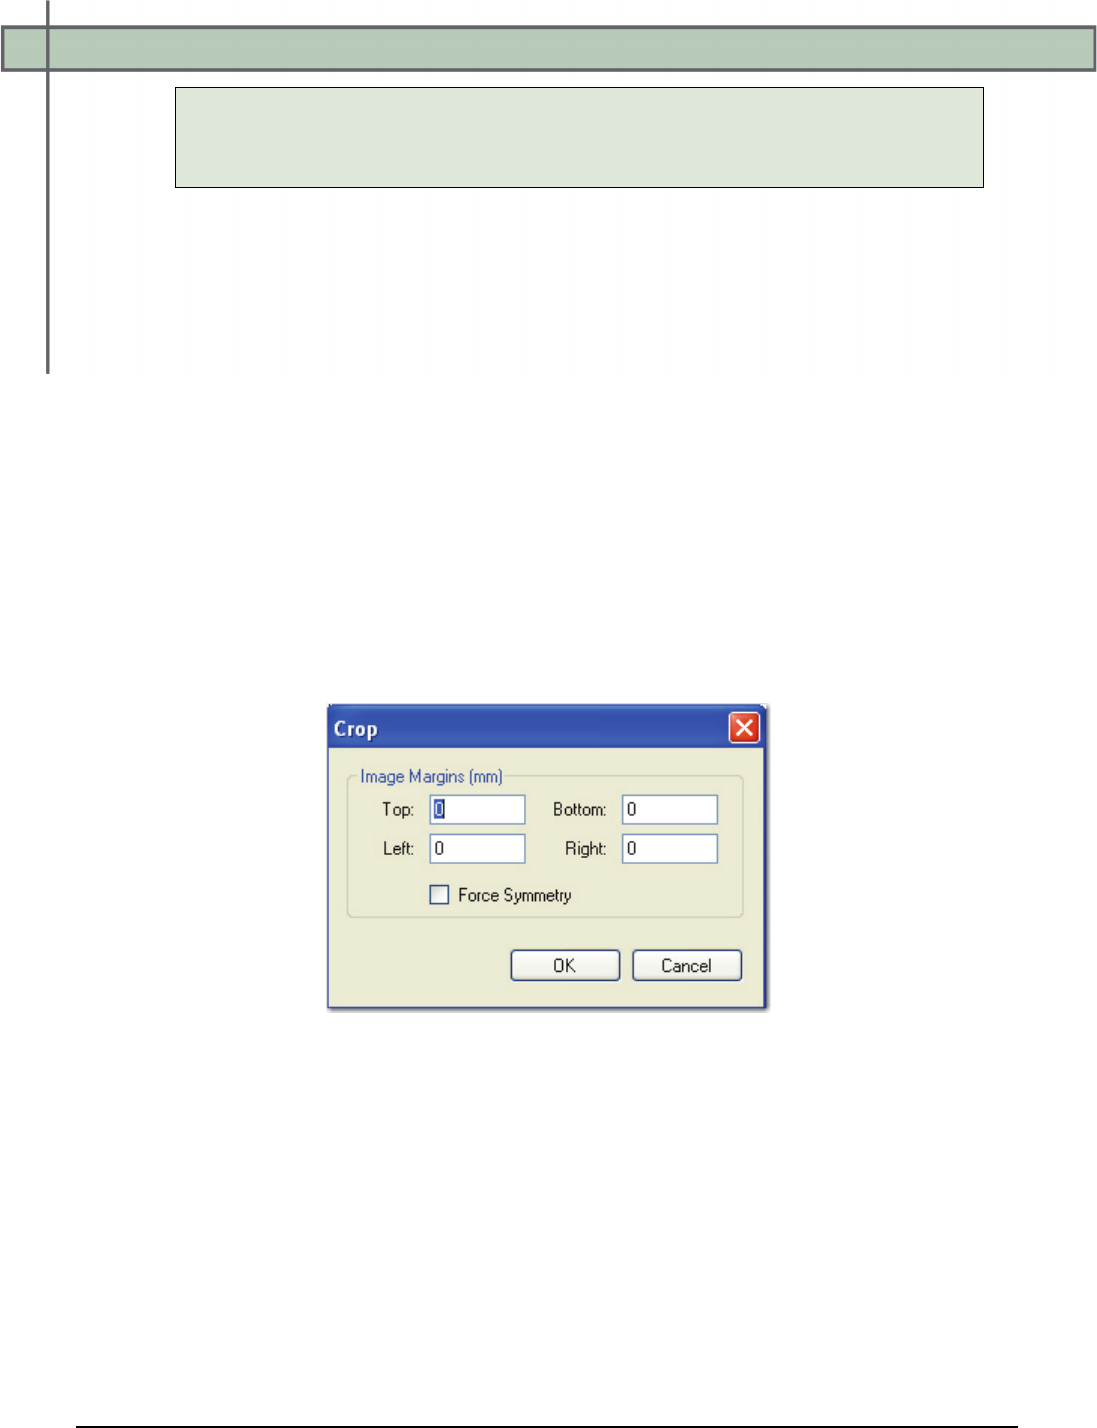
Chapter 11 – Image Processing
PaperVision® Capture Administration Guide 288
Note:
If the colors are not being restored, highlight the color in the Color Mapping
section, and then click the Remove button on top.
7. To zoom in on the image, select a larger percentage in the Scaling drop-down list.
8. To apply a larger magnitude to the color dropout filter, enter a value between 1 and
255.
• Or, move the slider to see the effect on the image.
• A larger magnitude value results in the removal of more adjoining colors to your
selected color.
9. Click on the color to extract. The selected color appears in the Color Mapping list on
top, along with its RGB color codes.
10. Click the Remove button to remove the color from the dropout list.
11. Select Clear All to remove all colors from the dropout list.
Crop
Cropping allows you to assign margins in millimeters (in whole or decimal numbers) to
remove white space from the edge of the image. You can set different values for each margin.
Crop
Image Margins
Positive margin values represent the white space between the edge of the image and the
black pixel closest to that edge. Negative margin values crop the specified amount from the
black pixel closest to the edge towards the center of the image. Enter values in the Top,
Bottom, Left, and Right fields to assign the margins.
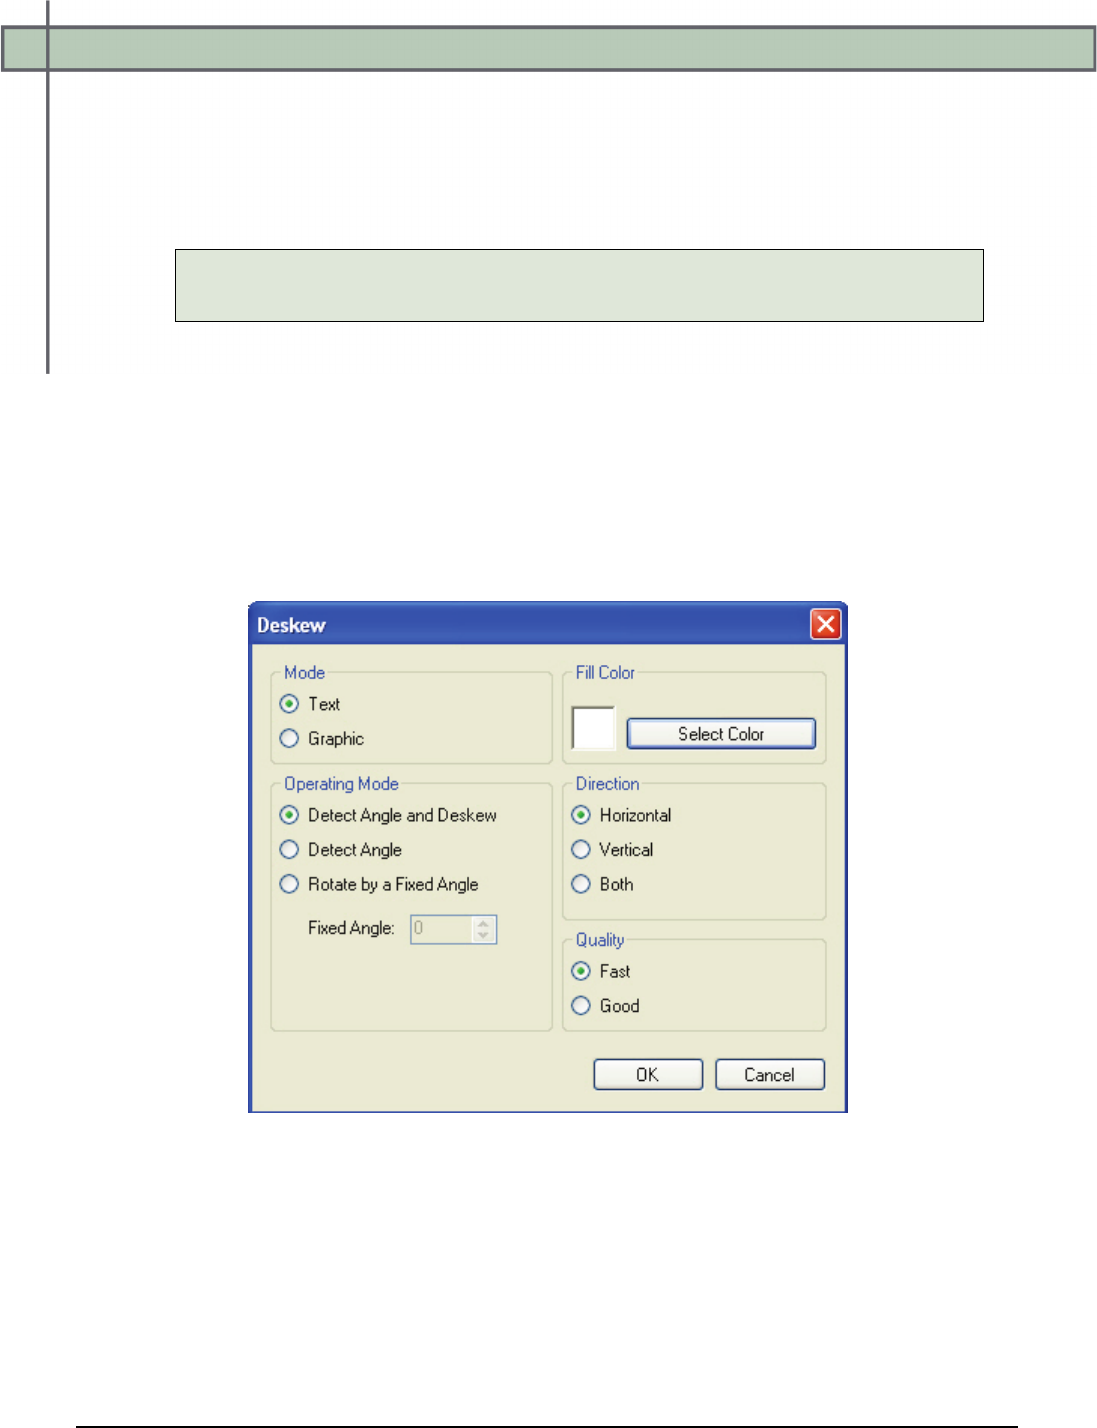
Chapter 11 – Image Processing
PaperVision® Capture Administration Guide 289
Force Symmetry
This setting assigns the same values to opposite margins.
• Enter a value in the Top field to apply the same value to the top and bottom margins.
• Enter a value in the Left field to apply the same value to the left and right margins.
Note:
If you enter values for the Bottom or Right fields, they are ignored.
Deskew
Skewing can occur when the original document was fed into the scanner, fax machine, or
photocopier. This filter examines the image and determines the skew angle, which is
measured between the edge of the image and the horizontal or vertical axis. The filter
straightens images that slant from their correct orientation.
You can rotate an image from -44.9 degrees to +44.9 degrees, in 0.1 degree increments,
without detecting a skew angle. You can adjust the values most suitable for your documents.
Deskew

Chapter 11 – Image Processing
PaperVision® Capture Administration Guide 290
Mode
The Mode setting indicates whether text or graphics will be used to determine the skew
angle.
• Select Text if pages primarily contain text with some tables and lines.
• Select Graphics if pages contain large blocks of black areas.
Operating Mode
• The default setting, Detect Angle and Deskew, automatically examines the images
and determines the skew angles.
• Rotate by a Fixed Angle rotates the image by your specified fixed angle.
• Detect Angle deskews the images by a fixed number of degrees.
Fill Color
You can assign a fill color of black or white (default), which can match the color in the
overscan area of the image. If the image contains a border, you can assign the fill color to
match the border after the image is deskewed.
Direction
This setting indicates the image's skew angle measurement direction.
• Select Horizontal if only horizontal text exists in the documents.
• Select Vertical if only vertical text exists in the documents.
• Select Both if either text orientation may exist.
Quality
This setting specifies the quality and speed of the deskew process.
• Fast causes deskewing to process quickly, and results in quality images.
• Good causes the deskewing to process more slowly, but results in better quality
images.
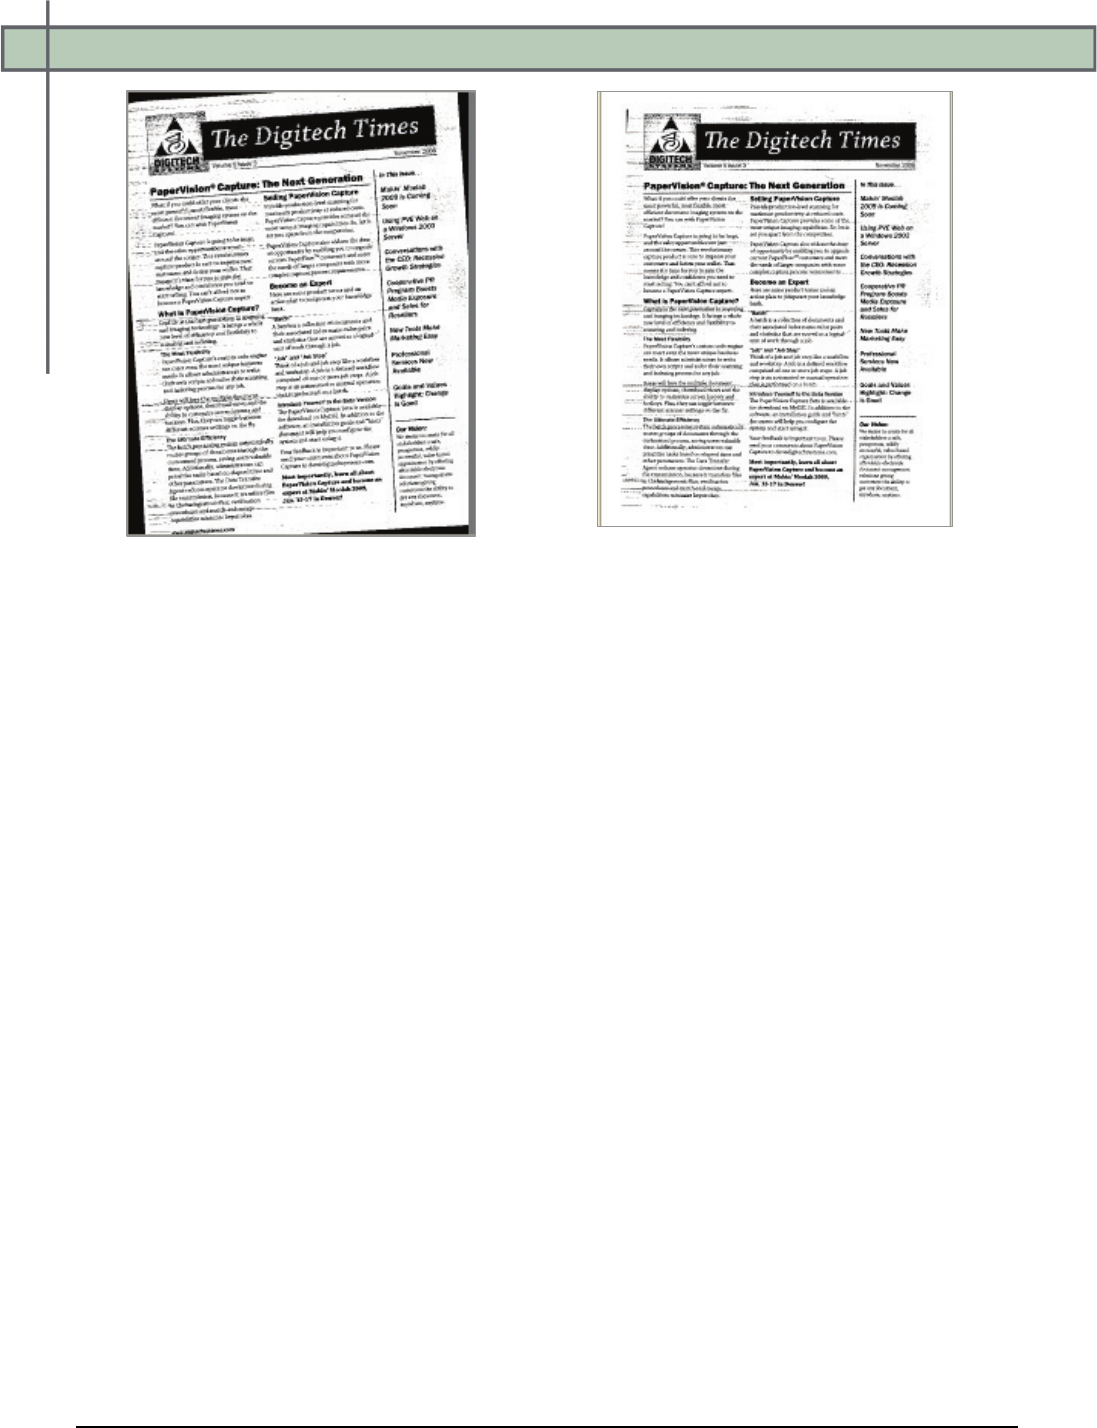
Chapter 11 – Image Processing
PaperVision® Capture Administration Guide 291
Before Deskew
After Deskew (with Binary Border Removal)
Chapter 11 – Image Processing
PaperVision® Capture Administration Guide 292
Image Fit
This filter is intended to crop images before they are processed through the Nuance Full-Text
OCR step. The minimum and maximum width and height dimensions that can be specified
are 16 x 16 to 8400 x 8400 pixels. If the image size is less than 16 x 16 pixels, white space
will be added to the image from the bottom and right corners until the minimum size (16 x 16
pixels) is reached. If the image size is greater than 8400 x 8400 pixels, the image is cropped
from the bottom and right corners until the maximum size is reached.
Image Fit
Chapter 11 – Image Processing
PaperVision® Capture Administration Guide 293
Redaction
The Redaction filter allows you to cover confidential or sensitive data on images. To ensure
redactions consistently cover the same area on every image, it is recommended to test images
with similar sizes that will be used in production. For your reference, the size (in pixels) of
each imported image appears in the title bar.
Redaction
To import an image:
1. Click the Import Image icon in the toolbar.
2. In the Open dialog box, locate the image.
3. Click Open.
Chapter 11 – Image Processing
PaperVision® Capture Administration Guide 294
To adjust the image view:
• To fit the image exactly within the window, click the Best Fit icon.
• To view the image in its actual size, click the Actual Size icon.
Drawing Redactions
After you have imported a sample image into the Redaction window, the cursor is
automatically equipped with the Redaction tool.
To draw a redaction:
1. Drag the cursor around the area on the image. By default, a transparent rectangle
appears on the image.
2. Once the redaction is drawn, the redaction properties appear in the properties grid on
the right. You can edit the color, position, and size of the redaction.
• Color: From the drop-down list, you can select the background color of the
redaction.
• Position: The X coordinate indicates the position of the redaction's upper-left
corner relative to the container's left edge. The Y coordinate indicates the position
of the redaction's upper-left corner relative to the container's top edge.
• Size: The width and height of the redaction are specified in pixels.
3. After making necessary adjustments, click OK to save the redaction properties.
To delete a redaction:
1. Select the redaction.
2. Click the Delete icon, or press the Delete key.
Chapter 11 – Image Processing
PaperVision® Capture Administration Guide 295
Rotation
The Rotation filter automatically rotates scanned images by your specified direction, fixed
amount of degrees, or detected text orientation. The Text setting detects the image's text
orientation using the Nuance Full-Text OCR or Open Text Full-Text OCR engine, and then
automatically rotates the image.
Rotation
Note:
If you select the Text auto-detect rotation, a Capture Nuance Full-Text OCR or
Capture Open Text Full-Text OCR license will also be consumed upon time of
capture. Additionally, the Mirror rotation setting will be disabled since both full-
text engines automatically detect mirrored text.
Chapter 11 – Image Processing
PaperVision® Capture Administration Guide 296
Before Rotation After 180-Degree Rotation
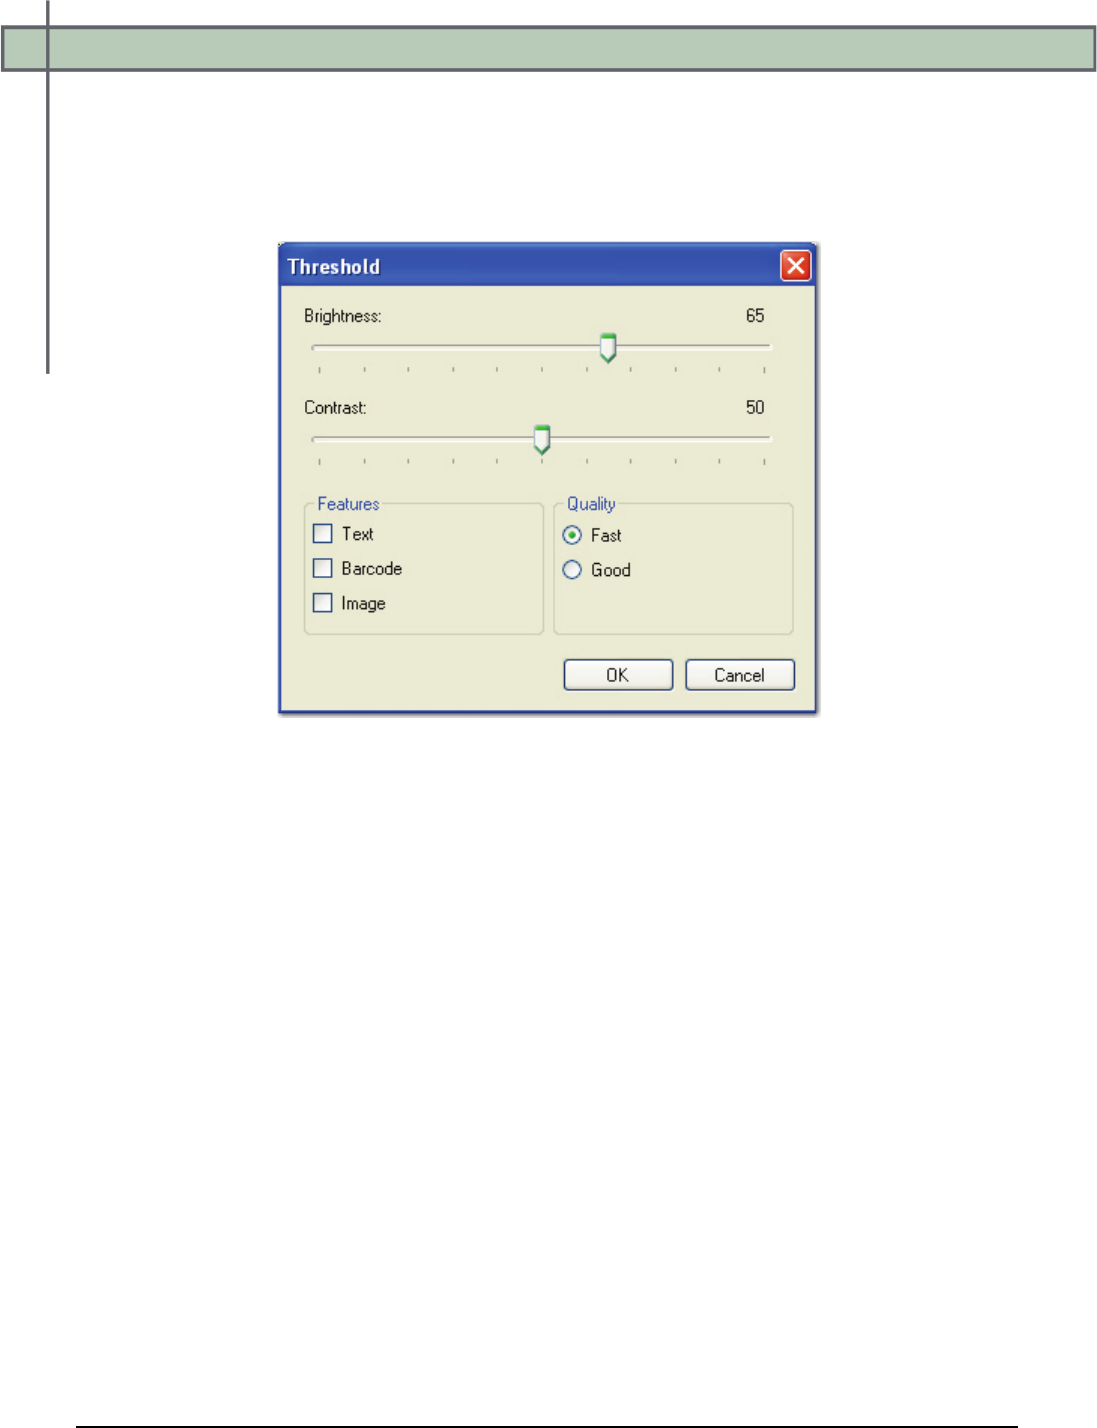
Chapter 11 – Image Processing
PaperVision® Capture Administration Guide 297
Threshold
The Threshold filter converts a 24-bit color image to a binary image. The pixels in a color image
that are darker than the specified Brightness and Threshold properties are converted to black.
The pixels that are lighter than the threshold are converted to white.
Threshold
To assign Threshold settings:
1. Move the Brightness slider to assign the point at which color pixels are converted to
white rather than black.
2. Move the Contrast slider to assign the contrast of the resulting binary image.
3. To preserve a specific feature from the color image in the resulting binary image,
select Text, Barcode, and/or Image.
4. Select Fast or Good thresholding quality.
• Fast causes thresholding to process quickly, and results in quality images.
• Good causes the thresholding to process more slowly, but results in better quality
images.
5. Click OK.

Chapter 11 – Image Processing
PaperVision® Capture Administration Guide 298
Before Threshold
After Threshold
Chapter 12 – Quality Control (QC)
PaperVision® Capture Administration Guide 299
PaperVision Capture’s Automated Quality Control (QC) job step provides
automated functionality for quality control operations on indexes and images,
eliminating the need for user input in the Operator Console. The Automated QC step can
greatly enhance QC accuracy and productivity for your batches and jobs. When an Automated
QC step is used in a job, a Capture QC Auto license is consumed upon image capture (in the
Capture step).
The Manual QC step enables an operator to manually tag batches, documents, pages, and
index fields for further review in the Operator Console. A second operator can then repair, re-
scan, re-index, etc., in subsequent steps that you configure. A Capture QC Manual license is
required to tag batches, documents, pages, and indexes in the Operator Console. Additionally,
a Capture QC Manual license is required to use the Auto Play operations (Start, Restart,
Pause, Stop, Previous/Next QC Groups) in the Operator Console.
Note:
Reviewing and removing QC Tags in the Operator Console do not consume a
Capture QC Manual license.
The “Allow Manual QC” property in the manual Capture and Indexing steps allows operators
to tag batches, documents, pages, and indexes for further review while they scan or hand-key
index. If you enable this property within a Capture or Indexing step, a Capture QC Manual
license is also required (in addition to the Capture Scan or Capture Index license).
QC batch statistics provide totals for tagged index values, pages, and documents per batch.
Batch Statistics also provide the total number of tags and record how many of each tag type
were applied. Additionally, the total amount of time the operator spent in the QC step is also
recorded. For descriptions of each statistic, see the section on Batch Statistics in Chapter 13.
Automated QC Step
You can configure the Automated QC step to perform specific checks on batches, documents,
pages, and indexes. For certain automated checks, you can determine the subsequent action if
no image path can be found, a document page count falls outside a specified range, indexing
errors are found, etc.
To view the Automated QC step’s properties:
1. In Job Definitions, select the Automated QC step.
2. Expand the properties grid, and then expand the Automated QC and General nodes.
For information on Automated QC step’s general properties, see the section on
General Properties in Chapter 4.

Chapter 12 – Quality Control (QC)
PaperVision® Capture Administration Guide 300
Automated QC – Order of Operations
When the Automated QC step executes, the following operations are performed in the
following order on each page, document, index, and batch.
1. For each page within a document, the Automated QC step performs the following
automated operations:
a. Invalid Image Path: Ensures a valid image path can be located
b. Invalid Image: Ensures the image can be opened successfully
c. Image Dimensions: Verifies that image dimensions fall within the specified
parameters (in pixels)
d. Image File Size: Verifies that image file size falls within specified parameters
(in kilobytes)
2. The Document Page Count operation verifies that the document page count falls
within the specified parameters.
3. The following automated operations are performed on each index field (in order):
a. Index values are reformatted as necessary (when Reformat Index Value is set
to True).
b. If the Index Masking Regular Expression property has been configured,
index values are masked accordingly.
c. If the Index Format property has been configured for certain index types, the
index value is formatted accordingly.
d. Any defined QC Index Formatting operations are completed.
e. The Check for Indexing Errors operation locates indexing errors resulting
from the following configured properties (in order):
• Index Type
• Index Verification Regular Expression
• Verification Search Strings
• Predefined Values
4. The Check Numeric Sequence operation finds the minimum and maximum numeric
values (only for numeric index types) that exist within a batch, then iterates between
all documents to ensure all possible values (between minimum and maximum values)
exist within that batch. If values do not fall within the specified range, missing ranges
are written out to batch-level tags.
5. Lastly, the Batch Document Count operation verifies the batch document count falls
within specified parameters.
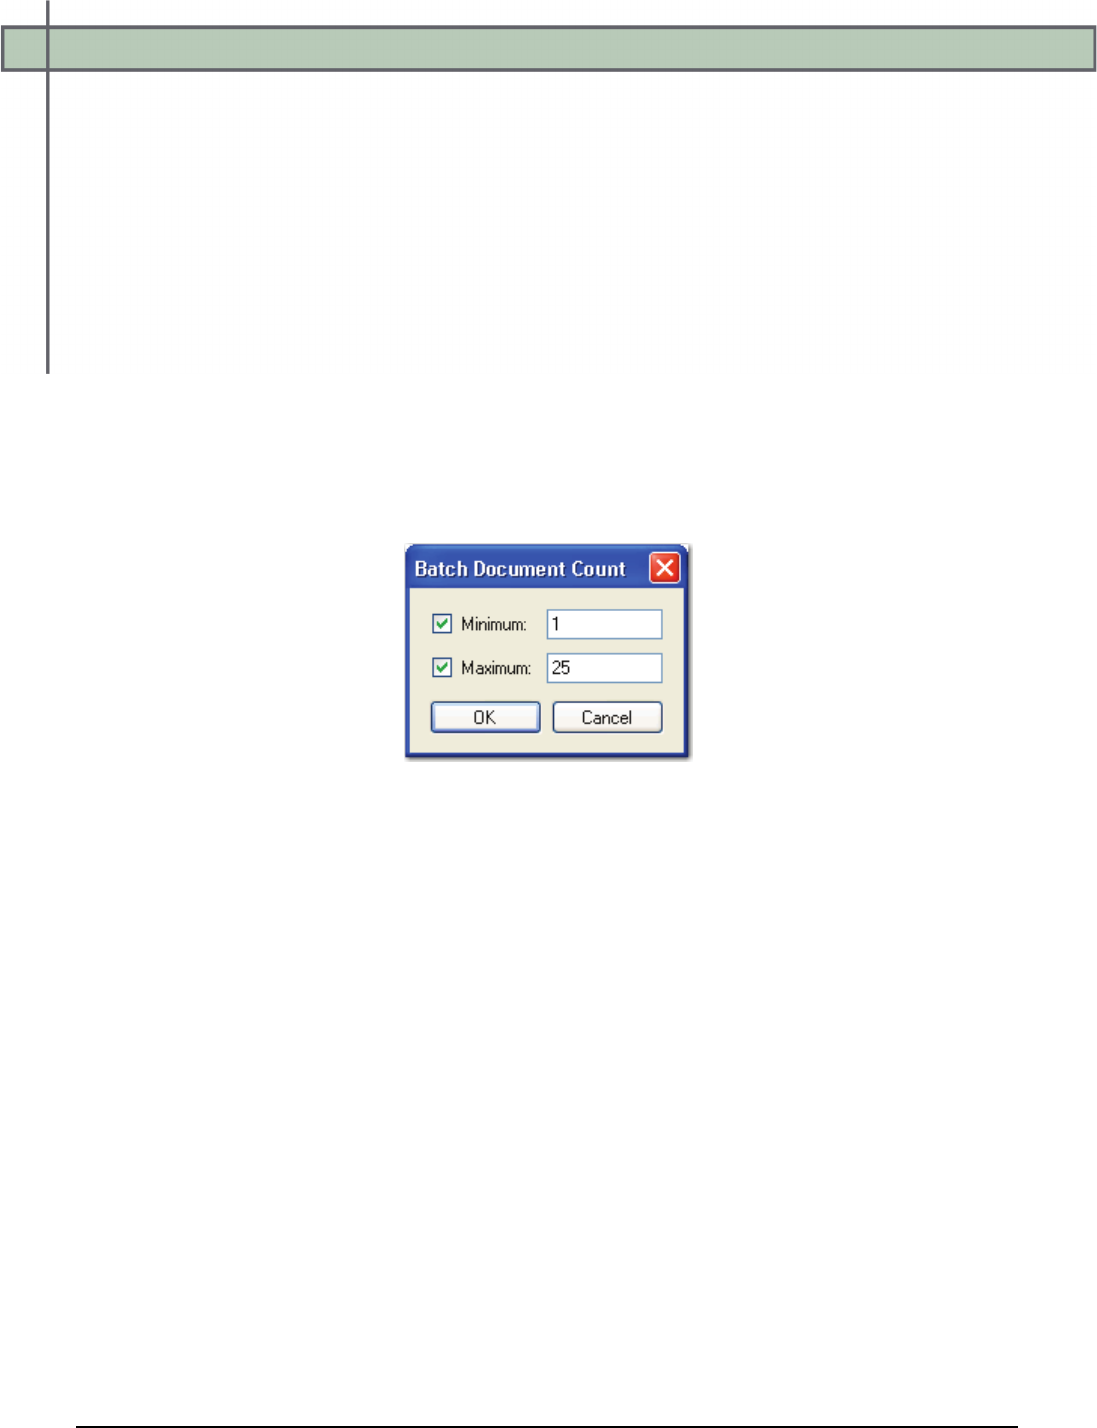
Chapter 12 – Quality Control (QC)
PaperVision® Capture Administration Guide 301
Automated Batch and Document QC
You can configure the Automated QC job step to execute specific automated operations on
each batch and document. For example, you can configure the Automated QC step to ensure
each batch contains a minimum and maximum number of documents. You can also configure
the Automated QC step to ensure that each document contains a certain number of pages.
Batch Document Count
The Automated QC step can ensure each batch contains a specific number of documents. If
the total number of documents does not fall within range, the documents are deleted or tagged
for review.
To configure the minimum and maximum batch document count:
1. Click the ellipsis button next to the Batch Document Count field, and the Batch
Document Count dialog box appears.
Batch Document Count
2. To enforce a minimum document count, select the Minimum check box, and then
enter the value.
3. To enforce a maximum document count, select the Maximum check box, and then
enter the value.
4. Click OK.
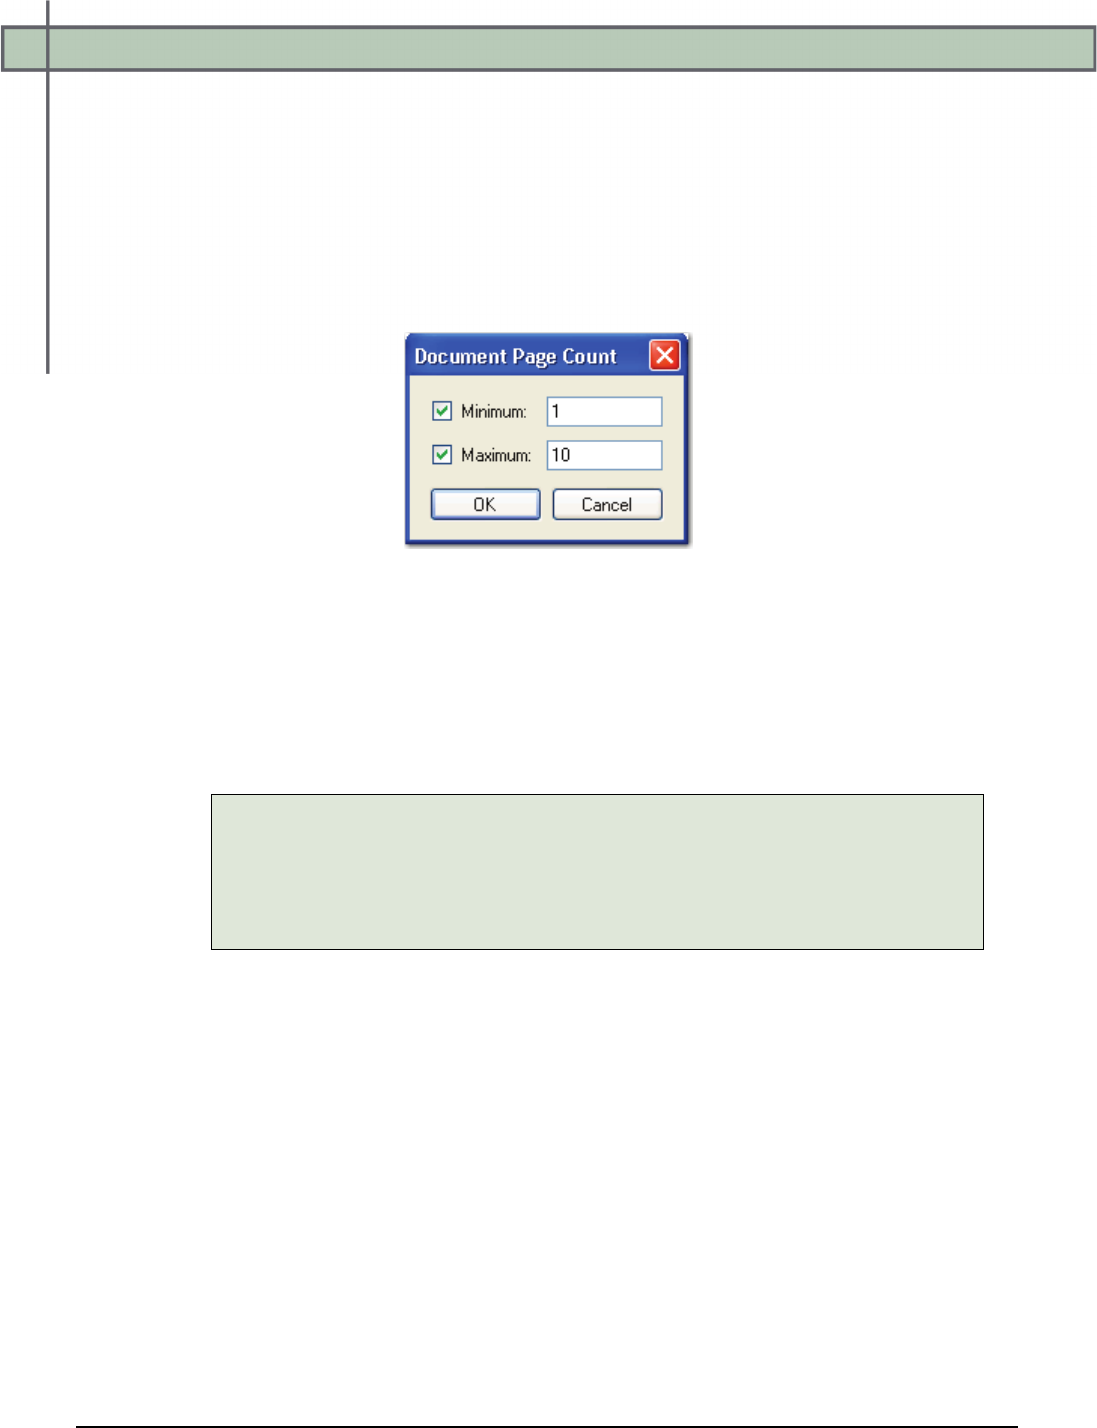
Chapter 12 – Quality Control (QC)
PaperVision® Capture Administration Guide 302
Document Page Count
You can configure the Automated QC step to ensure each document contains a minimum
and/or maximum number of pages. If a document’s page count falls outside a specified range,
it is tagged for review in the Operator Console.
To configure the minimum and maximum document page count:
1. Click the ellipsis button next to the Document Page Count field, and the Document
Page Count dialog box appears.
Document Page Count
2. To enforce a minimum document count, select the Minimum check box, and then
enter the value.
3. To enforce a maximum document count, select the Maximum check box, and then
enter the value.
4. Click OK.
Note:
As a final verification, the Automated QC step ensures the document page
count falls within range, since pages may have been removed as a result of
automated image operations. If the document page count falls outside this
range, the document is tagged for review.
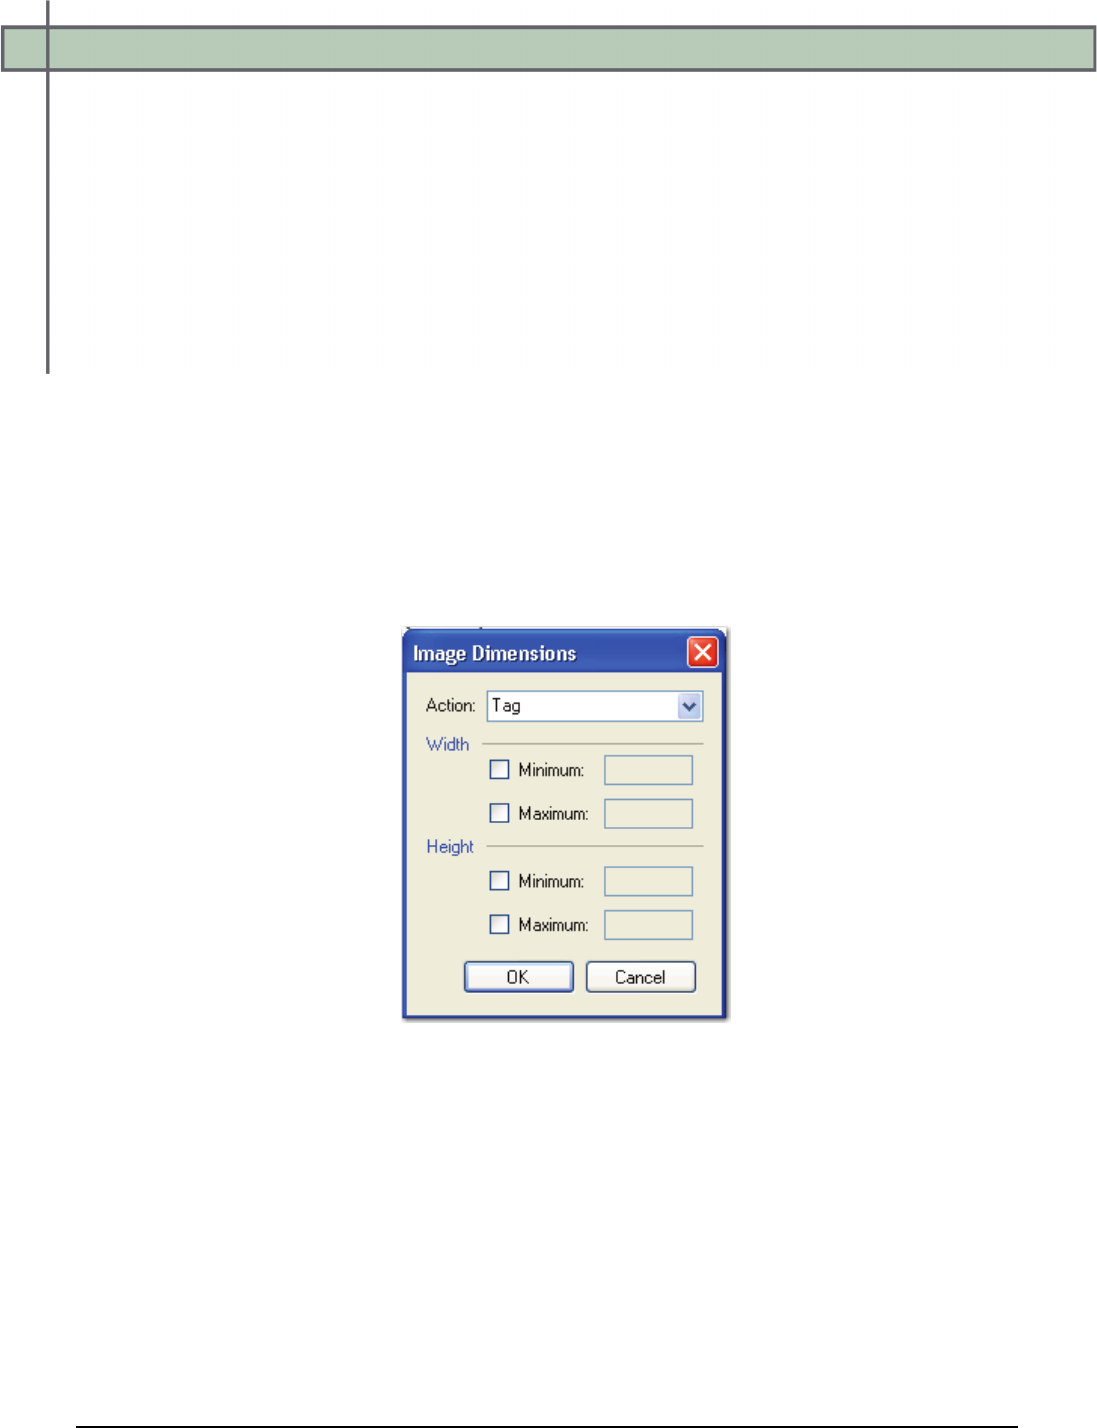
Chapter 12 – Quality Control (QC)
PaperVision® Capture Administration Guide 303
Automated Image QC
In addition to the batch and document automated operations, you can also configure the
Automated QC job step to execute automated operations on each image. The following
operations can be performed on each image within a document, and the image can be either
deleted or tagged for review in the Operator Console.
Image Dimensions
The Image Dimensions operation ensures that each image falls within a specified height
and/or width (in pixels). If an image’s dimensions do not fall within range, it can be deleted or
tagged for review in the Operator Console. To calculate the approximate dimensions of an
image in pixels, multiply the original size of the image (in inches) by the resolution of the
scanned image. For example, an 8.5 x 11 inch page that is scanned at 200 DPI would be
approximately 1700 pixels wide x 2200 pixels high.
To configure the image dimensions for the Automated QC step:
1. Click the ellipsis button next to the Image Dimensions field. The Image Dimensions
dialog box appears.
Image Dimensions
2. Select the action (Tag or Delete) to be executed if the image falls outside your
specified dimensions.
3. To specify a minimum and maximum width, select the appropriate check boxes, and
then enter the value in pixels.
4. To specify a minimum and maximum height, select the appropriate check boxes, and
then enter the value in pixels.
5. Click OK.
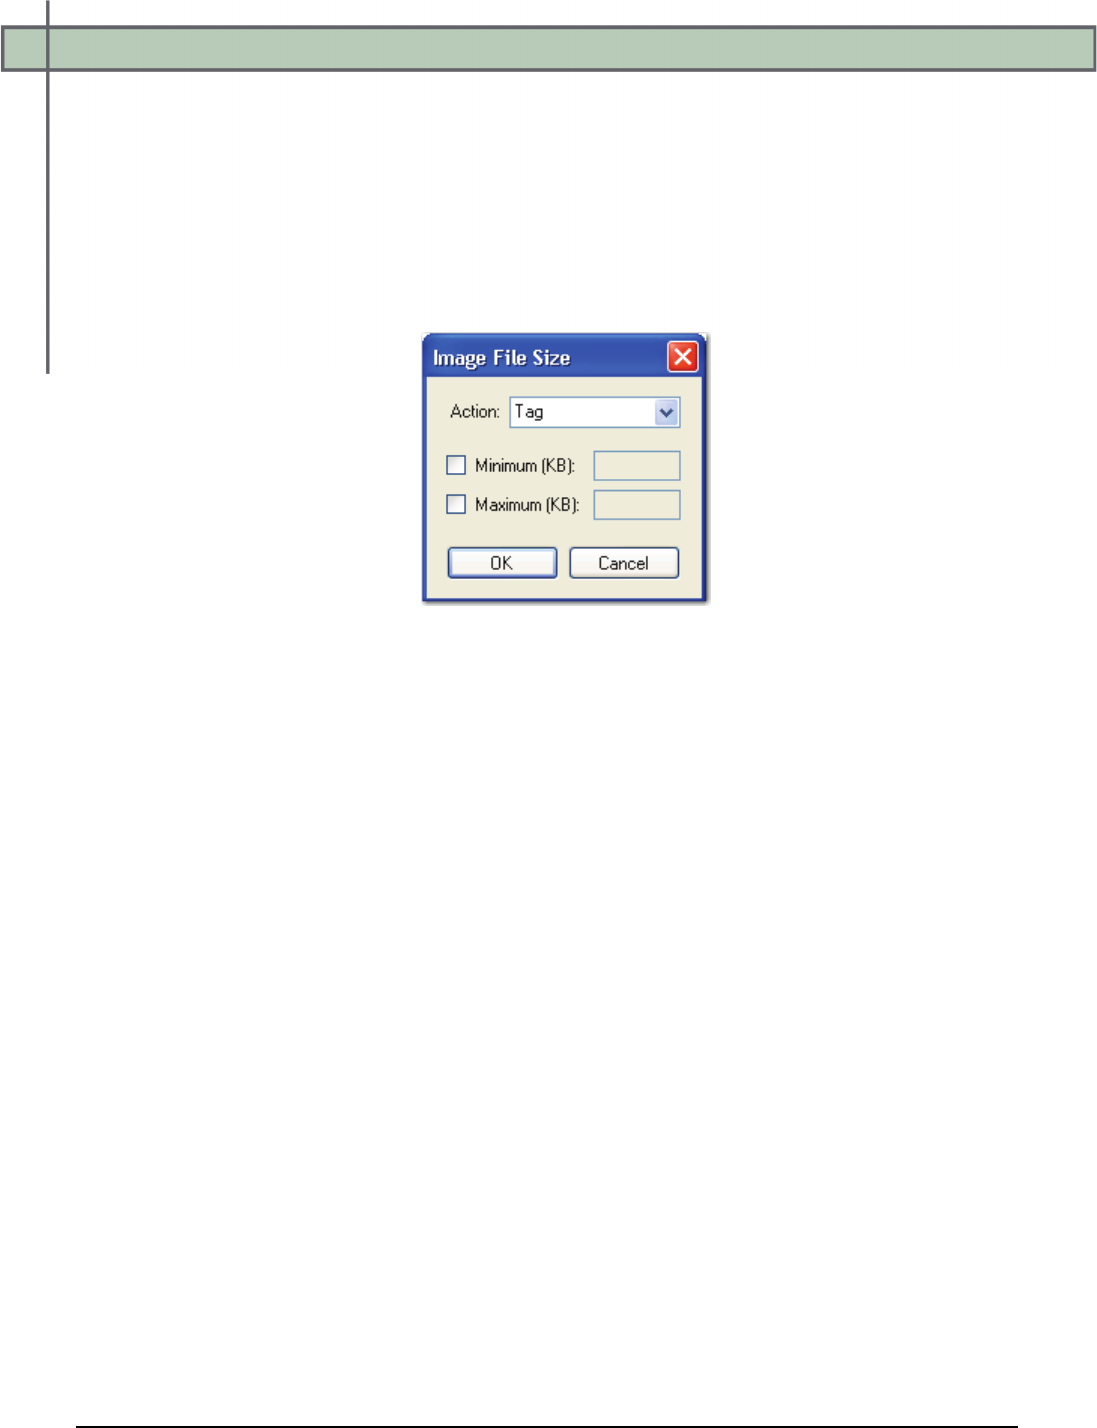
Chapter 12 – Quality Control (QC)
PaperVision® Capture Administration Guide 304
Image File Size (KB)
The Image File Size operation ensures that the file size falls within your specified parameters
(in kilobytes). If an image does not fall within range, it can be deleted or tagged for review in
the Operator Console.
To configure the image file size range for the Automated QC step:
1. Click the ellipsis button next to the Image File Size field. The Image File Size dialog
box appears.
Image File Size
2. Select the action (Tag or Delete) to be executed if the image file size falls outside
your specified range.
3. To specify a minimum file size, select the check box, and then enter the value in
kilobytes.
4. To specify a maximum file size, select the check box, and then enter the value in
kilobytes.
5. Click OK.
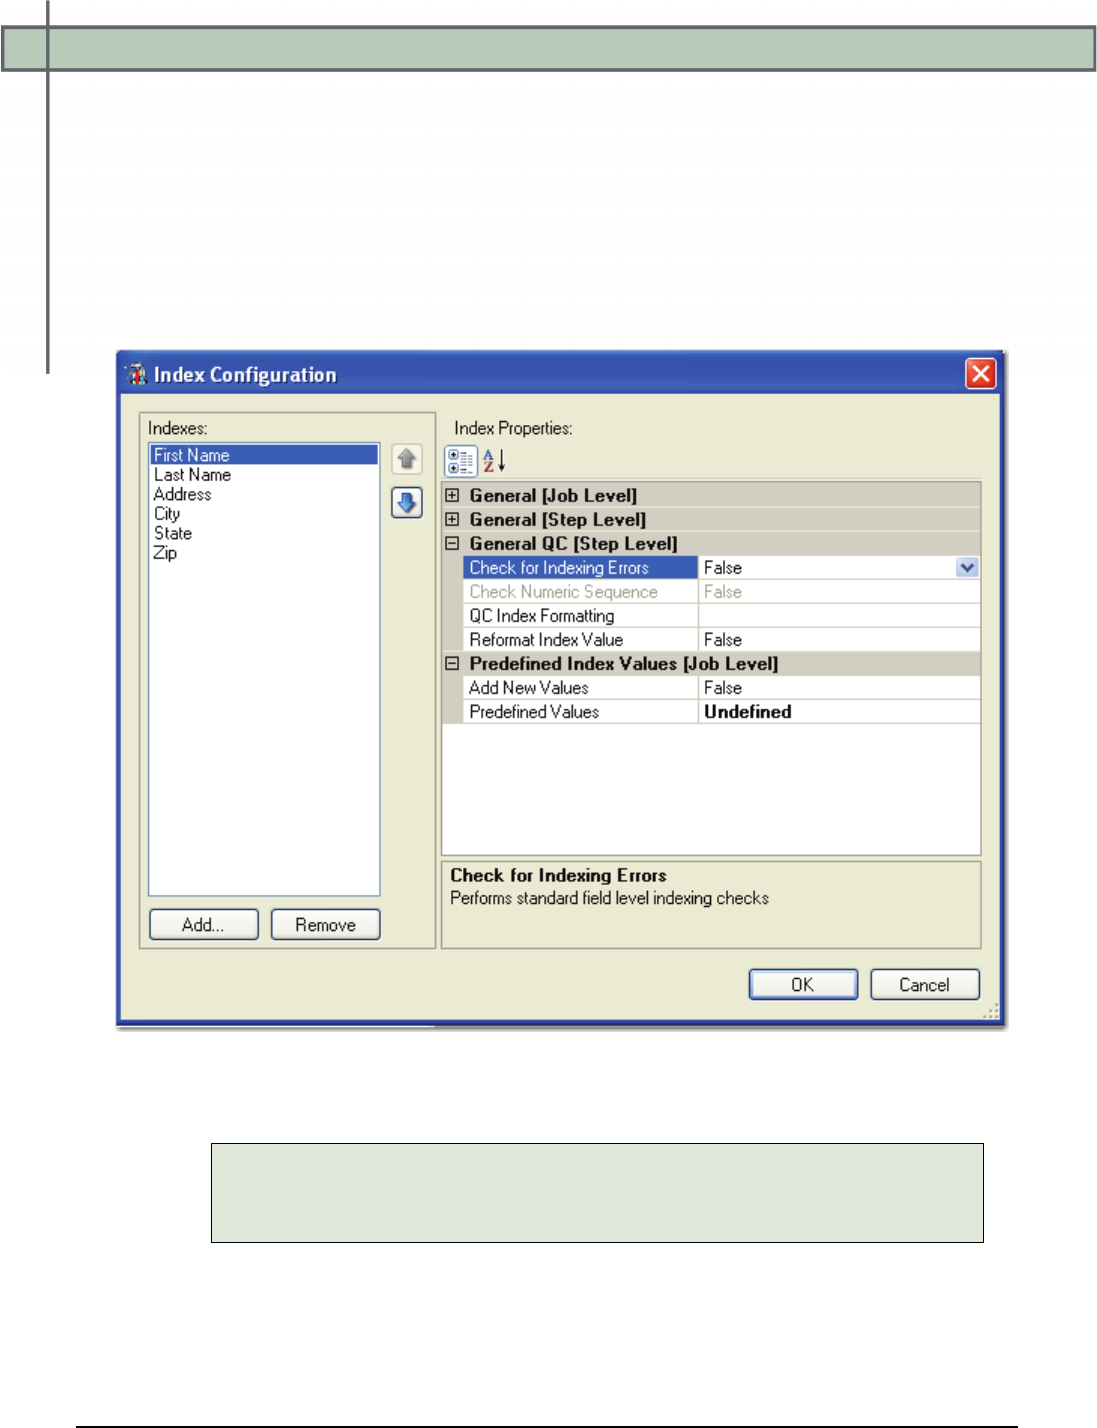
Chapter 12 – Quality Control (QC)
PaperVision® Capture Administration Guide 305
Indexes
Within the Automated QC step, you can add new indexes and configure automated operations
for each. General QC properties specific to the Automated QC step are described below.
To configure automated indexing operations in the Automated QC step:
1. Click the ellipsis button next to the Indexes field. The Index Configuration dialog
box appears.
Indexing Configuration (General QC – Step Level)
2. Click Add and enter a name for each required index field.
Note:
For information on the general Indexing properties (job and step level), see
Chapter 6 – Indexing Configuration.
3. Expand the General QC (Step Level) node.
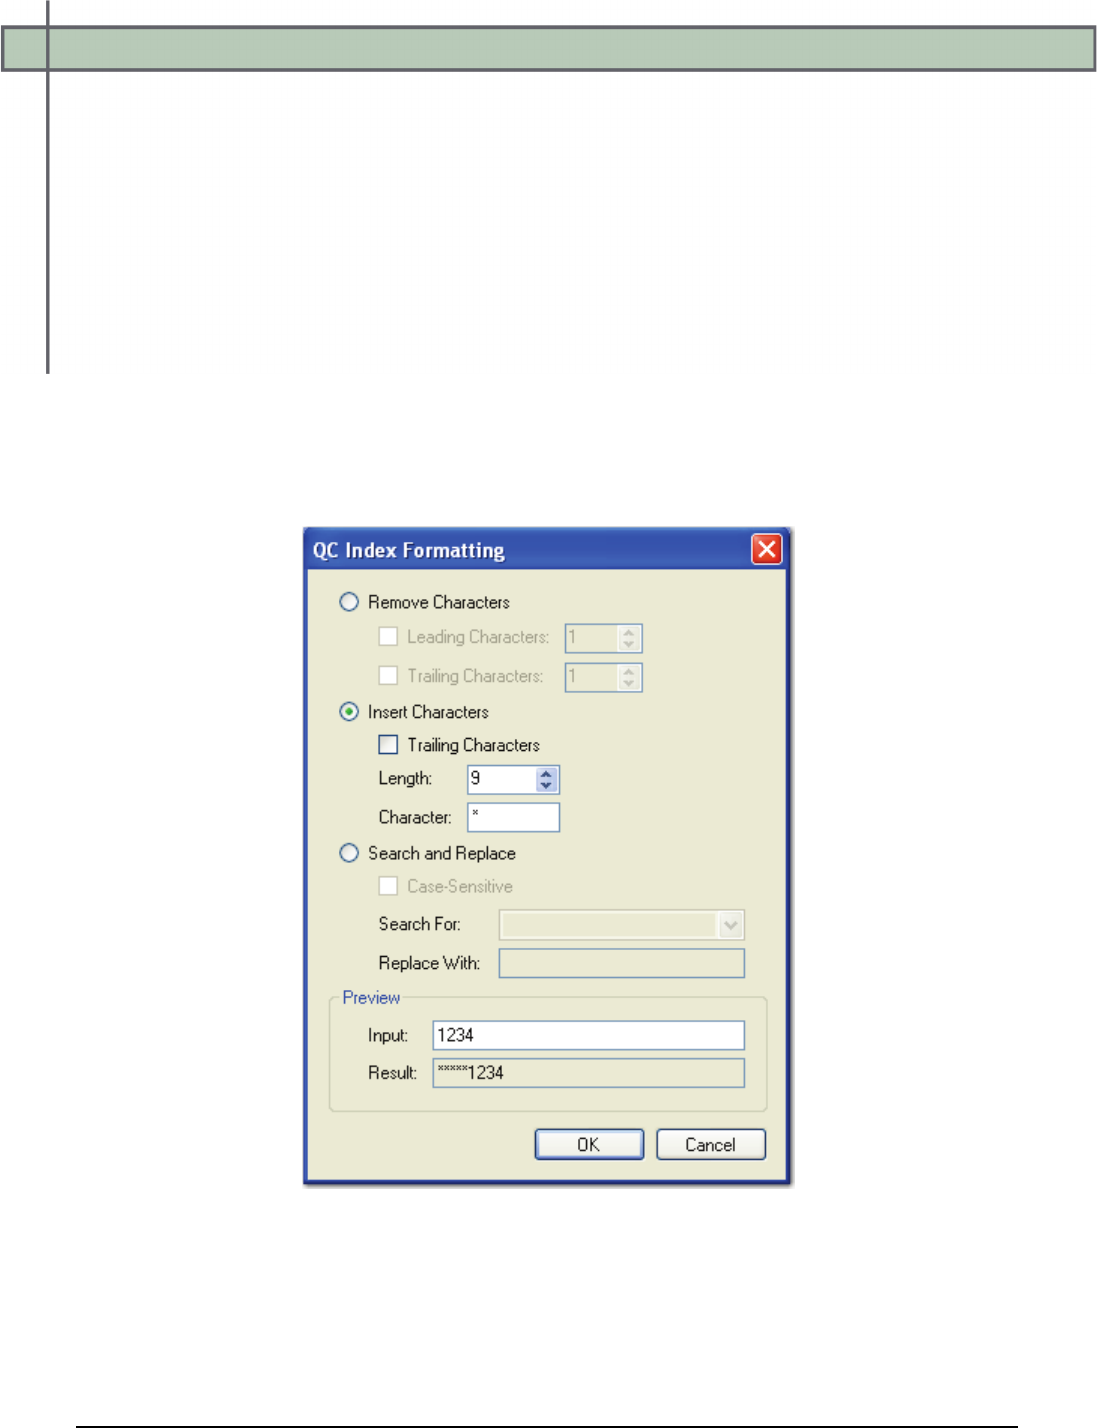
Chapter 12 – Quality Control (QC)
PaperVision® Capture Administration Guide 306
4. Select one or multiple automated QC operations that will be performed on each index
field:
• Check for Indexing Errors checks for indexing errors in each index field. If an
indexing error is found (e.g., blank field, invalid character or number, etc.), the
index field is tagged for review. Select True to enable this operation.
• Check Numeric Sequence checks for the minimum and maximum numeric index
values within the batch (applicable to numeric index field types). The process
then iterates between all documents to ensure all index values (between the
specified range) exist within the batch. Missing index values are written out to
batch-level tags. Select True to enable this operation.
• QC Index Formatting automatically inserts or removes leading or trailing
characters to create index values of a specific length. Additionally, this operation
can automatically execute a search for an index value and replace it with specific
characters.
QC Index Formatting

Chapter 12 – Quality Control (QC)
PaperVision® Capture Administration Guide 307
To remove a certain number of characters from an index value, select Remove
Characters. To remove characters at the beginning or end of an index value, select
Leading Characters or Trailing Characters, respectively. In either scenario, enter the
number of characters to remove from the index value.
Note:
You can remove both leading and trailing characters during the QC Index
Formatting operation.
To insert a certain number of characters at the beginning of an index value, select Insert
Characters. To insert characters at the end of the index value, select the Trailing
Characters check box. In either scenario, enter the number of characters the resulting
index value should contain in the Length field, and then enter the replacement character
in the Character field.
The search operation automatically searches for any portion of the index value containing
the specified text. For example, searching for “Test” in index values “123Test,”
Test123,” and “123Test123” will replace the word “Test” with your specified
replacement text. Optionally, you can select whether the Search and Replace operation is
case-sensitive (by default, this operation is case-insensitive).
When the Search For field is left blank, blank index fields will be replaced with your
Replace With text. When the Replace With field is left blank, any occurrences of the
Search For text will be removed from the index field. If you specify the Search For text
as an asterisk (*), all values (indexed or blank) will be substituted with your replacement
text.
To ensure leading or trailing characters appear correctly in the resulting index value,
enter a sample index value in the Input field and the result appears in the Result field.
• Reformat Index Values automatically re-formats specific index values (dates,
currency, etc.) and performs index masking.
Invalid Image
The Invalid Image operation verifies that each image can be opened successfully. To enable
this operation, select the action (Delete Page or Tag Page) to be executed if the image cannot
be opened in PaperVision Capture.
Invalid Image Path
The Invalid Image Path operation ensures that each image path can be located. To enable this
operation, select the action (Delete Page or Tag Page) to be executed if the image path
cannot be found.
Prefer Bitonal
When only using dual stream scanners, set this property to True.

Chapter 12 – Quality Control (QC)
PaperVision® Capture Administration Guide 308
Manual QC Step
You can configure the Manual QC step so operators can manually tag batches, documents,
pages, and index fields for further processing or review. Predefined QC tags are available for
selection in the Operator Console, but you can define custom tags for a job containing a QC
step. Optionally, you can define a fail path from a Manual QC step to determine the
subsequent job step if an operator tags a batch, document, page, or index.
Defining Custom QC Tags
You can define custom QC tags that will be available for selection when operators inspect
batches, documents, pages, and index fields in the Operator Console. The following
predefined tags are available in the Manual QC step (or in a Capture or Indexing step with the
Allow Manual QC property enabled.
• Document Count: Indicates that the document count falls outside the specified range
• Index Sequence: Indicates that one or more numeric index values fall outside the
specified minimum and maximum values
• Document Page Count: Indicates that a document page count falls outside the
specified range
• Document Re-Scan: Indicates that a document needs to be scanned once again
• Index Error: Indicates that an indexing error exists
• Re-Index: Indicates that a specific index field needs to be indexed once again
• Bad Image: Indicates that an image cannot be opened
• Bad Image Path: Indicates that an image cannot be located
• Image Dimensions: Indicates that an image falls outside the specified height and
width parameters
• Image File Size: Indicates that an image size falls outside the specified range
• Page Re-Scan: Indicates that the page needs to be scanned once again
Chapter 12 – Quality Control (QC)
PaperVision® Capture Administration Guide 309
To add custom QC tags to the job:
1. In the job's General Properties grid, click the ellipsis button next to the Custom QC
Tags row. The Custom QC Tags dialog box appears.
Custom QC Tags
Note:
Predefined Tags are provided only for informational purposes. All predefined
tags are available for selection when operators add QC tags in the Manual QC
step.
2. Custom QC tags that you define will be available for selection when operators tag
batches, documents, images, and indexes in the Manual QC step. In the Custom QC
Tags section, click the Add icon.
3. Enter the name of the custom QC tag.
4. To remove a custom tag, highlight one or more tags, and then click the Remove
icon.
5. Click OK.
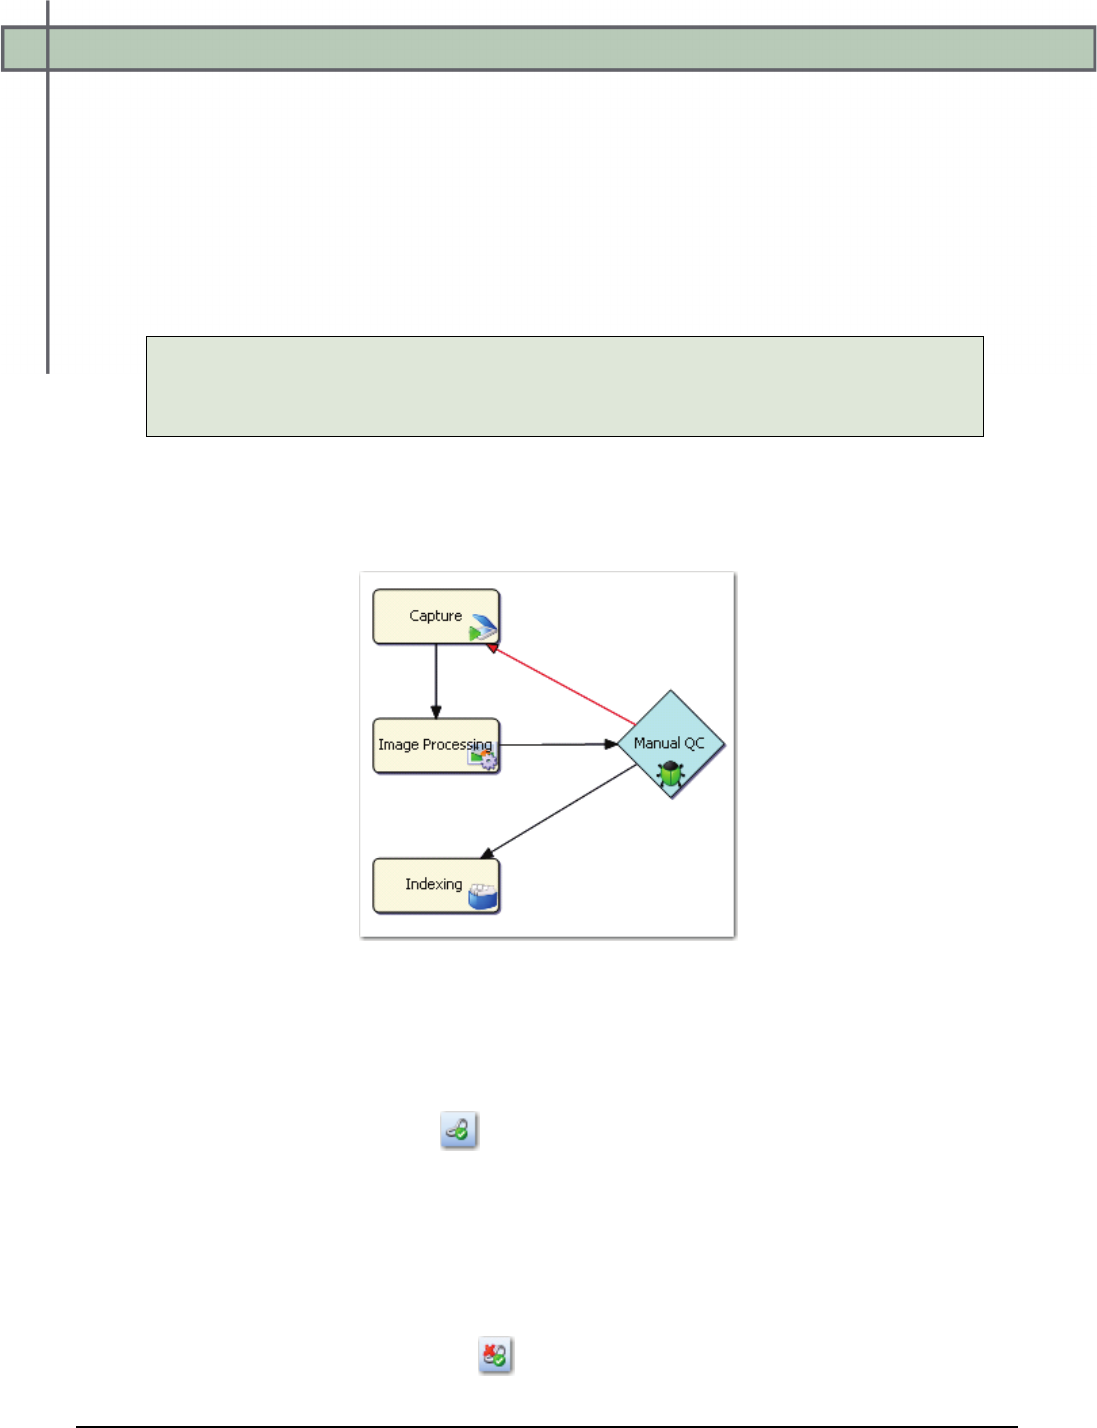
Chapter 12 – Quality Control (QC)
PaperVision® Capture Administration Guide 310
Adding and Removing QC Pass and Fail Links
When you configure a Manual or Automated QC step, you can define pass and fail links from
each QC step. Pass and fail links define the action taken after an operator completes a Manual
QC step in the Operator Console or when the Automated QC step finishes executing all
automated tasks. If one or more QC tags were added to a batch, document, image, or index,
then that batch fails the QC step and proceeds to the fail step upon batch submission. If no QC
tags were added to the batch, document, image, or index, then a QC step passes and proceeds
to the pass step.
Note:
It is not required to define a pass or fail link from a QC step. When using pass and
fail links, however, the job can only contain a single end step.
For example, in a job containing a Capture, Image Processing, Manual QC, and an Indexing
step, respectively, you can add a fail link from a Manual QC step that connects to a preceding
Capture step if an operator tags an image to be re-scanned. Then, you can add a pass link to a
subsequent Indexing step if an operator does not tag any images in the batch.
Pass and Fail Links to/from a Manual QC Step
To add a pass link from a QC step:
1. Select the appropriate Manual (or Automated) QC step.
2. While pressing the Ctrl key, select the subsequent job step if the QC step passes.
3. Click the Add Pass Link icon.
To remove a pass link from a QC step:
1. Select the appropriate Manual (or Automated) QC step.
2. While pressing the Ctrl key, select the job step to which the QC pass link is
connected.
3. Click the Remove Pass Link icon.
Chapter 12 – Quality Control (QC)
PaperVision® Capture Administration Guide 311
To add a fail link from a QC step:
1. Select the appropriate Manual (or Automated) QC step.
2. While pressing the Ctrl key, select the subsequent job step if the QC step fails.
3. Click the Add Fail Link icon.
To remove a fail link from a QC step:
1. Select the appropriate Manual (or Automated) QC step.
2. While pressing the Ctrl key, select the job step to which the QC fail link is
connected.
3. Click the Remove Fail Link icon.
Note:
QC fail links are not required prior to job validation, activation and check-in.
Custom Code Events (Step Level)
Within the Manual QC step, you can configure custom code that operators can execute in the
PaperVision Capture Operator Console. Click the ellipsis button next to the appropriate event
to select the programming language and to configure the custom code.
Batch Opened
Batch Opened executes custom code when the operator opens a batch in the Operator
Console. The following sample is a custom code event handler that can be inserted into the
code to display a message box, allowing the user to cancel the open batch operation:
CCustomCodeBatchOpeningEventArgs eventArgs
= (CCustomCodeBatchOpeningEventArgs)Parameter;
if (MessageBox.Show("Open Batch?", "Capture",
MessageBoxButtons.OKCancel,
MessageBoxIcon.Question)== DialogResult.Cancel)
{
eventArgs.CancelOpen = true;
}
Note:
The Batch Opened event will not execute if you have enabled the Max Documents per
Batch property and the user completes the Submit and Create New Batch operation.
Chapter 12 – Quality Control (QC)
PaperVision® Capture Administration Guide 312
Batch Submitted
Batch Submitted executes custom code when the operator submits a batch in the Operator
Console. The following sample is a custom code event handler that can be inserted into the
code to display a message box, allowing the operator to cancel the submit batch operation:
CCustomCodeBatchSubmittingEventArgs eventArgs
=(CCustomCodeBatchSubmittingEventArgs)Parameter;
if (MessageBox.Show("Submit Batch?", "Capture",
MessageBoxButtons.OKCancel,
MessageBoxIcon.Question) == DialogResult.Cancel)
{
eventArgs.CancelSubmit = true;
}
Custom Code Execution
Custom Code Execution executes when the operator clicks the Execute Custom Code button
in the PaperVision Capture Operator Console.
Tip:
To prevent the programming language prompt from appearing each time you
configure custom code events, right-click the ellipsis button, and select Custom
Code Options. Select either the C# or Visual Basic programming language to use
by default, and then choose the option to suppress the dialog when creating new
custom code.
General Properties
For information on the Manual QC step’s general properties that are applicable to all job steps,
see the section on General Properties in Chapter 4.
Indexes
You can configure index values for the job in the Manual QC step. For information on the
Indexing settings and configuration, see Chapter 6 – Indexing Configuration.
Note:
The Allow Hand-Key Indexing property is not available in the Manual QC step.
Operators assigned to the Manual QC step can review index values in the read-only
Index Manager so they can apply QC index tags as necessary (without consuming a
Capture Index license that is required to edit indexes).
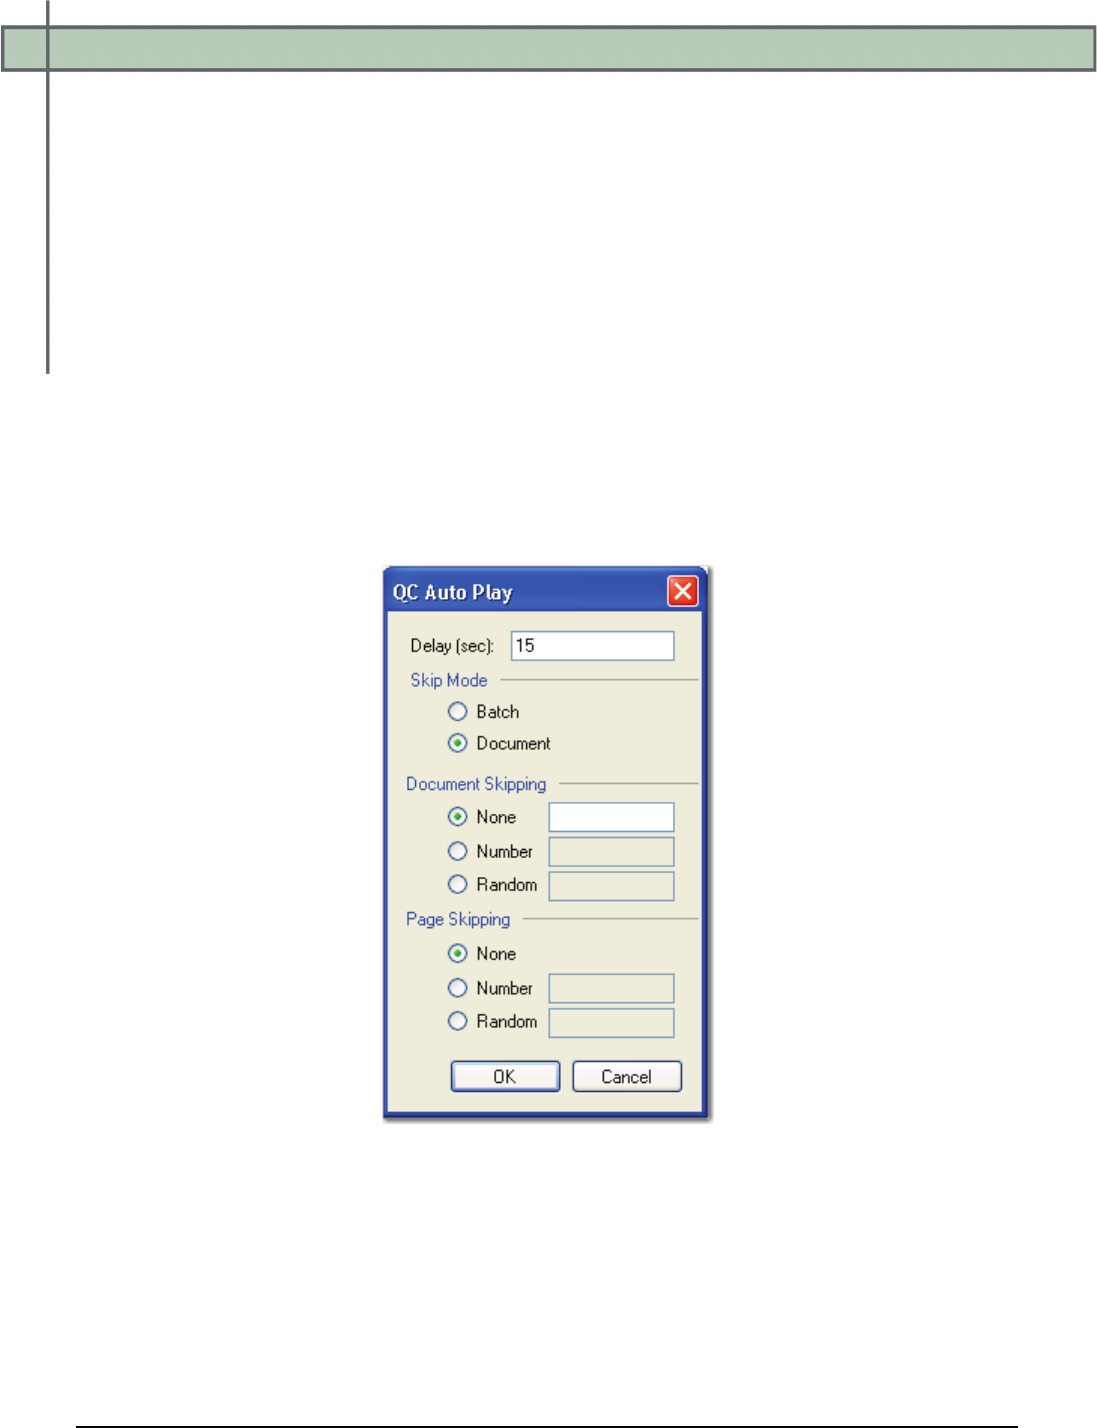
Chapter 12 – Quality Control (QC)
PaperVision® Capture Administration Guide 313
Manual QC - General Properties
The QC Auto Play setting, specific to the Manual QC step (and manual steps with the Allow
Manual QC setting enabled) is described in this section.
QC Auto Play
This setting is available only in the Manual QC step or in manual steps with the Allow
Manual QC property enabled, which requires a Capture QC Manual license. First, you can
determine how long (in seconds) each image appears on screen for operators to perform
inspections on batches, documents, pages, and indexes in the Operator Console.
Additionally, you can determine whether to skip batches or documents during auto play.
You can further refine batch and document skipping by entering a specific or random
number of documents or pages to skip during auto play.
To configure auto play settings:
1. Click the ellipsis button to the right of the Manual QC Auto Play field.
QC Auto Play
2. The Delay (sec) property determines how long each image or group of images
remains on screen at a time in the Manual QC step. Enter the length of time in
seconds.

Chapter 12 – Quality Control (QC)
PaperVision® Capture Administration Guide 314
3. The Skip Mode determines whether auto play skips batches or documents:
• If you select the Batch skip mode, then you can define how pages are skipped.
For page skipping, you can require that operators inspect all pages (None), by
page number (Number, such as 1, 5, 10, etc.), or by a random number of pages
(Random).
• If you select the Document skip mode, you can define how documents and pages
are skipped in the next two steps.
4. If you select document skipping, you can require that operators inspect one of the
following:
• All documents (None)
• By document number (Number, such as 1, 5, 10, etc.)
• By a random number of documents (Random)
5. If you select page skipping, you can require that operators inspect one of the
following:
• All pages (None)
• By page number (Number, such as 1, 5, 10, etc.)
• By a random number of pages (Random)
When you select the Random option, auto play skips an arbitrary number of pages or
documents (between zero and your assigned number). For example, if you enter “10,” then
three pages/documents may be skipped during the first auto play; nine pages/documents
during the second auto play; ten pages/documents during the third auto play; etc.

Chapter 12 – Quality Control (QC)
PaperVision® Capture Administration Guide 315
Operator Permissions
You can assign specific permissions that allow operators to perform operations on documents
and pages. In addition, you can determine whether operators can view the Browse Batch
window in the Operator Console. The Import Images operation (set to False by default) is the
only operation that requires an additional Capture Scan license (in addition to the Capture
Index license). The remaining permissions do not require an additional license and are
enabled by default to provide operators the flexibility in manipulating documents and pages
when performing manual QC operations in the Operator Console.
Add Documents
When set to True, the operator can append a blank document to the end of the batch.
Browse Batch
When set to True, the operator can view the Browse Batch window.
Copy Documents
When set to True, the operator can copy all pages and append the new document after the
selected document.
Copy/Move Pages
When set to True, the operator can copy/paste and cut/paste consecutive or non-consecutive
pages in one document or across multiple documents. The operator can also drag and drop
pages from one location to another in the Thumbnails window or multiple-display view.
Delete Documents
When set to True, the operator can delete a document and its associated images.
Delete Pages
When set to True, the operator can delete one or multiple page(s) within one document or
across multiple documents.
Extract and Copy Pages
When set to True, the operator can extract a region of an image and copy it to the next page
of the document.

Chapter 12 – Quality Control (QC)
PaperVision® Capture Administration Guide 316
Import Images
When set to True, the operator can import images into a document.
Note:
By default, this property to set to False. When you enable this property, the
Indexing step also consumes a Capture Scan license (in addition to the Capture
Index license).
Insert Document Breaks
When set to True, the operator can insert a document break within a document.
Invert and Save Pages
When set to True, the operator can invert one or multiple pages’ polarity and then save the
pages.
Remove Document Breaks
When set to True, the operator can remove an existing document break within a document.
Re-Save Pages
When set to True, the operator can save a page that has been rotated or whose polarity has
been inverted.
Rotate and Save Pages
When set to True, the operator can rotate one or multiple pages and then save the pages.
Shuffle Documents to Duplex
When set to True, the operator can shuffle documents to duplex.
Chapter 13 – Custom Code
PaperVision® Capture Administration Guide 317
PaperVision Capture’s custom code engine enables you to write VB.NET or C#
code that can be executed at any time during batch processing. Additionally,
Digitech Systems provides a .NET Application Programming Interface (API) that
you can use for read/write access to batch metadata, documents, images, OCR data, and index
values.
Job steps within Job Definitions contain the custom code capabilities. Each job step is capable
of triggering custom code events. These events differ by job step. For example, Indexing job
steps can initiate the "Saving Indexes" custom code event. So, in the Job Definitions screen,
you can configure the custom code that the system will execute when index values are being
saved.
WARNING!
Changes made to a batch via custom code that executes in a manual job step may not be
reflected in the Operator Console user interface unless your custom code specifies the
appropriate user-interface refresh level. For details, see the section on the
UIRefreshLevel enumeration described in this chapter.
Digitech Systems also provides a Custom Code job step, which is not event-based. Instead,
it will execute any code you specify. PaperVision Capture executes Custom Code job steps
as automatic processes that run in the background (i.e., you do not see them running within
the user interface in PaperVision Capture). Custom Code job steps can also be used for
validating or manipulating data and interfacing with an external application, such as an
external database or line-of-business application.
To view the properties for the Custom Code job step:
1. In the Job Definitions screen, select the Custom Code job step in the workspace.
2. In the Properties grid, expand the Custom Code Events (Step Level), General, and
Indexes nodes.
General Properties
For information on the Indexing step’s general properties, see the section on General
Properties in Chapter 4.
Chapter 13 – Custom Code
PaperVision® Capture Administration Guide 318
Custom Code Generators
When you configure the Custom Code step, you can select either the C# or Visual Basic
programming language and the custom code generator that will execute automatically during
batch processing. Custom Code generators include all PaperVision Capture exports, the
Match and Merge Wizard, and customizable scripts that contain pre-written, generic code to
edit and compile directly in the Script Editor window. You can configure Custom Code
generators within a graphical user interface that displays only the applicable properties for
your selection. Default settings are provided for each generator within drop-down menus,
editable fields, and check boxes (indicating a default True or False setting). The Basic
generator provides a generic code template, and the Export Sample generator provides a
generic template for custom exports that you can execute automatically during batch
processing.
IMPORTANT:
The Visual Basic programming language can only be used with the Basic, Export
Sample, and Match and Merge Wizard.
To select a Custom Code Generator:
1. Select the Custom Code job step.
2. In the Properties grid, expand the Custom Code Events (Step Level) node.
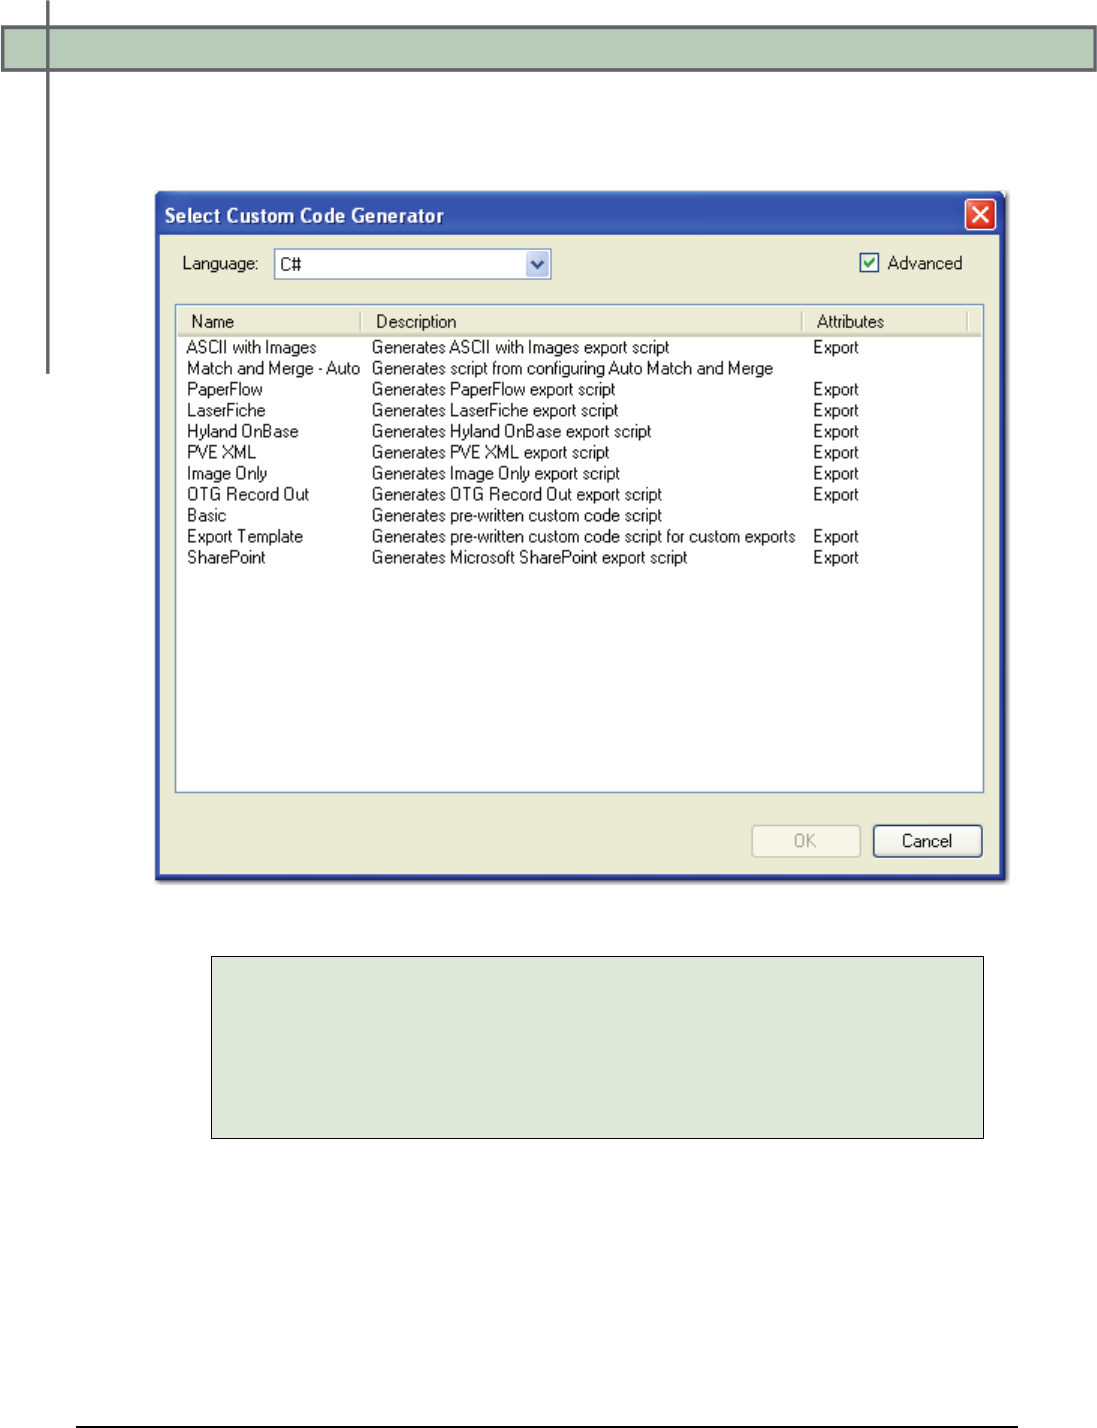
Chapter 13 – Custom Code
PaperVision® Capture Administration Guide 319
3. Click the ellipsis button in the right column next to the Step Executing field. The
Select Custom Code Generator dialog box appears, where each generator and
corresponding description are listed.
Select Custom Code Generator
Tip:
To remove existing custom code, right-click within the left Step Executing
field, and then click Reset in the context menu. Additionally, you can prevent
the Select Scripting Language prompt from appearing each time you
configure custom code by selecting the option, Suppress this dialog when
creating new custom code.

Chapter 13 – Custom Code
PaperVision® Capture Administration Guide 320
4. Select the C# or Visual Basic programming language. Your selected scripting
language determines which generators are available for configuration. For more
information on individual properties for PaperVision Capture exports and the constant
values that you can define for each, see the Exports section in this chapter.
• The Basic generator allows you to write your own custom code directly in the
Script Editor. For more information on configuring this generator, see the Script
Editor section in this chapter.
• The Match and Merge generator executes code from the Match and Merge
Wizard, where you will be prompted to enter information about your SQL Server
database, such as server name, user name, password, etc. For more information on
configuring this generator, see the Match and Merge Wizard section in this
chapter.
• The Export generators contain additional pre-defined code that will automatically
process batches. For more information on configuring PaperVision Capture
exports, see the Exports section in this chapter.
5. Double-click the generator, and its corresponding properties appear in tabbed dialog
boxes. Default values and applicable index fields are provided for your reference, and
drop-down menus contain only the options specific to your selected generator. You
can manually enter file paths or browse to the appropriate directory.
6. After you have configured the appropriate properties, save the generator. The
Custom Code Events (Step Level) field will display as Enabled.
Note:
The most recent template and programming language that you selected will
be retained the next time you configure a custom code generator.
Chapter 13 – Custom Code
PaperVision® Capture Administration Guide 321
Digitech Systems' API
Digitech Systems' API is accessible from within the Script Editor. The API provides classes
for reading/writing documents and indexes within the current batch. For more information on
the Digitech Systems API, launch the PVCaptureBatchAPI.chm help file located within the
Docs directory where PaperVision Capture was installed. This help file provides Microsoft
Developer Network (MSDN)-style documentation on our DSI.Capture.API namespace,
including code samples.
Custom code samples are located in the Library\Samples directory (as text or XML files),
where PaperVision Capture was installed. You can cut and paste the code directly into the
Script Editor for a Custom Code step.
The following code samples are included:
• AddPrefixValuetoBatchDocumentIndexes iterates through all documents
comprising a batch and appends prefixes to index values.
Note:
This script is intended to be executed in an automated custom code step.
• AutoCreateBatches_Part1 and AutoCreateBatches_Part2 use the PaperVision
Capture Automation Server to create and populate batches on the fly through two
custom code steps (e.g. polling a directory for TIF files, and then automatically
creating batches).
Note:
Creating and populating batches via automated Custom Code causes the
Automation Server to consume a PaperVision Capture Scan license as well as
licenses for any automated step in the batch, such as Image Processing, OCR,
and Barcode steps.
• CalltoCustomAssembly bridges out to code in your assembly.
• CopyIndexValues duplicates an index value from a source document to one or more
subsequent documents.
• DisplayBatchPageCount displays the total number of pages in the batch (designed to
be run in the Operator Console from a manual custom code execute event).
• ExportFullTextData copies full-text OCR data for each document stored in the batch
to a specified directory.
• ImportASCII with Images imports images and index information from external
document imaging systems.
Note:
Constants at the beginning of the script must be configured in order for the
operator to execute the script successfully.

Chapter 13 – Custom Code
PaperVision® Capture Administration Guide 322
• InspectBeforeAddPage examines the physical dimensions of a scanned image and
inserts a document break if the page is detected as an envelope.
• MatchAndMergeOnIndexValidate executes custom code that will look up and
populate index values when the operator enters a index value and tabs to the next field.
• MultiPageTIFFConversion divides a multi-page TIFF into separate images (one
image per page).
• OCRFullTextPageStatistics records Open Text Full-Text OCR statistics per selected
output. Statistics are recorded when the Open Text Full-Text OCR step processes a
page and converts the page to the selected output (s).
• OCRIndexZoneStatistics records Open Text Zonal OCR statistics when an Open
Text OCR zone populates an index value.
• OCRMarkSenseZoneStatistics records Open Text Zonal OCR statistics when an
Open Text OCR zone inserts an auto document break page between documents.
• OpenBatchCustomCode executes custom code when the operator opens a batch in
the Operator Console.
• QCDocumentPageCounts automatically applies a QC tag to every document in the
batch that contains fewer than four and greater than six pages. This script is designed
to be executed from within a manual job step from the Custom Code Execute event.
• QCTaggingIndexDocAndPageCustomCode automatically tags a document
containing more than “x” number of pages; pages less than “x” kilobytes; and, index
fields containing specific text. For example, to change the maximum number of pages
per document to 6, change the following lines to:
if (pages.Length > 6)
if(!this.Batch.TryAddDocumentTag(docId, "Document
Size", "Document contains more than 6 pages", out
error))
• RecordDailyDocumentAndPageCountStatistics, when used in an automated
Custom Code step following a Capture step, totals the number of documents and pages
for batches that flow through a job on a daily basis. Results are available as custom
statistics viewable/filterable from the Batch Statistics screen.
• SetScanDate automatically sets a scan date index value (document creation date) into
the batch for every document. The document’s creation date is the date/time the
document entered the batch. The date/time value is stored in Universal Time
Coordinated (UTC), also known as Greenwich Mean Time (GMT). For example,
Denver, Colorado’s UTC time at 2:00 PM on April 9, 2009 will display as
"04/09/2009 20:00:00". To change the date/time value to your local time zone instead
of UTC, change the code in line 46 to:
if (!this.Batch.TrySetIndexValue(id, "ScanDate",
documentCreatedDate.ToLocalTime(), true, out error))

Chapter 13 – Custom Code
PaperVision® Capture Administration Guide 323
• SubmitBatchCustomCode executes custom code when the operator submits a batch
in the Operator Console.
• ValidateIndex provides an example of how to validate an index field value.
Batch Property
Within your custom code, you can access the Digitech Systems API via the Batch
property. The Batch property is of the type DSI.Capture.API.Batch and represents the
primary entry point for the Digitech Systems API.
For example, to insert a new document to a batch within your CallHandler method (C# in
this case), you can type:
this.Batch.TryInsertDocument(/*see API documentation for
parameters*/)
Another approach would be to call out to your own assembly and pass the instance of the
Batch object to your code (again, the instance is available as the "Batch" property inside
the pre-written "Code" class.) This approach would allow you to use Visual Studio for
coding. Then, at run time, you would need to ensure that your assembly is located in the
same directory as the PaperVision Capture executables.

Chapter 13 – Custom Code
PaperVision® Capture Administration Guide 324
Custom Code Event Arguments
Each custom code event exposes an argument parameter that is specific to the given event
type. Within your code, you can access these arguments to read event-specific data and to
configure settings. For example, your code can change a property that determines the action
that is triggered in the PaperVision Capture Operator Console after the event. The event-
specific arguments are listed below.
Note:
The following classes are derived from the .NET System.Data.DataSet class and
support all DataSet properties and functions. Additionally, DataSets are mapped to
index values in the Operator Console’s Index Manager.
Add Page Event – CCustomCodeNewImageEventArgs
The Add Page event uses the CCustomCodeNewImageEventArgs class to pass every scanned
image to the custom code. Use of this argument is illustrated in the InspectBeforeAddPage
sample script:
CCustomCodeNewImageEventArgs args = base.Parameter as
CCustomCodeNewImageEventArgs;
The following properties are located within the custom code:
1. Image.Attributes (hashtable containing the following image attributes):
a. PageSide: string (indicates the side of the page as "Front" or "Back")
b. DriverName: string (indicates the name of the scanner driver)
2. PageTags: TagInfo[]
This property can be used to specify one or more page tags to be added after the page
has been appended to the batch. Tags added to a break page (based on job
configuration settings to delete break pages) will be ignored.
Barcode Detected Event - BarcodeReadEventArgs
The Barcode Detected event uses the BarcodeReadEventArgs class to pass every barcode's
data (from each barcode zone) to the custom code. This event is triggered each time a barcode
is successfully detected during scanning (multiple barcodes can be detected per page).
The following properties are located within the custom code:
1. BarcodeItem Properties
These properties contain all barcode data, including barcode value, location, size,
orientation, and barcode type.
2. PageTags: TagInfo[]
This property can be used to specify one or more page tags to be added after the page
has been appended to the batch. Tags added to a break page (based on job
configuration settings to delete break pages) will be ignored.

Chapter 13 – Custom Code
PaperVision® Capture Administration Guide 325
Custom Code Execution Event – ManualCustomCodeEventArgs
The Custom Code Execution event uses the ManualCustomCodeEventArgs class to pass the
operator’s index values to the manual custom code event. This event is triggered when the
operator triggers the Execute Custom Code operation in the Operator Console.
ManualCustomCodeEventArgs args = base.Parameter as
ManualCustomCodeEventArgs;
Index Populated Event – IndexPopulateEventArgs
The Index Populated event uses the IndexPopulateEventArgs class to pass the operator’s
index values to the custom code. This event is triggered when an index value is populated.
IndexPopulateEventArgs args = base.Parameter as
IndexPopulateEventArgs;
Index Validate Event – IndexValidateEventArgs
The Index Validate event uses the IndexValidateEventArgs class to pass the operator’s index
values to the custom code. This event is triggered once the operator proceeds or tabs to the
next index field in the Index Manager.
IndexValidateEventArgs args = base.Parameter as
IndexValidateEventArgs;
OCR Statistics Event - OCRFullTextPageProcessedEventArgs
The OCR Statistics custom code event uses the OCRFullTextPageProcessedEventArgs class
to pass Open Text full-text data from each page (per selected output format) to the custom
code. For each output type, this event is triggered once a page has been converted to PDF,
PaperVision Enterprise, PaperFlow, or Text full-text output.
The following properties are located within the custom code:
1. DocumentId: string
2. PageId: Guid
3. PageIndex: int32
4. OCRWords: int32
The OCRWords property contains the following variables:
internal OCRCharacter[] characters = new OCRCharacter[] { };
internal Int32 line = 0;
internal System.Drawing.Point location = new
System.Drawing.Point();
internal System.Drawing.Size size = new
System.Drawing.Size();

Chapter 13 – Custom Code
PaperVision® Capture Administration Guide 326
The OCRCharacter variable contains the following properties:
public System.Drawing.Point Location
{
get
{
return location;
}
}
public System.Drawing.Size Size
{
get
{
return size;
}
}
public Byte Confidence
{
get
{
return confidence;
}
}
public Char Code
{
get
{
return code;
}
}
public bool Rejected
{
get
{
return rejected;
}
}
public Char[] Alternatives
{
get
{
return alternatives;
}
}
5. RecognitionTime: int32 (milliseconds)
6. AdditionalValues: Hashtable
7. ConverterName: string

Chapter 13 – Custom Code
PaperVision® Capture Administration Guide 327
OCR Statistics Event - OCRIndexZoneProcessedEventArgs
The OCR Statistics custom code event uses the OCRIndexZoneProcessedEventArgs class to
pass index values populated by Open Text OCR zones to the custom code. This event is
triggered once the contents of an Open Text OCR zone populate an index value.
The following properties are located within the custom code:
1. DocumentId: string
2. PageId: Guid
3. PageIndex: int32
4. OCRWords: int32
The OCRWords property contains the following variables:
internal OCRCharacter[] characters = new OCRCharacter[] { };
internal Int32 line = 0;
internal System.Drawing.Point location = new System.Drawing.Point();
internal System.Drawing.Size size = new System.Drawing.Size();

Chapter 13 – Custom Code
PaperVision® Capture Administration Guide 328
The OCRCharacter variable contains the following properties:
public System.Drawing.Point Location
{
get
{
return location;
}
}
public System.Drawing.Size Size
{
get
{
return size;
}
}
public Byte Confidence
{
get
{
return confidence;
}
}
public Char Code
{
get
{
return code;
}
}
public bool Rejected
{
get
{
return rejected;
}
}
public Char[] Alternatives
{
get
{
return alternatives;
}
}
5. RecognitionTime: int32 (milliseconds)
6. AdditionalValues: Hashtable
7. FieldName: string

Chapter 13 – Custom Code
PaperVision® Capture Administration Guide 329
OCR Statistics Event - OCRMarkSenseZoneProcessedEventArgs
The OCR Statistics custom code event uses the OCRMarkSenseZoneProcessedEventArgs
class to pass auto document break zone statistics to the custom code. This event is triggered
when an Open Text OCR zone inserts an auto document break page between documents.
The following properties are located within the custom code:
1. DocumentId: string
2. PageId: Guid
3. PageIndex: int32
4. OCRWords: int32
The OCRWords property contains the following variables:
internal OCRCharacter[] characters = new OCRCharacter[] { };
internal Int32 line = 0;
internal System.Drawing.Point location = new
System.Drawing.Point();
internal System.Drawing.Size size = new
System.Drawing.Size();

Chapter 13 – Custom Code
PaperVision® Capture Administration Guide 330
The OCRCharacter variable contains the following properties:
public System.Drawing.Point Location
{
get
{
return location;
}
}
public System.Drawing.Size Size
{
get
{
return size;
}
}
public Byte Confidence
{
get
{
return confidence;
}
}
public Char Code
{
get
{
return code;
}
}
public bool Rejected
{
get
{
return rejected;
}
}
public Char[] Alternatives
{
get
{
return alternatives;
}
}
5. RecognitionT ime: int32 (milliseconds)
6. AdditionalValues: Hashtable

Chapter 13 – Custom Code
PaperVision® Capture Administration Guide 331
Saving Indexes Event – IndexSaveEventArgs
The Saving Indexes event uses the IndexSaveEventArgs class to pass the operator’s index
values to the custom code. The Saving Indexes event is triggered as index values are saved to
the batch. This class contains the BatchNavigation enumeration property that determines
which document (in the Operator Console) opens immediately after indexes are saved.
IndexSaveEventArgs args = base.Parameter as
IndexSaveEventArgs;
Note:
By default, the Saving Indexes event proceeds to the next document.
Within the custom code, you can use the following constants to set the BatchNavigation
enumeration property:
1. None: Remains on current document
2. NextDoc: Proceeds to next document
3. PreviousDoc: Returns to previous document
4. LastDoc: Proceeds to last document in batch
5. FirstDoc: Returns to first document in batch
For example, you can configure the BatchNavigation enumeration property to remain on the
current document after index values are saved:
args.BatchNavigation = BatchNavigation.None;
Submit Batch Event – CCustomCodeBatchSubmittingEventArgs
The Submit Batch event uses the CCustomCodeBatchSubmittingEventArgs class to execute
custom code when operators submit batches in the Operator Console. The
CCustomCodeBatchSubmittingEventArgs includes a read-only "IsStepCompleted" property
that is accessible from within custom code. When this property is False, the batch is being
submitted as "incomplete". This property allows code to execute only when a batch is being
submitted as "completed".

Chapter 13 – Custom Code
PaperVision® Capture Administration Guide 332
Additional API Functions
In addition to the API Functions documented in the PVCaptureBatchAPI.chm help file, the
API functions described in this section can be used within your custom code.
Custom Code/Export Functions
protected string[] GetPageFiles(string documentID)
Returns path values for all images contained in a document (from all pages)
protected Stream GetFileStream(PVFile file)
Returns the stream for a specified PVFile
protected Stream[]GetDocumentStreams(string documentID)
Returns an array of streams for all files contained in a document (from all pages)
protected Stream[] GetDocumentStreams(string documentID,
string jobStepName, bool bitonal)
Returns streams for all files contained in a document (from all pages) based on job step
name and bitonal option
protected void CopyStreamToDisk(Stream stream, string path)
Copies content of a stream to disk
public string[] CopyFilesToDisk(string documentID, string
rootPath)
Copies all files from a document (from all pages) to a folder and returns an array for all
image path values
protected void SetPersistValue(string key, string value,
string rootPath)
Copies all files from a document (from all pages) to a folder based on job step name and
bitonal option
protected string Get PersistValue(string key, string rootPath)
Reads persisted value for a key

Chapter 13 – Custom Code
PaperVision® Capture Administration Guide 333
Custom Code/Export Functions (continued)
protected string GetNextLockedPath(string root, Int32
maxExportSize, bool exclusive)
Returns the next available path (path is locked before it is returned)
Note:
If you set the EXCLUSIVE_EXPORT script constant to True, the function will
throw an exception if the last available folder is in use. If you set the
EXCLUSIVE_EXPORT script constant to True, it is strongly recommended to
specify an automation server that will process exports. The automation server can be
assigned within each export generator's Configuration > Options tab. For more
information, see the section on Export Definitions in this chapter.
String GetNextLockedPath(string root, Int32 maxExportSize,
ExcludePathDelegate excludeFunction, bool exclusive)
Returns the next available path (path is locked before it is returned)
Note:
If you set the EXCLUSIVE_EXPORT script constant to True, the function will
throw an exception if the last available folder is currently is in use. The delegate is
used to determine which folders should be skipped.
In addition, if you set the EXCLUSIVE_EXPORT script constant to True, it is
strongly recommended to specify an automation server that will process exports.
The automation server can be assigned within each export generator's
Configuration > Options tab. For more information, see the section on Export
Definitions in this chapter.

Chapter 13 – Custom Code
PaperVision® Capture Administration Guide 334
Custom Code/Export Functions (continued)
protected string GetNextLockedPath(string root, Int32
maxExportSize)
Returns the next available path (path is locked before it is returned)
Note:
If using this custom code function in conjunction with the EXCLUSIVE_EXPORT
script constant (set to True), it is strongly recommended to specify an automation
server during export configuration. The automation server can be assigned within
each export generator's Configuration > Options tab. For more information, see the
section on Export Definitions in this chapter.
protected void UnlockPath(string path)
Deletes lock for a specified path
void ClearRootPath(string path)
Deletes all folders containing empty subfolders for all folders listed under ‘path’
protected void SetExportComplete(string path)
Flags folder as complete by dropping export.complete file
protected bool IsExportComplete(string path)
Checks whether export folder is flagged as complete
protected bool IsExported(string documentID)
Checks whether document was previously exported
protected bool SetExported(string documentID)
Sets the document's exported status
protected void DeleteDocument(string documentID)
Deletes document after it has been exported
protected void SetStatus(string status, Int32 percentage)
Returns percentage of custom code that has been executed
Chapter 13 – Custom Code
PaperVision® Capture Administration Guide 335
Full-Text OCR Functions
protected string[] GetPageText (string filePath)
Returns text for each page
protected string[] GetOCRFiles (string documentID, string
stepName, string converterCode)
Returns Full-Text OCR files belonging to a specific converter
string[] GetOCRFiles (string documentID, string stepName,
string converterCode, string path)
Writes Full-Text OCR files belonging to a specific converter to directory ‘path’
Important!
The caller is responsible for post-processing clean-up if the files are not required.

Chapter 13 – Custom Code
PaperVision® Capture Administration Guide 336
Image Processing Functions
string ConvertImages(string[] sourceFiles, string
destinationFile, ConvertFileType convertFileType)
Converts one or more images to a single destination image file and returns the actual path
under which the file was saved
Int32 GetPageCount(string sourceFile)
Returns the number of pages found in a multi-page image
String GetPageImage(string sourceFile, Int32 pageIndex, string
destinationFile, OutputFileType outputFileType)
Retrieves a specific image referenced by a specific page index in a multi-page image
protected string[] GetPageFiles(string documentID)
Returns a path value for all images belonging to a document (from all pages)
bool IsMultipageFormat(ConvertFileType convertFileType)
Determines if the passed file type supports multi-page format
Chapter 13 – Custom Code
PaperVision® Capture Administration Guide 337
PVBatch Helper Functions
Int32 GetBlankIndexCount()
Returns the number of blank indices
string[] GetAvailableFields()
Returns the set of fields that can be written to
string GetIndexValue(string fieldname)
Returns the field value for the specified field name
void SetIndexValue(string fieldname, string fieldValue)
Assigns a field value for a specified field name
Note:
This function cannot be used with a detail set field; otherwise, an exception will
result. Also, when called from within an Index Validate event, this function can only
be used for the target index.
string[] GetDetailSetFields()
Returns the field names of the detail set in Match and Merge
void AssignDetailSet(DataRow row)
Assigns a detail set field in automated match and merge using a single passed DataRow
void AssignDetailSet(DataSet dataset)
Assigns detail set values from a DataSet (returned from the database) - used in match and
merge
void AssignDetailSet(DataRow row, DataSet indices)
Assigns a detail set from a passed DataRow value (manual match and merge) – detail set is
not written to the batch; instead, it is written to the indices DataSet which is passed from
the user interface
void AssignDetailSet(DataSet dataset, DataSet indices)
Assigns detail set values to passed indices (manual match and merge)

Chapter 13 – Custom Code
PaperVision® Capture Administration Guide 338
PVBatch Helper Functions (continued)
void UpdateCurrentIndex(DataRow row)
Updates the current index value from the passed DataRow - row is retrieved from a dataset
populated by the SQL database (match and merge)
Bool IsFieldDetailSet(string fieldName)
Checks whether the specified field is a detail set field
PVIndexMetadata GetIndexMetadata(string fieldName)
Returns metadata for an index
bool IsFieldEmpty(string fieldName)
Checks whether a field is empty
string GetMappedColumn(string fieldName)
Returns the mapped column to a specific field name (match and merge)
DataTable GetMapping()
Returns a mapping table between indices and table columns (match and merge)
string GetWhereClause()
Generates a WHERE clause to be used in the SQL query (match and merge)
string GetWhereClause(DataRow row)
Generates a WHERE clause to be used in the SQL query that uses the values in DataRow
to add conditions (match and merge)
string[] GetDocumentIDs()
Returns a list of document ID values
PVPage[] GetPages(string documentID)
Returns a list of pages for a specific document

Chapter 13 – Custom Code
PaperVision® Capture Administration Guide 339
PVBatch Helper Functions (continued)
string GetPath(PVFile file)
Returns a path for a specified file
PVIndex[] GetIndices(string documentID)
Returns a list of indices for a specific document
PVDetailSet[] GetDetailSets(string documentID)
Returns the detail set values for a specific document
PVFile GetPreferredFile(PVPage, string jobStepName, bool
bitonal)
Returns the file that matches the bitonal value (otherwise, first file in array is returned)
string GetExtension(string imagePath)
Returns the extension of an image path

Chapter 13 – Custom Code
PaperVision® Capture Administration Guide 340
Enumerations
The enumerations described in this section can be used within your custom code.
ConvertFileType
This enumeration is used by the ConvertImages() function and specifies the conversion types
that will be applied to one or more images.
public enum ConvertFileType
{
/// <summary>
/// No file conversion (returns image input path and
appends an extension if not passed in destinationFile
variable)
/// </summary>
CVT_NO_CONVERSION,
/// <summary>
/// TIFF with Group IV and/or medium JPEG compression
(single- or multi-page)
/// </summary>
CVT_TIFF_G4_MEDJPG,
/// <summary>
/// TIFF with Group IV and/or LZW compression (single-
or multi-page)
/// </summary>
CVT_TIFF_G4_LZW,
/// <summary>
/// TIFF with no compression (single- or multi-page)
/// </summary>
CVT_TIFF_NONE,
/// <summary>
/// PDF with Group IV and/or medium JPEG compression
(single- or multi-page)
/// </summary>
CVT_PDF_G4_MEDJPG,

Chapter 13 – Custom Code
PaperVision® Capture Administration Guide 341
/// <summary>
/// PDF with Group IV and/or LZW compression (single- or
multi-page, and image-only PDFs)
/// </summary>
CVT_PDF_G4_LZW,
/// <summary>
/// JPEG with medium JPEG compression (single-page only)
/// </summary>
CVT_JPG_MEDJPG,
/// <summary>
/// GIF (single-page only)
/// </summary>
CVT_GIF,
/// <summary>
/// BMP (single-page only)
/// </summary>
CVT_BMP,
/// <summary>
/// PNG (single-page only)
/// </summary>
CVT_PNG
/// <summary>
/// JPEG 2000
/// </summary>
CVT_JPG2000
}

Chapter 13 – Custom Code
PaperVision® Capture Administration Guide 342
OutputFileType
This enumeration is used by the GetPageImage() function, and specifies the output file types
when single pages are retrieved from a multi-page image.
public enum OutputFileType
{
/// <summary>
/// JPEG
/// </summary>
OFT_JPG
/// <summary>
/// TIFF
/// </summary>
OFT_TIFF
/// <summary>
/// Bitmap
/// </summary>
OFT_BMP
}

Chapter 13 – Custom Code
PaperVision® Capture Administration Guide 343
UIRefreshLevel
This enumeration synchronizes the Operator Console’s user interface with any changes made
to the batch via custom code. Setting the UIRefreshLevel in custom code forces the user
interface to refresh the selected component specified by the enumeration value (None, Index,
CurrentDocumentIndexes, etc.). If you use either the Index Populated or Index Validate
Custom Code Event to change an index value, the Operator Console's Index Manager will
remain synchronized using the UIRefreshLevel.Index value.
public enum UIRefreshLevel
{
/// <summary>
/// no UI refresh required
/// </summary>
None = 0x00,
/// <summary>
/// index field needs to be refreshed (i.e., via
IndexValidate or IndexPopulate event)
/// </summary>
Index = 0x01,
/// <summary>
/// all indexes for current document need to be refreshed
(does not apply to Match and Merge)
/// </summary>
CurrentDocumentIndexes = 0x02,
/// <summary>
/// current page needs to be refreshed
/// </summary>
SinglePage = 0x04,
/// <summary>
/// multiple pages need to be refreshed
/// </summary>
MultiPage = 0x08
}

Chapter 13 – Custom Code
PaperVision® Capture Administration Guide 344
Public Properties
The public properties listed in this section can be used within your custom code.
/// <summary>
/// Batch object
/// </summary>
public PVBatch Batch
/// <summary>
/// Parent window
/// </summary>
public Control Parent
/// <summary>
/// Control referencing the current index
/// </summary>
public Control Control
/// <summary>
/// Used to pass optional parameters
/// </summary>
public object Parameter
/// <summary>
/// Code result that returns status of custom code
execution
/// </summary>
public CodeResult CodeResult
/// <summary>
/// PDF Resolution used when importing PDF files
/// </summary>
public Int32 PDFResolution
/// <summary>
/// PDF Smoothing option used when importing PDF files
/// </summary>
public PDFSmoothing PDFSmoothing

Chapter 13 – Custom Code
PaperVision® Capture Administration Guide 345
Debugging Custom Code
Custom code that you enter in the Script Editor is compiled on-the-fly by the PaperVision
Capture application so there is no way to debug or step through this code at run time. However,
if you write code in your own assemblies and call out to these pre-compiled assemblies, then you
can debug this code by attaching your debugger to the appropriate capture process.
For code that is executed in a manual job step (e.g., code executing in a "Saving Indexes" event),
then you should attach your debugger to the CaptureClient.exe process.
To debug code that is executed in an automated custom code step:
1. On the machine where the code is going to be executed, stop the PaperVision Process
Initiator Windows service.
2. Set your debugger to start an external application for debugging.
3. From the directory where PaperVision Capture was installed, choose the
DSI.PVECommon.PVProcWork.exe executable and pass a command line argument
of “0". When you start this executable, it will execute any pending "Process Batch"
operations (including executing custom code steps) that have been appropriately
scheduled in the Automation Service Scheduling screen.
4. When you are finished debugging, restart the PaperVision Process Initiator Windows
service.
WARNING!
Do not attempt to debug code in a production environment. Doing so may
adversely impact system performance and have unpredictable impacts on
customer data and end-user functionality.
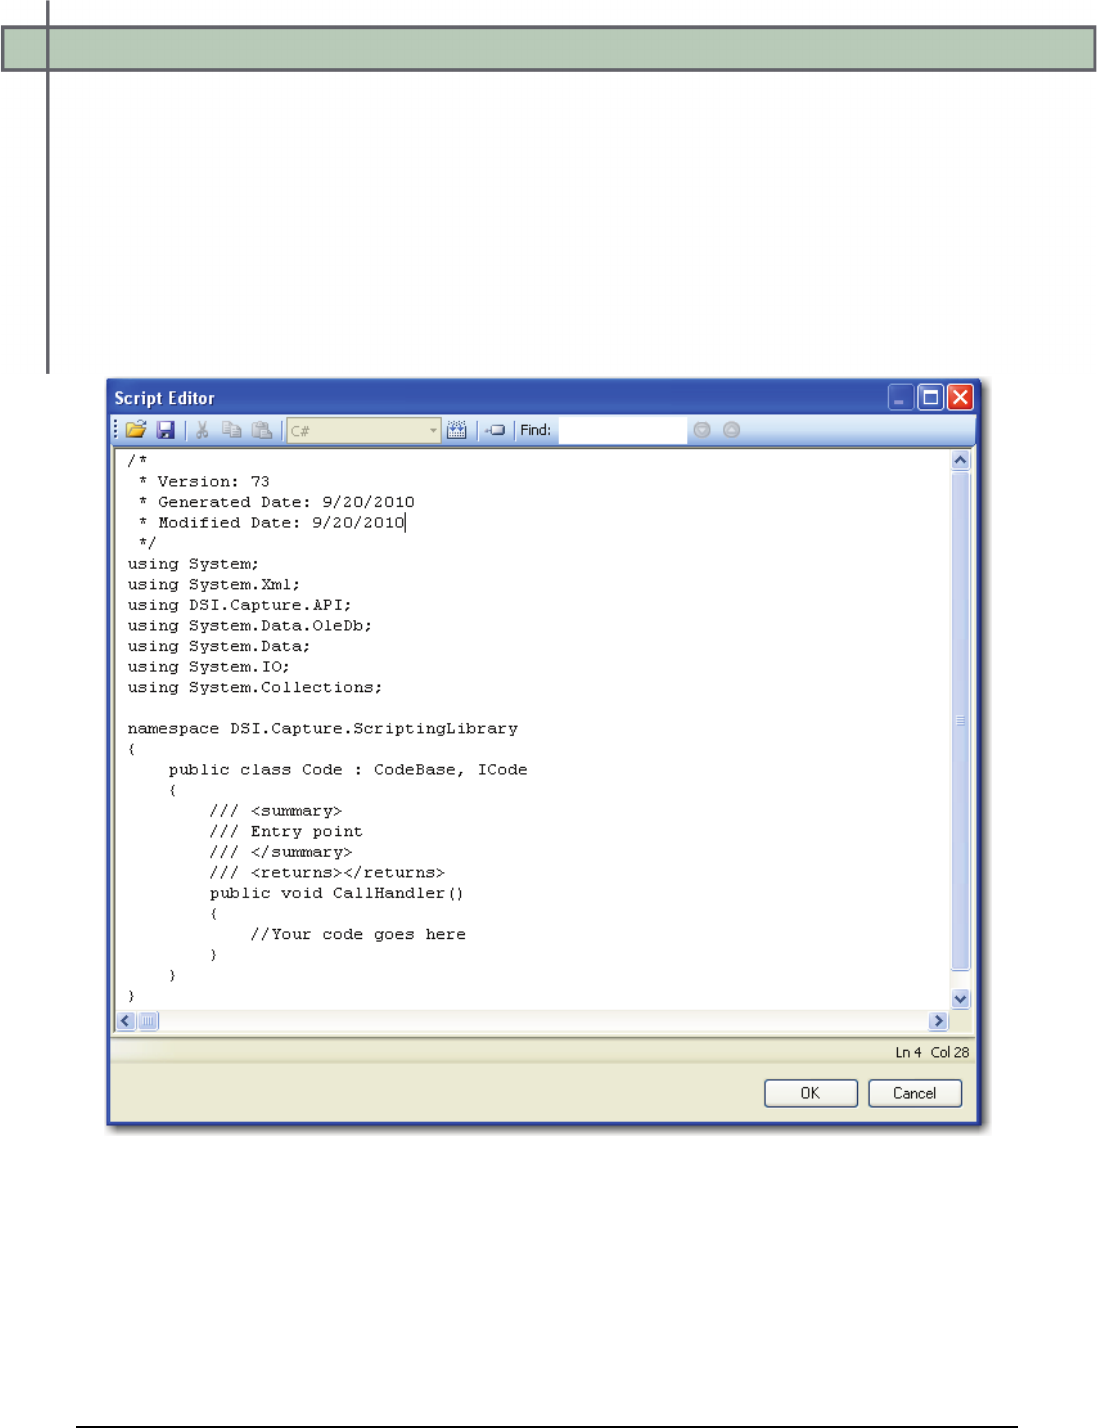
Chapter 13 – Custom Code
PaperVision® Capture Administration Guide 346
Script Editor
When you configure the Basic and Export Sample generators during custom code
configuration, the Script Editor launches with pre-written, generic code that you can edit and
compile directly in the window. The Script Editor window contains the "CallHandler" pre-
written method. Although you can add new methods or properties to the "Code" class or call
out to other classes (even those defined in your own, separately-compiled assemblies), you
should not remove the "CallHandler" method since it is the entry point for executing your
custom code. If you call out to other namespaces, remember to add a reference to the
necessary assemblies, which is described in the References section in this chapter.
Script Editor
Chapter 13 – Custom Code
PaperVision® Capture Administration Guide 347
Importing Custom Code
The Import command allows an external custom code XML file to be loaded into the Script
Editor.
To import an external XML file:
1. Click the Import icon.
2. In the Open dialog box, locate the XML file.
3. Select the XML file to import.
4. Click Open.
Exporting Custom Code
The Export command allows you to export custom code as an XML file.
To export custom code:
1. Click the Export icon.
Note:
Code that does not compile successfully in the Script Editor cannot be exported.
2. In the Save As dialog box, locate the directory to save the exported XML file.
3. Enter a file name.
4. Click Save.
Cutting, Copying, and Pasting Custom Code
You can cut, copy, and paste sections of the custom code within the same Script Editor or to
another editor.
To cut/paste custom code:
1. Highlight the code in the Script Editor.
2. Click the Cut icon.
3. Click the Paste icon to paste the code to the new location within the Script
Editor or to another editor.
To copy/paste custom code:
1. Highlight the code to copy.
2. Click the Copy icon.

Chapter 13 – Custom Code
PaperVision® Capture Administration Guide 348
3. Click the Paste icon to paste the code to the new location within the Script
Editor or to another editor.
Compiling Custom Code
The Compile command validates your code.
To compile your code:
1. After writing your custom code in the Script Editor, click the Compile icon. If
any compilation errors occur, they will display at the bottom.
2. Fix any errors that exist, and then compile again.
3. Once the success message appears, click OK.
References
References are used to link external assemblies, including standard .NET or custom
assemblies that you generate.
To add a reference:
1. Click the References icon, which opens the References dialog box.
References
2. Select the assembly <file name>.dll from the list.
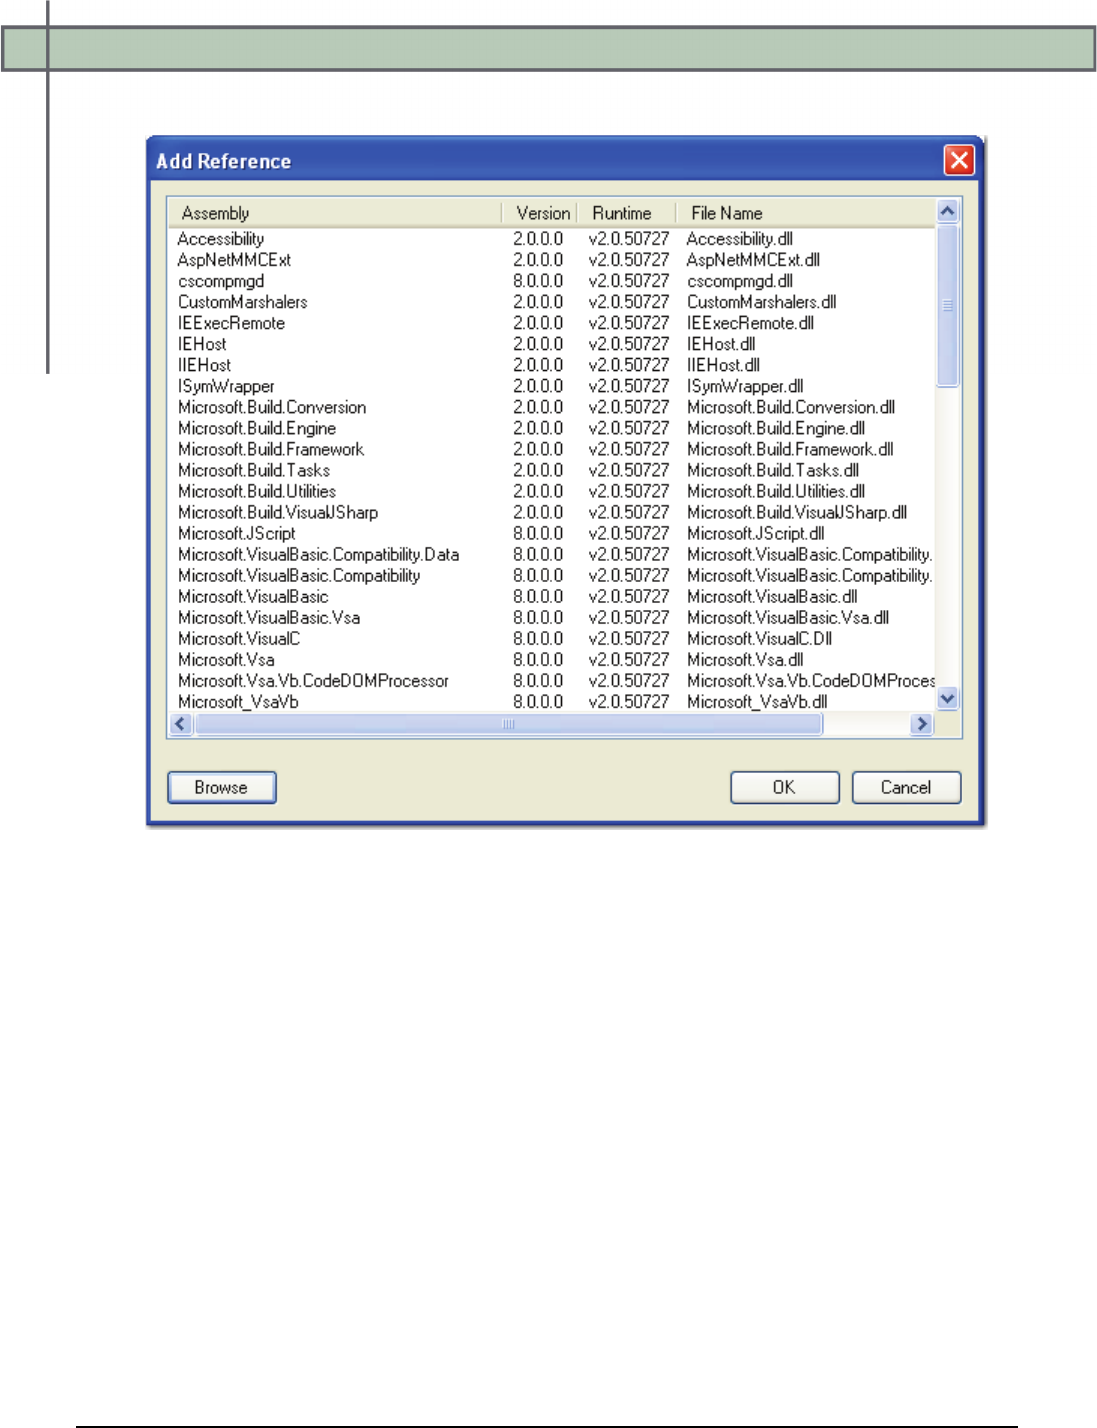
Chapter 13 – Custom Code
PaperVision® Capture Administration Guide 349
3. Or, click the Add button which opens the Add References list.
Add Reference
4. Select the .dll from the list.
5. Or, click the Browse button to locate the appropriate .dll.
6. Click OK.
7. To remove a reference from the list, highlight the reference, and then click the
Remove button in the References dialog box.
8. When you are finished adding and removing references, click OK in the References
dialog box.
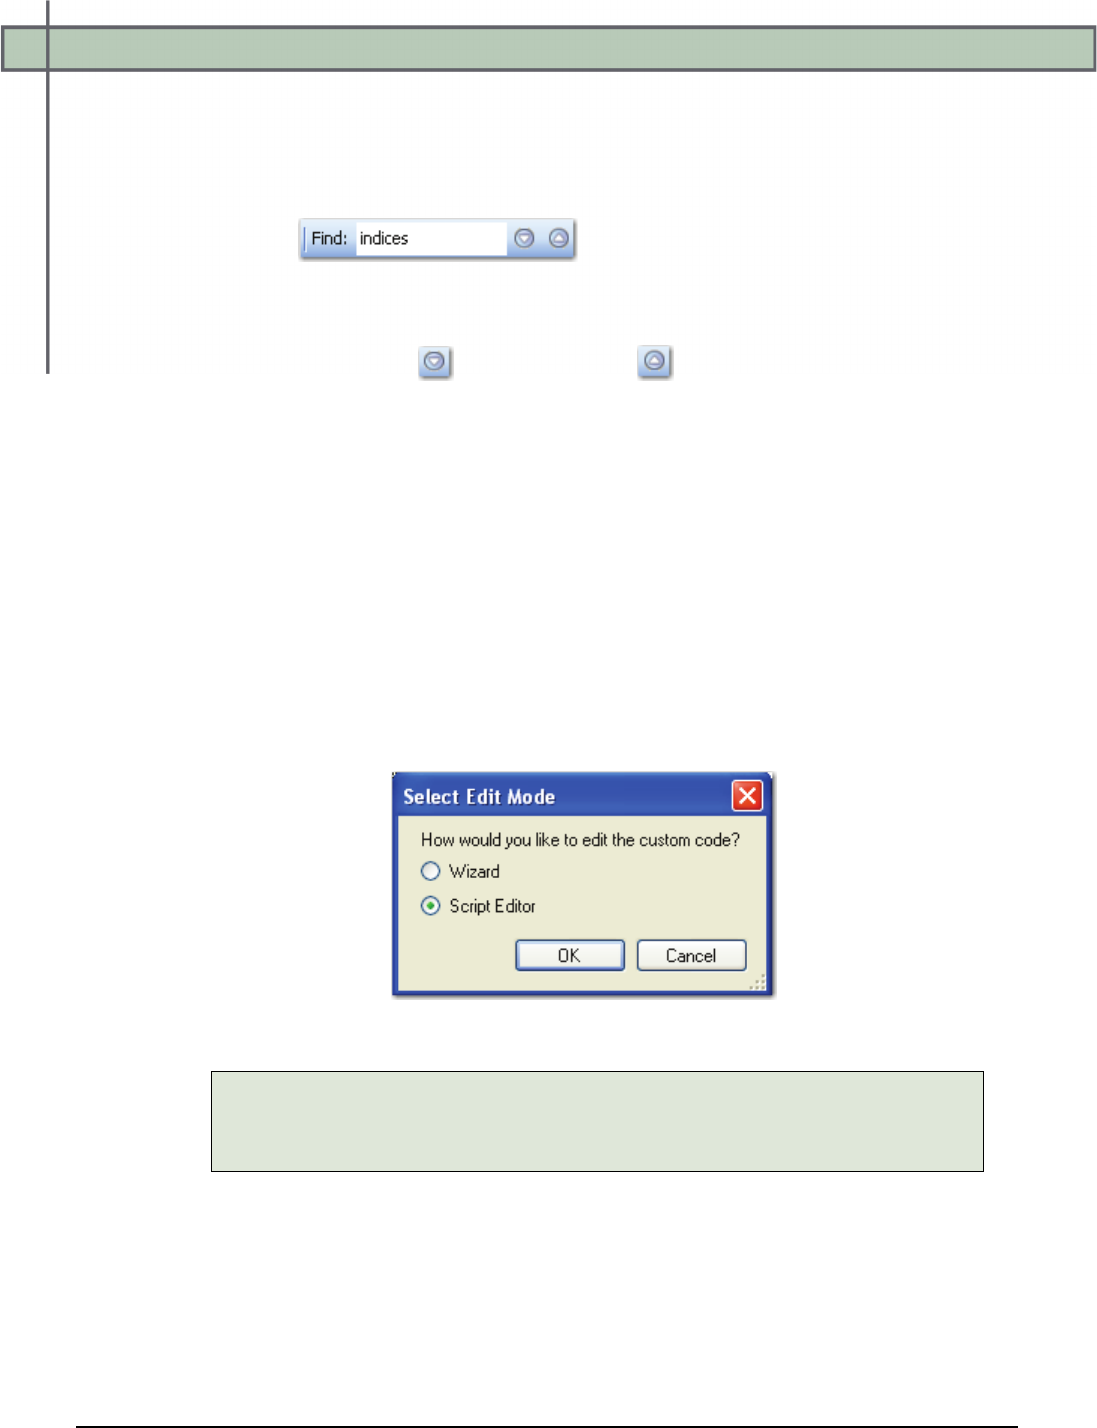
Chapter 13 – Custom Code
PaperVision® Capture Administration Guide 350
Finding Code in the Script Editor
You can quickly locate code in the script editor by using the Find operation.
To find code in the Script Editor:
1. In the Find field, enter the code or character.
2. Press Enter to initiate the search. The code or character will be highlighted in the
Script Editor.
3. Or, press the Find Next or Find Previous icon to search for instances of
your specified code or character.
Modifying Exports with the Script Editor
After you have initially configured exports with the Custom Code Generator Wizard, you can
opt to modify export scripts with the Script Editor.
To modify exports with the Script Editor:
1. In Job Definitions, select the Custom Code job step that contains the configured
export.
2. In the Properties grid, expand the Custom Code Events (Step Level) node.
3. Click the ellipsis button in the right column next to the Step Executing field. The
Select Edit Mode dialog box appears.
Select Edit Mode
Note:
For more information on specific exports, see the section on Export
Definitions in this chapter.
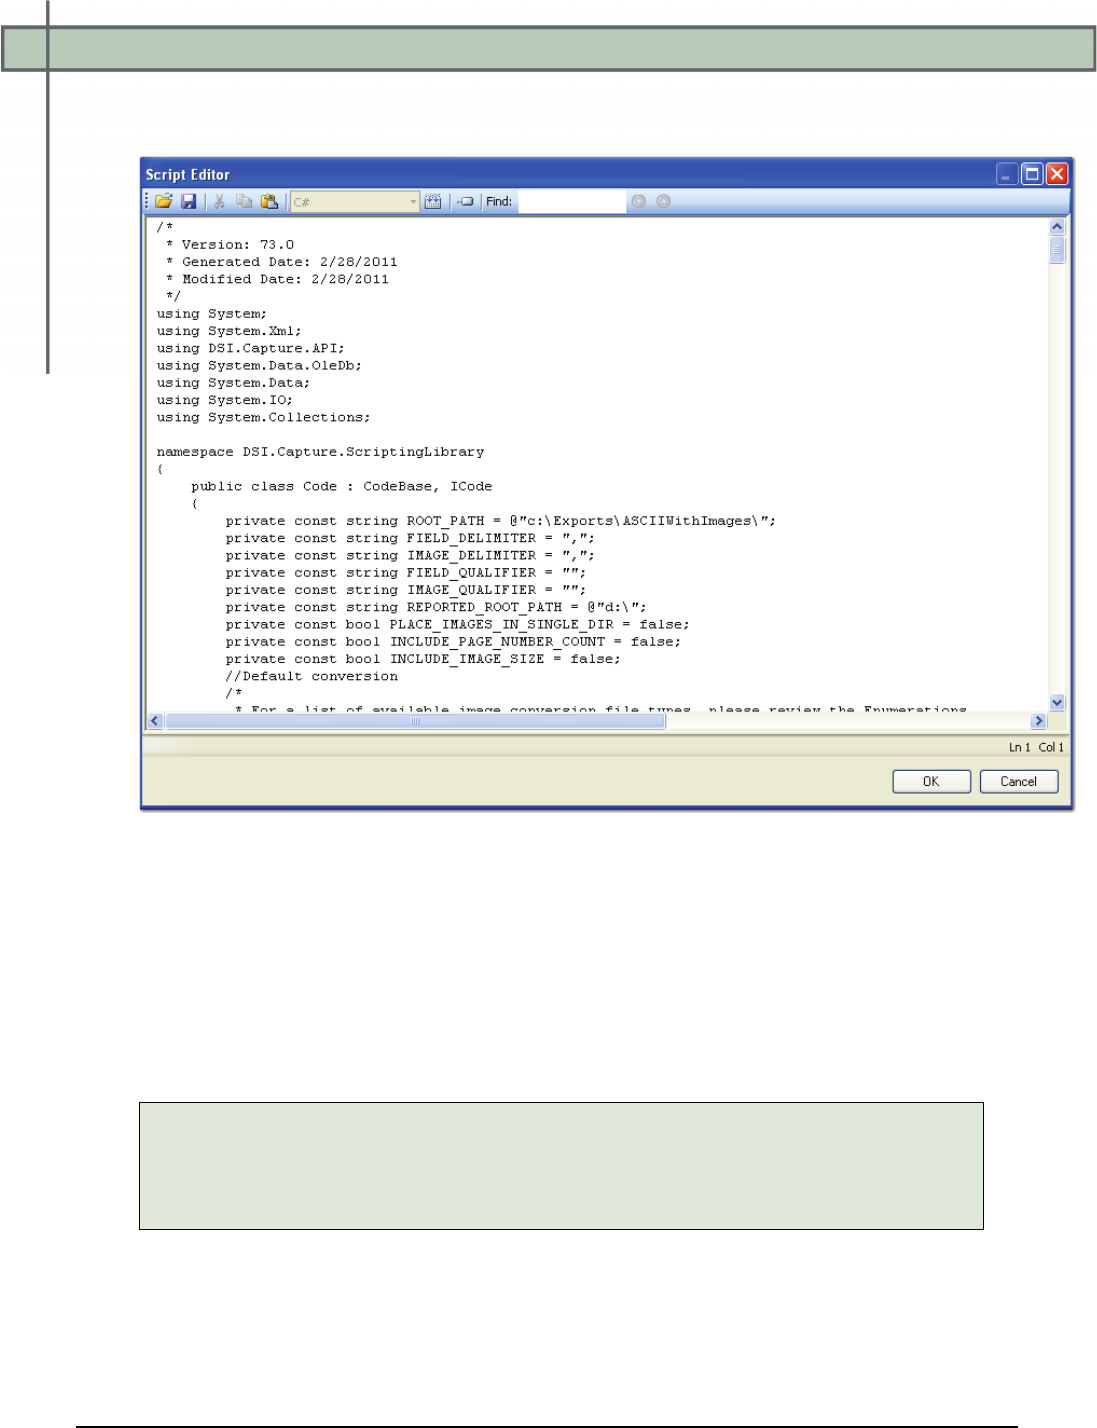
Chapter 13 – Custom Code
PaperVision® Capture Administration Guide 351
4. Select the Script Editor option, and the resulting export script appears in the Script
Editor.
Script Editor (ASCII with Images Export)
Modifying Export Constants
Within the Script Editor, you can modify export scripts that you previously created with
the Custom Code Generator Wizard. In the OCR tab, for example, you can change the
OCR_CONVERTER_CODE constant in the Script Editor so that PDF searchable images
will be exported (for Nuance Full-Text OCR). To modify the constant, the following line
in the XML script would read:
private const string OCR_CONVERTER_CODE = “PDFImageOnText”;
Note:
For a list of converter codes, see the PVCaptureBatchAPI.chm help file’s
PVBatch.TryGetOCRFiles Method topic found within the Docs directory where
PaperVision Capture was installed.
In another scenario, you can use full-text OCR data from another job step by modifying the
OCR_JOB_STEP_NAME constant. This is completed by entering the name of the step
between the quotes (e.g., “Nuance Full-Text OCR” or "Open Text Full-Text OCR").
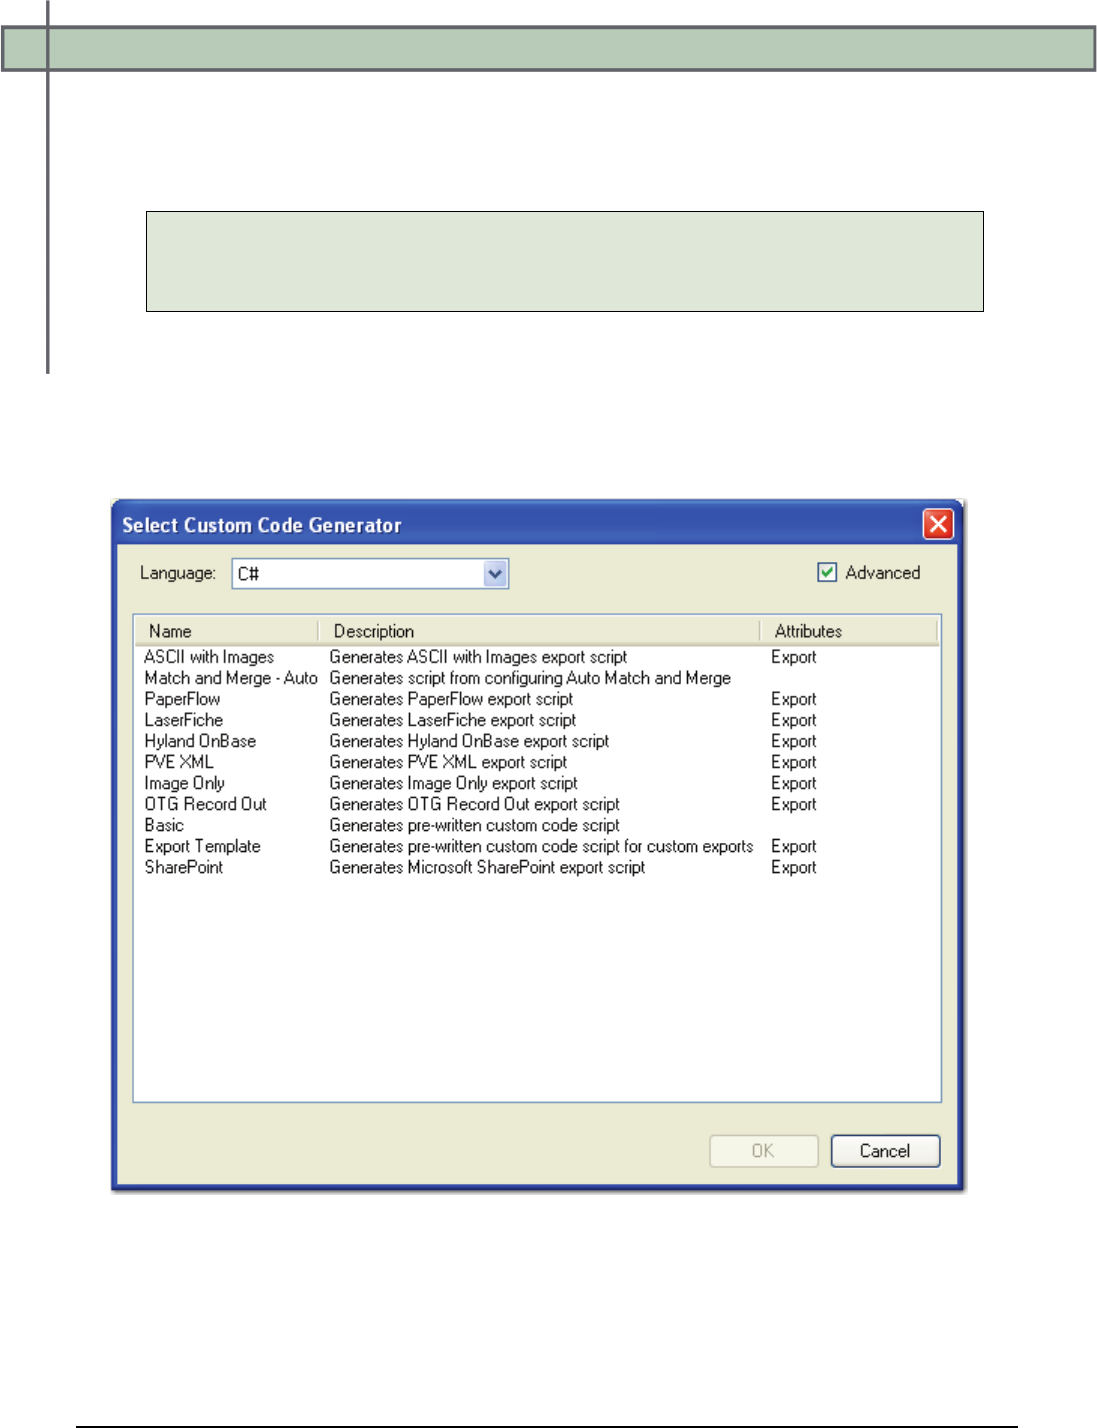
Chapter 13 – Custom Code
PaperVision® Capture Administration Guide 352
Match and Merge Wizard
The Match and Merge generator launches the Match and Merge Wizard where you configure
the connection properties, field mapping, and optional Match and Merge settings.
Note:
Ensure that the lookup table and columns for the database have been configured and
indexes have been defined before launching the Custom Code Wizard.
To select the Match and Merge Generator:
1. Select the Custom Code job step.
2. In the Properties grid, expand the Custom Code Events (Step Level) node.
3. Click the ellipsis button in the right column next to the Step Executing field. The
Select Custom Code Generator dialog box appears.
Select Custom Code Generator
4. Select the C# or Visual Basic programming language.
5. Double-click the Match and Merge - Auto generator, and the Match and Merge
Wizard launches.
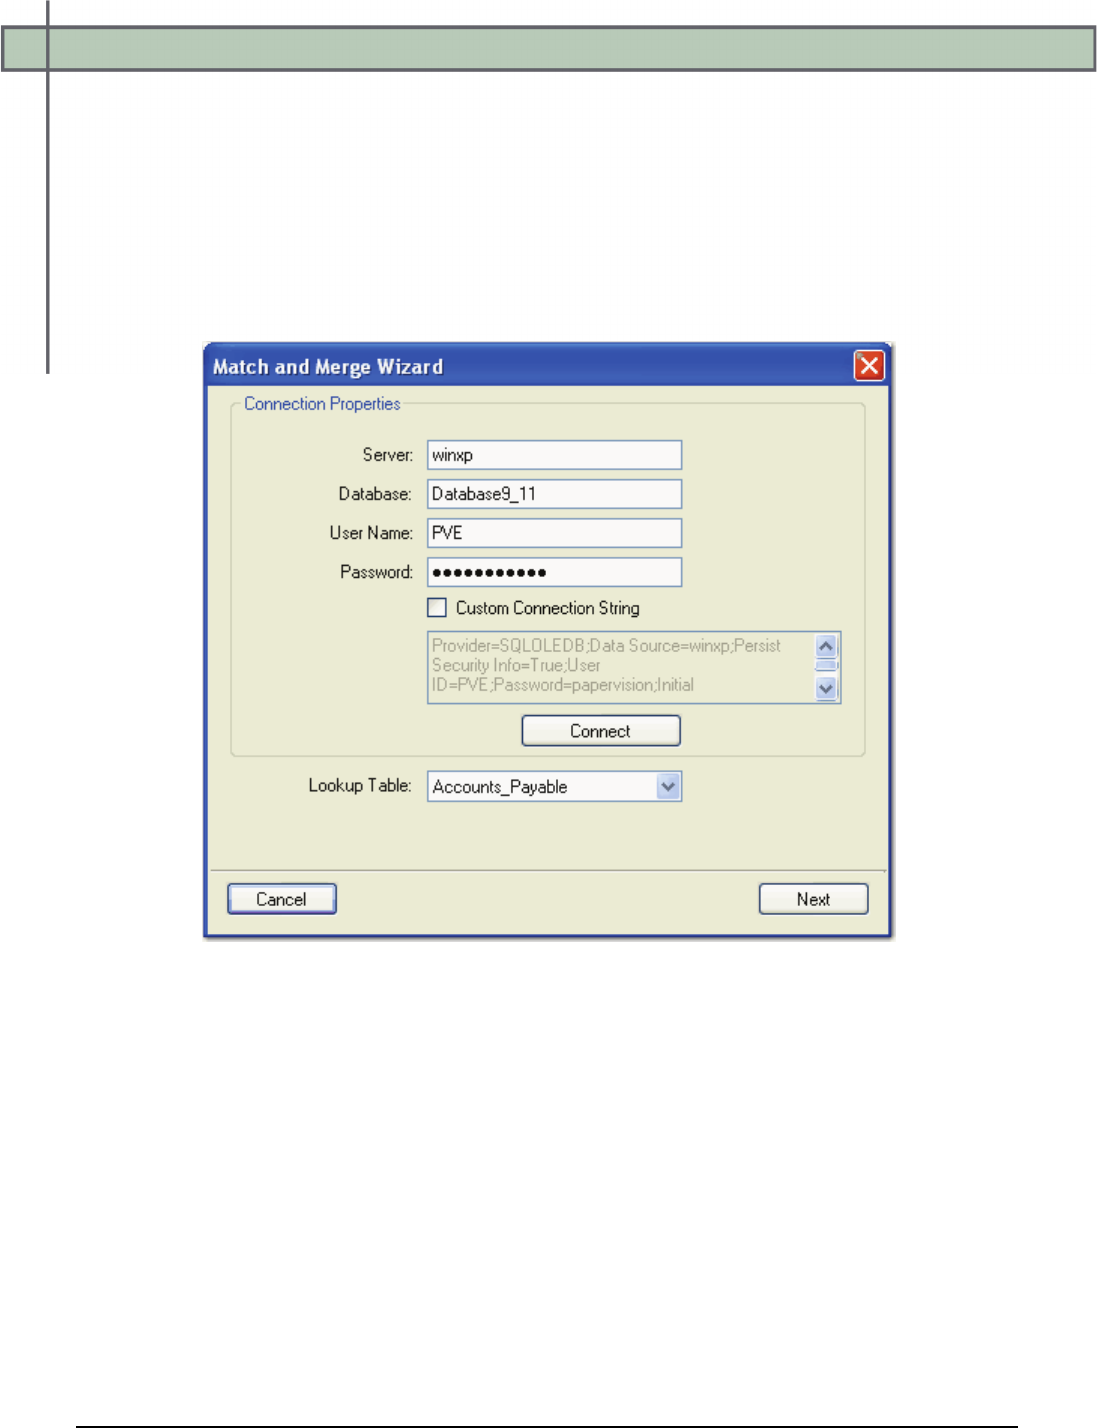
Chapter 13 – Custom Code
PaperVision® Capture Administration Guide 353
Match and Merge Wizard Configuration
After launching the wizard, the Connection Properties screen appears. You can configure
the database connection properties including the database server and name, user name and
password, and database lookup table.
To configure the Match and Merge Wizard:
1. In the Connection Properties screen, enter the database server and database name
where Match and Merge will be performed.
Connection Properties
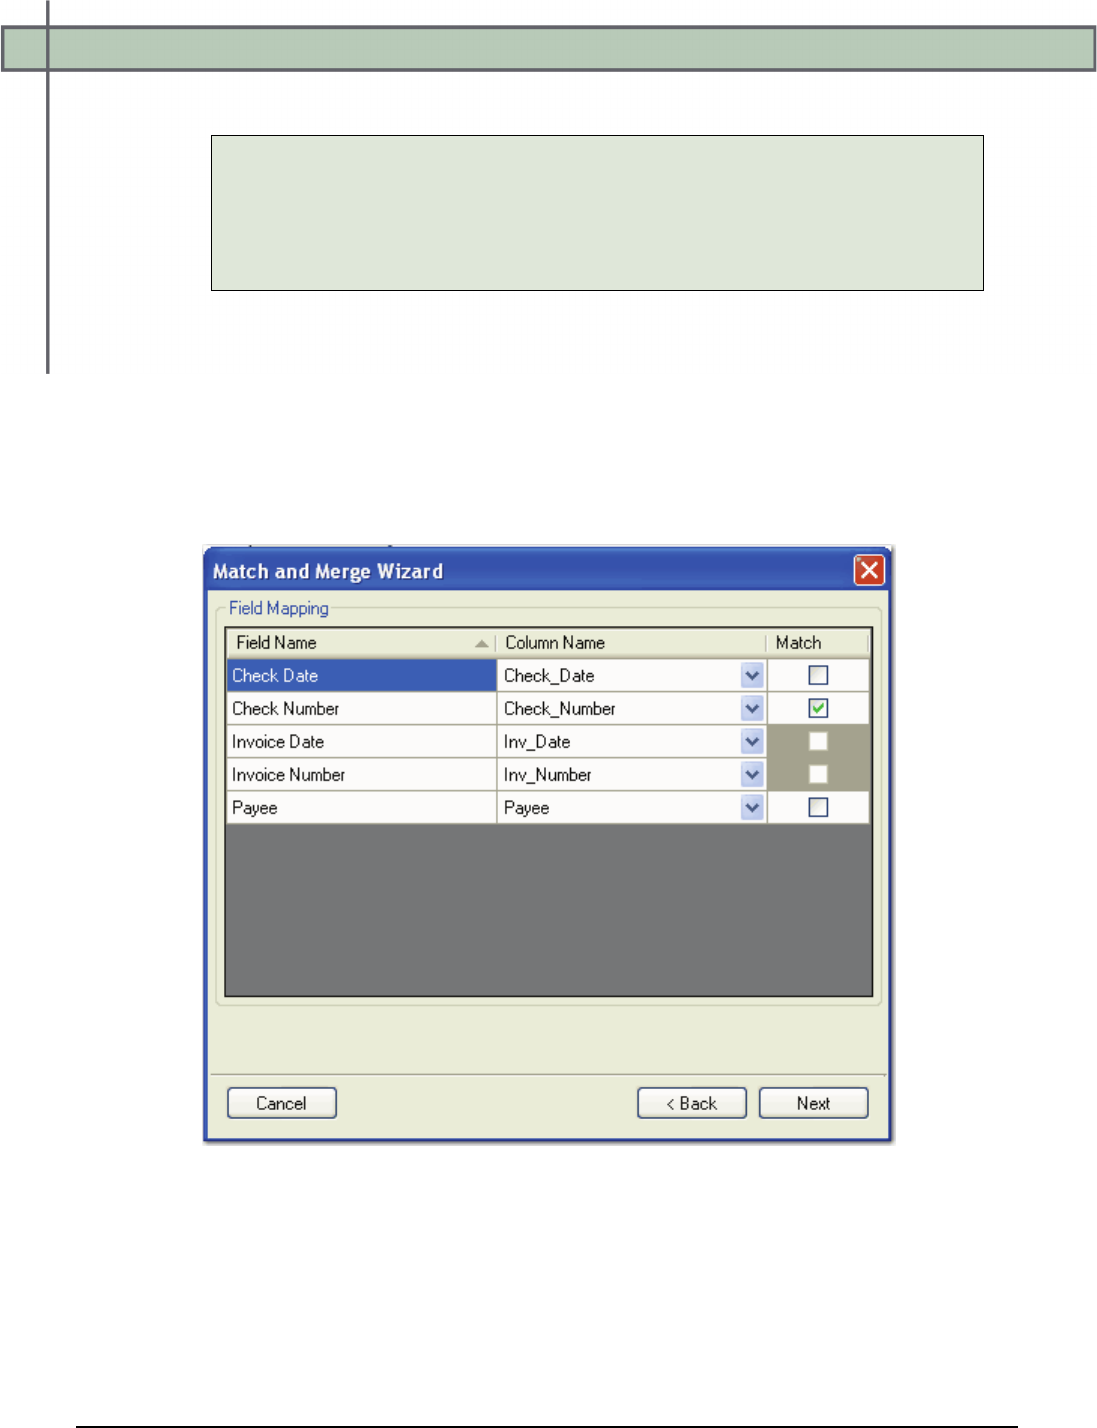
Chapter 13 – Custom Code
PaperVision® Capture Administration Guide 354
2. Enter the user name and password for the database server connection.
Note:
If the User Name and Password fields are left blank, the database
connection will use the Windows Authentication credentials. Entering a user
name and password for the database will supercede the Windows
Authentication credentials.
3. To insert a custom connection string, select the check box, and edit the string in
the window.
4. Click the Connect button to test the connection to the database. Once connected,
the Lookup Table drop-down list will populate.
5. Click the Lookup Table drop-down list to select the database table used for
lookups.
6. Click Next, and the Field Mapping screen appears.
Field Mapping
Chapter 13 – Custom Code
PaperVision® Capture Administration Guide 355
7. The Field Mapping screen allows you to match the columns in the database to the
field names (indexes) that you defined. Click the Column Name drop-down list(s)
to select the database column name that will match the field name(s).
Note:
Field names are synonymous with indexes that have been defined.
• If one of the index fields should not be matched, do not map it to the Column
Name.
• When the operator executes the Merge Index Values command, only the
mapped fields will be populated in the Index Manager.
8. After selecting the column names, click the Match check box(es). Detail fields are
denoted with shaded columns that cannot be selected for matching.
• In the example above, the Check Number index field, entered by the operator,
will be matched with the corresponding Check_Number column in the
database.
• Once the operator executes the Merge Index Values command, the
corresponding Check Date, Invoice Date, Invoice Number, and Payee are
populated in the Operator Console Index Manager.
• If the operator does not know the exact index value during hand-key indexing,
the operator can insert wildcard characters to perform a partial search against a
database. For example, the operator can insert the percent sign (%) to specify
any number of unknown characters to search for in a SQL, Sybase, or Oracle
database; the operator can insert the asterisk (*) to specify any number of
unknown characters to search for within a Microsoft Access database.
Note:
All fields with the Match column selected must be populated prior to
running Merge Index Values command in the Operator Console.

Chapter 13 – Custom Code
PaperVision® Capture Administration Guide 356
9. Click Next, and the Match and Merge Options screen appears.
Match and Merge Options
10. Match and Merge Options contain additional parameters that define the match and
merge process. Enter the number of fields that must be blank in order for
PaperVision Capture to attempt to match during the custom code execution.
• For example, you assign two required blank fields. If only one field is left
blank before the Match and Merge is executed, PaperVision Capture will
not match because at least two fields were not blank.
• Valid values range from zero to the number of database columns that are
defined. For example, if you have five database columns defined, you can
enter a value from zero to five.
11. If you select the Overwrite Existing Index Information check box, the Match
and Merge values will overwrite the existing index entries already populated in
the batch.
Chapter 13 – Custom Code
PaperVision® Capture Administration Guide 357
12. The Match Count Column setting applies only to integer data type columns in the
database. Select the Match Count Column check box if the match count should
increment in the database by one each time a match is encountered. If you enable
this setting, choose the database column from the drop-down menu.
13. Select the Delete Matching Records check box to remove the matching record
from the database once it is located during the match and merge process.
Note:
You can only enable the Match Count Column or the Delete Matching
Records setting, but not both.
14. For manual indexing, select the Enable Detail Sets check box if the detail fields
should be populated when the operator enters the index fields.
• If you do not select this check box, the operator is presented with a pick list of
data that meets the index field criteria.
• The operator then selects the appropriate record, and the detail fields are
populated according to the selected record.
When you define a Custom Code step to run an automated Match and Merge
process:
• If you select the check box, all detail fields are automatically populated (e.g.,
if five rows of data meet your criteria, five detail sets are populated).
• Conversely, if you do not select the check box, the detail fields populate with
data from the first row of results.
15. Click Next, which opens the last screen of the wizard.
16. Click Finish, which opens the Script Editor so you can make edits to the code if
necessary.
17. Click OK.
Matching and Merging with Text Files
If you are using custom code to match and merge index fields with a text file, you can control
how data is handled in the lookup table. If the text file contains dates, currency, or decimal
data, for example, you can manipulate how data is formatted by creating a schema
information (Schema.ini) file and placing it in the same directory where the text file resides. If
you do not define how date columns are handled, date values will be imported in the
DateTime format. Information on how to create Schema.ini files can be found in the
Microsoft Software Developer's Network:
http://msdn.microsoft.com/en-us/library/ms709353(VS.85).aspx
Chapter 13 – Custom Code
PaperVision® Capture Administration Guide 358
Exports
PaperVision Capture provides a graphical user interface for export definitions within the
Custom Code step. Exports can subsequently be imported into PaperVision Enterprise
(PVEXml.xml), PaperFlow (PaperFlow.xml), and other systems. If you have modified an
export script in PaperVision Capture R72 or earlier, the Exports library is located in Digitech
Systems\PaperVision Capture\Library\Exports where PaperVision Capture was installed.
If you have not modified an export script in R72 or earlier, or you are initially installing
PaperVision Capture R73, the Exports library will not exist since exports are configured
directly in the user interface.
As exports are executed, they are appended to the first available destination folder based on
sequence number and maximum export size (defined by the MAX_EXPORT_SIZE script
constant). When the maximum export size is reached, exports will be appended to the next
available folder. If two or more automated processes attempt to execute the same export (in
the same destination folder), the first process will place an exclusive lock on the folder. As a
result, all subsequent processes will append exports to the next available folder. This method
can be overwritten by specifying an automation server (in the export's Configuration >
Options tab) that will process exports.
Note:
If using multiple automation services and you specify multiple values for the
AUTOMATION_SERVER script constant (or, if using multiple automation services
and you do not specify a value for the AUTOMATION_SERVER script constant),
your exported data may output to multiple folders (e.g., data groups). If using
multiple automation services with the EXCLUSIVE_EXPORT script constant, your
exported data may also output to multiple folders (e.g., data groups).
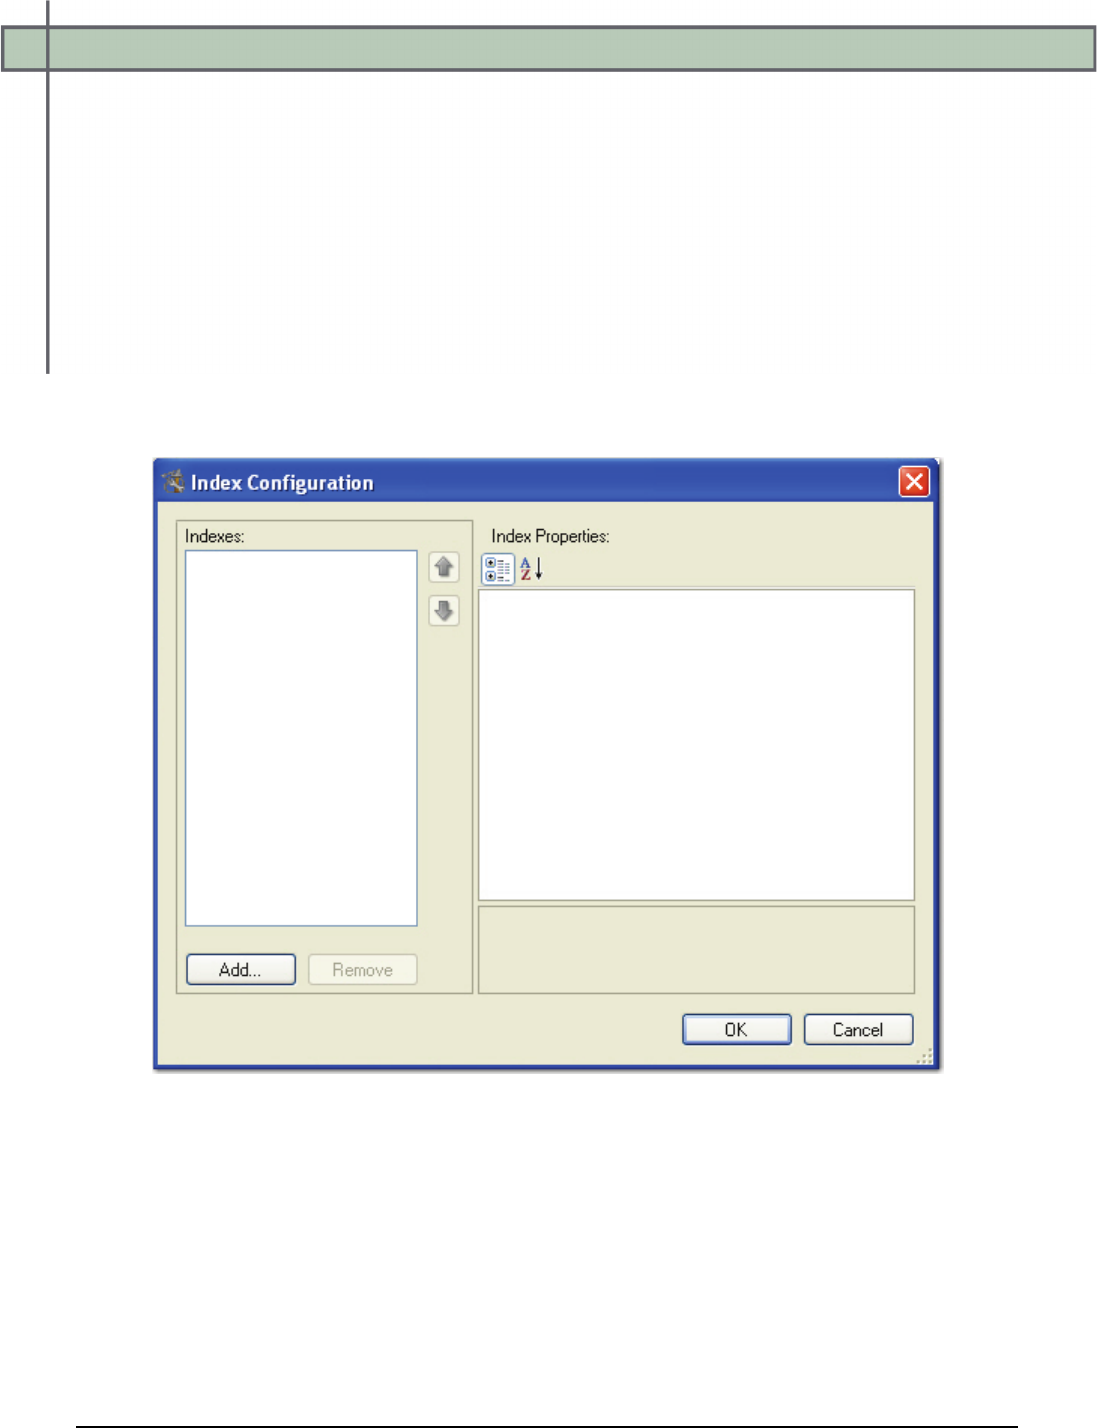
Chapter 13 – Custom Code
PaperVision® Capture Administration Guide 359
Configuring a Job to Process Exports
The following instructions describe how to configure a job that will process a PaperFlow
export that can be used to import batches into PaperFlow, OCRFlow, or QCFlow. The
following job contains a Capture, Indexing, and a Custom Code step with the export that
handles index and detail fields.
To configure a job that processes a PaperFlow export:
1. After inserting a Capture, Indexing, and Custom Code job step, respectively, into the
Job Definitions workspace, highlight the Indexing step in the workspace.
2. In the Properties grid for the Indexing step, expand the Indexes node.
3. Click the ellipsis button in the right column of the Indexes row, and the Index
Configuration dialog box appears.
Index Configuration
4. In the Index Configuration dialog box, click Add.
5. Select New Index and enter Check Number as the field name.
6. Click OK.
7. Repeat steps 4 to 6 for the remaining index fields:
• Check Date
• Check Amount
• Payee
Chapter 13 – Custom Code
PaperVision® Capture Administration Guide 360
8. Three detail sets will be added to the job. In the Index Configuration dialog box,
click Add.
Index Configuration
9. Select Job Detail Set, and then click OK.
Chapter 13 – Custom Code
PaperVision® Capture Administration Guide 361
10. In the Index Configuration dialog box, click the ellipsis button to the right of the
Detail Set row. The Detail Set Configuration dialog box appears.
Detail Set Configuration
11. In the Detail Set Configuration dialog box, click Add.
12. Select New Index and enter Invoice Number as the detail field name.
13. Click OK.
14. Repeat Steps 11 to 13 for the remaining detail fields:
• Invoice Date
• Invoice Amount
15. Click OK in the Detail Set Configuration dialog box.
Chapter 13 – Custom Code
PaperVision® Capture Administration Guide 362
16. Click OK in the Index Configuration dialog box.
Note:
Once you have configured the Indexing step, you must configure a Custom
Code step to create the PaperFlow export. Since detail fields are defined at
the job level, indexes and detail fields must be configured in the Indexing
step; otherwise, detail fields will not be included when the export runs.
17. Highlight the Custom Code step in the workspace.
18. In the Properties grid, expand the Custom Code Events (Step Level) node.
19. Click the ellipsis button next to the Step Executing property to configure the export.
The Select Custom Code Generator dialog box appears.
Select Custom Code Generator
20. Select the C# programming language.
Chapter 13 – Custom Code
PaperVision® Capture Administration Guide 363
21. Select the PaperFlow custom code generator, and then click OK. The PaperFlow
Configuration tabbed dialog box appears.
PaperFlow Configuration
22. In the PaperFlow Configuration - General tab, configure all required fields. For
more information on specific properties, see the Export Definitions section on the
PaperFlow export.
23. If applicable, proceed to the Indexes, OCR, Options, and FTP tabs to configure the
remaining properties.
24. Click OK in the PaperFlow Configuration dialog box, and the script automatically
compiles in the Script Editor. The constant values that you defined will appear in the
Script Editor within "quotation marks".
Note:
Do not remove the quotations from the resulting export script.
25. Click OK in the Script Editor.
26. In Job Definitions, assign the appropriate users to the Capture and Indexing steps.
27. Click the Activate Job icon.
28. Click the Check In Job icon to check the job into the server and make it available
for use in the Operator Console. The operator can then create and submit batches in
the PaperVision Capture Operator Console, and then the PaperFlow export will
automatically process the batch.
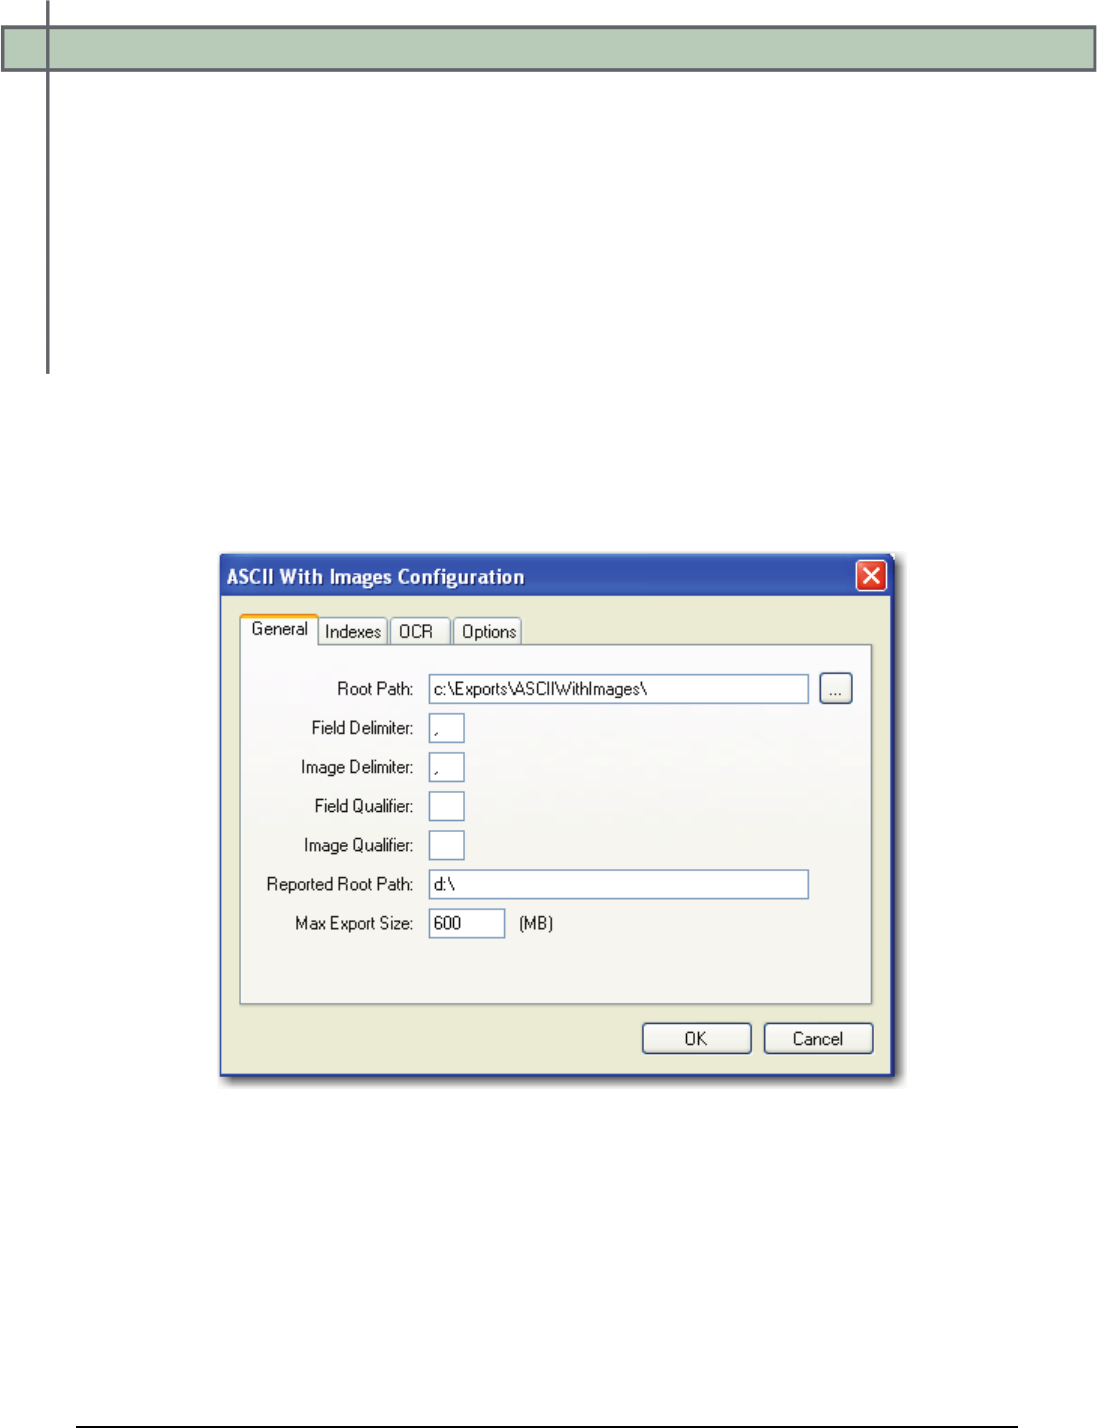
Chapter 13 – Custom Code
PaperVision® Capture Administration Guide 364
Export Definitions
PaperVision Capture exports contain specific definitions that can be configured within a
graphical user interface. When you configure an export from the Select Custom Code
Generator dialog box, properties for each export will be displayed in tabbed dialog boxes
including the General, Indexes, OCR, and Options tabs. Default properties are provided to
you in drop-down menus, editable fields, and check boxes that you can easily modify.
ASCII with Images
The ASCII with Images export creates an ASCII text file containing images that can be
imported into other systems. The format of the file is completely customizable.
To configure the ASCII with Images export:
1. From the Select Custom Code Generator dialog box, double-click the ASCII with
Images generator, and the tabbed ASCII with Images Configuration dialog box
appears.
ASCII with Images Configuration - General
Default values, paths, and other default settings are provided for your reference, and
drop-down menus contain only the options specific to your selected generator. In
addition, you can browse to the appropriate directories instead of manually entering
file paths.
2. Assign the appropriate properties in the Indexes, OCR, and Options tabs.
Descriptions for constant values appearing in the resulting export script begin on the
next page.
3. When you have finished configuring the export, click OK.

Chapter 13 – Custom Code
PaperVision® Capture Administration Guide 365
ASCII with Images - General
When you configure the properties in the General tab, the following constant values will
appear in the resulting export script:
• ROOT_PATH: This is the location where the exports will be created once the
automation service processes the step.
• FIELD_DELIMITER: This customizable delimiter separates index values, page
number/counts, and image sizes.
• IMAGE_DELIMITER: This customizable delimiter separates images when
exporting using multi-line indexing and converting to single-page images.
• FIELD_QUALIFIER: This constant contains the characters that surround the field
name values. By default, quotation marks will appear.
• IMAGE_QUALIFER: This constant contains the characters that surround the image
name values. By default, quotation marks will appear.
• REPORTED_ROOT_PATH: The path referenced in the export file originates from
this location, not the ROOT_PATH.
• MAX_EXPORT_SIZE: This constant indicates the maximum export file size (in
MB), which defaults to a value of "600".
Note:
If the Root Path is blank, the export will be written to the directory where the
application was installed (e.g., C:\Program Files\Digitech
Systems\PaperVision Capture). If the Reported Root Path is blank, the
resulting export script will display a blank value for the
REPORTED_ROOT_PATH.

Chapter 13 – Custom Code
PaperVision® Capture Administration Guide 366
ASCII with Images - Indexes
In the Indexes tab, you can select the index values that will appear in the export by double-
clicking within the appropriate check boxes. Alternatively, click the Select All button to
include all indexes in the export. You can also click Deselect All to remove all selections.
To change the order in which the index values display, press the Move Up or Move Down
buttons.
Tip:
Single-click an index name to move it up or down the list. Double-click an index
name to include it in the export.
ASCII with Images Configuration - Indexes
To edit the indexes in the resulting export script, you can modify the
INDICES_TO_INCLUDE constant described below:
• INDICES_TO_INCLUDE: This constant determines what index values are included in
the export file. In the resulting script, you can enter the name of the index value(s)
between quotation marks, and separate each index value with a comma. If you leave this
array blank, no indices are included.
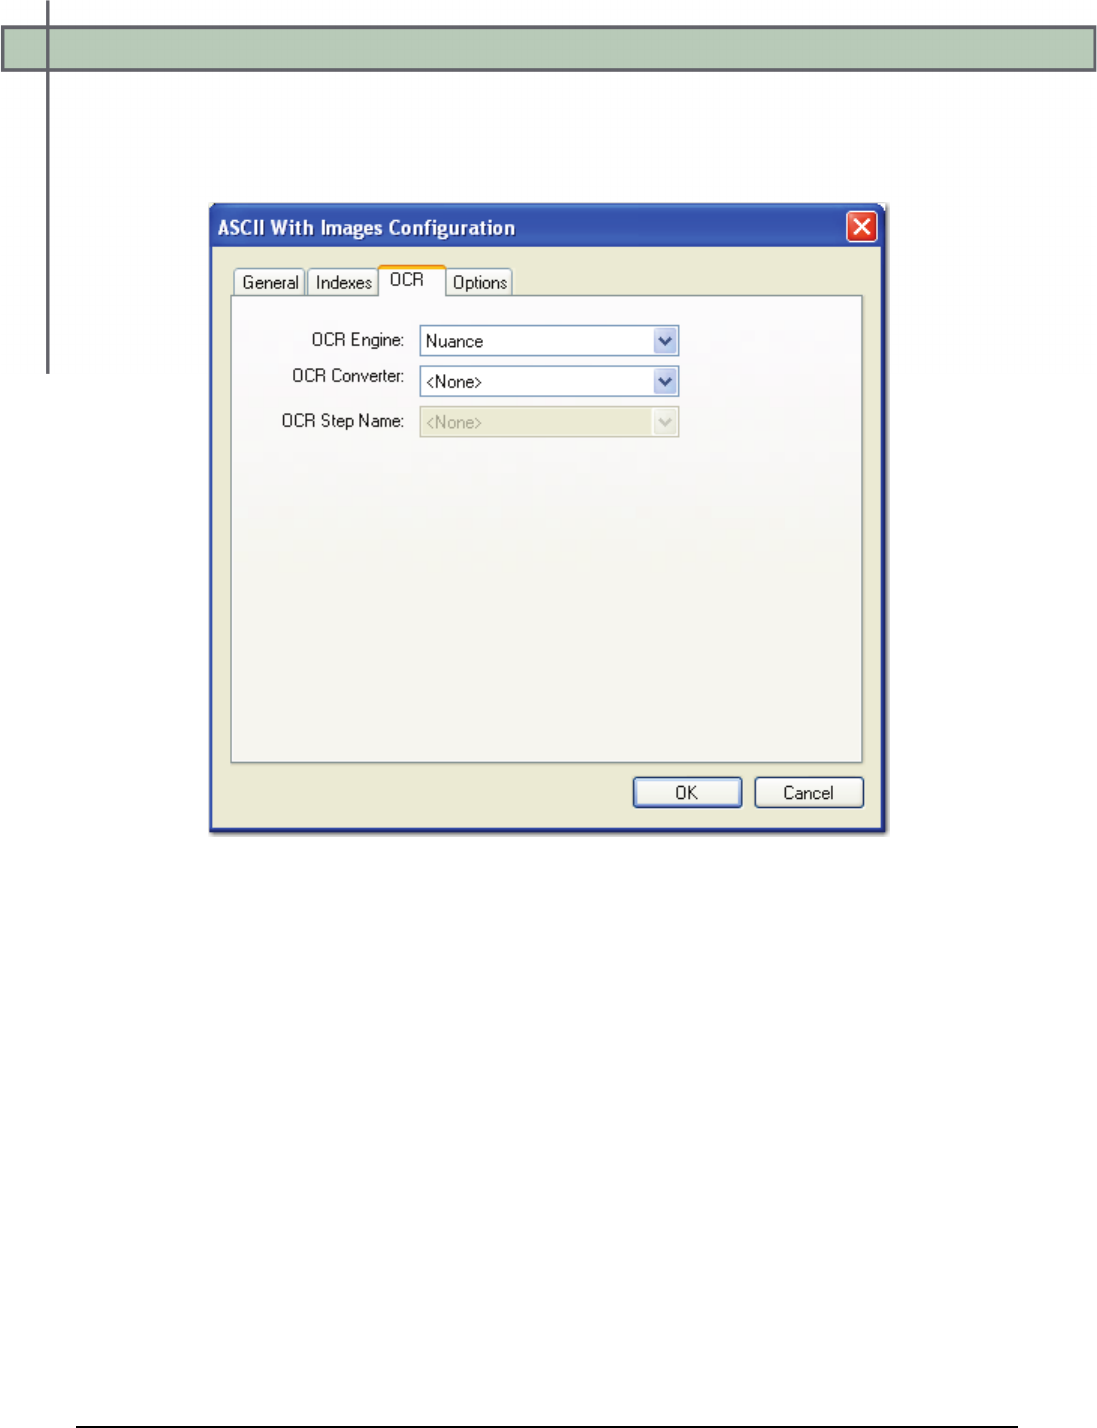
Chapter 13 – Custom Code
PaperVision® Capture Administration Guide 367
ASCII with Images - OCR
When you configure the properties in the OCR tab, you can modify constant values that
appear in the resulting export script. Descriptions for each constant value are listed below.
ASCII with Images Configuration - OCR
• OCR_ENGINE: This constant specifies the OCR engine (Nuance or Open Text) that
processes OCR data for the export.
• OCR_CONVERTER_CODE: This constant specifies the OCR converter code, such
as PDF, Text, etc., whose output format is used to export full-text data. When no value
is defined (default setting), both images and associated full-text data will be exported.
• OCR_JOB_STEP_NAME: This constant specifies the job step whose full-text data
are used for the export. No value is defined by default, so full-text data from the
current job step are used for the export.
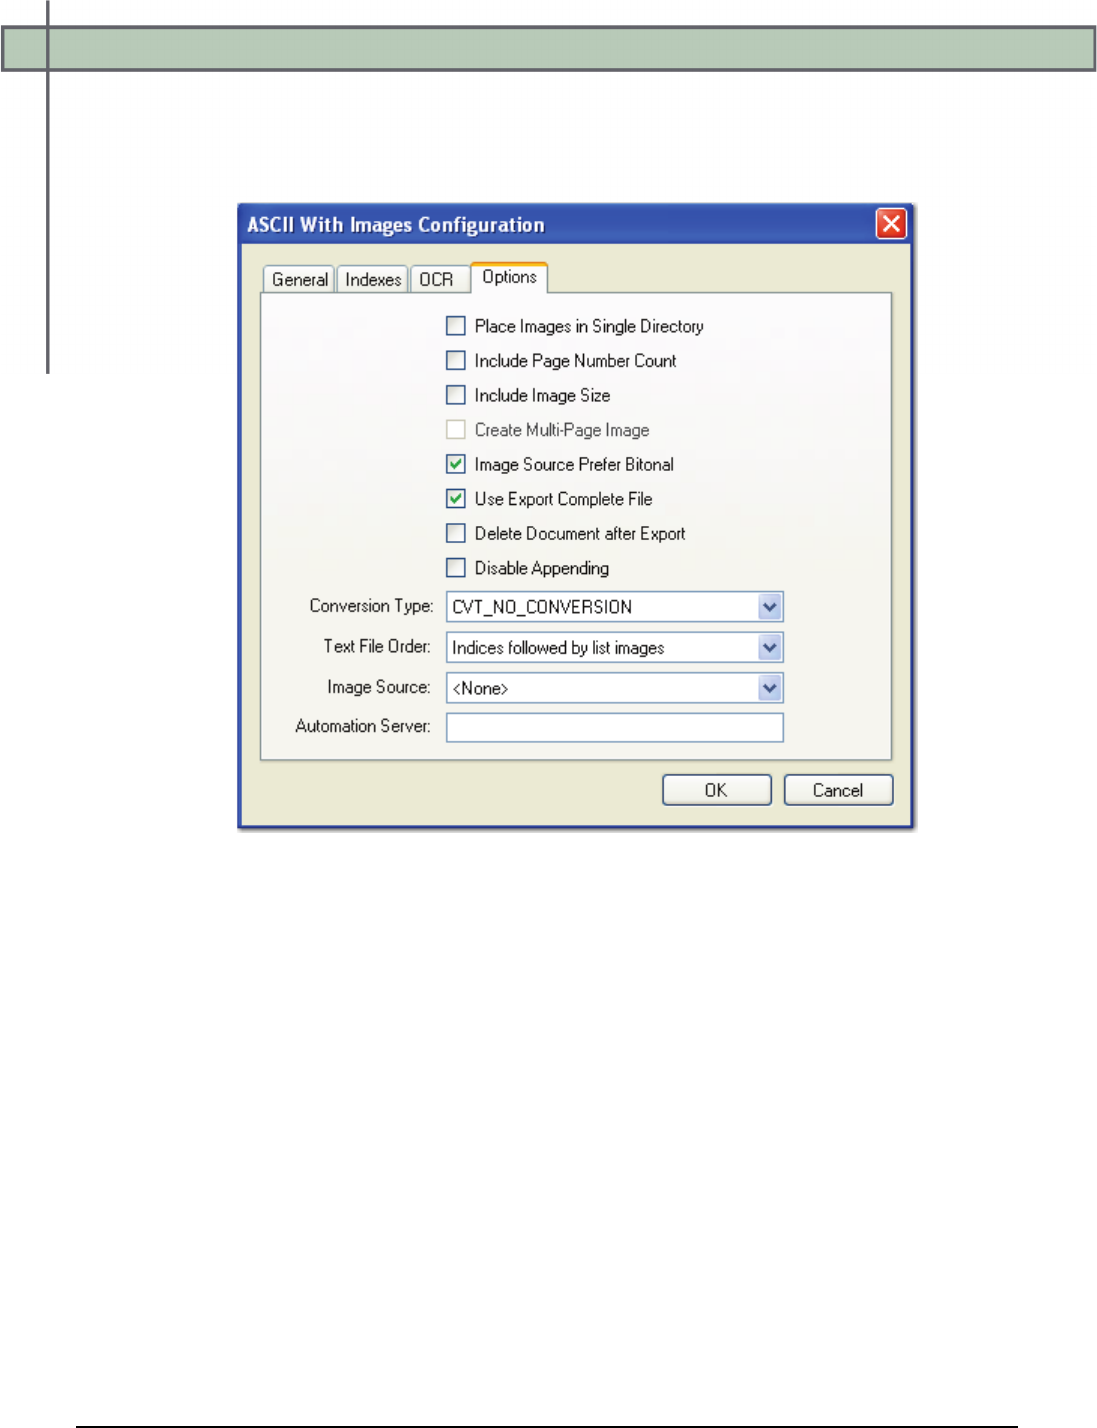
Chapter 13 – Custom Code
PaperVision® Capture Administration Guide 368
ASCII with Images - Options
When you configure properties in the Options tab, you can modify constant values that
appear in the resulting export script. Descriptions for each constant value are listed below.
ASCII with Images Configuration - Options
• PLACE_IMAGES_IN_SINGLE_DIR: If set to False, the images will be placed in
subdirectories at the ROOT_PATH (maximum of 1000 images per directory). If set to
True, the images will be placed directly in the ROOT_PATH folder.
• INCLUDE_PAGE_NUMBER_COUNT: This determines whether the page number
or page count of the document should be added as an additional field in the export. If
set to False, when exporting in a multi-line format and creating single-page images,
this value will match the page number of the document. If set to True, the value will
match the total number of pages in the document.
Chapter 13 – Custom Code
PaperVision® Capture Administration Guide 369
ASCII with Images - Options
• INCLUDE_IMAGE_SIZE: This constant determines whether the image file size is
added as an additional field in the export. If set to True, this value will match the
image size referenced on that line of the export file when exporting using a multi-line
format and creating single-page images. If set to False, this value will match the size
of the first page in the document.
• CREATE_MULTI_PAGE_IMAGE: Used in conjunction with
CONVERSION_TYPE, this constant determines whether exported images are multi-
page or single-page.
• IMG_SRC_PREFER_BITONAL_IMAGES: This constant is applicable to dual-
stream scanners and determines whether to export bitonal or color images. When set to
True, which is the default setting, bitonal images will be exported.
• USE_EXPORT_COMPLETE_FILE: This constant, set to True by default,
generates an "export.complete" file once an export has reached its maximum file size,
so data will no longer be appended to the export. When set to False, the
"export.complete" file is not generated, so data may be appended to export folders that
have not reached their maximum size.
If you set this constant to False, for example, and the following four folders are
available under the ROOT_PATH with the MAX_EXPORT_SIZE defined as 600
MB:
1. Folder_1: 600 MB
2. Folder_2: 400 MB
3. Folder_3: 600 MB
4. Folder_4: 100 MB
Since the maximum export size has been reached in Folder_1, Folder_2 will be
used as the export folder, and the "export.complete" file will not be generated.
Tip:
By default, the lockedPath (working directory) for any export is returned by
calling GetNextLockedPath(). If an export should contain this constant value, the
following line in the Script Editor, which is available to use in all exports, can be
changed to:
lockedPath = GetNextLockedpath(root, MAX_EXPORT_SIZE, true)
• DELETE_DOCUMENT_AFTER_EXPORT: This constant specifies whether
documents are deleted after they have been exported (set to False by default).
• DISABLE_APPENDING: This constant is set to False by default. When set to True,
exported images will not be appended to export folders whose maximum file sizes
have not been reached.

Chapter 13 – Custom Code
PaperVision® Capture Administration Guide 370
ASCII with Images - Options
• CONVERSION_TYPE: This constant determines the type of image file created
during the export. The default value, CVT_NO_CONVERSION, does not convert
images during the export. If exporting to a format that supports both single and multi-
page images, you must set the CREATE_MULTI_PAGE_IMAGE constant to True if
you want to create multi-page images; otherwise single page images will result. For
example, if you set this to CVT_TIFF_G4_MEDJPG, a TIFF image is created during
the export. If the source image is binary, it will create a TIFF using Group 4
compression; if the source image is color (JPG or BMP), it will create a TIFF using
Medium JPEG compression. For a list of file types that can be converted to during the
export, see the Enumerations section in this chapter.
• TEXT_FILE_ORDER: This constant determines how the export file is formatted.
You can select from the following options:
a. IndicesFollowedByListImages: This option creates a single row for each
document with indexes listed first, followed by image files.
b. ListImagesFollowedByIndices: This option creates a single row for each
document with images listed first, followed by the index values.
c. MultiLineIndicesFollowedBySingleImage: This option creates one row of
index values for every image created during the export. If multiple image files
are created for a single document, multiple rows of identical index values will be
created, each referencing a different page of the document. This will be
formatted with index values followed by images.
d. MultiLineImagesFollowedByIndices: One row of index values for every image
created during the export. If multiple image files are created for a single
document, multiple rows of identical index values will be created, each
referencing a different page of the document. This will be formatted with images
followed by index values.
• IMG_SRC: This constant determines the job step whose images are used for the export.
The default selection, <None>, uses the most recent image prior to exporting. To use
images from another job step, select the name of the step from the drop-down list.
Chapter 13 – Custom Code
PaperVision® Capture Administration Guide 371
ASCII with Images - Options
• AUTOMATION_SERVER: If you specify an automation server (in the
MACHINENAME_INSTANCE format), your specified server will process exports one
at a time in the ROOT_PATH location. When one or more automation servers are
specified, separate folders may be created for multiple exports that are processed
simultaneously.
If you leave the Automation Server field blank during export configuration, all servers
will be used to process the exports. If you are using multiple automation servers,
separate each server name with a comma. Alternatively, you can enter wildcards in this
field. In addition, values that you enter in this field are not case-sensitive.
Note:
If using multiple automation services and you specify multiple values for the
AUTOMATION_SERVER constant (or, if using multiple automation
services and you do not specify a value for the AUTOMATION_SERVER
constant), your exported data may output to multiple folders (e.g., data
groups).

Chapter 13 – Custom Code
PaperVision® Capture Administration Guide 372
Hyland OnBase
The Hyland OnBase export creates an ASCII text file and single-page TIFF images that can
be imported into the Hyland OnBase system. The following settings must be configured in the
Hyland OnBase system prior to importing any PaperVision Capture exports:
• The Document Import Processor separator must be set to New Line.
• The field delimiter must be set to None.
• The field type must be set to Tagged Fields.
Note:
If the PaperVision Capture job contains dates, the Hyland OnBase date format
settings must match the date field format for that job.
To configure the Hyland OnBase export:
1. From the Select Custom Code Generator dialog box, double-click the Hyland
OnBase generator, and the tabbed Hyland OnBase Configuration dialog box
appears.
Hyland OnBase Configuration
Default values, paths, and other properties are provided for your reference, and drop-
down menus contain options specific to your selected generator. In addition, you can
browse to some directories or manually enter file paths. Descriptions for all properties
begin on the next page.
2. Modify the appropriate constant values in the Indexes and Options tabs.
3. When you have finished configuring the export, click OK.

Chapter 13 – Custom Code
PaperVision® Capture Administration Guide 373
Hyland OnBase - General
When you configure the properties in the General tab, the following constant values will
appear in the resulting export script:
• ROOT_PATH: This is the location where the exports will be created once the
automation service processes the step.
• REPORTED_ROOT_PATH: The path referenced in the export file originates from
this location, not the ROOT_PATH.
Note:
If the Root Path is blank, the export will be written to the directory where the
application was installed (e.g., C:\Program Files\Digitech
Systems\PaperVision Capture). If the Reported Root Path is blank, the
resulting export script will display a blank value for the
REPORTED_ROOT_PATH.
• FULL_PATH_TAG: This tag precedes the REPORTED_ROOT_PATH in the export
file.
• DOCUMENT_TYPE: This is the specified field name for the index value that should
populate the DOCUMENT TYPE field in the export.
• MAX_EXPORT_SIZE: This constant indicates the maximum export file size (in
MB), which defaults to a value of "600".
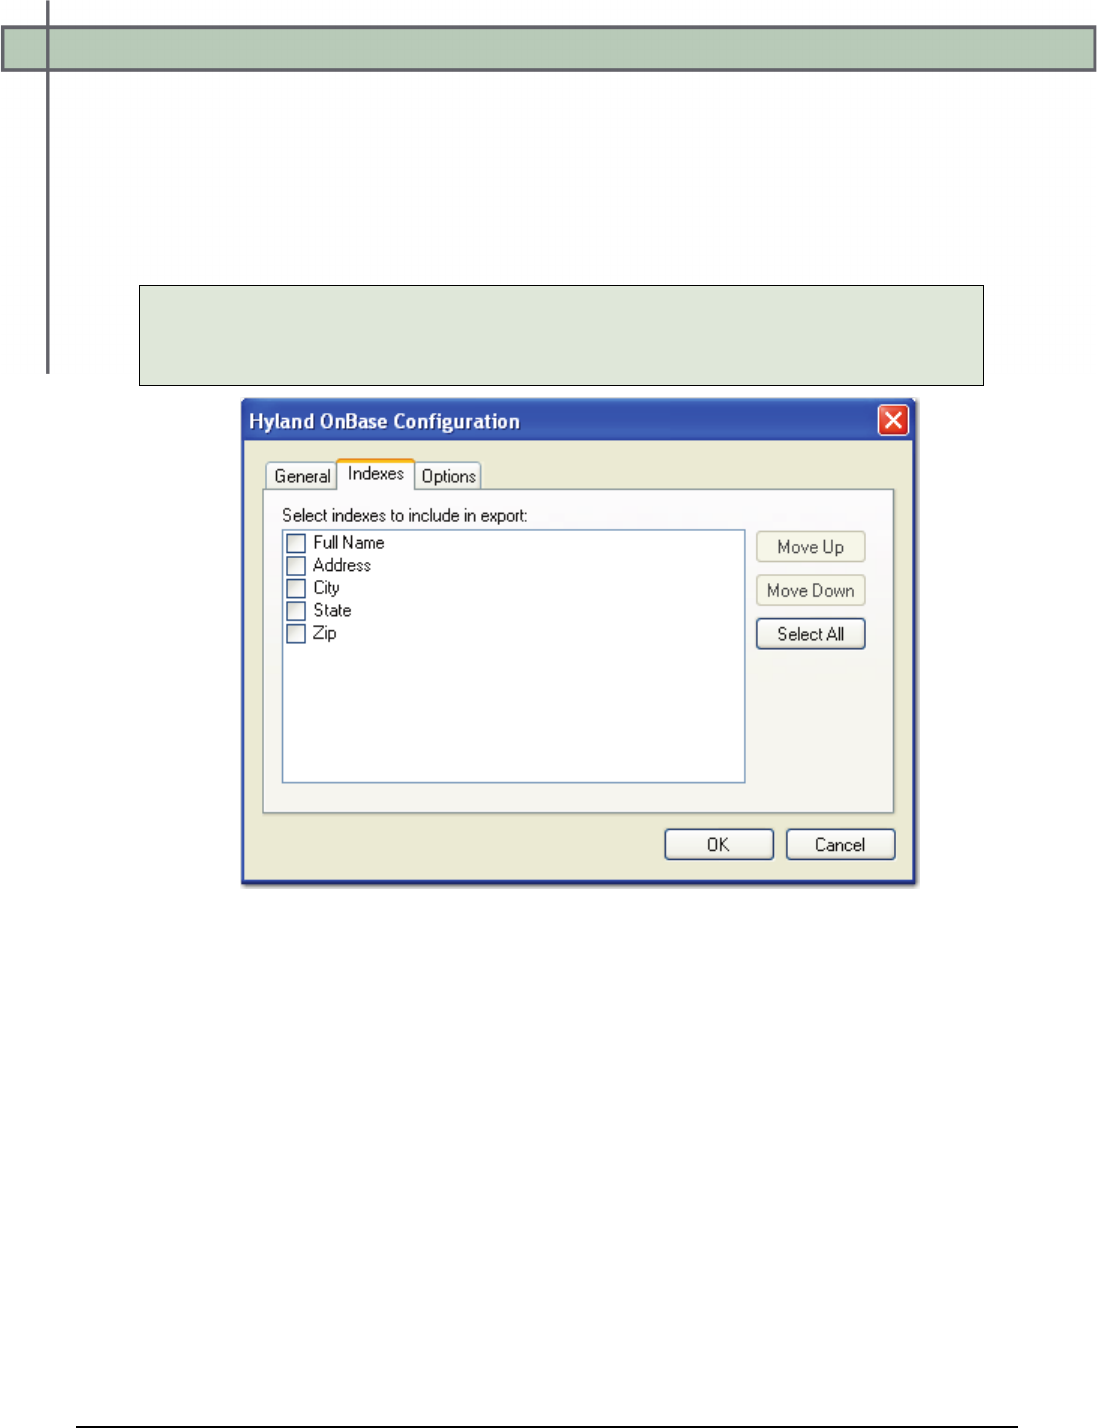
Chapter 13 – Custom Code
PaperVision® Capture Administration Guide 374
Hyland OnBase - Indexes
In the Indexes tab, you can select the index values that will appear in the export by double-
clicking within the appropriate check boxes. Alternatively, click the Select All button to
include all indexes in the export. You can also click Deselect All to remove all selections.
To change the order in which the index values display, press the Move Up or Move Down
buttons.
Tip:
Single-click an index name to move it up or down the list. Double-click an index
name to include it in the export.
Hyland OnBase Configuration - Indexes
To edit the indexes in the resulting export script, you can modify the
INDICES_TO_INCLUDE constant described below:
• INDICES_TO_INCLUDE: This constant determines the index values included in the
export file. If you selected any index values to be included in the export, name(s) will
appear between quotation marks; multiple index values are separated by commas.
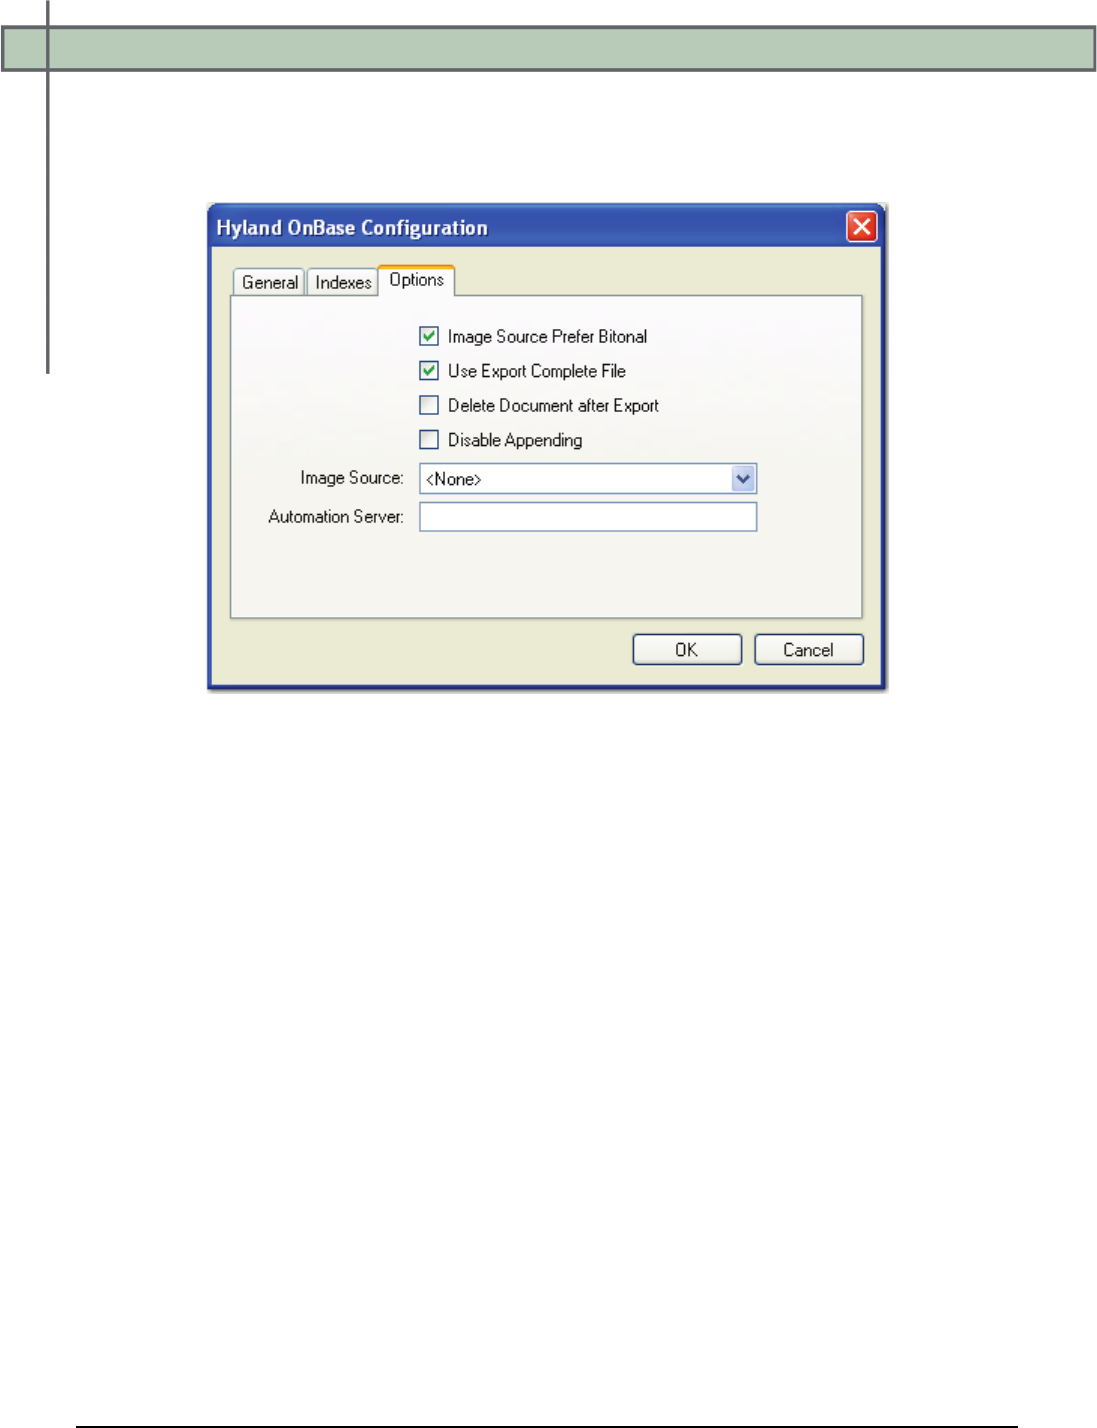
Chapter 13 – Custom Code
PaperVision® Capture Administration Guide 375
Hyland OnBase - Options
When you configure properties in the Options tab, you can modify constant values that
appear in the resulting export script. Descriptions for each constant value are listed below.
Hyland OnBase Configuration - Options
• IMG_SRC_PREFER_BITONAL_IMAGES: This constant is applicable to dual-
stream scanners and determines whether to export bitonal or color images. When set to
True, which is the default setting, bitonal images will be exported.

Chapter 13 – Custom Code
PaperVision® Capture Administration Guide 376
Hyland OnBase - Options
• USE_EXPORT_COMPLETE_FILE: This constant, set to True by default,
generates an "export.complete" file once an export has reached its maximum file size,
so data will no longer be appended to the export. When set to False, the
"export.complete" file is not generated, so data may be appended to export folders that
have not reached their maximum size.
If you set this constant to False, for example, and the following four folders are
available under the ROOT_PATH with the MAX_EXPORT_SIZE defined as 600
MB:
1. Folder_1: 600 MB
2. Folder_2: 400 MB
3. Folder_3: 600 MB
4. Folder_4: 100 MB
Since the maximum export size has been reached in Folder_1, Folder_2 will be used
as the export folder, and the "export.complete" file will not be generated.
Tip:
By default, the lockedPath (working directory) for any export is returned by
calling GetNextLockedPath(). If an export should contain this constant value, the
following line in the Script Editor, which is available to use in all exports, can be
changed to:
lockedPath = GetNextLockedpath(root, MAX_EXPORT_SIZE, true)
• DELETE_DOCUMENT_AFTER_EXPORT: This constant specifies whether
documents are deleted after they have been exported (set to False by default).
• DISABLE_APPENDING: This constant is set to False by default. When set to True,
exported images will not be appended to export folders whose maximum file sizes
have not been reached.
• IMG_SRC: This constant determines the job step whose images are used for the
export. The default selection, <None>, uses the most recent image prior to exporting.
To use images from another job step, select the name of the step from the drop-down
list.
Chapter 13 – Custom Code
PaperVision® Capture Administration Guide 377
Hyland OnBase - Options
• AUTOMATION_SERVER: If you specify an automation server (in the
MACHINENAME_INSTANCE format), your specified server will process exports
one at a time in the ROOT_PATH location. When one or more automation servers are
specified, separate folders may be created for multiple exports that are processed
simultaneously.
If you leave the Automation Server field blank during export configuration, all
servers will be used to process the exports. If you are using multiple automation
servers, separate each server name with a comma. Alternatively, you can enter
wildcards in this field. In addition, values that you enter in this field are not case-
sensitive.
Note:
If using multiple automation services and you specify multiple values for the
AUTOMATION_SERVER constant (or, if using multiple automation
services and you do not specify a value for the AUTOMATION_SERVER
constant), your exported data may output to multiple folders (e.g., data
groups).
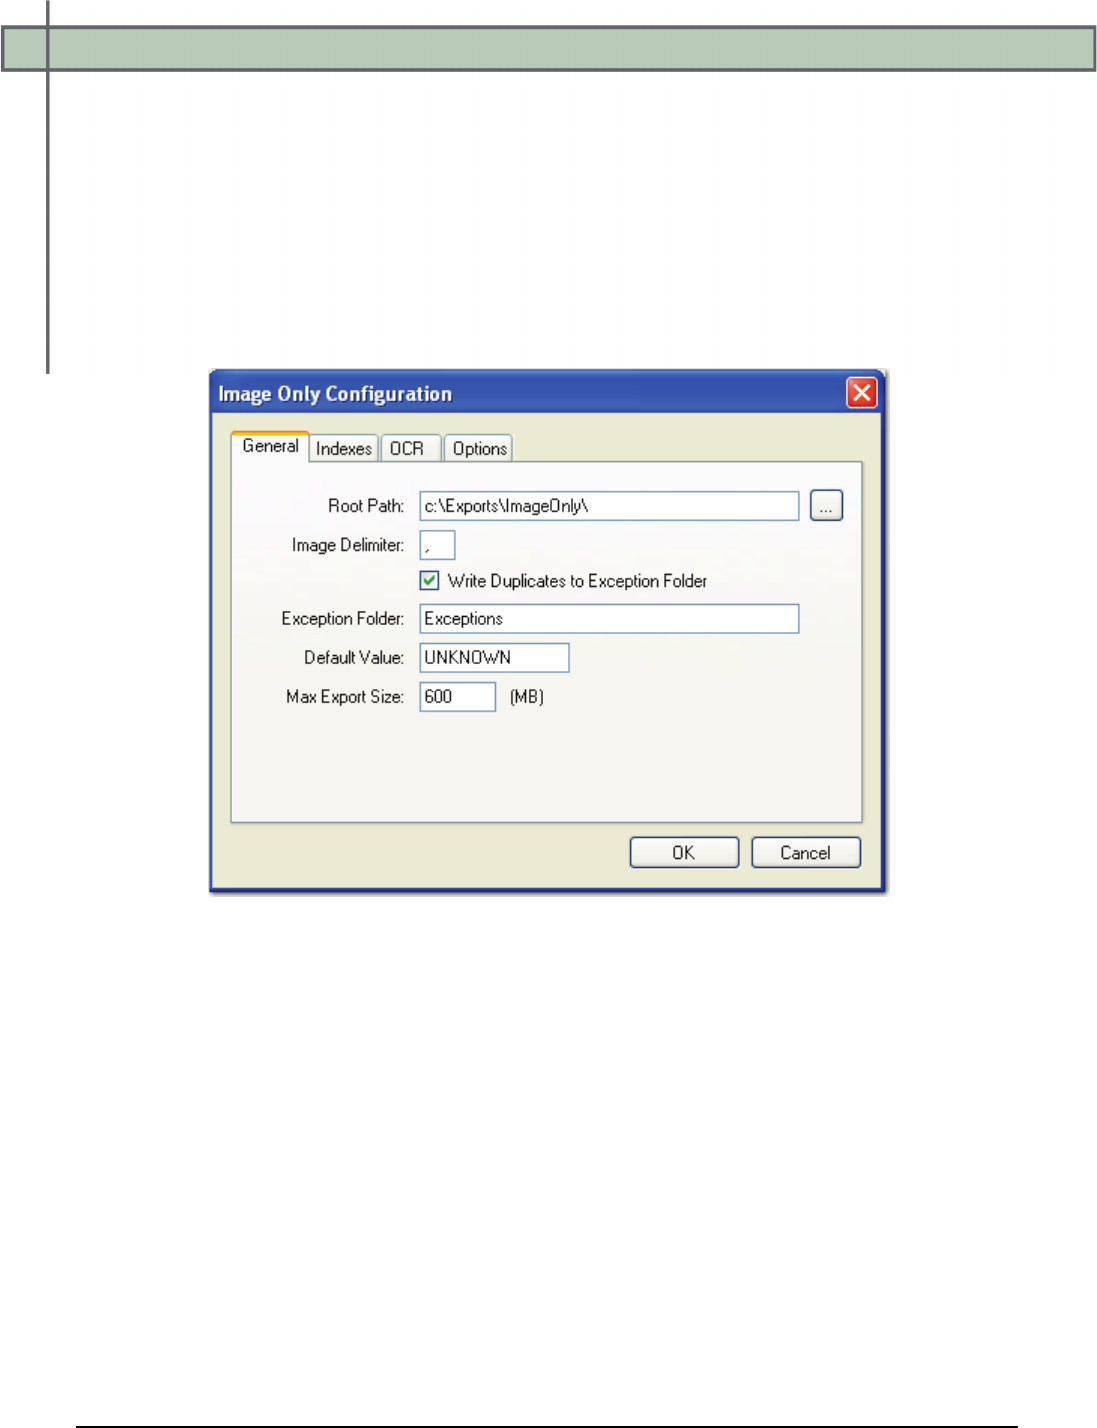
Chapter 13 – Custom Code
PaperVision® Capture Administration Guide 378
Image Only
The Image Only export creates image files that are named after a specific index field. Any
subdirectories containing those image files are named after other index fields (optional).
Single-page image file formats will be names with an “-X” at the end of the file name where
“X” denotes the page number.
To configure the Image Only export:
1. From the Select Custom Code Generator dialog box, double-click the Image Only
generator, and the tabbed Image Only Configuration dialog box appears.
Image Only Configuration - General
Default values, paths, and other properties are provided for your reference, and drop-
down menus contain options specific to your selected generator. In addition, you can
browse to some directories or manually enter file paths. Descriptions for all properties
begin on the next page.
2. Modify the appropriate constant values in the Indexes and Options tabs.
3. When you have finished configuring the export, click OK.
Chapter 13 – Custom Code
PaperVision® Capture Administration Guide 379
Image Only - General
When you configure the properties in the General tab, the following constant values will
appear in the resulting export script:
• ROOT_PATH: This is the location where the exports will be created once the
automation service processes the step.
Note:
If the Root Path is blank, the export will be written to the directory where the
application was installed (e.g., C:\Program Files\Digitech
Systems\PaperVision Capture).
• IMAGE_DELIMITER: This constant determines the character that will separate the
image file name if multiple index values are combined to create the image file name.
• WRITE_DUPLICATES_TO_EXCEPTION_FOLDER: If duplicate files are
created in the same directory during the export and this is set to False, PaperVision
Capture will not copy the duplicate files into the EXCEPTION_FOLDER directory. If
set to True, duplicate files are placed in the EXCEPTION_FOLDER instead.
Note:
Files appearing in the EXCEPTION_FOLDER directory will display with
"_#" appended to the file name, where "#" is a unique incrementing number
starting with "1". This appending process prevents the exception files from
being overwritten in the directory.
• EXCEPTION_FOLDER: If WRITE_DUPLICATES_TO_EXCEPTION_FOLDER
is True and multiple images with the same file name are created in the same directory,
duplicates will be placed in this folder at the ROOT_PATH instead of overwriting the
existing file of that name.
• DEFAULT_VALUE: As the export script executes, invalid characters are stripped
from index fields, possibly resulting in blank fields. By default, the resulting
DEFAULT_VALUE for these blank fields is defined as "Unknown".
• MAX_EXPORT_SIZE: This constant indicates the maximum export file size (in
MB), which defaults to a value of "600".
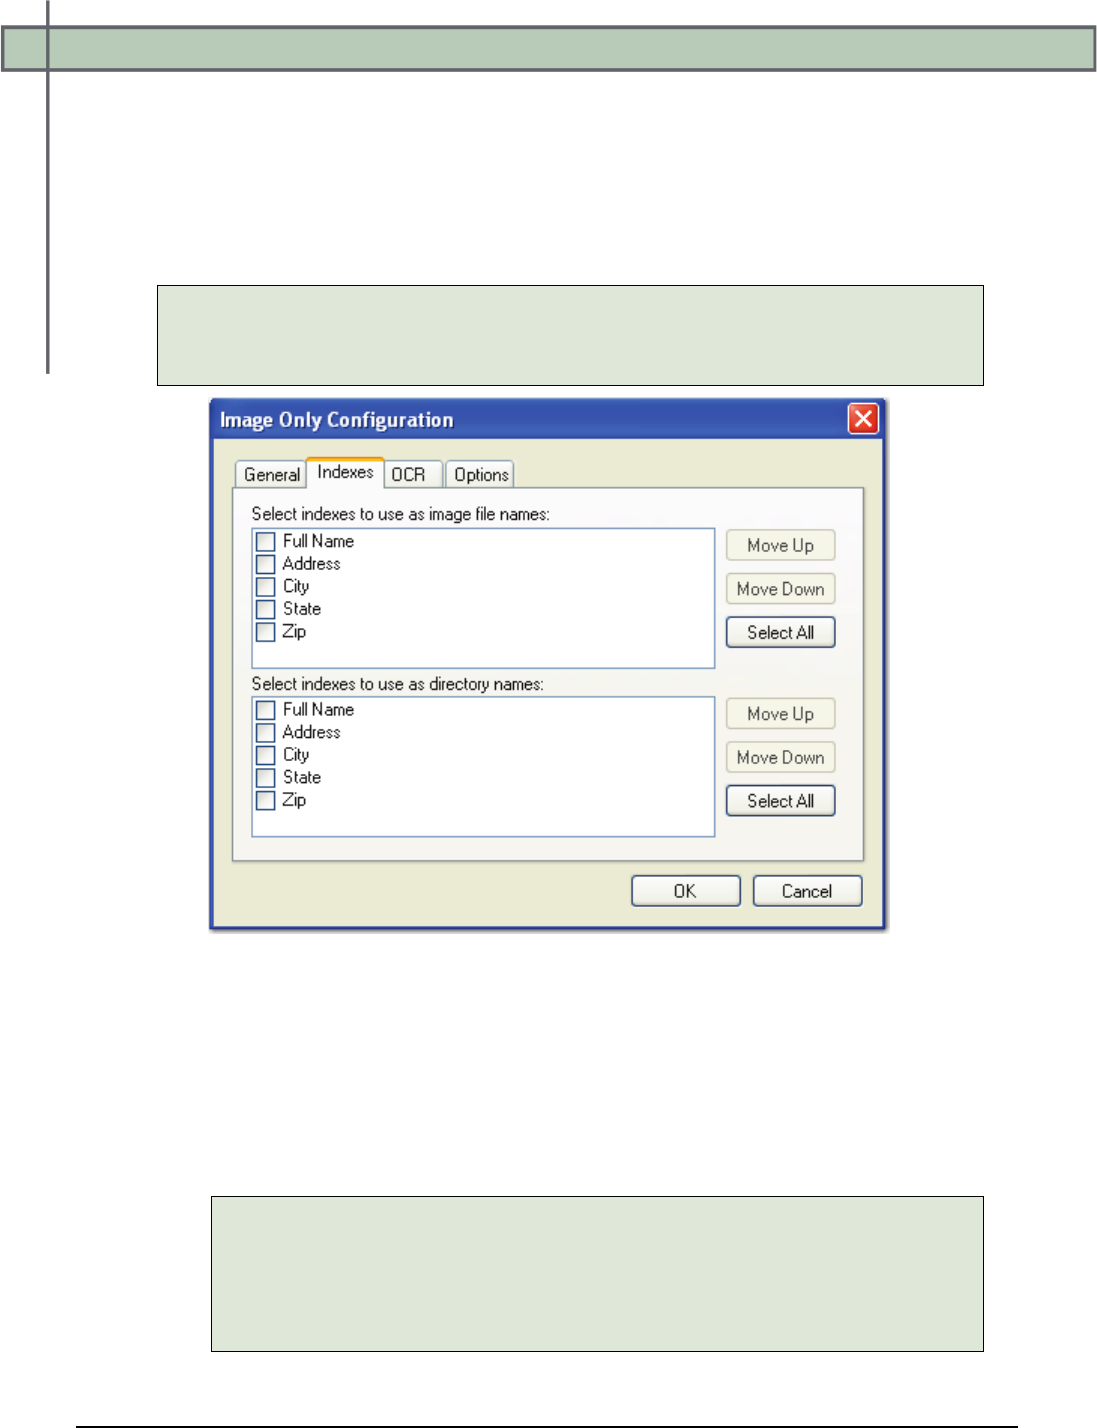
Chapter 13 – Custom Code
PaperVision® Capture Administration Guide 380
Image Only - Indexes
In the Indexes tab, you can select the index values that will appear in the export by double-
clicking within the appropriate check boxes. Alternatively, click the Select All button to
include all indexes in the export. You can also click Deselect All to remove all selections.
To change the order in which the index values display, press the Move Up or Move Down
buttons.
Tip:
Single-click an index name to move it up or down the list. Double-click an index
name to include it in the export.
Image Only Configuration - Indexes
To edit the indexes in the resulting export script, you can modify the
INDICES_TO_INCLUDE and FOLDER_INDICES constants described below:
• IMAGE_INDICES: Images created during the export will be named based on the
index fields mapped in the IMAGE_INDICES field. If multiple index fields are
mapped, the IMAGE_DELIMITER will be used to separate the fields in the name of
the file. If no fields are mapped, it will use a standard 8-digit incrementing file name.
Note:
Image file names are pulled from a single index field configured in the
IMAGE_INDICES field. Any subdirectories are also configured similarly.
Index fields should not contain characters that create invalid file names or
directory names.

Chapter 13 – Custom Code
PaperVision® Capture Administration Guide 381
• FOLDER_INDICES: Images created during the export will be placed in named
folders based on the FOLDER_INDICES. The first mapped field will match the first
folder, the second mapped field will match the name of the subfolder, etc. If no fields
are mapped, the images will be placed directly in the ROOT_PATH.
Image Only - OCR
When you configure the properties in the OCR tab, you can modify constant values that
appear in the resulting export script. Descriptions for each constant value are listed below.
Image Only Configuration - OCR
• OCR_ENGINE: This constant specifies the OCR engine (Nuance or Open Text) that
processes OCR data for the export.
• OCR_CONVERTER_CODE: This constant specifies the OCR converter code, such
as PDF, Text, etc., whose output format is used to export full-text data. When no value
is defined (default setting), both images and associated full-text data will be exported.
• OCR_JOB_STEP_NAME: This constant specifies the job step whose full-text data
are used for the export. No value is defined by default, so full-text data from the
current job step are used for the export.
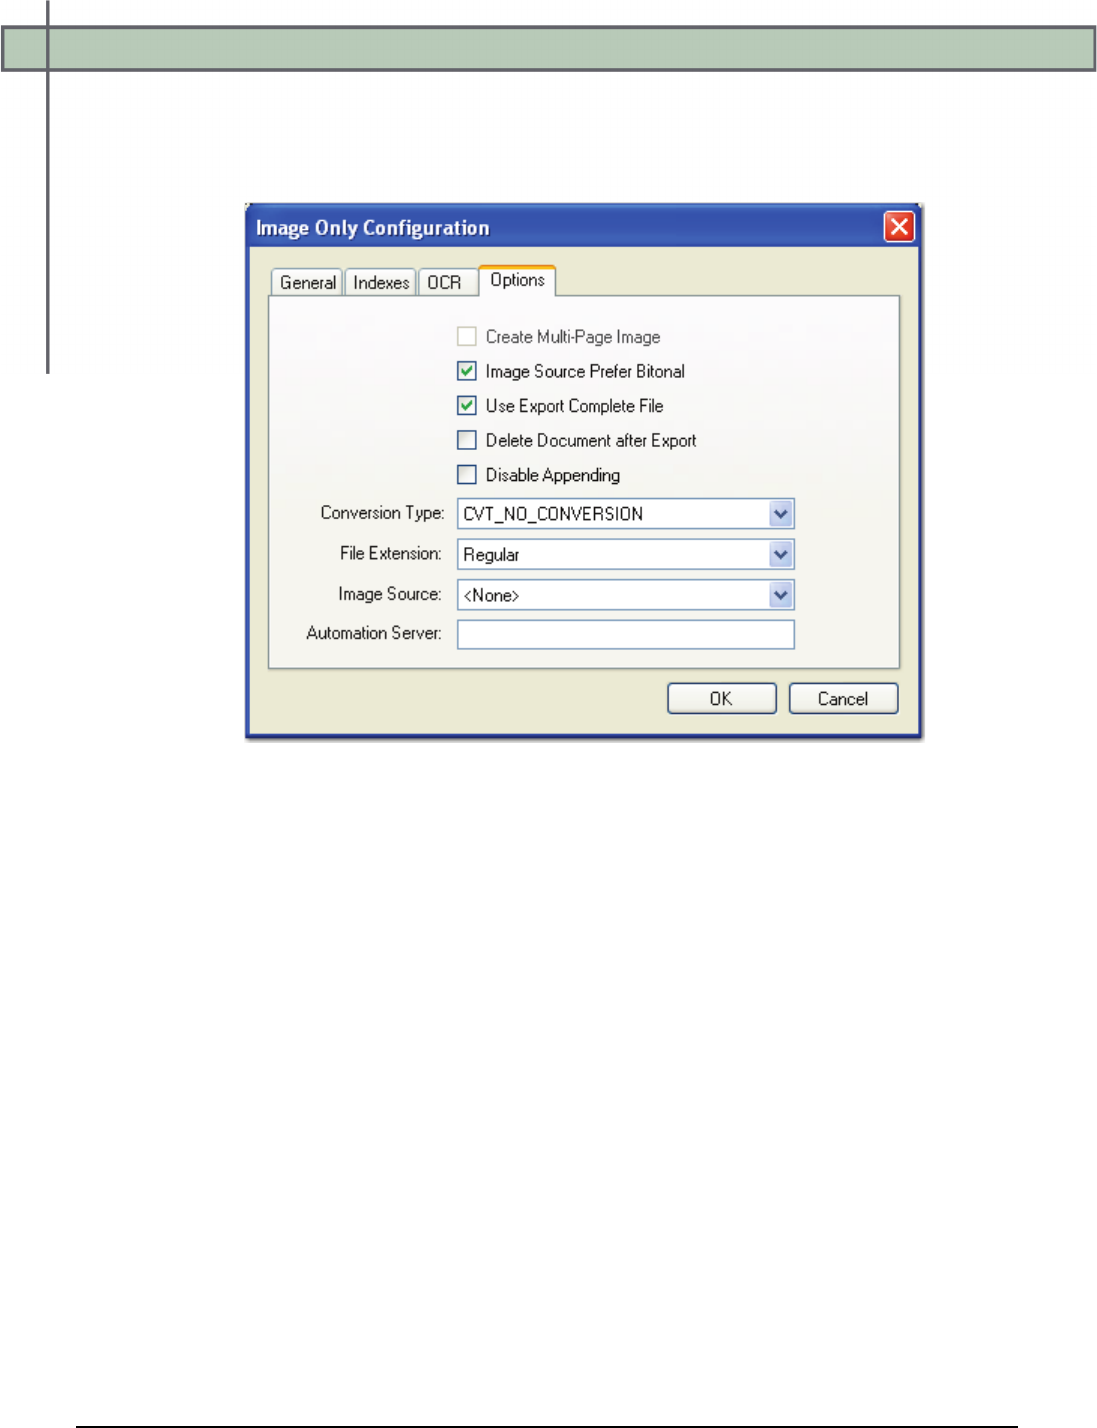
Chapter 13 – Custom Code
PaperVision® Capture Administration Guide 382
Image Only - Options
When you configure properties in the Options tab, the following constant values will
appear in the resulting export script:
Image Only Configuration - Options
• CREATE_MULTI_PAGE_IMAGE: Used in conjunction with
CONVERSION_TYPE, this constant determines whether exported images are multi-
page or single page.
• IMG_SRC_PREFER_BITONAL_IMAGES: This constant is applicable to dual-
stream scanners and determines whether to export bitonal or color images. When set to
True, which is the default setting, bitonal images will be exported.
Chapter 13 – Custom Code
PaperVision® Capture Administration Guide 383
Image Only - Options
• USE_EXPORT_COMPLETE_FILE: This constant, set to True by default,
generates an "export.complete" file once an export has reached its maximum file size,
so data will no longer be appended to the export. When set to False, the
"export.complete" file is not generated, so data may be appended to export folders that
have not reached their maximum size.
If you set this constant to False, for example, and the following four folders are
available under the ROOT_PATH with the MAX_EXPORT_SIZE defined as 600
MB:
1. Folder_1: 600 MB
2. Folder_2: 400 MB
3. Folder_3: 600 MB
4. Folder_4: 100 MB
Since the maximum export size has been reached in Folder_1, Folder_2 will be
used as the export folder, and the "export.complete" file will not be generated.
Tip:
By default, the lockedPath (working directory) for any export is returned by
calling GetNextLockedPath(). If an export should contain this constant value, the
following line in the Script Editor, which is available to use in all exports, can be
changed to:
lockedPath = GetNextLockedpath(root, MAX_EXPORT_SIZE, true)
• DELETE_DOCUMENT_AFTER_EXPORT: This constant specifies whether
documents are deleted after they have been exported (set to False by default).
• DISABLE_APPENDING: This constant is set to False by default. When set to True,
exported images will not be appended to export folders whose maximum file sizes
have not been reached.
• CONVERSION_TYPE: This constant determines the type of image file created
during the export. The default value, CVT_NO_CONVERSION, does not convert
images during the export. If exporting to a format that supports both single and multi-
page images, you must set the CREATE_MULTI_PAGE_IMAGE constant to True if
you want to create multi-page images; otherwise single page images will result. For
example, if you set this to CVT_TIFF_G4_MEDJPG, a TIFF image is created during
the export. If the source image is binary, it will create a TIFF using Group 4
compression; if the source image is color (.jpg or .bmp), it will create a TIFF using
Medium JPEG compression. For a list of file types that can be converted to during the
export, see the Enumerations section in this chapter.
Chapter 13 – Custom Code
PaperVision® Capture Administration Guide 384
Image Only - Options
• FILE_EXTENSION: This constant determines whether the file extension or page
number will be assigned to the file type created during the export.
a. Regular: This option uses the original file extension (.tif, .jpg, etc.).
b. PageNumberStartingZero: This option uses the page number for the file
extension, starting with 0 (e.g., -0, -1, etc.).
c. PageNumberStartingOne: This option uses the page number for file extension,
starting with 1 (e.g., -1, -2, etc.).
d. PageNumberStartingZeroWithPadding: This option uses the page number for
file extension, starting with 000 (e.g., -000, -001, etc.).
e. PageNumberStartingOneWithPadding: This option uses the page number for
file extension, starting with 001 (e.g., -001, -002, etc.).
• IMG_SRC: This constant determines the job step whose images are used for the
export. The default selection, <None>, uses the most recent image prior to exporting.
To use images from another job step, select the name of the step from the drop-down
list.
• AUTOMATION_SERVER: If you specify an automation server (in the
MACHINENAME_INSTANCE format), your specified server will process exports
one at a time in the ROOT_PATH location. When one or more automation servers are
specified, separate folders may be created for multiple exports that are processed
simultaneously.
If you leave the Automation Server field blank during export configuration, all
servers will be used to process the exports. If you are using multiple automation
servers, separate each server name with a comma. Alternatively, you can enter
wildcards in this field. In addition, values that you enter in this field are not case-
sensitive.
Note:
If using multiple automation services and you specify multiple values for the
AUTOMATION_SERVER constant (or, if using multiple automation
services and you do not specify a value for the AUTOMATION_SERVER
constant), your exported data may output to multiple folders (e.g., data
groups).
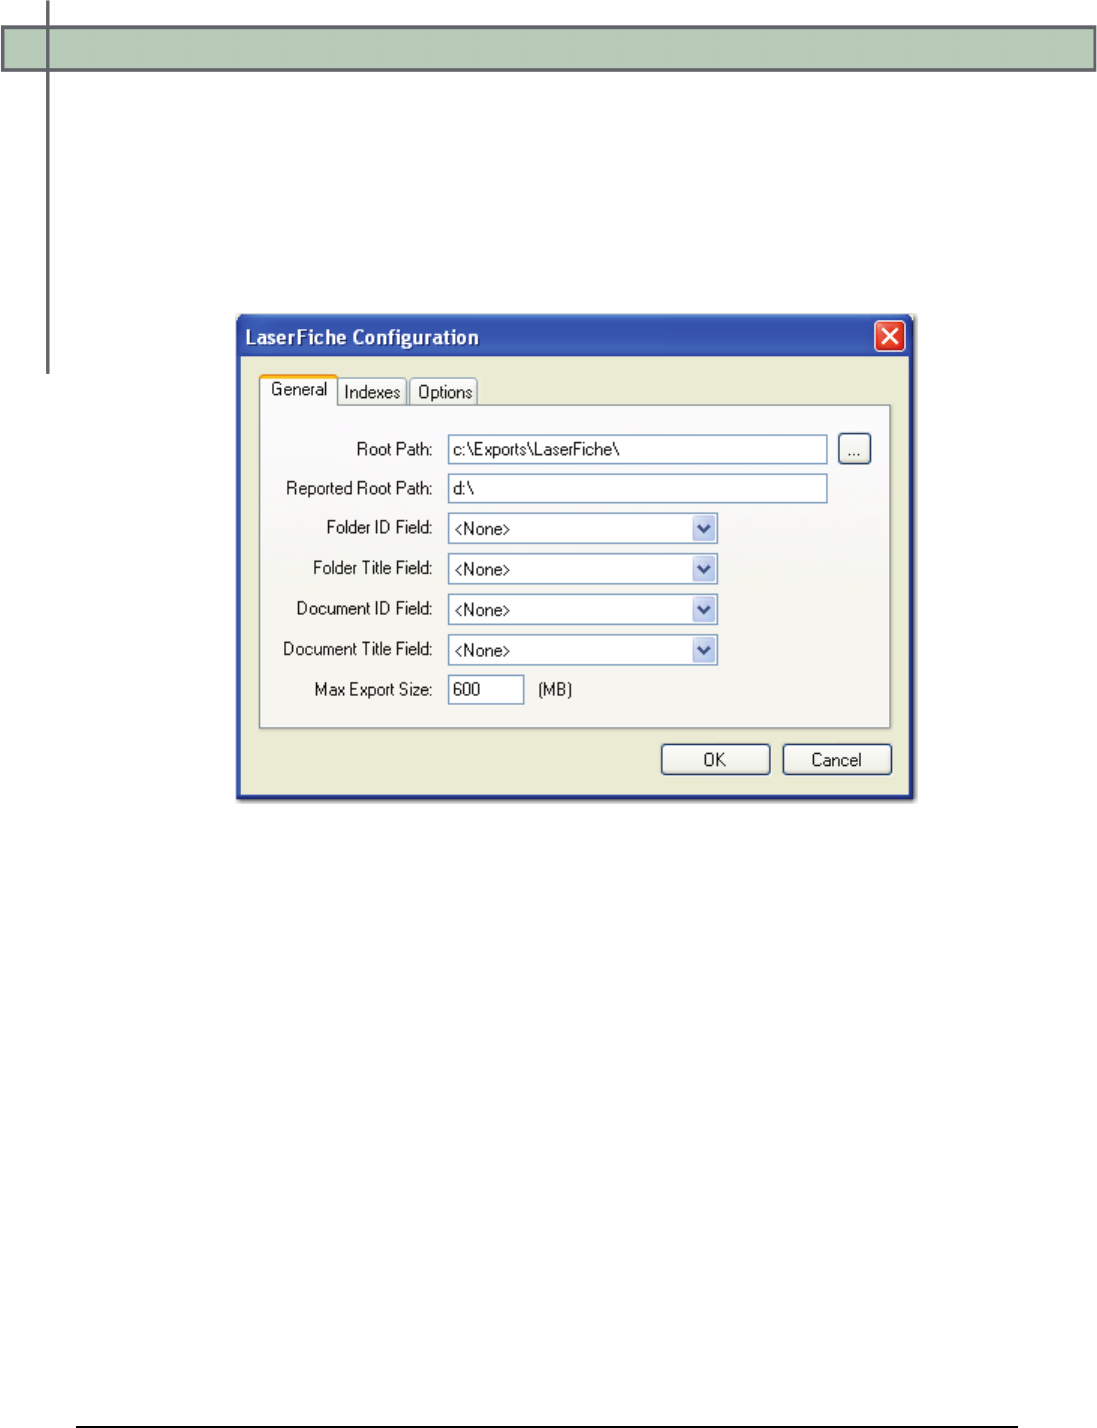
Chapter 13 – Custom Code
PaperVision® Capture Administration Guide 385
LaserFiche
The LaserFiche export creates an ASCII text file and single-page TIFF images that can be
imported into the LaserFiche system using the LaserFiche List Import Feature.
To configure the LaserFiche export:
1. From the Select Custom Code Generator dialog box, double-click the LaserFiche
generator, and the tabbed LaserFiche Configuration dialog box appears.
LaserFiche Configuration - General
Default values, paths, and other properties are provided for your reference, and drop-
down menus contain options specific to your selected generator. In addition, you can
browse to some directories or manually enter file paths. Descriptions for all properties
begin on the next page.
2. Proceed to the Indexes and Options tab to modify the appropriate properties.
3. When you have finished configuring the export, click OK.
Chapter 13 – Custom Code
PaperVision® Capture Administration Guide 386
LaserFiche - General
When you configure the properties in the General tab, the following constant values will
appear in the resulting export script:
• ROOT_PATH: This is the location where the exports will be created once the
automation service processes the step.
• REPORTED_ROOT_PATH: The path referenced in the export file originates from
this location, not the ROOT_PATH.
Note:
If the Root Path is blank, the export will be written to the directory where the
application was installed (e.g., C:\Program Files\Digitech
Systems\PaperVision Capture). If the Reported Root Path is blank, the
resulting export script will display a blank value for the
REPORTED_ROOT_PATH.
• FOLDER_ID_FIELD_NAME: This field name specifies the index value that
populates the FOLDER ID field in the export.
• FOLDER_TITLE_FIELD_NAME: This field name specifies the index value that
populates the FOLDER TITLE field in the export.
• DOCUMENT_ID_FIELD_NAME: This field name specifies the index value that
populates the DOCUMENT ID field in the export.
• DOCUMENT_TITLE_FIELD_NAME: This field name specifies the index value
that populates the DOCUMENT TITLE field in the export.
• MAX_EXPORT_SIZE: This constant indicates the maximum export file size (in
MB), which defaults to a value of "600".
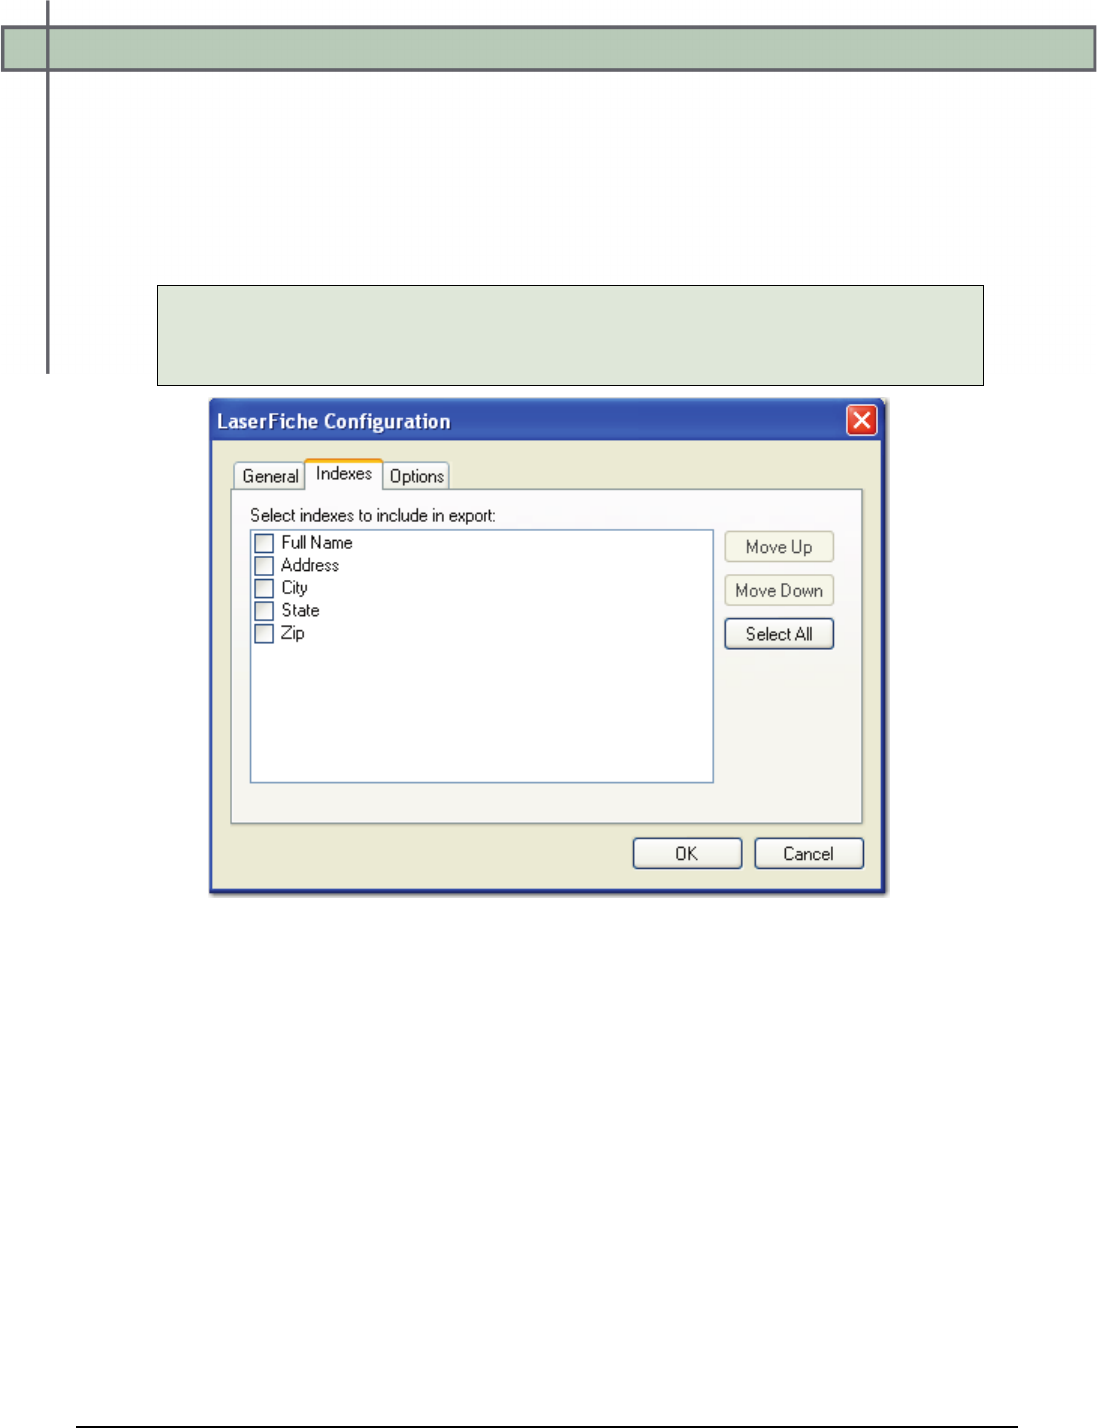
Chapter 13 – Custom Code
PaperVision® Capture Administration Guide 387
LaserFiche - Indexes
In the Indexes tab, you can select the index values that will appear in the export by double-
clicking within the appropriate check boxes. Alternatively, click the Select All button to
include all indexes in the export. You can also click Deselect All to remove all selections.
To change the order in which the index values display, press the Move Up or Move Down
buttons.
Tip:
Single-click an index name to move it up or down the list. Double-click an index
name to include it in the export.
LaserFiche Configuration - Indexes
To edit the indexes in the resulting export script, you can modify the
INDICES_TO_INCLUDE constant described below:
• INDICES_TO_INCLUDE: This constant determines the index values included in the
export file. If you selected any index values to be included in the export, its name will
appear between quotation marks; multiple index values are separated by commas.
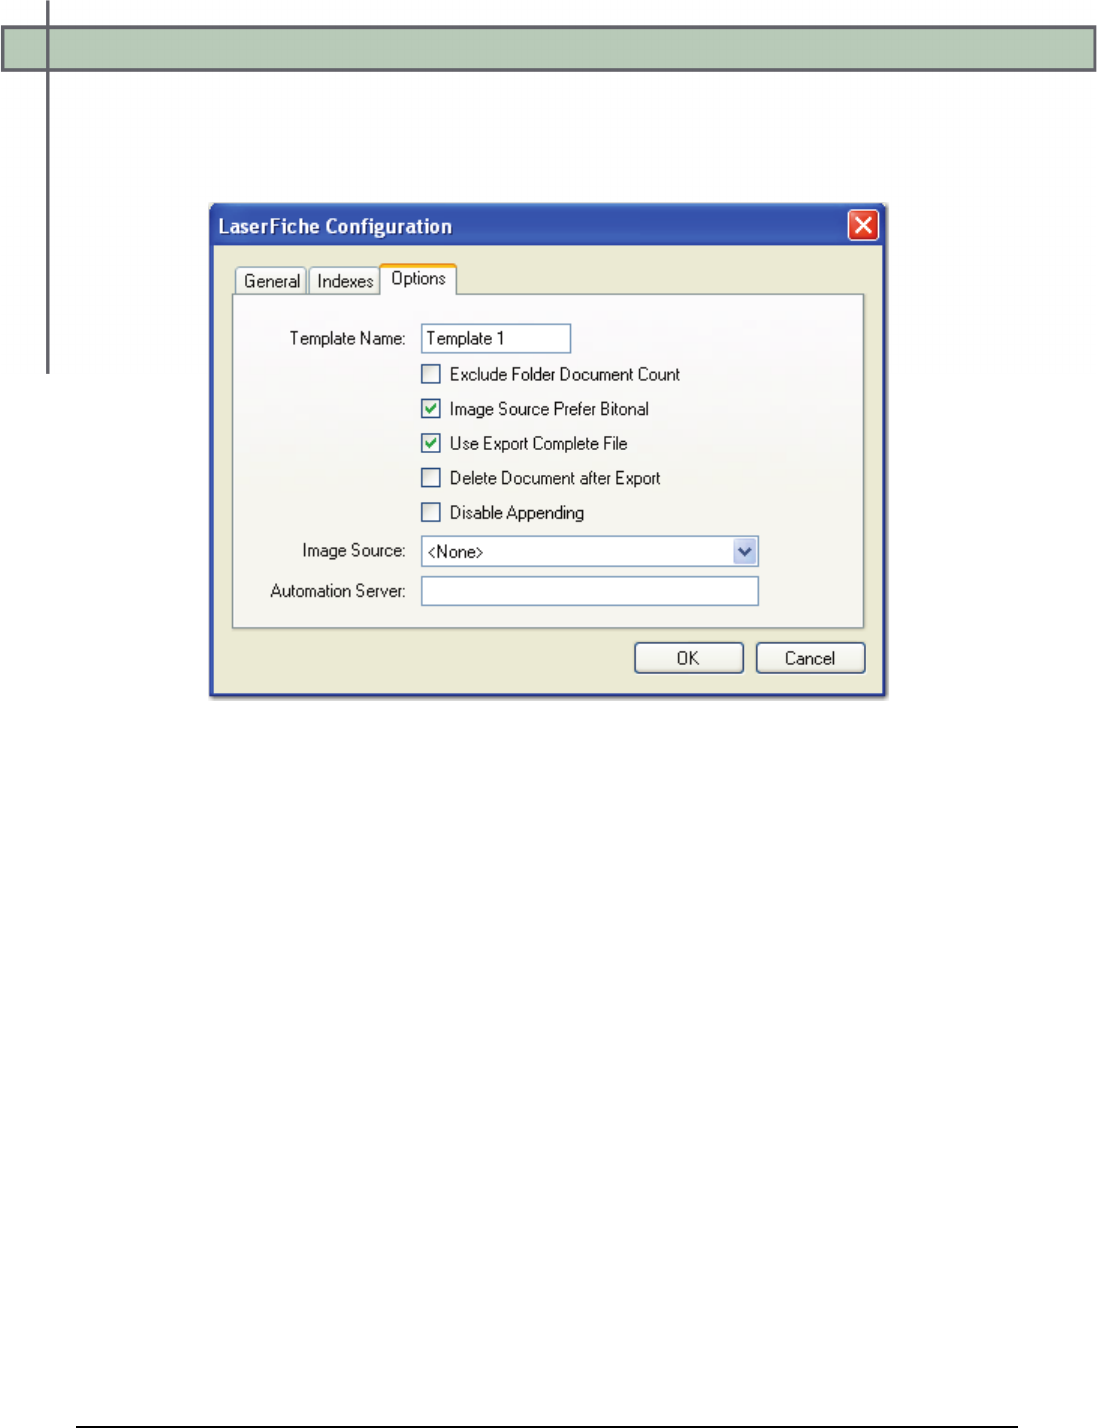
Chapter 13 – Custom Code
PaperVision® Capture Administration Guide 388
LaserFiche - Options
When you configure properties in the Options tab, you can modify the constant values that
appear in the resulting export script. Descriptions for each constant value are listed below.
LaserFiche Configuration - Options
• TEMPLATE_NAME: This specified value will populate the TEMPLATE NAME
field in the export.
• EXCLUDE_FOLDER_DOCUMENT_COUNT: When set to True, an
incrementing number can be appended to the FOLDER line of the export. It will
increment from 1 to 2, etc, for each new document. If set to False, no numbers are
appended to the FOLDER line of the export.
• IMG_SRC_PREFER_BITONAL_IMAGES: This constant is applicable to dual-
stream scanners and determines whether to export bitonal or color images. When set to
True, which is the default setting, bitonal images will be exported.

Chapter 13 – Custom Code
PaperVision® Capture Administration Guide 389
LaserFiche - Options
• USE_EXPORT_COMPLETE_FILE: This constant, set to True by default,
generates an "export.complete" file once an export has reached its maximum file size,
so data will no longer be appended to the export. When set to False, the
"export.complete" file is not generated, so data may be appended to export folders that
have not reached their maximum size.
If you set this constant to False, for example, and the following four folders are
available under the ROOT_PATH with the MAX_EXPORT_SIZE defined as 600
MB:
1. Folder_1: 600 MB
2. Folder_2: 400 MB
3. Folder_3: 600 MB
4. Folder_4: 100 MB
Since the maximum export size has been reached in Folder_1, Folder_2 will be
used as the export folder, and the "export.complete" file will not be generated.
Tip:
By default, the lockedPath (working directory) for any export is returned by
calling GetNextLockedPath(). If an export should contain this constant value, the
following line in the Script Editor, which is available to use in all exports, can be
changed to:
lockedPath = GetNextLockedpath(root, MAX_EXPORT_SIZE, true)
• DELETE_DOCUMENT_AFTER_EXPORT: This constant specifies whether
documents are deleted after they have been exported (set to False by default).
• DISABLE_APPENDING: This constant is set to False by default. When set to True,
exported images will not be appended to export folders whose maximum file sizes
have not been reached.
• IMG_SRC: This constant determines the job step whose images are used for the
export. The default selection, <None>, uses the most recent image prior to exporting.
To use images from another job step, select the name of the step from the drop-down
list.

Chapter 13 – Custom Code
PaperVision® Capture Administration Guide 390
LaserFiche - Options
• AUTOMATION_SERVER: If you specify an automation server (in the
MACHINENAME_INSTANCE format), your specified server will process exports
one at a time in the ROOT_PATH location. When one or more automation servers are
specified, separate folders may be created for multiple exports that are processed
simultaneously.
If you leave the Automation Server field blank during export configuration, all
servers will be used to process the exports. If you are using multiple automation
servers, separate each server name with a comma. Alternatively, you can enter
wildcards in this field. In addition, values that you enter in this field are not case-
sensitive.
Note:
If using multiple automation services and you specify multiple values for the
AUTOMATION_SERVER constant (or, if using multiple automation
services and you do not specify a value for the AUTOMATION_SERVER
constant), your exported data may output to multiple folders (e.g., data
groups).
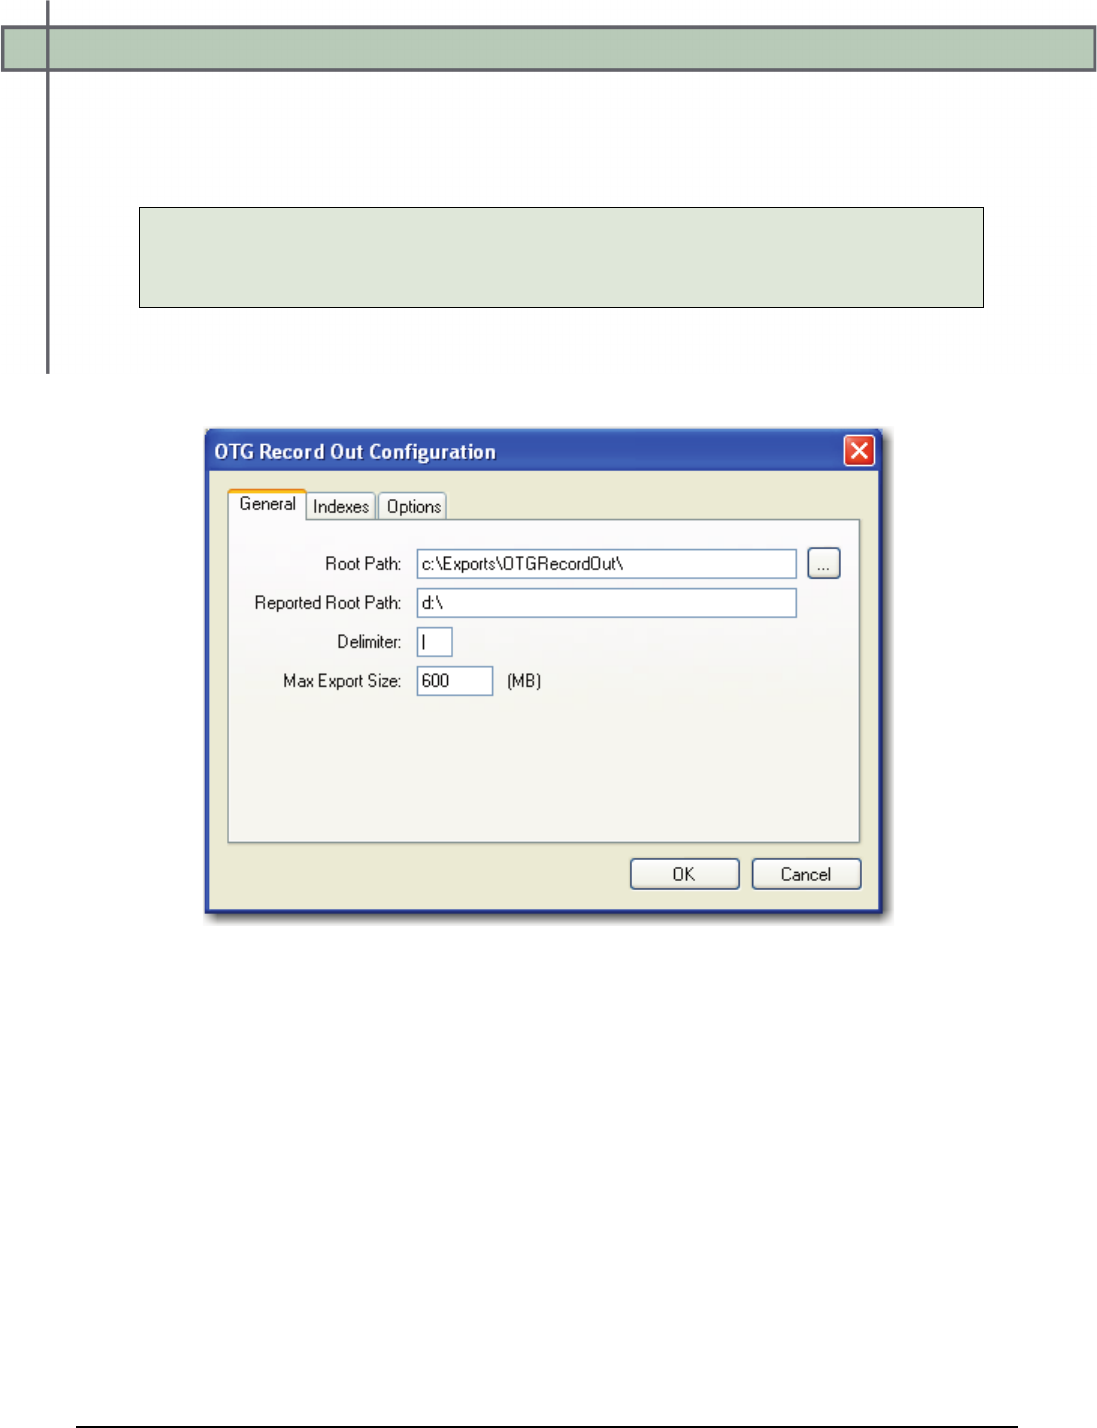
Chapter 13 – Custom Code
PaperVision® Capture Administration Guide 391
OTG Record Out
The OTG Record Out export creates a valid OTG Record-Out file and its associated images.
This can be imported into the OTG Application Extender system using the OTG RDS.
Note:
Ensure that date formats for the PaperVision Capture job correspond with date
formats configured in OTG and that all appropriate index values have been defined.
To configure the OTG Record Out export:
1. From the Select Custom Code Generator dialog box, double-click the OTG Record
Out generator, and the tabbed OTG Record Out Configuration dialog box appears.
OTG Record Out Configuration - General
Default values, paths, and other properties are provided for your reference, and drop-
down menus contain options specific to your selected generator. In addition, you can
browse to some directories or manually enter file paths. Descriptions for all properties
begin on the next page.
2. Proceed to the Indexes and Options tab to modify the appropriate properties.
3. When you have finished configuring the export, click OK.
Chapter 13 – Custom Code
PaperVision® Capture Administration Guide 392
OTG Record Out - General
When you configure the properties in the General tab, the following constant values will
appear in the resulting export script:
• ROOT_PATH: This is the location where the exports will be created once the
automation service processes the step.
• REPORTED_ROOT_PATH: The path referenced in the export file originates from
this location, not the ROOT_PATH.
Note:
If the Root Path is blank, the export will be written to the directory where the
application was installed (e.g., C:\Program Files\Digitech
Systems\PaperVision Capture). If the Reported Root Path is blank, the
resulting export script will display a blank value for the
REPORTED_ROOT_PATH.
• DELIMITER: This constant specifies the character that will delimit index values in
the export file.
• MAX_EXPORT_SIZE: This constant indicates the maximum export file size (in
MB), which defaults to a value of "600".
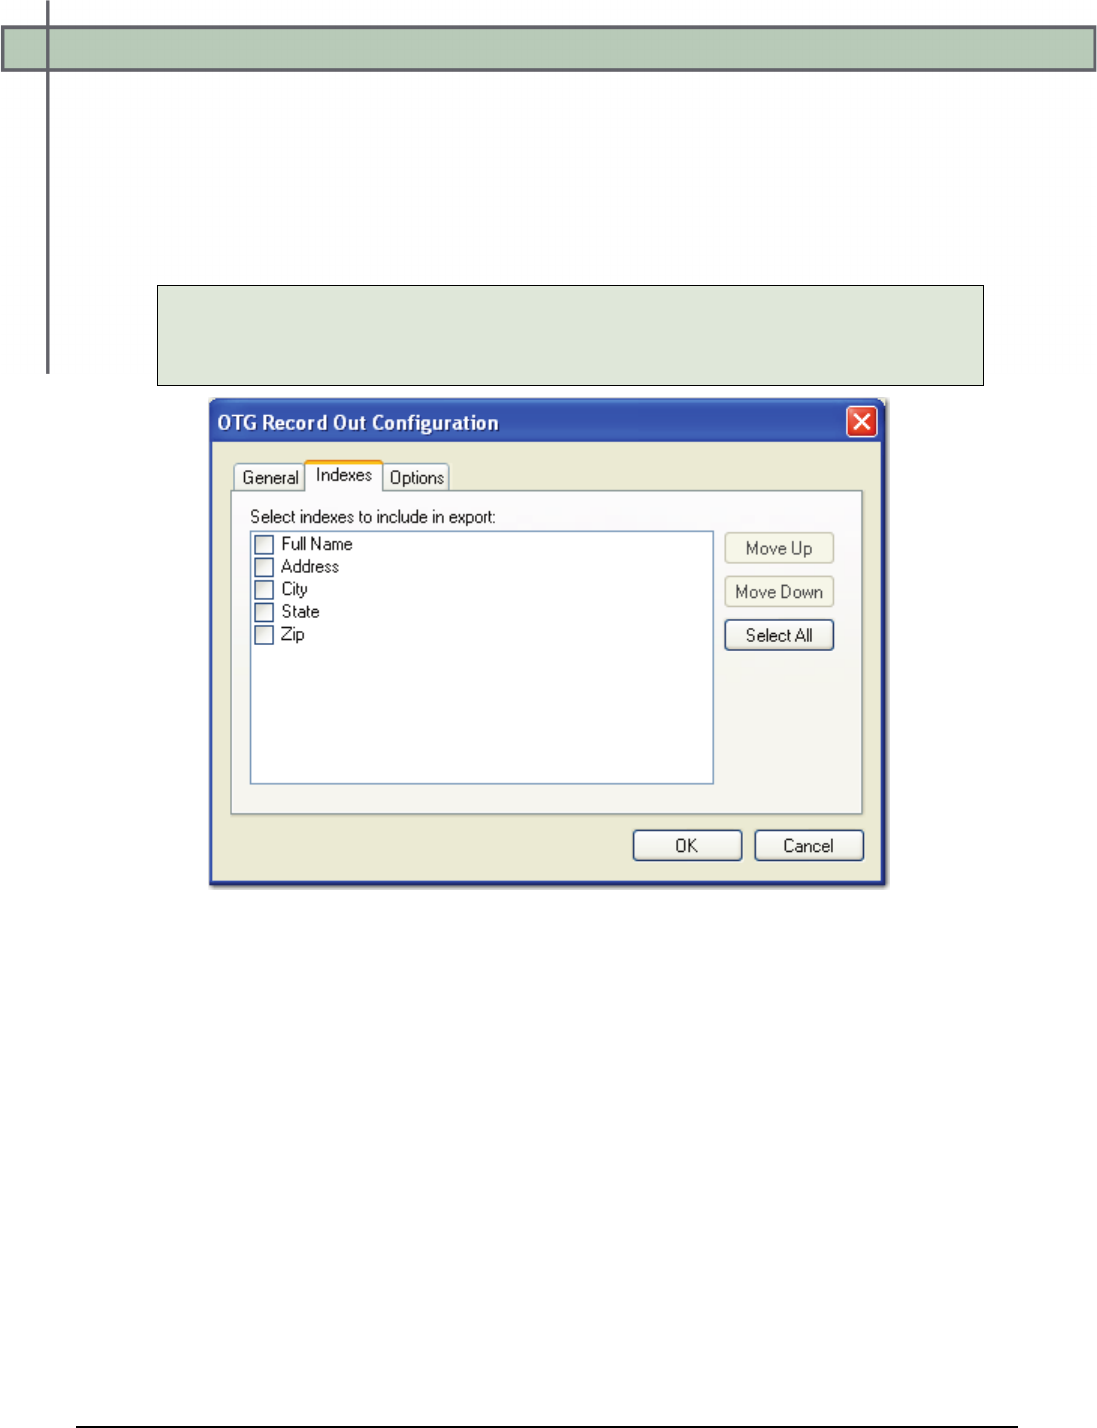
Chapter 13 – Custom Code
PaperVision® Capture Administration Guide 393
OTG Record Out - Indexes
In the Indexes tab, you can select the index values that will appear in the export by double-
clicking within the appropriate check boxes. Alternatively, click the Select All button to
include all indexes in the export. You can also click Deselect All to remove all selections.
To change the order in which the indexes display, single-click an index name (to highlight
it), and then click the Move Up or Move Down buttons.
Tip:
Single-click an index name to move it up or down the list. Double-click an index
name to include it in the export.
OTG Record Out Configuration - Indexes
To edit the indexes in the resulting export script, you can modify the
INDICES_TO_INCLUDE constant described below:
• INDICES_TO_INCLUDE: This constant determines the index values included in the
export file. Enter the name of the index value(s) between the quotation marks, and
separate each index value with a comma.
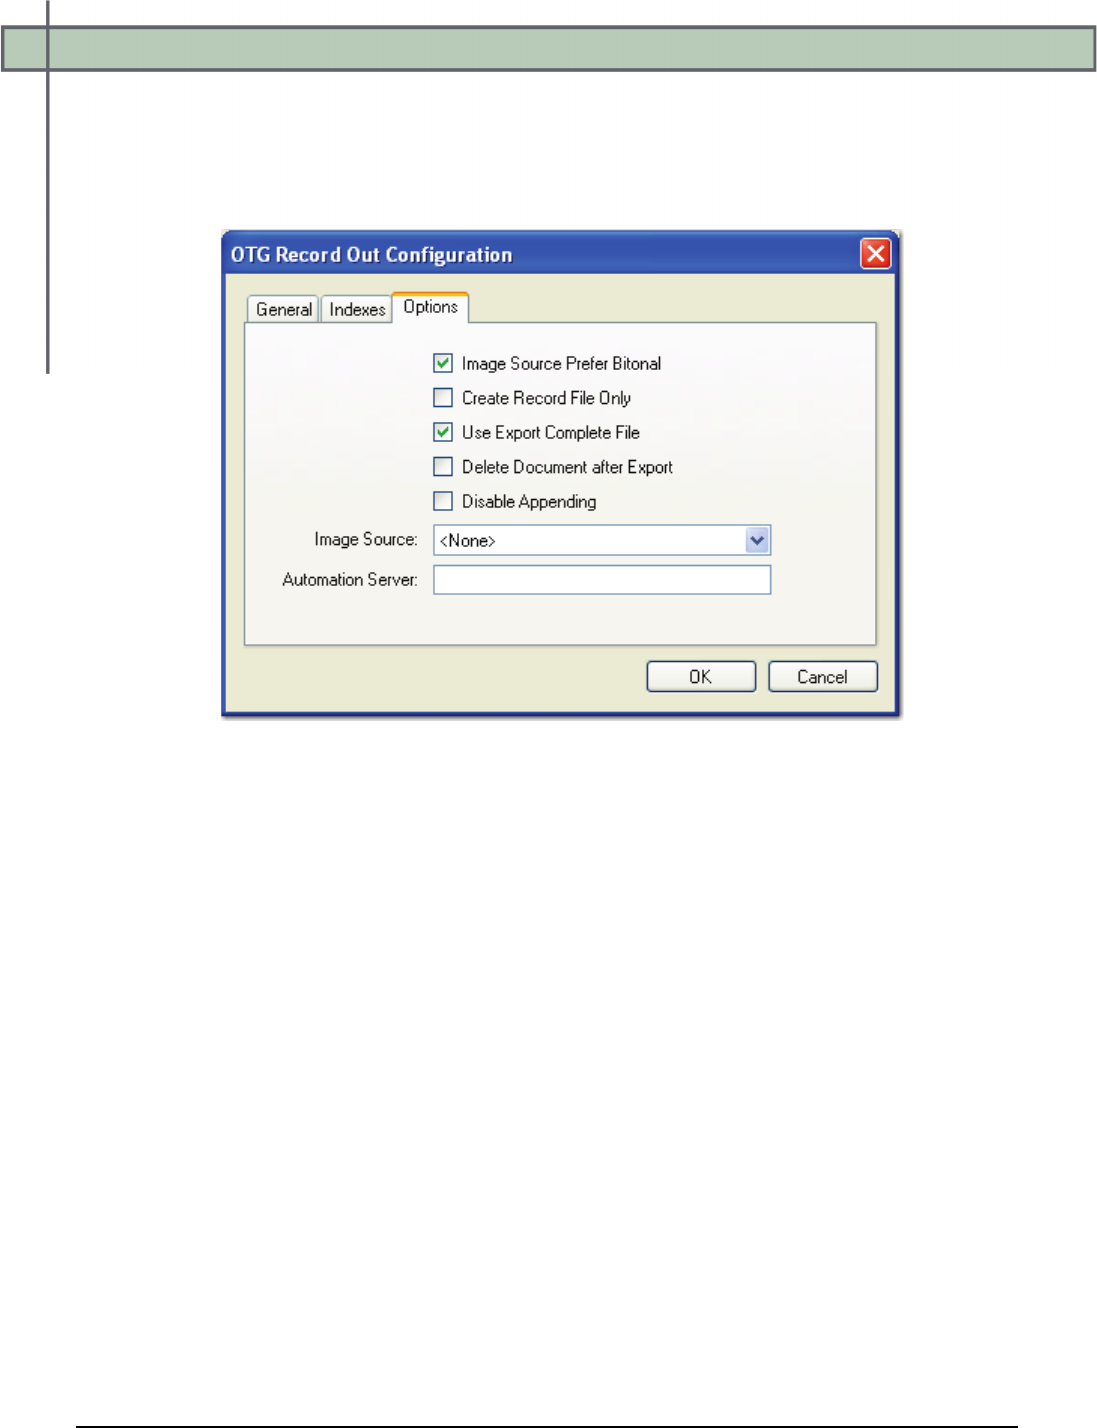
Chapter 13 – Custom Code
PaperVision® Capture Administration Guide 394
OTG Record Out - Options
When you configure the properties in the Options tab, you can modify constant values
that appear in the resulting export script. Descriptions for each constant value are listed
below.
OTG Record Out Configuration - Options
• IMG_SRC_PREFER_BITONAL_IMAGES: This constant is applicable to dual-
stream scanners and determines whether to export bitonal or color images. When set to
True, which is the default setting, bitonal images will be exported.
• CREATE_RECORD_FILE_ONLY: If set to True, a RECORD.TXT file will be
created, but no images will be created during the export.
Chapter 13 – Custom Code
PaperVision® Capture Administration Guide 395
OTG Record Out - Options
• USE_EXPORT_COMPLETE_FILE: This constant, set to True by default,
generates an "export.complete" file once an export has reached its maximum file size,
so data will no longer be appended to the export. When set to False, the
"export.complete" file is not generated, so data may be appended to export folders that
have not reached their maximum size.
If you set this constant to False, for example, and the following four folders are
available under the ROOT_PATH with the MAX_EXPORT_SIZE defined as 600
MB:
1. Folder_1: 600 MB
2. Folder_2: 400 MB
3. Folder_3: 600 MB
4. Folder_4: 100 MB
Since the maximum export size has been reached in Folder_1, Folder_2 will be
used as the export folder, and the "export.complete" file will not be generated.
Tip:
By default, the lockedPath (working directory) for any export is returned by
calling GetNextLockedPath(). If an export should contain this constant value,
the following line in the Script Editor, which is available to use in all exports,
can be changed to:
lockedPath = GetNextLockedpath(root, MAX_EXPORT_SIZE, true)
• DELETE_DOCUMENT_AFTER_EXPORT: This constant specifies whether
documents are deleted after they have been exported (set to False by default).
• DISABLE_APPENDING: This constant is set to False by default. When set to True,
exported images will not be appended to export folders whose maximum file sizes
have not been reached.
• IMG_SRC: This constant determines the job step whose images are used for the
export. The default selection, <None>, uses the most recent image prior to exporting.
To use images from another job step, select the name of the step from the drop-down
list.
• AUTOMATION_SERVER: If you specify an automation server (in the
MACHINENAME_INSTANCE format), your specified server will process exports
one at a time in the ROOT_PATH location. When one or more automation servers are
specified, separate folders may be created for multiple exports that are processed
simultaneously.

Chapter 13 – Custom Code
PaperVision® Capture Administration Guide 396
If you leave the Automation Server field blank during export configuration, all
servers will be used to process the exports. If you are using multiple automation
servers, separate each server name with a comma. Alternatively, you can enter
wildcards in this field. In addition, values that you enter in this field are not case-
sensitive.
Note:
If using multiple automation services and you specify multiple values for the
AUTOMATION_SERVER constant (or, if using multiple automation
services and you do not specify a value for the AUTOMATION_SERVER
constant), your exported data may output to multiple folders (e.g., data
groups).
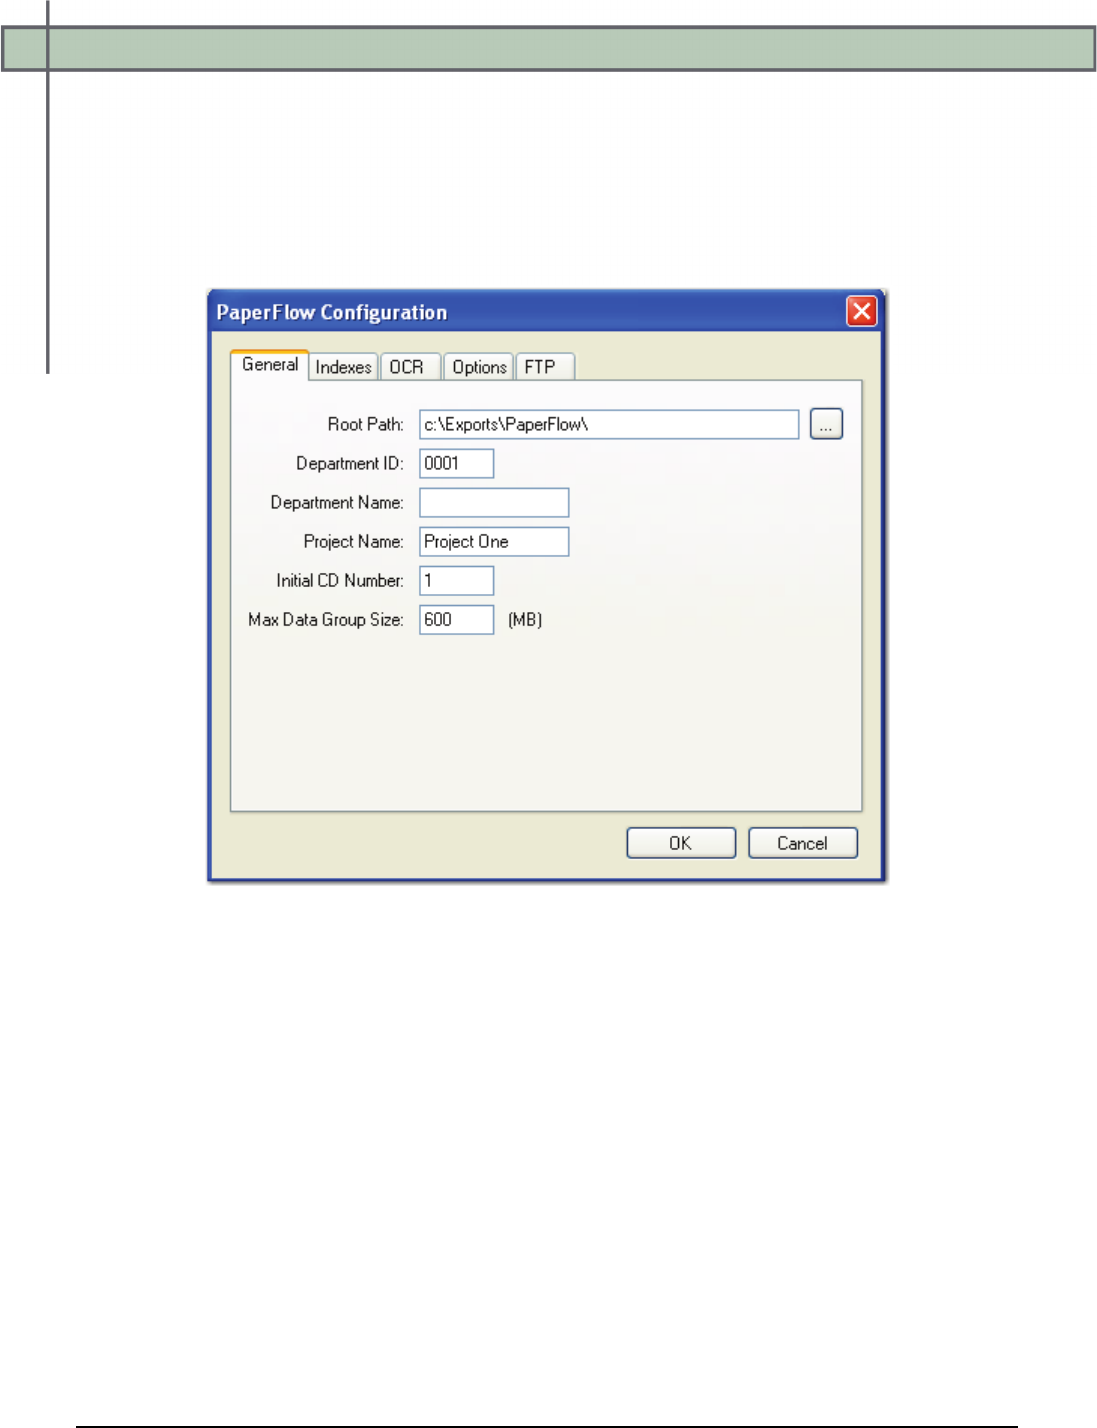
Chapter 13 – Custom Code
PaperVision® Capture Administration Guide 397
PaperFlow
The PaperFlow export can be used to import batches into PaperFlow, OCRFlow, or QCFlow.
To configure the PaperFlow export:
1. From the Select Custom Code Generator dialog box, double-click the PaperFlow
generator, and the tabbed PaperFlow Configuration dialog box appears.
PaperFlow Configuration - General
Default values, paths, and other properties are provided for your reference, and drop-
down menus contain options specific to your selected generator. In addition, you can
browse to some directories or manually enter file paths. Descriptions for all properties
begin on the next page.
2. Proceed to the Indexes, OCR, Options, and FTP tabs to modify the appropriate
properties.
3. When you have finished configuring the export, click OK.

Chapter 13 – Custom Code
PaperVision® Capture Administration Guide 398
PaperFlow - General
When you configure the properties in the General tab, the following constant values will
appear in the resulting export script:
• ROOT_PATH: This is the location where the exports will be created once the
automation service processes the step.
Note:
If the Root Path is blank, the export will be written to the directory where the
application was installed (e.g., C:\Program Files\Digitech
Systems\PaperVision Capture).
• DEPT_ID: This value is uniquely assigned to each client for which the export is
generated. The default value is "0001".
• DEPT_NAME: This value is uniquely assigned to each client or department and is a
required field. The default value is blank.
• PROJECT_NAME: This value is uniquely assigned to each client or department. The
default value is "Project".
• INITIAL_CD_NUMBER: This value can be used to export to a CD. The default
value is "1".
If you change this value after you have already run a PaperFlow export, the new value
will not be reflected in exported data groups unless you remove the “//” comment
codes. The “Reset CD Number?” code should appear as follows in the export script:
if (!PVUtilities.TrySetCustomCounter(DEPT_ID + "_" + PROJECT_NAME,
INITIAL_CD_NUMBER, out error))
throw (new Exception("Unable to reset custom counter: " + error.Message));
After you remove the comment codes, you must run the export to reset the counter.
The next data group that is created will reflect your new INITIAL_CD_NUMBER
value. Lastly, to ensure that new data groups increment properly from the new
INITIAL_CD_NUMBER, you must insert the “\\” comment codes once again:
//if (!PVUtilities.TrySetCustomCounter(DEPT_ID + "_" + PROJECT_NAME,
INITIAL_CD_NUMBER, out error))
//throw (new Exception("Unable to reset custom counter: " +
error.Message));
Note:
You must export to a directory that does not contain existing data groups.
Otherwise, the system will attempt to append to data groups whose maximum
size has not been reached, and the new INITIAL_CD_NUMBER value may
be ignored or other unexpected results may occur.
• MAX_DATAGROUP_SIZE: This indicates the maximum size (in MB) that a data
group can reach before a new data group begins. The default value is “600,” the
standard CD size.
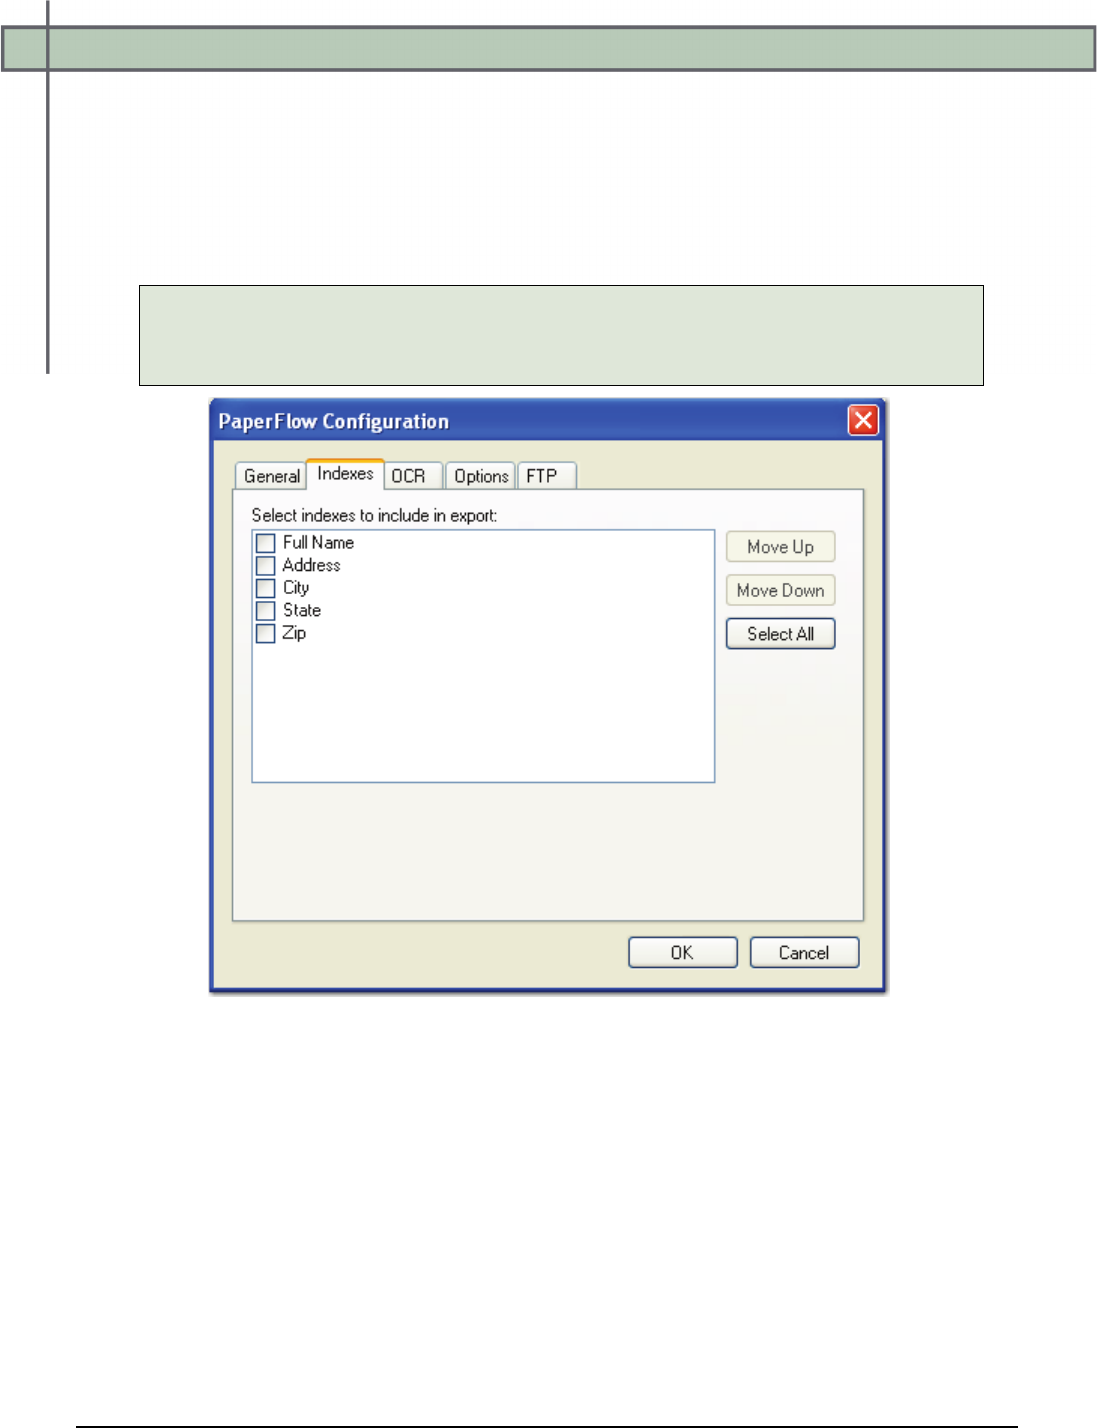
Chapter 13 – Custom Code
PaperVision® Capture Administration Guide 399
PaperFlow - Indexes
In the Indexes tab, you can select the index values that will appear in the export by double-
clicking within the appropriate check boxes. Alternatively, click the Select All button to
include all indexes in the export. You can also click Deselect All to remove all selections.
To change the order in which the indexes display, single-click an index name (to highlight
it), and then click the Move Up or Move Down buttons.
Tip:
Single-click an index name to move it up or down the list. Double-click an index
name to include it in the export.
PaperFlow Configuration - Indexes
To edit the indexes in the resulting export script, you can modify the
INDICES_TO_INCLUDE constant described below:
• INDICES_TO_INCLUDE: This constant determines the index values included in the
export file. Index value names appear between the quotation marks, and multiple
values are separated by a comma. To include all indices, leave the array blank.
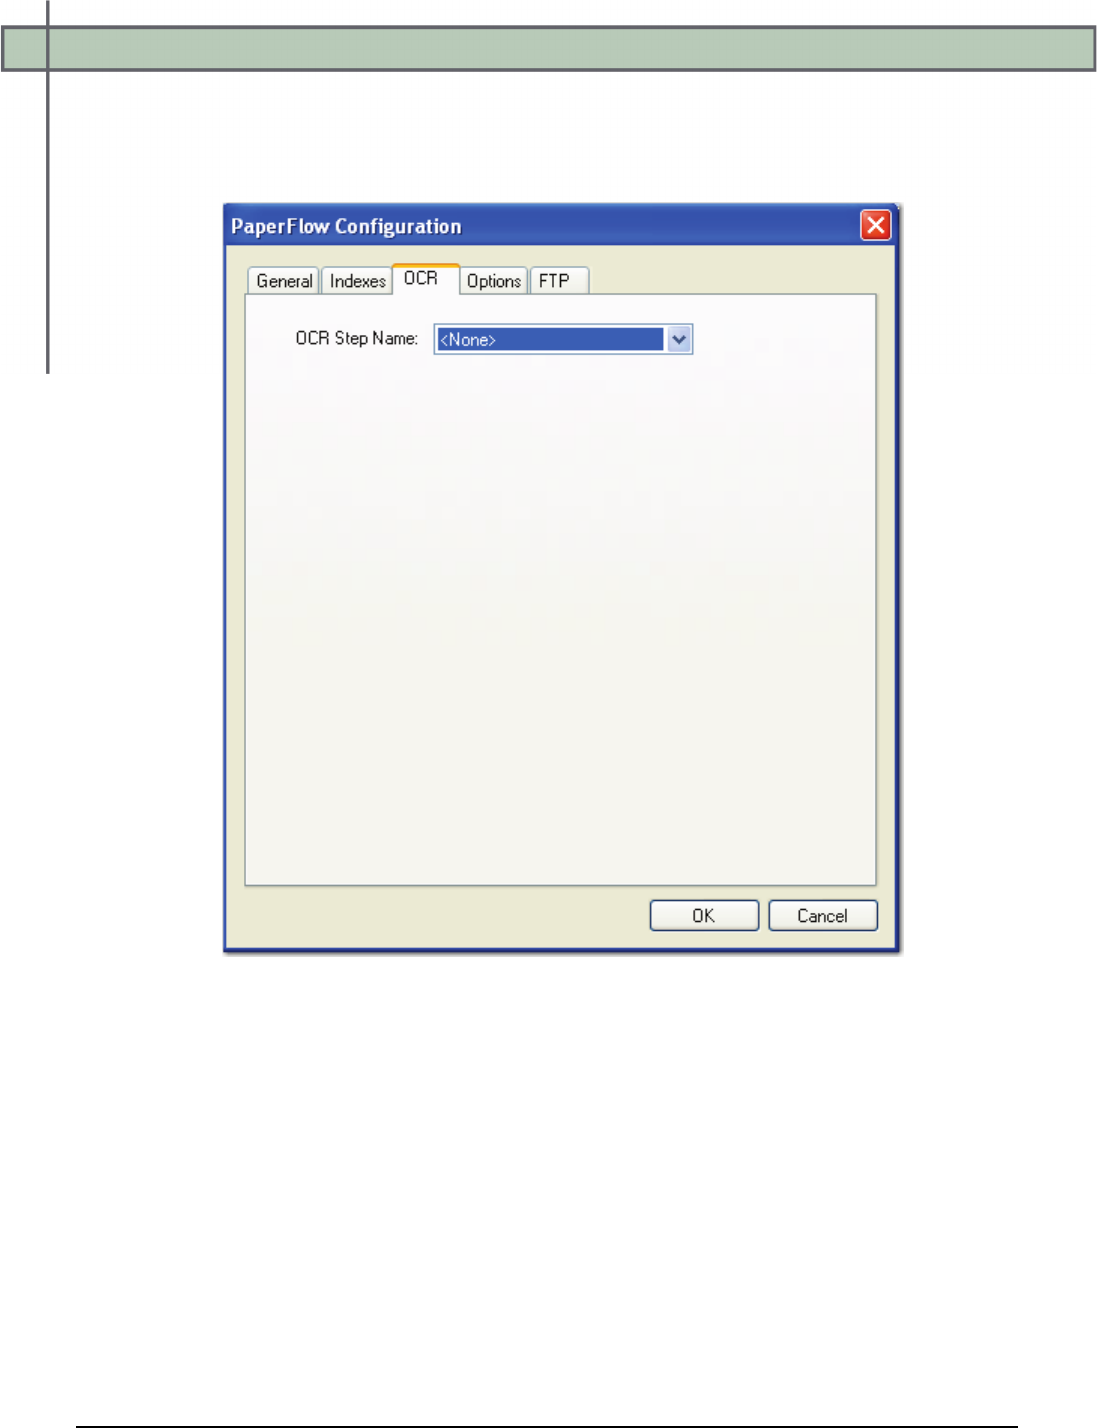
Chapter 13 – Custom Code
PaperVision® Capture Administration Guide 400
PaperFlow - OCR
When you configure the properties in the OCR tab, you can modify constant values that
appear in the resulting export script. Descriptions for each constant value are listed below.
PaperFlow Configuration - OCR
• OCR_JOB_STEP_NAME: This constant specifies the job step whose full-text data
are used for the export. No value is defined by default, so full-text data from the
current job step are used for the export.
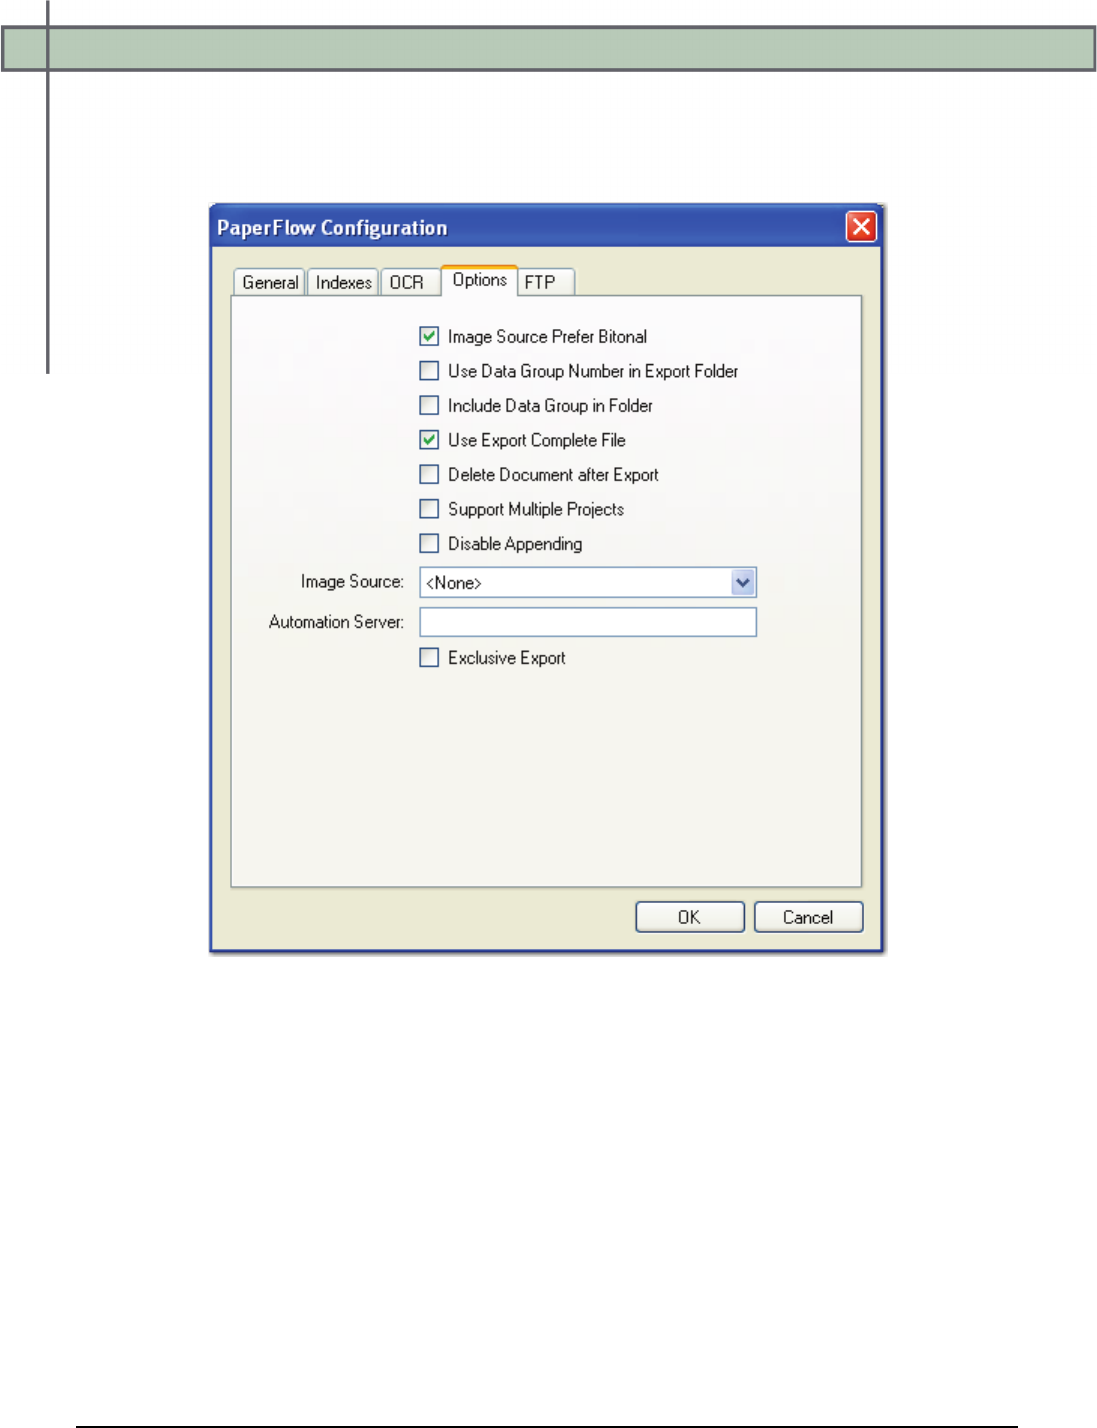
Chapter 13 – Custom Code
PaperVision® Capture Administration Guide 401
PaperFlow - Options
When you configure the properties in the Options tab, you can modify constant values that
appear in the resulting export script. Descriptions for each constant value are listed below.
PaperFlow Configuration - Options
• IMG_SRC_PREFER_BITONAL_IMAGES: This constant is applicable to dual-
stream scanners and determines whether to export bitonal (black and white) or color
images. When set to True, which is the default setting, bitonal images will be exported.
• USE_DATAGROUP_NUMBER_IN_EXPORT_FOLDER: When set to True, the
parent export directory will be organized by data group name instead of export
number.
• INCLUDE_DATAGROUP_IN_FOLDER: When set to True, a folder named
"DATAGRP" is created under the directory in which the export data is copied
(e.g.,<root>\<export#>\DATAGRP\<export data>). When set to False (default
setting), the "DATAGRP" folder is not created.

Chapter 13 – Custom Code
PaperVision® Capture Administration Guide 402
PaperFlow - Options
• USE_EXPORT_COMPLETE_FILE: This constant, set to True by default,
generates an "export.complete" file once an export has reached its maximum file size,
so data will no longer be appended to the export. When set to False, the
"export.complete" file is not generated, so data may be appended to export folders that
have not reached their maximum size.
If you set this constant to False, for example, and the following four folders are
available under the ROOT_PATH with the MAX_EXPORT_SIZE defined as 600
MB:
1. Folder_1: 600 MB
2. Folder_2: 400 MB
3. Folder_3: 600 MB
4. Folder_4: 100 MB
Since the maximum export size has been reached in Folder_1, Folder_2 will be
used as the export folder, and the "export.complete" file will not be generated.
Tip:
By default, the lockedPath (working directory) for any export is returned by
calling GetNextLockedPath(). If an export should contain this constant value, the
following line in the Script Editor, which is available to use in all exports, can be
changed to:
lockedPath = GetNextLockedpath(root, MAX_EXPORT_SIZE, true)
• DELETE_DOCUMENT_AFTER_EXPORT: This constant specifies whether
documents are deleted after they have been exported (set to False by default).
• SUPPORT_MULTIPLE_PROJECTS: When set to True, multiple Department IDs
will be exported to the same folder, creating a single MDB file. When set to False
(default setting), one Department ID will be exported to a single folder.
• DISABLE APPENDING: This constant is set to False by default. When set to True,
exported images will not be appended to export folders whose maximum file sizes
have not been reached.
• IMG_SRC: This constant determines the job step whose images are used for the
export. The default selection, <None>, uses the most recent image prior to exporting.
To use images from another job step, select the name of the step from the drop-down
list.

Chapter 13 – Custom Code
PaperVision® Capture Administration Guide 403
PaperFlow - Options
• AUTOMATION_SERVER: If you specify an automation server (in the
MACHINENAME_INSTANCE format), your specified server will process exports
and FTP one at a time in the ROOT_PATH location. When one or more automation
servers are specified, separate folders may be created for multiple exports and FTP
that are processed simultaneously.
If you leave the Automation Server field blank during export configuration, all
servers will be used to process the exports or FTP. If you are using multiple
automation servers, separate each server name with a comma. Alternatively, you can
enter wildcards in this field. In addition, values that you enter in this field are not
case-sensitive.
Note:
If using multiple automation services and you specify multiple values for the
AUTOMATION_SERVER constant (or, if using multiple automation
services and you do not specify a value for the AUTOMATION_SERVER
constant), your exported data may output to multiple folders (e.g., data
groups).
• EXCLUSIVE_EXPORT: This constant determines whether to create separate
folders for multiple exports that are processed simultaneously. When set to True, only
one export will be processed at a time in the ROOT_PATH location. If two or more
exports access the same ROOT_PATH location, an error message will appear in the
Windows Event Viewer, indicating the export folder is already in use.
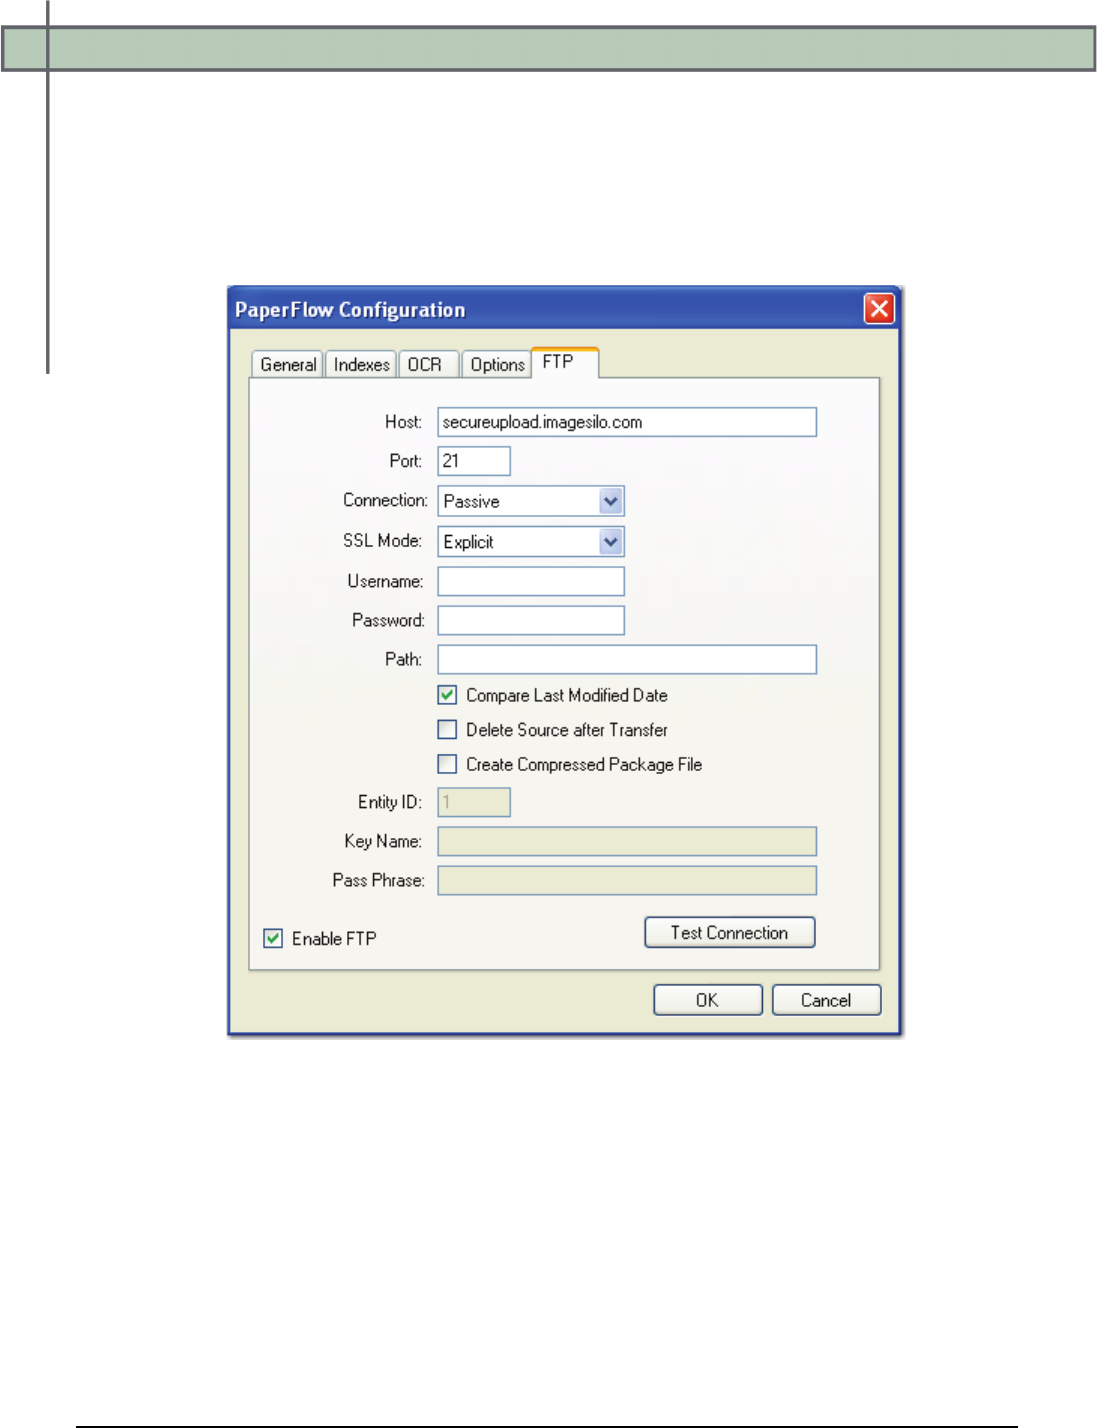
Chapter 13 – Custom Code
PaperVision® Capture Administration Guide 404
PaperFlow - FTP
The FTP tab contains settings to enable you to securely transfer data to an FTP site. Original
data files can be transferred in their original state, or they can be placed in a compressed
package file. When you configure the properties in the FTP tab, you can modify constant
values that appear in the resulting export script. Descriptions for each constant value are listed
below.
PaperFlow Configuration - FTP
• FTP_HOST: This constant specifies the FTP host site name used for the export.
• FTP_PORT: This constant specifies the command port number that will be used to
connect to the remote FTP server. FTP communications are typically initiated on port
21.

Chapter 13 – Custom Code
PaperVision® Capture Administration Guide 405
PaperFlow - FTP
• FTP_CONNECTION: This constant specifies the type of connection that will be
created. During an active connection, the remote FTP server specifies the data port
number that will be used. During a passive connection, PaperVision Capture specifies
the data port number that will be used.
• FTP_ENCRYPTION: This export supports fully encrypted FTP communications
using SSL (also known as FTPS). The remote FTP server must also support this
feature in order to take advantage of the export's capabilities. You can select one of
the following SSL modes:
1. Automatic SSL indicates the server will use SSL encryption, but will attempt
to automatically determine whether to use Implicit or Explicit SSL.
2. Implicit SSL indicates the SSL negotiation will start immediately after the
FTP connection is established.
3. Explicit SSL indicates the connection will be established in plain text and then
explicitly starts the SSL negotiation.
4. None (no SSL encryption) indicates a standard FTP, non-encrypted session
connection will be used.
• FTP_USERNAME: This constant specifies the user name that will be used to
authenticate to the remote FTP server.
• FTP_PASSWORD: This constant specifies the password that will be used to
authenticate to the remote FTP server. If desired, you can expose the password in the
Script Editor by inserting the tilde character (~) prefix before the password (e.g.,
~password).
• FTP_PATH: This constant specifies the folder name on the FTP site that stores the
exported data. By default, this field is blank, and will write data to the user's home
directory as specified by the FTP server.
For example, other possible paths include the following:
1. / (root)
2. FolderA (subdirectory under home directory)
3. /FolderA (subfolder under root path)
• FTP_COMPARE_LAST_MODIFIED_DATE: For an operation type related to
data groups or package files, the agent will automatically record the last modified
date of the file that is being processed. When the same job is processed (and
potentially the same file), the last modified date of the previous run is compared to
the current, last modified date. If the file has not changed, it will not be processed
again.
For data group processing, this will also allow users to perform incremental data
group processing. Once the data group has been changed, any data group files (i.e.,
images) that have a modified date/time greater than or equal to the previous run's
database (i.e., DATAGRP.MDB or DATAGRP.XML) last modified date/time will
be processed.

Chapter 13 – Custom Code
PaperVision® Capture Administration Guide 406
PaperFlow - FTP
• FTP_DELETE_SOURCE_AFTER_EXPORT: Once the data has been successfully
transferred, this constant allows the agent to delete the source data.
• FTP_ENABLE_PACKAGE: When pushing data groups or files to a remote site, you
can increase transfer speed by sending a single, large file rather than hundreds or
thousands of small files. This option causes the agent to create a compressed package
file that increases transfer speeds and security (if encryption is enabled).
• FTP_ENTITY_ID: When the export is configured to create compressed package
files, the Entity ID and Encryption values are placed into the package file to allow the
remote PaperFlow system to decrypt the data. This constant specifies the ID of the
remote entity whose encryption key will be used to decrypt the package file.
• FTP_KEY_NAME: This constant specifies the name of the encryption key used to
decrypt the package file.
• FTP_PASS_PHRASE: For compressed package files, this constant specifies a user-
defined pass phrase that is passed through a SHA-2 algorithm (Secure Hashing
Algorithm) to generate a 256-bit hash.
• FTP_ENABLE: This constant specifies whether FTP has been enabled for the
export.
Testing FTP Connections
After you have configured the FTP settings, click the Test Connection button to ensure the
connection is valid. If you successfully connected to the site, click OK in the Success prompt.
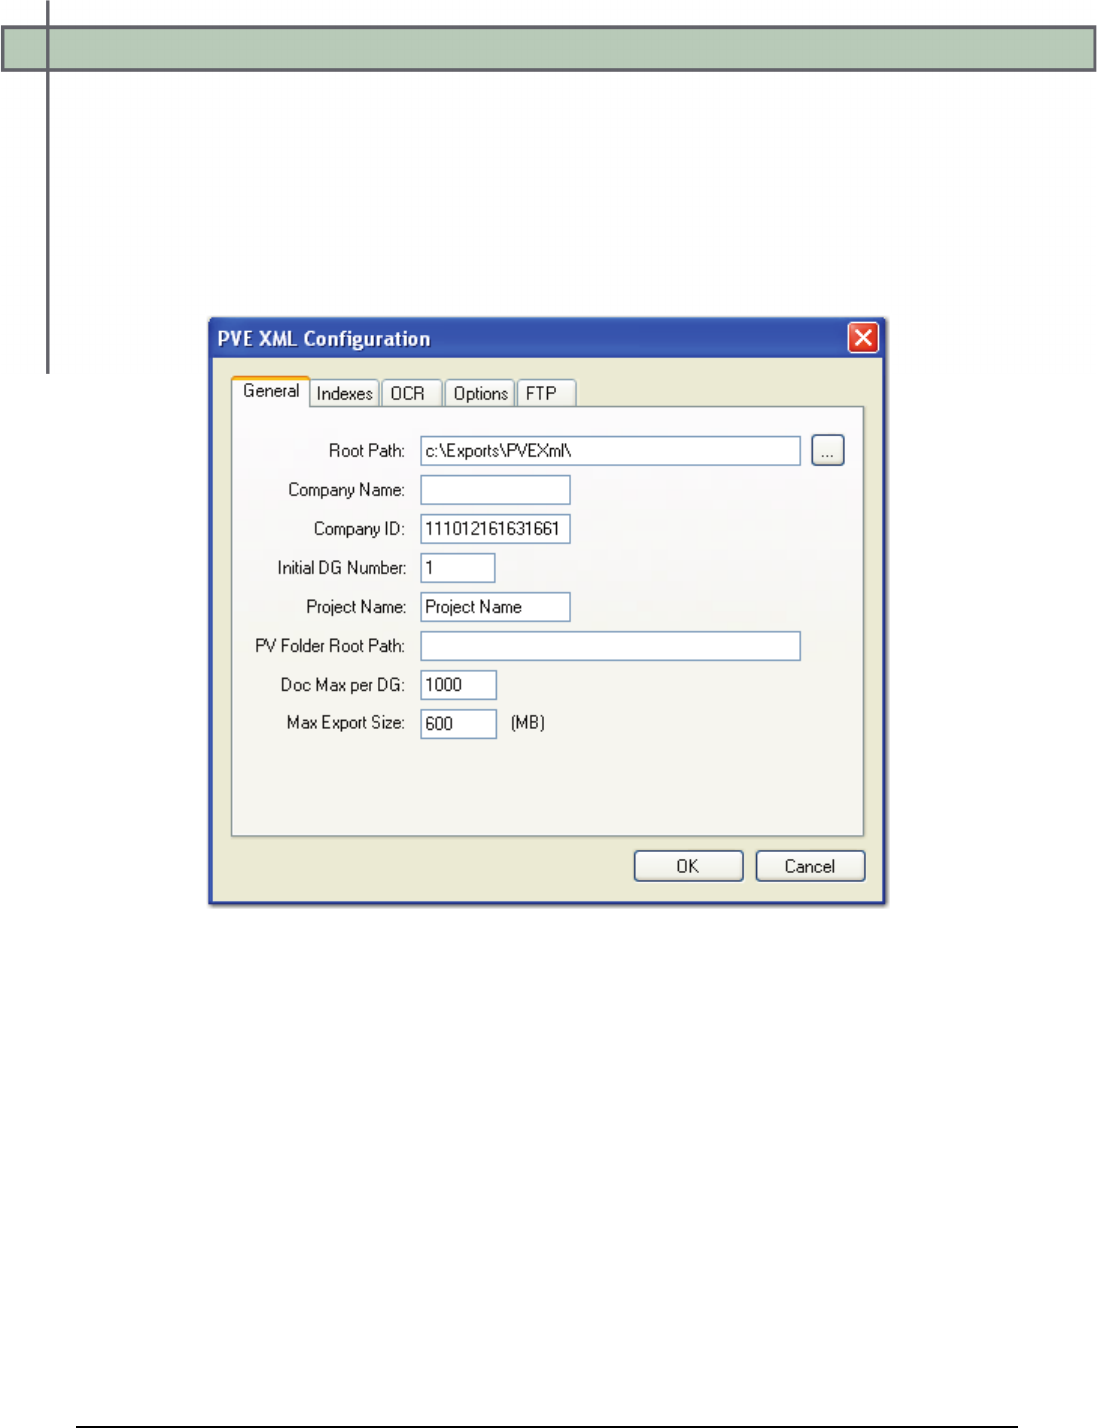
Chapter 13 – Custom Code
PaperVision® Capture Administration Guide 407
PVE XML
The PVE XML export creates an export that can be used to import batches into PaperVision
Enterprise.
To configure the PVE XML export:
1. From the Select Custom Code Generator dialog box, double-click the PVE XML
generator, and the tabbed PVE XML Configuration - General dialog box appears.
PVE XML - General
Default values, paths, and other properties are provided for your reference, and drop-
down menus contain options specific to your selected generator. In addition, you can
browse to some directories or manually enter file paths. Descriptions for all properties
begin on the next page.
2. Proceed to the Indexes, OCR, Options, and FTP tabs to modify the appropriate
properties.
3. When you have finished configuring the export, click OK.
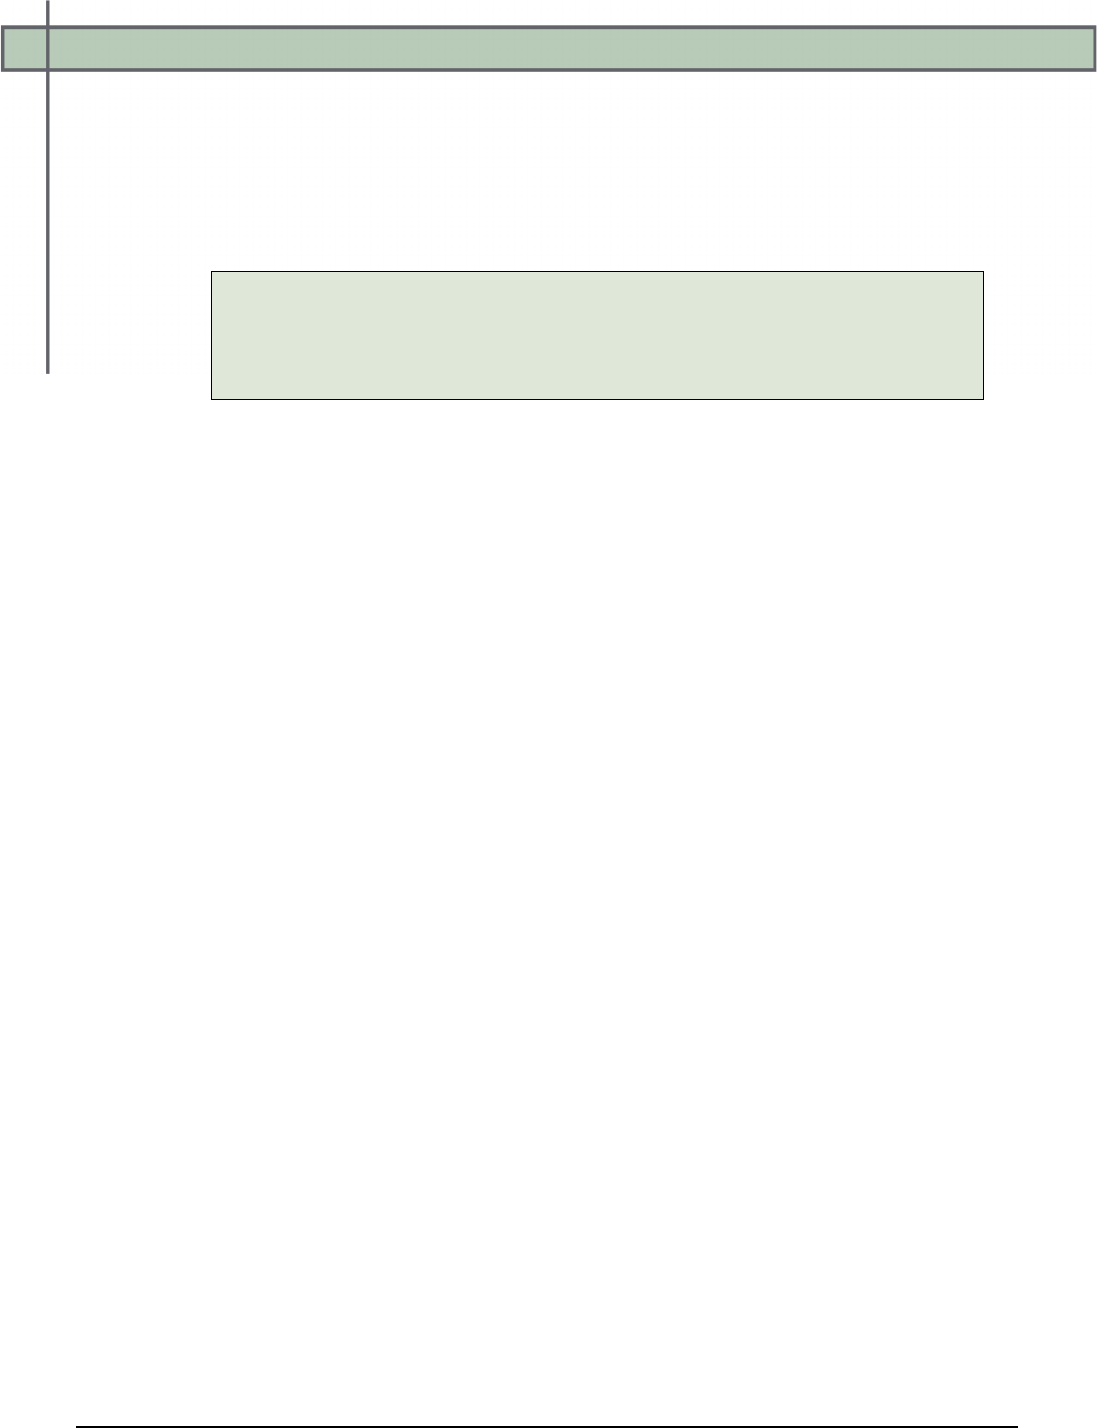
Chapter 13 – Custom Code
PaperVision® Capture Administration Guide 408
PVE XML - General
When you configure the properties in the General tab, the following constant values will
appear in the resulting export script:
• ROOT_PATH: This is the location where the exports will be created once the
automation service processes the step.
Note:
If the Root Path is blank, the export will be written to the directory where the
application was installed (e.g., C:\Program Files\Digitech
Systems\PaperVision Capture).
• COMPANY_NAME: This constant is the name of your company or department and
has a blank default value. The Company Name is required.
• COMPANY_ID: This constant is the ID of your company or department. The default
value is set to the identifier, "yymmddhhnnssms".
• INITIAL_DATA_GROUP_NUMBER: This constant represents the initial Data
Group number used by PaperVision Enterprise. The default value is "1".
• PROJECT_NAME: This constant indicates the name of your project. The default
value is set to "Project Name".
• PV_FOLDER_ROOT_PATH: This constant specifies the root path containing all
folders (used in the Folder view in PaperVision Enterprise). Enter the root path
between the quotes (e.g., C:\\Exports\\PVEXml\\FolderRootPath\\).
• DOCUMENT_MAX_PER_DATAGROUP: This constant indicates the maximum
number of documents per data group. The default value is "1000", which is the
recommended value for XML files.
• MAX_EXPORT_SIZE: This constant indicates the maximum export file size (in
MB), which defaults to a value of "600".
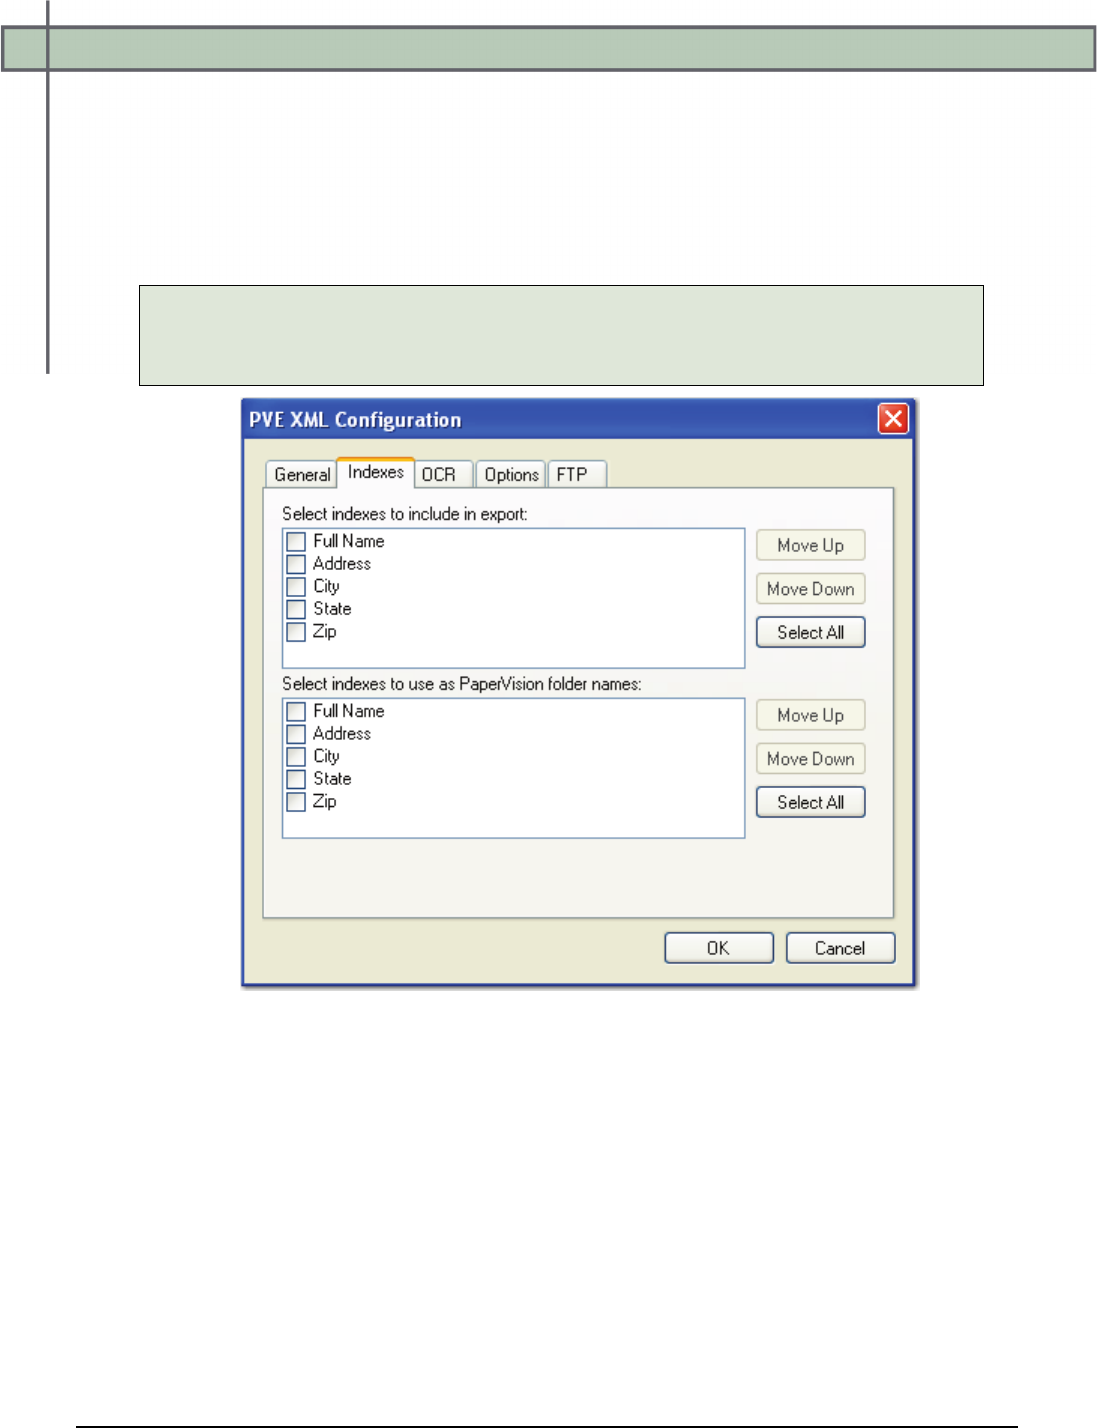
Chapter 13 – Custom Code
PaperVision® Capture Administration Guide 409
PVE XML - Indexes
In the Indexes tab, you can select the index values that will appear in the export by double-
clicking within the appropriate check boxes. Alternatively, click the Select All button to
include all indexes in the export. You can also click Deselect All to remove all selections.
To change the order in which the indexes display, single-click an index name (to highlight
it), and then click the Move Up or Move Down buttons.
Tip:
Single-click an index name to move it up or down the list. Double-click an index
name to include it in the export.
PVE XML Configuration - Indexes
To edit the indexes in the resulting export script, you can modify the
INDICES_TO_INCLUDE and PV_FOLDER_INDICES constants described below:
• INDICES_TO_INCLUDE: This constant determines the index values included in
the export file. To include all indices, leave the array blank.
• PV_FOLDER_INDICES: This constant determines the index value(s) representing
each folder (used in the Folder view in PaperVision Enterprise). If you leave the array
blank, no index values will be included.
Chapter 13 – Custom Code
PaperVision® Capture Administration Guide 410
PVE XML - OCR
When you configure the properties in the OCR tab, you can modify constant values that
appear in the resulting export script. Descriptions for each constant value are listed below.
PVE XML Configuration - OCR
• OCR_ENGINE: This constant specifies the OCR engine (Nuance or Open Text) that
processes OCR data for the export.
• OCR_CONVERTER_CODE: This constant specifies the OCR converter code, such
as PDF, Text, etc., whose output format is used to export full-text data. When no value
is defined (default setting), both images and associated full-text data will be exported.
If you select the PaperVision Full-Text OCR converter, only full-text data will be
exported (associated images will not be exported).
• OCR_JOB_STEP_NAME: This constant specifies the job step whose full-text data
are used for the export. No value is defined by default, so full-text data from the
current job step are used for the export.
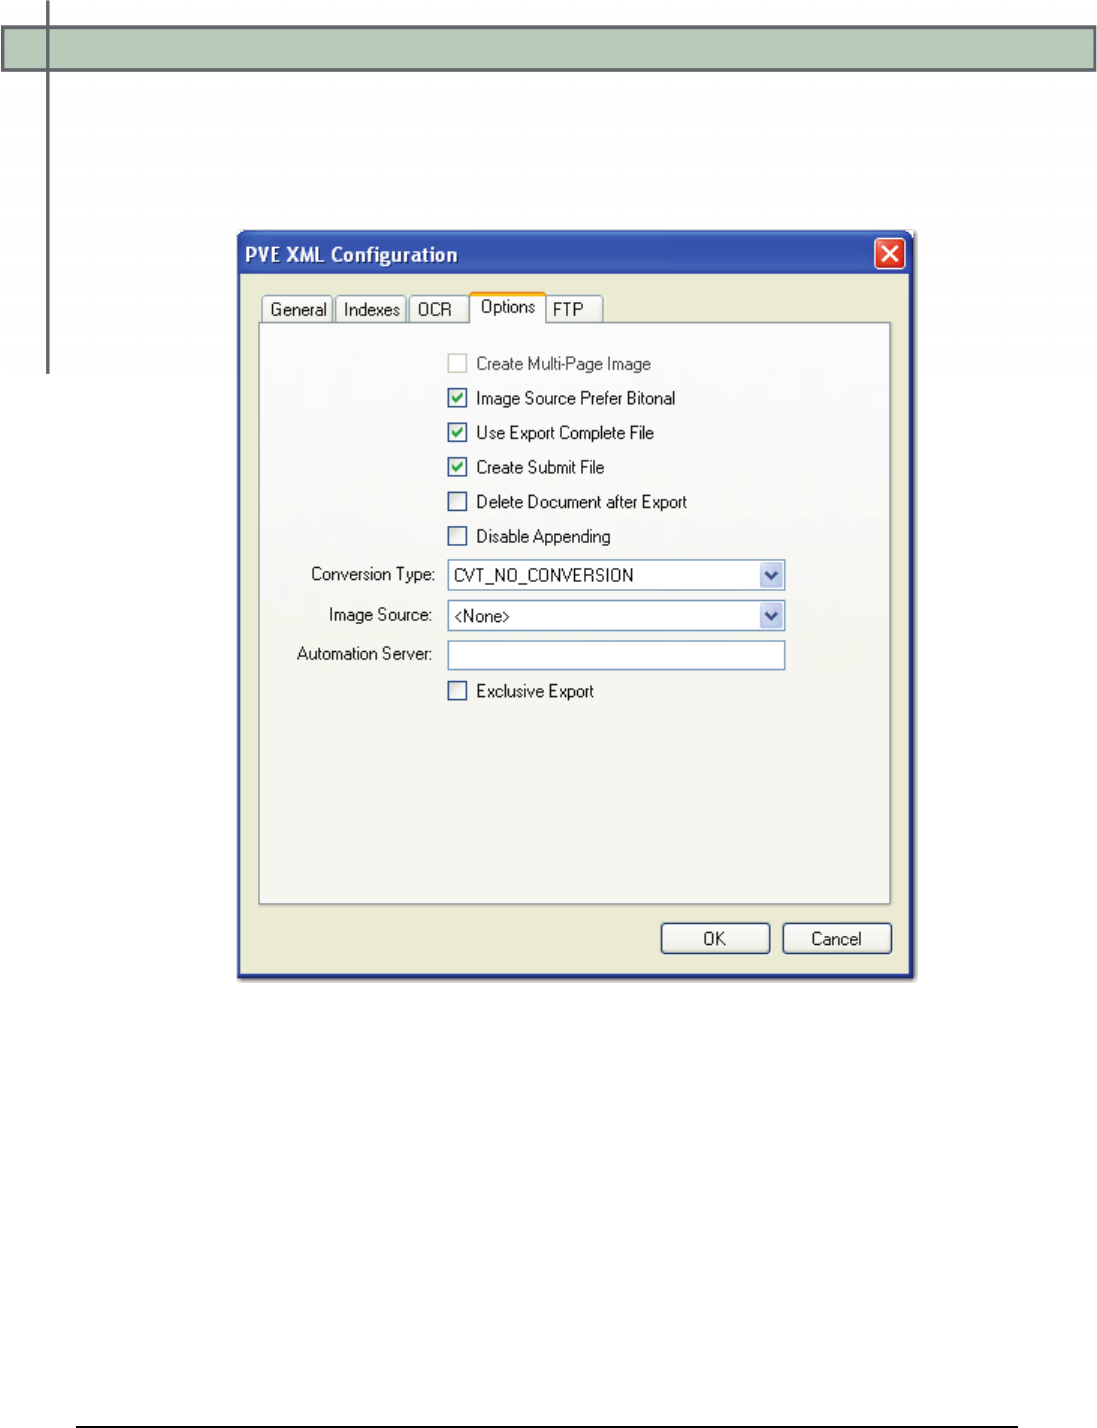
Chapter 13 – Custom Code
PaperVision® Capture Administration Guide 411
PVE XML - Options
When you configure the properties in the Options tab, you can modify constant values
that appear in the resulting export script. Descriptions for each constant value are listed
below.
PVE XML Configuration - Options
• CREATE_MULTI_PAGE_IMAGE: Used in conjunction with
CONVERSION_TYPE, this constant determines whether exported images are multi-
page or single-page.
• IMG_SRC_PREFER_BITONAL_IMAGES: This constant is applicable to dual-
stream scanners and determines whether to export bitonal or color images. When set to
True, which is the default setting, bitonal images will be exported.
Chapter 13 – Custom Code
PaperVision® Capture Administration Guide 412
PVE XML - Options
• USE_EXPORT_COMPLETE_FILE: This constant, set to True by default,
generates an "export.complete" file once an export has reached its maximum file size,
so data will no longer be appended to the export. When set to False, the
"export.complete" file is not generated, so data may be appended to export folders that
have not reached their maximum size.
If you set this constant to False, for example, and the following four folders are
available under the ROOT_PATH with the MAX_EXPORT_SIZE defined as 600
MB:
1. Folder_1: 600 MB
2. Folder_2: 400 MB
3. Folder_3: 600 MB
4. Folder_4: 100 MB
Since the maximum export size has been reached in Folder_1, Folder_2 will be
used as the export folder, and the "export.complete" file will not be generated.
Tip:
By default, the lockedPath (working directory) for any export is returned by
calling GetNextLockedPath(). If an export should contain this constant value, the
following line in the Script Editor, which is available to use in all exports, can be
changed to:
lockedPath = GetNextLockedpath(root, MAX_EXPORT_SIZE, true)
• CREATE_SUBMIT_FILE: Enable this option to automatically generate a
DATAGRP.SUBMIT file. If you are importing the data group into PaperVision
Enterprise via a Monitored Import Path or via Data Transfer Manager, this file is
required before the import can run in PaperVision Enterprise.
• DELETE_DOCUMENT_AFTER_EXPORT: This constant specifies whether
documents are deleted after they have been exported (set to False by default).
• DISABLE APPENDING: This constant is set to False by default. When set to True,
exported images will not be appended to export folders whose maximum file sizes
have not been reached.
• CONVERSION_TYPE: This constant determines the type of image file created
during the export. The default value, CVT_NO_CONVERSION, does not convert
images during the export. If exporting to a format that supports both single and multi-
page images, you must set the CREATE_MULTI_PAGE_IMAGE constant to True if
you want to create multi-page images; otherwise single page images will result. For
example, if you set this to CVT_TIFF_G4_MEDJPG, a TIFF image is created during
the export. If the source image is binary, it will create a TIFF using Group 4
compression; if the source image is color (.jpg or .bmp), it will create a TIFF using
Medium JPEG compression. For a list of file types that can be converted to during the
export, see the Enumerations section in this chapter.
Chapter 13 – Custom Code
PaperVision® Capture Administration Guide 413
PVE XML - Options
• IMG_SRC: This constant determines the job step whose images are used for the
export. The default selection, <None>, uses the most recent image prior to exporting.
To use images from another job step, select the name of the step from the drop-down
list.
• AUTOMATION_SERVER: If you specify an automation server (in the
MACHINENAME_INSTANCE format), your specified server will process exports
and FTP one at a time in the ROOT_PATH location. When one or more automation
servers are specified, separate folders may be created for multiple exports and FTP
that are processed simultaneously.
If you leave the Automation Server field blank during export configuration, all
servers will be used to process the exports or FTP. If you are using multiple
automation servers, separate each server name with a comma. Alternatively, you can
enter wildcards in this field. In addition, values that you enter in this field are not
case-sensitive.
Note:
If using multiple automation services and you specify multiple values for the
AUTOMATION_SERVER constant (or, if using multiple automation
services and you do not specify a value for the AUTOMATION_SERVER
constant), your exported data may output to multiple folders (e.g., data
groups).
• EXCLUSIVE_EXPORT: This constant determines whether to create separate
folders for multiple exports that are processed simultaneously. When set to True, only
one export will be processed at a time in the ROOT_PATH location. If two or more
exports access the same ROOT_PATH location, an error message will appear in the
Windows Event Viewer, indicating the export folder is already in use.
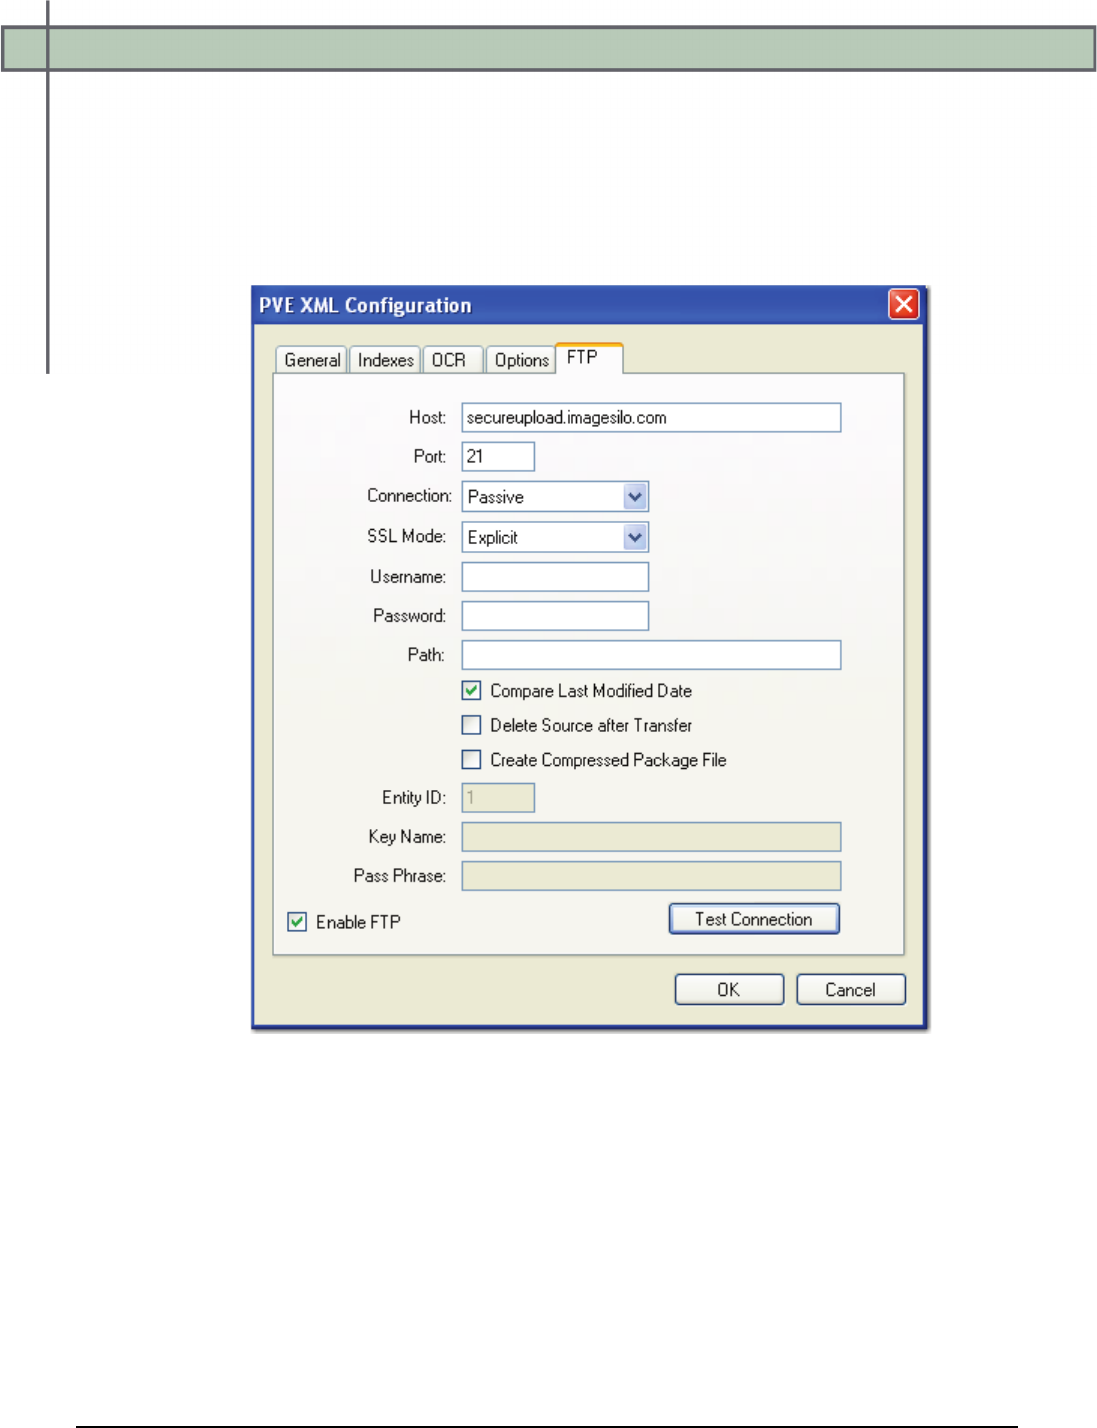
Chapter 13 – Custom Code
PaperVision® Capture Administration Guide 414
PVE XML - FTP
The FTP tab contains settings to enable you to securely transfer data to an FTP site. Original
data files can be transferred in their original state, or they can be placed in a compressed
package file. When you configure the properties in the FTP tab, you can modify constant
values that appear in the resulting export script. Descriptions for each constant value are listed
below.
PVE XML Configuration - FTP
• FTP_HOST: This constant specifies the FTP host site name used for the export.
• FTP_PORT: This constant specifies the command port number that will be used to
connect to the remote FTP server. FTP communications are typically initiated on port
21.
• FTP_CONNECTION: This constant specifies the type of connection that will be
created. During an active connection, the remote FTP server specifies the data port
number that will be used. During a passive connection, PaperVision Capture specifies
the data port number that will be used.

Chapter 13 – Custom Code
PaperVision® Capture Administration Guide 415
PVE XML - FTP
• FTP_ENCRYPTION: This export supports fully encrypted FTP communications
using SSL (also known as FTPS). The remote FTP server must also support this
feature in order to take advantage of the export's capabilities. You can select one of
the following SSL modes:
1. Automatic SSL indicates the server will use SSL encryption, but will attempt
to automatically determine whether to use Implicit or Explicit SSL.
2. Implicit SSL indicates the SSL negotiation will start immediately after the
FTP connection is established.
3. Explicit SSL indicates the connection will be established in plain text and then
explicitly starts the SSL negotiation.
4. None (no SSL encryption) indicates a standard FTP, non-encrypted session
connection will be used.
• FTP_USERNAME: This constant specifies the user name that will be used to
authenticate to the remote FTP server.
• FTP_PASSWORD: This constant specifies the password that will be used to
authenticate to the remote FTP server. If desired, you can expose the password in the
Script Editor by inserting the tilde character (~) prefix before the password (e.g.,
~password).
• FTP_PATH: This constant specifies the folder name on the FTP site that stores the
exported data. By default, this field is blank, and will write data to the user's home
directory as specified by the FTP server.
For example, other possible paths include the following:
1. / (root)
2. FolderA (subdirectory under home directory)
3. /FolderA (subfolder under root path)
• FTP_COMPARE_LAST_MODIFIED_DATE: For an operation type related to
data groups or package files, the agent will automatically record the last modified
date of the file that is being processed. When the same job is processed (and
potentially the same file), the last modified date of the previous run is compared to
the current, last modified date. If the file has not changed, it will not be processed
again.
For data group processing, this will also allow users to perform incremental data
group processing. Once the data group has been changed, any data group files (i.e.,
images) that have a modified date/time greater than or equal to the previous run's
database (i.e., DATAGRP.MDB or DATAGRP.XML) last modified date/time will
be processed.
• FTP_DELETE_SOURCE_AFTER_EXPORT: Once the data has been
successfully transferred, this constant allows the agent to delete the source data.
• FTP_ENABLE_PACKAGE: When pushing data groups or files to a remote site, you
can increase transfer speed by sending a single, large file rather than hundreds or
thousands of small files. This option causes the agent to create a compressed package
file that increases transfer speeds and security (if encryption is enabled).

Chapter 13 – Custom Code
PaperVision® Capture Administration Guide 416
PVE XML - FTP
• FTP_ENTITY_ID: When the export is configured to create compressed package
files, the Entity ID and Encryption values are placed into the package file to allow the
remote PaperFlow system to decrypt the data. This constant specifies the ID of the
remote entity whose encryption key will be used to decrypt the package file.
• FTP_KEY_NAME: This constant specifies the name of the encryption key used to
decrypt the package file.
• FTP_PASS_PHRASE: For compressed package files, this constant specifies a user-
defined pass phrase that is passed through a SHA-2 algorithm (Secure Hashing
Algorithm) to generate a 256-bit hash.
• FTP_ENABLE: This constant specifies whether FTP has been enabled for the
export.
Testing FTP Connections
After you have configured the FTP settings, click the Test Connection button to ensure the
connection is valid. If you successfully connected to the site, click OK in the Success prompt.

Chapter 13 – Custom Code
PaperVision® Capture Administration Guide 417
SharePoint
The SharePoint export creates a file that can be used to import PaperVision Capture data into
a Microsoft® SharePoint® site.
Note:
Only Microsoft SharePoint 2007 (on Windows Server 2003 or 2008) or Microsoft
SharePoint 2010 (on Windows Server 2008) are supported for this export.
To configure the SharePoint export:
1. From the Select Custom Code Generator dialog box, double-click the SharePoint
generator, and the tabbed SharePoint Configuration - General dialog box appears.
SharePoint Configuration - General
2. You must configure all properties (described in the next page) in the General tab.
3. Proceed to the Indexes tab. If you entered valid SharePoint data, you can map
PaperVision Capture index field names to SharePoint columns.
Note:
An error message will inform you when you have entered invalid SharePoint
data.

Chapter 13 – Custom Code
PaperVision® Capture Administration Guide 418
4. If applicable, map the appropriate index field names to SharePoint columns.
5. Proceed to the OCR and Options tabs to modify the appropriate properties that are
described below.
6. When you have finished configuring the export, click OK.
SharePoint - General
When you configure the properties in the General tab, the following constant values will
appear in the resulting export script:
• SHAREPOINT_BASE_URL: This constant specifies the Microsoft SharePoint host
site name and port used for the export.
• SHAREPOINT_USERNAME: This constant specifies the Microsoft SharePoint
user name.
• SHAREPOINT_PASSWORD: This constant specifies the Microsoft SharePoint
user's password. By default, the SharePoint password is encrypted in the Script Editor.
If desired, you can expose the password in the Script Editor by inserting the tilde (~)
prefix before the password (e.g., ~password).
• SHAREPOINT_DOMAIN: This constant specifies the Microsoft SharePoint domain
name.
Note:
If you select the Authenticated User option, the database connection will
use Windows Authentication credentials. Entering a user name and password
for the database will supercede the Windows Authentication credentials.
• SHAREPOINT_LIBRARY: This constant specifies the Microsoft SharePoint
library.
• CONTENT_TYPE: If applicable, select the SharePoint content type. If content types
have been created in the SharePoint library, they will appear in this list.
Note:
For more information, see the next section on Content Types.
• ROOT_PATH: This is the location on your SharePoint Server where the folders will
be created once the automation service processes the step. If you do not specify a
value for the Root Path property, no folders will be created on the SharePoint Server.
• LOCAL_TEMP_FOLDER: This constant specifies the local folder path where the
Microsoft SharePoint export is temporarily stored on your local machine prior to
moving to the Microsoft SharePoint site.

Chapter 13 – Custom Code
PaperVision® Capture Administration Guide 419
Content Types
When exporting documents to a SharePoint site, you can optionally link documents to content
types. Content types contain limited subsets of index fields in a SharePoint library. For
example, a Financial Documents SharePoint library can contain three content types including
Purchase Orders, Invoices, and Expense Reports. Each content type can be associated with a
specific subset of index fields. Document content types, the default selection, include all
index fields in the library. Content types are independent of file types, so one content type can
be applied to multiple file types, such as Microsoft Word documents, Excel spreadsheets, and
PowerPoint presentations.
For example, Purchase Orders, Invoices, and Expense Reports content types in a Financial
Documents library can be associated with the following index fields:
Content Type
Check
Number
Check
Date
Company
Name
PO
Number
P PO Date
Invoice
Number
Invoice
Date
Amount
Purchase Orders
x
x
x
x
Invoices
x
x
x
x
x
x
x
x
Expense Reports
x
x
x
Information on SharePoint 2007 and 2010 content types, respectively, can be found in the
following sites:
• http://technet.microsoft.com/en-us/library/cc262735(office.12).aspx
• http://technet.microsoft.com/en-us/library/cc262735.aspx
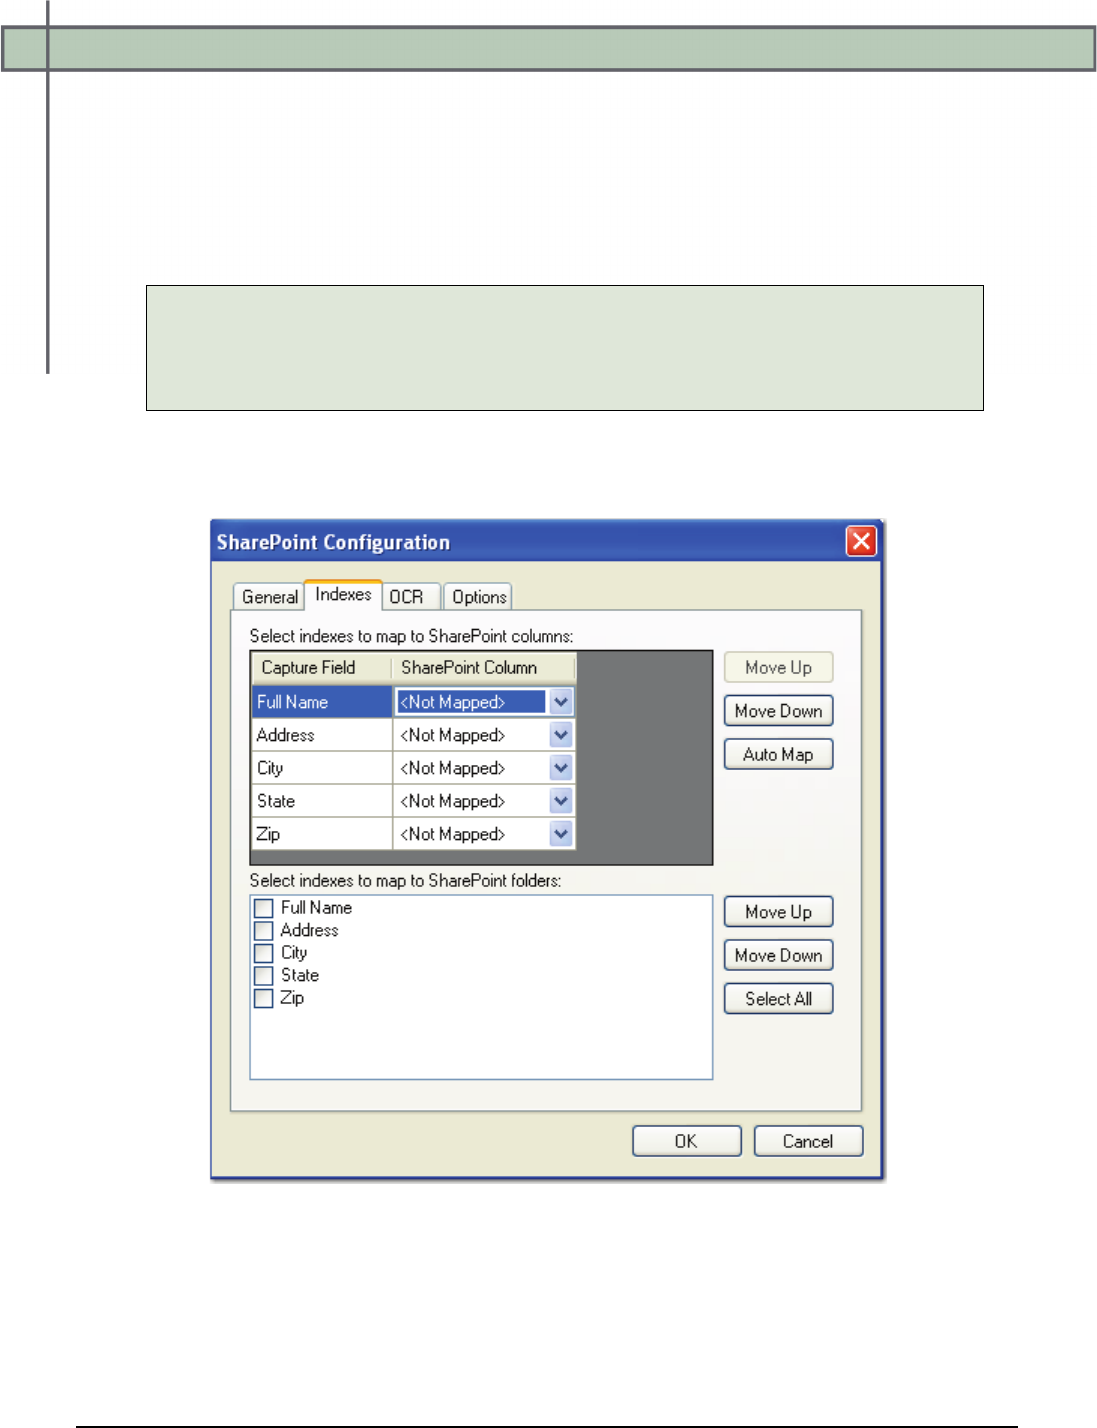
Chapter 13 – Custom Code
PaperVision® Capture Administration Guide 420
SharePoint - Indexes
In the Indexes tab, you can map PaperVision Capture index field names to SharePoint
column names. PaperVision Capture index field names appear in the left column. From the
SharePoint Column Name drop-down list, select the column name that maps to the
PaperVision Capture index field name. To automatically map a PaperVision Capture index
field to a similarly-named Microsoft SharePoint column, click the Auto Map button.
Note:
Some PaperVision Capture index field types may not be supported in Microsoft
SharePoint. Therefore, some index fields may not be mapped to SharePoint columns
in the export.
Alternatively, if a SharePoint column does not exist, you can create a new column that will
be mapped to the corresponding index field. To do this, select <Create New> from the
SharePoint Column drop down list.
SharePoint Configuration - Indexes
Chapter 13 – Custom Code
PaperVision® Capture Administration Guide 421
To edit the indexes in the resulting export script, you can modify the
INDICES_TO_INCLUDE constant described below.
• INDICES_TO_INCLUDE: This constant determines the index values mapped from
PaperVision Capture to Microsoft SharePoint columns. By default, no PaperVision
Capture index fields are mapped to SharePoint columns. To create new SharePoint
columns that automatically map to existing PaperVision Capture index fields, select
<Create New> from the drop-down list. To automatically map PaperVision Capture
index fields to similarly-named SharePoint columns, select the Auto Map button.
To provide a mapping between fields, the following format is required:
<Capture Field>:<SharePoint>
Example 1: "Field1", "Field 2", "Field 3", etc.
Note:
This format can be used when the same field names exist in both
PaperVision Capture and your Microsoft SharePoint site.
Example 2: "Field1:Field1", "Field2:Field2:", etc.
Note:
This constant is optional, so when an empty array is assigned to
INDICES_TO_INCLUDE, Microsoft SharePoint's metadata is not
populated.
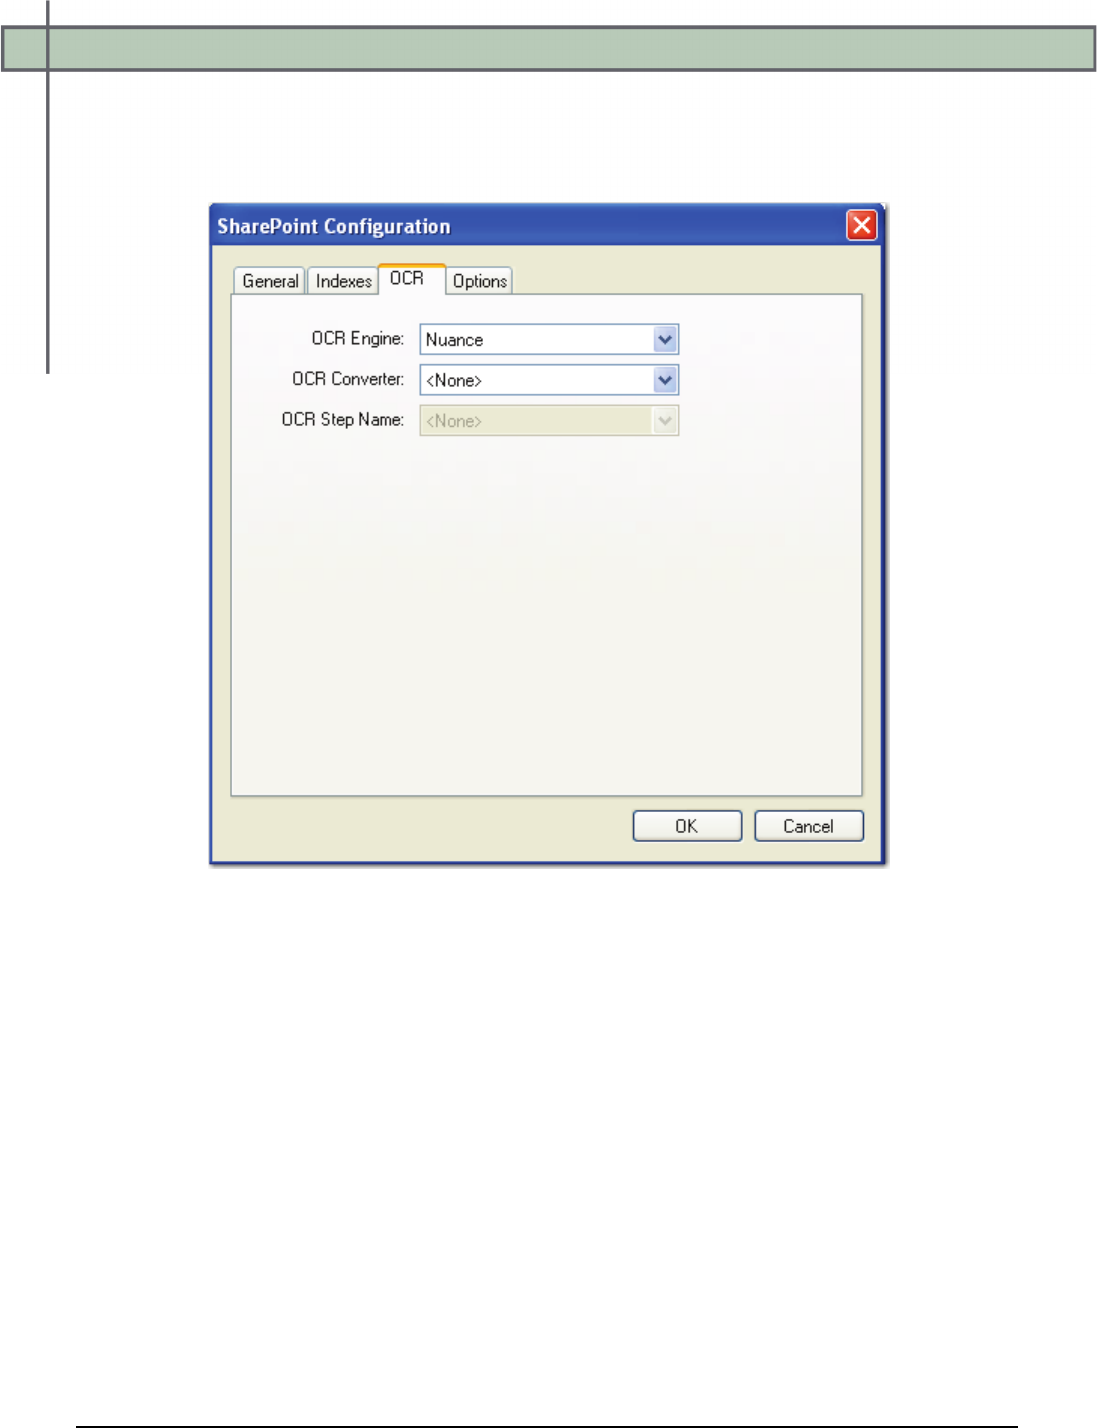
Chapter 13 – Custom Code
PaperVision® Capture Administration Guide 422
SharePoint - OCR
When you configure the properties in the OCR tab, you can modify constant values that
appear in the resulting export script. Descriptions for each constant value are listed below.
SharePoint Configuration - OCR
• OCR_ENGINE: This constant specifies the OCR engine (Nuance or Open Text) that
processes OCR data for the export.
• OCR_CONVERTER_CODE: This constant specifies the OCR converter code, such
as PDF, Text, etc., whose output format is used to export full-text data. When no value
is defined (default setting), both images and associated full-text data will be exported.
aperVision Capture was installed.
• OCR_JOB_STEP_NAME: This constant specifies the job step whose full-text data
are used for the export. No value is defined by default, so full-text data from the
current job step are used for the export.

Chapter 13 – Custom Code
PaperVision® Capture Administration Guide 423
SharePoint - Options
When you configure properties in the Options tab, you can modify constant values that
appear in the export script. Descriptions for each constant value are listed below.
SharePoint Configuration - Options
• IMG_SRC_PREFER_BITONAL_IMAGES: This constant is applicable to dual-
stream scanners and determines whether to export bitonal or color images. When set to
True, which is the default setting, bitonal images will be exported.
• DELETE_DOCUMENT_AFTER_EXPORT: This constant specifies whether
documents are deleted after they have been exported (set to False by default).
• CONVERSION_TYPE: This constant determines the type of image file created
during the export. The default value, CVT_NO_CONVERSION, does not convert
images during the export. If exporting to a format that supports both single and multi-
page images, you must set the CREATE_MULTI_PAGE_IMAGE constant to True if
you want to create multi-page images; otherwise single page images will result. For
example, if you set this to CVT_TIFF_G4_MEDJPG, a TIFF image is created during
the export. If the source image is binary, it will create a TIFF using Group 4
compression; if the source image is color (JPG or BMP), it will create a TIFF using
Medium JPEG compression. For a list of file types that can be converted to during the
export, see the Enumerations section in this chapter.
Chapter 13 – Custom Code
PaperVision® Capture Administration Guide 424
• IMG_SRC: This constant determines the job step whose images are used for the
export. The default selection, <None>, uses the most recent image prior to exporting.
To use images from another job step, select the name of the step from the drop-down
list.
• AUTOMATION_SERVER: If you specify an automation server (in the
MACHINENAME_INSTANCE format), your specified server will process exports
one at a time in the ROOT_PATH location. When one or more automation servers are
specified, separate folders may be created for multiple exports that are processed
simultaneously.
If you leave the Automation Server field blank during export configuration, all servers
will be used to process the exports. If you are using multiple automation servers,
separate each server name with a comma. Alternatively, you can enter wildcards in
this field. In addition, values that you enter in this field are not case-sensitive.
Note:
If using multiple automation services and you specify multiple values for the
AUTOMATION_SERVER constant (or, if using multiple automation
services and you do not specify a value for the AUTOMATION_SERVER
constant), your exported data may output to multiple folders (e.g., data
groups).
Chapter 14 – Capture Batches
PaperVision® Capture Administration Guide 425
In PaperVision Capture, a batch is a collection of documents and their
associated index name-value pairs and statistics that are moved as a logical unit
of work through a job. In the Administration Console, you can manage an entity's
batches by assigning batch ownership and other properties.
To open the Capture Batches screen:
1. Select Entities > Company > Capture Batches.
2. Dokuble-click either the Batch Management or Batch Statistics icon.
Batch Management
The Batch Management screen automatically tracks batches created in the PaperVision
Capture Operator Console and displays user and job data specific to each batch. If a batch is
not owned, you can edit the Batch Name, Batch Description, Date/Time, Administrative
Priority, Job Step, Scheduled Destruction, and Retain Statistics fields. If a batch is owned or
awaiting automated processing, you can change its status to ‘Not Owned’ so you can edit
these fields. Additionally, you can filter the batch list so you can quickly locate batches that
match your specified criteria.
Tips:
Move the pointer over a row to view a tool-tip summary of the batch. You can also
right-click on the batch and select the appropriate operation from the context menu.
Batch Management Grid

Chapter 14 – Capture Batches
PaperVision® Capture Administration Guide 426
Viewing the Properties of a Batch
To view the properties of a batch:
1. Highlight the batch in the list, and then click the Properties icon.
Batch Properties
2. To view a summary of each batch property, highlight the property in the grid, and a
summary of the property appears at the bottom left. Read-only fields appear with gray
text; editable fields appear with black text.
• Batch ID: Unique identifier of the batch in the database
• Internal Name: Unique name assigned and used by the system to store batch-
related files and metadata
• Name: Batch name assigned by the user (255 characters maximum)
• Description: Description assigned by the user (255 characters maximum)
• Date/Time: Date and time assigned by the user
• Status: Current status of the batch, including Owned, Unowned, In Transmission,
or Automated Processing
a. Owned: A user has assumed ownership of the batch in the Operator
Console.
Chapter 14 – Capture Batches
PaperVision® Capture Administration Guide 427
b. Not Owned: A user has not assumed ownership of the batch in the
Operator Console.
c. In Transmission: The batch is moving from the temporary local batch
repository to the master batch repository.
d. Automated Processing: The PaperVision Capture Automation Service is
currently processing the batch.
• Created: Date and time the batch was created
• Last Update: Most recent date and time that batch record was updated in the
database
• Administrative Priority: Priority (ranging from 0 - 999,999) assigned by an
administrator for the batch (the higher the value, the higher the priority)
• Batch Path: The path in the master batch repository where the batch files reside
• Job: Job name to which the batch is assigned
• Job Description: Description of the job to which the batch is assigned
• Step: Name of the job step in which the batch is currently processing or waiting
Note:
You can transition a batch to the end of the job (and skip all remaining steps)
by selecting the last blank line from this drop-down list. As a result, no
further processing of the batch will occur.
• Step Start: Date and time when the batch entered the job step
• Owned Date/Time: Date and time ownership of the batch was last taken
• Owned By User: User who currently owns the batch
• Owned By Workstation: Workstation where batch is currently owned
• Deleted: Indicates whether the batch has been deleted
• Scheduled Destruction: Date and time when the batch will be destroyed
• Retain Statistics: Indicates whether to retain the batch statistics upon batch
deletion
• Size: Indicates the total batch size in bytes, kilobytes, megabytes, or gigabytes
• Document Count: Number of total documents contained in the batch
• Page Count: Number of total pages contained in the batch
• Image Count: Number of total images contained in the batch
3. Click OK when you are finished viewing and/or changing the properties.
Chapter 14 – Capture Batches
PaperVision® Capture Administration Guide 428
Viewing the Batch History
You can view operations performed on a batch by viewing the batch's history.
To view the history of a batch:
1. Highlight the batch in the grid.
2. Click the History icon.
Batch History
3. The history displays the entry's description, date, user, and workstation information
for each event. To sort a column in ascending or descending order, click the column
header.
4. Click Close.
Chapter 14 – Capture Batches
PaperVision® Capture Administration Guide 429
Filtering the Batch List
The Filter command allows you to search for batches according to your specified criteria.
To filter the list of batches:
1. Click the Filter icon, and the Batch Filter dialog box appears.
Batch Filter
2. Enter the filter criteria to use in the search. See the section on Viewing the
Properties of a Batch for criteria descriptions. Additional criteria include:
• User Date: Date range entered by the user
• Created Date: Date range that the batches were created
• Owned by User: Includes active and inactive users
• Query Type: AND includes every specified criteria in the search; OR includes
any of the specified criteria in the search.
• Maximum Record Count: Maximum number of batch records to display per
page of search results
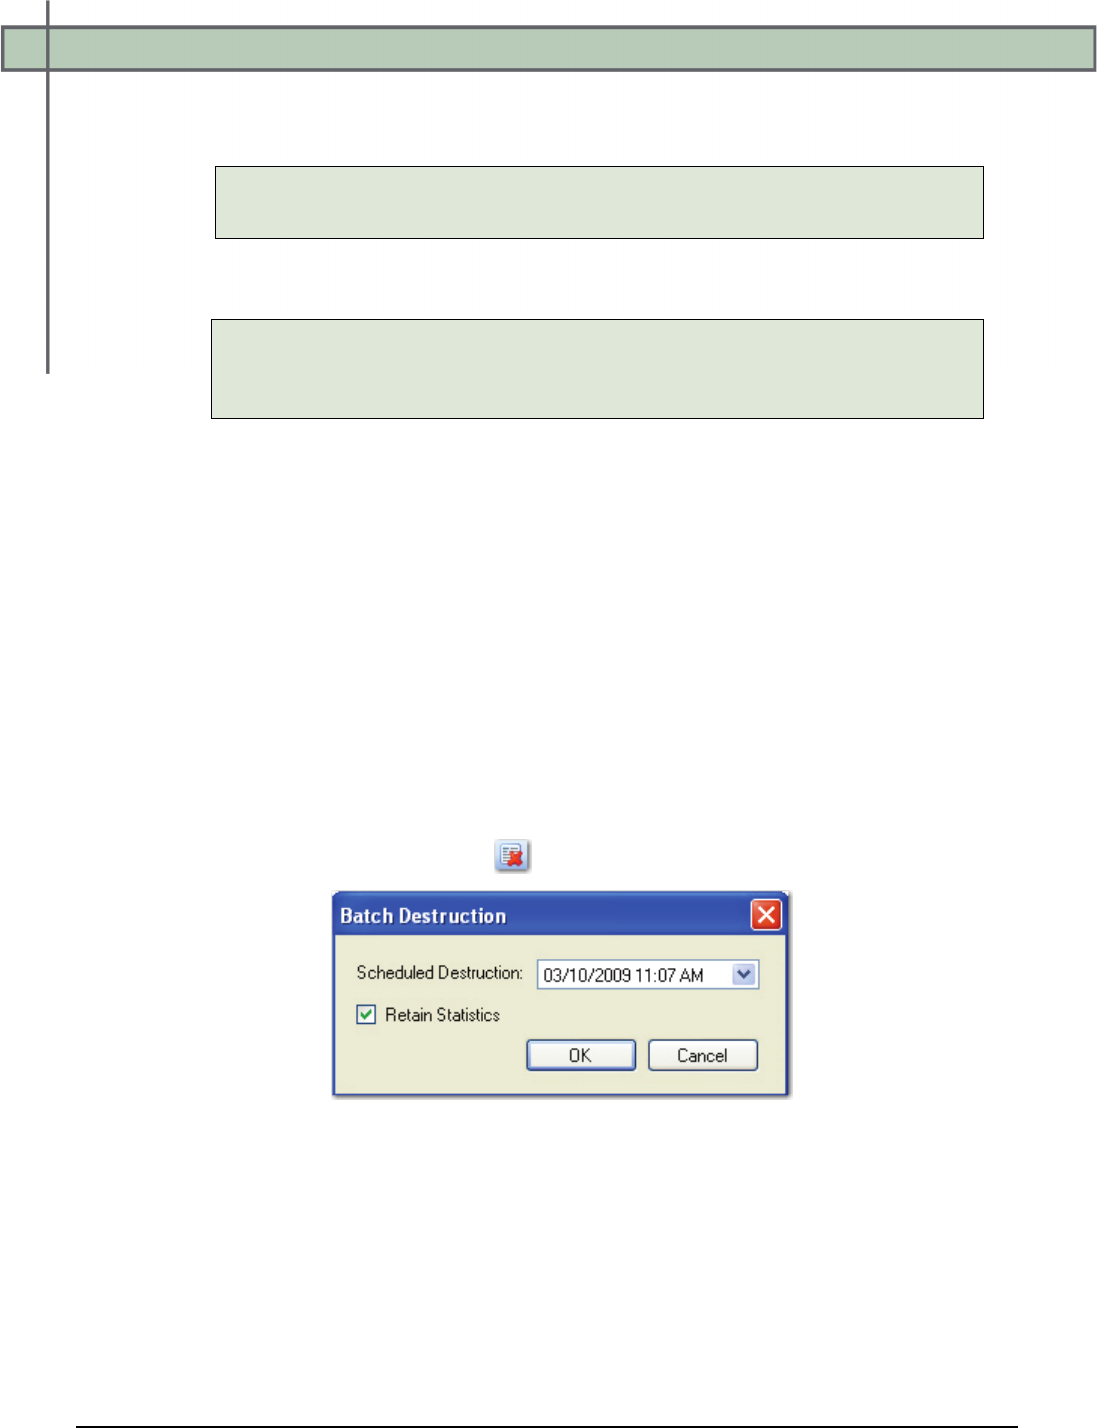
Chapter 14 – Capture Batches
PaperVision® Capture Administration Guide 430
• Show Destroyed: If selected, includes destroyed batches in the search results
• Scheduled Destruction: Date/time that the batches will be destroyed
Tip:
To remove all the filter criteria, click the Clear All button.
3. Click OK to initiate the search, and the Batch Management grid refreshes with your
search results.
Note:
Your most recent Batch Filter settings are retained the next time you open the
Batch Management screen.
Setting the Destruction Date
You can assign the batch destruction date and whether to retain batch statistics for one or
more batches. Only batches marked as “Not Owned” that have not been previously deleted
can be scheduled for destruction.
Setting the batch destruction date does not directly delete a batch; rather, the PaperVision
Capture Automation Service deletes the batch. When a batch is deleted, the image files are
removed from disk, but the batch’s database record (and potentially the statistics) remain in
the database. However, you can filter deleted batches so they do not appear in the Batch
Management grid.
To set the destruction date:
1. Highlight one or more batches in the grid.
2. Click the Set Destruction Date icon. The Batch Destruction dialog box appears.
Batch Destruction
3. From the Scheduled Destruction drop-down list, select the date and time, which
default to the current date and time.
4. Or, enter the date.
5. Select Retain Statistics to keep the batch statistics in the database after batch
destruction.
6. Click OK.
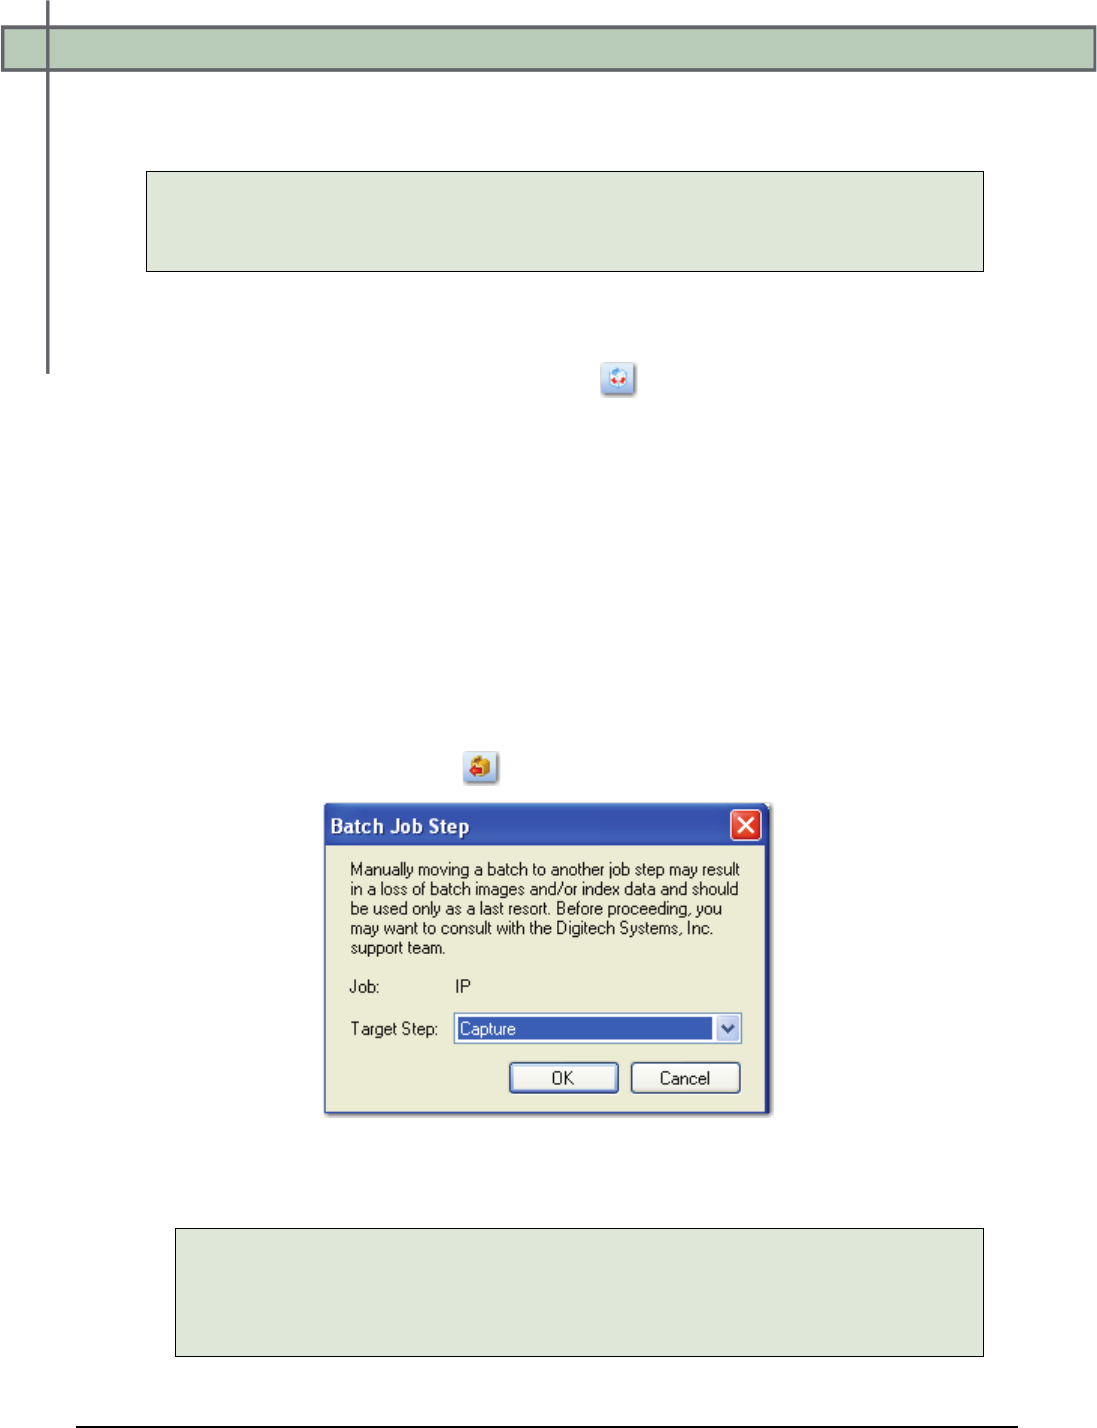
Chapter 14 – Capture Batches
PaperVision® Capture Administration Guide 431
Changing the Status to 'Not Owned'
You can change the status of one or more owned batches to the ‘Not Owned' status.
Note:
If you change the batch status to 'Not Owned' while an operator is working on a
batch, the operator's changes will be lost.
To change the batch status:
1. Highlight the batch in the grid.
2. Click the Change Status to 'Not Owned' icon.
3. Click Yes to update the selected batches.
4. Click OK to confirm the update.
Changing the Job Step
You can assign one or more batches to a different step within the same job. Multiple batches
may only be moved to another job step if (1) all of the selected batches are "Not Owned" and
(2) all of the selected batches are associated with the same job.
To change the job step:
1. Highlight one or more batches in the grid.
2. Click the Change Job Step icon. The Batch Job Step appears.
Batch Job Step
3. Select from the Target Step drop-down list.
Note:
You can transition a batch to the end of the job (and skip all remaining steps) by
selecting the last blank line from this drop-down list. As a result, no further
processing of the batch will occur.
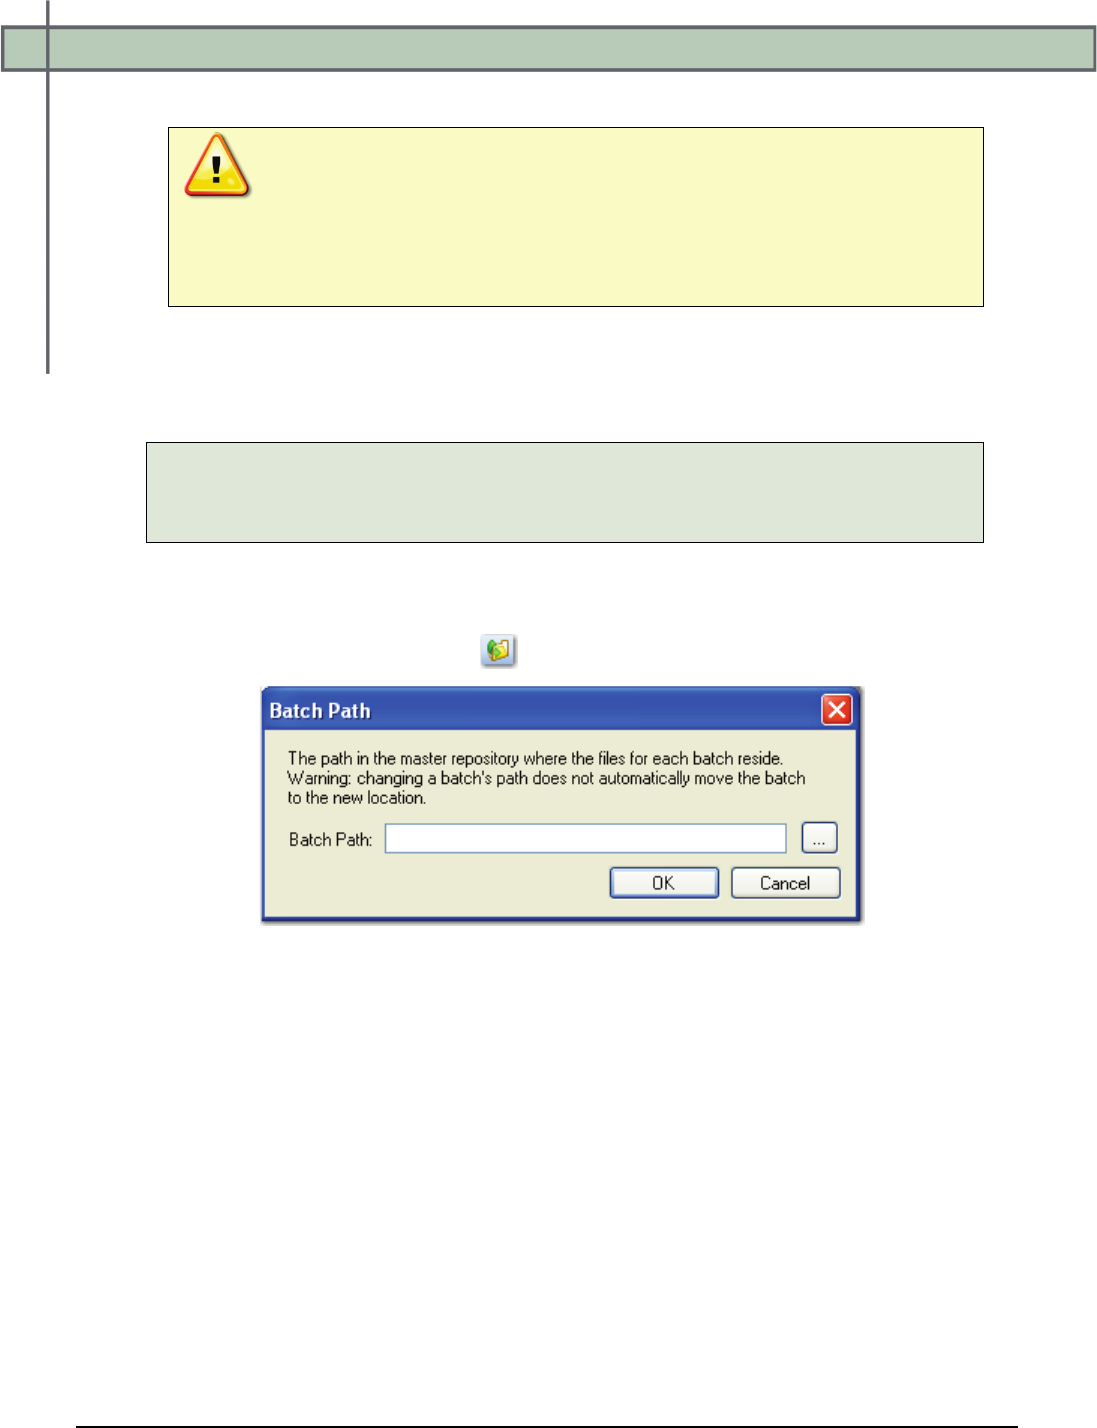
Chapter 14 – Capture Batches
PaperVision® Capture Administration Guide 432
4. Click OK.
WARNING:
Manually moving a batch to another job step may result in a loss of batch images
and/or index data and should be used only as a last resort. Before proceeding, you
may want to consult with Digitech Systems' Technical Support.
Changing the Batch Path
You can change one or multiple batch paths (for unowned batches) simultaneously.
Note:
This operation does not physically move batches; rather, the pointer in the database
to the batch’s location is updated.
To change the batch path:
1. Highlight one or more batches in the grid.
2. Click the Change Batch Path icon. The Batch Path dialog box appears.
Batch Path
3. Enter the new Batch Path or browse to the new location.
4. Click OK.

Chapter 14 – Capture Batches
PaperVision® Capture Administration Guide 433
Exporting Batch Metadata
You can export one or more batches' metadata to an XML file. The Export command does not
export documents, images, and associated index values.
To export batch metadata:
1. Highlight the batch in the list.
2. Click the Export icon.
3. Enter the File Name of the XML file in the Save As dialog box.
4. Click Save.
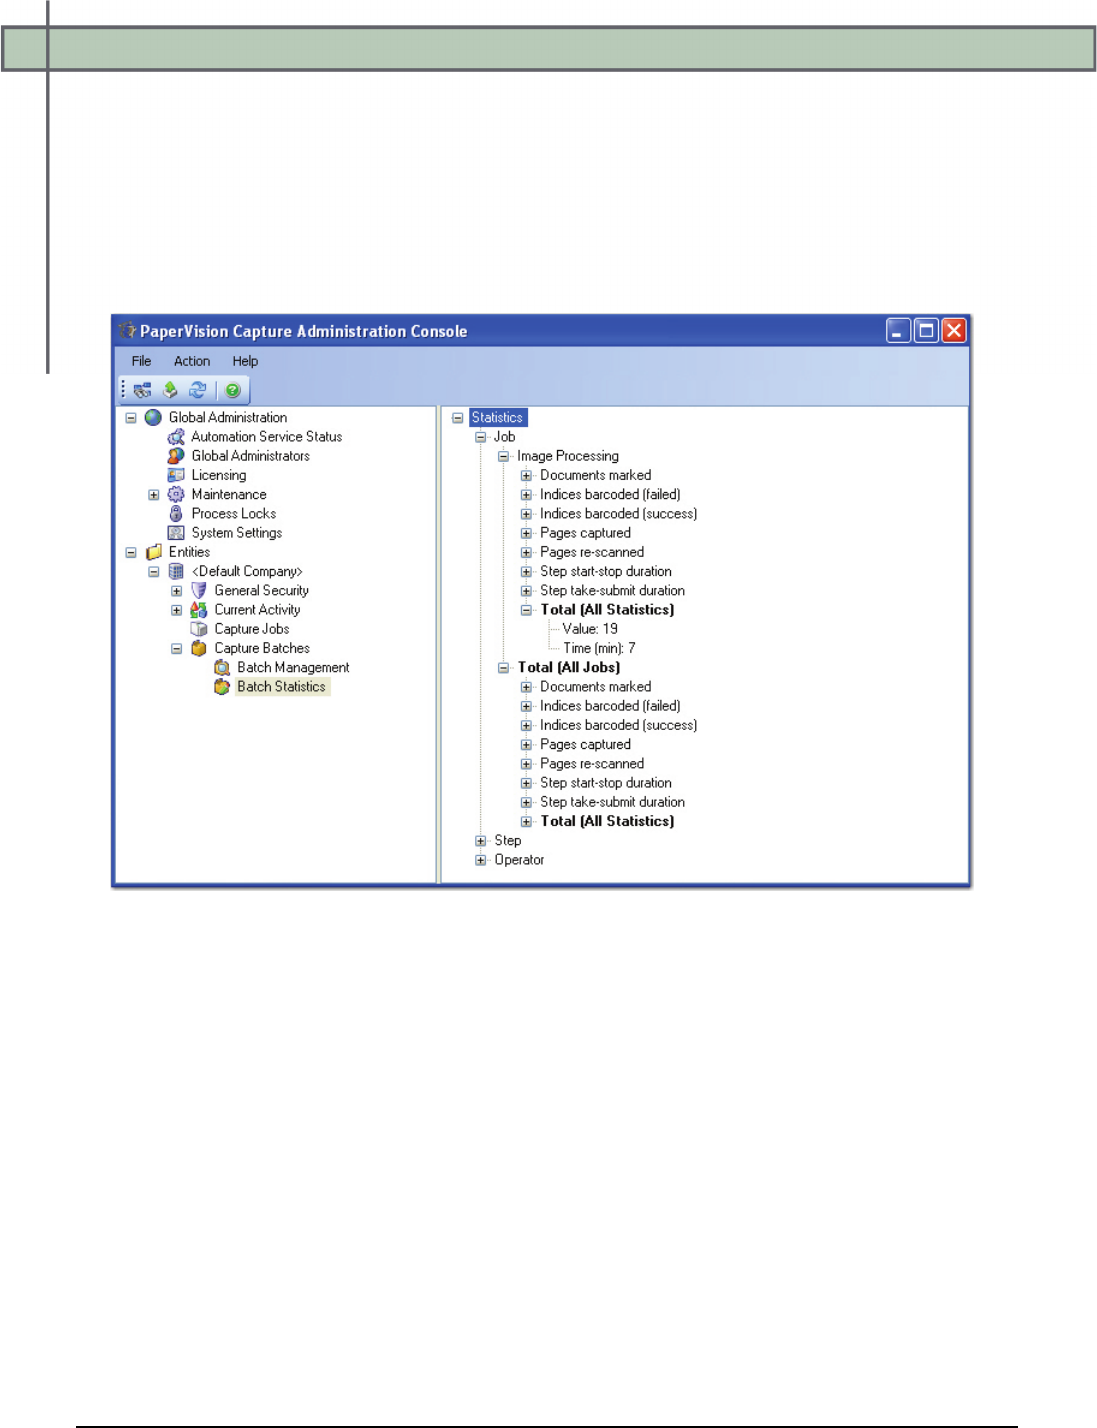
Chapter 14 – Capture Batches
PaperVision® Capture Administration Guide 434
Batch Statistics
Batch statistics are updated as operators submit batches in the PaperVision Capture Operator
Console and as batches are processed by the PaperVision Capture Automation Server. You
can view each set of statistics per job, job step, operator, or batch. Totals for all jobs, job
steps, operators, and batches are also included for your reference. Additionally, you can print
a representation of the statistics you have expanded in the tree. To view the Batch Statistics
screen, open Entities > Company > Capture Batches > Batch Statistics.
Batch Statistics
Each statistic and its corresponding value for each STATISTICTYPE column in the
PVCAP_BATCHSTATISTIC database table are described in the following section.
Characters Saved
This value is the total number of characters the operator has entered upon saving index values.
This statistic only applies to the manual Capture and Indexing steps.
Database Statistic Type: PVCAP_CharactersSaved
Chapter 14 – Capture Batches
PaperVision® Capture Administration Guide 435
Characters Saved (Automated Match and Merge)
This value is the total number of characters populated (upon index values being saved) only
via Match and Merge.
Database Statistic Type: PVCAP_CharactersSaved_AutoMM
Characters Saved (Excluding Match and Merge)
This value is the total number of characters the operator has entered upon saving index values.
The value excludes characters populated via Match and Merge.
Database Statistic Type: PVCAP_CharactersSaved_NoMM
Document Count
This valued is the total number of documents contained in all batches.
Database Statistic Type: PVCAP_DocumentCount
Documents Deleted
This statistic is the total number of documents deleted in a manual step.
Database Statistic Type: PVCAP_DocumentsDeleted
Documents Marked
This value increments each time the operator completes any of the following:
• Copy Document
• Insert Document Break
• Mark New Document
Note:
This value also increments each time a new document is marked through the
Automated Barcode job step, but does not increment when a new document is
marked through Custom Code execution.
Database Statistic Type: PVCAP_DocumentsMarked
Documents OCRed - Full Text (Success)
This statistic provides a count of documents that have been successfully OCRed (full-text).
Database Statistic Type: PVCAP_DocumentsOCRedFullTextSuccess
Chapter 14 – Capture Batches
PaperVision® Capture Administration Guide 436
Image Count
This statistic is the total number of images contained in all batches.
Database Statistic Type: PVCAP_ImageCount
Index Verification Errors
This number increments each time an error is found during the index verification process.
Database Statistic Type: PVCAP_IndexVerificationErrors
Indexed Documents
This statistic is the total number of documents indexed in a manual step.
Database Statistic Type: PVCAP_IndexedDocuments
Indexed Documents (Match and Merge)
This statistic is the count of documents for which one or more index values have been
successfully populated via match and merge in a manual step.
Database Statistic Type: PVCAP_IndexedDocumentsMM
Indices Barcoded (Failed)
This value increments each time a barcode does not successfully populate an index field.
Note:
This statistic does not include the number of auto document breaks inserted with
each barcode.
Database Statistic Type: PVCAP_IndicesBarcodedFailed
Indices Barcoded (Success)
This value increments each time a barcode successfully populates an index field.
Note:
This statistic does not include the number of auto-document breaks inserted with
each barcode.
Database Statistic Type: PVCAP_IndicesBarcodedSuccess
Chapter 14 – Capture Batches
PaperVision® Capture Administration Guide 437
Indices OCRed (Failed)
This value increments each time the Nuance OCR engine does not successfully populate an
index field.
Database Statistic Type: PVCAP_IndicesOCRedFailed
Indices OCRed (Success)
This value increments each time the Nuance OCR engine successfully populates an index
field.
Database Statistic Type: PVCAP_IndicesOCRedSuccess
Indices Saved
This is the total number of populated indices saved by the operator. This statistic only applies
to the manual Capture and Indexing steps.
Note:
This statistic does not include blank index fields.
Database Statistic Type: PVCAP_IndicesSaved
Indices Saved (Automated Match and Merge)
This is the total number of populated indices saved and increments only when indices are
populated via Match and Merge.
Database Statistic Type: PVCAP_IndicesSaved_AutoMM
Indices Saved (Excluding Match and Merge)
This is the total number of populated indices saved by the operator. The value excludes
indices populated via Match and Merge.
Note:
This statistic does not include blank index fields.
Database Statistic Type: PVCAP_IndicesSaved_NoMM
Nuance OCR Characters
This is the total number of characters detected by the Nuance OCR engine.
Database Statistic Type: PVCAP_OCREngineCharacters

Chapter 14 – Capture Batches
PaperVision® Capture Administration Guide 438
Nuance OCR Decomposition Time
This is the total amount of time the Nuance OCR engine spent on the image's page-layout
composition (i.e. auto-zoning).
Database Statistic Type: PVCAP_OCREngineDecompositionTime
Nuance OCR Full Recognition Time
This is the total amount of time the Nuance OCR engine spent on processing the image,
including the time spent processing the image through all recognition modules and in
checking the subsystem. Additionally, this statistic includes the time spent to recognize the
zones (writing recognition results to the recognition data file).
Database Statistic Type: PVCAP_OCREngineFullRecognitionTime
Nuance OCR Rejected Characters
This is the total number of characters the Nuance OCR engine failed to recognize.
Database Statistic Type: PVCAP_OCREngineCharactersRejected
Nuance OCR Suspect Words
This is the total number of suspect words that the Nuance OCR engine located in the image.
Suspect words must contain at least one character that was not recognized during OCR
processing.
Database Statistic Type: PVCAP_OCREngineWordsSuspect
Nuance OCR Words
This is the total number of words detected by the Nuance OCR engine.
Database Statistic Type: PVCAP_OCREngineWords
Page Count
This is the total number of pages contained in all batches.
Database Statistic Type: PVCAP_PageCount
Pages Barcoded
This statistic displays the count of pages from which one or more barcodes are read in manual
and automated steps.
Database Statistic Type: PVCAP_PagesBarcoded
Chapter 14 – Capture Batches
PaperVision® Capture Administration Guide 439
Pages Barcoded as Document Breaks
This statistic displays the count of pages barcoded as document break sheets in manual and
automated steps.
Database Statistic Type: PVCAP_PagesBarcodedDocumentBreaks
Pages Barcoded for Indices
This statistic displays the count of pages barcoded to populate one or more indices in manual
and automated steps.
Database Statistic Type: PVCAP_PagesBarcodedIndices
Pages Captured
This is the total number of pages captured per job, step, and operator. The counter increments
each time the operator imports a batch, imports an image, scans an image into the batch, and
extracts and copies a region.
Note:
This statistic only counts pages that are added to the batch. However, this statistic
does not include when the operator re-scans an image (performs the Re-Scan Pages
command).
Database Statistic Type: PVCAP_PagesCaptured
Pages OCRed - Full Text (Success)
This statistic provides a count of pages that have been successfully OCRed (full-text).
Database Statistic Type: PVCAP_PagesOCRedFullTextSuccess
Pages Re-scanned
This value is the total number of pages the operator re-scans (performs the Re-Scan Pages
command).
Database Statistic Type: PVCAP_PagesRescanned

Chapter 14 – Capture Batches
PaperVision® Capture Administration Guide 440
Pages Scanned
This statistic tracks the total number of pages scanned. The counter increments each time a
page is scanned, regardless of whether the page is added to the batch.
Note:
Some scanned pages are not added to the batch because of blank page deletion or
because they are break pages that are deleted.
Database Statistic Type: PVCAP_PagesScanned
Step Start-Stop Duration
This is the total amount of time that the operator worked on a job step in the PaperVision
Capture Operator Console.
Database Statistic Type: PVCAP_StepStartStop
Step Take-Submit Duration
This is the total amount of time that elapsed since the operator assumed ownership of the
batch until the operator submitted the batch.
Database Statistic Type: PVCAP_StepTakeSubmit

Chapter 14 – Capture Batches
PaperVision® Capture Administration Guide 441
QC Batch Statistics
QC batch statistics are recorded for Manual and Automated QC steps. The automated
statistics are recorded by the PaperVision Capture Automation Server when the Automated
QC step is executed.
Tags Added - Batch Document Count
This value is the total number of batch (document count) tags added to the batch.
Database Statistic Type: PVCAP_QCTAG-BatchDocumentCountTags
Tags Removed - Batch Document Count
This value is the total number of batch (document count) tags removed from the batch.
Database Statistic Type: PVCAP_QCTAG-BatchDocumentCountTagsRemoved
Tags Added – Batch Index Sequence
This value is the total number of batch (index sequence) tags added to the batch.
Database Statistic Type: PVCAP_QCTAG-BatchIndexSequenceTags
Tags Removed – Batch Index Sequence
This value is the total number of batch (index sequence) tags removed from the batch.
Database Statistic Type: PVCAP_QCTAG-BatchIndexSequenceTagsRemoved
Tags Added – Document Page Count
This value is the total number of document page count tags added to the batch.
Database Statistic Type: PVCAP_QCTAG-DocumentPageCountTags
Tags Removed – Document Page Count
This value is the total number of document page count tags removed from the batch.
Database Statistic Type: PVCAP_QCTAG-DocumentPageCountTagsRemoved
Tags Added – Document Re-Scan
This value is the total number of document re-scan tags added to the batch.
Database Statistic Type: PVCAP_QCTAG-DocumentRescanTags

Chapter 14 – Capture Batches
PaperVision® Capture Administration Guide 442
Tags Removed – Document Re-Scan
This value is the total number of document re-scan tags removed from the batch.
Database Statistic Type: PVCAP_QCTAG-DocumentRescanTagsRemoved
Tags Added - Documents
This value is the total number of document tags added to the batch.
Database Statistic Type: PVCAP_QCTAG-DocumentsTagged
Tags Removed - Documents
This value is the total number of document tags removed from the batch.
Database Statistic Type: PVCAP_QCTAG-DocumentTagsRemoved
Tags Added – Index Errors
This value is the total number of index error tags added to the batch.
Database Statistic Type: PVCAP_QCTAG-IndexErrorTags
Tags Removed – Index Errors
This value is the total number of index error tags removed from the batch.
Database Statistic Type: PVCAP_QCTAG-IndexErrorTagsRemoved
Tags Added – Index Re-Index
This value is the total number of index (re-index) tags added to the batch.
Database Statistic Type: PVCAP_QCTAG-IndexReindexTags
Tags Removed – Index Re-Index
This value is the total number of index (re-index) tags removed from the batch.
Database Statistic Type: PVCAP_QCTAG-IndexReindexTagsRemoved
Tags Added – Index Values
This value is the total number of index value tags added to the batch.
Database Statistic Type: PVCAP_QCTAG-IndexValuesTagged

Chapter 14 – Capture Batches
PaperVision® Capture Administration Guide 443
Tags Removed – Index Values
This value is the total number of index value tags removed from the batch.
Database Statistic Type: PVCAP_QCTAG-IndexValueTagsRemoved
Tags Added – Page Bad Image Path
This value is the total number of page (bad image path) tags added to the batch.
Database Statistic Type: PVCAP_QCTAG-PageBadImagePathTags
Tags Removed – Page Bad Image Path
This value is the total number of page (bad image path) tags removed from the batch.
Database Statistic Type: PVCAP_QCTAG-PageBadImagePathTagsRemoved
Tags Added – Page Image Bad
This value is the total number of page (image bad) tags added to the batch.
Database Statistic Type: PVCAP_QCTAG-PageImageBadTags
Tags Removed – Page Image Bad
This value is the total number of page (image bad) tags removed from the batch.
Database Statistic Type: PVCAP_QCTAG-PageImageBadTagsRemoved
Tags Added – Page Image Dimensions
This value is the total number of page (image dimensions) tags added to the batch.
Database Statistic Type: PVCAP_QCTAG-PageImageDimensionsTags
Tags Removed – Page Image Dimensions
This value is the total number of page (image dimensions) tags removed from the batch.
Database Statistic Type: PVCAP_QCTAG-PageImageDimensionsTagsRemoved
Tags Added – Page Image File Size
This value is the total number of page (image file size) tags added to the batch.
Database Statistic Type: PVCAP_QCTAG-PageImageFileSizeTags

Chapter 14 – Capture Batches
PaperVision® Capture Administration Guide 444
Tags Removed – Page Image File Size
This value is the total number of page (image file size) tags removed from the batch.
Database Statistic Type: PVCAP_QCTAG-PageImageFileSizeTagsRemoved
Tags Added – Page Re-Scan
This value is the total number of page re-scan tags added to the batch.
Database Statistic Type: PVCAP_QCTAG-PageRescanTags
Tags Removed – Page Re-Scan
This value is the total number of page re-scan tags removed from the batch.
Database Statistic Type: PVCAP_QCTAG-PageRescanTagsRemoved
Tags Added – Pages
This value is the total number of page tags added to the batch.
Database Statistic Type: PVCAP_QCTAG-PagesTagged
Tags Removed – Pages
This value is the total number of page tags removed from the batch.
Database Statistic Type: PVCAP_QCTAG-PageTagsRemoved
Tags Added – Total
This value is the total number of QC tags added to the batch.
Database Statistic Type: PVCAP_QCTAG-TotalTags
Tags Removed – Total
This value is the total number of QC tags removed from the batch.
Database Statistic Type: PVCAP_QCTAG-TotalTagsRemoved
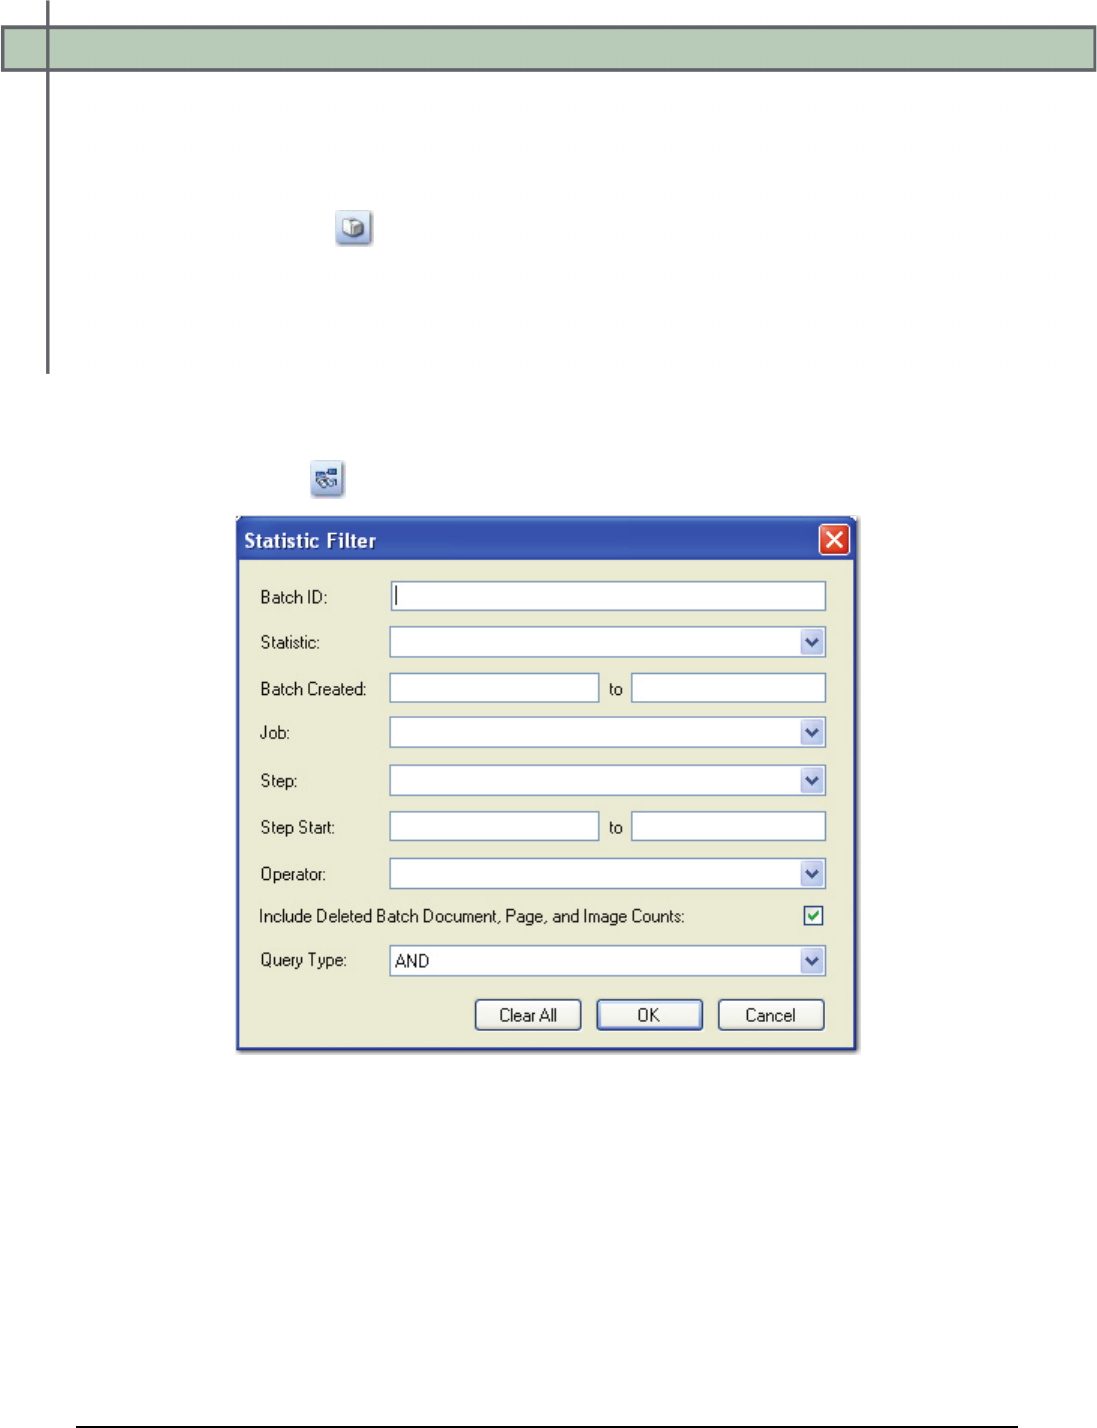
Chapter 14 – Capture Batches
PaperVision® Capture Administration Guide 445
Printing Batch Statistics
You can print a representation of the statistics you have expanded in the Batch Statistics tree.
To print batch statistics:
1. Click the Print icon.
2. Select the printing parameters, and then click OK.
Filtering Batch Statistics
The Filter command allows you to search for statistics according to your specified criteria.
To filter the list of batch statistics:
1. Click the Filter icon, and the Statistics Filter dialog box appears.
Statistic Filter
Chapter 14 – Capture Batches
PaperVision® Capture Administration Guide 446
2. Enter the applicable filter criteria to use in the search:
• Batch ID: Unique identifier of the batch in the database
• Statistic: Statistic type for which to search
• Batch Created: Date range that the batches were created
• Job: Name of the job to which the batch is assigned
• Step: Name of the job step in which the batch is currently processing or waiting
• Step Start: Date and time when the batch entered its current job step
Note:
This is a batch-level filter, so for any batches that fulfill this criterion, all
unfiltered statistics for those batches will be displayed.
• Operator: Includes active and inactive users; also includes the PaperVision Capture
Automation Service
• Include Deleted Batch Document, Page, and Image Counts: Includes deleted
documents, pages, and images in the batch count statistics
• Query Type: AND includes every specified criteria in the search; OR includes any of
the specified criteria in the search
Tip:
To remove all the filter criteria, click the Clear All button.
3. Click OK to initiate the search. The Batch Statistics grid refreshes with your search
results.
Note:
The most recent Statistic Filter settings are retained the next time they are accessed.
Exporting Batch Statistics
You can export all of the displayed batch statistics to an XML file.
To export all batch statistics:
1. Click the Export icon.
2. Enter the File Name of the XML file in the Save As dialog box.
3. Click Save.

Appendix A – Additional Help Resources
PaperVision® Capture Administration Guide 447
At Digitech Systems, we provide multiple resources to help find answers to
your questions.
Technical Support
Contact our legendary customer support staff Monday through Friday between the hours of
8 a.m. and 6 p.m. Central Time for answers to your questions about our products.
Direct: (402)484-7777
Toll-free: (877)374-3569
Email: support@digitechsystems.com
Help on the Web
MyDSI is an interactive tool for all Digitech Systems customers. Log in to
http://mydsi.digitechsystems.com to download product updates, license purchased software,
view support contract renewals, and check the status of your software support cases and
requests.
User Forums
Log in to http://forums.digitechsystems.com to exchange answers and ideas with other users
in our moderated community.
Knowledge Base
Log in to http://kb.digitechsystems.com to search our extensive Knowledge Base for articles
on all Digitech Systems products.
Appendix B – Supported Nuance OCR Spelling Languages
PaperVision® Capture Administration Guide 448
The following Nuance OCR spelling languages are supported in PaperVision
Capture:
Supported Nuance OCR Spelling Languages
Afrikaans - spoken in South Africa
Albanian
Automatic language selection for spell-checking only
Aymara - spoken in Bolivia and Peru
Basque
Byelorussian (Cyrillic) - includes the characters of the English language; other
spellings are Belarusian and Whire Russian
Bemba - alternate names are Chibemba, Ichibemba, Wemba, Chiwemba; spoken in
Zambia and Democratic Republic of Congo
Blackfoot - alternate name is Blackfeet, Siksika and Pikanii; spoken in Canada and
USA
Portuguese (Brazilian)
Breton
Bugotu - spoken in Solomon Islands
Bulgarian (Cyrillic) - includes the characters of the English language
Catalan
Chamorro - spoken in Guam and Northern Mariana Islands
Chechen
Chuana or Tswana - spoken in Botswana and South Africa
Corsican
Croatian
Crow - spoken in USA
Danish
Dutch
English
Eskimo
Esperanto
Estonian

Appendix B – Supported Nuance OCR Spelling Languages
PaperVision® Capture Administration Guide 449
Supported Nuance OCR Spelling Languages
Faroese
Fijian
French
Frisian - macrolanguage of three Frisian languages in Germany
Friulian - spoken in Italy
Galician (alternate names Gallegan and Gallego) - spoken in Spain and Portugal
Ganda or Luganda - spoken in Uganda
German
Gaelic Irish
Gaelic Scottish
Greek - includes the characters of the English language
Guarani (macrolanguage of the Chiripa and some Guarani languages) - spoken in
Paraguay, Argentina, Bolivia, and Brazil
Hani (alternate names are Hanhi, Haw and Hani Proper) - spoken in China, Laos,
and Vietnam
Hawaiian
Hungarian
Icelandic
Ido - constructed language
Finnish
Indonesian
Interlingua - constructed language
Italian
Kabardian (alternate name is Beslenei) - spoken in Russia and Turkey
Kashubian - spoken in Poland
Kawa (alternate names are Wa, Va, Vo, Wa Pwo, and Wakut) - spoken in China
Kikuyu - spoken in Kenya
Kongo (macrolanguage of Laari and Kongo languages) - spoken in the Democratic
Republic of the Congo, Angola, and Congo
Kpelle (macrolanguage of Kpelle languages) - spoken in Liberia and Guinea
Kurdish (if written in the Latin alphabet) - macrolanguage of the Kurdish
languages

Appendix B – Supported Nuance OCR Spelling Languages
PaperVision® Capture Administration Guide 450
Supported Nuance OCR Spelling Languages
Latvian
Lithuanian
Latin
Luba (alternate names are Luba-Lulua, Luba-Kasai, Tshiluba, Luva, and Western
Luba) - spoken in the Democratic Republic of the Congo
Luxembourgian (alternate names are Luxembourgeois and Letzburgish) - spoken
in Luxembourg
Macedonian (Cyrillic) - includes the characters of the English language
Maltese
Maori - spoken in New Zealand
Mayan
Miao (macrolanguage of Hmong languages and alternate name is Hmong) - spoken
in China, Laos, Thailand, Myanmar, and Viet Nam
Minankabaw
Malagasy (macrolanguage of Malagasy languages) - spoken in Madagascar
Malinke (alternate names are Western Maninkakan, Malinka, and Maninga)
spoken in Senegal, Gambia, and Mali
Malay
Mohawk - spoken in Canada and USA
Moldavian (Cyrillic) - includes the characters of the English language
Nahuatl
No language selection (for spell checking only) - this value can be used to specify
that the checking module will not use the Language dictionary
Norwegian
Nyanja (alternate names are Chichewa and Chinyanja) - spoken in Malawi,
Mozambique, Zambia, and Zimbabwe
Occidental - constructed language
Ojibway (macrolanguage of Ojibwa, Chippewa and Ottawa languages and
alternate names are Ojibwa and Ojibwe) - spoken in Canada and USA
Papiamento - spoken in Netherlands Antilles, Aruba
Pidgin English (alternate names are Tok Pisin, Naomalanesian, and New Guinean
Pidgin English) - spoken in Papua New Guinea
Polish

Appendix B – Supported Nuance OCR Spelling Languages
PaperVision® Capture Administration Guide 451
Supported Nuance OCR Spelling Languages
Portuguese
Provencal (alternate name is Occitan) - spoken in France, Italy, and Monaco
Quechua (macrolanguage of the Quechua languages) - spoken in Peru
Rhaetic (alternate names are Romansch and Rhaeto-Romance) - spoken in
Switzerland
Romanian
Romany - spoken all over Europe
Ruanda (alternate names are Kinyarwanda and Rwanda) - spoken in Rwanda, the
Democratic Republic of Congo, and Uganda
Rundi - spoken in Burundi and Uganda
Russian (Cyrillic) - includes the characters of the English language
Samoan - spoken in Samoa and American Samoa
Sardinian - macrolanguage of the Sardinian languages
Shona - spoken in Zimbabwe, Botswana, and Zambia
Sioux (alternate name is Dakota) - spoken in USA and Canada
Slovak
Slovenian
Sami - combination of the Sami language family
Lule Sami
Northern Sami
Southern Sami
Somali
Sotho, Suto, or Sesuto language selection - spoken in Lesotho and South Africa
Spanish
Serbian (Cyrillic)
Serbian (Latin)
Sundanese (alternate names are Sunda and Priangan) - spoken in Java and Bali in
Indonesia
Swahili (macrolanguage of the Swahili languages) - spoken in the Democratic
Republic of the Congo, Tanzania, Kenya, and Somalia
Swedish
Appendix B – Supported Nuance OCR Spelling Languages
PaperVision® Capture Administration Guide 452
Supported Nuance OCR Spelling Languages
Swazi (alternate names are Swati, Siswati, and Tekela) - spoken in Swaziland,
Lesotho, Mozambique, and South Africa
Tagalog - spoken in Philippines
Tahitian
Tinpo
Tongan (alternate names are Tonga, Siska and Nyasa) - spoken in Malawi
Tun (alternate names are Tunia and Tunya) - spoken in Chad
Turkish
Ukrainian (Cyrillic) - includes the characters of the English language
Visayan consists of Cebuano, Hiligaynon, and Samaran or Waray-waray languages
- spoken in the Philippines
Welsh
Wend or Sorbian
Wolof - spoken in Senegal and Mauritania
Xhosa - spoken in South Africa and Lesotho
Zapotec (macrolanguage of the Zapotec languages) - spoken in Mexico
Zulu - spoken in South Africa, Lesotho, Malawi, Mozambique, and Swaziland

Appendix C – Modifying the Process Batch Operation
PaperVision® Capture Administration Guide 453
By default, an Automation Service that is scheduled to perform the Process Batch
operation will execute every function associated with this operation, such as
custom code, image processing, and OCR. These functions are listed in the
DSI.PVECommon.PVProcWork.exe.config file under the
batchConfiguration/batchProcessors element. You can, however, configure an Automation
Service to perform a subset of these functions. For example, full-text OCR can be resource-
intensive and time-consuming, so you could dedicate an Automation Service to full-text OCR
to ensure that the throughput of your non-full-text OCR batches is not adversely affected.
To configure one or more Automation Services to process full-text OCR:
1. Install one or more new Automation Services on dedicated machines with sufficient
resources to perform the full-text OCR.
2. In the DSI.PVECommon.PVProcWork.exe.config file for each of the new services,
modify the batch configuration section such that all batch processing functions except
Nuance Full-Text OCR are excluded:
<batchConfiguration isLocal="true">
<batchProcessors>
<add jobStepType="AutomatedOCRFullText"
assembly="DSI.Capture.Business.dll"
batchProcessorClass="DSI.Capture.Business.OCRFullTextManager"/>
</batchProcessors>
<excludedBatchProcessors>
<add jobStepType="CustomCode"
assembly="DSI.Capture.ScriptingLibrary.dll"
batchProcessorClass="DSI.Capture.ScriptingLibrary.BatchProcessor"/>
<add jobStepType="AutomatedBarcode"
assembly="DSI.Capture.Business.dll"
batchProcessorClass="DSI.Capture.Business.BarcodeManager"/>
<add jobStepType="ImageProcessing"
assembly="DSI.Capture.Business.dll"
batchProcessorClass="DSI.Capture.Business.ImgProcessingManager"/>
<add jobStepType="AutomatedOCR" assembly="DSI.Capture.Business.dll"
batchProcessorClass="DSI.Capture.Business.OCRManager"/>
</excludedBatchProcessors>
</batchConfiguration>

Appendix C – Modifying the Process Batch Operation
PaperVision® Capture Administration Guide 454
3. For any Automation Services that should not be executing full-text OCR (i.e., the existing
services), change the DSI.PVECommon.PVProcWork.exe.config file such that only
full-text OCR is excluded:
<batchProcessors>
<add jobStepType="CustomCode"
assembly="DSI.Capture.ScriptingLibrary.dll"
batchProcessorClass="DSI.Capture.ScriptingLibrary.BatchProcessor"/>
<add jobStepType="AutomatedBarcode"
assembly="DSI.Capture.Business.dll"
batchProcessorClass="DSI.Capture.Business.BarcodeManager"/>
<add jobStepType="ImageProcessing"
assembly="DSI.Capture.Business.dll"
batchProcessorClass="DSI.Capture.Business.ImgProcessingManager"/>
<add jobStepType="AutomatedOCR" assembly="DSI.Capture.Business.dll"
batchProcessorClass="DSI.Capture.Business.OCRManager"/>
</batchProcessors>
<excludedBatchProcessors>
<add jobStepType="AutomatedOCRFullText"
assembly="DSI.Capture.Business.dll"
batchProcessorClass="DSI.Capture.Business.OCRFullTextManager"/>
</excludedBatchProcessors>
</batchConfiguration>
4. In the Administration Console, schedule the new Automation Services to perform the
Process Batch operation.
Appendix D – Maximum Image Sizes
PaperVision® Capture Administration Guide 455
This appendix outlines the approximate limits in image sizes that can be imported
Into PaperVision Capture and processed through the Nuance and Open Text
Full-Text OCR, Zonal OCR, and Image Processing steps. The Thumbnails windows, found in
both the Administration and Operator Consoles, can handle substantially larger images.
Additionally, images only stored in memory or simply ingested by PaperVision Capture
(therefore not viewed in Thumbnails windows or processed through the Nuance or Open Text
Full-Text OCR, Zonal OCR, or Image Processing steps), can also be significantly larger in
size.
DISCLAIMER – PLEASE READ
These dimensions are provided only as estimates to identify size limits in importing,
viewing, and processing images in PaperVision Capture. Variations in technical
environments may cause maximum image sizes to fluctuate across systems.
Maximum Image Sizes (in Pixels)
Stored Images
10,000 x 10,000*
* These dimensions can be greater in bitonal
images
Thumbnails 32,768 x 32,768
Image Processing 10,000 x 10,000*
* These dimensions can be greater in bitonal
images
Nuance Full-Text OCR and
Zonal OCR
8400 x 8400
Open Text Full-Text OCR and
Zonal OCR
32,000 x 24,000*
* The maximum supported image
dimensions that can be processed through the
Open Text engine vary with resolution. For
example, the maximum supported image
dimensions at 300 dpi are approximately 106
inches x 80 inches. Images that are processed
through the Open Text OCR engine must
contain matching horizontal and vertical
resolutions.
Appendix E – Terminal Services Configuration
PaperVision® Capture Administration Guide 456
The PaperVision Capture Operator Console can be configured to support a
terminal services environment, enabling multiple operators to remotely log into a
single workstation to complete tasks. This appendix describes how to configure PaperVision
Capture so multiple users can log into a single installation of the Operator Console.
In a terminal services configuration, the first operator who logs into the Operator Console and
creates or opens a batch consumes one or more concurrent licenses, depending on the batch’s
job configuration. Subsequent operators who log into that same installation of the Operator
Console also consume concurrent licenses. If no remaining concurrent licenses are available,
the operator will not be able to log into the Operator Console. For more information on
concurrent licensing, see the section on Licensing in Chapter 2 - Global Administration.
To configure the PaperVision Capture Operator Console to support a Terminal
Services environment:
1. Open the C:\Documents and Settings\All Users\Application Data\Digitech
Systems directory (or other directory as specified during the installation of
PaperVision Capture).
2. Open the ClientSettings.xml file.
3. Change the value of the following variable from “false” to “true”:
“<ALLOWMULTIPLEOPERATORCONSOLES>true</ALLOWMULTIPLEOPERATORCONSOLES>”
4. Save the file.
WARNING!
Improperly modifying the contents of a PaperVision Capture configuration file may
adversely impact system performance and the overall functionality of PaperVision
Capture.

Appendix F – Supported Open Text Countries and Languages
PaperVision® Capture Administration Guide 457
The table in this appendix displays the supported Open Text countries, languages,
country groups, language groups, and character sets available in PaperVision
Capture. If you narrow the search for specific languages or countries, the Open
Text OCR engine will process more rapidly during OCR recognition.
Each language, country, language group, country group, and character set is compatible with
specific code pages. When you select from the Country/Language property, you can only
select combinations of countries, languages, etc. within the same code page or code page
group (i.e., Latin). For example, a valid Latin combination can be Poland, Hungary, and
Germany. A valid Cyrillic combination can be Bulgaria and Russia. A valid Greek
combination can be Greek and OCR.
1. Cyrillic: Code page 1251
2. Greek: Code page 1253
3. Latin: Code pages 1250, 1252, 1254 and 1257 (i.e. Central Europe, Western Europe,
Turkey, Baltic)
4. Azerbaijanian
Note:
Code page 0 (OCR) can be added to any combination above.
Appendix F – Supported Open Text Countries and Languages
PaperVision® Capture Administration Guide 458
Supported Open Text Countries and Languages
Code Page
Australia
1252
Austria
1252
Azerbaijan
1254
Baltic
1257
Belgium
1252
Brazil
1252
Bulgaria
1251
Canada
1252
Central America
1252
Central Europe
1250
Croatia
1250
Cyrillic
1251
Czech
1250
Denmark
1252
Estonia
1257
Finland
1252
France
1252
Germany
1252
Great Britain
1252
Greece
1253
Hungary
1250
Ireland
1252
Italy
1252
Liechtenstein
1252
Lithuania
1257
Luxembourg
1252
Netherlands
1252
Appendix F – Supported Open Text Countries and Languages
PaperVision® Capture Administration Guide 459
Supported Open Text Countries and Languages
Code Page
New Zealand
1252
Norway
1252
Poland
1250
Portugal
1252
Romania
1250
Russia
1251
Scandinavia
1252
Slovakia
1250
Slovenia
1250
South Africa
1252
South America
1252
South America Spanish
1252
Spain
1252
Sweden
1252
Switzerland
1252
Turkey
1254
USA
1252
Western Europe
1252
OCR
0
Afrikaans
1252
Albanian
1250
Azerbaijani Latin
1254
Basque
1252
Bosnian Latin
1250
Bulgarian
1251
Catalan
1252
Croatian
1250
Czech Language
1250

Appendix F – Supported Open Text Countries and Languages
PaperVision® Capture Administration Guide 460
Supported Open Text Countries and Languages
Code Page
Danish
1252
Dutch
1252
English
1252
Estonian
1257
Faroese
1252
Finnish
1252
French
1252
Frisian
1252
German
1252
Greek
1253
Guarani
1252
Hani
1252
Hungarian
1250
Icelandic
1252
Indonesian
1252
Irish
1252
Italian
1252
Kirundi
1252
Latin
1252
Latvian
1257
Lithuanian
1257
Luxembourgish
1252
Malay
1252
Norwegian
1252
Polish
1250
Portuguese
1252
Quechua
1252
Rhaeto Romanic
1252
Appendix F – Supported Open Text Countries and Languages
PaperVision® Capture Administration Guide 461
Supported Open Text Countries and Languages
Code Page
Romanian
1250
Russian
1251
Rwanda
1252
Serbian Latin
1250
Shona
1252
Slovak
1250
Slovenian
1250
Somali
1252
Sorbian
1250
Spanish
1252
Swahili
1252
Swedish
1252
Turkish
1254
Wolof
1252
Xhosa
1252
Zulu
1252

Index
PaperVision® Capture Administration Guide 462
A
Add Page event ........................................................... 85, 97
administration
entity ............................................................................. 33
global ............................................................................ 13
administrators
capture ............................................................................ 9
global ........................................................................ 9, 16
system ............................................................................. 9
API
Batch property ............................................................ 323
introduction ................................................................ 321
API functions
Custom Code/Export .................................................. 332
Image Processing ........................................................ 336
PV_Batch Helper ........................................................ 339
auto document break
settings.......................................................................... 81
auto image orientation .................................................... 182
Auto Rotate property .............................................. 179, 247
Auto-Carry/Auto-Increment settings
Auto-Carry Characters Following Number ................ 103
Auto-Carry Characters Preceding Number ................. 103
Auto-Carry Entire Index Value .................................. 103
Auto-Increment Number ............................................ 103
Carry Values to Copied Document ............................. 104
Overwrite Existing Values ......................................... 103
Preview ....................................................................... 104
Auto-Fill Cursor Location............................................... 104
Automated QC properties
Batch Document Count .............................................. 301
Document Page Count ................................................ 302
Image Dimensions ...................................................... 303
Image File Size ........................................................... 304
index configuration ..................................................... 305
automation service
editing operations ......................................................... 32
automation service
removing operations ..................................................... 32
automation service processes
deleting ......................................................................... 15
starting .......................................................................... 14
stopping ........................................................................ 14
automation service scheduling .......................................... 30
adding new schedules ................................................... 31
automation service status ............................................ 13, 14
B
barcode
types ........................................................................... 143
barcode configuration
introduction ................................................................ 131
Barcode Detected event .................................................... 85
barcode types
selecting...................................................................... 144
barcode zone properties
Decode........................................................................ 144
Image Size ................................................................. 143
Orientation ................................................................. 144
Rectangle ................................................................... 145
Required for Delete (for Auto Document Breaks) ..... 144
Search Value .............................................................. 146
Use Checksum ........................................................... 146
barcode zones ................................................................. 139
adding ........................................................................ 141
Barcode Explorer ....................................................... 140
removing .................................................................... 142
barcodes
1D .............................................................................. 143
2D .............................................................................. 143
supported ................................................................... 143
testing......................................................................... 142
batch
definition ........................................................................ 6
history ........................................................................ 428
properties ................................................................... 427
Batch Management ................................................... 425–33
batch path ......................................................................... 36
batch priority
definition ........................................................................ 6
Batch Statistics
Characters Saved........................................................ 434
Characters Saved (Excluding Match and Merge) ....... 435
Document Count ........................................................ 435
Documents Marked .................................................... 435
Exporting ................................................................... 446
filtering ...................................................................... 445
Image Count............................................................... 436
Index Verification Errors ........................................... 436
Indices Barcoded (Failed) .......................................... 436
Indices Barcoded (Success) ....................................... 436
Indices OCRed (Failed) ............................................. 437
Indices OCRed (Success) ........................................... 437
Indices Saved ............................................................. 437
Indices Saved (Excluding Match and Merge) ............ 437
introduction ................................................................ 434
Nuance OCR statistics ............................................... 440
Page Count ................................................................. 438
Pages Captured .......................................................... 439
Pages Re-scanned .............................................. 439, 440
printing....................................................................... 445
QC ........................................................................ 440–44
Step Start-Stop Duration ............................................ 440
Step Take-Submit Duration ....................................... 440
Batch Submitted event ....................................... 86, 98, 312
batches
changing job step ....................................................... 431
changing status to 'not owned' .................................... 431
exporting metadata ..................................................... 433
filtering lists ............................................................... 429
setting destruction dates ............................................. 430
viewing properties ...................................................... 426

Index
PaperVision® Capture Administration Guide 463
C
Capture
Auto Document Break settings ..................................... 81
job step configuration ................................................... 81
Capture (job step properties)
Color Image File Type.................................................. 83
Custom Code Events (Step Level) ........................ 85, 311
Display Saved Images Only ......................................... 83
Indexes ......................................................... 87, 305, 312
Max Number Documents Per Batch ............................. 83
Minimum Page Size ..................................................... 84
New Batch Name (Regular Expression) ....................... 84
Prompt for New Batch Information (Auto) .................. 84
Rotate Before Barcode ................................................. 84
Capture Batches
introduction ................................................................ 425
character filters ............................................................... 157
ClientSettings.xml file
configuring for terminal services ................................ 456
code page ........................................................................ 175
color image file type ......................................................... 83
Constrained Handprint Recognition (Alphanumeric) ..... 171
Constrained Handprint Recognition (Numeric) .............. 169
current sessions ................................................................. 51
custom code
compiling .................................................................... 348
cutting, copying, and pasting in Script Editor............. 347
debugging ................................................................... 345
exporting .................................................................... 347
exports ........................................................................ 358
importing .................................................................... 347
introduction ................................................................ 317
linking to external assemblies..................................... 348
References .................................................................. 348
samples ....................................................... 177, 244, 321
Script Editor ............................................................... 346
custom code event arguments ......................................... 324
Custom Code Execution event ............................ 86, 98, 312
Custom Code job step
introduction ................................................................ 317
Custom Code Templates ................................................. 320
D
data group path ................................................................. 36
destroy batch ..................................................................... 31
detail sets .......................................................................... 69
configuring ........................................................... 70, 100
definition ........................................................................ 7
document
definition ........................................................................ 7
Document Page Count .................................................... 302
Draft Dot-Matrix ............................................................. 168
drawing image processing zones............................... 261–65
E
encryption keys
adding ........................................................................... 40
deleting ......................................................................... 41
editing .......................................................................... 41
entities
creating ........................................................................ 34
deleting ........................................................................ 36
enumerations ............................................................ 340–43
ConvertFileType ........................................................ 340
OutputFileType .......................................................... 342
UIRefreshLevel .......................................................... 343
exporting users ................................................................. 50
exports
ASCII with Images .................................................... 364
configuring jobs to handle ......................................... 358
Hyland OnBase .......................................................... 372
Image Only ................................................................ 378
LaserFiche.................................................................. 385
OTG Record Out ........................................................ 391
PaperFlow .................................................................. 397
PVEXml ............................................................. 407, 417
SharePoint .................................................................. 417
F
FTP properties
PaperFlow export ....................................................... 404
PVE XML export ....................................................... 414
FTP settings
PVE XML export ................................................. 414–16
full-text path ..................................................................... 36
G
general security ................................................................ 38
global administrator
properties ..................................................................... 18
setting password ........................................................... 17
global administrators ........................................................ 13
creating ........................................................................ 16
deleting ........................................................................ 17
H
hand-printed character height ......................................... 157
help
obtaining ...................................................................... 12
resources .................................................................... 447
I
image
definition ........................................................................ 7
size limits ................................................................... 455
image dimensions (Automated QC) ............................... 303
image file size (Automated QC) ..................................... 304
image processing
duplex documents ...................................................... 260
image processing configuration ...................................... 255
clearing output ........................................................... 259
importing images ....................................................... 257
removing all images ................................................... 257
removing filters .......................................................... 259
removing single image ............................................... 256

Index
PaperVision® Capture Administration Guide 464
rotating images ........................................................... 256
saving filters ............................................................... 255
saving images ............................................................. 266
scanner configuration ................................................. 256
starting scanning process ............................................ 256
stopping scanning process .......................................... 256
testing ......................................................................... 257
image processing filters ............................................ 267–98
Background Dropout ............................................ 267–68
Binary Border Removal .............................................. 269
Binary Crop ................................................................ 270
Binary Dilation ........................................................... 271
Binary Erosion ............................................................ 272
Binary Halftone Removal ........................................... 272
Binary Hole Removal ................................................. 273
Binary Invert Image .................................................... 274
Binary Line Removal ........................................... 275–77
Binary Noise Removal ......................................... 277–78
Binary Scaling ............................................................ 279
Binary Skeleton .......................................................... 280
Binary Smoothing....................................................... 280
Black Overscan Removal ........................................... 281
Color Detection and Conversion ................................ 285
Color Dropout ............................................................ 287
Crop ............................................................................ 288
Deskew ....................................................................... 289
Image Fit .................................................................... 292
Page Deletion - Always .............................................. 282
Page Deletion - Blank ................................................. 282
Page Deletion - Color Content .................................... 284
Page Deletion - Dimensions ....................................... 283
Page Deletion – File Size ........................................... 283
Redaction .................................................................... 293
Rotation ...................................................................... 295
Threshold .................................................................... 297
image processing zones (drawing) ............................ 261–65
image QC (automated) .................................................... 303
image redaction ......................................................... 293–94
importing users ................................................................. 50
index
definition ........................................................................ 7
index configuration
Blind Index Verification ............................................. 114
Custom Code Events properties (Step Level) ............. 101
font color/customization ............................................. 115
formatting date and time ............................................. 112
formatting double number .......................................... 112
general properties (step level) .................................... 114
general properties (job level) ...................................... 102
introduction .......................................................... 99–100
types and formats........................................................ 110
index masking
regular expression examples ....................................... 109
Index Masking Regular Expression ............................ 105–9
Index Verification Regular Expression ........................... 113
index zones
drawing ....................................................................... 120
indexes
configuring in Automated QC .................................... 305
Indexing (job step properties) ........................................... 97
Custom Code Events (Step Level) ................................ 97
J
job
configuration ................................................................ 53
definition ........................................................................ 7
Job Definitions
exiting .......................................................................... 67
introduction .................................................................. 57
job properties (general)
Age Priority ................................................................. 75
Assigned To ................................................................. 76
Batch Destruction Offset .............................................. 76
Is Start Step .................................................................. 77
License Requirements .................................................. 77
Merge Like Documents .......................................... 77–79
Mode ............................................................................ 79
Name ............................................................................ 79
Source Image Step ....................................................... 79
Step Priority ................................................................. 80
Type ............................................................................. 80
Use Non-Repudiation................................................... 80
Job Properties grid ............................................................ 58
job step
definition ........................................................................ 7
Job Step Toolbox .............................................................. 57
job steps ........................................................................... 72
adding links .................................................................. 74
Age Priority ................................................................. 62
aligning in workspace .................................................. 63
Barcode ........................................................................ 72
Capture ......................................................................... 72
Custom Code ............................................................... 73
flipping link direction .................................................. 74
general properties ......................................................... 75
Image Processing ......................................................... 73
Indexing ....................................................................... 72
OCR ............................................................................. 73
removing links ............................................................. 74
step priority .................................................................. 62
Job Steps grid ................................................................... 61
jobs
activating ..................................................................... 66
age priority ................................................................... 59
checking in ............................................................. 55, 67
checking out ........................................................... 54, 67
cloning ................................................................... 56, 65
closing .......................................................................... 67
comments ..................................................................... 59
creating new ........................................................... 53, 64
deactivating .................................................................. 67
deleting .................................................................. 54, 65
detail sets ..................................................................... 60
editing .......................................................................... 54
exporting ................................................................ 55, 65
importing ............................................................... 55, 65
opening ........................................................................ 64
saving ..................................................................... 54, 64
saving all ................................................................ 54, 64
status ............................................................................ 58
undoing a checkout ................................................ 55, 67
validating ............................................................... 65–66

Index
PaperVision® Capture Administration Guide 465
job steps
cutting, copying, pasting............................................... 68
L
language filters................................................................ 157
languages
spelling ................................................................. 448–52
licenses
concurrent ..................................................................... 19
creating new ................................................................. 21
demo ............................................................................. 20
editing properties .......................................................... 22
named ........................................................................... 19
licensing ...................................................................... 13, 19
line feed delimiter ........................................................... 148
logging in .......................................................................... 11
logging out ........................................................................ 11
M
maintenance ...................................................................... 13
maintenance logs .............................................................. 24
deleting ......................................................................... 26
exporting ...................................................................... 26
viewing log entries ....................................................... 24
maintenance queue ............................................................ 31
deleing items ................................................................ 23
maintenance queues .......................................................... 23
Master Batch Repository
definition ........................................................................ 8
Match and Merge event .............................................. 86, 98
Match and Merge Wizard
configuring ................................................................. 353
Connection Properties screen ..................................... 353
Field Mapping screen ................................................. 354
introduction ................................................................ 352
Match and Merge Options screen ............................... 356
Matrix Matching Recognition ......................................... 173
maximum global session idle time .................................... 28
maximum image sizes ..................................................... 455
migration path ................................................................... 36
N
Nuance Full-Text OCR
converter format configuration ................................... 189
override invalid pages................................................. 183
timeout (sec) ............................................................... 183
Nuance Full-Text OCR converters
eBook ......................................................................... 190
HTML 3.2 .................................................................. 191
HTML 4.0 .................................................................. 193
Microsoft Excel 2000, XP, 2003 ................................ 199
Microsoft Excel 2007 ......................................... 196, 197
Microsoft Excel 97 ..................................................... 198
Microsoft Infopath ...................................................... 195
Microsoft PowerPoint 2007 ................................ 200, 201
Microsoft PowerPoint 97 ............................................ 202
Microsoft Publisher ............................................ 203, 204
Microsoft Reader ........................................................ 205
Microsoft Word 2000/XP .................................. 210, 211
Microsoft Word 2003 (WordML) .............................. 208
Microsoft Word 2007 ......................................... 206, 207
PaperFlow Full-Text .................................................. 212
PaperVision Enterprise Full-Text .............................. 212
PDF .....................................................213, 214, 215, 217
PDF Edited................................................................. 216
PDF Searchable Image ............................................... 219
PDF with Image Substitutes ....................................... 222
RTF 2000 Exact Word ............................................... 225
RTF 6.0/95 ................................................................. 227
RTF Word 2000 ......................................................... 231
RTF Word 97 ............................................................. 229
Text ............................................................................ 233
Text - Comma Separated ........................................... 233
Text with Line Breaks ................................................ 234
Unicode Text ............................................................. 235
Unicode Text - Comma Separated ............................. 235
Unicode Text - Formatted .......................................... 236
Unicode Text with Line Breaks ................................. 236
Wave Audio ............................................................... 237
WordPad .................................................................... 238
WordPerfect 12 .......................................................... 239
XML .......................................................................... 240
XPS ............................................................................ 241
XPS Searchable Image ............................................... 241
O
OCR configuration
Auto Document Break ............................................... 148
introduction ................................................................ 148
OCR general properties .................................................. 156
Image Size ................................................................. 156
Region Size ................................................................ 156
Regular Expression Verification ................................ 156
OCR page properties ...................................................... 157
Brightness .................................................................. 157
Brightness Threshold ................................................. 157
Enable Fax-Handling (Omnifont Multi-Lingual) ....... 157
Hand-Printed Character Height .................................. 157
Hand-Printed Character Width ................................... 158
Recognition Languages .............................................. 158
Recognition Process Setting....................................... 159
Rejection Symbol ....................................................... 159
spelling languages ...................................................... 159
Vertical Dictionaries .................................................. 159
OCR recognition languages
selecting ..................................................................... 158
OCR recognition modules
Constrained Handprint Recognition (Alphanumeric) 172
Constrained Handprint Recognition (Numeric) ......... 169
Draft Dot-Matrix ........................................................ 168
introduction ................................................................ 165
Matrix Matching Recognition .................................... 173
Omnifont Matrix ........................................................ 165
Omnifont Multi-Lingual .................................... 166, 167
Omnifont Multi-Lingual (FRX) ................................. 175
Omnifont Plus (2W) and (3W) ................................... 174
OCR Statistics custom code events ................................ 325
OCR zones ..................................................................... 152
importing images ............................................... 155, 186

Index
PaperVision® Capture Administration Guide 466
removing a single image ............................................. 154
removing all images ................................................... 154
rotating images ................................................... 154, 186
saving ......................................................................... 153
scanner configuration ................................................. 153
starting the scanning process ...................................... 154
stopping the scanning process .................................... 154
testing ......................................................................... 155
zoom commands ................................................. 155, 188
Omnifont Matrix ............................................................. 165
Omnifont Multi-Lingual ......................................... 166, 167
Omnifont Multi-Lingual (FRX) ...................................... 175
Omnifont Plus (2W) and (3W) ....................................... 174
Operator Console login
multiple users and ....................................................... 456
operator permissions
Capture step .................................................................. 94
Indexing step .............................................................. 129
Manual QC step .......................................................... 315
overriding invalid images ............................................... 183
P
Page
definition ........................................................................ 8
PaperFlow export
FTP properties ............................................................ 404
PaperVision Capture Administration Console .................... 8
PaperVision Capture Automation Service .......................... 8
PaperVision Capture Data Transfer Agent Service ............. 8
PaperVision Capture Gateway Server ................................. 8
PaperVision Capture Operator Console .............................. 8
pre-caching ....................................................................... 79
process batch ..................................................................... 31
process locks ............................................................... 13, 27
deleting ......................................................................... 27
public properties in Code Base ....................................... 344
PVE XML export
FTP properties ............................................................ 414
Q
QC auto play ................................................................... 313
QC Auto Play .................................................................... 92
QC Batch Statistics ................................................... 440–44
QC pass and fail links ..................................................... 310
QC tags
adding to a job ............................................................ 309
batch statistics ...................................................... 440–44
quality control (manual) .................................................. 299
R
Reader Engine property .................................................. 180
redaction ................................................................... 293–94
References
adding ......................................................................... 348
S
Saving Indexes event .................................................. 86, 98
scanner
requirements ................................................................ 95
Saved Settings ............................................................ 125
Setup Settings ............................................................ 124
scanner settings
brightness ................................................................... 126
color format ............................................................... 125
dither .......................................................................... 126
horizontal resolution .................................................. 126
page size .................................................................... 126
scan type .................................................................... 126
vertical resolution ...................................................... 126
Script Editor ............................................................. 346–49
search values
assigning .................................................................... 156
security policy .................................................................. 42
session grant cleanup ........................................................ 31
SharePoint content types ................................................ 419
SharePoint export ........................................................... 417
size limits (images)......................................................... 455
Skipped Full Text Processing tag ................................... 183
spelling languages .................................................... 448–52
system groups ................................................................... 44
deleting ........................................................................ 46
editing properties ......................................................... 46
system requirements ......................................................... 10
system settings ........................................................... 13, 28
system users ..................................................................... 47
creating new ................................................................. 47
deleting ........................................................................ 49
editing properties ......................................................... 49
setting password ........................................................... 49
T
terminal services configuration ...................................... 456
testing SharePoint site connections ........................ 406, 416
thumbnails
Edit Barcode Zones screen ..................136, 153, 188, 253
Edit OCR Zones ......................................................... 153
U
user sessions
killing ........................................................................... 52
users
exporting ...................................................................... 50
importing ..................................................................... 50
supported ....................................................................... 9
V
vertical dictionaries ........................................................ 159
Z
zones
image processing.................................................. 261–65
zoom settings ............................................................ 74, 266
