Partner Mail R3 Planning Forms
Partner Mail R3 Planning Forms Partner_Mail_R3_Planning_Forms Avaya Partner Voice Mail
User Manual: Partner Mail R3 Planning Forms
Open the PDF directly: View PDF ![]() .
.
Page Count: 60
- Table of Contents
- 1. Mail System Planning
- Introduction
- Planning Responsibilities
- Form A: System Parameters—Part 1 Description
- Form B: Mailboxes Description
- Form C: System Parameters—Part 2 Description
- Form D: Schedule Description
- Form E: Touch-Tone Gate Description
- Form F: Voice Mail Greeting Description
- Form G: Main Menu Prompt Description
- Form H: Main Menu Definition Description
- Form I: Submenu Prompt Description
- Form J: Submenu Definition Description
- Form K: Announcement Description
- Form L: Group List Description
- Form M: Line Ownership Description
- Form N: System Security Description
- Form O: Security Checklist Description
- 2. Communications System Planning

AT&T
PARTNER MAIL®
Voice Messaging System
Release 3
Planning Forms
Copyright © 1996, AT&T
All Rights Reserved
Printed in U.S.A.
AT&T 585-322-517
Issue 1
June 1996
Notice
Every effort was made to ensure that the information in this book was complete and accurate at the time of printing. However,
information is subject to change.
Trademarks
PARTNER and PARTNER MAIL are registered trademarks of AT&T in the U.S. and other countries.
Ordering Information
Call: Publications Fulfillment Center
Voice 1 800 457-1235
International Voice 317 361-5353
Fax 1 800 457-1764 International Fax 317 361-5355
Write:
Publications Fulfillment Center
P.O. Box 4100
Crawfordsville, IN 47933
Order: Document No. 585-322-517
For information about other documents, refer to the section entitled, "Related Documents" in "About This Book."
Support Telephone Number
In the continental U.S., AT&T provides a toll-free customer hotline 24 hours a day. Call the hotline at
1 800 628-2888 or your authorized dealer if you need assistance when programming or using your system. Outside the
continental U.S., contact your Sales Representative or your local Authorized Dealer.

Contents
1
Mail System Planning
■
■
■
■
■
■
■
■
■
■
■
■
■
■
■
■
■
■
■
■
■
■
■
■
Introduction
Planning Responsibilities
Form A: System Parameters—Part 1 Description
Form B: Mailboxes Description
Form C: System Parameters—Part 2 Description
Form D: Schedule Description
Form E: Touch-Tone Gate Description
Form F: Voice Mail Greeting Description
Form G: Main Menu Prompt Description
Form H: Main Menu Definition Description
Form I: Submenu Prompt Description
Form J: Submenu Definition Description
Form K: Announcement Description
Form L: Group List Description
Form M: Line Ownership Description
Form N: System Security Description
Form O: Security Checklist Description
1-1
1-1
1-2
1-4
1-6
1-10
1-11
1-12
1-14
1-15
1-17
1-19
1-20
1-21
1-22
1-23
1-24
1-25
2
Communications System Planning
Introduction
Form A: System Configuration, Page 1
Form A: System Configuration, Page 2
Form B1: System Extensions
Form B2: Customized Extension Settings
Form C: Phone
Form D: Number Lists
2-1
2-1
2-2
2-5
2-7
2-9
2-12
2-14
Contents i

Mail System Planning
1
Introduction
This chapter contains the Planning Forms for PARTNER MAIL® Voice
Messaging System Release 3 and provides information about filling them out.
The forms are used to record information that is necessary to program the mail
system.
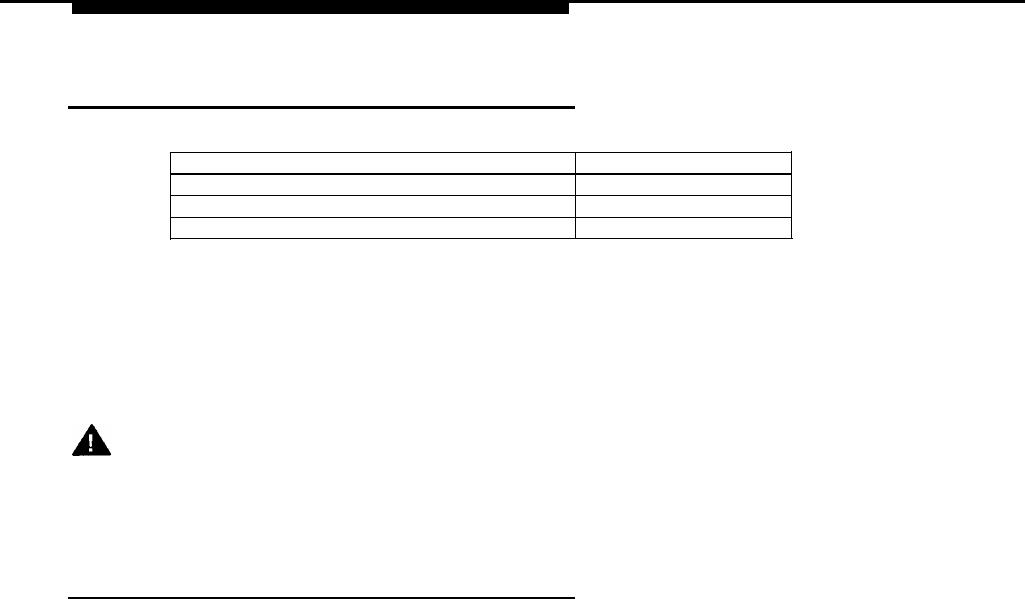
Table 1-1. Mail System Planning Forms
Form
Name
Form A
Form B
Form C
Form D
Form E
Form F
Form G
Form H
Form I
Form J
Form K
Form L
Form M
Form N
Form O
System Parameters–Part 1
Mailboxes
System Parameters–Part 2
Schedule
Touch-Tone Gate
Voice Mail Greeting
Main Menu Prompt
Main Menu Definition
Submenu Prompt
Submenu Definition
Announcement
Group List
Line Ownership
System Security
Security Checklist
Mail System Planning 1-1

Planning Responsibilities
Planning Responsibilities
As part of the planning process for the mail system, the customer should identify a person in
the company to act as System Administrator. The System Administrator is the person who is
responsible for the mail system.
The System Administrator should work with the salesperson or systems consultant to fill out
the PARTNER MAIL Planning Forms. The System Administrator should also participate in the
training for the system. The System Administrator can then make changes to the system after
installation, answer questions for mail system users, and train new users.
The same person may function as System Manager for the communications system and
System Administrator for the mail system, or the roles may be served by two different people.
When to Fill Out the Forms
The Planning Forms must be filled out before the mail system is installed. These forms are
required by the person who installs and programs the system.
After installation, the System Administrator should use the forms to record changes, so there
is an ongoing record of the programming for the mail system.
How to Fill Out the Forms
Before you begin to fill out the mail system Planning Forms, you need a complete, updated
copy of the communications system Planning Forms.
For each mail system Planning Form, there is a page or more of descriptive information to
help you understand each feature and decide between the available options. In most cases,
instructions for filling out the form are provided on the form itself.
Read through the entire set of forms before you attempt to fill them out. If you don’t
understand a feature or if you don’t have enough information to decide between available
options, consult Chapter 5 of PARTNER MAIL Voice Messaging System Release 3 Planning,
Installation, and Use.
Then, fill out the forms one at a time in order, rereading the descriptive information as
needed.
1-2 Mail System Planning

Planning Responsibilities
Information for the Installer
Because it is necessary to program Announcements and Submenus before the
higher-level menu options that select them, the installer should reorder the forms as
follows:
A, B, C, D, E, F,
K, J, I, H, G,
L, M, N, O
The installer should record all Announcements first. Then program Submenus,
starting with the lowest-level Submenu and continuing up the Submenu levels so that
the Main Menus are the last ones programmed.
Mail System Planning 1-3

Form A: System Parameters—Part 1 Description
Form A: System Parameters—Part 1
Description
System Language ( ✔ = Monolingual English)
The mail system comes with recorded greetings and prompts in U.S. English, Canadian French,
and Latin American Spanish. It can operate in monolingual or bilingual mode.
■
■
In monolingual mode, callers and mail system users hear language.
In bilingual mode, callers and mail system users can choose between two languages. One of
the languages must be English.
The mode and language selections on mail system Planning Form A apply to the entire mail system.
If bilingual mode is selected, any customized menu prompts, announcements, and greetings should
be recorded in both the Primary Language and the Secondary Language.
Maximum Digit Length ( ✔ = 2)
The mail system needs to know the maximum number of digits that a person can dial to transfer to
an extension, group, or mailbox. Choose 2, 3, or 4.
If the only 3-digit destinations that people need to transfer to are Hunt Groups 771 through 776 and
there will be no 4-digit mailbox numbers, leave the Maximum Digit Length setting at 2. However, if
there will be 3-digit (other than 771 through 776) or 4-digit mailbox numbers, change the setting to 3
or 4, as appropriate.
1.
2.
3.
Single or Multiple Automated Attendant ( ✔ = Single)
Automated Attendant Service can answer and handle calls, similar to a receptionist. Answered calls
can be handled as predetermined by the System Administrator or as determined by the caller
making a selection from a menu of options.
For interaction with Automated Attendant Service, the communications system must specify:
■Which lines are answered by Automated Attendant Service (VMS-AA Lines).
■
■
Whether calls are answered by Automated Attendant Service all the time, only during the day,
or only at night (VMS Hunt Schedule).
Whether Automated Attendant Service answers calls immediately or after a delay, giving the
receptionist a chance to answer the calls if he or she is available (VMS Hunt Delay).
All of these specifications are made on communications system Planning Form A.
The mail system must specify:
■What callers hear when Automated Attendant Service answers. This can include a greeting,
as well as prompts for a day main menu, night main menu, submenus, and announcements
(Greeting and Menu Structure).
■What controls Automated Attendant Service’s day and night operation (Schedule Controller).
This may be the communications system’s Night Service or a mail system schedule that is
programmed specifically for this purpose.
1-4 Mail System Planning

Form A: System Parameters—Part 1 Description
The mail system can have one (Single) or up to three (Multiple) Automated Attendants.
■For a Single Automated Attendant, all VMS-AA Lines use the same Greeting, Menu
Structure, and Schedule Controller setting.
■For Multiple Automated Attendants, different VMS-AA Lines are answered by different
Automated Attendants. Each Automated Attendant has its own Greeting, Menu
Structure, and Schedule Controller setting. The VMS Hunt Schedule and VMS Hunt
Delay settings are the same for all Automated Attendants.
4.
Line Assignment ( ✔ = Automated Attendant 1)
Complete this section only if there are Multiple Automated Attendants.
Line Assignment identifies which VMS-AA Lines (specified on communications system
Planning Form A) are answered by each Automated Attendant.
Mail System Planning 1-5
Form B: Mailboxes Description
Form B: Mailboxes Description
The mail system comes with the following factory-set mailboxes.
General Mailbox for Automated Attendant 1
Mailbox No. 9991
General Mailbox for Automated Attendant 2 Mailbox No. 9992
General Mailbox for Automated Attendant 3 Mailbox No. 9993
System Administrator’s Mailbox Mailbox No. 9997
All other mailboxes must be created. For security reasons, the mail system will not transfer a call to any
communications system extension, Calling Group, or Hunt Group that does not have a mailbox.
Therefore, you must create a mailbox for every extension, Calling Group, and Hunt Group that callers
need to reach from the mail system, with two exceptions:
■
■
The extension designated as the Call Answer Service Operator does not have to have a mailbox.
Fax Extensions should not have mailboxes.
Security Alert:
To prevent possible toll fraud abuse, mailboxes should exist only when they are needed. That
means that they should be created only as they are needed, and that they should be deleted
when they are no longer needed.
Class of Service
Each mailbox is assigned a class of service (COS) that defines the characteristics of that mailbox as
shown in the COS Table on page A-8. Following is a description of each column of the COS Table.
■
■
■
■
Mailbox Storage is the total time available for stored messages in an individual mailbox.
The factory-set total storage time available for all mailboxes is six hours for a two-port system, 11
hours for a four-port system, and 16 hours for a six-port system. The storage time for all mailboxes
that are created can exceed the total storage time available for the system. However, when the
total storage time has been used, the mail system will not take any more messages, even though
an individual mailbox may not be full. Call Answer Service mailbox owners (called subscribers)
must delete messages to free space for new messages.
Message Length is the maximum length of a message that can be recorded by a caller.
Greeting Length is the maximum length of the personal greeting for a Call Answer Service or
Transfer-Only mailbox and for a Bulletin Board message. In bilingual mode, the greeting length
applies to each language. For example, a subscriber can record a 2-minute personal greeting in
the primary language and a 2-minute personal greeting in the secondary language.
Transfer Permitted defines how the mail system processes a call when a caller identifies this
mailbox as a transfer destination:
—If transfer is permitted, the mail system tries to transfer the call to the extension, Calling
Group, or Hunt Group associated with the mailbox as identified by the caller.
—If transfer is not permitted, the system does not try to transfer the call to the extension, Calling
Group, or Hunt Group identified by the caller. Instead, the system transfers the call directly to
the mailbox. Use this for mailboxes that do not have extensions, Calling Groups, or Hunt
Groups associated with them.
1-6 Mail System Planning

Form B: Mailboxes Description
■
■
Mailbox Type identifies the function that the mailbox performs:
—A Call Answer Service mailbox provides message storage space. A caller who
reaches a Call Answer Service mailbox hears a greeting; the caller can leave a
message. This is the most commonly-used type of mailbox for extensions.
Call Answer Service mailboxes with Class of Service 5, 6, or 18 also can be created
for people who need to be able to receive messages, but who do not have their own
extension (for example, consultants). These are called Guest Mailboxes.
—An Automated Attendant mailbox provides access to a predetermined Automated
Attendant. A caller who reaches an Automated Attendant mailbox hears whatever has
been recorded for that Automated Attendant; the caller cannot leave a message. This
type of mailbox may or may not have an associated extension. The receptionist’s
extension, for example, could have an Automated Attendant mailbox.
—A Bulletin Board mailbox provides an informational message up to four minutes long.
A caller who reaches a Bulletin Board mailbox hears the message; the caller cannot
leave a message. This type of mailbox can be used, for example, in a real estate
office to advertise new listings.
—A Transfer-Only mailbox provides access to an extension that does not need a
mailbox with storage space; for example, the extension in a conference room or at a
loading dock. A caller who reaches a Transfer-Only mailbox hears a greeting; the
caller cannot leave a message but can transfer to another extension. A Transfer-Only
mailbox should be created for the extension to which the Remote Maintenance Device
is connected.
Mailboxes of any type (Call Answer, Automated Attendant, Bulletin Board, or Transfer-
Only) can be created for Calling Groups (71, 72, 73, 74) and Hunt Groups (771, 772, 773,
774, 775, 776). Then, if the group is busy when a caller tries to transfer from the mail
system to the group, the caller will be transferred to the mailbox.
NOTE:
✏The system considers a Hunt Group to be busy if all members of the group are on
the phone or have Do Not Disturb on. A Calling Group is busy if all members of the
group have Do Not Disturb on, a call is ringing in the Calling Group, or the Calling
Group is being paged. Be aware that there is no Voice Mail coverage for calls
that are ringing in a Calling Group or a Hunt Group.
A combined total of 100 Call Answer Service, Automated Attendant, and Bulletin Board
mailboxes can be created. But to avoid call traffic problems, a maximum of 60 is
recommended for a six-port system, 40 for a four-port system, and 20 for a two-port
system. In addition, up to 58 Transfer-Only mailboxes can be created.
Outcalling Permission defines whether or not the mailbox allows Outcalling. If Outcalling is
permitted and activated, whenever a new message is placed in the mailbox, the mail
system calls up to five telephone numbers designated by the subscriber.
Security Alert:
Use discretion when creating mailboxes that permit Outcalling. No constraints are
placed on the destination of the outside call other than those imposed by the
communications system’s Outgoing Call Restriction (#401), Disallowed Phone
Number Lists (#404)J and Allowed Phone Number Lists (#407). Business needs
should dictate the use of Outcalling.
Mail System Planning 1-7

Form B: Mailboxes Description
Instructions
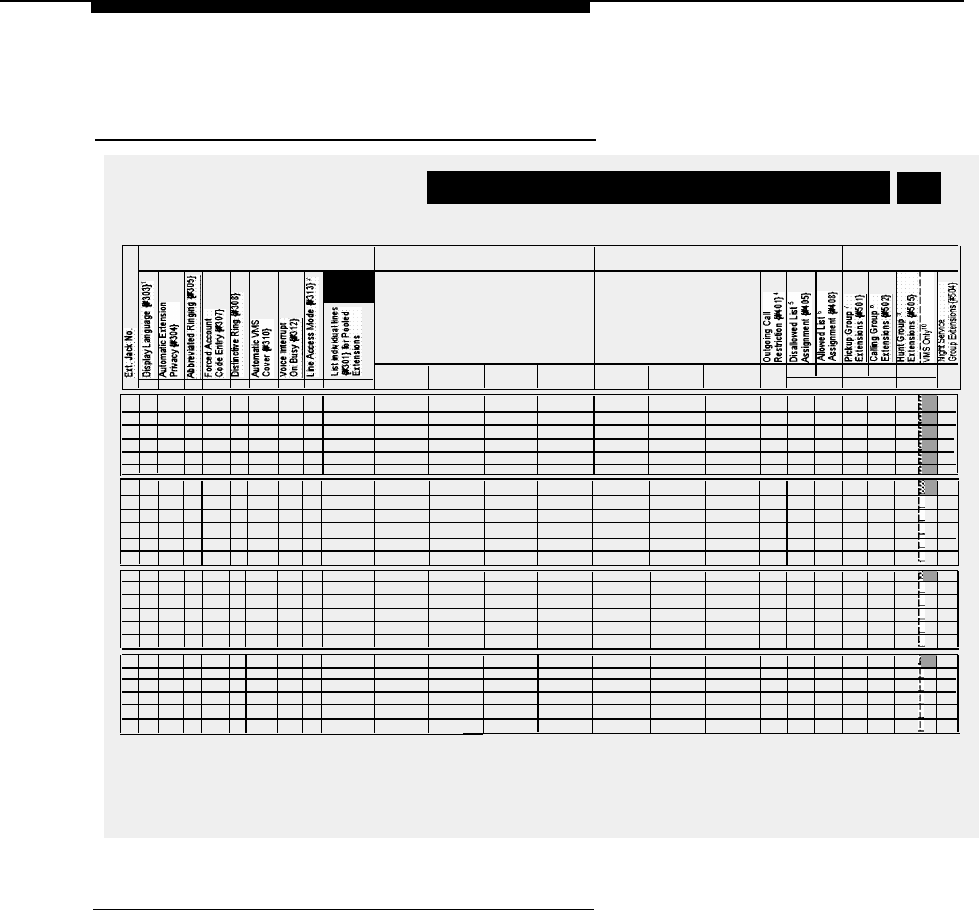
5. Fill in a row of the table on Form B for each mailbox to be created, as follows:
a.Description: Write the name of the person, group, location, or other descriptive label for the
mailbox. Examples are Joe Jones, Billing Department, Conference Room 201, and New Product
Bulletin Board. Leave this field blank for the Transfer-Only mailbox for the Remote Maintenance
Device.
b.Mailbox No.: For mailboxes with associated extensions, Calling Groups, or Hunt Groups, write
the extension or group number. Extensions are specified on communications system Form B1;
groups are specified on Form B2.
For mailboxes without associated extensions, such as Bulletin Board and Guest Mailboxes, write
an unused extension number. This can be a vacant extension jack in an installed 206 module or
an extension in the dialplan higher than the last extension jack in the last installed 206 module.
c. COS (Class of Service): Write the COS number that identifies the characteristics of the mailbox:
Mailbox Message Greeting Transfer Mailbox Outcalling
COS Storage Length Length Permitted *
Type
Permission
1
✓
2
3
4
5
6
15
16
17
18**
19
20
21
22
10 min
60 min
10 min
60 min
60 min
60 min
0 min
0 min
0 min
60 min
0 min
0 min
0 min
0 min
23
0 min
5 min
10 min
5 min
10 min
10 min
10 min
0 min
0 min
0 min
30 min
0 min
0 min
0 min
0 min
0 min
2 min
2 min
2 min
2 min
2 min
2 min
N/A
N/A
N/A
2 min
4 min
2 min
N/A
N/A
N/A
Yes*
Call Answer Service
No
Yes*
Call Answer Service
No
Yes*
Call Answer Service
Yes
Yes*
Call Answer Service
Yes
No
Call Answer Service
No
No
Call Answer Service
Yes
No
Automated Attendant 1
No
No
Automated Attendant 2
No
No
Automated Attendant 3
No
No
Call Answer Service
No
No
Bulletin Board
No
Yes*
Transfer-Only
No
Yes*
Automated Attendant 1
No
Yes*
Automated Attendant 2
No
Yes*
Automated Attendant 3
No
✓Indicates the default for all created mailboxes.
*Only mailboxes 10–57, 71–74, and 771–776 can be assigned a COS with Transfer Permitted.
** COS 18 is for special purposes (for example, dictation) where a long message needs to be recorded.
d.
Lang.: If the mail system is in bilingual mode, write 1 for Primary Language or 2 for Secondary
Language to indicate the language preference of the mailbox owner.
1-8 Mail System Planning

Form B: Mailboxes Description
e.
Mailbox Name: The name is used to create a directory that callers and subscribers
can access when they do not know the extension number. Write the first four letters of
the name of the person associated with the mailbox. Use first or last names
consistently. Then, write a 2-digit code beneath each letter as follows:
A = 21
J = 51 R = 73
B = 22 K = 52 S = 74
C = 23 L = 53 T = 81
D = 31
M = 61
U = 82
E = 32 N = 62 V = 83
F = 33 Ñ = 64
W = 91
G = 41
O = 63 X = 92
H = 42 P = 71 Y = 93
I = 43 Q = 72 Z = 94
✏
NOTE:
The letter Ñ can be entered only if the System Administrator’s Mailbox language is
Spanish.
Leave the Mailbox Name column blank for the Transfer-Only mailbox that is
associated with the extension to which the Remote Maintenance Device is connected.
f.
Group Mailbox Owner: If Mailbox No. 71, 72, 73, 74, 771, 772, 773, 774, 775, or 776
is a Call Answer Service mailbox (COS 1–6 or 18), you can assign an owner. The
message light on the owner’s telephone will go on when a new message arrives in the
Group Mailbox. The owner does not need to have a personal mailbox, but does need
a telephone with a message light.
Write the extension number of a Group Mailbox Owner.
Mail System Planning 1-9

Form C: System Parameters—Part 2 Description
Form C: System Parameters—Part 2 Description
6.
7.
8.
9.
Fax Extension and Fax Message Receiver
Fax Extension is the destination to which fax calls answered by the Automated Attendant are
transferred. This can be an extension to which a fax machine is connected or a Hunt Group
consisting of multiple fax machines.
✏NOTE:
In order for the Automated Attendant to transfer fax calls automatically, VMS Hunt Delay
(#506) on the communications system must be set to Immediate.
For each Fax Extension, you can identify a Fax Message Receiver to be notified when a fax arrives.
The Fax Message Receiver must have a Call Answer Service mailbox and a telephone with a
message light.
For Multiple Automated Attendants, the Fax Extension and the Fax Message Receiver can be the
same for all Automated Attendants, or each Automated Attendant can have a different Fax
Extension and Fax Message Receiver.
Extension assignments are specified on communications system Planning Form B1; Hunt Groups
assignments are specified on communications system Planning Form B2.
Call Answer Service Operator ( ✓ = 10)
Call Answer Service Operator is the extension to which callers needing help are transferred.
Although the Call Answer Service Operator can be any extension, it should be an extension
belonging to someone who usually is available to answer calls.
Extension assignments are specified on communications system Planning Form B1.
General Mailbox Owner ( ✓ = 10)
If the Automated Attendant’s Dial 0/Timeout Action (see Form H) is set to Transfer the Caller to the
General Mailbox, the caller can leave a message in the General Mailbox. An owner is assigned for
each General Mailbox. When a message is placed in the General Mailbox, the message light on the
owner’s telephone lights.
Although the General Mailbox Owner can be any extension that has a telephone with a message
light, it should be an extension belonging to a person who can frequently check the mailbox,
retrieve the messages, and forward them to the appropriate people.
For Multiple Automated Attendants, there is a General Mailbox for each Automated Attendant. The
owner can be the same for all, or each General Mailbox can have a different owner.
Extension assignments are specified on communications system Planning Form B1.
System Administrator’s Mailbox ( ✓ = 9997)
The mail system is administered from the System Administrator’s Mailbox. This must be a Call
Answer Service mailbox.
Security Alert:
It is strongly recommended that the System Administrator’s Mailbox be changed from the
factory setting.
Extension assignments are specified on communications system Planning Form B1.
1-10 Mail System Planning

Form D: Schedule Description
Form D: Schedule Description
10.
11.
12.
13.
System Date and Time
The installer must set the date and the time for the mail system. You do not need to write
anything on the form for this item.
Multiple Automated Attendant ONLY
If there are Multiple Automated Attendants, check one of the three boxes to show to which
Automated Attendant this form applies.
Schedule Controller ( ✓ = Follow the Switch Mode)
An Automated Attendant operates in day mode when the business is open and in night
mode when the business is closed. Each mode has its own menu structure.
The Schedule Controller setting determines what controls day and night mode. The
Automated Attendant can Follow the Switch Mode or Follow the PARTNER MAIL Business
Schedule.
■For Follow the Switch Mode, the Automated Attendant is in day mode when the
communications system’s Night Service is off and in night mode when Night Service
is on.
■For Follow the PARTNER MAIL Business Schedule, the Automated Attendant is in day
mode when the Weekly Business Schedule identifies that the business is open and in
night mode when the Weekly Business Schedule identifies that the business is closed.
The Weekly Business Schedule is completely independent of the communications
system’s Night Service.
✏NOTE:
Either Schedule Controller setting can be overridden if circumstances require a
change to the business’ normal hours of operation. The System Administrator
can use the Temporarily Closed option of the Weekly Business Schedule or the
Open or Closed for Today feature. These features are described under
"Business Schedule" and "Open or Closed for Today" in Chapter 5 of the
Planning, Installation, and Use guide.
For Multiple Automated Attendants, there is a Schedule Controller for each Automated
Attendant. The Schedule Controller settings can be the same for all Automated Attendants,
or they can be different.
Weekly Business Schedule ( ✓ = Closed)
Complete this section only if the Schedule Controller is set to Follow the PARTNER MAIL
Business Schedule.
The Weekly Business Schedule identifies the business’ normal hours of operation. It
identifies which days the business is open, and the time that the business opens and closes
each day.
For Multiple Automated Attendants for which the Schedule Controller is set to Follow the
PARTNER MAIL Business Schedule, the associated Weekly Business Schedules can be the
same or they can be different.
Mail System Planning 1-11

Form E: Touch-Tone Gate Description
Form E: Touch-Tone Gate Description
14.
15.
16.
Multiple Automated Attendant ONLY
If there are Multiple Automated Attendants, check one of the three boxes to show to which
Automated Attendant this form applies.
Touch-Tone Gate ( ✓ = Off)
It is recommended that the Touch-Tone Gate be On if most callers have rotary telephones
and Off if most callers have touch-tone telephones.
When the Touch-Tone Gate is on, calls from rotary telephones can be handled more quickly.
■
■
If the Touch-Tone Gate is on, the caller hears the Touch-Tone Gate Greeting before the
Automated Attendant menu prompt.
—In monolingual mode, the greeting should tell the caller to press 1 if calling from a
touch-tone telephone.
—In bilingual mode, the greeting should tell the caller to press 1 to choose the Primary
Language or
★
1
to choose the Secondary Language.
If the caller does not respond, the Automated Attendant assumes that the caller has a rotary
telephone and handles the call as determined by the Dial 0/Timeout Action. The caller does
not have to listen to the Automated Attendant Main Menu prompt before the call is handled.
If the Touch-Tone Gate is off, a caller with a rotary telephone must listen to the entire Main
Menu prompt, then wait an additional four seconds before the call is handled.
For Multiple Automated Attendants, each Automated Attendant has its own Touch-Tone Gate
setting. The settings can be the same for all Automated Attendants, or they can be different.
Touch-Tone Gate Greetings
Complete this section only if the Touch-Tone Gate is set to On.
A Touch-Tone Gate Greeting plays only if the Touch-Tone Gate is On. There are factory-set
greetings in English, French, and Spanish. For example, this is the factory-set greeting for a
monolingual English system:
"Welcome to PARTNER MAIL. If you are calling from a touch-tone telephone, press 1 now;
otherwise, please wait for assistance."
And this is the greeting for a bilingual system with English as the Primary Language and French as
the Secondary Language:
"Welcome to PARTNER MAIL. PARTNER MAIL vous souhaite la bienvenue. Pour le français,
appuyez sur l’étoile suivit du un maintenant. Si vous n’appelez pas d’un appareil téléphonique
touch-tone, veuillez patienter. If you are calling from a touch-tone telephone, press 1 now;
otherwise, please wait for assistance."
If a customized greeting is to be recorded, keep the following things in mind:
■
■
■
■
This greeting is the first thing that callers hear when the Automated Attendant answers.
The greeting should welcome callers to the company.
There is a day greeting and a night greeting.
In monolingual mode, both day and night greetings must tell callers to press 1 if calling from
a touch-tone telephone.
1-12 Mail System Planning

Form E: Touch-Tone Gate Description
■In bilingual mode, both day and night greetings first must tell callers in the Secondary
Language to press
★
1
to hear prompts in the Secondary Language. Then the
greetings must tell them in the Primary Language to press 1 if they are calling from a
touch-tone telephone.
For Multiple Automated Attendants, there is a day and a night Touch-Tone Gate Greeting for
each Automated Attendant for which the Touch-Tone Gate is turned on. The greetings can
be the same for all Automated Attendants, or they can be different.
Mail System Planning 1-13

Form F: Voice Mail Greeting Description
Form F: Voice Mail Greeting Description
17. Voice Mail Greeting
Although the Voice Mail Greeting can be changed, it is recommended that the factory-set
Voice Mail Greeting be used.
The Voice Mail Greeting plays when subscribers call Voice Mail Service to get or send messages or
administer their mailboxes. In bilingual mode, the Voice Mail Greeting plays first in the Primary
Language and then in the Secondary Language.
Here is the factory-set Voice Mail Greeting in each language:
English:
"Welcome to PARTNER MAIL. Please enter extension and pound sign."
French:
"PARTNER MAIL vous souhaite la bienvenue. Veuillez composer le numéro de
poste suivi d’un diése."
Spanish:
"Bienvenido a PARTNER MAIL. Favor de marcar la extension y después el signo
de números."
1-14 Mail System Planning

Form G: Main Menu Prompt Description
Form G: Main Menu Prompt Description
18.
19.
20.
Creating a Main Menu consists of multiple tasks.
■Form G must be used to write the Main Menu prompt.
■Form H must be used to specify the Main Menu option definitions.
■Forms I and J may be used for Submenus.
■Form K may be used for Announcements.
Multiple Automated Attendant ONLY
If there are Multiple Automated Attendants, check one of the three boxes to show to which
Automated Attendant this form applies.
Day or Night Main Menu
Check one of the two boxes to show whether this prompt is for the Day Main Menu or the
Night Main Menu.
Main Menu Prompt
When an Automated Attendant in day mode answers a call, the Day Main Menu prompt
plays. The Night Main Menu prompt plays if the Automated Attendant is in night mode. If the
Touch-Tone Gate is on, the Touch-Tone Gate Greeting plays before the Main Menu prompt.
There are various factory-set Main Menu prompts. For example, here is the English prompt
for a monolingual mail system with the Touch-Tone Gate on:
"Please enter the extension number of the person you wish to reach. For a directory of
extensions, press star A. For assistance, press zero or wait on the line."
Customized Main Menus can be created. For example, here is a customized Main Menu
prompt for a bilingual English Primary/Spanish Secondary mail system with the Touch-Tone
Gate off:
"Hello. You have reached Good Health Medical Associates. Para español, marque
asterisco uno ahora. Si no cuenta con un teléfono de tonos, por favor espere un
momento.
To make an appointment, press 1.
For billing information, press 2.
For directions to the office, press 3.
If you know the extension of the person you are calling, press 4.
Or stay on the line for assistance."
The following things should be considered when writing the Main Menu prompt:
■If the mail system is in bilingual mode, the prompt must be written and recorded in
both the Primary Language and the Secondary Language.
■If the Touch-Tone Gate is off, this prompt is the first thing that callers hear when the
Automated Attendant answers. Include a welcome. In bilingual mode, in the Primary
Language prompt, tell callers in the Secondary Language to press
★
1
if they want
to hear the prompt in the Secondary Language.
■If the Touch-Tone Gate is on, callers hear the Touch-Tone Gate Greeting before this
menu.
■Include five or fewer menu options.
Mail System Planning 1-15

Form G: Main Menu Prompt Description
■
■
■
■
■
List menu options in order from the one expected to be most frequently selected to the one
expected to be least frequently selected.
If a directory of subscribers exists, tell callers to press
★
A
(or
★
2
)
to access the directory.
Also tell them whether employees are listed by first name or last name.
If desired, include an option for callers who send faxes from older-model fax machines that do
not send the industry-standard fax (CNG) tone. Tell callers to wait for the fax machine to
answer before pressing the Start button on their fax machine.
Tell callers using rotary phones or callers needing assistance to stay on the line.
You can tell callers to press
★
4
to replay the menu.
For Multiple Automated Attendants, there is a Day Main Menu and a Night Main Menu for each
Automated Attendant. The Main Menus can be the same for all Automated Attendants, or they can
be different.
1-16 Mail System Planning
Form H: Main Menu Definition Description
Form H: Main Menu Definition Description
21.
22.
23.
Multiple Automated Attendant ONLY
If there are Multiple Automated Attendants, check one of the three boxes to show to which
Automated Attendant this form applies.
Day or Night Main Menu
Check one of the two boxes to show whether this prompt is for the Day Main Menu or the
Night Main Menu.
Main Menu Definition
The number that the caller presses to make a selection from an Automated Attendant menu
is called the Selector Code. There are nine possible Selector Codes. The Automated
Attendant’s response to the caller’s selection is called the Selector Code Action. There are
five possible Actions:
Action Automated Attendant Caller
1Performs Selector Code Transfer Is transferred to a predetermined extension,
Calling Group, Hunt Group, or mailbox.
2Plays a Submenu Hears another menu of options.
3Plays an Announcement Hears a recorded announcement.
4Prompts for Transfer Is prompted to dial an extension number.
5Performs Direct Extension Transfer Is transferred to the extension, Calling Group,
Hunt Group, or mailbox that the caller dials.
For Action 1, the transfer destination must be programmed as part of the menu definition.
For example, suppose Jane Brown on extension 20 is ABC Bank’s mortgage expert. If the
bank’s menu prompt says "Press 3 for information about mortgages," extension 20 can be
programmed as the transfer destination. When a caller presses 3 , the call is transferred to
Jane Brown.
In contrast to Action 1, the transfer destination for Action 5 must be identified by the caller.
For example, the menu prompt might say "If you know the extension of the person you wish
to reach, please enter it now." In the ABC Bank scenario described earlier, if the caller dials
20, the caller is transferred to Jane Brown.
Action 5 indicates that the first number dialed by the caller is the first digit of an extension,
Calling Group, Hunt Group, or mailbox number, not a menu selection. If callers should be
able to dial extension, Calling Group, Hunt Group, and mailbox numbers directly from the
Main Menu, Action 5 must be assigned to all Selector Codes that match the first digit of all
extensions, groups, and mailboxes in the system. For example, if the system has extensions
10 through 24, Guest Mailboxes 60 through 65, Calling Group 71, and Bulletin Board
mailboxes 80 through 83, Action 5 must be assigned to Selector Codes 1, 2, 6, 7, and 8.
The remaining Selector Codes can be used for other Actions.
Action 4 is similar to Action 5; it lets callers dial extension, Calling Group, Hunt Group, or
mailbox numbers. However, it uses only one Selector Code. The menu prompt says
something like, "If you know the extension number of the person you wish to reach, press
3
." When the caller presses
3
,
another prompt says, "Please enter the extension number
Mail System Planning 1-17

Form H: Main Menu Definition Description
now." Using the ABC Bank scenario, to reach Jane Brown, the caller would dial 3 , then
2
0
.
For Action 2, a unique Submenu Number must be programmed as part of the menu definition. Then,
Form I is used to write the Submenu prompt. Form J is used for the Submenu definition.
For Action 3, a unique Announcement Number must be programmed as part of the menu definition.
Then, Form K is used to write the Announcement.
24. Multiple Automated Attendant ONLY
If there are Multiple Automated Attendants, check one of the three boxes to show to which
Automated Attendant this form applies.
25. Dial 0/Timeout Action (Day ✓ = Transfer to Call Answer Service Operator; Night ✓ = Transfer to
General Mailbox)
The Dial 0/Timeout Action specifies the action that the Automated Attendant takes if the caller dials
0 or does not enter a Selector Code. The Automated Attendant can disconnect the call, or transfer it
to the Call Answer Service Operator, the General Mailbox, or a pre-defined extension.
1-18 Mail System Planning

Form I: Submenu Prompt Description
Form I: Submenu Prompt Description
26.
27.
28.
A Submenu provides callers with additional options when there are more options than can fit
on the Day or Night Main Menu. A Submenu can be invoked from an option on a Day Main
Menu, a Night Main Menu, or another Submenu.
Up to 99 Submenus can be created. It is recommended that no more than three levels be
used; too many menu levels can confuse callers. The same Submenu can be invoked from
more than one menu. For Multiple Automated Attendants, the same Submenu can be
invoked for more than one Automated Attendant.
When creating a submenu, Form I is used to write the prompt and Form J is used for the
Submenu definition.
Submenu Number
The number for a Submenu that is invoked from a Main Menu is specified on Form H. The
number for a Submenu that is invoked from another Submenu is specified on Form J.
Submenu Name
The name for a Submenu that is invoked from a Main Menu is specified in the Description
column on Form H. The name for a Submenu that is invoked from another Submenu is
specified in the Description column on Form J.
Submenu Prompt
The following things should be considered when writing a Submenu prompt:
■If the mail system is in bilingual mode, the prompt must be written and recorded in
both the Primary Language and the Secondary Language.
■Include five or fewer options.
■List the options in order from the one expected to be most frequently selected to the
one expected to be least frequently selected.
■In addition to Selector Code choices, a Submenu can ask the caller to press:
★
4
to play the Submenu again.
★
7
to play the Main Menu.
★
#
to play the previous menu.
0
to perform the Dial 0/Timeout Action.
★
T
(or
★
8
)
to transfer to another extension.
★
1
to play the Submenu in the alternate language (bilingual mode only).
Mail System Planning 1-19

Form J: Submenu Definition Description
Form J: Submenu Definition Description
29.
30.
31.
Submenu Number
The number for a Submenu that is invoked from a Main Menu is specified on Form H. The number
for a Submenu that is invoked from another Submenu is specified on Form J.
Submenu Name
The name for a Submenu that is invoked from a Main Menu is specified in the Description column on
Form H. The name for a Submenu that is invoked from another Submenu is specified in the
Description column on Form J.
Submenu Definition
Submenu definitions are similar to Main Menu definitions. However, Submenu definitions are
different from Main Menu definitions in the following ways:
■There are no factory-set Actions assigned to Selector Codes on Submenus.
■Submenus do not have their own Dial 0/Timeout Action. If a caller does not respond to a
Submenu, the call is handled according to the Dial 0/Timeout Action on the Day Main Menu or
the Night Main Menu that is in effect at the time of the call.
1-20 Mail System Planning

Form K: Announcement Description
Form K: Announcement Description
An Announcement provides up to two minutes of frequently requested information, such as
directions and hours of operation. Announcements can be updated regularly to provide
callers with the latest information about frequently-changing topics, such as weather
reports, interest-rate quotes, product prices, and entertainment listings.
An Announcement can be invoked from a Day Main Menu, a Night Main Menu, or a
Submenu. Up to 99 Announcements can be created. The same Announcement can be
invoked from more than one menu. For Multiple Automated Attendants, the same
Announcement can be invoked from more than one Automated Attendant.
Announcements are similar to Bulletin Board messages. However, the following differences
exist:
■Announcements can be up to two minutes long, while Bulletin Board messages can
be up to four minutes long.
■Announcements are recorded by accessing System Administration from the System
Administrator’s Mailbox. System Administration is not accessed to record a Bulletin
Board message.
Security Alert:
For security reasons it is unwise to allow more than one person to access System
Administration. Therefore, if someone other than the System Administrator will be
recording informational messages, it is strongly recommended that Bulletin
Board mailboxes be used rather than Announcements.
32.
Announcement Number
The number for an Announcement that is invoked from a Main Menu is specified on Form H.
The number for an Announcement that is invoked from a Submenu is specified on Form J.
Announcement Name
The name for an Announcement that is invoked from a Main Menu is specified in the
Description column on Form H. The name for an Announcement that is invoked from a
Submenu is specified in the Description column on Form J.
Announcement
The following things should be considered when creating Announcements:
■If the mail system is in bilingual mode, the Announcement must be written and
recorded in both the Primary Language and the Secondary Language.
■Near the end of the Announcement, the caller can be instructed to press:
★
4
to play the Submenu again.
★
7
to return to the Main Menu.
★
#
to return to the previous menu.
0
to perform the Dial 0/Timeout Action.
★
T
(or
★
8
)
to transfer to another extension.
After the Announcement, if the caller makes no response within the four seconds, the
call is disconnected.
■
Mail System Planning 1-21

Form L: Group List Description
Form L: Group List Description
35.
36.
37.
If there are groups of subscribers who frequently need to be sent the same message, Group Lists
can be created. Each list is assigned a number. Then, subscribers can send messages to the
group by dialing the list number, rather than dialing each recipient’s mailbox number individually.
Up to 99 Group Lists can be created.
Group List Number
Write a number (1–99) to identify this Group List.
Group List Name
Write a descriptive name to identify this Group List.
Group List Members
The following things should be considered when creating Group Lists:
■Up to 100 Call Answer Service mailboxes, including Guest Mailboxes, can be included on a
list. Automated Attendant mailboxes, Bulletin Board mailboxes, and Transfer-Only mailboxes
cannot be included.
■A mailbox can be on more than one list.
■A Group List cannot be a member of another Group List.
■The System Administrator should provide each subscriber with a copy of the Group Lists so
they can use them.
Mailbox assignments are specified on mail system Planning Form B.
1-22 Mail System Planning

Form M: Line Ownership Description
Form M: Line Ownership Description
38.
Complete this form only if VMS-Mail Lines specified on communications system Planning
Form A are to be assigned coverage using Group Call Distribution (#206) Setting 3. This
form should not be used if VMS-Mail Lines are to be assigned coverage using Line
Coverage Extension (#208); skip to Form N.
Mail system Planning Form M identifies line owners for VMS-Mail Lines for which Group Call
Distribution (#206) Setting 3 is used to assign VMS coverage. These lines are identified on
communications system Planning Form A.
■If a line owner is assigned, calls are sent to the line owner’s mailbox after four rings.
The mailbox’s Class of Service (COS) determines how the call is handled.
—If the COS is 1 through 6 or 18, the call receives Call Answer Service.
—If the COS is 15 through 17 or 21 through 23, the call receives Automated
Attendant Service.
—If the COS is 19, the call is transferred to a Bulletin Board mailbox.
■If a line owner is not assigned, unanswered calls go to the General Mailbox after four
rings. If there are Multiple Automated Attendants, there are Multiple General
Mailboxes. However, if line owners are not assigned, all unanswered calls go to the
General Mailbox for Automated Attendant 1.
For Release 4.0 and later communications system, Line Coverage Extension (#208) can be
used in place of Group Call Distribution (#206) Setting 3 with Line Ownership. Line
Coverage Extension assigns the line to the owner’s extension. This provides more flexibility
because calls are sent to the owner’s mailbox after the number of rings specified by VMS
Cover Rings (#117), if VMS Cover is on. Also, while VMS Cover is on, the owner can turn on
Do Not Disturb to send calls immediately to the mailbox.
Line Ownership
If VMS-Mail Lines specified on communications system Planning Form A are to be assigned
coverage using Group Call Distribution (#206) Setting 3, this form should be used to identify
the line owner’s name and mailbox number. Each line owner must have a Call Answer
Service mailbox, an Automated Attendant mailbox, or a Bulletin Board mailbox. Mailbox
assignments are specified on mail system Planning Form B.
Mail System Planning 1-23

Form N: System Security Description
Form N: System Security Description
39.
40.
There are two programmable system security features that are designed to maintain the
confidentiality of subscribers’ messages, ensure the integrity of the mail system, and protect the
communications system against toll fraud abuse. These features are:
■
Passwords
■Security Violation Notification
Minimum Password Length ( ✓ = 6)
Every Call Answer Service mailbox (including the System Administrator’s Mailbox), Transfer-Only
mailbox, and Bulletin Board mailbox has a password. The System Administrator can select the
minimum password length, which can be from 0 to 15 digits. Every mailbox password (including the
System Administrator’s Mailbox password) and the System Administration Password must meet the
length requirement established by this setting.
Security Alert:
Use the most restrictive values that the business allows. Use Lock the Mailbox unless it is too
restrictive for the business. Use Send a Warning Message otherwise. Using No Security
Violation Notification is strongly discouraged.
Security Violation Notification
The System Administrator can select the maximum number of consecutive unsuccessful attempts to
log in that are allowed and the action to be taken when that maximum number is exceeded.
Security Alert:
Use the most restrictive values that the business allows. Use Lock the Mailbox unless it is too
restrictive for the business. Use Send a Warning Message otherwise. Using No Security
Violation Notification is strongly discouraged.
1-24 Mail System Planning

Form O: Security Checklist Description
Form O: Security Checklist Description
Form O is a security checklist. It should be completed as the last step of mail system planning
to ensure that all available security features have been implemented.
✏NOTE for Item 12:
Extension(s) used for Outcalling are as follows:
If the system has... The Outcalling port is...
2 ports No. 2
4 ports No. 4
6 ports No. 5 and 6
When Form O is completed, it should be filed for safekeeping with the other planning forms as a
record of the programming for this system.
Mail System Planning 1-25

Communications System
Planning
2
Introduction
This chapter provides information about the communications system planning forms. It
describes the features that interact with the mail system. It is for reference purposes only.
Forms shown are from the System Planner for Release 4.1 of the communications system.
The appearance and the terminology in column headings may vary slightly on forms for
earlier releases of the communications system.
To order a complete set of communications system forms, call 1 800 457-1235 or 1 317
361-5353 and ask for the order number appropriate for your communications system, as
follows:
Communications System Order Number
PARTNER® II or PARTNER Plus system Release 4.1
518-455-338
PARTNER II or PARTNER Plus system Release 4.0
518-455-328
PARTNER II or PARTNER Plus system Release 3.1
518-455-319
PARTNER II system Release 3.0
518-455-315
Communications System Planning 2-1
Communications System Planning
Form A: System Configuration, Page 1
Form A: System Configuration
PAGE
1 of 3
Required for PARTNER II System and PARTNER Plus System.
For additional instructions, see page 2.
1. Customer Billing Name
3. Contact Name
6. Configure Hardware For Hybrid Mode (PARTNER II system only):
No ❑
Yes
❑
If yes, call local telephone company—
2. Installation Address MF Mode and FCC # AS5 USA-21312-MF-E
Phone 7. Features Customer is most interested in (most important first):
() –
4. Person to be Trained Phone
Alternate Trainee’s Name
Phone
() –() –
5. Sold by
❑
AT&T Sales Forcee Salesperson's Name Phone
❑
Dealear
8. System Lines
() –
Write Hybrid Mode Line Coverage—You can select one per line
Line Write the Telephone R if Only:
Rotary AA 1DXD 2VMS- 3ASA 4Hunt 5VMS- 6Write 7Write User’s Name for
Jack Numbers in order Check Identify other Local
AA Group Mail Ext. No. Personal or Owned Line if
(Dial
Write auxiliary
Pulse pool 881, 882, {#607} {#205} {#206} {#204} (write no.) {#206} for Call
{#206} Dedicated Line
Telephone Company
No. customer desires or Identify Equipment for Caller Subscription Services
(list personal and or Cover
dedicated lines last) Line 883 or No pool Only one of these ID(e.g., Repeat Call)
{#201}
{#207}
types per system {#208}
{#208}
Service
01
02
03
04
05
06
07
08
09
10
11
12
13
14
15
16
17
18
19
20
21
22
23
24
5. Write group number (1–6) covering this line. Also see Form B2, Hunt Group Extensions {#505) 1–6.
1. Check if desired. Also see Form B1, AA Extension {#607} column.
2. Check if desired. Also see Form A, Item 10—DXD, and Form C, Direct Extension Dial Button {#113}. 6. Check desired line for #206 or enter line owner's extension number for #208. Also see Form B1, PARTNER
3. Check if desired. Also see Form A, Item 10—VMS-AA, and Form B1, PARTNER MAIL or PARTNER MAIL VS MAIL or PARTNER MAIL VS column.
7. Write extension number of line owner eligible for Call Coverage. Also write line owner's name in next
column.
column.
4. Check if desired. Also see Form A. Item 10—ASA, and Form C, Automatic System Answer Button {#111}.
Form A: Page 1 Description
VMS-AA
For PARTNER II Release 3.0 systems, VMS-AA is written in the Line Coverage column.
Lines that are to be answered by the mail system’s Automated Attendant Service are identified in
this column. These lines are programmed using Group Call Distribution (#206) Setting 1 for Hunt
Group 7. Calls on these lines go directly to Automated Attendant Service, rather than having to be
answered and transferred by the receptionist. For these lines:
■VMS Hunt Schedule (#507) determines whether calls go to Automated Attendant Service all
the time, only during the day, or only at night. The VMS Hunt Schedule setting is specified on
Form A Page 2.
2-2 Communications System Planning

Ordering Codes
■VMS Hunt Delay (#506) determines whether Automated Attendant Service answers
calls immediately (on the second ring) or after a delay (after the fourth ring). The VMS
Hunt Delay setting is specified on Form A Page 2.
If the mail system will have multiple Automated Attendants and not all Automated
Attendants can follow the same VMS Hunt Schedule and VMS Hunt Delay, you cannot use
Group Call Distribution (#206) Setting 1 to configure all of the Automated Attendants. In
such cases, you can use one of the following alternative methods:
■Method 1:
Communications system feature: Group Call Distribution (#206) Setting 3.
Mail system features: Line Ownership, Automated Attendant mailbox.
1. Set Group Call Distribution (#206) to Setting 3 for the lines requiring Automated
Attendant service.
2. Create an Automated Attendant mailbox with the appropriate Class of Service
(COS):
Automated Attendant 1
COS 15 or 21
Automated Attendant 2 COS 16 or 22
Automated Attendant 3 COS 17 or 23
3.Use the voice mail system’s Line Ownership feature to assign the Automated
Attendant mailbox as the owner of the line(s).
Result: The communications system will direct calls both day and night to the
Automated Attendant mailbox after four rings. Using this method, there is no
way to send calls immediately to the mailbox.
■Method 2 (Available only for Release 4.0 and later communications systems):
Communications system features: Line Coverage Extension (#208), VMS Cover
button, Do Not Disturb button. This method requires a system telephone for each
Automated Attendant.
Mail system feature: Automated Attendant mailbox.
1. Use Line Coverage Extension (#208) to assign the lines requiring Automated
Attendant Service to the system phone’s extension.
2.
Assign a VMS Cover button and a Do Not Disturb button to the phone. Both of
these features must be assigned to buttons with lights.
3. Create an Automated Attendant mailbox for the extension:
Class of Service 15 or 21 Automated Attendant 1
Class of Service 16 or 22 Automated Attendant 2
Class of Service 17 or 23 Automated Attendant 3
Result:
When the VMS Cover button is Off, calls will not be sent to the Automated
Attendant.
When the VMS Cover button is On, calls will be sent to the Automated
Attendant mailbox. The status of the Do Not Disturb button will determine
how quickly the calls are sent. When the Do Not Disturb button is On, calls
will be sent to the Automated Attendant immediately. When the Do Not
Disturb button is Off, calls will be sent to the Automated Attendant after the
number of rings specified with the VMS Cover Rings (#117) feature.
Communications System Planning 2-3

Communications System Planning
The following table summarizes the interactions between the VMS Cover button and the Do
Not Disturb button.
Do Not Disturb ON Do Not Disturb OFF
VMS Cover ON Calls sent to Automated Calls sent to Automated Attendant
Attendant immediately. after VMS Cover Rings interval.
VMS Cover OFF No Automated Attendant No Automated Attendant Service.
service.
VMS-Mail
For PARTNER II Release 3.0 systems, VMS-MAIL is written in the Line Coverage column.
"Covered" or "owned" lines, which are to be answered by the mail system’s Call Answer Service, are
identified in this column.
Group Call Distribution (#206) Setting 3 can be used to assign VMS-Mail lines to Hunt Group 7.
Calls on these lines go to Voice Mail coverage after four rings. This is useful for personal lines or for
Automated Attendant service for certain multiple Automated Attendant configurations (see VMS-AA,
Method 1 on the previous page).
■
■
If a line owner is assigned using the mail system’s Line Ownership feature, calls are sent to
the line owner’s mailbox. The mailbox’s Class of Service (COS) determines how the call is
handled.
—
—
—
If the COS is 1–6 or 18, the caller hears the mailbox owner’s personal greeting if the line
owner does not answer. The caller can leave a message.
If the COS is 15–17 or 21–23, calls are answered after the fourth ring, both day and
night, by the associated Automated Attendant.
If the COS is 19, the caller hears a Bulletin Board message.
If a line owner is not assigned, unanswered calls go to the General Mailbox. If there are
multiple Automated Attendants, there are multiple General Mailboxes. However, if line owners
are not assigned, all unanswered calls go to the General Mailbox for Automated Attendant 1.
For information about Line Ownership and Class of Service, see the Descriptions for mail system
Planning Forms M and B, respectively.
For Release 4.0 and later communications systems, there is an additional way to implement Voice
Mail coverage. Line Coverage Extension (#208) can be used to assign the line to the owner’s
extension. This provides more flexibility because calls are sent to the owner’s mailbox after the
number of rings specified by VMS Cover Rings (#117), if VMS Cover is on. Also, the owner can turn
on Do Not Disturb to send calls immediately to the mailbox. The line owner’s extension should be
written in the VMS-Mail column; it is programmed as part of Line Coverage Extension (#208). The
type of mailbox (Call Answer, Bulletin Board, or Automated Attendant) assigned to the line owner’s
extension determines the type of service that unanswered calls to the extension receive. The Line
Ownership feature of the mail system is not used in this case.
2-4 Communications System Planning

Ordering Codes
Form A: System Configuration, Page 2
Form A: System Configuration
PAGE
2 of 3
Required for PARTNER II System and PARTNER Plus System.
For additional instructions, see page 3.
VMS-AA:
9.
System Settings. Write response on line for each item.
●
●
●
●
●
●
●
●
●
●
Receptionist answers calls during business hours? Write "Yes" or "No" _____.
Number of Lines {#104}—By default, 2 lines per 206 modules and 4 lines per 400 module
are assigned to each extension (or to pool 880 in PARTNER II Hybride Mode). Write
number if different from default _____.
Transfer Return Rings {#105}—By default, a transferred call rings 4 times before going to
the transfer return extension. Write number (0-9, 0 = no return) if different from
default _____.
Outside Conference Denial {#109}—By default, a conference call can include 2 outside
parties. Write "No" if 2 outside parties are not allowed _____.
Call Coverage Rings {#116} (PARTNER II only)—By default, a covered call rings 2 times
before going to the covering extention. Write number (1-9) if different from default _____.
VMS Cover Rings {#117}—By default, a call rings 3 times before going to the user's
mailbox. Write number (1-9) if diffferent from default_____.
Ring on Transfer {#119}—By deafult, the caller hears ringing when the call is transferred.
Write "NA" if music on hold or silence is desired _____.
Toll Call Prefix {#402}—By default, 0 or 1 must be dialed before the area code for a
long distance call. Write "No" is 0 or 1 is not required _____.
System Password {#403}—By default, no password is programmed to override dialing
restrictions and to turn Night Service on and off. Write 4 digits if password is
desired _ _ _ _ .
Music on Hold {#602}—By default, the Music on Hold jack on the processor module is
active. Write "No" if the jack is deactivated _____.
If VMS-AA is checked, specify the following:
VMS Hunt Delay {#506}—By default, VMS answers calls after 2 rings. Write "Del" if
calls ring 4 times before VMS answers _____.
VMS Hunt Schedule {#507}—By default, VMS is on all the time. Check if Day only or
Night only is desired:
❑
Day only
❑
Night only
ASA:
(PARTNER II system only) If ASA is checked, specigy the following:
Automatic System Answer Delay {#110}—By default, a call rings 2 times before it is
answered by the system. Write number (0-9) if different from default _____.
Automatic System Answer Mode {#121}—By default, ASA calls are put on hold after the
greeting plays. Check if call should continue to ring or be disconnected:
❑ Ring
❑
Disconnect
ASA Record/Playback
(I
891)—message of up to 10 seconds that caller hears
when the call is answered by the Automatic System Answer feature. Write
message below and record from extension 10 or 11:
10.
Line Coverage. Complete items based on Line Coverage selection on Form A, Item 8.
DXD:
(PARTNER II system only) If DXD is checked, specify the following:
Direct Extension Dial Delay {#112}—By default, a call rings 2 times before it is
answered by the system. Write number (0-9) if different from default _____.
Direct Extension Dial Record/Playback
(I
892)—message of up to 20 seconds that
that caller hears when call is answered with the Direct Extension Dial feature. Write
message below and record from extension 10 or 11:
Form A: Page 2 Description
Receptionist answers calls during business hours?
Release 3.1 and later communications systems ONLY
If "Yes" and Automated Attendant Service is implemented using Group Call Distribution
(#206) Setting 1 for Hunt Group 7, VMS Hunt Delay (#506) should be set to Delayed to allow
the receptionist time to answer the phone before the Automated Attendant does. VMS Hunt
Delay is described below.
Communications System Planning 2-5

Communications System Planning
VMS Cover Rings (#117) ( ✓ = 3)
Release 4.0 and later communications systems ONLY
The number of times that calls ring (1-9) before they are routed to the mail system’s Call Answer
Service is identified in this field. This feature applies to all intercom calls, transferred calls, and
outside calls on owned lines specified using Line Coverage Extension (#208) for extensions that
have VMS Cover or Automatic VMS Cover (#310) active.
Ring on Transfer (#119) ( ✓ = Active)
Release 4.1 communications system ONLY
If Music on Hold is desired, so callers hear music or recorded messages while the mail system
transfers their calls, "NA" should be written in this field. If "NA" is specified, an audio source must be
connected to the MUSIC ON HOLD jack on the primary processor module. If this field is blank,
callers hear ringing while their calls are being transferred.
Music on Hold (602) ( ✓ = Active)
This field is used to indicate whether Music on Hold is Active or Not Active.
For communications system Release 4.0 and earlier, it is recommended that Music on Hold be
Active so that callers hear music or recorded messages (rather than silence) while the mail system
transfers their calls. If Music on Hold is Active, an audio source must be connected to the MUSIC
ON HOLD jack on the primary processor module.
For communications system Release 4.1, Music on Hold may be Active; or the Ring on Transfer
(#119) setting can be left at the default so that callers hear ringing while they are being transferred.
Ring on Transfer (#119) is described above.
VMS-AA
The next two items apply only to lines receiving Automated Attendant Service that is implemented
using Group Call Distribution (#206) Setting 1 for Hunt Group 7.
VMS Hunt Delay (#506) ( ✓ = Immediate)
This field is used to indicate whether calls on VMS-AA lines specified on Form A Page 1
should be answered by Automated Attendant Service immediately (on the second ring) or
after a delay (after the fourth ring).
VMS Hunt Schedule (#507)
(
✓
= Always)
This field is used to indicate whether calls on VMS-AA lines specified on Form A Page 1
should be answered by Automated Attendant Service all the time, during the Day Only (Night
Service is Off) or during the Night Only (Night Service is On). A Night Service button is
required at extension 10 (see Form C).
2-6 Communications System Planning
Ordering Codes
Form B1: System Extensions
10
11
12
13
14
15
16
17
18
19
20
21
22
23
24
25
26
27
28
29
30
31
32
33
IMPORTANT:
A system display phone is required for programming at extension 10 or 11. Extension 10 typically is the receptionist’s extension.
Extension 11 is recommended as a second programming extension (typically the System Manager’s extension).
1. If checked, see Form B1, Page 3 of 4
2. If there is a mix of PARTNER-model and MLS-model phones, write “P” for PARTNER avd “M” for MLS.
6. Also write Transfer Return Ext. No. {#306} on this form (usually extension 10). Also see Form B2, Identify
Group Assignments. VMS Only.
3. Write “T” for touch-tone or “R” for rotary. If Call Waiting is desired, check next column.
4. Must be standard phone. If Immediate dialing is required, use a dedicated line. Do not assign restrictions that
7. To prevent other extensions from interrupting calls, assign Automatic Extension Privacy {#304} on Form B2.
8. Check corresponding alert extension in next column. To prevent outside calls, remove all outside lines see
prevent dialing the outside number. Forced Account Code Entry {#307}, or groups. Also see Form D, External
Hotline {#311}.
Lines/Pools Not Assigned on Form B2.
9. Also write Transfer Return Ext. No. {#306} on this form.
5. Standard phone is recommended. Write extension number of corresponding alert extension or “70” for loud-
speaker paging system in next column.
Form B1: System Extensions
PAGE
1 0F 4
Required for PARTNER II System and PARTNER Plus System.
For additional instructions, see page 5.
Identify Telephone Identify Auxiliary Equipment
Attached to this Extension Attached to this Extension
Ext.
Jack
No.
Write in
Other
Equipment
Write
Transfer
Return
Ext. No.
{#306}
Write Name/Description
Form B1: Description
Write Name/Description
“VMS–Port 1,” “VMS–Port 2” and so forth should be written in this column to identify the
extensions to which the mail system unit is to be connected. Two extensions should be
identified for a two-port mail system, 4 extensions for a four-port mail system, or 6
extensions for a six-port mail system.
Also, “VMS-RMD” should be written for the extension to which the Remote Maintenance
Device is to be connected.
Communications System Planning 2-7

Communications System Planning
PARTNER MAIL
For PARTNER II Release 3 systems, this column heading is VMS.
The extensions to which the mail system unit is to be connected are identified in this column. Two
extensions should be checked for a two-port mail system, 4 extensions for a four-port mail system,
or 6 extensions for a six-port mail system.
Also, the extension to which the Remote Maintenance Device is to be connected should be
checked.
NOTE:
✏The first extension jack on 206 modules should not be used as a PARTNER MAIL extension.
These jacks should be reserved for use during a power failure.
FAX Machine Extensions (#601)
The extensions to which fax machines are connected are identified in this column.
If VMS Hunt Delay is set to Immediate and a fax call comes in on a line covered by Automated
Attendant Service that is implemented using Group Call Distribution (#206) Setting 1 for Hunt Group
7, the call will be transferred automatically to the fax extension (or to a fax Hunt Group if there are
multiple fax machines). Also, a Fax Message Receiver can be identified; this extension is notified
when a fax arrives. For more information, see the Description for mail system Planning Form C.
If the mail system will automatically transfer fax calls, Line Ringing for the fax extension should be
set to No Ring. Line Ringing is specified on communications system Form B2.
Write Transfer Return Ext. No. (#306)
By default, a transferred call returns to the originating extension if the call is not answered. This
must be changed for all extensions to which the mail system unit is connected.
IMPORTANT:
For the two, four, or six PARTNER MAIL extensions identified above, select a different transfer return
extension—usually extension 10—where a person can pick up unanswered calls that are transferred
from the mail system.
2-8 Communications System Planning
Ordering Codes
Form B2: Customized Extension
Settings
Form B2: Customized Extension Settings
PAGE
1 of 2
Required if you want to change extension settings from defaults for PARTNER II System
and PARTNER Plus System. For additional instructions, see pages 6 and 7
Identify Extension Settings
if Different than Default
Identify Line Ringing {CTP} Option Identify Restrictions/Permissions
If Different than Default
If Different than Defaults
Identify
Group Assignments
Hybrid Mode
Only Write line numbers or pool access codes in each
column to show desired Line Ringing options Write line numbers or pool access codes
for Line Access Restriction {#302} or
Pool Access Restriction {#315}
No Restriction ✔
Immediate
✔ lines 1–41–41–4 1–41–6 7
Delayed No Ring
✔ pools Lines.Pools 3
Not Assigned Outgoing
only
Incomming
only No Access
NR
✔
NA
✔
E
✔
NA
✔
A
✔
10
11
12
13
14
15
KALL
21
22
23
24
25
26
27
28
29
30
31
32
33
1. Write S for Spanish or F for French.
2. In Hybrid Mode only. write K for Key extension. Extension 10 always operates
as a key extension.
3. In Key Mode, use Line Assignment {#301} to remove lines from or assign lines
to extensions. In Hybrid Mode, use Pool Extension Assignment {#314} to
remove pools from or assign pools to extensions.
4. Write IN for Inside Only or LOC for Local Only to indicate restrictions for all
outgoing calls on all lines.
NA
✔
A
✔
NA
✔
NA
✔
P
✔
NA
✔
NA
✔
NA
✔
NA
✔
16
17
18
19
20
5. Write list number (1–4). Also see Form D, Disallowed Phone Number Lists {#404}. Assignments
6. Write list number (1–4). Also see Form D, Allowed Phone Number Lists (#407). ✔ = Default
7. Write group number (1–4). A = Assigned or Active
8. Write group number (1–4). If a loudspeaker is connected and Simultaneous Paging is desired, E = English
put appropriate extensions in Calling Group 1 Also see Form C, Simultaneous Paging. NA = Not Assigned or Not Active
9. Write group number (1–6). NR = No Restriction
10. Check off the same PARTNER MAIL or PARTNER MAIL VS extensions indicated on Form B1. P = Pooled
{CTP} = Centralized Telephone Programming
Form B2: Description
Automatic Extension Privacy (#304) ( ✔ = Not Assigned)
There should be an “A” (Assigned) in this column for the VMS-RMD extension and Fax
Machine Extensions (#601) identified on Form B1. This feature prevents users from
accidentally interrupting Remote Maintenance Device or fax transmissions
Also, if VMS Hunt Delay (#506) is set to Immediate (see Form A Page 2), there should be an
“A” (Assigned) for the two, four, or six PARTNER MAIL extensions identified on Form B1.
This prevents users from accidentally picking up calls sent to Automated Attendant Service.
Communications System Planning 2-9

Communications System Planning
Automatic VMS Cover (#310)
(
✓
= Not Assigned)
There should be an "A" (Assigned) in this column for each extension for which unanswered calls are
to be sent automatically to the mailbox associated with that extension.
No Ring
If the mail system will automatically transfer fax calls, Line Ringing for the fax extensions should be
set to No Ring. Fax Machine Extensions (#601) are identified on communications system Form B1.
Lines/Pools Not Assigned
For PARTNER II Release 3 and 3.1 systems and PARTNER Plus Release 3.1 systems, this column
heading is Line Assignment (#301).
This column must indicate that all lines are to be removed from the VMS-RMD extension identified
on Form B1.
Security Alert:
All lines must be removed from the Remote Maintenance Device extension to limit the
possibility of toll fraud abuse.
Outgoing Call Restriction (#401) ( ✓ = No Restriction)
This column should indicate that the VMS-RMD extension identified on Form B1 is to be restricted to
Inside Only.
In addition,
■If Outcalling is not permitted on the mail system, the PARTNER MAIL extensions identified on
Form B1 also should be restricted to Inside Only.
■If Outcalling is permitted, Outgoing Call Restriction should be used with Allowed and
Disallowed Lists to meet the needs of the business while maintaining the security of the
system.
Security Alert:
Outcalling introduces the risk of toll fraud abuse. Outgoing Call Restriction, Allowed
Lists, and Disallowed Lists can reduce the risk. Extensions connected to the mail
system ports should be restricted as much as the needs of the business allow.
For the extensions connected to port 1 on a two-port system, ports 1, 2, and 3 on a four-port
system, or ports 1 through 4 on a six-port system, Outgoing Call Restriction should be set to
Inside Only.
For the extensions connected to the Outcalling ports (port 2 on a two-port system, port 4 on a
four-port system or ports 5 and 6 on a six-port system), Outgoing Call Restriction should be
set to the most restrictive value that the business allows; then Allowed and Disallowed Lists
should be assigned as needed. For example, if Outgoing Call Restriction is set to Inside Only,
an Allowed List containing all numbers to which Outcalls are allowed must be created. This list
must be assigned to the extensions connected to port 2, port 4, or ports 5 and 6.
Allowed and Disallowed Lists are created using communications system Form D. They are
assigned as described below.
2-10 Communications System Planning

Ordering Codes
Disallowed List Assignment (#405)
If the mail system permits Outcalling, this column can identify the Disallowed Phone Number
List that is to be assigned to the PARTNER MAIL extensions that are connected to the
Outcalling ports (port 2 on a two-port system, port 4 on a four-port system, or ports 5 and 6
on a six-port system), as identified on Form B1. The Disallowed Phone Number List is
created using communications system Form D.
Allowed List Assignment (#408)
If the mail system permits Outcalling, this column can identify the Allowed Phone Number
List that is to be assigned to the PARTNER MAIL extensions that are connected to the
Outcalling ports (port 2 on a two-port system, port 4 on a four-port system, ports 5 and 6 on
a six-port system), as identified on Form B1. The Allowed Phone Number List is created
using communications system Form D.
VMS Only (Hunt Group 7)
There should be a check in this column for each of the two, four, or six PARTNER MAIL
extensions identified on Form B1. These extensions should not be assigned to any other
Hunt Group, to any Calling Group or Pickup Group, or to the Night Service Group.
Communications System Planning 2-11
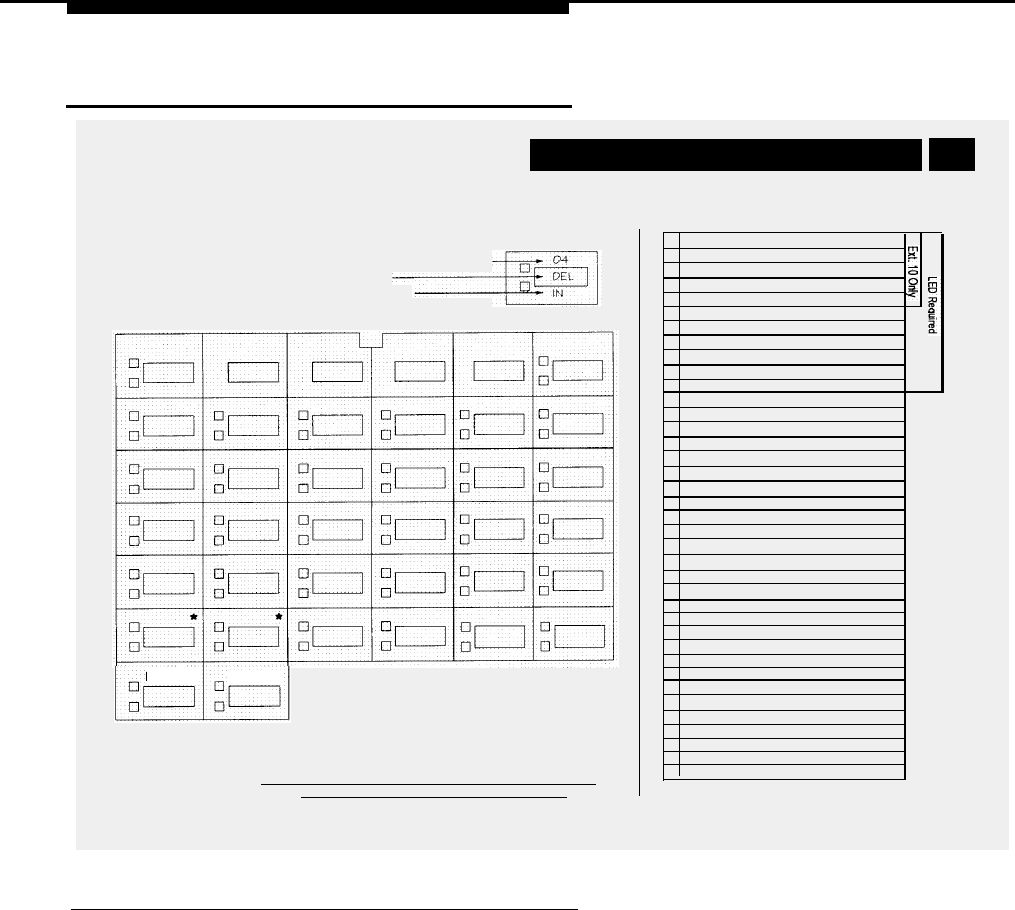
Communications System Planning
Form C: Phone
Form C1: PARTNER-34D Phone PAGE
1 of 8
Make as many copies as you need. Use template and/or checklist. For additional
instructions, see page 8.
Check Desired Features
Also write in extension or group number
Automatic System Answer Button {#111}
1
ASA
Direct Extension Dial Button {#113}
1
DXD
Night Service Button {#503}
NightSvc
Outgoing Call Restriction Button {#114}
2
OCR
Wake Up Service Button {#115} Wake
Callar ID Inspect (F 17)
1
ID-Inspect
Caller ID Name Display (F 16)
1
ID-Name
SAMPLE
Template Instructions
● If desired, write in line number, pool access code, dial code feature, or auto number
●
If desired, write in Line Ringing (lmm, Del, or No) From Form B2
●
If desired, write in Line Access Restriction or Pool Access Restriction
(Out, In, or No) from Form B2
Do Not Disturb (F 01)
DND
Privacy (F 07)
Priv
VMS Cover (F 15) VMSCover
Voice Interrupt on Busy Talk-Back (F 18)
VIOB
Account Code Entry (F 12)
3
ACE
Background Music (F 19)
3
Music
Call Coverage (F 20 XX XX)
1,3,5
Cover-XX XX
Call Forwarding/Call Follow-Me (F 11 XX XX)
3,5
CF-XX XX
1. PARTNER
II system
only.
2.
Requires
Auto Dial
button for
Call Park
(I
XX)
4
Park
Call Pickup
(I
6 XX) Pickup-XX
each
Conference Drop (F 06)
extension.
Drop
3.
Button with
Direct Line Pickup-Active Line
(I
68) DLPA
lights is
Direct Line Pickup-Idle Line
(I
8)
DLPI
recom-
mended, but
Exclusive Hold (F 02) ExHold
not required.
4.
Extension
Fax Management
(I
XX)
3
FAX-XX
number can
Group Calling-Ring/Page
(I
7 G or
I
*7 G) GCall-g
be pro-
Group Hunt-Ring/Signal
(I
77 G or
I
*77 G Hunt-g
grammed
as Auto Dial
Group Pickup
(I
66 G)
Intercom Autodial
(I
XX or
I
*XX)
3
Last Number Redial (F 05)
Loudspeaker Paging
(I
70)
Manual Signaling (F 13 XX or F 13 *XX)
3
Message Light Off (F 10 XX)
6
Message Light On (F 09 XX)
6
Recall (F 03)
button.
5.
You can
program the
origination
extension
only or both
the
origination
and
destination
extension.
6.
You can
program the
extension
number.
Intercom Intercom
P/U Grp-g
Ext-XX
LNR
Loudspk
MS-XX
MsgOff-XX
MsgOn-XX
Recall
SNR
SPage
Lock
TT-EN
VMMsgs-777
VMBox
Ext.
*
For PARTNER II systems in Hybrid mode only, if pool 880 is assigned, these two
buttons are associated with this pool.
Save Number Redial (F 04)
Simultaneous Paging
(I
*70)
Station Lock (F 21)
3
Touch-Tone Enable (F 08)
Voice Mail Messages Button
(I
777)
Voice Mailbox Transfer (F 14)
Specify Automatic Line Selection:
Identify extensions programmed as shown:
F = Feature button G = Group
I
= Left intercon button XX = Extension
Form C: Description
Night Service Button (#503) ( ✔ = Not Assigned)
Night Service must be Assigned to a button with lights at extension 10 if VMS Hunt Schedule (#507)
is set to Day Only or Night Only. The VMS Hunt Schedule setting is specified on Form A Page 2.
Do Not Disturb (Feature 0 1)
A Do Not Disturb button lets a system phone user press the button to prevent calls from audibly
alerting (lights still flash) at an extension. If the extension has a mailbox, calls are sent to the mailbox
when they finish alerting at the extension. A Do Not Disturb button can be Assigned to a button with
lights at any extension with a system phone. The button is used to turn the feature on and off. When
Do Not Disturb is on, outside callers hear ringing while inside callers hear a busy signal.
2-12 Communications System Planning

Ordering Codes
On communications systems Release 4.0 or later, if Do Not Disturb is on at the same time as
Automatic VMS Cover (#310) is Active or VMS Cover is on, intercom, transferred, and
outside calls on lines identified using Line Coverage Extension (#208) do not alert at the
extension; they go to the extension’s mailbox.
VMS Cover (Feature 1 5)
A VMS Cover button lets a system phone user at an extension with a mailbox press the
button to turn VMS Cover on and off. VMS Cover routes unanswered intercom and
transferred calls to the extension’s mailbox. In addition, on communications systems
Release 4.0 or later, VMS Cover routes unanswered calls on lines identified using Line
Coverage Extension (#208) to the extension’s mailbox.
A VMS Cover button can be Assigned to a button with lights at any extension with a system
phone. If a VMS Cover button is Assigned to an extension, it overrides the Automatic VMS
Cover (#310) setting for the extension, which is specified on communications system Form
B2.
Voice Mail Messages (Intercom 7 7 7)
An Auto Dial button on a system phone can be programmed to place an intercom call to the
mail system, so the user can check messages, send messages, or administer greetings.
Voice Mailbox Transfer (Feature 1 4)
A Voice Mailbox Transfer button lets a system phone user press the button and dial an
extension number to transfer a caller directly to an extension’s mailbox, so that the caller
can leave a message without first having to ring the extension. A Voice Mailbox Transfer
button can be Assigned to a button at any extension with a system phone. The extension
does not need to have a mailbox.
Communications System Planning 2-13
Communications System Planning
Form D: Number Lists
Form D: Number List
PAGE
1 of 2
Person/Place
Entry
Telephone Number1 Entry Telephone Number1Entry Telephone Number1 Entry Telephone Number1
0 1
02
01 01 01
02
Required if Form B1 identifies External Hotlines, or if Form B2
identifies Disallowed or Allowed List Assignments. For additional instructions,
see pages 14 and 15
Disallowed Phone Number Lists {#404} Emergency Phone Number List {#406}
Required only if Disallowed List Assignment {#405} is specified on Form B2. Write Emergency Phone Numbers that can be
Write the telephone numbers that users are prevented from dialing. dialed from any phone that has access to an
List 1
outside line regardless of assigned restrictions.
List 2 List 3 List 4 Entry Telephone Number2
01
02 03
02 02
03 04
03 03 05
03
04 04 04 04
05 05 05 05
06 06 06 06
07 07 08
07 07
08 08 08 08 10
09 09 09 09
10 10 10 10
06
07
09
External Hotline {#311}
Required if External Hotline {#311}
is checked on Form B1.
Write Extension Jack number specified on
Form B1, and the corresponding telephone
number to be assigned to Personal Speed Dial
Code 80 for that extension.
Ext Jack Telephone Number3
Allowed Phone Number Lists {#407}
Required only if Allowed List Assignment {#408} is specified on Form B2.
Write the telephone numbers that users can dial regardless of assigned restrictions.
List 1 List 2 List 3 List 4
Entry Telephcme Number
1
Entry
Telephone Number1
Entry Telephone Number
1
Entry Telephone Number
1
01 01 01 01
02 02 02 02
03 03
03
03
04 04 04 04
05 05 05 05
06
07
06 06 06
07 07 07
08 08
09 09 09 09
10 10 10 10
1. Telephone Number can be up to 12 characters including 0-9, *, and #. Write ! for wildcard (press Hold to program).
2. Telephone Number can be up to 12 digits (0-9).
08 08
3. Telephon Number can be up to 28 characters, including 0-9, *, #, and special dialing functions. You can have more
than 10 External Hotlines NOTE: An External Hotline phone is a phone that dials the specified
telephone number when the handset is lifted.
Form D: Description
Disallowed Phone Number Lists (#404)
A Disallowed Phone Number List prevents users from dialing specific telephone numbers or
categories of telephone (for example, international calls, calls to 976 exchanges for pre-recorded
messages such as horoscopes, and calls to 900 area code “chat lines.”)
If the mail system permits Outcalling, a Disallowed Phone Number List can be created and used in
conjunction with Outgoing Call Restriction (#401) and Allowed Phone Number Lists (#407) to meet
the needs of the business while maintaining the security of the system. (For more information, see
Outgoing Call Restriction under Form B2: Description.)
It is recommended that List 4 be used for Outcalling restrictions. Using Disallowed List Assignment
(#405) (see Form B2), the List should be assigned to the extensions that are connected to the
Outcalling ports (port 2 on a two-port system, port 4 on a four-port system, or ports 5 and 6 on a
six-port system), as identified on Form B1.
2-14 Communications System Planning

Ordering Codes
Allowed Phone Number Lists (#407)
An Allowed Phone Number List identifies specific numbers that are exceptions to
restrictions.
If the mail system permits Outcalling, an Allowed Phone Number List can be created and
used in conjunction with Outgoing Call Restriction (#401) and Disallowed Phone Number
Lists (#404) to meet the needs of the business while maintaining the security of the system.
(For more information, see Outgoing Call Restriction under Form B2: Description). It is
recommended that List 4 be used for Outcalling numbers. Using Allowed List Assignment
(#408) (see Form B2), the List should be assigned to the PARTNER MAIL extensions that
are connected to the Outcalling ports (port 2 on a two-port system, port 4 on a four-port
system, or ports 5 and 6 on a six-port system), as identified on Form B1.
IMPORTANT:
✏If Outgoing Call Restriction is set to Inside Only for the PARTNER MAIL extensions
that are connected to the Outcalling ports, an Allowed Phone Number List must be
created and assigned to these extensions. Outcalls can be made only to the numbers
specified on that Allowed List.
Communications System Planning 2-15
Customer Name:
PARTNER MAIL Voice Messaging System Release 3.0
Contact Name:
Phone:
Form A: System Parameters—Part 1
PAGE
1 of 1
Instructions:
✔
indicates the factory setting.
To indicate your selection, check the box or the line provided.
Numbers in brackets and Programming Path are for the installer. Ignore when filling out the form.
For more information, see "Form A: System Parameters—Part 1 Description."
1.
2.
3.
4.
System Language ❑ [1] Monolingual Mode ✔ ❑ [2] Bilingual Mode
If Monolingual: ❑ [1] English ✔ ❑ [2] French ❑ [3] Spanish
If Bilingual: Primary: ❑ [1] English ❑ [2] French ❑ [3] Spanish
Secondary:
❑ [1] English ❑ [2] French ❑ [3] Spanish
Programming Path: [1] System Parameters, [9] System Language
Maximum Digit Length ❑ 2 ✔ ❑ 3 ❑ 4
Programming Path: [1] System Parameters, [8] Maximum Digit Length
Single or Multiple Automated Attendant ❑ [1] Singled ✔ ❑ [2] Multiple
If Multiple, go to Item 4; otherwise, go to Form B.
Programming Path: [1] System Parameters, [1] Single or Multiple Automated Attendant
Line Assignment (Multiple Automated Attendant Only)
Line
AA1 ✔AA2 AA3
Line AA1
✔
AA2
AA3
01
02
03
04
05
06
07
08
09
10
11
12
13
14
15
16
17
18
19
20
21
22
23
24
Programming Path: [3] Automated Attendant, Automated Attendant [2 or 3],
[6] Line Assignments, [2] Add a Line
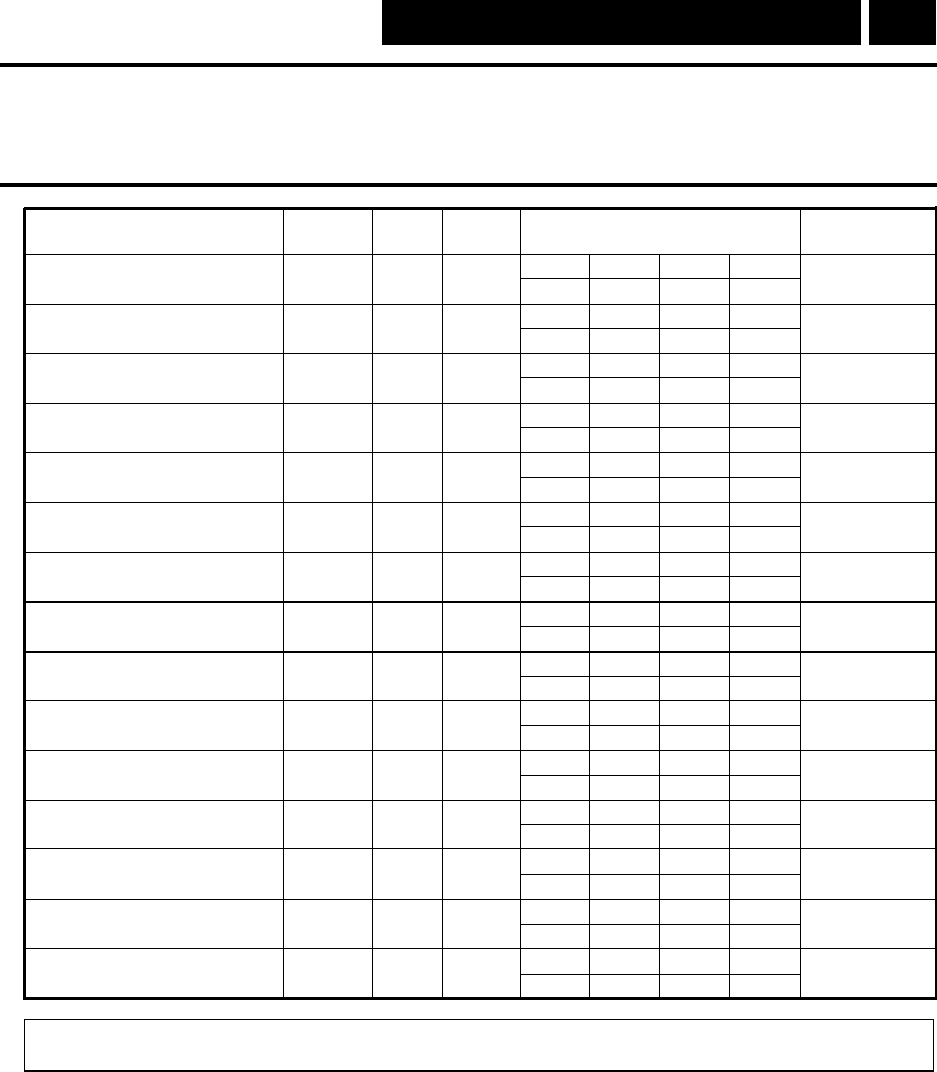
PARTNER MAIL Voice Messaging System Release 3.0
PAGE
Form B: Mailboxes
1 of 1
Instructions:
If necessary, make copies of this form for additional mailboxes.
For information about mailboxes, see "Form B: Mailboxes Description."
Programming Path is for the installer. Ignore when filling out the form.
5.
a. Description b. Mailbox c. COS d. Lang. e. Mailbox Name f. Group Mailbox
No.
Owner
| |
|
|
|
| | |
| | | |
|
| | |
| |
|
|
| |
|
|
||| |
| | | |
||| |
||
|
|
|||
|
| | | |
| |
|
|
|
|
| |
| | | |
Programming Path to Create Mailboxes: [4] Mailboxes, [4] Create a Mailbox
Programming Path to Assign Group Mailbox Owners: [4] Mailboxes, [7] Assign a Group Mailbox Owner
PARTNER MAIL Voice Messaging System Release 3.0
PAGE
Form C: System Parameters—Part 2
1 of 1
Instructions:
✔
indicates the factory setting.
To indicate your selection, write the information on the lines provided.
Programming Path is for the installer. Ignore when filling out the form.
For more information, see "Form C: System Parameters—Part 2 Description."
6.
Fax Extension and
Fax Ext. or Fax Message
Fax Message Receiver
Hunt Group Receiver Ext.
Automated Attendant 1:
Automated Attendant 2*:
Automated Attendant 3*:
Programming Path: [1] System Parameters, [4] Fax Extension and Fax Message Receiver,
(If Multiple Automated Attendants, [1, 2, or 3]), [1] Fax Extension and [2] Fax Message Receiver
7.
8.
9.
Call Answer Service Operator Ext.
(
✔
= 10)
Programming Path: [1] System Parameters, [5] Operator Extension
General Mailbox Owner Automated Attendant 1: Ext.
(
✔
= 10)
Automated Attendant 2*: Ext.
(
✔
= 10)
Automated Attendant 3*: Ext.
(
✔
= 10)
Programming Path: [1] System Parameters, [6] General Mailbox Owner
System Administrator’s Mailbox Mailbox No.
(
✔
= 9997)
Security Alert:
It is
strongly recommended
that the System Administrator’s Mailbox be changed from the
factory setting.
Programming Path: [1] System Parameters, [7] System Administrator’s Mailbox
* Multiple Automated Attendant Only
PARTNER MAIL Voice Messaging System Release 3.0
PAGE
Form D: Schedule
1 of 1
Instructions:
If necessary, make copies of this form for additional Automated Attendants.
✔
indicates the factory setting.
To indicate your selection for Items 11 and 12, check the box provided.
Numbers in brackets and Programming Path are for the installer. Ignore when filling out the form.
For more information, see "Form D: Schedule Description."
10.
11.
12.
13.
System Date and Time
Programming Path: [2] Schedule, [1] Update System Date and Time
Multiple Automated Attendant ONLY This applies to: ❑ AA1 ❑ AA2 ❑ AA3
Schedule Controller ❑ [1] Follow Switch Mode ✔ ❑ [2] Follow PARTNER MAIL Business Schedule
If Follow PARTNER MAIL Business Schedule, go to Item 12; otherwise, go to Form E.
Programming Path: [2] Schedule, [2] Automated Attendant Schedule, (If Multiple Automated
Attendants, [1, 2, or 3]), [1] Schedule Controller
Weekly Business Schedule
Day
a. Open/Closed b. Opening Time Closing Time
[1] Sunday / Closed
✔
[2] Monday / Closed
✔
[3] Tuesday / Closed
✔
[4] Wednesday / Closed
✔
[5] Thursday / Closed
✔
[6] Friday / Closed
✔
[7] Saturday / Closed
✔
a. Write 1 on the line for each day the business is open.
b. For each Open day, write the Opening Time and Closing Time. Use hhmm format where
hh = hour (01-12) or (00-23) and mm = minute (00-59).
Use 12- or 24-hour format depending on the System Administrator’s Mailbox language:
■
If English or Spanish, use 12-hour format (0100-1259) and specify a.m. or p.m.
■
If French, use 24-hour format (0000-2359).
If the business is open 24 hours a day, use Opening Time= 0000 and Closing Time = 0000.
Programming Path: [2] Schedule, [2] Automated Attendant Schedule, (If Multiple Automated
Attendants, [1, 2, or 3]), [2] Weekly Business Schedule
PARTNER MAIL Voice Messaging System Release 3.0
PAGE
Form E: Touch-Tone Gate
1 of 1
Instructions:
If necessary, make copies of this form for additional Automated Attendants.
✔
indicates the factory setting.
To indicate your selection for Items 13 and 14, check the box provided.
Numbers in brackets and Programming Path are for the installer. Ignore when filling out the form.
For more information, see "Form E: Touch-Tone Gate Description."
14.
15.
16.
Multiple Automated Attendant ONLY This applies to: ❑ AA1 ❑ AA2 ❑ AA3
Touch-Tone Gate ❑ [6] Off ✔ ❑ [9] On
If On, go to Item 16; otherwise, go to Form F.
Programming Path: [3] Automated Attendant, (If Multiple Automated Attendant, [1, 2, or 3]),
[5] Touch-Tone Gate
Touch-Tone Gate Greetings
a. Write the day greeting (maximum two minutes) that callers hear when the business is open.
. . . . . . . . . . . . . . . . . . . . . . . . . . . . . . . . . . . . . . . . . . . . . . . . . . . . . . . . . . . . . . . . . . . . . . . . . . . . . . . . . . . . .
. . . . . . . . . . . . . . . . . . . . . . . . . . . . . . . . . . . . . . . . . . . . . . . . . . . . . . . . . . . . . . . . . . . . . . . . . . . . . . . . . . . . . . . .
. . . . . . . . . . . . . . . . . . . . . . . . . . . . . . . . . . . . . . . . . . . . . . . . . . . . . . . . . . . . . . . . . . . . . . . . . . . . . . . . .
. . . . . . . . . . . . . . . . . . . . . . . . . . . . . . . . . . . . . . . . . . . . . . . . . . . . . . . . . . . . . . . . . . . . . . . . . . . . . . . . .
. . . . . . . . . . . . . . . . . . . . . . . . . . . . . . . . . . . . . . . . . . . . . . . . . . . . . . . . . . . . . . . . . . . . . . . . . . . . . . . . . . . . . . .
b. Write the night greeting (maximum two minutes) that callers hear when the business is closed.
. . . . . . . . . . . . . . . . . . . . . . . . . . . . . . . . . . . . . . . . . . . . . . . . . . . . . . . . . . . . . . . . . . . . . . . . . . . . . . . . . . . . . . . .
. . . . . . . . . . . . . . . . . . . . . . . . . . . . . . . . . . . . . . . . . . . . . . . . . . . . . . . . . . . . . . . . . . . . . . . . . . . . . . . . . . . . . . . .
. . . . . . . . . . . . . . . . . . . . . . . . . . . . . . . . . . . . . . . . . . . . . . . . . . . . . . . . . . . . . . . . . . . . . . . . . . . . . . . . . . . . . . . .
. . . . . . . . . . . . . . . . . . . . . . . . . . . . . . . . . . . . . . . . . . . . . . . . . . . . . . . . . . . . . . . . . . . . . . . . . . . . . . . . . . . . . . . .
. . . . . . . . . . . . . . . . . . . . . . . . . . . . . . . . . . . . . . . . . . . . . . . . . . . . . . . . . . . . . . . . . . . . . . . . . . . . . . . . . . . . . . . .
Programming Path: [7] System Greetings, [3] Automated Attendant Touch-Tone Gate Greeting,
(If Multiple Automated Attendant, [1, 2, or 3]), [1] Day Greeting and [2] Night Greeting
PARTNER MAIL Voice Messaging System Release 3.0
Form F: Voice Mail Greeting
PAGE
1 of 1
Instructions:
Programming Path is for the installer. Ignore when filling out the form.
For more information, see "Form F: Voice Mail Greeting Description."
17.
Voice Mail Greeting
a. Write the greeting (maximum two minutes). Be sure to tell subscribers to enter extension and
pound sign.
. . . . . . . . . . . . . . . . . . . . . . . . . . . . . . . . . . . . . . . . . . . . . . . . . . . . . . . . . . . . . . . . . . . . . . . . . . . . . . . . . . . . . . . .
. . . . . . . . . . . . . . . . . . . . . . . . . . . . . . . . . . . . . . . . . . . . . . . . . . . . . . . . . . . . . . . . . . . . . . . . . . . . . . . . . . . . . . . .
. . . . . . . . . . . . . . . . . . . . . . . . . . . . . . . . . . . . . . . . . . . . . . . . . . . . . . . . . . . . . . . . . . . . . . . . . . . . . . . . . . . . . . . .
. . . . . . . . . . . . . . . . . . . . . . . . . . . . . . . . . . . . . . . . . . . . . . . . . . . . . . . . . . . . . . . . . . . . . . . . . . . . . . . . . . . . . . . .
. . . . . . . . . . . . . . . . . . . . . . . . . . . . . . . . . . . . . . . . . . . . . . . . . . . . . . . . . . . . . . . . . . . . . . . . . . . . . . . . . . . . . . . .
. . . . . . . . . . . . . . . . . . . . . . . . . . . . . . . . . . . . . . . . . . . . . . . . . . . . . . . . . . . . . . . . . . . . . . . . . . . . . . . . . . . . . . . .
. . . . . . . . . . . . . . . . . . . . . . . . . . . . . . . . . . . . . . . . . . . . . . . . . . . . . . . . . . . . . . . . . . . . . . . . . . . . . . . . . . . . . . . .
b. Bilingual Mode ONLY, write the greeting (maximum two minutes) in the Secondary Language.
. . . . . . . . . . . . . . . . . . . . . . . . . . . . . . . . . . . . . . . . . . . . . . . . . . . . . . . . . . . . . . . . . . . . . . . . . . . . . . . . . . . . . . . .
. . . . . . . . . . . . . . . . . . . . . . . . . . . . . . . . . . . . . . . . . . . . . . . . . . . . . . . . . . . . . . . . . . . . . . . . . . . . . . . . . . . . . . . .
. . . . . . . . . . . . . . . . . . . . . . . . . . . . . . . . . . . . . . . . . . . . . . . . . . . . . . . . . . . . . . . . . . . . . . . . . . . . . . . . . . . . . . . .
. . . . . . . . . . . . . . . . . . . . . . . . . . . . . . . . . . . . . . . . . . . . . . . . . . . . . . . . . . . . . . . . . . . . . . . . . . . . . . . . . . . . . . . .
. . . . . . . . . . . . . . . . . . . . . . . . . . . . . . . . . . . . . . . . . . . . . . . . . . . . . . . . . . . . . . . . . . . . . . . . . . . . . . . . . . . . . . . .
. . . . . . . . . . . . . . . . . . . . . . . . . . . . . . . . . . . . . . . . . . . . . . . . . . . . . . . . . . . . . . . . . . . . . . . . . . . . . . . . . . . . . . . .
. . . . . . . . . . . . . . . . . . . . . . . . . . . . . . . . . . . . . . . . . . . . . . . . . . . . . . . . . . . . . . . . . . . . . . . . . . . . . . . . . . . . . . . .
. . . . . . . . . . . . . . . . . . . . . . . . . . . . . . . . . . . . . . . . . . . . . . . . . . . . . . . . . . . . . . . . . . . . . . . . . . . . . . . . . . . . . . . .
Programming Path: [7] System Greetings, [1] Voice Mail Greeting

PARTNER MAIL Voice Messaging System Release 3.0
PAGE
Form G: Main Menu Prompt
1 of 1
Instructions:
If necessary, make copies of this form for additional Main Menus.
Numbers in brackets and Programming Path are for the installer. Ignore when filling out the form.
For more information, see "Form G: Main Menu Prompt Description."
18.
19.
20.
Multiple Automated Attendant ONLY This applies to: ❑ AA1 ❑ AA2 ❑ AA3
Day or Night Main Menu ❑ [1] Day ❑ [2] Night
Main Menu Prompt
a. Write the prompt (maximum two minutes).
. . . . . . . . . . . . . . . . . . . . . . . . . . . . . . . . . . . . . . . . . . . . . . . . . . . . . . . . . . . . . . . . . . . . . . . . . . . . . . . . . . . . ...
. . . . . . . . . . . . . . . . . . . . . . . . . . . . . . . . . . . . . . . . . . . . . . . . . . . . . . . . . . . . . . . . . . . . . . . . . . . . . . . . . . . . . . . .
. . . . . . . . . . . . . . . . . . . . . . . . . . . . . . . . . . . . . . . . . . . . . . . . . . . . . . . . . . . . . . . . . . . . . . . . . . . . . . . . . . . . . . . .
. . . . . . . . . . . . . . . . . . . . . . . . . . . . . . . . . . . . . . . . . . . . . . . . . . . . . . . . . . . . . . . . . . . . . . . . . . . . . . . . . . . . . . . .
. . . . . . . . . . . . . . . . . . . . . . . . . . . . . . . . . . . . . . . . . . . . . . . . . . . . . . . . . . . . . . . . . . . . . . . . . . . . . . . . . . . . . . . .
. . . . . . . . . . . . . . . . . . . . . . . . . . . . . . . . . . . . . . . . . . . . . . . . . . . . . . . . . . . . . . . . . . . . . . . . . . . . . . . . . . . . . . . .
. . . . . . . . . . . . . . . . . . . . . . . . . . . . . . . . . . . . . . . . . . . . . . . . . . . . . . . . . . . . . . . . . . . . . . . . . . . . . . . . . . . . . . . .
b. Bilingual Mode ONLY, write the prompt (maximum two minutes) in the Secondary Language.
. . . . . . . . . . . . . . . . . . . . . . . . . . . . . . . . . . . . . . . . . . . . . . . . . . . . . . . . . . . . . . . . . . . . . . . . . . . . . . . . . . . . . . . .
. . . . . . . . . . . . . . . . . . . . . . . . . . . . . . . . . . . . . . . . . . . . . . . . . . . . . . . . . . . . . . . . . . . . . . . . . . . . . . . . . . . . . . . .
. . . . . . . . . . . . . . . . . . . . . . . . . . . . . . . . . . . . . . . . . . . . . . . . . . . . . . . . . . . . . . . . . . . . . . . . . . . . . . . . . . . . . . . .
. . . . . . . . . . . . . . . . . . . . . . . . . . . . . . . . . . . . . . . . . . . . . . . . . . . . . . . . . . . . . . . . . . . . . . . . . . . . . . . . . . . . . . . .
. . . . . . . . . . . . . . . . . . . . . . . . . . . . . . . . . . . . . . . . . . . . . . . . . . . . . . . . . . . . . . . . . . . . . . . . . . . . . . . . . . . . . . . .
. . . . . . . . . . . . . . . . . . . . . . . . . . . . . . . . . . . . . . . . . . . . . . . . . . . . . . . . . . . . . . . . . . . . . . . . . . . . . . . . . . . . . . . .
. . . . . . . . . . . . . . . . . . . . . . . . . . . . . . . . . . . . . . . . . . . . . . . . . . . . . . . . . . . . . . . . . . . . . . . . . . . . . . . . . . . . . . . .
Programming Path: See Form H, Page 2 of 2.

PARTNER MAIL Voice Messaging System Release 3.0
PAGE
Form H: Main Menu Definition
1 of 2
Instructions:
If necessary, make copies of this form for additional Main Menus.
✔
indicates the factory setting.
Numbers in brackets and Programming Path are for the installer. Ignore when filling out the form.
For more information, see "Form H: Main Menu Definition Description."
21.
22.
23.
Multiple Automated Attendant ONLY This applies to: ❑ AA1 ❑ AA2 ❑ AA3
Day or Night Main Menu ❑ [1] Day ❑ [2] Night
Main Menu Definition
Selector
Code
a. Action b. Number
Description
1
(5
✔
)
2
(5
✔
)
3
(5
✔
)
4
(5
✔
)
5
(5
✔
)
6
7
8
9
a. For each desired Selector Code, indicate the Action to take if the caller presses that Selector Code:
Action 1 = Transfer the caller to the specified destination
Action 2 = Play the specified Submenu
Action 3 = Play the specified Announcement
Action 4 = Prompt the caller to dial an extension number
Action 5 = Transfer the caller to the destination that the caller dials
b. For each Selector Code for which the Action is 1, 2, or 3, complete the table as follows:
If the
Action is... In the Number column... In the Description column...
1
Write the extension, Calling Group, Write a description of the destination; for
Hunt Group, Guest Mailbox, example, Joe Smith, Billing Department,
Automated Attendant mailbox, or Automated Attendant 2, or New Product
Bulletin Board mailbox number. Bulletin Board.
2
Assign a unique Submenu number Write a descriptive name for the Submenu.
(01-99).
3
Assign a unique Announcement Write a descriptive name for the
number (1-99). Announcement.

PARTNER MAIL Voice Messaging System Release 3.0
PAGE
Form H: Main Menu Definition
2 of 2
Instructions:
If necessary, make copies of this form for additional Main Menus.
✔
indicates the factory setting.
Numbers in brackets and Programming Path are for the installer. Ignore when filling out the form.
For more information, see "Form H: Main Menu Definition Description."
24.
25.
Multiple Automated Attendant ONLY This applies to: ❑ AA1 ❑ AA2 ❑ AA3
Dial 0/Timeout Action
❑
0 = Transfer the caller to the Call Answer Service Operator (
✔
Day Main Menu)
❑
1 = Transfer to the General Mailbox so the caller can leave a message (
✔
Night Main Menu)
❑ 2 = Disconnect the call
❑ 3 = Transfer the caller to Extension
Programming Path: [3] Automated Attendant, (If Multiple Automated Attendants, [1, 2, or 3]),
[1] Day or [2] Night, [6] Modify the Menu
PARTNER MAIL Voice Messaging System Release 3.0
Form I: Submenu Prompt
PAGE
1 of 1
Instructions:
If necessary, make copies of this form for additional Submenus.
Programming Path is for the installer. Ignore when filling out the form.
For more information, see "Form I: Submenu Prompt Description."
26.
27.
28.
Submenu Number
(01-99)
Submenu Name
Submenu Prompt
a. Write the prompt (maximum two minutes).
. . . . . . . . . . . . . . . . . . . . . . . . . . . . . . . . . . . . . . . . . . . . . . . . . . . . . . . . . . . . . . . . . . . . . . . . . . . . . . . . . . . . . . . . . . . .
. . . . . . . . . . . . . . . . . . . . . . . . . . . . . . . . . . . . . . . . . . . . . . . . . . . . . . . . . . . . . . . . . . . . . . . . . . . . . . . . . . . . . . . .
. . . . . . . . . . . . . . . . . . . . . . . . . . . . . . . . . . . . . . . . . . . . . . . . . . . . . . . . . . . . . . . . . . . . . . . . . . . . . . . . . . . . . . . .
. . . . . . . . . . . . . . . . . . . . . . . . . . . . . . . . . . . . . . . . . . . . . . . . . . . . . . . . . . . . . . . . . . . . . . . . . . . . . . . . . . . . . . . .
. . . . . . . . . . . . . . . . . . . . . . . . . . . . . . . . . . . . . . . . . . . . . . . . . . . . . . . . . . . . . . . . . . . . . . . . . . . . . . . . . . . . . . . .
. . . . . . . . . . . . . . . . . . . . . . . . . . . . . . . . . . . . . . . . . . . . . . . . . . . . . . . . . . . . . . . . . . . . . . . . . . . . . . . . . . . . . . . .
. . . . . . . . . . . . . . . . . . . . . . . . . . . . . . . . . . . . . . . . . . . . . . . . . . . . . . . . . . . . . . . . . . . . . . . . . . . . . . . . . . . . . . . .
b. Bilingual Mode ONLY, write the prompt (maximum two minutes) in the Secondary Language.
. . . . . . . . . . . . . . . . . . . . . . . . . . . . . . . . . . . . . . . . . . . . . . . . . . . . . . . . . . . . . . . . . . . . . . . . . . . . . . . . . . . . . . . .
. . . . . . . . . . . . . . . . . . . . . . . . . . . . . . . . . . . . . . . . . . . . . . . . . . . . . . . . . . . . . . . . . . . . . . . . . . . . . . . . . . . . . . . .
. . . . . . . . . . . . . . . . . . . . . . . . . . . . . . . . . . . . . . . . . . . . . . . . . . . . . . . . . . . . . . . . . . . . . . . . . . . . . . . . . . . . . . . .
. . . . . . . . . . . . . . . . . . . . . . . . . . . . . . . . . . . . . . . . . . . . . . . . . . . . . . . . . . . . . . . . . . . . . . . . . . . . . . . . . . . . . . . .
. . . . . . . . . . . . . . . . . . . . . . . . . . . . . . . . . . . . . . . . . . . . . . . . . . . . . . . . . . . . . . . . . . . . . . . . . . . . . . . . . . . . . . . .
. . . . . . . . . . . . . . . . . . . . . . . . . . . . . . . . . . . . . . . . . . . . . . . . . . . . . . . . . . . . . . . . . . . . . . . . . . . . . . . . . . . . . . . .
. . . . . . . . . . . . . . . . . . . . . . . . . . . . . . . . . . . . . . . . . . . . . . . . . . . . . . . . . . . . . . . . . . . . . . . . . . . . . . . . . . . . . . . .
Programming Path: See Form J.
PARTNER MAIL Voice Messaging System Release 3.0
PAGE
Form J: Submenu Definition
1 of 1
Instructions:
If necessary, make copies of this form for additional Submenus.
Programming Path is for the installer. Ignore when filling out the form.
For more information, see "Form J: Submenu Definition Description."
29.
30.
31.
Submenu Number
(01-99)
Submenu Name
Submenu Definition
Selector
Code
a. Action b. Number
Description
1
2
3
4
5
6
7
8
9
a. For each desired Selector Code, indicate the Action to take if the caller presses that Selector Code:
Action 1 = Transfer the caller to the specified destination
Action 2 = Play the specified Submenu
Action 3 = Play the specified Announcement
Action 4 = Prompt the caller to dial an extension number
Action 5 = Transfer the caller to the destination that the caller dials
b. For each Selector Code for which the Action is 1, 2, or 3, complete the table as follows:
If the
Action is...
1
2
3
In the Number column...
Write the extension, Calling Group,
Hunt Group, Guest Mailbox,
Automated Attendant mailbox, or
Bulletin Board mailbox number.
Assign a unique Submenu number
(01-99).
Assign a unique Announcement
number (1-99).
In the Description column . . .
Write a description of the destination; for
example, Joe Smith, Billing Department,
Automated Attendant 2, or New Product
Bulletin Board.
Write a descriptive name for the Submenu.
Write a descriptive name for the
Announcement.
Programming Path: [3] Automated Attendant, (If Multiple Automated Attendants, [1, 2, or 3]),
[3] Submenus, [4] Create
PARTNER MAIL Voice Messaging System Release 3.0
Form K: Announcement
PAGE
1 of 1
Instructions:
If necessary, make copies of this form for additional Announcements.
Programming Path is for the installer. Ignore when filling out the form.
For more information, see "Form K: Announcement Description."
32.
33.
34.
Announcement Number
(01-99)
Announcement Name
Announcement
a. Write the Announcement (maximum two minutes).
. . . . . . . . . . . . . . . . . . . . . . . . . . . . . . . . . . . . . . . . . . . . . . . . . . . . . . . . . . . . . . . . . . . . . . . . . . . . . . . . . . . . . . . .
. . . . . . . . . . . . . . . . . . . . . . . . . . . . . . . . . . . . . . . . . . . . . . . . . . . . . . . . . . . . . . . . . . . . . . . . . . . . . . . . . . . . . . . .
. . . . . . . . . . . . . . . . . . . . . . . . . . . . . . . . . . . . . . . . . . . . . . . . . . . . . . . . . . . . . . . . . . . . . . . . . . . . . . . . . . . . . . . .
. . . . . . . . . . . . . . . . . . . . . . . . . . . . . . . . . . . . . . . . . . . . . . . . . . . . . . . . . . . . . . . . . . . . . . . . . . . . . . . . . . . . . . . .
. . . . . . . . . . . . . . . . . . . . . . . . . . . . . . . . . . . . . . . . . . . . . . . . . . . . . . . . . . . . . . . . . . . . . . . . . . . . . . . . . . . . . . . .
. . . . . . . . . . . . . . . . . . . . . . . . . . . . . . . . . . . . . . . . . . . . . . . . . . . . . . . . . . . . . . . . . . . . . . . . . . . . . . . . . . . . . . . .
. . . . . . . . . . . . . . . . . . . . . . . . . . . . . . . . . . . . . . . . . . . . . . . . . . . . . . . . . . . . . . . . . . . . . . . . . . . . . . . . . . . . . . . .
b. Bilingual Mode ONLY, write the Announcement (maximum two minutes) in the Secondary Language.
. . . . . . . . . . . . . . . . . . . . . . . . . . . . . . . . . . . . . . . . . . . . . . . . . . . . . . . . . . . . . . . . . . . . . . . . . . . . . . . . . . . . . . . .
. . . . . . . . . . . . . . . . . . . . . . . . . . . . . . . . . . . . . . . . . . . . . . . . . . . . . . . . . . . . . . . . . . . . . . . . . . . . . . . . . . . . . .
. . . . . . . . . . . . . . . . . . . . . . . . . . . . . . . . . . . . . . . . . . . . . . . . . . . . . . . . . . . . . . . . . . . . . . . . . . . . . . . . . . . . . . . .
. . . . . . . . . . . . . . . . . . . . . . . . . . . . . . . . . . . . . . . . . . . . . . . . . . . . . . . . . . . . . . . . . . . . . . . . . . . . . . . . . . . . . . . .
. . . . . . . . . . . . . . . . . . . . . . . . . . . . . . . . . . . . . . . . . . . . . . . . . . . . . . . . . . . . . . . . . . . . . . . . . . . . . . . . . . . . . . . .
. . . . . . . . . . . . . . . . . . . . . . . . . . . . . . . . . . . . . . . . . . . . . . . . . . . . . . . . . . . . . . . . . . . . . . . . . . . . . . . . . . . . . . . .
. . . . . . . . . . . . . . . . . . . . . . . . . . . . . . . . . . . . . . . . . . . . . . . . . . . . . . . . . . . . . . . . . . . . . . . . . . . . . . . . . . . . . . . .
Programming Path: [3] Automated Attendant, (If Multiple Automated Attendants, [1, 2, or 3]),
[4] Announcements, [7] Record

PARTNER MAIL Voice Messaging System Release 3.0
Form L: Group List PAGE
1 of 1
Instructions:
If necessary, make copies of this form for additional mailboxes or additional Group Lists.
Programming Path is for the installer. Ignore when filling out the form.
For more information, see "Form L: Group List Description."
35.
36.
37.
Group List Number
(1-99)
Group List Name
Group List Members
Mailbox
No.
Name Mailbox
No.
Name
Programming Path: [5] Group Lists, [4] Create a Group List
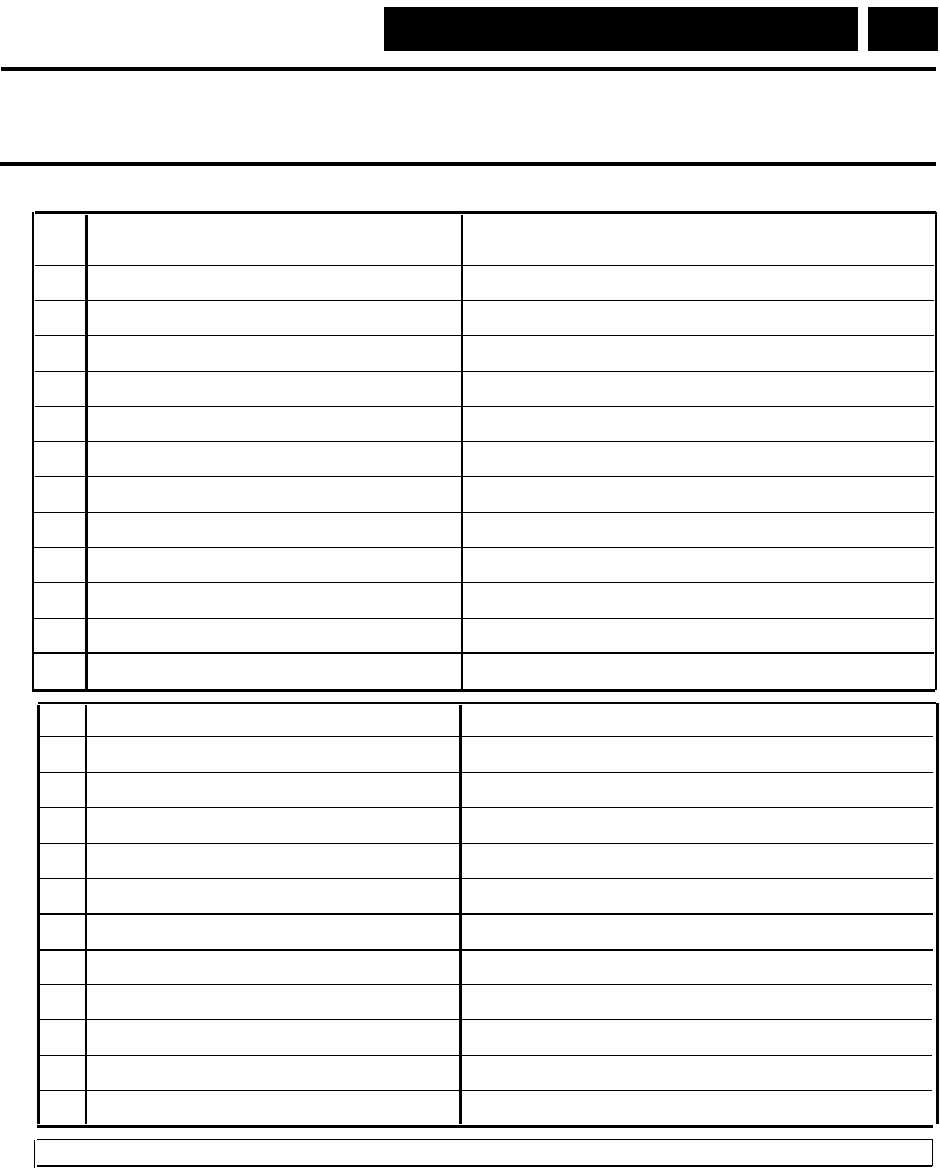
PARTNER MAIL Voice Messaging System Release 3.0
Form M: Line Ownership
PAGE
1 of 1
Instructions:
Programming Path is for the installer. Ignore when filling out the form.
For more information, see "Form M: Line Ownership Description."
38. Line Ownership
Line
No.
Line Owner’s Mailbox No. Line Owner’s Name
01
02
03
04
05
06
07
08
09
10
11
12
13
14
15
16
17
18
19
20
21
22
23
24
Programming Path: [6] Line Ownership, [4] Assign Line Ownership
PARTNER MAIL Voice Messaging System Release 3.0
Form N: System Security
PAGE
1 of 1
Instructions:
✔
indicates the factory setting.
Programming Path is for the installer. Ignore when filling out the form.
For more information, see "Form N: System Security Description."
39.
40.
Minimum Password Length
(0-15,
✔
= 6)
Security Alert:
A minimum password length of at least 6 digits is
strongly recommended.
The shorter the minimum
password length, the more vulnerable the system is to abuse by unauthorized persons.
Programming Path: [8] System Security, [2] Password Length
Security Violation Notification
a. Action to take if someone exceeds the value in b. below:
❑
1 = Lock the mailbox; notify the System Administrator and the subscriber
❑
2 = Send a warning message to the System Administrator and the subscriber
✔
❑
3 = Perform no security violation notification
b. Maximum consecutive unsuccessful login attempts allowed
(2-18,
✔
= 5)
Security Alert:
Use the most restrictive values that the business allows. Use Lock the Mailbox unless it is too
restrictive for the business. Use Send a Warning Message otherwise. Using No Security Violation
Notification is
strongly discouraged.
Programming Path: [8] System Security, [3] Security Violation Notification
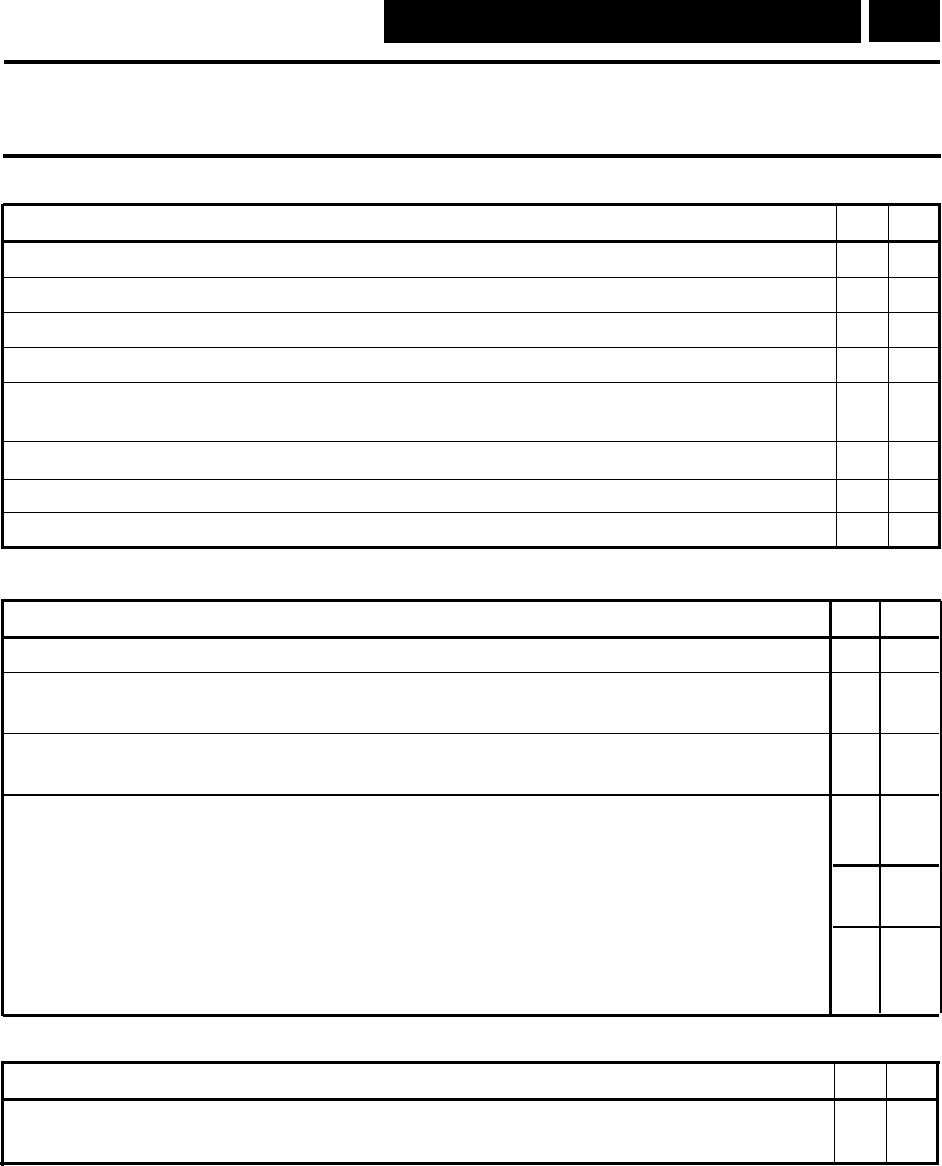
PARTNER MAIL Voice Messaging System Release 3.0
Form O: Security Checklist PAGE
1 of 1
Instructions:
To complete this security checklist, for each item, check the Yes column if the item is done or the No
column if the item is not done. For more information, see "Form O: Security Checklist Description."
Mail System
Item
Yes
No
1. Create only mailboxes that are necessary.
2. Permit no Outcalling, or permit it only for those requiring it.
3. Change System Administrator’s Mailbox.
4. Set Minimum Password Length to 6 digits or more.
5. Set Security Violation Notification action and number of attempts to the most restrictive
values the business allows.
6. Set System Administrator’s Mailbox password to a hard-to-guess value.
7. Set System Administration Password to a hard-to-guess value.
8. Turn off Remote Maintenance Device when it is not in use.
Communications System
Item
Yes No
9.
10.
11.
Remove all lines from the Remote Maintenance Device using Line Assignment (#301).
Restrict the Remote Maintenance Device to Inside Only using Outgoing Call
Restriction (#401).
If Outcalling is not permitted, restrict extensions associated with the mail system unit to
Inside Only using Outgoing Call Restriction (#401).
12.
If Outcalling is permitted:
■
Set extensions connected to ports that are not used for Outcalling to Inside Only
using Outgoing Call Restriction (#401).
■
Set extensions connected to ports that are used for Outcalling to the most restrictive
value that the business allows.
■
Create Disallowed Phone Number List (#404) and Allowed Phone Number List (#407)
and assign them to extensions connected to ports that are used for Outcalling using
Disallowed List Assignment (#405) and Allowed List Assignment (#408) respectively.
Security Policy
Item
Yes
No
13.
Establish a security policy as described in Chapter 1 of the Planning, Installation,
and Use guide.
For any security checklist item that is not done, on the back of this page, write the number of the item
and explain why it is not done.

AT&T 585-322-517
Issue 1
June 1996
Graphics © AT&T 1988
