PermiTrackMS4 Client User Guide Rel 4.1.0 Permi Track MS4
User Manual:
Open the PDF directly: View PDF ![]() .
.
Page Count: 78

Client User Guide
P
P
e
e
r
r
m
m
i
i
T
T
r
r
a
a
c
c
k
k
M
M
S
S
4
4
NPDES Storm Water
Permit Tracking
Re
lease 4.1
.0

SEH Client Access Point
–
Technical Support
For assistance with technical questions and/or issues regarding the applications on
the SEH Client Access Point, we o
ffer product support Monday through Friday, 7:00
a.m. to 5:00 p.m. (CST), excluding major holidays.
Support is available via
e
-
mail
or phone at 612.333.2123.
If a support technician is not available at the
time of your call, please leave a
message on voicemail.
When sending an e
-
mail or leaving a voicemail, be sure to include your name,
contact information, the application you are using, and a brief description of the
question and/or issue you are inquirin
g about.
Be sure and check the
FAQ
page for answers to Frequently Asked Questions. Our
support technicians will update this page regularly with questions submitted by other
users.
F
or content
-
specific assistance with any of the Client Access Point applications, feel
free to contact the appropriate staff person identified on the
Contact Us
page.

PermiTrackMS4
Contents | page
3
Contents
Getting Started
................................
................................
................................
................................
5
Logging into PermiTrackMS4
................................
................................
................................
...........................
5
What is on the Opening Screens?
................................
................................
................................
...................
6
Select Plan
................................
................................
................................
................................
...............
6
View Plan
................................
................................
................................
................................
..................
7
Logging Out of PermiTrackMS4
................................
................................
................................
.......................
7
Quick Reference
................................
................................
................................
..............................
9
Add MCMs to a Plan
................................
................................
................................
................................
........
9
Add BMPs
(Best
Management
Practices) to a Plan
................................
................................
.......................
10
Print Blank Copies of the Outfall Inspection Form
................................
................................
.........................
12
Assign
Parts of the Plan to Staff
................................
................................
................................
....................
13
Identify Incomplete Activities
................................
................................
................................
..........................
13
Publish an Annual Report
................................
................................
................................
..............................
14
Plans
................................
................................
................................
................................
..............
17
Create Plan tab
................................
................................
................................
................................
..............
17
Select tab
................................
................................
................................
................................
.......................
19
Plan View tab
................................
................................
................................
................................
.................
20
Edit Plan tab
................................
................................
................................
................................
..................
22
Delete Plan tab
................................
................................
................................
................................
..............
23
Add M
CM to Plan tab
................................
................................
................................
................................
.....
24
Publish tab
................................
................................
................................
................................
.....................
26
Notification page
................................
................................
................................
................................
............
27
MCM (Minim
um Control Measure) Views
................................
................................
.....................
29
Create an MCM
................................
................................
................................
................................
.............
29
View MCM tab
................................
................................
................................
................................
...............
29
Ed
it MCM tab
................................
................................
................................
................................
.................
30
Delete MCM tab
................................
................................
................................
................................
.............
31
Add BMP Form 1 to MCM tab
................................
................................
................................
........................
32
Add
BMP Form 2 to MCM tab
................................
................................
................................
........................
34
Add BMP tab
................................
................................
................................
................................
..................
36
Add BMP from DB tab
................................
................................
................................
................................
....
38
BMP (Best Management Practice) Views
................................
................................
.....................
41
Create a BMP
................................
................................
................................
................................
................
41
View BMP tab
................................
................................
................................
................................
................
41
Edit BMP tab
................................
................................
................................
................................
..................
42
Copy BMP tab
................................
................................
................................
................................
................
45
Move BMP tab
................................
................................
................................
................................
...............
46
Delete B
MP tab
................................
................................
................................
................................
..............
46

PermiTrackMS4
page
4
| Contents
Add Goal tab
................................
................................
................................
................................
..................
47
Goal Views
................................
................................
................................
................................
.....
51
Create a Goal
................................
................................
................................
................................
................
51
View Goal tab
................................
................................
................................
................................
................
51
Edit Measurable Goal tab
................................
................................
................................
..............................
52
Delete Goal tab
................................
................................
................................
................................
..............
53
Enter Goal Activity tab
................................
................................
................................
................................
...
53
Fields on the Enter Goal Activity page
................................
................................
................................
....
54
Ac
tivity for a Goal using the Default Goal Form Type
................................
................................
.............
54
Activity for a Goal using the Outfall Inspection Form Type
................................
................................
.....
55
Activity for
a Goal using the Outfall Information Form Type
................................
................................
....
58
Enter Goal Activity
Attach Documents page
................................
................................
...............................
59
Measurable Goal Activity Views
................................
................................
................................
...
61
Create a Measurable Goal Activity
................................
................................
................................
................
61
View Measurable Goal Activity tab
................................
................................
................................
................
61
Edit Measurable Goal Activity tab
................................
................................
................................
..................
62
Delete Measurable Goal Activity tab
................................
................................
................................
..............
62
Reports
................................
................................
................................
................................
..........
65
Report Options page
................................
................................
................................
................................
......
65
Areas of the Report Options page
................................
................................
................................
..........
66
Fields on the Report Options pag
e
................................
................................
................................
.........
67
Link to Report page
................................
................................
................................
................................
.......
68
Terminology
................................
................................
................................
................................
..
71
Appendix
–
Outfall In
spection Form
................................
................................
.............................
73
Index
................................
................................
................................
................................
..............
75

PermiTrackMS4
Getting Started
|
page
5
Getting Started
PermiTrackMS4
is a web
-
based application for
tracking NPDES (National Pollutant Discharge
Elimination System) permits
and publishing annual reports
for
compliance with
federal and state
stormwater
regulations
.
PermiTrackMS4
lets you keep all of your information in one, easy
-
to
-
access place.
Since it is available via the Internet, m
ultiple staff people
can
access and work
wit
h
this
data from an office computer
or
a
wireless notebook computer at a site.
PermiTrack
MS4
lets you:
Quickly create new plans based on templates that automatically populate the plan with
standard MCMs (Minimum Control Measures) and BMPs (Best Manag
ement Practices).
Customize
plan
MCM
s, BMPs, and goals to meet your unique needs.
Track activities as they are completed
and monitor incomplete activities.
Delegate responsibilities
and track the responsible parties via reports.
Remind staff via email
about up
-
coming permit
-
related goals.
Quickly report on everything
from
the past
year, in the correct format, to meet your
regulatory
deadline
.
PermiTrack
MS4
offers
:
Web
-
based technology
Ability to track multiple MCMs, BMPs, goals,
and activities
Drill
-
down tree structure for access to all MCMs, BMPs, measurable goals, and related
activities
D
ata integrity
and
security
Easy access to information from a central location
Published report
generator
Logging into PermiTrackMS4
To log in to
PermiTrack
MS4
:
1.
Open your web
-
browser on a computer.
2.
In the address field, enter the web address for your
PermiTrack
MS4
client site.
3.
On the Welcome page, click the Clie
nt Login link.
PermiTrackMS4
page
6
|
Getting Started
4.
On the login page, enter your user name and password.
Contact your Client Administrator if you need a user name and password assigned.
5.
Click the
PermiTrack
MS4
tab, if you have multiple SEH applications.
The application opens to the
Sele
ct
page
, where you select a plan to view, modify, or publish
(
see
page
19
).
What is on the
Opening Screens
?
Se
lect Plan
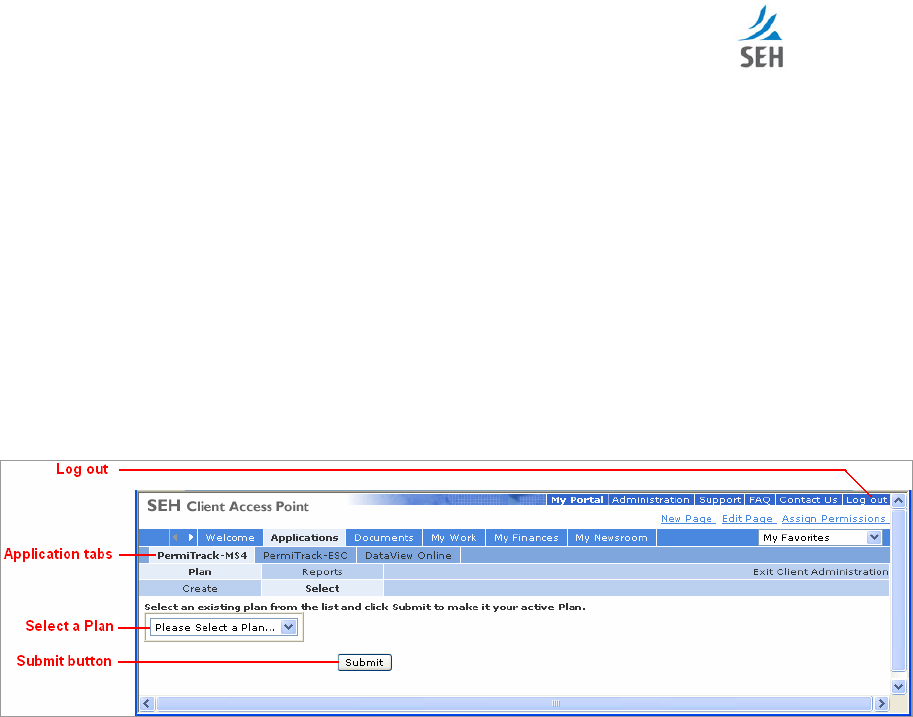
PermiTrackMS4
opens to the Select pa
ge
. On this page, choose the plan you want to view, edit, or
publish.
Figure
1
.
Select Plan
tab
Log Out
Click the Log Out link to close the application and log out of the website.
Application Tabs
If you have one or more SEH a
pplications, click the tab for the application you want to use.
Select a Plan
Choose a plan from the drop
-
down list. You will be working with this plan.
Submit button
Click the Submit button to open the plan (see View Plan below).
PermiTrackMS4
Getting Started
|
page
7
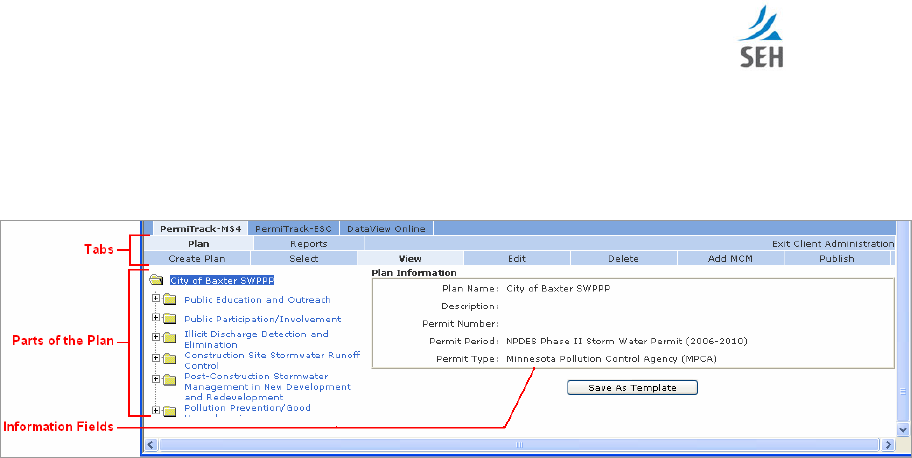
View Plan
The image below shows the main parts of the
PermiTrackMS4
screen
after
you select a plan. You
start
from
this page for most of your activities
. For more detailed information, see the description
of each page in later sections of this
guide
.
Figure
2
.
Plan
View
tab
Tabs
The tabs let
you add to or modify various parts of the plan.
The image above shows the tabs.
The tabs change when you click on a different folder/item in the treeview on the left side of t
he
page.
You must click on the Plan
name at the top of the
treeview to return to the highest level
tabs.
(See
“
Folders on the
Plan View tab
”
on page 20
for
information on the treevi
ew.)
Parts of the Plan
The
list
of folders
(called a treeview)
on the left side shows
the plan hierarchy. Each MCM, BMP,
and goal is represented by a folder
in the treeview
.
Click on a folder to view or make changes to
that item.
See “
Folders on the
Plan View tab
”
on pa
ge 20
for
more information on the treeview
.
Information
Fields
The
right
side
of the page displays either
information about the item highlighted
in the treeview
or
fields for entering data
.
The contents of this part of the page reflect the item highlighted in the
treeview and the tab selected near the top of the page
.
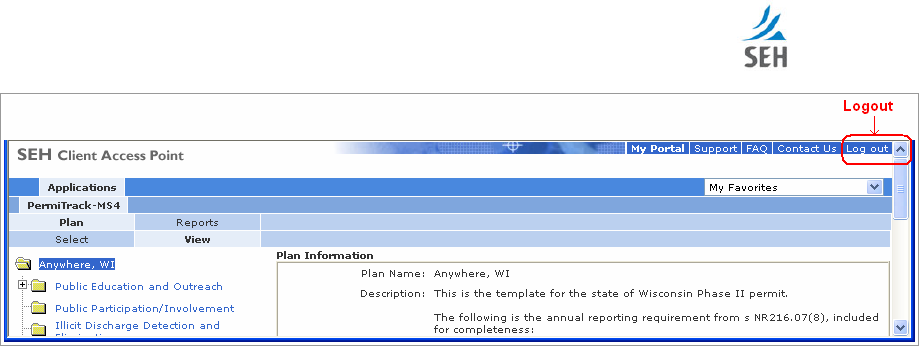
Logging Out of
PermiTrackMS4
To exit or log out of the system, click the Log Out link in the upper
-
right corner of the page.
PermiTrackMS4
page
8
|
Getting Started
Figure
3
. Logout link

PermiTrackMS4
Quick Reference
| page
9
Quick Reference
To help you get started
,
this section of the guide
provide
s
step
-
by
-
step instructions for
some of
your
key tasks.
The remainder of the document is designed as a reference to help
you to explore
and identify ways that
PermiTrackMS4
can b
est suit your needs
.
As you work through these sample procedures, please
see the
description
for
each screen in the
following sections
.
The reference sections provide more information about individual fields and
options on each page.
Add MCMs to a Plan
When a plan is created, a default set of MCMs and BMPs are added to the plan. To customize the
plan to match your precise reporting needs, you can add MCMs
and BMPs to the plan
. To add
an
MCM
to a plan:
Step
I
.
Select the Plan
1.
Go to the Select tab by doing
one
of the following:
Log in to the program. The program opens to the Select tab.
Continue with step 2
(below).
From elsewhere in the program, click o
n the plan name in the treeview on the left. Click
the Select tab.
Go to
Step
II
. Add
an MCM
(below).
2.
On the Select page
(
on page 19
)
, click on the name of the plan in the drop
-
down list.
3.
Click the Submit button.
Step
II
.
Add
an MCM
1.
With the plan highlighted in the treeview on the left, c
lick the
Add MCM tab
in the row of
tabs above the treeview
.
2.
On the Add MCM page, enter a name and description of the MCM.
(See page
24
for information on
this page
.)
3.
Select a Responsible Staff/Position from the drop
-
down list.
4.
Type a description in the main text box.
This description is included in the published report.
5.
Click the Spell Check button to check the spelling in each of the text fields.
6.
Clic
k the Create button to save your changes and add the MCM
to the plan.
The
program adds the MCM
at
the bottom of the treeview.
7.
Repeat the previous
steps to add another MCM to the plan, if needed.

PermiTrackMS4
page
10
|
Quick Reference
Add BMPs
(Best
Management
Practices) to a Plan
When a plan is created, a default set of BMPs are added to the plan. To customize the plan to
match your precise reporting needs, you can add BMPs to the plan. To
add a BMP:
Step
I
. Select the Plan
1.
Go to the Select tab by doing
one
of the following:
Log in to the program. The program opens to the Select tab.
Continue with step 2
(below).
From elsewhere in the program, click on the plan name in the treeview on th
e left. Click
the Select tab.
(Go to
Step
II
. Add a BMP from the Database
(below).
2.
On the
Select page (
on page 19
)
, click on the name of the plan in the drop
-
down list.
3.
Click the Submit button.
Step
II
.
A
dd
a
BMP
from th
e Database
Save time by addi
ng a BMP from the database. With this option, t
he
BMP
name, description,
etc.
are added
to the plan
automatically. After adding it, you can customize this BMP
.
However, i
f
you
prefer
to create a BMP from scratch, go to
S
tep
III
.
Set up a New
BMP
(
below)
.
1.
Expand the treeview
on the left side of the page
by
clicking on the
MCM where you want to
add the BMP
.
2.
Click the Add BMP from DB tab
in the row of tabs above the treeview
.
3.
On the Add BMP from DB page,
select a category for the
type of BMP you want to add.
(See page
38
.)
4.
S
croll through the list of BMPs
displayed below the category box
.
5.
If the BMP you want is in the list, click the name.
If the BMP you want is not in the list, go
to
S
tep
III
.
Set
up a New
BMP
(below
).
6.
On the BMP Edit page, select a Responsible Staff/Position from the drop
-
down list.
7.
Make changes to the name, description, or other fields, as needed.
The description is included in the published report.
8.
Click the Spell Check butto
n to check the spelling in each of the text fields.
9.
Click the Update button to save your changes.
Step
III
. Set up a New BMP
To create a BMP from scratch
:

PermiTrackMS4
Quick Reference
|
page
11
1.
Expand the treeview
on the left side of the page
by
clicking on the
MCM where you want to
add the
BMP.
2.
Click the Add BMP tab
in the row of tabs above the treeview
.
Note
:
Your application may display other Add BMP tabs.
The tabs available are based on
the type of plan.
See these topics for more information:
-
Add BMP Form 1 on page
32
-
Add BMP Form 2 on page
34
-
Add BMP on page
36
-
Add BMP from DB on page
38
3.
On the Add
BMP
page, enter a name and description of the
BMP
.
The description is included in the published report.
4.
Select a Responsible Staff/Position from the drop
-
down list.
5.
Click the Spell Check button to check the spelling in each of the text fields.
6.
Click the Create button to save your changes and add the
BMP
to the plan.
The program adds the
BMP
at the
bottom
of the
MCM that is highlighted in the
treeview.
7.
Repeat the previous steps to add another
BMP to the MCM
, if needed.
Step
IV
.
Add Goals and Measurable Activities to the BMPs
Goals and Activities are ad
ded to e
xisting
BMP
s
.
To add goals and activities to a BMP:
1.
Highlight a BMP in the treeview
on the left side of the page
.
2.
Click the Add Goal tab to add a goal to the BMP.
(See page
47
for more information on the fields on t
he Add Goal tab.)
3.
Complete the information on the Add Goal page, and then click the
Create button.
The program adds the
goal
at the bottom of
the
current
BMP.
4.
Highlight the Goal in the treeview.
5.
Click the
Enter Goal
Activity tab.
(See page
53
for more information on the
Enter Goal Activity
tab.)
6.
Complete the information on the Enter Goal Activity page
.
7.
Click
the Create button.
The program adds the
activity
at the bottom of the current goal
.
PermiTrackMS4
page
12
|
Quick
Reference
Print
Blank Copies of the
Out
fall
Inspection Form
Since you may have volunteers or temporary staff complete field inspections, you can print paper
copies of
the
outfall inspection form
to
be completed in the field.
After the inspection
, this
information is entered into the
PermiTrackMS4
application for reporting.
To print a blank copy of
the form:
Step
I
. Select the Plan
1.
Go to the Select tab by doing
one
of
the following:
Log in to the program. The program opens to the Select tab.
Continue with step 2
(below).
From elsewhere in the program, click on the plan name in the treeview on the left. Click
the Select tab.
Go to
Step
II
. Create a New Outfall Inspecti
on Activity
(below).
2.
On the
Select page (
on page 19
)
, click on the name of the plan in the drop
-
down list.
3.
Click the Submit button.
Step
II
. Create a New Outfall Inspection Activity
1.
Expand the treeview
on the left side
of the page
by clicking
on
the
MCM where you want to
record the outfall inspection
.
2.
Under the MCM, click the BMP that includes
the
inspection
.
3.
Under the BMP, click
the
Goal that requires
the
outfall inspection.
Note
:
In order to print the inspection for
m, the Goal must be setup using the
Outfall
Inspection Form
type.
4.
With the Goal highlighted in the treeview, click the
Enter
Goal Activity
tab
.
Step
III
. Print the Outfall Inspection Form
1.
On the
Enter Goal Activity
page
(
on page 53
)
, click the
Download PDF Form link
that is
above the text
fields
.
The system opens the form as an Acrobat PDF file
in a separate window
. From Acrobat
Reader, you can print the form.
Note
:
You must
have Adobe Acrobat Reader installed on your
computer, in order to print
the form. You can download Acrobat Reader from the Reports tab.
2.
Close the form in Acrobat.
3.
Do
one
of the following:
Click anywhere in the treeview to close the Enter Goal Activity page without recording
an activity. A new insp
ection record can be set up after the paper form is completed.

PermiTrackMS4
Quick Reference
|
page
13
Record the
n
ame,
d
escription,
activity date,
and o
utfall ID to
add
the inspection record.
This record can be edited after
the inspection has been
is completed. Click the Create
button to save
your changes.
Assign Part
s
of the Plan to Staff
When each MCM, BMP, Goal, and Measurable Activity is set up, you have the opportunity to
assign it to a staff person.
Later, y
ou
can
re
assign it to a different person.
The person named in the
Responsible Staff/Position field:
Receives an email notice when any activities under
the item
are scheduled to occur.
Is named in the Published
report
(see page
26
)
Can be selected in reports filtered by owner (see page
65
)
To assign an existing
MCM
to a staff person
:
1.
Go to the Select tab by doing
one
of the following:
Log in to the program
. The program opens to the Select tab.
Continue with step 2
(below).
From elsewhere in the program, click on the plan name in the treeview on the left. Click
the Select tab.
Go to step 4 (below).
2.
On the
Select page (
on page 19
)
, click on the name of the plan in the drop
-
down list.
3.
Click the Submit button.
4.
Click the
name of
an MCM
in the treeview on the left
.
5.
On the MCM View tab
(
on page 29
)
, click the Edit tab.
6.
On the Edit MCM page, selec
t a name from the Responsible Staff/Position drop
-
down list.
7.
Click the Update button to save your change.
Identify Incomplete Activities
Use the
Incomplete Measurable Goals option
on the report page
to generate a report that lists all
activities that are incomplete and fall wi
thin the current permit period. To identify incomplete
activities:
1.
Go to the Select tab by doing
one
of the fol
lowing
:
Log in to the program. The program opens to the Select tab.
Continue with step 2
(below).
From elsewhere in the program, click on the plan name in the treeview on the left. Click
the Select tab.
Go to step 4 (below).

PermiTrackMS4
page
14
|
Quick Reference
2.
On the
Select page (
on page 19
)
, click on the name of the plan in the drop
-
down li
st
.
3.
Click the Submit button.
4.
Click the Reports tab.
5.
On the Report Options page
(
on page 65
)
,
leave the default option
All Minimum Con
trol
Measures
selected in the upper area of the page.
6.
C
lick
the
Select Activities in a R
eporting P
eriod
option button
in the middle
area of the page
.
7.
Click the option button next to the
permit period
to cover. The current
permit
period is
selected auto
matically.
8.
Click the option button for
Incomplete Measurable Goals for Selected Period
in the
lower
area of the page.
9.
Click the
Run Report
button.
10.
The results page
(
on page 68
)
, c
lick the name of the report (in b
lue)
.
11.
A
t the system prompt, click the Open button to
open the report in Acrobat PDF format.
12.
View the report online, save it, or print it from Acrobat Reader.
Publish
an Annual R
eport
To publish the annual report for a plan
:
1.
Go to the Select tab by doing
one
of the following
:
Log in to the program. The program opens to the Select tab.
Continue with step 2
(below).
From elsewhere in t
he program, click on the plan name in the treeview on the left. Click
the Select tab.
Go to step 4
(below).
2.
On the Select page
(
on page 19
)
, click on the name of the plan in the drop
-
down list.
3.
Click the Submit button.
4.
C
lick the Publish tab near the top of the page.
5.
On the Publish page
(
on page 26
)
,
specify
the time period by doing
one
of the following:
Click the option button for the permit period.
Enter the Start and End dates, if you
elected to use a date range.
6.
Click the Publish Report
button.
The application tells you that the report has been published.

PermiTrackMS4
Quick Reference
|
page
15
7.
On the notification page
(
on page 27
)
, click the Link to Plan link.
The report opens as an
Acr
obat PDF file.
Note
:
You must have
Acrobat Reader installed on your computer to view the report.
To
install it, click the Adobe Reader icon in the upper
-
right part of the
notification
page.
8.
Save or print the Acrobat file.
The file can be saved to your co
mputer or a network location. The saved version can be
emailed, viewed, or linked to your website.

PermiTrackMS4
page
16
|
Quick Reference
This page intentionally left blank.
PermiTrackMS4
Plans
| page
17
P
lan
s
Plans
in the
PermiTrackMS4
program contain all of your
SWMP (Storm Water Management
Pl
an)
data
, organized in an easy
-
to
-
access format
. The plan structure helps you
organize the
documentation and requirements for complying with
and reporting on activities related to
federal
and state pollution control requirements.
From the plan, you can als
o publish interim reports or an
annual report.
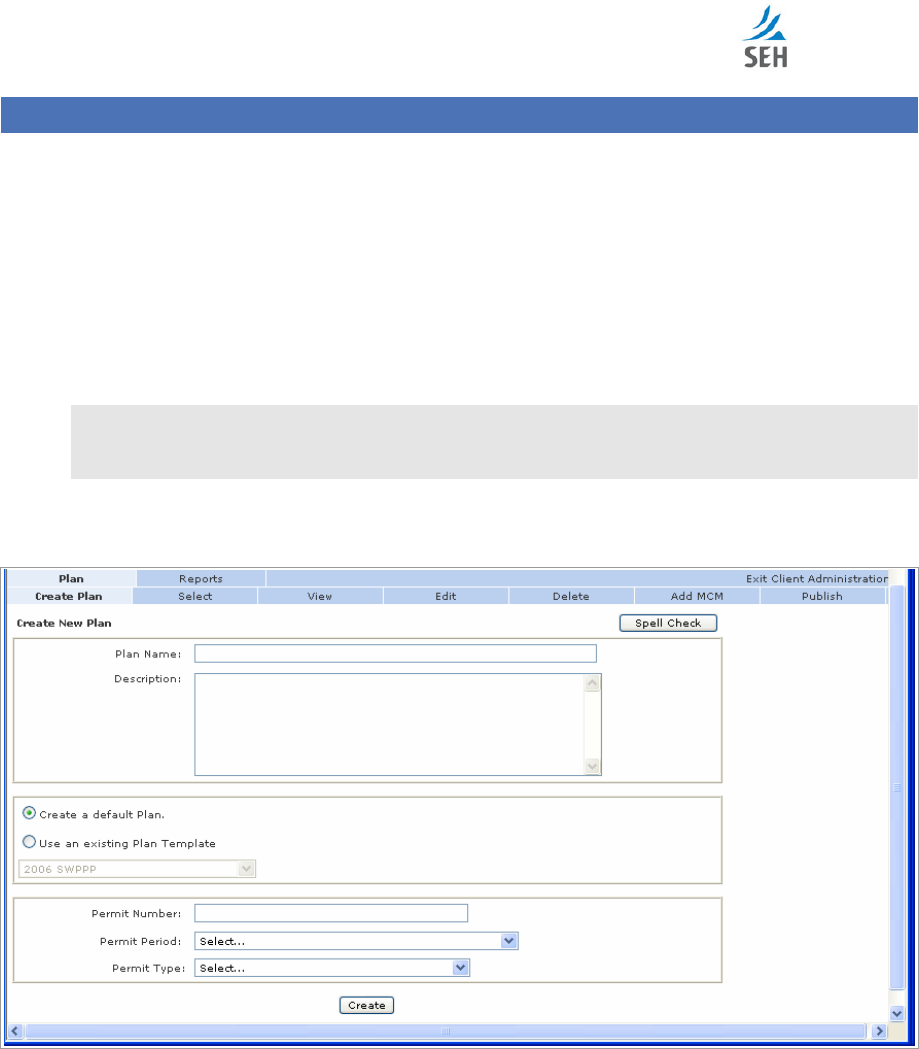
Create Plan tab
Use the Create Plan tab to set up a SWM
P
that can be used to track and
report on the
MCMs,
BMPs, goals, inspections, and
activities required to fulfill the plan obligations.
Note
:
Plans are often set up by SEH, Inc. as a service to clients. For example, SEH may set up a
plan based on the client’s existing SWMP documentation
in Microsoft Word. However,
clients can create plans directly in the application if they choose.
The Create P
lan tab opens when you
click on the Create Plan tab under the Plan
View
tab
(
on
page 20
.
Figure
4
. Create Plan
New
page
Fields & Button on the Create New Plan tab
Plan Name
:
Enter a descriptive name for the plan. This name helps you identify the plan
when it is selected
from the list of plans on the Select Plan page.
Description
:
Enter a
description of the plan, how it is used, notes on requirements addressed
by the plan, etc. This description is included in the published report.

PermiTrackMS4
page
18
|
Plans
Plan
Template
:
Select the template you want to use
as the basis
the plan. Using a templa
te
saves time by automatically adding standard MCMs and BMPs to the plan, in the correct
order. When editing the plan, the user can
customize
the
default
MCMs and BMPs, add goals,
and record goal activities.
Create a Default Plan
:
Select this option button to use the Default template.
The default
plan includes six standard MCMs
required by the EPA (Environmental Protection Agency).
Use an Existing Plan Template
:
Select t
his option button to use a template designed for a
specific state or purpose.
After selecting this option, choose a template from the drop
-
down
list below it.
With this option, you select from
templates that reflect the
plan
structure and components
requ
ired for a specific state or agency. For example, a template may
automatically set up
the
structure, MCMs, and BMPs required by the st
ate pollution control agency.
Note
:
Templates are created
and
maintained by SEH. If you
need a new template
, contact
your
SEH Administrator.
Permit Number
:
Enter the identification number for the permit issued by the agency
overseeing the program.
Permit Period
:
Select the period during which the permit is valid. These options are set up by
SEH. Contact your SEH system adm
inistrator to add a permit period.
Permit Type
:
Select the type of permit
supported by the plan.
Each permit type results in a
plan with
its own fields and options, to
support the unique requirements of the agency issuing
the permit
.
For example, the MP
CA permit type sets specific Add BMP tabs on the MCM View page.
These BMP tabs let you add BMPs with fields required by the MPCA
.
A plan based on t
he
default type does not include these tabs.
Options may include:
Minnesota Pollution Control Agency (MPCA
)
:
The MPCA
permit type
includes
special
numbering fields for section/subsection numbering in the published report, and
BMP tabs for adding the types of BMPs and BMP information speci
fically required by
the MPCA.
Default (EPA)
:
The Default
permit type
i
ncludes the basic
numbering scheme and BMP
setup
required by the EPA (Environmental Protection Agency).
Buttons on the Create New Plan tab
Spell Check
button
:
Check the spelling in each of the text fields on this page.
Create
button
:
Creates the SWMP plan. After clicking this button, the plan and its settings
are available through the Select tab.
After creating a plan, the application automatically takes you
to the Plan View tab.
PermiTrackMS4
Plans
|
page
19
Return to the
Plan Selection
Select a different plan
:
Click the Select tab to return to the
Select page (
below
)
where you
can choose a different plan without creating a new plan.
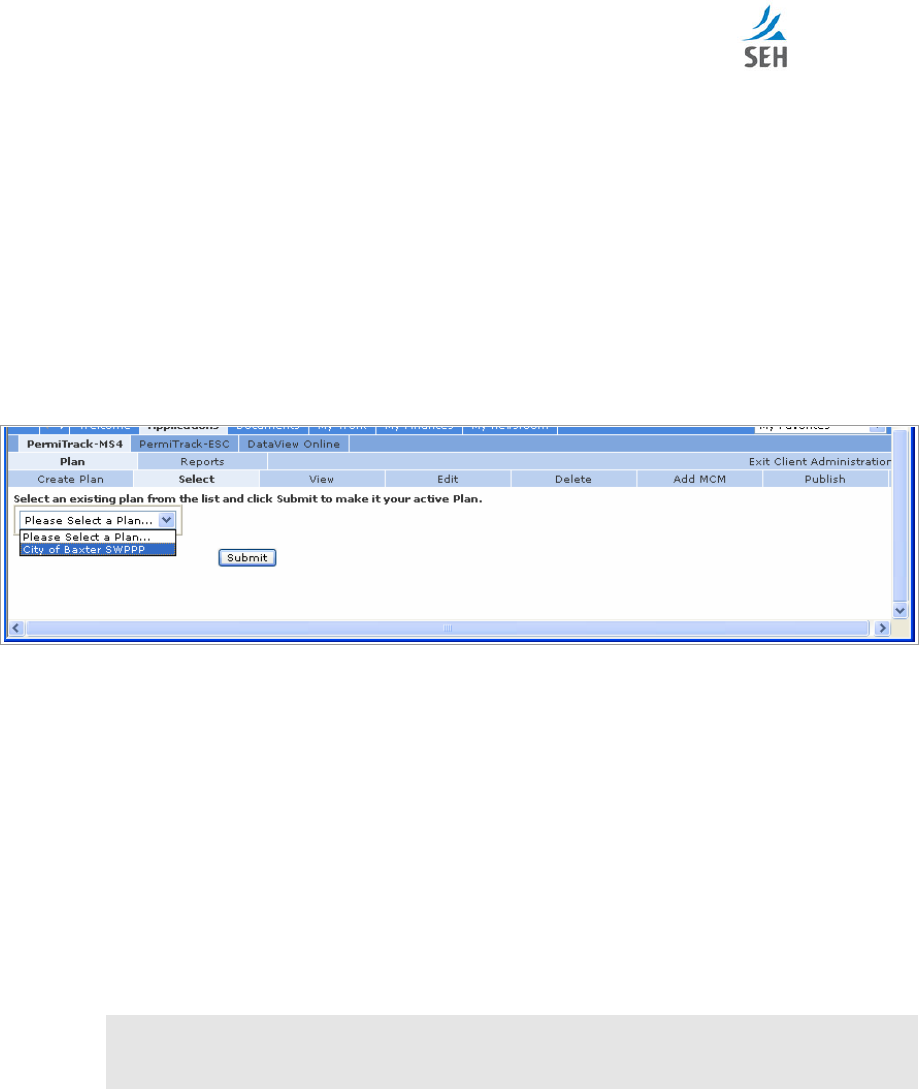
Select tab
The application opens to the Select tab.
On this page, you
can:
S
elect a plan to view, edit, track
, or publish
.
Create a new plan
The
Plan Select
opens when
you
open the
PermiTrackMS4
pro
g
ram
o
r
click on the
Select
tab
from the
Plan View tab
on page 20
.
Figure
5
.
Select Plan page
Fields & Button
on the
Select Plan tab
Select an Existing Plan
:
Click on the drop
-
down list and scroll
to
t
he plan you want to use
.
Information that you view or edit is for this plan.
Submit
button
:
Opens
the plan you
selected
and displays the View tab for the plan.
Tab
s on the
Select Plan tab
Tab
s across the top of the
Select Plan
tab
include:
Plan
:
Use the
t
abs below this tab to
select or
create a new plan
.
This tab is highlighted to
show that you are working with Plan data.
Create
:
Click the C
reate
tab to set up
a new
plan.
Note
:
Plans are often set up by SEH, Inc. as a service to clients. For example, SE
H may set
up a plan based on the client’s existing SWMP documentation in Microsoft Word.
However, clients can create plans directly in the application if they choose.
Select
:
Th
e Select
tab is highlighted to indicate that you are on the Select page
.
Repo
rts
: Click the Reports tab to generate a report for the last plan that you viewed.
Or,
select a plan and then click the Reports tab.
The reports tab is available only if you have
viewed a plan during the current session.
PermiTrackMS4
page
20
|
Plans
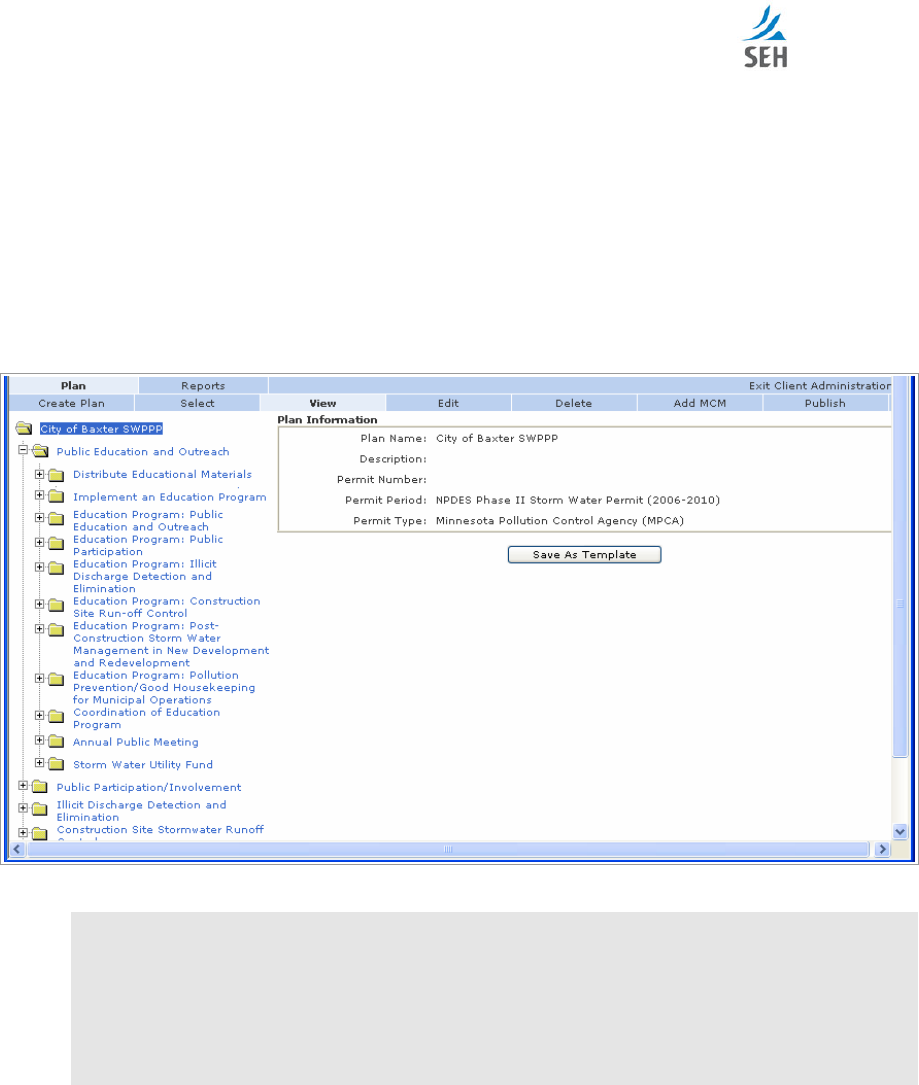
Plan View
tab
The View tab provides access to all of the
information included in the plan
.
The plan name, description, and permit information are displayed on the right side of the
page.
The
plan hierarchy,
(
refle
cted in the treeview on the left
)
includes the
MCMs, BMPs, goals,
and activities
associate
d
with the plan.
(See more information on the treeview below.)
The View tab opens when you select a plan
on the Select tab
(
on page 19
)
, or when you click on
the plan name at the top of the treeview
.
Figure
6
.
Plan
View
tab
Note
:
After you select a plan, the tabs
across the top of the page
reflect the item selected
in the
treeview
. You must click on the Plan
name at the top of the treeview
to return to the
highest level tabs.
For example, you see one set of tabs when the plan folder is highlighted, a different set
when
an MCM
folder is highlighted, and a third set when a BMP is highlighted in the
treeview.
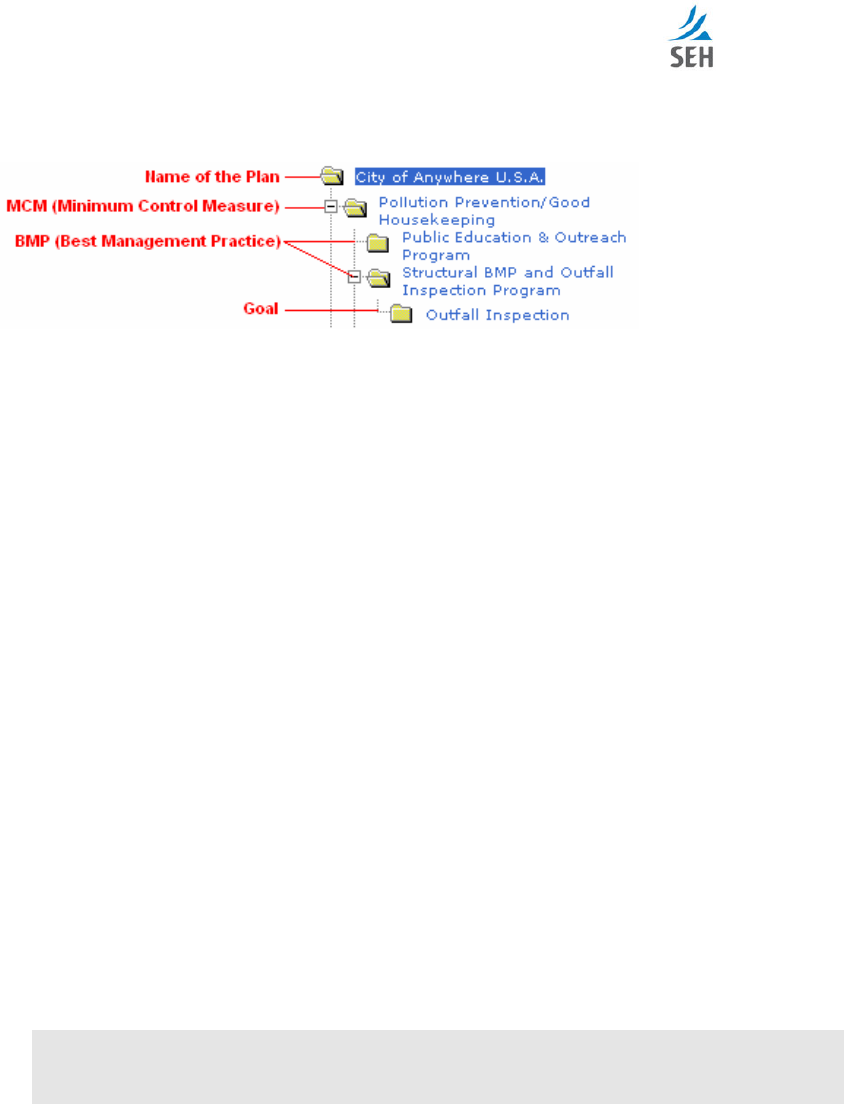
Folders on the
Plan View tab
The
treeview
on the left side of the page shows
the organization of the plan,
including
the
MCMs,
BMPs, and goals assigned to the plan.
For example, the branches und
er
an MCM
show the BMPs
that define the MCM. The branches under a BMP show the goals and activities that support the
BMP.
PermiTrackMS4
Plans
|
page
21
The published report for the plan is organized according to the arrangement displayed in the
treeview.
Click on a folder name to v
iew information about that item. The tabs
across the top of the page
and the view on the right side of the page change to reflect the item highlighted in the treeview.
Tabs on the
Plan View tab
Tabs across the top of the
Plan View
tab
include:
Plan
:
Use t
he
tabs on the
Plan View tab
to create or select a plan, make changes, view plan
data, or publish the
final
report
for a plan.
Create Plan
:
Create a new SWMP
plan.
Plans are often set up by SEH, so you may not
need to
use this tab.
Select
:
Opens the Sele
ct page, where you select a plan to view or edit.
View
:
The
View
tab
is highlighted to show that you are on this page. The View page
shows the plan information, including the
name, description, and permit number
.
Edit
:
Opens
Plan Edit
page for updating
t
he
plan
name, description,
or
permit number.
Delete
:
Opens the D
elete
page, where you can remove
the current plan.
Add MCM
:
Opens the Add MCM page
, where you can add an MCM to the plan.
Publish
:
Publish the
final report, which contains all of the plan i
nformation. The report is
an Acrobat PDF file that can be saved, printed,
emailed,
or posted on a website.
Reports
:
Select the Reports tab to
generate a report based on MCMs, BMPs, activities,
owners
, or time period
.
Reports help you track specific inform
ation as the plan is developed
and implemented.
Note
:
The a
nnual report for a plan is published throug
h the Publish
tab
, rather than the
Reports tab
. To publish the final report, select the plan and use t
he Publish tab on the
Plan View
. (See information a
bout the Publish tab on page
26
.)
Fields
& Button
on the
Plan View tab
This information is displayed on the right side of the page:
Plan Name
:
Descriptive name of the plan.
PermiTrackMS4
page
22
|
Plans
Description
:
Description of the plan and the purpos
e it serves. This description is included in
the published report.
Permit Number
:
The permit number
issued
to the project defined by the plan.
Permit Period
:
The
permit
period or number of years when the permit is valid.
Permit Type
:
Select the type of
permit supported by the plan. Each permit type results in a
plan with its own fields and options, to support the unique requirements of the agency issuing
the permit.
Return to the
Plan Selection
Select a different plan
: Click the Select tab on the
Plan V
iew tab
to return to the Select page
where you can choose a different plan.
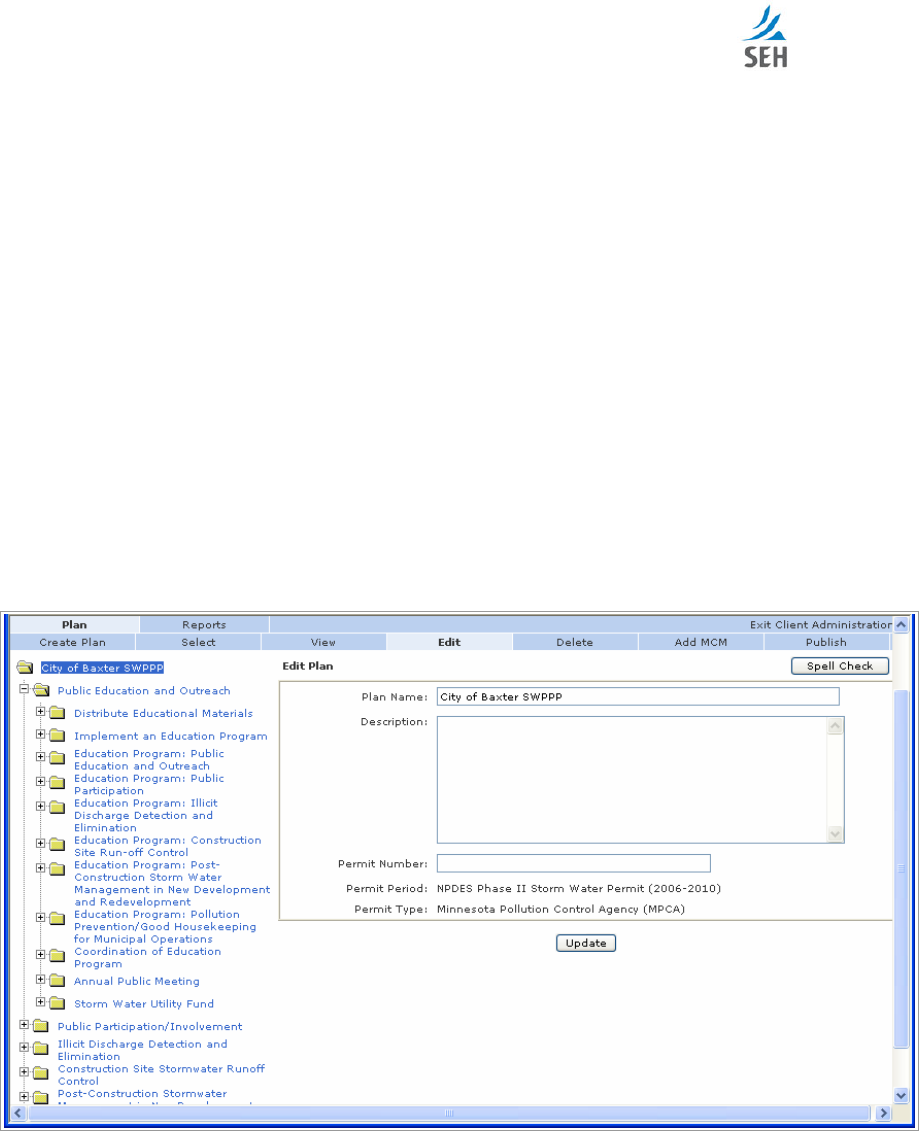
Edit
Plan
tab
On the Plan Edit page, you can change the plan name, description, or permit number. The other
information
displayed her
e
was defined when the plan was created.
The Plan Edit page opens when you select a plan, and then click the Edit tab
on the
Plan View
tab
on page 20
.
Figure
7
. Edit page for a Plan
Fields
& But
ton
on the Plan Edit page
Plan Name
:
Descriptive name of the plan.

PermiTrackMS4
Plans
|
page
23
Description
:
Description of the plan and the purpose it serves. This description is included in
the published report.
Permit Number
:
The permit number
issued
to the project
that is d
efine
d by the plan.
Permit Period
:
The permit period or number of years when the permit is valid.
Permit Type
:
Select the type of permit supported by the plan. Each permit type results in a
plan with its own fields and options, to support the unique requireme
nts of the agency issuing
the permit.
Spell Check
button
: Use the Spell Check button in the upper
-
right part of the page to check
the spelling in each of the text fields on this page.
Update
button
:
Click the Update button to save your changes to the pla
n.
The system returns
you to the
Plan View tab
.
Return to the
Plan View or Selection
View the Plan Information
: C
lick the name of the plan in the treeview
to leave edit mode
and return to the
Plan
View tab
without making changes
.
Select a different plan
:
Click the Select tab on the Plan Edit page to return to the Select page
where you can choose a different plan.
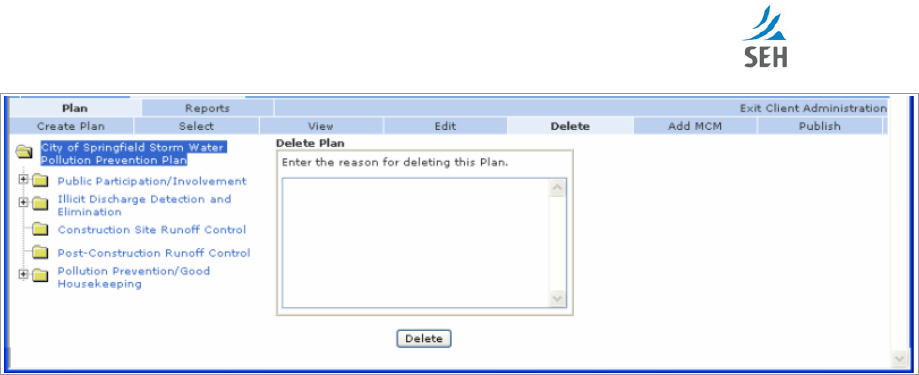
Delete
Plan
tab
Click the Delete tab when you want to delete the current plan. Before it is d
eleted, the
system
asks you to enter a reason for deleting
the plan.
Caution
:
The Delete function deletes the
plan, along with all of the MCMs, BMPs, goals,
and activities associated with it
.
We recommend deleting a plan only if
you are
certain that the p
lan and its contents will never be needed again. Generally,
complete plans are kept on the site as an archive
.
If you want to delete a plan but preserve items set up within the plan, contact
your SEH Administrator.
The Plan Delete page opens when you se
lect
the
plan
name at the top of the
treeview (
on page
20
)
, and then click the Delete tab.
PermiTrackMS4
page
24
|
Pla
ns
Figure
8
. Delete
Plan tab
Field &
Button
on the Delete
Plan
page
Enter the
reason
for deleting th
is
Plan
:
In the text box, enter a reason for deleting the
current plan. This information is saved in the database. If you need this information later,
contact your SEH Administrator.
Delete
button
:
Click the delete button to remove the plan from your site
.
Retu
rn to the
Plan Selection
After deleting the plan, the application takes you to the
Select tab
automatically.
From the Select
tab, you can choose a different plan.
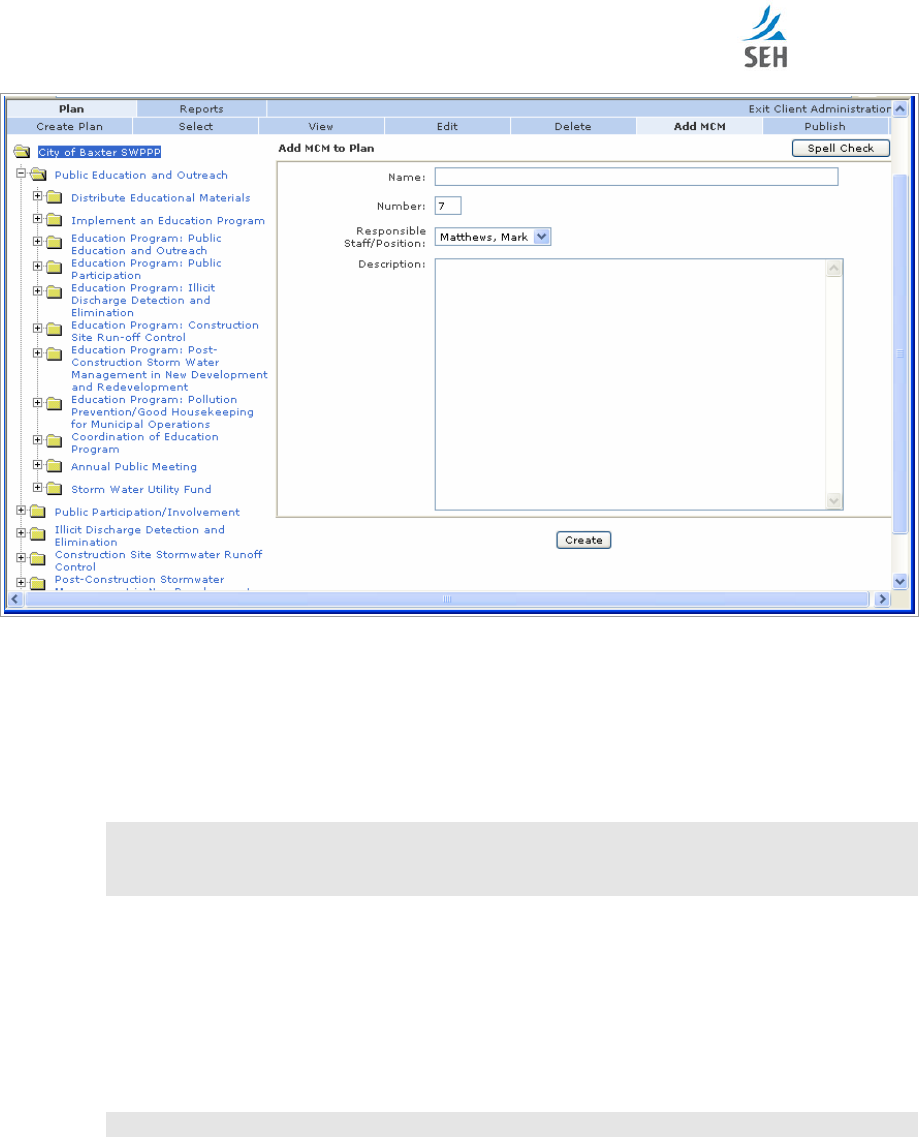
Add MCM
to Plan
tab
Use the Add MCM tab to add
an MCM
to the current plan.
The program adds the MCM at the
bottom
of the plan
treeview
on the left side of the page.
The Plan Add MCM page
in the treeview (
on page 20
)
you select a plan,
and then click the Add
MCM tab.
PermiTrackMS4
Plans
|
page
25
Figure
9
.
Add MCM
to Plan
page
Fields on the Add MCM page
Name
:
Enter a descriptive name for the MCM. This name is displayed in the
treeview
on the
left and used in the published report.
Number
:
Specifies
the position of this MCM in the plan list.
This number
is also used for
numbering sections
in the published report. The
system assigns this number automatically.
Caution
:
This number can be changed
to
move the MCM to
a different position in the
treeview, but we strongly recommend not changing the number
. Change it only if
you have full knowledge of all the consequences resulting from this change.
Responsible Staff
/Positi
on
:
Select the name of the sta
ff person or staff position responsible
for overseeing or implementing thi
s MCM. This
person
:
Rec
eives an email notice when
activities under this MCM are
scheduled to occur
.
Is named in the Published
report (see page
26
)
Can
be selected in r
eports filtered by owner (see page
65
)
Note
:
If the name you want is not listed, contact your SEH Administrator to add the name.
Description
:
Enter a description of the MCM
, why it is required, etc
.
This des
cription is
included in the published report.
PermiTrackMS4
page
26
|
Plans
Spell Check
button
:
Use the Spell Check button in the upper
-
right part of the page to check
the spelling
i
n each of the text fields on this page
.
Create
butto
n
:
After completing the fields above, click the Cr
eate button to add the MCM to
the current plan.
The program adds the
MCM at the bottom of the treeview.
Return to the
Plan
View or Selection
View the Plan Information
:
Click
the View tab or click the name of the plan in the treeview
to return to the
Plan
View tab
without creating a new MCM.
Select a different plan
:
Click the Select tab to return to the Select page where you can
choose a different plan.
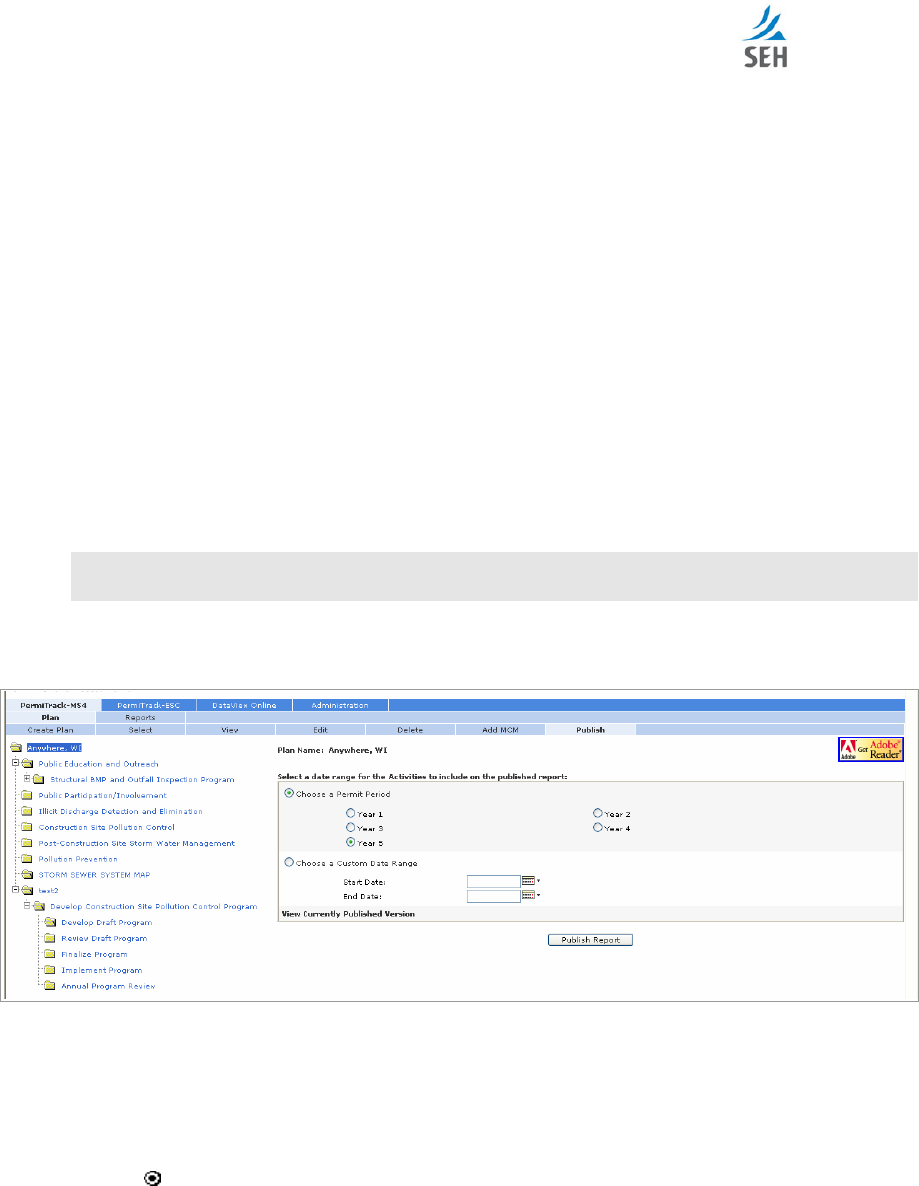
Publish tab
Use the Publish tab to generate a copy of the final annual report for a plan
in a format that is
ready for submission
. The report
includes all of the plan information, includin
g the name,
description, permit number,
MCMs, BMPs, goals, and activities
for the permit period you
specify.
The published report is organized according to the plan treeview.
Note
:
The Publish tab is for generating the final report. To produce progress or
summary
reports, use the Reports tab (see page
65
).
The Publish page opens when you select a plan
in the treeview (
on page 20
)
, and then click the
Publish tab.
Figure
10
. Publish page
Fields & Button
on the Publish page
C
hoose a Permit Period
:
Select the Choose a Permit Period option
to publish a report for a
specific
permit period. Next,
select an option button
below
to indicate the permit period
you
want t
o includ
e.
The current permit period is selected by default.
Year
1
:
Select this option button
to include data from this
permit period
in the
published report.
PermiTrackMS4
Plans
|
page
27
Year
1
:
Clear
this option button to exclude data from this
permit period
in the
published report.
C
hoose a
Custom Date Range
:
Select the Choose a
Custom Date range
option
to publish a
report that covers a specific period of time that
may
not correspond to
a
permit period.
The published report includes
the
plan
description, MCMs, BMPs, and only the g
oals and
activities scheduled b
etween the start date and the end date.
Start Date
:
Enter the
first day for the time period to include,
or click the
C
alendar
icon to select a date.
End Date
:
Enter the
last day for the time period to include,
or click th
e
C
alendar icon
to select a date.
View Currently Published Version
link
:
Click the View Currently Published Version link to
open the most recent copy of the published report. The report is available as an Acrobat PDF
file that you can view, print,
email
or link to your website.
Note:
When you click this link, an updated version of the report is
not
generated. This
link
lets
you
quickly view, save, or print an existing report.
Publish
Report
button
:
Click the
Run Report
button to generate the final repo
rt. The report is
available as an Acrobat PDF
file through the URL or web address displayed after you click
this button
.
Return to the
Plan View or Selection
View the Plan Information
:
Click the View tab or click the name of the plan i
n the treeview
to re
turn to the
Plan View tab
without
publishing a report.
Select a different plan
:
Click the Select tab to return to the Select page where you can
choose a different plan
without
publishing a report
.
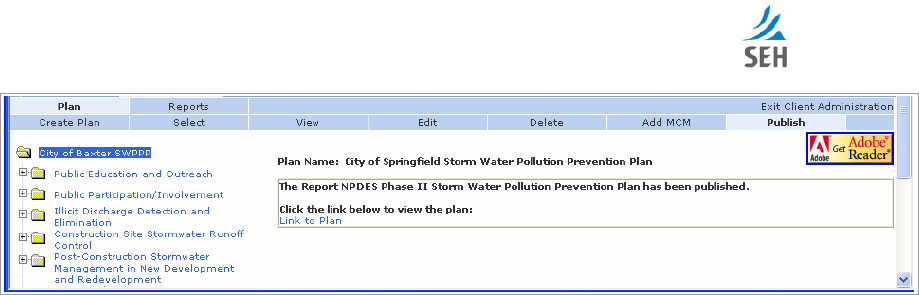
Notification page
Use the Notification page to
view a copy of the complete plan as an Acrobat PDF file. You can
save this file and link it to you
r website or distribute the file. It includes the complete plan for the
period you choose, plus any attachments.
The Notification page opens when you click the
Run Report button on the
Publish tab
(
on page
26
)
.
PermiTrackMS4
page
28
|
Plans
Figure
11
. Notification page
Link
on the
Notification
page
Link to Plan
:
Click the Link to Plan link to view the published plan. The published plan is
available
as an Acrobat PDF file
.
Note
: For a complete copy of the plan on a CD, contact
your SEH Administrator.
PermiTrackMS4
MCM (Minimum Control Measure) Views
| page
29
MCM
(Minimum Control Measure)
Views
MCMs are the measures that serve as the backbone of your management plan. They organize
the
plan activities into
the categories
or areas of concern that must be addressed by the plan
. The
MCMs
added when the plan was created also c
orrespond to
those
required by the EPA
, state
pollution control agency,
or other
organization
. For your convenience, the basic MCMs are added
to the plan
automatically when it is created.
Y
ou can
then
customize the
plan by adding your own
MCMs
, as needed
.
Create
an MCM
MCMs are added to a plan when the plan is created. Additional MCMs can also be added through
the
Plan View tab
. With a plan highlighted in
the treeview on the left, click the Add MCM tab.
Note
:
Because t
he Add
MCM
page is opened from the
Plan
View
tab
, it is covered in the Plan
section of this guide
. See
page
24
for
information
on this page
.
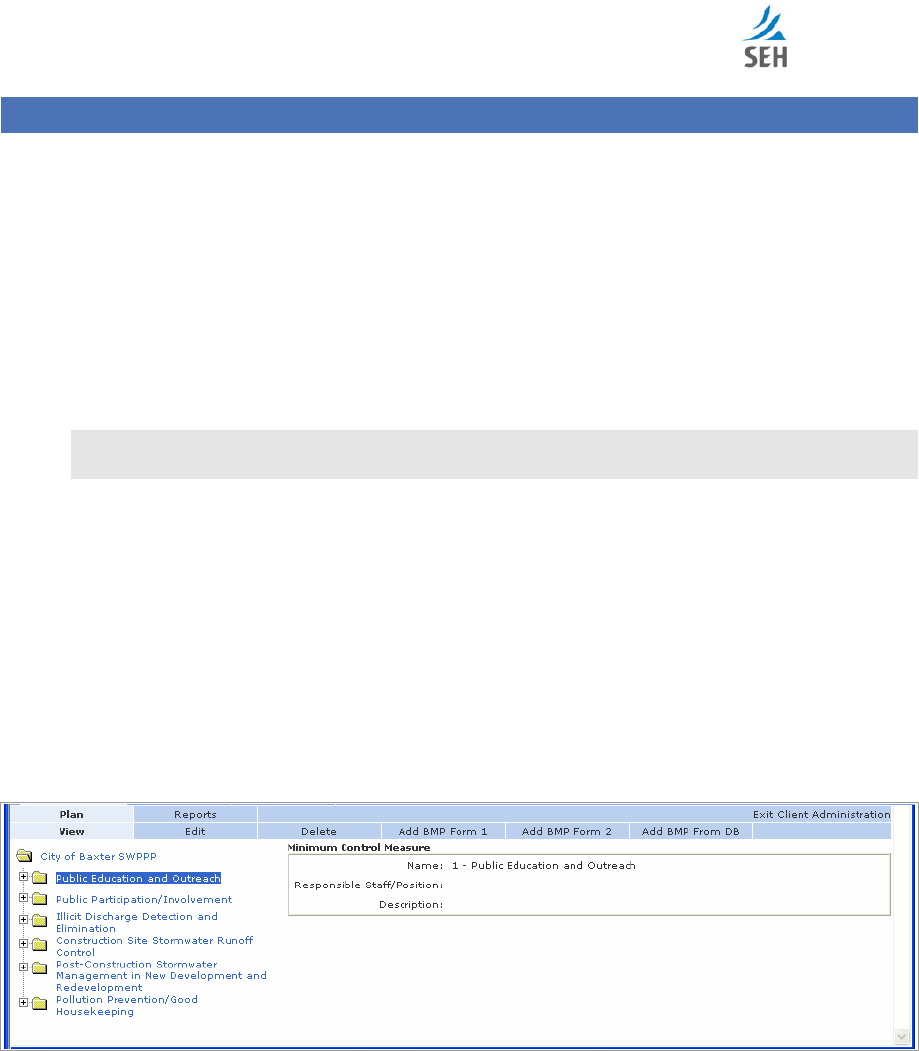
View
MCM tab
The
MCM View page shows
:
The plan treeview on the left
I
nformation about the
current
MCM
on the right side of the page, including the name,
responsible staff, and
description
.
This view also g
ives you access to other options, including
editing
the MCM
, deleting
the MCM
,
and adding a BMP to the MCM.
The MCM View page opens when you click the name of
an MCM
in the
treeview (
on page 20
)
.
Figure
12
. MCM View page
Field
s
& Folders
on the MCM View page
With the MCM View selected, the items listed within the MCM
folder
in the treeview
are the
BMPs associated with this MCM.
The right side of the page shows the name and description for this i
tem.
(See page
24
for
information
on the fields displayed on this page.)

PermiTrackMS4
page
30
|
MCM (Minimum Control Measure) Views
Tab
s on the MCM View page
The
tab
s on this page reflect the options available for working with
an MCM
within the plan.
Edit
:
Edit the
MCM
name, descript
ion, and responsible staff. Click the Edit tab to open
the
Edit Minimum Control Measure
page.
Delete
:
Delete the MCM highlighted in
the treeview
. Opens the Delete page
where you enter
a reason for deleting the MCM
.
Add BMP
:
Add a basic BMP to the current
MCM. This type of BMP includes only the
standard fields, including name, description, number, and responsible staff.
O
pen
s
the Add
BMP page.
Note
:
The Add BMP tabs that are available to you depend on
the permit type selected
when
the plan was created. Ea
ch of these tabs is briefly described below and in more detail
on pages
32
to
38
.
Add BMP Form 1
:
Add a
Form 1
BMP to the current MCM.
In addition to the
standard
fields,
this type of BMP includes
a field for the section
letter/number
and a field for specific
components or notes.
Add BMP Form 2
:
Add a Form 2 BMP to the current MCM. In addition to the standard
fields, this type of BMP includes a field for the section letter/number and fields to sup
port
educational goals and activities.
Add BMP from DB (Database)
:
The BMP database includes a wide array of BMPs that were
set up for other clients
or other plans
. These
universal
BMPs are
made available
to save you
time
.
After you choose a BMP from the
list, it is added to your plan with all of the
information entered automatically.
Return to the
Plan View
View the Plan Information
:
Click the name of the plan in the treeview to return to the
Plan
View tab
.
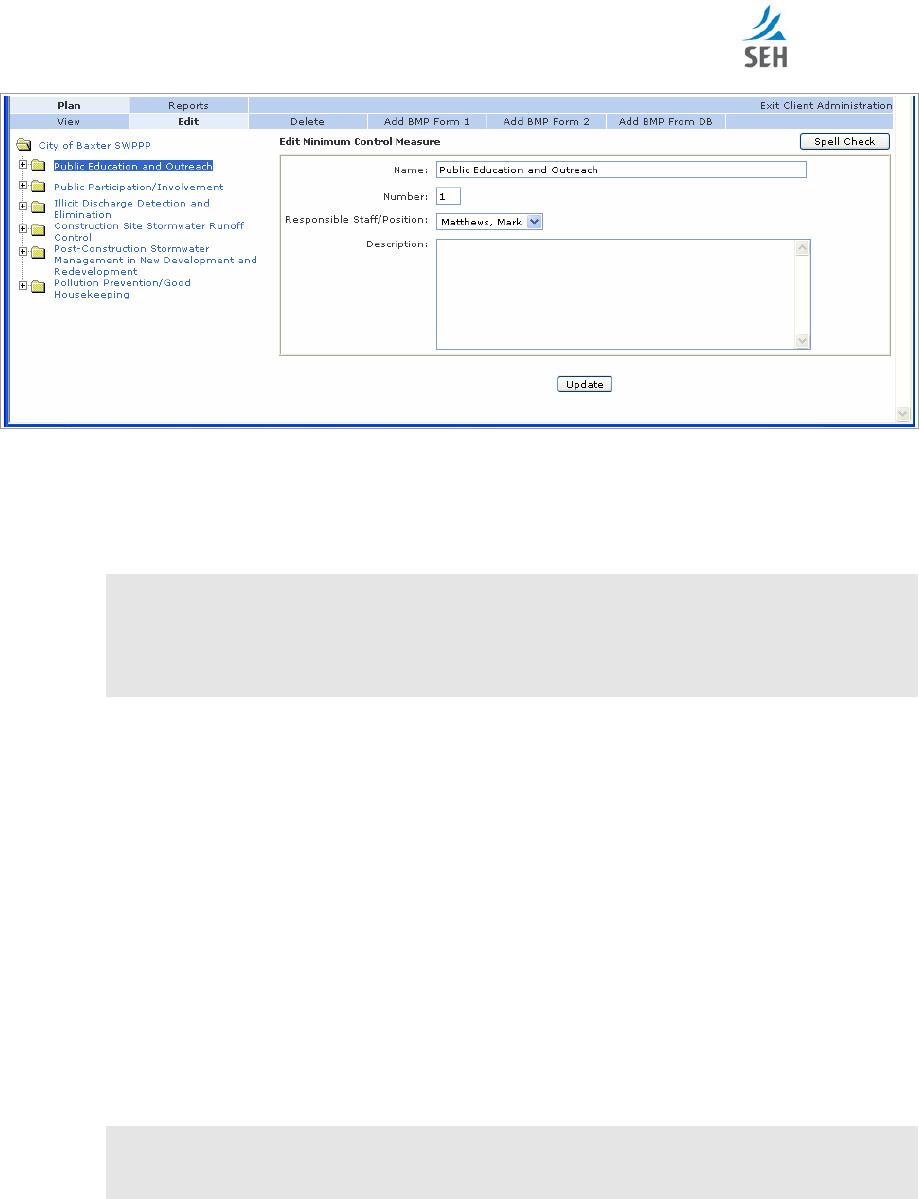
Edit
MCM tab
Use the MCM Edit page to change the
MCM
name or
to
assign
it to a different
staff person
or
position
.
The MCM Edit page opens when you click the name of
an MCM
treeview (
on page 20
)
, and then
cl
ick the Edit tab.
PermiTrackMS4
MCM (Minimum
Control Measure) Views
|
page
31
Figure
13
. MCM Edit page
Fields
& Button
on the MCM Edit page
The fields on the Edit page are the same as those completed when the MCM was created. For
inform
ation on these fields, see
Add MCM tab on
24
.
Caution
:
Th
e
value
in the Number field
can be changed to move the MCM to a different
position in the treeview, but we strongly recommend not changing the number.
Change it only if you have full knowledge of all the consequences re
sulting from
this change.
Spell Check
button
: Use the Spell Check button in the upper
-
right part of the page to check
the spelling in each of the text fields on this page.
Update
button
:
After entering your changes in the fields above, click the Update b
utton to
save your changes.
Return to the
MCM or Plan View
View the
MCM
Information
:
Click the View tab or click the name of the MCM in the
treeview to return to the MCM View page without making changes on the Edit page.
View the Plan Information
:
Click
the name of the plan in the treeview to return to the
Plan
View
tab.
Delete
MCM
tab
Use the Delete tab to remove the current MCM from the plan. The MCM highlighted in the
treeview is delete
d.
Caution
:
The Delete function deletes the current item and any items nested within it. For
example, if you delete
an MCM
from the plan, all BMPs and goals within that
MCM are also removed from the plan.

PermiTrackMS4
page
32
|
MCM (Minimum Control Measure) Views
The
Delete MCM
page opens when you select
an MCM
folder
in the treeview
(
on page 20
)
, and
then click the Delete tab.
Figure
14
. Delete
M
inimum
C
ontrol
M
easure page
Field
& Button
on the
Delete
MCM page
Enter
the
reason
for deleting the MCM
:
In
the text box, enter a reason for deleting the
current MCM. This information is saved in the database. If you need this information later,
contact your SEH Administrator.
Delete
button
:
Click the delete button to remove the MCM
,
its BMPs, goals, and activi
ties,
from your site.
You return to the
Plan View
tab.
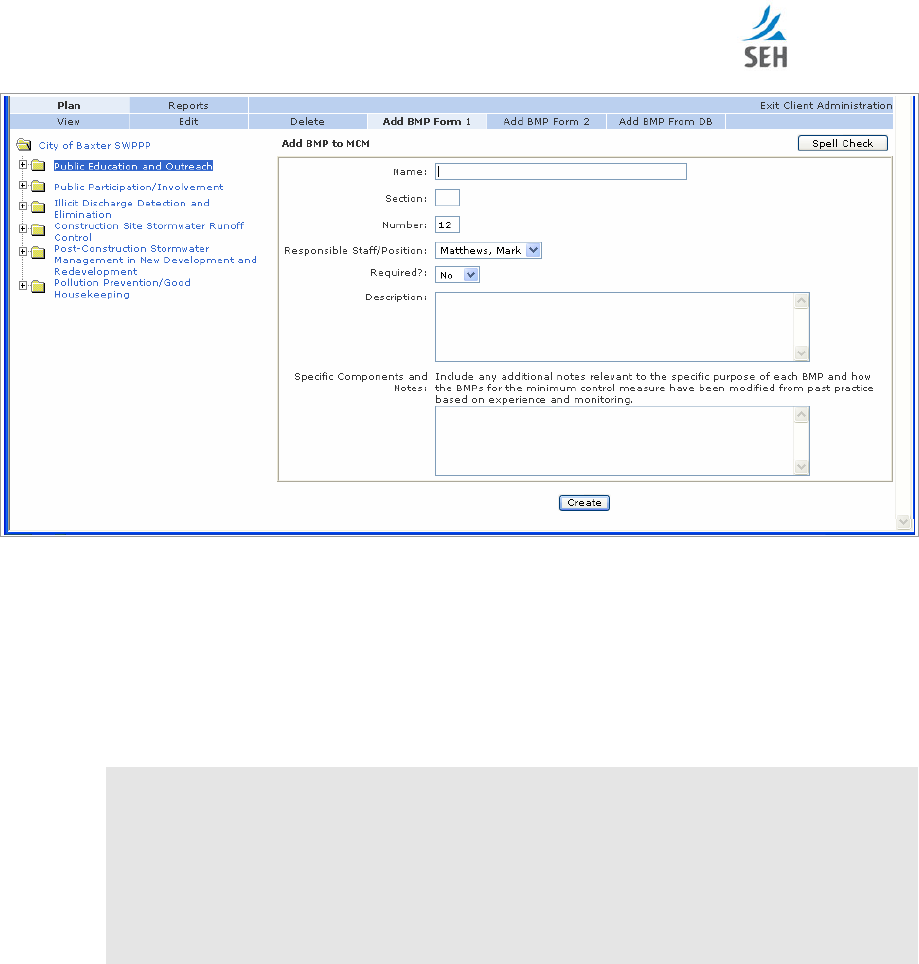
Add BMP Form 1
to MCM
tab
Use the
Add BMP Form 1 tab
to add
a
Form 1 BMP to the plan
.
I
n addition to the standard fields,
this type of BMP includes a field for the section letter/number and a field for specific components
or notes
.
Note
:
The Add BMP
Form 1
tab described here is available only if the plan is based on the
MPCA
permit type
.
A plan created with a different
permit type
may have different Add
BMP tabs.
The Add BMP
Form 1
page opens when you select
an MCM
in the
treeview (
on page 20
)
, and
then click the Add BMP
Form 1
tab above the viewing area.
PermiTrackMS4
MCM (Minimum Control Measure) Views
|
page
33
Figure
15
. Add BMP
Form 1
page
Fields on the Add BMP
Form 1
page
Name
:
Enter a descriptive name for the BMP. This name is displayed in the
treeview
on the
left and used in the published report.
Section
:
Enter a letter to indic
ate the section of the MCM where this BMP should be placed
in the published report
.
This section label, along with the number (
entered in the field
below),
is used in the report to designate sections and subsections
for example 3.E
-
6, etc.
Caution
:
A new
BMP is always added to the
bottom of the
list
within the MCM
even if
your section number suggests that it should be placed elsewhere within the
MCM.
To move this BMP in the
treeview
and in the published report, edit
each
of the
BMPs within the MCM
to
change their sections
and numbers
. Select the Unlock
Name Field for Edit option to edit the section and number fields
on the BMP Edit
page
.
Number
:
Defines the position of this BMP
within the MCM highlighted in the treeview
.
This
number also determines th
e order for the BMPs in the published report.
The system assigns
this number automatically.
Responsible Staff/Position
:
Select the name of the staff person or staff position responsible
for overseeing or
implementing this BMP. This
person
:
Receives an email notice when any activities under this BMP are schedule
d
to occur.
Is named in the Published
report (see page
26
)
Can be selected in reports
filtered by owner (see page
65
)

PermiTrackMS4
page
34
|
MCM (Minimum Control Measure) Views
Note
:
If the name you want is not listed, contact your SEH Administrator to add the name.
Required
:
Indicate whether this BMP must be implemented for the plan.
This option flags
the status of the BMP in the
published
rep
ort
.
The report includes b
oth
required
BMP
s and
BMPs that are not required
.
Yes
:
Select Yes from the drop
-
down list if t
he BMP is required for this plan.
In the
reports, it is marked as required.
No
:
Select No from the drop
-
down list if t
he BMP is not re
quired for this plan.
In the
reports, it is marked as not required.
Description
:
Enter a description of the BMP and its use. This description is included in the
published report.
Specific Components and Notes
:
Enter any additional information about the B
MP, how it
may have been modified, etc
.
These notes are included in the published report.
Button
s on the Add BMP Form 1 page
Spell Check
button
:
Use the Spell Check button in the upper
-
right part of the page to check
the spelling in each of the text field
s on this page.
Create
button
:
After completing the fields above, click the Create button to add the BMP to
the current plan.
The program adds the
BMP at the bottom of the current MCM.
Return to the
MCM or Plan View
View the
MCM
Information
:
Click the Vi
ew tab or click the name of the MCM in the
treeview to return to the MCM View page without adding a BMP.
View the Plan Information
:
Click the name of the plan in the treeview to return to the
Plan
View
tab.
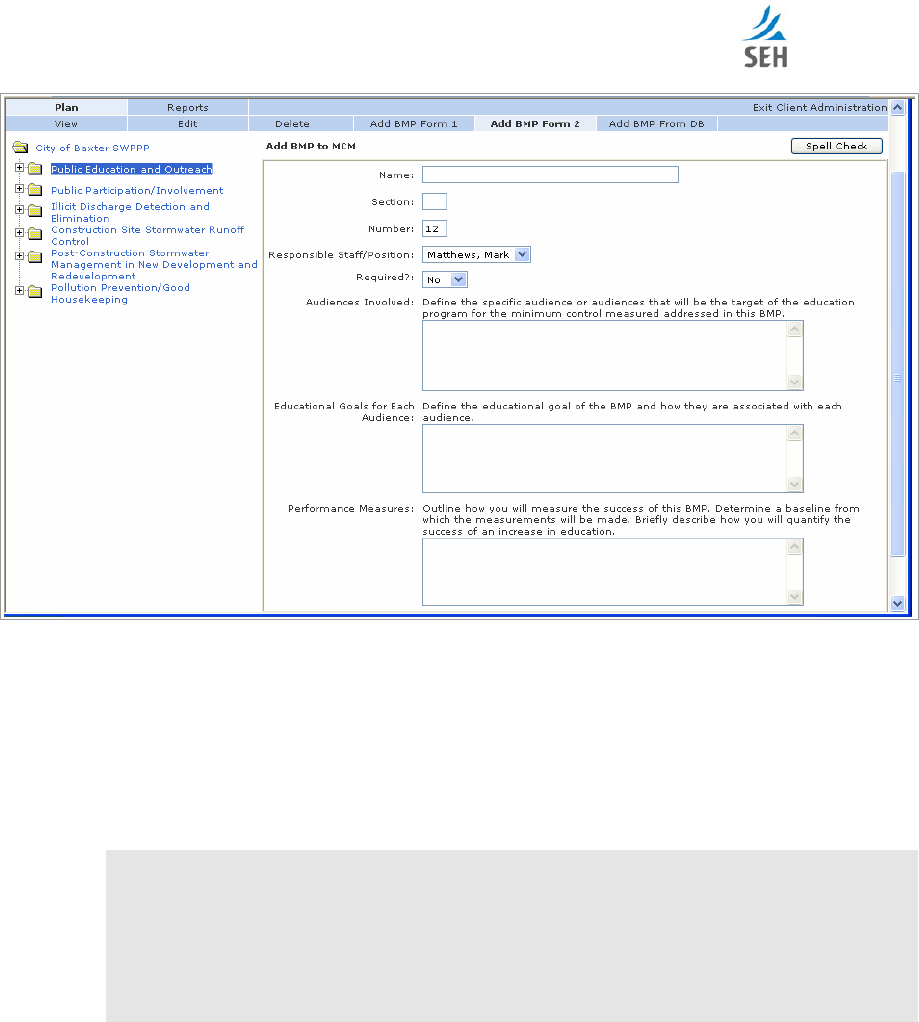
Add BMP Form
2
to MCM
tab
Use the Add BMP Form 2 tab to add a Form 2 BMP to the plan. In addition to the standard fields,
this type of BMP includes fields to support educational and public outreach goals and activit
ies.
Note
:
The Add BMP Form 2 tab described here is available only if the plan is based on the
MPCA
permit type
. A plan created with a different
permit type
may have different Add
BMP tabs.
The Add BMP Form 2 page opens when you select
an MCM
in the
tree
view (
on page 20
)
, and
then click the Add BMP Form 2 tab above the viewing area.
PermiTrackMS4
MCM (Minimum Control Measure) Views
|
page
35
Figure
16
. Add BMP Form
2
page
Fields on the Add BMP Form
2
page
Name
:
Enter a descriptive name for the BMP. This
name is displayed in the
treeview
on the
left and used in the published report.
Section
:
Enter a letter to indicate the section of the MCM where this BMP should be placed
in the published report.
This section number, along with the number (below), is used
i
n the
report to designate sections and subsections
for example 3.E
-
6, etc.
Caution
:
A new BMP is always added to the bottom of the list within the MCM
even if
your section number suggests that it should be placed elsewhere within the
MCM.
To move thi
s BMP in the
treeview
and in the published report, edit
each
of the
BMPs within the MCM to change their sections and numbers. Select the Unlock
Name Field for Edit option to edit the section and number fields.
Number
:
Defines the position of this BMP in t
he plan list.
This number also determines the
order for the BMPs in the published.
The system assigns this number automatically.
Responsible Staff/Position
:
Select the name of the staff person or staff p
osition responsible
for overseeing or implementing this BMP.
This person:
Receives an email notice when any activities under this BMP are
scheduled to occur
.
Is named in the Published
report (see page
26
)

PermiTrackMS4
page
36
|
MCM (Minimum Control Measure) Views
Can be selected for
reports
filtered by owner (see page
65
)
Note
:
If the name you want is not listed, contact your SEH Administrator to add the name.
Required
:
Indicate whether this BMP must be implemented for the plan. This option flags
the st
atus of the BMP in the reports.
Both types of BMP are included in the report.
Yes
: Select Yes from the drop
-
down list if the BMP is required for this plan. In the
reports, it is marked as required.
No
: Select No from the drop
-
down list if the BMP is not
required for this plan. In the
reports, it is marked as not required.
Audience
s
Involved
:
Describe the audiences that will be the target of the educational
program defined by this BMP
.
Educational Goals for
Each
:
Enter
educational goals to be achieved un
der this BMP and
how each goal is associated with an audience
identified
in the field above
.
Performance Measures
:
Outline how you will measure the success of this BMP. Mention
the baseline from which the measures will be made. Describe how you
will quant
ify
successful increase in education as a result of the BMP
activities
.
Button
s on the Add BMP Form 2 page
Spell Check
button
:
Use the Spell Check button in the upper
-
right part of the page to check
the spelling in each of the text fields on this page.
C
reate
button
:
After completing the fields above, click the Create button to add the BMP to
the current plan.
The program adds the
BMP at the bottom of the current MCM.
Return to the
MCM or Plan View
View the
MCM
Information
:
Click the View tab or click th
e name of the MCM in the
treeview to return to the MCM View page without adding a BMP.
View the Plan Information
:
Click the name of the plan in the treeview to return to the
Plan
View
tab.
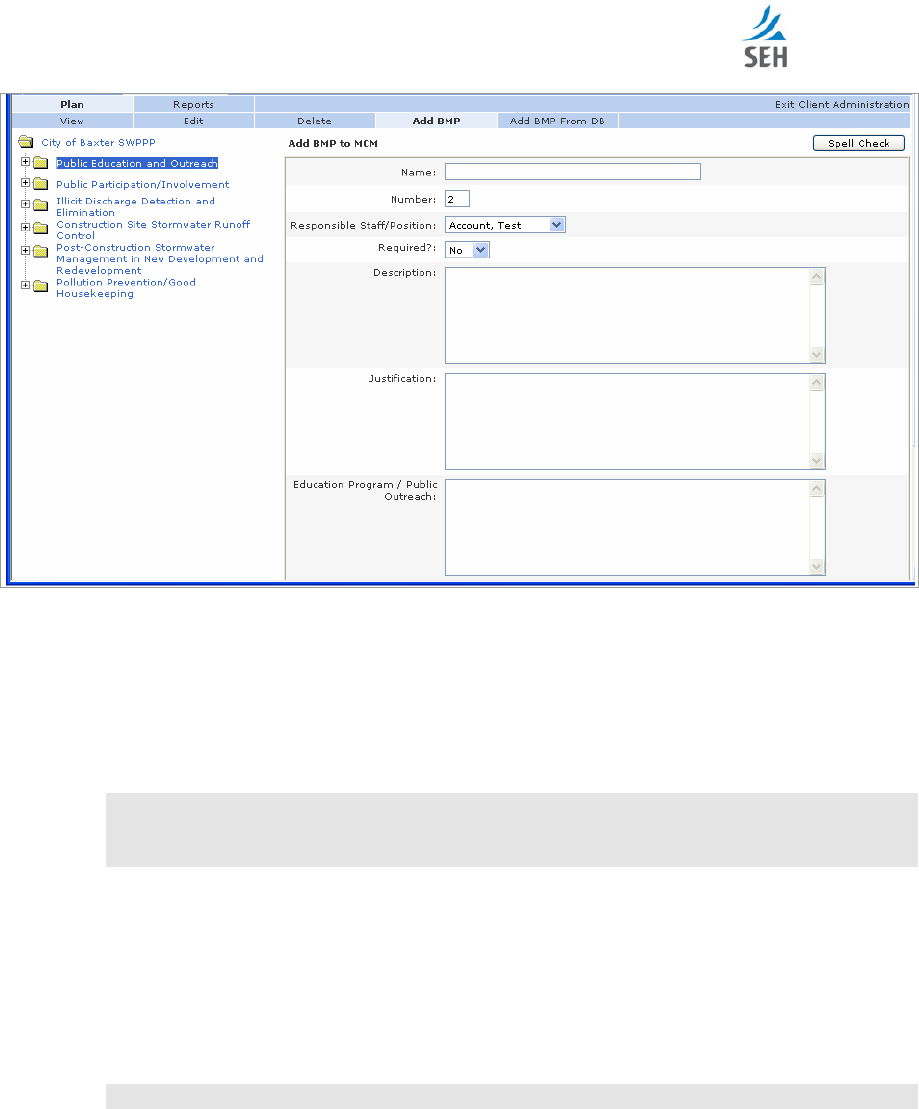
Add BMP
tab
The Add BMP tab includes the standard fields for entering the name, description, number, and
responsible staff
for a BMP
.
It also lets you record justifications for the BMP, information on
education or outreach programs, and annual reporting
items.
Note
:
The Add BMP tab described here is available only if the plan is based on the default
permit type
. A plan created with a different
permit type
may have different Add BMP
tabs.
The MCM Add BMP page opens when you select
an MCM
folder
in the
t
reeview (
on page 20
)
,
and then click the Add BMP tab
above the viewing area
.
PermiTrackMS4
MCM (Minimum Control Measure) Views
|
page
37
Figure
17
. Add BMP page
Fields on the Add BMP
to MCM
page
Name
:
Enter a descriptive name for the BMP. This name is dis
played in the
treeview
on the
left and used in the published report.
Number
:
Defines the position of this BMP in the plan list.
This number also determines the
order for the BMPs in the published report.
The system assigns this number automatically.
Caut
ion
:
This number can be changed to move the BMP to a different position in the
treeview, but we strongly recommend not changing the number. Change it only if
you have full knowledge of all the consequences resulting from this change.
Responsible Staff/Pos
ition
:
Select the name of the staff person or staff position responsible
for overseeing or implementing
this BMP.
This person:
Receives an email notice when any activities under this BMP are
scheduled to occur
.
Is named in the Published
report (see page
26
)
Can be selected for r
eports filtered by owner (see page
65
)
Note
:
If the name you want is not listed, contact your SEH Administrator to add the nam
e.
Required
: Indicate whether this BMP must be implemented for the plan. This option flags
the status of the BMP in the reports.
Both types of BMP are included in the report.
Yes
: Select Yes from the drop
-
down list if the BMP is required for this plan. I
n the
reports, it is marked as required.

PermiTrackMS4
page
38
|
MCM (Minimum Control Measure) Views
No
: Select No from the drop
-
down list if the BMP is not required for this plan. In the
reports, it is marked as not required.
Description
:
Enter a description of the BMP and its use.
This description is included i
n the
published report.
Justification
:
Enter the
reason
that this BMP is included in the plan. For example, this
section may discuss the risk or need that
this BMP
addresses.
Education Program / Public Outreach
:
If this BMP addresses the need for public
education
or outreach, enter a description of the need and the type of program.
Annual Reporting Items
:
List and/or describe any items that must be included in the annual
report. For example, annual reporting items may include attainment of measurable goa
ls,
examples of newsletters published, articles published on the website, etc.
Button
s on the Add BMP page
Spell Check
button
:
Use the Spell Check button in the upper
-
right part of the page to check
the spelling in each of the text fields on this page.
C
reate
button
:
After completing the fields above, click the Create button to add the BMP to
the current plan.
The program adds the
BMP at the bottom of the current MCM.
Return to the
MCM or Plan View
View the
MCM
Information
:
Click the View tab or click th
e name of the MCM in the
treeview to return to the MCM View page without adding a BMP.
View the Plan Information
:
Click the name of the plan in the treeview to return to the
Plan
View
tab.
Add BMP from DB tab
To save you time, we include a
special group of BMPs
that were developed for
other
plans and/or
client
s
.
They include BMPs commonly used as part of
MS4
plans.
When you select one of these
BMPs, the s
ystem
automatically
adds the BMP to your plan and
enters
all of the
required
information
.
After adding a BMP from the database, you can
edit
to suit your s
pecific plan
,
as needed, without
changing the source BMP in the database.
The Add BMP from DB page
opens when you select
an MCM
folder
in the
treeview (
on page
20
)
, and then click the Add BMP from DB tab
above the viewing area
.
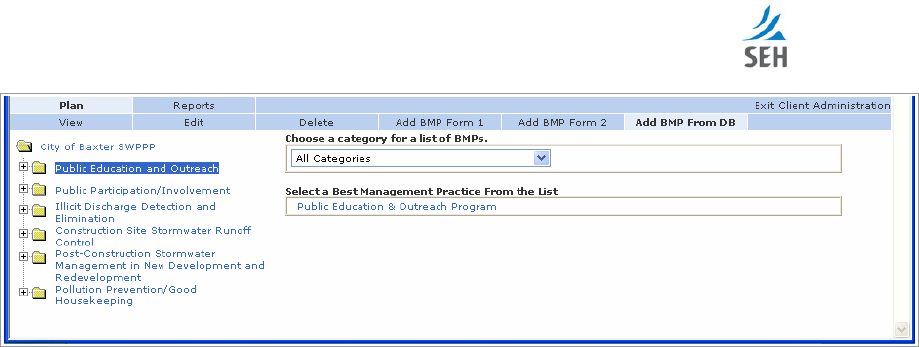
PermiTrackMS4
MCM (Minimum Control Measure) Views
|
page
39
Figure
18
. Add BMP from DB page
Fields on the Add BMP from DB page
Choose a Categor
y for a list of BMPs
:
Select a category to see a filtered list of BMPs.
The BMPs are organized into categories to help you locate a specific BMP more quickly. The
categories
group the BMPs by the
type of
action
or treatment
they provide
.
Select a B
est
M
anagement
P
ractice
from the List
:
Click on the name of a BMP in the list.
T
his box
list
s
all
of
the
BMPs
in
the category that you chose
above
. The BM
P
, with its
standard
settings and
components,
is added to the MCM highlighted in the
treev
iew
on the
left
.
After adding the BMP,
the application takes you to the BMP Edit page, where you can
modify
it to
suit the needs of
your
individual plan, as needed.
(See page
36
for information on
the fields available on thi
s page.)
Return to the
MCM or Plan View
View the
MCM
Information
:
Click the View tab or click the name of the MCM in the
treeview to return to the MCM View page without adding a BMP.
View the Plan Information
: Click the name of the plan in the treeview to
return to the Plan
View tab.

PermiTrackMS4
page
40
|
MCM (Minimum Control Measure) Views
This page intentionally left blank.
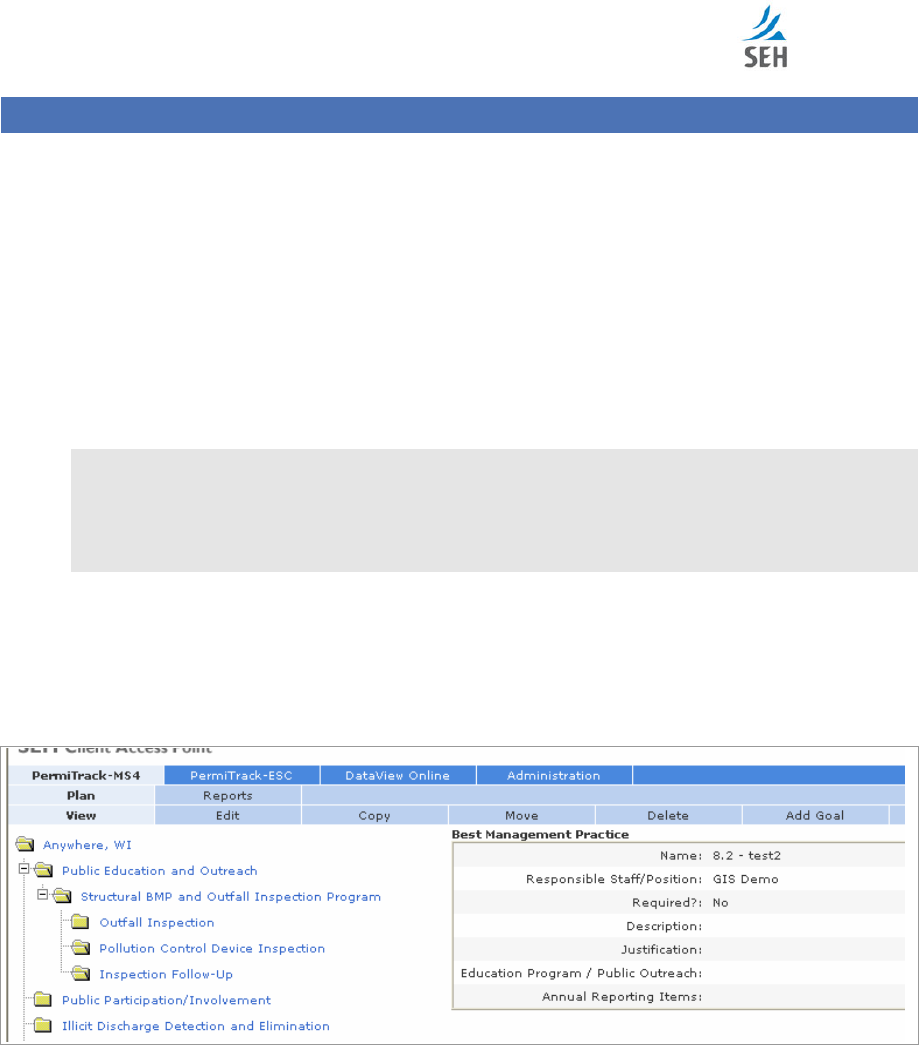
PermiTrackMS4
BMP (Best Management Practice) View
s
| page
41
BMP
(Best Management Practice)
Views
BMPs are added to reflect the management practices used to address the goals for
the plan. BMPs
are grouped within the MCMs to let you provide more detailed information about each practice or
solution.
BMPs identify the types of programs that you are using to address the goals and requirements for
the plan. For example, set up a BMP
to describe an outreach program, inspection program,
maintenance program, study, etc.
Create a BMP
BMPs are added to
an MCM
through the MCM View page. With
an MCM
highlighted in the
treeview on the left, click
one of the
Add BMP tab
s
.
Note
:
Because t
he Ad
d
BMP
page is opened from the
MCM
View
, it is covered in the MCM
section of this guide
. See
page
36
for
information
on this page
.
The Add BMP from DB page is opened from the MCM View. See page
38
for
information on this page.
View
BMP
tab
The BMP View page shows information about the BMP highlighted in the
treeview
.
The
information shown on the right side of the page depends on t
he type of BMP.
The BMP View page opens when you click the name of
a
BMP
in the
treeview (
on page 20
)
.
Figure
19
. BMP View page
Fields & Folders on the BMP View page
With the BMP View selected,
the BMP folder
in the treeview
includes the
goals
and activities
associated with this BMP.

PermiTrackMS4
page
42
|
BMP (Best Management Practice) Views
The right side of the page shows the
name,
description
, and other settings
for this
BMP. The
specific information available depends on the type of BMP
. (See page
s
32
to
36
for
information
on the fields displayed on this page.)
Tabs on the BMP View page
The tabs on this page reflect the options available for working with a BMP within the plan.
View
:
The View
tab is highlighted when you click on a BMP in the treeview.
Edit
:
Click the Edit tab to change the BMP name, description, assigned staff, or other
settings. Opens the Edit Best Management Practice page.
Copy
: Click the Copy tab to copy the BMP highlight
ed in the treeview, and place the copy
under another MCM in the plan or under the same MCM. Opens the Copy a Best
Management Practice page.
Move
: Click the Move tab to move the BMP highlighted in the treeview to a different MCM
in the plan. Opens the Move
a Best Management Practice page.
Delete
:
Delete the BMP highlighted in
the treeview
. Opens the Delete page, where you can
delete the current BMP.
Add Goal
:
Add a
goal to the BMP to identify a specific goal to be accomplished as part of
the plan
. Opens t
he Add
Goal
page.
Return to the
MCM or Plan View
View the
MCM
Information
:
Click the name of the MCM in the treeview to return to the
MCM View page.
View the Plan Information
:
Click the name of the plan in the treeview to return to the
Plan
View
tab.
Ed
it
BMP
tab
Use the BMP Edit page to change the
description or other information about the BMP
.
For
example, use this page to customize a BMP added from the database.
The BMP
Edit page opens when you click the name of a BMP
in
the treeview (
on page 20
)
, and
then click the Edit tab.
This Edit tab is only for the current BMP.
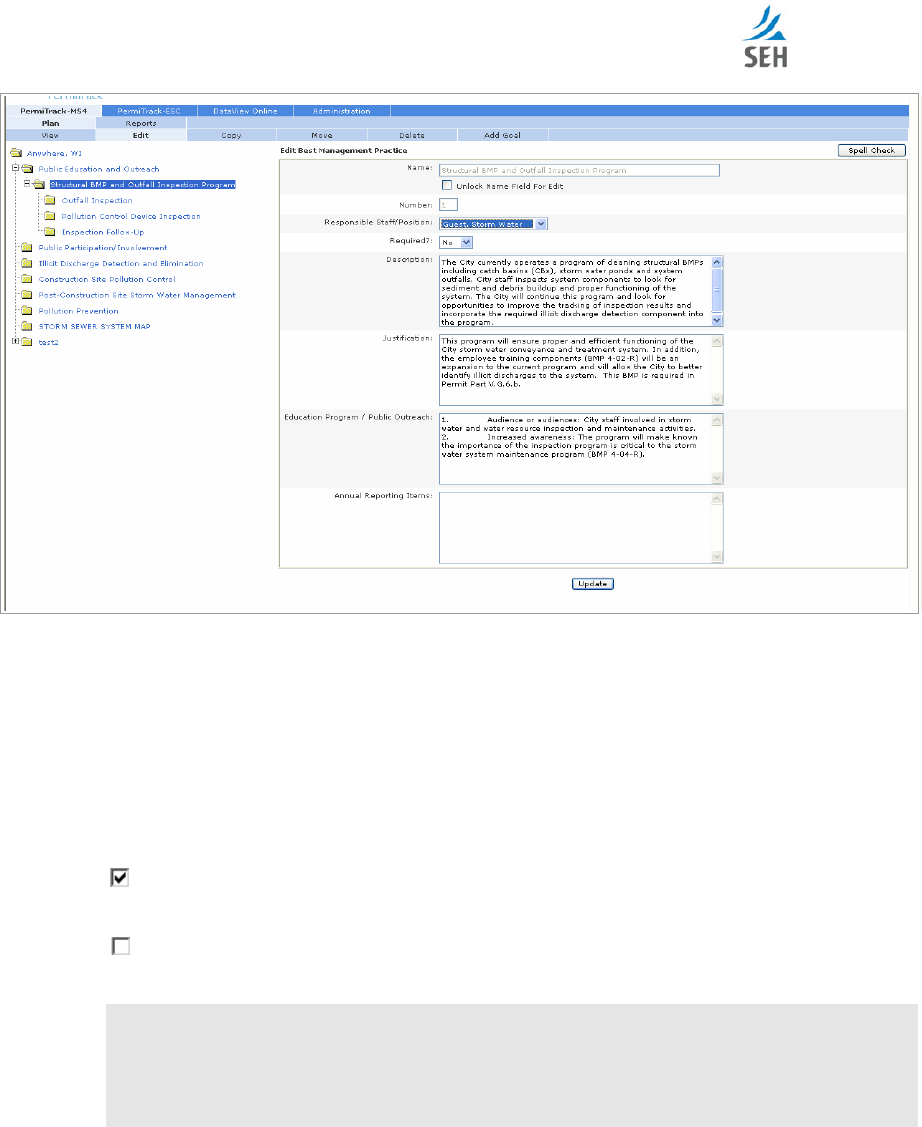
PermiTrackMS4
BMP (Best Management Practice) Views
|
page
43
Figure
20
. BMP Edit page
Fields
& Button
on
the BMP Edit page
Most of t
he fields on the Edit page are the same as those completed when the BMP was created.
Each type of BMP has its own set of fields.
For information on these fields, see
pages
32
to
36
.
The
following
fields and button
s
are unique to the BMP Edit page:
Unlock Name Field for Edit
: Use this option to
open
the Name
, Section, and Number
field
s
for editing
.
Unlock Name Field for E
dit
:
Select t
he Unlock Name Field for Edit
check box if you
want to change the name
, number, or section for
the BMP.
Unlock Name Field for Edit
:
Clear
the Unlock Name Field for Edit
to keep the Name
,
Section, and Number
field
s
as read
-
only.
These fields
cannot be edited
.
Caution
:
This box is cleared by
default
. Be sure you want to change the name
or numbers
before selecting this box
.
If
you change the Section or Number, these fields must
also
be changed for other
BMPs within the MCM.
Section
: Enter a
letter to indicate the section of the MCM where this BMP should be placed
in the published report. This section label, along with the number (entered in the field below),
is used in the report t
o designate sections and subsections
for example 3.E
-
6, etc.
PermiTrackMS4
page
44
|
BMP (Best Management Practice) Views
Caution
:
A new BMP is always added to the bottom of the list within the MCM
even if
your section number suggests that it should be placed elsewhere within the
MCM.
To move this BMP in the t
reeview and in the published report, edit
each
of the
BMPs within the MCM to change their sections and numbers. Select the Unlock
Name Field for Edit option to edit the section and number fields on the BMP Edit
page.
Number
: Defines the position of this B
MP within the MCM highlighted in the treeview. This
number also determines the order for the BMPs in the published report. The system assigns
this number automatically.
Responsible Staff/Position
: Select the na
me of the staff person or staff position responsible
for monitoring or implementing. This person:
Receives an email notice when any activities under this Goal are scheduled to occur.
Is named in the Published
report (see page
26
)
Can be selected for reports filtered by owner (see page
65
)
Note
:
If the name you want is not listed, contact your SEH Administrator to add the name.
Required
: Indicate whether this BMP must be implemented for the plan.
This option flags
the status of the BMP in the published report. The report includes both required BMPs and
BMPs that are not required.
Yes
:
Select Yes from the drop
-
down list if t
he BMP is required for this plan. In the
reports, it is marked as required
.
No
:
Select No from the drop
-
down list if t
he BMP is not required for this plan. In the
reports, it is marked as not required.
Description,
Justification
, etc
:
When editing a
BMP Form 1 and BMP Form 2
, the page
may
include
information fields with
inform
ation on measurable goals
,
activities, timeline,
specific components, etc.
This information is provided for your information, it
is not
included in the published report. It
cannot be edited.
Spell Check
button
: Use the Spell Check button in the upper
-
ri
ght part of the page to check
the spelling in each of the text fields on this page.
Update
button
:
After making changes on this page, click the Update button to save your
changes.
Tabs on the BMP Edit page
View
:
The View tab is highlighted when you click
on a BMP in the treeview.
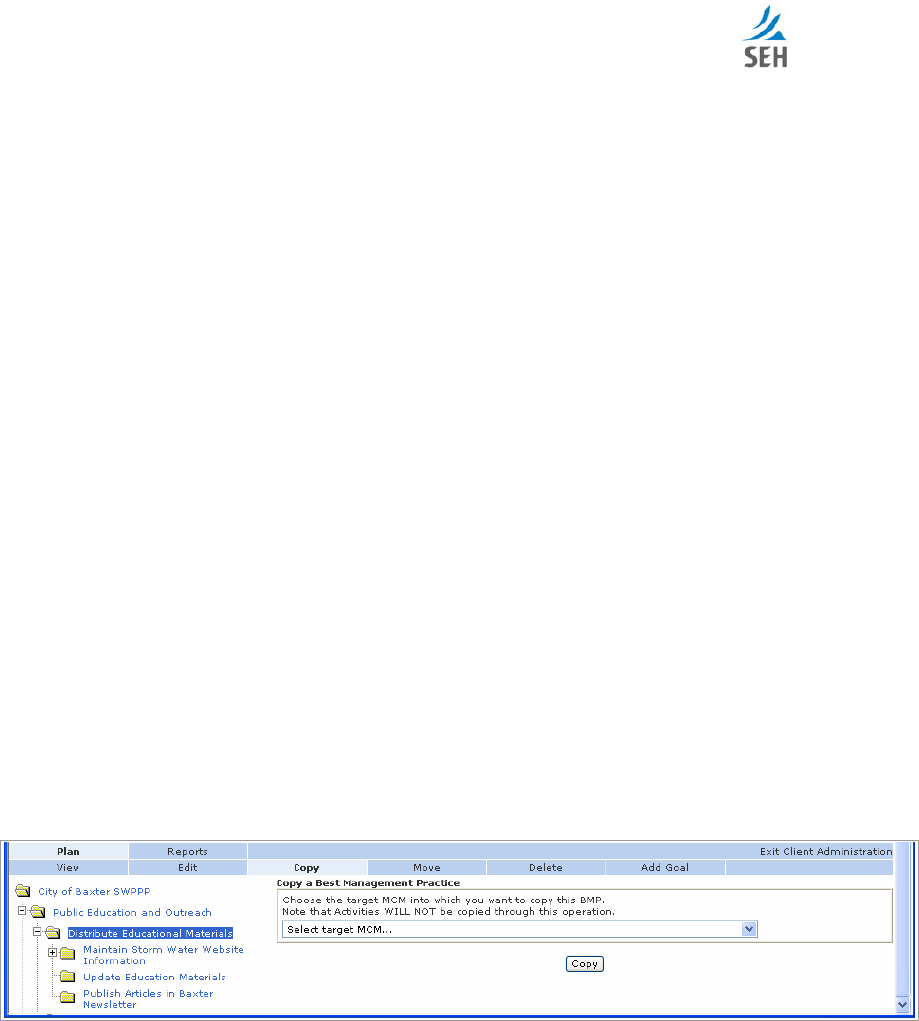
PermiTrackMS4
BMP (Best Management Practice) Views
|
page
45
Edit
:
Click the Edit tab to change the BMP name, description, assigned staff, or other
settings. Opens the Edit Best Management Practice page.
Copy
: Click the Copy tab to copy the BMP highlighted in the treeview, and place the
copy
under another MCM in the plan or under the same MCM. Opens the Copy a Best
Management Practice page.
Move
: Click the Move tab to move the BMP highlighted in the treeview to a different MCM
in the plan. Opens the Move a Best Management Practice page.
Delete
:
Delete the BMP highlighted in the treeview. Opens the Delete page, where you can
delete the current BMP.
Add Goal
:
Add a goal to the
current
BMP to identify a specific goal to be accomplished as
part of the plan. Opens the Add Goal page.
Return
to the
BMP or Plan View
View the
BMP
Information
:
Click the
View tab or the
name of the BMP in the treeview to
return to the BMP View page without making changes
on the Edit page
.
View the Plan Information
:
Click the name of the plan in the treeview to re
turn to the
Plan
View
tab.
Copy BMP tab
Use the Copy tab to copy the highlighted BMP and place the copy under another MCM
in the
plan
or
under
the same MCM.
This feature i
s useful when you want to create several BMPs with
similar information. The new copy includes the BMP
information
plus any goals within that
BMP. The goal activities are not copied.
The Copy BMP page opens when you select a BMP folder in the
treeview (
on page 20
)
, and then
click the Copy tab.
Figure
21
. Copy BMP page
Field
& Button on the Copy BMP page
Select target MCM
: Click on the down arrow to vi
ew a list of the MCMs in the plan. When
you highlight an MCM in the list and click the Copy button, the current BMP is copied to that
MCM.
Copy
button
:
Click the Copy button to make a copy of the highlighted BMP in the treeview
on the left. The new copy i
s placed under the MCM selected in the box above.
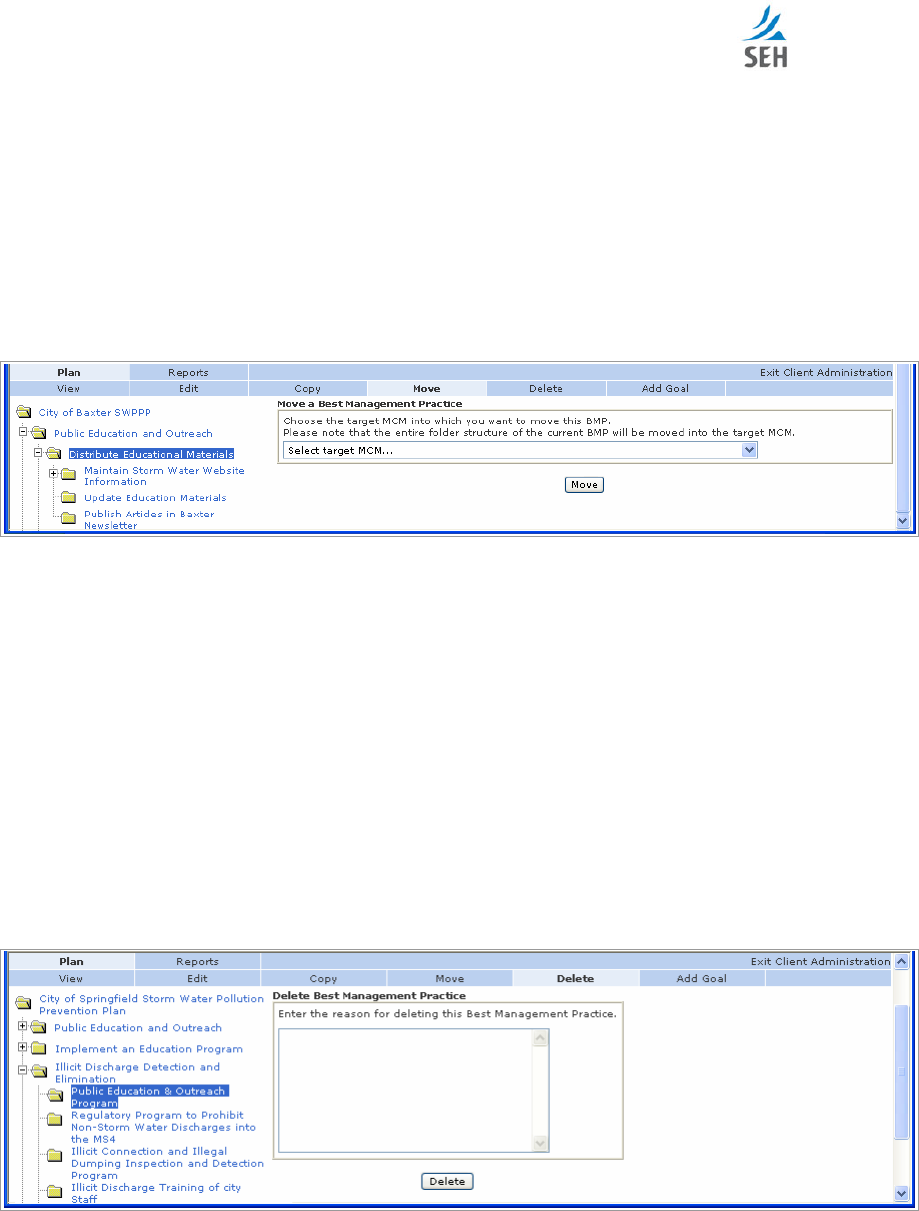
PermiTrackMS4
page
46
|
BMP (Best Management Practice) Views
Move BMP tab
Use the
Move t
ab to
move
the highlighted BMP
to a different
MCM in the plan.
When the BMP
is moved, all of t
he goals and goal activities under that BMP are moved along with it.
For
example, use this option to move a BMP to a new MCM that you created.
When you move a BMP, all of the goals and goal activities associated with the BMP are also
moved.
The
Move
BMP
page opens when you select a BMP folder in the
treeview (
on page 20
)
, and then
click the
Move
tab.
Figure
22
.
Move
BMP page
Field
& Button on the Move BMP page
Select target MCM
: Click on the down arrow to view a list of the MCMs in the plan. When
you highlight an MCM in the list and click the
Move
button, the current BMP is
mov
ed to
that MCM.
Move
button
:
Click the
Move
button to
move
the highlighte
d BMP in the treeview on the left.
The
BMP
is placed under the MCM selected in the box above.
Delete
BMP
tab
Use the BMP Delete tab to remove a BMP from the plan. To delete a BMP, highlight
the name of
the BMP in the treeview and click the Delete tab.
The BMP Delete page opens when you select a BMP folder in the
treeview (
on page 20
)
, and
then click the Delete tab.
Figure
23
. Dele
te
BMP
page

PermiTrackMS4
BMP (Best Management Practice) Views
|
page
47
Goals and Activities
Deleted
with the BMP
The Delete function deletes the current item and any items nested within it. For example, if you
delete a BMP from the plan, all goals and activities in the branches within that BMP are also
removed fro
m the plan.
Numbering
other BMPs
When a BMP is deleted, numbers for other BMPs within the same MCM are not updated.
For
example, if you deleted the third of five BMPs within
an MCM
, you must edit each of the other
BMPs to update the sequence number (enter
ed in the Number field).
Field & Button
on the BMP Delete page
Enter the
reason
for deleting the
BMP
:
In the text box, enter a reason for deleting the
current BMP. This information is saved in the database. If you need this information later,
contact your
SEH Administrator.
Delete
button: Click the delete button to remove the BMP, and all of its goals and activities,
from your site.
Return to the
Previous View
After deleting the BMP, the application takes you to the View MCM page automatically.
Add Goal
tab
On the Add Goal tab, you record information about a goal to be accomplished as part of the plan.
Goals provide a way to group related activities. For
example, a goal
could group
the various
publications produced as part of a specific public outreach program or
all
of the
outfall
inspections for a site
.
The Add Goal
to Best Management Practice
page opens when you select a BMP folder within the
treeview
(
on page 20
)
, and then click the Add Goal tab.
Figure
24
. Add Goal
to Best Management Practice
page
PermiTrackMS4
page
48
|
BMP (Best Man
agement Practice) Views
Fields on the Add Goal page
Name
:
Descriptive name of the goal.
Number
:
Defines the position
of this goal in the plan list.
This number also determines the
order for the items in the published report.
The system assigns this number automatically.
Caution
:
This number can be changed to move the goal to a different position in the
treeview, but we
strongly recommend not changing the number. Change it only if
you have full knowledge of all the consequences resulting from this change.
Responsible Staff/Position
:
Select the name of the staff person or staf
f position responsible
for
monitoring or implementing
.
This person:
Receives an email notice when any activities under this Goal are
scheduled to occur
.
Is named in the Published
report (see page
26
)
Can be selected for r
epor
ts filtered by owner (see page
65
)
Note
:
If the name you want is not listed, contact your SEH Administrator to add the name.
Description
:
Description of the goal, what it should accomplish, and why it is included
.
This
descr
iption is included in the published report.
Activity Form
:
Select a form that will serve as a template for the measurable activities you
add to this goal
.
Options include:
Default Form
:
Select
the Default Form
for
measurable activities
that
need only basic
fields, including name, description,
and activity date.
Outfall Inspection Form
:
Select the Outfall Inspect
ion Form
option to record an
inspection
for an
outfall site
or
print blank inspection forms
.
Outfall Information Form
:
Select the Outfall Information Form option
to reco
rd
information about an outfall that
needs to be
monitored
. Generally, one information form
is completed for each outfall.
Activity Frequency
:
Indicate how frequently the
information for this
activity
is updated
.
Select an option from the drop
-
down list.
For example, the activity may
be
updated
on a
specific date
or
updated
weekly.
Activity Date
:
In the date field next to the Activity Frequency,
enter the date the activity
should be updated
OR
the start date for a recurring activity
. A recurring activity
is updated
on
this date and continues at the frequency you specify.
Note
:
The Activity Date
does
not
reflect the frequency of the activity itself
. It
reflects how
often information about the frequency is entered into the system.
For example, if the
goal
covers street sweeping, the activity may occur weekly but the information only
recorded quarterly.
PermiTrackMS4
BMP (Best Management Practice) Views
|
page
49
Email Notification
:
Indicate whether the responsible staff/position should receive an email
when
the
goal activity is scheduled t
o occur
.
The timing for the email is
based
on:
A
ctivity
frequency (entered above)
: The email sent when the information needs to be
updated, based on the activity frequency and date.
Notify Days in Advance (entered below): The email is sent before the act
ivity date if
there is an entry in the field below.
Email Notification
:
Select
the Email Notification
check box to notify the person via email
that this goal has been created and assigned to them.
The staff person responsible for the goal,
the
BMP
tha
t includes the goal
, and
the
MCM
that
includes the
BMP and the
goal
are all notified.
Email Notification
:
Clear
the Email Notification
check
box to record the information
on
this page
but not generate an email.
Notify Days in Advance
:
If you enter a va
lue in this field, an email is sent to the responsible
staff/position before the goal deadline. Enter a number to indicate how many days in advance
of the activity date
to send the notification.
For example, for a quarterly goal, the email could
be sent 10
days before the end of the quarter.
Planned Activity
:
Select the check boxes to indicate
when
the activities defined by this goal
should occur
.
For example, a planning goal may be scheduled only for the first year, while a
prescriptive goal may be schedu
led for each year in the permit period.
The permit periods available here reflect those
specified for the plan when it was created. The
number of check boxes may vary from one plan to the next.
Note
:
When you publish the annual report, you can specify t
he permit period to include in
the report. Only activities planned for the same permit period are included in th
e
report.
Activities planned for other
permit periods a
re not included.
Year
1
:
Select this check box to indicate that this activity shou
ld b
e performed during
this
permit period
.
Year
1
:
Clear this check box
to indicate that the activity will not be performed during
this
permit period
.
Completion Status
:
Select the check boxes to indicate whether the activity was
completed
for that
permit period
.
This field is usually completed through the
G
oal
Edit
tab
(see page
51
)
after the activity has been completed.
The
permit periods available here reflect those
specified for the plan when it
was created. The
number of check boxes may vary from one plan to the next
.
Note
:
You must manually check the completion of the activity. The system does not know
when the activity is complete.

PermiTrackMS4
page
50
|
BMP (Best Management Practice) Views
Year
1
:
Select this check box to indicate that this activit
y
was completed
during this
permit period
.
Year
1
:
Clear this check box to indicate that the activity
was not completed during
this
permit period
.
Spell Check
button
: Use the Spell Check button in the upper
-
right part of the page to check
the spelling
in each of the text fields on this page.
Create
button
:
Click the Create button to save your changes and add the goal to the plan.
The
program adds the
goal
at the bottom of the current BMP
.
Return to the
BMP or Plan View
View the
BMP
Information
:
Click
the View tab or the name of the BMP in the treeview to
return to the BMP View page without adding a goal.
View the Plan Information
: Click the name of the plan in the treeview to return to the Plan
View tab.
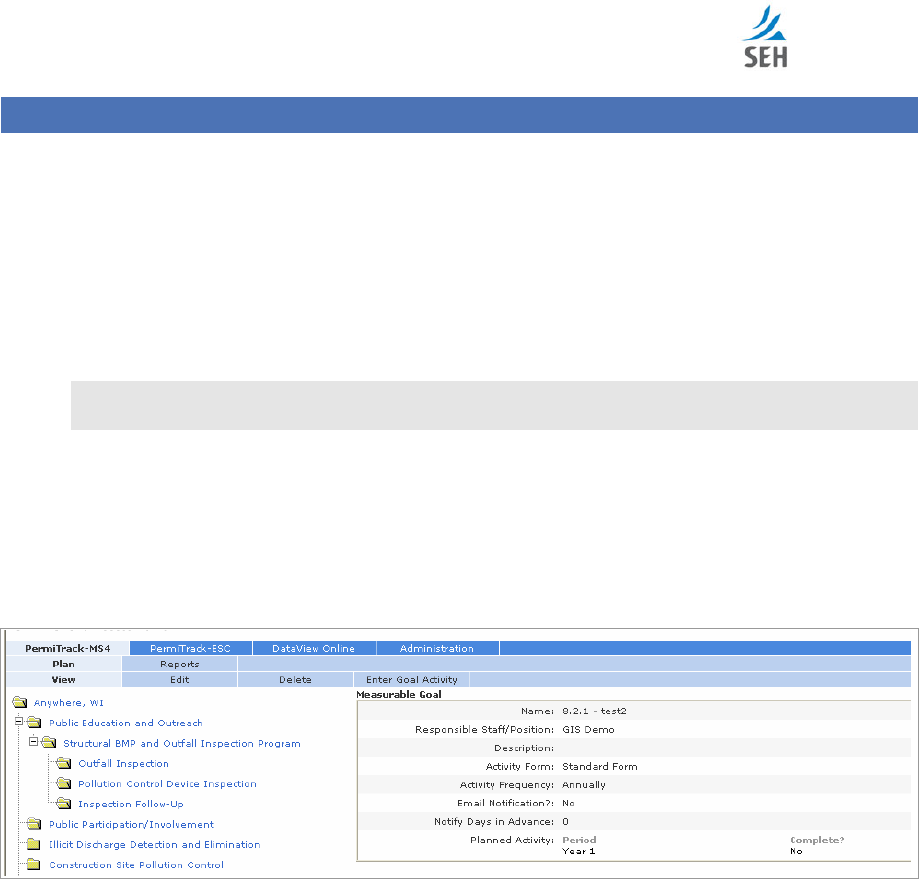
PermiTrackMS4
Goal Views
| page
51
Goal Views
Goals define target activities or outcomes associated with a BMP. For example, community
outreach goals may include an education program to educate the public about the hazards
associated with illicit discharges. A goal within the Il
licit Discharge Elimination BMP may
include development of a map for the MS4.
Create a Goal
Goals are added to a BMP through the BMP
View
page. With a BMP highlighted in the
treeview
on the left, click the Add Goal tab to open the Add Goal page.
Note
:
Be
cause t
he Add Goal page is opened from the BMP
V
iew
, it is covered in the BMP
section of this guide
. See
page
41
for
information
on this page
.
View
Goal tab
The Goal View page shows information about the Goal highlighted in the
treeview
.
This view
shows the name, number, description, and information about frequency and type of planned
activity.
The Goal View page opens when you click the name of
a
BMP
in th
e
treeview (
on page 20
)
.
Figure
25
. Goal View
tab
Fields & Folders on the Goal View page
With the Goal View selected, the Goal folder
in the treeview includes
measurable activities
associated wit
h this goal.
The right side of the page shows the name, description, and other settings for this goal. (See page
47
for
information
on the fields displayed on this page.)
Tabs on the Goal View page
The tabs on this page refle
ct the options available for working with a Goal within the plan.
View
:
The View tab is highlighted when you click on a Goal in the treeview.
Edit
:
Click the Edit tab to change the goal name, description, assigned staff, or other settings.
Opens the Edit
Measurable Goal page.

PermiTrackMS4
page
52
|
Goal Views
Delete
:
Delete the goal highlighted in the
treeview
. Opens the Delete page, where you can
delete the current goal.
Enter Goal Activity
:
Add a
specific measurable activity to the goal
to reflect a publication,
inspection, or other a
ctivity to support the goal
.
Opens the
Enter Goal Activity
page.
Edit
Measurable
Goal tab
Use the
Goal
Edit page
to change information about the goal or
to mark its completion status. For
example, if the goal is required during the first year, check the Completion Status
-
Permit Period
1
check box when the activity for the goal has been completed.
The
Goal
Edit page opens when you click the name of a
Goal
in the
treeview (
on pag
e 20
)
, and
then click the Edit tab.
Figure
26
.
Edit Measurable
Goal
page
Fields on the
Edit Measurable Goal
page
The fields
and tabs
on the Edit
Measurable Goal
page are th
e same as those completed on the
Add
Goal tab (see page
47
)
.
Tabs on the Edit Measurable Goal page
Tab
s across the top of the page include:
Delete
:
Delete the current goal.
Enter Goal Activity
:
Add a
measurable
activity to s
upport t
he current goal
.
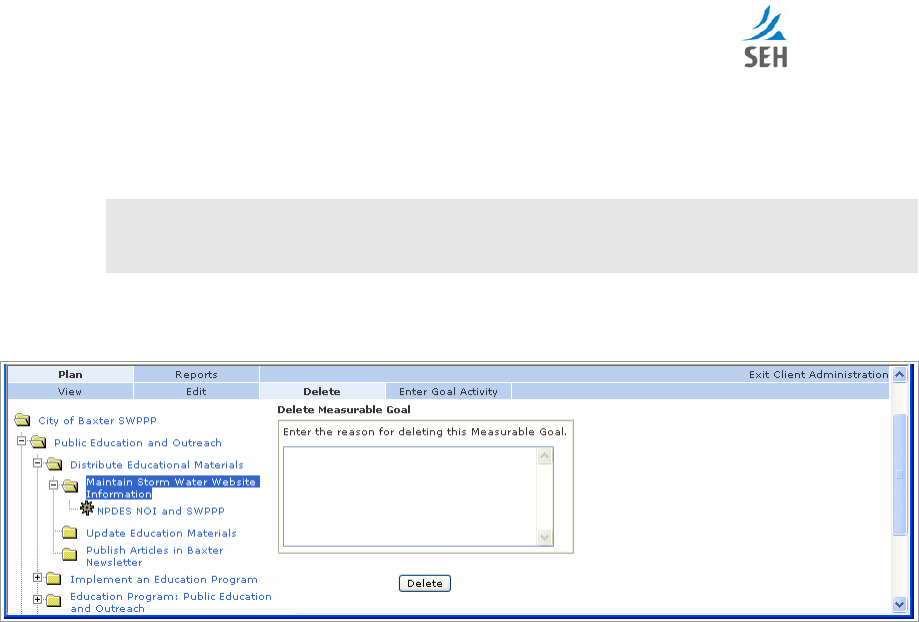
PermiTrackMS4
Goal Views
|
page
53
Delete
Goal
tab
Use the Delete tab to remove the current goal
from the plan. The goal highlighted in the treeview
is deleted.
Caution
:
The Delete function delet
es the current item and any items nested within it. For
example, if you delete a goal from the plan, all measurable activities within that
goal are also removed from the plan.
The Goal Delete page opens when you select a goal in the
treeview (
on page 20
)
, and then click
the Delete tab.
Figure
27
. Delete
Goal
page
Field
& Button
on the
Goal
Delete page
Enter t
he
reason
for deleting the Goal
:
In the text box, enter a reason for deleting the
current
goal. This information is saved in the database. If you need this information later,
contact your SEH Administrator.
Delete
button
:
Click the delete button to remove the goal, and all of its activities, from your
site.
Return to the
Previous View
After
deleting the Goal, the application takes you to the BMP View page automatically.
Enter
Goal
Activity
tab
The Enter Goal Activity tab lets you record specific
measurable
activit
ies that
support the
highlighted goal. The activity may describe the educational materials created, an inspection of the
outfall site, etc.
The goal activities are added after all
of the goals have been added to the
plan
.
The
Enter Goal Activity
page opens when you select a
Goal
in the
treeview (
on page 20
)
, and
then click the
Enter Goal Activity
tab.
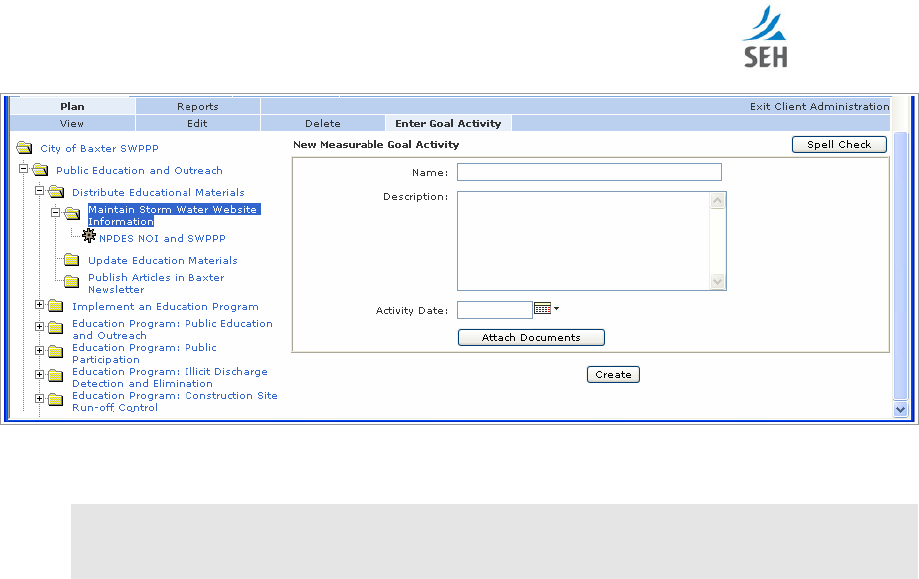
PermiTrackMS4
page
54
|
Goal Views
Figure
28
.
New Measu
rable
Goal
Activity
page
Fields on the Enter Goal Activity page
Note
:
The fields available on this form depend on the Goal Type selected when the goal was
added to a BMP. (See page
47
for information on the Add Goal tab, whi
ch includes the
Goal Type field). The fields for each goal type are covered separately.
Activity for a Goal
using
the Default Goal
Form
Type
When a measurable activity is added to a goal
that was
based on the Default Activity
type
, t
hese
fields are displa
yed on the
New Measurable Goal Activity page:
Measurable Goal Activity Information
Name
:
Descriptive name for the activity
.
Description
:
Enter a description of the activity and the reason it is included in the plan.
This
description is included in the p
ublished report.
Activity Date
:
Enter the date when this activity was entered into the system.
This date is used
to filter the results when you generate a report based on
a date range
.
Spell Check
button
: Use the Spell Check button in the upper
-
right par
t of the page to check
the spelling in each of the text fields on this page.
Attach Documents
button
:
Click the attach documents button to attach a map, Word
document, photo,
CAD/CAM file,
or other file to support, illustrate, or describe the activity.
Cl
icking the Attach Documents button opens the Attach Documents page (see page
59
).
These documents
become
part of the plan record and are available at any time by selecting
the plan and viewing the goal activity.
You can add a
s many documents as needed.
Update
button
: Click the Create button to
save your changes and create the activity record
.

PermiTrackMS4
Goal Views
|
page
55
Activity for a Goal
using
the
Outfall Inspection Form
Type
When a measurable activity is added to a goal based that was based on the
Outfall Inspection
Form type
, these fields are displayed on the New Measurable Goal Activity page:
Download PDF Form
In the upper
-
right part of the data entry area,
click the Download PDF Form
l
ink
to print
blank
copies of the outfall inspection form.
The blank copies
can be completed in the field
, and then
returned to the office for data entry
.
The
form
is available as
an Acrobat PDF file that you can
save, print, or distribute.
Note
:
This link
is only available when you are adding a new measurable activity to a goal based
on the Outfall Inspection Form type.
After entering data on this page and clicking the Create button, this link is available only
when you create another new activity of thi
s type.
Measurable Goal Activity Information
—
Outfall Inspection Form
Name
:
Descriptive name for the activity.
Description
:
Enter a description of the activity and the reason it is included in the plan.
This
description is included in the published rep
ort.
Activity Date
:
Enter the date when this information was entered into the system. The
inspection date is recorded in another section of this form.
General Outfall Information
—
Outfall Inspection Form
Record information about the location of the wast
ewater discharge into a body of water
.
Generally, this information is recorded for each outfall.
Outfall ID
:
The unique identification number used to identify this outfall.
Locatio
n
:
Enter a description of l
ocation of the outfall source being inspected
,
including the
coordinates, GIS, or
other specific information if available.
Zip Code
:
Zip code of the outfall source being inspected
.
Receiving Waterbody
:
Name of the stream, river, lake, or other body of wat
er where the
stormwater is discharging.
Major Watershed
:
Name of the watershed that is the source of water that discharges into the
receiving waterbody
.
Digital Photo
:
If a digital photo is available from t
he inspection site, it can be attached to the
inspection record. Click the Browse button to locate the photo on you
r computer or network
location.
After uploading, the original photo file
on your computer or network
can be moved
.
However, if you replace o
r make changes to the original photo, you must upload it through
the Activity Edit page.

PermiTrackMS4
page
56
|
Goal Views
Completed by Initials
:
Enter the initials of the person who
completed the inspection on
-
site
.
Weather
—
Outfall Inspection Form
Record information about recent weath
er events that may
have contributed to the pollution or
damage cause
d
by this
outfall.
Air Temperature
:
Temperature of the air in degrees Fahrenheit
.
Cloud Conditions
:
Select a word from the drop
-
down list that describes the cloud conditions
at the time
of the inspection.
Cloud Conditions
text box
:
If you choose Other in the Cloud Conditions drop
-
down list, this
text box is available on the right. Enter a descriptive word to describe the cloud conditions.
Precip
. (last 72
hours
)
:
Enter the number of inches of precipitation during the past 72 hours.
Inspection Information
—
Outfall Inspection Form
Record information about the pipe or ditch that conveys the outfall to the
receiving
body of water.
Outfall Type
:
Indicate whether the outfall is conveyed by a pipe, ditch, or other
type of drain
by selecting the type of outfall from the drop
-
down list.
Outfall Type
text box
:
If you choose Other in the Outfall Type drop
-
down list, this text box is
av
ailable on the right. Enter a descriptive word to describe the type of drain
being used
.
Pipe Type
:
Select an item from the drop
-
down list to indicate the shape of the pipe.
Pipe Type
text box
:
If you choose Other in the Pipe Type drop
-
down list, this t
ext box is
available on the right. Enter a descriptive word to describe the
shape
of
the
pipe
being
used.
Pipe Material
:
Select an item from the drop
-
down list to
indicate the pipe material
.
Pipe
Material
text box
:
If you choose Other in the Pipe Materi
al drop
-
down list, this text box
is available on the right. Enter a descriptive word to describe the pipe material.
Pipe Size
:
If a pipe is being used, enter the diameter of the
pipe, using the unit of measure
selected the right.
Inches
:
Click the drop
-
down list to select the unit of measure for the pipe size.
Ditch Width
:
If a ditch is being used, enter the width of the ditch
, using the unit of measure
selected the right.
Inches
:
Click the drop
-
down list to select the unit of measure for the ditch wi
dth
measurement
.

PermiTrackMS4
Goal Views
|
page
57
Ditch Depth
:
If a ditch is being used, enter the depth of the
ditch, using the unit of measure
selected the right.
Inches
:
Click the drop
-
down list to select the unit of measure for the
ditch
depth
measurement
.
Weir Type
:
If a weir is in place, select the type of dam from the drop
-
down list
Weir Type
text box
:
If you choose Other in the Weir
Type
drop
-
down list, this text box is
available on the right. Enter a descriptive word to
identify
the weir type.
Outfall Condi
tion Assessment
—
Outfall Inspection Form
Record information about the damage or erosion resulting from a
problem with the outfall pipe or
ditch
.
Outfall Damage
:
If the outfall
pipe
is damaged, select a descriptive word from the drop
-
down list.
Outfall
Damage
text box
:
If you choose Other in the Outfall Damage drop
-
down list, this text
box is available on the right. Enter a descriptive word to
identify the type of damage to the
pipe
.
Erosion
:
If the outfall ditch shows signs of erosion, select a descrip
tive word from the drop
-
down list.
Erosion
text box
:
If you choose Other in the Erosion drop
-
down list, this text box is available
on the right. Enter a descriptive word to identify the type of erosion that has damaged the
ditch.
Physical Discharge Info
rmation
—
Outfall Inspection Form
Record information about the wa
ter discharged from the outfall pipe or
ditch.
Flow Depth
:
Enter the depth of water being discharged, using the unit of measure selected
the right.
Inch
es
:
Click the drop
-
down list to select the unit of measure for the flow depth.
Odor
:
Select a word from the drop
-
down list to describe the odor from the discharge from the
pipe or ditch.
Odor
text box
:
If you choose Other in the
Odor
drop
-
down list, thi
s text box is available on
the right. Enter a descriptive word to identify the type of
odor from the discharge water
.
Water Color
:
Select a word from the drop
-
down list to describe the color of the discharge
from the pipe or ditch.
Water Color
text box
:
If you choose Other in the Water Color drop
-
down list, this text box is
available on the right. Enter a descriptive word to identify the color of the discharge water.

PermiTrackMS4
page
58
|
Goal Views
Turbidity
:
Select a word from the drop
-
down list to describe the clarity of the dischar
ge
water.
Turbidity
text box
:
If you choose Other in the Turbidity drop
-
down list, this text box is
available on the right. Enter a descriptive word to identify the clarity of the discharge water.
Floatables
:
Select a word from the drop
-
down list to des
cribe any debris or foreign material
in or on the discharge water.
Floatable
text box
:
If you choose Other in the Floatables drop
-
down list, this text box is
available on the right. Enter a descriptive word to identify the floatables present in the
disch
arge water.
Sample Collected
:
Indicate whether a sample of the discharge
water
was collected.
Sample Collected
:
Select th
e Sample Collected
check box if a sample of the discharge
was collected.
Sample Collected
:
Clear
the Samp
le Collected
check box if a sample of the discharge was
not collected
.
Discharge Analysis
—
Outfall Inspection Form
Record values recorded that reflect the analysis of the discharge water.
Specific Conductivity
:
Enter the value measured for the conductiv
ity of the discharge water.
The measure is expressed in micromhos per centimeter (µmhos/cm).
Water Temperature
:
Temperature of the discharge water in degrees Fahrenheit.
pH
:
Enter the value measured for the
pH of the discharge
water
.
Update
button
:
Clic
k the Create button to save your changes and create the activity record.
Activity for a Goal using the
Outfall Information Form
Type
When a measurable activity is added to a goal that was based on the Outf
all Information F
orm
type
, these fields are displa
yed on the New Measurable Goal Activity page:
Measurable Goal Activity Information
—
Outfall
Informati
on Form
Name
:
Descriptive name for the activity.
Description
:
Enter a description of the
outfall
and the reason it is included in the plan.
This
descrip
tion is included in the published report.
Activity Date
:
Enter the date when this information was entered into the system.
General Outfall Information
—
Outfall Information Form
Record
general information about the outfall
.
Outfall ID
:
The unique identi
fication number used to identify this outfall.

PermiTrackMS4
Goal Views
|
page
59
Permit Number
:
The identification number of the discharge permit issued for this site.
Locatio
n Descriptio
n
:
Enter a description of location of the outfall source being inspected,
including the coordinates
,
GIS,
or other specific information if available.
Zip Code
:
Zip code of the outfall source being
monitor
ed.
Material
:
Select an item from the drop
-
down list to indicate
the pipe material
.
Material
text box
:
If you choose Other in the Pipe Material drop
-
down list, this text box is
available on the right. Enter a descriptive word to describe the pipe material.
Drainage Basin
:
Name of the
area that drains into the body of water at the discharge site
.
Inspection Frequency
:
Select an item from the drop
-
down
list to indicate how often the
outfall site is inspected
.
Next Inspection Date
:
Enter the date or
click the
Calendar icon
to indicate the date for
the
firs
t scheduled inspection.
Physical
Information
—
Outfall Information Form
Record information about
the location of the
outfall
.
Size
:
Enter the size of the outfall or outlet into the body of water, using the unit of measure
selected the right.
Inches
: Click the drop
-
down list to select the unit of measure for the outfall size.
Side of Road
:
Select a
compass point from the drop
-
down list to indicate where the outfall
empties, in relation to the road
.
Offset Distance
: Enter
the distance from the road to the outfall
.
Milepost Number
:
Enter the number for the milepost that is closest to the outfall
.
R
eceiving Waterbody
:
Enter the name of the body of water that receives the water from the
outfall
.
GPS X
: Enter the GPS
X
coordinate
for the location of
the
outfall
.
GPS Y
: Enter the GPS
Y coordinate for the location of the outfall
.
Dri
ving Directions
: Enter directions for driving to the outfall.
Update
button
: Click the Create button to save your changes and create the activity record.
Enter Goal Activity
Attach Documents page
Use the Attach Documents to Goal Activity page to attach one or more files
to the plan record.
These documents can include maps, photos, CAD/CAM files, documents, etc.
T
hese documents
become part
of the plan
and are available at any time by selecting the plan and viewing the goal
activity.
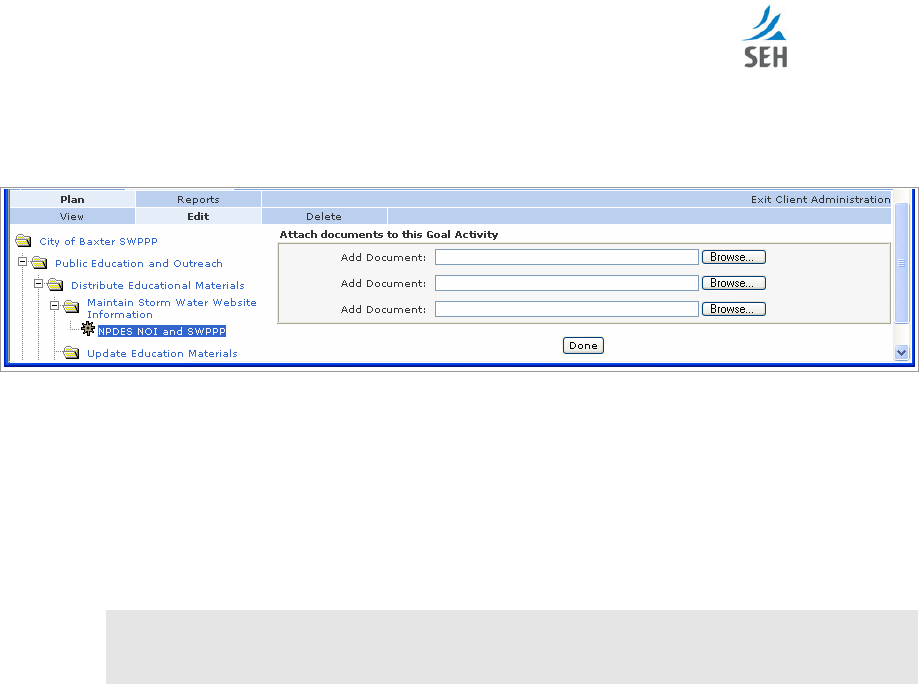
PermiTrackMS4
page
60
|
Goal Views
The
Attach Documents to Goal Activity
page
opens when you
click the Attach Documents button
on the
Enter Goal Activity
tab (
on page 53
)
or Edit Goal Activity tab
(
on page 62
)
based on a
default type of goal.
Figure
29
. Attach Documents to Goal Activity page
Fields
& Buttons
on the Attach Documents page
Add Document
:
This field shows the name of the document attached to the plan.
The document is uploaded and saved with the plan information on the sit
e.
After it is
uploaded, t
he original document
on your computer or network
can be moved to a different
location. However, if you make changes to the original document, it must be uploaded again
in order to update the plan copy.
Note
:
If you have more than
three documents to attach, additional documents can be added
through the Goal Activity Edit page (see page
61
). Each time y
ou edit the activity
three more documents can be attached.
(See procedure on page
60
.)
Browse
button
:
Click the Browse button to locate the file you want to attach.
Done
button
:
Click the Done button when you finish adding documents to the plan.
Attaching More than Three Documents to an Activity
To attach more than three do
cuments:
1.
Attach the first three documents when adding or editing the activity.
2.
Return to the
Edit tab
by highlighting the activity in the treeview, and then clicking the Edit
tab
.
3.
On the Edit tab, click the Attach Documents button.
The Attach Document
s page displays three fields for uploading documents.
4.
Upload your files by using the Browse button.
5.
Click the Done button to
upload the files and
return to the View page.
All of the attached documents are listed on the View page.
6.
To add more files, repe
at the steps above.
Each time you edit the activity, you can add up to
three more files.
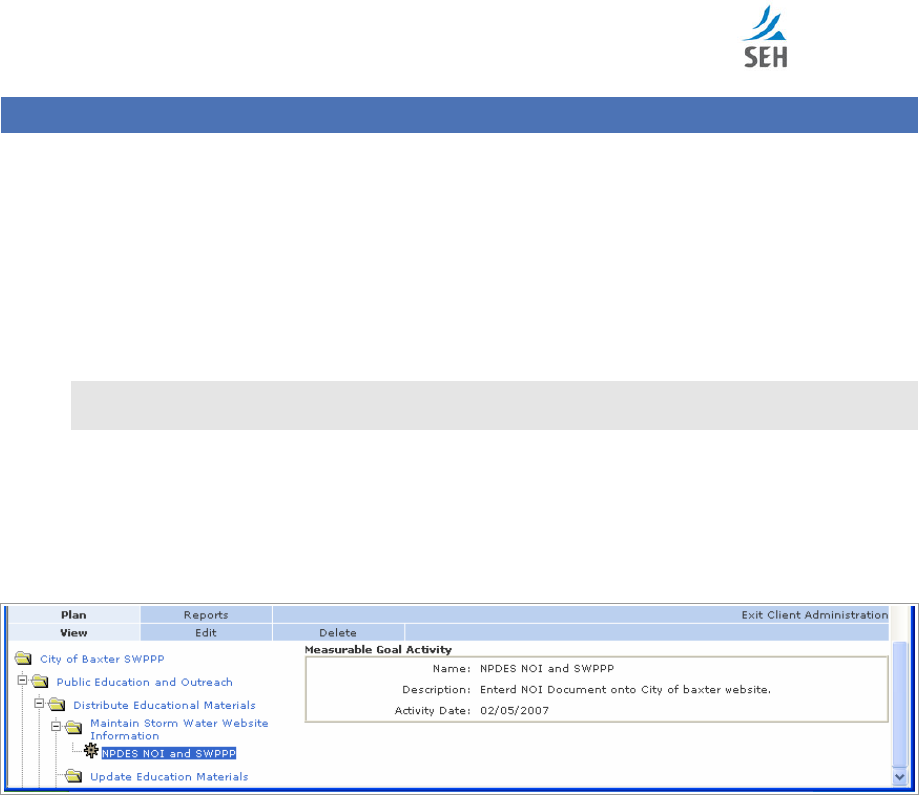
PermiTrackMS4
Measurable Goal Activity Views
| page
61
Measurable Goal Activity Views
Measurable Goal Activities provide a way to track each individual activity that supports a plan
goal. For example, the activities within a Public Education goal may define each educational
material developed and made available to the public.
Or, the activities within the Outfall
Inspection goal are used to record each individual outfall inspection.
Create a
Measurable Goal Activity
Measurable Goal Activities
are added to a
Goal
through the
Goal
View page. With
a
Goal
highlighted in the treev
iew on the left, click the
Enter Goal Activity
tab.
Note
:
The
Enter Goal Activity
page is opened from the
Goal
View
. See
page
53
for
information
on this page
.
View
Measurable Goal Activity tab
The Measurable Goal
Activity View
page shows
information about the Goal
Activity
highlighted
in the
treeview
.
The Goal View page opens when you click the name of
a
BMP
treeview (
on page 20
)
.
Figure
30
.
View
Measurable Goal Activity tab
Fie
lds on the Measurable Goal Activity
View
page
With the Goal Activity View selected
, the right side of the page shows the name, description, and
other settings for this
activity
. The fields displayed depend on the type of activity. (See pages
54
to
58
for
information
on the fields displayed on this page.)
Tabs on the
Measurable
Goal
Activity
View page
The tabs on this page reflect the options available for working with
an activity
within the plan.
View
:
The View tab is highlighted when you click on
an activity
in the treeview.
Edit
:
Click the Edit tab to change the goal name, description,
date
, or other settings. Opens
the Edit Measurable Goal page.
Delete
:
Delete the
activity
highlighted in the
treeview
. Opens the Delete page, where you can
delete the current
activity
.

PermiTrackMS4
page
6
2
|
Measurable Goal Activity Views
Edit Measurable Goal Activity
tab
Use the Goal Edit page to change the
information or settings for the activity
.
The Goal Edit page opens when you click the name of a BMP
treeview (
on page 20
)
, and then
click the Edit tab.
Fi
gure
31
. Edit Measurable Goal Activity
page
Fields on the Edit Measurable Activity page
The fields and tabs on the Edit Measurable Activity page are the same as those completed on the
Add Measurable Activity tab. (See pages
Error! Bookmark not defined.
to
58
for
information
on the fields displayed on this page.)
Tabs on the Edit Measurable Activity page
The tabs on this page reflect the options available for working with an
activity within the plan.
View
: Click the View tab to return to the View Measurable Activity page for the current
activity.
Edit
: The Edit tab is highlighted to show that you are on this page.
Delete
: Delete the activity highlighted in the treeview. Op
ens the Delete page, where you can
delete the current activity.
Delete
Measurable Goal Activity
tab
Use the Delete tab to remove the current activity from the plan. The activity highlighted in the
treeview is deleted.
The Delete
Activity
page opens when you select
an activity
folder
in the
treeview (
on page 20
)
,
and then click the Delete tab.
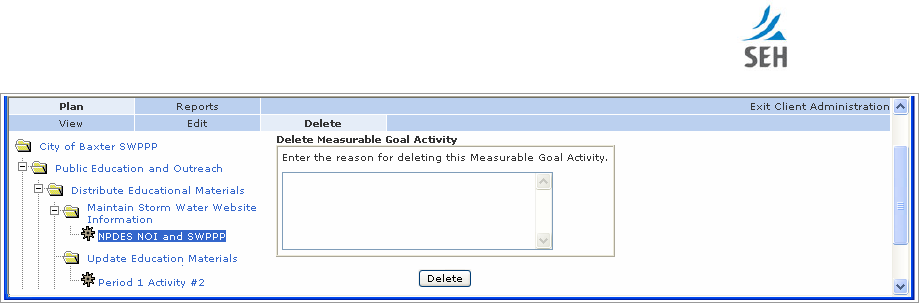
PermiTrackMS4
Measurable Goal Activity Views
|
page
63
Figure
32
. Delete Measurable Goal Activity tab
Field
& Button
on the
Activity
Delete page
Enter the
reason
for deleting the
Activity
:
In the text box, enter a reason for deletin
g the
current activity. This information is saved in the database. If you need this information later,
contact your SEH Administrator.
Delete
button
:
Click the delete button to remove the activity from your site.
Return to the
Previous View
After deletin
g
the Activity
, the application takes you to the Goal Vie
w page automatically.

PermiTrackMS4
page
64
|
Measurable Goal Activity Views
This page intentionally left blank.

PermiTrackMS4
Reports
| page
65
Reports
Reports provide a valuable tool for tracking on
-
going activities
and reviewing the plan data
. They
l
et you capture current information filtered on the:
Permit period
Selected MCMs, BMPs, or goals
Complete or incomplete goal status
Responsible staff
The Reports tab is available only after you select a Plan on the Select tab (see page
19
) or
highlight the Plan folder in the
treeview
.
Note
:
Reports are a tool for tracking current activities. When it is time to product an annual or
periodic
report to support plan compliance, use the Publish option. (See page
26
for more
information.)
Report Options page
Use the Report Options page to
specify
content of the
report you are generating. The options let
you customize reports based on the items included in the plan, activities, date range, or staff
person.
The Report Options page opens when you click on the Reports tab from the
Plan View tab
on
page 20
.

PermiTrackMS4
page
66
|
Reports
Figure
33
. Report
Options
page
Areas of the
Report Options page
Customize the report contents by selecting options in each of the boxes on this page. The report
includes data only for the options you se
lect.
The
areas
described below
include:
Choose the type of report you would like to view
Select the date range for activities you would like to include in the report
You may choose to filter the
report
by owner

PermiTrackMS4
Reports
|
page
67
Fields on the Report Options page
Type
:
Choo
se the type of report you would like to view
Select an option button to indicate which MCMs and BMPs to include in the report.
You can
select all MCMs (which include all of the BMPs) or report on selected items. The report follows
the structure i
n
the tree
view on
the
Plan View
tab.
All Minimum Control Measures
:
Include all of the MCMs for the plan.
All of the BMPs
assigned to the MCMs are included in the report.
Select a Minimum Control Measure
:
Select this option button, and then select a specific
MCM fr
om the drop
-
down list. Only information for this MCM
and BMPs under this MCM
are
included in the report.
Select a Best Management Practice
:
Select this option button, and then select a specific
BMP from the drop
-
down list. Only information for this BMP an
d any goals under the BMP
are included in the report
.
Select the date range for activities you would like to include in the report
Select an option button to indicate the type of date range and the filter to apply.
The selected
time
period can correspond
to your reporting periods or specific calendar days.
Select Activities in a
Permit
Period
:
Select this option to report on activities during a
specific
permit
period. After selecting this option, click the option button for the year or
permit
period to c
over.
Year
1
:
Select
the Period 1
option button to
include
only
activities
with an Activity
Date that falls within
this
permit
period for the plan.
Year
1
:
Clear
the Period 1
option button to indicate that you want to exclude
activities
with an Activ
ity Date that falls within this
permit
period for the
plan
.
You may choose to filter the report by Measurable Goal Completion Status Control
Measure
:
Select the option button to specify the types of goals to include in the report. The
report includes only
goal for the permit period selected above. Use these options to further
limit the goals included
:
All Measurable Goals
:
Select this option to include all measurable goals for the
permit
period selected above
.
Goals with or without activities are included
.
All Goals with Planned Activity for Selected Period
:
Select this option to include all
measurable goals that had an
also
activity specified for the
permit period
above.
Co
mpleted Measurable Goals for Selected Period
:
Select this option to include only
goals that were marked as completed during the selected
permit
period.
Incomplete Measurable Goals for Selected Period
:
Select this option to include only
goals that were scheduled
but not completed
during the selected
permit
period.
PermiTrackMS4
page
68
|
Reports
Include
Activities i
n a
Date Range
:
Select this option to report on activities during a
specific range of dates
, which may not correspond to a permit period
. After selecting this
option, enter the start and end dates or click the calen
dar icons to select the dates.
Start Dat
e
:
Enter the start date in this field or click the
Calendar icon to select a date.
End Date
:
Enter the start date in this field or click the
Calendar icon to select a date.
All
Activities
:
Select this option
to include all activities within the BMPs,
regardless of the
time period.
No
Activities
:
Select this option to exclude specific activities from the report. The MCMs
and/or BMPs selected above will still be included.
Owner
:
You may choose to filter the
report
by owner
Select an option button to
include all owners or only a specific owner. (Owners are the Staff or
Position specified for
an MCM
, BMP, goal,
or activity.)
All Owners
:
Select this option to include
MCMs, BMPs,
goals, and activities assigned to all
owners. This option is selected by de
fault.
Select an Owner
:
Select this option to report on BMPs, goals, and activities assigned to a
specific staff person or position. After selecting this option, select a name from the drop
-
down list.
The report includes
only
items where this person is
the responsible staff or owner.
Run Report
Run Report
button:
Click the Run Report button to generate the report.
From the Generated
Report page, y
ou can view the report as an Acrobat PDF
that can be viewed, printed, saved,
or distributed
.
Return to the P
lan View
Click the
name of the plan in the treeview
to return to the
Plan View
tab.
Link to
Report
page
When you generate a report, the system displays a page with a link
to the report. Click on the
report name to open
or save
the report as an Adobe Acrobat file.
Note
:
You must have Acrobat Reader to view the report.
If you do not have Acrobat Reader,
download it by clicking the Get Adobe Reader icon in the upper
-
right par
t of the page.
View, Print, or Save the Report
When you click the name of the report, the system asks if you want to
open
or save it:
Open
:
The report is opened in
Acrobat Reader.
From this view, you can print or save the
report.

PermiTrackMS4
Reports
|
page
69
Save
:
The system prompts
you for a location on your computer or network. S
ave the report
for reference or distribution
.
Return to the Report Options page
To return to the Report Options page, click the Return to Report Options button. From the Report
Options page, you can:
Gene
rate another report.
Return to the Plan View by clicking on the
name of the plan in the treeview
.

PermiTrackMS4
page
70
|
Reports
This page intentionally left blank.

PermiTrackMS4
Terminology
| page
71
Terminolog
y
BMP
A BMP is a Best Management Practice that supports your effo
rts to provide public
outreach, co
ntrol storm water pollution,
evaluate outfall sources
, etc
.
MCM
Minimum Control Measures (MCMs) define the minimum measures taken as part of
the storm water management program. The EPA (Environmental Protection
Agency) g
enerally requires MCMs to cover these areas:
Public education and outreach on stormwater impacts
Public involvement/participation
Illicit discharge detection and elimination
Construction site stormwater runoff control
Post
-
construction stormwater managemen
t in new development and
redevelopment
Pollution prevention/good housekeeping for municipal operations
This l
ist of basic MCMs
is from the EPA website
-
http://www.cfpub.epa.gov/npdex
MS4
Municipal Separate Storm Sewer System (MS
4
) programs define the cha
racteristics
of the plan for complying with permit requirements.
NPDES
The NPDES (
National Pollutant Discharge Elimination System
)
is sponsored by the
EPA (Environmental Protection Agency).
SWMP
The SWMP (Storm Water Management Program) administered by
the state defines
the infrastructure the planning, engineering, and requirements for
stormwater
pollution control. It covers the practices for managing stormwater runoff and
pollution control, permit requirements, and initiatives.
SWPPP
Describes the SW
PPP (Stormwater Pollution Prevention Plan) required for
construction permits. The plan defines the project, includes requirements for the
permit, describes activities, and includes information on
the bodies of water
affected
by the activities. The SWPPP is
administered by the EPA.

PermiTrackMS4
page
72
|
Terminology
This page intentionally left blank.

Appendix
–
Outfall Inspection Form
| page
73
Appendix
–
Outfall Inspection Form
Outfall Inspection Form
Measurable Goal Activity Information
Name: _____________________________________ Activity Date: ___/___/___
Description:
____
____________________________________________________________
________________________________________________________________
________________________________________________________________
________________________________________________________________
General Outfall Information
Outfall ID: _____________________________________ Zip Code: ______
-
______
Location:
________________________________________________________________
________________________________________________________________
_____________
___________________________________________________
Receiving
Waterbody:
________________________________________________________________
Major Watershed:
________________________________________________________________
Digital Photo:
No
Yes, filename:
________________ Completed by: __________
Weather
Air Temperature: _____ F
º
/C
º
(circle one) Precipitation (last 24 hours): _________inches
Cloud Conditions:
Clear
Cloudy
Other, describe:
_______________________________
Inspection Information
Outfa
ll Type:
Pipe/Culvert
Ditch/Swale
Other,
describe:______________________
Pipe Type:
Arch
Box Culvert
Circular
Elliptical
Other
Pipe Material:
Aluminum
Clay
Concrete
CMP
HDPE
Iron
PVC
RCP
Steel
Other
Pipe Size: ____ in
./ft. (circle one)
Ditch Width: ____ in./ft. (circle one)
Ditch Depth: ____ in./ft. (circle one)
Weir Type:
Broad
-
crested
Trapizoidal
V
-
notch
Other
Outfall Inspection Form
For use with PermiTrack
MS4
1 of 2

PermiTrackMS4
page
74
|
Appendix
–
Outfall Inspection Form
Outfall Inspection Form
Outfall Co
ndition Assessment
Outfall Damage:
No
Y
es (if Yes, identify type)
Cracking
Spalling
Corrosion
Broken
Other
Visible Erosion:
No
Yes (if Yes, identify type)
Undercutting
Sediment Delta
Other
Physical Discharge Information
Flow Depth
: ____ in./ft. (circle one)
Detectable Odor:
No
Yes (if Yes, identify type)
Sewage
Sulfide
Oil
Gas
Rancid
Other
Water Color:
No (clear)
Yes (if Yes, identify color)
Yellow
Brown
Green
Grey
Red
Other
Turbidity:
Clear
C
loudy
Opaque
Other
Floatables Visible:
No
Yes (if Yes, identify type)
Petroleum
Sheen
Sewage
Other
Discharge Analysis (if applicable)
Specific
Conductivity: _____ uS/cm
Water Temperature: _____ F
º
/C
º
(circle one)
pH: _____ pH
Other Ins
pection Comments
Inspection
Comments:
________________________________________________________________
________________________________________________________________
________________________________________________________________
Outfall Inspection For
m
For use with PermiTrack
MS4
2 of 2

PermiTrackMS4
Index
|
page
75
I
ndex
A
activity
delete · 62
edit · 62
information · 61
report incomplete activities · 13
View tab · 61
Activity ·
See
Measurable Goal Activity
add
Goal to Best Management Pra
ctice page · 47
Add BMP Form 1 tab · 32
Add BMP Form 2 tab · 34
Add BMP from DB tab
MCM · 38
Add BMP tab · 36
add BMP to plan
procedure · 10
Add Goal tab
BMP · 47
Add MCM tab
plan · 24
add MCM to plan
procedure · 9
Add MCM to Plan page · 24
annual report
c
opy of · 27
publish · 14, 26
assign
plan to staff · 13
attach documents
Goal Activity page · 59
B
Best Management Practice ·
See
BMP,
See
BMP
BMP
add BMP Form 1 · 32
add Form 1 to MCM · 32
add Form 2 to MCM · 34
Add Goal tab · 47
add to MCM · 36
add to MCM
from database · 38
add to plan · 10
copy · 45, 46
delete · 46
Delete tab · 46
edit · 42
information · 41
overview · 41
View tab · 41
BMP Edit tab · 42
C
CAD/CAM
attach to goal activity · 59
close
PermiTrackMS4 · 7
completion status · 49
computer
login to
PermiTrackMS4 · 5
logout of PermiTrackMS4 · 7
Copy a Best Management Practice page · 45, 46
Copy BMP tab · 45, 46
Create Plan tab · 17
customizing report · 65
D
default form goal type · 48
default plan template · 18
Delete tab
BMP · 46
Goal · 53
MCM · 31
M
easurable Goal Activity · 62
plan · 23
document
attach to goal activity · 59
E
edit BMP page · 42
Edit Goal page · 52
Edit Measurable Goal page · 52
Edit tab
BMP · 42
Goal · 52

PermiTrackMS4
page
76
|
Index
MCM · 30
Measurable Goal Activity · 62
plan · 22
email notification · 49
Enter
Goal Activity
Attach Documents page · 59
Enter Goal Activity tab · 53
EPA default plan · 18
existing plan template · 18
exit
PermiTrackMS4 · 7
F
file
attach to goal activity · 59
filtering report · 65
G
glossary · 71
goal
default form type · 48
delete · 53
Enter Goal Activity tab · 53
information · 51
outfall information form type · 48
outfall inspection form type · 48
View tab · 51
Goal
overview · 51
goal activity ·
See
Measurable Goal Activity
attach document, photo, map, CAD/CAM, etc. ·
59
delete · 62
ed
it · 62
View tab · 61
Goal Activity ·
See
Goal
Goal Delete tab · 53
Goal Edit tab · 52
I
incomplete activities
report · 13
inspection form
print · 55
print blank form · 12
L
login
PermiTrackMS$ · 5
logout
PermiTrackMS4 · 7
M
main screen
description · 6
map
attach to goal activity · 59
MCM
Add BMP Form 1 tab · 32
Add BMP Form 2 tab · 34
Add BMP from DB tab · 38
Add BMP tab · 36
add to plan · 9
delete · 31
edit · 30
information · 29
overview · 29
View tab · 29
MCM Delete tab · 31
MCM Edit tab · 30
measurable
goal activity
create new · 53
delete · 62
edit · 62
Measurable Goal Activity
Delete tab · 62
Edit tab · 62
information · 61
overview · 61
View tab · 61
Minimum Control Measure ·
See
MCM
Minimum Control Measure
–
See MCM · 9
Minnesota Pollution Control Agen
cy (MPCA) plan ·
18
MPCA plan · 18
N
New Measurable Goal Activity tab · 53
new plan

PermiTrackMS4
Index
|
page
77
Create Plan tab · 17
Notification page
publish plan · 27
O
outfall discharge qualities · 57
outfall information form goal type · 48
outfall inspection form
print blank copy
· 12
outfall inspection form goal type · 48
outfall sample · 58
outfall type, material, size · 56
owner
assign · 13
P
periodic report
publish · 14, 26
photo
attach to goal activity · 59
inspection site · 55
plan
Add MCM tab · 24
assign parts to staff · 13
Create Plan tab · 17
Delete tab · 23
Edit tab · 22
information · 20
overview · 17
publish · 26, 27
Publish Notification page · 27
Publish tab · 26
plan folders · 20
Plan tab
Create Plan page · 17
Select page · 19
View page · 20
plan template · 18
plan tre
eview · 20
precipitation · 56
print
inspection form · 55
outfall inspection form · 12
print report · 68
publish
annual report · 14
Publish tab
plan · 26
Q
quick reference · 9
quit
PermiTrackMS4 · 7
R
receiving waterbody · 55
report
customize · 65
incomplet
e activities · 13
link to · 68
publish annual report · 14, 26, 27
Report Options page · 65
Report Options page · 65
reports
overview · 65
responsible staff
assign · 13
Responsible Staff/Position field
BMP · 37, 44
BMP Form 1 · 33
BMP Form 2 · 35
goal · 48
MCM · 25
S
save report · 68
select plan · 19
Select Plan screen
overview · 6
Select tab · 19
T
terminology · 71
treeview · 20
U
Unlock Name Field for Edit field (BMP) · 43, 45, 46

PermiTrackMS4
page
78
|
Index
V
View Plan screen
overview · 7
view report · 68
View tab
Activity · 61
BMP
· 41
Goal · 51
MCM · 29
Measurable Goal Activity · 61
Plan · 20
W
waterbody · 55, 59
watershed · 55
websie
login PermiTrackMS · 5
weir type · 57
Word file
attach to goal activity · 59
