PingDirectory Delegated Admin Application Guide Ping Directory
User Manual:
Open the PDF directly: View PDF ![]() .
.
Page Count: 38
- PingDirectory™ Product Documentation
- Contents
- Delegated Admin overview
- Install Delegated Admin
- Configure Delegated Admin
- Configuration overview
- Authentication configuration
- Configure delegated administrator rights on PingDirectory Server
- Configure user self-service
- Configure attributes and attribute search on PingDirectory Server
- Users and groups
- Enable log tracing
- Change the application logo
- Configure the session timeout
- Verify the installation
- Upgrade Delegated Admin
- Configure PingFederate Server
- Index

Release 3.3.0
Delegated Admin Application Guide

Notice
PingDirectory™ Product Documentation
© Copyright 2004-2019 Ping Identity® Corporation. All rights reserved.
Trademarks
Ping Identity, the Ping Identity logo, PingFederate, PingAccess, and PingOne
are registered trademarks of Ping Identity Corporation ("Ping Identity"). All
other trademarks or registered trademarks are the property of their respective
owners.
Disclaimer
The information provided in these documents is provided "as is" without
warranty of any kind. Ping Identity disclaims all warranties, either express
or implied, including the warranties of merchantability and fitness for a
particular purpose. In no event shall Ping Identity or its suppliers be liable for
any damages whatsoever including direct, indirect, incidental, consequential,
loss of business profits or special damages, even if Ping Identity or its
suppliers have been advised of the possibility of such damages. Some states
do not allow the exclusion or limitation of liability for consequential or
incidental damages so the foregoing limitation may not apply.
Support
https://support.pingidentity.com/
PingDirectory | Contents | 5
Contents
Chapter 1: Delegated Admin overview.................................................................. 7
Introduction........................................................................................................................................................... 8
Features................................................................................................................................................................. 8
Chapter 2: Install Delegated Admin.......................................................................9
Installation locations........................................................................................................................................... 10
Prerequisites........................................................................................................................................................ 10
Obtain the installation files................................................................................................................................ 10
Before you install............................................................................................................................................... 10
Install the application......................................................................................................................................... 11
Unix or Linux......................................................................................................................................... 11
Windows..................................................................................................................................................11
All environments.....................................................................................................................................12
Next steps............................................................................................................................................................13
Chapter 3: Configure Delegated Admin.............................................................. 15
Configuration overview...................................................................................................................................... 16
Authentication configuration.............................................................................................................................. 16
Configure delegated administrator rights on PingDirectory Server...................................................................17
Configure user self-service.................................................................................................................................18
Configure attributes and attribute search on PingDirectory Server................................................................... 18
Users and groups................................................................................................................................................ 19
Enable user creation............................................................................................................................... 19
Manage groups........................................................................................................................................21
Create a group.........................................................................................................................................22
Add a user to a group............................................................................................................................ 23
Enable log tracing...............................................................................................................................................24
Change the application logo...............................................................................................................................24
Configure the session timeout............................................................................................................................ 24
Verify the installation......................................................................................................................................... 25
Chapter 4: Upgrade Delegated Admin.................................................................27
Upgrade PingDirectory Server........................................................................................................................... 28
Overview and considerations..................................................................................................................28
Update servers in a topology................................................................................................................. 28
Upgrade PingDirectory Server............................................................................................................... 29
Upgrade the application......................................................................................................................................29
Appendix A: Configure PingFederate Server......................................................31
PingFederate configuration................................................................................................................................. 32
Configure PingFederate as the identity provider................................................................................... 32
Configure the OAuth server................................................................................................................... 32
Configure PingDirectory Server as the token validator.........................................................................33
Configure Delegated Admin as a new client......................................................................................... 34
Configure profile management by users................................................................................................ 34


PingDirectory | Delegated Admin overview | 8
Introduction
Many organizations spend a disproportionate, and often wasteful, amount of time resetting passwords, updating
account data, and completing other simple but recurring tasks. Delegated Admin lets organizations assign these
responsibilities, as well as others associated with the management of identities in PingDirectory Server, to a subset of
administrators. Such delegated administrators can be any user outside the organization's IT department, including a
customer.
The following employees typically fulfill roles that involve at least a basic level of identity management:
• Help desk or customer service representatives who unlock and reset passwords
• Managers and Human Resources administrators who update employee profiles
• Application administrators who update identity attributes and manage access to applications
These employees represent strong candidates for inclusion in a group of delegated administrators.
Features
Delegated Admin lets delegated administrators complete the following tasks across groups, subtrees, and entire
organizations:
• Create, view, and search user profiles
• Update user attributes
• Enable and disable accounts
• Reset locked accounts
• Create and edit groups
• Manage the membership of groups and subgroups
• Manage the roles of users and groups

Chapter
2
Install Delegated Admin
Topics:
•Installation locations
•Prerequisites
•Obtain the installation files
•Before you install
•Install the application
•Next steps
Depending on your environment and the location of your installation,
different options and procedures are available when you install Delegated
Admin. Before attempting to install the application, make certain that you
complete the tasks in Prerequisites on page 10, and in Before you install
on page 10.

PingDirectory | Install Delegated Admin | 10
Installation locations
Delegated Admin can be installed in any of the following locations:
• PingDirectory Server, including replicated instances
• PingDirectoryProxy Server
• External web server
The location that you choose determines the steps that you must perform to install Delegated Admin.
Prerequisites
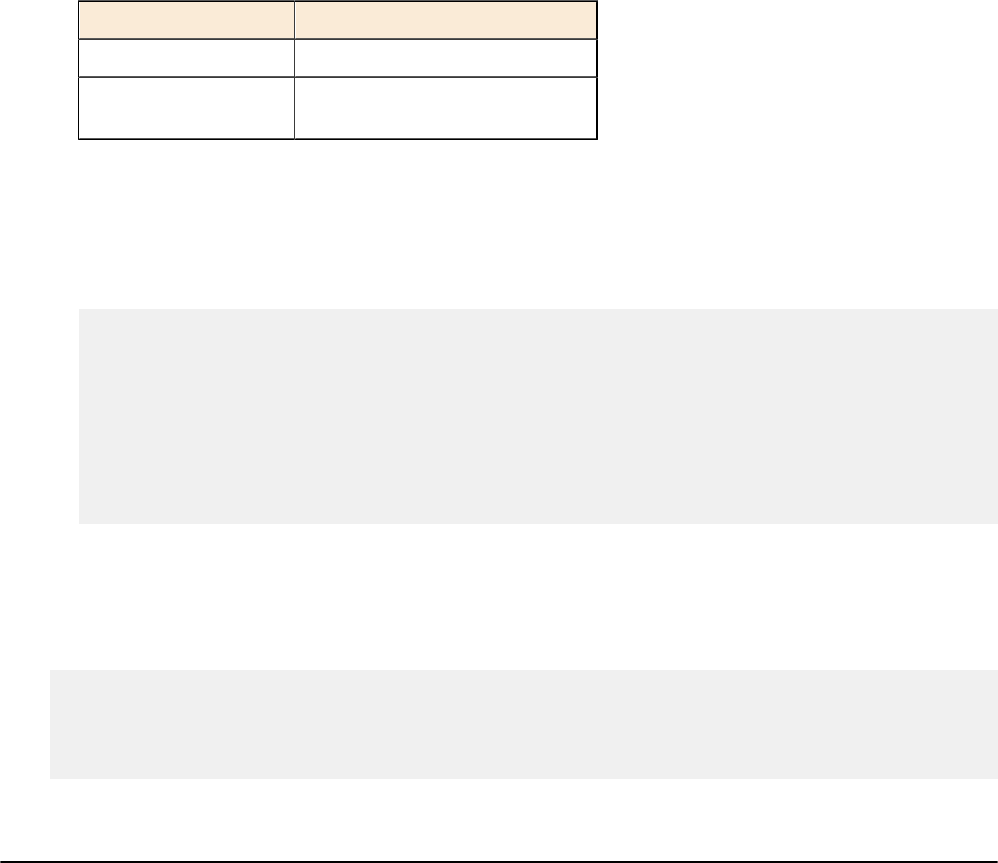
Regardless of the location of your Delegated Admin installation, make certain the following Ping Identity products
are installed and configured before attempting to install Delegated Admin.
Product Description Minimum
Version
PingDirectory Server Stores user-identity data. The HTTPS port that was configured during
PingDirectory Server setup is required to install Delegated Admin.
For information about upgrading PingDirectory Server, see Upgrade
PingDirectory Server on page 28. For information about installing
and configuring PingDirectory Server, refer to PingDirectory Server
Administration Guide.
7.2.1.0
PingFederate Server Provides identities for authentication and authorization. For information
about installing and configuring PingFederate Server, see Configure
PingFederate Server on page 31, or refer to PingFederate Server
Guide.
9.0
Obtain the installation files
To obtain the Delegated Admin installation files, perform the following steps:
1. Download the Delegated Admin installation package, pingdirectory-delegator-{version}.zip, to
the server on which you plan to install the application.
2. Extract the contents of the installation package.
3. Copy the folder named /delegator and its contents to the appropriate directory, as shown by the following
table.
Server Directory
PingDirectory Server /webapps
Replicated instance of PingDirectory Server /webapps
PingDirectoryProxy Server /webapps
External web server Directory for web-based apps
Before you install
If you plan to install Delegated Admin on PingDirectory Server or a replicated instance of PingDirectory Server,
complete the relevant tasks in this section before installing the application.

PingDirectory | Install Delegated Admin | 11
PingDirectory Server
If you are installing Delegated Admin on a PingDirectory Server installation that had "Install with sample data"
chosen as the installation option, remove the relevant Access Control Information (ACI) from the PingDirectory
Server base entry. For more information, refer to the LDIF file delegator/remove-sample-directory-
data-aci.ldif.
If you are installing Delegated Admin on a PingDirectory Server installation that did not have "Install with sample
data" chosen as the installation option, proceed to Obtain the installation files on page 10.
Replicated instance of PingDirectory Server
If you plan to install Delegated Admin on a replicated instance of PingDirectory Server, perform the following steps:
1. Make certain that replication is enabled for the PingDirectory Servers.
For information about enabling server replication, refer to PingDirectory Server Administration Guide.
2. To ensure that configuration changes are applied to all the servers in your topology, configure the PingDirectory
Servers to use a configuration group called all-servers, as follows:
$ bin/dsconfig set-global-configuration-prop \
--set configuration-server-group:all-servers
3. If you are installing Delegated Admin on a replicated PingDirectory Server that had "Install with sample data"
chosen as the installation option, remove the relevant Access Control Information (ACI) from the PingDirectory
Server base entry.
Because replicated instances share the same data, perform this step against only one of the servers. For more
information, refer to the LDIF file delegator/remove-sample-directory-data-aci.ldif.
If you are installing Delegated Admin on a PingDirectory Server installation that did not have "Install with sample
data" chosen as the installation option, proceed to Obtain the installation files on page 10.
Install the application
The steps for installing Delegated Admin depend on whether you are setting up the application in a Unix/Linux or
Windows environment.
Unix or Linux
To begin installing Delegated Admin in a Unix or Linux environment, run the following script in the /delegator
directory from Obtain the installation files on page 10:
$ ./set-up-delegator.sh
The system generates a configuration file named config.js and a batch file named delegated-
admin.dsconfig.
Windows
To begin installing Delegated Admin in a Windows environment, perform the following steps:
1. In the Delegated Admin application directory, copy or rename the file example.config.js to config.js.
config.js contains comments and placeholders for necessary information. For example, the client ID that is
required in this file must be one of the client IDs that has been defined for the PingFederate configuration. This
value represents the client intended for token issuance, such as dadmin.
2. Open config.js in a text editor.
3. Change the variable values to match your setup configuration, as the following table shows.

PingDirectory | Install Delegated Admin | 12
config.js Variable Value
window.PF_HOST Public address of the PingFederate Server to which the application
redirects the user’s browser when logging on
window.PF_PORT PingFederate port number
window.DADMIN_CLIENT_ID PingFederate Client ID for the application
4. Save your changes to config.js.
5. Copy or rename the batch file delegated-admin-template.dsconfig to delegated-
admin.dsconfig.
6. Open delegated-admin.dsconfig in a text editor and replace the variables (${variable}) with actual
values.
7. Save your changes to delegated-admin.dsconfig.
All environments
Regardless of whether you are installing Delegated Admin in a Unix/Linux or Windows environment, perform the
relevant steps in this section after you complete the previous OS-specific tasks.
PingDirectoryProxy Server
If you are installing Delegated Admin on PingDirectoryProxy Server, perform the following steps on all instances of
PingDirectory Server:
1. Open the batch file delegated-admin.dsconfig in a text editor.
2. Configure the following elements exactly as they are configured on PingDirectoryProxy Server:
• Virtual-attribute Delegated Admin Privilege
• Global ACI Authenticated access to the multi-update extended request for the
Delegated Admin API
• Global ACI Authenticated access to the no-op request control for the
Delegated Admin API
3. Remove the following elements and sections:
• Web-application-extension Delegator
• Access-token-validator PingFederateValidator
• Definition rest-resource-type
• Definition delegated-admin-rights
4. Save your changes to delegated-admin.dsconfig.
Replicated instances of PingDirectory Server
If you are installing Delegated Admin on one or more replicated instances of PingDirectory Server, apply the
following commands in delegated-admin.dsconfig to each instance:
$ ./bin/dsconfig \
--bindDN "cn=Directory Manager" \
--no-prompt \
--batch-file webapps/delegator/delegated-admin.dsconfig \
--applyChangeTo server-group
External web server
If you are installing Delegated Admin on an external web server, perform the following steps:
1. Open config.js in a text editor.
2. Change the variable values to specify the location of PingDirectory Server, as the following table shows.
PingDirectory | Install Delegated Admin | 13
config.js Variable Value
window.DS_HOST Hostname of PingDirectory Server
window.DS_PORT HTTPS port of PingDirectory
Server
To view an example outline that features these settings, refer to example.config.js.
3. Save your changes to config.js.
4. Open delegated-admin.dsconfig in a text editor.
5. Comment out the following lines, which are located in the Configure the delegator web app section,
near the bottom of the file:
dsconfig create-web-application-extension --extension-name Delegator --
set base-context-path:/delegator --set document-root-directory:webapps/
delegator/app
dsconfig set-connection-handler-prop --handler-name "HTTPS Connection
Handler" --add web-application-extension:Delegator
dsconfig set-connection-handler-prop --handler-name "HTTPS Connection
Handler" --set enabled:false
dsconfig set-connection-handler-prop --handler-name "HTTPS Connection
Handler" --set enabled:true
6. Save your changes to delegated-admin.dsconfig.
All locations except replicated PingDirectory Server instances
To continue installing Delegated Admin on PingDirectory Server, PingDirectoryProxy Server, or an external web
server, apply the following commands in delegated-admin.dsconfig to the appropriate server:
$ ./bin/dsconfig \
--bindDN "cn=Directory Manager" \
--no-prompt \
--batch-file webapps/delegator/delegated-admin.dsconfig
Next steps
After you finish installing Delegated Admin, visit https://webserverHost:httpPort/delegator to
view the application's Sign On page. At this time, you cannot log on to Delegated Admin because the rights of the
delegated administrators have not been configured. For more information about configuring administrative rights, the
REST resource type, session timeout values, and other properties, see Configure Delegated Admin on page 15.
After you configure Delegated Admin, verify that the application is installed and working successfully.

Chapter
3
Configure Delegated Admin
Topics:
•Configuration overview
•Authentication configuration
•Configure delegated
administrator rights on
PingDirectory Server
•Configure user self-service
•Configure attributes
and attribute search on
PingDirectory Server
•Users and groups
•Enable log tracing
•Change the application logo
•Configure the session timeout
•Verify the installation
This chapter describes the necessary configuration to support Delegated
Admin after the application is installed successfully.
At a minimum, you must configure the following properties on PingDirectory
Server:
• Delegated administrator rights
• REST resource type
• Attributes and attribute searching

PingDirectory | Configure Delegated Admin | 16
Configuration overview
Delegated Admin must have a PingDirectory Server and PingFederate Server installed. For installation instructions,
refer to the documentation for each product.
The process of configuring support for Delegated Admin on PingDirectory Server includes the following tasks:
• Configure users as Delegated Admin administrators.
• Configure attributes and attribute searching.
• Configure groups whose management requires delegation
The process of configuring PingFederate Server includes the following tasks:
• Configure PingFederate as the identity provider for Delegated Admin.
• Configure PingFederate as the OAuth server for Delegated Admin.
• Register Delegated Admin as a client.
• Register PingDirectory Server as an OAuth token validator client.
Authentication configuration
The delegated administrator logs on to Delegated Admin through the PingFederate Server, which is configured as
the authentication server and OpenID Connect (OIDC) provider. PingFederate validates the user's credentials against
PingDirectory Server, encapsulates information claims about the user's identity, and issues an access token to
Delegated Admin, which presents the token to PingDirectory Server in the HTTP Authorization request header.
Interaction with PingDirectory Server
PingDirectory Server is configured to accept access tokens by using Access Token Validators. The values that
PingFederate Server sets for the access token sub claim must be mappable to a distinguished name (DN) in
PingDirectory Server. Setting up an access token validator for use with Delegated Admin requires some coordination
with the server configuration. In the suggested default configuration, the access token contains the entryUUID of the
administrator user entry in the sub claim. This value is mapped back to a PingDirectory Server entry by using an
Exact Match Identity Mapper.
Authorization by PingDirectory Server
After validation, PingDirectory Server checks the Delegated Admin configuration for authorization of the delegated
administrator. Users or groups of users are authorized as delegated administrators in the PingDirectory Server
Administrator Console, or with the dsconfig tool.
Configure authentication
Before installing and configuring Delegated Admin, configure the following OAuth clients within PingFederate:
• Delegated Admin, which obtains an OIDC token that describes the authenticated user
• PingDirectory Server itself, which calls PingFederate to validate the OIDC token that Delegated Admin passes to
it
Specifically, the Delegated Admin OAuth client must be configured as follows:
• The client ID is dadmin and requires no client secret key.
• The redirect URL is https://webserverHost:httpPort/delegator/*, where
webserverHost:httpPort represents the public host and port of the web application.
Note: If you specify 443 as the httpPort number, some web browsers might strip the value from the
URL. In this scenario, we recommend using both of the following redirect URLs:
•https://webserverHost/delegator/*

PingDirectory | Configure Delegated Admin | 17
•https://webserverHost:443/delegator/*
• The grant type is Implicit.
• The OIDC policy uses JWT tokens, where the entryUUID of the user is passed through the sub claim of the
OIDC token.
Configure the PingDirectory Server OAuth client as follows:
• The client ID is pingdirectory and requires a secret key.
• The grant type is Access Token Validation.
For more information about configuring PingFederate Server, see Configure PingFederate Server on page 31.
Configure delegated administrator rights on PingDirectory Server
To use Delegated Admin, an administrator must possess more than valid credentials and an access token that
PingDirectory Server can validate. He or she must possess rights that are designated through the PingDirectory Server
configuration. To delegate users or groups as administrators, use the PingDirectory Server Administrator Console
(Delegated Admin rights and resource rights) or the dsconfig create-delegated-admin-rights and
create-delegated-admin-resource-rights commands.
The example commands in this section illustrate the configuration options for delegated administration and are
performed on PingDirectory Server.
Note: Delegated administrators who manage only users in specified groups cannot create new users, and a
new user cannot be assigned to one of the specified groups when created. Further, administrators who manage
only specific subtrees cannot create users in an organization that does not reside under, or at the same level as,
one of the subtrees.
• The following commands restrict an administrator to manage users in specified subtrees:
$ bin/dsconfig create-delegated-admin-rights \
--rights-name admin1 \
--set "admin-user-dn:uid=admin1,ou=people,dc=example,dc=com"
--set enabled:true
$ bin/dsconfig create-delegated-admin-resource-rights \
--rights-name admin1 \
--rest-resource-type users \
--set admin-scope:resources-in-specific-subtrees \
--set "resource-subtree:ou=org1,dc=example,dc=com" \
--set admin-permission:create \
--set admin-permission:read \
--set admin-permission:update \
--set admin-permission:delete \
--set enabled:true
• An administrator can be restricted to managing the member users of one or more specified groups. In the
following example, we assume the existence of a static or dynamic group entry whose members include the users
to be managed:
$ bin/dsconfig create-delegated-admin-rights \
--rights-name admin1 \
--set "admin-user-dn:uid=admin1,ou=people,dc=example,dc=com"
--set enabled:true
$ bin/dsconfig create-delegated-admin-resource-rights \
--rights-name admin1 \
--rest-resource-type users \
--set admin-scope:resources-in-specific-groups \
--set "resources-in-group:cn=User Group,dc=example,dc=com" \
--set admin-permission:read \
--set admin-permission:update \
--set enabled:true
PingDirectory | Configure Delegated Admin | 18
• Rather than delegate a single user as an administrator, you might find it more convenient to delegate an entire
group of users as administrators, as follows:
$ bin/dsconfig create-delegated-admin-rights \
--rights-name admin-group1 \
--set "admin-group-dn:cn=Admin Group,ou=people,dc=example,dc=com"
--set enabled:true
$ bin/dsconfig create-delegated-admin-resource-rights \
--rights-name admin-group1 \
--rest-resource-type users \
--set admin-scope:all-resources-in-base \
--set admin-permission:create \
--set admin-permission:read \
--set admin-permission:update \
--set admin-permission:delete \
--set enabled:true
In this example, groups can be configured to manage specific subtrees or groups with the resources-in-
specific-subtrees or resources-in-group setting for the admin-scope. For more information
about PingDirectory Server administrators and configuring dynamic and static groups, refer to the PingDirectory
Server Administration Guide.
Configure user self-service
PingFederate Server provides end users with the ability to self-service their own profiles. To enable this capability,
additional configuration is required on the user REST resource type in PingDirectory Server.
Before attempting to configure the REST resource type, ensure that you have already configured profile management
by users on PingFederate Server. For more information, refer to "Configure profile management by users" and "Set up
PingDirectory for customer identities" in the PingFederate Administrator's Manual.
Configure the REST resource type as follows:
$ bin/dsconfig set-rest-resource-type-prop --type-name users \
--add auxiliary-ldap-objectclass:pf-connected-identities \
--set post-create-constructed-attribute:pf-connected-identity
Important: To ensure that you can view users who are already defined in the directory, add the auxiliary
object class pf-connected-identities to all existing users in your PingDirectory Server.
Configure attributes and attribute search on PingDirectory Server
The file that installs Delegated Admin also specifies the following values:
• Object class of user entries through structural-ldap-objectclass:inetOrgPerson
• Number of user attributes to expose
1. If necessary, change the attribute that is designated as the primary attribute.
$ bin/dsconfig set-rest-resource-type-prop \
--type-name users \
--set primary-display-attribute-type:mail
2. Configure any additional user attributes to appear in Delegated Admin by specifying the LDAP attribute type to
expose and by providing a display name for it.
$ bin/dsconfig create-delegated-admin-attribute \
--type-name users \
--attribute-type customAttr

PingDirectory | Configure Delegated Admin | 19
--set "display-name:My custom attribute"
3. Use the following command to set the search filter, where %% represents the search text entered in the web
application:
$ bin/dsconfig set-rest-resource-type-prop \
--type-name users \
--set 'search-filter-pattern:(|(cn=*%%*)(mail=%%*)(uid=%%*))'
When search text is entered in Delegated Admin, the property search-filter-pattern specifies which
attributes to search in PingDirectory Server. To satisfy the query, define the appropriate attribute indexes for
PingDirectory Server. For more information, refer to PingDirectory Server Administration Guide.
4. To manage users whose profiles feature a large number of attributes, place the attributes in logical groupings,
called attribute categories, and give them a specific display order.
The following commands create attribute categories and specify their display order:
$ bin/dsconfig create-delegated-admin-attribute-category \
--display-name "Basic Information" \
--set display-order-index:1
$ bin/dsconfig create-delegated-admin-attribute-category \
--display-name "Contact Information" \
--set display-order-index:2
$ bin/dsconfig create-delegated-admin-attribute-category \
--display-name "Other Attributes" \
--set display-order-index:3
5. The following example commands assign attributes to a category and specify the display order of each attribute
within its category.
$ bin/dsconfig set-delegated-admin-attribute-prop \
--type-name users \
--attribute-type cn \
--set "attribute-category:Basic Information" \
--set display-order-index:1
$ bin/dsconfig set-delegated-admin-attribute-prop \
--type-name users \
--attribute-type sn \
--set "attribute-category:Basic Information" \
--set display-order-index:2
Unassigned attributes are displayed in a miscellaneous category.
Users and groups
Delegated administrators can be configured to manage users and groups in PingDirectory Server, as follows:
• Create new entries
• Read, view, and search existing entries
• Edit and update existing entries
The following sections describe users and groups in more detail.
Enable user creation
Enable the creation of new users and resources by configuring either a parent entry distinguished name (DN) or
parent resource type where new users will be located. If you configure a parent DN, the entry that it references must
exist in PingDirectory Server. All new users are created in this single location. If necessary, use ldapmodify to
PingDirectory | Configure Delegated Admin | 20
create the parent entry. For more information about the ldapmodify tool or about command-line help, refer to the
PingDirectory Server Administration Guide. Alternatively, if a parent resource type is configured, the administrator
can choose the specific resource where the new user is created.
Note: Delegated Admin cannot list organizations in which the delegated administrator is unable to manage
user entries. Delegated administrators who manage only users in specified groups cannot create new users,
and a new user cannot be assigned to a specified group when created. Further, administrators who manage
only specific subtrees cannot create users in an organization that does not reside under, or at the same level as,
one of the subtrees.
The following example specifies a single location for new users on PingDirectory Server:
$ bin/dsconfig set-rest-resource-type-prop \
--type-name users \
--set "parent-dn:ou=people,dc=example,dc=com" \
--reset parent-resource-type
The setup script creates a resource type named orgs, which works with entries that feature the organization
objectClass.
The following example shows that any organization resource can function as the location for new users on
PingDirectory Server:
$ bin/dsconfig set-rest-resource-type-prop \
--type-name users \
--reset parent-dn \
--set parent-resource-type:orgs
A different resource type can be created for organizationalUnit objectClass entries, as follows:
$ bin/dsconfig create-rest-resource-type \
--type-name orgUnits \
--set "display-name:Organizational Units" \
--set primary-display-attribute-type:ou \
--set "search-filter-pattern:(&(objectClass=organizationalUnit)(ou=%%))" \
--set structural-ldap-objectclass:organizationalUnit \
--set enabled:false
$ bin/dsconfig create-delegated-admin-attribute \
--type-name orgUnits \
--attribute-type ou \
--set "display-name:Organizational Unit"
$ bin/dsconfig set-rest-resource-type-prop \
--type-name orgUnits \
--set enabled:true
The new resource type can be referenced as a parent-resource-type.
By default, new entries are named by their server-generated entryUUID values. To change this behavior, configure
the LDAP RDN attribute.
Note: The RDN attribute type must also be configured as a Delegated Admin attribute. For more information,
see Configure attributes and attribute search on PingDirectory Server on page 18. Do not set read-only
attributes as the RDN attribute.
In the following example, uid names new entries and becomes a required attribute:
$ bin/dsconfig set-rest-resource-type-prop \
--type-name users \
--set create-rdn-attribute-type:uid

PingDirectory | Configure Delegated Admin | 21
New users are always created with their configured structural LDAP objectclass. One or more auxiliary LDAP
objectclasses can be specified, as the following example shows:
$ bin/dsconfig set-rest-resource-type-prop \
--type-name users \
--set auxiliary-ldap-objectclass:ubidPersonAux
When existing users without all of the specified auxiliary objectclasses are edited, the missing
objectclasses are updated automatically.
Manage groups
Use the following commands to delegate a user as a group administrator:
$ bin/dsconfig create-delegated-admin-rights \
--rights-name group-admin1 \
--set "admin-user-dn:uid=admin1,ou=people,dc=example,dc=com"
--set enabled:true
$ bin/dsconfig create-delegated-admin-resource-rights \
--rights-name group-admin1 \
--rest-resource-type groups \
--set admin-scope:resources-in-specific-subtrees \
--set "resource-subtree:ou=Groups,dc=example,dc=com" \
--set admin-permission:manage-group-membership \
--set admin-permission:create \
--set admin-permission:read \
--set admin-permission:update \
--set admin-permission:delete \
--set enabled:true
$ bin/dsconfig create-delegated-admin-resource-rights \
--rights-name group-admin1 \
--rest-resource-type users \
--set admin-scope:resources-in-specific-subtrees \
--set "resource-subtree:ou=org1,dc=example,dc=com" \
--set admin-permission:read \
--set enabled:true
The administrative scope for users determines which users are visible to the group administrator. In this example, all
users in the subtree ou=org1,dc=example,dc=com are visible. An administrator can be configured to edit users
as well as to manage group memberships.
The group administrator can view, add, and remove any of the users within their administrative scope to the
membership of groups within the groups' administrative scope. Static groups can be nested. Users who belong
indirectly to a group through nesting are visible as group members but cannot be removed. Users can be removed only
from the group of which they are a member. For example, an Employees group might include a Developers group as
a nested member. In such a scenario, a user in the Developers group is a direct member of that group and an indirect
member of Employees. This member can be removed only when viewing the Developers group, not when viewing the
Employees group.
If a group is configured as a dynamic or virtual static group rather than a static group, then the group and its members
are visible, but the group membership cannot be modified.

PingDirectory | Configure Delegated Admin | 22
Set group attributes
The default settings for group attributes specify cn and description as group attributes, with cn used for the
group title in Delegated Admin. To create the default settings, use the following commands with a search DN and
parent DN ("dc=example,dc=com"):
$ bin/dsconfig create-rest-resource-type \
--type group \
--type-name groups \
--set "display-name:Groups" \
--set enabled:false \
--set "search-base-dn:dc=example,dc=com" \
--set primary-display-attribute-type:cn \
--set resource-endpoint:groups \
--set "search-filter-pattern:(cn=*%%*)" \
--set structural-ldap-objectclass:groupOfUniqueNames
--set parent-dn:dc=example,dc=com
$ bin/dsconfig create-delegated-admin-attribute \
--type-name groups \
--attribute-type cn \
--set "display-name:Name"
$ bin/dsconfig create-delegated-admin-attribute \
--type-name groups \
--attribute-type description \
--set "display-name:Description"
$ bin/dsconfig set-rest-resource-type-prop \
--type-name groups \
--set enabled:true
Set group search filter
When entering text to search for groups, the groups' search-filter-pattern property specifies the
attributes to be searched in PingDirectory Server. To satisfy the query, define the appropriate attribute indexes for
PingDirectory Server. The default setting searches the attribute cn for the search text, which is represented by %%.
Use the following command to set the group search filter:
$ bin/dsconfig set-rest-resource-type-prop \
--type-name groups \
--set 'search-filter-pattern:(cn=*%%*)'
For more information about managing groups, refer to PingDirectory Server Administrator Guide.
Create a group
Users can be added as members to groups that delegated administrators create and manage. Subgroups can also be
added as members to a group.
The configuration for each delegated group type consists of the following elements:
• Group REST resource type – Defines the attributes to locate groups in the directory information tree (DIT).
• Parent DN or Parent resource type – Specifies the location in which to create groups in the DIT.
• To specify a Parent DN for a resource type, type the value in the Parent DN text box in the
Resource Creation section. The Parent DN is often identical to the Search Base DN, such as
ou=customers,ou=Groups, dc=example,dc=com.
• To specify a Parent resource type, select a value from the Parent Resource Type list box in the Resource
Creation section. Delegated administrators are subsequently presented with a list box that lets them select a
resource, and the group is created under the selected parent resource. If you specify a Parent resource type, set
PingDirectory | Configure Delegated Admin | 23
a value for the Primary Display Attribute Type in the Delegated Admin section. This setting determines the
values that are displayed in the Delegated Admin GUI. For example, a Primary Display attribute type of ou
displays the first ou value in the list box for each resource within the Parent resource type.
• Attributes to present to the delegated administrators.
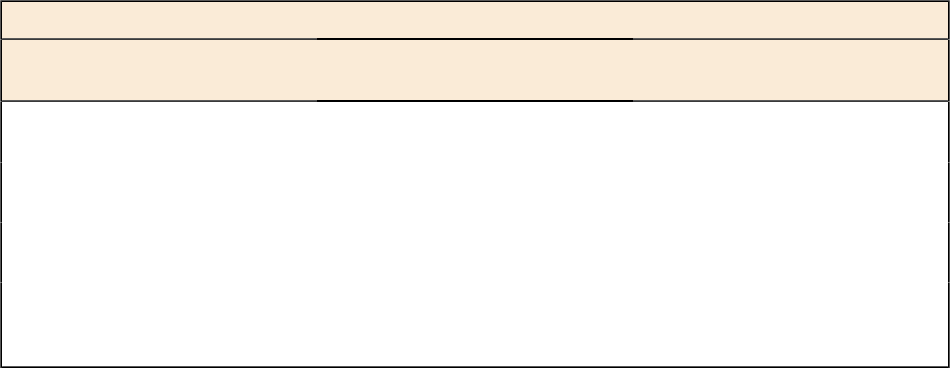
To configure a Group REST resource type, use the Edit Group REST Resource Type page in the PingData
Administrator Console. The Search Base DN value in the General Configuration section determines the data
structure that is searched in Delegated Admin, and the Display Name value in the Delegated Admin section specifies
the label of the REST resource in the Delegated Admin GUI.
PingData Administrator Console Delegated Admin
UI Element Page and Section UI Element on
Create a New Group Page
Display Name General Configuration > Delegated
Admin
Select a Type label
REST Resource Type Edit Delegated Admin Rights >
Delegated Admin Resource Rights
Select a Type option
Parent Resource Type General Configuration > Resource
Creation
Display name for Parent resource
type
Display Name General Configuration > Delegated
Admin Attributes
Additional elements like CN,
Description, Business
Category, and Organization
Add a user to a group
Users can be added to groups from the Manage Users page as well as from the Manage Groups page.
Add a user from the Manage Users page
To add a user from the Manage Users page, perform the following steps:
1. In Delegated Admin, click Manage Users.
2. Select or search for the user to add to a group.
3. Expand the user profile.
4. Click Edit.
5. Click Groups.
6. Select or search for the appropriate group.
7. From the Nonmember Groups list, click + to the right of the group.
The group is moved to the Member Groups list.
Add a user from the Manage Groups page
To add a user from the Manage Groups page, perform the following steps:
1. In Delegated Admin, click Manage Groups.
2. Select or search for the appropriate group.
3. Expand the group profile.
4. Click Edit.
5. Select or search for the appropriate user.
6. From the Nonmembers list, click + to the right of the user.
The user is moved to the Members list.
PingDirectory | Configure Delegated Admin | 24
Enable log tracing
Log tracing can be enabled for OAuth token processing, HTTP request and response actions, and API debugging.
To view OAuth token processing and full HTTP request/response tracing, enable the debug trace logger, as follows:
$ bin/dsconfig set-log-publisher-prop \
--publisher-name 'Debug Trace Logger' \
--set enabled:true
To enable dadmin API debug logging, use the following commands:
$ bin/dsconfig create-debug-target \
--publisher-name 'File-Based Debug Logger' \
--target-name com.unboundid.directory.server.http \
--set debug-level:VERBOSE
$ bin/dsconfig create-debug-target \
--publisher-name 'File-Based Debug Logger' \
--target-name com.unboundid.directory.server.extensions.dadmin \
--set debug-level:VERBOSE
$ bin/dsconfig create-debug-target \
--publisher-name 'File-Based Debug Logger' \
--target-name com.unboundid.directory.broker.api \
--set debug-level:VERBOSE
$ bin/dsconfig set-log-publisher-prop \
--publisher-name 'File-Based Debug Logger' \
--set enabled:true
Change the application logo
To change the Ping logo to your corporate logo, add the following line to the configuration file config.js:
window.HEADER_BAR_LOGO = '<filename>';
Support for corporate logos includes, but is not limited to, the following file types:
• JPG
• PNG
• SVG
Add the logo to the build directory, making certain to use the same file name that you specified earlier. The corporate
logo appears in the header, and the Ping logo becomes relegated to the sidebar, in grayscale, with a "Powered by" line
above it.
To maintain an appropriate aspect ratio, logo images are resized in Delegated Admin to a height of 22px and a
maximum width of 150px.
Configure the session timeout
By default, Delegated Admin features an idle session timeout value of 30 minutes. To adjust this value, perform the
following steps:

PingDirectory | Configure Delegated Admin | 25
1. Open the configuration file config.js in a text editor.
2. Add the following line, where {TimeoutValue} is an integer that represents, in minutes, the session timeout
value:
window.TIMEOUT_LENGTH_MINS={TimeoutValue};
To view an example outline that features this setting, refer to example.config.js.
3. Save your changes to config.js.
Verify the installation
To verify that Delegated Admin is installed successfully, visit https://webserverHost:httpPort/
delegator and log on to the application.
If your logon attempt is unsuccessful, see Enable log tracing on page 24, and use your browser's debug feature to
gain insight into the token-validation process.

Chapter
4
Upgrade Delegated Admin
Topics:
•Upgrade PingDirectory Server
•Upgrade the application
Ping Identity periodically issues software with new features, enhancements,
and fixes for improved performance. Administrators can use the
PingDirectory Server’s update tool to upgrade the current code version.
This chapter presents some update scenarios and the related implications to
consider when upgrading your version of Delegated Admin.

PingDirectory | Upgrade Delegated Admin | 28
Upgrade PingDirectory Server
Before attempting to upgrade Delegated Admin to version 3.2.0, ensure that you are running version 7.2.1.0 of
PingDirectory Server. If you are already running PingDirectory Server 7.2.1.0, proceed to Upgrade the application on
page 29.
Overview and considerations
The process of upgrading PingDirectory Server involves downloading and extracting a new version of the
PingDirectory Server ZIP file on the server to be updated, and running the update utility with the --serverRoot
or -R option value from the new root server pointing to the installation to be upgraded.
Consider the following when upgrading replicating servers:
• Upgrade affects only the server being upgraded. The process does not alter the configuration of other servers.
• The update tool will verify that the version of Java that is installed meets the new server requirements. To
simplify the process, install the version of Java that is supported by the new server before running the tool.
• To be safe, backup the user data (userRoot) before an upgrade. Restoring from a backup could be necessary if all
other servers in the replication topology have been upgraded and a database or encoding change in the new server
version prevents the database from being used with the older server version. The update and revert-update
utilities will issue a warning when this is the case.
• Temporarily raise the replication purge delay for all servers in the topology to cover the expected downtime for
maintenance. This will result in a temporary increase in disk usage for the replicationChanges database stored in
<server-root>/changelogDb.
• Replication does not need to be disabled on a server before an upgrade.
• Make sure upgraded servers are working as expected before upgrading the last server in the topology
• Enable new features after all replicating servers are upgraded.
Update servers in a topology
An update to the current PingDirectory Server release includes significant changes as well as the introduction of a
topology registry, which stores information that was stored previously in the admin backend, such as server instances,
instance and secret keys, server groups, and administrator user accounts. For the admin backend to be migrated, the
update tool must be provided LDAP authentication options to the peer servers of the server being updated.
The LDAP connection security option requested (either plain, TLS, StartTLS, or SASL) must be configured on
every server in the topology. The LDAP credentials must be present on every server in the topology, and must have
permissions to read from the admin backend and the config backend of every server in the topology. For example, a
root DN user with the inherit-default-privileges set to true (such as the cn=Directory Manager
user) that exists on every server can be used.
After enabling or fixing the configuration of the LDAP connection handler(s) to support the desired connection
security mechanism on each server, run the following dsframework command on the server being updated so that
its admin backend has the most up-to-date information:
$ bin/dsframework set-server-properties \
--serverID serverID \
--set ldapport:port \
--set ldapsport:port \
--set startTLSEnabled:true
The update tool will verify that the following conditions are satisfied on every server in the topology before
allowing the update:
• When the first server is being updated, all other servers in the topology must be online. When updating additional
servers, all topology information will be obtained from one of the servers that has already been updated. The
update tool will connect to the peer servers of the server being updated to obtain the necessary information to

PingDirectory | Upgrade Delegated Admin | 29
populate the topology registry. The provided LDAP credentials must have read permissions to the config and
admin backends of the peer servers.
• The instance name is set on every server, and is unique across all servers in the topology. The instance name
is a server’s identifier in the topology. After all servers in the topology have been updated, each server will
be uniquely identified by its instance name. Once set, the name cannot be changed. If needed, the following
command can be used to set the instance name of a server prior to the update:
$ bin/dsconfig set-global-configuration-prop \
--set instance-name:uniqueName
• The cluster-wide configuration is synchronized on all servers in the topology. Older versions have some topology
configuration under cn=cluster,cn=config (JSON attribute and field constraints). These items did not
support mirrored cluster-wide configuration data. An update should avoid custom configuration changes on
a server being overwritten with the configuration on the mirrored subtree master. To synchronize the cluster-
wide configuration data across all servers in the topology, run the config-diff tool on each pair of servers
to determine the differences, and use dsconfig to update each instance using the config-diff output. For
example:
$ bin/config-diff --sourceHost hostName \
--sourcePort port \
--sourceBindDN bindDN \
--sourceBindPassword password \
--targetHost hostName \
--targetPort port \
--targetBindDN bindDN \
--targetBindPassword password
If any of these conditions are not satisfied, the update tool will list all of the errors encountered for each server, and
provide instructions on how to fix them.
Upgrade PingDirectory Server
To upgrade PingDirectory Server, perform the following steps:
1. Download and extract the new version of PingDirectory Server to a location outside the existing server's
installation.
For these steps, assume that the existing server installation resides in /prod/PingDirectory, and that the
new server version is extracted to /home/stage/PingDirectory.
2. Run the update tool provided with the new server package to update the existing PingDirectory Server.
The tool might prompt for confirmation on server configuration changes if it detects customization.
$ /home/staging/PingDirectory/update --serverRoot /prod/PingDirectory
Upgrade the application
Delegated Admin 3.2.0 requires PingDirectory Server 7.2.1.0. The Delegated Admin configuration was changed in
version 7.2.1.0, as follows:
•delegated-admin-resource-type was removed and replaced with rest-resource-type.
•delegated-administrator was removed and replaced with delegated-admin-rights and
delegated-admin-resource-rights.
The update tool converts earlier configurations to new configuration definitions. This tool is also used during the
process of upgrading PingDirectory Server.
The migrated Delegated Admin configuration features a group REST resource type for the structural object classes
groupOfNames and groupOfUniqueNames. If the original user's resource type configuration includes a value
for Org Search Filter, then the migrated configuration also features a generic orgs REST resource type, with

PingDirectory | Upgrade Delegated Admin | 30
the structural object class organizationalUnit as the parent resource type of users. If necessary, change the
structural object class on the resource type configuration after the Delegated Admin update completes.
Note: If you change the structural object class, you must stop the server to proceed with the update.
To upgrade Delegated Admin on PingDirectory Server, perform the following steps:
1. Extract the contents of the Delegated Admin upgrade ZIP file.
2. Rename the original delegator folder to retain a backup copy of the earlier version.
3. Copy the extracted folder named delegator to the PingDirectory Server folder named webapps.
4. Copy the configuration file config.js to the new delegator folder.
config.js is located in {OriginalDelegatorFolder}/app/config.js.
5. Restart PingDirectory Server.
For more information, including details about upgrading the RPM package and reverting an update, refer to the
PingDirectory Server Administration Guide.


PingDirectory | Configure PingFederate Server | 32
PingFederate configuration
The following is a sample PingFederate configuration. Minimal support for Delegated Admin includes configuring
PingFederate to use the HTML Form Adapter to authenticate users for Delegated Admin, and configuring
PingFederate to identify an authenticated user through the user’s entryUUID, which is mapped to the subject of
the OIDC token.
Note: Some of the PingFederate interface terms have changed from version 9.0 to the latest version. The
terminology in this sample configuration represents version 9.2.
Configure PingFederate as the identity provider
This procedure configures the PingFederate Server as the identity provider for PingDirectory Server.
Note: Before starting, download the LDAPS certificate from PingDirectory Server. All other steps are
performed on the PingFederate server. For more information, refer to PingDirectory Server Administration
Guide.
1. Click System > Protocol Settings > Roles and Protocols.
2. Under Enable OAuth 2.0 Authorization Server (AS) role, select OpenID Connect.
3. Upload the PingDirectory Server LDAPS certificate in Security > Trusted CAs.
4. Add an LDAP data store in System > Data Stores. Specify:
a) The PingDirectory Server hostname and LDAPS port.
b) Select Use LDAPS.
c) Under Advanced, clear the Verify LDAPS hostname option.
d) Click Next.
e) Click Done.
f) Click Save.
5. Create the HTML form IdP Adapter and Password Credential Validator that is used to authenticate users
against PingDirectory Server:
a) Select Identity Provider > Adapters > Create New Instance.
b) Select the HTML Form type.
c) Click Next, scroll to the bottom of the page, and click Manage Password Credential Validators.
d) Select Create New Instance.
e) Click Next and select the LDAP Username Password Credential Validator.
f) Click Next and enter the following search filter to use the email address or username to log on to the system:
(|(uid=${username})(mail=${username}))
g) Click Next and extend the contract with entryUUID and cn.
These values are used later.
h) Click Next, Done, and Save until the Create Adapter Instance screen.
i) Add a new row to Password Credential Validators, choose the new LDAP Password Credential Validator, and
click Update.
j) Click Next and extend the contract with entryUUID and cn.
These values are used later.
k) Select entryUUID for a pseudonym, and then click Next, Next, Done, and Save.
6. Enable session tracking in Identity Provider > Sessions, and select the Track adapter session for logout and
Enable authentication sessions for all sources options.
7. Click Save.
Configure the OAuth server
1. Click IdP Adapter Mapping and add the new IdP adapter for creating OAuth grants.
PingDirectory | Configure PingFederate Server | 33
An additional attribute source is unnecessary. Fulfill the contract with the USER_KEY from adapter entryUUID
and with the USER_NAME from adapter cn, and then click Next, Next, and Save.
2. Select an existing instance or click Access Token Management > Create New Instance.
If selecting an existing instance, JSON Web Tokens (JWTs) are configured automatically:
a) If creating a new instance, select JSON Web Tokens.
If selecting an existing instance, click Instance Configuration.
b) Choose one-way encryption for JWT, which only requires a symmetric key (not a certificate and private key).
This step requires the client to validate the token by hitting the validation endpoint on the server.
c) Add a row to symmetric keys and use 32 bytes or 64 chars of hex.
d) Choose the JWS Algorithm HMAC using SHA-256.
e) Choose your symmetric key for Active Symmetric Key ID and click Next.
f) Select all options and click Next.
g) List at least one attribute to be defined in the access token, add sub, and click Save.
3. Click Access Token Mapping and map the access token attributes from the persistent grant, as follows:
a) Choose Default Context and the new Access Token Manager.
b) Click Contract Fulfillment.
c) In the sub row, make the following selections:
• From the Source list box, select Persistent Grant.
• From the Value list box, select USER_KEY.
d) Click Save.
4. Click OpenID Connect Policy Management > Add Policy.
a) Choose the previously created Access Token Manager and click Next.
b) Delete all extended contract attributes except sub.
Other scopes are defined, if configured.
c) Click Next to reach Contract Fulfillment.
d) Fulfill the OIDC contract sub with the Access Token attribute sub.
e) Click Next and then click Done.
f) If a default OIDC policy is not already defined, set this new policy as the default, and click Save.
5. Add scopes for PingDirectory Server APIs.
a) Click Scope Management > Exclusive Scopes.
b) Add a value and description for urn:pingidentity:directory-delegated-admin.
c) Click Save.
Configure PingDirectory Server as the token validator
When creating a PingFederate Access Token Validator in PingDirectory Server, use the pingdirectory client ID
and secret. PingDirectory Server uses an identity mapper to match the sub claim against the entryUUID attribute.
To configure PingDirectory Server as the token validator, perform the following steps:
1. Click Create new client.
2. For both the Client ID and Name, specify pingdirectory.
3. Make the following selections:
• In the Client Authentication section, select Client Secret.
• In the Client Secret section, select Change Secret.
4. Click Generate Secret to generate a new secret key.
5. Copy the secret key.
6. In the Allowed Grant Types section, select Access Token Validation.
7. Click Save.

PingDirectory | Configure PingFederate Server | 34
Configure Delegated Admin as a new client
To configure Delegated Admin as a new client, perform the following steps:
1. Click Create new client.
2. For both the Client ID and Name, specify dadmin.
Note: Do not configure authentication.
3. Define the redirect URI as "https://${directoryServer:httpPort}/delegator/*", using the
hostname and HTTPS listener port for PingDirectory Server.
4. Make the following selections:
• Select Bypass Authorization Approval.
• Select Allow Exclusive Scopes, and then select urn:pingidentity:directory-delegatedadmin.
• For the Grant Type, select Implicit.
• Select the default ATM that was created previously for Delegated Admin.
• Select the OIDC policy that was created previously.
5. Click Save.
6. Click OAuth Server > Authorization Server Settings > Allowed Origin Settings.
7. Add "https://${directoryServer:httpPort}" to the Allowed origins, using the hostname and
HTTPS listener port for PingDirectory Server.
8. Click Save.
Configure profile management by users
Users created by delegated administrators can manage their own profiles through PingFederate. Additional
configuration steps must be taken to enable users whom delegated administrators create to manage their own profiles
through the PingFederate local identity profile-management feature.
This example assumes PingDirectory Server and PingFederate are configured for local identity profile management,
following the PingFederate administrator documentation for Customer IAM. Specifically, the entryUUID attribute
of the user record must be mapped to the subject of the local identity profile contract in PingFederate's Authentication
Policies contract fulfillment.
1. On PingFederate Server, copy the LDIF file local-identity-pingdirectory.ldif from the following
location:
<pf_install>/pingfederate/server/default/conf/local-identity/ldif-scripts/
local-identity-pingdirectory.ldif
2. Use the command scopy to securely copy the LDIF file to your local machine.
3. Update the LDAP schema, as follows:
a) Log on to the PingDirectory Server Administrator Console.
b) Click LDAP Schema > Schema Utilities.
c) Click Import Schema Element.
d) Copy the schema changes from the file <pf_install>/pingfederate/server/default/conf/
local-identity/ldif-scripts/local-identity-pingdirectory.ldif.
e) Paste the schema changes into the text area.
If you are creating a new organizational unit as part of the LDIF import, edit the DN information.
f) Click Import.
4. On PingDirectory Server, create a constructed attribute for pf-connected-identity (for example where the
entryUUID is the PingFederate user ID attribute):
$ bin/dsconfig create-constructed-attribute \
--attribute-name pf-connected-identity \
--set attribute-type:pf-connected-identity \
--set value-pattern:auth-source=pf-local-identity:user-id={entryUUID}
PingDirectory | Index | 37
Index
A
attribute configuration 18
C
change application logo 24
create users 19
D
dadmin logging 24
Delegated Admin application
configure attributes 18
introduction 8
prerequisites to install 10
delegated-admin-cfg.dsconfig 10
Directory Server
about the upgrading considerations 28
about upgrade topology 28
upgrading
using update 29
Directory Server HTTP port 10
document copyright 3
G
groups 21
I
Identity Provider configuration 32
L
LDAPS certificate 32
logo, application branding 24
log traces 24
O
OAuth server configuration 32
P
PingFederate, as identity provider 10
PingFederate configuration 32
S
search filter 21
U
update 29
upgrade 29
user profile management 34
PingDirectory | Index | 38
