Oracle Database Platform Guide For Windows
User Manual:
Open the PDF directly: View PDF ![]() .
.
Page Count: 272 [warning: Documents this large are best viewed by clicking the View PDF Link!]
- Contents
- Preface
- What's New in Oracle Database for Windows
- 1 Oracle Database Architecture on Windows
- 2 Database Tools on Windows
- 2.1 Choosing a Database Tool
- 2.2 Starting Database Tools
- 2.3 Using SQL*Loader
- 2.4 Using Windows Tools
- 2.4.1 Using Event Viewer to Monitor a Database
- 2.4.2 Using Microsoft Management Console to Administer a Database
- 2.4.3 Using Oracle Counters for Windows Performance Monitor
- 2.4.4 Using Registry Editor to Modify Configuration Information
- 2.4.5 Using Task Manager to Monitor Applications and Processes
- 2.4.6 Using Local Users and Groups to Manage Users and Groups
- 2.5 Optional Windows Diagnostic and Tuning Utilities
- 3 Postinstallation Database Creation on Windows
- 3.1 Naming Conventions for Oracle Database
- 3.2 Creating a Database on Windows Using Database Configuration Assistant
- 3.3 Creating a Database on Windows Using Command-Line Tools
- 3.3.1 Exporting an Existing Database
- 3.3.2 Deleting Database Files
- 3.3.3 Modifying the Initialization Parameter File
- 3.3.4 Creating and Starting an Oracle Database Service
- 3.3.5 Starting an Oracle Database Instance
- 3.3.6 Putting the CREATE DATABASE Statement in a Script
- 3.3.7 the CREATE DATABASE Script
- 3.3.8 Importing a Database
- 3.3.9 Updating ORACLE_SID in the Registry
- 3.3.10 Backing Up the New Database
- 3.4 Using ORADIM to Administer an Oracle Database Instance
- 3.5 Database Migration from a 32-bit Windows Computer
- 4 Postinstallation Configuration Tasks on Windows
- 4.1 Windows Firewall
- 4.2 Resetting Passwords for Default Accounts
- 4.3 NTFS File System and Windows Registry Permissions
- 4.4 Configuring External Job Support for the Scheduler on Windows
- 4.5 Configuring Oracle Multimedia on Windows
- 4.6 Configuring Oracle Text on Windows
- 4.7 Configuring Oracle Spatial on Windows
- 4.8 Configuring Advanced Replication on Windows
- 5 Administering a Database on Windows
- 5.1 Managing Oracle Database Services
- 5.2 Starting and Shutting Down a Database with SQL*Plus
- 5.3 Starting and Shutting Down a Database Using Services
- 5.4 Starting Multiple Instances
- 5.5 Creating and Populating Password Files
- 5.6 Connecting Remotely to the Database as SYS
- 5.7 Automatically Encrypted Database Passwords
- 5.8 Archiving Redo Log Files
- 6 Monitoring a Database on Windows
- 7 Tuning Windows to Optimize Oracle Database
- 7.1 Windows Tuning Overview
- 7.2 Large Page Support
- 7.3 Reduce Priority of Foreground Applications on Server Console
- 7.4 Configure Windows Server to Be an Application Server
- 7.5 Disable Unnecessary Services
- 7.6 Remove Unused Network Protocols
- 7.7 Reset Network Protocol Bind Order
- 7.8 Setting the Order of Multiple Network Interface Cards
- 7.9 Apply Latest Reliable Windows Server Service Pack
- 7.10 Use Hardware or Operating System Striping
- 7.11 Multiplex Windows Server Virtual Memory Paging File
- 7.12 Close All Unnecessary Foreground Applications
- 8 Performing Database Backup and Recovery with VSS
- 8.1 Overview of Database Backup and Recovery with VSS
- 8.2 Installing and Uninstalling the Oracle VSS Writer Service
- 8.3 Backing Up a Database
- 8.4 Restoring and Recovering a Database
- 8.5 Integrating VSS with Third-Party Requester Applications
- 8.6 Duplicating a Database
- 9 Authenticating Database Users with Windows
- 10 Administering External Users and Roles on Windows
- 10.1 Oracle Administration Assistant for Windows
- 10.1.1 Managing a Remote Computer
- 10.1.2 Adding a Computer and Saving Your Configuration
- 10.1.3 Granting Administrator Privileges for All Databases on a Computer
- 10.1.4 Granting Operator Privileges for All Databases on a Computer
- 10.1.5 Connecting to a Database
- 10.1.6 Viewing Database Authentication Parameter Settings
- 10.1.7 Creating an External Operating System User
- 10.1.8 Creating a Local Database Role
- 10.1.9 Creating an External Operating System Role
- 10.1.10 Granting Administrator Privileges for a Single Database
- 10.1.11 Granting Operator Privileges for a Single Database
- 10.2 Manually Administering External Users and Roles
- 10.1 Oracle Administration Assistant for Windows
- 11 Storing Oracle Wallets in the Windows Registry
- 12 Oracle PKI Integration with Windows
- 13 Using Oracle Database with Microsoft Active Directory
- 13.1 Microsoft Active Directory Support
- 13.2 Oracle Components That Integrate with Active Directory
- 13.2.1 Directory Naming
- 13.2.2 Automatic Discovery of Directory Servers
- 13.2.3 Integration with Windows Tools
- 13.2.4 User Interface Extensions for Oracle Net Directory Naming
- 13.2.5 Enhancement of Directory Object Type Descriptions
- 13.2.6 Integration with Windows Login Credentials
- 13.2.7 Oracle Directory Objects in Active Directory
- 13.3 Requirements for Using Oracle Database with Active Directory
- 13.4 Configuring Oracle Database to Use Active Directory
- 13.5 Testing Connectivity
- 13.6 Access Control List Management for Oracle Directory Objects
- 14 Oracle Database Specifications for Windows
- 15 Configuration Parameters and the Registry
- 15.1 About Configuration Parameters
- 15.2 Registry Overview
- 15.3 Registry Parameters
- 15.3.1 HKEY_LOCAL_MACHINE\SOFTWARE\ORACLE\KEY_HOME_NAME
- 15.3.1.1 MSHELP_TOOLS
- 15.3.1.2 NLS_LANG and Other Globalization Parameters
- 15.3.1.3 ORA_CWD
- 15.3.1.4 ORA_SID_AUTOSTART
- 15.3.1.5 ORA_SID_PFILE
- 15.3.1.6 ORA_SID_SHUTDOWN
- 15.3.1.7 ORA_SID_SHUTDOWN_TIMEOUT
- 15.3.1.8 ORA_SID_SHUTDOWNTYPE
- 15.3.1.9 ORA_TZFILE
- 15.3.1.10 ORACLE_AFFINITY
- 15.3.1.11 ORACLE_BASE
- 15.3.1.12 ORACLE_GROUP_NAME
- 15.3.1.13 ORACLE_HOME
- 15.3.1.14 ORACLE_HOME_KEY
- 15.3.1.15 ORACLE_HOME_NAME
- 15.3.1.16 ORACLE_PRIORITY
- 15.3.1.17 ORACLE_SID
- 15.3.1.18 OSAUTH_PREFIX_DOMAIN
- 15.3.1.19 RDBMS_ARCHIVE
- 15.3.1.20 RDBMS_CONTROL
- 15.3.1.21 SQLPATH
- 15.3.2 HKEY_LOCAL_MACHINE\SOFTWARE\ORACLE
- 15.3.3 HKEY_LOCAL_MACHINE\SYSTEM\CurrentControlSet\Services
- 15.3.1 HKEY_LOCAL_MACHINE\SOFTWARE\ORACLE\KEY_HOME_NAME
- 15.4 Oracle RAC Registry Parameters
- 15.5 Managing Registry Parameters with regedit
- 15.6 Managing Registry Parameters with Oracle Administration Assistant for Windows
- 15.7 Modifying Oracle Counters for Windows Performance Monitor Parameters
- 16 Developing Applications for Windows
- 16.1 Finding Information on Application Development for Windows
- 16.1.1 Java Enhancements
- 16.1.2 ODP.NET
- 16.1.3 Oracle Developer Tools for Visual Studio
- 16.1.4 Oracle Providers for ASP.NET
- 16.1.5 XML Support
- 16.1.6 Support for Internet Applications
- 16.1.7 Oracle Services For Microsoft Transaction Server
- 16.1.8 Oracle Objects for OLE
- 16.1.9 Oracle Provider for OLE DB
- 16.1.10 Oracle ODBC Driver
- 16.1.11 Oracle COM Automation Feature
- 16.1.12 Pro*C/C++ and Pro*COBOL Applications
- 16.2 Building External Procedures
- 16.3 Multithreaded Agent Architecture
- 16.4 Debugging External Procedures
- 16.5 Accessing Text Files with UTL_FILE
- 16.6 Accessing Web Data with Intercartridge Exchange
- B.1 Raw Partition Overview
- B.2 Creating a Raw Partition and a Mount Point
- B.3 Creating a Tablespace in a Raw Partition
- B.4 Configuring Disks for Automatic Storage Management
- C.1 Configuring Oracle Database to Communicate with ASM
- C.2 Understanding Oracle Net Services Registry Parameters and Subkeys
- C.3 Listener Requirements
- C.4 Understanding Optional Configuration Parameters
- C.5 Advanced Network Configuration
- D.1 ORA-09275: CONNECT INTERNAL No Longer Supported
- D.2 OSD-04000 to OSD-04599: Windows-Specific Oracle Database Messages
- D.3 DIM-00000 to DIM-00039: ORADIM Command Syntax Errors
- D.4 Database Connection Issues
- E.1 Automatic Startup and Shutdown
- E.2 Background Processing and Batch Jobs
- E.3 Diagnostic and Tuning Utilities
- E.4 Direct Writes to Disk
- E.5 Dynamic Link Libraries (DLLs)
- E.6 Hot Backups
- E.7 Initialization Parameters: Multiple Database Writers
- E.8 Install Accounts and Groups
- E.9 Installation
- E.10 Memory Resources
- E.11 Microsoft Transaction Server
- E.12 Multiple Oracle Homes and OFA
- E.13 Processes and Threads
- E.14 Raw Partitions
- E.15 Services
- 16.1 Finding Information on Application Development for Windows
- Glossary
- Index

[1]
Oracle® Database
Platform Guide
11g Release 2 (11.2) for Microsoft Windows
E10845-13
December 2014
Oracle Database Platform Guide, 11g Release 2 (11.2) for Microsoft Windows
E10845-13
Copyright © 1996, 2014, Oracle and/or its affiliates. All rights reserved.
Primary Author: Reema Khosla
Contributing Author: Ashmita Bose, Lance Ashdown
Contributors: Beldalker Anand, Adam Bentley, Ricky Chen, David Collelo, David Friedman, Janelle
Simmons, Sue K. Lee, Rich Long, Satish Panchumarthy, Ravi Thammaiah, Michael Verheij
This software and related documentation are provided under a license agreement containing restrictions on
use and disclosure and are protected by intellectual property laws. Except as expressly permitted in your
license agreement or allowed by law, you may not use, copy, reproduce, translate, broadcast, modify, license,
transmit, distribute, exhibit, perform, publish, or display any part, in any form, or by any means. Reverse
engineering, disassembly, or decompilation of this software, unless required by law for interoperability, is
prohibited.
The information contained herein is subject to change without notice and is not warranted to be error-free. If
you find any errors, please report them to us in writing.
If this is software or related documentation that is delivered to the U.S. Government or anyone licensing it
on behalf of the U.S. Government, the following notice is applicable:
U.S. GOVERNMENT END USERS: Oracle programs, including any operating system, integrated software,
any programs installed on the hardware, and/or documentation, delivered to U.S. Government end users
are "commercial computer software" pursuant to the applicable Federal Acquisition Regulation and
agency-specific supplemental regulations. As such, use, duplication, disclosure, modification, and
adaptation of the programs, including any operating system, integrated software, any programs installed on
the hardware, and/or documentation, shall be subject to license terms and license restrictions applicable to
the programs. No other rights are granted to the U.S. Government.
This software or hardware is developed for general use in a variety of information management
applications. It is not developed or intended for use in any inherently dangerous applications, including
applications that may create a risk of personal injury. If you use this software or hardware in dangerous
applications, then you shall be responsible to take all appropriate fail-safe, backup, redundancy, and other
measures to ensure its safe use. Oracle Corporation and its affiliates disclaim any liability for any damages
caused by use of this software or hardware in dangerous applications.
Oracle and Java are registered trademarks of Oracle and/or its affiliates. Other names may be trademarks of
their respective owners.
Intel and Intel Xeon are trademarks or registered trademarks of Intel Corporation. All SPARC trademarks
are used under license and are trademarks or registered trademarks of SPARC International, Inc. AMD,
Opteron, the AMD logo, and the AMD Opteron logo are trademarks or registered trademarks of Advanced
Micro Devices. UNIX is a registered trademark of The Open Group.
This software or hardware and documentation may provide access to or information on content, products,
and services from third parties. Oracle Corporation and its affiliates are not responsible for and expressly
disclaim all warranties of any kind with respect to third-party content, products, and services. Oracle
Corporation and its affiliates will not be responsible for any loss, costs, or damages incurred due to your
access to or use of third-party content, products, or services.

iii
Contents
Preface ............................................................................................................................................................... xiii
Audience..................................................................................................................................................... xiii
Documentation Accessibility................................................................................................................... xiv
Related Documents ................................................................................................................................... xiv
Conventions ............................................................................................................................................... xiv
What's New in Oracle Database for Windows........................................................................... xv
1 Oracle Database Architecture on Windows
1.1 Oracle Database on Windows Architecture............................................................................ 1-1
1.1.1 Automatic Storage Management....................................................................................... 1-1
1.1.2 Thread-Based Architecture................................................................................................. 1-1
1.1.3 File I/O Enhancements....................................................................................................... 1-4
1.1.4 Raw File Support ................................................................................................................. 1-4
1.2 Oracle Database Scalability on Windows................................................................................ 1-5
1.2.1 Support for Very Large Memory (VLM) Configurations .............................................. 1-5
1.2.2 Windows 4 GB RAM Tuning (4GT).................................................................................. 1-7
1.2.3 Large User Populations....................................................................................................... 1-8
1.3 Oracle Database Integration with Windows........................................................................... 1-8
1.3.1 Oracle PKI Integration with Windows............................................................................. 1-8
1.3.2 Oracle Services for Microsoft Transaction Server........................................................... 1-8
1.3.3 Oracle Fail Safe Integration with Windows..................................................................... 1-9
1.4 Other Sources of Information.................................................................................................... 1-9
2 Database Tools on Windows
2.1 Choosing a Database Tool ......................................................................................................... 2-1
2.1.1 Database Tools and Operating System Compatibility................................................... 2-2
2.1.2 Preferred Database Tools.................................................................................................... 2-2
2.2 Starting Database Tools.............................................................................................................. 2-4
2.2.1 Starting Database Tools in Multiple Oracle Homes ....................................................... 2-4
2.2.1.1 Starting Tools from Oracle8i Release 8.1.3 and Later Multiple Oracle Homes ... 2-4
2.2.2 Running Tools with Windows User Account Control................................................... 2-4
2.2.3 Starting Database Tools from the Start Menu ................................................................. 2-5
2.2.4 Starting Database Tools from the Command Line ......................................................... 2-7
2.2.5 Starting Windows Tools ..................................................................................................... 2-9
iv
2.3 Using SQL*Loader ................................................................................................................... 2-10
2.3.1 Windows Processing Options......................................................................................... 2-10
2.3.1.1 Default (No Processing Option) or "str terminator_string"................................. 2-10
2.3.2 Control File Conventions................................................................................................. 2-11
2.4 Using Windows Tools ............................................................................................................. 2-11
2.4.1 Using Event Viewer to Monitor a Database ................................................................. 2-11
2.4.2 Using Microsoft Management Console to Administer a Database ........................... 2-12
2.4.3 Using Oracle Counters for Windows Performance Monitor...................................... 2-12
2.4.4 Using Registry Editor to Modify Configuration Information.................................... 2-13
2.4.5 Using Task Manager to Monitor Applications and Processes ................................... 2-13
2.4.6 Using Local Users and Groups to Manage Users and Groups .................................. 2-13
2.5 Optional Windows Diagnostic and Tuning Utilities.......................................................... 2-14
3 Postinstallation Database Creation on Windows
3.1 Naming Conventions for Oracle Database ............................................................................. 3-1
3.2 Creating a Database on Windows Using Database Configuration Assistant .................... 3-1
3.3 Creating a Database on Windows Using Command-Line Tools......................................... 3-2
3.3.1 Exporting an Existing Database......................................................................................... 3-3
3.3.2 Deleting Database Files....................................................................................................... 3-5
3.3.3 Modifying the Initialization Parameter File..................................................................... 3-5
3.3.4 Creating and Starting an Oracle Database Service ......................................................... 3-6
3.3.5 Starting an Oracle Database Instance ............................................................................... 3-7
3.3.6 Putting the CREATE DATABASE Statement in a Script ............................................... 3-7
3.3.7 the CREATE DATABASE Script....................................................................................... 3-8
3.3.8 Importing a Database.......................................................................................................... 3-8
3.3.9 Updating ORACLE_SID in the Registry .......................................................................... 3-9
3.3.10 Backing Up the New Database ....................................................................................... 3-10
3.4 Using ORADIM to Administer an Oracle Database Instance ........................................... 3-11
3.4.1 Creating an Instance......................................................................................................... 3-12
3.4.2 Starting an Instance and Services................................................................................... 3-13
3.4.3 Stopping an Instance and Services................................................................................. 3-14
3.4.4 Editing an Instance ........................................................................................................... 3-14
3.4.5 Deleting an Instance ......................................................................................................... 3-15
3.5 Database Migration from a 32-bit Windows Computer..................................................... 3-15
3.5.1 Backing Up a 32-Bit Oracle Database............................................................................. 3-15
3.5.2 Migrating an Oracle Database 11g Release 2 (11.2) ..................................................... 3-16
3.5.3 Migrating an Oracle Database 10g Release 2 (10.2) or Earlier Database................... 3-19
4 Postinstallation Configuration Tasks on Windows
4.1 Windows Firewall....................................................................................................................... 4-1
4.1.1 Oracle Executables Requiring Firewall Exceptions ........................................................ 4-2
4.1.1.1 Firewall Exceptions for Oracle Database ................................................................. 4-3
4.1.1.2 Firewall Exceptions for Oracle Database Examples ................................................ 4-3
4.1.1.3 Firewall Exceptions for Oracle Gateways................................................................. 4-3
4.1.1.4 Firewall Exceptions for Oracle Clusterware and Oracle ASM .............................. 4-4
4.1.1.5 Firewall Exceptions for Other Oracle Products ....................................................... 4-4
4.1.2 Configuring the Windows Firewall .................................................................................. 4-4
v
4.1.3 Troubleshooting Windows Firewall Exceptions............................................................. 4-5
4.2 Resetting Passwords for Default Accounts............................................................................. 4-6
4.3 NTFS File System and Windows Registry Permissions........................................................ 4-6
4.3.1 File Permissions ................................................................................................................... 4-6
4.3.1.1 File Permissions Set by Oracle Universal Installer .................................................. 4-6
4.3.1.2 File Permissions Set by Database Configuration Assistant.................................... 4-7
4.3.1.3 File Permissions Set by Database Upgrade Assistant ............................................ 4-7
4.3.2 Setting NTFS File System Security .................................................................................... 4-8
4.3.3 Setting Windows Registry Security................................................................................... 4-8
4.4 Configuring External Job Support for the Scheduler on Windows..................................... 4-9
4.5 Configuring Oracle Multimedia on Windows........................................................................ 4-9
4.6 Configuring Oracle Text on Windows.................................................................................. 4-10
4.7 Configuring Oracle Spatial on Windows ............................................................................. 4-11
4.8 Configuring Advanced Replication on Windows............................................................... 4-12
4.8.1 Checking Tablespace and Rollback Segment Requirements...................................... 4-12
4.8.2 Adding and Modifying Initialization Parameters ....................................................... 4-13
4.8.3 Monitoring Data Dictionary Tables ............................................................................... 4-13
5 Administering a Database on Windows
5.1 Managing Oracle Database Services ........................................................................................ 5-1
5.1.1 Oracle Database Service Naming Conventions for Multiple Oracle Homes.............. 5-1
5.1.2 Starting Oracle Database Services..................................................................................... 5-2
5.1.3 Stopping Oracle Database Services................................................................................... 5-2
5.1.4 Auto-starting Oracle Database Services........................................................................... 5-3
5.2 Starting and Shutting Down a Database with SQL*Plus ...................................................... 5-4
5.3 Starting and Shutting Down a Database Using Services ...................................................... 5-6
5.4 Starting Multiple Instances........................................................................................................ 5-8
5.5 Creating and Populating Password Files ................................................................................ 5-9
5.5.1 Viewing and Hiding the Password File ........................................................................ 5-10
5.6 Connecting Remotely to the Database as SYS .................................................................... 5-11
5.7 Automatically Encrypted Database Passwords ................................................................. 5-11
5.8 Archiving Redo Log Files ....................................................................................................... 5-12
6 Monitoring a Database on Windows
6.1 Database Monitoring Overview ............................................................................................... 6-1
6.2 Using Oracle Counters for Windows Performance Monitor ............................................... 6-2
6.2.1 Registry Information ........................................................................................................... 6-2
6.2.2 Accessing Oracle Counters for Windows Performance Monitor ................................. 6-3
6.2.3 Modifying Views ................................................................................................................. 6-3
6.2.4 Understanding Oracle Database Performance Objects.................................................. 6-4
6.2.5 Oracle Counters for Windows Performance Monitor Troubleshooting Information 6-5
6.3 Using Event Viewer.................................................................................................................... 6-6
6.3.1 Reading Event Viewer ........................................................................................................ 6-7
6.3.2 Managing Event Viewer ..................................................................................................... 6-8
6.4 Trace Files..................................................................................................................................... 6-8
6.5 Alert Logs..................................................................................................................................... 6-9
vi
6.6 Viewing Threads......................................................................................................................... 6-9
7 Tuning Windows to Optimize Oracle Database
7.1 Windows Tuning Overview...................................................................................................... 7-1
7.2 Large Page Support .................................................................................................................... 7-2
7.3 Reduce Priority of Foreground Applications on Server Console ........................................ 7-4
7.4 Configure Windows Server to Be an Application Server ..................................................... 7-4
7.5 Disable Unnecessary Services ................................................................................................... 7-5
7.6 Remove Unused Network Protocols ....................................................................................... 7-5
7.7 Reset Network Protocol Bind Order ........................................................................................ 7-5
7.8 Setting the Order of Multiple Network Interface Cards ....................................................... 7-6
7.9 Apply Latest Reliable Windows Server Service Pack............................................................ 7-6
7.10 Use Hardware or Operating System Striping......................................................................... 7-7
7.10.1 Multiple Striped Volumes for Sequential and Random Access.................................... 7-8
7.11 Multiplex Windows Server Virtual Memory Paging File ..................................................... 7-8
7.12 Close All Unnecessary Foreground Applications.................................................................. 7-9
8 Performing Database Backup and Recovery with VSS
8.1 Overview of Database Backup and Recovery with VSS ....................................................... 8-1
8.1.1 Purpose of Database Backup and Recovery with VSS ................................................... 8-1
8.1.2 Scope of This Chapter ......................................................................................................... 8-1
8.1.3 Basic Concepts of Database Backup and Recovery with VSS ....................................... 8-2
8.1.3.1 Component-Based Shadow Copies............................................................................ 8-2
8.1.3.2 Volume-Based Shadow Copies................................................................................... 8-2
8.1.3.3 Oracle VSS Backup Types ........................................................................................... 8-3
8.1.4 Basic Steps of Backup and Recovery with VSS ............................................................... 8-3
8.2 Installing and Uninstalling the Oracle VSS Writer Service................................................... 8-4
8.3 Backing Up a Database............................................................................................................... 8-5
8.3.1 About Component-Based Backups ................................................................................... 8-5
8.3.2 Backing Up a Database in ARCHIVELOG Mode ........................................................... 8-7
8.3.2.1 Making Component-Based Backups of an ARCHIVELOG Database .................. 8-7
8.3.2.2 Making Volume-Based Backups of an ARCHIVELOG Database ......................... 8-7
8.3.3 Backing Up a Database in NOARCHIVELOG Mode..................................................... 8-7
8.3.3.1 Making Component-Based Backups of a NOARCHIVELOG Database.............. 8-8
8.3.3.2 Making Volume-Based Backups of a NOARCHIVELOG Database..................... 8-8
8.4 Restoring and Recovering a Database ..................................................................................... 8-8
8.4.1 Restoring and Recovering a Database in ARCHIVELOG Mode.................................. 8-8
8.4.1.1 Restoring the Server Parameter File .......................................................................... 8-9
8.4.1.2 Recovering from the Loss of All Control Files ...................................................... 8-10
8.4.1.3 Recovering Tablespaces or Datafiles ...................................................................... 8-10
8.4.1.4 Recovering All Tablespaces ..................................................................................... 8-10
8.4.1.5 Performing Disaster Recovery................................................................................. 8-11
8.4.2 Restoring a Database in NOARCHIVELOG Mode ..................................................... 8-11
8.4.2.1 Restoring Component-Based Backups of a NOARCHIVELOG Database........ 8-11
8.4.2.2 Restoring Volume-Based Backups of a NOARCHIVELOG Database............... 8-11
8.5 Integrating VSS with Third-Party Requester Applications ............................................... 8-11
8.5.1 Writer Control Commands.............................................................................................. 8-12
vii
8.5.2 Control Commands for Database or All Tablespaces Component ........................... 8-12
8.6 Duplicating a Database ........................................................................................................... 8-12
8.6.1 Creating a Nonstandby Database from Shadow Copies ............................................ 8-13
8.6.2 Creating a Standby Database From Shadow Copies................................................... 8-13
9 Authenticating Database Users with Windows
9.1 Windows Native Authentication Overview ........................................................................... 9-1
9.2 Windows Authentication Protocols ......................................................................................... 9-2
9.3 User Authentication and Role Authorization Methods........................................................ 9-2
9.3.1 Authentication and Authorization Methods To Use...................................................... 9-3
9.4 Operating System Authentication Enabled at Installation ................................................... 9-3
10 Administering External Users and Roles on Windows
10.1 Oracle Administration Assistant for Windows................................................................... 10-1
10.1.1 Managing a Remote Computer....................................................................................... 10-2
10.1.2 Adding a Computer and Saving Your Configuration................................................. 10-2
10.1.3 Granting Administrator Privileges for All Databases on a Computer ..................... 10-3
10.1.4 Granting Operator Privileges for All Databases on a Computer............................... 10-4
10.1.5 Connecting to a Database ................................................................................................ 10-5
10.1.5.1 Troubleshooting Connection Problems.................................................................. 10-6
10.1.6 Viewing Database Authentication Parameter Settings............................................... 10-8
10.1.7 Creating an External Operating System User............................................................... 10-9
10.1.8 Creating a Local Database Role .................................................................................... 10-13
10.1.9 Creating an External Operating System Role............................................................. 10-15
10.1.10 Granting Administrator Privileges for a Single Database ........................................ 10-18
10.1.11 Granting Operator Privileges for a Single Database ................................................. 10-19
10.2 Manually Administering External Users and Roles ......................................................... 10-20
10.2.1 Manually Creating an External Operating System User........................................... 10-21
10.2.1.1 External User Authentication Tasks on the Oracle Database Server ............... 10-21
10.2.1.2 External User Authentication Tasks on the Client Computer .......................... 10-24
10.2.2 Manually Granting Administrator and Operator Privileges for Databases .......... 10-25
10.2.2.1 SYSDBA/SYSOPER/SYSASM Authentication Tasks on the Oracle Database
Server 10-25
10.2.2.2 SYSDBA/SYSOPER/SYSASM Authentication Tasks on the Client Computer..........
10-26
10.2.3 Manually Creating an External Role............................................................................ 10-26
10.2.3.1 External Role Authorization Tasks on the Oracle Database Server................. 10-27
10.2.3.2 External Role Authorization Tasks on the Client Computer ............................ 10-28
10.2.4 Manually Migrating Users ............................................................................................ 10-29
11 Storing Oracle Wallets in the Windows Registry
11.1 Storing Private Keys and Trust Points.................................................................................. 11-1
11.2 Storing User's Profile............................................................................................................... 11-1
11.3 Registry Parameters for Wallet Storage................................................................................ 11-1
11.3.1 Oracle Wallet Manager .................................................................................................... 11-2
11.3.1.1 Sharing Wallets and sqlnet.ora Files Among Multiple Databases ..................... 11-2
viii
12 Oracle PKI Integration with Windows
12.1 Oracle Public Key Infrastructure ........................................................................................... 12-1
12.2 Windows Public Key Infrastructure...................................................................................... 12-1
12.2.1 Microsoft Certificate Stores ............................................................................................. 12-2
12.2.2 Microsoft Certificate Services.......................................................................................... 12-2
12.2.3 Using Microsoft Certificate Stores with Oracle PKI Applications............................. 12-2
13 Using Oracle Database with Microsoft Active Directory
13.1 Microsoft Active Directory Support ..................................................................................... 13-1
13.1.1 About Microsoft Active Directory.................................................................................. 13-1
13.1.2 Accessing Active Directory ............................................................................................ 13-1
13.2 Oracle Components That Integrate with Active Directory................................................ 13-2
13.2.1 Directory Naming............................................................................................................. 13-2
13.2.2 Automatic Discovery of Directory Servers ................................................................... 13-2
13.2.3 Integration with Windows Tools.................................................................................... 13-2
13.2.4 User Interface Extensions for Oracle Net Directory Naming..................................... 13-3
13.2.5 Enhancement of Directory Object Type Descriptions ................................................. 13-3
13.2.6 Integration with Windows Login Credentials.............................................................. 13-3
13.2.7 Oracle Directory Objects in Active Directory ............................................................... 13-4
13.3 Requirements for Using Oracle Database with Active Directory..................................... 13-5
13.3.1 Directory Naming Software Requirements .................................................................. 13-5
13.3.2 Creating an OracleContext .............................................................................................. 13-5
13.3.2.1 Network Configuration Assistant (NetCA)........................................................... 13-6
13.3.3 Oracle Schema Objects Creation..................................................................................... 13-7
13.4 Configuring Oracle Database to Use Active Directory ...................................................... 13-8
13.5 Testing Connectivity................................................................................................................ 13-9
13.5.1 Testing Connectivity from Client Computers .............................................................. 13-9
13.5.2 Testing Connectivity from Microsoft Tools................................................................ 13-10
13.6 Access Control List Management for Oracle Directory Objects ..................................... 13-12
13.6.1 Security Groups .............................................................................................................. 13-12
13.6.1.1 OracleDBCreators.................................................................................................... 13-13
13.6.1.2 OracleNetAdmins.................................................................................................... 13-13
13.6.1.3 NetService Objects .................................................................................................. 13-13
13.6.2 Setting ACLs on NetService Entries............................................................................. 13-13
13.6.3 Adding and Deleting Security Group Members........................................................ 13-14
14 Oracle Database Specifications for Windows
14.1 Initialization Parameter File Overview................................................................................. 14-1
14.1.1 Location of the Initialization Parameter File ................................................................ 14-2
14.1.2 Editing The Initialization Parameter File ...................................................................... 14-2
14.1.3 Database Configuration Assistant Renames init.ora................................................... 14-2
14.2 Sample File................................................................................................................................ 14-2
14.3 SGA_MAX_SIZE Parameter................................................................................................... 14-3
14.4 Initialization Parameters Without Windows-Specific Values........................................... 14-3
14.5 Displaying Initialization Parameter Values......................................................................... 14-4
14.6 Uneditable Database Initialization Parameters ................................................................... 14-4
ix
14.7 Calculating Database Limits................................................................................................... 14-5
15 Configuration Parameters and the Registry
15.1 About Configuration Parameters .......................................................................................... 15-1
15.2 Registry Overview ................................................................................................................... 15-1
15.3 Registry Parameters................................................................................................................. 15-2
15.3.1 HKEY_LOCAL_MACHINE\SOFTWARE\ORACLE\KEY_HOME_NAME ........ 15-2
15.3.1.1 MSHELP_TOOLS ...................................................................................................... 15-2
15.3.1.2 NLS_LANG and Other Globalization Parameters ............................................... 15-3
15.3.1.3 ORA_CWD ................................................................................................................. 15-3
15.3.1.4 ORA_SID_AUTOSTART.......................................................................................... 15-3
15.3.1.5 ORA_SID_PFILE........................................................................................................ 15-3
15.3.1.6 ORA_SID_SHUTDOWN .......................................................................................... 15-3
15.3.1.7 ORA_SID_SHUTDOWN_TIMEOUT ..................................................................... 15-4
15.3.1.8 ORA_SID_SHUTDOWNTYPE ................................................................................ 15-4
15.3.1.9 ORA_TZFILE.............................................................................................................. 15-4
15.3.1.10 ORACLE_AFFINITY................................................................................................. 15-4
15.3.1.11 ORACLE_BASE ......................................................................................................... 15-4
15.3.1.12 ORACLE_GROUP_NAME ...................................................................................... 15-5
15.3.1.13 ORACLE_HOME....................................................................................................... 15-5
15.3.1.14 ORACLE_HOME_KEY............................................................................................. 15-5
15.3.1.15 ORACLE_HOME_NAME ........................................................................................ 15-5
15.3.1.16 ORACLE_PRIORITY ................................................................................................ 15-5
15.3.1.17 ORACLE_SID............................................................................................................. 15-5
15.3.1.18 OSAUTH_PREFIX_DOMAIN ................................................................................. 15-5
15.3.1.19 RDBMS_ARCHIVE ................................................................................................... 15-6
15.3.1.20 RDBMS_CONTROL.................................................................................................. 15-6
15.3.1.21 SQLPATH ................................................................................................................... 15-6
15.3.2 HKEY_LOCAL_MACHINE\SOFTWARE\ORACLE ................................................ 15-6
15.3.2.1 INST_LOC .................................................................................................................. 15-6
15.3.2.2 OO4O........................................................................................................................... 15-6
15.3.3 HKEY_LOCAL_MACHINE\SYSTEM\CurrentControlSet\Services...................... 15-6
15.3.3.1 Parameters for Oracle Counters for Windows Performance Monitor............... 15-6
15.3.3.2 Parameters for Oracle Database Services............................................................... 15-8
15.4 Oracle RAC Registry Parameters........................................................................................... 15-8
15.4.1 HKEY_LOCAL_MACHINE\SOFTWARE\ORACLE\OCR..................................... 15-8
15.5 Managing Registry Parameters with regedit....................................................................... 15-8
15.5.1 Modifying a Parameter Value with regedit .................................................................. 15-8
15.5.2 Adding a Registry Parameter with regedit................................................................... 15-9
15.6 Managing Registry Parameters with Oracle Administration Assistant for Windows 15-10
15.6.1 Starting Oracle Administration Assistant for Windows........................................... 15-10
15.6.2 Adding Oracle Home Parameters................................................................................ 15-12
15.6.3 Editing Oracle Home Parameters................................................................................. 15-12
15.6.4 Deleting Oracle Home Parameters............................................................................... 15-13
15.7 Modifying Oracle Counters for Windows Performance Monitor Parameters.............. 15-14
15.7.1 Using operfcfg ................................................................................................................ 15-14
15.7.2 Using Oracle Administration Assistant for Windows .............................................. 15-14
x
16 Developing Applications for Windows
16.1 Finding Information on Application Development for Windows ................................... 16-1
16.1.1 Java Enhancements........................................................................................................... 16-1
16.1.2 ODP.NET ........................................................................................................................... 16-1
16.1.3 Oracle Developer Tools for Visual Studio..................................................................... 16-1
16.1.4 Oracle Providers for ASP.NET........................................................................................ 16-2
16.1.5 XML Support..................................................................................................................... 16-2
16.1.6 Support for Internet Applications.................................................................................. 16-2
16.1.7 Oracle Services For Microsoft Transaction Server ....................................................... 16-2
16.1.8 Oracle Objects for OLE..................................................................................................... 16-3
16.1.9 Oracle Provider for OLE DB ........................................................................................... 16-3
16.1.10 Oracle ODBC Driver......................................................................................................... 16-3
16.1.11 Oracle COM Automation Feature .................................................................................. 16-3
16.1.12 Pro*C/C++ and Pro*COBOL Applications .................................................................. 16-3
16.2 Building External Procedures ................................................................................................ 16-4
16.2.1 External Procedures Overview....................................................................................... 16-4
16.2.2 Installing and Configuring.............................................................................................. 16-5
16.2.2.1 Installing Oracle Database........................................................................................ 16-5
16.2.2.2 Configuring Oracle Net Services............................................................................. 16-5
16.2.3 Writing an External Procedure ....................................................................................... 16-6
16.2.4 Building a DLL.................................................................................................................. 16-6
16.2.5 Registering an External Procedure................................................................................. 16-7
16.2.6 Restricting Library-Related Privileges to Trusted Users Only................................... 16-8
16.2.7 Executing an External Procedure ................................................................................... 16-8
16.3 Multithreaded Agent Architecture........................................................................................ 16-9
16.4 Debugging External Procedures............................................................................................ 16-9
16.4.1 Using Package DEBUG_EXTPROC ............................................................................. 16-10
16.5 Accessing Text Files with UTL_FILE .................................................................................. 16-10
16.6 Accessing Web Data with Intercartridge Exchange.......................................................... 16-10
16.6.1 Configuring Intercartridge Exchange.......................................................................... 16-11
16.6.2 Using Intercartridge Exchange ..................................................................................... 16-12
16.6.2.1 Packaged Function UTL_HTTP.REQUEST ......................................................... 16-12
16.6.2.2 Packaged Function UTL_HTTP.REQUEST_PIECES.......................................... 16-12
16.6.3 UTL_HTTP Exception Conditions ............................................................................... 16-13
16.6.3.1 UTL_HTTP.REQUEST ............................................................................................ 16-13
16.6.3.2 UTL_HTTP.REQUEST_PIECES ............................................................................ 16-13
16.6.4 Exception Conditions and Error Messages................................................................. 16-14
A Getting Started with Your Documentation
B Storing Tablespaces on Raw Partitions
B.1 Raw Partition Overview ........................................................................................................... B-1
B.1.1 Physical Disk ....................................................................................................................... B-1
B.1.2 Logical Partition.................................................................................................................. B-2
B.1.3 Physical Disk and Logical Partition Considerations ..................................................... B-2
B.1.4 Compatibility Issues........................................................................................................... B-3
xi
B.2 Creating a Raw Partition and a Mount Point ........................................................................ B-3
B.3 Creating a Tablespace in a Raw Partition............................................................................... B-4
B.4 Configuring Disks for Automatic Storage Management ..................................................... B-4
C Oracle Net Services Configuration on Windows
C.1 Configuring Oracle Database to Communicate with ASM ................................................. C-1
C.2 Understanding Oracle Net Services Registry Parameters and Subkeys............................ C-1
C.2.1 Oracle Net Service Subkeys............................................................................................... C-1
C.3 Listener Requirements .............................................................................................................. C-2
C.4 Understanding Optional Configuration Parameters............................................................ C-2
C.4.1 LOCAL ................................................................................................................................. C-2
C.4.2 TNS_ADMIN....................................................................................................................... C-3
C.4.3 USE_SHARED_SOCKET................................................................................................... C-3
C.5 Advanced Network Configuration ......................................................................................... C-3
C.5.1 Configuring Authentication Method............................................................................... C-3
C.5.2 Configuring Security for Named Pipes Protocol ........................................................... C-3
C.5.3 Modifying Configuration of External Procedures for Higher Security...................... C-4
D Error Messages on Windows
D.1 ORA-09275: CONNECT INTERNAL No Longer Supported.............................................. D-1
D.2 OSD-04000 to OSD-04599: Windows-Specific Oracle Database Messages ....................... D-1
D.2.1 File I/O Errors: OSD-04000 to OSD-04099...................................................................... D-4
D.2.2 Memory Errors: OSD-04100 to OSD-04199 ..................................................................... D-7
D.2.3 Process Errors: OSD-04200 to OSD-04299 ....................................................................... D-8
D.2.4 Loader Errors: OSD-04300 to OSD-04399...................................................................... D-10
D.2.5 Semaphore Errors: OSD-04400 to OSD-04499 .............................................................. D-11
D.2.6 Miscellaneous Errors: OSD-04500 to OSD-04599 ......................................................... D-11
D.3 DIM-00000 to DIM-00039: ORADIM Command Syntax Errors........................................ D-12
D.4 Database Connection Issues ................................................................................................... D-19
E Oracle Database Windows/UNIX Differences
E.1 Automatic Startup and Shutdown .......................................................................................... E-1
E.2 Background Processing and Batch Jobs.................................................................................. E-2
E.3 Diagnostic and Tuning Utilities............................................................................................... E-2
E.4 Direct Writes to Disk ................................................................................................................. E-2
E.5 Dynamic Link Libraries (DLLs)............................................................................................... E-3
E.6 Hot Backups................................................................................................................................ E-3
E.7 Initialization Parameters: Multiple Database Writers .......................................................... E-3
E.8 Install Accounts and Groups.................................................................................................... E-3
E.9 Installation .................................................................................................................................. E-3
E.10 Memory Resources .................................................................................................................... E-4
E.11 Microsoft Transaction Server ................................................................................................... E-4
E.12 Multiple Oracle Homes and OFA............................................................................................ E-4
E.13 Processes and Threads .............................................................................................................. E-5
E.14 Raw Partitions ............................................................................................................................ E-5
E.15 Services........................................................................................................................................ E-6

xiii
Preface
This guide provides platform-specific information about administering and
configuring Oracle Database 11g Release 2 (11.2) on the Microsoft Windows 32-Bit and
64-bit platforms:
■Windows XP Professional
■Windows Server 2003 - all editions
■Windows Server 2003 R2 - all editions
■Windows Vista - Business, Enterprise, and Ultimate editions
■Windows Server 2008 - Standard, Enterprise, Datacenter, Web, and Foundation
editions. The specific operating system components that are not supported are
Hyper-V and Server Core.
■Windows Server 2008 R2 (64-bit) - Standard, Enterprise, Datacenter, Web, and
Foundation editions. The specific operating system components that are not
supported are Hyper-V and Server Core.
■Windows 7 - Professional, Enterprise, and Ultimate editions
■Windows 8 - Pro and Enterprise editions
■Windows 8.1 - Pro and Enterprise editions
■Windows Server 2012 - Standard, Datacenter, Essentials, and Foundation editions
■Windows Server 2012 R2 - Standard, Datacenter, Essentials, and Foundation
editions
This Preface contains these topics:
■Audience
■Documentation Accessibility
■Related Documents
■Conventions
Audience
This guide is intended for database administrators, network administrators, security
specialists, and developers who use Oracle Database for Windows.
Note: Windows Multilingual User Interface Pack is supported on all
Windows operating systems.

xiv
To use this document, you need:
■Oracle-certified Windows operating system software installed and tested
■Knowledge of object-relational database management concepts
Documentation Accessibility
For information about Oracle's commitment to accessibility, visit the Oracle
Accessibility Program website at
http://www.oracle.com/pls/topic/lookup?ctx=acc&id=docacc
.
Access to Oracle Support
Oracle customers have access to electronic support through My Oracle Support. For
information, visit
http://www.oracle.com/pls/topic/lookup?ctx=acc&id=info
or
visit
http://www.oracle.com/pls/topic/lookup?ctx=acc&id=trs
if you are hearing
impaired.
Related Documents
For more information, refer to the following documents in the Oracle Database
documentation set:
■Oracle Database Installation Guide for Microsoft Windows
■Oracle Database Platform Guide for Microsoft Windows
■Oracle Database Concepts
Many books in the documentation set use the sample schemas, which are installed by
default when you select the Typical Installation option with an Oracle Database
installation. Refer to Oracle Database Sample Schemas for information on how these
schemas were created and how you can use them yourself.
Conventions
The following text conventions are used in this document:
Convention Meaning
boldface Boldface type indicates graphical user interface elements associated
with an action, or terms defined in text or the glossary.
italic Italic type indicates book titles, emphasis, or placeholder variables for
which you supply particular values.
monospace
Monospace type indicates commands within a paragraph, URLs, code
in examples, text that appears on the screen, or text that you enter.

xv
What's New in Oracle Database for Windows
This section describes new features of Oracle Database and provides pointers to
additional information.
The following are the Windows specific new features:
■Secure Database Services
■Active Directory Security Enhancements
■Volume Shadow Copy Service (VSS) Writer
■Windows Operating System Support
■Support for Online Patching
Secure Database Services
In Oracle Database 11g, you can secure the Database Services data in the active
directory, which is considered to be public. You can control the access to Database
Services data by setting Access Control List (ACL) on it and allow only the
authenticated users to access the data.
To use enhanced security in Oracle Database 11g, clients for Oracle Database 11g or
later, must configure for authentication binds. However, clients of the earlier releases
cannot access Database Services after setting restricted ACLs.
Active Directory Security Enhancements
This feature enhances security through better integration with the default Active
Directory configuration, adding support for operating system authentication with
Active Directory.
This feature improves Net Naming support for Microsoft Active Directory.
Volume Shadow Copy Service (VSS) Writer
The Oracle VSS writer allows Oracle Database to participate in VSS-initiated backup
and recovery on Windows 2003 and above. VSS is a Windows infrastructure composed
of three participants:
■Requesters - management applications that initiate backup and recovery
■Writers - applications that own the data
See Also: Oracle Database New Features Guide for information on new
features in Oracle Database 11g Release 2 (11.2) that are not
platform-specific

xvi
■Providers - storage/hardware applications that coordinate the reading and writing
of the data to appropriate storage
Several leading backup and storage vendors currently provide requester and provider
applications. With the Oracle VSS writer, customers can reliably back up and recover
Oracle data in a VSS environment, which inter operates with these vendors'
components.
This feature provides full inter operability with Volume Shadow Copy Service (VSS)
infrastructure on Windows 2003 and above.
Windows Operating System Support
Starting with Oracle Database 11g Release 2, the following Windows operating
systems are supported:
■Windows Server 2008 R2
■Windows 7
■Windows 8
■Windows 8.1
■Windows Server 2012
■Windows Server 2012 R2
Support for Online Patching
An online patch is a special kind of patch that can be applied to a live, database
instance. Installing an online patch does not require shutting down the database
instance. An online patch can be installed or uninstalled using
OPatch
command.
Starting with Oracle Database 11g Release 2, Online Patching is supported on 32-bit
and 64-bit Windows platforms.
Note: Windows data access client features are not included in this
section.
See Also: "Running Tools with Windows User Account Control"

1
Oracle Database Architecture on Windows 1-1
1
Oracle Database Architecture on Windows
This chapter describes how Oracle Database architecture takes advantage of some
more advanced services in Windows operating systems.
This chapter contains these topics:
■Oracle Database on Windows Architecture
■Oracle Database Scalability on Windows
■Oracle Database Integration with Windows
■Other Sources of Information
1.1 Oracle Database on Windows Architecture
Oracle Database on Windows is a stable, reliable, and high performing system upon
which to build applications. Each release of the database provides new
platform-specific features for high performance on Windows.
Oracle Database operates the same way on Windows as it does on other platforms. The
architecture offers several advantages on Windows, such as:
■Automatic Storage Management
■Thread-Based Architecture
■File I/O Enhancements
■Raw File Support
1.1.1 Automatic Storage Management
Automatic Storage Management (ASM) is an integrated file system and volume
manager expressly built for Oracle Database files. ASM provides the performance of
raw I/O with the easy management of a file system. It simplifies database
administration by eliminating the need for you to directly manage potentially
thousands of Oracle Database files. It does this by enabling you to divide all available
storage into disk groups. You manage a small set of disk groups, and ASM automates
the placement of the database files within those disk groups.
1.1.2 Thread-Based Architecture
The internal process architecture of Oracle Database is thread-based. Threads are
objects within a process that run program instructions. Threads allow concurrent
See Also: "Using Automatic Storage Management" in Oracle
Database Administrator's Guide

Oracle Database on Windows Architecture
1-2 Oracle Database Platform Guide
operations within a process so that a process can run different parts of its program
simultaneously on different processors. A thread-based architecture provides the
following advantages:
■Faster context switching
■Simpler System Global Area allocation routine, because it does not require use of
shared memory
■Faster spawning of new connections, because threads are created more quickly
than processes
■Decreased memory usage, because threads share more data structures than
processes
Internally, the code to implement the thread model is compact and separate from the
main body of Oracle Database code. Exception handlers and routines track and
de-allocate resources. They add robustness, with no downtime because of resource
leaks or an ill-behaved program.
Oracle Database is not a typical Windows process. On Windows, an Oracle Database
or Automatic Storage Management instance (threads and memory structures) is a
Windows service: a background process registered with the operating system. The
service is started by Windows and requires no user interaction to start. This enables
the database to open automatically at computer startup.
When multiple Oracle Database or Automatic Storage Management instances on
Windows, each instance runs its own Windows service with multiple component
threads. Each thread may be required for the database to be available, or it may be
optional and specific to certain platforms. The background processes read and write
from various datafiles, depending on your configuration. Oracle Database architecture
on Windows is illustrated in Figure 1–1. Examples of Oracle Database required threads
on Windows are listed in Table 1–1.
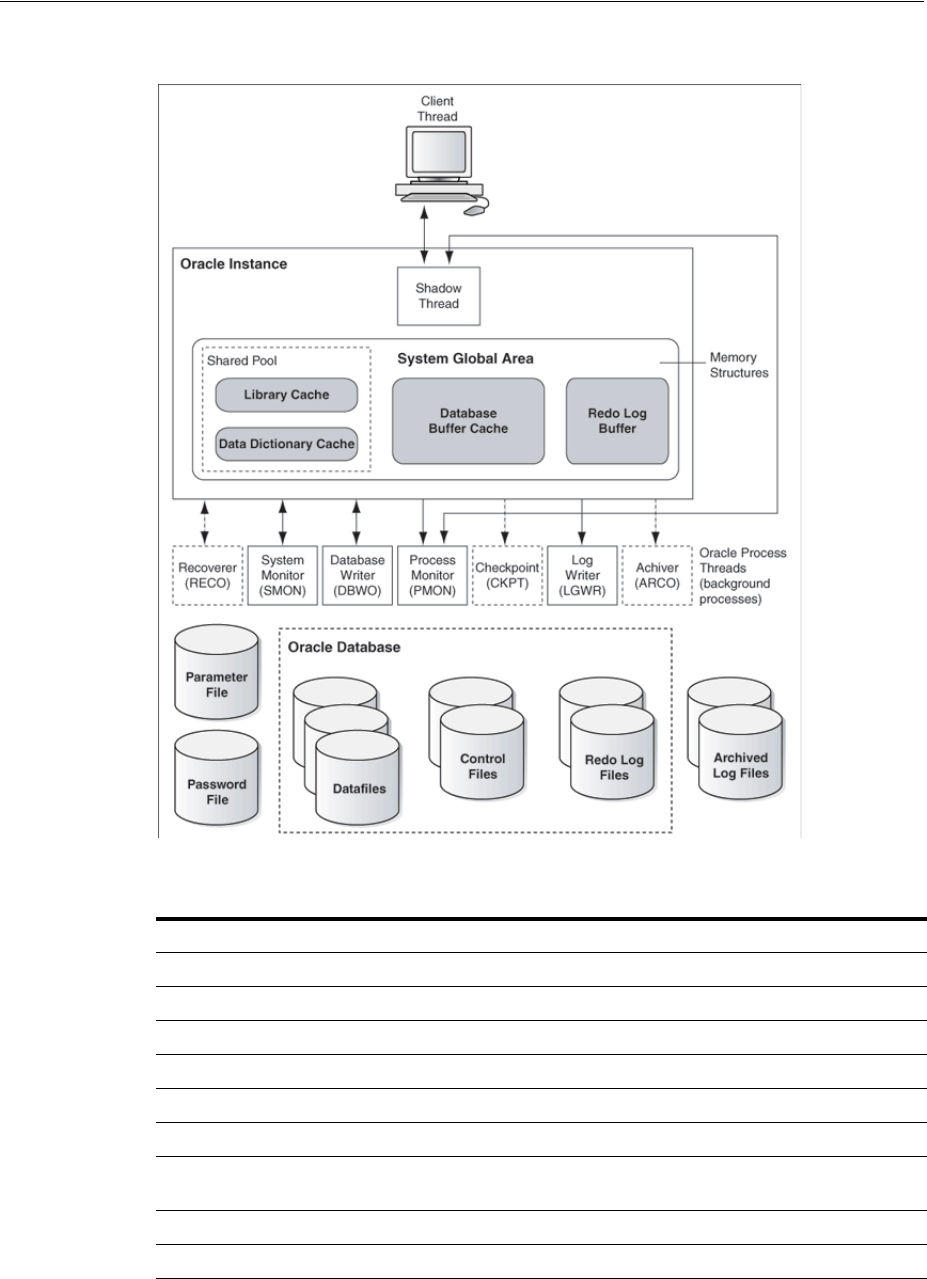
Oracle Database on Windows Architecture
Oracle Database Architecture on Windows 1-3
Figure 1–1 Oracle Database Architecture on Windows
Table 1–1 Oracle Database Threads
Oracle Database Thread Description Required/Optional
DBW0
database writer Required
LGWR
log writer Required
MMAN
memory manager process Required
PMON
process monitor Required
PSPO
process spawner process Required
SMON
system monitor Required
CKPT
checkpoint process (thread on Windows) that
runs by default on Windows Required
ARCH0
archive process (or thread on Windows) Required
RECO
distributed recovery background process Required

Oracle Database on Windows Architecture
1-4 Oracle Database Platform Guide
Oracle Database for Windows is supplied as a set of executables and dynamic link
libraries (DLLs). Executable images can be modified using
ORASTACK
to change the size
of the stack used by the threads of the Oracle Database process. Oracle recommends
you use this tool only under the guidance of Oracle Support Services.
1.1.3 File I/O Enhancements
Oracle Database supports 64-bit file I/O to allow use of files larger than 4 gigabytes
(GB). In addition, physical and logical raw files are supported as data, log, and control
files to support Oracle Real Application Clusters (Oracle RAC) on Windows and for
those cases where performance needs to be maximized.
With Oracle Database 11g, instead of using the operating system kernel NFS client, you
can configure Oracle Database to access NFS V3 servers directly using an Oracle
internal Direct NFS client. Through this integration, Oracle can optimize the I/O path
between Oracle and the NFS server providing significantly superior performance. In
addition, Direct NFS client simplifies and optimizes the NFS client configuration for
database workloads.
Volumes mounted through CIFS cannot be used for storing Oracle database files
without configuring Direct NFS. The atomic write requirements needed for database
writes are not guaranteed through CIFS protocol, consequently CIFS can only be used
for operating system level access. For example, for commands such as copy.
Oracle Direct NFS Client currently supports up to four parallel network paths to
provide scalability and high availability. Direct NFS Client delivers optimized
performance by automatically load balancing requests across all specified paths. If one
network path fails, then Direct NFS Client reissues commands over any remaining
paths ensuring fault tolerance and high availability.
1.1.4 Raw File Support
Oracle recommends that you use Automatic Storage Management instead of raw files.
It provides the performance benefits of raw files with much better manageability.
Automatic Storage Management is available for both single instance and Oracle RAC
databases.
Raw files are unformatted disk partitions that can be used as one large file. Raw files
have the benefit of no file system overhead, because they are unformatted partitions.
Windows supports raw files, similar to UNIX. Using raw files for database or log files
can have a slight performance gain. Windows XP has a disk manager (
diskmgmt.msc
)
to manage all volumes. Windows 2003 and later includes command line utilities
(
diskpart.exe
) to manage volumes including raw. Oracle recommends that you use
Windows volume mount points for addressing raw volumes.
To Oracle Database, raw files are no different from other Oracle Database files. They
are treated in the same way by Oracle Database as any other file and can be backed up
and restored through Recovery Manager or
OCOPY
.
Note: You can view background processes by issuing the following
query:
SQL> select * from v$bgprocess where paddr <> '00';
See Also: Your vendor documentation to complete NFS
configuration and mounting

Oracle Database Scalability on Windows
Oracle Database Architecture on Windows 1-5
1.2 Oracle Database Scalability on Windows
Features in Oracle Database and in the Windows operating system work together to
help increase scalability, throughput, and database capacity. These features include:
■Support for Very Large Memory (VLM) Configurations
■Windows 4 GB RAM Tuning (4GT)
■Large User Populations
1.2.1 Support for Very Large Memory (VLM) Configurations
Oracle Database for Windows 32-Bit supports Very Large Memory (VLM)
configurations, which allows Oracle Database to access more than the 4 gigabyte (GB)
of RAM traditionally available to Windows applications. Specifically, Oracle Database
uses Address Windowing Extensions (AWE) to access more than 4 GB of RAM.
The requirements for taking advantage of this support are:
1. The computer on which Oracle Database is installed must have more than 4 GB of
memory.
2. The operating system must be configured to take advantage of Physical Address
Extensions (PAE) by adding the /PAE switch in
boot.ini
. See Microsoft
Knowledge Base article 268363 for instructions on modifying
boot.ini
to enable
PAE.
3. It is advisable (though not necessary) to enable 4GT support by adding the /3GB
parameter in
boot.ini
. See Microsoft Knowledge Base article Q171793 for
additional requirements and instructions on modifying
boot.ini
to enable 4GT.
4. The user account under which Oracle Database runs (typically the
LocalSystem
account), must have the "Lock pages in memory" privilege.
5.
USE_INDIRECT_DATA_BUFFERS=TRUE
must be present in the initialization parameter
file for the database instance that uses VLM support. If this parameter is not set,
then Oracle Database 10g Release 1 (10.1) or later behaves in same way as previous
releases.
6. Initialization parameters
DB_BLOCK_BUFFERS
and
DB_BLOCK_SIZE
must be set to
values you have chosen for Oracle Database.
Note:
■You must be logged on either as Administrator or a user name
that is a member of the Administrators group.
■To open Disk Management console, click Start, Run, and then
type: diskmgmt.msc.
See Also:
■Appendix B, "Storing Tablespaces on Raw Partitions"
■"Using Automatic Storage Management" in Oracle Database
Administrator's Guide

Oracle Database Scalability on Windows
1-6 Oracle Database Platform Guide
7. Registry parameter
AWE_WINDOW_MEMORY
must be created and set in the appropriate
key for your Oracle home. This parameter is specified in bytes and has a default
value of 1 GB.
AWE_WINDOW_MEMORY
tells Oracle Database how much of its 2 GB (3
GB if you enabled 4 GT) address space to reserve for mapping in database buffers.
This memory comes from the 2 GB (3 GB if you enabled 4 GT) virtual address
space in Oracle Database, so its value must be less than 3 GB. Setting this
parameter to a large value has the effect of using more of the address space for
buffers and using less AWE memory for buffers. However, since accessing AWE
buffers is somewhat slower than accessing virtual address space buffers, Oracle
recommends that you tune these parameters to be as large as possible without
adversely limiting database operations.
In general, the higher
AWE_WINDOW_MEMORY
is set, the fewer connections and
memory allocations are possible for Oracle Database. The lower
AWE_WINDOW_
MEMORY
is set, the lower the performance.
8. Once this parameter is set, Oracle Database can be started and it functions the
same as before except that more database buffers are available to the instance. In
addition, disk I/O may be reduced because more Oracle Database data blocks can
be cached in the System Global Area (SGA).
VLM Instance Tuning
VLM configurations improve database performance by caching more database buffers
in memory. This reduces disk I/O compared to configurations without VLM. VLM
support in Oracle Database 10g Release 1 (10.1) or later has been re-written to integrate
very closely with Windows. Compared to Oracle8i Release 2 (8.1.6), VLM users should
see better performance with the newer implementation.
Note: The total number of bytes of database buffers (that is,
DB_
BLOCK_BUFFERS
multiplied by
DB_BLOCK_SIZE
) is no longer limited to 3
GB.
Dynamic SGA and multiple block size are not supported with VLM.
When VLM is enabled, the following new buffer cache parameters are
not supported:
■
DB_CACHE_SIZE
■
DB_2K_CACHE_SIZE
■
DB_4K_CACHE_SIZE
■
DB_8K_CACHE_SIZE
■
DB_16K_CACHE_SIZE
■
DB_32K_CACHE_SIZE
To select the block size for the instance, use the initialization
parameter
DB_BLOCK_SIZE
. The buffer cache size is set by the
initialization parameter
DB_BLOCK_BUFFERS
.
Note: Registry parameter
VLM_BUFFER_MEMORY
, which enabled VLM
configurations in earlier releases, is not supported in Oracle Database
10g Release 1 (10.1) or later.

Oracle Database Scalability on Windows
Oracle Database Architecture on Windows 1-7
Tuning for VLM is no different than tuning for configurations without VLM. It is an
iterative task that begins by selecting appropriate
DB_BLOCK_SIZE
and
DB_BLOCK_
BUFFERS
initialization parameters for the application being supported.
AWE_WINDOW_MEMORY
, a new registry parameter specific to VLM, tells Oracle Database
how much of its address space to reserve for mapping in database buffers. It defaults
to a value of 1 GB, which should be suitable for most installations. If
DB_BLOCK_SIZE
is
large, however, the default
AWE_WINDOW_MEMORY
value of 1 GB may not be sufficient to
start the database.
Increasing the value of
AWE_WINDOW_MEMORY
improves performance, but it also limits
the amount of memory available for other Oracle Database threads (like foreground
threads). Clients may see "out of memory" errors if this value is set too large. As a
general guideline, increase the
AWE_WINDOW_MEMORY
registry value by 20 percent.
For example, if
DB_BLOCK_SIZE
is set to 8 KB,
AWE_WINDOW_MEMORY
is set to 1 GB, and
the number of LRU latches is set to 32 (16 processor computer), then database startup
fails with out of memory errors 27102 and 34. Increasing the value of
AWE_WINDOW_
MEMORY
to 1.2 GB fixes the problem.
Having a large cache in a VLM configuration may also slow down database writer
(
DBWR
) threads. Having more
DBWR
threads distributes work, required to identify and
write buffers to disk and to distribute I/O loads among threads. Initialization
parameter
DB_WRITER_PROCESSES
enables you to configure multiple database writer
threads.
A large cache can also introduce contention on the LRU (least recently used) latch. On
symmetric multiprocessor (SMP) systems, Oracle Database sets the number of LRU
latches to a value equal to one half the number of processors on the system. You can
reduce contention on such configurations by increasing the number of LRU latches to
twice (or four times) the number of processors on the system.
1.2.2 Windows 4 GB RAM Tuning (4GT)
The following 32-Bit Windows operating systems include a feature called 4 GB RAM
Tuning (4GT):
■Windows Server 2003 R2
■Windows Server 2003
■Windows Vista
■Windows Server 2008
■Windows 7
This feature allows memory-intensive applications on Oracle Database Enterprise
Edition to access up to 3 GB of memory, as opposed to the standard 2 GB in previous
operating system versions. 4GT provides a tremendous benefit: 50 percent more
memory is available for database use, increasing SGA sizes or connection counts.
Note: VLM configurations do not support multiple database block
sizes.
See Also: Oracle Database Performance Tuning Guide for more
information on instance tuning

Oracle Database Integration with Windows
1-8 Oracle Database Platform Guide
1.2.3 Large User Populations
Several features allow Oracle Database to support an increasingly large number of
database connections on Windows:
■Oracle Database Shared Server Process, which limits the number of threads
needed in the Oracle Database process, supports over 10,000 simultaneous
connections to a single database instance.
■Oracle Net multiplexing and connection pooling features allow a large
configuration to connect more users to a single database instance.
■Oracle RAC raises connection counts dramatically by allowing multiple server
computers to access the same database files, increasing the number of user
connections by tens of thousands, also increasing throughput.
1.3 Oracle Database Integration with Windows
Oracle Database is increasingly integrated with Windows, easing maintenance and
improving enterprise-level deployment in security, directory, and transaction services.
Integration features in Oracle Database include:
■Oracle PKI Integration with Windows
■Oracle Services for Microsoft Transaction Server
■Oracle Fail Safe Integration with Windows
1.3.1 Oracle PKI Integration with Windows
Oracle Advanced Security includes Oracle PKI (public key infrastructure) integration
for authentication and single sign-on. You can integrate Oracle-based applications
with the PKI authentication and encryption framework, using Oracle Wallet Manager.
1.3.2 Oracle Services for Microsoft Transaction Server
Microsoft Transaction Server (MTS) is used in the middle tier as an application server
for COM objects and transactions in distributed environments. It is also called COM+
and Enterprise Services. Oracle Services for Microsoft Transaction Server allows Oracle
Database to be used as a resource manager in Microsoft Transaction
Server-coordinated transactions, providing strong integration between Oracle
solutions and Microsoft Transaction Server. Oracle Services for Microsoft Transaction
Server can operate with Oracle Database on any operating system.
Oracle Database takes advantage of a native implementation and also stores recovery
information in Oracle Database itself. Oracle Services for Microsoft Transaction Server
allows development in all industry-wide data access interfaces, including Oracle
Objects for OLE (OO4O), Oracle Call Interface (OCI), ActiveX Data Objects (ADO),
OLE DB, and Open Database Connectivity (ODBC). The Oracle APIs, Oracle Data
Provider for .NET, OO4O and OCI, offer greatest efficiency.
Note: Oracle RAC is not supported on Windows XP and Windows
Vista.

Other Sources of Information
Oracle Database Architecture on Windows 1-9
1.3.3 Oracle Fail Safe Integration with Windows
Oracle Fail Safe ensures that Oracle Database (and also other Oracle and third-party
applications) can be configured and managed for high availability on Windows
clusters. An instance runs on only one node at a time.
A cluster is a group of independent computing systems that operates as a single
virtual system, eliminating individual host systems as points of failure. Oracle Fail
Safe works with Microsoft Cluster Server to ensure that if a failure occurs on one
cluster system, then workloads on that system fail over quickly and automatically to a
surviving system. Oracle Database combined with Oracle Fail Safe on a Windows
cluster ensures protection from both hardware and software failures.
For well-configured solutions, Oracle Fail Safe ensures a surviving system to be
operational in less than a minute, even for heavily-used databases.
1.4 Other Sources of Information
See the following sources for additional information:
■Appendix E, "Oracle Database Windows/UNIX Differences"
■Chapter 2, "Database Tools on Windows" for more information about Oracle
Database integration with Windows tools
■Chapter 16, "Developing Applications for Windows" for more information about
Oracle Database integration with Windows features
Note: Windows operating systems, Windows XP, Windows Vista,
and Windows 7 do not support the clustering technology found in
Microsoft Cluster Server. Therefore, Oracle Fail Safe Server, which
integrates with Microsoft Cluster Server, is not supported on these
operating systems.
See Also: Oracle Fail Safe documentation set is available on separate
media in the Oracle Database media pack

Other Sources of Information
1-10 Oracle Database Platform Guide

2
Database Tools on Windows 2-1
2
Database Tools on Windows
Oracle Database for Windows includes various tools to perform database functions.
This chapter describes preferred tools to perform common database administration
tasks and explains how tools can be started.
Unless otherwise noted, features described in this guide are common to Oracle
Database Enterprise Edition, Oracle Database Standard Edition, Oracle Database
Standard Edition One and Oracle Database Personal Edition.
This chapter contains these topics:
■Choosing a Database Tool
■Starting Database Tools
■Using SQL*Loader
■Using Windows Tools
■Optional Windows Diagnostic and Tuning Utilities
2.1 Choosing a Database Tool
Database tools is a collective term for tools, utilities, and assistants that you can use to
perform database administration tasks. Some database tools perform similar tasks,
though no one database tool performs all database administration tasks. The following
sections indicate which database tools can be used on particular operating systems
and preferred tools to use for common database administration tasks.
■Database Tools and Operating System Compatibility
■Preferred Database Tools
See Also:
■Chapter 5, "Administering a Database on Windows" for
OracleServiceSID configuration tasks
■Chapter 6, "Monitoring a Database on Windows" for thread
management tasks
■Chapter 9, "Authenticating Database Users with Windows" for
authentication tasks
■Chapter 15, "Configuration Parameters and the Registry" and
Chapter 6, "Monitoring a Database on Windows" for Oracle
Counters for Windows Performance Monitor tasks
■Oracle Database Installation Guide for Microsoft Windows for
components available for installation

Choosing a Database Tool
2-2 Oracle Database Platform Guide
2.1.1 Database Tools and Operating System Compatibility
Almost all database tools are available on all supported versions of Windows. The
exceptions are:
■Oracle Migration Workbench is available only at Oracle Technology Network
(OTN). See
http://www.oracle.com/technology/tech/migration/workbench/index.html
■Oracle Enterprise Manager and its optional management packs have additional
integrated tools to assist in managing databases. See Oracle Database 2 Day DBA for
more information.
2.1.2 Preferred Database Tools
Table 2–1 lists various database tools you can use to perform common database
administration tasks. Oracle recommends you use tools listed in the "Preferred
Database Tool" column of the table. After choosing a tool to perform a task, go to
Table 2–2, on page 2-6 for instructions on how to start the tool.
Note: The
VOLSIZE
parameter for Export and Import utilities is not
supported on Windows. If you attempt to use the utilities with the
VOLSIZE
parameter, then error LRM-00101 occurs. For example:
D:\> exp system full=y volsize=100m;
Password: password
LRM-00101: unknown parameter name 'volsize'
EXP-00019: failed to process parameters, type 'EXP HELP=Y' for help
EXP-00000: Export terminated unsuccessfully
Table 2–1 Preferred Database Tools
Administration Task Preferred Tool Other Tools
Create a database Database Configuration Assistant SQL*Plus or SQL*Plus Worksheet
Create database services Database Configuration Assistant ORADIM
Delete database services Database Configuration Assistant ORADIM
Start a database Oracle Enterprise Manager Database
Control SQL*Plus or SQL*Plus Worksheet
Or
srvctl
for database managed by
Oracle Clusterware.
Shut down a database Oracle Enterprise Manager Database
Control Control Panel
SQL*Plus or SQL*Plus Worksheet
Change passwords in the
database password file ORAPWD ORADIM
Migrate database users to a
directory User Migration Utility None
Migrate a database Oracle Database Upgrade Assistant Upgrade Information Tool
Upgrade a database Oracle Database Upgrade Assistant Run provided scripts in SQL*Plus
Export data Data Pump Export (EXPDP) Export (EXP)
Import data Data Pump Import (IMPDP) Import (IMP)

Choosing a Database Tool
Database Tools on Windows 2-3
The following points refer to tools listed in Table 2–1, " Preferred Database Tools":
■SQL*Plus Worksheet is part of Oracle Enterprise Manager and is only supported
on Windows 32-Bit.
■ORADIM can only set a password when none was previously set. If a password
has been previously set, then ORADIM can change it only by deleting and
re-creating Oracle Database services.
■User Migration Utility can migrate local or external users to enterprise users. For
more information, refer to "Using the User Migration Utility" in Oracle Database
Enterprise User Security Administrator's Guide.
■Oracle Database Upgrade Assistant can upgrade the following databases to the
current release: Oracle9i Release 2 (9.2), Oracle Database 10g Release 1 (10.1), and 2
(10.2). Oracle Database Upgrade Assistant can also be used to apply patch sets.
■Data Pump Export and Data Pump Import are preferred for Oracle Database 10g
Release 1 (10.1) and later data; Export and Import are preferred for earlier data.
■If you back up files while you are shutting down the database, then your backup
will be invalid. You cannot use an invalid backup to restore files at a later date.
■You cannot use earlier versions of Oracle Wallet Manager to manage Oracle
Database 10g Release 1 (10.1) and later wallets that contain password-based
credentials for authentication to Oracle Internet Directory. These credentials are
placed in the wallet when an Oracle Database server is registered in Oracle
Internet Directory.
The database wallet that Database Configuration Assistant automatically
generates during database registration can only be used with an Oracle Database
Load data Oracle Enterprise Manager Load Wizard SQL*Loader (SQLLDR)
Back up database Oracle Enterprise Manager Backup
Wizard Recovery Manager (RMAN)
OCOPY
Recover database Oracle Enterprise Manager Recovery
Wizard Recovery Manager (RMAN)
OCOPY
Authenticate database
administrators and users Oracle Enterprise Manager Database
Control SQL*Plus or SQL*Plus Worksheet
Windows operating system
Oracle Administration Assistant for
Windows
Store encrypted and decrypted
Oracle Wallet (Oracle
Advanced Security and Oracle
PKI integration)
Oracle Wallet Manager None
Grant database roles Oracle Enterprise Manager Database
Control Local Users and Groups
SQL*Plus
Create database objects Oracle Enterprise Manager Database
Control SQL*Plus
See Also: Oracle Database Upgrade Guide for more information about
upgrading single instance and cluster databases
Table 2–1 (Cont.) Preferred Database Tools
Administration Task Preferred Tool Other Tools

Starting Database Tools
2-4 Oracle Database Platform Guide
10g Release 1 (10.1) or later server. You cannot use this database wallet for earlier
versions of the database, nor can you use it for Oracle Internet Directory Release
9.0.4 or earlier.
■For guidelines on creating database objects, see Oracle Database Administrator's
Guide.
2.2 Starting Database Tools
This section describes how to start each of the database tools in the following
categories:
■Starting Database Tools in Multiple Oracle Homes
■Running Tools with Windows User Account Control
■Starting Database Tools from the Start Menu
■Starting Database Tools from the Command Line
■Starting Windows Tools
2.2.1 Starting Database Tools in Multiple Oracle Homes
If you have multiple Oracle homes on your computer from previous releases, then see
Appendix B, "Optimal Flexible Architecture", in Oracle Database Installation Guide for
Microsoft Windows for a description of differences between Oracle homes in different
releases.
2.2.1.1 Starting Tools from Oracle8i Release 8.1.3 and Later Multiple Oracle Homes
Beginning in Oracle8i release 8.1.3, each Oracle home, including the first Oracle home
you create on your computer, has a unique HOME_NAME. To start Oracle
Administration Assistant for Windows from any Oracle home, from the Start menu,
select Programs, then select Oracle - HOME_NAME, then select Configuration and
Migration Tools and then select Administration Assistant for Windows
2.2.2 Running Tools with Windows User Account Control
To ensure that only trusted applications run on your computer, Windows Vista,
Windows Server 2008, Windows Server 2008 R2, Windows 7, Windows 8, Windows
8.1, Windows Server 2012, and Windows Server 2012 R2 provide User Account
Control. If you have enabled this security feature, then, depending on how you have
configured it, Oracle Universal Installer prompts you for either your consent or your
credentials when installing Oracle Database Client. Provide either the consent or your
Windows Administrator credentials as appropriate.
You must have Administrator privileges to run some configuration tools, or to run any
tool or application that writes to any directory within the Oracle home. If User
Account Control is enabled, and you are logged in as the local Administrator, then you
can successfully run each of these commands in the usual way. However, if you are
logged in as a member of the Administrator group, then you must explicitly run these
tasks with Windows Administrator privileges.
The following tools must be run with Administrator privileges:
■Oracle Administration Assistant for Windows. This tool is available as a
Configuration and Migration Tool.

Starting Database Tools
Database Tools on Windows 2-5
■Oracle Net Configuration Assistant. This tool is available as a Configuration and
Migration Tool.
■Oracle OLAP Analytic Workspace Manager and Worksheet. This tool is available
as an Integrated Management Tool.
■Oracle Database Configuration Assistant. This tool is available as a Configuration
and Migration Tool.
■Oracle Database Wallet Manager. This tool is available as an Integrated
Management Tool.
■Oracle Database Upgrade Assistant. This tool is available as a Configuration and
Migration Tool.
■Oracle Net Manager. This tool is available as a Configuration and Migration Tool.
■Oracle ASM Configuration Assistant (
asmca
). This tool is available as a
Configuration and Migration Tool.
■Oracle ASM Disk Stamping Tool (
asmtool(g)
). This tool is available as a
Configuration and Migration Tool.
To run any Start menu tool with Administrator privileges:
1. Click the Start menu option.
2. Navigate to Programs, then to Oracle - HOME_NAME.
3. Right-click the name of the tool or application you want to run, then select Run as
administrator.
These steps describe how to start a tool as an Administrator from the command
prompt:
1. On your desktop, create a shortcut for the command prompt window. An icon for
that shortcut appears on the desktop.
2. Right-click the icon for the newly created shortcut, and specify Run as
administrator.
When you open this window, the title bar reads Administrator: Command
Prompt. Commands run from within this window are run with Administrator
privileges.
2.2.3 Starting Database Tools from the Start Menu
Table 2–2 describes how to start assistants and other tools from the Start Menu. It also
tells where to go for further information on using these products.
Note: When you use an assistant, you must have read and write
access to the directory where database files will be moved or created.
To create an Oracle Database, you must have an administrative
privilege. If you run Database Configuration Assistant from an
account that is not part of the Administrators group, then the tool
exits without completing the operation.
Note: All Start Menu paths begin with the Start menu where you
select Programs, then select Oracle - HOME_NAME and so on.

Starting Database Tools
2-6 Oracle Database Platform Guide
Table 2–2 Starting Database Tools from the Start Menu
Tool Start Menu Path More Information
Oracle
Administration
Assistant for
Windows
From Configuration and Migration
Tool s , select Administration Assistant
for Windows
Chapter 9, "Authenticating Database Users with
Windows"
Oracle Database
Upgrade Assistant From Configuration and Migration
Tool s , select Database Upgrade
Assistant
Oracle Database Upgrade Guide
Oracle Database
Configuration
Assistant
From Configuration and Migration
Tool s , select Database Configuration
Assistant
"Creating a Database on Windows Using
Database Configuration Assistant" on page 3-1
Oracle Locale Builder From Configuration and Migration
Tool s , select Locale Builder
Oracle Database Globalization Support Guide
Microsoft ODBC
Administrator From Configuration and Migration
Tool s , select Microsoft ODBC
Administration
Microsoft ODBC Administration online help
Oracle Migration
Workbench From Configuration and Migration
Tool s , select Migration Workbench
Oracle Migration Workbench software and
documentation are available at
http://www.oracle.com/technology/tech/migra
tion/workbench/index.html
Oracle Net
Configuration
Assistant
From Configuration and Migration
Tool s , select Net Configuration
Assistant
Oracle Database Net Services Administrator's Guide
Oracle Net Manager From Configuration and Migration
Tool s , select Net Manager
Oracle Database Net Services Administrator's Guide
Oracle Directory
Manager From Integrated Management Tools,
select Oracle Directory Manager
Oracle Fusion Middleware Administrator's Guide for
Oracle Internet Directory
Oracle Counters for
Windows
Performance Monitor
From Configuration and Migration
Tool s , select Oracle Counters for
Windows Performance Monitor
To install Oracle Counters for Windows
Performance Monitor, choose Advanced
Installation and then the Custom installation type.
"Using Oracle Counters for Windows
Performance Monitor" on page 6-2
SQL*Plus From Application Development,
select SQL*Plus
SQL*Plus User's Guide and Reference
"Starting and Shutting Down a Database with
SQL*Plus" on page 5-4
SQL*Plus Worksheet From Application Development,
select SQL*Plus Worksheet
From Integrated Management Tools,
select SQL*Plus Worksheet
SQL*Plus Worksheet is available from the Start
Menu only with Oracle Database Client.
Oracle Wallet
Manager From Integrated Management Tools,
select Wallet Manager
Oracle Database Security Guide
Automatic Storage
Management
Configuration
Assistant
From Configuration and Management
Tool s , select Automatic Storage
Management Configuration Assistant
Oracle Grid Infrastructure Installation Guide for
Microsoft Windows x64 (64-Bit)

Starting Database Tools
Database Tools on Windows 2-7
2.2.4 Starting Database Tools from the Command Line
Table 2–3 describes how to start Oracle Database tools from the command line, and
where to go for further information on using these products.
Note: After installing Oracle Database 11g Companion Products,
Oracle Wallet Manager is not available from the Start menu. See
Table 2–3, " Starting Database Tools from the Command Line" on
page 2-7 for instructions on starting Oracle Wallet Manager from the
command line.
Table 2–3 Starting Database Tools from the Command Line
Tool Enter at Prompt More Information
DBVERIFY
C:\> dbv
DBVERIFY starts and prompts you for a filename
parameter. To obtain a list of parameters, enter:
C:\> dbv help=y
Oracle Database Utilities
Data Pump
Export
C:\> expdp username
EXP starts and prompts you for parameters. To
obtain a list of these parameters, enter:
C:\> exp help=y
Oracle Database Utilities for instructions
on use of Data Pump Export
Oracle Database Error Messages for
information on error messages
Data Pump
Import
C:\> impdp username
IMP starts and prompts you for parameters. To get a
list of these parameters, enter:
C:\> imp help=y
Oracle Database Utilities for instructions
on use of Data Pump Import
Oracle Database Error Messages for
information on error messages
Database
Configuration
Assistant
C:\> dbca
DBCA wizard starts in interactive mode. For silent
options and other command line options enter:
C:\> dbca -help
"Starting DBCA" in Oracle Database 2
Day DBA
Database Upgrade
Assistant
C:\> dbua
DBUA wizard starts in interactive mode. For silent
options and other command line options enter:
C:\> dbua -help
Oracle Database Upgrade Guide
Export
C:\> exp username
EXP starts and prompts you for parameters. To
obtain a list of these parameters, enter:
C:\> exp help=y
Oracle Database Utilities for instructions
on use of Export
Oracle Database Error Messages for
information on error messages
Net Services
Configuration
C:\> netca
NETCA wizard starts in interactive mode. For silent
options and other command line options enter:
C:\> netca -help
Oracle Database Upgrade Guide
Import
C:\> imp username
IMP starts and prompts you for parameters. To get a
list of these parameters, enter:
C:\> imp help=y
Oracle Database Utilities for instructions
on use of Import
Oracle Database Error Messages for
information on error messages

Starting Database Tools
2-8 Oracle Database Platform Guide
operfcfg
C:\> operfcfg
"Modifying Oracle Counters for
Windows Performance Monitor
Parameters" on page 15-14
Oracle Wallet
Manager
C:\> cd ORACLE_HOME\bin
C:\ORACLE_HOME\bin
>
launch.exe ORACLE_
HOME\bin owm.cl
Chapter 11, "Storing Oracle Wallets in
the Windows Registry"
ORADIM
C:\> oradim
options
To get a list of ORADIM options, enter either of the
following:
C:\> oradim
C:\> oradim -? | -h | -help
"Using ORADIM to Administer an
Oracle Database Instance" on page 3-11
Password Utility
(ORAPWD)
C:\> orapwd
Password file is hidden. Use Windows Explorer to
see it in a file list. From the View menu, select
Options, then select View and then select Show All
Files
"Creating and Populating Password
Files" on page 5-9
Recovery
Manager (RMAN)
C:\> rman
parameters
Oracle Database Backup and Recovery
User's Guide
SQL*Plus
(SQLPLUS)
C:\> sqlplus
SQL*Plus User's Guide and Reference
"Starting and Shutting Down a Database
with SQL*Plus" on page 5-4
SQL*Loader
(SQLLDR)
C:\> sqlldr
SQL*Loader displays a Help screen with available
keywords and default values.
Oracle Database Utilities
Oracle Database Error Messages
"Starting Windows Tools" on page 2-9
TKPROF
C:\> tkprof
Oracle Database Performance Tuning Guide
User Migration
Utility
C:\> umu
parameters
To get a list of parameters, enter:
C:\> umu
help=yes
"Using the User Migration Utility" in
Oracle Database Enterprise User Security
Administrator's Guide
asmtool
asmtoolg
■
C:\> asmtool
Following are the list of options:
C:\> asmtool -add
C:\> asmtool -addprefix
C:\> asmtool -list
C:\> asmtool -delete
■
C:\> asmtoolg
Note:
asmtoolg
is the GUI based tool that does
the same actions done through the command
line asmtool tool. To run
asmtool
and
asmtoolg
, follow the instructions documented
in section "Running Tools with Windows User
Account Control".
"Marking Disk Partitions for Oracle
ASM Before Installation" in Oracle Grid
Infrastructure Installation Guide for
Microsoft Windows x64 (64-Bit)
Table 2–3 (Cont.) Starting Database Tools from the Command Line
Tool Enter at Prompt More Information

Starting Database Tools
Database Tools on Windows 2-9
2.2.5 Starting Windows Tools
Table 2–4 describes how to start each Windows tool and where to go for more
information on using these products.
Note:
■Three special conditions apply when running Export or Import
utilities on Windows. First, default values for
BUFFER
and
RECORDLENGTH
parameters are 4 KB and 2 KB respectively. This
default
RECORDLENGTH
parameter does not depend on the value of
BUFSIZ
defined in the system header file. If you specify a value
larger than
USHRT_MAX
(64 KB), you will get a warning message.
Second, the
VOLSIZE
parameter is not supported. Third, to export
an entire database, you must use the
EXP_FULL_DATABASE
role.
■Oracle Enterprise Manager Database Control is another database
tool for managing the database. For more information, refer to
"Logging in to Enterprise Manager Database Control" in Oracle
Database Installation Guide for Microsoft Windows.
Table 2–4 Starting Windows Tools
Tool Start Procedure More Information
Event Viewer From the Start menu, select
Programs, then select
Administrative Tools and then
select Event Viewer
"Using Event Viewer to Monitor a Database" on page 2-11
Your operating system documentation
Microsoft
Management
Console (MMC)
From the Start menu, select
Programs, then select Oracle -
HOME_NAME, then select
Configuration and Migration
Tools and then select
Administration Assistant for
Windows
Your operating system documentation
Oracle Counters
for Windows
Performance
Monitor
From the Start menu, select
Programs, then select Oracle -
HOME_NAME, then select
Configuration and Migration
Tools and then select Oracle
Counters for Windows
Performance Monitor
"Using Oracle Counters for Windows Performance
Monitor" on page 6-2
Your operating system documentation
Registry Editor At the command prompt, enter:
C:\> regedit
"Using Registry Editor to Modify Configuration
Information" on page 2-13
Chapter 15, "Configuration Parameters and the Registry"
Your operating system documentation
Task Manager Right-click the Task Bar and select
Task Manager
"Using Task Manager to Monitor Applications and
Processes" on page 2-13
Your operating system documentation
Local Users and
Groups From the Start menu, select
Settings, then select Control
Panel. Double-click
Administrative Tools.
Double-click Computer
Management. In the console tree,
click Local Users and Groups.
"Using Local Users and Groups to Manage Users and
Groups" on page 2-13
Chapter 9, "Authenticating Database Users with
Windows"
Your operating system documentation

Using SQL*Loader
2-10 Oracle Database Platform Guide
2.3 Using SQL*Loader
This section describes Windows-specific information for using SQL*Loader (
SQLLDR
).
■Windows Processing Options
■Control File Conventions
2.3.1 Windows Processing Options
This section discusses possible values for the operating system dependent file
processing specifications string option (
os_file_proc_clause
), referred to in
"Specifying Datafile Format and Buffering" in Chapter 8, "SQL*Loader Control File
Reference", in Oracle Database Utilities.
2.3.1.1 Default (No Processing Option) or "str terminator_string"
Stream record format in which each record is terminated by a record terminator. If "str
terminator_string" is not specified, then the record terminator defaults to either the
Windows-style record terminator (the two-character sequence carriage return, \r,
followed by line feed, \n) or the UNIX-style record terminator (single-character line
feed, \n). Maximum record size is 48 KB.
When processing stream format datafiles, SQL*Loader can usually recognize record
terminators automatically, whether they are Windows-style or UNIX-style. So you
usually do not need to specify which record terminator you are using.
For external table loads, however, only Windows-style record terminators are
recognized automatically. If your datafile contains UNIX-style record terminators, you
must specify the record terminator. If you are using SQL*Loader (with
external_
table
option), then specify the UNIX-style record terminator by specifying
"str
'\n'"
on the
INFILE
line in the SQL*Loader control file. For example:
INFILE mydata.dat "str '\n'"
You can also specify the record terminator in hex, by specifying
"str x'0a'"
(assuming an ASCII-based character set). For example:
INFILE mydata.dat "str x'0a'"
Note that the "
0
" (zero) before the "
a
" is required. If you are using SQL with an access
parameter list to create the external table, then you must specify
'\n'
in a
RECORDS
DELIMITED
BY
clause. For example:
RECORDS DELIMITED BY '\n'
You can also use a hex string in this case. For example:
RECORDS DELIMITED BY 0x'0a'
Note that in this case, the "0" (zero) before the "x" and the "0" (zero) before the "a" are
both required.
Note: Microsoft Management Console is started whenever Oracle
Administration Assistant for Windows is started.

Using Windows Tools
Database Tools on Windows 2-11
2.3.2 Control File Conventions
When preparing SQL*Loader control files (
.ctl
), you must follow certain syntax and
notational conventions.
In full path descriptions, backslashes do not require escape characters or other special
treatment. When embedding a single or double quotation mark inside a string
delimited by double quotation marks, place a backslash escape character before the
embedded quotation mark.
When specifying data types in the SQL*Loader control file, note that the default sizes
of native data types shown in Table 2–5 are specific to Windows. These data types can
be loaded with correct results only between systems where they have the same length
in bytes. You cannot override these defaults in the control file. If the byte order is
different between the systems, you can indicate the byte order of the data with the
BYTEORDER
parameter, or you can place a byte-order mark (BOM) in the file.
2.4 Using Windows Tools
You can use Windows tools in various ways to manage Oracle Database:
■Using Event Viewer to Monitor a Database
■Using Microsoft Management Console to Administer a Database
■Using Oracle Counters for Windows Performance Monitor
■Using Registry Editor to Modify Configuration Information
■Using Task Manager to Monitor Applications and Processes
■Using Local Users and Groups to Manage Users and Groups
2.4.1 Using Event Viewer to Monitor a Database
Event Viewer lets you monitor events in your system. An event is an important
occurrence in the system or application (such as Oracle Database) that requires user
notification. While messages for major events can appear on-screen as you work at
your computer, events not requiring your immediate attention are recorded by
Windows in the Event Viewer log file. You can then view this information at your
convenience.
Table 2–5 Default Sizes of Native Data types
Native Data Types Default Field Length
DOUBLE 8
FLOAT 4
INTEGER 4
SMALLINT 2
Note: The default listed is correct if
INTEGER
is specified without a
size. But
INTEGER(n)
is also allowed. In that case,
n
specifies the size of
the
INTEGER
field in bytes.
See Also: Oracle Database Utilities for a complete list of options and
instructions on using SQL*Loader

Using Windows Tools
2-12 Oracle Database Platform Guide
Use Event Viewer to monitor Oracle Database events, such as:
■Initialization of System Global Area for active instance
■Initialization of Program Global Area (PGA) for background processes of active
instance
■Connection to Oracle Database using
AS
SYSDBA
In addition, the operating system audit trail is logged in the Event Log, which is
viewable with the Event Viewer.
2.4.2 Using Microsoft Management Console to Administer a Database
Microsoft Management Console provides a central location for network
administration. Microsoft Management Console hosts applications (called snap-ins)
that administrators can use to manage their networks. Oracle snap-ins enable database
administrators to:
■Configure Oracle Database administrators, operators, users, and roles so the
Windows operating system can authenticate them
■Configure
OracleServiceSID
■Modify registry parameters for all Oracle homes on the computer
■Modify the computer host name, username, and password for the database being
monitored by Oracle Counters for Windows Performance Monitor
■View and terminate an Oracle Database thread
2.4.3 Using Oracle Counters for Windows Performance Monitor
Oracle Counters for Windows Performance Monitor is integrated into Windows
Performance Monitor. This tool enables you to view performance of processors,
memory, cache, threads, and processes. Performance information provided includes
device usage, queue lengths, delays, throughput measurements, and internal
congestion measurements. This information is provided as charts, alerts, and reports.
You can use Oracle Counters for Windows Performance Monitor to monitor key Oracle
Database information, such as:
■Library cache
■Buffer cache
■Data dictionary cache
■Redo log buffer cache
■Thread activity
You can use your findings to improve database performance.
See Also: Chapter 6, "Monitoring a Database on Windows" for
specific instructions on accessing and using Event Viewer to monitor
Oracle Database events
See Also: "Using Oracle Counters for Windows Performance
Monitor" on page 6-2 for specific instructions on accessing and using
Oracle Counters for Windows Performance Monitor to monitor Oracle
Database performance

Using Windows Tools
Database Tools on Windows 2-13
2.4.4 Using Registry Editor to Modify Configuration Information
Oracle Database stores its configuration information in a structure known as the
registry. You can view and modify this configuration information through Registry
Editor. The registry contains configuration information for your computer and must
not be accessible for editing by inexperienced users. Only experienced administrators
should view and change this information.
Registry Editor displays configuration information in a format similar to Windows
Explorer. In the left-hand window is a tree-like format consisting of keys (or folders).
When one of these keys is highlighted, parameters and values assigned to that key are
displayed in the right-hand window.
When you install products from your media, configuration parameters are
automatically entered in the registry. These parameters are read each time your
Windows computer is started and whenever an Oracle Database product is started.
These parameters include settings for:
■Oracle home directory
■Language
■Company name
■Oracle home subdirectories for individual products
■Individual products such as SQL*Plus
■Services
2.4.5 Using Task Manager to Monitor Applications and Processes
Task Manager has four tabs:
■Applications tab displays what applications run. This is useful for identifying and
ending unresponsive tasks. (Oracle Database does not appear as an application
because it runs as a service.)
■Processes tab displays details of currently running processes and their resource
usage. Columns are customizable.
■Performance tab graphically displays real-time CPU and memory usage, which is
useful for spotting sudden changes.
■Networking tab graphically displays the network traffic taking place over the
computer’s network connections.
2.4.6 Using Local Users and Groups to Manage Users and Groups
Local Users and Groups enables you to manage users and groups on Windows.
Specifically, you can:
■Create and modify local user accounts
■Create and modify user profiles
■Create, add, and delete local groups
See Also: Chapter 15, "Configuration Parameters and the Registry"
for definitions of Oracle Database configuration parameters and
specific instructions on using the registry to modify Oracle Database
configuration parameters

Optional Windows Diagnostic and Tuning Utilities
2-14 Oracle Database Platform Guide
2.5 Optional Windows Diagnostic and Tuning Utilities
Windows Resource Kit includes several diagnostic and tuning utilities.
Process Viewer summarizes resource usage by a process.
Process Monitor displays real-time file systems, registry and process-thread activity. It
combines
Filemon
and
Regmon
utilities and provides reliable process information.
Process Explorer provides a detailed display of resource usage by a process.
Task List displays resource usage and other details of a process when its processor
identifier or process name is given as an argument. This tool also displays a list of
executables and DLLs associated with a process.

3
Postinstallation Database Creation on Windows 3-1
3
Postinstallation Database Creation on
Windows
This chapter describes how to create a database after installing Oracle Database, using
either Database Configuration Assistant or command-line tools.
This chapter contains these topics:
■Naming Conventions for Oracle Database
■Creating a Database on Windows Using Database Configuration Assistant
■Creating a Database on Windows Using Command-Line Tools
■Using ORADIM to Administer an Oracle Database Instance
■Database Migration from a 32-bit Windows Computer
3.1 Naming Conventions for Oracle Database
All mounted Oracle Database servers in a network must have unique database names.
When a database is created, a name is associated with it and stored in its control files.
If you provide the database keyword, either in the
CREATE DATABASE
statement or
when prompted by Database Configuration Assistant, then that value becomes the
name for that database.
If you attempt to mount two Oracle Database servers with the same database name,
then you receive the following error during mounting of the second server:
ORA-01102: cannot mount database in EXCLUSIVE mode
If there are two or more Oracle Database servers on the same computer, but located in
different Oracle homes, then the following rules apply:
■Each database name must be unique
■Each SID must be unique
To change the name of an existing database, you must use the
CREATE CONTROLFILE
statement to re-create your control files and specify a new database name.
3.2 Creating a Database on Windows Using Database Configuration
Assistant
Oracle recommends you use Database Configuration Assistant to create a database,
because it is easier. It offers the same interface and operates the same way on all
supported platforms, so no step-by-step procedures or screen shots are included here.

Creating a Database on Windows Using Command-Line Tools
3-2 Oracle Database Platform Guide
Database Configuration Assistant enables you to:
■Create a Database
■Configure Database Options in a database
■Delete a Database
■Manage Templates
An initialization parameter file is an ASCII text file containing parameters. Use this
file to create and modify a database using command-line tools. When you create a
database using Database Configuration Assistant, a server parameter file (SPFILE) is
created from the initialization parameter file, and the initialization parameter file is
renamed. Oracle does not recognize the renamed file as an initialization parameter file,
and it is not used after the instance is started.
If you want to modify an instance created with Database Configuration Assistant after
it starts, you must use
ALTER SYSTEM
statements. You cannot change the Server
Parameter File itself, because it is a binary file that cannot be browsed or edited using a
text editor. The location of the newly-created Server Parameter File is
ORACLE_
HOME\database
. The Server Parameter File file name is
spfileSID.ora
.
3.3 Creating a Database on Windows Using Command-Line Tools
This section describes how to create a new database manually. As part of its database
software files, Oracle Database provides a sample initialization parameter file, which
can be edited to suit your needs. You can choose to create database creation scripts
using DBCA.
Database creations are of three types:
■Copy an existing database and delete the old database.
■Copy an existing database and keep the old database.
■Create a new database when no database exists on your system.
Table 3–1 summarizes tasks involved in creating a new database for each of these
database creation categories. Each step is explained in detail in the following
subsections.
See Also: Oracle Database 2 Day DBA for instructions on using
Database Configuration Assistant
See Also: "Managing Initialization Parameters Using a Server
Parameter File" in Oracle Database Administrator's Guide
Table 3–1 Manual Database Creation Tasks
Task
Copy existing
database and delete
old database
Copy existing
database and keep
old database
Create new database when
no database exists on
system
Exporting an Existing
Database Yes Note 1 Not applicable
Deleting Database Files Yes No Not applicable
Modifying the Initialization
Parameter File Yes Yes Yes
Starting an Oracle Database
Instance Yes Yes Yes

Creating a Database on Windows Using Command-Line Tools
Postinstallation Database Creation on Windows 3-3
Note 1
Yes if you copy data from the existing database to the new database; no otherwise.
Note 2
Yes if you import tables and other objects exported from the existing database; not
otherwise.
We use an example in the following sections to demonstrate how to create a database.
In this example, the existing database is the starter database with a
SID
of
orcl
located
in directory
C:\app\username\product\11.2.0\oradata\orcl.
You will copy
orcl
to
a new database with a database name and
SID
of
prod
located in directory
C:\app\username\product\11.2.0\oradata\prod.
You will then delete starter
database
orcl
.
3.3.1 Exporting an Existing Database
You are required to export an existing database only if you intend to copy its contents
to a new database. If you are working with data from an earlier Oracle release, then
you can use Export for this task. If you are using Oracle Database 10g Release 1 (10.1)
or later data, then Oracle recommends that you use Data Pump Export because it
supports new Oracle Database 10g Release 1 (10.1) or later features, such as floating
points.
Although you can start Data Pump Export or Export in either parameter mode or
interactive mode, Oracle recommends parameter mode. Interactive mode provides less
functionality than parameter mode and exists for backward compatibility only.
The syntax for Data Pump Export parameter mode is:
C:\> expdp SYSTEM DUMPFILE=myexp.dmp FULL=y LOGFILE=myexp.log
Password: password
The syntax for Data Pump Export interactive mode is:
C:\> expdp SYSTEM
Password: password
Enter only the command
expdp
SYSTEM
to begin an interactive session and let Data
Pump Export prompt you for information it needs.
Creating and Starting an
Oracle Database Service No Yes Yes
Putting the CREATE
DATABASE Statement in a
Script
Yes Yes Yes
the CREATE DATABASE
Script Yes Yes Yes
Importing a Database Yes Note 2 Not applicable
Updating ORACLE_SID in the
Registry No Only if you change the
default
SID
Yes
Backing Up the New Database Yes Yes Yes
Table 3–1 (Cont.) Manual Database Creation Tasks
Task
Copy existing
database and delete
old database
Copy existing
database and keep
old database
Create new database when
no database exists on
system

Creating a Database on Windows Using Command-Line Tools
3-4 Oracle Database Platform Guide
The syntax for Export parameter mode is:
C:\> exp SYSTEM FILE=myexp.dmp FULL=y LOG=myexp.log
Password: password
The syntax for Export interactive mode is:
C:\> exp SYSTEM
Password: password
Enter only the command
exp
SYSTEM
to begin an interactive session and let Export
prompt you for information it needs.
To export all data from an existing database to a new database:
1. Set
ORACLE_SID
to the database service of the database whose contents you intend
to export. For example, if the database you intend to export is starter database
orcl
, then enter the following at the command prompt. Note that there are no
spaces around the equal sign (
=
) character.
C:\> set ORACLE_SID=orcl
2. If the existing database is Oracle Database 10g Release 1 (10.1) or later, then start
Data Pump Export from the command prompt:
C:\> expdp SYSTEM DUMPFILE=myexp.dmp FULL=y LOG=myexp.log
Password: password
You now have a full database export of starter database
orcl
in file
myexp.dmp
. All
messages from Data Pump Export are logged in file
myexp.log
.
3. If the existing database is before Oracle Database 10g Release 1 (10.1), then start
Export from the command prompt:
C:\> exp SYSTEM FILE=myexp.dmp FULL=y LOG=myexp.log
Password: password
Note: If you use parameter mode, then Data Pump Export considers
file names and directory names to be invalid if they contain one or
more blank spaces. The workaround is to enclose the full path in the
DUMPFILE=
parameter in triple quotation marks. For example:
DUMPFILE="""C:\program files\export.dmp"""
If Data Pump Export is used in interactive mode, then the file name or
directory name can contain a space without quotation marks.
Note: If you use parameter mode, then Export considers file names
and directory names to be invalid if they contain one or more blank
spaces. The workaround is to enclose the full path in the
FILE=
parameter in triple quotation marks. For example:
FILE="""C:\program files\export.dmp"""
If Export is used in interactive mode, then the file name or directory
name can contain a space without quotation marks.
See Also: Oracle Database Utilities for more information on using
Data Pump Export or Export

Creating a Database on Windows Using Command-Line Tools
Postinstallation Database Creation on Windows 3-5
You now have a full database export of starter database
orcl
in file
myexp.dmp
. All
messages from Export are logged in file
myexp.log
.
3.3.2 Deleting Database Files
Deleting database files is required only when you copy an existing database to a new
database to replace the old database. In the following example, you delete the database
files of starter database
orcl
.
To delete database files:
1. Shut down starter database
orcl
at the command prompt:
C:\> oradim -SHUTDOWN -SID orcl -SHUTTYPE inst -SHUTMODE immediate
2. Delete the following files from directory
C:\app\username\product\11.2.0\oradata\orcl:
3.3.3 Modifying the Initialization Parameter File
To use starter database
orcl
as the basis for your new database, first copy
ORACLE_
BASE\admin\orcl\pfile\init.ora
. Second, put the copy in
ORACLE_
BASE\admin\prod\pfile\init.ora
. Third, modify the file as described in this section.
If you do not have an existing database on your system, then you cannot copy an
existing initialization parameter file to use as the basis for your new initialization
parameter file. However, you can use the sample initialization parameter file
initsmpl.ora
provided in
ORACLE_HOME\admin\sample\pfile
as the basis for the initialization parameter file for database
prod
.
If you use
initsmpl.ora
as the basis for the initialization parameter file, then you
must set the following parameters to the indicated values, or you will not be able to
start database
prod
:
File Name File Name File Name File Name
control01.ctl
drsys01.dbf
temp01.dbf
xdb01.dbf
control02.ctl
cwmlite01.dbf
tools01.dbf
redo01.log
control03.ctl
example01.dbf
undotbs01.dbf
redo02.log
index01.dbf
system01.dbf
user01.dbf
redo03.log
Note: Beginning with Oracle9i Release 2 (9.2), nesting of quotation
marks using the backslash (\) escape character is no longer supported.
This may affect how Oracle Database interprets parameter values in
your initialization parameter file. For example, if you specified
CONTROL_FILES = "ctlfile\'1.ora"
in releases before release 9.2, the
file name would be interpreted as
ctlfile'1.ora
. Starting with
release 9.2, the file name would be interpreted as
ctlfile\'1.ora
.
Oracle highly recommends modifying your parameter files to remove
such references. See Oracle Database Reference for other methods of
nesting quotation marks in initialization parameter values.

Creating a Database on Windows Using Command-Line Tools
3-6 Oracle Database Platform Guide
■
DB_NAME=prod.domain
Parameter
DB_NAME
indicates the database name and must match the name used in
the
CREATE DATABASE
statement in "Putting the CREATE DATABASE Statement in
a Script" on page 3-7. You give a unique database name to each database. You can
use up to eight characters for a database name. The name is not required to match
the
SID
of the database service.
■
INSTANCE_NAME=prod.domain
■
SERVICE_NAMES=prod.domain
■
CONTROL_FILES = (
"C:\app\username\product\11.2.0\oradata\prod\control01.ctl",
"C:\app\username\product\11.2.0\oradata\prod\control02.ctl",
"C:\app\username\product\11.2.0\oradata\prod\control03.ctl")
Parameter
CONTROL_FILES
lists database control files. You do not have control files
on your file system at this point, because control files are created when you run
the
CREATE DATABASE
statement. Ensure that you specify the complete path and
file name, including drive letter.
■
DB_FILES=100
Modifying initialization parameter
DB_FILES
is not required, but it is
recommended to optimize performance. Set this parameter to the same number as
the value of the
MAXDATAFILES
option of the
CREATE DATABASE
statement. The value
of
100
is used for this example.
The
DIAGNOSTIC_DEST
initialization parameter sets the location of the Automatic
Diagnostic Repository (ADR), which is a directory structure stored outside of the
database. The ADR is used in problem diagnostics.
DIAGNOSTIC_DEST =
ORACLE_HOME\log
if the environment variable
ORACLE_BASE
is not
set.
DIAGNOSTIC_DEST =
ORACLE_BASE
variable if the environment variable
ORACLE_BASE
is
set.
3.3.4 Creating and Starting an Oracle Database Service
You are required to create and start an Oracle Database service only if you do one of
the following:
■Copy an existing database to a new database and keep the old database
■Create a new database when you have no other database to copy
Before you create the database, first create a Windows service to run the database. This
service is the Oracle Database process,
oracle.exe
, installed in the form of a Windows
service.
Use ORADIM to create the service. After it has been created, the service starts
automatically. See "Using ORADIM to Administer an Oracle Database Instance" on
page 3-11 for information on how to use ORADIM.
To create and start an Oracle Database service:
See Also: Oracle Database Reference for information on other
initialization parameters that you can add or modify
See Also: Oracle Database Installation Guide for Microsoft Windows for
information on ADR

Creating a Database on Windows Using Command-Line Tools
Postinstallation Database Creation on Windows 3-7
1. Run ORADIM from the command prompt:
C:\> oradim -NEW -SID prod -STARTMODE manual
-PFILE "C:\app\oracle\product\11.2.0\admin\prod\pfile\init.ora"
Note that the previously created initialization parameter file is specified, with
complete path, including drive name. You can check if the service is started in the
Services window of the Control Panel.
2. Set
ORACLE_SID
to equal
prod
. Note that there are no spaces around the equal sign
(=) character:
C:\> set ORACLE_SID=prod
3.3.5 Starting an Oracle Database Instance
Start an instance without mounting a database.
SQL> STARTUP NOMOUNT
You are not required to specify the
PFILE
clause in this example, because the
initialization parameter file is stored in the default location. At this point, there is no
database. Only the SGA is created and background processes are started in
preparation for the creation of a new database.
3.3.6 Putting the CREATE DATABASE Statement in a Script
The
CREATE DATABASE
statement is a SQL statement that creates the database. A script
containing this statement can be used anytime you create a database.
The
CREATE DATABASE
statement may have the following parameters:
■
MAXDATAFILES
- default value: 32, maximum value: 65534
■
MAXLOGFILES
- default value: 32, maximum value: 255
When you run a
CREATE DATABASE
statement, Oracle Database performs several
operations depending upon clauses that you specified in the
CREATE DATABASE
statement or initialization parameters that you have set.
To create database
prod
, copy and save the following statement in a file named
script_name.sql
:
CREATE DATABASE prod
USER SYS IDENTIFIED BY sys_password
USER SYSTEM IDENTIFIED BY system_password
MAXLOGFILES 5
MAXDATAFILES 100
DATAFILE 'C:\app\oracle\product\11.2.0\oradata\prod\system01.dbf' SIZE 325M REUSE
AUTOEXTEND ON NEXT 10240K MAXSIZE UNLIMITED
UNDO TABLESPACE "UNDOTBS" DATAFILE
'app\oracle\product\11.2.0\oradata\prod\undotbs01.dbf'
Note: Oracle Managed Files is a feature that works with the
CREATE
DATABASE
statement to simplify administration of Oracle Database.
Oracle Managed Files eliminates the requirement to directly manage
operating system files comprising an Oracle Database server, because
you specify operations in terms of database objects rather than file
names. For more information on using Oracle Managed Files see
Oracle Database Administrator's Guide.

Creating a Database on Windows Using Command-Line Tools
3-8 Oracle Database Platform Guide
SIZE 200M REUSE AUTOEXTEND ON NEXT 5120K MAXSIZE UNLIMITED
CHARACTER SET WE8MSWIN1252
logfile 'C:\app\username\product\11.2.0\oradata\prod\redo01.log' size 100M reuse,
'C:\app\username\product\11.2.0\oradata\prod\redo02.log' size 100M reuse,
'C:\app\username\product\11.2.0\oradata\prod\redo03.log' size 100M reuse
EXTENT MANAGEMENT LOCAL;
3.3.7 the CREATE DATABASE Script
To use the SQL script to create a database:
1. Verify that the service is started in the Control Panel. In this example, the service
name is
OracleServicePROD
, and its status column must display Started. If not,
then select the service name and choose Start.
You can also check the status of the service by entering the following at the
command prompt:
C:\> net START
A list of all Windows services currently on the system appears. If
OracleServicePROD
is missing from the list, then enter:
C:\> net START OracleServicePROD
2. Make
PROD
the current
SID
:
C:\> set ORACLE_SID=PROD
3. Add
ORACLE_HOME\bin
to your
PATH
environment variable:
set PATH=ORACLE_BASE\ORACLE_HOME\bin;%PATH%
4. Start SQL*Plus from the command prompt, and connect to the database as
SYSDBA:
C:\> sqlplus /NOLOG
SQL> CONNECT / AS SYSDBA
The message
connected
appears.
5. Turn on spooling to save messages:
SQL> SPOOL script_name.log
6. Run script
script_name.sql
that you created in "Putting the CREATE DATABASE
Statement in a Script" on page 3-7:
SQL> C:\app\oracle\product\11.2.0\dbhome_1\rdbms\admin\script_name.sql;
If the database is successfully created, then the instance is started and the
following message appears numerous times:
Statement
processed
3.3.8 Importing a Database
You can use Data Pump Import (for Oracle Database 10g Release 1 (10.1) or later data)
or Import (for earlier data) to import the full export created in "Exporting an Existing
Database" on page 3-3 into the new database. Although you can start Data Pump
Import or Import using either parameter mode or interactive mode, Oracle
recommends parameter mode because it provides more functionality. Interactive mode
exists solely for backward compatibility.

Creating a Database on Windows Using Command-Line Tools
Postinstallation Database Creation on Windows 3-9
The syntax for Data Pump Import parameter mode is:
C:\> impdp SYSTEM DUMPFILE=myexp.dmp FULL=y LOG=myexp.log
Password: password
The syntax for Data Pump Import interactive mode is:
C:\> impdp SYSTEM
Password: password
Enter only
impdp
SYSTEM
to begin an interactive session and let Data Pump Import
prompt you for information it needs.
3.3.9 Updating ORACLE_SID in the Registry
If this is the first database on the system or if you intend to make the new database the
default database, then you must make a change in the registry.
1. Start Registry Editor at the command prompt:
C:\> regedit
The Registry Editor window appears.
2. Choose subkey
\HKEY_LOCAL_MACHINE\SOFTWARE\ORACLE\HOME0
for the first Oracle
home on your computer. For subsequent installations to different Oracle homes on
the same computer, the path is
\HKEY_LOCAL_MACHINE\SOFTWARE\ORACLE\HOMEID
where ID is the unique number identifying the Oracle home.
3. Locate parameter
ORACLE_SID
on the right side of the Registry Editor window.
4. Double-click the parameter name and change the data to the new
SID
, which is
prod
in this example.
Note:
■If you use parameter mode, then Data Pump Import considers file
names and directory names to be invalid if they contain one or
more blank spaces. The workaround is to enclose the full path in
the
DUMPFILE=
parameter in triple quotation marks. For example:
DUMPFILE="""C:\program files\export.dmp"""
If you use Data Pump Import in interactive mode, then the file
name or directory name can contain a space without quotation
marks.
■If the original database from which the export file was generated
contains a tablespace that is not in the new database, then Import
tries to create that tablespace with associated datafiles.
The easy solution is to ensure that both databases contain the
same tablespaces. Datafiles are not required to be identical. Only
tablespace names are important.
See Also: Oracle Database Utilities for more information on using
Data Pump Import or Import
See Also: Chapter 15, "Configuration Parameters and the Registry"
for more information on subkey locations for multiple Oracle homes
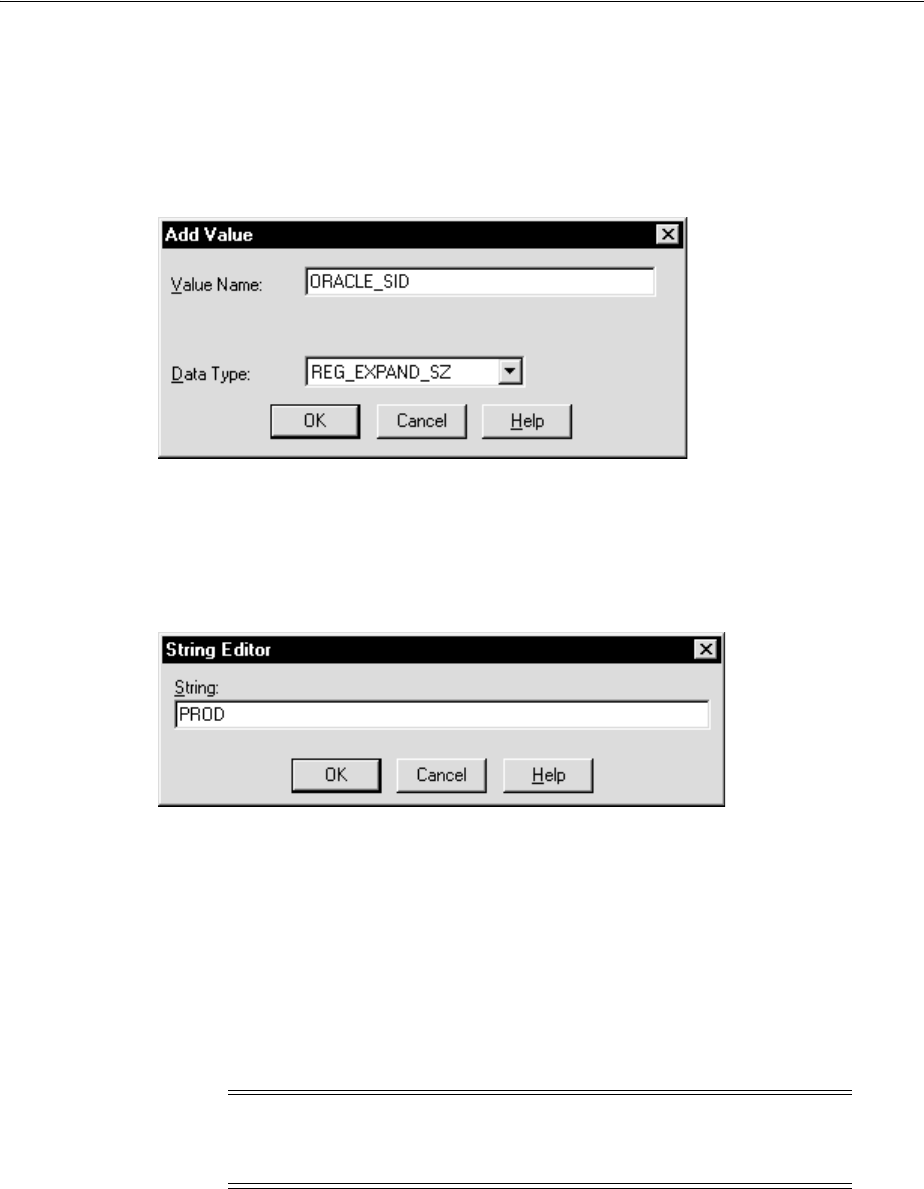
Creating a Database on Windows Using Command-Line Tools
3-10 Oracle Database Platform Guide
If you do not yet have parameter
ORACLE_SID
, because this is the first database on your
system, then you must create it.
To create parameter
ORACLE_SID
:
1. Choose Add Value from the Edit menu.
The Add Value dialog appears:
2. Enter
ORACLE_SID
in the Value Name field.
3. Select REG_EXPAND_SZ (for an expandable string) in the Data Type list.
4. Click OK.
A string editor dialog appropriate for the data type appears:
5. Enter prod in the String field.
6. Click OK.
Registry Editor adds parameter
ORACLE_SID
.
7. Choose Exit from the Registry menu.
Registry Editor exits.
3.3.10 Backing Up the New Database
To back up the new database:
1. Shut down the database instance and stop the service:
C:\> oradim -SHUTDOWN -SID prod -SHUTTYPE srvc,inst -SHUTMODE immediate
Caution: If anything goes wrong while operating the new database
without a backup, then you must repeat the database creation
procedure. Back up your database now to prevent loss of data.

Using ORADIM to Administer an Oracle Database Instance
Postinstallation Database Creation on Windows 3-11
2. Using the tool of your choice, back up database files.
Database files consist of the initialization parameter file, control files, online redo
log files, and datafiles.
When the backup is complete, you can start the database again, create users and
objects, if necessary, make any other changes, and use the database.
Be sure to back up the database after making any significant changes, such as
switching archiving mode or adding a tablespace or datafile.
3.4 Using ORADIM to Administer an Oracle Database Instance
ORADIM is a command-line tool that is available with Oracle Database. You are
required to use ORADIM only if you are manually creating, deleting, or modifying
databases. Database Configuration Assistant is an easier tool to use for this purpose.
The following sections describe ORADIM commands and parameters. Note that each
command is preceded by a dash (
-
). To get a list of ORADIM parameters, enter:
oradim -? | -h | -help
When you use ORADIM, a log file called
oradim.log
opens in
ORACLE_HOME\database
,
or in the directory specified by registry parameter
ORA_CWD
. All operations, whether
successful or failed, are logged in this file. You must check this file to verify success of
an operation.
If you have installed an Oracle Database service on Windows, then when logging in as
SYSTEM user (LocalSystem), with startup mode set to Automatic, it is possible that the
Oracle Database service starts but the database does not start automatically. The
following error message is written to file
ORADIM.LOG
in directory
ORACLE_
HOME\database
:
ORA-12640: Authentication adapter initialization failed
Caution: Although
ORADIM
returns the prompt immediately, you
must wait for the database and the service to stop completely before
continuing to Step 2. Wait until the Control Panel indicates service
OracleServicePROD
has stopped. If you do not do this, then the
backup may be useless because it was taken while data was being
written to datafiles.
See Also: For more information on archiving, backup, and recovery
■Oracle Database Concepts
■Oracle Database Backup and Recovery User's Guide
■Oracle Database 2 Day DBA
Caution: Do not store database files on a compressed drive. This can
result in write errors and decreased performance.
Note: Specifying
oradim
without any options also returns a list of
ORADIM parameters and descriptions.

Using ORADIM to Administer an Oracle Database Instance
3-12 Oracle Database Platform Guide
Oracle Enterprise Management Agent, Oracle Enterprise Manager Management Server
and Oracle Internet Directory may also fail, because they cannot connect to the
database for the same reason. The workarounds are:
■Modify
SQLNET.ORA
You can modify
SQLNET.ORA
, either by removing the line
sqlnet.authentication_services=(NTS)
or by changing it to
sqlnet.authentication_services=(NONE)
■Start the database after the service starts
You can start the database manually after the Oracle Database service has started,
using SQL*Plus and connecting as
SYSDBA
.
■Start the service as a specific user
3.4.1 Creating an Instance
To use ORADIM to create an instance, enter:
oradim [-NEW -SID SID] | -SRVC service_name | -ASMSID SID | -ASMSRVC service_name
[-SYSPWD password] [-STARTMODE auto | manual] [-SRVCSTART system | demand]
[-PFILE filename | -SPFILE] [-SHUTMODE normal | immediate | abort] [-TIMEOUT
secs] [-RUNAS osusr/ospass]
where
■
-NEW
indicates that you are creating a new instance. This is a mandatory
parameter.
■
-SID
SID
is the name of the instance to create.
■
-SRVC
service_name
is the name of the service to create (
OracleServiceSID
).
■
-ASMSID SID
is the name of the Automatic Storage Management instance to create.
■
-ASMSRVC service_name
is the name of the Automatic Storage Management
service to create.
■
-SYSPWD
password
is the system password.
■
-STARTMODE
auto
|
manual
indicates whether to start the instance when the Oracle
Database service is started. Default is
manual
.
■
-SRVCSTART system | demand
indicates whether to start the Oracle Database
service on computer restart. Default is
demand.
Here,
system
specifies that the
service be configured to automatically start when the system boots or reboots.
Demand
specifies that the user has to explicitly start the service.
■
-PFILE
filename
is the initialization parameter file to be used with this instance.
Ensure that you specify the complete path name of this file, including drive letter.
■
-SPFILE
indicates that a server parameter file (SPFILE) be used during startup
instead of a PFILE.
See Also: Your operating system documentation for instructions on
starting services

Using ORADIM to Administer an Oracle Database Instance
Postinstallation Database Creation on Windows 3-13
■
-SHUTMODE
specifies how to stop an instance. It requires an argument and the
default is
immediate.
If
SHUTMODE
is omitted, then there is no attempt made to
shutdown the instance when the service is shutdown.
■
-TIMEOUT
secs
sets the maximum time to wait (in seconds) before the service for a
particular
SID
stops. The default is 90 seconds. It cannot be used without the
SHUTDOWN
argument.
■
-RUNAS osusr/ospass
("run as") sets the operating system user with which the
Oracle service logs on to the system. You supply an operating system user name
and password, and the service logs on and runs with the privileges of that user. If
omitted, the service logs on to the system using the Local system account, which is
a privileged user.
To create an instance called
PROD
, for example, you can enter:
C:\> oradim -NEW -SID prod -STARTMODE auto -PFILE
C:\app\oracle\product\11.2.0\admin\prod\pfile\init.ora
3.4.2 Starting an Instance and Services
To use ORADIM to start an instance and services, enter:
oradim -STARTUP -SID SID | -ASMSID SID [-SYSPWD password] [-STARTTYPE srvc |
inst | srvc,inst] [-PFILE filename | -SPFILE]
where
■
-STARTUP
indicates that you are starting an instance that already exists. This is a
mandatory parameter.
■
-SID
SID
is the name of the instance to start.
■
-ASMSID SID
is the name of the Automatic Storage Management instance to start.
■
-STARTTYPE
srvc
,
inst
indicates whether to start the service or the instance. One
or both values can be specified. If it is not specified, then the registry is checked for
the current setting.
-STARTTYPE srvc
is equivalent to
net start oracleservice<sid>
from the
command line.
-STARTTYPE inst
is equivalent of
startup
within SQL*Plus.
■
-PFILE
filename
is the initialization parameter file to be used with this instance.
Ensure that you specify the complete path name of this file, including drive letter.
■
-SPFILE
indicates that a server parameter file (SPFILE) be used during startup
instead of a PFILE.
To start an instance called
puma
, for example, you can enter:
C:\> oradim -STARTUP -SID puma -STARTTYPE inst -PFILE
C:\app\oracle\product\11.2.0\admin\prod\pfile\init.ora
Note: For simplicity in demonstrating this feature, this example does
not perform the password management techniques that a deployed
system normally uses. In a production environment, follow the Oracle
Database password management guidelines, and disable any sample
accounts. See Oracle Database Security Guide for password management
guidelines and other security recommendations.

Using ORADIM to Administer an Oracle Database Instance
3-14 Oracle Database Platform Guide
3.4.3 Stopping an Instance and Services
The Enterprise Database Control service (
OracleDBConsoleSID
) is dependent on the
Oracle Database service (
OracleServiceSID
). You must stop the dependent Enterprise
Database Control service (if installed) before
ORADIM
to stop the database instance
service.
To use ORADIM to stop an instance, enter:
oradim -SHUTDOWN -SID SID | -ASMSID SID [-SYSPWD password]
[-SHUTTYPE srvc | inst | srvc,inst] [-SHUTMODE normal | immediate | abort]
where
■
-SHUTDOWN
indicates that you are stopping an instance. This is a mandatory
parameter.
■
-SID
SID
specifies the name of the instance to stop.
■
-ASMSID SID
is the name of the Automatic Storage Management instance to stop.
■
-SHUTTYPE
srvc
,
inst
indicates whether to stop the service or the instance. One or
both values can be specified. If it is not specified, then the registry is checked for
the current setting.
■
-SHUTMODE
specifies how to stop an instance. This is an optional parameter. If you
do not specify how to stop an instance, then
immediate
is the default mode.
To stop an instance called
puma
, for example, you can enter:
C:\> oradim -SHUTDOWN -SID puma -SHUTTYPE srvc,inst
3.4.4 Editing an Instance
You can edit an existing instance to change such values as instance name, startup
mode, shutdown mode, and shutdown type. To use ORADIM to modify an instance,
enter:
oradim -EDIT -SID SID | -ASMSID SID [-SYSPWD password] [-STARTMODE auto |
manual] [-SRVCSTART system | demand] [-PFILE filename | -SPFILE][SHUTMODE normal
| immediate | abort] [SHUTTYPE srvc | inst | srvc,inst]
where
■
-EDIT
indicates that you are modifying an instance. This is a mandatory
parameter.
■
-SID
SID
specifies the name of the instance to modify. This is a mandatory
parameter.
■
-ASMSID SID
is the name of the Automatic Storage Management instance to
modify.
■
-STARTMODE
indicates whether to start the instance when the Oracle Database
service is started. Default is
manual
.
■
-SRVCSTART system | demand
indicates whether to start the Oracle Database
service on computer restart. Default is
demand.
■
-PFILE
filename
specifies the initialization parameter file to be used with this
instance. Ensure that you specify the complete path name of this file, including
drive letter.
■
-SPFILE
indicates that a server parameter file (SPFILE) be used during startup
instead of a PFILE.

Database Migration from a 32-bit Windows Computer
Postinstallation Database Creation on Windows 3-15
■
-SHUTMODE
specifies how to stop an instance. This is an optional parameter. If you
do not specify how to stop an instance, then
immediate
is the default mode.
■
-SHUTTYPE
indicates whether to stop the service or the instance. One or both values
can be specified. If it is not specified, then the registry is checked for the current
setting.
To specify a new initialization parameter file for the instance
prod
, for example, you
can enter:
C:\> oradim -EDIT -SID prod -PFILE
C:\app\oracle\product\11.2.0\admin\lynx\pfile\init.ora
3.4.5 Deleting an Instance
The Enterprise Database Control service (
OracleDBConsoleSID
) is dependent on the
Oracle Database service (
OracleServiceSID
). You must stop the dependent Enterprise
Database Control service (if installed) before
ORADIM
to delete the database instance.
To use ORADIM to delete an instance, enter:
oradim -DELETE -SID SID | -ASMSID SID | -SRVC service_name | -ASMSRVC service_name
where
■
-DELETE
indicates that you are deleting an instance or service. This is a mandatory
parameter.
■
-SID
SID
specifies the name of the
SID
to delete.
■
-SRVC
service_name
specifies the name of the service to delete (OracleServiceSID).
User should specify either
SID
or SRVC.
■
-ASMSID SID
is the name of the Automatic Storage Management instance to delete.
■
-ASMSRVC service_name
is the name of the Automatic Storage Management
service to delete.
To delete an instance called
prod
, for example, you can enter:
C:\> oradim -DELETE -SID prod
3.5 Database Migration from a 32-bit Windows Computer
This section contains these topics:
■Backing Up a 32-Bit Oracle Database
■Migrating an Oracle Database 11g Release 2 (11.2)
■Migrating an Oracle Database 10g Release 2 (10.2) or Earlier Database
3.5.1 Backing Up a 32-Bit Oracle Database
To back up a 32-bit Oracle home database:
1. Start SQL*Plus:
C:\> sqlplus /NOLOG
See Also: Oracle Database Upgrade Guide for information about
upgrading an earlier release of Oracle Database to Oracle Database
11g Release 2 (11.2)

Database Migration from a 32-bit Windows Computer
3-16 Oracle Database Platform Guide
2. Connect to the database instance as
SYSDBA
:
SQL> CONNECT / AS SYSDBA;
3. Create a
.trc
file to use as a template to re-create the control files on the 64-bit
computer:
SQL> ALTER DATABASE BACKUP CONTROLFILE TO TRACE;
4. Shut down the database:
SQL> SHUTDOWN IMMEDIATE;
5. Perform a full offline backup of the database.
3.5.2 Migrating an Oracle Database 11g Release 2 (11.2)
To migrate an Oracle Database 11g Release 2 (11.2) for 32-bit Windows to an Oracle
Database 11g Release 2 (11.2) for 64-bit Windows:
1. Install Oracle Database 11g Release 2 (11.2) for 64-bit Windows.
2. Create the new Oracle Database 11g Release 2 (11.2) service at the command
prompt:
C:\> ORADIM -NEW -SID SID [-INTPWD PASSWORD ]-MAXUSERS USERS
-STARTMODE AUTO -PFILE ORACLE_HOME\DATABASE\INITSID.ORA
The following table provides more information on the values you must supply.
3. Copy the 32-bit datafiles to the new 64-bit Oracle home.
4. Copy the 32-bit configuration files to the 64-bit Oracle home.
a. If your 32-bit initialization parameter file has an
IFILE
(include file) entry, then
copy the file specified by the
IFILE
entry to the 64-bit Oracle home and edit
the
IFILE
entry in the initialization parameter file to point to its new location.
b. If you have a password file that resides in the 32-bit Oracle home, then copy
the password file to the 64-bit Oracle home. The default 32-bit password file is
located in
ORACLE_HOME\database\pwdSID.ora
., where
SID
is your Oracle
instance ID.
See Also: Oracle Database Backup and Recovery User's Guide for an
overview of backup and recovery solutions
See Also: Oracle Database Installation Guide for Microsoft Windows
Parameter Description
SID
SID
of the database you are migrating
PASSWORD
Password for the new Oracle Database 11g Release 2 (11.2) for 64-bit
Windows database. This is the password for the user connected with
SYSDBA
privileges. The
-INTPWD
option is not required. If you do not
specify it, then operating system authentication is used, and no
password is required.
USERS
Maximum number of users who can be granted
SYSDBA
and
SYSOPER
privileges
ORACLE_HOME
Oracle home directory. Ensure that you specify the full path name with
the
-PFILE
option, including drive letter of the Oracle home directory.

Database Migration from a 32-bit Windows Computer
Postinstallation Database Creation on Windows 3-17
5. In the 64-bit Oracle home, add the
_SYSTEM_TRIG_ENABLED = false
parameter to
the
ORACLE_HOME\database\ORACLE_SID
\init.ora
file before changing the word
size.
6. Remove this parameter from the initialization file after the word size change is
complete.
7. Go to the 64-bit
ORACLE_HOME\rdbms\admin
directory from the command prompt.
8. Start SQL*Plus:
C:\> sqlplus /NOLOG
9. Connect to the database instance as
SYSDBA
:
SQL> CONNECT / AS SYSDBA;
10. Re-create the 64-bit control files using the
CREATE CONTROLFILE
command. Edit the
trace file created in "Backing Up a 32-Bit Oracle Database" on page 3-15 to change
the paths to the datafiles, log files and control files to point to the Oracle home on
the 64-bit computer. This creates the new control file in
ORACLE_HOME\database
.
Here is an example of a database named
orcl32
on a 32-bit computer migrating to
orcl64
on a 64-bit computer:
CREATE CONTROLFILE REUSE DATABASE "T1" NORESETLOGS NOARCHIVELOG
MAXLOGFILES 32
MAXLOGMEMBERS 2
MAXDATAFILES 32
MAXINSTANCES 16
MAXLOGHISTORY 1815
LOGFILE
GROUP 1 'C:\app\oracle\product\11.2.0\oradata\orcl64\REDO03.LOG' SIZE 1M,
# was 'C:\app\oracle\product\11.2.0\oradata\orcl32\...LOG'
# on the 32-bit computer
GROUP 2 'C:\app\oracle\product\11.2.0\oradata\orcl64\REDO02.LOG' SIZE 1M,
GROUP 3 'C:\app\oracle\product\11.2.0\oradata\orcl64\REDO01.LOG' SIZE 1M
DATAFILE
'C:\app\oracle\product\11.2.0\oradata\orcl64\SYSTEM01.DBF',
# was 'C:\app\oracle\product\11.2.0\oradata\orcl32\...DBF'
# on the 32-bit computer
'C:\app\oracle\product\11.2.0\oradata\orcl64\RBS01.DBF',
'C:\app\oracle\product\11.2.0\oradata\orcl64\USERS01.DBF',
'C:\app\oracle\product\11.2.0\oradata\orcl64\TEMP01.DBF',
'C:\app\oracle\product\11.2.0\oradata\orcl64\TOOLS01.DBF',
'C:\app\oracle\product\11.2.0\oradata\orcl64\INDX01.DBF',
'C:\app\oracle\product\11.2.0\oradata\orcl64\DR01.DBF'
CHARACTER SET WE8ISO8859P1;
11. Alter the
init
file from the 32-bit computer to include the new control file
generated in the preceding step.
12. Shut down the database:
SQL> SHUTDOWN IMMEDIATE;
13. Start the database in
UPGRADE
mode to run
utlirp.sql
:
SQL> STARTUP UPGRADE;
See Also: Oracle Database Upgrade Guide for more information on
changing word size

Database Migration from a 32-bit Windows Computer
3-18 Oracle Database Platform Guide
You must use the
PFILE
option to specify the location of your initialization
parameter file.
14. Set the system to spool results to a log file for later verification of success. For
example:
SQL> SPOOL mig32-64.log;
15. Enter the following command to view the output of the script on-screen:
SQL> SET ECHO ON;
16. Recompile existing PL/SQL modules in the format required by the 64-bit Oracle
Database:
SQL> @utlirp.sql;
17. Turn off the spooling of script results to the log file:
SQL> SPOOL OFF;
18. Check the spool file and verify that the packages and procedures compiled
successfully. Correct any problems you find in this file.
19. Shut down the database:
SQL> SHUTDOWN IMMEDIATE;
20. Start the database:
SQL> STARTUP;
21. If the JServer JAVA Virtual Machine component is installed, perform the following
steps after connecting as
SYS
:
begin
update obj$ set status=5 where obj#=(select obj# from obj$,javasnm$
where owner#=0 and type#=29 and short(+)=name and
nvl(longdbcs,name)='oracle/aurora/rdbms/Compiler');
commit;
declare
cursor C1 is select
'DROP JAVA DATA "' || u.name || '"."' || o.name || '"'
from obj$ o,user$ u where o.type#=56 and u.user#=o.owner#;
ddl_statement varchar2(200);
iterations number;
previous_iterations number;
loop_count number;
my_err number;
begin
previous_iterations := 10000000;
loop
-- To make sure we eventually stop, pick a max number of iterations
select count(*) into iterations from obj$ where type#=56;
exit when iterations=0 or iterations >= previous_iterations;
previous_iterations := iterations;
loop_count := 0;
open C1;
loop
begin
fetch C1 into ddl_statement;

Database Migration from a 32-bit Windows Computer
Postinstallation Database Creation on Windows 3-19
exit when C1%NOTFOUND or loop_count > iterations;
exception when others then
my_err := sqlcode;
if my_err = -1555 then -- snapshot too old, re-execute fetch query
exit;
else
raise;
end if;
end;
initjvmaux.exec(ddl_statement);
loop_count := loop_count + 1;
end loop;
close C1;
end loop;
end;
commit;
initjvmaux.drp('delete from java$policy$shared$table');
update obj$ set status=1 where obj#=(select obj# from obj$,javasnm$
where owner#=0 and type#=29 and short(+)=name and
nvl(longdbcs,name)='oracle/aurora/rdbms/Compiler');
commit;
end;
/
create or replace java system;
/
22. Recompile existing PL/SQL modules in the format required by the 64-bit Oracle
Database:
SQL> @utlrp.sql;
3.5.3 Migrating an Oracle Database 10g Release 2 (10.2) or Earlier Database
To migrate an Oracle Database 10g Release 2 (10.2) to an Oracle Database 11g Release 2
(11.2) for 64-bit Windows:
1. Perform steps 1 - 11 in "Migrating an Oracle Database 11g Release 2 (11.2)" on
page 3-16.
2. Shut down the database on the 64-bit computer:
SQL> SHUTDOWN IMMEDIATE;
3. Start the database migration:
SQL> STARTUP MIGRATE;
4. Migrate the database as described in Chapter 3, "Upgrading to the New Release"
in Oracle Database Upgrade Guide.
5. Shut down the database:
SQL> SHUTDOWN IMMEDIATE;
6. Restart the database:
SQL> STARTUP OPEN;

Database Migration from a 32-bit Windows Computer
3-20 Oracle Database Platform Guide

4
Postinstallation Configuration Tasks on Windows 4-1
4
Postinstallation Configuration Tasks on
Windows
This chapter describes configuration tasks you can perform to increase security and
other configuration tasks you must perform before using Oracle Multimedia and other
Oracle options. Where appropriate, the chapter provides references to other guides for
those configuration tasks.
This chapter contains these topics:
■Windows Firewall
■Resetting Passwords for Default Accounts
■NTFS File System and Windows Registry Permissions
■Configuring External Job Support for the Scheduler on Windows
■Configuring Oracle Multimedia on Windows
■Configuring Oracle Text on Windows
■Configuring Oracle Spatial on Windows
■Configuring Advanced Replication on Windows
4.1 Windows Firewall
By default, all newer Windows operating systems enable the Windows Firewall to
block virtually all TCP network ports to incoming connections. As a result, any Oracle
products that listen for incoming connections on a TCP port will not receive any of
those connection requests, and the clients making those connections will report errors.
Depending upon which Oracle products are installed and how they are used, some
postinstallation configuration of the Windows Firewall might be required for the
products to be functional on these operating systems.
This section contains these topics:
■Oracle Executables Requiring Firewall Exceptions
■Configuring the Windows Firewall
Note: Directory path examples in this chapter follow Optimal
Flexible Architecture (OFA) guidelines. If you specified non-OFA
compliant directories during installation, then your directory paths
will differ. See Appendix B, "Optimal Flexible Architecture", in Oracle
Database Installation Guide for Microsoft Windows for more information.

Windows Firewall
4-2 Oracle Database Platform Guide
■Troubleshooting Windows Firewall Exceptions
4.1.1 Oracle Executables Requiring Firewall Exceptions
Table 4–1 lists the Oracle Database 10g Release 1 (10.1) or later executables that listen
on TCP ports on Windows. If they are in use and accepting connections from a remote
client computer, then Oracle recommends that you add them to the Windows Firewall
exceptions list to ensure correct operation. Except as noted, they can be found in
ORACLE_HOME\bin
.
You must configure exceptions for the Windows Firewall if your system meets all of
the following conditions:
■Oracle server-side components are installed on a Windows Server 2003, Windows
Server 2003 R2, Windows Server 2008, Windows 2008 R2, Windows Server 2012 or
Windows Server 2012 R2 system. The list of components includes the Oracle
Database, Oracle Grid Infrastructure, network listeners, or any Web servers or
services.
■The Windows system in question accepts connections from other machines over
the network. If no other machines will be connecting to the Windows system to
access the Oracle software, then no postinstallation configuration steps are
required and the Oracle software will function as expected.
■The Windows system in question is configured to run the Windows Firewall. If the
Windows Firewall is not enabled, then no postinstallation configuration steps are
required.
If all of the above conditions are met, then the Windows Firewall must be configured
to allow successful incoming connections to the Oracle software. To enable Oracle
software to accept connection requests, Windows Firewall needs to be configured by
either opening up specific static TCP ports in the firewall or by creating exceptions for
specific executables so they can receive connection requests on any ports they choose.
This firewall configuration can be done by one of the following methods:
■From the Control Panel, select Windows Firewall. In the Windows Firewall
application, select the Exceptions tab and then click either Add Program or Add
Port to create exceptions for the Oracle software.
■From the command prompt, use the
netsh
firewall add...
command.
■When Windows notifies you that a foreground application is attempting to listen
on a port, and gives you the opportunity to create an exception for that executable.
If you choose the create the exception in this way, the effect is the same as creating
an exception for the executable either through Control Panel or from the command
line.
The following sections list the Oracle Database 11g Release 2 executables that listen on
TCP ports on Windows, along with a brief description of the executable. It is
recommended that these executables (if in use and accepting connections from a
remote, client computer) be added to the exceptions list for the Windows Firewall to
ensure correct operation. In addition, if multiple Oracle homes are in use, firewall
exceptions may need to be created for the same executable, for example, oracle.exe,
multiple times, once for each Oracle home from which that executable loads.
Note: If multiple Oracle homes are in use, then several firewall
exceptions may be needed for the same executable: one for each home
from which that executable loads.

Windows Firewall
Postinstallation Configuration Tasks on Windows 4-3
■Firewall Exceptions for Oracle Database
■Firewall Exceptions for Oracle Database Examples
■Firewall Exceptions for Oracle Gateways
■Firewall Exceptions for Oracle Clusterware and Oracle ASM
■Firewall Exceptions for Other Oracle Products
4.1.1.1 Firewall Exceptions for Oracle Database
For basic database operation and connectivity from remote clients (SQL*Plus, OCI,
ODBC, OLE DB applications, and so on), the following executables must be added to
the Windows Firewall exception list:
■
Oracle_home\bin\oracle.exe
- Oracle Database executable
■
Oracle_home\bin\tnslsnr.exe
- Oracle Listener
For remote monitoring capabilities to be available for a database on Windows, the
following executables must be added to the Windows Firewall exception list:
■
Oracle_home\bin\emagent.exe
- Oracle Database Control
■
Oracle_home\jdk\bin\java.exe-
Java Virtual Machine
4.1.1.2 Firewall Exceptions for Oracle Database Examples
After installing the Oracle Database Examples, the following executables must be
added to the Windows Firewall exception list:
■
Oracle_home\opmn\bin\opmn.exe
- Oracle Process Manager
■
Oracle_home\jdk\bin\java.exe
- Java Virtual Machine
4.1.1.3 Firewall Exceptions for Oracle Gateways
If your Oracle database interacts with non-Oracle software through a gateway, then
you must add the gateway executable to the Windows Firewall exception list.
Table 4–1 table lists the gateway executables used to access non-Oracle software.
Table 4–1 Oracle Executables Requiring Windows Firewall Exceptions
File Name Executable Name
omtsreco.exe
Oracle Services for Microsoft Transaction
Server
dg4sybs.exe
Oracle Database Gateway for Sybase
dg4tera.exe
Oracle Database Gateway for Teradata
dg4msql.exe
Oracle Database Gateway for SQL Server
dg4db2.exe
Oracle Database Gateway for DRDA
pg4arv.exe
Oracle Database Gateway for APPC
pg4t4ic.exe
Oracle Database Gateway for APPC
dg4mqs.exe
Oracle Database Gateway for WebSphere
MQ
dg4mqc.exe
Oracle Database Gateway for WebSphere
MQ
dg4odbc.exe
Oracle Database Gateway for ODBC

Windows Firewall
4-4 Oracle Database Platform Guide
4.1.1.4 Firewall Exceptions for Oracle Clusterware and Oracle ASM
If you installed the Oracle grid infrastructure software on the nodes in your cluster,
then you can enable the Windows Firewall only after adding the following executables
and ports to the Firewall exception list. The Firewall Exception list must be updated on
each node.
■
Grid_home\bin\gpnpd.exe
- Grid Plug and Play daemon
■
Grid_home\bin\oracle.exe
- Oracle ASM executable (if using Oracle ASM for
storage)
■
Grid_home\bin\racgvip.exe
- Virtual Internet Protocol Configuration Assistant
■
Grid_home\bin\evmd.exe
- OracleEVMService
■
Grid_home\bin\crsd.exe
- OracleCRService
■
Grid_home\bin\ocssd.exe
- OracleCSService
■
Grid_home\bin\octssd.exe
- Cluster Time Synchronization Service daemon
■
Grid_home\bin\mDNSResponder.exe
- multicast-DNS Responder Daemon
■
Grid_home\bin\gipcd.exe
- Grid IPC daemon
■
Grid_home\bin\gnsd.exe
- Grid Naming Service daemon
■
Grid_home\bin\ohasd.exe
- OracleOHService
■
Grid_home\bin\TNSLSNR.EXE
- SCAN listener and local listener for Oracle
Database and Oracle ASM
■
Grid_home\opmn\bin\ons.exe
- Oracle Notification Service
■
Grid_home\jdk\jre\bin\java.exe
- Java Virtual Machine
4.1.1.5 Firewall Exceptions for Other Oracle Products
In additional to all the previously listed exceptions, if you use any of the Oracle
software listed in, then you must create an exception for Windows Firewall for the
associated executable.
4.1.2 Configuring the Windows Firewall
Postinstallation configuration for the Windows Firewall must be undertaken if all of
the following conditions are met:
■Oracle server-side components are installed.
These components include the Oracle Database, network listeners, and any Web
servers or services.
■The computer services connections from other computers over a network.
If no other computers connect to the computer with the Oracle software, then no
postinstallation configuration steps are required and the Oracle software will
function as expected.
Table 4–2 Other Oracle Software Products Requiring Windows Firewall Exceptions
Oracle Software Product Executable Name
Data Guard Manager
dgmgrl.exe
Oracle Internet Directory LDAP Server
oidldapd.exe
External Procedural Calls
extproc.exe

Windows Firewall
Postinstallation Configuration Tasks on Windows 4-5
■The Windows Firewall is enabled.
If the Windows Firewall is not enabled, then no postinstallation configuration
steps are required.
You can configure Windows Firewall by opening specific static TCP ports in the
firewall or by creating exceptions for specific executables so that they are able to
receive connection requests on any ports they choose. To configure the firewall, from
the Control Panel, select Windows Firewall and then select Exceptions or enter
netsh
firewall add...
at the command line.
Alternatively, Windows will inform you if a foreground application is attempting to
listen on a port, and it will ask you if you want to create an exception for that
executable. If you choose to do so, then the effect is the same as creating an exception
for the executable either in the Control Panel or from the command line.
4.1.3 Troubleshooting Windows Firewall Exceptions
If you cannot establish certain connections even after granting exceptions to the
executables listed in Table 4–1, then follow these steps to troubleshoot the installation:
1. Examine Oracle configuration files (such as
*.conf
files), the Oracle key in the
Windows registry, and network configuration files in
ORACLE_
HOME\network\admin
.
2. Pay particular attention to any executable listed in
ORACLE_
HOME\network\admin\listener.ora
in a
PROGRAM=
clause. Each of these must be
granted an exception in the Windows Firewall, because a connection can be made
through the TNS Listener to that executable.
3. Examine Oracle trace files, log files, and other sources of diagnostic information
for details on failed connection attempts. Log and trace files on the database client
computer may contain useful error codes or troubleshooting information for failed
connection attempts. The Windows Firewall log file on the server may contain
useful information as well.
4. If the preceding troubleshooting steps do not resolve a specific configuration issue
on Windows XP Service Pack 2, then provide the output from command
netsh
firewall show state verbose=enable
to Oracle Support for diagnosis and
problem resolution.
Note: Windows 2008 and later operating systems do not provide
any information on applications attempting to listen on a port.
Instead, a security audit event is logged to signal that an application is
blocked.
See Also:
■
http://www.microsoft.com/downloads/details.aspx?FamilyID=a7
628646-131d-4617-bf68-f0532d8db131&displaylang=en
for information on Windows Firewall troubleshooting
■
http://support.microsoft.com/kb/875357
for more information
on Windows Firewall configuration

Resetting Passwords for Default Accounts
4-6 Oracle Database Platform Guide
4.2 Resetting Passwords for Default Accounts
Oracle Database installs with many default accounts. Database Configuration
Assistant locks and expires most default database accounts upon successful
installation. Oracle recommends changing all user passwords immediately after
installation.
4.3 NTFS File System and Windows Registry Permissions
Oracle recommends that you configure Oracle Database files, directories, and registry
settings to allow only authorized database administrators (DBAs) to have full control.
If you created a database using Database Configuration Assistant or upgraded a
database using Oracle Database Upgrade Assistant, then no further action is required.
This section describes the permissions automatically set by Oracle Universal Installer,
Database Configuration Assistant, and Oracle Database Upgrade Assistant and the
steps to set these permissions manually.
This section contains these topics:
■File Permissions
■Setting NTFS File System Security
■Setting Windows Registry Security
4.3.1 File Permissions
Beginning with Oracle9i Release 2 (9.2), Oracle Universal Installer, Database
Configuration Assistant, and Database Upgrade Assistant set file permissions when
Oracle Database software is installed or upgraded.
This section contains these topics:
■File Permissions Set by Oracle Universal Installer
■File Permissions Set by Database Configuration Assistant
■File Permissions Set by Database Upgrade Assistant
4.3.1.1 File Permissions Set by Oracle Universal Installer
During Oracle Database installation, by default Oracle Universal Installer installs
software in
ORACLE_HOME
. Oracle Universal Installer sets the following permissions to
this directory, and all files and directories under this directory:
■
Administrators
- Full control
■
System
- Full control
■
Authenticated Users
- Read, Execute, and List Contents
See Also: Oracle Database Administrator's Guide for more information
on default database accounts and passwords
See Also: Your operating system documentation for more
information about modifying NTFS file system and Windows registry
settings

NTFS File System and Windows Registry Permissions
Postinstallation Configuration Tasks on Windows 4-7
4.3.1.2 File Permissions Set by Database Configuration Assistant
During database configuration, Database Configuration Assistant installs files and
directories in the following default locations, where
database_name
is the database
name or
SID
:
■
ORACLE_BASE\admin\database_name
(administration file directories)
■
ORACLE_BASE\oradata\database_name
(database file directories)
■
ORACLE_BASE\oradata\database_name
(redo log files and control files)
■
ORACLE_HOME\database
(
SPFILESID.ORA
)
Database Configuration Assistant sets the following permissions to these directories,
and all files and directories under these directories:
■
Administrators
- Full Control
■
System
- Full Control
4.3.1.3 File Permissions Set by Database Upgrade Assistant
When an older version of the database is upgraded to Oracle Database 10g Release 1
(10.1) or later, Database Upgrade Assistant installs software in the following
directories, where
database_name
is the database name or
SID
:
■
ORACLE_BASE\admin\database_name
(administration files)
■
ORACLE_BASE\oradata\database_name
(database file directories)
■
ORACLE_BASE\oradata\database_name
(redo log files and control files)
■
ORACLE_BASE\ORACLE_HOME\database
(
SPFILESID.ORA
)
Database Upgrade Assistant sets the following permissions to these directories, and all
files and directories under these directories:
■
Administrators
- Full Control
■
System
- Full Control
Beginning with Oracle Database 11g Release 2 (11.2), Database Upgrade Assistant can
also configure Enterprise Manager. If the "Enable daily backup" option is selected
Important: If these accounts already exist and possess more
restrictive permissions, then the most restrictive permissions are
retained. If accounts other than
Administrators
,
System
, and
Authenticated
Users
already exist, then the permissions for these
accounts are removed.
Important: If these accounts already exist and possess more
restrictive permissions, then the most restrictive permissions are
retained. If accounts other than
Administrators
and
System
already
exist, then the permissions for these accounts are removed.
Important: If these accounts already exist and possess more
restrictive permissions, then the most restrictive permissions are
retained. If accounts other than
Administrators
and
System
already
exist, then the permissions for these accounts are removed.

NTFS File System and Windows Registry Permissions
4-8 Oracle Database Platform Guide
while configuring Enterprise Manager, then Database Upgrade Assistant shows a
separate screen asking for Fast Recovery Area. Database Upgrade Assistant will try to
create the directory structure in whatever file system location is specified if it does not
exist. It will put the same set of file permissions to this location. The default location
shown by DBUA for fast recovery area is:
■
ORACLE_BASE\recovery_area
4.3.2 Setting NTFS File System Security
To ensure that only authorized users have full file system permissions:
1. Go to Windows Explorer.
2. Set the following permissions for each directory or file:
4.3.3 Setting Windows Registry Security
Oracle recommends that you remove write permissions from users who are not Oracle
Database DBAs or system administrators in
HKEY_LOCAL_MACHINE\SOFTWARE\ORACLE
of
the Windows registry.
To remove write permissions:
1. Open the registry.
2. Go to
HKEY_LOCAL_MACHINE\SOFTWARE\ORACLE
.
3. Select Permissions from the Security main menu.
The Registry Key Permissions dialog appears.
See Also: "Oracle ACFS and File Access and Administration
Security" section of Oracle Automatic Storage Management
Administrator's Guide for more information about using Oracle ACFS
and administration security
Directory Group and Permissions
ORACLE_HOME
■
Administrators
- Full Control
■
System
- Full Control
■
Authenticated
Users
- Read, Execute and
List Contents
ORACLE_BASE\admin\database_name
■
Administrators
- Full Control
■
System
- Full Control
ORACLE_BASE\oradata\database_name
■
Administrators
- Full Control
■
System
- Full Control
ORACLE_HOME\database\spfileSID.ora
■
Administrators
- Full Control
■
System
- Full Control
Note: Oracle Database uses the Windows LocalSystem built-in
security account. Therefore, file permissions must be granted to the
System
account of the local computer Oracle Database.
See Also: Your operating system online help for more information
about how to modify NTFS file system and registry settings

Configuring Oracle Multimedia on Windows
Postinstallation Configuration Tasks on Windows 4-9
4. Remove write permissions from any users who are not Oracle Database DBAs or
system administrators. Note that the
SYSTEM
account must have Full Control, since
this is the account with which Oracle Database runs.
5. Ensure that user accounts that must run Oracle applications have read privileges.
6. Choose OK.
7. Exit the registry.
4.4 Configuring External Job Support for the Scheduler on Windows
This release includes Oracle Scheduler (the Scheduler) which provides enterprise
scheduling functionality. External jobs performed by the user are started using the
OracleJobSchedulerSID
service. This service is disabled by default. To use the external
jobs functionality, the administrator must set the user name and password for the user
account under which this service must run and enable the service.
Restricting execution of external jobs to a low-privileged user prevents unauthorized
database users from gaining operating system level privileges, but it also places
restrictions on the kinds of jobs that can be run. Jobs requiring a higher level of
operating system privileges cannot be run by this mechanism.
Enabling and starting the
OracleJobSchedulerSID
service is required only for
compatibility with Oracle Database 10g Release 1 and Release 2, for local external jobs
that do not use credentials. This service is not required if all local external jobs use
credentials. For improved security, Oracle recommends that all local external jobs use
credentials.
4.5 Configuring Oracle Multimedia on Windows
Oracle Multimedia (formerly interMedia) is a feature that enables Oracle Database to
store, manage, and retrieve images. It also helps DICOM format medical images and
other DICOM data, audio, video, or other heterogeneous media data in an integrated
fashion with other enterprise information. Oracle Multimedia extends Oracle Database
reliability, availability, and data management to multimedia content in traditional,
Internet, electronic commerce, medical, and media-rich applications.
If you install Standard Edition, Standard Edition One, or Enterprise Edition, then
Database Configuration Assistant starts automatically at the end of installation. If you
choose any Database Configuration Assistant installation type other than Customized,
then Oracle Multimedia does not require manual configuration. All tasks described in
this section are performed automatically.
If you select Customized installation, then Database Configuration Assistant will
guide you through configuration of Oracle Multimedia.
If you are creating and configuring a database manually, then you can configure
Oracle Multimedia as follows:
1. Start SQL*Plus:
C:\> sqlplus /NOLOG
2. Connect to Oracle Database with account
SYSDBA
:
SQL> CONNECT / AS SYSDBA
See Also: Oracle Database Administrator's Guide for more information
about external jobs

Configuring Oracle Text on Windows
4-10 Oracle Database Platform Guide
3. Start the database (if necessary):
SQL> STARTUP
4. Run script
ordinst.sql
:
SQL> ORACLE_HOME\ord\admin\ordinst.sql SYSAUX SYSAUX
5. Run script
iminst.sql
:
SQL> ORACLE_HOME\ord\im\admin\catim.sql
6. Exit SQL*Plus:
SQL> EXIT
4.6 Configuring Oracle Text on Windows
Oracle Text enables text queries through SQL and PL/SQL from most Oracle interfaces.
By installing Oracle Text with an Oracle Database server, client tools such as SQL*Plus
and Pro*C/C++ are able to retrieve and manipulate text in Oracle Database.
Oracle Text manages textual data in concert with traditional data types in Oracle
Database. When text is inserted, updated, or deleted, Oracle Text automatically
manages the change.
If you install Oracle Text from the media and do not have a previous release of Oracle
Text installed, then Oracle Database is already configured for use with Oracle Text if
one of the following is true:
■You created the database by using Database Configuration Assistant in standalone
mode, and selected Typical database creation type.
■The database is a starter database that you created by performing the following
sequence of steps:
1. Select Oracle Database 11g in the Select a Product to Install window.
2. Select Typical Installation in the Select Installation Method window.
If none of these is true, then you must configure Oracle Database for use with Oracle
Text by using "Configuring Oracle Text Using Database Configuration Assistant".
Note: If you manually copy your Oracle8i
listener.ora
and
tnsnames.ora
files into your Oracle Database network directory, then
you must modify network configuration files
tnsnames.ora
and
listener.ora
on your server to enable external routine calls to work
and Oracle Multimedia to function properly. Follow the procedure in
Oracle Net Services Administrator's Guide.
See Also:
■Chapter 3, "Postinstallation Database Creation on Windows"
■Oracle Database Installation Guide for Microsoft Windows for more
information about creating a starter database

Configuring Oracle Spatial on Windows
Postinstallation Configuration Tasks on Windows 4-11
Upgrading Oracle Text from a Previous Release
If you install Oracle Text from the 11.2 media and have a previous release of Oracle
Text (formerly called interMedia Text) already installed, then the executables for
USER_FILTER are now executed from
ORACLE_HOME\ctx\bin.
Therefore, after the
upgrade, you must issue the following sql command as database user
SYS, SYSTEM,
or
CTXSYS,
to get a list of USER_FILTER executables. These executables must be copied
from
ORACLE_HOME\bin
to
ORACLE_HOME\ctx\bin
:
SQL> SELECT IXV_VALUE FROM CTXSYS.CTX_INDEX_VALUES WHERE IXV_CLASS=’FILTER’
AND IXV_OBJECT=’USER_FILTER’ AND IXV_ATTRIBUTE=’COMMAND’;
Configuring Oracle Text Using Database Configuration Assistant
To use Database Configuration Assistant to configure Oracle Database for use with
Oracle Text at the time you create the database, simply select Oracle Text as the option
to configure when prompted.
To configure the database at a later time:
1. Start Database Configuration Assistant.
From the Start menu, select Programs, then select Oracle - HOME_NAME, then
select Configuration and Migration Tools and then select Database
Configuration Assistant.
2. Select Configure database options in a database.
3. Select the database to modify when prompted.
4. Select Oracle Text as the option to configure when prompted.
4.7 Configuring Oracle Spatial on Windows
Oracle Spatial makes storage, retrieval, and manipulation of spatial data easier and
more intuitive to users.
One example of spatial data is a road map. A road map is a two-dimensional object
that contains points, lines, and polygons representing cities, roads, and political
boundaries such as states. A road map represents geographic information. Locations of
cities, roads, and political boundaries are projected onto a two-dimensional display or
piece of paper, preserving relative positions and relative distances of objects.
If you install Oracle Spatial through Enterprise Edition, then no manual configuration
is required. All Oracle Spatial configuration tasks are performed automatically.
If you install both Oracle Spatial and Oracle Database together through Enterprise
Edition or Standard Edition Custom installation, then Database Configuration
Assistant starts automatically at the end of installation. If you choose Custom
installation and select Create new database, then the assistant asks if Oracle Spatial is
to be configured automatically.
If you install Oracle Spatial during a separate installation from Enterprise Edition, then
you must either start Database Configuration Assistant and select Configure database
options in a database or configure Oracle Spatial manually.
To configure Oracle Spatial manually:
1. Start SQL*Plus at the command prompt:
C:\> sqlplus /NOLOG
See Also: Oracle Text Application Developer's Guide

Configuring Advanced Replication on Windows
4-12 Oracle Database Platform Guide
2. Connect to Oracle Database with account
SYSDBA
:
SQL> CONNECT / AS SYSDBA
3. Start the database (if necessary):
SQL> STARTUP
4. Run script
ordinst.sql
:
SQL> ORACLE_HOME\ord\admin\ordinst.sql SYSAUX SYSAUX
5. Connect to the database as user SYSTEM:
SQL> CONNECT SYSTEM
Enter password: system_password
6. Run script
mdinst.sql
:
SQL> ORACLE_HOME\md\admin\mdinst.sql
7. Exit SQL*Plus:
SQL> EXIT
4.8 Configuring Advanced Replication on Windows
Oracle Database installs replication packages and procedures automatically rather
than as a separate manual process. There are many configuration and usage
possibilities with Advanced Replication.
This section describes how to manually configure Advanced Replication in Oracle
Database. Follow the instructions only if you add Advanced Replication to an
installation of Oracle Database that was not previously configured with this feature.
Configuring Advanced Replication consists of the following steps:
■Checking Tablespace and Rollback Segment Requirements
■Adding and Modifying Initialization Parameters
■Monitoring Data Dictionary Tables
4.8.1 Checking Tablespace and Rollback Segment Requirements
Recommended tablespace and rollback segment requirements for Advanced
Replication are shown in Table 4–3.
Note: Script
mdinst.sql
has a variable
%MD_SYS_PASSWORD%
that
Oracle Universal Installer will instantiate at installation time.
Therefore, if you have changed the mdsys user's password, then
during a manual installation remember to update script mdinst.sql
with that password.
See Also: Oracle Database Advanced Replication for more information
about Advanced Replication and for definitions of master sites and
materialized view sites

Configuring Advanced Replication on Windows
Postinstallation Configuration Tasks on Windows 4-13
4.8.2 Adding and Modifying Initialization Parameters
If you use Advanced Replication, then certain parameter values must be added to the
initialization parameter file, and others must be set to recommended values. Parameter
names and values for the master site and materialized view sites are shown in
Table 4–4.
Note
Depends on number of n-way sites.
4.8.3 Monitoring Data Dictionary Tables
If you use Advanced Replication and intend to set up a large number of replicated
objects, then you are required to monitor the following data dictionary tables with the
SQL SELECT
command:
■
ARGUMENT$
■
IDL_CHAR$
■
IDL_UB1$
■
IDL_UB2$
■
IDL_SB4$
■
I_ARGUMENT1
■
I_SOURCE1I$
■
SOURCE$
Table 4–3 Advanced Replication Tablespace/Rollback Segment Requirements
Tablespace/Rollback Segment Minimum Free Space
SYSTEM 20 MB
UNDO TABLESPACE 10 MB
RBS 5 MB
TEMP 10 MB
USERS No specific requirement
Note: Replication triggers and procedures are stored here.
Table 4–4 Advanced Replication Initialization Parameters
Parameter Name Recommended Value Site
JAVA_POOL_SIZE
50 MB master
DISTRIBUTED_LOCK_TIMEOUT
300 seconds master
GLOBAL_NAMES
TRUE master
OPEN_LINKS
4master
PROCESSES
Add 9 to current value master
JOB_QUEUE-PROCESSES
2 Note master
JOB_QUEUE_PROCESSES
2materialized view

Configuring Advanced Replication on Windows
4-14 Oracle Database Platform Guide
■
TRIGGER
If necessary, increase storage parameters to accommodate storage requirements of
large numbers of replicated objects.

5
Administering a Database on Windows 5-1
5
Administering a Database on Windows
This chapter describes how to administer Oracle Database for Windows.
This chapter contains these topics:
■Managing Oracle Database Services
■Starting and Shutting Down a Database with SQL*Plus
■Starting and Shutting Down a Database Using Services
■Starting Multiple Instances
■Creating and Populating Password Files
■Connecting Remotely to the Database as SYS
■Automatically Encrypted Database Passwords
■Archiving Redo Log Files
5.1 Managing Oracle Database Services
This section tells you how to manage the services that Oracle Database installs on your
computer.
This section provides information on the following:
■Oracle Database Service Naming Conventions for Multiple Oracle Homes
■Starting Oracle Database Services
■Stopping Oracle Database Services
■Auto-starting Oracle Database Services
5.1.1 Oracle Database Service Naming Conventions for Multiple Oracle Homes
Oracle Database for Windows lets you have multiple Oracle homes on a single
computer. This feature, described in Appendix B, "Optimal Flexible Architecture", in
Oracle Database Installation Guide for Microsoft Windows, affects Oracle services naming
conventions. As you perform installations into Oracle home directories:
■You must accept default Oracle home name provided or specify a different name
for each Oracle home directory.
■You are prompted to give a system identifier and global database name for each
database installation.

Managing Oracle Database Services
5-2 Oracle Database Platform Guide
5.1.2 Starting Oracle Database Services
Oracle Database services must be started for you to use Oracle Database and its
products. You can start Oracle Database services from three different locations:
■Control Panel
■Command Prompt
■Oracle Administration Assistant for Windows
Control Panel
To start Oracle Database services from the Control Panel:
1. Access your Windows Services dialog.
2. Find the service to start in the list, select it, and click Start.
If you cannot find
OracleServiceSID
in the list, then use ORADIM to create it.
3. Click Close to exit the Services dialog.
Command Prompt
To start Oracle Database services from the command prompt, enter:
C:\> NET START service
where
service
is a specific service name, such as
OracleServiceORCL.
Oracle Administration Assistant for Windows
To start Oracle Database services from Oracle Administration Assistant for Windows:
1. From the Start menu, select Programs, then select Oracle - HOME_NAME, then
select Configuration and Migration Tools and then select Administration
Assistant for Windows.
2. Right-click the
SID
.
where
SID
is a specific instance name, such as
orcl
.
3. Click Start Service.
This starts service
OracleServiceORCL
.
5.1.3 Stopping Oracle Database Services
On occasion (for example, when re-installing Oracle Database), you must stop Oracle
Database services. You can stop Oracle Database services from three different
locations:
■Control Panel
■Command Prompt
Note: You can start Oracle Database when you start
OracleServiceSID
. See "Starting and Shutting Down a Database
Using Services" on page 5-6 for information on registry parameters
that enable you to do this.
See Also: Your operating system documentation for instructions

Managing Oracle Database Services
Administering a Database on Windows 5-3
■Oracle Administration Assistant for Windows
Control Panel
To stop Oracle Database services from the Control Panel:
1. Access your Windows Services dialog.
2. Select
OracleHOME_NAMETNSListener
and click Stop.
OracleHOME_NAMETNSListener
is stopped.
3. Select
OracleServiceSID
and click Stop.
4. Click OK.
OracleServiceSID
is stopped.
Command Prompt
To stop Oracle Database services from the command prompt, enter:
C:\> net STOP service
where
service
is a specific service name, such as
OracleServiceORCL
.
Oracle Administration Assistant for Windows
To stop Oracle Database services from Oracle Administration Assistant for Windows:
1. From the Start menu, select Programs, then select Oracle - HOME_NAME, then
select Configuration and Migration Tools and then select Administration
Assistant for Windows.
2. Right-click the
SID
.
where
SID
is a specific instance name, such as
orcl
.
3. Click Stop Service.
This stops service OracleServiceORCL.
5.1.4 Auto-starting Oracle Database Services
Oracle Database services can be set to start automatically whenever the Windows
computer is restarted. You can turn auto-start on or off from two different locations:
■Control Panel
■Oracle Administration Assistant for Windows
Control Panel
To use the Control Panel to configure when and how Oracle Database is started:
1. Access your Windows Services dialog.
Note: You can stop Oracle Database in normal, immediate, or abort
mode when you stop
OracleServiceSID
. See "Starting and Shutting
Down a Database Using Services" on page 5-6 for information on
registry parameters that enable you to do this.
See Also: Your operating system documentation for instructions
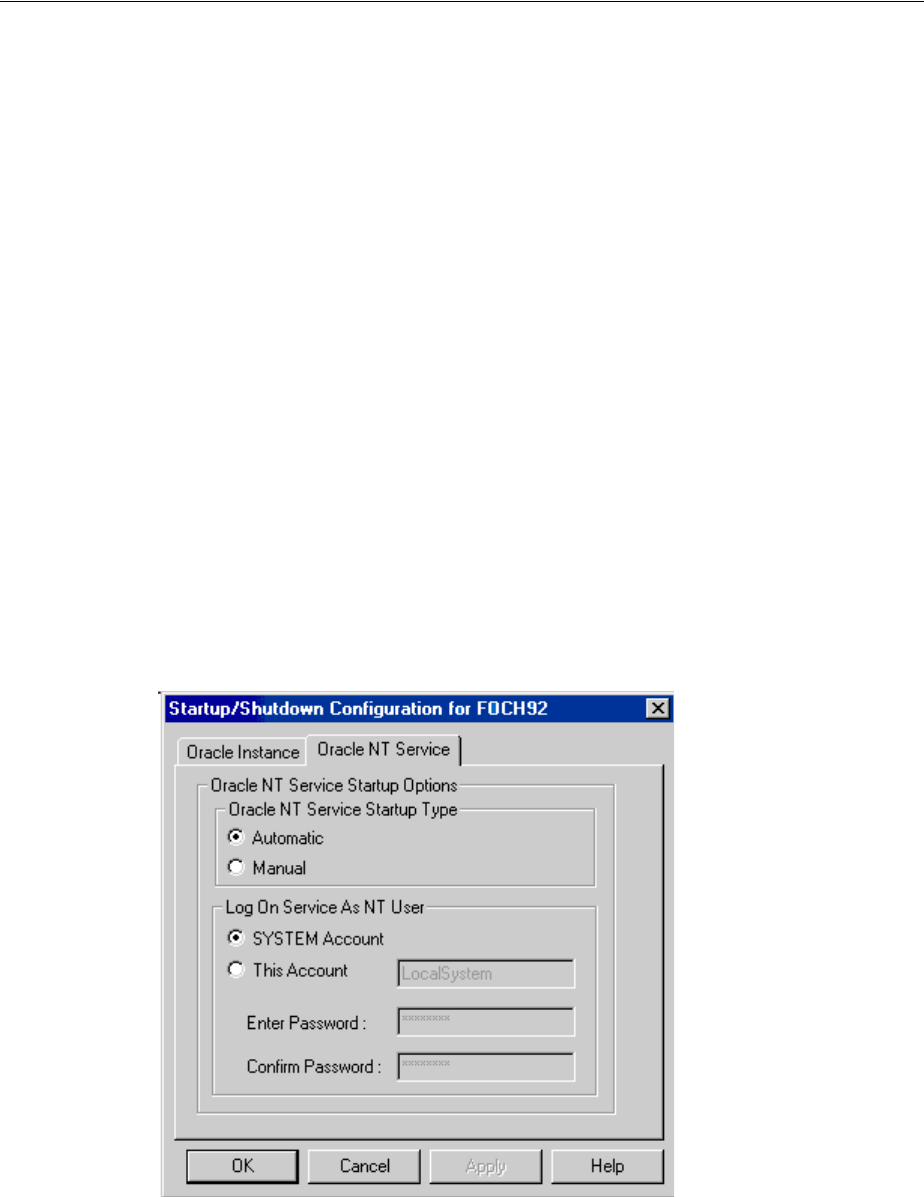
Starting and Shutting Down a Database with SQL*Plus
5-4 Oracle Database Platform Guide
2. Select service OracleServiceSID and click Startup.
3. Choose Automatic from the Startup Type field.
4. Click OK.
5. Click Close to exit the Services dialog.
Oracle Administration Assistant for Windows
To automatically start Oracle Database services from Oracle Administration Assistant
for Windows:
1. From the Start menu, select Programs, then select Oracle - HOME_NAME, then
select Configuration and Migration Tools and then select Administration
Assistant for Windows.
2. Right-click the
SID
.
where
SID
is a specific instance name, such as
orcl
.
3. Choose Startup/Shutdown Options.
4. Choose the Oracle Service tab.
5. Choose Automatic in Oracle Service Startup Type.
6. Click Apply.
7. Click OK.
5.2 Starting and Shutting Down a Database with SQL*Plus
These instructions assume that a database instance has been created.
See Also: Your operating system documentation for instructions

Starting and Shutting Down a Database with SQL*Plus
Administering a Database on Windows 5-5
To start or shut down Oracle Database:
1. Go to your Oracle Database server.
2. Start SQL*Plus at the command prompt:
C:\> sqlplus /NOLOG
3. Connect to Oracle Database with username SYSDBA:
SQL> CONNECT / AS SYSDBA
4. To start a database, enter:
SQL> STARTUP [PFILE=path\filename]
This command uses the initialization parameter file specified in
path\filename
.
To start a database using a file named
init2.ora
located in
C:\app\oracle\product\11.2.0\admin\orcl\pfile
you would enter:
SQL> STARTUP PFILE=C:\app\oracle\product\11.2.0\admin\orcl\pfile\init2.ora
If no
PFILE
is specified, then the command looks for an
SPFILE
in
ORACLE_
HOME\database
. If the command finds one, then the command uses it to start the
database. If it does not find an
SPFILE
, then it uses the default initialization
parameter file located in
ORACLE_BASE\ADMIN\db_name\pfile
.
5. To stop a database, enter:
SQL> SHUTDOWN [mode]
where mode is
normal
,
immediate
, or
abort
.
In a
normal
shutdown, Oracle Database waits for all currently-connected users to
disconnect and disallows any new connections before shutting down. This is the
default mode.
In an
immediate
shutdown, Oracle Database terminates and rolls back active
transactions, disconnects clients, and shuts down.
In an
abort
shutdown, Oracle Database terminates active transactions and
disconnects users; it does not roll back transactions. The database performs
automatic recovery and rollback the next time it is started. Use this mode only in
emergencies.
Note: Directory path examples in this chapter follow Optimal
Flexible Architecture (OFA) guidelines. If you specified non-OFA
compliant directories during installation, then your directory paths
will differ. See Appendix B, "Optimal Flexible Architecture", in Oracle
Database Installation Guide for Microsoft Windows for more information.
See Also: Chapter 2, "Database Tools on Windows" for a list of other
tools that can start Oracle Database and this guide for information on
options you can specify when starting your database.

Starting and Shutting Down a Database Using Services
5-6 Oracle Database Platform Guide
5.3 Starting and Shutting Down a Database Using Services
You can start or shut down Oracle Database by starting or stopping service
OracleServiceSID
in the Control Panel. Starting
OracleServiceSID
is equivalent to
using the
STARTUP
command or manually entering:
C:\> oradim -STARTUP -SID SID [-STARTTYPE srvc | inst | srvc,inst] [-PFILE
filename | -SPFILE]
Stopping
OracleServiceSID
is equivalent to using the
SHUTDOWN
command or
manually entering:
C:\> oradim -SHUTDOWN -SID SID [-SHUTTYPE srvc | inst | srvc,inst] [-SHUTMODE
normal | immediate | abort]
You can enable starting and stopping Oracle Database through
OracleServiceSID
two
different ways:
■Oracle Administration Assistant for Windows
■Setting Registry Parameters
Oracle Administration Assistant for Windows
To start or stop a database using Oracle Database services from Oracle Administration
Assistant for Windows:
1. From the Start menu, select Programs, then select Oracle - HOME_NAME, then
select Configuration and Migration Tools and then select Administration
Assistant for Windows.
2. Right-click the
SID
.
where
SID
is a specific instance name, such as
ORCL
.
3. Choose Startup/Shutdown Options.
4. Choose the Oracle Instance tab.
5. Select Start up instance when service is started, Shut down instance when
service is stopped, or both.
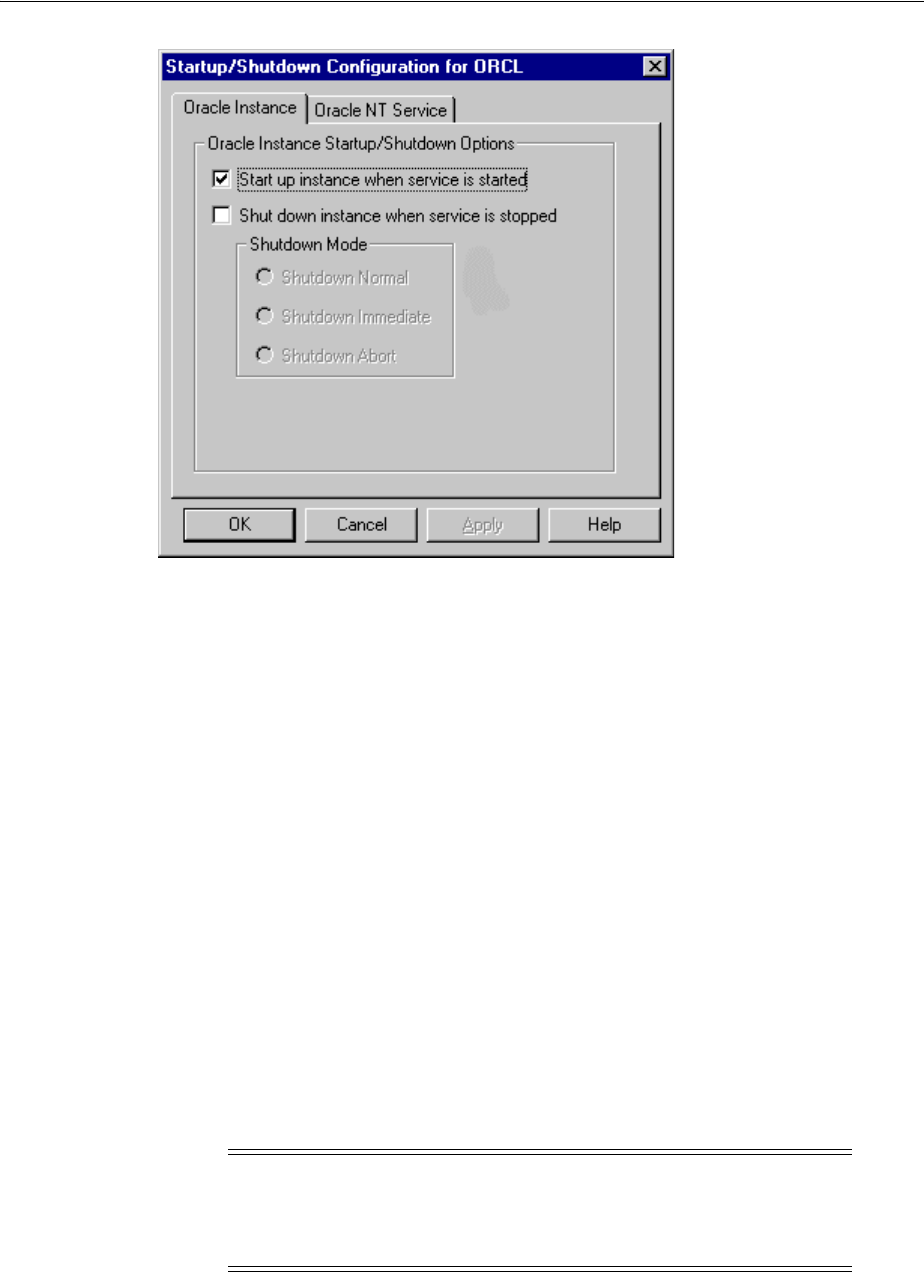
Starting and Shutting Down a Database Using Services
Administering a Database on Windows 5-7
Setting Registry Parameters
To start or stop Oracle Database through Oracle Database Services, set the following
registry parameters to the indicated values:
■
ORA_SID_AUTOSTART
When set to
true
, the default value, this parameter causes Oracle Database to start
when
OracleServiceSID
is started.
■
ORA_SID_PFILE
This parameter sets the full path to the initialization parameter file. If this entry is
not present, then oradim will try to start the database with an
SPFILE
or
PFILE
from
ORACLE_HOME\database
.
■
ORA_SHUTDOWN
When set to
true
, this parameter enables the selected instance of Oracle Database
to be shut down when
OracleServiceSID
is stopped. This includes any database
in the current Oracle home. Default value is
false
.
■
ORA_SID_SHUTDOWN
When set to
true
, the default value, this parameter causes the instance of Oracle
Database identified by the
SID
value to shut down when
OracleServiceSID
is
stopped manually—using either the Control Panel or Net stop command.
The following two registry parameters are optional:
■
ORA_SID_SHUTDOWNTYPE
Caution: If
ORA_SHUTDOWN
or
ORA_SID_SHUTDOWN
is set to
false
, then
manually shutting down OracleServiceSID will still shut down Oracle
Database. But it will be an abnormal shutdown, and Oracle does not
recommend it.

Starting Multiple Instances
5-8 Oracle Database Platform Guide
This parameter controls database shutdown mode. Set it to
a
(
abort
),
i
(
immediate
), or
n
(
normal
). Default mode is
i
(
immediate
) if you do not set this
parameter.
■
ORA_SID_SHUTDOWN_TIMEOUT
This parameter sets maximum time to wait before the service for a particular
SID
stops.
The registry location of these required and optional parameters is determined by the
number of Oracle home directories on your computer. If you have only one Oracle
home directory, then these parameters belong in:
HKEY_LOCAL_MACHINE\SOFTWARE\ORACLE\HOME0
If you have multiple Oracle home directories, then these parameters belong in:
HKEY_LOCAL_MACHINE\SOFTWARE\ORACLE\HOMEID
where
ID
is incremented for each additional Oracle home directory on your computer.
Starting or Stopping OracleService
SID
from the Control Panel
1. To start the database, start OracleService
SID
.
This automatically starts ORADIM and issues the -
STARTUP
command using the
initialization parameter file identified by
ORA_SID_PFILE
.
2. To stop the database, stop OracleService
SID
.
This automatically starts ORADIM, which issues the
-SHUTDOWN
command in the
mode indicated by
ORA_SID_SHUTDOWNTYPE
, and shuts down Oracle Database.
5.4 Starting Multiple Instances
1. Start the service for each instance using ORADIM or the Services dialog of the
Control Panel.
2. At the command prompt set the
ORACLE_SID
configuration parameter to the
SID
for the first instance to run:
C:\> SET ORACLE_SID=SID
where
SID
is the name of the Oracle Database instance.
3. Start SQL*Plus:
C:\> sqlplus /NOLOG
4. Connect
AS
SYSDBA
:
SQL> CONNECT / AS SYSDBA
Note: If you use ORADIM to create or edit instances, then it
automatically sets the relevant registry parameters to their
appropriate values.
See Also: Chapter 15, "Configuration Parameters and the Registry"
for instructions on adding and editing registry parameters
See Also: Your operating system documentation for instructions on
starting and stopping services.

Creating and Populating Password Files
Administering a Database on Windows 5-9
5. Start up the first instance:
SQL> STARTUP PFILE=ORACLE_BASE\admin\db_name\pfile\init.ora
where
ORACLE_BASE
is
c:\app\oracle\product\11.2.0
(unless you changed it
during installation) and
db_name
is the name of the instance.
6. Repeat Steps 2-5 for the other instances to run.
5.5 Creating and Populating Password Files
Use Password Utility to create password files. Password Utility is automatically
installed with Oracle Database utilities. Password files are located in directory
ORACLE_
HOME\database
and are named
PWDsid.ora
, where
SID
identifies the Oracle Database
instance. Password files can be used for local or remote connections to Oracle
Database.
To create and populate a password file:
1. Create a password file with the Password Utility:
C:\> orapwd FILE=PWDsid.ora ENTRIES=max_users
where
■
FILE
specifies the password file name.
■
SID
identifies the database instance.
■
ENTRIES
sets maximum number of entries in password file. This corresponds
to maximum number of distinct users allowed to connect to the database
simultaneously with either the SYSDBA or the SYSOPER DBA privilege.
2. Set initialization parameter file parameter
REMOTE_LOGIN_PASSWORDFILE
to
exclusive
,
shared
, or
none
.
The value
exclusive
specifies that only one instance can use the password file and
that the password file contains names other than
SYS
. In search of the password
file, Oracle Database looks in the registry for the value of parameter
ORA_SID_
PWFILE
. If no value is specified, then it looks in the registry for the value of
parameter
ORA_PWFILE
, which points to a file containing usernames, passwords,
and privileges. If that is not set, then it uses the default:
ORACLE_HOME\DATABASE\PWDsid.ORA.
The default value is
shared
. It specifies that multiple instances (for example, an
Oracle RAC environment) can use the password file. However, the only user
recognized by the password file is
SYS
. Other users cannot log in with
SYSOPER
or
SYSDBA
privileges even if those privileges are granted in the password file. The
shared
value of this parameter affords backward compatibility with earlier Oracle
releases. Oracle Database looks for the same files as it does when the value is
exclusive
.
The value
none
specifies that Oracle Database ignores the password file and that
authentication of privileged users is handled by the Windows operating system.
3. Start SQL*Plus:
C:\> sqlplus /NOLOG
4. Connect
AS SYSDBA
:

Creating and Populating Password Files
5-10 Oracle Database Platform Guide
SQL> CONNECT / AS SYSDBA
For an ASM instance, connect
AS SYSASM
:
SQL> CONNECT / AS SYSASM
5. Start Oracle Database:
SQL> STARTUP
6. Grant appropriate privileges to each user. Users who must perform database
administration, for example, would be granted privilege
SYSDBA
:
SQL> GRANT SYSDBA TO db_administrator;
For an ASM instance:
SQL> GRANT SYSASM TO SYS;
If the grant is successful, then the following message displays:
Statement Processed.
This adds
scott
to the password file and enables
scott
to connect to the database
with
SYSDBA
privileges. Use SQL*Plus to add or delete usernames, user passwords,
and user privileges in password files.
5.5.1 Viewing and Hiding the Password File
The password file is not automatically hidden. It can be made invisible and visible
again from two different locations:
■Command Prompt
■Windows Explorer
Command Prompt
1. To see the password file, enter:
ORACLE_BASE\ORACLE_HOME\database> attrib
The password file is displayed as
PWDsid.ora
:
A ORACLE_HOME\database\oradba.exe
A ORACLE_HOME\database\oradim.log
A ORACLE_HOME\database\PWDsid.ora
A ORACLE_HOME\database\SPFILEsid.ora
2. To make the password file invisible, enter:
ORACLE_HOME\database> attrib +H PWDsid.ora
3. To see the effect of the change, enter:
Caution: Copying or manually moving password files may result in
ORADIM being unable to find a password to start an instance.
Note: The password file must be visible before it can be moved,
copied, or deleted.

Automatically Encrypted Database Passwords
Administering a Database on Windows 5-11
ORACLE_HOME\database> attrib
The password file is now hidden:
A ORACLE_HOME\database\oradba.exe
A ORACLE_HOME\database\oradim.log
A H ORACLE_HOME\database\PWDsid.ora
A ORACLE_HOME\database\SPFILEsid.ora
4. To make the password file visible again, enter:
ORACLE_HOME\database> attrib -H PWDsid.ora
Windows Explorer
To make the password file invisible or visible again:
1. Navigate to directory
ORACLE_HOME\database
.
2. Right-click PWDsid.ora.
3. Choose Properties.
The
PWDsid.ora
Properties dialog opens.
4. In Attributes, check or clear the checkbox next to Hidden.
5. Click OK.
To view or hide an invisible password file:
1. Navigate to directory
ORACLE_BASE\ORACLE_HOME\database
.
2. Choose Folder Options from the View main menu.
3. Choose the View tab.
4. To view an invisible password file, choose Show hidden files and folders.
5. To hide a visible password file, choose Do not show hidden files and folders.
6. Click OK.
5.6 Connecting Remotely to the Database as SYS
When connecting to the starter database from a remote computer as
SYS
, you must
use a different password from the one described in Oracle Database Installation Guide for
Microsoft Windows when logging on with
SYSDBA
privileges. This is because the
password file enables database access in this situation and it requires the password
oracle
for this purpose.
5.7 Automatically Encrypted Database Passwords
With Oracle Database, the password used to verify a remote database connection is
automatically encrypted. Whenever a user attempts a remote login, Oracle Database
encrypts the password before sending it to the remote database. If the connection fails,
then the failure is noted in the operating system audit log.
Note: Configuration parameter
ORA_ENCRYPT_LOGIN
is retained for
backward compatibility and is set to
true
by default. See Chapter 15,
"Configuration Parameters and the Registry" for instructions on
adding and setting configuration parameters in the registry.

Archiving Redo Log Files
5-12 Oracle Database Platform Guide
5.8 Archiving Redo Log Files
If you installed Oracle Database through the Typical installation, then it is created in
NOARCHIVELOG
mode. If you created your database through the Custom option of
Database Configuration Assistant, then you had the choice of either
ARCHIVELOG
or
NOARCHIVELOG
.
In
NOARCHIVELOG
mode, redo logs are not archived. Setting your archive mode to
ARCHIVELOG
and enabling automatic archiving causes redo log files to be archived.
This protects Oracle Database from both instance and disk failure.
See Also: "Managing Archived Redo Logs" in Oracle Database
Administrator's Guide for more information about the archiving modes
and the archiving process.

6
Monitoring a Database on Windows 6-1
6
Monitoring a Database on Windows
This chapter describes how to monitor Oracle Database for Windows.
This chapter contains these topics:
■Database Monitoring Overview
■Using Oracle Counters for Windows Performance Monitor
■Using Event Viewer
■Trace Files
■Alert Logs
■Viewing Threads
6.1 Database Monitoring Overview
Table 6–1 describes tools that enable you to monitor Oracle Database.
Table 6–1 Database Monitoring Tools
Tool Functionality
Oracle Counters for
Windows Performance
Monitor
Monitor database objects, such as CPU usage, buffer cache, or a
background process.
Event Viewer Monitor database events.
Trace Files Record occurrences and exceptions of database operations
Alert Logs Record important information about error messages and
exceptions during database operations.
Oracle Enterprise Manager
Database Management
Packs
Monitor and tune using tools with real-time graphical
performance information.
See Also: Your Oracle Enterprise Manager documentation set for
more information
Oracle Administration
Assistant for Windows View information on or terminate any Oracle thread.
See Also: Oracle Database Performance Tuning Guide for general
tuning information

Using Oracle Counters for Windows Performance Monitor
6-2 Oracle Database Platform Guide
6.2 Using Oracle Counters for Windows Performance Monitor
Oracle Counters for Windows Performance Monitor is a graphical tool for measuring
the performance of Oracle Database for Windows objects on a local server or other
servers on a network. This tool is the same in appearance and operation as Windows
Performance Monitor, except it has been loaded with Oracle Database performance
elements.
On each computer, you can view behavior of objects, such as buffer cache, data
dictionary cache, datafiles, threads, and processes. An object is a graphical
representation of an element in your system. Every element, resource, and device in
your system can be represented as an object.
A set of counters is associated with each object. A counter is a unit of measurement
used by Performance Monitor to display activity. The type of activity the counter
measures depends on the type of object.
Certain types of objects and their respective counters are present on all systems. Other
counters, such as application-specific counters, appear only if the computer is the
associated software.
Each of these objects has an associated set of counters that provide information about
device usage, queue lengths, delays, and information used to measure throughput and
internal congestion.
6.2.1 Registry Information
When you install Oracle Counters for Windows Performance Monitor, values are
automatically set in the registry as described in Chapter 15, "Configuration Parameters
and the Registry".
Oracle Counters for Windows Performance Monitor lets you monitor only one
database instance at a time. For this reason, the registry contains the following values:
■
Hostname
■
Username
■
Password
Use
operfcfg
to change these values. Oracle recommends setting the security level on
each of these registry values.
To use Oracle Counters for Windows Performance Monitor for another database
instance on the same computer or a UNIX computer, change the values appropriately
in the registry. You can also monitor non-Windows installations of Oracle Database by
changing
Hostname
registry value so it points to another computer specified in file
tnsnames.ora
.
Note: Before using Oracle Counters for Windows Performance
Monitor to view Oracle-specific counters, you must specify the
SYSTEM
password using
operfcfg.exe
or Oracle Administration Assistant for
Windows. See "Using operfcfg" on page 15-14 or "Using Oracle
Administration Assistant for Windows" on page 15-14 for instructions.
See Also: Chapter 15, "Configuration Parameters and the Registry"
for instructions on how to use
operfcfg

Using Oracle Counters for Windows Performance Monitor
Monitoring a Database on Windows 6-3
6.2.2 Accessing Oracle Counters for Windows Performance Monitor
To access Oracle Counters for Windows Performance Monitor:
From the Start menu, select Programs, then select Oracle - HOME_NAME, then select
Configuration and Migration Tools and then select Oracle Counters for Windows
Performance Monitor.
Oracle Counters for Windows Performance Monitor has four views you can choose
from the View menu:
■Chart view displays database activity as it occurs.
■Alert view lets you know when certain minimum performance criteria are not
being met, or maximum criteria are being exceeded.
■Log view maintains continuous records on performance.
■Report view saves information about specific criteria.
6.2.3 Modifying Views
For each view you can decide objects to monitor, what counters to use for each object,
and graphical attributes of the view. When an object is chosen, it is assigned a counter,
a color, and added to the status bar at the bottom of Oracle Counters for Windows
Performance Monitor.
To add objects to a view:
1. Choose Add To (Chart, Alert, Log, Report) from the Edit menu. (This example
uses Add to Chart, but other dialogs are similar.)
The Add to Chart dialog appears.
2. In the Computer list, select the computer to monitor.
3. In the Object list, select the object or objects to monitor, then click Add.
If no data or Oracle Database objects appear, then either Oracle Database is not or
an invalid host string or password has been entered. If the database is not started,
then exit Oracle Counters for Windows Performance Monitor, start the database,
and restart Oracle Counters for Windows Performance Monitor.
4. In the Counter list, select one or more counters for each object you have selected.
Note that the contents of the Counter list change depending upon your selection in
the Object list. For details on how a counter works, highlight the counter and click
Explain.
5. In the Instance list, select an instance for this counter.
6. In the Color list, choose a color for the display of the selected counter.
7. In the Scale list, choose the scale at which to display the counter.
8. In the Width list, specify the width of the line on the graph.
9. In the Style list, choose a style for your graph line.
10. Click Done when you are finished.
The selections you have chosen to monitor are displayed.
See Also: Your operating system documentation for complete
information about the four views

Using Oracle Counters for Windows Performance Monitor
6-4 Oracle Database Platform Guide
6.2.4 Understanding Oracle Database Performance Objects
All Oracle Database system resources that can be monitored through Oracle Counters
for Windows Performance Monitor begin with 'Oracle Database'. This section lists
Oracle Database objects and describes their associated counters. These measures are
defined in:
ORACLE_HOME\dbs\PERFver.ora
Oracle Database Buffer Cache
The counter is phyrds/gets %. The percentage of phyrds/gets is calculated as a Miss
ratio. The lower the Miss counter, the better. To improve performance, increase the
number of buffers in the buffer cache, if memory is available on the computer. This
value is not time-derived.
Oracle Database Redo Log Buffer
The counter is redo log space requests. The value of this counter must be near zero. If
this value increments consistently, then processes have had to wait for space in the
redo log buffer. In this case, it may be necessary to increase the size of the redo log
buffer.
Oracle Database Data Dictionary Cache
The counter is getmisses/gets %. The value of this counter must be less than 10 or 15%
for frequently accessed data dictionary caches. If the ratio continues to increase over
this threshold while your application is, then increase the amount of memory available
to the data dictionary cache.
To increase the memory available to the cache, increase the value of initialization
parameter
SHARED_POOL_SIZE
. This value is not time-derived.
Oracle Database Library Cache
The counter is reloads/pins %. This is the percentage of SQL statements, PL/SQL
blocks, and object definitions that required reparsing. Total Reloads must be near zero.
If the ratio of Reloads to Pins is greater than 1%, then reduce the library cache misses.
This value is not time-derived.
Oracle Database Datafiles
The counters are phyrds/sec and phywrts/sec. These values are time-derived. Disk
contention occurs when multiple processes try to access the same disk simultaneously.
Depending on results from monitoring disk activity, corrective actions could include:
■Distributing I/O
■Separating datafiles and redo log files
See Also: Oracle Database Performance Tuning Guide for additional
information on these objects
Note: You can monitor only one instance at a time using Oracle
Counters for Windows Performance Monitor on a given computer.
See Also: Oracle Database Performance Tuning Guide for more detailed
information on tuning memory allocation in Oracle Database

Using Oracle Counters for Windows Performance Monitor
Monitoring a Database on Windows 6-5
■Separating tables and indexes
■Striping table data
Oracle Database DBWR stats1
The two counters available, buffers scanned/sec and LRU scans/sec, are helpful in
tuning Buffer Cache. Buffers scanned/sec is the number of buffers DBWR scanned in
each second. The buffers scanned are on the LRU (Least Recently Used) list. LRU
scans/sec is the number of times DBWR scanned the (Least Recently Used) buffer list
in each second.
Oracle Database DBWR stats2
The two counters available, timeouts/sec and checkpoints/sec, are helpful in
determining how much work DBWR has been requested to perform. Timeouts/sec is
the number of times DBWR timed-out in each second. DBWR is on a three second
timeout interval. If DBWR has not been posted within a three second interval, then it
times out.
Checkpoints/sec is the number of checkpoint messages processed by database writer
in each second. Whenever a checkpoint occurs, DBWR must be messaged (posted) to
"write dirty buffers to disk".
Oracle Database Dynamic Space Management
The counter is recursive calls/sec. Dynamic extension causes Oracle Database to
execute SQL statements in addition to those SQL statements issued by user processes.
These SQL statements are called recursive calls.
If Oracle Database makes excessive recursive calls while an application is, then it may
be necessary to determine the cause. Examine the recursive calls statistic through
dynamic performance table
V$SYSSTAT
.
Oracle Database Free List
The counter is free list waits/requests %. Contention for free lists is reflected by
contention for free data blocks in buffer cache. You can determine if contention for free
lists is reducing performance by querying
V$WAITSTAT
.
If the number of free list waits for free blocks is greater than 1% of the total number of
requests, then consider adding more free lists to reduce contention.
Oracle Database Sorts
The available counters are sorts in memory/sec and sorts on disk/sec. The default sort
area size is adequate to hold all data for most sorts. However, if your application often
performs large sorts on data that does not fit into the sort area, then you may increase
sort area size.
6.2.5 Oracle Counters for Windows Performance Monitor Troubleshooting Information
If no data or Oracle Database objects appear in the Objects list of the Add to (Chart,
Alert, Log, Report) dialog, then:
1. Ensure that Oracle Database instance is up. If it is not, then exit Oracle Counters
for Windows Performance Monitor, and start the database.
2. If the database instance is up but no data or Oracle Database objects appear, then
check the error file for Oracle Counters for Windows Performance Monitor:
ORACLE_HOME\dbs\OPERFver.log
Using Event Viewer
6-6 Oracle Database Platform Guide
If the log file indicates an invalid host string or password, then check the registry
for correct values for
Hostname
,
Password
, and
Username
. See "HKEY_LOCAL_
MACHINE\SYSTEM\CurrentControlSet\Services" on page 15-6 for further
information about these values.
3. Restart Oracle Counters for Windows Performance Monitor.
6.3 Using Event Viewer
Oracle Database for Windows problems and other significant occurrences are recorded
as events in an application event log. View and manage these recorded events in Event
Viewer.
To access Event Viewer:
1. From the Start menu, select Programs, then select Administrative Tools and then
select Event Viewer.
The Event Viewer window appears.
2. Choose Application from the Log menu.
Figure 6–1 displays the Application view window, Table 6–2 shows what is recorded in
each column, and Table 6–3 interprets icons that appear at the left edge of the viewer.
Figure 6–1 Application View Window
Table 6–2 Application View Definitions
Column Name Definition
Date Date event took place
Time Time event took place
Source Application that recorded event
Category Classification of event

Using Event Viewer
Monitoring a Database on Windows 6-7
6.3.1 Reading Event Viewer
Oracle Database for Windows events display with a source of Oracle.
SID
.
Event number 34 specifies an audit trail event. These events are recorded if parameter
AUDIT_TRAIL
is set to
db
(
true
) or
os
in the initialization parameter file. Option
os
enables system wide auditing and causes audited records to be written to Event
Viewer. Option
db
enables system wide auditing and causes audited records to be
written to the database audit trail (table
SYS.AUD$
). Some records, however, are written
to Event Viewer.
Event numbers other than 34 specify general database activities, such as an instance
being started or stopped.
When you double-click an icon in Event Viewer, the Event Detail dialog appears with
more information about the selected event. Figure 6–2, for example, shows details
about EventID 1011. In the Description field you will find a text description of the
event. In the Data field you can choose Bytes to see the information in hexadecimal
format or Words to see DWORDS for the same data.
Event Unique number assigned to event
Computer Computer name on which event occurred
Table 6–3 Event Viewer Icons
Icon Event Type Suggested Action
Red Stop Sign Error Always check these icons.
Lower-case "i" in
Blue Circle Information Noncritical system events. Check these icons only to
track a specific event.
Exclamation Point in
Yellow Circle Warning Special events, such as instance termination or
services shutdown. Investigate these icons, but they
are usually noncritical.
Table 6–2 (Cont.) Application View Definitions
Column Name Definition
Trace Files
6-8 Oracle Database Platform Guide
Figure 6–2 Event Detail Dialog
6.3.2 Managing Event Viewer
Setting
AUDIT_TRAIL
to
db
or
os
causes more records to be written to Event Viewer.
This can fill up the Event Viewer log file. Follow these procedures to increase log file
size:
1. Choose Log Settings from the Log menu.
The Event Log Settings dialog appears.
2. Adjust the setting in the Maximum Log Size field to an appropriate level.
3. Click OK.
You are returned to Event Viewer.
6.4 Trace Files
Oracle Database for Windows background threads use trace files to record occurrences
and exceptions of database operations, and errors. Background thread trace files are
created and stored in the ADR directory specified by parameter
DIAGNOSTIC_DEST
in
the initialization parameter file.
See Also: Microsoft operating system documentation for more
information on using Event Viewer
Caution: Audit information cannot be spooled to a file. Parameter
AUDIT_FILE_DEST
is supported on Windows to write XML format
audit files when
AUDIT_TRAIL
is set to
XML
or
XML
,
EXTENDED
format and
thus must be added to the initialization parameter file.

Viewing Threads
Monitoring a Database on Windows 6-9
Oracle Database creates a different trace file for each foreground and background
thread. The name of the trace file contains the name of the thread, followed by the
extension ".
trc"
. The following are examples of foreground trace file names:
■
ops_ora_5804.trc
■
ops_ora_4160.trc
The following are examples of background trace file names:
■
ops_pmon_1556.trc
■
ops_mmon_3768.trc
■
ops_lgwr_2356.trc
■
ops_dbw0_132.trc
Trace files are also created for user threads and stored in the ADR directory specified
by parameter
DIAGNOSTIC_DEST
in the initialization parameter file. Trace files for user
threads have the form
oraxxxxx.trc
, where
xxxxx
is a 5-digit number indicating the
Windows thread
ID
.
6.5 Alert Logs
Alert logs contain important information about error messages and exceptions that
occur during database operations. Each Oracle Database for Windows instance has one
alert log; information is appended to the file each time you start the instance. All
threads can write to the alert log.
For example, when automatic archiving of redo logs is halted because no disk space is
available, a message is placed in the alert log. The alert log is the first place to check if
something goes wrong with the database and the cause is not immediately obvious.
The alert log is named
alert_SID.log
and is found in the ADR directory specified by
parameter
DIAGNOSTIC_DEST
in the initialization parameter file. Alert logs should be
deleted or archived periodically.
6.6 Viewing Threads
To view information on Oracle Database threads using Oracle Administration
Assistant for Windows, you must either enable Windows native authentication for the
database or run utility
ocfgutil.exe
with arguments
username
and
password
. The
utility stores the user name and password in the following registry location:
HKEY_LOCAL_MACHINE\SYSTEM\CurrentControlSet\Services\OracleOraConfig
When Windows native authentication is not enabled, Oracle Remote Configuration
Agent retrieves the user name and password from this registry key to log in to the
database.
To view information on Oracle Database threads using Oracle Administration
Assistant for Windows:
See Also:
■"Modifying the Initialization Parameter File" on page 3-5
■"ADMIN Directory" section in Oracle Database Installation Guide for
Microsoft Windows
Viewing Threads
6-10 Oracle Database Platform Guide
1. From the Start menu, select Programs, then select Oracle - HOME_NAME, then
select Configuration and Migration Tools and then select Administration
Assistant for Windows.
2. Right-click the
SID
, where
SID
is a specific instance name, such as
orcl
.
3. Choose Process Information.
The Process Information dialog appears, listing name, type, user, thread ID, and
CPU usage for each Oracle Database thread.
4. To terminate a thread, select it and click Kill Thread.

7
Tuning Windows to Optimize Oracle Database 7-1
7
Tuning Windows to Optimize Oracle Database
This chapter describes how to tune the Windows Server operating system to ensure
that Oracle Database is in the best possible environment.
This chapter contains these topics:
■Windows Tuning Overview
■Large Page Support
■Reduce Priority of Foreground Applications on Server Console
■Configure Windows Server to Be an Application Server
■Disable Unnecessary Services
■Remove Unused Network Protocols
■Reset Network Protocol Bind Order
■Setting the Order of Multiple Network Interface Cards
■Apply Latest Reliable Windows Server Service Pack
■Use Hardware or Operating System Striping
■Multiplex Windows Server Virtual Memory Paging File
■Close All Unnecessary Foreground Applications
7.1 Windows Tuning Overview
Windows Server operating systems offer considerably fewer tuning adjustments than
UNIX. This difference constrains systems administrators when they try to optimize
Windows Server performance, but it also makes Windows Server easier to use.
There are still ways, however, to make Windows Server a better application server
environment for Oracle Database. Most of the operating system specific procedures
described in this chapter enable Oracle Database to reserve more system resources,
such as CPU, memory, and disk I/O.
In addition, because Oracle Database is a high-performance database management
system that effectively uses resources of your Windows computer, it should not also
serve as any of the following:
■Primary or backup domain controller
Note: For the sake of brevity, this discussion uses the collective term
Windows Server when a statement applies to all supported Windows
operating systems.

Large Page Support
7-2 Oracle Database Platform Guide
■File or print server
■Remote access server
■Router
These configurations consume network, memory, and CPU resources. In addition, the
Windows computer that is Oracle Database should not be locally accessed with a high
frequency or intensively used for local user processing, unless it has enough resources
to accommodate all this activity.
7.2 Large Page Support
Large page support is a feature of Oracle Database 10g Release 1 (10.1) or later. It
provides a performance boost for memory-intensive database instances on Windows
Server 2003. By taking advantage of newly introduced operating system support,
Oracle Database 10g Release 1 (10.1) or later can now make more efficient use of
processor memory addressing resources. Specifically, when large page support is
enabled, the CPUs in the system will be able to access the Oracle Database buffers in
RAM more quickly. Instead of addressing the buffers in 4KB increments, the CPUs are
told to use 2 MB page sizes in Physical Address Extension (PAE) mode and 4MB page
sizes in non-PAE mode when addressing the database buffers.
This feature is particularly useful when the Oracle buffer cache is several gigabytes.
Smaller-sized configurations will still see a gain when using large pages, but the gain
will not be as great as when the database is accessing large amounts of memory.
To enable large page support, set
ORA_LPENABLE
to
1
in the Oracle key of the Windows
Server 2003 registry.
If the service is as a user instead of the default
SYSTEM
user, then the administrator
must grant the "Lock pages in memory" privilege to the user. This privilege is not
enabled by default when Windows is installed. To grant this privilege:
1. From the Start menu, select Settings and then select Control Panel.
The Control Panel window opens.
2. Double-click Administrative Tools.
The Administrative Tools window opens.
3. Double-click Local Security Policy.
The Local Security Settings window opens.
4. In the left pane of the Local Security Settings window, expand Local Policies and
select User Rights Assignment.
5. In the right pane of the Local Security Settings window, select Lock pages in
memory and select Action and then Security...
The Local Security Policy Setting dialog opens.
6. Click Add...
The Select Users or Groups dialog opens.
7. Select the
oracle
user from the Name list.
See Also: "Support for Very Large Memory (VLM) Configurations"
on page 1-5 for instructions on setting Physical Address Extension
mode

Large Page Support
Tuning Windows to Optimize Oracle Database 7-3
8. Click Add.
9. Click OK to close the Select Users or Groups dialog.
10. Click OK to close the Local Security Policy Setting dialog.
To take advantage of large pages on Windows Server 2003, the amount of physical
memory must be greater than the amount of System Global Area (SGA) specified in
the parameter file.
Large pages may not be allocated always during instance startup; either all of the SGA
is allocated using large pages or all of SGA is allocated using regular pages.
To enable large page support:
1. Go to
ORACLE_HOME\bin\oracle.key
.
2. Open
oracle.key
in a text editor and record the value found. It is set by Oracle
Universal Installer. The default is:
SOFTWARE\ORACLE\KEY_HOME_NAME
3. Start Registry Editor at the command prompt:
C:\> regedit
4. Go to
HKEY_LOCAL_MACHINE
.
Find the key corresponding to the value found in
oracle.key
. In the default case,
for example, you would look for:
HKEY_LOCAL_MACHINE\SOFTWARE\ORACLE\KEY_HOME_NAME
5. Create one of the following, depending on where you want to enable large page
support:
■
ORA_LPENABLE=1
to enable large page support on all instances
■
ORA_SID_LPENABLE=1
to enable large page support on a specific instance
6. Exit Registry Editor.
Note: Large page usage locks the entire SGA into physical memory.
Physical memory is not released during a shrink operation.
See Also: Your operating system documentation for restrictions on
allocating large pages.
Note: Although Registry Editor lets you view and modify registry
keys and parameter values, you usually are not required to do so. In
fact, you can render your system useless if you make incorrect
changes. Therefore, only advanced users should edit the registry. Back
up your system before making any changes in the registry.
oracle.key
file must not be modified in any way or removed. Oracle
binaries open it to determine the location in the registry where their
variables are stored.

Reduce Priority of Foreground Applications on Server Console
7-4 Oracle Database Platform Guide
By default, Oracle allocates the minimum available large page size when using large
pages. The minimum available large page size, 16 MB, is obtained by using the
GetLargePageMinumum
function.
7.3 Reduce Priority of Foreground Applications on Server Console
One of the settings provided by default during installation of Windows Server gives
interactive foreground applications priority over every background process. To
prevent foreground applications on the server console from taking excessive processor
time away from Oracle Database, you can reduce priority for foreground applications.
7.4 Configure Windows Server to Be an Application Server
Windows memory manager divides up system memory into three different pools
described in Table 7–1.
Windows Server memory manager tries to balance each application's usage of memory
by dynamically paging memory between physical RAM and a virtual memory paging
file. If an application is particularly memory-intensive (like Oracle Database) or if a
large number of applications run concurrently, then combined memory requirements
of the applications may exceed physical memory capacity.
The large proportion of memory reserved for file caching (41%) can be quite beneficial
to file and print servers. But it may not be advantageous to application servers that
often run memory-intensive network applications. A Windows Server file cache is
particularly unnecessary for Oracle Database, which performs its own caching through
System Global Area.
You can reset the Windows Server memory model from the default file and print
server, with its large file cache, to a network applications model, with a reduced file
cache and more physical memory available for Oracle Database.
Caution: Do not set initialization parameter
lock_sga
when large
pages are enabled. Large page usage locks the entire SGA into
physical memory. When used with parameter
lock_sga
, database
startup fails with an error because the operating system automatically
locks. That is, it prevents memory from being paged to disk when
large pages are requested. Physical memory is not released during a
shrink operation.
See Also: Your operating system documentation for instructions on
reducing priority of foreground applications
Table 7–1 Windows Server Memory Shares
Pool Percent of Total Memory
Kernel and other system services 9%
File Cache 41%
Paged Memory 50%
See Also: Your operating system documentation for instructions

Reset Network Protocol Bind Order
Tuning Windows to Optimize Oracle Database 7-5
7.5 Disable Unnecessary Services
After you have significantly reduced the file cache as described in "Configure
Windows Server to Be an Application Server" on page 7-4, you can retrieve additional
physical memory for Oracle Database by disabling services not needed for core
operating system functionality. Unnecessary services include:
■License Logging Service
■Plug and Play
■Remote Access Autodial Manager
■Remote Access Connection Manager
■Remote Access Server
■Telephony Service
Consult with your systems administrator to identify other unnecessary services.
Do not disable any of the following services:
■Alerter
■Computer Browser
■EventLog
■Messenger
■OracleService
SID
■OracleHOME_NAMETNSListener
■OracleStart
SID
(Oracle8 release 8.0.6 and earlier)
■Remote Procedure Call (RPC) Service
■Server
■Spooler
■TCP/IP NetBIOS Helper
■Workstation
7.6 Remove Unused Network Protocols
Remove all unnecessary network protocols on Windows so that processing time can be
concentrated on servicing only critical protocols.
7.7 Reset Network Protocol Bind Order
If multiple protocols must be installed on the server, you can give the protocol most
frequently used by Oracle Database highest priority by resetting the network protocol
bind order.
See Also: Your operating system documentation for instructions on
disabling unnecessary services
See Also: Your operating system documentation for instructions on
removing unnecessary network protocols

Setting the Order of Multiple Network Interface Cards
7-6 Oracle Database Platform Guide
7.8 Setting the Order of Multiple Network Interface Cards
If you have public and private network interface cards (NICs) on a single Windows
computer and they are not in the correct order, then you might experience problems
with any configuration (Oracle Enterprise Manager, for example) that uses
gethostname
.
If the private NIC is seen first by Windows, then a
gethostname
call will return the
host name of the private interconnect. Whichever tool is calling
gethostname
will have
configuration or connectivity problems stemming from this non-public network
information.
You can determine the current order of your NICs, and change it if necessary, as
follows:
1. From the Start menu, select Settings and then select Network and Dial-up
Connections.
2. Select Advanced and then select Advanced Settings.
3. The Connections: field lists your public and private Local Area Connections. To
change the order in which Windows accesses them, select one of them and click
the Arrow options to move it up or down.
4. When the public and private NICs are in the order you want, click OK.
5. The change in priority takes effect immediately. Restarting your computer is not
necessary.
7.9 Apply Latest Reliable Windows Server Service Pack
Microsoft releases operating system patches, called Service Packs, on a quarterly basis.
Service Packs are collections of bug fixes and product enhancements to the basic
Windows Server release. In general, apply Service Packs as soon as it is safe to do so,
since they fix bugs and can improve Windows Server performance or functionality.
While Service Packs are supposed to fix bugs, they sometimes introduce new problems
as well. In general, it is safest to wait a few weeks after a Service Pack is released
before implementing it. This allows time for other field sites to report any problems
with the SP release.
The latest Windows Server Service Packs may be downloaded as self-extracting
archives from
http://support.microsoft.com
Unless there are assurances that the Service Pack works without flaws on Windows
Server, choose to create an
Uninstall
directory. This enables the Service Pack to be
removed and the original configuration to be restored.
Service Pack files overwrite similarly-named files in the previous Windows Server
configuration. However, Service Pack files can be overwritten in turn by setup
programs that copy files from the original installation media.
For example, installing a new network protocol or printer driver usually requires
copying files from original Windows Server installation media. When Service Pack
files are comprehensively or selectively overwritten, the Service Pack must be
re-applied.
See Also: Your operating system documentation for instructions on
resetting network protocol bind order

Use Hardware or Operating System Striping
Tuning Windows to Optimize Oracle Database 7-7
7.10 Use Hardware or Operating System Striping
Compared to CPU and memory speeds, hard disk drives are extremely slow. Now that
hard disk drives are relatively inexpensive, Oracle recommends that Windows Server
use logical volumes comprised of striped physical disks. Data striping is an effective
means of reducing the impact of relatively slow hard drives by distributing file I/O
across a number of hard drives simultaneously.
Striping data across a number of disks is one example of a redundant array of
inexpensive disks (RAID). There are several different types of RAID, also referred to as
RAID levels, ranging from high performance to high reliability. The three most
common RAID levels in Oracle Database installations are RAID-0, RAID-1, and
RAID-5. Descriptions of each RAID level follow Table 7–2, which shows each level's
read and write penalties.
Note
Read penalty is ratio of I/O operations to read requests.
Note
Write penalty is ratio of I/O operations to write requests.
Disk Striping
RAID level 0 enables high-performance, fault-intolerant disk striping. Multiple
physical hard disks are aggregated into a logical whole, either by a disk controller or
through the operating system. Data operations against the logical volume are broken
down into as many chunks as there are physical drives in the array, making
simultaneous use of all disks. Given identical hard disks, if one hard disk has a
throughput rate of
DISKRATE
operations/second, then a RAID 0 logical volume has a
rate of:
(DISKRATE * [number of physical drives in array]) operations/second
The downside of RAID 0 is its lack of fault tolerance. If one disk in the logical volume
fails, the whole volume fails and must be restored from a backup.
Note: Data striping through the operating system is not permitted
with Automatic Storage Management (ASM), which does its own
striping. Hardware striping is allowed with ASM, but it is not
necessary.
See Also: "Using Automatic Storage Management" in Oracle
Database Administrator's Guide
Table 7–2 RAID Levels in Oracle Database Installations
RAID Level Read PenaltyNote Write PenaltyNote
0 (Disk Striping) 1:1 1:1
1 (Disk Mirroring) 1:1 2:1
0 + 1 1:1 2:1
5 (Distributed Data Gathering) 1:1 4:1

Multiplex Windows Server Virtual Memory Paging File
7-8 Oracle Database Platform Guide
Disk Mirroring
RAID level 1 enables fault tolerant disk mirroring with some chance of a performance
penalty. Essentially, every write to a mirrored disk is duplicated on another drive
dedicated to this purpose (the mirror drive). If the mirrored disk fails, the mirror drive
is brought online in real time. After the faulted drive is replaced, the mirror
configuration can be reestablished.
The read penalty for RAID level 1 is nominally 1:1, but it may benefit from split reads
on some controllers. When the controller knows which mirror can be accessed fastest,
for example, it can lower seek times by directing I/O operations to that disk.
Disk Striping + Mirroring
RAID level 0+1 enables mirroring of an array of striped hard disks. This is a blend of
RAID 0 and RAID 1, offering high-performing fault tolerance.
Distributed Data Guarding
RAID level 5, also known as disk striping with parity, eliminates the costly
requirement to mirror. In RAID 5, multiple hard disks are aggregated into a striped
logical volume, similar to RAID 0, but each drive contains parity information such that
any single drive failure is tolerated. With one failed drive, a RAID-5 system can allow
continued access to data, although access times are greatly reduced due to on-the-fly
rebuilding of bytes from parity information. RAID-5 solutions usually allow
hot-swapping of faulty drives with replacements, triggering a rebuild of the failed
drive's data onto the replacement from parity information.
The write penalty of 4:1 results from 2 reads and 2 writes during parity calculation.
7.10.1 Multiple Striped Volumes for Sequential and Random Access
If there are enough physical disks in Windows Server, create at least two striped
volumes (in addition to a standalone hard disk or striped volume for the operating
system). One striped volume can be used for sequential data access, and the other can
be used for random data access.
Oracle Database redo logs and archived redo logs, for example, are written in
sequential order. Because of reduced head movement, hard disks perform best when
reading or writing sequential data.
Oracle Database datafiles, however, are usually accessed in random order. Random
access in a hard disk results in significant head movement, translating to slower data
access.
Unless redo logs are separated from datafiles (at physical device level), undo file I/O
contention may result, increasing access times for both types of files.
7.11 Multiplex Windows Server Virtual Memory Paging File
Some virtual memory paging is likely even if Oracle Database is the only network
application on Windows Server, because Windows Server memory manager will
attempt to move seldom-used pages to disk to free up more physical memory for hot
pages.
Multiplexing the Windows Server virtual memory paging file is a good strategy to
boost overall system performance. Splitting the paging file onto at least two different
physical volumes (or logical volumes as long as underlying physical volumes do not
overlap) provides a significant performance boost to virtual memory swapping
operations.

Close All Unnecessary Foreground Applications
Tuning Windows to Optimize Oracle Database 7-9
Even though this is a good technique to increase speed of virtual memory paging, too
much paging activity is still a performance hit and should be corrected by adding
more RAM to the server.
General Page File Sizing Tip
Oracle recommends that total combined size of your page files be at least equal to
physical RAM on your computer. Configurations where combined size is two to four
times the size of physical RAM are not uncommon. Minimize paging as much as
possible. But situations in which the operating system runs out of or low on paging
space are to be avoided at all costs. Adequately-sized paging files spaced across
physical disks spread out I/O most efficiently, because the operating system spreads
paging evenly across page files.
7.12 Close All Unnecessary Foreground Applications
Once procedures in previous sections have been applied, remember to close any
unnecessary foreground applications. First, remove all applications from Startup
folders of Windows Server console operators. Second, minimize the window when
executing long- scripts from a command prompt, so that Windows Server can focus on
the operation and not on a flood of window repaint messages. Third, disable screen
savers, which can quickly saturate the CPU. If a screen saver must be run, choose
Blank Screen, which uses the least amount of processing time.
Note: Internal read/write batch size for Windows is 4K.

Close All Unnecessary Foreground Applications
7-10 Oracle Database Platform Guide

8
Performing Database Backup and Recovery with VSS 8-1
8
Performing Database Backup and Recovery
with VSS
This chapter explains how to use Volume Shadow Copy Service (VSS) applications to
back up and recover an Oracle database. This chapter contains the following topics:
■Overview of Database Backup and Recovery with VSS
■Installing and Uninstalling the Oracle VSS Writer Service
■Backing Up a Database
■Restoring and Recovering a Database
■Integrating VSS with Third-Party Requester Applications
■Duplicating a Database
8.1 Overview of Database Backup and Recovery with VSS
This section explains the basic concepts and tasks involved in backup and recovery
with component-based shadow copies. The following topics are described:
■Purpose of Database Backup and Recovery with VSS
■Scope of This Chapter
■Basic Concepts of Database Backup and Recovery with VSS
■Basic Steps of Backup and Recovery with VSS
8.1.1 Purpose of Database Backup and Recovery with VSS
VSS provides a Windows-specific interface that enables coordination between
requesters that back up data, writers that update data on disk, and providers that
manage storage. Oracle Database functions as a writer that is integrated with
VSS-enabled applications.
You can use VSS-enabled software and storage systems on Windows to back up and
restore an Oracle database. A key benefit is the ability to use a VSS-enabled application
to make an online backup of the whole database.
8.1.2 Scope of This Chapter
This chapter assumes that you are familiar both with VSS applications and the Oracle
Database backup and recovery principles and techniques described in Oracle Database
Backup and Recovery User's Guide. This chapter does not attempt to provide an

Overview of Database Backup and Recovery with VSS
8-2 Oracle Database Platform Guide
introduction to backup and recovery: it only explains how to perform database backup
and recovery in the VSS infrastructure.
8.1.3 Basic Concepts of Database Backup and Recovery with VSS
VSS is an infrastructure on Windows server platforms that enables applications to
create shadow copies. A shadow copy is a consistent snapshot of the data held on a
volume or component at a well-defined point in time. A shadow copy set is a
collection of shadow copies that are all taken at the same time. VSS identifies each
shadow copy and shadow copy set by a persistent Global Unique Identifier (GUID).
VSS provides the following infrastructure for VSS applications:
■Coordinates activities of requesters, providers, and writers in the creation and use
of shadow copies
■Furnishes the default system provider
■Implements low-level driver functionality necessary for any provider to work
A VSS requester is an application that requests VSS services to create shadow copies.
Typically, VSS requesters are backup applications. Requesters communicate with
writers to gather system data and signal writers to prepare data for backup.
A VSS provider manages storage volumes and creates shadow copies on demand. In
response to a requester, a provider generates COM events to signal applications of an
impending shadow copy and creates and maintains this copy until it is no longer
needed. During the life cycle of the shadow copy, the provider effectively supports
two independent copies: the disk that is actively updated and a fixed copy that is
stable for backup.
A VSS writer is an application or service that writes data to disk and cooperates with
VSS providers and requesters. During backups, writers ensure that data is in the
proper state for a shadow copy.
The Oracle VSS writer is a Windows service that coordinates an Oracle database
instance and other VSS components. The writer service, which is started under the
user account with
SYSDBA
privileges, runs separately from the database instance. You
must use third-party requesters to perform backup and recovery within the VSS
infrastructure.
As explained in the following sections, the Oracle VSS writer supports both
volume-based and component-based shadow copies. You can use these shadow copies
in a backup and recovery strategy or to create a copy of your original database. You
can use the duplicate database for testing or as a standby database.
8.1.3.1 Component-Based Shadow Copies
The Oracle VSS writer supports component-based shadow copies, which are sets of
database files. The recommended technique for backing up an Oracle database with
VSS writer is to create shadow copies of components. During a backup, the Oracle VSS
writer saves the redo generated during snapshot creation in a metadata document.
During a restore operation, the writer automatically extracts the redo from the
metadata document and applies it to files restored from a snapshot.
8.1.3.2 Volume-Based Shadow Copies
The Oracle VSS writer supports volume-based shadow copies, which are snapshots of
complete drive or volumes. Oracle Database places the files that it manages in a state
suitable to create shadow copies. For example, the datafiles are placed in hot backup
mode and a new snapshot control file is created for a database in
ARCHIVELOG
mode.

Overview of Database Backup and Recovery with VSS
Performing Database Backup and Recovery with VSS 8-3
Oracle VSS writer excludes files such as the current control file and online redo logs
from the shadow copies. The writer also returns an error if the snapshot cannot be
taken. For example, if a
NOARCHIVELOG
database is open in read/write mode, then the
writer returns an error indicating that the snapshot is not possible.
8.1.3.3 Oracle VSS Backup Types
Oracle VSS writer supports log, copy, full, differential, and incremental backups. The
VSS writer uses time stamp mechanism for incremental and differential backups and
stores a time stamp in the backup document using
SetBackupStamp()
API. This
backup stamp is used by Oracle VSS writer during incremental or differential backups
to specify changed files since the last full or incremental backup using
AddDifferencedFilesByLastModifyTime()
API.
Oracle VSS writer also stores backup metadata and restore metadata, which must be
available during restore operations so that the VSS writer can perform intelligent
postrestore operations. In case of full or copy backup, the restore metadata contains
important redo information to make the restored files consistent. Hence, it is
imperative that Oracle VSS writer is called during restore operations to perform the
recovery operations.
8.1.4 Basic Steps of Backup and Recovery with VSS
The Oracle VSS writer is installed automatically as part of the database. If you must
install or uninstall it manually, see "Installing and Uninstalling the Oracle VSS Writer
Service" on page 8-4.
In the most typical backup scenario, you select the
Oracle Database
component in
your VSS-enabled application and create a shadow copy. The shadow copy contains
the database files, control files, and server parameter file. If the database is in
ARCHIVELOG
mode, then you can create the shadow copy when the database is open or
closed; otherwise, only when closed.
In a typical recovery scenario, you select the
Oracle Database
component in your
VSS-enabled application and restore it. Afterward, you can open the database either in
read-only mode or with the
RESETLOGS
option. The Oracle VSS writer also supports
applications that perform point-in-time recovery.
To restore a subset of database files, you can select individual components and restore
them. The Oracle VSS writer performs the appropriate actions automatically in the
postrestore phase so that the file can be used (or brought online) at the end of restore
operation. For example, if you select a datafile component for restore, then the writer
automatically recovers the datafile by using RMAN.
Note: Automatic Storage Management files and raw files are not
supported for Oracle VSS snapshots.
See Also:
■"Backing Up a Database" on page 8-5 to learn about the
components that you can back up and the procedures for making
component-based and volume-based backups
■"Restoring and Recovering a Database" on page 8-8 to learn about
the components that you can restore and the procedures for
performing restore and recovery

Installing and Uninstalling the Oracle VSS Writer Service
8-4 Oracle Database Platform Guide
8.2 Installing and Uninstalling the Oracle VSS Writer Service
The Oracle VSS writer runs separately from the Oracle database instance. From the
perspective of the database, the VSS writer is simply an OCI client.
The Oracle VSS writer provides command-line options to install and uninstall the
writer service. During installation, you can specify the Windows account under which
the service must be started. The writer uses operating system authentication when
connecting to a database instance. Thus, the Windows user must be able to log in as
SYSDBA
to the Oracle database instances managed by the writer service.
The command-line syntaxes for the Oracle VSS writer are as follows:
oravssw {/q [/start | /stop | /status]}
oravssw SID [/tl trace_level] [/tf trace_file]
oravssw SID [/i] [/d]
Table 8–1 describes the options for the Oracle VSS writer.
In Example 8–1, you install the service so that it connects to the
prod1
instance.
Example 8–1 Installing Oracle VSS Writer
oravssw prod1 /i
Note: You can change the userid and password using the Services
snapin.
Table 8–1 Oracle VSS Writer Options
Option Description
SID SID
of the Oracle instance to which the service connects.
/i
Installs the service for a specified
SID
.
/q
Queries the Oracle VSS writer services. But when not used with
options like
/start
or
/status
or
/stop
, it just displays the list
of Oracle VSS writer services.
/status
Displays the current status of all Oracle writer services and can
be used only with the
/q
option.
/start
Starts all Oracle VSS writer services and can be used only with
the
/q
option.
/stop
Stops all Oracle VSS writer services and can be used only with
the
/q
option.
/tl
Specifies the trace level for a Oracle VSS writer for a specified
SID
.
/tf
Specifies the trace file name for Oracle VSS writer for a specified
SID
.
/d
Uninstalls the service for a specified
SID
.

Backing Up a Database
Performing Database Backup and Recovery with VSS 8-5
8.3 Backing Up a Database
The technique for backing up a database depends on the archiving mode of the
database and whether you are making a component-based or volume-based backup.
Oracle recommends shadow copies taken in component mode for backing up the
Oracle database using VSS writer. The Oracle VSS writer defines the components that
include the set of database files. The Oracle VSS writer then saves the redo generated
during hot backup mode when the snapshot was created in the backup writer
metadata document.
The component hierarchy defined by the Oracle VSS writer is illustrated in Figure 8–1.
Figure 8–1 Oracle VSS Writer Component Hierarchy
"About Component-Based Backups" on page 8-5 explains which components you can
select when making component-based backups.
8.3.1 About Component-Based Backups
The components supported by the Oracle VSS writer are listed in Table 8–2. The name
of the component is the value returned by an
OnIdentify
VSS message. The Selectable
for Backup column indicates whether a component is eligible to be selected in VSS
shadow copies.
Note:
■Any errors during operation of the Oracle VSS writer are reported
by means of Windows System Event logging APIs. You can view
these errors with the Windows Event Viewer.
■Oracle Database 10g Release 2 (10.2.0.3) supports Oracle VSS
snapshots only when Oracle VSS writer 11g is configured to
manage the 10.2.0.3 database. See My Oracle Support (formerly
OracleMetaLink)
https://support.oracle.com
Note 580558.1 for
more information about installing Oracle VSS writer for use with
9i and 10g databases.

Backing Up a Database
8-6 Oracle Database Platform Guide
You can select only
Oracle Database
,
ArchiveLogDest_n
, and
Fast Recovery Area,
exposed by the Oracle VSS writer during a backup. The availability of the components
in Table 8–2 may depend on the database state. For example, if the database is in
NOARCHIVELOG
mode, the
Archived Logs
component will not be returned. Likewise, if
the instance is not started with a server parameter file, the
Server Parameter File
component will not be returned.
When you select
Oracle
Database
component for backup or restore, all other
components are implicitly selected for backup or restore. This implies that all files that
are part of the selected component are candidates for backup or restore.
ArchiveLogDest_n
and
Fast
Recovery
Area
components are defined to contain only
log or incremental files. This means that the requester should backup files from these
components only when creating a log for incremental or differential backup. Likewise,
the requester should restore files from these components only when restoring from log
or incremental or differential backups.
The files in all other components other than
ArchiveLogDest_n
and
Fast
Recovery
Area
define database files. This means that the requester should backup files from
these components only when creating a full or copy backup. Likewise, the requester
Table 8–2 Components Backed Up by the Oracle VSS Writer
Component Description
Selectable for
Backup
Oracle Database Contains the database files, control files, and server parameter file. Yes
Control File Contains the snapshot location of the control file for a database in
ARCHIVELOG
mode, or the current control file locations when all
database files are recovered to a consistent SCN.
Note: The files included in the Control File component determine
whether current control files or snapshot control files are excluded.
For example, if the database is opened in read-only mode, then the
snapshot control file location is excluded from the snapshot.
No
Server Parameter File Contains the location of the server parameter file, if the instance is
using one. No
All TableSpaces Includes all tablespaces in a snapshot. No
tablespace_namesSelects individual TableSpaces. No
Datafile number=nSelects individual datafiles. The metadata will contain
RESETLOGS
information, tablespace number, tablespace name, and DBID. No
ArchiveLogDest_nSelects individual local archiving destinations other than the fast
recovery area. Yes
Fast Recovery Area Includes all backup files and archived logs in the Fast Recovery Area
in the VSS snapshot.
Files backed up by VSS from the Fast Recovery Area can be subjected
to deletion under space constraints.
Yes
Archived Logs Logs in Fast Recovery Area No
Backup Files Backs up from Fast Recovery Area No
Note: The components that are not marked as Selectable for Backup
are implicitly included by components marked as Selectable for
Backup.

Backing Up a Database
Performing Database Backup and Recovery with VSS 8-7
should restore files from these components only when restoring from full or copy
backup.
8.3.2 Backing Up a Database in ARCHIVELOG Mode
The procedures in this section assume that the database is open read/write. You can
also make closed, consistent backups by following the procedures in "Backing Up a
Database in NOARCHIVELOG Mode" on page 8-7.
8.3.2.1 Making Component-Based Backups of an ARCHIVELOG Database
This section explains how to back up the whole database. You can back up only
Oracle
Database,
ArchiveLogDest_n
, and
Fast Recovery Area
, listed in Table 8–2,
" Components Backed Up by the Oracle VSS Writer" on page 8-6.
To back up the whole database:
1. Start a SQL*Plus session on the target database and make sure the database is
open
READ WRITE
.
2. Use a third-party VSS requester to select the
Oracle Database
component.
3. Create a snapshot of the database.
Oracle VSS writer includes the server parameter file, control file, and datafiles in
the snapshot. The online redo logs will not be included in the snapshot.
8.3.2.2 Making Volume-Based Backups of an ARCHIVELOG Database
To make volume-based shadow copies of Oracle database when the database is open
in read/write mode, the archived redo logs must be physically located on a separate
volume from the volume containing the oracle datafiles, control files, server parameter
file, and online redo logs.
To back up the database and archived redo logs by volume:
1. Start a SQL*Plus session on the target database and make sure the database is
open
READ WRITE
.
2. Use a third-party VSS requester to select the volumes where the datafiles, control
files, and server parameter file are physically located.
3. Create a snapshot of the database files.
Oracle VSS writer includes the server parameter file, control file, and datafiles in
the snapshot. The online redo logs will not be included in the snapshot. Note that
you can restore the server parameter file individually, but the control files and
datafiles must be always restored together.
4. Use a third-party VSS requester to select the volumes where all of the archived
redo logs (or the fast recovery area) are physically located.
5. Create a snapshot of the archived redo logs.
8.3.3 Backing Up a Database in NOARCHIVELOG Mode
For an Oracle database in
NOARCHIVELOG
mode, the database must be in a consistent
state when you create a VSS snapshot. Backups made while the database is open
read/write are not supported.

Restoring and Recovering a Database
8-8 Oracle Database Platform Guide
8.3.3.1 Making Component-Based Backups of a NOARCHIVELOG Database
For an Oracle database in
NOARCHIVELOG
mode, the only supported component-based
VSS snapshot is of
Oracle Database
when the type is full, default, or copy.
To back up the database by component:
1. Start a SQL*Plus session on the target database and place the database in a
consistent state. For example, enter the following commands:
SHUTDOWN
STARTUP MOUNT
2. Use a third-party VSS requester to select the
Oracle Database
component.
3. Create a volume-based VSS snapshot.
Oracle VSS writer includes the server parameter file, control file, and datafiles in
the snapshot. The online redo logs will not be included in the snapshot.
8.3.3.2 Making Volume-Based Backups of a NOARCHIVELOG Database
To back up the database by volume:
1. Start a SQL*Plus session on the target database and place the database in a
consistent state. For example, enter the following commands:
SHUTDOWN
STARTUP MOUNT
2. Use a third-party VSS requester to select the volumes where the datafiles, control
files, and server parameter file are physically located.
3. Create a volume-based VSS snapshot.
Oracle VSS writer includes the server parameter file, control file, and datafiles in
the snapshot. The online redo logs will not be included in the snapshot. Note that
you can restore the server parameter file individually, but the control files and
datafiles must be always restored together.
8.4 Restoring and Recovering a Database
This section explains how to restore and recover VSS snapshots. As in the case of
backups, the procedure depends on the archiving mode of the database and the type
of snapshot that you are restoring. The following topics are described:
■Restoring and Recovering a Database in ARCHIVELOG Mode
■Restoring a Database in NOARCHIVELOG Mode
8.4.1 Restoring and Recovering a Database in ARCHIVELOG Mode
You can select the components listed in Table 8–3, " Components Usable in a Restore
Operation" in a restore and recovery operation. The table describes the validations that
Oracle VSS writer performs for the components during the pre-restore phase, and the
actions that it performs after the restore completes.

Restoring and Recovering a Database
Performing Database Backup and Recovery with VSS 8-9
8.4.1.1 Restoring the Server Parameter File
This section explains how to restore the server parameter file.
To restore the server parameter file:
1. Select the component named
Server Parameter File
from a VSS snapshot.
2. Restore the server parameter file.
Table 8–3 Components Usable in a Restore Operation
Component Pre-Restore Phase PostRestore Phase Section
Server
Parameter File Verifies that the database
instance is not started.
Otherwise, the writer returns a
pre-restore failure.
Ensures that the database is
started
NOMOUNT
. If the server
parameter file is restored to the
default location for the Oracle
home, then the instance starts
NOMOUNT
automatically.
Otherwise, you must set
ORA_
SID_PFILE
to the location of the
text-based initialization
parameter file that points to the
location of the server
parameter file.
"Restoring the Server
Parameter File" on page 8-
9
Control File Verifies that the instance is
either started
NOMOUNT
or not
started. If the instance is not
started, the writer either starts
the instance with the
ORA_SID_
PFILE
instance parameter file,
or uses the initialization
parameter file or server
parameter file in the default
location.
Mounts control file after
replicating control file to all the
current control file locations
pointed to by the instance.
"Recovering from the Loss
of All Control Files" on
page 8-10
Tablespace or
datafile
component
Verifies that the database must
be mounted or the specified
datafiles or tablespaces must be
offline.
Performs complete recovery of
these tablespaces or datafiles.
The requester application can
override the default recovery
behavior.
"Recoverin
g
Tables
p
aces or
Datafiles" on page 8-10
All Tablespaces Verifies that the database is
mounted. Extracts redo from the backup
writer metadata document and
performs incomplete recovery
on all the restored datafiles up
to the time of snapshot
creation. The requester
application can override the
default recovery behavior.
"Recovering All
Tablespaces" on page 8-10
Oracle Database Verifies that the instance is not
started. Starts the database instance,
mounts the control file, and
performs recovery. See the
descriptions of postrestore
behavior for Server Parameter
File, Control File, and All
Tablespaces.
"Performing Disaster
Recovery" on page 8-11 an
d
"Restoring
Com
p
onent-Based Backu
ps
of a NOARCHIVELOG
Database" on page 8-11
Archived redo
log or fast
recovery area
None. Does not perform default
recovery of this component.
Nevertheless, the requester
application can run required
RMAN commands.

Restoring and Recovering a Database
8-10 Oracle Database Platform Guide
Oracle VSS writer restores the server parameter file to the original location from
where it was copied. You can also restore it to a new location.
8.4.1.2 Recovering from the Loss of All Control Files
This section explains how to recover from the loss of all multiplexed control files.
To recover from the loss of all control files:
1. Ensure that the database is in
NOMOUNT
state or can be started in
NOMOUNT
state by
the Oracle VSS writer.
2. Select the component named
Control File
from a VSS snapshot.
3. Restore the component containing the lost control file.
The Oracle VSS writer automatically mounts the database with the restored
control files. If only the control file needs to be recovered, then the VSS requester
application can ask the Oracle writer to perform complete recovery.
4. Restore and recover other database components if necessary.
5. Open the database with the
RESETLOGS
option.
8.4.1.3 Recovering Tablespaces or Datafiles
This section explains how to recover from the loss of one or more tablespaces or
datafiles. This procedure assumes that not all datafiles are lost.
To recover from the loss of all tablespaces or datafiles:
1. Ensure that the database is either mounted or open. If the database is open, then
take the datafiles or tablespaces needing recovery offline with the
ALTER DATABASE
... OFFLINE
statement.
2. If the archived redo logs are required for recovery of the datafiles or tablespaces,
then restore the archived redo logs.
3. Select the components from the VSS snapshot that contains the lost datafiles, or all
datafiles in the lost tablespaces.
4. Restore the component containing the lost datafiles.
The Oracle VSS writer automatically recovers the restored datafiles. If some
archived logs are missing, then you can restore the logs and recover the datafiles
with SQL*Plus or RMAN.
5. Bring the offline datafiles or tablespaces back online.
8.4.1.4 Recovering All Tablespaces
This section explains how to recover from the loss of all tablespaces.
To recover all datafiles:
1. Ensure that the database is mounted.
2. If the archived redo logs are required for recovery of the datafiles or tablespaces,
then restore the archived redo logs.
3. Select the component named
All Tablespaces
from a VSS snapshot.
4. Restore the tablespaces.
The Oracle VSS writer automatically recovers the restored datafiles. If some
archived logs are missing, then you can restore the logs and recover the datafiles
with SQL*Plus or RMAN.

Integrating VSS with Third-Party Requester Applications
Performing Database Backup and Recovery with VSS 8-11
5. Open the database.
8.4.1.5 Performing Disaster Recovery
This section explains how to recover from the loss of the server parameter file, control
file, and all datafiles.
To perform disaster recovery:
1. Ensure that the instance is not started.
2. If the archived redo logs are required for recovery of the datafiles or tablespaces,
then restore the archived redo logs.
3. Select the component named
Oracle Database
from a VSS snapshot.
4. Restore the database.
The Oracle VSS writer automatically starts the instance, mount the database, and
recovers the restored datafiles. If some archived logs are missing, then you can
restore the logs and recover the datafiles with SQL*Plus or RMAN.
5. Open the database with the
RESETLOGS
option.
8.4.2 Restoring a Database in NOARCHIVELOG Mode
For an Oracle database in
NOARCHIVELOG
mode, no archived redo logs have been
generated so no media recovery is possible. The database files must be in consistent
state and require no additional recovery.
8.4.2.1 Restoring Component-Based Backups of a NOARCHIVELOG Database
To restore a component-based backup:
1. Use a third-party VSS requester to select the
Oracle Database
component.
The Oracle VSS writer automatically restores the datafiles and mounts the
database.
2. Open the database with the
RESETLOGS
option.
8.4.2.2 Restoring Volume-Based Backups of a NOARCHIVELOG Database
To restore a volume-based backup:
1. Use a third-party VSS requester to select the volumes where the datafiles, control
files, and server parameter file are physically located.
2. Restore all volumes where datafiles and logs are located.
3. Open the database with the
RESETLOGS
option.
8.5 Integrating VSS with Third-Party Requester Applications
Oracle VSS writer allows third-party requester applications to control the behavior of
recovery and backup sessions. Third-party requester applications use VSS API
setBackupOptions
or
setRestoreOptions
to pass an appropriate string to the writer.
The writer uses
getBackupOptions
or
getRestoreOptions
to get the string set from the
requester to perform the pre or post backup and restore actions.
The following are the protocols to follow to exploit the flexibility of recovery
operations provided by the writer:
■Writer Control Commands

Duplicating a Database
8-12 Oracle Database Platform Guide
■Control Commands for Database or All Tablespaces Component
8.5.1 Writer Control Commands
The writer control commands are applicable to all the restored components during the
postrestore phase. The format is as follows:
OP1=CMD1, OP2=CMD2, . . .
Run the commands in the following sequence:
1.
POST_WTRCMD=NORECOVER
This command instructs the writer to not perform any postrestore recovery
activities defined in the default postrestore recovery operations for the restored
component. Otherwise, the postrestore phase default actions are performed.
2.
POST_RMANCMD=cmdstr
This command instructs the writer to run specific RMAN commands, instead of
the default operations, after the current operation.
3.
PRE_SQLCMD=cmdstr
This command instructs the writer to run specific SQL commands in
OnPrepareBackup
or
OnPreRestore
callback, before performing any other
validations. The command is used to stop MRP on a standby database before VSS
snapshot is created or to shut down database instance creating a cold backup of
the database.
4.
POST_SQLCMD=cmdstr
This command instructs the writer to run specific SQL commands in PostSnapshot
or PostRestore callback. This command is used to restart MRP on standby
database after VSS snapshot is created or to restart the database instance after the
cold backup of the database is performed.
8.5.2 Control Commands for Database or All Tablespaces Component
Run the following command:
POST_WTRCMD=UNTIL_SNAPSHOT
This command instructs the writer to perform recovery to the snapshot creation time.
The writer extracts the system change number of the redo logs stored in the database
component and performs recovery until the system change number.
8.6 Duplicating a Database
If your VSS shadow copies are transportable, then you can use these shadow copies to
duplicate the primary database. In this context of this chapter, duplication refers to the
creation of a new database out of the shadow copies for a different database. A
duplicate database created from shadow copies can either be a nonstandby database or
a standby database for use in a Data Guard environment. Note that RMAN
duplication, which makes use of the
DUPLICATE
command, is a different procedure.
This section covers the following topics:
■Creating a Nonstandby Database from Shadow Copies
■Creating a Standby Database From Shadow Copies

Duplicating a Database
Performing Database Backup and Recovery with VSS 8-13
8.6.1 Creating a Nonstandby Database from Shadow Copies
This section assumes that you are duplicating the database on a host with the same file
system structure as the primary database.
To create a nonstandby database from shadow copies:
1. Restore the database on the new host by following the procedure in "Performing
Disaster Recovery" on page 8-11.
2. Start a SQL*Plus session on the duplicate database and obtain the DBID. You can
query the DBID as follows:
SELECT DBID FROM V$DATABASE;
3. Shut down the database consistently. You can shut down the database as follows:
SHUTDOWN;
4. Use the DBNEWID utility to change the DBID.
Oracle Database Utilities explains how to use DBNEWID.
5. Open the database.
6. Start a SQL*Plus session on the duplicate database and query the DBID. You can
query the DBID as follows:
SELECT DBID FROM V$DATABASE;
8.6.2 Creating a Standby Database From Shadow Copies
This section assumes that you are create a standby database on a host with the same
file system structure as the primary database. This section also assumes that you have
read Oracle Data Guard Concepts and Administration and are familiar with standby
database creation and maintenance.
To create a standby database from shadow copies:
1. Restore the database on the standby host by following the procedure in
"Performing Disaster Recovery" on page 8-11.
2. Start a SQL*Plus session on the new database and a new standby control file must
be obtained from primary database. You can create the control file with the SQL
statement
ALTER DATABASE CREATE STANDBY CONTROLFILE
.
3. Start the instance and mount the standby control file.

Duplicating a Database
8-14 Oracle Database Platform Guide

9
Authenticating Database Users with Windows 9-1
9
Authenticating Database Users with
Windows
This chapter describes authentication of Oracle Database users with Windows
operating systems.
This chapter contains these topics:
■Windows Native Authentication Overview
■Windows Authentication Protocols
■User Authentication and Role Authorization Methods
■Operating System Authentication Enabled at Installation
9.1 Windows Native Authentication Overview
Oracle Database can use Windows user login credentials to authenticate database
users. Benefits include:
■Enabling users to connect to Oracle Database without supplying a username or
password
■Centralizing Oracle Database user authentication and role authorization
information in Windows, which frees Oracle Database from storing or managing
user passwords or role information
The Windows native authentication adapter (automatically installed with Oracle Net
Services) enables database user authentication through Windows. This enables client
computers to make secure connections to Oracle Database on a Windows server. The
server then permits the user to perform database actions on the server.
Note:
■Current user database links are not supported with Windows
native authentication.
■This chapter describes using Windows native authentication
methods with Windows XP and later. For information on Secure
Sockets Layer (SSL) protocol and Oracle Internet Directory, see
Oracle Database Security Guide and Oracle Fusion Middleware
Administrator's Guide for Oracle Internet Directory.

Windows Authentication Protocols
9-2 Oracle Database Platform Guide
9.2 Windows Authentication Protocols
The Windows native authentication adapter works with Windows authentication
protocols to enable access to Oracle Database.
NTLM and Kerberos are the authentication mechanisms used by the NTS adapter.
Client computers do not need to specify an authentication protocol when attempting a
connection to Oracle Database. Instead, Oracle Database determines the protocol to
use, completely transparent to the user. The only Oracle Database requirement is to
ensure that the parameter
SQLNET.AUTHENTICATION_SERVICES
contains
nts
in the
following file on both the client and database server:
ORACLE_HOME\network\admin\sqlnet.ora
This is the default setting for both after installation.
If typical, your Oracle Database network includes client computers and database
servers, and computers on this network may use different Oracle Database software
releases on different Windows operating systems on different domains. This
combination of different releases means that the authentication protocol being used
can vary.
9.3 User Authentication and Role Authorization Methods
This section describes how user login credentials are authenticated and database roles
are authorized in Windows domains. User authentication and role authorization are
defined in Table 9–1.
Oracle Database supports user authentication and role authorization in Windows
domains. Table 9–2 describes these basic features.
See Also: "Configuring Oracle Database to Communicate with
ASM" on page C-1
See Also: Your operating system documentation for more
information on authentication protocol
Table 9–1 User Authentication and Role Authorization Defined
Feature Description More Information
User authentication Process by which the database uses the user's
Windows login credentials to authenticate the user. Oracle Database 2
Day DBA
Role authorization Process of granting an assigned set of roles to
authenticated users. Oracle Database 2
Day DBA
Table 9–2 Basic Features of User Authentication and Role Authorization
Feature Description
Authentication
of external
users
Users are authenticated by the database using the user's Windows login
credentials enabling them to access Oracle Database without being prompted
for additional login credentials.

Operating System Authentication Enabled at Installation
Authenticating Database Users with Windows 9-3
9.3.1 Authentication and Authorization Methods To Use
Table 9–3 describes user authentication and role authorization methods to use based
on your Oracle Database environment:
9.4 Operating System Authentication Enabled at Installation
When you install Oracle Database, a special Windows local group called
ORA_DBA
is
created (if it does not already exist from an earlier Oracle Database installation), and
your Windows user name is automatically added to it. Members of local group
ORA_
DBA
automatically receive the SYSDBA privilege.
Authorization
of external
roles
Roles are authorized using Windows local groups. Once an external role is
created, you can grant or revoke that role to a database user. Initialization
parameter
OS_ROLES
is set to
false
by default. You must set
OS_ROLES
to
true
to authorize external roles.
Table 9–3 User Authentication and Role Authorization Methods
Method Database Environment
Enterprise users and roles You have many users connecting to multiple databases.
Enterprise users have the same identity across multiple
databases. Enterprise users require use of a directory server.
Use enterprise roles in environments where enterprise users
assigned to these roles are located in many geographic regions
and must access multiple databases. Each enterprise role can be
assigned to multiple enterprise user in the directory. If you do
not use enterprise roles, then you must assign database roles
manually to each database user. Enterprise roles require use of a
directory server.
External users and roles You have a smaller number of users accessing a limited number
of databases. External users must be created individually in each
database and do not require use of a directory server.
External roles must also be created individually in each
database, and do not require use of a directory server. External
roles are authorized using group membership of the users in
local groups on the system.
See Also: Oracle Database Enterprise User Security Administrator's
Guide for more information on Enterprise users and roles
Note: If you use a domain account for database administration, then
that domain account must be granted local administrative privileges
and ORA_DBA membership explicitly. It is not sufficient for the
domain account to inherit these memberships from another group.
You must ensure that the user performing the installation is in the
same domain as this domain account. If not, it results in an NTS
authentication failure.
Table 9–2 (Cont.) Basic Features of User Authentication and Role Authorization
Feature Description

Operating System Authentication Enabled at Installation
9-4 Oracle Database Platform Guide
Membership in
ORA_DBA
enables you to:
■Connect to local Oracle Database servers without a password with the command
SQL> CONNECT / AS SYSDBA
■Connect to remote Oracle Database servers without a password with the
command
SQL> CONNECT /@net_service_name AS SYSDBA
where
net_service_name
is the net service name of the remote Oracle Database
server
■Perform database administration procedures such as starting and shutting down
local databases
■Add additional Windows users to
ORA_DBA
, enabling them to have the
SYSDBA
privilege

10
Administering External Users and Roles on Windows 10-1
10
Administering External Users and Roles on
Windows
External users and roles are in general defined by something external to Oracle
Database. In a Windows environment, they are defined by the operating system.
This chapter describes external user and external role creation and management using
either Oracle Administration Assistant for Windows or by a combination of Oracle
Database command line tools, Registry Editor, and other Windows tools.
This chapter contains these topics:
■Oracle Administration Assistant for Windows
■Manually Administering External Users and Roles
10.1 Oracle Administration Assistant for Windows
Oracle Administration Assistant for Windows runs from Microsoft Management
Console and enables you to configure the following Oracle Database users and roles
so that the Windows operating system can authenticate them, and they can access
Oracle Database without a password:
■Regular Windows domain users and global groups as external users
■Windows database administrators (with the SYSDBA privilege)
■Windows database operators (with the SYSOPER privilege)
In addition, Oracle Administration Assistant for Windows can create and grant local
and external database roles to Windows domain users and global groups.
With Oracle Administration Assistant for Windows, none of the following need be
done manually:
■Create local groups that match the database system identifier and role
■Assign domain users to these local groups
■Authenticate users in SQL*Plus with
SQL> CREATE USER username IDENTIFIED EXTERNALLY
This section describes how to perform the following tasks with Oracle Administration
Assistant for Windows:
See Also: See Oracle Database Enterprise User Security Administrator's
Guide for more information on tools available for administering
enterprise users and roles.

Oracle Administration Assistant for Windows
10-2 Oracle Database Platform Guide
■Managing a Remote Computer
■Adding a Computer and Saving Your Configuration
■Granting Administrator Privileges for All Databases on a Computer
■Granting Operator Privileges for All Databases on a Computer
■Connecting to a Database
■Viewing Database Authentication Parameter Settings
■Creating an External Operating System User
■Creating a Local Database Role
■Creating an External Operating System Role
■Granting Administrator Privileges for a Single Database
■Granting Operator Privileges for a Single Database
10.1.1 Managing a Remote Computer
If you want to use Oracle Administration Assistant for Windows to manage a remote
computer, you must have administrator privileges for the remote computer. Oracle
Administration Assistant for Windows always creates users in Oracle Database with
the domain name as the prefix. If you are managing Oracle7 release 7.x or later
databases remotely, you must set registry parameter
OSAUTH_PREFIX_DOMAIN
to
true
on
the remote computer. This parameter is located in
HKEY_LOCAL_MACHINE\SOFTWARE\ORACLE\KEY_HOME_NAME
If a computer is not identified with a Domain Name System (DNS) domain name, you
will receive the following error message:
Calling query w32RegQueries1.7.0.17.0 RegGetValue
Key = HKEY_LOCAL_MACHINE
SubKey = SYSTEM\CurrentControlSet\Services\Tcpip\Parameters
Value = Domain
Query Exception: GetValueKeyNotFoundException
Query Exception Class: class oracle.sysman.oii.oiil.OiilQueryException
...
To assign a DNS name or change the primary DNS suffix, refer to your Microsoft
documentation.
10.1.2 Adding a Computer and Saving Your Configuration
When you use Oracle Administration Assistant for Windows for the first time, it adds
the local computer to its navigation tree. You can then add other computers.
To add a computer to the Microsoft Management Console tree:
1. From the Start, select Programs, then select Oracle - HOME_NAME, then select
Configuration and Migration Tools and then select Administration Assistant for
Windows.
Microsoft Management Console starts.
2. Double-click Oracle Managed Objects.
The Computer icon appears.
3. Right-click Computers.
Oracle Administration Assistant for Windows
Administering External Users and Roles on Windows 10-3
4. Select New and then select Computer.
The Add Computer dialog appears.
5. Specify the domain and computer name for the computer on which Oracle
Database is installed.
6. Click OK.
7. Double-click Computers to display the computer you added.
8. Double-click the computer you added. Several nodes for authenticating database
administrators and operators appear.
The OS Database Administrators - Computer node creates an operating
system-authenticated database administrator with
SYSDBA
privileges for every
database instance on the computer. The OS Database Operators - Computer node
creates an operating system-authenticated database operator with
SYSOPER
privileges for every database instance on the computer.
9. Save your configuration in a console file by choosing Save in the Console main
menu. You can now authenticate database administrators and operators for all
instances on the computer.
10.1.3 Granting Administrator Privileges for All Databases on a Computer
To grant database administrator (
SYSDBA
) privileges to database administrators (DBAs)
for all databases on a computer:
1. From the Start, select Programs, then select Oracle - HOME_NAME, then select
Configuration and Migration Tools, and then select Administration Assistant for
Windows.
Oracle Administration Assistant for Windows starts.
2. Right-click OS Database Administrators - Computer.
3. Click Add/Remove.
Note: If you use a domain account for database installation, then the
domain user must be granted local administrative privileges. It is not
sufficient for the domain user to inherit membership privileges from
another group. You must ensure that the user performing the
installation is in the same domain, if not it results in an NTS
authentication failure.

Oracle Administration Assistant for Windows
10-4 Oracle Database Platform Guide
The OS Database Administrators - Computer for
hostname
dialog appears.
4. Select the domain of the user to which to grant
SYSDBA
privileges from the Domain
list.
5. Select the user.
6. Click Add.
The user now appears in the OS Database Administrators - Computer window.
7. Click OK.
10.1.4 Granting Operator Privileges for All Databases on a Computer
To grant database operator (
SYSOPER
) privileges to DBAs for all databases on a
computer:
1. From the Start, select Programs, then select Oracle - HOME_NAME, then select
Configuration and Migration Tools and then select Administration Assistant for
Windows.
Oracle Administration Assistant for Windows starts.
2. Right-click OS Database Operators - Computer.
3. Click Add/Remove.
The OS Database Operators - Computer for
hostname
dialog appears.

Oracle Administration Assistant for Windows
Administering External Users and Roles on Windows 10-5
4. Select the domain of the user to which to grant
SYSOPER
privileges from the
Domain list.
5. Select the user.
6. Click Add.
The user now appears in the OS Database Operators - Computer window.
7. Click OK.
10.1.5 Connecting to a Database
To enable Secure Sockets Layer (SSL) when connecting to Oracle Database, start the
Oracle Database service and the listener service in the same user account as the wallet
created in Oracle Wallet Manager. Do not use the default user account in the Windows
Services dialog. If the Oracle Database service and the listener service are started in the
default user accounts, then SSL does not work, and the listener does not start. Support
for SSL is an Oracle Advanced Security feature. Oracle Wallet Manager is also an
Oracle Advanced Security feature.
To connect to a database:
1. Right-click the database instance you want to access in the Microsoft Management
Console scope pane. In the example here, a connection is to be made to
ORCL
:
See Also: Oracle Database Security Guide for more information on SSL
support
Oracle Administration Assistant for Windows
10-6 Oracle Database Platform Guide
2. Choose Connect Database.
If you connect to Oracle Database, the following Windows nodes appear beneath
the instance. If these nodes do not appear, double-click the instance.
■External OS Users
■Local Roles
■External OS Roles
■OS Database Administrators
■OS Database Operators
10.1.5.1 Troubleshooting Connection Problems
When connecting to a local computer, Oracle Administration Assistant for Windows
first tries to connect to the database as a
SYSDBA
, using the Bequeath networking
protocol. When connecting to a remote computer, Oracle Administration Assistant for
Windows first tries to connect to the database using Windows native authentication as
a
SYSDBA,
using the TCP/IP networking protocol (port 1521 or the deprecated 1526). If
it is unsuccessful, one or more dialogs appear and prompt you to enter information to
connect to the database.
The dialog shown here appears because the Windows domain user with which you are
attempting to connect to Oracle Database is not recognized as an authenticated user

Oracle Administration Assistant for Windows
Administering External Users and Roles on Windows 10-7
with
SYSDBA
privileges. Enter an Oracle Database username and password to access
the database. To avoid being prompted with this dialog again, configure your domain
user to be a database administrator authenticated by the Windows operating system.
The next dialog appears either because you are not using the TCP/IP networking
protocol to connect to a remote installation of Oracle Database or because Oracle
Database is not. Using a protocol other than TCP/IP (Named Pipes for example)
causes this dialog to appear each time you attempt a remote connection.
If you do not want this dialog to appear each time, then change to the TCP/IP protocol
and make sure the Oracle Net Services listener for the database is listening on the
default port 1521 (or the deprecated default port 1526). Otherwise, this dialog appears
every time. Ensure also that Oracle Database is started.
1. Enter the net service name with which to connect to Oracle Database. You must
enter a net service name regardless of the authentication method you select.
2. If you want to access the database with an Oracle Database user name and
password, select the Database Authenticated option. This user name and
password must exist in Oracle Database and have the
SYSDBA
privilege.

Oracle Administration Assistant for Windows
10-8 Oracle Database Platform Guide
3. If you want to access the database with the Windows domain user with which you
are currently logged in, select the OS Authenticated Connection as SYSDBA
option. This domain user must already be recognized by Windows as an
authenticated user with
SYSDBA
privileges. Otherwise, your logon fails.
10.1.6 Viewing Database Authentication Parameter Settings
To view database authentication parameter settings:
1. Right-click the database.
2. Choose Properties.
3. The Properties dialog appears displaying the following parameter values:
■
OS_AUTHENT_PREFIX
■
OS_ROLES
OS_AUTHENT_PREFIX
is an
init.ora
file parameter that authenticates external users
attempting to connect to Oracle Database with the user's Windows user name and
password. The value of this parameter is attached to the beginning of every user's
Windows username.
By default, the parameter is set to none ("") during Oracle Database creation.
Therefore, a Windows domain user name of
frank
is authenticated as user name
frank
. If you set this parameter to
xyz
, then Windows domain user
frank
is
authenticated as user
xyzfrank
.
OS_ROLES
is an
init.ora
file parameter that, if set to
true
, enables the Windows
operating system to manage authorization of an external role for a database user. By
default,
OS_ROLES
is set to
false
. You must set
OS_ROLES
to
true
and restart Oracle
Database before you can create external roles. If
OS_ROLES
is set to
false
, Oracle
Database manages granting and revoking of roles for database users.
If
OS_ROLES
is set to
true
, and you assign an external role to a Windows global group,
then it is granted only at the Windows global group level, and not at the level of the
individual user in this global group. This means that you cannot revoke or edit the
external role assigned to an individual user in this global group through the Roles tab
of the User Name Properties dialog at a later time. Instead, you must use the field in
the Assign External OS Roles to a Global Group dialog to revoke the external role from
this global group (and therefore all its individual users).
External roles assigned to an individual domain user or local roles (with
OS_ROLES
set
to
false
) assigned to an individual domain user or Windows global group are not
affected by this issue. They can be edited or revoked.
If
OS_ROLES
is set to
true
, you cannot grant local roles in the database to any database
user. You must grant roles through Windows. See "Creating a Local Database Role" on
page 10-13 and "Creating an External Operating System Role" on page 10-15 for more
information.
Note: Oracle Net Services provides a Trace Assistant tool that helps
diagnose connection problems by converting existing trace file text
into a more readable format. See "Using the Trace Assistant to
Examine Trace Files" in Oracle Database Net Services Administrator's
Guide.

Oracle Administration Assistant for Windows
Administering External Users and Roles on Windows 10-9
10.1.7 Creating an External Operating System User
The External OS Users node of Oracle Administration Assistant for Windows enables
you to authenticate a Windows user to access Oracle Database as an external user
without being prompted for a password. External users are typically regular database
users (not database administrators) to which you assign standard database roles (such
as
DBA
), but do not want to assign
SYSDBA
(database administrator) or
SYSOPER
(database operator) privileges.
To create an external operating system user:
1. Follow the steps in "Connecting to a Database" on page 10-5 to connect to a
database.
2. Right-click External OS Users. A contextual menu appears.
3. Choose Create.
Create External OS User Wizard starts, and the first of three wizard dialogs
appears. The first dialog is for Windows Users and Groups.

Oracle Administration Assistant for Windows
10-10 Oracle Database Platform Guide
4. In Domain Users and Groups select the domain in which your Windows domain
users and global groups are located.
5. Select the Windows domain users and global groups to which to grant access to
the database.
6. Click Add. The selected users and groups now appear in the New External OS
Users list.
7. Click Next. The Profile and Tablespace dialog appears.
Oracle Administration Assistant for Windows
Administering External Users and Roles on Windows 10-11
8. In the Assigned Profile list, select a profile for the new external users. A profile is
a named set of resource limits. If resource limits are enabled, Oracle Database
limits database usage and instance resources to whatever is defined in the user's
profile. You can assign a profile to each user and a default profile to all users who
do not have specific profiles.
9. In Tablespace Quota double-click the tablespace to assign a tablespace quota.
10. Click Next. The Roles dialog appears.
Oracle Administration Assistant for Windows
10-12 Oracle Database Platform Guide
11. In Available Roles select the database roles to grant to the new external users.
12. Click Grant.
13. Click Finish.
14. Right-click the external user for which you want to view information and select
Properties.
The assigned properties appear.
Note: If you select a Windows global group for authentication when
using Oracle Administration Assistant for Windows, all users
currently in the group are added to Oracle Database. If at a later time,
you use a Windows tool to add or remove users in this Windows
global group, these updates are not reflected in Oracle Database. The
newly added or removed users must be explicitly added or removed
in Oracle Database with Oracle Administration Assistant for
Windows.
Oracle Administration Assistant for Windows
Administering External Users and Roles on Windows 10-13
10.1.8 Creating a Local Database Role
The Local Roles node of Oracle Administration Assistant for Windows enables you to
create a role and have it managed by the database. Once a local role is created, you can
grant or revoke that role to a database user. To create a local database role:
1. Follow the steps in "Connecting to a Database" on page 10-5 to connect to a
database.
2. Right-click Local Roles for the database for which you want to create a local role.
3. Choose Create.
Create Local Role Wizard starts, and the first of three wizard dialogs appears. The
first dialog is for Name and Authentication.
4. Enter a local role name to use.
5. In Authentication select None if you want a user to use this local role without
being required to enter a password.
Select Password if you want use of this role to be protected by a password. These
roles can only be used by supplying an associated password with the
SET ROLE
command. See Oracle Database 2 Day DBA for additional information.
Enter the password to use with this role.
Confirm the password by entering it a second time.
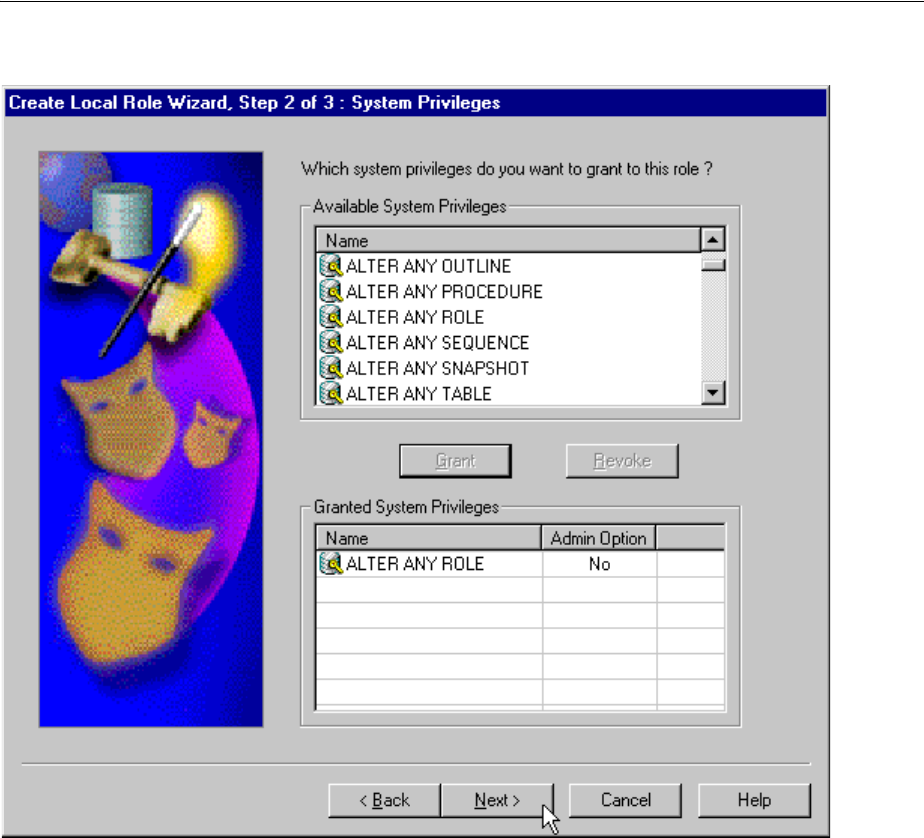
Oracle Administration Assistant for Windows
10-14 Oracle Database Platform Guide
6. Click Next. The System Privileges dialog appears.
7. In Available System Privileges select the system privileges you want to assign to
the local role.
8. Click Grant to grant the selected system privileges to the local role.
The Granted System Privileges field displays the list of system privileges granted
to the local role. To revoke a system privilege, make an appropriate selection, then
choose Revoke.
9. If you want to grant Admin Option to this role, click the value in the Admin
Option column to display a list. This enables you to select Yes.
10. Click Next. The Roles dialog appears.
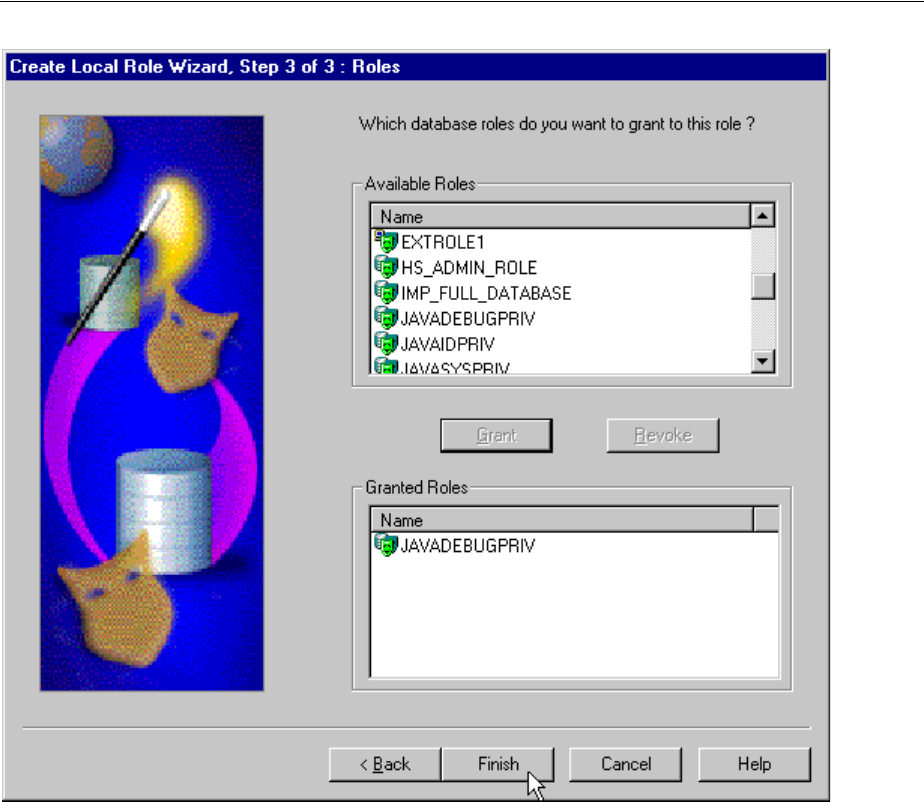
Oracle Administration Assistant for Windows
Administering External Users and Roles on Windows 10-15
11. In Available Roles select the roles you want to assign to the local role. Both local
roles and external roles appear in this list.
12. Click Grant to grant the selected roles to the role.
The Granted Roles field displays the list of roles granted to the role. Both local
roles and external roles can appear in this list. To revoke roles, make appropriate
selections, then choose Revoke.
13. Click Finish.
10.1.9 Creating an External Operating System Role
The External OS Roles node of Oracle Administration Assistant for Windows enables
you to create an external role and have it managed by the Windows operating system.
Once an external role is created, you can grant or revoke that role to a database user.
To create an external role:
1. Follow the steps in "Connecting to a Database" on page 10-5 to connect to a
database.
2. Right-click External OS Roles for the database for which to create an external role.
3. Choose Create.
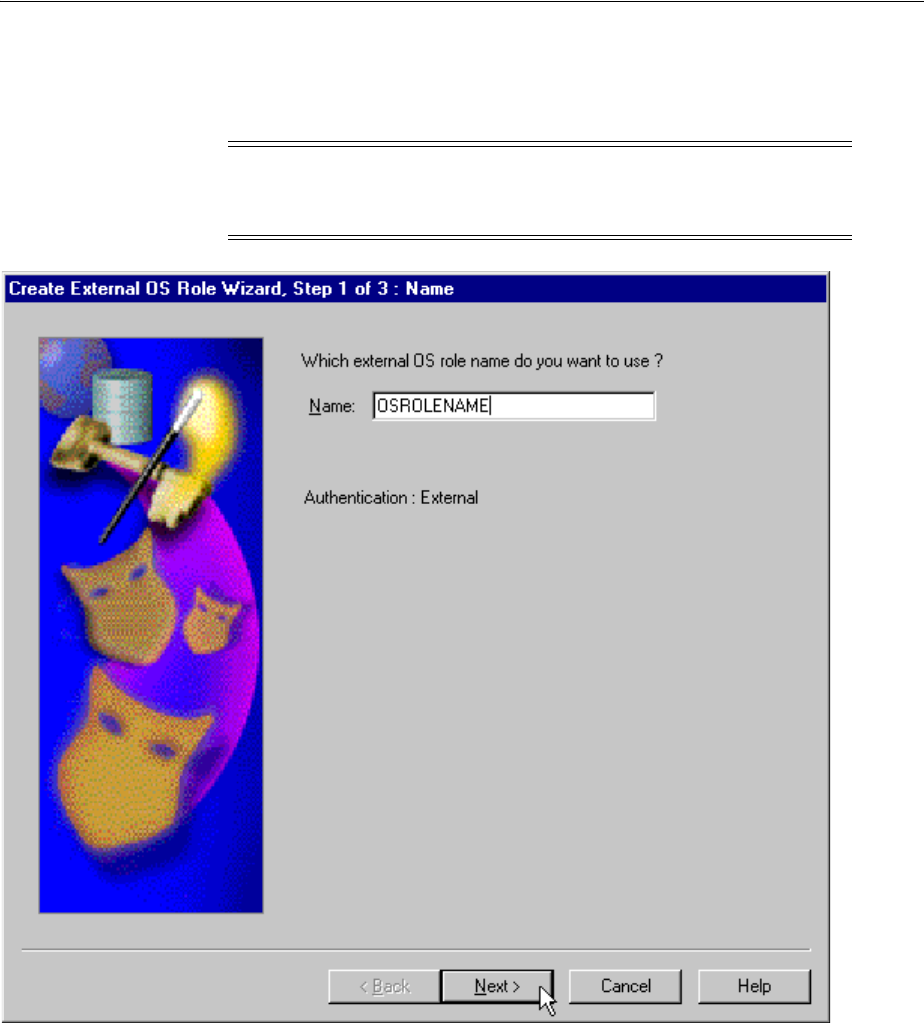
Oracle Administration Assistant for Windows
10-16 Oracle Database Platform Guide
Create External OS Role Wizard starts, and the first of three wizard dialogs
appears. The first dialog is for Name. Authentication: External appears in this
dialog to indicate that only external roles can be created.
4. Enter an external role name to use. An external role is a role that is managed by
the Windows operating system.
5. Click Next.
The System Privileges dialog appears.
Note: Create External OS Role Wizard is available only if
init.ora
parameter
OS_ROLES
is set to
true
. If it is set to
false
, then you must
first change it to
true
and then restart Oracle Database.
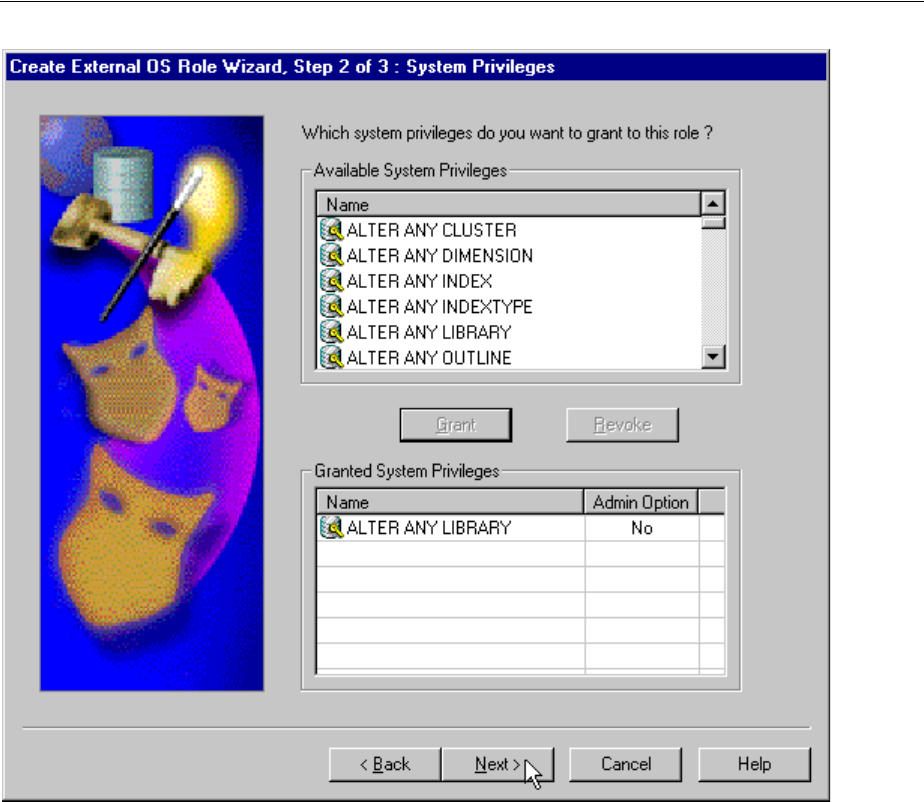
Oracle Administration Assistant for Windows
Administering External Users and Roles on Windows 10-17
6. In Available System Privileges select the system privileges you want to assign to
the external role.
7. Choose Grant to grant the selected system privileges to the external role.
8. The Granted System Privileges field displays the list of system privileges granted
to the external role. To revoke a system privilege, make an appropriate selection,
then click Revoke.
9. If you want to grant Admin Option to this role, choose the value in the Admin
Option column to display a list. This enables you to select Yes.
10. Click Next.
The Roles dialog appears.
Oracle Administration Assistant for Windows
10-18 Oracle Database Platform Guide
11. In Available Roles select the roles you want to assign to the external role. Both
local roles and external roles appear in this list.
12. Click Grant to grant the selected roles to the external role.
The Granted Roles field displays the list of roles granted to the external role.
13. Click Finish.
10.1.10 Granting Administrator Privileges for a Single Database
The OS Database Administrators node of Oracle Administration Assistant for
Windows enables you to authorize a Windows user with
SYSDBA
privileges for a
specific instance on a computer. To grant administrator
(SYSDBA)
privileges for a single
database:
1. Follow the steps in "Connecting to a Database" on page 10-5 to connect to a
database.
2. Right-click OS Database Administrators.
3. Choose Add/Remove.
The OS Database Administrators for
instance
dialog appears. In the example
shown here, the instance is
MARK
:

Oracle Administration Assistant for Windows
Administering External Users and Roles on Windows 10-19
4. In Domain Users and Groups select the domain of the user to which to grant
SYSDBA
privileges from the Domain list.
5. Select the user.
The user now appears in OS Database Administrators.
6. Click OK.
10.1.11 Granting Operator Privileges for a Single Database
The OS Database Operators node of Oracle Administration Assistant for Windows
enables you to authorize a Windows user with SYSOPER privileges for a specific
instance on a computer. To grant operator (SYSOPER) privileges for a single database:
1. Follow the steps in "Connecting to a Database" on page 10-5 to connect to a
database.
2. Right-click OS Database Operators.
3. Choose Add/Remove.
The OS Database Operators for
instance
dialog appears. In the example shown
here, the instance is
MARK
:

Manually Administering External Users and Roles
10-20 Oracle Database Platform Guide
4. In Domain Users and Groups select the domain of the user to which to grant
SYSOPER
privileges from the Domain list.
5. Select the user.
6. Click Add.
The user now appears in OS Database Operators.
7. Click OK.
10.2 Manually Administering External Users and Roles
Instead of using Oracle Administration Assistant for Windows, you can manually
configure administrators, operators, users, and roles to be authenticated by the
operating system. Manual configuration involves using Oracle Database command
line tools, editing the registry, and creating local groups in Active Directory Users and
Computers.
All of the following can be manually configured to access Oracle Database without a
password:
■External operating system users
■Windows database administrators (with
SYSDBA
privilege)
■Windows database operators (with
SYSOPER
privilege)
In addition, you can manually create and grant local and external database roles to
Windows domain users and global groups.
This section describes:

Manually Administering External Users and Roles
Administering External Users and Roles on Windows 10-21
■Manually Creating an External Operating System User
■Manually Granting Administrator and Operator Privileges for Databases
■Manually Creating an External Role
■Manually Migrating Users
10.2.1 Manually Creating an External Operating System User
This section describes how to authenticate external operating system users (not
database administrators) using Windows, so that a password is not required when
accessing the database. When you use Windows to authenticate external operating
system users, your database relies solely on the operating system to restrict access to
database usernames.
In the following procedure, two Windows usernames are authenticated:
■Local user
frank
■Domain user
frank
on domain
sales
Local user
frank
logs into its local Windows client computer to access an Oracle
Database server, which can be on a different computer. To access other databases and
resources on other computers, the local user must provide a user name and password
each time.
Domain user
frank
on domain
sales
logs into a
sales
domain that includes many
other Windows computers and resources, one of which contains an Oracle Database
server. The domain user can access all the resources the domain provides with a single
user name and password.
The procedure is divided into two sets of tasks performed on different computers:
■External User Authentication Tasks on the Oracle Database Server
■External User Authentication Tasks on the Client Computer
10.2.1.1 External User Authentication Tasks on the Oracle Database Server
Perform the following external user authentication tasks on the Oracle Database
server:
1. Add parameter
OS_AUTHENT_PREFIX
to your
init.ora
file.
The
OS_AUTHENT_PREFIX
value is prefixed to local or domain usernames
attempting to connect to the server with the user's operating system name and
password. The prefixed user name is compared with Oracle Database usernames
in the database when a connection request is attempted. Using parameter
OS_
AUTHENT_PREFIX
with Windows native authentication methods is the
recommended method for performing secure, trusted client connections to your
server.
2. Set a value for
OS_AUTHENT_PREFIX
. Your choices are:
■Any character string
Note: Use extreme care when manually configuring administrators,
operators, users, and roles to be authenticated by the operating
system. If possible, use Oracle Administration Assistant for Windows
to perform configuration procedures.

Manually Administering External Users and Roles
10-22 Oracle Database Platform Guide
If you specify
xyz
, as in this procedure's example, then
xyz
is prefixed to the
beginning of the Windows user name (for example,
xyzfrank
for local user
frank
or
xyzsales\frank
for domain user
frank
on domain
sales
).
String
values are case insensitive.
■
""
(two double quotes with no space between)
This option is recommended, because it eliminates the need for any prefix to
Windows usernames (for example,
frank
for local user
frank
or
sales\frank
for domain user
frank
on domain
sales
).
■No value specified
If you do not specify a value for
OS_AUTHENT_PREFIX
, it defaults to
OPS$
(for
example,
OPS$frank
for local user
frank
or
OPS$sales\frank
for domain user
frank
on domain
sales
).
3. Create a Windows local user name for
frank
with the Computer Management
tool, or create a domain user name for
frank
with Active Directory Users and
Computers (if the appropriate name does not currently exist). See your operating
system documentation for detailed instructions.
4. Do this step only if you are not authenticating a domain name with a user (for
example, just
frank
instead of
frank
on domain
sales
). Otherwise, go to step 8.
a. Start Registry Editor from the command prompt:
C:\> regedit
b. Go to
HKEY_LOCAL_MACHINE\SOFTWARE\ORACLE\HOMEID
, where
ID
is the Oracle
home directory you want to edit.
c. Select Edit and then select Add Value.
The Add Value dialog appears:
d. Enter
OSAUTH_PREFIX_DOMAIN
in the Value Name field.
e. Choose
REG_EXPAND_SZ
from the Data Type list.
f. Click OK.
The String Editor dialog appears:

Manually Administering External Users and Roles
Administering External Users and Roles on Windows 10-23
5. Enter
true
in the String field to enable authentication at the domain level.
There may be multiple
frank
usernames on your network, including local user
frank
, domain user
frank
on
sales
, and possibly several domain users
frank
on
other domains. Entering
true
enables the server to differentiate among them.
Entering
false
causes the domain to be ignored and local user
frank
to become
the default value of the operating system user returned to the server.
6. Click OK.
Registry Editor adds the parameter.
7. Choose Exit from the Registry menu.
Registry Editor exits.
8. Ensure that parameter
SQLNET.AUTHENTICATION_SERVICES
in file
sqlnet.ora
contains
nts
.
9. Start SQL*Plus:
C:\> sqlplus /NOLOG
10. Connect to the database with the SYSTEM database administrator (DBA) name:
SQL> CONNECT SYSTEM
Enter password: system_password
Unless you have changed it, the
SYSTEM
password is
MANAGER
by default.
11. Create a local external user by entering:
SQL> CREATE USER xyzfrank IDENTIFIED EXTERNALLY;
where
xyz
is the value you chose for initialization parameter
OS_AUTHENT_PREFIX
,
and
frank
is the Windows local username.
12. Grant a local external user database roles by entering:
SQL> GRANT DBA TO xyzfrank;
13. Create a domain external user by entering:
SQL> CREATE USER "XYZSALES\FRANK" IDENTIFIED EXTERNALLY;
where
XYZ
is the value you chose for initialization parameter
OS_AUTHENT_PREFIX
,
and
SALES\FRANK
is the domain name and Windows domain username. Double
quotes are required and the entire syntax must be in uppercase.
14. Grant a domain external user database roles by entering:
SQL> GRANT DBA TO "XYZSALES\FRANK";
Double quotes are required and the entire syntax must be in uppercase.
15. Connect to the database with the
SYSDBA
name:
SQL> CONNECT / AS SYSDBA
16. Shut down the database:
SQL> SHUTDOWN
17. Restart the database:
SQL> STARTUP

Manually Administering External Users and Roles
10-24 Oracle Database Platform Guide
This causes the change to parameter
OS_AUTHENT_PREFIX
to take effect.
10.2.1.2 External User Authentication Tasks on the Client Computer
Perform the following external user authentication tasks on the client computer:
1. Create Windows local or domain user name
frank
with the same user name and
password that exist on the Windows server (if the appropriate name does not
currently exist).
2. Ensure that parameter
SQLNET.AUTHENTICATION_SERVICES
in file
sqlnet.ora
contains
nts
.
3. Use Oracle Net Configuration Assistant to configure a network connection from
your client computer to the Windows server on which Oracle Database is installed.
See Oracle Database Net Services Administrator's Guide for instructions.
4. Start SQL*Plus:
C:\> sqlplus /NOLOG
5. Connect to your Windows server:
SQL> CONNECT /@connect_identifier
where
connect_identifier
is the net service name for Oracle Database.
Oracle Database searches the data dictionary for an automatic login user name
corresponding to the Windows local or domain username, verifies it, and enables
connection as
xyzfrank
or
xyzsales\frank
.
6. Verify that you have connected to Oracle Database as local or domain user
frank
by viewing the roles assigned in steps 12 or 14 of "External User Authentication
Tasks on the Oracle Database Server".
SQL> SELECT * FROM USER_ROLE_PRIVS;
which outputs for local user
frank
:
USERNAME GRANTED_ROLE ADM DEF OS_
------------------------------ ------------------------------ --- --- ---
XYZFRANK DBA NO YES NO
1 row selected.
or, for domain user
frank
:
USERNAME GRANTED_ROLE ADM DEF OS_
------------------------------ ------------------------------ --- --- ---
XYZSALES\FRANK DBA NO YES NO
1 row selected.
Because the Oracle Database user name is the whole name
xyzfrank
or
xyzsales\frank
, each object created by
xyzfrank
or
xyzsales\frank
(that is, table,
view, index, and so on) is prefixed by this name. For another user to reference the
table
shark
owned by
xyzfrank
, for example, the user must enter:
SQL> SELECT * FROM xyzfrank.shark
Note: Automatic authorization is supported for all Oracle Net
protocols.

Manually Administering External Users and Roles
Administering External Users and Roles on Windows 10-25
10.2.2 Manually Granting Administrator and Operator Privileges for Databases
This section describes how to enable Windows to grant the database administrator
(
SYSDBA
), database operator (
SYSOPER
) and database administrator for ASM (
SYSASM
)
privileges to database administrators. With this privilege, database administrators can
issue the following commands from a client computer and connect to Oracle Database
without entering a password:
SQL> CONNECT / AS SYSOPER
SQL> CONNECT / AS SYSDBA
SQL> CONNECT / AS SYSASM
To enable this feature, the Windows local or domain user name of the database
administrator must belong to one of the Windows local groups listed in Table 10–1.
Note
ORA_DBA is automatically created during installation. See section "Operating System
Authentication Enabled at Installation" on on page 9-3 for information.
The manual procedure for enabling database administrators to connect as
SYSOPER
or
SYSDBA
or
SYSASM
without a password is divided into two sets of tasks performed on
different computers:
■SYSDBA/SYSOPER/SYSASM Authentication Tasks on the Oracle Database Server
■SYSDBA/SYSOPER/SYSASM Authentication Tasks on the Client Computer
10.2.2.1 SYSDBA/SYSOPER/SYSASM Authentication Tasks on the Oracle Database
Server
1. Create a Windows local group corresponding to the privileges you want Windows
to grant (see Table 10–1).
2. Add your database administrator usernames to this group.
3. Ensure that parameter
SQLNET.AUTHENTICATION_SERVICES
in file
sqlnet.ora
contains
nts
.
4. Start Registry Editor from the command prompt:
C:\>regedit
5. Go to
HKEY_LOCAL_MACHINE\SOFTWARE\ORACLE\HOMEID
where
ID
is the Oracle home that you want to edit.
Table 10–1 Windows Local Groups with SYSDBA, SYSOPER, and SYSASM Privileges
Local Group Privileges
ORA_OPER
SYSOPER
privileges for all databases on a computer
ORA_DBA
Note
SYSDBA
privileges for all databases on a computer
ORA_DBA
SYSASM
privileges for all databases on a computer
ORA_SID_OPER
SYSOPER
privileges for a single database (identified by
SID
)
ORA_SID_DBA
SYSDBA
privileges for a single database (identified by
SID
)
ORA_SID_DBA
SYSASM
privileges for a single database (identified by
SID
)
See Also: Your operating system documentation for instructions on
managing users and groups

Manually Administering External Users and Roles
10-26 Oracle Database Platform Guide
6. Set parameter
OSAUTH_PREFIX_DOMAIN
to
true
.
10.2.2.2 SYSDBA/SYSOPER/SYSASM Authentication Tasks on the Client Computer
1. Create a Windows local or domain user name with the same user name and
password that exist on the Windows server (if the appropriate user name does not
currently exist).
2. Ensure that parameter
SQLNET.AUTHENTICATION_SERVICES
in file
sqlnet.ora
contains
nts
.
3. Use Oracle Net Configuration Assistant to configure a network connection from
your client computer to the Windows server on which Oracle Database is installed.
See Oracle Database Net Services Administrator's Guide for instructions.
4. Start SQL*Plus:
C:\> sqlplus /NOLOG
5. Connect to Oracle Database:
SQL> SET INSTANCE net_service_name
where
net_service_name
is the Oracle Net net service name for Oracle Database.
6. If you specified
ORA_DBA
or
ORA_SID_DBA
in step 1 of
"SYSDBA/SYSOPER/SYSASM Authentication Tasks on the Oracle Database
Server", then enter either of the following:
SQL> CONNECT / AS SYSOPER
SQL> CONNECT / AS SYSDBA
SQL> CONNECT / AS SYSASM
If you specified
ORA_OPER
or
ORA_SID_OPER
in step 1, then enter:
SQL> CONNECT / AS SYSOPER
You are now connected to the Windows server. If you connect with
SYSDBA
, you
are given DBA privileges.
10.2.3 Manually Creating an External Role
This section describes how to grant Oracle Database roles to users directly through
Windows (known as external roles). When you use Windows to authenticate users,
Windows local groups can grant these users external roles.
All privileges for these roles are active when the user connects. When using external
roles, all roles are granted and managed through the operating system. You cannot use
both external roles and Oracle Database roles at the same time.
Consider the following example. With external roles enabled, you log on to a Windows
domain with domain user name
sales\frank
(
sales
is the domain name and
frank
is
the domain username). You then connect to Oracle Database as Oracle Database user
scott
. In this case, you receive the roles granted to
sales\frank
but not the roles
granted to
scott
.
The procedure for manually creating an external role is divided into two sets of
authorization tasks performed on different computers:
■External Role Authorization Tasks on the Oracle Database Server
■External Role Authorization Tasks on the Client Computer

Manually Administering External Users and Roles
Administering External Users and Roles on Windows 10-27
10.2.3.1 External Role Authorization Tasks on the Oracle Database Server
1. Add initialization parameter
OS_ROLES
to the
init.ora
file.
2. Set
OS_ROLES
to
true
.
The default setting for this parameter is
false
.
3. Ensure that parameter
SQLNET.AUTHENTICATION_SERVICES
in file
sqlnet.ora
contains
nts
.
4. Start SQL*Plus:
C:\> sqlplus /NOLOG
5. Connect to your Windows server:
SQL> CONNECT / AS SYSDBA
6. Create a new database role. You can give this new role whatever name you want.
In this example the role is named
DBSALES3
:
SQL> CREATE ROLE DBSALES3 IDENTIFIED EXTERNALLY;
7. Grant to
DBSALES3
whatever Oracle Database roles are appropriate to your
database environment:
SQL> GRANT DBA TO DBSALES3 WITH ADMIN OPTION;
8. Connect to the database as
SYSDBA
:
SQL> CONNECT / AS SYSDBA
9. Shut down the database:
SQL> SHUTDOWN
10. Restart the database:
SQL> STARTUP
11. Create a Windows local group with the following syntax:
ORA_sid_rolename[_D][_A]
where
■
sid
identifies the database instance
■
rolename
identifies the database role granted
■
D
indicates that this database role is to be a default role of the database user
■
A
indicates that this database role includes
ADMIN
OPTION
Characters
D
and
A
are optional. If specified, they must be preceded by an
underscore.
For this example,
ORA_orcl_dbsales3_D
is created.
12. Add one or more Windows local or domain usernames to this group.
You can create multiple database roles and grant them to several possible
Windows groups with differing options, as shown in the following table. Users
See Also: Your operating system documentation for instructions on
managing users and groups

Manually Administering External Users and Roles
10-28 Oracle Database Platform Guide
connecting to the
ORCL
instance and authenticated by Windows as members of all
four of these Windows local groups will have the privileges associated with
dbsales3
and
dbsales4
by default (because of option
_D
). If these users first
connect as members of
dbsales3
or
dbsales4
and use the
SET ROLE
command,
then they can also gain access to database roles
dbsales1
and
dbsales2
. But if
these users try to connect with
dbsales1
or
dbsales2
without first connecting with
a default role, they are unable to connect. Finally, these users can grant
dbsales2
and
dbsales4
to other roles (because of option
_A
).
10.2.3.2 External Role Authorization Tasks on the Client Computer
1. Create a Windows local or domain user name with the same user name and
password that exist on the Windows server (if the appropriate user name does not
currently exist).
2. Ensure that parameter
SQLNET.AUTHENTICATION_SERVICES
in file
sqlnet.ora
contains
nts
.
3. Use Oracle Net Configuration Assistant to configure a network connection from
your client computer to Oracle Database. See Oracle Database Net Services
Administrator's Guide for instructions.
4. Start SQL*Plus:
C:\> sqlplus /NOLOG
5. Connect to the correct instance:
SQL> SET INSTANCE connect_identifier
where
connect_identifier
is the net service name for the Oracle Database
connection that you created in Step 3.
6. Connect to Oracle Database:
SQL> CONNECT SCOTT
Enter password: password
You are connected to the Windows server over net service with Oracle Database
user name
scott
. Roles applied to Oracle Database user name
scott
consist of all
roles defined for the Windows user name that were previously mapped to the
database roles (in this case,
ORA_DBSALES3_D
). All roles available under an
authenticated connection are determined by the Windows user name and the
Oracle-specific Windows local groups to which the user belongs (for example,
ORA_SID_DBSALES1
or
ORA_SID_DBSALES4_DA
).
Database Roles Windows Groups
dbsales1
ORA_ORCL_dbsales1
dbsales2
ORA_ORCL_dbsales2_a
dbsales3
ORA_ORCL_dbsales3_d
dbsales4
ORA_ORCL_dbsales4_da
Note: When Oracle Database converts the group name to a role
name, it changes the name to uppercase.

Manually Administering External Users and Roles
Administering External Users and Roles on Windows 10-29
10.2.4 Manually Migrating Users
You can migrate local or external users to enterprise users with User Migration Utility.
Migrating from a database user model to an enterprise user model provides solutions
to administrative, security, and usability challenges in an enterprise environment. In
an enterprise user model, all user information is moved to an LDAP directory service,
which provides the following benefits:
■Centralized storage and management of user information
■Centralized user authentication
■Enhanced security
User Migration Utility is a command-line tool. Its syntax is of the form:
C:\ umu parameters
To get a list of User Migration Utility parameters, enter:
C:\ umu help=yes
Note: OSDBA and OSOPER are generic names for two special
operating system groups that control database administrator logins
when using operating system authentication. Windows-specific names
for OSDBA and OSOPER are described in "Manually Granting
Administrator and Operator Privileges for Databases" on page 10-25.
See Oracle Database Administrator's Guide for more information on
OSDBA and OSOPER.
See Also: "Using the User Migration Utility" in Oracle Database
Enterprise User Security Administrator's Guide

Manually Administering External Users and Roles
10-30 Oracle Database Platform Guide

11
Storing Oracle Wallets in the Windows Registry 11-1
11
Storing Oracle Wallets in the Windows
Registry
This chapter describes storing and retrieving of Oracle Wallets in the Windows
registry.
11.1 Storing Private Keys and Trust Points
Oracle Wallets store private keys, trust points, and digital certificates used in public
key applications for authentication and encryption. Oracle Wallet Manager creates and
manages Oracle Wallets. Oracle public key applications use obfuscated Oracle Wallets
for authentication and encryption.
11.2 Storing User's Profile
In Windows domain, a user's profile is stored on the local computer. When a local user
logs on to that computer, that user's profile on the local computer is uploaded into the
user profile in that computer's registry. When a user logs out, that user's profile stored
on the local file system is updated, ensuring that the domain user or local user always
has the most recent user profile version.
11.3 Registry Parameters for Wallet Storage
Parameter
WALLET_LOCATION
in file
sqlnet.ora
specifies the location of the obfuscated
Oracle Wallet for use by Oracle PKI applications. For example, the
WALLET_LOCATION
parameter for storing an Oracle Wallet in the registry in:
\\HKEY_CURRENT_USER\SOFTWARE\ORACLE\WALLETS\SALESAPP
would be:
WALLET_LOCATION = (SOURCE= (METHOD=REG) (METHOD_DATA= (KEY=SALESAPP)))
Continuing the example, the encrypted Oracle Wallet would be stored in the registry
in:
\\HKEY_CURRENT_USER\SOFTWARE\ORACLE\WALLETS\SALESAPP\EWALLET.P12
and the obfuscated Oracle Wallet would be stored in:
\\HKEY_CURRENT_USER\SOFTWARE\ORACLE\WALLETS\SALESAPP\CWALLET.SSO
Note: Oracle Wallet Manager is a feature of Oracle Advanced
Security, a separately licensable option to Oracle Database.

Registry Parameters for Wallet Storage
11-2 Oracle Database Platform Guide
On Windows operating systems, if there is no value specified for parameter
WALLET_
LOCATION
, then Oracle PKI applications first look for the obfuscated wallet in registry
key:
\\HKEY_CURRENT_USER\SOFTWARE\ORACLE\WALLETS\DEFAULT
If no obfuscated wallet is found there, Oracle PKI applications look for it in the file
system of the local computer at location:
%USERPROFILE%\ORACLE\WALLETS
Regardless of location, wallets are always stored in the same format. All functionality
is the same except for the location of the wallets.
11.3.1 Oracle Wallet Manager
Oracle Wallet Manager creates and manages Oracle Wallets. If you want to use the
Windows registry for Oracle Wallets, then you must select the Use Windows System
Registry check box. If Windows System Registry is selected, then the tool shows a list
of existing keys when it opens a wallet or saves a new wallet. The list appears in:
\\HKEY_CURRENT_USER\SOFTWARE\ORACLE\WALLETS
You can select one of the existing locations or enter the name for a new location
(registry key). If you enter a new key called
key1
, for example, then the tool creates the
following registry key:
\\HKEY_CURRENT_USER\SOFTWARE\ORACLE\WALLETS\KEY1
The encrypted wallet will be stored in:
\\HKEY_CURRENT_USER\SOFTWARE\ORACLE\WALLETS\KEY1\EWALLET.P12
The obfuscated wallet will be stored in:
\\HKEY_CURRENT_USER\SOFTWARE\ORACLE\WALLETS\KEY1\CWALLET.SSO
If you do not select the Use Windows System Registry check box, then the tool
displays all the available drives and directories on the local computer. You can select
one of the existing directories or enter a new directory. The tool stores the encrypted or
obfuscated wallet in the selected directory or creates the directory if it does not exist.
11.3.1.1 Sharing Wallets and sqlnet.ora Files Among Multiple Databases
Multiple nonreplicated databases cannot share wallets. If
sqlnet.ora
files contain
wallet location information, then databases also cannot share
sqlnet.ora
files.
The only exception to this rule is password-authenticated or Kerberos-authenticated
enterprise user security with default database-to-directory connection configuration
that uses passwords. This configuration keeps database wallets in the default location,
where Database Configuration Assistant creates them. In this situation, no wallet
location information is stored in the
sqlnet.ora
file, and the wallet can be shared
among multiple databases.
Note: If SSL is used for enterprise user authentication, then the
wallet location must be specified in the
sqlnet.ora
file. So,
sqlnet.ora
files cannot be shared by multiple databases for
SSL-authenticated enterprise users.

12
Oracle PKI Integration with Windows 12-1
12
Oracle PKI Integration with Windows
This chapter describes integration of Oracle public key infrastructure (PKI) with public
key infrastructure (Windows PKI) on Windows operating systems.
This chapter contains the following topics:
■Oracle Public Key Infrastructure
■Windows Public Key Infrastructure
12.1 Oracle Public Key Infrastructure
Oracle public key infrastructure (PKI) is used by Oracle Enterprise Security Manager,
LDAP-enabled Oracle Enterprise Manager, Oracle's Secure Socket Layer (SSL)
authentication, Oracle Database, and Oracle Application Server.
Oracle PKI includes the following components:
■Oracle Wallets
■Oracle Wallet Manager (OWM)
Oracle Wallets store digital certificates, trust points, and private keys used in public
key applications for encryption, decryption, digital signature, and verification.
12.2 Windows Public Key Infrastructure
This section describes Windows public key infrastructure.
This section contains these topics:
■Microsoft Certificate Stores
■Microsoft Certificate Services
■Using Microsoft Certificate Stores with Oracle PKI Applications
Note: Oracle Security Manager is installed only with Oracle
Database Client.

Windows Public Key Infrastructure
12-2 Oracle Database Platform Guide
12.2.1 Microsoft Certificate Stores
Microsoft Certificate Stores are repositories for storing digital certificates and their
associated properties. Windows operating systems store digital certificates and
certificate revocation lists in logical and physical stores. Logical stores contain pointers
to public key objects in physical stores. Logical stores enable public key objects to be
shared between users, computers, and services without requiring storage of duplicates
of objects for each user, computer, or services. Public key objects are physically stored
in the registry of the local computer or, for some user certificates, in Active Directory.
Standard system certificate stores defined by Microsoft include:
■MY or Personal
■CA
■ROOT
MY or Personal holds a user's certificates for which the associated private key is
available. The MY certificate store maintains certificate properties that indicate the
Cryptographic Service Provider (CSP) associated with the private key. An application
uses this information to obtain the private key from the CSP for the associated
certificate. CA holds issuing or intermediate certificate authority (CA) certificates.
ROOT holds only self-signed CA certificates for trusted root CAs.
12.2.2 Microsoft Certificate Services
Microsoft Certificate Services (MCS) consists of the following modules:
■Server Engine
■Intermediary
■Policy
Server Engine handles all certificate requests. It interacts with other modules at each
processing stage to ensure that the proper action is taken based on the state of the
request. The Intermediary module receives requests for new certificate from clients
and then submits them to Server Engine. The Policy module contains the set of rules
controlling the issuance of certificates. This module may be upgraded or customized
as needed.
12.2.3 Using Microsoft Certificate Stores with Oracle PKI Applications
Wallet Resource Locator (WRL) specifies that parameter
WALLET_LOCATION
in file
sqlnet.ora
identifies a particular PKI. You can choose between using Oracle Wallet or
Microsoft Certificate Stores by setting parameter
WALLET_LOCATION
in
sqlnet.ora
. To
use credentials from Microsoft Certificate Stores, set parameter
WALLET_LOCATION
in
sqlnet.ora
to:
WALLET_LOCATION = (SOURCE = (METHOD=MCS))
Note: Microsoft Certificate Store integration works only with digital
certificates that use Microsoft Enhanced Cryptographic Provider. To
create these certificates, you must install Windows High Encryption
Pack and select Microsoft Enhanced Cryptographic Provider. Also,
when there are multiple certificates available for the same key usage
(signature/key exchange), the first certificate retrieved will be used
for Oracle SSL.

Windows Public Key Infrastructure
Oracle PKI Integration with Windows 12-3
The Oracle application uses Oracle's TCP/IP with SSL protocol (TCPS) to connect to
Oracle Server. The SSL protocol uses X.509 certificates and trust points from the user's
Microsoft Certificate Store for SSL authentication.

Windows Public Key Infrastructure
12-4 Oracle Database Platform Guide

13
Using Oracle Database with Microsoft Active Directory 13-1
13
Using Oracle Database with Microsoft
Active Directory
This chapter describes how to configure and use Microsoft Active Directory as the
LDAP directory.
This chapter contains these topics:
■Microsoft Active Directory Support
■Oracle Components That Integrate with Active Directory
■Requirements for Using Oracle Database with Active Directory
■Configuring Oracle Database to Use Active Directory
■Testing Connectivity
■Access Control List Management for Oracle Directory Objects
13.1 Microsoft Active Directory Support
This section describes how Microsoft Active Directory is used as an LDAP directory
server by Oracle Database.
This section contains these topics:
■About Microsoft Active Directory
■Accessing Active Directory
13.1.1 About Microsoft Active Directory
Active Directory is the LDAP-compliant directory server included with Windows
server operating systems. Active Directory stores all Windows operating system
information, including users, groups, and policies. Active Directory also stores
information about network resources (such as databases) and makes this information
available to application users and network administrators. Active Directory enables
users to access network resources with a single login. The scope of Active Directory
can range from storing all the resources of a small computer network to storing all the
resources of several wide areas networks (WANs).
13.1.2 Accessing Active Directory
When using Oracle features that support Active Directory, ensure that the Active
Directory computer can be successfully reached using all possible TCP/IP host name
forms to reach the domain controller. For example, if the host name of the domain

Oracle Components That Integrate with Active Directory
13-2 Oracle Database Platform Guide
controller is
server1
in the domain
example.com
, then ensure that you can ping that
computer using all of the following:
■
server1.example.com
■
example.com
■
server1
Active Directory often issues referrals back to itself in one or more of these forms,
depending upon the operation being performed. If any of the forms cannot reach the
Active Directory computer, then some LDAP operations may fail.
13.2 Oracle Components That Integrate with Active Directory
The following Oracle Database features support or have been specifically designed to
integrate with Active Directory:
■Directory Naming
■Automatic Discovery of Directory Servers
■Integration with Windows Tools
■User Interface Extensions for Oracle Net Directory Naming
■Enhancement of Directory Object Type Descriptions
■Integration with Windows Login Credentials
■Oracle Directory Objects in Active Directory
13.2.1 Directory Naming
Oracle Database provides Oracle Net Services directory naming, which makes use of a
directory server. This feature has been enabled to work with Microsoft Active
Directory. Directory Naming enables clients to connect to the database making use of
information stored centrally in an LDAP-compliant directory server such as Active
Directory. For example, any net service name previously stored in the
tnsnames.ora
file can now be stored in Active Directory.
13.2.2 Automatic Discovery of Directory Servers
Oracle Net Configuration Assistant provides automatic discovery of directory servers.
When you select Active Directory as the directory server type, Oracle Net
Configuration Assistant automatically discovers the directory server location and
performs related tasks.
13.2.3 Integration with Windows Tools
Oracle Database services, net service names, and enterprise role entries in Active
Directory can be displayed and tested in two Windows tools:
■Windows Explorer
■Active Directory Users and Computers
See Also: "Configuring Oracle Database to Use Active Directory" on
page 13-8 for more information on Active Directory configuration

Oracle Components That Integrate with Active Directory
Using Oracle Database with Microsoft Active Directory 13-3
Windows Explorer displays the hierarchical structure of files, directories, and local and
network drives on your computer. It can display and test Oracle Database service and
net service name objects.
Active Directory Users and Computers is an administrative tool installed on Windows
servers configured as domain controllers. This tool enables you to add, modify, delete,
and organize Windows accounts and groups, and publish resources in the directory of
your organization. Like Windows Explorer, it can display and test Oracle Database
service and net service name objects. Additionally, it can manage access control.
13.2.4 User Interface Extensions for Oracle Net Directory Naming
The property menus of Oracle Database service and net service name objects in
Windows Explorer and Active Directory Users and Computers have been enhanced.
When you right-click these Oracle directory objects, you now see two new options for
testing connectivity:
■Test
■Connect with SQL*Plus
The Test option tests whether the username, password, and net service name you
initially entered can actually connect to Oracle Database. The Connect with SQL*Plus
option starts SQL*Plus, which enables you to perform database administration, run
scripts, and so on.
13.2.5 Enhancement of Directory Object Type Descriptions
Oracle directory object type descriptions in Active Directory have been enhanced to
make them easier to understand. In the right pane of Figure 13–1 on page 13-4, for
example, the Type column reveals that
sales
is an Oracle Net Service name.
13.2.6 Integration with Windows Login Credentials
Oracle database and configuration tools can use the login credentials of the Windows
user currently logged on to connect to Active Directory without having to re-enter the
login credentials. This feature has the following benefits:
■Oracle clients and databases can securely connect to Active Directory and retrieve
the net service name.
■Oracle configuration tools can connect automatically to Active Directory and
configure Oracle Database and net service name objects. The enabled tools include
Oracle Net Configuration Assistant and Database Configuration Assistant.
■In Oracle Database 11g, enhancements are made to make secure access over the
internet to avoid anonymous binds to the directory. The enhanced security enables
the sites to restrict access to Database Service by setting access control (ACL) on
Database Service DN in Directory Server. The enhancement gives clients the
option to use authenticated binds for LDAP name lookup. Clients will have access
See Also:
■"Testing Connectivity from Microsoft Tools" on page 13-10
■"Access Control List Management for Oracle Directory Objects" on
page 13-12
See Also: "Testing Connectivity from Microsoft Tools" on page 13-10

Oracle Components That Integrate with Active Directory
13-4 Oracle Database Platform Guide
to Database Service object if the object (DN of Database Service Entry) has been
configured with restrictive access control.
Configuration on machines that require authenticated name lookups
Add the following entry in
sqlnet.ora
to enable authenticated name lookup:
names.ldap_authenticate_bind = TRUE
13.2.7 Oracle Directory Objects in Active Directory
If Oracle Database and Oracle Net Services are installed and configured to access
Active Directory, then Active Directory Users and Computers displays Oracle
directory objects, as illustrated in Figure 13–1:
Figure 13–1 Oracle Directory Objects in Active Directory Users and Computers
Table 13–1 describes the Oracle directory objects appearing in Figure 13–1.
Table 13–1 Oracle Directory Objects
Object Description
oranet.dev
The domain in which you created your Oracle Context. This domain (also
known as the administrative context) contains various Oracle entries to
support directory naming. Oracle Net Configuration Assistant
automatically discovers this information during Oracle Database
integration with Active Directory.
OracleContext
The top-level Oracle entry in the Active Directory tree. It contains Oracle
Database service and net service name object information. All Oracle
software information is placed in this folder.
orcl
The Oracle Database service name used in this example.
Products
Folder for Oracle product information.
sales
The net service name object used in this example.

Requirements for Using Oracle Database with Active Directory
Using Oracle Database with Microsoft Active Directory 13-5
13.3 Requirements for Using Oracle Database with Active Directory
To use Net Directory Naming with Active Directory, you must have certain Microsoft
and Oracle software releases, and you must create Oracle schema objects and an
Oracle Context. These requirements are discussed in the following sections:
■Directory Naming Software Requirements
■Creating an OracleContext
■Oracle Schema Objects Creation
13.3.1 Directory Naming Software Requirements
For client computers from which you want to manage Oracle Database enterprise
users, roles and domains, you must have Oracle8i Client release 8.1.6 or later and one
of the supported Windows operating systems.
For the database, you must have Oracle8i Database release 8.1.6 or later. This is
required for registering the database service as an object in Active Directory. The
database can use any of the supported Windows operating systems.
Both the client computers and the database must be members of a Windows server
domain.
Directory Naming adaptor connects anonymously to directory by default.
13.3.2 Creating an OracleContext
You must create an Oracle Context to use net directory naming features with Active
Directory. Oracle Context is the top-level Oracle entry in the Active Directory tree. It
contains Oracle Database service and Oracle Net service name object information.
■You can create only one Oracle Context for each Windows server domain
(administrative context).
■You must have the right to create domain and enterprise objects to create the
Oracle Context in Active Directory with Oracle Net Configuration Assistant.
■Use Oracle Net Configuration Assistant to create your Oracle Context. You can
create the Oracle Context during or after Oracle Database Custom installation.
Users
Folder for the Oracle security groups. See "Access Control List
Management for Oracle Directory Objects" on page 13-12 for more
information. Enterprise users and roles created with Oracle Enterprise
Security Manager also appear in this folder.
Note:
■The Oracle schema objects and Oracle Context can both be created
by Oracle Net Configuration Assistant.
■Regardless of the Oracle Database Client and Oracle Database
releases you are using, you must be in a Windows Server 2003,
Windows Server 2008, Windows Server 2008 R2 x64, Windows
Server 2012, or Windows Server 2012 R2 x64 domain to integrate
Net Directory Naming with Active Directory.
Table 13–1 (Cont.) Oracle Directory Objects
Object Description

Requirements for Using Oracle Database with Active Directory
13-6 Oracle Database Platform Guide
13.3.2.1 Network Configuration Assistant (NetCA)
Oracle Net Configuration Assistant (NetCA) is a graphical, wizard-based tool used to
configure and manage Oracle Network configurations.
Run the Network Configuration Assistant (NetCA).
To start NetCA:
1. Click Start, then click All Programs.
2. Click Oracle, Configuration and Migration Tools, then Net Configuration
Assistant.
3. Select the Directory Usage Configuration option, then click Next.
4. Select Directory Type Microsoft Active Directory, then click Next.
5. Select the option to configure the directory for Oracle usage and create the Oracle
Schema and Context, then click Next.
6. Enter the Active Directory host name, then click Next.
7. Select the option to upgrade the Oracle Schema, then click Next.
The next page should denote successful Directory configuration.
Directory usage configuration complete!
The distinguished name of your default Oracle Context is:
cn=OracleContext,DC=home,DC=com
8. Click Next, then click Finish.
9. The earlier message may only denote partial success:
The Assistant is unable to create or upgrade the Oracle Schema
for the following reason: ConfigException: Oracle Schema creation
was successful, but Active Directory Display Specifier creation
failed.oracle.net.config.ConfigException; TNS-04420: Problem
LDAPMODIFY
Click OK, then click Finish.
10. If you receive the preceding error, disregard the message and re-run NetCA using
the originally supplied values.
The wizard should complete denoting successful Directory configuration:
Directory usage configuration complete!
The distinguished name of your default Oracle Context is:
cn=OracleContext,DC=home,DC=com
Click Next, then click Finish.
See Also:
■Oracle Database Installation Guide for Microsoft Windows for
installation procedures
■Oracle Database Net Services Administrator's Guide for configuration
procedures
Note: The Microsoft Active Directory configuration option is only
available in the Windows version of NetCA.

Requirements for Using Oracle Database with Active Directory
Using Oracle Database with Microsoft Active Directory 13-7
13.3.3 Oracle Schema Objects Creation
You must create Oracle schema objects to use net directory naming features with
Active Directory. Schema objects are sets of rules for Oracle Net Services and Oracle
Database entries and their attributes stored in Active Directory. The following
restrictions apply to creating Oracle schema objects to use with Active Directory:
■Only one Oracle schema object can be created for each forest.
■The Windows server domain controller must be the operations master that allows
schema updates. See your operating system documentation for instructions.
To create an Oracle schema object:
1. Log in as a member of the Schema Administrator group. Domain administrators
are in the Schema Administrator group by default.
2. Use Oracle Net Configuration Assistant to create the Oracle schema object. You
can create your schema object during or after database installation.
If the Active Directory display is not configured to accept all 24 default languages,
then Oracle schema object creation can fail while Oracle Net Configuration Assistant is
configuring Active Directory as the directory server. Before Oracle Net Configuration
Assistant to complete directory access configuration, verify that the display specifiers
for all 24 languages are populated by entering the following at the command prompt:
ldifde -p OneLevel -d cn=DisplaySpecifiers,cn=Configuration,domain context -f
temp file
where:
■
domain
context
is the domain context for this Active Directory server.
For example,
dc=example
,
dc=com
.
■
temp
file
is a file where you want to put the output.
If the command reports that fewer than 24 entries were found, then you can still use
Oracle Net Configuration Assistant. However, the report will indicate that Oracle
schema object creation failed, rather than simply reporting that display specifiers for
some languages were not created.
Display Specifiers Not Created
When Net Configuration Assistant creates the Oracle schema object in Active
Directory, the display specifiers for Oracle entries are not created. This means you
cannot view Oracle database entries in Active Directory interfaces.
You can manually add these entries into Active Directory after the Oracle schema
object has been created by doing the following, using the same Windows user
identification you used when creating the Oracle schema object with Net
Configuration Assistant:
1. Open a command shell.
2. Change directory to
ORACLE_HOME\ldap\schema\ad
.
3. Copy
adDisplaySpecifiers_us.sbs
to
adDisplaySpecifiers_us.ldif
.
4. Copy
adDisplaySpecifiers_other.sbs
to
adDisplaySpecifiers_other.ldif
.
5. Edit each of these
.ldif
files, replacing all occurrences of
%s_AdDomainDN%
with the
domain DN for the specific Active Directory into which you want to load the
display specifiers (for example,
dc=example,dc=com
).
6. Run the following commands:

Configuring Oracle Database to Use Active Directory
13-8 Oracle Database Platform Guide
ldapmodify -h <ad hostname> -Z -f adDisplaySpecifiers_us.ldif
ldapmodify -h <ad hostname> -Z -f adDisplaySpecifiers_other.ldif
where
<ad hostname>
is the host name of the Active Directory domain controller
to which you want to load the display specifiers.
13.4 Configuring Oracle Database to Use Active Directory
Oracle Net Configuration Assistant enables you to configure client computers and
Oracle Database to access a directory server. When you choose directory access
configuration from Oracle Net Configuration Assistant, it then prompts you to specify
a directory server type to use. When you select Active Directory as the directory server
type, the Automatic Discovery of Directory Servers feature of Oracle Net
Configuration Assistant automatically:
■Discovers the Active Directory server location
■Configures access to the Active Directory server
■Creates the Oracle context (also known as your domain)
If the Active Directory server already has an Oracle Context, then select the following
nondefault option:
Select the directory server you want to use, and configure the directory server for
Oracle usage. (Create or upgrade Oracle schema objects and Oracle Context as
necessary.)
Oracle Net Configuration Assistant will report that the Oracle Context does not exist.
Ignore this and choose to create the Oracle Context anyway. Directory access
configuration will complete without trying to re-create the existing Oracle Context.
See Also: "Automatic Discovery of Directory Servers" on page 13-2
Note: Oracle Net Configuration Assistant does not configure
DIRECTORY_SERVERS
parameter in
ldap.ora
, in which case, clients
automatically discover the Active Directory server for Net Naming.
Note: Regardless of the Oracle Database Client and Oracle Database
releases you are using, you must be in a Windows Server 2003,
Windows Server 2003 R2, Windows Server 2008, Windows Server 2008
R2, Windows Server 2012, or Windows Server 2012 R2 domain to take
advantage of the automatic directory server discovery features of
Oracle Net Configuration Assistant. Oracle Net Configuration
Assistant does not automatically discover your directory server, and
instead prompts you for additional information, such as the Active
Directory location.

Testing Connectivity
Using Oracle Database with Microsoft Active Directory 13-9
13.5 Testing Connectivity
This section describes how to connect to an Oracle Database server through Active
Directory.
This section contains these topics:
■Testing Connectivity from Client Computers
■Testing Connectivity from Microsoft Tools
13.5.1 Testing Connectivity from Client Computers
When using Oracle Net directory naming, client computers connect to a database by
specifying the database or net service name entry that appears in the Oracle Context.
For example, if the database entry under the Oracle Context in Active Directory is
orcl
, and the client and the database are in the same domain, then a user connects to
the database through SQL*Plus by entering the following connect string:
SQL> CONNECT username@orcl
Enter password: password
If the client and the database are in different domains, then a user connects to the
database through SQL*Plus by entering:
SQL> CONNECT username@orcl.domain
Enter password: password
where
domain
is the domain in which the Oracle Database server is located.
The LDAP naming adapter has an internal function which we call simplified naming,
which will attempt to translate a DNS-style name into an x500 (LDAP) style name
(DN) based on the naming convention used in
ldap.ora:DEFAULT_ADMIN_CONTEXT.
It relies on
ldap.ora:default_admin_context
using either an org form or a domain
component (dc) form. This cues the mechanism to use either of the following
conventions to convert the domain name to an x500 DN:
■’dc=, dc=’
■’ou=, o=’
■’ou=, o=, c=’
For example,
SQL> CONNECT SCOTT@hr.example.com
Enter password: password
The following values for default_admin_context will result in the associated DN:
See Also:
■"Oracle Schema Objects Creation" on page 13-7 for information
about possible failures during configuration
■"Requirements for Using Oracle Database with Active Directory"
on page 13-5
■"Automatic Discovery of Directory Servers" on page 13-2
■Oracle Database Net Services Administrator's Guide for configuration
procedures

Testing Connectivity
13-10 Oracle Database Platform Guide
DEFAULT_ADMIN_CONTEXT="o=stdev"
The resulting DN is
cn=HR,cn=OracleContext,ou=EXAMPLE,o=COM
DEFAULT_ADMIN_CONTEXT="dc=oracle, dc=com"
The resulting DN is
cn=HR,cn=OracleContext,dc=EXAMPLE,dc=COM
DEFAULT_ADMIN_CONTEXT="o=oracle,c=us"
The resulting DN is
cn=HR,cn=OracleContext,o=EXAMPLE,c=COM
DNS-style conventions enable client users to access an Oracle Database server through
a directory server by entering minimal connection information, even when the client
computer and Oracle Database server are in separate domains. Names following the
X.500 convention are longer, especially when the client and Oracle Database server are
located in different domains (also known as administrative contexts).
13.5.2 Testing Connectivity from Microsoft Tools
Oracle directory objects in Active Directory are integrated with two Microsoft tools:
■Windows Explorer
■Active Directory Users and Computers
You can test connectivity to an Oracle Database server from within these Microsoft
tools by actually connecting to it, or you can just test the connection with actually
connecting. To test connectivity:
1. Start Windows Explorer or Active Directory Users and Computers.
To start Windows Explorer:
a. From the Start menu, select Programs, then select Accessories and then select
Windows Explorer.
Note: The value of the
default_admin_context
is not used literally,
since the queried-name is given in a fully qualified form. The
default_admin_context
determines which style DN is produced, or
which left-hand-side to use when converting each domain in the given
DN component.
See Also:
■"Configuration Management Concepts" in Oracle Database Net
Services Administrator's Guide for more information about X.500
naming conventions
■"Unlocking and Changing Passwords" in Oracle Database
Installation Guide for Microsoft Windows
Testing Connectivity
Using Oracle Database with Microsoft Active Directory 13-11
b. Expand My Network Places.
c. Expand Entire Network.
d. Expand Directory.
To start Active Directory Users and Computers:
From the Start menu, select Programs, then select Administrative Tools, and then
select Active Directory Users and Computers.
2. Expand the domain in which your Oracle Context is located.
3. Expand your Oracle Context.
4. Right-click a database service or Oracle Net Service name object.
A menu appears with several options. This section covers only the Test and
Connect with SQL*Plus options.
Note: All clients accessing an Oracle Database server through Active
Directory require read access on all net service name objects in the
Oracle Context. If Oracle Net will not be configured to require
authentication for name lookup, then clients must be able to
authenticate anonymously with Active Directory. With Windows
Server 2003, Windows Server 2003 R2, Windows Server 2008,
Windows Server 2008 R2 , Windows Server 2012, and Windows Server
2012 R2 domain, this will require changing the Active Directory
default setting so that anonymous access will be allowed. If
anonymous access is not going to be allowed to this directory the
clients must be configured to authenticate and net service objects must
have access control definitions which allow clients to read them as
appropriate.
See also: Oracle Database Net Services Administrator's Guide for more
information

Access Control List Management for Oracle Directory Objects
13-12 Oracle Database Platform Guide
5. If you want to test the database connection without actually connecting to it, then
choose Test. A status message appears describing the status of your connection
attempt.
6. If you want to test the database connection by actually connecting to it, then
choose Connect with SQL*Plus. The Oracle SQL*Plus Logon dialog appears.
7. Enter your user name and password, then click OK. A status message appears
describing the status of your connection attempt.
13.6 Access Control List Management for Oracle Directory Objects
This section identifies security groups specific to Oracle directory objects within Active
Directory and explains how to add and delete security group members.
This section contains these topics:
■Security Groups
■Adding and Deleting Security Group Members
13.6.1 Security Groups
Security groups are automatically created when the Oracle Context is created in Active
Directory. The user configuring access (and thus creating the Oracle Context) is
automatically added to each group. The relevant groups are:
■OracleDBCreators
■OracleNetAdmins
■NetService Objects

Access Control List Management for Oracle Directory Objects
Using Oracle Database with Microsoft Active Directory 13-13
13.6.1.1 OracleDBCreators
The
OracleDBCreators
group is for the person registering the Oracle Database server.
The domain administrator is automatically a member of this group. Users in this
group can:
■Create new Oracle Database objects in the Oracle Context.
■Modify the Oracle Database objects that they create.
■Read, but not modify, the membership for this group.
13.6.1.2 OracleNetAdmins
Users in the
OracleNetAdmins
group can:
■Create, modify, and read Oracle Net Services objects and attributes.
■Read the group membership of this group.
13.6.1.3 NetService Objects
In 11g, directory clients may optionally be configured to authenticate with the
directory while resolving DB names to connect strings. This makes it possible for
NetService objects to be protected using ACLs.
There are many ways in which the identities of users may be defined in the directory,
and how those users or certain groups of users may be given access to some or all Net
Services. Oracle supplies no pre-defined groups, and has no procedures in the config
tools for defining read-access restrictions on this data, so administrators must use
standard object management tools from their directory system to manually create any
necessary groups and ACLs. Existing identity structures may be referred to by Net
Service ACLs.
Because the access definitions for objects are complex and may involve security
properties which are inherited from parent nodes in the Directory Information Tree
(DIT), Oracle recommends that the administrators should refer to the relevant tools
and documentation for the directory system they are using, and formulate or integrate
access management for NetService objects into a directory-wide policy and security
implementation.
13.6.2 Setting ACLs on NetService Entries
Use
Dsacls
tool to set ACLs on Directory Object.
Dsacls.exe
command-line tool displays and changes permissions (access control
entries) in the access control list (ACL) of objects in Active Directory. This
command-line tool will be included in Support Tools on the product media.
Examples:
To enable anonymous generic read on
orcl
service, run the following command:
dsacls "CN=orcl,CN=OracleContext,OU=Example,O=Com" /G "anonymous logon":GR
To enable generic read on
orcl
service for the user
scott
in EXAMPLE domain, run
the following command:
Note: Pre-11g clients can only bind to the directory as anonymous,
so any ACL protection on NetServices will disable older clients.
Access Control can only be implemented if all clients requiring access
to these objects are 11g or later.

Access Control List Management for Oracle Directory Objects
13-14 Oracle Database Platform Guide
dsacls "CN=orcl,CN=OracleContext,OU=Example,O=Com" /G example\scott:GR
To disable anonymous generic read on
orcl
service, run following command:
dsacls "CN=orcl,CN=OracleContext,OU=Example,O=Com" /R "anonymous logon"
To disable generic read on
orcl
service for the user
scott
in EXAMPLE domain, run
the following command:
dsacls "CN=orcl,CN=OracleContext,OU=Example,O=com" /R example\scott
13.6.3 Adding and Deleting Security Group Members
You can add or remove users in the security groups with Active Directory Users and
Computers.
To add or remove users:
1. From the Start menu, select Programs, then select Administrative Tools, and then
select Active Directory Users and Computers.
2. Choose Advanced Features from the View main menu.
This enables you to view and edit information that is normally hidden.
3. Expand the domain (administrative context) in which your Oracle Context is
located.
4. Expand Users.
The security groups appear in the right window pane.
See Also:
http://support.microsoft.com/kb/281146
for complete
description of the dsacls tool
Note: Use Active Directory Users and Computers to perform the
procedures described in this section. Windows Explorer does not
provide the necessary functionality.

Access Control List Management for Oracle Directory Objects
Using Oracle Database with Microsoft Active Directory 13-15
5. Right-click the Oracle security group that you want to view or modify.
A menu appears with several options.
6. Choose Properties.
7. Choose the Members tab.
The Properties dialog for the group you selected appears (in this example,
OracleDBCreators
).
8. To add users, click Add.
The Select Users, Contacts, Computers, or Groups dialog appears.
9. Select the users or groups you want to add and click Add.
Your selections appear in the Select Users, Contacts, Computers, or Groups dialog.

Access Control List Management for Oracle Directory Objects
13-16 Oracle Database Platform Guide
10. To remove a user, select the user name from the Members list and click Remove.
11. When you are finished adding and removing users, click OK.

14
Oracle Database Specifications for Windows 14-1
14
Oracle Database Specifications for Windows
Oracle Database for Windows uses initialization parameters to enable various features
of the database every time an instance is started.
This chapter contains these topics:
■Initialization Parameter File Overview
■Sample File
■SGA_MAX_SIZE Parameter
■Initialization Parameters Without Windows-Specific Values
■Displaying Initialization Parameter Values
■Uneditable Database Initialization Parameters
■Calculating Database Limits
14.1 Initialization Parameter File Overview
An initialization parameter file is an ASCII text file containing parameters. By
changing parameters and values in an initialization parameter file, you can specify, for
example:
■Amount of memory Oracle Database uses
■Whether to archive filled online redo logs
■Which control files currently exist
Every database instance has a corresponding initialization parameter file and an
ORACLE_SID
registry parameter that points to the system identifier for the instance.
The initialization parameter file name takes the form
init.ora
. A single instance
might have several initialization parameter files, each having some differences that
affect system performance.
Note: Your
init.ora
file for initialization parameters is set by Oracle
Universal Installer during database installation. These parameter
settings may vary depending on your hardware configuration. For
descriptions of all initialization parameters and instructions for setting
and displaying their values, see Oracle Database Reference.

Sample File
14-2 Oracle Database Platform Guide
14.1.1 Location of the Initialization Parameter File
If you do not specify a different initialization file with option
PFILE
at database
startup, then by default Oracle Database uses initialization parameter files located in
ORACLE_HOME\Database\init.ora
14.1.2 Editing The Initialization Parameter File
To customize Oracle Database functions, you may be required to edit the initialization
parameter file. Use only an ASCII text editor to modify the file.
14.1.3 Database Configuration Assistant Renames init.ora
When you create a database using Database Configuration Assistant, a Server
Parameter File (SPFILE) is created from the initialization parameter file, and the
initialization parameter file is renamed. Oracle does not recognize the renamed file as
an initialization parameter file, and it is not used after the instance is started.
If you want to modify an instance created with Database Configuration Assistant after
it starts, you must use
ALTER SYSTEM
statements. You cannot change the Server
Parameter File itself, because it is a binary file that cannot be browsed or edited using a
text editor. The location of the newly-created Server Parameter File is
ORACLE_
HOME\database
. The Server Parameter File file name is
spfileSID.ora
.
14.2 Sample File
Oracle Database provides an annotated sample initialization parameter file with
alternative values for initialization parameters. These values and annotations are
preceded by comment signs (
#
), which prevent them from being processed. To activate
a particular parameter, remove the preceding
#
sign. To de-activate a particular
parameter, edit the initialization parameter file to add a comment sign. The sample file
is called
initsmpl.ora
. and is located in
ORACLE_HOME\admin\sample\pfile.
If you installed a starter database, the initialization parameter file used by the starter
database is located in the same directory. You can use either
initsmpl.ora
or the
starter database
init.ora
as a basis for creating a new Oracle Database initialization
parameter file.
To use sample file
initsmpl.ora
as part of database creation:
1. Rename the sample file
init.ora
.
2. Edit this file to reflect the correct location of your database control files and the
name of your database, as a minimum.
Note: If you create a database manually using a SQL script, then you
are required to create an initialization parameter file or copy an
existing initialization parameter file and modify the contents. If you
use Database Configuration Assistant to create a database, then the
initialization parameter file is automatically created for you.
See Also: "Managing Initialization Parameters Using a Server
Parameter File" in Oracle Database Administrator's Guide

Initialization Parameters Without Windows-Specific Values
Oracle Database Specifications for Windows 14-3
Here are two examples of activation and de-activation of alternative parameters.
Several initialization parameters are specified with three different values to create a
small, medium, or large System Global Area, respectively. The parameter that creates
a small SGA is active in this first example:
db_block_buffers = 200 # SMALL
# db_block_buffers = 550 # MEDIUM
# db_block_buffers = 3200 # LARGE
To create a medium-sized SGA, comment out the small parameter definition and
activate the medium parameter definition. Edit the initialization parameter file as in
this second example:
# db_block_buffers = 200 # SMALL
db_block_buffers = 550 # MEDIUM
# db_block_buffers = 3200 # LARGE
14.3 SGA_MAX_SIZE Parameter
Parameter
SGA_MAX_SIZE
holds the maximum size that System Global Area (SGA) can
reach for a particular instance. Beginning with Oracle9i Release 1 (9.0.1), Oracle
Database can change its SGA configuration while the instance is. This allows sizes of
buffer cache, shared pool, and large pool to be changed without instance shutdown.
Oracle Database can start instances underconfigured and allow the instance to use
more memory by growing SGA up to a maximum of
SGA_MAX_SIZE
. If no
SGA_MAX_
SIZE
value is specified, then Oracle Database selects a default value that is the sum of
all components specified or defaulted at initialization time. If
SGA_MAX_SIZE
specified
in the initialization parameter file is less than the sum of all components specified or
defaulted to at initialization time, then the setting of
SGA_MAX_SIZE
in the initialization
parameter file serves as an upper bound.
Memory allocated for the SGA of an instance is displayed on instance startup when
using Oracle Enterprise Manager (or SQL*Plus). You can also display the SGA size of
the current instance by using the SQL*Plus
SHOW
statement with the SGA clause.
14.4 Initialization Parameters Without Windows-Specific Values
Oracle Database Reference describes default values for many initialization parameters as
being operating system-specific. However, not all parameters that it describes as
having operating system-specific values affect Windows. In these cases, Windows uses
either the default value set in the Oracle Database kernel or does not use the
parameter. Table 14–1 describes these initialization parameters:
See Also:
■Oracle Database Performance Tuning Guide for more information
about SGA initialization parameters
■Oracle Database Concepts for more information about SGA and its
components

Displaying Initialization Parameter Values
14-4 Oracle Database Platform Guide
14.5 Displaying Initialization Parameter Values
Windows-specific parameter values can be viewed by using an ASCII editor to open
the initialization parameter file:
ORACLE_HOME\admin\db_name\pfile\init.ora
To display any parameter value (whether set in the initialization parameter file or the
Oracle Database kernel), enter the following command at the SQL*Plus command
prompt:
SQL> SHOW PARAMETER parameter_name
where
parameter_name
is the name of a specific initialization parameter.
14.6 Uneditable Database Initialization Parameters
Check the initialization parameters in Table 14–2 when creating a new database. They
cannot be modified after you have created the database. See Chapter 3,
"Postinstallation Database Creation on Windows" for details on creating a new
database, including the part of the procedure where you modify these parameters.
Table 14–1 Initialization Parameters Without Windows-Specific Values
Parameter Description
AUDIT_FILE_DEST
Supported on Windows to write XML format audit files
DB_WRITER_PROCESSES
Supported, but typically unnecessary due to Windows asynchronous I/O
capabilities
COMPATIBLE_NO_RECOVERY
Uses default value set in Oracle Database kernel (no Windows-specific
value)
BACKGROUND_CORE_DUMP
Specifies whether Oracle Database includes SGA in core file for Oracle
Database background processes
SHADOW_CORE_DUMP
Specifies whether Oracle Database includes SGA in core file for foreground
(client) processes
CORE_DUMP_DEST
Specifies directory where Oracle Database dumps core files
CPU_COUNT
Oracle Database automatically sets value to number of processors available
for your Oracle Database instance
HI_SHARED_MEMORY_ADDRESS
Not applicable to Windows
SHARED_MEMORY_ADDRESS
Not applicable to Windows
LARGE_POOL_SIZE
Uses maximum value limited by available memory
LOG_BUFFER
Starter database uses value set in Oracle Database kernel (no
Windows-specific value). The Custom database creation option of Database
Configuration Assistant enables you to customize the value for this
parameter.
SPIN_COUNT
Uses default value set in Oracle Database kernel (no Windows-specific
value)
Table 14–2 Uneditable Database Initialization Parameters
Parameter Description
CHARACTER SET
Specifies database Globalization Support character set to use. This
parameter can be set only when you create the database.

Calculating Database Limits
Oracle Database Specifications for Windows 14-5
14.7 Calculating Database Limits
Use size guidelines in this section to calculate Oracle Database limits.
DB_BLOCK_SIZE
Specifies size in bytes of standard Oracle Database blocks.
DB_NAME
Specifies name of the database to be created. Database name is a string of
eight characters or less. You cannot change the name of a database.
Note: Not an initialization parameter, but rather a clause in the
CREATE DATABASE statement. See Chapter 3, "Postinstallation
Database Creation on Windows" for an example of using this clause.
Table 14–3 Block Size Guidelines
Type Size
Maximum block size 16,384 bytes or 16 kilobytes (KB)
Minimum block size 2 kilobytes (KB)
Maximum blocks for each file 4,194,304 blocks
Maximum possible file size with 16 K
sized blocks 64 Gigabytes (GB)
(4,194,304 * 16,384) = 64 gigabytes (GB)
Table 14–4 Maximum Number of Files for Each Database
Block Size Number of Files
2 KB 20,000
4 KB 40,000
8 KB 65,536
16 KB 65,536
Table 14–5 Maximum File Sizes
Type Size
Maximum file size for a FAT file 4 GB
Maximum file size in NTFS 16 Exabytes (EB)
Maximum database size 65,536 * 64 GB equals approximately 4 Petabytes (PB)
Maximum control file size 20,000 blocks
Table 14–2 (Cont.) Uneditable Database Initialization Parameters
Parameter Description

Calculating Database Limits
14-6 Oracle Database Platform Guide

15
Configuration Parameters and the Registry 15-1
15
Configuration Parameters and the Registry
This chapter describes use of the registry for various Oracle Database for Windows
components. It also lists recommended values and ranges for configuration
parameters.
This chapter contains these topics:
■About Configuration Parameters
■Registry Overview
■Registry Parameters
■Oracle RAC Registry Parameters
■Managing Registry Parameters with regedit
■Managing Registry Parameters with Oracle Administration Assistant for Windows
■Modifying Oracle Counters for Windows Performance Monitor Parameters
15.1 About Configuration Parameters
Oracle Database for Windows uses configuration parameters to locate files and specify
run-time parameters common to all Oracle products. When an Oracle program or
application requires a translation for a particular configuration variable, Oracle
Database for Windows uses the associated parameter. All Oracle parameters are stored
in the registry.
15.2 Registry Overview
Oracle Database for Windows stores its configuration information in a repository (the
registry) that is organized in a tree format. The tree format consists of keys in the
registry and parameter values for the keys. Keys and parameter values can be viewed
and modified in Registry Editor.
Keys are folders that appear in the left pane of a Registry Editor window. A key
contains subkeys or parameters.
Caution: Although Registry Editor lets you view and modify
registry keys and parameter values, you normally are not required to
do so. In fact, you can render your system useless if you make
incorrect changes. Therefore, only advanced users should edit the
registry. Back up your system before making any changes in the
registry.

Registry Parameters
15-2 Oracle Database Platform Guide
Parameters in Registry Editor appear as a string, consisting of three components:
■Parameter name
■Value class or type of entry
■Value itself
For example, parameter
ORACLE_SID
can have the following entry in the registry:
ORACLE_SID:reg_sz:orcl1
Value classes for Oracle Database for Windows parameters are:
■String value with a
REG_SZ
,
REG_EXPAND_SZ
(for an expandable string), or a
REG_
MULTI_SZ
(for multiple strings) prefix to identify a parameter value entry as a data
string
■Binary value with a
REG_DWORD
prefix to identify a value entry as a
dword
(hexadecimal data) entry
Most Oracle Database for Windows parameter values are string types. Use Oracle
Universal Installer defaults when a type is not given.
15.3 Registry Parameters
This section describes Oracle Database for Windows registry parameters for the
following keys. Other products, such as Oracle Enterprise Manager, have additional
keys and parameters that are not described in this chapter.
■HKEY_LOCAL_MACHINE\SOFTWARE\ORACLE\KEY_HOME_NAME
■HKEY_LOCAL_MACHINE\SOFTWARE\ORACLE
■HKEY_LOCAL_MACHINE\SYSTEM\CurrentControlSet\Services
To modify these registry values, see "Managing Registry Parameters with regedit" on
page 15-8.
15.3.1 HKEY_LOCAL_MACHINE\SOFTWARE\ORACLE\KEY_HOME_NAME
Each time you install Oracle products into a new Oracle home on your computer,
HKEY_LOCAL_MACHINE\SOFTWARE\ORACLE\KEY_HOME_NAME
is created. This subkey
contains parameter values for most Oracle products.
HKEY_LOCAL_MACHINE\SOFTWARE\ORACLE\KEY_HOME_NAME
includes the following
parameters for an Oracle home directory. Depending on products you install,
additional parameters can also be created. See your Windows development manuals.
15.3.1.1 MSHELP_TOOLS
Specifies the location of Windows help files. The default value is
ORACLE_HOME\mshelp
Note: See Appendix B, "Optimal Flexible Architecture", in Oracle
Database Installation Guide for Microsoft Windows for details on the
PATH variable and registry values when you are working with
multiple Oracle homes.

Registry Parameters
Configuration Parameters and the Registry 15-3
15.3.1.2 NLS_LANG and Other Globalization Parameters
Specifies supported language, territory, and character set. This parameter specifies the
language in which messages appear, the territory and its conventions for calculating
week and day numbers, and the character set displayed. Oracle Universal Installer sets
this value during installation based on the language setting of the operating system.
The default value for
NLS_LANG,
if not set, is
AMERICAN_AMERICA.US7ASCII.
There are other globalization parameters that can be set along
NLS_LANG
to override
some values implicitly determined by
NLS_LANG.
These parameters are:
NLS_DATE_FORMAT
NLS_TIMESTAMP_FORMAT
NLS_TIMESTAMP_TZ_FORMAT
NLS_DATE_LANGUAGE
NLS_NUMERIC_CHARACTERS
NLS_CURRENCY
NLS_ISO_CURRENCY
NLS_DUAL_CURRENCY
NLS_SORT
The following parameters can also be set along
NLS_LANG
to determine globalization
behavior that is independent from the value of
NLS_LANG:
NLS_CALENDAR
NLS_COMP
NLS_NCHAR_CONV_EXCP
NLS_LENGTH_SEMANTICS
See Oracle Database Globalization Support Guide for more information about NLS_LANG
and other globalization parameters
15.3.1.3 ORA_CWD
Specifies current working directory. For example, if you set this parameter and then
use ORADIM, a log file called
oradim.log
is created in this directory. This parameter
must be manually set.
15.3.1.4 ORA_SID_AUTOSTART
Starts Oracle Database when
OracleServiceSID
service is started. The default value is
true.
15.3.1.5 ORA_SID_PFILE
Specifies full path to initialization parameter file. The default value is
ORACLE_
BASE\admin\DB_NAME\pfile\init.ora
15.3.1.6 ORA_SID_SHUTDOWN
When set to
true
, the default value, this parameter shuts down the instance of Oracle
Database identified by
SID
when
OracleServiceSID
is stopped manually—using
either the Control Panel or Net stop command.
Note: All globalization parameters set in the environment and
Registry for a database client are ignored if
NLS_LANG
is not set.

Registry Parameters
15-4 Oracle Database Platform Guide
15.3.1.7 ORA_SID_SHUTDOWN_TIMEOUT
Sets maximum time (in seconds) to wait for shutdown to complete before the service
for a particular
SID
stops. The default value is
30
.
15.3.1.8 ORA_SID_SHUTDOWNTYPE
Specifies mode in which Oracle Database is shut down when you stop
OracleServiceSID
. Valid values are
a
(abort),
i
(immediate), and
n
(normal). The
default value is
i
.
15.3.1.9 ORA_TZFILE
Specifies location of time zone file. Each file contains:
■Valid time zone names
■Offset from UTC
■Abbreviation for standard time
■Abbreviation for daylight savings time
In previous releases, the default value for
ORA_TZFILE
was
ORACLE_BASE\ORACLE_HOME\oracore\zoneinfo\timezlrg.dat
Beginning with Oracle Database 11g Release 2 (11.2), the default value is
ORACLE_HOME\oracore\zoneinfo\timezlrg_11.dat
The
timezone_version_number.dat
datafiles contain most commonly used time zones
and are smaller for better database performance. The new default,
timezlrg_version_
number.dat
, includes time zones not defined in the smaller file.
15.3.1.10 ORACLE_AFFINITY
Specifies Windows processor affinity of each thread within the Oracle Database
process. This parameter must be manually added. Oracle recommends consulting
Oracle Support Services before changing this parameter. The format is:
name1:cpumask1;name2:cpumask2
Each
name
setting must be the name of a background thread,
user
for non-background
(shadow) threads, or
def
for any thread type not handled specifically.
The
name
mask sets the affinity mask of the Oracle Database process. Valid background
thread names include
DBW0
,
LGWR
,
PMON
,
SMON
,
ARCH
,
RECO
,
CKPT
,
TRWR
,
J000
through
J999
,
P000
through
P481
, and any other name found in the
NAME
column of the
v$bgprocess
data dictionary view.
Each affinity setting must be a valid affinity mask (or its numeric equivalent) for the
corresponding name. Process affinity masks are used only when Oracle services are
first started. Each thread's affinity is set only when the individual thread is started (for
example, at database startup time for the background threads).
15.3.1.11 ORACLE_BASE
Specifies the top-level Oracle directory (for example,
C:\app\oracle\product\11.2.0
)
that contains
ORACLE_HOME
,
admin
, and
oradata
. The default is
ORACLE_BASE
.
See Also: Oracle Database Globalization Support Guide for additional
details about time zone files

Registry Parameters
Configuration Parameters and the Registry 15-5
15.3.1.12 ORACLE_GROUP_NAME
Specifies the name of the group containing icons of the Oracle products installed. The
parameter is added to your registry when you first install Oracle products, even if
Oracle Universal Installer does not create a program group for Oracle products you
have installed (for example, if you have installed only Oracle Net software). The
default value is
Oracle
-
HOME_NAME
.
15.3.1.13 ORACLE_HOME
Specifies Oracle home directory in which Oracle products are installed. This directory
is immediately beneath the Oracle base directory in the Oracle directory hierarchy. The
default value is the drive letter and name that you specify during installation.
15.3.1.14 ORACLE_HOME_KEY
The
HKEY_LOCAL_MACHINE
location of Oracle parameters. The default value is
software\oracle\HOMEID.
15.3.1.15 ORACLE_HOME_NAME
Specifies home name of Oracle home directory in which Oracle products are installed.
The default value is the name that you specify during installation.
15.3.1.16 ORACLE_PRIORITY
Determines Windows scheduling priorities of threads within the Oracle Database
management system process. The format is:
name1:priority1;name2:priority2 . . .
The
name
class sets the
priority
class of the Oracle Database process. Threads can be
assigned priority either collectively or individually. The collective name
user
designates non-background (shadow) threads; the collective name
def
designates any
thread type not handled specifically. Valid individual background thread names
include
DBW0
,
LGWR
,
PMON
,
SMON
,
ARCH0
,
RECO
,
CKPT
,
TRWR
,
J000
through
J999SNP0
through
SNP9
, and any other name found in the
NAME
column of the
v$bgprocess
data
dictionary view.
The default value is
class:normal; def:normal
.
15.3.1.17 ORACLE_SID
Specifies the name of the Oracle Database instance on the host computer. The value of
this parameter is the
SID
for the instance. The default value is specified by the entry in
the Database Identification window of Oracle Universal Installer.
15.3.1.18 OSAUTH_PREFIX_DOMAIN
Enables user authentication. When it is set to
true
, it enables the server to differentiate
between one username and another, whether they are local users, domain users, or
domain users on another domain in your network. When it is set to
false
, the domain
is ignored, and the local user becomes the default value of the operating system user
returned to the server. The default value is
true
.
Note:
ORACLE_PRIORITY
is not automatically created for you in the
registry. When it is not defined in the registry, Windows default values
are used for thread priorities.

Registry Parameters
15-6 Oracle Database Platform Guide
15.3.1.19 RDBMS_ARCHIVE
Specifies the location of backup database files. The default value is
ORACLE_
HOME\database\archive
.
15.3.1.20 RDBMS_CONTROL
Specifies the location of backup database control files. The default value is
ORACLE_
HOME\database
.
15.3.1.21 SQLPATH
Specifies the location of SQL scripts. The default value is
ORACLE_HOME\dbs
.
15.3.2 HKEY_LOCAL_MACHINE\SOFTWARE\ORACLE
This subkey contains the following parameters:
15.3.2.1 INST_LOC
Specifies the location of Oracle Universal Installer files. The default value is
System
Drive:\program files\oracle\inventory.
15.3.2.2 OO4O
Specifies the location of Oracle Objects for OLE message files. The default value is
ORACLE_HOME\oo4o\mesg.
15.3.3 HKEY_LOCAL_MACHINE\SYSTEM\CurrentControlSet\Services
HKEY_LOCAL_MACHINE\SYSTEM\CurrentControlSet
contains four keys:
■Control
■Enum
■HardwareProfiles
■Services
The first three are used by the operating system. You can edit only the
Services
subkey, which contains:
■Parameters for Oracle Counters for Windows Performance Monitor
■Parameters for Oracle Database Services
15.3.3.1 Parameters for Oracle Counters for Windows Performance Monitor
Oracle Counters for Windows Performance Monitor parameters appear in:
HKEY_LOCAL_MACHINE\SYSTEM\CURRENTCONTROLSET\SERVICES\ORACLEver\PERFORMANCE
where
ORACLEver
refers to whatever version of Oracle Database is installed.
For multiple Oracle homes compliance starting with Oracle Database 10g Release 1
(10.1), parameters
Hostname
,
Username
,
Password
,
LOGFILE
, and
PERF_FILE_NAME
have
been moved to
HKEY_LOCAL_MACHINE\SYSTEM\CURRENTCONTROLSET\SERVICES\ORACLEver\PERFORMANCE\KEY_
HOME_NAME.

Registry Parameters
Configuration Parameters and the Registry 15-7
For Oracle Counters for Windows Performance Monitor to display information for
Oracle Database performance objects, it must log in to the database. Modify the
following parameters if the default information is not applicable or if you want to
access another database:
■
Hostname
displays the
SID
of the database that Oracle Counters for Windows
Performance Monitor will connect to. The default value is blank, causing Oracle
Counters for Windows Performance Monitor to connect to the default database on
the computer.
If you specify a different
SID
, you must also add a connect descriptor for that
SID
to your
tnsnames.ora
file. Oracle recommends that you use Oracle Net
Configuration Assistant, but you can also copy, paste, and modify the following
example:
SERVICE_NAME =
(DESCRIPTION =
(ADDRESS_LIST =
(ADDRESS = (PROTOCOL = TCP)(HOST = HOST_NAME)(PORT = 1521))
)
(CONNECT_DATA =
(SERVER = DEDICATED)
(SERVICE_NAME = SERVICE_NAME)
)
)
■
Password
displays the encrypted password for the user name to access the
database.
■
Username
displays the user name to access the database. The default value is
SYSTEM
.
Oracle Counters for Windows Performance Monitor requires the following parameters
as entry points:
■
Close
specifies the close entry point for the DLL. The default value is
CloseOracleverPerformanceData
.
■
Collect
specifies the collect entry point for the DLL. The default value is
CollectOracleverPerformanceData
.
■
Library
specifies the name of the Oracle Counters for Windows Performance
Monitor DLL. The default value is
ORAPERFver.dll
■
Open
specifies the open entry point for the DLL. The default value is
OpenOracleverPerformanceData
.
The following parameters specify Oracle Counters for Windows Performance Monitor
log file and object configuration files:
■
LOGFILE
specifies the name of the Oracle Counters for Windows Performance
Monitor log file. This log file reports any errors, such as Oracle Database objects
not appearing or database access problems. The default value is
ORACLE_
HOME\dbs\operfver
.
log
.
Note: Modify only the
Hostname
,
Password
, and
Username
values to
point to any database. Oracle recommends that you use
operfcfg
. See
"Using operfcfg" on page 15-14.

Oracle RAC Registry Parameters
15-8 Oracle Database Platform Guide
■
PERF_FILE_NAME
specifies the location of the
PERFver.ora
file, which contains all
performance objects displayed by Oracle Counters for Windows Performance
Monitor. The default value is
ORACLE_HOME\dbs\perfver.ora
15.3.3.2 Parameters for Oracle Database Services
HKEY_LOCAL_MACHINE\SYSTEM\CURRENTCONTROLSET\SERVICES
subkey contains
additional subkeys that correspond to each Oracle Database service.
Each service subkey contains the following parameters:
■
DisplayName
specifies the service name of the instance whose
SID
is
SID
. The
default value is the name of the service. For example,
OracleServiceORCL1
, where
ORCL1
is the
SID
.
■
ImagePath
specifies the fully qualified path name of the executable started by the
service and any command-line arguments passed into the executable at run time.
The default value is the path to the executable file of the product.
■
ObjectName
specifies the logon user account and computer to which the service
should log on. The default value is
LocalSystem
.
15.4 Oracle RAC Registry Parameters
Oracle RAC registry values are based on the clusterware. If you are not using the
clusterware, then some of this information may not be applicable to your particular
cluster environment.
15.4.1 HKEY_LOCAL_MACHINE\SOFTWARE\ORACLE\OCR
This subkey contains the following values:
■
OCRROOT
points to the location of the Oracle Cluster Registry file
■
LOCAL_ONLY
which is set to
False
for a cluster installation and
True
for a
single-instance database installation
15.5 Managing Registry Parameters with regedit
15.5.1 Modifying a Parameter Value with regedit
To edit Oracle-related settings:
1. Start Registry Editor in one of two ways:
■From the command prompt, enter:
C:\> regedit
Note: Oracle RAC is not supported on Windows XP, Windows Vista,
Windows 7, and any 32-bit Windows operating system.
Caution: Do not edit your registry unless absolutely necessary. If an
error occurs in your registry, then Oracle Database for Windows can
stop functioning, and the registry itself can become unusable.
Managing Registry Parameters with regedit
Configuration Parameters and the Registry 15-9
■From the Start menu, select Run, enter
regedit
in the Open field, and click
OK.
The Registry Editor window appears.
2. Navigate to the values you want to view or modify by double-clicking appropriate
keys.
The left-hand side of the window shows the hierarchy of registry keys, and the
right-hand side of the window shows various values associated with a key.
3. Double-click the parameter to edit.
The String Editor dialog appears:
4. Make any necessary edits.
5. Click OK.
6. Choose Exit from the Registry menu.
15.5.2 Adding a Registry Parameter with regedit
To add a parameter to the registry:
1. Start Registry Editor in one of two ways:
■From the command prompt, enter:
C:\> regedit
■From the Start menu, select Run, enter
regedit
in the Open field, and click
OK.
The Registry Editor window appears.
2. Navigate to the key to which you want to add the new value.
3. Choose Add Value from the Edit menu.
The Add Value dialog appears:
Managing Registry Parameters with Oracle Administration Assistant for Windows
15-10 Oracle Database Platform Guide
Screen shot of the Add Value dialog. The window has two fields. The first is a
user-entry field and is labeled Value Name: The second is a pull-down list and is
labeled Data Type:
At the bottom of the window are three options labeled OK, Cancel, and Help.
***********************************************************************************************
4. In the Value Name field, type the name of the value that you want to add to the
currently selected key.
5. In the Data Type list, select the data type that you want to assign to the added
value:
■
REG_SZ
,
REG_EXPAND_SZ
(for an expandable string), or
REG_MULTI_SZ
(for
multiple strings) for a data string
■Binary value with a
REG_DWORD
prefix to identify a value entry as a
DWORD
(hexadecimal data) entry
6. Click OK.
The String Editor dialog appears:
Screen shot of the String Editor dialog, where parameters are edited. The dialog
contains a user-entry field labeled String and three options labeled OK, Cancel, and
Help.
***********************************************************************************************
7. Type the value for the parameter.
8. Click OK.
Registry Editor adds the parameter.
9. Choose Exit from the Registry menu.
15.6 Managing Registry Parameters with Oracle Administration Assistant
for Windows
Instead of using
regedit
to add, edit, and delete parameters for an Oracle home, you
can use the Oracle Home Configuration snap-in, one of several snap-ins included as
part of Oracle Administration Assistant for Windows. You must have Microsoft
Management Console on your computer to use this product.
See "HKEY_LOCAL_MACHINE\SOFTWARE\ORACLE\KEY_HOME_NAME" on
page 15-2 for more information about Oracle home parameters.
15.6.1 Starting Oracle Administration Assistant for Windows
To start Oracle Administration Assistant for Windows:

Managing Registry Parameters with Oracle Administration Assistant for Windows
Configuration Parameters and the Registry 15-11
1. From the Start menu, select Programs, then select Oracle - HOME_NAME, then
select Configuration and Migration Tools, and then select Administration
Assistant for Windows.
Oracle Administration Assistant for Windows starts.
2. Expand Oracle Homes.
3. Right-click the Oracle home that you want to modify.
4. Click Properties. The Properties dialog appears.
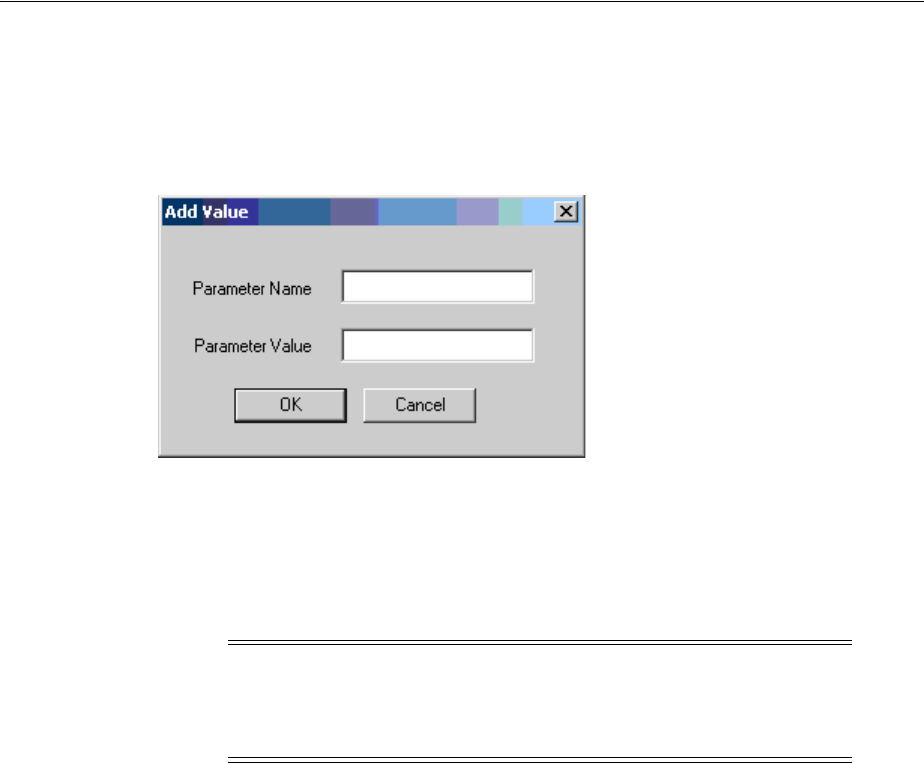
Managing Registry Parameters with Oracle Administration Assistant for Windows
15-12 Oracle Database Platform Guide
15.6.2 Adding Oracle Home Parameters
To add an Oracle home parameter:
1. Click Add in the Properties dialog.
The Add Value dialog appears.
2. Enter the name in the Parameter Name field.
3. Enter the value in the Parameter Value field.
4. Click OK.
5. Click Apply.
15.6.3 Editing Oracle Home Parameters
To change the default
SID
, select the
SID
from the Default
SID
list in the Properties
dialog. To edit one of the other parameters:
1. Select the parameter in the Other Settings list in the Properties dialog.
2. Click Edit.
Note: With Oracle Administration Assistant for Windows, you can
add parameters only with a data type of
REG_SZ
. Use
regedit
to add
parameters with a data type of
REG_EXPAND_SZ
,
REG_MULTI_SZ
, or
REG_
DWORD
.
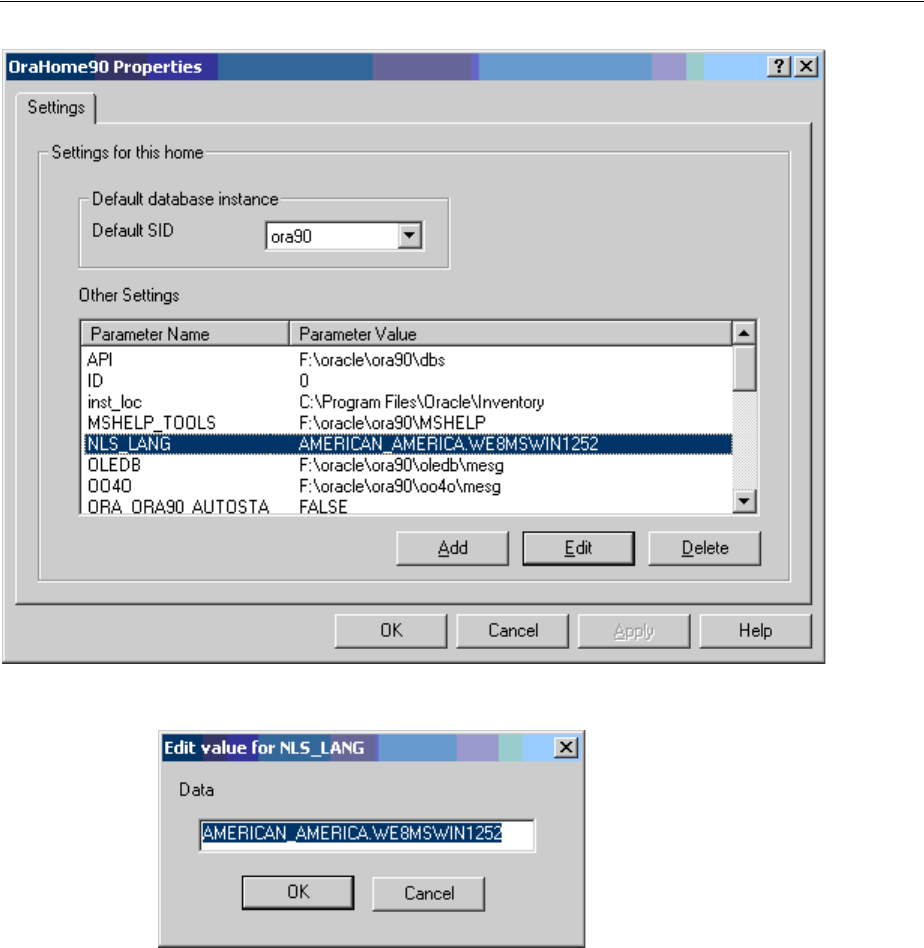
Managing Registry Parameters with Oracle Administration Assistant for Windows
Configuration Parameters and the Registry 15-13
The Edit Value dialog appears.
3. Modify the value.
4. Click OK.
5. Click Apply.
15.6.4 Deleting Oracle Home Parameters
To delete an Oracle home parameter:
1. Select the parameter in the Other Settings list in the Properties dialog.
2. Click Delete.

Modifying Oracle Counters for Windows Performance Monitor Parameters
15-14 Oracle Database Platform Guide
15.7 Modifying Oracle Counters for Windows Performance Monitor
Parameters
Instead of using
regedit
to modify Oracle Counters for Windows Performance
Monitor's
Hostname
,
Password
, and
Username
parameters, you can use
operfcfg
or
Oracle Administration Assistant for Windows.
15.7.1 Using operfcfg
operfcfg
is an Oracle Database tool that you run from the command prompt. You
must specify the system password by
operfcfg.exe
, located in the
ORACLE_HOME\bin
directory.
operfcfg.exe
prompts for a user name, password, and TNS alias.
For example:
DRIVE_LETTER:\> ORACLE_HOME\bin\operfcfg.exe
Enter user-name: system
Enter password: password
Enter tns-alias: orcl
operfcfg: New registry values have been successfully set.
If you run the following command, then
operfcfg.exe
does not prompt for a
password:
operfcfg.exe -U user_name -D tns_alias
The
-U
and
-D
commands are optional.
The following examples illustrate use of
operfcfg
. First, to change user name to
dba_
admin
and leave database name at its current value, you would enter:
C:\> operfcfg -U dba_admin
To change user name to
dba_admin
and database name to
prod
, you would enter:
C:\> operfcfg -U dba_admin -D prod
In the final example, you change
host name
to a blank value, causing Oracle Counters
for Windows Performance Monitor to connect to the default database on the computer.
The current user name and password must be valid user accounts on this database.
Enter:
C:\> operfcfg -D
15.7.2 Using Oracle Administration Assistant for Windows
Oracle Counters for Windows Performance Monitor snap-in is part of Oracle
Administration Assistant for Windows. You must have Microsoft Management
Console on your computer to use this product.
To use Oracle Counters for Windows Performance Monitor snap-in:
1. From the Start menu, select Programs, then select Oracle - HOME_NAME, then
select Configuration and Migration Tools, and then select Administration
Assistant for Windows.
Oracle Administration Assistant for Windows starts.
See Also: "Parameters for Oracle Counters for Windows
Performance Monitor" on page 15-6 for more information about
Hostname
,
Password
, and
Username
parameters

Modifying Oracle Counters for Windows Performance Monitor Parameters
Configuration Parameters and the Registry 15-15
2. Right-click Performance Monitor.
3. Click Properties.
The Performance Monitor Properties dialog appears.
4. Modify the text in the Username, Password, or Database fields.
5. Click Apply.

Modifying Oracle Counters for Windows Performance Monitor Parameters
15-16 Oracle Database Platform Guide

16
Developing Applications for Windows 16-1
16
Developing Applications for Windows
This chapter points to sources of information on developing applications for Windows
and outlines a procedure for building and debugging external procedures.
This chapter contains these topics:
■Finding Information on Application Development for Windows
■Building External Procedures
■Multithreaded Agent Architecture
■Debugging External Procedures
■Accessing Text Files with UTL_FILE
■Accessing Web Data with Intercartridge Exchange
16.1 Finding Information on Application Development for Windows
This section describes where to find information on developing applications
specifically for Windows. These products are included on your Oracle Database Server
media.
16.1.1 Java Enhancements
Oracle Database includes an integrated Java Virtual Machine and JIT Compiler. Oracle
Database also provides Oracle Java Database Connectivity (JDBC) Drivers. For more
information, refer to Oracle Database Java Developer's Guide and Oracle Database JDBC
Developer's Guide.
16.1.2 ODP.NET
Oracle Data Provider for .NET (ODP.NET) is an implementation of a data provider for
Oracle Database. ODP.NET uses Oracle native APIs to offer fast and reliable access to
Oracle data and features from any .NET application. ODP.NET also uses and inherits
classes and interfaces available in the Microsoft .NET Framework Class Library. For
more information, refer to Oracle Data Provider for .NET Developer's Guide and My
Oracle Support Note 726240.1.
16.1.3 Oracle Developer Tools for Visual Studio
The Oracle Developer Tools for Visual Studio (ODT) is a tightly integrated "Add-in"
for Microsoft Visual Studio 2008, 2005, and 2003. ODT integrates with Visual Studio to
make it easy to browse and edit Oracle schema objects using integrated visual
designers and can automatically generate .NET code through a simple drag and drop.

Finding Information on Application Development for Windows
16-2 Oracle Database Platform Guide
Developers can modify table data, execute Oracle SQL statements, edit and debug
PL/SQL code, generate and edit SQL scripts, and develop and deploy .NET stored
procedures. There are many more features included with these tools. For more
information, visit the ODT Web home at
http://www.oracle.com/technetwork/developer-tools/visual-studio/overview/i
ndex-097110.html
16.1.4 Oracle Providers for ASP.NET
Beginning with .NET Framework 2.0, ASP.NET includes service providers that store
state in databases. By storing this state in a database, applications can ensure high
availability of data, while making the data equally available to all Web servers. For
more information, refer to Oracle Providers for ASP.NET Developer's Guide for Microsoft
Windows.
16.1.5 XML Support
Oracle XML products include XML Developer's Kit (XDK) and Oracle XML SQL
Utility. For more information, refer to:
■Oracle XML Developer's Kit Programmer's Guide
■Oracle XML DB Developer's Guide
■Oracle Database XML Java API Reference
■Oracle Database XML C API Reference
■Oracle Database XML C++ API Reference
■Oracle Database SQL Language Reference
■Oracle Database PL/SQL Packages and Types Reference
16.1.6 Support for Internet Applications
Oracle Database support for internet applications includes Oracle Portal, which
enables you to publish your data to the Web, Oracle HTTP Server, and PL/SQL
Embedded Gateway, which offers PL/SQL procedures stored in Oracle Database that
can be started through browsers. For more information, refer to:
■Oracle Portal Installation Guide and Tutorial
■Oracle Enterprise Manager Grid Control Installation and Basic Configuration
Oracle Database provides built-in mechanisms that address the requirements of
the largest PHP, Ruby, Python Web, and Rich Internet Applications. The features
include extreme connectivity, scalability, caching, nonintrusive performance
acceleration, advanced security, and high-availability.
16.1.7 Oracle Services For Microsoft Transaction Server
Oracle Database for Windows permits enhanced deployment of COM/COM+
components in Microsoft Transaction Server, using Oracle Database as the resource
Note: Oracle Portal is available on a separate media and included
with Oracle Database for Windows.

Finding Information on Application Development for Windows
Developing Applications for Windows 16-3
manager. For more information, refer to Oracle Services for Microsoft Transaction Server
Developer's Guide for Microsoft Windows.
16.1.8 Oracle Objects for OLE
Oracle Objects for OLE (OO4O) provides easy access to data stored in Oracle Database
servers with any programming or scripting language that supports the Microsoft COM
Automation and ActiveX technology. These include Visual Basic, Visual C++, Visual
Basic For Applications (VBA), IIS Active Server Pages (VBScript and JavaScript), and
others. For more information, refer to Oracle Objects for OLE Developer's Guide for
Microsoft Windows.
16.1.9 Oracle Provider for OLE DB
Refer to Oracle Provider for OLE DB Developer's Guide for Microsoft Windows for
information on OLE DB.
16.1.10 Oracle ODBC Driver
Open Database Connectivity (ODBC) provides a common C programming interface
for applications to access data from database management systems. Access to
databases is managed by the ODBC Driver Manager. The driver manager provides the
linkage between an ODBC application and an ODBC driver for a specific database
management system.
Oracle ODBC Driver provides access to Oracle databases for applications written
using the ODBC interface.
Oracle Technology Network has both OracleHome based ODBC driver and Instant
Client enabled ODBC driver.
16.1.11 Oracle COM Automation Feature
Oracle COM automation feature enables PL/SQL and Java stored procedure
developers and COM/COM+ developers to load COM/COM+ objects from Oracle
Database. For more information, refer to Oracle COM Automation Feature Developer's
Guide for Microsoft Windows.
16.1.12 Pro*C/C++ and Pro*COBOL Applications
Refer to the following guides for more information on Pro*C/C++ and Pro*COBOL
applications:
■Pro*C/C++ Programmer's Guide
Note: Download Instant Client enabled ODBC driver from
http://www.oracle.com/technetwork/database/features/instant-
client/index.html
Note: Oracle ODBC Driver is updated on a regular basis. The newest
release available is included on your media. To download the latest
release, visit:
http://www.oracle.com/technology/index.html
Select Oracle ODBC Drivers from the Select a Utility or Driver list.

Building External Procedures
16-4 Oracle Database Platform Guide
■Pro*COBOL Programmer's Guide
■Oracle Call Interface Programmer's Guide
16.2 Building External Procedures
This section describes how to create and use external procedures on Windows. The
following files are located in
ORACLE_HOME\rdbms\extproc
:
■
extern.c
is the code example shown in "Writing an External Procedure"
■
make.bat
is the batch file that builds the dynamic link library
■
extern.sql
automates the instructions described in "Registering an External
Procedure" and "Executing an External Procedure"
16.2.1 External Procedures Overview
External procedures are functions written in a third-generation language (C, for
example) and callable from within PL/SQL or SQL as if they were a PL/SQL routine
or function. External procedures let you take advantage of strengths and capabilities of
a third-generation programming language in a PL/SQL environment.
The main advantages of external procedures are:
■Performance, because some tasks are performed more efficiently in a
third-generation language than in PL/SQL, which is better suited for SQL
transaction processing
■Code re-usability, because dynamic link libraries (DLLs) can be called directly
from PL/SQL programs on the server or in client tools
You can use external procedures to perform specific processes:
■Solving scientific and engineering problems
■Analyzing data
■Controlling real-time devices and processes
To create and use an external procedure, perform the following sequential steps:
■Installing and Configuring
■Writing an External Procedure
■Building a DLL
■Registering an External Procedure
Note: Oracle Database also provides a special purpose interface, the
call specification, that lets you call external procedures from other
languages, as long as they are callable by C.
Caution: Special security precautions are warranted when
configuring a listener to handle external procedures. See "Modifying
Configuration of External Procedures for Higher Security" on
page C-4 and Oracle Database Net Services Administrator's Guide for
more information.

Building External Procedures
Developing Applications for Windows 16-5
■Restricting Library-Related Privileges to Trusted Users Only
■Executing an External Procedure
16.2.2 Installing and Configuring
This section describes installation and configuration of Oracle Database and Oracle
Net.
16.2.2.1 Installing Oracle Database
Follow the steps in Oracle Database Installation Guide for Microsoft Windows to install
these products on your Windows server:
■Oracle Database Enterprise Edition, Oracle Database Standard Edition, or Oracle
Database Personal Edition. Each type contains PL/SQL, from which external
procedures are called, and the PL/SQL external procedure program (EXTPROC),
which runs external procedures.
■Oracle Net Services
■Oracle Protocol Support
16.2.2.2 Configuring Oracle Net Services
During database server installation, Oracle Net Configuration Assistant configures
listener.ora
and
tnsnames.ora
files for external procedure calls.
When an application calls an external procedure, Oracle Net Listener starts an external
procedure agent called EXTPROC. Using a network connection established by the
listener, the application passes the following information to EXTPROC:
■DLL name
■External procedure name
■Parameters (if necessary)
EXTPROC then loads the DLL, runs the external procedure, and passes back any
values returned by the external procedure.
If you overwrite default
listener.ora
and
tnsnames.ora
files, then you must
manually configure the following files for the external procedure behavior described
previously to occur:
■
ORACLE_HOME\network\admin\listener.ora
■
ORACLE_HOME\network\admin\tnsnames.ora
Note:
■You must have a C compiler and linker installed on your system
to build DLLs.
■You can combine the instructions described in the fourth and fifth
tasks into one SQL script that automates the task of registering
and executing your external procedure. See
ORACLE_
HOME\rdbms\extproc\extern.sql
for an example of a SQL script
that combines these steps.

Building External Procedures
16-6 Oracle Database Platform Guide
16.2.3 Writing an External Procedure
Using a third-generation programming language, you can write functions to be built
into DLLs and started by EXTPROC. The following is a simple Microsoft Visual C++
example of an external procedure called
FIND_MAX
:
#include <windows.h>
#define NullValue -1
/*
This function tests if x is at least as big as y.
*/
long __declspec(dllexport) find_max(long x,
short x_indicator,
long y,
short y_indicator,
short *ret_indicator)
{
/* It can be tricky to debug DLL's that are being called by a process
that is spawned only when needed, as in this case.
Therefore try using the DebugBreak(); command.
This will start your debugger. Uncomment the line with DebugBreak();
in it and you can step right into your code.
*/
/* DebugBreak(); */
/* First check to see if you have any nulls. */
/* Just return a null if either x or y is null. */
if ( x_indicator==NullValue || y_indicator==NullValue) {
*ret_indicator = NullValue;
return(0);
} else {
*ret_indicator = 0; /* Signify that return value is not null. */
if (x >= y) return x;
else return y;
}
}
16.2.4 Building a DLL
After writing your external procedure(s) in a third-generation programming language,
use the appropriate compiler and linker to build a DLL, making sure to export the
external procedures as noted previously. See your compiler and linker documentation
for instructions on building a DLL and exporting its functions.
You can build the external procedure
FIND_MAX
, created in "Writing an External
Procedure" on page 16-6, into a DLL called
extern.dll
by going to
ORACLE_
Caution: Additional security may be required for the listener in a
production environment. See Oracle Database Net Services
Administrator's Guide for more information.
Note: Because external procedures are built into DLLs, they must be
explicitly exported. In this example, the
DLLEXPORT
storage class
modifier exports the function
FIND_MAX
from a dynamic link library.

Building External Procedures
Developing Applications for Windows 16-7
HOME\rdbms\extproc
and typing
make
. After building the DLL, you can move it to any
directory on your system.
Starting with Oracle9i Release 2, however, the default behavior of EXTPROC is to load
DLLs only from
ORACLE_HOME\bin
or
ORACLE_HOME\lib
. To load DLLs from other
directories, you must set environment variable
EXTPROC_DLLS
to a colon (:) separated
list of DLL names qualified with their complete paths. The preferred way to set this
environment variable is through the
ENVS
parameter in
listener.ora
.
16.2.5 Registering an External Procedure
Once you have built a DLL containing your external procedure(s), you must register
your external procedure(s) with Oracle Database:
To create a PL/SQL library to map to the DLL:
1. Set environment variable
EXTPROC_DLLS
in the
ENVS
parameter in
listener.ora
.
For example:
SID_LIST_LISTENER =
(SID_LIST =
(SID_DESC =
(SID_NAME=PLSExtProc)
(ENVS=EXTPROC_DLLS=C:\app\oracle\product\11.2.0\dbhome_
1\rdbms\extproc\extern.dll)
(ORACLE_HOME=C:\app\oracle\product\11.2.0\dbhome_1)
(PROGRAM=extproc)
)
)
2. Start SQL*Plus:
C:\> sqlplus
3. Connect to the database with appropriate username and password.
4. Create the PL/SQL library using the
CREATE LIBRARY
command:
SQL> CREATE LIBRARY externProcedures AS 'C:\app\oracle\product\11.2.0\dbhome_
1\rdbms\ extproc\extern.dll';
where
externProcedures
is an alias library (essentially a schema object in the
database), and
C:\app\oracle\product\11.2.0\dbhome_1\rdbms\extproc\extern.dll
is the path to the Windows operating system
dllextern.dll
. This example uses
C:\app\oracle\product\11.2.0
as your Oracle base and
dbhome_1
as your Oracle
home.
5. Create a PL/SQL program unit specification.
See Also: Oracle Database Advanced Application Developer's Guide for
more information on EXTPROC
Note: The DBA must grant the
EXECUTE
privilege on the PL/SQL
library to users who want to call the library's external procedure from
PL/SQL or SQL.

Building External Procedures
16-8 Oracle Database Platform Guide
Do this by writing a PL/SQL subprogram that uses the
EXTERNAL
clause instead of
declarations and a
BEGIN...END
block. The
EXTERNAL
clause is the interface
between PL/SQL and the external procedure. The
EXTERNAL
clause identifies the
following information about the external procedure:
■Name
■DLL alias
■Programming language in which it was written
■Calling standard (defaults to C if omitted)
In the following example,
externProcedures
is a DLL alias. You need the
EXECUTE
privilege for this library. The external procedure to call is
find_max
. If enclosed in
double quotation marks, it becomes case-sensitive. The
LANGUAGE
term specifies
the language in which the external procedure was written.
CREATE OR REPLACE FUNCTION PLS_MAX(
x BINARY_INTEGER,
y BINARY_INTEGER)
RETURN BINARY_INTEGER AS
EXTERNAL LIBRARY externProcedures
NAME "find_max"
LANGUAGE C
PARAMETERS (
x long, -- stores value of x
x_INDICATOR short, -- used to determine if x is a NULL value
y long, -- stores value of y
y_INDICATOR short, -- used to determine if y is a NULL value
RETURN INDICATOR short ); -- need to pass pointer to return value's
-- indicator variable to determine if NULL
-- This means that my function will be defined as:
-- long max(long x, short x_indicator,
-- long y, short y_indicator, short * ret_indicator)
16.2.6 Restricting Library-Related Privileges to Trusted Users Only
The
CREATE LIBRARY
,
CREATE ANY LIBRARY
,
ALTER ANY LIBRARY
, and
EXECUTE ANY
LIBRARY
privileges, and grants of
EXECUTE ON
library_name
convey a great deal of
power to users. If you plan to create PL/SQL interfaces to libraries, only grant the
EXECUTE
privilege to the PL/SQL interface. Do not grant
EXECUTE
on the underlying
library. You must have the
EXECUTE
privilege on a library to create the PL/SQL
interface to it. However, users have this privilege implicitly on libraries that they
create in their own schemas. Explicit grants of
EXECUTE ON
library_name
are rarely
required. Only make an explicit grant of these privileges to trusted users, and never to
the
PUBLIC
role.
16.2.7 Executing an External Procedure
To run an external procedure, you must call the PL/SQL program unit (that is, the
alias for the external function) that registered the external procedure. These calls can
appear in any of the following:
■Anonymous blocks
■Standalone and packaged subprograms
■Methods of an object type
■Database triggers

Debugging External Procedures
Developing Applications for Windows 16-9
■SQL statements (calls to packaged functions only)
In "Registering an External Procedure", PL/SQL function
PLS_MAX
registered external
procedure
find_max
. Follow these steps to run
find_max
:
1. Call PL/SQL function
PLS_MAX
from a PL/SQL routine named
UseIt
:
SET SERVER OUTPUT ON
CREATE OR REPLACE PROCEDURE UseIt AS
a integer;
b integer;
c integer;
BEGIN
a := 1;
b := 2;
c := PLS_MAX(a,b);
dbms_output.put_line('The maximum of '||a||' and '||b||' is '||c);
END;
2. Run the routine:
SQL> EXECUTE UseIt;
16.3 Multithreaded Agent Architecture
An agent process is started for each session to access a system at the same time leading
to several thousand agent processes concurrently. The agent processes operate
regardless of whether each individual agent process is actually active at the moment.
Agent processes and open connections can consume a disproportionate amount of
system resources. This problem is addressed by using multithreaded agent
architecture.
The multithreaded agent architecture uses a pool of shared agent threads. The tasks
requested by the user sessions are put in a queue and are picked up by the first
available multithreaded agent thread. Because only a small percentage of user
connections are active at a given moment, using a multithreaded architecture allows
for more efficient use of system resources.
16.4 Debugging External Procedures
Usually, when an external procedure fails, its C prototype is faulty. That is, the
prototype does not match the one generated internally by PL/SQL. This can happen if
you specify an incompatible C data type. For example, to pass an
OUT
parameter of
type
REAL
, you must specify
float
*
. Specifying
float
,
double
*
, or any other C data
type will result in a mismatch.
In such cases, you might get a
lost
RPC
connection
to
external
procedure
agent
error, which means that agent
extproc
terminated abnormally because the external
procedure caused a core dump. To avoid errors when declaring C prototype
parameters, refer to Oracle Database Data Cartridge Developer's Guide.
See Also:
■Part III of Oracle Database Advanced Application Developer's Guide
■"Multithreaded Agents" in Oracle Database Heterogeneous
Connectivity User's Guide

Accessing Text Files with UTL_FILE
16-10 Oracle Database Platform Guide
16.4.1 Using Package DEBUG_EXTPROC
To help you debug external procedures, PL/SQL provides utility package DEBUG_
EXTPROC. To install the package, run script
dbgextp.sql
, which you can find in the
PL/SQL demo directory.
To use the package, follow instructions in
dbgextp.sql
. Your Oracle Database account
must have
EXECUTE
privileges on the package and
CREATE
LIBRARY
privileges.
To debug external procedures:
1. From Windows Task Manager, in the Processes dialog, select ExtProc.exe.
2. Right click, and select Debug.
3. Click OK in the message window.
If you have built your DLL in a debug fashion with Microsoft Visual C++, then
Visual C++ is activated.
4. In the Visual C++ window, select Edit
>
Breakpoints.
Use the breakpoint identified in
dbgextp.sql
in the PL/SQL demo directory.
16.5 Accessing Text Files with UTL_FILE
Package
UTL_FILE
allows your PL/SQL programs to read and write operating system
text files. It provides a restricted version of standard operating system stream file I/O,
including open, put, get, and close operations. When you want to read or write a text
file, you call the function
fopen
, which returns a file handle for use in subsequent
procedure calls. For example, the procedure
put_line
writes a text string and line
terminator to an open file, and the procedure
get_line
reads a line of text from an
open file into an output buffer.
FSEEK
, a
UTL_FILE
subprogram, adjusts the file pointer forward or backward within
the file by the number of bytes specified. In order for
UTL_FILE.FSEEK
to work
correctly, the lines in the file must have platform-specific line terminator characters.
On Windows platforms the correct line terminator characters are
<CR><LF>
.
16.6 Accessing Web Data with Intercartridge Exchange
This section discusses the following topics:
■Configuring Intercartridge Exchange
■Using Intercartridge Exchange
See Also:
■
ORACLE_HOME\rdbms\extproc\readme.doc
(explains how to run
the sample and provides debugging advice)
■Oracle Database PL/SQL Language Reference
■Oracle Database Java Developer's Guide
■"Calling External Procedures" in Oracle Database Advanced
Application Developer's Guide
■Oracle Database Data Cartridge Developer's Guide
See Also: Oracle Database PL/SQL Packages and Types Reference for
more information on
UTL_FILE

Accessing Web Data with Intercartridge Exchange
Developing Applications for Windows 16-11
■UTL_HTTP Exception Conditions
■Exception Conditions and Error Messages
16.6.1 Configuring Intercartridge Exchange
You must add a parameter to the registry before using Intercartridge Exchange.
1. Start Registry Editor from the command prompt:
C:\> regedit
The Registry Editor window appears.
2. Add
HTTP_PROXY
to the registry subkey of the Oracle home directory that you are
using. The location of this parameter is determined by how many Oracle home
directories are on your computer. If you have only one home directory, add
HTTP_
PROXY
to
HKEY_LOCAL_MACHINE\SOFTWARE\ORACLE\HOME0.
If you have multiple home directory, add it to
HKEY_LOCAL_MACHINE\SOFTWARE\ORACLE\KEY_HOME_NAME
3. Choose Add Value from the Edit menu.
The Add Value dialog appears.
4. Type
HTTP_PROXY
in the Value Name field and
REG_SZ
in the Data Type field.
5. Click OK.
6. Type
www-proxy.your-site
in the String field.
In this example, the Web site is
marketing.com
. You will enter the domain name of
your actual Web site.
Note: For another way to configure your registry, see "Managing
Registry Parameters with regedit" on page 15-8

Accessing Web Data with Intercartridge Exchange
16-12 Oracle Database Platform Guide
16.6.2 Using Intercartridge Exchange
Intercartridge Exchange enables you to use a stored package called
UTL_HTTP
to make
Hypertext Transfer Protocol (HTTP) calls from PL/SQL, SQL, and SQL*Plus
statements.
UTL_HTTP
can do both of the following:
■Access data on the Internet
■Call Oracle Web Application Server cartridges
UTL_HTTP
contains two similar entry points, known as packaged functions, that turn
PL/SQL and SQL statements into HTTP callouts:
■
UTL_HTTP.REQUEST
■
UTL_HTTP.REQUEST_PIECES
Both packaged functions perform the following tasks:
■Take a string universal resource locator (URL) of a site
■Contact that site
■Return data (typically HTML) obtained from that site
Declarations to use with both packaged functions are described in the following
subsections.
16.6.2.1 Packaged Function UTL_HTTP.REQUEST
UTL_HTTP.REQUEST
uses a URL as its argument and returns up to the first 2000 bytes of
data retrieved from that URL. Specify
UTL_HTTP.REQUEST
as follows:
FUNCTION REQUEST (URL IN VARCHAR2) RETURN VARCHAR2;
To use
UTL_HTTP.REQUEST
from SQL*Plus, enter:
SQL> SELECT UTL_HTTP.REQUEST('HTTP://WWW.ORACLE.COM/') FROM DUAL;
which returns:
UTL_HTTP.REQUEST('HTTP://WWW.ORACLE.COM/')
------------------------------------------------------
<html>
<head><title>Oracle Home Page</title>
<!--changed Jan. 16, 19
1 row selected.
16.6.2.2 Packaged Function UTL_HTTP.REQUEST_PIECES
UTL_HTTP.REQUEST_PIECES
uses a URL as its argument and returns a PL/SQL table of
2000 bytes of data retrieved from the given URL. The final element can be shorter than
2000 characters. The
UTL_HTTP.REQUEST_PIECES
return type is a PL/SQL table of type
UTL_HTTP.HTML_PIECES
.
UTL_HTTP.REQUEST_PIECES
, which uses type
UTL_HTTP.HTML_PIECES
, is specified as:
type html_pieces is table of varchar2(2000) index by binary_integer;
function request_pieces (url in varchar2,
max_pieces natural default 32767)
return html_pieces;
A call to
REQUEST_PIECES
can look like this example. Note the use of PL/SQL table
method
COUNT
to discover the number of pieces returned; it can be zero or more:

Accessing Web Data with Intercartridge Exchange
Developing Applications for Windows 16-13
declare pieces utl_http.html_pieces;
begin
pieces := utl_http.request_pieces('http://www.oracle.com/');
for i in 1 .. pieces.count loop
.... -- process each piece
end loop;
end;
The second argument to
UTL_HTTP.REQUEST_PIECES
(
MAX_PIECES
) is optional.
MAX_
PIECES
is the maximum number of pieces (each 2000 characters in length, except for
the last, which can be shorter) that
UTL_HTTP.REQUEST_PIECES
returns. If provided,
that argument is usually a positive integer.
For example, the following block retrieves up to 100 pieces of data (each 2000 bytes,
except perhaps the last) from the URL. The block prints the number of pieces retrieved
and the total length, in bytes, of the data retrieved.
set serveroutput on
declare
x utl_http.html_pieces;
begin
x := utl_http.request_pieces('http://www.oracle.com/', 100);
dbms_output.put_line(x.count || ' pieces were retrieved.');
dbms_output.put_line('with total length ');
if x.count < 1
then dbms_output.put_line('0');
else dbms_output.put_line
((2000 * (x.count - 1)) + length(x(x.count)));
end if;
end;
which displays:
Statement processed.
4 pieces were retrieved.
with total length
7687
Elements of the PL/SQL table returned by
UTL_HTTP.REQUEST_PIECES
are successive
pieces of data obtained from the HTTP request to that URL.
16.6.3 UTL_HTTP Exception Conditions
This subsection describes exceptions (errors) that can be raised by packaged functions
UTL_HTTP.REQUEST
and
UTL_HTTP.REQUEST_PIECES
.
16.6.3.1 UTL_HTTP.REQUEST
PRAGMA
RESTRICT_REFERENCES
enables display of exceptions:
create or replace package utl_http is
function request (url in varchar2) return varchar2;
pragma restrict_references (request, wnds, rnds, wnps, rnps);
16.6.3.2 UTL_HTTP.REQUEST_PIECES
PRAGMA
RESTRICT_REFERENCES
enables display of exceptions:
create or replace package utl_http is
type html_pieces is table of varchar2(2000) index by binary_integer;
function request_pieces (url in varchar2,

Accessing Web Data with Intercartridge Exchange
16-14 Oracle Database Platform Guide
max_pieces natural default 32767)
return html_pieces;
pragma restrict_references (request_pieces, wnds, rnds, wnps, rnps);
16.6.4 Exception Conditions and Error Messages
If initialization of the HTTP callout subsystem fails for environmental reasons (such as
lack of available memory), then exception
UTL_HTTP.INIT_FAILED
is raised:
init_failed exception;
If the HTTP call fails due to failure of the HTTP daemon or because the argument to
REQUEST
or
REQUEST_PIECES
cannot be interpreted as a URL (because it is
NULL
or has
non-HTTP syntax), then exception
UTL_HTTP.REQUEST_FAILED
is raised
:
request_failed exception;
Unless explicitly caught by an exception handler, these first two exceptions are
reported by a generic message that shows them as "user-defined" exceptions, even
though they are defined in this system package:
ORA-06510: PL/SQL: unhandled user-defined exception
If any other exception is raised during processing of the HTTP request (for example,
an out-of-memory error), then function
UTL_HTTP.REQUEST
or
UTL_HTTP.REQUEST_
PIECES
reraises that exception.
If no response is received from a request to the given URL, because the function made
no contact with a site corresponding to that URL, then a formatted HTML error
message may be returned:
<HTML>
<HEAD>
<TITLE>Error Message</TITLE>
</HEAD>
<BODY>
<H1>Fatal Error 500</H1>
Can't Access Document: http://home.nothing.comm.
<P>
<B>Reason:</B> Can't locate remote host: home.nothing.comm.
<P>
<P><HR>
<ADDRESS><A HREF="http://www.w3.org">
CERN-HTTPD3.0A</A></ADDRESS>
</BODY>
</HTML>
If
UTL_HTTP.REQUEST
or
UTL_HTTP.REQUEST_PIECES
raises an exception or returns an
HTML-formatted error message, yet you believe that the URL argument is correct, try
contacting that same URL with a browser to verify network availability from your
computer.

A
Getting Started with Your Documentation A-1
A
Getting Started with Your Documentation
The Oracle Database documentation set is provided in both HTML and PDF formats
on the software product media. Use this media to browse the library or copy files
directly to a local system.
The library includes a Web-based search tool that enables you to search for
information about a particular product, parameter, file name, procedure, error
message, or other area of interest. The search tool also makes it possible to construct a
"virtual book" drawn from the complete documentation library, but consisting only of
topics and procedures relevant to your needs. The library also includes a
comprehensive Master Index, and lists of SQL and PL/SQL keywords, initialization
parameters, catalog views, and data dictionary views.
Instructions for installing the library and viewing its contents are in three README
files at the root level of the documentation media:
■
README.htm
■
README.pdf
■
README.txt
The contents of the three files are identical; only the format differs.
The following guides are not included on the Oracle Database Online Documentation
Library media for Windows:
■Oracle Database Installation Guide for Microsoft Windows and Oracle Database Release
Notes for Microsoft Windows
To access these documents, open
welcome.htm
in the
\doc
directory on the
component media.
■Oracle Migration Workbench documentation
Note: The
readme.txt
file contains UNIX line breaks. If you simply
double-click it, it will open in Notepad by default, and Notepad does
not recognize UNIX line breaks. Use
write.exe
or
edit.com
instead.

A-2 Oracle Database Platform Guide
■Oracle Fail Safe documentation
This document is on the Oracle Fail Safe product media pack.
Note: Oracle Migration Workbench is available only at Oracle
Technology Network (OTN). See:
http://www.oracle.com/technology/tech/migration/workbench/in
dex.html
Oracle Migration Workbench is only supported on Windows 32-bit
operating systems. They are not supported on any Windows 64-bit
platforms.

B
Storing Tablespaces on Raw Partitions B-1
B
Storing Tablespaces on Raw Partitions
This appendix describes how to configure your system to store datafiles for a
tablespace on raw partitions.
This appendix contains these topics:
■Raw Partition Overview
■Creating a Raw Partition and a Mount Point
■Creating a Tablespace in a Raw Partition
■Configuring Disks for Automatic Storage Management
B.1 Raw Partition Overview
Datafiles for tablespaces can be stored on a file system or on raw partitions. A raw
partition is a portion of a physical disk that is accessed at the lowest possible level.
Input/output (I/O) to a raw partition offers approximately a 5% to 10% performance
improvement over I/O to a partition with a file system on it.
B.1.1 Physical Disk
A physical disk represents the entire disk and points to the following:
\Device\Harddiskx\Partition0
Symbolic link name
\\.\PhysicalDrivex
is automatically defined by Windows for
every hard disk in the computer. For example, a computer with three hard disks will
have the following symbolic links:
\\.\PhysicalDrive0
\\.\PhysicalDrive1
\\.\PhysicalDrive2
Internally, these names expand to the following:
\\.\PhysicalDrive0 =\Device\Harddisk0\Partition0
\\.\PhysicalDrive1 =\Device\Harddisk1\Partition0
\\.\PhysicalDrive2 =\Device\Harddisk2\Partition0
Note: Oracle RAC requires additional configuration tools. See Oracle
Real Application Clusters Administration and Deployment Guide for
information. Do not use this appendix to create partitions for Oracle
RAC.

Raw Partition Overview
B-2 Oracle Database Platform Guide
Partition0
is special, because it represents the entire physical disk regardless of any
partitioning scheme on that disk. Windows writes a signature on the first block of all
disks it recognizes. To avoid overwriting that block, Oracle Database skips the first
block of a physical raw partition that is used for an Oracle Database datafile.
B.1.2 Logical Partition
Logical partitions point to drives other than
\Device\Harddiskx\Partition0
. They are
initially assigned names with drive letters (
\\.\drive_letter
:) and typically
re-assigned symbolic link names (
\\.\symbolic link name
). For example,
\\.\D
:
may be assigned a symbolic link name of
\\.\ACCOUNTING_1
. Regardless of whether a
drive letter or symbolic link name is used, logical partitions are defined to represent a
specific partition in a disk rather than the entire disk. Internally, these names can
expand to:
\\.\D:= \Device\Harddisk2\Partition1
\\.\ACCOUNTING_1= \Device\Harddisk3\Partition2
B.1.3 Physical Disk and Logical Partition Considerations
Consider the following when deciding which raw partition to use:
■Physical disks are automatically defined by Windows to represent the entire disk,
and should never be defined by the user.
■Logical partitions must be defined by the user to represent a specific partition in a
disk. These partitions should be logical partitions or drives contained in an
extended partition. They should never be defined as
Partition0
.
■Using an entire disk (
Partition0
) for an Oracle Database datafile and using a
partition that occupies the entire disk for an Oracle Database datafile are not the
same thing. Even when a partition occupies the entire disk, there is still a small
space on the disk that is not part of the partition.
■If you are using an entire disk for an Oracle Database datafile (
Partition0
), then
use the pre-defined physical raw names that Windows provides.
■If you are using a specific partition and it occupies the entire disk, then use a
logical partition.
■If you are using a specific partition created with Windows disk-management tools,
then define and use a symbolic link name rather than a logical partition number
(even if it occupies the entire disk).
Note: Although you can use physical disks, Oracle recommends that
you use logical partitions.
Note: Oracle Database does not skip the first block of a logical raw
partition used for an Oracle Database datafile.
Note: For both physical and logical raw conventions, use OCOPY to
transfer the contents of a raw partition to a standard file system for
backup purposes.

Creating a Raw Partition and a Mount Point
Storing Tablespaces on Raw Partitions B-3
B.1.4 Compatibility Issues
You can create logical partitions, but define physical disk convention names for them.
For example:
\\.\PhysicalDriveACCOUNTING_1 = \Device\Harddisk2\Partition1
\\.\PhysicalDriveACCOUNTING_2 = \Device\Harddisk3\Partition1
Oracle Database then handles datafiles using the physical disk convention even
though it really is a logical partition. This will not cause any data corruption or loss as
long as you continue to use physical disk naming conventions. Oracle recommends
that you convert to the logical partition at your earliest convenience.
You can also create logical names representing
Partition0
, but this is definitely not
recommended. For example:
\\.\ACCOUNTING_1 = \Device\Harddisk1\Partition0
This poses severe problems, because Disk Management typically writes a signature
into the first block of every disk, and consequently may overwrite a portion of the
datafile header. It can also cause data loss. Never use
Partition0
with the logical
partition convention.
Physical and logical partition conventions are not compatible with one another
because of the extra block that is skipped for physical raw conventions. This also
means you cannot simply use OCOPY to copy from a physical disk to a logical
partition, because contents of these partitions are incompatible.
To convert from a physical convention to a logical convention, you must:
1. Perform a full database export to a (local) file system.
2. Create logical partitions and define logical names for these partitions.
3. Recreate the database by using the new logical partitions.
4. Perform the full database import to the newly-created database.
If your database installation uses physical disk conventions with logical partitions,
Oracle recommends converting to the logical partition conventions at your earliest
convenience, using the preceding steps.
B.2 Creating a Raw Partition and a Mount Point
To create a raw partition, you must first generate an extended partition and a logical
partition. An extended partition points to raw space on the disk that can be assigned
multiple logical partitions for database files. An extended partition also avoids the
four-partition limit by letting you define large numbers of logical partitions to
accommodate applications using the Oracle Database server. Logical partitions can
then be given symbolic link names to free up drive letters.
On Windows Vista, Windows Server 2008, Windows Server 2008 R2, Windows Server
2012, and Windows Server 2012 R2, create primary partitions and logical drives in
extended partitions by selecting the New Simple Volume option. To create a raw
device, select Do not assign a drive letter or drive path. To mount the raw device,
assign and remove a drive letter. Do not use spanned volumes or striped volumes.
These options will convert the volume to a dynamic disk. Automatic Storage
Management does not support dynamic disks.
See Also: Your operating system documentation for information on
creating extended and logical partitions

Creating a Tablespace in a Raw Partition
B-4 Oracle Database Platform Guide
You can use
diskpart.exe
for disk management from the command line. It can
increase the disk volume capacity dynamically and create, delete, and resize partitions
and volumes.
Volume mount point offers additional storage space on a volume. Different partitions
appear as a single logical volume and that is why it surpasses the 26-drive letter
limitation. Use mount points as an alternative to drive letters.
B.3 Creating a Tablespace in a Raw Partition
To create a tablespace using a datafile located in a raw partition:
1. Start SQL*Plus:
C:\> sqlplus
2. Connect to the Oracle Database repository database:
SQL> CONNECT SYSTEM
Enter password: password
where
password
for user account SYSTEM is
MANAGER
by default. If you have
changed this password, substitute the correct password for
MANAGER
.
3. Create the tablespace:
SQL> CREATE TABLESPACE tablespace DATAFILE '\\.\datafile' SIZE xm;
where:
■
tablespace
is the tablespace name
■
'\\.\'
is the drive letter or symbolic link name assigned to the raw partition
■
x
is the tablespace size in megabytes (Twenty megabytes is a good starting
place.)
For example, to create a tablespace named
accounting_1
that was assigned a symbolic
link name of
accounting_1
, enter the following:
SQL> CREATE TABLESPACE accounting_1 DATAFILE '\\.\accounting_1' SIZE 502M;
B.4 Configuring Disks for Automatic Storage Management
To use Automatic Storage Management with direct attached storage (DAS) or storage
area network (SAN) storage, the disks must be stamped with a header by
asmtool
or
asmtoolg
(GUI version).
See Also: The Microsoft Web site for more information about raw
partitions and volume mount points
http://www.microsoft.com/en/us/default.aspx
Note: If you are creating a database with the
SQL
script, modify
datafiles that are stored on raw partitions with a naming convention
of
\\.\drive_letter:
or
\\.\symbolic link name
.

Configuring Disks for Automatic Storage Management
Storing Tablespaces on Raw Partitions B-5
Each DAS or SAN disk must have a partition table. Oracle recommends creating
exactly one partition for each disk containing the entire disk. Use Microsoft Computer
Management or the command line tool
diskpart
to create the partition. Once the
partitions have been created, run
asmtoolg
or
asmtool
. These tools associate
meaningful, persistent names with disks to facilitate using those disks with Automatic
Storage Management. Automatic Storage Management uses disk strings to more easily
operate on groups of disks at once, so the names created by
asmtool
make this easier
than using Windows drive letters. All disk names created by
asmtool
begin with the
prefix
ORCLDISK
for identification purposes.
Automatic Storage Management uses the value of initialization parameter
ASM_
DISKSTRING
as its search path when it discovers disks. The default value of
ASM_
DISKSTRING
is
\\.\ORCLDISKn
. If you want a different search path, then you must
specify a different value for this parameter.
See Also: "Manually Configuring Disks for Automatic Storage
Management" in Oracle Database Installation Guide for Microsoft
Windows for instructions on using
asmtool
or
asmtoolg
See Also: "About Initialization Parameters and Initialization
Parameter Files" in Oracle Database Administrator's Guide

Configuring Disks for Automatic Storage Management
B-6 Oracle Database Platform Guide

C
Oracle Net Services Configuration on Windows C-1
C
Oracle Net Services Configuration on
Windows
This appendix describes Oracle Net Services configuration for Windows. For more
generic information on Oracle Net Services configuration, see Oracle Database Net
Services Administrator's Guide.
This appendix contains these topics:
■Configuring Oracle Database to Communicate with ASM
■Understanding Oracle Net Services Registry Parameters and Subkeys
■Listener Requirements
■Understanding Optional Configuration Parameters
■Advanced Network Configuration
C.1 Configuring Oracle Database to Communicate with ASM
Oracle Database for Windows installations that use Automatic Storage Management
(ASM) must use Windows native authentication, which is enabled by default. To
ensure that it is, check that the
sqlnet.ora
file, by default located in
ORACLE_
HOME\network\admin
, has NTS enabled. For example:
sqlnet.authentication_services=(NTS)
C.2 Understanding Oracle Net Services Registry Parameters and
Subkeys
The registry contains entries for Oracle Net Services parameters and subkeys. To
successfully add or modify Oracle Net Services configuration parameters, you must
understand where they are located and the rules that apply to them.
C.2.1 Oracle Net Service Subkeys
HKEY_LOCAL_MACHINE\SYSTEM\CurrentControlSet\Services
contains subkeys that
correspond to services. Depending on what is installed, your Oracle Net Services
consist of all or a subset of the following:
■
OracleHOME_NAMEClientCache
■
OracleHOME_NAMECMAdmin
See Also: "Windows Authentication Protocols" on page 9-2

Listener Requirements
C-2 Oracle Database Platform Guide
■
OracleHOME_NAMECMan
■
OracleHOME_NAMETNSListener
Each service subkey contains the parameters shown in Table C–1.
C.3 Listener Requirements
In Oracle Database 10g Release 1 (10.1) or later, the listener is set to start automatically
at system restart. If you intend to use only the listener for all of your databases, ensure
that only the Windows service for the listener, as listed in the Control Panel, is set to
start automatically.
Oracle usually recommends that you only have a single net listener service on a
Windows computer at any one time. This single listener can support multiple
databases. If you must have two different net listener services on a Windows
computer at the same time, ensure that they are configured to listen on different
TCP/IP port numbers.
If the same IP address and port are used for different listeners, you might expect that
the second and subsequent listeners would fail to bind. Instead, Windows allows them
all to listen on the same IP address and port, resulting in unexpected behavior of the
listeners. This is a suspected Windows operating system problem with TCP/IP and
has been reported to Microsoft.
C.4 Understanding Optional Configuration Parameters
You can use the following parameters on Windows:
■LOCAL
■TNS_ADMIN
■USE_SHARED_SOCKET
Oracle Net Service first checks for the parameters as environment variables, and uses
the values defined. If environment variables are not defined, it searches for these
parameters in the registry.
C.4.1 LOCAL
You can use parameter
LOCAL
to connect to Oracle Database without specifying a
connect identifier in the connect string. The value of parameter
LOCAL
is any connect
identifier, such as a net service name. For example, if parameter
LOCAL
is specified as
finance
, you can connect to a database from SQL*Plus with:
SQL> CONNECT SCOTT
Enter password: password
rather than
SQL> CONNECT SCOTT@finance
Table C–1 Service Subkey Parameters
Parameter Description
DisplayName
Specifies service name.
ImagePath
Specifies fully qualified path name of the executable started by service and
any command line arguments passed to executable at run time.
ObjectName
Specifies logon user account and computer to which service should log on.

Advanced Network Configuration
Oracle Net Services Configuration on Windows C-3
Enter password: password
Oracle Net checks if
LOCAL
is defined as an environment variable or as a parameter in
the registry, and uses
finance
as the service name. If it exists, Oracle Net connects.
C.4.2 TNS_ADMIN
You can add parameter
TNS_ADMIN
to change the directory path of Oracle Net Services
configuration files from the default location of
ORACLE_HOME\network\admin
. For
example, if you set
TNS_ADMIN
to
ORACLE_HOME\test\admin
, the configuration files are
used from
ORACLE_HOME\test\admin
.
C.4.3 USE_SHARED_SOCKET
The use of shared sockets is enabled by default, that is the default value of
USE_
SHARED_SOCKET
is
true
. In this case, the network listener passes the socket descriptor
for client connections to the database thread. As a result, the client does not establish a
new connection to the database thread and the database connection time improves. All
database connections also share the port number used by the network listener, which
can be useful if you are setting third-party proxy servers.
This parameter only works in dedicated server mode in a TCP/IP environment. To
reserve a dedicated server for an instance of Oracle Database not associated with the
same Oracle home as the listener and with shared socket enabled, you must set
USE_
SHARED_SOCKET
parameter for both the Oracle homes.
C.5 Advanced Network Configuration
The following sections describe advanced configuration procedures specifically for
Oracle Net Services on Windows operating systems:
■Configuring Authentication Method
■Configuring Security for Named Pipes Protocol
■Modifying Configuration of External Procedures for Higher Security
C.5.1 Configuring Authentication Method
Oracle Net Services provides authentication methods for Windows operating systems
using Windows Native Authentication.
C.5.2 Configuring Security for Named Pipes Protocol
The network listener service may be unable to open the Named Pipe created by Oracle
Names unless service
OracleHOME_NAMETNSListener
has a valid user ID and password
associated with it.
Note: Do not set this parameter explicitly in your registry unless
instructed by Oracle Support. Setting
USE_SHARED_SOCKET
to
false
disables the use of shared sockets.
See Also: Your operating system documentation for instructions on
setting up network listener permissions

Advanced Network Configuration
C-4 Oracle Database Platform Guide
C.5.3 Modifying Configuration of External Procedures for Higher Security
This section supplements generic information provided in Oracle Database Net Services
Administrator's Guide to configure a listener on Windows operating systems to
exclusively handle external procedures. For a higher level of security, you are
instructed to start the listener for external procedures from a user account with lower
privileges than the
oracle
user. For Windows operating systems, this requires that you
change the user account from LocalSystem to a local, unprivileged user for the
OracleHOME_NAMETNSListenerextproc_listener_name service
.
To change the listener account:
1. Create a new user account and grant it Log on as a Service privilege.
2. Stop service
OracleHOME_NAMETNSListenerextproc_listener_name
.
3. Select
OracleHOME_NAMETNSListenerextproc_listener_name
service in the
Services dialog and then display the properties of the service.
4. Select This Account and enter the user name and password.
5. Start the listener by clicking Start. You must start the listener in this way because
you cannot use the Listener Control utility to start the listener as an unprivileged
local user.
Note: The following instructions assume that you have performed
steps 1 through 5 in the section "Modifying Configuration of External
Procedures for Higher Security" in Oracle Database Net Services
Administrator's Guide.
Note: Ensure that this user account does not have general access to
files owned by
oracle
. Specifically, this user should not have
permission to read or write to database files or to the Oracle Database
server address space. In addition, this user should have read access to
the
listener.ora
file, but must not have write access to it.
See Also: Your operating system documentation for instructions on
accessing the Services dialog and stopping services
Note: If the
OracleHOME_NAMETNSListenerextproc_listener_name
service does not exist, issue the following command from the
command prompt:
lsnrctl start extproc_listener_name
This creates the
OracleHOME_NAMETNSListenerextproc_listener_
name
service. When you return to the list of services, stop this service
before proceeding to the next step of this procedure.

Advanced Network Configuration
Oracle Net Services Configuration on Windows C-5
Note: You can also use
NET START OracleHOME_
NAMETNSListenerextproc_listener_name
to start the listener from the
command prompt. the listener with lower privileges prevents you
from using Listener Control utility
SET
commands to alter the
configuration of this listener in file
listener.ora
. You can perform
other administrative tasks on this listener with the Listener Control
utility, including stopping the listener. Oracle recommends that you
complete
listener.ora
file configuration before the listener.

Advanced Network Configuration
C-6 Oracle Database Platform Guide

D
Error Messages on Windows D-1
D
Error Messages on Windows
This appendix lists error messages, causes, and corrective actions that are specific to
operation of Oracle Database for Windows. This appendix also includes database
connection issues.
This appendix contains these topics:
■ORA-09275: CONNECT INTERNAL No Longer Supported
■OSD-04000 to OSD-04599: Windows-Specific Oracle Database Messages
■DIM-00000 to DIM-00039: ORADIM Command Syntax Errors
■Database Connection Issues
D.1 ORA-09275: CONNECT INTERNAL No Longer Supported
ORA-09275
Connect internal is not a valid DBA connection
Cause:
CONNECT INTERNAL
is no longer supported for DBA connections.
Action: If NTS is enabled, you can connect to the database as
CONNECT / AS
SYSDBA
or
CONNECT / AS SYSOPER.
If NTS is not enabled, you can connect as
CONNECT SYS AS SYSDBA
. You can also connect as an existing user with the
appropriate password.
D.2 OSD-04000 to OSD-04599: Windows-Specific Oracle Database
Messages
Error messages in this section are Oracle Database operating system-dependent (OSD)
messages displayed in response to an error condition in Windows. Each message in
this section triggers an Oracle Database error message.
Error messages appear first in summary tables consisting of error numbers and the
corresponding error message. Following the tables is a more detailed discussion of
errors, including causes and corrective actions.
■File I/O Errors: OSD-04000 to OSD-04099
■Memory Errors: OSD-04100 to OSD-04199
■Process Errors: OSD-04200 to OSD-04299
Note: The
ora.hlp
file, which was shipped in previous releases, is no
longer available. See this Appendix and Oracle Database Error Messages
for information on error messages.

OSD-04000 to OSD-04599: Windows-Specific Oracle Database Messages
D-2 Oracle Database Platform Guide
■Loader Errors: OSD-04300 to OSD-04399
■Semaphore Errors: OSD-04400 to OSD-04499
■Miscellaneous Errors: OSD-04500 to OSD-04599
File I/O Errors: OSD-04000 to OSD-04099
4000 Logical block size mismatch
4001 Invalid logical block size
4002 Unable to open file
4003 Unable to read file header block
4004 Invalid file header
4005 SetFilePointer() failure, unable to read from file
4006 ReadFile() failure, unable to read from file
4007 Truncated read
4008 WriteFile() failure, unable to write to file
4009 Truncated write
4010 <create> option specified, file already exists
4011 GetFileInformationByHandle() failure, unable to obtain file info
4012 File size mismatch
4013 Unable to read line from file
4014 Unable to close file
4015 An asynchronous I/O request returned an error
4016 Error queuing an asynchronous I/O request
4017 Unable to open the specified RAW device
4018 Unable to access the specified directory or device
4019 Unable to set file pointer
4020 Unable to set eof file marker
4021 Unable to read file
4022 Unable to write file
4023 SleepEx() failure, unable to Sleep
4024 Unable to delete file
4025 Invalid question asked
4026 Invalid parameter passed
Memory Errors: OSD-04100 to OSD-04199
4100 malloc() failure, unable to allocate memory
4101 Invalid SGA: SGA not initialized
4102 Unable to open/create file for shared memory object
4103 Unable to attach to SGA: SGA does not exist
4104 Unable to map shared memory (SGA) into the address space
4105 Shared memory (SGA) mapped to wrong address
4106 Unable to allocate memory with VirtualAlloc
4107 Unable to deallocate memory with VirtualFree
4108 Unable to protect memory with VirtualProtect

OSD-04000 to OSD-04599: Windows-Specific Oracle Database Messages
Error Messages on Windows D-3
Process Errors: OSD-04200 to OSD-04299
4200 Unable to begin another thread
4201 No pid structure supplied to spdcr()
4202 DosSetPriority() failure, unable to set process priority
4203 DosKillProcess() failure, unable to kill process
4204 Invalid pid
4205 CreateProcess() failure, unable to spawn process
4207 Invalid priority specified in CONFIG parameter ORACLE_PRIORITY
4208 OpenProcess() failure, unable to open process handle
4209 Incorrect or unknown background image name given to spdcr()
4210 Timeout waiting for thread semaphore
4211 Thread information not found
4212 Maximum number of ORACLE threads reached
4213 ORACLE thread unable to DuplicateHandle()
4214 ORACLE thread unable to CreateEvent()
4215 Bad function code supplied to ssthreadop
4216 Unable to find file handle for that thread
4217 Unable to retrieve system username for current user
4218 Cannot post thread
4219 Bad thread list semaphore
4221 Target thread is currently busy
4222 Unable to get the threads context
4223 Unable to set the threads context
4224 Unable to suspend the target thread
4225 Unable to resume the target thread
Loader Errors: OSD-04300 to OSD-04399
4300 Unable to read complete record from datafile
4301 Record size too large
4302 Invalid record type, load options, or both
Semaphore Errors: OSD-04400 to OSD-04499
4400 Unable to acquire internal semaphore for process
4401 WaitForSingleObject() failure, unable to obtain semaphore
Miscellaneous Errors: OSD-04500 to OSD-04599
4500 Illegal option specified
4501 Internal buffer overflow
4502 Translations nested too deep
4503 Text contains no translatable elements
4505 stdin not responding
4506 Unable to spawn process through system()
4510 Operating system roles are not supported

OSD-04000 to OSD-04599: Windows-Specific Oracle Database Messages
D-4 Oracle Database Platform Guide
D.2.1 File I/O Errors: OSD-04000 to OSD-04099
OSD-04000
Logical block size mismatch
Cause: Database block size specified in initialization parameter file does not
match block size of actual database files.
Action: Use matching logical block sizes.
OSD-04001
Invalid logical block size
Cause: Logical block size is not a multiple of 512 bytes, or it is too large.
Action: Change the value of
DB_BLOCK_SIZE
in the initialization parameter file.
OSD-04002
Unable to open file
Cause: Specified path or file name is invalid, or destination device is full. This
error can also be caused by insufficient Windows file handles.
Action: Make sure path and file exist, and device has free space. If this fails, then
increase number of Windows file handles.
OSD-04003
Unable to read file header block
Cause: Media has been damaged.
Action: Recover file, if necessary, and verify that Windows is functioning
correctly.
OSD-04004
Invalid file header
Cause: File is damaged.
Action: Recover file.
OSD-04005
SetFilePointer() failure, unable to read from file
Cause: Unexpected return from Windows system service SetFilePointer().
Action: Check operating system error code and operating system documentation.
OSD-04006
ReadFile() failure, unable to read from file
Cause: Unexpected return from Windows system service ReadFile().
Action: Check operating system error code and operating system documentation.
OSD-04007
Truncated read
4511 Unable to get date and time from the operating system
4512 Unable to translate the 'USERNAME' config.ora variable on server
4513 'remote_os_authent' init.ora variable not set to true
4514 The Windows Group name is too long for internal buffer
4515 This command is not implemented at this time
Miscellaneous Errors: OSD-04500 to OSD-04599

OSD-04000 to OSD-04599: Windows-Specific Oracle Database Messages
Error Messages on Windows D-5
Cause: System encountered an unexpected end-of-file, which is due to damaged
media.
Action: Verify that file is not damaged.
OSD-04008
WriteFile() failure, unable to write to file
Cause: Unexpected return from Windows system service WriteFile().
Action: Check operating system error code and operating system documentation.
OSD-04009
Truncated w r i te
Cause: Destination device is full, or media is damaged.
Action: Verify that device has free space and that file is not damaged.
OSD-04010
<create> option specified, file already exists
Cause: File you attempted to create already exists.
Action: Delete existing file or use
REUSE
option in SQL statement.
OSD-04011
GetFileInformationByHandle() failure, unable to obtain file info
Cause: Unexpected return from Windows system service
GetFileInformationByHandle().
Action: Check operating system error code and operating system documentation.
OSD-04012
File size mismatch
Cause: File to be re-used is either too large or too small.
Action: Specify correct file size or delete existing file.
OSD-04013
Unable to read line from file
Cause: This error is caused by an operating system error or by damaged media.
Action: Check operating system error code (if available) and operating system
documentation. If no operating system error code is presented, then verify that
media is not damaged.
OSD-04014
Unable to close file
Cause: Media has been damaged.
Action: Recover file, if necessary, and verify that Windows is functioning
correctly.
OSD-04015
Asynchronous I/O request returned an error
Cause: Unexpected return from Windows system service.
Action: Check operating system error code and operating system documentation.
OSD-04016
Error queuing an asynchronous I/O request
Cause: Unexpected return from Windows system service.

OSD-04000 to OSD-04599: Windows-Specific Oracle Database Messages
D-6 Oracle Database Platform Guide
Action: Check operating system error code and operating system documentation.
OSD-04017
Unable to open the specified RAW device
Cause: An invalid path or file name was specified, or device is full.
Action: Make sure file exists and device is not full; verify that operating system is
functioning correctly.
OSD-04018
Unable to access the specified directory or device
Cause: An invalid path name was specified.
Action: Make sure directory or device exists and is accessible.
OSD-04019
Unable to set file pointer
Cause: This error is caused by an operating system error or by damaged media.
Action: Check operating system error code (if available) and operating system
documentation. If no operating system error code is presented, then verify that
media is not damaged.
OSD-04020
Unable to set eof file marker
Cause: This error is caused by an operating system error or by damaged media.
Action: Check operating system error code (if available) and operating system
documentation. If no operating system error code is presented, then verify that
media is not damaged.
OSD-04021
Unable to read file
Cause: This error is caused by an operating system error or by damaged media.
Action: Check operating system error code (if available) and operating system
documentation. If no operating system error code is presented, then verify that
media is not damaged.
OSD-04022
Unable to write file
Cause: This error is caused by an operating system error or by damaged media.
Action: Check operating system error code (if available) and operating system
documentation. If no operating system error code is presented, then verify that
media is not damaged.
OSD-04023
SleepEx() failure, unable to Sleep
Cause: Unexpected return from Windows system service.
Action: Check operating system error code and operating system documentation.
OSD-04024
Unable to delete file
Cause: This error is caused by an operating system error or by damaged media.

OSD-04000 to OSD-04599: Windows-Specific Oracle Database Messages
Error Messages on Windows D-7
Action: Check operating system error code (if available) and operating system
documentation. If no operating system error code is presented, then verify that
media is not damaged.
OSD-04025
Invalid question asked
Cause: This is an internal error, not normally expected to occur.
Action: Contact Oracle Support Services.
OSD-04026
Invalid parameter passed
Cause: This is an internal error, not normally expected to occur.
Action: Contact Oracle Support Services.
D.2.2 Memory Errors: OSD-04100 to OSD-04199
OSD-04100
Malloc() failure, unable to allocate memory
Cause: Program is out of memory.
Action: Shut down all unnecessary processes or install more memory in the
computer.
OSD-04101
Invalid SGA: SGA not initialized
Cause: System Global Area (SGA) has been allocated but not initialized.
Action: Wait until STARTUP has completed before attempting to connect.
OSD-04102
Unable to open/create file for shared memory object
Cause: Unexpected return from Windows system service CreateFile().
Action: Check operating system error code and operating system documentation.
OSD-04103
Unable to attach to SGA: SGA does not exist
Cause: SGA does not exist.
Action: Start up an Oracle Database instance.
OSD-04104
Unable to map shared memory (SGA) into the address space
Cause: Unexpected return from Windows system service MapViewOfFileEx().
Action: Check operating system error code and operating system documentation.
OSD-04105
Shared memory (SGA) mapped to wrong address
Cause: Unexpected return from Windows system service MapViewOfFileEx().
Action: Check operating system error code and operating system documentation.
OSD-04106
Unable to allocate memory with VirtualAlloc
Cause: Program is out of memory.

OSD-04000 to OSD-04599: Windows-Specific Oracle Database Messages
D-8 Oracle Database Platform Guide
Action: Shut down all unnecessary processes or install more memory in the
computer.
OSD-04107
Unable to deallocate memory with VirtualFree
Cause: Unexpected return from Windows system service VirtualFree().
Action: Check operating system error code and operating system documentation.
OSD-04108
Unable to protect memory with VirtualProtect
Cause: Unexpected return from Windows system service VirtualProtect().
Action: Check operating system error code and operating system documentation.
D.2.3 Process Errors: OSD-04200 to OSD-04299
OSD-04200
Unable to begin another thread
Cause: Program has run out of system resources.
Action: Shut down all unnecessary processes; install more memory in the
computer.
OSD-04201
No pid structure supplied to spdcr()
Cause: This is an internal error, not normally expected to occur.
Action: Contact Oracle Support Services.
OSD-04202
DosSetPriority() failure, unable to set process priority
Cause: Unexpected return from Windows system service DosSetPriority().
Action: Check operating system error code and operating system documentation.
OSD-04203
DosKillProcess() failure, unable to kill process
Cause: Unexpected return from Windows system service DosKillProcess().
Action: Check operating system error code and operating system documentation.
OSD-04204
Invalid pid
Cause: Process ID not recognized by system; process previously terminated.
Action: Verify that process ID is correct and that process is active.
OSD-04205
CreateProcess() failure, unable to spawn process
Cause: Unexpected return from Windows system service CreateProcess().
Action: Check operating system error code and operating system documentation.
OSD-04207
Invalid priority specified in CONFIG parameter
ORACLE_PRIORITY
Cause: Priority specified is invalid or out of range.
Action: Specify a valid setting for
ORACLE_PRIORITY
.

OSD-04000 to OSD-04599: Windows-Specific Oracle Database Messages
Error Messages on Windows D-9
OSD-04208
OpenProcess() failure, unable to open process handle
Cause: Unexpected return from Windows system service OpenProcess().
Action: Check operating system error code and operating system documentation.
OSD-04209
Incorrect or unknown background image name given to spdcr()
Cause: Unexpected background name given to spdcr().
Action: Contact Oracle Support Services.
OSD-04210
Timeout waiting for thread semaphore
Cause: An Oracle Database thread died holding the semaphore.
Action: Restart Oracle Database instance.
OSD-04211
Thread information not found
Cause: An Oracle Database thread died without deleting its information.
Action: Restart Oracle Database instance.
OSD-04212
Maximum number of Oracle threads reached
Cause: Maximum number of Oracle Database threads for the instance is reached.
Action: Wait until some connections exit before trying again.
OSD-04213
Oracle thread unable to DuplicateHandle()
Cause: This is an internal error, not normally expected to occur.
Action: Contact Oracle Support Services.
OSD-04214
Oracle thread unable to CreateEvent()
Cause: This is an internal error, not normally expected to occur.
Action: Contact Oracle Support Services.
OSD-04215
Bad function code supplied to ssthreadop
Cause: This is an internal error, not normally expected to occur.
Action: Contact Oracle Support Services.
OSD-04216
Unable to find file handle for that thread
Cause: This is an internal error, not normally expected to occur.
Action: Contact Oracle Support Services.
OSD-04217
Unable to retrieve system username for current user
Cause: This is an internal error, not normally expected to occur.
Action: Contact Oracle Support Services.

OSD-04000 to OSD-04599: Windows-Specific Oracle Database Messages
D-10 Oracle Database Platform Guide
OSD-04218
Cannot post thread
Cause: This is an internal error, not normally expected to occur.
Action: Contact Oracle Support Services.
OSD-04219
Bad thread list semaphore
Cause: This is an internal error, not normally expected to occur.
Action: Contact Oracle Support Services.
OSD-04221
Target thread is currently busy
Cause: Target thread is processing an Oracle Database utility command.
Action: Wait and resend command.
OSD-04222
Unable to get the threads context
Cause: Check operating system error code.
Action: Remedy operating system error.
OSD-04223
Unable to set the threads context
Cause: Check operating system error code.
Action: Remedy operating system error.
OSD-04224
Unable to suspend the target thread
Cause: Check operating system error code.
Action: Remedy operating system error.
OSD-04225
Unable to resume the target thread
Cause: Check operating system error code.
Action: Remedy operating system error.
D.2.4 Loader Errors: OSD-04300 to OSD-04399
OSD-04300
Unable to read complete record from datafile
Cause: Datafile ended in the middle of a record. This error occurs when loading
files with a fixed record length.
Action: Verify that datafile is of correct length and contains complete records.
OSD-04301
Record size too large
Cause: Specified record size is too large to load.
Action: Reduce record size and reload data.
OSD-04302
Invalid record type, load options, or both

OSD-04000 to OSD-04599: Windows-Specific Oracle Database Messages
Error Messages on Windows D-11
Cause: Control file's Windows file processing options string contains an invalid
option or keyword.
Action: Set Windows file processing options string to an acceptable value.
D.2.5 Semaphore Errors: OSD-04400 to OSD-04499
OSD-04400
Unable to acquire internal semaphore for process
Cause: Oracle Database has exceeded the maximum number of connections.
Action: Delete any unused connections and try again.
OSD-04401
WaitForSingleObject() failure, unable to obtain semaphore
Cause: Unexpected return from Windows system service WaitForSingleObject().
Action: Check operating system error code and operating system documentation.
D.2.6 Miscellaneous Errors: OSD-04500 to OSD-04599
OSD-04500
Illegal option specified
Cause: This is an internal error, not normally expected to occur.
Action: Contact Oracle Support Services.
OSD-04501
Internal buffer overflow
Cause: This is an internal error, not normally expected to occur.
Action: Contact Oracle Support Services.
OSD-04502
Translations nested too deep
Cause: Program encountered too many intermediate translations while
attempting to translate a configuration variable.
Action: Simplify values of configuration parameters to include fewer
intermediate translations.
OSD-04503
Text contains no translatable elements
Cause: Program cannot recognize variables in text to be translated.
Action: Check and, if necessary, correct text to be translated.
OSD-04505
stdin not responding
Cause: System cannot receive input from standard input stream.
Action: Verify that process has access to an input device.
OSD-04506
Unable to spawn process through system()
Cause: System is out of memory or executable is invalid.
Action: Shut down unnecessary processes; install more memory in the computer.
Verify name of executable.

DIM-00000 to DIM-00039: ORADIM Command Syntax Errors
D-12 Oracle Database Platform Guide
OSD-04510
Operating system roles are not supported
Cause: An attempt was made to use an operating system role.
Action: Only use roles that were created '
IDENTIFIED
BY
PASSWORD
' as opposed to
'
IDENTIFIED
EXTERNALLY
'.
OSD-04511
Unable to get date and time from the operating system
Cause: Unexpected return from GetLocalTime() call.
Action: Verify that system time is correct on the computer.
OSD-04512
Unable to translate the '
USERNAME
' config.ora variable on server
Cause: '
USERNAME
' configuration parameter variable on host is not properly set.
Action: Verify '
USERNAME
' variable is set.
OSD-04513
'remote_os_authent' init.ora variable not set to TRUE
Cause: For remote operating system logon to function, '
REMOTE_OS_AUTHENT
'
parameter must be set to
TRUE
.
Action: Shut down and start up instance with '
REMOTE_OS_AUTHENT = TRUE
' in
initialization parameter file.
OSD-04514
The Windows Group name is too long for internal buffer
Cause: Windows Group name is too long.
Action: Use a shorter Windows group name.
D.3 DIM-00000 to DIM-00039: ORADIM Command Syntax Errors
ORADIM
is a command-line tool for starting and stopping database instances that is only
available on Oracle Database for Windows. It is not available on any other platform.
Oradim Errors DIM-0000 to DIM-0039
00000 ORADIM completed with no errors
00001 ORADIM: <command> [options]. Refer to manual.
00002 The specified command was invalid.
00003 An argument is missing for the parameter
00004 SID or service name was not specified.
00005 SID with more than 64 characters specified.
00006 Missing SID
00007 Missing or invalid
-
STARTMODE parameter. Valid
-
STARTMODE parameter is AUTO or
MANUAL.
00008 A valid service name is OracleService appended with a SID
00009 SID name is mandatory.
00010
SYSTEM\CurrentControlSet\Services\OracleService
key does not exist.
00011 The specified service does not exist.
00012 A PFILE is necessary for AUTOSTART option.
00013 Service start mode could not be set in the registry.

DIM-00000 to DIM-00039: ORADIM Command Syntax Errors
Error Messages on Windows D-13
DIM-00000
ORADIM completed with no errors.
Cause: The specified operation completed successfully.
Action: None.
00014 Cannot open the Windows Service Control Manager.
00015 Cannot start already- ORACLE - shut it down first.
00016 Missing or invalid
-
SHUTTYPE parameter. A valid
-
SHUTTYPE parameter is SRVC or INST.
00017 Instance shutdown mode must be one of the following: a for abort, i for immediate or n for
normal.
00018 Failed to stop Oracle Service.
00019 Create Service Error.
00020 A service for this name exists.
00021 Registry open failed.
00023 Create an instance by specifying the following options:
00024 -NEW -SID sid | -SRVC srvc | -ASMSID sid | -ASMSRVC srvc [-SYSPWD pass]
00025 [-STARTMODE auto | manual] [-SRVCSTART system | demand] [-PFILE file | -SPFILE]
00026 [-SHUTMODE normal | immediate | abort] [-TIMEOUT secs] [-RUNAS osusr/ospass]
00027 Edit an instance by specifying the following options:
00028 -EDIT -SID sid | -ASMSID sid [-SYSPWD pass]
00029 [-STARTMODE auto | manual] [SRVCSTART system | demand] [-PFILE file | -SPFILE]
00030 [-SHUTMODE normal | immediate | abort] [-SHUTTYPE srvc | inst] [-RUNAS osusr/ospass]
00031 Delete instances by specifying the following options:
00032 -DELETE -SID sid | -ASMSID sid | -SRVC srvc | -ASMSRVC srvc
00033 Startup services and instance by specifying the following options:
00034 -STARTUP -SID sid | -ASMSID sid [-SYSPWD pass]
00035 [-STARTTYPE srvc | inst | srvc,inst] [-PFILE filename | -SPFILE]
00036 Shutdown services and instance by specifying the following options:
00037 -SHUTDOWN -SID sid | -ASMSID sid [-SYSPWD pass]
00038 [-SHUTTYPE srvc | inst | srvc,inst] [-SHUTMODE normal | immediate | abort]
00039 Query for help by specifying the following parameters: -? | -h | -help
00040 Invalid option for the -NEW command.
00041 Invalid option for the -EDIT command.
00042 Invalid option for the -DELETE command.
00043 Invalid option for the -STARTUP command.
00044 Invalid option for the -SHUTDOWN command.
00045 Internal error in ORADIM.
00046 Invalid Pfile.
00050 Instance deleted.
00051 Instance created.
00075 Failed to control service.
00076 Failed to delete service.
00077 Failed to change service configuration.
00078 Failed to start service.
Oradim Errors DIM-0000 to DIM-0039

DIM-00000 to DIM-00039: ORADIM Command Syntax Errors
D-14 Oracle Database Platform Guide
DIM-00001
ORADIM: <command> [options]. Refer to manual.
Cause: The specified options were invalid or no arguments were supplied.
Action: Usage: ORADIM <command> [options]
DIM-00002
The specified command was invalid.
Cause: Valid commands are: -DELETE, -EDIT, -NEW, -STARTUP, and
-SHUTDOWN.
Action: Use valid command.
DIM-00003
An argument is missing for the parameter.
Cause: Missing or invalid argument.
Action: Use a valid argument and run the program again.
DIM-00004
SID or service name was not specified.
Cause: Either a SID or service name is mandatory.
Action: Enter a valid
SID
of 64 characters and retry.
DIM-00005
SID with more than 64 characters specified.
Cause: SID with more than 64 characters specified.
Action: Change SID to 64 unique characters and ensure that there is no other
service with this name.
DIM-00006
Missing SID.
Cause: SID was not specified in the arguments.
Action: Specify a SID.
DIM-00007
Missing or invalid -STARTMODE parameter. Valid -STARTMODE parameter is AUTO
or MANUAL.
Cause: An argument for STARTMODE is missing.
Action: Enter a valid start mode and retry.
DIM-00008
A valid service name is OracleService appended with a SID
Cause: The Oracle service name specified is invalid.
Action: Correct the name of service and retry.
DIM-00009
SID name is mandatory.
Cause: SID was not specified.
Action: Enter the SID and retry.
DIM-00010
SYSTEM\CurrentControlSet\Services\OracleService key does not exist.

DIM-00000 to DIM-00039: ORADIM Command Syntax Errors
Error Messages on Windows D-15
Cause: Specified registry key was not found.
Action: Try reinstalling. If the problem persists, contact Oracle Support Services.
DIM-00011
The specified service does not exist.
Cause: An attempt to edit a service failed.
Action: Make sure the service exists or user has enough privileges.
DIM-00012
A PFILE is necessary for AUTOSTART option.
Cause: A parameter file {PFILE} was not specified.
Action: Specify a parameter file.
DIM-00013
Service start mode could not be set in the registry.
Cause: The start mode entry in the registry for the service could not be set.
Action: Check if the user has privileges to modify registry.
DIM-00014
Cannot open the Windows Service Control Manager.
Cause: The Service Control Manager could not be opened.
Action: Check for user privileges.
DIM-00015
Cannot start already- ORACLE - shut it down first.
Cause: The instance is already started.
Action: Stop the database before restarting.
DIM-00016
Missing or invalid -SHUTTYPE parameter. A valid -SHUTTYPE parameter is SRVC or
INST.
Cause: An option for SHUTTYPE was missing or invalid.
Action: Enter parameter to shut down the instance or the service and retry.
DIM-00017
Instance shutdown mode must be one of the following: a for abort, i for immediate or n for
normal.
Cause: Invalid option to shut down the instance was specified.
Action: Enter the correct mode and retry.
DIM-00018
Failed to stop Oracle Service.
Cause: An attempt to stop the service failed.
Action: Retry, check for user privileges.
DIM-00019
Create service error.
Cause: Service could not be created.
Action: Check for user privileges and retry.
DIM-00020

DIM-00000 to DIM-00039: ORADIM Command Syntax Errors
D-16 Oracle Database Platform Guide
A service for this name exists.
Cause: An attempt was made to create a service name when it already existed.
Action: Retry with a different service name or SID.
DIM-00021
Registry open failed
Cause: An attempt to open the registry failed.
Action: Check for user privileges and retry the operation.
DIM-00023
Create an instance by specifying the following options:
Cause: n/a
Action: n/a
DIM-00024
-NEW -SID sid | -SRVC srvc | -ASMSID sid | -ASMSRVC srvc [-SYSPWD pass]
Cause: n/a
Action: n/a
DIM-00025
[-STARTMODE auto | manual] [-SRVCSTART system | demand] [-PFILE file |
-SPFILE]
Cause: n/a
Action: n/a
DIM-00026
[-SHUTMODE normal | immediate | abort] [-TIMEOUT secs] [-RUNAS osusr/ospass]
Cause: n/a
Action: n/a
DIM00027
Edit an instance by specifying the following options:
Cause: n/a
Action: n/a
DIM-00028
-EDIT -SID sid | -ASMSID sid [-SYSPWD pass]
Cause: n/a
Action: n/a
DIM-00029
[-STARTMODE auto | manual] [-SRVCSTART system | demand] [-PFILE file |
-SPFILE]
Cause: n/a
Action: n/a
DIM-00030
[-SHUTMODE normal | immediate | abort] [-SHUTTYPE srvc | inst] [-RUNAS
osusr/ospass]
Cause: n/a

DIM-00000 to DIM-00039: ORADIM Command Syntax Errors
Error Messages on Windows D-17
Action: n/a
DIM-00031
Delete instances by specifying the following options:
Cause: n/a
Action: n/a
DIM-00032
-DELETE -SID sid | -ASMSID sid | -SRVC srvc | -ASMSRVC srvc
Cause: n/a
Action: n/a
DIM-00033
Start up services and instance by specifying the following options:
Cause: n/a
Action: n/a
DIM-00034
-STARTUP -SID sid | -ASMSID sid [-SYSPWD pass]
Cause: n/a
Action: n/a
DIM-00035
[-STARTTYPE srvc | inst | srvc,inst] [-PFILE filename | -SPFILE]
Cause: n/a
Action: n/a
DIM-00036
Shut down services and instance by specifying the following options:
Cause: n/a
Action: n/a
DIM-00037
-SHUTDOWN -SID sid | -ASMSID sid [-SYSPWD pass]
Cause: n/a
Action: n/a
DIM-00038
[-SHUTTYPE srvc | inst | srvc,inst] [-SHUTMODE normal | immediate | abort]
Cause: n/a
Action: n/a
DIM-00039
Query for help by specifying the following parameters: -? | -h | -help
Cause: n/a
Action: n/a
DIM-00040
Invalid option for the -NEW command.
Cause: One or more arguments for creating new service is invalid.

DIM-00000 to DIM-00039: ORADIM Command Syntax Errors
D-18 Oracle Database Platform Guide
Action: Specify required option and retry.
DIM-00041
Invalid option for the -EDIT command.
Cause: One or more arguments for editing existing service is invalid.
Action: Specify required option and retry.
DIM-00042
Invalid option for the -DELETE command.
Cause: One or more arguments for deleting service is invalid.
Action: Specify required option and retry.
DIM-00043
Invalid option for the -STARTUP command.
Cause: One or more arguments for starting the instance is invalid.
Action: Specify required option and retry.
DIM-00044
Invalid option for the -SHUTDOWN command.
Cause: One or more arguments for shutting down the instance is invalid.
Action: Specify required option and retry.
DIM-00045
Internal error in ORADIM
Cause: Unknown.
Action: Contact Oracle Support Services.
DIM-00046
Invalid Pfile.
Cause: The parameter file name is invalid.
Action: Check that the path name is correct.
DIM-00050
Instance deleted
Cause: The request for deleting instance was successful.
Action: None.
DIM-00051
Instance created.
Cause: The request for creating new instance was successful.
Action: None.
DIM-00075
Failed to control service.
Cause: An attempt to control the service failed.
Action: Check additional error, ensure that user has enough privileges.
DIM-00076
Failed to delete service.
Cause: The request for service deletion failed.

Database Connection Issues
Error Messages on Windows D-19
Action: Check additional error, ensure that user has enough privileges.
DIM-00077
Failed to change service configuration.
Cause: An attempt to change configuration failed.
Action: Check additional error, ensure that user has enough privileges.
DIM-00078
Failed to start service.
Cause: The request to start service failed.
Action: Check additional error, ensure that user has enough privileges.
D.4 Database Connection Issues
The following are common Oracle Database connection error codes, their causes, and
suggested remedies.
TNS-12203
TNS: unable to connect to destination
Cause: OracleServiceSID service, OracleHOME_NAMETNSListener service, or
both are not.
Action: Ensure that both services are started.
ORA-12560
TNS: lost contact
Cause: OracleServiceSID service, OracleHOME_NAMETNSListener service, or
both are not. You receive this error if you attempt to use any Oracle Database
utilities, such as SQL*Plus. This error is analogous to the following Oracle7 error:
ORA-09352:
Windows
32-bit
Two-Task
driver
unable
to spawn
new
ORACLE
task
.
Action: Ensure that both services are started.
ORA-28575
unable to open RPC connection to external procedure agent
Cause:
tnsnames.ora
and listener.ora files have not been correctly configured to
use external procedures.
Action: Reconfigure services.
ORA-06512
at "APPLICATIONS.OSEXEC", line 0
Cause:
tnsnames.ora
and listener.ora
files have not been correctly configured to
use external procedures.
Action: Reconfigure services.
ORA-06512
at "APPLICATIONS.TEST", line 4
Cause:
tnsnames.ora
and
listener.ora
files have not been correctly configured
to use external procedures.
Action: Reconfigure services.
ORA-06512
at line 2

Database Connection Issues
D-20 Oracle Database Platform Guide
Cause:
tnsnames.ora
and
listener.ora
files have not been correctly configured
to use external procedures.
Action: Reconfigure services.
ORA-01031 and LCC-00161
Both codes appear at startup
Cause: Parameter file (init.ora) or Windows services are damaged. These errors
usually appear when the parameter file cannot be read by Oracle Database at
database startup.
Action: Delete and re-create the SID and services. Make sure you are logged on as
the user Administrator, or a user within the Windows Administrator's Group with
full administrative rights. At the command prompt, enter:
oradim -delete -sid
sid
where
sid
is the name of your database (for example,
orcl
). Re-create the SID
and services by entering:
oradim -new -sid sid -startmode auto -pfile full_
path_to_init.ora

E
Oracle Database Windows/UNIX Differences E-1
E
Oracle Database Windows/UNIX Differences
This chapter lists major differences between Oracle Database on Windows and UNIX.
For Oracle Database developers and database administrators moving from a UNIX
platform to Windows, this information can be helpful in understanding Windows
features that are relevant to Oracle Database.
This chapter contains these topics:
■Automatic Startup and Shutdown
■Background Processing and Batch Jobs
■Diagnostic and Tuning Utilities
■Direct Writes to Disk
■Dynamic Link Libraries (DLLs)
■Hot Backups
■Initialization Parameters: Multiple Database Writers
■Install Accounts and Groups
■Installation
■Memory Resources
■Microsoft Transaction Server
■Multiple Oracle Homes and OFA
■Processes and Threads
■Raw Partitions
■Services
E.1 Automatic Startup and Shutdown
On UNIX, several files and scripts in different directories are used to start an instance
automatically. Other scripts are run on computer shutdown, allowing applications
such as Oracle Database to shut down cleanly.
For automatic startup on Windows, set registry parameter
ORA_SID_AUTOSTART
to
true
using an Oracle Database tool such as ORADIM. Enter the following with parameters
at the command prompt:
C:\> oradim options
To start the listener automatically, set services startup type to automatic.

Background Processing and Batch Jobs
E-2 Oracle Database Platform Guide
For automatic shutdown on Windows, set registry parameters
ORA_SHUTDOWN
and
ORA_
SID_SHUTDOWN
to stop the relevant OracleServiceSID and shut down. Set registry
parameter
ORA_SID_SHUTDOWNTYPE
to control shutdown mode (default is
i
, or
immediate
).
E.2 Background Processing and Batch Jobs
UNIX provides sophisticated control mechanisms for background processing and
batch jobs.
For similar functionality on Windows, use the AT command or a GUI version in the
Microsoft Resource Kit.
E.3 Diagnostic and Tuning Utilities
On UNIX, utilities such as
sar
and
vmstat
are used to monitor Oracle Database
background and shadow processes. These utilities are not integrated with Oracle
Database.
Performance utilities available on Windows include Oracle Counters for Windows
Performance Monitor, Task Manager, Control Panel, Event Viewer, and Microsoft
Management Console.
Oracle Database is integrated with several of these tools. For example:
■Oracle Counters for Windows Performance Monitor displays key Oracle Database
information. This tool is the same in appearance and operation as Windows
Performance Monitor, except it has been loaded with Oracle Database
performance elements.
■Event Viewer displays system alert messages, including Oracle Database
startup/shutdown messages and audit trail.
■Task Manager on Windows displays currently processes and their resource usage,
similar to the UNIX
ps -ef
command or HP OpenVMS
SHOW SYSTEM
. But Task
Manager is easier to interpret and the columns can be customized.
E.4 Direct Writes to Disk
On both UNIX and Windows platforms, bypassing the file system buffer cache ensures
data is written to disk.
On UNIX, Oracle Database uses the
O_SYNC
flag to bypass the file system buffer
cache. The flag name depends on the UNIX port.
On Windows, Oracle Database bypasses the file system buffer cache completely.
See Also:
■Chapter 5, "Administering a Database on Windows"
■Oracle Database 2 Day DBA
See Also:
■Chapter 2, "Database Tools on Windows"
■Chapter 6, "Monitoring a Database on Windows"

Installation
Oracle Database Windows/UNIX Differences E-3
E.5 Dynamic Link Libraries (DLLs)
Shared libraries on UNIX are similar to shared DLLs on Windows. Object files and
archive libraries are linked to generate Oracle Database executables. Relinking is
necessary after certain operations, such as installation of a patch.
On Windows, Oracle Database DLLs form part of the executable at run time and are
therefore smaller. DLLs can be shared between multiple executables. Relinking by the
user is not supported, but executable images can be modified using ORASTACK.
Modifying executable images on Windows reduces the chances of out of virtual
memory when using a large SGA or when supporting thousands of connections.
However, Oracle recommends doing this only under the guidance of Oracle Support
Services.
E.6 Hot Backups
A (manual) hot backup is equivalent to backing up a tablespace that is in offline
backup mode.
Backup strategy on UNIX is as follows: put the tablespace into backup mode, copy the
files to the backup location, and bring the tablespace out of backup mode.
Windows supports the same backup strategy, but you cannot copy files in use with
normal Windows utilities. Use OCOPY to copy open database files to another disk
location. Then use a utility to copy the files to tape.
E.7 Initialization Parameters: Multiple Database Writers
On UNIX, you can specify many database writer process with initialization parameter
DB_WRITERS
. Multiple database writers can help, for example, when a UNIX port does
not support asynchronous I/O.
DB_WRITERS
is supported but typically unnecessary on Windows, which has its own
asynchronous I/O capabilities.
E.8 Install Accounts and Groups
UNIX uses the concept of a DBA group. The
root
account cannot be used to install
Oracle Database. A separate Oracle Database account must be created manually.
On Windows, Oracle Database must be installed by a Windows username in the
Administrators group. The user name is automatically added to the Windows local
group
ORA_DBA
, which receives the SYSDBA privilege. This allows the user to log in to
the database using
CONNECT
/
AS SYSDBA
and not be prompted for a password.
You can also create an
ORA_OPER
group to grant
SYSOPER
privileges to the other
Windows users.
Password files are located in the
ORACLE_HOME\database
directory and are named
pwdSID.ora
, where
SID
identifies the Oracle Database instance.
E.9 Installation
The following manual setup tasks, all required on UNIX, are not required on Windows:
See Also: Chapter 14, "Oracle Database Specifications for Windows"
See Also: Chapter 5, "Administering a Database on Windows"

Memory Resources
E-4 Oracle Database Platform Guide
■Set environment variables
■Create a DBA group for database administrators
■Create a group for users Oracle Universal Installer
■Create an account dedicated to installing and upgrading Oracle Database
components
E.10 Memory Resources
The resources provided by the UNIX default kernels are often inadequate for a
medium or large instance of Oracle Database. The maximum size of a shared memory
segment (
SHMMAX
) and maximum number of semaphores available (
SEMMNS
) may be too
low for Oracle Database recommendations.
On Windows, fewer resources are needed for interprocess communication (IPC),
because the Oracle Database relational database management system is thread-based
and not process-based. These resources, including shared memory and semaphores,
are not adjustable by the user.
E.11 Microsoft Transaction Server
UNIX does not support Microsoft Transaction Server.
Windows supports Microsoft Transaction Server beginning with Oracle8. Using Oracle
Services for Microsoft Transaction Server, you can develop and deploy applications
based on COM. Microsoft Transaction Server coordinates application transactions for
Oracle Database.
E.12 Multiple Oracle Homes and OFA
The goal of OFA is to place all Oracle Database software under one ORACLE_HOME
directory and to spread database files across different physical drives as databases
increase in size. OFA is implemented on Windows and UNIX in the same way, and
main subdirectory and file names are the same on both operating systems. Windows
and UNIX differ, however, in their OFA directory tree top-level names and in the way
variables are set.
On UNIX,
ORACLE_BASE
is associated with a user's environment. ORACLE_HOME and
ORACLE_SID
must be set in system or user login scripts. Symbolic links are supported.
Although everything seems to be in one directory on the same hard drive, files may be
on different hard drives if they are symbolically linked or have that directory as a
mount point.
On Windows,
ORACLE_BASE
is defined in the registry (for example, in
HKEY_LOCAL_
MACHINE\SOFTWARE\ORACLE\HOME0
).
ORACLE_HOME
and
ORACLE_SID
are variables defined
in the registry. Symbolic links like those on UNIX are not supported, although
Microsoft has announced the intention to support them.
See Also: Oracle Database Installation Guide for Microsoft Windows
See Also: Oracle Services for Microsoft Transaction Server Developer's
Guide for Microsoft Windows
See Also: Appendix B, "Optimal Flexible Architecture" in Oracle
Database Installation Guide for Microsoft Windows

Raw Partitions
Oracle Database Windows/UNIX Differences E-5
E.13 Processes and Threads
On UNIX, Oracle Database uses a process to implement each of such background tasks
as database writer (
DBW0
), log writer (
LGWR
), shared server process dispatchers, and
shared servers. Each dedicated connection made to the database causes another
operating system process to be spawned on behalf of that session.
On Windows, each background process is implemented as a thread inside a single,
large process. For each Oracle Database instance or system identifier, there is one
corresponding process for Oracle Database. For example, 100 Oracle Database
processes for a database instance on UNIX are handled by 100 threads inside one
process on Windows.
All Oracle Database background, dedicated server, and client processes are threads of
the master Oracle Database Windows process, and all threads of the Oracle Database
process share resources. This multithreaded architecture is highly efficient, allowing
fast context switches with low overhead.
To view processes or end individual threads, use Oracle Administration Assistant for
Windows. From the Start menu, select Programs, then select Oracle - HOME_NAME,
then select Configuration and Migration Tools and then select Administration
Assistant for Windows. Right-click the
SID
and choose Process Information.
E.14 Raw Partitions
Datafiles for tablespaces may be stored on a file system or on raw partitions. A raw
partition is a portion of a physical disk that is accessed at the lowest possible level.
UNIX supports raw partitions (logical drives). There is no limitation on the number of
disk drives.
Windows is limited to using drive letters A-Z, but creating raw partitions lets you
bypass the disk drive limitation and divide disks into smaller sections.
Use Windows disk management tools to create an extended partition on a physical
drive. An extended partition points to raw space on the disk that can be assigned
multiple logical partitions for database files.
An extended partition avoids the four-partition limit on Windows by allowing you to
define large numbers of logical partitions to accommodate applications using Oracle
Database. Logical partitions can then be given symbolic link names to free up drive
letters.
On Windows Vista, Windows Server 2008, Windows Server 2008 R2, Windows Server
2012, and Windows Server 2012 R2, create primary partitions and logical drives in
extended partitions by selecting the New Simple Volume option. To create a raw
device, select Do not assign a drive letter or drive path. To mount the raw device,
assign and remove a drive letter. Do not use spanned volumes or striped volumes.
Note: Microsoft Management Console (MMC) is started when Oracle
Administration Assistant for Windows is started. Oracle Database has
integrated several database administration snap-ins into Microsoft
Management Console.
See Also:
■Oracle Administration Assistant for Windows online help
■Chapter 1, "Oracle Database Architecture on Windows"

Services
E-6 Oracle Database Platform Guide
These options will convert the volume to a dynamic disk. Automatic Storage
Management does not support dynamic disks.
E.15 Services
Windows services are similar to UNIX daemons.
Oracle Database registers a database instance as a service (OracleServiceSID). Services
start background processes.
To connect to and use an Oracle Database instance, an Oracle Database service is
created during database creation and associated with Oracle Database. Once a service
is created with Oracle Database, the service can run even while no user is logged on.
By default, services run under the SYSTEM account. From the Start menu, select
Settings, then select Control Panel and then select Services to access the Services
dialog.
Note: Oracle RAC is not supported on Windows XP, Windows Vista,
Winodws 7, and any 32-bit Windows operating system.
See Also: Chapter 5, "Administering a Database on Windows"

Glossary-i
Glossary
alert log
A file that contains important information and error messages that are generated
during database operations.
authenticate
To verify the identity of a user, device, or other entity in a computer system, often as a
prerequisite for allowing access to resources in a system.
authorization
Permission given to a user, program, or process to access an object or set of objects. In
Oracle Database, authorization is done through the role mechanism. A single person
or a group of people can be granted a role or a group of roles. A role, in turn, can be
granted other roles.
backup
A representative copy of data. This copy includes important parts of your database
such as control files, redo log files, and datafiles.
A backup is a safeguard against unexpected data loss; if you lose your original data,
then you can use the backup to make the data available again. A backup is also a
safeguard against an application error; if an application makes incorrect changes, then
you can restore the backup.
certificate authority
A certificate authority (CA) is a trusted third party that certifies the identity of other
entities such as users, databases, administrators, clients, and servers. The certificate
authority verifies the user's identity and grants a certificate, signing it with one of the
certificate authority's private keys.
COM
Microsoft's Component Object Model is an object-oriented programming architecture
and a set of operating system services. These services notify application components of
significant events and ensure that they are authorized to run. COM is intended to
make it relatively easy to create business applications that work well with Microsoft
Transaction Server.
component-based shadow copies
VSS snapshots of Oracle database components. Examples of components include
tablespaces or archived redo logs.

connect descriptor
Glossary-ii
connect descriptor
A specially formatted description of the destination for a network connection. A
connect descriptor contains destination services and network route information. The
destination service is indicated by using its service name for Oracle9i or Oracle8i
databases or its Oracle system identifier for Oracle8 Release 8.0 databases. The
network route provides, at a minimum, the location of the listener through use of a
network address.
connect identifier
A net service name or service name, that maps to a connect descriptor. Users initiate a
connect request by passing a username and password along with a connect identifier
in a connect string for the services to which they want to connect, for example:
CONNECT username/password@connect_identifier
connect string
See net service name.
control files
Files that record the physical structure of a database and contain the database name,
the names and locations of associated databases and online redo log files, the time
stamp of the database creation, the current log sequence number, and checkpoint
information.
credentials
A username, password, or certificate used to gain access to the database.
data dictionary
A set of read-only tables that provide information about a database.
database alias
See net service name.
decryption
Process of converting contents of a message that has gone through encryption
(ciphertext) back into its original readable format (plaintext).
digital certificates
ITU X.509 v3 standard data structures that securely bind an identity to a public key. A
certificate is created when an entity's public key is signed by a trusted identity, a
certificate authority. The certificate ensures that the entity's information is correct and
that the public key actually belongs to that entity.
digital signature
Digital signatures are created when a public key algorithm is used to sign messages
with senders' private keys. A digital signature assures that a document is authentic,
has not been forged by another entity, has not been altered, and cannot be repudiated
by the sender.
DLL
See dynamic link library.

external user
Glossary-iii
downgrade
To convert the data in Oracle Database to an earlier Oracle release. See upgrade and
migrate.
dynamic link library
An executable file that a Windows application can load when needed.
encryption
Process of disguising a message, rendering it unreadable to any but the intended
recipient.
enterprise domains
Directory constructs consisting of Oracle Database and enterprise users and roles.
enterprise role
A directory structure which contains global roles on multiple databases, and which
can be granted to an enterprise user.
enterprise user
A user that has a unique identity across an enterprise. An enterprise user connects to
individual databases through a schema and is assigned an enterprise role that
determines the user's access privileges on databases.
external procedures
Functions written in a third-generation language (C, for example) and callable from
within PL/SQL or SQL as if they were PL/SQL functions or procedures.
external role
Roles created and managed by Windows operating systems. Once an external role is
created, you can grant or revoke that role to a database user. You must set init.ora
parameter
OS_ROLES
to
true
and restart Oracle Database before you can create an
external role. You cannot use both Windows operating systems and Oracle Database to
grant roles concurrently.
external routine
A function written in a third-generation language (3GL), such as C, and callable from
within PL/SQL or SQL as if it were a PL/SQL function or procedure.
external user
A user authenticated by the Windows operating system who can access Oracle
Database without being prompted for a password. External users are typically regular
database users (non-database administrators) to which you assign standard database
roles (such as
DBA
), but do not want to assign SYSDBA (database administrator) or
SYSOPER (database operator) privilege.
external user
The Windows operating system can authenticate a user, who can then access Oracle
Database without being prompted for a password. External users are typically regular
database users (non-database administrators) to whom you assign standard database
roles (such as
DBA
), but do not want to assign the SYSDBA (database administrator) or
SYSOPER (database operator) privilege.

global groups
Glossary-iv
global groups
See Windows global groups.
global role
A role whose privileges are contained within a single database, but which is managed
in a directory.
Globalization Support
The Oracle Database architecture that ensures that database utilities, error messages,
sort order, date, time, monetary, numeric, and calendar conventions automatically
adapt to the native language and locale.
HOME_NAME
Represents the name of an Oracle home. In Oracle Database 11g Release 2 (11.2), all
Oracle homes have a unique HOME_NAME.
init.ora
See initialization parameter file.
initialization parameter file
An ASCII text file that contains information needed to initialize a database and
instance.
instance
Every Oracle Database is associated with an Oracle Database or Automatic Storage
Management instance. When a database is started on a database server (regardless of
the type of computer), Oracle Database allocates a memory area called the System
Global Area and starts one or more Oracle Database processes. This combination of
the System Global Area and Oracle Database processes is called an instance. The
memory and processes of an instance manage the associated database's data efficiently
and serve the users of the database.
instantiate
Produce a more defined version of some object by replacing variables with values (or
other variables).
latch
A simple, low-level serialization mechanism to protect shared data structures in the
System Global Area.
LDAP
See Lightweight Directory Access Protocol (LDAP).
Lightweight Directory Access Protocol (LDAP)
A standard, extensible directory access protocol. It is a common language that LDAP
clients and servers use to communicate. LDAP is a framework of design conventions
supporting industry-standard directory products, such as Oracle Internet Directory.
listener
The Oracle Database server process that listens for and accepts incoming connection
requests from client applications. The listener process starts Oracle Database processes
to handle subsequent communications with the client; then it goes back to listening for
new connection requests.

obfuscated
Glossary-v
listener.ora
A configuration file that describes one or more Transparent Network Substrate (TNS)
listeners on a server.
local groups
See Windows local groups.
local roles
Roles created and managed by the database. Once a local role is created, you can grant
or revoke that role to a database user. You cannot use Windows (for external role
management) and Oracle Database (for local role management) concurrently.
Microsoft Management Console
An application that serves as a host for administrative tools called snap-ins. By itself,
Microsoft Management Console does not provide any functionality.
Microsoft Transaction Server
A transaction processing system based on COM that runs on an Internet or network
server.
migrate
To upgrade or downgrade an Oracle Database or convert the data in a non-Oracle
database into an Oracle Database.
mount
To associate a database with an instance that has been started.
MTS
See Microsoft Transaction Server
multiple Oracle homes
The capability of having multiple Oracle home on a computer.
net service name
The name used by clients to identify an Oracle Net server and the specific system
identifier or database for the Oracle Net connection. A net service name is mapped to
a port number and protocol. Also known as a connect string, database alias, host
string, or service name.
This also identifies the specific system identifier or database to which the connection is
attaching, not just the Oracle Net server.
network listener
A listener on a server that listens for connection requests for one or more databases on
one or more protocols. See listener.
network service
In an Oracle application network, a service performs tasks for its service consumers.
For example, a Names Server provides name resolution services for clients.
obfuscated
Protected by a process often used by companies for intellectual property written in the
form of Java programs. The obfuscation process mixes up Java symbols found in the

OCI
Glossary-vi
code. It leaves the original program structure intact, allowing the program to run
correctly, while changing the names of the classes, methods, and variables to hide the
intended behavior. Although it is possible to decompile and read non-obfuscated Java
code, obfuscated Java code is sufficiently difficult to decompile to satisfy U.S.
government export controls.
OCI
See Oracle Call Interface.
OFA
See Optimal Flexible Architecture.
Optimal Flexible Architecture
A set of file naming and placement guidelines for Oracle Database software and
databases.
ORACLE_BASE
ORACLE_BASE is the root of the Oracle Database directory tree. If you install an
OFA-compliant database using Oracle Universal Installer defaults, then ORACLE_
BASE is
X:\app\oracle\product\11.2.0
where
X
is any hard drive.
Oracle Call Interface
An application programming interface that enables you to manipulate data and
schema in an Oracle Database. You compile and link an Oracle Call Interface
application in the same way that you compile and link a non-database application.
There is no need for a separate preprocessing or precompilation step.
ORACLE_HOME
Corresponds to the environment in which Oracle Database products run. This
environment includes the location of installed product files, the PATH variable
pointing to the binary files of installed products, registry entries, net service names,
and program groups.
If you install an OFA-compliant database, using Oracle Universal Installer defaults,
then Oracle home (known as ORACLE_HOME in this guide) is located beneath
ORACLE_BASE. It contains subdirectories for Oracle Database software executables
and network files.
Oracle Internet Directory
An Oracle Database-based LDAP V3 directory server, used for centralizing database
user, Oracle Net network connector, and database listener parameters. Oracle Internet
Directory ships only with Oracle Application Server, not the Oracle Database 11g
product set.
Oracle Net
A component of Oracle Net Services that enables a network session from a client
application to an Oracle Database server. Once a network session is established, Oracle
Net acts as a data courier for the client application and the database server. It is
responsible for establishing and maintaining the connection between the client
application and database server, and exchanging messages between them. Oracle Net
can perform these jobs because it is located on each computer in the network.

process
Glossary-vii
Oracle Net Services
A suite of networking components that provide enterprise-wide connectivity solutions
in distributed, heterogeneous computing environments. Oracle Net Services are
comprised of Oracle Net, listener, Oracle Connection Manager, Oracle Net
Configuration Assistant, and Oracle Net Manager.
Oracle PKI
Oracle Advanced Security includes Oracle PKI (public key infrastructure) integration
for authentication and single sign-on. Oracle-based applications are integrated with
the PKI authentication and encryption framework, using Oracle Wallet Manager.
Oracle Protocol Support
A product that maps the functions of a given network protocol into Oracle Transparent
Network Substrate (TNS) architecture. This process translates TNS function calls into
requests to the underlying network protocol. This allows TNS to act as an interface
among all protocols. Oracle Net requires Oracle Protocol Support.
Oracle services
Windows services that are associated with particular Oracle Database components.
Oracle VSS writer
A service on Windows systems that acts as coordinator between an Oracle database
instance and other VSS components, enabling data providers to create a shadow copy
of files managed by the Oracle instance. For example, the Oracle VSS writer can place
datafiles in hot backup mode to provide a recoverable copy of these datafiles in a
shadow copy set.
PL/SQL
Procedural language extension to SQL that is part of Oracle Database.
PL/SQL enables you to mix SQL statements with procedural constructs. You can
define and run PL/SQL program units such as procedures, functions, and packages.
precompiler
A programming tool that enables you to embed SQL statements in a high-level source
program.
private keys
In public key cryptography, these are the secret keys. They are used primarily for
decryption but also for encryption with a digital signature.
privilege
A right to run a particular type of SQL statement or to access another user's object.
process
A mechanism in an operating system that can run an executable. (Some operating
systems use the terms job or task.) A process normally has its own private memory
area in which it runs. On Windows a process is created when an application runs (such
as Oracle Database or Microsoft Word). In addition to an executable program, all
processes consist of at least one thread. The Oracle Database master process contains
hundreds of threads.

provider
Glossary-viii
provider
Software or hardware that creates shadow copies on demand. Typically, a provider is a
disk storage system. In response to a request from a requester, a provider responds to
VSS COM messages to create and maintain shadow copies.
public key
In public key cryptography, this key is made public to all. It is primarily used for
encryption but can also be used for verifying signatures.
public key cryptography
Public key cryptography involves information encryption and decryption using a
shared public key paired with private keys. Provides for secure, private
communications within a public network.
quota
A limit on a resource, such as a limit on the amount of database storage used by a
database user. A database administrator can set tablespace quotas for each Oracle
Database username.
raw partitions
Portions of a physical disk that are accessed at the lowest possible disk (block) level.
recovery
To restore a physical backup is to reconstruct it and make it available to the Oracle
Database server. To recover a restored backup is to update it using redo records (that
is, records of changes made to the database after the backup was taken). Recovering a
backup involves two distinct operations: rolling forward the backup to a more current
time by applying redo data, and rolling back all changes made in uncommitted
transactions to their original state.
redo log buffer
A circular buffer in the System Global Area that contains information about changes
made to the database.
redo log files
Files that contain a record of all changes made to data in the database buffer cache. If
an instance failure occurs, then the redo log files are used to recover the modified data
that was in memory.
registry
A Windows repository that stores configuration information for a computer.
remote computer
A computer on a network other than the local computer.
remote database
A database on a computer other than the local database.
requester
An application that uses the VSS API to create shadow copies. Requester applications
communicate with VSS writers to gather information on the system and to signal
writers to prepare data for backup. The requester maintain control over VSS backup
and restore operations by generating COM events through calls in the VSS API.

starter database
Glossary-ix
replication
The process of copying and maintaining database objects in multiple databases that
make up a distributed database system.
role
A named groups of related privileges. You can grant a role to users or to another role.
schema
A named collection of objects, such as tables, views, clusters, procedures, and
packages, associated with one or more particular users.
services
Executable processes installed in the Windows registry and administered by
Windows. Once services are created and started, they can run even when no user is
logged on to the computer.
service name
See net service name.
SGA
See System Global Area.
shadow copy
A consistent snapshot of a component or volume.
shadow copy set
A collection of shadow copies that are all taken at the same time.
Shared Server Process
A server configuration which allows many user processes to share very few server
processes. The user processes connect to a dispatcher background process, which
routes client requests to the next available shared server process.
SID
See system identifier.
snap-ins
Administrative tools that run within Microsoft Management Console.
snapshot
(1) Information stored in rollback segments provide transaction recovery and read
consistency. Use Rollback segment information to re-create a snapshot of a row before
an update.
(2) A point-in-time copy of a master table located on a remote site. Read-only
snapshots can be queried, but not updated. Updateable snapshots can be queried and
updated. They are periodically refreshed to reflect changes made to the master table,
and at the snapshot site.
starter database
A preconfigured, ready-to-use database that requires minimal user input to create.

SYSDBA
Glossary-x
SYSDBA
A special database administration role that contains all system privileges with the
ADMIN
OPTION
, and the SYSOPER system privilege.
SYSDBA
also permits
CREATE
DATABASE
actions and time-based recovery.
SYSOPER
A special database administration role that permits a database administrator to
perform
STARTUP
,
SHUTDOWN
,
ALTER
DATABASE
OPEN/MOUNT
,
ALTER
DATABASE
BACKUP
,
ARCHIVE
LOG
, and
RECOVER
, and includes the
RESTRICTED
SESSION
privilege.
System Global Area
A group of shared memory structures that contain data and control information for an
Oracle Database instance.
system identifier
A unique name for an Oracle Database instance. To switch between instances of
Oracle Database, users must specify the desired system identifier. The system
identifier is included in the
CONNECT
DATA
parts of the connect descriptors in a
tnsnames.ora file, and in the definition of the network listener in a tnsnames.ora file.
SYSTEM
One of two standard database administrator usernames automatically created with
each database. (The other user name is
SYS
.). The
SYSTEM
user name is the preferred
user name for database administrators to use for database maintenance.
tablespace
A database is divided into one or more logical storage units called tablespaces.
Tablespaces are divided into logical units of storage called segments, which are further
divided into extents.
thread
An individual path of execution within a process. Threads are objects within a process
that run program instructions. Threads allow concurrent operations within a process
so that a process can run different parts of its program simultaneously on different
processors. A thread is the most fundamental component that can be scheduled on
Windows.
tnsnames.ora
A file that contains connect descriptors mapped to net service names. The file can be
maintained centrally or locally, for use by all or individual clients.
trace file
Each server and background process can write to an associated trace file. When a
process detects an internal error, it dumps information about the error to its trace file.
Some information written to a trace file is intended for the database administrator,
while other information is intended for Oracle Support Services. Trace file information
is also used to tune applications and instances.
trust points
Trust points or trusted certificates are third party identities that are qualified with a
level of trust. A trusted certificate is used when an identity is being validated as the
entity it claims to be. Certificate authorities you trust are called trusted certificates. If

writer
Glossary-xi
there are several levels of trusted certificates, a trusted certificate at a lower level in the
certificate chain does not need to have all its higher level certificates reverified.
universal groups
Universal groups are available in Windows. They can contain other groups, including
other universal groups, local groups, and global groups.
upgrade
To convert the data in an Oracle Database into a later release. See downgrade and
migrate.
username
A name that can connect to and access objects in a database.
view
A selective presentation of the structure and data of one or more tables. Views can also
be based on other views.
volume-based shadow copies
VSS snapshots of complete drives or volumes.
Volume Shadow Copy Service (VSS)
An infrastructure on Windows server platforms that enables requesters, writers and
providers to participate in creation of consistent snapshots called Shadow Copies. The
VSS service uses well-defined COM interfaces.
Windows global groups
Groups that can be granted permissions and rights in their own domain, member
servers and workstations of their domain, and in trusted domains. They can also
become members of Windows local groups in all these places. But global groups can
contain user accounts only from their own domains.
Windows local groups
Groups that can be granted permissions and rights only for its own computer or, if
part of a domain, to the domain controllers of that domain. Local groups can, however,
contain user accounts and Windows global groups from both their own domain and
from trusted domains
writer
An application or service that stores persistent information on disk and cooperates
with providers and requesters within the VSS infrastructure.

writer
Glossary-xii

Index-1
Index
A
Access Control Lists
adding and deleting members, 13-14
available security groups, 13-12
Active Directory
adding and deleting security group
members, 13-14
automatic discovery of directory servers, 13-2
connecting to a database, 13-9
how Oracle directory objects appear, 13-4
integration with directory servers, 13-9
managing Access Control Lists, 13-12
managing security groups, 13-12
requirements for using Oracle, 13-9
testing connectivity from client computers, 13-9
testing connectivity with SQL*Plus, 13-3
testing database connectivity, 13-3
user interface extensions, 13-3
Active Directory Users and Computers
integration with Oracle objects in Active
Directory, 13-2
Advanced Replication support
data dictionary tables, 4-13
initialization parameter requirements, 4-13
tablespace requirements, 4-12, 4-13
alert logs
monitoring a database, 6-1
using, 6-8
application development
finding information, 16-1
architecture
thread-based, 1-1
archiving mode
controlling, 5-12
custom database, 5-12
starter database, 5-12
archiving procedures
for redo log files, 5-12
asmtool
starting, 2-8
asmtoolg
starting, 2-8
audit trail
managing, 6-8
operating system, 2-12
AUDIT_FILE_DEST, 6-8, 14-3
authentication
automatically enabling during installation, 9-3
enhancements, 9-2
OSAUTH_PREFIX_DOMAIN parameter, 10-21
overview, 9-1, 13-8
using a password file, 5-9
using Windows native authentication
methods, 13-8
using Windows native methods, 9-1
viewing parameter settings, 10-8
Automatic Storage Management
about, 1-1
Automatic Storage Management Configuration
Assistant
starting, 2-6
auto-starting
Oracle Database services, 5-3
B
background processes
querying, 1-4
Backing up Database, 8-5
backup
control files, 15-6
databases, 3-10
Backup Wizard
preferred tools, 2-2
block size
maximum, 14-5
blocks for each file, maximum, 14-5
C
commands
CREATE DATABASE, 3-7
NET START, 3-8
REGEDT32, 3-9
configuration parameters
defined, 15-1
LOCAL, C-2
registry, defined, 15-1
TNS_ADMIN, C-3
USE_SHARED_SOCKET, C-3
configuring

Index-2
Named Pipes Protocol Adapter, C-3
Oracle Spatial, 4-11
Oracle Text, 4-10
CONNECT /AS SYSDBA
connecting without a password, 9-3
using, 5-4
connecting
LOCAL parameter, C-2
to a database, 5-4
control files
maximum size, 14-5
CREATE DATABASE command, 3-7
CREATE LIBRARY command, 16-7
custom database
archiving mode, 5-12
D
data dictionary
Advanced Replication tables, 4-13
Data Pump Export
starting, 2-7
Data Pump Import
starting, 2-7
database administrator privileges
for a single database on a computer, 10-18
for all databases on a computer, 10-3
Database Configuration Assistant
preferred tools, 2-2
registering a database object in a directory
server, 13-3
starting, 2-6
database connection
error messages, D-19
database files
deleting, 3-5
database monitoring
using Oracle Counters for Windows Performance
Monitor, 6-2
with alert logs, 6-8
with Event Viewer, 6-6
with trace files, 6-8
database operator privileges
for a single database on a computer, 10-19
for all databases on a computer, 10-4
database privileges
in Windows local groups, 10-27
database tools
operating system compatibility, 2-2
starting from the command line, 2-7
starting from the Start Menu, 2-5
starting in multiple Oracle Homes, 2-4
databases
backing up, 3-10
connecting to, 5-4
creating manually, 3-2
deleting, 3-5
exporting, 3-3
importing, 3-8
monitoring, 6-1
naming conventions, 3-1
password encryption, 5-11
shutting down, 5-4, 5-6
starting, 5-4
DBVERIFY
starting, 2-7
debugging external procedures, 16-9
developing applications
for Windows, 16-1
diagnostic and tuning utilities
for Windows, 2-14
directory servers
automatic discovery of directory servers, 13-2
features integrated with Oracle11g, 13-2
how Oracle directory objects display in Active
Directory, 13-4
integration with Active Directory, 13-9
managing Access Control Lists, 13-12
requirements for using Oracle with Active
Directory, 13-9
user interface extensions, 13-3
DisplayName parameter, C-2
DLLs
compared to UNIX shared libraries, E-3
displaying with Task List, 2-14
external procedures, 16-6
Oracle Counters for Windows Performance
Monitor, 15-7
Oracle Real Application Clusters, 15-8
DNS-style naming convention, 13-9
Duplicating a Database, 8-12
E
encrypting, database passwords, 5-11
enhanced security, 4-6 to 4-9
error messages
DIM-00000 to DIM-00039, D-12
Intercartridge Exchange, 16-14
ORA-01102, 3-1
ORA-09275, D-1
ORA-12560, D-19
OSD-04000 to OSD-04099, D-4
OSD-04100 to OSD-04199, D-7
OSD-04200 to OSD-04299, D-8
OSD-04300 to OSD-04399, D-10
OSD-04400 to OSD-04499, D-11
OSD-04500 to OSD-04599, D-11
Event Viewer
blue (informational) icon, 6-6
defined, 2-11
for monitoring a database, 6-1
integration with Oracle Database, 2-11
logging operating system audit trail, 2-12
managing, 6-8
reading, 6-7
red (stop sign) icon, 6-6
starting, 2-9
using, 6-6
yellow (exclamation point) icon, 6-6

Index-3
exception conditions, Intercartridge Exchange, 16-13
executable images
modifying, 1-4
EXECUTE privileges, on a PL/SQL library, 16-7
Export
databases, 3-3
interactive mode, 3-3
parameter mode, 3-3, 3-4
preferred tools, 2-2
starting, 2-7
Export Wizard
preferred tools, 2-2
extended partition
defined, B-1
EXTERNAL clause, 16-7
external operating system users
administering, 10-1, 10-20
creating, 10-9, 10-21
external procedures
building a DLL, 16-6
creating a PL/SQL library, 16-7
debugging, 16-9
EXTERNAL clause, 16-7
granting EXECUTE privileges, 16-7
registering with Oracle Database, 16-7
using EXTPROC, 16-5
writing, 16-6
external roles
administering, 10-1, 10-20
creating, 10-15
external users
administering, 10-1, 10-20
creating, 10-9, 10-21
EXTPROC
example, 16-6
explained, 16-5
responsibilities, 16-5
F
features
4GT tuning, 1-7
large user populations, 1-8
Oracle PKI, 1-8
file I/O enhancements, 1-4
file permissions, 4-6 to 4-9
files
maximum number for each database, 14-5
maximum size possible, 14-5
sample init.ora, 14-2
trace, 6-8
FSEEK
line terminators, 16-10
H
Hostname parameter, 6-2
I
ICX. See Intercartridge Exchange
ImagePath parameter, C-2
Import
databases, 3-8
parameter mode, 3-9
preferred tools, 2-2
Import Wizard
preferred tools, 2-2
initialization parameter file
defined, 14-1
editing, 14-2
location, 14-2
initialization parameter requirements
Advanced Replication Support, 4-13
initialization parameters
OS_ROLES, 9-2
path in registry, 15-3
instances
modifying, 3-14
Oracle Database, 1-2
running multiple instances, 5-8
integration with Windows
4GT tuning, 1-7
Oracle Fail Safe, 1-9
Oracle PKI, 1-8
Oracle Services for MTS, 1-8
Intercartridge Exchange
accessing Web data, 16-10
configuring, 16-11
error messages, 16-14
exception conditions, 16-13
packaged functions, 16-12
stored packages, 16-12
using, 16-12
K
keys
defined, 15-1
L
Load Wizard
preferred tools, 2-2
local database role
creating, 10-13
local groups
with database privileges, 10-27
LOCAL networking parameter, C-2
logs
alert, 6-8
M
MAXDATAFILES, 3-6
memory usage, 7-4
Microsoft Certificate Services, 12-2
Microsoft Certificate Stores, 12-2
Microsoft Management Console
defined, 2-12
integration with Oracle Database, 2-12
starting, 2-9

Index-4
Microsoft ODBC Administration
starting, 2-6
Migration Utility
preferred tools, 2-2
MMC. See Microsoft Management Console
monitoring
alert logs, 6-1
Event Viewer, 6-1
Management Pack, 6-1
Oracle Counters for Windows Performance
Monitor, 6-1
Oracle Database events, 2-12
trace files, 6-1
multiple instances, running, 5-8
multiple Oracle homes
service naming conventions, 5-1
multithreaded agent architecture, 16-9
N
Named Pipes Protocol Adapter
with an Oracle Names Server, C-3
naming conventions for multiple Oracle homes, 5-1
NET START command, 3-8
networking parameters
LOCAL, C-2
TNS_ADMIN, C-3
USE_SHARED_SOCKET, C-3
NTFS
file system permission setting, 4-6
NTS. See Windows native authentication
O
ObjectName parameter, C-2
OCOPY
and raw files, 1-4
preferred tools, 2-2
operating system authentication
automatically enabling during installation, 9-3
connecting as SYSDBA without a password, 9-3
OSAUTH_PREFIX_DOMAIN parameter, 10-21
operating systems
audit trail, 2-12
authentication overview, 9-1, 13-8
operfcfg
starting, 2-8
syntax examples, 15-14
ORA_DBA local group
adding users to, 9-3
Oracle Administration Assistant for Windows
adding a computer to the navigation tree, 10-2
connecting to a database, 10-5
creating a local database role, 10-13
creating an external operating system user, 10-9
creating an external role, 10-15
database connection issues, 10-6
defined, 2-12
granting administrator privileges, 10-18
granting operator privileges, 10-19
integration with Oracle Database, 2-12
managing remote computers, 10-2
saving a navigation tree configuration, 10-2
setting OS_AUTHENT_PREFIX, 10-8
starting, 2-6
using, 10-1, 15-10, 15-14
using the Oracle Counters for Windows
Performance Monitor snap-in, 15-14
using the Oracle Home Configuration
snap-in, 15-10
viewing authentication settings, 10-8
Oracle Counters for Windows Performance Monitor
accessing, 6-3
for monitoring a database, 6-1
Hostname parameter, 6-2
integration with Windows, E-2
parameters, 15-6
Password parameter, 6-2
registry information, 6-2
starting, 2-6, 2-9
troubleshooting information, 6-5
Username parameter, 6-2
using, 2-12, 6-2, 15-14
Oracle Database
connecting to, 5-4
password encryption, 5-11
shutting down, 5-4, 5-6
specifications, 14-5
starting, 5-4
Oracle Database services
auto-starting, 5-3
naming conventions for multiple Oracle
homes, 5-1
shutting down a database, 5-6
starting, 5-2
stopping, 5-2
Oracle Database Upgrade Assistant
preferred tools, 2-2
starting, 2-6
Oracle Directory Manager
starting, 2-6
Oracle Enterprise Manager
Management Pack, 6-1
Oracle Enterprise Manager Console
preferred tools, 2-2
Oracle Home Configuration snap-in
using, 15-10
Oracle Locale Builder
starting, 2-6
Oracle Managed Files, 3-7
Oracle Migration Workbench
starting, 2-6
Oracle Names
Named Pipes Protocol Adapter, C-3
Oracle Net
configuring for external procedures, 16-5
Oracle Net Configuration Assistant
configuring Oracle software with a directory
server, 13-2, 13-3
creating the Oracle schema, 13-5

Index-5
starting, 2-6
Oracle Net directory naming
connecting to a database through a directory
server, 13-9
Oracle Net Manager
starting, 2-6
Oracle public key infrastructure, 12-1
Oracle Real Application Clusters
registry values, 15-8
Oracle schema
creating with Oracle Net Configuration
Assistant, 13-5
Oracle Spatial
configuring, 4-11
Oracle Text
configuring, 4-10
Oracle Wallet Manager, 11-2
starting, 2-6
Oracle Wallets, 11-1
storing in the registry, 11-1
storing private keys and trust points, 11-1
ORACLE_SID, 3-9, 5-8
OracleDBCreator security group
defined, 13-13
OracleHOME_NAMEClientCache, C-1
OracleHOME_NAMECMAdmin, C-1
OracleHOME_NAMECMan, C-2
OracleHOME_NAMETNSListener, C-2
OracleHOME_NAMETNSListener service, C-3
OracleNetAdmins security group
defined, 13-13
ORADIM
command syntax errors, D-12
modifying an instance, 3-14
moving or copying password files, 5-10
preferred tools, 2-2
starting, 2-8
ORAPWD
creating password files, 5-9
starting, 2-8
OS_AUTHENT_PREFIX parameter
case insensitivity, 10-21
defined, 10-8
using, 10-21
OS_ROLES parameter
defined, 10-8
using with external roles, 9-2
OSAUTH_PREFIX_DOMAIN, 10-2, 10-21
OSAUTH_PREFIX_DOMAIN parameter, 10-21
Overview of Database Backup and Recovery with
VSS, 8-1
P
packaged functions
Intercartridge Exchange, 16-12
UTL_HTTP.REQUEST, 16-12
UTL_HTTP.REQUEST_PIECES, 16-12
parameter mode
Export, 3-3, 3-4
Import, 3-9
parameters
AUDIT_FILE_DEST, 6-8
DisplayName, 15-8, C-2
Hostname, 6-2, 15-7
ImagePath, 15-8, C-2
INST_LOC, 15-6
LOCAL, C-2
LOGFILE, 15-7
MSHELP_TOOLS, 15-2
NLS_LANG and Other Globalization
Parameters, 15-3
ObjectName, 15-8, C-2
OO4O, 15-6
ORA_AFFINITY, 15-4
ORA_CWD, 15-3
ORA_SID_AUTOSTART, 15-3
ORA_SID_PFILE, 15-3
ORA_SID_SHUTDOWN, 15-3
ORA_SID_SHUTDOWN_TIMEOUT, 15-4
ORA_SID_SHUTDOWNTYPE, 15-4
Oracle Counters for Windows Performance
Monitor, 15-14
ORACLE_BASE, 15-4
ORACLE_GROUP_NAME, 15-5
ORACLE_HOME, 15-5
ORACLE_HOME_KEY, 15-5
ORACLE_HOME_NAME, 15-5
ORACLE_PRIORITY, 15-5
ORACLE_SID, 3-9, 5-8, 15-5
OS_AUTHENT_PREFIX, 10-8
OS_ROLES, 10-8
OSAUTH_PREFIX_DOMAIN, 10-2, 10-21, 15-5
Password, 6-2
PERF_FILE_NAME, 15-8
RDBMS_ARCHIVE, 15-6
RDBMS_CONTROL, 15-6
REMOTE_LOGIN_PASSWORDFILE, 5-9
SQLPATH, 15-6
TNS_ADMIN, C-3
USE_SHARED_SOCKET, C-3
Username, 6-2, 15-7
partitions
extended, B-1
logical partition, B-2
physical disk, B-1
raw, B-1
password
encryption, 5-11
not needed with SYSDBA, 9-3
utility, 5-9
password file
authenticating database administrators, 5-9
creating, 5-9
hiding, 5-9
viewing, 5-10
Password parameter, 6-2, 15-7
PERFORMANCE key, 15-6
Performance Monitor
See Oracle Counters for Windows Performance

Index-6
Monitor
Performance Pack, monitoring a database, 6-1
PhysicalDrive, B-1
PL/SQL Embedded Gateway, 16-2
postinstallation
setting NTFS file system permissions, 4-6
setting Windows registry security, 4-8
PRAGMA RESTRICT_REFERENCES, with
Intercartridge Exchange, 16-13
privileges
in Windows local groups, 10-27
Process Explode, 2-14
Process Viewer, 2-14
PWDSID.ORA file, 5-9
R
raw files
using, 1-4
raw partition
defined, B-1
logical partition, B-2
overview, B-1
physical disk, B-1
Recovery Manager
preferred tools, 2-2
starting, 2-8
Recovery Wizard
preferred tools, 2-2
redo log files
archiving, 5-12
REGEDT32 command, 3-9
registering an external procedure, 16-7
registry
adding parameters, 15-9
and Oracle Real Application Clusters, 15-8
configuration parameters, defined, 15-1
DisplayName, 15-8, C-2
editor, 15-1
editor, starting, 2-9
Hostname, 6-2, 15-7
ImagePath, 15-8, C-2
INST_LOC, 15-6
keys, defined, 15-1
LOGFILE, 15-7
modifying values, 15-8
MSHELP_TOOLS, 15-2
NLS_LANG and Other Globalization
Parameters, 15-3
ObjectName, 15-8, C-2
OO4O, 15-6
ORA_AFFINITY, 15-4
ORA_CWD, 15-3
ORA_SID_AUTOSTART, 15-3
ORA_SID_PFILE, 15-3
ORA_SID_SHUTDOWN, 15-3
ORA_SID_SHUTDOWN_TIMEOUT, 15-4
ORA_SID_SHUTDOWNTYPE, 15-4
ORACLE_BASE, 15-4
ORACLE_GROUP_NAME, 15-5
ORACLE_HOME, 15-5
ORACLE_HOME_KEY, 15-5
ORACLE_HOME_NAME, 15-5
ORACLE_PRIORITY, 15-5
ORACLE_SID, 15-5
OracleHOME_NAMEClientCache, C-1
OracleHOME_NAMECMAdmin, C-1
OracleHOME_NAMECMan, C-2
OracleHOME_NAMETNSListener, C-2
OSAUTH_PREFIX_DOMAIN, 10-21, 15-5
Password, 6-2, 15-7
PERF_FILE_NAME, 15-8
PERFORMANCE key, 15-6
RDBMS_ARCHIVE, 15-6
RDBMS_CONTROL, 15-6
REG_DWORD, 15-2, 15-10
REG_EXPAND_SZ, 15-2, 15-10
REG_MULTI_SZ, 15-2, 15-10
REG_SZ, 15-2, 15-10
REGEDT32, 15-8, 15-9
setting security, 4-8
SQLPATH, 15-6
update ORACLE_SID, 3-9
Username, 6-2, 15-7
using operfcfg, 15-14
remote computers
managing with Oracle Administration Assistant
for Windows, 10-2
REMOTE_LOGIN_PASSWORDFILE, 5-9
requirements
for using Oracle with Active Directory, 13-9
Restoring and Recovering a Database, 8-8
role authorization
description, 9-2
method enhancements, 9-2
roles
creating, 10-15
creating a local database role, 10-13
S
security groups
adding and deleting members, 13-14
services, 5-1
auto-starting, 5-3
shutting down a database, 5-6
starting, 3-6, 5-2
stopping, 5-2
SET INSTANCE command, 10-26, 10-27
SET ORACLE_SID=SID, 5-8
Shared Server Process, 1-8
shutting down
databases, 5-4, 5-6
snap-ins
Oracle Counters for Windows Performance
Monitor, 15-14
Oracle Home Configuration, 15-10
SQL*Loader
control file conventions, 2-11
preferred tools, 2-2

Index-7
starting, 2-8
SQL*Plus
connecting to a database through Active
Directory, 13-3
preferred tools, 2-2
shutting down the database, 5-4
starting, 2-6, 2-8, 5-4
starting the database, 5-4
SQL*Plus Worksheet
preferred tools, 2-2
starting, 2-6
sqlnet.ora file
and Windows native authentication, 10-26, 10-27
location of, 10-26, 10-27
starter database
archiving mode, 5-12
starting
databases, 5-4
Oracle Counters for Windows Performance
Monitor, 6-3
Oracle Database services, 5-2
SQL*Plus, 5-4
Steps of Backup and Recovery with VSS, 8-3
stopping, Oracle Database services, 5-2
stored packages, Intercartridge Exchange, 16-12
storing private keys and trust points
Oracle Wallets, 11-1
symbolic links
creating, B-4
SYSDBA privileges
connecting without a password, 9-3
for a single database on a computer, 10-18
for all databases on a computer, 10-3
SYSOPER privileges
for a single database on a computer, 10-19
for all databases on a computer, 10-4
T
tablespaces
Advanced Replication support, 4-12, 4-13
Task List, 2-14
Task Manager
starting, 2-9
using, 2-13
threads
and Microsoft Management Console, 2-12
and multiple Oracle Database instances, 1-2
and ORASTACK, 1-4
and shared server process, 1-8
and UNIX processes, E-5
defined, 1-1
optional and required, 1-2
process errors, D-3
processor affinity, 15-4
scheduling priority, 15-5
TKPROF
starting, 2-8
TNS_ADMIN networking parameter, C-3
tools, starting
asmtool, 2-8
asmtoolg, 2-8
Automatic Storage Management Configuration
Assistant, 2-6
Data Pump Export, 2-7
Data Pump Import, 2-7
Database Configuration Assistant, 2-6
DBVERIFY, 2-7
Event Viewer, 2-9
Export, 2-7
Microsoft Management Console, 2-9
Microsoft ODBC Administration, 2-6
operfcfg, 2-8
Oracle Administration Assistant for
Windows, 2-6
Oracle Counters for Windows Performance
Monitor, 2-6, 2-9
Oracle Database Upgrade Assistant, 2-6
Oracle Directory Manager, 2-6
Oracle Locale Builder, 2-6
Oracle Migration Workbench, 2-6
Oracle Net Configuration Assistant, 2-6
Oracle Net Manager, 2-6
Oracle Wallet Manager, 2-6
ORADIM, 2-8
ORAPWD, 2-8
Recovery Manager, 2-8
Registry Editor, 2-9
SQL*Loader, 2-8
SQL*Plus, 2-6, 2-8
SQL*Plus Worksheet, 2-6
Task Manager, 2-9
TKPROF, 2-8
trace files
for monitoring a database, 6-1
using, 6-8
troubleshooting
ORA-12560 error, D-19
ORA-28575 error, D-19
TNS-12203 error, D-19
tuning Windows Server operating system, 7-1
U
UNIX
and Windows, Oracle Database differences, E-1
USE_SHARED_SOCKET networking
parameter, C-3
user authentication
description, 9-2
enhancement methods, 9-2
Username parameter, 6-2
UTL_FILE
using, 16-10
UTL_HTTP.REQUEST_PIECES, Intercartridge
Exchange, 16-12
UTL_HTTP.REQUEST, Intercartridge
Exchange, 16-12

Index-8
V
viewing
password file, 5-10
W
Wallet Resource Locator, 12-2
Web data, Intercartridge Exchange, 16-10
Windows
and UNIX, Oracle Database differences, E-1
diagnostic and tuning utilities, 2-14
Windows domains
administering external users and roles, 10-1,
10-20
basic features, 9-2
Windows local groups
with database privileges, 9-3, 10-27
Windows native authentication
benefits, 9-1, 13-8
enhancements, 9-2
installation of, 9-1, 13-8
methods and use of, 9-1, 13-8
overview, 9-1, 13-8
role authorization enhancements, 9-2
setting the sqlnet.ora file, 10-26, 10-27
user and role requirements, 9-2
user authentication enhancements, 9-2
Windows tuning
applying latest service packs, 7-6
closing unnecessary foreground applications, 7-9
configuring server to be an application server, 7-4
disable unnecessary services, 7-5
foreground applications, 7-4
multiple striped volumes for sequential and
random access, 7-8
overview, 7-1
removing unused network protocols, 7-5
resetting the network protocol bind order, 7-5
using hardware and operating system
striping, 7-7
Windows-specific
audit trail, 6-7
automatic database startup after restart, 5-3
initialization parameter file, 14-1
parameter file location, 14-2
parameter filename and location, 14-1
password filename and location, 5-9
role syntax, 10-27
trace file names, 6-8
X
X.500 naming convention, 13-9
