Genymotion Plugin For Android Studio Guide 1.0.7
User Manual:
Open the PDF directly: View PDF ![]() .
.
Page Count: 8

Plugin for Android Studio Guide
Version 1.0.7
Copyright
No part of this document may be reproduced or transmitted
in any form or by any means, without prior written
permission of Genymobile.
Android is a trademark of Google Inc. Amazon Web Services
is a trademark of Amazon Technologies Inc.
Plugin for Android Studio 1.0.7 Guide
Copyright - 2


Overview - 4
Plugin for Android Studio 1.0.7 Guide
Overview
The Genymotion plugin for Android Studio allows you to test your application developed with
the Android Studio IDE. It uses ADB to connect to any active virtual device and push your
application.
This guide explains how to install, use the plugin and run Android applications.
In this guide, the following instructional icons are used:
Notes, tips or additional information.
Situations that could cause performance issues or data losses.

Installing the plugin - 5
Plugin for Android Studio 1.0.7 Guide
Installing the plugin
You can install Genymotion plugin for Android Studio in one of the following ways:
JetBrains repository method (recommended);
Manual method.
JetBrains repository method (recommended)
1. Start Android Studio.
2. Go to:
Windows and Linux: File/Settings.
macOS: Android Studio/Preferences.
3. Select Plugins and click Browse repositories.
4. Right-click (double-click for Mac OS X) on Genymotion.
5. Click Download and install and proceed with the next steps.
6. Restart Android Studio by clicking Restart.
From Android Studio 0.3.0 onwards, the toolbar, where Genymotion icon
is displayed, is hidden by default. To display it, click View > Toolbar.
Manual method
1. Download the Genymotion plugin for Android Studio from the Plugins page.
2. Start Android Studio.
3. Go to:
Windows and Linux:File/Settings.
Mac OS X:Android Studio/Preferences.
4. Select Plugins and click Install plugin from disk.
5. Select the genymotion-IDEA-plugin.jar file and click OK.
6. Restart Android Studio by clicking Restart.
From Android Studio 0.3.0 onwards, the toolbar, where Genymotion icon
is displayed, is hidden by default. To display it, click View > Toolbar.
Using the plugin - 6
Plugin for Android Studio 1.0.7 Guide
Using the plugin
To start using the plugin:
1. Click from the Android Studio toolbar.
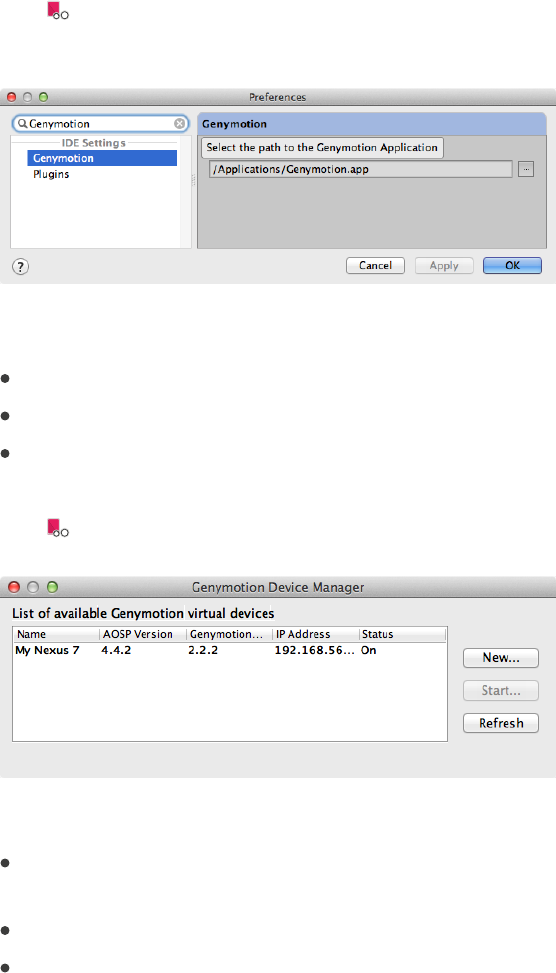
The following window opens:
2. Browse for the Genymotionapplication installation directory:
Windows: C:\Program Files\Genymobile\Genymotion
macOS: /Applications/Genymotion.app
Linux: /home/<user>/genymotion
3. Click OK.
4. Click to open the Genymotion Device Manager window:
From this window, you can perform the following actions:
Create a new virtual device using New;
This automatically starts the Genymotion creation wizard.
Start a virtual device using Start;
Refresh the list of virtual devices using Refresh.

Using the plugin - 7
Plugin for Android Studio 1.0.7 Guide
The virtual device activation status is displayed in the Status column. Values can be:
Off: the virtual device is deactivated;
Paused: the virtual device has been started and paused.
The Restart action gets back to the exact same state;
On: the virtual device is activated, but not connected to ADB.
It means that you cannot select this virtual device in the Choose Device window of the ADB
plugin.

Running Android applications - 8
Plugin for Android Studio 1.0.7 Guide
Running Android applications
1. Click from the Android Studio toolbar.
2. Select the virtual device you want to use and click Start.
3. Close the Genymotion window.
4. In your application project, click .
The Choose Device window opens.
5. Click on the virtual device you started or created.
After a reboot or an unexpected halt of a virtual device, its name in the
Choose Device window may become irrelevant. Close and reopen the
plugin to solve this.
6. Click OK.
While Genymotionplugin window is open, errors are displayed in the
Android Studio console.
