Point85 OEE Getting Started Guide
User Manual:
Open the PDF directly: View PDF ![]() .
.
Page Count: 18
OEE Getting Started Guide Page 1
Point85
Overall Equipment Effectiveness (OEE) Getting Started GuideOverall Equipment Effectiveness (OEE) Getting Started GuideOverall Equipment Effectiveness (OEE) Getting Started Guide
Version 2.2.0Version 2.2.0Version 2.2.0
Kent Randall
March 6, 2019
OEE Getting Started Guide Page 2
Introduction.....................................................................................................................................................................2
Installation.......................................................................................................................................................................2
Desktop Applications ................................................................................................................................................2
Data Collector ...........................................................................................................................................................4
Operator Web Application.........................................................................................................................................5
Plant Model .....................................................................................................................................................................5
Physical Model..........................................................................................................................................................5
Defining Data Collection ........................................................................................................................................10
Testing Data Collection ...........................................................................................................................................14
Data Collector ...............................................................................................................................................................16
Monitor..........................................................................................................................................................................16
Web Application............................................................................................................................................................17
IIINTRODUCTIONNTRODUCTIONNTRODUCTION
This document is a tutorial on how to get started with a minimal system to collect and display OEE data.
For a description of all the capabilities offered by Point85 OEE, please refer to the Point 85 Overall Equip-
ment Effectiveness (OEE) User Guide.
IIINSTALLATIONNSTALLATIONNSTALLATION
Prior to installing the OEE applications, a 32-bit Java 8 JRE must be installed and the JAVA_HOME envi-
ronment variable set. After installation of the JRE, a database from one of the following vendors and ver-
sions (or later) must be installed:
Microsoft SQL Server 2012 or SQL Server Express
Oracle 12c
MySql 8
PostgresQL 11
HyperSQL (HSQLDB) 2.4.1
For the purposes of this guide, a default initialized HSQLDB database is installed in the /data-
base/hsql/data/oeedb folder and is named “OEE”. Run the Windows shell script “run-hsqldb-server.bat”
to launch a local HSQLDB server connected to the OEE database in the PUBLIC schema. The default JDBC
connection string for the JavaFX 8 desktop applications and Vaadin web application are configured to
connect to this default server. This is the quickest way to get the Point85 applications running.
DDDESKTOPESKTOPESKTOP A A APPLICATIONSPPLICATIONSPPLICATIONS
The desktop applications are packaged in the oee-<version>.zip file in the OEE-Designer’s dist folder.
Download the oee.zip file and expand the archive into the following folder structure:
root: oee-apps-<version>.jar (Designer, Monitor, Collector and Tester apps), oee-collector-<ver-
sion>.jar (data collector in-process app), run-collector-app.bat (example Windows shell script for ex-
ecuting the data collector test UI), run-designer-app.bat (example Windows shell script for executing
the designer application), run-monitor-app.bat (example Windows shell script for executing the

OEE Getting Started Guide Page 3
monitor app), run-tester-app.bat (example Windows shell script for executing the tester applica-
tion).
config > logging: log4j.properties configuration file
database
import: example CSV import files (reasons.csv and materials.csv)
mssql: create_tables.sql and create_event_table.sql - SQL scripts to create the Microsoft
SQL Server database tables
oracle: create_tables.sql and create_event_table.sql - SQL scripts to create the Oracle data-
base tables
mysql: create_tables.sql and create_event_table.sql - SQL scripts to create the MySQL data-
base tables
postgresql: create_tables.sql and create_event_table.sql - SQL scripts to create the Post-
greqsQL database tables
hsql: create_tables.sql, create_event_table.sql, create_indexes.sql and create_event_ta-
ble_indexes.sql - SQL scripts to create the HSQLDB database tables and indexes. Note that
if the default local OEE database is being used, these scripts have already been executed.
run_hsql_server.bat - Windows shell script to launch the HSQLDB server. The database files
are in the “data” folder.
lib: contains oee-domain-<version>.jar domain classes plus dependent jars
logs: empty folder to contain the Log4j and Java Service Wrapper logging files
wrapper
Win
bin: 32-bit Tanuki Java Service Wrapper community edition (wrapper.exe), install-
oee-collector.bat (Windows shell script to install the data collector as a Windows
service), uninstall-oee-collector.bat (Windows shell script to uninstall the data collec-
tor Windows service), oee-collector.bat (Windows shell script to execute the wrap-
per as a console app)
conf: wrapper.conf (Java Service Wrapper configuration file)
lib: wrapper.dll and wrapper.jar for Java Service Wrapper
MacOSX
bin: 64-bit Tanuki Java Service Wrapper community edition (wrapper), oee-collector
(OS X shell script to execute the wrapper as a console app)
conf: wrapper.conf (Java Service Wrapper configuration file)
lib: libwrapper.jnilib and wrapper.jar for Java Service Wrapper

OEE Getting Started Guide Page 4
The Java Service Wrapper wrapper.conf file requires that the following parameters be defined:
wrapper.java.command: path to a Windows 32-bit Java 8 JRE compatible with the 32-bit Java Serv-
ice Wrapper (or Unix 64-bit JRE compatible with a 64-bit Java Service Wrapper), e.g. for Windows:
set.JAVA_HOME=C:/jdk/jdk1.8.0_152-32/jre
wrapper.java.command=%JAVA_HOME%/bin/java
program arguments for the JDBC connection string and autenticated user. For example for Micro-
soft SQL Server running on localhost at port 1433 and connecting to the OEE database with SQL
Server authenticated user “Point85” and password “Point85”:
wrapper.app.parameter.2=jdbc:sqlserver://localhost:1433;databaseName=OEE
wrapper.app.parameter.3=Point85
wrapper.app.parameter.4=Point85
For Oracle, the JDBC connection string would be similar to jdbc:oracle:thin:@localhost:1521:orcl SYS-
TEM admin, for MySQL to jdbc:mysql://localhost:3306/oee Point85 Point85, for PostgresQL to jdbc:post-
gresql://localhost/oee Point85 Point85 and for HSQLDB to jdbc:hsqldb:hsql://localhost/OEE Point85
Point85.
Before running any desktop applications:
Edit the config/logging/log4j.properties file to set the location of the Point85.log file and logging lev-
els.
If not using the pre-installed HSQLDB server, create a database and then initialize it by executing the
table creation scripts. If using an interface table as a data source, execute the create_event_ta-
ble.sql script.
Optionally, download and install the RabbitMQ broker from https://www.rabbitmq.com. The moni-
tor application now can be used for real-time collector status updates.
DDDATAATAATA C C COLLECTOROLLECTOROLLECTOR
For your operating system (wrapper/MacOSX or wrapper/Win) under the OEE-<version> root folder, the
in-process data collector can be deployed as follows:
Edit the conf/wrapper.conf file to set JAVA_HOME and the database JDBC connection, user name
and password properties (wrapper.app.parameter.2, 3 and 4)
Execute the shell script to install the collector as a Windows service (Win/bin/install-oee-collec-
tor.bat and uninstall-oee-collector.bat), Unix daemon (MacOSX/bin/oee-collector.sh) or Windows
console program (Win/bin/oee-collector.bat).

OEE Getting Started Guide Page 5
OOOPERATORPERATORPERATOR W W WEBEBEB A A APPLICATIONPPLICATIONPPLICATION
Download the operator web application’s war file (OEE-Operator-<version>.war) in the OEE-Operations
project’s dist folder. The web.xml file in the war needs to be edited for the database connection infor-
mation. To do this use a zip file manager application such as 7-Zip to edit WEB-INF/web.xml’s jdbcConn,
userName and password parameters. For example:
<init-param>
<param-name>jdbcConn</param-name>
<param-value>jdbc:sqlserver://localhost:1433;databaseName=OEE</param-value>
</init-param>
<init-param>
<param-name>userName</param-name>
<param-value>Point85</param-value>
</init-param>
<init-param>
<param-name>password</param-name>
<param-value>Point85</param-value>
</init-param>
For this tutorial, we will use Apache Tomcat. Install Tomcat, then run the Tomcat Web Application Man-
ager. In the section of the web page titled “WAR file to deploy,” browse to the war file and click the De-
ploy button. Under the Applications section, the path will be “/OEE-Operator-<version>”.
The Point85 operator application URL is http://<host>:<port>/<war_file_name>/. If Tomcat is installed
locally on the default port of 8080, the URL will be http://localhost:8080/OEE-Operator-<version>/.
PPPLANTLANTLANT M M MODELODELODEL
In the <root> intall folder, execute the run-designer-app.bat script to launch the Designer desktop appli-
cation.
PPPHYSICALHYSICALHYSICAL M M MODELODELODEL
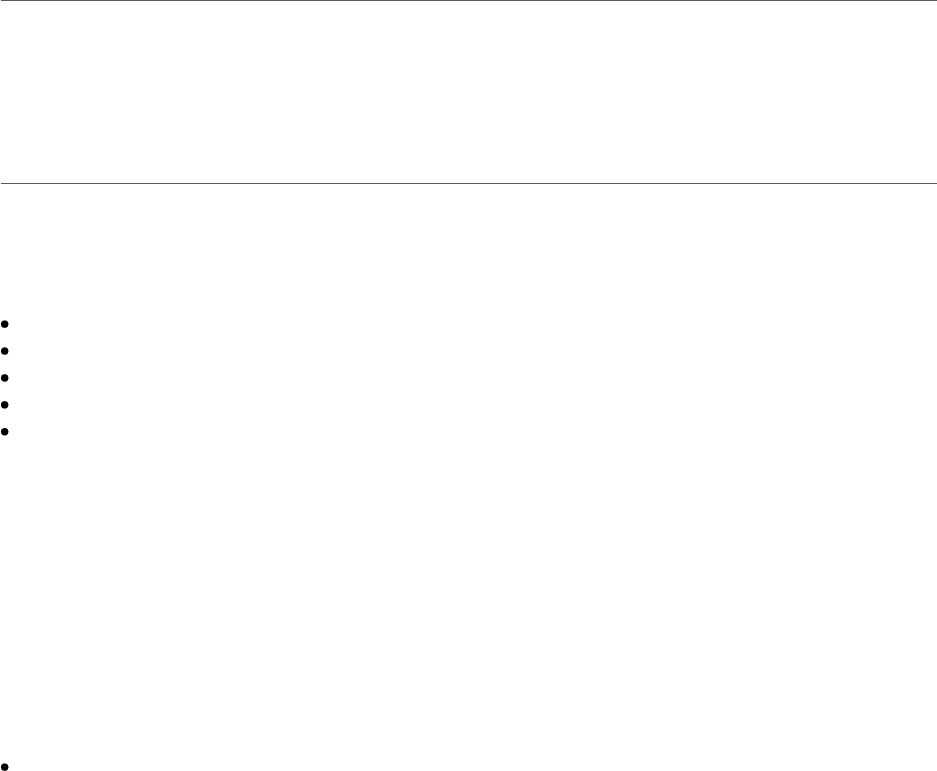
In this guide, we will create a single piece of equipment. In the physical model screen, click on the New
button. Select EQUIPMENT as the type, enter the name and description as well as a 90 day data reten-
tion period. Click Save and answer yes to the question about creating the equipment as a top-level en-
tity.
The screen should look similar to:
OEE Getting Started Guide Page 6
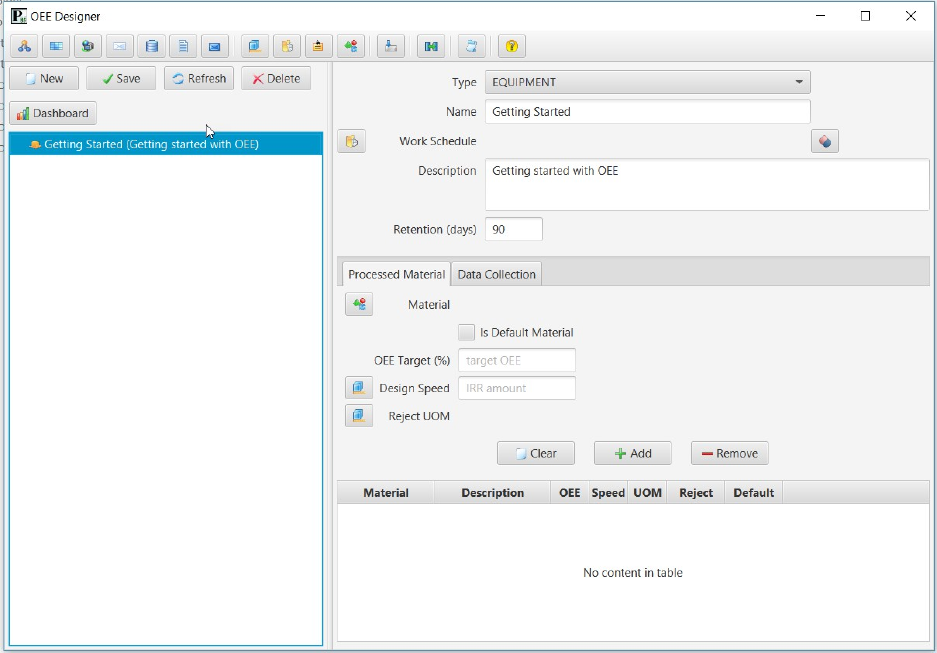
Click on the button to the left of the “Work Schedule” label to assign a work schedule to this equipment.
Rather than creating a work schedule from scratch, we will use one of the pre-defined schedules.
In the work schedule editor, click on the Import button and select the “Manufacturing Company” sched-
ule, then click OK. Select this schedule in the left-hand pane. The editor should look like this:
OEE Getting Started Guide Page 7
Click Done to return to the physical model editor. Select the equipment and click the Save button.
Now we are ready to define the material(s) that can be produced by this equipment. For the purposes
of this guide, we will create just one material. First, click the Clear button above the list of produced ma-
terials (note, for the first material the list is empty).
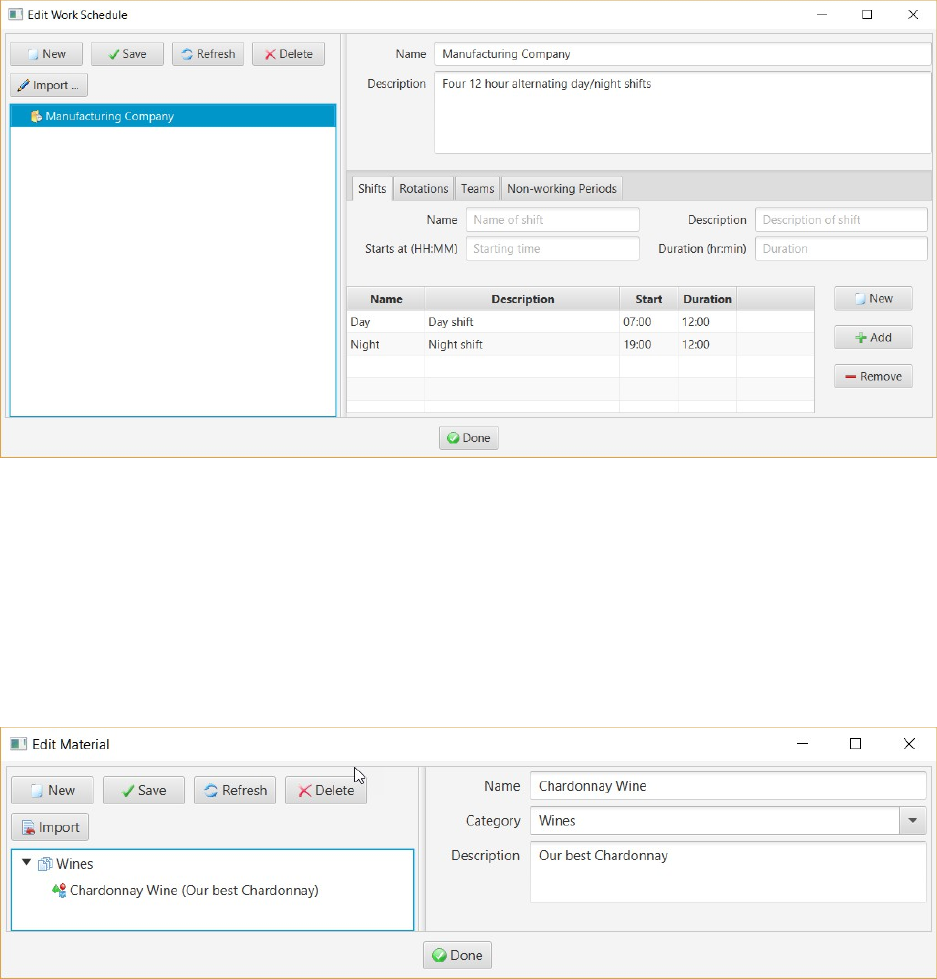
With the “Processed Material” tab selected, click the button to the left of the “Material” label to launch
the material editor. Click the New button, then enter the name of a material produced by this equip-
ment, a category and description for it. Then click the Save button. The editor should similar to:
Click Done to return to the equipment editor. Check the “Is Default Material” box to indicated that this
material will be assumed to be produced if an explicit setup has not been done. Enter a value for the
target OEE, e.g. 85 then click the Save button.
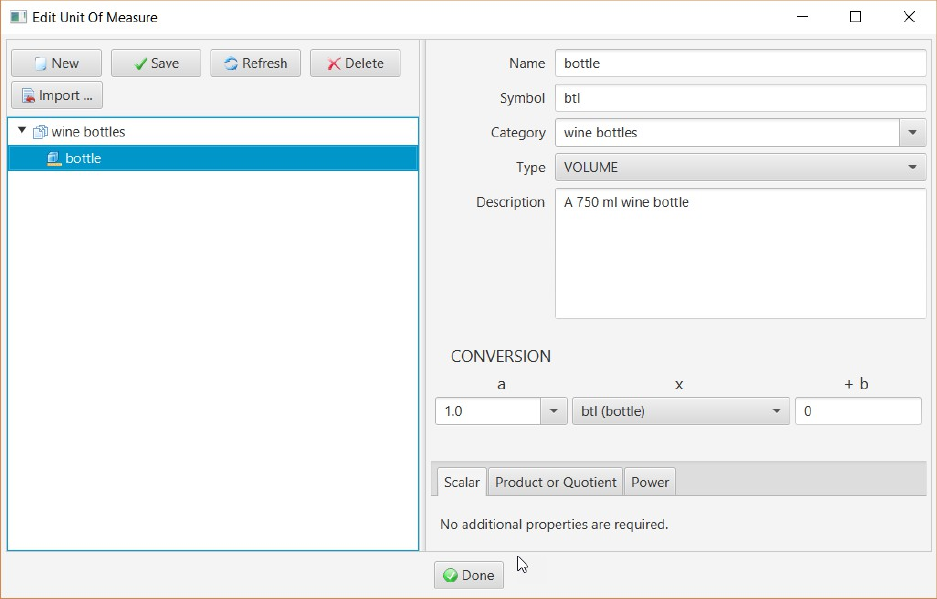
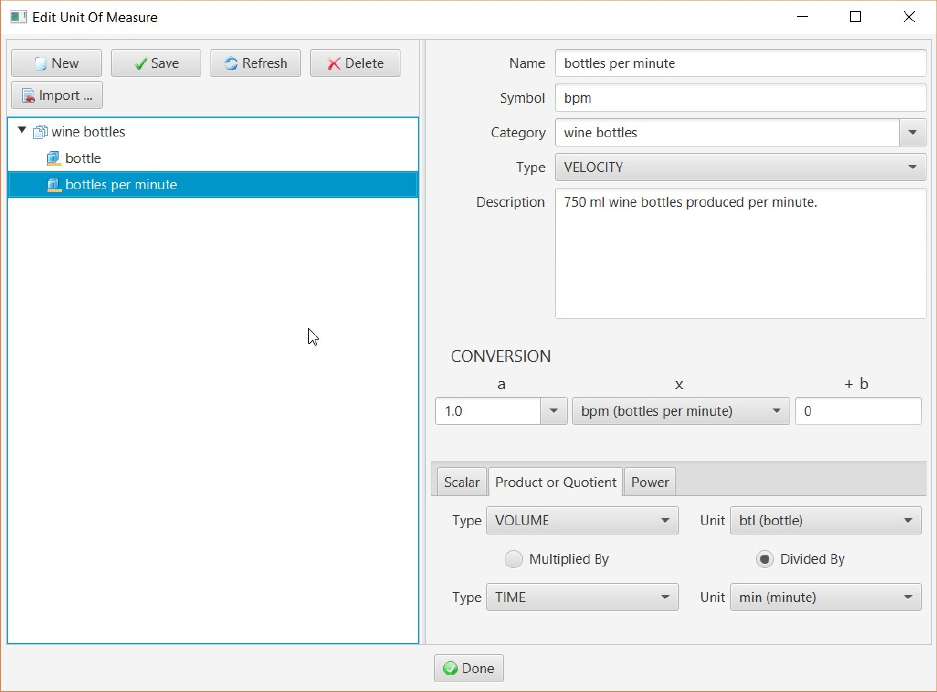
Click the button to the left of the “Design Speed” label to launch the unit of measure editor. Click the
New button, then enter the name, symbol, category, type and description for the unit of measure of
produced material. Click the Save button. The example below creates a bottle for the produced Char-
donnay wine.
OEE Getting Started Guide Page 8
Since the design speed is a rate, we need to create a quotient unit of measure where the numerator is
the previously created unit, and the denominator is a time unit. Click the New button, then enter the
name, symbol, category (same as before), type and description for the rate unit of measure of produced
material.
Select the “Product or Quotient” tab. Select the dividend type (e.g. VOLUME), then the previously cre-
ated unit (e.g. bottle). Click the “Divided By” radio button, then select TIME as the denominator type.
Select “min (minute)” for the unit. Click the Save button.
The example below creates a rate of bottles per minute for the produced Chardonnay wine:
OEE Getting Started Guide Page 9
Select the rate unit of measure, then click the Done button to return to the equipment editor.
The rate symbol will be displayed to the right of the design speed value. Enter the design speed, e.g. 10.
Click on the button to the left of the “Reject UOM” label to re-launch the unit of measure editor.
Choose the previously created scalar unit, e.g. “bottle”, then click the Done button to return to the
equipment editor.
Click the Add button the add this material to the list of materials produced by this equipment (in our
case, it is the first and only one). Click the Save button. The equipment editor should look similar to:
OEE Getting Started Guide Page 10
DDDEFININGEFININGEFINING D D DATAATAATA C C COLLECTIONOLLECTIONOLLECTION
Now we will define how the availabilty and production OEE data is collected. For the purpose of this
guide, assume that the provider will make a web service call to the embedded HTTP server.
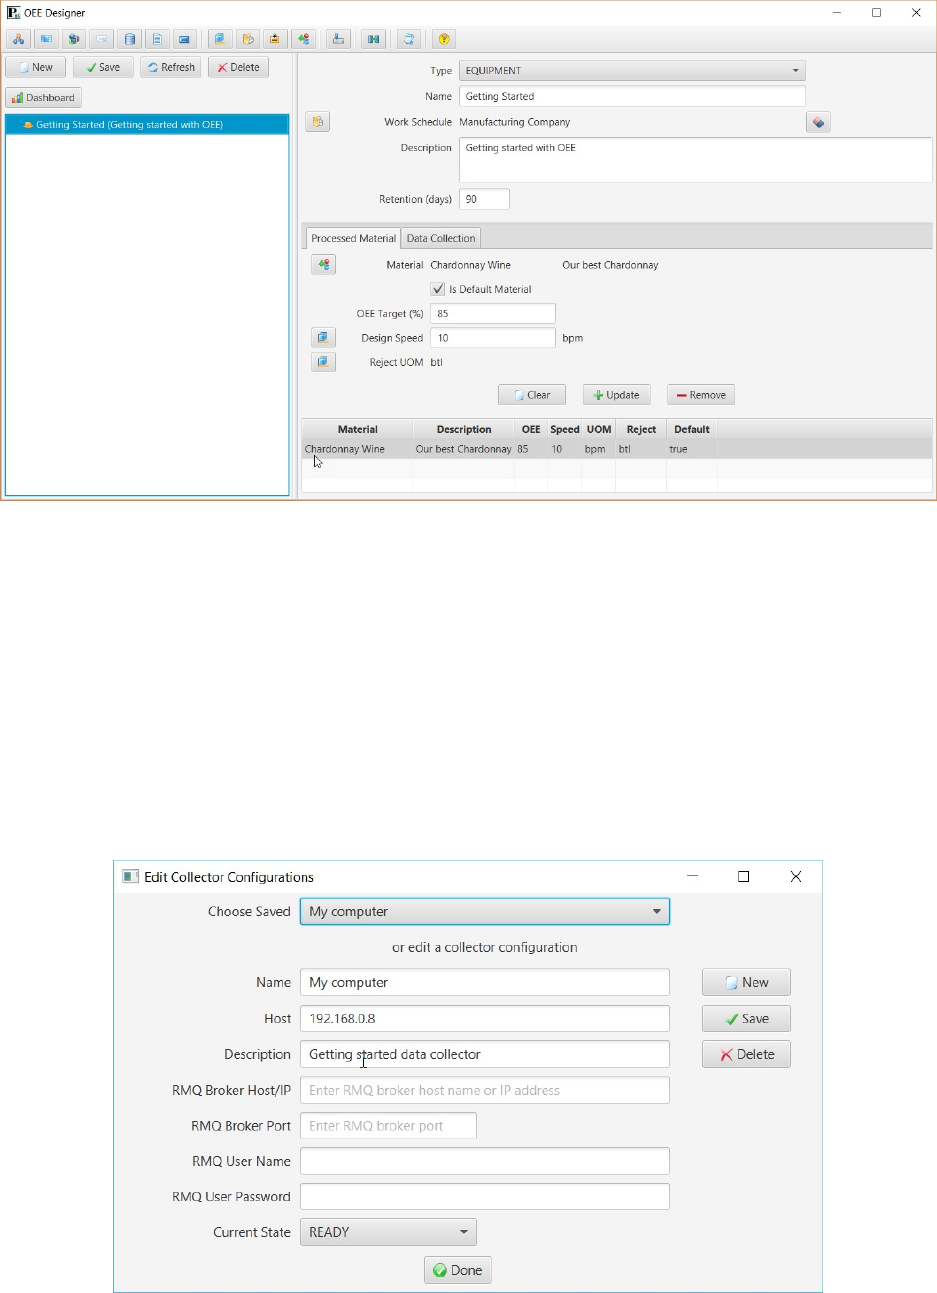
In the equipment editor, select the previously created equipment, then click on “Data Collection” tab.
Click on the button to the left of the “Collector Host” label to launch the data collector editor.
Click New. Enter a name, host IP address (not “localhost”) and description. Set the current state to
READY. For the purposes of this tutorial, leave the RabbitMQ properties blank. Click Save. The editor
should look like:

OEE Getting Started Guide Page 11
Click the Done button to return to the equipment editor. Select this data collector in the combobox. In
the “Resolver For” combobox, select AVAILABILITY. This will be the first resolver created. For the source
type, select “HTTP”.
Click on the button to the left of the “Source Id” label to launch the HTTP server editor. For the purposes
of this tutorial, we will define just one HTTP server on the same machine that the data collector will run.
Click the New button, then fill in the host IP address (not “localhost”), port and a description. Port 8182
is the embedded HTTP server’s default port. Click the Save button. The editor should look like this:
Click the Done button to return to the equipment editor. The source id and server fields will be updated
with the data type indicated a a string.
Click on the button to the left of the “Script” label to launch the JavaScript editor. The editor will look
like this:
OEE Getting Started Guide Page 12
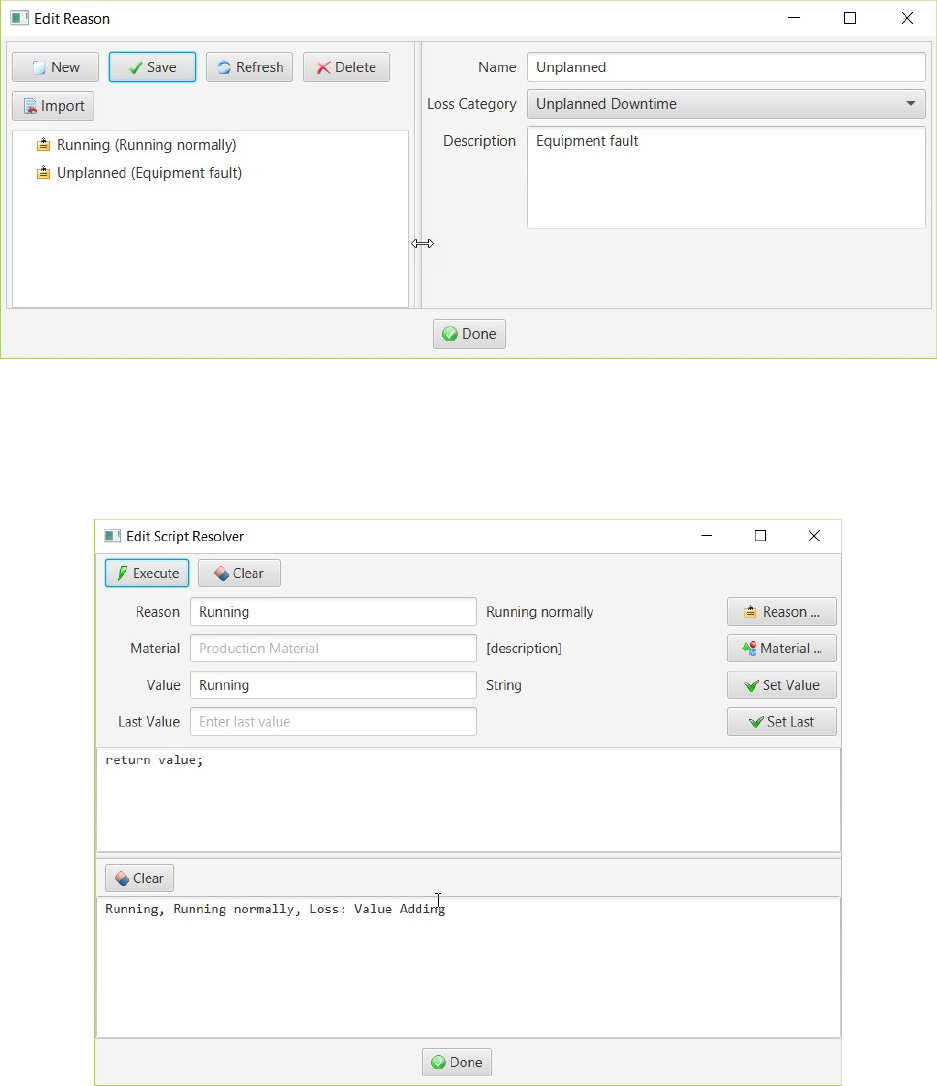
We will define two availability reasons now. Click on the Reason... button to launch the availability rea-
son editor. Click the New button and enter “Running” as the reason name. Choose a loss category of
“Value Adding” (i.e. no loss) and enter a description. Click the Save button and answer “yes” to create a
top-level reason. Repeat these steps for a reason of “Unplanned” with a loss category of “Unplanned
Downtime.” The reason editor should like this:
Select the “Running” reason, then click the Done button to return to the script editor. The “Running”
reason will appear in the text box next to the reason label. Cut and paste this reason into the Value field,
then click the Set Value button. Finally click the Execute button to run the script with “Running” as the
input value. The output Running reason will be displayed at the bottom of the editor.
The script editor should look like this now:
OEE Getting Started Guide Page 13
Click Done to accept the default script that just passes the input availability reason name as the output
reason name and return to the equipment editor.
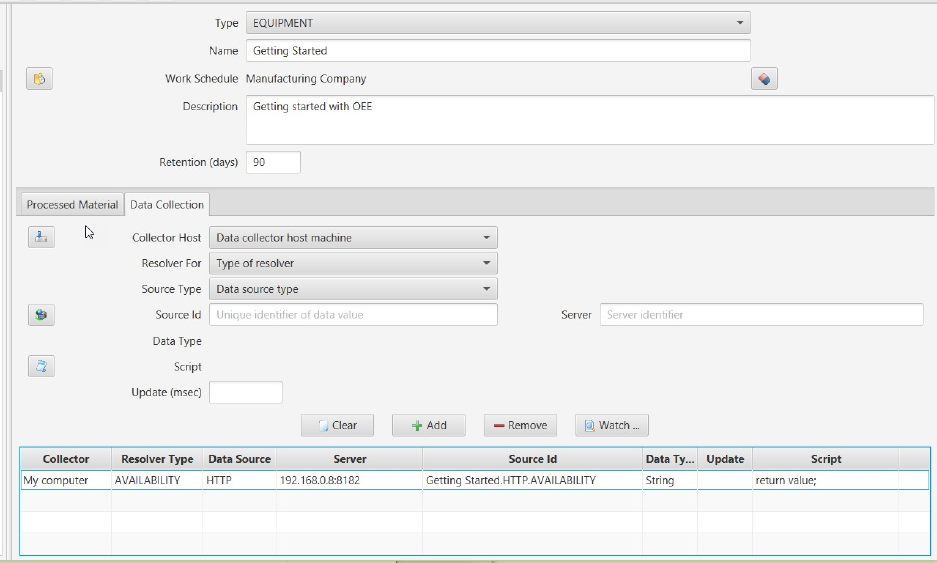
At this point, we have fully defined an HTTP script resolver (it is not necessary to set the update period
for such a resolver). Click the Add button to add this availability resolver as the first one for this equip-
ment. Then click the Save button.
The data collection tab should now display the single availability resolver:
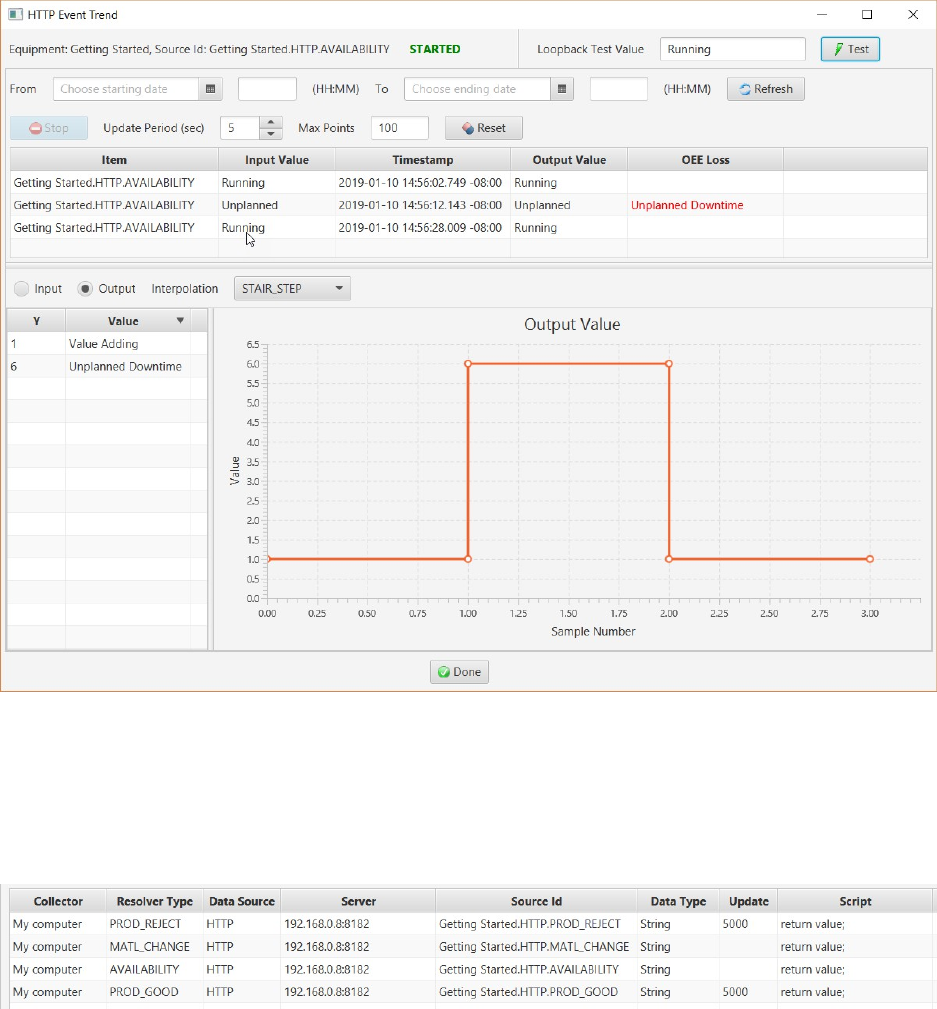
In order to test this resolver in a historical trend chart, select it in the table and click the Watch button to
launch the trend dialog. Select “Output” and interpolation type STAIR_STEP.
Enter “Running” as the loopback test value and click the Test button. The first data point will appear. En-
ter “Unplanned” as the test value and click the Test button. The second data point will appear. Repeat
for “Running” again. The trend dialog should look like this:
OEE Getting Started Guide Page 14
Next, define an HTTP resolver for good production (PROD_GOOD) and one for reject production
(PROD_REJECT) counts by following steps similar to the availability resolver above. Finally define a ma-
terial setup HTTP resolver (MATL_CHANGE).
These new resolvers will look like this when completed:
The production count and material setup resolvers can be tested in the trend chart similar to the avail-
ability chart.
TTTESTINGESTINGESTING D D DATAATAATA C C COLLECTIONOLLECTIONOLLECTION
Besides displaying input and output values in a trend chart in the Designer application, a collector test
application and HTTP/Messaging test application can be used. On the computer with the data collector
that is defined for the four resolvers above (e.g. 192.168.0.8), execute the run-collector-app.bat shell
OEE Getting Started Guide Page 15
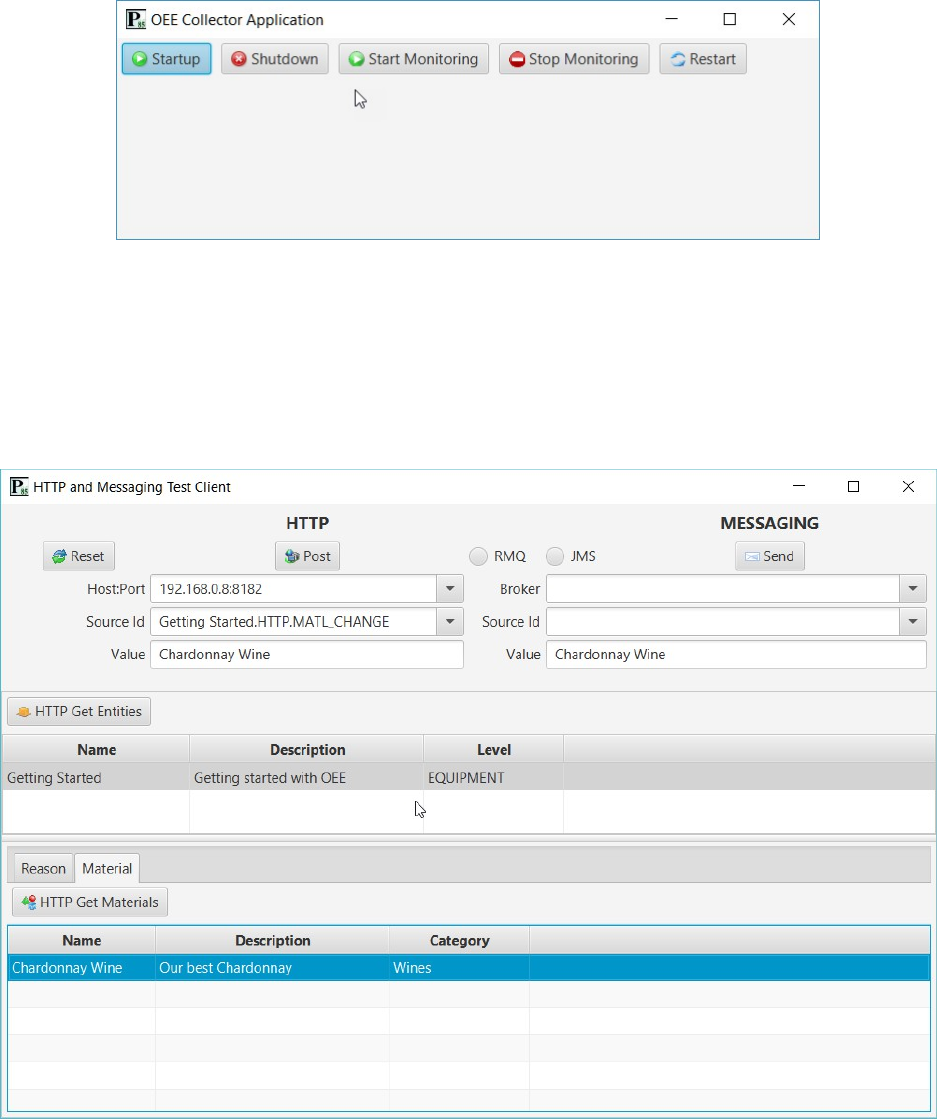
script in the root folder. The collector UI will appear. Click the Startup button. When the collector is
ready, the other four buttons will be enabled:
Now, execute the run-tester-app.bat shell script. The HTTP and messaging test application will appear.
For this tutorial, we will only use the HTTP capabilities.
In the Host:Port combobox, select the previously defined HTTP server. Next, click the “HTTP Get Enti-
ties” button to display the physical model with the single piece of equipment and then select it. In the
“Source Id” combobox, select the material change id. Select the Material tab and click the “HTTP Get
Materials”. Select the previously created wine material. The test client should look like this:
Click the Post button to make a material change request to the collector’s HTTP server. A material setup
will be recorded in the database.
OEE Getting Started Guide Page 16
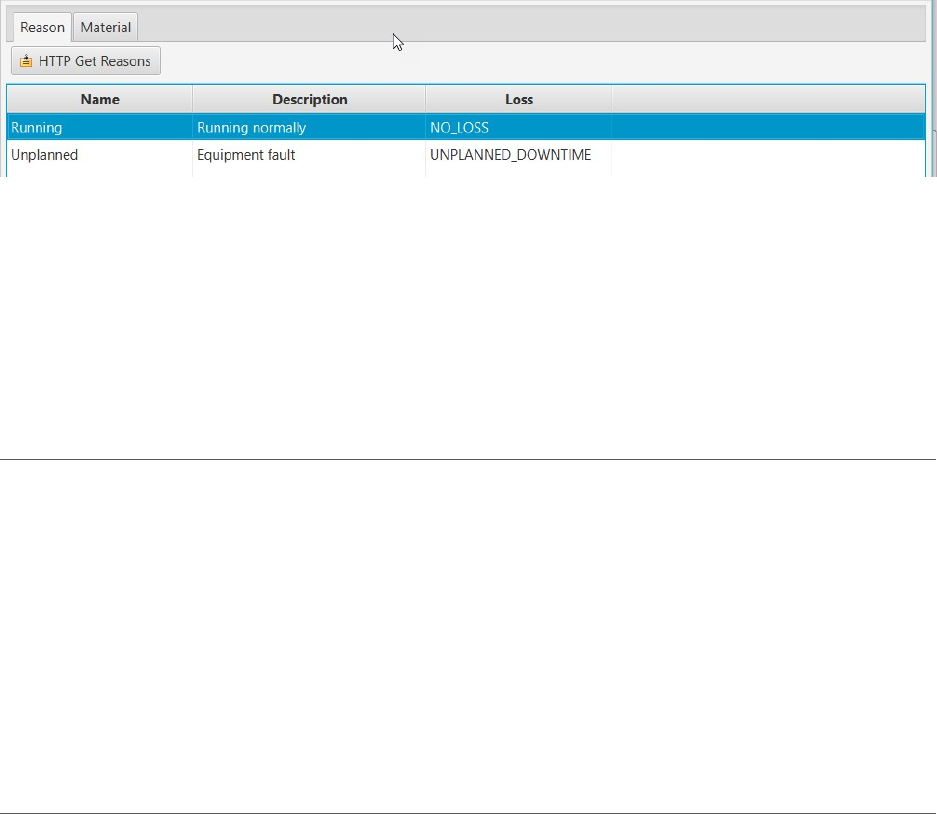
Now, select the Reason tab and click the “HTTP Get Reasons” button to display the availability reasons:
Select the Running reason. Select the availability source id. Click the Post button to make an equipment
availability request to the collector’s HTTP server for a Running reason. Repeat this for the Unplanned
reason.
Now, select the good production source id and enter a numerical value in the “Value” field. Repeat for
the reject source id.
DDDATAATAATA C C COLLECTOROLLECTOROLLECTOR
The data collector is a Windows service or Unix daemon and runs on the computer configured with a col-
lector (in our case 192.168.0.8).
For the purposes of this tutorial, we will run the collector as a Windows console application. Execute
<root>/wrapper/Win/bin/oee-collector.bat shell script. The logging output will appear in the console
window.
Now, execute the run-tester-app.bat shell script. The HTTP and messaging test application will appear.
Follow the steps above to send requests to the collector.
MMMONITORONITORONITOR
The Monitor is a desktop application with an OEE dashboard. The dashboard is also accessible from the
Designer’s equipment editor. To launch the Monitor, execute <root>/run-monitor-app.bat shell script.
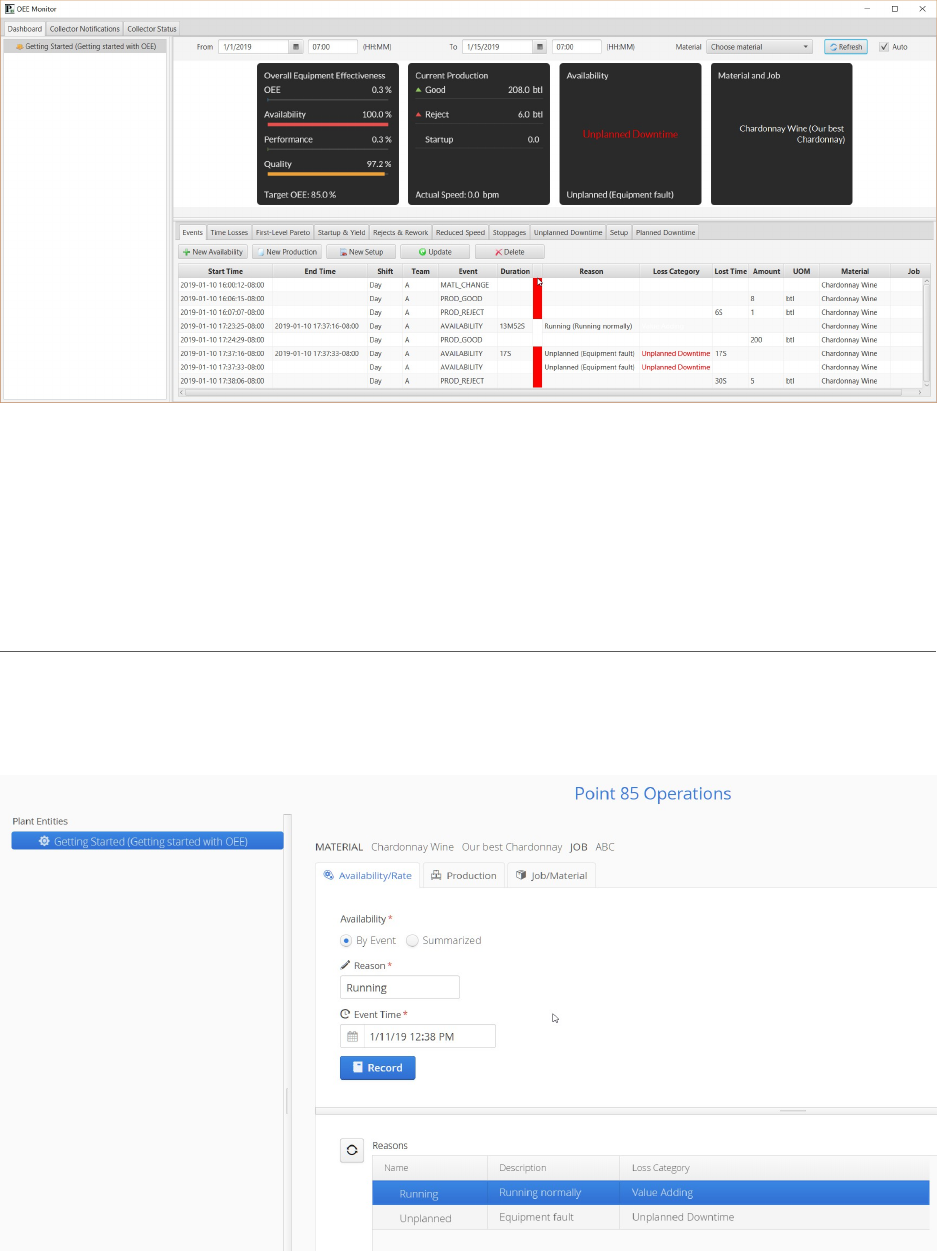
Select the equipment of interest in the left-hand panel. Enter a date and time-of-day range when the
data from this tutorial was collected, then click the Refresh button. Select the “Events” tab. The Moni-
tor’s dashboard will display OEE information from this data. For example:
OEE Getting Started Guide Page 17
If the RabbitMQ message broker is installed, the monitor will update based on equipment events and
status messages sent by the data collectors. Without a message broker, polling of the database is en-
abled by checking the “Auto” checkbox to update the OEE dashboard.
WWWEBEBEB A A APPLICATIONPPLICATIONPPLICATION
Browse to the URL where the Point85 web app is installed, then select the equipment configured above.
Select the Availability/Rate tab, and click the “By Event” radio button. Select “Running” as the reason in
the table below and enter the event date and time of day:
Click the Record button to save this availability event to the database.
OEE Getting Started Guide Page 18
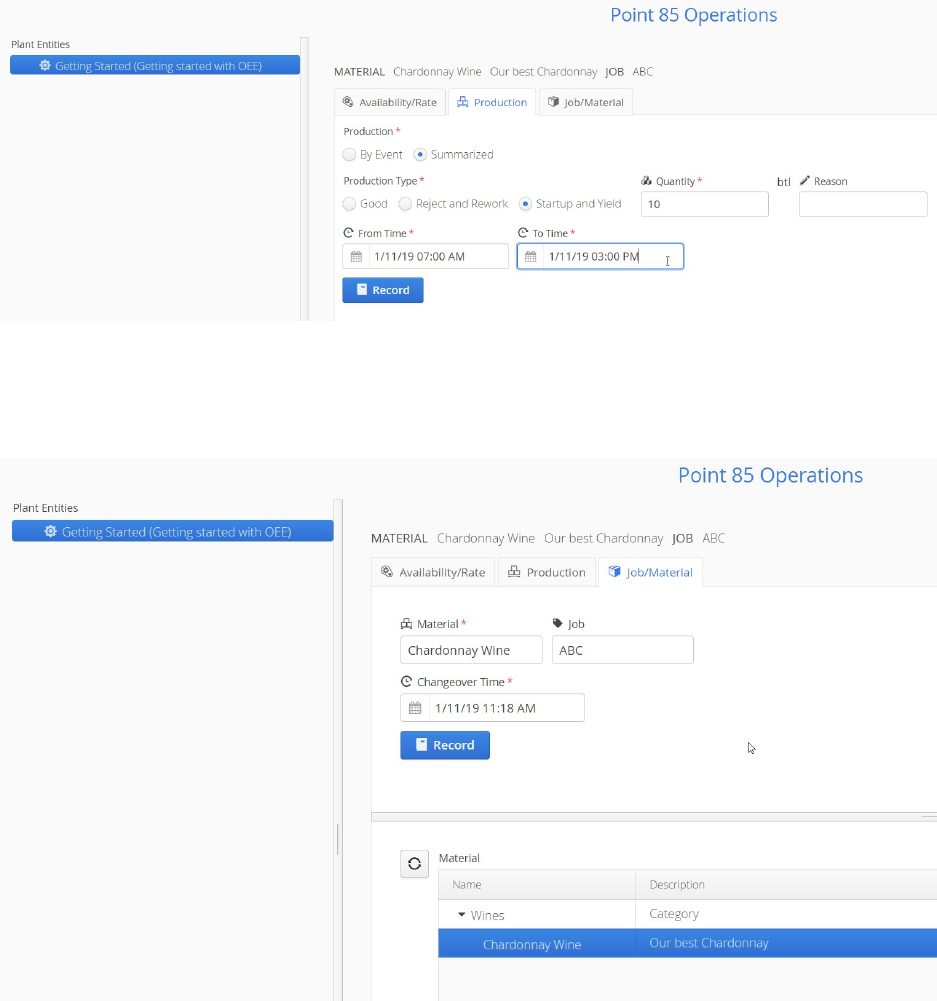
Select the Production tab, and click the “Summarized” radio button. Select “Startup & Yield” as the pro-
duction type and enter the quantity. Enter the beginning and ending date and time of day (e.g. an en-
tire shift) for the summarized startup and yield production counts:
Click the Record button to save this production event to the database.
Select the Job/Material tab, and enter the material being produced for a job number and changeover
time. The web page should look similar to:
Click the Record button to save this job change to the database.
