Daylab Plus User Guide SX 70 Polaroid 35 Users
User Manual: Daylab SX-70
Open the PDF directly: View PDF ![]() .
.
Page Count: 22
- Table of contents
- Introduction
- Daylab 35 Plus Components
- Preparing your film holder
- Assembling the Daylab 35 Plus
- Film Processing time
- Preparing to make an enlargement
- Setting the Exposure Controls
- "A Filter Primer"
- Processing the Film
- Possible Problems, Causes
- Tips for better enlargements
- Specifications
- Daylab 35 Plus Kit Contents
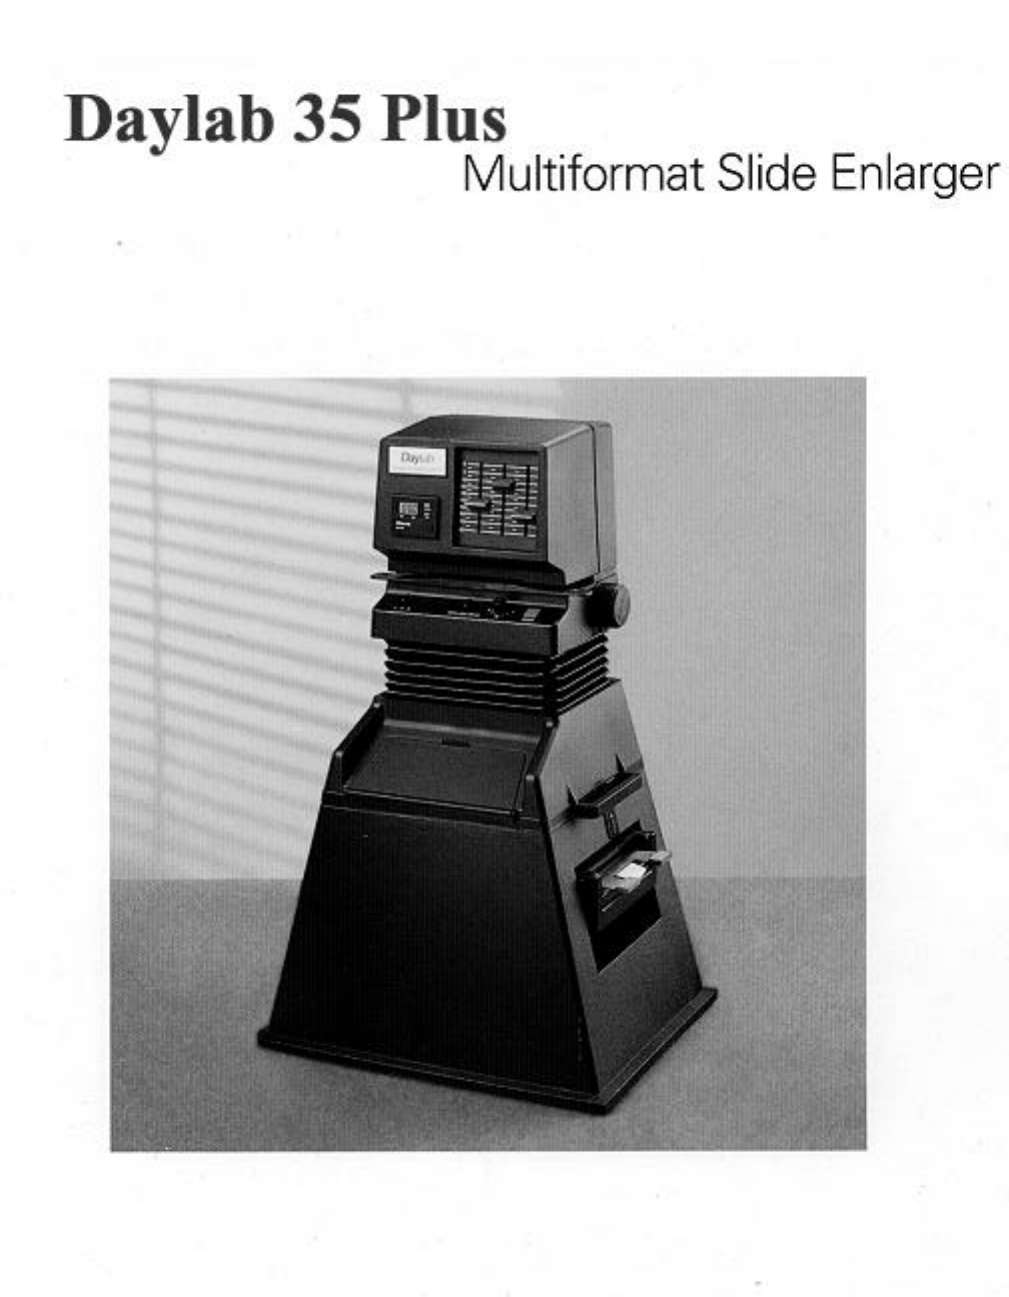
Table of contents
Introduction
1
2
Daylab 35 Plus
components
Preparing your film holder
3
4Assembling the Daylab 35 Plus
Determining the processing time
of the film
5
Preparing to make an enlargement
Setting the exposure controls
Setting the color filtration controls
Exposing the film
Processing the film
Possible problems, causes
Tips for better enlargements
6
7
9
12
13
14
15
16Warranty
For information or assistance
16
17 Parts and accessories
18 Specifications
Illustrations
20 Parts Schematic
19 Components
The Daylab 35 Plus Multiformat Slide Enlarger
enables you to make enlargements of
35mm slides on to Polaroid peel-apart
instant films.
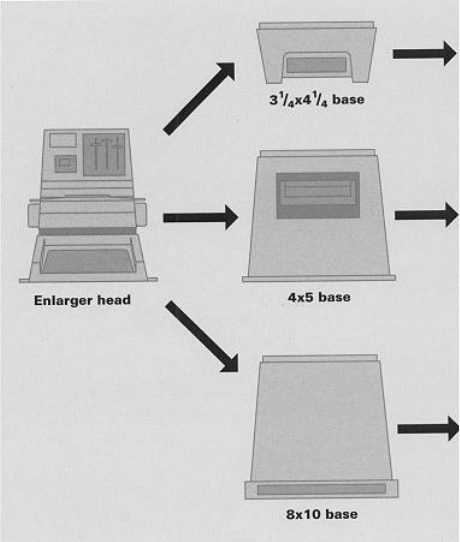
With its modular components, the
Daylab 35 Plus is easy to assemble and simple
to operate. The enlarger head is designed
for use with any of four interchangeable
bases, giving you the capability of using
different Polaroid instant film formats.
The Daylab 35 Plus comes with a base that
uses the 4x5 instant film format.
Featuring built-in color filters,
automatic exposure control, manual
exposure adjustment and enlarging
capabilities, the Daylab 35 Plus allows for
a wide range of creative applications,
including the Polaroid Image/Emulsion Transfer
processes. (For detailed information about
these processes, refer to the Polaroid publica-
tion entitled Creative Uses included in your
Daylab 35 Plus kit).
Introduction
1
Three other bases are available as Daylab 35 Plus
accessories (for a complete list of
accessories, see pages 16-17 of this
The letters throughout the text refer
to the Daylab 35 Plus illustration on
page 20 of this manual.
manual):
The Daylab 35 Plus has two main components:
4 x 5
base:
This base has a Graph-Lok
adapter, a built-in locking system, that
accepts either the Polaroid Model 545i
Film Holder for use with 4 x 5 in. single
1 The enlarger head (a): With built-in
color filters, automatic exposure control,
manual exposure adjustment and
enlarging capabilities.
sheet films or the Polaroid Model 550
2 The film-holder base (g): You can
choose from four film-holder bases that
Film Holder for use with 4 x 5 in. pack film
(ten exposures per pack). With the 4 x 5
base, you can enlarge a projected image
to enlarge your slides ontoenable you
the following peel-apart film formats:
31/4 in. x 41/4 in., 4 x 5 in.and 8 x10 in.
The bases are easily changed at any time.
Each base comes with either a dark slide
or a focusing panel (f) which is to be
inserted into your film holder. When fully
inserted into the film holder, it prevents
accidental exposure of your film. This
dark slide/focusing panel has a white
surface for use when you compose and
focus your image.
by
60%.
Note:
The 4 x 5 base comes with a white
plastic focusing panel, for viewing and
focusing images, to be used with the
Polaroid Model 545 Film Holder. It is not
intended for use with the Polaroid Model
550 Film Holder which has its own dark
slide.
· 8x10 Base: For use with Polaroid
8 x 10 in. film. This bases accepts a
Polaroid Model #81-06 Film Holder.
The 8 x 10 base is available separately
or as part of a kit with the Calumet 8 x 10
Instant Film Processor and the Polaroid
Model #81-06 Film Holder (see Parts and
accessories on pages 17-18). With the
8 x 10 base, you can enlarge a projected
For use with 3 1/4x 4 1/4in.
pack film. . With the 3 1/4 x 4 1/4 base, you
can enlarge a projected image by 54%
image by 78%
.
Note: The 8 x 10 base comes with a dark
slide, one side of which is white for
viewing and focusing images. It is
intended for use with the Polaroid Model
#81-06 Film Holder.
3 1/4 x 4 1/4 Base:
(This base comes standard with the
Daylab 35 Plus less 4x5 holder)
Also available in limited quantities is
an SX 70 Base for use with Time
Zero Film for SX 70 Manipulations.
Contact Polaroid or Daylab for further
information.
Time Zero SX 70 Base:
Daylab 35 Plus Components
2
Polaroid for a replacement dark slide
Recommended film types for specific
Daylab 35 Plus applications are listed in the
chart below.
Before
loading the film,
you may need to prepare your film
holder, depending on which film format
and Daylab 35 Plus base you plan to use.
and or assistance on(see for information
page 15 of this manual).
Do not
try to
use the white plastic focusing panel,
specifically designed for the 545i film
holder, with the 550 film holder.
8 x 10 base:
The 8 x10 base is intended
for use with the Polaroid #81-06 Film
Holder which can be used with either the
Polaroid 8 x 10 Film Processor or the
Calumet 8 x 10 Instant Film Processor.
Before loading film, take the dark slide
that comes with 8 x 10 base and insert
it into the film holder. Be sure that the
white side
of the dark slide faces upward,
4 x 5 base: You can use three types of
film holders with this base.
The
Polaroid Models 545i & 545 Pro Film Holders.
For use with 4 x 5 in. single sheet film.
A white plastic focusing panel (f) for com-
posing and focusing your image is included
with the base. Insert it into the 545 type film
to compose and focus yourenabling you
image.
holders as you would a single sheet of film.
The Polaroid Model 550 Film Holder:
For use with 4 x 5 in. pack film. Be sure
the white side of the film-holder dark slide
faces upward, enabling you to compose
and focus your image on the dark slide.
Note: If you purchase a 550 film holder
separately, the stainless steel dark slide
does not have a white side. Contact
Loading film
To load film, refer to your film holder
instructions.
Note
: When using either the 3 1/4 x 4 1/4 or
the 4 x 5 film-holder base, load your film
into the film holder before assembling
the enlarger head and the base.
Recommended Polaroid peel-apart instant films,
for use with the following Daylab 35 Plus applications:
Inter-
Slidelmage/Emulsion
transfer negative
Film format copies
Color Applications
669& 679
669
3 1/4 x 4 1/4 pack film
559
4 x 5 pack film
559
59 & Polacolor pro 100
59
4 x 5 sheet film
809809
8 x 10 sheet film
Black and-white applications - Polapan Pro 100
665
3 1/4 x 4 1/4 pack film
- Polapan Pro 100
4 x 5 pack film
-
Polapan Pro 100
55
4x 5 sheet film
-
8 x 10 sheet film Polapan Pro 100
Preparing your film holder3
3 1/4 x 4 1/4 film holder: The film holder that is
built into the 31/4 x 41/4 base comes
ready-to-use. Continue with Loading film.
SX 70
Manipulation
SX 70 film Time Zero SX 70
8 x 10 base: After loading the 8 x 10
negative sheet into the film holder and
removing the negative envelope, insert
the film holder into the base. The film
holder slides into the slot at the bottom of
the base (see illustration below). Push the
holder into the slot as far as it will go.
When correctly inserted, the film holder
locks securely into place
After preparing the film holder and
loading the film, assemble the Daylab 35 Plus
as follows:
1
Attach your film holder to the film-holder
base (g). Step 1 is required only when
using the 4 x 5 or 8 x 10 film-holder base.
If using the 3 1/4 x 4 1/4 base, proceed with
Step 2.
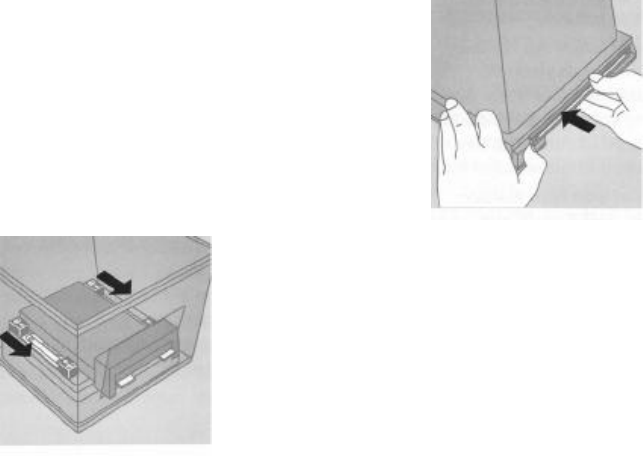
4 x 5 base: Attach either the Polaroid
Model 545i, Pro or the Polaroid Model 550
Film Holder to the base. Turn the base
upside down so the two sliding metal
bars with the "lock" and "unlock"
symbols are in view. Slide both bars
as far as they will go in the "Unlock"
direction. Place the film holder over the
opening between the bars as shown in
the illustration below.
2
Attach the enlarger head (
a
) to the
film-holder base (9).
3 1/4 x 4 1/4 base: Align the assembly
fittings (e) on the sides of the enlarger
head with the assembly locks on the
base. When properly mounted, the
enlarger head rests securely on the base.
Be sure that the side of the film holder
with the dark slide or focusing panel (f)
faces this opening. With the film holder
in place, slide the bars back to the "lock"
position, in the direction indicated by the
arrows in the illustration. When the film
holder is properly mounted, the bars fit
into the grooved edges of the film holder,
securing it to the base.
4Assembling the Daylab 35 Plus
different film
Processing times vary for
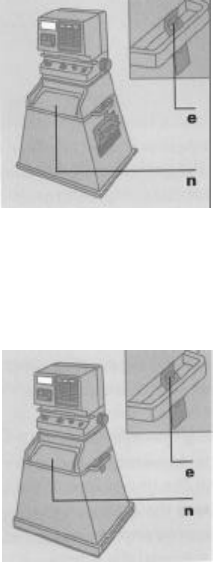
4 x 5 and 8x10 bases:
As shown in
the illustrations below, orient the base
so the previewing door (n) faces you and
you can access the film-holder opening
(4 x 5 base) or slot (8 x 10 base) from the
right side of the base. Then, holding the
enlarger head so the controls are facing
you, place it upon the base so the
assembly fittings (e) snap into the locks
(see illustration insets)
types. Also, temperature affects the
processing time of your film. Check your
film instructions for the recommended
processing times.
Note: When you make image transfers,
the film requires a different processing
time. For recommended processing
times, refer to the Creative Uses Guide
included with your system.
The Daylab 35 Plus
head, mounted on the
4
x 5 film-holder base
The Daylab 35 Plus
head mounted on the
8x10 film-holder base
3 Plug the power supply (d) into an
appropriate electrical outlet and then
into the connection on the back of the
enlarger head.
Film Processing time5

Select a slide
The Daylab 35 Plus allows you to add creative
effects to your slides, but it cannot
improve the photographic quality of your
original image. Choose a clean, dust-free
35mm slide that is in sharp focus, has an
even exposure (neither too light nor too
dark) and accurately renders your
subject's colors.
Open the previewing door (n) to view
your image projected onto the white
focusing panel or dark slide of the film
holder (as shown below)
Orient your slide on the slide carrier
Holding the slide carrier (i) with its long
edge facing you (the guides that hold the
slide in place face upward), lay your slide
-side-up (dull-side-up) on theemulsion Notice that the slide carrier does not lock
into position in the slide carrier slot,
allowing you to move it in any direction
to crop and center the projected image
For more information on composing your
carrier sothat it fits within the guides.
Be sure to orient the slide on the carrier
so the image is upside down and appears
as a mirror image on the focusing panel
or dark slide. picture, see Tips for
better enlargements
on page 14 of this manual.
Compose your picture
With the slide correctly oriented, insert
the slide carrier into the slide carrier slot
(see illustration below).
Focus your picture
As you view the image projected on the
dark slide, turn the cropping and focusing
control (c) on either side of the enlarger
or reduce the image to ahead to enlarge
desired size. Raising the enlarger head
enlarges the image; lowering it reduces
the image. To bring the image into sharp
focus, slowly reverse the direction that
you turned the cropping and focusing
control when you cropped the image,
until the image is focused.
Caution: After bringing your image
into sharp focus, be sure to close the
previewing door. Leaving the previewing
door open while you expose the film
fogs the print.
Set the VIEW-OFF-PRINT switch (
1
)
at VIEW: the viewing light inside the
be on.enlarger head should now
Preparing to make an enlargement
6

Setting the Exposure Controls
On the front of the Daylab 35 Plus enlarger
head are the four controls that let you set
film type and make an exposure: the
automatic exposure switch (M), the VIEW-
OFF-PRINT switch (L), the manual
exposure adjustment dial (K) and the
START button (J).
The Daylab 35 Plus has a built-in exposure
sensor that measures the density of your
slide and automatically sets the intensity of
the electronic flash. Combining the func-
tions of the automatic exposure switch and
the manual exposure adjustment dial, you
can fine-tune the exposure of your print.
The automatic exposure switch (M)
You can choose from three set exposure
times. For recommendations for specific
exposure settings for the type of film you
are using, refer to the chart below. As a
general rule, use the settings as follows:
Setting 1: For use with Polaroid 8 x 10 in.
Type 809 peel-apart instant film.
Setting 2: For use with Polaroid SX-70,
Type 669, 59, and 559 3 1/4 x 4 1/4 in. and
4 x 5 in. peel-apart instant films.
Setting 3: For use with Polaroid Type 689
and Pro 100 films.
The VIEW-OFF-PRINT switch (I)
With three settings: VIEW, OFF, and
PRINT, use this switch to select the proper
light source as you compose an image on
the darkslide/focusing panel or as you print
an image.
VIEW:
Select VIEW to compose an
image on the dark slide focusing
panel. This setting activates the
lamp that illuminates your image
onto the dark slide.
Note:
With VIEW selected, you
cannot preview the effects of any
color filtration on your projected
image.
Caution:
Never leave your slide under
the view lamp longer than necessary.
Heat from the lamp can damage
your slide.
OFF:
After you compose and focus
your image, return the switch to
OFF until you are ready to make a
print. This helps extend the life of
the VIEW lamp. When you finish
using the Daylab 35 Plus, return the
switch to OFF.
PRINT:
Select PRINT when you are
ready to make an exposure.
The following is the recommended starting point for the various
film types:
Film Type Setting Adjustment Filters
SX-70 2 -3 0 0 0
559 2 0 0 0 0
59 2 0 000
664 3 -1 0 0 0
669 2 0 0 0 0
689 Pro 100 3 -2 0 0 0
809 1 0 0 0 0
If you are enlarging you need to turn the adjustment o plus one
click to the +. If you are using more than 30cc’s of color, you
might also have to add another click. If you have any ques-
tions, please call Daylab at 800-235-3233.
7
The manual exposure adjustment
dial (k)
Use the manual exposure adjustment dial
to override the three automatic exposure
settings. The dial lets you make exposure
corrections to your prints and has an
exposure-correction range with seven
settings. Use the "0" setting at the
midpoint of the range when no exposure
correction is needed. If you are making an
enlargement of a
properly exposed
slide,
use the "0" setting as your starting point.
You can either add or subtract exposure
time from the "0" setting. Adjusting the
exposure by one line on the dial is
equivalent to 1/2 f/stop. The dial lets you
add or subtract up to 2 1/2 f/stops. Turning
the dial from "0" clockwise in the "+"
The START button (j)
The red START button activates the
automatic exposure sensor and the
printing light which exposes the film.
Note: Only a slight amount of pressure
is needed to activate the START button.
By using a light touch, you also minimize
the possibility of moving the enlarger
head and blurring the image.
direction lets you increase the exposure
Caution: When you are ready to make
an exposure, be sure to close the
previewing door (n). If you leave the
door open, you will fog your print.
to lighten your printed image.
Turning the dial from "0" counterclock-
wise in the "-" direction lets you reduce
the exposure to darken your printed
image. For more information see Possible
problems, causes on page 13 of this
manual.
8
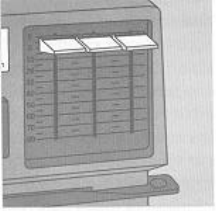
The filters are scaled so you can measure
the amount of filtration for each color.
Use "0" for no filtration Or, increase the
filtration by increments of "5", up to "80,"
the maximum filtration level.
On the front of the enlarger head are
three color filtration controls (
h
), allowing
for color correction to your projected
image (see illlustration below).
As you evaluate the color balance of
your image to determine what correction
it may need, first select a portion of the
image that should be
neutral or gray
to
detect any undesirable color cast
Whenever possible, look also at
skin
tones
for improperly balanced color. To
eliminate
the undesired color cast from
your image, you will need to add filtration
for that color's complement (for color
correction, refer to the chart on page 10)
.
The Daylab 35 Plus enables you to adjust the
color balance of your enlargement by
adding amounts of the three primary
colors: cyan, magenta and yellow (singly
or in combination) to your print.
9

To add a certain color to your printed
In color photography, light is broken
down into three primary colors: cyan
(greenish blue), magenta (reddish purple)
and yellow. By pairing these colors in
equal amounts, you can create the image, you must either add that same
color with filtration or decrease its
complement. Use the chart below to
determine what filter or combination
of filters you need to correct your image.
following secondary colors:
CYAN + MAGENTA = BLUE
MAGENTA + YELLOW = RED
YELLOW + CYAN = GREEN
Correcting prints from color slides
or
subtract:
If you want:
add:
Less YELLOW CYAN + MAGENTA
YELLOW
CYAN - MAGENTAMore YELLOW
YELLOW
CYAN
MAGENTA + YELLOWLess RED (MAGENTA + YELLOW)
More RED
CYAN
MAGENTA + YELLOW
Less MAGENTA
YELLOW + CYAN
MAGENTA
More MAGENTA
YELLOW + CYAN
MAGENTA
CYAN + MAGENTA
YELLOW
Less BLUE (CYAN + MAGENTA)
More BLUE
YELLOW
CYAN + MAGENTA
Less CYAN
CYAN
MAGENTA + YELLOW
More CYAN MAGENTA + YELLOW
CYAN
YELLOW + CYANLess GREEN (YELLOW + CYAN)
MAGENTA
More GREEN
YELLOW + CYAN
MAGENTA
10 "A Filter Primer"
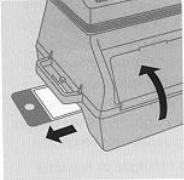
5 in order to expose the film, first close the
previewing door (
n
) as shown in the
illustration below. Then pull the dark slide
or focusing panel (
f
) as shown, following
the directions that apply to the film holder
and film holder base you are using.
1 Slide the automatic exposure switch (
m
)
to the setting appropriate for the type of
film you are using.
2 Set the manual exposure adjustment
dial (
k
) at the setting appropriate for
your slide. For a slide image with average
lighting conditions, start with the "0"
setting.
3 Set the VIEW-OFF-PRINT switch (
I
) at
PRINT.
4 If you are printing onto color film, set
the color filtration controls (
h
) all to
the zero setting to start.
Most slides will print well with no fitration.
If printing onto
black-and-white films,
you should initially set the three color
The Daylab 35 Plus, mounted on
the 3 1/4 x 4 1/4 base
3 1/4 x 4 1/4 base:
Gently pull the dark
filtration controls to "0" You can,
slide out
as far as it will go.
however, use filters to add or subract
4 x 5 base:
if you are using a Polaroid
Model 545i or Pro Film Holder, gently pull the
white plastic focusing panel
all the way
out of the film holder and replace it with
a single sheet of film. Then, following the
instructions in the film holder instruction
manual, continue with the film-exposing
process by pulling out the negative
envelope of the single sheet of film.
If you are using a Polaroid Model 550
Film Holder, pull the dark
slide all the
tonal values for black-and-white prints.
way out
of the film holder.
8 x 10 base:
Gently pull the dark slide
all the way out of the
film holder.
Caution:
To steady the Daylab
35 Plus
as you
remove the 8 x 10 dark slide, grip the
enlarger head handle on the left side of
the Daylab
35 Plus
(the side opposite the side
of the dark slide).
Do not
try to steady the
Daylab
35 Plus
by placing your hand
on top
of
the enlarger head as you can lose your
cropping and focusing settings.
11
6 Press the START button (j) to expose To process the film, follow the instructions
that come with your Polaroid film holder.
Wait the required processing time.
Continue processing the film as directed
in your film holder instructions.
Caution: The Polaroid instant film
process uses a caustic paste. Avoid
contact with skin, eyes and mouth and
the film. Press the button gently.
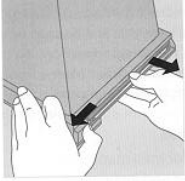
7
After exposing the film, gently insert the
focusing panel or dark slide (f) back into
the film holder, as far as it will go.
8 x 10 base:
After inserting the dark
slide into the film holder, remove the film
holder from the base. With your left-hand
thumb, release the locking device as
shown in the illustration below. At the
same time, grip the film holder with your
right hand, as shown, and pull the film
holder out of the base.
keep away from children and animals.
If you get some paste on your skin,
wipe it off immediately and wash with
water to avoid an alkali burn. If eye or
mouth contact occurs, quickly wash the
area with plenty of water and see a
doctor. Keep discarded materials away
from children, animals, clothing and
furniture.
Processing the Film
12
The image is blurred, out of focus
· An over- or underexposed print. If the
print is overexposed, decrease exposure
with the manual exposure adjustment
dial (
k
) by-1 or more depending on the
severity of the overexposure. It under-
exposed, increase exposure with the
manual exposure adjustment dial by +1
or more depending on the severity of the
underexposure. If the print is severely
underexposed, you may need to increase
exposure by selecting a higher setting
(setting 2 or 3) with the automatic
exposure switch (
m
) or possibly expose
the print more than once.
Most likely causes are:
·
An original slide not in sharp focus.
·
Too much pressure applied when
pressing the START button (
j
) to expose
the print, causing the enlarger head (
a
)
to vibrate or move.
·
Altered focus settings from pressing on
the top of the enlarger head (
a
) while
pulling the dark slide/focusing panel (
f
)
out of the film holder.
The print is blank
Most likely causes are:
·
Forgetting to press the START button (
j
)
The image printed backwards
The slide is incorrectly oriented on the
slide carrier (i). Be sure that the
image
projected on the focusing panel or
dark slide
appears as a
mirror image
of what you want for your final print.
to expose the film.
·
Forgetting to move the VIEW-OFF-PRINT
switch (
I
) to PRINT before pressing the
Start Button(
j
) to expose the film.
(No exposure will have been made.}
·
Leaving the previewing door (
n
) of the
Lamp replacement
film-holder base (
g
) open while pressing
START(
j
) to expose the film. Contact Polaroid for information on
replacement lamps and installation
·
Leaving the focusing panel/dark slide (
f
)
inserted in the film holder while making instructions. See For Information or
an exposure.
·
While using a Polaroid Model 545i or Pro Film
Other film-processing problems
For other problems specifically related to
film processing : black edges, missing
corners, spots or streaks on your prints,
see your film holder instructions for
possible causes. A frequent cause of
film-processing problems is dirty rollers.
Inspect the film rollers in your film
holder frequently and keep them clean.
For further assistance, call Polaroid
Corporation toll-free at 1- 800-343-5000
Mon - Fri. 8 AM to 8 PM (Eastern Time).
Holder
(for 4 x 5 in. sheet film), the
negative came out with the cover. Make
sure the sheet is pushed all the way into
the holder. If the holder is bent or has
matter jammed inside, it may not be
able to grasp the negative.
The print is too light or too dark
Most likely causes are:
·
An original slide over- or underexposed.
The Daylab 35 Plus cannot enhance an
improperly exposed original image.
13 Possible Problems, Causes
Assistance on page 15.
15
Using more than one slide at a time
You can also use the Daylab 35 Plus to print
a single image from two slides. Remove
the two 35mm slide transparencies from
their originals mounts, lay one slide on
top of the other, and align them carefully
to compose your picture. Then, place the
slides together in
a single
mount to keep
the image properly aligned. The Daylab 35 Plus
automatically adjusts the exposure to
compensate for the second slide.
Remember, however, that you can
fine-tune the exposure by overriding
the automatic exposure setting with the
manual exposure adjustment dial (
k
).
Composition and cropping
By repositioning the slide carrier (
i
) in the
slide carrier slot, you have control over
cropping an image as you compose a
picture. When you preview the projected
image on the white focusing panel (
f
),
you can move the slide around to center
of the projected image on theany portion
focusing panel or to crop out that portion
of the image you want to exclude from
out (
lowering
theyour print. Zooming
enlarger head) lets you project an
uncropped image (the full format) of your
35mm slide. Also, you can change the
orientation of an image by rotating your
slide 90 degrees on the slide carrier.
Note: When using the 31/4 x 41/4 base,
you cannot print the full format of your
m out to project anslide. As you zoo
uncropped image of the slide, you lose
approximately 1 /16 in. from the horizontal
dimension of the image.
14 Tips for better enlargements
For further information or warranty assis-
tance with the Daylab 35 Plus or for information
or assistance with the Polaroid image
Your Daylab 35 Plus is guaranteed against
defects in materials and workmanship
for one full year from the date of original
purchase. During this period, any such
defects will be remedied without charge,
except for transportation costs. The
warranty excludes damage resulting
from normal wear, mishandling or
accident, and a charge will be made
for such repairs. The warranty excludes
lightbulbs and the timer battery. This
warranty excludes consequential
damages.
Corporation,
Transfer process, call Polaroid
toll-free at 1-800-343-5000, Mon.-Fri.,
8 AM to 8 PM (Eastern Time).
For Service: Before returning the
Daylab 35 Plus for service, contact Polaroid
Corporation at 1-800-343-5000 for shipping
instructions and service information.
Polaroid Corporation provides
referral and shipping assistance
with the Daylab 35 Plus with the consent
of Daylab and solely as a service
for Polaroid customers. This service
shall not be construed to warrant or
represent the function, fitness, work-
manship or design of any non-Polaroid
products.
15

To order Daylab
35 Plus
parts or accessories,
call Polaroid Corporation toll-free at
1-800-343-5000, Mon.-Fri., 8 AM to 8 PM
(Eastern Time).
Order
number
Item Description
Daylab 35 Plus Multiformat Slide Enlarger 114725
Complete slide-enlarging system
for use with Polaroid 4x5
instant peel-apart films;
includes:
Enlarger head
4 x 5 Film-Holder Base
with Graph-Lok Adapter
Power supply
101371
Daylab 3 1/4 x 4 1/4 Base
Compatible with the Daylab 35 Plus enlarger
head, for use with Polaroid 3 1/4x4 1/4 instant
pack films
619456
Daylab 8 x 10 Film-Holder Base Compatible with the Daylab 35 Plus enlarger
head, for use with Polaroid 8 x 10 instant
peel-apart films;
includes a dark slide with a single
white side for use with a Polaroid
#81-06 Film Holder;
Film Holder & Processor purchased separately
619459
Compatible with the Daylab 35 Plus enlargerCalumet Processor and
Polaroid 8 x10 Film Kit head, includes:
Calumet 8 x 10 Film Processor
Daylab 8 x 10 Film-Holder Base #619456
Polaroid #81-06 Film Holder #603977
Creative Techniques Brochure
Note: All film holders & accessories above are interchangeable with the Original Daylab II System
Daylab Time Zero Base 625554 Use with Time Zero film for SX 70 Manipulations
Includes a focusing panel for
the Polaroid 545i Film Holder;
Polaroid Model 545i, Pro and 550
Film Holders purchased separately
16

Order
number DescriptionItem
Includes:
616164
Polaroid image Transfer Kit
Twin pack of Polaroid Type 669 fiIm
Instructions for producing 31/4 x 41/4 in.
format image transfers
Speedball burnisher/roller, Chipboard, Plastic Tray,
& Watercolor Paper
the Polaroid 545i Film Holder;
617878
Polaroid 546i Film Holder Compatible with the Daylab 35 Plus
4 x 5 Film-Holder base, for use with
Polaroid 4 x 5 instant sheet films
604030
Polaroid 550 Film Holder Compatible with the Daylab 35 Plus
4 x 5 Film-Holder Base, for use with
Polaroid 4 x 5 instant pack films
603977
Polaroid #81-06 Film Holder Compatible with the Daylab 35 Plus
8 x 10 Film-Processing Base, for use with
Polaroid 8 x 10 instant film
Polaroid 545 Pro film holder
100072
Use with Polaroid Holder & Processor
Compatible with the Daylab 35 Plus
4 x 5 Film-Holder base, for use with
Polaroid 4 x 5 instant sheet films
17
Polaroid #81-09 Loading Tray 603978
Polaroid 8x10 Processor 607224
Polaroid 8x10 Processing System 716568
Motorized 8x10 Processor
Includes one Holder, Loading Tray &
8 x10 Motorized Processor

These specifications are for the standard
Daylab 35 Plus enlarger head and 4x5
film-holder base.
Feature Specification
Weight: 8 Ibs.
Height (minimum magnification): 16 in.
Height (maximum magnification): 20 in.
Length: 10 in.
Width: 10 in.
Weight and dimensions
Built-in, non-removable,
35mm, f/:3.5, 4 element:
automatically stops down
to f/5.6 for printing
Enlarging lens
Power supply PS 115 Standard 115 VAC
to 12 volt DC power supply:
also available:
· PS 220 to 240 VAC to 12 volt DC
· PS 100 VAC to 12 volt DC
Built-in cyan, magenta and yellow filters:
Filtration
color correctionadjustable from 0 to 80 cc
units in color density;
more filtration may be added
Automatic sensor, manual override;
control provides 5 f-stop range
(+/- 2 1/2 f-stops)
Exposure control
Built-in electronic Flash
exposure system is automatically controlled
based on density of slide,
subject to manual override
Exposure system
Three-speed switch for:
Film ISO control
1
Polaroid films
2
mid-range ISO films
3
low ISO films
Use settings 2 and 3 for longer exposures
of Polaroid instant films
3 1/4 X 4 1/4 base 54 % enlargement
Magnification range
capability
4 x 5 base: 60 % enlargement capability
8 x 10 base: 78 % enlargement capability
Specifications
18
Daylab II kit contents
The Daylab 35 Plus kit has several components.
Inspect your kit upon opening to be sure
The chart below lists the Polaroid instant
films that are compatible with the Daylab 35 Plus
film-holder bases. (For recommendations
on what films are appropriate for specific
applications, refer to the chart on page 3
of this manual.)
Note: The bases shown below for
it contains the following
:
Enlarger head
4x5 Daylab base
4 x 5 in. and 8 x 10 in. films are available
as accessories. For a complete listing of
Daylab 35 Plus accessories, see pages 16-17
of this manual.
Power supply
This instruction manual
Registration card
3 1/4 x 4 1/4 pack films
Type 665
Type 669
Polacolor Pro 100
4x5 Pack Films
Type 559
Polapan Pro 100
4x5 sheet films
Type 55 P/N
Type
59
Polapan Pro 100
8xlO sheet films
Type 809
Polapan Pro 100
Daylab 35 Plus Kit Contents
Polaroid Creative Techniques Brochere
19
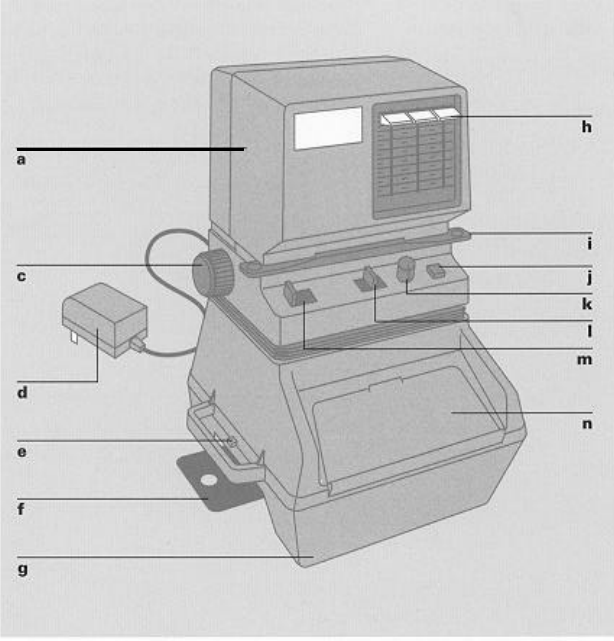
The Daylab 35 Plus enlarger head mounted on the 3 1/4 x4 1/4" film-holder base
a Enlarger head h Color fiItration controls
i Slide carrier
c Cropping and focusing control
d Power supply
e Assembly fittings
f Dark slide/focusing panel
g Film-holder base
j START button
k Manual exposure adjustment dial
I
VlEW-OFF-PRINT switch
m
Automatic exposure switch
n
Previewing door
20
