VCP 2 Manual Polsen User
2019-01-31
: Polsen Vcp-2 User Manual polsen_vcp-2_user_manual files 13673 data
Open the PDF directly: View PDF ![]() .
.
Page Count: 8
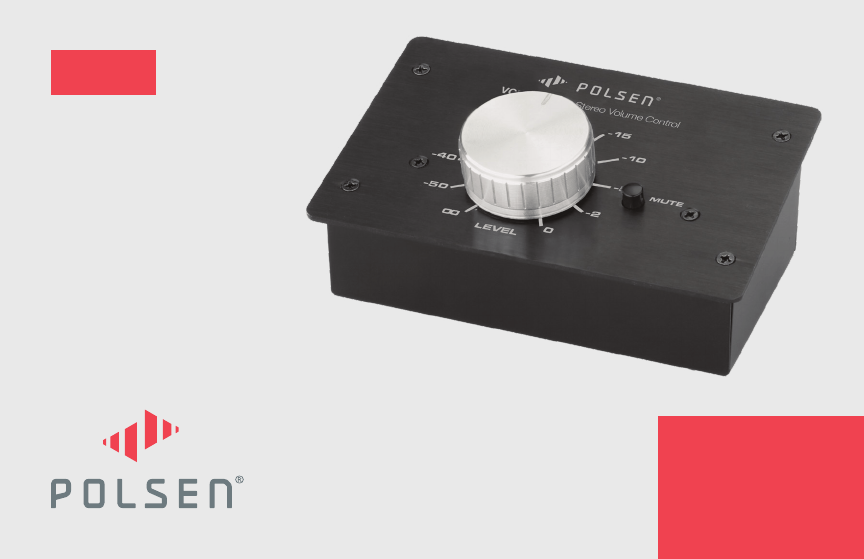
VCP-2
PASSIVE STEREO
VOLUME CONTROL
PRODUCT
MANUAL

2
THANK YOU FOR CHOOSING POLSEN.
The Polsen VCP-2 is a passive monitor controller that’s an effective and dependable addition to any pro, project,
or home studio. This monitor controller adjusts the level of the audio signal that travels between a computer
and powered monitors. It offers a convenient way to control the volume of your speakers without accessing
the computer’s or sound card’s volume controls. The VCP-2 is equipped with XLR/TRS combo inputs for
compatibility with a variety of pro and consumer equipment, and it can be used anywhere a separate volume
controller is needed. The passive design will not alter or color the sound originating on your computer or other
device. With its steel housing, the VCP-2 will stand up to constant and demanding use.
PRECAUTIONS
• Please read and follow these instructions, and keep this manual in a safe place.
• Keep this unit away from water and any ammable gases or liquids.
• Clean the unit with only a soft, dry cloth.
• Do not attempt to disassemble or repair the equipment. Doing so will void the warranty, and Polsen will not
be responsible for any damage.
• All images are for illustrative purposes only.
3
VCP-2 Passive Stereo Volume Control
VCP-2 Passive Stereo Volume Control
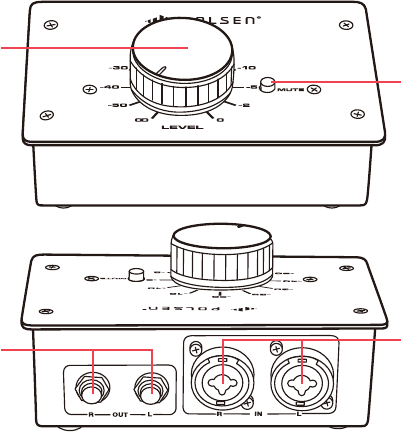
OVERVIEW
Front
1. Volume control knob
2. Mute button
Back
3. 1/4 in. TS/TRS outputs
4. XLR/TRS combo inputs
2.
4.
3.
1.

4
CONNECTING THE VCP-2 TO A COMPUTER
To connect the VCP-2 to a device with a 1/8 in. (3.5 mm) TRS stereo output, follow these steps:
1. Connect the audio output of your computer or device to the two XLR/TRS combo inputs of the VCP-2.
Use a 1/8 in. stereo to two XLR male cable or a 1/8 in. stereo to two 1/4 in. TRS cable.
2. Connect the 1/4 in. TRS outputs of the VCP-2 to your monitors.
3. Set the sound output of your computer to its maximum volume.
4. Turn the VPC-2‘s volume control knob to full attenuation (all the way to the left).
5. Turn on the monitors.
6. Start playing audio on your computer or device, and turn up the volume control knob to the desired level.

5
CONNECTING THE VCP-2 TO AN AUDIO INTERFACE OR SOUND CARD
To connect the VCP-2 to a device with XLR or 1/4 in. TRS outputs, such as an audio interface or sound,
follow these steps:
1. Connect the outputs of your interface or sound card to the inputs of the VCP-2. The VCP-2 will accept XLR or
1/4 in. TRS plugs.
2. Connect the 1/4 in. TRS outputs of the VCP-2 to your monitors.
3. Set the sound output of your computer to its maximum level.
4. Turn the VPC-2‘s volume control knob to full attenuation (all the way to the left).
5. Turn on the monitors.
6. Start playing audio on your computer or device, and turn up the volume control knob to the desired level.
MUTE BUTTON
The mute button quickly silences the sound output. To mute the sound, press the mute button. To
unmute, press the mute button again.

6
DESIGN Passive
CHANNELS 2
INPUT CONNECTORS XLR/TRS combo (×2)
OUTPUT CONNECTORS 1/4 in. TRS (×2)
OUTPUT IMPEDANCE Balanced: 10 kΩ
Unbalanced: 5 kΩ
INPUT IMPEDANCE 600 Ω
FREQUENCY RESPONSE 20 Hz to 20 kHz
DISTORTION <0.005%
ATTENUATION Volume knob: ∞ to 0 dB
CONTROLS Volume knob, mute button
DIMENSIONS (H × W × D) 2 × 5.3 × 3.5 in. (5.1 × 13.5 × 8.9 cm)
WEIGHT 11.8 oz. (335 g)
SPECIFICATIONS

7
Problem Solution
No sound is
coming from the
speakers.
If the sound
is coming
directly from the
computer’s audio
output:
• Check the sound preferences on your computer to ensure the master volume
is at its highest level.
• Make sure your speakers are correctly connected to the VCP-2.
• Make sure the volume knob of the VCP-2 is turned up.
• Make sure the mute button is not engaged.
If the sound is
coming from
your audio
interface:
• Check your settings in the Sound and Audio Devices control panel (Windows)
or the Sound Preferences (Mac OS). Make sure you have selected the
appropriate default output device, and that the output volume is turned up to
the highest volume.
• Make sure your speakers are correctly connected to the VCP-2.
• Make sure the volume knob of the VCP-2 is turned up.
• Make sure the mute button is not engaged.
TROUBLESHOOTING

8
GG1
ONE-YEAR LIMITED WARRANTY
This Polsen product is warranted to the original purchaser to be free from defects in materials and workmanship under normal
consumer use for a period of one (1) year from the original purchase date or thirty (30) days after replacement, whichever occurs
later. The warranty provider’s responsibility with respect to this limited warranty shall be limited solely to repair or replacement, at the
provider’s discretion, of any product that fails during normal use of this product in its intended manner and in its intended environment.
Inoperability of the product or part(s) shall be determined by the warranty provider. If the product has been discontinued, the warranty
provider reserves the right to replace it with a model of equivalent quality and function.
This warranty does not cover damage or defect caused by misuse, neglect, accident, alteration, abuse, improper installation or
maintenance. EXCEPT AS PROVIDED HEREIN, THE WARRANTY PROVIDER MAKES NEITHER ANY EXPRESS WARRANTIES NOR ANY IMPLIED
WARRANTIES, INCLUDING BUT NOT LIMITED TO ANY IMPLIED WARRANTY OF MERCHANTABILITY OR FITNESS FOR A PARTICULAR
PURPOSE. This warranty provides you with specic legal rights, and you may also have additional rights that vary from state to state.
To obtain warranty coverage, contact the Polsen Customer Service Department to obtain a return merchandise authorization (“RMA”)
number, and return the defective product to Polsen along with the RMA number and proof of purchase. Shipment of the defective product
is at the purchaser’s own risk and expense.
For more information or to arrange service, visit www.polsenaudio.com or call Customer Service at 212-594-2353.
Product warranty provided by the Gradus Group.
www.gradusgroup.com
Polsen is a registered trademark of the Gradus Group. © 2018 Gradus Group LLC. All Rights Reserved.
