A Practical Guide To Database Design Practical.Guide.To.Database.Design.From.UBC.Library
User Manual:
Open the PDF directly: View PDF ![]() .
.
Page Count: 431 [warning: Documents this large are best viewed by clicking the View PDF Link!]
- Cover
- Half Title
- Title Page
- Copyright Page
- Dedication
- Table of Contents
- Introduction
- Author
- CHAPTER 1: Overview of Databases
- CHAPTER 2: Data Normalization
- CHAPTER 3: Database Implementation
- CHAPTER 4: Normalization and Physical Design Exercise
- CHAPTER 5: The erwin Data Modeling Tool
- 5.1 WHAT IS A DATA MODELING TOOL?
- 5.2 WHY DO I NEED A DATA MODELING TOOL?
- 5.3 REVERSE ENGINEERING
- 5.4 CHANGE MANAGEMENT
- 5.5 DOWNLOAD AND INSTALL ERWIN TRIAL SOFTWARE
- 5.6 CREATE THE UNIVERSITY LOGICAL DATA MODEL
- 5.7 CREATE THE UNIVERSITY PHYSICAL DATA MODEL
- 5.8 CREATE AN SQL SERVER UNIVERSITY DATABASE
- QUESTIONS
- REFERENCE
- CHAPTER 6: Using Microsoft Access
- CHAPTER 7: Using SQL Server
- CHAPTER 8: Using Perl to Extract and Load Data
- CHAPTER 9: Building User Interfaces
- CHAPTER 10: Creating the University Database Application
- 10.1 CREATE TABLES FOR UNIVERSITY ENVIRONMENT
- 10.2 CREATE RELATIONSHIPS TO ENFORCE REFERENTIAL INTEGRITY
- 10.3 DESIGN A SCREEN TO ADD NEW STUDENTS
- 10.4 CREATE A SCREEN TO ENROLL STUDENTS IN A CLASS
- 10.5 CREATE A SCREEN TO ASSIGN GRADES
- 10.6 CREATE SCREENS TO ENTER MIDTERM AND FINAL GRADES
- 10.7 CREATE A “MAIN” MENU
- 10.8 DEVELOPING APPLICATIONS FOR UNIVERSITY ADMINISTRATORS
- QUESTIONS
- CHAPTER 11: PHP Implementation and Use
- APPENDIX A: WARNING MESSAGES
- APPENDIX B: ERROR MESSAGES
- APPENDIX C: UNIVERSITY DDL
- APPENDIX D: SEARCH FOR TERMS
- APPENDIX E: SQL SERVER LOG CHECK
- INDEX

A Practical Guide to
Database Design


A Practical Guide to
DatabaseDesign
Second Edition
Rex Hogan
CRC Press
Taylor & Francis Group
6000 Broken Sound Parkway NW, Suite 300
Boca Raton, FL 33487-2742
© 2018 by Taylor & Francis Group, LLC
CRC Press is an imprint of Taylor & Francis Group, an Informa business
No claim to original U.S. Government works
Printed on acid-free paper
International Standard Book Number-13: 978-1-1385-7806-7 (Hardback)
This book contains information obtained from authentic and highly regarded sources. Reasonable efforts have been made
to publish reliable data and information, but the author and publisher cannot assume responsibility for the validity of all
materials or the consequences of their use. The authors and publishers have attempted to trace the copyright holders of all
material reproduced in this publication and apologize to copyright holders if permission to publish in this form has not been
obtained. If any copyright material has not been acknowledged please write and let us know so we may rectify in any future
reprint.
Except as permitted under U.S. Copyright Law, no part of this book may be reprinted, reproduced, transmitted, or utilized
in any form by any electronic, mechanical, or other means, now known or hereafter invented, including photocopying,
microfilming, and recording, or in any information storage or retrieval system, without written permission from the
publishers.
For permission to photocopy or use material electronically from this work, please access www.copyright.com (http://www.
copyright.com/) or contact the Copyright Clearance Center, Inc. (CCC), 222 Rosewood Drive, Danvers, MA 01923, 978-750-
8400. CCC is a not-for-profit organization that provides licenses and registration for a variety of users. For organizations that
have been granted a photocopy license by the CCC, a separate system of payment has been arranged.
Trademark Notice: Product or corporate names may be trademarks or registered trademarks, and are used only for
identification and explanation without intent to infringe.
Library of Congress Cataloging‑in‑Publication Data
Names: Hogan, Rex, 1944- author.
Title: A practical guide to database design / Rex Hogan.
Description: Second edition. | Boca Raton : Taylor & Francis, CRC Press,
2017. | Includes index.
Identifiers: LCCN 2017050960 | ISBN 9781138578067 (hardback : alk. paper)
Subjects: LCSH: Database design.
Classification: LCC QA76.9.D26 H64 2017 | DDC 005.74/3--dc23
LC record available at https://lccn.loc.gov/2017050960
Visit the Taylor & Francis Web site at
http://www.taylorandfrancis.com
and the CRC Press Web site at
http://www.crcpress.com
Visit the eResources at
http://crcpress.com/9781138578067

To my wife Cindy, for always being there for me.


vii
Contents
Introduction, xiii
Author, xv
Chapter 1 ◾ Overview of Databases 1
1.1 WHAT’S A “DATABASE”? 1
1.2 GUARANTEED ACCURACY AND AVAILABILITY OF DATA 2
1.2.1 Atomicity 2
1.2.2 Consistency 3
1.2.3 Isolation 3
1.2.4 Durability 3
1.3 DYNAMIC ALTERATION OF DESIGN 3
1.4 DYNAMIC QUERIES—ANY DATA, ANY TIME 5
1.5 REFERENTIAL INTEGRITY ENFORCEMENT 6
1.6 BACKUP/RECOVERY 8
1.7 FAILOVER 9
1.8 TYPICAL INSTALLATION 10
QUESTIONS 13
REFERENCES 14
Chapter 2 ◾ Data Normalization 15
2.1 INTRODUCTION 15
2.2 THE LANGUAGE OF NORMALIZATION 16
2.3 CREATING THE ENTITY/ATTRIBUTE LIST 17
2.3.1 e Order Entry Model 18
2.4 CLEANING UP THE ENTITY/ATTRIBUTE LIST 20
2.4.1 Problem Type 1—Synonyms 20
2.4.2 Problem Type 2—Homonyms 20

viii ◾ Content s
2.4.3 Problem Type 3—Redundant Information 20
2.4.4 Problem Type 4—Mutually Exclusive Data 21
2.4.5 Problem Type 1—Synonyms 21
2.4.6 Problem Type 2—Homonyms 23
2.4.7 Problem Type 3—Redundant Information 23
2.4.8 Problem Type 4—Mutually Exclusive Data 23
2.5 NORMALIZATION 24
2.5.1 First Normal Form 25
2.5.1.1 Requirement 1—Keys to Create Uniqueness 25
2.5.1.2 Requirement 2—Attributes Can Have Only One Value 26
2.5.2 Second Normal Form 29
2.5.3 ird Normal Form 31
2.6 CREATING THE DATA MODEL 35
2.7 FOURTH NORMAL FORM 37
2.8 FIFTH NORMAL FORM 37
QUESTIONS 39
REFERENCES 40
Chapter 3 ◾ Database Implementation 41
3.1 LOGICAL TO PHYSICAL DESIGN 41
3.2 USAGE PATH ANALYSIS 42
3.3 TABLE KEY AND COLUMN DATA TYPES 44
3.4 INDEXES 45
3.5 TABLE CREATION 46
3.5.1 Using Microso Access 47
3.5.2 Using SQL Server 56
3.5.3 Using Oracle 72
QUESTIONS 73
Chapter 4 ◾ Normalization and Physical Design Exercise 75
4.1 INTRODUCTION 75
4.2 CREATING THE ENTITY/ATTRIBUTE LIST 75
4.3 MOVING TO THIRD NORMAL FORM 78
4.4 THE PHYSICAL DATA MODEL 88
QUESTIONS 91

Contents ◾ ix
Chapter 5 ◾ The erwin Data Modeling Tool 93
5.1 WHAT IS A DATA MODELING TOOL? 93
5.2 WHY DO I NEED A DATA MODELING TOOL? 93
5.3 REVERSE ENGINEERING 93
5.4 CHANGE MANAGEMENT 94
5.5 DOWNLOAD AND INSTALL ERWIN TRIAL SOFTWARE 95
5.6 CREATE THE UNIVERSITY LOGICAL DATA MODEL 96
5.7 CREATE THE UNIVERSITY PHYSICAL DATA MODEL 109
5.8 CREATE AN SQL SERVER UNIVERSITY DATABASE 114
QUESTIONS 115
REFERENCE 116
Chapter 6 ◾ Using Microsoft Access 117
6.1 OVERVIEW 117
6.2 MODIFICATIONS TO THE DATABASE DESIGN 118
6.3 LOADING DATA INTO TABLES 118
6.4 CREATING QUERIES 119
6.4.1 Create a Customer-Credit_Card Query 119
6.4.2 Create a Query Using SQL Commands 125
6.4.3 Filtering Query Results 125
6.5 USING FORMS 129
6.5.1 Create a Form to Update Advertised_Items 129
6.5.2 Create a Form to Add a New Customer 141
6.5.3 Generating a Master Screen for Users 146
6.6 GENERATING REPORTS 146
6.6.1 Using Reports to View a Customer Order 146
6.7 DEPLOYING ACCESS FOR A TEAM OF USERS 153
6.7.1 Linking to an SQL Server or Oracle Database 155
6.8 THE ROLE OF PASS-THROUGH QUERIES 155
QUESTIONS 156
Chapter 7 ◾ Using SQL Server 157
7.1 OVERVIEW 157
7.1.1 Advantages 157
7.1.2 Change Management for SQL Server 157

x ◾ C ontent s
7.2 DATABASE CREATION/INSTALLATION 158
7.2.1 Installation Planning 158
7.2.2 Soware Installation 160
7.3 CREATING DATABASES 170
7.3.1 Create an SQLSvrLogs Database 171
7.3.2 Create the University Database 174
7.3.2.1 Table Denitions 174
7.3.2.2 Creating Indexes 177
7.3.2.3 Index Maintenance 180
7.3.2.4 Referential Integrity Constraints 180
7.4 USER ROLES 184
7.5 AUTHORIZED USERS 186
7.6 BACKUP/RECOVERY 190
7.7 LOADING DATA INTO TABLES 195
7.8 CREATING VIEWS 202
7.9 MANUAL QUERIES AND EDITS 204
7.10 USING STORED PROCEDURES 207
7.11 USING SQL SERVER AGENT 208
QUESTIONS 210
Chapter 8 ◾ Using Perl to Extract and Load Data 213
8.1 WHY PERL? 213
8.2 PERL VERSUS PYTHON 219
8.3 WINDOWS VERSUS UNIX 219
8.4 REVIEW KEY MATCHING FEATURES 221
8.5 MONITOR SQL SERVER LOGS 222
8.6 MONITORING WINDOWS LOGS 225
8.7 OTHER APPLICATIONS AND USES 226
8.8 LOADING DATA INTO TABLES 227
8.9 SUMMARY 229
QUESTIONS 229
REFERENCE 230

Contents ◾ xi
Chapter 9 ◾ Building User Interfaces 231
9.1 MICROSOFT ACCESS IN A TYPICAL OFFICE ENVIRONMENT 231
9.1.1 General Capabilities 231
9.1.2 Advantages 232
9.1.3 Disadvantages 232
9.2 USE MICROSOFT ACCESS AS GUI 232
9.2.1 General Capabilities 232
9.2.2 Advantages 232
9.2.3 Disadvantages 233
9.3 .NET FRAMEWORK 233
9.3.1 General Capabilities 233
9.3.2 Advantages 233
9.3.3 Disadvantages 234
9.4 PHP 234
9.4.1 General Capabilities 234
9.4.2 Advantages 234
9.4.3 Disadvantages 235
9.5 JAVA 235
9.5.1 General Capabilities 235
9.5.2 Advantages 235
9.5.3 Disadvantages 235
QUESTIONS 235
Chapter 10 ◾ Creating the University Database Application 237
10.1 CREATE TABLES FOR UNIVERSITY ENVIRONMENT 237
10.2 CREATE RELATIONSHIPS TO ENFORCE REFERENTIAL INTEGRITY 241
10.3 DESIGN A SCREEN TO ADD NEW STUDENTS 244
10.4 CREATE A SCREEN TO ENROLL STUDENTS IN A CLASS 260
10.5 CREATE A SCREEN TO ASSIGN GRADES 268
10.6 CREATE SCREENS TO ENTER MIDTERM AND FINAL GRADES 271
10.7 CREATE A “MAIN” MENU 271
10.8 DEVELOPING APPLICATIONS FOR UNIVERSITY
ADMINISTRATORS 272
QUESTIONS 273

xii ◾ Content s
Chapter 11 ◾ PHP Implementation and Use 275
11.1 WHY PHP? 275
11.2 SYSTEM COMPONENTS 276
11.3 DESIGN OF WEB-BASED INTERFACE 279
11.3.1 User Logon Options 280
11.3.2 User Authentication 281
11.3.3 Home Page User Options 283
11.3.4 Review/Check Warning Records 283
11.3.5 Review/Check Error Records 292
11.4 SCRIPT LOGIC 292
11.4.1 Warning Records Logic 292
11.4.2 Error Records Logic 294
QUESTIONS 295
REFERENCES 296
APPENDIX A: WARNING MESSAGES, 297
APPENDIX B: ERROR MESSAGES, 309
APPENDIX C: UNIVERSITY DDL, 321
APPENDIX D: SEARCH FOR TERMS, 405
APPENDIX E: SQL SERVER LOG CHECK, 407
INDEX, 409

xiii
Introduction
ABOUT THIS BOOK
is is a book intended for those who are involved in the design or development of a
database system or application. It begins by focusing on how to create a logical data model
where data are stored where it belongs. Next, data usage is reviewed to transform the logical
model into a physical data model that will satisfy user performance requirements. Finally,
it describes how to use various soware tools to create user interfaces to review and update
data in a database.
ORGANIZATION OF THIS BOOK
• Chapter 1 describes the functionality of database management systems and how they
guarantee accuracy and availability of data.
• Chapters 2 through 4 describe how to dene and normalize data requirements to
create a logical data model, and then map them into an initial solution for a physical
database.
• Chapter 5 describes how to use an industry-leading data modeling tool to dene and
manage logical and physical data models.
• Chapters 6 and 7 describe how to implement a physical database using either Microso
Access or Structured Query Language (SQL) Server and how to use Microso Access
to create windows interfaces to query or update data in tables.
• Chapter 8 describes how to use the PERL programming language to identify and
extract records of interest from les and load these records into a database. As an
example, it includes a script that identies and extracts warning and error messages
from an SQL Server log le and shows how to load these records into tables in a track-
ing database described in Chapter 7.
• Chapter 9 reviews various soware tools that are commonly used to create user inter-
faces to databases to retrieve or update data.
• As with most skills, the ability to design and implement a database improves with
practice and experience. Chapter 10 reviews the design and implementation of a data-
base using a much more complex data environment for a University.

xiv ◾ Introduction
• Finally, Chapter 11 describes how to use PHP to build a web-based interface to review
and update data in a database.
e database used in this example is the tracking database created in Chapter 7 and
loaded with the PERL script in Chapter 8. Appendices A and B contain the PHP scripts
used by this interface to update the status ags in that database.
• Appendix C contains the Data Denition Language (DDL) text le generated by the
data modeling tool to create the University database.
HOW TO USE THIS BOOK
User Specialists and Design Teams
• Learn how to create a logical data model where data are stored where it belongs by
reviewing the material and exercises in Chapter 2.
• Learn how to analyze data-processing requirements to create a physical design model
that will satisfy user response times by reviewing the material in Chapters 3 and 4.
Database Administrators
• In addition to the above-mentioned uses, learn how to use an industry-leading data
modeling tool by reviewing the material and exercises in Chapter 5. It includes
instructions on how to create the DDL statements needed to create a physical data-
base. e DDL to create the University database is included as Appendix C.
• Learn how to implement a physical database using either Microso Access or SQL
Server by following the exercises in Chapters 6 and 7.
Developers
• Learn how to translate user requirements into a database solution by reviewing the
material and exercises in Chapters 2 through 4.
• Chapter 8 shows how to use the PERL language to identify records containing data of
interest from external les and load them into a table in a database.
• Learn how to use Microso Access to develop user interfaces by reviewing the exer-
cises in Chapters 6 and 10.
• Gain an understanding of soware used to develop user interfaces by reading
Chapter 9.
• Learn how to use PHP to develop a web-based interface to a database by reviewing
the information and code contained in Chapter 11 and listed in Appendices A and B.

xv
Author
Rex Hogan is the author of A Practical Guide to Database Design (rst edition). In addi-
tion, he has written Diagnostic Techniques for IMS Data Bases and coauthored Managing
IMS DataBases with Steve Shapiro and Maxie Zinsmeister.
Rex has more than 40years of experience as a database administrator and a soware
engineer. is includes more than 17years of experience with Southwestern Bell/AT&T
where he became their lead database specialist. During this period, he also taught various
undergraduate and graduate classes at Washington University’s Center for the Study of
Data Processing in St. Louis, Missouri. He then worked for TRW/Northrop Grumman in
Fair Lakus, VA for 16years, primarily as a database administrator (DBA)/senior soware
engineer in the Intelligence Community where he became a specialist in the rapid design
and development of database systems and applications. Finally, he worked for ve years as
a computer scientist for the Air Force Oce of Special Investigations, where he developed
computer systems to monitor usage of Air Force Internet trac.


1
Chapter 1
Overview of Databases
1.1 WHAT’S A “DATABASE”?
Today, generally everyone uses a computer in one form or another.
• Home-based computers are frequently used for managing a personal business, update
spreadsheets, or complete school assignments. Others use them for email, social
interaction with friends and family members, monitoring the Internet for news, or
for entertainment.
• Owners of small businesses use spreadsheets and/or soware products such as
QuickBooks to keep track of personal or business expenses.
• Oce environments must gather and store and manage information for a wide range
of topics or subjects, such as customers or clients, appointments, or customer orders.
• Business environments must manage a much wider scope of data regarding the infor-
mation and data needed to run or manage the business.
• Users using computers in government oces need computers to manage their
jobs. Forthose working as analysts in the Department of Defense (DOD) or in the
Intelligence Community, the nature of the job is continually expanding, requir-
ing analysts to monitor or track new information or data as it becomes available.
Analytical teams continually face the responsibility of analyzing new and evolving
forms of information to identify and extract information of relevance using soware
tools available to them. Oen, that means having not much more than the desktop
Microso Oce products ranging from Excel to Microso Access.
As the data needed by the user or customer community grow in size, complexity, and
importance, the care and feeding of that data requires the use of a database management
system (DBMS) to store, manage, and protect it.

2 ◾ A Practical Guide to Database Design
A DBMS1 is a special soware package that is designed to dene and manage data
within one or more databases. Individual databases, in turn, manage the denition of data
objects/tables in a given subject area and provide controlled user access to that data.
Examples of DBMSs include Structured Query Language (SQL) Server, Oracle, and
Microso Access. An SQL Server or Oracle instance would then serve as host to, for exam-
ple, a personnel database.
1.2 GUARANTEED ACCURACY AND AVAILABILITY OF DATA
A DBMS is, by its very nature, built to guarantee the accuracy and availability of data as
updates occur. Updates are bundled as application transactions2 that apply all data updates
within a logical unit of work3 associated with that application. ese updates must be made
on an all or nothing basis; either all the updates are applied, or, if a logical or database error
occurs, none of the updates are applied, leaving all of the data in a clean consistent state
from the user and application perspective.
e application soware updating the database issues commands to the database to start
a unit of work. If all updates complete successfully, a commit call is issued to make those
updates permanent. If in the process of making those updates some condition is found that
prevents the update from occurring, a rollback call is made to reverse any updates and put
the data back in a logical state representing the data at the beginning of the transaction.
For example, a user might log on to their banking system and start an update to move
funds from their savings to checking accounts.
• Aer logging in and starting the transfer, the soware performing the updates rst
issues a database update to debit the savings account for the specied amount.
• If that update is successful, it issues an update to credit the checking account by that
amount.
• Upon successful completion, a commit call is issued to commit the changes and
release database locks on the rows being updated. An appropriate message would be
sent to the user conrming that the funds transfer was completed.
• If, however, the update to the checking account failed (e.g., the user entered the wrong
savings account number), a rollback call would be made to reverse all updates made,
and an appropriate error message would be sent to the user. As a result, the database
and the underlying data are le in a clean, consistent state.
e ACID4 properties (atomicity, consistency, isolation, and durability) of database systems
and transactions guarantee the accuracy and availability of data.
1.2.1 Atomicity
e atomicity is the all or nothing requirement when making updates. Either all updates made
during the unit or work succeed or no updates are made. is protection includes updates in
a unit of work or transaction, device input/output errors, network errors, and power failures.

Overview of Databases ◾ 3
1.2.2 Consistency
Consistency requires that transactions take the database from one valid state to another.
Any and all updates must conform and enforce any referential integrity5 constraints
dened. (Referential integrity constraints dene and control any one-to-many relation-
ships between tables in a database.)
1.2.3 Isolation
Isolation of database updates involves mechanisms that enable multiple concurrent users
to simultaneously access and update the same data elements within a database.
As database updates occur, locks are transparently placed on updated rows that prevent
subsequent users to access or update those rows until the updating process commits those
updates and the locks are released. Any processes requesting access to rows being updated
are held/delayed until the updater’s commit point is made.
1.2.4 Durability
is feature/requirement ensures that any updates made by a transaction (i.e., a unit of
work completed and updates committed) will survive a subsequent system error or prob-
lem, for example, a system failure or a power or disk failure.
Database systems have mechanisms/features that support a full database backup. In
addition, database systems log updates to nonvolatile devices (a database log le) as updates
are made to the database. If/When necessary, a database can be rebuilt/recovered totally by
rst using the database backup to recover all data to the point the backup was made, then
using the database log to reapply all updates made to the database aer that point in time.
is subject is covered in more detail in Section 1.6.
1.3 DYNAMIC ALTERATION OF DESIGN
Relational database management system (RDBMS) represent the third generation of
DBMS products. As one of their key features, these products give the user the abil-
ity to dynamically add or drop columns to data or make other changes live while the
database is online and being updated by users. That provides a significant change
over the second-generation hierarchical systems that had to be taken down and modi-
fied off-line to apply changes. Third-generation systems include products such as SQL
Server, Oracle, and Microsoft Access.
Note that MySQL is touted as an RDBMS and it has many relational-like features.
However, it has signicant limitations that, in my opinion, prevent it from being classied
as a true RDBMS.
For example, each table in MySQL is implemented as a at le with indexes as
needed to support data retrieval. If/When any changes are required, for example,
a column is to be added, MySQL creates a new temporary table with the new col-
umn, copies all records from the original le to the new, and then deletes and
renames the old and new les accordingly.
4 ◾ A Practical Guide to Database Design
In a former role, I prototyped a MySQL implementation for a data collection appli-
cation running a UNIX (Solaris) server. As the prototype progressed, it was no
surprise to nd that I needed to add new columns to the MySQL table to help track
information about what was being collected. I found that the time requirements to
make changes to a MySQL table with a million rows were anything but transparent.
As a work around, I then made what I hoped was a one-time modication to the
table adding spare columns (Spare1, Spare2, Spare3, etc.) with the plan of renaming
these columns if/when needed to reect application-specic, meaningful names.
at helped, but even then I found that MySQL required/used too much overhead
for managing large tables.
e ability to dynamically change table denitions can, in most products, be made using
that product’s database administrator (DBA) graphical user interface, or by working at the
command line by issuing commands using the product’s data denition language (DDL).
e DBA user interface is much easier and quicker to use, but when supporting mission-
critical applications, change management procedures are used to control updates across
multiple environments and platforms, each with their own copy and version of the applica-
tion database.
• A Development platform is used to design, develop, and test individual soware com-
ponents and tables within a database.
• Incremental changes are made by manually running DDL changes at the command
prompt.
• All incremental changes are accumulated as they are applied, creating a change pack-
age with all modications needed for that release.
• When all changes have been made and tested for a soware release, a Test platform
is used.
• With the test system database congured for the older soware release, the change
package is applied and the soware release is tested to ensure all updates have been
correctly applied and the soware works as intended.
• If errors are found, the change package must be revised as necessary and the entire
update process repeated.
• Aer changes have been successfully applied and tested on the Test system, the
change package is ready to be applied to the Production platform.
e careful application and use of change packages on the Test platform allows the sched-
uling of downtime of the Production system with the expectation of no surprises when the
updates are applied.

Overview of Databases ◾ 5
1.4 DYNAMIC QUERIES—ANY DATA, ANY TIME
Although RDBMS products made a huge improvement by allowing dynamic changes, an
even more signicant enhancement was through the implementation of the SQL language.
is gives the user the ability to ask for any data, at any time. For example, any autho-
rized user can connect to the database and, using one of several query managers typically
available, issue a command to retrieve data using the command syntax, where {} indicates
optional parameters:
“SELECT <column name(s)> FROM <table name> {WHERE <column name> =
<value>};”
For example,
“SELECT First_Name, Last_Name FROM EMPLOYEE WHERE DEPT-NUMBER =
12;”
would retrieve the rst and last names from the Employee table where that table’s DEPT-
NUMBER column has a value of 12.
SQL has, of course, many variations to extend the power and exibility of the com-
mands issued. Some simpler examples are
“SELECT * FROM EMPLOYEE;”
would retrieve/display all columns in the Employee table;
“SELECT COUNT(*) FROM EMPLOYEE;”
would display the number of Employees in the Employee table; and
“SELECT MAX(Annual_Salary) FROM EMPLOYEE;”
would display the highest annual salary found in the Employee table.
e power of SQL is multiplied by creating a “View”6 of two or more tables that create a
virtual object to query against. For example, a View can be created named “Department_
Employees” that combines the Department table with the Employee table matching the
DepartmentID column in Department with the DepartmentID in Employee.
Using this virtual table,
“SELECT * FROM DEPARTMENT_EMPLOYEES WHERE DepartmentID = 12;”
will list all information for employees that are assigned to Department 12.
Developers and users, however, must be aware that SQL implementations are not all
equal.7 RDBMS vendors have worked together over the years to dene and implement
SQL within their products beginning in 1986. However, at the implementation level, SQL

6 ◾ A Practical Guide to Database Design
commands will vary depending on the RDBMS product being used. e major vendors
support the basic SQL standards (i.e., their product will provide some specic function-
ality), but the details of implementation will be dierent. For example, SQL provides for
a wildcard character to allow/support either single character matches or to match any
number of characters in a search string. If using SQL Server or Oracle:
“SELECT * FROM PRODUCTS WHERE Product_Name LIKE ‘DELL%’;”
will display all information from the products table for product names begin with “DELL.”
If using Microso Access, this command would be
“SELECT * FROM PRODUCTS WHERE Product_Name LIKE ‘DELL*’;”
to match the wild card character used in Access.
In addition, each vendor will include their own SQL enhancements (features going
beyond the standard) to support their products’ competitive advantage.
Fortunately, from the developer’s point of view, 90%–95% of their SQL skills will
transfer/apply when working with another RDBMS product.
1.5 REFERENTIAL INTEGRITY ENFORCEMENT
A database will contain multiple tables, each containing information about one type of
information to be stored in the database. For example, an employee database might have
a table for department, one for employee, and another for employee-deduction. Each table
contains detailed information about that particular item/object, each containing at a mini-
mum the following information:
Department
DepartmentID
DepartmentName
DepartmentManagerID
Employee
EmployeeID
EmployeeFirstName
EmployeeMiddleName
EmployeeLastName
EmployeeWorkPhoneNumber
EmployeeHomePhoneNumber

Overview of Databases ◾ 7
EmployeeStreetAddress
EmployeeCity
EmployeeState
EmployeeZipCode
DepartmentID
Employee-Deduction
EmployeeID
DeductionCode
DeductionAmount
When the tables are loaded, information for each occurrence is loaded as a row in the
respective table and each data element/value is associated with its respective column in the
table. For example, a row in the department table might have the following content:
DepartmentID DepartmentName DepartmentManagerID
SalesArea1 Northern Virginia Marketing E1005
Looking at the employee table, the rst row for an employee assigned to the above-
mentioned department might appear as follows:
EmployeeID EmployeeFirstName EmployeeMiddleName EmployeeLastName … DepartmentID
E2001 Albert Alan Smith SalesArea1
Note that the relationship between the Department row for the Northern Virginia
Marketing unit and the Employee row for Albert Smith is determined by the fact that the
DepartmentID, “SalesArea1,” is stored as the value for the DepartmentID column in the
Employee table. is illustrates the one-to-many relationship between Department and
Employee and is referred to as Referential Integrity.
Referential Integrity is fundamental to data integrity and is normally activated and
enforced by the RDBMS as data are inserted or deleted from individual tables. For example
• Any DepartmentID value assigned to a new employee must match a DepartmentID
value in the Department table.
• Any new Employee-Deduction rows must contain a valid/matching EmployeeID.
• More importantly, if/when an employee is terminated, all Employee-Deduction rows
will be automatically deleted without the programmer having to remember to per-
form that function.

8 ◾ A Practical Guide to Database Design
1.6 BACKUP/RECOVERY
All DBMSs have, inherently, built-in backup/recovery systems. If the database fails
(e.g., the underlying disk drive(s) fail), the database can be restored to the point of failure;
that is, restored to contain data up to the last unit of work completed before the failure
occurred. Depending on the DBMS product being used, backup/recovery services include
some combination of the following:
• A mechanism/service to create a complete cold backup (i.e., the data are oine and
not being updated).
• A mechanism/service to create a hot backup (i.e., the database is online and being
backed up while the backup is being made).
• Depending on the RDBMS, incremental or partial services may be available to record
all changes to the database since the last backup was made.
• A logging service to record all updates to the database as they are being made to a
log le. In a non-RAID (redundant array of inexpensive disks) environment, the log
le(s) should be stored on a dierent disk drive from that used to store the RDBMS
tables to avoid losing both the data and the log le if the disk drive fails.
• Depending on the RDBMS, dual log les may be maintained to mitigate problems/
issues if errors are encountered when using the primary copy.
Both SQL Server and Oracle support cold, hot, and incremental backups.
As hot backups are taken while the database is being updated, there are additional tech-
nical issues involved to deal with log records created while the backup is being taken.
Backup/Recovery operations consist of the following:
• Taking a full backup of the database: is operation takes a complete copy of the data-
base and provides the initial starting point for a future recovery operation. Depending
on the size of the database, cold backups could require a signicant amount of time.
• Logging all changes as the database is updated: Logging operations are a funda-
mental component of all RDBMSs. To ensure logs are always available for recovery
operations, dual logging may be used to create two copies when logs are written to
non-RAID devices.
• Recovering the database: A recovery operation starts with the last full backup of the
database and applies all log updates made up to the point of failure.
• Note that the database must be oine to users during the recovery operation.
Depending on the size of the backup and the number of logs required, the time
required could be unacceptable to the user community.
• More frequent cold database backups shorten the time for database recovery but
normally require more downtime for the user community.

Overview of Databases ◾ 9
• If incremental/partial backups were taken, the recovery would start with the last full
image of the database, apply the latest incremental/partial backup, and apply logs
made aer the incremental/partial backup were taken. is approach is more com-
plex to manage but signicantly reduces the time required to recover the database.
• Note that this operation requires having a full and usable copy of the database.
Ifdatabase backups are taken to non-RAID devices, a second copy should be taken
for critical databases to ensure a usable backup le is available if/when needed.
• Recovery operations might also be required in case of extensive user operations/
issues. For example, a full backup of the database is advisable before applying a new
soware release for the user. If the soware upgrade causes major issues/problems,
the entire system must be restored to a point before the soware update was made.
• Service agreements: Major database operations require a database recovery plan,
which details the use and frequency of full and partial database backups. e plan
is included as part of the service agreement drawn up for the user, specifying the
acceptable down time to the user community if database recovery is involved.
1.7 FAILOVER
As noted in Section 1.1, a single instance of an RDBMS may, in turn, serve as host to mul-
tiple databases. Backup and recovery mechanisms have always been used to guarantee the
availability of the data for a database hosted by the RDBMS. Failover mechanisms have
more recently been implemented to guarantee the availability of all databases running on
that RDBMS in the event of a host or RDBMS soware failure.
In setting up a failover environment, a remote copy of the source database is created on
another host, either within the same computer complex, in another building, or even in
another city. When normal processing on the host resumes, all log updates are recorded on
the local log and transmitted to the remote log as well. In the event of a system failure, all
connections and processing active on the failed host are switched to the failover host and
RDBMS instance and processing resumes.
If the database is important enough to have failover protection, determination of the
failover site involves a number of issues.
• A failover environment requires a high speed, secure network connection between
the primary host and the failover host to handle the volume of database log activity
as processing occurs.
• A failover host in the same building as the primary host is fairly easy to set-up and
manage. However, this provides no protection if the building is lost due to storm
damage or through an act of terrorism.
• A failover host in a nearby building may be economically practical in the sense of
installing a suciently fast network but may still be at risk if a natural disaster or
storm occurs in the city.

10 ◾ A Practical Guide to Database Design
• A failover host at a remote location will of course provide more protection by the
physical separation of the buildings, but the cost of a secure high speed network may
be cost-prohibitive.
Now let us take a look at the detail involved in setting up and running an RDBMS and its
associated databases.
1.8 TYPICAL INSTALLATION
• e rst step in creating a database is to install the system soware for the RDBMS
itself.
• For light and small databases, Microso Access comes preinstalled as part of the
Professional or Enterprise versions of Microso Access.
• SQL Server runs in a Windows environment and comes with an installation disk
that is very straightforward to use. e installer must of course rst choose a disk
drive for the system soware and later indicate which system options are to be
installed.
As part of the installation sequence, the installer must specify what type of
accounts may be used to access the data. The default is for a system/Windows
account, but SQL Server accounts may also be used. These are accounts known
and managed only by SQL Server, which I personally prefer. As a senior DBA,
Iwant total control of establishing account names and controlling who can
access what and remove all responsibility for database account control from
system administrators.
As part of the installation process, an SQL Server system administrator account and
password are created.
Note that depending on the particular version of SQL Server being installed and
the version of Windows soware being used, prerequisite soware updates may be
necessary. If the host computer has an internet connection, any required soware
will be automatically found and downloaded. If, however, the host computer does
not have an internet connection, the installer may have to use another computer to
download the update from the internet, sneaker-net/copy the update to the com-
puter being used and run the update, then try to continue with the SQL Server
installation.
• Oracle runs on both Windows and UNIX. My experience with Oracle has been
limited to building and managing high-performance, high-availability systems on
Solaris. Windows platforms cannot support the availability requirements of a data-
base that cannot be down for more than a couple of hours every year, and of course
Windows platforms are prone to security exposures/issues.
Overview of Databases ◾ 11
Oracle provides a written procedure for UNIX installations that are very straight-
forward. ere are two steps, however, that require a user with root privileges to
perform.
Aer the RDBMS soware has been installed, a database can be created. As part of
that process, the DBA must make decisions on how many les (or Oracle Tablespaces)
will be used to store data, where the various data les will be placed (i.e., what disk
drive(s) to use), and where to store the log les needed for database recovery.
All of these decisions must be made with an eye toward performance. Let us take a minute
to review how data are managed.
• Rows in a table are stored in a page, the smallest amount of data managed by an
RDBMS in I/O operations.
Some RDBMS systems (e.g., Oracle) allow the DBA to specify the page size. A large
page size would be chosen if the data in the table are oen processed sequentially;
therefore, with one I/O operation, many rows are retrieved and can be accessed with-
out requiring another I/O operation. A small page size would be chosen if the rows
are processed in a random sequence; the smaller page size would be transferred more
quickly than a large one.
SQL Server, on the other hand, has a xed page size.
• When a new row is added to a table, the RDMBS will rst identify a most desirable
block. Each table will normally have a unique key column (or set of columns), and
the page with the row having the next lowest key value would be the most desirable
location to store the new row.
• Aer storing the new row, one or more indexes must now be updated to record the
row just added. Each index, in itself, contains a layered set of values, represented in
a tree structure that must be traversed to do a lookup. As a result, for each index,
two or three I/Os may be required to make that update. is operation must then be
repeated for each index associated with that row.
In summary, the addition of just one row to a table requires multiple I/Os to add the row itself
and to update all of the associated indexes associated with that table. e time required to
perform these operations can be drastically reduced if the les being updated can be spread
across multiple devices so that multiple I/O operations can be performed simultaneously.
If the host computer is built which has multiple disk drives available, the following types
of data should be placed on dierent disk drives:
• e RDBMS soware.
• Data les for the database tables.
12 ◾ A Practical Guide to Database Design
• Index les should be placed on a dierent drive(s) from the data les.
• If at all possible, the RDMBS log le must be on a dierent drive from data les to
ensure recoverability in case the data drive fails.
If the host computer has nothing but a single disk drive, you can, of course, implement the
RDBMS, its databases, and log le(s) on that host. Of course, additional disk drives would
support a higher performance level and have greater odds of being recoverable should a
failure occur.
RAID8 implementations work well and are used whenever possible to support an RDBMS
and its databases. In each case, a RAID conguration is used to support I/O operations as
it was one physical drive. e more signicant RAID types used are
• RAID 0: RAID 0 stripes or spreads the I/O activity across all drives in the RAID unit.
Although having no protection for device failure, this implementation is used where
speed is the primary factor.
• RAID 1: RAID 1 implementations focus on disk failure by conguring drives such
that every drive used has a backup or copy. All I/Os are targeted to both, and if one
drive fails, the second drive will continue to support all I/O activity.
• RAID 5: RAID 5 stripes data to support fast performance but includes parity func-
tions that allow operations to continue if a single device fails. A minimal RAID5
system with four disks would stripe data across three drives and use the fourth
for parity. This configuration supports a higher level of performance while pro-
viding protection for a single device failure. However, when a file (or table) is
updated, additional overhead is generated to make not only the file update but
update the parity map as well. If the RDBMS is update intensive, this overhead
could be significant.
• RAID 10: RAID 10 provides the best of both worlds. Data are striped to support fast
I/O, and each disk has a copy to protect against device failure. Expensive, yes, but it
supports the highest performance as well as protecting against device failure.
RAID drives are game changers when conguring an RDBMS and its databases. A single
RAID 5 system could be used to store and manage all data, indexes, and logs, provid-
ing performance enhancements through striping as well as recovery protection against
device failure. e best possible solution, of course, is to use RAID 10 for everything,
totally removing the DBA from concerns about separation of data and indexes and log
les.
Given an understanding about how to install an RDBMS and creating the associated
databases, the next step involves how to design a database that will meet the user’s needs.
at is covered in Chapter 2.

Overview of Databases ◾ 13
QUESTIONS
1. Do you consider MYSQL to be a database? Why or why not?
2. In the context of a database transaction, what is a unit of work? Why is it important?
3. What are the ACID properties of a RDBMS? Why are they important?
4. In a database recovery operation, what les are used to restore the database? What
does each contain?
5. What’s the dierence between a Table and a View?
6. Given the following table structure, write an SQL query to nd the EmployeeID and
employee name from the Employee table for those assigned to Department 20.
Employee
EmployeeID
EmployeeFirstName
EmployeeMiddleName
EmployeeLastName
EmployeeWorkPhone Number
EmployeeHomePhone Number
EmployeeStreetAddress
EmployeeCity
EmployeeState
EmployeeZipCode
DepartmentID
7. Are SQL queries identical between products such as Microso Access, SQL Server,
and Oracle?
8. Write an SQL query to nd the number of employees in Department 20.
9. In writing an SQL query, what’s the dierence between = and like?
10. You are part of a team conguring a mission critical database for failover. What are
the issues in locating the failover instance in the same building, in adjacent building,
or in a nearby location?
11. What are the dierences between RAID 0 and 1?

14 ◾ A Practical Guide to Database Design
12. You are asked to install a RDBMS on a desktop computer with two internal drives.
How would you congure the system across those drives to provide the best possible
backup/recovery protection?
13. Why are Referential Integrity constraints important?
14. A new database has a new table for Department and another for Employee as shown
in Section 1.5, and Referential Integrity constraints created. Files are available to load
each table. Does it matter in which order the tables are loaded? Why or why not?
15. In setting up backup/recovery operations for a database for use by your business,
what considerations are there in making/storing external backups for the database?
REFERENCES
1. Database management system, Techopedia, Retrieved from https://www.techopedia.com/
denition/24361/database-management-systems-dbms (accessed August 18, 2017).
2. Rouse, M., Transaction, Whatis.com, Retrieved from http://searchcio.techtarget.com/
denition/transaction (accessed August 18, 2017).
3. Database logical unit of work (LUW), SAP Documentation, Retrieved from https://help.
sap.com/saphelp_nwpi71/helpdata/en/41/7af4bca79e11d1950f0000e82de14a/content.htm
(accessed August 18, 2017).
4. Pinal, D., ACID, SQLAuthority.com, Retrieved from https://blog.sqlauthority.com/2007/12/
09/sql-server-acid-atomicity-consistency-isolation-durability/ (accessed August 18, 2017).
5. Referential integrity, Techopedia, Retrieved from https://www.techopedia.com/
denition/1233/referential-integrity-ri (accessed August 18, 2017).
6. Relational database view, essentialSQL, Retrieved from https://www.essentialsql.com/what-
is-a-relational-database-view/ (accessed August 18, 2017).
7. Arvin, T., Comparison of dierent SQL implementations, Retrieved from http://troels.arvin.
dk/db/rdbms/ (accessed August 18, 2017).
8. RAID, PRESSURE.COM, Retrieved from https://www.prepressure.com/library/technology/
raid (accessed August 18, 2017).

15
Chapter 2
Data Normalization
2.1 INTRODUCTION
e rst step in designing a database is to decide what needs to be done by identifying
the data requirements of the users. at sounds deceptively simple, and it can be, but it
usually is not. Why? It is because users, the people for whom the system is being built,
rarely can clearly describe what they need. at is bad enough, but the problems are
oen compounded quite unintentionally by the data-processing (DP) sta. ese good
folks, normally quite knowledgeable in the current system, know in detail what data exist,
and how the existing programs work. However, what is rarely matches what is needed in
the future system. Oen, in-depth knowledge of how the system functions causes tunnel
vision in the DP sta as well as the users and inhibits creative thought in determining the
requirements for a new, enhanced system.
In short, the system design team, composed of user representatives, computer analysts,
and/or programmers, and the database/data administration team, cannot communicate
eectively.
A process called normalization can solve these problems. By using this technique,
users describe what their requirements are without the use of the buzz words and terms
so common in DP. e DP and data administration sta participate in these discussions,
recording data requirements while serving as advisors in the analysis and providing their
insight into what the new system might consist of. Aerward, when all data requirements
have been identied, the technical sta can then decide on the details for a satisfactory
physical database design.
is analysis technique will not be easy for end users to immediately understand and
use. However, only a few basic concepts and denitions are required to begin. With the
proper introduction and coaching, users can fully participate as members of the design
team. eir input is so important to this process that many companies have created

16 ◾ A Practical Guide to Database Design
full-time user positions as data/database analysts to translate requirements into entity/
attribute specications for the technical development team.
Oh, and do not let the terms entity or attribute confuse or bother you. An entity is just
a collection of data elements that ultimately may be implemented within a table (when
using a relational database management system) or as a le (if implemented in a at le
system). Similarly, attributes refer to what will become columns in a table (when using a
relational database management system), or elds within rows when implemented using
a at le system. We are deliberately referring to data elements as entities and attributes
in the design phase in large part to avoid terms that might imply physical implementation
decisions. It is much too early to think about physical design and implementation. Using
this process, we will rst analyze what data elements we need by creating a normalized
data model; next, we will analyze how the data are used; and nally, we will make physical
design decisions to product a result that will satisfy user data requirements within accept-
able time frames.
How is this technique dierent from others? e key is in communication. Users can,
for the rst time, concentrate on something they know and understand—a description of
the information they use to perform their jobs—without using any technical terminology.
e DP sta also benet by hearing a description of the user’s data requirements in the
common language of normalization. At a later point in the design, these data requirements
will be translated by the technical sta into a specic list of data elements required for each
process (or program).
is technique is oen referred to as entity/relationship modeling.
2.2 THE LANGUAGE OF NORMALIZATION
To review data and data requirements with user representatives, the terms entity and
attribute must rst be dened.
• An entity is something about which information is known. It describes or represents
something of interest to the user, such as a person, a place, or a thing. Typical exam-
ples of entities include employee, payroll record, and department.
• An attribute provides detailed information about an entity. It helps one to identify,
describe, or clarify the entity by providing a value for some quantiable characteris-
tic or trait. For example, for the entity employee, appropriate attributes would be the
employee’s name, address, social security number, and home phone number. Each
attribute describes the employee by providing detailed information about that person.
For example, John Smith, SSN 111-22-3333, lives at 2505 Hillcrest Drive and has a
phone number of 757-345-1234.
Those of you with DP background have probably matched the terms entity and
attribute with the terms record and field, respectively. That is exactly what they are,
or how they may be implemented. The difference is that entities represent what you

Data Normalization ◾ 17
might ultimately implement in terms of record structures and content; they by no
means represent a physical design decision. It is far too early for that. Physical design
decisions will be made after you have identified all of the data requirements and have
analyzed the overall impact of accessing that data to meet user requirements. The
entity/attribute terminology focuses on the information needed by the user, detailing
the meaning of the information being analyzed. At the same time, these terms help
one to suppress the urge of the technical staff to prematurely jump into physical design
decisions.
What, then, is normalization? For now, let us say it is a technique for reviewing the
entity/attribute lists to ensure that attributes are located where they belong. A more com-
prehensive denition will be given later. For example, an employee entity should contain
only attributes that provide information about the employee. If, by accident or oversight,
an attribute is incorrectly associated with employee, the normalization process will enable
you to identify and correct the error.
In many respects, normalization is simply applied common sense. e end result of the
analysis reects the same type of logic analysts have used for years; this approach merely
provides a set of formal rules to avoid mistakes or oversights. We will review exactly what
these rules are later in the current chapter.
2.3 CREATING THE ENTITY/ATTRIBUTE LIST
Let us assume that you have formed a design team composed of representatives from the
end user, application programming, and database support sta. Your team has agreed to
use the normalization approach to data analysis and have dened and discussed the terms
entity and attribute. In getting started, what is done rst?
As a starting point, search through existing reports or forms to identify data require-
ments. If part of the system is already automated, study the le layouts and/or database
design. If you have already automated some tasks, you will probably need that data in the
new or expanded system. Ask the users what else they need to track. What other informa-
tion will they be wanting in the future? You want to keep those future requirements in
mind, even though the proposed data may not exist for six months or more.
On the other hand, recognize that requirements do change. Most of us who have been
around the DP business for any amount of time can recall, for example, a report that has
been produced for the last ve years and is no longer used. You need to be careful to ensure
that the data are still relevant to today’s (and tomorrow’s) business.
Try brainstorming to identify data elements. Less-experienced end users will nd the
discussion particularly useful because the DP sta can suggest “if you have this type of
data, then you can perform these functions.” For example, bill of material data for a shop
assembly operation would include information on parts that are on order from suppliers.
e anticipated delivery date of parts, along with the cost of each item, could be used
to forecast account payable information for the nance department. As with any type
of brainstorming session, accept all ideas and suggestions without question. Revise and
rene later.
18 ◾ A Practical Guide to Database Design
You will soon nd that a massive volume of notes will be generated, along with the need
to get this information organized in some way. e easiest thing to do is to enter these
initial entity/attribute lists in a data modeling tool, such as erwin (discussed in Chapter 5).
Data modeling tools are specialized applications that allow you to capture and
record denitions for entities, their associated attributes, and illustrate the asso-
ciation between entities (the data model). In addition, they support mapping of
logical to physical designs and can generate DDL (Data Denition Language)
statements to create tables in DBMS products such as Structured Query Language
Server and Oracle.
Once these reports are available, review them to verify that an attribute is precisely and
accurately dened. All team participants must agree on these denitions; disagree-
ment oen identies the need for additional attributes to be created. Fortunately, a data
modelingtool greatly reduces the administrative tasks required.
2.3.1 The Order Entry Model
Let us review the data environment that will serve as the sample problem used to illustrate
the database design process.
Assume that you are part of the design team for a company that will advertise and sell
merchandise on the Internet.
• Customers will connect to the company’s website, search Advertised_Items for sale,
and place orders for the items selected. e orders are then lled and shipped to the
customer by the stock room.
• Each item advertised has a reorder level. When the number of items in inventory
drops to or below that quantity, available suppliers are searched and additional items
will be ordered from one of those suppliers on the basis of their current selling price.
e data model to be created will include data requirements to create orders for customers,
to ll orders from the stock room, to monitor inventory quantities, and to reorder items
from suppliers as needed.
As part of the design team, consider the above-mentioned overview of this environment
and try to come up with ve or six entities that seem appropriate (e.g. customer). Next,
try to identify at least four attributes for each (as in Customer Name, Address, and Phone
Number). Be sure to clearly dene the meaning of each attribute that you identify.
When you have completed your list, compare your answer to that of Figure 2.1. is will
serve as a starting point for the next phase of analysis, as it contains several intentional
errors which will be resolved as part of the normalization process.

Data Normalization ◾ 19
Attribute Description
Customer
CustomerTelephoneNumber e customer’s telephone number
CustomerName e customer’s name
CustomerStreetAddress e street name associated with the customer’s account
CustomerCity e city in which the customer lives
CustomerState e state in which the customer lives
CustomerZipCode e customer’s zip code
CustomerCreditRating e credit rating for this customer
OrderNumber An order number for this customer
Order
OrderNumber A unique identier for each order
CustomerPhoneNumber e customer’s telephone number
CustomerName e unique name for this customer
OrderDate e date when the order was placed
NumberOfDays e number of days from when the order was placed until shipped
CustomerStreetAddress e street address for where the order is to be shipped
CustomerCity e city to which the order is to be shipped
CustomerState e state to which the order is to be shipped
CustomerZipCode e zip code associate with the shipping address
CustomerCreditCardNumber e credit card number used for this purchase
CustomerCreditCardName e customer’s name on the credit card used
StockNumber e stock number for the item purchased
ShippingDate e date the order was shipped
Advertised_Item
ItemNumber e unique identier for each Advertised_Item
ItemDescription A description of the item advertised
ClothingFlag A code identifying clothing items
HealthFlag A code identifying items as Health and Beauty
ItemWeight e shipping weight for each item
ItemColor e color of the item
ItemPrice e selling price of the item sold
SupplierCode e unique identier for the supplier of this item
OrderNumber e order number on which this item appears
Supplier
SupplierID A unique identier for each supplier
CompanyName e unique name for this supplier
SupplierStreetAddress e street address for this supplier’s main oce
SupplierCity e city in which the supplier’s main oce is located
SupplierState e state in which the supplier’s main oce is located
SupplierZipCode e zip code for the supplier’s main oce
StockNumber e unique identier for each advertised item
Purchased_Item
ItemNumber e unique identier for each item on an order
ItemDescription e description of the item advertised
QuantityOrdered e number of items purchased
SellingPrice e price of the item purchased
ShippingDate e date the item purchased was shipped to the customer
FIGURE 2.1 e initial entity/attribute list.

20 ◾ A Practical Guide to Database Design
2.4 CLEANING UP THE ENTITY/ATTRIBUTE LIST
Before beginning the normalization process, the initial entity/attribute list must be checked
for errors or oversights.
2.4.1 Problem Type 1—Synonyms
A synonym is created when two dierent names are used for the same information
( attribute). If an attribute resides in more than one entity, insure that all entities use the
same attribute name.
For example, the attributes “SupplierCode” and “SupplierID” below are both intended to
represent the unique identier (key eld) for supplier. As they have been spelled dierently,
this represents an error.
Advertised_Item Supplier
SupplierCode <== error SupplierID <== error
By using more than one name for the same attribute will cause many problems, including
a failure to recognize one-to-many (1:M) relationships when the data model is developed.
Advertised_Item Supplier
SupplierID <== correction SupplierID
2.4.2 Problem Type 2—Homonyms
A homonym is the reverse of a synonym. Just as you cannot use dierent names for the
same attribute, you cannot use the same name for dierent attributes.
For example, the attribute “CompanyName” under the Customer entity refers to a dier-
ent data element “CompanyName” under Supplier. is is another error in data denition.
Customer Supplier
CompanyName - e unique name
forthis customer <== error CompanyName - e unique
name for this supplier <== error
One or both names must be changed to reect their dierences.
Customer Supplier
CustomerName - e unique name
forthis customer <== correction SupplierName - e unique name
for this supplier <== correction
2.4.3 Problem Type 3—Redundant Information
is problem, in which the same information is stored in two dierent forms or ways, is
a bit harder to spot. One way to check for it is to consider if the value of any attribute is
known or is derivable through the other attributes dened.
For example, in an “Employee” entity, storing an employee’s age is redundant informa-
tion when the birth date is also stored as an attribute.

Data Normalization ◾ 21
Employee
EmployeeAge <== error
EmployeeBirthDate <== error
In this example, removing EmployeeAge will eliminate the error condition. When needed,
the employee’s age can be derived using the EmployeeBirthDate and the current date.
2.4.4 Problem Type 4—Mutually Exclusive Data
Mutually exclusive data exist when attributes occur, all the values of which, perhaps
expressed as yes/no indicators, cannot be true for any single entity.
As an example, consider an Employee entity with attributes of “Married” and “Single.”
Employee
Married <== error
Single <== error
Errors of this type oen represent values of a larger category. Whenever possible, resolve
the error by creating the larger categorical attribute.
In this case, these two elements can be resolved by creating an attribute of
“MaritalStatus,” which would have a value of either M (Married) or S (Single).
Employee
MaritalStatus—An indicator of
the Employee’s marital status
Study Figure 2.1 and see what suggestions you would make to correct any discrepancies as
dened earlier. When you are nished, compare your list with the comments below, and
the revised entity/attribute list shown in Figure 2.2.
2.4.5 Problem Type 1—Synonyms
Customer Order
CustomerTelephoneNumber <== error CustomerPhoneNumber <== error
Note that the CustomerTelephoneNumber in Customer and CustomerPhoneNumber in
Order refer to the same attribute but have dierent names. CustomerPhoneNumber will be
changed to CustomerTelephoneNumber.
Customer Order
CustomerTelephoneNumber CustomerTelephoneNumber <== correction
Advertised_Item Supplier
ItemNumber <== error StockNumber <== error

22 ◾ A Practical Guide to Database Design
Attribute Description
Customer
CustomerTelephoneNumber e customer’s telephone number
CustomerName e customer’s name
CustomerStreetAddress e street name associated with the customer’s account
CustomerCity e city in which the customer lives
CustomerState e state in which the customer lives
CustomerZipCode e customer’s zip code
CustomerCreditRating e credit rating for this customer
OrderNumber An order number for this customer
Order
OrderNumber A unique identier for each order
CustomerTelephoneNumber e customer’s telephone number
CustomerName e unique name for this customer
OrderDate e date when the order was placed
ShippingStreetAddress e street address for where the order is to be shipped
ShippingCity e city to which the order is to be shipped
ShippingState e state to which the order is to be shipped
ShippingZipCode e zip code associate with the shipping address
CustomerCreditCardNumber e credit card number used for this purchase
CustomerCreditCardName e customer’s name on the credit card used
StockNumber e stock number for the item purchased
ShippingDate e date the order was shipped
Advertised_Item
ItemNumber e unique identier for each Advertised_Item
ItemDescription A description of the item advertised
ItemDepartment A code classifying the item into one of the various product
categories of items for sale
ItemWeight e shipping weight for each item
ItemColor e color of the item
ItemPrice e selling price of the item sold
SupplierID e unique identier for the supplier of this item
OrderNumber e order number on which this item appears
Supplier
SupplierID A unique identier for each supplier
CompanyName e unique name for this supplier
SupplierStreetAddress e street address for this supplier’s main oce
SupplierCity e city in which the supplier’s main oce is located
SupplierState e state in which the supplier’s main oce is located
SupplierZipCode e zip code for the supplier’s main oce
ItemNumber e unique identier for each advertised item
Item_Ordered
ItemNumber e unique identier for each item on an order
ItemDescription e description of the item advertised
QuantityOrdered e number of items purchased
SellingPrice e price of the item purchased
ShippingDate e date the item purchased was shipped to the customer
FIGURE 2.2 e revised entity/attribute list.

Data Normalization ◾ 23
e ItemNumber attribute represents the unique identier for each advertised item, as
does StockNumber in Supplier. e same attribute name must be used in both entities as
they represent the same information.
Advertised_Item Supplier
ItemNumber ItemNumber <== correction
2.4.6 Problem Type 2—Homonyms
In Figure 2.1, the customer’s address appears in both the Customer and Order entities with
the same attribute names, but they refer to dierent data elements.
Customer Order
CustomerStreetAddress <== error CustomerStreetAddress <== error
CustomerCity <== error CustomerCity <== error
CustomerState <== error CustomerState <== error
CustomerZipCode<== error CustomerZipCode<== error
e Customer address attributes refer to the address associate with the customer’s account/
home location, but the Order’s address attributes refer to where the order is to be shipped.
e Order attributes must be changed.
Customer Order
CustomerStreetAddress ShippingStreetAddress <== correction
CustomerCity ShippingCity <== correction
CustomerState ShippingState <== correction
CustomerZipCode ShippingZipCode <== correction
2.4.7 Problem Type 3—Redundant Information
In Order, the NumberOfDays was dened/intended to track the length of time between
when the order was placed and when the order was shipped. e same result can be
obtained by nding the dierence between the OrderDate and ShippingDate attributes.
erefore, NumberOfDays can be eliminated.
2.4.8 Problem Type 4—Mutually Exclusive Data
In Advertised_Item, the ClothingFlag attribute classies the item as a clothing item,
whereas HealthFlag classies the item as a health/beauty product. ey both cannot be
true for any single item.
is is xed by removing both from Item and adding a new attribute ItemDepartment.
Item
ItemDepartment – A code classifying each item into one of the various product categories of items for sale
Figure 2.2 shows the corrections described earlier.

24 ◾ A Practical Guide to Database Design
2.5 NORMALIZATION
Now that a clean entity/attribute list exists in which an attribute has one and only one
name as well as a unique meaning, the normalization process can begin.
More formally stated, normalization is the process of analyzing the dependencies
between attributes within entities. Each attribute is checked against three or more sets of
rules, then making adjustments as necessary to put each in rst, second, and third normal
form (3NF). (It is possible you may want to move further to fourth or h normal form
[5NF], but in most cases, 3NF is not only adequate, but preferred; more later.) ese rules
will be reviewed in detail in the next section and provide a procedural way to make sure
attributes are placed where they belong.
Based on mathematical theory, normalization forms the basis for the implementa-
tion of tables within relational database systems. In practice, it is simply applied common
sense; for example, you should only put attributes in an employee entity (table) attributes
(or columns) that describe the employee. If you should nd an attribute that describes
something else, put it wherever it belongs.
Employee
EmployeeID
DeductionAmount <== error
In this example, DeductionAmount should not be associated with Employee, because it
does not provide information about the employee as a person or individual. Instead, it pro-
vides additional detail about a payroll deduction for that employee. A Payroll Deduction
entity would be created, if necessary, and DeductionAmount moved to it.
Employee Payroll Deduction
EmployeeID <== unique employee identier EmployeeID <== identies the employee involved
PayrollDate
DeductionAmount
Practical issues, typically related to performance, may later require you to use tricks of one
kind or another when setting up physical structures. But you are not there yet! Place your
data in 3NF and do all subsequent analysis with that view of data. Later, when all require-
ments are known, and aer considering usage requirements, decisions will be made regard-
ing physical structures. If at that time non–third normal structures are needed for reasons
of eciency, ne. For now, however, it is far too early to make judgments or decisions
related to physical design.
e following steps put the data model into, successively, rst, second, and 3NFs. Keep
in mind two points. First, although they may appear overly meticulous, they provide the
Data Normalization ◾ 25
user with specic guidance on how to put the data model into 3NF. Second, aer you have
developed several data models, the result will appear as common sense to you, and you will
tend to think third normal and create entity/attribute data models in 3NF automatically. So,
although the process appears to be tedious, it really is not.
2.5.1 First Normal Form
In his book, An Introduction to Database Systems, C. J. Date gives the denition of rst
normal form (1NF) as “A relation R is in rst normal form (1NF) if and only if all underly-
ing domains contain atomic values only.”1 It is important to note that, in Date’s discussion
of this topic, it is implied that a relation has a primary key associated with it.
I prefer to rephrase this denition by giving the following criteria. An entity is in 1NF if
1. All entities must have a key, composed of an attribute or combination of attributes
which uniquely identify one occurrence of the entity.
2. For any single occurrence of an entity, each attribute must have one and only one
value.
2.5.1.1 Requirement 1—Keys to Create Uniqueness
For a specic value for the key attribute(s), there can only be one occurrence of the
entity. For example, in the entity Advertised_Item, the ItemNumber is used to identify
one unique Advertised_Item. Of course, the key should be unambiguous; there must be
no question or confusion on what ItemNumber identies. In addition, the key must be
constant/unchanging over time. If an entity does not have a unique key, one must be created
to provide a unique identier for each occurrence of the entity.
ere may, in fact, be more than one within an entity to obtain uniqueness. Analyze
each and pick (or create) an attribute that clearly communicates/identies the associated
entity.
In the Customer entity, CustomerName appears to be good choice to identify custom-
ers. However, in practice, using names (particularly for businesses) creates many problems.
First, dierent businesses can exist having the same name. In addition, a business may
oen be referred to by many names; I was once told that there are 27 dierent ways to spell
or refer to AT&T. Although we need a standard spelling for the name for each customer,
using CustomerName as a key introduces many problems.
Also in the Customer entity, CustomerTelephoneNumber would uniquely identify each
customer but would be a poor choice for a key. First, the number itself does not have much
inherent meaning. In addition, if the customer were to move their oce to another loca-
tion, the CustomerTelephoneNumber would change, and data relationships based on the
old telephone number would no longer exist.

26 ◾ A Practical Guide to Database Design
For the Customer entity, I recommend creating a new attribute CustomerIdentier,
based on an alpha-numeric combination of characters that are of course unique for each
customer.
If you do nd two candidates for keys, perhaps one can be eliminated. In many cases,
however, both may be needed (as in the CustomerName and CustomerTelephoneNumber
above). ey each are required to provide dierent information about any specic cus-
tomer instance. In this example, CustomerName can be considered a secondary key
(i.e., an entity that uniquely identies uniqueness but is not practical to use as a primary
identier).
Review the revised entity/attribute list in Figure 2.2 and identify keys for each entity.
When nished, refer to Figure 2.3 in which the key attributes are identied with an “**”
indicator.
2.5.1.2 Requirement 2—Attributes Can Have Only One Value
e second requirement for 1NF is oen stated as “an entity must have no repeating
groups.”
To understand what a repeating group is, consider the OrderNumber attribute within
Customer. At any given moment, the attribute OrderNumber will have multiple val-
ues, each reecting a dierent OrderNumber for that customer at that moment in time.
OrderNumber, therefore, is a repeating group.
As a second example, the ItemNumber attribute in Supplier is also a repeating group
because a supplier normally provides multiple times of items that will be advertised for
sale.
Customer Supplier (Revised in Figure 2.3)
OrderNumber <== error – repeating group ItemNumber <== error – repeating group
In contrast, consider CustomerName in the Customer entity. For a given customer, we
create one unique name for that customer. CustomerName, therefore, is not a repeating
group.
Whenever repeating groups occur, they must be removed and placed where it belongs,
moving it to (or creating it within) the entity to which it belongs. To see what that means in
practice, consider the following example.
Department Employee
DepartmentNumber EmployeeNumber
EmployeeNumber <== error – repeating group
Step 1: e repeating attribute must be removed from the entity in which it appears, aer
assuring that the attribute exists in the data model in 1NF.

Data Normalization ◾ 27
Attribute Description
Customer
**CustomerIdentier e alpha-numeric string that uniquely identies each customer
CustomerTelephoneNumber e customer’s telephone number
CustomerName e customer’s name
CustomerStreetAddress e street name associated with the customer’s account
CustomerCity e city in which the customer lives
CustomerState e state in which the customer lives
CustomerZipCode e customer’s zip code
CustomerCreditRating e credit rating for this customer
OrderNumber An order number for this customer
Order
**OrderNumber A unique identier for each order
CustomerTelephoneNumber e customer’s telephone number
CustomerName e unique name for this customer
OrderDate e date when the order was placed
ShippingStreetAddress e street address for where the order is to be shipped
ShippingCity e city to which the order is to be shipped
ShippingState e state to which the order is to be shipped
ShippingZipCode e zip code associate with the shipping address
CustomerCreditCardNumber e credit card number used for this purchase
CustomerCreditCardName e customer’s name on the credit card used
StockNumber e stock number for the item purchased
ShippingDate e date the order was shipped
Advertised_Item
**ItemNumber e unique identier for each Advertised_Item
ItemDescription A description of the item advertised
ItemDepartment A code classifying the item into one of the various product categories
of items for sale
ItemWeight e shipping weight for each item
ItemColor e color of the item
ItemPrice e selling price of the item sold
SupplierID e unique identier for the supplier of this item
OrderNumber e order number on which this item appears
Supplier
**SupplierID A unique identier for each supplier
CompanyName e unique name for this supplier
SupplierStreetAddress e street address for this supplier’s main oce
SupplierCity e city in which the supplier’s main oce is located
SupplierState e state in which the supplier’s main oce is located
SupplierZipCode e zip code for the supplier’s main oce
ItemNumber e unique identier for each item
Item_Ordered
**ItemNumber e unique identier for each item on an order
**OrderNumber A unique identier for each order
ItemDescription e description of the item advertised
QuantityOrdered e number of items purchased
SellingPrice e price of the item purchased
ShippingDate e date the item purchased was shipped to the customer
FIGURE 2.3 e revised entity/attribute list with keys.
28 ◾ A Practical Guide to Database Design
You cannot just throw the attribute away. First ensure that the attribute exists where
it belongs. Analyze what the attribute describes and, if necessary, create a new entity
in 1NF. Once an entity exists (or is identied), move the attribute to that entity and
remove the repeating attribute in which it was originally found.
In the above-mentioned example, EmployeeNumber is a repeating group with
Department (departments have more than one employee). As EmployeeNumber
was also found (correctly) in Employee, the error is resolved by simply removing
EmployeeNumber from Department.
Step 2: Next, study the relationship between the entities from where the repeating
attribute came from and where it moved to. Determine if the from–to relationship
is one-to-many (1:M) or many-to-many (M:M).
In the above-mentioned Department–Employee example, the from entity is
Department, and the to entity is Employee. To determine if this is a 1:M or M:M, ask
“for one Department, are there one or many employees?”, then repeat the question
in reverse by asking “for one employee, are there one or many departments?”. In this
case, one Department has many employees, but one employee is associated with one
department. erefore, the relationship is 1:M.
When the relationship is 1:M, this is an acceptable relationship and no further adjust-
ments are necessary. If, on the other hand, the answer is M:M, then one nal check/
adjustment is necessary before you move to Step 3.
In reviewing the OrderNumber entity in the Customer entity, the OrderNumber
attribute already exists within Order. It can therefore be removed from the Customer
entity. Next, in checking the relationship between the Customer and Order entities,
we nd that one customer can have many orders, but one order relates to a single
customer. erefore, there is a 1:M relationship between Customer and Order, and no
further adjustments are necessary.
However, now consider the ItemNumber attribute with Supplier.
• Where does ItemNumber belong to? As it is the unique identier for an
Advertised_Item, it belongs under Advertised_Item and already exists there. It
can therefore be removed from the Supplier entity.
• Is the relationship 1:M or M:M? One item can be purchased from many sup-
pliers, and a single supplier provides many items. Therefore, the relationship
is M:M.
• Now, we have a problem. The M:M relationship between Advertised_Item and
Supplier requires that we have an entity to hold information (attributes) about
one Advertised_Item when purchased from a unique supplier. For example,
how much does that supplier charge for that item, and what was the quality
Data Normalization ◾ 29
of the merchandise received when that Advertised_Item was ordered from a
unique supplier?
Advertised_Item
**ItemNumber
<<-------------------------------->>
Reorder cost?
Quality of item last received?
Supplier
**SupplierID
If it does not already exist, a new entity must be created to store the attributes common
to the entities in the M:M relationship (in this case, Advertised_Item and Supplier);
see Step 3.
Step 3: Convert each M:M relationship into two 1:M relationships by creating
(if necessary) a new derived entity.
A M:M relationship poses a basic design problem because there is no place to store
attributes common to the two entities involved, that is, attributes that lie in the
intersection of the two entities.
Creating a new entity to store the intersection elements transforms the M:M relation-
ship into two 1:M relationships and provides a storage location for the data common
to the two entities involved.
In the above-mentioned example, create a new entity Reorder_Item, which repre-
sents information for items that can be ordered from suppliers. is modies the data
model to include two new 1:M relationships:
Reorder_Item
**ItemNumber
**SupplierID
Reorder_Cost
QualityOfItemReceived
Advertised_Item
**ItemNumber
Supplier
**SupplierID
<------->> <<-------->
Study the information contained in Figure 2.3 and make a list of any adjustments you
feel are necessary to put the entity/attribute list in 1NF. When you are ready, compare
your solution to that shown in Figure 2.4.
2.5.2 Second Normal Form
Mr. Date’s denition for second normal form (2NF) is: “A relation R is in second normal
form (2NF) if and only if it is in 1NF and every non-key attribute is fully dependent on the
primary key.”2
I prefer a slight modication by stating this additional requirement as follows:
For 2NF, each nonkey attribute must depend on the key and all parts of the key.
If the value of an attribute can be determined by knowing only part of the entity’s key,
there is a violation of 2NF.

30 ◾ A Practical Guide to Database Design
Attribute Description
Customer
**CustomerIdentier e alpha-numeric string that uniquely identies each customer
CustomerTelephoneNumber e customer’s telephone number
CustomerName e customer’s name
CustomerStreetAddress e street name associated with the customer’s account
CustomerCity e city in which the customer lives
CustomerState e state in which the customer lives
CustomerZipCode e customer’s zip code
CustomerCreditRating e credit rating for this customer
Order
**OrderNumber A unique identier for each order
CustomerTelephoneNumber e customer’s telephone number
CustomerName e unique name for this customer
OrderDate e date when the order was placed
ShippingStreetAddress e street address for where the order is to be shipped
ShippingCity e city to which the order is to be shipped
ShippingState e state to which the order is to be shipped
ShippingZipCode e zip code associate with the shipping address
CustomerCreditCardNumber e credit card number used for this purchase
CustomerCreditCardName e customer’s name on the credit card used
ShippingDate e date the order was shipped
Advertised_Item
**ItemNumber e unique identier for each Advertised_Item
ItemDescription A description of the item advertised
ItemDepartment A code classifying the item into one of the various product categories
of items for sale
ItemWeight e shipping weight for each item
ItemColor e color of the item
ItemPrice e selling price of the item sold
Supplier
**SupplierID A unique identier for each supplier
SupplierName e unique name for this supplier
SupplierStreetAddress e street address for this supplier’s main oce
SupplierCity e city in which the supplier’s main oce is located
SupplierState e state in which the supplier’s main oce is located
SupplierZipCode e zip code for the supplier’s main oce
Item_Ordered
**ItemNumber e unique identier for each item on an order
**OrderNumber A unique identier for each order
ItemDescription e description of the item advertised
QuantityOrdered e number of items purchased
SellingPrice e price of the item purchased
ShippingDate e date the item purchased was shipped to the customer
Restock_Item
**ItemNumber e unique identier for each item on an order
**SupplierID A unique identier for each supplier
PurchasePrice e current cost of this item if purchased from this supplier
FIGURE 2.4 e rst normal form entity/attribute list.

Data Normalization ◾ 31
Consider the following denition of a Payroll Deduction entity to record deductions for
every paycheck.
Payroll Deduction
**EmployeeID
**DateDeductionTaken
EmployeeName <== 2NF error; dependent only on EmployeeID
DeductionType
DeductionAmount
Here, the EmployeeName is an error for 2NF because the name is dependent only on the
EmployeeID and not the date when the deduction was taken.
Any adjustments for 2NF violations follow the same steps as for 1NF errors. First,
ensure that the attribute in error exists correctly in 1NF. Next, check the relationship
between the entity in error (here it is Payroll Deduction) and the entity in which the
attribute is correctly associated (Employee). If there is a 1:M relationship, no further
adjustments are necessary. However, if there is an M:M relationship between these
entities, verify that the intersection entity exists, and if necessary, create that derived
entity.
Almost all violations of 2NF are found in entities having more than one attribute con-
catenated together to form the entity key. It seems almost trivial to state that, for entities
with a single key, nonkey attributes must rely on that key. (For example, in a Customer
entity, you would expect to nd only attributes that provide information about that cus-
tomer.) If, when the entity/attribute lists are created, keys were immediately identied and
checks made to ensure that only attributes dependent on that key were added, you need
only check entities that use concatenated attributes for keys. If that initial check was not
done, you should check all attributes in each entity to verify that attributes are dependent
on that entity’s key.
Take a look at the 1NF solution in Figure 2.4 and determine what, if any, further adjust-
ments are necessary to move to 2NF. When you are nished, compare your results to
Figure 2.5.
2.5.3 Third Normal Form
Finally, Mr. Date gives a denition for 3NF as follows: “A relation R is in third normal form
(3NF) if and only if it is in 2NF and every nonkey attribute is nontransitively dependent on
the primary key.”3
Once again, I prefer to phrase the requirement dierently, adding the following criteria
to that for 2NF:
A nonkey attribute must not depend on any other nonkey attribute.

32 ◾ A Practical Guide to Database Design
Attribute Description
Customer
**CustomerIdentier e alpha-numeric string that uniquely identies each customer
CustomerTelephoneNumber e customer’s telephone number
CustomerName e customer’s name
CustomerStreetAddress e street name associated with the customer’s account
CustomerCity e city in which the customer lives
CustomerState e state in which the customer lives
CustomerZipCode e customer’s zip code
CustomerCreditRating e credit rating for this customer
Order
**OrderNumber A unique identier for each order
CustomerTelephoneNumber e customer’s telephone number
CustomerName e unique name for this customer
OrderDate e date when the order was placed
ShippingStreetAddress e street address for where the order is to be shipped
ShippingCity e city to which the order is to be shipped
ShippingState e state to which the order is to be shipped
ShippingZipCode e zip code associate with the shipping address
CustomerCreditCardNumber e credit card number used for this purchase
CustomerCreditCardName e customer’s name on the credit card used
ShippingDate e date the order was shipped
Advertised_Item
**ItemNumber e unique identier for each Advertised_Item
ItemDescription A description of the item advertised
ItemDepartment A code classifying the item into one of the various product
categories of items for sale
ItemWeight e shipping weight for each item
ItemColor e color of the item
ItemPrice e selling price of the item sold
Supplier
**SupplierID A unique identier for each supplier
SupplierName e unique name for this supplier
SupplierStreetAddress e street address for this supplier’s main oce
SupplierCity e city in which the supplier’s main oce is located
SupplierState e state in which the supplier’s main oce is located
SupplierZipCode e zip code for the supplier’s main oce
Item_Ordered
**ItemNumber e unique identier for each item on an order
**OrderNumber A unique identier for each order
QuantityOrdered e number of items purchased
SellingPrice e price of the item purchased
ShippingDate e date the item purchased was shipped to the customer
Restock_Item
**ItemNumber e unique identier for each item on an order
**SupplierID A unique identier for each supplier
PurchasePrice e current cost of this item if purchased from this supplier
FIGURE 2.5 e second normal form entity/attribute list.
Data Normalization ◾ 33
If a nonkey attribute’s value can be obtained simply by knowing the value of another
nonkey attribute, the entity is not in 3NF.
For example, in the Order entity, you see the nonkey attributes
CustomerCreditCardNumber and CustomerCreditCardName. ere is an obvious depen-
dency between the credit card number and the name on that credit card. A violation of
3NF exists, and CustomerCreditCardName must be removed.
How do we make this adjustment? Once again, repeat the steps covered under
1NF adjustments. Make sure the proper entity exists, then check for 1:M versus M:M
relationships. In this case, you need to create a new entity Credit_Card to store infor-
mation about the credit cards that the customer might use. The key for the entity is
CustomerCreditCardNumber, and the CustomerCreditCardName would be a nonkey
attribute.
Start from the 2NF solution in Figure 2.5 and see what other adjustments are necessary
to get to 3NF, then check your solution against that shown in Figure 2.6.
By the way, try this shortcut expression for the rules of normalization.
For an entity to be in 3NF, each nonkey attribute must relate to the key, the
whole key, and nothing but the key.
e entity/attribute list is now in 3NF, and each attribute is where it belongs. Nonkey
attributes appear only once, in the entity which they describe. Attributes in key elds can
(and do) appear in several related entities. ese repeated occurrences establish the vari-
ous one-to-many relationships that exist between entities. is redundancy is required
for a relational DBMS, which provides data linkage on the basis of data content only. For
example, those entities related to Advertised_Item (Ordered_Item and Restock_Item)
must all have the Advertised_Item’s key, ItemNumber, stored in them to support access/
data retrieval by ItemNumber.
It is important to keep in mind that the final data structure/design has not been
created/finalized yet. The data model is just a logical view of data elements and how
they relate to each other. This logical structure could be used to create tables and table
structures, but the final decisions on database design and table structures will come
later, after considering the results of how the data will be accessed. This is covered later
in the book.
For now, there is one nal step at this part of the analysis, which claries your solution
by drawing a picture of the data relationships that have been created.

34 ◾ A Practical Guide to Database Design
Attribute Description
Customer
**CustomerIdentier e alpha-numeric string that uniquely identies each customer
CustomerTelephoneNumber e customer’s telephone number
CustomerName e customer’s name
CustomerStreetAddress e street name associated with the customer’s account
CustomerCity e city in which the customer lives
CustomerState e state in which the customer lives
CustomerZipCode e customer’s zip code
CustomerCreditRating e credit rating for this customer
Order
**OrderNumber A unique identier for each order
CustomerIdentifer e unique name for this customer
OrderDate e date when the order was placed
ShippingStreetAddress e street address for where the order is to be shipped
ShippingCity e city to which the order is to be shipped
ShippingState e state to which the order is to be shipped
ShippingZipCode e zip code associate with the shipping address
CustomerCreditCardNumber e credit card number used for this purchase
ShippingDate e date the order was shipped
Ordered_Item
**OrderNumber A unique identier for each order
**ItemNumber e unique identier for each Advertised_Item
QuantityOrdered e number of items purchased
SellingPrice e price of the item purchased
ShippingDate e date the item purchased was shipped to the customer
Advertised_Item
**ItemNumber e unique identier for each Advertised_Item
ItemDescription A description of the item advertised
ItemDepartment A code classifying the item into one of the various product
categories of items for sale
ItemWeight e shipping weight for each item
ItemColor e color of the item
ItemPrice e selling price of the item sold
Supplier
**SupplierID A unique identier for each supplier
SupplierName e unique name for this supplier
SupplierStreetAddress e street address for this supplier’s main oce
SupplierCity e city in which the supplier’s main oce is located
SupplierState e state in which the supplier’s main oce is located
SupplierZipCode e zip code for the supplier’s main oce
Restock_Item
**ItemNumber e unique identier for each item on an order
**SupplierID A unique identier for each order
ReorderPrice e current cost of new items ordered from this supplier
Credit_Card
**CustomerCreditCardNumber e credit card number used for this purchase
CustomerCreditCardName e customer’s name on the credit card used
FIGURE 2.6 e 3NF entity/attribute list.
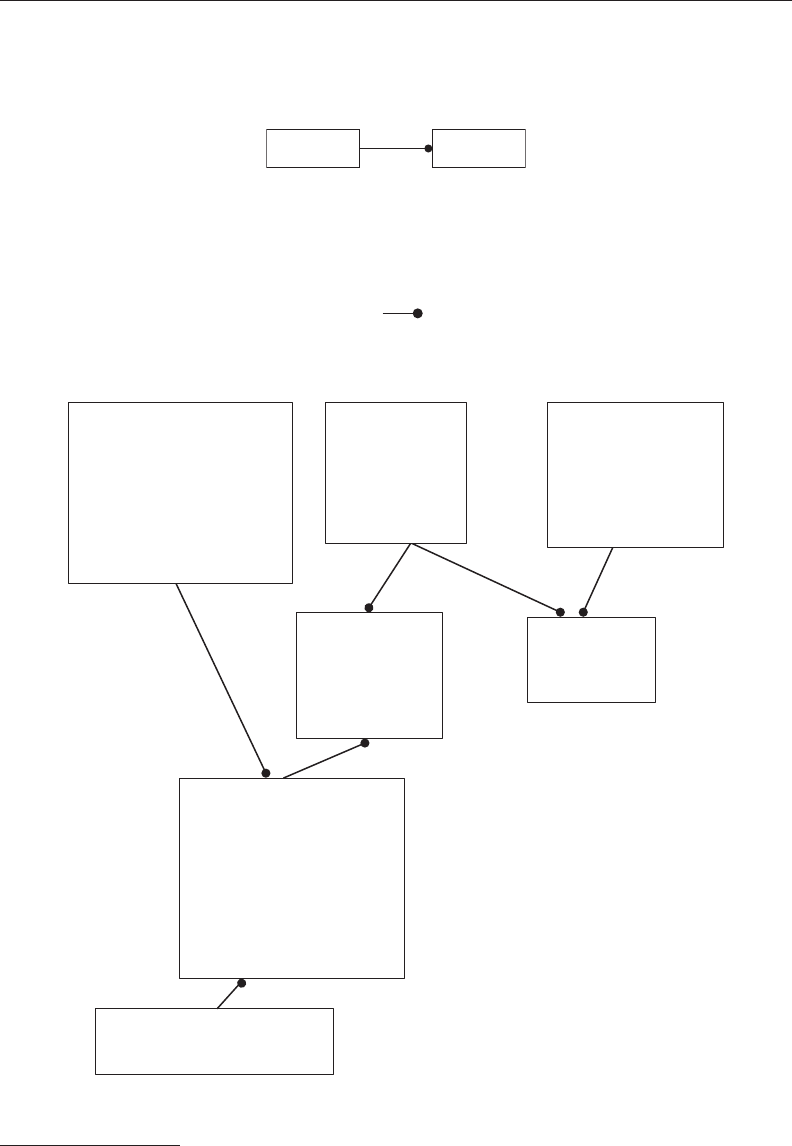
Data Normalization ◾ 35
2.6 CREATING THE DATA MODEL
e best way to view the results of this analysis is to draw a pictorial representation of the
3NF data, usually referred to as a data model or a relational view. In this type of diagram,
each entity is represented by a box, which is labeled with the entity’s name. e related
boxes are connected with an arrow, such as*
Customer Order
In words, there is a one-to-many relationship between Customer and Order, or, for each
customer, there are many orders.
is is a fairly easy diagram to draw. Begin by simply drawing and labeling a box for
each entity. en, for each entity, ask “Does the key of this entity exist entirely within
another entity?” If so, connect them with a line.
Draw the data model for the 3NF solution in Figure 2.6 and compare your results with
that shown in Figure 2.7.
* Note: 1:M relationships are oen drawn using a >-------<< connector line.
Supplier
**SupplierID
SupplierName
SupplierStreetAddress
SupplierCity
SupplierState
SupplierZipCode
Order
**OrderNumber
CustomerIdentifer
OrderDate
ShippingStreetAddress
ShippingCity
ShippingState
ShippingZipCode
CustomerCreditCardNumber
ShippingDate
Ordered_Item
**OrderNumber
**ItemNumber
QuantityOrdered
SellingPrice
ShippingDate
Restock_Item
**SupplierID
**ItemNumber
ReorderPrice
Credit_Card
**CustomerCreditCardNumber
CustomerCreditCardName
Customer
**CustomerIdentier
CustomerTelephoneNumber
CustomerName
CustomerStreetAddress
CustomerCity
CustomerState
CustomerZipCode
CustomerCreditRating
Advertised_Item
**ItemNumber
ItemDescription
ItemDepartment
ItemWeight
ItemColor
ItemPrice
FIGURE 2.7 e initial entity/attribute diagram.
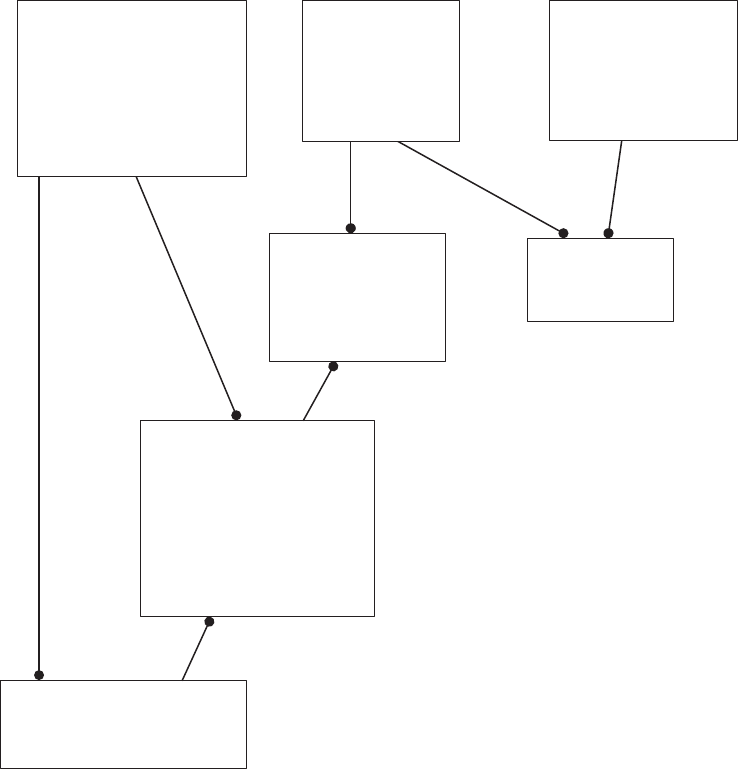
36 ◾ A Practical Guide to Database Design
Be very rigorous about drawing the 1:M lines and only draw them in which “the key of one
appears within the many.” When nished, check your diagram carefully to see that it “makes
sense.” You may nd two entities that logically should be related but have not been connected
by a line. Adjust the data model attributes as needed to allow you to then add the 1:M line.
For example, in Figure 2.7, common sense suggests that there should be a 1:M relation-
ship between Customer and Credit_Card. One was not drawn in Figure 2.7 because the
customer’s key was not (at that time) in Credit_Card. Aer reviewing this, it is clear that
there should be a 1:M relationship between these two entities, so we add the customer key
(CustomerIdentier) to Credit_Card, then draw the 1:M relationship between the two. See
the revised entity/attribute diagram in Figure 2.8.
For completeness, I will now review fourth and 5NFs, although in my experience, they
have limited practical application for real-world applications/databases.
Supplier
**SupplierID
SupplierName
SupplierStreetAddress
SupplierCity
SupplierState
SupplierZipCode
Order
**OrderNumber
CustomerIdentifer
OrderDate
ShippingStreetAddress
ShippingCity
ShippingState
ShippingZipCode
CustomerCreditCardNumber
ShippingDate
Ordered_Item
**OrderNumber
**ItemNumber
QuantityOrdered
SellingPrice
ShippingDate
Restock_Item
**SupplierID
**ItemNumber
ReorderPrice
Credit_Card
**CustomerCreditCardNumber
CustomerCreditCardName
CustomerIdentier
Customer
**CustomerIdentier
CustomerTelephoneNumber
CustomerName
CustomerStreetAddress
CustomerCity
CustomerState
CustomerZipCode
CustomerCreditRating
Advertised_Item
**ItemNumber
ItemDescription
ItemDepartment
ItemWeight
ItemColor
ItemPrice
FIGURE 2.8 e nal entity/attribute diagram.

Data Normalization ◾ 37
2.7 FOURTH NORMAL FORM
Ronald Fagin gives the following denition for fourth normal form. “A relation schema R*
is in fourth normal form (4NF) if, whenever a nontrivial multivalued dependency X -->>
Y holds for R*, then so does the functional dependency X --> A for every column name A
of R*. Intuitively all dependencies are the result of keys.”4
Wikipedia restates this denition as “A table is in 4NF if and only if, for every one of its
non-trivial multivalued dependencies X ->> Y, X is a superkey—that is, X is either a candi-
date key or a superset thereof.”5
eir example helps one to clarify the meaning behind this change. ey show a 3NF
table containing information for restaurants, pizza variety, and delivery area. Note that the
unique key for this table requires the concatenation of all three columns.
Pizza Delivery
**Restaurant
**Pizza_Variety <== 4NF error
**Delivery_Area <== 4NF error
If a restaurant oers all varieties at all locations, the 4NF issue is that Pizza_Variety
depends only on Restaurant and is independent of Delivery_Area. e 4NF solution
would break the above into two tables:
Restaurant Variety
**Restaurant
**Pizza_Variety
Delivery Area
**Restaurant
**Delivery_Area
Although from the theoretical point of view this might provide a cleaner denition/
delineation of data types, in practice it breaks the data into two tables. As a result, when
data about restaurants, varieties, and delivery areas are needed, more I/O is required to
retrieve the same equivalent as opposed to the 3NF solution, and application performance
is degraded.
5NF takes this one step further.
2.8 FIFTH NORMAL FORM
Wikipedia contains the following definition for 5NF. “A join dependency*{A, B, ..., Z}
on R is implied by the candidate key(s) of R if and only if each of A, B, ..., Z is a super-
key for R.”6
Wikipedia’s explanation restates this as “A table is said to be in the 5NF if and only if
every non-trivial join dependency in it is implied by the candidate keys.”

38 ◾ A Practical Guide to Database Design
Once again, there is an example that claries the intent of this requirement. e 3NF
solution for information regarding traveling salesman, brands, and product information
calls for a table with the following design:
Saleman Product by Brand
**Traveling_Saleman
**Brand
**Product_Type
To be in 5NF, this information must be implemented in the following table structures:
Product Type by Salesman
**Traveling_Saleman
**Product_Type
Brand by Salesman
**Traveling_Salesman
**Brand
Product Type by Brand
**Brand
**Product_Type
Once again, an implementation based on 5NF requires that the data be implemented across
more tables. Application logic processing these data will generate more I/O activity, and
performance will be degraded.
Does this matter? e answer is “It depends.”
I nd it interesting to recall that “It depends” is the correct response to almost any
question on database design or implementation. en again, aer being in this
business for more than 40 years, I have seen or been involved in projects ranging
from the smallest to the largest.
For simple, small systems, the additional I/O may not make a dierence. In general, however,
a large, complex system would (in my opinion) generally suer from a 5NF implementa-
tion. Early prototyping of a solution may be required to predict or measure the performance
of a proposed solution to see if performance will be acceptable. Depending on the size and
importance of the system being designed, two steps are typically taken.
1. Vendors typically publish performance criteria that reect how a specied cong-
uration will perform to a standard workload. Mapping the anticipated application
data workload against these standards can measure the eectiveness of the proposed
conguration.7

Data Normalization ◾ 39
2. A more accurate benchmark can be done by building a scaled-down version of the
database with sample data and running applications or queries to measure database
performance.
Does performance matter? For a database of sucient size or complexity, absolutely. When
I last worked for Southwestern Bell Telephone/AT&T, I was a manager on the project to
design a database that would support anything the company might sell/oer in the future.
Our design team did an in-depth analysis of the associated data and derived a 5NF set of
entities for this environment. e resulting design contained more than 500 entities. At
this phase, we felt we could not make any performance-related changes in the data model
because we did not want to hamper/prevent more sophisticated data accesses if/when new
data requirements were identied.
When we nished the 5NF solution, we implemented it and used it with a modied bill-
ing program (revised to run against the relational tables) that had to run each night. e
nightly run took days to complete.
So where are we in terms of database design? In practice, I start with a 3NF design as
a hypothetical solution for relational tables. It is my understanding that this, in general,
is an industry practice, and 4NF and above are rarely used outside of academic circles.8
Ithen analyze data access required to meet application requirements and modify the logi-
cal design as needed to a design for physical tables. ese steps will be covered in detail in
the next chapter.
QUESTIONS
1. Dene the terms entity and attribute and give examples of each.
2. In developing a new data model for Customers, some having multiple oces, a data
requirement for a “Customer Location” has been identied. Is this an entity, or an
attribute, and why?
Referring to the data model shown in Figure 2.8:
3. If the attribute “PreferredCreditCard” is to be added, how would the entity/ attribute
list change?
4. If information were to be added to track the quality of items sold by a supplier, what
changes would be made to the data model?
5. What is the dierence between the ItemPrice in Advertised_Item and SellingPrice in
Ordered_Item?
You are asked to participate in creating a logical data model for a physician’s oce.
6. List ve entities you would expect to see in this data model and give a description of
each.
7. For each entity, list ve attributes that would be appropriate for each.

40 ◾ A Practical Guide to Database Design
8. For each entity, what attribute(s) would be appropriate as a key?
9. Develop a data model showing these ve entities and their relationships.
You are asked to lead a design team for a new database to be used by your company.
10. Who would you ask to participate as a member of the design team? Why?
11. When developing an initial list of entities for the database, what guidelines would you
give the participants on what to consider/not consider?
12. How would you document the entity/attribute lists as they are developed?
13. What do you feel is the appropriate level for data normalization for the entity/
attribute lists to be developed? Why?
14. Is the database to be used for implementation a factor at this stage? Why or why not?
15. As the logical data model is developed, should any signicant usage requirements be
noted or documented? Why or why not?
REFERENCES
1. Date, C. J., An Introduction to Database Systems, Reading, MA, Addison-Wesley, 1985, p. 367.
2. Date, C. J., An Introduction to Database Systems, Reading, MA, Addison-Wesley, 1985, p. 370.
3. Date, C. J., An Introduction to Database Systems, Reading, MA, Addison-Wesley, 1985, p. 373.
4. Fagin, R., Multivalued Dependencies and a New Normal Form for Relational Databases,
ACM Transactions on Database Systems, 2, 267, 1977.
5. Fourth normal form, Wikipedia.com, https://en.wikipedia.org/wiki/Fourth_normal_form
(accessed August 23, 2017).
6. Fih normal form, Wikipedia.org, https://en.wikipedia.org/wiki/Fih_normal_form
(accessed August 23, 2017).
7. Active TPC benchmarks, TPC.org, http://www.tpc.org/information/benchmarks.asp
(accessed August 23, 2017).
8. Fourth normal form, Techopedia.com, https://www.techopedia.com/denition/19453/
fourth-normal-form-4nf (accessed August 23, 2017).

41
Chapter 3
Database Implementation
3.1 LOGICAL TO PHYSICAL DESIGN
Let us begin with a review of the (third normal form) 3NF logical data model from
Chapter2 (Figure 3.1).
In theory, we would like to use this diagram to implement a physical model conforming
as close as possible to this architecture. In other words, we would implement a database
with a table for each of these entities with columns for each attribute. e only replications
of attributes across entities are those needed to make one-to-many associations between
entities.
e advantage of this form of implementation is that any piece of information is
only stored in one place inside the database and table structure. If/When that informa-
tion changes, for example, a Supplier’s name changes, that name must be changed in
only one location. e soware application designed for the database is much simpler,
and any database rules (the soware implementation of the company’s business rules
and their implementation through data relationships) are simpler to implement and
maintain.
In practice, however, a 3NF physical data model seldom provides an acceptable perfor-
mance level. As a rst step aer deriving the logical model, we need to look at how the user
needs to access the data to estimate the I/O requirements for that design/implementation.
If we can make changes to the physical model by storing information redundantly, we
can drastically reduce I/O requirements to access information with minor changes in the
application soware.
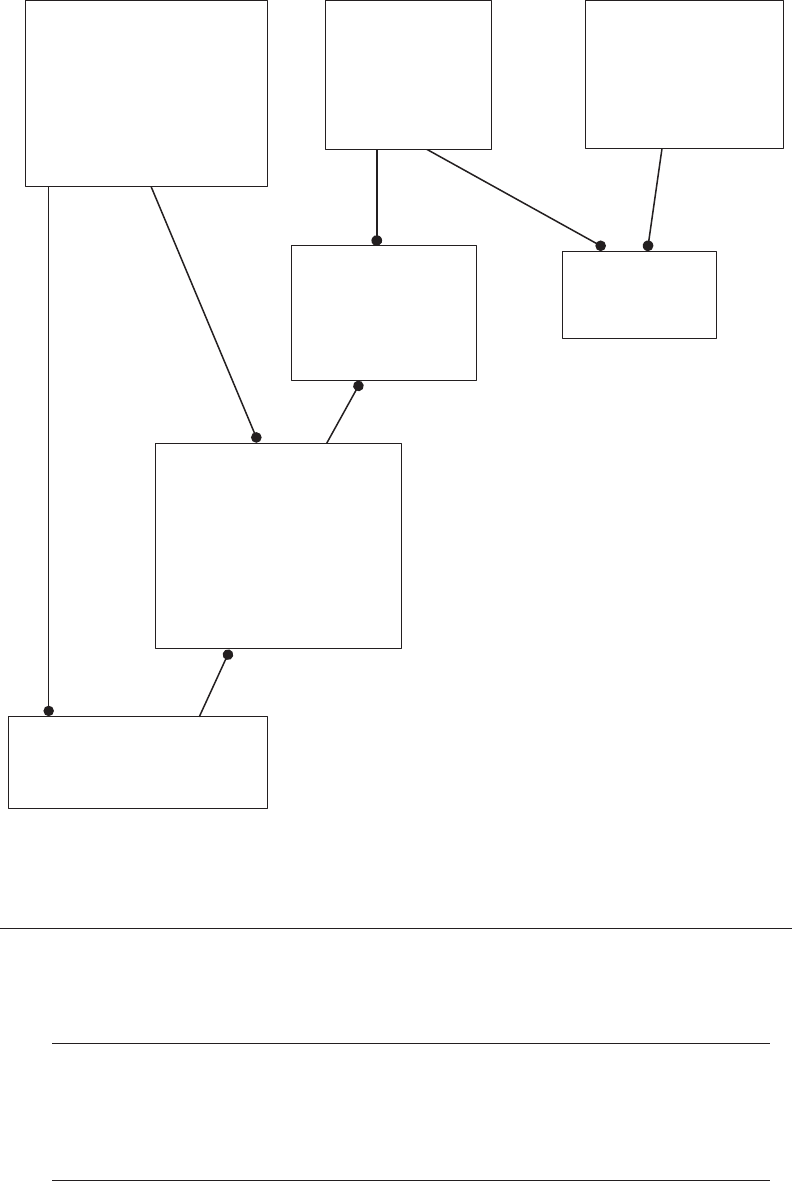
42 ◾ A Practical Guide to Database Design
3.2 USAGE PATH ANALYSIS
Using the above-mentioned data model, let us review the accesses needed to satisfy some
important, frequently used queries.
• For a specic Customer order, what is the total cost?
Table Search Criteria Number of Rows Why Needed
Customer CustomerIdentier 1 To get Customer information to be displayed
for verication
Order CustomerIdentier 1 To get Order details to be displayed
Order_Item OrderNumber Multiple To obtain SellingPrice to compute total cost
Supplier
**SupplierID
SupplierName
SupplierStreetAddress
SupplierCity
SupplierState
SupplierZipCode
Order
**OrderNumber
CustomerIdentifer
OrderDate
ShippingStreetAddress
ShippingCity
ShippingState
ShippingZipCode
CustomerCreditCardNumber
ShippingDate
Ordered_Item
**OrderNumber
**ItemNumber
QuantityOrdered
SellingPrice
ShippingDate
Restock_Item
**SupplierID
**ItemNumber
ReorderPrice
Credit_Card
**CustomerCreditCardNumber
CustomerCreditCardName
CustomerIdentifier
Customer
**CustomerIdentifier
CustomerTelephoneNumber
CustomerName
CustomerStreetAddress
CustomerCity
CustomerState
CustomerZipCode
CustomerCreditRating
Advertised_Item
**ItemNumber
ItemDescription
ItemDepartment
ItemWeight
ItemColor
ItemPrice
FIGURE 3.1 e 3NF logical data model.

Database Implementation ◾ 43
If we change the physical model to add OrderTotalCost to Order, the access paths
would be
Table Search Criteria Number of Rows Why Needed
Customer CustomerIdentier 1 To get Customer information to be
displayed for verication
Order CustomerIdentier 1 To get Order details to be displayed
and the OrderTotalCost
Note that the OrderTotalCost information must now be implemented in application
logic, preferably by using a database trigger or stored procedure. Triggers and stored
procedures are the preferred methods to implement business rules, rather than
embedding them within some arbitrary application soware module.
• For a specic Advertised_Item, what is the lowest price currently oered by a Supplier?
Table Search Criteria Number of Rows Why Needed
Advertised_Item ItemNumber 1 To get Advertised_Item information
to be displayed for verication
Restock_Item ItemNumber Multiple To get the ReorderPrice values
Supplier SupplierID Multiple To obtain Supplier information
associated with that SellingPrice
If Advertised_Item were modied to include LowestPrice and LowestPriceSupplier,
then the above would change to the following:
Table Search Criteria Number of Rows Why Needed
Advertised_Item ItemNumber 1 To get Advertised_Item information
and the lowest price and its
associated Supplier code
Supplier SupplierID 1 To obtain Supplier information
associated with that SupplierID
Once again, accesses are signicantly reduced at the cost of implementing logic within
a trigger or stored procedure to update this information as Supplier price updates are
received.
• When Customer information is retrieved, include their preferred credit card number.
Table Search Criteria Number of Rows Why Needed
Customer CustomerIdentier 1 To get Customer information
Credit_Card CustomerIdentier Multiple To nd the Credit_Card information
with the PreferredOption set

44 ◾ A Practical Guide to Database Design
If the Customer table were modied to include a CustPreferredCreditCard column,
access change to the following.
Table Search Criteria Number of Rows Why Needed
Customer CustomerIdentier 1 To get Customer
information as well as
their preferred credit card
number
e revised 3NF data model now represents a physical data model, showing all tables
and the columns to be dened within each.
Design modications are generally always necessary to provide satisfactory levels for
the application. e earlier the performance issues can be identied, the easier they
are to address without impacting soware or database changes as design and testing
progress.
3.3 TABLE KEY AND COLUMN DATA TYPES
In reviewing the physical model for the database, the design team must decide on what
to do regarding keys for each table. Normally, this is very straightforward, because the
rst step of the normalization process involves identifying a key for each entity. However,
determining the exact form and value for key columns requires consideration of several
factors before detailed physical design decisions can be made.
• Are key column(s) an absolute requirement? In most cases, yes, because database
applications inherently store and update data throughout the life cycle of the data ele-
ments. (is is the time from when data are added to a table until it is deleted because
it is no longer needed.) Without uniqueness, we have no way of retrieving or updating
a specic row in the table.
ere are, however, exceptions. If data records are being collected and stored in a
table that can be analyzed and treated as a group without the need to retrieve and
update individual rows, a key identier/column may not be required. For example, if
bulk data are being collected that includes a column for date and time, that column
can be used to review and summarize results for that date, and that set of rows can be
deleted when no longer needed.
• What data type is appropriate for each key? Are there any inherent business rules that
guide or determine acceptable values?
For example, the Customer table in the physical model has a “CustomerIdentier”
column that will uniquely retrieve one specic row for a Customer. e user may
have business rules dening how CustomerIdentier values are assigned for
new Customers. In that case, the storage format for CustomerIdentier might be
“varchar(50)” (i.e., a character eld varying in length up to 50 characters).

Database Implementation ◾ 45
As an alternative, we could make CustomerIdentier a large integer number and
use the RDMBS feature that uses an ever increasing integer value (“auto increment”
in Microso Access and Structured Query Language [SQL] Server, and the Oracle
“Identity” feature). is is used when the application or data have no inherent busi-
ness rules dictating how the table’s key column is created and you simply need a way
to create a unique value for the row’s key. is approach is also used when the under-
lying data are so complex or the column length for a key is very large. In either case,
creating a key column as an integer is much more ecient to use, especially consider-
ing the size of the indexes in the primary and subordinate tables (see the next section
for details).
• Next, the storage format/data type for each non-key column must also be reviewed
and noted. is information will be used when dening columns for each table in the
database.
Note that the design team cannot rush through this step. Each column needs to be
carefully reviewed to see exactly what will be stored. For example, for a phone num-
ber, will only 10 digits be recorded, or will a character format be used to store number
in the form of “nnn-nnn-nnnn”?
Aer all data types have been reviewed, as one last step before creating tables in a database,
you must identify indexes needed to eciently support relationships across tables.
3.4 INDEXES
As noted earlier, RDMBS systems and SQL give the user or application the ability to ask for
any data at any time. For example, the following query will retrieve all Restock_Item rows
for a specied Advertised_Item.
SELECT * FROM Restock_Item WHERE ItemNumber = “DELL_12345”;
If the Restock_Item table was implemented without any indexes, the above-mentioned
search would still execute and return the correct information/matching rows. However,
if an index was created in the Restock_Item table on the ItemNumber column, the index
would be used to immediately retrieve only the rows that matched that ItemNumber. e
answer to the query is the same, but the index allows for the data to be retrieved without all
of the I/Os required to do a table scan.
Identifying and creating indexes, then, are critical in obtaining acceptable performance
levels for a database application. As a general rule, indexes should be created in tables for
• e column(s) that make up the primary key for the table.
• Columns that serve as foreign keys, that is, those columns on the many side of a
one-to-many relationship.
• Columns found used as search criteria in the usage path analysis.
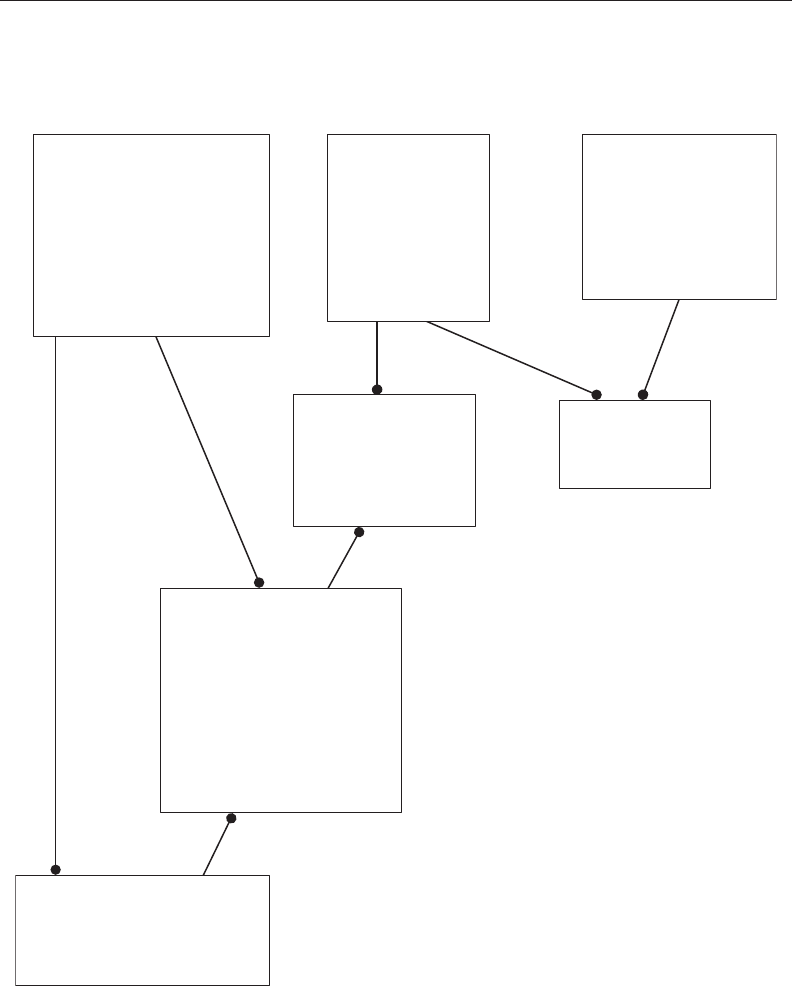
46 ◾ A Practical Guide to Database Design
ese criteria in themselves may not result in the best possible database design, but they
will get you o to a good start. In addition, tools are available for SQL Server and Oracle to
help you monitor I/O activity while your application is being designed and tested to help
you identify and deal with unexpected performance issues.
3.5 TABLE CREATION
Aer reviewing the composition of keys for each table and identifying the indexes needed,
we are now ready to implement those decisions by creating tables in the newly created
database. e following sections describe how to create tables for the physical data model
shown in Figure 3.2.
Supplier
**SupplierID
SupplierName
SupplierStreetAddress
SupplierCity
SupplierState
SupplierZipCode
Order
**OrderNumber
CustomerIdentifer
OrderDate
ShippingStreetAddress
ShippingCity
ShippingState
ShippingZipCode
CustomerCreditCardNumber
OrderShippingDate
OrderTotalCost
Ordered_Item
**OrderNumber
**ItemNumber
QuantityOrdered
SellingPrice
ItemShippingDate
Restock_Item
**SupplierID
**ItemNumber
ReorderPrice
Credit_Card
**CustomerCreditCardNumber
CustomerCreditCardName
CustomerIdentifier
PreferredOption
Customer
**CustomerIdentifier
CustomerTelephoneNumber
CustomerName
CustomerStreetAddress
CustomerCity
CustomerState
CustomerZipCode
CustomerCreditRating
CustPreferredCreditCard
Advertised_Item
**ItemNumber
ItemDescription
ItemDepartment
ItemWeight
ItemColor
ItemPrice
LowestPrice
LowestPriceSupplier
FIGURE 3.2 e physical data model.
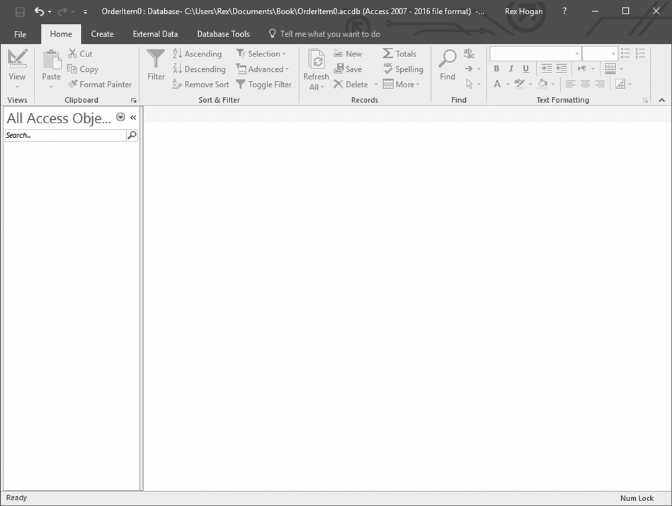
Database Implementation ◾ 47
3.5.1 Using Microsoft Access
• Create a new database
If you haven not already done so, open Microso Access and select “Blank Database”
to begin the dialog to create a new database. Next, click the folder to the right of the
le name and navigate to the folder you want to use to store the new database. Finally,
change the le name to the name you want to use for the database, click “OK;” then,
click the Create box. e new database will appear as follows.
• To dene a new table
From the above-mentioned screen, select the Create tab, then click the Table Design
item:
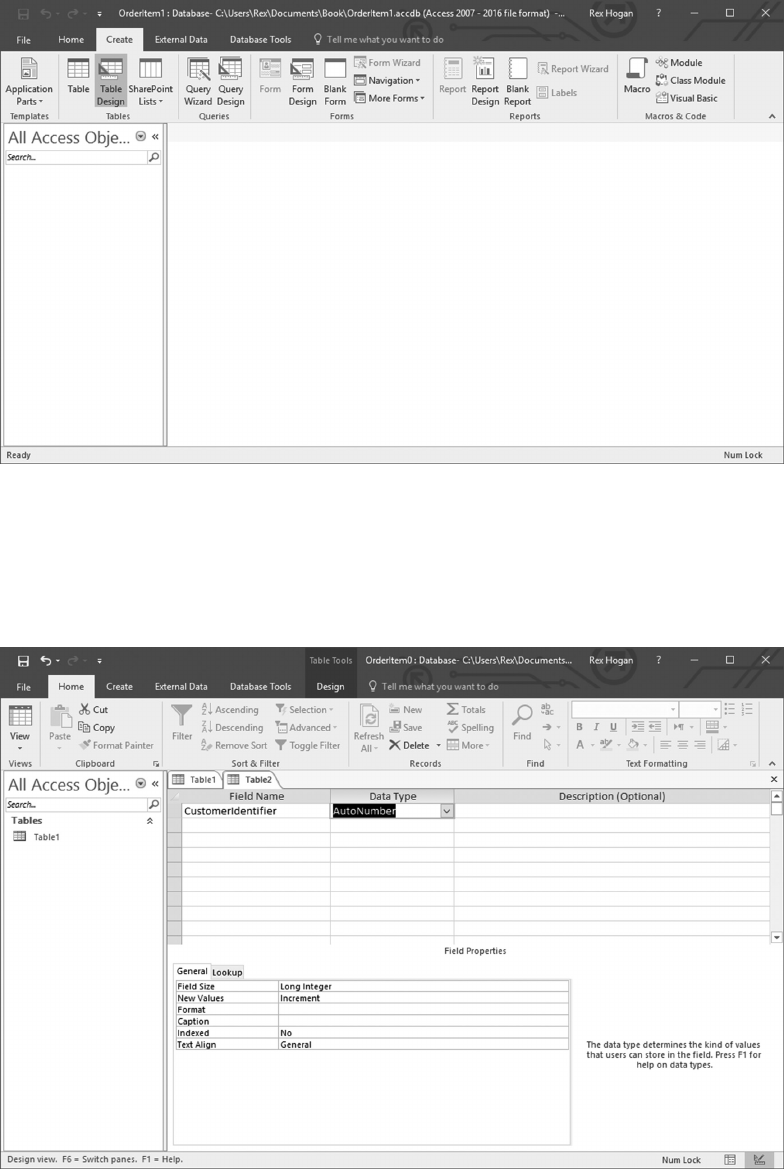
48 ◾ A Practical Guide to Database Design
e detailed design screen will open. Under “Field Name,” type the name of the rst
column (in this example, “CustomerIdentier” in the Customer table), then click the
pull-down under “Data Type” and select “Number” to reect a decision to use the
auto-increment feature for this column.
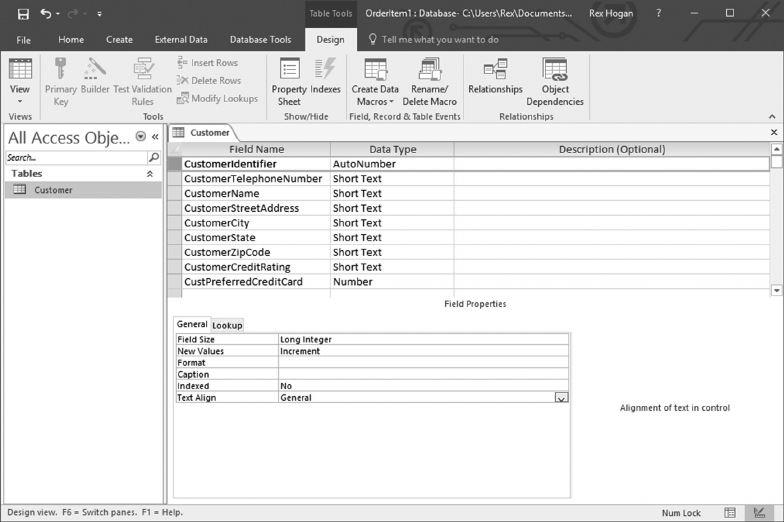
Database Implementation ◾ 49
Continue adding column names under “Field Name,” entering an appropriate Data
Type for each. e design of the Customer table appears as follows.
When closing the table’s design, you will be prompted to enter the name of the table
being saved.
In addition, you will be prompted if you want to have a primary key dened for the
table, reply “No.”
Finally, edit the table to identify the primary key. Click on the table name, then right
click and select “Design View.” When the table opens, select the CustomerIdentier
row, right click it, then select the “Primary Key” from the pop-up list. e table can
now be saved with that change.
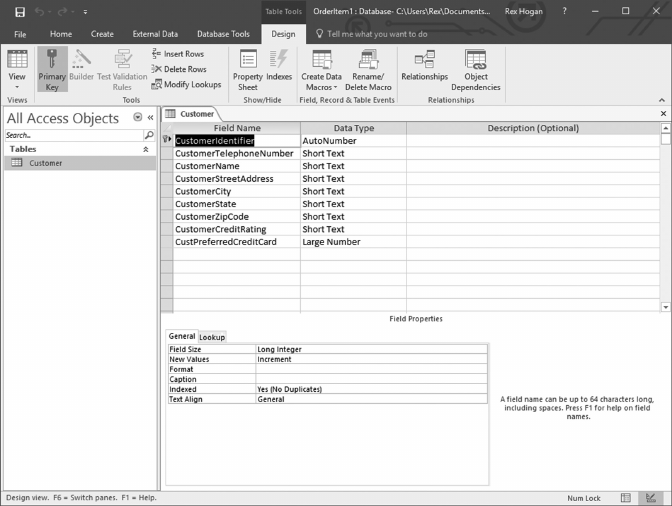
50 ◾ A Practical Guide to Database Design
Referring to Figure 3.2, repeat this process to create tables for all items in the dia-
gram. For each column, choose the appropriate data type.
Note that Access does not support varchar data types. If available, varchar data
types are much more ecient than a xed-length implementation. For example,
if the string “Wilson Grocery” was stored with a data type of varchar(50), only
14characters of storage would be needed/used. However, Short Text data types
are xed length. If stored as Short Text with the default of 255 characters, “Wilson
Grocery” would use 255bytes of storage. When using Short Text data types, it is
important to change the default length for that column to a lower, more reason-
able value. I have changed the length for all of my Short Text columns to 50.
Aer creating all of the tables shown in the physical data model, the database will
look like the following.

Database Implementation ◾ 51
Technically, the database can be used at this moment as is. However, to improve
processing eciency and data integrity, we need to implement indexes as well as
Referential Integrity constraints.
First, we will modify the database to add the Referential Integrity constraints. Click
on the “Database Tools” tab, then choose “Relationships,” and the following list will
appear.
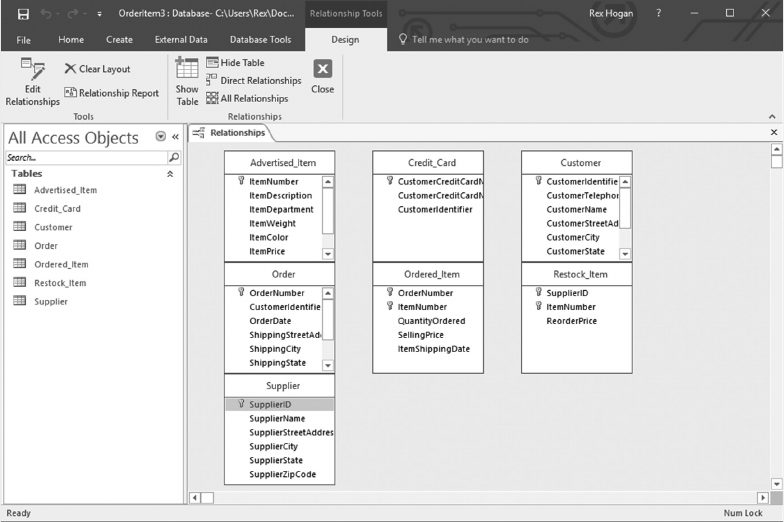
52 ◾ A Practical Guide to Database Design
Selecting all table names in the list and clicking Add produces this display.
I have rearranged the display of tables in my database to that shown on the next page.
Study the diagram on the next page and conrm that each of these one-to-many rela-
tionships exists based on the primary keys as dened.
• Between Customer and CreditCard
• Between Customer and Order
• Between Credit_Card and Order
• Between Order and Ordered_Item
• Between Advertised_Item and Ordered_Item
• Between Advertised_Item and Restock_Item
• Between Supplier and Restock_Item
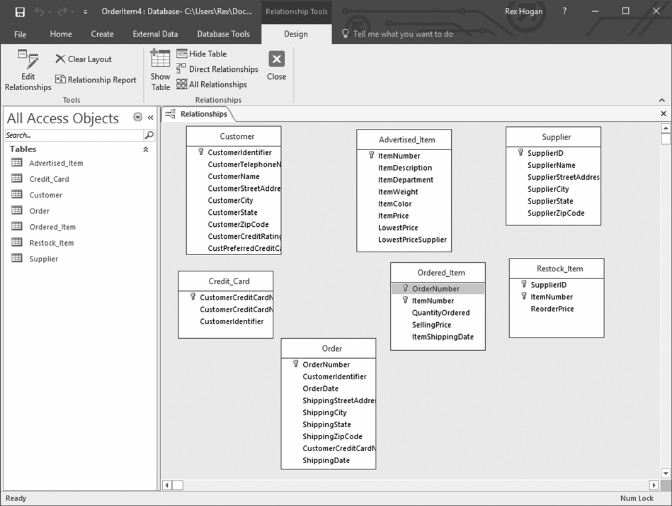
Database Implementation ◾ 53
We are now ready to dene the one-to-many relationships shown in Figure 3.2. In
this instance, it is simple; we simply ask “does the key for a given table appear within
another table?” Whenever that relationship is found, a Referential Integrity relation-
ship must be created. We therefore need Referential Integrity constraints
• Between Customer and CreditCard
• Between Customer and Order
• Between Credit_Card and Order
• Between Order and Ordered_Item
• Between Advertised_Item and Ordered_Item
• Between Advertised_Item and Restock_Item
• Between Supplier and Restock_Item
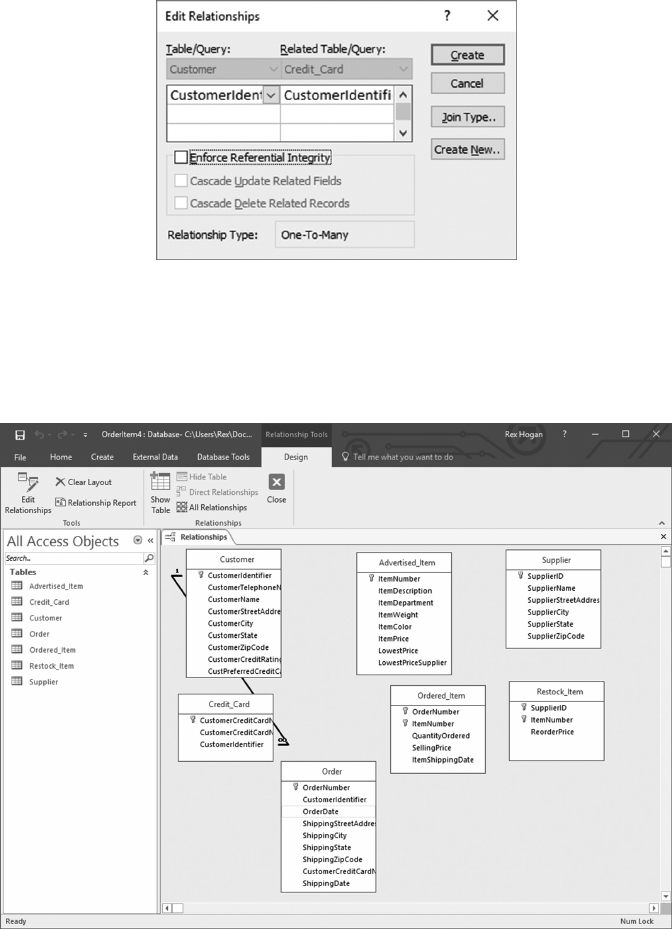
54 ◾ A Practical Guide to Database Design
To create Referential Integrity between Customer and Credit_Card
• Click on the Customer table and select CustomerIdentier
• Select Customer’s CustomerIdentier, hold the le mouse button down, and drag
the arrow to CustomerIdentier in Credit_Card. Releasing the mouse produces this
display:
Verify the table and column names selected for the one-to-many relationship, then
click the box to “Enforce Referential Integrity” as well as the two cascade options when
they appear. Clicking “Create” activates Referential Integrity between Customer and
Credit_Card as indicated by the line shown in the following.
Now repeat that process for each one-to-many relationship shown in Figure 3.2 and
compare your results to the following:
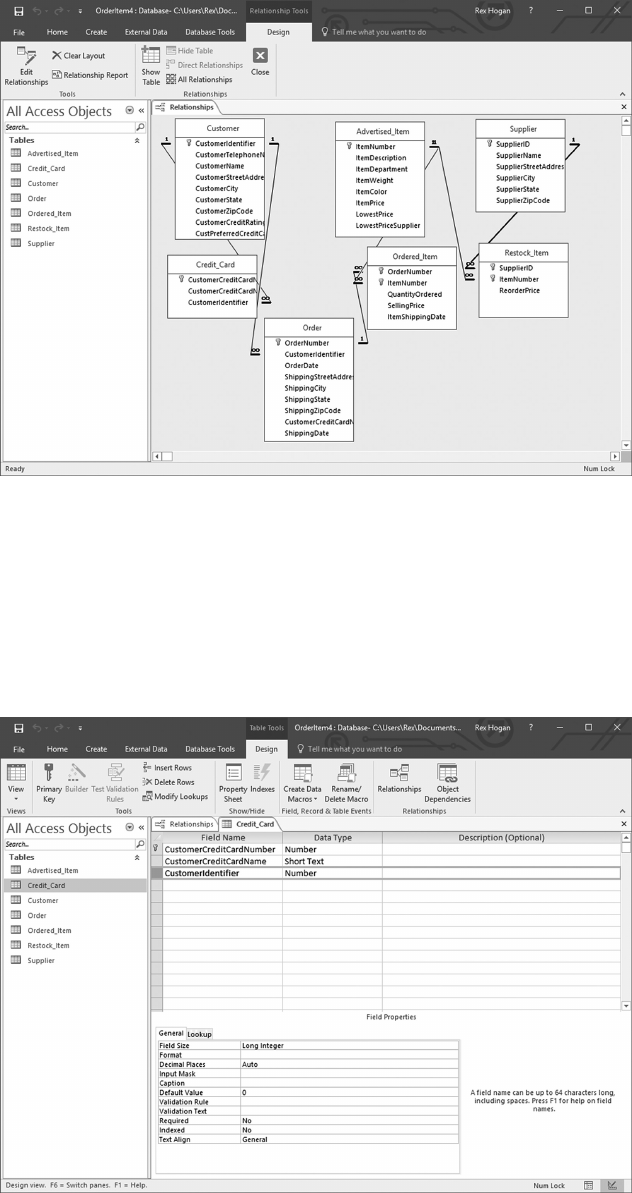
Database Implementation ◾ 55
e last remaining task is to create indexes where needed.
• Note that Access has already specied that each table’s key column(s) will be indexed.
• For each one-to-many relationship, we want an index on each column serving as
a foreign key (i.e., those that are keys in another table).
For example, we want an index in Credit_Card’s CustomerIdentier column. To
create that index, open Credit_Card in “Design” view.
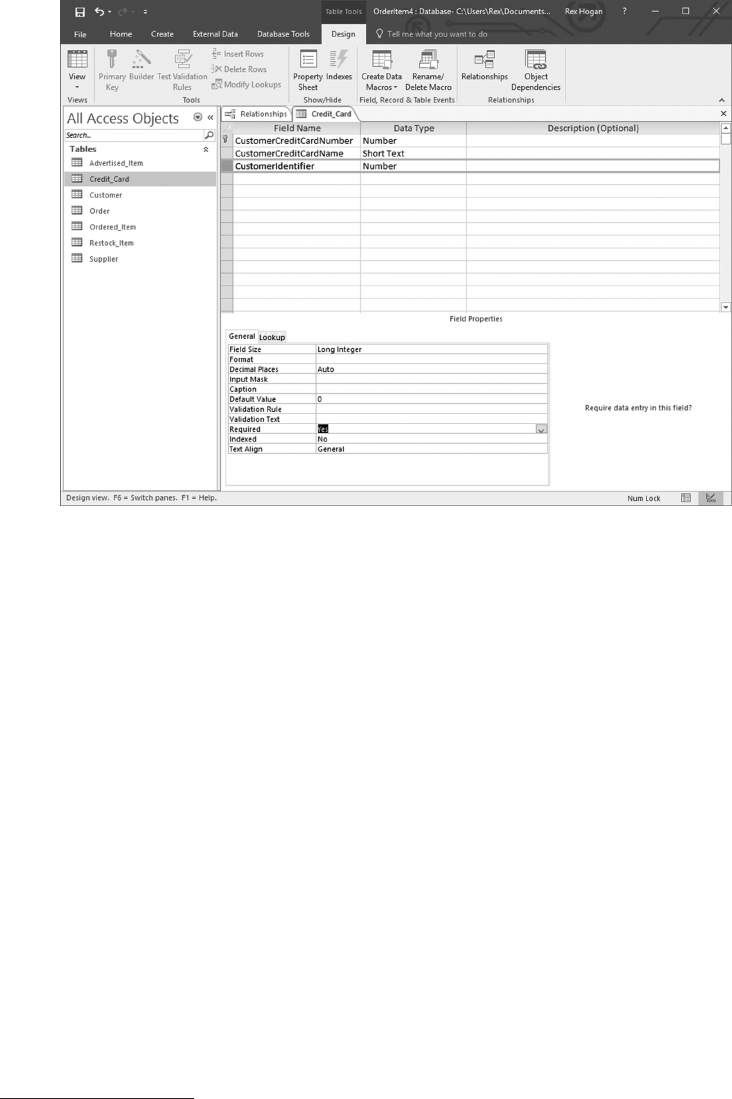
56 ◾ A Practical Guide to Database Design
Note at the bottom of the display that CustomerIdentier is not indexed. Change that
option to “Yes” and close and save that view.
Now make those changes for all columns serving as foreign keys to other tables.
We also need indexes to support signicant retrieval for tables using other than the
table’s key or foreign key column(s).
For example, if we found that we frequently needed to retrieve Customer information
using only the customer’s telephone number, we can create an index on that column.
As we are using a relational database management system (RDBMS), this change can
be made at any time, while the database is online or in use.
Indexes are one of the primary solutions to performance problems as they are dis-
covered in application development and testing. Remember that most RDBMSs have
monitoring and tuning tools that can help discover issues as testing progresses.
Now let us look at how to implement the physical data model using SQL Server.
3.5.2 Using SQL Server*
• Create a new database
Use the SQL Server Management Studio to create and manage all databases on this
system.
* Note that the installation instructions for SQL Server are included in Chapter 7.

Database Implementation ◾ 57
From the Windows “All Programs” “Start” icon, navigate to the Microso SQL Server
folder created for this soware installation and choose SQL Server Management
Studio. Optionally, type “sql server” in the search window and select “Sql Server
Management Studio.”
Aer verifying the log on information is using a Windows account that was autho-
rized as an SQL Server administrator, click “Connect” to log on.
You will be presented with a menu displaying the dierent types of services available.
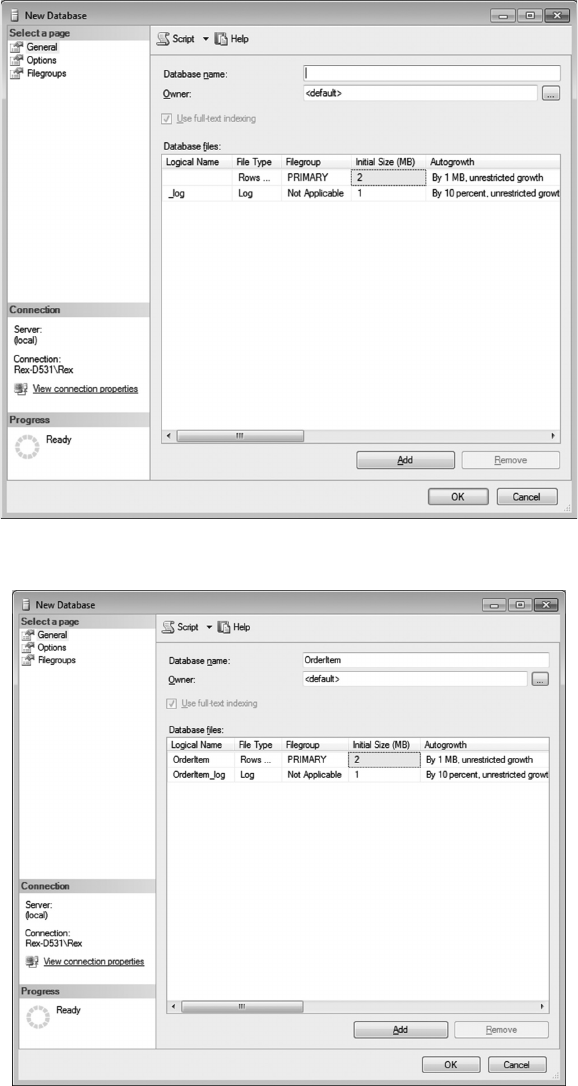
58 ◾ A Practical Guide to Database Design
Put the cursor on “Databases,” right click and select “New Database.” You will then
be presented with the following screen showing details of installation options.
Enter the name of the new database in the “Database Name” block.
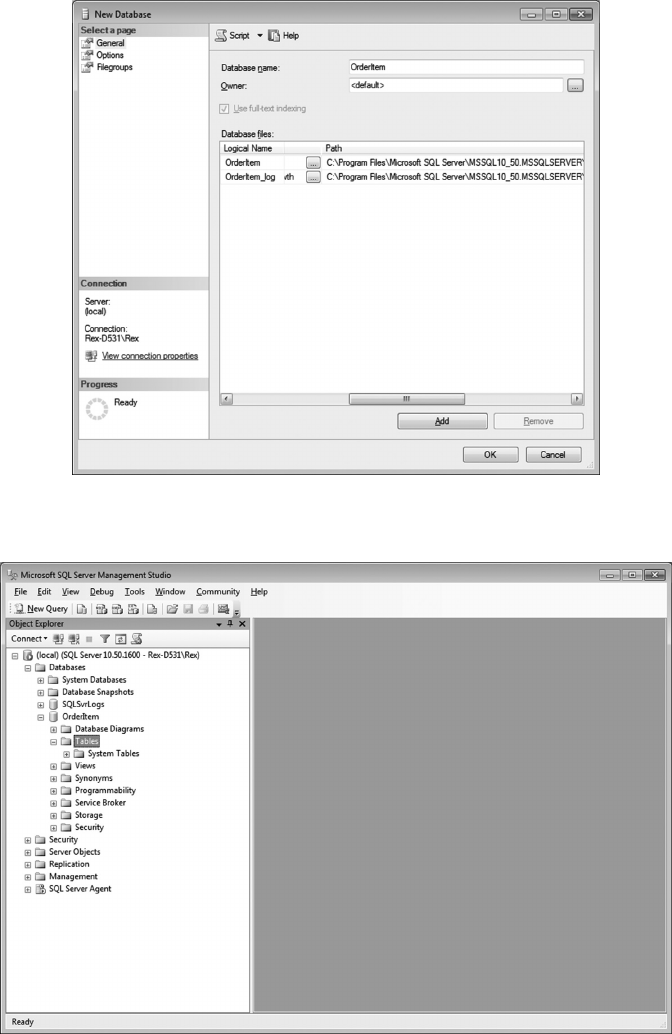
Database Implementation ◾ 59
Next, use the scroll bar at the bottom of this window to move to the right to show
where the database will be installed.
Change the default conguration details as appropriate.
Double click on “Databases” and again on the name for the database just created.
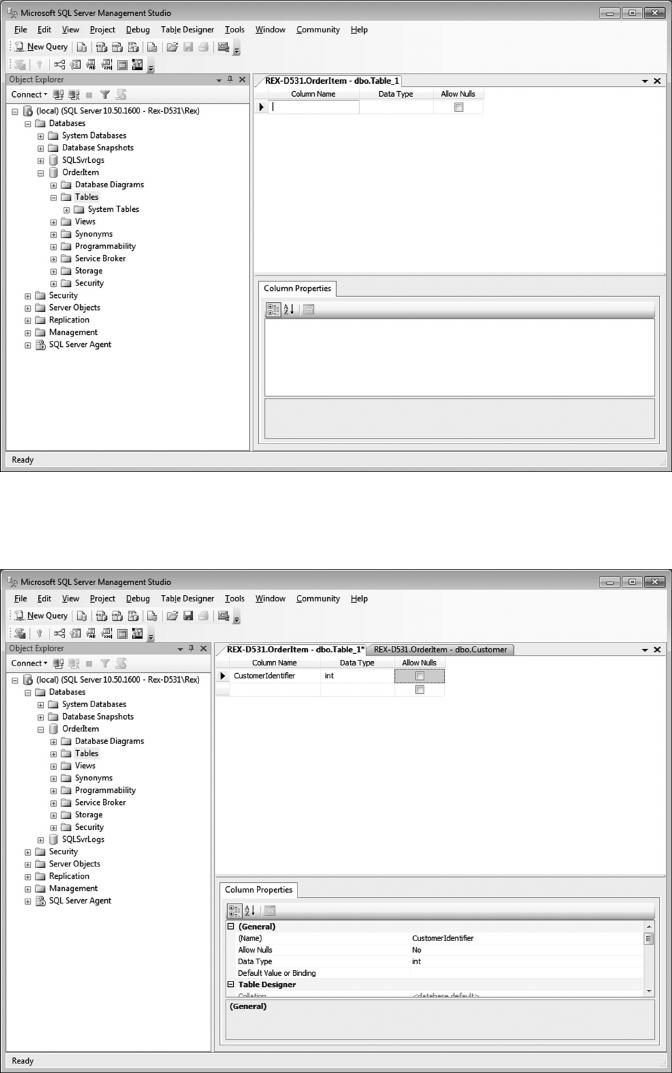
60 ◾ A Practical Guide to Database Design
• Create tables
To create a table in the database, right click on “Tables” and select “New Table” to open
a window to dene columns for that new table (in this example, the Customer table).
Referring to the physical data model, enter the name of the rst column in Customer
with an appropriate data type.
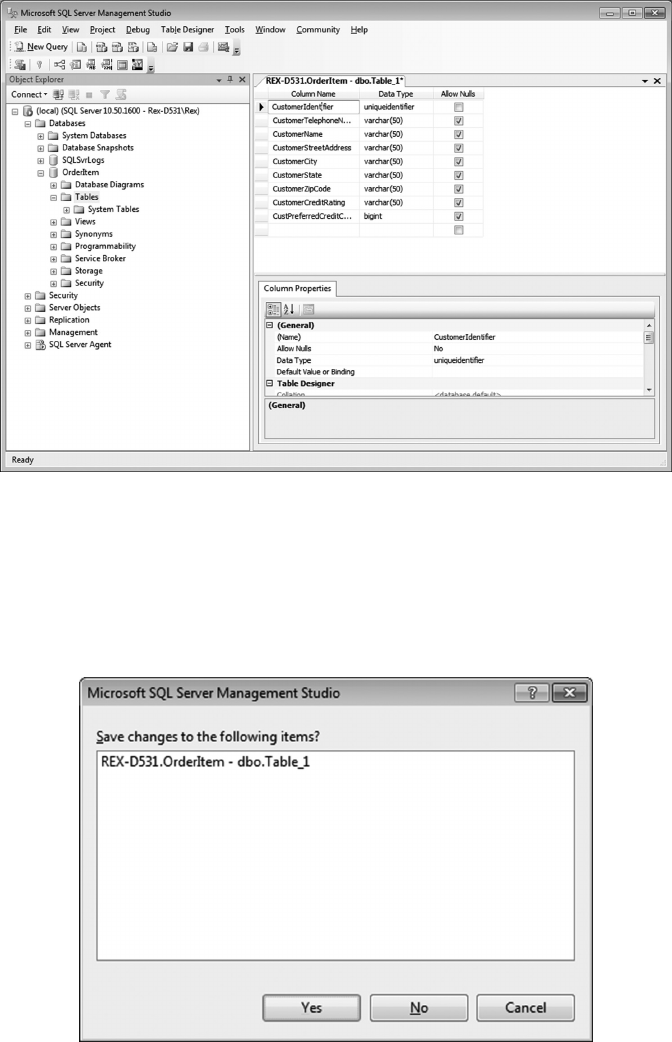
Database Implementation ◾ 61
Click on the next row under Column Name to enter the next column and data type.
Continue adding columns for Customer until all columns have been entered.
Aer all columns have been dened, modify the design to show the column(s)
that dene the table key. In this case, put the cursor on the box to the le of
CustomerIdentier, then right click and choose “Set Primary Key.”
To save this design, click on the “x” at the top-right part of Table Design window.
Clicking “Yes” brings up a display where the table name can be entered.
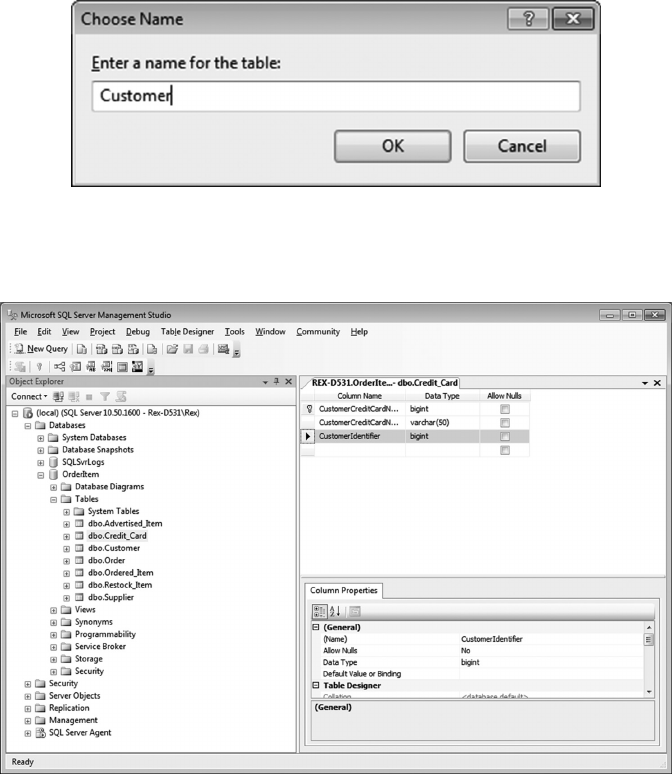
62 ◾ A Practical Guide to Database Design
Repeat the above-mentioned sequence to create all tables shown in the physical data
model.
You are now ready to implement Referential Integrity constraints between tables in
the database.
• Creating Referential Integrity Constraints
As was done with Microso Access, Referential Integrity constraints must now be
created for all dependent tables in one-to-many relationships reected in the physical
data model.
Let us start with the relationship between Customer and Credit_Card. To create a
Referential Integrity constraint in Credit_Card:
Under Tables, select Credit_Card and then Design to alter its denition.
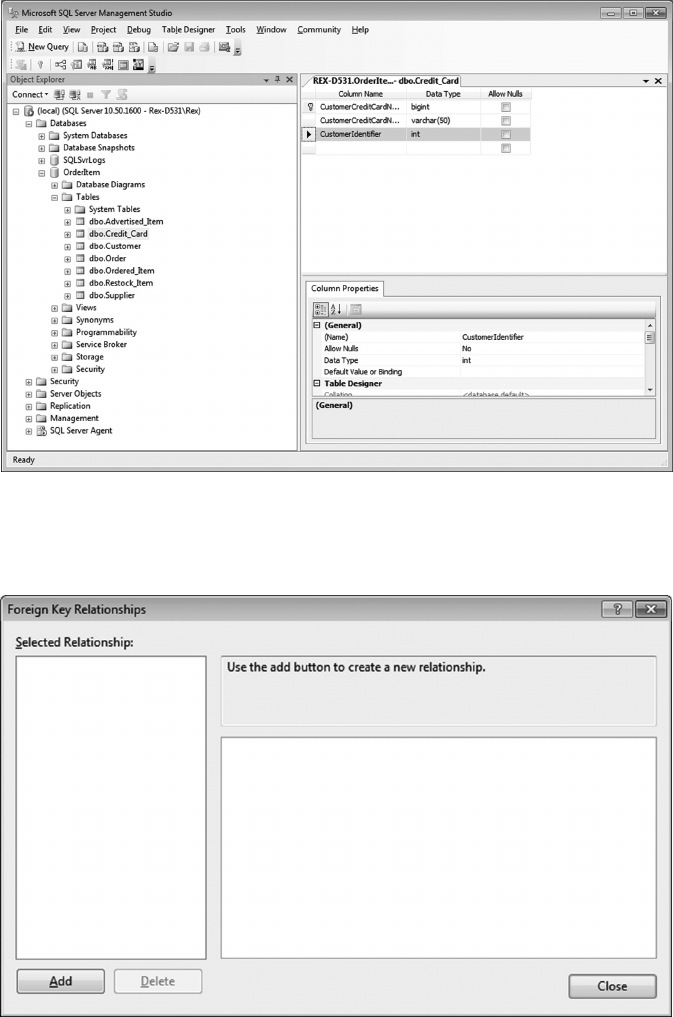
Database Implementation ◾ 63
Next, select the column involved with the one-to-many relationship; in this case,
it is the CustomerIdentifer column (the key of Customer) that establishes/enables
that relationship.
Next, click on the arrow at the le column of CustomerIdentier, right-click, and
select “Relationships” from the pop-up window, which generates the following:
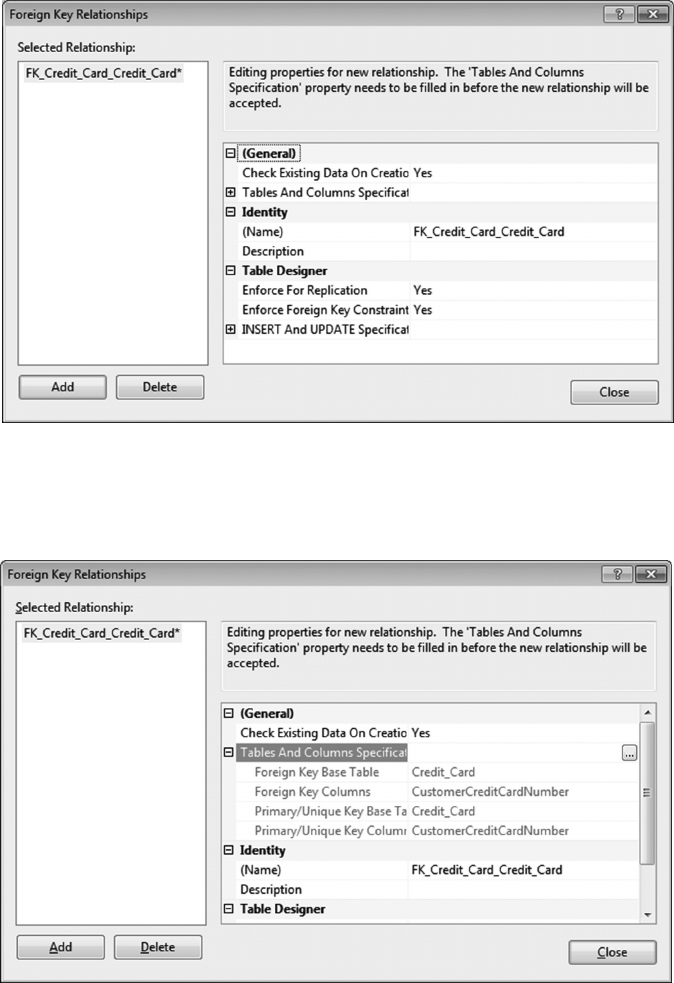
64 ◾ A Practical Guide to Database Design
Click “Add” to create a new Referential Integrity Relationship.
Click on “Tables and Columns Specications” to open a window where the col-
umn relationships are specied.
Click the box at the right side of the display containing “…” to open the following:
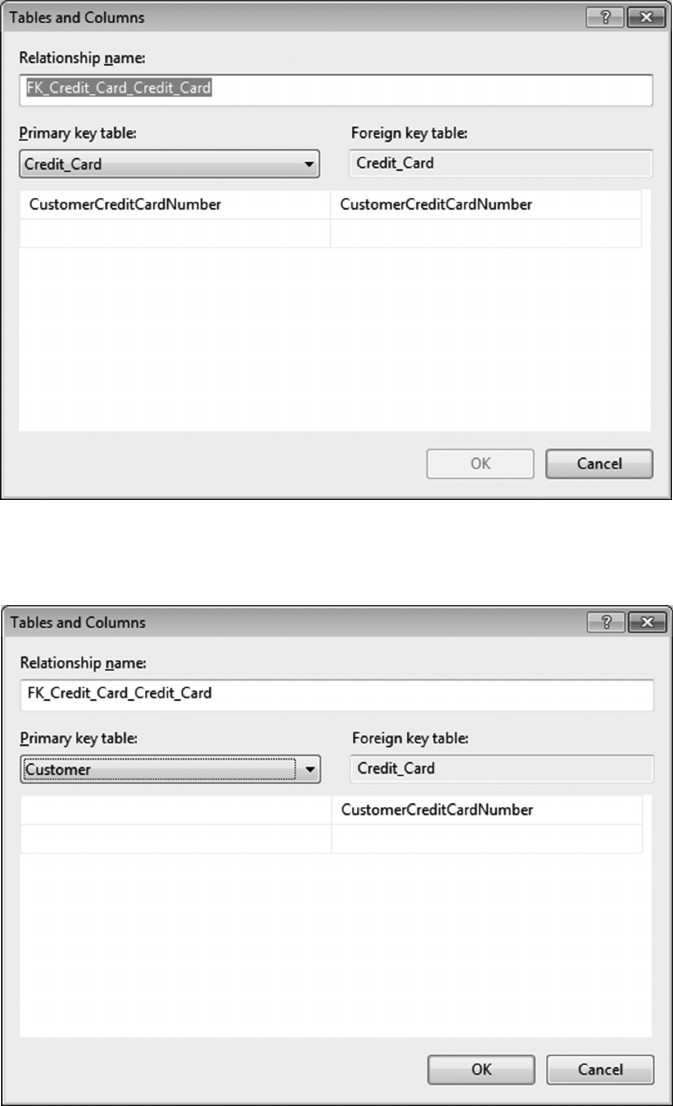
Database Implementation ◾ 65
Using the pull-down arrows for “Primary key table,” change the Primary key
table to “Customer.”
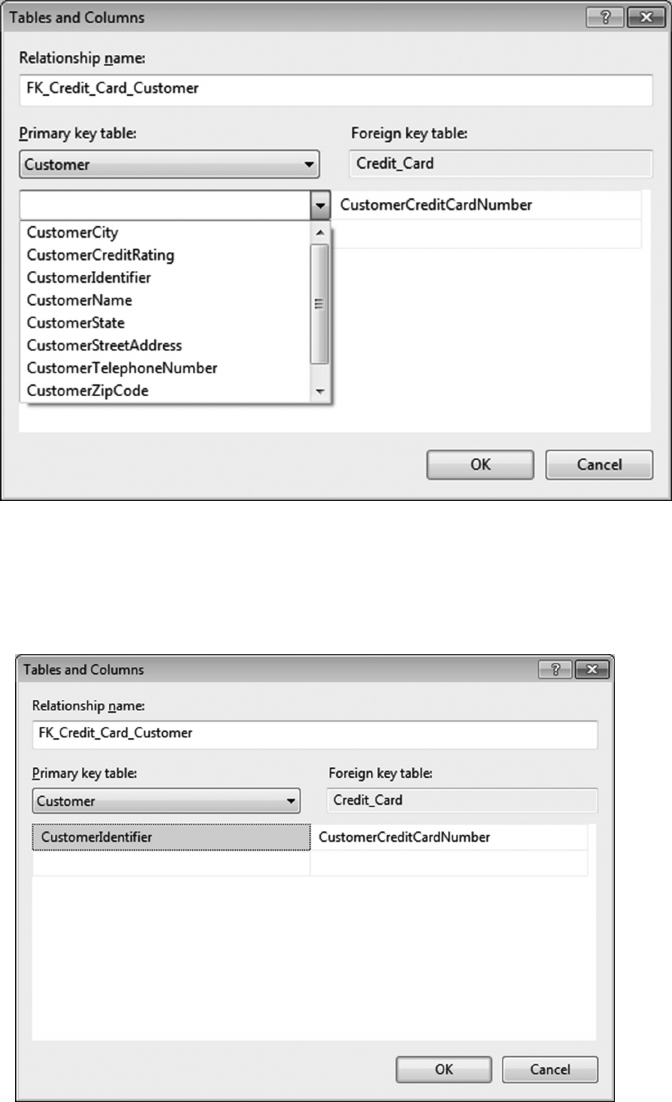
66 ◾ A Practical Guide to Database Design
Clicking on the rst open row under Customer generates a list of all columns in
the Customer table.
Select CustomerIdentier to complete the primary key specication for this
relationship.
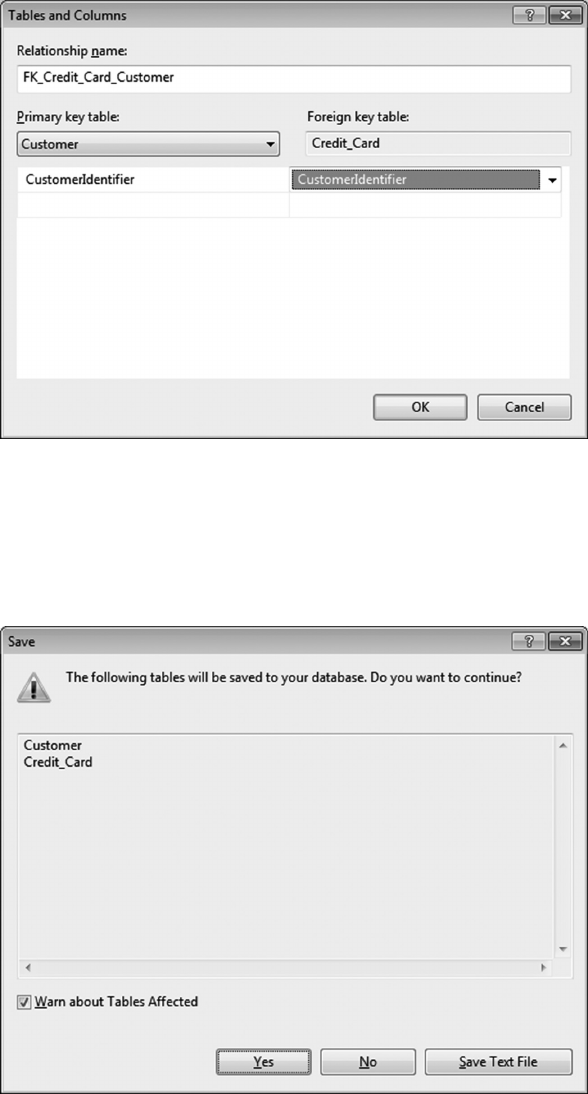
Database Implementation ◾ 67
As this relationship is based on the Customer key appearing in the Credit_Card
table, click on “CustomerCreditCardNumber” then select the arrow to the right
to generate a list of all columns in that table. Select “CustomerIdentier.”
Review all selections and verify the table names and columns match what is
shown in the physical design model. Click OK to create that Referential Integrity
relationship in the database.
As part of saving these changes, you will be prompted that you want these changes
to be saved.
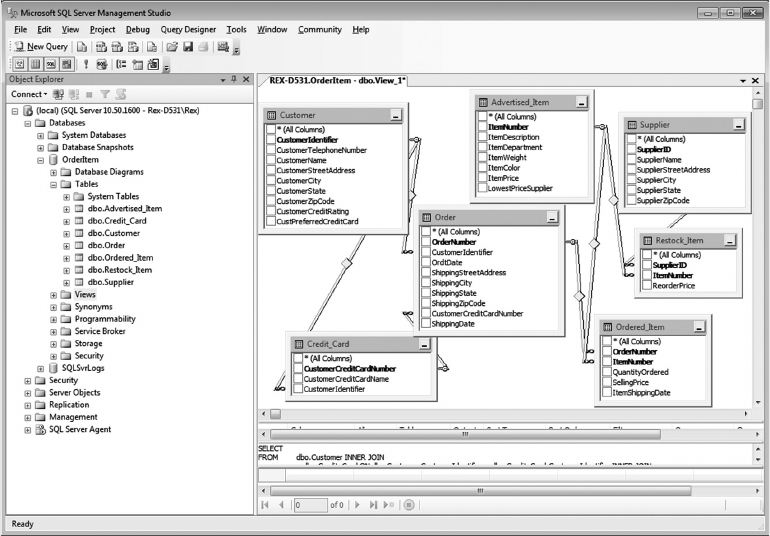
68 ◾ A Practical Guide to Database Design
Refer to the physical design model and continue making these adjustments for all
tables having foreign key relationships.
When adding each new relationship, make sure the “Relationship name” assigned
makes logical sense; each of mine include the name of the Primary key table.
To verify your results, in SQL Server Management Studio, select “Views,” right
click, and then select “New View.” A list of all tables in OrderItem will be dis-
played. Do a “block select” to select all names displayed and then click “Add.” e
following display shows all one-to-many relationships currently dened in the
database. Rearranging those gives the display shown on the next page.
Creating a View with this complexity does not make sense and is not practical,
but the visual display serves as a visual aid to ensure all one-to-many relation-
ships have been created.
Aer this verication, click on the “x” at the top right of the view display to close
it and respond “No” when asked if you want to save the view.

Database Implementation ◾ 69
• Additional indexes
We now need to update our tables to create indexes where needed. First, check all
tables involved with foreign key relationships to ensure that the column(s) with the
foreign key have indexes. For example, in Credit_Card, CustomerIdentier is a for-
eign key to Customer; therefore, we want to create an index on the CustomerIdentier
column in Credit_Card.
To create this index, rst use SQL Server Studio Manager to navigate to the Credit_
Card table and expand the Keys and Index sections as shown in the following.
Note the name of the Referential Integrity constraint created earlier. SQL Server
gives the user total exibility for naming objects, but I recommend naming
theindex based on the name used for the Referential Integrity constraint to
make it easier to cross-reference items as the design is completed. In this case,
Iwill use FK_Credit_Card_Customer as the name of the index that will be
created.
Next, select Index, right click and select the New Index option.
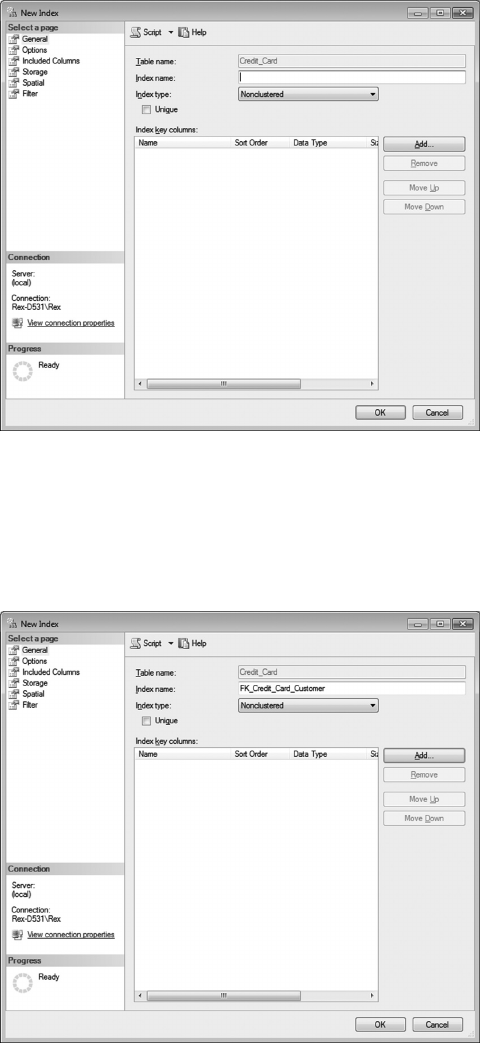
70 ◾ A Practical Guide to Database Design
Enter the name for the new index (FK_Credit_Card_Customer) and complete the
remaining items; that is, it will be NonClustered (rows in this table would not be
ordered by the CustomerIdentier) and it will not be unique (the Customer may
have many credit cards on le).
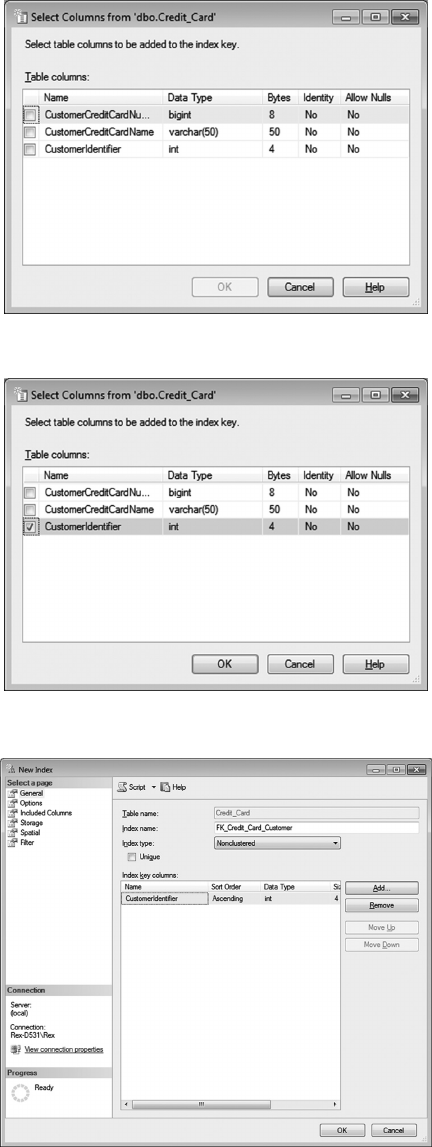
Database Implementation ◾ 71
Clicking “Add” now brings up a window to pick the column to be indexed.
Select CustomerIdentier as the column to be indexed.
Clicking OK brings up a screen with specications for the new index.
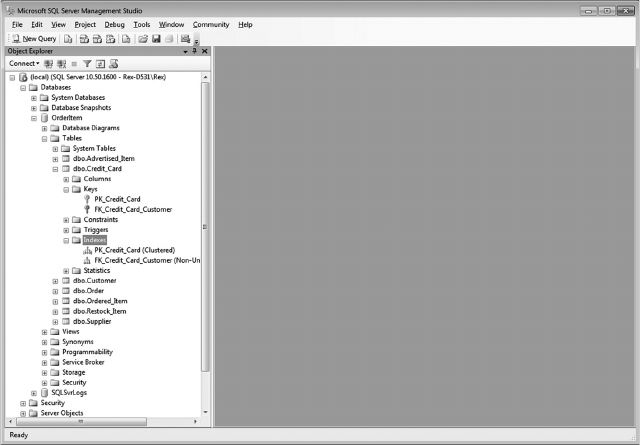
72 ◾ A Practical Guide to Database Design
Clicking OK will create the new index.
Referring to the physical design model, create new indexes for columns in all
tables containing foreign keys.
As a nal review for our rst-cut physical solution, we need to review the antici-
pated call patterns for all signicant user accesses to determine if any addi-
tional indexes are needed. For example, we might want to create an index on the
Customer’s CustomerTelephoneNumber to support immediate, direct retrieval of
the Customer record using their phone number.
Once again, because we are using an RDBMS, indexes can be added or deleted as
needed to maintain the highest possible performance for the application system.
3.5.3 Using Oracle
Oracle systems tend by their nature to be large and complex and use rigid change man-
agement processes to test and migrate SQL Data Denition Language change packages
between development, test, and production environments. ose changes are best man-
aged strictly using scripts to dene all involved objects.
Fortunately, Computer Associate’s erwin soware provides a graphical tool that database
administrators can use to create both logical and physical data models. When the model
is complete, the database administrator can then generate the Data Denition Language
statements needed to create or modify data objects. erwin is covered in detail in Chapter 5.
e next chapter contains a review/exercise in the creation of a 3NF data model for a
university environment, as well as the physical design of the resulting tables for that envi-
ronment using Microso Access and SQL Server. Chapters 6 and 7 then go into more detail
on how to use Microso Access and SQL Server to design and support application systems
for reviewing and updating data.

Database Implementation ◾ 73
QUESTIONS
1. When creating a database table, what data type would you recommend for the vari-
ous columns with zip codes? Why?
2. When creating a database table, what data type would you recommend for the vari-
ous columns with telephone numbers?
3. If the physical data model is to be expanded to include information for individual
stores associated with each customer, describe in detail what changes need to be
made.
4. As part of the changes made for Question 3, are any changes to Referential Integrity
constraints needed? Why or why not?
5. e Supplier table in Figure 3.2 has a minimal amount of information. What col-
umns do you recommend be added?
6. Describe in detail what steps to be taken to add the new columns from Question 5
tothe Supplier table. How much down time/maintenance time is required?
7. Using the physical data model in Figure 3.2, describe the sequence of tables to be
accessed to show all information regarding a customer order and all items on that
order.
8. Are any indexes needed to provide a higher level of performance for Question 7?
9. What must be changed in the physical data model to store information with customer
ratings for items purchased from each supplier?
10. Using the Physical Data Model in Figure 3.2, describe the sequence of tables to be
accessed in order to show, for an advertised item, the available suppliers for each that
have a customer rating of “4” or better.
11. If the query described in Question 10 runs too slowly, what would you do?
12. Using the physical data model in Figure 3.2, for a specic Advertised_Item, describe
the sequence of tables to nd the Supplier having the lowest price for that item. Are
any indexes necessary and why?
13. A database has been created based on the physical data model in Figure 3.2, and
we nd that we frequently need to nd Customer records based on their telephone
number. What changes need to be made to provide a higher level of performance?
14. When using Microso Access, what steps are necessary to create an Index for a col-
umn in a table?
15. When using SQL Server, what steps are necessary to create an Index for a column in
a table?


75
Chapter 4
Normalization and
Physical Design Exercise
4.1 INTRODUCTION
e normalization process is an essential skill for business analysts participating in a data-
base design project. Without an accurate understanding and denition of what data are
needed, the design and implementation team simply cannot do their job.
As normalization will probably be new to most readers, this current chapter will help
develop that skill by designing a database for a university. Aer reviewing data require-
ments, a third normal form data model will be developed. Physical design issues will also
be reviewed, resulting in a physical design model. Implementation issues for these tables
will also be reviewed.
4.2 CREATING THE ENTITY/ATTRIBUTE LIST
Let us begin by reviewing some of the information that is needed for a university’s data-
base. e subjects needed include
• Entries describing the various schools in the university.
• e departments that exist for each school and, for each, the various curriculums
available and their associated degrees.
• Courses oered within each department and, where applicable, course prerequisites.
• Curriculum information must be cross-referenced on the school’s website to map job
classications to applicable curriculum(s) available.
• Information for faculty members for each department.

76 ◾ A Practical Guide to Database Design
• Information for students currently enrolled, and transcript records for each com-
pleted course.
• Finally, for each course, information on assignments for each course as well as grades
recorded as they are completed.
Take a few minutes to create an initial list of the entities applicable to the university envi-
ronment. When nished, compare your list to that shown below.
Entity General Information
School e name and description of each school in the university
Department e name and description for each department within a school
Curriculum Information about the various degree programs oered with a department
Degree For each department, information about the various degrees that are oered
Faculty Information for each faculty member
Course Information describing what covered for each course
Course prerequisite Course prerequisite(s) when applicable
Job classication Job titles in the industry and their relationships to curriculum(s) supported
by the university
Student Information for each student currently enrolled
Student transcript Grades for completed courses and the credit hours earned
Course oering Information about the courses currently oered
Assignment Information about each assignment given for a course
Compare your list to the above.
Next, create an entity/attribute list for this initial list of entities. When ready, compare
your results to that shown in Figure 4.1.
ere will, of course, be dierences, for several reasons.
• e names chosen for entities and attributes will be dierent.
is is only to be expected; in fact, each member of a design team would have their
own personal interpretation of the data elements needed and what to name them.
at is why it is important to work together as a team to develop a common set of
terms as well as an explicit denition for each.
And, of course, the documentation needs to be maintained as a reference for team mem-
bers. Although this could be done by thinking of each entity as a table and documenting
the details using the relational database management system to be used, this is prob-
lematic; it is too early to be making physical design decisions. e entity/attribute lists
represent only hypothetical table denitions. It is much better to use a data modeling
tool such as erwin (reviewed in Chapter 5) to document logical data structures as they
develop, then modifying them as needed as the physical design decisions are made.
• Figure 4.1 results include some intentional issues as discussion items for the normal-
ization exercise.

Normalization and Physical Design Exercise ◾ 77
Attribute Description
School
SchoolID A unique identier for each School
SchoolName e name of the School
SchoolDescription A description for the scope of subjects oered by the School
SchoolCampusLocation e campus address for the Dean’s oce
SchoolDeanID e FacultyID for the Dean
Department
DepartmentID A unique identier for the Department
DepartmentName e name of the Department
DepartmentHeadID e FacultyID for the Department head
DeptCampusLocation
Degree
DegreeID A unique identier for the Degree
DegreeName e name of the Degree
Course
CourseID A unique identier for the Course
CourseName e name of the Course
CreditHours e number of credit hours associated with the Course
CourseDescription A general description for the subjects covered in the Course
CoursePrerequisite
CourseID A unique identier for the Course with a prerequisite
PrerequisiteCseID e CourseID for the prerequisite
CourseOering
CourseID e course identier associated with this class oering
SectionID e section number associated with this class oering
FacultyID e Faculty member teaching this class oering
Location e building and room number where the class meets
ClassSchedule e day(s) and time the class meets
StudentID e Students enrolled in this class oering
Faculty
FacultyID A unique identier for a Faculty member
DepartmentID e Department to which the Faculty member is assigned
FacultyPrex e title associated with the Faculty member
FacultyLastName e last name of the Faculty member
FacultyMiddleName e middle name of the Faculty member
FacultyFirstName e rst name of the Faculty member
FacultyStreetAddr e street address of the Faculty member
FacultyCity e city associated with the Faculty member’s mailing address
FacultyState e state associated with the Faculty member’s mailing address
FacultyZipCode e ZipCode associated with the Faculty member’s address
FIGURE 4.1 An initial entity/attribute list. (Continued)

78 ◾ A Practical Guide to Database Design
4.3 MOVING TO THIRD NORMAL FORM
As the rst step in normalization, review Figure 4.1 to identify changes needed to move to
rst normal form. If you recall, each entity must have a unique identier, and there can be
no repeating groups. Compare your results to Figure 4.2.
Attribute Description
Curriculum
CurriculumID A unique identier for the Curriculum
CurriculumName e name for the Curriculum
DegreeID e unique identier for the Degree associated with this Curriculum
CurriculumDescription A description of the scope of subjects associated with the Curriculum
CourseID e Course numbers associated with this Curriculum
Job Classication
ClassicationID A unique identier for this Job classication
ClassicationName e name commonly used for jobs with this classication
ClassicationDescription A description of the type of work associated with this job
CurriculumID e unique identiers for Curriculums related to this job
Student
StudentID A unique identier for each student
DepartmentID e Department identier associated with a student
StudentLastName e last name of the Student
StudentMiddleName e middle name of the Student
StudentFirstName e rst name of the Student
StudentTelephoneNumber e contact phone number for the Student
StudentStreetAddr e street address for this Student
StudentCity e city associated with the Student’s mailing address
StudentState e state associated with the Student’s mailing address
StudentZipCode e zip code associated with the Student’s mailing address
ClassLevel e current class level for the Student (e.g., Freshman)
Student Transcript
StudentID e Student identier associated with this transcript grade
CourseID e Course number associated with this transcript grade
Grade e grade recorded for this Student and Course
DateCompleted e date this grade was reported
CreditHoursEarned e number of credit hours earned upon course completion
Assignment
CourseID e Course identier associated with this Assignment
SectionID e Section number associated with these class assignments
AssignmentNo A unique sequential number assigned to each Assignment
AssignmentDescription A description of the work to be done to complete the assignment
AssignmentGrade e Student grades reported for each completed Assignment
FIGURE 4.1 (Continued) An initial entity/attribute list.

Normalization and Physical Design Exercise ◾ 79
Attribute Description
School
*SchoolID A unique identier for each School
SchoolName e name of the School
SchoolDescription A description for the scope of subjects oered by the School
SchoolCampusLocation e campus address for the Dean’s oce
SchoolDeanID e FacultyID for the Dean
Department
*DepartmentID A unique identier for the Department
DepartmentName e name of the Department
DepartmentHeadID e FacultyID for the Department head
DeptCampusLocation e campus address for the Department
Degree
*DegreeID A unique identier for the Degree
DegreeName e name of the Degree
Course
*CourseID A unique identier for the Course
CourseName e name of the Course
CreditHours e number of credit hours associated with the Course
CourseDescription A general description for the subjects covered in the Course
CoursePrerequisite
*CourseID A unique identier for the Course with a prerequisite
*PrerequisiteCseID e CourseID for the prerequisite
CourseOering
*CourseID e course identier associated with this class oering
*SectionID e section number associated with this class oering
FacultyID e Faculty member teaching this class oering
Location e building and room number where the class meets
ClassSchedule e day(s) and time the class meets
StudentID e Students enrolled in this class oering
Faculty
*FacultyID A unique identier for a Faculty member
DepartmentID e Department to which the Faculty member is assigned
FacultyPrex e title associated with the Faculty member
FacultyLastName e last name of the Faculty member
FacultyMiddleName e middle name of the Faculty member
FacultyFirstName e rst name of the Faculty member
FacultyStreetAddr e street address of the Faculty member
FacultyCity e city associated with the Faculty member’s mailing address
FacultyState e state associated with the Faculty member’s mailing address
FacultyZipCode e ZipCode associated with the Faculty member’s address
FIGURE 4.2 e revised entity/attribute list. (Continued)

80 ◾ A Practical Guide to Database Design
In reviewing the above, note the following:
• An “*” denotes unique identiers for each entity.
• Attributes shown in bold italics are repeating groups, that is, when associated with
this entity, this value has more than one value.
Attribute Description
Curriculum
*CurriculumID A unique identier for the Curriculum
CurriculumName e name for the Curriculum
DegreeID e unique identier for the Degree associated with this Curriculum
CurriculumDescription A description of the scope of subjects associated with the Curriculum
CourseID e Course numbers associated with this Curriculum
Job Classication
*ClassicationID A unique identier for this Job classication
ClassicationName e name commonly used for jobs with this classication
ClassicationDescription A description of the type of work associated with this job
CurriculumID e unique identiers for Curriculums related to this job
Student
*StudentID A unique identier for each student
DepartmentID e Department identier associated with a student
StudentLastName e last name of the Student
StudentMiddleName e middle name of the Student
StudentFirstName e rst name of the Student
StudentTelephoneNumber e contact phone number for the Student
StudentStreetAddr e street address for this Student
StudentCity e city associated with the Student’s mailing address
StudentState e state associated with the Student’s mailing address
StudentZipCode e zip code associated with the Student’s mailing address
ClassLevel e current class level for the Student (e.g., Freshman)
Student Transcript
*StudentID e Student identier associated with this transcript grade
*CourseID e Course number associated with this transcript grade
Grade e grade recorded for this Student and Course
DateCompleted e date this grade was reported
CreditHoursEarned e number of credit hours earned upon course completion
Assignment
*CourseID e Course identier associated with this Assignment
*SectionID e Section number associated with these class assignments
*AssignmentNo A unique sequential number assigned to each Assignment
AssignmentDescription A description of the work to be done to complete the assignment
AssignmentGrade e Student grades reported for each completed Assignment
FIGURE 4.2 (Continued) e revised entity/attribute list.

Normalization and Physical Design Exercise ◾ 81
Unique identiers: In creating the information in Figure 4.1, unique identiers were
included and were simply agged with an “*.” Of course, for some entities, more than
one attribute must be used to identify a unique occurrence of the entity.
Repeating groups: For each attribute that has more than one value, it must be
removed and placed where it belongs. Next, we must check to see if the relationship
between those two attributes is one-to-many or many-to-many. If that relation-
ship is one-to-many, we are OK and simply continue, but if it is many-to-many, we
must create a new entity to store the intersection data (the attributes common to
both).
Let us look at each from Figure 4.2:
• StudentID in CourseOering
Does StudentID appear where it belongs? (Yes, in Student).
Is the relationship between Student and CourseOering one-to-many, or many-to-
many? (Many-to-many; a student may be enrolled in multiple courses, and each
course will have more than one student).
A new entity “Course Enrollment” is needed, along with attributes for a student
enrollment:
Course Enrollment
*CourseID
*StudentID
EnrollmentStatus
DateEnrolled
MidTermGrade
FinalGrade
• CourseID in Curriculum
Does CourseID appear where it belongs? (Yes, in Course).
Is the relationship between Course and Curriculum one-to-many or many-to-
many? (Many-to-many; a Course will be relevant to multiple Curriculums, and any
Curriculum will be associated with multiple courses).
A new “Course Curriculum” entity is required along with relevant attributes:
Course Curriculum
*CurriculumID
*CourseID
Opt-MandatoryFlag
CurriculumCseInfo
82 ◾ A Practical Guide to Database Design
• CurriculumID in “Job Classication”
Does CurriculumID appear where it belongs? (Yes, in Curriculum).
Is the relationship between Curriculum one-to-many or many-to-many? (Many-to-
many; any particular job/job classication may be associated with more than one
curriculum, and a curriculum will be associated with many jobs/job classications).
A new “Curriculum Job Classication” is needed, along with descriptive information
about how they are associated.
Curriculum Job Classication
*CurriculumID
*ClassicationID
Job Relationship
• AssignmentGrade in Assignment
Is AssignmentGrade where it belongs? (No, we need a new entity “Student Grade.”)
Student Grade
*CourseID
*SectionID
*StudentID
*AssignmentID
AssignmentGrade
DateGraded
Is the relationship between “Student Grade” and “Assignment” one-to-many or many-
to-many? (One-to-many; as dened earlier, an Assignment will have multiple grades
(one for each student), but a “Student Grade” is associated with one Assignment).
With these adjustments, we have moved to a rst normal form for the data model as shown
in Figure 4.3.
Attribute Description
School
*SchoolID A unique identier for each School
SchoolName e name of the School
SchoolDescription A description for the scope of subjects oered by the School
SchoolCampusLocation e campus address for the Dean’s oce
SchoolDeanID e FacultyID for the Dean
Department
*DepartmentID A unique identier for the Department
DepartmentName e name of the Department
FIGURE 4.3 e rst normal form entity/attribute list. (Continued)

Normalization and Physical Design Exercise ◾ 83
Attribute Description
DepartmentHeadID e FacultyID for the Department head
DeptCampusLocation
Degree
*DegreeID A unique identier for the Degree
DegreeName e name of the Degree
Course
*CourseID A unique identier for the Course
CourseName e name of the Course
CreditHours e number of credit hours associated with the Course
CourseDescription A general description for the subjects covered in the Course
CoursePrerequisite
*CourseID A unique identier for the Course with a prerequisite
*PrerequisiteCseID e CourseID for the prerequisite
CourseOering
*CourseID e course identier associated with this class oering
*SectionID e section number associated with this class oering
FacultyID e Faculty member teaching this class oering
Location e building and room number where the class meets
ClassSchedule e day(s) and time the class meets
Faculty
*FacultyID A unique identier for a Faculty member
DepartmentID e Department to which the Faculty member is assigned
FacultyPrex e title associated with the Faculty member
FacultyLastName e last name of the Faculty member
FacultyMiddleName e middle name of the Faculty member
FacultyFirstName e rst name of the Faculty member
FacultyStreetAddr e street address of the Faculty member
FacultyCity e city associated with the Faculty member’s mailing address
FacultyState e state associated with the Faculty member’s mailing address
FacultyZipCode e ZipCode associated with the Faculty member’s address
Curriculum
*CurriculumID A unique identier for the Curriculum
CurriculumName e name for the Curriculum
DegreeID e unique identier for the Degree associated with this Curriculum
CurriculumDescription A description of the scope of subjects associated with the Curriculum
Job Classication
*ClassicationID A unique identier for this Job classication
ClassicationName e name commonly used for jobs with this classication
ClassicationDescription A description of the type of work associated with this job
Student
*StudentID A unique identier for each student
DepartmentID e Department identier associated with a student
StudentLastName e last name of the Student
FIGURE 4.3 (Continued) e rst normal form entity/attribute list.

84 ◾ A Practical Guide to Database Design
Attribute Description
StudentMiddleName e middle name of the Student
StudentFirstName e rst name of the Student
StudentTelephoneNumber e contact phone number for the Student
StudentStreetAddr e street address for this Student
StudentCity e city associated with the Student’s mailing address
StudentState e state associated with the Student’s mailing address
StudentZipCode e zip code associated with the Student’s mailing address
ClassLevel e current class level for the Student (e.g., Freshman)
Student Transcript
*StudentID e Student identier associated with this transcript grade
*CourseID e Course number associated with this transcript grade
Grade e grade recorded for this Student and Course
DateCompleted e date this grade was reported
CreditHoursEarned e number of credit hours earned upon course completion
Assignment
*CourseID e Course identier associated with this Assignment
*SectionID e Section number associated with these class assignments
*AssignmentNo A unique sequential number assigned to each Assignment
AssignmentDescription A description of the work to be done to complete the assignment
Course Enrollment
*CourseID e Course identier for this enrollment record
*StudentID e Student identier for this enrollment record
EnrollmentStatus A label giving the student’s enrollment status in this course
DateEnrolled e date the student enrolled in this course
MidTermGrade e student’s mid-term grade for this course
FinalGrade e nal grade given for this student in this course
Curriculum Course
*CurriculumID e Curriculum identier associated with this course
*CourseID e Course identier for this course
Opt-MandatoryFlag An Optional/Mandatory ag for this Course/Curriculum relationship
CurriculumCseInfo Descriptive information on how this course is associated with this
Curriculum
Curriculum Job Classication
*CurriculumID e Curriculum identier for this Job relationship
*ClassicationID e Classication identier for this Curriculum relationship
Job Relationship Descriptive information about how this job title maps to this Curriculum
Student Grade
*CourseID e Course identier for this course/student/assignment
*SectionID e Section identier for this course/student/assignment
*StudentID e Student identier for this course/student/assignment
*AssignmentID e Assignment number for this course/student/assignment
Assignment Grade e grade given for this student/assignment
DateGraded e date the grade was given
FIGURE 4.3 (Continued) e rst normal form entity/attribute list.
Normalization and Physical Design Exercise ◾ 85
Now that the data model is in rst normal form, let us use this information to draw the
data model and verify that it makes sense. Refer to Figure 4.3 and use this information to
draw all one-to-many relationships in the data model. Be careful and only draw arrows
when the key of one entity is embedded within another.
When you are nished, compare your results to that shown in Figure 4.4.
Aer drawing the logical data model, review the diagram to see if all one-to-many
relationships are shown and that they make sense. Do you see any issues in the above-
mentioned diagram?
ere should be a one-to-many arrow between Department and Course, but it is not
shown above because at this moment, the key of Department (DepartmentID) does not
exist within Course.
In my initial entity/attribute list, I (deliberately) neglected to add the DepartmentID
attribute to the Course entity.
In drawing the above-mentioned diagram, the design team should recognize that
there should be a one-to-many arrow between these two entities, but that relationship
is not supported by the current entity/attribute denitions. is is easy to resolve; just
add the DepartmentID attribute to the Course entity and add the one-to-many arrow
between Department and Course.
When drawing the logical data model, do not just draw one-to-many arrows where they
intuitively belong. Draw them only where/when supported by the entity/attribute list,
check the diagram for errors/omissions, and adjust the entity/attribute list and diagram
accordingly.
Figure 4.5 shows a corrected logical data model based on the rst normal form entity/
attribute list.
Now let us continue with the Normalization process.
Let us review the requirement for second normal form. As stated in Chapter 2:
For second normal form, each non-key attribute must depend on the key and all
parts of the key.
Take a minute to review Figure 4.5 and see what, if any, changes need to be made for the
data model to be in second normal form.
No changes are necessary; the data model is in second normal form.
Next, the requirement for third normal form is: “A non-key attribute must not depend
on any other non-key attribute.”
Review the data model once more to see if any changes are necessary for third normal
form.
Once again, no changes are necessary for third normal form.
86 ◾ A Practical Guide to Database Design
FIGURE 4.4 e logical data model (based on Figure 4.3).
School
*SchoolID
SchoolName
SchoolDescription
SchoolCampusLocation
SchoolDeanID
Faculty
*FacultyID
DepartmentID
FacultyPrefix
FacultyLastName
FacultyMiddleName
FacultyFirstName
FacultyStreetAddr
FacultyCity
FacultyState
FacultyZipCode
Department
*DepartmentID
SchoolID
DepartmentName
DepartmentHeadID
DeptCampusLocation
Student
*StudentID
DepartmentID
StudentLastName
StudentMiddleName
StudentFirstName
StudentTelephoneNumber
StudentStreetAddr
StudentCity
StudentState
StudentZipcode
ClassLevel
Job Classification
*ClassificationID
ClassificationName
ClassificationDescription
Course Offering
*CourseID
*SectionID
FacultyID
Location
ClassSchedule
Assignment
*CourseID
*SectionID
*AssignmentNo
AssignmentDescription
Course Enrollment
*CourseID
*SectionID
*StudentID
EnrollmentStatus
DateEnrolled
MidTermGrade
FinalGrade Student Grade
*CourseID
*SectionID
*StudentID
*AssignmentNo
AssignmentGrade
DateGraded
Student Transcript
*StudentID
*CourseID
Grade
DateCompleted
CreditHoursEarned
Degree
*DegreeID
DegreeName
DepartmentID
Curriculum
*CurriculumID
CurriculumName
DegreeID
CurriculumDescription
Curriculum Job Classification
*CurriculumID
*ClassificationID
Job Relationship
Course Curriculum
*CurriculumID
*CourseID
Opt-MandatoryFlag
CurriculumCseInfo
Course
*CourseID
CourseName
CreditHours
CourseDescription
CoursePrerequisite
*CourseID
*PrerequisiteCseID
Normalization and Physical Design Exercise ◾ 87
School
*SchoolID
SchoolName
SchoolDescription
SchoolCampusLocation
SchoolDeanID
Faculty
*FacultyID
DepartmentID
FacultyPrefix
FacultyLastName
FacultyMiddleName
FacultyFirstName
FacultyStreetAddr
FacultyCity
FacultyState
FacultyZipCode
Department
*DepartmentID
SchoolID
DepartmentName
DepartmentHeadID
DeptCampusLocation
Student
*StudentID
DepartmentID
StudentLastName
StudentMiddleName
StudentFirstName
StudentTelephoneNumber
StudentStreetAddr
StudentCity
StudentState
StudentZipcode
ClassLevel
Job Classification
*ClassificationID
ClassificationName
ClassificationDescription
Course Offering
*CourseID
*SectionID
FacultyID
Location
ClassSchedule
Assignment
*CourseID
*SectionID
*AssignmentNo
AssignmentDescription
Course Enrollment
*CourseID
*SectionID
*StudentID
EnrollmentStatus
DateEnrolled
MidTermGrade
FinalGrade Student Grade
*CourseID
*SectionID
*StudentID
*AssignmentNo
AssignmentGrade
DateGraded
Student Transcript
*StudentID
*CourseID
Grade
DateCompleted
CreditHoursEarned
Degree
*DegreeID
DegreeName
Curriculum
*CurriculumID
Curriculum Name
DegreeID
CurriculumDescription
Curriculum Job Classification
*CurriculumID
*ClassificationID
Job Relationship
Course Curriculum
*CurriculumID
*CourseID
Opt-Mandatory Flag
CurriculumCseInfo
Course
*CourseID
CourseName
CreditHours
DepartmentID
CourseDescription
CoursePrerequisite
*CourseID
*PrerequisiteCseID
FIGURE 4.5 e updated logical data model.

88 ◾ A Practical Guide to Database Design
4.4 THE PHYSICAL DATA MODEL
e data model developed earlier gives us a clean data model that could be imple-
mented as is; we need to review how the data will be used before making physical design
decisions.
With our university data model, most data elements are rather static. e most active
area involves inserting new Student Grade entries for each assignment, and in viewing
grades that have been posted. One approach would involve de-normalizing that entity and
creating a table that has one column for each week’s assignment. e following structure
shows the table design for Student Grade for a 16-week semester.
Student Grade
*CourseID
*SectionID
*StudentID
Assignment1
Assignment2
Assignment3
Assignment4
Assignment5
...
Assignment16
is implementation drastically reduces I/Os for inserting new grades and searching for
grades.
Aer making this change, the initial physical design model is given in Figure 4.6.
Note, however, the one-to-one relationship between Course Enrollment and Student
Grade. Why?
• e key of Course Enrollment appears within Student Grade.
• e key of Student Grade appears within Course Enrollment.
A one-to-one relationship should always raise a warning ag. If the two entities have identi-
cal keys, then why not combine all attributes into one entity?
ere may be times when having two separate entities makes sense. For example, the
two entities may be populated at dierent points in time. Having two separate entities may
then make sense, using one to store active/current information and the second to store
older, historic data.
In this case, however, I recommend combining Course Enrollment and Student Grade,
moving all Student Grade attributes into Course Enrollment. e physical data model
reecting this change is shown in Figure 4.7.
Normalization and Physical Design Exercise ◾ 89
School
*SchoolID
SchoolName
SchoolDescription
SchoolCampusLocation
SchoolDeanID
Faculty
*FacultyID
DepartmentID
FacultyPrefix
FacultyLastName
FacultyMiddleName
FacultyFirstName
FacultyStreetAddr
FacultyCity
FacultyState
FacultyZipCode
Department
*DepartmentID
SchoolID
DepartmentName
DepartmentHeadID
DeptCampusLocation
Student
*StudentID
DepartmentID
StudentLastName
StudentMiddleName
StudentFirstName
StudentTelephoneNumber
StudentStreetAddr
StudentCity
StudentState
StudentZipcode
ClassLevel
Job Classification
*ClassificationID
ClassificationName
ClassificationDescription
Course Offering
*CourseID
*SectionID
FacultyID
Location
ClassSchedule
Assignment
*CourseID
*SectionID
*AssignmentNo
AssignmentDescription
Course Enrollment
*CourseID
*SectionID
*StudentID
EnrollmentStatus
DateEnrolled
MidTermGrade
FinalGrade
Student Transcript
*StudentID
*CourseID
Grade
DateCompleted
CreditHoursEarned
Degree
*DegreeID
DegreeName
DepartmentID
Curriculum
*CurriculumID
CurriculumName
DegreeID
CurriculumDescription
Curriculum Job Classification
*CurriculumID
*ClassificationID
Job Relationship
Course Curriculum
*CurriculumID
*CourseID
Opt-MandatoryFlag
CurriculumCseInfo
Course
*CourseID
CourseName
CreditHours
DepartmentID
CourseDescription
CoursePrerequisite
*CourseID
*PrerequisiteCseID
Student Grade
*CourseID
*SectionID
*StudentID
Assignment1
Assignment2
Assignment3
Assignment4
. . .
Assignment16
FIGURE 4.6 e initial physical data model.
90 ◾ A Practical Guide to Database Design
School
*SchoolID
SchoolName
SchoolDescription
SchoolCampusLocation
SchoolDeanID
Faculty
*FacultyID
DepartmentID
FacultyPrefix
FacultyLastName
FacultyMiddleName
FacultyFirstName
FacultyStreetAddr
FacultyCity
FacultyState
FacultyZipCode
Department
*DepartmentID
SchoolID
DepartmentName
DepartmentHeadID
DeptCampusLocation
Student
*StudentID
DepartmentID
StudentLastName
StudentMiddleName
StudentFirstName
StudentTelephoneNumber
StudentStreetAddr
StudentCity
StudentState
StudentZipcode
ClassLevel
Job Classification
*ClassificationID
ClassificationName
ClassificationDescription
Course Offering
*CourseID
*SectionID
FacultyID
Location
ClassSchedule
Assignment
*CourseID
*SectionID
*AssignmentNo
AssignmentDescription
Student Transcript
*StudentID
*CourseID
Grade
DateCompleted
CreditHoursEarned
Degree
*DegreeID
DegreeName
DepartmentID
Curriculum
*CurriculumID
CurriculumName
DegreeID
CurriculumDescription
Curriculum Job Classification
*CurriculumID
*ClassificationID
Job Relationship
Course Curriculum
*CurriculumID
*CourseID
Opt-MandatoryFlag
CurriculumCseInfo
Course
*CourseID
CourseName
CreditHours
DepartmentID
CourseDescription
CoursePrerequisite
*CourseID
*PrerequisiteCseID
Course Enrollment
*CourseID
*SectionID
*StudentID
EnrollmentStatus
DateEnrolled
MidTermGrade
FinalGrade
Assignment1
Assignment2
Assignment3
Assignment4
Assignment5
Assignment6
.
.
Assignment16
FIGURE 4.7 e physical data model.

Normalization and Physical Design Exercise ◾ 91
When implementing the aforementioned physical data model, we would of course cre-
ate indexes for columns that are unique identiers. We would also create indexes on attri-
butes in a table that serve as foreign keys to another table.
If our database implementation supports some sort of clustering of tables (e.g., Oracle
Tablespaces), we would want to cluster this information by grouping tables on disk based
on projected update activity and storing like data together.
School
Department
Degree
Curriculum
Job classication
Curriculum job
classication
Course curriculum
Faculty
Course
Course prerequisite
Course oering
Course enrollment
Assignment
Student grade
Student
Student transcript
e normalization process may seem overwhelming at rst. e good news is that it is
really just applied common sense; entities are created for each unique object in the scope of
the design, and attributes are associated with the entity it describes. With a little practice,
normalization will become second nature, and new data models will need minimal adjust-
ments to get to third normal form.
e next chapter reviews how the erwin data modeling tool can be used to create logical
data models which, in turn, are used as input to physical data models.
QUESTIONS
1. Explain the dierence between a Logical Data Model and a Physical Data Model.
2. When does a one-to-many relationship exist between two entities?
3. Can a Logical Data Model contain a many-to-many relationship? Why/why not?
4. Is a one-to-one relationship valid? Why/why not?
5. When describing a column in a table, what is the meaning of the Optional or
Mandatory setting?
6. What information is considered when moving from a Logical Data Model to a
Physical Data Model?
7. What changes would you make to the Physical Data Model to add a telephone num-
ber for faculty? Give an example. What Storage format would you use?
8. What changes would you make to the Physical Data Model to add minimal grade
requirements for prerequisite courses? Would this be an Optional or Mandatory
column?
92 ◾ A Practical Guide to Database Design
9. What changes would you make to the Physical Data Model to add email address for
students and faculty? What Storage format would you use?
10. What changes would you make to the Physical Data Model to add information on
textbooks needed for each course?
11. In Course Curriculum, what storage format would you choose for the Opt-Mandatory
column?
12. If this university had multiple campus locations, what changes would you make to
the Physical Data Model to store information about faculty positions at each campus
location?
13. If this university had multiple campus locations, what changes must be made to the
Physical Data Model to track what courses are taught at each location?
14. What changes must be made to the Physical Data Model to store information regard-
ing graduates?
15. Faculty members are optionally appointed as course developers. What changes to the
Physical Data Model are necessary to track that information?

93
Chapter 5
The erwin Data Modeling Tool
5.1 WHAT IS A DATA MODELING TOOL?
A data modeling tool is a soware tool used by the design team developing a new business
system that captures the information requirements for that system, documents the mean-
ing and use of each data element, and supports the creation of the normalized data model
for that system.
5.2 WHY DO I NEED A DATA MODELING TOOL?
As described in Chapter 2, designing a new business system involves the documentation,
review, and renement of all data requirements for the new system as the scope and details
of that system evolve. A data modeling tool is essential in providing a central data reposi-
tory for the team’s use in reviewing and rening these data elements as the design develops
and to support the generation of a normalized data model.
In addition, leading data modeling tools such as erwin1 can also transform the logical
data model into a physical data model. at physical data model would then be changed to
reect design changes resulting from anticipated access paths. Finally, Structured Query
Language (SQL) Data Denition Language (DDL) commands can be generated to create
tables in a relational database running under SQL Server or Oracle as well as others.
5.3 REVERSE ENGINEERING
One of the more signicant features of erwin is that it also can Reverse Engineer a data-
base, that is, connect to an existing database, analyze the table and columns it contains,
and create a physical design model of that structure. is is a wonderful feature to have for
a database administrator (DBA) who inherits a running system that has minimal, if any,
documentation!
Similar to anything else, however, this feature has limitations. erwin will analyze the
tables it nds and report on the columns found within each, then create the one-to-many
relationships found. If column names within the system being analyzed were chosen
wisely, then the physical data model created by erwin will be logically correct and make

94 ◾ A Practical Guide to Database Design
sense. If, however, the original designers were careless in their choice of names, the result-
ing physical data model would not make sense.
For example, if the key columns for several tables were all named “SEQUENCE_
NUMBER,” the resulting display would show relationships between all of these tables and
not make any sense from the business perspective.
When this happens, the confusing/incorrect physical data model is not the fault of
erwin; rather, it is just the result of the design and naming conventions chosen when the
system was rst built.
5.4 CHANGE MANAGEMENT
Next, a word on the need for a Change Management process.
Database systems are typically large and require complex web-based user interfaces, as
well as logic embedded within stored procedures and triggers in the database. Members of
development teams have members with a wide range of skills, each supporting the evolution
of a small piece of an intricate infrastructure. e design and implementation of changes
for a system upgrade must be carefully managed to simultaneously migrate changes for all
components, avoiding surprises and downtime for users when system updates are made.
Complex systems typically require three dierent types of environments.
• Development environment
A development environment will be supported by a host computer and its associated
disk arrays and database. is is where development team members code and test
individual components for components being developed.
All members of the development team will carefully record and track individual
changes to soware and interfaces as they are developed. DBAs apply updates using
DDL statements and carefully record details of each individual change.
When the development team has successfully completed testing a set of updates,
change packages are prepared to migrate these changes to another environment. For
DBAs on the team, their change package will consist of the DDL for all sequential
changes made to the development database.
• Test environment
A test environment will run on another host with its own set of disk arrays and
database.
e purpose of this environment is to test the accuracy and completeness of a change
package with changes being migrated. If errors or omissions are found, changes
arebacked o, and the development team will research and resolve the issues found,
preparing a new change package to be applied to the test environment.
Aer a change package has been successfully tested, the team can now migrate those
changes to the production environment.

The erwin Data Modeling Tool ◾ 95
• Production environment
As the name suggests, this is the host environment for the real-time production
environment. It of course runs on another host with its own set of disk arrays and
database.
ese systems oen run 24×7, and some high-availability systems have an accept-
able downtime of a few hours per year. Migration testing of changes to a test envi-
ronment is essential for the smooth migration of a change package to the production
environment with no surprises.
DBAs have online graphical user interface tools that give them the capability to make
quick and easy changes to tables, stored procedures, and triggers. However, using this type
of tool makes it dicult to impossible to track all changes, then sequentially apply those
changes to another environment.
For this reason, DBAs apply all changes using a sequence of DDL updates, recording
each into a master set of changes to be applied when the change package is ready to be
applied to another environment.
For licensed users of erwin, my recommendation is to use it to rst create the tables in
the initial physical data model (or reverse engineer a live system). Aer creating that initial
baseline, manually create DDL change packages for subsequent updates to the database
while keeping erwin up to date as changes are applied. Details on how to use erwin for
tracking changes are beyond the scope of the current book.
Let us now see how to use erwin to create the logical and physical models for the
University data model created in Chapter 4.
5.5 DOWNLOAD AND INSTALL ERWIN TRIAL SOFTWARE
ere are two ways to download and install trial versions of the erwin data modeling
tool.
• Demo soware trial: Go to http://erwin.com/resources/soware-trials and select
“Request Demo”; ll out and submit the form and select “Submit Request.” You will
be sent a link and instructions on how to download and install a limited version of
the soware.
• Academic soware trial: e vendor now supports another version of erwin that can
be downloaded and used for one year. is version does, however, require the use of
an email account associated with an educational institution.
Go to http://erwin.com/education/erwin-academic-program/academic-edition and
click on “Get erwin Data Modeler Academic Edition.” Aer submitting the requested
information, you will receive a link and instructions on how to download and install
the trial soware.

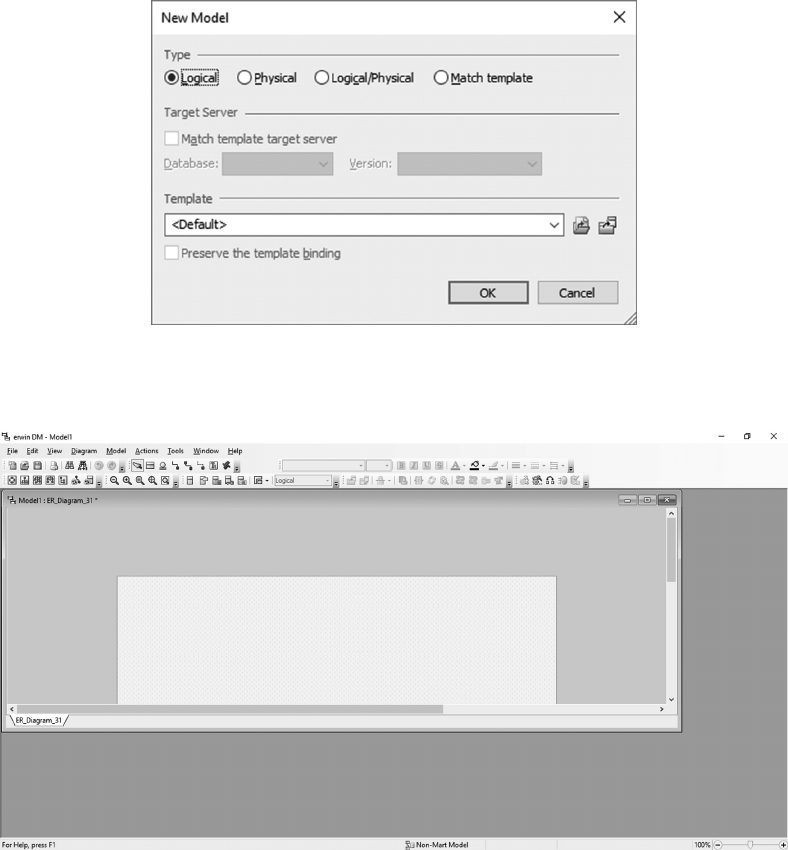
The erwin Data Modeling Tool ◾ 97
• Next, click the File/New option to get the following:
• Leave the Logical option selected and click OK.

98 ◾ A Practical Guide to Database Design
• Next, select the View/Windows/Explorer Pane option.
You are now ready to use this display to add the entities and attributes for the
University logical data model.
To add new entities, select Entities/New to get the following.
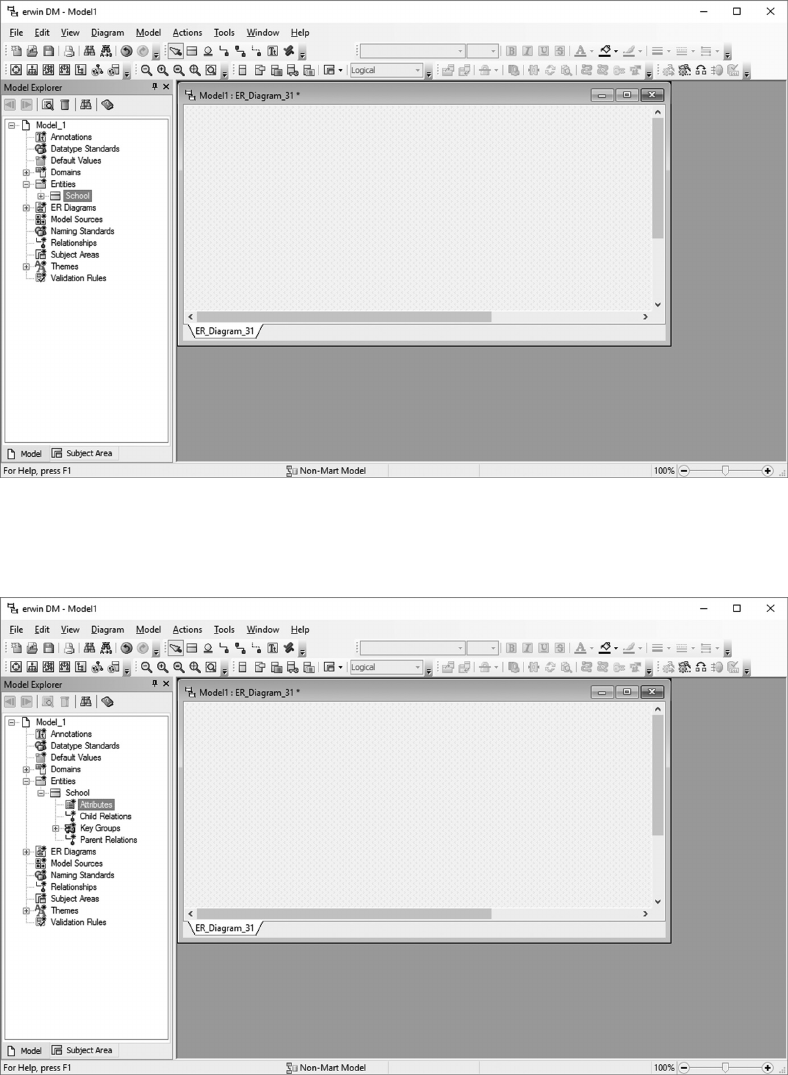
The erwin Data Modeling Tool ◾ 99
• Under Entities, change “E/1” to the name of the rst entity to be dened (in this case,
“School”).
• Next, select School, then right-click and select “Properties.”
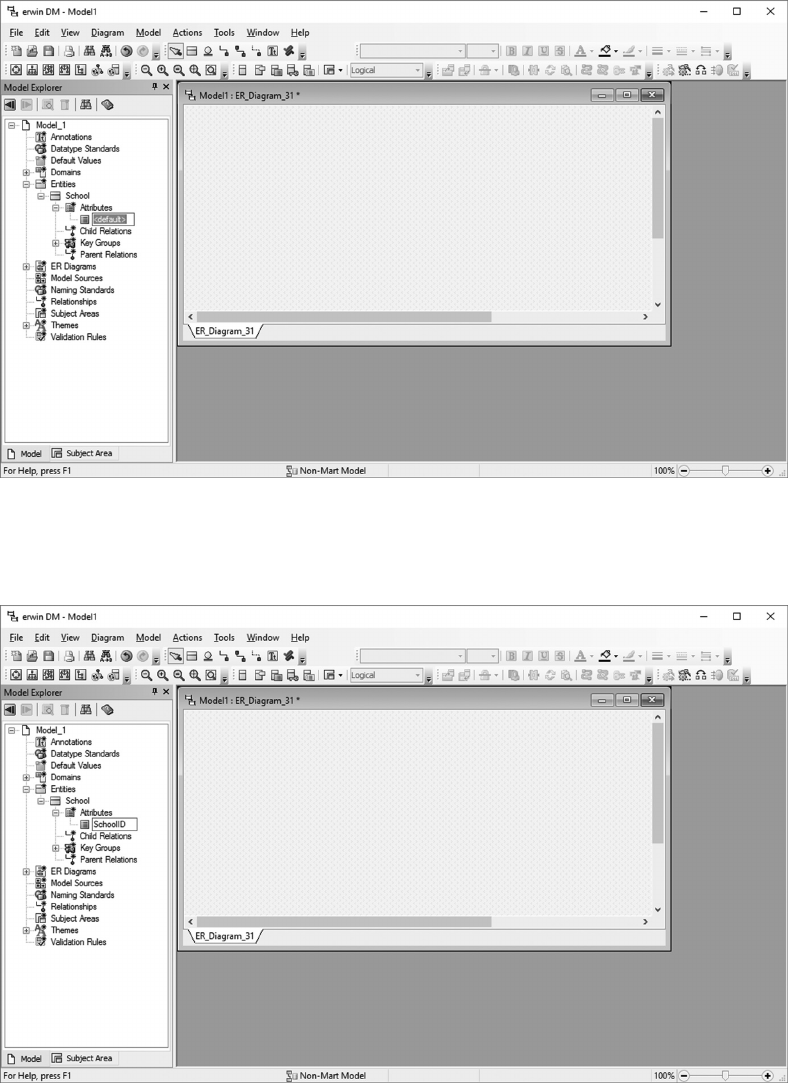
100 ◾ A Practical Guide to Database Design
• Use this window to add attributes for School. Start by selecting the Attributes/New
option to get the following:
• Change “<default>” to the rst attribute to be added, in this case SchoolID.
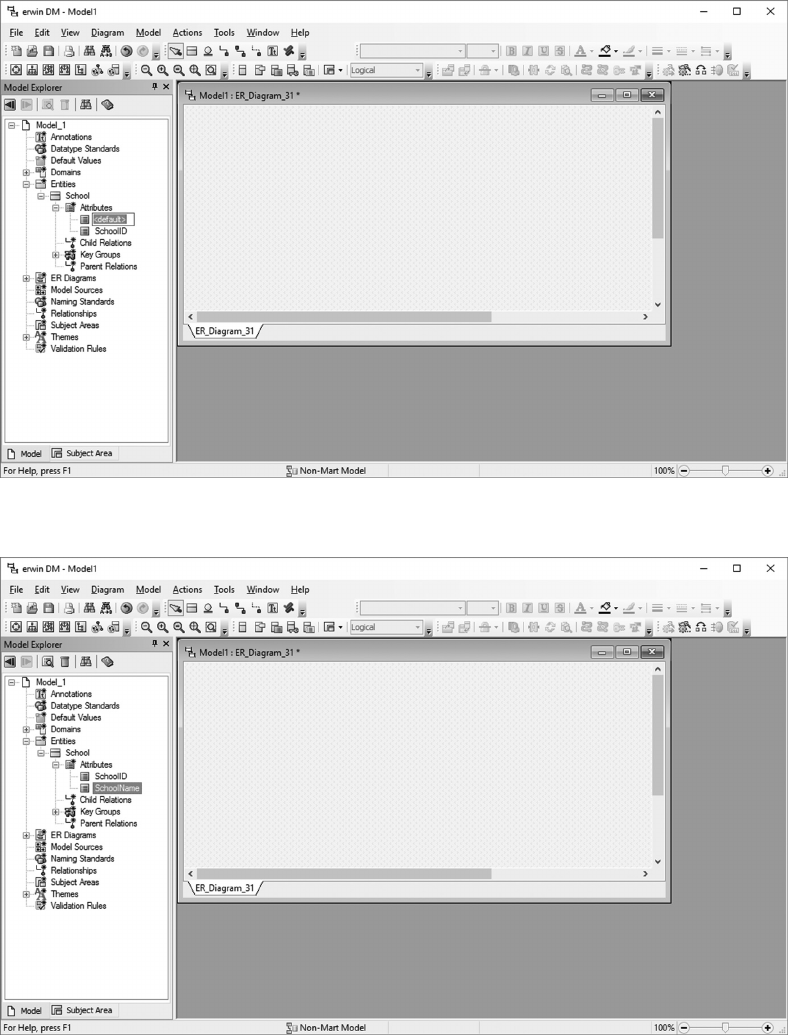
The erwin Data Modeling Tool ◾ 101
• Optionally, select SchoolID/Properties to open a window where a detailed denition
for this attribute can be entered. is becomes the central information repository for
the design team.
• Select the Attributes/New sequence to add another attribute.
• Change “<default>” to the next attribute being added (in this case, SchoolName).

102 ◾ A Practical Guide to Database Design
• Repeat this sequence to add the other attributes for the School entity.
• Let us now set properties for these attributes. Select SchoolID, then Properties to get
the following.
Use this screen to identify the key column for the entity (in this case, SchoolID) and
to change the data type to the data type anticipated for the physical design model.
In this case, all were changed to varchar(50), where a value of SchoolID has
• A mixture characters and numbers.
• A maximum length of 50bytes.

The erwin Data Modeling Tool ◾ 103
• e varchar option results in a SchoolID value of only 10 bytes to require
10bytes of physical storage. Using varchar therefore supports exible yet ecient
implementations.
• Continue using this sequence of command to add the other entities and attributes in
the University data model.
Note that at any time, the “File/Save As” feature can be used to save the logical data model.
e following display shows all of the entities aer being created in the logical data
model.
• To create the logical data model diagram, we will now add each entity to the dia-
gram on the right. To add Assignment, select it in the le pane, then select “Add to
Diagram.”
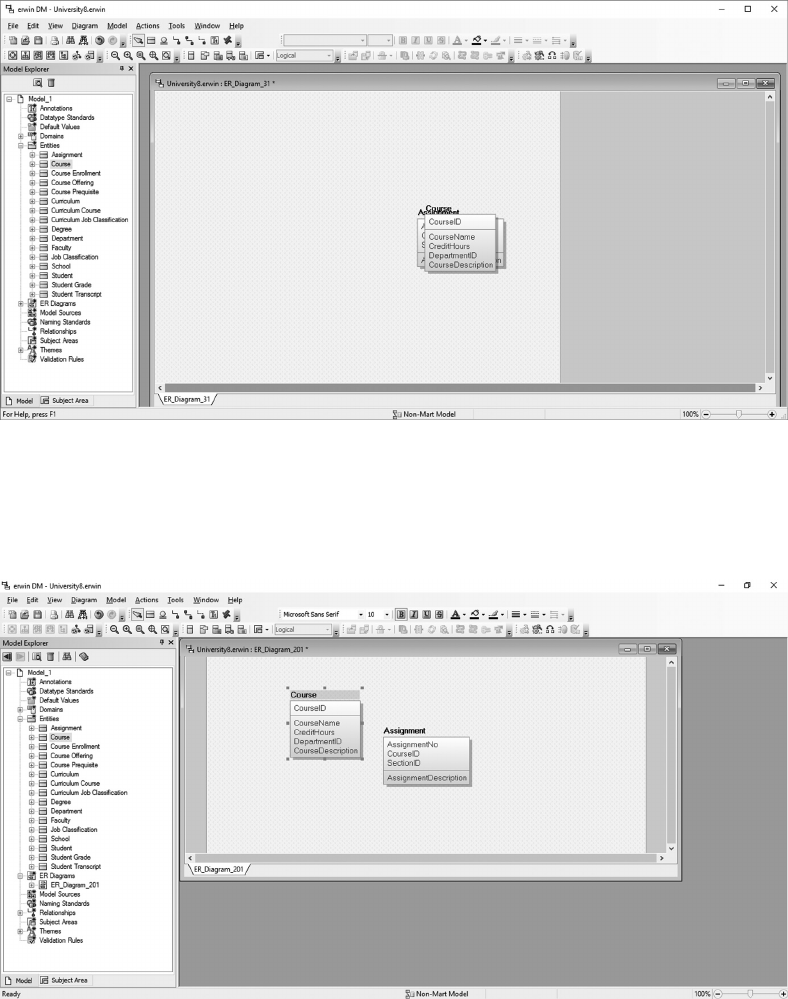
104 ◾ A Practical Guide to Database Design
• Note the layout/arrangement of attributes in Assignment. e top section, with
AssignmentNo, CourseID, SectionID, identies the primary key for that entity (in
this case, the concatenation of these attributes). e attributes below the line are the
non-key attribute(s).
• To add Course to the diagram, rst select Course and “Add to Diagram” to get the
following:
• Note how the CourseID attribute is shown as the primary key.
• When adding entities to the diagram, they will overlay each other as shown earlier. It
is best to move each as it is added to make each visible in the diagram, just select an
entity in the diagram, and drag it to a new position.
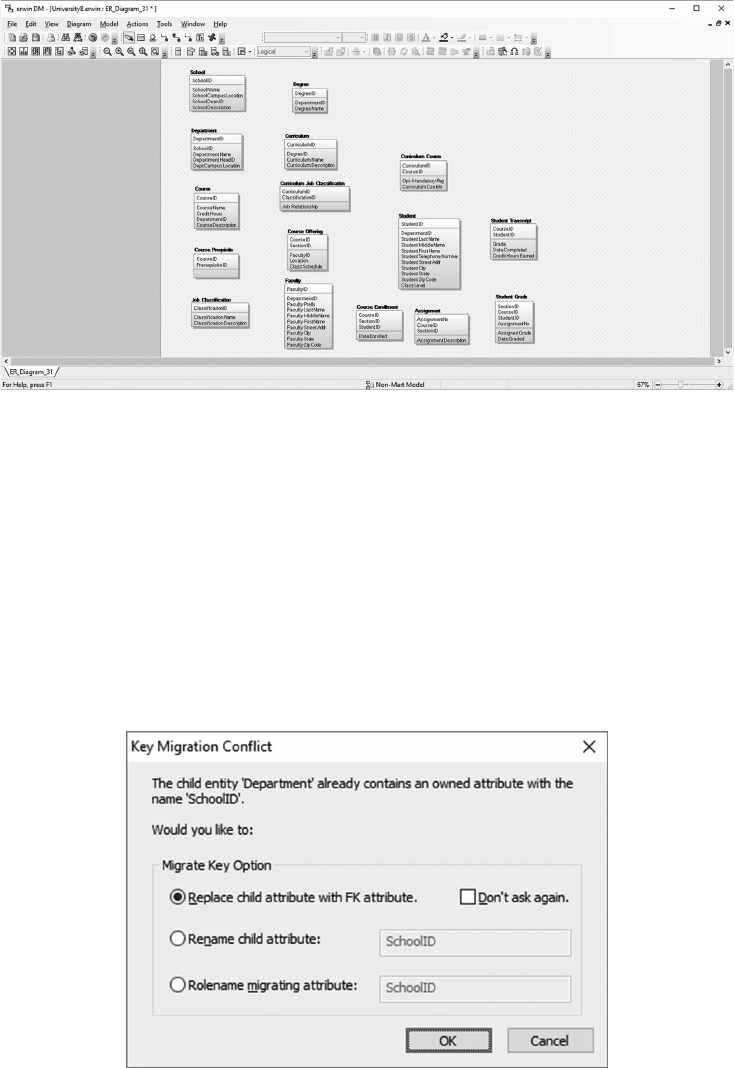
The erwin Data Modeling Tool ◾ 105
• Continue adding other entities, moving each in the display and arranging them close
to associated entities.
• e next display shows the diagram with all entities; the Model Explorer window was
closed to free up space in the display.
Now let us modify the diagram to add one-to-many relationships.
• To add a relationship between School and Department, rst select the one-to-many
icon (under the Tools label).
• Click on the key of School (SchoolID), hold the mouse button down, and drag the
arrow to SchoolID in Department.
• Check to conrm the arrow drawn connects the SchoolID attribute between School
and Department.
• Release the mouse button.
e following screen will be generated.

106 ◾ A Practical Guide to Database Design
• Click OK to nish dening this relationship.
• In the following diagram, note the one-to-many relationship created between School
and Department.
• Note, however, that the primary key for Department was changed to include the for-
eign key SchoolID. SchoolID is a foreign key but does not need to be part of the
primary key.
• To make this change, select the Department entity, right-click, and select Attribute
Properties; the following window will open.
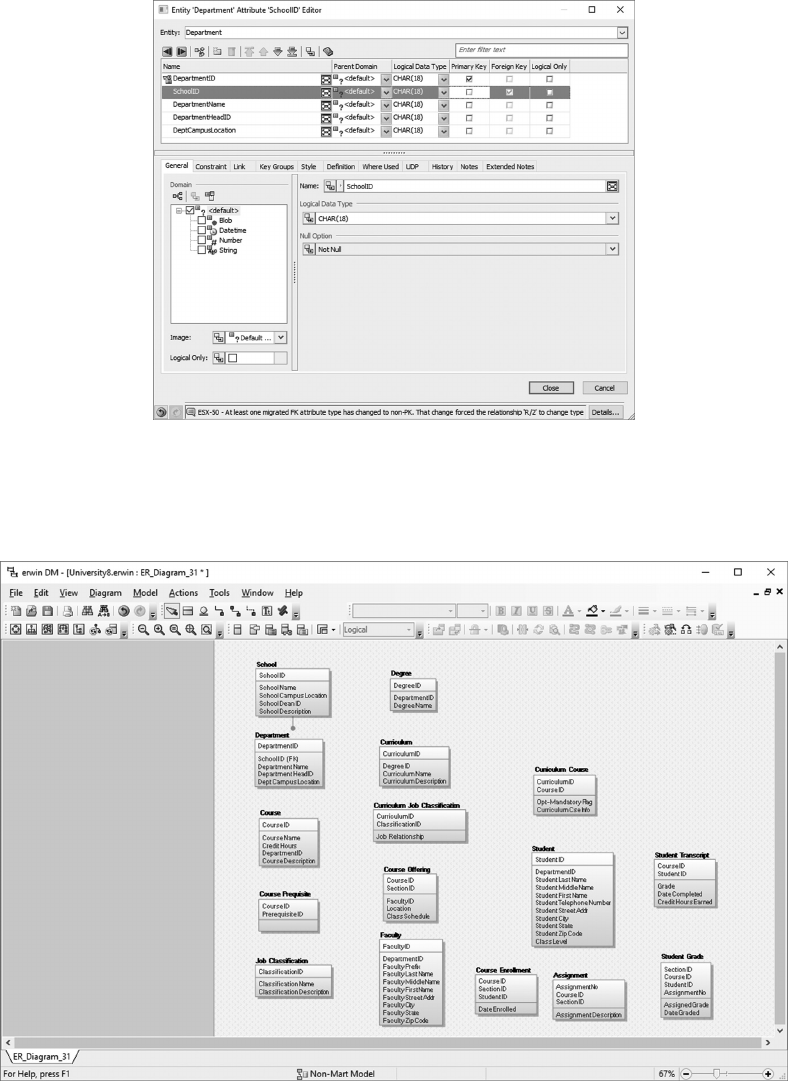
The erwin Data Modeling Tool ◾ 107
• On the SchoolID row, simply click on the check in the Primary Key column to dese-
lect that specication.
• Closing that window corrects the attribute specications for Department. Note the
change in the following window.
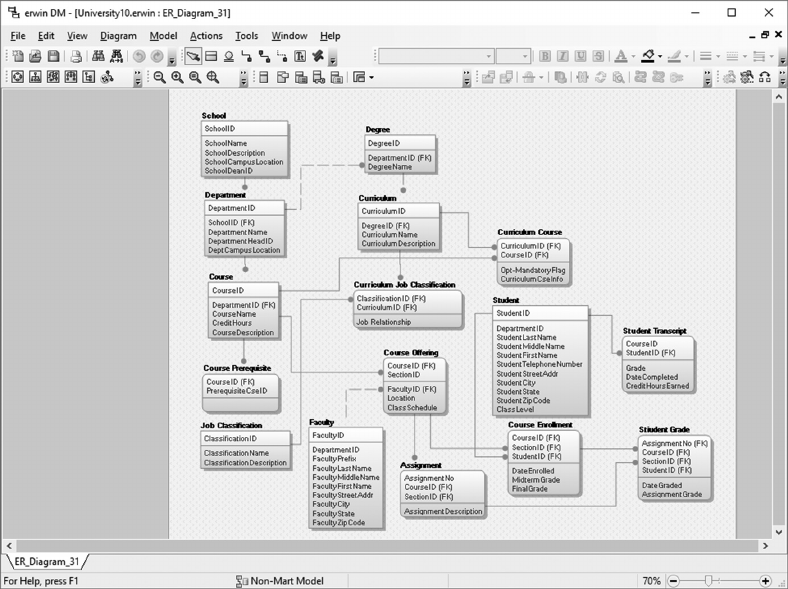
108 ◾ A Practical Guide to Database Design
• Continue analyzing the logical diagram, adding all one-to-many relationships
reected in the logical model. When nished, compare your results to the one on the
next page.
is is the third-normal form logical data model for the University database.
As with any logical model, one-to-many relationships can only exist when the primary
key of an entity exists within another entity. In addition, the diagram must make sense; if
your business sense suggests a one-to-many relationship exists between two entities, the
primary key of the rst should be added as a foreign key to the second entity.
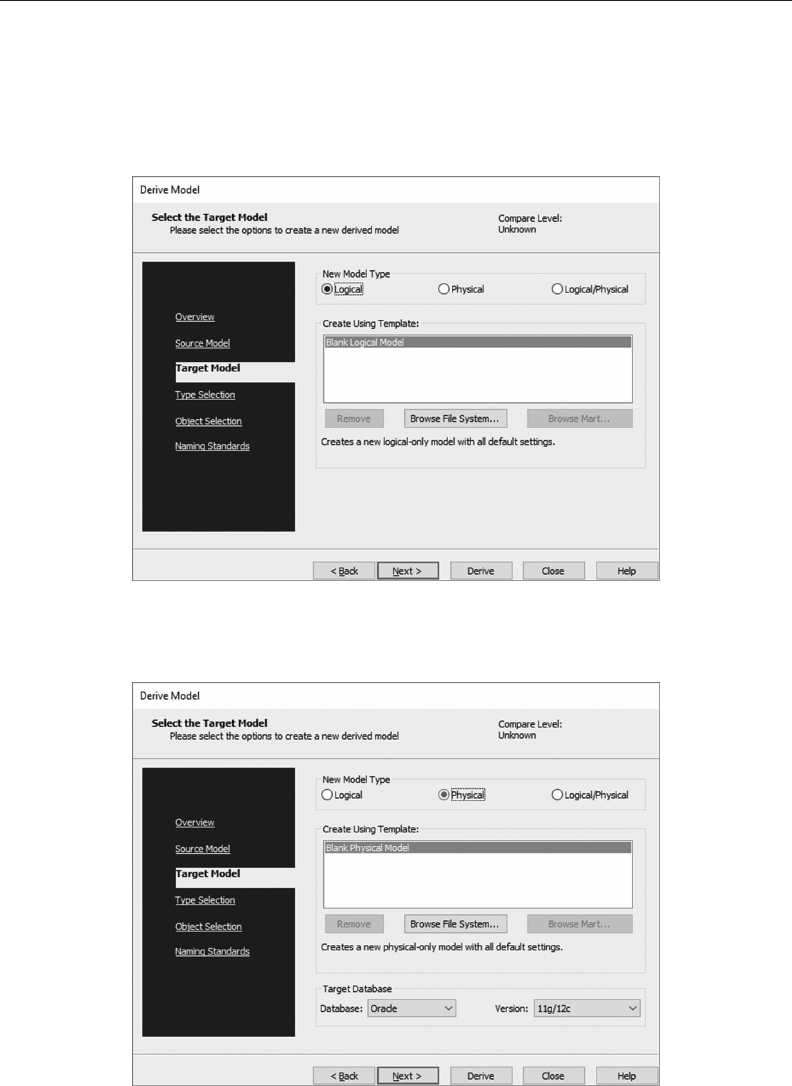
The erwin Data Modeling Tool ◾ 109
5.7 CREATE THE UNIVERSITY PHYSICAL DATA MODEL
Aer completing (and saving) the logical model, it can be used to create a physical data
model.
• Move the mouse cursor through the Actions/Design Layers sequence and click on
Derive New Model.
• Next, change the New Model Type to Physical.
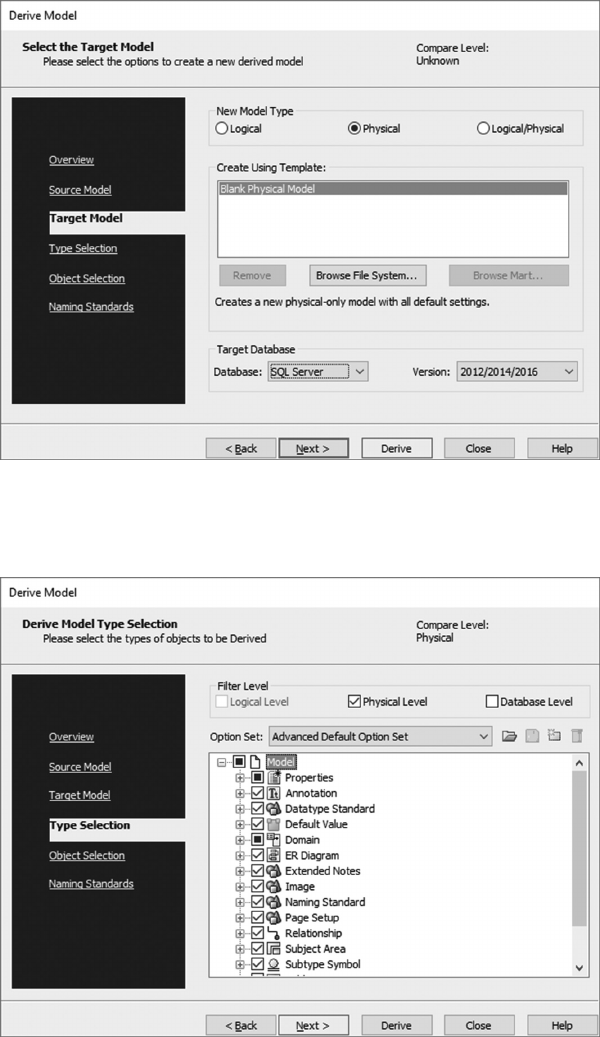
110 ◾ A Practical Guide to Database Design
• Under Target Database, use the pull-down to select the type of RDBMS to be used (in
this case, SQL Server).
• Clicking Next takes you to a screen to specify how much of the logical model is to be
used as input for the conversion.
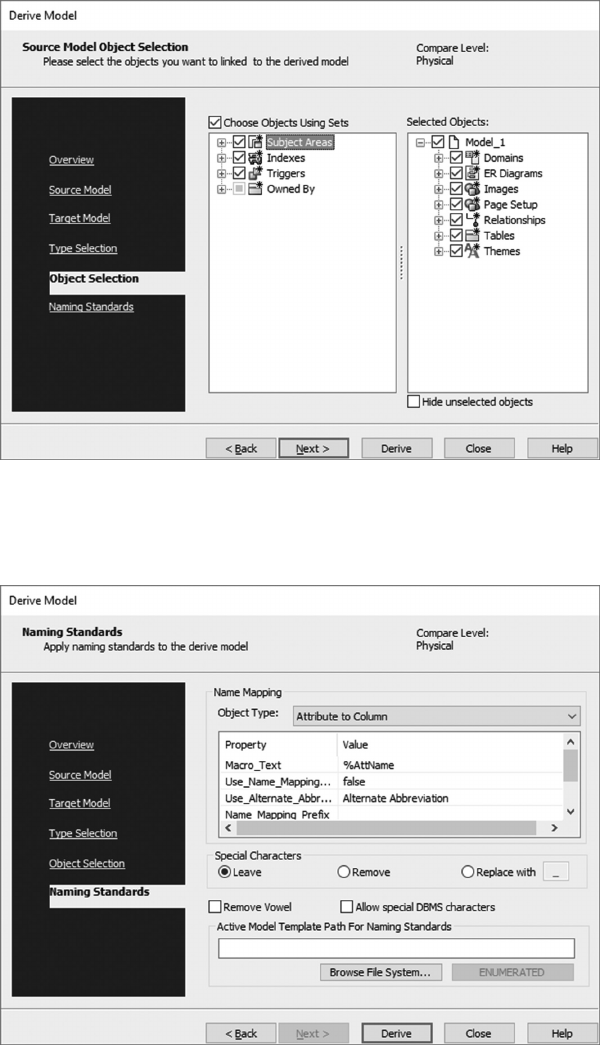
The erwin Data Modeling Tool ◾ 111
• Clicking Next allows you to specify the objects to be linked in the new model.
• Clicking Next opens another window with options for Naming Standards.
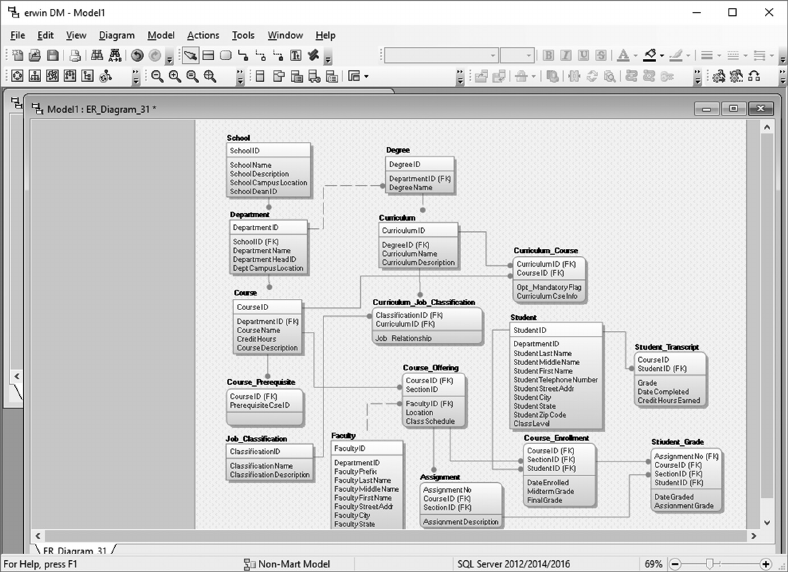
112 ◾ A Practical Guide to Database Design
• Click Next to create the physical model.
is diagram now represents tables and columns to be created in a new database. is
physical model should be saved with an appropriate name.
Before we create physical tables, let us refer to the usage analysis for this model and note
the insert activity required when new Student_Grade rows are entered, and the subsequent
read activity to retrieve Student_Grade rows for review or updating.
To provide an implementation with a higher level of performance, let us de-normalize
the Student_Grade table, removing AssignmentNo while adding a column for each week’s
grade. is design requires only one row in the table to hold all grades for each student and
eliminates the I/O activity when new grades are added. e physical design model now
looks that shown on the next page.
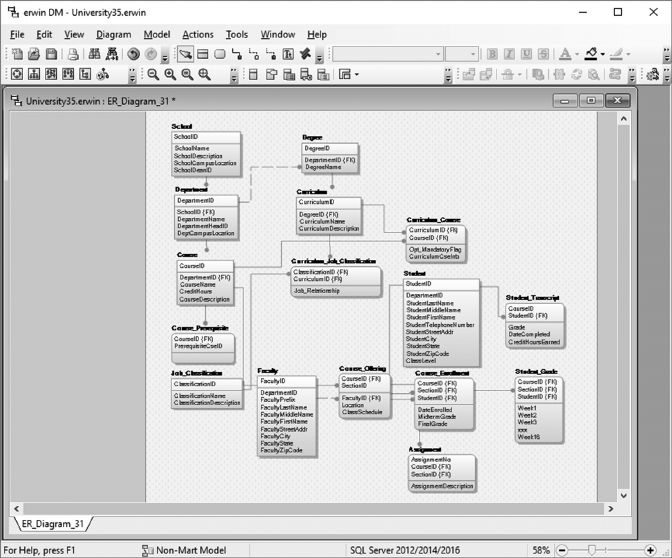
The erwin Data Modeling Tool ◾ 113
Remember that our third-normal form data model was deliberately kept clean and
simple to give a good foundation for the original physical design. Now, however, we
must review usage requirements, anticipate physical accesses to satisfy user require-
ments, and make changes to the physical design as needed to improve performance of
the system.
If there are no further changes based on initial performance predictions, we can now use
erwin to create DDL statement to create a database containing these columns, attributes,
and constraints.

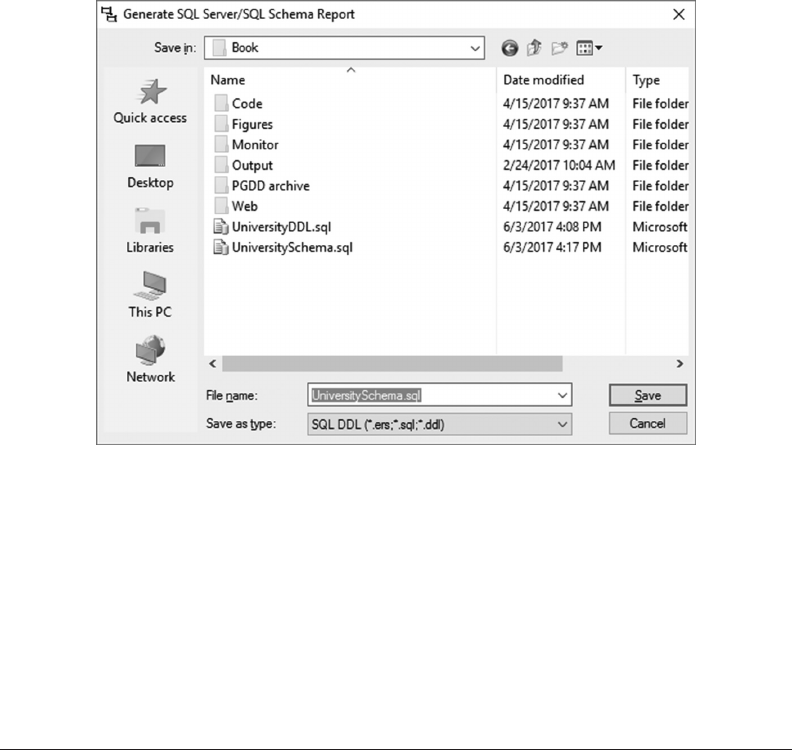
The erwin Data Modeling Tool ◾ 115
• Navigate to the directory in which you want to create the DDL le and name the le
to be created:
• Clicking Save will create a DDL le to dene all tables, columns, and constraints
shown in the physical design model.
erwin has the capability to directly connect to an Oracle or SQL Server instance to create
and/or manage databases, but that is beyond the scope of the current book.
To see the SQL code generated by erwin to create the schema from this physical model,
refer to Appendix C—University DDL.txt.
QUESTIONS
1. What is a data modeling tool? How does it help a design team when designing a new
database?
2. What is the dierence between a logical data model and a physical data model?
3. Name two RDBMS products supported by erwin’s physical data modeling soware.
4. What is reverse engineering, and when/how is it used?
5. What does the erwin reverse engineering le use as input, and what does it produce?
6. How accurate are the results of a reverse engineering process?
7. What is the change management process, and why is it important?

116 ◾ A Practical Guide to Database Design
8. Describe the components of a change management system and describe what they do.
9. When using erwin for logical data modeling, where is the information entered that
gives a full denition/description for each attribute?
10. When dening attributes in a logical data model, what is the purpose of dening/
selecting logical data types?
11. When using erwin for logical data modeling and dening a new entity and its attri-
butes, how is the key column identied?
12. Aer creating tables in a logical data model, how are one-to-many relationships
identied?
13. Aer creating a logical data model, what needs to be done to create a matching
physical data model?
14. When creating a physical data model, when/how are referential integrity constraints
created?
15. When using erwin for physical data modeling, what needs to be done to create the
DDL to create a new database?
REFERENCE
1. Erwin tutorial, learndatamodeling.com, https://learndatamodeling.com/blog/erwin-
tutorial/ (accessed August 24, 2017).

117
Chapter 6
Using Microsoft Access
6.1 OVERVIEW
Microso Access is a relational database management system (RDBMS) that is included as
a component in the Professional and Enterprise versions of Microso Oce. Although it
lacks the depth of RDBMS features provided by SQL Server or Oracle, it has a number of
features which make it ideal for developing applications for many desktop users.
• Users can design tables and views and can import data into tables.
• It includes tools to help the user to quickly create queries and view and update data.
• Microso Access includes a graphical user interface (GUI) allowing the user to
quickly create reasonably complex interfaces.
• As it is embedded in higher end Microso Oce packages, it is available for use by all
users in the Department of Defense and Intelligence communities.
• Microso Access supports a somewhat limited version of SQL. However, a complex
query can oen be accomplished by combining multiple smaller, simpler views to
create the more complex result.
Access can be used to develop and deploy database management system (DBMS) tools for
a team of users. One database can be designed as the team GUI containing the query and
update mechanisms needed. is database would contain a link to another Access data-
base that contains the table(s) being viewed/updated. Deploying the Access GUI to each
user’s computer would allow each user to view and/or update the single database instance
with the data shared by the user community.
• Access provides an ideal platform to rapidly develop a prototype of a new system,
allowing users to see and provide quick feedback on features that are needed.
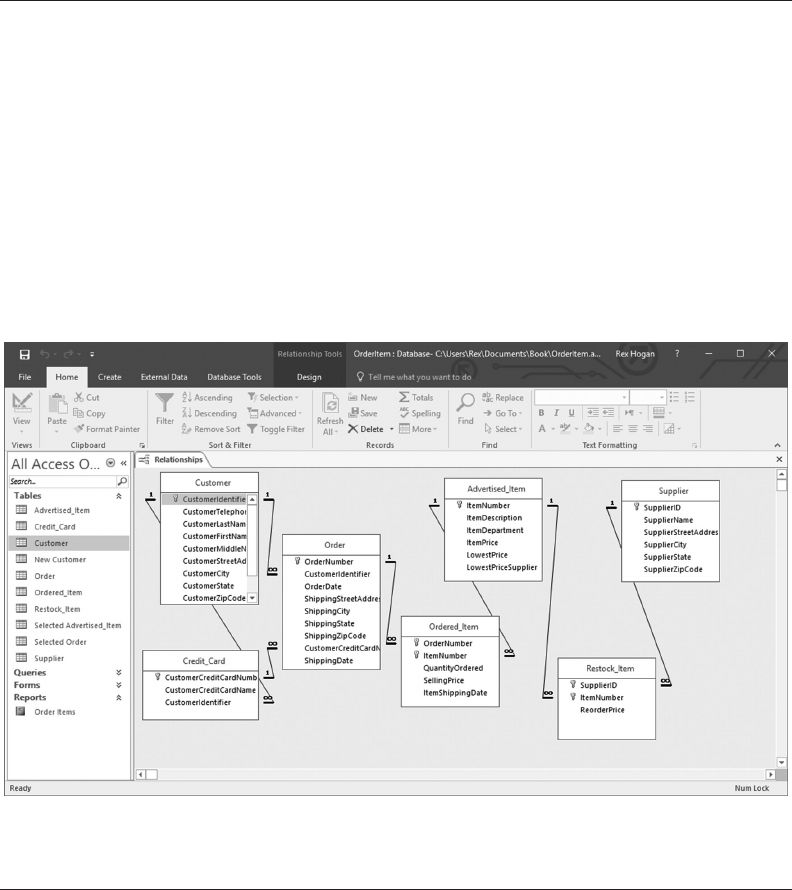
118 ◾ A Practical Guide to Database Design
• Tables in Access can be dened as links to tables that reside in another RDBMS.
Mechanisms created in Access can then be created to view and update data, for example,
from an SQL Server table.
Let us begin by using the OrderItem database created in Chapter 3.
6.2 MODIFICATIONS TO THE DATABASE DESIGN
e physical design for the OrderItem database used in the current chapter is based on that
developed in Section 3.5.1 with the following changes:
• In the Customer table, the DataType for the CustomerIdentier was changed from
AutoNumber (used in that chapter to illustrate that feature) to ShortText with a
length of 50bytes. is format is more realistic and exible for that column and pres-
ents fewer issues when generating Forms and Reports.
• In the Advertised_Item table, the ItemWeight and ItemColor columns were removed.
With those changes, the OrderItem database now contains the following structure:
6.3 LOADING DATA INTO TABLES
Data can be loaded into tables in a number of ways.
• For quick development and testing, Access allows the user to open a table directly
and enter new rows, or to modify data already loaded.
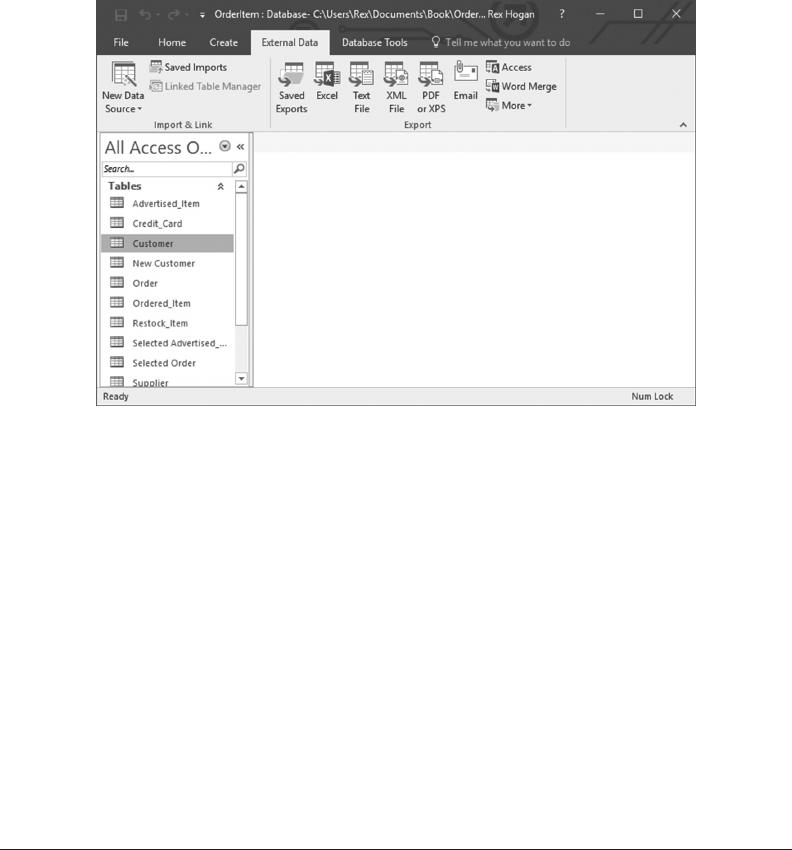
Using Microsoft Access ◾ 119
Note that when loading tables involved with one-to-many relationships, tables on
the primary (one) side of the relationship must be added before rows on the many
side. For example, a Customer record must be created before any Credit_Card
rows with that CustomerIdentier can be added.
• Tables are oen loaded by importing data from an external le. To load Customer
data, select Customer, then use the “External Data” tab to select the source type.
e most common sources for table imports are Excel les. Choosing the Excel le
opens a window allowing you to navigate to and select the le to be imported.
e import mechanism will attempt to match the table design to the le content and
gives the user the option to skip/ignore columns in the le being imported.
As an option, the user may import the le as is into a new table using column
names found on the rst line of the input le. Aer importing the le, the user
can then run an SQL command using the “INSERT INTO <table1> VALUES
(<column names>) SELECT <column names> FROM <table2>” syntax to take
rows from the table just created and add them to the table to be updated.
e import wizard also makes it easy to import data from delimited at les, where
columns of information are separated by special characters (e.g., tab characters).
6.4 CREATING QUERIES
e Query wizard is an easy and powerful tool for use in building complex queries.
6.4.1 Create a Customer-Credit_Card Query
• To create a query showing Customer and Credit_Card rows, click on the Create tab,
then nd the Query Wizard.
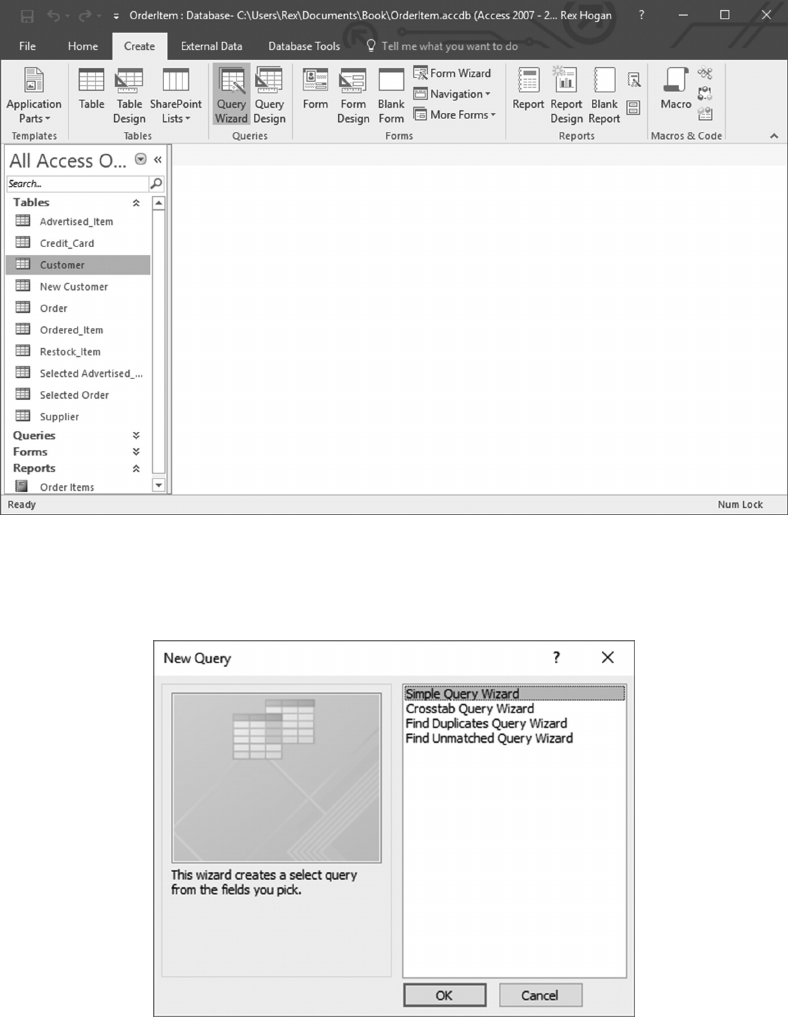
120 ◾ A Practical Guide to Database Design
• Next, select “Simple Query Wizard” and click OK.
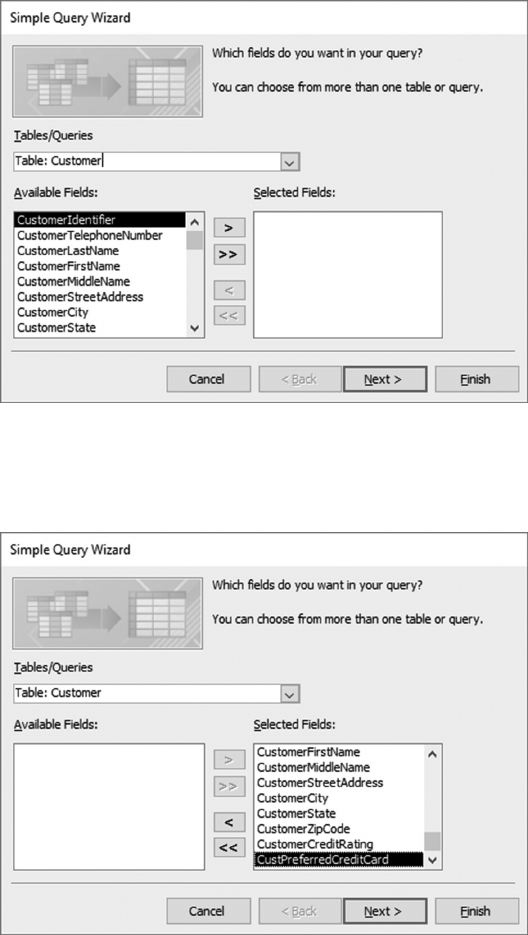
Using Microsoft Access ◾ 121
• By using the pull-down menu for Tables, select the primary table of interest (in this
case, Customer).
• Individual column names can be selected for use by selecting the column name and
clicking “>”; clicking “>>” will add all columns to the query being build.

122 ◾ A Practical Guide to Database Design
• Clicking Next brings up a screen allowing you to see the results of the query being
developed, or you can choose the Modify option to continue developing the query.
• Clicking Finish opens the query in design mode.

Using Microsoft Access ◾ 123
• To add the Credit_Card table to the query, click in the design pane, then right-click
and select the “Show Table” option to bring up the following.
• Select the table to be added to the query design (Credit_Card) and click Add. e
“Show Table” menu will remain open to add other tables; click “Close” to close that
panel.
• e query now will show all Customers and their associated Credit_Card rows. Click
the View option to see the data returned by the query as it stands.
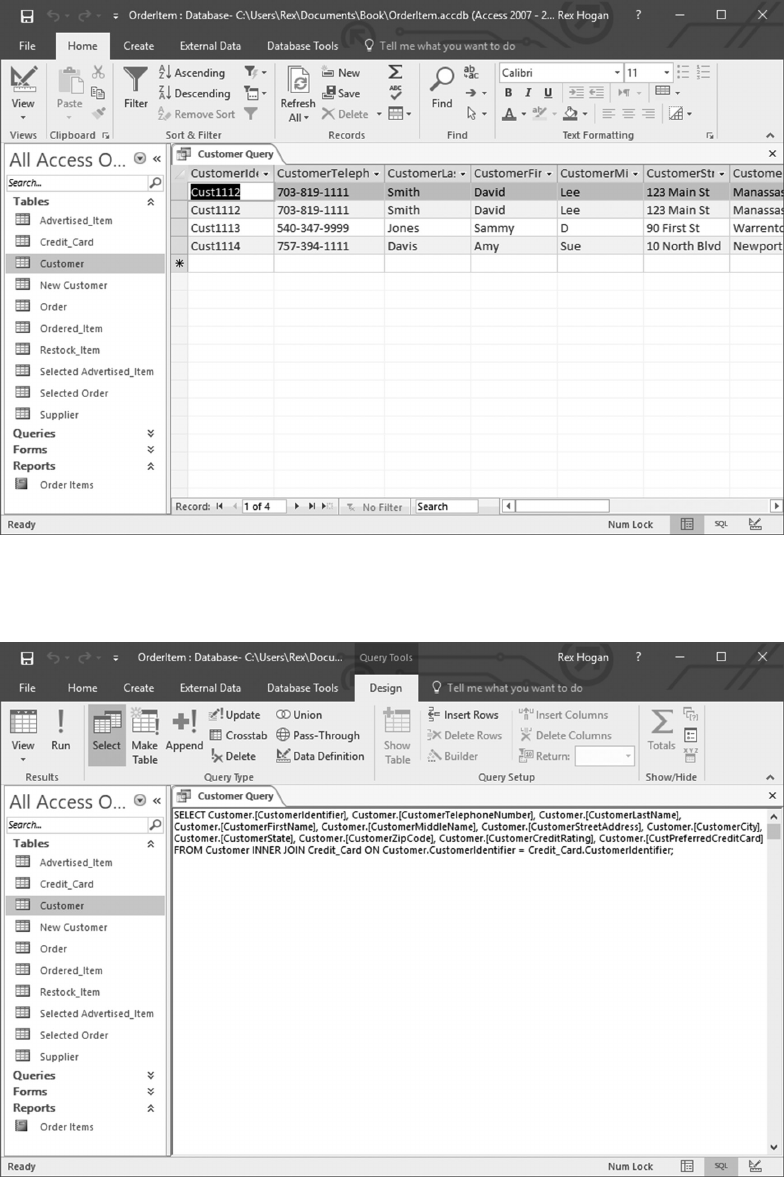
124 ◾ A Practical Guide to Database Design
Optionally, you can also select “SQL View” to see the SQL statement that will be used
to run the query.
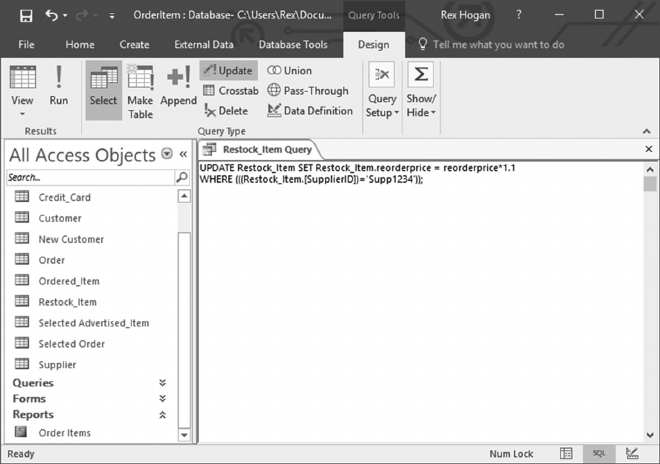
Using Microsoft Access ◾ 125
Delete or rearrange the order of columns if desired; when nished, clicking x on the
Customer Query line will close the query, giving you the option to rename it.
6.4.2 Create a Query Using SQL Commands
In some cases, it will be simpler to simply enter the SQL for a query directly in the Design
Panel. Assume one Supplier with the SupplierID “Supp1234” has raised the price of each of
the items they sell by 10%.
• Use the Query wizard to start building a query on the Restock_Item table, and when
the panel opens, switch to SQL View. Next, replace the code displayed with the fol-
lowing SQL command:
UPDATE Restock_Item SET Restock_Item.reorderprice =
reorderprice*1.1
WHERE (((Restock_Item.[SupplierID])='Supp1234'));
• At the top of the pane, select the “Update” button, then close the query and give it an
appropriate name.
6.4.3 Filtering Query Results
In viewing Query results, Access provides pull-down options for each column to allow the
user to lter results as needed.
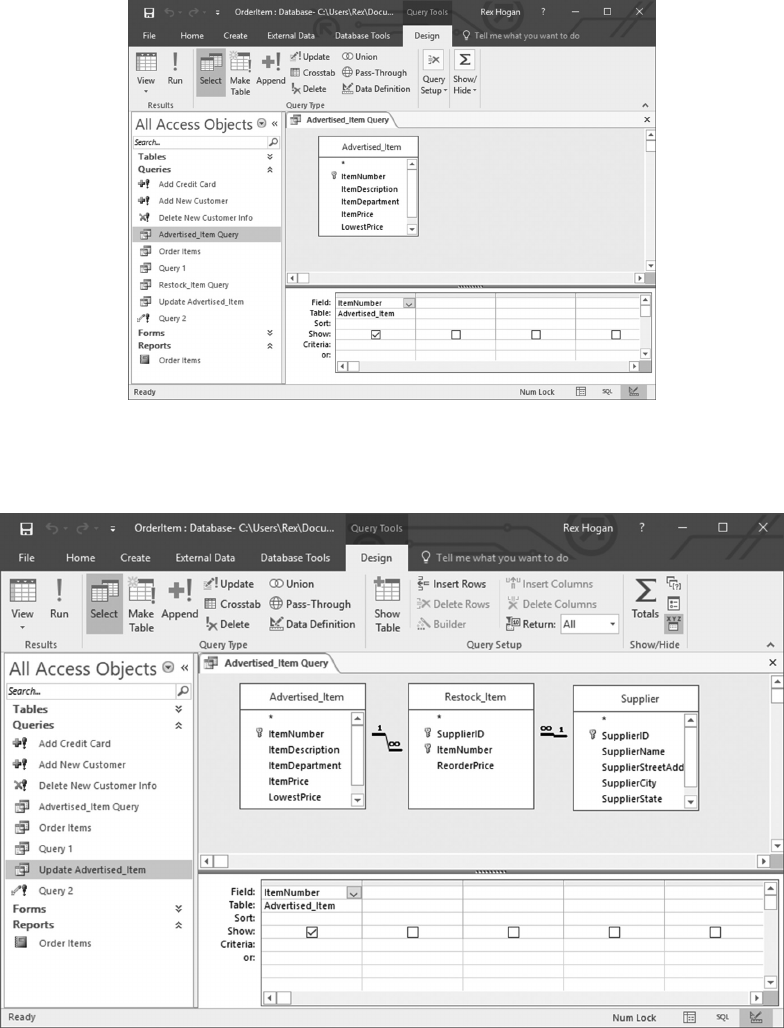
126 ◾ A Practical Guide to Database Design
Let us see how a query can be created and used to view and lter prices from Suppliers
for an Advertised_Item.
• By using the Query wizard, start building a query for the Advertised_Item table.
• Next, click in the design pane and add the Restock_Item and Supplier tables.

Using Microsoft Access ◾ 127
• Update the query to display the Supplier name and the ReorderPrice.
• Finally, save and open the query to view the results.
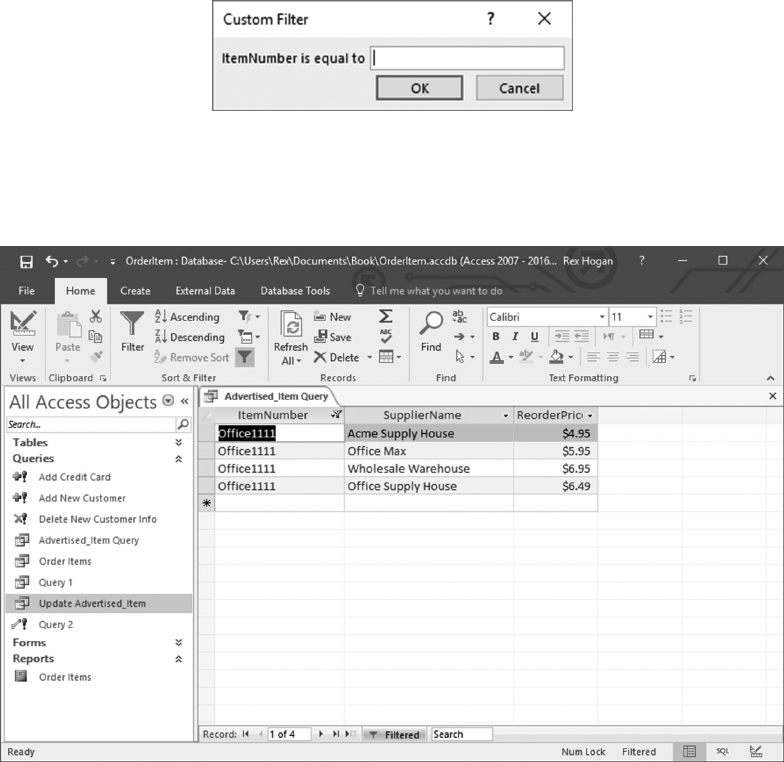
128 ◾ A Practical Guide to Database Design
• To see prices for one item (e.g., ItemNumber Oce1111), click on the pull-down for
ItemNumber to see a list of all values for that column; deselect all values and select
only Oce1111.
• Alternatively, select the Text Filters/Equals sequence:
• Entering Oce1111 lters the output display to show the prices oered by the four
Suppliers in the database.
e ad-hoc use of query results can be very eective.
• For example, if a Supplier was discontinuing selling three specic items, the
above-mentioned query could be ltered to show all prices for items from that
supplier and then sort results by ItemNumber. Next, select an ItemNumber being
discontinued.
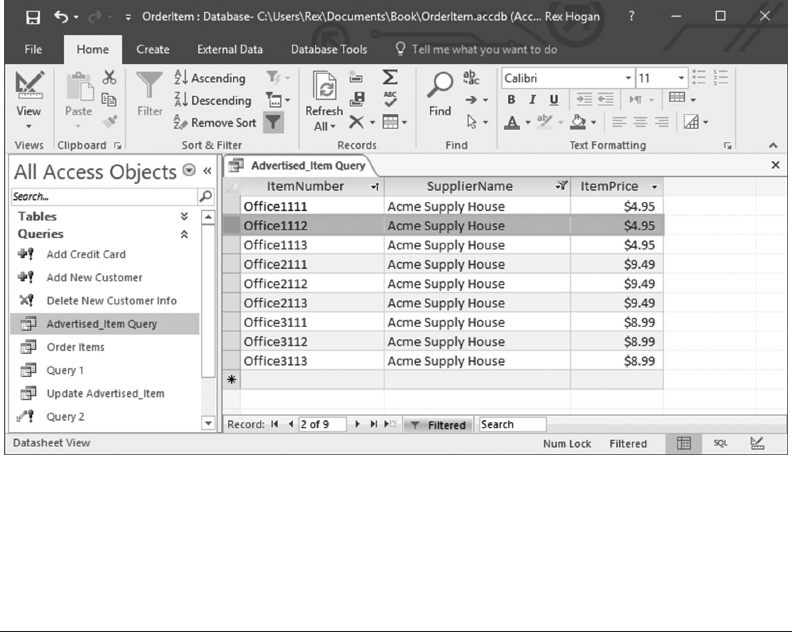
Using Microsoft Access ◾ 129
• Right-clicking on this row opens a pop-up menu containing the “Delete Record”
option; click that option to delete the row selected.
6.5 USING FORMS
e Query wizard is a powerful tool used to view and update data in tables. Typical users,
however, need a better user interface to view and update data of interest.
e Forms wizard is a fundamental tool used to create displays to select and update data
in tables. Although they are relatively easy to create and use, they are normally built using
queries to make it easy to lter and/or update subsets of data of interest to the user.
6.5.1 Create a Form to Update Advertised_Items
As a rst example, let us create a form to select and update information about an Advertised_
Item. We will rst need a mechanism to select a unique Advertised_Item row of interest.
• Create a table that will be used to hold the key for the Advertised_Item of interest.
Ihave named this table beginning with the word “Selected” to set it apart from a
typical application data tables (“Selected Advertised_Item”). is table will have one
column with the same storage format as Advertised_Item’s ItemNumber.
• Next, we will create a form that can look up ItemNumber values from Advertised_
Item and store the selected value in this table.
• Aer that value is stored, we will then open another form to display and edit the col-
umns in the selected Advertised_Item row.
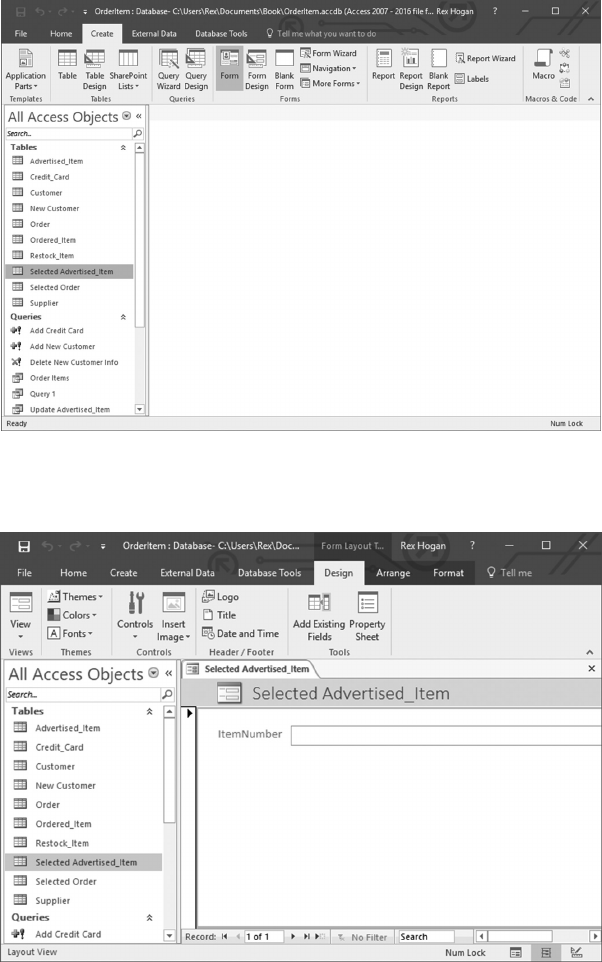
130 ◾ A Practical Guide to Database Design
Let us begin by creating a form to set the value in the “Selected Advertised_Item” table.
• Click on the “Selected Advertised_Item” table name, then click the Create/Form icon.
• Clicking “Form” creates a form with an empty ItemNumber data element.

Using Microsoft Access ◾ 131
• At the top le, click on View and Design View to switch to a design view of this form.
Now we will change the ItemNumber to a Combo box.
• Select the ItemNumber element, then delete it.
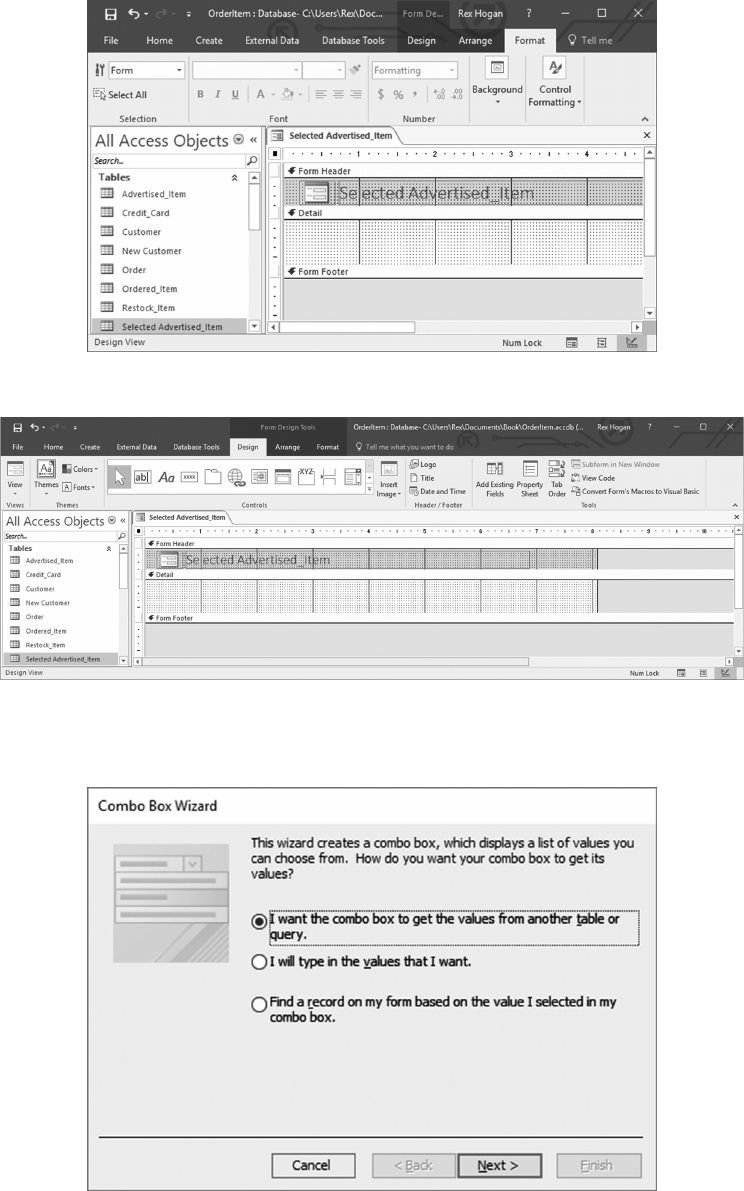
132 ◾ A Practical Guide to Database Design
• Next, choose the Combo box icon from the Design tab.
• Click on the location where ItemNumber originally was located starts a wizard for
the drop-down function for the Combo box.
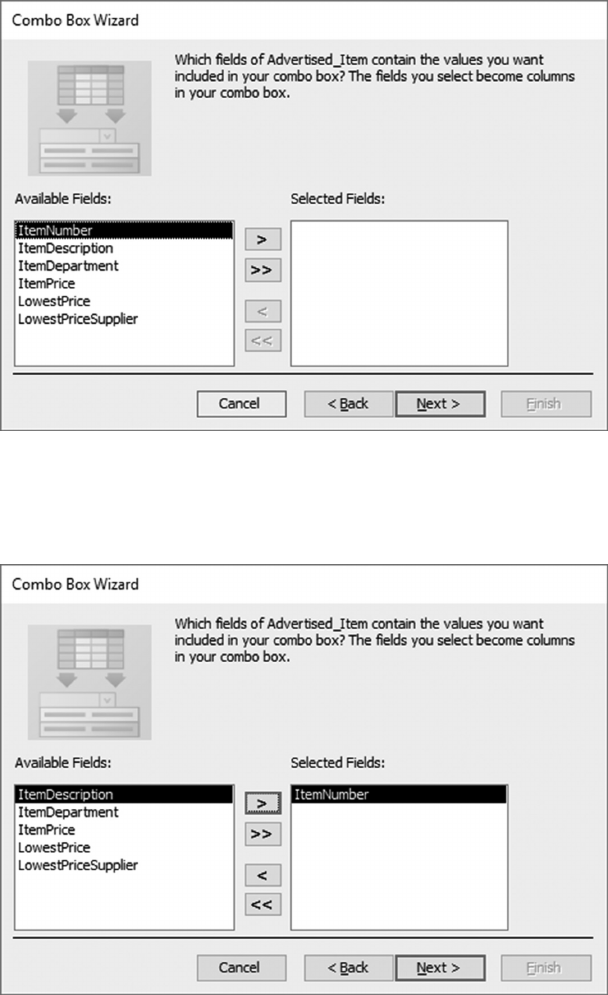
Using Microsoft Access ◾ 133
• Click Next to see a list of data sources for the lookup. Choose the Advertised_Item
table.
• Next, move the column to be retrieved (ItemNumber) to the right pane by clicking
“>.”
• Click Next through the next series of results.

134 ◾ A Practical Guide to Database Design
• Next, choose the option to store the results as ItemNumber.

Using Microsoft Access ◾ 135
• Clicking Next allows you to store the data retrieved with a name.
• Clicking Finish shows the completed form in design mode.
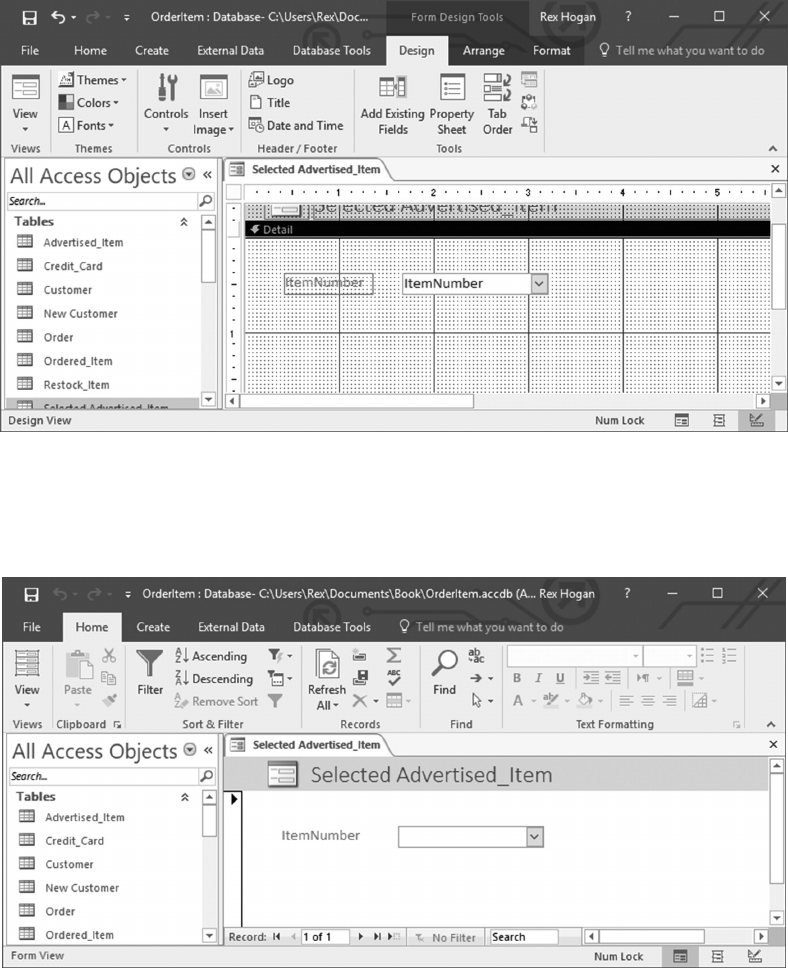
136 ◾ A Practical Guide to Database Design
• Rearrange and resize the placement of the element as desired. Leave enough space
above Form Footer to add a “Save” button later.
• Save the form with the current design, then click the View/Form View option to see
how it works.
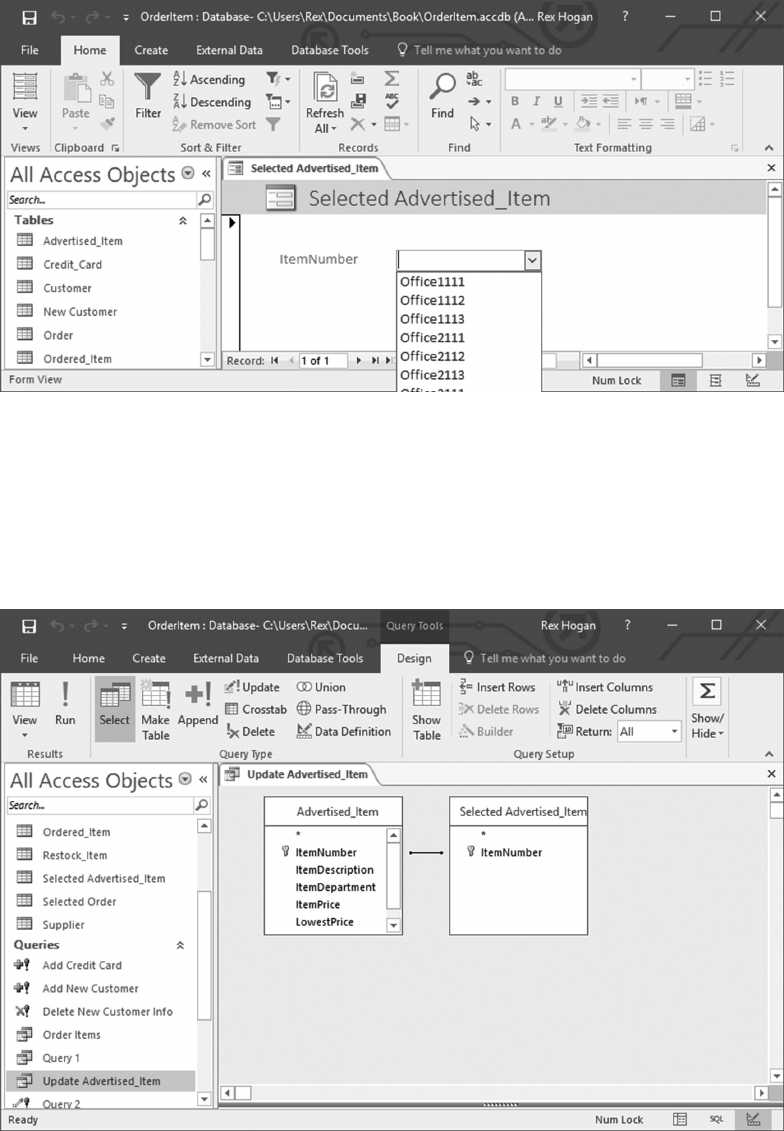
Using Microsoft Access ◾ 137
• Click the pull-down to see a list of ItemNumber values from Advertised_Item.
• Selecting a value and closing the form will store that value in the “Selected Advertised_
Item” table.
• Next, create a query linking this table (once populated) to Advertised_Item and save
it with an appropriate name (in this case, “Update Advertised_Item” as that is the
intended use of the query and associated form).

138 ◾ A Practical Guide to Database Design
• Aer saving the query, select it as a source in the le pane, then click on Create/Form
Wizard.
• Clicking on Form opens a display of the data returned by the query.
• Click View/Design View to edit the layout or size of the data elements displayed.
Expand the display over the Form Footer label to leave room for a button/command
to be added.
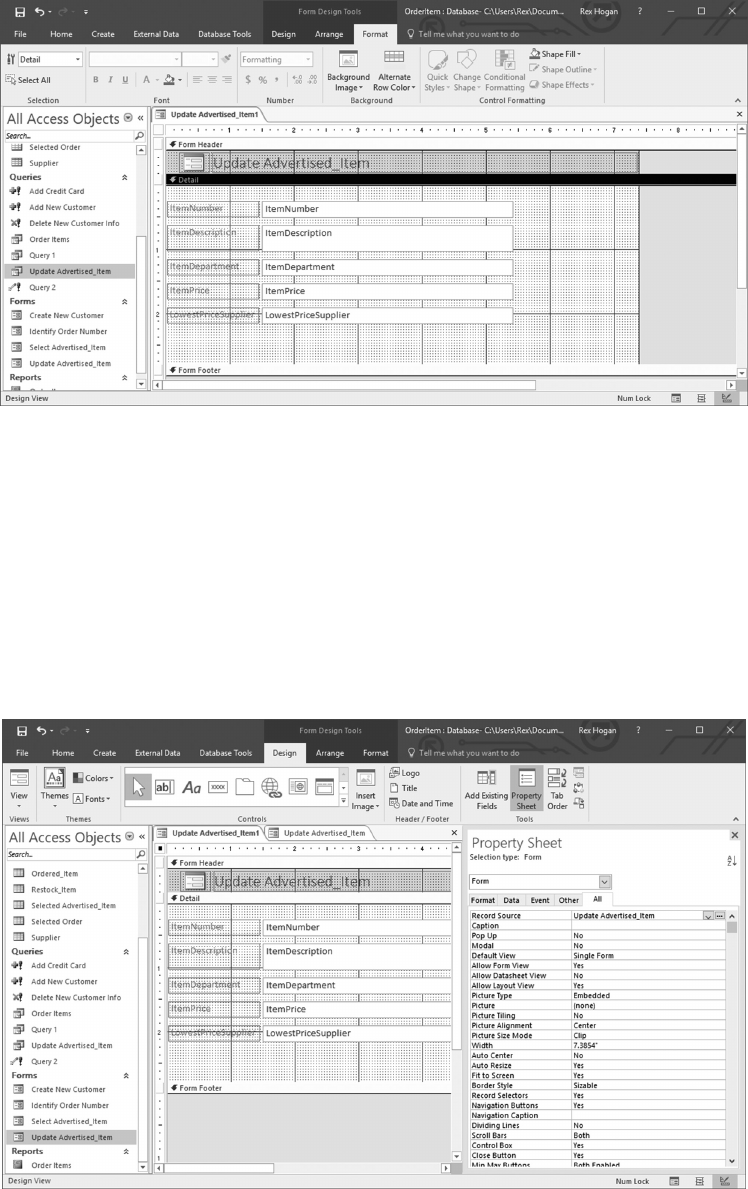
Using Microsoft Access ◾ 139
• Save the form with the current design.
Note that this form allows for all Advertised_Item columns to be edited. However, the
ItemNumber column is the key eld for this table and should not be changed. If the item
advertised changes signicantly, a new Advertised_Item should be created and an older,
now obsolete item should be deleted.
To prevent alteration of the ItemNumber column:
• Put the form in Design mode, right-click ItemNumber, and click Properties. Scroll
down the “All” tab until the Locked entry is found.

140 ◾ A Practical Guide to Database Design
• Change No to Yes to prevent this column from being updated.
• e two forms needed to select an Advertised_Item and then to change the data found
have now been created. e only remaining tasks are to link these forms together by
adding buttons to each, invoking commands to close that form and open the other.
• Open the “Select Advertised_Item” form in Design mode.
• Next, select the “Button” box and click in the Design panel slightly above Form
Footer. Immediately cancel the wizard that opens and save the change giving the box
the name “Select.”
• Next, click on the newly created “Select” box, right-click on the surrounding orange
perimeter, and select “Build Event.”
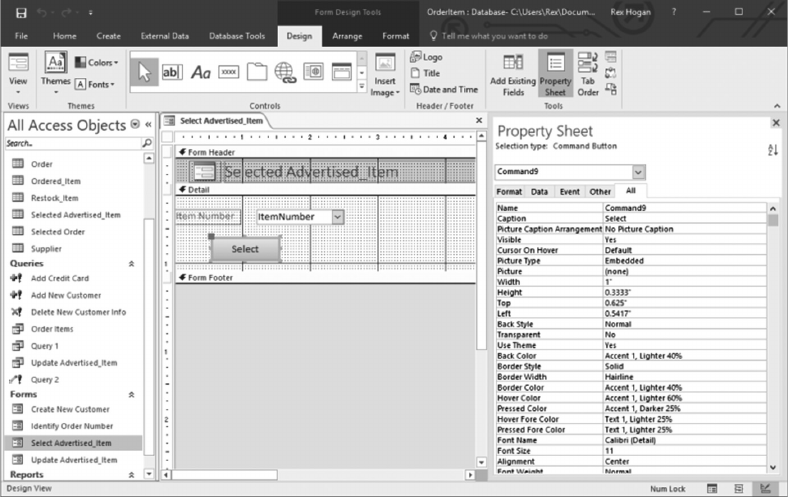
Using Microsoft Access ◾ 141
• Enter commands to rst close this form (and thereby saving the ItemNumber selected),
then to open the “Update Advertised Item” form to view/edit that information.
DoCmd.Close acForm, "Select Advertised_Item", acSaveYes
DoCmd.OpenForm "Update Advertised_Item"
• Now repeat this process with the “Update Advertised Item” form to add a button clos-
ing this form (aer edits have been made) and to open the “Select Advertised_Item”
form to perform more edits.
6.5.2 Create a Form to Add a New Customer
Creating a Form to add a new Customer row is fairly simple but once again involves the use
of several Access objects to capture the data and add it to the Customer table. e following
steps create the objects needed for the Form.
• First, create a work table (“New Customer”) to hold/capture data elements for the new
Customer.
• Open the Customer table in Design mode and do a “File/Save As” to create a table
named “New Customer.”
• Next, create a query to add the row from “New Customer” into “Customer.”
• Use the Query wizard to create a new query, switch to SQL View, and enter the fol-
lowing command:
INSERT INTO Customer
SELECT *
FROM [New Customer];

142 ◾ A Practical Guide to Database Design
• Save this as an Append query as “Add New Customer.”
Aer adding a Customer, we will also need to add a row to the Credit_Card table to record
the credit card number included in the Customer table.
• Use the Query wizard to create a query, switch to SQL View mode, and enter the fol-
lowing command.
INSERT INTO Credit_Card ( CustomerCreditCardNumber,
CustomerIdentifier )
SELECT [New Customer].CustPreferredCreditCard, [New Customer].
CustomerIdentifier
FROM [New Customer];
• Save this query as “Add Credit Card.”
We will also need a query to delete the contents of “New Customer” aer the updates
are run.
• Use the Query wizard again to create another query, switch to SQL View, and enter
the following command:
DELETE *
FROM [New Customer];
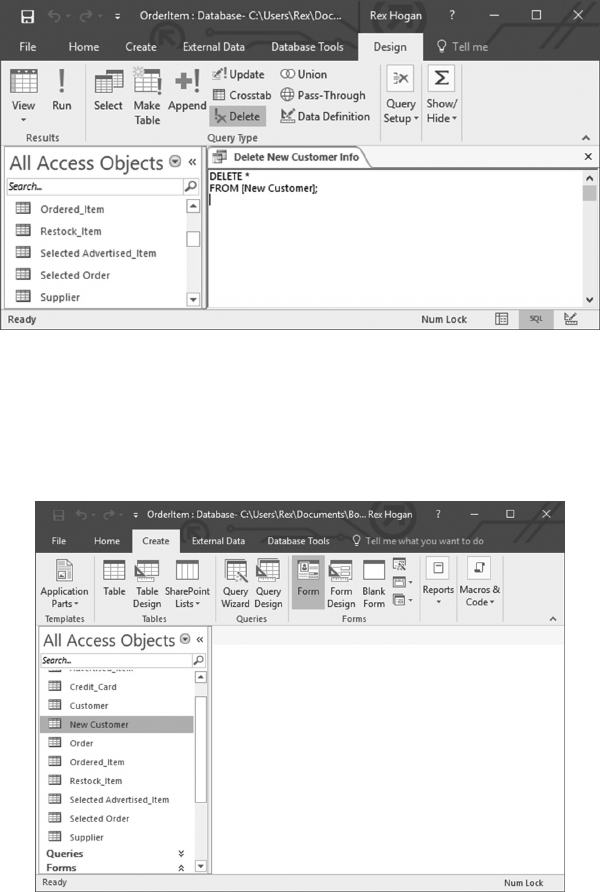
Using Microsoft Access ◾ 143
• Save this query as “Delete New Customer Info” and save it as a Delete query.
Next, create a Form based on “New Customer.”
• Select the “New Customer” table and click on Create/Form to open a form with the
New Customer data elements.
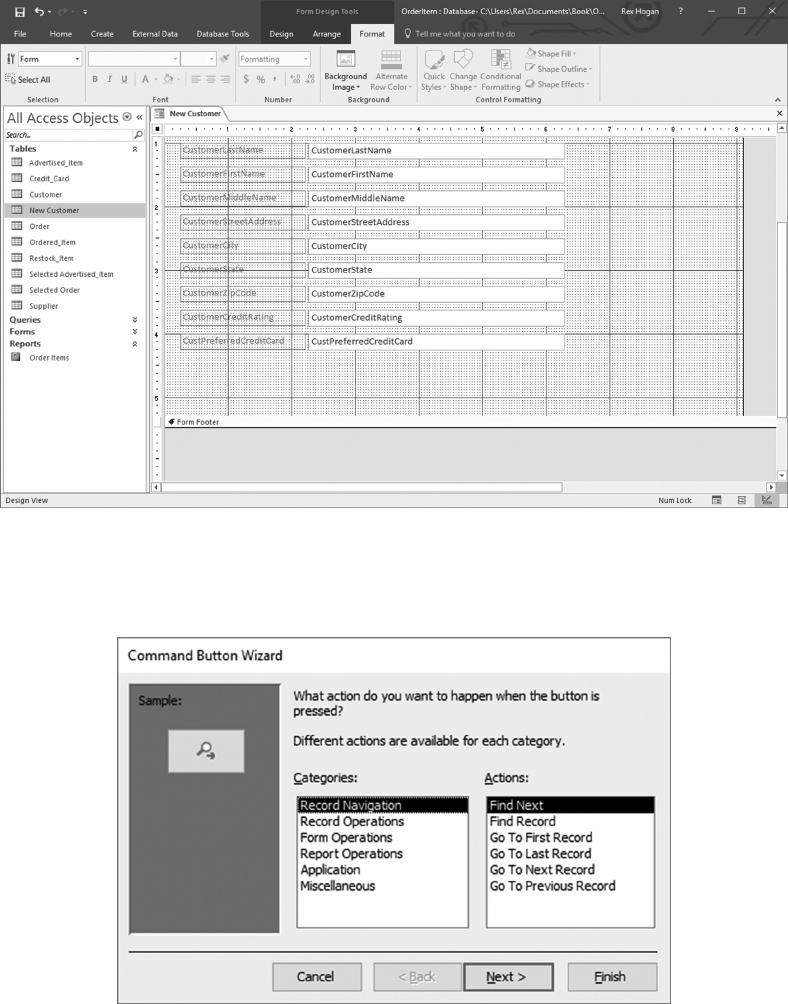
144 ◾ A Practical Guide to Database Design
• Put the form in Design mode and adjust the length of the data elements. In addition,
increase the space above the Form Footer to allow space for a button.
• Click on Design/Button, then click in the blank space above Form Footer where you
want to add the button to open the Create Button Wizard.
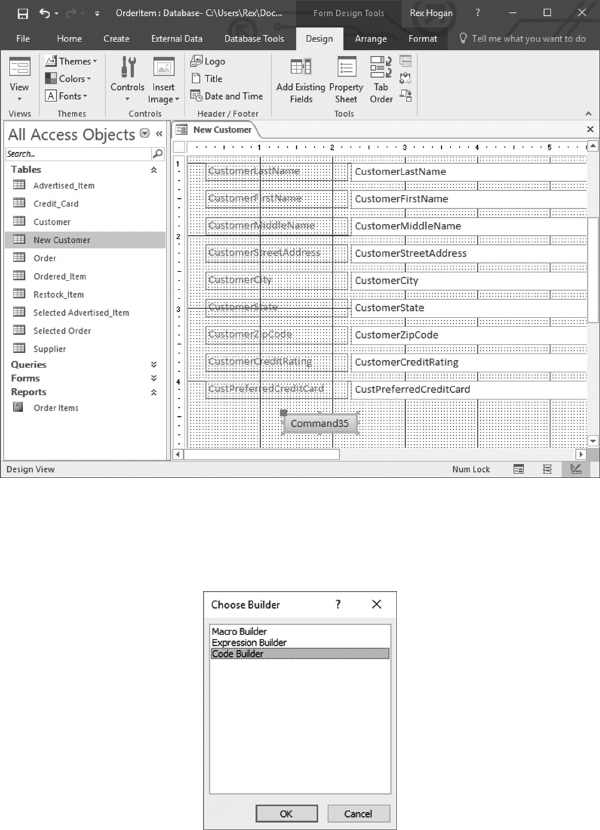
Using Microsoft Access ◾ 145
• Select “Cancel” to stop the wizard, creating a black button on the form.
• Next, put the cursor on the yellow box around the button, right-click, and select
“Build Event.”
• Pick “Code Builder” and click OK. When the window opens, add commands to
• Close the form (saving data that was entered).
• Turn automatic warning o (pending update queries about to the run).
• Execute the query to insert the new Customer using the “New Customer” table.
• Execute the query to add the customer’s credit card.
• Execute the query to delete information in the “New Customer” table.
• Turn warnings back on.

146 ◾ A Practical Guide to Database Design
• Re-open the “Create New Customer” form to add more Customers.
DoCmd.Close acForm, "Create New Customer", acSaveYes
DoCmd.SetWarnings False
CurrentDb.Execute "Add New Customer", dbFailOnError
CurrentDb.Execute "Add Credit Card", dbFailOnError
DoCmd.OpenQuery "Delete New Customer Info", acViewNormal,
acEdit
DoCmd.SetWarnings True
DoCmd.OpenForm "Create New Customer"
• Save the form with an appropriate name; it is now ready for use.
6.5.3 Generating a Master Screen for Users
Forms and queries generate powerful and useful tools for users in reviewing, analyzing,
and processing data. However, as more user tools are developed, the number of tools and
their relationship can easily become lost or muddled from the user perspective.
To group and nd like items, a Master display is oen created and used to identify and
classify the tools available. If appropriate, additional Forms can be used to group func-
tional buttons at a lower level of detail, and those Forms shown on the Master “dashboard”
to create a hierarchical ordering of subject areas and the tools available for each.
6.6 GENERATING REPORTS
Forms work well when dealing with a single row of data retrieved from a table or query but
have limitations in dealing with display multiple rows of data. e Query browser, of course,
displays multiple rows of data but has limited options for customizing the output display.
Reports bridge these elements to produce a customized display showing multiple rows of data.
6.6.1 Using Reports to View a Customer Order
Building a Report to display data requires, as with Forms, a few minutes of thought and
analysis to determine the various items necessary in generating the report.
In order to display all items associated with a Customer order, we need to
• Identify the Order number involved. Preferably, this can be selected by a drop-down
list rather than entering the Order number manually.
• Use a Query to nd the Customer information and all items on the order.
• Generate a customized Report using that query to display the columns of informa-
tion desired.
Let us start by creating a table to hold the value of the order number of interest.
• Open the Order number in design mode and note the format for the OrderNumber
column; in this case, it is a text column 50bytes long.
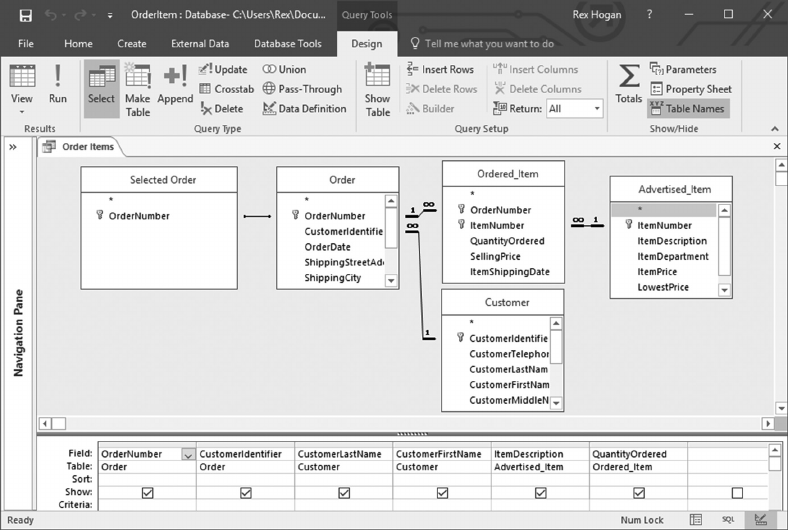
Using Microsoft Access ◾ 147
• You can do a “Save As” to create a “Selected Order” table and then remove all col-
umns but OrderNumber, or close the Order table and use the Create Table wizard
to create a new “Selected Order” table having one column, OrderNumber, with a
data format of 50 text bytes.
Next, create a query to display the information needed.
• e query will include “Selected Order” (to link to Order), Order, Customer (to get
the Customer name), Ordered_Item (to get the quantity ordered), and Advertised_
Item (to get the item name). Study the following diagram and note the columns from
each table that are selected to be displayed.
• Save the query with an appropriate name; here, the name “Order Items” was used.
We need a way to specify the OrderNumber of interest; we will do that with a Form.
• Select the “Selected Order” table name, then click on Create/Form to open the Form
wizard.
• Save the Form wizard and reopen it in Design mode.
• Select and delete the OrderNumber row.
• Go to the Design tab and select the Combo box icon, then click in the form where
OrderNumber appeared.
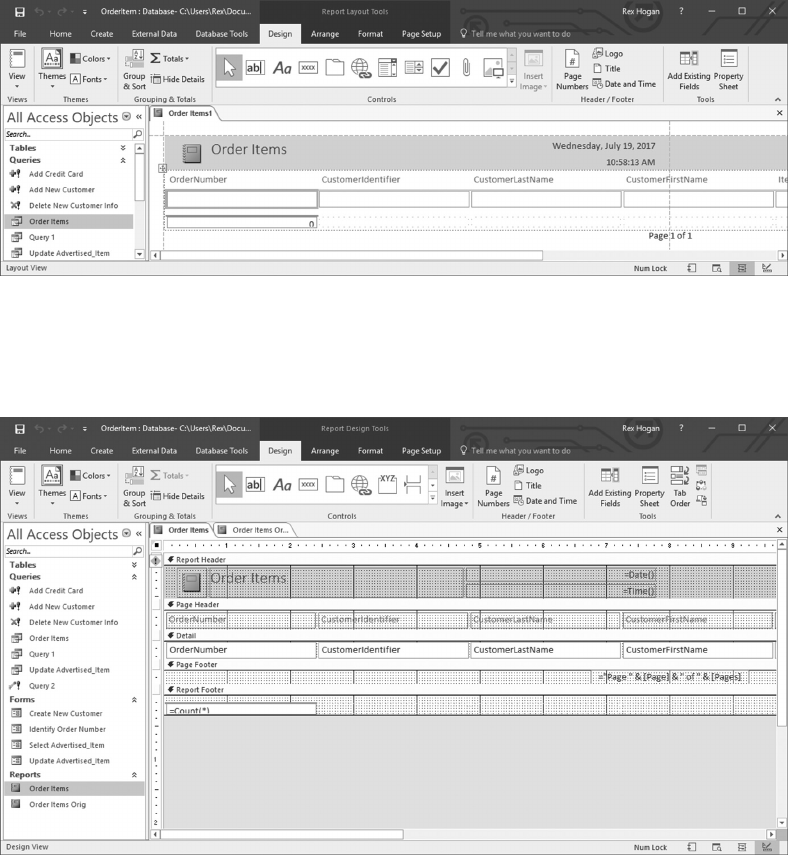
148 ◾ A Practical Guide to Database Design
• Use the wizard to select the Order table, then OrderNumber to retrieve those values,
storing them in this location in the Form.
• Next, add a Button with the name “Select” at the bottom of the form. Cancel the
Button wizard when it opens; we will update the button later with actions to be taken
aer the OrderNumber is selected.
• Save the Form with an appropriate name (e.g., “Identify Order Number”).
Finally, let us create a Report to display the relevant information.
• Select the Order Items query, then click on the Create/Report to open the Report
wizard. Note that the display opens showing all columns in one line.
We need to modify this output to add a drop-down box to save a value in “Selected
Order” and rearrange the column display into something more readable.
• Save the Report, then reopen it in Design Mode.
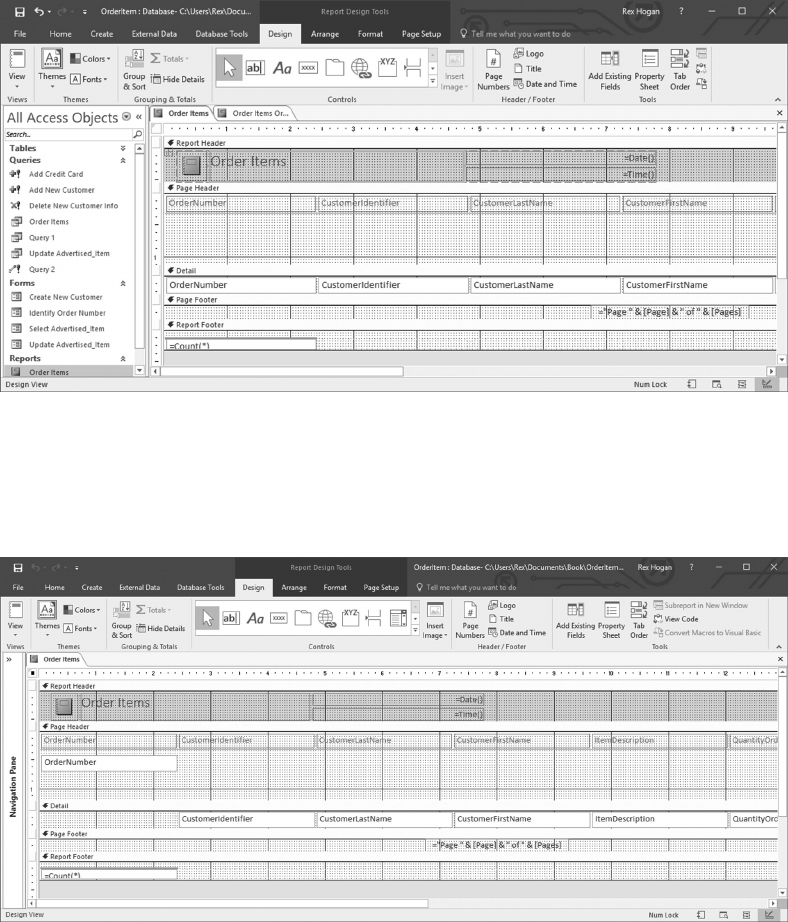
Using Microsoft Access ◾ 149
• Note that the report has column names in the Header section, with all column values
in the Detail portion.
We want to rearrange the format to display order-specic information (the Order
number and Customer information) in the Header, leaving in the Detail portion
those data elements with more than one row (ItemDescripton and QuantityOrdered).
• With the Report in Design mode, carefully move the cursor over the portion for the
Page Header until the “+”-like symbol appears. Click the mouse and drag the symbol
down to enlarge the Header portion.
• In the Detail portion, pick an item to be moved to the Header. Click on it, copy that
item, then move the mouse and click in the Header, and do a paste to add the item to
that section. Finally, delete the item from the Detail section.
e following display shows OrderNumber aer being moved.
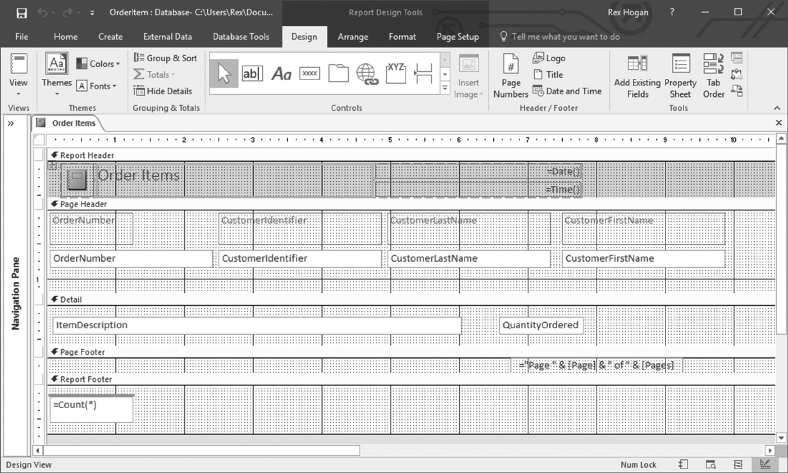
150 ◾ A Practical Guide to Database Design
• Repeat the copy/paste operation on the Customer elements to move then all to the
Header. Resize each as appropriate.
In addition, delete the ItemDescription and QuantityOrdered labels from the Header.
• Finally, select the Detail section and enlarge it slightly. en move the ItemDescription
and QuantityOrdered elements to the le and resize them accordingly.
Note that the Header now includes information about the order as a whole, and the
Detail section contains information about the individual items on the order. “View”
the report to check the display of the items it contains, and Save and close the report
when you are nished.
We now have to make one nal modication to tie all of this together.
• Go back to the Form just created (“Identify Order Number”) and put it in “Design
View” mode.
• Select the “Save” button added at the bottom, right-click on the orange box, and select
“Build Event.”
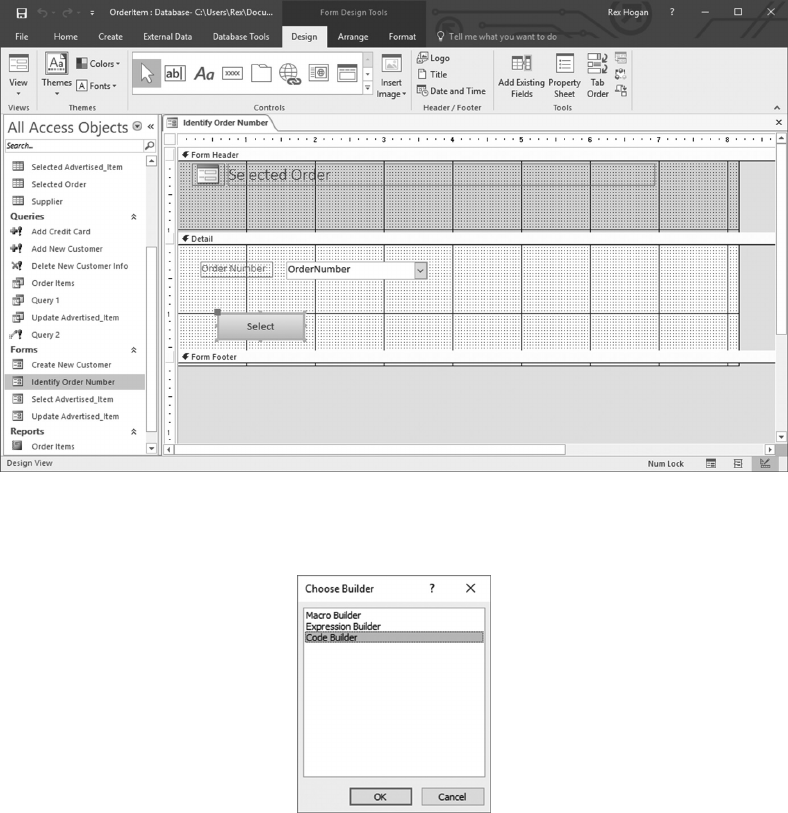
Using Microsoft Access ◾ 151
• Choose “Code Builder” to open a window to enter commands.
• When this Form is initially opened, we will use the drop-down menu from the
Combo box to select an OrderNumber. Aer that number is selected, we just need
to close this form (and thereby update the Query results) and open the Report to see
the results.
To perform these functions, enter the following commands in the code section of the
above-mentioned window:
DoCmd.Close acForm, "Identify Order Number", acSaveYes
DoCmd.OpenReport "Order Items", acViewPreview
• Save these changes and close the Form.

152 ◾ A Practical Guide to Database Design
e following screens give an example of how the Query/Form/Report elements work
together.
Alternatively, aer the “Selected Order Number” table has been updated, the Report can
be opened manually.

Using Microsoft Access ◾ 153
Hopefully, you now see how Microso Access can be used to create a reasonably sophisti-
cated GUI for users. It just takes a bit of thought and analysis to identify and design all of
the individual components and queries required.
• Access does not support complex queries, but oen several small, simple queries can
be created that together produce the desired result.
• When building multiple tools to achieve a result, naming conventions can help iden-
tify associated items in Queries, Forms, and Reports and make the overall system
more understandable and easier to maintain.
6.7 DEPLOYING ACCESS FOR A TEAM OF USERS
As shown earlier, a Microso Access Database uses Table objects to dene database tables,
and other object types to support Queries, Forms, and Reports to sort or analyze data in
those tables.
To deploy that Database to a team of users, it needs to be divided into two dierent data
bases.
• e rst database would host (contain) only the Table objects (the core data tables
shared by the user community).
• e second database would serve as a team GUI and contain all of the objects and
code used to access or analyze the data.
• e Tables section of the GUI database would initially be empty when initially cre-
ated. e External Data/New Data Source icons would be selected.
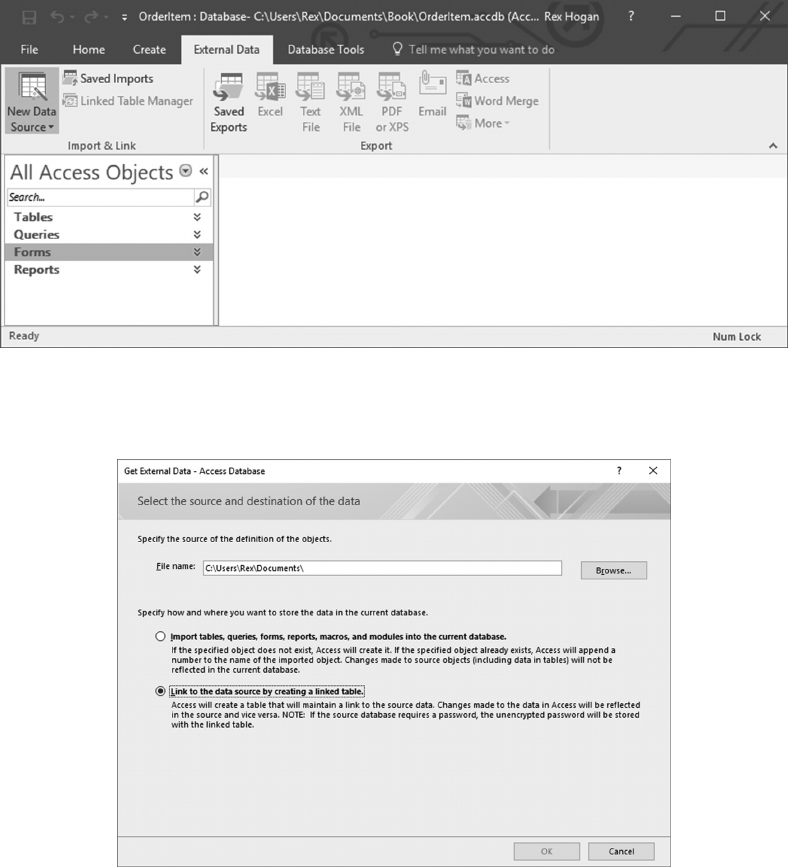
154 ◾ A Practical Guide to Database Design
• A connection wizard will open; select “From Database” and Access.
• Select the “Link” option as shown and click OK. Next, browse the network shared
by users to nd and select the data portion of the database. Select all tables in that
database.
• Linked tables will now appear in the Tables section of the GUI database.
• at GUI database can now be given to each user who needs access to the database.

Using Microsoft Access ◾ 155
6.7.1 Linking to an SQL Server or Oracle Database
Important note: e above-mentioned instructions can also be used to link to tables residing in
SQL Server or Oracle. When starting the connection wizard, use the New Data Source/From
Other Sources/ODBC (Microso’s “Open Database Connectivity” interface) database option.
• e wizard needs a DSN name to identify the type of ODBC driver needed to access
the data.
• If one has not already been created, clicking “New” presents a pull-down list of
DBMSs that are supported. “ODBC for Oracle” and “SQL Server” are both on the list.
• Select the appropriate ODBC driver and navigate on the user network to the location
where the database is installed. You will be asked to log on to that database.
• When nished, the tables selected will appear as linked objects in the Table section
of the GUI database.
As a result, the GUI database now provides all of the Windows-based functions for users
with the data component running in SQL Server or Oracle.
6.8 THE ROLE OF PASS-THROUGH QUERIES
Microso Access supports a reasonable degree of queries to view or modify data. Complex
queries can oen be created by combining the results of multiple simple queries to achieve
a more complex query requirement.
If the source data resides in SQL Server or Oracle, the Query wizard can be used in “SQL
View” mode to enter, for example, a complex SQL Server query to run against the linked
table. In the Design tab, “Pass-rough” would then be selected as the query is saved.
When executed, this classication instructs Access to not attempt to execute the logic but
to simply pass the query logic directly to the host RDBMS for execution on that server.
is allows the GUI to be designed and developed using much more complex queries
than those supported by Microso Access.
In summary, Microso Access provides a platform to rapidly develop and deploy data
and user interfaces to view and/or update the data and has these advantages:
• Microso Access is deployed as part of the desktop environment for all users in
Department of Defense and in the Intelligence community. It therefore is a common,
free soware environment for use by analytical teams.
• e linked table and Pass-rough options for queries support an environment where
complex queries can be run against industrial strength database platforms such as
SQL Server and Oracle.

156 ◾ A Practical Guide to Database Design
• Users oen have diculty describing what functionality is needed in a new system.
A design team can rapidly design and develop both tables and user interface mecha-
nisms in a prototype that users can see and react to, in order to determine core user
requirements.
It is amazing how much can be done with such a simple tool.
QUESTIONS
1. What soware product(s) are required to install and use Microso Access? Is a
Microso Access database a logical or physical database?
2. Where is a Microso Access database stored?
3. How do you assign the DataType for a column in a table?
4. When creating a table, how are key column(s) identied?
5. When dening a column in a table, how can an index be created on that column?
6. When dening an index on a column, does that index have to be unique?
7. Can a table be created that does not have a unique key?
8. When creating a table whose key column is an ever-increasing numeric value, what
DataType should be used for that column?
9. What steps are taken to import data into a table?
10. What steps must be taken to create a Query for three linked tables in the database?
11. Can columns in a table be updated using a Query?
12. What steps are followed to create an Update query?
13. How can you use Microso Access to view data in a table in an SQL Server database?
14. How can you run a query against a table in an SQL Server database using SQL Server-
specic SQL?
15. How can a table be manually browsed or ltered?

157
Chapter 7
Using SQL Server
7.1 OVERVIEW
SQL Server is a relational database management system (RDBMS) developed by Microso
and runs on Windows platforms ranging from a laptop to a dedicated database server.
Itcomes with a graphical user interface (GUI—the SQL Server Management Studio) that
makes it easy to create and manage individual databases running on that platform. Although
primarily aimed at small-to-mid-range applications, it is suitable for large, complex Internet
applications with multiple concurrent users.
7.1.1 Advantages
• SQL Server is relatively inexpensive and is easy to install. Trial versions are available
to download and install, as well as a free entry-level “Express” version.
• e SQL Server Management Studio provides a central tool to dene tables, indexes,
views, and referential integrity constraints within a database.
• SQL Server handles complex queries and supports functions and stored procedures.
• SQL Server does not require the care and feeding from database administrators
(DBAs) typically required with Oracle.
• SQL Server supports full-text search against character-based columns, allowing the
user to search for a word embedded in a column.
• SQL Server also supports the ability to replicate a database on a remote host and sup-
ports failover to that host should the primary host fails.
7.1.2 Change Management for SQL Server
I have used SQL Server for years in doing rapid prototyping of database applications. e
fact that SQL Server is so easy to use is both good and bad news. e development team
must pay additional attention in documenting and migrating design changes as they are

158 ◾ A Practical Guide to Database Design
developed and deployed to minimize downtime for the upgrade and to avoid surprises in
the upgrade process.
• Changes oen include table modications as well as to code (stored procedures, func-
tions, views, or to the web interface).
• Individual changes using the Management Studio must be carefully documented to
capture the sequence and details involved with each change.
• To properly develop and test design changes, you need additional computer platforms
to host development and test versions of the database.
• e development platform is used to test individual changes as they take place.
Later, all planned changes are combined together in a change package to upgrade
the application from one level of functionality to the next.
• e test platform is where the change package is applied and tested. If the change
package is applied successfully, it is ready for use in upgrading the production
platform with minimal downtime for production users. If errors are found on the
test platform, the change package must be corrected and retested.
• Aer successfully testing a change package, that package is ready for use in updat-
ing the production platform.
In the current chapter, we will review key factors in the creation and use of an SQL Server
database.
7.2 DATABASE CREATION/INSTALLATION
7.2.1 Installation Planning
• Preinstallation considerations: Before installing SQL Server, decisions need to be
made on what features are needed. In addition, early planning must be done on how
to map the dierent type of les across the disk drives that are available.
• Will redundant array of inexpensive disk (RAID) drives be used? If not, how
many drives are available and how will they be used? (is is covered in more
detail in the following.)
• Does the Full-Text Search feature need to be installed?
• Is Database Failover needed? If so, the SQL Server Replication feature must be
installed.
• Logons to SQL Server can be done using Windows accounts or accounts internal
to SQL Server (“Mixed Mode”). Which are to be used to control access to the
database?
Using SQL Server ◾ 159
I recommend using SQL Server accounts to control all database access. is gives
DBAs total control of accounts and how they are used.
• Installing SQL Server on a laptop: As mentioned earlier, SQL Server can be installed
on a laptop or desktop. Although these platforms have limitations in terms of perfor-
mance and protection against hardware failures, they provide a database platform at
minimal hardware expense.
Aer installation, periodic database backups must be taken. If possible, they should
be stored on a dierent drive from the database itself to protect against device failure.
• If only one drive is available, consider using a zip drive to store a backup of
thedatabase.
• If two drives are available, install the database and all its les on one drive and the
log les and periodic backups on the second.
• Installing SQL Server on a server: If the server is congured with multiple drives, we
want to separate as much as possible the RDBMS system soware, data les, indexes,
database log les, and les created from database backups.
Fortunately, systems today are more commonly built using RAID technology.
• RAID 5 congurations using a combination of striping (for performance) and
parity checking (forrecoverability), and protect against single-device failure. As
data are striped, performance is not as much of an issue, and device separation
for les is not important; the system will continue to run aer failure of one drive.
• RAID 10 congurations combine disk mirroring and disk striping and support a
higher level of performance while providing against single device failures. ey
require twice as many drives as a non-RAID installation but avoid the overhead
required for the RAID 5 parity when updates are made.
When using RAID arrays, all les for the RDBMS and its databases can be placed on
the same RAID array.
• Prerequisites: As you might guess, SQL Server has specic hardware and soware
prerequisites for each version. ese can be found by using the Internet to request a
download, then reading the “System Requirements” section from the download page.
e next section describes the steps necessary to install a trial version of the SQL
Server 2008 R2 “Enterprise Edition” on a laptop. Aer downloading and extracting
the soware, the installer displays a number of options in the le pane; the plan-
ning options are shown on the next page. Hardware and Soware Requirements will
use the Internet as a resource to download and display this information. Clicking
on “System Conguration Checker” will check the computer being used to see if all
requirements have been met. If the computer is connected to the Internet and some
soware is needed, in most cases, that soware will automatically be downloaded
and installed.

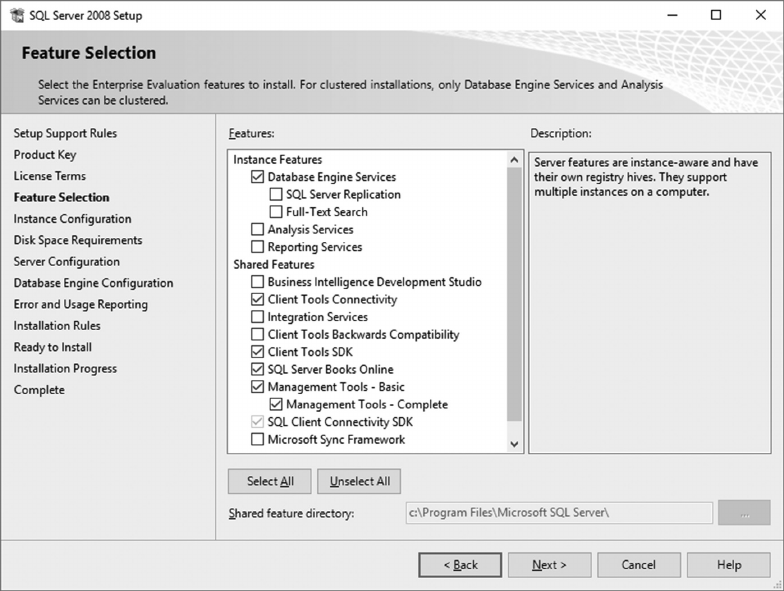
Using SQL Server ◾ 161
Clicking on the rst link to install a “New SQL Server stand-alone installation…” starts the
installation wizard, showing features available.
e following options were chosen to install a relatively simple database without the
Full-Text Search or Replication features.
Selecting Next gives the user the option of changing the name of the SQL Server Instance
being installed; I have chosen the default option of MSSQLSERVER.
Note that for security reasons, the user may choose to change the default name to
make it more dicult for a hacker/intruder to identify any database instance running
on the host.
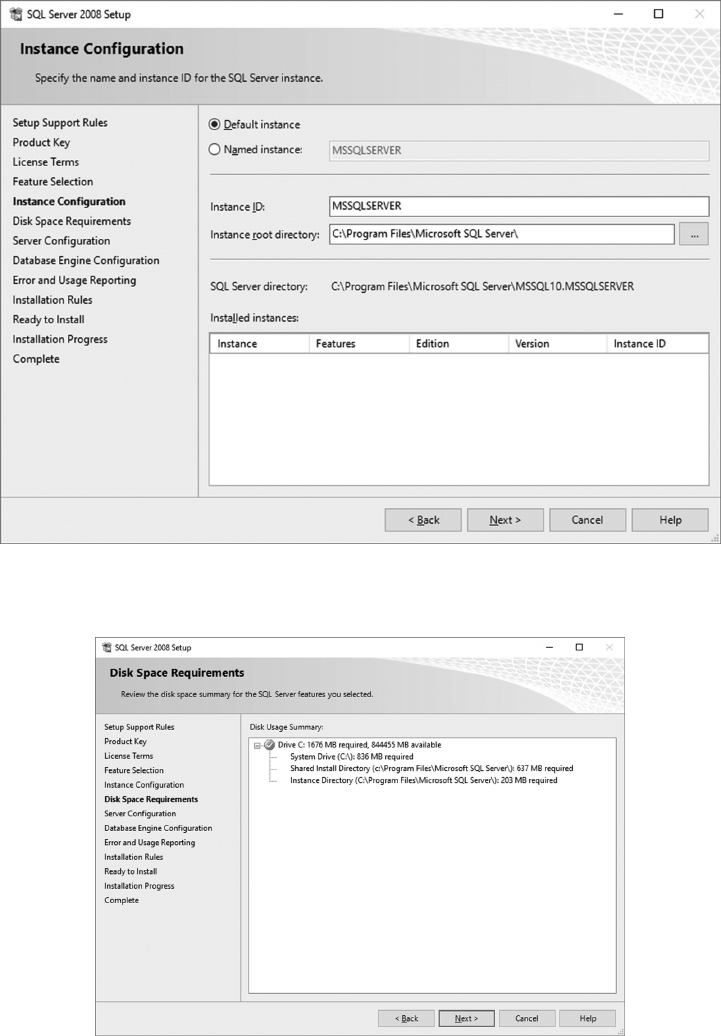
162 ◾ A Practical Guide to Database Design
Clicking Next gives a summary of disk space found on that computer.
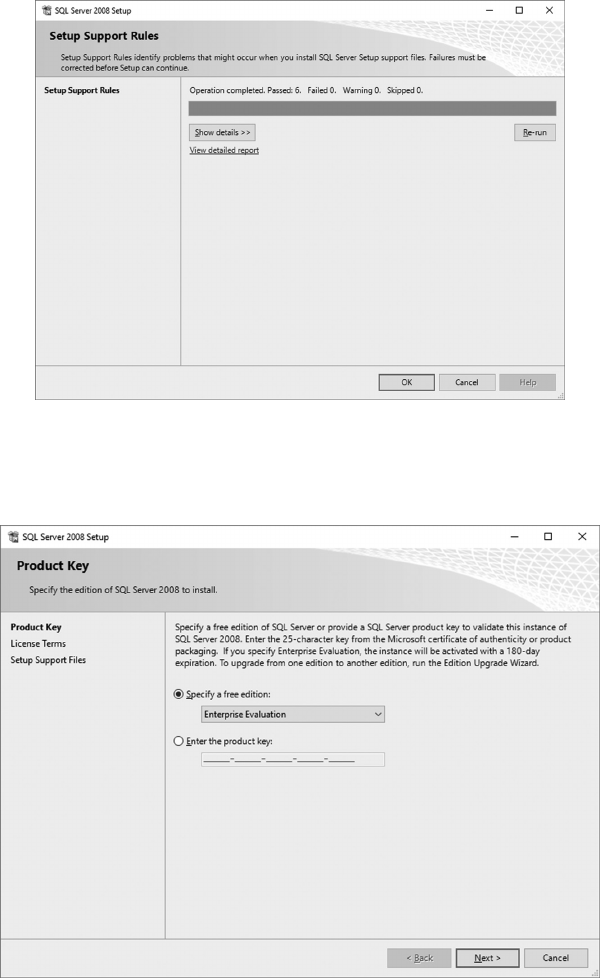
Using SQL Server ◾ 163
Clicking Next runs a check searching for installation issues.
Click OK to display a screen to enter a product key, if available. Click Next to install a trial
version.
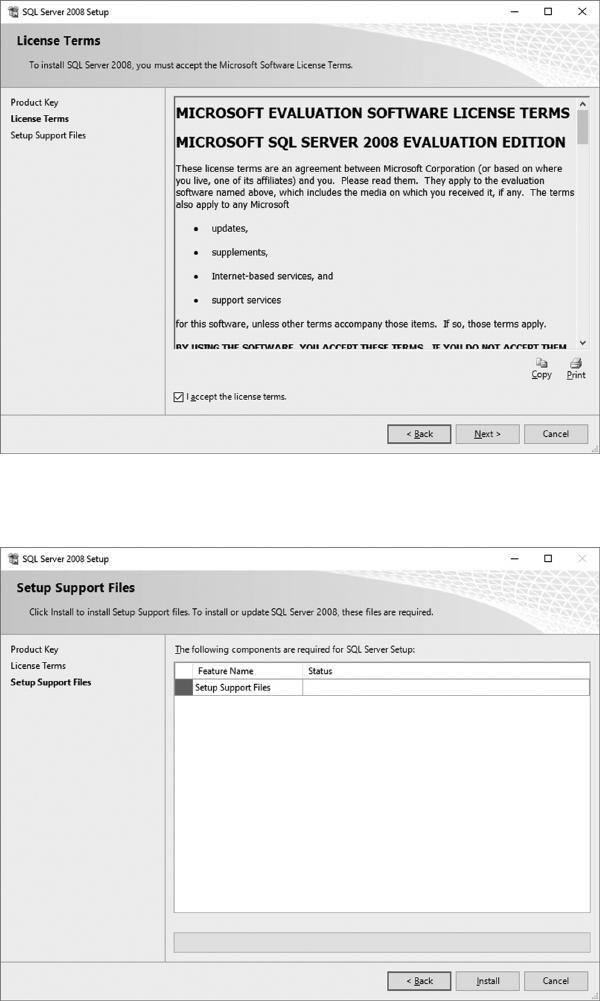
164 ◾ A Practical Guide to Database Design
Click Next to display a screen of soware license terms.
Accept the terms and click Next to advance to the next screen.
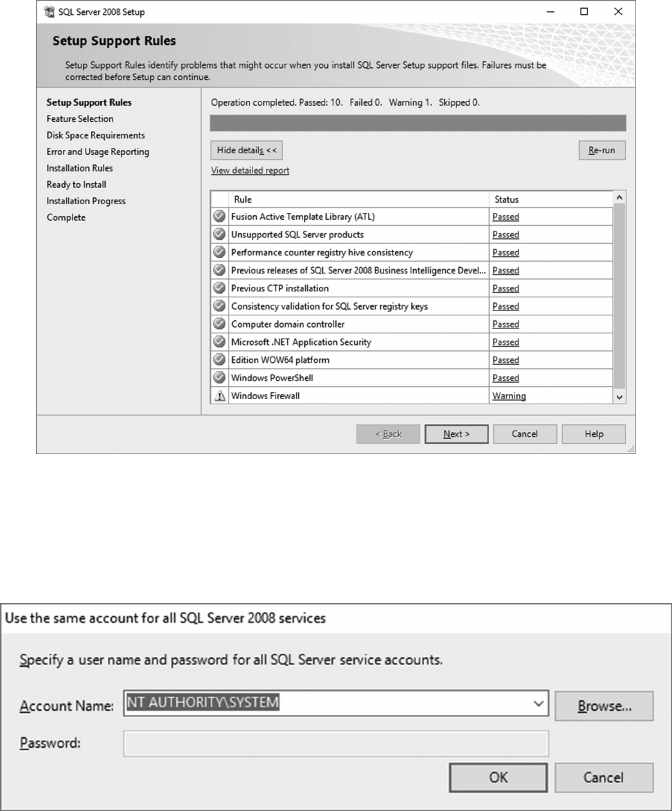
Using SQL Server ◾ 165
Click Install to begin the installation process. e next screen displays the results of a
system check before installing the soware.
Click Next to see a display asking for the names of accounts used to manage SQL Server.
Click the button to “Use the same account for all SQL Server services.”
I have chosen the option shown in the following.
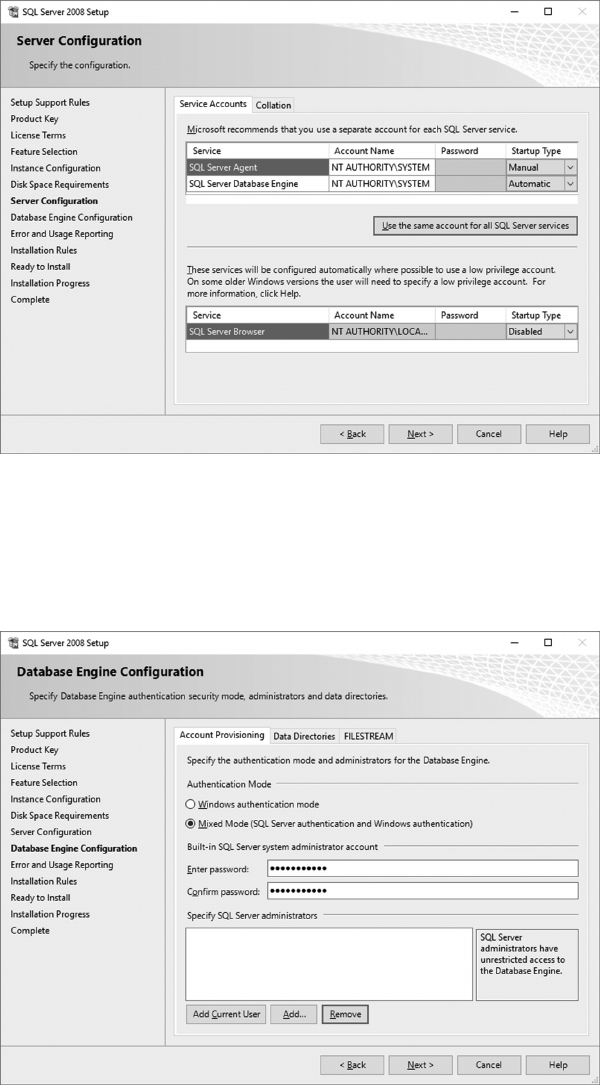
166 ◾ A Practical Guide to Database Design
Clicking OK displays my choices for accounts.
Clicking Next now displays options for accounts to be used. I recommend “Mixed Mode,”
preferring to control all data access using SQL Server account names for users.
Note also a section to enter the password for the SQL Server default Administrator
account “sa.”
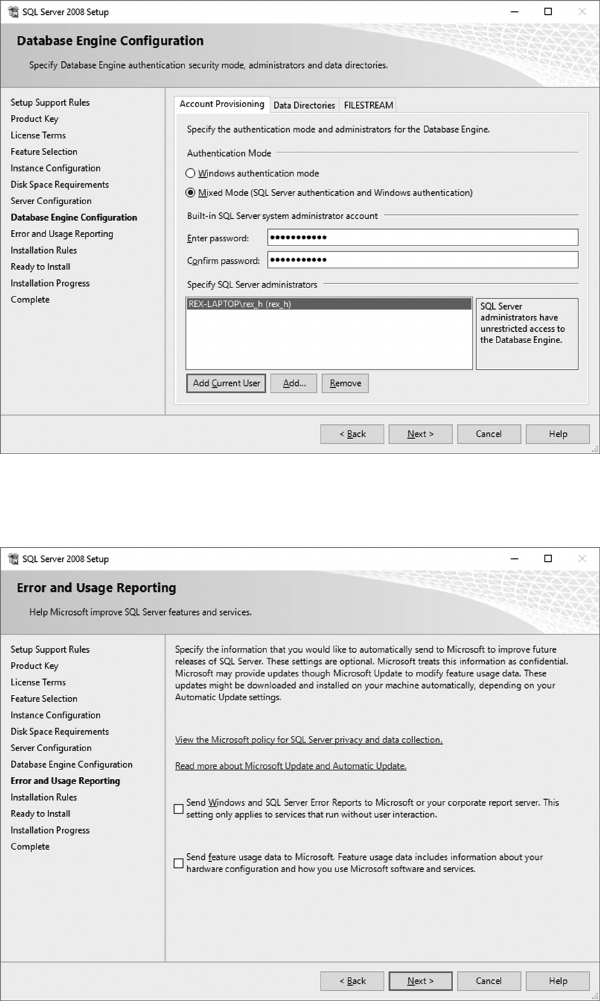
Using SQL Server ◾ 167
In addition, I want to register my Windows account as an Administrator; click Add Current
User to make that change.
Click Next to display options for error reporting.

168 ◾ A Practical Guide to Database Design
Click Next to continue with another installation check.
Click Next again for a preinstallation status screen.
Click Install to begin the soware installation.
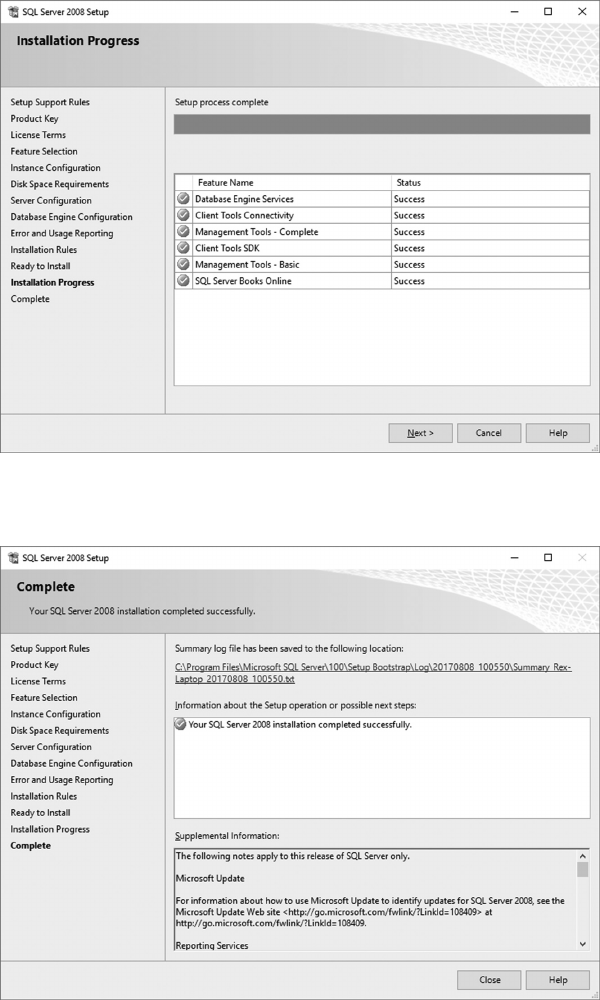
Using SQL Server ◾ 169
Click Next again to move to the nal screen.
SQL Server is now ready for use.

170 ◾ A Practical Guide to Database Design
7.3 CREATING DATABASES
At this point, the SQL Server instance/system soware has been installed, but no databases
have been created; that is done using SQL Server Management Studio. In the following,
two databases will be created, SQLSvrLogs and the University database.
SQLSvrLogs: e SQLSvrLogs database has two tables storing information about
warning messages and error messages from an SQL Server instance. Here is how this
database is updated and used:
• Chapter 8 contains a Perl script designed to run continuously to extract warning
and error messages from an SQL Server log le. It also describes how the bcp util-
ity is used to load the contents of these les into tables.
• Chapter 11 describes how to use PHP to develop a web-based interface allowing
a DBA or administrator to review warning and error messages. When reviewing
new messages, status ags are set appropriately to keep track of records that have
been reviewed, those that are being researched to see if corrective action is neces-
sary, and those where the underlying problem/issue has been resolved.
Section 7.3.1 shows how to create a database with the WarningRecords and ErrorRecords
tables. Although very simple in nature, these tables are interesting in several respects.
• Each table has one long varchar column storing the information found in the
logrecord. Nothing in the log format is suitable for use as a unique identier. As
such, the “RecordKey” column was dened with an “int” data format to support
ever-increasing numeric values automatically incremented as rows are inserted
into thetable.
• Users will use the web interface to review all Warning and Error log records and
set ags for each row to label/classify the row as follows:
– Reviewed (and can be ignored).
– Pending (need to be researched further to determine if any corrective action
is needed).
– Resolved (and can subsequently be ignored from future reviews).
• e table design must include columns for each of these status ags using a “bit”
data format. In addition, as part of the process when loading new rows, a Stored
Procedure is needed to reset the null values for new rows to “0” (o).
e University Database: Chapter 4 describes the design of a University database
to store information about courses oered, students enrolled, and student grades.
Section 7.3.2 describes how to create a database in SQL Server to manage this infor-
mation based on the physical data model shown in Figure 4.7.
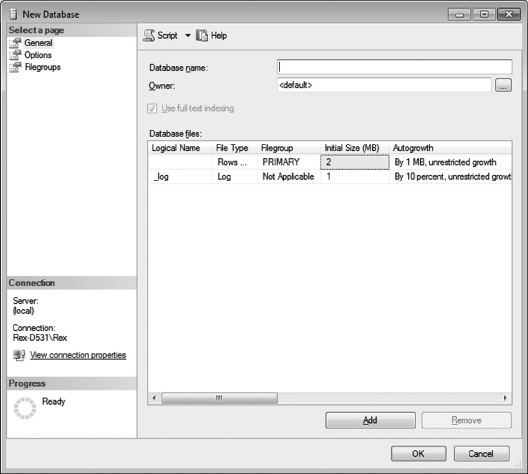
Using SQL Server ◾ 171
7.3.1 Create an SQLSvrLogs Database
In this section, we will create an SQLSvrLogs database with tables to store WarningRecords
and ErrorRecords. To understand the design and operational use of this database, let us
review how it would be used in the eld.
• In practice, new records for each table would be obtained by running a PERL script
24×7 modeled aer the one shown in Section 8.5. New les are moved to the input
directory referenced in the next paragraph.
• A script is needed on the database host to continually monitor an input directory
for new les. When new les are found, they would be imported into the respective
table, and a Stored Procedure run to initialize the Reviewed/Pending/Resolved ags
described earlier.
Here are the steps required to create an SQLSvrLogs database with these two tables.
• Start SQL Server Management Studio, select Databases, right-click and chose New
Database.
Enter the Database Name in the block shown.
If multiple drives are available, the location of the new database can be changed by
scrolling to the right of this screen.

172 ◾ A Practical Guide to Database Design
Click OK to create the database on the designated disk drive.
To create tables, rst click on SQLSvrLogs to expand the options, click Tables, right-
click, and select New Table.
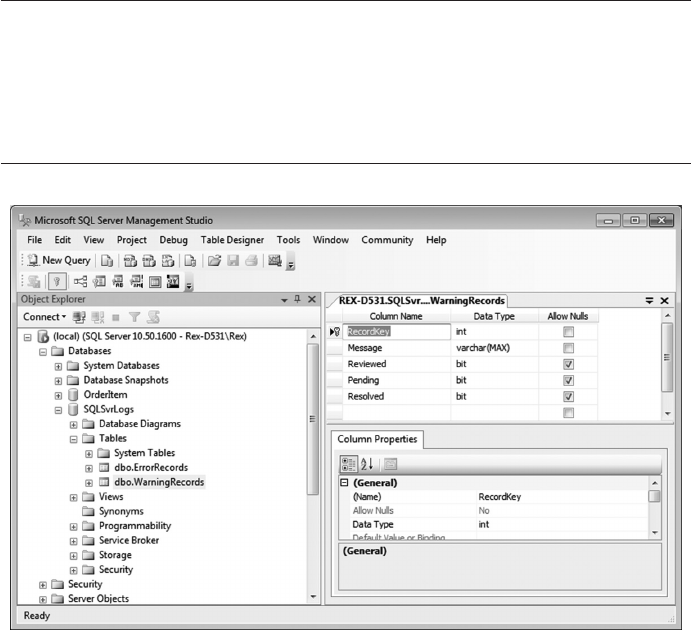
Using SQL Server ◾ 173
Use this window to dene the following columns for the WarningRecords table:
Column Name Format Usage/Purpose
RecordKey int An ever-increasing value used as the key column
Message Varchar(MAX) e content of the log record
Reviewed bit Set aer record has been reviewed
Pending bit Set for records to be researched
Resolved bit Set when issue has been resolved
Note the “Allow Nulls” settings; this permits new rows to be added to the table with no
(null) values for these columns.
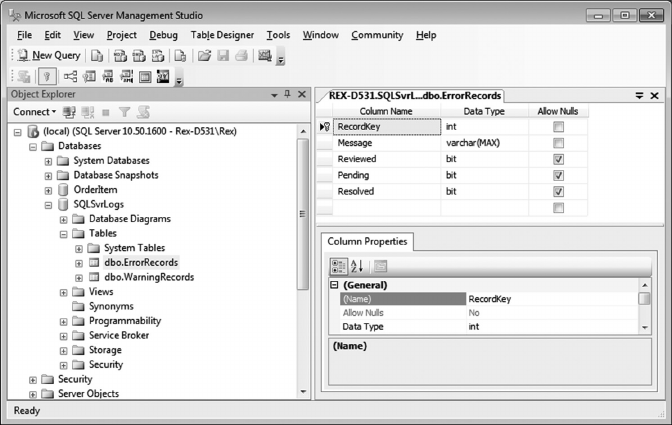
174 ◾ A Practical Guide to Database Design
Aer dening each column, click the x at the top right of the table denition window to
close the window. You will be asked if you want to Save the table; choose Yes, then enter a
name for the table being saved (WarningRecords).
Repeat this sequence to dene the ErrorRecords table.
For this application, the web interface executes queries directly against each table. ere are
no subordinate/linked tables; therefore, no Referential Integrity constraints are required.
e only additional item needed is the Stored Procedure used to initialize the three sta-
tus ags aer new rows are added to the two tables.
It will identify all newly imported rows (having status ags of “null”), and reset each to
zero. Section 7.10 shows how to create this Stored Procedure.
7.3.2 Create the University Database
is section describes the steps necessary to create the University database based on the
physical data model shown in Figure 4.7.
First, using SQL Server Management Studio, right-click on Databases and select “New
Database.” Repeat the steps followed earlier to dene the University database.
7.3.2.1 Table Denitions
Now create tables for each entity shown in Figure 4.7. For each, right-click on Tables and
select “New Table.” Create entries for each column using the following guidelines.
• In general, most columns should be dened using a Data Type of varchar(50). is
results in using a variable number of bytes per column to store a character string up
to 50bytes long.
• Where appropriate, pick an appropriate Data Type of Integer or Date/Time.
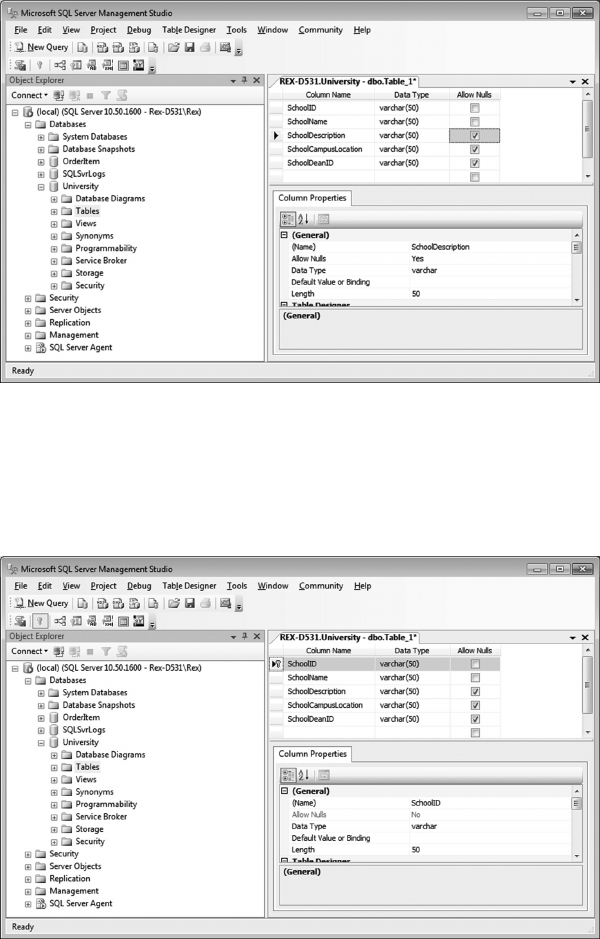
Using SQL Server ◾ 175
• Click the “Allow Nulls” box for columns where information may not be available
when the tables are initially loaded.
For example, here are the column denitions for the School table.
• Aer entering all column names for a table, identify the column(s) used as a key for
the table. If the key is only one column, click on the line with that column, right-click,
and select “Set Primary Key.”
Aer all columns and the primary key are dened, select the x at the top right of the
design window to close and save the denition, entering a table name when prompted.
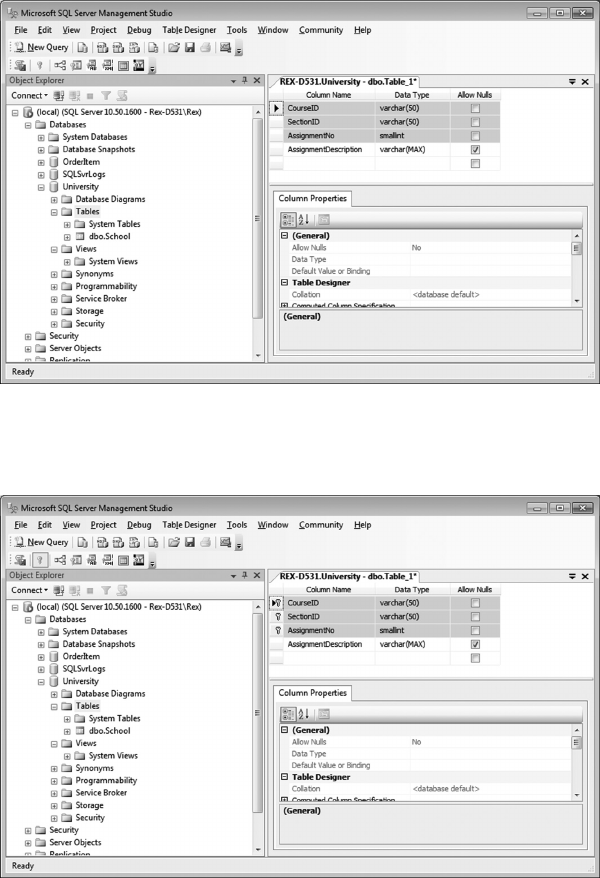
176 ◾ A Practical Guide to Database Design
If the table requires more than one column for the key (e.g., the Assignment table), select the
rst column in the key, hold the shi key down, and select the last column. In Assignment,
the rst three columns are used in combination to identify a unique assignment.
Aer doing the group select shown earlier, right-click, and select the “Set Primary
Key” option.
Finally, click on the x at the top right of the design window to close the table design;
enter the table name when prompted.
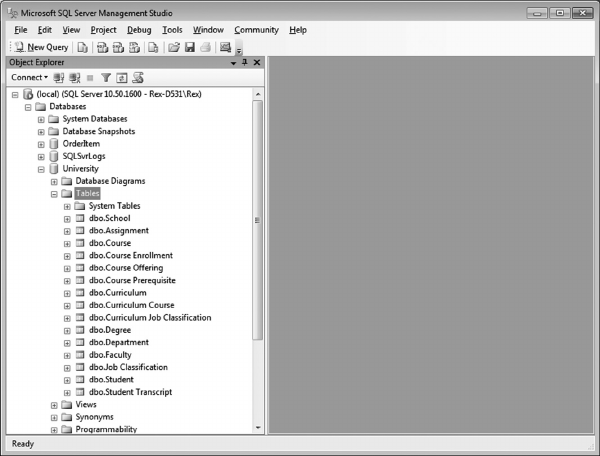
Using SQL Server ◾ 177
Continue adding table denitions for all tables shown in Figure 4.7 and compare your
results to the following.
7.3.2.2 Creating Indexes
Next, we will create the indexes needed for these tables.
• As with Microso Access, indexes are automatically created for primary keys for
tables.
• Indexes are also needed to support frequently used access paths anticipated by the
design team. As one example, school administrators frequently need to see all stu-
dents enrolled in a specic department.
• If a query were executed specifying all students for a specic department and
the Student table had no index on the DepartmentID column, the Student table
would be scanned and only rows matching the DepartmentID qualier would be
returned. is would require a signicant amount of I/O activity.
• If the same query were executed aer an index was created on the DepartmentID
column in Student, then the RDBMS would use the index to retrieve only stu-
dents within the specied department, requiring signicantly fewer I/Os.
To create an index on the DepartmentID column in Student, double-click on the
Student table to show all options, click on Indexes, right-click, and select New
Index from the pop-up menu. is opens the following window.
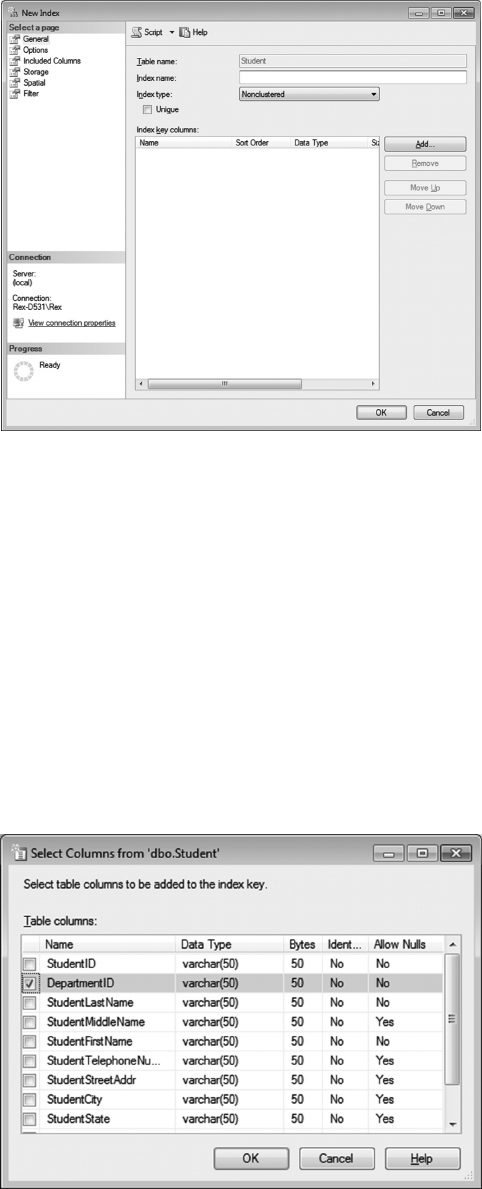
178 ◾ A Practical Guide to Database Design
Fill in the Index Name entry.
• Next, select an Index type from the pull down.
Indexes are Clustered if the rows in the table are in the sequence of the column
specied. If not, they are NonClustered.
• Note the unique box, chosen when each value in the index will apply to only
one row in the table. In this case, there will be many students with the same
DepartmentID, so the box is not checked.
• Next, click the Add button to see a list of column names available. Click on
DepartmentID.
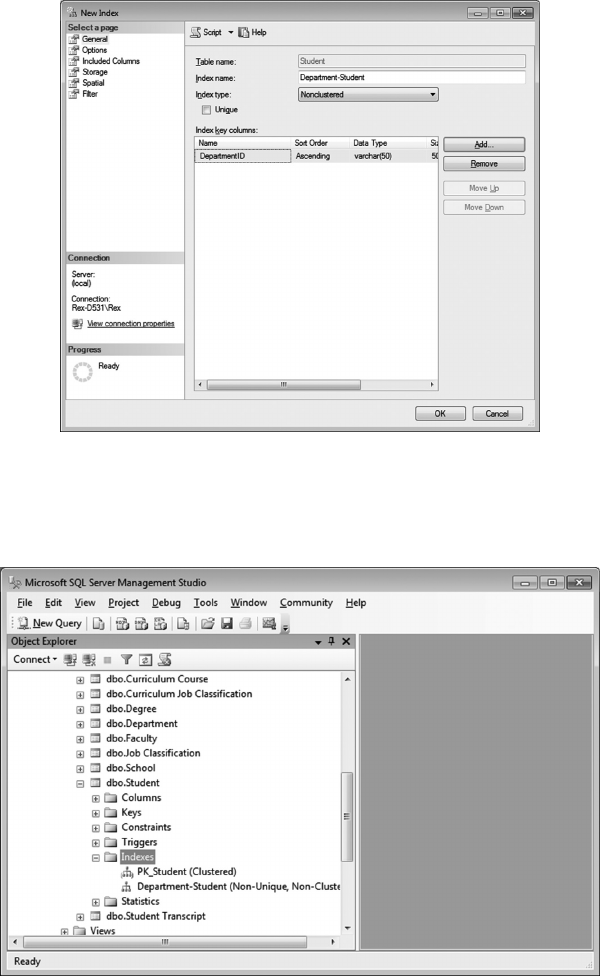
Using SQL Server ◾ 179
• Click OK to see details of the index being created.
• Click OK again to create the index.
Note the details of the new index on the Student table.
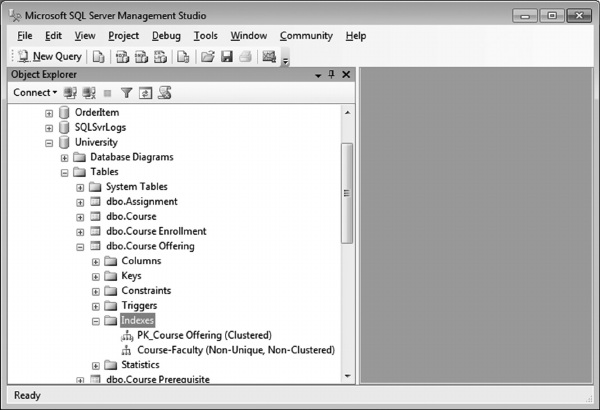
180 ◾ A Practical Guide to Database Design
• In addition, administrators also frequently want to see all courses taught by a par-
ticular Faculty member. is will require an index be built on the FacultyID column
in Course Oering.
Follow the above-mentioned steps to modify the Course Oering table.
7.3.2.3 Index Maintenance
Aer the database is placed in operation, inserts and deletes of rows in tables will cause
indexes to grow in size to allow room for new entries. Index maintenance must be periodi-
cally performed to condense all current entries and reclaim free space.
7.3.2.4 Referential Integrity Constraints
Referential Integrity constraints must now be created for all one-to-many relationships in
Figure 4.7.
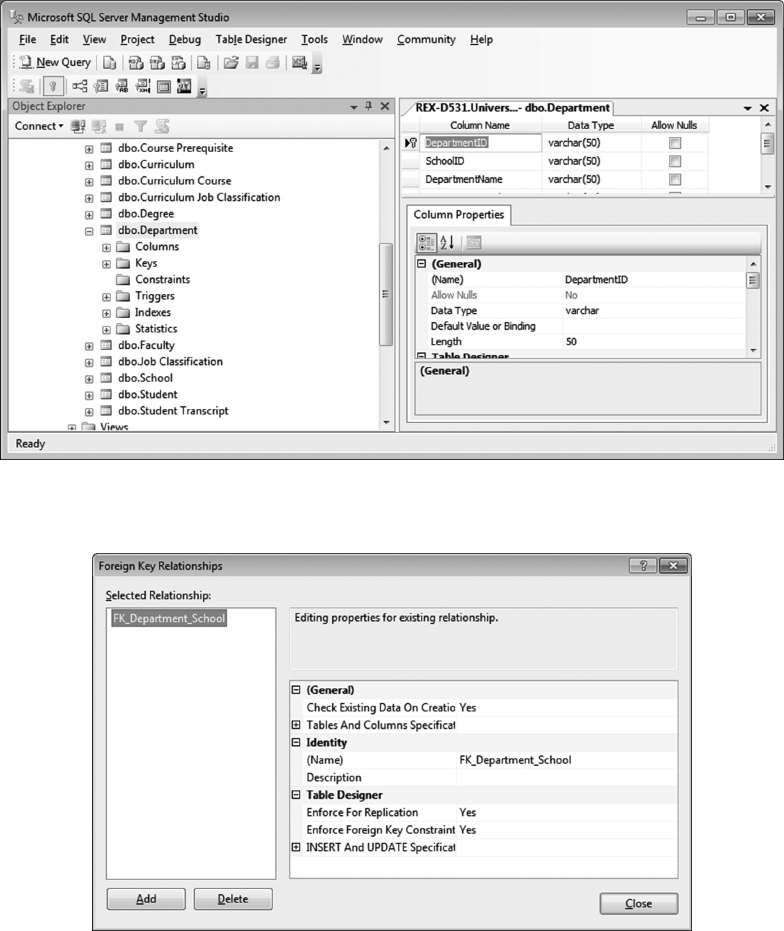
Using SQL Server ◾ 181
To create a constraint for the School–Department relationship:
• Select the table on the many side of the relationship (Department) and put it in Design
mode.
• Click on the SchoolID column, right-click, and choose Relationships.
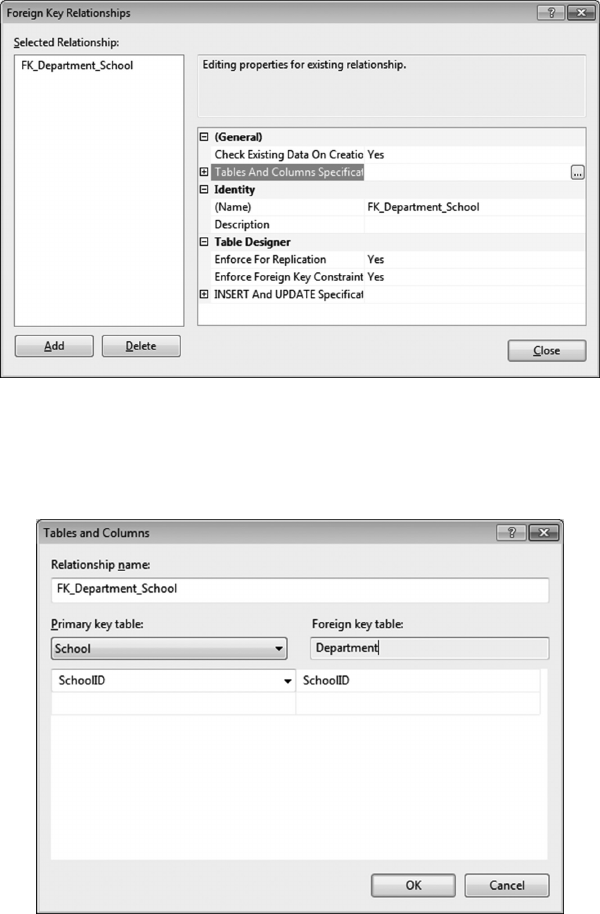
182 ◾ A Practical Guide to Database Design
• Select “Tables and Columns Specications,” then click on the “…” button.
• In the next window, change the table name and columns within each to reect the
tables and columns associated with the one-to-many relationship.
• Take a minute to review the table and columns identied for this relationship. If they
are correct, click OK.
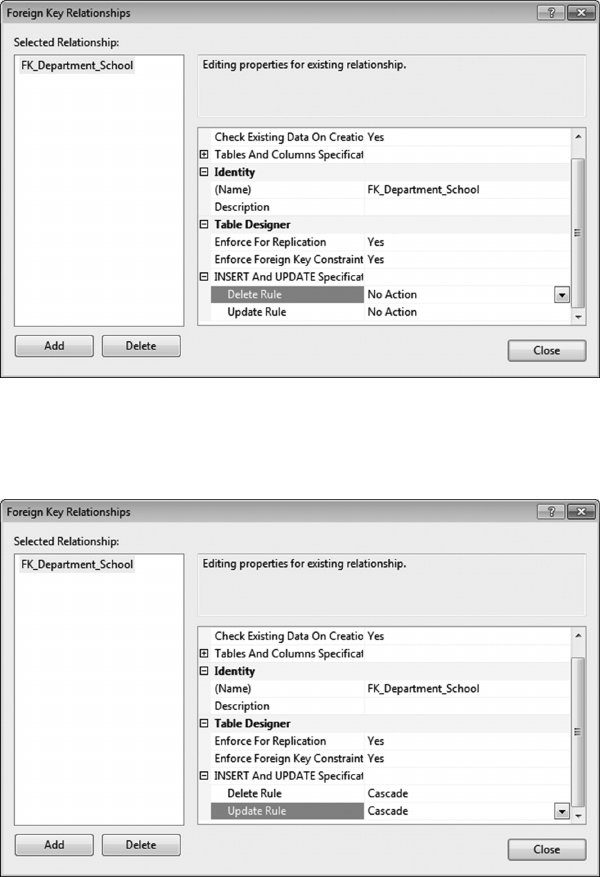
Using SQL Server ◾ 183
• Next, select Insert and Update Specications.
• Use the pull downs for the Update and Delete rules and change both to Cascade. is
tells the RDBMS to enforce the RI constraint between School and Department.
• Click Close to end the RI constraint specications. Next, click the top right x on the
Design window, and click Yes on the window to save these changes.
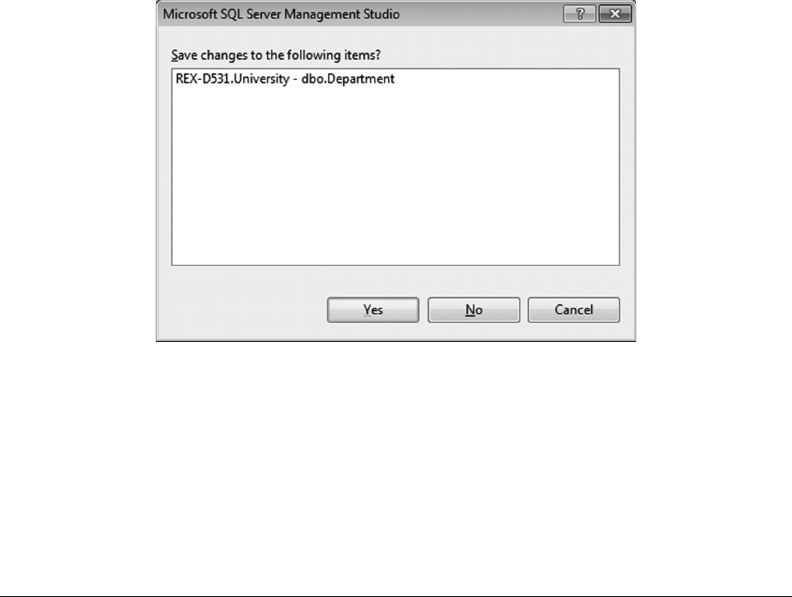
184 ◾ A Practical Guide to Database Design
• Repeat this sequence to create RI constraints for each of the remaining one-to-many
relationships.
At this point, the database is ready for use. As a rst step, user accounts will be created.
7.4 USER ROLES
When creating user accounts for database users, you can set permissions for table-level
read or update authority, or add administrative permissions for each user. is is very
tedious and error prone. It is much easier to dene Roles for users and grant detailed privi-
leges at the Role level. Later, when creating an account for a new user, simply assign that
role to the user to grant those permissions.
e SQL Server Management Studio can be used to create roles at a broad level. For
example, for a University database, the following Roles would typically be used.
• Read: Read-only access to all tables, typically granted to students or administrative
tasks that have no update authority.
• Update: Read and write access to all tables, but no authority to alter table
definitions.
• Developer: A user with read and write access to all changes and can change table
denitions.
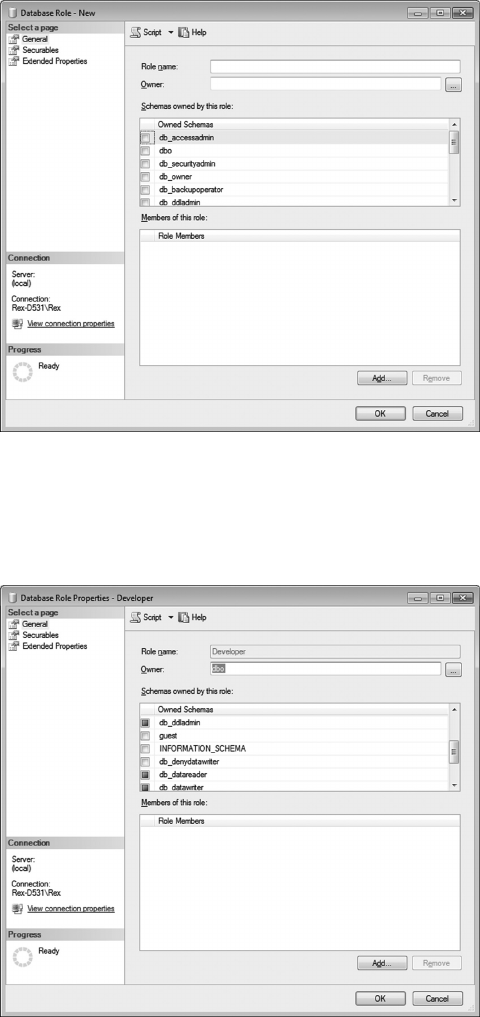
Using SQL Server ◾ 185
To create one of these roles, use Management Studio to select the University database,
click on Security and then Roles. Next, select Database Roles, right-click, and select New
Database Role.
• Give the role a name (e.g., Developer), enter “dbo” for owner, then select the appropri-
ate entry from the pull-down items. See the following to show read, update, and Data
Denition Language authority for the Developer role.
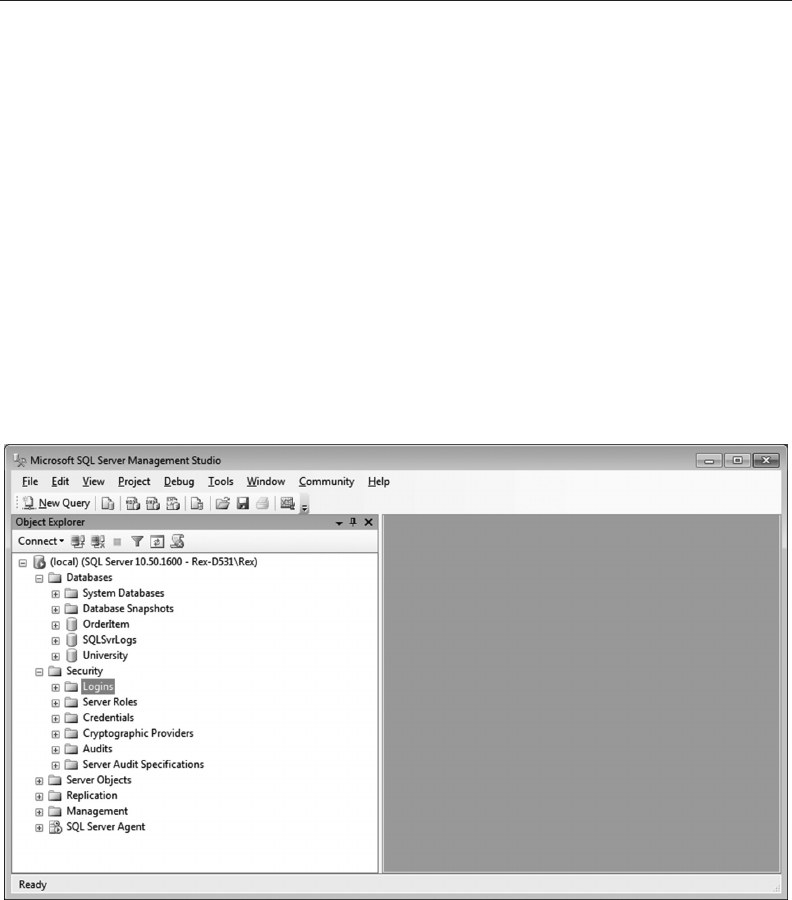
186 ◾ A Practical Guide to Database Design
• Click OK to create that role.
• Now repeat this process to create the “Read” role for read-only access and “Update”
for users with table update authority.
For more precise permission control, use Transact-SQL (the command line interface) to
dene a schema and associate role to manage read and write permission at the Table level.
7.5 AUTHORIZED USERS
If you recall, we chose “Mixed Mode” when the database was created, which allows the
use of both Windows accounts as well as internal SQL Server user accounts to control user
permissions.
SQL Server accounts should be used to manage user accounts and permissions.
• In classied environments, SQL Server DBAs are not allowed to have system admin-
istrator accounts and privileges as a security measure. ey therefore have no control
over creation of Windows accounts.
• Having all user accounts in a single location makes them easier to manage.
User accounts on an SQL Server instance can be managed in two ways.
• To create an account for any/all databases running on that instance, select the primary
Security tab, click on Logins, and right-click on the New Login pop up.
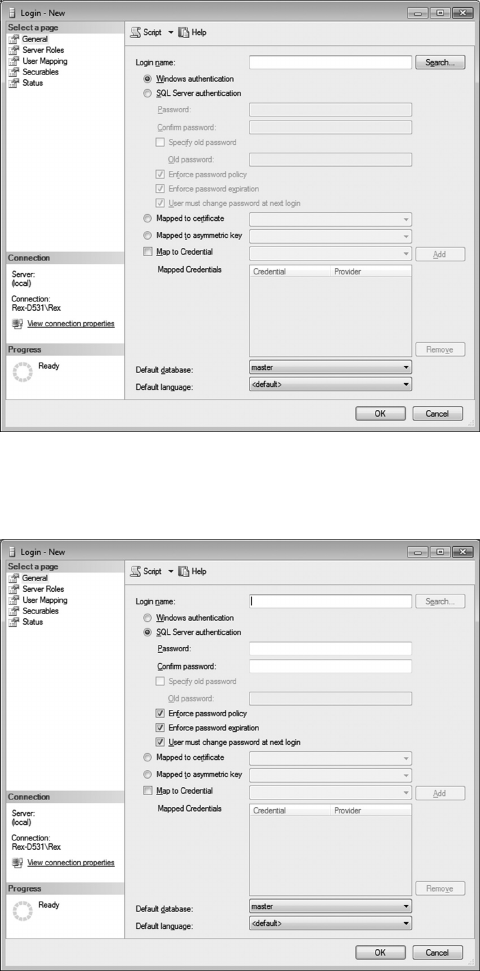
Using SQL Server ◾ 187
e following screen will open.
• Next, click on SQL Server authentication.
• Fill in the account name for the user and enter a password. Note the checks to force
the user to change the password on the rst logon and to enforce password policy
(strength of the password and periodic changes).
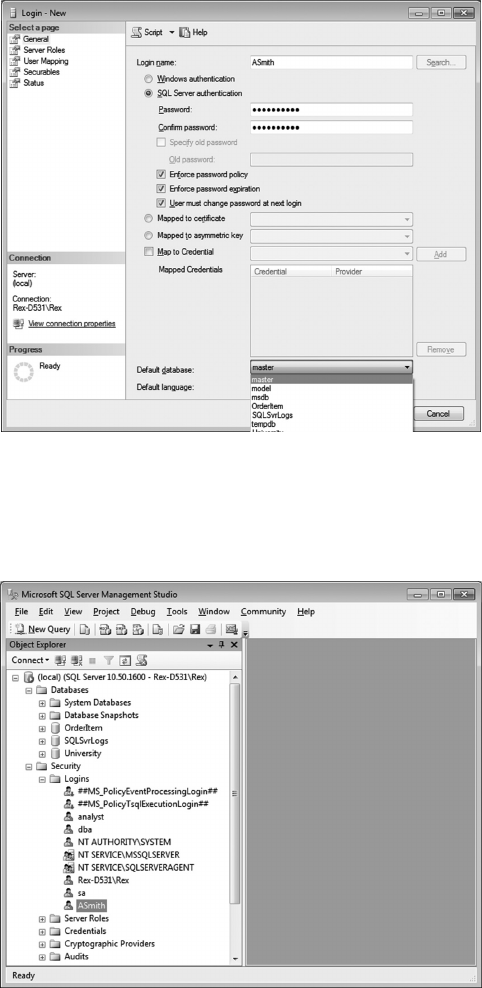
188 ◾ A Practical Guide to Database Design
• Click the Default database arrow and select the default database for this user.
• Click OK to create this account.
To grant Read access to this user, select the user name in the Security tab.

Using SQL Server ◾ 189
• Next, right-click on the name and select Properties.
• Use the pull down to change the Default database to University. Next, click the User
Mapping label.
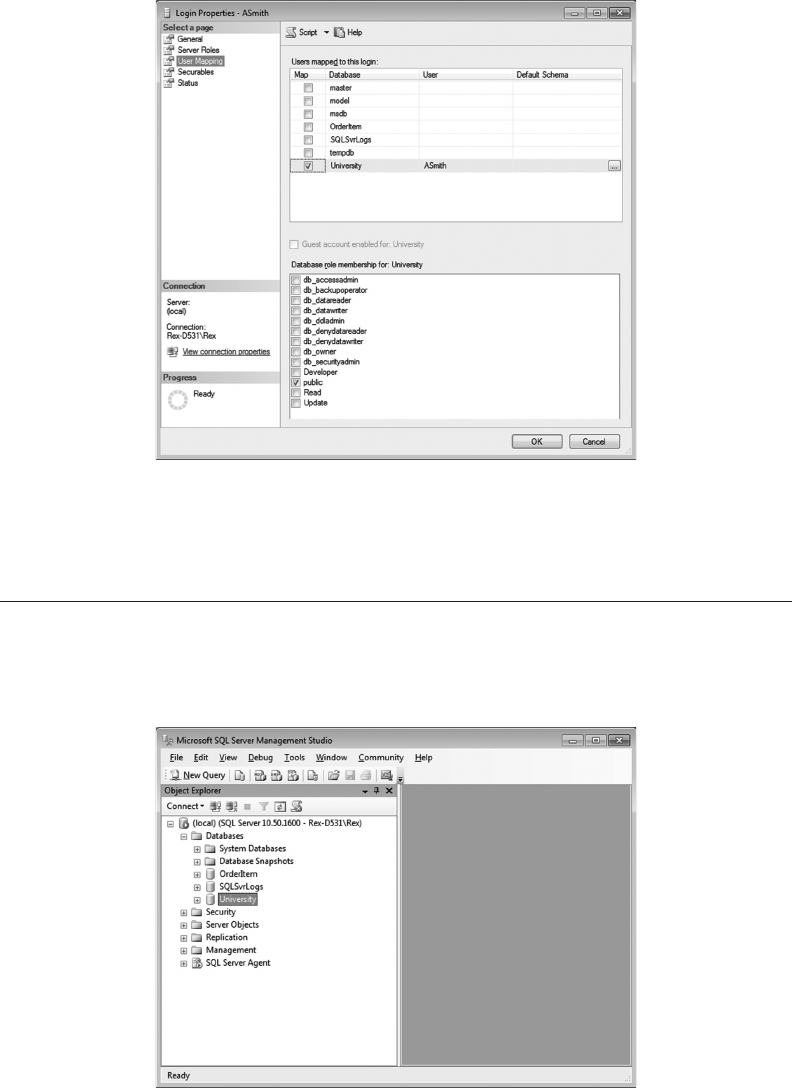
190 ◾ A Practical Guide to Database Design
• Click the box for University, then at the bottom select Read, Update, or Developer to
assign that role to this user.
Remember to always use the primary Security tab to add users, then modify that user
account to map it to the appropriate database and assign permissions as appropriate.
7.6 BACKUP/RECOVERY
Database Backup/Recovery services give the user the capability to restore a database to a
point before a database failure occurred.
To take a copy of the database, rst select the database in question.

Using SQL Server ◾ 191
• Next, right-click and choose Tasks/Backup.
• Review the settings. Note that the Backup type gives options for Full, Dierential,
and Transaction Log.
If desired, change the backup location to a dierent drive or directory. Click OK to
take the backup le.
• Also note the Options tab.
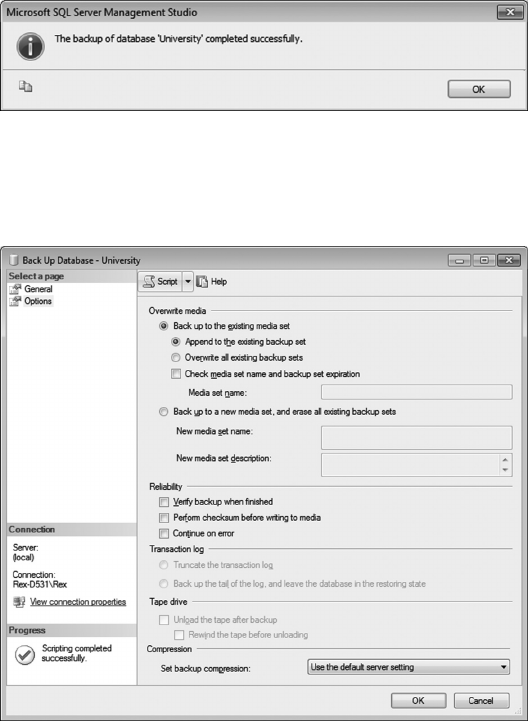
192 ◾ A Practical Guide to Database Design
• Note by default, the output le is appended when a backup is taken. e Append pro-
vides more options for recovery in the future to deal with any user errors or applica-
tion updates, but of course results in more disk space being used.
• Click OK to create the backup le.
• To create a job to automatically take a backup on a scheduled basis, repeat the above-
mentioned steps but click Scripts in the following window.
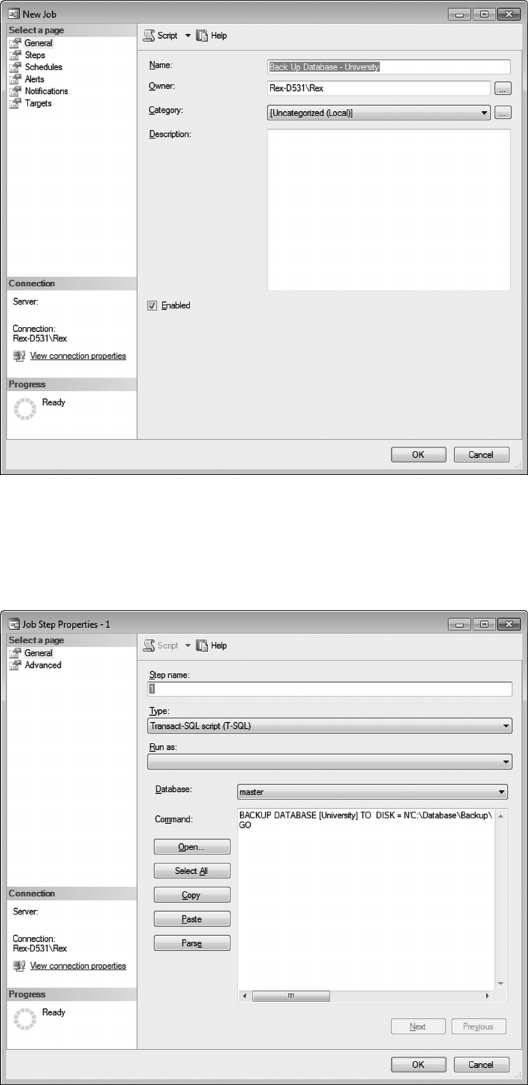
Using SQL Server ◾ 193
• Aer selecting Scripts, choose Script Action to Job.
• From this window select Steps, then click Edit to see the details of the job being
created.
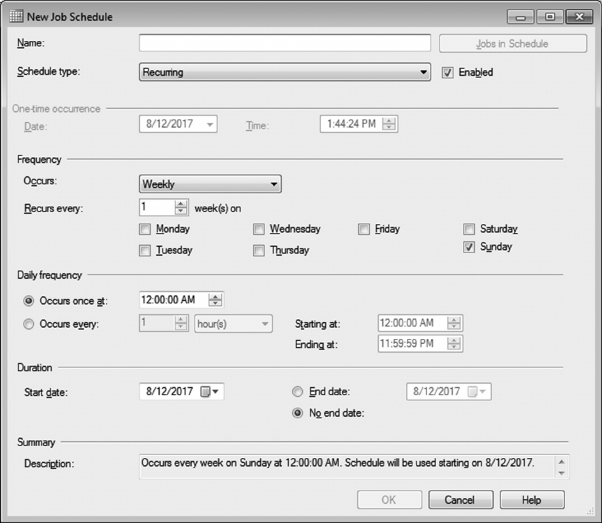
194 ◾ A Practical Guide to Database Design
• From the prior window, click Schedule and then New.
• Specify date and time settings, then click OK.
A job has now been created to automatically run the job per the settings recorded.
See the Jobs entry in SQL Server Agent to monitor the status of the automated
backupjob.
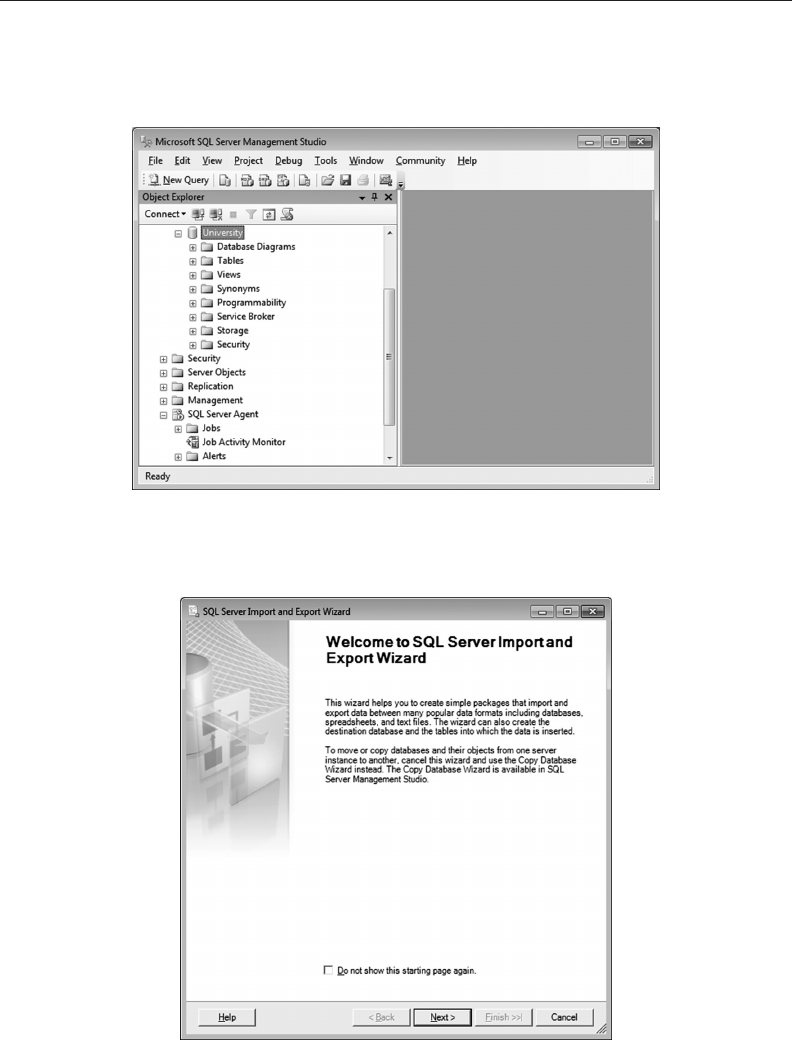
Using SQL Server ◾ 195
7.7 LOADING DATA INTO TABLES
As with Microso Access, SQL Server has wizards which make it easy to import data from
an external source into a table.
To start the process, select the name of the database to be updated.
• Next, right-click and choose Tasks/Import data to start the import wizard.
• Click Next to move to the window where the source and destination are designated.
Click the pull down on Data source to select the origin of the input. In the following,
a at le has been selected.
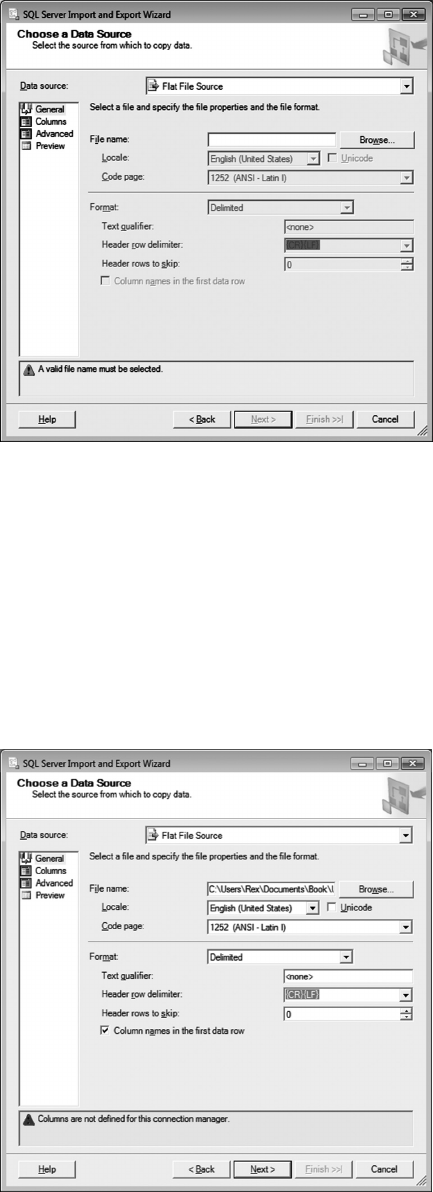
196 ◾ A Practical Guide to Database Design
• Use the Browse button to navigate to the le to be imported.
Note the entries under Format.
• Text in the input le may have delimiters (e.g., “); enter that delimiter, if used.
• If the le is originated from a UNIX platform, the Header row delimiter must be
changed to line feed.
• e input le may, or may not, have headers. Set the Header rows to skip accordingly.
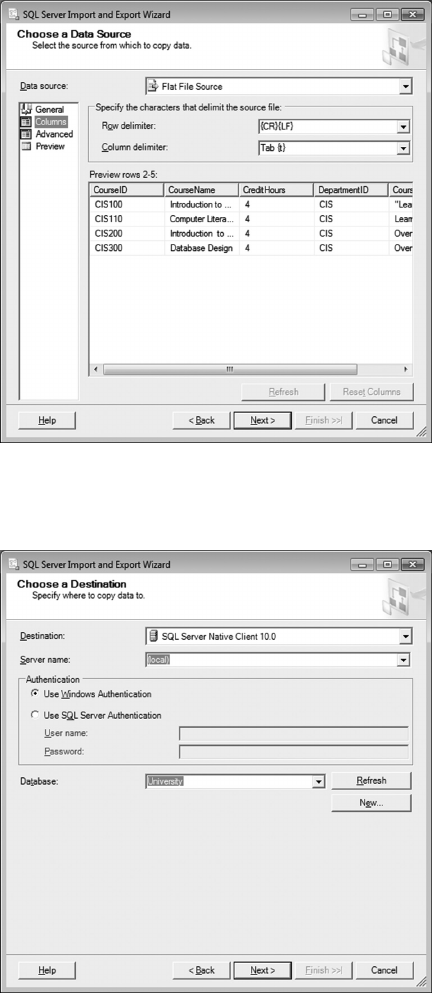
Using SQL Server ◾ 197
• Clicking Next previews the data being imported.
• Clicking Next moves to the Destination options.
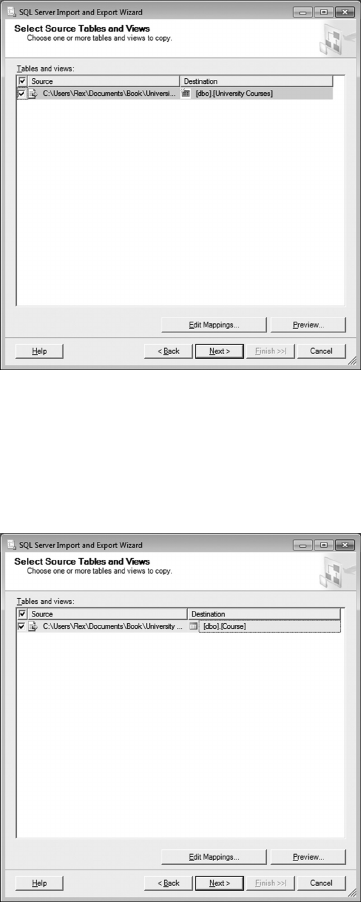
198 ◾ A Practical Guide to Database Design
• Click Next to show a mapping between source and destination.
• Note that the Destination is populated using the name of the input le. Click
the Destination column, then use the pull-down list to select the table being
updated.
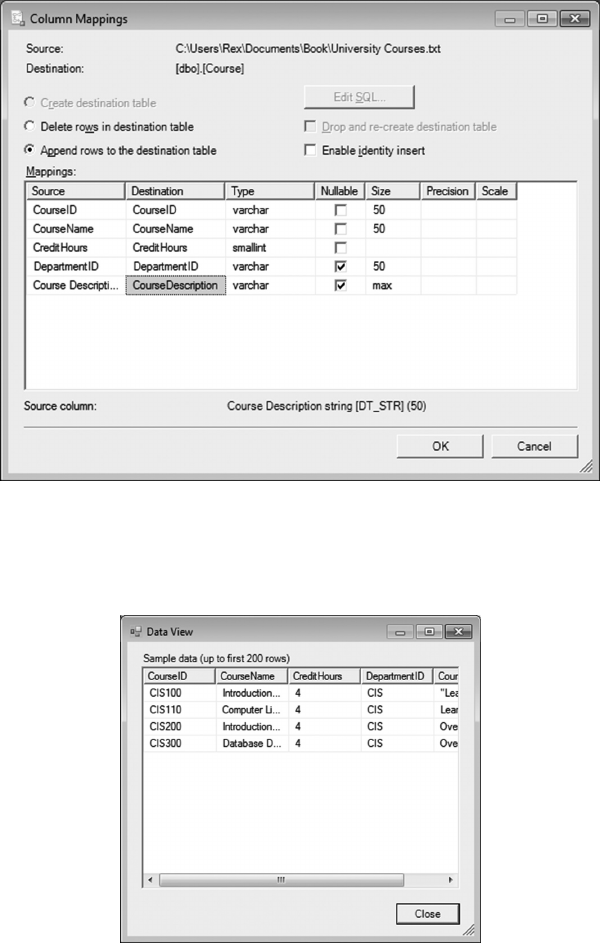
Using SQL Server ◾ 199
• Select Edit Mappings to verity the mapping on input and output column operations;
change when appropriate. Click the Enable identity, insert if the target table has an
ever-increasing integer value as its key column.
• Click OK, then select Preview to see anticipated results of the import.
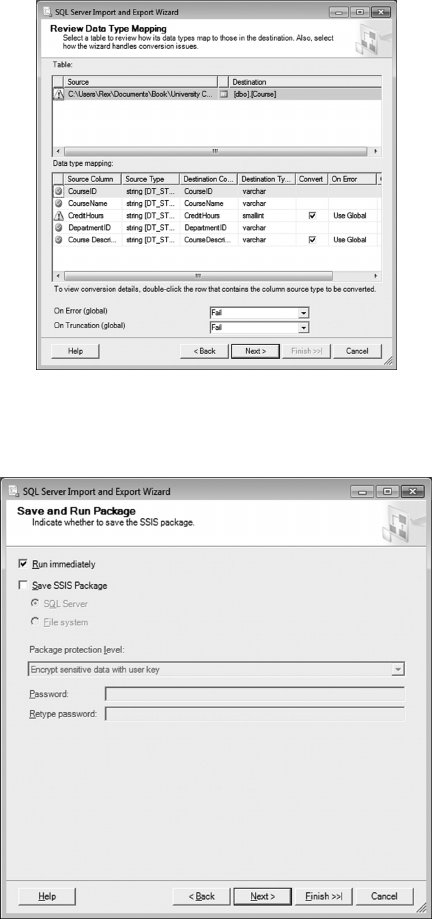
200 ◾ A Practical Guide to Database Design
• Click Close, then Next to see one nal check.
• Click Next, then Run immediately to start the import.
Note the option to save the details of the import operation to repeat the process in the
future.
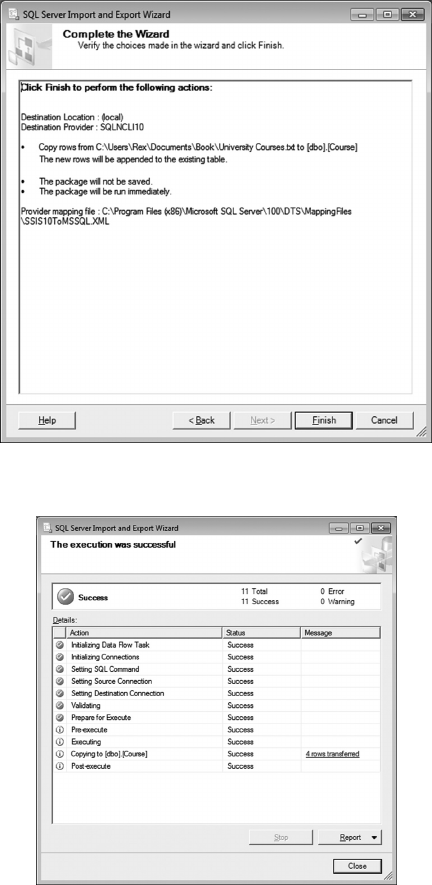
Using SQL Server ◾ 201
• Click Next, then Finish to start the import.
e Import/Export wizard can also be used to move table data between two dierent
databases.
When loading data into tables with Referential Integrity constraints, the table on the
one side of a relationship must be updated before the table on the many side.
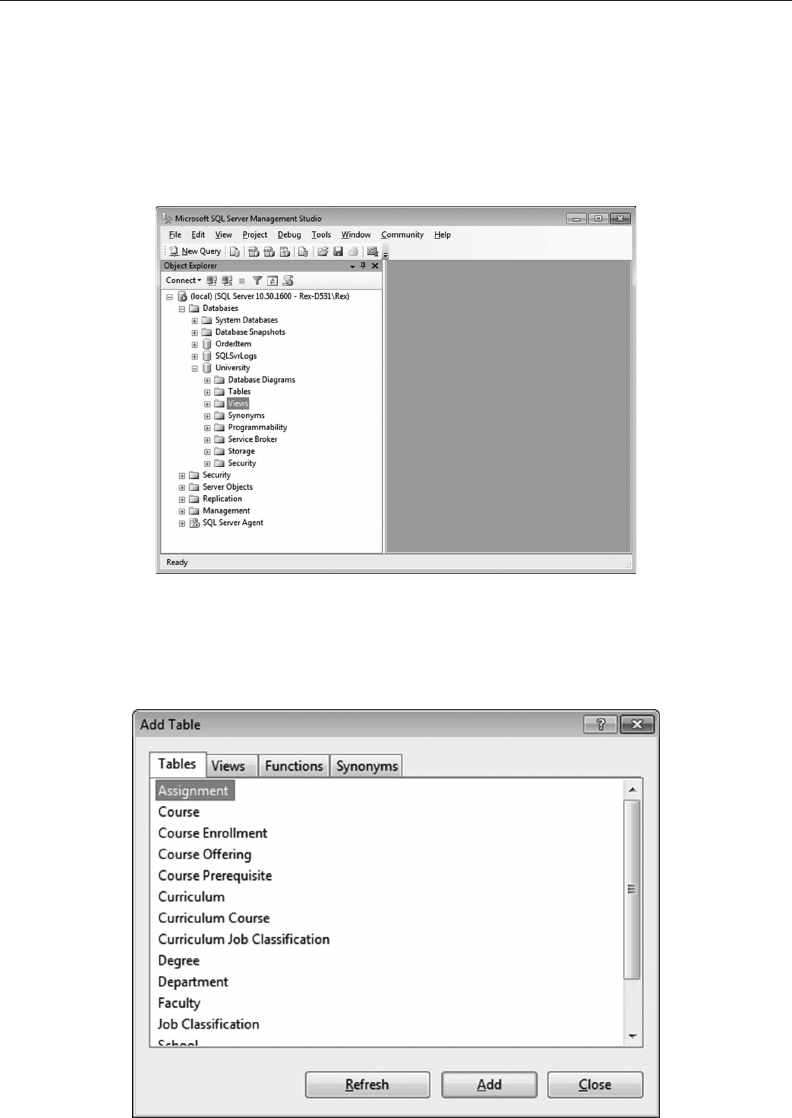
202 ◾ A Practical Guide to Database Design
7.8 CREATING VIEWS
Now let us see how to create a View to support queries against the database.
In Section 7.3.2, we saw how to create an index in the University database to more
rapidly support a query to see all courses taught by a specic instructor. Let us now create
a Viewto display the results of such a query.
• Expand the University database and click on View.
• Right-click on View and select “New view” from the pull down; the following win-
dow opens showing all tables available for the view.
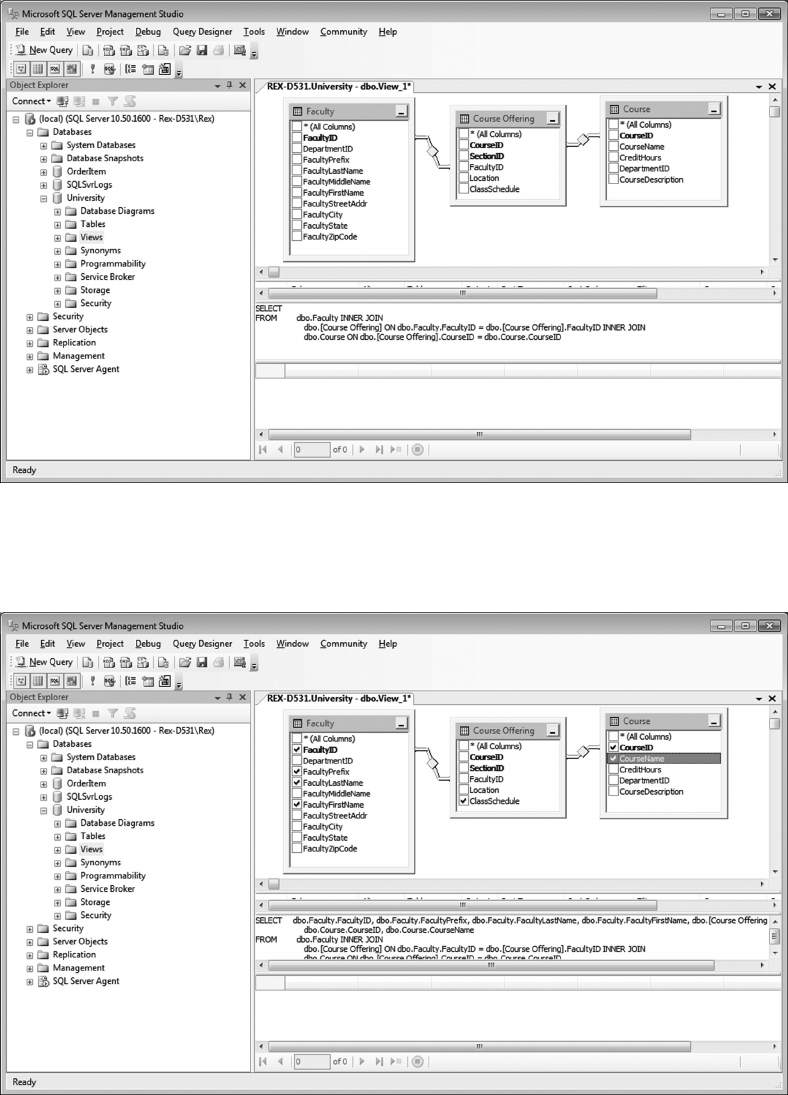
Using SQL Server ◾ 203
• For each table needed, select the table name then click Add. For this query, we will
need information from the Faculty, Course Oering, and Course tables. e follow-
ing display shows the design pane aer adding these tables.
• Next, click on the column names to be displayed. For Faculty, we want the instruc-
tor’s ID and name; for Course Oering, the ClassSchedule showing when it meets;
and for Course, the Course ID and name.

204 ◾ A Practical Guide to Database Design
• Click the x at the top right of the design window to close the view, click Yes to save it,
typing in a name on the next window.
e view has now been saved.
To run the query, open the Views tab in the University database and double-click the
view to be used to run the query.
7.9 MANUAL QUERIES AND EDITS
SQL Server Management Studio makes it easy to manually view or update rows in
atable.
• To manually see rows in the Course Enrollment table, expand the Tables option
in the University database, right-click Course Enrollment, and click on “Select top
1000 rows.”
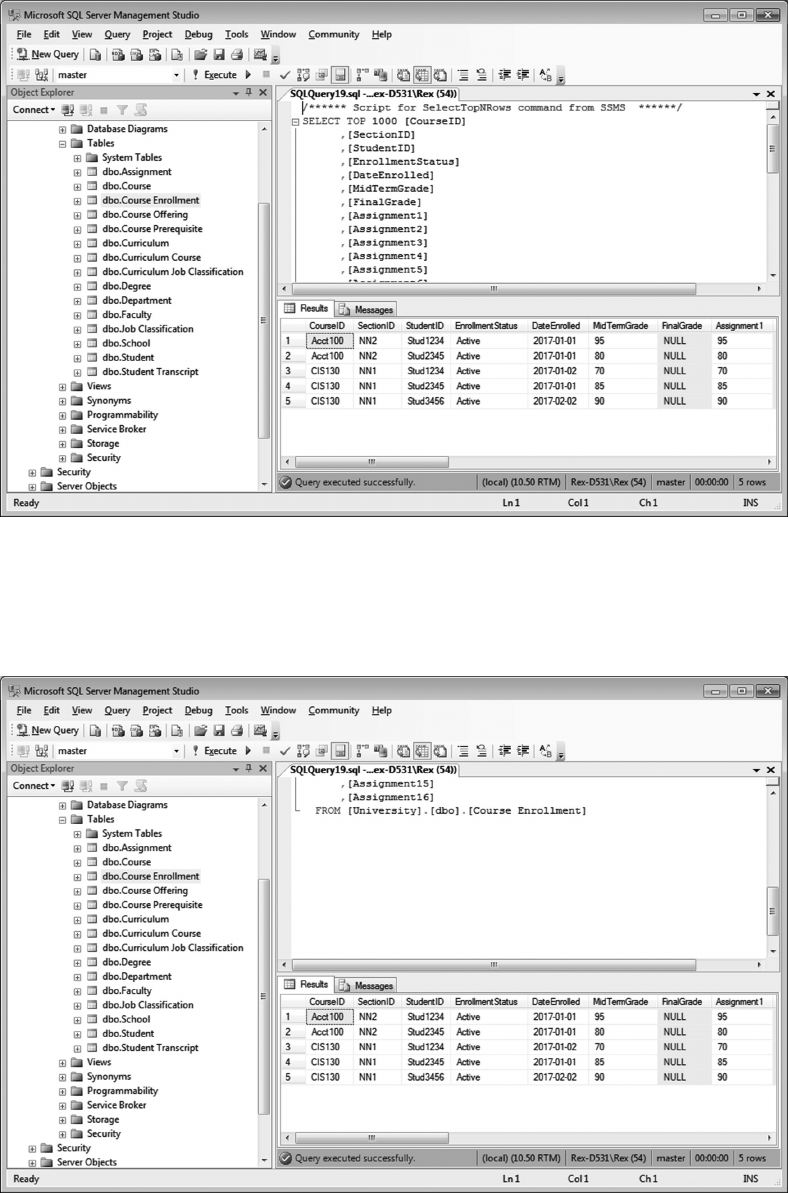
Using SQL Server ◾ 205
• To further qualify the query, scroll down the top-right pane to see all of the SQL code
for the query.
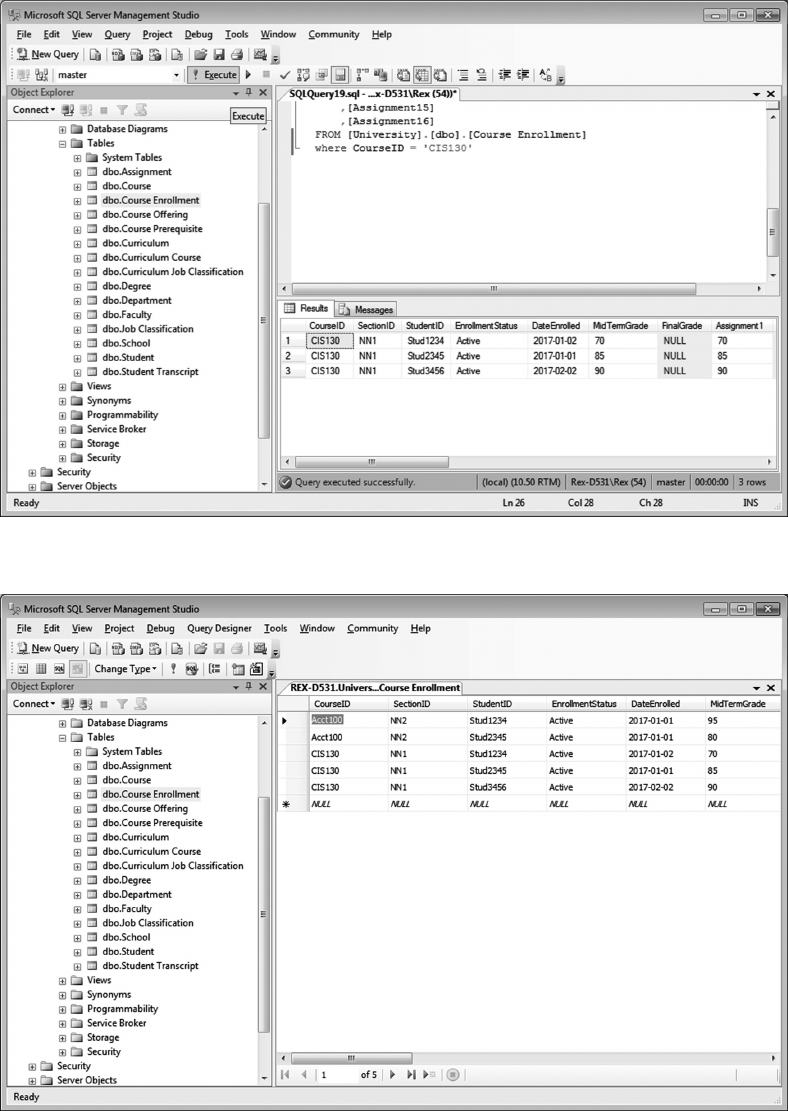
206 ◾ A Practical Guide to Database Design
• To see only student for CIS130, add “where CourseID = ‘CIS130’” to the SQL code,
then click the “! Execute” button at the top of the window.
To do simple edits, select the table name, right-click, and select “Edit top 200 rows.”
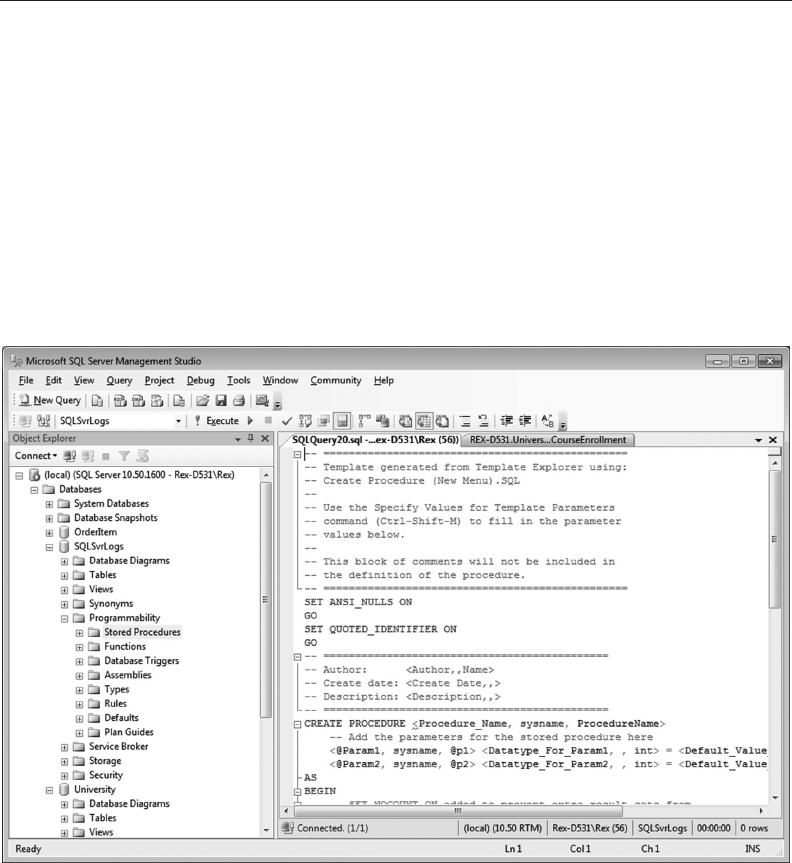
Using SQL Server ◾ 207
All of the columns in the display are editable. Change individual entries as needed, and
click the x at the top right of the pane to close the table.
For more complex edits, create a view of the target table selecting columns of interest
and qualifying the view if necessary to select rows of interest. Save the view, then select it
by name, right-click, and select “Edit top 200 rows.”
7.10 USING STORED PROCEDURES
A Stored Procedure is a collection of SQL statements that are compiled and stored in
the RDBMS. When executed, it will typically perform a predened set of updates to the
database.
Stored Procedures are an ideal place to store repeatable application logic. Developers are
removed from having to deal with the logic or rules embedded within the procedure and
simply call/invoke it by name when needed.
As one example, in the SQLSvrLogs database, when new WarningRecords and
ErrorRecords rows are imported, the tracking ags in each are null (have no value).
AStored Procedure is needed to initialize those ags to “0.”
To create this Stored Procedure, expand the database and Programmability options,
select Stored Procedure, and right-click on New Stored Procedure.
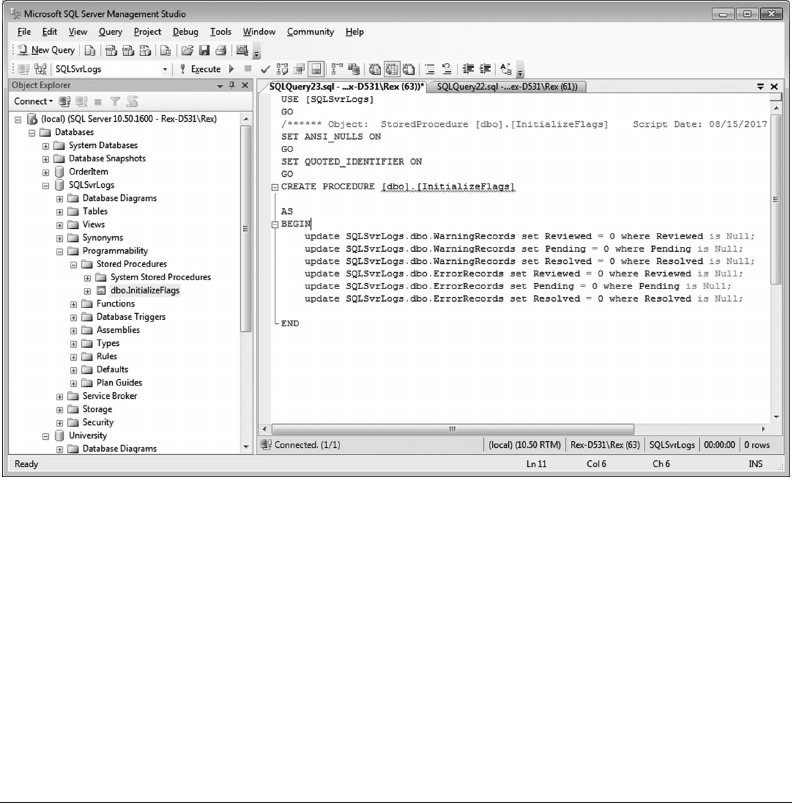
208 ◾ A Practical Guide to Database Design
A template opens to enter the code for the Stored Procedure. Note the green blocks for
comments and blue lines for SQL statements.
SQL code to initialize the tracking ags appears in the next window. Note the where
qualiers which limit the updates to only new rows which have null values by default.
Aer adding the SQL code, click the “! Execute” button to run the code and create the
Stored Procedure.
To make changes to a Stored Procedure, use the database/Programmability/Stored
Procedure sequence to show a list of all Stored Procedures, select the one to be updated,
right-click, and choose Modify.
A window will open showing the original code in a “Modify Procedure” block. Make
changes as needed, then click “! Execute” to run the code to modify the logic.
7.11 USING SQL SERVER AGENT
SQL Server Agent is a component of SQL Server that allows DBAs to create and schedule
jobs, including the details of each step within a job. To add a job, start (if necessary) open
SQL Server Agent, select Jobs, right-click, and click on New Job.

Using SQL Server ◾ 209
• Enter the job name and select a Category, then select Steps to add details of specic
actions to take.
Note the buttons to move the sequence of tasks within a job. ere are also options to
specify the action to take when the step completes successfully or if it fails.
Jobs are oen used to
• Schedule a backup of the database.
• Automatically import new les into tables.
• Generate daily reports.

210 ◾ A Practical Guide to Database Design
• If connected to the Internet, run maintenance checks and send alerts to DBAs when
appropriate.
• Rebuild indexes to conserve on space.
• As an example, at one point in time I had the responsibility of monitoring an SQL
Server instance at a remote location. To verify SQL Server was continually running,
I created a task that periodically did an export of a small table to a le, which in turn
was p’ed to a server used to monitor the status of system components. e date/time
of the exported le was used to verify SQL Server was running at that day and time.
e SQL Server Agent has a manual interface to Error Logs to view the current log or older
logs that have archived.
Note also that the system services for SQL Server and for SQL Server Agent are
independently managed, although of course the SQL Server service must be started rst.
Although the SQL Server Management Studio gives the DBA a powerful, easy-to-use
interface for dening and managing databases and for performing maintenance tasks,
additional soware tools are needed to provide user interfaces needed by users.
• Chapter 9 shows how Microso Access can be used as a GUI to provide application
functionality, using links to SQL Server tables.
• For more sophisticated applications, Chapter 11 shows how to use PHP to create a
web-based interface to an SQL Server database.
QUESTIONS
1. Explain the dierence between a RDMS and a relational database.
2. When doing hardware planning for an SQL Server database, what type of les must
be planned for and mapped to disk drives(s)?
3. If you installed SQL Server on a laptop, how would you congure the database les
mentioned in #2?
4. If you installed SQL Server on a desktop computer with two disk drives, how would
you congure/store the database les mentioned in #2?
5. If you installed SQL Server on a server with RAID 5 disk drives, how would you con-
gure/store the database les mentioned in #2?
6. When conguring an SQL Server Database Backup, you can choose to overwrite or
append the new backup to the output le. Which would you choose and why? What
are the ramications of this decision regarding recoverability options?
7. When creating a new table, how is the primary key identied?
8. When creating a table, when is the “Allow null” option selected for a column?
Using SQL Server ◾ 211
9. When creating a table whose key column is an ever-increasing numeric value, how is
that column dened when it is created?
10. When dening a column in a table, how can an index be created on that column?
11. When creating tables for a new database, when are indexes automatically created?
12. What steps must be taken to create a View of three linked tables in a database?
13. When dening an index on a column, does that index have to be unique?
14. What is the signicance of a “Clustered Index”?
15. What does it mean to rebuild an index? When is that done?


213
Chapter 8
Using Perl to Extract
and Load Data
8.1 WHY PERL?
Aer moving into the Intelligence Community and beginning to support Intelligence
Analysts, it did not take long before users needed to nd and extract specic types of data
strings that were embedded within a collection of les or documents.
is began with nding and extracting phone numbers found within each le. By
using Perl, you can, for example, search for data strings such as “nnn-nnnn” (three
digits, followed by a dash, followed by four more digits) by specifying a pattern search
“s/(\d\d\d-\d\d\d\d)/.” In this pattern, the “\d” specication calls for a match of any
numeric character. If the phone numbers include area codes, the search pattern would
be “s/(\d\d\d-\d\d\d-\d\d\d\d)/.”
Date strings were also important and can appear in various ways. Perl can be used to
nd and modify them when necessary to conform to a local standard. For example, a date
string with the format “yyyy-mm-dd” can be changed to “mm/dd/yyyy” using the follow-
ing search string:
“s/(\d{4})-(\d{1,2})-(\d{1,2})/$2\/$3\/$1/”
Let us analyze each element in detail.
• e “(” and “)” characters bound/identify a single search element.
• e (\d{4}) string species exactly four numerical digits.
• e (\d{1,2}) strings specify numeric strings either one or two digits long.
214 ◾ A Practical Guide to Database Design
• So, the above-mentioned specications within the rst two “/” delimiters can be read
as “four numeric digits followed by a ‘-’ followed by one or two digits followed by a
dash followed by one or two more digits.”
• e “()” pairs delimit unique string variables. In the above, the rst ($1) represents
the year, the second ($2) the month, and the third ($3). Used in this context, it allows
changing the order of the string variables found between the original and the modi-
ed output.
• is “s” syntax can be read as “change yyyy-mm-dd to mm/dd/yyyy.”
In general, then, Perl scripts are used to search les and identify records that have char-
acter strings that match specic patterns. When found, that record is typically bro-
ken down into substrings, and records are written to an output le using the character
strings found.
A typical application would be to analyze log records for a computer or database. Search
patterns are created to identify/classify log records with information, warnings, or errors,
decomposing those records, and writing these records to informational, warning, or error
output les. When nished, those output les can then be reviewed by an administrator or
database administrator (DBA) to determine the general health of the system being moni-
tored and to identify any corrective action necessary.
Search patterns can also be used to identify:
• Variations of date and time expressions.
• Phone numbers and zip codes.
• Records that contain any of a number of search terms of interest.
When a record is found that matches some search pattern, Perl has numerous functions
that support decomposing records/input strings and analyzing its contents.1 e more use-
ful include:
• split—to decompose a string into subelds based on a common eld delimiter (oen
tabs, commas, or spaces).
• substr—to create a substring of a record beginning at a specied oset and length.
• length—nd the length of a character string.
• index—nd the location in a string where a substring begins.
• chomp—remove line separators between records in an input le.
• while—identies the start of a series of commands. Used aer opening a le, it identi-
es the start of logic on how to treat/process records in the le.
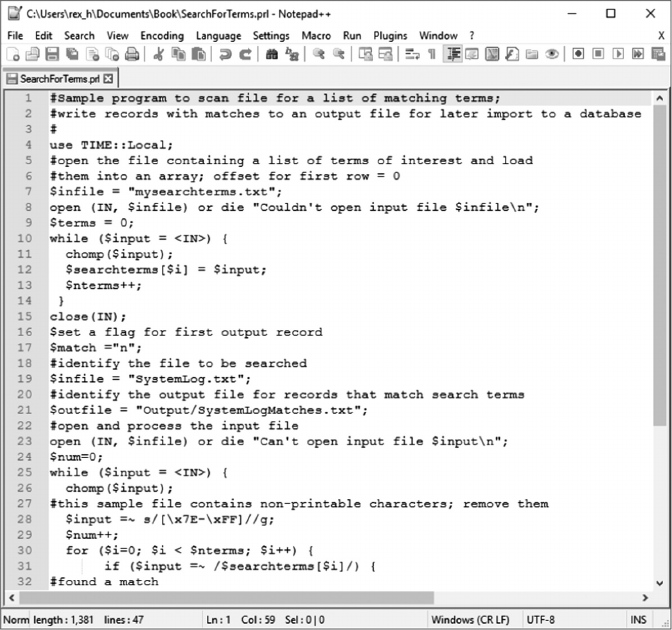
Using Perl to Extract and Load Data ◾ 215
See lines 10–14 in Figure 8.1 to see how a while loop is used to read all records in a le.
• if/then/else constructs to group logic to be used when specic search patterns are
found.
• s—the general substitute operator, for example, “s/aaa/bbb/g,” species changing the
string “aaa” to “bbb” whenever found.
• system—execute an operating system command. For example, it is frequently used
to execute a directory command to nd the names of all les in a directory and write
those names to a le. at le in turn can then be opened in the Perl script to identify
and open les that need to be processed.
• sleep—pause the execution of a script for a specied time. is does not use any CPU
time and is used in a script that runs continuously to wait for a specied time before
continuing with the next cycle of checks/operations performed by the script.
• Arrays—a simple list accessed by index number.
FIGURE 8.1 First part of script to search le based on search terms.
216 ◾ A Practical Guide to Database Design
Arrays are simple but extremely useful. In the following example, an array is used to
store the contents of a le of search terms of interest to the user community associated
with a specic subject area. ose terms then form the basis for a scan of a collection
of log les, in which records containing any of these terms are written to an output
le. is output le would then be imported into a database for further review and
analysis.
As one possible application, users of Department of Defense computer systems are
prohibited from using government systems for illegal purposes/acts, for example, to
search the internet for pornography. By using this approach, system administrators
can create a le of terms typically associated with pornography and use that le as
input to scan new proxy log les to identify users doing internet searches using those
terms. e script can be set up to run every hour, with the les for search results
imported into a database for further review and analysis by system analysts.
Figure 8.1 shows the rst part of a script to perform these operations, which is shown
in Appendix D.
• Lines 7–15 open the input le of search terms and load each line as one element
of the array.
• Next, lines 16–23 open the input le to be searched (in this case, a system log le).
• Lines 25–43 in Figure 8.2 show the logic for searching each record for a match of
a search term.
• Line 26 removes the record separator at the end of the rst record.
• e le being analyzed is a log le containing nonprintable characters. Line 28
removes those characters from the input record.
• Lines 20–42 show how, for each record, the record is scanned for a matching
term. If a match is found, a record is written to an output le. Note the logic in
lines 35–42 that opens the output le the rst time a match is found.
In practice, the output le would then be imported into a database. Analysts would
then review what was found to see what, if any, further actions are necessary.
As another example, Oracle Database Administrators can use this approach to
constantly monitor Oracle database logs for informational, warning, and error
conditions that are of interest.
• First, they would create three dierent les of search terms, each containing the
Oracle message number/label of interest for that condition/state.
• When started, the script would read each set of search terms into dierent arrays.
• Next, the script would open and read the Oracle log le, searching for log records
with a date–time stamp that is more current from the last time the script was run.
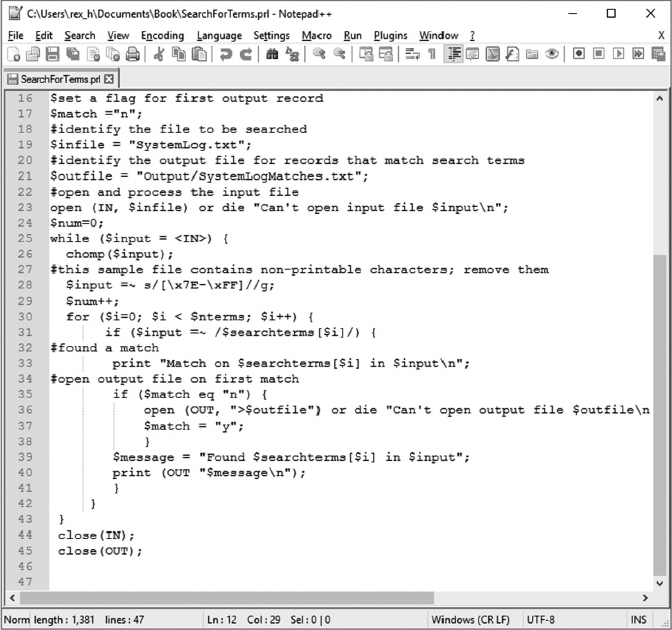
Using Perl to Extract and Load Data ◾ 217
• When a new log record is found, it would be checked against each of the three
arrays of search terms, with any matches written to an associated output le. Note
that the name of the output le would contain an element identifying when the
le was created.
• e script would save the most recent date–time stamp from the log le for use
on the next cycle.
• e script would then sleep for a designated time frame (e.g., 30min) before run-
ning again.
is script would run continuously, and at the end of each cycle, the les of search
results would be moved to a directory to be reviewed by DBAs monitoring the data-
base system’s overall health.
• Hashes (associative arrays)—a hash is an array using an index to store a value. Hash
variables provide extremely fast access in searching the array for values associated
with the key term.
FIGURE 8.2 Second part of script to search le based on search terms.
218 ◾ A Practical Guide to Database Design
ey are extremely useful when searching les for records that contain a match for
some term in a predened list. Terms of interest are rst loaded into a hash when the
script starts. Next, when a new record is read and broken into substrings, each sub-
string can be compared to the indexed hash to one if there is a match.
• time, localtime—get the current date and time.
• A “.” is used to concatenate two character strings, for example, $newstring
=$string1.$string2.
• int—a function used to return the integer portion of a variable or calculation.
• %—a modulus operator to nd the dierence between to integers. I have oen used this
to make decisions on the basis of the current time stamp when an operation begins.
For example, assume an environment where one server acts as a le collection system
that receives les and then pass them o to one of three servers for detailed analysis/
processing. Let us also assume Server1 and Server2 have half the processing capabil-
ity of Server3. Let us look at how % can be used to evenly distribute the workload
across these three servers.
• First, get the current time and set a variable to the current value of the minute, $min.
• Next, compute the value of a variable based on a modulus of four by computing
“$val=$min % 4;”. As a result, the value of $val will vary from 0 to 3, that is,
if $min = 1, $min % 4will equal 1;
if $min = 2, $min % 4will equal 2;
if $min = 3, $min % 4will equal 3;
if $min = 4, $min % 4will equal 0;
if $min = 5, $min % 5will equal 1; and so on.
Note that by using a modulus of 4, each value of $val will occur 25% of the time.
e value of $val, therefore, can be used to invoke logic blocks that will be acti-
vated 25% of the time, based on the clock time when the logic starts. By using this
approach, les can be forwarded using this logic:
$val = $min % 4;
if ($val == 1) {
<commands to ftp/sftp files to Server1>
}
elseif ($val == 2) {
<commands to ftp/sftp files to Server2>
}
elseif ($val == 3) {
<commands to ftp/sftp files to Server3>
}

Using Perl to Extract and Load Data ◾ 219
elseif ($val == 0) {
<commands to ftp/sftp files to Server3>
}
Note also that because Server3 is twice as powerful as the other two, it will receive
les 50% of the time, and each of the other servers receives les 25% of the time.
8.2 PERL VERSUS PYTHON
As much as I love Perl, Python has recently evolved as an equivalent soware product.
Ihave experimented with Python and see some advantages, but the two products have the
same general functionality and capabilities.
Python uses and recognizes tabs as part of the logic to identify and manage the begin-
ning and end of logical operations.
Perl takes roughly twice as much code to produce the same result, but a Perl script is
totally readable; “what you see is what you get.” Not having to worry about tab indenta-
tions make Perl scripts so much more readable and manageable, especially when you have
inherited scripts written by someone else.
8.3 WINDOWS VERSUS UNIX
Perl soware is free and runs on both Windows and Unix platforms.
For Windows, the ActivePerl project provides a commercial-grade community distribu-
tion which can be downloaded for both 32- and 64-bit computers. For Unix, Perl comes
preinstalled on essentially all Unix operating systems.
Scripts written in Perl can run somewhat transparently between Windows and Unix
computers.
• Scripts oen must invoke system (operating system) commands. ose are of course
dierent between Windows and Unix.
• If the script interrogates directories to nd and process les, the most signicant changes
involve dealing with the separator variables when interrogating/using a directory path.
Unix directory paths use “/” separators, whereas Windows uses “\” characters.
As an example, assume the user Analyst has a Documents directory that in turn contains an
“InputFiles” directory. Our script needs to identify all les within the InputFiles directory
and open and process each. Let us look at the code necessary to nd and open each le.
For Unix, the script would rst issue a command to create a le that contains the names
of all les found there. e Perl commands would be
#create a variable identifying the directory to be checked
$chkdir = “/home/Analyst/Documents/InputFiles”;
#create a file containing a list of all files in that directory
# and write the files found to a file named “filelist”
#..first, create the command to be executed
220 ◾ A Practical Guide to Database Design
$cmd = “Is $chkdir > filelist”;
#next, invoke that command to create filenames
system ($cmd);
#now open the list of files to be processed
$inputfile = filelist;
open (LIST, $inputfile) or die “Can’t open file list
$inputfile\n”;
while ($files = <LIST>) {
chomp ($files);
#create a variable with the name of the file to be opened
# by concatenating the directory name and the file name
$filenames = “$chkdir” . “$files”;
#open and process that file
open (IN, $filenames) or die “Can’t open input file
$filenames\n”;
while ($input = <IN>) {
chomp($input);
.
.
.
}
close (IN);
}
close (LIST);
is script can be modied to run in Windows with minimal changes.
• First, the details of the directory path must be modied using “\” separators. Using
the Unix naming convention shown earlier, the directory would be “\home\Analyst\
Documents\InputFiles;” using Windows naming conventions modies the directory
name to “\Users\Analyst\Documents\InputFiles.”
• Next, a Perl variable set to “\Users\Analyst\Documents\InputFiles” would not work
as is because the “\” character has a special meaning in Perl and is ignored as an input
character/value. e “\” tells Perl to treat the next character in the string as is and to
ignore any special meaning associated with it.
For example, to use a “?” as part of a search pattern, we would use “\$” in that pat-
tern to specify the use of the $ as a character. Otherwise, Perl treats the $ as a meta-
character specifying the end of a string.1
To tell Perl we want to treat the “\” as a character value and not as a meta-character,
we change the string to include two “\\” characters:
“\\Users\\Analyst\\Documents\\InputFiles.”
• In addition, the command to list les in a directory must be changed from the Unix
“Is” to the DOS equivant “dir”.

Using Perl to Extract and Load Data ◾ 221
As a result, the Windows version of this script is
#create a variable identifying the directory to be checked
$chkdir = “\\Users\\Analyst\\Documents\\InputFiles”;
#create a file containing a list of all files in that directory
# and write the files found to a file named “filelist”
#..first, create the command to be executed
$cmd = “dir $chkdir > filelist”;
#next, invoke that command to create filenames
system ($cmd);
#now open the list of files to be processed
$inputfile = filelist;
open (LIST, $inputfile) or die “Can’t open file list $inputfile\n”;
while ($files = <LIST>) {
chomp ($files);
#create a variable with the name of the file to be opened
# by concatenating the directory name and the file name
$filenames = “$chkdir” . “$files”;
#open and process that file
open (IN, $filenames) or die “Can’t open input file $filenames\n”;
while ($input = <IN>) {
chomp($input);
.
.
.
}
close (IN);
}
close (LIST);
I have rarely had to move/migrate scripts between Unix and Windows. However, the fact
that Perl scripts are 98% portable made it much easier and faster to develop new applica-
tions or services by reusing sophisticated logic regardless of the computer platform.
8.4 REVIEW KEY MATCHING FEATURES
In the previous sections, we have seen examples of Perl scripts to identify and open les in a
directory that are ready for processing as well as scripts to search the contents of these les
for a specic set of terms. Now, let us review some of the more advanced search patterns
that can be used. In each case, assume the script has opened and is processing an input le
read as $record.
To search log records for records beginning with “Error”:
#read “if record begins with “Error”
if ($record =~ /^Error/) {
#additional logic on what to do
}

222 ◾ A Practical Guide to Database Design
To search records for a phone number using a pattern of “nnn-nnn-nnnn”:
Option 1:
#note multiple patterns of [0-9] (specifies any character from
0to 9)
#with - delimiters
if ($record =~ /[0-9][0-9][0-9]-[0-9][0-9][0-9]-[0-9][0-9][0-9]
[0-9]/) {
#additional logic on what to do
}
Option 2:
#note (\d{3}) calls for 3 consecutive digits
if ($record =~ /(\d{3})-(\d{3})-(\d{4)/) {
#additional logic on what to do
}
To search records for a time pattern of “nn:nn AM”:
#note the first pattern calls for either one or two digits
if ($record =~ /(\d{1,2}):(\d{2}) AM/) {
#additional logic on what to do
}
8.5 MONITOR SQL SERVER LOGS
Now let us take a look at a Perl script that can be used to continually monitor Structured
Query Language (SQL) Server log les. First, let us review some basic information about
the SQL Server log les.
• Note that SQL Server error messages are much simpler than Oracle log les, classify-
ing each message as informational, warning, or error messages.
• SQL Server logs are installation specic. In this example, they were installed by default
in the C:\Windows\Program Files\Microso SQL Server\MSSQL\Log directory.
• e simplest way to monitor the system is to continually monitor changes in the
SQLAGENT.OUT le in SQL Server’s Log directory. In this le, informational mes-
sages contain a “?” character, warning messages contain a “?”, and error messages
contain an “!”.
e following Perl script (shown in Appendix E) opens the SQLAGENT le and
scans for informational, warning, and error messages. When found, they are writ-
ten to a corresponding output le. At the end of the check cycle, the script pauses
for 30min and repeats the checks. Note that each output le includes a date/time
Using Perl to Extract and Load Data ◾ 223
stamp as part of the name to separate the information being generated from each
cycle. At some appropriate time interval, all output les would be moved to a direc-
tory used by DBA’s to monitor the database’s status. Typically, another Perl script
would run continuously in parallel to check for new les associated with error mes-
sages and display a white on red status message to alert DBA’s to review new les for
the latest error messages/updates.
Let us analyze this script in detail, starting with Figure 8.3.
• Line 5 denes a variable for the location of the SQL Server SQLAGENT le.
• Line 7 sets a user variable for the time delay between log checks. Here, it is set to
30min, with the associated number of seconds computed in line 9.
• Line 9 determines the point at which the logic repeats with the next cycle.
• Lines 10–12 set ags for each class of output le; these ags control the opening of
each class of le when the rst record for each is found.
• Line 13 gets the current date and time information. A date–time variable is
extracted in line 15 to make them usable as part of a le name; spaces and “:”
characters are altered in lines 17 and 18.
• e log le is opened in line 20, and the cyclical check of the log records begins
with line 21.
• Line 22 removes the line separators in the record.
• Line 23 removes all unprintable characters.
• Lines 23–27 extract the date–time string from the last non-blank record.
• In line 29, the date–time string is compared with the last date–time string from
the previous check. If the current record has a date–time string with a lower value,
it has already been checked and can be ignored.
• Lines 31–41 show the logic for handling informational records (i.e., those con-
taining the “?” character).
• Lines 32–37 show the logic executed the rst time an informational record is
found in this check cycle. e le name is created embedding the date–time vari-
able set in lines 14–19, the le is opened, and the log record written to it.
• In lines 38–40, if the output le is already open, the log record is written to it.
Figure 8.3 shows the remaining part of the script with logic for warning and error log
records.
• Lines 42–52 duplicate the logic for lines 31–41 modied as needed to handle
warning records identied with a “+” character. Note the use of the $warn vari-
able to control the warning output le.
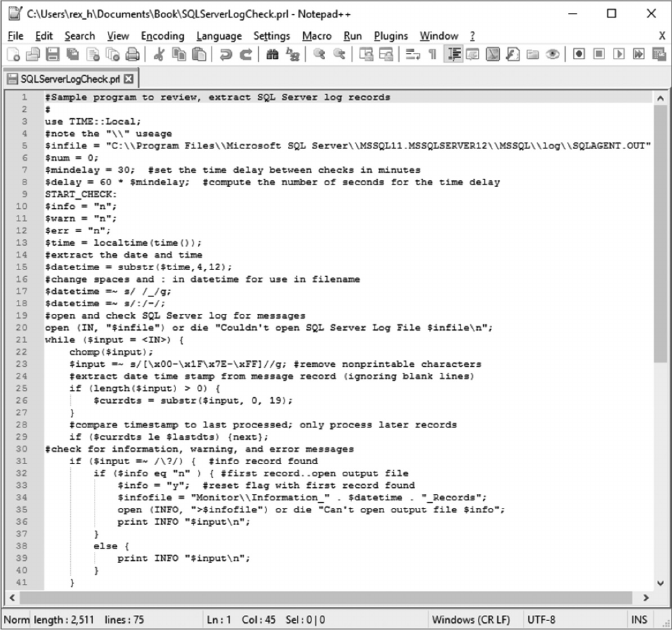
224 ◾ A Practical Guide to Database Design
• Lines 53–63 duplicate the logic for lines 31–41 modied as needed to handle error
records identied with an “!” character. As was done earlier, the $err variable
controls the error output le.
• Aer the le is checked, the last date–time string is saved in line 66. All les are
then closed in lines 67–70.
• e local time is obtained in line 71 and used in the message generated by line 72.
• e sleep function invoked in line 73 temporarily halts all processing, and the
process sleeps until the specied time delay ends.
• At that point, the logic is redirected by line 74 to resume processing at the START_
CHECK label at line 9.
Note that this process will loop/continuously process until manually interrupted/
canceled.
FIGURE 8.3 First part of script to monitor SQL Server logs.

Using Perl to Extract and Load Data ◾ 225
8.6 MONITORING WINDOWS LOGS
To monitor Windows logs, use the Windows Event Viewer to review the application, secu-
rity, and system log collections. In each, errors are labeled using “Information,” “Warning,”
and “Error” labels for each record. In most cases, simply reviewing the logs will provide
sucient information regarding the system’s health.
To provide more of an in-depth analysis, Perl scripts can help by siing through each
le and consolidating message for each type. To perform this type of analysis,
• Open the Event Viewer and open the “Windows Logs” label to display the types of
logs available for analysis. Note the Application, Security, and System labels.
• Select either the Application, Security, or System labels and note the list of log records
that have been created. In the right-most pane, select “Save all events as” to create an
external le containing these log records.
• Use the “Save as” browser window to navigate to the working directory in which
these logs are to be stored for analysis.
• Next, change the “Save as type” to Text to create a tab-delimited text le using a le
name indicating the type of log records being used.
• e script shown in Figures 8.3 and 8.4 can be modied to review and summarize
these log records. ese changes are fairly straight forward:
• Change line 5 to indicate the directory path and name of the input le created earlier.
• is script will be used once aer each log record extraction and not run con-
tinuously. As such, the date–time information is not needed, so the code in lines
25–29 and 71–74 can be commented out or deleted. Note that the $datetime vari-
able is still set for use when creating the name of the output le of log records.
• In line 31, change the specication for information records from “/\?/” to
“/Information/.”
• Similarly, in line 42, change “/\+/” to “/Warning/,” and in line 53, change “/\!/” to
“/Error/.”
• Finally, modify the $infole, $warnle, and $errle variables to include the names
“Application,” “Security,” or “System” based on the type of log le being analyzed.
• Repeat this process, changing the name of the input le and the $infole, $warnle,
and $errle variables as appropriate.
ese scripts are now ready for use. To analyze one or all of the Windows logs, use
Event Viewer to extract and save the records to be reviewed in a tab-delimited le,
then run the appropriate extraction script.
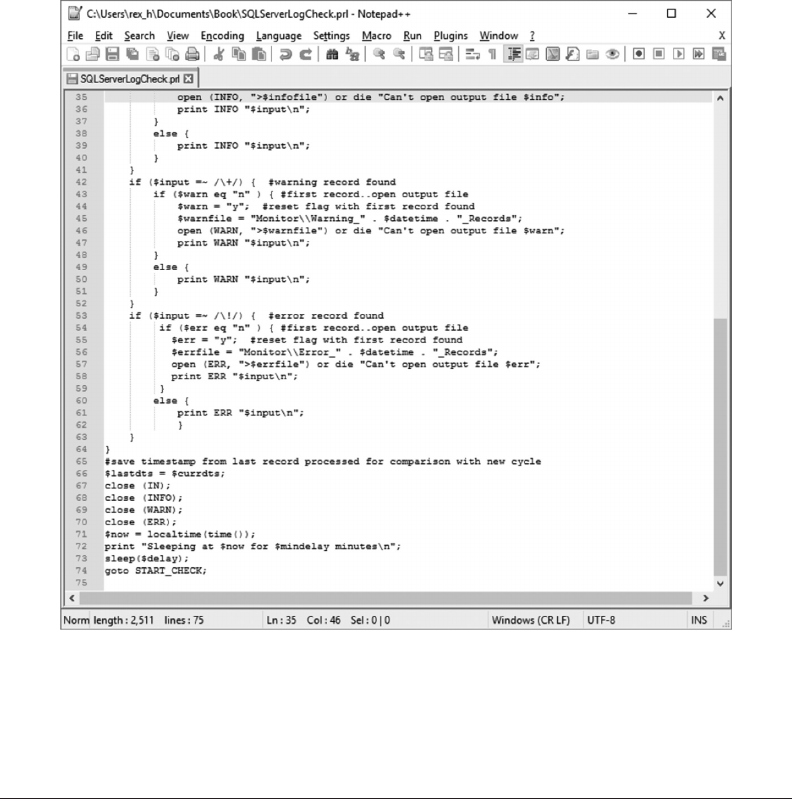
226 ◾ A Practical Guide to Database Design
8.7 OTHER APPLICATIONS AND USES
In addition to the above, I have oen used Perl to create various system monitors to con-
tinuously monitor the state of a system and/or its processes.
• When running on Unix, use system to invoke a “ps -ef|processname> checks”
command. is command identies all running process, lters them for the name
processname, and write matches to a checks le. e checks le can then be opened
and reviewed to verify that processname is running. If not, an error message can be
displayed for corrective action.
• To verify that some host is alive and well, create and monitor a mechanism that cre-
ates a system heartbeat.
• is may be as simple as monitoring a directory for new les that are created
continuously.
FIGURE 8.4 Second part of script to monitor SQL Server logs.

Using Perl to Extract and Load Data ◾ 227
• If SQL Server is running on that system, an agent can be created to periodically export
the contents of a small table. Checking the date and time stamp of the exported le
veries that both the operating system and SQL Server are up and running.
• A Perl script can be written to create an output le each time run, then sleep for
aspecied period and repeat the process. Monitoring the date and time stamp of the
output le conrms that the host and Perl script were active at that date and time.
• Next, a collection/monitoring script is needed to check the results of all monitor-
ing scripts running by either directly checking to output directories in which
these scripts run or by p/sp-ing the results of these directories to a local direc-
tory. e monitoring script can then continuously check the health of a number
of remote systems without requiring an analyst/administrator to continuously
connect to each to perform a manual verication. When run on Unix, I always
reset the display to white on red to make the information stand out.
If this monitoring script runs on Windows, it can be made even easier to use by
not only displaying error messages when errors are found but also playing selected
Windows sounds to get the attention of the analyst/administrator running the system
checks. My personal favorites are the sound of glass breaking followed by a tinkling
sound. ey get your attention!
• Perl scripts can easily monitor a directory for new les that have been created and
then take an appropriate action to forward or process the new les.
• e command-line option of Perl can be used for sophisticated editing of the le con-
tents, for example, to enforce consistency of formatting of date/time strings.
8.8 LOADING DATA INTO TABLES
Hopefully by now, you have an understanding of how easy it is to use Perl to extract
data from input le(s) and to create output les for analysis or review by analysts or
administrators.
In some cases, simply reviewing new les may be sucient. For example, DBAs can
monitor an output directory for new les with warning and error messages regarding the
care and feeding of their databases. Monitoring newly created les for current events/con-
ditions will allow them to take whatever corrective action may be necessary. For example,
a tablespace may be running out of space and needs to be extended.
If, however, such monitoring identies problem symptoms that need to be investigated,
these messages can be imported into a problem-tracking database and used by DBAs
toidentify and track the status of error messages that are being reviewed/ investigated.
Aweb-based interface for such a database is described in Chapter 11 to review and classify
error records as Reviewed (no further action necessary), Pending (currently under inves-
tigation/analysis), and Resolved (problem/issue has been resolved). Using this approach
requires importing the error messages captured into a database table.
228 ◾ A Practical Guide to Database Design
In other cases, incremental changes on what is being monitored is insucient, and a
broader view of activity within the last day, week, or month is necessary to understand the
scope and nature of what is being monitored. In this case, the les of change records must
be imported into a database so that an analyst can query/review/summarize bulk activity to
assess what is happening. Perhaps the best example of this is in the monitoring of proxy log
les on government computer systems. Users of these systems know they are for ocial use
only and that their activity will be monitored. ose warnings are oen insucient to pre-
vent users from using government systems for other than ocial and/or authorized purposes.
For example, the script shown in Figures 8.1 and 8.2 can be used to build a monitoring
system for pornography.
• First, les associated with pornography can be loaded as a set of search terms.
• Next, new proxy log records are reviewed to identify any internet activity associated
with those terms.
• Finally, records that match one of these search terms can be imported into a
pornography table for analysts to review in detail. This normally invokes review
of all activity for a user over a period of time to identify real abuse versus a one-
time finger-check/error.
A web-based interface such as described in Chapter 11 can be created for analysts to
allow them to classify records as Reviewed (no further analysis required), Pending
(current records under review), and Reported (activity/records that have been
reported).
Fortunately, les created with Perl can be easily imported into a database.
• Files can be directly imported into Microso Access, most commonly using a tab or
comma delimited le as input.
• If using SQL Server, files can be imported into a table using SQL Server’s bcp
utility.
• If using Oracle, les are imported using Oracle’s SQL*Loader utility.
Depending on the design and content of what is being monitored, the import function
may be totally sucient to update the database. In a more sophisticated application, such
as monitoring and reporting on proxy log activity described in Chapter 11, newly imported
rows need status ags set accordingly. ose can easily be handled within the database as
part of import processing.
While the import processing is very straight forward, there are some subtleties that
must be checked.
• e order of the data in the le to be imported will normally match the sequence of
columns in the table’s denition.

Using Perl to Extract and Load Data ◾ 229
• Each row will normally have a key eld/column embedded within the data record. In
some cases, rows are identied only by an ever-ascending row value which is incre-
mented automatically when new rows are imported.
• Imported les are driven/controlled by delimiters that separate the strings represent-
ing dierent columns. Check carefully to ensure that the delimiters chosen for use
never appear within the character strings being imported.
• In some cases, post-processing of data in new rows is necessary. For example,
in the proxy log monitoring discussed earlier, newly imported rows have null
valuesfor the Reviewed/Pending/Reported columns which should all be set by a
database update to have N values, which ag new records that need to be reviewed
by analysts.
8.9 SUMMARY
I have spent most of my work life with a database-centric point of view. In my later years as
a developer of database systems, I have continually found user requirements that involved
nding data within les of all types and extracting it, transforming it into information
needed by the user community. Perl has been invaluable. Going forward, I would recom-
mend including Perl (or Python) in every developer’s tool bag.
QUESTIONS
1. What must be done to a PERL scripts being migrated from a UNIX to a Windows
platform?
2. What are search patterns? What purpose do they serve?
3. Describe a pattern that will detect a date in the format of “mm-dd-yyyy.”
4. Show the PERL command to change a date string “mm-dd-yyyy” to “yyyy-mm-dd.”
5. What is the purpose of the split command? Give an example of how it can
beused.
6. What is the purpose of the index operator? Give an example of how it can be used.
Refer to the PERL script shown in Figures 8.1 and 8.2.
7. What is the purpose of the $nterms variable?
8. What is the purpose of the “if” test in lines 31–42?
9. What is the purpose of the $match variable?
10. What records are written to the Out le?
11. If you wanted to expand the search to include additional terms, what would you do?
Refer to the PERL script shown in Figures 8.3 and 8.4.

230 ◾ A Practical Guide to Database Design
12. In line 42, what is the purpose of the “\” character?
13. How are warning messages identied in the input le?
14. What are the output les produced when this script runs? Where are they stored?
15. What happens aer the script runs and nishes searching for warning and error
records?
REFERENCE
1. Medinets, D., PERL 5 by Example, Indianapolis, IN, Que Corporation, 1996, p. 203.

231
Chapter 9
Building User Interfaces
9.1 MICROSOFT ACCESS IN A TYPICAL OFFICE ENVIRONMENT
As you might guess, the typical desktop environment for users in the Department of
Defense (DOD) as well as in the Intelligence Community includes the Microso Oce
“Professional” or “Enterprise” soware suite, which includes Microso Access. Yes,
Microso Access is a light-weight database engine with limited capability to handle com-
plex queries, but it is amazing how far you can push Access when that is all you have to
work with.
9.1.1 General Capabilities
• As shown in Chapter 6, you can use Access to design, load, and query tables. In addi-
tion, Forms can be used to view or update subsets of data, and Reports can generate
output of complex queries.
• Table links can be created to view and update tables residing in another database
running on the user network. Links can be created for tables managed by Microso
Access, Structured Query Language (SQL) Server, Oracle, and others.
• Complex queries for an SQL Server or Oracle database can be created in Access and
classied as “Pass-rough” to forward the query directly the host database manage-
ment system (DBMS) for execution.
• Very large Access databases can be supported by partitioning tables across multiple
databases based on, for example, date ranges contained within the table. e user
interface merely needs a lter to identify the data range of interest to the user, then
opening the specic table-hosting data for that time period.
• Access contains embedded database administrator tools to shrink and repair the
database, reclaiming free space and restoring tables and indexes.

232 ◾ A Practical Guide to Database Design
9.1.2 Advantages
• Microso Oce is standard soware in essentially all government oces, including
those in Intelligence Community and DOD.
• It is easy to import data into tables from at les, Excel, or other databases.
• User functionality can be divided between a Data database having the core tables
needed by users and a second database serving as the graphical user interface (GUI)
to the data. e GUI would contain the query and update mechanisms and the Forms
and Reports needed by users; its tables simply be links to the physical tables residing
in the Data database. Each user would then be given a copy of the GUI database to
run on their workstation.
• If/When necessary, a table can be manually viewed, sorted, and/or ltered to view
data of interest. ose rows can subsequently be updated or deleted as needed.
9.1.3 Disadvantages
• Complex queries oen require numerous work tables, queries, or macros to achieve
a specic result. From the database administrator perspective, documentation for the
design and functionality of the numerous components can prove dicult to write and
maintain.
• Complex user displays can be dicult to create.
9.2 USE MICROSOFT ACCESS AS GUI
Microso Access can also be used simply as a GUI to view or update a database running
on the user’s network.
9.2.1 General Capabilities
• An Access database can be created in which the tables section only contains links to
tables in another database.
• Access can be used to generate Windows-based screens to view or modify those tables.
• Pass-rough queries can be created to forward complex SQL queries to the database
host.
• e GUI would be stored on each user’s desktop computer.
9.2.2 Advantages
• Queries and Forms are normally quick and easy to design and test. Developers can
get immediate feedback from users from the eectiveness and usefulness of the pro-
totype being developed.
• Access is preinstalled on all DOD and Intelligence Community computers.

Building User Interfaces ◾ 233
• ODBC links can be easily created to access SQL Server or Oracle databases running
on the server.
• More complex queries can be passed to the server using the “Pass-rough” option.
is passes the SQL for the query directly to the database on the server for interpreta-
tion and execution.
• As stated earlier, tables can be manually viewed, sorted, and/or ltered to display data
of interest. ese rows can then be updated or deleted as needed.
9.2.3 Disadvantages
• Complex queries are dicult to support. Multiple simple queries can be tied together
to achieve a more complex result, but documenting the details of the design can be
dicult.
• e GUI database must be installed on each user’s computer.
• More complex user displays can be dicult to implement.
9.3 .NET FRAMEWORK
9.3.1 General Capabilities
• Microso’s .NET Framework can generate complex Windows display of options and
actions that can be performed.
• ese implementations are user aware and can respond to the cursor position and
mouse clicks.
• e soware components are object oriented and typically use object-oriented design
patterns.
• e .NET Framework is based on C++.
9.3.2 Advantages
• e Windows displays built in a .NET Framework are very powerful. Very complex
windows can be displayed with action icons/buttons.
• ese tools can interoperate with other Windows-based tools. For example, a display
can be generated to interact with vendor soware to monitor and control that ven-
dor’s surveillance cameras.
• Object-oriented “Design Patterns” are quite benecial.
For example, the “Template” approach is quite eective in creating mechanisms to control
dierent types of surveillance cameras. Essentially, all cameras require the same type of
agents to control camera functions (tilt, zoom, etc.), but individual agents would contain
the vendor-specic code to operate that type of camera.

234 ◾ A Practical Guide to Database Design
9.3.3 Disadvantages
• e .NET Framework runs only on Microso Windows platforms.
• .NET implementations are totally dependent on the specic version of Microso
operating system and internals used to build them.
• e .NET Framework and tools that run under it must be installed on each computer
to be used.
• Development and support of .NET Framework tools are very complex and are deeply
interwoven with Microso internals. In addition, they are dicult and complex to
maintain.
• I found it dicult to update existing .NET-based tool because the behavior of the
application can be mouse- or cursor-sensitive in which the developer does not see the
code causing some result.
9.4 PHP
PHP is a widely used scripting language that can be used to develop web pages displaying
information and options to users. Chapter 11 describes the creation and use of a web page
to monitor database updates using PHP.
9.4.1 General Capabilities
• Options in each web page/window represent active links the user can select to open
and process dierent web pages.
• Each web page has HTML component(s) to manage the display of data and/or options
to the user and hidden code (invisible to web-based users) that check and act on
parameters passed to the web page when opened.
• e hidden code can have embedded SQL statements to connect to, retrieve, and/or
update data from a database.
9.4.2 Advantages
• Web pages built with PHP are independent of the operating system on client
computers.
• Although hidden from users, the logic and SQL commands are seen in clear text by
developers and are easy to read and maintain.
• PHP soware can be downloaded at no cost.

Building User Interfaces ◾ 235
9.4.3 Disadvantages
• e setup for a PHP-based implementation is somewhat complex.
• It requires (of course) a web browser running on the host.
• Typically, data encryption of web trac is required.
• PHP requires database drivers for the DBMS to be used.
• PHP must be set up and activated on the host before development can begin.
9.5 JAVA
I have personally never developed web pages with JAVA. I have, however, worked in a sup-
port role in which a team of developers were using JAVA to build entire database applica-
tions for users.
9.5.1 General Capabilities
• JAVA applications can support complex displays and serve as a platform for database
applications.
9.5.2 Advantages
• Development tools are commonly available.
9.5.3 Disadvantages
• Developers require additional training and use of development tools.
• JAVA is, in my opinion, not suitable for rapid prototyping.
QUESTIONS
1. When using Microso Access as a GUI, name two RDBMS’s that can serve as the
source for a database query.
2. When using Microso Access as a GUI, what is a linked table?
3. When using Microso Access as a GUI, how can a complex query using DBMS-
specic SQL be executed?
4. By default, where is a Microso Access database installed? What users can run que-
ries against the database?
5. Compare the use of Microso Access and PHP when performing a rapid prototype
for a new database application.
236 ◾ A Practical Guide to Database Design
A design team supporting a small group of analysts must do a rapid prototype to develop
a GUI to be used to analyze data collected for the team.
6. What relational database management systems could be used to store the database
and its tables?
7. Would a .NET framework be appropriate for use to develop the GUI? Why or why
not?
8. Would Microso Access be appropriate for use as a GUI? Why or why not?
9. Would PHP be appropriate for use to develop the GUI? Why or why not?
Assume a university environment where hundreds of teachers and administrators
have Windows-based computers varying in size and capacity and with a mixture
of Windows7 and Windows 10 operating systems. GUIs must now be developed to
administer course and student information.
10. Would a .NET framework be appropriate for use? Why or why not?
11. Would Microso Access be appropriate for use? Why or why not?
12. Would PHP be appropriate for use? Why or why not?

237
Chapter 10
Creating the University
Database Application
In Chapter 6, we saw how Microso Access can be used to create and load tables, run
simple queries, and create simple Forms. In the current chapter, we will see how to use
Access to create a more complex application based on the University data model developed
in Chapter 4. We will use Forms to create a Windows-based application to
• Enroll students into courses
• Enter grades for assignments
• Enter midterm and nal grades
Let us begin by creating tables for the University database using the physical data model
in Figure 4.7.
10.1 CREATE TABLES FOR UNIVERSITY ENVIRONMENT
Before we can create tables in a database, we must rst create the relational database
management system (RDBMS) system that will serve as a host to the tables and query
mechanisms.
• From the Start menu, click on the Access label for your system (e.g., “Access 2016”) to
start the RDBMS soware on your computer.
• Next, click “Blank Database” to start a new database management system instance.
• When the “Blank Database” screen opens, click on the folder icon and navigate to
the directory in which the RDBMS is to be located. Next, change the le name to
“University.accdb,” and click “Create.”
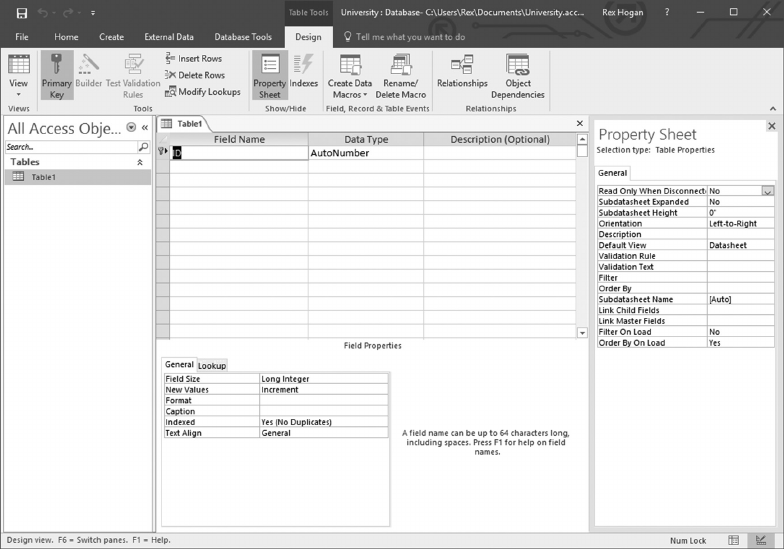
238 ◾ A Practical Guide to Database Design
• e Table1 window opens in data entry mode with a default name for the rst column
as ID. Click the small “x” at the top right of the Table1 pane.
• A window will open for you to specify the table name, enter “School,” then click
“OK.”
• We now have a window where we can enter the column names (under Field Name)
and the data type for each.
For the School table, enter the column name SchoolID and choose “Short Text” for a
data type; in the lower part of the window, change the Field Size to 50bytes.
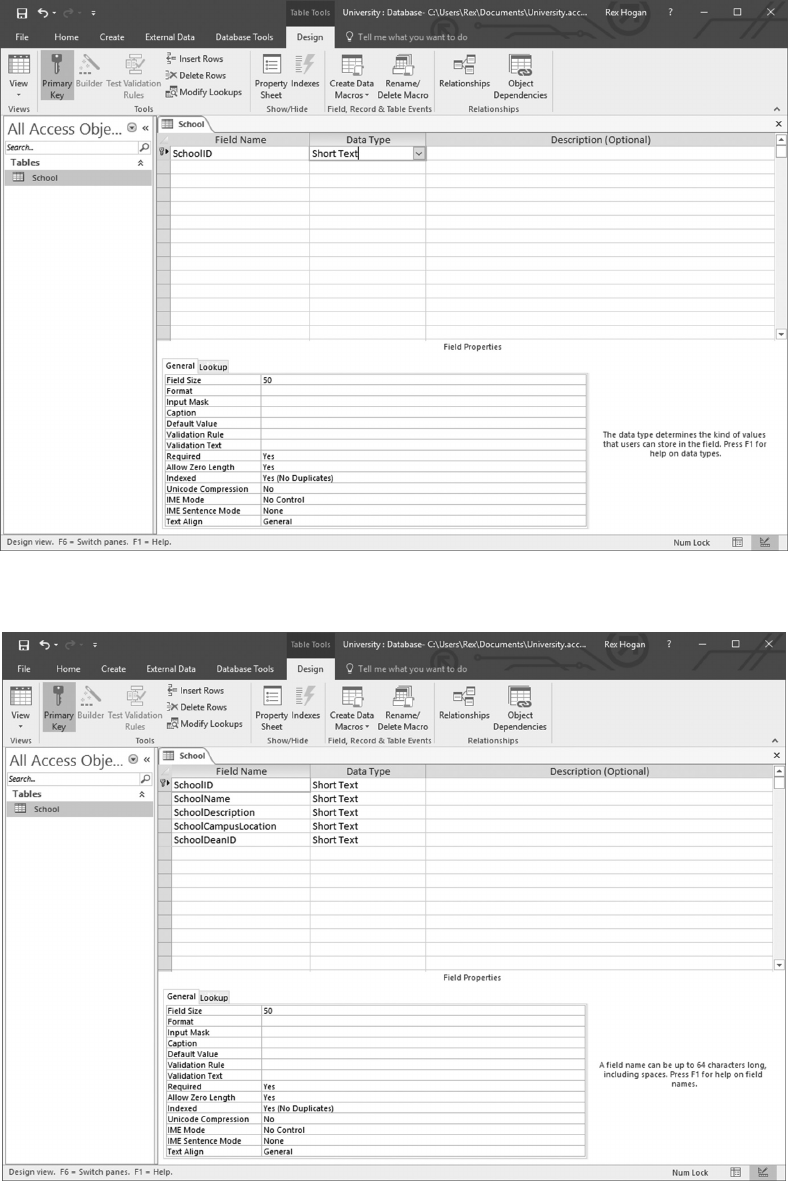
Creating the University Database Application ◾ 239
• Continue entering the column names and data types for the School table.
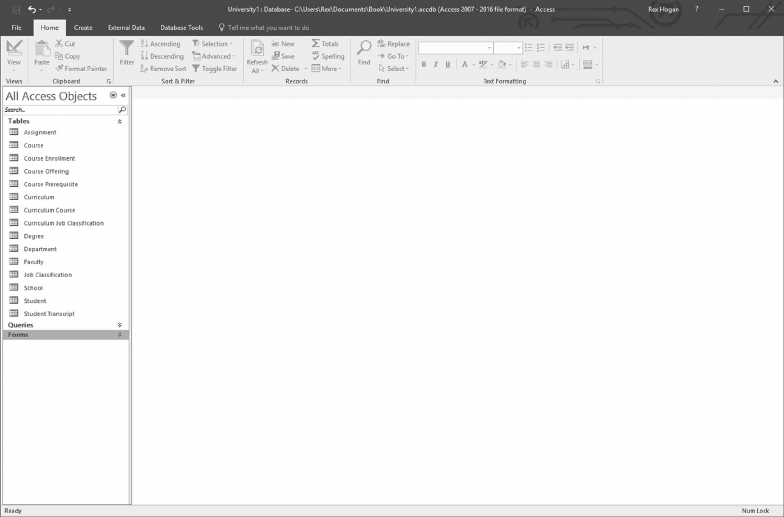
240 ◾ A Practical Guide to Database Design
When entering data type for a column, note that Access does not support varchar,
instead choose “Short Text” as a data type, and in the lower pane, change the eld size
to 50.
• Verify that the key symbol appears in the row(s) for the key column(s) for this table
and click the small “x” on the School line to close the table. In response to “Do you
want to save changes to the design of table ‘School’,” click “Yes.”
• Referring to Figure 4.7, repeat this sequence to create all tables in the physical data
model.
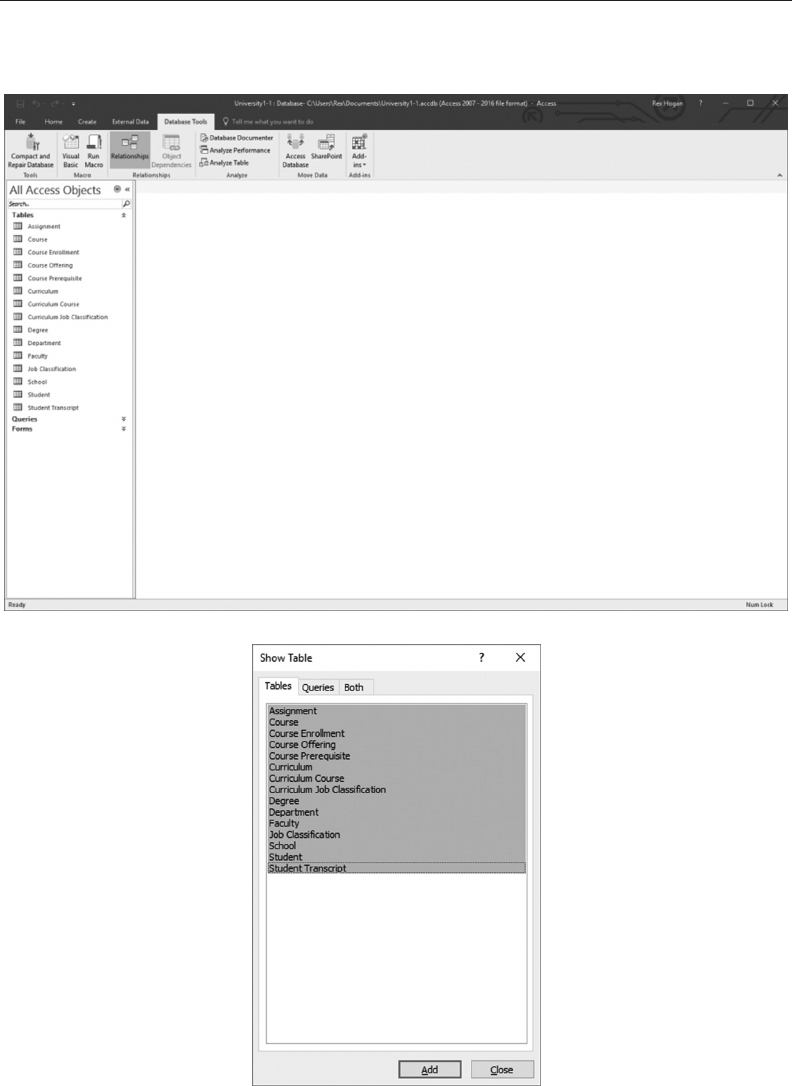


Creating the University Database Application ◾ 243
Now let us set the Referential Integrity constraints between tables.
• Note that the key of School (SchoolID) appears in Department. To set that relation-
ship, click on SchoolID in School, then hold the mouse down and drag the arrow to
SchoolID in Department. When you release the mouse, you see
Click the “Enforce Referential Integrity” box, then “Create.”
e one-to-many relationship is then created.
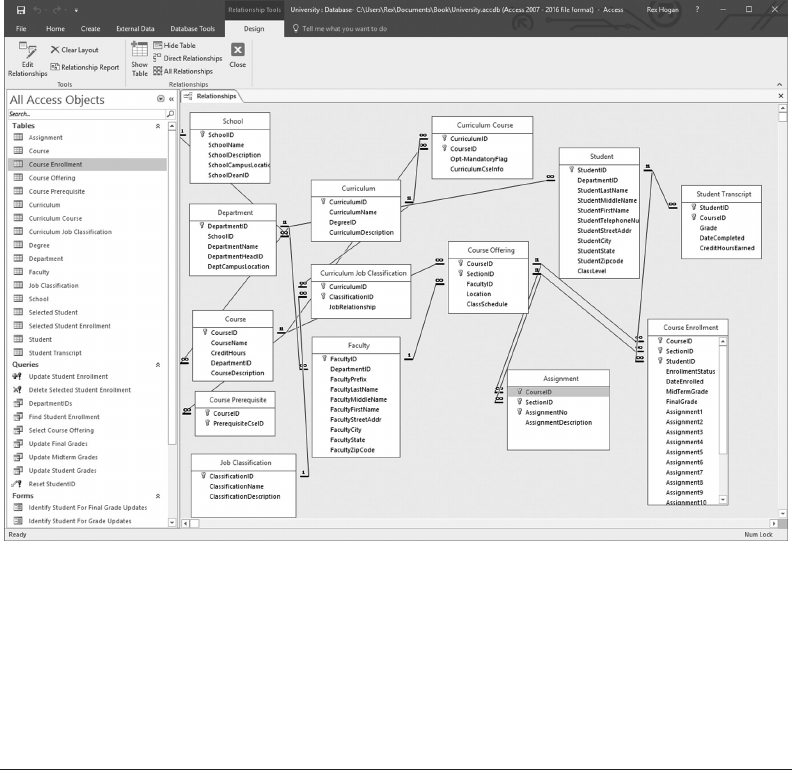
244 ◾ A Practical Guide to Database Design
• Study each table and create additional one-to-many relationships as indicated.
Compare your results to that shown in the following.
At this point, we are ready to start developing Forms-based mechanisms to enter
students and associated grades. However, before starting developing any forms, I rst
edited the School, Department, Course, and Course Oering tables to add a couple of
rows in each with test data. You will see the test data in the following screen shots as
queries and forms are developed.
10.3 DESIGN A SCREEN TO ADD NEW STUDENTS
To add new students, we need a window/screen to support capturing/recording each col-
umn of information in the Student table.
In reviewing these columns, however, note that one column contains the DepartmentID
for that student. Rather than having the person making the update type that value in (and
taking a chance of a typing error), we’ll use a pull-down menu in the form to select the
DepartmentID from a list of valid values.
To develop the desired form, follow these steps:
• Select/Click on the Student table name.
• Next, click on Create, then Form.

Creating the University Database Application ◾ 245
A screen will open with a “Student” form in design mode. Note that all columns from the
Student table have been added to this window.
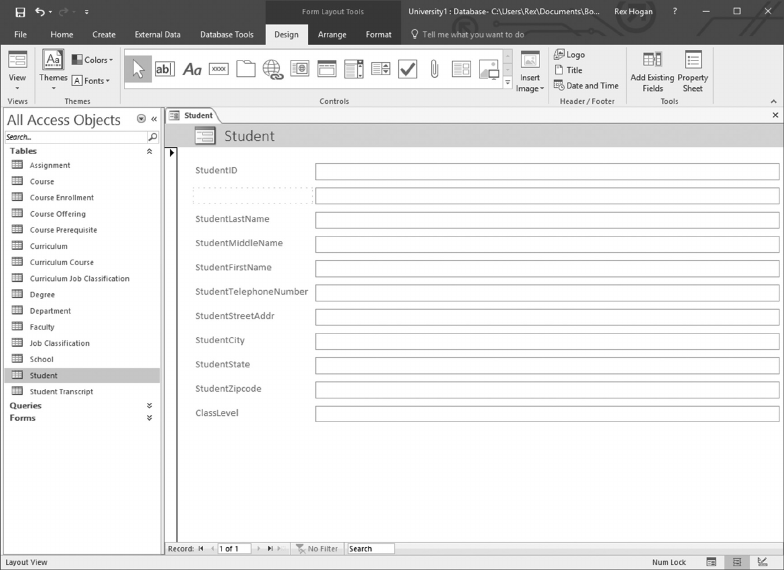
246 ◾ A Practical Guide to Database Design
is form could be used as is with no changes; however, remember that we want to use
a pull-down box for DepartmentID to choose an acceptable value rather than having to
type the value.
To make this change
• Click on the DepartmentID row in the Student form design window.
• Right-click and select “Delete” to delete that item in the form window.
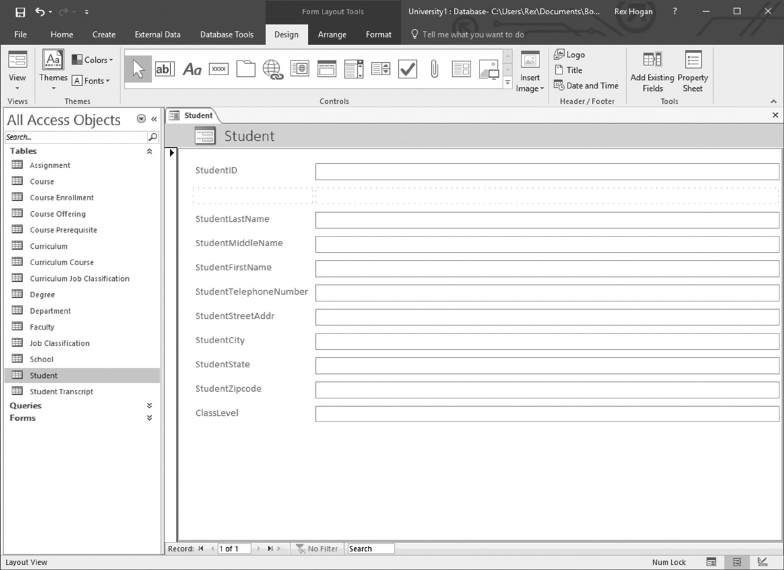
Creating the University Database Application ◾ 247
• Select the empty box to the right of where the DepartmentID label appeared, then
right-click and select “Delete.”
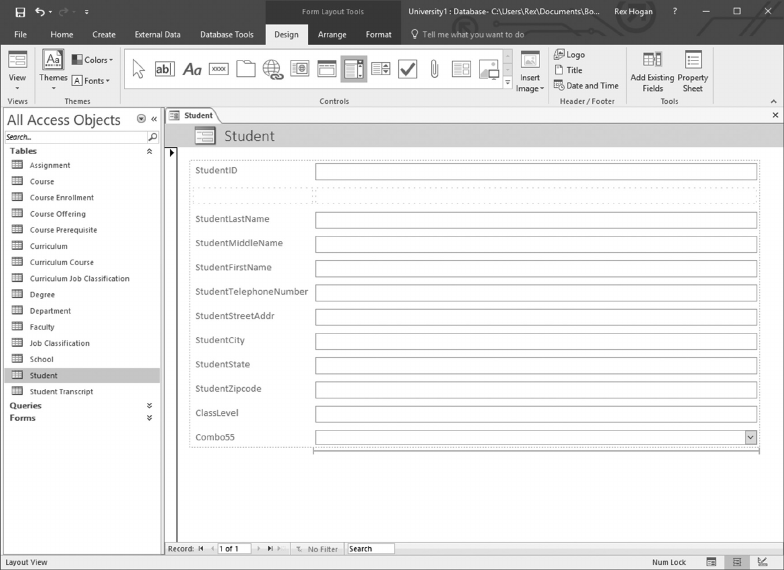
248 ◾ A Practical Guide to Database Design
e form design has now been modied to allow a space for the DepartmentID drop-
down box.
• Click the Design tab and scroll/nd the drop-down box icon; click on that symbol as
shown in the following.

Creating the University Database Application ◾ 249
• Click on the box where the Combo box is to be created:

250 ◾ A Practical Guide to Database Design
• Aer clicking the Combo box icon in the above-mentioned location, the following
dialog opens:
• Next, use the pull-down menu to select the Department table:
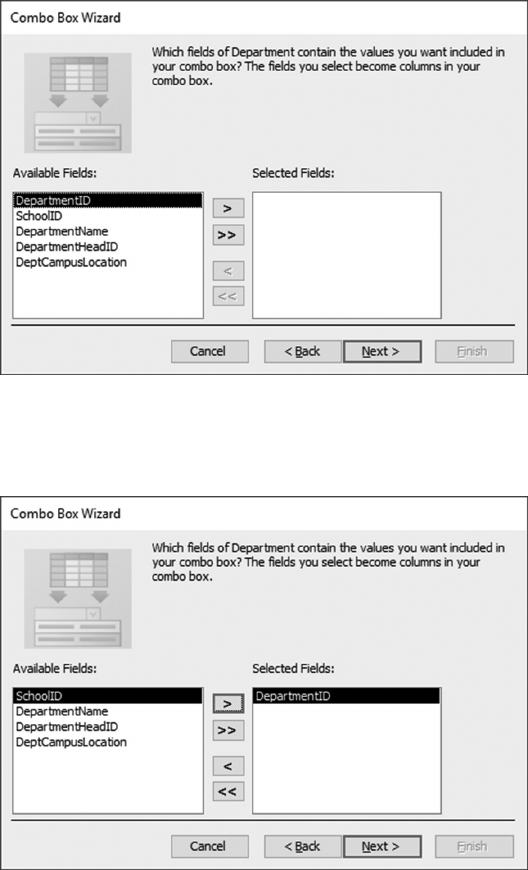
Creating the University Database Application ◾ 251
• Clicking Next opens the following window:
• First select DepartmentID as shown earlier, then click the “>” symbol to get the
following:

252 ◾ A Practical Guide to Database Design
• We have now specied that we want a Combo box (a pull-down list of values) to see
DepartmentID; the next window gives us the option of choosing a sort option.
• Clicking Next gives us the following screen:
is screen gives us the option to adjust the width of the display; the values shown
earlier show the test values previously entered for Departments.
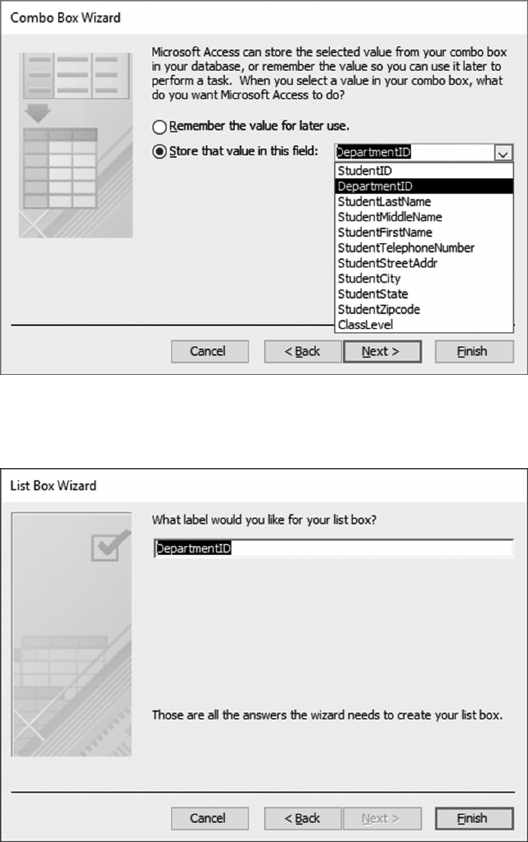
Creating the University Database Application ◾ 253
• In the next window, choose the “Store” option and select DepartmentID to store the
value retrieved into the form as DepartmentID.
• Clicking Next brings up a window asking for a name for the list; enter DepartmentID.
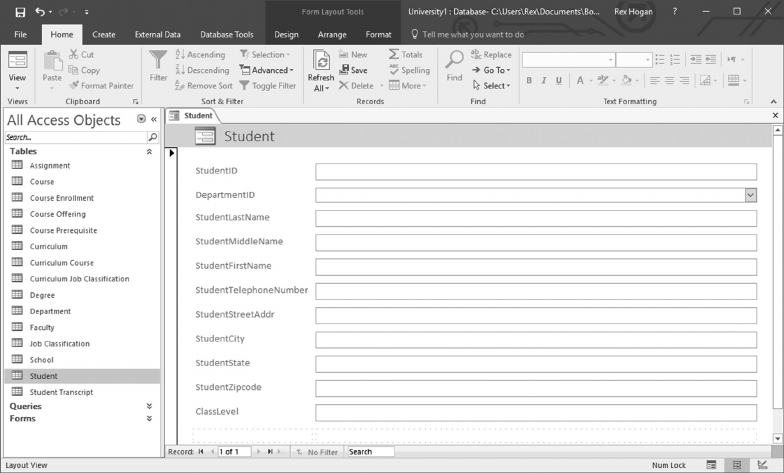
254 ◾ A Practical Guide to Database Design
• e Form has now been modied to include the Combo box just created.
e Form has now been updated to include a drop-down list with all DepartmentIDs.
To nish the design of the form, we need to make one further modication. At the
bottom of the form layout, add a “Save” button to add this information to the database.
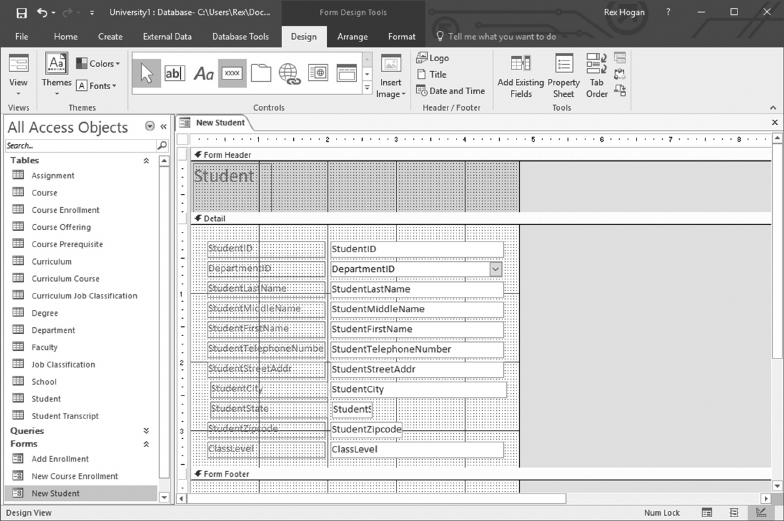
Creating the University Database Application ◾ 255
• With the form in design mode, select the Design and Button options as shown in the
following.
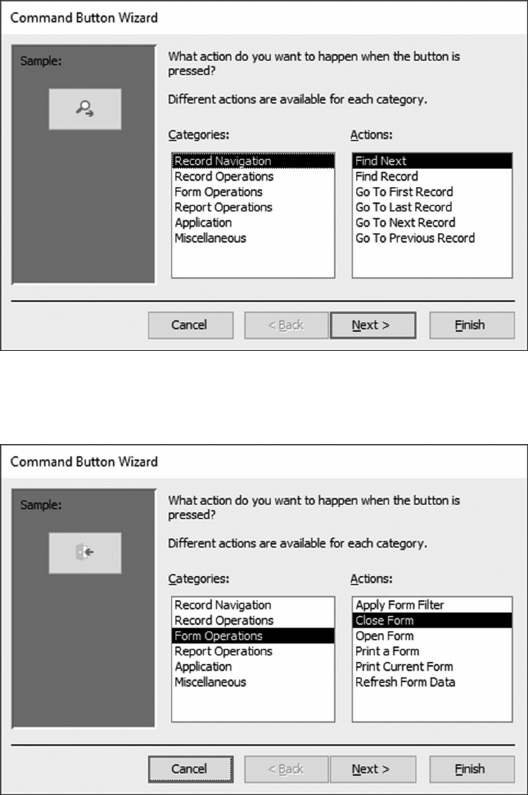
256 ◾ A Practical Guide to Database Design
• Next, move the mouse to the bottom of the form and drag it open to form a box.
Releasing the mouse gives the following:
• Click on Form Operations, then Close Form.

Creating the University Database Application ◾ 257
• Click Next, then select Text and enter “Save.”
• Click Finish, then enter a meaning name at the top of the form.

258 ◾ A Practical Guide to Database Design
• Clicking Finish adds the Save button to the form.
• Close and save the form, assigning an appropriate name to the form (in this case,
New Student Enrollment).
Opening the form opens a blank record where student information can be entered.
Note the drop-down icon on the DepartmentID line.
• Clicking on that arrow displays a list of all DepartmentIDs. Choose the one appropri-
ate for the student being enrolled.
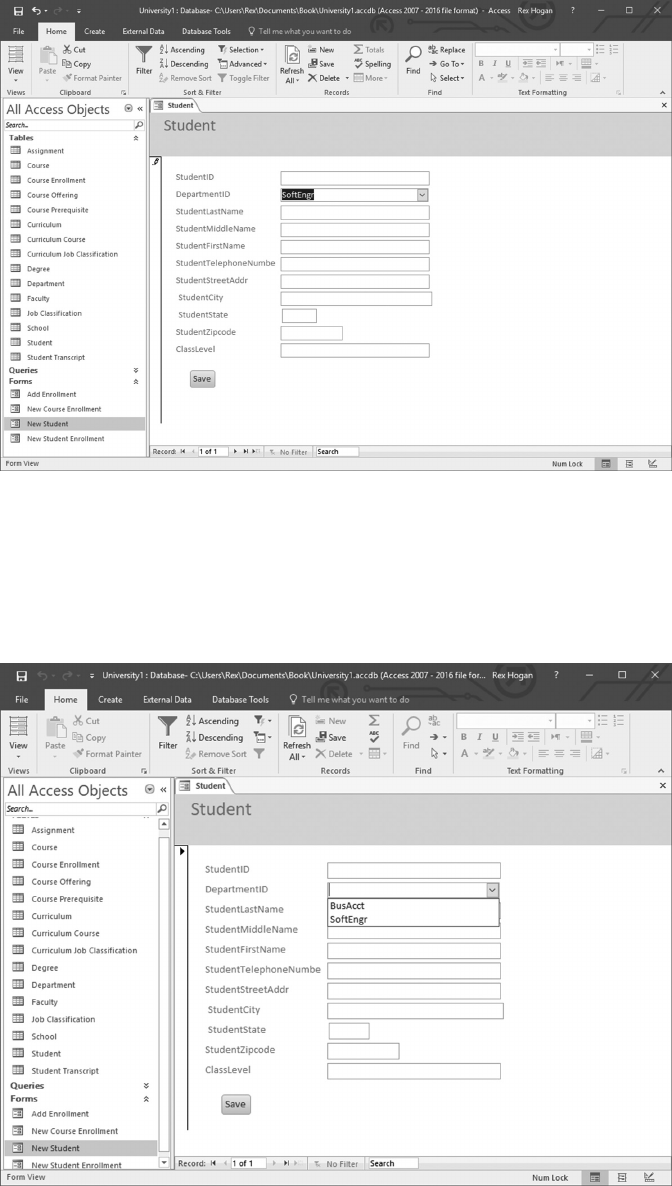
Creating the University Database Application ◾ 259
• Fill in the other information for that student, then click the Save button to add the
information to the Student table and close the form.
• To use the form, click on Forms/New Student and the following screen opens. Note
that the pull-down is populated with a list of DepartmentIDs in the Department table.

260 ◾ A Practical Guide to Database Design
Select the DepartmentID for the new student, ll out the other items, and click Save
to add that information to the Student table.
One of the last things we will do in this section is to create a “Main” page with con-
trols to activate/perform all of the functions needed. We will add a button to that
page to open this form when needed.
If you also need a form to modify Student information, follow the above-mentioned
steps, but instead of creating a Combo box for DepartmentID, create a Combo
boxbased on StudentID in Student. at form would then read and display all
information for the selected student, and Save would close the form with those
updates.
10.4 CREATE A SCREEN TO ENROLL STUDENTS IN A CLASS
e previous example illustrates how to create forms for simple tasks. Most applica-
tions require tools that are more sophisticated. When developing Forms-based tools
with Microso Access, I typically start by creating work tables to hold key data that will
be used in designing a query or form. To more easily identify this type table from a core
table associated with the database, I’ve used the word “Selected” as the rst word in the
table name.
In thinking about the steps needed to enroll students, the following steps need to be
taken:
• Using a form linked to a work table, capture the information about the student,
course, and section involved.
• Save the form to update the work table with this information.
• Insert these data into the Course Enrollment table.
• Delete the information in the work table (to clear it for the next enrollment).
• Reopen the enrollment form to start a new enrollment record.
To create a form for enrolling students in a class:
Create a “Selected Student Enrollment” table patterned aer the Course Enrollment
table with those columns used when enrolled a student (CourseID, SectionID,
StudentID, EnrollmentStatus, and DateEnrolled).

Creating the University Database Application ◾ 261
• Using this table as a source, create a form based on its contents.

262 ◾ A Practical Guide to Database Design
• Delete the CourseID row and replace it with a Combo box to look up DepartmentID
values from the Course Oering table, that is, show a list of DepartmentIDs for all
courses being oered.
• Delete the SectionID row and replace it with a Combo box to look up SectionID val-
ues from the Course Oering table.
When this Combo box is built, a query is created with the syntax “Select SectionID
from [Course Oering];”, and the list returned will contain all SectionID values
for all course oerings. e query needs to be changed to include the CourseID
value from the previous line; that is, show only SectionID values for the selected
course.
To make this change, select the SectionID line just created and select the
SectionIDbox.
Right-click that box and click Properties to see the details behind the Combo box.
On the Data tab of the Property sheet, note the beginning of the “Select” clause for
the Structured Query Language (SQL) query.
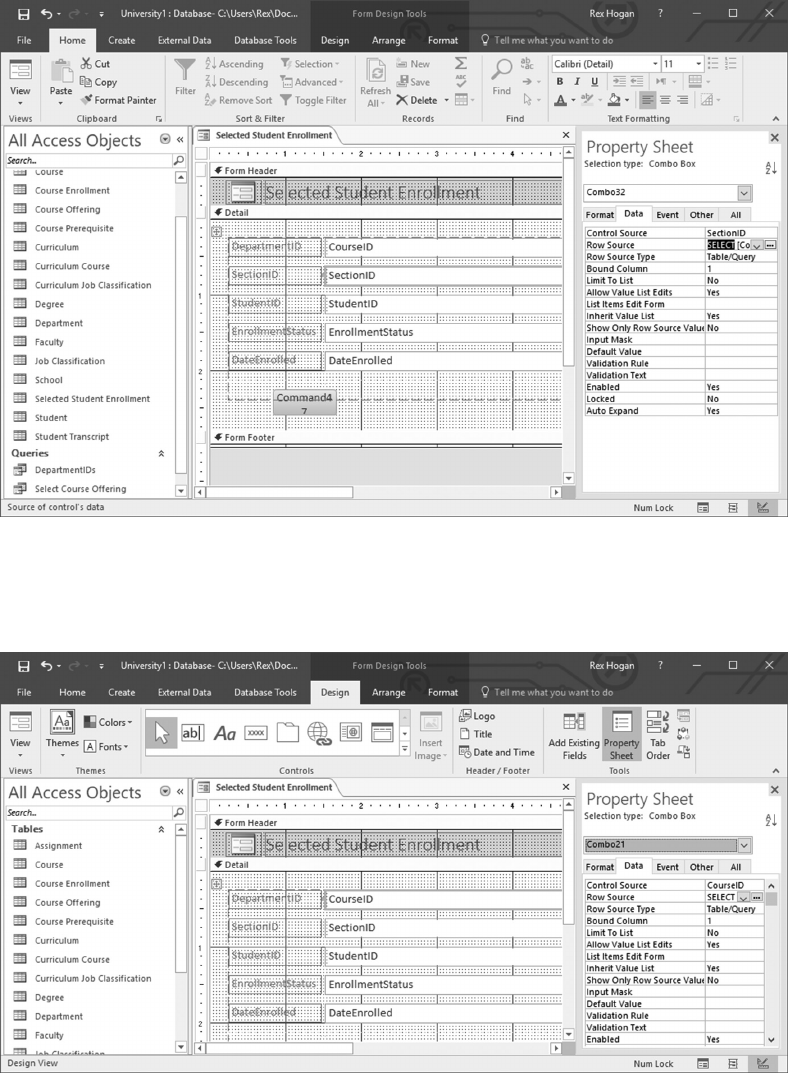
Creating the University Database Application ◾ 263
is query must be modied to include the CourseID value from the form. To get this
value, go to the CourseID line and click on the CourseID box.

264 ◾ A Practical Guide to Database Design
e Property sheet for this box shows at the top the internal name for this box/value;
in this case, “Combo21” is displayed. is is the value that needs to be included in the
SectionID query.
Going back to the SectionID query, click on the box with the three dots to open the
query.
e design mode can be used to add the qualier of CourseID = Combo10. I prefer
touse the SQL mode, so right-click the design view and choose “SQL View” to get
this display.
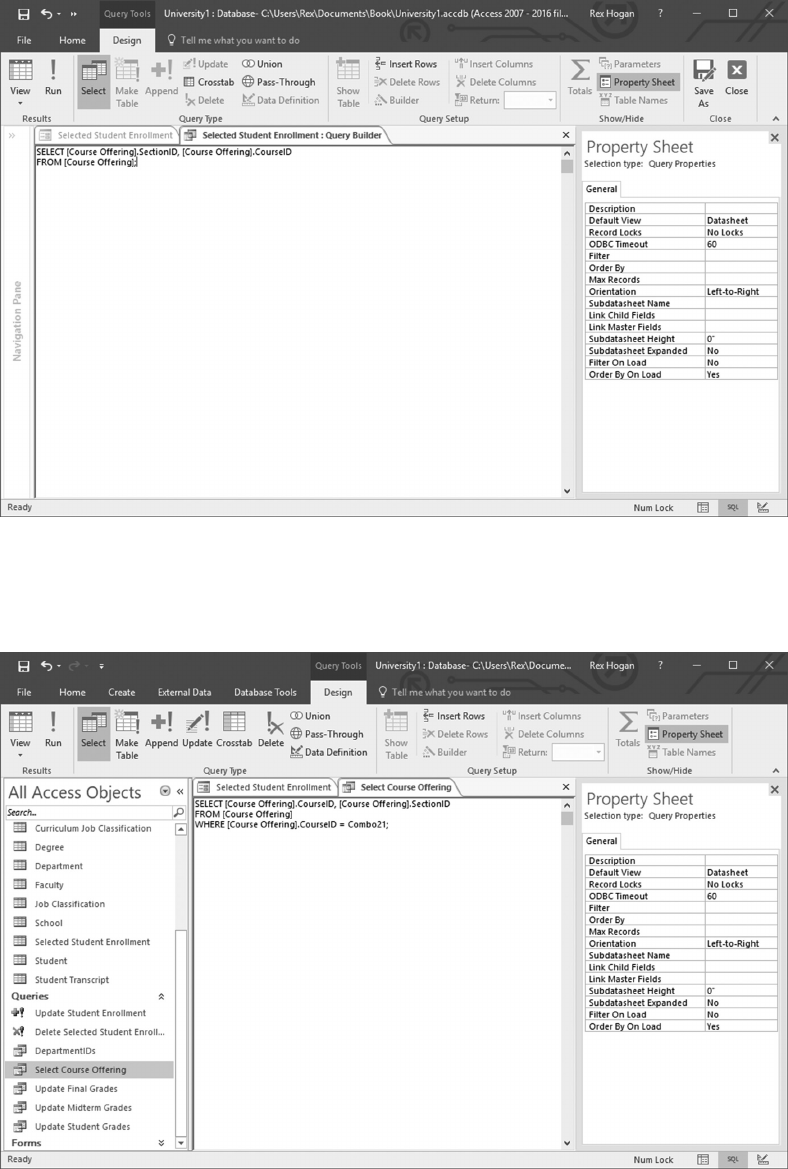
Creating the University Database Application ◾ 265
Modify this query to add the qualier “Where [Course Oering].CourseID =
Combo21;”
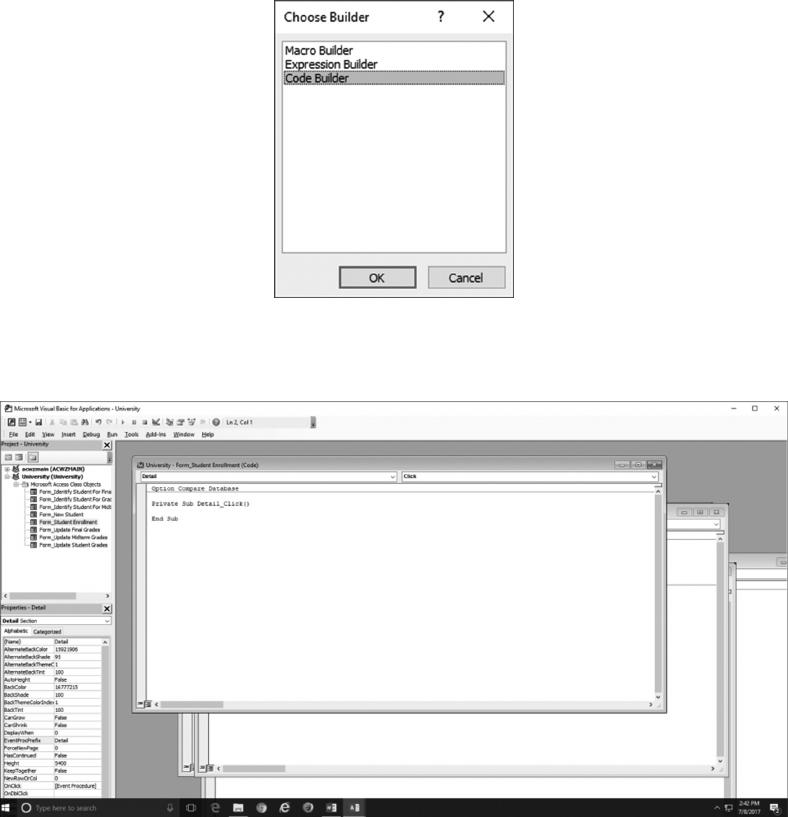
266 ◾ A Practical Guide to Database Design
Click the x at the top right of the design window to close and save this change.
When using this form and clicking on the SectionID drop down, the list will now
show SectionIDs for the CourseID selected on the form.
• Delete the StudentID line and replace it with a Combo box displaying the StudentID
values from the Student table.
e basic changes in the form are now complete.
Next, with the form in Design mode, start to add a Button at the bottom of the form;
when the rst question comes up, click “Cancel.” Next, click on the button just cre-
ated, right-click, then pick “Build Event” at the top of the list of options shown.
Next, pick “Code Builder” from the options shown.
Clicking OK opens the following window.
Creating the University Database Application ◾ 267
is is the window that we will use to enter commands to perform the following
actions:
• Close the form (thereby saving data that was entered in the “Selected Student
Enrollment” table).
• Run an INSERT command to add that data to the Class Enrollment table.
• Delete the data in the “Selected Student Enrollment” table.
• Reopen the form to clear it to enter another student.
Opening and closing forms are simple commands. Let us concentrate rst on how to
run the INSERT and DELETE commands; I recommend creating queries to perform
both functions.
• For the INSERT command, use the Query wizard to start a new query and switch to
“SQL View”. Using the “INSERT INTO …” syntax, enter the following command:
“INSERT INTO [Course Enrollment] ( CourseID, SectionID, StudentID,
EnrollmentStatus, DateEnrolled )
SELECT [Selected Student Enrollment].CourseID, [Selected Student
Enrollment].SectionID, [Selected Student Enrollment].StudentID,
[Selected Student Enrollment].EnrollmentStatus, [Selected Student
Enrollment].DateEnrolled
FROM [Selected Student Enrollment];”
• Aer saving the query, open it again in Design mode, right-click the upper pane,
move the cursor down to “Query Type,” and select “Append Query.”
• e query can now be run manually to test it, if desired.
• For the DELETE command, use the Query wizard to start a new query and switch
to “SQL View.” Enter the following command:
“DELETE * FROM [Selected Student Enrollment];”
• Close and save this query. Run it manually to test it, if desired.
You are now ready to add commands to the button just created to add the functional-
ity described earlier.
• With the form in Design mode, click on the button added earlier, right-click it,
and choose “Build Event” at the top of the pop-up menu.
• Between the “Private Sub …” line and the “End Sub” lines, insert the following
commands:
DoCmd.Close acForm, "Selected Student Enrollment", acSaveYes
DoCmd.SetWarnings False

268 ◾ A Practical Guide to Database Design
CurrentDb.Execute "Update Student Enrollment", dbFailOnError
DoCmd.OpenQuery "Delete Selected Student Enrollment",
acViewNormal, acEdit
DoCmd.SetWarnings True
DoCmd.OpenForm "Student Enrollment"
Note the “SetWarnings” commands. e INSERT and DELETE commands will
notify/warn the user of pending updates; turning the warnings o for these com-
mands makes for a smoother operation.
• Rename the label in the new button to “Save,” and close the form, saving all updates.
e form is now ready for use.
10.5 CREATE A SCREEN TO ASSIGN GRADES
Now let us look at the steps necessary to create a screen to change grades for a student
enrolled in a course.
Following the above-mentioned approach, perform the following steps:
• Create a work table “Selected Student” with columns DepartmentID, SectionID, and
StudentID.
• Open the Query wizard to Design mode and add tables “Selected Student” and
“Course Enrollment.”
• Holding the mouse down, move the cursor between DepartmentID in the two tables;
repeat that operation for SectionID and Student ID.
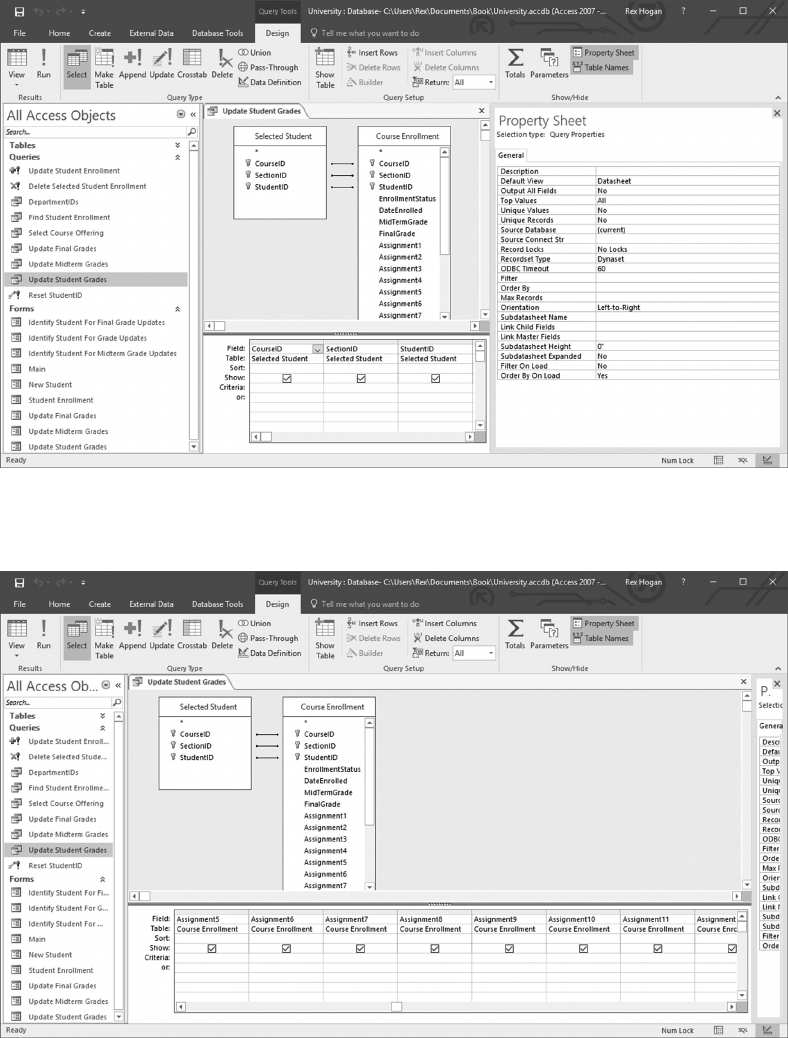
Creating the University Database Application ◾ 269
is directs SQL to join those two tables.
Next, specify which columns are to be displayed; moving le to right, click on a Field
column and use the pull down to select rst CourseID, SectionID, and StudentID
from the Selected Student table.
Continue adding Assignment columns from the Course Enrollment table until all
Assignments are added.
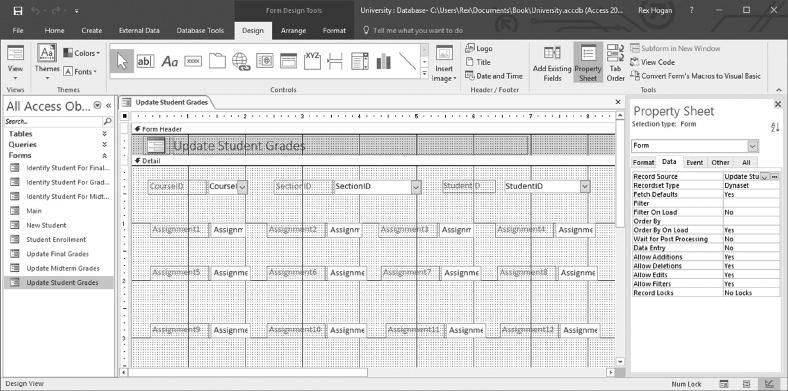
270 ◾ A Practical Guide to Database Design
Now close and save the form.
Next, create a form based o this query; I chose “Update Student Grades” for the query
name.
• Select the query “Update Student Grades” and use the Forms Query wizard to create
a form based on that query.
e form will open with simple boxes for each item.
• Delete and replace the CourseID, SectionID, and StudentID with Combo
boxesreading data from the Course Enrollment table. As was done earlier, mod-
ify the SectionID query to add a CourseID qualifier based on the value cho-
sen forCourseID, and StudentID based on the CourseID and SectionID values
chosen.
e StudentID SELECT statement will look something like:
SELECT [Course Enrollment].StudentID
FROM [Course Enrollment] WHERE [Course Enrollment] .CourseID =
Combo10 AND [Course Enrollment] .SectionID = Combo20;
• Rearrange the boxes displayed in the Design panel to be more readable; for
example:

Creating the University Database Application ◾ 271
• As one nal step, add a button at the bottom of the form. When the query wizard
starts, cancel the operation, select the box and right-click it to open the “Build Event”
option. Enter “DoCmd” commands modeled aer that shown above to close the
form, then reopen it.
e form can be closed and saved and is ready for use.
10.6 CREATE SCREENS TO ENTER MIDTERM AND FINAL GRADES
Finally, here are the steps to follow to create screens to enter midterm and nal grades.
For midterm grades:
• Following the aforementioned steps, use the Selected Student and Class Enrollment
tables to create a query displaying only CourseID, SectionID, StudentID, and
MidTerm Grade.
• Select this query and use the Forms query to create a new form.
• As was done earlier, change CourseID, SectionID, and StudentID to create Combo
boxes for these elements based on Course Enrollment.
• Add a button at the bottom that will close and reopen the form just created.
For Final Grades:
• Once again, following the above-mentioned steps, use the Selected Student and Class
Enrollment tables to create a query displaying only CourseID, SectionID, StudentID,
and Final Grade.
• Select this query and use the Forms query to create a new form.
• As was done earlier, change CourseID, SectionID, and StudentID to create Combo
boxes for these elements based on Course Enrollment.
• Add a button at the bottom that will close and reopen the form just created.
10.7 CREATE A “MAIN” MENU
As a nal step, create a master screen allowing the user to select and run all of the functions
created previously.
• Use the Forms wizard to create a black form.
• Add buttons to the form to open each of the forms created earlier.

272 ◾ A Practical Guide to Database Design
• As the wizard for each button opens, choose Form Operations and Open Form.
• Next, pick the form name to be opened.
• Text labels can be added if desired to label dierent sections of the display.
• If desired, the background color can be changed.
• Save this form with an appropriate name, for example, “Main.”
Your “Main” form will then look something like this:
is “Dashboard” can then be used to invoke any of the functions created within the
database.
Testing and using each component will show additional minor changes needed. For
example, most forms opened may need to be modied to add a button to take the user
to the “Main” page.
10.8 DEVELOPING APPLICATIONS FOR UNIVERSITY ADMINISTRATORS
If Microso Access is used to create a user interface for use by multiple sta members, the
core/original database can be divided into two components.
• Begin by copying the original database into a “Data” database and again to a “User
Interface” database.
• e “Data” database will contain only the core tables running on a master computer
that is network accessible to the other sta members. All other components are
deleted from the “Data” database.

Creating the University Database Application ◾ 273
• e User Interface database is modied by deleting all data tables (not the
“work”/“Selected…” items) and recreating each table by linking each to the Access
“Data” database. is User Interface database is given/copied to each user’s workstation.
Hosting applications in this way supports the rapid development and testing of applica-
tions. As new versions of the application are created, users just need to be given a copy of
the new User Interface for the application.
QUESTIONS
1. Describe the dierence between a database Table, a View, and a Query.
2. By default, what columns have indexes created when a Table is dened?
3. What is a Form? How does it dier from a Query?
4. When using the Query wizard to create a query, what does the “View” mode/ button do?
5. What are the dierent types of queries supported by Microso Access? What does
each do?
6. What is a Pass-rough query? When/Why is it used?
7. What is an Update query? Why/When is this specied?
e remaining questions are based on the Microso Access University Database.
8. What is the purpose of the “Reset StudentID” query?
A query must be created to display all students associated with a specic department.
9. When using the query wizard, what tables are needed?
10. To run the query, what can be done to identify/select the DepartmentID of interest?
A query is needed to show all students enrolled in any course for a specic department.
11. What tables must be included in the query?
12. When designing the query, how are specic columns included or excluded from the
output display?
13. What is the purpose of the “Main” form, and what does it contain?
14. When using the Form wizard, what object is typically chosen as the basis for the
Form design?
15. If the database design described in Section 10.3 were to be altered to store core data
tables in SQL Server, what changes must be made to the table denitions?


275
Chapter 11
PHP Implementation and Use
11.1 WHY PHP?
Aer loading data into a database, its overall usefulness to the user community will be
driven by the type of user interface that can be developed to allow users to query and use
the data.
• If all users are on the same network, Microso Access can be used to create and
deploy user interfaces that are each linked to a master database containing the tables
needed/used by users.
is approach is fast and simple but limited by the functionality available in using
Access. In addition, there may be signicant overhead in deploying/maintaining the
Access graphical user interface on each user’s computer. ere may also be design/
implementation issues if users need to simultaneously read and update the same data.
• Microso’s Visual Studio soware suite allows you to create complex and powerful
user interfaces/applications. However, because these applications must be deployed
on each user’s computer, these implementations create soware dependencies for
computers on which they are to be deployed and are dependent on the version of the
Windows operating system used to develop the application. In addition, from the
developer’s point of view, applications that are sensitive/aware on mouse movements
and actions are more dicult to develop and maintain.
• Java can be used but again has soware dependencies and introduces a higher level of
soware complexity to design and deploy the application.

276 ◾ A Practical Guide to Database Design
• PHP, on the other hand, provides a powerful but developer-friendly environment.1
• PHP scripts reside on the web-based host where the database runs.
• Clients can connect to this host using either Windows or UNIX operating systems.
• PHP scripts are composed of HTML statements that are delivered to the user’s
browser, and PHP language statements that are not delivered to the user’s browser.
As such, PHP can be used to manage secure web pages.
• e HTML component manages the output displayed to the user and reacts to
user input to take some specic action or to branch to another web page.
• PHP statements are written in plain English where the logic and commands are
totally visible to the developer. is includes Structured Query Language (SQL)
calls to connect to and query/update the database. is what you see is what you
get framework is so much easier to develop and support database applications!
Section 7.3 covered the design and implementation of an SQLSvrLogs database. Next,
Section 8.5 includes a description of how to use PERL to extract Warning and Error mes-
sages from an SQL Server log. is section ties this material together and shows how to
develop a PHP web-based application that allows users to identify and review new Warning
and Error log records as they occur.
Note that this process is based on the process of capturing log records of inter-
est, importing them into SQL Server tables that include the message content plus
columns/flags to denote Reviewed, Pending, and Resolved statuses, and providing a
user interface to monitor and update this information as new updates are applied. All
of these steps can run 24×7 and allow the user to focus on new log messages as they
occur. In addition, the overall design and components are very generic in nature. This
approach can easily be adapted to monitor and review log records in another database.
Forexample, system administrators tasked with monitor proxy logs for internet traffic
could use this approach using status flags to denote Reviewed, Pending, or Reported
statuses.
Let us now review how to implement all of these components on a single host that serves
as the web interface for tracking SQL Server log messages.
11.2 SYSTEM COMPONENTS
A web-based computer that serves as a host to a PHP-based database application requires
a number of components to provide and manage that environment.
• e host itself must of course provide a web browser such as IIS or Apache. When
using IIS, setup issues include
• Establishing the host’s web directory that will hold the scripts and HTML les
that are to be accessed/used by external users.

PHP Implementation and Use ◾ 277
• Creating a “Handler Mapping” that associated PHP scripts (i.e., les ending in
“.php”) with IIS’s FastCGI module. is provides IIS with a high-performance
mechanism for processing PHP scripts.
• Any supporting les for web page management would be placed in subdirectories
in the directory dened earlier.
• PHP itself must be downloaded and installed. einstallationitselfisverystraight-
forward.
• First, download the PHP soware for your host.
• Next, a few lines in the php.ini le must be edited per PHP’s installation instructions
to reect the soware environment on that computer. For example, there is an “open_
basedir” variable that must be set to the web directory to be used for web scripts.
• In addition, database drivers must be downloaded to match the database that will
be used. ese drivers are placed in PHP’s “ext” directory, and the php.ini le
updated to include the name of those drivers.
e PHP conguration can be tested by (1) creating a le with the content “<?php
phpinfo(); ?>”; (2) saving this le with the name “phpinfo.php” in the host’s Web
directory; then (3) opening a web browser and entering the following link http://
localhost/phpinfo.php.
If PHP is installed correctly, a report will be display showing the details of the PHP
conguration and installation.
• e database management system to be used must of course be installed, along with
the database itself and any required tables.
• In the example application reviewed in Chapter 7, SQL Server 2008 R2 was
installed on the host computer.
• Next, an SQL Server database named “SQLSvrLogs” was created with tables to
store the data needed by online users (see Section 7.3.1 for details).
e tables referred to in this chapter are an extension of the material discussed
in Section 8.5 for the review and analysis of Warning and Error messages from
SQL Server logs. Tables “WarningRecords” and “ErrorRecords” have the follow-
ing columns:
Column Name Data Type Allow Nulls
RecordKeys Int No
Message Varchar(Max) No
Reviewed bit Yes
Pending bit Yes
Resolved bit Yes
278 ◾ A Practical Guide to Database Design
Note that the RecordKeys column is created within SQL Server using the Identify
property. is causes SQL Server to automatically increment the value for row
keys by “1” each time a new row is added. With this construct, individual rows
can uniquely be identied/used for updates without having to dene uniqueness
within the content of the message strings themselves.
• To run in a 24×7 environment, a script must be created to periodically check
for new les in a directory used to store updates. When found, each le must be
imported using “bcp” into the appropriate table, then moved from the import
staging directory to an archive directory.
As the tables being updated have more columns than the data being imported
(thestatus ags/columns), a format le must be used to describe the contents of
the le(s) being imported. To create the “LogRecords.fmt” format le, use the fol-
lowing command:
bcp SqlSvrLogs.dbo.WarningRecords format nul -c -f LogRecords.fmt –T
is format le contains descriptions for each column in the table.
As the le being imported will only contain the message information, the format
le must be edited to reect that only the Message column is being imported. e
edited format le will now contain
10.0
1
1 SQLCHAR 0 0 “\r\n” 2 Message SQL_Latin1_General_CP1_CI_AS
e Warning and Error log messages created by the PERL script can now be
imported using the following command syntax:
bcp SQLSvrLogs.dbo.WarningRecords IN <warninginputfile> -f LogRecords.
fmt -T
bcp SQLSvrLogs.dbo.ErrorRecords IN <errorinputfile> -f LogRecords.
fmt –T
• Aer new messages are imported into the WarningRecords and ErrorRecords
tables, the Reviewed, Pending, and Resolved ags for each new row will have null
values. Aer all new rows have been imported, an SQL Server process must run
an SQL update that checks the WarningRecords and ErrorRecords that change all
null status ags to “0” (i.e., o).

PHP Implementation and Use ◾ 279
Update SQLSvrLogs.dbo.WarningRecords set Reviewed = 0 where Reviewed
is null;
Update SQLSvrLogs.dbo.WarningRecords set Pending = 0 where Pending
is null;
Update SQLSvrLogs.dbo.WarningRecords set Reported = 0 where Reported
is null;
Update SQLSvrLogs.dbo.ErrorRecords set Reviewed = 0 where Reviewed
is null;
Update SQLSvrLogs.dbo.ErrorRecords set Pending = 0 where Pending is
null;
Update SQLSvrLogs.dbo.ErrorRecords set Reported = 0 where Reported
is null;
Although the above-mentioned details may appear daunting or tedious, remem-
ber that all of these actions involve setting up a 24×7 system for processing data-
base updates. Once created and activated, the imports and table ag updates run
in a hands o mode with minimal care and feeding of database administrators
(DBAs)/host administrators monitoring the host system processes.
• Data collection
In creating a 24×7 operation for monitoring database log records, we need a
background process that periodically checks for new log records and extracts
warning and error records when found. ese newly created les are then moved
to the input directory being monitored for table updates.
Section 8.5 contains a PERL script that monitors SQL Server logs for warning
and error messages. is script can be set up to run continuously, for example,
every 15min, creating new les to be imported into the database. At the end of
each cycle, new les found would be moved to the directory for table updates,
and the script sleeps for the designated wait time. e script itself continues to
run, requiring minimal attention from DBAs/system administrators to ensure all
required processes are still active.
11.3 DESIGN OF WEB-BASED INTERFACE
A web-based interface for the application described earlier must support at a minimum the
following functions2:
• A PHP script supporting user logon and authentication to enter/access supported
functions.
• Aer users have logged on, a PHP script displaying links for the primary options
provided for users.
• Each link in turn is mapped to the respective PHP script supporting that function.
In this application, a PHP script is needed to view and manage warning records, and
another to view and manage error records.
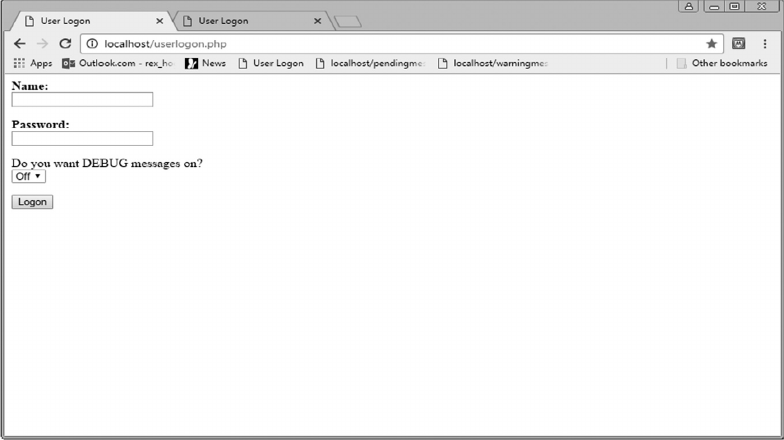
280 ◾ A Practical Guide to Database Design
11.3.1 User Logon Options
• is web page will prompt the user for a user name and a password.
• In addition, all of the scripts provided for this sample application have debug
options which, if selected here, will display to the user details of key script
variablesand SQL calls that can be used to verify the PHP script is functioning as
intended.
Note that this debug variable is passed continuously from one web page to the next as
the user activates each link.
• At the bottom of the page is a Logon button, which passes the user name, password,
and debug operation to the PHP script that authenticates the user.
When loaded from the host’s web directory, the script produces the following display on
the following page.
To log in, the user/analyst enters their logon name and password, then selects the Logon
button.
If the user or developer is testing code changes and wants to see internal trace informa-
tion from the subsequent page accesses and database calls, they would select the down
arrow by the Debug question and choose Yes before selecting Logon.
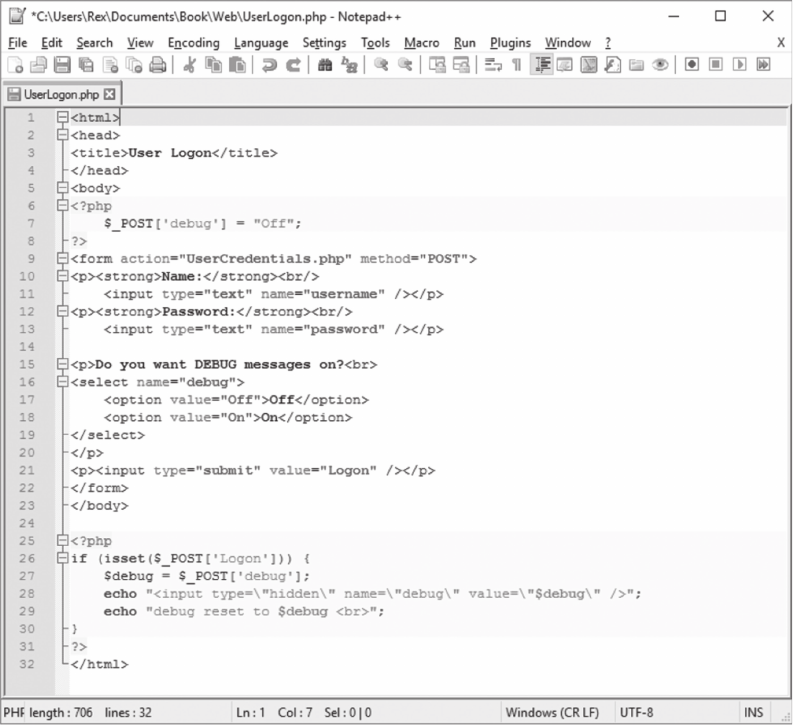
PHP Implementation and Use ◾ 281
In this application, the name of the PHP script is UserLogon.php and appears below.
Note that when the form is submitted, the UserCredentials.php script is called. at
script is reviewed under the section “User Authentication.”
UserLogon.php
11.3.2 User Authentication
As mentioned earlier, the UserCredentials.php script is called when the UserLogon.php
Logon button is selected.
• is script takes the name and password provided by the user/analyst and attempts
to log on to the SQL Server “SQLSvrLogs” database.
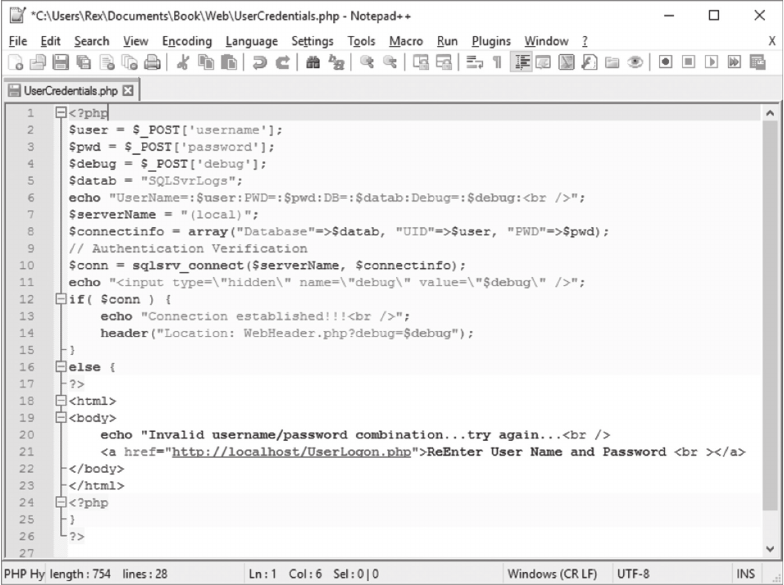
282 ◾ A Practical Guide to Database Design
• If that logon is successful, the WebHeader.php script is called/loaded. If the logon
fails, an error is displayed and a link is provided to redirect the user back to the User
Logon page.
UserCredentials.php
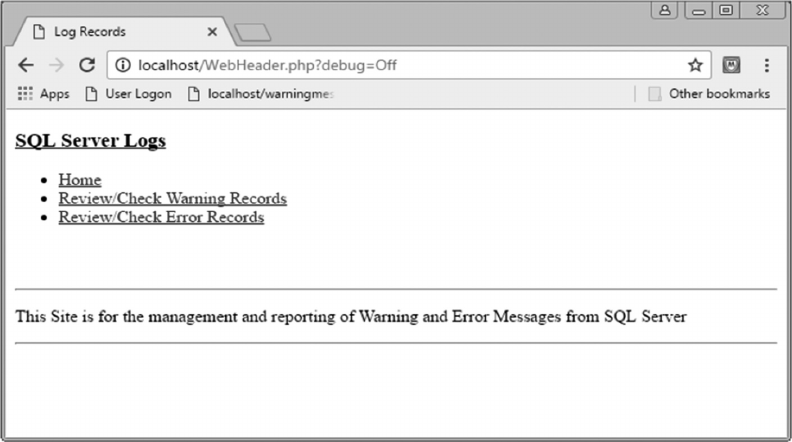
PHP Implementation and Use ◾ 283
11.3.3 Home Page User Options
e WebHeader.php script contains the primary links/options available to the user, pro-
ducing the following display.
e links displayed are for the following functions:
• Home: A return to the Home WebHeader.php page. (is page is always loaded in
subsequent pages and allows the user to get back to the primary option page.)
• Review/check warning records: e link to WarningMessages.php allows the user/
analyst to review new warning messages and provides a mechanism to change the
various ags for those records.
• Review/check error records: e link to ErrorMessages.php allows the user/ analyst to
review new error messages and provides a mechanism to change the various ags for
those records.
11.3.4 Review/Check Warning Records
When this link is selected, the following display is produced. Note that to demonstrate the
functionality of this application, the SQL Server database used was loaded with records
from the database’s log le. e following shows four warning messages to be reviewed/
analyzed by the user/DBA.
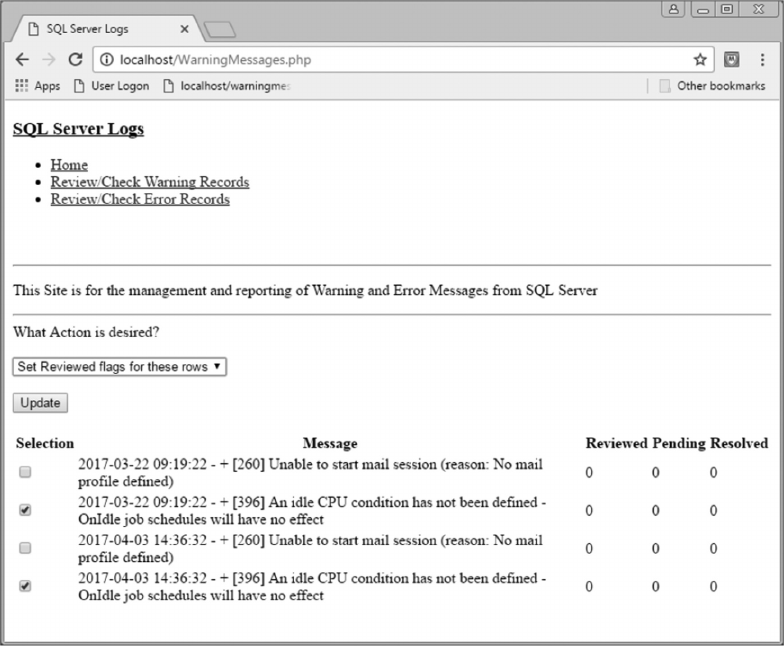
284 ◾ A Practical Guide to Database Design
Following on with this example, records two and four are not signicant and can be
ignored by setting their Reviewed ags. is is done by clicking the Selection boxes for
these rows, clicking the arrow for Actions, and selecting the option Set Reviewed Flags for
these rows as shown in the following.
Aer making the above-mentioned selections and setting the Action desired, click-
ing the Update button reloads this script/web page, passes parameters to the database to
update the Reviewed ags, then reruns the query to identify warning messages yet to be
reviewed. By using this example, the output displayed is on the next page.

PHP Implementation and Use ◾ 285
is cycle would then be repeated, allowing the user/analyst to
• Set Reviewed ags for records identifying insignicant events/states which can be
ignored
• Set Pending ags for records that should be analyzed further
• Set Resolved ags for records that reect issues or conditions that have been resolved
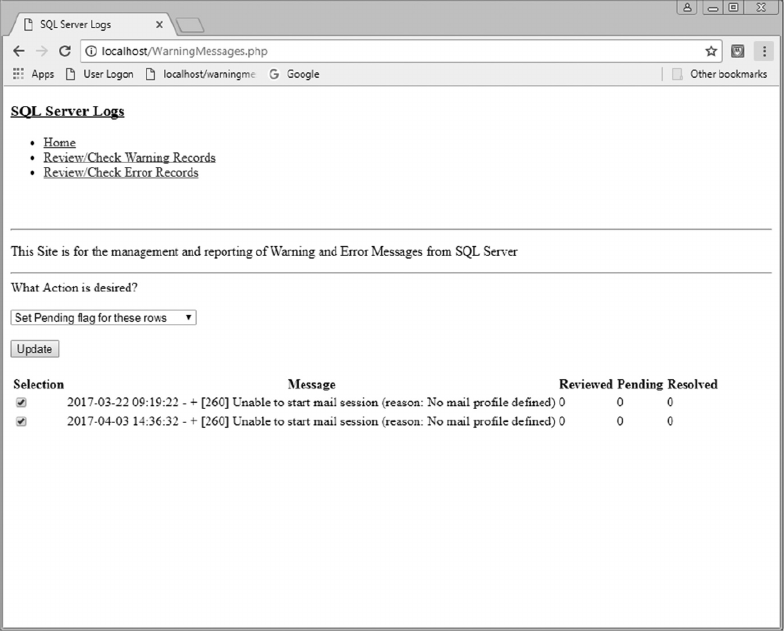
286 ◾ A Practical Guide to Database Design
In this example, assume that the two remaining records should be researched further.
To set these ags, click the Selection columns for these records, click the Actions pull-
down and select the option Set Pending ag for these rows as shown in the display on the
following page.
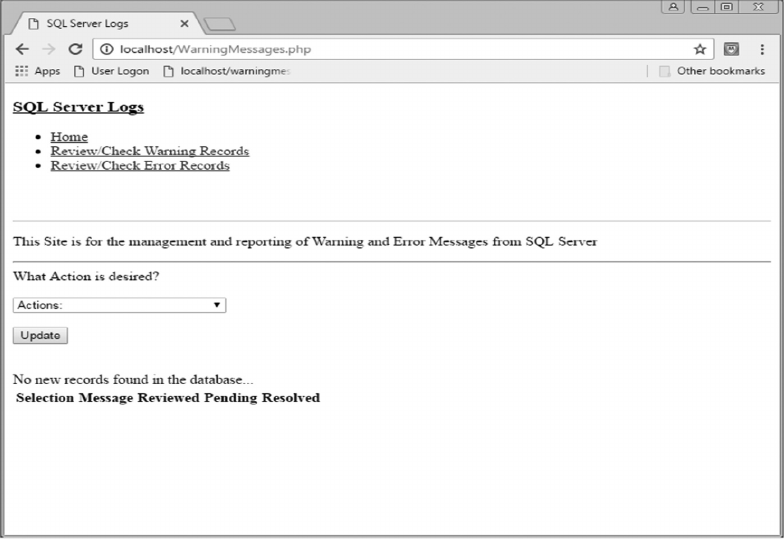
PHP Implementation and Use ◾ 287
Clicking on Update will repeat the process of passing these options to this web page as it
is reloaded, running the SQL updates associated with these records, and running the query
to check for any additional records.
Note that no new additional warning records need to be reviewed.
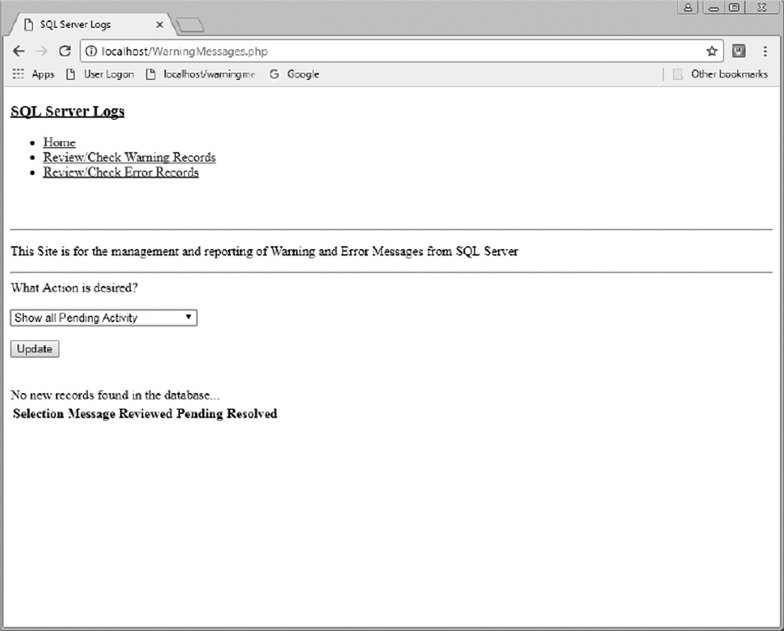
288 ◾ A Practical Guide to Database Design
Continuing on with this example, let us now check for warning records with a Pending
status. To see those records, rst click the Actions pull-down and select the option Show
all Pending Activity.
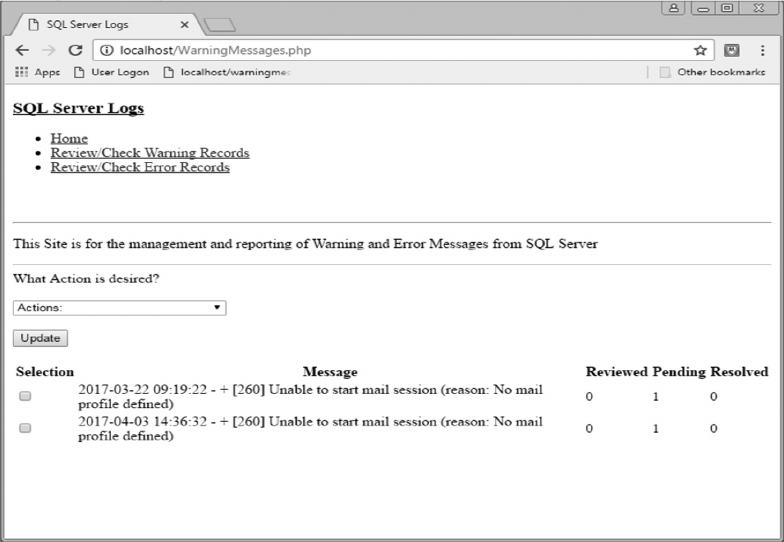
PHP Implementation and Use ◾ 289
Clicking on the Update button produces the following display, showing the two records
that were set to Pending in the last update earlier.
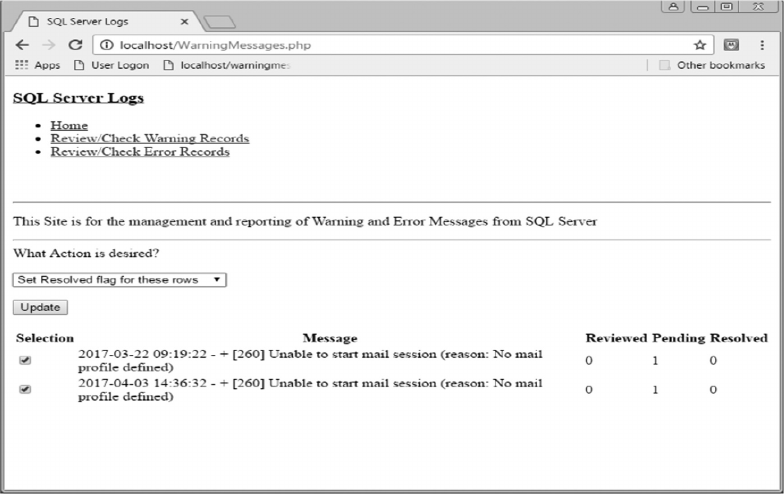
290 ◾ A Practical Guide to Database Design
Assume that these conditions have been investigated and any required action taken to
resolve the issue. To set these ags to Resolved, click the Selection boxes, then click the
Action pull-down and select the option for Set Resolved ag for these rows as shown in the
following.
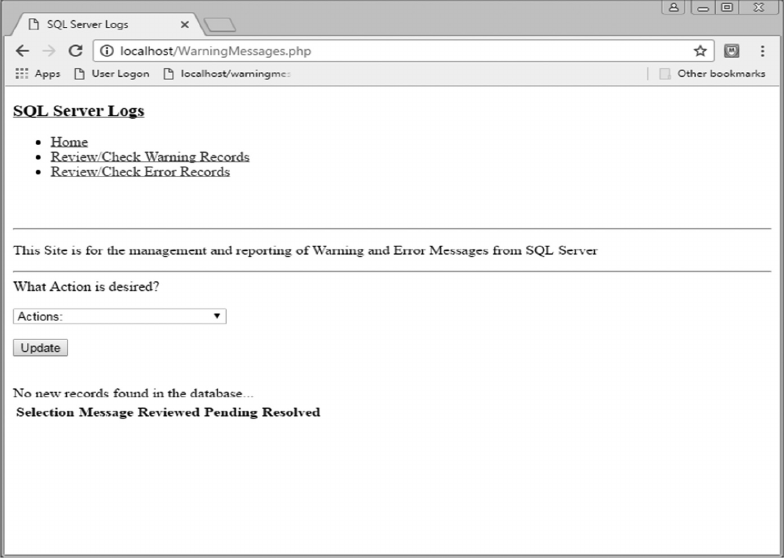
PHP Implementation and Use ◾ 291
Clicking the Update button will reset these ags and update the display of records being
reviewed.
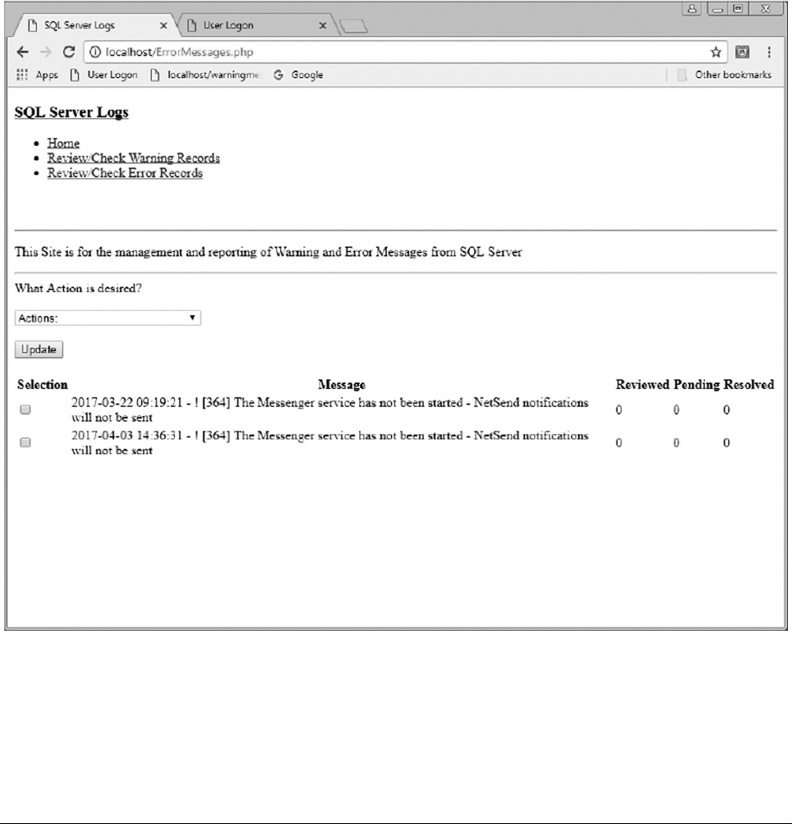
292 ◾ A Practical Guide to Database Design
11.3.5 Review/Check Error Records
As with warning messages, the link to ErrorMessages.php allows the user/analyst to review
error messages and provides a mechanism to change the various ags involved. Clicking
on this link opens a similar display, only using the messages in the ErrorRecords table.
is page works identically to that shown in Section 11.3.4 except it is associated with
the ErrorRecords table in the database.
11.4 SCRIPT LOGIC
Now let us review in detail how the WarningMessages.php script works.
11.4.1 Warning Records Logic
e WarningMessages.php script has more than 400 lines of code and is found in
“Appendix A—WarningMessages.docx.”
PHP Implementation and Use ◾ 293
When the script is initially run, it performs several functions.
• e WebHeader.php is called to display/make available those links/options to the
user.
• It uses a hidden script to log on and authenticate the user to the SQL Server database
in preparation for subsequent user actions/updates.
• It displays a menu of pull-down options for subsequent actions selected by the
user.
• It displays new warning messages (i.e., records whose Reviewed, Pending, and
Resolved ags have not been set).
As described earlier, if the user chooses an action to update some record ags or requests a
display of pending or resolved records, when the Update button is selected, the script/web
page reloads with those options selected.
• If ag updates were requested, SQL updates are made to update the selected rows.
• Another query is then run to display records having no ags set.
• If an action is taken to display Pending or Resolved records, the default query SQL
string is overwritten appropriately so that when the query is run for records to be
displayed, the selected record types are retrieved/displayed.
• e user could of course simply select one of the links at the top of the display.
e user must then review the display and determine what subsequent action is needed or
select a link at the top of the display to review a dierent set of messages.
With these dierent operations in mind, here is how they are implemented within
WarningMessages.php:
Lines 11–14: A locally developed trace/Debug option. e script contains trace messages
throughout that display message string at execution time if the Debug operation is
turned on when the user logs in.
Lines 16–80: A startup/initialization function called when the script is loaded. If the
Debug option is set, messages are set to display the value of key variables. It also
handles Selection options when set.
Line 82: Saving the name of the web page loaded as the default for the next web page to
be called.
Line 85: Displaying/Calling WebHeader.php.
294 ◾ A Practical Guide to Database Design
Line 88: Calling the hidden script to logon and authenticate the user to the SQL Server
database.
Line 90: Invoking the startup function.
Lines 91, 92: Checking for SQL data returned from a prior SQL Select call.
Lines 97–282: Logic to handle the Action operation selected on a prior execution.
Lines 101–123: Handling data returned from a prior SQL Select call to the database.
Lines 125–131: Option 1—Dening the query to be used.
Lines 134–169: Option 2—e logic to update the Reviewed ag/column for the selected
records/rows in the database.
Lines 172–210: Option 3—e logic to update the Pending ag/column for the selected
records/rows in the database.
Lines 213–251: Option 4—e logic to update the Resolved ag/column for the selected
records/rows in the database.
Lines 254–264: Option 5—Reset the query statement to be issued for displaying warning
records to show all records with the Pending ag set.
Lines 267–281: Option 6—Reset the query statement to be issued for displaying warning
records to show all records with the Resolved ag set.
Lines 289–308: Logic to test for and preserve variables passed when a new web page is
called.
Lines 311–326: Logic to handle the options in the Actions drop-down list.
Lines 341–387: Logic to deal with the query to be issued, to issue the SQL call to the
database, and build a header display of the column names returned.
Lines 388–408: Logic to issue the SQL query and display results returned.
11.4.2 Error Records Logic
As mentioned earlier, the ErrorMessages.php script is identical to the WarningMessages.
php script with two changes. In WarningMessages.php, all references to
WarningMessages.php were changed to ErrorMessages.php, changing the name of the
web pages/scripts to be used. In addition, all SQL references to WarningRecords were
changed to ErrorRecords to change the name of the SQLSvrLogs table that is being
queried or updated.

PHP Implementation and Use ◾ 295
One nal note, all scripts and displays in Chapters 8 and 9 were taken from a working
Windows 7 computer congured and running as a web host with IIS and an SQL Server
SQLSvrLogs database loaded with actual SQL Server log messages. All scripts and
command-line instructions were taken from alive, running system. Together they hope-
fully illustrate how easy it is to design and create a system to perform real-time monitoring
of events or log les, load items of interest into a database, and provide analysts with a web-
based interface to review and categorize the collected information.
QUESTIONS
1. Name the system soware necessary to provide a web-based interface to a database.
2. When setting up a PHP server, where are the PHP scripts stored/located?
3. What code can an external user see when using a PHP script?
4. What restrictions are there for client systems that must use this interface?
5. How does PHP know what type of relational database management system is being
accessed?
6. In the scripts shown in the current chapter, what tables were accessed, and how were
they updated?
7. Give the name of the soware component that performs verication of the user’s
name and password.
8. In this application, where are user names and passwords stored and managed?
9. Give the name of the php scripts and how they are used.
10. e rst display of WarningMessages.php has titles for each of the ve columns
of information from the database. Map each of the title names to columns in the
database.
is application is based on continuous updates from a PERL script that loads new
rows into the associated tables. e display of data from these tables is based on bit
settings at the time each query is run.
11. What are the bit settings for new rows aer they are loaded into the database?
12. When and how are these bit settings changed?
Figure 11.1 shows the initial display of WarningRecords in the database when the
browser is rst opened.
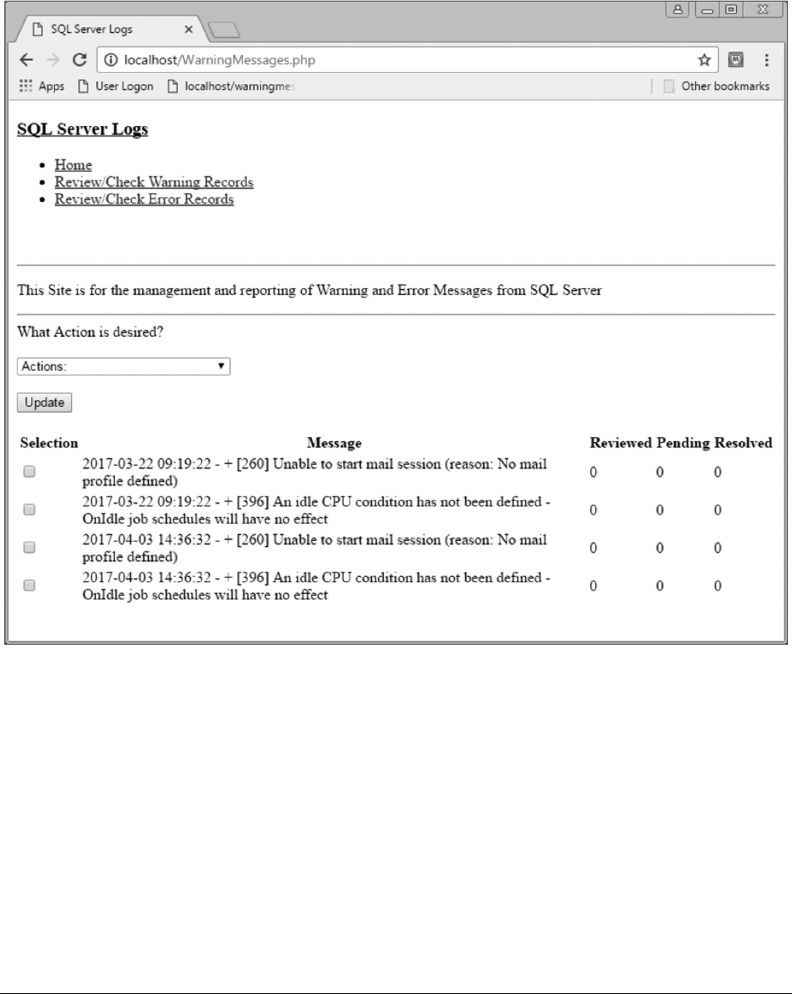
296 ◾ A Practical Guide to Database Design
13. If the rst messages were considered important and the user wants to set the Pending
ag until more research is done, what steps/selections are made by the user?
14. When making this update, how is the row being updated mapped to the information
on the web page?
15. In the WebHeader.php web page, what does the Review/Check Warning Records label
represent? What happens when it is selected?
REFERENCES
1. Valade, J., PHP 5 for Dummies, Indianapolis, IN, Wiley Publishing, 2004.
2. e World Wide Web Consortium (W3C) is an international community that develops open
standards to ensure the long-term growth of the Web. Accessed from http://www.w3.org/.
FIGURE 11.1 Warning messages.

297
Appendix A: Warning
Messages
1 <!DOCTYPE html PUBLIC "-//W3C//DTD XHTML 1.0 Transitional//
EN" "http://www.w3.org/TR/xhtml1/DTD/xhtml1-transitional.
dtd">
2 <html xmlns="http://www.w3.org/1999/xhtml" xml:lang="en"
lang="en" dir="ltr"> 3 <head>
4 <title>SQL Server Logs</title>
5 <meta http-equiv="Content-Type" content="text/html;
charset=ISO-8859-1" />
6 <script type="text/javascript">
7 </script>
8 </head>
9 <body>
10 <?php
11 function trace($string) {
12 if ($_POST['debug'] == "On") {
13 echo "$string<br>";
14 }
15 }
16 function startup () {
17 //**********************************************************
18 // $_POST['debug'] = "On";
19 // $_POST['debug'] = "Off";
20
21 if (($_POST['debug']) == "On") {
22 $debug = $_POST['debug'];
23 trace ("***Message update logic***");
24 echo "...DEBUG set to $debug <br>";
25 if (isset($_POST['selection'])) {
26 $var = $_POST['selection'];
27 echo "...Selection is on and set to :$var:<br>";
28 }
29 else {
30 echo "...Selection is Off..<br>";
31 }
298 ◾ A pp endix A
32 if (isset($_POST['TypeQuery'])) {
33 $var = $_POST['TypeQuery'];
34 echo "...TypeQuery is on and set to :$var:<br>";
35 }
36 else {
37 echo "...TypeQuery is Off..<br>";
38 }
39
40 if (isset($_POST['Query'])) {
41 $var = $_POST['Query'];
42 echo "...Query is on and set to :$var:<br>";
43 }
44 else {
45 echo "...Query is Off..<br>";
46 }
47
48 if (isset($_POST['formAction'])) {
49 $var = $_POST['formAction'];
50 echo "...formAction is on and set to :$var:<br>";
51 }
52 else {
53 echo "...formAction is Off..<br>";
54 }
55 if (isset($_POST['selection'])) {
56 $var = $_POST['selection'];
57 $val = $var[0];
58 echo "...selection is on and set to :$var:$val:<br>";
59 }
60 else {
61 echo "...selection is Off..<br>";
62 }
63
64 if (isset($_POST['RecordKey'])) {
65 $val = $_POST['RecordKey'];
66 echo "...RecordKey is on and set to :$val:<br>";
67 }
68 else {
69 echo "...RecordKey is Off..<br>";
70 }
71 echo "<br>***************************<br>";
72
73 }
74 trace ("Initialization...");
75 if (isset($_POST['selection'])) {
76 $data = $_POST['selection'];
77 echo "<input type=\"hidden\" name=\"selection\" value=$data
/>";
Appendix A ◾ 299
78 trace ("Found selection, first values:$data:$reckey");
79 }
80 }
81
82 $self = $_SERVER['PHP_SELF'];
83 date_default_timezone_set('America/New_York');
84
85 include "WebHeader.php";
86 //****************** start php logic
87 // DB Variables
88 include "credentials.php"; // Connect to DB
89
90 startup();
91 $parms = array();
92 $options = array( "Scrollable" => SQLSRV_CURSOR_KEYSET );
93
94 //*****************option processing
95 //**********************************************************
96 //**********************************************************
97 if (isset($_POST['formAction']) and $_POST['formAction']
!== "") {
98 trace("Action Processing Selected...");
99 $action = $_POST['formAction'];
100 $data = $_POST['selection'];
101 if (!isset($_POST['RecordKey'])) {
102 $reckey = $data[0];
103 $_POST['RecordKey'] = $reckey;
104 }
105 trace ("Initializing with Record key = $reckey");
106 // echo "<input type=\"hidden\" name=\"RecordKey\"
value=\"$reckey\" />";
107 if ($reckey === "A") {
108 echo "*****Record not selected*****...try
again...<br><br>";
109 unset($_POST['formAction']);
110 $action = 0;
111 $_POST['Error'] = "On";
112 $debug = $_POST['debug'];
113 trace ("***Refresh values...first value = $reckey<br>");
114 echo "<form action=\"WarningMessages.php\" method =
\"POST\">";
115 echo "<input type=\"hidden\" name=\"debug\"
value= \"$debug\" />";
116 echo "<input type=\"submit\" name=\"link\" value=\"OK\"
/>";
117 }
118 else {
300 ◾ A pp endix A
119 unset($_POST['Error']);
120 }
121 if ($_POST['debug'] == "On") {
122 echo "**Action option = $action<br>";
123 }
124 //*************************** option 1 Show all Warning
records
125 if ($action == 1) {
126 trace ("Creating sql string for option 1");
127 $query = "SELECT Recordkey as Selection, Message,
Reviewed, Pending, Resolved from WarningRecords ";
128 $_POST['Query'] = $query;
129 echo "<form action=\"WarningMessages.php\" method =
\"POST\">";
130 echo "<input type=\"hidden\" name=\"debug\"
value=\"$debug\" /Message,
Reviewed, Pending, Resolved from WarningRecords>";
131 }
132
133 //*************************** option 2 Set Reviewed flags
for these rows
134 else if ($action == 2) {
135 trace ("Processing options for action 2");
136 $parms = array();
137 if ((isset($_POST['selection'])) and
($_POST['selection'] !== "") ) {
138 trace ("Reviewed Flag Updates being processed...");
139 $data = $_POST['selection'];
140 $reckey = $data[0];
141 trace ("Using record key:" . $reckey . ":");
142 $debug = $_POST['debug'];
143 if ($_POST['debug'] == "On") {
144 echo "**Reviewed selected set value = $reckey<br>";
145 }
146 foreach ($data as $reckey) {
147 $string1 = 'Update WarningRecords set Reviewed = 1 ';
148 $string2 = 'Where RecordKey = ' . $reckey;
149 $sqlcmd = "$string1 $string2";
150 if ($_POST['debug'] == "On") {
151 echo "Command issued: $sqlcmd <br>";
152 }
153 if ($return = sqlsrv_query($conn, $sqlcmd)) {
154 if ($_POST['debug'] == "On") {
155 echo "REVIEWED flag set...<br>";
156 }
157 }
158 else {
Appendix A ◾ 301
159 echo "ah crap...<br>";
160 echo "Command issued: $sqlcmd <br>";
161 }
162 }
163 }
164 unset ($_POST['formAction']);
165 unset ($_POST['selection']);
166 // $query = "SELECT Message, Reviewed, Pending, Resolved
from WarningRecords where Reviewed = 1";
167 echo "<form action=\"WarningMessages.php\" method =
\"POST\">";
168 echo "<input type=\"hidden\" name=\"debug\" value=\"$debug\"
/>";
169 }
170
171 //*************************** option 3 Set Pending flags for
these rows
172 else if ($action == 3) {
173 trace ("Processing updates for option 3");
174 $parms = array();
175 if ((isset($_POST['selection'])) and
($_POST['selection'] !== "") ) {
176 trace ("Pending Flag Updates being processed...");
177 $data = $_POST['selection'];
178 $reckey = $data[0];
179 trace ("Using record key:" . $reckey . ":");
180 $debug = $_POST['debug'];
181 if ($_POST['debug'] == "On") {
182 echo "**Reviewed selected set value = $reckey<br>";
183 }
184 foreach ($data as $reckey) {
185 $string1 = 'Update WarningRecords set Pending = 1 ';
186 $string2 = 'Where RecordKey = ' . $reckey;
187 $sqlcmd = "$string1 $string2"; 188 if ($_
POST['debug'] == "On") {
189 echo "Command issued: $sqlcmd <br>";
190 }
191 if ($return = sqlsrv_query($conn, $sqlcmd)) {
192 if ($_POST['debug'] == "On") {
193 echo "Pending flag set...<br>";
194 }
195 }
196 else {
197 echo "ah crap...<br>";
198 echo "Command issued: $sqlcmd <br>";
199 }
200 }
302 ◾ A pp endix A
201 }
202 unset ($_POST['action']);
203 unset ($_POST['selection']);
204 unset ($_POST['RecordKey']);
205 $query = "SELECT Message, Reviewed, Pending,
Resolved from WarningRecords ";
206
207 echo "<form action=\"WarningMessages.php\" method =
\"POST\">";
208 echo "<input type=\"hidden\" name=\"Query\"
value=\"$query\" />";
209 echo "<input type=\"hidden\" name=\"debug\"
value=\"$debug\" />";
210 }
211
212 //*************************** option 4 Set Resolved flags
for these rows
213 else if ($action == 4) {
214 trace ("Processing updates for option 4");
215 $parms = array();
216 if ((isset($_POST['selection'])) and ($_
POST['selection'] !== "") ) {
217 trace ("Resolved Flag Updates being processed...");
218 $data = $_POST['selection'];
219 $reckey = $data[0];
220 trace ("Using record key:" . $reckey . ":");
221 $debug = $_POST['debug'];
222 if ($_POST['debug'] == "On") {
223 echo "**Reviewed selected set value = $reckey<br>";
224 }
225 foreach ($data as $reckey) {
226 $string1 = 'Update WarningRecords set Resolved = 1 ';
227 $string2 = 'Where RecordKey = ' . $reckey;
228 $sqlcmd = "$string1 $string2";
229 if ($_POST['debug'] == "On") {
230 echo "Command issued: $sqlcmd <br>";
231 }
232 if ($return = sqlsrv_query($conn, $sqlcmd)) {
233 if ($_POST['debug'] == "On") {
234 echo "Resolved flag set...<br>";
235 }
236 }
237 else {
238 echo "ah crap...<br>";
239 echo "Command issued: $sqlcmd <br>";
240 }
241 }
Appendix A ◾ 303
242 }
243 unset ($_POST['action']);
244 unset ($_POST['selection']);
245 unset ($_POST['RecordKey']);
246 $query = "SELECT Message, Reviewed, Pending, Resolved
from WarningRecords ";
247
248 echo "<form action=\"WarningMessages.php\" method =
\"POST\">";
249 echo "<input type=\"hidden\" name=\"Query\" value=\"$query\"
/>";
250 echo "<input type=\"hidden\" name=\"debug\" value=\"$debug\"
/>";
251 }
252
253 //*************************** option 5 Show all Pending
activity
254 else if ($action == 5) {
255 trace ("Setting query for option 5");
256 $query1 = "SELECT Recordkey as Selection, Message,
Reviewed, Pending, Resolved from WarningRecords ";
257 $query2 = " Where Pending = 1 and Resolved = 0";
258 $query = $query1 . $query2;
259 unset ($_POST['formAction']);
260 unset ($_POST['selection']);
261 $_POST['Query'] = $query;
262 echo "<form action=\"WarningMessages.php\" method =
\"POST\">";
263 echo "<input type=\"hidden\" name=\"debug\" value=\"$debug\"
/>";
264 }
265
266 //*************************** option 6 Show all Resolved
activity
267 else if ($action == 6) {
268 trace ("setting query for option 6");
269
270 $query1 = "SELECT Recordkey as Selection, Message,
Reviewed, Pending, Resolved from WarningRecords ";
271 $query2 = "Where Resolved = 1";
272 $query = $query1 . $query2;
273 unset ($_POST['formAction']);
274 echo "<form action=\"WarningMessages.php\" method =
\"POST\">";
275 echo "<input type=\"hidden\" name=\"debug\" value=\"$debug\"
/>";
276 $_POST['Query'] = $query;
304 ◾ Ap pe ndix A
277 }
278 echo "<form action=\"WarningMessages.php\" method =
\"POST\">";
279 echo "<input type=\"hidden\" name=\"debug\"
value=\"$debug\" />";
280 echo "<input type=\"hidden\" name=\"formAction\"
value=\"$action\" />";
281 }
282
283 //**********************************************************
284 //**********************************************************
285 //Display data based on default starting point or user
selections from above
286
287 trace("Starting Query Logic");
288
289 if (isset($_POST['TypeQuery'])){
290 $query = $_POST['TypeQuery'];
291 trace ("query set to $query<br>");
292 }
293 if (isset($_POST['Query'])) {
294 $qval = $_POST['Query'];
295 trace ("Set query string to $qval<br>");
296 }
297
298 if (isset($_POST['formAction'])) {
299 $val = $_POST['formAction'];
300 trace ("Set formAction to $val<br>");
301 }
302
303 if (isset($_POST['debug'])) {
304 $debug = $_POST['debug'];
305 }
306 else {
307 $debug = "**";
308 }
309
310 ?>
311 <form action="<?php echo $self; ?>" method = "post">
312 <label for='formAction[]'>What Action is desired?</
label><br><br>
313 <select name="formAction">
314 <option value="">Actions:</option>
315 <option value="1"> Show All Log Records </option>
316 <option value="2"> Set Reviewed flags for these rows</
option>
Appendix A ◾ 305
317 <option value="3"> Set Pending flag for these rows</option>
318 <option value="4"> Set Resolved flag for these rows</
option>
319 <option value="5"> Show all Pending Activity </option>
320 <option value="6"> Show all Resolved Activity </option>
321
322 </select>
323 <br>
324 <br>
325 <form action="<?php echo $self; ?>" method = "post">
326 <input type="submit" name="selection" name=formAction
value="Update"><br>
327
328 <?php
329 //get value for debug for subsequent reposting of value
330 if (isset($_POST['debug'])) {
331 $debug = $_POST['debug'];
332 $select = $_POST['selection'];
333 trace ("Selection value = $select");
334 trace ("Display value = $display");
335 $query = $_POST['Query'];
336 trace("restored query to :$query:<br>");
337 }
338 else {
339 $debug = "**";
340 }
341 $parms = array();
342 $options = array( "Scrollable" => SQLSRV_CURSOR_KEYSET );
343 $colnames = array();
344 $header = "<th><a>Selection</a></th>";
345
346 //set default query
347 $string1 = "SELECT TOP 100 Recordkey as Selection, Message,
Reviewed, Pending, Resolved ";
348 $string2 = " FROM WarningRecords Where (Reviewed = 0 and
Pending = 0 and Resolved = 0) ";
349 $query = $string1 . $string2;
350
351 if (isset($_POST['Query'])) {
352 $query = $_POST['Query'];
353 echo "<input type=\"hidden\" name=\"TypeQuery\"
value=\"$query\" />";
354 trace ("reset value of query to :$query:<br>");
355 }
356 echo "<input type=\"hidden\" name=\"Query\" value=\"$query\"
/>";
306 ◾ Ap pe ndix A
357 echo "<input type=\"hidden\" name=\"TypeQuery\"
value=\"$query\" />";
358 echo "<input type=\"hidden\" name=\"debug\" value=\"$debug\"
/>";
359
360 //Generate a header based on the sql query issued
361 trace ("SQL command:$query<br>");
362 $i = 0;
363 echo "<br />";
364 $return = sqlsrv_prepare($conn, $query);
365 foreach (sqlsrv_field_metadata ($return) as $fieldMetadata) {
366 foreach( $fieldMetadata as $name => $value) {
367 if ($name == 'Name') {
368 $i++;
369 if ($i > 1) {
370 $colnames[$i] = $value;
371 trace ("Name Offset $i: $value");
372 $header = $header . "<th>$colnames[$i]</th>";
373 }
374 }
375 }
376 }
377 $cols = $i;
378 ?>
379 <table class="FloatTitle" onMouseOver="javascript:trac
kTableHighlight(event, '#99cc99');" onMouseOut="javasc
ript:highlightTableRow(0);">
380 <thead>
381 <tr class="header" style='background-
color:#666666;font-size:8pt;color:#fff;border:1px
solid #c3c3c3;padding:3px;'>
382 </tr></thead>
383 <tbody>
384 <?php
385 //********************************************* Display rows
based on sql query
386 //*********************************************
387 echo "$header";
388 $return = sqlsrv_query ($conn, $query, $parms, $options);
389 if ($return == false) {
390 die ( print_r( sqlsrv_errors(), true));
391 }
392 $i = 0;
393 $numrows = sqlsrv_num_rows($return);
394 if ($numrows == 0) {
395 #print message when no rows found
396 echo "$string<br>";
Appendix A ◾ 307
397 echo "No new records found in the database...<br>";
398 }
399 trace ("Found " . $numrows . " rows in the database");
400 //*********************************************** Normal
(Default) Output Display
401 while ($row = sqlsrv_fetch_array ($return)) {
402 $i++;
403 echo "<tr class=\"d".($i & 1)."\">\n" .
404 "<td><input type=\"checkbox\" name=\"selection[]\"
value =\"$row[0]\" /></td>";
405 for ($c = 1; $c < $cols; $c++) {
406 echo "<td>$row[$c]</td>\n";
407 }
408 }
409 #print message when no rows found
410 //echo ("Numrows:" . $numrows . ":<br>");
411 ?>
412 </body>
413


309
Appendix B: Error Messages
1 <!DOCTYPE html PUBLIC "-//W3C//DTD XHTML 1.0 Transitional//
EN" "http://www.w3.org/TR/xhtml1/DTD/xhtml1-transitional.
dtd">
2 <html xmlns="http://www.w3.org/1999/xhtml" xml:lang="en"
lang="en" dir="ltr">
3 <head>
4 <title>SQL Server Logs</title>
5 <meta http-equiv="Content-Type" content="text/html;
charset=ISO-8859-1" />
6 <script type="text/javascript">
7 </script>
8 </head>
9 <body>
10 <?php
11 function trace($string) {
12 if ($_POST['debug'] == "On") {
13 echo "$string<br>";
14 }
15 }
16 function startup () {
17 //************************************************************
18 // $_POST['debug'] = "On";
19 // $_POST['debug'] = "Off";
20
21 if (($_POST['debug']) == "On") {
22 $debug = $_POST['debug'];
23 trace ("***Message update logic***");
24 echo "...DEBUG set to $debug <br>";
25 if (isset($_POST['selection'])) {
26 $var = $_POST['selection'];
27 echo "...Selection is on and set to :$var:<br>";
28 }
29 else {
30 echo "...Selection is Off..<br>";
31 }
32 if (isset($_POST['TypeQuery'])) {
33 $var = $_POST['TypeQuery'];
310 ◾ A pp endi x B
34 echo "...TypeQuery is on and set to :$var:<br>";
35 }
36 else {
37 echo "...TypeQuery is Off..<br>";
38 }
39
40 if (isset($_POST['Query'])) {
41 $var = $_POST['Query'];
42 echo "...Query is on and set to :$var:<br>";
43 }
44 else {
45 echo "...Query is Off..<br>";
46 }
47
48 if (isset($_POST['formAction'])) {
49 $var = $_POST['formAction'];
50 echo "...formAction is on and set to :$var:<br>";
51 }
52 else {
53 echo "...formAction is Off..<br>";
54 }
55 if (isset($_POST['selection'])) {
56 $var = $_POST['selection'];
57 $val = $var[0];
58 echo "...selection is on and set to :$var:$val:<br>";
59 }
60 else {
61 echo "...selection is Off..<br>";
62 }
63
64 if (isset($_POST['RecordKey'])) {
65 $val = $_POST['RecordKey'];
66 echo "...RecordKey is on and set to :$val:<br>";
67 }
68 else {
69 echo "...RecordKey is Off..<br>";
70 }
71 echo "<br>***************************<br>";
72
73 }
74 trace ("Initialization...");
75 if (isset($_POST['selection'])) {
76 $data = $_POST['selection'];
77 echo "<input type=\"hidden\" name=\"selection\" value=$data
/>";
78 trace ("Found selection, first values:$data:$reckey");
79 }
Appendix B ◾ 311
80 }
81
82 $self = $_SERVER['PHP_SELF'];
83 date_default_timezone_set('America/New_York');
84
85 include "WebHeader.php";
86 //****************** start php logic
87 // DB Variables
88 include "credentials.php"; // Connect to DB
89
90 startup();
91 $parms = array();
92 $options = array( "Scrollable" => SQLSRV_CURSOR_KEYSET );
93
94 //*****************option processing
95 //**********************************************************
96 //**********************************************************
97 if (isset($_POST['formAction']) and $_POST['formAction']
!== "") {
98 trace("Action Processing Selected...");
99 $action = $_POST['formAction'];
100 $data = $_POST['selection'];
101 if (!isset($_POST['RecordKey'])) {
102 $reckey = $data[0];
103 $_POST['RecordKey'] = $reckey;
104 }
105 trace ("Initializing with Record key = $reckey");
106 // echo "<input type=\"hidden\" name=\"RecordKey\"
value=\"$reckey\" />";
107 if ($reckey === "A") {
108 echo "*****Record not selected*****...try
again...<br><br>";
109 unset($_POST['formAction']);
110 $action = 0;
111 $_POST['Error'] = "On";
112 $debug = $_POST['debug'];
113 trace ("***Refresh values...first value = $reckey<br>");
114 echo "<form action=\"ErrorMessages.php\" method =
\"POST\">";
115 echo "<input type=\"hidden\" name=\"debug\"
value=\"$debug\" />";
116 echo "<input type=\"submit\" name=\"link\" value=\"OK\"
/>";
117 }
118 else {
119 unset($_POST['Error']);
120 }
312 ◾ Ap pe ndix B
121 if ($_POST['debug'] == "On") {
122 echo "**Action option = $action<br>";
123 }
124 //*************************** option 1 Show all Warning
records
125 if ($action == 1) {
126 trace ("Creating sql string for option 1");
127 $query = "SELECT Recordkey as Selection, Message,
Reviewed, Pending, Resolved from ErrorRecords ";
128 $_POST['Query'] = $query;
129 echo "<form action=\"ErrorMessages.php\" method =
\"POST\">";
130 echo "<input type=\"hidden\" name=\"debug\"
value=\"$debug\" /Message, Reviewed, Pending, Resolved
from ErrorRecords>";
131 }
132
133 //*************************** option 2 Set Reviewed flags
for these rows
134 else if ($action == 2) {
135 trace ("Processing options for action 2");
136 $parms = array();
137 if ((isset($_POST['selection'])) and
($_POST['selection'] !== "") ) {
138 trace ("Reviewed Flag Updates being processed...");
139 $data = $_POST['selection'];
140 $reckey = $data[0];
141 trace ("Using record key:" . $reckey . ":");
142 $debug = $_POST['debug'];
143 if ($_POST['debug'] == "On") {
144 echo "**Reviewed selected set value = $reckey<br>";
145 }
146 foreach ($data as $reckey) {
147 $string1 = 'Update ErrorRecords set Reviewed = 1 ';
148 $string2 = 'Where RecordKey = ' . $reckey;
149 $sqlcmd = "$string1 $string2";
150 if ($_POST['debug'] == "On") {
151 echo "Command issued: $sqlcmd <br>";
152 }
153 if ($return = sqlsrv_query($conn, $sqlcmd)) {
154 if ($_POST['debug'] == "On") {
155 echo "REVIEWED flag set...<br>";
156 }
157 }
158 else {
159 echo "ah crap...<br>";
Appendix B ◾ 313
160 echo "Command issued: $sqlcmd <br>";
161 }
162 }
163 }
164 unset ($_POST['formAction']);
165 unset ($_POST['selection']);
166 // $query = "SELECT Message, Reviewed, Pending, Resolved
from ErrorRecords where Reviewed = 1";
167 echo "<form action=\"ErrorMessages.php\" method =
\"POST\">";
168 echo "<input type=\"hidden\" name=\"debug\" value=\"$debug\" />";
169 }
170
171 //*************************** option 3 Set Pending flags for
these rows
172 else if ($action == 3) {
173 trace ("Processing updates for option 3");
174 $parms = array();
175 if ((isset($_POST['selection'])) and
($_POST['selection'] !== "") ) {
176 trace ("Pending Flag Updates being processed...");
177 $data = $_POST['selection'];
178 $reckey = $data[0];
179 trace ("Using record key:" . $reckey . ":");
180 $debug = $_POST['debug'];
181 if ($_POST['debug'] == "On") {
182 echo "**Reviewed selected set value = $reckey<br>";
183 }
184 foreach ($data as $reckey) {
185 $string1 = 'Update ErrorRecords set Pending = 1 ';
186 $string2 = 'Where RecordKey = ' . $reckey;
187 $sqlcmd = "$string1 $string2";
188 if ($_POST['debug'] == "On") {
189 echo "Command issued: $sqlcmd <br>";
190 }
191 if ($return = sqlsrv_query($conn, $sqlcmd)) {
192 if ($_POST['debug'] == "On") {
193 echo "Pending flag set...<br>";
194 }
195 }
196 else {
197 echo "ah crap...<br>";
198 echo "Command issued: $sqlcmd <br>";
199 }
200 }
201 }
314 ◾ A pp en dix B
202 unset ($_POST['action']);
203 unset ($_POST['selection']);
204 unset ($_POST['RecordKey']);
205 $query = "SELECT Message, Reviewed, Pending,
Resolved from ErrorRecords ";
206
207 echo "<form action=\"ErrorMessages.php\" method = \"POST
\">";
208 echo "<input type=\"hidden\" name=\"Query\"
value=\"$query\" />";
209 echo "<input type=\"hidden\" name=\"debug\"
value=\"$debug\" />";
210 }
211
212 //*************************** option 4 Set Resolved flags for
these rows
213 else if ($action == 4) {
214 trace ("Processing updates for option 4");
215 $parms = array();
216 if ((isset($_POST['selection'])) and
($_POST['selection'] !== "") ) {
217 trace ("Resolved Flag Updates being processed...");
218 $data = $_POST['selection'];
219 $reckey = $data[0];
220 trace ("Using record key:" . $reckey . ":");
221 $debug = $_POST['debug'];
222 if ($_POST['debug'] == "On") {
223 echo "**Reviewed selected set value = $reckey<br>";
224 }
225 foreach ($data as $reckey) {
226 $string1 = 'Update ErrorRecords set Resolved = 1 ';
227 $string2 = 'Where RecordKey = ' . $reckey;
228 $sqlcmd = "$string1 $string2";
229 if ($_POST['debug'] == "On") {
230 echo "Command issued: $sqlcmd <br>";
231 }
232 if ($return = sqlsrv_query($conn, $sqlcmd)) {
233 if ($_POST['debug'] == "On") {
234 echo "Resolved flag set...<br>";
235 }
236 }
237 else {
238 echo "ah crap...<br>";
239 echo "Command issued: $sqlcmd <br>";
240 }
241 }
Appendix B ◾ 315
242 }
243 unset ($_POST['action']);
244 unset ($_POST['selection']);
245 unset ($_POST['RecordKey']);
246 $query = "SELECT Message, Reviewed, Pending,
Resolved from ErrorRecords ";
247
248 echo "<form action=\"ErrorMessages.php\" method =
\"POST\">";
249 echo "<input type=\"hidden\" name=\"Query\"
value=\"$query\" />";
250 echo "<input type=\"hidden\" name=\"debug\"
value=\"$debug\" />";
251 }
252
253 //*************************** option 5 Show all Pending
activity
254 else if ($action == 5) {
255 trace ("Setting query for option 5");
256 $query1 = "SELECT Recordkey as Selection, Message,
Reviewed, Pending, Resolved from ErrorRecords ";
257 $query2 = " Where Pending = 1 and Resolved = 0";
258 $query = $query1 . $query2;
259 unset ($_POST['formAction']);
260 unset ($_POST['selection']);
261 $_POST['Query'] = $query;
262 echo "<form action=\"ErrorMessages.php\" method =
\"POST\">";
263 echo "<input type=\"hidden\" name=\"debug\"
value=\"$debug\" />";
264 }
265
266 //*************************** option 6 Show all Resolved
activity
267 else if ($action == 6) {
268 trace ("setting query for option 6");
269
270 $query1 = "SELECT Recordkey as Selection, Message,
Reviewed, Pending, Resolved from ErrorRecords ";
271 $query2 = "Where Resolved = 1";
272 $query = $query1 . $query2;
273 unset ($_POST['formAction']);
274 echo "<form action=\"ErrorMessages.php\" method =
\"POST\">";
275 echo "<input type=\"hidden\" name=\"debug\"
value=\"$debug\" />";
316 ◾ A pp endix B
276 $_POST['Query'] = $query;
277 }
278 echo "<form action=\"ErrorMessages.php\" method =
\"POST\">";
279 echo "<input type=\"hidden\" name=\"debug\"
value=\"$debug\" />";
280 echo "<input type=\"hidden\" name=\"formAction\"
value=\"$action\" />";
281 }
282
283 //**********************************************************
284 //**********************************************************
285 //Display data based on default starting point or user
selections from above
286
287 trace("Starting Query Logic");
288
289 if (isset($_POST['TypeQuery'])) {
290 $query = $_POST['TypeQuery'];
291 trace ("query set to $query<br>");
292 }
293 if (isset($_POST['Query'])) {
294 $qval = $_POST['Query'];
295 trace ("Set query string to $qval<br>");
296 }
297
298 if (isset($_POST['formAction'])) {
299 $val = $_POST['formAction'];
300 trace ("Set formAction to $val<br>");
301 }
302
303 if (isset($_POST['debug'])) {
304 $debug = $_POST['debug'];
305 }
306 else {
307 $debug = "**";
308 }
309
310 ?>
311 <form action="<?php echo $self; ?>" method = "post">
312 <label for='formAction[]'>What Action is desired?</
label><br><br>
313 <select name="formAction">
314 <option value="">Actions:</option>
315 <option value="1"> Show All Log Records </option>
316 <option value="2"> Set Reviewed flags for these rows</option>
317 <option value="3"> Set Pending flag for these rows</option>
Appendix B ◾ 317
318 <option value="4"> Set Resolved flag for these rows</option>
319 <option value="5"> Show all Pending Activity </option>
320 <option value="6"> Show all Resolved Activity </option>
321
322 </select>
323 <br>
324 <br>
325 <form action="<?php echo $self; ?>" method = "post">
326 <input type="submit" name="selection" name=formAction
value="Update"><br>
327
328 <?php
329 //get value for debug for subsequent reposting of value
330 if (isset($_POST['debug'])) {
331 $debug = $_POST ['debug'];
332 $select = $_POST['selection'];
333 trace ("Selection value = $select");
334 trace ("Display value = $display");
335 $query = $_POST['Query'];
336 trace("restored query to :$query:<br>");
337 }
338 else {
339 $debug = "**";
340 }
341 $parms = array();
342 $options = array( "Scrollable" => SQLSRV_CURSOR_KEYSET );
343 $colnames = array();
344 $header = "<th><a>Selection</a></th>";
345
346 //set default query
347 $string1 = "SELECT TOP 100 Recordkey as Selection, Message,
Reviewed, Pending, Resolved ";
348 $string2 = " FROM ErrorRecords Where (Reviewed = 0 and
Pending = 0 and Resolved = 0) ";
349 $query = $string1 . $string2;
350
351 if (isset($_POST['Query'])) {
352 $query = $_POST['Query'];
353 echo "<input type=\"hidden\" name=\"TypeQuery\" value=
\"$query\" />";
354 trace ("reset value of query to :$query:<br>");
355 }
356 echo "<input type=\"hidden\" name=\"Query\" value=\"$query\" />";
357 echo "<input type=\"hidden\" name=\"TypeQuery\"
value=\"$query\" />";
358 echo "<input type=\"hidden\" name=\"debug\" value=\"$debug\"
/>";
318 ◾ Ap pe ndix B
359
360 //Generate a header based on the sql query issued
361 trace ("SQL command:$query<br>");
362 $i = 0;
363 echo "<br />";
364 $return = sqlsrv_prepare($conn, $query);
365 foreach (sqlsrv_field_metadata ($return) as $fieldMetadata) {
366 foreach( $fieldMetadata as $name => $value) {
367 if ($name == 'Name') {
368 $i++;
369 if ($i > 1) {
370 $colnames[$i] = $value;
371 trace ("Name Offset $i: $value");
372 $header = $header . "<th>$colnames[$i]</th>";
373 }
374 }
375 }
376 }
377 $cols = $i;
378 ?>
379 <table class="FloatTitle" onMouseOver="javascript:trac
kTableHighlight(event, '#99cc99');" onMouseOut="javasc
ript:highlightTableRow(0);">
380 <thead>
381 <tr class="header" style='background-
color:#666666;font-size:8pt;color:#fff;border:1px
solid #c3c3c3;padding:3px;'>
382 </tr></thead>
383 <tbody>
384 <?php
385 //***************************************** Display rows
based on sql query 386 //*********************************
********
387 echo "$header";
388 $return = sqlsrv_query ($conn, $query, $parms, $options);
389 if ($return == false) {
390 die ( print_r( sqlsrv_errors(), true));
391 }
392 $i = 0;
393 $numrows = sqlsrv_num_rows($return);
394 if ($numrows == 0) {
395 #print message when no rows found
396 echo "$string<br>";
397 echo "No new records found in the database...<br>";
398 }
399 trace ("Found " . $numrows . " rows in the database");
Appendix B ◾ 319
400 //*********************************************** Normal
(Default) Output Display
401 while ($row = sqlsrv_fetch_array ($return)) {
402 $i++;
403 echo "<tr class=\"d".($i & 1)."\">\n" .
404 "<td><input type=\"checkbox\" name=\"selection[]\"
value =\"$row[0]\" /></td>";
405 for ($c = 1; $c < $cols; $c++) {
406 echo "<td>$row[$c]</td>\n";
407 }
408 }
409 #print message when no rows found
410 //echo ("Numrows:" . $numrows . ":<br>");
411 ?>
412 </body>
413


321
Appendix C: University DDL
CREATE TABLE [Assignment]
(
[AssignmentNo] char(18) NOT NULL ,
[CourseID] varchar(50) NOT NULL ,
[SectionID] varchar(50) NOT NULL ,
[AssignmentDescription] char(18) NULL
)
go
ALTER TABLE [Assignment]
ADD CONSTRAINT [XPKAssignment] PRIMARY KEY CLUSTERED
([AssignmentNo] ASC,[CourseID] ASC,[SectionID] ASC)
go
CREATE TABLE [Course]
(
[CourseID] varchar(50) NOT NULL ,
[DepartmentID] varchar(50) NOT NULL ,
[CourseName] varchar(50) NULL ,
[CreditHours] varchar(50) NULL ,
[CourseDescription] varchar(50) NULL
)
go
ALTER TABLE [Course]
ADD CONSTRAINT [XPKCourse] PRIMARY KEY CLUSTERED ([CourseID] ASC)
go
CREATE TABLE [Course_Enrollment]
(
[CourseID] varchar(50) NOT NULL ,
[SectionID] varchar(50) NOT NULL ,
[StudentID] varchar(50) NOT NULL ,
[DateEnrolled] datetime NULL ,
322 ◾ A pp en dix C
[MidtermGrade] char(18) NULL ,
[FinalGrade] char(18) NULL
)
go
ALTER TABLE [Course_Enrollment]
ADD CONSTRAINT [XPKCourse_Enrollment] PRIMARY KEY CLUSTERED
([CourseID] ASC,[SectionID] ASC,[StudentID] ASC)
go
CREATE TABLE [Course_Offering]
(
[CourseID] varchar(50) NOT NULL ,
[SectionID] varchar(50) NOT NULL ,
[FacultyID] varchar(50) NOT NULL ,
[Location] varchar(50) NULL ,
[ClassSchedule] varchar(50) NULL
)
go
ALTER TABLE [Course_Offering]
ADD CONSTRAINT [XPKCourse_Offering] PRIMARY KEY CLUSTERED
([CourseID] ASC,[SectionID] ASC)
go
CREATE TABLE [Course_Prerequisite]
(
[CourseID] varchar(50) NOT NULL ,
[PrerequisiteCseID] varchar(50) NOT NULL
)
go
ALTER TABLE [Course_Prerequisite]
ADD CONSTRAINT [XPKCourse_Prerequisite] PRIMARY KEY CLUSTERED
([CourseID] ASC,[PrerequisiteCseID] ASC)
go
CREATE TABLE [Curriculum]
(
[CurriculumID] char(18,50) NOT NULL ,
[DegreeID] varchar(50) NOT NULL ,
[CurriculumName] varchar(50) NULL ,
[CurriculumDescription] varchar(50) NULL
)
go
Appendix C ◾ 323
ALTER TABLE [Curriculum]
ADD CONSTRAINT [XPKCurriculum] PRIMARY KEY CLUSTERED
([CurriculumID] ASC)
go
CREATE TABLE [Curriculum_Course]
(
[CurriculumID] char(18,50) NOT NULL ,
[CourseID] varchar(50) NOT NULL ,
[Opt_MandatoryFlag] varchar(50) NULL ,
[CurriculumCseInfo] varchar(50) NULL
)
go
ALTER TABLE [Curriculum_Course]
ADD CONSTRAINT [XPKCurriculum_Course] PRIMARY KEY CLUSTERED
([CurriculumID] ASC,[CourseID] ASC)
go
CREATE TABLE [Curriculum_Job_Classification]
(
[ClassificationID] varchar(50) NOT NULL ,
[CurriculumID] char(18,50) NOT NULL ,
[Job_Relationship] varchar(50) NULL
)
go
ALTER TABLE [Curriculum_Job_Classification]
ADD CONSTRAINT [XPKCurriculum_Job_Classification] PRIMARY KEY
CLUSTERED ([ClassificationID] ASC,[CurriculumID] ASC)
go
CREATE TABLE [Degree]
(
[DegreeID] varchar(50) NOT NULL ,
[DepartmentID] varchar(50) NOT NULL ,
[DegreeName] char(18,50) NULL
)
go
ALTER TABLE [Degree]
ADD CONSTRAINT [XPKDegree] PRIMARY KEY CLUSTERED ([DegreeID] ASC)
go
CREATE TABLE [Department]
(
[DepartmentID] varchar(50) NOT NULL ,
324 ◾ A pp endi x C
[SchoolID] varchar(50) NOT NULL ,
[DepartmentName] varchar(50) NULL ,
[DepartmentHeadID] varchar(50) NULL ,
[DeptCampusLocation] varchar(50) NULL
)
go
ALTER TABLE [Department]
ADD CONSTRAINT [XPKDepartment] PRIMARY KEY CLUSTERED
([DepartmentID] ASC)
go
CREATE TABLE [Faculty]
(
[FacultyID] varchar(50) NOT NULL ,
[DepartmentID] varchar(50) NULL ,
[FacultyPrefix] varchar(50) NULL ,
[FacultyLastName] varchar(50) NULL ,
[FacultyMiddleName] varchar(50) NULL ,
[FacultyFirstName] varchar(50) NULL ,
[FacultyStreetAddr] varchar(50) NULL ,
[FacultyCity] varchar(50) NULL ,
[FacultyState] varchar(50) NULL ,
[FacultyZipCode] varchar(50) NULL
)
go
ALTER TABLE [Faculty]
ADD CONSTRAINT [XPKFaculty] PRIMARY KEY CLUSTERED ([FacultyID]
ASC)
go
CREATE TABLE [Job_Classification]
(
[ClassificationID] varchar(50) NOT NULL ,
[ClassificationName] varchar(50) NULL ,
[ClassificationDescription] varchar(50) NULL
)
go
ALTER TABLE [Job_Classification]
ADD CONSTRAINT [XPKJob_Classification] PRIMARY KEY CLUSTERED
([ClassificationID] ASC)
go
Appendix C ◾ 325
CREATE TABLE [School]
(
[SchoolID] varchar(50) NOT NULL ,
[SchoolName] varchar(50) NULL ,
[SchoolDescription] varchar(50) NULL ,
[SchoolCampusLocation] varchar(50) NULL ,
[SchoolDeanID] varchar(50) NULL
)
go
ALTER TABLE [School]
ADD CONSTRAINT [XPKSchool] PRIMARY KEY CLUSTERED ([SchoolID]
ASC)
go
CREATE TABLE [Student]
(
[StudentID] varchar(50) NOT NULL ,
[DepartmentID] varchar(50) NULL ,
[StudentLastName] varchar(50) NULL ,
[StudentMiddleName] varchar(50) NULL ,
[StudentFirstName] varchar(50) NULL ,
[StudentTelephoneNumber] varchar(50) NULL ,
[StudentStreetAddr] varchar(50) NULL ,
[StudentCity] varchar(50) NULL ,
[StudentState] varchar(50) NULL ,
[StudentZipCode] varchar(50) NULL ,
[ClassLevel] varchar(50) NULL
)
go
ALTER TABLE [Student]
ADD CONSTRAINT [XPKStudent] PRIMARY KEY CLUSTERED ([StudentID] ASC)
go
CREATE TABLE [Student_Grade]
(
[CourseID] varchar(50) NOT NULL ,
[SectionID] varchar(50) NOT NULL ,
[StudentID] varchar(50) NOT NULL ,
[Week1] varchar(50) NULL ,
[Week2] varchar(50) NULL ,
[Week3] varchar(50) NULL ,
[xxx] varchar(50) NULL ,
[Week16] varchar(50) NULL
)
go
326 ◾ A pp endix C
ALTER TABLE [Student_Grade]
ADD CONSTRAINT [XPKStudent_Grade] PRIMARY KEY CLUSTERED
([CourseID] ASC,[SectionID] ASC,[StudentID] ASC)
go
CREATE TABLE [Student_Transcript]
(
[CourseID] varchar(50) NOT NULL ,
[StudentID] varchar(50) NOT NULL ,
[Grade] varchar(50) NULL ,
[DateCompleted] datetime NULL ,
[CreditHoursEarned] varchar(50) NULL
)
go
ALTER TABLE [Student_Transcript]
ADD CONSTRAINT [XPKStudent_Transcript] PRIMARY KEY CLUSTERED
([CourseID] ASC,[StudentID] ASC)
go
ALTER TABLE [Assignment]
ADD CONSTRAINT [R_14] FOREIGN KEY ([CourseID],[SectionID])
REFERENCES [Course_Offering]([CourseID],[SectionID])
go
ALTER TABLE [Assignment]
ADD CONSTRAINT [R_31] FOREIGN KEY ([CourseID],[SectionID])
REFERENCES [Course_Offering]([CourseID],[SectionID])
go
ALTER TABLE [Course]
ADD CONSTRAINT [R_21] FOREIGN KEY ([DepartmentID]) REFERENCES
[Department]([DepartmentID])
go
ALTER TABLE [Course_Enrollment]
ADD CONSTRAINT [R_13] FOREIGN KEY ([CourseID],[SectionID])
REFERENCES [Course_Offering]([CourseID],[SectionID])
go
ALTER TABLE [Course_Enrollment]
ADD CONSTRAINT [R_18] FOREIGN KEY ([StudentID]) REFERENCES
[Student]([StudentID])
go
Appendix C ◾ 327
ALTER TABLE [Course_Enrollment]
ADD CONSTRAINT [R_32] FOREIGN KEY ([CourseID],[SectionID])
REFERENCES [Course_Offering]([CourseID],[SectionID])
go
ALTER TABLE [Course_Enrollment]
ADD CONSTRAINT [R_33] FOREIGN KEY ([StudentID]) REFERENCES
[Student]([StudentID])
go
ALTER TABLE [Course_Offering]
ADD CONSTRAINT [R_11] FOREIGN KEY ([CourseID]) REFERENCES
[Course]([CourseID])
go
ALTER TABLE [Course_Offering]
ADD CONSTRAINT [R_12] FOREIGN KEY ([FacultyID]) REFERENCES
[Faculty]([FacultyID])
go
ALTER TABLE [Course_Offering]
ADD CONSTRAINT [R_29] FOREIGN KEY ([CourseID]) REFERENCES
[Course]([CourseID])
go
ALTER TABLE [Course_Offering]
ADD CONSTRAINT [R_30] FOREIGN KEY ([FacultyID]) REFERENCES
[Faculty]([FacultyID])
go
ALTER TABLE [Course_Prerequisite]
ADD CONSTRAINT [R_5] FOREIGN KEY ([CourseID]) REFERENCES [Course]
([CourseID])
go
ALTER TABLE [Course_Prerequisite]
ADD CONSTRAINT [R_22] FOREIGN KEY ([CourseID]) REFERENCES
[Course]([CourseID])
go
ALTER TABLE [Curriculum]
ADD CONSTRAINT [R_24] FOREIGN KEY ([DegreeID]) REFERENCES
[Degree]([DegreeID])
go
328 ◾ Ap pe ndix C
ALTER TABLE [Curriculum_Course]
ADD CONSTRAINT [R_25] FOREIGN KEY ([CurriculumID]) REFERENCES
[Curriculum]([CurriculumID])
go
ALTER TABLE [Curriculum_Course]
ADD CONSTRAINT [R_26] FOREIGN KEY ([CourseID]) REFERENCES
[Course]([CourseID])
go
ALTER TABLE [Curriculum_Job_Classification]
ADD CONSTRAINT [R_6] FOREIGN KEY ([ClassificationID]) REFERENCES
[Job_Classification]([ClassificationID])
go
ALTER TABLE [Curriculum_Job_Classification]
ADD CONSTRAINT [R_23] FOREIGN KEY ([ClassificationID]) REFERENCES
[Job_Classification]([ClassificationID])
go
ALTER TABLE [Curriculum_Job_Classification]
ADD CONSTRAINT [R_28] FOREIGN KEY ([CurriculumID]) REFERENCES
[Curriculum]([CurriculumID])
go
ALTER TABLE [Degree]
ADD CONSTRAINT [R_19] FOREIGN KEY ([DepartmentID]) REFERENCES
[Department]([DepartmentID])
go
ALTER TABLE [Department]
ADD CONSTRAINT [R_1] FOREIGN KEY ([SchoolID]) REFERENCES [School]
([SchoolID])
go
ALTER TABLE [Department]
ADD CONSTRAINT [R_2] FOREIGN KEY ([SchoolID]) REFERENCES [School]
([SchoolID])
go
ALTER TABLE [Department]
ADD CONSTRAINT [R_20] FOREIGN KEY ([SchoolID]) REFERENCES
[School]([SchoolID])
go
ALTER TABLE [Student_Grade]
ADD CONSTRAINT [R_27] FOREIGN KEY ([CourseID],[SectionID],[StudentID
]) REFERENCES [Course_Enrollment]([CourseID],[SectionID],[StudentID])
go
Appendix C ◾ 329
ALTER TABLE [Student_Transcript]
ADD CONSTRAINT [R_36] FOREIGN KEY ([StudentID]) REFERENCES
[Student]([StudentID])
go
CREATE TRIGGER tI_Assignment ON Assignment FOR INSERT AS
/* erwin Builtin Trigger */
/* INSERT trigger on Assignment */
BEGIN
DECLARE @numrows int,
@nullcnt int,
@validcnt int,
@errno int,
@severity int,
@state int,
@errmsg varchar(255)
SELECT @numrows = @@rowcount
/* erwin Builtin Trigger */
/* Course_Offering Assignment on child insert restrict */
/* ERWIN_RELATION:CHECKSUM="00031487", PARENT_OWNER="",
PARENT_TABLE="Course_Offering"
CHILD_OWNER="", CHILD_TABLE="Assignment"
P2C_VERB_PHRASE="", C2P_VERB_PHRASE="",
FK_CONSTRAINT="R_31", FK_COLUMNS="CourseID""SectionID" */
IF
/* %ChildFK(" OR",UPDATE) */
UPDATE(CourseID) OR
UPDATE(SectionID)
BEGIN
SELECT @nullcnt = 0
SELECT @validcnt = count(*)
FROM inserted,Course_Offering
WHERE
/* %JoinFKPK(inserted,Course_Offering) */
inserted.CourseID = Course_Offering.CourseID and
inserted.SectionID = Course_Offering.SectionID
/* %NotnullFK(inserted," IS NULL","select @nullcnt = count(*)
from inserted where"," and") */
IF @validcnt + @nullcnt != @numrows
BEGIN
SELECT @errno = 30002,
@errmsg = 'Cannot insert Assignment because Course_
Offering does not exist.'
GOTO error
END
END
330 ◾ A pp endix C
/* erwin Builtin Trigger */
/* Course_Offering Assignment on child insert restrict */
/* ERWIN_RELATION:CHECKSUM="00000000", PARENT_OWNER="",
PARENT_TABLE="Course_Offering"
CHILD_OWNER="", CHILD_TABLE="Assignment"
P2C_VERB_PHRASE="", C2P_VERB_PHRASE="",
FK_CONSTRAINT="R_14", FK_COLUMNS="CourseID""SectionID" */
IF
/* %ChildFK(" OR",UPDATE) */
UPDATE(CourseID) OR
UPDATE(SectionID)
BEGIN
SELECT @nullcnt = 0
SELECT @validcnt = count(*)
FROM inserted,Course_Offering
WHERE
/* %JoinFKPK(inserted,Course_Offering) */
inserted.CourseID = Course_Offering.CourseID and
inserted.SectionID = Course_Offering.SectionID
/* %NotnullFK(inserted," IS NULL","select @nullcnt = count(*)
from inserted where"," and") */
IF @validcnt + @nullcnt != @numrows
BEGIN
SELECT @errno = 30002,
@errmsg = 'Cannot insert Assignment because Course_
Offering does not exist.'
GOTO error
END
END
/* erwin Builtin Trigger */
RETURN
error:
RAISERROR (@errmsg, -- Message text.
@severity, -- Severity (0~25).
@state) -- State (0~255).
rollback transaction
END
go
CREATE TRIGGER tU_Assignment ON Assignment FOR UPDATE AS
/* erwin Builtin Trigger */
/* UPDATE trigger on Assignment */
BEGIN
DECLARE @numrows int,
@nullcnt int,
Appendix C ◾ 331
@validcnt int,
@insAssignmentNo char(18),
@insCourseID varchar(50),
@insSectionID varchar(50),
@errno int,
@severity int,
@state int,
@errmsg varchar(255)
SELECT @numrows = @@rowcount
/* erwin Builtin Trigger */
/* Course_Offering Assignment on child update restrict */
/* ERWIN_RELATION:CHECKSUM="00032302", PARENT_OWNER="",
PARENT_TABLE="Course_Offering"
CHILD_OWNER="", CHILD_TABLE="Assignment"
P2C_VERB_PHRASE="", C2P_VERB_PHRASE="",
FK_CONSTRAINT="R_31", FK_COLUMNS="CourseID""SectionID" */
IF
/* %ChildFK(" OR",UPDATE) */
UPDATE(CourseID) OR
UPDATE(SectionID)
BEGIN
SELECT @nullcnt = 0
SELECT @validcnt = count(*)
FROM inserted,Course_Offering
WHERE
/* %JoinFKPK(inserted,Course_Offering) */
inserted.CourseID = Course_Offering.CourseID and
inserted.SectionID = Course_Offering.SectionID
/* %NotnullFK(inserted," IS NULL","select @nullcnt = count(*)
from inserted where"," AND") */
IF @validcnt + @nullcnt != @numrows
BEGIN
SELECT @errno = 30007,
@errmsg = 'Cannot update Assignment because Course_
Offering does not exist.'
GOTO error
END
END
/* erwin Builtin Trigger */
/* Course_Offering Assignment on child update restrict */
/* ERWIN_RELATION:CHECKSUM="00000000", PARENT_OWNER="",
PARENT_TABLE="Course_Offering"
CHILD_OWNER="", CHILD_TABLE="Assignment"
P2C_VERB_PHRASE="", C2P_VERB_PHRASE="",
332 ◾ A pp endi x C
FK_CONSTRAINT="R_14", FK_COLUMNS="CourseID""SectionID" */
IF
/* %ChildFK(" OR",UPDATE) */
UPDATE(CourseID) OR
UPDATE(SectionID)
BEGIN
SELECT @nullcnt = 0
SELECT @validcnt = count(*)
FROM inserted,Course_Offering
WHERE
/* %JoinFKPK(inserted,Course_Offering) */
inserted.CourseID = Course_Offering.CourseID and
inserted.SectionID = Course_Offering.SectionID
/* %NotnullFK(inserted," IS NULL","select @nullcnt = count(*)
from inserted where"," AND") */
IF @validcnt + @nullcnt != @numrows
BEGIN
SELECT @errno = 30007,
@errmsg = 'Cannot update Assignment because Course_
Offering does not exist.'
GOTO error
END
END
/* erwin Builtin Trigger */
RETURN
error:
RAISERROR (@errmsg, -- Message text.
@severity, -- Severity (0~25).
@state) -- State (0~255).
rollback transaction
END
go
CREATE TRIGGER tD_Course ON Course FOR DELETE AS
/* erwin Builtin Trigger */
/* DELETE trigger on Course */
BEGIN
DECLARE @errno int,
@severity int,
@state int,
@errmsg varchar(255)
/* erwin Builtin Trigger */
/* Course Course_Offering on parent delete restrict */
/* ERWIN_RELATION:CHECKSUM="000536a7", PARENT_OWNER="",
PARENT_TABLE="Course"
CHILD_OWNER="", CHILD_TABLE="Course_Offering"
Appendix C ◾ 333
P2C_VERB_PHRASE="", C2P_VERB_PHRASE="",
FK_CONSTRAINT="R_29", FK_COLUMNS="CourseID" */
IF EXISTS (
SELECT * FROM deleted,Course_Offering
WHERE
/* %JoinFKPK(Course_Offering,deleted," = "," AND") */
Course_Offering.CourseID = deleted.CourseID
)
BEGIN
SELECT @errno = 30001,
@errmsg = 'Cannot delete Course because Course_
Offering exists.'
GOTO error
END
/* erwin Builtin Trigger */
/* Course Curriculum_Course on parent delete restrict */
/* ERWIN_RELATION:CHECKSUM="00000000", PARENT_OWNER="",
PARENT_TABLE="Course"
CHILD_OWNER="", CHILD_TABLE="Curriculum_Course"
P2C_VERB_PHRASE="", C2P_VERB_PHRASE="",
FK_CONSTRAINT="R_26", FK_COLUMNS="CourseID" */
IF EXISTS (
SELECT * FROM deleted,Curriculum_Course
WHERE
/* %JoinFKPK(Curriculum_Course,deleted," = "," AND") */
Curriculum_Course.CourseID = deleted.CourseID
)
BEGIN
SELECT @errno = 30001,
@errmsg = 'Cannot delete Course because Curriculum_
Course exists.'
GOTO error
END
/* erwin Builtin Trigger */
/* Course Course_Prerequisite on parent delete restrict */
/* ERWIN_RELATION:CHECKSUM="00000000", PARENT_OWNER="",
PARENT_TABLE="Course"
CHILD_OWNER="", CHILD_TABLE="Course_Prerequisite"
P2C_VERB_PHRASE="", C2P_VERB_PHRASE="",
FK_CONSTRAINT="R_22", FK_COLUMNS="CourseID" */
IF EXISTS (
SELECT * FROM deleted,Course_Prerequisite
WHERE
/* %JoinFKPK(Course_Prerequisite,deleted," = "," AND") */
Course_Prerequisite.CourseID = deleted.CourseID
)
334 ◾ A pp endix C
BEGIN
SELECT @errno = 30001,
@errmsg = 'Cannot delete Course because Course_
Prerequisite exists.'
GOTO error
END
/* erwin Builtin Trigger */
/* Course Course_Offering on parent delete restrict */
/* ERWIN_RELATION:CHECKSUM="00000000", PARENT_OWNER="",
PARENT_TABLE="Course"
CHILD_OWNER="", CHILD_TABLE="Course_Offering"
P2C_VERB_PHRASE="", C2P_VERB_PHRASE="",
FK_CONSTRAINT="R_11", FK_COLUMNS="CourseID" */
IF EXISTS (
SELECT * FROM deleted,Course_Offering
WHERE
/* %JoinFKPK(Course_Offering,deleted," = "," AND") */
Course_Offering.CourseID = deleted.CourseID
)
BEGIN
SELECT @errno = 30001,
@errmsg = 'Cannot delete Course because Course_
Offering exists.'
GOTO error
END
/* erwin Builtin Trigger */
/* Course Course_Prerequisite on parent delete restrict */
/* ERWIN_RELATION:CHECKSUM="00000000", PARENT_OWNER="",
PARENT_TABLE="Course"
CHILD_OWNER="", CHILD_TABLE="Course_Prerequisite"
P2C_VERB_PHRASE="", C2P_VERB_PHRASE="",
FK_CONSTRAINT="R_5", FK_COLUMNS="CourseID" */
IF EXISTS (
SELECT * FROM deleted,Course_Prerequisite
WHERE
/* %JoinFKPK(Course_Prerequisite,deleted," = "," AND") */
Course_Prerequisite.CourseID = deleted.CourseID
)
BEGIN
SELECT @errno = 30001,
@errmsg = 'Cannot delete Course because Course_
Prerequisite exists.'
GOTO error
END
Appendix C ◾ 335
/* erwin Builtin Trigger */
RETURN
error:
RAISERROR (@errmsg, -- Message text.
@severity, -- Severity (0~25).
@state) -- State (0~255).
rollback transaction
END
go
CREATE TRIGGER tI_Course ON Course FOR INSERT AS
/* erwin Builtin Trigger */
/* INSERT trigger on Course */
BEGIN
DECLARE @numrows int,
@nullcnt int,
@validcnt int,
@errno int,
@severity int,
@state int,
@errmsg varchar(255)
SELECT @numrows = @@rowcount
/* erwin Builtin Trigger */
/* Department Course on child insert restrict */
/* ERWIN_RELATION:CHECKSUM="00017ce4", PARENT_OWNER="",
PARENT_TABLE="Department"
CHILD_OWNER="", CHILD_TABLE="Course"
P2C_VERB_PHRASE="", C2P_VERB_PHRASE="",
FK_CONSTRAINT="R_21", FK_COLUMNS="DepartmentID" */
IF
/* %ChildFK(" OR",UPDATE) */
UPDATE(DepartmentID)
BEGIN
SELECT @nullcnt = 0
SELECT @validcnt = count(*)
FROM inserted,Department
WHERE
/* %JoinFKPK(inserted,Department) */
inserted.DepartmentID = Department.DepartmentID
/* %NotnullFK(inserted," IS NULL","select @nullcnt = count(*)
from inserted where"," and") */
IF @validcnt + @nullcnt != @numrows
BEGIN
SELECT @errno = 30002,
336 ◾ Ap pe ndix C
@errmsg = 'Cannot insert Course because Department
does not exist.'
GOTO error
END
END
/* erwin Builtin Trigger */
RETURN
error:
RAISERROR (@errmsg, -- Message text.
@severity, -- Severity (0~25).
@state) -- State (0~255).
rollback transaction
END
go
CREATE TRIGGER tU_Course ON Course FOR UPDATE AS
/* erwin Builtin Trigger */
/* UPDATE trigger on Course */
BEGIN
DECLARE @numrows int,
@nullcnt int,
@validcnt int,
@insCourseID varchar(50),
@errno int,
@severity int,
@state int,
@errmsg varchar(255)
SELECT @numrows = @@rowcount
/* erwin Builtin Trigger */
/* Course Course_Offering on parent update restrict */
/* ERWIN_RELATION:CHECKSUM="0006ee2e", PARENT_OWNER="",
PARENT_TABLE="Course"
CHILD_OWNER="", CHILD_TABLE="Course_Offering"
P2C_VERB_PHRASE="", C2P_VERB_PHRASE="",
FK_CONSTRAINT="R_29", FK_COLUMNS="CourseID" */
IF
/* %ParentPK(" OR",UPDATE) */
UPDATE(CourseID)
BEGIN
IF EXISTS (
SELECT * FROM deleted,Course_Offering
WHERE
/* %JoinFKPK(Course_Offering,deleted," = "," AND") */
Course_Offering.CourseID = deleted.CourseID
Appendix C ◾ 337
)
BEGIN
SELECT @errno = 30005,
@errmsg = 'Cannot update Course because Course_
Offering exists.'
GOTO error
END
END
/* erwin Builtin Trigger */
/* Course Curriculum_Course on parent update restrict */
/* ERWIN_RELATION:CHECKSUM="00000000", PARENT_OWNER="",
PARENT_TABLE="Course"
CHILD_OWNER="", CHILD_TABLE="Curriculum_Course"
P2C_VERB_PHRASE="", C2P_VERB_PHRASE="",
FK_CONSTRAINT="R_26", FK_COLUMNS="CourseID" */
IF
/* %ParentPK(" OR",UPDATE) */
UPDATE(CourseID)
BEGIN
IF EXISTS (
SELECT * FROM deleted,Curriculum_Course
WHERE
/* %JoinFKPK(Curriculum_Course,deleted," = "," AND") */
Curriculum_Course.CourseID = deleted.CourseID
)
BEGIN
SELECT @errno = 30005,
@errmsg = 'Cannot update Course because Curriculum_
Course exists.'
GOTO error
END
END
/* erwin Builtin Trigger */
/* Course Course_Prerequisite on parent update restrict */
/* ERWIN_RELATION:CHECKSUM="00000000", PARENT_OWNER="",
PARENT_TABLE="Course"
CHILD_OWNER="", CHILD_TABLE="Course_Prerequisite"
P2C_VERB_PHRASE="", C2P_VERB_PHRASE="",
FK_CONSTRAINT="R_22", FK_COLUMNS="CourseID" */
IF
/* %ParentPK(" OR",UPDATE) */
UPDATE(CourseID)
BEGIN
IF EXISTS (
SELECT * FROM deleted,Course_Prerequisite
338 ◾ A pp endix C
WHERE
/* %JoinFKPK(Course_Prerequisite,deleted," = "," AND") */
Course_Prerequisite.CourseID = deleted.CourseID
)
BEGIN
SELECT @errno = 30005,
@errmsg = 'Cannot update Course because Course_
Prerequisite exists.'
GOTO error
END
END
/* erwin Builtin Trigger */
/* Course Course_Offering on parent update restrict */
/* ERWIN_RELATION:CHECKSUM="00000000", PARENT_OWNER="",
PARENT_TABLE="Course"
CHILD_OWNER="", CHILD_TABLE="Course_Offering"
P2C_VERB_PHRASE="", C2P_VERB_PHRASE="",
FK_CONSTRAINT="R_11", FK_COLUMNS="CourseID" */
IF
/* %ParentPK(" OR",UPDATE) */
UPDATE(CourseID)
BEGIN
IF EXISTS (
SELECT * FROM deleted,Course_Offering
WHERE
/* %JoinFKPK(Course_Offering,deleted," = "," AND") */
Course_Offering.CourseID = deleted.CourseID
)
BEGIN
SELECT @errno = 30005,
@errmsg = 'Cannot update Course because Course_
Offering exists.'
GOTO error
END
END
/* erwin Builtin Trigger */
/* Course Course_Prerequisite on parent update restrict */
/* ERWIN_RELATION:CHECKSUM="00000000", PARENT_OWNER="",
PARENT_TABLE="Course"
CHILD_OWNER="", CHILD_TABLE="Course_Prerequisite"
P2C_VERB_PHRASE="", C2P_VERB_PHRASE="",
FK_CONSTRAINT="R_5", FK_COLUMNS="CourseID" */
IF
Appendix C ◾ 339
/* %ParentPK(" OR",UPDATE) */
UPDATE(CourseID)
BEGIN
IF EXISTS (
SELECT * FROM deleted,Course_Prerequisite
WHERE
/* %JoinFKPK(Course_Prerequisite,deleted," = "," AND") */
Course_Prerequisite.CourseID = deleted.CourseID
)
BEGIN
SELECT @errno = 30005,
@errmsg = 'Cannot update Course because Course_
Prerequisite exists.'
GOTO error
END
END
/* erwin Builtin Trigger */
/* Department Course on child update restrict */
/* ERWIN_RELATION:CHECKSUM="00000000", PARENT_OWNER="",
PARENT_TABLE="Department"
CHILD_OWNER="", CHILD_TABLE="Course"
P2C_VERB_PHRASE="", C2P_VERB_PHRASE="",
FK_CONSTRAINT="R_21", FK_COLUMNS="DepartmentID" */
IF
/* %ChildFK(" OR",UPDATE) */
UPDATE(DepartmentID)
BEGIN
SELECT @nullcnt = 0
SELECT @validcnt = count(*)
FROM inserted,Department
WHERE
/* %JoinFKPK(inserted,Department) */
inserted.DepartmentID = Department.DepartmentID
/* %NotnullFK(inserted," IS NULL","select @nullcnt = count(*)
from inserted where"," AND") */
IF @validcnt + @nullcnt != @numrows
BEGIN
SELECT @errno = 30007,
@errmsg = 'Cannot update Course because Department
does not exist.'
GOTO error
END
END
340 ◾ Ap pe ndix C
/* erwin Builtin Trigger */
RETURN
error:
RAISERROR (@errmsg, -- Message text.
@severity, -- Severity (0~25).
@state) -- State (0~255).
rollback transaction
END
go
CREATE TRIGGER tD_Course_Enrollment ON Course_Enrollment FOR
DELETE AS
/* erwin Builtin Trigger */
/* DELETE trigger on Course_Enrollment */
BEGIN
DECLARE @errno int,
@severity int,
@state int,
@errmsg varchar(255)
/* erwin Builtin Trigger */
/* Course_Enrollment Student_Grade on parent delete restrict
*/
/* ERWIN_RELATION:CHECKSUM="000156e7", PARENT_OWNER="",
PARENT_TABLE="Course_Enrollment"
CHILD_OWNER="", CHILD_TABLE="Student_Grade"
P2C_VERB_PHRASE="", C2P_VERB_PHRASE="",
FK_CONSTRAINT="R_27", FK_COLUMNS="StudentID""CourseID"
"SectionID" */
IF EXISTS (
SELECT * FROM deleted,Student_Grade
WHERE
/* %JoinFKPK(Student_Grade,deleted," = "," AND") */
Student_Grade.CourseID = deleted.CourseID AND
Student_Grade.SectionID = deleted.SectionID AND
Student_Grade.StudentID = deleted.StudentID
)
BEGIN
SELECT @errno = 30001,
@errmsg = 'Cannot delete Course_Enrollment because
Student_Grade exists.'
GOTO error
END
/* erwin Builtin Trigger */
RETURN
error:
Appendix C ◾ 341
RAISERROR (@errmsg, -- Message text.
@severity, -- Severity (0~25).
@state) -- State (0~255).
rollback transaction
END
go
CREATE TRIGGER tI_Course_Enrollment ON Course_Enrollment FOR
INSERT AS
/* erwin Builtin Trigger */
/* INSERT trigger on Course_Enrollment */
BEGIN
DECLARE @numrows int,
@nullcnt int,
@validcnt int,
@errno int,
@severity int,
@state int,
@errmsg varchar(255)
SELECT @numrows = @@rowcount
/* erwin Builtin Trigger */
/* Student Course_Enrollment on child insert restrict */
/* ERWIN_RELATION:CHECKSUM="0005e02c", PARENT_OWNER="",
PARENT_TABLE="Student"
CHILD_OWNER="", CHILD_TABLE="Course_Enrollment"
P2C_VERB_PHRASE="", C2P_VERB_PHRASE="",
FK_CONSTRAINT="R_33", FK_COLUMNS="StudentID" */
IF
/* %ChildFK(" OR",UPDATE) */
UPDATE(StudentID)
BEGIN
SELECT @nullcnt = 0
SELECT @validcnt = count(*)
FROM inserted,Student
WHERE
/* %JoinFKPK(inserted,Student) */
inserted.StudentID = Student.StudentID
/* %NotnullFK(inserted," IS NULL","select @nullcnt = count(*)
from inserted where"," and") */
IF @validcnt + @nullcnt != @numrows
BEGIN
SELECT @errno = 30002,
@errmsg = 'Cannot insert Course_Enrollment because
Student does not exist.'
342 ◾ A pp endix C
GOTO error
END
END
/* erwin Builtin Trigger */
/* Course_Offering Course_Enrollment on child insert restrict
*/
/* ERWIN_RELATION:CHECKSUM="00000000", PARENT_OWNER="",
PARENT_TABLE="Course_Offering"
CHILD_OWNER="", CHILD_TABLE="Course_Enrollment"
P2C_VERB_PHRASE="", C2P_VERB_PHRASE="",
FK_CONSTRAINT="R_32", FK_COLUMNS="CourseID""SectionID" */
IF
/* %ChildFK(" OR",UPDATE) */
UPDATE(CourseID) OR
UPDATE(SectionID)
BEGIN
SELECT @nullcnt = 0
SELECT @validcnt = count(*)
FROM inserted,Course_Offering
WHERE
/* %JoinFKPK(inserted,Course_Offering) */
inserted.CourseID = Course_Offering.CourseID and
inserted.SectionID = Course_Offering.SectionID
/* %NotnullFK(inserted," IS NULL","select @nullcnt = count(*)
from inserted where"," and") */
IF @validcnt + @nullcnt != @numrows
BEGIN
SELECT @errno = 30002,
@errmsg = 'Cannot insert Course_Enrollment because
Course_Offering does not exist.'
GOTO error
END
END
/* erwin Builtin Trigger */
/* Student Course_Enrollment on child insert restrict */
/* ERWIN_RELATION:CHECKSUM="00000000", PARENT_OWNER="",
PARENT_TABLE="Student"
CHILD_OWNER="", CHILD_TABLE="Course_Enrollment"
P2C_VERB_PHRASE="", C2P_VERB_PHRASE="",
FK_CONSTRAINT="R_18", FK_COLUMNS="StudentID" */
IF
/* %ChildFK(" OR",UPDATE) */
UPDATE(StudentID)
Appendix C ◾ 343
BEGIN
SELECT @nullcnt = 0
SELECT @validcnt = count(*)
FROM inserted,Student
WHERE
/* %JoinFKPK(inserted,Student) */
inserted.StudentID = Student.StudentID
/* %NotnullFK(inserted," IS NULL","select @nullcnt = count(*)
from inserted where"," and") */
IF @validcnt + @nullcnt != @numrows
BEGIN
SELECT @errno = 30002,
@errmsg = 'Cannot insert Course_Enrollment because
Student does not exist.'
GOTO error
END
END
/* erwin Builtin Trigger */
/* Course_Offering Course_Enrollment on child insert restrict
*/
/* ERWIN_RELATION:CHECKSUM="00000000", PARENT_OWNER="",
PARENT_TABLE="Course_Offering"
CHILD_OWNER="", CHILD_TABLE="Course_Enrollment"
P2C_VERB_PHRASE="", C2P_VERB_PHRASE="",
FK_CONSTRAINT="R_13", FK_COLUMNS="CourseID""SectionID" */
IF
/* %ChildFK(" OR",UPDATE) */
UPDATE(CourseID) OR
UPDATE(SectionID)
BEGIN
SELECT @nullcnt = 0
SELECT @validcnt = count(*)
FROM inserted,Course_Offering
WHERE
/* %JoinFKPK(inserted,Course_Offering) */
inserted.CourseID = Course_Offering.CourseID and
inserted.SectionID = Course_Offering.SectionID
/* %NotnullFK(inserted," IS NULL","select @nullcnt = count(*)
from inserted where"," and") */
IF @validcnt + @nullcnt != @numrows
BEGIN
SELECT @errno = 30002,
344 ◾ A ppe ndix C
@errmsg = 'Cannot insert Course_Enrollment because
Course_Offering does not exist.'
GOTO error
END
END
/* erwin Builtin Trigger */
RETURN
error:
RAISERROR (@errmsg, -- Message text.
@severity, -- Severity (0~25).
@state) -- State (0~255).
rollback transaction
END
go
CREATE TRIGGER tU_Course_Enrollment ON Course_Enrollment FOR
UPDATE AS
/* erwin Builtin Trigger */
/* UPDATE trigger on Course_Enrollment */
BEGIN
DECLARE @numrows int,
@nullcnt int,
@validcnt int,
@insCourseID varchar(50),
@insSectionID varchar(50),
@insStudentID varchar(50),
@errno int,
@severity int,
@state int,
@errmsg varchar(255)
SELECT @numrows = @@rowcount
/* erwin Builtin Trigger */
/* Course_Enrollment Student_Grade on parent update restrict */
/* ERWIN_RELATION:CHECKSUM="00075239", PARENT_OWNER="",
PARENT_TABLE="Course_Enrollment"
CHILD_OWNER="", CHILD_TABLE="Student_Grade"
P2C_VERB_PHRASE="", C2P_VERB_PHRASE="",
FK_CONSTRAINT="R_27", FK_COLUMNS="CourseID""StudentID"
"SectionID" */
IF
/* %ParentPK(" OR",UPDATE) */
UPDATE(CourseID) OR
UPDATE(SectionID) OR
Appendix C ◾ 345
UPDATE(StudentID)
BEGIN
IF EXISTS (
SELECT * FROM deleted,Student_Grade
WHERE
/* %JoinFKPK(Student_Grade,deleted," = "," AND") */
Student_Grade.CourseID = deleted.CourseID AND
Student_Grade.SectionID = deleted.SectionID AND
Student_Grade.StudentID = deleted.StudentID
)
BEGIN
SELECT @errno = 30005,
@errmsg = 'Cannot update Course_Enrollment because
Student_Grade exists.'
GOTO error
END
END
/* erwin Builtin Trigger */
/* Student Course_Enrollment on child update restrict */
/* ERWIN_RELATION:CHECKSUM="00000000", PARENT_OWNER="",
PARENT_TABLE="Student"
CHILD_OWNER="", CHILD_TABLE="Course_Enrollment"
P2C_VERB_PHRASE="", C2P_VERB_PHRASE="",
FK_CONSTRAINT="R_33", FK_COLUMNS="StudentID" */
IF
/* %ChildFK(" OR",UPDATE) */
UPDATE(StudentID)
BEGIN
SELECT @nullcnt = 0
SELECT @validcnt = count(*)
FROM inserted,Student
WHERE
/* %JoinFKPK(inserted,Student) */
inserted.StudentID = Student.StudentID
/* %NotnullFK(inserted," IS NULL","select @nullcnt = count(*)
from inserted where"," AND") */
IF @validcnt + @nullcnt != @numrows
BEGIN
SELECT @errno = 30007,
@errmsg = 'Cannot update Course_Enrollment because
Student does not exist.'
GOTO error
END
END
346 ◾ Ap pe ndix C
/* erwin Builtin Trigger */
/* Course_Offering Course_Enrollment on child update restrict
*/
/* ERWIN_RELATION:CHECKSUM="00000000", PARENT_OWNER="",
PARENT_TABLE="Course_Offering"
CHILD_OWNER="", CHILD_TABLE="Course_Enrollment"
P2C_VERB_PHRASE="", C2P_VERB_PHRASE="",
FK_CONSTRAINT="R_32", FK_COLUMNS="CourseID""SectionID" */
IF
/* %ChildFK(" OR",UPDATE) */
UPDATE(CourseID) OR
UPDATE(SectionID)
BEGIN
SELECT @nullcnt = 0
SELECT @validcnt = count(*)
FROM inserted,Course_Offering
WHERE
/* %JoinFKPK(inserted,Course_Offering) */
inserted.CourseID = Course_Offering.CourseID and
inserted.SectionID = Course_Offering.SectionID
/* %NotnullFK(inserted," IS NULL","select @nullcnt = count(*)
from inserted where"," AND") */
IF @validcnt + @nullcnt != @numrows
BEGIN
SELECT @errno = 30007,
@errmsg = 'Cannot update Course_Enrollment because
Course_Offering does not exist.'
GOTO error
END
END
/* erwin Builtin Trigger */
/* Student Course_Enrollment on child update restrict */
/* ERWIN_RELATION:CHECKSUM="00000000", PARENT_OWNER="",
PARENT_TABLE="Student"
CHILD_OWNER="", CHILD_TABLE="Course_Enrollment"
P2C_VERB_PHRASE="", C2P_VERB_PHRASE="",
FK_CONSTRAINT="R_18", FK_COLUMNS="StudentID" */
IF
/* %ChildFK(" OR",UPDATE) */
UPDATE(StudentID)
BEGIN
SELECT @nullcnt = 0
SELECT @validcnt = count(*)
FROM inserted,Student
Appendix C ◾ 347
WHERE
/* %JoinFKPK(inserted,Student) */
inserted.StudentID = Student.StudentID
/* %NotnullFK(inserted," IS NULL","select @nullcnt = count(*)
from inserted where"," AND") */
IF @validcnt + @nullcnt != @numrows
BEGIN
SELECT @errno = 30007,
@errmsg = 'Cannot update Course_Enrollment because
Student does not exist.'
GOTO error
END
END
/* erwin Builtin Trigger */
/* Course_Offering Course_Enrollment on child update restrict
*/
/* ERWIN_RELATION:CHECKSUM="00000000", PARENT_OWNER="",
PARENT_TABLE="Course_Offering"
CHILD_OWNER="", CHILD_TABLE="Course_Enrollment"
P2C_VERB_PHRASE="", C2P_VERB_PHRASE="",
FK_CONSTRAINT="R_13", FK_COLUMNS="CourseID""SectionID" */
IF
/* %ChildFK(" OR",UPDATE) */
UPDATE(CourseID) OR
UPDATE(SectionID)
BEGIN
SELECT @nullcnt = 0
SELECT @validcnt = count(*)
FROM inserted,Course_Offering
WHERE
/* %JoinFKPK(inserted,Course_Offering) */
inserted.CourseID = Course_Offering.CourseID and
inserted.SectionID = Course_Offering.SectionID
/* %NotnullFK(inserted," IS NULL","select @nullcnt = count(*)
from inserted where"," AND") */
IF @validcnt + @nullcnt != @numrows
BEGIN
SELECT @errno = 30007,
@errmsg = 'Cannot update Course_Enrollment because
Course_Offering does not exist.'
GOTO error
END
END
348 ◾ Ap pe ndix C
/* erwin Builtin Trigger */
RETURN
error:
RAISERROR (@errmsg, -- Message text.
@severity, -- Severity (0~25).
@state) -- State (0~255).
rollback transaction
END
go
CREATE TRIGGER tD_Course_Offering ON Course_Offering FOR DELETE AS
/* erwin Builtin Trigger */
/* DELETE trigger on Course_Offering */
BEGIN
DECLARE @errno int,
@severity int,
@state int,
@errmsg varchar(255)
/* erwin Builtin Trigger */
/* Course_Offering Course_Enrollment on parent delete
restrict */
/* ERWIN_RELATION:CHECKSUM="00048585", PARENT_OWNER="",
PARENT_TABLE="Course_Offering"
CHILD_OWNER="", CHILD_TABLE="Course_Enrollment"
P2C_VERB_PHRASE="", C2P_VERB_PHRASE="",
FK_CONSTRAINT="R_32", FK_COLUMNS="CourseID""SectionID" */
IF EXISTS (
SELECT * FROM deleted,Course_Enrollment
WHERE
/* %JoinFKPK(Course_Enrollment,deleted," = "," AND") */
Course_Enrollment.CourseID = deleted.CourseID AND
Course_Enrollment.SectionID = deleted.SectionID
)
BEGIN
SELECT @errno = 30001,
@errmsg = 'Cannot delete Course_Offering because
Course_Enrollment exists.'
GOTO error
END
/* erwin Builtin Trigger */
/* Course_Offering Assignment on parent delete restrict */
/* ERWIN_RELATION:CHECKSUM="00000000", PARENT_OWNER="",
PARENT_TABLE="Course_Offering"
CHILD_OWNER="", CHILD_TABLE="Assignment"
P2C_VERB_PHRASE="", C2P_VERB_PHRASE="",
Appendix C ◾ 349
FK_CONSTRAINT="R_31", FK_COLUMNS="CourseID""SectionID" */
IF EXISTS (
SELECT * FROM deleted,Assignment
WHERE
/* %JoinFKPK(Assignment,deleted," = "," AND") */
Assignment.CourseID = deleted.CourseID AND
Assignment.SectionID = deleted.SectionID
)
BEGIN
SELECT @errno = 30001,
@errmsg = 'Cannot delete Course_Offering because
Assignment exists.'
GOTO error
END
/* erwin Builtin Trigger */
/* Course_Offering Assignment on parent delete restrict */
/* ERWIN_RELATION:CHECKSUM="00000000", PARENT_OWNER="",
PARENT_TABLE="Course_Offering"
CHILD_OWNER="", CHILD_TABLE="Assignment"
P2C_VERB_PHRASE="", C2P_VERB_PHRASE="",
FK_CONSTRAINT="R_14", FK_COLUMNS="CourseID""SectionID" */
IF EXISTS (
SELECT * FROM deleted,Assignment
WHERE
/* %JoinFKPK(Assignment,deleted," = "," AND") */
Assignment.CourseID = deleted.CourseID AND
Assignment.SectionID = deleted.SectionID
)
BEGIN
SELECT @errno = 30001,
@errmsg = 'Cannot delete Course_Offering because
Assignment exists.'
GOTO error
END
/* erwin Builtin Trigger */
/* Course_Offering Course_Enrollment on parent delete
restrict */
/* ERWIN_RELATION:CHECKSUM="00000000", PARENT_OWNER="",
PARENT_TABLE="Course_Offering"
CHILD_OWNER="", CHILD_TABLE="Course_Enrollment"
P2C_VERB_PHRASE="", C2P_VERB_PHRASE="",
FK_CONSTRAINT="R_13", FK_COLUMNS="CourseID""SectionID" */
IF EXISTS (
SELECT * FROM deleted,Course_Enrollment
350 ◾ A pp endix C
WHERE
/* %JoinFKPK(Course_Enrollment,deleted," = "," AND") */
Course_Enrollment.CourseID = deleted.CourseID AND
Course_Enrollment.SectionID = deleted.SectionID
)
BEGIN
SELECT @errno = 30001,
@errmsg = 'Cannot delete Course_Offering because
Course_Enrollment exists.'
GOTO error
END
/* erwin Builtin Trigger */
RETURN
error:
RAISERROR (@errmsg, -- Message text.
@severity, -- Severity (0~25).
@state) -- State (0~255).
rollback transaction
END
go
CREATE TRIGGER tI_Course_Offering ON Course_Offering FOR INSERT AS
/* erwin Builtin Trigger */
/* INSERT trigger on Course_Offering */
BEGIN
DECLARE @numrows int,
@nullcnt int,
@validcnt int,
@errno int,
@severity int,
@state int,
@errmsg varchar(255)
SELECT @numrows = @@rowcount
/* erwin Builtin Trigger */
/* Faculty Course_Offering on child insert restrict */
/* ERWIN_RELATION:CHECKSUM="00053126", PARENT_OWNER="",
PARENT_TABLE="Faculty"
CHILD_OWNER="", CHILD_TABLE="Course_Offering"
P2C_VERB_PHRASE="", C2P_VERB_PHRASE="",
FK_CONSTRAINT="R_30", FK_COLUMNS="FacultyID" */
IF
/* %ChildFK(" OR",UPDATE) */
UPDATE(FacultyID)
Appendix C ◾ 351
BEGIN
SELECT @nullcnt = 0
SELECT @validcnt = count(*)
FROM inserted,Faculty
WHERE
/* %JoinFKPK(inserted,Faculty) */
inserted.FacultyID = Faculty.FacultyID
/* %NotnullFK(inserted," IS NULL","select @nullcnt = count(*)
from inserted where"," and") */
IF @validcnt + @nullcnt != @numrows
BEGIN
SELECT @errno = 30002,
@errmsg = 'Cannot insert Course_Offering because
Faculty does not exist.'
GOTO error
END
END
/* erwin Builtin Trigger */
/* Course Course_Offering on child insert restrict */
/* ERWIN_RELATION:CHECKSUM="00000000", PARENT_OWNER="",
PARENT_TABLE="Course"
CHILD_OWNER="", CHILD_TABLE="Course_Offering"
P2C_VERB_PHRASE="", C2P_VERB_PHRASE="",
FK_CONSTRAINT="R_29", FK_COLUMNS="CourseID" */
IF
/* %ChildFK(" OR",UPDATE) */
UPDATE(CourseID)
BEGIN
SELECT @nullcnt = 0
SELECT @validcnt = count(*)
FROM inserted,Course
WHERE
/* %JoinFKPK(inserted,Course) */
inserted.CourseID = Course.CourseID
/* %NotnullFK(inserted," IS NULL","select @nullcnt = count(*)
from inserted where"," and") */
IF @validcnt + @nullcnt != @numrows
BEGIN
SELECT @errno = 30002,
@errmsg = 'Cannot insert Course_Offering because
Course does not exist.'
GOTO error
END
END
352 ◾ Ap pe ndix C
/* erwin Builtin Trigger */
/* Faculty Course_Offering on child insert restrict */
/* ERWIN_RELATION:CHECKSUM="00000000", PARENT_OWNER="",
PARENT_TABLE="Faculty"
CHILD_OWNER="", CHILD_TABLE="Course_Offering"
P2C_VERB_PHRASE="", C2P_VERB_PHRASE="",
FK_CONSTRAINT="R_12", FK_COLUMNS="FacultyID" */
IF
/* %ChildFK(" OR",UPDATE) */
UPDATE(FacultyID)
BEGIN
SELECT @nullcnt = 0
SELECT @validcnt = count(*)
FROM inserted,Faculty
WHERE
/* %JoinFKPK(inserted,Faculty) */
inserted.FacultyID = Faculty.FacultyID
/* %NotnullFK(inserted," IS NULL","select @nullcnt = count(*)
from inserted where"," and") */
IF @validcnt + @nullcnt != @numrows
BEGIN
SELECT @errno = 30002,
@errmsg = 'Cannot insert Course_Offering because
Faculty does not exist.'
GOTO error
END
END
/* erwin Builtin Trigger */
/* Course Course_Offering on child insert restrict */
/* ERWIN_RELATION:CHECKSUM="00000000", PARENT_OWNER="",
PARENT_TABLE="Course"
CHILD_OWNER="", CHILD_TABLE="Course_Offering"
P2C_VERB_PHRASE="", C2P_VERB_PHRASE="",
FK_CONSTRAINT="R_11", FK_COLUMNS="CourseID" */
IF
/* %ChildFK(" OR",UPDATE) */
UPDATE(CourseID)
BEGIN
SELECT @nullcnt = 0
SELECT @validcnt = count(*)
FROM inserted,Course
WHERE
/* %JoinFKPK(inserted,Course) */
inserted.CourseID = Course.CourseID
Appendix C ◾ 353
/* %NotnullFK(inserted," IS NULL","select @nullcnt = count(*)
from inserted where"," and") */
IF @validcnt + @nullcnt != @numrows
BEGIN
SELECT @errno = 30002,
@errmsg = 'Cannot insert Course_Offering because
Course does not exist.'
GOTO error
END
END
/* erwin Builtin Trigger */
RETURN
error:
RAISERROR (@errmsg, -- Message text.
@severity, -- Severity (0~25).
@state) -- State (0~255).
rollback transaction
END
go
CREATE TRIGGER tU_Course_Offering ON Course_Offering FOR UPDATE AS
/* erwin Builtin Trigger */
/* UPDATE trigger on Course_Offering */
BEGIN
DECLARE @numrows int,
@nullcnt int,
@validcnt int,
@insCourseID varchar(50),
@insSectionID varchar(50),
@errno int,
@severity int,
@state int,
@errmsg varchar(255)
SELECT @numrows = @@rowcount
/* erwin Builtin Trigger */
/* Course_Offering Course_Enrollment on parent update restrict
*/
/* ERWIN_RELATION:CHECKSUM="000a4fc9", PARENT_OWNER="",
PARENT_TABLE="Course_Offering"
CHILD_OWNER="", CHILD_TABLE="Course_Enrollment"
P2C_VERB_PHRASE="", C2P_VERB_PHRASE="",
FK_CONSTRAINT="R_32", FK_COLUMNS="CourseID""SectionID" */
354 ◾ A pp endix C
IF
/* %ParentPK(" OR",UPDATE) */
UPDATE(CourseID) OR
UPDATE(SectionID)
BEGIN
IF EXISTS (
SELECT * FROM deleted,Course_Enrollment
WHERE
/* %JoinFKPK(Course_Enrollment,deleted," = "," AND") */
Course_Enrollment.CourseID = deleted.CourseID AND
Course_Enrollment.SectionID = deleted.SectionID
)
BEGIN
SELECT @errno = 30005,
@errmsg = 'Cannot update Course_Offering because
Course_Enrollment exists.'
GOTO error
END
END
/* erwin Builtin Trigger */
/* Course_Offering Assignment on parent update restrict */
/* ERWIN_RELATION:CHECKSUM="00000000", PARENT_OWNER="",
PARENT_TABLE="Course_Offering"
CHILD_OWNER="", CHILD_TABLE="Assignment"
P2C_VERB_PHRASE="", C2P_VERB_PHRASE="",
FK_CONSTRAINT="R_31", FK_COLUMNS="CourseID""SectionID" */
IF
/* %ParentPK(" OR",UPDATE) */
UPDATE(CourseID) OR
UPDATE(SectionID)
BEGIN
IF EXISTS (
SELECT * FROM deleted,Assignment
WHERE
/* %JoinFKPK(Assignment,deleted," = "," AND") */
Assignment.CourseID = deleted.CourseID AND
Assignment.SectionID = deleted.SectionID
)
BEGIN
SELECT @errno = 30005,
@errmsg = 'Cannot update Course_Offering because
Assignment exists.'
GOTO error
END
END
Appendix C ◾ 355
/* erwin Builtin Trigger */
/* Course_Offering Assignment on parent update restrict */
/* ERWIN_RELATION:CHECKSUM="00000000", PARENT_OWNER="",
PARENT_TABLE="Course_Offering"
CHILD_OWNER="", CHILD_TABLE="Assignment"
P2C_VERB_PHRASE="", C2P_VERB_PHRASE="",
FK_CONSTRAINT="R_14", FK_COLUMNS="CourseID""SectionID" */
IF
/* %ParentPK(" OR",UPDATE) */
UPDATE(CourseID) OR
UPDATE(SectionID)
BEGIN
IF EXISTS (
SELECT * FROM deleted,Assignment
WHERE
/* %JoinFKPK(Assignment,deleted," = "," AND") */
Assignment.CourseID = deleted.CourseID AND
Assignment.SectionID = deleted.SectionID
)
BEGIN
SELECT @errno = 30005,
@errmsg = 'Cannot update Course_Offering because
Assignment exists.'
GOTO error
END
END
/* erwin Builtin Trigger */
/* Course_Offering Course_Enrollment on parent update restrict
*/
/* ERWIN_RELATION:CHECKSUM="00000000", PARENT_OWNER="",
PARENT_TABLE="Course_Offering"
CHILD_OWNER="", CHILD_TABLE="Course_Enrollment"
P2C_VERB_PHRASE="", C2P_VERB_PHRASE="",
FK_CONSTRAINT="R_13", FK_COLUMNS="CourseID""SectionID" */
IF
/* %ParentPK(" OR",UPDATE) */
UPDATE(CourseID) OR
UPDATE(SectionID)
BEGIN
IF EXISTS (
SELECT * FROM deleted,Course_Enrollment
WHERE
/* %JoinFKPK(Course_Enrollment,deleted," = "," AND") */
Course_Enrollment.CourseID = deleted.CourseID AND
Course_Enrollment.SectionID = deleted.SectionID
)
356 ◾ A pp endix C
BEGIN
SELECT @errno = 30005,
@errmsg = 'Cannot update Course_Offering because
Course_Enrollment exists.'
GOTO error
END
END
/* erwin Builtin Trigger */
/* Faculty Course_Offering on child update restrict */
/* ERWIN_RELATION:CHECKSUM="00000000", PARENT_OWNER="",
PARENT_TABLE="Faculty"
CHILD_OWNER="", CHILD_TABLE="Course_Offering"
P2C_VERB_PHRASE="", C2P_VERB_PHRASE="",
FK_CONSTRAINT="R_30", FK_COLUMNS="FacultyID" */
IF
/* %ChildFK(" OR",UPDATE) */
UPDATE(FacultyID)
BEGIN
SELECT @nullcnt = 0
SELECT @validcnt = count(*)
FROM inserted,Faculty
WHERE
/* %JoinFKPK(inserted,Faculty) */
inserted.FacultyID = Faculty.FacultyID
/* %NotnullFK(inserted," IS NULL","select @nullcnt = count(*)
from inserted where"," AND") */
IF @validcnt + @nullcnt != @numrows
BEGIN
SELECT @errno = 30007,
@errmsg = 'Cannot update Course_Offering because
Faculty does not exist.'
GOTO error
END
END
/* erwin Builtin Trigger */
/* Course Course_Offering on child update restrict */
/* ERWIN_RELATION:CHECKSUM="00000000", PARENT_OWNER="",
PARENT_TABLE="Course"
CHILD_OWNER="", CHILD_TABLE="Course_Offering"
P2C_VERB_PHRASE="", C2P_VERB_PHRASE="",
FK_CONSTRAINT="R_29", FK_COLUMNS="CourseID" */
IF
/* %ChildFK(" OR",UPDATE) */
UPDATE(CourseID)
Appendix C ◾ 357
BEGIN
SELECT @nullcnt = 0
SELECT @validcnt = count(*)
FROM inserted,Course
WHERE
/* %JoinFKPK(inserted,Course) */
inserted.CourseID = Course.CourseID
/* %NotnullFK(inserted," IS NULL","select @nullcnt = count(*)
from inserted where"," AND") */
IF @validcnt + @nullcnt != @numrows
BEGIN
SELECT @errno = 30007,
@errmsg = 'Cannot update Course_Offering because
Course does not exist.'
GOTO error
END
END
/* erwin Builtin Trigger */
/* Faculty Course_Offering on child update restrict */
/* ERWIN_RELATION:CHECKSUM="00000000", PARENT_OWNER="",
PARENT_TABLE="Faculty"
CHILD_OWNER="", CHILD_TABLE="Course_Offering"
P2C_VERB_PHRASE="", C2P_VERB_PHRASE="",
FK_CONSTRAINT="R_12", FK_COLUMNS="FacultyID" */
IF
/* %ChildFK(" OR",UPDATE) */
UPDATE(FacultyID)
BEGIN
SELECT @nullcnt = 0
SELECT @validcnt = count(*)
FROM inserted,Faculty
WHERE
/* %JoinFKPK(inserted,Faculty) */
inserted.FacultyID = Faculty.FacultyID
/* %NotnullFK(inserted," IS NULL","select @nullcnt = count(*)
from inserted where"," AND") */
IF @validcnt + @nullcnt != @numrows
BEGIN
SELECT @errno = 30007,
@errmsg = 'Cannot update Course_Offering because
Faculty does not exist.'
GOTO error
END
END
358 ◾ A pp endix C
/* erwin Builtin Trigger */
/* Course Course_Offering on child update restrict */
/* ERWIN_RELATION:CHECKSUM="00000000", PARENT_OWNER="",
PARENT_TABLE="Course"
CHILD_OWNER="", CHILD_TABLE="Course_Offering"
P2C_VERB_PHRASE="", C2P_VERB_PHRASE="",
FK_CONSTRAINT="R_11", FK_COLUMNS="CourseID" */
IF
/* %ChildFK(" OR",UPDATE) */
UPDATE(CourseID)
BEGIN
SELECT @nullcnt = 0
SELECT @validcnt = count(*)
FROM inserted,Course
WHERE
/* %JoinFKPK(inserted,Course) */
inserted.CourseID = Course.CourseID
/* %NotnullFK(inserted," IS NULL","select @nullcnt = count(*)
from inserted where"," AND") */
IF @validcnt + @nullcnt != @numrows
BEGIN
SELECT @errno = 30007,
@errmsg = 'Cannot update Course_Offering because
Course does not exist.'
GOTO error
END
END
/* erwin Builtin Trigger */
RETURN
error:
RAISERROR (@errmsg, -- Message text.
@severity, -- Severity (0~25).
@state) -- State (0~255).
rollback transaction
END
go
CREATE TRIGGER tI_Course_Prerequisite ON Course_Prerequisite FOR
INSERT AS
/* erwin Builtin Trigger */
/* INSERT trigger on Course_Prerequisite */
BEGIN
DECLARE @numrows int,
@nullcnt int,
Appendix C ◾ 359
@validcnt int,
@errno int,
@severity int,
@state int,
@errmsg varchar(255)
SELECT @numrows = @@rowcount
/* erwin Builtin Trigger */
/* Course Course_Prerequisite on child insert restrict */
/* ERWIN_RELATION:CHECKSUM="0002b871", PARENT_OWNER="",
PARENT_TABLE="Course"
CHILD_OWNER="", CHILD_TABLE="Course_Prerequisite"
P2C_VERB_PHRASE="", C2P_VERB_PHRASE="",
FK_CONSTRAINT="R_22", FK_COLUMNS="CourseID" */
IF
/* %ChildFK(" OR",UPDATE) */
UPDATE(CourseID)
BEGIN
SELECT @nullcnt = 0
SELECT @validcnt = count(*)
FROM inserted,Course
WHERE
/* %JoinFKPK(inserted,Course) */
inserted.CourseID = Course.CourseID
/* %NotnullFK(inserted," IS NULL","select @nullcnt = count(*)
from inserted where"," and") */
IF @validcnt + @nullcnt != @numrows
BEGIN
SELECT @errno = 30002,
@errmsg = 'Cannot insert Course_Prerequisite because
Course does not exist.'
GOTO error
END
END
/* erwin Builtin Trigger */
/* Course Course_Prerequisite on child insert restrict */
/* ERWIN_RELATION:CHECKSUM="00000000", PARENT_OWNER="",
PARENT_TABLE="Course"
CHILD_OWNER="", CHILD_TABLE="Course_Prerequisite"
P2C_VERB_PHRASE="", C2P_VERB_PHRASE="",
FK_CONSTRAINT="R_5", FK_COLUMNS="CourseID" */
IF
/* %ChildFK(" OR",UPDATE) */
UPDATE(CourseID)
BEGIN
SELECT @nullcnt = 0
360 ◾ A pp endix C
SELECT @validcnt = count(*)
FROM inserted,Course
WHERE
/* %JoinFKPK(inserted,Course) */
inserted.CourseID = Course.CourseID
/* %NotnullFK(inserted," IS NULL","select @nullcnt = count(*)
from inserted where"," and") */
IF @validcnt + @nullcnt != @numrows
BEGIN
SELECT @errno = 30002,
@errmsg = 'Cannot insert Course_Prerequisite because
Course does not exist.'
GOTO error
END
END
/* erwin Builtin Trigger */
RETURN
error:
RAISERROR (@errmsg, -- Message text.
@severity, -- Severity (0~25).
@state) -- State (0~255).
rollback transaction
END
go
CREATE TRIGGER tU_Course_Prerequisite ON Course_Prerequisite FOR
UPDATE AS
/* erwin Builtin Trigger */
/* UPDATE trigger on Course_Prerequisite */
BEGIN
DECLARE @numrows int,
@nullcnt int,
@validcnt int,
@insCourseID varchar(50),
@insPrerequisiteCseID varchar(50),
@errno int,
@severity int,
@state int,
@errmsg varchar(255)
SELECT @numrows = @@rowcount
/* erwin Builtin Trigger */
/* Course Course_Prerequisite on child update restrict */
/* ERWIN_RELATION:CHECKSUM="0002c28b", PARENT_OWNER="",
PARENT_TABLE="Course"
Appendix C ◾ 361
CHILD_OWNER="", CHILD_TABLE="Course_Prerequisite"
P2C_VERB_PHRASE="", C2P_VERB_PHRASE="",
FK_CONSTRAINT="R_22", FK_COLUMNS="CourseID" */
IF
/* %ChildFK(" OR",UPDATE) */
UPDATE(CourseID)
BEGIN
SELECT @nullcnt = 0
SELECT @validcnt = count(*)
FROM inserted,Course
WHERE
/* %JoinFKPK(inserted,Course) */
inserted.CourseID = Course.CourseID
/* %NotnullFK(inserted," IS NULL","select @nullcnt = count(*)
from inserted where"," AND") */
IF @validcnt + @nullcnt != @numrows
BEGIN
SELECT @errno = 30007,
@errmsg = 'Cannot update Course_Prerequisite because
Course does not exist.'
GOTO error
END
END
/* erwin Builtin Trigger */
/* Course Course_Prerequisite on child update restrict */
/* ERWIN_RELATION:CHECKSUM="00000000", PARENT_OWNER="",
PARENT_TABLE="Course"
CHILD_OWNER="", CHILD_TABLE="Course_Prerequisite"
P2C_VERB_PHRASE="", C2P_VERB_PHRASE="",
FK_CONSTRAINT="R_5", FK_COLUMNS="CourseID" */
IF
/* %ChildFK(" OR",UPDATE) */
UPDATE(CourseID)
BEGIN
SELECT @nullcnt = 0
SELECT @validcnt = count(*)
FROM inserted,Course
WHERE
/* %JoinFKPK(inserted,Course) */
inserted.CourseID = Course.CourseID
/* %NotnullFK(inserted," IS NULL","select @nullcnt = count(*)
from inserted where"," AND") */
IF @validcnt + @nullcnt != @numrows
BEGIN
SELECT @errno = 30007,
362 ◾ A pp endix C
@errmsg = 'Cannot update Course_Prerequisite because
Course does not exist.'
GOTO error
END
END
/* erwin Builtin Trigger */
RETURN
error:
RAISERROR (@errmsg, -- Message text.
@severity, -- Severity (0~25).
@state) -- State (0~255).
rollback transaction
END
go
CREATE TRIGGER tD_Curriculum ON Curriculum FOR DELETE AS
/* erwin Builtin Trigger */
/* DELETE trigger on Curriculum */
BEGIN
DECLARE @errno int,
@severity int,
@state int,
@errmsg varchar(255)
/* erwin Builtin Trigger */
/* Curriculum Curriculum_Job_Classification on parent delete
restrict */
/* ERWIN_RELATION:CHECKSUM="00024e0d", PARENT_OWNER="",
PARENT_TABLE="Curriculum"
CHILD_OWNER="", CHILD_TABLE="Curriculum_Job_Classification"
P2C_VERB_PHRASE="", C2P_VERB_PHRASE="",
FK_CONSTRAINT="R_28", FK_COLUMNS="CurriculumID" */
IF EXISTS (
SELECT * FROM deleted,Curriculum_Job_Classification
WHERE
/* %JoinFKPK(Curriculum_Job_Classification,deleted," =
"," AND") */
Curriculum_Job_Classification.CurriculumID = deleted.
CurriculumID
)
BEGIN
SELECT @errno = 30001,
@errmsg = 'Cannot delete Curriculum because
Curriculum_Job_Classification exists.'
GOTO error
END
Appendix C ◾ 363
/* erwin Builtin Trigger */
/* Curriculum Curriculum_Course on parent delete restrict */
/* ERWIN_RELATION:CHECKSUM="00000000", PARENT_OWNER="",
PARENT_TABLE="Curriculum"
CHILD_OWNER="", CHILD_TABLE="Curriculum_Course"
P2C_VERB_PHRASE="", C2P_VERB_PHRASE="",
FK_CONSTRAINT="R_25", FK_COLUMNS="CurriculumID" */
IF EXISTS (
SELECT * FROM deleted,Curriculum_Course
WHERE
/* %JoinFKPK(Curriculum_Course,deleted," = "," AND") */
Curriculum_Course.CurriculumID = deleted.CurriculumID
)
BEGIN
SELECT @errno = 30001,
@errmsg = 'Cannot delete Curriculum because
Curriculum_Course exists.'
GOTO error
END
/* erwin Builtin Trigger */
RETURN
error:
RAISERROR (@errmsg, -- Message text.
@severity, -- Severity (0~25).
@state) -- State (0~255).
rollback transaction
END
go
CREATE TRIGGER tI_Curriculum ON Curriculum FOR INSERT AS
/* erwin Builtin Trigger */
/* INSERT trigger on Curriculum */
BEGIN
DECLARE @numrows int,
@nullcnt int,
@validcnt int,
@errno int,
@severity int,
@state int,
@errmsg varchar(255)
SELECT @numrows = @@rowcount
/* erwin Builtin Trigger */
/* Degree Curriculum on child insert restrict */
/* ERWIN_RELATION:CHECKSUM="000160a1", PARENT_OWNER="",
PARENT_TABLE="Degree"
364 ◾ Ap pe ndix C
CHILD_OWNER="", CHILD_TABLE="Curriculum"
P2C_VERB_PHRASE="", C2P_VERB_PHRASE="",
FK_CONSTRAINT="R_24", FK_COLUMNS="DegreeID" */
IF
/* %ChildFK(" OR",UPDATE) */
UPDATE(DegreeID)
BEGIN
SELECT @nullcnt = 0
SELECT @validcnt = count(*)
FROM inserted,Degree
WHERE
/* %JoinFKPK(inserted,Degree) */
inserted.DegreeID = Degree.DegreeID
/* %NotnullFK(inserted," IS NULL","select @nullcnt = count(*)
from inserted where"," and") */
IF @validcnt + @nullcnt != @numrows
BEGIN
SELECT @errno = 30002,
@errmsg = 'Cannot insert Curriculum because Degree
does not exist.'
GOTO error
END
END
/* erwin Builtin Trigger */
RETURN
error:
RAISERROR (@errmsg, -- Message text.
@severity, -- Severity (0~25).
@state) -- State (0~255).
rollback transaction
END
go
CREATE TRIGGER tU_Curriculum ON Curriculum FOR UPDATE AS
/* erwin Builtin Trigger */
/* UPDATE trigger on Curriculum */
BEGIN
DECLARE @numrows int,
@nullcnt int,
@validcnt int,
@insCurriculumID char(18,50),
@errno int,
@severity int,
@state int,
@errmsg varchar(255)
Appendix C ◾ 365
SELECT @numrows = @@rowcount
/* erwin Builtin Trigger */
/* Curriculum Curriculum_Job_Classification on parent update
restrict */
/* ERWIN_RELATION:CHECKSUM="0003cdcd", PARENT_OWNER="",
PARENT_TABLE="Curriculum"
CHILD_OWNER="", CHILD_TABLE="Curriculum_Job_Classification"
P2C_VERB_PHRASE="", C2P_VERB_PHRASE="",
FK_CONSTRAINT="R_28", FK_COLUMNS="CurriculumID" */
IF
/* %ParentPK(" OR",UPDATE) */
UPDATE(CurriculumID)
BEGIN
IF EXISTS (
SELECT * FROM deleted,Curriculum_Job_Classification
WHERE
/* %JoinFKPK(Curriculum_Job_Classification,deleted," =
"," AND") */
Curriculum_Job_Classification.CurriculumID = deleted.
CurriculumID
)
BEGIN
SELECT @errno = 30005,
@errmsg = 'Cannot update Curriculum because
Curriculum_Job_Classification exists.'
GOTO error
END
END
/* erwin Builtin Trigger */
/* Curriculum Curriculum_Course on parent update restrict */
/* ERWIN_RELATION:CHECKSUM="00000000", PARENT_OWNER="",
PARENT_TABLE="Curriculum"
CHILD_OWNER="", CHILD_TABLE="Curriculum_Course"
P2C_VERB_PHRASE="", C2P_VERB_PHRASE="",
FK_CONSTRAINT="R_25", FK_COLUMNS="CurriculumID" */
IF
/* %ParentPK(" OR",UPDATE) */
UPDATE(CurriculumID)
BEGIN
IF EXISTS (
SELECT * FROM deleted,Curriculum_Course
WHERE
/* %JoinFKPK(Curriculum_Course,deleted," = "," AND") */
Curriculum_Course.CurriculumID = deleted.CurriculumID
)
366 ◾ A pp endix C
BEGIN
SELECT @errno = 30005,
@errmsg = 'Cannot update Curriculum because
Curriculum_Course exists.'
GOTO error
END
END
/* erwin Builtin Trigger */
/* Degree Curriculum on child update restrict */
/* ERWIN_RELATION:CHECKSUM="00000000", PARENT_OWNER="",
PARENT_TABLE="Degree"
CHILD_OWNER="", CHILD_TABLE="Curriculum"
P2C_VERB_PHRASE="", C2P_VERB_PHRASE="",
FK_CONSTRAINT="R_24", FK_COLUMNS="DegreeID" */
IF
/* %ChildFK(" OR",UPDATE) */
UPDATE(DegreeID)
BEGIN
SELECT @nullcnt = 0
SELECT @validcnt = count(*)
FROM inserted,Degree
WHERE
/* %JoinFKPK(inserted,Degree) */
inserted.DegreeID = Degree.DegreeID
/* %NotnullFK(inserted," IS NULL","select @nullcnt = count(*)
from inserted where"," AND") */
IF @validcnt + @nullcnt != @numrows
BEGIN
SELECT @errno = 30007,
@errmsg = 'Cannot update Curriculum because Degree
does not exist.'
GOTO error
END
END
/* erwin Builtin Trigger */
RETURN
error:
RAISERROR (@errmsg, -- Message text.
@severity, -- Severity (0~25).
@state) -- State (0~255).
rollback transaction
END
go
Appendix C ◾ 367
CREATE TRIGGER tI_Curriculum_Course ON Curriculum_Course FOR
INSERT AS
/* erwin Builtin Trigger */
/* INSERT trigger on Curriculum_Course */
BEGIN
DECLARE @numrows int,
@nullcnt int,
@validcnt int,
@errno int,
@severity int,
@state int,
@errmsg varchar(255)
SELECT @numrows = @@rowcount
/* erwin Builtin Trigger */
/* Course Curriculum_Course on child insert restrict */
/* ERWIN_RELATION:CHECKSUM="0002aed3", PARENT_OWNER="",
PARENT_TABLE="Course"
CHILD_OWNER="", CHILD_TABLE="Curriculum_Course"
P2C_VERB_PHRASE="", C2P_VERB_PHRASE="",
FK_CONSTRAINT="R_26", FK_COLUMNS="CourseID" */
IF
/* %ChildFK(" OR",UPDATE) */
UPDATE(CourseID)
BEGIN
SELECT @nullcnt = 0
SELECT @validcnt = count(*)
FROM inserted,Course
WHERE
/* %JoinFKPK(inserted,Course) */
inserted.CourseID = Course.CourseID
/* %NotnullFK(inserted," IS NULL","select @nullcnt = count(*)
from inserted where"," and") */
IF @validcnt + @nullcnt != @numrows
BEGIN
SELECT @errno = 30002,
@errmsg = 'Cannot insert Curriculum_Course because
Course does not exist.'
GOTO error
END
END
/* erwin Builtin Trigger */
/* Curriculum Curriculum_Course on child insert restrict */
/* ERWIN_RELATION:CHECKSUM="00000000", PARENT_OWNER="",
PARENT_TABLE="Curriculum"
CHILD_OWNER="", CHILD_TABLE="Curriculum_Course"
P2C_VERB_PHRASE="", C2P_VERB_PHRASE="",
368 ◾ A pp endix C
FK_CONSTRAINT="R_25", FK_COLUMNS="CurriculumID" */
IF
/* %ChildFK(" OR",UPDATE) */
UPDATE(CurriculumID)
BEGIN
SELECT @nullcnt = 0
SELECT @validcnt = count(*)
FROM inserted,Curriculum
WHERE
/* %JoinFKPK(inserted,Curriculum) */
inserted.CurriculumID = Curriculum.CurriculumID
/* %NotnullFK(inserted," IS NULL","select @nullcnt = count(*)
from inserted where"," and") */
IF @validcnt + @nullcnt != @numrows
BEGIN
SELECT @errno = 30002,
@errmsg = 'Cannot insert Curriculum_Course because
Curriculum does not exist.'
GOTO error
END
END
/* erwin Builtin Trigger */
RETURN
error:
RAISERROR (@errmsg, -- Message text.
@severity, -- Severity (0~25).
@state) -- State (0~255).
rollback transaction
END
go
CREATE TRIGGER tU_Curriculum_Course ON Curriculum_Course FOR
UPDATE AS
/* erwin Builtin Trigger */
/* UPDATE trigger on Curriculum_Course */
BEGIN
DECLARE @numrows int,
@nullcnt int,
@validcnt int,
@insCurriculumID char(18,50),
@insCourseID varchar(50),
@errno int,
@severity int,
@state int,
@errmsg varchar(255)
Appendix C ◾ 369
SELECT @numrows = @@rowcount
/* erwin Builtin Trigger */
/* Course Curriculum_Course on child update restrict */
/* ERWIN_RELATION:CHECKSUM="0002c09b", PARENT_OWNER="",
PARENT_TABLE="Course"
CHILD_OWNER="", CHILD_TABLE="Curriculum_Course"
P2C_VERB_PHRASE="", C2P_VERB_PHRASE="",
FK_CONSTRAINT="R_26", FK_COLUMNS="CourseID" */
IF
/* %ChildFK(" OR",UPDATE) */
UPDATE(CourseID)
BEGIN
SELECT @nullcnt = 0
SELECT @validcnt = count(*)
FROM inserted,Course
WHERE
/* %JoinFKPK(inserted,Course) */
inserted.CourseID = Course.CourseID
/* %NotnullFK(inserted," IS NULL","select @nullcnt = count(*)
from inserted where"," AND") */
IF @validcnt + @nullcnt != @numrows
BEGIN
SELECT @errno = 30007,
@errmsg = 'Cannot update Curriculum_Course because
Course does not exist.'
GOTO error
END
END
/* erwin Builtin Trigger */
/* Curriculum Curriculum_Course on child update restrict */
/* ERWIN_RELATION:CHECKSUM="00000000", PARENT_OWNER="",
PARENT_TABLE="Curriculum"
CHILD_OWNER="", CHILD_TABLE="Curriculum_Course"
P2C_VERB_PHRASE="", C2P_VERB_PHRASE="",
FK_CONSTRAINT="R_25", FK_COLUMNS="CurriculumID" */
IF
/* %ChildFK(" OR",UPDATE) */
UPDATE(CurriculumID)
BEGIN
SELECT @nullcnt = 0
SELECT @validcnt = count(*)
FROM inserted,Curriculum
WHERE
/* %JoinFKPK(inserted,Curriculum) */
inserted.CurriculumID = Curriculum.CurriculumID
370 ◾ A pp endix C
/* %NotnullFK(inserted," IS NULL","select @nullcnt = count(*)
from inserted where"," AND") */
IF @validcnt + @nullcnt != @numrows
BEGIN
SELECT @errno = 30007,
@errmsg = 'Cannot update Curriculum_Course because
Curriculum does not exist.'
GOTO error
END
END
/* erwin Builtin Trigger */
RETURN
error:
RAISERROR (@errmsg, -- Message text.
@severity, -- Severity (0~25).
@state) -- State (0~255).
rollback transaction
END
go
CREATE TRIGGER tI_Curriculum_Job_Classification ON Curriculum_Job_
Classification FOR INSERT AS
/* erwin Builtin Trigger */
/* INSERT trigger on Curriculum_Job_Classification */
BEGIN
DECLARE @numrows int,
@nullcnt int,
@validcnt int,
@errno int,
@severity int,
@state int,
@errmsg varchar(255)
SELECT @numrows = @@rowcount
/* erwin Builtin Trigger */
/* Curriculum Curriculum_Job_Classification on child insert
restrict */
/* ERWIN_RELATION:CHECKSUM="0004c8eb", PARENT_OWNER="",
PARENT_TABLE="Curriculum"
CHILD_OWNER="", CHILD_TABLE="Curriculum_Job_Classification"
P2C_VERB_PHRASE="", C2P_VERB_PHRASE="",
FK_CONSTRAINT="R_28", FK_COLUMNS="CurriculumID" */
IF
/* %ChildFK(" OR",UPDATE) */
UPDATE(CurriculumID)
Appendix C ◾ 371
BEGIN
SELECT @nullcnt = 0
SELECT @validcnt = count(*)
FROM inserted,Curriculum
WHERE
/* %JoinFKPK(inserted,Curriculum) */
inserted.CurriculumID = Curriculum.CurriculumID
/* %NotnullFK(inserted," IS NULL","select @nullcnt = count(*)
from inserted where"," and") */
IF @validcnt + @nullcnt != @numrows
BEGIN
SELECT @errno = 30002,
@errmsg = 'Cannot insert Curriculum_Job_
Classification because Curriculum does not exist.'
GOTO error
END
END
/* erwin Builtin Trigger */
/* Job_Classification Curriculum_Job_Classification on child
insert restrict */
/* ERWIN_RELATION:CHECKSUM="00000000", PARENT_OWNER="",
PARENT_TABLE="Job_Classification"
CHILD_OWNER="", CHILD_TABLE="Curriculum_Job_Classification"
P2C_VERB_PHRASE="", C2P_VERB_PHRASE="",
FK_CONSTRAINT="R_23", FK_COLUMNS="ClassificationID" */
IF
/* %ChildFK(" OR",UPDATE) */
UPDATE(ClassificationID)
BEGIN
SELECT @nullcnt = 0
SELECT @validcnt = count(*)
FROM inserted,Job_Classification
WHERE
/* %JoinFKPK(inserted,Job_Classification) */
inserted.ClassificationID = Job_Classification.
ClassificationID
/* %NotnullFK(inserted," IS NULL","select @nullcnt = count(*)
from inserted where"," and") */
IF @validcnt + @nullcnt != @numrows
BEGIN
SELECT @errno = 30002,
@errmsg = 'Cannot insert Curriculum_Job_
Classification because Job_Classification does not exist.'
GOTO error
END
END
372 ◾ Ap pe ndix C
/* erwin Builtin Trigger */
/* Job_Classification Curriculum_Job_Classification on child
insert restrict */
/* ERWIN_RELATION:CHECKSUM="00000000", PARENT_OWNER="",
PARENT_TABLE="Job_Classification"
CHILD_OWNER="", CHILD_TABLE="Curriculum_Job_Classification"
P2C_VERB_PHRASE="", C2P_VERB_PHRASE="",
FK_CONSTRAINT="R_6", FK_COLUMNS="ClassificationID" */
IF
/* %ChildFK(" OR",UPDATE) */
UPDATE(ClassificationID)
BEGIN
SELECT @nullcnt = 0
SELECT @validcnt = count(*)
FROM inserted,Job_Classification
WHERE
/* %JoinFKPK(inserted,Job_Classification) */
inserted.ClassificationID = Job_Classification.
ClassificationID
/* %NotnullFK(inserted," IS NULL","select @nullcnt = count(*)
from inserted where"," and") */
IF @validcnt + @nullcnt != @numrows
BEGIN
SELECT @errno = 30002,
@errmsg = 'Cannot insert Curriculum_Job_
Classification because Job_Classification does not exist.'
GOTO error
END
END
/* erwin Builtin Trigger */
RETURN
error:
RAISERROR (@errmsg, -- Message text.
@severity, -- Severity (0~25).
@state) -- State (0~255).
rollback transaction
END
go
CREATE TRIGGER tU_Curriculum_Job_Classification ON Curriculum_Job_
Classification FOR UPDATE AS
/* erwin Builtin Trigger */
/* UPDATE trigger on Curriculum_Job_Classification */
BEGIN
DECLARE @numrows int,
@nullcnt int,
Appendix C ◾ 373
@validcnt int,
@insClassificationID varchar(50),
@insCurriculumID char(18,50),
@errno int,
@severity int,
@state int,
@errmsg varchar(255)
SELECT @numrows = @@rowcount
/* erwin Builtin Trigger */
/* Curriculum Curriculum_Job_Classification on child update
restrict */
/* ERWIN_RELATION:CHECKSUM="0004b030", PARENT_OWNER="",
PARENT_TABLE="Curriculum"
CHILD_OWNER="", CHILD_TABLE="Curriculum_Job_Classification"
P2C_VERB_PHRASE="", C2P_VERB_PHRASE="",
FK_CONSTRAINT="R_28", FK_COLUMNS="CurriculumID" */
IF
/* %ChildFK(" OR",UPDATE) */
UPDATE(CurriculumID)
BEGIN
SELECT @nullcnt = 0
SELECT @validcnt = count(*)
FROM inserted,Curriculum
WHERE
/* %JoinFKPK(inserted,Curriculum) */
inserted.CurriculumID = Curriculum.CurriculumID
/* %NotnullFK(inserted," IS NULL","select @nullcnt = count(*)
from inserted where"," AND") */
IF @validcnt + @nullcnt != @numrows
BEGIN
SELECT @errno = 30007,
@errmsg = 'Cannot update Curriculum_Job_
Classification because Curriculum does not exist.'
GOTO error
END
END
/* erwin Builtin Trigger */
/* Job_Classification Curriculum_Job_Classification on child
update restrict */
/* ERWIN_RELATION:CHECKSUM="00000000", PARENT_OWNER="",
PARENT_TABLE="Job_Classification"
CHILD_OWNER="", CHILD_TABLE="Curriculum_Job_Classification"
P2C_VERB_PHRASE="", C2P_VERB_PHRASE="",
FK_CONSTRAINT="R_23", FK_COLUMNS="ClassificationID" */
374 ◾ A pp endi x C
IF
/* %ChildFK(" OR",UPDATE) */
UPDATE(ClassificationID)
BEGIN
SELECT @nullcnt = 0
SELECT @validcnt = count(*)
FROM inserted,Job_Classification
WHERE
/* %JoinFKPK(inserted,Job_Classification) */
inserted.ClassificationID = Job_Classification.
ClassificationID
/* %NotnullFK(inserted," IS NULL","select @nullcnt = count(*)
from inserted where"," AND") */
IF @validcnt + @nullcnt != @numrows
BEGIN
SELECT @errno = 30007,
@errmsg = 'Cannot update Curriculum_Job_
Classification because Job_Classification does not exist.'
GOTO error
END
END
/* erwin Builtin Trigger */
/* Job_Classification Curriculum_Job_Classification on child
update restrict */
/* ERWIN_RELATION:CHECKSUM="00000000", PARENT_OWNER="",
PARENT_TABLE="Job_Classification"
CHILD_OWNER="", CHILD_TABLE="Curriculum_Job_Classification"
P2C_VERB_PHRASE="", C2P_VERB_PHRASE="",
FK_CONSTRAINT="R_6", FK_COLUMNS="ClassificationID" */
IF
/* %ChildFK(" OR",UPDATE) */
UPDATE(ClassificationID)
BEGIN
SELECT @nullcnt = 0
SELECT @validcnt = count(*)
FROM inserted,Job_Classification
WHERE
/* %JoinFKPK(inserted,Job_Classification) */
inserted.ClassificationID = Job_Classification.
ClassificationID
/* %NotnullFK(inserted," IS NULL","select @nullcnt = count(*)
from inserted where"," AND") */
IF @validcnt + @nullcnt != @numrows
BEGIN
SELECT @errno = 30007,
Appendix C ◾ 375
@errmsg = 'Cannot update Curriculum_Job_
Classification because Job_Classification does not exist.'
GOTO error
END
END
/* erwin Builtin Trigger */
RETURN
error:
RAISERROR (@errmsg, -- Message text.
@severity, -- Severity (0~25).
@state) -- State (0~255).
rollback transaction
END
go
CREATE TRIGGER tD_Degree ON Degree FOR DELETE AS
/* erwin Builtin Trigger */
/* DELETE trigger on Degree */
BEGIN
DECLARE @errno int,
@severity int,
@state int,
@errmsg varchar(255)
/* erwin Builtin Trigger */
/* Degree Curriculum on parent delete restrict */
/* ERWIN_RELATION:CHECKSUM="00010c21", PARENT_OWNER="",
PARENT_TABLE="Degree"
CHILD_OWNER="", CHILD_TABLE="Curriculum"
P2C_VERB_PHRASE="", C2P_VERB_PHRASE="",
FK_CONSTRAINT="R_24", FK_COLUMNS="DegreeID" */
IF EXISTS (
SELECT * FROM deleted,Curriculum
WHERE
/* %JoinFKPK(Curriculum,deleted," = "," AND") */
Curriculum.DegreeID = deleted.DegreeID
)
BEGIN
SELECT @errno = 30001,
@errmsg = 'Cannot delete Degree because Curriculum
exists.'
GOTO error
END
/* erwin Builtin Trigger */
RETURN
376 ◾ A pp endix C
error:
RAISERROR (@errmsg, -- Message text.
@severity, -- Severity (0~25).
@state) -- State (0~255).
rollback transaction
END
go
CREATE TRIGGER tI_Degree ON Degree FOR INSERT AS
/* erwin Builtin Trigger */
/* INSERT trigger on Degree */
BEGIN
DECLARE @numrows int,
@nullcnt int,
@validcnt int,
@errno int,
@severity int,
@state int,
@errmsg varchar(255)
SELECT @numrows = @@rowcount
/* erwin Builtin Trigger */
/* Department Degree on child insert restrict */
/* ERWIN_RELATION:CHECKSUM="0001719c", PARENT_OWNER="",
PARENT_TABLE="Department"
CHILD_OWNER="", CHILD_TABLE="Degree"
P2C_VERB_PHRASE="", C2P_VERB_PHRASE="",
FK_CONSTRAINT="R_19", FK_COLUMNS="DepartmentID" */
IF
/* %ChildFK(" OR",UPDATE) */
UPDATE(DepartmentID)
BEGIN
SELECT @nullcnt = 0
SELECT @validcnt = count(*)
FROM inserted,Department
WHERE
/* %JoinFKPK(inserted,Department) */
inserted.DepartmentID = Department.DepartmentID
/* %NotnullFK(inserted," IS NULL","select @nullcnt = count(*)
from inserted where"," and") */
IF @validcnt + @nullcnt != @numrows
BEGIN
SELECT @errno = 30002,
@errmsg = 'Cannot insert Degree because Department
does not exist.'
Appendix C ◾ 377
GOTO error
END
END
/* erwin Builtin Trigger */
RETURN
error:
RAISERROR (@errmsg, -- Message text.
@severity, -- Severity (0~25).
@state) -- State (0~255).
rollback transaction
END
go
CREATE TRIGGER tU_Degree ON Degree FOR UPDATE AS
/* erwin Builtin Trigger */
/* UPDATE trigger on Degree */
BEGIN
DECLARE @numrows int,
@nullcnt int,
@validcnt int,
@insDegreeID varchar(50),
@errno int,
@severity int,
@state int,
@errmsg varchar(255)
SELECT @numrows = @@rowcount
/* erwin Builtin Trigger */
/* Degree Curriculum on parent update restrict */
/* ERWIN_RELATION:CHECKSUM="00027b9b", PARENT_OWNER="",
PARENT_TABLE="Degree"
CHILD_OWNER="", CHILD_TABLE="Curriculum"
P2C_VERB_PHRASE="", C2P_VERB_PHRASE="",
FK_CONSTRAINT="R_24", FK_COLUMNS="DegreeID" */
IF
/* %ParentPK(" OR",UPDATE) */
UPDATE(DegreeID)
BEGIN
IF EXISTS (
SELECT * FROM deleted,Curriculum
WHERE
/* %JoinFKPK(Curriculum,deleted," = "," AND") */
Curriculum.DegreeID = deleted.DegreeID
)
378 ◾ A pp endix C
BEGIN
SELECT @errno = 30005,
@errmsg = 'Cannot update Degree because Curriculum
exists.'
GOTO error
END
END
/* erwin Builtin Trigger */
/* Department Degree on child update restrict */
/* ERWIN_RELATION:CHECKSUM="00000000", PARENT_OWNER="",
PARENT_TABLE="Department"
CHILD_OWNER="", CHILD_TABLE="Degree"
P2C_VERB_PHRASE="", C2P_VERB_PHRASE="",
FK_CONSTRAINT="R_19", FK_COLUMNS="DepartmentID" */
IF
/* %ChildFK(" OR",UPDATE) */
UPDATE(DepartmentID)
BEGIN
SELECT @nullcnt = 0
SELECT @validcnt = count(*)
FROM inserted,Department
WHERE
/* %JoinFKPK(inserted,Department) */
inserted.DepartmentID = Department.DepartmentID
/* %NotnullFK(inserted," IS NULL","select @nullcnt = count(*)
from inserted where"," AND") */
IF @validcnt + @nullcnt != @numrows
BEGIN
SELECT @errno = 30007,
@errmsg = 'Cannot update Degree because Department
does not exist.'
GOTO error
END
END
/* erwin Builtin Trigger */
RETURN
error:
RAISERROR (@errmsg, -- Message text.
@severity, -- Severity (0~25).
@state) -- State (0~255).
rollback transaction
END
go
Appendix C ◾ 379
CREATE TRIGGER tD_Department ON Department FOR DELETE AS
/* erwin Builtin Trigger */
/* DELETE trigger on Department */
BEGIN
DECLARE @errno int,
@severity int,
@state int,
@errmsg varchar(255)
/* erwin Builtin Trigger */
/* Department Course on parent delete restrict */
/* ERWIN_RELATION:CHECKSUM="0001f42a", PARENT_OWNER="",
PARENT_TABLE="Department"
CHILD_OWNER="", CHILD_TABLE="Course"
P2C_VERB_PHRASE="", C2P_VERB_PHRASE="",
FK_CONSTRAINT="R_21", FK_COLUMNS="DepartmentID" */
IF EXISTS (
SELECT * FROM deleted,Course
WHERE
/* %JoinFKPK(Course,deleted," = "," AND") */
Course.DepartmentID = deleted.DepartmentID
)
BEGIN
SELECT @errno = 30001,
@errmsg = 'Cannot delete Department because Course
exists.'
GOTO error
END
/* erwin Builtin Trigger */
/* Department Degree on parent delete restrict */
/* ERWIN_RELATION:CHECKSUM="00000000", PARENT_OWNER="",
PARENT_TABLE="Department"
CHILD_OWNER="", CHILD_TABLE="Degree"
P2C_VERB_PHRASE="", C2P_VERB_PHRASE="",
FK_CONSTRAINT="R_19", FK_COLUMNS="DepartmentID" */
IF EXISTS (
SELECT * FROM deleted,Degree
WHERE
/* %JoinFKPK(Degree,deleted," = "," AND") */
Degree.DepartmentID = deleted.DepartmentID
)
BEGIN
SELECT @errno = 30001,
@errmsg = 'Cannot delete Department because Degree
exists.'
GOTO error
END
380 ◾ A pp endix C
/* erwin Builtin Trigger */
RETURN
error:
RAISERROR (@errmsg, -- Message text.
@severity, -- Severity (0~25).
@state) -- State (0~255).
rollback transaction
END
go
CREATE TRIGGER tI_Department ON Department FOR INSERT AS
/* erwin Builtin Trigger */
/* INSERT trigger on Department */
BEGIN
DECLARE @numrows int,
@nullcnt int,
@validcnt int,
@errno int,
@severity int,
@state int,
@errmsg varchar(255)
SELECT @numrows = @@rowcount
/* erwin Builtin Trigger */
/* School Department on child insert restrict */
/* ERWIN_RELATION:CHECKSUM="0003db4f", PARENT_OWNER="",
PARENT_TABLE="School"
CHILD_OWNER="", CHILD_TABLE="Department"
P2C_VERB_PHRASE="", C2P_VERB_PHRASE="",
FK_CONSTRAINT="R_20", FK_COLUMNS="SchoolID" */
IF
/* %ChildFK(" OR",UPDATE) */
UPDATE(SchoolID)
BEGIN
SELECT @nullcnt = 0
SELECT @validcnt = count(*)
FROM inserted,School
WHERE
/* %JoinFKPK(inserted,School) */
inserted.SchoolID = School.SchoolID
/* %NotnullFK(inserted," IS NULL","select @nullcnt = count(*)
from inserted where"," and") */
IF @validcnt + @nullcnt != @numrows
BEGIN
SELECT @errno = 30002,
Appendix C ◾ 381
@errmsg = 'Cannot insert Department because School
does not exist.'
GOTO error
END
END
/* erwin Builtin Trigger */
/* School Department on child insert restrict */
/* ERWIN_RELATION:CHECKSUM="00000000", PARENT_OWNER="",
PARENT_TABLE="School"
CHILD_OWNER="", CHILD_TABLE="Department"
P2C_VERB_PHRASE="", C2P_VERB_PHRASE="",
FK_CONSTRAINT="R_2", FK_COLUMNS="SchoolID" */
IF
/* %ChildFK(" OR",UPDATE) */
UPDATE(SchoolID)
BEGIN
SELECT @nullcnt = 0
SELECT @validcnt = count(*)
FROM inserted,School
WHERE
/* %JoinFKPK(inserted,School) */
inserted.SchoolID = School.SchoolID
/* %NotnullFK(inserted," IS NULL","select @nullcnt = count(*)
from inserted where"," and") */
IF @validcnt + @nullcnt != @numrows
BEGIN
SELECT @errno = 30002,
@errmsg = 'Cannot insert Department because School
does not exist.'
GOTO error
END
END
/* erwin Builtin Trigger */
/* School Department on child insert restrict */
/* ERWIN_RELATION:CHECKSUM="00000000", PARENT_OWNER="",
PARENT_TABLE="School"
CHILD_OWNER="", CHILD_TABLE="Department"
P2C_VERB_PHRASE="", C2P_VERB_PHRASE="",
FK_CONSTRAINT="R_1", FK_COLUMNS="SchoolID" */
IF
/* %ChildFK(" OR",UPDATE) */
UPDATE(SchoolID)
BEGIN
SELECT @nullcnt = 0
382 ◾ A pp endix C
SELECT @validcnt = count(*)
FROM inserted,School
WHERE
/* %JoinFKPK(inserted,School) */
inserted.SchoolID = School.SchoolID
/* %NotnullFK(inserted," IS NULL","select @nullcnt = count(*)
from inserted where"," and") */
IF @validcnt + @nullcnt != @numrows
BEGIN
SELECT @errno = 30002,
@errmsg = 'Cannot insert Department because School
does not exist.'
GOTO error
END
END
/* erwin Builtin Trigger */
RETURN
error:
RAISERROR (@errmsg, -- Message text.
@severity, -- Severity (0~25).
@state) -- State (0~255).
rollback transaction
END
go
CREATE TRIGGER tU_Department ON Department FOR UPDATE AS
/* erwin Builtin Trigger */
/* UPDATE trigger on Department */
BEGIN
DECLARE @numrows int,
@nullcnt int,
@validcnt int,
@insDepartmentID varchar(50),
@errno int,
@severity int,
@state int,
@errmsg varchar(255)
SELECT @numrows = @@rowcount
/* erwin Builtin Trigger */
/* Department Course on parent update restrict */
/* ERWIN_RELATION:CHECKSUM="0006055a", PARENT_OWNER="",
PARENT_TABLE="Department"
Appendix C ◾ 383
CHILD_OWNER="", CHILD_TABLE="Course"
P2C_VERB_PHRASE="", C2P_VERB_PHRASE="",
FK_CONSTRAINT="R_21", FK_COLUMNS="DepartmentID" */
IF
/* %ParentPK(" OR",UPDATE) */
UPDATE(DepartmentID)
BEGIN
IF EXISTS (
SELECT * FROM deleted,Course
WHERE
/* %JoinFKPK(Course,deleted," = "," AND") */
Course.DepartmentID = deleted.DepartmentID
)
BEGIN
SELECT @errno = 30005,
@errmsg = 'Cannot update Department because Course
exists.'
GOTO error
END
END
/* erwin Builtin Trigger */
/* Department Degree on parent update restrict */
/* ERWIN_RELATION:CHECKSUM="00000000", PARENT_OWNER="",
PARENT_TABLE="Department"
CHILD_OWNER="", CHILD_TABLE="Degree"
P2C_VERB_PHRASE="", C2P_VERB_PHRASE="",
FK_CONSTRAINT="R_19", FK_COLUMNS="DepartmentID" */
IF
/* %ParentPK(" OR",UPDATE) */
UPDATE(DepartmentID)
BEGIN
IF EXISTS (
SELECT * FROM deleted,Degree
WHERE
/* %JoinFKPK(Degree,deleted," = "," AND") */
Degree.DepartmentID = deleted.DepartmentID
)
BEGIN
SELECT @errno = 30005,
@errmsg = 'Cannot update Department because Degree
exists.'
GOTO error
END
END
384 ◾ A pp endix C
/* erwin Builtin Trigger */
/* School Department on child update restrict */
/* ERWIN_RELATION:CHECKSUM="00000000", PARENT_OWNER="",
PARENT_TABLE="School"
CHILD_OWNER="", CHILD_TABLE="Department"
P2C_VERB_PHRASE="", C2P_VERB_PHRASE="",
FK_CONSTRAINT="R_20", FK_COLUMNS="SchoolID" */
IF
/* %ChildFK(" OR",UPDATE) */
UPDATE(SchoolID)
BEGIN
SELECT @nullcnt = 0
SELECT @validcnt = count(*)
FROM inserted,School
WHERE
/* %JoinFKPK(inserted,School) */
inserted.SchoolID = School.SchoolID
/* %NotnullFK(inserted," IS NULL","select @nullcnt = count(*)
from inserted where"," AND") */
IF @validcnt + @nullcnt != @numrows
BEGIN
SELECT @errno = 30007,
@errmsg = 'Cannot update Department because School
does not exist.'
GOTO error
END
END
/* erwin Builtin Trigger */
/* School Department on child update restrict */
/* ERWIN_RELATION:CHECKSUM="00000000", PARENT_OWNER="",
PARENT_TABLE="School"
CHILD_OWNER="", CHILD_TABLE="Department"
P2C_VERB_PHRASE="", C2P_VERB_PHRASE="",
FK_CONSTRAINT="R_2", FK_COLUMNS="SchoolID" */
IF
/* %ChildFK(" OR",UPDATE) */
UPDATE(SchoolID)
BEGIN
SELECT @nullcnt = 0
SELECT @validcnt = count(*)
FROM inserted,School
WHERE
/* %JoinFKPK(inserted,School) */
inserted.SchoolID = School.SchoolID
/* %NotnullFK(inserted," IS NULL","select @nullcnt = count(*)
from inserted where"," AND") */
Appendix C ◾ 385
IF @validcnt + @nullcnt != @numrows
BEGIN
SELECT @errno = 30007,
@errmsg = 'Cannot update Department because School
does not exist.'
GOTO error
END
END
/* erwin Builtin Trigger */
/* School Department on child update restrict */
/* ERWIN_RELATION:CHECKSUM="00000000", PARENT_OWNER="",
PARENT_TABLE="School"
CHILD_OWNER="", CHILD_TABLE="Department"
P2C_VERB_PHRASE="", C2P_VERB_PHRASE="",
FK_CONSTRAINT="R_1", FK_COLUMNS="SchoolID" */
IF
/* %ChildFK(" OR",UPDATE) */
UPDATE(SchoolID)
BEGIN
SELECT @nullcnt = 0
SELECT @validcnt = count(*)
FROM inserted,School
WHERE
/* %JoinFKPK(inserted,School) */
inserted.SchoolID = School.SchoolID
/* %NotnullFK(inserted," IS NULL","select @nullcnt = count(*)
from inserted where"," AND") */
IF @validcnt + @nullcnt != @numrows
BEGIN
SELECT @errno = 30007,
@errmsg = 'Cannot update Department because School
does not exist.'
GOTO error
END
END
/* erwin Builtin Trigger */
RETURN
error:
RAISERROR (@errmsg, -- Message text.
@severity, -- Severity (0~25).
@state) -- State (0~255).
rollback transaction
END
go
386 ◾ Ap pe ndix C
CREATE TRIGGER tD_Faculty ON Faculty FOR DELETE AS
/* erwin Builtin Trigger */
/* DELETE trigger on Faculty */
BEGIN
DECLARE @errno int,
@severity int,
@state int,
@errmsg varchar(255)
/* erwin Builtin Trigger */
/* Faculty Course_Offering on parent delete restrict */
/* ERWIN_RELATION:CHECKSUM="000227e6", PARENT_OWNER="",
PARENT_TABLE="Faculty"
CHILD_OWNER="", CHILD_TABLE="Course_Offering"
P2C_VERB_PHRASE="", C2P_VERB_PHRASE="",
FK_CONSTRAINT="R_30", FK_COLUMNS="FacultyID" */
IF EXISTS (
SELECT * FROM deleted,Course_Offering
WHERE
/* %JoinFKPK(Course_Offering,deleted," = "," AND") */
Course_Offering.FacultyID = deleted.FacultyID
)
BEGIN
SELECT @errno = 30001,
@errmsg = 'Cannot delete Faculty because Course_
Offering exists.'
GOTO error
END
/* erwin Builtin Trigger */
/* Faculty Course_Offering on parent delete restrict */
/* ERWIN_RELATION:CHECKSUM="00000000", PARENT_OWNER="",
PARENT_TABLE="Faculty"
CHILD_OWNER="", CHILD_TABLE="Course_Offering"
P2C_VERB_PHRASE="", C2P_VERB_PHRASE="",
FK_CONSTRAINT="R_12", FK_COLUMNS="FacultyID" */
IF EXISTS (
SELECT * FROM deleted,Course_Offering
WHERE
/* %JoinFKPK(Course_Offering,deleted," = "," AND") */
Course_Offering.FacultyID = deleted.FacultyID
)
BEGIN
SELECT @errno = 30001,
@errmsg = 'Cannot delete Faculty because Course_
Offering exists.'
GOTO error
END
Appendix C ◾ 387
/* erwin Builtin Trigger */
RETURN
error:
RAISERROR (@errmsg, -- Message text.
@severity, -- Severity (0~25).
@state) -- State (0~255).
rollback transaction
END
go
CREATE TRIGGER tU_Faculty ON Faculty FOR UPDATE AS
/* erwin Builtin Trigger */
/* UPDATE trigger on Faculty */
BEGIN
DECLARE @numrows int,
@nullcnt int,
@validcnt int,
@insFacultyID varchar(50),
@errno int,
@severity int,
@state int,
@errmsg varchar(255)
SELECT @numrows = @@rowcount
/* erwin Builtin Trigger */
/* Faculty Course_Offering on parent update restrict */
/* ERWIN_RELATION:CHECKSUM="0002433c", PARENT_OWNER="",
PARENT_TABLE="Faculty"
CHILD_OWNER="", CHILD_TABLE="Course_Offering"
P2C_VERB_PHRASE="", C2P_VERB_PHRASE="",
FK_CONSTRAINT="R_30", FK_COLUMNS="FacultyID" */
IF
/* %ParentPK(" OR",UPDATE) */
UPDATE(FacultyID)
BEGIN
IF EXISTS (
SELECT * FROM deleted,Course_Offering
WHERE
/* %JoinFKPK(Course_Offering,deleted," = "," AND") */
Course_Offering.FacultyID = deleted.FacultyID
)
BEGIN
SELECT @errno = 30005,
@errmsg = 'Cannot update Faculty because Course_
Offering exists.'
GOTO error
END
END
388 ◾ A pp endix C
/* erwin Builtin Trigger */
/* Faculty Course_Offering on parent update restrict */
/* ERWIN_RELATION:CHECKSUM="00000000", PARENT_OWNER="",
PARENT_TABLE="Faculty"
CHILD_OWNER="", CHILD_TABLE="Course_Offering"
P2C_VERB_PHRASE="", C2P_VERB_PHRASE="",
FK_CONSTRAINT="R_12", FK_COLUMNS="FacultyID" */
IF
/* %ParentPK(" OR",UPDATE) */
UPDATE(FacultyID)
BEGIN
IF EXISTS (
SELECT * FROM deleted,Course_Offering
WHERE
/* %JoinFKPK(Course_Offering,deleted," = "," AND") */
Course_Offering.FacultyID = deleted.FacultyID
)
BEGIN
SELECT @errno = 30005,
@errmsg = 'Cannot update Faculty because Course_
Offering exists.'
GOTO error
END
END
/* erwin Builtin Trigger */
RETURN
error:
RAISERROR (@errmsg, -- Message text.
@severity, -- Severity (0~25).
@state) -- State (0~255).
rollback transaction
END
go
CREATE TRIGGER tD_Job_Classification ON Job_Classification FOR
DELETE AS
/* erwin Builtin Trigger */
/* DELETE trigger on Job_Classification */
BEGIN
DECLARE @errno int,
@severity int,
@state int,
@errmsg varchar(255)
Appendix C ◾ 389
/* erwin Builtin Trigger */
/* Job_Classification Curriculum_Job_Classification on parent
delete restrict */
/* ERWIN_RELATION:CHECKSUM="00028d10", PARENT_OWNER="",
PARENT_TABLE="Job_Classification"
CHILD_OWNER="", CHILD_TABLE="Curriculum_Job_Classification"
P2C_VERB_PHRASE="", C2P_VERB_PHRASE="",
FK_CONSTRAINT="R_23", FK_COLUMNS="ClassificationID" */
IF EXISTS (
SELECT * FROM deleted,Curriculum_Job_Classification
WHERE
/* %JoinFKPK(Curriculum_Job_Classification,deleted," =
"," AND") */
Curriculum_Job_Classification.ClassificationID = deleted.
ClassificationID
)
BEGIN
SELECT @errno = 30001,
@errmsg = 'Cannot delete Job_Classification because
Curriculum_Job_Classification exists.'
GOTO error
END
/* erwin Builtin Trigger */
/* Job_Classification Curriculum_Job_Classification on parent
delete restrict */
/* ERWIN_RELATION:CHECKSUM="00000000", PARENT_OWNER="",
PARENT_TABLE="Job_Classification"
CHILD_OWNER="", CHILD_TABLE="Curriculum_Job_Classification"
P2C_VERB_PHRASE="", C2P_VERB_PHRASE="",
FK_CONSTRAINT="R_6", FK_COLUMNS="ClassificationID" */
IF EXISTS (
SELECT * FROM deleted,Curriculum_Job_Classification
WHERE
/* %JoinFKPK(Curriculum_Job_Classification,deleted," =
"," AND") */
Curriculum_Job_Classification.ClassificationID = deleted.
ClassificationID
)
BEGIN
SELECT @errno = 30001,
@errmsg = 'Cannot delete Job_Classification because
Curriculum_Job_Classification exists.'
GOTO error
END
390 ◾ Ap pe ndix C
/* erwin Builtin Trigger */
RETURN
error:
RAISERROR (@errmsg, -- Message text.
@severity, -- Severity (0~25).
@state) -- State (0~255).
rollback transaction
END
go
CREATE TRIGGER tU_Job_Classification ON Job_Classification FOR
UPDATE AS
/* erwin Builtin Trigger */
/* UPDATE trigger on Job_Classification */
BEGIN
DECLARE @numrows int,
@nullcnt int,
@validcnt int,
@insClassificationID varchar(50),
@errno int,
@severity int,
@state int,
@errmsg varchar(255)
SELECT @numrows = @@rowcount
/* erwin Builtin Trigger */
/* Job_Classification Curriculum_Job_Classification on parent
update restrict */
/* ERWIN_RELATION:CHECKSUM="0002e6e0", PARENT_OWNER="",
PARENT_TABLE="Job_Classification"
CHILD_OWNER="", CHILD_TABLE="Curriculum_Job_Classification"
P2C_VERB_PHRASE="", C2P_VERB_PHRASE="",
FK_CONSTRAINT="R_23", FK_COLUMNS="ClassificationID" */
IF
/* %ParentPK(" OR",UPDATE) */
UPDATE(ClassificationID)
BEGIN
IF EXISTS (
SELECT * FROM deleted,Curriculum_Job_Classification
WHERE
/* %JoinFKPK(Curriculum_Job_Classification,deleted," =
"," AND") */
Curriculum_Job_Classification.ClassificationID = deleted.
ClassificationID
)
Appendix C ◾ 391
BEGIN
SELECT @errno = 30005,
@errmsg = 'Cannot update Job_Classification because
Curriculum_Job_Classification exists.'
GOTO error
END
END
/* erwin Builtin Trigger */
/* Job_Classification Curriculum_Job_Classification on parent
update restrict */
/* ERWIN_RELATION:CHECKSUM="00000000", PARENT_OWNER="",
PARENT_TABLE="Job_Classification"
CHILD_OWNER="", CHILD_TABLE="Curriculum_Job_Classification"
P2C_VERB_PHRASE="", C2P_VERB_PHRASE="",
FK_CONSTRAINT="R_6", FK_COLUMNS="ClassificationID" */
IF
/* %ParentPK(" OR",UPDATE) */
UPDATE(ClassificationID)
BEGIN
IF EXISTS (
SELECT * FROM deleted,Curriculum_Job_Classification
WHERE
/* %JoinFKPK(Curriculum_Job_Classification,deleted," =
"," AND") */
Curriculum_Job_Classification.ClassificationID = deleted.
ClassificationID
)
BEGIN
SELECT @errno = 30005,
@errmsg = 'Cannot update Job_Classification because
Curriculum_Job_Classification exists.'
GOTO error
END
END
/* erwin Builtin Trigger */
RETURN
error:
RAISERROR (@errmsg, -- Message text.
@severity, -- Severity (0~25).
@state) -- State (0~255).
rollback transaction
END
go
392 ◾ A pp endix C
CREATE TRIGGER tD_School ON School FOR DELETE AS
/* erwin Builtin Trigger */
/* DELETE trigger on School */
BEGIN
DECLARE @errno int,
@severity int,
@state int,
@errmsg varchar(255)
/* erwin Builtin Trigger */
/* School Department on parent delete restrict */
/* ERWIN_RELATION:CHECKSUM="0002e790", PARENT_OWNER="",
PARENT_TABLE="School"
CHILD_OWNER="", CHILD_TABLE="Department"
P2C_VERB_PHRASE="", C2P_VERB_PHRASE="",
FK_CONSTRAINT="R_20", FK_COLUMNS="SchoolID" */
IF EXISTS (
SELECT * FROM deleted,Department
WHERE
/* %JoinFKPK(Department,deleted," = "," AND") */
Department.SchoolID = deleted.SchoolID
)
BEGIN
SELECT @errno = 30001,
@errmsg = 'Cannot delete School because Department
exists.'
GOTO error
END
/* erwin Builtin Trigger */
/* School Department on parent delete restrict */
/* ERWIN_RELATION:CHECKSUM="00000000", PARENT_OWNER="",
PARENT_TABLE="School"
CHILD_OWNER="", CHILD_TABLE="Department"
P2C_VERB_PHRASE="", C2P_VERB_PHRASE="",
FK_CONSTRAINT="R_2", FK_COLUMNS="SchoolID" */
IF EXISTS (
SELECT * FROM deleted,Department
WHERE
/* %JoinFKPK(Department,deleted," = "," AND") */
Department.SchoolID = deleted.SchoolID
)
BEGIN
SELECT @errno = 30001,
@errmsg = 'Cannot delete School because Department
exists.'
Appendix C ◾ 393
GOTO error
END
/* erwin Builtin Trigger */
/* School Department on parent delete restrict */
/* ERWIN_RELATION:CHECKSUM="00000000", PARENT_OWNER="",
PARENT_TABLE="School"
CHILD_OWNER="", CHILD_TABLE="Department"
P2C_VERB_PHRASE="", C2P_VERB_PHRASE="",
FK_CONSTRAINT="R_1", FK_COLUMNS="SchoolID" */
IF EXISTS (
SELECT * FROM deleted,Department
WHERE
/* %JoinFKPK(Department,deleted," = "," AND") */
Department.SchoolID = deleted.SchoolID
)
BEGIN
SELECT @errno = 30001,
@errmsg = 'Cannot delete School because Department
exists.'
GOTO error
END
/* erwin Builtin Trigger */
RETURN
error:
RAISERROR (@errmsg, -- Message text.
@severity, -- Severity (0~25).
@state) -- State (0~255).
rollback transaction
END
go
CREATE TRIGGER tU_School ON School FOR UPDATE AS
/* erwin Builtin Trigger */
/* UPDATE trigger on School */
BEGIN
DECLARE @numrows int,
@nullcnt int,
@validcnt int,
@insSchoolID varchar(50),
@errno int,
@severity int,
@state int,
@errmsg varchar(255)
394 ◾ A pp endi x C
SELECT @numrows = @@rowcount
/* erwin Builtin Trigger */
/* School Department on parent update restrict */
/* ERWIN_RELATION:CHECKSUM="00032787", PARENT_OWNER="",
PARENT_TABLE="School"
CHILD_OWNER="", CHILD_TABLE="Department"
P2C_VERB_PHRASE="", C2P_VERB_PHRASE="",
FK_CONSTRAINT="R_20", FK_COLUMNS="SchoolID" */
IF
/* %ParentPK(" OR",UPDATE) */
UPDATE(SchoolID)
BEGIN
IF EXISTS (
SELECT * FROM deleted,Department
WHERE
/* %JoinFKPK(Department,deleted," = "," AND") */
Department.SchoolID = deleted.SchoolID
)
BEGIN
SELECT @errno = 30005,
@errmsg = 'Cannot update School because Department
exists.'
GOTO error
END
END
/* erwin Builtin Trigger */
/* School Department on parent update restrict */
/* ERWIN_RELATION:CHECKSUM="00000000", PARENT_OWNER="",
PARENT_TABLE="School"
CHILD_OWNER="", CHILD_TABLE="Department"
P2C_VERB_PHRASE="", C2P_VERB_PHRASE="",
FK_CONSTRAINT="R_2", FK_COLUMNS="SchoolID" */
IF
/* %ParentPK(" OR",UPDATE) */
UPDATE(SchoolID)
BEGIN
IF EXISTS (
SELECT * FROM deleted,Department
WHERE
/* %JoinFKPK(Department,deleted," = "," AND") */
Department.SchoolID = deleted.SchoolID
)
BEGIN
SELECT @errno = 30005,
@errmsg = 'Cannot update School because Department
exists.'
Appendix C ◾ 395
GOTO error
END
END
/* erwin Builtin Trigger */
/* School Department on parent update restrict */
/* ERWIN_RELATION:CHECKSUM="00000000", PARENT_OWNER="",
PARENT_TABLE="School"
CHILD_OWNER="", CHILD_TABLE="Department"
P2C_VERB_PHRASE="", C2P_VERB_PHRASE="",
FK_CONSTRAINT="R_1", FK_COLUMNS="SchoolID" */
IF
/* %ParentPK(" OR",UPDATE) */
UPDATE(SchoolID)
BEGIN
IF EXISTS (
SELECT * FROM deleted,Department
WHERE
/* %JoinFKPK(Department,deleted," = "," AND") */
Department.SchoolID = deleted.SchoolID
)
BEGIN
SELECT @errno = 30005,
@errmsg = 'Cannot update School because Department
exists.'
GOTO error
END
END
/* erwin Builtin Trigger */
RETURN
error:
RAISERROR (@errmsg, -- Message text.
@severity, -- Severity (0~25).
@state) -- State (0~255).
rollback transaction
END
go
CREATE TRIGGER tD_Student ON Student FOR DELETE AS
/* erwin Builtin Trigger */
/* DELETE trigger on Student */
BEGIN
DECLARE @errno int,
@severity int,
@state int,
396 ◾ A pp endix C
@errmsg varchar(255)
/* erwin Builtin Trigger */
/* Student Student_Transcript on parent delete restrict */
/* ERWIN_RELATION:CHECKSUM="00033391", PARENT_OWNER="",
PARENT_TABLE="Student"
CHILD_OWNER="", CHILD_TABLE="Student_Transcript"
P2C_VERB_PHRASE="", C2P_VERB_PHRASE="",
FK_CONSTRAINT="R_36", FK_COLUMNS="StudentID" */
IF EXISTS (
SELECT * FROM deleted,Student_Transcript
WHERE
/* %JoinFKPK(Student_Transcript,deleted," = "," AND") */
Student_Transcript.StudentID = deleted.StudentID
)
BEGIN
SELECT @errno = 30001,
@errmsg = 'Cannot delete Student because Student_
Transcript exists.'
GOTO error
END
/* erwin Builtin Trigger */
/* Student Course_Enrollment on parent delete restrict */
/* ERWIN_RELATION:CHECKSUM="00000000", PARENT_OWNER="",
PARENT_TABLE="Student"
CHILD_OWNER="", CHILD_TABLE="Course_Enrollment"
P2C_VERB_PHRASE="", C2P_VERB_PHRASE="",
FK_CONSTRAINT="R_33", FK_COLUMNS="StudentID" */
IF EXISTS (
SELECT * FROM deleted,Course_Enrollment
WHERE
/* %JoinFKPK(Course_Enrollment,deleted," = "," AND") */
Course_Enrollment.StudentID = deleted.StudentID
)
BEGIN
SELECT @errno = 30001,
@errmsg = 'Cannot delete Student because Course_
Enrollment exists.'
GOTO error
END
/* erwin Builtin Trigger */
/* Student Course_Enrollment on parent delete restrict */
/* ERWIN_RELATION:CHECKSUM="00000000", PARENT_OWNER="",
PARENT_TABLE="Student"
CHILD_OWNER="", CHILD_TABLE="Course_Enrollment"
P2C_VERB_PHRASE="", C2P_VERB_PHRASE="",
Appendix C ◾ 397
FK_CONSTRAINT="R_18", FK_COLUMNS="StudentID" */
IF EXISTS (
SELECT * FROM deleted,Course_Enrollment
WHERE
/* %JoinFKPK(Course_Enrollment,deleted," = "," AND") */
Course_Enrollment.StudentID = deleted.StudentID
)
BEGIN
SELECT @errno = 30001,
@errmsg = 'Cannot delete Student because Course_
Enrollment exists.'
GOTO error
END
/* erwin Builtin Trigger */
RETURN
error:
RAISERROR (@errmsg, -- Message text.
@severity, -- Severity (0~25).
@state) -- State (0~255).
rollback transaction
END
go
CREATE TRIGGER tU_Student ON Student FOR UPDATE AS
/* erwin Builtin Trigger */
/* UPDATE trigger on Student */
BEGIN
DECLARE @numrows int,
@nullcnt int,
@validcnt int,
@insStudentID varchar(50),
@errno int,
@severity int,
@state int,
@errmsg varchar(255)
SELECT @numrows = @@rowcount
/* erwin Builtin Trigger */
/* Student Student_Transcript on parent update restrict */
/* ERWIN_RELATION:CHECKSUM="0003701f", PARENT_OWNER="",
PARENT_TABLE="Student"
CHILD_OWNER="", CHILD_TABLE="Student_Transcript"
P2C_VERB_PHRASE="", C2P_VERB_PHRASE="",
FK_CONSTRAINT="R_36", FK_COLUMNS="StudentID" */
398 ◾ A pp endi x C
IF
/* %ParentPK(" OR",UPDATE) */
UPDATE(StudentID)
BEGIN
IF EXISTS (
SELECT * FROM deleted,Student_Transcript
WHERE
/* %JoinFKPK(Student_Transcript,deleted," = "," AND") */
Student_Transcript.StudentID = deleted.StudentID
)
BEGIN
SELECT @errno = 30005,
@errmsg = 'Cannot update Student because Student_
Transcript exists.'
GOTO error
END
END
/* erwin Builtin Trigger */
/* Student Course_Enrollment on parent update restrict */
/* ERWIN_RELATION:CHECKSUM="00000000", PARENT_OWNER="",
PARENT_TABLE="Student"
CHILD_OWNER="", CHILD_TABLE="Course_Enrollment"
P2C_VERB_PHRASE="", C2P_VERB_PHRASE="",
FK_CONSTRAINT="R_33", FK_COLUMNS="StudentID" */
IF
/* %ParentPK(" OR",UPDATE) */
UPDATE(StudentID)
BEGIN
IF EXISTS (
SELECT * FROM deleted,Course_Enrollment
WHERE
/* %JoinFKPK(Course_Enrollment,deleted," = "," AND") */
Course_Enrollment.StudentID = deleted.StudentID
)
BEGIN
SELECT @errno = 30005,
@errmsg = 'Cannot update Student because Course_
Enrollment exists.'
GOTO error
END
END
/* erwin Builtin Trigger */
/* Student Course_Enrollment on parent update restrict */
/* ERWIN_RELATION:CHECKSUM="00000000", PARENT_OWNER="",
PARENT_TABLE="Student"
Appendix C ◾ 399
CHILD_OWNER="", CHILD_TABLE="Course_Enrollment"
P2C_VERB_PHRASE="", C2P_VERB_PHRASE="",
FK_CONSTRAINT="R_18", FK_COLUMNS="StudentID" */
IF
/* %ParentPK(" OR",UPDATE) */
UPDATE(StudentID)
BEGIN
IF EXISTS (
SELECT * FROM deleted,Course_Enrollment
WHERE
/* %JoinFKPK(Course_Enrollment,deleted," = "," AND") */
Course_Enrollment.StudentID = deleted.StudentID
)
BEGIN
SELECT @errno = 30005,
@errmsg = 'Cannot update Student because Course_
Enrollment exists.'
GOTO error
END
END
/* erwin Builtin Trigger */
RETURN
error:
RAISERROR (@errmsg, -- Message text.
@severity, -- Severity (0~25).
@state) -- State (0~255).
rollback transaction
END
go
CREATE TRIGGER tI_Student_Grade ON Student_Grade FOR INSERT AS
/* erwin Builtin Trigger */
/* INSERT trigger on Student_Grade */
BEGIN
DECLARE @numrows int,
@nullcnt int,
@validcnt int,
@errno int,
@severity int,
@state int,
@errmsg varchar(255)
SELECT @numrows = @@rowcount
/* erwin Builtin Trigger */
/* Course_Enrollment Student_Grade on child insert restrict */
400 ◾ A pp endix C
/* ERWIN_RELATION:CHECKSUM="0001dd00", PARENT_OWNER="",
PARENT_TABLE="Course_Enrollment"
CHILD_OWNER="", CHILD_TABLE="Student_Grade"
P2C_VERB_PHRASE="", C2P_VERB_PHRASE="",
FK_CONSTRAINT="R_27", FK_COLUMNS="CourseID""SectionID"
"StudentID" */
IF
/* %ChildFK(" OR",UPDATE) */
UPDATE(CourseID) OR
UPDATE(SectionID) OR
UPDATE(StudentID)
BEGIN
SELECT @nullcnt = 0
SELECT @validcnt = count(*)
FROM inserted,Course_Enrollment
WHERE
/* %JoinFKPK(inserted,Course_Enrollment) */
inserted.CourseID = Course_Enrollment.CourseID and
inserted.SectionID = Course_Enrollment.SectionID and
inserted.StudentID = Course_Enrollment.StudentID
/* %NotnullFK(inserted," IS NULL","select @nullcnt = count(*)
from inserted where"," and") */
IF @validcnt + @nullcnt != @numrows
BEGIN
SELECT @errno = 30002,
@errmsg = 'Cannot insert Student_Grade because
Course_Enrollment does not exist.'
GOTO error
END
END
/* erwin Builtin Trigger */
RETURN
error:
RAISERROR (@errmsg, -- Message text.
@severity, -- Severity (0~25).
@state) -- State (0~255).
rollback transaction
END
go
CREATE TRIGGER tU_Student_Grade ON Student_Grade FOR UPDATE AS
/* erwin Builtin Trigger */
/* UPDATE trigger on Student_Grade */
Appendix C ◾ 401
BEGIN
DECLARE @numrows int,
@nullcnt int,
@validcnt int,
@insCourseID varchar(50),
@insSectionID varchar(50),
@insStudentID varchar(50),
@errno int,
@severity int,
@state int,
@errmsg varchar(255)
SELECT @numrows = @@rowcount
/* erwin Builtin Trigger */
/* Course_Enrollment Student_Grade on child update restrict */
/* ERWIN_RELATION:CHECKSUM="0001d56c", PARENT_OWNER="",
PARENT_TABLE="Course_Enrollment"
CHILD_OWNER="", CHILD_TABLE="Student_Grade"
P2C_VERB_PHRASE="", C2P_VERB_PHRASE="",
FK_CONSTRAINT="R_27", FK_COLUMNS="CourseID""StudentID"
"SectionID" */
IF
/* %ChildFK(" OR",UPDATE) */
UPDATE(CourseID) OR
UPDATE(SectionID) OR
UPDATE(StudentID)
BEGIN
SELECT @nullcnt = 0
SELECT @validcnt = count(*)
FROM inserted,Course_Enrollment
WHERE
/* %JoinFKPK(inserted,Course_Enrollment) */
inserted.CourseID = Course_Enrollment.CourseID and
inserted.SectionID = Course_Enrollment.SectionID and
inserted.StudentID = Course_Enrollment.StudentID
/* %NotnullFK(inserted," IS NULL","select @nullcnt = count(*)
from inserted where"," AND") */
IF @validcnt + @nullcnt != @numrows
BEGIN
SELECT @errno = 30007,
@errmsg = 'Cannot update Student_Grade because
Course_Enrollment does not exist.'
GOTO error
END
END
402 ◾ A pp endix C
/* erwin Builtin Trigger */
RETURN
error:
RAISERROR (@errmsg, -- Message text.
@severity, -- Severity (0~25).
@state) -- State (0~255).
rollback transaction
END
go
CREATE TRIGGER tI_Student_Transcript ON Student_Transcript FOR
INSERT AS
/* erwin Builtin Trigger */
/* INSERT trigger on Student_Transcript */
BEGIN
DECLARE @numrows int,
@nullcnt int,
@validcnt int,
@errno int,
@severity int,
@state int,
@errmsg varchar(255)
SELECT @numrows = @@rowcount
/* erwin Builtin Trigger */
/* Student Student_Transcript on child insert restrict */
/* ERWIN_RELATION:CHECKSUM="000179c3", PARENT_OWNER="",
PARENT_TABLE="Student"
CHILD_OWNER="", CHILD_TABLE="Student_Transcript"
P2C_VERB_PHRASE="", C2P_VERB_PHRASE="",
FK_CONSTRAINT="R_36", FK_COLUMNS="StudentID" */
IF
/* %ChildFK(" OR",UPDATE) */
UPDATE(StudentID)
BEGIN
SELECT @nullcnt = 0
SELECT @validcnt = count(*)
FROM inserted,Student
WHERE
/* %JoinFKPK(inserted,Student) */
inserted.StudentID = Student.StudentID
/* %NotnullFK(inserted," IS NULL","select @nullcnt = count(*)
from inserted where"," and") */
Appendix C ◾ 403
IF @validcnt + @nullcnt != @numrows
BEGIN
SELECT @errno = 30002,
@errmsg = 'Cannot insert Student_Transcript because
Student does not exist.'
GOTO error
END
END
/* erwin Builtin Trigger */
RETURN
error:
RAISERROR (@errmsg, -- Message text.
@severity, -- Severity (0~25).
@state) -- State (0~255).
rollback transaction
END
go
CREATE TRIGGER tU_Student_Transcript ON Student_Transcript FOR
UPDATE AS
/* erwin Builtin Trigger */
/* UPDATE trigger on Student_Transcript */
BEGIN
DECLARE @numrows int,
@nullcnt int,
@validcnt int,
@insCourseID varchar(50),
@insStudentID varchar(50),
@errno int,
@severity int,
@state int,
@errmsg varchar(255)
SELECT @numrows = @@rowcount
/* erwin Builtin Trigger */
/* Student Student_Transcript on child update restrict */
/* ERWIN_RELATION:CHECKSUM="0001701c", PARENT_OWNER="",
PARENT_TABLE="Student"
CHILD_OWNER="", CHILD_TABLE="Student_Transcript"
P2C_VERB_PHRASE="", C2P_VERB_PHRASE="",
FK_CONSTRAINT="R_36", FK_COLUMNS="StudentID" */
404 ◾ Ap pe ndix C
IF
/* %ChildFK(" OR",UPDATE) */
UPDATE(StudentID)
BEGIN
SELECT @nullcnt = 0
SELECT @validcnt = count(*)
FROM inserted,Student
WHERE
/* %JoinFKPK(inserted,Student) */
inserted.StudentID = Student.StudentID
/* %NotnullFK(inserted," IS NULL","select @nullcnt = count(*)
from inserted where"," AND") */
IF @validcnt + @nullcnt != @numrows
BEGIN
SELECT @errno = 30007,
@errmsg = 'Cannot update Student_Transcript because
Student does not exist.'
GOTO error
END
END
/* erwin Builtin Trigger */
RETURN
error:
RAISERROR (@errmsg, -- Message text.
@severity, -- Severity (0~25).
@state) -- State (0~255).
rollback transaction
END
go

405
Appendix D: Search for Terms
1 #Sample program to scan file for a list of matching terms;
2 #write records with matches to an output file for later
import to a database
3 #
4 use TIME::Local;
5 #open the file containing a list of terms of interest and
load
6 #them into an array; offset for first row = 0
7 $infile = "mysearchterms.txt";
8 open (IN, $infile) or die "Couldn't open input file
$infile\n";
9 $terms = 0;
10 while ($input = <IN>) {
11 chomp($input);
12 $searchterms[$i] = $input;
13 $nterms++;
14 }
15 close(IN);
16 $set a flag for first output record
17 $match ="n";
18 #identify the file to be searched
19 $infile = "SystemLog.txt";
20 #identify the output file for records that match search terms
21 $outfile = "Output/SystemLogMatches.txt";
22 #open and process the input file
23 open (IN, $infile) or die "Can't open input file $input\n";
24 $num=0;
25 while ($input = <IN>) {
26 chomp($input);
27 #this sample file contains non-printable characters; remove
them
28 $input =~ s/[\x7E-\xFF]//g;
29 $num++;
30 for ($i=0; $i < $nterms; $i++) {
31 if ($input =~ /$searchterms[$i]/) {
32 #found a match
33 print "Match on $searchterms[$i] in $input\n";
406 ◾ A p pen dix D
34 #open output file on first match
35 if ($match eq "n") {
36 open (OUT, ">$outfile") or die "Can't open output file
$outfile\n";
37 $match = "y";
38 }
39 $message = "Found $searchterms[$i] in $input";
40 print (OUT "$message\n");
41 }
42 }
43 }
44 close(IN);
45 close(OUT);

407
Appendix E: SQL Server Log Check
1 #Sample program to review, extract SQL Server log records
2 #
3 use TIME::Local;
4 #note the "\\" useage
5 $infile = "C:\\Program Files\\Microsoft SQL Server\\MSSQL11.
MSSQLSERVER12\\MSSQL\\log\\SQLAGENT.OUT";
6 open (IN, "$infile") or die "Couldn't open SQL Server Log
File $infile\n";
7 $num = 0;
8 $mindelay = 10;#set the time delay between checks in minutes
9 $delay = 60 * $mindelay;#compute the number of seconds for
the time delay
10 START_CHECK:
11 $info = "n";
12 $warn = "n";
13 $err = "n";
14 $time = localtime(time());
15 #extract the date and time
16 $datetime = substr($time,4,12);
17 #change spaces and : in datetime for use in filename
18 $datetime =~ s/ /_/g;
19 $datetime =~ s/:/-/;
20 #open and check SQL Server log for messages
21 while ($input = <IN>) {
22 chomp($input);
23 $input =~ s/[\x00-\x1F\x7E-\xFF]//g; #remove nonprintable
characters
24 #extract date time stamp from message record (ignoring blank
lines)
25 if (length($input) > 0) {
26 $currdts = substr($input, 0, 19);
27 }
28 #compare timestamp to last processed; only process later
records
29 if ($currdts lt $lastdts) {next};
30 #check for information, warning, and error messages
31 if ($input =~ /\?/) {#info record found
408 ◾ Ap pe ndix E
32 if ($info eq "n" ) { #first record..open output file
33 $info = "y";#reset flag with first record found
34 $infofile = "Monitor\\Information_" . $datetime . "_Records";
35 open (INFO, ">$infofile") or die "Can't open output file
$info";
36 print INFO "$input\n";
37 }
38 else {
39 print INFO "$input\n";
40 }
41 }
42 if ($input =~ /\+/) {#warning record found
43 if ($warn eq "n" ) { #first record..open output file
44 $warn = "y";#reset flag with first record found
45 $warnfile = "Monitor\\Warning_" . $datetime . "_Records";
46 open (WARN, ">$warnfile") or die "Can't open output file
$warn";
47 print WARN "$input\n";
48 }
49 else {
50 print WARN "$input\n";
51 }
52 }
53 if ($input =~ /\!/) {#error record found
54 if ($err eq "n" ) { #first record..open output file
55 $err = "y";#reset flag with first record found
56 $errfile = "Monitor\\Error_" . $datetime . "_Records";
57 open (ERR, ">$errfile") or die "Can't open output file
$err";
58 print ERR "$input\n";
59 }
60 else {
61 print ERR "$input\n";
62 }
63 }
64 }
65 #save timestamp from last record processed for comparison
with new cycle
66 $lastdts = $currdts;
67 close (IN);
68 close (INFO);
69 close (WARN);
70 close (ERR);
71 $now = localtime(time());
72 print "Sleeping at $now for $mindelay minutes\n";
73 sleep($delay);
74 goto START_CHECK;

409
Index
Note: Page numbers followed by f refer to gures.
1:M (one-to-many) relationship, 28
3NF data, 35–36
1NF. See First normal form (1NF)
2NF (second normal form), 29, 31
entity/attribute list, 32f
3NF. See ird normal form (3NF)
4NF (fourth normal form), 37
5NF (h normal form), 37–39
A
ACID properties, 2–3
ActivePerl, 219
Arrays, 215–216
Associative arrays, 217
Atomicity, ACID properties, 2
Attributes, 16. See also Entity/attribute list
B
Backup/recovery service, database, 8–9
SQL Server, 190–194
C
Change management, 94–95
SQL Server, 157–158
Chomp function, Perl, 214
Computer, uses, 1
Consistency, ACID properties, 3
D
Database, 1
accuracy and data availability, 2–3
ACID properties, 2–3
backup/recovery, 8–9, 190–194
commit call, 2
DBMS, 2
DELETE command, 267
failover mechanisms, 9–10
incremental/partial backups of, 9
INSERT command, 267
installation, 10–12
Microso Access, 10
Oracle, 10–11
SQL Server, 10
logical data model
3NF, 42f
university database, 85, 86f, 87f, 96–108
MySQL, 3–4
physical data model. See Physical data model
RDBMS, 3
rollback call, 2
service agreements, 9
SQL, 5–6
SQLSvrLogs, 171–174
university. See University database
updates, 2–3
Database administrator (DBA), 93, 95, 210,
214,227
graphical user interface, 4
Database management system (DBMS), 1–3, 117
Data Denition Language (DDL), 18, 95, 114–115
university, 321–404
Data modeling tools, 18, 93
erwin
Change Management, 94–95
DDL creation, 114–115
erwin trial soware, 95
logical data model, 96–108
physical data model, 109–113
reverse engineering, 93–94
purpose of, 93

410 ◾ Inde x
Data normalization, 15–16
1NF, 25
attributes with one value, 26, 28–29
entity/attribute list, 30f
entity uniqueness, keys for, 25–26
2NF, 29, 31, 32f
3NF, 31, 33, 34f
data model, 35–36, 35f, 36f, 42f
4NF, 37
5NF, 37–39
entity/attribute list
creation, 17–18
errors, 20–23
initial, 19f
order entry model, 18
revised, 22f, 27f
language of, 16–17
Payroll Deduction, 31
university database, 75–91
Date, C. J., 25
DBA. See Database administrator (DBA)
DBMS (database management system),
1–3,117
DDL. See Data Definition Language (DDL)
Development environment, complex
systems,94
.NET Framework, 233
advantages, 233
disadvantages, 234
“.” operator, 218
Durability, ACID properties, 3
E
Entity, 16
relationship, 28
Entity/attribute list
1NF, 30f
2NF, 32f
3NF, 34f
brainstorming, 17
creation, 17–18
errors
homonym, 20, 23
mutually exclusive data, 21, 23
rectifying, 21, 23
redundant information, 20–21, 23
synonyms, 20–21, 23
initial, 19f
order entry model, 18
revised, 22f
with keys, 27f
university database, 75–76
1NF, 82f–84f
initial, 77f–78f
revised, 79f–80f
Entity/relationship modeling, 16
erwin data modeling tool
change management, 94–95
erwin trial soware, 95
reverse engineering, 93–94
university database
logical data model, 96–108
physical data model, 109–113
SQL Server, 114–115
F
Fagin, Ronald, 37
Failover mechanisms, database, 9–10
Fih normal form (5NF), 37–39
First normal form (1NF), 25
attributes with one value, 26, 28–29
entity/attribute list, 30f
entity uniqueness, keys for, 25–26
of university database, 78–85
Foreign keys, 45
Forms wizard, 129
Fourth normal form (4NF), 37
G
Graphical user interface (GUI)
DBA, 4
Microso Access as, 232
advantages, 232–233
capabilities, 232
disadvantages, 233
H
Hashes, 217–218
Homonym, entity/attribute error, 20, 23
I
Index(es), 45–46, 55–56, 69–72, 91, 177–180
functions of Perl, 214
An Introduction to Database Systems (book), 25
Isolation, ACID properties, 3
J
Java, 235
PHP and, 275

Index ◾ 411
L
Logical data model
3NF, 42f
university database, 85, 86f, 87f
using erwin, 96–108
M
Many-to-many (M:M) relationship, 28
Microso Access, 10, 117–118
advantages, 155–156
database design modications, 118
data import mechanism, 119
features, 117
forms, 129
Master screen, 146
for new customer, 141–146
for updating data in tables, 129–141
as GUI, 232
advantages, 232–233
capabilities, 232
disadvantages, 233
linking to SQL Server/Oracle database, 155
in oce environment, 231
advantages and disadvantages, 232
capabilities, 231
Pass-rough queries, 155–156, 231
PHP and, 275
physical data model using, 47
indexes creation, 55–56
Referential Integrity constraints in, 51–54
table creation, 47–50
query, 119–125
results, 125–129
using SQL commands, 125
Query wizard, 119, 125, 129, 155
reports, 146–153
tables in, 118
loading data into, 118–119
for team of users, 153–155
Microso’s Visual Studio, 275
M:M (many-to-many) relationship, 28
Modulus operator (%), 218
Mutually exclusive data, entity/attribute error,
21, 23
MySQL, 3–4
N
Normalization process, 17, 24, 75. See also Data
normalization
O
One-to-many (1:M) relationship, 28
3NF data, 35–36
Oracle, 10–11
physical data model using, 72
Order entry model, 18
P
Pass-rough queries, 155–156, 231
Perl, 213
applications and uses, 226–227
“\” character in, 220
functions
arrays in, 215–216
chomp, 214
hashes, 217–218
if/then/else, 215
index, 214
int, 218
length, 214
modulus operator, 218–219
“.” operator, 218
sleep, 215
split, 214
substitute operator, 215
substr, 214
system, 215, 226
while loop, 214
key matching features, 221–222
loading data into tables, 227–229
versus Python, 219
scripts to monitoring
SQL Server logs, 222–224, 224f
Windows logs, 225, 226f
to search le, 215f, 216–217, 217f, 405–406
in Oracle database, 216–217
search patterns, 214
Warning and Error log messages, 278
in Windows versus Unix, 219–221
PHP, 234, 275–276
advantages, 234
conguration testing, 277
disadvantages, 235
features, 276
format le command, 278
Handler Mapping, 277
IIS and, 276–277
installation, 277
and Java, 275
and Microso Access, 275

412 ◾ Ind ex
PHP (Continued)
user interface and, 275
web-based application, 276
error messages, 294–295, 309–319
system components, 276–279
warning messages, 292–294, 297–307
web-based interface, 279
home page user options, 283
review/check error records, 292
review/check warning records, 283–291
user authentication, 281–282
user logon options, 280–281
Physical data model, 41, 46f
access paths, 42–44
indexes, 45–46
table
creation, 46
key and column data types, 44–45
university database, 88–91
Referential Integrity constraints, 241–244
tables creation, 237–240
using erwin, 109–113
using Microso Access, 47
indexes creation, 55–56
Referential Integrity constraints in, 51–54
table creation, 47–50
using SQL Server
database creation, 56–59
indexes in, 69–72
Referential Integrity constraints in, 62–68
table creation, 60–62
Production environment, complex systems, 95
Python, 219
Q
Query wizard, 119, 125, 129, 155
R
Redundant array of inexpensive disks (RAID), 12,
159
Redundant information, entity/attribute error,
20–21, 23
Referential Integrity, 6–7
constraints, 3, 51–54, 62–68, 180–184, 241–244
Relational database management system (RDBMS),
3, 117. See also Microso Access;
Structured Query Language (SQL) Server
Reports, Microso Access, 146–153
Reverse engineering, 93–94
S
Second normal form (2NF), 29, 31
entity/attribute list, 32f
Sleep function, Perl, 215
Split function, Perl, 214
SQL. See Structured Query Language (SQL)
SQL Server Agent, 208–210
SQL Server Management Studio, 56, 68, 157, 170,
184, 204, 210
SQLSvrLogs database, 171–174, 207
Stored Procedure, 207–208
Structured Query Language (SQL)
language, 5–6
for query creation, 125
Structured Query Language (SQL) Server, 2, 10, 157
advantages, 157
authorized users, 186–190
Change Management, 157–158
databases
backup/recovery services, 190–194
creation, 170
installation
on laptop, 159
preinstallation considerations, 158–159
prerequisites, 159
on server, 159
soware, 160–169
loading data into tables, 195–201
logs, 222
check, 407–408
Perl scripts to monitoring, 222–224, 224f
manual queries and edits, 204–207
Microso Access to, 155
physical data model using
database creation, 56–59
indexes in, 69–72
Referential Integrity constraints in, 62–68
table creation, 60–62
SQL Server Agent, 208–210
SQLSvrLogs, 171–174, 207
Stored Procedure, 207–208
university database, 114–115, 174
indexes, 177–180
Referential Integrity constraints, 180–184
table creation, 174–177
user roles, 184–186
View creation, 202–204
Substitute operator, Perl, 215
Substr function, Perl, 214
Synonyms, entity/attribute errors, 20–21, 23

Index ◾ 413
T
Table
creation
using Microso Access, 47–56
using SQL Server, 56–72, 174–177
indexes in, 45–46
keys in physical data model, 44–45
Test environment, complex systems, 94
ird normal form (3NF), 31, 33. See also Data
normalization
data model, 35–36
logical, 42f
physical, 41–44
entity/attribute
diagram, 35f, 36f
list, 34f
of university database, 78–87
Transact-SQL, 186
U
Unique identiers, 81
University database
1NF, 78–85
3NF, 78–87
entity/attribute list, 75–76
1NF, 82f–84f
initial, 77f–78f
revised, 79f–80f
logical data model, 85, 86f, 87f
using erwin, 96–108
physical data model, 88–91
using erwin, 109–113
SQL Server, 114–115, 174
indexes, 177–180
Referential Integrity constraints, 180–184
table creation, 174–177
user roles, 184
University database application, 237
master screen, 271–272
Referential Integrity constraints, 241–244
tables creation, 237–240
for university administrators, 272–273
window/screen creation
for adding new students, 244–260
for assigning grades, 268–271
for enrollment of students, 260–268
for entering midterm/nal grades, 271
University DDL, 321–404
V
View creation, SQL Server, 202–204
W
While loop, Perl, 214
Windows Event Viewer, 225

