Prism Portal User Manual
User Manual:
Open the PDF directly: View PDF ![]() .
.
Page Count: 49

PRISM PORTAL
User Manual

2
Overview
●Prism Portal
○Update Closing stock Balance
○View Stock in Hand
○Manage Sales Process
○Manage Purchases Process
2

Introduction
3
❏Stockist portal aims at easing of Sales process and Purchase process for the stockist
and KAD users of Romsons.
❏Romsons stockist/KAD users can now create Sales Orders, Deliveries, Billings from
the portal.
❏Options were also provided to Cancel Sales Orders, Deliveries, Billings and also
manage Payments.
❏Romsons admins can approve customers for the stockist from the portal.

Login Flow
●Once the User is assigned to a Business Partner, an Email will be sent to the
registered Email Address.
●Set the password by clicking on the link received in Email.
●Now the user enters login details(i.e, Email ID and Password) and click on ‘Login’
button to login to Romsons portal.
●User can retain the password using the “Forgot Password” link in the login page.
4

5
Login Flow

Login Flow
6
●User will navigate to selection page in case single user have roles both as stockist
and KAD .
●User will be navigated to respective plant if user acts as only stockist or KAD.

Stockist/KAD Navigation
7
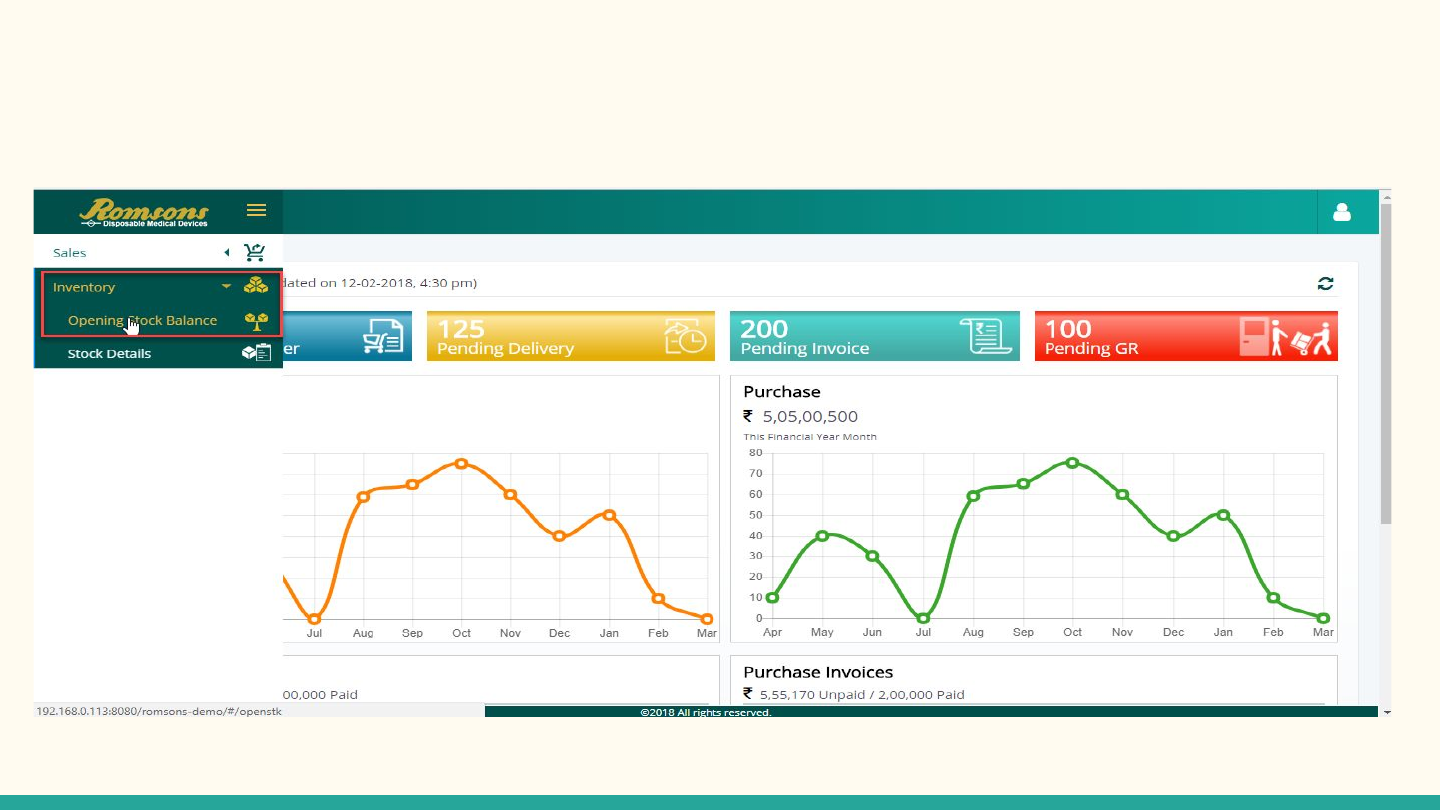
Opening Stock Balance
●How to Download Opening stock balance?
○From left menu, under Inventory, user needs to click on ‘Opening Stock Balance’ .
8
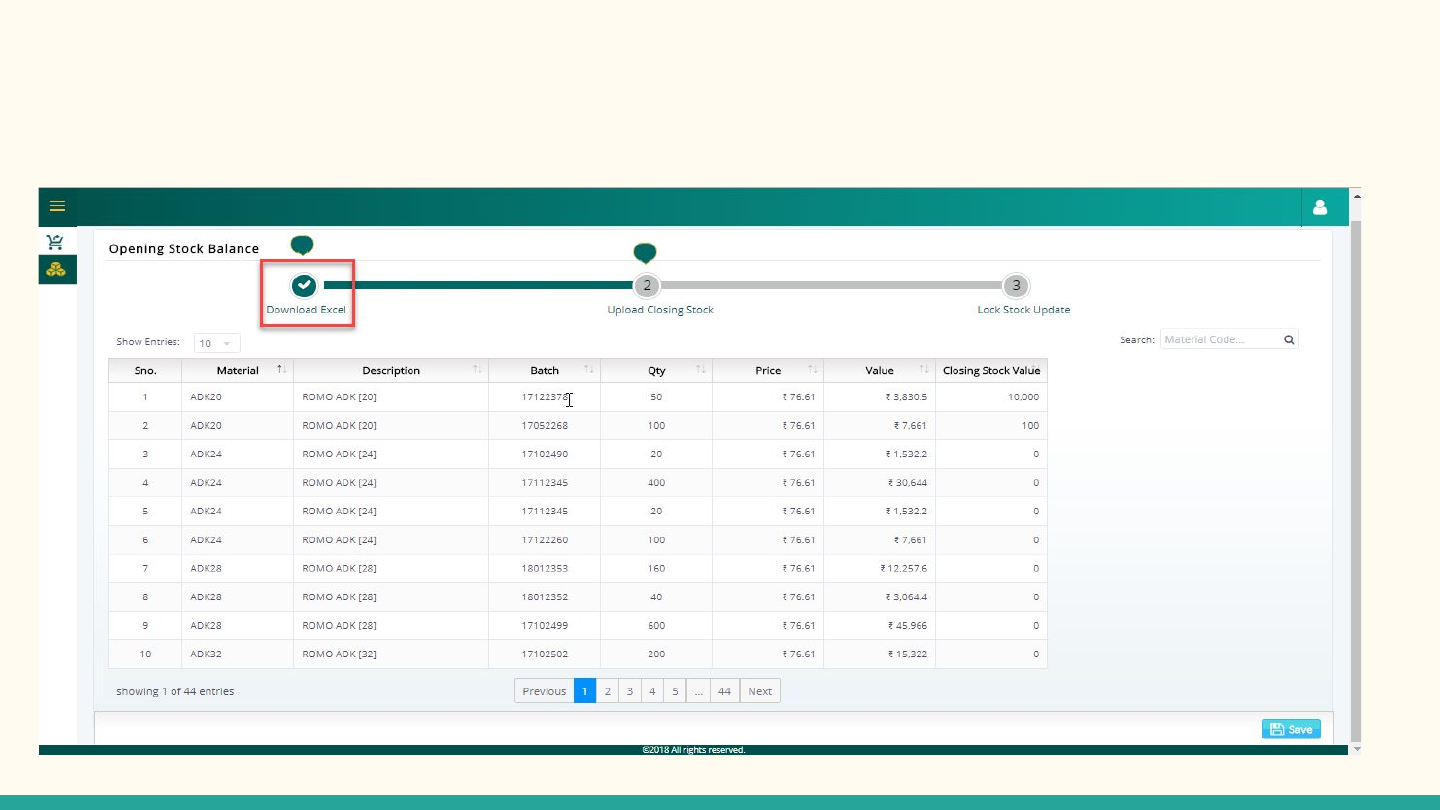
Opening Stock Balance (Cont…)
○User can update closing stock balance directly or can download the data by clicking on ‘Download
Excel’ from Progress Bar.
9

Opening Stock Balance (Cont…)
●How to Upload the closing stock balance?
○The user can update values under ‘’Closing Stock Value” with updated stock balance in the
downloaded excel sheet.
○Now, the user should just click on “Upload Closing Stock” from the Progress Bar and select the file.
This will give a preview of the updated data, where the user can click on ‘Submit’ or ‘Close’
buttons.
○Also, the user can edit manually the stock balance and Save the data.
10

Opening Stock Balance (Cont…)
11
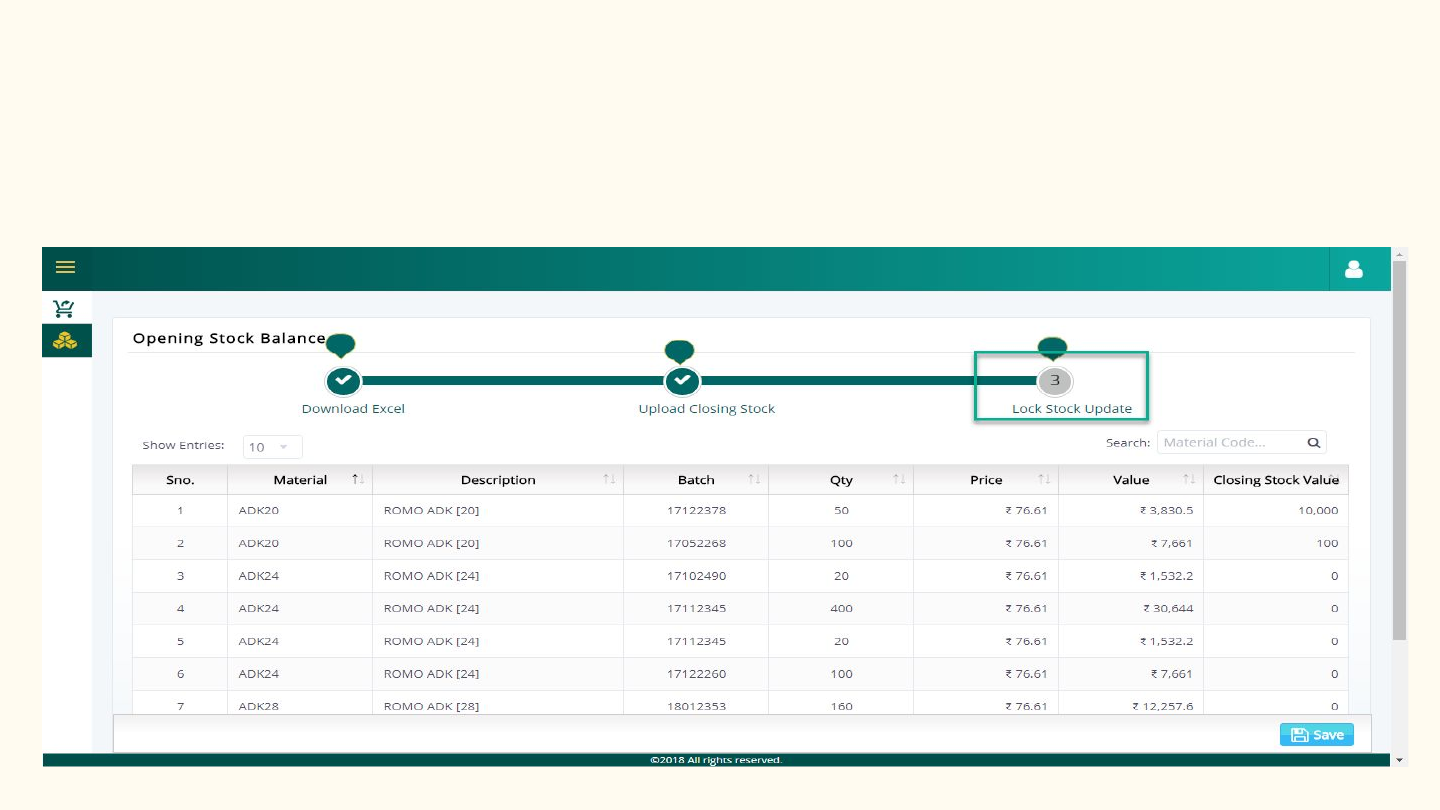
Opening Stock Balance (Cont…)
●How to Lock the closing stock balance?
○Once the user has updated all stock balance, now a click on “Lock Stock Update” from
Progress Bar will freeze all the Opening Stock Balance and no changes can be done
further.
12

Sales Process
•Once stock is updated (This is a one time process), users can now carry forward with the
sales process.
•New customers can be created and sent for approval from the Romsons admin.
•Once approved, sales orders can be created against the customer.
13

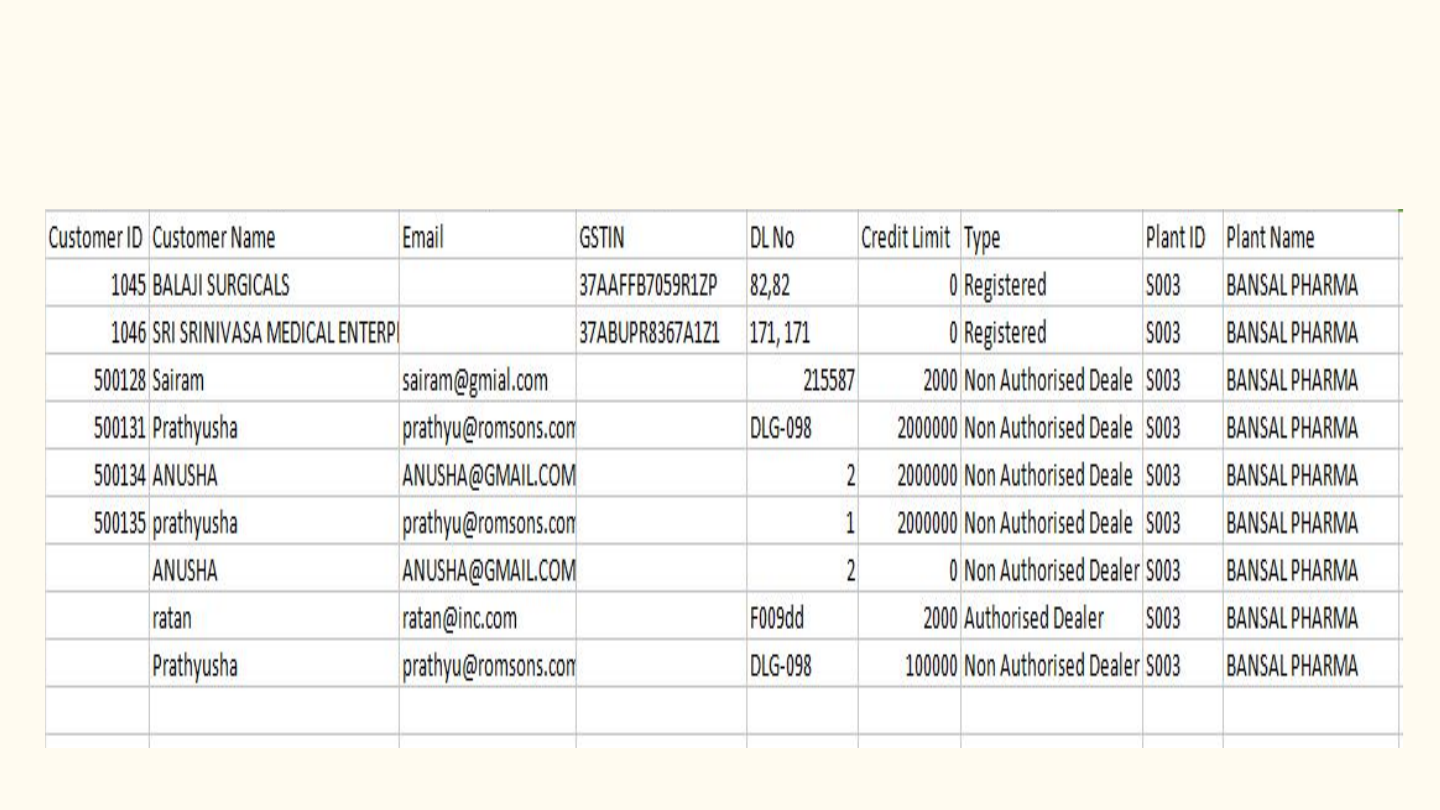
Customer Management
Customer Details:
Here we are providing option to create the customer in stockist and KAD portal.Once the
customer is created, the customer must be approved by admin of Romsons .
A customer can be linked only for a single drug licence.
Create Customer in Stockist portal:
•Navigate to customer details page from the Customer Details option under the Sales
Menu
•To create customer, click on create button in the customer details page on left panel.
• Provide all the mandatory details and click on save button.
•The customer will be created with the status as pending.
•Once the admin approves, the the status will be changed as Active.
•If the Admin rejects the customer, then the status will be changed as rejected.
14
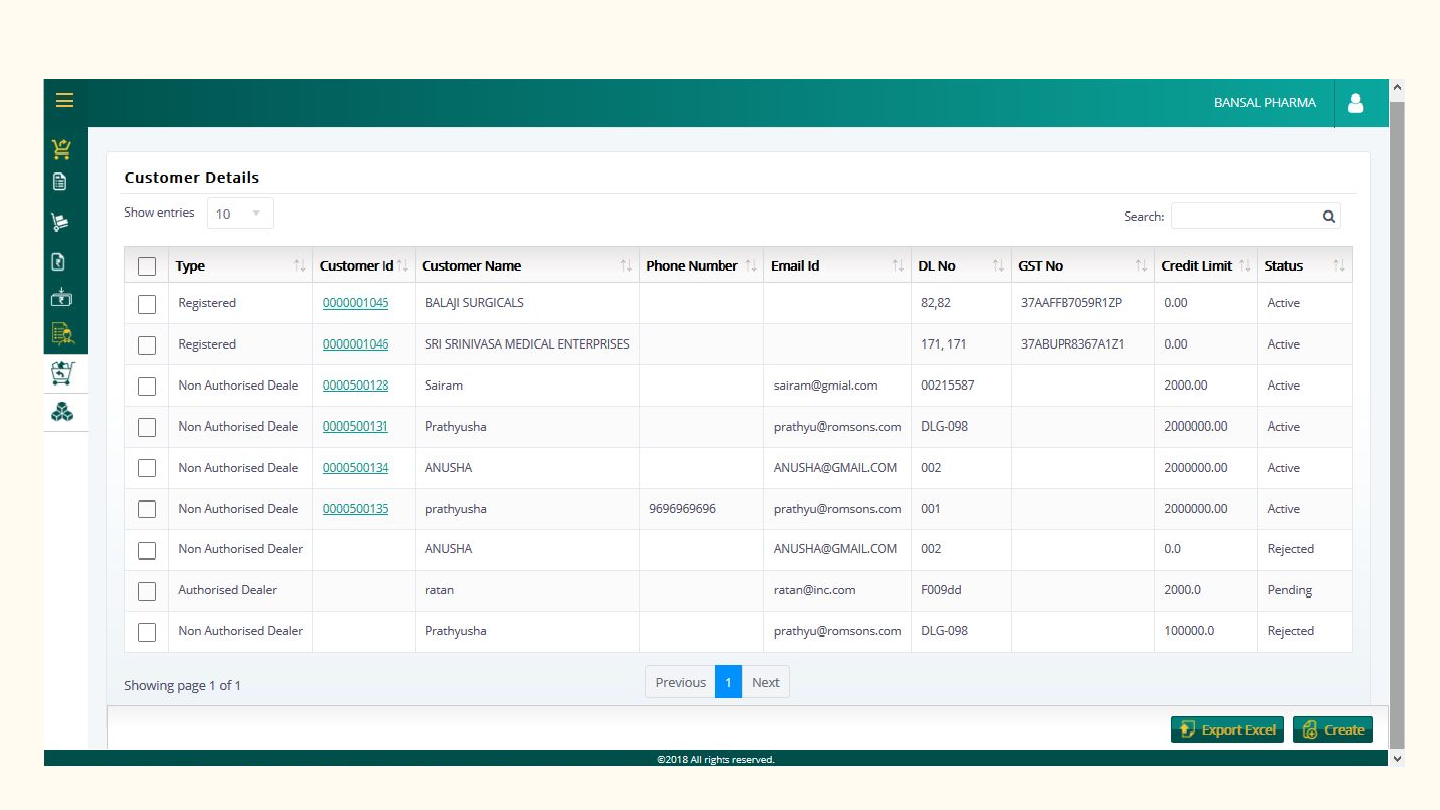
Customer list view page
15

Create Customer
16
Export Excel:
Click on export excel button to download all the customer list file as a csv.
17

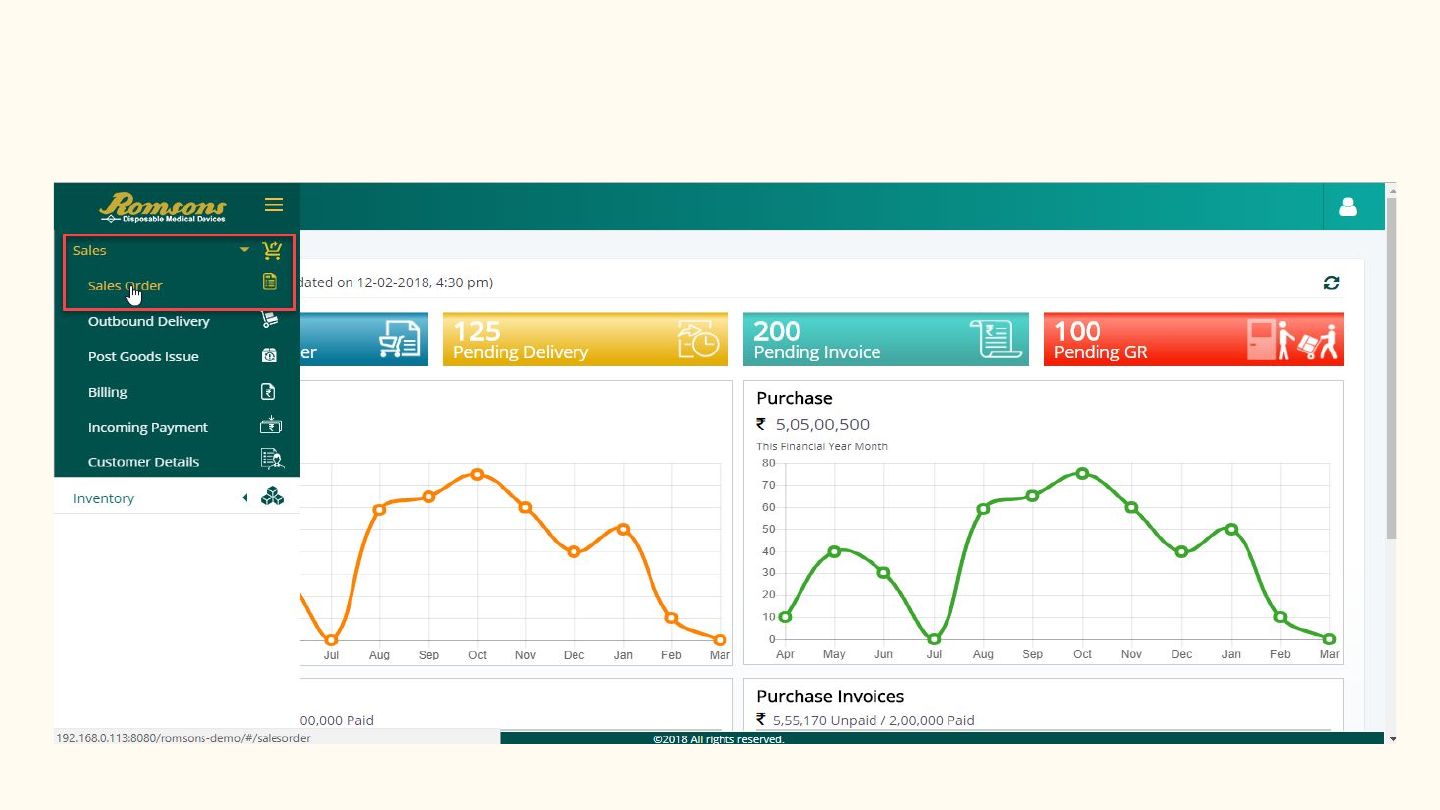
Sales
●Sales
○Sales Order
■Create Sales Order
■Export Excel
■Edit Sales Order
■Cancel Sales Order
■Print / Preview
18
Sales Order
●How to Create a Sales Order in Romsons Stockist Web Portal?
○From the left menu, click on Sales and then click on Sales Order
19
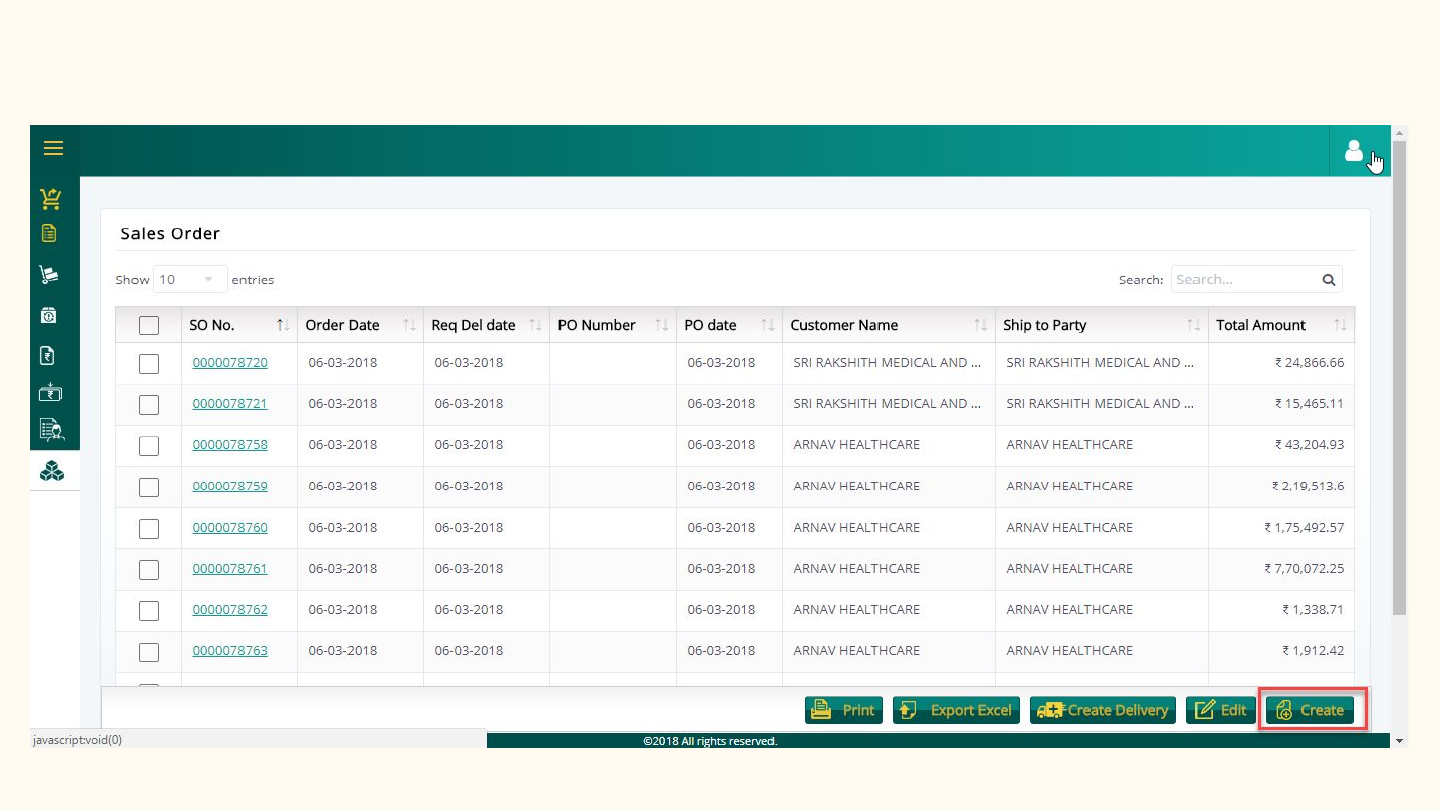
Sales Order ( Cont…)
●Now the User must click on ‘Create’ button.
20

Sales Order ( Cont…)
●Select the Order Type from the dropdown i.e, Direct Sales or Sales Return.
●Enter the Customer name, and then click on ‘OK’ button (Auto suggestion available for
Customer Name).
21

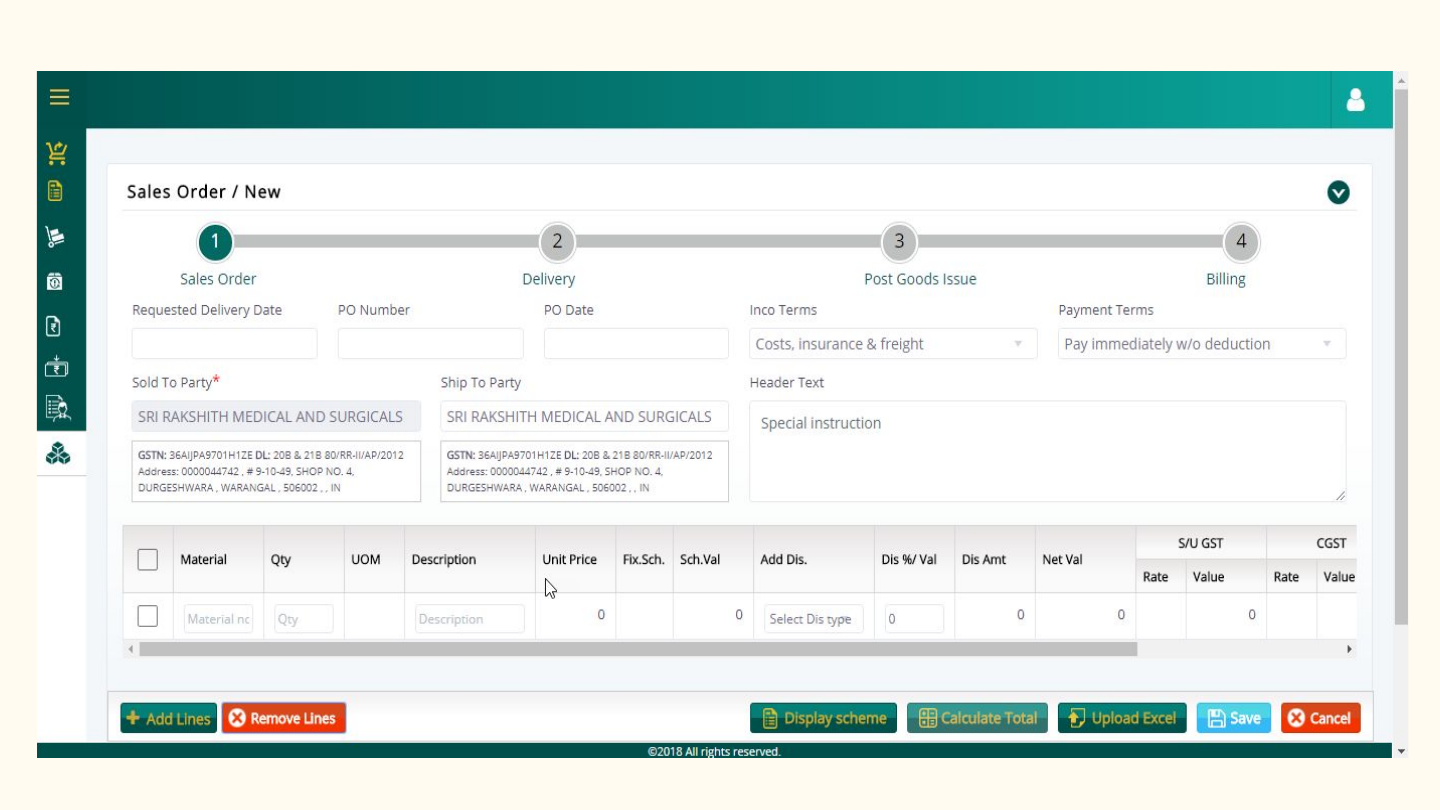
Sales Order (Cont…)
●Sales Order page will be displayed, where items can be added from Excel or Manual Entry
●All the header fields are editable except ‘Sold to Party’
●Enter the Item details(i.e, Material Number, Quantity), this will auto fill Unit of Measure
and Description. Auto suggest dropdown will be available for Material.
●Now click on ‘Calculate Total’ button, which auto calculates Unit Price, Fixed Scheme,
Scheme value, Net Value, Rate, IGST, (U)SGST/CGST, Total Value.
22
Sales Order (Cont…)
23

Sales Order (Cont…)
Created Sales Order
24
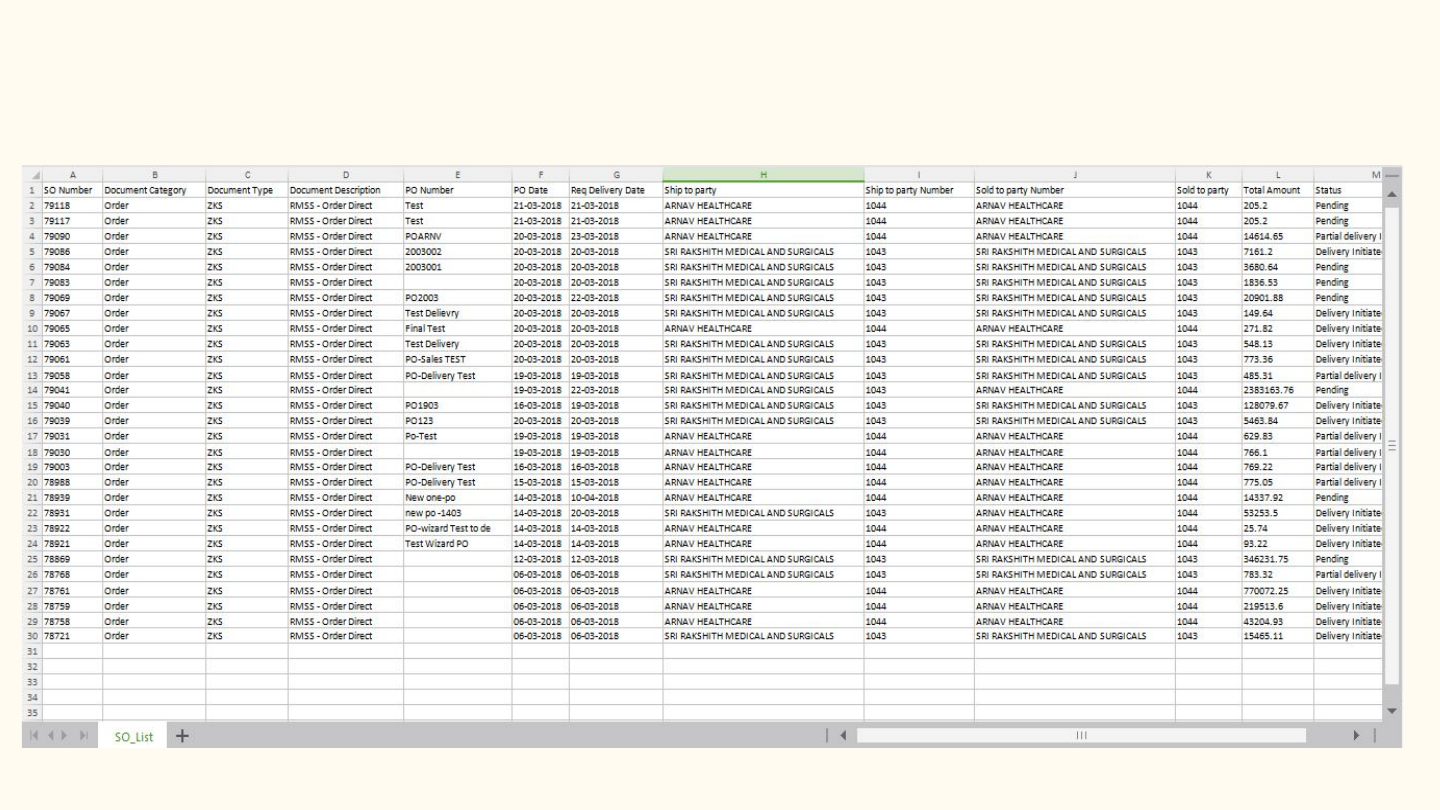
Export to Excel
●Navigate to Sales Orders from left menu under Sales.
●Click on “Export to Excel” button, to download all the data in Sales Order.
25

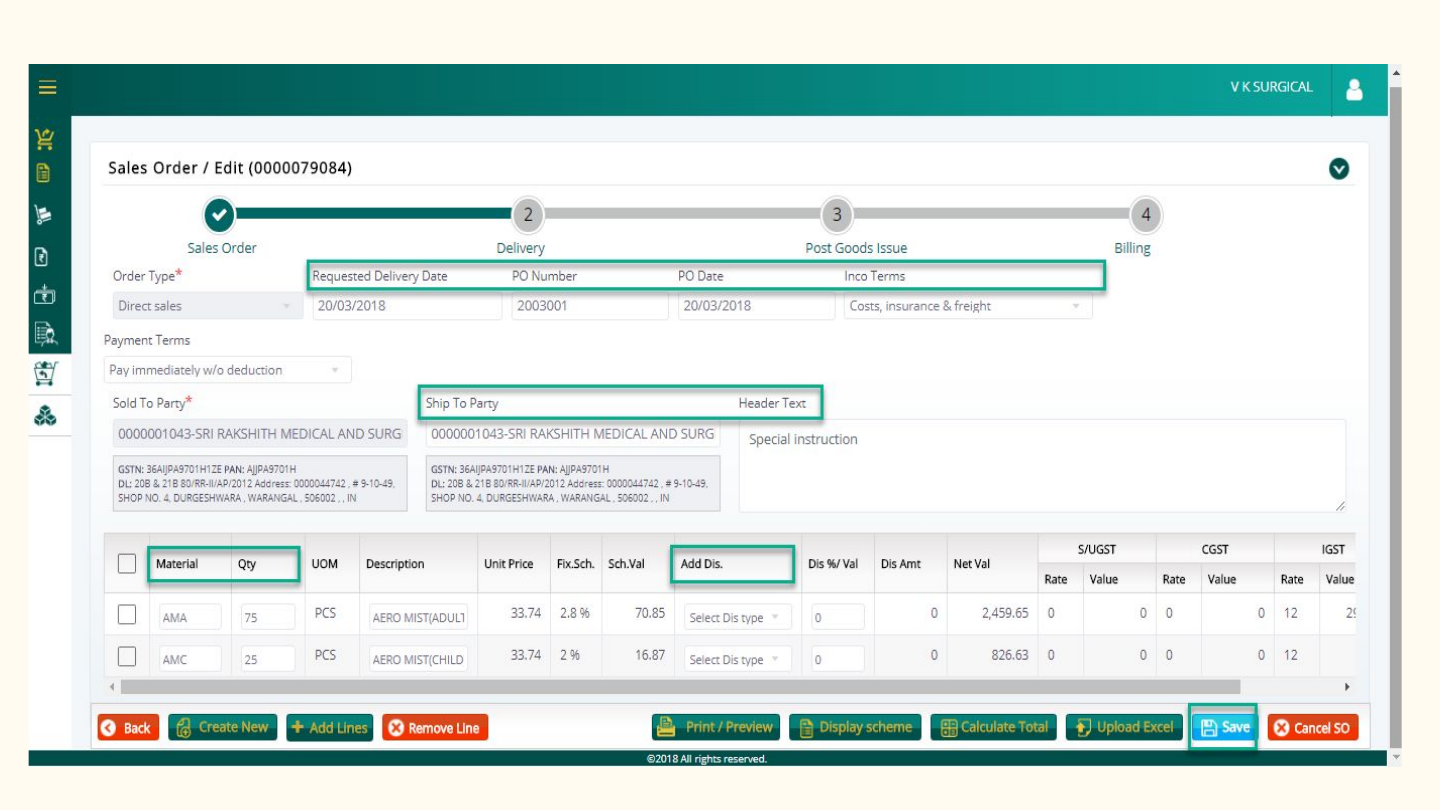
Edit Sales Order
●Firstly, navigate to Sales Orders from left menu under Sales
●Select the Sales Orders which are in “Pending” status and click on “Edit” button, this will
open Sales Order page where the user can edit Quantity,Material,Additional Discount, PO
Number, PO Date,Shit to Party,Header text can be edited
●Now, the user must click on “Save” button for the changes to be displayed
26
Edit sales Order
27
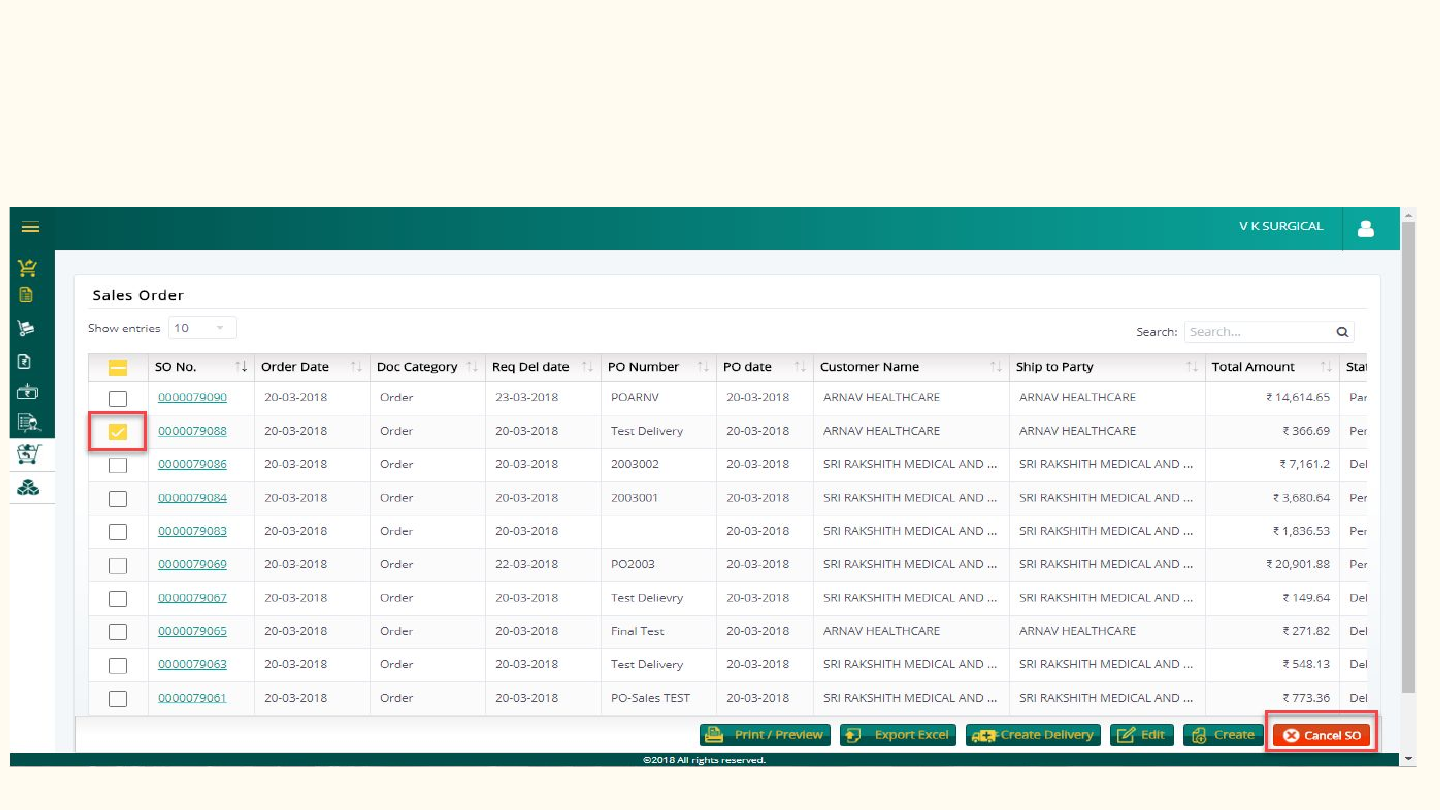
Cancel Sales Order
●Firstly, navigate to Sales Orders from left menu under Sales
●Select the Sales Orders which are in “Pending” status and click on “Cancel SO” button
●Click on “OK” button in the alert popup, this will cancel the sales order.
28
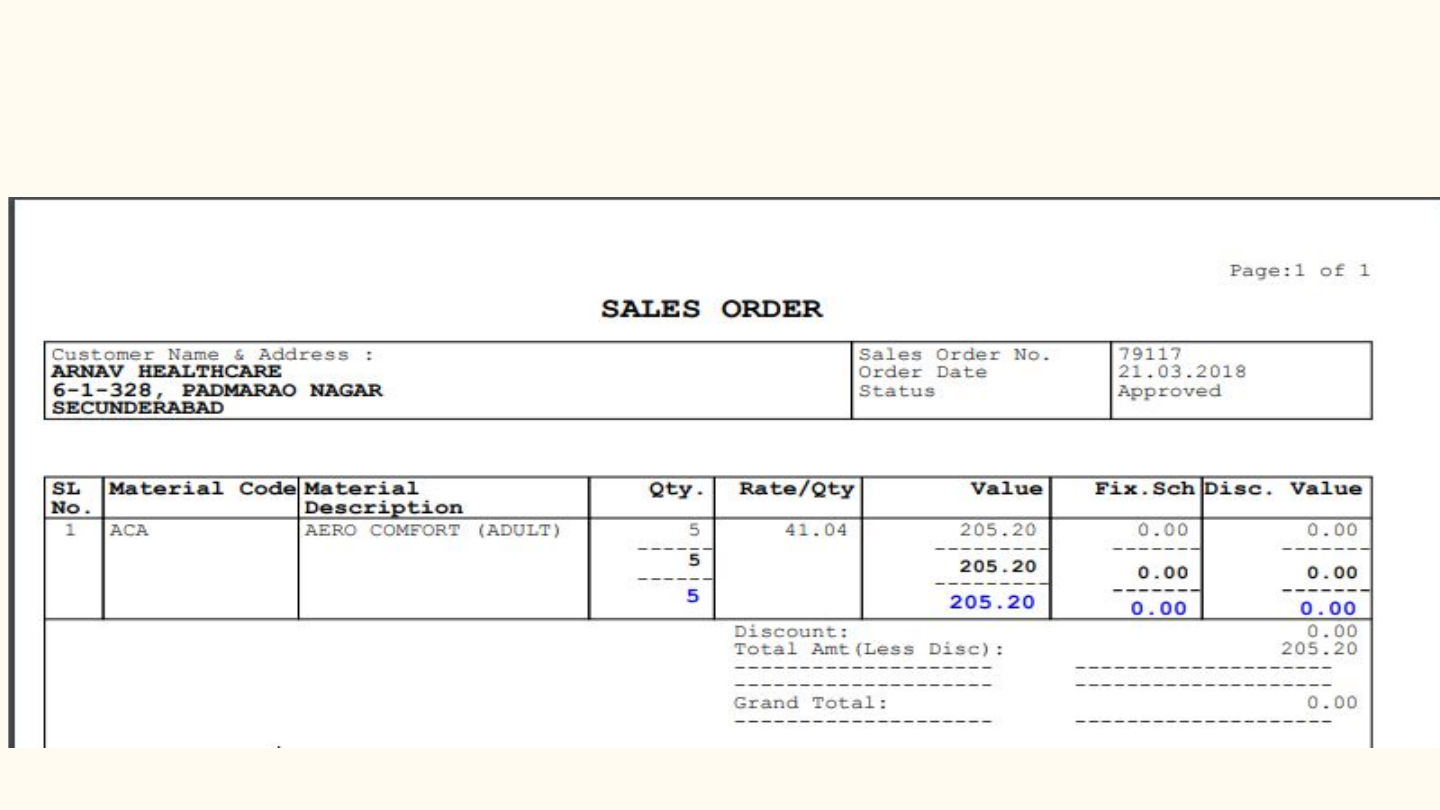
Print / Preview
●Navigate to Sales Orders from left menu under Sales
●Select the Sales Orders for which user wants a print/preview
●Click on “Print/Preview” button, to print the SO’s.
29

Outbound Delivery
●Sales
○Outbound Delivery
■Create
■Export to Excel
■Edit
■Cancel
■Print / Preview
■Post Goods Issue
30
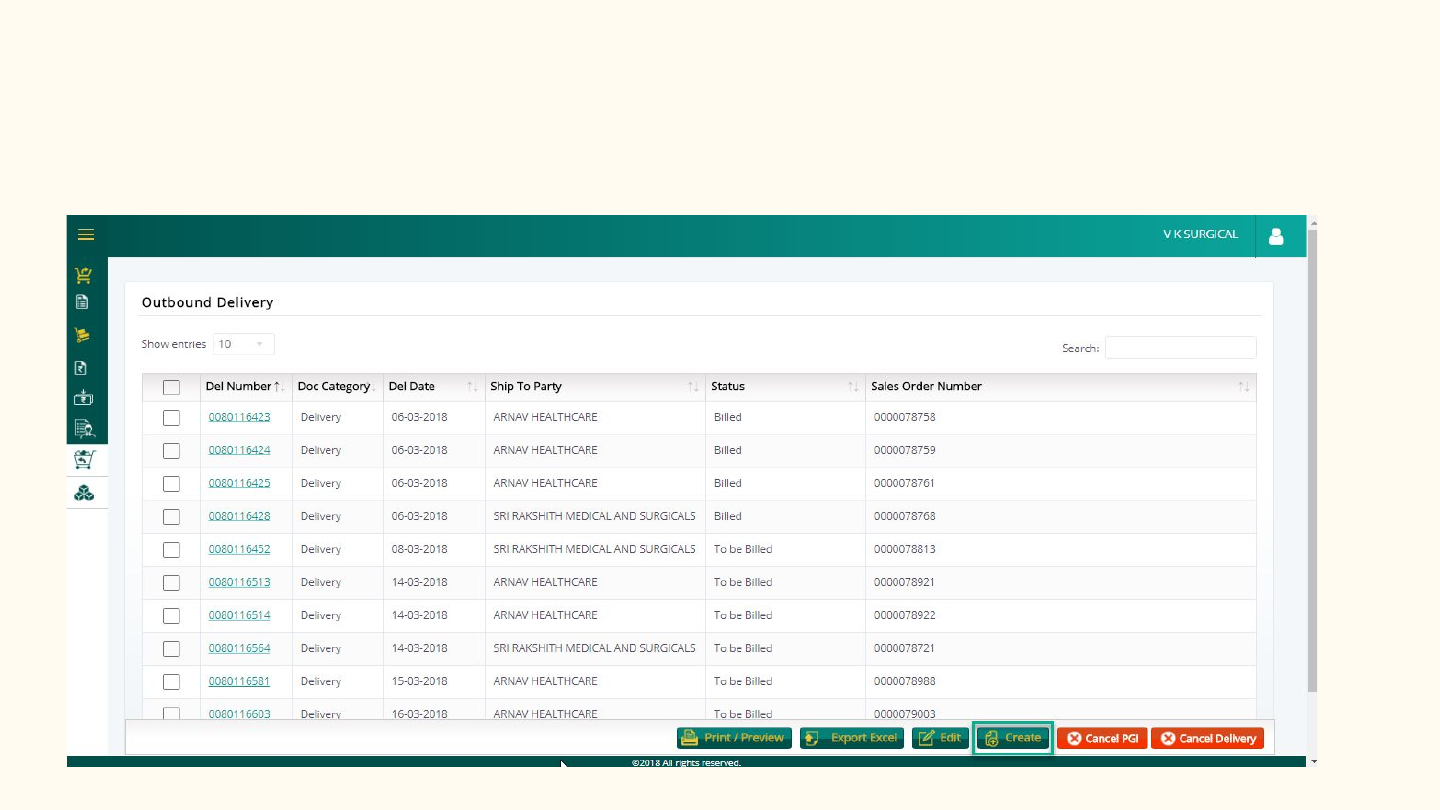
Create Outbound Delivery
●How to Create a Outbound Delivery Order in Romsons Stockist Web Portal?
○From the left menu, click on Sales and then click on Outbound Delivery
○Click on ‘Create’ button
31
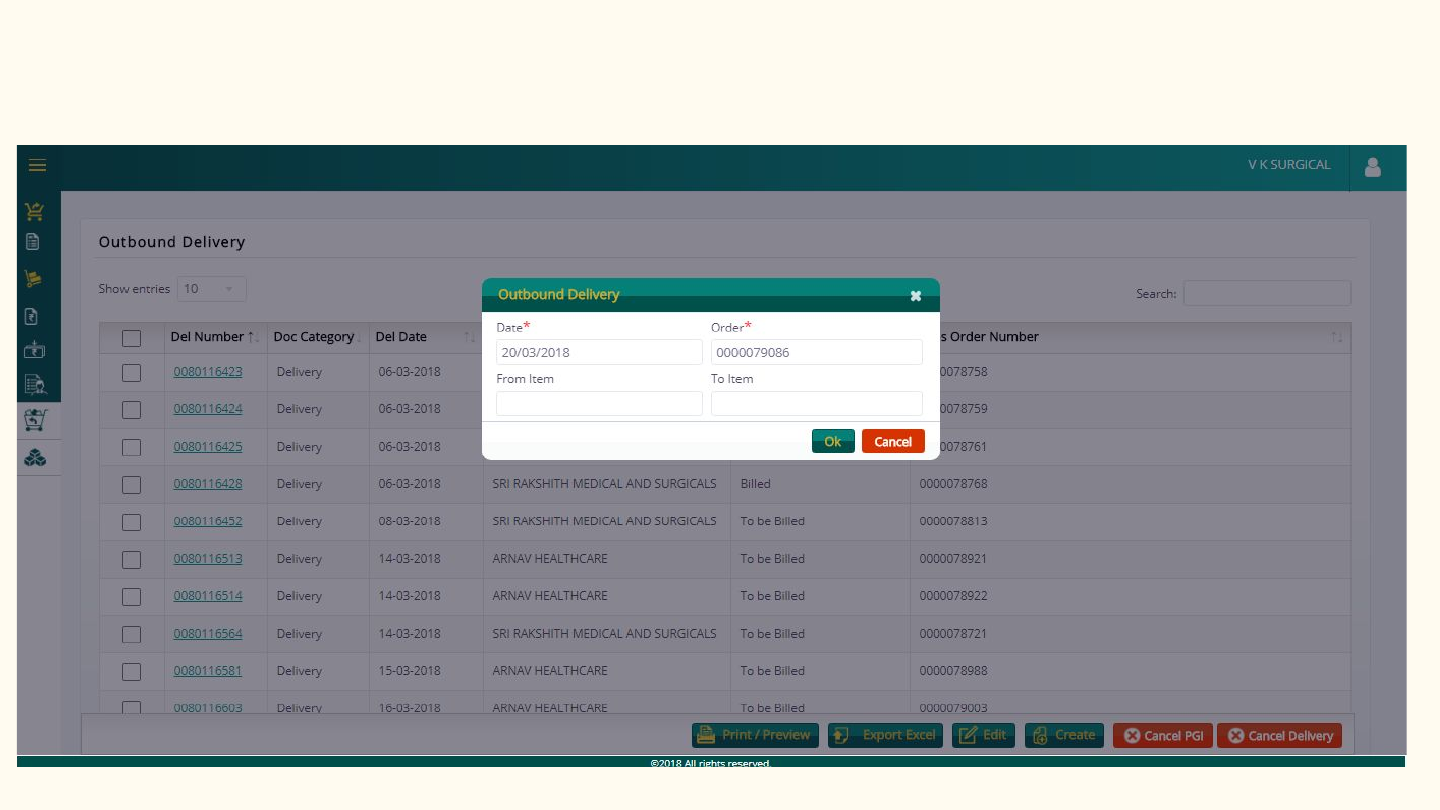
●Select Date and Sales Order Number
●Click on ‘OK’ button
32
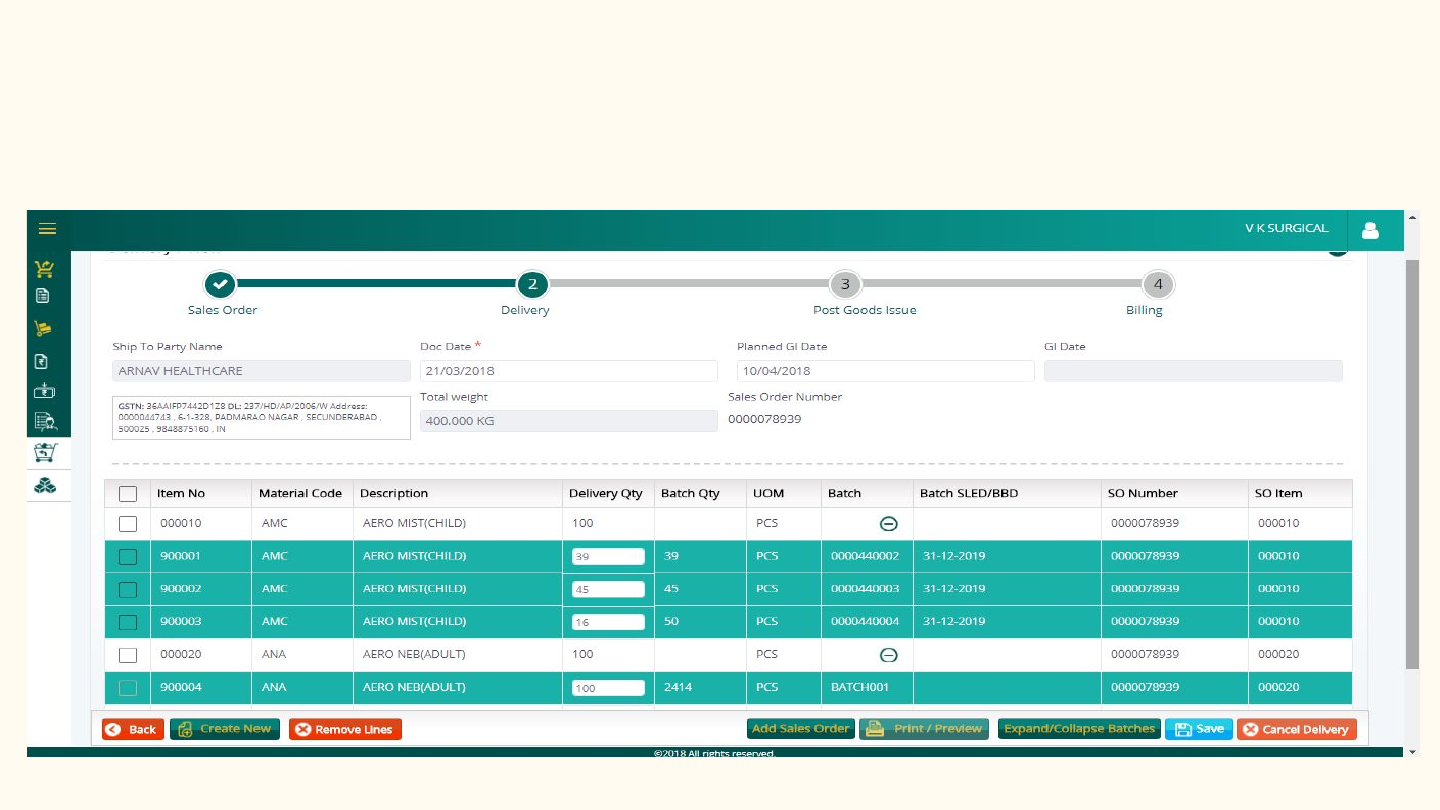
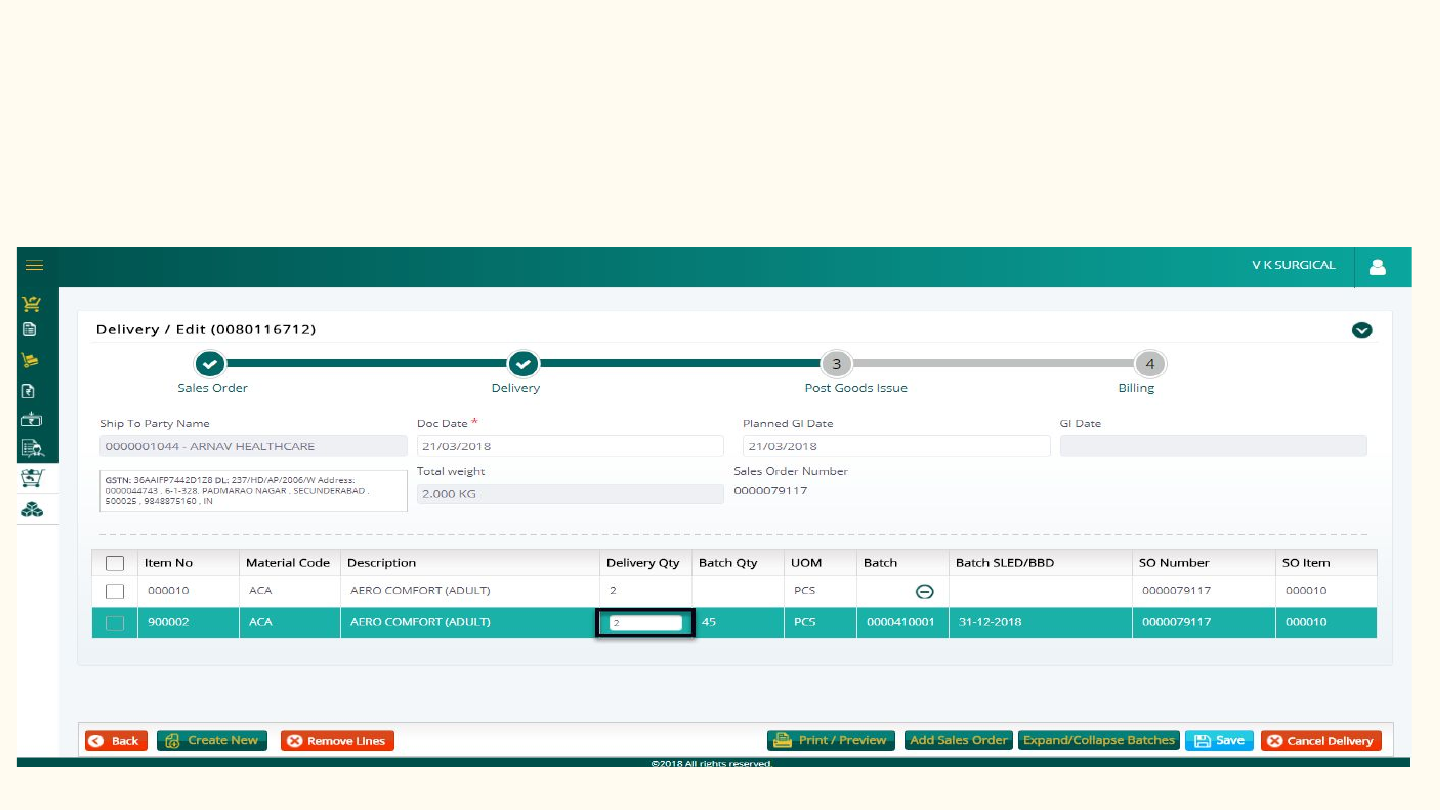
●User can change delivery quantity from each batch (i.e, Based on Batch Quantity ) and
Planned GI Date
●Now, click on “Save” button to create a Outbound Delivery Order
33
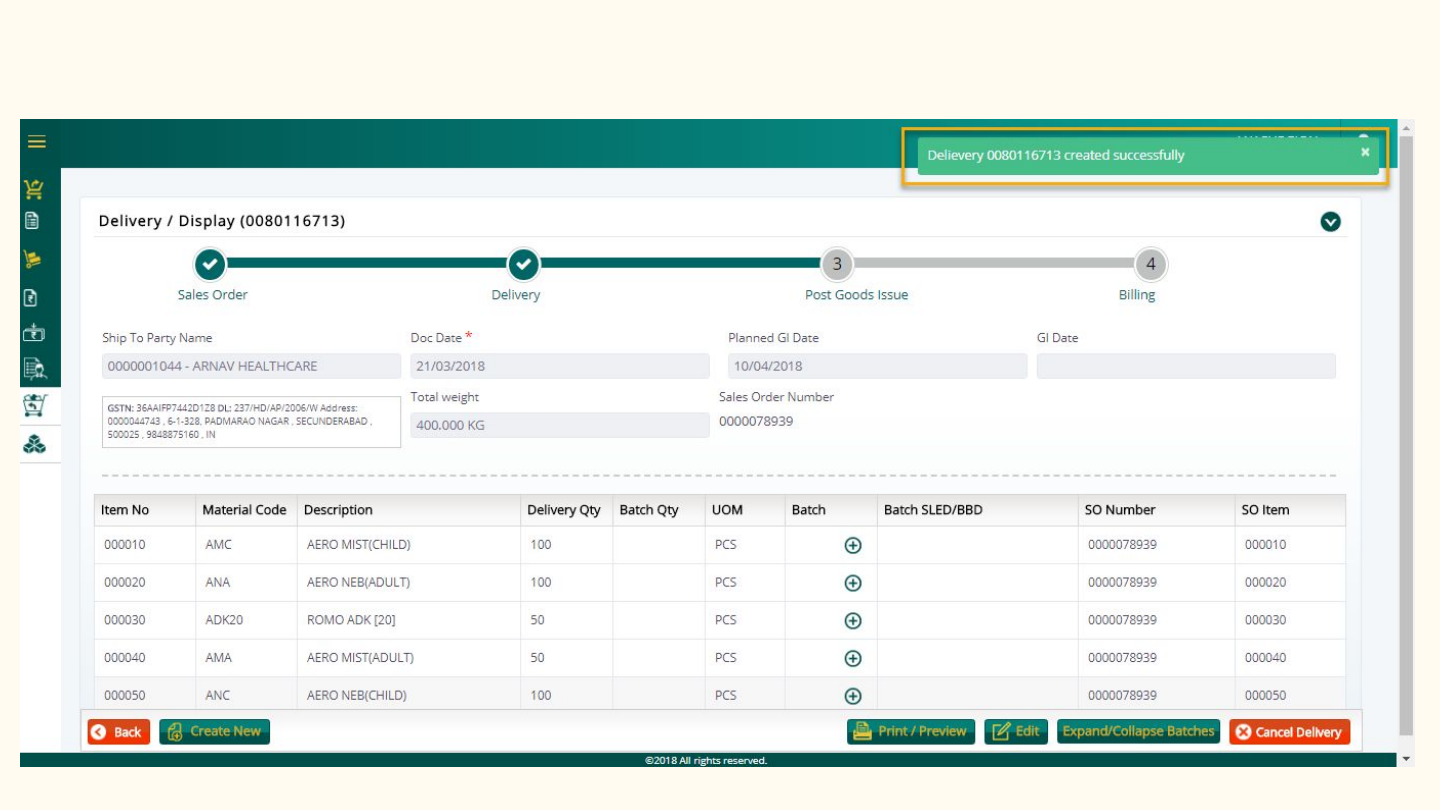
Created Outbound Delivery
34
Edit Outbound Delivery
●Select the checkboxes of Delivery Order for which the status is/are “Goods to be Issued”
and click on “Edit” button
●The user can modify values only in ‘Delivery Quantity’ field
●Please click on “Save” button to update the changes made
35
Cancel Outbound Delivery
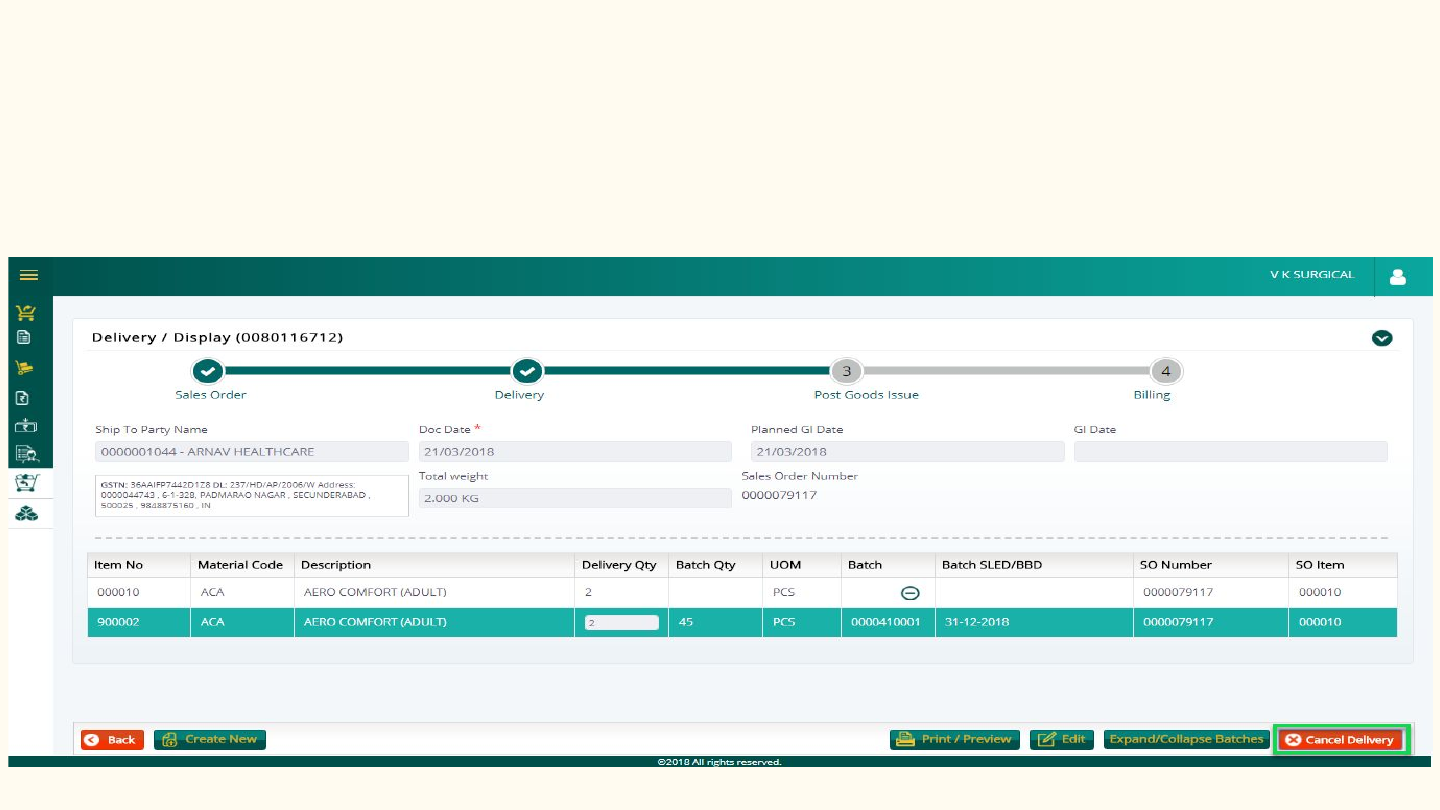
●Select the checkboxes of Delivery Order for which the status is/are “Goods to be Issued”
and click on “Cancel Delivery” button
●Once the Delivery Order is cancelled, it will be removed from list view and its related Sales
Order’s status will be moved to “Pending”
36
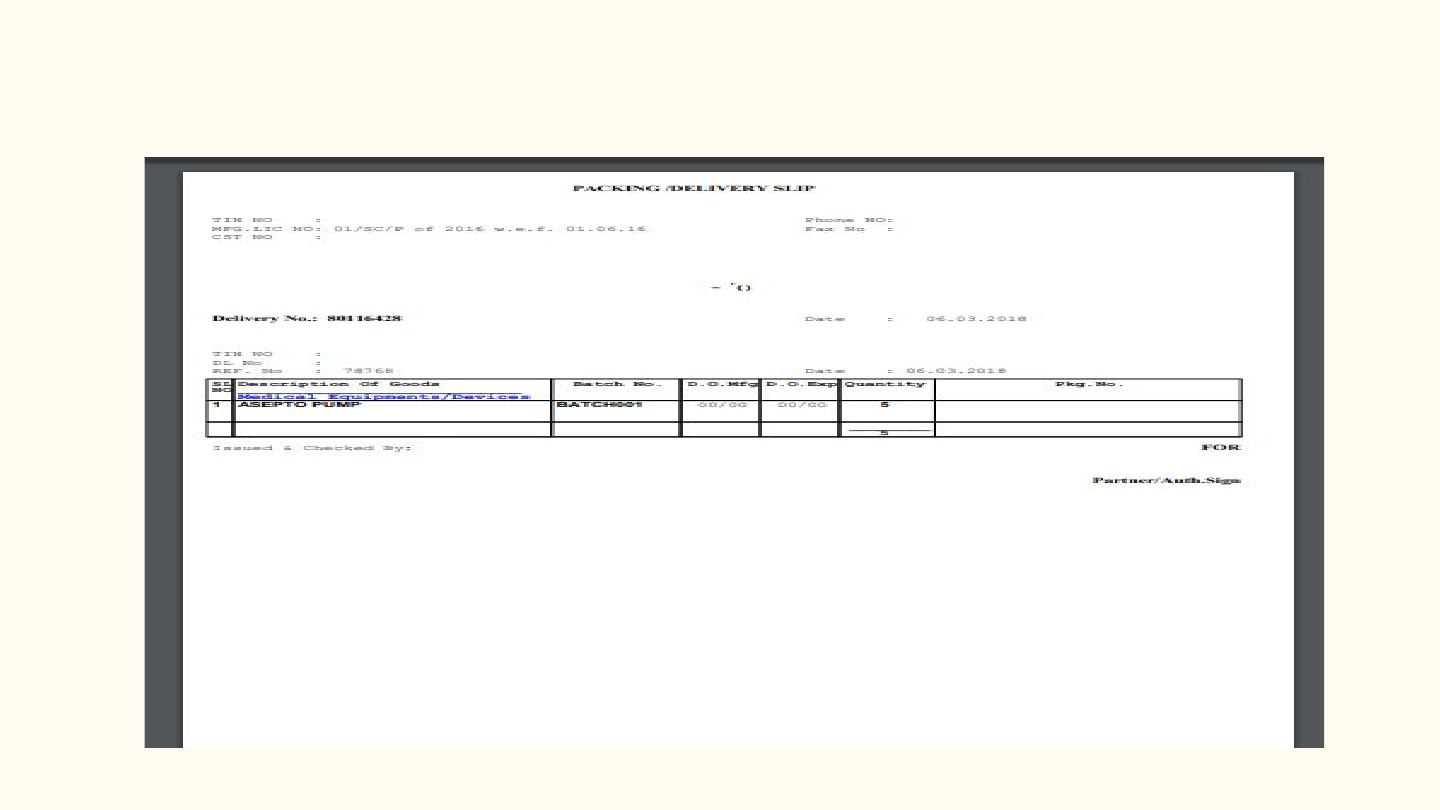
Print / Preview Outbound Delivery
●To see how the Delivery Order is displayed in printable format, the user needs to select the
check box and click on “Print / Preview” button
37

Post Goods Issue
Once the Delivery Order is created successfully, it implies that goods are ready for delivery.
To create PGI for delivery document click on PGI in outbound delivery page.Once the PGI is
completed then the delivery document is ready for billing process.
38

Billing
Billing Process :
Once the PGI(post goods issue) is completed for particular delivery document, then the
billing process will be started.once the billing document is created the invoice number will be
generated.
Below functionalities are available in billing process
❖Create Billing
❖Edit Billing
❖Cancel Billing
❖Print/Preview Billing document(Multiple print option is also available).
39
Create Billing
40
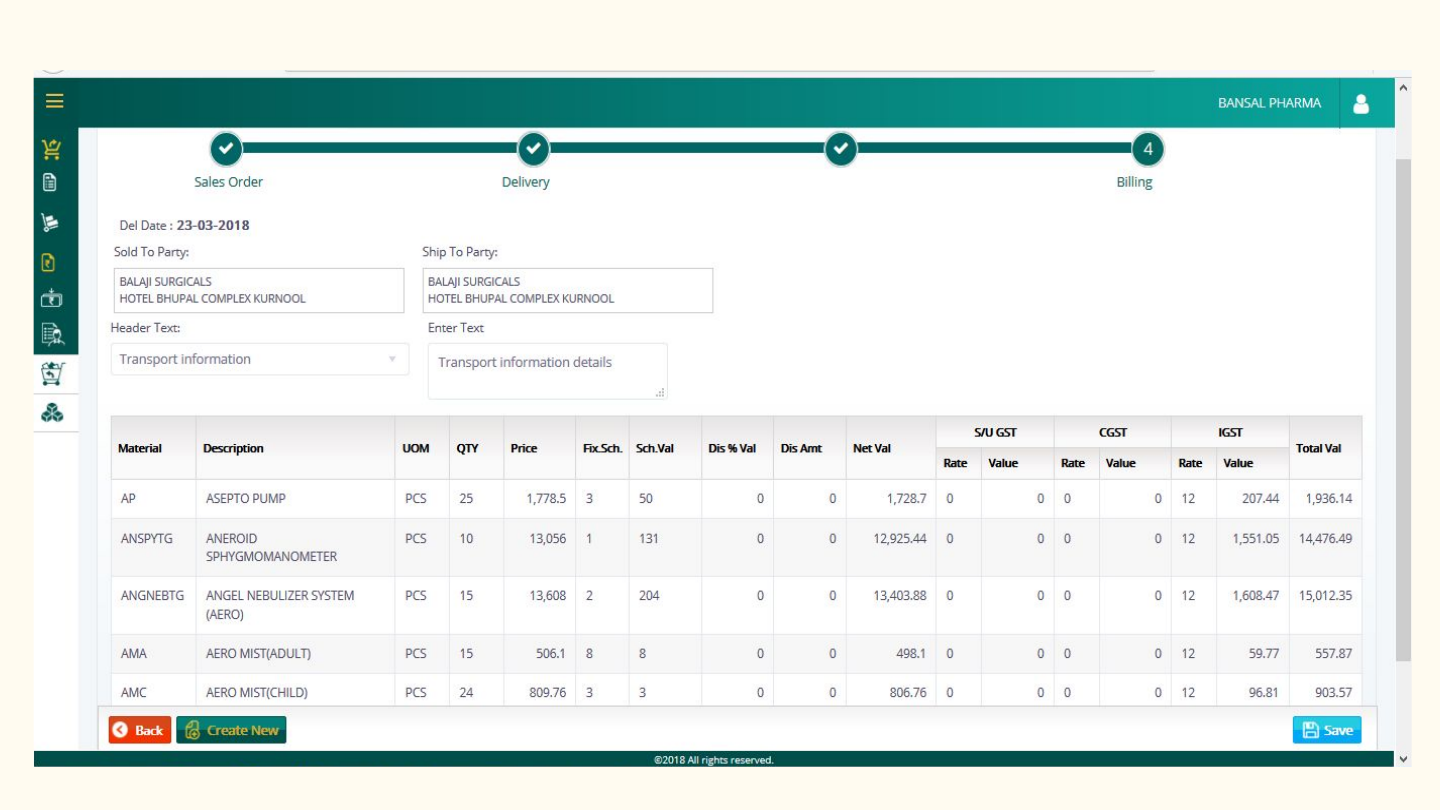
Create billing
41

Create Billing
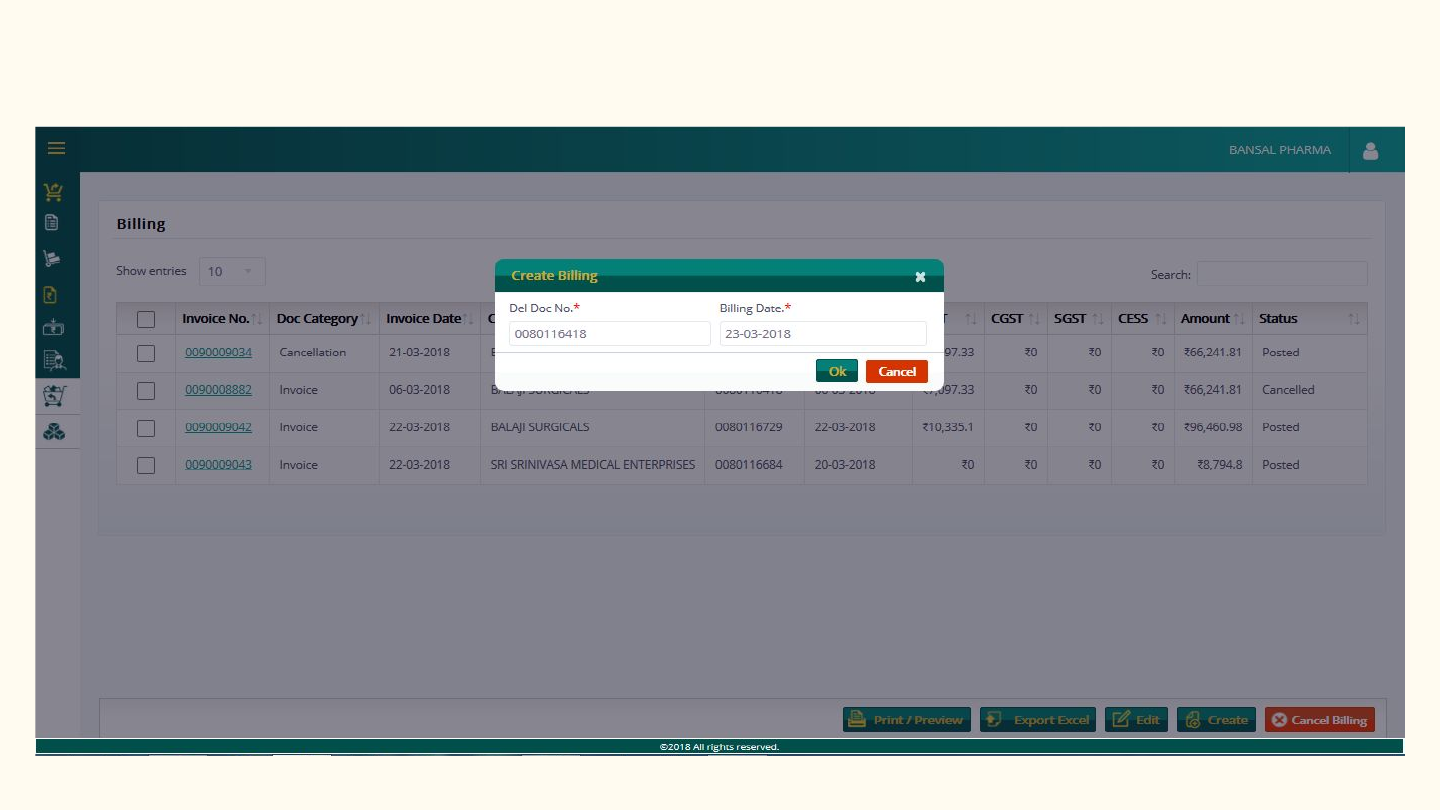
To create billing follow below steps
•Navigate to Billing list page.
•Click on create button.
•Create billing popup will be opened,Provide Delivery document number and doc date and
click on Ok.
•Create Billing will be opened
•User can only add header text in the billing,there is no option to edit any details in the
create page.
•select any text type and add text against text type and click on save.
•User can add multiple header text for one document.
•After clicking on save button invoice number will be generated.
Invoice will be created with the status Posted.
42

Display Billing document
Display Billing :
The user can see added header text for one document.
In display billing document screen user have below actions to perform
•Cancel billing document
•Print/Preview
•Create new Billing Document
•Edit Billing Document.
All the above actions also present on list view of billing documents.
43
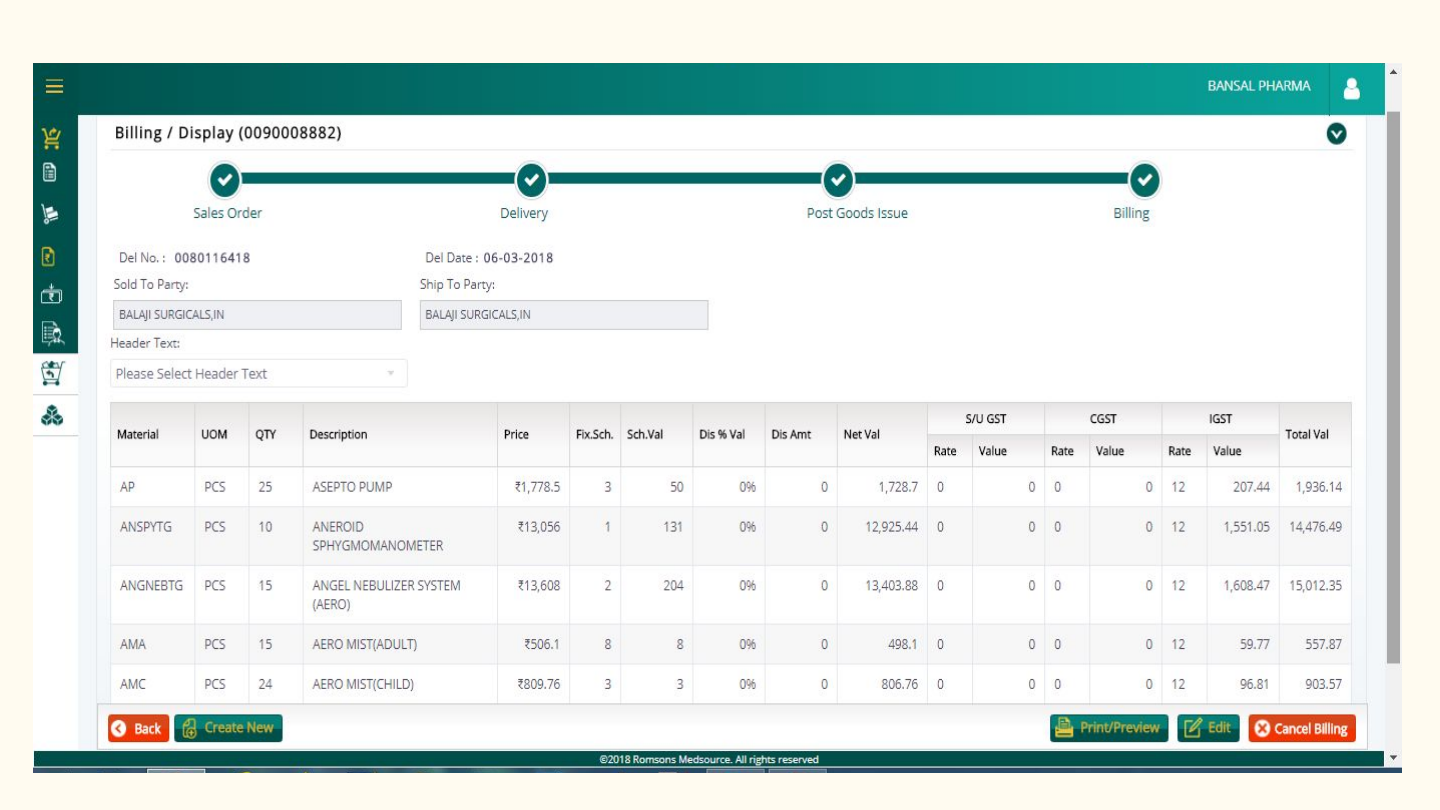
Display Billing
44

Edit Billing Document
User can only added header texts for particular documents.
To Edit billing document please follow the below steps.
•Select any document in billing list.
•Click on Edit button and edit billing document page is opened.
•Select any Header text type and edit the text ,now click on save to save the new changes.
User can see the changes with opening Billing/invoice document.
45
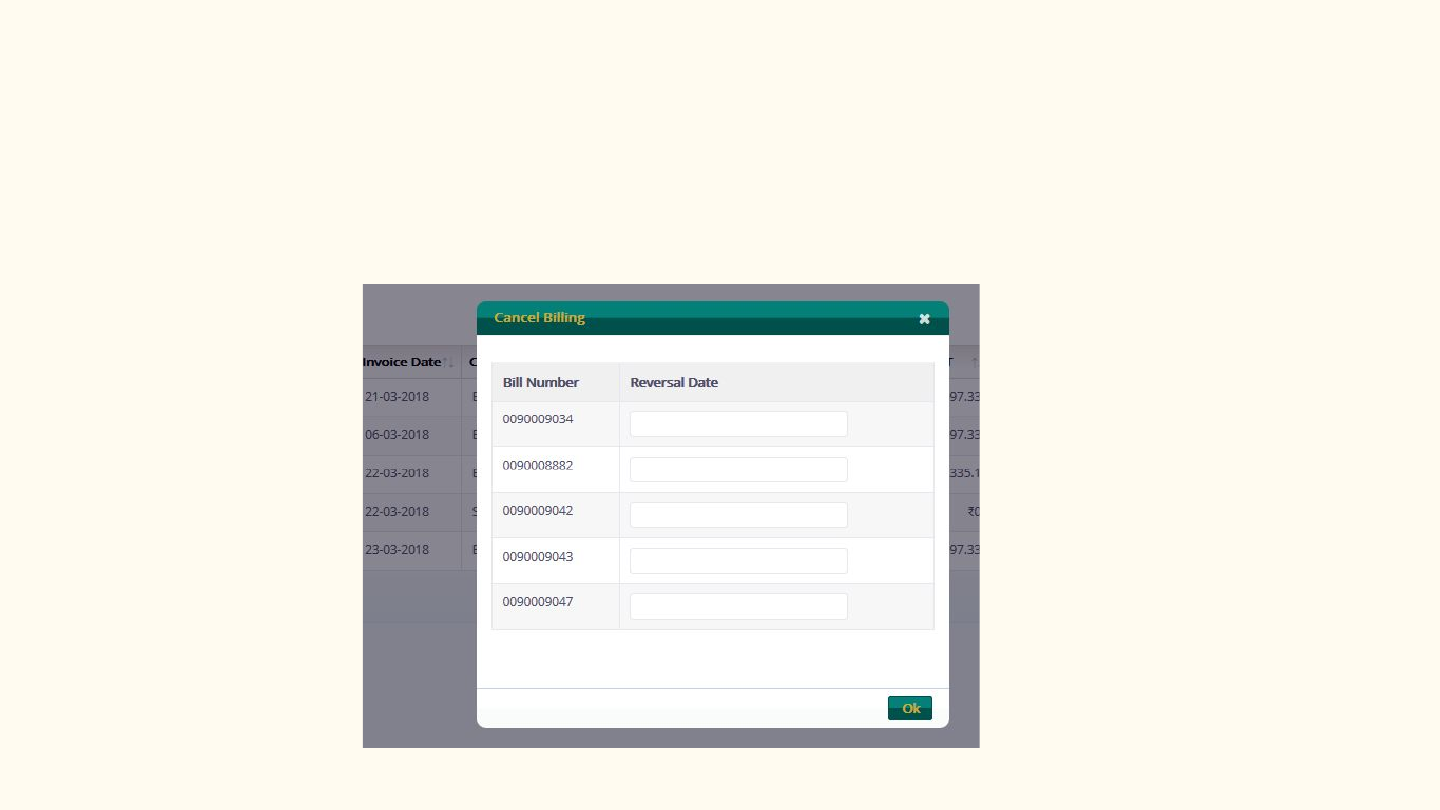
Cancel Billing
To cancel billing document please follow the below steps
•Select single or multiple billing documents which are in posted status.
•Click on Cancel document and pop up will be opened.
46

Cancel Billing /Export Excel
•Provide reversal date and click on ok.
•If the documents are in “posted” status the document is canceled successfully message will
be displayed.
•If the documents are in “canceled” status then the document is already canceled message
will be opened.
“To be billed” status will be displayed For cancelled documents the The status in the outbound
delivery.
Export Excel:
Click on Export excel button to download the billing documents,here we are providing csv file
extension.
47

Print/Preview
•To print/preview invoice document select any document and click on print/preview option.
Here we are providing multiple billing documents at a time.
•To print/preview multiple invoices at a time slect multiple documents and click on
print/preview button.
Sample billing document is provided below for preview
48
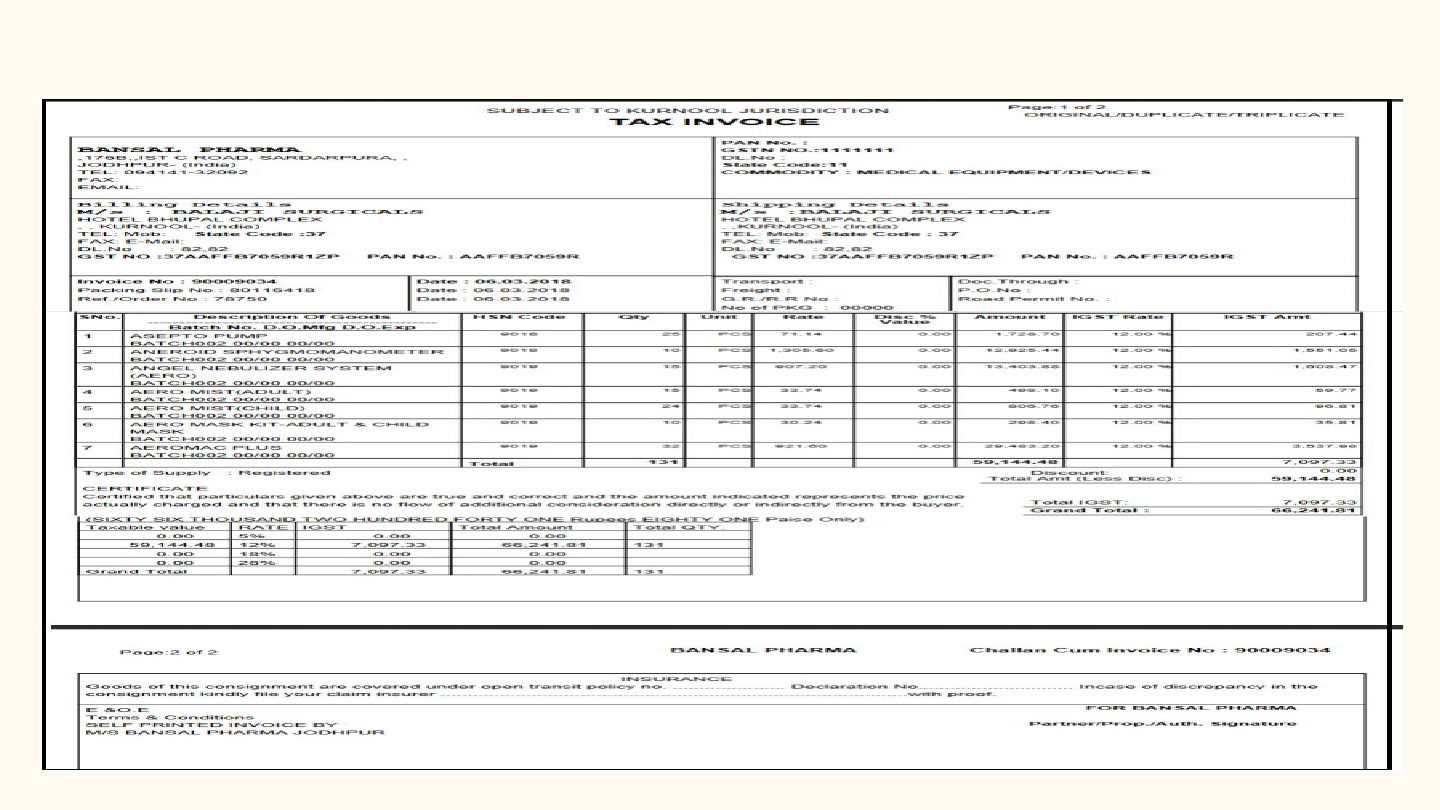
Print/Preview of billing document
49
