QBSDK_ProGuide Pro Guide
sdk-guide
User Manual:
Open the PDF directly: View PDF ![]() .
.
Page Count: 598 [warning: Documents this large are best viewed by clicking the View PDF Link!]
- Intuit QuickBooks® SDK
- Programmer’s Guide
- Version 13 .0
- About This Manual
- Introduction to QBSDK Programming
- What is the SDK?
- What Kinds of Integrations are Possible with the SDK?
- Which QuickBooks Editions/Versions Support My Application?
- What’s Included in the QuickBooks SDK Package?
- What is the Onscreen Reference OSR? Why Must I Use It?
- How Does QuickBooks Toggling Affect My Application?
- Do I Have to Use XML? Or are Convenience Libraries Available?
- Which Programming Languages Can I Use?
- What Do I Need to Know Before I Start Programming?
- What Kind of Technical Support is Available?
- Jumpstart
- The Communication Model and Ways of Implementing It
- Specifying Authorization Preferences
- Accessing Desktop QuickBooks Editions
- Using Java with QB SDK
- A Note About the Request Processor
- How to Access QuickBooks
- Multiple Sessions versus a Single Session
- Using AuthFlags to Specify Support for QuickBooks Editions
- More Information about Login Modes
- Limitations on Accessing Company Files
- Allowing Application Access to Personal Data
- Single-User vs. Multi-User Mode
- Microsoft Windows Vista & Windows 7 and UAC
- Building Requests In QBFC and in qbXML
- Handling Responses Using QBFC or qbXML
- Creating Queries
- Generating Reports
- Modifying and Deleting Transactions and List Objects
- Modifying Objects in General
- How to Modify Transactions
- Parts of a Transaction
- Modifying the Body of a Transaction
- Modifying Transaction Body Without Modifying Line Items
- Shortcut Way to Retaining a Line Item Exactly As Is
- Modifying a Line Item
- Inserting a New Line Item In a Mod Operation
- Deleting a Line Item
- Example: Modifying Transaction Lines
- Example: Modifying Groups within the Line Item Table
- Example: Modifying Item Lines in an Item Group
- About Modifying Rate, Quantity, and Amount Line Item Fields
- Deleting an Object
- Data Ext: Using Custom Fields and Private Data
- Core Differences Between Custom Fields and Private Data
- How Do I Create Data Extensions?
- What Makes a Data Ext Definition a Custom Field vs Private?
- A Cool Feature: Transactions Inherit From Customer, Item
- How Do I Get DataExt Data Back Using Queries?
- Writing Data to a Data Extension
- Clearing a Value from a Data Extension
- Deleting a Data Extension Definition: Limitations
- Making Custom Fields Show Up In QuickBooks and in Print
- I Want to Use Private Data: How Do I Use GUIDs?
- Using Other, Other1, Other2 in Transactions
- Writing Custom Field Data to Transaction Lines
- Modifying Custom Field Data in Transaction Item Lines
- Using Macros In Requests
- Objects, ObjectRefs, Fullnames, and Attributes
- Event Notification
- Integrating with the QuickBooks UI
- Handling Receive Payment, Bill Payment, and Deposit Transactions
- Linking ItemReceipt/Bill to PurchaseOrder, Invoice to Sales Order
- Important Note about Querying for Linked Transactions
- Linking Bill or ItemReceipt to PurchaseOrder
- Rules For Linking a Bill or ItemReceipt to a PurchaseOrder
- Why Does the OSR List LinkToTxn for Unsupported Transactions?
- Converting ItemReceipts to Bills
- Limitations and Pitfalls of Modifying a Bill or ItemReceipt
- ItemReceipt and Bill Split Option for QuickBooks Enterprise
- Re: “Is Manually Closed” in Purchase Orders and Sales Orders
- Linking Invoices to SalesOrders
- Using SalesReceipt Functionality
- Using Credit Card Refund Functionality
- Using Price Levels in Transactions
- Using Billing Rates To Bill For Time
- Using the Multicurrency Feature in the SDK
- Impact of Multicurrency on Existing Applications
- Company Preferences and Multicurrency
- QuickBooks Currencies/Exchange Rates and the SDK
- Multicurrency Effect on Transaction Amounts and Balances
- Multicurrency Effect on List Objects Amounts and Balances
- Multicurrency Effects on Reports
- ARAccountRef/APAccountRef Guidelines
- Using the Multi-Location Inventory Feature in the SDK
- Impact of Multi-Location Inventory on Existing Applications
- Company Preferences and Multi-Location Inventory
- InventorySite features for Multi-Location Inventory
- Transfer Inventory Transactions Feature
- Site Attributes for Transaction with Multi-Location Inventory
- Multi-Location Inventory Support for Group Items
- Using the Quickbooks Vehicle Mileage Feature
- Key Limitations of QB SDK Support for Vehicle Mileage
- How the Vehicle Mileage Feature Works
- Setting Up an Item to be Used In Billable Mileage Transactions
- What Happens to Mileage Charges When I Create Invoices?
- Adding a Vehicle Mileage Transaction
- Querying and Deleting Vehicle Mileage Transactions
- Modifying Vehicle Mileage Transactions
- Adding, Modifying, Querying Vehicles in the Vehicle List
- Adding, Modifying, Querying Worker Comp Codes
- Using the Unit of Measure Feature Via the SDK
- How Can I Tell If the UOM Feature is Available?
- Which SDK Requests Support UOM?
- How Does the UOM Feature Work?
- Creating a UOM Set in the UI
- How Do I Create a UOM Set in the SDK?
- Why Do I Need to Follow the UOM Set Naming Convention?
- Can I Modify a UOM Set in the SDK?
- Can I Set UOM Set Defaults for Purchase, Sales, and Shipping?
- How Do I Specify Which Units the UOM Set Contains?
- What Does the Abbreviation Field Do? Why’s it Required?
- Creating a UOM Set in QBFC
- Creating a UOM Set in qbXML
- Specifying a UOM Set for an Item
- Using UOM in Transactions
- Merging Accounts, Customers, Vendors, Classes
- Using Assembly Item and BuildAssembly Functionality
- Overview of QuickBooks Assembly Items and Build Assembly
- You Must Have Sufficient Components for the BuildAssembly
- QB Activities that Change BuildAssembly Transactions into Pending
- Consequences of Modifying an Existing Inventory Assembly Item
- Impact of SalesReceipts and Invoices on Assemblies in Inventory
- Disassembling Inventory Assemblies
- Getting BuildAssembly and Assembly Item Reports
- Adding an Inventory Assembly Item
- Modifying an Existing Inventory Assembly Item
- Querying for Inventory Assembly Items
- Adding a BuildAssembly Transaction
- Modifying an Existing BuildAssembly Transaction
- Querying for BuildAssembly Transactions
- Overview of QuickBooks Assembly Items and Build Assembly
- Taxes and Discounts (US Versions)
- Remote Data Sharing and Your Application
- Error Recovery
- The General Error Recovery Mechanism
- Automated Error Recovery in QBFC
- Using Error Recovery in qbXML-based Applications
- Error Recovery Using Old and New Message IDs
- How to Clear All Error Recovery Information
- Steps for Using Error Recovery in qbXML-based Applications
- Example
- Message Set Status Code
- Request ID
- Comparing Requests (Performing a Checksum)
- Status for Individual Requests within a Message Set
- Clearing State (oldMessageSetID)
- Maintaining State within Your Application
- Clearing Error Recovery Records Maintained by QuickBooks
- How to Use the QBFC Convenience Library
- QBFC Language Reference
- QBSessionManager Object and Methods
- QBSessionManager.BeginSession
- QBSessionManager.ClearErrorRecovery
- QBSessionManager.CloseConnection
- QBSessionManager.CommunicateOutOfProcess
- QBSessionManager.ConnectionType
- QBSessionManager.CreateMsgSetRequest
- QBSessionManager.CreateSubscriptionMsgSetRequest
- QBSessionManager.DoRequests
- QBSessionManager.DoRequestsFromXMLString
- QBSessionManager.DoSubscriptionRequests
- QBSessionManager.DoSubscriptionRequestsFromXMLString
- QBSessionManager.EnableErrorRecovery
- QBSessionManager.EndSession
- QBSessionManager.ErrorRecoveryID
- QBSessionManager.GetCurrentCompanyFileName
- QBSessionManager.GetErrorRecoveryStatus
- QBSessionManager.GetSavedMsgSetRequest
- QBSessionManager.GetVersion
- QBSessionManager.IsErrorRecoveryInfo
- QBSessionManager.OpenConnection2
- QBSessionManager.QBAuthPreferences
- QBSessionManager.QBXMLVersionsForSession
- QBSessionManager.QBXMLVersionsForSubscription
- QBSessionManager.SaveAllMsgSetRequestInfo
- QBSessionManager.ToEventsMsgSet
- QBSessionManager.ToMsgSetRequest
- QBSessionManager.ToMsgSetResponse
- QQBSessionManager.ToSubscriptionMsgSetResponse
- IQBAuthPreferences Object and Properties
- IQBAuthPreferences.GetIsReadOnly
- IQBAuthPreferences.GetPersonalDataPref
- IQBAuthPreferences.GetUnattendedModePref
- IQBAuthPreferences.PutAuthFlags
- IQBAuthPreferences.PutIsReadOnly
- IQBAuthPreferences.PutPersonalDataPref
- IQBAuthPreferences.PutUnattendedModePref
- IQBAuthPreferences.WasAuthPreferencesObeyed
- IMsgSetRequest Object and Methods
- IMsgSetRequest.Append*
- IMsgSetRequest.Attributes
- IMsgSetResponse Object and Methods
- IRequest Object and Methods
- IResponse Object and Methods
- Digitally Signing Your Code
- Tips and Techniques
- Supporting Your User
- Making Your Application Robust
- Redistributing SDK Components With Your Application
- Status Codes for qbXML Responses
- QuickBooks Data Accessible Via SDK Objects/Operations
- qbXML Specification for the Canadian and UK Editions
- qbXML RequestProcessor Method Reference
- AuthPreferences
- BeginSession
- CloseConnection
- EndSession
- GetCurrentCompanyFileName
- GetIsReadOnly
- GetPersonalDataPref
- GetUnattendedModePref
- WasAuthPreferencesObeyed
- PutAuthFlags
- PutIsReadOnly
- PutPersonalDataPref
- PutUnattendedModePref
- MajorVersion
- MinorVersion
- OpenConnection2
- ProcessRequest
- ProcessSubscription
- QBXMLVersionsForSession
- QBXMLVersionsForSubscription
- ReleaseLevel
- ReleaseNumber
- Enterprise Edition and Single/Multi-User Issues
- Overpayments and Refunds
Intuit QuickBooks
®
SDK
Programmer’s Guide
Version 13.0
SDK version 13.0, released November 2013. (c) 2013 Intuit Inc. All rights
reserved.
QuickBooks and Intuit are registered trademarks of Intuit Inc. All other
trademarks are the property of their respective owners and should be treated
as such.
Acknowledgement: This product includes software developed by the Apache
Software Foundation (<http://www.apache.org>) (c) 1999-2006 The Apache
Software Foundation. All rights reserved.
Intuit Inc.
P.O. Box 7850
Mountain View, CA 94039-7850
For more information about the QuickBooks SDK and the SDK documentation,
visit http://developer.intuit.com/.
Contents
3
(c) 2013 Intuit Inc. All rights reserved.
C
ONTENTS
About This Manual
Who Should Read This Manual? . . . . . . . . . . . . . . . . . . . . . . . . . . . . . . . . . . . . . . 19
Before You Begin . . . . . . . . . . . . . . . . . . . . . . . . . . . . . . . . . . . . . . . . . . . . . . . . 19
What’s New in This Guide?. . . . . . . . . . . . . . . . . . . . . . . . . . . . . . . . . . . . . . . . . . 20
Chapter 1: Introduction to QBSDK Programming
What is the SDK? . . . . . . . . . . . . . . . . . . . . . . . . . . . . . . . . . . . . . . . . . . . . . . . . 21
What Kinds of Integrations are Possible with the SDK? . . . . . . . . . . . . . . . . . . . . . . 22
Which QuickBooks Editions/Versions Support My Application? . . . . . . . . . . . . . . . . . 23
What’s Included in the QuickBooks SDK Package? . . . . . . . . . . . . . . . . . . . . . . . . . 23
What is the Onscreen Reference OSR? Why Must I Use It? . . . . . . . . . . . . . . . . . . . 24
How Does QuickBooks Toggling Affect My Application? . . . . . . . . . . . . . . . . . . . . . . 24
Do I Have to Use XML? Or are Convenience Libraries Available? . . . . . . . . . . . . . . . . 24
Which Programming Languages Can I Use? . . . . . . . . . . . . . . . . . . . . . . . . . . . . . . 25
What Do I Need to Know Before I Start Programming? . . . . . . . . . . . . . . . . . . . . . . 25
What Kind of Technical Support is Available? . . . . . . . . . . . . . . . . . . . . . . . . . . . . . 25
Chapter 2: Jumpstart
After the Tech Overview and the SDK Essentials Video... . . . . . . . . . . . . . . . . . . . . . 27
Chapter 3: The Communication Model and Ways of Implementing It
The Basic Communication Pattern. . . . . . . . . . . . . . . . . . . . . . . . . . . . . . . . . . . . . 29
Authorizations You Need to Know About . . . . . . . . . . . . . . . . . . . . . . . . . . . . . . . . 29
Company Owner Authorization of SDK Applications . . . . . . . . . . . . . . . . . . . . . . 30
Intuit Gateway Authorization of SDK Applications . . . . . . . . . . . . . . . . . . . . . . . 30
Messages: The Content of the Communication . . . . . . . . . . . . . . . . . . . . . . . . . . . . 30
What’s in a Message?. . . . . . . . . . . . . . . . . . . . . . . . . . . . . . . . . . . . . . . . . . . 31
Ways to Implement Communication With QuickBooks . . . . . . . . . . . . . . . . . . . . . . . 31
Desktop Applications Accessing Local QuickBooks . . . . . . . . . . . . . . . . . . . . . . . 32
Web Services Accessing QuickBooks via QB Web Connector . . . . . . . . . . . . . . . . 32
Chapter 4: Specifying Authorization Preferences
How the QuickBooks UI Supports Authorization/Access . . . . . . . . . . . . . . . . . . . . . . 35
When is the Authorization Dialog Displayed?. . . . . . . . . . . . . . . . . . . . . . . . . . . 35
The Default Authorization Dialog . . . . . . . . . . . . . . . . . . . . . . . . . . . . . . . . . . . 35
How the AuthPreferences Object Works. . . . . . . . . . . . . . . . . . . . . . . . . . . . . . . . . 37
How to Use the AuthPreferences Functionality. . . . . . . . . . . . . . . . . . . . . . . . . . 38
What Happens as a Result of the AuthPreference Settings? . . . . . . . . . . . . . . . . 40
Setting Authorization Preferences Within QuickBooks. . . . . . . . . . . . . . . . . . . . . 42
4
Contents
(c) 2013 Intuit Inc. All rights reserved.
Chapter 5: Accessing Desktop QuickBooks Editions
Using Java with QB SDK . . . . . . . . . . . . . . . . . . . . . . . . . . . . . . . . . . . . . . . . . . . . 45
A Note About the Request Processor . . . . . . . . . . . . . . . . . . . . . . . . . . . . . . . . . . . 45
How to Access QuickBooks . . . . . . . . . . . . . . . . . . . . . . . . . . . . . . . . . . . . . . . . . . 46
VB Code Snippets for Access if You Use qbXML . . . . . . . . . . . . . . . . . . . . . . . . . 46
VB Code Snippets for Access if You Use QBFC . . . . . . . . . . . . . . . . . . . . . . . . . . 47
What Happens in the Call to BeginSession? . . . . . . . . . . . . . . . . . . . . . . . . . . . . 47
Troubleshooting Errors in the BeginSession Call . . . . . . . . . . . . . . . . . . . . . . . . . 48
Multiple Sessions versus a Single Session. . . . . . . . . . . . . . . . . . . . . . . . . . . . . . . . 48
Using AuthFlags to Specify Support for QuickBooks Editions . . . . . . . . . . . . . . . . . . . 49
Setting AuthFlags to Specify Support for a QuickBooks Edition. . . . . . . . . . . . . . . 50
More Information about Login Modes . . . . . . . . . . . . . . . . . . . . . . . . . . . . . . . . . . . 51
Setting Up Auto-Login. . . . . . . . . . . . . . . . . . . . . . . . . . . . . . . . . . . . . . . . . . . 52
Only One Auto-Login User per Application . . . . . . . . . . . . . . . . . . . . . . . . . . . . . 53
Limitations on Accessing Company Files . . . . . . . . . . . . . . . . . . . . . . . . . . . . . . . . . 53
Allowing Application Access to Personal Data . . . . . . . . . . . . . . . . . . . . . . . . . . . . . 54
Single-User vs. Multi-User Mode . . . . . . . . . . . . . . . . . . . . . . . . . . . . . . . . . . . . . . 54
Trade-offs of Using Single-User Mode . . . . . . . . . . . . . . . . . . . . . . . . . . . . . . . . 55
Microsoft Windows Vista & Windows 7 and UAC. . . . . . . . . . . . . . . . . . . . . . . . . . . . 55
Chapter 6: Building Requests In QBFC and in qbXML
A Few Notes About Using QBFC . . . . . . . . . . . . . . . . . . . . . . . . . . . . . . . . . . . . . . . 57
Building a Request using QBFC . . . . . . . . . . . . . . . . . . . . . . . . . . . . . . . . . . . . . . . 57
What You Need to Do in QBFC . . . . . . . . . . . . . . . . . . . . . . . . . . . . . . . . . . . . . 58
Sample: Building a SalesOrder Using QBFC . . . . . . . . . . . . . . . . . . . . . . . . . . . . 58
The Importance of the CreateMsgSetRequest Call . . . . . . . . . . . . . . . . . . . . . . . 59
Background Details About the MsgSetRequest Object . . . . . . . . . . . . . . . . . . . . . 60
Another View of the Message Set Request Structure . . . . . . . . . . . . . . . . . . . . . . 61
Building a qbXML Request . . . . . . . . . . . . . . . . . . . . . . . . . . . . . . . . . . . . . . . . . . 62
What You Need to Do in qbXML using a DOM Document . . . . . . . . . . . . . . . . . . . 62
Chapter 7: Handling Responses Using QBFC or qbXML
Processing a Response Using QBFC . . . . . . . . . . . . . . . . . . . . . . . . . . . . . . . . . . . . 65
Background Information: Understanding IMsgSetResponse . . . . . . . . . . . . . . . . . 68
Background Information II: IResponse . . . . . . . . . . . . . . . . . . . . . . . . . . . . . . . 69
Processing a qbXML Response. . . . . . . . . . . . . . . . . . . . . . . . . . . . . . . . . . . . . . . . 72
What You Need to Do to Process a Response in qbXML . . . . . . . . . . . . . . . . . . . . 73
Processing a Response Message Set: Sample Code. . . . . . . . . . . . . . . . . . . . . . . 73
Chapter 8: Creating Queries
When to Use a Query vs a Report. . . . . . . . . . . . . . . . . . . . . . . . . . . . . . . . . . . 75
Different Ways of Using Queries to Get the Same Data . . . . . . . . . . . . . . . . . . . . 75
Getting a Count of Query Objects . . . . . . . . . . . . . . . . . . . . . . . . . . . . . . . . . . . 76
Filters . . . . . . . . . . . . . . . . . . . . . . . . . . . . . . . . . . . . . . . . . . . . . . . . . . . . . . . . 76

Contents
5
(c) 2013 Intuit Inc. All rights reserved.
Limiting the Number of Objects Returned . . . . . . . . . . . . . . . . . . . . . . . . . . . . . . . 76
Using Iterators to Walk Through Large Query Returns . . . . . . . . . . . . . . . . . . . . 77
Limiting Returned Data Using IncludeRetElement . . . . . . . . . . . . . . . . . . . . . . . 79
Using MaxReturned . . . . . . . . . . . . . . . . . . . . . . . . . . . . . . . . . . . . . . . . . . . . 80
List Queries: Commonly Used Filters. . . . . . . . . . . . . . . . . . . . . . . . . . . . . . . . . . . 81
ListID or FullName. . . . . . . . . . . . . . . . . . . . . . . . . . . . . . . . . . . . . . . . . . . . . 81
Active Status . . . . . . . . . . . . . . . . . . . . . . . . . . . . . . . . . . . . . . . . . . . . . . . . 82
Filtering by Date Modified. . . . . . . . . . . . . . . . . . . . . . . . . . . . . . . . . . . . . . . . 82
Match Criterion for Names . . . . . . . . . . . . . . . . . . . . . . . . . . . . . . . . . . . . . . . 83
Ranges for Names . . . . . . . . . . . . . . . . . . . . . . . . . . . . . . . . . . . . . . . . . . . . . 83
Special Information Contained in an AccountRet Object . . . . . . . . . . . . . . . . . . . 84
Special Filters . . . . . . . . . . . . . . . . . . . . . . . . . . . . . . . . . . . . . . . . . . . . . . . . 85
Transaction Queries: Commonly Used Filters . . . . . . . . . . . . . . . . . . . . . . . . . . . . . 86
TxnID or Reference Number . . . . . . . . . . . . . . . . . . . . . . . . . . . . . . . . . . . . . . 86
Date Filters. . . . . . . . . . . . . . . . . . . . . . . . . . . . . . . . . . . . . . . . . . . . . . . . . . 86
Entity Filters . . . . . . . . . . . . . . . . . . . . . . . . . . . . . . . . . . . . . . . . . . . . . . . . . 87
Account Filters . . . . . . . . . . . . . . . . . . . . . . . . . . . . . . . . . . . . . . . . . . . . . . . 88
Reference Number Filters . . . . . . . . . . . . . . . . . . . . . . . . . . . . . . . . . . . . . . . . 89
Paid Status . . . . . . . . . . . . . . . . . . . . . . . . . . . . . . . . . . . . . . . . . . . . . . . . . . 90
Requesting Additional Data. . . . . . . . . . . . . . . . . . . . . . . . . . . . . . . . . . . . . . . 90
Special Queries . . . . . . . . . . . . . . . . . . . . . . . . . . . . . . . . . . . . . . . . . . . . . . . . . 90
The Generic TransactionQuery. . . . . . . . . . . . . . . . . . . . . . . . . . . . . . . . . . . . . 90
TransactionQuery and Access Permissions . . . . . . . . . . . . . . . . . . . . . . . . . . . . 91
Filters for TransactionQuery . . . . . . . . . . . . . . . . . . . . . . . . . . . . . . . . . . . . . . 91
Chapter 9: Generating Reports
Before You Begin . . . . . . . . . . . . . . . . . . . . . . . . . . . . . . . . . . . . . . . . . . . . . . . . 93
Categories of Reports . . . . . . . . . . . . . . . . . . . . . . . . . . . . . . . . . . . . . . . . . . . . . 93
General Summary Reports . . . . . . . . . . . . . . . . . . . . . . . . . . . . . . . . . . . . . . . 94
Job Reports . . . . . . . . . . . . . . . . . . . . . . . . . . . . . . . . . . . . . . . . . . . . . . . . . 95
Time Reports . . . . . . . . . . . . . . . . . . . . . . . . . . . . . . . . . . . . . . . . . . . . . . . . 95
Aging Reports . . . . . . . . . . . . . . . . . . . . . . . . . . . . . . . . . . . . . . . . . . . . . . . . 95
Budget Summary Reports. . . . . . . . . . . . . . . . . . . . . . . . . . . . . . . . . . . . . . . . 96
General Detail Reports . . . . . . . . . . . . . . . . . . . . . . . . . . . . . . . . . . . . . . . . . . 96
Payroll Summary Reports . . . . . . . . . . . . . . . . . . . . . . . . . . . . . . . . . . . . . . . . 97
Payroll Detail Reports. . . . . . . . . . . . . . . . . . . . . . . . . . . . . . . . . . . . . . . . . . . 97
Custom Summary and Detail Reports. . . . . . . . . . . . . . . . . . . . . . . . . . . . . . . . 98
Default Reports . . . . . . . . . . . . . . . . . . . . . . . . . . . . . . . . . . . . . . . . . . . . . . . . . 98
A Practical Approach . . . . . . . . . . . . . . . . . . . . . . . . . . . . . . . . . . . . . . . . . . . . . . 99
Creating a Report Request . . . . . . . . . . . . . . . . . . . . . . . . . . . . . . . . . . . . . . . . . . 99
Modifying a Profit and Loss Standard Report . . . . . . . . . . . . . . . . . . . . . . . . . . . 99
Setting Up Filters for a Profit and Loss Standard Report . . . . . . . . . . . . . . . . . . .103
“IncludeColumn” Field . . . . . . . . . . . . . . . . . . . . . . . . . . . . . . . . . . . . . . . . . .104
Required Filter for Certain Job Reports . . . . . . . . . . . . . . . . . . . . . . . . . . . . . . .105
Required Filter for Missing Checks Report . . . . . . . . . . . . . . . . . . . . . . . . . . . . .105
Example of a Report Request . . . . . . . . . . . . . . . . . . . . . . . . . . . . . . . . . . . . .105
Creating Requests for Budget Reports . . . . . . . . . . . . . . . . . . . . . . . . . . . . . . .105
6
Contents
(c) 2013 Intuit Inc. All rights reserved.
Interpreting the Report Response . . . . . . . . . . . . . . . . . . . . . . . . . . . . . . . . . . . . 107
Report Meta-data . . . . . . . . . . . . . . . . . . . . . . . . . . . . . . . . . . . . . . . . . . . . . 107
Report Data . . . . . . . . . . . . . . . . . . . . . . . . . . . . . . . . . . . . . . . . . . . . . . . . . 109
Example . . . . . . . . . . . . . . . . . . . . . . . . . . . . . . . . . . . . . . . . . . . . . . . . . . . 109
Enumerated Values for “ClearedStatus” Column . . . . . . . . . . . . . . . . . . . . . . . . 110
Transaction Detail Reports . . . . . . . . . . . . . . . . . . . . . . . . . . . . . . . . . . . . . . . 111
Order Column . . . . . . . . . . . . . . . . . . . . . . . . . . . . . . . . . . . . . . . . . . . . . . . 113
Including Personal Data in Reports . . . . . . . . . . . . . . . . . . . . . . . . . . . . . . . . . 113
Including Payroll Data in Reports . . . . . . . . . . . . . . . . . . . . . . . . . . . . . . . . . . 114
My Report Has No Data! . . . . . . . . . . . . . . . . . . . . . . . . . . . . . . . . . . . . . . . . 114
Valid Request Options for Individual Report Types . . . . . . . . . . . . . . . . . . . . . . . . . 115
Chapter 10: Modifying and Deleting Transactions and List Objects
Modifying Objects in General . . . . . . . . . . . . . . . . . . . . . . . . . . . . . . . . . . . . . . . 125
Edit Sequence . . . . . . . . . . . . . . . . . . . . . . . . . . . . . . . . . . . . . . . . . . . . . . . 125
One Way to Delete an Element’s Value . . . . . . . . . . . . . . . . . . . . . . . . . . . . . . 125
Clearing References . . . . . . . . . . . . . . . . . . . . . . . . . . . . . . . . . . . . . . . . . . . 126
Clearing Aggregates . . . . . . . . . . . . . . . . . . . . . . . . . . . . . . . . . . . . . . . . . . . 126
How to Modify Transactions . . . . . . . . . . . . . . . . . . . . . . . . . . . . . . . . . . . . . . . . 127
Parts of a Transaction . . . . . . . . . . . . . . . . . . . . . . . . . . . . . . . . . . . . . . . . . . 128
Modifying the Body of a Transaction . . . . . . . . . . . . . . . . . . . . . . . . . . . . . . . . 128
Modifying Transaction Body Without Modifying Line Items . . . . . . . . . . . . . . . . . 130
Shortcut Way to Retaining a Line Item Exactly As Is . . . . . . . . . . . . . . . . . . . . . 130
Modifying a Line Item . . . . . . . . . . . . . . . . . . . . . . . . . . . . . . . . . . . . . . . . . . 131
Inserting a New Line Item In a Mod Operation . . . . . . . . . . . . . . . . . . . . . . . . . 131
Deleting a Line Item . . . . . . . . . . . . . . . . . . . . . . . . . . . . . . . . . . . . . . . . . . . 131
Example: Modifying Transaction Lines . . . . . . . . . . . . . . . . . . . . . . . . . . . . . . . 131
Example: Modifying Groups within the Line Item Table . . . . . . . . . . . . . . . . . . . 132
Example: Modifying Item Lines in an Item Group . . . . . . . . . . . . . . . . . . . . . . . 133
About Modifying Rate, Quantity, and Amount Line Item Fields. . . . . . . . . . . . . . . . . 134
Deleting an Object. . . . . . . . . . . . . . . . . . . . . . . . . . . . . . . . . . . . . . . . . . . . . . . 134
Must be in Single-User Mode (Except for Enterprise). . . . . . . . . . . . . . . . . . . . . 135
Accountant Copy Restrictions . . . . . . . . . . . . . . . . . . . . . . . . . . . . . . . . . . . . . 135
Locked Transactions . . . . . . . . . . . . . . . . . . . . . . . . . . . . . . . . . . . . . . . . . . . 135
About Closed Transactions . . . . . . . . . . . . . . . . . . . . . . . . . . . . . . . . . . . . . . . 135
About Permissions . . . . . . . . . . . . . . . . . . . . . . . . . . . . . . . . . . . . . . . . . . . . 136
Voiding an Object . . . . . . . . . . . . . . . . . . . . . . . . . . . . . . . . . . . . . . . . . . . . . 136
Chapter 11: Data Ext: Using Custom Fields and Private Data
Core Differences Between Custom Fields and Private Data . . . . . . . . . . . . . . . . . . . 137
How Do I Create Data Extensions? . . . . . . . . . . . . . . . . . . . . . . . . . . . . . . . . . . . 139
Enough Pictures: Show Me Some Code . . . . . . . . . . . . . . . . . . . . . . . . . . . . . . 141
What Makes a Data Ext Definition a Custom Field vs Private? . . . . . . . . . . . . . . . . . 143
But There is More To It . . . . . . . . . . . . . . . . . . . . . . . . . . . . . . . . . . . . . . . . . 143
A Cool Feature: Transactions Inherit From Customer, Item . . . . . . . . . . . . . . . . . . . 143
Inheriting from Customer to Transactions . . . . . . . . . . . . . . . . . . . . . . . . . . . . 143

Contents
7
(c) 2013 Intuit Inc. All rights reserved.
Inheriting from Item to Transactions . . . . . . . . . . . . . . . . . . . . . . . . . . . . . . . .145
Do Individual Transactions Also Inherit Custom Field Values? . . . . . . . . . . . . . . .146
Writing to Custom Fields Only Affects the Current Transaction . . . . . . . . . . . . . .146
How Do I Get DataExt Data Back Using Queries? . . . . . . . . . . . . . . . . . . . . . . . . . .146
Writing Data to a Data Extension . . . . . . . . . . . . . . . . . . . . . . . . . . . . . . . . . . . . .147
Clearing a Value from a Data Extension. . . . . . . . . . . . . . . . . . . . . . . . . . . . . . . . .148
Deleting a Data Extension Definition: Limitations . . . . . . . . . . . . . . . . . . . . . . . . . .148
Deleting Custom Fields From the QuickBooks UI . . . . . . . . . . . . . . . . . . . . . . . .148
Making Custom Fields Show Up In QuickBooks and in Print . . . . . . . . . . . . . . . . . . .148
I Want to Use Private Data: How Do I Use GUIDs? . . . . . . . . . . . . . . . . . . . . . . . . .151
The Format of the GUID within the Request . . . . . . . . . . . . . . . . . . . . . . . . . . .151
How Do I Retrieve OwnerIDs? . . . . . . . . . . . . . . . . . . . . . . . . . . . . . . . . . . . . .151
What is an OwnerIDList? . . . . . . . . . . . . . . . . . . . . . . . . . . . . . . . . . . . . . . . .151
Using Other, Other1, Other2 in Transactions . . . . . . . . . . . . . . . . . . . . . . . . . . . . .151
Writing Custom Field Data to Transaction Lines . . . . . . . . . . . . . . . . . . . . . . . . . . .152
Modifying Custom Field Data in Transaction Item Lines . . . . . . . . . . . . . . . . . . . . . .153
Chapter 12: Using Macros In Requests
What is a Macro? . . . . . . . . . . . . . . . . . . . . . . . . . . . . . . . . . . . . . . . . . . . . . . . .155
Must Macro Names be Unique? . . . . . . . . . . . . . . . . . . . . . . . . . . . . . . . . . . . .155
A Sample Macro . . . . . . . . . . . . . . . . . . . . . . . . . . . . . . . . . . . . . . . . . . . . . . . . .156
Where Can You Define a Macro? Use a Macro? . . . . . . . . . . . . . . . . . . . . . . . . . . . .157
Using Macros to Set Cleared Status . . . . . . . . . . . . . . . . . . . . . . . . . . . . . . . . . . .157
Chapter 13: Objects, ObjectRefs, Fullnames, and Attributes
Lists . . . . . . . . . . . . . . . . . . . . . . . . . . . . . . . . . . . . . . . . . . . . . . . . . . . . . .159
Transactions . . . . . . . . . . . . . . . . . . . . . . . . . . . . . . . . . . . . . . . . . . . . . . . . .161
Identifiers. . . . . . . . . . . . . . . . . . . . . . . . . . . . . . . . . . . . . . . . . . . . . . . . . . .162
ListID. . . . . . . . . . . . . . . . . . . . . . . . . . . . . . . . . . . . . . . . . . . . . . . . . . . . . .162
FullName . . . . . . . . . . . . . . . . . . . . . . . . . . . . . . . . . . . . . . . . . . . . . . . . . . .164
Object References . . . . . . . . . . . . . . . . . . . . . . . . . . . . . . . . . . . . . . . . . . . . .167
About DateTimes . . . . . . . . . . . . . . . . . . . . . . . . . . . . . . . . . . . . . . . . . . . . . .167
Templates. . . . . . . . . . . . . . . . . . . . . . . . . . . . . . . . . . . . . . . . . . . . . . . . . . .167
Operations. . . . . . . . . . . . . . . . . . . . . . . . . . . . . . . . . . . . . . . . . . . . . . . . . . . . .167
Adding an Object: Example of a Request and Response . . . . . . . . . . . . . . . . . . .168
Querying for Objects . . . . . . . . . . . . . . . . . . . . . . . . . . . . . . . . . . . . . . . . . . .170
Attributes in the SDK . . . . . . . . . . . . . . . . . . . . . . . . . . . . . . . . . . . . . . . . . . . . .171
Message Set-Level Attributes . . . . . . . . . . . . . . . . . . . . . . . . . . . . . . . . . . . . .171
Request Attributes. . . . . . . . . . . . . . . . . . . . . . . . . . . . . . . . . . . . . . . . . . . . .172
Response Attributes. . . . . . . . . . . . . . . . . . . . . . . . . . . . . . . . . . . . . . . . . . . .172
Query Attributes . . . . . . . . . . . . . . . . . . . . . . . . . . . . . . . . . . . . . . . . . . . . . .173
Chapter 14: Event Notification
Using the C# App Template to Implement Eventing . . . . . . . . . . . . . . . . . . . . . . . .175
What Requests Do I Use and How Do I Invoke These? . . . . . . . . . . . . . . . . . . . . . .175
8
Contents
(c) 2013 Intuit Inc. All rights reserved.
How Do I Invoke Subscription Events? . . . . . . . . . . . . . . . . . . . . . . . . . . . . . . 176
Overview: The Event Notification Framework . . . . . . . . . . . . . . . . . . . . . . . . . . . . 176
QuickBooks Events and Event Notification . . . . . . . . . . . . . . . . . . . . . . . . . . . . 176
Subscribing to Events . . . . . . . . . . . . . . . . . . . . . . . . . . . . . . . . . . . . . . . . . . 178
Authorizing a Callback Application to Receive Events . . . . . . . . . . . . . . . . . . . . 181
Processing Events in a Callback Application . . . . . . . . . . . . . . . . . . . . . . . . . . . 182
Handling Special QuickBooks Operations . . . . . . . . . . . . . . . . . . . . . . . . . . . . . 189
Putting it All Together: The Event Notification Flow . . . . . . . . . . . . . . . . . . . . . . 191
Implementing Event-Awareness in qbXML . . . . . . . . . . . . . . . . . . . . . . . . . . . . . . 191
Subscribing, Unsubscribing, and Querying Subscriptions in qbXML . . . . . . . . . . . 191
Implementing a qbXML-based Callback (IQBEventCallback) . . . . . . . . . . . . . . . . 196
Chapter 15: Integrating with the QuickBooks UI
Using the C# App Template to Implement UI Events . . . . . . . . . . . . . . . . . . . . . . . 199
What Types of Integrations Can I Do? . . . . . . . . . . . . . . . . . . . . . . . . . . . . . . . . . 199
Before Your Application Can Extend the QuickBooks UI . . . . . . . . . . . . . . . . . . . . . 200
Subscription . . . . . . . . . . . . . . . . . . . . . . . . . . . . . . . . . . . . . . . . . . . . . . . . 200
Authorization . . . . . . . . . . . . . . . . . . . . . . . . . . . . . . . . . . . . . . . . . . . . . . . . 201
Authorization Scenarios Affecting UI Extensions . . . . . . . . . . . . . . . . . . . . . . . . 201
UI Guidelines . . . . . . . . . . . . . . . . . . . . . . . . . . . . . . . . . . . . . . . . . . . . . . . . . . 204
Menu-Extension Guidelines . . . . . . . . . . . . . . . . . . . . . . . . . . . . . . . . . . . . . . 204
Adding a Menu Item to QuickBooks . . . . . . . . . . . . . . . . . . . . . . . . . . . . . . . . . . . 206
Where Your Menu Item Will Appear . . . . . . . . . . . . . . . . . . . . . . . . . . . . . . . . 206
Menu Item Names . . . . . . . . . . . . . . . . . . . . . . . . . . . . . . . . . . . . . . . . . . . . 207
Display Conditions . . . . . . . . . . . . . . . . . . . . . . . . . . . . . . . . . . . . . . . . . . . . 209
Getting QuickBooks Context Information From a Menu Item Click . . . . . . . . . . . 211
Error Handling . . . . . . . . . . . . . . . . . . . . . . . . . . . . . . . . . . . . . . . . . . . . . . . . . 211
When the Authorization Level Changes . . . . . . . . . . . . . . . . . . . . . . . . . . . . . . 212
Lost UI Events . . . . . . . . . . . . . . . . . . . . . . . . . . . . . . . . . . . . . . . . . . . . . . . 212
Invoking the QuickBooks UI . . . . . . . . . . . . . . . . . . . . . . . . . . . . . . . . . . . . . . . . 213
Opening Transaction Forms . . . . . . . . . . . . . . . . . . . . . . . . . . . . . . . . . . . . . . 213
Opening and Prefilling a New Transaction . . . . . . . . . . . . . . . . . . . . . . . . . . . . 214
Opening List Windows. . . . . . . . . . . . . . . . . . . . . . . . . . . . . . . . . . . . . . . . . . 215
Displaying Reports . . . . . . . . . . . . . . . . . . . . . . . . . . . . . . . . . . . . . . . . . . . . 216
Chapter 16: Handling Receive Payment, Bill Payment, and Deposit
Transactions
Core Concepts for Receive Payment and Bill Payment . . . . . . . . . . . . . . . . . . . . . . 217
Applying Payments, Credits, and Discounts . . . . . . . . . . . . . . . . . . . . . . . . . . . 217
Linked Transactions . . . . . . . . . . . . . . . . . . . . . . . . . . . . . . . . . . . . . . . . . . . 218
Returned Object for AppliedToTxnAdd . . . . . . . . . . . . . . . . . . . . . . . . . . . . . . . 219
Creating Links Instead of Transactions . . . . . . . . . . . . . . . . . . . . . . . . . . . . . . 219
Receive Payment Transactions. . . . . . . . . . . . . . . . . . . . . . . . . . . . . . . . . . . . . . . 219
Applying a Payment . . . . . . . . . . . . . . . . . . . . . . . . . . . . . . . . . . . . . . . . . . . 219
Setting Discounts . . . . . . . . . . . . . . . . . . . . . . . . . . . . . . . . . . . . . . . . . . . . . 221
Setting Credits . . . . . . . . . . . . . . . . . . . . . . . . . . . . . . . . . . . . . . . . . . . . . . . 221

Contents
9
(c) 2013 Intuit Inc. All rights reserved.
Using ReceivePayment for Credit Card Authorization and Capture . . . . . . . . . . . .224
Modifying a ReceivePayment Transaction . . . . . . . . . . . . . . . . . . . . . . . . . . . . . . . .224
Bill Payment Transactions . . . . . . . . . . . . . . . . . . . . . . . . . . . . . . . . . . . . . . . . . .224
Payment Method . . . . . . . . . . . . . . . . . . . . . . . . . . . . . . . . . . . . . . . . . . . . . .225
Paying the Bill . . . . . . . . . . . . . . . . . . . . . . . . . . . . . . . . . . . . . . . . . . . . . . . .225
Setting a Credit. . . . . . . . . . . . . . . . . . . . . . . . . . . . . . . . . . . . . . . . . . . . . . .226
Setting a Discount . . . . . . . . . . . . . . . . . . . . . . . . . . . . . . . . . . . . . . . . . . . . .227
Bill Payment Examples . . . . . . . . . . . . . . . . . . . . . . . . . . . . . . . . . . . . . . . . . .227
Modifying a BillPaymentCheck Transaction . . . . . . . . . . . . . . . . . . . . . . . . . . . . . . .229
Deposits . . . . . . . . . . . . . . . . . . . . . . . . . . . . . . . . . . . . . . . . . . . . . . . . . . . . . .230
Chapter 17: Linking ItemReceipt/Bill to PurchaseOrder, Invoice to
Sales Order
Important Note about Querying for Linked Transactions . . . . . . . . . . . . . . . . . . . . .233
Linking Bill or ItemReceipt to PurchaseOrder . . . . . . . . . . . . . . . . . . . . . . . . . . . . .234
The Basic User Scenario in the QuickBooks UI . . . . . . . . . . . . . . . . . . . . . . . . .234
Linking an ItemReceipt or Bill to PurchaseOrder Using the SDK. . . . . . . . . . . . . .237
Rules For Linking a Bill or ItemReceipt to a PurchaseOrder . . . . . . . . . . . . . . . . . . .242
Why Does the OSR List LinkToTxn for Unsupported Transactions?. . . . . . . . . . . . . . .242
Converting ItemReceipts to Bills . . . . . . . . . . . . . . . . . . . . . . . . . . . . . . . . . . . . . .243
Limitations and Pitfalls of Modifying a Bill or ItemReceipt . . . . . . . . . . . . . . . . . . . .243
ItemReceipt and Bill Split Option for QuickBooks Enterprise. . . . . . . . . . . . . . . . . . .243
Re: “Is Manually Closed” in Purchase Orders and Sales Orders. . . . . . . . . . . . . . . . .244
Linking Invoices to SalesOrders . . . . . . . . . . . . . . . . . . . . . . . . . . . . . . . . . . . . . .244
The Basic User Scenario in the QuickBooks UI . . . . . . . . . . . . . . . . . . . . . . . . .245
Linking Invoices to SalesOrders in the SDK. . . . . . . . . . . . . . . . . . . . . . . . . . . .248
Chapter 18: Using SalesReceipt Functionality
Adding a SalesReceipt. . . . . . . . . . . . . . . . . . . . . . . . . . . . . . . . . . . . . . . . . . . . .255
Some Expected Data May be Missing from the Response . . . . . . . . . . . . . . . . . .262
Adding a SalesReceipt in QBFC . . . . . . . . . . . . . . . . . . . . . . . . . . . . . . . . . . . .262
Adding a SalesReceipt in qbXML . . . . . . . . . . . . . . . . . . . . . . . . . . . . . . . . . . .265
Modifying a SalesReceipt . . . . . . . . . . . . . . . . . . . . . . . . . . . . . . . . . . . . . . . . . . .266
Special Limitations Imposed By Credit Card Payment Method . . . . . . . . . . . . . . .267
Which SalesReceipt Fields Can Be Modified? . . . . . . . . . . . . . . . . . . . . . . . . . . .267
Which SalesReceipt Fields Can Be Cleared?. . . . . . . . . . . . . . . . . . . . . . . . . . . .267
Modifying a SalesReceipt in qbXML . . . . . . . . . . . . . . . . . . . . . . . . . . . . . . . . . . . .268
Modifying a SalesReceipt in QBFC . . . . . . . . . . . . . . . . . . . . . . . . . . . . . . . . . .269
Querying for SalesReceipts . . . . . . . . . . . . . . . . . . . . . . . . . . . . . . . . . . . . . . . . .273
Querying for SalesReceipts in qbXML . . . . . . . . . . . . . . . . . . . . . . . . . . . . . . . .273
Querying for SalesReceipts in QBFC . . . . . . . . . . . . . . . . . . . . . . . . . . . . . . . . .273
Deleting and Voiding SalesReceipts. . . . . . . . . . . . . . . . . . . . . . . . . . . . . . . . . . . .273
Chapter 19: Using Credit Card Refund Functionality
Adding a Credit Card Refund Transaction . . . . . . . . . . . . . . . . . . . . . . . . . . . . . . . .275
10
Contents
(c) 2013 Intuit Inc. All rights reserved.
Adding a Credit Card Refund in QBFC . . . . . . . . . . . . . . . . . . . . . . . . . . . . . . . 278
Adding a Credit Card Refund in qbXML . . . . . . . . . . . . . . . . . . . . . . . . . . . . . . 280
Querying for ARRefundCreditCard Transactions . . . . . . . . . . . . . . . . . . . . . . . . . . . 282
Deleting and Voiding ARRefundCreditCard Transactions . . . . . . . . . . . . . . . . . . . . . 282
Chapter 20: Using Price Levels in Transactions
What is a Price Level? . . . . . . . . . . . . . . . . . . . . . . . . . . . . . . . . . . . . . . . . . . . . 283
The Two Types of Price Levels Supported by QuickBooks . . . . . . . . . . . . . . . . . . 284
Why Are Price Levels Useful? . . . . . . . . . . . . . . . . . . . . . . . . . . . . . . . . . . . . . . . 284
Are Price Levels Automatically Available? . . . . . . . . . . . . . . . . . . . . . . . . . . . . . . . 284
Using Price Level Functionality in Your Application . . . . . . . . . . . . . . . . . . . . . . . . . 284
How to Create a Price Level . . . . . . . . . . . . . . . . . . . . . . . . . . . . . . . . . . . . . . . . 286
Creating a Fixed Percent Price Level . . . . . . . . . . . . . . . . . . . . . . . . . . . . . . . . 286
Creating a Per Item Price Level . . . . . . . . . . . . . . . . . . . . . . . . . . . . . . . . . . . 287
How to Apply a Price Level to a Customer. . . . . . . . . . . . . . . . . . . . . . . . . . . . . . . 288
How to Apply a Price Level to a Line Item. . . . . . . . . . . . . . . . . . . . . . . . . . . . . . . 289
Chapter 21: Using Billing Rates To Bill For Time
Which QuickBooks Editions Support Billing Rates? . . . . . . . . . . . . . . . . . . . . . . 291
Key SDK Limitations You Need to Know Before You Start. . . . . . . . . . . . . . . . . . 291
What Happens If I Use Both Price Levels and Billing Rates? . . . . . . . . . . . . . . . . 292
What is a Billing Rate? . . . . . . . . . . . . . . . . . . . . . . . . . . . . . . . . . . . . . . . . . . . . 292
What is the Workflow? How Do I use a Billing Rate?. . . . . . . . . . . . . . . . . . . . . . . . 292
A Detailed Look at the Billing Rates Workflow . . . . . . . . . . . . . . . . . . . . . . . . . . . . 293
Creating Service Items . . . . . . . . . . . . . . . . . . . . . . . . . . . . . . . . . . . . . . . . . 294
Creating Billing Rates in the UI . . . . . . . . . . . . . . . . . . . . . . . . . . . . . . . . . . . 299
Creating Billing Rates in the QB SDK. . . . . . . . . . . . . . . . . . . . . . . . . . . . . . . . 301
Assigning Billing Rates to Employees, Vendors, Other Names. . . . . . . . . . . . . . . 303
Using Billing Rates in Time Transactions . . . . . . . . . . . . . . . . . . . . . . . . . . . . . 304
Invoicing Customers for Billable Time (UI Only) . . . . . . . . . . . . . . . . . . . . . . . . 305
Chapter 22: Using the Multicurrency Feature in the SDK
Impact of Multicurrency on Existing Applications . . . . . . . . . . . . . . . . . . . . . . . . . . 309
Company Preferences and Multicurrency . . . . . . . . . . . . . . . . . . . . . . . . . . . . . . . 310
Getting Multicurrency and Home Currency from PreferencesQuery . . . . . . . . . . . 310
QuickBooks Currencies/Exchange Rates and the SDK. . . . . . . . . . . . . . . . . . . . . . . 310
“Built-in” Vs. User Defined Currencies . . . . . . . . . . . . . . . . . . . . . . . . . . . . . . . 310
Active Vs. Inactive Currencies . . . . . . . . . . . . . . . . . . . . . . . . . . . . . . . . . . . . 311
How Do You Set Currency Exchange Rates? . . . . . . . . . . . . . . . . . . . . . . . . . . . 311
What Happens in Transactions When You Change Exchange Rate? . . . . . . . . . . . 311
Multicurrency Effect on Transaction Amounts and Balances. . . . . . . . . . . . . . . . . . . 311
Multicurrency Effect on List Objects Amounts and Balances . . . . . . . . . . . . . . . . . . 311
Multicurrency Effects on Reports . . . . . . . . . . . . . . . . . . . . . . . . . . . . . . . . . . . . . 312
ARAccountRef/APAccountRef Guidelines . . . . . . . . . . . . . . . . . . . . . . . . . . . . . . . . 312

Contents
11
(c) 2013 Intuit Inc. All rights reserved.
Chapter 23: Using the Multi-Location Inventory Feature in the SDK
Impact of Multi-Location Inventory on Existing Applications. . . . . . . . . . . . . . . . . . .313
Company Preferences and Multi-Location Inventory . . . . . . . . . . . . . . . . . . . . . . . .313
Getting Multi-Location Inventory from PreferencesQuery . . . . . . . . . . . . . . . . . .313
InventorySite features for Multi-Location Inventory . . . . . . . . . . . . . . . . . . . . . . . .314
Transfer Inventory Transactions Feature . . . . . . . . . . . . . . . . . . . . . . . . . . . . . . . .314
Site Attributes for Transaction with Multi-Location Inventory . . . . . . . . . . . . . . . . . .315
Multi-Location Inventory Support for Group Items . . . . . . . . . . . . . . . . . . . . . . . . .316
Chapter 24: Using the Quickbooks Vehicle Mileage Feature
Key Limitations of QB SDK Support for Vehicle Mileage . . . . . . . . . . . . . . . . . . .318
How the Vehicle Mileage Feature Works. . . . . . . . . . . . . . . . . . . . . . . . . . . . . . . . .319
Setting Up an Item to be Used In Billable Mileage Transactions . . . . . . . . . . . . . . . .321
What Happens to Mileage Charges When I Create Invoices? . . . . . . . . . . . . . . . . . .322
Mileage Charges and Invoices in the UI . . . . . . . . . . . . . . . . . . . . . . . . . . . . . .322
Mileage Charges and Invoices in the SDK . . . . . . . . . . . . . . . . . . . . . . . . . . . . .323
Adding a Vehicle Mileage Transaction . . . . . . . . . . . . . . . . . . . . . . . . . . . . . . . . . .324
Adding Vehicle Mileage in qbXML . . . . . . . . . . . . . . . . . . . . . . . . . . . . . . . . . . .324
Adding Vehicle Mileage in QBFC. . . . . . . . . . . . . . . . . . . . . . . . . . . . . . . . . . . .324
Querying and Deleting Vehicle Mileage Transactions . . . . . . . . . . . . . . . . . . . . . . . .325
Modifying Vehicle Mileage Transactions . . . . . . . . . . . . . . . . . . . . . . . . . . . . . . . . .325
Adding, Modifying, Querying Vehicles in the Vehicle List . . . . . . . . . . . . . . . . . . . . .325
Chapter 25: Adding, Modifying, Querying Worker Comp Codes
What Can I Do With the Comp Codes I Create? . . . . . . . . . . . . . . . . . . . . . . . . . . .327
Workers’ Comp Code Feature Requires Payroll Subscription . . . . . . . . . . . . . . . . . . .327
How Can I Tell Whether the Company is Subscribed to Payroll?. . . . . . . . . . . . . .328
Workers Comp Codes in the UI and in the SDK . . . . . . . . . . . . . . . . . . . . . . . . . . .328
Adding a Comp Code with Several Rates Possible via SDK . . . . . . . . . . . . . . . . .329
Current Effective Date and Current Rate. . . . . . . . . . . . . . . . . . . . . . . . . . . . . .329
Rate History: Visible Only Through the SDK . . . . . . . . . . . . . . . . . . . . . . . . . . .329
Adding a Workers Comp Code . . . . . . . . . . . . . . . . . . . . . . . . . . . . . . . . . . . . . . .330
Adding a Comp Code Using QBFC . . . . . . . . . . . . . . . . . . . . . . . . . . . . . . . . . .330
Adding a Comp Code Using qbXML . . . . . . . . . . . . . . . . . . . . . . . . . . . . . . . . .331
Querying for Workers Comp Codes . . . . . . . . . . . . . . . . . . . . . . . . . . . . . . . . . . . .331
Querying for Comp Codes in qbXML . . . . . . . . . . . . . . . . . . . . . . . . . . . . . . . . .331
Modifying Workers Comp Codes . . . . . . . . . . . . . . . . . . . . . . . . . . . . . . . . . . . . . .332
Modifying a Comp Code in qbXML . . . . . . . . . . . . . . . . . . . . . . . . . . . . . . . . . .333
Chapter 26: Using the Unit of Measure Feature Via the SDK
How Can I Tell If the UOM Feature is Available? . . . . . . . . . . . . . . . . . . . . . . . . . . .335
Which SDK Requests Support UOM? . . . . . . . . . . . . . . . . . . . . . . . . . . . . . . . . . . .335
How Does the UOM Feature Work? . . . . . . . . . . . . . . . . . . . . . . . . . . . . . . . . . . . .336
Creating a UOM Set in the UI . . . . . . . . . . . . . . . . . . . . . . . . . . . . . . . . . . . . . . . .340
12
Contents
(c) 2013 Intuit Inc. All rights reserved.
How Do I Create a UOM Set in the SDK? . . . . . . . . . . . . . . . . . . . . . . . . . . . . . . . 341
Why Do I Need to Follow the UOM Set Naming Convention? . . . . . . . . . . . . . . . 342
Can I Modify a UOM Set in the SDK?. . . . . . . . . . . . . . . . . . . . . . . . . . . . . . . . 342
Can I Set UOM Set Defaults for Purchase, Sales, and Shipping? . . . . . . . . . . . . . 342
How Do I Specify Which Units the UOM Set Contains?. . . . . . . . . . . . . . . . . . . . 342
What Does the Abbreviation Field Do? Why’s it Required? . . . . . . . . . . . . . . . . . 343
Creating a UOM Set in QBFC . . . . . . . . . . . . . . . . . . . . . . . . . . . . . . . . . . . . . 343
Creating a UOM Set in qbXML . . . . . . . . . . . . . . . . . . . . . . . . . . . . . . . . . . . . 344
Specifying a UOM Set for an Item . . . . . . . . . . . . . . . . . . . . . . . . . . . . . . . . . . . . 345
What You Must Do in an Item Mod . . . . . . . . . . . . . . . . . . . . . . . . . . . . . . . . . 345
Specifying a UOM Set in an Item* Add Request . . . . . . . . . . . . . . . . . . . . . . . . 345
Specifying a UOM Set in an Item* Mod Requst. . . . . . . . . . . . . . . . . . . . . . . . . 346
Using UOM in Transactions . . . . . . . . . . . . . . . . . . . . . . . . . . . . . . . . . . . . . . . . . 347
Using UOM in a Transaction Add Request. . . . . . . . . . . . . . . . . . . . . . . . . . . . . 347
Using UOM in a Transaction Mod Request . . . . . . . . . . . . . . . . . . . . . . . . . . . . 348
Chapter 27: Merging Accounts, Customers, Vendors, Classes
What Does ListMerge Do?. . . . . . . . . . . . . . . . . . . . . . . . . . . . . . . . . . . . . . . . . . 351
What Happens in the ListMerge Operation? . . . . . . . . . . . . . . . . . . . . . . . . . . . 351
When Can I NOT Do a ListMerge? . . . . . . . . . . . . . . . . . . . . . . . . . . . . . . . . . . 352
Can I Undo or Reverse a ListMerge? . . . . . . . . . . . . . . . . . . . . . . . . . . . . . . . . . . 352
What Must I Do Before Merging? . . . . . . . . . . . . . . . . . . . . . . . . . . . . . . . . . . . . . 352
Merging Accounts . . . . . . . . . . . . . . . . . . . . . . . . . . . . . . . . . . . . . . . . . . . . . . . 353
Comparing AccountType and Changing Sublevel. . . . . . . . . . . . . . . . . . . . . . . . 354
Merging Classes . . . . . . . . . . . . . . . . . . . . . . . . . . . . . . . . . . . . . . . . . . . . . . . . 357
Merging Customers . . . . . . . . . . . . . . . . . . . . . . . . . . . . . . . . . . . . . . . . . . . . . . 357
Code Sample . . . . . . . . . . . . . . . . . . . . . . . . . . . . . . . . . . . . . . . . . . . . . . . . 358
Merging Vendors . . . . . . . . . . . . . . . . . . . . . . . . . . . . . . . . . . . . . . . . . . . . . . . . 359
Chapter 28: Using Assembly Item and BuildAssembly Functionality
Overview of QuickBooks Assembly Items and Build Assembly . . . . . . . . . . . . . . . . . 361
You Must Have Sufficient Components for the BuildAssembly. . . . . . . . . . . . . . . 362
QB Activities that Change BuildAssembly Transactions into Pending . . . . . . . . . . 363
Consequences of Modifying an Existing Inventory Assembly Item. . . . . . . . . . . . 363
Impact of SalesReceipts and Invoices on Assemblies in Inventory . . . . . . . . . . . 364
Disassembling Inventory Assemblies . . . . . . . . . . . . . . . . . . . . . . . . . . . . . . . 364
Getting BuildAssembly and Assembly Item Reports . . . . . . . . . . . . . . . . . . . . . 365
Adding an Inventory Assembly Item . . . . . . . . . . . . . . . . . . . . . . . . . . . . . . . . . . 365
Adding an ItemInventoryAssembly in qbXML . . . . . . . . . . . . . . . . . . . . . . . . . . 369
Adding an Assembly Item in QBFC . . . . . . . . . . . . . . . . . . . . . . . . . . . . . . . . . 370
Modifying an Existing Inventory Assembly Item . . . . . . . . . . . . . . . . . . . . . . . . . . 372
Modifying an Assembly Item in qbXML . . . . . . . . . . . . . . . . . . . . . . . . . . . . . . 372
Modifying an Assembly Item in QBFC . . . . . . . . . . . . . . . . . . . . . . . . . . . . . . . 372
Querying for Inventory Assembly Items . . . . . . . . . . . . . . . . . . . . . . . . . . . . . . . . 374
Querying for Assembly Items in qbXML . . . . . . . . . . . . . . . . . . . . . . . . . . . . . . 375
Querying for Assembly Items in QBFC. . . . . . . . . . . . . . . . . . . . . . . . . . . . . . . 376

Contents
13
(c) 2013 Intuit Inc. All rights reserved.
Adding a BuildAssembly Transaction . . . . . . . . . . . . . . . . . . . . . . . . . . . . . . . . . . .376
Adding a BuildAssembly Transaction in qbXML . . . . . . . . . . . . . . . . . . . . . . . . .378
Adding a BuildAssembly Transaction in QBFC . . . . . . . . . . . . . . . . . . . . . . . . . .380
Modifying an Existing BuildAssembly Transaction . . . . . . . . . . . . . . . . . . . . . . . . . .380
Modifying a BuildAssembly in qbXML . . . . . . . . . . . . . . . . . . . . . . . . . . . . . . . .381
Modifying a BuildAssembly in QBFC . . . . . . . . . . . . . . . . . . . . . . . . . . . . . . . . .383
Querying for BuildAssembly Transactions. . . . . . . . . . . . . . . . . . . . . . . . . . . . . . . .384
Querying For BuildAssembly Transactions in qbXML . . . . . . . . . . . . . . . . . . . . . .385
Querying For BuildAssembly Transactions in QBFC. . . . . . . . . . . . . . . . . . . . . . .385
Chapter 29: Taxes and Discounts (US Versions)
Calculating Sales Tax . . . . . . . . . . . . . . . . . . . . . . . . . . . . . . . . . . . . . . . . . . . . .387
Applying Multiple Taxes . . . . . . . . . . . . . . . . . . . . . . . . . . . . . . . . . . . . . . . . . . . .387
Applying Discounts . . . . . . . . . . . . . . . . . . . . . . . . . . . . . . . . . . . . . . . . . . . . . . .388
Flat vs. Percentage Discounts . . . . . . . . . . . . . . . . . . . . . . . . . . . . . . . . . . . . .389
Nontaxable Flat Discount . . . . . . . . . . . . . . . . . . . . . . . . . . . . . . . . . . . . . . . .389
Taxable Flat Discount . . . . . . . . . . . . . . . . . . . . . . . . . . . . . . . . . . . . . . . . . . .390
Chapter 30: Remote Data Sharing and Your Application
What is Remote Data Sharing?. . . . . . . . . . . . . . . . . . . . . . . . . . . . . . . . . . . . . . .391
Using RDS Client for Remote Access with QuickBooks Installed Locally . . . . . . . .391
RDS and Event Notification . . . . . . . . . . . . . . . . . . . . . . . . . . . . . . . . . . . . . . .391
Compatibility with Older Versions of RDS . . . . . . . . . . . . . . . . . . . . . . . . . . . . .392
About the RDS Server . . . . . . . . . . . . . . . . . . . . . . . . . . . . . . . . . . . . . . . . . .392
About the RDS Client . . . . . . . . . . . . . . . . . . . . . . . . . . . . . . . . . . . . . . . . . . .394
Distributing RDS. . . . . . . . . . . . . . . . . . . . . . . . . . . . . . . . . . . . . . . . . . . . . . . . .395
How to Use the SDK Installers and Merge Modules . . . . . . . . . . . . . . . . . . . . . .396
Choices in Implementing Your Installer . . . . . . . . . . . . . . . . . . . . . . . . . . . . . .398
Supporting RDS . . . . . . . . . . . . . . . . . . . . . . . . . . . . . . . . . . . . . . . . . . . . . . . . .399
What Your Application Must Do to Use RDS. . . . . . . . . . . . . . . . . . . . . . . . . . . .399
Which Versions of QuickBooks Support RDS? . . . . . . . . . . . . . . . . . . . . . . . . . .400
What You Need to Tell Your Customers about RDS . . . . . . . . . . . . . . . . . . . . . . .400
RDS-Specific HRESULTs Messages . . . . . . . . . . . . . . . . . . . . . . . . . . . . . . . . . .400
Chapter 31: Error Recovery
The General Error Recovery Mechanism . . . . . . . . . . . . . . . . . . . . . . . . . . . . . . . .403
When to Invoke Error Recovery. . . . . . . . . . . . . . . . . . . . . . . . . . . . . . . . . . . .403
HRESULTs Returned by QuickBooks . . . . . . . . . . . . . . . . . . . . . . . . . . . . . . . . .403
Automated Error Recovery in QBFC. . . . . . . . . . . . . . . . . . . . . . . . . . . . . . . . . . . .404
Implementing Automated Error Recovery . . . . . . . . . . . . . . . . . . . . . . . . . . . . .404
Using Error Recovery in qbXML-based Applications . . . . . . . . . . . . . . . . . . . . . . . . .405
Error Recovery Using Old and New Message IDs . . . . . . . . . . . . . . . . . . . . . . . .405
How to Clear All Error Recovery Information . . . . . . . . . . . . . . . . . . . . . . . . . . .405
Steps for Using Error Recovery in qbXML-based Applications. . . . . . . . . . . . . . . .405
Example . . . . . . . . . . . . . . . . . . . . . . . . . . . . . . . . . . . . . . . . . . . . . . . . . . . .406
14
Contents
(c) 2013 Intuit Inc. All rights reserved.
Message Set Status Code . . . . . . . . . . . . . . . . . . . . . . . . . . . . . . . . . . . . . . . 407
Request ID . . . . . . . . . . . . . . . . . . . . . . . . . . . . . . . . . . . . . . . . . . . . . . . . . 408
Comparing Requests (Performing a Checksum) . . . . . . . . . . . . . . . . . . . . . . . . 408
Status for Individual Requests within a Message Set. . . . . . . . . . . . . . . . . . . . . 408
Clearing State (oldMessageSetID) . . . . . . . . . . . . . . . . . . . . . . . . . . . . . . . . . 409
Maintaining State within Your Application . . . . . . . . . . . . . . . . . . . . . . . . . . . . 410
Clearing Error Recovery Records Maintained by QuickBooks. . . . . . . . . . . . . . . . 411
Chapter 32: How to Use the QBFC Convenience Library
Understanding QBFC Objects . . . . . . . . . . . . . . . . . . . . . . . . . . . . . . . . . . . . . . . 413
Objects, Objects Everywhere: Where Do I Start? . . . . . . . . . . . . . . . . . . . . . . . 413
Which Objects Do I Need to Create a Request? . . . . . . . . . . . . . . . . . . . . . . . . . . . 414
How Do I Use the OSR to Fully Construct the Request? . . . . . . . . . . . . . . . . . . . 415
Other Useful IMsgSetRequest Methods . . . . . . . . . . . . . . . . . . . . . . . . . . . . . . 417
Which Objects Do I Need to Process a Response? . . . . . . . . . . . . . . . . . . . . . . . . . 418
Getting Data from the Ret Object . . . . . . . . . . . . . . . . . . . . . . . . . . . . . . . . . . 419
Objects and Methods Used in Processing Response Data . . . . . . . . . . . . . . . . . . 420
Chapter 33: QBFC Language Reference
QBSessionManager Object and Methods . . . . . . . . . . . . . . . . . . . . . . . . . . . . . . . . 423
QBSessionManager.BeginSession. . . . . . . . . . . . . . . . . . . . . . . . . . . . . . . . . . . . . 425
QBSessionManager.ClearErrorRecovery . . . . . . . . . . . . . . . . . . . . . . . . . . . . . . . . 428
QBSessionManager.CloseConnection . . . . . . . . . . . . . . . . . . . . . . . . . . . . . . . . . . 429
QBSessionManager.CommunicateOutOfProcess . . . . . . . . . . . . . . . . . . . . . . . . . . . 430
QBSessionManager.ConnectionType . . . . . . . . . . . . . . . . . . . . . . . . . . . . . . . . . . . 431
QBSessionManager.CreateMsgSetRequest. . . . . . . . . . . . . . . . . . . . . . . . . . . . . . . 432
QBSessionManager.CreateSubscriptionMsgSetRequest . . . . . . . . . . . . . . . . . . . . . . 433
QBSessionManager.DoRequests. . . . . . . . . . . . . . . . . . . . . . . . . . . . . . . . . . . . . . 434
QBSessionManager.DoRequestsFromXMLString . . . . . . . . . . . . . . . . . . . . . . . . . . . 435
QBSessionManager.DoSubscriptionRequests . . . . . . . . . . . . . . . . . . . . . . . . . . . . . 436
QBSessionManager.DoSubscriptionRequestsFromXMLString . . . . . . . . . . . . . . . . . . 437
QBSessionManager.EnableErrorRecovery . . . . . . . . . . . . . . . . . . . . . . . . . . . . . . . 438
QBSessionManager.EndSession . . . . . . . . . . . . . . . . . . . . . . . . . . . . . . . . . . . . . . 439
QBSessionManager.ErrorRecoveryID . . . . . . . . . . . . . . . . . . . . . . . . . . . . . . . . . . 440
QBSessionManager.GetCurrentCompanyFileName . . . . . . . . . . . . . . . . . . . . . . . . . 441
QBSessionManager.GetErrorRecoveryStatus . . . . . . . . . . . . . . . . . . . . . . . . . . . . . 442
QBSessionManager.GetSavedMsgSetRequest . . . . . . . . . . . . . . . . . . . . . . . . . . . . 443
QBSessionManager.GetVersion . . . . . . . . . . . . . . . . . . . . . . . . . . . . . . . . . . . . . . 444
QBSessionManager.IsErrorRecoveryInfo . . . . . . . . . . . . . . . . . . . . . . . . . . . . . . . . 445
QBSessionManager.OpenConnection2. . . . . . . . . . . . . . . . . . . . . . . . . . . . . . . . . . 446
QBSessionManager.QBAuthPreferences . . . . . . . . . . . . . . . . . . . . . . . . . . . . . . . . 447
QBSessionManager.QBXMLVersionsForSession. . . . . . . . . . . . . . . . . . . . . . . . . . . . 448
QBSessionManager.QBXMLVersionsForSubscription . . . . . . . . . . . . . . . . . . . . . . . . 449
QBSessionManager.SaveAllMsgSetRequestInfo . . . . . . . . . . . . . . . . . . . . . . . . . . . 450
QBSessionManager.ToEventsMsgSet. . . . . . . . . . . . . . . . . . . . . . . . . . . . . . . . . . . 451
QBSessionManager.ToMsgSetRequest. . . . . . . . . . . . . . . . . . . . . . . . . . . . . . . . . . 452

Contents
15
(c) 2013 Intuit Inc. All rights reserved.
QBSessionManager.ToMsgSetResponse . . . . . . . . . . . . . . . . . . . . . . . . . . . . . . . . .453
QQBSessionManager.ToSubscriptionMsgSetResponse . . . . . . . . . . . . . . . . . . . . . . .454
IQBAuthPreferences Object and Properties . . . . . . . . . . . . . . . . . . . . . . . . . . . . . .455
IQBAuthPreferences.GetIsReadOnly . . . . . . . . . . . . . . . . . . . . . . . . . . . . . . . . . . .456
IQBAuthPreferences.GetPersonalDataPref . . . . . . . . . . . . . . . . . . . . . . . . . . . . . . .457
IQBAuthPreferences.GetUnattendedModePref . . . . . . . . . . . . . . . . . . . . . . . . . . . .458
IQBAuthPreferences.PutAuthFlags . . . . . . . . . . . . . . . . . . . . . . . . . . . . . . . . . . . .459
IQBAuthPreferences.PutIsReadOnly . . . . . . . . . . . . . . . . . . . . . . . . . . . . . . . . . . .460
IQBAuthPreferences.PutPersonalDataPref . . . . . . . . . . . . . . . . . . . . . . . . . . . . . . .461
IQBAuthPreferences.PutUnattendedModePref. . . . . . . . . . . . . . . . . . . . . . . . . . . . .462
IQBAuthPreferences.WasAuthPreferencesObeyed . . . . . . . . . . . . . . . . . . . . . . . . . .463
IMsgSetRequest Object and Methods . . . . . . . . . . . . . . . . . . . . . . . . . . . . . . . . . .464
IMsgSetRequest.Append* . . . . . . . . . . . . . . . . . . . . . . . . . . . . . . . . . . . . . . . . . .466
IMsgSetRequest.Attributes . . . . . . . . . . . . . . . . . . . . . . . . . . . . . . . . . . . . . . . . .467
IMsgSetResponse Object and Methods . . . . . . . . . . . . . . . . . . . . . . . . . . . . . . . . .468
IRequest Object and Methods . . . . . . . . . . . . . . . . . . . . . . . . . . . . . . . . . . . . . . .468
IResponse Object and Methods . . . . . . . . . . . . . . . . . . . . . . . . . . . . . . . . . . . . . .469
Chapter 34: Digitally Signing Your Code
Can I Sign ActiveX or Java Applications? . . . . . . . . . . . . . . . . . . . . . . . . . . . . . . . .471
About Microsoft Authenticode. . . . . . . . . . . . . . . . . . . . . . . . . . . . . . . . . . . . . . . .471
What is a Digital Certificate? . . . . . . . . . . . . . . . . . . . . . . . . . . . . . . . . . . . . . . . .471
The Certificate Authority . . . . . . . . . . . . . . . . . . . . . . . . . . . . . . . . . . . . . . . .472
Code Signing . . . . . . . . . . . . . . . . . . . . . . . . . . . . . . . . . . . . . . . . . . . . . . . .472
Obtaining a Digital Certificate . . . . . . . . . . . . . . . . . . . . . . . . . . . . . . . . . . . . . . .472
Commercial CA Entities You Can Use . . . . . . . . . . . . . . . . . . . . . . . . . . . . . . . .473
Obtaining the Certificate . . . . . . . . . . . . . . . . . . . . . . . . . . . . . . . . . . . . . . . .473
Signing Your Code . . . . . . . . . . . . . . . . . . . . . . . . . . . . . . . . . . . . . . . . . . . . . . .473
Do You Have Everything You Need? . . . . . . . . . . . . . . . . . . . . . . . . . . . . . . . . .473
An Example Using a Test Application . . . . . . . . . . . . . . . . . . . . . . . . . . . . . . . .474
Signing Code With the Internet Client Software Developer’s Kit . . . . . . . . . . . . .475
Chapter 35: Tips and Techniques
Best Practices . . . . . . . . . . . . . . . . . . . . . . . . . . . . . . . . . . . . . . . . . . . . . . . . . .481
Validating Requests . . . . . . . . . . . . . . . . . . . . . . . . . . . . . . . . . . . . . . . . . . . . . .483
Investigating the Problem Thoroughly . . . . . . . . . . . . . . . . . . . . . . . . . . . . . . . . . .483
Building a Test Case to Make Available to Developer Support . . . . . . . . . . . . . . . . . .483
Sending a Test Case and the Log File to Developer Support . . . . . . . . . . . . . . . . . . .484
Chapter 36: Supporting Your User
Using the SDKDiag Tool to Support Your User . . . . . . . . . . . . . . . . . . . . . . . . . . . .485
Helping Users Troubleshoot and Resolve Problems . . . . . . . . . . . . . . . . . . . . . . . . .485
Multiple Installed Versions of QuickBooks . . . . . . . . . . . . . . . . . . . . . . . . . . . . .486
Incompatible Versions: QuickBooks and Company File . . . . . . . . . . . . . . . . . . . .486
Different Company File Is Already Open . . . . . . . . . . . . . . . . . . . . . . . . . . . . . .486
16
Contents
(c) 2013 Intuit Inc. All rights reserved.
Warn Your Users to Complete Error Recovery
before Upgrading . . . . . . . . . . . . . . . . . . . . . . . . . . . . . . . . . . . . . . . . . . . . . 487
Versions of Integrated Applications. . . . . . . . . . . . . . . . . . . . . . . . . . . . . . . . . 487
Provide a Means for Breaking Out of Error Recovery . . . . . . . . . . . . . . . . . . . . . 487
Topics to Include in Your Documentation . . . . . . . . . . . . . . . . . . . . . . . . . . . . . . . 488
Permissions Required for Auto-Login. . . . . . . . . . . . . . . . . . . . . . . . . . . . . . . . 488
QuickBooks User Permissions. . . . . . . . . . . . . . . . . . . . . . . . . . . . . . . . . . . . . 488
Application Access to Personal Data . . . . . . . . . . . . . . . . . . . . . . . . . . . . . . . . 489
Complete Error Recovery before Upgrading . . . . . . . . . . . . . . . . . . . . . . . . . . . 489
Chapter 37: Making Your Application Robust
Types of Error Codes . . . . . . . . . . . . . . . . . . . . . . . . . . . . . . . . . . . . . . . . . . . . . 491
Appendix A for Status Code Information . . . . . . . . . . . . . . . . . . . . . . . . . . . . . 491
Monitoring HRESULTs and HTTP Errors . . . . . . . . . . . . . . . . . . . . . . . . . . . . . . 492
Monitoring Message Set Status Codes. . . . . . . . . . . . . . . . . . . . . . . . . . . . . . . 492
Monitoring Status Codes . . . . . . . . . . . . . . . . . . . . . . . . . . . . . . . . . . . . . . . . 492
Using the Log File . . . . . . . . . . . . . . . . . . . . . . . . . . . . . . . . . . . . . . . . . . . . . . . 493
Software Versions . . . . . . . . . . . . . . . . . . . . . . . . . . . . . . . . . . . . . . . . . . . . . . . 494
Checklist . . . . . . . . . . . . . . . . . . . . . . . . . . . . . . . . . . . . . . . . . . . . . . . . . . . 494
Checking the QuickBooks Version . . . . . . . . . . . . . . . . . . . . . . . . . . . . . . . . . . 494
Dealing with Unsupported Features . . . . . . . . . . . . . . . . . . . . . . . . . . . . . . . . 498
Error Recovery . . . . . . . . . . . . . . . . . . . . . . . . . . . . . . . . . . . . . . . . . . . . . . . . . 499
Synchronizing Data between Your Application and Quickbooks . . . . . . . . . . . . . . . . 499
Monitor Status Codes . . . . . . . . . . . . . . . . . . . . . . . . . . . . . . . . . . . . . . . . . . 499
Example of Synchronizing Data with QuickBooks . . . . . . . . . . . . . . . . . . . . . . . 500
Three-Month Limit for ListDeletedQueryRq . . . . . . . . . . . . . . . . . . . . . . . . . . . 503
Modification Time . . . . . . . . . . . . . . . . . . . . . . . . . . . . . . . . . . . . . . . . . . . . . 503
Cases Needing Complete Re-Sync . . . . . . . . . . . . . . . . . . . . . . . . . . . . . . . . . 503
Check with the User . . . . . . . . . . . . . . . . . . . . . . . . . . . . . . . . . . . . . . . . . . . 503
Chapter 38: Redistributing SDK Components With Your Application
Using the Installers and Merge Modules . . . . . . . . . . . . . . . . . . . . . . . . . . . . . . . . 505
Using the Stand-Alone Installers . . . . . . . . . . . . . . . . . . . . . . . . . . . . . . . . . . 506
Using the Merge Modules . . . . . . . . . . . . . . . . . . . . . . . . . . . . . . . . . . . . . . . 506
Appendix A: Status Codes for qbXML Responses
HRESULTS from qbXML COM Methods . . . . . . . . . . . . . . . . . . . . . . . . . . . . . . . . . 515
Appendix B: QuickBooks Data Accessible Via SDK Objects/Operations
Objects/Operations Supported by Desktop Editions . . . . . . . . . . . . . . . . . . . . . . . . 519
SDK Requests Supported in QuickBooks Simple Start Edition . . . . . . . . . . . . . . . . . 522
Additional Differences for SDK Support of QB Simple Start . . . . . . . . . . . . . . . . . . . 529

Contents
17
(c) 2013 Intuit Inc. All rights reserved.
Appendix C: qbXML Specification for the Canadian and UK Editions
Notes for QB CA/UK 2008 and Newer . . . . . . . . . . . . . . . . . . . . . . . . . . . . . . . . . .531
Canada . . . . . . . . . . . . . . . . . . . . . . . . . . . . . . . . . . . . . . . . . . . . . . . . . . . .531
UK . . . . . . . . . . . . . . . . . . . . . . . . . . . . . . . . . . . . . . . . . . . . . . . . . . . . . . . .531
Notes for QB CA/UK 2007 and Older . . . . . . . . . . . . . . . . . . . . . . . . . . . . . . . . . . .532
Differences Between the Canadian and UK Specs . . . . . . . . . . . . . . . . . . . . . . .532
Differences Between the US and Canadian qbXML Spec . . . . . . . . . . . . . . . . . . .534
Installation . . . . . . . . . . . . . . . . . . . . . . . . . . . . . . . . . . . . . . . . . . . . . . . . . .536
About Units of Measure . . . . . . . . . . . . . . . . . . . . . . . . . . . . . . . . . . . . . . . . .536
About UI Integration . . . . . . . . . . . . . . . . . . . . . . . . . . . . . . . . . . . . . . . . . . .537
Appendix D: qbXML RequestProcessor Method Reference
AuthPreferences . . . . . . . . . . . . . . . . . . . . . . . . . . . . . . . . . . . . . . . . . . . . . . . . .542
BeginSession . . . . . . . . . . . . . . . . . . . . . . . . . . . . . . . . . . . . . . . . . . . . . . . . . . .543
CloseConnection. . . . . . . . . . . . . . . . . . . . . . . . . . . . . . . . . . . . . . . . . . . . . . . . .545
EndSession . . . . . . . . . . . . . . . . . . . . . . . . . . . . . . . . . . . . . . . . . . . . . . . . . . . .546
GetCurrentCompanyFileName . . . . . . . . . . . . . . . . . . . . . . . . . . . . . . . . . . . . . . .547
GetIsReadOnly . . . . . . . . . . . . . . . . . . . . . . . . . . . . . . . . . . . . . . . . . . . . . . . . . .548
GetPersonalDataPref . . . . . . . . . . . . . . . . . . . . . . . . . . . . . . . . . . . . . . . . . . . . . .549
GetUnattendedModePref . . . . . . . . . . . . . . . . . . . . . . . . . . . . . . . . . . . . . . . . . . .550
WasAuthPreferencesObeyed. . . . . . . . . . . . . . . . . . . . . . . . . . . . . . . . . . . . . . . . .551
PutAuthFlags . . . . . . . . . . . . . . . . . . . . . . . . . . . . . . . . . . . . . . . . . . . . . . . . . . .552
PutIsReadOnly . . . . . . . . . . . . . . . . . . . . . . . . . . . . . . . . . . . . . . . . . . . . . . . . . .553
PutPersonalDataPref . . . . . . . . . . . . . . . . . . . . . . . . . . . . . . . . . . . . . . . . . . . . . .554
PutUnattendedModePref . . . . . . . . . . . . . . . . . . . . . . . . . . . . . . . . . . . . . . . . . . .555
MajorVersion . . . . . . . . . . . . . . . . . . . . . . . . . . . . . . . . . . . . . . . . . . . . . . . . . . .556
MinorVersion . . . . . . . . . . . . . . . . . . . . . . . . . . . . . . . . . . . . . . . . . . . . . . . . . . .557
OpenConnection2 . . . . . . . . . . . . . . . . . . . . . . . . . . . . . . . . . . . . . . . . . . . . . . . .558
ProcessRequest . . . . . . . . . . . . . . . . . . . . . . . . . . . . . . . . . . . . . . . . . . . . . . . . .559
ProcessSubscription . . . . . . . . . . . . . . . . . . . . . . . . . . . . . . . . . . . . . . . . . . . . . .560
QBXMLVersionsForSession . . . . . . . . . . . . . . . . . . . . . . . . . . . . . . . . . . . . . . . . . .561
QBXMLVersionsForSubscription. . . . . . . . . . . . . . . . . . . . . . . . . . . . . . . . . . . . . . .562
ReleaseLevel . . . . . . . . . . . . . . . . . . . . . . . . . . . . . . . . . . . . . . . . . . . . . . . . . . .563
ReleaseNumber . . . . . . . . . . . . . . . . . . . . . . . . . . . . . . . . . . . . . . . . . . . . . . . . .564
Appendix E: Enterprise Edition and Single/Multi-User Issues
Enterprise Features Requiring Single User Mode . . . . . . . . . . . . . . . . . . . . . . . . . . .565
Enterprise List Operations Requiring Single User Mode . . . . . . . . . . . . . . . . . . . . . .566
Enterprise Multi User Features . . . . . . . . . . . . . . . . . . . . . . . . . . . . . . . . . . . . . . .566
Appendix F: Overpayments and Refunds
Overpayments and Refunds . . . . . . . . . . . . . . . . . . . . . . . . . . . . . . . . . . . . . . . . .569
The Manual Solution . . . . . . . . . . . . . . . . . . . . . . . . . . . . . . . . . . . . . . . . . . . . . .572
18
Contents
(c) 2013 Intuit Inc. All rights reserved.
Taking it to the SDK. . . . . . . . . . . . . . . . . . . . . . . . . . . . . . . . . . . . . . . . . . . . . . 577
QuickBooks 2007 to the Rescue! . . . . . . . . . . . . . . . . . . . . . . . . . . . . . . . . . . . . . 582
Conclusion . . . . . . . . . . . . . . . . . . . . . . . . . . . . . . . . . . . . . . . . . . . . . . . . . . . . 587

Who Should Read This Manual?
19
(c) 2013 Intuit Inc. All rights reserved.
A
BOUT
T
HIS
M
ANUAL
This manual provides general and detailed information on how to create an application that
effectively integrates with QuickBooks. A wide range of topics is covered, including how
to make the communication work, how to build request mesages, the structure and content
of specific request messages, how to use the QBFC convenience library, and so forth. It
assumes that you are familiar with and have read the Technical Overview, which introduces
many of the concepts used in this document.
A very useful video called QuickBooks SDK Essentials is also available online at the IPP
developer website to help you get started quickly and in the the right direction.
Who Should Read This Manual?
This manual is a reference resource for all developers who are creating applications that
integrate with QuickBooks. It provides practical information on how to create request
messages and interpret response messages using the QuickBooks SDK, regardless of which
API you choose (that is, qbXML or QBFC) or the QuickBooks product that is your target.
It describes the details of how to create queries and reports and guides you through dealing
with complex transactions such as receive payment and bill payment. Important new
features such as event notification and integrating with the QuickBooks user interface are
described in detail. This manual also focuses on general application concerns such as error
recovery, how to synchronize application data with QuickBooks, and how to anticipate
typical user problems in your application.
Before You Begin
Before you read the rest of this manual, be sure you’ve read the Technical Overview for the
QuickBooks Software Development Kit (SDK). This manual assumes you’re already
familiar with the introductory material and key concepts contained in the overview. Be sure
to check out the Onscreen Reference for QuickBooks, which contains the syntax for each
request and response message type for all of the SDK APIs.
This manual applies to integrating an application with any QuickBooks product. In many
cases, developers may be creating an application that integrates with several QuickBooks
products (for example, U.S. edition of QuickBooks, Canadian edition of QuickBooks, and
UK edition of QuickBooks).
I
MPORTANT
The Onscreen Reference is central to your programming
tasks. You need to refer to it when you are programming
because it contains the syntax and tag names required.

20
About This Manual
(c) 2013 Intuit Inc. All rights reserved.
What’s New in This Guide?
This version of the programmer’s guide has been restructured to highlight important topics
at the table of contents level. New chapters have been added to cover aspects of SDK
programming that were troublesome for many developers and existing chapters have been
revised for the same reason. Also new in this version is documentation on new features
available in the SDK, such as billing rates, vehicle mileage, and so forth.

What is the SDK?
21
(c) 2013 Intuit Inc. All rights reserved.
C
HAPTER
1 1
I
NTRODUCTION
TO
QBSDK P
ROGRAMMING
1
This chapter provides answers to questions many developers have when they start
investigating the QuickBooks SDK, which we’ll call “QBSDK” or simply “SDK” from this
point forward. What you should expect to find here are answers to many of the questions
you are likely to have when you first pick up the QBSDK and try to figure out what it does
and how you can use it:
•What is the SDK and why should I use it?
•What kinds of integrations are possible with the SDK? What kind of integrations with
the QuickBooks UI and event flow are possible? Which QuickBooks features and data
are accessible or not accessible?
•If I develop an application, which versions and editions of QuickBooks will support it?
•What is all this stuff included in the SDK package?
•What is the Onscreen Reference, and why do I need to use it?
•Do I have to use XML or are there convenience libraries to make life easier for me?
•Which programming languages can I use?
•What do I need to know in order to start programming?
•What kind of technical support is available? Where can I go for information that is not
in the SDK documentation?
•What impact does the QuickBooks Accountant version’s toggling feature have on
integrated applications?
What is the SDK?
The term “QuickBooks SDK” or simply “SDK” can refer either to the QBSDK package that
contains the tools, samples, and documentation or it can refer to the QBXML request
processor, which is a runtime component that is shipped with QuickBooks. In this guide,
we’ll use “SDK” to mean the runtime component and “SDK package” when we are referring
to the set of tools, samples, and so on.
It is the QBXML request processor that provides the actual functionality that integrated
applications use when these applications access QuickBooks. Your application uses the
request processor whenever it accesses a QuickBooks company: the request processor does
the qbXML validation, sends the requests to QuickBooks and returns the QuickBooks
responses (see Figure 1-1 on page 22).
As shown in Figure 1-1 on page 22, the request processor provides QuickBooks access to
your application for QuickBooks desktop edition. Notice that the input and the output is
XML, even if you use the QBFC convenience library, but QBFC does all the XML work for
you (more on the QBFC library later in this chapter).
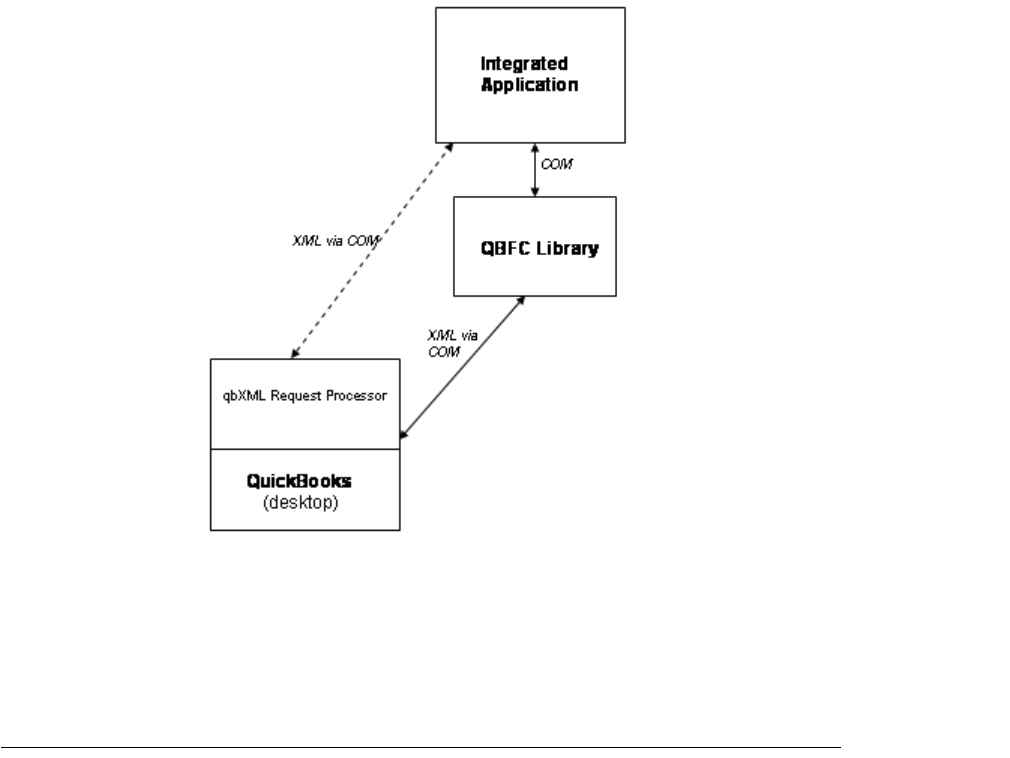
22
Chapter 1: Introduction to QBSDK Programming
(c) 2013 Intuit Inc. All rights reserved.
Figure 1-1 Accessing QuickBooks through the request processor
Notice that the Request Processor is a DLL that is installed during a QuickBooks installation,
and runs in the same process as QuickBooks.
What Kinds of Integrations are Possible with the SDK?
If you are scoping out a potential application, you’ll want to know the kinds of integrations
that are possible with the SDK. The SDK originally provided only data access integration,
and data access is still the most prominent feature of the SDK. A list of the QuickBooks
data and objects that are made accessible via the SDK is provided in Appendix B,
“QuickBooks Data Accessible Via SDK Objects/Operations.”
However, more recent releases of the SDK also provide integration with QuickBooks
events, where your application can subscribe to various events and receive notification
when certain types of QuickBooks activity occur, for example, you can be notified when a
customer is added or modified, and so forth.
Another integration that is possible is to integrate with the QuickBooks UI in two specific
areas:
•Menu, where your application can place a menu item within certain QuickBooks
pulldown menus.’
•Displaying forms, where your application can cause certain QuickBooks forms to be
displayed, and even prefill some of these forms.

Which QuickBooks Editions/Versions Support My Application?
23
(c) 2013 Intuit Inc. All rights reserved.
The Programmer’s Guide describes all of the integrations, the data integrations are covered
throughout the guide. The UI and event integrations are covered in two chapters:
•Chapter 15, “Integrating with the QuickBooks UI.”
•Chapter 14, “Event Notification,”
Which QuickBooks Editions/Versions Support My Application?
The release notes provided with the QB SDK package include the latest tables listing the
QuickBooks versions and editions and the corresponding level of the qbXML spec that they
support. Please refer to the release notes for those details.
The SDK provides methods for querying which version of the qbXML specification is
supported by the version of QuickBooks that is currently running on the user’s system. (The
QBXMLVersionsForSession) method can be called after the session begins.) If you write
“smart” code that checks the version and responds accordingly, your application can run
against multiple versions of QuickBooks.
What’s Included in the QuickBooks SDK Package?
Conceptually, the QuickBooks SDK includes the following software libraries, manuals,
utilities, and examples. Remember that the qbXML Request Processor is a runtime
components of QuickBooks itself and is shipped with QuickBooks.
• Software libraries. APIs for creating, sending, and receiving QuickBooks messages.
These libraries, include
> qbXML Request Processor Interface
> QuickBooks Foundation Class (QBFC) Library
• qbXML specification. The qbXML specification is described in qbXML schema files
that are distributed with QuickBooks. QuickBooks validates your application’s requests
against the qbXML specification.
• QuickBooks Web Connector. The QB Web Connector is a component that makes it
easier for web services to access QuickBooks. Programming applications that work
with the QB Web Connector is documented in the QuickBooks Web Connector
Programmer’s Guide, which is included with the SDK.
• qbmsXML specification. The qbmsXML specification details the QBMS transaction
requests and responses that are available for applications that integrate with the
QuickBooks Merchant Service.
• Example qbXML file. This file (qbxmlops*.xml) includes examples of all qbXML
request and response messages.
• Example qbmsXML file. This file (qbmsxmlops*.xml) includes examples of all
qbmsXML request and response messages.
• Documentation. In addition to this Programmer’s Guide, the following QuickBooks
SDK documentation is available:
> Onscreen Reference

24
Chapter 1: Introduction to QBSDK Programming
(c) 2013 Intuit Inc. All rights reserved.
>Developer’s Guide for QBMS (QuickBooks Merchant Service)
> QuickBooks Web Connector Programmer’s Guide
> Technical Overview
• Utilities. The SDK includes several utilities to aid in your development cycle. To verify
that a given qbXML or qbmsXML document conforms to the qbXML or qbmsXML
specification, use the qbXML Validator utility. To test the request/response cycle, use
the SDKTest+ utility, which accepts a qbXML request, sends it to QuickBooks, and
returns the response. Source code for SDKTest+ is available in multiple languages for
desktop versions of QuickBooks.
• Sample applications. The SDK includes a large set of sample application programs,
including both source code and executable files in Visual Basic, C, C++, and Java.
What is the Onscreen Reference OSR? Why Must I Use It?
Once you’re ready to program, you’ll use the Onscreen Reference often to find out the exact
syntax of a given request or response. This online tool provides detailed reference
information for all developer libraries—qbXML and QBFC for QuickBooks (U.S),
QuickBooks (Canada), QuickBooks (UK), and qbmsXML (for QuickBooks Merchant
Service).
The OSR includes descriptions of each object, aggregate, and element in the SDK. For each
element, it includes the data type, maximum length (for strings) or range (for numerical
values), whether it is required or optional, and whether it is restricted to a particular release.
This online tool is also a handy place to look up the meaning of any SDK error code.
How Does QuickBooks Toggling Affect My Application?
QuickBooks 2006 and later Premier and Enterprise Accountant versions support the
toggling feature, in which the Accountant version can be toggled to become the other
editions and flavors. Some developers use the Accountant version for just that toggling
ability, to make sure their application works on targetted editions and flavors.
Notice that any SDK application with an open connection to the company file must close
that connection prior to the toggling. After the toggling, the application can re-open the
connection.
Do I Have to Use XML? Or are Convenience Libraries Available?
An important initial decision you’ll need to make is whether to use the qbXML Request
Processor API or the QBFC API. The main difference between the two approaches is that the
qbXML Request Processor API requires you to create and parse qbXML documents
explicitly. With the QBFC interface, you are relieved of the task of parsing the qbXML
content because you specify the data in terms of parameter/value pairs within COM methods.
There is little performance difference between the two approaches.

Which Programming Languages Can I Use?
25
(c) 2013 Intuit Inc. All rights reserved.
Which Programming Languages Can I Use?
The QuickBooks SDK is designed for use by a wide variety of developers in many different
development environments. Its application programming interfaces (APIs) can be used by any
programming language that is compatible with Microsoft’s Component Object Model
(COM).
What Do I Need to Know Before I Start Programming?
You need to know the functional area of QuickBooks that you intend to access in your
program. You need to know how the UI works in that area: what you can do in the UI and
what you cannot do. In general, the SDK simply mirrors the functionality provided in the
UI.
What Kind of Technical Support is Available?
The best source of additional information are the forums, knowledgebases, and FAQs that
are provided free of charge at https://developer.intuit.com. If further assistance is required,
use the technical support links provided at that site to contact technical support.
26
Chapter 1: Introduction to QBSDK Programming
(c) 2013 Intuit Inc. All rights reserved.

After the Tech Overview and the SDK Essentials Video...
27
(c) 2013 Intuit Inc. All rights reserved.
C
HAPTER
2 1
J
UMPSTART
1
If you are new to QB SDK programming, the fastest and surest way to get started in QB
SDK programming is use the following two resources:
•The Technical Overview, which is supplied with the QB SDK installation.
•The QuickBooks SDK Essentials Video available free at the IPP Website
The video, which can be downloaded or viewed on the web, runs about one hour. It will
save you many times over that amount of time in getting you on the right track. We highly
recommend this video to newcomers and to anyone not entirely comfortable in SDK
programming.
After the Tech Overview and the SDK Essentials Video...
Once you read the Technical Overview and take a look at the SDK Essentials video, and are
ready to investigate programming one of the SDK features, consider these resources in this
recommended order:
1. Consult the QB SDK Programmer’s Guide (this document) for the topic area you are
interested in. Doing this can save you lots of time later.
2. Check out the OSR for an understanding of the request features.
3. Check out the programming samples in the qbsdk\samples subdirectory, including the
xmlfiles subdirectory. You should be able to find much of what you need there.
4. Search the IPP Live Community forums.
28
Chapter 2: Jumpstart
(c) 2013 Intuit Inc. All rights reserved.
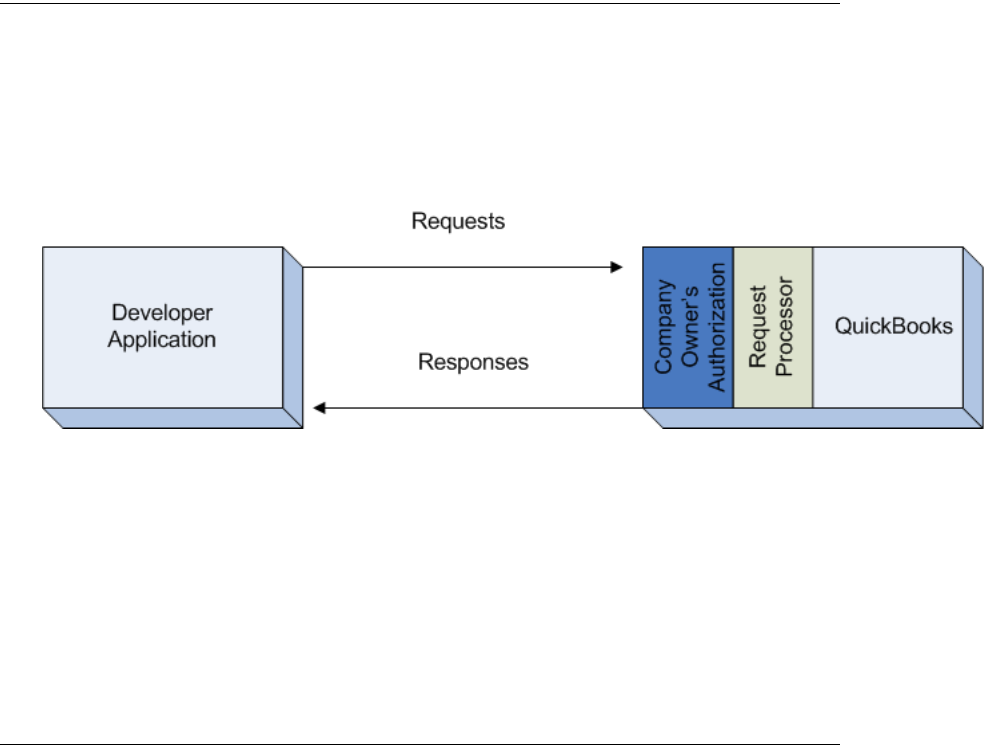
The Basic Communication Pattern
29
(c) 2013 Intuit Inc. All rights reserved.
C
HAPTER
3 1
T
HE
C
OMMUNICATION
M
ODEL
AND
W
AYS
OF
I
MPLEMENTING
I
T
1
This chapter describes the basic communication pattern used by all SDK applications,
authorizations of SDK applications, which is part of that pattern, and the different ways that
you can implement communication with QuickBooks.
The Basic Communication Pattern
All communication between QuickBooks and SDK applications follow the same basic
pattern. The application first establishes communication with QuickBooks (this involves
both connection-related method calls AND human interaction (getting the company
owner’s authorization). The application then sends a request set containing one or more
requests. QuickBooks processes the requests and sends back a response set containing one
or more responses (Figure 3-1).
Figure 3-1 The Basic Communication Model
This is a pretty high level view of things, but it is general enough to serve for the various
supported ways to access QuickBooks. Once you get down to particular types of access,
such as desktop applications accessing local QuickBooks, you’ll learn about request
processor DLL running in the QuickBooks process to handle incoming requests and send
out outgoing requests. We’ll cover those details a little further on in this chapter.
Authorizations You Need to Know About
There are two types of authorization that impact your application:
•Company owner authorization, which applies to all SDK applications
•Gateway authorization, which applies to applications using Intuit gateway such as QB
Merchant Services.

30
Chapter 3: The Communication Model and Ways of Implementing It
(c) 2013 Intuit Inc. All rights reserved.
Company Owner Authorization of SDK Applications
No SDK application can access a QuickBooks company unless the company owner (your
customer) authorizes that application. The first time your application accesses QuickBooks,
the company owner is prompted to grant or deny the access and also limit the access to
certain areas of QuickBooks data. The authorization grant can be a good-until-cancelled
authorization or a single session authorization. The authorization also can restrict access to
sensitive data, if desired by the company owner.
Once authorization is granted, the application can access the company, but you should be
aware that the owner can revoke that authorization at any time from within QuickBooks.
The way authorization is granted and how your application responds to the authorization
mechanism varies with the way you are communicating with QuickBooks. So we’ll discuss
authorization mainly from within each type of implementation.
Intuit Gateway Authorization of SDK Applications
If your application is using Intuit gateway QB Merchant Services, then it must be
authorized by those Intuit gateways or your connection attempt through them will fail.
Gateway authorization is entirely separate from company owner authorization: it is
controlled entirely from the side of Intuit. The gateway’s authorization for desktop
applications is acquired by registering the application with IPP. The gateway’s authorization
for hosted web applications is acquired by registering with IPP and in addition acquiring a
certificate from Intuit. Application registrations and certificates are described in the chapter
that covers accessing QBMS.
Authorization of your application, whether desktop or hosted, can be revoked by the Intuit
gateways at any time if your application is causing problems, which is why your
registration should have current contact information in it.
Messages: The Content of the Communication
Whatever the communication model, the “stuff” being communicated is qbXML message.
Messages are of two types:
•requests that your application sends to QuickBooks
•responses that QuickBooks returns to your application
One or more individual messages are grouped into a message set, which contains a
collection of either requests or responses.

Ways to Implement Communication With QuickBooks
31
(c) 2013 Intuit Inc. All rights reserved.
The name of a message indicates the QuickBooks object it deals with and the operation to
be performed on that object, as described in the following sections. Request messages have
the suffix Rq, and response messages have the suffix Rs. To get a feel for the messages
you’ll be working with, spend a few minutes exploring the Onscreen Reference for your
target QuickBooks product.
What’s in a Message?
The smallest component of a message is an element. The exact form of an element depends
on the API you’re using—whether you’re using the qbXML Request Processor API or the
QBFC (QuickBooks Foundation Class) Library to create requests and interpret responses.
Elements are name/value pairs and sometimes have associated attributes. Messages group
elements into containers called aggregates.
Regardless of the API you choose, the concepts are the same, which is why this manual
addresses the needs of multiple QuickBooks SDK audiences. For purposes of brevity, most
of the examples are in qbXML. If you’re using the QBFC COM API, the messages will be
constructed differently, but the elements, aggregates, and attributes will be used in exactly
the same manner.
For example, here is a request to add an account, AccountAddRq:
<AccountAddRq requestID=”2”>
<AccountAdd>
<Name>Checking Account</Name>
<AccountType>Bank</AccountType>
<BankNumber>0350039560</BankNumber>
</AccountAdd>
</AccountAddRq>
In this example, AccountAdd is an aggregate that contains the essential data of the
message. Name, AccountType, and BankNumber are all elements. AccountAddRq is also
an aggregate and is often referred to as the message aggregate since it contains the entire
message and its request ID (which, in qbXML, is an attribute).
In qbXML, an element or aggregate begins with its name in angled brackets:
<AccountAdd>
and ends with the name, preceded by a backslash, also in angled brackets:
</AccountAdd>
Ways to Implement Communication With QuickBooks
Your application can communicate with QuickBooks in any of the following ways:
•A desktop application accessing a local QuickBooks
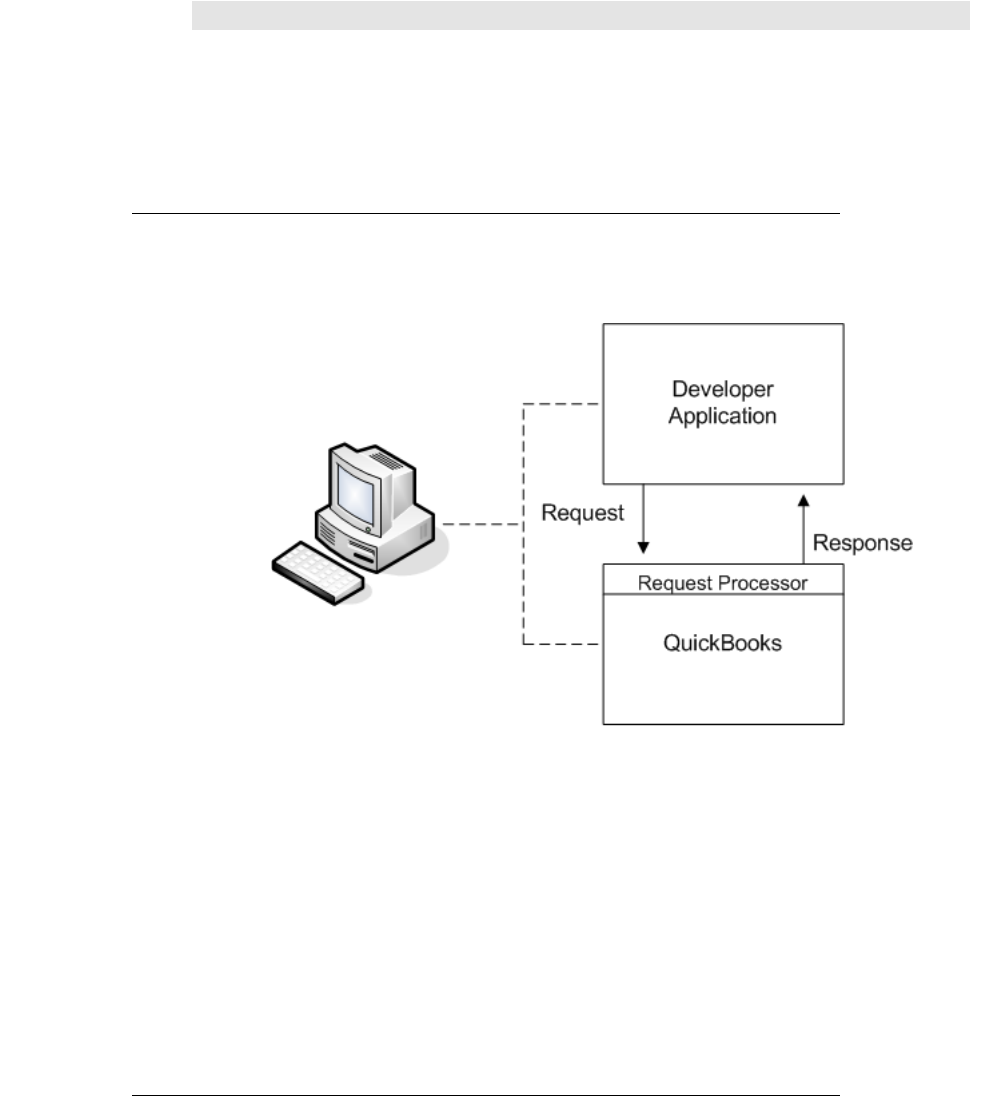
32
Chapter 3: The Communication Model and Ways of Implementing It
(c) 2013 Intuit Inc. All rights reserved.
•A remote web application (web service) accessing a local QuickBooks via the local
QuickBooks Web Connector (QBWC)
I
MPORTANT
You can also access QuickBooks POS and/or QuickBooks
Merchant Service (QBMS) from any of the above
implementations. For details please refer to the QB POS SDK
Programmer’s Guide and the QBMS Programmer’s Guide.
Desktop Applications Accessing Local QuickBooks
The most typical communication is shown in Figure 3-2, where a desktop application
accesses a QuickBooks installation running on the same machine.
Figure 3-2 Desktop Application to Desktop QuickBooks Communication
In this implementation type, notice that the developer application drives the connection and
data exchange.
Where to Find More Details
This communication type has been around forever and so has the documentation for it. For
all the details related to communication, including sample code, see Chapter 5, “Accessing
Desktop QuickBooks Editions.”.
Web Services Accessing QuickBooks via QB Web Connector
One of the more recent access types is a remote web service accessing a local QuickBooks
(see Figure 3-3).
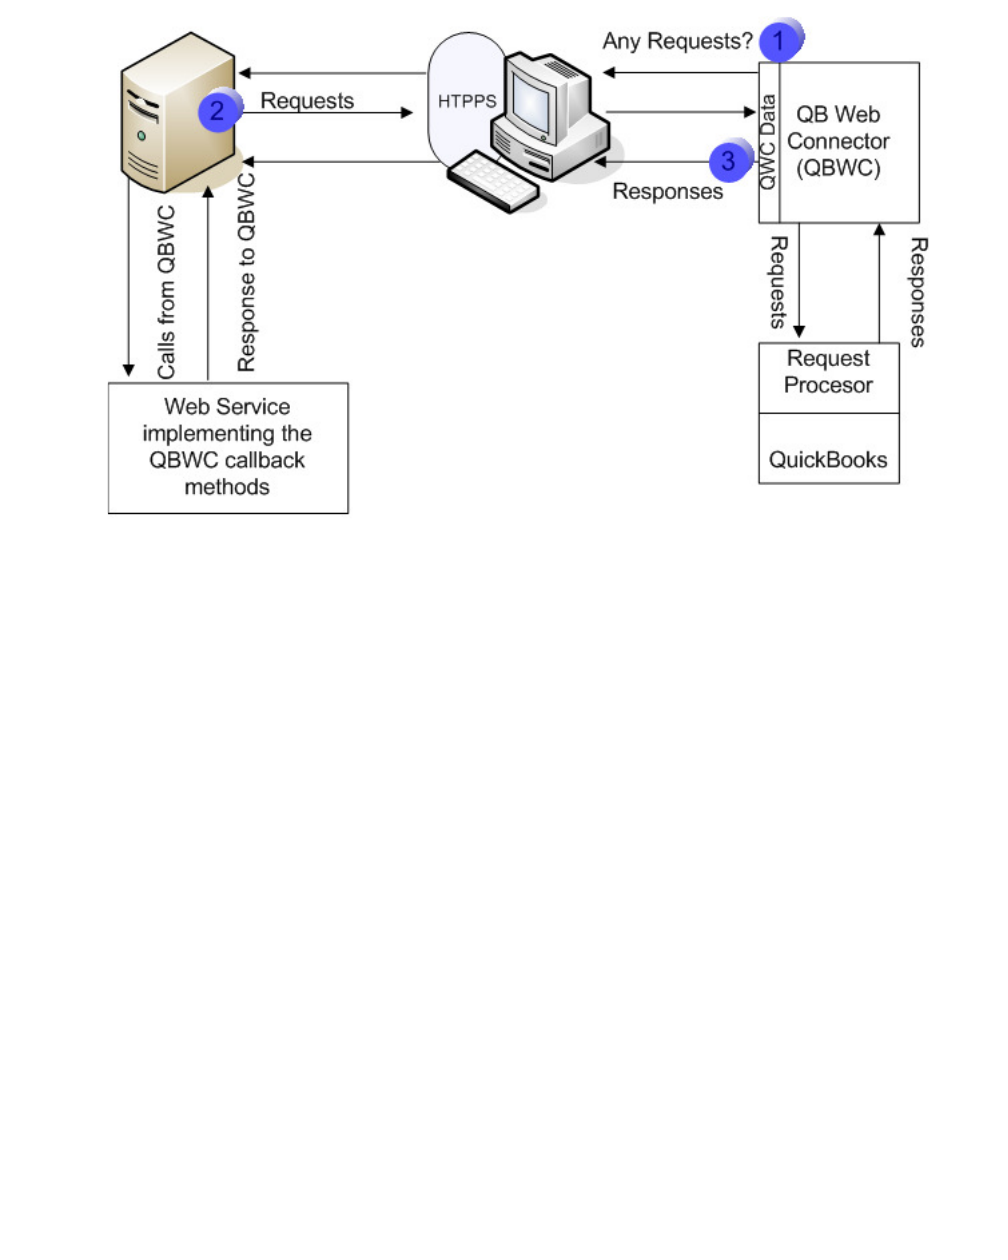
Ways to Implement Communication With QuickBooks
33
(c) 2013 Intuit Inc. All rights reserved.
Figure 3-3 Remote Web Service Accessing Local QuickBooks
As shown in the figure, the Web Connector functions as the SDK application. At user
specified intervals, the Web Connector asks the remote web service if it has any outstanding
work to do. (QBWC knows how to contact the web service from a QWC file obtained from
the web service provider.)
User name and password are supplied to the web service in this initial contact, so the web
service can do the lookups and see what needs to be done for that user. If the web service
has work for the user, it sends the proper qbXML requests to QBWC. QBWC passes them
on to QuickBooks and then returns the QuickBooks response to the remote service.
All the communication between web service and QBWC is done over HTTPS for security
purposes. This means a web service must obtain and use a standard industry certificate from
providers like Thawte, Verisign, and so forth.
Where to Find More Details
For complete details on implementing the required QBWC web service interfaces, see the
QBWC Programmer’s Guide, which is included in the QB SDK.
34
Chapter 3: The Communication Model and Ways of Implementing It
(c) 2013 Intuit Inc. All rights reserved.

How the QuickBooks UI Supports Authorization/Access
35
(c) 2013 Intuit Inc. All rights reserved.
C
HAPTER
4 1
S
PECIFYING
A
UTHORIZATION
P
REFERENCES
1
The QuickBooks administrative user is the one who authorizes your application for access
to the company, and can restrict that authorization in various ways, such as not allowing
access to sensitive financial data. This can adversely affect your application if it needs more
access permissions than the QuickBooks user grants it. How do you handle this situation?
For QB Simple Start edition, there is no built-in way using the SDK to solve this problem.
However, for desktop editions of QuickBooks other than Simple Start, there is a way for
your application to notify the user about required access permissions. You can use the
AuthPreferences object to tell the QuickBooks user what your application needs.
This chapter describes the overall authorization behavior built into the QuickBooks UI, and
how the AuthPreferences object works with it to prompt the user to grant needed access
rights.
How the QuickBooks UI Supports Authorization/Access
The first time your application logs in to QuickBooks, QuickBooks must already be
launched and running in the foreground with a company file open and the administrator
user logged in. These requirements prevent unauthorized applications from gaining access
to QuickBooks. The authorization process is triggered by the call to BeginSession.
When is the Authorization Dialog Displayed?
The authorization dialog appears when an application tries to access a QuickBooks
company file for the first time. The authorization dialog is also displayed when
•A QuickBooks company file is opened for the first time by an application after it makes
an event subscription
•An application previously authorized to access a particular QuickBooks company file
attempts to access that file in a way different than authorized or with different
preferences than the last time it accessed that file. This supports the AuthPreference
functionality that allows your application to prompt the user to provide the type of
authorization your application needs.
The Default Authorization Dialog
The default authorization dialog is the one that QuickBooks presents to the user if the
AuthPreferences property is not used. It is shown in Figure 4-1. In this authorization dialog,
the QuickBooks administrator can
36
Chapter 4: Specifying Authorization Preferences
(c) 2013 Intuit Inc. All rights reserved.
•Refuse authorization by selecting “No”
•Authorize for only the current session and force the application to be authorized again
the next time the application attempts to access a company file by selecting "Prompt
each time"
•Authorize the application to access QuickBooks with no additional authorization
whenever that company file is open, regardless of which user is logged in by selecting
“Yes, whenever this company file is open.”.
•Authorize the application to log on in unattended mode (auto login) by selecting “Yes,
allow access even if QuickBooks is not running.”
> If the user selects unattended mode authorization, and if there is more than one user
(not just the administrative user) then the “login as” dropdown is visible and
enabled, presenting the user with a list of login IDs currently able to log in to that
company file.
•The checkbox at the bottom of the authorization dialog, if checked, authorizes your
application to access sensitive personal data. However. the currently logged in user is
still restricted by the permissions set up in QuickBooks, regardless of whether or not
the checkbox is checked.
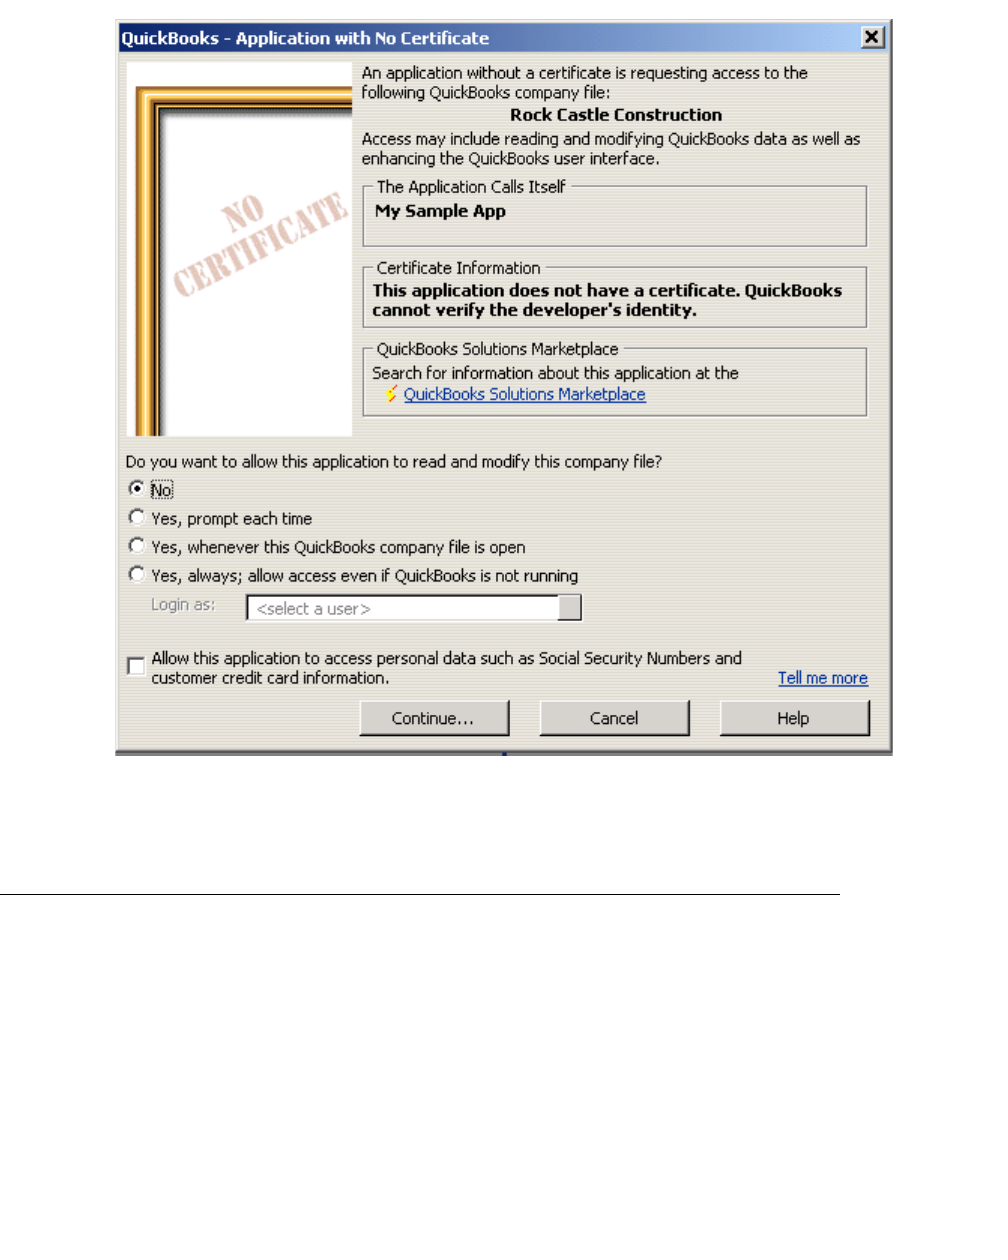
How the AuthPreferences Object Works
37
(c) 2013 Intuit Inc. All rights reserved.
Figure 4-1 Default Authorization Form
How the AuthPreferences Object Works
Starting with QuickBooks 2005, you can use the AuthPreferences object to inform the user
via the QuickBooks authorization dialog itself, about the level of access that your
application requires.
AuthPreferences allows you to let the user know immediately what your application
requires, simplifies the user’s choices by displaying only those authorization selections in
the dialog that are relevant to your application, and eliminates unnecessary work by the
user, such as navigating through multiple QuickBooks menus and dialogs. Notice that the
user must be logged in as the QuickBooks administrative user in order to authorize these
preferences.

38
Chapter 4: Specifying Authorization Preferences
(c) 2013 Intuit Inc. All rights reserved.
How to Use the AuthPreferences Functionality
The AuthPreferences object is a property of the QB XML request processor. We’ll show
you how to instantiate this and set it in a code sample in just a moment. But first, let’s take
a look at what you can do with the object and its methods.
The AuthPreferences object has three write methods, which must be invoked BEFORE the
call to BeginSession:
•PutIsReadOnly. This causes the QuickBooks authorization dialog to display text
informing the user that its access will be read-only.
•PutUnattendedModePref. This has different effects depending on the parameter
specified:
> umpRequired, which causes the QuickBooks authorization dialog to display only
the selection choices of “No” (no authorization) or “Yes, allow access even if
QuickBooks is not running” (authorize unattended mode). In other words, you use
this value to tell the user you need to run in unattended mode if you’re going to run
at all.
> umpOptional, which causes the QuickBooks authorization dialog to display its
default selections and let the user pick. You would only use this setting if your
application didn’t need unattended mode.
•PutPersonalDataPref which has different effects depending on the parameter specified:
> pdpRequired, which causes the QuickBooks authorization dialog to not display the
personal information checkbox for user selection, and instead display a warning
that the application needs to access personal data such as SSN or credit card
information.
> pdpOptional, which causes the QuickBooks authorization dialog to display a
checkbox for user selection asking whether the user wants to allow the application
to access personal data such as SSN or credit card information. That is, your
application doesn’t absolutely require the access, although it could use data from
such access if it were granted.
> pdpNotNeeded, which causes the QuickBooks authorization dialog to not display
the personal information checkbox for user selection, and instead display an
informational message that the application will NOT access personal data such as
SSN or credit card information. That is, if your application doesn’t use any of that
data, the nice thing to do is let the user know up front and not prompt the user for
access you don’t need.
There are three Get methods (GetIsReadOnly, GetUnattendedModePref, and
GetPersonalDataPref) that return the authorization preferences currently in effect, but these
methods can only be invoked AFTER the call to BeginSession.

How the AuthPreferences Object Works
39
(c) 2013 Intuit Inc. All rights reserved.
I
MPORTANT
Your code implementing the new authorization capabilities will
not set preferences on QB versions earlier than QuickBooks
2005. However, no errors will occur if you use
AuthPreferences and its related methods, so you can safely
write code and expect no failures. However, you may want to
do a check, using the AuthPreferences method
WasAuthPreferencesObeyed to determine whether the
QuickBooks version supports AuthPreferences or not.
Code Sample: AuthPreferences via the Request Processor
The following snippet shows the use of the AuthPreference object to set preferences in
AuthPreferences. This sample uses the request processor directly (QBXMLRP2Lib). We’ll
give a short QBFC snippet shortly.
Notice that this does not set QuickBooks authorization preferences (only the QuickBooks
administrator can do that) but it sets up AuthPreferences so that QuickBooks will display
the authorization dialogs that correspond to the preferences your applications has specified.
If (frmSDKTestPlus3.AuthPrefsDirty) Then
Dim prefs As QBXMLRP2Lib.AuthPreferences
Set prefs = qbXMLCOM.AuthPreferences
If (frmSDKTestPlus3.Unattended.Value) Then
prefs.PutUnattendedModePref umpRequired
Else
prefs.PutUnattendedModePref umpOptional
End If
prefs.PutIsReadOnly frmSDKTestPlus3.ReadOnly.Value
If (frmSDKTestPlus3.pdRequired.Value) Then
prefs.PutPersonalDataPref pdpRequired
ElseIf (frmSDKTestPlus3.pdNotNeeded.Value) Then
prefs.PutPersonalDataPref pdpNotNeeded
Else
prefs.PutPersonalDataPref pdpOptional
End If
End If
In this snippet, the parent form frmSDKTestPlus3 is checked to see whether any
preferences have been changed. If any changes were made, the various components in the
form are checked for new user selections and those choices are then set in the
AuthPreferences object.
N
OTE
This snippet is for a sandbox type application that allows for a
toggling of the AuthPreferences requirements for test
purposes. Your application probably would not do this, but
would instead simply set the preferences in the way your
application requires.

40
Chapter 4: Specifying Authorization Preferences
(c) 2013 Intuit Inc. All rights reserved.
Code Sample: AuthPreferences via QBFC
The following snippet shows the setting of the AuthPreferences object in QBFC.
Dim SessionManager As QBSessionManager
Set SessionManager = New QBSessionManager
Dim MyAuthPrefs As IAuthPreferences
Set MyAuthPrefs = SessionManager.QBAuthPreferences
MyAuthPrefs.PutIsReadOnly
SessionManager.OpenConnection2 appID, appleName, ctLocalQBD
SessionManager.BeginSession "", omDontCare
What Happens as a Result of the AuthPreference Settings?
The next time the application connects to QuickBooks after any change to AuthPreferences,
the proper authorization dialog is displayed to the user. For example, if you set the
AuthPreferences such that access to personal data was required, the ability to run in
unattended mode was required, and you specified read-only access, then the authorization
dialog shown in Figure 4-2 on page 41 would be displayed to the user.
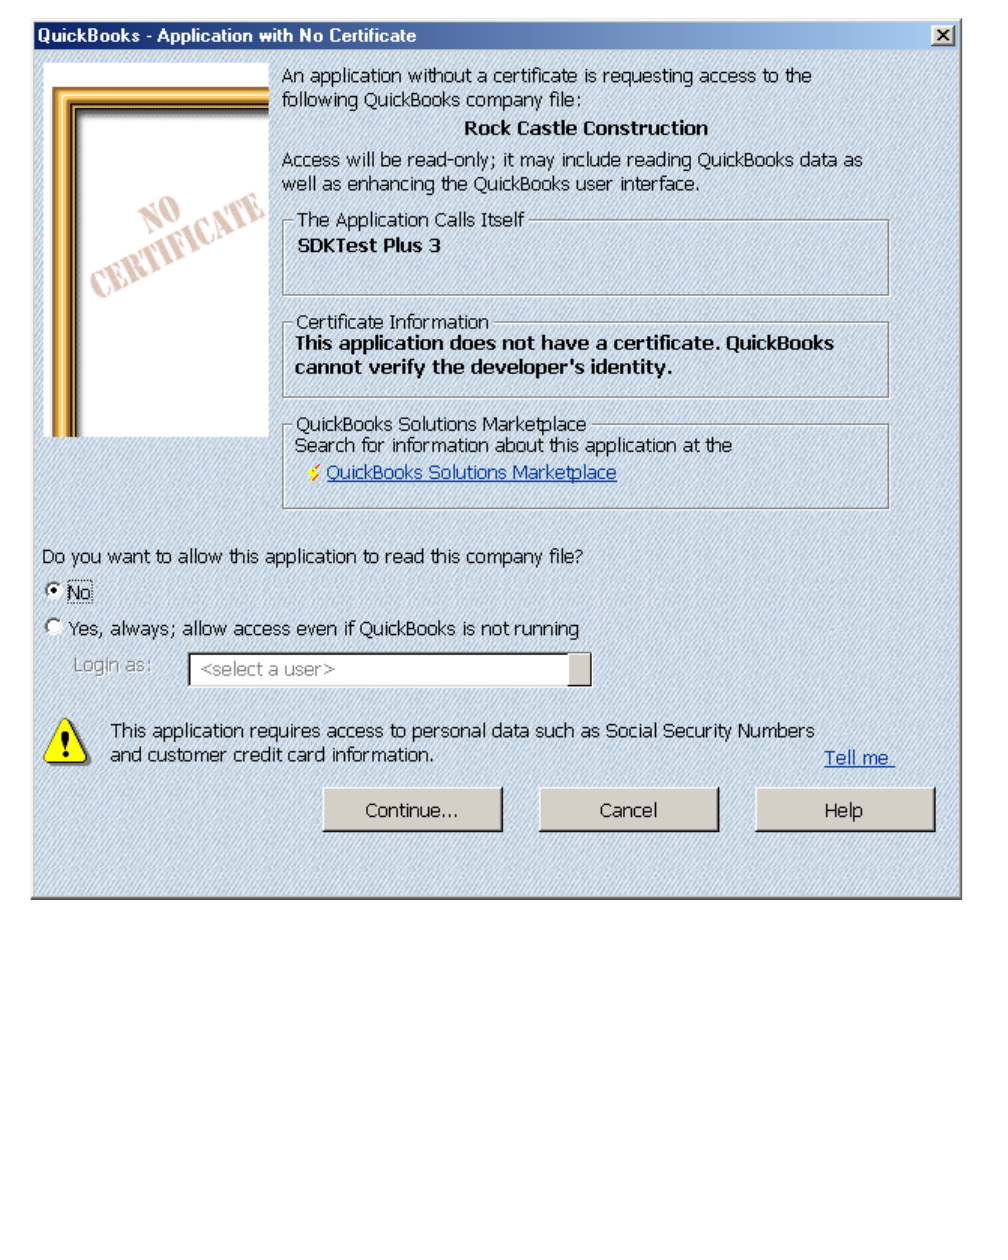
How the AuthPreferences Object Works
41
(c) 2013 Intuit Inc. All rights reserved.
Figure 4-2 Authorization Dialog for Read-Only, Personal Data, and Unattended Mode
If the user chooses to authorize, QuickBooks pops up the confirmation message shown in
Figure 4-3 on page 42.
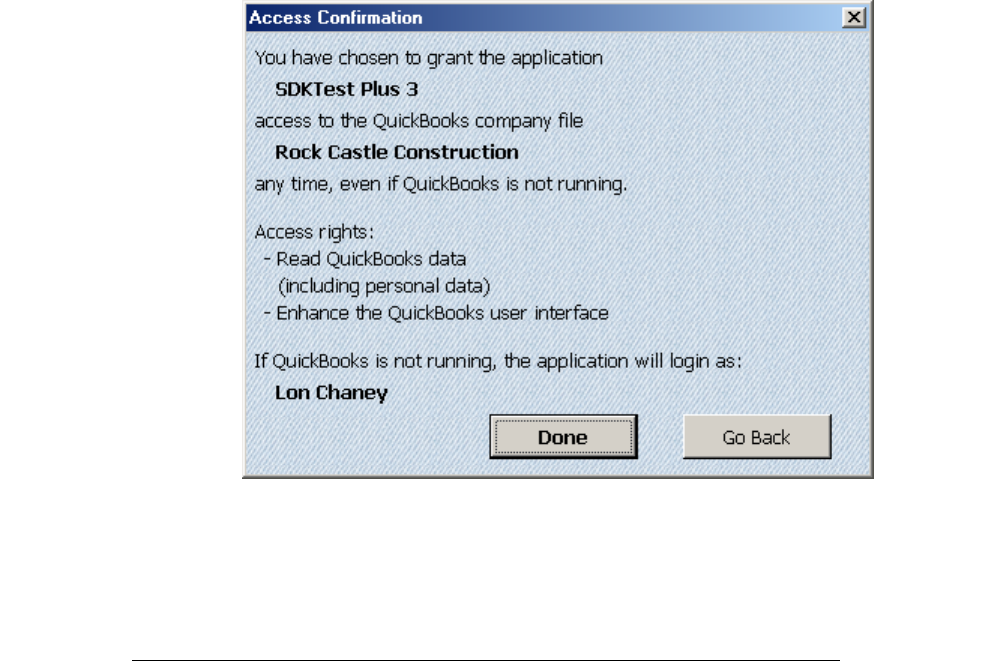
42
Chapter 4: Specifying Authorization Preferences
(c) 2013 Intuit Inc. All rights reserved.
Figure 4-3 Authorization Confirmation
Notice that the confirmation messages lists all of the authorized access preferences.
Setting Authorization Preferences Within QuickBooks
If your application does not use the AuthPreferences object and methods to help the
QuickBooks administrator set authorizations properly, the QuickBooks administrator may
need to set additional authorization preferences or change existing authorization
preferences for integrated applications within QuickBooks by clicking on the Integrated
Applications icon in the QuickBooks Preferences window, then selecting Company
Preferences. Preferences that can be set by the administrator include the following:
•Disallowing or changing application access
•Enabling certificate date checking
•Listing authorized applications
•Granting auto-login privileges and assigning the name of the auto-login user
•Allowing application access to personal company data
Figure 4-4 on page 43 shows the window presented to the administrator for managing
integrated applications and their access to QuickBooks.
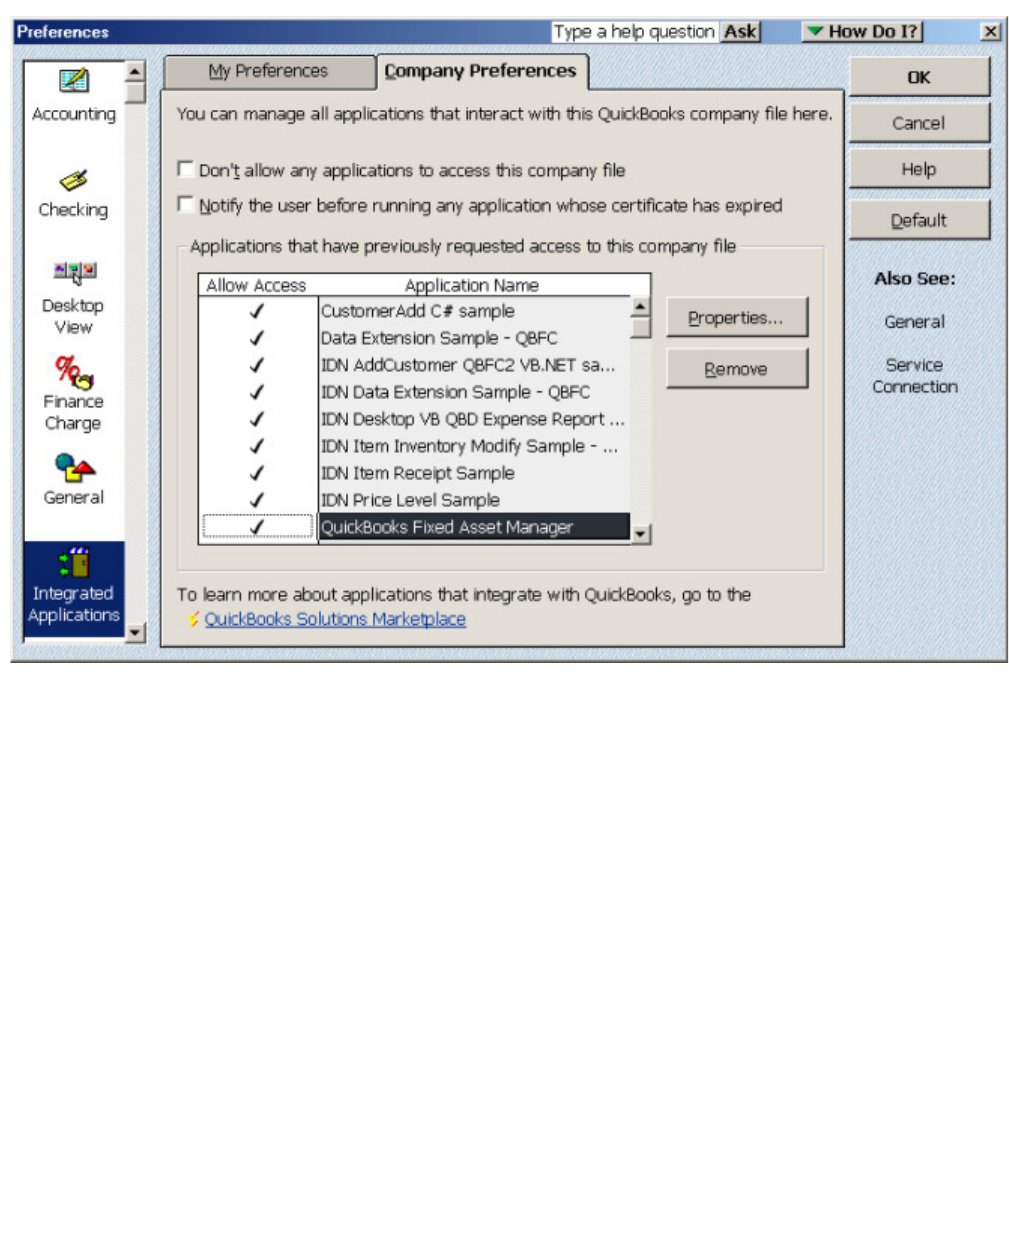
How the AuthPreferences Object Works
43
(c) 2013 Intuit Inc. All rights reserved.
Figure 4-4 Integrated Application Preferences
44
Chapter 4: Specifying Authorization Preferences
(c) 2013 Intuit Inc. All rights reserved.

Using Java with QB SDK
45
(c) 2013 Intuit Inc. All rights reserved.
C
HAPTER
5 1
A
CCESSING
D
ESKTOP
Q
UICK
B
OOKS
E
DITIONS
1
This chapter assumes that you have read about the basic communication model used for
accessing desktop QuickBooks editions, in Chapter 3, “The Communication Model and
Ways of Implementing It.”
Accessing desktop QuickBooks editions is pretty straightforward whether you use the
request processor or the QBFC convenience library. At bare minimum, there are only three
lines of code for the access: OpenConnection2, BeginSession, and ProcessRequest (or
DoRequests if you use QBFC). And two lines of housekeeping code when you’re finished:
EndSession and CloseConnection. We’ll cover that simple case in this chapter.
But there are a couple of other things you may want to know about as well. Such as
•Single user mode vs multi-user mode.
•Auto-login mode, which allows your application to run without an interactive user.
•How to specify which QB editions your application supports and which ones it doesn’t.
•How to tell your user which access rights your application needs in order to work. (This
isn’t covered here, but it is covered in Chapter 4, “Specifying Authorization
Preferences,”)
These topics are covered in this chapter.
Using Java with QB SDK
If you want to use Java with the QB SDK, you need to use a Java to COM bridge, for
example the Jacob bridge product. For more information, search the web, and take a look at
the blog Using the QuickBooks SDK via JACOB Java-Com Bridge.from Theoden’s Coding
Tips.
The programming samples included with the SDK also include a sample implementation
using a Java to COM bridge.
A Note About the Request Processor
The qbXML Request Processor is the gatekeeper between your application and
QuickBooks. The Request Processor implements the COM interface that allows your
application to establish a connection to QuickBooks and set up a working session for a
particular QuickBooks company file. Because it straddles the process boundary with
QuickBooks, the Request Processor is available even when QuickBooks is not running or a
working session for a specific company file has not yet been established.

46
Chapter 5: Accessing Desktop QuickBooks Editions
(c) 2013 Intuit Inc. All rights reserved.
N
OTE
The Request Processor supplies an API that allows event
subscriptions without requiring a QuickBooks session. The
subscriptions go into effect the next time the company file is
opened, or when QuickBooks is next started. (For more
information, Chapter 14, “Event Notification.”)
How to Access QuickBooks
To access QuickBooks, your application needs to do this:
1. Open a connection to QuickBooks.
2. Start a session for working on a specific QuickBooks company file.
3. Send whatever requests you want to do something in QuickBooks.
4. When you’re done or before your application exits, end the session.
5. Then close the connection.
VB Code Snippets for Access if You Use qbXML
If you use qbXML, you need to use QBXMLRP2Lib, however your language does this,
such as by an import statement, or by specifying it in your project reference, Then, here’s
what the above steps 1 through 5 look like in code:
Dim MyQbXMLRP2 As QBXMLRP2Lib.RequestProcessor2
Set MyQbXMLRP2 = New QBXMLRP2Lib.RequestProcessor2
MyQbXMLRP2.OpenConnection2 "", "My Sample App", localQBD
Dim ticket As String
ticket = MyQbXMLRP2.BeginSession("", QBXMLRP2Lib.qbFileOpenDoNotCare)
‘ The variable “xml” here is a fully formed message request set:
‘ we left out that part to keep this as simple as possible
Dim sendXMLtoQB As String
sendXMLtoQB = MyQbXMLRP2.ProcessRequest(ticket, xml)
MyQbXMLRP2.EndSession ticket
MyQbXMLRP2.CloseConnection
Some Commentary on the Code Snippet
The OpenConnection2 call is interesting partly because of the third parameter, which we’ve
shown as localQBD. Other possibilities could be to use localQBDLaunchUI, which would
start QuickBooks in interactive mode.
The first parameter to BeginSession is the full path to the QuickBooks company file you
want to use. We show an empty string here because we are using whatever file is currently
open in QuickBooks. The second parameter is the file mode. This is where you specify

How to Access QuickBooks
47
(c) 2013 Intuit Inc. All rights reserved.
whether you’re accessing the company file in single user mode or multi-user mode, which
we’ll describe shortly. We specified the file mode of “do not care” which allows for either
multi-user or single-user mode, depending on whether the file is currently opened or not.
If the BeginSession call succeeds, you get back a session ticket which you need to supply as
a parameter for the various calls into the request processor, such as ProcessRequest and
CloseConnection.
VB Code Snippets for Access if You Use QBFC
If you use QBFC, you need to use the QBFC DLL however your language does this, such
as by an import statement, or by specifying it in your project reference. Then, here’s how
you access QuickBooks:
Dim MySessionManager As QBSessionManager
Set MySessionManager = New QBSessionManager
MySessionManager.OpenConnection2 “ “, “My Sample App”, ctLocalQBD
MySessionManager.BeginSession "", omDontCare
‘ “MyMsgRequestSet” here is a fully formed message request set:
‘ we left out that part to keep this as simple as possible
Dim MyDataExt_resp As IMsgSetResponse
Set MyDataExt_resp = MySessionManager.DoRequests(MyMsgRequestSet)
MySessionManager.EndSession
MySessionManager.CloseConnection
Some Commentary on the QBFC Code Snippet
The same commentary provided for the qbXML snippet above applies here. One interesting
difference you’ll notice is the absence of the session ticket when you use QBFC. That is
managed automatically by QBFC.
What Happens in the Call to BeginSession?
When your application makes a BeginSession call to QuickBooks, the Request Processor
checks to ensure that the following are true:
•The current QuickBooks supports the SDK (QuickBooks Version 10 or greater).
•The version of QuickBooks and the version of the company data file, if one was
specified, match one another. (If NULL or an empty string was specified, this task is
skipped.)
•The file access mode specified by your application and the mode in which the company
data file is currently open are compatible.
•The Request Processor is able to successfully launch the located, required version of
QuickBooks. If it cannot start QuickBooks, any number of problems might exist; for

48
Chapter 5: Accessing Desktop QuickBooks Editions
(c) 2013 Intuit Inc. All rights reserved.
instance, QuickBooks might not have been correctly installed (perhaps only partially
installed) or there might be some other problem with QuickBooks.
•If the application attempts auto login and if this permission has not been granted by the
QuickBooks administrative user, QuickBooks returns an error code to your application
in the BeginSession call.
If any of these tasks fail, your application will not be able to complete the login process or
connect to QuickBooks. However, in the event of failure, your application will have the
opportunity to present the user with direction on how to resolve the problem. For related
information, see Chapter 37, “Making Your Application Robust.”
Troubleshooting Errors in the BeginSession Call
For help with these and other errors, check out the IPP Developer website for more
information and a useful diagnostic tool called qbSDKDiag.
The qbSDKDiag tool turns on the maximum logging capability of QuickBooks and the
SDK, gathers important registry data about QuickBooks, starts QuickBooks, and attempts
to establish a connection with QuickBooks in interactive mode using QBXMLRP and
QBXMLRP2.
Having successfully connected in interactive mode, the user is then asked to enable
unattended access for the diagnostic tool and to close QuickBooks. The diagnostic tool then
attempts to connect with both QBXMLRP and QBXMLRP2 using unattended mode.
Finally, all the log files (qbsdklog.txt, qbinstancefinder.log, qbwin.log, and the diagnostic
log itself) are zipped up and e-mailed to the address supplied in the diagnostic application,
currently to IPP support.
Multiple Sessions versus a Single Session
A session gives your application access to QuickBooks data belonging to one company file.
Depending on whether your typical user deals with a single company file or multiple
company files in QuickBooks, you will have one or multiple sessions within a connection.
If your user typically deals with only one company’s data, you will probably open a
connection, begin a session, process multiple requests, and then end the session, as shown
in Figure 5-1 on page 49.
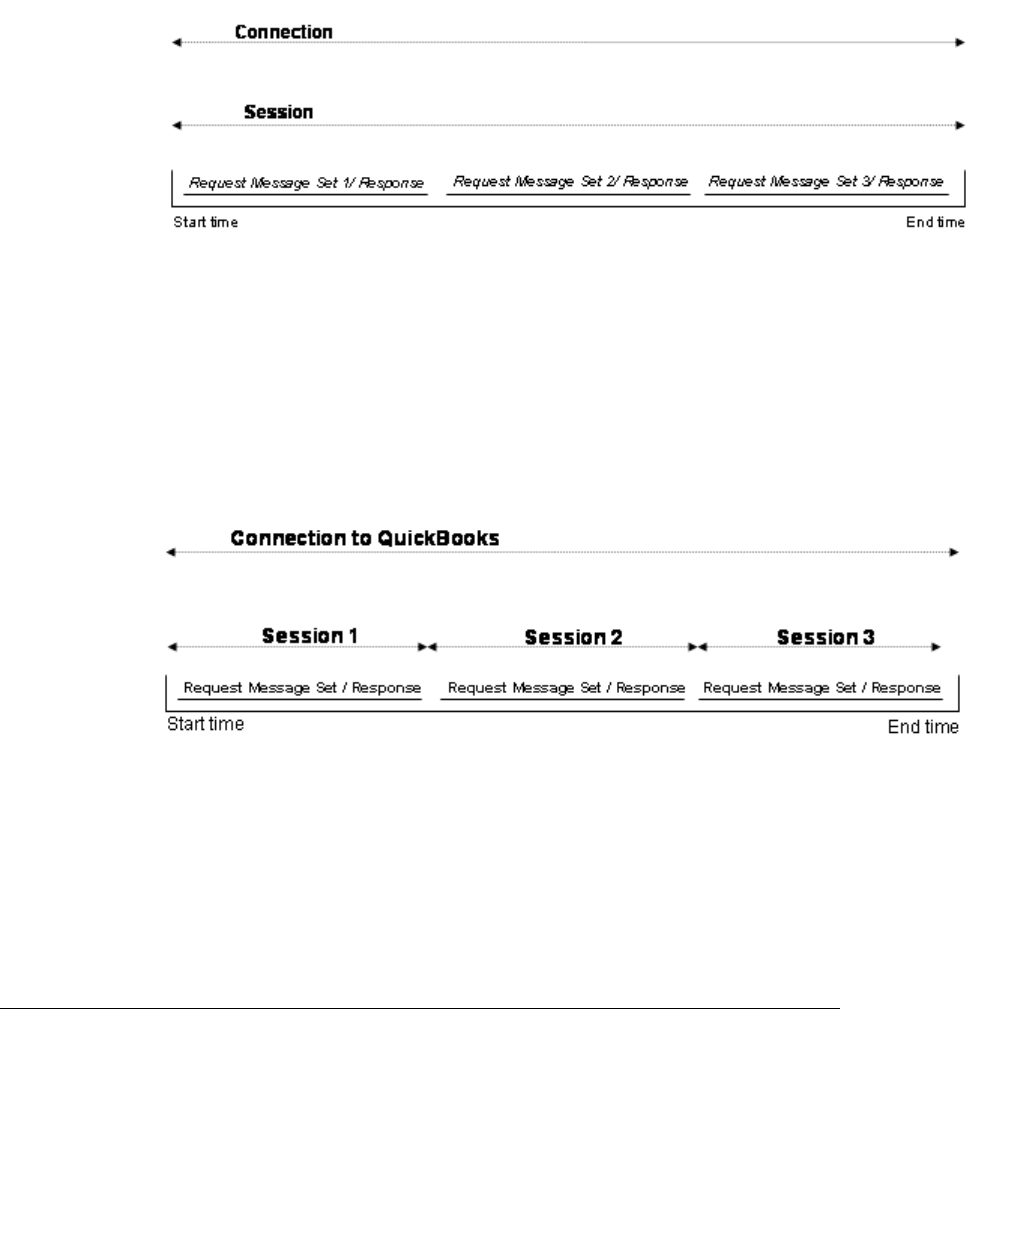
Using AuthFlags to Specify Support for QuickBooks Editions
49
(c) 2013 Intuit Inc. All rights reserved.
Figure 5-1 A single session within one connection.
If the user of your application often deals with multiple companies as, for example, a
professional accountant who manages finances for multiple organizations, your application
will probably open a connection and then begin and end several sessions on different
company files before finally closing the connection, as shown in Figure 5-2 on page 49.
Sessions do not overlap.
Figure 5-2 Multiple sessions within one connection.
In most cases, an application will send multiple requests to QuickBooks in a single session.
The processing is synchronous: your application must wait until one ProcessRequest call
completes execution and returns with the qbXML response data sent from QuickBooks
before issuing the next ProcessRequest call.
Using AuthFlags to Specify Support for QuickBooks Editions
Prior to QuickBooks 2006, the various editions of QuickBooks provided virtually the same
support for the various SDK requests. However, beginning with QuickBooks 2006, a new
edition called QuickBooks Simple Start provides support for a subset of SDK requests.
Consequently, to prevent applications from behaving unexpectedly while running on
QuickBooks Simple Start, the request processor now checks the AuthFlags property during
the call to BeginSession to determine whether your application supports QuickBooks
Simple Start.

50
Chapter 5: Accessing Desktop QuickBooks Editions
(c) 2013 Intuit Inc. All rights reserved.
For existing applications that aren’t designed for QuickBooks Simple Start, no code
changes are necessary, because by default, AuthFlags is set to support QuickBooks Pro,
Premier, and Enterprise.
However, if you are writing an application that does support QuickBooks Simple Start, you
need to explicitly set AuthFlags to indicate your application’s support of that edition.
Otherwise, if your application attempts to begin a session with QuickBooks Simple Start,
you will get an error when you call BeginSession.
Setting AuthFlags to Specify Support for a QuickBooks Edition
To specify which editions your application supports, you invoke the PutAuthFlags method
of the AuthPreferences object before you call BeginSession. The basic call sequence is
straightforward:
1. Instantiate the request processor
2. Instantiate the AuthPreferences object.
3. Construct the desired AuthFlags value
4. Invoke the PutAuthFlags method on AuthPreferences using the AuthFlags value you
just constructed.
The tricky part in all this is the constructing of the AuthFlags value. You need to know a
few facts other than its data type, which by the way, is an integer value (a Long in VB).
Internally, the editions are represented by the following enumerated values:
The ForceAuthDialog value is included as a convenience: if you including it when you
construct your AuthFlags, you cause QuickBooks to display the authorization dialog again
for the user to change the permissions they may have already set for your application.
To specify support for each edition, you simply OR the values for each edition you are
supporting. In the following VB snippet, we specify support for all of the QuickBooks
editions and force the display of the auth dialog to boot.
Dim authFlags As Long
authFlags = 0
authFlags = authFlags Or &H8&
authFlags = authFlags Or &H4&
authFlags = authFlags Or &H2&
authFlags = authFlags Or &H1&
authFlags = authFlags Or &H80000000
When we finish constructing the AuthFlags, we set it as follows:
Behavior Needed Value
SupportQBSimpleStart 0x1
SupportQBPro 0x2
SupportQBPremier 0x4
SupportQBEnterprise 0x8
ForceAuthDialog 0x80000000

More Information about Login Modes
51
(c) 2013 Intuit Inc. All rights reserved.
Dim qbXMLCOM As QBXMLRP2Lib.RequestProcessor2
Dim prefs As QBXMLRP2Lib.AuthPreferences
Set prefs = qbXMLCOM.AuthPreferences
prefs.PutAuthFlags (authFlags)
The SDK sample program SDKTestPlus3 provides an example of constructing the
AuthFlags a bit more selectively, ORring only those editions you choose through UI
components.
I
MPORTANT
If you start your application by invoking BeginSession with
LocalQBLaunchUI AND you have SimpleStart, but do not set
the authFlags to specify Simple Start support, SimpleStart will
launch with the company file specified, and you’ll get an error
regarding the fact that your application doesn’t support
SimpleStart. Once Simple Start is launched in this scenario,
your application won’t have SDK access to Simple Start.
More Information about Login Modes
Integrated applications can log in to QuickBooks in one of two modes:
•In interactive mode, QuickBooks runs in the foreground, and its user interface is
displayed. The user logs in to QuickBooks and opens a company file. Subsequently,
your application is launched and “attaches” to the company file that has already been
opened. The user can interact directly with your application and with QuickBooks.
•In unattended mode (auto-login), QuickBooks runs in the background, and its user
interface may or may not be displayed, depending on the connection type you specify
in the call to OpenConnection2. The ctLocalQBD type either uses the local
QuickBooks currently running or, if not running, launches QB in unattended mode
(without UI, thus non interactively). If QuickBooks is not running, the
ctLocalQBDLaunchUI type launches it in interactive mode (the UI is displayed). If
your connection type doesn’t specify the launching of the QuickBooks UI, then
QuickBooks features are fully available to your application but not to the user. Notice
that whenever QuickBooks is started by the application rather than by the small-
business owner, it is in auto-login mode.
N
OTE
When an application accesses a company file that was opened
by a user from the QuickBooks user interface, the application
has the same privileges as that logged-in user. In some cases,
the user can impose further restrictions via the preferences
for the application. (In QuickBooks, bring up preferences by
selecting Edit->Preferences->Integrated Applications-
>Company Preferences->Properties.)
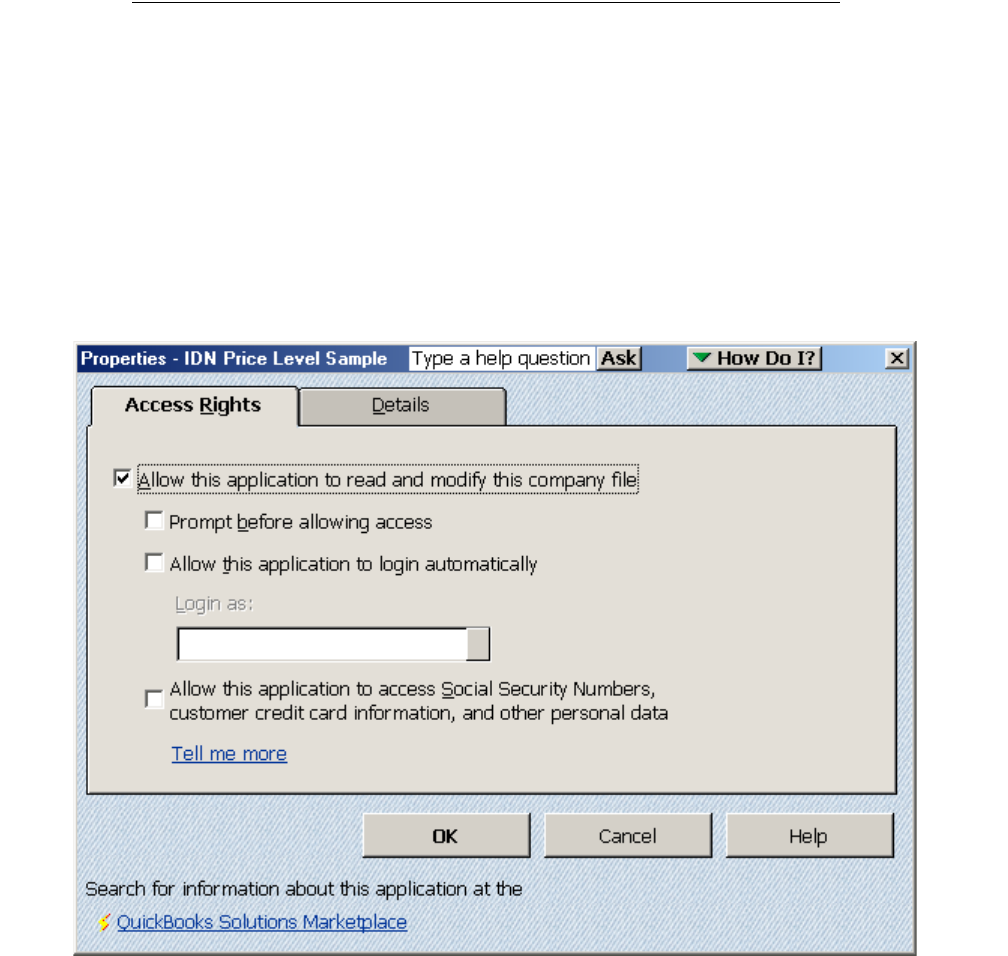
52
Chapter 5: Accessing Desktop QuickBooks Editions
(c) 2013 Intuit Inc. All rights reserved.
Setting Up Auto-Login
You use the AuthPreferences object to inform the user that auto-login (unattended) mode is
required (Chapter 4, “Specifying Authorization Preferences.”). The proper dialog with the
auto-login prompt will be presented to the user for confirmation. If the user chooses not to
authorize your application’s requirements, then your application will not be allowed to
access the QuickBooks company. Notice that this is “all or nothing.” Either your
application gets all of its requirements or it is refused access to QuickBooks.
Alternatively, you can set up auto-login from within QuickBooks. Using this method, the
QuickBooks administrator sets the user name under which your application will run in
QuickBooks under Company Preferences, Properties, Access Rights, a window that is
accessible only to QuickBooks administrators (see Figure 5-3 on page 52).
Figure 5-3 QuickBooks window for allowing auto-login by an integrated application
If you don’t use AuthPreferences, be sure to tell your user that the QuickBooks
administrator must give your application the necessary authorizations.
What Happens if the Administrative User Deletes the Auto-Login User?
If an application is set up for auto-login, then a warning message is displayed to the
administrative user when that user attempts to delete. The message indicates that the user to
be deleted is used by an integrated application.

Limitations on Accessing Company Files
53
(c) 2013 Intuit Inc. All rights reserved.
I
MPORTANT
If an application starts QuickBooks in auto-login mode, any
subsequent applications authorized for auto-login will have
the privileges of the first application during that session. The
first auto-login application sets the user for any subsequent
applications during the session. This is the user that is the
“active” user for all applications until all of the applications
end their sessions and QuickBooks exits.
Only One Auto-Login User per Application
Regardless of whether single-user or multi-user mode is specified for a given session, there
can be only one auto-login active during that session. Figure 5-4 on page 53 illustrates a
multi-user session, with four different users accessing the same company file. Because Joe
is designated as an auto-login user on System 4, no other users can log in automatically
until “Joe” (the auto-user) logs out. When multiple instances of an integrated application
are running on different systems and accessing the same company file, as shown in Figure
5-4 on page 53, each user must have a different name.
Figure 5-4 Multiple users accessing the same company file
Limitations on Accessing Company Files
Only one company file at a time can be accessed by integrated applications on any given
machine running QuickBooks. The company file that must be used by integrated
applications is the one currently opened by the user from the QuickBooks user interface, or
the company file that is currently open by an application that started QuickBooks in auto-
login mode.

54
Chapter 5: Accessing Desktop QuickBooks Editions
(c) 2013 Intuit Inc. All rights reserved.
Allowing Application Access to Personal Data
The Access Rights window shown in Figure 5-3 on page 52 also includes a checkbox that
allows your application access to personal data in the company file. Personal data can
include:
•Employee social security numbers
•Any field directly related to an employee’s salary or wages
•Anything related to credit card numbers or bank account numbers
Be sure to instruct the QuickBooks administrator to check this box if your application
requires access to personal employee or customer data. (Alternatively, your application can
require access to personal data using the AuthPreferences object, which is available for
QuickBooks 2005 and later.)
Single-User vs. Multi-User Mode
During a QuickBooks session, your application specifies whether to open the company data
file in single-user or multi-user mode. It is important to balance your needs with the overall
implications of selecting one mode over the other. Table 5-1 on page 55 summarizes the
different combinations. Another interesting case is that even when the integrated
application opens a company file in multi-user mode, other integrated applications can
access the company file, but no actual users can access that company file on the same
system.
I
MPORTANT
If QuickBooks 2007 and later is running non hosted, SDK
applications starting QuickBooks in DoNotCare mode will open
QuickBooks in single-user mode.

Microsoft Windows Vista & Windows 7 and UAC
55
(c) 2013 Intuit Inc. All rights reserved.
Table 5-1 QuickBooks company file login mode access conditions and rIghts
Trade-offs of Using Single-User Mode
Here are some of the advantages and disadvantages of using single-user mode.
Advantages:
•Certain QuickBooks features require that a user operate in single-user mode. For
instance, a company file must be open in single-user mode for you to delete any of its
list items.
•Locking and opening protection. If the company file is not already opened by another
QuickBooks-integrated application, your application will be able to open it with
exclusive access (locking out other applications), gaining improved performance.
Disadvantages:
•Lockout. If your application attempts to open a company file in single-user mode and
that company file is already open in multi-user mode, your application will not be able
to access the company data file. Your application will be locked out. (If your
application specifies multi-user mode, it can share access to the company file.)
Microsoft Windows Vista & Windows 7 and UAC
On the released version of Windows Vista & Win 7, applications built with any version of
the QuickBooks SDK should work correctly with QuickBooks 2011 R7 and newer (and
QuickBooks Enterprise Solutions 11.0 R7 and newer), the latest available update release,
with the following additions:
Who started QuickBooks Mode Who may obtain access
Integrated Application Single-user All other integrated applications
= access
Integrated Application Multi-user QB users on same machine =
no access
All other integrated applications
= access
QB users on other machines =
access
QuickBooks User Single-user QB user already logged in
Only one integrated application
= access
QuickBooks User Multi-user QB users = access
Integrated applications = access

56
Chapter 5: Accessing Desktop QuickBooks Editions
(c) 2013 Intuit Inc. All rights reserved.
With User Access Control (UAC) ON - Both QuickBooks and the application accessing it
through the SDK can run with elevated user permissions (Run as Administrator) under
following setup for a successful SDK connection.
a. QuickBooks running as Administrator in AND Application accessing QuickBooks
through SDK running as Administrator.
b. QuickBooks in Unattended mode AND Application accessing QuickBooks through
SDK running as Administrator.
The following limitations are still in place
With UAC ON, either one of these – QuickBooks or SDK application cannot be run in
Elevated access.
a. Unsuccessful connection when QuickBooks in Standard user permission and SDK
Application running as Administrator.
b. Unsuccessful connection when QuickBooks running as Administrator and SDK
Application in Standard user permission.
Table 5-2 Use case for UAC
Cases UAC
Mode Of
Connection Client QuickBooks
SDK
Connection in
2011 R7
a. UAC ON Attended Elevated Elevated Successful
b. UAC On Unattended Eleveated Not Running Successful
Limitations:
a.
UAC ON Attended Standard Elevated Unsuccessful
b. UAC ON Attended Elevated Standard Unsuccessful

A Few Notes About Using QBFC
57
(c) 2013 Intuit Inc. All rights reserved.
C
HAPTER
6 1
B
UILDING
R
EQUESTS
I
N
QBFC
AND
IN
QB
XML 1
This chapter describes how to build requests using the QBFC library or the request
processor directly, via qbXML. Because the request processor API method requires you to
build valid qbXML request strings and parse the returned qbXML responses, this chapter
shows the use of Microsoft’s XML Services 4.0 DOM to build and parse the XML using
DOM documents.
A Few Notes About Using QBFC
The QBFC library provides a convenience layer that allows you to construct requests using
the familiar object and object property paradigm. You will notice that the convenience layer
is a thin layer, so consequently there are a lot of objects to contend with in QBFC. In fact,
each request is a separate object, and each request object has its own unique sub objects, for
example the line item add object for SalesOrders is different than the line item add object
for SalesReceipts.
Fortunately, the abundance of objects is not as daunting as it might seem. All of the
requests are built in the same way and in the same order, and the line items are appended to
their parent object in the same way as well.
N
OTE
If your development environment and language supports
Intellisense, a list of the message set’s Append methods are
available from within your environment. You could also use
the Visual Studio Object Browser to look up the Append
methods.
Alternatively, you can look up the request name in the OSR and prefix that
name with Append and suffix it with Rq. Also, the top level object Tag
name in the OSR for each request entry is the name of the object that is
returned by the message set’s corresponding AppendRequest method.
Building a Request using QBFC
In QBFC, you build a message set object and fill it with the requests you want to send to
QuickBooks. You use the QBSessionManager object to do the building and the sending.

58
Chapter 6: Building Requests In QBFC and in qbXML
(c) 2013 Intuit Inc. All rights reserved.
I
MPORTANT
You’ll notice there is no built-in way to get/set RequestID in
QBFC. You don’t need to manage RequestID when you use
QBFC because QBFC automatically assigns requestIDs to
requests within the message request set, from 0 to N. QBFC
automatically returns the responses in the ResponseList in the
exactìthe order of the requests.
What You Need to Do in QBFC
The followng general process for building requests is illustrated in Listing 6-1.
1. Instantiate the QB SessionManager object.
2. Create the request message set object (SessionManager.CreateMsgSetRequest).
3. Set any desired message set-level attributes in that message set object.
4. Append the desired request objects to the message set object.
5. Set all required or desired field values (see OSR) in that request object.
6. If the request contains line items, append the appropriate line item add object to the
request and set its field values.
7. If you want to add more requests, append the desired request objects to the message set
and set its values as described above.
8. Open a connection to QuickBooks.
9. Begin the session with the specified QuickBooks Company.
10. Invoke DoRequests to send the requests to QuickBooks.
11. Process the response.
12. If you’re done, end the session and close the connection.
Notice that the open connection and begin session calls are shown after the request is
constructed. This is not required. You can perform the open connection and begin session
calls at any time before the call to DoRequests. We made these calls at the end mainly to
point out that you don’t need to be connected to QuickBooks in order to construct requests.
Sample: Building a SalesOrder Using QBFC
Listing 6-1 shows an example in VB that constructs a SalesOrder request with two line
items and sends it to QuickBooks.
______ Listing 6-1 Building a SalesOrderAdd Request
Dim SessionManager As QBSessionManager
Set SessionManager = New QBSessionManager

Building a Request using QBFC
59
(c) 2013 Intuit Inc. All rights reserved.
‘ We’re going to use US QuickBooks and the 6.0 spec
Dim SalesOrderSet As IMsgSetRequest
Set SalesOrderSet = SessionManager.CreateMsgSetRequest("US", 6, 0)
‘ Need a separate Append* for each request in the MsgSetRequest object
‘ First set properties in the main body of the sales order
Dim salesOrder As ISalesOrderAdd
Set salesOrder = SalesOrderSet.AppendSalesOrderAddRq
salesOrder.CustomerRef.FullName.setValue "John Hamilton"
salesOrder.RefNumber.setValue "121345"
‘ Now add the line items. Every transaction with line items will look very similar to this
Dim SOLineItemAdder As ISalesOrderLineAdd
Set SOLineItemAdder = salesOrder.ORSalesOrderLineAddList.Append.salesOrderLineAdd
SOLineItemAdder.ItemRef.FullName.setValue "fee"
SOLineItemAdder.Quantity.setValue 3
SOLineItemAdder.Other1.setValue "gold"
‘ Add another line item. Notice our re-use of the SOLineItemAdder variable
Set SOLineItemAdder = salesOrder.ORSalesOrderLineAddList.Append.salesOrderLineAdd
SOLineItemAdder.ItemRef.FullName.setValue "fee"
SOLineItemAdder.Quantity.setValue 5
SOLineItemAdder.Other1.setValue "silver"
‘ OK, we’re done, send this to QB; for grins show results in a message box
‘ We close everything down when done for illustration only: you would keep the session and
‘ connection open if you were going to send more requests
SessionManager.OpenConnection2 appID, appName, ctLocalQBD
‘ Let’s use whatever company file happens to be open now
SessionManager.BeginSession "", omDontCare
Dim SOAddResp As IMsgSetResponse
Set SOAddResp = SessionManager.DoRequests(SalesOrderSet)
MsgBox SOAddResp.ToXMLString
SessionManager.EndSession
SessionManager.CloseConnection
Set SessionManager = Nothing
The Importance of the CreateMsgSetRequest Call
When you create the message set object, you need to specify the qbXML spec version that
this message set supports. The sample above creates a message set that supports version 6.0
of the qbXML specification. The purpose of this is to make sure that the currently installed
QBFC library and request processor can support the type of requests your application is
going to make. (In our example, we could have used 2.1, since that was the spec version
that first supported SalesOrderAdd.)
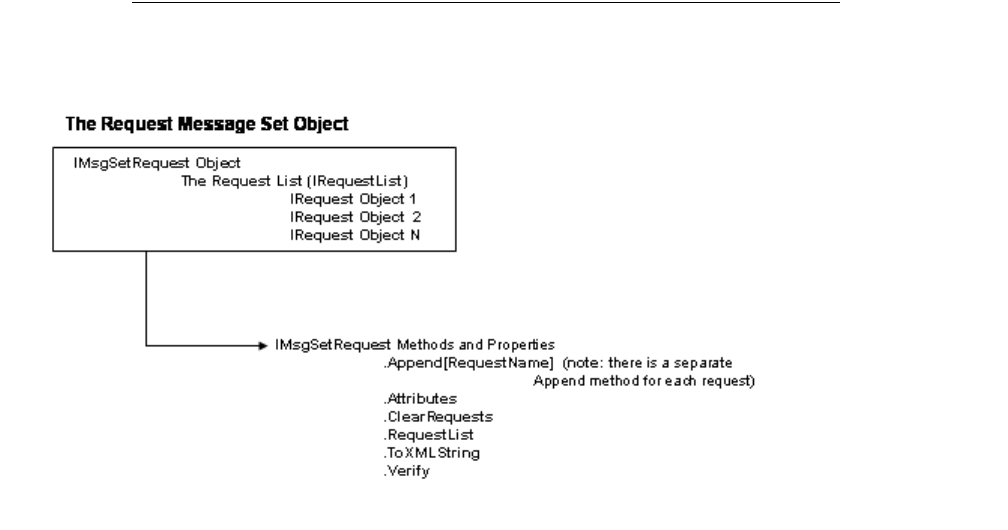
60
Chapter 6: Building Requests In QBFC and in qbXML
(c) 2013 Intuit Inc. All rights reserved.
Background Details About the MsgSetRequest Object
For the visually inclined, Figure 6-1 represents the message set request object.
Figure 6-1 The Request Message Set Object
You need to be aware of the request message set methods and properties that are available
for your use. The various Append methods are used to add request objects of a specific type
to the message set. Each Append method call returns a corresponding request object that
must be filled with property values as desired.
• The Attributes property is used to set message set-level attributes: currently continue
on error and stop on error are the supported attributes. We’ll describe this attribute later
in this chapter.
• The ClearRequests method empties the message set once you’ve invoked DoRequests
and are otherwise finished with the original request. After you clear out the message set
object, you can fill it again with new requests that you want to send. It saves some
overhead.
• The RequestList method returns the list (IRequestList) of request objects in the
message set. IRequestList has a count property and a GetAt (index) method to support
retrieval of requests from the list.
• The ToXMLString method returns a complete and valid qbXML string that represents
the message set object and all its requests. This is useful for diagnostic purposes or if
you simply want to make sure you are building the objects as you expect.
• The Verify method can be used before the call to DoRequests to make sure the
requests are fully formed (all required fields have been set) and valid. However, the
DoRequests method call also performs this checking automatically.
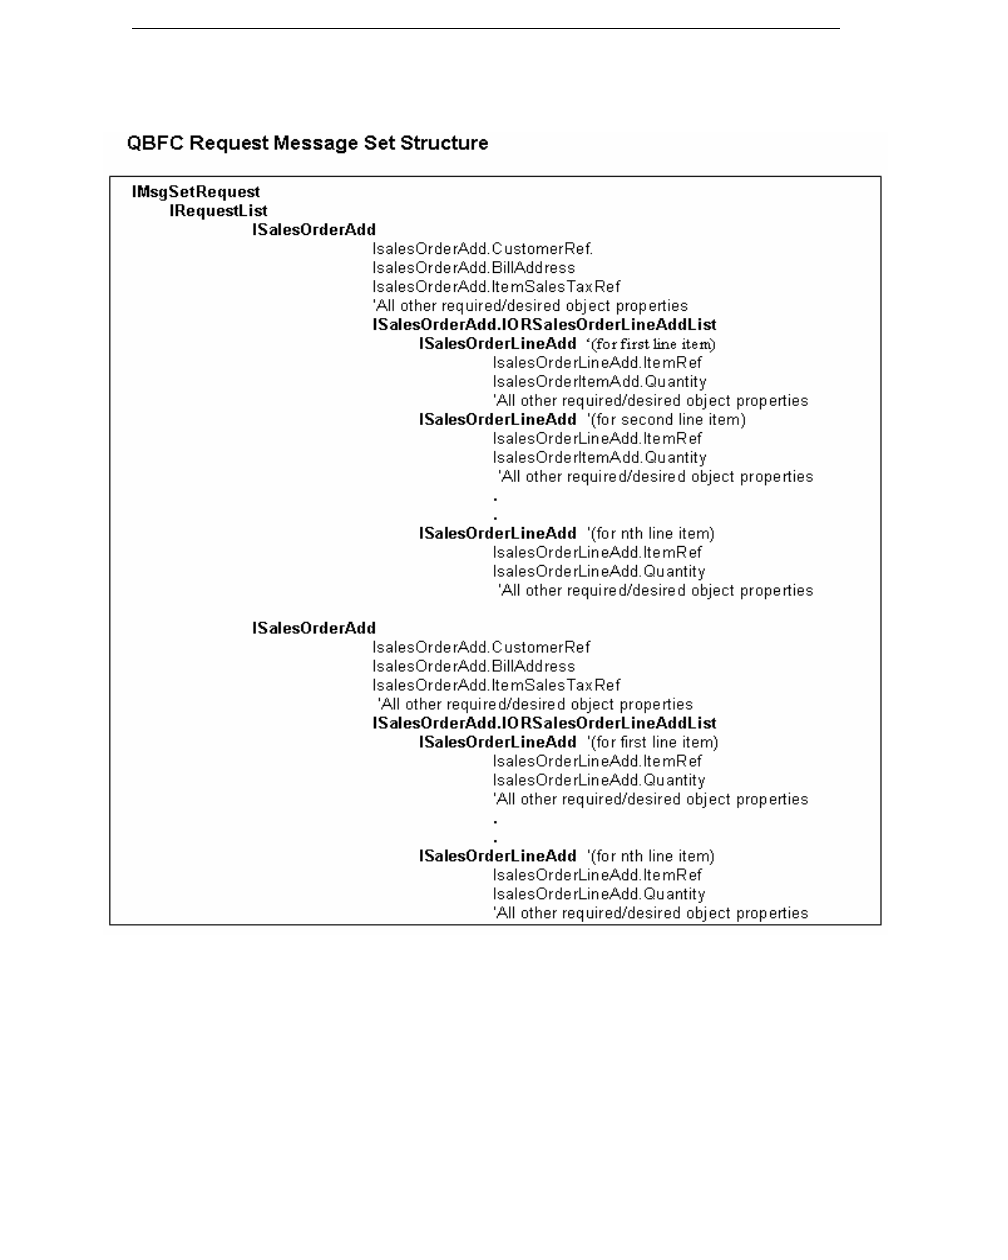
Building a Request using QBFC
61
(c) 2013 Intuit Inc. All rights reserved.
Another View of the Message Set Request Structure
Figure 6-2 on page 61 shows a more detailed view of the logical arrangement of the
individual requests in a request message set, along with some sample property values.
Figure 6-2 Request Message Set Structure
The figure shows a message set for a transaction containing two SalesOrderAdd requests.
Each SalesOrder usually has a separate line item for each item ordered. Notice that the line
item objects also have properties that need to be set in order to finish constructing the
request. There can be as many line item objects as you need.
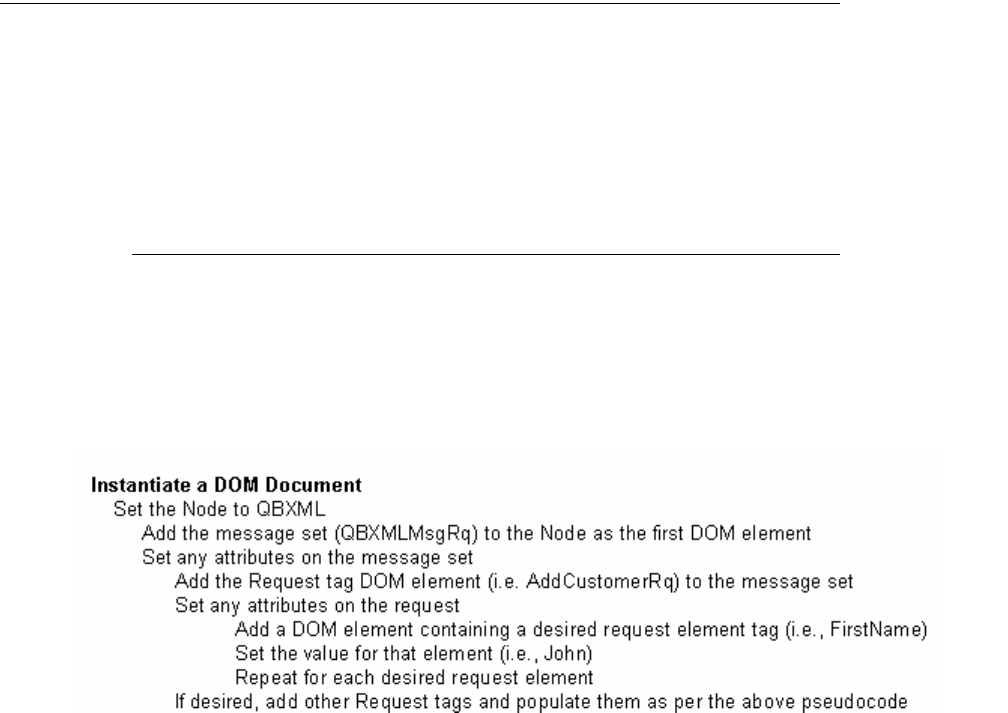
62
Chapter 6: Building Requests In QBFC and in qbXML
(c) 2013 Intuit Inc. All rights reserved.
The basic message set structure shown in Figure 6-2 is the same for every request object
that has line items: these are usually transactions. If the object is a list object, which does
not contain line items, such as Customer, you don’t add any line item sub objects as shown
in the sample figure. Instead you simply set the object properties as shown in the top of the
figure.
Notice the OnError attribute setting of the message set. This specifies how errors in the
individual requests are handled. If you specify roeContinue, as the sample does, then the
failure of one request in the message set won’t prevent other requests from being processed.
If you specify roeStop, then an error in one request stops the processing of any succeeding
requests.
Building a qbXML Request
Building a qbXML request and sending it to QuickBooks is simply a matter of writing out a
valid qbXML string that contains the requests you want and then sending them to
QuickBooks. However, because building syntactically correct XML “by hand” is so tedious
and prone to error, we strongly recommend the use of technology that does all the tedious
stuff for you (angle brackets, start and end tags, and so on), so you can focus on including
those qbXML elements that you want.
What You Need to Do in qbXML using a DOM Document
Our samples show the use of Microsoft XML (MSXML) API DOMDocument, a
technology which is currently free from Microsoft. When you build the qbXML, you
should refer to the Onscreen Reference (OSR) for details on required request elements.
Figure 6-3 on page 62 shows the general steps in building a request using a DOM
document.
Figure 6-3 Building a qbXML Request

Building a qbXML Request
63
(c) 2013 Intuit Inc. All rights reserved.
The following VB code snippet shows the qbXML for adding a new customer, with just a
few of the available fields filled out, to keep things simple. Once the request is filled out,
our code snippet prepends the required header information and sends the completed XML
string to qbXML via the request processor.
' Build the request XML
Dim builder As New DOMDocument40
Dim QBXML As IXMLDOMNode
‘After the header tags, <QBXML> is always the first element tag,
‘followed by the message set <QBXMLMsgsRq>
Set QBXML = builder.createElement("QBXML")
builder.appendChild QBXML
Dim msgsRq As IXMLDOMElement
Set msgsRq = QBXML.appendChild(builder.createElement("QBXMLMsgsRq"))
‘Set attributes on the message set
msgsRq.setAttribute "onError", "continueOnError"
Dim CustomerAddRq As IXMLDOMElement
Dim CustomerAdd As IXMLDOMElement
Set CustomerAddRq =
msgsRq.appendChild(builder.createElement("CustomerAddRq"))
CustomerAddRq.setAttribute "requestID", "1"
Set CustomerAdd = CustomerAddRq.appendChild(builder.createElement
("CustomerAdd"))
Dim dataElement As IXMLDOMElement
If firstName <> "" Then
Set dataElement = CustomerAdd.appendChild(builder.createElement
("FirstName"))
dataElement.appendChild builder.createTextNode(firstName)
End If
If lastName <> "" Then
Set dataElement = CustomerAdd.appendChild(builder.createElement
("LastName"))
dataElement.appendChild builder.createTextNode(lastName)
End If
‘The request is built except for the headers: so build these and
‘append the request to them:
requestXML = "<?xml version=""" & "1.0" & """?>"
requestXML = requestXML + "<?qbxml version=""" & "6.0" & """?>" +
builder.xml
‘Start a QB session and send the request
Dim qbXMLRP As QBXMLRP2Lib.RequestProcessor2
Set qbXMLRP = New QBXMLRP2Lib.RequestProcessor2
Dim Ticket As String
qbXMLRP.OpenConnection2 cAppID, cAppName, localQBD
Ticket = qbXMLRP.BeginSession(qbfilename, qbFileOpenDoNotCare)
64
Chapter 6: Building Requests In QBFC and in qbXML
(c) 2013 Intuit Inc. All rights reserved.
responseXML = qbXMLRP.ProcessRequest(ticket, requestXML)
qbXMLRP.EndSession ticket
qbXMLRP.CloseConnection
Set qbXMLRP = Nothing

Processing a Response Using QBFC
65
(c) 2013 Intuit Inc. All rights reserved.
C
HAPTER
7 1
H
ANDLING
R
ESPONSES
U
SING
QBFC
OR
QB
XML 1
This chapter describes how to handle responses using the QBFC library or the request
processor API.
I
MPORTANT
You’ll notice there is no built-in way to get/set RequestID in
QBFC. You don’t need to manage RequestID when you use
QBFC because QBFC automatically assigns requestIDs to
requests within the message request set, from 0 to N. QBFC
automatically returns the responses in the ResponseList in the
exactìthe order of the requests.
Processing a Response Using QBFC
Processing responses using QBFC is somewhat like building requests, only in reverse.
When you invoke DoRequests to send the requests to QuickBooks, DoRequest returns an
IMsgSetResponse object. This object contains all of the response data, so you need to know
how to traverse this object and the other objects it contains.
I
MPORTANT
Not all invocations of DoRequest will result in a response with
StatusCode and StatusMessage. Certain failures will return
only an HRESULT indicating the nature of the failure.
Figure 7-1 shows the generalized method for getting response data.
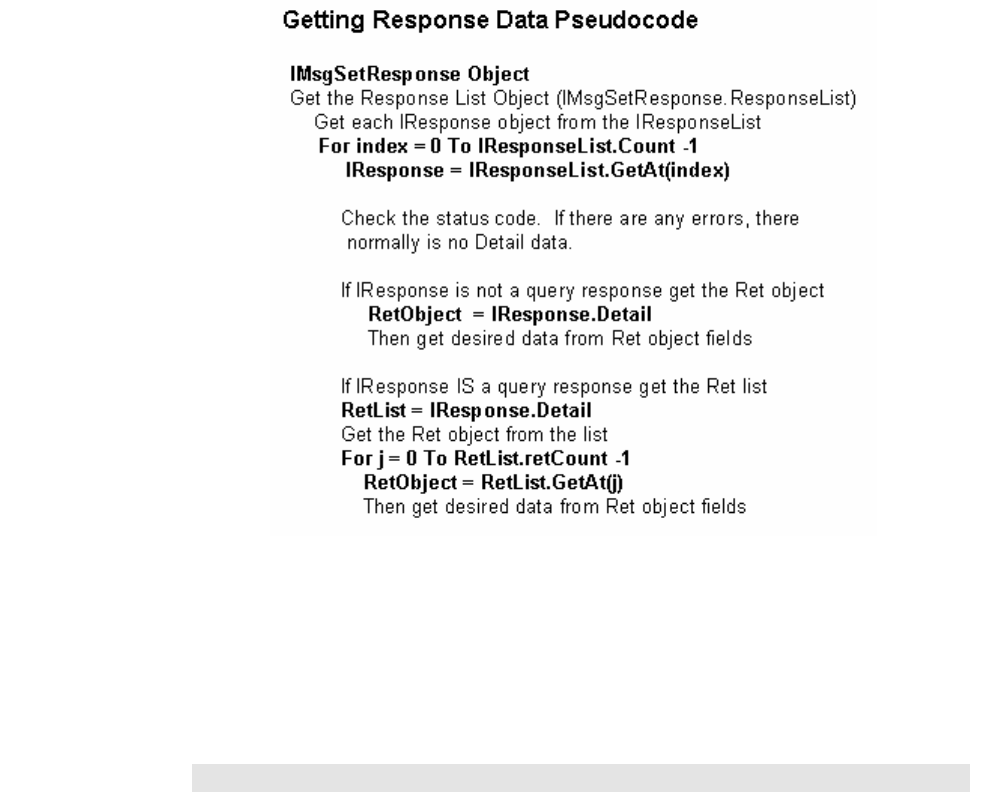
66
Chapter 7: Handling Responses Using QBFC or qbXML
(c) 2013 Intuit Inc. All rights reserved.
Figure 7-1 Getting Response Data
Processing Responses: QBFC Sample Code
The following code snippet shows the response to an ItemInventoryAdd request. Because
this is not a query, the response will contain only the Ret object and not the Ret list, which
would have to be processed further.
N
OTE
In the sample, notice the response type. You can look up all
the response types in the Visual Studio object browser under
the ENResponseType or you can construct them from the
response name by prefixing the response name with rt, for
example, the type for an ItemInventoryAddRs response is
rtItemInventoryAddRs.
Also, the OSR is useful in looking up the Ret object and Ret list names for
each Response. The Ret or Ret list for the response is listed at the top of
the OSR entry for each response.
‘Send the request message and get the response message: then get the first
‘response message. This sample only expects one response
Dim responseMsgSet As IMsgSetResponse
Dim response As IResponse
Set responseMsgSet = sessionManager.DoRequests(requestMsgSet)
Set response = responseMsgSet.ResponseList.GetAt(0)

Processing a Response Using QBFC
67
(c) 2013 Intuit Inc. All rights reserved.
‘Make sure the response type is the expected ItemInventoryAddRs type
‘then get the expected IItemInventoryRet object data: we only want ListID
Dim itemInventoryListID As String
If (Not response. Is Nothing) Then
Dim responseType As Integer
responseType = response.Type.GetValue
Dim j As Integer
‘Notice that we make an implicit upcast here (supported in VB),
‘upcasting the detail to the itemInventoryRet type. In other languages,
‘you must do an explicit upcast, for example, in VB.Net:
‘itemInventoryRet = response.Detail as itemInventoryRet
If (responseType = rtItemInventoryAddRs) Then
Dim itemInventoryRet As IItemInventoryRet
Set itemInventoryRet = response.Detail
itemInventoryListID = itemInventoryRet.ListID.GetValue
End If
End If
The code snippet below shows how to get data from a query response, which does have a
Ret list of Ret objects.
‘Send the request message and get the response message: then get the first
‘response message. This sample only expects one response
Dim responseMsgSet As IMsgSetResponse
Dim response As IResponse
Set responseMsgSet = sessionManager.DoRequests(requestMsgSet)
Set response = responseMsgSet.ResponseList.GetAt(0)
'We’re expecting an ItemInventoryQuery response.
If (Not response.Detail Is Nothing) Then
Dim responseType As Integer
responseType = response.Type.GetValue
Dim j As Integer
‘Get the ret list
If (responseType = rtItemInventoryQueryRs) Then
Dim itemInventoryRetList As IItemInventoryRetList
Set itemInventoryRetList = response.Detail
Dim itemInventoryRet As IItemInventoryRet
ItemFlexGrid.Rows = (1 + itemInventoryRetList.Count)

68
Chapter 7: Handling Responses Using QBFC or qbXML
(c) 2013 Intuit Inc. All rights reserved.
‘load each ret object from the list into a separate row in the
‘grid control to display certain ret object fields
For j = 0 To itemInventoryRetList.Count - 1
Set itemInventoryRet = itemInventoryRetList.GetAt(j)
Set itemInventoryRet = itemInventoryRetList.GetAt(j)
If (Not itemInventoryRet.Desc1 Is Nothing) Then
ItemFlexGrid.Col = 0
ItemFlexGrid.Row = j + 1
ItemFlexGrid.Text = itemInventoryRet.ListID.GetValue
ItemFlexGrid.Col = 1
ItemFlexGrid.Text = itemInventoryRet.FullName.GetValue
ItemFlexGrid.Col = 2
ItemFlexGrid.Text = itemInventoryRet.SalesDesc.GetValue
ItemFlexGrid.Col = 3
ItemFlexGrid.Text = itemInventoryRet.QuantityOnHand.GetValue
End If
Next j
End If
End If
In the preceding code sample, an item inventory query is sent to get a list of inventory items
and display the list ID, fullname, description, and on hand quantity from each item in a VB
flex grid control. We just get the ret list, and in the same loop that we use to go through the
ret list, we also populate each row in the flex grid control.
Background Information: Understanding IMsgSetResponse
The IMsgSetResponse object is always returned unless DoRequest fails. IMsgSetResponse
contains a response list that has one or more response objects, as shown in Figure 7-2.
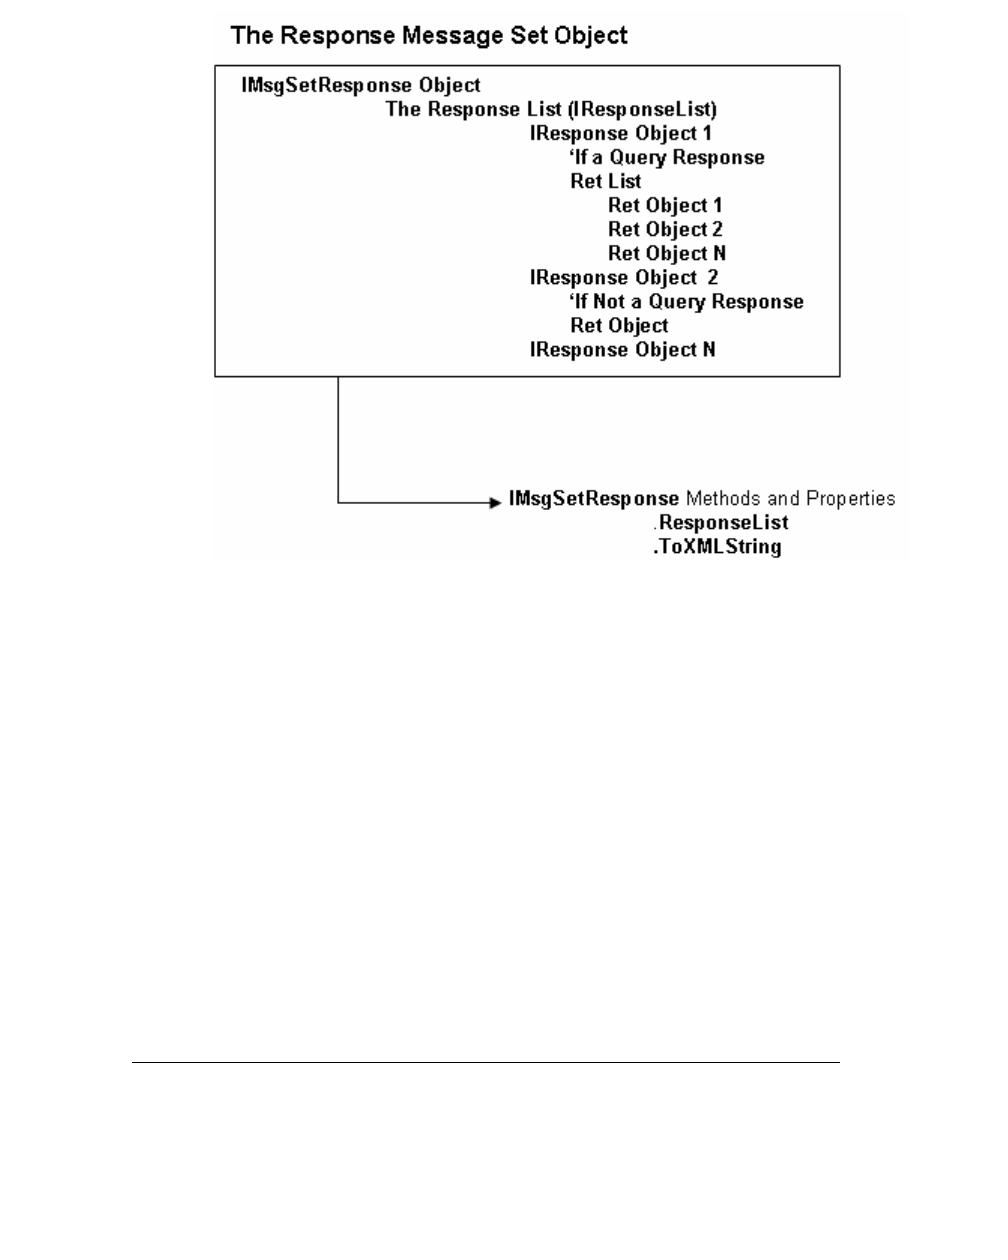
Processing a Response Using QBFC
69
(c) 2013 Intuit Inc. All rights reserved.
Figure 7-2 Response Message Set Structure
As shown in Figure 7-2, a response object that is a query response contains a Ret list object
that contains potentially multiple Ret objects. A response object that is not a query response
contains only one Ret object and no Ret list. This difference is crucial when it comes to
processing the response data. We’ll describe these in more detail shortly.
Also as shown in the figure, you’ll need to be aware of these response object methods:
• The ResponseList method returns the IResponseList object containing the individual
response objects in the message set. IResponseList has a count property and a GetAt
(index) method to support retrieval of responses from the list.
• The ToXMLString method returns a complete and valid qbXML string that represents
the response message set object and all its individual responses. This is useful if you
want to dump out the response message to see the contents either for diagnostic
purposes or if you want to make sure you are getting the data you expect.
Background Information II: IResponse
The data, that you are interested in is contained in the IResponse. How do you get the
IResponse from the response message set?
To get the individual responses contained in the response message set,
70
Chapter 7: Handling Responses Using QBFC or qbXML
(c) 2013 Intuit Inc. All rights reserved.
1. Invoke ResponseList on the response message object to get the IResponseList
2. Use the IResponseList Count and GetAt methods to get the individual IResponse
objects.
Ok, you have an IResponse, which is response data to one of the requests that was sent to
QuickBooks. How do you traverse IResponse to get the response data from it? This is a
little tricky, since the IResponse can be either an object or another list.
To show you what we mean, take a look at Figure 7-3:
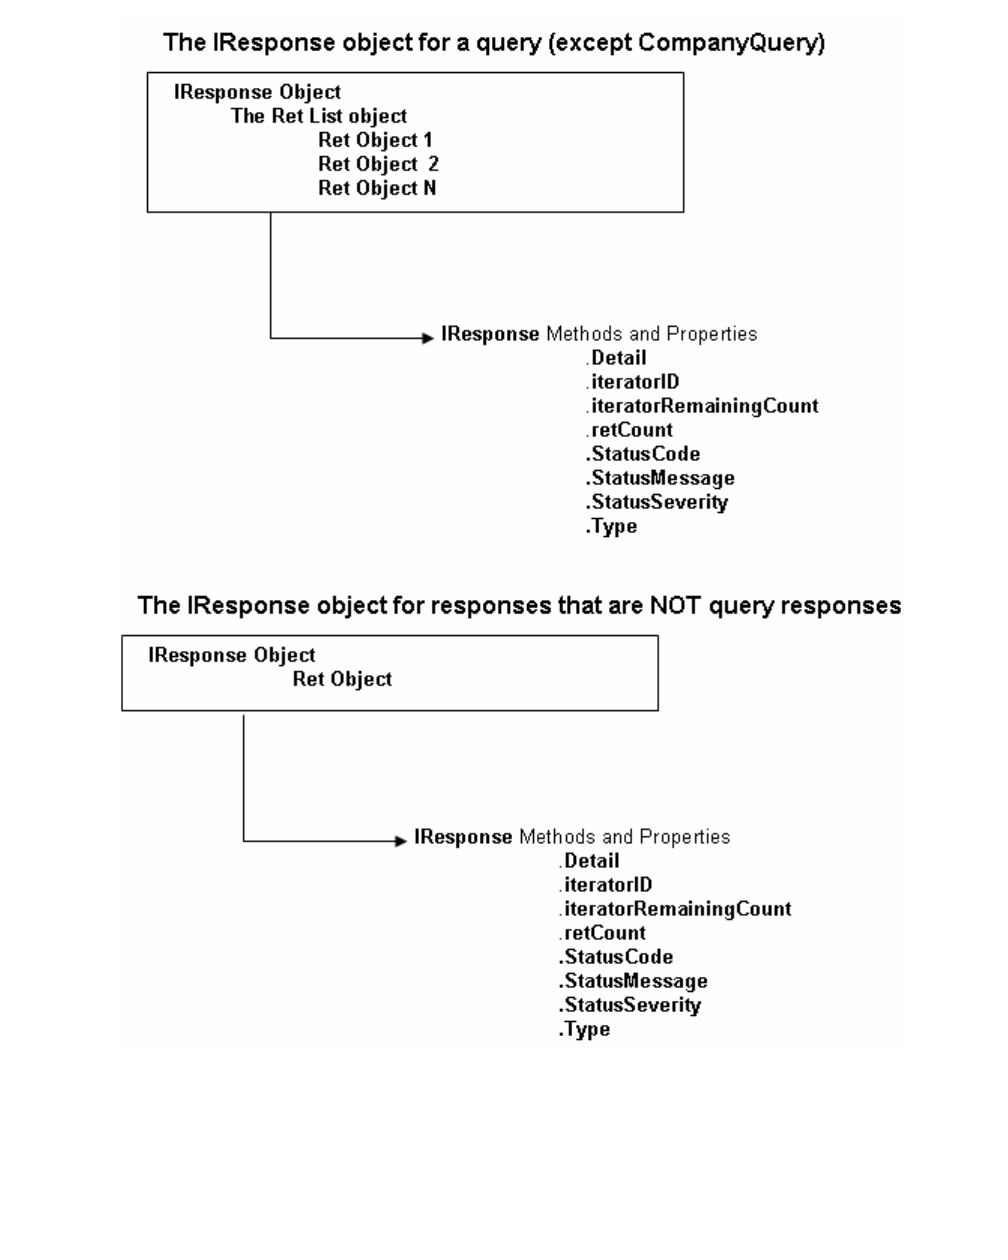
Processing a Response Using QBFC
71
(c) 2013 Intuit Inc. All rights reserved.
Figure 7-3 The IResponse Object
As shown in the figure, an IResponse that is a query response has a Ret list object
containing one or more Ret objects. The retCount, iteratorID, and iteratorRemainingCount
properties are provided to support getting the individual Ret objects from the Ret list.

72
Chapter 7: Handling Responses Using QBFC or qbXML
(c) 2013 Intuit Inc. All rights reserved.
The IResponse that is not a query response has no ret list. It has only the single Ret object,
from which data can be extracted.
Useful IResponse Methods/Properties You’ll Need to Use
I
MPORTANT
Not all invocations of DoRequest will result in a response with
StatusCode and StatusMessage. Certain failures will return
only an HRESULT indicating the nature of the failure.
The IResponse object has these methods and properties:
•The Detail method does different things depending on whether the response is a query
response or not. For a query response, the Detail method returns the Ret list, which can
be looped through to get the individual Ret objects. For non query responses, Detail
returns the Ret object itself.
• Notice that each request has a corresponding Ret object, for example,
ItemInventoryAddRq has the response Ret object of IInventoryRet.
• Notice also that CompanyQuery is a special request that is treated as a
non-query request and response
•The iteratorID property returns the iterator ID, which is used only for query responses
whose originating request was set up to use iterators.
•The iteratorRemainingCount property returns the number of objects remaining in the
iteration. This is used only for query responses whose originating request was set up to
use iterators..
•The retCount property returns the number of Ret objects contained in the Ret list.It is
used only for query responses.
•The StatusCode property returns the status code of the response. Every response has a
status code indicating success (the value zero) or a non zero code that indicating the
nature of the failure.
•The StatusMessage property returns the a text description of the status code in the
response. Every response has a status message.
•The StatusSeverity property returns the severity level of the error.
•The Type property identifies the response type. This is useful if you want to make sure
the response you are processing is of the expected type. You can invoke GetValue to get
the type as an enumerated value, which is the easiest way to do a comparison with an
expected type. Alternatively, you can invoke GetAsString to get the string
representation of the type.
Processing a qbXML Response
The response XML string is returned from the ProcessRequests API call that sent the
original request set to QuickBooks. The suggested way to process that qbXML response
message set is to load it into a DOM document and walk its node list as shown in the
following pseudocode and Visual Basic code sample.
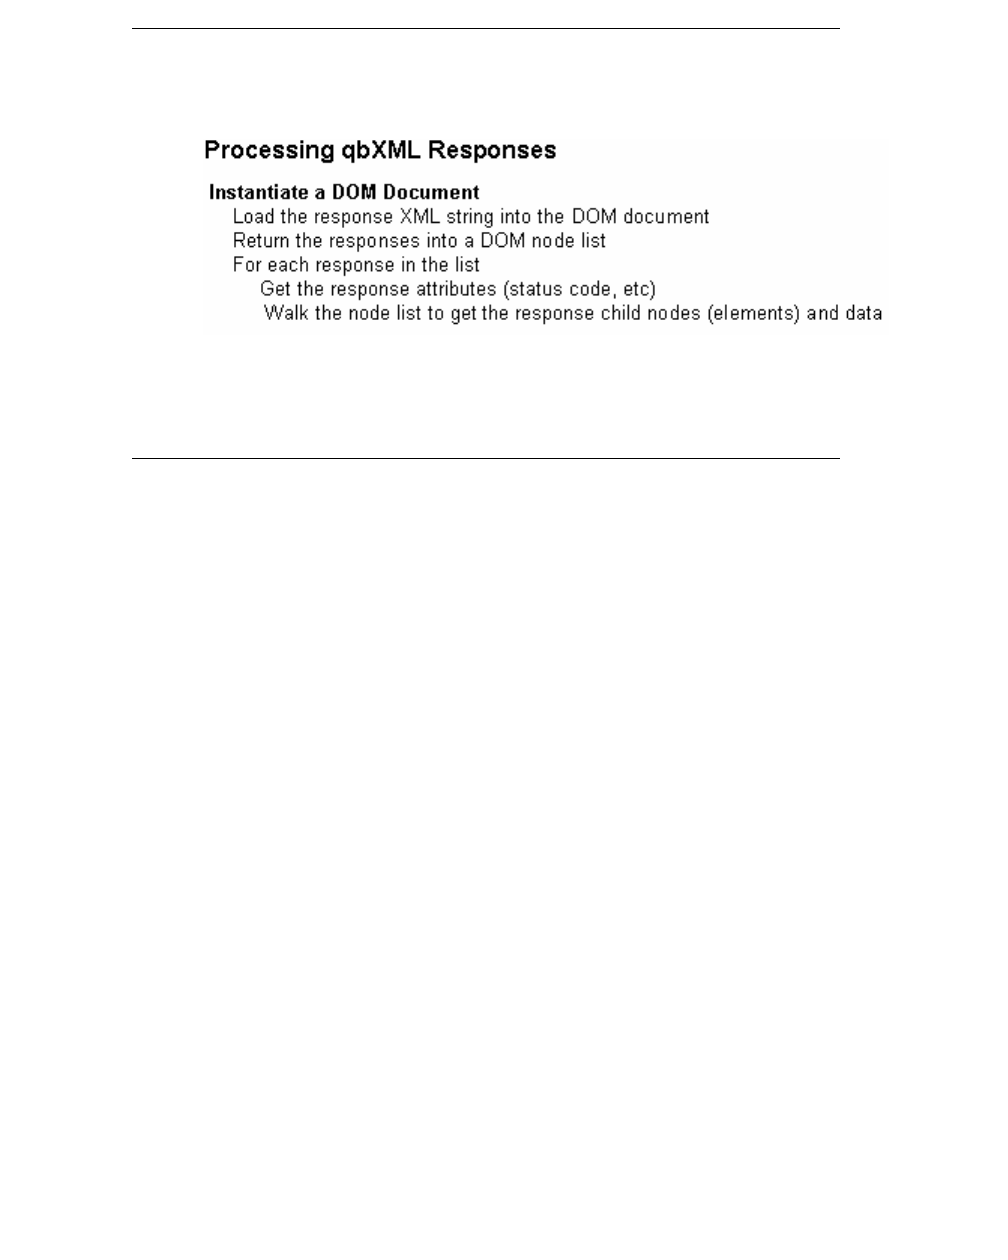
Processing a qbXML Response
73
(c) 2013 Intuit Inc. All rights reserved.
What You Need to Do to Process a Response in qbXML
Figure 7-4 on page 73 shows the general process of getting response data using DOM
documents.
Figure 7-4 Processing qbXML Responses
Processing a Response Message Set: Sample Code
The following code snippet shows how to load the response message set into the DOM
document and walk the node list for response data. Notice that there can be more than one
response in the message set to process.
Dim retStatusCode As String
Dim retStatusMessage As String
Dim retStatusSeverity As String
' Create xmlDoc Obj
Dim xmlDoc As New DOMDocument40
Dim objNodeList As IXMLDOMNodeList
' Node objects
Dim objChild As IXMLDOMNode
Dim custChildNode As IXMLDOMNode
Dim attrNamedNodeMap As IXMLDOMNamedNodeMap
Dim i As Integer
Dim ret As Boolean
Dim errorMsg As String
' Get CustomerAddRs nodes list
Set objNodeList = xmlDoc.getElementsByTagName("CustomerAddRs")
For i = 0 To (objNodeList.length - 1)
' Get the CustomerRetRs
Set attrNamedNodeMap = objNodeList.Item(i).Attributes
' Get the status Code, info and Severity
retStatusCode = attrNamedNodeMap.getNamedItem("statusCode").nodeValue
retStatusSeverity = attrNamedNodeMap.getNamedItem
("statusSeverity").nodeValue
retStatusMessage = attrNamedNodeMap.getNamedItem
("statusMessage").nodeValue
74
Chapter 7: Handling Responses Using QBFC or qbXML
(c) 2013 Intuit Inc. All rights reserved.
' Walk through the child nodes of CustomerAddRs node
For Each objChild In objNodeList.Item(i).childNodes
' Get the CustomerRet block
If objChild.nodeName = "CustomerRet" Then
' Get the elements in this block
For Each custChildNode In objChild.childNodes
If custChildNode.nodeName = "ListID" Then
resListID = custChildNode.Text
ElseIf custChildNode.nodeName = "Name" Then
resCustName = custChildNode.Text
ElseIf custChildNode.nodeName = "FullName" Then
resCustFullName = custChildNode.Text
End If
Next
End If ' End of customerRet
Next ' End of customerAddret
Next

75
(c) 2013 Intuit Inc. All rights reserved.
C
HAPTER
8 1
C
REATING
Q
UERIES
1
Query requests ask QuickBooks for data that meets specified criteria. Often, there are
multiple ways to obtain the same data from QuickBooks, but depending on the type of
query you send, the returned objects contain different elements and differing amounts of
related detail.
There are several basic types of query:
•List query, which returns list objects.
•Object-specific transaction query, which returns complete data from the specified
transactions.
•Generic transaction query, which returns a common subset of data (common to all
transaction types) for the specified transactions.
•Reports
This chapter describes list queries, object-specific queries, and the generic transaction
query. Reports are covered separately in due to their special characteristics.
When to Use a Query vs a Report
Although reports are covered in a separate chapter, it may be helpful to consider upfront
whether you need to use a simple query of the types described in this chapter or whether
you should really be using a report.
Whether you use a simple query request or a report request depends on exactly what data
you need and how you plan to use it. If you need a simple snapshot of one or more objects
then try a query request. If you need a more complete view, across multiple objects and
over a time period then use a report. Also, some collections of information are more simply
expressed in a report.
Different Ways of Using Queries to Get the Same Data
There are sometimes a number of ways to get at the same data. For example, suppose you
wanted to obtain customers with unpaid balances:
•Suppose you want to write collection letters to the customers with unpaid balances.
This task requires that you have both the names and addresses of the customers. In this
case, you could use a CustomerQueryRq and specify a TotalBalance greater than zero.
The response would return a list of customer objects.
•Suppose you want to create statements for the customers with unpaid balances. In this
case, you could use an InvoiceQueryRq and specify NotPaidOnly for PaidStatus.

76
Chapter 8: Creating Queries
(c) 2013 Intuit Inc. All rights reserved.
•A third way to obtain this information is to issue a Collections Report, which is a type
of AgingReportQueryRq. This returns the data you’re seeking, but in report form rather
than in the form of a particular QuickBooks object.
Getting a Count of Query Objects
In some instances, you may want to get an approximate count of the objects that will be
returned in a particular query, for example if you want to allocate enough memory or break
down the returned data in manageable chunks. Queries have an attribute called metaData,
which can be set so that no objects are returned in the query, just an approximate count. The
reason the count is approximate is that other users can add or delete objects between the
time you query for the count and the time you query for the objects.
Filters
Filters enable you to specify selection criteria for the objects or categories of objects that
are returned by QuickBooks in response to a query. If multiple filters are specified, the
results are ANDed. In general, filters have two general purposes:
•To obtain a set of objects that meet specified criteria
•To limit the number of objects returned in a response to a manageable quantity
Filters can be grouped into two general categories: filters that operate on lists and filters
that operate on transactions.
N
OTE
This chapter presents filters conceptually and, therefore, not
always in the same order as they appear in the actual qbXML
request. Be sure to check out the exact order and syntax for
each request in the Onscreen Reference for your target
QuickBooks product and the API you are using.
Limiting the Number of Objects Returned
There are two ways to limit the data returned from a query. The best way is to use the
iterator feature, which is specific to queries. This feature is available only to desktop
editions QB 2006 and later using qbXML spec 5.0 and greater.
The second way is to use the IncludeRetElement feature, which is a feature common to
nearly all qbXML requests, not just queries.

Limiting the Number of Objects Returned
77
(c) 2013 Intuit Inc. All rights reserved.
Using Iterators to Walk Through Large Query Returns
The iterator attribute provided with most query types also allows you to break down query
results in smaller and more manageable chunks of data. An iterator results in responses that
contain only the specified number of objects. Iterators are only valid for the application that
starts them, and they are only valid for the current QuickBooks session. (Once the current
QuickBooks session ends, or QuickBooks is shut down, all the iterators go away.)
I
MPORTANT
Starting an iterator preloads the set of things that are going
to be returned to you and gives you the specified number
(MaxReturn) that you requested in each iteration. However,
the iterator DOES NOT remember all aspects of your query
(just the filters!). Accordingly, if you use other fields in the
query, such as IncludeRetElement, then you have to repeat
those in each continuation of the iterated query!
Starting an Iteration
How do iterators work? The iterator is created when a query contains the iterator attribute
set to Start, along with a MaxReturn value specifying how many records are to be returned
in each iteration. The response to that first query iteration contains, along with the response
data, an IteratorID value that uniquely identifies that iterator. This is important because you
can have many iterators active at the same time. The following example shows how to start
an iteration
<?xml version="1.0" ?>
<?qbxml version="5.0" ?>
<QBXML>
<QBXMLMsgsRq onError="stopOnError">
<CustomerQueryRq requestID="5001" iterator="Start">
<MaxReturned>10</MaxReturned>
<IncludeRetElement>ListID</IncludeRetElement>
</CustomerQueryRq>
</QBXMLMsgsRq>
</QBXML>
The response contains the returned objects, with the iteration-related information returned
in the response attributes, as shown in the following snippet:
<CustomerQueryRs requestID = "5001" statusCode = "0" statusSeverity =
"INFO" statusMessage = "..." iteratorRemainingCount = "50" iteratorID =
"{D7355385-A17B-4f5d-B34D-F34C79C3E6FC}">
In the query responses, notice the attribute called iteratorRemainingCount that contains the
number of objects left in the iteration. You must check for a value of 0 because that means
not only that there are no more objects, but more importantly, it means that the Iterator is
now removed from memory and therefore further attempts to access it will fail: its

78
Chapter 8: Creating Queries
(c) 2013 Intuit Inc. All rights reserved.
iteratorID is no longer valid. Other than checking for this remaining count value of 0, you
can use this iteratorRemainingCount value any way you want, for example, to change the
current MaxReturned settings.
I
MPORTANT
When the remainingCount value returned in the query
response contains a value of 0, this indicates that the
corresponding Iterator can no longer be used.
Continuing the Iteration
To continue a particular iteration, you simply issue the same query request again, but this
time with the iterator value now set to Continue, and the IteratorID field set to the
IteratorID value returned from the first query iteration. Remember that the iterator DOES
NOT remember all aspects of your query (just the filters!). Accordingly, if you use other
fields in the query, such as IncludeRetElement, then you have to repeat those in each
continuation of the iterated query.
A qbXML example is shown below:
<?xml version="1.0" ?>
<?qbxml version="5.0" ?>
<QBXML>
<QBXMLMsgsRq onError="stopOnError">
<CustomerQueryRq requestID="5001" iterator="Continue"
iteratorID="{D7355385-A17B-4f5d-B34D-F34C79C3E6FC}">
<MaxReturned>10</MaxReturned>
<IncludeRetElement>ListID</IncludeRetElement> </
CustomerQueryRq>
</QBXMLMsgsRq>
</QBXML>
Once a query has been issued with an iterator, subsequent iterations (i.e., queries using that
same iteratorID and the iterator attribute set to Continue) cannot change any filtering. The
only thing that can be changed during an iteration is the MaxReturned value.
Stopping the Iteration
At any point during an iteration, you can stop the iteration and destroy the iterator (freeing
up memory) by issuing the query request with the iterator attribute set to “Stop” and the
iteratorID set to the proper iterator ID. It is a good practice to do this if you want to stop an
iteration before it is complete, otherwise the iterator will continue to be held in memory
until the current QuickBook session ends, potentially occupying a large amount of memory.
(If your application crashes before cleaning up its iterators, the iterators it was using can be
removed from memory by stopping QuickBooks and starting it again.)

Limiting the Number of Objects Returned
79
(c) 2013 Intuit Inc. All rights reserved.
I
MPORTANT
If you exhaust the iteration, so that the last query shows an
iteratorRemainingCount value of 0, you need not and in fact
cannot issue the query with the iterator attribute set to
“Stop.” The iteratorID you would have to supply is no longer
valid.
Limiting Returned Data Using IncludeRetElement
I
MPORTANT
Although IncludeRetElement is mentioned here for queries, it
is designed for use with Add and Mod operations as well, to
limit response data to those data that you want.
You use the IncludeRetElement tag in the request to limit the data that will be returned in
the response. Inside this tag you specify the name of the top-level element or aggregate that
is to be returned in the response to the request. You cannot specify elements within an
aggregate, for example, you cannot specify a City within an Address: you must specify
Address and will get the entire address.
I
MPORTANT
You can specify multiple IncludeRetElement lines if you want
multiple aggregates or elements returned. Each aggregate or
element must be specified in a separate IncludeRetElement
line. The specified tag name is not parsed, so you must be
especially careful to supply a valid tag, properly cased,
because no error is returned in the status code if you specify
an invalid tag name.
The following sample customer query shows where you need to place the
IncludeRetElement tag:
<?xml version="1.0"?>
<?qbxml version="4.0"?>
<QBXML>
<QBXMLMsgsRq onError="continueOnError">
<CustomerQueryRq requestID="2">
<IncludeRetElement>FullName</IncludeRetElement>
</CustomerQueryRq>
</QBXMLMsgsRq>
</QBXML>
The following response shows what would be returned in the customer query listed above:

80
Chapter 8: Creating Queries
(c) 2013 Intuit Inc. All rights reserved.
<?xml version="1.0" ?>
<QBXML>
<QBXMLMsgsRs>
<CustomerQueryRs requestID="2" statusCode="0" statusSeverity="Info"
statusMessage="Status OK">
<CustomerRet>
<FullName>Abercrombie, Kristy</FullName>
</CustomerRet>
<CustomerRet>
<FullName>Abercrombie, Kristy:Family Room</FullName>
</CustomerRet>
......more customer names.......
</CustomerQueryRs>
</QBXMLMsgsRs>
</QBXML>
EmployeeQuery and IncludeRetElement
Notice that prior to QuickBooks 2005, an EmployeeQueryRq would return a permissions
error if the currently logged in QuickBooks user did not have “Payroll and Employees”
permission. This would occur even if you only needed data that was not restricted.
However, because of IncludeRetElement (new in SDK 4.0), the situation has changed
somewhat. You can use that new element to specify fields in the EmployeeRet object that
do not require “Payroll and Employees” permissions. Such a query would return the
unrestricted data (such as Name) from an EmployeeQueryRq even if the logged in user
lacks "Payroll and Employees” permissions.
Using MaxReturned
Most queries include the MaxReturned element, which is actually a delimiter that specifies
the maximum number of objects to return in each response. If your application deals with
large amounts of data, it is recommended that you use this delimiter to ensure acceptable
application performance.
If you’re using filters, the filters are applied first and then the MaxReturned value is applied
if needed. When you use MaxReturned, your application is responsible for keeping track of
the last object returned and specifying the start of the next search, as described in the
following paragraphs.
Basically, you’ll follow this technique:
1. 1. Issue a query (for example, a CustomerQueryRq request) with a MaxReturned
equal to a reasonable amount of data (for example, 100). This first query does not
include a From/To specification.
2. 2. For subsequent queries, issue the same type of query (here, a CustomerQueryRq
request) and specify the starting point for the next query. For example, if you are
dealing with an alphabetized list of names, you will use the
NameRangeFilter:FromName field and specify the last object that was returned in the
previous response. Do not specify the ToName field. (The value specified for
MaxReturned will determine the number of objects returned in the response.)

List Queries: Commonly Used Filters
81
(c) 2013 Intuit Inc. All rights reserved.
List Queries: Commonly Used Filters
List queries generally support the following types of filters:
•ListID or FullName
•Active status
•Filtering by date and time modified
•Matching criterion for names
•Ranges for names
You can optionally ask that each returned object also contain the Data Extension values for
one or more Owner IDs.
ListID or FullName
List queries allow you to specify a ListID or a FullName, or to specify other criteria for the
list items that are to be returned. Specifying ListIDs is the fastest way to obtain list items
with a query.
Listing 8-1 is an example of a customer query request that specifies ListIDs.
_______ Listing 8-1 List filter using a set of ListIDs as the selection criteria
<QBXML>
<QBXMLMsgsRq onError = "continueOnError">
<CustomerQueryRq requestID = "101">
<ListID>150000-933272658</ListID>
<ListID>160000-933272658</ListID>
<ListID>180000-933272658</ListID>
<ListID>940000-1071506775</ListID>
<ListID>950000-1071506823</ListID>
</CustomerQueryRq>
</QBXMLMsgsRq>
</QBXML>
Listing 8-2 shows a customer query request that specifies a FullName to obtain all customer
objects for the purchase of an AirRow transporter by the customer DaVinci.
_______ Listing 8-2 List filter using FullName as the search criteria
<CustomerQueryRq requestID = "591">
<FullName>DaVinci:AirRow</FullName>
</CustomerQueryRq>

82
Chapter 8: Creating Queries
(c) 2013 Intuit Inc. All rights reserved.
Active Status
List queries allow you to select a list object based on whether it is currently active. The
ActiveStatus filter allows you to specify ActiveOnly (the default), InactiveOnly, or All.
Filtering by Date Modified
List queries can filter for objects modified during a specified range of dates. Using the
FromModifiedDate and ToModifiedDate filters, you can specify “From” and “To”
modification dates, or simply a beginning or ending cutoff modification date. Dates are of
type DATETIMETYPE, which specifies both date and time (up to seconds). Listing 8-3
shows a customer query request for all customer objects that are currently enabled for use
by QuickBooks and that also have been modified any time between the beginning of day on
October 12, 2003, and end of day on October 15, 2003 (see “Default Values for Date/
Time,” below).
______ Listing 8-3 List filter using ActiveStatus and inclusive date range
<CustomerQueryRq requestID = "541">
<ActiveStatus>ActiveOnly</ActiveStatus>
<FromModifiedDate>2003-10-12</FromModifiedDate>
<ToModifiedDate>2003-10-15</ToModifiedDate>
</CustomerQueryRq>
Default Values for Date/Time
The following tables list default values assigned by the SDK when all or part of the time is
not specified. When a time zone is not specified, local time is assumed.
Table 8-1 Default values for “From” date/times
NOTE: If “From” is not specified at all, the start period is the earliest date possible.
“From” is
specified Start period Example
Date only Beginning of the day 10/1/02 means 10/1/02 00:00:00
Date and hour only Beginning of the hour 10/1/02 8 means 10/1/02 8:00:00
Date, hour, and
minute only
Beginning of the minute 10/1/02 8:20 means 10/1/02 8:20:00
Date, hour, minute,
and second
The second 10/1/02 8:20:40 means 10/1/02 8:20:40

List Queries: Commonly Used Filters
83
(c) 2013 Intuit Inc. All rights reserved.
Table 8-2 Default values for “To” date/times
NOTE: If “To” is not specified at all, the end period is up to the last date used.
Date Ranges (Versions 1.1 and 2.0)
The acceptable range of dates for FromModifiedDate and ToModifiedDate changed from
SDK version 1.1 to version 2.0.
•For version 2.0 and above, the range is from 1970-01-01 to 2038-01-19T03:14:07
(2038-01-18T19:14:07-08:00 PST).
•For versions 1.1 and 1.0, the range is different for list objects and transaction objects.
For list objects, the range is from 1970-01-01 and 2038-01-19T03:14:07 (2038-01-
18T19:14:07-08:00 PST).
For transaction objects in versions 1.1 and 1.0, the range is from 01/01/1901 to 12/31/
9999.
Match Criterion for Names
Another useful filter available in most list queries is the NameFilter, which allows you to
obtain list objects that match a specified string. You specify both the string itself (which can
be all or a portion of a FullName value) and the MatchCriterion, which can be StartsWith,
Contains, or EndsWith. For example, you could use this filter with a customer query and
request all customers whose names start with “Mac.” Or you could perform a customer
query for all elements that contain “kitchen” as part of their full name.
Ranges for Names
Another alternative is to create a query that specifies a range of names for the list objects to
be returned. Using the NameRangeFilter, you can specify both the starting and ending
points of the range, only the start of the range, or only the end of the range. String values
for names are case-insensitive. In a sorted list, punctuation characters are first, followed by
numeric characters, and then alphabetical characters. Values progress from 0 to 9 and from
A to Z. If both FromName and ToName are specified, ToName must be lexicographically
higher than FromName. See the section “Limiting the Number of Objects Returned,”
beginning on page 76, for information on how to use the name range filter in conjunction
with MaxReturned.
“To” is specified Start period Example
Date only End of the day 10/1/02 means 10/1/02 23:59:59
Date and hour only Beginning of the hour 10/1/02 8 means 10/1/02 8:00:00
Date, hour, and
minute only
Beginning of the minute 10/1/02 8:20 means 10/1/02 8:20:00
Date, hour, minute,
and second
The second 10/1/02 8:20:40 means 10/1/02 8:20:40

84
Chapter 8: Creating Queries
(c) 2013 Intuit Inc. All rights reserved.
Special Information Contained in an AccountRet Object
This section provides information concering the AccountRet object, which is contained in
the response to an AccountQuery request.
Special Account Type
Most QuickBooks accounts are created in response to an explicit request by the small
business owner. “Special accounts” are accounts created automatically by QuickBooks for a
special purpose, usually as a side-effect of creating some other transaction. The
SpecialAccountType value is an enumerated type and is returned only if the queried
account is a special account. Examples of special account types are AccountsPayable,
AccountsReceivable, CostOfGoodsSold, SalesOrders, UncategorizedExpenses, and
UndepositedFunds.
If QuickBooks needs to create one of its special accounts and the name it uses for this
account type has already been used (because a manually created account was assigned the
same name), QuickBooks prepends an asterisk (*) to the account name (for example,
*UndepositedFunds).
Tax Line Information
The tax line information returned in the AccountRet response relates to the tax form the
user selected for the Company (for example, Form1120, Form1120S, Form1065). To
determine what tax form the tax lines relate to, you can query the Company object and
inspect the TaxForm field returned in the CompanyRet object.
The tax line information (TaxLineInfoRet) contains two elements:
• TaxLineID: an internal number used by QuickBooks to identify a particular line in the
specified tax form
• TaxLineName: a descriptive name of the line on the specified tax form
Note that if the user changes the specified tax form, or if the tax form changes from year to
year, the tax line information previously returned is no longer accurate.
Cash Flow Classification
If the user assigned a cash flow classification in QuickBooks, you can obtain the
classification for a given account from the AccountRet object. The user assigns this value to
an account in QuickBooks by selecting Preferences > Reports & Graphs > Company
Preferences > Classify Cash. The SDK defines the following enumerated values for the
CashFlowClassification element:
•Operating: corresponds to the Operating classification in QuickBooks
•Investing: corresponds to the Investing classification in QuickBooks
•Financing: corresponds to the Financing classification in QuickBooks
•NotApplicable: this account cannot be assigned a cash flow classification

List Queries: Commonly Used Filters
85
(c) 2013 Intuit Inc. All rights reserved.
•None: no cash flow classification has yet been assigned to this account
Special Filters
Some queries contain special filters useful in a particular context. These filters include the
following:
•Account type
•Total balance
•ToDo query
Account Type
The AccountType filter, contained in the AccountQueryRq, allows you to specify an
account type (Accounts Payable, Accounts Receivable, Bank, CreditCard, and so on) that
enables you to focus on data for a particular type of account.
Total Balance
Queries for customer and vendor entity lists allow you to specify a TotalBalance filter. This
filter allows you to specify an amount and an operator (LessThan, LessThanEqual, Equal,
GreaterThan, GreaterThanEqual). Only the customers or vendors with balances that meet
the specified criteria for this total balance will be returned. The returned objects are sorted
by TotalBalance, with items in ascending order (by TotalBalance) for the operators
LessThan, LessThanEqual, and Equal—for example:
LessThan 100:
-50
-10
+10
+70
+99
The items are in descending order (by TotalBalance) for the operators GreaterThan and
GreaterThanEqual—for example:
GreaterThan 1000:
50,000
10,000
5,000
2,000
ToDo Query
Queries for ToDo lists allow you to specify a DoneStatus filter for the elements to be
returned. You can specify NotDoneOnly (the default), DoneOnly, or All for this filter.

86
Chapter 8: Creating Queries
(c) 2013 Intuit Inc. All rights reserved.
Transaction Queries: Commonly Used Filters
Transaction queries generally support the following types of filters:
•TxnID or reference number
•Date filters
•Entity filters
•Account filters
•Reference number filters
You can also modify the data returned to you by including one or both of these elements:
•IncludeLinkedTxns
•IncludeLineItems
TxnID or Reference Number
Transaction queries allow you to specify a TxnID or a RefNumber, or to specify certain
criteria for transaction objects to be returned. Remember that TxnIDs, because they are
assigned by QuickBooks, are guaranteed to remain the same. Specifying TxnIDs is the
fastest way to obtain transactions with a query.
Date Filters
Because transactions are time-stamped, date filters are a useful query mechanism. You can
filter dates based on the following:
•When the object was created or modified (ModifiedDateRangeFilter). This filter uses a
timestamp assigned by QuickBooks.
•A date assigned to the transaction by the small business owner (TxnDateRangeFilter).
•A DateMacro (for example, ThisWeekToDate, ThisMonthToDate, LastWeek,
LastFiscalQuarter, LastFiscalYear).
Filtering by Modification Date
As with list queries, transaction queries can filter for transactions modified during a
specified range of dates. Using the ModifiedDateRangeFilter, you can specify “From” and
“To” modification dates, or simply a beginnning or ending cutoff for the modification date.
Dates are of type DATETIMETYPE, which specifies time in terms of year/month/day/
hours/minutes/seconds.

Transaction Queries: Commonly Used Filters
87
(c) 2013 Intuit Inc. All rights reserved.
Filtering by Transaction Date
Similarly, transaction queries can filter for transactions that have dates assigned during a
specified range of dates. You can specify “From” (FromTxnDate) and “To” (ToTxnDate)
dates, or simply a beginning or ending cutoff date. Dates are of type DATETYPE, which
specifies time in terms of year/month/day.
Filtering by QuickBooks Date Macro
The SDK queries also support the date macros commonly used in QuickBooks, such as
ThisWeekToDate, ThisFiscalQuarterToDate, LastMonth, and so on. Do not include
DateMacro if you are specifying a FromTxnDate or ToTxnDate.
Entity Filters
You will often use entity or name filters to specify names of customers, vendors,
employees, or other names associated with a transaction object. Entity filters are often used,
for example, to obtain invoices or payments for a specific customer or set of customers or
to query bills received from a specific vendor.
The entity filter allows you to specify a ListID, FullName, FullNameWithChildren, or
ListIDWithChildren. FullNameWithChildren and ListIDWithChildren include all objects
pertaining to the specified FullName or ListID as well as all the descendants of those
objects.
Listing 8-4 shows an example of an invoice query that includes both a date range filter and
an entity filter. This request asks QuickBooks to return all invoices pertaining to the Jones’s
kitchen that were modified between January 2 and January 5, 2002.
_______ Listing 8-4 Transaction filter using date range and entity filters
<InvoiceQueryRq requestID = "73">
<ModifiedDateRangeFilter>
<FromModifiedDate>2002-01-02</FromModifiedDate>
<ToModifiedDate>2002-01-05</ToModifiedDate>
</ModifiedDateRangeFilter>
<EntityFilter>
<FullName>Jones:Kitchen</FullName>
</EntityFilter>
</InvoiceQueryRq>
Listing 8-5 shows an item inventory query that asks for all items with the word bolt in their
name. The filter is case-insensitive.

88
Chapter 8: Creating Queries
(c) 2013 Intuit Inc. All rights reserved.
______ Listing 8-5 ItemInventoryQueryRq using a match criterion for a name filter
<ItemInventoryQueryRq requestID = "795944”/>
<NameFilter>
<MatchCriterion>Contains</MatchCriterion>
<Name>bolt</Name>
</NameFilter>
</ItemInventoryQueryRq>
Account Filters
An account filter is another useful way to focus on transactions related to a particular
account or set of accounts. You can specify a ListID, FullName, ListIDWithChildren, or
FullNameWithChildren for the account.
Be sure you use an account in the account filter that is appropriate for the transaction you
are querying for. For example, an account filter for invoices must be an Accounts
Receivable type account or no transactions can be returned. (A common mistake is to
expect transactions to be returned in a query for the accounts affected by item or expense
lines.)
The account filter only operates properly on the main account associated with a transaction.
For example, the main accounts for invoices are A/R accounts, bills are associated with A/P
accounts, and so on. Suppose you have an invoice for the A/R account “My AR Account”
that includes a line item, and the funds from that item are accounted for in an income
account called “Sales.” Using “Sales” in the account filter will not return that invoice—in
fact, it won’t return any invoices because “Sales” is not an A/R account. If you use the
account “My AR Account” in the account filter, the invoice would be returned (assuming
the rest of the filters included the invoice in the return list).
Listing 8-6 asks QuickBooks to return all invoices for the
AccountsReceivable:SportingGoods account that were created during the last month.
______ Listing 8-6 Query request using date range and account filters
<InvoiceQueryRq requestID = "73">
<TxnDateRangeFilter>
<DateMacro>LastMonth</DateMacro>
</TxnDateRangeFilter>
<AccountFilter>
<FullName>AccountsReceivable:SportingGoods</FullName>
</AccountFilter>
</InvoiceQueryRq>
Listing 8-7 uses date range and entity filters to request all bills from its landlord, New
World Real Estate, for rent in all of its San Jose offices from January 01, 2003, through
March 31, 2003.

Transaction Queries: Commonly Used Filters
89
(c) 2013 Intuit Inc. All rights reserved.
_______ Listing 8-7 Query request using modified date range and entity filters
<BillQueryRq requestID = "81">
<ModifiedDateRangeFilter>
<FromModifiedDate>2003-01-01</FromModifiedDate>
<ToModifiedDate>2003-03-31</ToModifiedDate>
</ModifiedDateRangeFilter>
<EntityFilter>
<FullNameWithChildren>NewWorldRealEstate:rent:SanJoseOffices
</FullNameWithChildren>
</EntityFilter>
</BillQueryRq>
Reference Number Filters
You can filter for transactions by supplying specific reference numbers or by specifying a
range of reference numbers. If you are interested only in a few invoices, you can filter by
reference number. Such focused queries are particularly useful in the testing and
development phases, where you will probably want to run repeated controlled tests on the
same object or set of objects.
Match Criterion for Reference Numbers
The RefNumberFilter allows you to obtain transactions that match a specified criterion. The
match criterion can be StartsWith, Contains, or EndsWith.
Ranges for Reference Numbers
Another alternative is to specify a range of reference numbers using the
RefNumberRangeFilter and specifying the “From” and “To” reference numbers. You can
specify the starting and ending points of the range, or only the starting or ending point of
the range.
What If a Transaction Has No Reference Number?
Some transactions do not have a reference number. These transactions are ignored by
queries that use RefNumber or RefNumberFilter. When a RefNumberRangeFilter is
used and both “From” and “To” fields are specified, these transactions are also ignored.
However, if the RefNumberRangeFilter is used with only the “From” field or the “To”
field specified, QuickBooks returns the transactions that have no reference numbers.
Using RefNumberCaseSensitive Instead of RefNumber
Prior to QuickBooks 2006, if the reference number contained letters, not just numeric
digits, RefNumber could be very slow. The RefNumberCaseSensitive tag was provided for
this case to improve performance. However, starting with QuickBooks 2006, RefNumber
and RefNumberCaseSensitive provide the same good performance. The
RefNumberCaseSensitive tag can be used if case sensitivity is desired, however.

90
Chapter 8: Creating Queries
(c) 2013 Intuit Inc. All rights reserved.
Paid Status
The PaidStatus filter searches for invoices or bills on the basis of whether their balances are
paid or not. If you specify PaidOnly for this filter, QuickBooks returns only those bills or
invoices that are completely paid (that is, closed). If you specify NotPaidOnly, QuickBooks
returns those bills or invoices that have a non-zero balance. (You will probably not bother
specifying All for this filter, since that is the equivalent of not specifying the filter.)
Requesting Additional Data
The following elements allow you to request that additional data be returned by a given
query:
•IncludeLinkedTxns
•IncludeLineItems
A linked transaction is a transaction that is associated with the original transaction in some
way. For example, a credit memo could be linked to a customer invoice, thereby adding
credit to a customer’s account. A line item is a line that adds detail to a transaction object
such as an invoice or a bill. A transaction object can be composed of multiple line items.
By default, these flags are False: queries that lack these tags will not return any line items
or linked transactions. If you are interested in this additional information, specify True.
Special Queries
A number of special queries assist you with common tasks:
• PreferencesQuery - allows you to check whether certain operations will be permitted
before you attempt to perform them. This way, you can anticipate errors that would be
returned by QuickBooks and take appropriate action ead of time.
• HostQuery - returns information about the QuickBooks product and version as well as
the versions of the qbXML specification.
• CompanyQuery - returns basic information about a QuickBooks company file
• CompanyActivityQuery - This query allows you to determine the date when the
company file was last restored. If you receive Status Code 3240 (Time creation
mismatch), you will need to identify the most up-to-date copy of the company file.
• BillToPayQuery - returns the transaction ID for all open bills and credits.
• ReceivePaymentToDepositQuery - returns the transaction IDs for all customer
payments that need to be deposited.
The Generic TransactionQuery

Special Queries
91
(c) 2013 Intuit Inc. All rights reserved.
TransactionQuery is a generic transaction query that provides functionality (e.g. filters)
similar to the Advanced Find window in the QuickBooks UI. It allows you to search for
transactions across different transaction types. In contrast to the other transaction-specific
queries, the TransactionQuery only returns data common to all transactions, such as TxnID,
type, dates, accountRef, and so on.
Accordingly, if additional and more transaction-specific data is required, a subsequent call
to the desired query can be used to get that transaction-specific data. For example, the
TransactionQuery can be used to present all transactions in a certain date range, then the
user can select a particular transaction, say an invoice transaction. In response to this
choice, you could do an InvoiceQuery to pull up all of the invoice data, similar to
QuickZoom in the QuickBooks UI.
I
MPORTANT
TimeTracking transactions are not supported in the generic
TransactionQuery. (This mirrors the QuickBooks UI where
TimeTracking transactions aren’t available in the Find
functionality.)
TransactionQuery and Access Permissions
QuickBooks access permissions are obeyed in this query. The behavior varies depending on
how you use (or don’t use) the transaction type filter. If you set the transaction type filter to
"All" (or if you don't set it at all), the query searches only those transaction types that are
permissible types for the user currently logged in. If instead of "all," you specify a
transaction type that the currently logged in user is not permitted to access, you get a
runtime error, even if other permissible transaction types were specified as well.
Finally, the transaction type filter is subject to sensitive data access level restrictions and
payroll subscription status.
Filters for TransactionQuery
The TransactionQuery has filters similar to those available for reports, although the filter
names are special toTransactionQuery, including:
•TransactionFilter, where you can specify one or more specific transaction types or “All”
types if you wish.
•TransactionDetailLevelFilter, where you can specify the detail level of the query
results: all results, summary only (the default), or all except summary
.
(Summary only
refers to the transaction as a whole, whereas all except summary refers to the
transaction lines.)
•TransactionPostingStatusFilter, where you can specify transactions based on posting
status. Valid values are posting, non-posting, or either (the default). (Posting status
refers to whether QuickBooks records a transaction in one of your account registers.)
92
Chapter 8: Creating Queries
(c) 2013 Intuit Inc. All rights reserved.
TransactionPaidStatusFilter, where you can search for "open" transactions, i.e. transactions
with a remaining balance (for example, credits not fully applied or invoices not fully paid).
Valid values are closed, open, or either (the default).
Before You Begin
93
(c) 2013 Intuit Inc. All rights reserved.
C
HAPTER
9 1
G
ENERATING
R
EPORTS
1
Reports provide the QuickBooks user with multiple views of data over a specified time
period. They can span multiple data types and can be customized in a wide variety of ways.
The QuickBooks SDK supports most of the report types and customizations and a number
of the filters currently found in QuickBooks. The SDK also supports the Custom Summary
and Custom Transaction Detail reports, which can be used when no preset report type exists
to fill a given need.
Before You Begin
Before you begin working with reports in the SDK, you need a thorough understanding of
reports in QuickBooks. Specifically, you should be knowledgeable about the following:
•What preset reports are available in QuickBooks (both summary and detail reports)
•The purpose of these reports
•What features in the preset reports can be customized
The QuickBooks Report Finder is a useful tool that shows samples of all preset reports. It
allows you to explore the different report types and discover exactly which parameters can
be easily modified.
Categories of Reports
For efficiency and convenience, the SDK groups QuickBooks reports into a number of
logical categories. Each category has a corresponding request and response message, as
shown in Table 9-1.
Table 9-1 Categories of Reports in the SDK
Category Request Name Response Name
Aging AgingReportQueryRq AgingReportQueryRs
BudgetSummary BudgetSummaryReportQueryRq BudgetSummaryReportQueryRs
Custom Detail CustomDetailReportQueryRq CustomDetailReportQueryRs
Custom Summary CustomSummaryReportQueryRq CustomSummaryReportQueryRs
General Detail GeneralDetailReportQueryRq GeneralDetailReportQueryRs
General Summary GeneralSummaryReportQueryRq GeneralSummaryReportQueryRs
Job JobReportQueryRq Job ReportQueryRs
PayrollDetail PayrollDetailReportQueryRq PayrollDetailReportQueryRs

94
Chapter 9: Generating Reports
(c) 2013 Intuit Inc. All rights reserved.
All reports in a given category have similar customizable data. (The reports themselves,
however, may differ widely from each other.)
Tables 4-2 through 4-9 list the reports in each category.
General Summary Reports
The General Summary Reports category is the largest category for summary reports. In
addition to common customizations, the reports within this category can be customized by
the number of columns that are returned and by period comparisons for the data in the
report.
Table 9-2 General Summary Reports
PayrollSummary PayrollSummaryReportQueryRq PayrollSummaryReportQueryRs
Time TimeReportQueryRq TimeReportQueryRs
Balance Sheet Previous Year Comparison
Balance Sheet Standard
Balance Sheet Summary
Customer Balance Summary
Expense by Vendor Summary
Income by Customer Summary
Income Tax Summary
Inventory Stock Status by Item
Inventory Stock Status by Vendor
Inventory Valuation Summary
Physical Inventory Worksheet
Profit and Loss by Class
Profit and Loss by Job
Profit and Loss Previous Year Comparison
Profit and Loss Standard
Profit and Loss YTD Comparison
Purchase by Item Summary
Purchase by Vendor Summary
Sales by Customer Summary
Sales by Item Summary
Sales by Rep Summary
Sales Tax Liability
Sales Tax Revenue Summary
Trial Balance
Vendor Balance Summary
Category Request Name Response Name

Categories of Reports
95
(c) 2013 Intuit Inc. All rights reserved.
Job Reports
The Job Reports category includes both summary and transaction detail reports. They can
be customized only by date range, by column summarization, and by common filters. Some
job reports require a customer:job reference in order to work.
Table 9-3 Job Reports
Time Reports
The Time Reports category includes summary and detail reports related by time.
Summarized columns can be customized in these reports.
Table 9-4 Time Reports
Aging Reports
The Aging Reports category includes summary and detail reports related to aging criteria.
Table 9-5 Aging Reports
Item Estimates vs. Actual
Item Profitability
Job Estimates vs. Actuals Details
Job Estimates vs. Actuals Summary
Job Profitability Detail
Job Profitability Summary
Time by Item
Time by Job Detail
Time by Job Summary
Time by Name
AP Aging Detail
AP Aging Summary
AR Aging Detail
AR Aging Summary
Collections Report

96
Chapter 9: Generating Reports
(c) 2013 Intuit Inc. All rights reserved.
Budget Summary Reports
The Budget Summary Reports category consists of all summary budget reports.
Table 9-6 Budget Summary Reports
General Detail Reports
The General Detail Reports category consists exclusively of transaction detail reports.
Table 9-7 General Detail Reports
Balance Sheet Budget Overview
Balance Sheet Budget vs. Actual
Profit and Loss Budget Overview
Profit and Loss Budget vs. Actual
Profit and Loss Budget Performance
1099 Detail
Audit Trail
Balance Sheet Detail
Check Detail
Customer Balance Detail
Deposit Detail
Estimates by Job
Expense by Vendor Detail
General Ledger
Income by Customer Detail
Income Tax Detail
Inventory Valuation Detail
Job Progress Invoices vs. Estimates
Journal
Missing Checks
Open Invoices
Open POs
Open POs by Job
Open Sales Order By Customer
Open Sales Order By Items
Pending Sales
Profit and Loss Detail
Purchase by Item Detail

Categories of Reports
97
(c) 2013 Intuit Inc. All rights reserved.
Payroll Summary Reports
Payroll Summary Reports can be generated if your application is accessing a company file
that is currently signed up for a subscription to a payroll service. (If your application is not
signed up, it will receive an error when it attempts to generate a report in this category.)
The restrictions noted above about payroll reports requiring the use of the Intuit Payroll
service do not apply to the QuickBooks sample companies. You can still test out these
reports on the sample companies without subscribing to the payroll service. For all other
companies, however, the company must be subscribed.
Table 9-8 Payroll Summary Reports
Payroll Detail Reports
Payroll Detail Reports can be generated if your application is accessing a company file that
is currently signed up for a subscription to a payroll service. (If your application is not
signed up, it will receive an error when it attempts to generate a report in this category.)
The restrictions noted above about payroll reports requiring the use of the Intuit Payroll
service do not apply to the QuickBooks sample companies. You can still test out these
reports on the sample companies without subscribing to the payroll service. For all other
companies, however, the company must be subscribed.
Purchase by Vendor Detail
Sales by Customer Detail
Sales by Item Detail
Sales by Rep Detail
Transaction Detail by Account
Transaction List by Customer
Transaction List by Date
Transaction List by Vendor
Unbilled Costs by Job
Unpaid Bills Detail
Vendor Balance Detail
Employee Earnings Summary
Payroll Liability Balances
Payroll Summary

98
Chapter 9: Generating Reports
(c) 2013 Intuit Inc. All rights reserved.
Table 9-9 Payroll Detail Reports
Custom Summary and Detail Reports
If you want complete control over the report content, you will be interested in both the
Custom Summary Report and the Custom Transaction Detail Report. Custom reports do not
make any assumptions about the data you are interested in—they require you to specify
exactly what data you want included in the report. Your application has to select the row
and column axes, and it controls the output using common customization parameters for
dates and filters. For the Custom Transaction Detail Report, you must specify all the
include columns for the transactions you want returned in the report. For these reports, you
are also required to specify a date element (a DateMacro or a custom date range).
Default Reports
A default report is generated when the application issues a request that contains only the
type of the report. For example, the following report request would generate a default AP
Aging Summary report:
<QBXML>
<QBXMLMsgsRq>
<AgingReportQueryRq>
<AgingReportType>APAgingSummary</AgingReportType>
</AgingReportQueryRq>
</QBXMLMsgsRq>
</QBXML>
A default report generated by the SDK uses the same default parameters as are used in the
QuickBooks user interface.
N
OTE
Different editions of QuickBooks (for example, the Accountant
edition, the Contractor edition) may produce slightly different
versions of a given report. For example, in a standard Profit
and Loss report, the Accountant edition replaces the Amount
column with two columns: Credit and Debit. If such
Employee State Taxes Detail
Payroll Item Detail
Payroll Review Detail
Payroll Transaction Detail
Payroll Transactions by Payee

A Practical Approach
99
(c) 2013 Intuit Inc. All rights reserved.
differences are a concern, you may want to test the different
QuickBooks editions for a given report so that your application
can handle them appropriately. To isolate your program from
this uncertainty, always specify the columns that are needed
by your application using the IncludeColumn element.
A Practical Approach
Because the SDK produces the same reports and offers similar customizations as the
QuickBooks user interface, the following practical approach is suggested for creating a
report request using the SDK:
1. In the QuickBooks user interface, select the QuickBooks report that presents the basic
type of data you need (for example, Purchase by Vendor Summary).
2. Also in the QuickBooks user interface, modify the report, if necessary. For example,
you might want to display columns by quarter, and you might want to add subcolumns
for the previous period.
3. In the QuickBooks user interface, generate the report and see if you’re satisfied. If not,
continue modifying the report until you have the desired results.
4. Make a list of the modifications you made to the preset report (fields and values).
5. Determine which fields in the SDK request for this report type correspond to each of
the user interface features that you used to modify the report. (In our example, we
would look at the fields for the request GeneralSummaryReportQueryRq, since the
Purchase by Vendor Summary report is in the General Summary Report category.)
6. Construct the request in the SDK using either the qbXML Request Processor API or the
QBFC API.
The request will specify the standard report name, as well as the fields and values for each
of the modifications you want to make. The following section presents an example of how
the user interface features in QuickBooks correspond to the fields in an SDK report request.
Creating a Report Request
This section uses a common report, Profit and Loss Standard, as an example that shows the
correspondence between user interface features in QuickBooks and fields in an SDK report
request. First, it presents a general summary of how the SDK translates user interface
features into name/value pairs. Subsequent sections provide further detail on how the SDK
implements specific customizable features.
Modifying a Profit and Loss Standard Report
This section shows how the QuickBooks user interface fields correspond to SDK fields
used in request messages by qbXML and QBFC. As an example, it uses the Profit and Loss
Standard Report. In the SDK, this report belongs to the GeneralSummaryReport category.
In qbXML, the request begins:
100
Chapter 9: Generating Reports
(c) 2013 Intuit Inc. All rights reserved.
<GeneralSummaryReportQueryRq requestID=”
4235
”>
<GeneralSummaryReportType>ProfitAndLossStandard
</GeneralSummaryReportType>
.
.
.
</GeneralSummaryReportQueryRq>
The General Summary report request contains the following fields, which correspond to
features on the QuickBooks Modify Report screen for the Profit and Loss report (see Figure
9-1):
• ReportDateMacro or ReportPeriod - for setting the Report Date Range
• SummarizeColumnsBy - specifies how data is organized in the report
• IncludeSubcolumns - specifies whether or not you want the extra subcolumns
included in your report
• ReportCalendar - specifies whether you want the report for the fiscal, calendar, or
income tax year. In QuickBooks, this choice appears when the user presses the
Advanced button.
• ReturnRows - specifies whether you want the report to include only rows with active
information, all rows, or only rows with nonzero values. In QuickBooks, this choice
appears when the user presses the Advanced button.
• ReturnColumns - specifies whether you want the report to include only columns with
active information, all columns, or only columns with nonzero values. In QuickBooks,
this choice appears when the user presses the Advanced button.
• ReportBasis - specifies whether to use accrual or cash basis for the report. (A value of
“None” is used only for reports that do not allow a report basis setting; see Table 9-18.)
Date Range
The SDK parallels the QuickBooks user interface and allows you to choose whether you
want the report to cover a date range explicitly specified by you in the FromReportDate and
ToReportDate fields, or whether you want to choose one of the standard report date ranges
using the ReportDateMacro. Enumerated values for the ReportDateMacro field correspond
directly to those in the user interface drop-down list—for example, Today, ThisWeek,
ThisWeekToDate, and so on.
“SummarizeColumnsBy” Field
The SummarizeColumnsBy field specifies how the data is organized in the report and is a
common modification to many reports. The enumerated values available in the SDK for
this field parallel those of the QuickBooks user interface and are time-based, entity-based,
item-based, and so on (for example: Day, Month, Year; Employee, Customer, Vendor; and
PayrollItemDetail, ItemDetail, ItemType). In the example in “A Practical Approach” (page
99), you would set SummarizeColumnsBy equal to “Quarter.”

Creating a Report Request
101
(c) 2013 Intuit Inc. All rights reserved.
“SummarizeRowsBy” Field
The SummarizeRowsBy field is used in the General Detail, Custom Detail, Custom
Summary, and Payroll Detail reports. It is an optional element in the General Detail and
Payroll Detail reports. Each transaction detail report has a default value for
SummarizeRowsBy, and this is usually the value you will use. For custom reports, you
must specify this field. This field determines the way QuickBooks will sumarize the
transaction data in the report.
Note that it is possible to select a combination of values for the SummarizeRowsBy and
SummarizeColumnsBy fields that are valid but that do not make sense for a given report
type. For example, specifying “Account” for SummarizeColumnsBy and
“IncomeStatement” for SummarizeRowsBy does not generate a programmatic warning, but
the returned report is invalid.
“IncludeSubcolumns” Field
The IncludeSubcolumns field is a Boolean value. In general, False specifies not to include
any subcolumn information. True specifies to include certain default subcolumns that have
been defined for a given report type. You do not have to use all of the returned subcolumn
information even if you ask for it. You can process only the data you’re interested in.
The following sections provide details on exactly which subcolumn information is returned
for specific types of reports when you specify True for this field.
In the example in “A Practical Approach” (page 99), you would set IncludeSubcolumns to
True because you want to add subcolumns for the previous period. When you process the
response, you would simply discard the subcolumn information you weren’t interested in.
Subcolumns that are available in the user interface but unavailable in the SDK, such as $
Change and % Change, can be calculated using values from returned data elements.
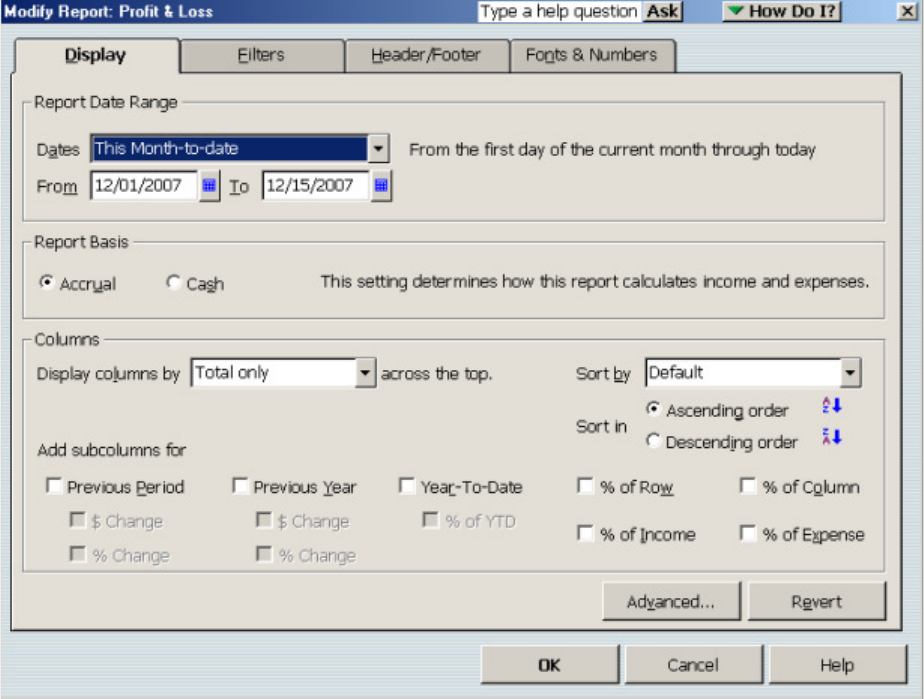
102
Chapter 9: Generating Reports
(c) 2013 Intuit Inc. All rights reserved.
Figure 9-1 SDK field names for a General Summary report request
Default Values for Time and Job Reports (IncludeSubcolumns)
By default, all subcolumns are returned for Time and Job reports. If you specify False for
IncludeSubcolumns, one subcolumn—Average Cost—will always be returned (otherwise
the report would contain no data).
Default Values for Summary Reports (IncludeSubcolumns)
For Summary reports, specifying True for IncludeSubcolumns will cause the following
default values to be turned on (with certain qualifications described in the next section):
•Previous Period
•Previous Year
•% of Row
•% of Column

Creating a Report Request
103
(c) 2013 Intuit Inc. All rights reserved.
Previous Period/ Previous Year (IncludeSubcolumns)
If you specify True for IncludeSubcolumns, the PreviousPeriod and PreviousYear
subcolumns will be turned on for reports that have this information, provided that
ReportDateMacro is not set to ALL or FromDate is provided.
Special Case: Sales By ItemSummary Report
The SalesByItemSummary report has eight subcolumns that are included by default: Qty,
Amount, % of Sales, Avg. Price, Average Cost, COGS, Gross Margin, Gross Margin %. If
you specify False, four columns are turned off and these columns remain: Qty, Amount, %
of Sales, Avg. Price.
Report Basis
Certain reports support ReportBasis, as shown in Table 9-18. If you specify ReportBasis for
a report type that does not support it, an error is returned.
For requests that support ReportBasis, you can specify Cash, Accrual, or None. The value
“None” in a report request is equivalent to omitting the ReportBasis field: it means “do not
change this value; use the default setting.” This default setting can be either the setting used
in the report Preferences or it can be the QuickBooks default setting for a given type of
report. (In general, do not specify a ReportBasis unless you have a specific need to specify
either Cash or Accrual.) QuickBooks follows the setting from Preferences > Reports and
Graphs.
In the report response, the SDK returns “None” as the value for the ReportBasis field for
reports that do not support this field.
Setting Up Filters for a Profit and Loss Standard Report
The General Summary report request contains the ReportAccountFilter field, which
corresponds to the Filter drop-down list in the QuickBooks Filters screen for the Profit and
Loss report (see Figure 9-2). The SDK allows you to include the following types of filters:
• ReportAccountFilter - allows you to report on a specific account type or grouping of
account types (for example, accounts payable, accounts receivable, liability) or an ID
or FullName
• ReportClassFilter - Allows you to report on a particular class of transactions you have
defined
• ReportDetailLevelFilter - allows you to limit the amount of detail returned in a given
report
• ReportEntityFilter - allows you to report on a specified name type (for example,
customer, employee, vendor, or other) or an ID or FullName
• ReportItemFilter - allows you to report on a specified item (for example, discount,
inventory, non-inventory) or an ID or FullName
• ReportModifiedDateRangeFilter or ReportModifiedDateRangeMacro - allow you
to report on transactions created or modified in a given time frame
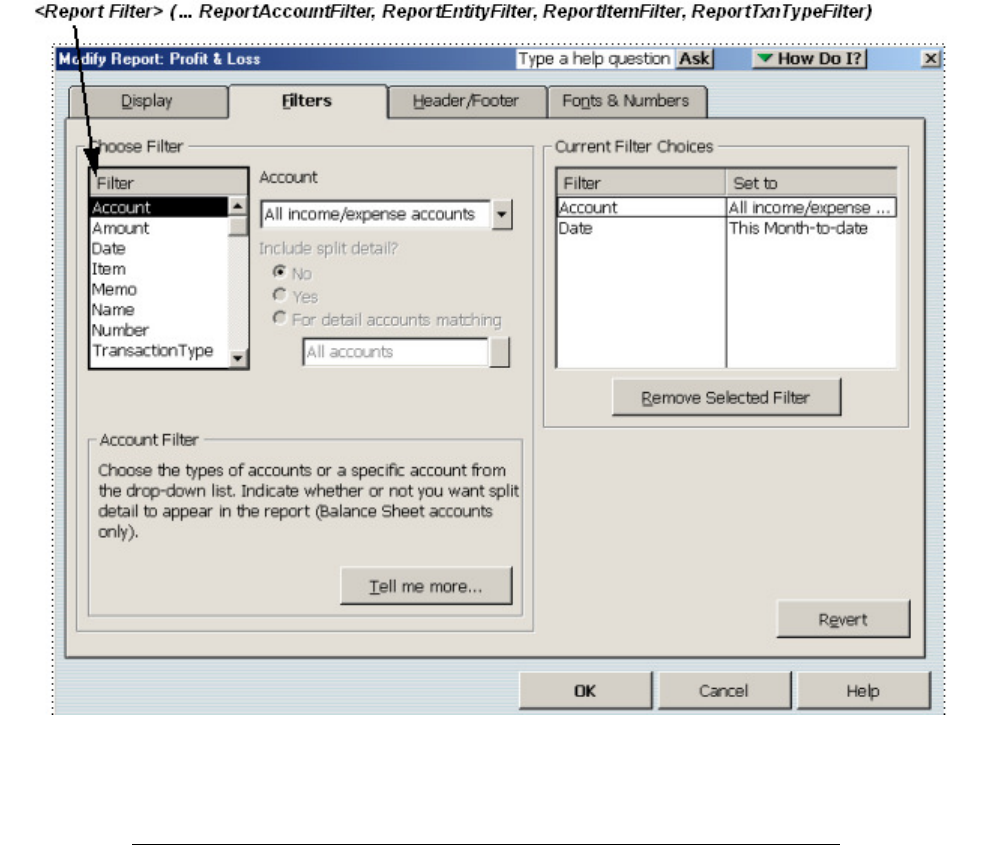
104
Chapter 9: Generating Reports
(c) 2013 Intuit Inc. All rights reserved.
• ReportPostingStatusFilter - allows you to report on only posting transactions or only
nonposting transactions (for transactions with posting status)
• ReportTxnTypeFilter - allows you to report on one or more specific transaction types
(for example, check, deposit, estimate)
Report filters are very similar, though not identical, to filters that are used in queries. For
reports that require either a customer job reference or an account reference, the reference is
specified using the appropriate filter.
Figure 9-2 SDK fields for modifying report filters
“IncludeColumn” Field
The IncludeColumn field is used in Aging, Custom Detail, PayrollDetail, and General
Detail reports. If you specify a value for this field, the original checked items that appear in
the QuickBooks user interface are cleared; if you want those values too, you’ll need to
specify them explicitly. Some choices available in the QuickBooks user interface for the

Creating a Report Request
105
(c) 2013 Intuit Inc. All rights reserved.
Columns scrollable listbox for a given report type are not available in the SDK. Table 9-19
lists the column types and their corresponding data types. It also indicates whether the
column type can be used in the IncludeColumn field.
A convenient way to obtain a number of transaction IDs is to include TxnID in the
IncludeColumn field of a report. (The PurchaseOrder Modify sample program included in
the SDK provides an example of this technique.) This method is often more convenient
than performing queries to obtain the TxnIDs.
Required Filter for Certain Job Reports
For the JobEstimatesVsActualsDetail report and the JobProfitabilityDetail report, you must
provide a ReportEntity filter that specifies a customer reference.
Required Filter for Missing Checks Report
For the MissingChecks report (a General Detail report), you must provide an Account filter
that specifies an account reference.
Example of a Report Request
Here is a sample report request for a Purchase by Vendor Summary report, for the period
This Month to Date. Columns are labeled by quarter. Subcolumn information is requested
(for this report, subcolumn information includes Previous Period, Previous Year, and Year-
To-Date). Only rows and columns with active information will be included in the response.
<GeneralSummaryReportQueryRq requestID = "928">
<GeneralSummaryReportType>PurchaseByVendorSummary
</GeneralSummaryReportType>
<ReportDateMacro>ThisMonthToDate</ReportDateMacro>
<SummarizeColumnsBy>Quarter</SummarizeColumnsBy>
<IncludeSubcolumns>true</IncludeSubcolumns>
<ReturnRows>ActiveOnly</ReturnRows>
<ReturnColumns>ActiveOnly</ReturnColumns>
</GeneralSummaryReportQueryRq>
Creating Requests for Budget Reports
Before you can obtain a Budget report, the “target” budget must be defined in QuickBooks.
The type of this budget determines the valid combinations of rows and columns you can
specify in a Budget report request. Budget reports fall into two general categories: Balance
Sheet and Profit and Loss. In addition, each of these categories has both an overview and an
actual projection of the budget. When you request a Budget report, you specify data
associated with the budget itself, and then you specify the rows and columns for the report.
There are three pieces of data you specify regarding the budget:

106
Chapter 9: Generating Reports
(c) 2013 Intuit Inc. All rights reserved.
•BudgetSummary Report type
•Fiscal year
•Budget criterion
Report Types
The following Budget Summary report types are supported:
•BalanceSheetBudgetOverview
•BalanceSheetBudgetVsActual
•ProfitAndLossBudgetOverview
•ProfitAndLossBudgetVsActual
•ProfitAndLossBudgetPerformance
Fiscal Year
The fiscal year identifies the budget for the report.
Budget Criterion
The BudgetCriterion you specify depends on the type of report you’re requesting and on
the information that is defined in the target budget. If you select a Balance Sheet report, you
must always specify “Accounts” for the BudgetCriterion. If you select one of the Profit and
Loss report types, you an specify any of the values for BudgetCriterion, as long as your
budget defines them for the appropriate year. The types are
•Accounts
•AccountsAndClasses
•AccountsAndCustomers
Specifying Rows and Columns for the Budget Report
If the BudgetCriterion is set to “Accounts,” the only valid settings are
This rule applies to both BalanceSheetBudgetOverview and BalanceSheetBudgetVsActual.
If BudgetCriterion is set to “AccountsAndClasses,” the valid row/column combinations are
Row Column
Account Date
Row Column
Account Class
Account Date
Class Date

Interpreting the Report Response
107
(c) 2013 Intuit Inc. All rights reserved.
If BudgetCriterion is set to “AccountsAndCustomers,” the valid row/column combinations
are
Interpreting the Report Response
The report response contains two main types of information:
•Meta-data that describes the report as a whole, including its title, number of rows and
columns, and column titles
•Report data, which is presented as sequential rows of data with accompanying
descriptive information
Report Meta-data
The first part of the report response contains information that pertains to the report as a
whole:
• Report Title and Subtitle (see Figure 9-3)
• Report Basis (that is, Cash, Accrual, None). “None” indicates that the cash/accrual
distinction does not apply to this type of report (for example, the 1099 report has its
own basis for generation).
• Number of rows in the report
• Number of columns in the report
•Number of rows in the column title
•For each column in the report, a column descriptor that includes the ID, title, column
type and data type.
Column Descriptor
The column ID is the column number. Columns are numbered from the left, starting with 1.
Depending on the report, column titles may require one row or multiple rows. The
NumColTitleRows element is an integer used to describe how many rows to allocate for
column titles in a given report. Although this number is usually 1, with some reports it is 2
or 3. (For an example of column titles that span multiple rows, look at a
ProfitAndLossByJob report. With the default settings, this report has 2 rows per column
title. If you add subcolumns, it has 3 rows per column title.)
Row Column
Account Customer
Account Date
Customer Date

108
Chapter 9: Generating Reports
(c) 2013 Intuit Inc. All rights reserved.
Examples of column types are Account, Amount, PaymentMethod, Percent, ClearedStatus,
ShipToAddr1, and so on. Types are formatted qbXML types. A value of type Percent, for
example, would have two digits after the decimal point: 7.90. A value of type Duration that
is shown in QuickBooks as “hr:min” (for example “8:20”) would be returned in qbXML as
“PT8H20M.” (See also Table 9-19.)
Figure 9-3 SDK field names for a report response
The column descriptor also includes the dataType of the values in the column. This
information is more reliable than the column type in determining how the data is formatted.
The dataType value may be overridden on a cell-by-cell basis but usually is not. Table 9-19
contains a complete list of all the possible values for ColType, what the corresponding
DataType is, and whether the column can be used in the “IncludeColumn” field.

Interpreting the Report Response
109
(c) 2013 Intuit Inc. All rights reserved.
Report Data
The report data consists of rows of data, expressed in name/value pairs. A row is one of the
following types, as shown in Figure 9-3:
•Text row - contains only text and is used mainly for headings.
•Data row - contains the report data.
•Subtotal row - contains a calculated subtotal.
•Total row - contains a calculated total for the entire report. There will be only one Total
row.
A text row contains one field, RowData, which contains the row type and the row value.
The other types of rows contain two fields: RowData (a row type and a row value) and
ColData (column ID and column value).The column ID refers to the column ID defined in
the column descriptor meta-data.
Sometimes, the datatype within a given column differs from the overall column type
specified in the column descriptor. In such exception cases, the datatype of the particular
column is also listed with the ColData. In the following excerpt, for example, the datatype
in the column descriptor is AMTTYPE, but the datatype for column 9 is QUANTYPE.
<ColDesc colID="9" dataType="AMTTYPE">
<ColTitle titleRow="1" value="Sales Price" />
<ColType>UnitPrice</ColType>
</ColDesc>
<ColData colID="9" value="57.75111" dataType="QUANTYPE" />
Example
The following qbXML excerpt shows the beginning of the response for a standard Profit
and Loss report (as shown in Figure 9-3).
<QBXMLMsgsRs>
<GeneralSummaryReportQueryRs
requestID="862" statusCode="0"
statusSeverity="Info" statusMessage="Status OK">
<ReportRet>
<ReportTitle>Profit & Loss</ReportTitle>
<ReportBasis>Accrual</ReportBasis>
<NumRows>55</NumRows>
<NumColumns>2</NumColumns>
<NumColTitleRows>1</NumColTitleRows>
<ColDesc colID="1" dataType="STRTYPE">
<ColTitle titleRow="1" />
<ColType>Label</ColType>
</ColDesc>
<ColDesc colID="2" dataType="AMTTYPE">

110
Chapter 9: Generating Reports
(c) 2013 Intuit Inc. All rights reserved.
<ColTitle titleRow="1" value="Dec 1 - 15, 03" />
<ColType>Amount</ColType>
</ColDesc>
<ReportData>
<TextRow rowNumber="1">
<RowData rowType="label" value="Ordinary Income/Expense"/>
</TextRow>
<TextRow rowNumber="2">
<RowData rowType="label" value="Income" />
</TextRow>
<DataRow rowNumber="3">
<RowData rowType="account" value="Construction" />
<ColData colID="1" value="Construction" />
</DataRow>
<DataRow rowNumber="4">
<RowData rowType="account" value="Construction:Labor" />
<ColData colID="1" value="Labor" />
<ColData colID="2" value="12226.00" />
</DataRow>
<DataRow rowNumber="5">
<RowData rowType="account"
value="Construction:Materials"/>
<ColData colID="1" value="Materials" />
<ColData colID="2" value="27346.60" />
</DataRow>
<DataRow rowNumber="6">
<RowData rowType="account"
value="Construction:Miscellaneous"/>
<ColData colID="1" value="Miscellaneous" />
<ColData colID="2" value="2232.03" />
</DataRow>
<DataRow rowNumber="7">
<RowData rowType="account"
value="Construction:Subcontractors"/>
<ColData colID="1" value="Subcontractors" />
<ColData colID="2" value="16305.76" />
.
.
.
</ReportRet>
</GeneralSummaryReportQueryRs>
</QBXMLMsgsRs>
Enumerated Values for “ClearedStatus” Column
Some columns, for example the “Clr” column in a transaction detail report, use symbols to
indicate whether an item has cleared or not. The following enumerated values are used in
the SDK in place of the symbols that appear in the QuickBooks user interface:

Interpreting the Report Response
111
(c) 2013 Intuit Inc. All rights reserved.
Table 9-10 Enumerated values used in a “ClearedStatus” column
Transaction Detail Reports
In a transaction detail report, each column has a different label—for example, TxnNumber,
PONumber, DeliveryDate, Quantity, SalesPrice, Clear. The following qbXML example
shows the beginning of an A/P Aging Detail report. For purposes of comparison, the
corresponding part of the report, as it appears in QuickBooks, is also shown in Figure 9-4.
<QBXMLMsgsRs>
<AgingReportQueryRs statusCode="0" statusSeverity="Info"
statusMessage="Status OK">
<ReportRet>
<ReportTitle>A/P Aging Detail</ReportTitle>
<ReportSubtitle>As of December 15, 2003</ReportSubtitle>
<ReportBasis>Accrual</ReportBasis>
<NumRows>35</NumRows>
<NumColumns>8</NumColumns>
<NumColTitleRows>1</NumColTitleRows>
<ColDesc colID="1" dataType="STRTYPE">
<ColTitle titleRow="1" />
<ColType>Blank</ColType>
</ColDesc>
<ColDesc colID="2" dataType="STRTYPE">
<ColTitle titleRow="1" value="Type" />
<ColType>TxnType</ColType>
</ColDesc>
<ColDesc colID="3" dataType="DATETYPE">
<ColTitle titleRow="1" value="Date" />
<ColType>Date</ColType>
</ColDesc>
<ColDesc colID="4" dataType="STRTYPE">
<ColTitle titleRow="1" value="Num" />
<ColType>RefNumber</ColType>
</ColDesc>
<ColDesc colID="5" dataType="STRTYPE">
<ColTitle titleRow="1" value="Name" />
<ColType>Name</ColType>
</ColDesc>
<ColDesc colID="6" dataType="DATETYPE">
<ColTitle titleRow="1" value="Due Date" />
<ColType>DueDate</ColType>
</ColDesc>
<ColDesc colID="7" dataType="INTTYPE">
<ColTitle titleRow="1" value="Aging" />
Symbol Enumerated Value
* (asterisk) Pending
(checkmark) Cleared
(lightning bolt) Not cleared
112
Chapter 9: Generating Reports
(c) 2013 Intuit Inc. All rights reserved.
<ColType>Aging</ColType>
</ColDesc>
<ColDesc colID="8" dataType="AMTTYPE">
<ColTitle titleRow="1" value="Open Balance" />
<ColType>OpenBalance</ColType>
</ColDesc>
<ReportData>
<TextRow rowNumber="1" value="Current" />
<DataRow rowNumber="2">
<ColData colID="2" value="Bill" />
<ColData colID="3" value="2003-12-05" />
<ColData colID="5" value="Hopkins Construction Rentals" />
<ColData colID="6" value="2003-12-20" />
<ColData colID="8" value="550.00" />
</DataRow>
<DataRow rowNumber="3">
<ColData colID="2" value="Bill" />
<ColData colID="3" value="2003-12-08" />
<ColData colID="5" value="Hopkins Construction Rentals" />
<ColData colID="6" value="2003-12-23" />
<ColData colID="8" value="150.00" />
</DataRow>
<DataRow rowNumber="4">
<ColData colID="2" value="Bill" />
<ColData colID="3" value="2003-11-24" />
<ColData colID="5" value="Middlefield Drywall" />
<ColData colID="6" value="2003-12-24" />
<ColData colID="8" value="1200.00" />
</DataRow>
<DataRow rowNumber="5">
<ColData colID="2" value="Bill" />
<ColData colID="3" value="2003-12-11" />
<ColData colID="5" value="Lew Plumbing" />
<ColData colID="6" value="2003-12-26" />
<ColData colID="8" value="1200.00" />
</DataRow>
...
</ReportData>
</ReportRet>
</AgingReportQueryRs>
</QBXMLMsgsRs>
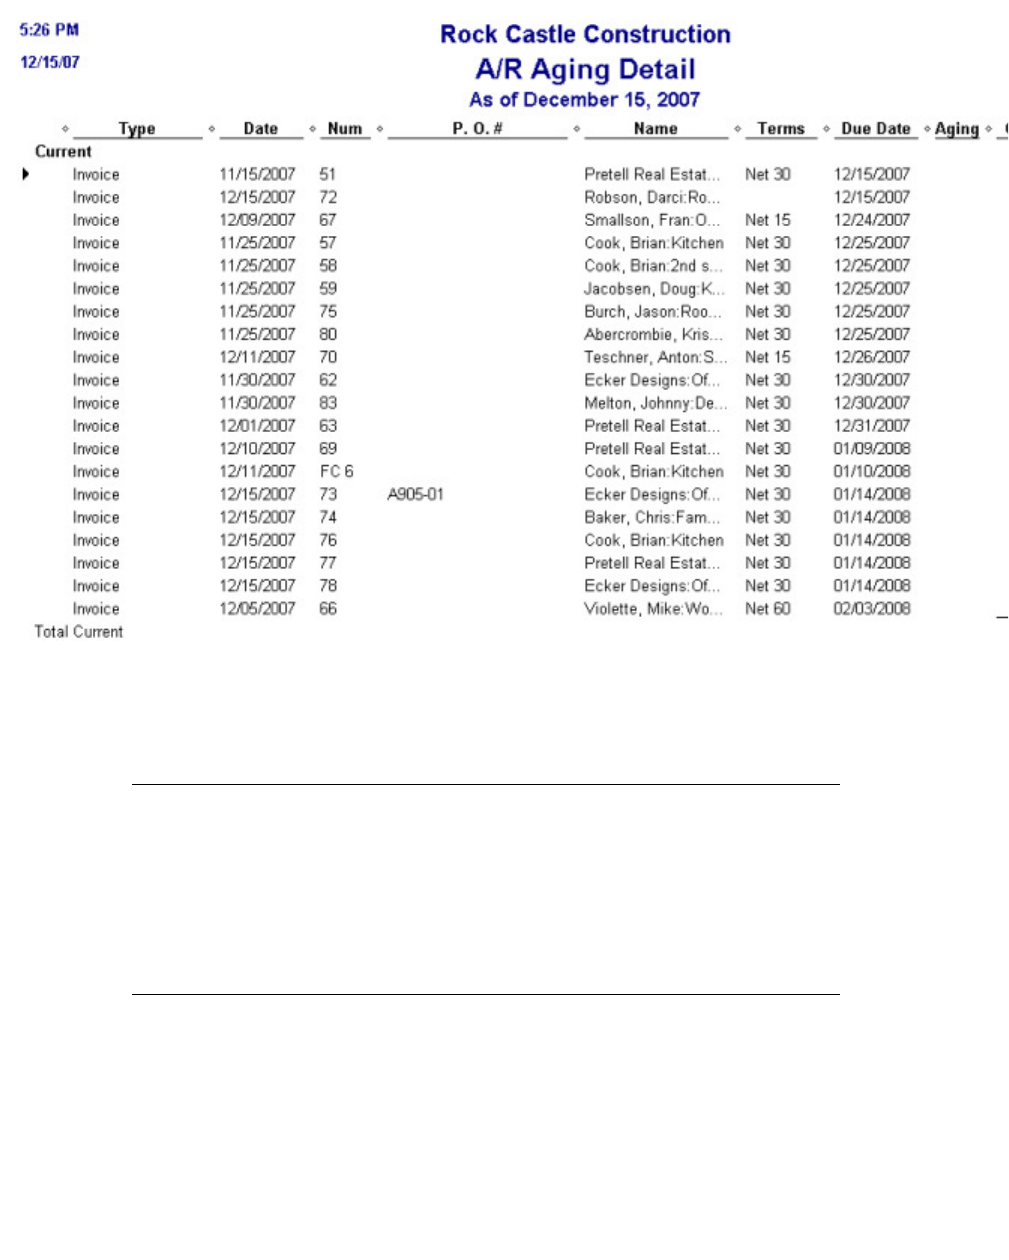
Interpreting the Report Response
113
(c) 2013 Intuit Inc. All rights reserved.
Figure 9-4 Sample transaction detail report (see corresponding qbXML report
response)
Order Column
The Order column that appears in the user interface on some reports includes a checkmark
to indicate when a particular item should be reordered. In the SDK, this column is
represented by the Suggested Reorder field. Report responses use a Boolean value for this
field (True = checkmark).
Including Personal Data in Reports
In QuickBooks, the application must have special permission to view fields that contain
personal data such as SSNOrTaxID. If your application requests a report that contains such
data, QuickBooks checks the required permission before it returns the personal data. If the
application does not have the appropriate permission, the following status message is
returned:
status code 3261: The integrated application has no permission to access
personal data.

114
Chapter 9: Generating Reports
(c) 2013 Intuit Inc. All rights reserved.
This status message might be generated, for example, when an application issues a request
for a report that shows columns for SSN and the application does not have the required
permission to view that data.
Including Payroll Data in Reports
The following payroll data has several restrictions associated with it:
•IncomeSubjectToTax
•PayrollItemDetail
•WageBase
•WageBaseTips
In order to be included in a payroll report
•The administrative user must have granted the application permission to view personal
data, as described in the previous section, and
•The application must be accessing a company file that is currently signed up for a
subscription to a payroll service
If you send a report query and do not have the proper access to the company file, the
following status message is returned:
status code 3262: In order to complete this request, the company data file
has to be subscribed to the Intuit Payroll Service.
It is important to note that if you request a Detail report and specify a restricted value for an
IncludeColumn field and you do not have the appropriate access to view that information,
the entire request fails.
My Report Has No Data!
Each category defines a request for a group of different QuickBooks reports. Not all fields
defined for the request apply to all reports within the group. Because of this, it is possible to
create a request that is programmatically correct (that is, is valid qbXML or compilable
QBFC code) but that asks for fields that are invalid for the particular report type. In these
cases, no data is returned. (In other cases, data is not returned because the particular type of
data is not implemented in the SDK.)
As you create the report request, check the QuickBooks user interface to determine whether
the relevant fields are actually included in the report type you’re interested in. Also, check
that the SDK supports all the fields you’re requesting (Table 9-11 through Table 9-17).
Status code 3151 and the following status message are returned when you request a field
that is not supported by the requested report:
Cannot use the element XXX in this request.

Valid Request Options for Individual Report Types
115
(c) 2013 Intuit Inc. All rights reserved.
This message would be generated, for example, if you requested a Physical Inventory
Worksheet along with an entity filter. The entity filter is not used by this report.
A different status code is returned when a field is supported, but a particular value for that
field is not supported. In this case, you receive status code 3152, along with the following
message:
The enumerated value XXX may not be used in the element YYY in this
request.
For example, in a PurchaseByVendorSummary report, the element SummarizeColumnsBy
is supported, but the value Vendor is not supported.
Valid Request Options for Individual Report Types
Tables 4-11 through 4-18 list valid request options for different report types. An “X” in the
column indicates that this is a valid request option. Each table contains reports for a given
report category.
Table 9-11 Aging Reports: Valid Options
NOTE ReportAgingAsOf is an enum (Today, ReportEndDate); in this table an “X” indicates the SDK supports this
report option. IncludeAccounts is also an enum (InUse or All);as in QuickBooks, this option is supported only in the
Collections Report.
Table 9-12 Job Reports: Valid Options
NOTE Dates includes TotalOnly, Day, Week, TwoWeek, FourWeek, HalfMonth, Month, Quarter, Year. Reports support either
all dates or no dates.
Report
Include
Columns ReportAgingAsOf IncludeAccounts
APAgingDetail Supports all X
APAgingSummary (none) X
AR AgingDetail Supports all X
ARAgingSummary (none) X
CollectionsReport Supports all X X
Report SummarizeColumnsBy Subcolumns Entity Filter
ItemEstimatesVsActuals Dates and Class X
ItemProfitability Dates and Class X
JobEstimatesVsActualsDetail Dates and Class X Required
JobEstimatesVsActualsSummary Dates and Class X
JobProfitabilityDetail Dates and Class X Required
JobProfitabilitySummary Dates and Class X

116
Chapter 9: Generating Reports
(c) 2013 Intuit Inc. All rights reserved.
Table 9-13 Time Reports: Valid Options
NOTE Time Reports do not support AccountFilter or TxnTypeFilter.
Report SummarizeColumnsBy
Report
Calendar Return Rows
Return
Columns
TimeByItem Dates only X X X
TimeByJobDetail no columns
TimeByJobSummary Dates only X X X
TimeByName Dates only X X X

Valid Request Options for Individual Report Types
117
(c) 2013 Intuit Inc. All rights reserved.
Table 9-14 General Detail Reports: Valid Options
NOTE Values shown for IncludeAccount and ReportBalanceAsOf are the default values used by
QuickBooks if not specified in the request. “None” means the report doesn’t use the setting.
Report
Dates
Allowed
Account
Filter
Include-
Accounts
Report-
Balance-
AsOf
1099Detail X InUse Current
AuditTrail X None None
BalanceSheetDetail X All Current
CheckDetail X InUse Current
CustomerBalanceDetail X InUse Current
DepositDetail X InUse Current
EstimatesByJob X InUse Current
ExpenseByVendorDetail X InUse Current
GeneralLedger X All Current
IncomeByCustomerDetail X InUse Current
IncomeTaxDetail X InUse Current
InventoryValuationDetail X InUse Current
JobProgressInvoicesVs-
Estimates
Journal X InUse Current
MissingChecks X Required None None
OpenInvoices X InUse Current
OpenPOs X InUse Current
OpenPOsByJob X InUse Current
OpenSalesOrderByCustomer X InUse Current
OpenSalesOrderByItem X InUse Current
PendingSales X InUse Current
ProfitAndLossDetail X InUse Current
PurchaseByItemDetail X InUse Current
PurchaseByVendorDetail X InUse Current
SalesByCustomerDetail X InUse Current
SalesByItemDetail X InUse Current
SalesByRepDetail X InUse Current
TxnDetailByAccount X InUse Current
TxnListByCustomer X InUse Current
TxnListByDate X InUse Current
TxnListByVendor X InUse Current
UnbilledCostsByJob X InUse Current
UnpaidBillsDetail X InUse Current
VendorBalanceDetail X InUse Current

118
Chapter 9: Generating Reports
(c) 2013 Intuit Inc. All rights reserved.
Table 9-15 General Summary Reports:
Valid Options for SummarizeColumnsBy (Part 1 of 4)
*All reports except PhysicalInventoryWorksheet also support macro/custom Dates
NOTE Dates includes TotalOnly, Day, Week, TwoWeek, FourWeek, HalfMonth, Month, Quarter, Year. Reports support either
all dates or no dates.
NOTE All report types support the value “Total Only” for SummarizeColumnsBy.
Report Dates*
Customer-
Job Vendor Employee
Payroll-
Item-
Detail
BalanceSheetPrevYearComp X
BalanceSheetStandard X
BalanceSheetSummary X
CustomerBalanceSummary X
ExpenseByVendorSummary X
IncomeByCustomerSummary X
IncomeTaxSummary
InventoryStockStatusByItem
InventoryStockStatusByVendor
InventoryValuationSummary
PhysicalInventoryWorksheet
ProfitAndLossByClass X X X X X
ProfitAndLossByJob X X X X X
ProfitAndLossPrevYearComp X X X X X
ProfitAndLossStandard X X X X X
ProfitAndLossYTDComp X X X X X
PurchaseByItemSummary X X X X
PurchaseByVendorSummary X
SalesByCustomerSummary X
SalesByItemSummary X X X X
SalesByRepSummary X
SalesTaxLiability
SalesTaxRevenueSummary X X X X X
TrialBalance
VendorBalanceSummary X

Valid Request Options for Individual Report Types
119
(c) 2013 Intuit Inc. All rights reserved.
Table 9-16 General Summary Reports:
Valid Options for SummarizeColumnsBy (Part 2 of 4)
Report Payee Rep Class ItemType ItemDetail
BalanceSheetPrevYearComp
BalanceSheetStandard
BalanceSheetSummary
CustomerBalanceSummary
ExpenseByVendorSummary
IncomeByCustomerSummary
IncomeTaxSummary
InventoryStockStatusByItem
InventoryStockStatusByVendor
InventoryValuationSummary
PhysicalInventoryWorksheet
ProfitAndLossByClass X X X X X
ProfitAndLossByJob X X X X X
ProfitAndLossPrevYearComp X X X X X
ProfitAndLossStandard X X X X X
ProfitAndLossYTDComp X X X X X
PurchaseByItemSummary X X X
PurchaseByVendorSummary X X X X
SalesByCustomerSummary X X X X
SalesByItemSummary X X X
SalesByRepSummary X X X X
SalesTaxLiability
SalesTaxRevenueSummary X X X X X
TrialBalance
VendorBalanceSummary

120
Chapter 9: Generating Reports
(c) 2013 Intuit Inc. All rights reserved.
Table 9-17 General Summary Reports:
Valid Options for SummarizeColumnsBy (Part 3 of 4)
Report ShipMethod Terms
Payment-
Method
SalesTax-
Code Account
BalanceSheetPrevYearComp
BalanceSheetStandard
BalanceSheetSummary
CustomerBalanceSummary
ExpenseByVendorSummary
IncomeByCustomerSummary
IncomeTaxSummary
InventoryStockStatusByItem
InventoryStockStatusByVendor
InventoryValuationSummary
PhysicalInventoryWorksheet
ProfitAndLossByClass X X X X
ProfitAndLossByJob X X X X
ProfitAndLossPrevYearComp X X X X
ProfitAndLossStandard X X X X
ProfitAndLossYTDComp X X X X
PurchaseByItemSummary X X X X
PurchaseByVendorSummary X X X X
SalesByCustomerSummary X X X X
SalesByItemSummary X X X X
SalesByRepSummary X X X X
SalesTaxLiability
SalesTaxRevenueSummary X X X X
TrialBalance
VendorBalanceSummary

Valid Request Options for Individual Report Types
121
(c) 2013 Intuit Inc. All rights reserved.
Table 9-18 General Summary Reports:
Valid Options for SummarizeColumnsBy (Part 4 of 4)
NOTE Subcolumns is a Boolean; either return subcolumns or do not return subcolumns.
ReportCalendar can be FiscalYear, CalendarYear, or TaxYear.
ReturnRows and ReturnColumns can be ActiveOnly, NonZero, or All.
Report Subcolumns
Return
Rows
Return
Columns
Report
Calendar
Report
Basis
BalanceSheetPrevYearComp X NonZero ActiveOnly FiscalYear X
BalanceSheetStandard X NonZero ActiveOnly FiscalYear X
BalanceSheetSummary X NonZero ActiveOnly FiscalYear X
CustomerBalanceSummary X NonZero ActiveOnly FiscalYear no
ExpenseByVendorSummary X ActiveOnly ActiveOnly FiscalYear X
IncomeByCustomerSummary X ActiveOnly ActiveOnly FiscalYear X
IncomeTaxSummary no ActiveOnly Active3
Only
TaxYear X
InventoryStockStatusByItem no no no no no
InventoryStockStatusByVendor no no no no no
InventoryValuationSummary no no no no no
PhysicalInventoryWorksheet no no no no no
ProfitAndLossByClass X ActiveOnly ActiveOnly FiscalYear X
ProfitAndLossByJob X ActiveOnly ActiveOnly FiscalYear X
ProfitAndLossPrevYearComp X ActiveOnly ActiveOnly FiscalYear X
ProfitAndLossStandard X ActiveOnly ActiveOnly FiscalYear X
ProfitAndLossYTDComp X ActiveOnly ActiveOnly FiscalYear X
PurchaseByItemSummary X NonZero ActiveOnly FiscalYear X
PurchaseByVendorSummary X ActiveOnly ActiveOnly FiscalYear X
SalesByCustomerSummary X ActiveOnly ActiveOnly FiscalYear X
SalesByItemSummary X ActiveOnly ActiveOnly FiscalYear X
SalesByRepSummary X ActiveOnly ActiveOnly FiscalYear X
SalesTaxLiability no ActiveOnly ActiveOnly Calendar-
Year
X
SalesTaxRevenueSummary X ActiveOnly ActiveOnly Calendar-
Year
X
TrialBalance no ActiveOnly ActiveOnly FiscalYear X
VendorBalanceSummary X NonZero ActiveOnly FiscalYear no

122
Chapter 9: Generating Reports
(c) 2013 Intuit Inc. All rights reserved.
Table 9-19 Column types and corresponding data types
ColType IncludeColumn DataType
Account X STRTYPE
Addr1 STRTYPE
Addr2 STRTYPE
Addr3 STRTYPE
Addr4 STRTYPE
Addr5 STRTYPE
Aging X INTTYPE
Amount X AMTTYPE
AmountDifference X AMTTYPE
AverageCost X AMTTYPE
BilledDate X DATETYPE
BillingStatus X ENUMTYPE
Blank STRTYPE
CalculatedAmount X AMTTYPE
Class X STRTYPE
ClearedStatus X ENUMTYPE
CostPrice X AMTTYPE
CreateDate DATETYPE
Credit X AMTTYPE
CustomField STRTYPE
Date X DATETYPE
Debit X AMTTYPE
DeliveryDate X DATETYPE
DueDate X DATETYPE
Duration TIMEINTERVAL-
TYPE
EarliestReceiptDate DATETYPE
EstimateActive X ENUMTYPE
FOB X STRTYPE
IncomeSubjectToTax X AMTTYPE
Invoiced X QUANTYPE
IsAdjustment BOOLTYPE
Item X STRTYPE
ItemDesc X STRTYPE
ItemVendor STRTYPE
Label STRTYPE
LastModifiedBy X STRTYPE
Memo X STRTYPE
ModifiedTime X STRTYPE

Valid Request Options for Individual Report Types
123
(c) 2013 Intuit Inc. All rights reserved.
Name X STRTYPE
NameAccountNumber X STRTYPE
NameAddress X STRTYPE
NameCity X STRTYPE
NameContact X STRTYPE
NameEmai X STRTYPE
NameFax X STRTYPE
NamePhone X STRTYPE
NameState X STRTYPE
NameZip X STRTYPE
OpenBalance X AMTTYPE
OriginalAmount X AMTTYPE
PaidAmount X AMTTYPE
PaidStatus X STRTYPE
PaidThroughDate X DATETYPE
PaymentMethod X STRTYPE
PayrollItem X STRTYPE
Percent PERCENTTYPE
PercentChange PERCENTTYPE
PercentOfTotalRetail PERCENTTYPE
PercentOfTotalValue PERCENTTYPE
PhysicalCount INTTYPE
PONumber X STRTYPE
PrintStatus X STRTYPE
ProgressAmount X AMTTYPE
ProgressPercent X PERCENTTYPE
Quantity X QUANTYPE
QuantityAvailable X QUANTYPE
QuantityOnHand X QUANTYPE
QuantityOnOrder QUANTYPE
QuantityOnSalesOrder X QUANTYPE
ReceivedQuantity X QUANTYPE
RefNumber X STRTYPE
ReorderPoint QUANTYPE
RetailValueOnHand AMTTYPE
RunningBalance X AMTTYPE
SalesPerWeek QUANTYPE
SalesRep X STRTYPE
SalesTaxCode X STRTYPE
ShipDate X DATETYPE
ColType IncludeColumn DataType

124
Chapter 9: Generating Reports
(c) 2013 Intuit Inc. All rights reserved.
NOTE The Transaction ID does not appear in the QuickBooks user interface. This information can only be
requested in a report by the SDK.
ShipMethod X STRTYPE
ShipToAddr1 STRTYPE
ShipToAddr2 STRTYPE
ShipToAddr3 STRTYPE
ShipToAddr4 STRTYPE
ShipToAddr5 STRTYPE
SONumber STRTYPE
SourceName X STRTYPE
SplitAccount X STRTYPE
SSNOrTaxID X STRTYPE
SuggestedReorder BOOLTYPE
TaxLine X STRTYPE
TaxTableVersion X STRTYPE
Terms X STRTYPE
Total AMTTYPE
TxnID
(see Note below)
X IDTYPE
TxnNumber X INTTYPE
TxnType X STRTYPE
UnitPrice X AMTTYPE
UserEdit X STRTYPE
ValueOnHand X AMTTYPE
WageBase X AMTTYPE
WageBaseTips X AMTTYPE
ColType IncludeColumn DataType

Modifying Objects in General
125
(c) 2013 Intuit Inc. All rights reserved.
C
HAPTER
10 1
M
ODIFYING
AND
D
ELETING
T
RANSACTIONS
AND
L
IST
O
BJECTS
1
If you intend to modify transactions or list objects, you need to know what is in this chapter
or you won’t be successful when you send the Mod request (hint: edit sequences). Or, you
may be successful in executing the Mod request, but find you are unexpectedly missing
scads of your transaction line item data (hint: specifying the TxnLineID of each line you
want to retain).
Modifying Objects in General
The QB SDK allows modification of many list objects and transactions. For a complete
listing, see the Technical Overview. To modify a list object, you must supply the ListID and
EditSequence elements for the list to be modified. To modify a transaction, you must
supply the TxnID and the EditSequence elements for the transaction to be modified.
Edit Sequence
Every time an object is changed, QuickBooks changes the value of the EditSequence
element. In response to an Add, Modify, or Query request, QuickBooks returns the
EditSequence. When your application attempts to modify an object, QuickBooks compares
the EditSequence of your application’s version of the object with the EditSequence of its
own version of the object. If they match, then your application is up to date and
QuickBooks continues with the operation. If they don’t match, QuickBooks rejects the
request and returns an error.
If the Modify request is processed successfully, QuickBooks returns an ObjectRet response
(where Object is the name of the object modified).
One Way to Delete an Element’s Value
To remove the current value of an object that already exists in QuickBooks, specify the
element without any data in a Modify request. Listing 10-1, for example, shows clearing the
sales price, purchase cost, and a parent reference.
______Listing 10-1 Modify request

126
Chapter 10: Modifying and Deleting Transactions and List Objects
(c) 2013 Intuit Inc. All rights reserved.
<QBXML>
<QBXMLMsgsRq onError = "continueOnError">
<ItemServiceModRq requestID = "101">
<ItemServiceMod>
<ListID>60000-933272656</ListID>
<EditSequence>933272656</EditSequence>
<ParentRef>
<ListID></ListID>
</ParentRef>
<SalesAndPurchaseMod>
<SalesPrice></SalesPrice>
<PurchaseCost></PurchaseCost>
</SalesAndPurchaseMod>
</ItemServiceMod>
</ItemServiceModRq>
</QBXMLMsgsRq>
</QBXML>
Clearing References
Using a Modify request, you can clear a reference in one of four ways:
•Provide an empty reference:
<ClassRef />
•Provide an empty ListID:
<ClassRef>
<ListID></ListID>
</ClassRef>
•Provide an empty FullName tag:
<ClassRef>
<FullName></FullName>
</ClassRef>
•Provide an empty ListID and an empty FullName:
<ClassRef>
<ListID></ListID>
<FullName></FullName>
</ClassRef>
Clearing Aggregates
Clearing an aggregate such as an address or shipping address is similar to clearing a
reference in a Modify request. You can either provide empty versions of all the elements in
the aggregate, or you can simply provide an empty aggregate:

How to Modify Transactions
127
(c) 2013 Intuit Inc. All rights reserved.
<BillAddress>
<Addr1></Addr1>
<Addr2></Addr2>
<Addr3></Addr3>
<Addr4></Addr4>
<City></City>
<State></State>
<PostalCode></PostalCode>
<Country></Country>
</BillAddress>
or
<BillAddress />
If only a subset of an aggregate is provided in the Modify request, the subset is modified
and the rest of the aggregate is preserved. For example, if you specify only the PostalCode
in a Modify request for an address that was added in a previous request, only the
PostalCode field will be changed.
How to Modify Transactions
This section provides additional details on modifying transactions. If you’re mainly
interested in an overview at this point, you can skip the remaining sections on modifying
transactions and continue reading the section on “Deleting an Object,” beginning on page
134.
I
MPORTANT
Unless noted otherwise, if you are making changes to any
line item, you need to specify all of the line items to be
retained in the transaction. Otherwise, any lines omitted in
the transaction Mod operation will be dropped!
Currently, the following transactions can be modified:
•Bills
•BillPaymentCheck
•BuildAssembly
•Charge
•Check
•CreditCardCharge
•CreditCardCredit
•Credit Memos
•Deposits
•Estimates
•Invoices

128
Chapter 10: Modifying and Deleting Transactions and List Objects
(c) 2013 Intuit Inc. All rights reserved.
•JournalEntry
•ItemReceipt
•PriceLevel
•Purchase Orders
•ReceivePayment
•Sales Orders
•SalesReceipt
•Statement Charges
•TimeTracking
•VendorCredit
Each transaction Modify request must include the following fields:
•Transaction ID (TxnID) of the transaction to modify (obtained from the TxnRet object,
where “Txn” substitutes for the exact name of the transaction)
•Edit sequence (to ensure that changes are being made to the most recent copy of the
transaction)
Each request message (for example, PurchaseOrderModRq) has a corresponding response
message (for example, PurchaseOrderModRs). A TxnRet object is returned each time a
Modify request succeeds, or when the provided edit sequence is invalid. If the Modify
request fails for a reason other than an invalid edit sequence, the TxnModRs contains a
status code and status message. (A TxnRet object is not returned in this case.)
Parts of a Transaction
For modification purposes, transactions consist of two parts: a table of line items, which is
shown in the circled areas of Figure 10-1, and the transaction body,which is everything else
in the transaction form. Rules for modifying the components of the body of a transaction
are slightly different from the rules for modifying pieces of the line item table, as described
in the following paragraphs.
Modifying the Body of a Transaction
To modify one of the components in the body of a transaction, specify the element tag with
the new value. For example:

How to Modify Transactions
129
(c) 2013 Intuit Inc. All rights reserved.
<PurchaseOrderModRq>
<PurchaseOrderMod>
<TxnID>100-100052155</TxnID>
<EditSequence>100052155</EditSequence>
<ShipToEntityRef>
<FullName>Tom Jones</FullName>
</ShipToEntityRef>
</PurchaseOrderMod>
</PurchaseOrderModRq>
If an element has a default value, specifying an empty element tag results in the default
value being used. If an element has no default value, specifying an empty element tag clears
the value.
Some fields in a given transaction require a value and cannot be cleared. For example, in a
purchase order, the due date, expected date, and transaction date must be filled in. Also,
some Boolean values such as printing state cannot be cleared because there is no default
value for the logical state. In the Onscreen Reference, see the Modify request for each
modifiable transaction for a table that lists the fields that can be cleared within that
transaction (for example, see PurchaseOrderModRq, InvoiceModRq, and so on).
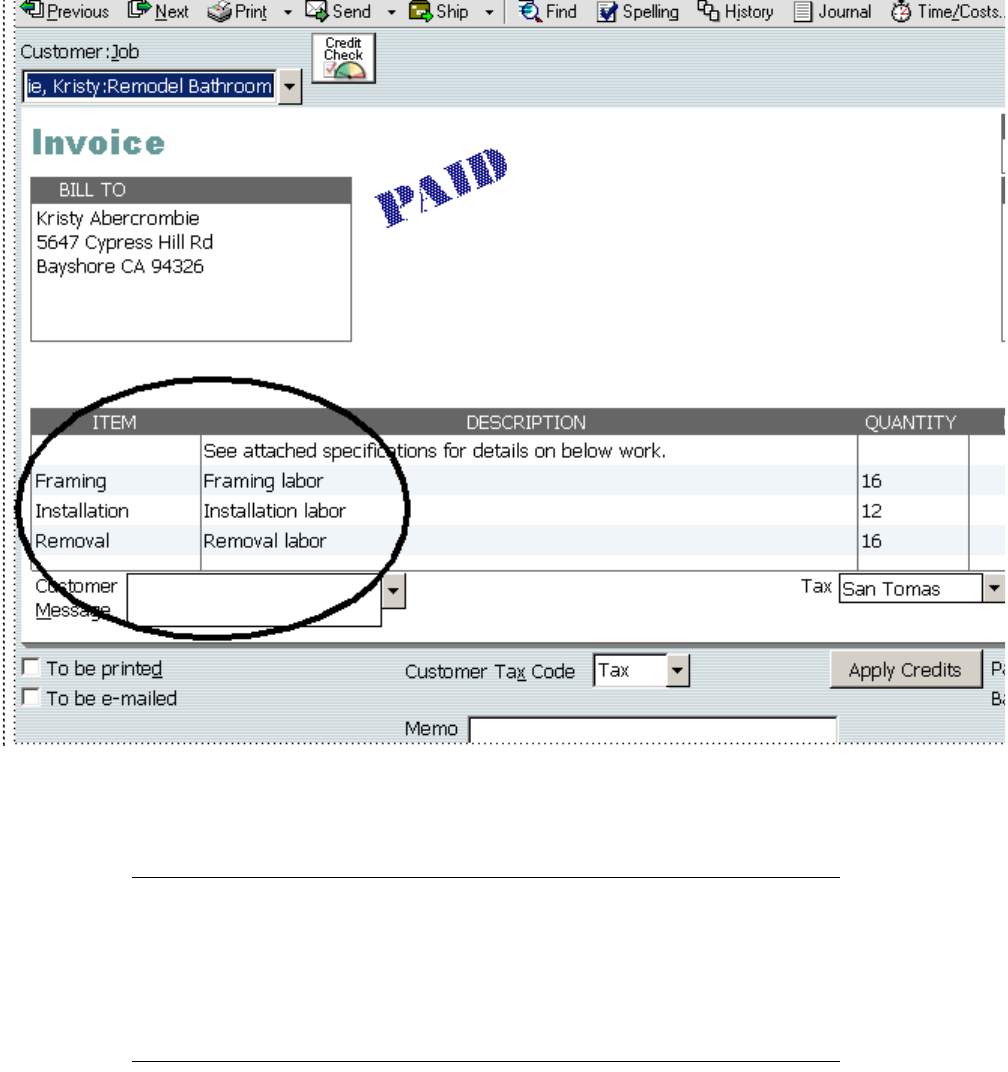
130
Chapter 10: Modifying and Deleting Transactions and List Objects
(c) 2013 Intuit Inc. All rights reserved.
Figure 10-1 Body and line items within a transaction
Modifying Transaction Body Without Modifying Line Items
If you are not making any changes to the line item table of a transaction, do not include
references to any of the lines in the transaction Modify request. The line item table will be
retained as is, and ignoring the table completely will speed up processing of the request.
Shortcut Way to Retaining a Line Item Exactly As Is
Remember: if you modify any line item, you need to specify all of the other line items or
else they will be dropped as a result of the Mod. However, you need not fully specify the
line item with all its ItemRef, Quantity, and other elements. You need only specify its
TxnLineID as follows:

How to Modify Transactions
131
(c) 2013 Intuit Inc. All rights reserved.
<PurchaseOrderLineMod>
<TxnLineID>101</TxnLineID>
</PurchaseOrderLineMod>
This will retain the line item exactly as it was prior to the Mod.
Modifying a Line Item
To modify a line item, specify the TxnLineID and any new data for the elements in the line
item.
Inserting a New Line Item In a Mod Operation
You can add new lines to an existing transaction. However, a common mistake is to use the
ItemLineAdd aggregate. That won’t work. You have to use the ItemLineMod aggregate
with the TxnLineID element set to -1 (and then specify the new data for that new line).
This new line can be used for a new line item, or it can be an empty line used as a separator
or comment in the transaction table.
Deleting a Line Item
To delete a line item from the table, simply omit it from the Modify request.
Example: Modifying Transaction Lines
The following example shows modifying line items in a transaction table. Line item 1 has
changes made to its rate and quantity values. Line item 2 has a change made to its
description. Line item 3 does not change but still needs to be specified in the Modify
request in order to be retained.
<PurchaseOrderModRq>
<PurchaseOrderMod>
<TxnID>100-100052155</TxnID>
<EditSequence>100052155</EditSequence>
.
.
.
<!—- modifying the quantity and rate of the itemLine1 -->
<PurchaseOrderLineMod>
<TxnLineID>101</TxnLineID>
<Quantity>12</Quantity>
<Rate>10.00</Rate>
</PurchaseOrderLineMod>
<!—- modifying the description of the itemLine2 -->
<PurchaseOrderLineMod>
132
Chapter 10: Modifying and Deleting Transactions and List Objects
(c) 2013 Intuit Inc. All rights reserved.
<TxnLineID>102</TxnLineID>
<Desc>new description</Desc>
</PurchaseOrderLineMod>
<!— even if the itemline3 doesn’t change, it needs to be
specified in the Modify request.
Omitting the itemline3 is interpreted as a deletion -->
<PurchaseOrderLineMod>
<TxnLineID>103</TxnLineID>
</PurchaseOrderLineMod>
</PurchaseOrderMod>
</PurchaseOrderModRq>
Example: Modifying Groups within the Line Item Table
If you want to retain a group within a modified table exactly as is, you can pass in
<TxnLineGroupMod> (for example, PurchaseOrderLineGroupMod) and specify the
TxnLineID for the group. This shortcut indicates to keep the group and its items as
originally specified. However, if you want to change any of the items in the group, you
need to pass in the whole group and its items again (the “new look”).
The following example shows inserting a new line item line into an item group. The table
below shows the invoice lines before and after the addition. The invoice has one item group
that has two components: service1 and service2. A new line is added following service1.
<InvoiceModRq>
<InvoiceMod>
<TxnID>100-100052155</TxnID>
<EditSequence>100052155</EditSequence>
…
…
<!—- no changes to item group start -->
<InvoiceLineGroupMod>
<TxnLineID>101</TxnLineID>
<InvoiceLineMod>
<TxnLineID>102</TxnLineID>
</InvoiceLineMod>
<!—- Pass in a TxnLineID = -1 indicates that it is a new itemline -->
<InvoiceLineMod>
Original invoice table Invoice table after modification
ItemLine1 (TxnLineID=101) - Group
start
ItemLine1 (TxnLineID=101) - Group start
ItemLine2 (TxnLineID=102) -
service1
ItemLine2 (TxnLineID=102) - service1
ItemLine3 (TxnLineID=103) -
service 2
ItemLine3 (TxnLineID=-1) - new line
(service3)
ItemLine4 (TxnLineID=103) - service2

How to Modify Transactions
133
(c) 2013 Intuit Inc. All rights reserved.
<TxnLineID>-1</TxnLineID>
<ItemRef>
<FullName>service3</FullName>
</ItemRef>
<Quantity>10</Quantity>
<Rate>3.20</Rate>
</InvoiceLineMod>
<InvoiceLineMod>
<TxnLineID>103</TxnLineID>
</InvoiceLineMod>
<!—- the object representing the end of the group is not returned in the
InvoiceRet object (or on any transaction ret). Therefore, the user cannot
provide its TxnLineID. You cannot change directly the line representing the
End of the group or delete it. -->
</InvoiceLineGroupMod>
</InvoiceMod>
</InvoiceModRq>
Example: Modifying Item Lines in an Item Group
The following example shows modifying item lines in an item group. The table below
shows the invoice lines before and after the modifications. The invoice has one item group
that has two components: service1 and service2. Changes are made here to the item group
itself (quantity) as well as to the two service item lines.
<InvoiceModRq>
<InvoiceMod>
<TxnID>100-100052155</TxnID>
<EditSequence>100052155</EditSequence>
…
…
<InvoiceLineGroupMod>
<TxnLineID>101</TxnLineID>
<Quantity>15</Quantity
<InvoiceLineMod>
<TxnLineID>102</TxnLineID>
Original invoice table Invoice table after modification
ItemLine1 (TxnLineID=101) - Group
start
ItemLine1 (TxnLineID=101) - Group start:
change the quantity
ItemLine2 (TxnLineID=102) -
service 1
ItemLine2 (TxnLineID=102) - service1:
change description
Item Line3 (TxnLineID=103) -
service 2
ItemLine3 (TxnLineID=103) - service 2:
change item name to service 3, quantity
and rate

134
Chapter 10: Modifying and Deleting Transactions and List Objects
(c) 2013 Intuit Inc. All rights reserved.
<Desc>new description</Desc>
</InvoiceLineMod>
<InvoiceLineMod>
<TxnLineID>103</TxnLineID>
<ItemRef>
<FullName>service3</FullName >
</ItemRef>
<Quantity>10</Quantity>
<Rate>3.20</Rate>
</InvoiceLineMod>
</InvoiceLineGroupMod>
</InvoiceMod>
</InvoiceModRq>
About Modifying Rate, Quantity, and Amount Line Item Fields
Many transactions, including purchase orders and invoices, include Rate, Quantity, and
Amount elements. The general formula used to calculate rate, quantity, and amount is
Quantity * Rate = Amount
However, since QuickBooks always calculates these values, giving rate and amount in the
same request is not permitted. If you do supply both values in a request, QuickBooks enters
a warning in the log file, and the rate you supply is ignored. QuickBooks calculates the rate
as
Amount / Quantity
Note that Amount, Rate, and Quantity fields cannot be cleared.
Deleting an Object
Unlike the many forms of Add and Mod requests, which specify the object explicitly (for
example, CustomerAdd, InvoiceAdd, CreditMemoAdd, and so on), delete requests take
only one form for transactions (TxnDelRq) and one form for list objects (ListDelRq). You
cannot delete a whole list at once; instead, you delete individual objects in the list, such as a
single employee or customer.
When you delete a transaction or a list object, you need to specify its QuickBooks ID (the
TxnID or ListID) and the object type. See Chapter 3 of the Technical Overview for a list of
objects that can be deleted.

Deleting an Object
135
(c) 2013 Intuit Inc. All rights reserved.
Must be in Single-User Mode (Except for Enterprise)
To delete a list object, you must have the QuickBooks company file open in single-user
mode. However, for QuickBooks Enterprise edition, it is possible to delete list items in
multi user mode.
Accountant Copy Restrictions
Some transaction and list operations may fail if an Accountant’s Copy has been made.
Beginning with QB 2009 and qbXML 8.0, you can use the Accountant Copy Exists request
to check for this before running requests that will fail if the accountant copy exists.
Locked Transactions
A locked transaction is a transaction that is currently being edited in the user interface.The
QuickBooks SDK also locks transactions for the time required to write them during an Add
or Modify operation. If your application attempts to delete or void a locked transaction, you
will receive an error ( status code 3175). You will also receive an error if you attempt to
delete or void a transaction (for example, a sales receipt) while a linked transaction (such as
a deposit) is locked in the user interface (error 3176 “related object is in use.).
For this reason, if you receive status code 3175, you will not know whether the locked
transaction is the one you are trying to delete or void, or one that is linked to it.
About Closed Transactions
Under certain conditions, you can delete (or void) a transaction that was created prior to the
company’s closing date. There must be no password set by the QuickBooks Admin under
“edit transaction on or before date” in the Accounting preferences. Also, the user must have
the appropriate permissions, as described in the QuickBooks user interface.
Before a qualified user can delete or void a transaction from within the QuickBooks user
interface, the following warning appears: “The transaction’s date is prior to the closing date
for this company file. This will affect your accounting. Are you sure you want to make this
change?” Your application should check the company preferences (using a
PreferencesQueryRq) to find out the closing date of the company so you can issue a similar
warning when your users try to delete a transaction that is already closed.
If your application tries to delete or void a closed transaction, you will receive status code
3161.
N
OTE
Starting with QB 2009 and qbXML 8.0, closing date
preferences for the company file can be obtained from a
PreferencesQuery.

136
Chapter 10: Modifying and Deleting Transactions and List Objects
(c) 2013 Intuit Inc. All rights reserved.
About Permissions
If your application attempts an operation without having the correct permissions, you will
receive status code 3260 (“Insufficient permission level to perform this action”). For
information about permissions, see the onscreen help in the QuickBooks user interface.
Voiding an Object
Use a TxnVoidRq request message to void a transaction. See Chapter 3 of the Technical
Overview for a list of transactions that can be voided.
•Voiding a transaction changes the transaction amount to zero, but leaves a record of the
transaction in QuickBooks. It is not possible to void a list object.
•Deleting a transaction removes the transaction from QuickBooks altogether.
A TxnVoidRq contains two elements, both required: the TxnVoidType element indicates the
transaction type, and the TxnID identifies the exact transaction to be voided. A void request
will return a TxnVoidRs response message, which can include the original information that
was sent in the request, plus TimeCreated, TimeModified, and the RefNumber of the
transaction that was voided.

Core Differences Between Custom Fields and Private Data
137
(c) 2013 Intuit Inc. All rights reserved.
C
HAPTER
11 1
D
ATA
E
XT
: U
SING
C
USTOM
F
IELDS
AND
P
RIVATE
D
ATA
1
If you want to store a SMALL amount of your own data in QuickBooks list objects or in
transactions using the QB SDK, there are two ways to go about it. You can choose to store
the data in custom fields, which are public, viewable within the QuickBooks UI, and can be
printed along with other transaction data. Or, you can use private data, which are visible
only to your application and to other applications that are granted access by your
application.
Both of these methods (customer field and private data) use the same SDK mechanism,
which is the data extension, or “data ext” in common QB SDK parlance. This mechanism
does have some quirks, which results in a fair number of questions for us here at IPP. So, if
you’re new to this feature, you’ll want to read this chapter carefully.
I
MPORTANT
Data extensions are really meant for SMALL amounts of data:
a reference to something in your database, and so forth.
Currently, the maximum amount of DataExt data for a given
object (for example, customer John Smith) is 4096 bytes.
This is the amount available for all private data from all
applications!
Core Differences Between Custom Fields and Private Data
Table 11-1 shows the key differences between public custom fields and the private data.

138
Chapter 11: Data Ext: Using Custom Fields and Private Data
(c) 2013 Intuit Inc. All rights reserved.
Table 11-1 Things You Can and Can’t Do with Custom Fields and Private Data
Can You Do This With It?
Custom
Field
Private
Data
Can a QuickBooks user access it (view/print)
within the QuickBooks UI?
(This means add, modify, delete via QuickBooks UI
as well.)
Yes No
Use them with virtually any object? No*
*Can be defined only
for customers,
employees, items, and
vendors.
Can be inherited by
certain transactions
from customer and item
(see “A Cool Feature:
Transactions Inherit
From Customer, Item”).
Yes
Use them for a variety of data types? No*
Must be STR255 type,
(string, max 255 chars)
Yes
Define as many as I want? No*
*QuickBooks allows a
fixed number of custom
fields for customer, for
item, for vendor, and
for employee.
This relatively small
fixed number must be
shared by the end user
and all integrated
solutions!
Yes*
You can define as many as
you want, but you cannot
have more than 4096 bytes
of private data per any
given object (e.g.,
customer John Smith)
Attach it directly to a transaction? Yes and No*
Yes, beginning with
qbXML spec 6.0, you
can use the Other,
Other1, and Other2
custom fields built into
transactions.
No, you cannot attach
any other custom fields.
You must define custom
fields for customer or
item, and the
transaction inherits
these.
Yes*
But not to transaction
lines! (There is no way to
retrieve the private data
from transaction lines.)
Access it from any SDK integrated application? Yes No*
*Only to those application
that that know the GUID
used in the creation of the
data ext definition.

How Do I Create Data Extensions?
139
(c) 2013 Intuit Inc. All rights reserved.
How Do I Create Data Extensions?
On the theory that a picure is worth a thousand words, let’s start off with a couple of
diagrams.
Use it in transaction lines? Yes No*
*Not returned in queries
Pull its data into a column on reports via the SDK? No*
This is not available via
the SDK report
features.
However, custom field
data can be displayed in
detail reports. In this
case, the QuickBooks
user must customize
the detail report to
include the custom field
No
Can You Do This With It?
Custom
Field
Private
Data
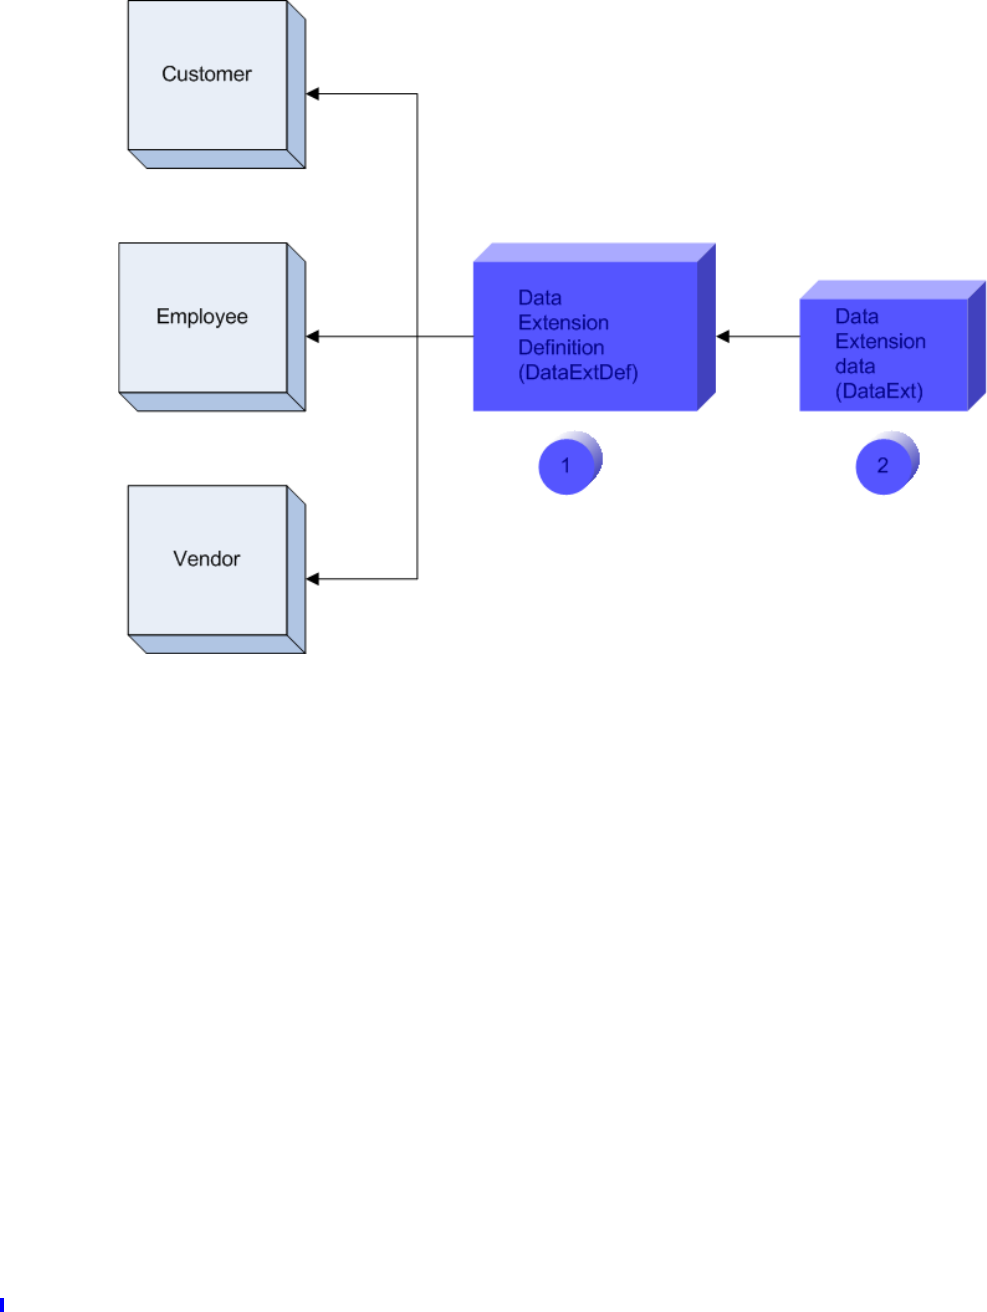
140
Chapter 11: Data Ext: Using Custom Fields and Private Data
(c) 2013 Intuit Inc. All rights reserved.
Figure 11-1 Order of creation: Data Ext Definition created first, then Data Ext
As we hope to convey in Figure 11-1, you start off your custom field or private data work
by creating the data ext definition first, during which process you specify the objects you
want to assign this definition to. We happened to pick customer, employee, and vendor,
which will work for both custom data and private data.
After you create the definition and assign it to one or more object types, you can write the
actual custom data or private data to an instance of the object that has the definition, as we
show in Figure 11-2.
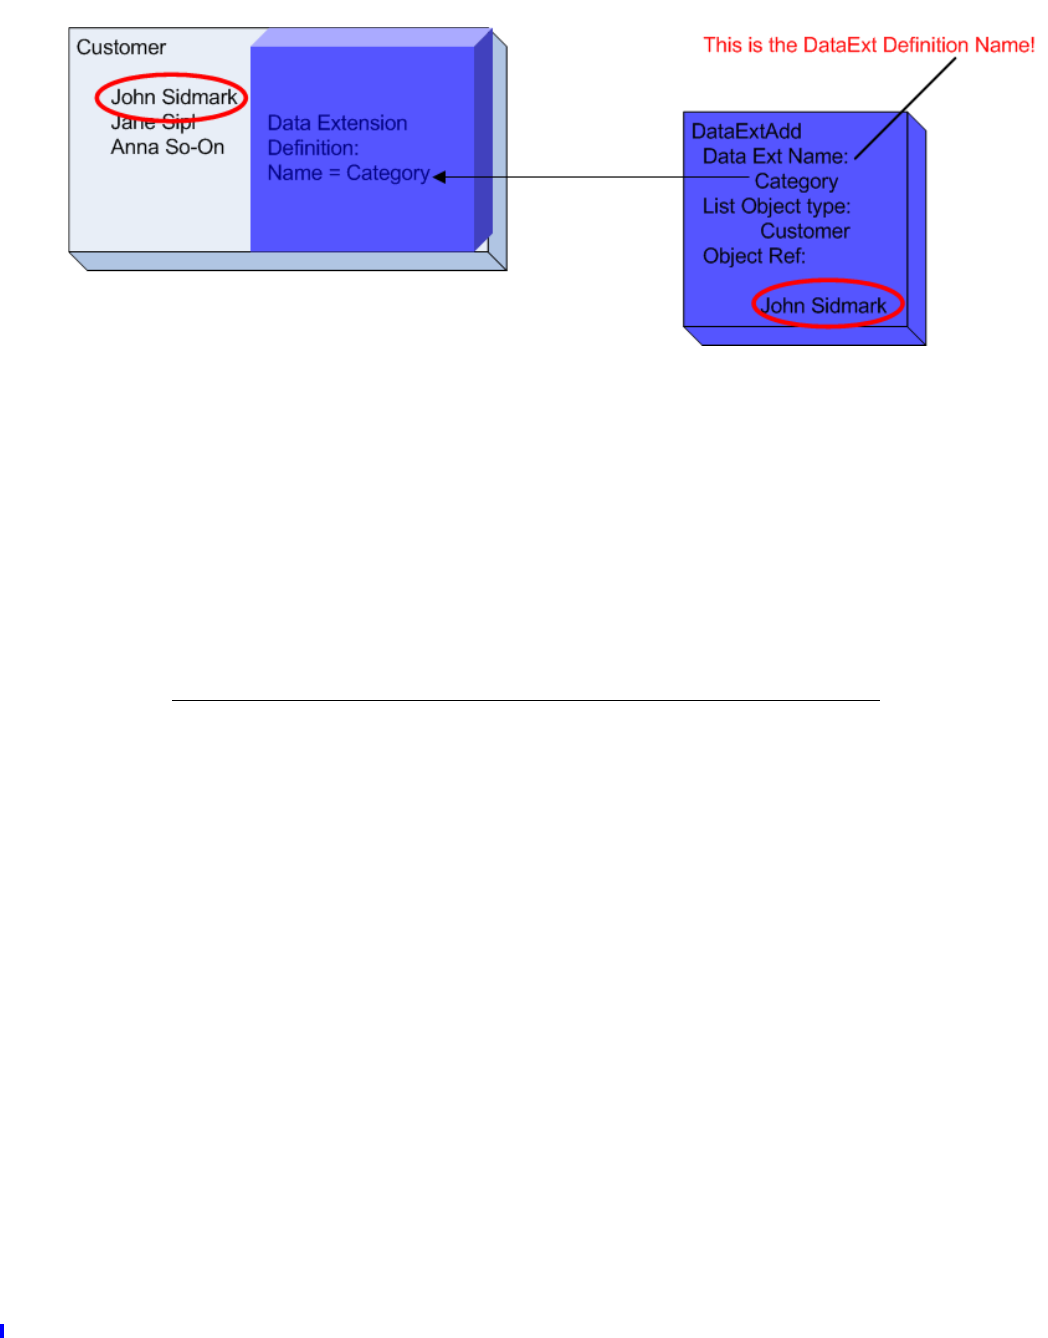
How Do I Create Data Extensions?
141
(c) 2013 Intuit Inc. All rights reserved.
Figure 11-2 Writing DataExt data to a customer instance: John Sidmark
As indicated in Figure 11-2, we have already added a data ext definition named “Category”
to the object type Customer. Because Customer now has the Category definition, we can
write Category data to an individual customer, say, John Sidmark. You do this via the SDK
request DataExtAdd or DataExtMod.
The SDK knows to write the data to the John Sidmark record because the ObjectRef inside
the DataExtAdd specifies “John Sidmark”. The SDK knows how to write the data because
the DataExtAdd tells it to use the definition “Category.”
Enough Pictures: Show Me Some Code
Listing 11-1 shows how to define a custom field extension and then write data to it. The
sample adds the data ext def “Category” to the Customer object type using the QBFC
library in VB. It then uses that definition to write the data “Gold Member” to a customer,
John Sidmark.
______Listing 11-1 Adding a DataExtDef to Customer and using it to write data to a customer (QBFC)
‘ Build a 6.0 request set and create a data ext def add request
Dim DataExt_Set As IMsgSetRequest
Set DataExt_Set = SessionManager.CreateMsgSetRequest("US", 6, 0)
DataExt_Set.Attributes.OnError = roeContinue
Dim MyDataExtDef As IDataExtDefAdd
Set MyDataExtDef = DataExt_Set.AppendDataExtDefAddRq
‘ We’re making this a custom field, so use 0 for ownerID, STR255TYPE for the type
MyDataExtDef.DataExtName.setValue "Category"
MyDataExtDef.OwnerID.setValue "0"
MyDataExtDef.DataExtType.setValue detSTR255TYPE
MyDataExtDef.AssignToObjectList.Add atoCustomer

142
Chapter 11: Data Ext: Using Custom Fields and Private Data
(c) 2013 Intuit Inc. All rights reserved.
‘ Write data to the custom field using DataExtMod, as a shortcut
‘ For private data, our first write to an object’s data ext MUST be a DataExtAdd
Dim MyDataExtMod As IDataExtMod
Set MyDataExtMod = DataExt_Set.AppendDataExtModRq
MyDataExtMod.DataExtName.setValue "Category"
MyDataExtMod.DataExtValue.setValue "Gold Member"
MyDataExtMod.OwnerID.setValue "0"
MyDataExtMod.ORListTxn.ListDataExt.ListDataExtType.setValue ldetCustomer
MyDataExtMod.ORListTxn.ListDataExt.ListObjRef.FullName.setValue "John Sidmark"
‘ Now send the request to QB
Dim MyDataExt_resp As IMsgSetResponse
Set MyDataExt_resp = SessionManager.DoRequests(DataExt_Set)
SessionManager.EndSession
SessionManager.CloseConnection
Set SessionManager = Nothing
In the sample, notice that we happened to send the data ext def and then write to it within
the same message set. If you do this, you need to build the data ext def first in the request
set, preceding the DataExtAdd/Mod that uses it. Of course, you aren’t required to do it this
way. You could add your data ext definition by iteself and then later use it in your
DataExtAdd/Mod when you need to write data.
If you want to do the same thing in qbXML, here is how it would look:
_____ Listing 11-2 qbXML to add a new DataExtDef
<?xml version="1.0" ?>
<?qbxml version="6.0"?>
<QBXML>
<QBXMLMsgsRq onError = "stopOnError">
<DataExtDefAddRq requestID = "0">
<DataExtDefAdd>
<OwnerID>0</OwnerID>
<DataExtName>Category</DataExtName>
<DataExtType>STR255TYPE</DataExtType>
<AssignToObject>Customer</AssignToObject>
</DataExtDefAdd>
</DataExtDefAddRq>
<DataExtModRq requestID = "1">
<DataExtMod>
<OwnerID>0</OwnerID>

What Makes a Data Ext Definition a Custom Field vs Private?
143
(c) 2013 Intuit Inc. All rights reserved.
<DataExtName>Category</DataExtName>
<ListDataExtType>Customer</ListDataExtType>
<ListObjRef>
< FullName>John Sidmark</FullName>
</ListObjRef>
<DataExtValue>Gold Member</DataExtValue>
</DataExtMod>
</DataExtModRq>
</QBXMLMsgsRq>
</QBXML>
What Makes a Data Ext Definition a Custom Field vs Private?
The die is cast, so to speak, when you create the data ext definition (DataExtDefAdd). You
specify at that time whether the data ext definition is custom or private and you cannot go
back later and modify it to become the other type.
If you look at Listing 11-2, which creates a custom data ext definition, notice the line
<OwnerID>0</OwnerID>
That is the magic code. The OwnerID of zero is reserved for custom fields. If you wanted to
make it private data, you would use a GUID here, like this:
<OwnerID>{E09C86CF-9D6E-4EF2-BCBE-4D66B6B0F754}</OwnerID>
But There is More To It
If you’re creating a custom field, you have to build two other things in your
DataExtDefAdd correctly. Check these two lines from Listing 11-2:
<DataExtType>STR255TYPE</DataExtType>
<AssignToObject>Customer</AssignToObject>
For a custom field definition, the DataExtType is always STR255TYPE. Also, the
AssignToObject must be Customer, or Employee, or Vendor, or Item.
A Cool Feature: Transactions Inherit From Customer, Item
You cannot create a data ext definition for transactions via the SDK. Does this mean you
can’t use custom fields in transactions? No, because transactions inherit custom field
definitions from Customer and Item. (Nothing is inherited from vendor or employee.)
Inheriting from Customer to Transactions
If you were to run the qbXML in Listing 11-2, which builds a custom field definition and
assigns it to the Customer object, this is what you would get in the response:
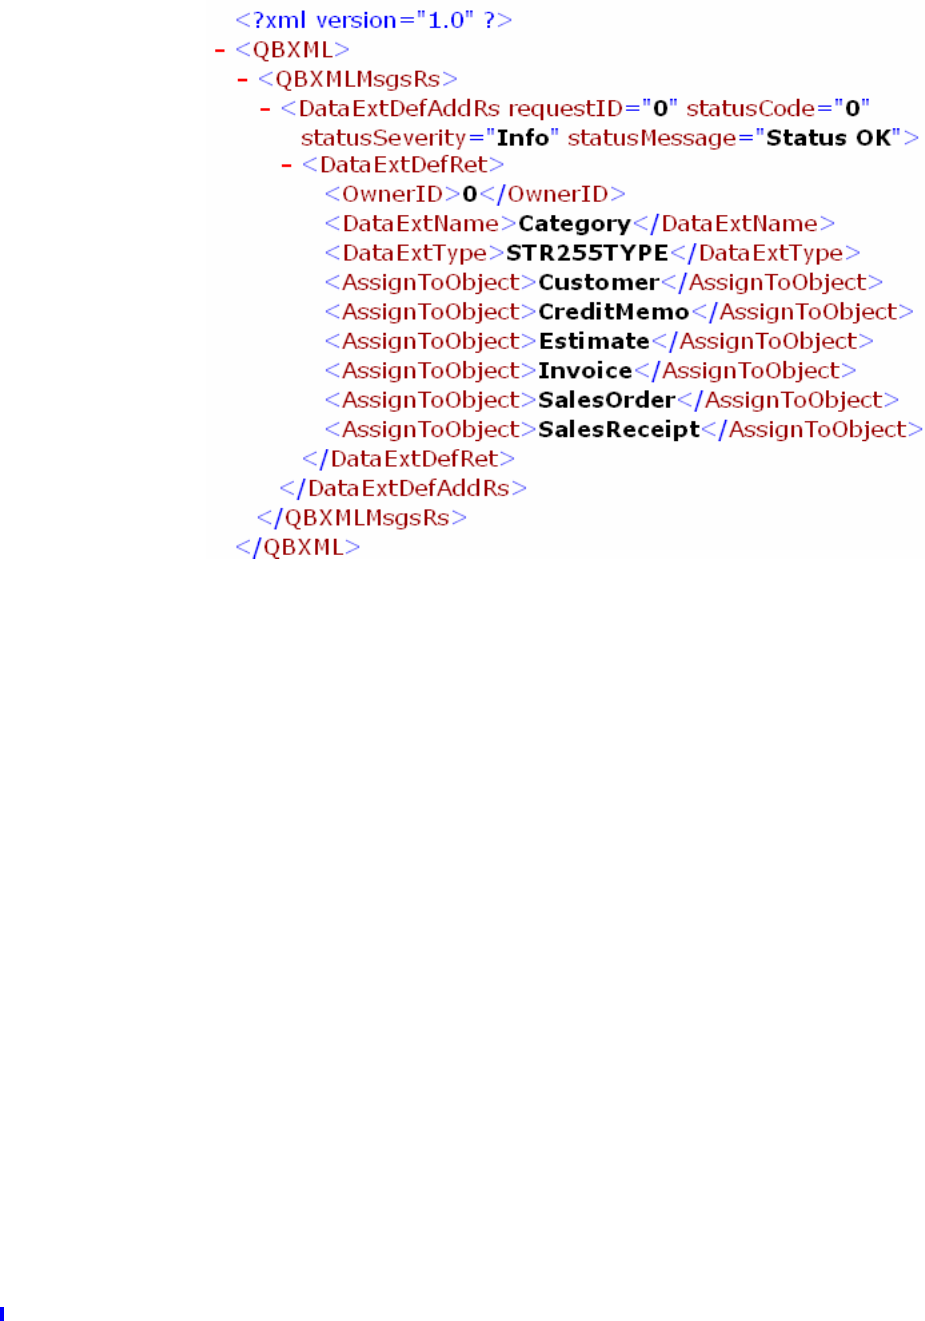
144
Chapter 11: Data Ext: Using Custom Fields and Private Data
(c) 2013 Intuit Inc. All rights reserved.
Figure 11-3 Response to a custom field DataExtDefAddRq for Customer
We only assigned our data extension definition to Customer. How come all those other
transactions are shown as assigned as well? This is a useful feature of custom fields.
When you add a custom field definition, that definition automatically propagates to all
transaction types that inherit Customer custom fields. This means that you can write (via
DataExtAdd or DataExtMod) data to those transactions using the data ext definitions in
effect for Customer.
Transactions That Inherit Custom Fields from Customer
Here is the propagation for customer:
•Customer
•CreditMemo
•Estimate
•Invoice
•SalesOrder
•SalesReceipt
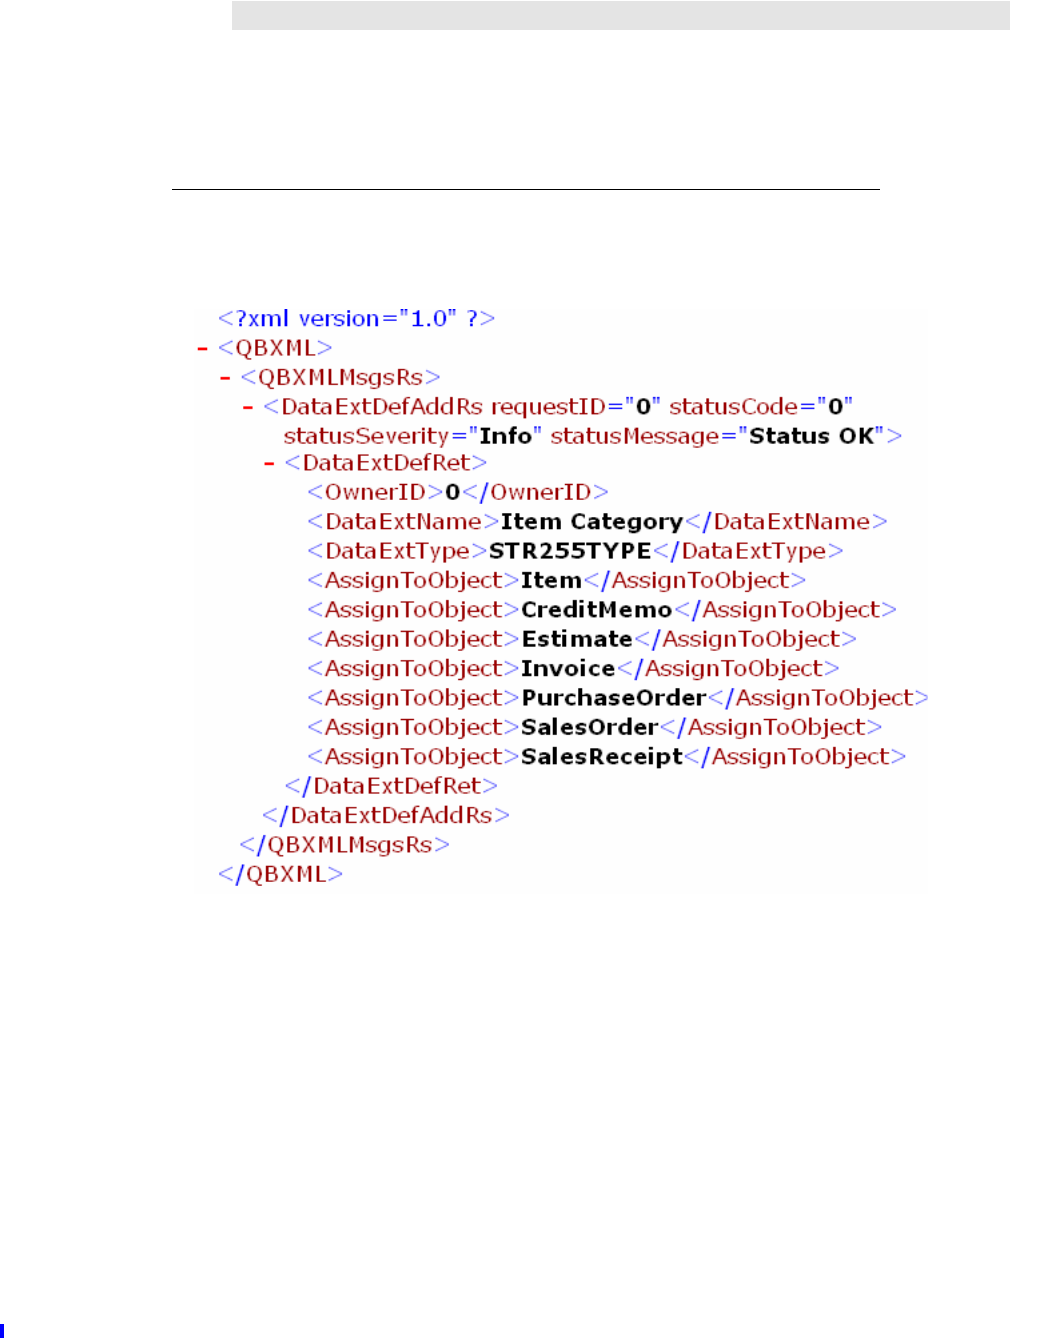
A Cool Feature: Transactions Inherit From Customer, Item
145
(c) 2013 Intuit Inc. All rights reserved.
I
MPORTANT
The custom fields propagated from Customer are available at
the transaction-level, NOT to the line items! For line items,
you’ll need to use the Item propagation, as we show below.
Inheriting from Item to Transactions
Suppose we replaced “Customer” with “Item” in the AssignToObject element in Listing 11-
2 and run the request. Here’s what we would get:
Figure 11-4 Response to a custom field DataExtDefAddRq for Item
Again, the custom field definition assigned to Item automatically propagates to the
transactions shown, and can be used at the line item level!
Transactions That Inherit Custom Fields from Item
Here is the propagation for item:
•Item
•CreditMemo
•Estimate

146
Chapter 11: Data Ext: Using Custom Fields and Private Data
(c) 2013 Intuit Inc. All rights reserved.
•Invoice
•PurchaseOrder
•SalesOrder
•SalesReceipt
Do Individual Transactions Also Inherit Custom Field Values?
Suppose a customer, for example, John Smith, has a custom field named Birthday, and that
custom field is turned on in the template being used by the transaction (see “Making
Custom Fields Show Up In QuickBooks and in Print”). When I create a invoice for John
Smith, does the Birthday field in my Invoice have the Birthday value from John Smith?
Yes. The value from a customer custom field is inherited by the transaction using it. You
can modify this value to any value you want in the transaction, however, without affecting
the John Smith customer record or any other transaction using that custom field.
Writing to Custom Fields Only Affects the Current Transaction
As you specify the customer, items, and so forth to build a transaction, the values of the
custom fields inherited from the customer and items referenced by the invoice are copied
from the customer and the items. Each transaction then stores a private copy of those
custom field values
For example, suppose you have a custom field on the customer that contains a contract
number. You could create many invoices for that customer and set a different contract
number in each one. Similarly, you could build an invoice with multiple line items, each
using the same item but using a different color and material in each line—without affecting
any default setting that might be in the customer or item record itself.
How Do I Get DataExt Data Back Using Queries?
To get the values of custom fields assigned to a list item or transaction, include the
OwnerID filter with a value of 0 (zero) in the query for that list item or transaction. For
private data, instead of the value 0 for the OwnerID, use the GUID that is your OwnerID
for the private data you want back. (Remember that you cannot get private data from
transaction lines!)
Here’s a customer query that includes all custom field data:
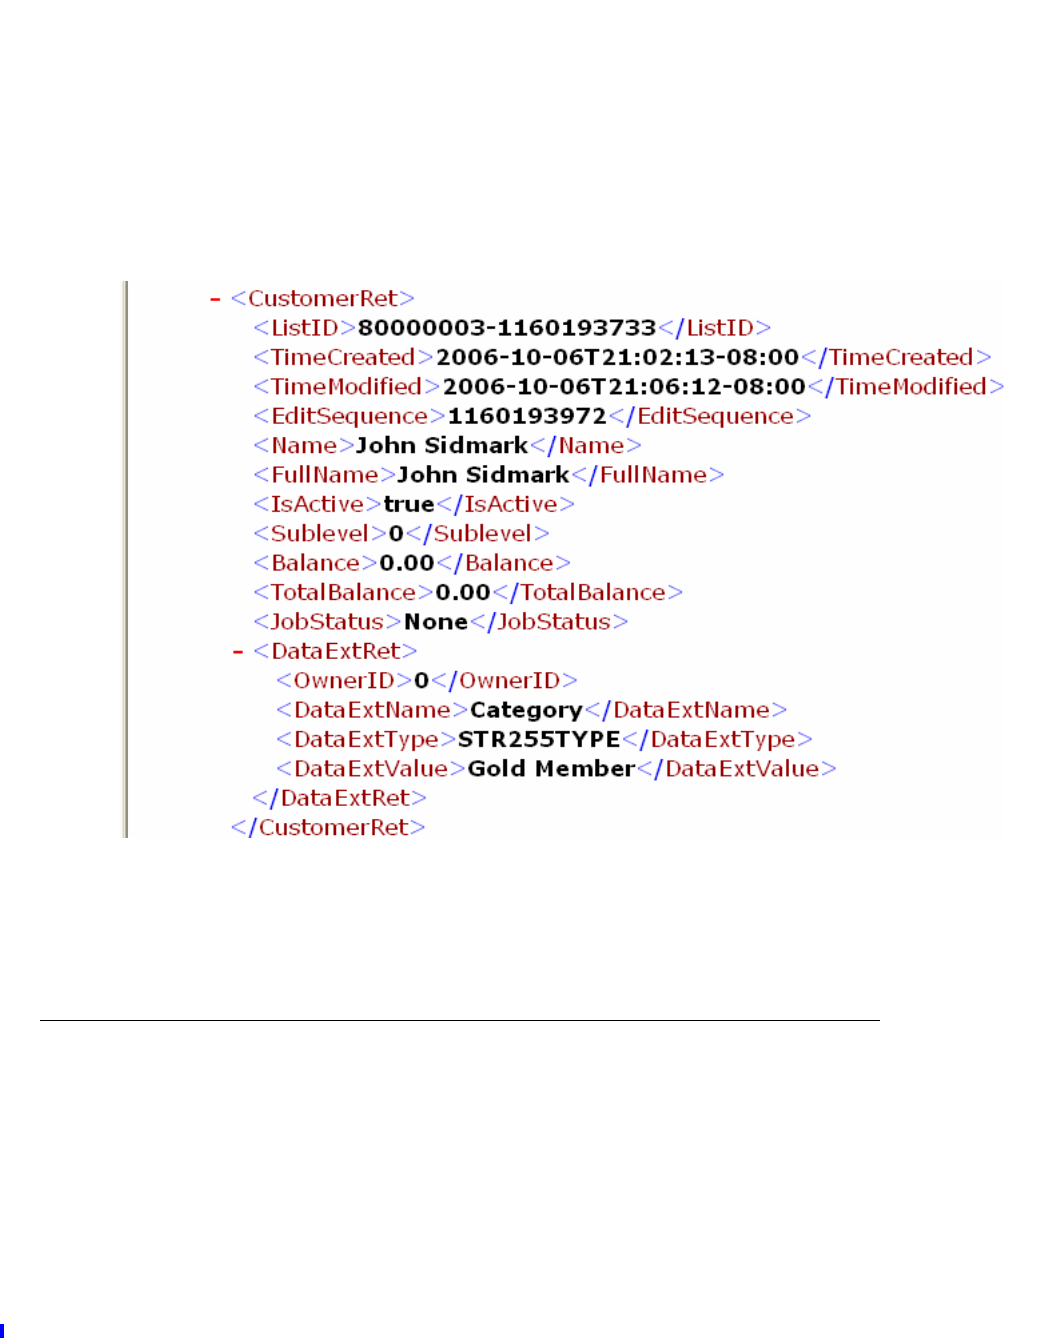
Writing Data to a Data Extension
147
(c) 2013 Intuit Inc. All rights reserved.
<?xml version="1.0"?>
<?qbxml version="6.0"?>
<QBXML>
<QBXMLMsgsRq onError="continueOnError">
<CustomerQueryRq requestID="2">
<OwnerID>0</OwnerID>
</CustomerQueryRq>
</QBXMLMsgsRq>
</QBXML>
and here’s the response. Notice the DataExt stuff is always the last thing in the Ret.
Figure 11-5 DataExt values in a Query response
Notice that you can query only using the OwnerID, not the actual DataExt values.
Writing Data to a Data Extension
If you are writing to a custom field, you simply use DataExtModRq, as shown in Listing
11-2.
If you are writing private data, the first time you write to that data extension for a given
object (e.g., customer John Smith), you must use DataExtAdd. All subsequent writes to that
data extension for that object MUST use DataExtMod.

148
Chapter 11: Data Ext: Using Custom Fields and Private Data
(c) 2013 Intuit Inc. All rights reserved.
Clearing a Value from a Data Extension
To clear a value from the data extension in a given object, whether the extension is a
custom field or private data, you must use DataExtDel.
Deleting a Data Extension Definition: Limitations
Once you create a private data ext definition AND assign it to an object type, you cannot
delete that definition using the SDK. It may appear that you can, because the
DataExtDefDel request will appear to succeed. But the private data ext def is still there: you
won’t be able to write to it anymore, nor will you be able to create another private data ext
definition with that same name and OwnerID.
You cannot use DateExtDefDel to delete any custom field definition whether the definition
was assigned in the UI or via the SDK. Moreover, from the SDK, you will not be able to
access a custom field that was deleted from the UI and then re-added with the same name.
Deleting Custom Fields From the QuickBooks UI
You’ll notice you cannot get rid of custom fields from the transaction template. For custom
fields inherited from Customer, you need to go to the Customer Edit form and click on
Define Fields to bring up the custom fields form and delete them there.
For custom fields inherited from Item, go to the Edit Item form, click on Custom Fields,
and click on Define Fields, where you can delete the custom fields.
Making Custom Fields Show Up In QuickBooks and in Print
We’ve already shown how to create the custom fields, write to them, and get data back in
queries. If you stop here, you will be able to write data to the fields and get data back in
queries. But your end user won’t be able to see those custom fields in the expected
QuickBooks transaction forms or in the transactions printed from QuickBooks.
Why is this? The transaction forms, for example, the Create Invoice form, use a transaction
template that QuickBooks itself uses to to display the transaction and to print it. By default,
any custom fields that are added via the SDK are indeed available in the various templates,
but they are turned off: they won’t be visible or be printable. You need to tell your user to
turn them on.
How do you do this? Lets take a look at Figure 11-6, which shows the template dropdown
selection list in the Create Invoices form, with the current selection of the Product Invoice
Modern template.
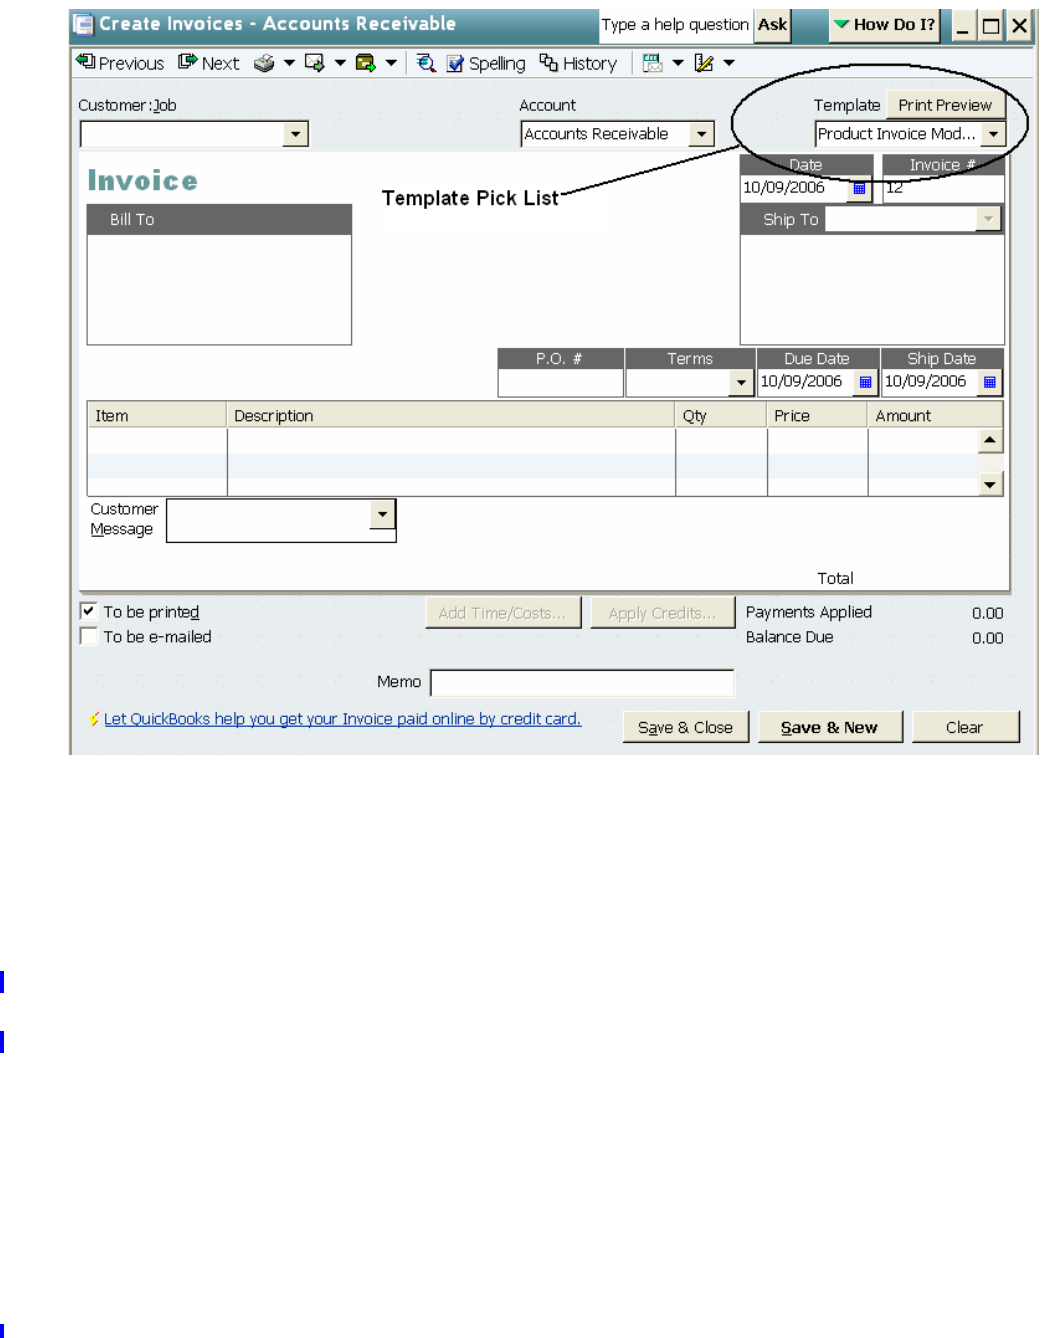
Making Custom Fields Show Up In QuickBooks and in Print
149
(c) 2013 Intuit Inc. All rights reserved.
Figure 11-6 Template currently in effect for an invoice
From this form, we see no way to get to the template to edit it and turn on the custom Fields
What we need the QuickBooks user to do is to edit the templates directly. To do this, the
user
1. Opens the templates list by selecting Lists->Templates from the main QB menubar.
2. Double-click the template being used for that transaction to bring up the Basic
Customization form for it.
3. Click on the Additional Customization button at the bottom of the form. Note: doing
this on some templates will result in the user being warned that some customizations
may cause the transaction to print improperly on some Intuit pre-printed invoice forms!
This is one issue you’ll need to investigate in advance and tell the user what to do. If
the user chooses to continue, the Additional Customization form will be displayed,
which looks like this:
150
Chapter 11: Data Ext: Using Custom Fields and Private Data
(c) 2013 Intuit Inc. All rights reserved.
4. In the form, the Header tab is for custom fields inherited from Customer, or the “built-
in” custom field named Other. The Columns tab is for custom fields inherited from
Item, or the built-in Other1 and Other2 custom fields. We’ve added two custom fields
to Item, named “Our custom field” and “Ours too!” Notice that the Screen and Print
checkboxes for this are not checked, by default. This means our two custom fields
won’t be visible in QuickBooks and won’t print.
5. The user must check those checkboxes to get the custom fields to display and print.
6. If the user does check these items, the user next needs to return to the Basic
Customization form and use the layout editor to add the new headers and/or columns in
a way that will display/print as desired. Again, changing the layout can impact the use
of Intuit pre-printed forms.
7. After the user makes the custom fields visible/printable as we’ve already described, and
uses the layout editor to position the new custom fields, the user is finished and the
fields will display and print as expected.

I Want to Use Private Data: How Do I Use GUIDs?
151
(c) 2013 Intuit Inc. All rights reserved.
I Want to Use Private Data: How Do I Use GUIDs?
All Microsoft development environments include an application called GUIDGen.exe
which will create a GUID for you that you can copy and paste into your application. You
generally generate the GUID for your app ONCE and hard-code it into a constant variable
in your application when you are developing your app. You would not want to generate a
GUID at runtime because then you wouldn't be able to get at the data extensions you
created in the previous run.
As a design consideration, you should use one GUID OwnerID for your application, not for
each individual data extension. In other words, one application, one GUID for many
DataExt definitions. However, from the technical perspective, you can have as many
GUIDs as you want.
The Format of the GUID within the Request
Notice the GUIDs are placed in the <OwnerID> field with curly braces around the value,
like this:
<OwnerID>{E09C86CF-9D6E-4EF2-BCBE-4D66B6B0F769}</OwnerID>
How Do I Retrieve OwnerIDs?
You cannot retrieve OwnerIDs from QuickBooks. Private data would not be so private if
anyone could discover your GUID and thus write values, perhaps unexpected ones, to your
application.
What is an OwnerIDList?
An OwnerIDList is used in a CompanyQuery to specify a list of GUIDs for private data
when you are doing a company query and want to see private data. You’ll get back all the
private data that you specify in the OwnerIDList.
Using Other, Other1, Other2 in Transactions
Beginning with qbXML 6.0 and QB 2007, you can write to the Other, Other1, and Other2
fields that are available to transactions. The Other field is used for the transaction Header.
Other1 and Other2 are used for the transaction Columns (that is, the values will appear in
the transaction line items).
The Other, Other1, and Other2 fields are available in the transaction templates, but these
are not turned on by default. The QuickBooks user needs to turn these on, as described in
“Making Custom Fields Show Up In QuickBooks and in Print”.

152
Chapter 11: Data Ext: Using Custom Fields and Private Data
(c) 2013 Intuit Inc. All rights reserved.
Writing Custom Field Data to Transaction Lines
Prior to QuickBooks 2006 and qbXML spec 5.0, in order to write data to custom fields in
transaction lines, you had to create the transaction first, then invoke DataExtMod on each
line. As a result, the transaction would get saved once for each invocation of DataExtMod,
which could lead to poor performance.
Beginning with QuickBooks 2006 and qbXML spec 5.0, you can add custom data directly
in the transaction lines as you create them. The following code sample shows you how to
do this:
_____ Listing 11-3 Writing custom data to a transaction line
‘ Assume that invoiceAdd has already been constructed, except for the line items.
Dim orInvoiceLineAdd1 As IORInvoiceLineAdd
' Create the first line item for the invoice
Set orInvoiceLineAdd1 = invoiceAdd.ORInvoiceLineAddList.Append
' Set the values for the first invoice line
orInvoiceLineAdd1.InvoiceLineAdd.ItemRef.FullName.setValue "Installation"
orInvoiceLineAdd1.InvoiceLineAdd.Quantity.setValue 2
‘ Now add your custom field value:
Dim MyDataExt As IDataExt
Set MyDataExt = orInvoiceLineAdd1.InvoiceLineAdd.DataExtList.Append
MyDataExt.OwnerID.setValue ("0")
MyDataExt.DataExtName.setValue ("Truck")
MyDataExt.DataExtValue.setValue ("Dodge")
‘ Just for grins, lets add a second line item
' Set the values for the second invoice line
orInvoiceLineAdd1.InvoiceLineAdd.ItemRef.FullName.setValue "Labor"
orInvoiceLineAdd1.InvoiceLineAdd.Quantity.setValue 1
‘ Add your custom field value again
Set MyDataExt = orInvoiceLineAdd1.InvoiceLineAdd.DataExtList.Append
MyDataExt.OwnerID.setValue ("0")
MyDataExt.DataExtName.setValue ("Truck")
MyDataExt.DataExtValue.setValue ("Ford")
The alert reader will note that while DataExtAdd’s TxnID field allows the useMacro
attribute, the TxnLineID does not. Nor does DataExtMod support useMacro in either field.
This is unfortunate, and I’ll take my case to the engineers!

Modifying Custom Field Data in Transaction Item Lines
153
(c) 2013 Intuit Inc. All rights reserved.
Modifying Custom Field Data in Transaction Item Lines
Modifying custom field data within the transaction lines is no different than modifying
other line item data. The details are provided in Chapter 10, “Modifying and Deleting
Transactions and List Objects.”

154
Chapter 11: Data Ext: Using Custom Fields and Private Data
(c) 2013 Intuit Inc. All rights reserved.

What is a Macro?
155
(c) 2013 Intuit Inc. All rights reserved.
C
HAPTER
12 1
U
SING
M
ACROS
I
N
R
EQUESTS
1
Many requests contain a reference to some other object that is needed for the request to
succeed. This is a problem if you want to create the referenced object in the same batch of
messages (that is, within the same message set) as the requests making the object reference.
How do you get around this? Macros.
What is a Macro?
A macro is a mechanism used to define certain elements that are created in a new request
and subsequently use them in a later request in the same message set or any time within the
same session. This mechanism eliminates the need to wait and parse the response to obtain
the transaction ID for an element before you reference it in a subsequent request.
The definition of the macro is marked by the defMacro keyword followed by the ID
<InvoiceAdd defMacro="TxnID:1234">
the subsequent use of that macro is marked by the useMacro keyword followed by that
same ID:
<TxnID useMacro="TxnID:1234"></TxnID>
Listing 12-1 shows a complete example.
Must Macro Names be Unique?
Macro names must be unique within the current QuickBooks session: Once the macro has
been defined, it is stored until the session is ended. and are limited to 40 characters. They
can include any alphanumeric character, as well as the dash (-) and underscore (_)
characters.
Each use of defMacro can be associated with only one tagname/name combination. (For
example, you can’t have defMacro="TxnID:1234;TxnLineID:5678." ) Be sure to think
about what a given request defines and returns before you define and use the macro
mechanism.

156
Chapter 12: Using Macros In Requests
(c) 2013 Intuit Inc. All rights reserved.
A Sample Macro
Listing 12-1 shows defining a macro for an invoice that is to be added to QuickBooks. The
macro is used to represent the transaction ID that QuickBooks will assign to the invoice
when it creates it. In the same message set, a ReceivePaymentAddRq applies a payment to
the newly created invoice. The macro mechanism allows QuickBooks to substitute the
actual TxnID it creates as a result of the InvoiceAdd request when it encounters the
following instruction later in the message set:
useMacro="TxnID:1234"
_____ Listing 12-1 Defining a macro for an invoice
<QBXMLMsgsRq onError = "stopOnError">
<InvoiceAddRq requestID = "695">
<InvoiceAdd defMacro="TxnID:1234">
<CustomerRef>
<FullName>Jones</FullName>
</CustomerRef>
<TxnDate>2002-08-29</TxnDate>
<RefNumber>123-ABC</RefNumber>
<InvoiceLineAdd>
<ItemRef>
<FullName>Services</FullName>
</ItemRef>
<Desc>For the house</Desc>
<Quantity>1</Quantity>
<Rate>120.00</Rate>
</InvoiceLineAdd>
</InvoiceAdd>
</InvoiceAddRq>
<ReceivePaymentAddRq requestID = "UUIDTYPE">
<ReceivePaymentAdd>
<CustomerRef>
<FullName>Jones</FullName>
</CustomerRef>
<TotalAmount>20.00</TotalAmount>
<AppliedToTxnAdd> >
<TxnID useMacro="TxnID:1234"></TxnID>
<PaymentAmount>20.00</PaymentAmount>
</AppliedToTxnAdd>
</ReceivePaymentAdd>
</ReceivePaymentAddRq>
</QBXMLMsgsRq>
In Listing 12-1, the tagname for the macro is “TxnID” and the name is “1234.”
Where Can You Define a Macro? Use a Macro?
157
(c) 2013 Intuit Inc. All rights reserved.
Where Can You Define a Macro? Use a Macro?
You need to check the OSR for the requests where you want to use macros. Elements in the
request that support defining a macro have the text defMacro in parens next to them (Figure
12-1). Elements supporting the use of a macro have the text useMacro in parens (Figure 12-
2).
Figure 12-1 defMacro in OSR
Figure 12-2 useMacro in OSR
Macros are normally defined (defMacro) for transactions. Macros are normally used
(useMacro) in the following ID elements:
PaymentTxnID
PaymentTxnLineID
TxnID
TxnLineID
The request elements that support macros are listed in the OSR.
Using Macros to Set Cleared Status
Another use of macros is to set the cleared status for an element. A typical use would be to
add a deposit and then set the cleared status for the transaction via the useMacro.
Listing 12-2 shows creating a deposit with cash back to the Savings account. It then clears
both the deposit and the cash back.
158
Chapter 12: Using Macros In Requests
(c) 2013 Intuit Inc. All rights reserved.
_____ Listing 12-2 Using macros to set the cleared status for an element
<DepositAddRq requestID = "695">
<DepositAdd defMacro="TxnID:66">
<TxnDate>2002-09-12</TxnDate>
<DepositToAccountRef>
<FullName>Jones</FullName>
</DepositToAccountRef>
<CashBackInfoAdd defMacro="TxnLineID:33">
<AccountRef>
<FullName>Savings</FullName>
</AccountRef>
<Amount>5.00</Amount>
</CashBackInfoAdd>
<DepositLineAdd>
<EntityRef>
<FullName>Smith</FullName>
</EntityRef>
<AccountRef>
<FullName>other</FullName>
</AccountRef>
<CheckNumber>1986</CheckNumber>
<Amount>20.00</Amount>
</DepositLineAdd>
</DepositAdd>
</DepositAddRq>
<ClearedStatusModRq requestID = "5629">
<ClearedStatusMod>
<TxnID useMacro="TxnID:66"></TxnID>
<ClearedStatus>Cleared</ClearedStatus>
</ClearedStatusMod>
</ClearedStatusModRq>
<ClearedStatusModRq requestID = "8411">
<ClearedStatusMod>
<TxnID useMacro="TxnID:66"></TxnID>
<TxnLineID useMacro="TxnLineID:33">2</TxnLineID>
<ClearedStatus>Cleared</ClearedStatus>
</ClearedStatusMod>
</ClearedStatusModRq>

159
(c) 2013 Intuit Inc. All rights reserved.
C
HAPTER
13 1
O
BJECTS
, O
BJECT
R
EFS
, F
ULLNAMES
,
AND
A
TTRIBUTES
1
When you program using the SDK, you will be accessing QuickBooks accounts, payments,
credits, vendors, invoices, purchase orders, and so on. In the QuickBooks SDK
documentation, we sometimes call these Quickbooks entities objects. These objects are
categorized either as list objects or transaction objects, as described in the following
subsections. One of the first things you must do in determining how to access some
QuickBooks feature is to determine whether you are dealing with a list or with a
transaction, since the programming required for each of these is different.
N
OTE
There are a few miscellaneous objects that are neither lists
nor transactions—namely, company, host, preferences, and
reports. These can be queried.
Lists
QuickBooks uses lists of information that you may want to access. Table 13-1 shows
functional groupings of those lists that are supported by the SDK. The functional groupings
are important because they illustrate certain commonalities within the functional group.
That is, if you know how to use Customer list objects (within the Entity group in Table 13-
1), then using Vendor list objects (which is also an Entity type) will be very similar. So, if
you have sample code for Customers but not Vendors, you can look at the Customer sample
code to see what you must do for Vendors.
N
OTE
When you are programming, you normally will have the SDK’s
Onscreen Reference open in order to see how to build the
requests. A quick way to determine whether the object you
are working with is a List object or a transaction object is to
look at the Response message for the object. It will have a
ListID at the beginning of the Ret object. A transaction will
have a TxnID in the beginning of the Ret object.

160
Chapter 13: Objects, ObjectRefs, Fullnames, and Attributes
(c) 2013 Intuit Inc. All rights reserved.
Table 13-1 List Types
Some list objects can have associated sub-objects—for example, a customer can have a
number of jobs associated with the same customer. The relationship between a list object
and its sub-object is described as a parent-child relationship. List objects can have up to
four levels of children.
When you attempt to modify a list object, the attempt can fail if the object is currently
being edited in the QuickBooks UI, or if the object was modified since the time you
retrieved it from QuickBooks in a query. If this failure occurs, you can handle it by
querying QuickBooks to get the object again and then apply the modifications to this
updated copy.
A Note about ListIDs
Notice that you can assign a name to the list object when you create or modify it. However,
only QuickBooks can assign the ListID and that ListID cannot be changed. However, in
some circumstances QuickBooks may appear to cause a ListID change. How? Suppose you
have a customer that has job information, and you attempt to add a job to the customer.
Entity Lists Item Lists
Customer ItemDiscount
Employee ItemFixedAsset
OtherName ItemGroup
Vendor ItemInventory
ItemInventoryAssembly
*
Customer and Vendor Profile Lists ItemNonInventory
Currency ItemOtherCharge
CustomerMessage ItemPayment
CustomerType ItemSalesTax
DateDrivenTerms ItemSalesTaxGroup
JobType ItemService
PaymentMethod ItemSubtotal
SalesRep PayrollItemWage
SalesTaxCode PayrollItemNonWage
ShipMethod
StandardTerms Other Lists
VendorType Class
BillingRate**
PriceLevel
Account List Template
Account ToDo
Vehicle
*Premier Edition and above
**Contractor, Professsional Services,
Accountant flavors of Premier and above

161
(c) 2013 Intuit Inc. All rights reserved.
From the QuickBooks UI, you can split the job information stored in the customer record,
which effectively creates a NEW customer record, populates it with the non-job data of the
original customer, and makes the original customer record with job data a child of that new
record. Consequently, because the customer record is new, it will have a new ListID, but
the same name. This will make it seem as though the ListID of that customer has changed.
(The old customer ListID in this example is now referencing the customer job!)
Notice that you can do the same thing from the SDK when you get an error in trying to add
a job to a customer, using the same logic.
Transactions
QuickBooks transactions reflect the flow of money into and out of a business. Table 13-2
lists functional groupings of the QuickBooks transactions that are supported in the SDK.
Although you can assign a reference number to some transactions, QuickBooks always
assigns a transaction ID to a transaction when it is created, and this ID cannot be modified.
Table 13-2 Transaction Objects
Accounts Receivable General Journal
Charge JournalEntry
CreditCardRefund Check
CreditMemo
Invoice
ReceivePayment Bank and Sales Receipt
Check
Accounts Payable Deposit
Bill SalesReceipt
BillPaymentCheck
BillPaymentCreditCard
ItemReceipt Time-Tracking
SalesTaxPaymentCheck TimeTracking
VendorCredit

162
Chapter 13: Objects, ObjectRefs, Fullnames, and Attributes
(c) 2013 Intuit Inc. All rights reserved.
Identifiers
Identifiers are used to refer to list objects and transactions. They are used in elements
within requests and responses and in object references (see the following section). List
objects have two types of identifiers:
• ListID: an ID, assigned by QuickBooks. A ListID does not change and is unique
among list objects of a given type (see details in “ListID,” beginning on page 162).
• FullName: the fully qualified name of the list object, which includes the list object
name preceded by the names of all of its parents (see details in “FullName,” beginning
on page 164). List object names are assigned by the user or by the application.
Transactions also have two types of identifiers:
• TxnID: an ID that is unique across all transactions (regardless of type). A TxnID is
assigned by QuickBooks and does not change.
• RefNumber: an optional user-assigned string that appears in various QuickBooks user
interface forms. Examples are check numbers, invoice numbers, and purchase order
numbers. This string may not be unique, even within the same transaction type.
ListID
A given list ID is unique within each of the groups shown in Table 13-3.
Credit Card Other
CreditCardCharge InventoryAdjustment
CreditCardCredit BuildAssembly (US Premier Edition
and above)
VehicleMileage
Non-posting
Estimate
PurchaseOrder
SalesOrder (US Premier Edition and
above)
Accounts Receivable General Journal

163
(c) 2013 Intuit Inc. All rights reserved.
Table 13-3 Unique IDs for List Groups
For example, a customer list object will never have the same ListID as a vendor list object.
Entity Lists Item Lists
Customer ItemDiscount
Employee ItemFixedAsset
OtherName ItemGroup
Vendor ItemInventory
ItemInventoryAssembly
Terms Lists ItemNonInventory
DateDrivenTerms ItemOtherCharge
StandardTerms ItemPayment
ItemSalesTax
Payroll Item Lists ItemSalesTaxGroup
PayrollItemNonWage ItemService
PayrollItemWage ItemSubtotal

164
Chapter 13: Objects, ObjectRefs, Fullnames, and Attributes
(c) 2013 Intuit Inc. All rights reserved.
The list IDs for objects in these lists need not be unique because each list is separate:
FullName
When a list object is created, a name is assigned to it, either by the user or by the
application. This name can be changed. Some list objects are simple standalone list objects.
Other list objects can have children. Examples of hierarchical list objects are customer/job,
job/subjob, account/subaccount, class/subclass. Table 13-4 contains the complete set of
hierarchical lists.
A FullName is a case-insensitive string that contains the name of an object, prefixed by the
names of each of its ancestors. Each name is delimited by a colon. A FullName can include
up to five object names. An example of a FullName is
Brian Cook:Home:Kitchen:Sink
The maximum length of a FullName depends on the maximum length of the base object
name, according to this formula:
maxlength = maxLengthBaseObjectName x nbrOfNames + nbrOfColons
Account
Class
CustomerMessage
CustomerType
JobType
PaymentMethod
SalesRep
SalesTaxCode
ShipMethod
Template
ToDo
VendorType

165
(c) 2013 Intuit Inc. All rights reserved.
Table 13-4 Hierarchical Lists
About Names
A name is a case-insensitive string that identifies an object. If the object has parents, a
name does not include the name of the parents. Also, if the object does not have parents,
Name is the same as FullName.
Sublevel Number
When a hierarchical object is returned by QuickBooks, the response indicates the sublevel
of the object, which is a number indicating how many parents the object has. The sublevel
is returned in any Add, Modify, and Query response.
Example
Table 13-5 shows a number of transactions for work on various jobs completed for the
customer Kristy Abercrombie.
Table 13-5 Invoices by Customer List
Each full name must be unique. Individual child names, such as “Floor” in this example,
need not be unique, since they are qualified by their parent names.
Account
Class
Customer
CustomerType
ItemDiscount
ItemInventory
ItemNonInventory
ItemOtherCharge
ItemService
JobType
VendorType
FullName Invoice # Description
Kristy Abercrombie Invoice #6 Permits
Kristy Abercrombie:Bathroom Invoice #1 Demolition
Kristy Abercrombie:Bathroom:Floor Invoice #2 Tile
Kristy Abercrombie:Bathroom:Floor Invoice #4 Install
Kristy Abercrombie:Bathroom:Tub Invoice #3 Tub install
Kristy Abercrombie:Bathroom:Sink Invoice #5 Reimbursement
Kristy Abercrombie:Kitchen Invoice #7 General
Kristy Abercrombie:Kitchen:Floor Invoice #8 Tile

166
Chapter 13: Objects, ObjectRefs, Fullnames, and Attributes
(c) 2013 Intuit Inc. All rights reserved.
Suppose you perform a query on the invoices listed in Table 13-5 asking for all invoices
pertaining to
<FullName>Kristy Abercrombie:Bathroom</FullName>
The response will contain Invoice #1. The following list shows other possible invoice
queries you could request for Table 13-5 and the corresponding invoices that would be
returned:
ListID versus FullName
Many messages allow you to specify either the ListID or the FullName for an object.
Because ListIDs cannot be changed, it is always safest to specify the ListID. If you specify
both a ListID and a FullName for an object, QuickBooks looks only at the ListID. The
FullName is completely ignored in this case, even if the ListID cannot be found. (Note:
This behavior applies to all Add and Mod requests.)
For Queries: FullNamewithChildren
FullNameWithChildren is an element used in entity, account, and item filters. For example,
in Table 13-5, if you query invoices for
<FullNameWithChildren>Kristy Abercrombie</FullNameWithChildren>
the response would include information for Kristy Abercrombie as well as the child jobs of
this customer, which in this case would be all of the invoices listed in
Table 13-5, since they are all children of Kristy Abercrombie. Other examples of invoice
queries that specify FullNameWithChildren for items in Table 13-5 would return the
following invoices:
ListID has an analogous element: ListIDWithChildren. ListIDWithChildren includes the
parent object as well as all of its descendants, just as FullNameWithChildren does.
If you perform an invoice query for ...
This invoice is
returned ...
<FullName>Kristy Abercrombie:Bathroom</FullName> Invoice #1
<FullName>Kristy Abercrombie</FullName> Invoice #6
<FullName>Kristy Abercrombie:Bathroom:Sink</FullName> Invoice #5
If you perform an invoice query for ...
This invoice is returned
...
<FullNameWithChildren>Kristy Abercrombie:Bathroom</
FullNameWith Children>
Invoices #1, 2, 3, 4, 5
<FullNameWithChildren>Kristy Abercrombie:Bathroom:Sink</
FullNameWith Children>
Invoice #5

Operations
167
(c) 2013 Intuit Inc. All rights reserved.
Object References
An object reference is used within an object to point to a list object. An object reference
contains a ListID and a FullName. Object references are used for two primary purposes:
•To connect list objects together in hierarchical relationships. These references are called
parent references. Only hierarchical list objects (Table 13-4) can contain parent
references. (Transaction objects cannot have parent references because they are not
hierarchical. Also, note that even if an object is a member of a hierarchical list, it may
not actually have a parent.)
•To refer to another object that contains relevant data. Both transaction objects and list
objects can contain object references.This reference might be for convenience, for
reporting purposes, or because the item is required for basic accounting purposes.
The name of the object reference implies the type of object referred to. For example, a
VendorTypeRef reference refers to a VendorType list object. A SalesRepEntityRef refers to
a SalesRep. An ExpenseAccountRef refers to an account of type Expense, and so on.
In general, if you want to add or modify an object that contains an object reference, the
referenced object must already exist in QuickBooks. However, the referenced object can be
defined in an Add request in the same message set as the referring object. In this case, the
referring object must come after the referenced object, and it must use a FullName as the
reference if the referring object is a list object. (Transaction objects can use either
FullName or macros.) For more information on macros, see Chapter 12, “Using Macros In
Requests.”
About DateTimes
Currently, the epoch is defined as the year 2038. You must specify DateTimes that fall on or
before the epoch, as DateTimes after the epoch are invalid.
Templates
You can query for templates using the TemplateQueryRq to obtain the names of all
templates that have been defined in QuickBooks. Templates are mainly used for specifying
how to print certain transactions. The following transactions can have templates defined for
them: credit memo, estimate, invoice, purchase order, sales order, and sales receipt.
Templates have an important correlation to custom fields: a transaction needs to reference a
customized template that has custom fields turned on in order for a custom field to be
displayed or printed. By default, custom fields are not turned on (and are therefore not
displayed or printed by default either).
Operations
The SDK supports the following operations:

168
Chapter 13: Objects, ObjectRefs, Fullnames, and Attributes
(c) 2013 Intuit Inc. All rights reserved.
•Add - adds an object to QuickBooks
•Modify - modifies an existing QuickBooks object (lists and some transactions)
•Delete - removes the list object or transaction object from QuickBooks
•Void - changes the transaction amount to zero but leaves a record of the transaction in
QuickBooks (does not apply to lists)
•Query - obtains information about one or more objects according to specified criteria
Adding an Object: Example of a Request and Response
The AccountAdd object in Listing 13-1, which adds an account, includes two required
elements (Name and AccountType) and one optional element (BankNumber). For optional
elements that are left unspecified (such as AccountNumber and OpenBalance, in this case)
QuickBooks will assume default values, if defaults exist. Elements that don’t have defaults
are left blank.
_____ Listing 13-1 Add request
<AccountAddRq requestID = "423">
<AccountAdd>
<Name>Checking Account</Name>
<AccountType>Bank</AccountType>
<BankNumber>0350039560</BankNumber>
</AccountAdd>
</AccountAddRq>
The response to an AccountAddRq is named AccountAddRs. The AccountAddRs response
contains an AccountRet object. An AccountRet object is also returned when an account
object is modified (AccountModRq).
After QuickBooks has successfully added the object, it returns a response message
containing the AccountRet object. In this object, QuickBooks adds some elements,
including the ListID, the time the object was created in QuickBooks (TimeCreated), the
time the object was last modified (TimeModified), and a value representing the version of
the object (EditSequence), plus some default values. Listing 13-2 shows the AccountAddRs
sent in response to the AccountAddRq message in Listing 13-1.

Operations
169
(c) 2013 Intuit Inc. All rights reserved.
______Listing 13-2 Add response
<AccountAddRs requestID = "423"
statusCode = "0"
statusSeverity = "Info"
statusMessage = "Status OK">
<AccountRet>
<ListID>60000-933272656</ListID>
<TimeCreated>2001-02-19T13:54:39-08:00</TimeCreated>
<TimeModified>2001-02-19T13:54:39-08:00</TimeModified>
<EditSequence>933272656</</EditSequence>
<Name>Checking Account</Name>
<FullName>Checking Account</FullName>
<IsActive>true</IsActive>
<Sublevel>0</Sublevel>
<AccountType>Bank</AccountType>
<BankNumber>0350039560</BankNumber>
</AccountRet>
</AccountAddRs>
Use of the Request ID
A request can specify an optional request ID, which can be used by your application to
match up requests you send to QuickBooks with the responses it returns to you. This
attribute is returned unchanged from QuickBooks in the matching response. Listing 13-1
specifies the optional ID, and Listing 13-2 returns it. The request ID can be very helpful in
error recovery if you don’t use QBFC. (See Chapter 31, “Error Recovery.”)
Balance vs. TotalBalance
The AccountRet and CustomerRet objects contain two elements, Balance and TotalBalance,
which have different meanings. Balance refers to an amount that applies only to a specific
element. In Table 13-6, for example, the subjobs Floor, Sink, and Bathroom each have
individual balances. TotalBalance is a cumulative total that is the sum of all subjob
balances in a job (or, more generally, of descendants of a given parent object). In Table 13-
6, TotalBalance for Kitchen is $800 ($500 for floor and $300 for sink). The TotalBalance
for KristyAbercrombie is the Kitchen TotalBalance ($800) plus the Bathroom TotalBalance
($400), or $1200.
Table 13-6 Comparison of Balance and TotalBalance
Job Balance TotalBalance
Kristy Abercrombie 0.00 1200.00
Kitchen 0.00 800.00
Floor 500.00 500.00
Sink 300.00 300.00
Bathroom 400.00 400.00

170
Chapter 13: Objects, ObjectRefs, Fullnames, and Attributes
(c) 2013 Intuit Inc. All rights reserved.
Querying for Objects
A query request enables an application to obtain objects of a certain type or group of types
and according to certain criteria from QuickBooks. The SDK defines a Query request for
each type of list object and transaction object. Filters allow you to specify selection criteria
for particular characteristics and parameters of the objects returned.
When a query specifies multiple filters, QuickBooks ANDs the filters and returns all
objects that satisfy the criteria of all the filters specified.
Some query requests have no filters, such as the HostQueryRq, CompanyQueryRq, and
PreferencesQueryRq.
HostQuery Request
The HostQuery request enables your application to obtain from QuickBooks the product
name and version information. (However, if you are primarily interested in supported
version information, and you use QBXMLRP2, then using the QBXMLVersionsForSession
call invoked against the request processor would be a better choice.)
In response, QuickBooks returns a HostRet object containing the following information
(see the Onscreen Reference for details):
• ProductName
-
This is the name of the product, such as “QuickBooks Pro Edition
2003.”
• MajorVersion
-
This is the version number identifying a major version of the
product, such as 13 (2004 US and Canadian Pro and above and Enterprise v4).
• MinorVersion
-
The minor version identifies a specific release of a major version. A
major bug fix or a new feature might be included in a minor version, for instance,
minor version 0 (release 1). Your application may need to check the version to
determine whether a particular feature is supported.
• Country - A string identifying the country for which QuickBooks is built. Possible
values are US (United States), CA (Canada), UK (United Kingdom), and AU
(Australia). Country-specific features include currency, taxes, spelling, and so on.
• SupportedQBXMLVersion
-
This is a list of all versions of the qbXML
specification that are supported by the version of QuickBooks that is currently serving
requests.
• IsAutomaticLogin - Indicates whether the application has logged in to QuickBooks in
Interactive mode (QuickBooks runs in the foreground and its user interface is
displayed) or in Automatic mode (QuickBooks runs in the background and its user
interface is not displayed).
• QBFileMode - Indicates whether the QuickBooks company file has been opened in
single-user or multi-user mode.
For detailed information on queries and filters, see Chapter 8, “Creating Queries.” For
detailed information on reports, see Chapter 9, “Generating Reports.”

Attributes in the SDK
171
(c) 2013 Intuit Inc. All rights reserved.
Attributes in the SDK
Attributes details are covered in the OSR. This section provides some background for the
OSR discussion.
There are several general types of Attributes that are available:
•message set-level attributes
•request attributes
•response attributes
•query attributes
We’ll describe each of these in the following sections.
Message Set-Level Attributes
There are several attributes related to how QuickBooks responds to errors in processing
requests sent by your application.
These are message set-level attributes governing how the message set is to processed. For
example, the onError attribute specifies how to proceed with subsequent requests in a
message set if an error occurs. The newMessageSetID and oldMessageSetID instruct
QuickBooks to save processing information in its state until you are sure your request and
its response have been successfully processed. The responseData attribute specifies how
much of the response to include.
onError Attribute
Every request message set must include the onError attribute, which specifies how to
proceed when an error occurs:
• stopOnError - directs QuickBooks to process requests until an error occurs and then
stop. Neither the current request that raised the error nor any subsequent requests will
be processed. Any requests in the same message set that were previously processed
successfully are retained. A nonzero status code is returned for the operation that
caused the error condition. For messages in the message set subsequent to the one that
raised the error, status code 3231 (“Status unprocessed”) is returned.
• continueOnError - directs QuickBooks to continue processing requests even if an
error occurs in processing the current request message set.
responseData Attribute
The responseData attribute can have a value of includeAll (the default) or includeNone.
Note that if a response is returned without data, it might be because of an error, or it might
be the result of the setting for this attribute.

172
Chapter 13: Objects, ObjectRefs, Fullnames, and Attributes
(c) 2013 Intuit Inc. All rights reserved.
Attributes for Error Recovery
If your application modifies data in the QuickBooks company file, you need to include the
error recovery attributes in your request messages:
•oldMessageSetID
•newMessageSetID
•messageSetStatusCode (see below)
The messageSetStatusCode attribute will be in the response message if error-recovery
attributes were included in the message set request. It provides the status of the entire
request message that was set in the QBXMLMsgsRq request.
For a complete discussion of the use of the oldMessageSetID and newMessageSetID
attributes and how to implement an error recovery routine in your application, see Chapter
31, “Error Recovery.” These attributes allow you to instruct QuickBooks to save state
concerning processing of the request, to check the processing status of a given request, and
to clear state for a given request when you are sure that you’re finished processing the
response. Also see the error recovery example included with the QuickBooks SDK
Samples.
Request Attributes
For requests that are not queries, there is one optional attribute, requestID. This attribute is
used in requests in message sets where there are more than one request. The request ID
allows you to match up requests and responses (the response to a request will have the same
requestID) when you receive them in the response message set. This is important, because
the order of requests submitted in the request message set might not be the order of
responses coming back in the response message set.
Notice that if you use QBFC, you don’t have to deal with requestIDs. QBFC automatically
assigns the requestID to the requests inside the message set, and guarantees that the order of
responses returned matches the order of the requests submitted.
Response Attributes
Every response contains three types of status information:
• requestID- See above under ‘Request Attributes”
• statusCode - 0 for success; nonzero for information, warnings, and errors.
• statusSeverity - This attribute indicates how severe the error is. It can have one of
three values:
>Info - QuickBooks completed processing your qbXML request and has returned the
corresponding data in the remainder of this message.

Attributes in the SDK
173
(c) 2013 Intuit Inc. All rights reserved.
>Warning - QuickBooks completed processing your request and has returned the
corresponding data, but the results might not be consistent with what you expected.
>Error - The request was not completed. No data will appear in the response after
the status message.
• statusMessage - This attribute explains the error or warning condition that is indicated
by the status code.
Query Attributes
In addition to the general request and response attributes listed above, queries have several
other attributes. These generally are intended to help you manage the amount of query data
returned.
Query Request Attributes
These are attributes found in the query request
•iterator may have one of the following values: Start, Continue, Stop
•iteratorID is optional
•metaData is optional and may have one of the following values: NoMetaData,
MetaDataOnly, MetaDataAndResponseData
Query Response Attributes
•iteratorID is optional
•iteratorRemainingCount
•retCount
For details on the query attributes, see Chapter 8, “Creating Queries.”
174
Chapter 13: Objects, ObjectRefs, Fullnames, and Attributes
(c) 2013 Intuit Inc. All rights reserved.
Using the C# App Template to Implement Eventing
175
(c) 2013 Intuit Inc. All rights reserved.
C
HAPTER
14 1
E
VENT
N
OTIFICATION
1
This chapter describes the QuickBooks SDK event notification framework and how to use
it in your qbXML-based application to respond to certain QuickBooks events. This chapter
provides general information applicable to both QBFC-based and qbXML-based
applications.
The chapter is divided into two main parts
•An Overview section containing background information about the event notification
framework.
•An Implementation section containing details and sample code.
I
MPORTANT
Events are not supported for QuickBooks Simple Start edition.
Using the C# App Template to Implement Eventing
The QB SDK includes an application template wizard that generates a great deal of the
event code you need or may want to implement. It does a lot of the heavy lifting for you
and we strongly recommend using this if you can. The information in this chapter is still
useful background information, but the template will save you LOTS of time and potential
mistakes. The template is for Visual Studio 2005 and later and works for C# applications. If
you have VS 2005, this will be automatically installed for you in the templates directory.
For more information see “C# Project Wizard” in the QB SDK program group accessed
from the Windows Start menu.
What Requests Do I Use and How Do I Invoke These?
The following requests are the event related requests:
Name Description
DataEventSubscriptionAdd Adds one or more subscriptions to the specified QuickBooks data events.
DataEventSubscriptionQuery Queries for subscriptions by SubscriberID and qbXML version.
SubscriptionDel Deletes all subscriptions matching subscriber ID and qbXML version.
UIEventSubscriptionAdd Adds one or more subscriptions to the specified QuickBooks UI events.
UIEventSubscriptionQuery Queries for subscriptions by SubscriberID and qbXML version.
UIExtensionSubscriptionAdd Adds one or more subscriptions to the specified QuickBooks UI extension
events.
UIExtensionSubscriptionQuery Queries for subscriptions by SubscriberID and qbXML version.

176
Chapter 14: Event Notification
(c) 2013 Intuit Inc. All rights reserved.
These requests are documented in the OSR under the pulldown menu “Select Subscription
Message”
Your callback application gets all events in a QBXMLEvents response message.
How Do I Invoke Subscription Events?
You must invoke the requests to add, query, and delete subscriptions using the request
processor method ProcessSubscription() if you use qbXML.
If you use QBFC, you must append the subscription request to an
ISubscriptionMsgSetRequest object instantiated by the QBSessionManager method
CreateSubscriptionMsgSetRequest() and invoke the method DoSubscriptionRequests().
I
MPORTANT
You cannot invoke QBXMLEvent, since that is a return-only
message.
Overview: The Event Notification Framework
To obtain a general understanding of how QuickBooks event notification works, you need
to understand the following:
•“QuickBooks Events and Event Notification” (page 176)
•“Subscribing to Events” (page 178)
•“Authorizing a Callback Application to Receive Events” (page 181)
•“Processing Events in a Callback Application” (page 182)
•“Handling Special QuickBooks Operations” (page 189)
•“Putting it All Together: The Event Notification Flow” (page 191)
These items are discussed in the following subsections.
QuickBooks Events and Event Notification
I
MPORTANT
The event mechanism described in this chapter applies only to
company files opened in interactive mode under QuickBooks.
No events are sent to applications if QuickBooks auto-login
mode, also called “background” mode, is used. (Auto-login
mode is used where applications access company files without
QuickBooks running.)
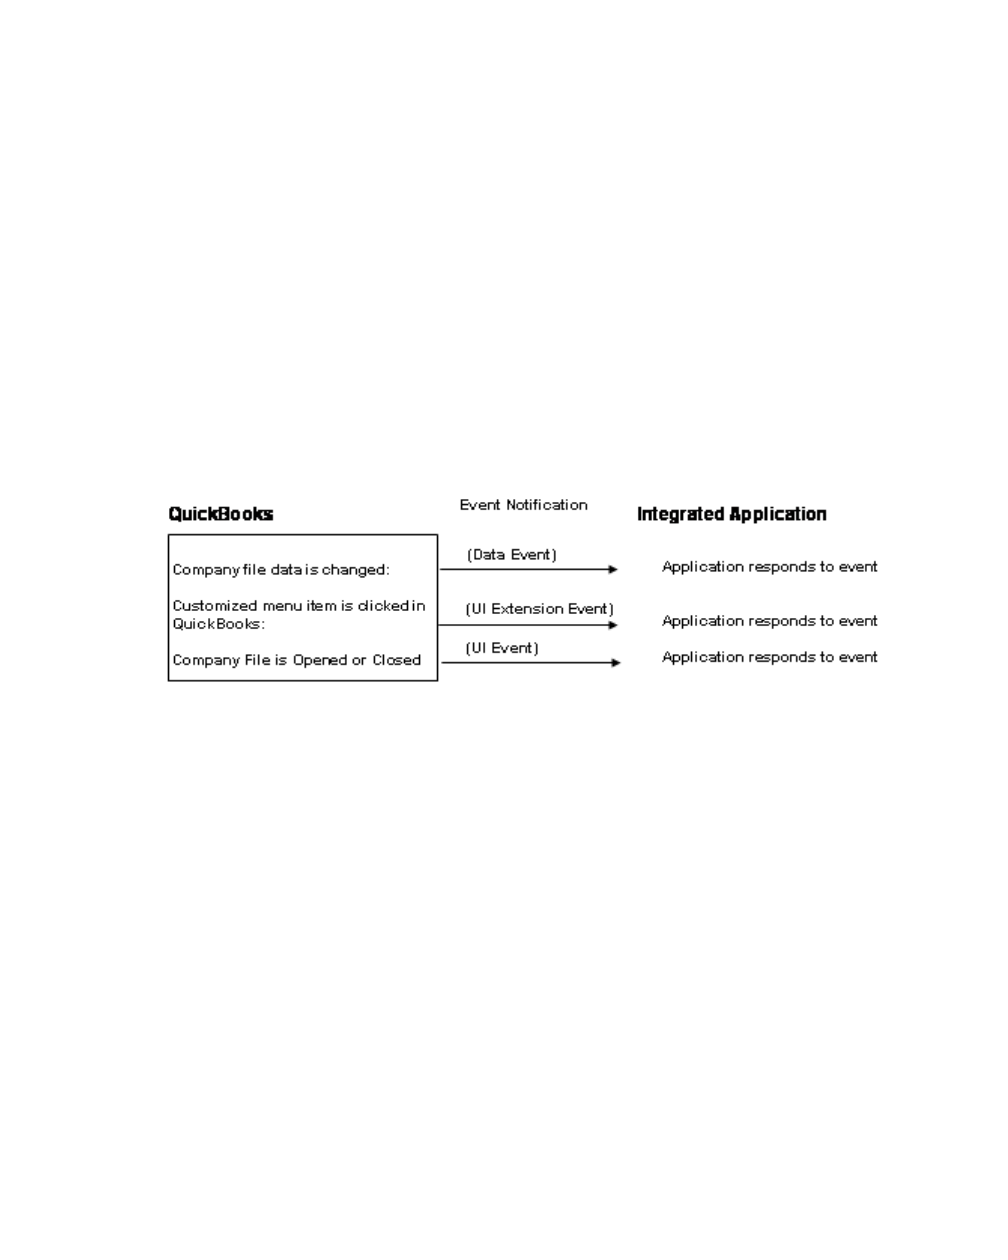
Overview: The Event Notification Framework
177
(c) 2013 Intuit Inc. All rights reserved.
An application that is integrated with QuickBooks via the SDK may need to know about
certain changes to data in the company file when they occur. For example, if it uses
QuickBooks customer data or account data, the application may need to know if a customer
or account is added, modified, or deleted. Such changes are called QuickBooks data events,
or simply data events.
Similarly, an application may need to be notified when certain QuickBooks UI-related
events occur, such as the opening or closing of the company file. These are called UI
events.
Finally, an application may need to launch itself or display its user interface (UI) in
response to an end user clicking a customized menu item that the application has added to
the QuickBooks UI. The menu click on a custom menu item is called a UI extension event.
(Adding a custom menu item to QuickBooks is described in Chapter 15, “Integrating with
the QuickBooks UI.”)
Event notification refers to the delivery of event information to an integrated application
when any of the three types of event occurs. See Figure 14-1 (page 177).
Figure 14-1 QuickBooks Events and Event Notification
Which Events are Supported?
Your application can receive notification of certain QuickBooks data events, UI extension
events, and UI events. See the Onscreen Reference for a complete listing of possible events.
Supported Data Events
Any QuickBooks list or transaction object supported by the SDK is also supported by the
event notification framework.
Your application can receive notification about additions, deletions, and modifications to
these types of QuickBooks objects, whether the changes occur directly in the QuickBooks
UI (such as by adding a customer) or programmatically from an integrated application
(such as by sending an InvoiceAdd request).

178
Chapter 14: Event Notification
(c) 2013 Intuit Inc. All rights reserved.
N
OTE
Your application receives its own data events unless you
specify otherwise when you subscribe the application. To
avoid receiving your own events, set the DeliverOwnEvents
field to False in the DataEventSubscriptionAdd request.
Supported UI Extension Events
Through UI extension subscriptions, you can add your own custom menu item and/or menu
subitems to the QuickBooks UI. Your application can also receive notification when these
items are clicked by an end user.
Supported UI Events
Company file events, such as the opening or closing of the company file, are considered to
be UI events, and are supported by the event notification framework. Currently, these are
the only two UI events supported.
How qbXML Versioning is Handled in Subscriptions
The event data that is returned can potentially differ depending on the qbXML version. For
example, in the 4.0 qbXML spec, there is a new tag that could be returned in the
QBXMLEvent response called CurrentWindow. If an application is designed for the 3.0
spec but not the 4.0 spec, how is this situation handled?
Beginning with SDK 4.0, the spec version that issued the original subscription request
determines which data is returned in the response. For example, if your application
subscribed using qbXML 3.0 (that is, the qbXML processing instruction is set like this:
<?qbxml version="3.0"?> ), then the QBXMLEvent data that is returned is the data from
3.0, that is, you don’t receive additional data made available in 4.0. If you needed that data,
you would first do a 3.0 unsubscribe to get rid of the old subscription, then resubscribe
using a qbXML 4.0 subscription request.
In addition, suppose you have a current subscription issued using qbXML 3.0. To delete
that subscription, you have to issue a SubscriptionDel request with the qbXML version tag
set to 3.0. The reason for this is that you might want to keep 3.0 spec subscriptions for
backwards compatibility.
Subscribing to Events
In order for your application to receive notification about one or more supported
QuickBooks events, the event notification framework must know about the application and
the events that the application wants to receive. That is, your application must be
subscribed to an event before it can receive notification about it.
Once your application is subscribed, your application will receive all the specified events.
For example, if it is subscribed to CustomerAdd events it will receive notifications
whenever a new customer is added in QuickBooks to any company file.

Overview: The Event Notification Framework
179
(c) 2013 Intuit Inc. All rights reserved.
The application receiving the events handles them in a callback, as described later in this
chapter. This application is called the callback application and must be an .exe binary: it
cannot be a DLL.
N
OTE
The application that makes a subscription request does not
have to be the same application that will receive the event
notification. (For example, your installation application might
call a subscription request that specifies callback information
for your main application.)
When Does a Subscription Go into Effect?
QuickBooks does not need to be running when you subscribe and unsubscribe an
application. Notice that the subscribe or unsubscribe does not go into effect immediately,
however. For data and UI events, the subscribe/unsubscribe goes into effect when the
company file is next opened by QuickBooks. (Consequently, when you subscribe or
unsubscribe, you should notify the user to reopen any company files that are currently
open.) For UI extension events, the subscribe/unsubscribe goes into effect when
QuickBooks is next started.
Which Company Files are Affected by a Subscription?
When you add a subscription, it applies to all company files on that machine. However,
notice that the QuickBooks user must still authorize your application for each company file.
If you want events from only one particular company file, you can filter out the events from
any unwanted company file by checking the CompanyFilePath element in the incoming
event XML that your application receives.
What Information Do I Need to Write Subscription Code?
The actual subscription code differs depending on whether you use qbXML or QBFC to
accomplish it. Implementing qbXML-based subscription is described later in this chapter
under “Implementing Event-Awareness in qbXML.”
You need to supply the following information in your subscriber application:

180
Chapter 14: Event Notification
(c) 2013 Intuit Inc. All rights reserved.
Unsubscribing From Events
Both QBFC and qbXML support unsubscribing from events of a specified type: data
events, UI events or UI extension events. The unsubscribe request specifies the type and the
application. For example, if you unsubscribe from data events, the application is
unsubscribed from all data events, if you unsubscribe from UI events, the application is
Information Description
Callback application name The name of the application that contains the
callback that handles the events.
CLSID (or ProgID) You must assign a CLSID (or a ProgID, depending on
the programming language that you use and your
own preferences) for the callback class that
implements the SDK interface IQBEventCallback.
The CLSID or ProgID must be registered in the
Windows registry before the subscription request can
be made successfully.
Notice that you can only have one CLSID/ProgID per
SubscriberID. For example, if you use the same
SubscriberID to subscribe to data event, UI event,
and UI extension events, then you will also need to
specify the same CLSID.
If you want multiple CLSIDs for your application
(perhaps because you want one EXE to handle data
events, another EXE to handling UI events, and still
another EXE to handle UI extension events), you use
a different SubscriberID to subscribe to each event
type.
DeliveryPolicy You need to specify the QBFC or qbXML value for
“deliver only if running” if you want your application
to receive events only when it is running.
Specify the QBFC or qbXML value for “deliver
always” if you want your application to be started up
to receive the incoming events if the application isn’t
running. Notice that the callback will be started up
only once during the QuickBooks session.
The actual values specified vary depending on
whether QBFC or qbXML is used.
subscriberID This is a GUID that you must create for your
application. You also use this value whenever you
query or delete subscriptions.
TrackLostEvents For data events only. Specify the QBFC or qbXML
value for “all” if you want a DataEventRecoveryTime
to be recorded when there is a lost event. You would
do this if you wanted to implement lost event
recovery, as described under “Recovering From Lost
Data Events” (page 187).
Specify the QBFC or qbXML value for “none” if your
application does not care about lost events.

Overview: The Event Notification Framework
181
(c) 2013 Intuit Inc. All rights reserved.
unsubscribed from all UI events, and so on. Just like subscribing, the unsubscribe changes
take effect only when the company file is next opened (for data events and UI events) or
when QuickBooks is restarted (for UI extension events).
I
MPORTANT
During your application’s uninstall, you should always
unsubscribe from any events to which your application is
subscribed.
Modifying a Subscription
There is no subscription Modify functionality. However, you can achieve the same result by
deleting the subscription and adding a new subscription that contains all of the events of
that type you want to receive, including ones that may have been in the previous
subscription.
Querying a Subscription
Both QBFC and qbXML support querying for the events that are currently under
subscription. This is useful for determining the current subscription. The response returns
different information depending on the query type. See the Onscreen Reference for more
information.
Authorizing a Callback Application to Receive Events
The QuickBooks UI to authorize an application to receive data, UI, and UI extension events
is the same as for regular SDK calls. Notice that the QuickBooks UI prompts for
permissions based on the callback’s certificate if it is signed or the AppName specified in
the subscription XML if the callback is not signed.
Once an application is authorized to access QuickBooks via the SDK, the application
automatically has permission to receive event notifications. Similarly, once an application is
authorized to receive events, it is automatically authorized to access QuickBooks via the
SDK.
However, there is one difference worth noting. With standard SDK requests, when the user
has chosen to be prompted before allowing access, a prompt will be displayed at each call
to BeginSession. With events, when this same access level is chosen, a prompt will also be
displayed each time the company file is opened in attended mode. Then, if the user grants
the application permission by selecting "Yes, Always," the application will receive events
in future sessions without prompting. If the user selects "Yes, This time,” the application
will receive events for as long as that company file remains open. If the user selects “Yes,
Always,” the application will not be prompted in future sessions. In your documentation
and messaging to your user, you should recommend that they choose “Yes, Always” as this
will provide the best user experience.

182
Chapter 14: Event Notification
(c) 2013 Intuit Inc. All rights reserved.
If the company file is opened in unattended mode, a prompt will not be displayed and no
events will be sent to the application while that company file remains open.
Security and Certification
If your application is digitally signed as described in Chapter 34, “Digitally Signing Your
Code,” QuickBooks verifies that the correct application is receiving the notification to
which your application is subscribed.
QuickBooks reads, encrypts, and stores the certificate information from the callback
executable when the subscription request is made. Then, starting the callback application,
QuickBooks reads the signature information from the callback executable that is about to be
notified and makes sure that it matches the information that was read when the subscription
request was made.
If the certificate is invalid or revoked, QuickBooks silently fails to start the application and
an error is logged because it is considered disruptive to tell the user in the UI (which is
what regular SDK requests do) in this case.
If the certificate is expired, and the user has chosen to be prompted about expired
certificates, QuickBooks will also silently fail to start the application. However, if the user
hasn’t chosen to be prompted about expired certificates, or has previously allowed access to
an application even though it is expired, then the application will continue to receive
events.
If the information does not match (meaning that the executable has been replaced), no
notification will be sent, and for UI extensions an error dialog will be displayed (the same
one that’s shown when the notification fails for any other reason).
If your application is not digitally signed, the SDK will send notification events without any
verification.
Processing Events in a Callback Application
In order to process events, your callback application must implement the required COM
interface and it must account for a range of expected event behavior. (The COM interface is
defined in the file SDKEvent.dll, located in the QuickBooks install directory.) These two
areas are described in more detail in the following subsections.
Importing the Required Libraries
In addition to implementing the callback class, you must import the required event library
into the project that implements the callback.
For Visual Basic you import the library by adding the QBSDKEvents type library to the
project references. To do this, select Project > References from within your VB project.
Find QBSDKEvent 1.0 Type Library in the list and check the box next to it, then click OK.
If you don’t find the entry in the list, you can browse to it.

Overview: The Event Notification Framework
183
(c) 2013 Intuit Inc. All rights reserved.
For Visual C++ you import the library named sdkevent.dll, which is installed in C:\Program
Files\Intuit\<QuickBooksInstallDirectory> where <QuickBooksInstallDirectory> is the
name of the QuickBooks product you are using when you build your application. You need
to add the statement
#import "sdkevent.dll"
in the header file for the callback. Finally, in Microsoft Visual Studio, remember to specify
the QuickBooks executable path for the project. The method for doing this is different for
Visual Studio 6.0 and Visual Studio.NET.
For Visual Studio 6.0, select “Options” from the “Tools” menu. Select the “Directories” tab
and then select “Executable Files.” Add the QuickBooks executable path to the list of
directories here.
For Visual Studio.NET, select “Properties” from the “Project” menu. Under the “C/C++”
options, select “General” and add the QuickBooks executable path to the “Additional
Include Directories.” Under the “MIDL” options, also select “General” and add the
QuickBooks executable path to “Additional Include Directories.”
The IQBEventCallback Class
You need to implement the Inform method (IQBSDKCallback::Inform) of the
IQBEventCallback interface.
The inform method returns the event string in XML format. The following is the virtual
method signature for IQBSDKCallback::Inform:
virtual HRESULT __stdcall inform (/*[in]*/ BSTR eventXML ) = 0;
If you use Visual Basic, you need to implement it by adding the lines
Implements QBSDKEVENTLib.IQBEventCallback
Public Sub IQBEventCallback_inform(ByVal eventXML As String)
followed by your implementation code.
Adding the CallBack Class to Your Application
The event notification framework uses COM to notify applications about events.
Accordingly, in order to receive the events you subscribe to, you must implement the SDK-
defined COM interface IQBEventCallback. The implementation is described in detail in
“Implementing a qbXML-based Callback (IQBEventCallback)” (page 196). Notice that you
must register the callback application EXE before any attempt to subscribe the callback
application
.

184
Chapter 14: Event Notification
(c) 2013 Intuit Inc. All rights reserved.
I
MPORTANT
In-process COM servers are not allowed, only out-of-process
local servers. So, you must implement the callback class in an
EXE, not in a DLL.
Specifying CLSID/ProgID for the Callback Class
In the subscription code you must supply the class ID (CLSID) or ProgID for the callback
class. QuickBooks uses the CLSID/ProgID to invoke your application’s callback method in
response to subscribed events.
In some programming languages you can use the ProgID instead of CLSID. For VB
projects, the ProgID is the ’<Name of Project>.<Name of COM class>.
I
MPORTANT
If you use CLSIDs in VB, you must set the VB project
properties for binary compatibility or this value will change
every time you compile and the CLSID won’t match the one
expected by QuickBooks. You must remember to do this
because the VB default for projects does not use binary
compatibility.
To set binary compatibility, open your project, select the
Project pull-down menu, and click on your application’s
properties at the bottom of the pull-down. In the ensuing
properties window, select the Component tab. In the ensuing
tab window, select the option Binary Compatibility and click
OK.
Determine Which Delivery Policy Your CallBack Supports
DeliveryPolicy determines whether QuickBooks will start your callback application when
the application is not running. If your application specifies a delivery policy of “deliver
always” then it will be started up (if not running already) upon the first subscribed
QuickBooks event. If the subscription specifies “deliver only if running” then any events
occurring when the application is not running are not delivered but are marked as “lost
events.”
Regardless of the delivery policy, once your callback application starts, you should be
aware that QuickBooks doesn’t release that callback application’s COM pointer until the
company file closes. The callback application therefore cannot be dismissed by the user. So
if you use a UI for your callback, you need to design the UI to handle this.
If your application needs to distinguish between being started by QuickBooks and being
started by the user, you should add a command line argument to the shortcut for the EXE,
because QuickBooks never passes a command line argument when starting the application.
If your application subscribes with a delivery policy of “deliver only if running,” then you
may want to implement lost event handling, as described in “Recovering From Lost Data
Events” on page 187.

Overview: The Event Notification Framework
185
(c) 2013 Intuit Inc. All rights reserved.
What to Do and What to Avoid in the Callback
Your implementation of the IQBEventCallback routine should do minimal processing and
should return quickly. Why is this a design requirement? First, your callback application
cannot receive any other events until you return from your callback. Instead, QuickBooks
maintains such events (except company file close) in a queue in the order in which they
occur.
Once you return from the callback, QuickBooks will send the next event from this queue. It
is therefore recommended that if the application needs to display some UI in the callback, it
should choose to use nonblocking UI calls instead of blocking UI calls, so that the callback
method can return without delay.
The queue contains a limited number of events. If the queue becomes full, events are no
longer delivered to your application but are marked as lost events. If this is happening, your
application is not processing events fast enough.
N
OTE
Even though your application does not receive more events
until it has returned from its callback method, during this time
other applications are free to receive events and QuickBooks
itself is able to function normally. (QuickBooks can handle UI
actions from the user, as well as SDK requests.)
Another reason for performing minimal processing in the callback implementation is that
the callback application must be able to respond quickly to a company file close event.
If your callback makes SDK queries into QuickBooks, rather than caching the Request
Processor pointer, we recommend that you make the BeginSession and EndSession calls
within the callback.
What the Callback Implementation Cannot Do
In your implementation of the IQBEventCallback::Inform callback routine, you cannot
invoke any QuickBooks SDK request that writes immediately to the QuickBooks company
file, if the callback is a data event callback. As a result, you can only issue query requests,
as well as make subscription changes, since they aren’t immediately written to the company
file. The only exception to this is that you can also perform a DataEventRecoveryInfoDel
request during a callback. See “Recovering From Lost Data Events” (page 187) for
information on data event recovery.
Also, in a data event callback, you cannot invoke the QuickBooks UI, that is, post some
QuickBooks form.
Finally, you should not make SDK requests in the callback for company close events.
186
Chapter 14: Event Notification
(c) 2013 Intuit Inc. All rights reserved.
Avoiding Infinite Loops
As noted above, an application is prevented from making data modifying requests in its
callback routine. This is done to help avoid the infinite recursion problem, for example,
where applications A and B each modify data in its callback that the other listens to, thus
becoming locked in an infinite recursion.
Consequently, as much as possible, you should avoid writing to QuickBooks in direct
response to events.
For ideas on how to work with these concerns, see the three sample set under
QBSDK3.0\samples\qbdt\vb\qbxml\DataEvents.
Event Behavior Your CallBack Application Should Be Aware Of
The following subsections describe some event behaviors that you should be aware of when
you implement the callback application.
Can the User Dismiss the Callback Application?
QuickBooks doesn’t release a callback application’s COM pointer until the company file
closes. Consequently, if the callback application has a UI that can be dismissed by the user,
you should be aware that the callback app doesn’t really go away. It goes away only when
the company file closes. If you use a UI for your callback, you need to design the UI to
handle this.
Do Applications Receive Events from Their Own Requests?
Beginning with SDK 4.0, an application can choose not to receive its own data events when
it makes its subscription. By default, however, applications do receive subscribed-to events
for QuickBooks activity resulting from the application’s own add/mod/delete activities
within QuickBooks. To avoid receiving your own events, set the DeliverOwnEvents field to
False in the DataEventSubscriptionAdd request.
Indirect Events
You should be aware that some QuickBooks actions may generate multiple events if the
action affects different QuickBooks objects. For example, adding a new invoice in
QuickBooks also affects accounts. Accordingly, when there is an InvoiceAdd event, there
could be multiple AccountMod events.
Are Events Generated from Custom Fields and Private Data Extensions?
If an end user adds or changes data in a custom field via the QuickBooks UI, or if an
integrated application successfully issues a DataExtAdd or DataExtMod request for a
custom field or private data extension, a Mod event is generated for the parent object, and
the Time Modified value for the parent object is updated. For example, if a Customer has a
custom field called “shoe size,” modifying the value of that custom field generates a
Customer mod event and causes an update to the customer’s Time Modified field.
Can Applications Receive Events From Remote Machines?
An application running on one machine with QuickBooks generally receives events only
from events generated by that local QuickBooks. The application won’t receive events
generated by interactive users sharing the same company file on other machines or by SDK

Overview: The Event Notification Framework
187
(c) 2013 Intuit Inc. All rights reserved.
clients running on other machines. If you need to track those remotely-made changes in the
company file, you can can use the event recovery mechanism described under “Recovering
From Lost Data Events” on page 187.
However, you should be aware that if the local QuickBooks needs to refresh its view of an
object, because it is being edited locally, or because a list is being refreshed, or because an
SDK client issues a query request, then events may be delivered that came from other
machines.
What Kind of Information is Contained in an Event?
When a subscribed event occurs, your application’s callback routine receives the event in
the form of a qbXML aggregate, QBXMLEvents, which contains one of three aggregates
based on the type of event that occurred: DataEventRet, UIExtensionRet, and UIEventRet.
Regardless of event type, the path to the company file is always supplied. The rest of the
data varies by type:
•UI extension events also include the menu tag you specified in the original subscription
in order to identify the specific custom menu item that was selected
•UI events also include
> an indicator that tells whether the file event is a company file open or close
> an indicator that tells whether the company file just opened is a new company file
•Data events also include
> a last restore timestamp if a restore has occurred and this is the first event sent to
your application after the company file was opened
> a last condense timestamp if a condense has occurred and this is the first event sent
to your application after the company file was opened
> a data recovery timestamp if there have been lost events and TrackLostEvents is set
to All in the subscription.
> the object type, e.g., Account, Customer, JobType, Estimate, Invoice, and so on
> the operation causing the event (Add, Modify, Delete, or Merge)
> the object ID (ListID or TxnID)
> the reference number (for transactions)
See the Onscreen Reference for a complete listing of the possible contents of the
QBXMLEvents aggregate.
Recovering From Lost Data Events
There are a few situations in which data events aren’t sent to your application by
QuickBooks. When this happens, the event notification framework provides a way for you
to recover from these lost data events in order to synchronize the data your application
maintains with the data in QuickBooks.
188
Chapter 14: Event Notification
(c) 2013 Intuit Inc. All rights reserved.
How Are Data Events Lost?
Data events can be lost due to a variety of conditions. There are basically two groups of
causes: normal conditions and failure conditions. This distinction is important because the
event notification system behaves differently depending on whether an event was lost due
to failure conditions or not. If data events are lost due to normal conditions, attempts will
still be made to deliver future events. If events are lost due to failure conditions, no attempt
will be made to deliver future events during the rest of the current session with the
company file.
Normal conditions leading to lost events. The list below describes normal conditions in
which data events are lost for your application:
•Your application does not have access to events at the present time. This can occur
when the user denies such access.
•QuickBooks is being run in unattended mode.
•The application has subscribed as DeliverOnlyIfRunning and it isn’t running
•A data event occurs to which your application has subscribed, but your application is
on a different machine from the machine triggering the data event. The following two
scenarios illustrate how this can happen:
> The data event subscription of application A on machine A has taken effect in a
company file. (A subscription takes effect in a company file upon company file
open.) That company file is then accessed on machine B, which doesn’t have
application A. When a data event that application A subscribed to gets triggered on
machine B (by user action, for example), application A is considered to have lost
that event.
> Application A resides on machine A and application B resides on machine B.
Machine A and machine B are accessing the same company file at the same time in
QuickBooks multi-user mode, and both applications have taken effect in that
company file. When a data event gets triggered on machine A, application B is
considered to have lost that event. Similarly, when a data event is triggered on
machine B, application A is considered to have lost that event.
> Notice that the same application could be installed on both machines in the two
scenarios above, in which case application A and application B would be referring
to two different instances of the same application. Lost events are really tracked for
each unique machine/SubscriberID pair.
•The application is processing events too slowly so that the event queue maintained by
QuickBooks for your application exceeds the queue limit.
•The QuickBooks company file is closed while there are still events in the queue it
maintains for your application.
Failure conditions leading to lost data events. The list below describes failure conditions
in which data events are lost for your application:
•QuickBooks encounters an error when attempting to send the event to your application,
for example, if your application crashed, or if a failure HRESULT is returned from your
callback.

Overview: The Event Notification Framework
189
(c) 2013 Intuit Inc. All rights reserved.
I
MPORTANT
If data events are lost due to failure conditions, no more data
events are sent to the application until the company file is re-
opened.
How Do I Determine Whether Any Data Events Have Been Lost?
Provided that you set the TrackLostEvents field in the data event subscription request to
All, the DataEventRecoveryTime will be recorded whenever data events are lost, as
described above. There are then two ways to check the DataEventRecoveryTime to
determine if any events have been lost.
The first way is by examining a data event for the presence of the DataEventRecoveryTime
field. If this field exists, then a data event was lost as of this time. The other way is by
issuing a DataEventRecoveryInfoQuery request. If the response contains a
DataEventRecoveryTime, then, again, a data event was lost as of this time.
Notice that if more than one event was lost, the DataEventRecoveryTime will retain the
time of the first lost event.
How Do I Recover From Lost Data Events?
After you determine that data events have in fact been lost, you can query for all the objects
your application cares about, with the FromModifiedDate filter set to the
DataEventRecoveryTime. This will synchronize your records with the QuickBooks
company file and account for any data events that were lost after the specified time.
Once you have done this, you must then clear the DataEventRecoveryTime using the
DataEventRecoveryInfoDel request, specifying your application’s SubscriberID. By
resetting this time, you are then guaranteed that any future existence of the
DataEventRecoveryTime will indicate that data events have been lost from which your
application has yet to recover.
Handling Special QuickBooks Operations
There are special QuickBooks operations that affect an application’s subscriptions and data
synchronization with QuickBooks. They are listed below:
•Restore
•Condense
•Merge
Each of these is described in more detail in the following subsections.
Restore
After a company file goes through a restore, its application permission records (the
information in the Preferences > Integrated Applications window) may not be current
anymore; there may be applications whose permission records weren’t in the backup file
190
Chapter 14: Event Notification
(c) 2013 Intuit Inc. All rights reserved.
that the company file restored to. Upon opening the company file after the restore
operation, QuickBooks will prompt the user to grant permission for those applications that
still have subscriptions so that they can keep receiving events after the user grants them
permission again.
Any application that has data that needs to match what is currently in QuickBooks will need
to resynchronize its data with QuickBooks after a restore. The LastRestoreTime in the
company file is updated every time a restore happens. An application can use this
timestamp to detect that a restore happened by saving this time when it first sees it and then
comparing it with the one currently stored by QuickBooks. To get the current
LastRestoreTime, an application can issue a CompanyActivityQuery request. Alternatively,
the last restore timestamp is also included in an application’s first data event after a
company file is opened, so that an application doesn’t need to make a separate query
request. Notice that an application only needs to check this timestamp once while a
company file is open, as a restore always involves closing and then reopening the company
file.
Condense
No events are sent during the condense operation of a company file. Any application that
has data that needs to match what is currently in QuickBooks will need to detect when a
condense has happened and then synchronize any data changes after the condense
operation.
After the application detects a condense, it can get all the data changes as a result of
condense by using LastCondenseTime as a filter in the queries (the FromModifiedDate and
FromDeletedDate). A condense operation also always involves closing and then reopening
the company file.
Merge
A list object in QuickBooks can be merged with another list object of the same type. After
the merge operation, all transactions that reference the merged-from object will be changed
to reference the merged-to object, and the merged-from object is deleted. For example, after
the user merges object A to object B, all transactions that used to refer to object A will now
refer to object B, and object A will be deleted.
An application can expect to get a merge event and a delete event during a merge operation,
but it will not get any transaction modify events. For example, in the above scenario, an
application will get a merge event on object A (containing the after-merge list ID, which is
object B’s list ID) and a delete event on object A. However, the application is expected to
walk its own transaction list and update any references to object A itself.
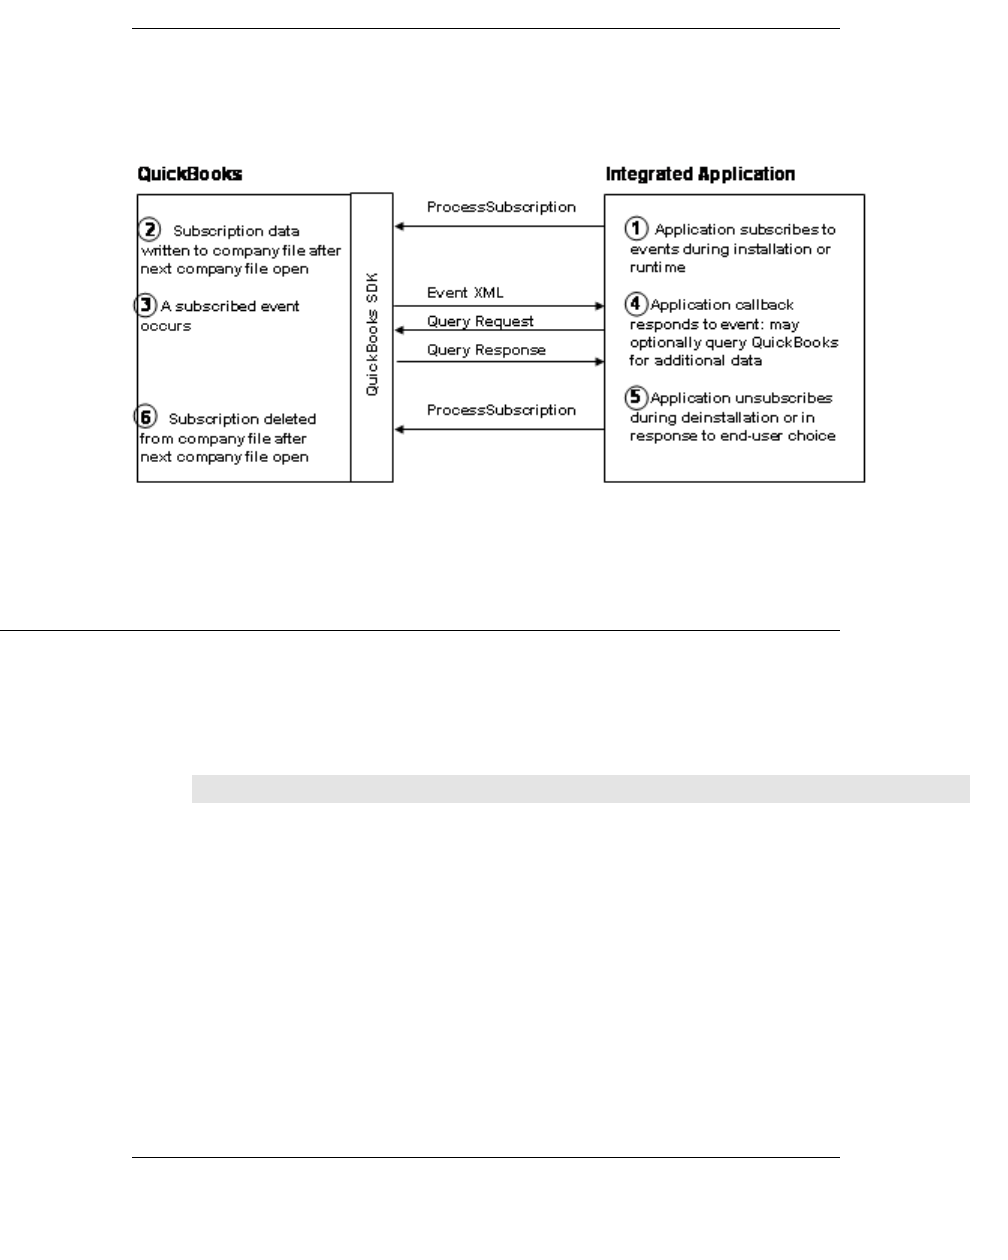
Implementing Event-Awareness in qbXML
191
(c) 2013 Intuit Inc. All rights reserved.
Putting it All Together: The Event Notification Flow
Figure 14-2 (page 191) shows the overall flow within the event notification framework.
Figure 14-2 Event Notification Flow Between Application and QuickBooks
Implementing Event-Awareness in qbXML
This section describes implementation details for qbXML-based applications. In addition,
the syntax and code samples shown are in Visual Basic. If you are programming in Visual
C++, see the fully commented code samples located at the QBSDK install subdirectory
\samples\qbdt\cpp\qbxml\UIandEventTest.
I
MPORTANT
If you have used previous versions of the SDK, you may have
used the Request Processor named QBXMLRPLib. Starting
with SDK 3.0, a new Request Processor is available,
QBXMLRP2Lib.RequestProcessor2. Only this new Request
Processor supports event subscription and other new features
of SDK 3.0. Backwards compatibility with the old Request
Processor is maintained in the new one.
To enable your application to receive and respond to QuickBooks events, you need to
subscribe the application to the events and you need to handle those incoming events in
your callback code. This section describes each of these coding activities.
Subscribing, Unsubscribing, and Querying Subscriptions in qbXML
Subscribing, unsubscribing, and querying for subscription data are performed via the
Request Processor ProcessSubscription method call. (In Visual Basic,
QBXMLRP2Lib.RequestProcessor2::ProcessSubscription.)

192
Chapter 14: Event Notification
(c) 2013 Intuit Inc. All rights reserved.
This method call takes a qbXML request string containing the desired subscription,
subscription delete, or subscription query qbXML.
Performing a Subscription in qbXML
In order to subscribe an application to events, a qbXML-based application creates an
instance of the Request Processor, connects to QuickBooks, builds the desired
SubscriptionAddRq request, and makes a call to the method ProcessSubscription
(QBXMLRP2Lib.RequestProcessor2::ProcessSubscription).
When you build the qbXML SubscriptionAdd request you use one of the following
requests, depending on the type of subscription you are making:
•DataEventSubscriptionAddRq (for data events)
•UIExtensionSubscriptionAddRq (for UI extension events)
•UIEventSubscriptionAddRq (for UI events)
For the full description of each of these subscription messages, see the Onscreen Reference.
Building the Subscription Add Request in Visual Basic
The following sample is from a more fully commented sample in the SDK called
QBDataEventSubscriber, which is located at the SDK installation subdirectory
\samples\qbdt\vb\qbxml\DataEvents\QBDataEventSubscriber. (Notice that sample does not
check for errors or exceptions.) The main items to take away from the sample are:
•The initial setup where the Request Processor is created and the connection to
QuickBooks is made (notice there is no QuickBooks session started: not needed or
recommended for subscribing or unsubscribing because subscriptions apply to all
company files).
•The building of the data event subscription add request (not so much the DOM parser
code but more the actual tags and values that are used).
•The building of the UI event subscription add request to QuickBooks.
I
MPORTANT
If an application attempts to subscribe before deleting its
current subscription, it will generate an error. Your application
must check for the error and act accordingly.

Implementing Event-Awareness in qbXML
193
(c) 2013 Intuit Inc. All rights reserved.
Private Sub SubscribeBtn_Click()
' Subscribe to events...
Dim ConnOpen As Integer
ConnOpen = 0
' Get the RequestProcessor and open a connection.
Dim RP As New QBXMLRP2Lib.RequestProcessor2
RP.OpenConnection "", "DataEventSample"
ConnOpen = 1
' Create the outer subscription request XML "envelope"
Dim doc As New DOMDocument40
Dim QBXML As IXMLDOMElement
Set QBXML = doc.createElement("QBXML")
doc.appendChild QBXML
Dim SubReq As IXMLDOMElement
' For subscription we use a QBXMLSubscriptionMsgsRq, not a QBXMLMsgsRq
Set SubReq = doc.createElement("QBXMLSubscriptionMsgsRq")
QBXML.appendChild SubReq
' Create the Data Event subscription for customer changes
Dim DataSubReq As IXMLDOMElement
Set DataSubReq = doc.createElement("DataEventSubscriptionAddRq")
SubReq.appendChild DataSubReq
Dim DataSubAdd As IXMLDOMElement
Set DataSubAdd = doc.createElement("DataEventSubscriptionAdd")
DataSubReq.appendChild DataSubAdd
' Remember to generate your own GUID for the SubscriberID
AddSimpleElement doc, DataSubAdd, "SubscriberID",
"{2B6C9DB4-EBE2-45E7-A14F-4E1C49C965F7}"
' Specify the Callback app
Dim COMCallback As IXMLDOMElement
Set COMCallback = doc.createElement("COMCallbackInfo")
DataSubAdd.appendChild COMCallback
AddSimpleElement doc, COMCallback, "AppName", "DataEventSample"
' Supply the ProgID; more convenient than CLSID in VB
AddSimpleElement doc, COMCallback, "ProgID",
"QBDataEventManager.QBEventHandler"
' We chose to specify delivery policy DeliverAlways
AddSimpleElement doc, DataSubAdd, "DeliveryPolicy", "DeliverAlways"
' Tell QuickBooks what events we want: ListEvents that affect Customer
' (add, modify, delete, and merge).
Dim ListEventSub As IXMLDOMElement
Set ListEventSub = doc.createElement("ListEventSubscription")
DataSubAdd.appendChild ListEventSub
AddSimpleElement doc, ListEventSub, "ListEventType", "Customer"
AddSimpleElement doc, ListEventSub, "ListEventOperation", "Add"
AddSimpleElement doc, ListEventSub, "ListEventOperation", "Modify"
AddSimpleElement doc, ListEventSub, "ListEventOperation", "Delete"
AddSimpleElement doc, ListEventSub, "ListEventOperation", "Merge"
194
Chapter 14: Event Notification
(c) 2013 Intuit Inc. All rights reserved.
'we're all done we are going to subscribe to the UIEvents for company
'otherwise QuickBooks won't be able to close
Dim UISubReq As IXMLDOMElement
Set UISubReq = doc.createElement("UIEventSubscriptionAddRq")
SubReq.appendChild UISubReq
Dim UISubAdd As IXMLDOMElement
Set UISubAdd = doc.createElement("UIEventSubscriptionAdd")
UISubReq.appendChild UISubAdd
AddSimpleElement doc, UISubAdd, "SubscriberID",
"{2B6C9DB4-EBE2-45E7-A14F-4E1C49C965F7}"
' Same Callback info as for DataEvents, and same delivery policy
Set COMCallback = doc.createElement("COMCallbackInfo")
UISubAdd.appendChild COMCallback
AddSimpleElement doc, COMCallback, "AppName", "DataEventSample"
AddSimpleElement doc, COMCallback, "ProgID",
"QBDataEventManager.QBEventHandler"
AddSimpleElement doc, UISubAdd, "DeliveryPolicy", "DeliverAlways"
Dim UIEventSub As IXMLDOMElement
Set UIEventSub = doc.createElement("CompanyFileEventSubscription")
UISubAdd.appendChild UIEventSub
' We care only about the Close event, not the open event.
AddSimpleElement doc, UIEventSub, "CompanyFileEventOperation", "Close"
'Send the subscription request to QuickBooks
Dim subXML As String
subXML = "<?xml version=""1.0""?>" & vbCrLf & "<?qbxml version=""3.0""?>"
& vbCrLf & doc.xml
saveXMLStream subXML
Dim resp As String
resp = RP.ProcessSubscription(subXML)
' We'll just show the response.
MsgBox Prompt:=resp, Title:="Subscribe Complete"
' And finally close our connection to QuickBooks
If (ConnOpen) Then
RP.CloseConnection
End If
End Sub
Unsubscribing in qbXML
When you no longer want to receive events of a certain type, or want to change a
subscription, you make a call to the same method used to start receiving the events in the
first place, QBXMLRP2Lib.RequestProcessor2::ProcessSubscription, but instead of
supplying a SubscriptionAdd request, you provide a SubscriptionDel request. This deletes
all subscription information for your application’s SubscriberID for the type of events you
specify (data, UI extension, or UI).
Notice that you cannot unsubscribe from a subset of the original subscription of any type
using the SubscriptionDel request. This request deletes all subscriptions of the specified
type for the application that invokes it.

Implementing Event-Awareness in qbXML
195
(c) 2013 Intuit Inc. All rights reserved.
When you build the qbXML SubscriptionDelRq request you use one of the following
requests, depending on the type of subscription you are making:
•DataEventSubscriptionDelRq (for data events)
•UIExtensionSubscriptionDelRq (for UI extension events)
•UIEventSubscriptionDelRq (for UI events)
For the full description of each of these subscription messages,see the Onscreen Reference.
Building the Subscription Delete Request in Visual Basic
The following sample is from a more fully commented sample in the SDK called
QBDataEventSubscriber, which is located at the QBSDK subdirectory
\samples\qbdt\vb\qbxml\DataEvents\QBDataEventSubscriber. The main items to take away
from the sample are:
•The initial setup where the Request Processor is created and the connection to the
company file is made (notice there is no QuickBooks session started: not needed or
recommended for subscribing or unsubscribing).
•The building of the data event subscription delete request (not so much the DOM parser
code but more the actual tags and values that are used).
•The building of the UI event subscription delete request to the company file. Notice
that the UI close event is unsubscribed along with the data event unsubscribe.
Private Sub Unsubscribe_Click()
'Simply delete the subscriptions we set up in Subscribe_click
Dim ConnOpen As Integer
ConnOpen = 0
Dim RP As New QBXMLRP2Lib.RequestProcessor2
RP.OpenConnection "", "DataEventSample"
ConnOpen = 1
' Create the outer subscription request XML "envelope"
Dim doc As New DOMDocument40
Dim QBXML As IXMLDOMElement
Set QBXML = doc.createElement("QBXML")
doc.appendChild QBXML
Dim SubReq As IXMLDOMElement
Set SubReq = doc.createElement("QBXMLSubscriptionMsgsRq")
QBXML.appendChild SubReq
' Create a subscription delete request for the Data event subscription
Dim DataSubDel As IXMLDOMElement
Set DataSubDel = doc.createElement("SubscriptionDelRq")
SubReq.appendChild DataSubDel
AddSimpleElement doc, DataSubDel, "SubscriberID", "
{2B6C9DB4-EBE2-45E7-A14F-4E1C49C965F7}"
AddSimpleElement doc, DataSubDel, "SubscriptionType", "Data"

196
Chapter 14: Event Notification
(c) 2013 Intuit Inc. All rights reserved.
'Create subscription delete request for the UIEvent for company close
Dim UISubDel As IXMLDOMElement
Set UISubDel = doc.createElement("SubscriptionDelRq")
SubReq.appendChild UISubDel
AddSimpleElement doc, UISubDel, "SubscriberID",
"{2B6C9DB4-EBE2-45E7-A14F-4E1C49C965F7}"
AddSimpleElement doc, UISubDel, "SubscriptionType", "UI"
'Send the subscription delete requests to QuickBooks
Dim subXML As String
subXML = "<?xml version=""1.0""?>" & vbCrLf & "<?qbxml version=""3.0""?>"
& vbCrLf & doc.xml
saveXMLStream subXML
Dim resp As String
resp = RP.ProcessSubscription(subXML)
' Show the response
MsgBox Prompt:=resp, Title:="Subscriptions Removed"
' Close the connection to QuickBooks.
If (ConnOpen) Then
RP.CloseConnection
End If
End Sub
Implementing a qbXML-based Callback (IQBEventCallback)
The callback that handles the incoming QuickBooks events must be an implementation of
the SDK-defined callback interface, IQBEventCallback. This callback accepts the event
XML string sent by QuickBooks and does whatever handling is desired. The best way to
handle events is to hand them off to another application for queuing and processing.
Other than the Implements statement and the required input parameter, there are no
restrictions on your callback other than the ones mentioned in “What to Do and What to
Avoid in the Callback” (page 185).
Sample Visual Basic CallBack Implementation
The following sample is from a more fully commented sample in the SDK called
QBDataEventSubscriber, which is located at the QBSDK subdirectory
\samples\qbdt\vb\qbxml\DataEvents\QBDataEventManager. The main items to take away
from the sample are:
•The Implements statement and the signature of the subroutine that implements the
callback.
•The initial check to determine whether the event is a company file close event. This
must be handled quickly and quasi-preemptively.
•The immediate hand-off of the eventXML to another application queue where it can be
handled at leisure. This way, the queue event limit built into the event notification
framework will never be hit.

Implementing Event-Awareness in qbXML
197
(c) 2013 Intuit Inc. All rights reserved.
Implements QBSDKEVENTLib.IQBEventCallback
Public Sub IQBEventCallback_inform(ByVal eventXML As String)
' You should treat this like interrupt handling in an OS, where
' you process the interrupt (event) as quickly as possible
' Display the event we got
Dim tmpXML As String
tmpXML = eventXML
EventCounter = EventCounter + 1
QBDataEventManagerDisplay.eventXML.Text =
Replace(tmpXML, vbLf, vbCrLf, 1, -1, vbTextCompare)
QBDataEventManagerDisplay.eventLabel.Caption =
"Received Event #" & EventCounter
QBDataEventManagerDisplay.Show
SetForegroundWindow QBDataEventManagerDisplay.hwnd
'Now check if it is a company close event or a data event
If (InStr(1, eventXML, "CompanyFileEventOperation>Close<", vbTextCompare)
> 0) Then
'Company close, shut ourselves down
QBDataEventManagerDisplay.Hide
Unload QBDataEventManagerDisplay
End If
'queue it up if we are supposed to be tracking events.
If (QBDataEventManagerDisplay.Tracking) Then
QBDataEventManagerDisplay.Debug.Text = "Queing event #" & EventCounter
QBDataEventManagerDisplay.EventQueue.EnQueue (eventXML)
End If
End Sub
198
Chapter 14: Event Notification
(c) 2013 Intuit Inc. All rights reserved.

Using the C# App Template to Implement UI Events
199
(c) 2013 Intuit Inc. All rights reserved.
C
HAPTER
15 1
I
NTEGRATING
WITH
THE
Q
UICK
B
OOKS
UI 1
This chapter describes how to integrate your application with the QuickBooks UI.
I
MPORTANT
Events are not supported for QuickBooks Simple Start edition.
Using the C# App Template to Implement UI Events
The QB SDK includes an application template wizard that generates a great deal of the
event code you need or may want to implement. It does a lot of the heavy lifting for you
and we strongly recommend using this if you can. The information in this chapter is still
useful background information, but the template will save you LOTS of time and potential
mistakes. The template is for Visual Studio 2005 and later and works for C# applications. If
you have VS 2005, this will be automatically installed for you in the templates directory.
For more information see “C# Project Wizard” in the QB SDK program group accessed
from the Windows Start menu.
What Types of Integrations Can I Do?
You can programmatically interact with the QuickBooks user interface (UI) in these ways:
•Menu extensions and menu event notification
Your application can add a single menu item, with subitems, to a top-level QuickBooks
menu. Also, your application has some control over whether or not your menu
extensions are visible. Starting with SDK 4.0, your application can get context data,
namely which QuickBooks form was open when your menu item was clicked. See
“Getting QuickBooks Context Information From a Menu Item Click” (page 211). Your
application will be notified when an end user selects one of your menu items.
•UI invocation
Your application can open certain QuickBooks transaction windows, list windows, and
reports to present them to the end user. Starting with SDK 4.0, your application can
prefill certain transaction creation forms with customer, vendor, employee, or
OtherName data. See “Error Handling” (page 211).
•UI-event notification
Your application can request notification from QuickBooks about a few UI events, such
as the company file opening or closing. For more information about this, see Chapter
14, “Event Notification.”

200
Chapter 15: Integrating with the QuickBooks UI
(c) 2013 Intuit Inc. All rights reserved.
Canadian Edition and UK Editions of QuickBooks
For important information about adding UI extensions to Canadian editions of QuickBooks,
see “Canadian, UK, and U.S. Applications” on page 200.
Local vs. Remote Support
Menu extensions and menu-extension event notification cannot be used remotely, only
locally. For more information, see “Adding a Menu Item to QuickBooks.”
UI invocation works locally or remotely. For more information, see “Error Handling” (page
211).
Before Your Application Can Extend the QuickBooks UI
Before your menu extensions will appear in QuickBooks and return event notifications,
your application must send subscription information to QuickBooks, QuickBooks must be
restarted, and the QuickBooks administrator must grant access.
Subscription
To subscribe to UI events, either to receive notification of your own menu item being
selected or to receive notification about other UI events (such as the company file opening
and closing), your application must send a subscription request to QuickBooks. Your
application can do this during its installation or as part of its “QuickBooks setup”
functionality. (QuickBooks does not have to be running when the subscription is sent.)
A single subscription applies to all QuickBooks data files on a machine and to all
installations of QuickBooks on a machine (except QuickBooks Basic). For more details
about how to subscribe to events, see Chapter 14, “Event Notification.”
T
IP
If you certify your application, the SDK can verify that a
malicious application has not replaced the callback application
specified in your subscription requests.
To see the syntax of what you would include in a UI subscription (contained in a
UIExtensionSubscriptionAddRq message), look up the UIExtensionSubscriptionAdd
message in the Onscreen Reference.
Canadian, UK, and U.S. Applications
If you have several versions of your application, for example, one for Canadian, one for UK
and one for U.S. editions of QuickBooks, note these important limitations:
•It is possible that a user who selects your UI extension from within a Canadian or UK
edition of QuickBooks will be taken to the U.S. version of your application, and vice
versa. You cannot create a subscription on one machine such that a UI item added to
U.S. editions of QuickBooks will invoke the U.S. version of your application while that
same UI item in Canadian editions of QuickBooks will invoke the Canadian version of

Before Your Application Can Extend the QuickBooks UI
201
(c) 2013 Intuit Inc. All rights reserved.
your application. Instead, each version of the application will overwrite any existing
subscription, so that the last one installed “wins.”
•If you have a U.S.-only application, you cannot prevent your UI items from showing up
in Canadian or UK editions of QuickBooks. Conversely, if you have a Canada or UK-
only application, you cannot have a UI item that only shows up in Canadian or UK
editions of QuickBooks. UI extensions show up in all editions of QuickBooks.
Authorization
As with QuickBooks data events, the QuickBooks UI is not accessible until the
QuickBooks administrator grants permission. Access applies to all types of SDK access, so
the administrator cannot give UI access without giving data access, for example.
N
OTE
Access permission will carry over when the QuickBooks user
upgrades to a newer version of QuickBooks. Permission will
also carry over to installations that are separate from the
current installation, for example, if the QuickBooks user puts
a QuickBooks upgrade in a different directory or installs a
different type of QuickBooks, such as the Contractor Edition.
Authorization Scenarios Affecting UI Extensions
Table 15-1 shows what will happen in various situations when an end user starts
QuickBooks and selects a QuickBooks data file to open after you have added a UI-
extension subscription.

202
Chapter 15: Integrating with the QuickBooks UI
(c) 2013 Intuit Inc. All rights reserved.
Table 15-1 What happens when a QuickBooks user opens a data file
Figure 15-1 shows this information as a flow chart.
Situation Data File Behavior
The QuickBooks administrator
previously granted your application
access.
The data file will open with your
UI extensions.
The administrator previously granted
your application access, but has
since revoked access.
The data file will open without
your UI extensions.
The administrator did not previously
grant access, or the administrator
granted access but has since
removed your application from the
data file.
• If the user is the QuickBooks
administrator, the authorization
dialog box will appear. If the
administrator grants access, the
data file will open with your UI
extensions showing.
• If the user is not the
QuickBooks administrator, or if
the user is the QuickBooks
administrator but he or she
denies access to your
application, the data file will
open without your UI extensions
showing.
end user opens QuickBooks on a
machine where
• your application is not installed, or
• your application did not add the
UI subscription, or
• the administrator has not granted
access.
Your UI extensions will not be
available. For example, an
accountant with an accountant’s
copy of the data file would not see
your application’s menu items.
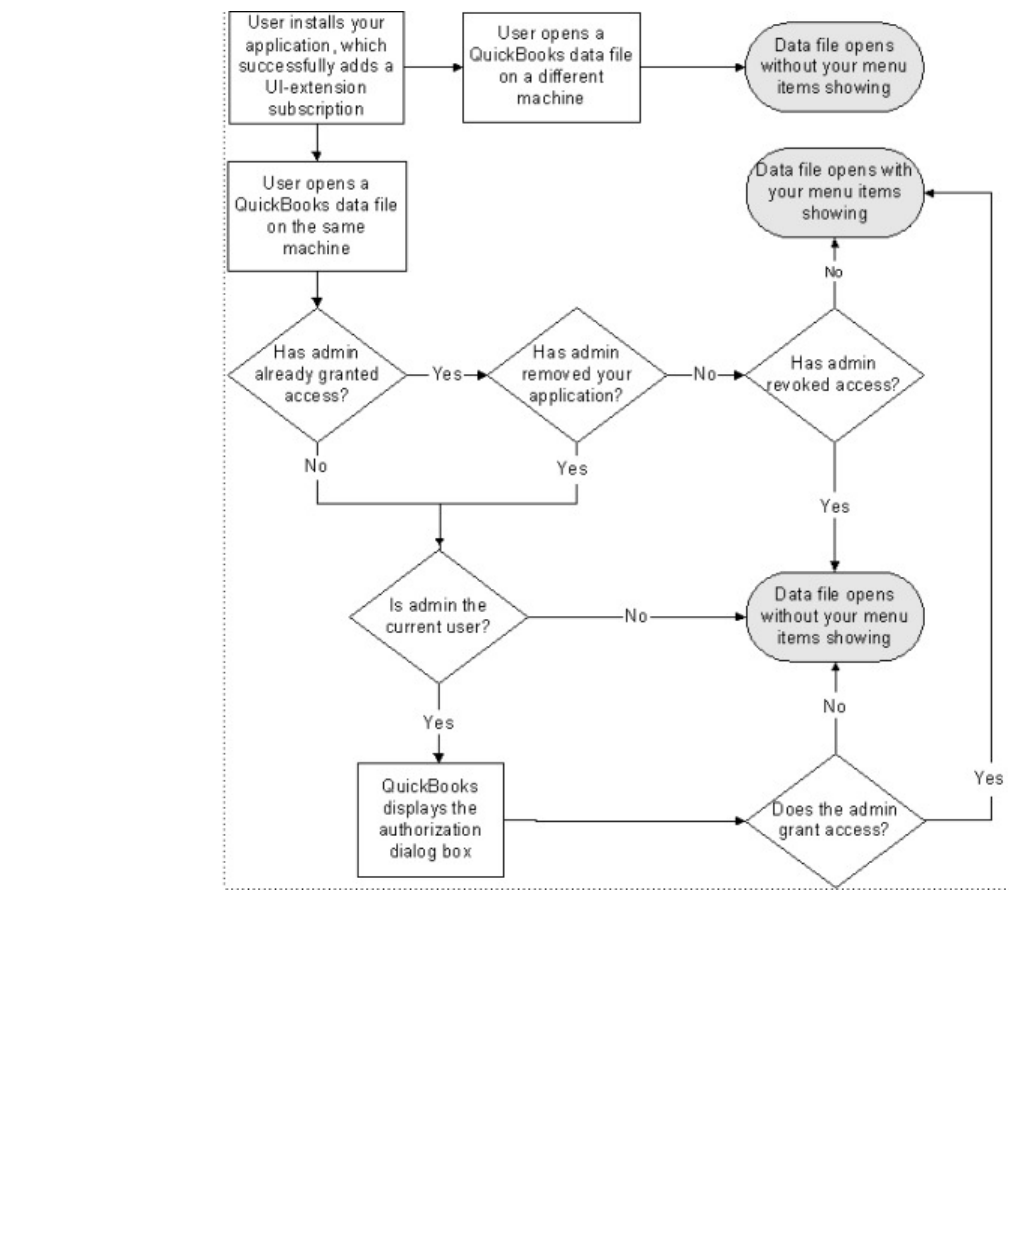
Before Your Application Can Extend the QuickBooks UI
203
(c) 2013 Intuit Inc. All rights reserved.
Figure 15-1 What happens when an end user opens a data file
QuickBooks will only prompt the QuickBooks administrator once, as long as he or she
clicks “No” or “Yes, Always” when the authorization dialog box appears. If the
administrator clicks “Yes, This Time,” the prompt will come up again the next time the data
file is opened.
The effects of UI subscription changes that your application makes while QuickBooks is
running will not appear until QuickBooks is restarted.

204
Chapter 15: Integrating with the QuickBooks UI
(c) 2013 Intuit Inc. All rights reserved.
UI Guidelines
The QuickBooks UI adheres to certain guidelines, and we recommend that your UI
extensions follow these guidelines as well. The more closely aligned your UI extensions are
with the QuickBooks look and feel, the better your end users’ experience will be.
Menu-Extension Guidelines
General Guidelines for Menu Items
•Try to place your menu item in the appropriate QuickBooks top-level menu. (See
“Choosing the Right QuickBooks Menu,” below.)
•If the machine will attempt to connect to the Internet when a user selects a menu item,
it’s a good idea to name the item in a way that makes that clear. (For example, if
selecting help will connect the user to your web site, you might name that subitem
“View Online Help” rather than just “View Help.”)
Naming Menu Items
•Menu-item names should be as short as possible.
•If a menu item opens a dialog box or form within your application, it’s a good idea to
have the QuickBooks menu-item name match the resulting window title or the title of
the front pane or tab.
•Try to begin the name of each subitem with a verb. For example:
>
Launch Invoice Manager
>
Show Invoice List
•Using an ellipsis (...) after a menu-item name lets users know that they will have to
complete some extra step before the command is carried out.
Choosing the Right QuickBooks Menu
Think about how a menu extension will fit with the existing menu structure, and how a user
will perceive it when it appears among the other QuickBooks menu items. In general, the
QuickBooks top-level menus (those that accept menu extensions) serve the following
purposes:
•File menu commands move data into or out of QuickBooks, interact with external files,
and operate on the file in its entirety. For example, if your application imported and
exported data to and from QuickBooks, your menu extension would fit well under the
File menu.
•The Company, Customers, Vendors, Employees, and Banking menus correspond to the
activities and information shown in the QuickBooks Navigators. For example, if your
application managed sales tax or inventory, your menu extension would fit well under
the Vendors menu.

UI Guidelines
205
(c) 2013 Intuit Inc. All rights reserved.
Avoid Using “Separators”
In QuickBooks, separators divide some menus into functional sections. If you have
subitems under your main menu item, we recommend that you not include separators, for
the following reasons:
•In QuickBooks, a separator shows as a single line that spans the width of the menu. The
SDK does not support the creation of separators that would look like this, because a
MenuText element cannot include HTML or graphics.
•QuickBooks separators are impossible to select, whereas a user could select whatever
characters you used to create your separator.
If you can’t organize your submenu without creating a separator, we recommend that you
follow these guidelines:
•Nothing should happen if an end user selects your separator.
•Avoid using words in a separator.
•If separators don’t make it easier for users to find what they’re looking for, consider
leaving them out.

206
Chapter 15: Integrating with the QuickBooks UI
(c) 2013 Intuit Inc. All rights reserved.
Adding a Menu Item to QuickBooks
Your application can add one (and only one) menu item to one (and only one) of these top-
level QuickBooks menus:
•File menu
•Company menu
•Customers menu
•Vendors menu
•Employees menu
•Banking menu
The added menu item can include subitems, but not nested submenus. You can specify
optional display conditions that determine when your menu items will appear (visible/
invisible) and when they will be grayed out (enabled/disabled). (See “Display Conditions”
on page 209.) If you don’t specify display conditions, all of your menu items will show up
as specified.
Your application’s name will appear in a predesignated place on the menu, usually at the
bottom. (See “Where Your Menu Item Will Appear,” below.) If your menu item has
subitems, you can name these in whatever way is appropriate, but the top-level QuickBooks
menu will always show your application’s name. (See “Menu Item Names” on page 207.)
When an end user selects your menu item (or one of your subitems), QuickBooks will
notify your application. At that point, your application might launch itself and display a UI,
update certain QuickBooks data, or invoke a QuickBooks window.
UI extensions and UI event notification are “per machine”—that is, UI extensions show up
and UI events are sent only on the machine where your application is installed. To make
your UI event notification and UI extensions available on multiple machines:
•Your application must be installed on each machine, and
•The QuickBooks administrator must grant access on each machine, for each data file.
Where Your Menu Item Will Appear
Menu extensions have assigned locations in QuickBooks menus. Table 15-2 shows where
QuickBooks will place menu extensions in those menu that allows extensions.

Adding a Menu Item to QuickBooks
207
(c) 2013 Intuit Inc. All rights reserved.
Table 15-2 Position of menu extensions in QuickBooks menus
For example, Figure 15-2 shows where menu extensions are positioned in the QuickBooks
Vendors menu.
Figure 15-2 Where menu extensions appear in the QuickBooks Vendors menu
Menu Item Names
Subscription add requests require an AppName, which has a maximum of 128 characters.
The AppName string will appear as the name of your application in the authorization dialog
box and in the QuickBooks menu.
How AppName is used with the MenuText depends on whether you add a single menu item
(see “A Single Menu Item,” below) or a submenu (see “A Menu Item with Subitems,”
below). The MenuText field is used for menu-item names. Menu-item names:
Menu Position
File Between "Shipping" and "Update QuickBooks" (as shown in Figure
15-3, Figure 15-4, and Figure 15-5)
Company Between "Synchronize Contacts" and "Company Services"
Customers Between "Billing Solutions" and "Check Credit"
Vendors Between "Item List" and "Vendor Services" (as shown in Figure 15-
2)
Employees Between "Payroll Item List" and "Employer Services"
Banking Between "Memorized Transaction List" and "Banking Services"
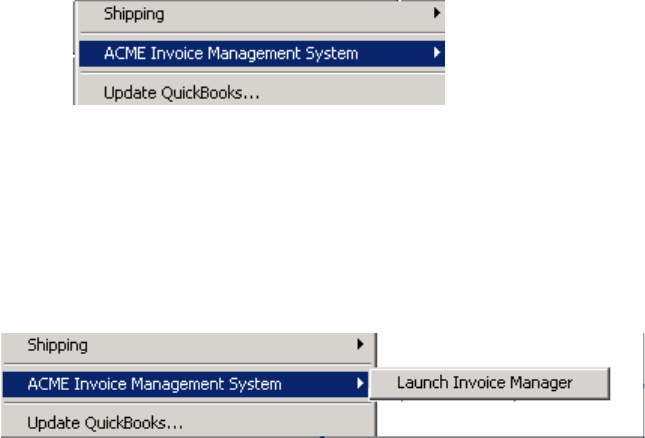
208
Chapter 15: Integrating with the QuickBooks UI
(c) 2013 Intuit Inc. All rights reserved.
•Cannot have keyboard shortcuts or access keys (mnemonics) set for them
•Cannot have functional check boxes, radio buttons, or other graphics next to them
•Can have up to 50 characters
•Can use special characters
A Single Menu Item
If you add a single menu item, its name (MenuText) follows your AppName, separated by a
colon. Figure 15-3 shows how it would look if an application named “ACME Invoice
Management System” added a menu item called “Export Invoice” to the QuickBooks File
menu.
Figure 15-3 Single menu item with combined
AppName
and
MenuText
of fewer than
50 characters
If the AppName and MenuText strings add up to more than 50 characters, the menu-item
name will appear as a subitem, as Figure 15-4 shows. (The colon and the following space
are not counted toward the 50 characters.)
Figure 15-4 Single menu item with combined
AppName
and
MenuText
of more than 50
characters
A Menu Item with Subitems
An SDK-added menu item can have as many subitems as your application needs. In this
case, your AppName and a right arrow will appear in the top-level QuickBooks menu.
Figure 15-5 shows an example of how this could look.
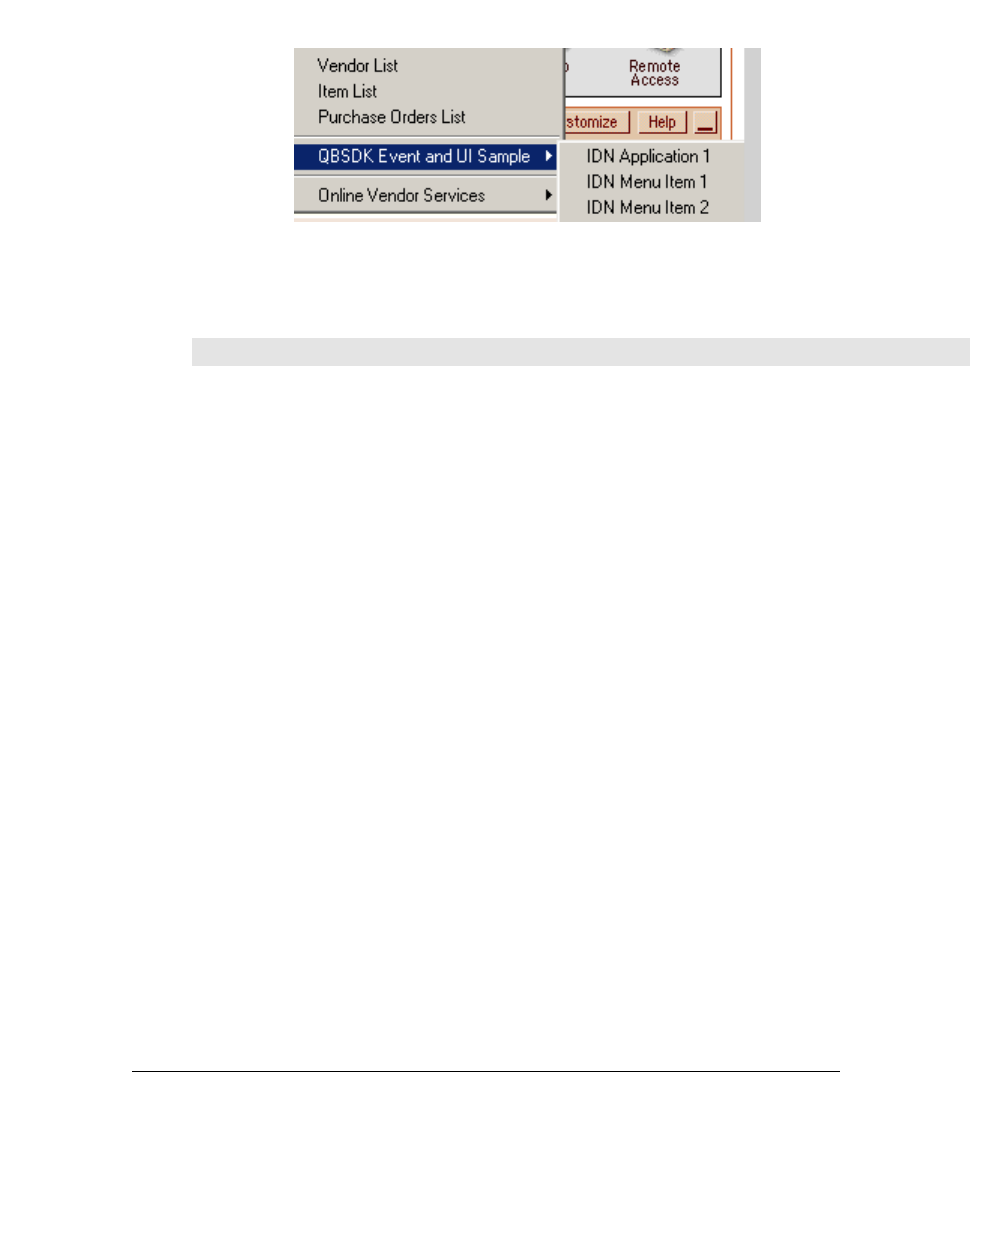
Adding a Menu Item to QuickBooks
209
(c) 2013 Intuit Inc. All rights reserved.
Figure 15-5 A menu item with subitems
N
OTE
The subitems (specified as a list of MenuItem objects) show
up in the order in which you specify them in the Submenu
object. For more information, see the
UIExtensionSubscriptionAdd message in the Onscreen
Reference.
Placing the AppName at Desired Locations in Menu Text
You can specify the application name to be displayed at various places in the menu text by
using the the value {AppName} in the menu text. This will cause the app name to be placed
as defined by the text. For example:
- Some text {AppName}
- {AppName} some text
- Some text {AppName} more text
- {AppName} (if all you want to show is the application name
Notice that the value {AppName} is a literal string. You don’t replace it with some other
value: you have to use {AppName} within curly braces.
When Several Applications Add to the Same Menu
If some other application adds a menu item to the same top-level menu as your application,
the applications will be listed in alphabetical order according to the first ten letters of the
application name. If two application names share the first ten characters, they will be
ordered randomly.
Display Conditions
Your application has some control over whether your menu extension is visible and
enabled, depending on certain conditions being true or false within QuickBooks. Display
conditions are contained in lists (VisibleIf, VisibleIfNot, EnabledIf, and EnabledIfNot)
within the DisplayCondition object.
The following display conditions are available:

210
Chapter 15: Integrating with the QuickBooks UI
(c) 2013 Intuit Inc. All rights reserved.
•HasCustomers (Do any customers, active or inactive, exist in the data file?)
•HasVendors (Do any vendors, active or inactive, exist in the data file?)
•MultiUserMode (Is this data file open in multi-user mode?)
•AccountantCopyExists (Has an Accountant’s Copy been created for this data file?)
•IsAccountantCopy (Is this data file the Accountant’s Copy?)
•InventoryEnabled, ClassesEnabled, PriceLevelsEnabled , EstimatesEnabled,
SalesTaxEnabled, TimeTrackingEnabled, PayrollEnabled (Does this data file use
inventory, classes, price levels, and so on? The end user enables or disables these in the
Preferences dialog box.)
•SalesOrdersEnabled, AssemblyItemsEnabled (Does this data file use sales orders?
Assembly items? If this is a Premier or Enterprise edition of QuickBooks, the end user
enables or disables these in the Preferences dialog box. If it is a Pro edition of
QuickBooks, sales orders and assembly items are not available.)
Visible and Enabled States
In the DisplayCondition aggregate:
•The VisibleIf and VisibleIfNot tags control whether or not a menu item is displayed.
•The EnabledIf and EnabledIfNot tags control whether or not a menu item is grayed out.
You can combine visible and enabled states. When multiple criteria for a state are given, all
criteria must be true for the state to be “on.” For example, if VisibleIf were set to
HasCustomers and HasVendors, the data file would have to have both customers and
vendors for the menu item to be visible.
All combinations are valid, but not all combinations make sense within QuickBooks. For
example, you could have a menu item that in some cases is not visible, in other cases is
visible but grayed out, and in yet other cases is both visible and enabled. (An item must be
visible to be enabled, of course.) So if you use visible and enabled conditions on the same
item, you must make sure that both conditions can be true at the same time.
I
MPORTANT
A menu item does not change its state based on the states of
its subitems. The worst case of this would be if all the
subitems ended up not visible. In this case, the menu item
would still be visible, but there would be no subitems under it
(and therefore it would not have any functionality).
You can avoid this problem by including an always-visible
“Learn About” or “Help” link that provides information about
the conditions that will make the other menu items visible.

Error Handling
211
(c) 2013 Intuit Inc. All rights reserved.
When to Use Visible and Enabled Conditions
To avoid cluttering an end user’s menu with items that will never be used, try to match
display conditions with whatever user Preferences are set. For example, in a QuickBooks
data file that had the time-tracking preference turned off, you would not want a time-
tracking submenu item to show up.
Getting QuickBooks Context Information From a Menu Item Click
If you are subscribed to UIExtensionEvents, and the user clicks on your subscribed menu
item, the CurrentWindow element in the QBXMLEvent delivered to your callback contains
the name of the QuickBooks form (if any) that was open when the user clicked the menu
item.
Error Handling
This section describes error-handling situations specific to UI extensions. (For information
about QuickBooks SDK error handling in general, see the section on error recovery section
in Chapter 31, “Error Recovery.”)
Sometimes QuickBooks end users will not receive a response (or will not realize that they
have received a response) after they select your menu item. With careful planning, you can
prevent the following three scenarios (each of which is a bad experience for the end user):
1. Your application window comes up behind the QuickBooks window when the end user
selects your menu item.
2. Your application does something behind the scenes, without informing the end user
what’s going on.
3. The end user uninstalls your application from the machine, but your uninstall process
does not unregister its UI extensions, so your menu extensions still show up in
QuickBooks. (To unregister itself, your application must send a SubscriptionDelRq
request message to QuickBooks. For details about the syntax of this message, see the
SubscriptionDel message in the Onscreen Reference.)
The following three scenarios are outside your control, but knowing about them will help
you to plan your application’s response:
1. Someone deletes your application from the machine without uninstalling it.
2. Someone uninstalls your application while QuickBooks is running, and your
application correctly unregisters itself (as described in 3, above). But because
QuickBooks has not yet been restarted, your menu items still appear (and can still be
selected).
3. The notification process fails for some other reason (for example, the machine or an
application is frozen).
When a QuickBooks user selects a menu extension and there is no response for one of the
three reasons listed above, QuickBooks will put up a message box similar to the one shown
in Figure 15-6.
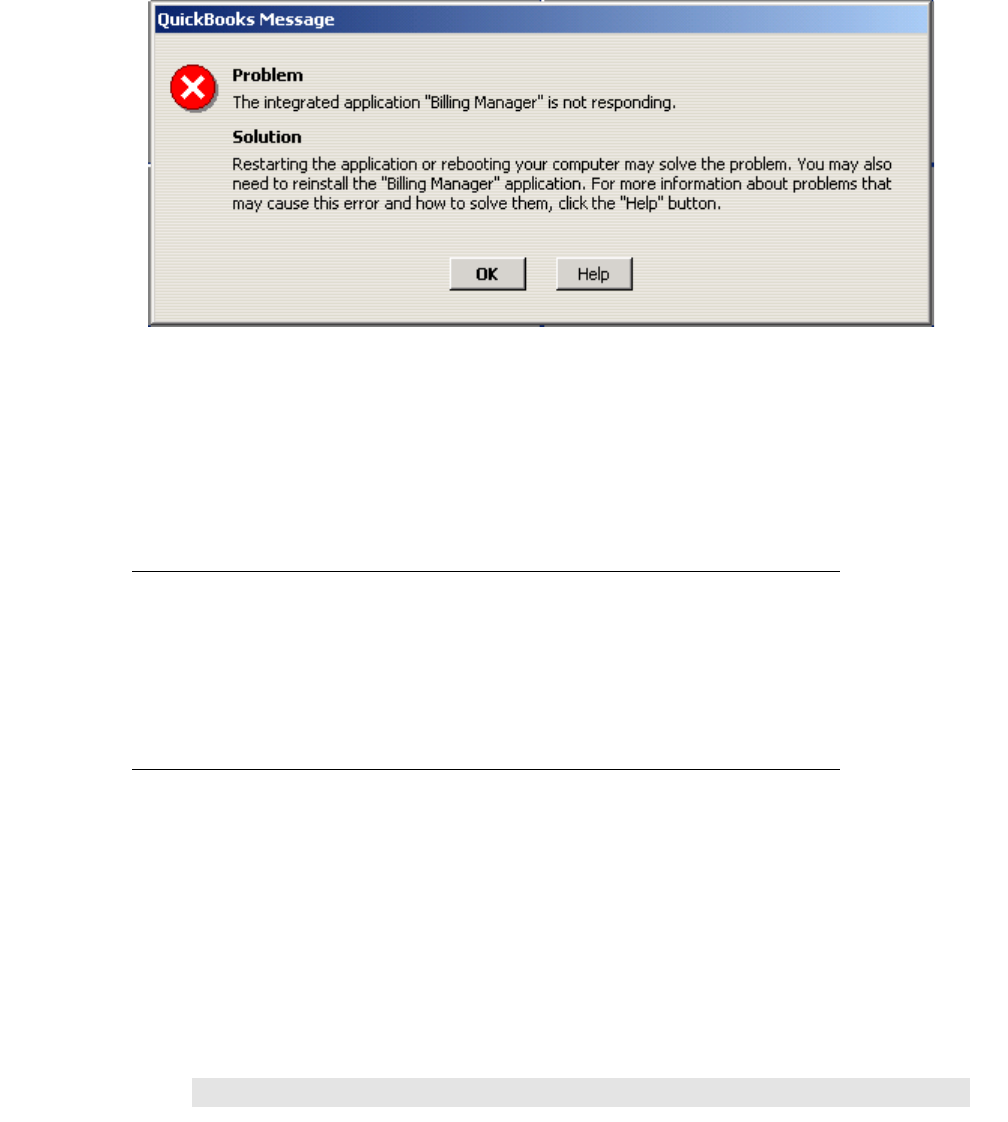
212
Chapter 15: Integrating with the QuickBooks UI
(c) 2013 Intuit Inc. All rights reserved.
Figure 15-6 A message box like this one will appear if the user clicks a menu item and
application notification fails for any of the three reasons listed above.
A menu click might also fail because your application is still responding to the last menu-
click. In this case, the error message shown above would not show up. For more
information about what would happen, see “Lost UI Events” (page 212).
When the Authorization Level Changes
If the QuickBooks administrator uses the Integrated Applications Preferences page to
remove your application or disallow access, the menus will update right away. (The
Integrated Applications Preferences page is described in Chapter 4, “Specifying
Authorization Preferences.”)
Lost UI Events
If your application is unable to receive a UI or UI-extension event, the event is lost and
cannot be recovered. Your application will not even know that it missed an event.
For example, when a user clicks one of your menu items, subsequent clicks will not send
any more notifications until your callback method returns. The user can keep clicking your
application’s menu items (the QuickBooks UI does not prevent it by freezing), but nothing
will happen. These user menu-clicks are lost. Menu item clicks will also be lost if the
callback application is in the process of handling a data event callback.
Lost data events can be detected and recovered. For more information about this, see
Chapter 14, “Event Notification.”
T
IP
Your application should return as quickly as possible, without
waiting for UI interaction within your application.

Invoking the QuickBooks UI
213
(c) 2013 Intuit Inc. All rights reserved.
For example, if your application shows a message that the
user must dismiss by clicking OK, your application should not
wait until OK is clicked before returning from the callback.
Invoking the QuickBooks UI
Besides adding menu extensions, your application can interact with the QuickBooks UI by
opening certain QuickBooks windows for the end user. If QuickBooks is already running,
your application can invoke its UI in several ways:
•You can launch a blank transaction form or list window so the QuickBooks user can
create a new transaction or a new list object.
•Starting with SDK 4.0, you can launch various types of transaction window with a new
transaction prefilled with customer, vendor, employee, or OtherName data.
•You can launch an existing transaction form or list window so the user can edit it.
•You can display any of the reports that can be queried through the SDK.
Your application can invoke the QuickBooks UI either locally or remotely. On the end
user’s machine, QuickBooks will return to full size if it was minimized, come to the
foreground, and open the windows you have invoked. Invoked windows appear within the
QuickBooks UI, not within your application.
In general, permissions and preferences affect UI invocation the same way they affect the
QuickBooks UI itself. For example, if Jeff doesn’t have permission to open an Invoice form
in QuickBooks, your application cannot open an Invoice form while Jeff is using
QuickBooks.
Opening Transaction Forms
Your application can use the TxnDisplayAdd request or the TxnDisplayMod request to
open any of the following transaction forms in the QuickBooks UI:
Bill Invoice
Bill payment Item receipt
BuildAssembly
Charge Journal entry
Check Purchase order
Credit card charge Receive payment
Credit card credit Sales order
Credit memo Sales receipt
Deposit Sales tax payment check
Estimate Vendor credit
Inventory adjustment

214
Chapter 15: Integrating with the QuickBooks UI
(c) 2013 Intuit Inc. All rights reserved.
Use TxnDisplayAdd to open a blank form, which you specify with the
TxnDisplayAddType. Use TxnDisplayMod to open an existing transaction form so the user
can modify it. You must specify the TxnID of the transaction to be modified.
N
OTE
The SalesTaxPaymentCheck form is modal. Therefore, if a
sales-tax payment form is already open and your application
tries to open another sales-tax payment form, your
application will receive an error indicating that QuickBooks is
locked in a modal state and cannot be accessed (HRESULT
0x80040414).
In some cases, the end user will have to take an extra step to view the right form after your
application invokes a transaction form. This is because in the QuickBooks UI, some
transaction types share forms:
•CreditCardCharge and CreditCardCredit use the same form. If a CreditCardCharge
form is open and you send an add request to open a new CreditCardCredit form,
QuickBooks will open a new CreditCardCharge form instead.
Similarly, if a CreditCardCredit form is open, invoking a new CreditCardCharge brings
up a new CreditCardCredit form.
•ItemReceipt, Bill, and VendorCredit use the same form. So, for example, if a Bill form
is open and you send an add request to open a new ItemReceipt form, QuickBooks will
open a new Bill form instead.
The user can get to the needed form by selecting a radio button or check box. For example,
the difference between CreditCardCharge and CreditCardCredit is a single radio button
that’s either Charge or Credit, the difference between Bill and VendorCredit is a single
radio button that’s either Bill or Credit, and the difference between Bill and ItemReceipt is
a check box that says “Bill Received.”
Opening and Prefilling a New Transaction
Your application can use the EntityRef aggregate (new in SDK 4.0) in the TxnDisplayAdd
request to open and prefill any of the following transaction forms in the QuickBooks UI:
•Bill
•BuildAssembly
•Check
•Credit card charge
•Credit card credit
•Credit memo
•Deposit
•Estimate
•Invoice
•Item receipt

Invoking the QuickBooks UI
215
(c) 2013 Intuit Inc. All rights reserved.
•Purchase order
•Receive payment
•Sales order
•Sales receipt
•Vendor credit
The EntityRef aggregate refers to a customer, vendor, employee or OtherName; the
aggregate contains either the ListID or the FullName. Notice that the prefilling that is
performed is exactly the same as if the end user had typed in a name in that form. That is,
the name will appear, but not the rest of the data for that name, for example the address.
That will be done automatically in QuickBooks once the end user tabs out of the form,
which mirrors the behavior within the QuickBooks UI.
N
OTE
If you supply an entity that is not supported by the
transaction, for example, if you specify a vendor name for an
invoice form, the SDK does not return any error. Instead,
when the user tabs out of the transaction form, QuickBooks
will display an error, just as if the user had typed in the
invalid name.
If you supply an EntityRef for an unsupported transaction type, an error is returned in the
response to the TxnDisplayAdd.
Opening List Windows
Your application can use the ListDisplayAdd request or the ListDisplayMod request to open
any of the following list windows in the QuickBooks UI:
•Account
•Customer
•Employee
•Item
•Other Name
•Vendor
Use ListDisplayAdd to open a blank window, which you specify with the
ListDisplayAddType. Use ListDisplayMod to open an existing list window so the user can
modify it. You must specify the ListID of the list object to be modified.
Sometimes the list window you are trying to invoke will not open:
•Job and Customer use the same form, so if the user is viewing the Edit Job form when
your application invokes a new Customer form, the New Job form will open instead. It
is not possible to show a New Customer form if a Job form is already up. However, if
the user is viewing the Edit Customer form when you invoke a new Customer, a new
(blank) Customer form will open.

216
Chapter 15: Integrating with the QuickBooks UI
(c) 2013 Intuit Inc. All rights reserved.
Displaying Reports
To display a report, set the DisplayReport BOOLEAN value to true in the related report
query request. (DisplayReport is false by default.)
If you want the request to display the report without returning any data to your application,
set the responseData attribute to includeNone, for example:
<QBXMLMsgsRq onError = "continueOnError" responseData = "includeNone">
Displaying the report to the QuickBooks user without having data returned to your
application can cut down significantly on the time needed to process the query.

Core Concepts for Receive Payment and Bill Payment
217
(c) 2013 Intuit Inc. All rights reserved.
C
HAPTER
16 1
H
ANDLING
R
ECEIVE
P
AYMENT
, B
ILL
P
AYMENT
,
AND
D
EPOSIT
T
RANSACTIONS
1
This chapter describes the basic concepts related to receive payment and bill payment
transactions in QuickBooks. Because these transactions are somewhat more complex than
most other transactions, this chapter provides detailed examples of how payments, credits,
and discounts are handled in different scenarios. The chapter also includes with information
and examples related to deposits.
The following objects are discussed here:
•ReceivePaymentAdd/Mod and the return (Ret) object
•BillPaymentCheckAdd/Mod and the return (Ret) object
•BillPaymentCreditCardAdd and the return(Ret) object.
•DepositAdd//Mod and the Ret object
•Helper queries: ReceivePaymentToDeposit, BillToPayQuery
Each of the Add/Ret objects has a corresponding query object as well. See the Onscreen
Reference for detailed information on the structure of each object. Also see the
qbxmlops70.xml file for samples of each object.
Core Concepts for Receive Payment and Bill Payment
This section describes concepts that apply to both receive payment and bill payment
transactions. Later sections describe aspects that are unique to each type of transaction.
Shared concepts include the following topics:
•Applying payments, credits, and discounts
•Returned object for AppliedToTxnAdd
•Creating links instead of transactions
Applying Payments, Credits, and Discounts
In QuickBooks, you can use receive payment and bill payment functionality to do three
things separately or in combination:
•Apply a payment
•Set discounts
•Set credits

218
Chapter 16: Handling Receive Payment, Bill Payment, and Deposit Transactions
(c) 2013 Intuit Inc. All rights reserved.
This information is included in the AppliedToTxnAdd aggregate, which is similar, though
not identical, for receive payment and bill payment.
About Payments
In both receive payment and bill payment, you have the option of distributing the payment
among multiple transactions. Receive payment also offers an “auto-apply” feature that
allows QuickBooks to distribute the payment according to a specified algorithm. See
“Applying the Payment “Automatically”” (page 220).
Creating a Credit vs Setting a Credit
It’s important to note the difference between creating a credit and setting a credit. For
example, a credit can be created when a customer returns some merchandise or overpays an
invoice. For bill payment, a credit can be created when the business returns some
merchandise to one of its vendors or overpays a bill. Creating a credit means making a
credit available to be applied in the future to a transaction such as an invoice or bill.
Setting a credit, on the other hand, means using an already existing credit to pay off some
or all of the balance of a receivable or billed transaction. The AppliedToTxnAdd aggregate
includes the SetCredit aggregate, which allows you to apply (or set) an available credit.
Why Applied Credits Can’t be Modified
You can use the SDK to modify certain payment transactions, such as ReceivePaymentMod
and BillPaymentCheckMod. But in those transactions, you cannot modify credits that have
already been applied in the corresponding ReceivePaymentAdd and
BillPaymentCheckAdd. (You can only apply additional credits.) The reason is that
QuickBooks currently has no way of remembering which transactions consumed which
credits. Once the credits are applied, there is no way of unapplying them short of deleting
the transaction (if that is possible) and redoing the transaction with the desired credits.
Linked Transactions
Adding a receive payment or bill payment object generates links between transactions.
Query requests for invoice, credit memo, bill, and bill credit objects contain an
IncludeLinkedTxns
flag, which specifies whether to include information about these
links in the response. If this flag is true, a
LinkedTxn
aggregate is returned for each linked
transaction. If no linked transactions exist, no
LinkedTxn
aggregates are returned.
If you specify true for this flag in an
InvoiceQueryRq
, for example, then
InvoiceRet
will include a list of all transactions linked to that invoice. This list is similar to the History
view of a transaction in the user interface, but not identical, as the SDK list contains only
linked transactions, not items. By default, the
IncludeLinkedTxns
flag is false.

Receive Payment Transactions
219
(c) 2013 Intuit Inc. All rights reserved.
Returned Object for AppliedToTxnAdd
The response returned for a receive payment or bill payment object can include either a
“full” version or a “lean” version of the AppliedToTxnRet object. For certain transactions, a
full AppliedToTxnRet object is not required (see “Example: Creating Links Only” and
“Setting a Credit”). The lean version returned in these cases includes only:
•Transaction ID (for the affected transaction)
•Transaction type
To find out exactly what happened, you need to perform the appropriate query on the
returned TxnID.
Creating Links Instead of Transactions
Although receive payment and bill payment are referred to as “transactions,” adding these
objects to QuickBooks does not always result in a transaction. For example, when a credit
is applied in a receive payment or bill payment object and no payment is involved, links are
created, but no transactions are created (see “Example: Creating Links Only” and “Setting a
Credit”).
Receive Payment Transactions
QuickBooks receive payment transactions can be added, queried, and deleted through the
SDK. This section describes the effects of sending a ReceivePaymentAdd request object to
QuickBooks.
Applying a Payment
In a ReceivePaymentAdd object, TotalAmount is optional. TotalAmount represents the total
amount of money that is being received from the customer named in the CustomerRef. The
reason TotalAmount is not required is that a ReceivePaymentAdd object can be used to set
credits or discounts without receiving any payment.
You can use either AppliedToTxnAdd or IsAutoApply to distribute the received payment,
as described in the following sections.
Distributing the Payment Explicitly
You can include one or more instances of AppliedToTxnAdd, which allows you to specify
exactly how to distribute TotalAmount for this customer job. Each instance of
AppliedToTxnAdd refers to a different transaction, assigning a PaymentAmount to each
one. (If you include AppliedToTxnAdd aggregates with duplicate TxnIDs, you will receive
a status code error.)

220
Chapter 16: Handling Receive Payment, Bill Payment, and Deposit Transactions
(c) 2013 Intuit Inc. All rights reserved.
You need to know the transaction ID of each transaction to which payment is applied. In
QuickBooks, the main type of transactions that can receive payment are as follows:
•Invoices
•General journal debits
•Checks (for example, a customer job might receive a payment reimbursing a check that
was written for an expense for that customer job)
•Statement charges
Table 16-1 shows how the sum of the payment amounts relates to the TotalAmount
specified. The sum of the PaymentAmount elements in all the AppliedToTxnAdd
aggregates should be less than or equal to the TotalAmount (in the ReceivePaymentAdd
object).
Table 16-1 How the sum of all payment amounts relates to the TotalAmount specified
Applying the Payment “Automatically”
The IsAutoApply flag is used instead of AppliedToTxnAdd. This flag allows QuickBooks
to apply the payment according to its set of rules, or simply to receive the payment without
applying it to a specific transaction, as follows:
•If IsAutoApply is true, QuickBooks applies TotalAmount according to the following
rules:
> If it finds an outstanding transaction for this customer job that exactly matches
TotalAmount, it applies the payment to that transaction.
> If no exact match is found, the payment is applied to the outstanding transactions
beginning with the oldest one. Within the QuickBooks user interface, you can set
credits or discounts even when you auto-apply a payment, but you cannot do this
through the SDK.
•If IsAutoApply is false, QuickBooks receives the payment but does not apply it to any
outstanding transaction. QuickBooks creates a credit that will appear on the customer
job’s next transaction (not on the current transaction). For example, the
ReceivePaymentAdd request shown in Listing 16-1 will result in a credit of $620.40
being available to the Smith:kitchen customer job account. On the next transaction
involving the Smith:kitchen customer job, at least $620.40 of credit will be available.
(More than $620.40 will be available if this customer job already had a credit.)
Relationship of Payment Amounts to
TotalAmount Result
payment amounts = TotalAmount Entire received amount is distributed
payment amounts < TotalAmount UnusedPayment amount is returned in the
ReceiveAmountRet object and is available
for a future payment transaction
payment amounts > TotalAmount Error!

Receive Payment Transactions
221
(c) 2013 Intuit Inc. All rights reserved.
______Listing 16-1 ReceivePaymentAdd request with IsAutoApply set to false; creating a credit
<ReceivePaymentAddRq requestID="356088">
<ReceivePaymentAdd>
<CustomerRef>
<FullName>Smith:kitchen</FullName>
</CustomerRef>
<ARAccountRef>
<FullName>Accounts Receivable</FullName>
</ARAccountRef>
<TotalAmount>620.40</TotalAmount>
<IsAutoApply>false</IsAutoApply>
</ReceivePaymentAdd>
</ReceivePaymentAddRq>
Setting Discounts
Applying a discount reduces the amount that is to be received from the customer job. The
discount is debited from the account referenced by DiscountAccountRef. In the
QuickBooks user interface you can also apply discounts to statement charges, but you
cannot do this through the SDK.
You can apply a discount to an invoice transaction by including a DiscountAmount in an
AppliedToTxnAdd aggregate. You cannot set a discount if you auto-apply the payment.
Setting Credits
You can set a credit (add credit to a customer job account) by including the SetCredit
aggregate in an AppliedToTxnAdd aggregate. You cannot set a credit if you auto-apply the
payment.
If you set one or more credits in a ReceivePaymentAdd request but do not distribute a
payment or set a discount, then no transaction will be created. Setting a credit merely
creates links between existing transactions (for example, between a credit memo transaction
and an invoice transaction), and no information about these links will be returned to you in
the ReceivePaymentRet response.
The AppliedToTxnRet aggregate included in the returned ReceivePaymentRet object will
not refer directly to any credit that was set. If you want information about credits, you must
do a query on the TxnID returned by AppliedToTxnRet. For example, if AppliedToTxnRet
refers to an invoice with a particular TxnID, if you query that TxnID you can get
information about credit memos that are linked to that transaction.
For more information and an example of setting a credit, see “Example: Creating Links
Only.”
222
Chapter 16: Handling Receive Payment, Bill Payment, and Deposit Transactions
(c) 2013 Intuit Inc. All rights reserved.
Example: Creating Links Only
Listing 16-2 shows a ReceivePaymentAdd object that sets a credit but does not include a
PaymentAmount or DiscountAmount element. This ReceivePaymentAdd object will create
a link between a credit memo and an invoice transaction, but will not create a new
transaction.
The customer named Smith previously returned merchandise, and a credit memo was
created for their account. A CreditMemoQueryRq query returned information about the
amount and transaction ID of this credit memo (110.29 and 120-1012533559).
In Listing 16-2, the full amount from the credit memo is applied to the customer job
Smith:kitchen, and a link is created to the invoice with the TxnID of 24-974954. The
balance of that invoice will be reduced by $110.29, and closed altogether if the previous
balance was $110.29.
_____ Listing 16-2 ReceivePaymentAdd object that creates links but does not create a transaction
<ReceivePaymentAddRq requestID="356089">
<ReceivePaymentAdd>
<CustomerRef>
<FullName>Smith:kitchen</FullName>
</CustomerRef>
<AppliedToTxnAdd>
<TxnID>24-974954</TxnID>
<SetCredit>
<CreditTxnID>120-1012533559</CreditTxnID>
<AppliedAmount>110.29</AppliedAmount>
</SetCredit>
</AppliedToTxnAdd>
</ReceivePaymentAdd>
</ReceivePaymentAddRq>
A ReceivePaymentAdd object that does not create a transaction will return a lean
AppliedToTxnRet aggregate (page 219). For example, Listing 16-3 shows a
ReceivePaymentRet object that could be returned from the ReceivePaymentAdd request
shown in Listing 16-2.
_____ Listing 16-3 ReceivePaymentRet object returned by the ReceivePaymentAddRq shown in Listing 16-2
<ReceivePaymentAddRs> requestID="356089" statusCode="0"
statusSeverity="Info" statusMessage="Status OK">
<ReceivePaymentRet>
<AppliedToTxnRet>
<TxnID>24-974954</TxnID>
<TxnType>Invoice</TxnType>
<TxnDate>2002-02-10</TxnDate>
</AppliedToTxnRet>
</ReceivePaymentRet>
</ReceivePaymentAddRs>

Receive Payment Transactions
223
(c) 2013 Intuit Inc. All rights reserved.
Getting a small response such as this might prompt you to query the specified invoice
further to learn about any linked transactions. For example, after receiving the response
shown in Listing 16-2, you might send an InvoiceQueryRq with TxnID of 24-974954 and
IncludeLinkedTxns set to true. The query would return a LinkedTxn aggregate representing
a credit memo with TxnID of 120-1012533559. For more information, see “Linked
Transactions,” beginning on page 218.
N
OTE
You can perform additional queries for links only if the
affected transaction (the transaction returned in the
AppliedToTxnRet) is an invoice. For example, if the
TxnID 24-974954 had a TxnType of JournalEntry, it would not
be possible to query the journal entry to find out about linked
transactions because a JournalEntryQueryRq does not include
an IncludeLinkedTxns flag.
Example: Applying Payment, Credit, and Discount in One Request
Listing 16-4 shows a request that applies a payment, credit, and discount. The invoice with
TxnID 43-222560 has a balance of $100.00, and a payment is received for $100.00. The
invoice will be closed, but there will also be an unused payment, because both a credit (for
$5.00) and a discount (for $7.00) are set. QuickBooks will reduce the internal payment
amount to $88.00 [$100.00 - ($5.00 + $7.00)]. This example will produce an overpayment
of $12.00, so UnusedPayment will be 12.00 in the returned ReceivePaymentRet object.
______Listing 16-4 Applying Payment, Credit, and Discount in a ReceivePaymentAdd Request
<ReceivePaymentAddRq>
<ReceivePaymentAdd>
.
.
.
<TotalAmount>100.00</TotalAmount>
<AppliedToTxnAdd>
<TxnID>43-222560</TxnID>
<PaymentAmount>100.00</PaymentAmount>
<SetCredit>
<CreditTxnID>4552-22629</CreditTxnID>
<AppliedAmount>5.00</AppliedAmount>
</SetCredit>
<DiscountAmount>7.00</DiscountAmount>
<DiscountAccountRef>
<FullName>discount</FullName>
</DiscountAccountRef>
</AppliedToTxnAdd>
</ReceivePaymentAdd>
</ReceivePaymentAddRq>

224
Chapter 16: Handling Receive Payment, Bill Payment, and Deposit Transactions
(c) 2013 Intuit Inc. All rights reserved.
Using ReceivePayment for Credit Card Authorization and Capture
If the company is subscribed to QBMS, you can record a ReceivePaymentAdd that is
basically a pending transaction. That is, in this usage, you want to save a QBMS
authorization transaction into QuickBooks. Thus, the ReceivePaymentAdd contains a
CreditCardTxnInfo aggregate with a CreditCardTxnType of Authorization. QuickBooks
saves this as a pending transaction.
Later, when the authorized charge is captured to become a real charge in QBMS, you can
record that charge into QuickBooks by modifying that ReceivePayment
(ReceivePaymentMod). The ReceivePaymentMod will have a CreditCardTxnInfoMod
containing data from the QBMS capture transaction, with a CreditCardTxnType of Capture.
QuickBooks automatically removes the pending status and records the transaction.
Modifying a ReceivePayment Transaction
Beginning with qbXML specification 6.0 and QuickBooks 2007, you can modify a
ReceivePayment transaction via the SDK. However, notice that you cannot modify applied
credits.
Beginning with qbXML spec 7.0 and QuickBooks 2008, you can modify a ReceivePayment
transaction to add a CreditCardTxnInfo aggregate or modify an existing one if you want.
The most common use of this feature is described under the topic “Using ReceivePayment
for Credit Card Authorization and Capture.” However, you can make other modifications if
you wish because the feature is not limited to an authorization/capture usage.
Bill Payment Transactions
A bill payment transaction is used to pay one or more bills for the same vendor. Payment
can be either by check or by credit card. (Online banking is not currently supported in the
SDK.) In addition, a bill payment transaction, like a receive payment transaction, can be
used to set credits and discounts.
The Pay Bills window in QuickBooks shows all open bills for all vendors. The user can
select multiple bills from multiple vendors and pay them, all at one time. In the SDK, you
can pay multiple bills in one bill payment object, but they must all be from the same
vendor.

Bill Payment Transactions
225
(c) 2013 Intuit Inc. All rights reserved.
Payment Method
There are two types of bill payment objects:
•BillPaymentCheckAdd
•BillPaymentCreditCardAdd
The type of bill payment object created depends on which payment method the user selects.
Paying the Bill
A bill payment is always applied to a particular transaction. The payment amount can be
less than, equal to, or greater than the amount due. In the case of an overpayment, a credit
in the amount of the overpayment is created. This credit appears in the Credits window list.
Special Helper Query
When you pay a bill (using AppliedToTxnAdd), you must specify the transaction ID and
the payment amount. Use the BillToPayQuery to obtain the transaction ID. This query
returns a list of all open bills and credits available.
Example: BillToPayQuery
Listing 16-5 shows an example of a BillToPayQuery request for all bills and credits for
Allison BMW as of August 16, 2002. The corresponding response is shown in Listing 16-6.
It returns information on two bills and one credit.
______Listing 16-5 BillToPayQuery request
<BillToPayQueryRq requestID = "123456">
<PayeeEntityRef>
<FullName>Allison BMW</FullName>
</PayeeEntityRef>
<APAccountRef>
<FullName>Accounts Payable</FullName>
</APAccountRef>
<DueDate>2002-08-16</DueDate>
</BillToPayQueryRq>

226
Chapter 16: Handling Receive Payment, Bill Payment, and Deposit Transactions
(c) 2013 Intuit Inc. All rights reserved.
_____ Listing 16-6 BillToPayQuery response
<BillToPayQueryRs requestID="123456" statusCode="0"
statusSeverity="Info" statusMessage="Status OK">
<BillToPayRet>
<BillToPay>
<TxnID>101-1029260941</TxnID>
<TxnType>Bill</TxnType>
<APAccountRef>
<ListID>280000-1026788471</ListID>
<FullName>Accounts Payable</FullName>
</APAccountRef>
<TxnDate>2002-07-26</TxnDate>
<RefNumber>0126</RefNumber>
<DueDate>2002-08-16</DueDate>
<AmountDue>152.00</AmountDue>
</BillToPay>
</BillToPayRet>
<BillToPayRet>
<BillToPay>
<TxnID>FE-1029260914</TxnID>
<TxnType>Bill</TxnType>
<APAccountRef>
<ListID>280000-1026788471</ListID>
<FullName>Accounts Payable</FullName>
</APAccountRef>
<TxnDate>2002-08-13</TxnDate>
<RefNumber>0125</RefNumber>
<DueDate>2002-07-17</DueDate>
<AmountDue>1250.00</AmountDue>
</BillToPay>
</BillToPayRet>
<BillToPayRet>
<CreditToApply>
<TxnID>104-1029260962</TxnID>
<TxnType>VendorCredit</TxnType>
<APAccountRef>
<ListID>280000-1026788471</ListID>
<FullName>Accounts Payable</FullName>
</APAccountRef>
<TxnDate>2002-08-13</TxnDate>
<RefNumber>0300</RefNumber>
<CreditRemaining>125.00</CreditRemaining>
</CreditToApply>
</BillToPayRet>
</BillToPayQueryRs>
</QBXMLMsgsRs>
</QBXML>
Setting a Credit
If you apply only a credit (and no payment), links are created between the bill and the credit
transaction, but no transaction is actually created. The return object in this case is a “lean”
AppliedToTxnRet object. See “Returned Object for AppliedToTxnAdd” (page 219).

Bill Payment Transactions
227
(c) 2013 Intuit Inc. All rights reserved.
Setting a Discount
You can discount only bills in the BillTxnList. (An attempt to set a discount on other types
of objects results in an error.) If you discount a bill without paying it, only a general journal
entry is created (but no BillPaymentCreditCardRet or BillPaymentCheckRet transaction).
The return object in this case is a lean AppliedToTxnRet object. See “Returned Object for
AppliedToTxnAdd” (page 219).
If you apply both a credit and a discount amount (but no payment), the combined total
cannot exceed the total amount due of the bill.
Bill Payment Examples
Here are a few examples of different bill payment scenarios.
Example: Applying Payment, Credit, and Discount
In this example, the amount due on Bill 1 (B1) is $100. Suppose you pay $80 on Bill 1 and
also apply a credit of $10 and a discount of $10 to the same bill. Listing 16-7 shows the
AppliedToTxnAdd aggregate for this transaction.
______Listing 16-7 Paying and closing a bill
<AppliedToTxnAdd>
<TxnID>B1</TxnID>
<PaymentAmount>80.00</PaymentAmount>
<SetCredit>
<CreditTxnID>C1</CreditTxnID>
<AppliedAmount>10.00</AppliedAmount>
</SetCredit>
<DiscountAmount>10.00</DiscountAmount>
<DiscountAccountRef>
<FullName>D1</FullName>
</DiscountAccountRef>
</AppliedToTxnAdd>
The result is that QuickBooks pays the bill and closes it, because the sum of payments,
credits, and discounts is exactly equal to the amount of the bill.
Example: Overpayment
In this example, the amount due on Bill 1 (B1) is $100. Now suppose you specify a
payment of $80 on Bill 1, apply a $20 credit from Credit 1 on Bill 1 and a discount of $10
also on Bill 1, as shown in Listing 16-8. In this example, the total payment for Bill 1 is
$110. A $10 credit is created as a result of this overpayment.
228
Chapter 16: Handling Receive Payment, Bill Payment, and Deposit Transactions
(c) 2013 Intuit Inc. All rights reserved.
_____ Listing 16-8 Creating a credit as a result of overpaying a bill
<AppliedToTxnAdd>
<TxnID>B1</TxnID>
<PaymentAmount>80.00</PaymentAmount>
<SetCredit>
<CreditTxnID>C1</CreditTxnID>
<AppliedAmount>20.00</AppliedAmount>
</SetCredit>
<DiscountAmount>10.00</DiscountAmount>
<DiscountAccountRef>
<FullName>D1</FullName>
</DiscountAccountRef>
</AppliedToTxnAdd>
Example: Error!
In this example, the following are applied to Bill1, which is for $100 (see Listing 16-9):
•Payment = $50
•Credit = $60
•Discount = $45
This example results in an error, since the combined credits and discounts applied to a bill
cannot exceed the amount due of the bill.
_____ Listing 16-9 Status code error: attempting to apply credits and discounts that exceed the bill amount
<AppliedToTxnAdd>
<TxnID>B1</TxnID>
<PaymentAmount>50.00</PaymentAmount>
<SetCredit>
<CreditTxnID>C1</CreditTxnID>
<AppliedAmount>60.00</AppliedAmount>
</SetCredit>
<DiscountAmount>45.00</DiscountAmount>
<DiscountAccountRef>
<FullName>”GoodCustomerDiscount”</FullName>
</DiscountAccountRef>
</AppliedToTxnAdd>

Modifying a BillPaymentCheck Transaction
229
(c) 2013 Intuit Inc. All rights reserved.
Example: Paying Two Bills
This example, shown in Listing 16-10, applies the following to Bill 1, which has an amount
due of $100:
•Payment = $80
•Credit = $10
•Discount = $10
It also applies a credit of $10 to Bill 2, which has an amount due of $50. (Note that one
credit, C1, is applied to multiple bills in this example.) No payment is applied to Bill 2.
_____ Listing 16-10 Paying two bills (generates two AppliedToTxnRet objects)
<BillPaymentCheckAddRq>
<AppliedToTxnAdd>
<TxnID>B1</TxnID>
<PaymentAmount>80.00</PaymentAmount>
<SetCredit>
<CreditTxnID>C1</CreditTxnID>
<AppliedAmount>10.00</AppliedAmount>
</SetCredit>
<DiscountAmount>10.00</DiscountAmount>
<DiscountAccountRef>
<FullName>D1</FullName>
</DiscountAccountRef>
</AppliedToTxnAdd>
<AppliedToTxnAdd>
<TxnID>B2</TxnID>
<SetCredit>
<CreditTxnID>JulyRebate</CreditTxnID>
</SetCredit>
</AppliedToTxnAdd>
</BillPaymentCheckAddRq>
Two AppliedToTxnRet objects will be returned in the response message—one for Bill 1
and one for Bill 2. The returned object for Bill 1 will be the full AppliedToTxnRet. The
returned object for Bill 2 will be the lean version since no payment was made for Bill 2. To
find out more about Bill 2, you can perform additional queries for links using the
IncludeLinkedTxns flag.
Modifying a BillPaymentCheck Transaction
Beginning with qbXML specification 6.0 and QuickBooks 2007, you can modify
BillPaymentCheck transactions via the SDK. However, you cannot modify any credit that
was applied to a bill either using the bill payment UI or BillPaymentCheckAdd.

230
Chapter 16: Handling Receive Payment, Bill Payment, and Deposit Transactions
(c) 2013 Intuit Inc. All rights reserved.
Deposits
A deposit is used to move funds to an asset account from the Undeposited Funds account,
or to move funds to the same asset account from another asset account. A deposit contains
the following important information:
•Account the funds are coming from
•Account the funds are going to (an asset account)
•Reference to a customer name
You can specify the transfer of deposited funds explicitly to a given account, or you can
specify it using the PaymentTxnID and PaymentTxnLineID elements contained in the
DepositAdd request, as shown by the following examples.
Listing 16-11 is an example of a straightforward DepositAdd request. A total deposit, in the
amount of $50, is taken from customer1’s savings account. A cash back payment ($12) is
taken, and the remainder of the funds ($38) is deposited into the checking account.
____ Listing 16-11 Adding a deposit to the specified account
<DepositAddRq requestID = "SDK deposit 3">
<DepositAdd>
<DepositToAccountRef>
<FullName>checking</FullName>
</DepositToAccountRef>
<Memo>SDK deposit 3</Memo>
<CashBackInfo>
<AccountRef>
<FullName>cash</FullName>
</AccountRef>
<Memo>SDK cash back</Memo>
<Amount>12.00</Amount>
</CashBackInfo>
<DepositLineAdd>
<EntityRef>
<FullName>customer1</FullName>
</EntityRef>
<AccountRef>
<FullName>savings</FullName>
</AccountRef>
<PaymentMethodRef>
<FullName>cash</FullName>
</PaymentMethodRef>
<Amount>50.00</Amount>
</DepositLineAdd>
</DepositAdd>
</DepositAddRq>
Listing 16-12 shows a simple request that issues the helper query
ReceivePaymentToDeposit. The response to this request, shown in Listing 16-13, returns
the IDs of the transactions and lines that are ready to be deposited.

Deposits
231
(c) 2013 Intuit Inc. All rights reserved.
_____ Listing 16-12 ReceivePaymentToDeposit helper query request
<QBXMLMsgsRq onError = "continueOnError">
<ReceivePaymentToDepositQueryRq />
</QBXMLMsgsRq>
Listing 16-13 shows the response to the ReceivePaymentToDeposit query. This response
shows that Kristy Abercrombie has paid $200.00 against an invoice, and lists the TxnID
and TxnLineID that the funds are being applied to. The payment received from Kristy
Abercrombie was already included on the original invoice in the form of a payment line
item.
_____ Listing 16-13 Response to ReceivePaymentToDeposit query
<ReceivePaymentToDepositQueryRs statusCode="0"
statusSeverity="Info" statusMessage="Status OK">
<ReceivePaymentToDepositRet>
<TxnID>48ED-1071532336</TxnID>
<TxnLineID>48F1-1071532336</TxnLineID>
<TxnType>Invoice</TxnType>
<CustomerRef>
<ListID>170000-933272658</ListID>
<FullName>Abercrombie, Kristy:Kitchen</FullName>
</CustomerRef>
<TxnDate>2003-12-15</TxnDate>
<Amount>200.00</Amount>
</ReceivePaymentToDepositRet>
</ReceivePaymentToDepositQueryRs>
Listing 16-14 shows a DepositAdd request, which feeds the TxnID and TxnLineID
obtained in Listing 16-13 into a deposit. The funds are desposited to the account referred to
by the DepositToAccountRef element in the DepositAdd request—namely, the checking
account.
_____ Listing 16-14 DepositAdd request using the obtained data
<DepositAddRq requestID = "101">
<DepositAdd>
<DepositToAccountRef>
<FullName>checking</FullName>
</DepositToAccountRef>
<Memo>SDK deposit 3</Memo>
<DepositLineAdd>
<PaymentTxnID>48ED-1071532336</PaymentTxnID>
<PaymentTxnLineID>48F1-1071532336</PaymentTxnLineID>
</DepositLineAdd>
</DepositAdd>
</DepositAddRq>
An alternative to accomplish the same end would be to issue an InvoiceQuery request. Then
you could look at the InvoiceRet message and extract the TxnID and TxnLineID
information and supply them in the DepositAdd request.

232
Chapter 16: Handling Receive Payment, Bill Payment, and Deposit Transactions
(c) 2013 Intuit Inc. All rights reserved.
T
IP
If you use the ReceivePaymentToDeposit query to obtain a
TxnID and TxnLineID, be sure to supply both of these values
to the DepositAdd request (in the PaymentTxnID and
PaymentTxnLineID elements).

Important Note about Querying for Linked Transactions
233
(c) 2013 Intuit Inc. All rights reserved.
C
HAPTER
17 1
L
INKING
I
TEM
R
ECEIPT
/B
ILL
TO
P
URCHASE
O
RDER
, I
NVOICE
TO
S
ALES
O
RDER
1
Within the QuickBooks UI, as user can receive items against one or more existing purchase
orders and enter a bill for those received items, with the purchase order being updated
automatically. Similarly, the user can invoice against existing sales orders, with the sales
orders being updated automatically.
These features are also available via the SDK by linking the transactions together, where
ItemReceipt and Bill transactions are linked to existing PurchaseOrder transactions (in the
ItemReceiptAdd and BillAdd requests only). An invoice transaction can be linked to
existing SaleOrder transactions as well, in the InvoiceAdd request. The line item
information is pulled automatically from the PurchaseOrders or SalesOrders, and the
PurchaseOrders or SalesOrders are automatically updated.
This chapter describes the transaction linking between ItemReceipt or Bill and
PurchaseOrder, and between Invoice and SalesOrder. (These are the only transaction links
that are currently supported.) The chapter describes the typical scenario where this feature
is used, the effect on the linked objects, the types of linking you can do, and the rules of
linking that you must follow.
I
MPORTANT
In the SDK, linking to the PurchaseOrder is supported only for
the Bill and ItemReceipt Add operations, not for Mod
operations. Likewise, linking to SalesOrder is supported only
for InvoiceAdd, not InvoiceMod.
Important Note about Querying for Linked Transactions
You can find transactions linked to PurchaseOrders and SalesOrders by setting the
IncludeLinkedTxns element to true in the PurchaseOrder or SalesOrder query. (By default,
linked transactions are NOT returned.)
However, notice that the linked transaction as a whole is returned--you get the txnID, but
not any txnLineIDs. This is fine if you linked the whole transaction to your SalesOrder or
PurchaseOrder. But what happens if you linked individual transaction line items to line
items in your SalesOrder or PurchaseOrder? The answer to this is that you cannot retrieve
that line item information so you can see which line items in the PurchaseOrder/SalesOrder
came from which lines in the bill, item receipt, or invoice.
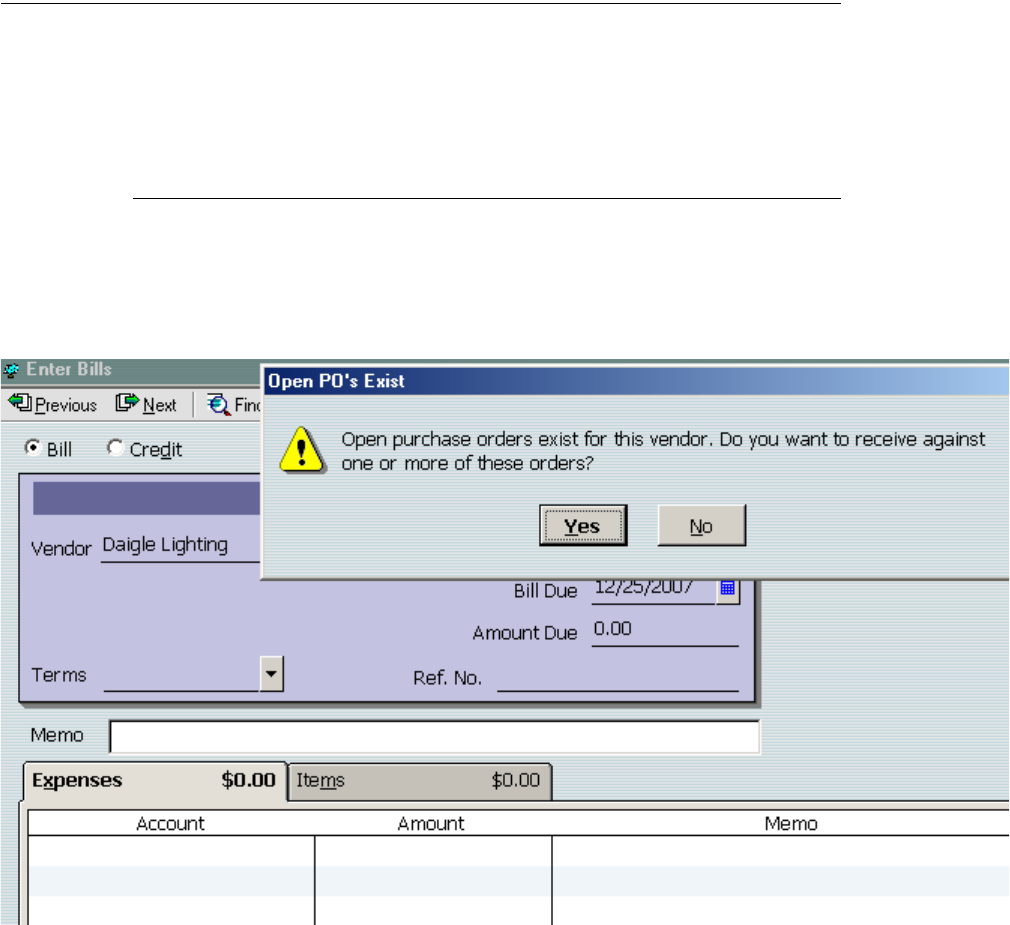
234
Chapter 17: Linking ItemReceipt/Bill to PurchaseOrder, Invoice to Sales Order
(c) 2013 Intuit Inc. All rights reserved.
Linking Bill or ItemReceipt to PurchaseOrder
Generally, the SDK is intended to allow an application to perform the same tasks
programmatically that a user would do manually within QuickBooks. Accordingly, to
understand how to use the SDK transaction linking, you need to know how this feature
operates for an end user looking at the QuickBooks UI.
The Basic User Scenario in the QuickBooks UI
In the QuickBooks UI, when a user creates a Bill or ItemReceipt (BillAdd or
ItemReceiptAdd in the SDK), the user selects a vendor. If the vendor has any open purchase
orders, the user is presented with a selection list of purchase orders (see Figure 17-1 on
page 234).
Figure 17-1 Creating a Bill: Open PO advisory
After the user links a PurchaseOrder to the ItemReceipt or Bill, data from that
PurchaseOrder automatically fills the ItemReceipt or Bill, so that every receivable line item
in the PurchaseOrder becomes a line item in the ItemReceipt or Bill (Figure 17-2).
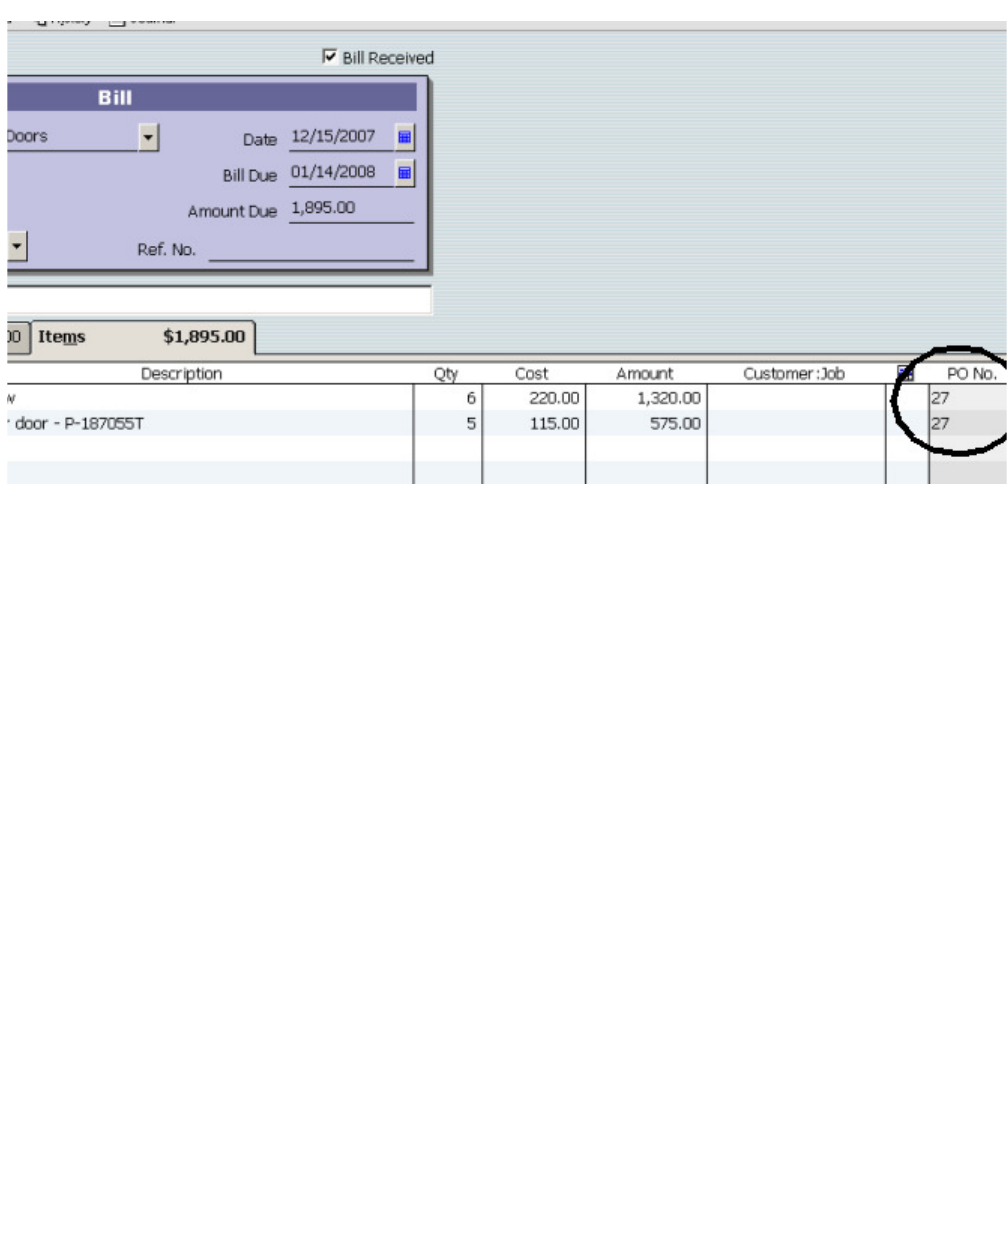
Linking Bill or ItemReceipt to PurchaseOrder
235
(c) 2013 Intuit Inc. All rights reserved.
Figure 17-2 Linking PO to new Bill
Notice the PurchaseOrder number circled in the lower right of the figure. This shows which
line items belong to which PurchaseOrder, which is useful if the user links multiple
PurchaseOrders to the Bill.
The user could simply accept all the PurchaseOrder line items as received by clicking the
Save and Close” button. If the user does this, and subsequently displays the PurchaseOrder,
it will indicate that all its items were received, as shown in Figure 17-3 on page 236.
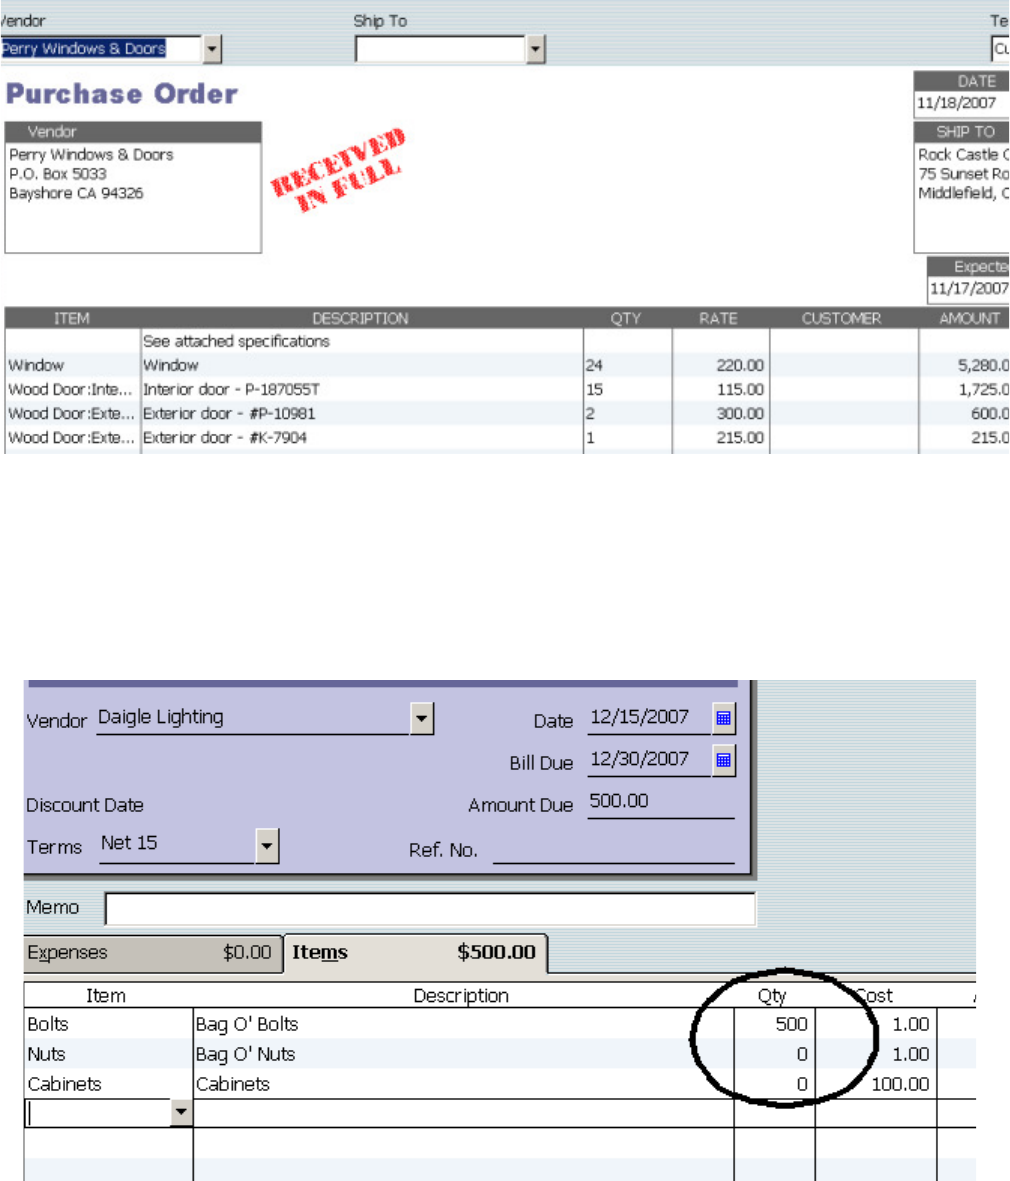
236
Chapter 17: Linking ItemReceipt/Bill to PurchaseOrder, Invoice to Sales Order
(c) 2013 Intuit Inc. All rights reserved.
Figure 17-3 PurchaseOrder after linking to a Bill
But what happens if the user received only some of the items in the PurchaseOrder, and not
others? The user in this case would simply modify the quantity field in any line item that
was not fully received. (See the circled area in Figure 17-4 on page 236.)
Figure 17-4 Partially accepting PO by zeroing Quantity
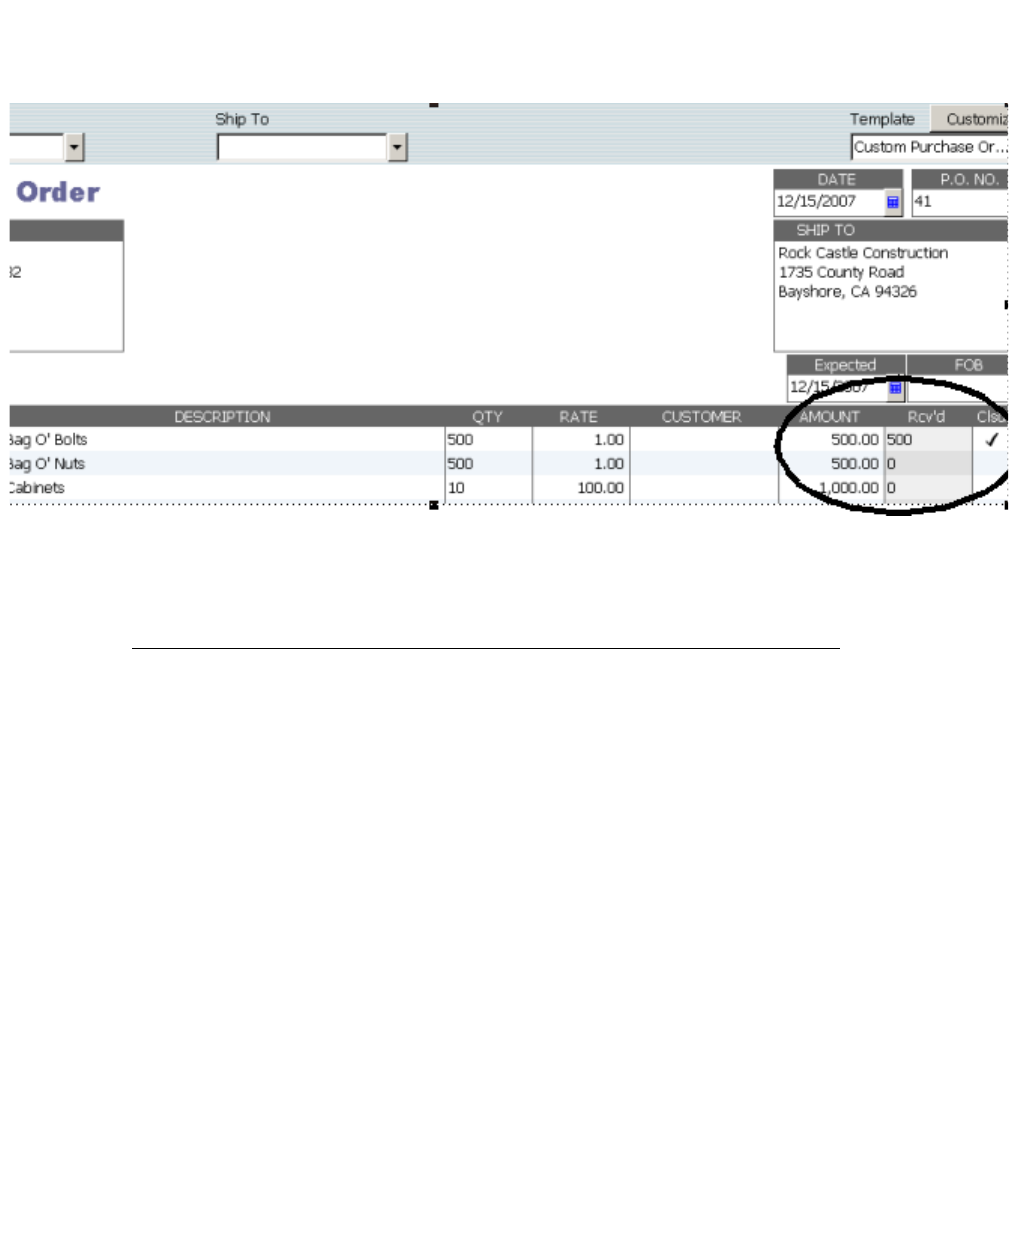
Linking Bill or ItemReceipt to PurchaseOrder
237
(c) 2013 Intuit Inc. All rights reserved.
The PurchaseOrder in this case would not display the “Received in Full” stamp, but would
show received and unreceived items with the number received indicated. The fully received
items are marked as closed “Clsd.” See the circled area in Figure 17-5 on page 237.
Figure 17-5 PurchaseOrder partially received in a Bill
Linking an ItemReceipt or Bill to PurchaseOrder Using the SDK
You can duplicate the previously described UI user scenarios in the SDK by linking an
ItemReceipt or Bill to one or more PurchaseOrders in the SDK when you create an
ItemReceipt or Bill.
The SDK supplies one element and one aggregate to enable you to make the PurchaseOrder
links you want:
•To link a Bill or ItemReceipt to one or more entire PurchaseOrders, use the
LinkToTxnID element in the BillAdd or ItemReceiptAdd request. (This adds all of the
line items in the specified PurchaseOrder.) See the circled area of Figure 17-6 on page
238, which shows the Onscreen Reference listing. The purchase orders linked in this
way to an item receipt will be marked as received in full and will be closed as a result
of the ItemReceiptAdd.
•To link a Bill or ItemReceipt to specific line items in one or more PurchaseOrders, use
the LinkToTxn aggregate inside the ItemLineAdd aggregate. See the circled area of
Figure 17-7 on page 239, which shows the Onscreen Reference listing. Typically, if all
the items don’t arrive at the same time, a separate item receipt is issued when the items
are received. Purchase orders linked in this way to item receipts will be closed only
after all of the items are received.
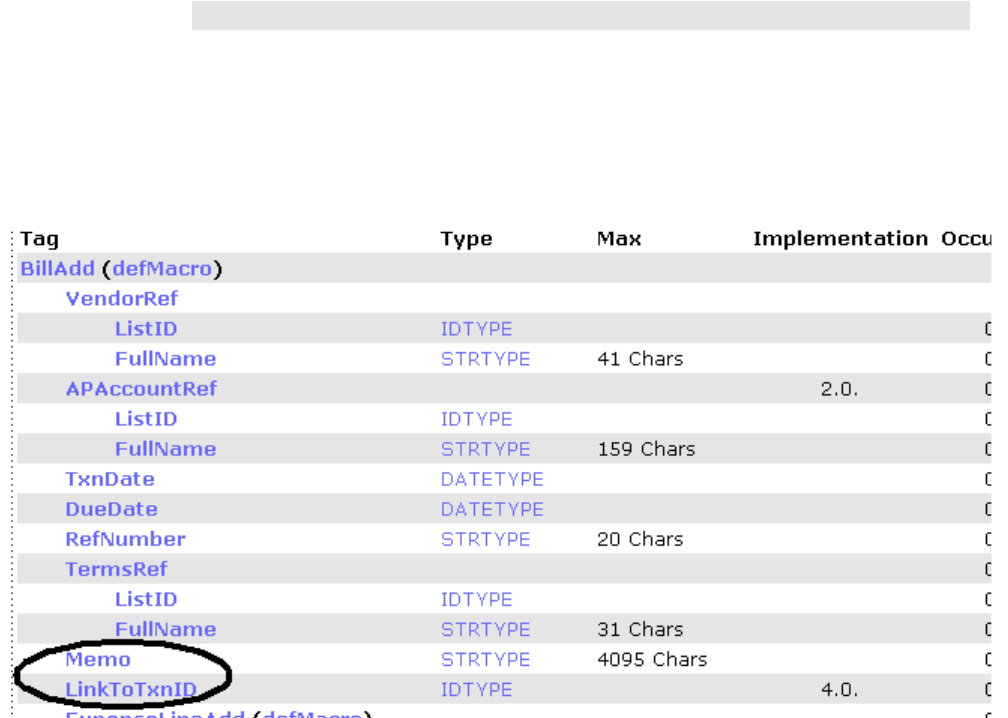
238
Chapter 17: Linking ItemReceipt/Bill to PurchaseOrder, Invoice to Sales Order
(c) 2013 Intuit Inc. All rights reserved.
N
OTE
Purchase Orders are automatically closed and marked as fully
received when the item receipts linked to them fully receive
the purchase order line items. However, if you want to close a
Purchase Order or close out line items in a Purchase Order
without receiving the items, you can perform a
PurchaseOrderMod and manually close individual line items or
the Purchase Order itself.
Figure 17-6 Use LinkToTxnID element to link entire PO
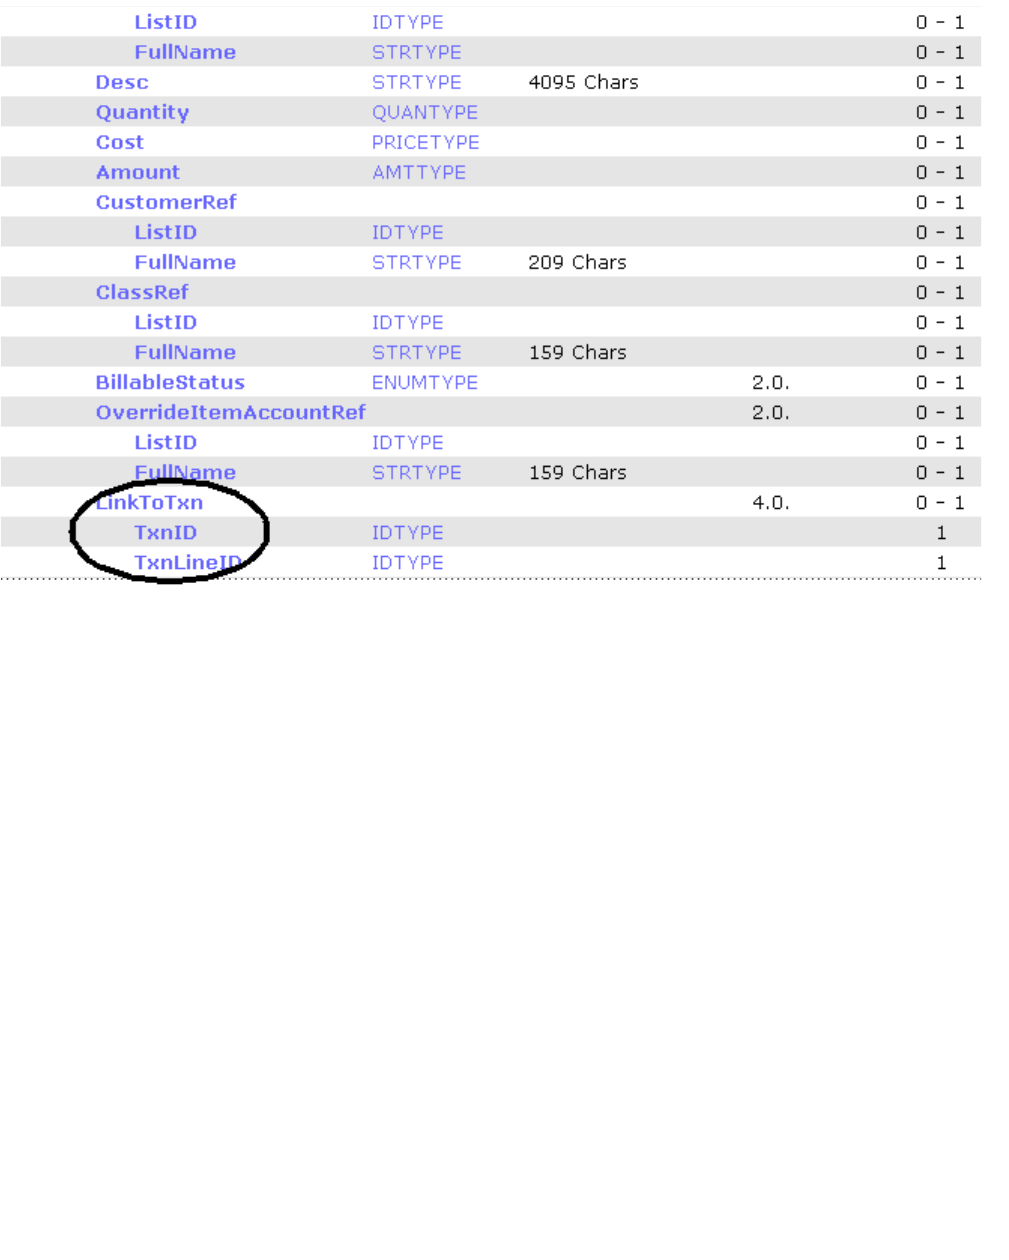
Linking Bill or ItemReceipt to PurchaseOrder
239
(c) 2013 Intuit Inc. All rights reserved.
Figure 17-7 Using LinkToTxn aggregate to link one PO line item
Receiving/Billing Against All of the Purchase Order Lines
The following sample qbXML shows a BillAdd request that is linked to two different
PurchaseOrders using LinkToTxnID. Using this element means that the resulting Bill will
contain all of the line items from the specified PurchaseOrders.
<?qbxml version="4.0"?>
<QBXML>
<QBXMLMsgsRq onError = "stopOnError">
<BillAddRq requestID = "2">
<BillAdd>
<VendorRef>
<FullName>Daigle Lighting</FullName>
</VendorRef>
<APAccountRef>
<FullName>Accounts Payable</FullName>
</APAccountRef>
<TxnDate>2004-10-28</TxnDate>
240
Chapter 17: Linking ItemReceipt/Bill to PurchaseOrder, Invoice to Sales Order
(c) 2013 Intuit Inc. All rights reserved.
<DueDate>2004-11-28</DueDate>
<TermsRef>
<FullName>Net 30</FullName>
</TermsRef>
<LinkToTxnID>25D6-1071508328</LinkToTxnID>
<LinkToTxnID>53C4-1197730858</LinkToTxnID>
</BillAdd>
</BillAddRq>
</QBXMLMsgsRq>
</QBXML>
In the above qbXML sample, notice the required element VendorRef. The vendor you
specify here must match the vendor in all of the PurchaseOrders you are linking in the
BillAdd or ItemReceiptAdd. (You can only specify one vendor per BillAdd or
ItemReceiptAdd.)
Also, notice the APAccountRef. It is included here simply to encourage the practice of
using this. If you don’t include this, the QuickBooks default AP account will be used,
which may not be desirable if you have AP accounts other than the default AP account.
There is a common pitfall of SDK programming where programmers omit the
APAccountRef when creating Bills--thereby using the default APAccount, and then specify
a different APAccountRef when paying the Bill (using BillPayment*).
Finally, notice that the two LinkToTxnID elements contain the TxnID of the
PurchaseOrders that are to be linked. The BillAdd or ItemReceiptAdd request will fail if the
PurchaseOrders used here have already been closed.
The result of this sample qbXML is that all receivable line items in the linked
PurchaseOrders using LinkToTxnID are received and closed: the PurchaseOrder is closed
in its entirety.
Receiving/Billing Against Specific Purchase Order Lines
The following sample qbXML shows a BillAdd request that is linked to two individual line
items from one purchase order.
<?qbxml version="4.0"?>
<QBXML>
<QBXMLMsgsRq onError = "stopOnError">
<BillAddRq requestID = "2">
<BillAdd>
<VendorRef>
<FullName>Daigle Lighting</FullName>
</VendorRef>
<APAccountRef>
<FullName>Accounts Payable</FullName>
</APAccountRef>
<TxnDate>2004-10-28</TxnDate>
<DueDate>2004-11-28</DueDate>
<TermsRef>
<FullName>Net 30</FullName>
</TermsRef>
<ItemLineAdd>
<LinkToTxn>

Linking Bill or ItemReceipt to PurchaseOrder
241
(c) 2013 Intuit Inc. All rights reserved.
<TxnID>53DD-1197743928</TxnID>
<TxnLineID>53DF-1197743928</TxnLineID>
</LinkToTxn>
</ItemLineAdd>
<ItemLineAdd>
<LinkToTxn>
<TxnID>53DD-1197743928</TxnID>
<TxnLineID>53E0-1197743928</TxnLineID>
</LinkToTxn>
</ItemLineAdd>
</BillAdd>
</BillAddRq>
</QBXMLMsgsRq>
</QBXML>
Receiving/Billing Specific Purchase Order Lines From Multiple
Purchase Orders
You can receive items or bill against specific purchase order line items from different
purchase orders, as per the sample below. You can, in the same request, do all this along
with receiving/billing against an entire purchase order, again, as shown below.
<?qbxml version="4.0"?>
<QBXML>
<QBXMLMsgsRq onError = "stopOnError">
<BillAddRq requestID = "2">
<BillAdd>
<VendorRef>
<FullName>Daigle Lighting</FullName>
</VendorRef>
<APAccountRef>
<FullName>Accounts Payable</FullName>
</APAccountRef>
<TxnDate>2004-10-28</TxnDate>
<DueDate>2004-11-28</DueDate>
<LinkToTxnID>25D6-1071508328</LinkToTxnID>
<LinkToTxnID>53C4-1197730858</LinkToTxnID>
<TermsRef>
<FullName>Net 30</FullName>
</TermsRef>
<ItemLineAdd>
<LinkToTxn>
<TxnID>53DD-1197743928</TxnID>
<TxnLineID>53DF-1197743928</TxnLineID>
</LinkToTxn>
</ItemLineAdd>
<ItemLineAdd>
<LinkToTxn>
<TxnID>58DD-1197743928</TxnID>
<TxnLineID>53E0-1197743928</TxnLineID>
</LinkToTxn>
</ItemLineAdd>
</BillAdd>
</BillAddRq>
</QBXMLMsgsRq>
</QBXML>

242
Chapter 17: Linking ItemReceipt/Bill to PurchaseOrder, Invoice to Sales Order
(c) 2013 Intuit Inc. All rights reserved.
In the above qbXML sample, notice that you can use both types of links: you can link entire
PurchaseOrders and link individual lines from one or more PurchaseOrders in the same
BillAdd or ItemReceiptAdd request. There are some important rules that you must follow,
however. These are listed under “Rules For Linking a Bill or ItemReceipt to a
PurchaseOrder” on page 242.
As indicated in the sample qbXML, the SDK allows you to link a Bill or ItemReceipt to
multiple PurchaseOrders, as long as they are from the same vendor (which is specified in
the VendorRef).
Rules For Linking a Bill or ItemReceipt to a PurchaseOrder
The following rules are enforced during runtime, and are listed here to help you avoid
runtime errors, some of which may not be obvious to track down and fix.
•Rule 1: Don’t use the same TxnID in a LinkToTxnID element and a LinkToTxn
aggregate in the same Bill or Item receipt.
•Rule 2: If you link to specific line items (the LinkToTxn aggregate), you must maintain
the order of lines between the PurchaseOrder and the ItemReceipt or Bill. For example,
you may not list a LinkToTxn aggregate for Purchase Order line 2 and then list a
LinkToTxn aggregate for PurchaseOrder line 1. The LinkToTxn aggregate specifying
PO Line 1 must precede the LinkToTxn aggregate specifying PO Line 2, and so on.
•Rule 3: If you use LinkToTxn aggregates, you cannot mix lines from different
PurchaseOrders in the ItemReceipt or Bill. That is, you cannot specify line 1 of
PurchaseOrder A, then line 1 of PurchaseOrder B followed by line 2 of PurchaseOrder
A, and so on. All of the desired PurchaseOrder A lines must be specified in LinkToTxn
aggregates sequentially before any of the PurchaseOrder B lines.
•Rule 4: If a PurchaseOrder contains a group line item, you must link only to the
individual lines within the group, not to the group itself. A group item is essentially a
UI convenience and is not linkable.
•Rule 5: When linking a Bill or ItemReceipt to a PurchaseOrder, the vendors (in the
VendorRef aggregates) for each of these must match.
•Rule 6: You may only link to receivable Purchase Order lines. That is, for that Purchase
Order line, the ReceivedQuantity element must exist, it cannot be marked manually
closed, and the Quantity must be greater than the ReceivedQuantity.
•Rule 7: You cannot specify both an ItemRef and a LinkToTxn aggregate within the
same line item. You’ll get a conflict error.
Why Does the OSR List LinkToTxn for Unsupported Transactions?
Because of the way the qbXML spec makes use of macros to ensure that common elements
are consistent across multiple request types, the LinkToTxn aggregate within the
ItemLineAdd aggregate also appear in the VendorCreditAdd, CheckAdd,

Converting ItemReceipts to Bills
243
(c) 2013 Intuit Inc. All rights reserved.
CreditCardChargeAdd, and CreditCardCreditAdd requests, even though these are not
implemented. If you attempt to use the LinkToTxn aggregate in those requests you will get
a not supported warning (statusCode 530) in your response.
Converting ItemReceipts to Bills
The QuickBooks UI makes it look like Bills can be linked to ItemReceipts by clicking the
Receive Bill icon in the vendor navigator. However, the UI has not actually linked the Bill
to the ItemReceipt, it has converted the ItemReceipt to a Bill. If you query for the
ItemReceipt, it will no longer be there, and the PurchaseOrder will record only the link to
the Bill.
Notice that although the UI actually converts this transaction, that same functionality does
not exist in the SDK. However, you can achieve the same end result by deleting the
ItemReceipt using the TxnDel request and using BillAdd to link a bill to the PurchaseOrder
instead of an ItemReceipt.
Limitations and Pitfalls of Modifying a Bill or ItemReceipt
You cannot link a PurchaseOrder to a Bill or ItemReceipt in the BillMod and
ItemReceiptMod requests. That is, you cannot add new lines that link to a PurchaseOrder to
an existing Bill or ItemReceipt. Also, when you modify transaction lines in a Bill or an
ItemReceipt, you may lose links between the Bill and the PurchaseOrder or between the
ItemReceipt and the PurchaseOrder. So you should be very careful before modifying
transaction lines.
ItemReceipt and Bill Split Option for QuickBooks Enterprise
ItemReceipt and Bill transactions split is a feature which allows an ItemReceipt and a Bill
to be two transactions on their own instead of one transaction that share the ItemReceipt/
Bill states. The ItemReceipt/Bill split feature is created to solve inventory requirements
from our users that the current existing design of one transaction did not solve. For
example, a user writes up an ItemReceipt on 1/1/2011 for receiving some inventories and
then on 2/1/2011, a Bill is received. In our current one transaction design the Bill on 2/1/
2011 will replace the ItemReceipt on 1/1/2011. This will create a problem of not enough
quantity on hand for building assemblies that depend on receiving inventories on 1/1/2011.
This feature will only be available to Enterprise users and is controlled by a preference to
allow our users to continue with the one transaction design or completely switch to the new
two transaction split design.
•ItemReceipt and Bill can be brought up separately on the UI and edited simultaneously
by our users. They no longer share the same UI with a check box to identify as an
ItemReceipt or Bill.
•Two new link types will be introduced. One new link type is to allow linking from a
Purchase Order to a Bill since the Bill is split from the ItemReceipt. Another new link

244
Chapter 17: Linking ItemReceipt/Bill to PurchaseOrder, Invoice to Sales Order
(c) 2013 Intuit Inc. All rights reserved.
type is to allow linking from ItemReceipt to Bill or reverse since ItemReceipt and Bill
are separate transactions.
•Purchase Order targets will contain two new fields to hold information about the Bills
they link to.
•ItemReceipt cost will no longer be allowed to be edited by users and they will contain
the average costing of the Bills in the order.
•A new Inventory Offset account is introduced to wash the monies posted between
ItemReceipts and Bills.
•ItemReceipts will post against Inventory Offset (src target) and Inventory Asset/
income/expense (dist targets).
•Bills will post against Account Payable (src targets) and Inventory Offset (dist targets).
•Item history will only pick up ItemReceipt targets with Inventory Offset account for
calculating quantity and on hand and average costing.
Re: “Is Manually Closed” in Purchase Orders and Sales Orders
On a purchase order, a check in the Closed column can indicate either that the items have
been received in full or that the line item has been manually closed. To determine why a
line item was closed, check its IsManuallyClosed field in PurchaseOrderLineRet. If this
field is False, then compare the ReceivedQuantity value with the Quantity originally
ordered. If the Quantity is equal to the ReceivedQuantity value, the order is fully received.
Note that if you try to manually close a line that has already been fully received, you will
receive an error.
The IsManuallyClosed flag on the main transaction takes precedence over the
IsManuallyClosed flag on individual lines within the transaction. To avoid ambiguity, if the
IsManuallyClosed flag is specified for the main transaction, do not set it for individual
lines.
Linking Invoices to SalesOrders
The Invoice to SalesOrder linking works very similar to ItemReceipt/Bill and
PurchaseOrder linking. As is the case with those other types of transaction linking, it helps
to first take a look at how this feature works for an end user within the QuickBooks UI.
I
MPORTANT
Since a sales order is a non-posting transaction, QuickBooks
business logic doesn’t require the sales tax information at the
point where the SalesOrder is added. (In the OSR this is an
optional field.) However, the sales tax item IS required by the
business logic for the invoice. So if the SalesOrder doesn’t
have a SalesTaxItem set for it, you need to modify it so that it
does have one before you create an invoice using that sales
order.
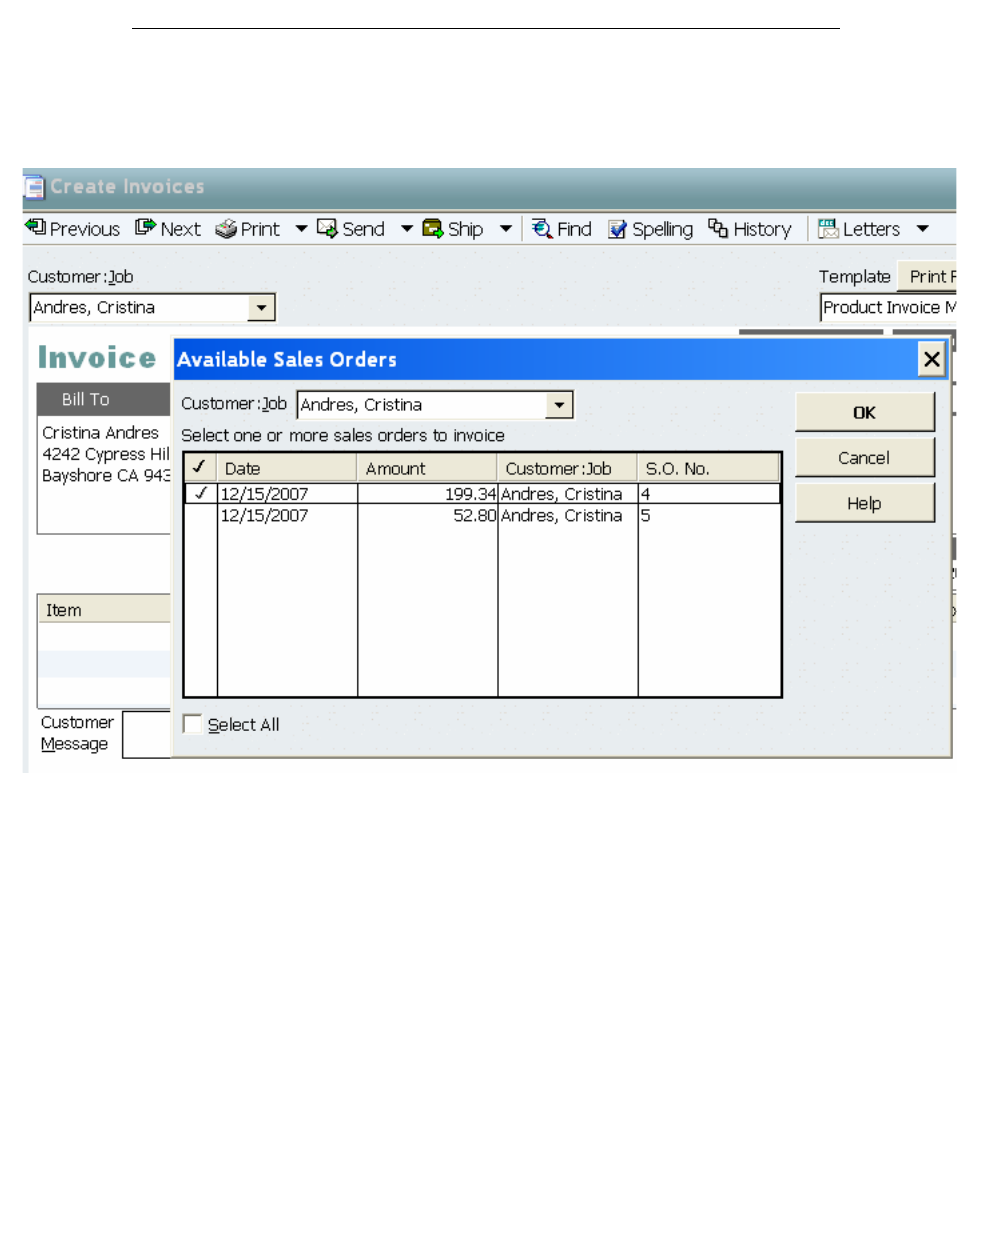
Linking Invoices to SalesOrders
245
(c) 2013 Intuit Inc. All rights reserved.
The Basic User Scenario in the QuickBooks UI
In the QuickBooks UI, during invoice creation the user selects a customer to invoice
against. If the customer has outstanding sales orders, the user is presented with a selection
list of available sales order to link against (Figure 17-8).
Figure 17-8 From the UI: Selecting SaleOrders to Link to Invoice
If the user selects one or more of the sales orders, the user is prompted for the type of
linking: import all of the sales order lines, or just some (Figure 17-9)
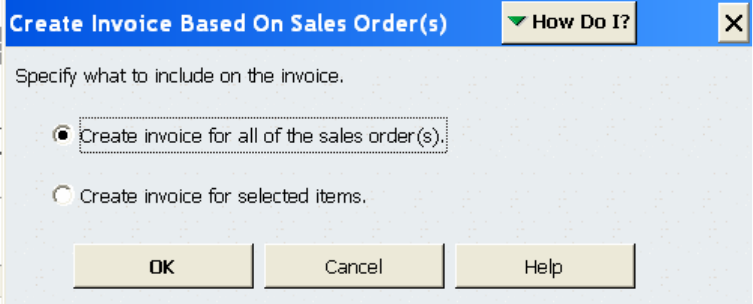
246
Chapter 17: Linking ItemReceipt/Bill to PurchaseOrder, Invoice to Sales Order
(c) 2013 Intuit Inc. All rights reserved.
Figure 17-9 Invoice entire SalesOrder or or just a partial
If the user chooses “Create invoice for all of the sales order(s)” then for each sales order
selected in the list, all of the line items will be added to the invoice: (Figure 17-10)
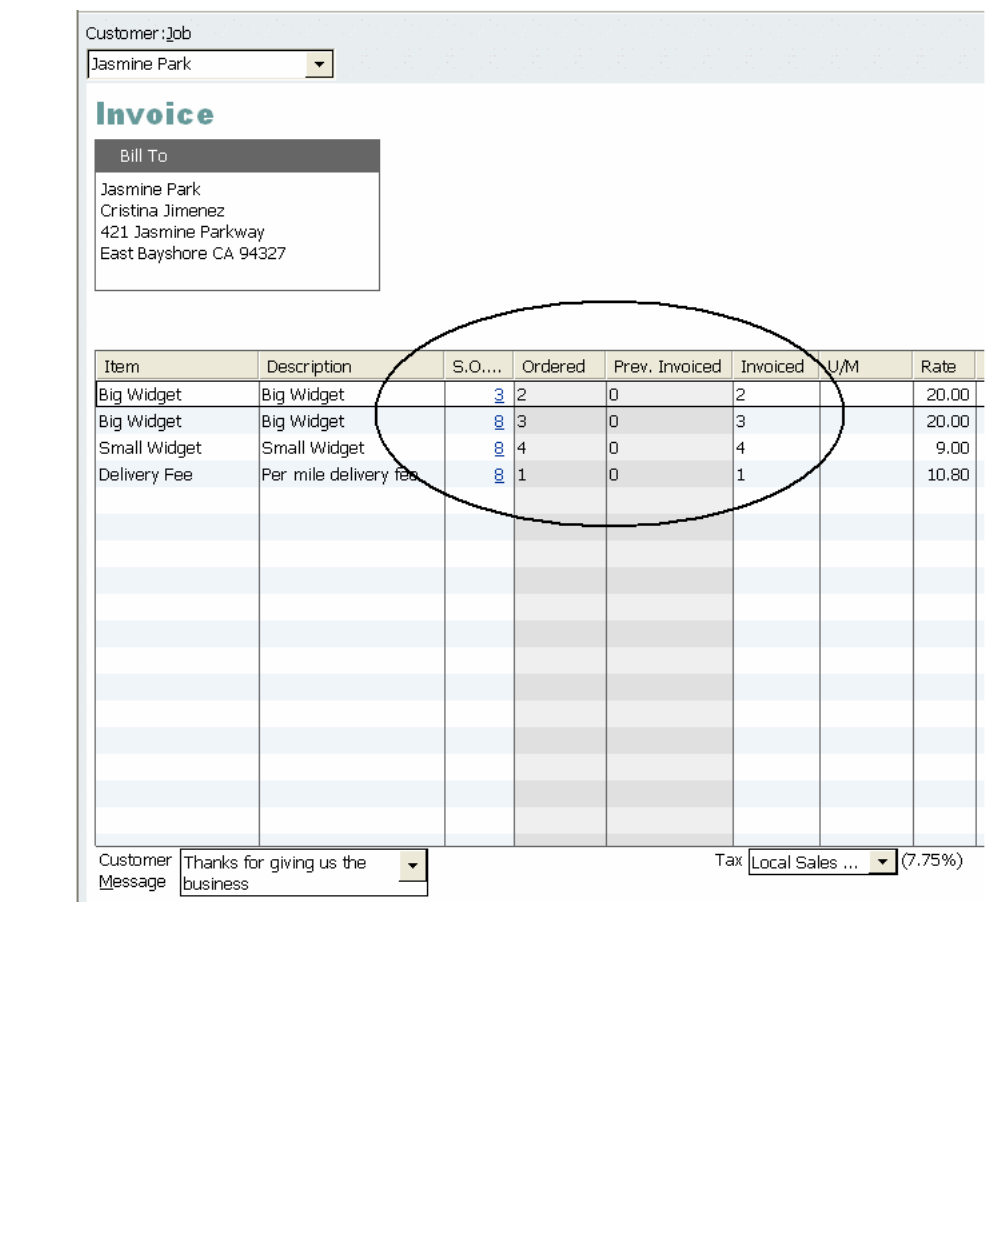
Linking Invoices to SalesOrders
247
(c) 2013 Intuit Inc. All rights reserved.
Figure 17-10 Invoicing against two complete sales orders
In this scenario, all of the sales order lines and quantities are imported: notice in the circled
area that the source sales order for each line is listed, and the ordered quantities and the
invoiced quantities are the same. (The user can change the invoiced quantities.)
If instead of choosing to invoice against entire sales orders, the user chooses “Create
invoice for selected items”, an invoice quantities form is posted to allow the user to change
quantities before the sales order lines are dumped into the invoice form (Figure 17-11):
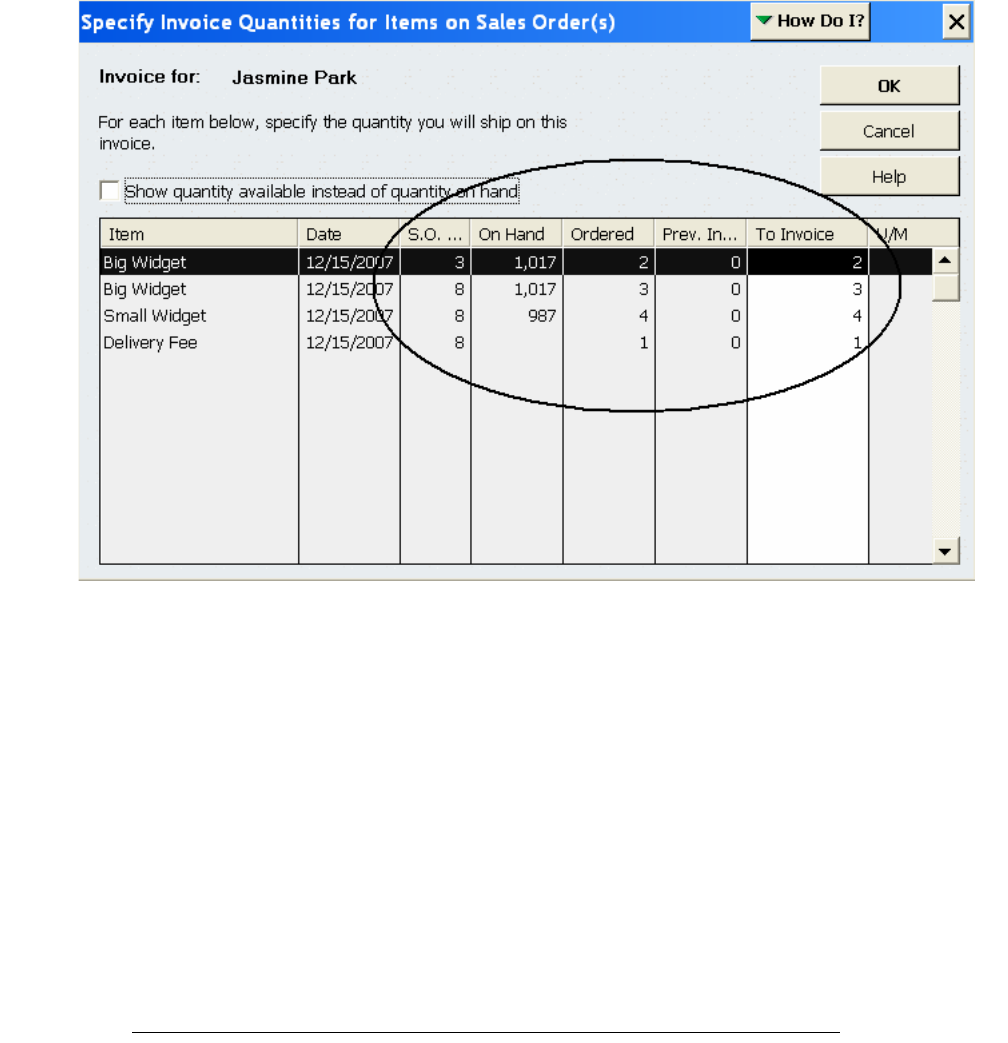
248
Chapter 17: Linking ItemReceipt/Bill to PurchaseOrder, Invoice to Sales Order
(c) 2013 Intuit Inc. All rights reserved.
Figure 17-11 Partial Invoicing against Sales Orders
The user simply changes the quantities as desired, or enters a value of 0 if the customer
isn’t to be invoiced for a particular item. (By default, QuickBooks doesn’t print invoice
items with 0 quantities, but be forewarned: the user can change this.) When the user is
done, the populated invoice form is shown.
Automatic Selection of Invoice Template
In the UI, if the user invoices against more than one sales order, the default invoice
template changes to the multiple sales order template. This same behavior is reflected in the
SKD. That is, if you don’t specify a template in the TemplateRef and you link to more than
one sales order, the default invoice template that will be used is the multiple sales order
template.
Linking Invoices to SalesOrders in the SDK
You can automate the UI user scenarios as we just described using the SDK. You just need
to link an invoice to one or more SalesOrders in the SDK when you create that invoice. The
way the linking works is identical to the linking used between Bill/ItemReceipt and
PurchaseOrder described earlier in this chapter.

Linking Invoices to SalesOrders
249
(c) 2013 Intuit Inc. All rights reserved.
You use one (or more) LinkToTxnID element at the invoice level to link to the entire Sales
Order and pull in all its lines, or you use a LinkToTxn aggregate at the line level to pull in a
specific sales order line. Or, you can use a combination: pull in some entire sales orders and
also some specific lines from other sales orders.
What Happened to My Invoice BillAddress/ShipAddress Data?
If you link your invoice to a sales order that contains a customer address, the result is that
the sales order’s address will be pulled in and used, even if you specify a different
BillAddress and/or ShipAddress in the InvoiceAdd. In this event, none of the data you
specify in the InvoiceAdd BillAddress/ShipAddress will be written to the invoice, including
any notes. This approximates the behavior in the UI.
If you need to update the BillAddress/ShipAddress data, you can do an InvoiceMod after
the InvoiceAdd.
Invoicing Against the Whole Sales Order
To link an invoice to one or more entire Sales Orders, use the LinkToTxnID element in the
InvoiceAdd request. (This adds all of the line items in the specified Sales Order.) See the
circled area of Figure 17-12, which shows the Onscreen Reference listing. The sales orders
linked in this way to an invoice will be marked as fully invoiced and closed.
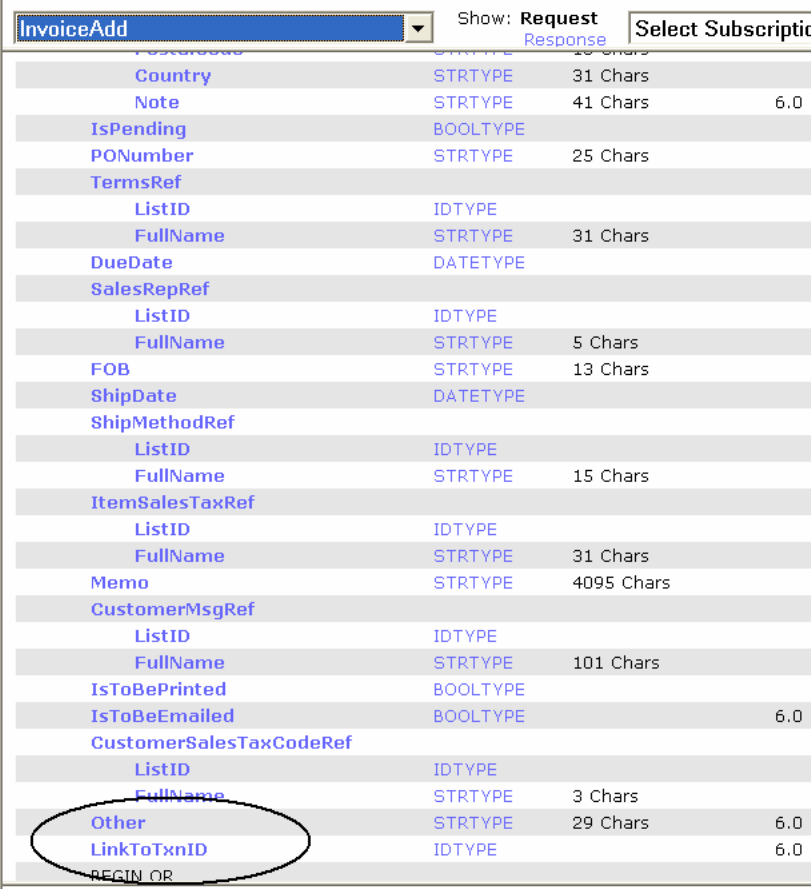
250
Chapter 17: Linking ItemReceipt/Bill to PurchaseOrder, Invoice to Sales Order
(c) 2013 Intuit Inc. All rights reserved.
Figure 17-12 LinkToTxnID in InvoiceAdd
You can make as many of these entire SalesOrder links to your invoice as you want. Just
specify a separate LinkToTxnID for each one whose lines are to be pulled into the invoice.
Notice that you cannot use the same TxnId in a LinktoTxnID element, and also inside the
LinktoTxn aggregate. That is, you cannot link the whole SalesOrder and then specify one
line item from it. You’ll get a runtime error if you do.
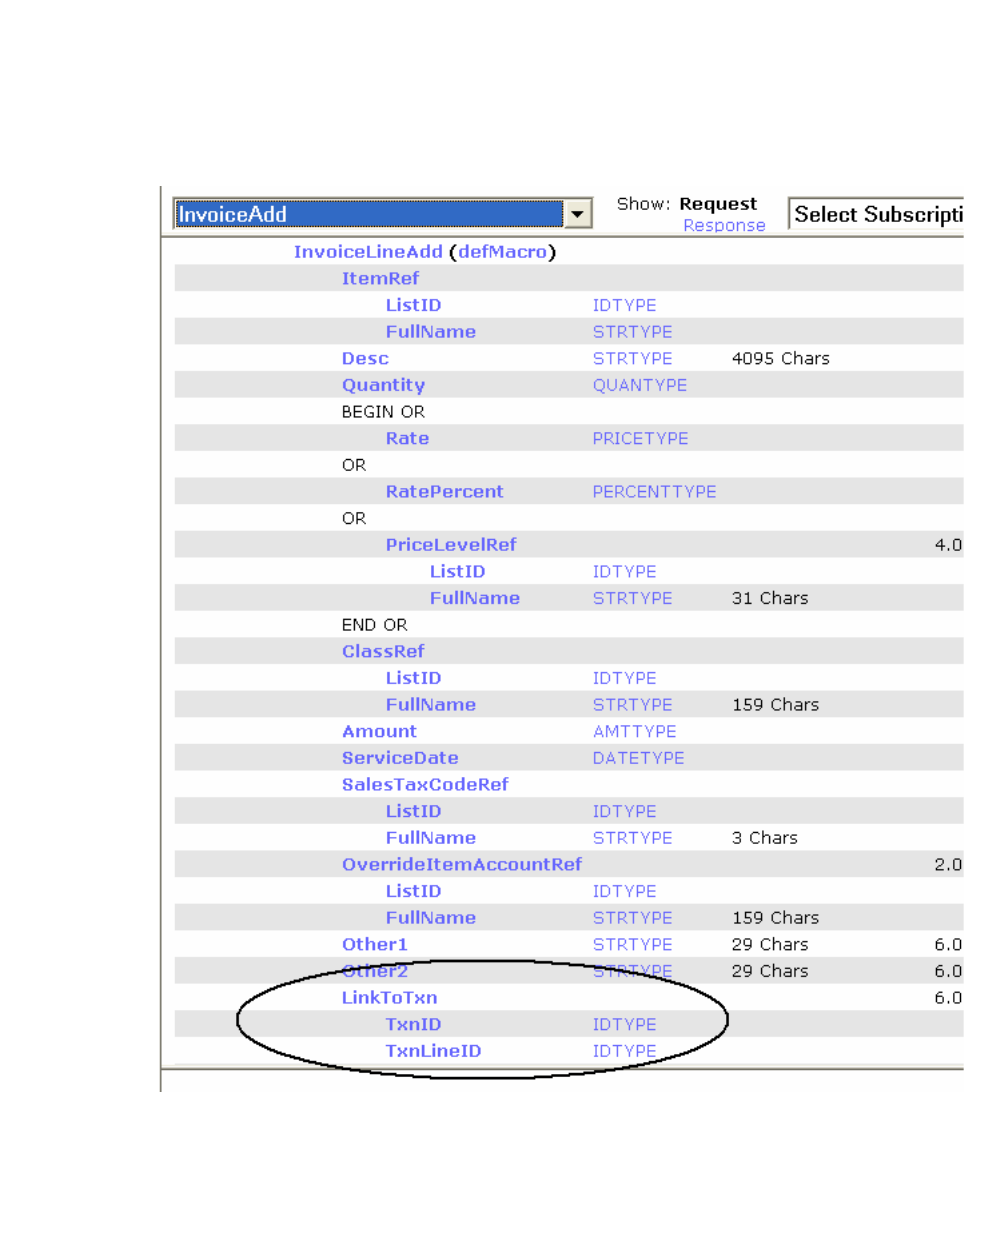
Linking Invoices to SalesOrders
251
(c) 2013 Intuit Inc. All rights reserved.
Invoicing Against Specific Sales Order Lines
To link an invoice to a specific line item in a SalesOrder, use the LinkToTxn aggregate
inside the ItemLineAdd aggregate. See the circled area of Figure 17-13, which shows the
Onscreen Reference listing. Notice where it is located. The order is important if you want to
change the Quantity, for example. Sales orders linked in this way to invoices will be closed
only after all of the items are invoiced.
Figure 17-13 LinkToTxn in InvoiceAdd
252
Chapter 17: Linking ItemReceipt/Bill to PurchaseOrder, Invoice to Sales Order
(c) 2013 Intuit Inc. All rights reserved.
Linking Rules
The rules you must follow are the same as listed above under “Rules For Linking a Bill or
ItemReceipt to a PurchaseOrder.”
Example: Using qbXML to Invoice Against Sales Orders
The following qbXML script links two SalesOrders to the invoice, bringing all lines in from
those two SalesOrders. It also links to specific line items from two other SalesOrders.
<?xml version="1.0" ?>
<?qbxml version="6.0"?>
QBXML>
<QBXMLMsgsRq onError="stopOnError">
<InvoiceAddRq requestID="0">
<InvoiceAdd>
<CustomerRef>
<FullName>Kaushik, Laxmi</FullName>
</CustomerRef>
<ARAccountRef>
<FullName>Accounts Receivable</FullName>
</ARAccountRef>
<IsToBeEmailed>1</IsToBeEmailed>
<LinkToTxnID>611-1197728725</LinkToTxnID>
<LinkToTxnID>616-1197728784</LinkToTxnID>
<InvoiceLineAdd>
<Quantity>1</Quantity>
<LinkToTxn>
<TxnID>65F-1197730157</TxnID>
<TxnLineID>661-1197730157</TxnLineID>
</LinkToTxn>
</InvoiceLineAdd>
<InvoiceLineAdd>
<Quantity>1</Quantity>
<LinkToTxn>
<TxnID>665-1197730212</TxnID>
<TxnLineID>667-1197730212</TxnLineID>
</LinkToTxn>
</InvoiceLineAdd>
</InvoiceAdd>
</InvoiceAddRq>
</QBXMLMsgsRq>
</QBXML>
Example: Using QBFC to Invoice Against Sales Orders
The following one-shot QBFC sample is a VB sample that links two SalesOrders to the
invoice, bringing all lines in from those two SalesOrders. It also links to specific line items
from two other SalesOrders.
In the sample, notice how the invoice object IInvoiceAdd is returned from the
AppendInvoiceAddRq method and then is set from that point. Also notice how each invoice
line is added and constructed, with the IInvoiceLineAdd object returned and filled. Notice
the reuse of the IInvoiceLineAdd object for multiple item lines.

Linking Invoices to SalesOrders
253
(c) 2013 Intuit Inc. All rights reserved.
Dim SessionManager As QBSessionManager
Set SessionManager = New QBSessionManager
SessionManager.OpenConnection "", "InvoiceAdd_wSalesOrder_Sample"
SessionManager.BeginSession "", omDontCare
Dim InvoiceAddSet As IMsgSetRequest
Set InvoiceAddSet = SessionManager.CreateMsgSetRequest("US", 6, 0)
Dim InvoiceSalesAdd As IInvoiceAdd
Set InvoiceSalesAdd = InvoiceAddSet.AppendInvoiceAddRq
InvoiceSalesAdd.CustomerRef.FullName.setValue "Kaushik, Laxmi"
InvoiceSalesAdd.ARAccountRef.FullName.setValue "Accounts Receivable"
InvoiceSalesAdd.IsToBeEmailed.setValue True
InvoiceSalesAdd.LinkToTxnIDList.Add "611-1197728725"
InvoiceSalesAdd.LinkToTxnIDList.Add "616-1197728784"
Dim InvoiceLineAdder As IInvoiceLineAdd
Set InvoiceLineAdder = InvoiceSalesAdd.ORInvoiceLineAddList.Append.InvoiceLineAdd
InvoiceLineAdder.Quantity.setValue 1
InvoiceLineAdder.LinkToTxn.TxnID.setValue "65F-1197730157"
InvoiceLineAdder.LinkToTxn.TxnLineID.setValue "661-1197730157"
Set InvoiceLineAdder = InvoiceSalesAdd.ORInvoiceLineAddList.Append.InvoiceLineAdd
InvoiceLineAdder.Quantity.setValue 1
InvoiceLineAdder.LinkToTxn.TxnID.setValue "665-1197730212"
InvoiceLineAdder.LinkToTxn.TxnLineID.setValue "667-1197730212"
Dim InvoiceSalesAddResp As IMsgSetResponse
Set InvoiceSalesAddResp = SessionManager.DoRequests(InvoiceAddSet)
SessionManager.EndSession
SessionManager.CloseConnection
254
Chapter 17: Linking ItemReceipt/Bill to PurchaseOrder, Invoice to Sales Order
(c) 2013 Intuit Inc. All rights reserved.
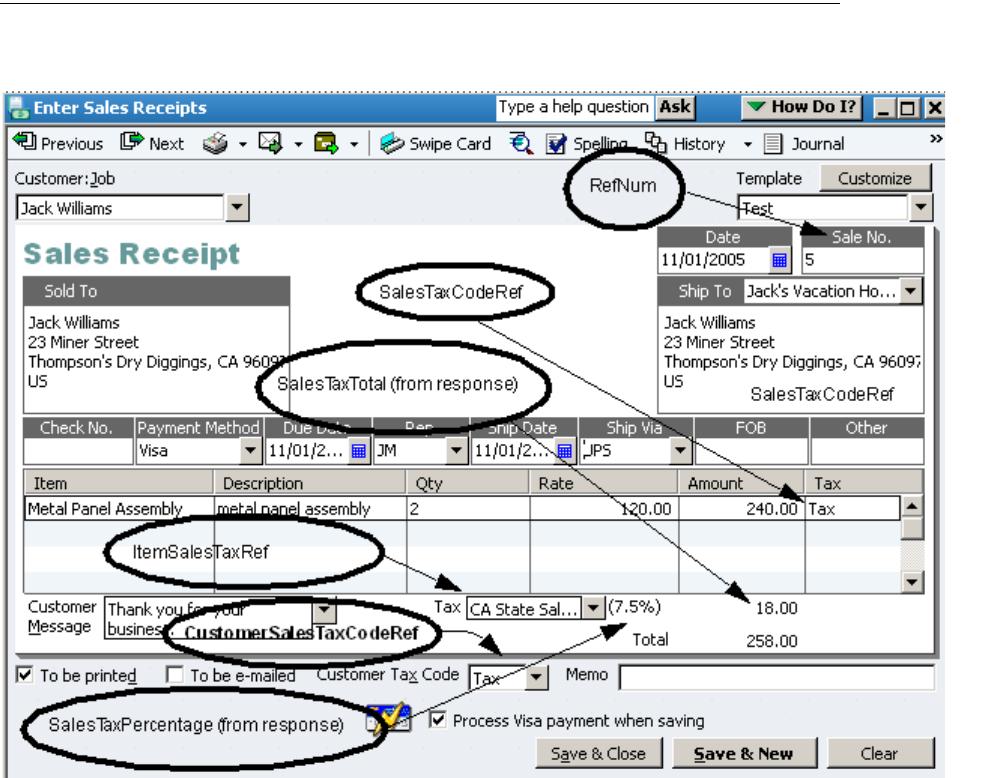
Adding a SalesReceipt
255
(c) 2013 Intuit Inc. All rights reserved.
C
HAPTER
18 1
U
SING
S
ALES
R
ECEIPT
F
UNCTIONALITY
1
The ability to add SalesReceipts in the SDK has been around forever, “forever” in this case
meaning since the release of qbXML 1.0. However, some key new SalesReceipt features
were added a little more recently, such as the ability to support credit card transactions (4.1)
and the ability to modify sales receipts (5.0). This chapter provides some information on
using the SalesReceipt features in the SDK: namely how to add, modify, query, void, and
delete SalesReceipts.
Adding a SalesReceipt
In the UI, you add a sales receipt by clicking on the Create Sales Receipts icon in the main
QuickBooks navigator. This displays the Enter Sales Receipts form shown in Figure 18-1.
Figure 18-1 Entering new sales receipts from the UI
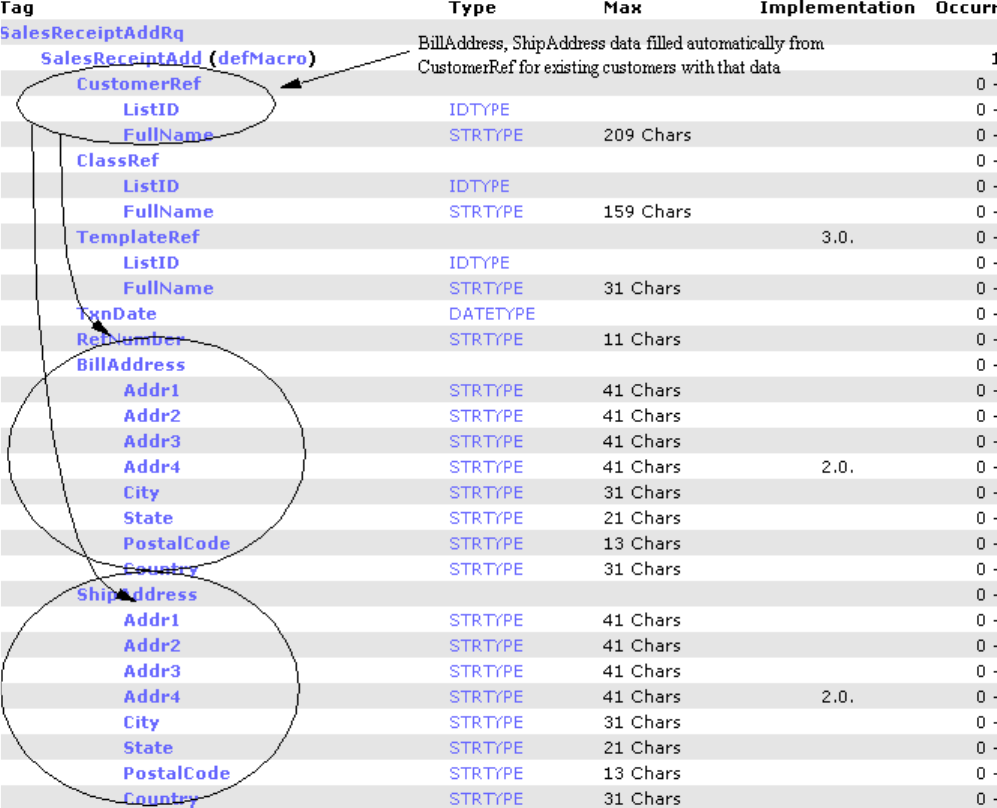
256
Chapter 18: Using SalesReceipt Functionality
(c) 2013 Intuit Inc. All rights reserved.
If you compare the OSR listing for SalesReceiptAdd with the UI, most of what you see in
the UI has easily identifiable counterparts in the OSR listing. There are exceptions, of
course. We’ve circled some of the less obvious OSR-to-UI mappings in Figure 18-1, and
labeled them with the corresponding OSR tag. These are mainly tax-related.
The OSR listing is quite lengthy, so we’ve broken it up in the following figures and
provided some general commentary on each of these smaller OSR pieces.
Figure 18-2 OSR listing for SalesReceiptAdd: main part and addresses
In Figure 18-2, notice the customer Ref, the BillAddress aggregate, and the ShipAddress
aggregate. If the customer has already been set up in QuickBooks with a billing address and
a default shipping address, you can simply supply the customer Ref and omit the Bill and
Ship Address. That information will be automatically added to the SalesReceipt from the
referenced customer, and the Bill/Ship addresses will be returned in the SalesReceiptAdd
response, unless you use IncludeRetElement to limit data returns.
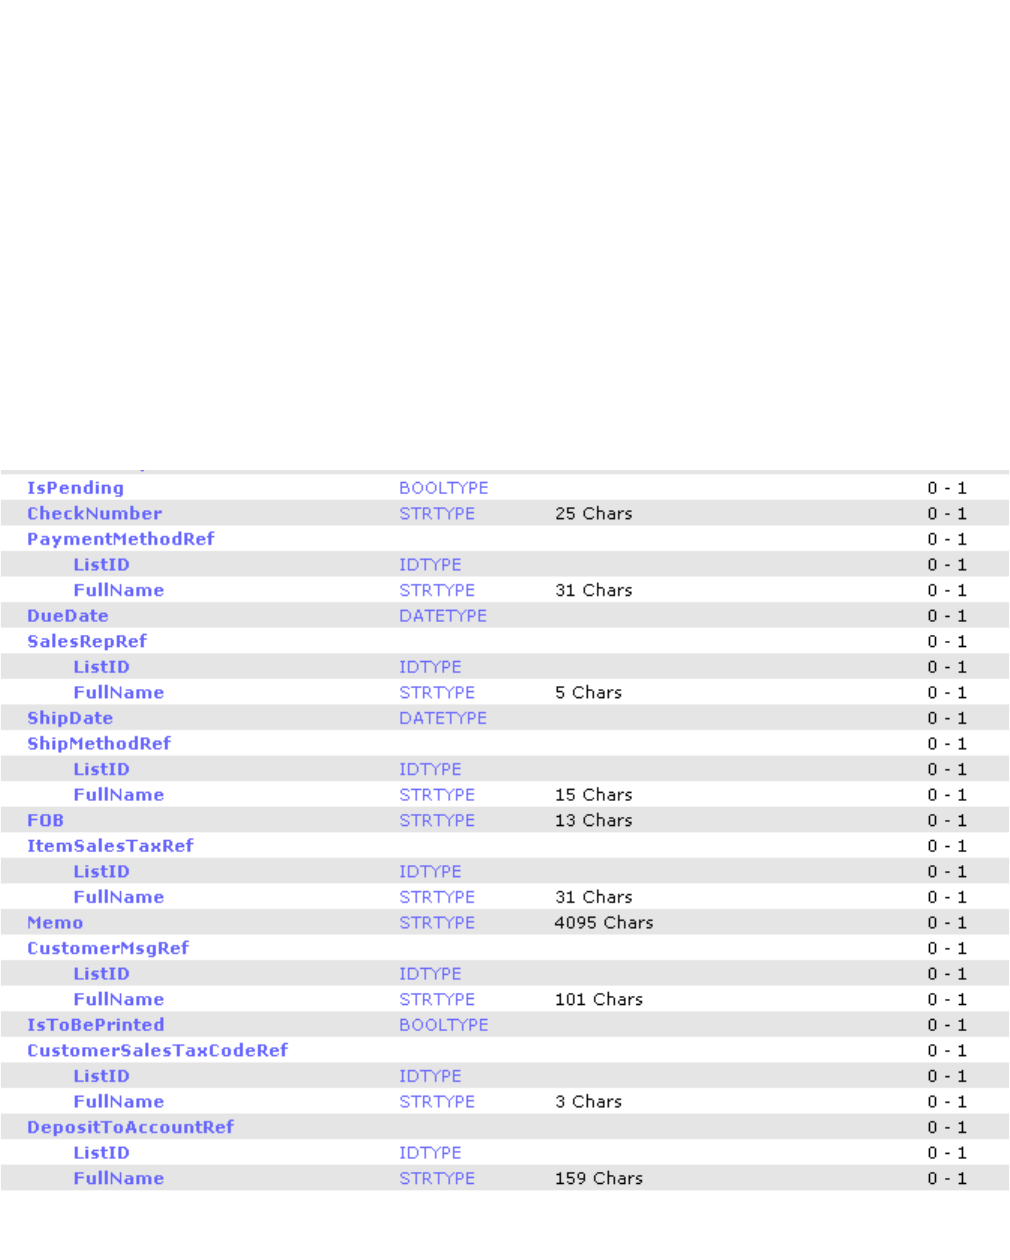
Adding a SalesReceipt
257
(c) 2013 Intuit Inc. All rights reserved.
Notice the ClassRef in Figure 18-2. If you use classes to track categories of sales (for
example, tracking transactions by departments), you need to set up your classes first, then
reference the class that you want this SalesReceipt to be tracked under. This ClassRef is the
transaction-level ClassRef. If you also want to track the individual line items in the
transaction, you also need to specify the ClassRef at the line item level, as shown in Figure
18-5. Notice that even if Class tracking is turned off in in a company’s Accounting
preferences, the ClassRef data for the SalesReceipt transaction will be saved: the class data
simply won’t be visible in QuickBooks unless class tracking is turned on in preferences.
You can add a TemplateRef if you want to use an existing template containing your
customizations to the Sales Receipt form. Notice that the SDK does not enable you to
change the template “on the fly” to show a different set of fields, columns, etc.
Finally, notice the TxnDate and RefNumber tags. If you omit the TxnDate tag, the current
date is used for the transaction date. If you omit the RefNumber tag, QuickBooks will
supply the reference number for you.
Let’s scroll down a bit more in Figure 18-3 to see more details of the OSR listing.
Figure 18-3 PaymentMethod/SalesRep/ShipMethod Refs and more
258
Chapter 18: Using SalesReceipt Functionality
(c) 2013 Intuit Inc. All rights reserved.
In Figure 18-3, notice the IsPending tag. You can set this to true if you want to keep the
transaction from posting if you don’t want to finalize the sale for some reason, such as
incomplete sale or for estimates. However, there are usually other preferrable ways to
support these kinds of activities, such as Estimates, SalesOrders and so forth. The default is
false so you normally just omit this tag.
You should supply the PaymentMethodRef to indicate the method of payment. If you use
the CreditCardTxnInfo aggregate and its sub-aggregates, you must specify the
PaymentMethodRef to indicate the credit card type used.
The CheckNumber tag is used if you select Check as your payment method. The SDK (or
the UI) won’t prevent you from specifying this even if you select other payment methods
but this can confuse your customer. This value will show up in the UI in the Check Number
text box.
DueDate is another tag like IsPending that supports the use of sales receipts in the unusual
case where the transaction is non posting. Normally you wouldn’t use this tag.
The SalesRepRef tag can be supplied if you use Sales Reps. The data is visible in the
SalesReceipt only if the template used for Sales Receipts has the Rep field turned on. This
tag is tricky if you use FullNames in the ref. You can only supply a 5 character value: so if
you try to supply a larger number, say “John Martin”, the request will fail validation at the
parser level. If you supply simply “John” it will also fail. What you need to do in nearly all
cases is to make sure the Sales Rep is created with initials and use those initials within the
FullName tag for the SalesRepRef. (If you do a SalesRepQuery, those initials are returned
in the response in the Initial tag.)
The ShipDate tag is automatically added with the current date when the SalesReceipt is
created, whether you actually do any shipping or even if the customer has no shipping
address. So you normally don’t need to supply this tag. However, if you need to indicate
some other date for some reason, you can supply that date in this tag.
The
ItemSalesTaxRef tag specifies the already set-up sales tax item that is to be applied to
each taxable item in the sales receipt. This
sales tax item already added in QuickBooks
contains a single sales tax rate that applied to the items and it contains pay-to information
(the agency to which the tax is paid.) Remember that the tax status specified in the
CustomerSalesTaxCodeRef overrides the other tax settings in the SalesReceipt.
Notice the IsToBePrinted tag, corresponding to the “To be printed” checkbox in the UI.
Notice also that the SDK currently does not support the “To be emailed” feature that the UI
supports.
The CustomerSalesTaxCodeRef tag specifies the customer-related tax code that governs the
sales tax on this transaction. The QuickBooks default codes are Tax and Non (tax), with
Tax allowing any taxes specified in the other tax refs to be calculated and charged, and Non
suspending any such taxes. This is a customer-related tax setting because it hinges on the
customer’s tax status. For example, customers who are government agencies are usually
Non taxable.
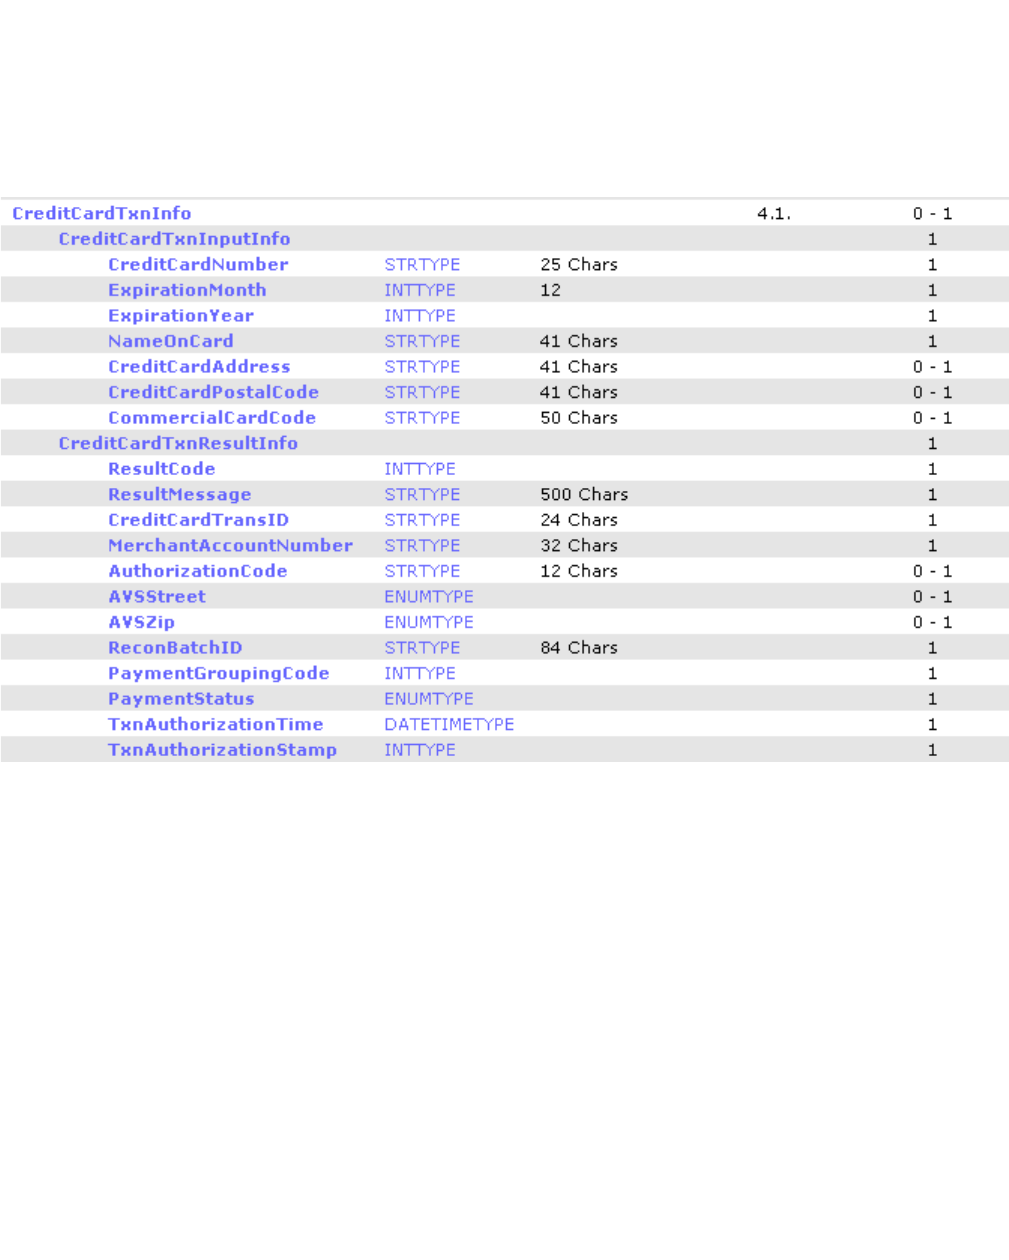
Adding a SalesReceipt
259
(c) 2013 Intuit Inc. All rights reserved.
The DepositToAccountRef tag species the QuickBooks account that receives the funds from
this transaction. Undeposited Funds is the default account and is normally used. Notice that
if you don’t specify an account using the DepositToAccountRef tag the default is
automatically used. It is probably a good practice to specify accounts, however, wherever
you have the opportunity to do so.
Figure 18-4 shows the OSR tag listings for including credit card data in the SalesReceipt.
Figure 18-4 Credit card-related tags in the SalesReceipt
You cannot use the optional CreditCardTxnInfo aggregate unless the company is currently
subscribed to the QuickBooks Merchant Service (QBMS) and has a valid Merchant
account. If the company hasn’t been set up with QBMS already, you’ll get a runtime error
when you send a SalesReceiptAdd request containing this aggregate. How can you
determine this in the SDK? Simply do a company query and check the SubscribedServices
aggregate for the QBMS service.
If you do supply the CreditCardTxnInputInfo aggregate, you must supply the
CreditCardTxnResultInfo and the CreditCardTxnInfo sub aggregates along with all their
required elements, as shown in the OSR. Notice that the CreditCardTxnType usually has
the value Charge for a SalesReceipt, but VoiceAuthorization and Refund are also supported.
260
Chapter 18: Using SalesReceipt Functionality
(c) 2013 Intuit Inc. All rights reserved.
The InputInfo subaggregate is the data from the originating qbmsXML request that effected
the credit card transaction. The ResultInfo subaggregate is the qbmsXML response to that
request. You include all of this data in the SalesReceipt request if you want to save that
QBMS transaction data within QuickBooks. For more information, see the Developer’s
Guide for QB Merchant Services.
The CreditCardTxnInfo cannot be modified in the SalesReceipt, which is why that
aggregate isn’t listed in the OSR for SalesReceiptMod.
If the original QBMS transaction was a qbmsXML 2.0 or greater request, and the qbXML
spec level of your SalesReceiptAdd request is 6.0 or greater, the credit card number must be
masked, that is, all X, except for the last 4 digits.
Notice that including the QBMS transaction data in the request does not result in any
interactions with QBMS or in any attempts to connect to QBMS.
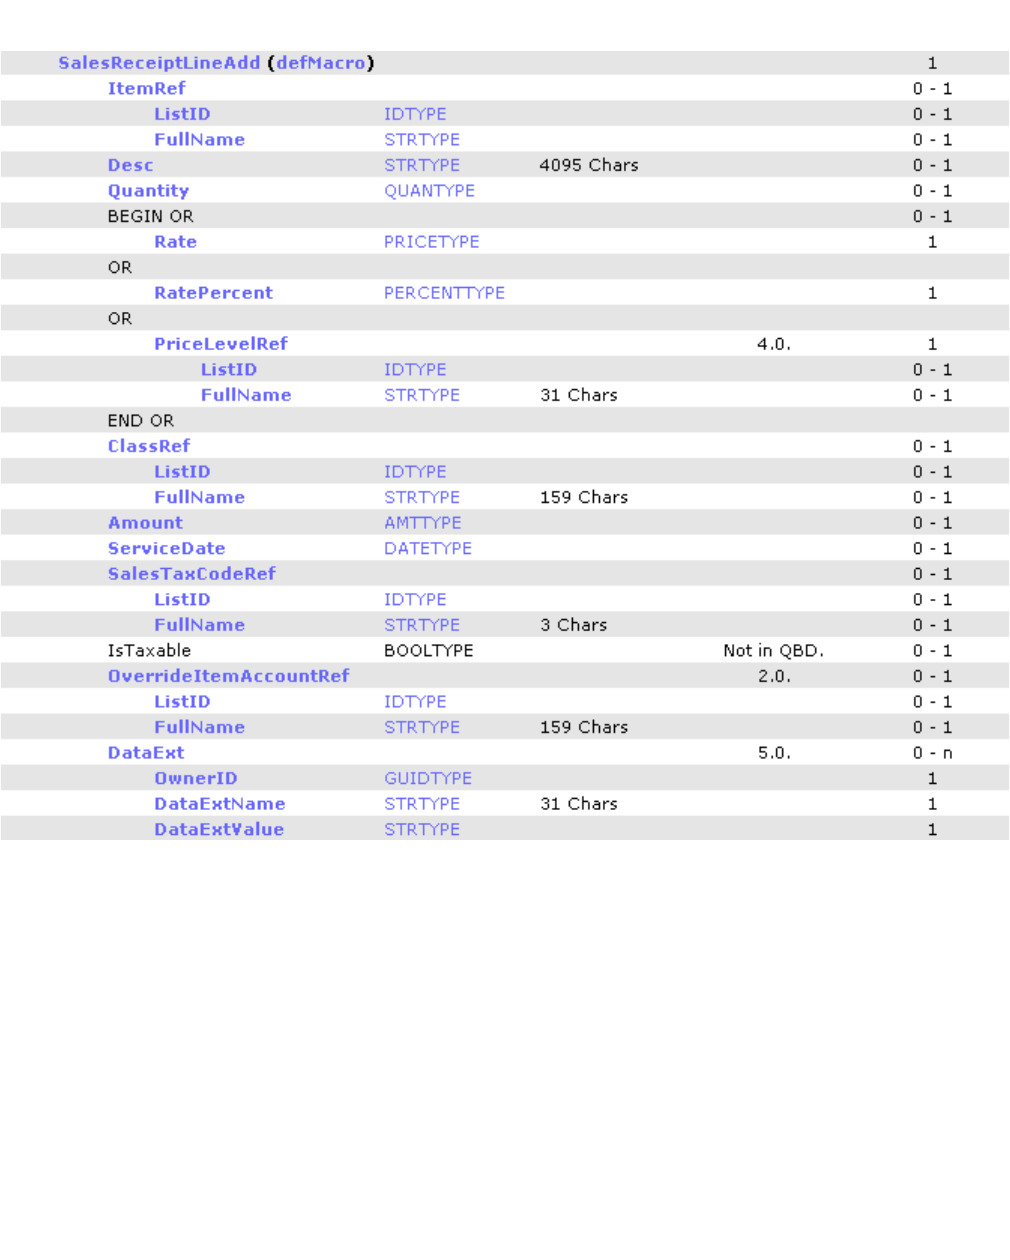
Adding a SalesReceipt
261
(c) 2013 Intuit Inc. All rights reserved.
Figure 18-5 shows the OSR tag listings for the line items in the SalesReceipt.
Figure 18-5 Line item-related tags for SalesReceiptAdd
Each line item to be added in the SalesReceipt is added under a separate
SalesReceiptLineAdd aggregate. Within each SalesReceiptLineAdd aggregate, you must
include an ItemRef, which specifies the QuickBooks item, and you must supply the
Quantity.
Notice that you don’t have to supply a Rate (any of the available Rate-related tags) or an
Amount. The rate is the price of the item and is taken directly from the item in the ItemRef,
if the item is set up properly with price data. The Amount is then calculated from the
Quantity and the Rate. If you do choose to supply a Rate or an Amount, remember that you
can supply one or the other, but not both.
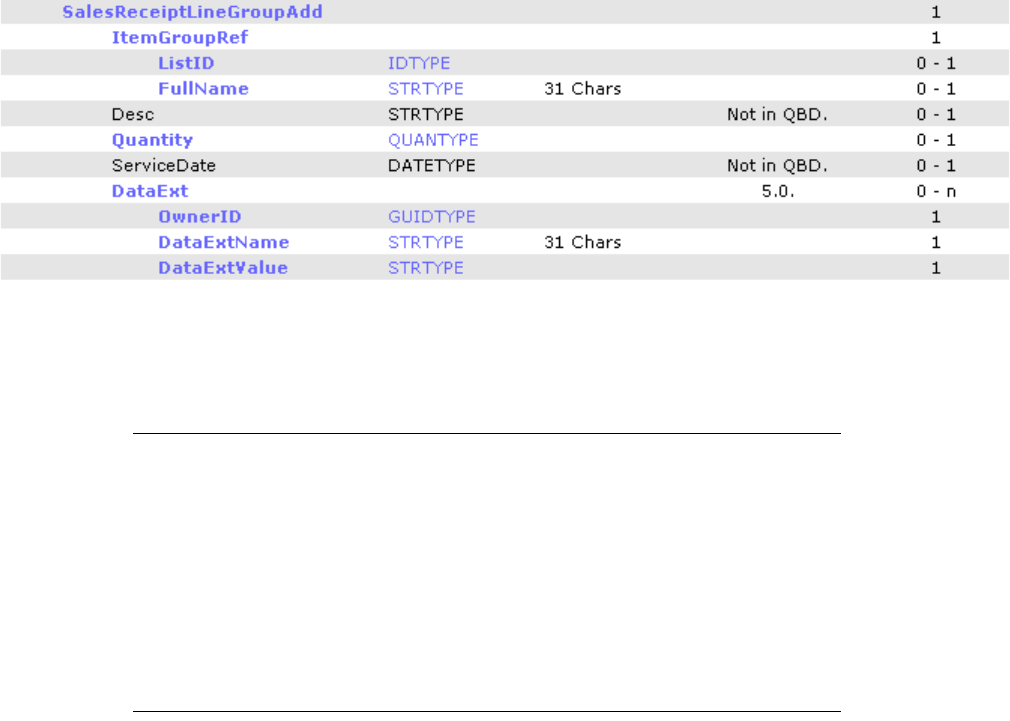
262
Chapter 18: Using SalesReceipt Functionality
(c) 2013 Intuit Inc. All rights reserved.
The SalesTaxCodeRef tag allows you to specify whether the line item is taxable or not. You
override this value if you set a conflicting value (taxable or not taxable) in the
CustomerSalesTaxRef for the entire sales receipt.
The OverrideItemAccountRef tag allows you to specify an account other than the
DepositToAccountRef account for a specific line item.
Notice the DataExt tag, which is available for QuickBooks 2006 and later. This tag allows
you to specify custom data at the line item level. It provides a tremendous performance
enhancement over the former methods of using custom data in SalesReceipts.
For sake of completeness, we show the final set of tags in the OSR listing for
SalesReceiptAdd in Figure 18-6.
Figure 18-6 Line item group tags
Some Expected Data May be Missing from the Response
If the integrated application lacks sufficient permissions for sensitive data, that data is not
returned in the response to Add, Modify, and Query requests. For example, although an
integrated application does not need access to sensitive data permissions for submitting a
SalesReceiptAdd request that contains credit card data, that credit card data won’t be
returned in the response if the application doesn’t have the required permissions. You can
set these permissions in the Integrated Applications preferences in QuickBooks.
Adding a SalesReceipt in QBFC
Listing 18-1 shows how to construct the SalesReceipt in QBFC. The sample takes the
shipping address from the customer Ref, and the line item prices from the item Refs. The
payment is a credit card payment effected previously with a qbmsXML interaction with
QBMS.

Adding a SalesReceipt
263
(c) 2013 Intuit Inc. All rights reserved.
______Listing 18-1 Constructing a SalesReceiptAdd in QBFC
Public Sub QBFC_AddSalesReceipt()
Dim SessionManager As QBSessionManager
Set SessionManager = New QBSessionManager
SessionManager.OpenConnection "", "IDN Add SalesReceipt Sample"
SessionManager.BeginSession "", omDontCare
Dim requestMsgSet As IMsgSetRequest
Set requestMsgSet = SessionManager.CreateMsgSetRequest("US", 5, 0)
' Initialize the message set request's attributes
requestMsgSet.Attributes.OnError = roeStop
' Add the request to the message set request object
Dim SalesRecptAdd As ISalesReceiptAdd
Set SalesRecptAdd = requestMsgSet.AppendSalesReceiptAddRq
'Set the properties in the assembly object
SalesRecptAdd.CustomerRef.FullName.setValue ("Jack Williams")
SalesRecptAdd.TemplateRef.FullName.setValue ("Test")
SalesRecptAdd.PaymentMethodRef.FullName.setValue ("Visa")
SalesRecptAdd.SalesRepRef.FullName.setValue ("JM")
SalesRecptAdd.ShipMethodRef.FullName.setValue ("UPS")
SalesRecptAdd.ItemSalesTaxRef.FullName.setValue ("CA State Sales Tax")
SalesRecptAdd.CustomerMsgRef.FullName.setValue ("Thank you for your business.")
SalesRecptAdd.DepositToAccountRef.FullName.setValue ("Undeposited Funds")
‘Add credit card data from prior qbmsXML transaction with QBMS
SalesRecptAdd.CreditCardTxnInfo.CreditCardTxnInputInfo.CreditCardNumber.setValue
("4111111111111111")
SalesRecptAdd.CreditCardTxnInfo.CreditCardTxnInputInfo.ExpirationYear.setValue (2008)
SalesRecptAdd.CreditCardTxnInfo.CreditCardTxnInputInfo.ExpirationMonth.setValue (11)
SalesRecptAdd.CreditCardTxnInfo.CreditCardTxnInputInfo.NameOnCard.setValue ("H. Rezoner")
SalesRecptAdd.CreditCardTxnInfo.CreditCardTxnInputInfo.CreditCardAddress.setValue ("12
West St., Westlands")
SalesRecptAdd.CreditCardTxnInfo.CreditCardTxnInputInfo.CreditCardPostalCode.setValue
("96965")
SalesRecptAdd.CreditCardTxnInfo.CreditCardTxnInputInfo.CreditCardTxnType.setValue
ccttCharge
SalesRecptAdd.CreditCardTxnInfo.CreditCardTxnResultInfo.ResultCode.setValue (0)
SalesRecptAdd.CreditCardTxnInfo.CreditCardTxnResultInfo.ResultMessage.setValue
("STATUS OK")
SalesRecptAdd.CreditCardTxnInfo.CreditCardTxnResultInfo.CreditCardTransID.setValue
("V54A60275101")
264
Chapter 18: Using SalesReceipt Functionality
(c) 2013 Intuit Inc. All rights reserved.
SalesRecptAdd.CreditCardTxnInfo.CreditCardTxnResultInfo.MerchantAccountNumber.setValue
("4269281420247209")
SalesRecptAdd.CreditCardTxnInfo.CreditCardTxnResultInfo.AuthorizationCode.setValue
("185PNI")
SalesRecptAdd.CreditCardTxnInfo.CreditCardTxnResultInfo.ReconBatchID.setValue
("420050223 MC 2005-02-23 QBMS 15.0 pre-beta")
SalesRecptAdd.CreditCardTxnInfo.CreditCardTxnResultInfo.PaymentGroupingCode.setValue (4)
SalesRecptAdd.CreditCardTxnInfo.CreditCardTxnResultInfo.PaymentStatus.setValue
(pssCompleted)
SalesRecptAdd.CreditCardTxnInfo.CreditCardTxnResultInfo.TxnAuthorizationTime.setValue
"2005-11-01", False
SalesRecptAdd.CreditCardTxnInfo.CreditCardTxnResultInfo.TxnAuthorizationStamp.setValue
(1109192233)
‘Now add the first line item
Dim SalesRecLineItem As IORSalesReceiptLineAdd
Dim SalesRecLineItem2 As IORSalesReceiptLineAdd
Set SalesRecLineItem = SalesRecptAdd.ORSalesReceiptLineAddList.Append
SalesRecLineItem.SalesReceiptLineAdd.ItemRef.FullName.setValue ("Metal Panel Assembly")
SalesRecLineItem.SalesReceiptLineAdd.Desc.setValue ("Metal Panel Assembly")
SalesRecLineItem.SalesReceiptLineAdd.Quantity.setValue (2)
SalesRecLineItem.SalesReceiptLineAdd.SalesTaxCodeRef.FullName.setValue ("Tax")
‘Add the second line item
Set SalesRecLineItem2 = SalesRecptAdd.ORSalesReceiptLineAddList.Append
SalesRecLineItem2.SalesReceiptLineAdd.ItemRef.FullName.setValue ("Screws")
SalesRecLineItem2.SalesReceiptLineAdd.Desc.setValue ("Large package of screws")
SalesRecLineItem2.SalesReceiptLineAdd.Quantity.setValue (6)
SalesRecLineItem2.SalesReceiptLineAdd.SalesTaxCodeRef.FullName.setValue ("Tax")
' Perform the request and obtain a response from QuickBooks
Dim responseMsgSet As IMsgSetResponse
Set responseMsgSet = SessionManager.DoRequests(requestMsgSet)
‘write the response to a file for grins
‘Need to use the Microsoft Scripting Runtime for this bit
Dim fname As String
Dim xml As String
xml = requestMsgSet.ToXMLString
fname = "XML_output.doc"
Dim fso As New FileSystemObject
Dim ts As TextStream
Set ts = fso.CreateTextFile(fname, True)
ts.Write (xml)

Adding a SalesReceipt
265
(c) 2013 Intuit Inc. All rights reserved.
' Close the session and connection with QuickBooks.
SessionManager.EndSession
SessionManager.CloseConnection
End Sub
Adding a SalesReceipt in qbXML
Listing 18-2 shows a SalesReceiptAdd request that uses a credit card payment previously
obtained from qbmsXML requests interacting with QBMS. The request contains two line
items, one that specifies an Amount and one that doesn’t specify an amount or rate, getting
that info automatically from the item.
______Listing 18-2 Constructing SalesReceiptAdd in qbXML
<?xml version="1.0" ?>
<?qbxml version="5.0"?>
<QBXML>
<QBXMLMsgsRq onError = "stopOnError">
<SalesReceiptAddRq requestID = "0">
<SalesReceiptAdd>
<CustomerRef>
<FullName>Kristie Abercrombie</FullName>
</CustomerRef>
<TemplateRef>
<FullName>Test</FullName>
</TemplateRef>
<SalesRepRef>
<FullName>JM</FullName>
</SalesRepRef>
<ItemSalesTaxRef>
<FullName>CA State Sales Tax</FullName>
</ItemSalesTaxRef>
<CustomerMsgRef>
<FullName>Thank you for your business.</FullName>
</CustomerMsgRef>
<CreditCardTxnInfo>
<CreditCardTxnInputInfo>
<CreditCardNumber>4111111111111111</CreditCardNumber>
<ExpirationMonth>11</ExpirationMonth>
<ExpirationYear>2008</ExpirationYear>
<NameOnCard>Harry Rezoner</NameOnCard>
<CreditCardAddress>12 West St., Westlands</CreditCardAddress>
<CreditCardPostalCode>96965</CreditCardPostalCode>
<TransactionMode>CardNotPresent</TransactionMode>
<CreditCardTxnType>Charge</CreditCardTxnType>
</CreditCardTxnInputInfo>
<CreditCardTxnResultInfo>
<ResultCode>0</ResultCode>
<ResultMessage>STATUS OK</ResultMessage>
<CreditCardTransID>V54A60275101</CreditCardTransID>
<MerchantAccountNumber>4269281420247209</MerchantAccountNumber>

266
Chapter 18: Using SalesReceipt Functionality
(c) 2013 Intuit Inc. All rights reserved.
<AuthorizationCode>185PNI</AuthorizationCode>
<ReconBatchID>
420050223 MC 2005-02-23 QBMS 15.0 pre-beta
</ReconBatchID>
<PaymentGroupingCode>4</PaymentGroupingCode>
<PaymentStatus>Completed</PaymentStatus>
<TxnAuthorizationTime>
2005-11-01T00:00:00
</TxnAuthorizationTime>
<TxnAuthorizationStamp>1109192233</TxnAuthorizationStamp>
</CreditCardTxnResultInfo>
</CreditCardTxnInfo>
<SalesReceiptLineAdd>
<ItemRef>
<FullName>Metal Panel Assembly</FullName>
</ItemRef>
<Desc>Metal Panel Assembly</Desc>
<Quantity>2</Quantity>
<Amount>120.00</Amount>
<SalesTaxCodeRef>
<FullName>Tax</FullName>
</SalesTaxCodeRef>
</SalesReceiptLineAdd>
<SalesReceiptLineAdd>
<ItemRef>
<FullName>Screws</FullName>
</ItemRef>
<Desc>Large Package of Screws</Desc>
<Quantity>10</Quantity>
<SalesTaxCodeRef>
<FullName>Tax</FullName>
</SalesTaxCodeRef>
</SalesReceiptLineAdd>
</SalesReceiptAdd>
</SalesReceiptAddRq>
</QBXMLMsgsRq>
</QBXML>
Modifying a SalesReceipt
The considerations and rules for modifying sales receipts is similar to modifying other
transactions. Because you can easily produce undesired results if you aren’t careful, you
need to become very familiar with the material on modifying transactions that is provided
in Chapter 10, “Modifying and Deleting Transactions and List Objects.” In particular, if you
modify any line items or group line items, be sure to follow the instructions on modifying
these as described in that chapter.

Modifying a SalesReceipt
267
(c) 2013 Intuit Inc. All rights reserved.
Special Limitations Imposed By Credit Card Payment Method
If the payment method used in the original SalesReceipt is a credit card, with the credit card
transaction data provided by QBMS via the qbmsXML requests and responses, you cannot
change the customer, payment method, or the total transaction amount, including any line
item changes that would change the total amount of the transaction.
Which SalesReceipt Fields Can Be Modified?
See the OSR listing for SalesReceiptMod. This listing contains all the fields that are
modifiable.
Which SalesReceipt Fields Can Be Cleared?
Table 18-1 and Table 18-2 provide a list of the fields in the SalesReceipt main body and
SalesReceipt line item fields, respectively, that can be cleared. If a field has a default value,
clearing the field results in the use of the default. If there is no default value, clearing
simply clears the field. Refer to the OSR for information on defaults for field values.
268
Chapter 18: Using SalesReceipt Functionality
(c) 2013 Intuit Inc. All rights reserved.
Table 18-1 Clearable SalesReceipt Fields
Table 18-2 Clearable Line Item/Group Line Item Fields
Modifying a SalesReceipt in qbXML
Listing 18-3 shows a SalesReceiptMod request that clears the sales rep and memo data in
the sales receipt specified, and inserts one line item between the existing two line items in
SalesReceipt Field Modify Clear Clear behavior
BillingAddress (and its sub-aggregates) Yes Yes Cleared
CheckNumber Yes Yes Cleared
Class Yes Yes Cleared
Customer Yes No
CustomerMessage Yes Yes Cleared
CustomerSalesTaxCode Yes Yes Cleared
DepositToAccount Yes No
DueDate Yes No
FOB Yes Yes Cleared
IsPending Yes No
IsToBePrinted Yes No
ItemSalesTax Yes No
Memo Yes Yes Cleared
PaymentMethod Yes Yes Cleared
RefNumber Yes Yes Cleared
SalesRep Yes Yes Cleared
ShipAddress (and its sub-aggregates) Yes Yes Cleared
ShipDate Yes No
ShipMethod Yes Yes Cleared
Template Yes No
TxnDate Yes No
Line/Group Line Items Fields in
SalesReceipt Modify Clear Clear behavior
Amount Yes No
Class Yes Yes Cleared
Description Yes Yes Cleared
Item reference Yes No
OverrideItemAccountRef Yes No
Quantity Yes No
Rate/Rate % Yes No
Sales tax code Yes No
Service date Yes Yes

Modifying a SalesReceipt in qbXML
269
(c) 2013 Intuit Inc. All rights reserved.
the receipt. (If there were any other line items, they are not specified in this request, so they
would be deleted from QuickBooks.)
Notice the use of the -1 in the TxnLineID tag for the new line item. The SDK uses
recognizes this value and causes the insertion to be made. You specify the location of the
new item within the sales receipt by placing it before or after one of the existing lines in the
Mod request.
______Listing 18-3 Constructing a SalesReceiptMod Request in QBXML
<?xml version="1.0" ?>
<?qbxml version="5.0"?>
<QBXML>
<QBXMLMsgsRq onError = "stopOnError">
<SalesReceiptModRq requestID = "0">
<SalesReceiptMod>
<TxnID>90-1131042763</TxnID>
<EditSequence>1131042763</EditSequence>
<TxnDate>2005-11-03</TxnDate>
<SalesRepRef>
<FullName/>
</SalesRepRef>
<Memo/>
<SalesReceiptLineMod>
<TxnLineID>92-1131042763</TxnLineID>
</SalesReceiptLineMod>
<SalesReceiptLineMod>
<TxnLineID>-1</TxnLineID>
<ItemRef>
<FullName>Metal Panel Assembly</FullName>
</ItemRef>
<Quantity>2</Quantity>
</SalesReceiptLineMod>
<SalesReceiptLineMod>
<TxnLineID>93-1131042763</TxnLineID>
</SalesReceiptLineMod>
</SalesReceiptMod>
</SalesReceiptModRq>
</QBXMLMsgsRq>
</QBXML>
Modifying a SalesReceipt in QBFC
Listing 18-4 shows a SalesReceiptMod construction where we query for a SalesReceipt by
RefNumber range, grab the first one we find, then modify some of the fields in the main
body, and then insert a new line item in the sales receipt after the first line. Because the
insertion changes the total amount, this request couldn’t be used with sales receipts having
a credit card payment method.
Some key things to notice in the sample code:
270
Chapter 18: Using SalesReceipt Functionality
(c) 2013 Intuit Inc. All rights reserved.
•In the original query we specify IncludeLineItems. By default, no line items are
returned in queries, and we need the line items so we can get their TxnLineID values.
•We check for response detail data before retrieving it. This data is not guaranteed to be
there, so the check is necessary.
•Because we are touching the line item table, we need to specify fully all of the line
items we want to retain or change. We aren’t changing anything, just inserting a new
line, but we still have to specify all of the TxnLineID values from the original sales
receipt or else they will be dropped from the sales receipt. Each TxnLineID is added in
a separate SalesReceiptLineMod aggregate.
_____ Listing 18-4 Constructing a SalesReceiptMod request in QBFC
Public Sub QBFC_ModSalesReceipt()
Dim SessionManager As QBSessionManager
Set SessionManager = New QBSessionManager
SessionManager.OpenConnection "", "IDN Mod SalesReceipt Sample"
SessionManager.BeginSession "", omDontCare
Dim requestMsgSet As IMsgSetRequest
Set requestMsgSet = SessionManager.CreateMsgSetRequest("US", 5, 0)
' Initialize the message set request's attributes
requestMsgSet.Attributes.OnError = roeStop
'First we query QB for sales receipt transactions within a date range
Dim SalesRecptQuery As ISalesReceiptQuery
Set SalesRecptQuery = requestMsgSet.AppendSalesReceiptQueryRq
'We just want to get the Txn ID and edit sequence so we can do the mod
SalesRecptQuery.IncludeRetElementList.Add ("TxnID")
SalesRecptQuery.IncludeRetElementList.Add ("EditSequence")
SalesRecptQuery.ORTxnQuery.TxnFilter.ORRefNumberFilter.RefNumberRangeFilter.FromRefNumber.
setValue ("23")
Dim responseMsgSet As IMsgSetResponse
Set responseMsgSet = SessionManager.DoRequests(requestMsgSet)
Dim response As IResponse
' Response list contains one response, corresponding to our single request
Set response = responseMsgSet.ResponseList.GetAt(0)
'This is a query, so the response detail is a ret list for sales receipt
Dim SalesRecptRetList As ISalesReceiptRetList
If response.Detail Is Nothing Then
MsgBox "No Detail available"

Modifying a SalesReceipt in qbXML
271
(c) 2013 Intuit Inc. All rights reserved.
Exit Sub
End If
Set SalesRecptRetList = response.Detail
Dim SalesRecptRet As ISalesReceiptRet
'There are potentially many SalesReceipt txns in the retlist: we get the first one
'This is for our convenience: you'll do something smarter or let the user pick
Set SalesRecptRet = SalesRecptRetList.GetAt(0)
'Save the TxnID: we need it for the followup query
Dim TransID As String
TransID = SalesRecptRet.TxnID.getValue
requestMsgSet.ClearRequests
'Get the specific receipt we want complete with all line items
Set SalesRecptQuery = requestMsgSet.AppendSalesReceiptQueryRq
SalesRecptQuery.ORTxnQuery.TxnIDList.Add (TransID)
SalesRecptQuery.IncludeLineItems.setValue (True)
Set responseMsgSet = SessionManager.DoRequests(requestMsgSet)
' Response list contains one response, corresponding to our single request
Set response = responseMsgSet.ResponseList.GetAt(0)
'Need to get the ret list first
If response.Detail Is Nothing Then
MsgBox "No Detail available"
Exit Sub
End If
Set SalesRecptRetList = response.Detail
'From this query, we expect only one SalesReceipt txns in the retlist
'Save the receipt: we'll need it later for its line item TxnIDs
Set SalesRecptRet = SalesRecptRetList.GetAt(0)
requestMsgSet.ClearRequests
' Now build the mod request
Dim SalesRecptMod As ISalesReceiptMod
Set SalesRecptMod = requestMsgSet.AppendSalesReceiptModRq
'Set the properties in the SalesReceipt mod object using data
'from the sales receipt we just grabbed in the last query
SalesRecptMod.TxnID.setValue SalesRecptRet.TxnID.getValue
SalesRecptMod.EditSequence.setValue SalesRecptRet.EditSequence.getValue
SalesRecptMod.TxnDate.setValue ("2005-11-03")
SalesRecptMod.Memo.SetEmpty
SalesRecptMod.SalesRepRef.FullName.SetEmpty
272
Chapter 18: Using SalesReceipt Functionality
(c) 2013 Intuit Inc. All rights reserved.
Dim SalesRecptModLine As ISalesReceiptLineMod
Dim SalesRecptLineRet As IORSalesReceiptLineRet
Dim i As Integer
For i = 0 To SalesRecptRet.ORSalesReceiptLineRetList.Count - 1
Set SalesRecptLineRet = SalesRecptRet.ORSalesReceiptLineRetList.GetAt(i)
Set SalesRecptModLine = SalesRecptMod.ORSalesReceiptLineModList.Append.
SalesReceiptLineMod
SalesRecptModLine.TxnLineID.setValue SalesRecptLineRet.SalesReceiptLineRet.TxnLineID.
getValue
If i = 0 Then
Set SalesRecptModLine = SalesRecptMod.ORSalesReceiptLineModList.Append.
SalesReceiptLineMod
SalesRecptModLine.TxnLineID.setValue "-1"
SalesRecptModLine.ItemRef.FullName.setValue "Metal Panel Assembly"
SalesRecptModLine.Quantity.setValue 2
End If
Next i
' Perform the request and obtain a response from QuickBooks
Set responseMsgSet = SessionManager.DoRequests(requestMsgSet)
'save full xml response for grins
Dim fname As String
Dim xml As String
xml = responseMsgSet.ToXMLString
fname = "XML_output.doc"
Dim fso As New FileSystemObject
Dim ts As TextStream
Set ts = fso.CreateTextFile(fname, True)
ts.Write (xml)
' Close the session and connection with QuickBooks.
SessionManager.EndSession
SessionManager.CloseConnection
End Sub

Querying for SalesReceipts
273
(c) 2013 Intuit Inc. All rights reserved.
Querying for SalesReceipts
Querying for SalesReceipts in qbXML
In Listing 18-5, two sample queries are provided. The first gets a range of sales receipts, all
whose ref number is greater than 23, and specifies that only the TxnID and EditSequence
are to be returned. This query works hand-in-hand with the second query, which takes a
TxnID and and EditSequence to get a full sales receipt record with all the line items.
______Listing 18-5 Sample queries for SaleReceipts
<?xml version="1.0" ?>
<?qbxml version="5.0"?>
<QBXML>
<QBXMLMsgsRq onError = "stopOnError">
<SalesReceiptQueryRq requestID = "0">
<RefNumberRangeFilter>
<FromRefNumber>23</FromRefNumber>
</RefNumberRangeFilter>
<IncludeRetElement>TxnID</IncludeRetElement>
<IncludeRetElement>EditSequence</IncludeRetElement>
</SalesReceiptQueryRq>
</QBXMLMsgsRq>
</QBXML>
<?xml version="1.0" ?>
<?qbxml version="5.0"?>
<QBXML>
<QBXMLMsgsRq onError = "stopOnError">
<SalesReceiptQueryRq requestID = "0">
<TxnID>90-1131042763</TxnID>
<IncludeLineItems>1</IncludeLineItems>
</SalesReceiptQueryRq>
</QBXMLMsgsRq>
</QBXML>
Querying for SalesReceipts in QBFC
The code sample in Listing 18-4 shows a couple of SalesReceiptQuery requests.
Deleting and Voiding SalesReceipts
To delete and void sales receipt transactions, you use TxnDelRq and TxnVoidRq,
respectively, as described in Chapter 10, “Modifying and Deleting Transactions and List
Objects.”
274
Chapter 18: Using SalesReceipt Functionality
(c) 2013 Intuit Inc. All rights reserved.
Notice that this deletes any credit card information (CreditCardTxnInfo) in QuickBooks
only. This does NOT delete any data at QBMS.

Adding a Credit Card Refund Transaction
275
(c) 2013 Intuit Inc. All rights reserved.
C
HAPTER
19 1
U
SING
C
REDIT
C
ARD
R
EFUND
F
UNCTIONALITY
1
Prior to QuickBooks 2006, QuickBooks provided no transaction specifically for refunds to
customers, for example in the case of returned goods or overpayments. Beginning with
QuickBooks 2006 credit card refund transactions are supported.
You must link the refund to an existing credit memo transaction in QuickBooks.
Notice that via the SDK you can specify one or more of these transactions. In comparison,
the UI limits you to linking one credit transaction per refund.
The refund can be a full refund of the entire amount of the specified credit memo or it can
be a partial refund. (The response to the ARRefundCreditCard Add or Query returns the
amount remaining on each credit for which you are issuing the refund.)
The ARRefundCreditCard* functionality provided by the SDK also supports the credit card
transaction data provided by qbmsXML interaction with QBMS, so that the actual credit
card transaction data can be stored in QuickBooks.
Adding a Credit Card Refund Transaction
Figure 19-1 shows the OSR listing for ARRefundCreditCardAdd.
The CustomerRef is required and must match the customer in the target transactions you
want to link.
The RefundFromAccountRef is the source account from which the refund is made. Typically
this is the default Undeposited Funds account, but you could specify any bank account or
asset account here. This is optional: if you omit this, the Undeposited Funds default account
is used.
The ARAcountRef is also optional. If you omit it, the default Accounts Receivable account
is used. Make sure this account matches the ARAccountRef in the credit memo transactions
you are linking to.
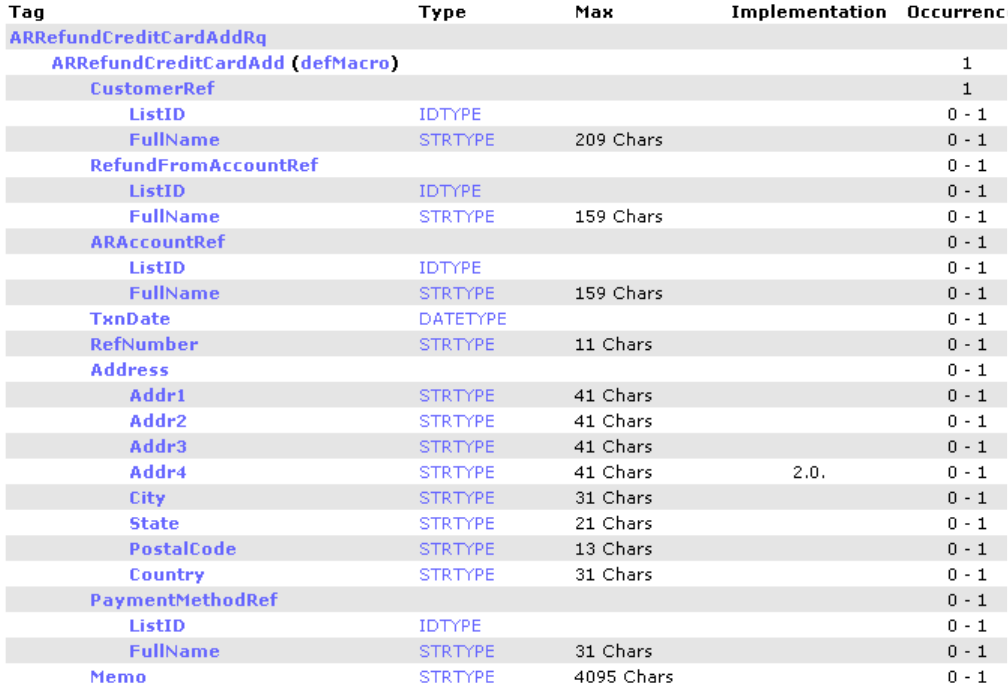
276
Chapter 19: Using Credit Card Refund Functionality
(c) 2013 Intuit Inc. All rights reserved.
Figure 19-1 OSR listing for ARRefundCreditCardAdd
TxnDate and RefNumber are supplied for you automatically, but you can supply your own
values if you want.
The address information is supplied for you via the CustomerRef so normally you need not
add it in the request.
The PaymentMethodRef specifies the type of credit card used in the refund transaction. If
there is credit card data included in the QuickBooks customer information, you can omit
this tag and let QuickBooks supply the card type automatically. If you specify a non-credit
card type here, you’ll get a runtime error.
Memo is available for any notes you want to save with the transaction.
Adding a Credit Card Refund Transaction
277
(c) 2013 Intuit Inc. All rights reserved.
Figure 19-2 shows the remainder of the OSR listing for ARRefundCreditCardAdd:
Figure 19-2 ARRefundCreditCardAdd listing: credit card and linked transactions
The credit card information contained in the CreditCardTxnInfo aggregate is optional, but if
you supply that aggregate, you have to supply both the CreditCardTxnInputInfo and the
CreditCardTxnResultInfo sub aggregates along with their required elements, as shown in
the OSR. Can you supply just any credit card data here? No, the data supplied here must be
data from a qbmsXML refund transaction against the QuickBooks Merchant Service.
Notice that the CreditCardTransType will always be Refund.
This means that you can supply this only if the company has a valid QBMS account and
you use qbmsXML to interact with QBMS for credit card transactions. How can you
determine this in the SDK? Simply do a company query and check the SubscribedServices
aggregate for the QBMS service.
The InputInfo subaggregate is the data from the originating qbmsXML request that effected
the credit card transaction. The ResultInfo sub aggregate is the qbmsXML response to that
request. You include all of this data in this request if you want to save that QBMS
transaction data within QuickBooks. For more information, see the Developer’s Guide for
QuickBooks Merchant Services.

278
Chapter 19: Using Credit Card Refund Functionality
(c) 2013 Intuit Inc. All rights reserved.
If the original QBMS transaction was a qbmsXML 2.0 request or greater, and the qbXML
spec level of your SalesReceiptAdd request is 6.0 or greater, the credit card number must be
masked, that is, all X, except for the last 4 digits.
Notice that including the QBMS transaction data in the request does not result in any
interactions with QBMS or in any attempts to connect to QBMS.
You link this refund to the target credit memo using the RefundAppliedToTxnAdd aggregate.
You must link to at least one of these transactions; you can link to as many as you want.
The TxnID is unique among these transactions, so you don’t (in fact you can’t) specify a
transaction type.
The RefundAmount specifies how much of the linked credit transaction is to be refunded. If
you specify an amount here that is greater than the credit, you’ll get a runtime error.
Adding a Credit Card Refund in QBFC
Listing 19-1 shows how to build the credit card refund request in QBFC. This listing
happens to include credit card transaction data from QBMS but this is not required. The
code for building the refund is pretty straightforward. We don’t do any checks to make sure
we don’t exceed any credit amounts, but you’ll need to do this.
_____ Listing 19-1 Constructing a credit card refund request in QBFC
Public Sub QBFC_AddARRefundCreditCard()
Dim SessionManager As QBSessionManager
SetSessionManager = New QBSessionManager
SessionManager.OpenConnection "", "IDN Add ARRefundCreditCard Sample"
SessionManager.BeginSession "", omDontCare
Dim requestMsgSet As IMsgSetRequest
Set requestMsgSet = SessionManager.CreateMsgSetRequest("US", 5, 0)
' Initialize the message set request's attributes
requestMsgSet.Attributes.OnError = roeStop
' Add the request to the message set request object
Dim ARRefundCCAdd As IARRefundCreditCardAdd
Set ARRefundCCAdd = requestMsgSet.AppendARRefundCreditCardAddRq
'Set the properties in the Refund add object
ARRefundCCAdd.CustomerRef.FullName.setValue ("Jack Williams")
ARRefundCCAdd.RefundFromAccountRef.FullName.setValue ("Undeposited Funds")
ARRefundCCAdd.ARAccountRef.FullName.setValue ("Accounts Receivable")
ARRefundCCAdd.PaymentMethodRef.FullName.setValue ("Visa")
ARRefundCCAdd.Memo.setValue ("Partial refund sample")

Adding a Credit Card Refund Transaction
279
(c) 2013 Intuit Inc. All rights reserved.
'Add optional credit card info from a qbmsXML transaction with QBMS
ARRefundCCAdd.CreditCardTxnInfo.CreditCardTxnInputInfo.CreditCardNumber.
setValue ("4111111111111111")
ARRefundCCAdd.CreditCardTxnInfo.CreditCardTxnInputInfo.ExpirationYear.setValue (2008)
ARRefundCCAdd.CreditCardTxnInfo.CreditCardTxnInputInfo.ExpirationMonth.setValue (11)
ARRefundCCAdd.CreditCardTxnInfo.CreditCardTxnInputInfo.NameOnCard.setValue
("Jack Williams")
ARRefundCCAdd.CreditCardTxnInfo.CreditCardTxnInputInfo.CreditCardTxnType.setValue
ccttRefund
ARRefundCCAdd.CreditCardTxnInfo.CreditCardTxnResultInfo.ResultCode.setValue (0)
ARRefundCCAdd.CreditCardTxnInfo.CreditCardTxnResultInfo.ResultMessage.setValue
("STATUS OK")
ARRefundCCAdd.CreditCardTxnInfo.CreditCardTxnResultInfo.CreditCardTransID.setValue
("V54A60275101")
ARRefundCCAdd.CreditCardTxnInfo.CreditCardTxnResultInfo.MerchantAccountNumber.setValue
("4269281420247209")
ARRefundCCAdd.CreditCardTxnInfo.CreditCardTxnResultInfo.AuthorizationCode.setValue
("185PNI")
ARRefundCCAdd.CreditCardTxnInfo.CreditCardTxnResultInfo.ReconBatchID.setValue
("420050223 MC 2005-02-23 QBMS 15.0 pre-beta")
ARRefundCCAdd.CreditCardTxnInfo.CreditCardTxnResultInfo.PaymentGroupingCode.setValue (4)
ARRefundCCAdd.CreditCardTxnInfo.CreditCardTxnResultInfo.PaymentStatus.setValue
(pssCompleted)
ARRefundCCAdd.CreditCardTxnInfo.CreditCardTxnResultInfo.TxnAuthorizationTime.setValue
"2005-11-01", False
ARRefundCCAdd.CreditCardTxnInfo.CreditCardTxnResultInfo.TxnAuthorizationStamp.setValue
(1109192233)
'Now link two transactions whose TxnID we hardcoded here
Dim RefundAppliedToTxn As IRefundAppliedToTxnAdd
Set RefundAppliedToTxn = ARRefundCCAdd.RefundAppliedToTxnAddList.Append
RefundAppliedToTxn.RefundAmount.setValue (1)
RefundAppliedToTxn.TxnID.setValue ("B0-1131081904")
Set RefundAppliedToTxn = ARRefundCCAdd.RefundAppliedToTxnAddList.Append
RefundAppliedToTxn.RefundAmount.setValue (1)
RefundAppliedToTxn.TxnID.setValue ("9F-1131074959")
' Perform the request and obtain a response from QuickBooks
Dim responseMsgSet As IMsgSetResponse
Set responseMsgSet = SessionManager.DoRequests(requestMsgSet)
‘Save the results to a file for grins. requires Microsoft Scripting Runtime
Dim fname As String
Dim xml As String
xml = responseMsgSet.ToXMLString

280
Chapter 19: Using Credit Card Refund Functionality
(c) 2013 Intuit Inc. All rights reserved.
fname = "XML_request.doc"
Dim fso As New FileSystemObject
Dim ts As TextStream
Set ts = fso.CreateTextFile(fname, True)
ts.Write (xml)
' Close the session and connection with QuickBooks.
SessionManager.EndSession
SessionManager.CloseConnection
End Sub
Adding a Credit Card Refund in qbXML
Listing 19-2 shows a simple Refund add request with linked credit memos.
_____ Listing 19-2 An ARRefundCreditCardAdd request with two linked credit transactions
<?xml version="1.0" ?>
<?qbxml version="5.0"?>
<QBXML>
<QBXMLMsgsRq onError = "stopOnError">
<ARRefundCreditCardAddRq requestID = "0">
<ARRefundCreditCardAdd>
<CustomerRef>
<FullName>Jack Williams</FullName>
</CustomerRef>
<RefundFromAccountRef>
<FullName>Undeposited Funds</FullName>
</RefundFromAccountRef>
<ARAccountRef>
<FullName>Accounts Receivable</FullName>
</ARAccountRef>
<PaymentMethodRef>
<FullName>Visa</FullName>
</PaymentMethodRef>
<Memo>Partial refund sample</Memo>
<RefundAppliedToTxnAdd>
<TxnID>B0-1131081904</TxnID>
<RefundAmount>1.00</RefundAmount>
</RefundAppliedToTxnAdd>
<RefundAppliedToTxnAdd>
<TxnID>9F-1131074959</TxnID>
<RefundAmount>1.00</RefundAmount>
</RefundAppliedToTxnAdd>
</ARRefundCreditCardAdd>
</ARRefundCreditCardAddRq>
</QBXMLMsgsRq>
</QBXML>
Listing 19-3 shows a Refund add request with credit card transaction data from a preceding
qbmsXML request/response interaction with QBMS.

Adding a Credit Card Refund Transaction
281
(c) 2013 Intuit Inc. All rights reserved.
______Listing 19-3 An ARRefundCreditCardAdd request with QBMS transaction data
<?xml version="1.0" ?>
<?qbxml version="5.0"?>
<QBXML>
<QBXMLMsgsRq onError = "stopOnError">
<ARRefundCreditCardAddRq requestID = "0">
<ARRefundCreditCardAdd>
<CustomerRef>
<FullName>Jack Williams</FullName>
</CustomerRef>
<RefundFromAccountRef>
<FullName>Undeposited Funds</FullName>
</RefundFromAccountRef>
<ARAccountRef>
<FullName>Accounts Receivable</FullName>
</ARAccountRef>
<PaymentMethodRef>
<FullName>Visa</FullName>
</PaymentMethodRef>
<Memo>Partial refund sample</Memo>
<CreditCardTxnInfo>
<CreditCardTxnInputInfo>
<CreditCardNumber>4111111111111111</CreditCardNumber>
<ExpirationMonth>11</ExpirationMonth>
<ExpirationYear>2008</ExpirationYear>
<NameOnCard>Jack Williams</NameOnCard>
<TransactionMode>CardNotPresent</TransactionMode>
<CreditCardTxnType>Refund</CreditCardTxnType>
</CreditCardTxnInputInfo>
<CreditCardTxnResultInfo>
<ResultCode>0</ResultCode>
<ResultMessage>STATUS OK</ResultMessage>
<CreditCardTransID>V54A60275101</CreditCardTransID>
<MerchantAccountNumber>4269281420247209</MerchantAccountNumber>
<AuthorizationCode>185PNI</AuthorizationCode>
<ReconBatchID>420050223 MC 2005-02-23 QBMS 15.0 pre-beta</ReconBatchID>
<PaymentGroupingCode>4</PaymentGroupingCode>
<PaymentStatus>Completed</PaymentStatus>
<TxnAuthorizationTime>2005-11-01T00:00:00</TxnAuthorizationTime>
<TxnAuthorizationStamp>1109192233</TxnAuthorizationStamp>
</CreditCardTxnResultInfo>
</CreditCardTxnInfo>
<RefundAppliedToTxnAdd>
<TxnID>B0-1131081904</TxnID>
<RefundAmount>1.00</RefundAmount>
</RefundAppliedToTxnAdd>
<RefundAppliedToTxnAdd>
<TxnID>9F-1131074959</TxnID>

282
Chapter 19: Using Credit Card Refund Functionality
(c) 2013 Intuit Inc. All rights reserved.
<RefundAmount>1.00</RefundAmount>
</RefundAppliedToTxnAdd>
</ARRefundCreditCardAdd>
</ARRefundCreditCardAddRq>
</QBXMLMsgsRq>
</QBXML>
Querying for ARRefundCreditCard Transactions
When you query for credit card refund transactions and use the entity filter, you must
specify only customer or customer jobs. Other than this, this is a standard query, which is
described in Chapter 8, “Creating Queries.”
Deleting and Voiding ARRefundCreditCard Transactions
To delete and void credit card refund transactions, you use TxnDelRq and TxnVoidRq,
respectively, as described in Chapter 10, “Modifying and Deleting Transactions and List
Objects.”
Notice that this deletes any credit card information (CreditCardTxnInfo) in QuickBooks
only. This does NOT delete any data at QBMS.

What is a Price Level?
283
(c) 2013 Intuit Inc. All rights reserved.
C
HAPTER
20 1
U
SING
P
RICE
L
EVELS
IN
T
RANSACTIONS
1
This chapter describes price levels: what they are, why they are useful, how they function in
QuickBooks, and what you need to do in your program to support the use of them.
What is a Price Level?
A price level is a List object that is used on a customer/customer job, or on an individual
line item in an invoice, sales receipt, sales order, or credit memo. (This is accomplished by
using the PriceLevelRef aggregate in the Add and Mod requests for each of these supported
objects.)
When applied to customers or customer jobs, the price level allows you to set custom
pricing on a per customer or a per job basis. That is, after you use a price level with a
customer or customer job, QuickBooks automatically uses that custom price as the default
price each time you create an invoice, sales receipt, sales order, or credit memo for that
customer or customer job.
Of course, price levels can also be dynamically applied to the individual line items in an
invoice, sales receipt, sales order, or credit memo: you don’t have to simply accept the
default customer price level.
I
MPORTANT
When you apply a price level to a line item, QuickBooks does
not store any information about which price level was used.
That is, after the price level is applied, there is no way to
determine later which price level was applied to the line item.
Notice that if you use price levels on a per line item basis, and have created price levels, the
QuickBooks UI automatically provides support where needed, for example, for each line
item in the Sales Order form, the Rate column is a drop-down list that lets the user select
any of the available price levels.

284
Chapter 20: Using Price Levels in Transactions
(c) 2013 Intuit Inc. All rights reserved.
The Two Types of Price Levels Supported by QuickBooks
There are two types of price levels: Fixed Percent and Per Item. The type is specified at
price level creation time: the type cannot be changed later by a PriceLevelMod operation.
Of these two types, the Fixed Percent type is supported by the QuickBooks Pro tier and
above, while the Per Item type is supported only by the QuickBooks Premier and Enterprise
tiers.
•The Fixed Percent price level modifies any item’s base price by a fixed percentage.
•The Per Item price level supports custom prices on individual items.
N
OTE
If an application attempts to use Per Item price levels in QB
Pro, it will receive the error “FEATURE_NOT_ENABLED”
(3250).
Why Are Price Levels Useful?
You need to use price levels any time special prices are needed; for midnight madness sales,
preferred customers, sales-rep discretionary pricing, and so on.
Are Price Levels Automatically Available?
In order for price levels to have any effect, or become available for use in transactions, they
must be enabled in the Sales & Customers preferences for the company file. So, you need
to check for this by using a PreferencesQuery and examine the
SalesAndCustomersPreferences aggregate within the response. In particular, the sub-
aggregate PriceLevels field IsUsingPriceLevels must contain the value True; otherwise
price levels are not available
.
Based on this check, your own application can respond appropriately, either by displaying
information to the user and/or disabling your own application’s price-level oriented
features. Notice that your application cannot enable price levels via the SDK.
Using Price Level Functionality in Your Application
The PriceLevel is a List object, so it is manipulated in the same general way as other List
objects. You create one using PriceLevelAdd, modify it using PriceLevelMod (notice that
you cannot modify the type, fixed versus per item), query for price levels using
PriceLevelQuery, and delete a PriceLevel using ListDel. Also, PriceLevel is supported in
the related queries, for example, ListDeletedQuery can provide a list of recently deleted
PriceLevels, CustomerQuery can return the price level (if any) linked to the customer, and
so on.

Using Price Level Functionality in Your Application
285
(c) 2013 Intuit Inc. All rights reserved.
I
MPORTANT
When you perform a PriceLevelMod, for the table in a per item
price level, the Mod request should only specify the rows of
the table that are actually changing. There is no need to
specify the details of an existing row that will not change.
Notice that the PriceLevelQuery contains an ItemRef, which allows you to find all price
levels that apply to that item.This is very useful when selecting the price level for an
individual line item because you’ll get a runtime error 3140 if you specify an inapplicable
price level for a given item.
Notice that you use positive values to increase the price from the base price and negative
ones to decrease from the base price.
Similar to adding a group item or invoice line, when you create a per item price level, you
supply a list of PriceLevelPerItem aggregates that reference an Item and supply a custom
price/percent or a percentage adjustment relative to either the standard price, the item cost,
or the currently existing custom price. (This is useful on PriceLevelMod requests.)
Notice that the response for a sales transaction does not contain information on which price
level was used. It only indicates the Rate used for the item.
I
MPORTANT
Once a user links a customer to a price level, all sales
transactions for that customer will by default use the item
prices set by the price level. This differs from versions of
QuickBooks prior to 2005, where an invoice entered from the
SDK defaulted to the standard price for each line item (unless
a price was specified).

286
Chapter 20: Using Price Levels in Transactions
(c) 2013 Intuit Inc. All rights reserved.
How to Create a Price Level
In the following subsections, creating a fixed percent price level is described first, then
creating a per item price level is described.
Creating a Fixed Percent Price Level
You can create a Fixed Percent type price level using the following qbXML:
<?qbxml version="4.0"?>
<QBXML>
<QBXMLMsgsRq onError = "stopOnError">
<PriceLevelAddRq requestID = "0">
<PriceLevelAdd>
<Name>Special Customer Discount</Name>
<IsActive>true</IsActive>
<PriceLevelFixedPercentage>-5</PriceLevelFixedPercentage>
</PriceLevelAdd>
</PriceLevelAddRq>
</QBXMLMsgsRq>
</QBXML>
In the above sample qbXML, a price level with the name “Special Customer Discount” is
created with a fixed percentage amount of -5%. This means there will be a 5% reduction of
the Rate (price each) of the sales price of the item line item where this price level is applied
in an invoice, sales order, and so on. The IsActive tag by default is true, so you don’t need
to supply it. It is shown for completeness. In a PriceLevelAdd you might set it to false if
you were preparing for a sale and didn’t want this price level to show up yet. (In a
PriceLeveMod, you would set it to false if you wanted to discontinue a particular discount.)
Figures 20-1, 20-2, and 20-3 show how a user would apply price level to a line in a sales
order or invoice in QuickBooks. The first figure shows the standard item price (Rate) for
the line item, and the total amount. The second figure shows the dropdown list that appears
in the Rate column if Price Levels are enabled in QuickBooks AND if there are any
existing price levels, AND if a price level has NOT been applied to the customer.
In this dropdown list (Figure 20-2), notice the Special Customer Discount price level that
we just created.
In the third figure (20-3), notice that the Rate and Amount have changed after the user
selected Special Customer Discount from the dropdown list of price levels. The Rate
reflects the 5% discount for each item, and the total amount also reflects it.
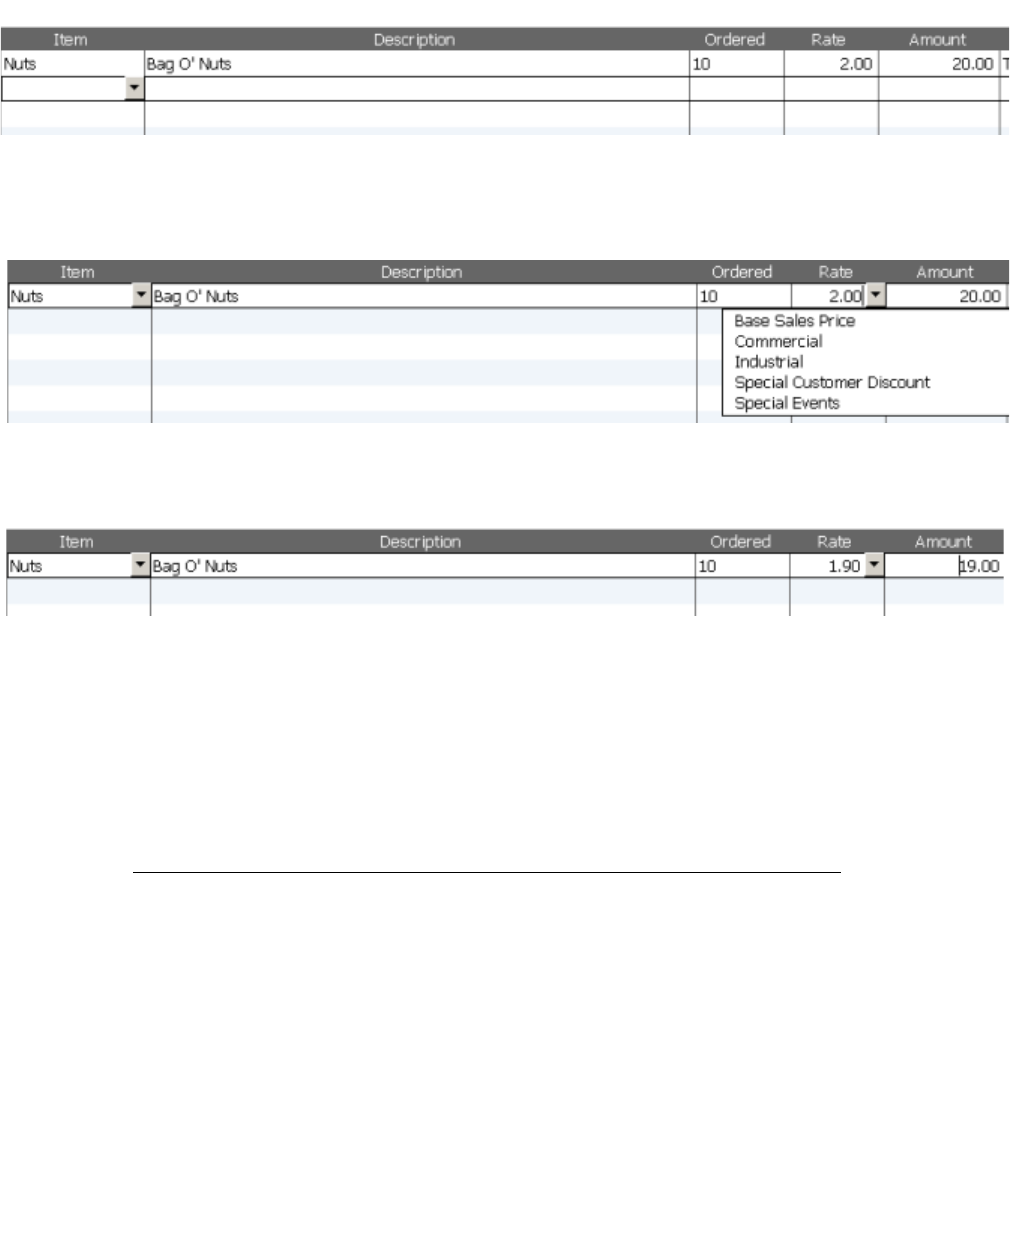
How to Create a Price Level
287
(c) 2013 Intuit Inc. All rights reserved.
Figure 20-1 A line item before applying a price level: note the rate and amount
Figure 20-2 Applying the level in the QuickBooks UI
Figure 20-3 Line item rate and amount after applying the price level in QuickBooks
What would happen if the price level were applied to the customer? Then the default price
shown in the Rate column (and the total in the Amount column) would automatically adjust
to the price level. The user could still select from the dropdown list of price levels,
however.
Creating a Per Item Price Level
Creating a per item price for an item results in the creation of a custom price for the item
that is visible in the QuickBooks Edit Price Level form. Consequently, you can apply
discounts to this custom price as well as to the item’s cost and standard sales price.
In the per item price level, you can choose between two approaches. You can create a price
level that specifies ONE of the following prices:
•A fixed price for an item or a fixed percentage discount to be applied to an item’s cost
•A discount percentage applied to an item’s cost, standard sales price, or current custom
price
The following sample qbXML shows how to build a per item price level using a discount
percentage applied to an item’s cost.

288
Chapter 20: Using Price Levels in Transactions
(c) 2013 Intuit Inc. All rights reserved.
<?qbxml version="4.0"?>
<QBXML>
<QBXMLMsgsRq onError = "stopOnError">
<PriceLevelAddRq requestID = "0">
<PriceLevelAdd>
<Name>Cost-Plus Sale</Name>
<IsActive>true</IsActive>
<PriceLevelPerItem>
<ItemRef>
<FullName>Bolts</FullName>
<AdjustPercentage>10</AdjustPercentage>
<AdjustRelativeTo>Cost</AdjustRelativeTo>
</PriceLevelPerItem>
</PriceLevelAdd>
</PriceLevelAddRq>
</QBXMLMsgsRq>
</QBXML>
In this sample, the Cost-Plus Sale price level specifies a price for the Bolts item that is 10
percent more than the cost.
How to Apply a Price Level to a Customer
You can apply a price level to a customer when you create the customer (CustomerAddRq)
or when you modify the customer (CustomerModRq). You’ll notice that the customer can
have only one price level applied at a time, however. The following sample qbXML shows
the price level “Cost-Plus Sale” applied to the customer Geraldine Wilson when that
customer is being added to QuickBooks.
<?qbxml version="4.0"?>
<QBXML>
<QBXMLMsgsRq onError = "stopOnError">
<CustomerAddRq requestID = "2">
<CustomerAdd>
<Name>Geraldine Wilson</Name>
<FirstName>Geraldine</FirstName>
<LastName>Wilson</LastName>
<BillAddress>
<Addr1>123 Main St.</Addr1>
<City>Mountain View</City>
<State>CA</State>
<PostalCode>94566</PostalCode>
</BillAddress>
<Phone>650-944-1111</Phone>
<PriceLevelRef>
<FullName>Cost-Plus Sale</FullName>
</PriceLevelRef>
</CustomerAdd>
</CustomerAddRq>
</QBXMLMsgsRq>
</QBXML>

How to Apply a Price Level to a Line Item
289
(c) 2013 Intuit Inc. All rights reserved.
How to Apply a Price Level to a Line Item
If you want to use the SDK to apply price levels to individual line items in the various types
of transactions, for example, invoice, sales orders, sales receipts, and so on, you can do so
by including a PriceLevelRef in the line item Add or Mod aggregate. For example, in an
InvoiceAdd request, you can specify a price level for an invoice line item inside the
InvoiceLineAdd aggregate as follows:
<InvoiceLineAdd>
<ItemRef>
<FullName>Bolts</FullName>
</ItemRef>
<Desc>Bag O’ Bolts</Desc>
<Quantity>10</Quantity>
<PriceLevelRef>
<FullName>Special Customer Discount</FullName>
</PriceLevelRef>
</InvoiceLineAdd>
It is important to note that for per item price levels, the item inside the ItemRef above must
support the price level inside the PriceLevelRef. (For Fixed Percent price levels, this is not
an issue.)
Notice that the Amount tag has been omitted. This is calculated by QuickBooks
automatically from the Rate, or, in this case the Rate as automatically adjusted by the price
level.
290
Chapter 20: Using Price Levels in Transactions
(c) 2013 Intuit Inc. All rights reserved.

291
(c) 2013 Intuit Inc. All rights reserved.
C
HAPTER
21 1
U
SING
B
ILLING
R
ATES
T
O
B
ILL
F
OR
T
IME
1
Billing rates (called billing rate levels in the UI, but simply billing rates in this document)
are used in certain QuickBooks editions to allow you to charge different rates for a service
item based on who does the work (employee, or vendor, or other name). This feature
supports scenarios such as allowing you to bill at different rates for employees doing the
same service but with different experience levels. Another scenario supported is the ability
to charge different rates for employees based on the difficulty of a task.
This chapter describes the use of billing rates first from the perspective of the QuickBooks
UI, to show the workflow that is supported by this feature, and any limitations of the
feature when exercised by the SDK requests. The chapter also shows you how to build the
BillingRateAdd request in qbXML and in QBFC.
Which QuickBooks Editions Support Billing Rates?
The billing rates feature is currently available only in certain flavors of QuickBooks
Premier and Enterprise:
•Contractor
•Professional Services
•Accountant
Key SDK Limitations You Need to Know Before You Start
One key limitation of the SDK’s support of the billing rates feature is that you cannot
automate the insertion of billable time charges directly into invoices via QB SDK requests.
Only the QuickBooks interactive user can do that because it entails choosing charges from a
list of outstanding customer charges at the time of invoice creation, and the company owner
(the QuickBooks interactive user) must remain in control of this.
Another limitation in the SDK is that you can assign Billing Rates only to employees and
vendors, whereas in the UI, you can assign Billing Rates to employees, vendors, and other
names.

292
Chapter 21: Using Billing Rates To Bill For Time
(c) 2013 Intuit Inc. All rights reserved.
What Happens If I Use Both Price Levels and Billing Rates?
It is possible for a customer to have a price level that changes the standard rate assigned to
a service item. What happens when you have billable time against that customer using the
same service item and you also have a billing rate that applies to that service item? In the
case where there is both a customer price level and a billing rate operating on a service item
price, the price level always “wins”. Only the price level is used in this case.
What is a Billing Rate?
A billing rate is a custom price that overrides the standard price set for a service item, based
on the entity that does the work (employee, vendor, or other name). The billing rate is
attached to the entity and is in effect when that entity is assigned to a time transaction.
There are two ways that this rate override works. You can set up a billing rate to do a
simple override of ALL service item rates by imposing a fixed rate that will override all the
standard rates. Or, you can set up the billing rate to overide specific service items (one or
more) by a fixed amount or percentage.
I
MPORTANT
The kind of rate you have on the service item determines the
kind of billing rate you may have on that item. That is, if you
attempt to set the Billing Rate to a percentage for a service
item that has an amount for the Rate, you will get an error.
What is the Workflow? How Do I use a Billing Rate?
The core transaction in the billing rate workflow is the time tracking transaction because
that is where the billable time charges are recorded against the customer. From the UI
perspective, this transaction is recorded via the Weekly Timesheet form or the Time/Enter
Single Activity form in the UI. The easiest way to arrive at these forms is to click on the
Enter Time icon in the QuickBooks Home page navigator. (In the SDK, you use the
TimeTrackAdd request.) Figure 21-1 shows the Time/Enter SingleActivity form.
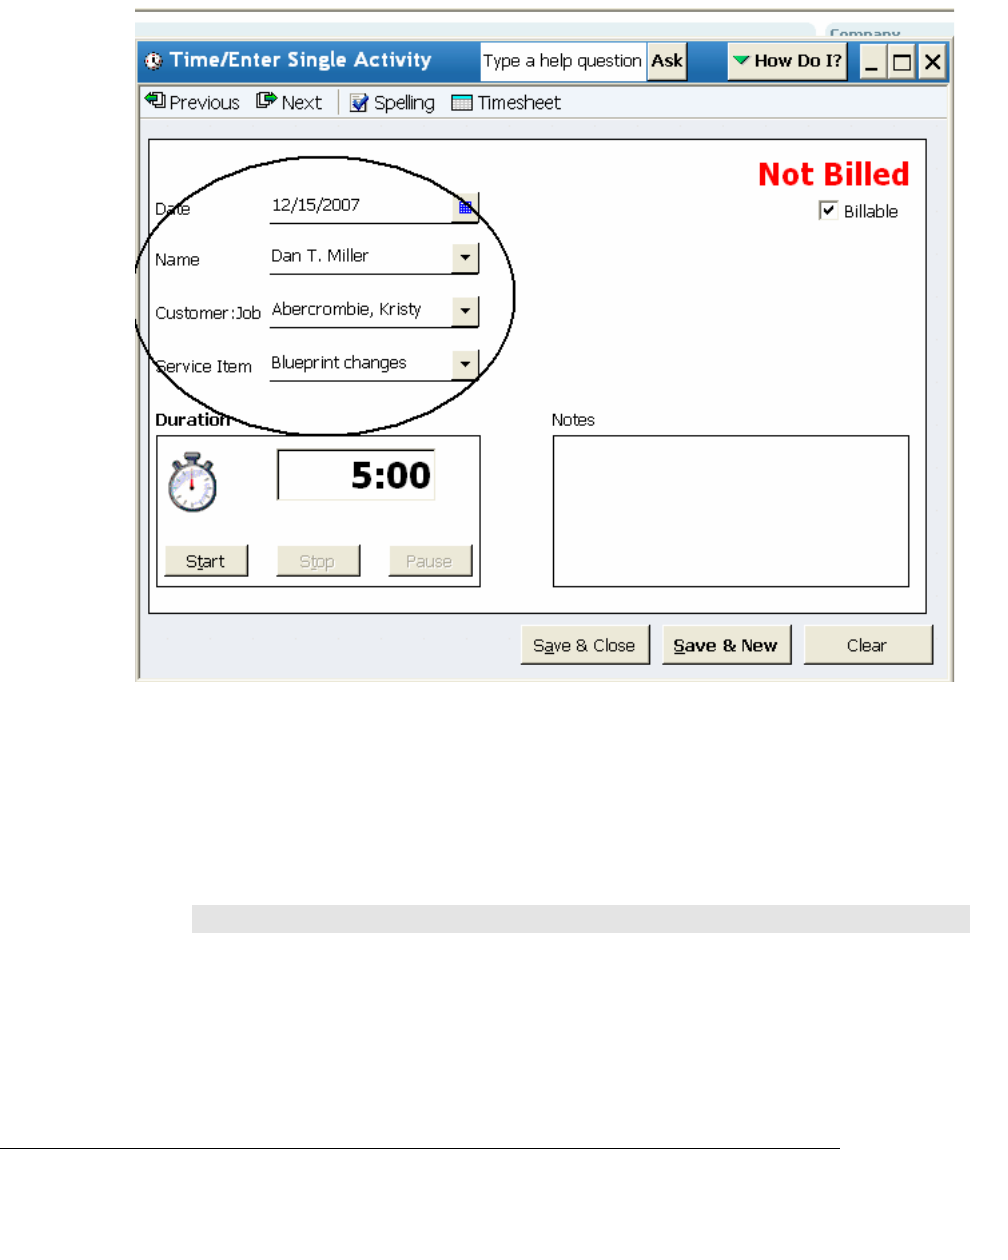
A Detailed Look at the Billing Rates Workflow
293
(c) 2013 Intuit Inc. All rights reserved.
Figure 21-1 Entering a time tracking transaction
The time transaction, not surprisingly, tracks time duration of billable and unbillable
activities within the specified timeframe. In the time transaction, you specify the customer,
the time duration, the service item that identifies the type of activity performed, the entity
that did the work (employee, vendor, or other name), and so forth as shown in the circled
items in Figure 21-1. Notice that you can choose to make the time billable or not.
N
OTE
One scenario where you would not make the time billable
would be if you were tracking vendor time but were passing
the vendor’s time bills directly to the customer: in this case
you wouldn’t want to make the time billable as that would
result in double billing.
A Detailed Look at the Billing Rates Workflow
The billing rate workflow is as follows:

294
Chapter 21: Using Billing Rates To Bill For Time
(c) 2013 Intuit Inc. All rights reserved.
1. Create one or more service items with a standard price/rate for the task(s) for which
you want to bill time.
2. Create billing rates that express the pricing structure you want to apply to those service
items. (A billing rate is always linked to a service item.)
3. Assign the billing rates as desired to your employees, vendors, and/or other names.
4. Track the time in a time transaction (single activity form or weekly timesheet form).
This transaction specifies the customer to be billed, the service item, the entity doing
the work.
5. Invoice the customer for the billable time charges, selecting from the list of the
customer’s billable time charges when prompted.
We’ll cover each of these aspects of the workflow in more detail in the following sections.
Creating Service Items
A service item is an item on the item list. You can get to the new item form from the main
QuickBooks pulldown menu, Lists->Item List->Item->New. Select Service as the item type
as shown in Figure 21-2.
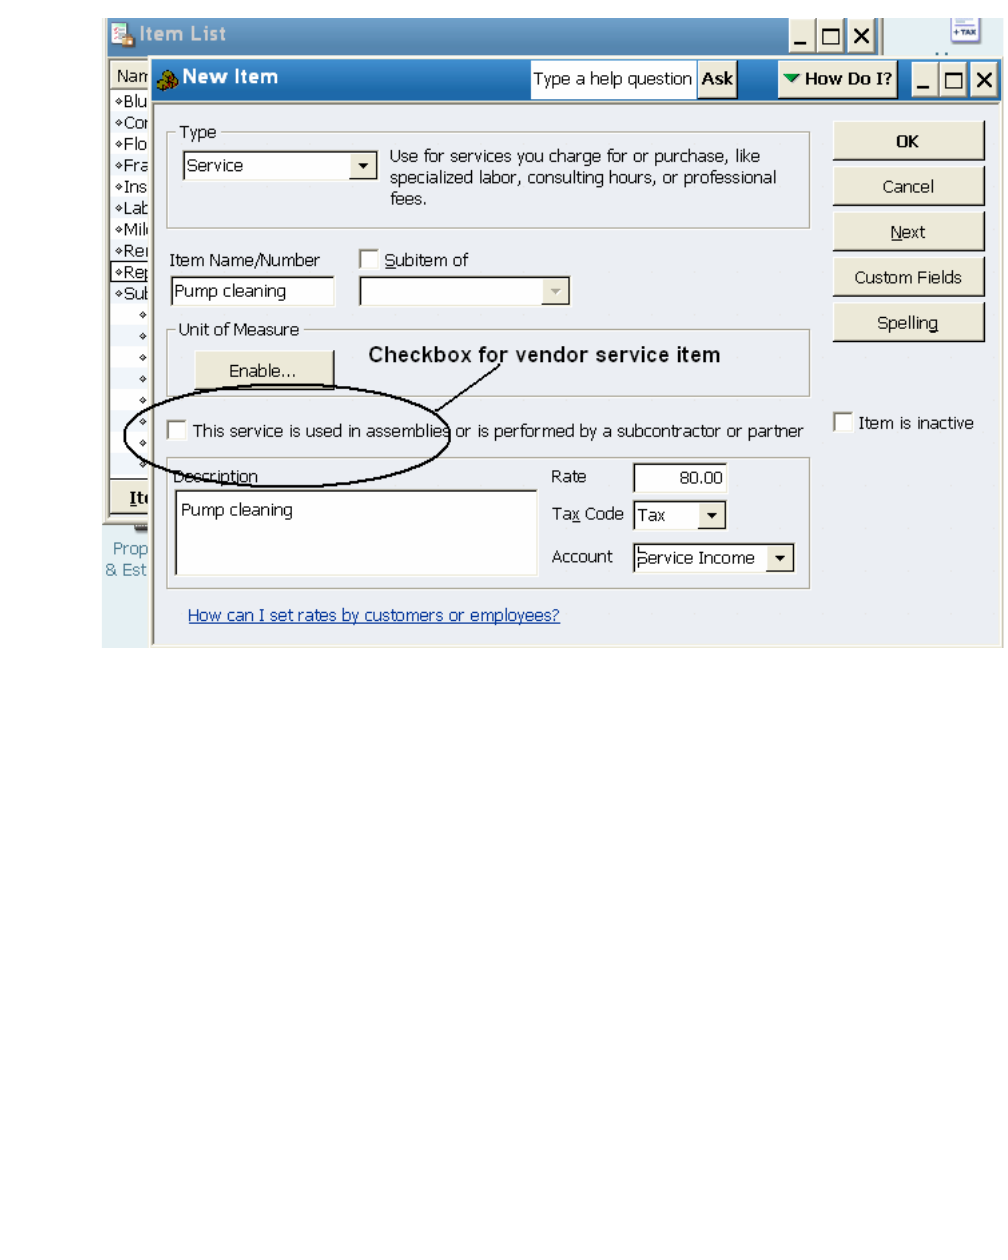
A Detailed Look at the Billing Rates Workflow
295
(c) 2013 Intuit Inc. All rights reserved.
Figure 21-2 New Service Item form
The Rate field shows the value that will be impacted by the billing rate, when that is
applied in the time transaction. Notice that you must assign an income account to the
service item.
Also, notice the checkbox labelled “This service is used in...or is performed by a
subcontractor.” You check this if you are creating a service item for work to be performed
by a vendor. Figure 21-3 shows the additional fields you need to supply for vendor service
items.
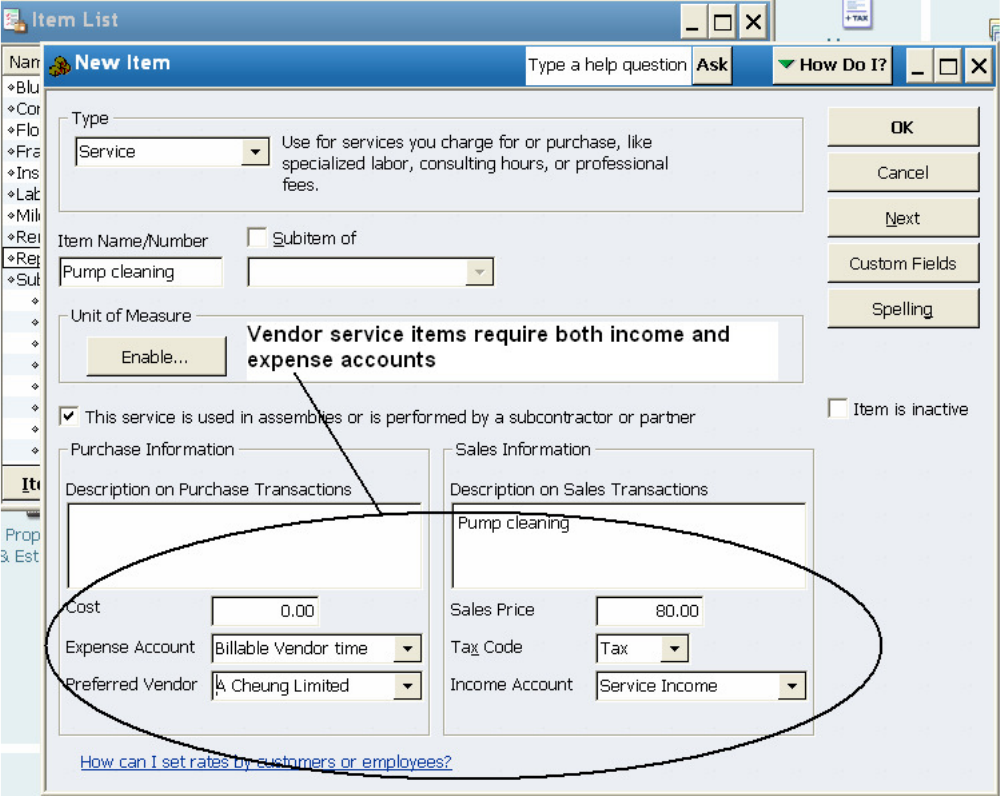
296
Chapter 21: Using Billing Rates To Bill For Time
(c) 2013 Intuit Inc. All rights reserved.
Figure 21-3 New Service Item form for vendor service items
In this usage, in addition to the income account used for the money coming in as a result of
the service item, you need to specify an expense account, which is used for the money
going out to the vendor to pay for that work.
Creating a Service Item in the SDK
In the SDK, you would simply use the ItemServiceAdd request, whose fields are listed in
the OSR as shown in Figure 21-4:
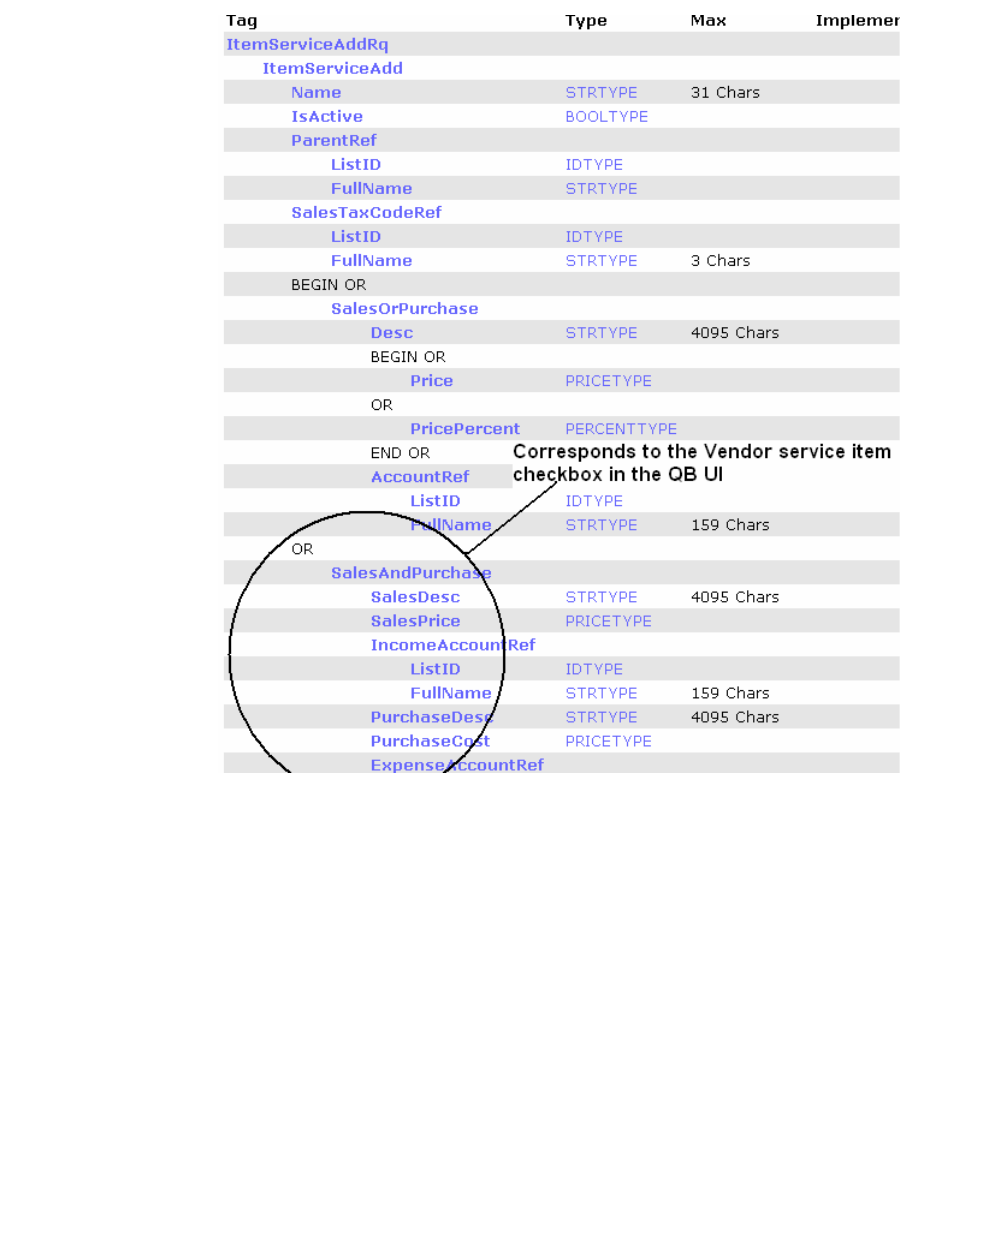
A Detailed Look at the Billing Rates Workflow
297
(c) 2013 Intuit Inc. All rights reserved.
Figure 21-4 Creating a new service item in the SDK
Notice that to fill out a service item for employees, you would use the SalesOrPurchase
aggregate, whereas you’d use the SalesAndPurchase aggregate to specify a service item to
be performed by a vendor.
qbXML Code Sample: Adding a Service Item
The following qbXML request adds a service item with the name “Pump repair” and a rate
of 50.
298
Chapter 21: Using Billing Rates To Bill For Time
(c) 2013 Intuit Inc. All rights reserved.
<?xml version="1.0" ?>
<?qbxml version="6.0"?>
<QBXML>
<QBXMLMsgsRq onError = "stopOnError">
<ItemServiceAddRq requestID = "0">
<ItemServiceAdd>
<Name>Pump Repair</Name>
<SalesOrPurchase>
<Desc>repair small pumps</Desc>
<Price>50.00</Price>
<AccountRef>
<FullName>Service Income</FullName>
</AccountRef>
</SalesOrPurchase>
</ItemServiceAdd>
</ItemServiceAddRq>
</QBXMLMsgsRq>
</QBXML>
QBFC Code Sample: Adding a Service Item
The following VB code is a one-shot program that adds the same service item as the above
qbXML snippet. Notice the use of ORSalesPurchase.SalesOrPurchase. If we wanted this
service item to be used by vendors we would have used
ORSalesPurchase.SalesAndPurchase.
Dim SessionManager As QBSessionManager
Set SessionManager = New QBSessionManager
SessionManager.OpenConnection "", "IDN ItemService Add Sample"
SessionManager.BeginSession "", omDontCare
Dim ItemServiceAddSet As IMsgSetRequest
Set ItemServiceAddSet = SessionManager.CreateMsgSetRequest("US", 6, 0)
Dim ServiceItemAdder As IItemServiceAdd
Set ServiceItemAdder = ItemServiceAddSet.AppendItemServiceAddRq
ServiceItemAdder.Name.setValue "Pump Repair"
ServiceItemAdder.ORSalesPurchase.SalesOrPurchase.Desc.setValue "repair small pumps"
ServiceItemAdder.ORSalesPurchase.SalesOrPurchase.ORPrice.Price.setValue 50
ServiceItemAdder.ORSalesPurchase.SalesOrPurchase.AccountRef.FullName.setValue
"Service Income"
Dim ItemServiceAddResp As IMsgSetResponse
Set ItemServiceAddResp = SessionManager.DoRequests(ItemServiceAddSet)
SessionManager.EndSession
SessionManager.CloseConnection
A Detailed Look at the Billing Rates Workflow
299
(c) 2013 Intuit Inc. All rights reserved.
Creating Billing Rates in the UI
In the UI, you can open the billing rate form from the main QuickBooks menubar: Lists-
>Billing Rate Level List->Billing Rate Level. Figure 21-5 shows that form:
Figure 21-5 New billing rate form
In the form above we selected a fixed hourly rate. This means that whoever has this billing
rate assigned, employee, vendor, or other name, that fixed rate will override any service
item rate used in the billable time transaction.
If you wanted to override a smaller subset of the service items, you would choose the
second option: Custom Hourly Rate per Service Item (Figure 21-6):

300
Chapter 21: Using Billing Rates To Bill For Time
(c) 2013 Intuit Inc. All rights reserved.
Figure 21-6 Billing rate form with Custom Hourly rate selected
Notice that you can select one or more service items in the list. Also, notice that you can
specify a fixed rate for each service item (overriding the standard rate) by entering values in
the Billing Rate column, as shown in the figure.
What if you wanted to charge a percentage higher or lower than the standard rate? To do
that, you would click Adjust Selected Rates and specify the desired adjust higher or lower
(Figure 21-7):
A Detailed Look at the Billing Rates Workflow
301
(c) 2013 Intuit Inc. All rights reserved.
Figure 21-7 Adjusting service item rates higher or lower by percentage
Creating Billing Rates in the QB SDK
The follow two examples show how to add Billing Rates using the BillingRateAdd request.
Creating Billing Rates Using qbXML
The following qbXML builds a billing rate called “Junior Level” which applies to the
“Pump Repair” service item. The billing rate is applied to the standard rate, giving a 50%
discount to the standard rate. Notice that to obtain a lower rate than the standard, you
specify a negative number in the AdjustPercentage field: -50 means 50% lower than the
standard rate. A value of 50 would mean 50% higher.
<?xml version="1.0" ?>
<?qbxml version="6.0"?>
<QBXML>
<QBXMLMsgsRq onError = "stopOnError">
302
Chapter 21: Using Billing Rates To Bill For Time
(c) 2013 Intuit Inc. All rights reserved.
<BillingRateAddRq requestID = "0">
<BillingRateAdd>
<Name>Junior Consultant Level</Name>
<BillingRatePerItem>
<ItemRef>
<FullName>Pump Repair</FullName>
</ItemRef>
<AdjustPercentage>-50.0</AdjustPercentage>
<AdjustBillingRateRelativeTo>StandardRate</AdjustBillingRateRelativeTo>
</BillingRatePerItem>
</BillingRateAdd>
</BillingRateAddRq>
</QBXMLMsgsRq>
</QBXML>
Creating Billing Rates Using QBFC
The following VB sample is a one-shot program that does the same thing as the qbXML
sample above, building a billing rate called “Junior Level” that applies to the “Pump
Repair” service item.
Again, notice the billing rate is applied to the standard rate, giving a 50% discount to the
standard rate because it is a negative number in the AdjustPercentage field. To specify a
higher rate than the standard, you would specify a positive number in the AdjustPercentage
field.
Dim SessionManager As QBSessionManager
Set SessionManager = New QBSessionManager
SessionManager.OpenConnection "", "IDN BillingRate Add Sample"
SessionManager.BeginSession "", omDontCare
Dim BillingRateAddSet As IMsgSetRequest
Set BillingRateAddSet = SessionManager.CreateMsgSetRequest("US", 6, 0)
Dim BillingRateAdder As IBillingRateAdd
Set BillingRateAdder = BillingRateAddSet.AppendBillingRateAddRq
BillingRateAdder.Name.setValue "Junior Consultant Level"
Dim MyItem As IBillingRatePerItem
Set MyItem = BillingRateAdder.ORBillingRate.BillingRatePerItemList.Append()
MyItem.ItemRef.FullName.setValue "Pump Repair"
MyItem.ORBillingRateItem.BillingRateAdjustment.AdjustBillingRateRelativeTo.setValue
abrrtStandardRate
MyItem.ORBillingRateItem.BillingRateAdjustment.AdjustPercentage.setValue -50
Dim BillingRateAddResp As IMsgSetResponse
Set BillingRateAddResp = SessionManager.DoRequests(BillingRateAddSet)
SessionManager.EndSession
SessionManager.CloseConnection
A Detailed Look at the Billing Rates Workflow
303
(c) 2013 Intuit Inc. All rights reserved.
Assigning Billing Rates to Employees, Vendors, Other Names
A billing rate takes effect only if it is assigned to an entity involved in a billable time
transaction. Assigning the billing rate works similarly for employees, vendors, and other
names, so we’ll only describe the employee, to keep our story short. (Again, remember that
in the SDK, you won’t be able to assign billing rates to an Other Name entity.)
To assign a billing rate, open the Employee form. You get there by clicking on the
Employee center icon, then clicking on an existing employee name or clicking on the New
Employee button, if you are adding a new employee. The form looks like this (once you
click on the Additional Info tab, which is where you assign a billing rate):
Figure 21-8 Assigning a billing rate to an employee
Notice that you can assign only one billing rate to an entity.
304
Chapter 21: Using Billing Rates To Bill For Time
(c) 2013 Intuit Inc. All rights reserved.
Assigning a Billing Rate in the SDK
In the SDK, you can assign a billing rate to an employee or vendor in the EmployeeAdd,
EmployeeMod, VendorAdd, and VendorMod requests. You simply use a BillingRateRef
aggregate in those requests to add the billing rate. You can add only one billing rate per
entity. We won’t bother with sample code here because of its simplicity. Take a look at the
OSR for details on building Employee or Vendor requests.
Using Billing Rates in Time Transactions
The only way billing rates take effect is in a billable time transaction. However, the heading
to this section is a bit of a misnomer because you don’t directly use billing rates in a time
transaction. Instead, they are applied indirectly, by specifying the entity doing the billable
time (e.g., employee, vendor) and by specifying the service item.
In the UI, you can enter time either in a weekly timesheet, or in the single activity form
shown below (Figure 21-9):
Figure 21-9 The single activity time form

A Detailed Look at the Billing Rates Workflow
305
(c) 2013 Intuit Inc. All rights reserved.
The Name field in the figure above is the entity doing the work. You can select a name
from the list. (By the way, only employees, vendors, and other names are on that list.) If the
entity name you select has a billing rate assigned, it will be applied to the service item
specified in the transaction in the Service Item field. Checking the Billable checkbox means
the transaction will result in time charges for the customer specified in the customer:job
field.
Time Transactions in the SDK
In the SDK, you use the TimeTxnAdd/TimeTxnMod requests, which are more like the
single activity form. Time Transactions are described in another chapter in this document,
so we won’t cover any SDK details here.
Invoicing Customers for Billable Time (UI Only)
For the sake of completeness, we’ll cover the invoicing process here, where billable time
charges are added to a customer invoice. There is currently no way to use the SDK to insert
billable time charges into an invoice.
During invoice creation, when you specify a customer you are prompted to include any
outstanding time charges (Figure 21-10):
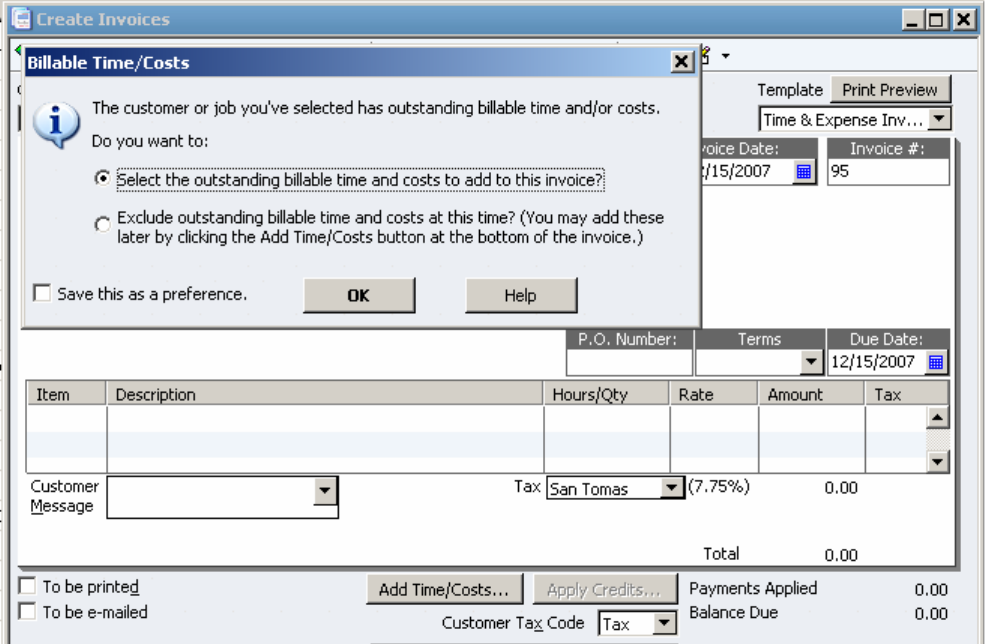
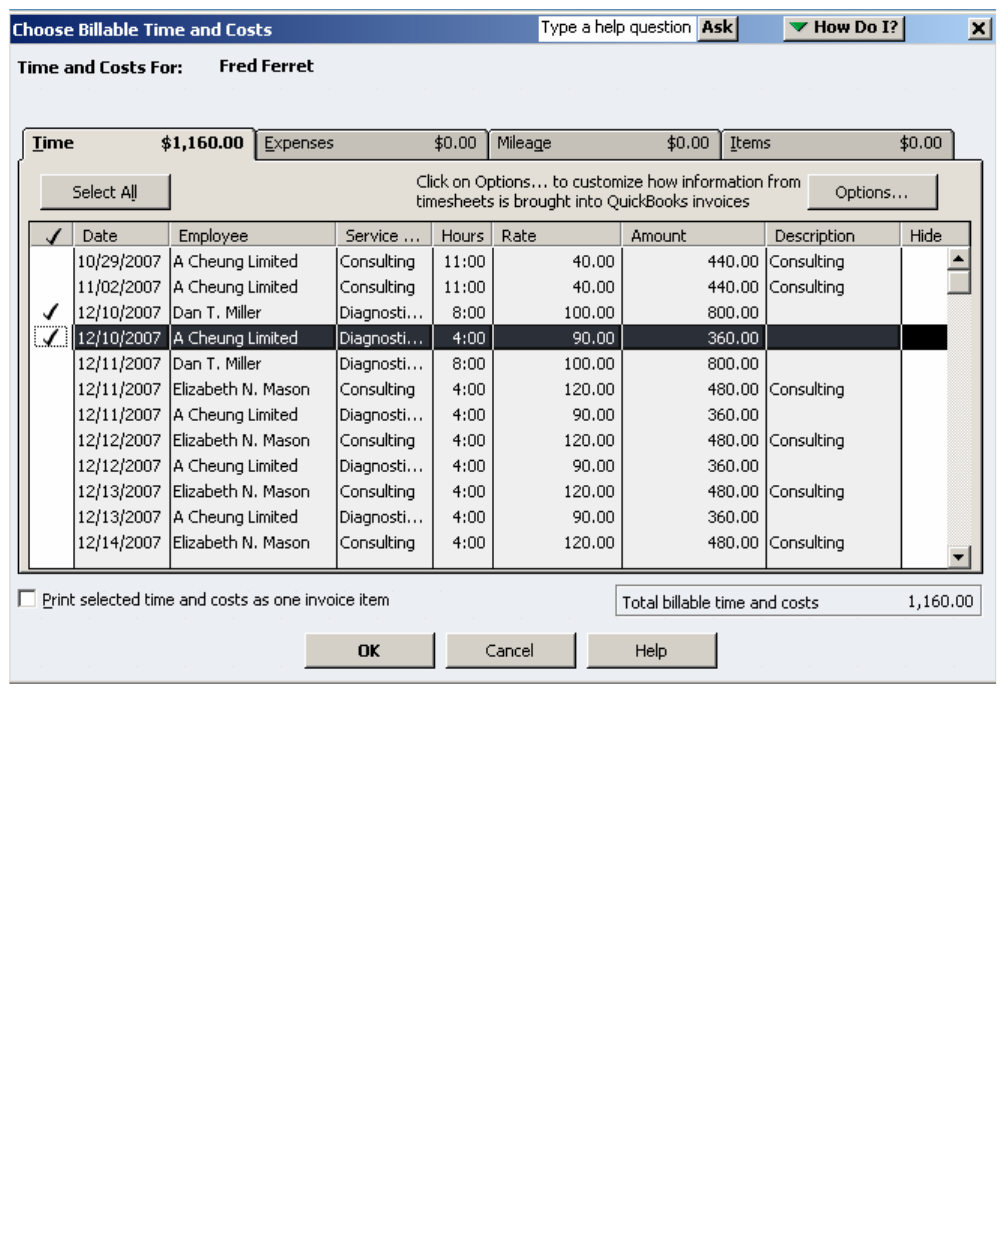
A Detailed Look at the Billing Rates Workflow
307
(c) 2013 Intuit Inc. All rights reserved.
Figure 21-11 Billable time and costs
You simply select as many of the charges as you want: each will become a separate line
item in the invoice. Notice that the rate that appears in the invoice Rate column is the
standard service item charge if no billing rates are in effect for a billable charge, and the
billing rate charge if billing rates apply. (That is, if the entity performing the billable time
had a billing rate assigned.)
308
Chapter 21: Using Billing Rates To Bill For Time
(c) 2013 Intuit Inc. All rights reserved.

Impact of Multicurrency on Existing Applications
309
(c) 2013 Intuit Inc. All rights reserved.
C
HAPTER
22 1
U
SING
THE
M
ULTICURRENCY
F
EATURE
IN
THE
SDK 1
Starting with QuickBooks 2009 (US version) and qbXML spec 8.0, the QB SDK supports
the QuickBooks multicurrency feature. For full information on how this feature works,
please consult the in-product help for QuickBooks.
In this chapter we’ll briefly overview the QuickBooks multicurrency feature from the
perspective of the SDK. We’ll cover the multicurrency impact on company preferences,
transactions, list objects and reports.
Impact of Multicurrency on Existing Applications
If your users are using QB 2009 and have multicurrency turned on, your application can be
affected by multicurrency even if your application does not take advantage of the 8.0
features and issues only requests using qbXML spec 7.0 and older.
Here are the new behaviors that impact your app:
•Balances for customers and vendors, if they are set up with foreign currency, have the
balance amount in that currency and that balance amount will fluctuate when exchange
rates change.
•For transactions involving a foreign entity with foreign currency, transaction amounts
are in that foreign currency. QuickBooks also tracks this in your home currency (say
USD). However, that home currency is CALCULATED from the foreign amount using
the current exchange rate, which can fluctuate.
•When a transaction occurs using a foreign currency for the first time, where there is an
ARAccountRef and/or APAccountRef, QuickBooks will automatically create and use a
foreign AR and/or AP account with the following FullName nomenclature:
> Accounts Payable - <CurrencyCode>
Accounts Receivable - <CurrencyCode>
for example, if our transaction was in Japanese Yen, this is the account that would
have to be referenced:
Accounts Receivable - JPY
Thus, if your application explicitly specifies a different AR or AP account it can
fail when doing the transaction.
These are issues you need to be aware of.

310
Chapter 22: Using the Multicurrency Feature in the SDK
(c) 2013 Intuit Inc. All rights reserved.
Company Preferences and Multicurrency
You cannot set multicurrency-related preferences from the SDK. That has to be done in the
UI.
By default company files are created with multicurrency turned off. To turn multicurrency
on you have to use the QuickBooks UI with the company file open. From the main
menubar, Edit->Preferences->Multiple Currencies->Yes, I use more than once currency.
Once you turn multicurrency on for that company file, you won’t be able to turn it off ever
again. There’s a prompt notifying you about this when you go to turn this on.
Next, you’ll need to specify the Home Currency, again you must do this in the UI, in the
preferences as noted above. Once you set the Home Currency, you will not be able to
change it later.
Getting Multicurrency and Home Currency from PreferencesQuery
You can use the SDK to get the current company file settings for multicurrency by doing a
PreferencesQuery using qbXML 8.0 or greater, you’ll get back a MultiCurrencyPreferences
aggregate that contains the IsMultiCurrencyOn boolean and HomeCurrencyRef that
indicates the home currency used with this company file.
QuickBooks Currencies/Exchange Rates and the SDK
To understand the multicurrency feature, you need to know about
•““Built-in” Vs. User Defined Currencies”
•“Active Vs. Inactive Currencies”
•“How Do You Set Currency Exchange Rates?”
•“What Happens in Transactions When You Change Exchange Rate?”
“Built-in” Vs. User Defined Currencies
There are two “categories” of currencies supported by QuickBooks: QuickBooks’ own
extensive list of built-in currencies and currencies added by the QuickBooks user, which are
called user-defined currencies. ((Currencies can be added either in the UI or using the SDK
CurrencyAdd request.)
Both types of currencies show up in the UI Currency List or from the list obtained through
the SDK’s CurrencyQuery request. In the Ret from the Currency Query, each currency is
identified as built-in (the IsUserDefinedCurrency field is set to false) or as user-defined (the
IsUserDefinedCurrency field is set to true).

Multicurrency Effect on Transaction Amounts and Balances
311
(c) 2013 Intuit Inc. All rights reserved.
Active Vs. Inactive Currencies
Although the built-in currency list is extensive, you’ll notice that only a few show up in the
various picklists in QuickBooks. That’s because only those few are active by default. You
can change any of these to active (or from active to inactive) either in the UI or using the
SDK’s CurrencyMod request.
When you create a currency using CurrencyAdd, the currency by default is active.
How Do You Set Currency Exchange Rates?
You can manually set the exchange rate for a currency itself by editing the currency in the
UI, not through the SDK. However, there is a quasi-automatic rate update feature in
QuickBooks that the user can invoke by clicking (from the main menubar) List->Currency
List->Activities->Download Latest Exchange Rates, which automatically fetches the
currency rates for all built-in ACTIVE currencies over the Internet. This feature does not
update user-defined currencies (these must be updated manually) and this feature is not
available through the SDK.
The exchange rate setting for a currency is used by default when you add a transaction,
either in UI or via SDK. However, these default exchange rates can be overridden by
supplying a different exchange rate in the transaction, both in the UI and in the SDK
through the ExchangeRate field.
What Happens in Transactions When You Change Exchange Rate?
When you change the exchange rate on transactions, the foreign value stays the same and
the value in your home currency changes. Using the SDK, you can update the foreign price
by doing a Mod on the transaction where you specify the latest exchange rate and then re-
specify all of the transaction lines.
Multicurrency Effect on Transaction Amounts and Balances
QuickBooks keeps track of the line item amounts in both foreign and home currency, with
the home currency amount calculated from the foreign amount using the exchange rate in
effect for that transaction (foreign amount X exchange rate).
Multicurrency Effect on List Objects Amounts and Balances
Amount balances for list objects (for example account, customer, and vendor) are in the
currency associated with that account, customer, or vendor, and fluctuate based on the
exchange rate.

312
Chapter 22: Using the Multicurrency Feature in the SDK
(c) 2013 Intuit Inc. All rights reserved.
Multicurrency Effects on Reports
All amounts in Reports have values expressed in home currency amounts, due to required
accounting and reporting to government agencies.
ARAccountRef/APAccountRef Guidelines
Prior to QuickBooks 2009, developers were advised to explicitly supply the optional AP
and AR account references instead of using the default Accounts Payable and Accounts
Receivable. This advice was given to help developers avoid the scenario of mismatched AP
and/or AR accounts when one transaction was linked to another.
With QuickBooks 2009 the ground has changed significantly due to the way QuickBooks
does accounting for foreign currencies. QuickBooks automatically creates a new AP and/or
AP account the first time a foreign transaction occurs in a given foreign currency. For
example, for a new Invoice to a Japanese customer this AR account is created and used:
Accounts Receivable - JPY
So if you were to do an InvoiceAdd to that customer, you MUST either not specify the
ARAccountRef (the SDK will automatically use the correct one) or you must refer to that
new AR account explicitly--you cannot just use some other account.
For transactions that do not reference any other transaction, it is easier to not supply the AR
or AP accountRef and let the defaults be used.

Impact of Multi-Location Inventory on Existing Applications
313
(c) 2013 Intuit Inc. All rights reserved.
C
HAPTER
23 1
U
SING
THE
M
ULTI
-L
OCATION
I
NVENTORY
F
EATURE
IN
THE
SDK 1
Starting with QuickBooks Enterprise v11 (2011 - US version) and qbXML spec 10.0, the
QB SDK supports the QuickBooks multi-location inventory feature. For full information on
how this feature works, please consult the in-product help for QuickBooks.
In this chapter we’ll briefly overview the QuickBooks multi-location inventory feature from
the perspective of the SDK. We’ll cover the multi-location inventory impact on company
preferences, transactions, list objects and reports.
Impact of Multi-Location Inventory on Existing Applications
If your users are using Enterprise v11 and have multi-location inventory turned on, your
application can be affected by multi-location inventory even if your application does not
take advantage of the 10.0 features and issues only requests using qbXML spec 8.0 and
older.
Here are the new behaviors that impact your app:
•Sites will be set to UnspecifiedSite, if SDK version used is less than 10.0.
These are issues you need to be aware of.
Company Preferences and Multi-Location Inventory
You cannot set multi-location inventory related preferences from the SDK. That has to be
done in the UI.
By default company files are created with multi-location inventory turned off. To turn
multi-location inventory on you have to use the QuickBooks UI with the company file
open. From the main menubar, Edit->Preferences->Item & Inventory->Company tab->
Select Advanced Inventory is enabled.
Getting Multi-Location Inventory from PreferencesQuery
You can use the SDK to get the current company file settings for multi-location inventory
by doing a PreferencesQuery using qbXML 10.0 or greater, you’ll get back a
MultiLocationInventoryPreferences aggregate that contains the
IsMultiLocationInventoryAvailable and IsMultiLocationInventoryEnabled boolean that
indicates if multi-location inventory is used with this company file.

314
Chapter 23: Using the Multi-Location Inventory Feature in the SDK
(c) 2013 Intuit Inc. All rights reserved.
InventorySite features for Multi-Location Inventory
InventorySiteAdd:
A new inventory site can be added to the Inventory Site List via SDK
1. For this feature to work via SDK, the preference that allows inventory items to be in
multiple sites has to be turned on.
2. The only required field to add a site is the Name field. This name has to be unique: all
the elements in this list must have unique names.
3. The address block of the Inventory Site List emulates that of the Customer List.
InventorySiteMod:
An already existing inventory site can be modified through this request.
1. Like all other list modify requests, this too requires the list ID and edit sequence of the
element being modified.
2. The name of an element can be changed as long as the modified name isn’t already in
use by another element.
3. If the ‘IsDefaultSite’ is set to true for an element, then it can be made false only by
setting the <IsDefaultSite> tag true for another element in the list. By sending
<IsDefaultSite>false</IsDefaultSite> for the site will not have any effect for a site whose
<IsDefaultSite> tag is already true.
InventorySiteQuery:
FullName, ActiveStatus, From & To ModifiedDate, NameFilter, NameRageFilter are
available as filters.
Transfer Inventory Transactions Feature
This SDK request to expose the "Transfer Inventory" feature. This feature is a transaction
that has been introduced as a part of Multi Location Inventory.
The SDK functionality includes ADD, MOD, DEL & QUERY requests.
This new set of requirements allows the user to transfer inventory from one site to another
in different locations.
Transfer Inventory Add:
1. This request requires "To" & "From" sites and one entry in the transaction line.
2. It also has the provision to set External GUID
Transfer Inventory Mod:

Site Attributes for Transaction with Multi-Location Inventory
315
(c) 2013 Intuit Inc. All rights reserved.
1. It allows the modification of the transaction body and transaction lines.
2. If the transaction line isn't explicitly mentioned in the modline aggregate, the transaction
is deleted
Transfer Inventory Query
Standard filters and Site Filter are available.
Site Attributes for Transaction with Multi-Location Inventory
Applying Site to transactions through SDK, when MLI is turned on.
Site can be set to the transactions during with Add Request and Modify Request.
The <InventorySiteRef> tag is currently supported for Line Items only.
For Group Items, we cannot explicitly specify the site, in this case, UnSpecifiedSite will be
set.
For Invoice, CreditMemo, Check, Bill, ItemReceipt, BuildAssembly, SalesReceipt,
CreditCardCharge, CreditCardCredit, VendorCredit, Charge, InventoryAdjustment:
1) For Add /Mod Request, the Site passed with <InventorySiteRef> tag will be applied to
the transactions once it is saved.
2) If there are more than one <InventorySiteRef> aggregates, SDK will set Site for all the
transactions.
3) Transaction Add / Mod would succeed, even if Site is not specified, but it will set the
Site to UnspecifiedSite. The SDK response is created with the Transaction Ret, which
includes the details of Site.
4) In a transaction, if quantity is negative, then that transaction becomes non-posting, hence
Site will be treated as an optional field.
5) For Charge, BuildAssembly, InventoryAdjustment transactions, the Site will be provided
in header and will be copied to all the Line Items.
6) For all other transactions, Site will be provided in the Line Items.
For Estimate, PurchaseOrder and SalesOrder:
1) Transactions are non-posting, so Site is not a mandatory field.
2) For PurchaseOrder transaction, the Site will be provided in header and will be copied to
all the Line Items.

316
Chapter 23: Using the Multi-Location Inventory Feature in the SDK
(c) 2013 Intuit Inc. All rights reserved.
Multi-Location Inventory Support for Group Items
This functionality has not been implemented. Calls to this request will return as
unsupported.
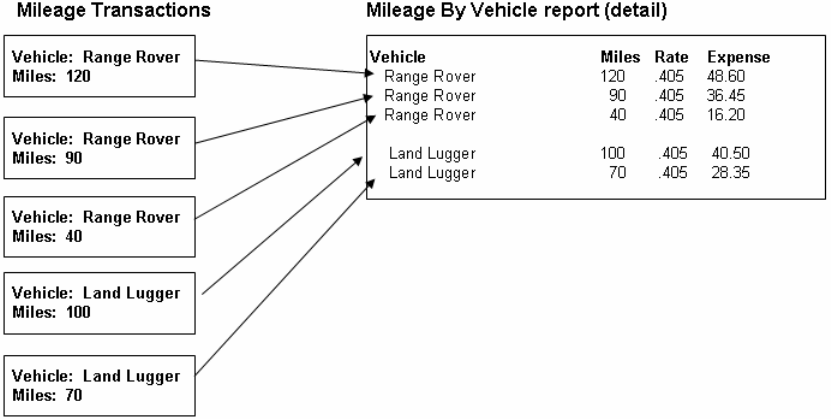
317
(c) 2013 Intuit Inc. All rights reserved.
C
HAPTER
24 1
U
SING
THE
Q
UICKBOOKS
V
EHICLE
M
ILEAGE
F
EATURE
1
In QuickBooks, vehicle mileage tracking is trip-based, with each trip and its mileage
entered as a separate transaction in QuickBooks, with QuickBooks automatically
calculating the resulting mileage costs based on user supplied rates. When you need to see
the information accumulated from these transactions, you can run the Mileage by Vehicle or
Mileage by Job reports (Figure 24-1 on page 317).
Figure 24-1 Mileage transactions and mileage expense reports
In addition to accumulating and generating data for reports, another way to use the vehicle
mileage feature is to use it in conjunction with invoices to bill customers for mileage-
related charges. To use the feature in this way you simply make the transaction billable and
add a little more information to the vehicle mileage transaction, such as the customer to be
charged and the item used to set the billable mileage rate (Figure 24-2 on page 318).
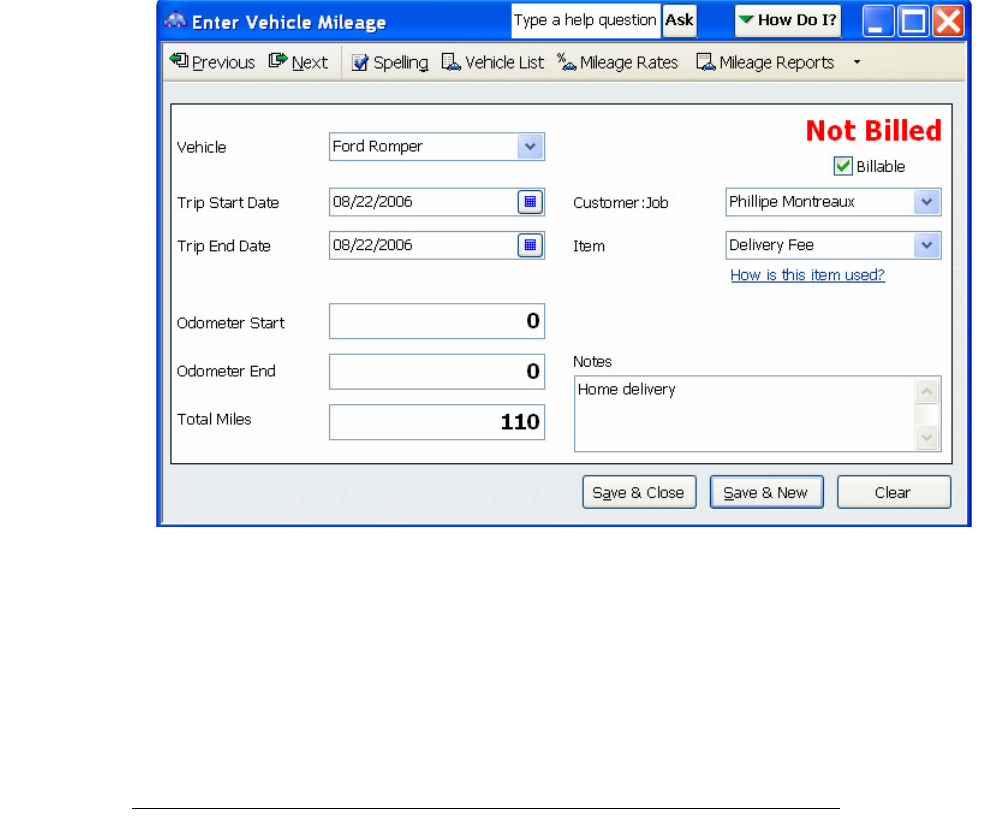
318
Chapter 24: Using the Quickbooks Vehicle Mileage Feature
(c) 2013 Intuit Inc. All rights reserved.
bi
Figure 24-2 Billable mileage transaction
Keep in mind that the tax mileage rate is completely unrelated to and unaffected by the
billable mileage rate, and cannot be set via the SDK. For that reason, QuickBooks provides
two separate mileage reports: Mileage by Vehicle, which reports only the tax-related
vehicle mileage and mileage expense, and Mileage by Job, which tracks both non billable
and billable mileage (along with the billable charges).
Key Limitations of QB SDK Support for Vehicle Mileage
One key limitation of the SDK’s support of this feature is that you cannot automate the
insertion of billable mileage charges directly into invoices via QB SDK requests. Only the
QuickBooks interactive user can do that because it entails choosing charges from a list of
outstanding customer charges at the time of invoice creation, and the company owner (the
QuickBooks interactive user) must remain in control of this.
Another limitation, which we have already mentioned, is that the mileage rate used to
calculate mileage expense for the tax agency (such as the IRS) can only be set in the
QuickBooks UI, via the Mileage Rates button in the Mileage entry form. Only the billable
mileage rate can be specified via the QB SDK, by setting the amount in the item (service
item or other charge item) you use for mileage charges.
Finally, the Vehicle Mileage Mod operation is currently not supported, whereas you can
modify a vehicle mileage transaction in the UI.
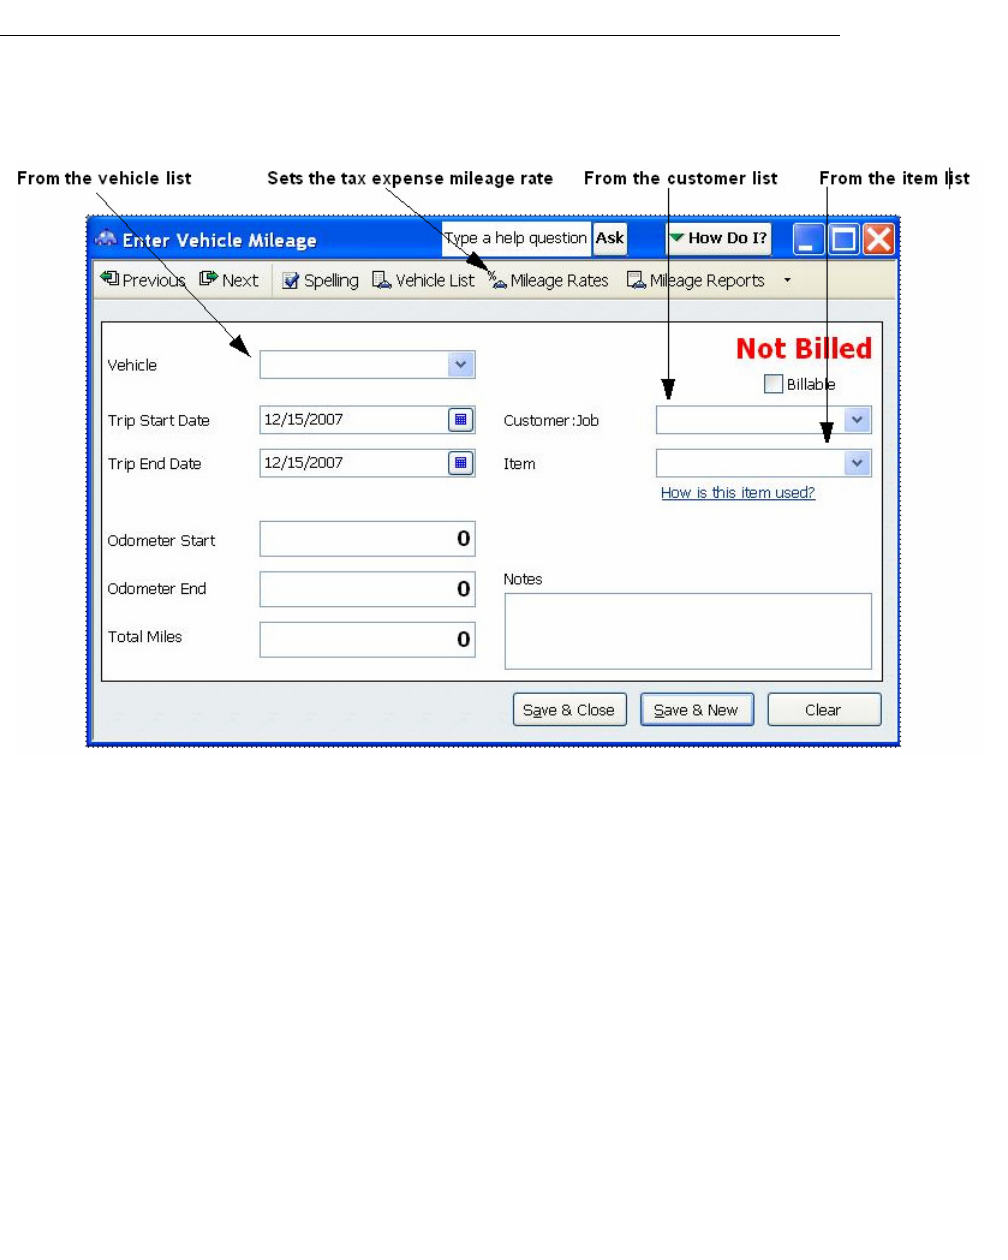
How the Vehicle Mileage Feature Works
319
(c) 2013 Intuit Inc. All rights reserved.
How the Vehicle Mileage Feature Works
The best way to see how the mileage feature works is to look at the QuickBooks UI. Figure
24-3 on page 319 shows the Vehicle Mileage entry form, which is where you create the
mileage transactions in the UI.
Figure 24-3 The vehicle mileage edit form
We’ll describe most of the fields in the following paragraphs, at least, those fields that need
some description beyond what’s obvious in the UI form.
Vehicle. You must always specify a vehicle. In the UI , a dropdown list contains all of the
vehicles in the vehicle list. You can choose one or create a new vehicle by selecting New
within the list. The SDK differs slightly, as you use the VehicleRef element to specify the
vehicle, and the vehicle must already exist in the QuickBooks company.
Trip Start Date/End Date. This is an optional field. In the UI, the default is the current
date, and this is always supplied if you don’t supply a different date. In the SDK, this
corresponds to the elements TripStartDate and TripEndDate. If you omit either or both of
these, the current date will be supplied for the omitted element(s).
Odometer Start/Odometer End/Total Miles. In the UI, you can specify values for all
three of these fields, as long as the total miles matches the QuickBooks-calculated value for
Odometer End minus Odometer Start. In the SDK, in the VehicleMileageAdd request, you
can specify either the Odometer Start and End or you can specify Total Miles, but you
320
Chapter 24: Using the Quickbooks Vehicle Mileage Feature
(c) 2013 Intuit Inc. All rights reserved.
cannot specify both, since doing so results in a parser error. The VehicleMileageAdd
elements corresponding to these UI fields are as you would expect: OdometerStart,
OdometerEnd, and TotalMiles.
Billable. One of the key choices you make when filling out this form, or doing the
equivalent in the SDK, is whether a customer is to be charged for the mileage.
If a customer is to be charged, check the Billable checkbox in the upper right of the form. In
the SDK, set the BillableStatus element in the VehicleMileageAdd request to Billable. Then
specify the customer to be billed and the item used to set the charged mileage rate.
QuickBooks will save the tax related expense data, and will also save the mileage charge as
an outstanding time or cost for that customer.
If you don’t intend to charge the customer, in the UI leave the checkbox unchecked. In the
SDK, set the BillableStatus to NotBillable. You can omit customer and item, or you can
optionally supply the customer and item, if for some reason you want to track this in the
Mileage By Job detail report under that supplied customer. If you supply customer and item
in a non billable transaction, the entry will be listed in the Mileage by Job detail report as
Non Billable and no customer charge will be made.
Customer:Job. You must specify a customer if you check the Billable checkbox or do the
equivalent in the VehicleMileageAdd request by setting BillableStatus to Billable.The UI
control here is a dropdown list containing all of the customers in the customers list. You can
create a new customer by selecting New within the list. In the VehicleMileageAdd request
you use the CustomerRef element to specify the customer, and the customer must already
exist in the QuickBooks company.
The billable charge resulting from this mileage transaction will be saved in QuickBooks as
an outstanding Billable Time and Cost for that customer. The next time an invoice is
created for that customer in the UI, the QuickBooks user will be prompted to add that
outstanding charge to the invoice. Notice that no such prompt will occur for invoices
created via the SDK, nor will you be able to insert any of these outstanding charges into the
invoice via the SDK.
Item. You must specify an item if you check the Billable checkbox or do the equivalent in
the SDK. The UI control here is the familiar dropdown list but it is a filtered list of only
service items and other charge items. These are the only item types that can be used in
vehicle mileage transactions. If you supply an item of a different type than service or other
charge via the SDK, you’ll get a runtime error.
Mileage Rate. A UI-only feature. The Mileage Rate button is located in the top middle of
the Vehicle Mileage entry form. You click on it to display the Mileage Rates form, which is
where you specify the mileage rate for your current tax year. This rate is established by
your income tax authority, for example, the IRS. This rate multiplied by the mileage from
the mileage transactions yields the mileage expense reported by the Mileage By Vehicle
reports.
Notice that you can change this rate from the UI whenever you want for that tax year, and
the Mileage by Vehicle reports automatically reflect those changes. However, you cannot
set or modify this rate via the SDK.

Setting Up an Item to be Used In Billable Mileage Transactions
321
(c) 2013 Intuit Inc. All rights reserved.
Mileage Reports. A UI-only feature. The mileage reports can be accessed via this button in
the Vehicle Mileage entry form, or through the usual UI features that support reports: the
Report Center or the Report pulldown menu.
The reports consist of two main reports:
•Summary and detail reports for Mileage by Vehicle, which lists the mileage and
expenses calculated using the mileage rates set via the Mileage Rate button.
•Summary and detail reports for Mileage by Job, which lists the mileage and charges for
each customer. The charges are derived from the mileage multiplied by the rate
specified in the item used in the mileage transaction.
Setting Up an Item to be Used In Billable Mileage Transactions
If you want to bill your customers for mileage, you need to create a service item or an other
charge item that will show up on the invoice as the line item and also establish the mileage
rate. shows a sample service item set up to bill the mileage at a rate of 0.70 per mile.
Figure 24-4 Setting up a service item for mileage charges
Keep in mind that the Rate field in service items, and the Amount field in other charge
items are both used in Mileage transactions in exactly the same way. That is, they are rates,
and they are multiplied against the mileage in a mileage transaction to yield the charges for
the customer. They cannot be used to establish a flat fee amount.
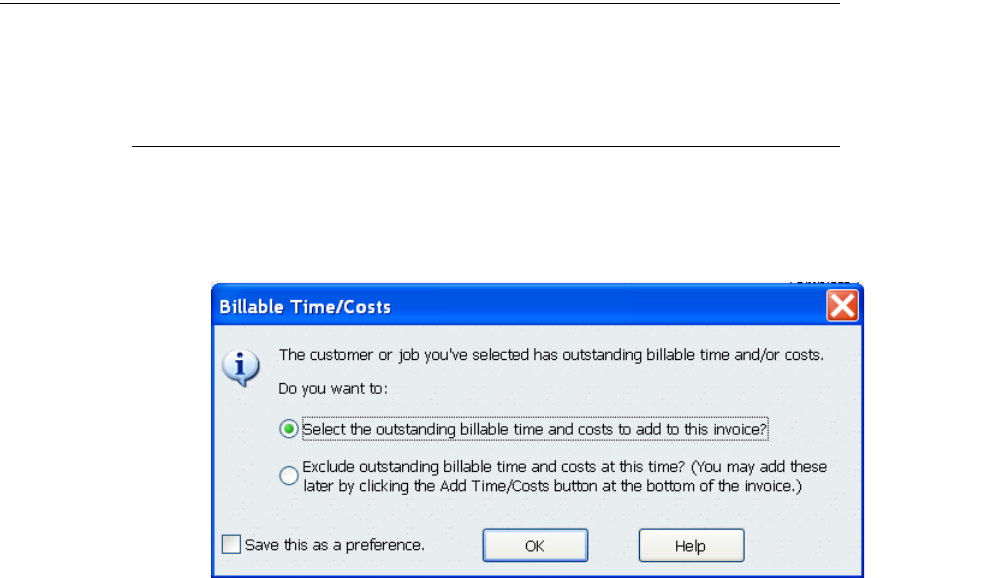
322
Chapter 24: Using the Quickbooks Vehicle Mileage Feature
(c) 2013 Intuit Inc. All rights reserved.
Other than the Rate/Amount issue, there is nothing special to note here, except that when
you create either a service item or an other charge item to bill customers against, the
account you specify for that item is typically an income account. The tax code field refers
to sales tax. If your company doesn’t use sales tax, then this doesn’t appear as a choice.
What Happens to Mileage Charges When I Create Invoices?
The behavior of invoices and mileage charges varies slightly depending on whether you add
the invoice from the UI or via the SDK
Mileage Charges and Invoices in the UI
In the UI, when you create an invoice for a customer who has any outstanding charges, such
as mileage charges from Vehicle Mileage transactions, you are prompted to added them to
the invoice (Figure 24-5 on page 322).
Figure 24-5 Billable Time/Costs prompt
If you want to add these charges and click OK, a selection form is displayed (Figure 24-6
on page 323). The list of outstanding mileage charges for the customer is displayed when
you select the Mileage tab.
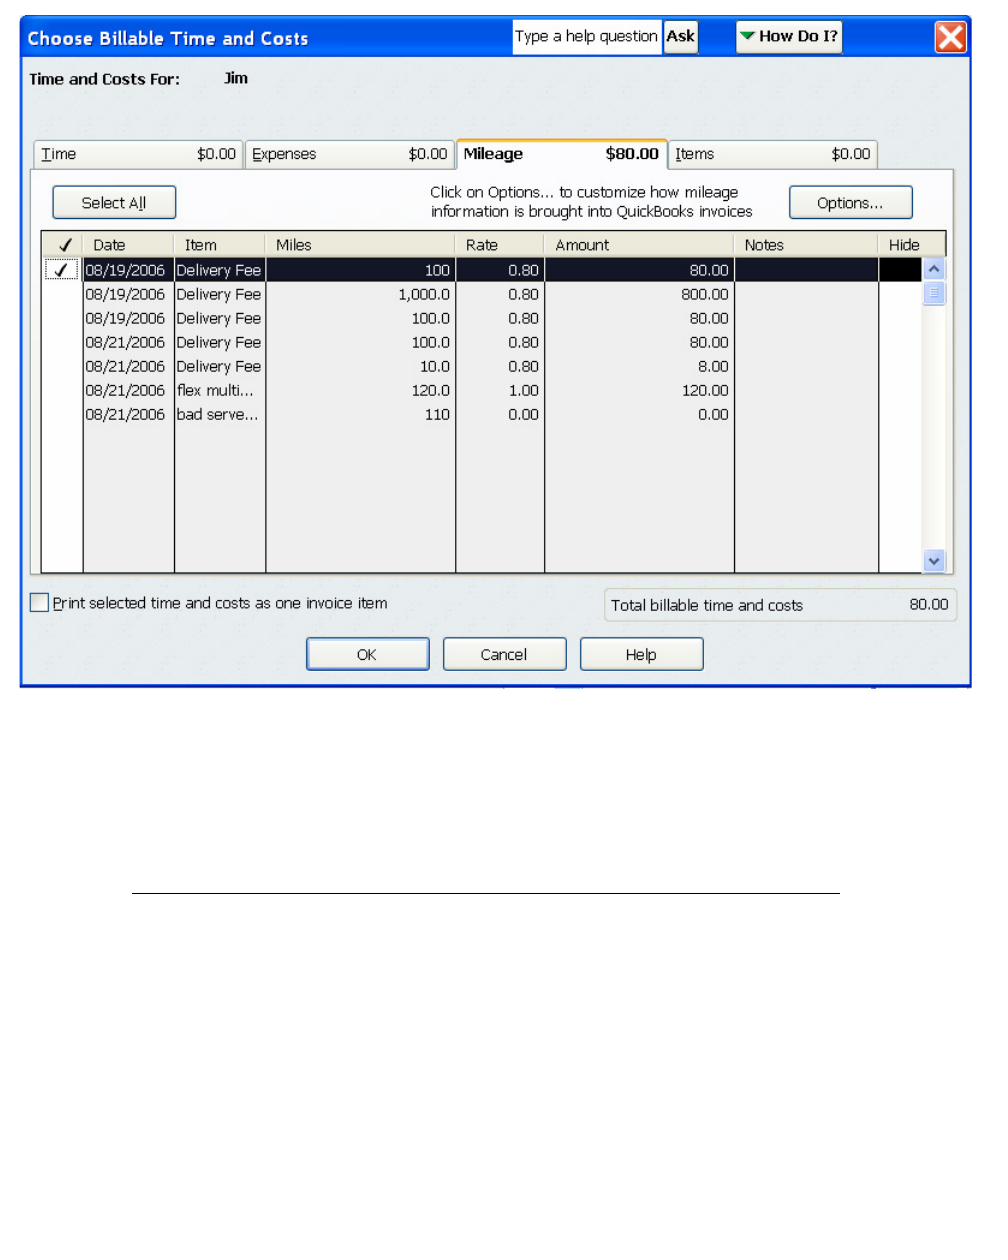
What Happens to Mileage Charges When I Create Invoices?
323
(c) 2013 Intuit Inc. All rights reserved.
Figure 24-6 .Billable Time/Costs Mileage tab
You apply charges to the invoice by selecting them then clicking OK. The charges appear as
line items in the invoice.
Mileage Charges and Invoices in the SDK
What happens when you create an invoice for a customer via the SDK by issuing the
InvoiceAdd request? If that customer has outstanding mileage charges, how do you get
those charges into the invoice? Is the outstanding charges prompt dialog displayed, as it is
when you create an invoice via the UI?
The answer is that you cannot add these mileage charges at all if you are creating invoices
via the SDK. No prompt is displayed to allow the user to add the charges to the invoice as
the SDK creates them. The only way to add a customer’s outstanding mileage charges is for
a user to create the invoice entirely from the UI.

324
Chapter 24: Using the Quickbooks Vehicle Mileage Feature
(c) 2013 Intuit Inc. All rights reserved.
Adding a Vehicle Mileage Transaction
You can use qbXML to add the transaction or you can use QBFC.
Adding Vehicle Mileage in qbXML
<?xml version="1.0"?>
<?qbxml version="6.0"?>
<QBXML>
<QBXMLMsgsRq onError="continueOnError">
<VehicleMileageAddRq requestID = "UUIDTYPE">
<VehicleMileageAdd >
<VehicleRef>
<FullName>Land Lugger</FullName>
</VehicleRef>
<CustomerRef>
<FullName>Jim Fuller</FullName>
</CustomerRef>
<ItemRef>
<FullName>Delivery Fee</FullName>
</ItemRef>
<OdometerStart>1500</OdometerStart>
<OdometerEnd>1600</OdometerEnd>
<BillableStatus>Billable</BillableStatus>
</VehicleMileageAdd>
</VehicleMileageAddRq>
</QBXMLMsgsRq>
</QBXML>
Adding Vehicle Mileage in QBFC
The following VB sample shows how to build a VehicleMileageAdd request using QBFC.
It is a one-shot sample that opens the connection with the currently open QuickBooks
company, starts the session, builds a billable mileage request, sends it to QuickBooks.
The transaction properties are all set with hardcoded values, since the purpose of this
snippet is only to show how to build the VehicleMileageAdd request.
SessionManager As QBSessionManager
Set SessionManager = New QBSessionManager
SessionManager.OpenConnection "", "VehicleMileageAdd_Sample"
SessionManager.BeginSession "", omDontCare
Dim VehicleMileageAddSet As IMsgSetRequest
Set VehicleMileageAddSet = SessionManager.CreateMsgSetRequest("US", 6, 0)
Dim VehicleMileageAdd As IVehicleMileageAdd
Set VehicleMileageAdd = VehicleMileageAddSet.AppendVehicleMileageAddRq

Querying and Deleting Vehicle Mileage Transactions
325
(c) 2013 Intuit Inc. All rights reserved.
VehicleMileageAdd.VehicleRef.FullName.setValue "Land Lugger"
VehicleMileageAdd.CustomerRef.FullName.setValue "Phillipe Montreaux"
VehicleMileageAdd.ItemRef.FullName.setValue "Delivery Fee"
VehicleMileageAdd.ORVehicleMileageAdd.OdometerReadingAdd.OdometerStart.setValue 1200
VehicleMileageAdd.ORVehicleMileageAdd.OdometerReadingAdd.OdometerEnd.setValue 1400
VehicleMileageAdd.BillableStatus.setValue bsBillable
Dim VehicleMileageAddResp As IMsgSetResponse
Set VehicleMileageAddResp = SessionManager.DoRequests(VehicleMileageAddSet)
SessionManager.EndSession
SessionManager.CloseConnection
Querying and Deleting Vehicle Mileage Transactions
When you query for vehiclemileage transactions and use a TxnDateRangeFilter, the From
and To dates that you specify are assumed to be the Trip End dates, so the filter will filter
for the Trip End date values that satisfy your filter range.
Vehicle mileage transactions can be queried and deleted like other transactions, and are
subject to the same rules and limitations. For more information, see these chapters: Chapter
8, “Creating Queries,” and Chapter 10, “Modifying and Deleting Transactions and List
Objects.”
Modifying Vehicle Mileage Transactions
Mileage transactions can be modified in the UI, but currently cannot be modified via the
SDK.
Adding, Modifying, Querying Vehicles in the Vehicle List
Vehicles are simple items, and the SDK allows you to add them, modify them, and query
for them.
Adding a Vehicle in qbXML
<?xml version="1.0"?>
<?qbxml version="6.0"?>
<QBXML>
<QBXMLMsgsRq onError="continueOnError">
<VehicleAddRq requestID = "UUIDTYPE">
<VehicleAdd>
<Name>Ford Romper</Name>
<IsActive>true</IsActive>
<Desc>flatbed</Desc>
</VehicleAdd>
</VehicleAddRq>
</QBXMLMsgsRq>
</QBXML>
326
Chapter 24: Using the Quickbooks Vehicle Mileage Feature
(c) 2013 Intuit Inc. All rights reserved.

What Can I Do With the Comp Codes I Create?
327
(c) 2013 Intuit Inc. All rights reserved.
C
HAPTER
25 1
A
DDING
, M
ODIFYING
, Q
UERYING
W
ORKER
C
OMP
C
ODES
1
Workers compensation insurance companies categorize the various types of work your
employees perform and assign codes to them, with different insurance rates applied to the
different codes. In QuickBooks, you need to create these workers compensation codes and
the premiums (rates) that apply to them and then assign them to employees. You need to do
this so QuickBooks can track the premiums you owe as you pay your employees.
Beginning with qbXML spec 7.0 and QuickBooks 2008, the SDK provides access to the
workers comp code feature via the WorkersCompCodeAdd, WorkersCompCodeMod, and
WorkersCompCodeQuery requests.
The following functionalities are NOT supported in the SDK:
•You cannot assign codes to employees in the SDK--you must use the workers’ comp
setup within the QuickBooks UI for that.
•The Experience Modification feature available in the QuickBooks UI for workers’
comp codes is not available in the SDK.
•You cannot currently delete codes from the SDK using the ListDel request. You have to
delete unwanted codes using the QuickBooks UI.
What Can I Do With the Comp Codes I Create?
Once the workers comp codes are created, you use the workers’ comp code wizard within
the QuickBooks UI to assign a code to an employee. You cannot assign codes to an
employee from the SDK. Once a code is assigned, information about workers comp
premiums paid for the employee are accessible through the various workers comp reports
available through the QuickBooks UI.
Workers’ Comp Code Feature Requires Payroll Subscription
For both the QuickBooks UI and the SDK, you are able to access the QuickBooks workers’
comp codes feature only if the company file is subscribed to the Intuit payroll service, or, if
the company file is a sample QuickBooks company.
If neither of these are the case, then you won’t be able to access the feature in the
QuickBooks UI. In the SDK, you’ll get an error when you send workers’ comp code add,
modify, or query requests.
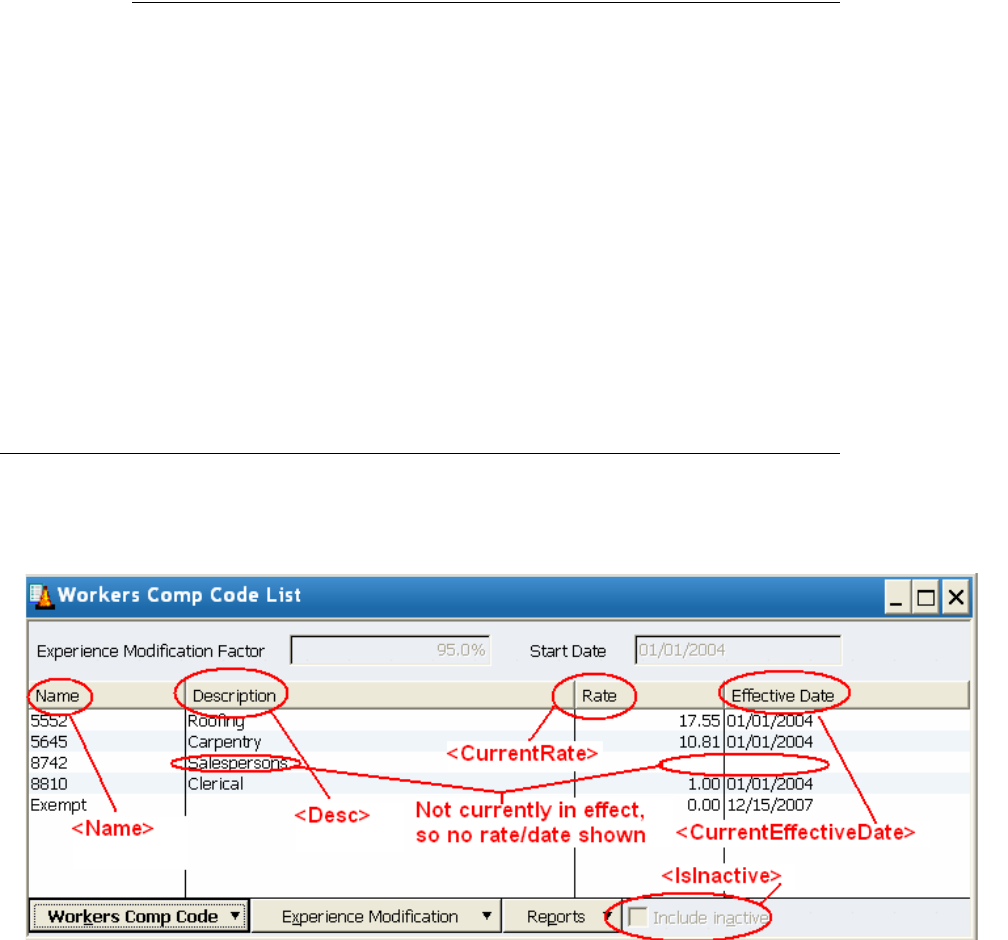
328
Chapter 25: Adding, Modifying, Querying Worker Comp Codes
(c) 2013 Intuit Inc. All rights reserved.
How Can I Tell Whether the Company is Subscribed to Payroll?
PreferencesQuery and HostQuery do not indicate whether the company is subscribed to
payroll.
However, you can determine this by simply issuing a WorkersCompCodeQuery and
checking the response for the error status code of 3250, feature not available.
Here is a query you could use for this:
<?xml version="1.0"?>
<?qbxml version="7.0"?>
<QBXML>
<QBXMLMsgsRq onError="continueOnError">
<WorkersCompCodeQueryRq requestID="2" />
</QBXMLMsgsRq>
</QBXML>
Workers Comp Codes in the UI and in the SDK
In the QuickBooks UI (if the company is a sample company or subscribed to the Intuit
payroll service), you you can add new workers compensation codes by selecting List ->
Workers Comp List to display the workers comp list (see Figure 25-1).
Figure 25-1 The Workers’ Comp List
In the list display form shown above, notice the code name, description, rate, and effective
dates, which correspond to the SDK fields used in the WorkersCompCode Add/Mod/Query
that we’ve called out in Figure 25-1. That form displays all of the names of the currently
created codes, but only the dates and rates of codes that are currently in effect (see the entry
in the figure for Salespersons). That is, if the code has a future effective date (or a past one)
and no currently effective date, the rate and date fields are empty in the form. That is why
we show the <CurrentRate> and <CurrentEffectiveDate> tags in Figure 25-1.

Workers Comp Codes in the UI and in the SDK
329
(c) 2013 Intuit Inc. All rights reserved.
Adding a Comp Code with Several Rates Possible via SDK
In the QuickBooks UI, you can specify a comp code that has a single rate. However, in the
SDK, you can create a comp code that has several rates, each of which has its own effective
date.
Current Effective Date and Current Rate
When you add or modify a workers’ comp code through the SDK, you’ll notice that you
can supply only the tags <Rate> and <EffectiveDate>. Where do the tags <CurrentRate>
and <CurrentEffectiveDate> come from? Those tags are from the responses to the
WorkersCompAdd/Mod/Query request. QuickBooks compares the supplied dates to the
current date and figures out whether the supplied effective date is in the past, present, or
future, and identifies the date as such in the Ret object.
Rate History: Visible Only Through the SDK
QuickBooks maintains rate history. This rate history includes the current date and rate, one
future date and rate and all past dates and rates. (If you already have a future effective date
and rate, and then add a new future effective date and rate, the new entry replaces the
currently existing one in the rate history.)
Although QuickBooks maintains the rate history, that history is not available in the
QuickBooks UI. To see the rate history, you’ll need to check the response to a
WorkersCompCode Add/Mod/Query request. The rate history is shown in the RateHistory
aggregates (in bold font) in the following response to a query request:
<?xml version="1.0" ?>
<QBXML>
<QBXMLMsgsRs>
<WorkersCompCodeModRs requestID="2" statusCode="0" statusSeverity="Info"
statusMessage="Status OK">
<WorkersCompCodeRet>
<ListID>80000006-1197741184</ListID>
<TimeCreated>2007-12-15T09:53:04-08:00</TimeCreated>
<TimeModified>2007-12-15T15:39:35-08:00</TimeModified>
<EditSequence>1197761975</EditSequence>
<Name>66891</Name>
<IsActive>true</IsActive>
<Desc>ordinance defuser</Desc>
<CurrentRate>78.00</CurrentRate>
<CurrentEffectiveDate>2007-07-07</CurrentEffectiveDate>
<NextRate>88.00</NextRate>
<NextEffectiveDate>2008-07-07</NextEffectiveDate>
<RateHistory>
<Rate>78.00</Rate>
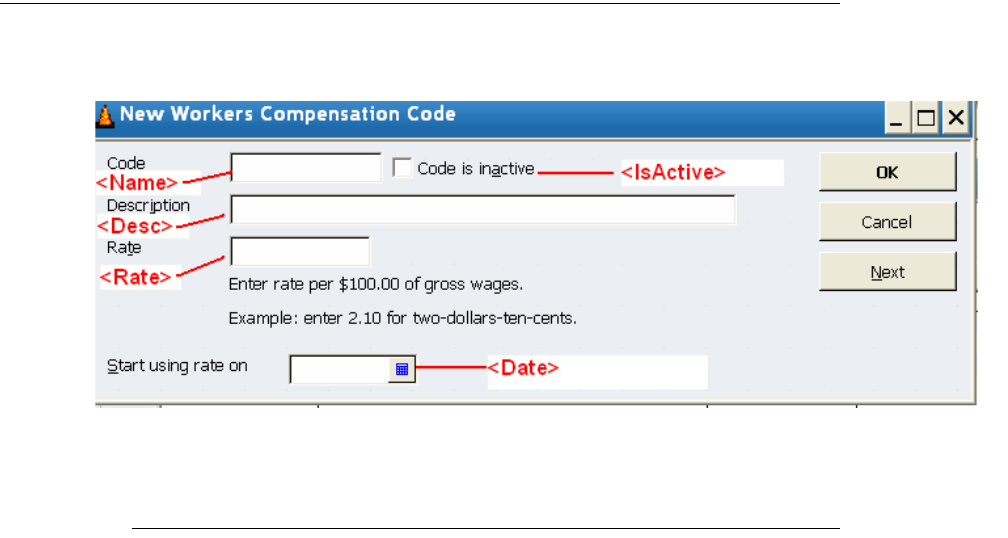
330
Chapter 25: Adding, Modifying, Querying Worker Comp Codes
(c) 2013 Intuit Inc. All rights reserved.
<EffectiveDate>2007-07-07</EffectiveDate>
</RateHistory>
<RateHistory>
<Rate>88.00</Rate>
<EffectiveDate>2008-07-07</EffectiveDate>
</RateHistory>
</WorkersCompCodeRet>
</WorkersCompCodeModRs>
</QBXMLMsgsRs>
</QBXML>
Adding a Workers Comp Code
To add a comp code via the UI, select List -> Workers Comp List->Workers Comp Code-
>New to display the New Workers Compensation Code form.
Figure 25-2 New Workers Comp Code Form
Adding a Comp Code Using QBFC
The following QBFC code (in VB) adds the workers’ comp code 8013. It has one rate that
goes into effect on July 7, 2007.
SessionManager.OpenConnection "", "IDN WorkersCompCode Add Sample"
SessionManager.BeginSession "", omDontCare
Dim WorkersCompCode_Set As IMsgSetRequest
Set WorkersCompCode_Set = SessionManager.CreateMsgSetRequest("US", 7, 0)
Dim WorkersCompCodeAdder As IWorkersCompCodeAdd
Set WorkersCompCodeAdder = WorkersCompCode_Set.AppendWorkersCompCodeAddRq
WorkersCompCodeAdder.Name.setValue "8013"
WorkersCompCodeAdder.Desc.setValue "driver"
WorkersCompCodeAdder.IsActive.setValue True

Querying for Workers Comp Codes
331
(c) 2013 Intuit Inc. All rights reserved.
Dim RateEntree As IRateEntry
Set RateEntree = WorkersCompCodeAdder.RateEntryList.Append
RateEntree.EffectiveDate.setValue #7/7/2007 9:35:00 AM#
RateEntree.Rate.setValue 1#
Adding a Comp Code Using qbXML
The following qbXML adds the workers’ comp code 8813. It has one rate that goes into
effect on July 7, 2007, and another rate that supercedes that rate on January 7, 2008.
<?xml version="1.0"?>
<?qbxml version="7.0"?>
<QBXML>
<QBXMLMsgsRq onError="continueOnError">
<WorkersCompCodeAddRq requestID="2">
<WorkersCompCodeAdd>
<Name>8813</Name>
<IsActive>true</IsActive>
<Desc>tack driver</Desc>
<RateEntry>
<Rate>1.00</Rate>
<EffectiveDate>2007-07-07</EffectiveDate>
</RateEntry>
<RateEntry>
<Rate>1.10</Rate>
<EffectiveDate>2008-01-07</EffectiveDate>
</RateEntry>
</WorkersCompCodeAdd>
</WorkersCompCodeAddRq>
</QBXMLMsgsRq>
</QBXML>
Querying for Workers Comp Codes
To query for comp codes using the SDK, use the request WorkersCompCodeQuery. You
can filter on the name of the code, the active status, effective date/date range, and modified
date.
Notice that this query does not support iterators, as the number of codes is expected to be
relatively small.
Querying for Comp Codes in qbXML
The following qbXML shows a query that checks for all comp codes (inactive as well as
active) that have the number 5 in the comp code name, and that has an effective date
between January 1, 2003 and December 28, 2008. Also, just to show another filter in the
mix, we want only those that have been modified between the start of 2003 and the end of
2007.
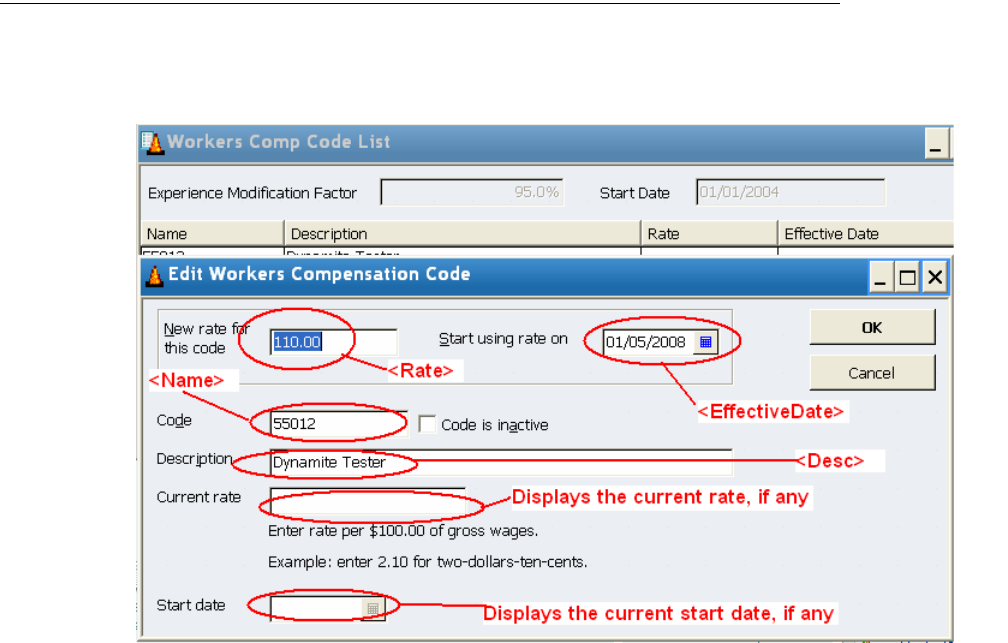
332
Chapter 25: Adding, Modifying, Querying Worker Comp Codes
(c) 2013 Intuit Inc. All rights reserved.
<?xml version="1.0"?>
<?qbxml version="7.0"?>
<QBXML>
<QBXMLMsgsRq onError="continueOnError">
<WorkersCompCodeQueryRq requestID="2">
<ActiveStatus>All</ActiveStatus>
<FromModifiedDate>2003-01-01</FromModifiedDate>
<ToModifiedDate>2007-12-28</ToModifiedDate>
<NameFilter>
<MatchCriterion>Contains</MatchCriterion>
<Name>5</Name>
</NameFilter>
<FromEffectiveDate>2003-01-01</FromEffectiveDate>
<ToEffectiveDate>2008-12-28</ToEffectiveDate>
</WorkersCompCodeQueryRq>
</QBXMLMsgsRq>
</QBXML>
Modifying Workers Comp Codes
To edit a comp code via the UI, select List -> Workers Comp List->, then doubleclick on
the desired comp code to edit that code in the Edit Workers’ Compensation Code window
(Figure 25-3):
Figure 25-3 Editing the Comp Code
The element names you use in WorkersCompCodeMod are shown in the figure next to the
UI fields that they affect. Notice the two display-only text fields at the bottom of the form:
there are no fields in the Modify request that correspond to these.

Modifying Workers Comp Codes
333
(c) 2013 Intuit Inc. All rights reserved.
Compared to the UI, using the SDK to modify comp codes provides you with a little more
flexibility. That is, you can modify several rate entry aggregates, each with its own rate and
corresponding effective date, whereas in the UI you can modify only one.
Modifying a Comp Code in qbXML
The following XML sample modifies a comp code with the name “8813” that has a single
entry (rate and effective date).
<?xml version="1.0"?>
<?qbxml version="7.0"?>
<QBXML>
<QBXMLMsgsRq onError="continueOnError">
<WorkersCompCodeModRq requestID="2">
<WorkersCompCodeMod>
<ListID>80000007-1197757964</ListID>
<EditSequence>1197757964</EditSequence>
<Name>8813</Name>
<IsActive>true</IsActive>
<Desc>operator</Desc>
<RateEntry>
<Rate>1.00</Rate>
<EffectiveDate>2007-08-08</EffectiveDate>
</RateEntry>
</WorkersCompCodeMod>
</WorkersCompCodeModRq>
</QBXMLMsgsRq>
</QBXML>
334
Chapter 25: Adding, Modifying, Querying Worker Comp Codes
(c) 2013 Intuit Inc. All rights reserved.

How Can I Tell If the UOM Feature is Available?
335
(c) 2013 Intuit Inc. All rights reserved.
C
HAPTER
26 1
U
SING
THE
U
NIT
OF
M
EASURE
F
EATURE
V
IA
THE
SDK 1
With the unit of measure feature (called UOM in this chapter) turned on in the QuickBooks
company file, you can specify what measure is being used to express an item’s quantity,
prices, rates, and costs. For example, if you enter a quantity of 25 on an invoice for a ball
point pen item, the unit of measure can show whether that quantity means 25 individual
pens, 25 boxes of 12, or 25 cases containing 120 pens each.
The QuickBooks company file can be set to support a single UOM for an item, or to
support multiple UOMs per item where you can order in one unit and sell in another.
SDK support of the feature begins in qbXML spec 7.0 and QB 2008. The design intention
of the SDK is to allow applications to use UOM in a similar manner as the interactive user.
This chapter describes how to use the UOM feature in QuickBooks in the SDK.
How Can I Tell If the UOM Feature is Available?
An application can access UOM functionality for QuickBooks 2008 or greater versions IF
the company file being used has UOM enabled.
How do you tell if the company file has UOM enabled? The PreferencesQuery does not
currently indicate whether UOM is enabled or not, so you cannot use that. However, a good
way to determine this is to do a UnitOfMeasureSetQuery as follows:
<?xml version="1.0"?>
<?qbxml version="7.0"?>
<QBXML>
<QBXMLMsgsRq onError="continueOnError">
<UnitOfMeasureSetQueryRq requestID="0" />
</QBXMLMsgsRq>
</QBXML>
If UOM is disabled for the company file, the query will return an error code of 3250 “This
feature is not enabled or not available in this version of QuickBooks”.
Which SDK Requests Support UOM?
SDK support of UOM features are provided in the following requests:
•UnitOfMeasureSetAdd, which creates a unit of measure set.
•UnitOfMeasureSetQuery, which queries for existing UOM sets.
•The various Item add and mod requests contain an optional UnitOfMeasureSetRef
aggregate that specifies which UOM set applies to the item. The various Item mod

336
Chapter 26: Using the Unit of Measure Feature Via the SDK
(c) 2013 Intuit Inc. All rights reserved.
requests also contain a ForceUOMChange boolean that is needed to dismiss the UI user
prompt that QuickBooks puts up when you try to modify a UOM setting.
> ItemServiceAdd and Mod
> ItemGroupAdd and Mod
> ItemInventoryAdd and Mod
> ItemNonInventoryAdd and Mod
> ItemInventoryAssemblyAdd and Mod
•In the following transactions, UOM support is provided in transaction line items
through the UnitOfMeasure element that specifies which one of the item’s UOMs is to
be used.
> Bill Add + Mod
> Charge Add and Mod
> Check Add and Mod
> CreditCardCharge Add and Mod
> CreditCardCredit Add and Mod
> CreditMemo Add and Mod
> Estimate Add and Mod
> Invoice Add and Mod
> PurchaseOrder Add and Mod
> SalesOrder Add+Mod
> SalesReceipt Add and Mod
> Vendor Credit Add and Mod
> ItemReceipt Add
How Does the UOM Feature Work?
In QuickBooks, you first create a UOM set with a base measure and, optionally, related
measures that are some multiple of the base measure (Figure 26-1). We’ll cover how to
create UOM sets later; right now, we just want to introduce some concepts. Notice the
naming convention of the UOM set. It starts with “By the.” This is significant and we’ll
talk about that later as well.

How Does the UOM Feature Work?
337
(c) 2013 Intuit Inc. All rights reserved.
Figure 26-1 UOM Sets
That UOM set appears in the UOM list from which it can be assigned to an item when the
item is created or modified. Figure 26-2 shows what is happening when you assign a UOM
set to an item. You get all the UOMs within that UOM set via the UOM set reference.
Figure 26-2 Assigning a UOM set to an item (SDK)
Figure 26-3 shows the assigning of a UOM set from within the UI.
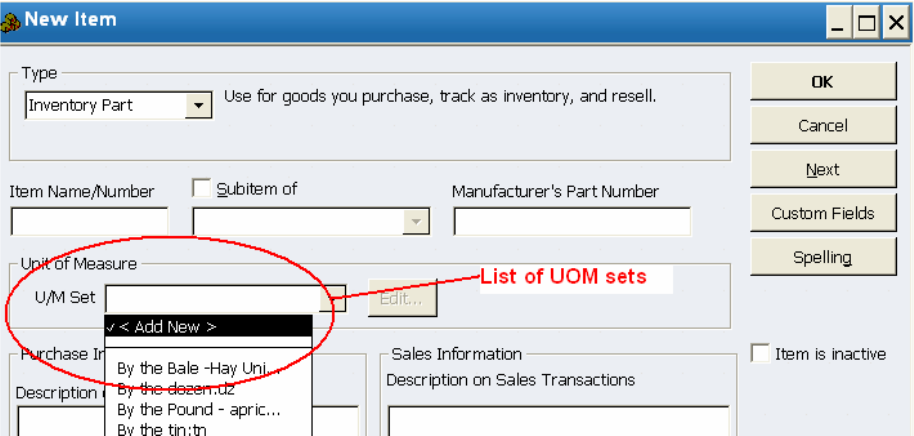
338
Chapter 26: Using the Unit of Measure Feature Via the SDK
(c) 2013 Intuit Inc. All rights reserved.
Figure 26-3 Assigning a UOM set to an item (UI)
Subsequently, in transactions, any of the units of measure within that item’s UOM set can
be used in a transaction line item for that item, to specify the unit used in the transaction
(see Figure 26-4).
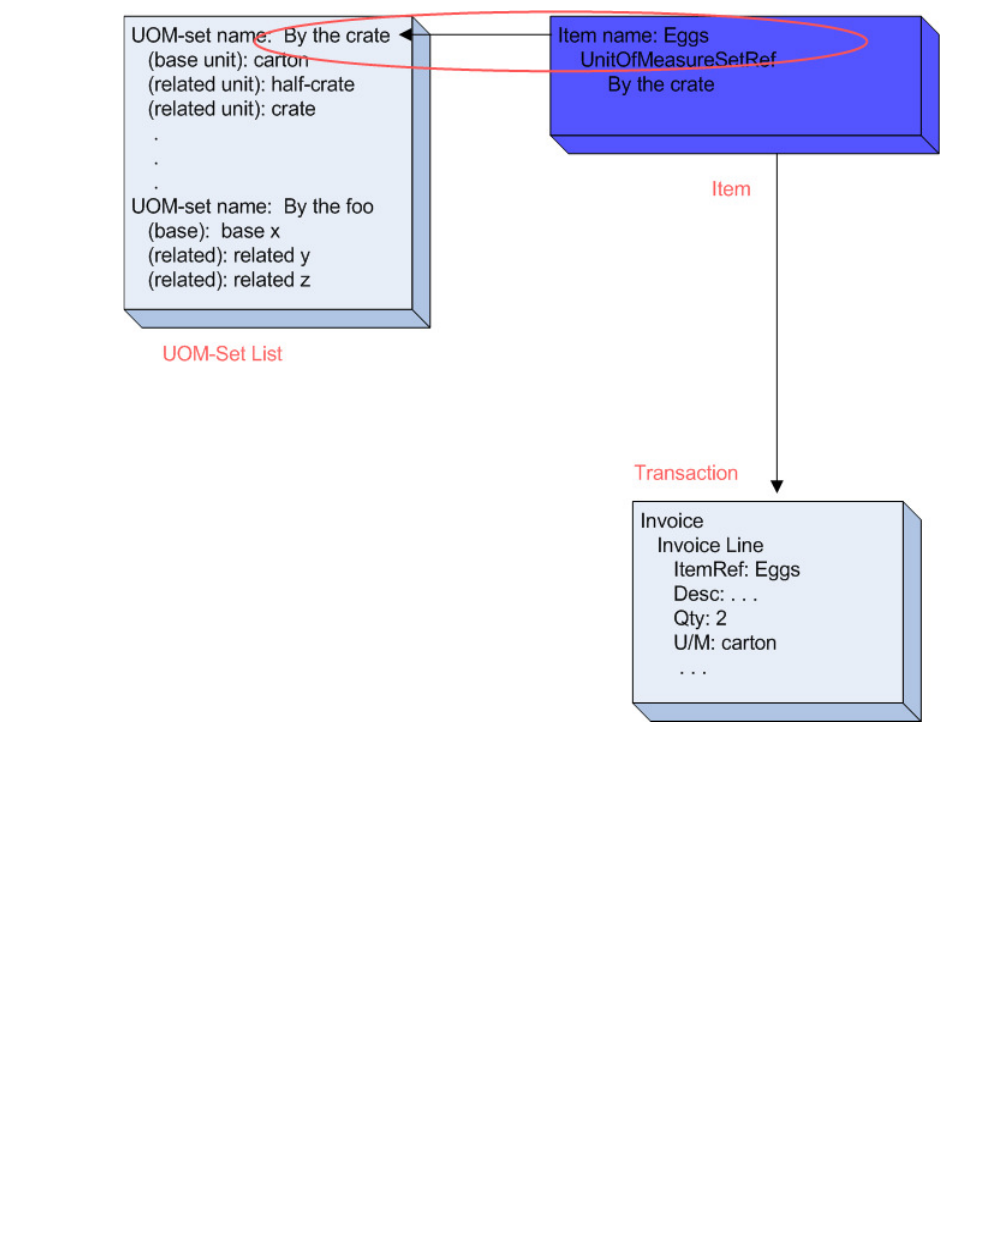
How Does the UOM Feature Work?
339
(c) 2013 Intuit Inc. All rights reserved.
Figure 26-4 Invoice line gets UOMs from the UOM set assigned to ItemRef (eggs)
The above is true only if the conpany file is set to multiple UOM per item mode. If the
company file is set to single UOM per item, only the base unit can be used.
Figure 26-5 shows how a UOM is assigned in a transaction line in the QuickBooks UI.
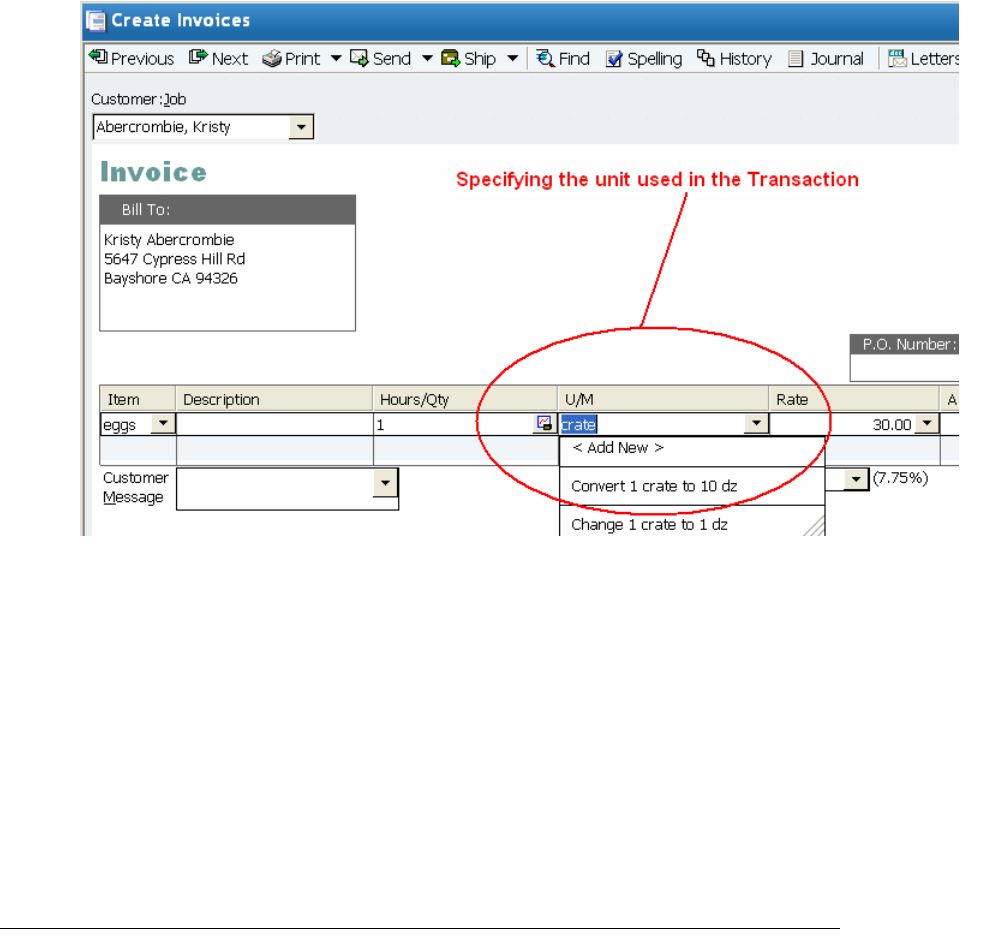
340
Chapter 26: Using the Unit of Measure Feature Via the SDK
(c) 2013 Intuit Inc. All rights reserved.
Figure 26-5 Specifying a UOM in a transaction line (UI)
Again the above figure holds true only in multiple UOM mode. In single UOM per item,
there is no dropdown list and the U/M is listed but greyed out, disinviting any user
selection, because only the base unit is allowed. Even in the SDK, if the company file is set
to single UOM per item, you can only specify the base unit. Specifying some other unit will
result in an error status code of 3210.
Unfortunately there currently no way to determine whether the company file is in single
UOM or multiple UOM mode, other than perhaps checking for error 3210 when assigning a
non-base unit to a transaction line.
Creating a UOM Set in the UI
In the QuickBooks UI, if the company is enabled for multiple UOMs per item, a UOM can
be created either from the UOM set list (Lists->U/M Set List->U/M Set->New) as shown in
Figure 26-6, or from the New or Edit Item forms by clicking <Add New> within the U/M
Set dropdown listbox.
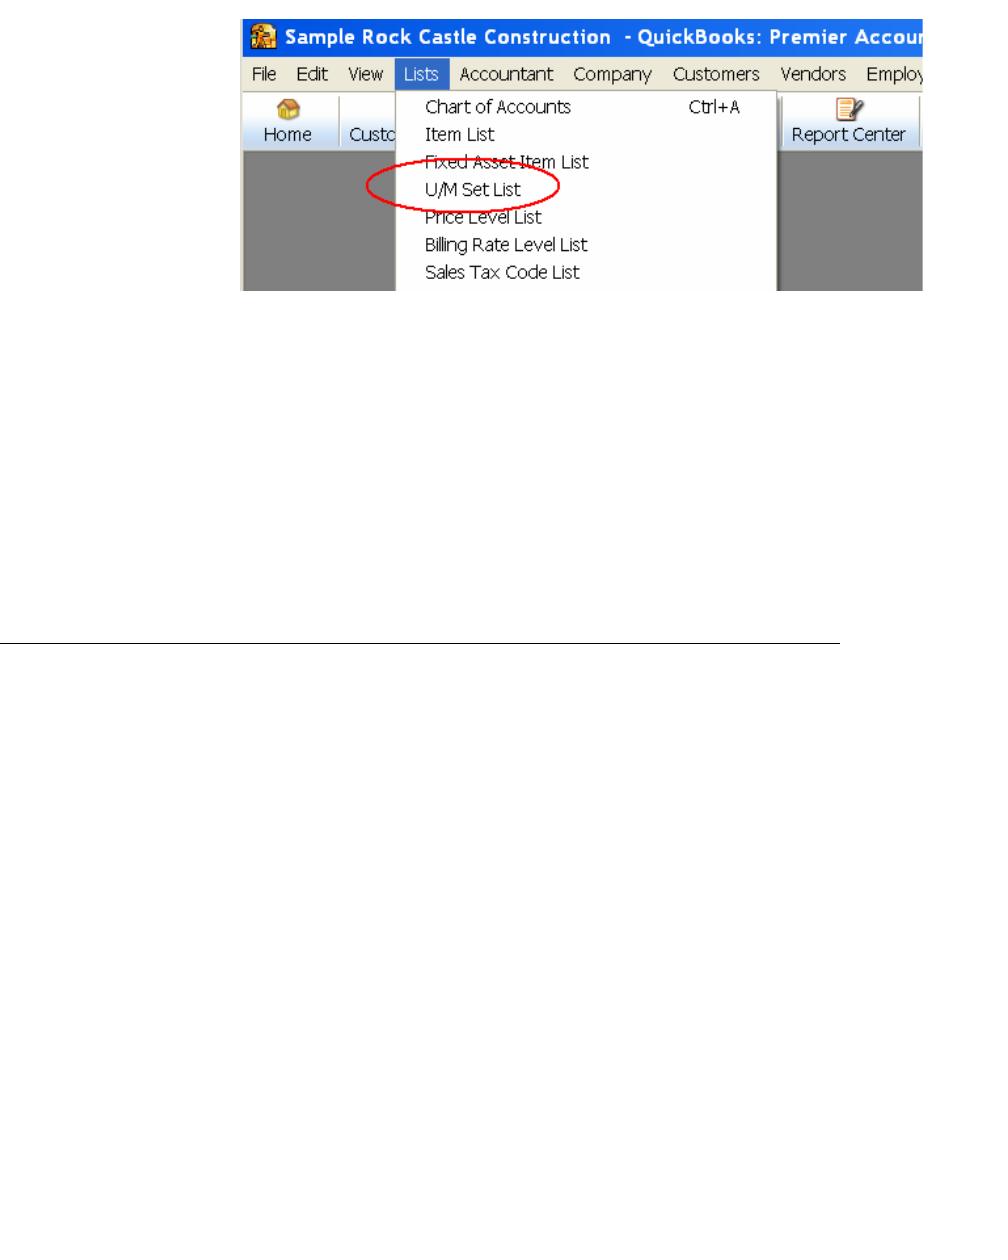
How Do I Create a UOM Set in the SDK?
341
(c) 2013 Intuit Inc. All rights reserved.
Figure 26-6 UOM Set List (UI)
If the company file is enabled for single UOM per item, then you simply create a new
UOM in the U/M dropdown list by clicking <Add New>. QuickBooks will then create a
default UOM set for that new UOM, and assign that unit as the base unit and name the
UOM set “By the <whatever name you pick for the new unit>”, for example “By the carat”.
Of course, because in single UOM/item mode the UI will not have the UOM list, you won’t
be able to see the UOM set in the UI in single UOM mode, but you will be able to get the
UOM sets by doing a UnitOfMeasureSetQuery.
How Do I Create a UOM Set in the SDK?
You use UnitOfMeasureSetAdd to create a UOM set in the SDK. You’ll need to
1. Specify a unique name for the UOM set, starting with the prefix “By the”. You’ll get an
error code 3100 in the response if the name is not unique.
2. Create a base unit. See the online help in QuickBooks for an explanation of units of
measure and base units and how to pick the base unit.
3. Optionally, but normally, you’ll create one or more related units using the RelatedUnit
aggregate, where you specify the conversion ratio (how many base units are contained
in that related unit). For example, if base unit is carton and the related unit “case”
contains 10 cartons, then the conversion ratio is 10.
4. You can also optionally specify which one of the units in the UOM set is to be used as
the default unit (via the DefaultUnit aggregate) in transaction lines for purchases, or for
sales, or for shipping. The unit specified in a default here will be the unit automatically
used in the transaction lines.
5. Check the response to your UOM set add request to determine whether the company
file is enabled for UOM. If this isn’t the case, you’ll get an error code of 3250 in your
response, indicating the feature is not supported.

342
Chapter 26: Using the Unit of Measure Feature Via the SDK
(c) 2013 Intuit Inc. All rights reserved.
Why Do I Need to Follow the UOM Set Naming Convention?
Every UOM set name should begin with “By the”. For example, “By the pound” or “By the
weigh”. Why is this? Unless you begin the UOM set with “By the” then the UOM set won’t
show up in the UI when the company file is enabled for single UOM per item mode. That
is, in the New Item or Edit Item form, the units in those UOM sets won’t appear and you
won’t be able to use them in the UI. (However, UOM sets that don’t follow this convention
will still show up in a UnitOfMeasureSet query.)
Can I Modify a UOM Set in the SDK?
No. This is currently not supported.
Can I Set UOM Set Defaults for Purchase, Sales, and Shipping?
Yes. You use the DefaultUnit aggregate in the UnitOfMeasureSetAdd request to specify
defaults:
<DefaultUnit>
<UnitUsedFor>Shipping</UnitUsedFor>
<Unit>box</Unit>
</DefaultUnit>
The <Unit> field can contain any unit specified in the UOM set (base unit or related units).
The <UnitUsedFor> field can contain one of the following values:
•Sales
•Purchase
•Shipping
If you don’t specify any defaults, the base unit will be used as the default for purchase and
sales, and there will be no default for shipping.
See the samples below to see how to set the defaults in QBFC and qbXML.
How Do I Specify Which Units the UOM Set Contains?
You do this by specifying one <BaseUnit>, which is required, and 0 to N <RelatedUnit>,
which are all optional, as shown in the following qbxML snippet:

How Do I Create a UOM Set in the SDK?
343
(c) 2013 Intuit Inc. All rights reserved.
<UnitOfMeasureSetAddRq requestID="0">
<UnitOfMeasureSetAdd>
<Name>Munitions</Name>
<UnitOfMeasureType>Count</UnitOfMeasureType>
<BaseUnit>
<Name>cartridge</Name>
<Abbreviation>ctrdge</Abbreviation>
</BaseUnit>
<RelatedUnit>
<Name>box</Name>
<Abbreviation>bx</Abbreviation>
<ConversionRatio>25.00</ConversionRatio>
</RelatedUnit>
</UnitOfMeasureSetAdd>
</UnitOfMeasureSetAddRq>
What Does the Abbreviation Field Do? Why’s it Required?
The <Abbreviation> field specified the characters that are to be displayed and printed in the
transaction line item if that unit is selected for the item. Without the abbreviation,
QuickBooks won’t be able to indicate the unit.
Creating a UOM Set in QBFC
The following code sample shows how to build a UOM set. The UOM set name, type, and
base unit are required. The sample assigns default units to purchase and sales transaction
line items and also for shipping. The sample creates only one related unit.
SessionManager.OpenConnection "", "IDN UOM Set Add Sample"
SessionManager.BeginSession "", omDontCare
Dim UOM_AddSet As IMsgSetRequest
Set UOM_AddSet = SessionManager.CreateMsgSetRequest("US", 7, 0)
‘Append the add request and get the object so we can set its properties
Dim UOMSetAdder As IUnitOfMeasureSetAdd
Set UOMSetAdder = UOM_AddSet.AppendUnitOfMeasureSetAddRq
‘Set all required properties
UOMSetAdder.UnitOfMeasureType.setValue uomtCount
UOMSetAdder.Name.setValue "By the bale"
UOMSetAdder.BaseUnit.Abbreviation.setValue "ble"
UOMSetAdder.BaseUnit.Name.setValue "bale"
‘Not required, but handy. We set default UOM for purchases, sales, and
‘shipping.
Dim DefUnitList As IDefaultUnit
Set DefUnitList = UOMSetAdder.DefaultUnitList.Append
DefUnitList.Unit.setValue "flake"

344
Chapter 26: Using the Unit of Measure Feature Via the SDK
(c) 2013 Intuit Inc. All rights reserved.
‘Specify uufSales to set the unit as default in a Sales txn line item,
‘uufPurchase to set the unit as default in a Purchase txn line item,
‘uufShipping to set a default for a shipping line.
DefUnitList.UnitUsedFor.setValue uufSales
‘Notice we can re-use the IDefaultUnit object.
Set DefUnitList = UOMSetAdder.DefaultUnitList.Append
DefUnitList.Unit.setValue "bale"
DefUnitList.UnitUsedFor.setValue uufPurchase
Set DefUnitList = UOMSetAdder.DefaultUnitList.Append
DefUnitList.Unit.setValue "bale"
DefUnitList.UnitUsedFor.setValue uufShipping
‘Now we specify the other units of measure within the set. You use the
‘conversion ratio field to specify how many base units are contained in the
‘related unit. Here, the conversion ratio is 20 because there
‘are 20 flakes of hay in a bale, which is the base unit.
Dim RelUnit As IRelatedUnit
Set RelUnit = UOMSetAdder.RelatedUnitList.Append
RelUnit.Abbreviation.setValue "flk"
RelUnit.ConversionRatio.setValue 20
RelUnit.Name.setValue "flake"
Creating a UOM Set in qbXML
The following code sample shows how to build a UOM set. The UOM set name, type, and
base unit are required. The sample assigns default units to purchase and sales transaction
line items and also for shipping. The sample creates two related units.
<?xml version="1.0" ?>
<?qbxml version="7.0"?>
<QBXML>
<QBXMLMsgsRq onError="stopOnError">
<UnitOfMeasureSetAddRq requestID="0">
<UnitOfMeasureSetAdd>
<Name>By the cartridge</Name>
<UnitOfMeasureType>Count</UnitOfMeasureType>
<BaseUnit>
<Name>cartridge</Name>
<Abbreviation>ctrdge</Abbreviation>
</BaseUnit>
<RelatedUnit>
<Name>box</Name>
<Abbreviation>bx</Abbreviation>
<ConversionRatio>25.00</ConversionRatio>
</RelatedUnit>
<RelatedUnit>
<Name>case</Name>
<Abbreviation>cse</Abbreviation>
<ConversionRatio>500.00</ConversionRatio>
</RelatedUnit>
<DefaultUnit>
<UnitUsedFor>Sales</UnitUsedFor>

Specifying a UOM Set for an Item
345
(c) 2013 Intuit Inc. All rights reserved.
<Unit>box</Unit>
</DefaultUnit>
<DefaultUnit>
<UnitUsedFor>Purchase</UnitUsedFor>
<Unit>case</Unit>
</DefaultUnit>
<DefaultUnit>
<UnitUsedFor>Shipping</UnitUsedFor>
<Unit>box</Unit>
</DefaultUnit>
</UnitOfMeasureSetAdd>
</UnitOfMeasureSetAddRq>
</QBXMLMsgsRq>
</QBXML>
Specifying a UOM Set for an Item
You can specify a UOM set for a service item, inventory item, non-inventory item, item
assembly, and item group. You do this by using the UnitOfMeasureSetRef aggregate to
refer to an existing UOM set. In an Item* Add request, the UnitOfMeasureSetRef is all you
use.
What You Must Do in an Item Mod
In an Item* Mod request, you also need to use the ForceUOMChange if you are changing
the UOM set and the base unit of the new set doesn’t match the base unit of the UOM set
currently assigned to the item. This does the same thing as the user accepting the warning
prompt in the UI. If you don’t specify ForceUOMChange, the default is false, and you’ll
get an error if you try to change the UOM set if the new set has a different base unit.
You should be aware that if you change the base unit for an item, you should also change
the item's quantities on hand and cost to reflect the new unit; otherwise the values will be
inaccurate. An alternative to handle such UOM changes to an item is to create a new item
with the desired UOM set and inactivate the old item.
Specifying a UOM Set in an Item* Add Request
The following code creates a service item with a UOM set specified.
In QBFC
SessionManager.OpenConnection "", "IDN ItemService Add Sample"
SessionManager.BeginSession "", omDontCare
Dim ItemServiceAddSet As IMsgSetRequest
Set ItemServiceAddSet = SessionManager.CreateMsgSetRequest("US", 7, 0)

346
Chapter 26: Using the Unit of Measure Feature Via the SDK
(c) 2013 Intuit Inc. All rights reserved.
Dim ServiceItemAdder As IItemServiceAdd
Set ServiceItemAdder = ItemServiceAddSet.AppendItemServiceAddRq
ServiceItemAdder.Name.setValue "Pump Repair"
ServiceItemAdder.ORSalesPurchase.SalesOrPurchase.Desc.setValue "repair
small pumps"
ServiceItemAdder.ORSalesPurchase.SalesOrPurchase.ORPrice.Price.setValue 50
ServiceItemAdder.ORSalesPurchase.SalesOrPurchase.AccountRef.FullName.
setValue "Service Income"
ServiceItemAdder.UnitOfMeasureSetRef.FullName.setValue "By the hour"
In qbXML
<?xml version="1.0" ?>
<?qbxml version="7.0"?>
<QBXML>
<QBXMLMsgsRq onError="stopOnError">
<ItemServiceAddRq requestID="0">
<ItemServiceAdd>
<Name>Pump Repair</Name>
<UnitOfMeasureSetRef>
<FullName>By the hour</FullName>
</UnitOfMeasureSetRef>
<SalesOrPurchase>
<Desc>repair small pumps</Desc>
<Price>50.00</Price>
<AccountRef>
<FullName>Service Income</FullName>
</AccountRef>
</SalesOrPurchase>
</ItemServiceAdd>
</ItemServiceAddRq>
</QBXMLMsgsRq>
</QBXML>
Specifying a UOM Set in an Item* Mod Requst
The following code modifies a service item to change the UOM set.
In QBFC
SessionManager.OpenConnection "", "IDN ItemService Mod Sample"
SessionManager.BeginSession "", omDontCare
Dim ItemServiceAddSet As IMsgSetRequest
Set ItemServiceAddSet = SessionManager.CreateMsgSetRequest("US", 7, 0)
Dim ServiceItemAdder As IItemServiceMod
Set ServiceItemAdder = ItemServiceAddSet.AppendItemServiceModRq
ServiceItemAdder.EditSequence.setValue "1197702697"
ServiceItemAdder.ListID.setValue "80000057-1197702697"
ServiceItemAdder.UnitOfMeasureSetRef.FullName.setValue "by the day"
ServiceItemAdder.ForceUOMChange.setValue True

Using UOM in Transactions
347
(c) 2013 Intuit Inc. All rights reserved.
In qbXML
<?xml version="1.0" ?>
<?qbxml version="7.0"?>
<QBXML>
<QBXMLMsgsRq onError="stopOnError">
<ItemServiceModRq requestID="0">
<ItemServiceMod>
<ListID>80000057-1197702697</ListID>
<EditSequence>1197702697</EditSequence>
<UnitOfMeasureSetRef>
<FullName>by the day</FullName>
</UnitOfMeasureSetRef>
<ForceUOMChange>1</ForceUOMChange>
</ItemServiceMod>
</ItemServiceModRq>
</QBXMLMsgsRq>
</QBXML>
Using UOM in Transactions
When you create or modify a transaction, you specify the UOM in the transaction line item
using the UnitOfMeasure element, which occurs after the Quantity element. You must
specify a unit from the UOM set for the item that is referenced in that line. Otherwise,
you’ll get a runtime error.
Also, the quantity field always reflects the quantity in terms of the base unit. Suppose your
base unit is one dozen (eggs). If you order a quantity of 3 and set the units to the related
unit of crate (a crate having 10 dozen eggs), then QuickBooks automatically recalculates
the quantity to a value of 0.3 because the order now uses the unit crate! It does this
calculation using the conversion ratio of that related unit.
Using UOM in a Transaction Add Request
The following code creates a SalesOrder containing one line item of “eggs” with a UOM
set to “crate”, which contains 10 dozen eggs. Because the base unit is one dozen eggs, the
quantity here means 3 dozen eggs, not 3 crates. QuickBooks sees the unit of crate and
automatically changes that quantity to reflect the crates unit: 3 dozen eggs becomes 0.3
crates and so the actual SalesOrder is for 0.3 crates of eggs.
In QBFC
Dim SessionManager As QBSessionManager
Set SessionManager = New QBSessionManager
SessionManager.OpenConnection2 appID, appleName, ctLocalQBD
SessionManager.BeginSession "", omDontCare

348
Chapter 26: Using the Unit of Measure Feature Via the SDK
(c) 2013 Intuit Inc. All rights reserved.
Dim SalesOrderSet As IMsgSetRequest
Set SalesOrderSet = SessionManager.CreateMsgSetRequest("US", 7, 0)
Dim salesOrder As ISalesOrderAdd
Set salesOrder = SalesOrderSet.AppendSalesOrderAddRq
salesOrder.CustomerRef.FullName.setValue "Abercrombie, Kristy"
salesOrder.RefNumber.setValue "121345"
Dim SOLineItemAdder As ISalesOrderLineAdd
Set SOLineItemAdder =
salesOrder.ORSalesOrderLineAddList.Append.SalesOrderLineAdd
SOLineItemAdder.ItemRef.FullName.setValue "eggs"
SOLineItemAdder.Quantity.setValue 3
SOLineItemAdder.UnitOfMeasure.setValue "crate"
In qbXML
<?xml version="1.0" ?>
<?qbxml version="7.0"?>
<QBXML>
<QBXMLMsgsRq onError = "stopOnError">
<SalesOrderAddRq requestID = "0">
<SalesOrderAdd>
<CustomerRef>
<FullName>Abercrombie, Kristy</FullName>
</CustomerRef>
<RefNumber>121345</RefNumber>
<SalesOrderLineAdd>
<ItemRef>
<FullName>eggs</FullName>
</ItemRef>
<Quantity>3</Quantity>
<UnitOfMeasure>crate</UnitOfMeasure>
</SalesOrderLineAdd>
</SalesOrderAdd>
</SalesOrderAddRq>
</QBXMLMsgsRq>
</QBXML>
Using UOM in a Transaction Mod Request
When you modify a transaction line to change the unit of measure used in that line, (a unit
of measure, NOT the UOM set itself!!), you use the OverrideUOMSetRef aggregate to
specify the UOM set that is already specified for the item referenced in that transaction line,
and then specify the desired unit within that set.
The name of this aggregate is slightly unfortunate since it might lead you to believe that
you can change the UOM set itself here to whatever you want. That is not possible! When
you change the UOM in a transaction Mod request, you cannot change the UOM set itself!
You can only change to a different unit within the UOM set already specifid for the item.
You’ll get an error code of 3210 if you try to change the UOM set.

Using UOM in Transactions
349
(c) 2013 Intuit Inc. All rights reserved.
The following code modifies a SalesOrder containing one line item of “eggs” that has a
UOM set to “crate”. It changes the quantity from 3 to 4 and changes the unit to “dozen”.
In QBFC
Dim SessionManager As QBSessionManager
Set SessionManager = New QBSessionManager
SessionManager.OpenConnection2 appID, appleName, ctLocalQBD
SessionManager.BeginSession "", omDontCare
Dim SalesOrderSet As IMsgSetRequest
Set SalesOrderSet = SessionManager.CreateMsgSetRequest("US", 7, 0)
Dim salesOrder As ISalesOrderMod
Set salesOrder = SalesOrderSet.AppendSalesOrderModRq
salesOrder.EditSequence.setValue "1197739296"
salesOrder.TxnID.setValue "5C56-1197739296"
Dim SOLineItemMod As ISalesOrderLineMod
Set SOLineItemMod =
salesOrder.ORSalesOrderLineModList.Append.SalesOrderLineMod
SOLineItemMod.TxnLineID.setValue "5C58-1197739296"
SOLineItemMod.ItemRef.FullName.setValue "eggs"
SOLineItemMod.Quantity.setValue 4
‘We aren’t changing the UOM set here! Just specifying the UOM set
‘already specified for “eggs”!
SOLineItemMod.OverrideUOMSetRef.FullName.setValue "by the dozen"
SOLineItemMod.UnitOfMeasure.setValue "dozen"
In qbXML
<?xml version="1.0" ?>
<?qbxml version="7.0"?>
<QBXML>
<QBXMLMsgsRq onError = "stopOnError">
<SalesOrderModRq requestID = "0">
<SalesOrderMod>
<TxnID>5C56-1197739296</TxnID>
<EditSequence>1197739296</EditSequence>
<SalesOrderLineMod>
<TxnLineID>5C58-1197739296</TxnLineID>
<ItemRef>
<FullName>eggs</FullName>
</ItemRef>
350
Chapter 26: Using the Unit of Measure Feature Via the SDK
(c) 2013 Intuit Inc. All rights reserved.
<Quantity>4</Quantity>
<UnitOfMeasure>dozen</UnitOfMeasure>
<OverrideUOMSetRef>
<FullName>by the dozen</FullName>
</OverrideUOMSetRef>
</SalesOrderLineMod>
</SalesOrderMod>
</SalesOrderModRq>
</QBXMLMsgsRq>
</QBXML>

What Does ListMerge Do?
351
(c) 2013 Intuit Inc. All rights reserved.
C
HAPTER
27 1
M
ERGING
A
CCOUNTS
, C
USTOMERS
, V
ENDORS
, C
LASSES
1
Merging certain types of list objects is a useful feature of QuickBooks. For example,
merging accounts is useful for eliminating redundant accounts within a given account type.
For example, you might have an expense account that tracks paper reams and a different
expense account that tracks office supplies. Yet, you may want to change this to have only a
single account--the office supplies account--that tracks paper reams along with other office
supplies.
The QuickBooks UI solves these types of problems by allowing users to merge accounts,
customers, and vendors. Beginning with qbXML spec 7.0 and QuickBooks 2008, these
types of list merge operations can also be performed through the SDK by using the request
ListMerge. Ability to merge Classes was added in qbXML 8.0 and QB 2009.
This chapter describes the use of ListMerge and the work you need to do before you
actually invoke ListMerge.
What Does ListMerge Do?
ListMerge is a request that allows you to merge the following:
•Merge one account into another account
•Merge one customer/customer job into another customer/customer job
•Merge one vendor into another vendor
•Merge two classes into one class
I
MPORTANT
ListMerge requires the company file to be opened in single
user mode.
What Happens in the ListMerge Operation?
What happens in the merge is that one of the objects, the “merge-from” object, is merged
into the other object, the “merge-to” object. For example, suppose the expense account
“Paper Reams” is merged into the expense account “Office Supplies.” After the merge,
there is only the “Office Supplies” account, and all transactions in the past that referenced
“Paper Reams” now automatically reference “Office Supplies.” This means that balances
will change in the merged-to object as it receives the merged-from balances.

352
Chapter 27: Merging Accounts, Customers, Vendors, Classes
(c) 2013 Intuit Inc. All rights reserved.
When Can I NOT Do a ListMerge?
You cannot do a ListMerge if an accountant copy of the company exists--if you do, you’ll
get an error. The idea is that any merges ought to be done in the accountant copy. Beginning
with QB 2009 and qbXML 8.0, you can use the Account Copy Exists request to check for
this before issuing the list merge request.
Can I Undo or Reverse a ListMerge?
No.
What Must I Do Before Merging?
The merging “rules” are not many in number, but they are different for accounts, customers,
and vendors. The following table shows the rules applying to each:

Merging Accounts
353
(c) 2013 Intuit Inc. All rights reserved.
Table 27-1 Merging Rules and how to follow them
Merging Accounts
To merge two accounts,
1. Compare AccountType of the merge-from account with the AccountType of the merge-
to account. If they aren’t the same stop: you cannot continue. If AccountTypes are the
same:
a. Compare the Sublevel of the merge-from account with the Sublevel of the merge-to
account.
b. If the Sublevels are not the same, change the Sublevel of either the merge-from
account or the merge-to account so that the Sublevels match.
Objects to
Merge Required Pre-Merge Conditions How to Satisfy the Conditions
Accounts 1. Accounts must be of the same AccountType
2. Accounts must be at the same hierarchical
level within the chart of accounts.
1. If the AccountTypes are different,
you cannot proceed. You cannot
change the AccountType.
2. You can change the Sublevel of one
account so that it matches the
Sublevel of the other account. For
more information, see “Merging
Accounts.”
Class No requirements NA.
Customers 1. Only one of the customer/customer jobs can
have child elements.
2. You cannot merge a customer and a vendor.
1. If you merge customers, only one
of the customers can have customer
jobs. If you merge customer jobs,
only one of them can have children
(sub-jobs).
If merging customers and both
customers have jobs, you must move
jobs from the merge-from customer
to the “merge-to” customer before
invoking ListMerge. Or, you must
make them inactive or delete them.
If merging customer jobs, only one of
them may have child jobs (sub jobs).
If both have children, you must move
child jobs from merge-from object to
the merge-to object BEFORE doing
the merge. Or make them inactive or
delete them.
For more information, see “Merging
Customers.”
2. Cannot change this.
Vendors 1. You cannot merge a customer and a vendor 1. Cannot change this.

354
Chapter 27: Merging Accounts, Customers, Vendors, Classes
(c) 2013 Intuit Inc. All rights reserved.
2. Using the current EditSequence for each account, and their ListIDs, invoke ListMerge
and check the response for success.
Comparing AccountType and Changing Sublevel
The Account object contains an AccountType field. You need to compare this type before
proceeding to merge accounts.
If the AccountType is the same, you next need to determine whether the accounts to be
merged have the same Sublevel (yes, there is a Sublevel field in the Ret!). If Sublevels are
not equal, you need to do an AccountMod on one of them to change its Sublevel--by
changing the ParentRef (or removing it if a Sublevel of 0 is desired).
Code Sample
The following code snippet does a query for two hardcoded accounts, and arbitrarily picks
the first as the “merge-from” account, and the second as the “merge-to” account, and
adjusts the Sublevel accordingly. After the Sublevel is fixed by changing the ParentRef, we
invoke AccountMod to make the changes, store the changed EditSequence, and then do the
list merge.
SessionManager.OpenConnection "", "IDN List Merge Sample"
SessionManager.BeginSession "", omDontCare
Dim ListMerge_Set As IMsgSetRequest
Set ListMerge_Set = SessionManager.CreateMsgSetRequest("US", 7, 0)
ListMerge_Set.Attributes.OnError = roeContinue
‘Do query to get latest Sublevel and EditSequence data for the Accounts:
‘We hardcode the accounts just for convenience
Dim AccountQuery As IAccountQuery
Set AccountQuery = ListMerge_Set.AppendAccountQueryRq
AccountQuery.ORAccountListQuery.FullNameList.Add "Office Supplies:Paper
Reams"
AccountQuery.ORAccountListQuery.FullNameList.Add "Office Supplies"
Dim ListMergeAddResp As IMsgSetResponse
Set ListMergeAddResp = SessionManager.DoRequests(ListMerge_Set)
‘Process the query response: we need ListID, EditSequence, Sublevel, and
‘of course, AccountType. We’ll store all these in our one-shot method, so
‘be patient with all our variables here
Dim MyResponse As IResponse
Dim AccountRet As IAccountRet
Dim ResponseType As Integer
Dim AccountRetList As IAccountRetList

Merging Accounts
355
(c) 2013 Intuit Inc. All rights reserved.
Dim AccountType_MergeFrom As Integer
Dim AccountType_MergeTo As Integer
Dim Sublevel_MergeTo As String
Dim Sublevel_MergeFrom As String
Dim ListID_MergeFrom As String
Dim ListID_MergeTo As String
Dim EditSequence_MergeTo As String
Dim EditSequence_MergeFrom As String
Dim ParentRef_MergeTo As String
ParentRef_MergeTo = "empty"
Dim ParentRef_MergeFrom As String
ParentRef_MergeFrom = "empty"
Set MyResponse = ListMergeAddResp.ResponseList.GetAt(0)
If (Not MyResponse.Detail Is Nothing) Then
ResponseType = MyResponse.Type.getValue
If (Not ResponseType = rtAccountQueryRs) Then
Exit Sub
End If
End If
‘Store the values from the first account, which we arbitrarily use as the
‘merge from account.
Set AccountRetList = MyResponse.Detail
Set AccountRet = AccountRetList.GetAt(0)
ListID_MergeFrom = AccountRet.ListID.getValue
EditSequence_MergeFrom = AccountRet.EditSequence.getValue
AccountType_MergeFrom = AccountRet.AccountType.getValue
Sublevel_MergeFrom = AccountRet.Sublevel.getValue
‘If Sublevel is 0, there won’t be any ParentRef
If (Not AccountRet.ParentRef Is Nothing) Then
ParentRef_MergeFrom = AccountRet.ParentRef.FullName.getValue
End If
‘Store the values from the second account, which we arbitrarily use as
‘the merge-to account.
Set AccountRet = AccountRetList.GetAt(1)
ListID_MergeTo = AccountRet.ListID.getValue
EditSequence_MergeTo = AccountRet.EditSequence.getValue
AccountType_MergeTo = AccountRet.AccountType.getValue
Sublevel_MergeTo = AccountRet.Sublevel.getValue
If (Not AccountRet.ParentRef Is Nothing) Then
ParentRef_MergeTo = AccountRet.ParentRef.FullName.getValue
End If
‘Now for the checking: AccountTypes and Sublevels must match.
If (Not AccountType_MergeFrom = AccountType_MergeTo) Then
MsgBox "Only accounts of the same AccountType can be merged!)"
Exit Sub
End If
356
Chapter 27: Merging Accounts, Customers, Vendors, Classes
(c) 2013 Intuit Inc. All rights reserved.
‘For convenience only, we just check the condition where merge-from
‘has higher sublevel than merge-to. If merge-to sublevel is 1 or greater,
‘we set the merge-from ParentRef equal to the ParentRef of the merge-to,
as this results in same Sublevel. If merge-to has no ParentRef, we make
merge-from have no ParentRef either.
If (Sublevel_MergeFrom > Sublevel_MergeTo) Then
If (Not ParentRef_MergeTo = "empty") Then
ParentRef_MergeFrom = ParentRef_MergeTo
Else
ParentRef_MergeFrom = "empty"
End If
‘Now Mod the merge-from account, changing it’s ParentRef as needed
ListMerge_Set.ClearRequests
Dim AccountMod As IAccountMod
Set AccountMod = ListMerge_Set.AppendAccountModRq
AccountMod.ListID.setValue ListID_MergeFrom
AccountMod.EditSequence.setValue EditSequence_MergeFrom
If (ParentRef_MergeFrom = "empty") Then
AccountMod.ParentRef.FullName.SetEmpty
Else
AccountMod.ParentRef.FullName.setValue ParentRef_MergeFrom
End If
End If
Set ListMergeAddResp = SessionManager.DoRequests(ListMerge_Set)
‘Process the response to the AccountMod to get the updated EditSequence.
Set MyResponse = ListMergeAddResp.ResponseList.GetAt(0)
If (Not MyResponse.Detail Is Nothing) Then
ResponseType = MyResponse.Type.getValue
If (Not ResponseType = rtAccountModRs) Then
MsgBox "unexpected response type"
Exit Sub
End If
End If
Set AccountRet = MyResponse.Detail
EditSequence_MergeFrom = AccountRet.EditSequence.getValue
‘We have everything we need to do the merge, so let’s do it.
Dim ListMergeAdder As IListMerge
ListMerge_Set.ClearRequests
Set ListMergeAdder = ListMerge_Set.AppendListMergeRq
ListMergeAdder.ListMergeType.setValue lmtAccount
ListMergeAdder.MergeFrom.ListID.setValue ListID_MergeFrom
ListMergeAdder.MergeFrom.EditSequence.setValue EditSequence_MergeFrom
ListMergeAdder.MergeTo.ListID.setValue ListID_MergeTo
ListMergeAdder.MergeTo.EditSequence.setValue EditSequence_MergeTo
Set ListMergeAddResp = SessionManager.DoRequests(ListMerge_Set)
‘Take a peek at what happened
MsgBox ListMergeAddResp.ToXMLString
SessionManager.EndSession
SessionManager.CloseConnection

Merging Classes
357
(c) 2013 Intuit Inc. All rights reserved.
Merging Classes
The following sample code merges two classes:
Dim qbSessionManager As QBSessionManager
Dim msgSetRequest As IMsgSetRequest
qbSessionManager = New QBSessionManager()
qbSessionManager.OpenConnection2("", "BocaLupa",
ENConnectionType.ctLocalQBD)
qbSessionManager.BeginSession("", ENOpenMode.omDontCare)
msgSetRequest = qbSessionManager.CreateMsgSetRequest("US", 8, 0)
msgSetRequest.Attributes.OnError = ENRqOnError.roeStop
Dim classMerj As IListMerge
classMerj = msgSetRequest.AppendListMergeRq
classMerj.ListMergeType.SetValue(ENListMergeType.lmtClass)
classMerj.MergeFrom.ListID.SetValue("80000001-1232787304")
classMerj.MergeFrom.EditSequence.SetValue("1232787304")
classMerj.MergeTo.ListID.SetValue("80000002-1232787304")
classMerj.MergeFrom.EditSequence.SetValue("1231787354")
And the same thing in XML:
<?xml version="1.0" ?>
<?qbxml version="8.0"?>
<QBXML>
<QBXMLMsgsRq onError = "stopOnError">
<ListMergeRq requestID = "0">
<ListMergeType>Class</ListMergeType>
<MergeFrom>
<ListID>80000001-1232787304</ListID>
<EditSequence>1232787304</EditSequence>
</MergeFrom>
<MergeTo>
<ListID>80000002-1232787304</ListID>
<EditSequence>1232787304</EditSequence>
</MergeTo>
</ListMergeRq>
</QBXMLMsgsRq>
</QBXML>
Merging Customers
To merge two customers/customer jobs,
1. See if both customers/jobs have children. To do this, use a customer query with a
NameFilter that has its MatchCriterion set to “Contains” and the Name element set to

358
Chapter 27: Merging Accounts, Customers, Vendors, Classes
(c) 2013 Intuit Inc. All rights reserved.
the full name of the customer or customer job. This will return you the customer/
customer job and all child jobs of that customer/customer job.
2. If both customer/jobs have children, move all the children of the move-from customer/
job to the merge-to customer/job. To do this, do a CustomerMod on each child job,
changing the ParentRef from the merge-from customer/job to the merge-to customer/
job. Alternatively, you could do a CustomerMod on each child job and make it inactive
by setting the IsActive field to False. Or, to be more extreme, you could do a ListDel on
each child job, but that is not recommended.
3. Using the ListIDs and recent EditSequence from merge-from and merge-to customer/
jobs, invoke the ListMerge request
Code Sample
The following code snippets show to do the various tasks you’ll need to do, building a
customer query to look for child jobs, changing the ParentRef in a child job so it points to
the merge-to customer, and building the ListMerge request.
Building the CustomerQuery
Here is a snippet that builds customer query to look for child jobs for the customer job
Jacobsen, Doug:Kitchen. The query will return Jacobsen, Doug:Kitchen and any child jobs
because those child jobs will have Jacobsen, Doug:Kitchen within their fullname.
SessionManager.OpenConnection "", "IDN List Merge Sample"
SessionManager.BeginSession "", omDontCare
Dim ListMerge_Set As IMsgSetRequest
Set ListMerge_Set = SessionManager.CreateMsgSetRequest("US", 7, 0)
ListMerge_Set.Attributes.OnError = roeContinue
Dim custQuery As ICustomerQuery
Set custQuery = ListMerge_Set.AppendCustomerQueryRq
custQuery.ORCustomerListQuery.CustomerListFilter.ORNameFilter.NameFilter.Ma
tchCriterion.setValue mcContains
custQuery.ORCustomerListQuery.CustomerListFilter.ORNameFilter.
NameFilter.Name.setValue "Jacobsen, Doug:Kitchen"
Dim ListMergeSampleResp As IMsgSetResponse
Set ListMergeSampleResp = SessionManager.DoRequests(ListMerge_Set)
Changing the ParentRef of a customer job
If the customer query turns up child jobs, and you have child jobs in both merge-to and
merge-from customer/jobs, you need to change the ParentRef in each merge-from child job
so that it points to the merge-to customer. The following code snippet shows the
CustomerMod used to change this.
SessionManager.OpenConnection "", "IDN List Merge Sample"
SessionManager.BeginSession "", omDontCare

Merging Vendors
359
(c) 2013 Intuit Inc. All rights reserved.
Dim ListMerge_Set As IMsgSetRequest
Set ListMerge_Set = SessionManager.CreateMsgSetRequest("US", 7, 0)
ListMerge_Set.Attributes.OnError = roeContinue
Dim custMod As ICustomerMod
Set custMod = ListMerge_Set.AppendCustomerModRq
‘We’re modifying one of the child jobs
custMod.EditSequence.setValue "1197731900"
custMod.ListID.setValue "800000AA-1197731900"
‘Changing the ParentRef to point to the merge-to customer/job
custMod.ParentRef.ListID.setValue "1F0000-933272658"
Dim ListMergeSampleResp As IMsgSetResponse
Set ListMergeSampleResp = SessionManager.DoRequests(ListMerge_Set)
Building the ListMerge Request
After any child jobs have been moved over to the merge-to customer/job, you can invoke
the ListMerge request, as shown in the following code snippet:
SessionManager.OpenConnection "", "IDN List Merge Sample"
SessionManager.BeginSession "", omDontCare
Dim ListMerge_Set As IMsgSetRequest
Set ListMerge_Set = SessionManager.CreateMsgSetRequest("US", 7, 0)
ListMerge_Set.Attributes.OnError = roeContinue
Dim ListMergeAdder As IListMerge
Set ListMergeAdder = ListMerge_Set.AppendListMergeRq
ListMergeAdder.ListMergeType.setValue lmtCustomer
ListMergeAdder.MergeFrom.ListID.setValue "80000007-1188956785"
ListMergeAdder.MergeFrom.EditSequence.setValue "1188956785"
ListMergeAdder.MergeTo.ListID.setValue "80000002-1188956165"
ListMergeAdder.MergeTo.EditSequence.setValue "1188956165"
Dim ListMergeSampleResp As IMsgSetResponse
Set ListMergeSampleResp = SessionManager.DoRequests(ListMerge_Set)
Merging Vendors
There aren’t any tricks to merging vendors. Just supply the list IDs and the latest
EditSequences to the ListMerge request.
360
Chapter 27: Merging Accounts, Customers, Vendors, Classes
(c) 2013 Intuit Inc. All rights reserved.

Overview of QuickBooks Assembly Items and Build Assembly
361
(c) 2013 Intuit Inc. All rights reserved.
C
HAPTER
28 1
U
SING
A
SSEMBLY
I
TEM
AND
B
UILD
A
SSEMBLY
F
UNCTIONALITY
1
I
MPORTANT
If you are testing an application that uses assembly item and
building assembly features, we recommend that you do not
use the sample companies provided with QuickBooks. These
sample companies have future dates in them that can yield
nexpected results with regard to on hand quantities. You
should create your own sample company with current dates.
Integrated applications running on Premier and Enterprise editions can use the SDK to add
assembly items (ItemInventoryAssemblyAddRq
)
and then “build” those assembly items
(BuildAssemblyAddRq
)
. We put “build” in quotations because the BuildAssembly
transaction does not actually build the assembly, of course, but simply causes the
accounting transaction that enables a business to track finished goods inventory and the
component item inventory accurately.
Although the SDK ItemInventoryAssemblyAdd (available since SDK 2.0) and
BuildAssemblyAdd (available starting in QuickBooks 2006) works only on Premier and
Enterprise, your application may be able run on other editions of QuickBooks with
inventory features if your application simply views, edits, sells, or reports on existing
assembly items or BuildAssembly transactions. (The OSR lists the required SDK spec
version required for each of these ItemInventoryAssembly* and BuildAssembly* requests.)
In order to use the SDK to add assembly items and build assemblies, you first need to know
a few things about item assemblies in QuickBooks. So we’ll start off with some background
information before getting into creating and building assembly items, along with modifying
and querying for them.
Overview of QuickBooks Assembly Items and Build Assembly
An assembly item in QuickBooks is an inventory-tracked item made up of individual
inventory items (inventory “parts” in the UI) and/or other assembly items as shown in
Figure 28-1 on page 362. The items and/or assemblies that make up the assembly are called
components. All of the components in an assembly must first be defined in the QuickBooks
company as inventory items or assembly items before you can use them in an assembly.
(Services cannot be used as a component part.)
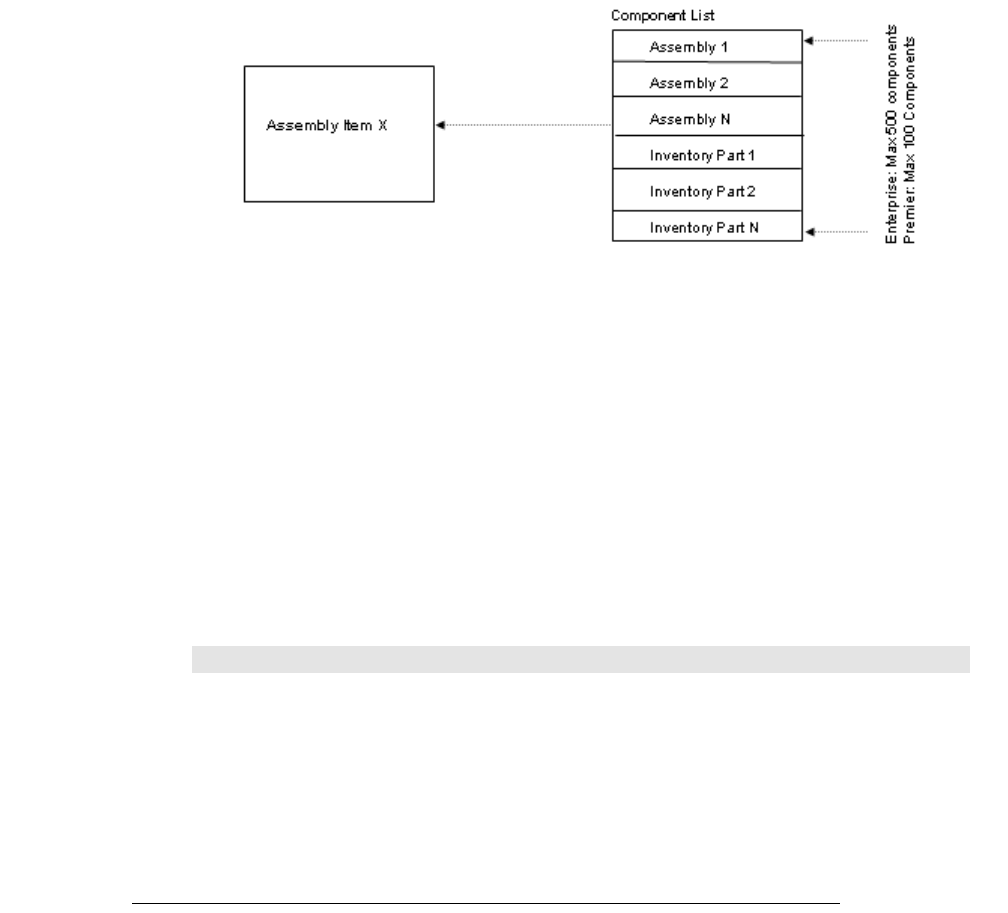
362
Chapter 28: Using Assembly Item and BuildAssembly Functionality
(c) 2013 Intuit Inc. All rights reserved.
Figure 28-1 Assembly item and its component parts
How many components can an assembly have? For Premier, an assembly can have a
maximum of 100 components. For Enterprise, the maximum is 500 components.
When you add an assembly item (ItemInventoryAssemblyAddRq in the SDK
)
you produce
no affect on any inventory levels, since the assembly item serves as a “definition” that
specifies how the assembly is to be built, which accounts are to be used, the sale price, and
so forth. Inventory is not affected until you perform a Build Assembly transaction either via
the QuickBooks UI or via the SDK BuildAssemblyAdd request.
As a result of the build assembly transaction, the assembly item units are incremented in
inventory and the component parts or component assemblies are decremented from
inventory.
N
OTE
If you enter a quantity on hand in the New Item window while
defining a new assembly item, this transaction is recorded as
an inventory adjustment where assembly units are added to
inventory but components are not deducted from inventory.
Notice that inventory permissions are required to add assembly items and build assemblies.
You Must Have Sufficient Components for the BuildAssembly
In the QuickBooks UI, you have the option of creating a pending build if there aren’t
enough components in inventory to build the assembly in the quantities specified.
Beginning with qbXML 7.0 and QuickBooks 2008, you can also do this via the SDK using
the MarkPendingIfRequired.
If you don’t use MarkPendingIfRequired and you invoke BuildAssemblyAdd with a
quantity that would exceed the on-hand quantities of any component, you get a status code
error of 3370 and a status message indicating that there are insufficient components for the
request.

Overview of QuickBooks Assembly Items and Build Assembly
363
(c) 2013 Intuit Inc. All rights reserved.
You will get the same status code error 3370 if you attempt to use BuildAssemblyMod to
remove the pending status from a pending BuildAssembly transaction (created via the UI) if
you lack sufficient component quantities, because this is effectively performing a
BuildAssembly.
QB Activities that Change BuildAssembly Transactions into Pending
There are circumstances where even a finalized BuildAssembly transaction can be changed
into a pending transaction by other activities in QuickBooks, whether from the UI or from
the SDK.
Finalized builds change to pending whenever the quantity of at least one component drops
below the quantity needed to build the specified number of assemblies on the build
transaction date.
This means that if a QB user or integrated application changes past inventory quantities or
the dates of purchase orders, invoices, or sales receipts in ways that result in QuickBooks
built assemblies lacking sufficient components on the build date, the affected assembly
builds would change from finalized to pending.
Consequences of Modifying an Existing Inventory Assembly Item
Assembly definition details, such as the list of and quantity of components, can be modified
at any time either in the UI or via the SDK. If an assembly item is modified while there is a
pending build for that assembly, at the time when the pending build is actually built
QuickBooks prompts the user to build either with the most recent assembly definition or
with the definition that is currently in effect for that build.
Keep in mind that such modifications to the assembly (revision history) is not tracked; if
you need to build a previous version of an assembly, you need to modify the assembly
again to reflect the desired component list. One feature that can help you reconstruct a
previously used assembly item is to look up a past BuildAssembly transaction
(BuildAssemblyQuery in the SDK) and use the component list from that transaction. The
component list for the transaction is saved even if the assembly item’s component list is
changed subsequent to the BuildAssembly transaction. However, this approach requires the
QuickBooks user or the integrated application to note and keep track of whichever
BuildAssembly transaction (and thus its component list) is important for revision history
purposes.
Finally, keep in mind that changing quantity on hand for assemblies adjusts the overall
number of assembly units in inventory, but it does not change the quantity on hand of
components (inventory part items or assemblies) used in the parent assembly.

364
Chapter 28: Using Assembly Item and BuildAssembly Functionality
(c) 2013 Intuit Inc. All rights reserved.
Impact of SalesReceipts and Invoices on Assemblies in Inventory
If a QB user or application attempts to sell via sales receipt or invoice more assembly units
than are available in inventory, the UI behavior varies slightly from the SDK. In the UI, the
user is warned that quantities are insufficient to fulfill the order: the user can respond by
accepting or cancelling. In the SDK, the SalesReceiptAdd or InvoiceAdd simply adds the
SalesReceipt or Invoice without the warning. But for both SDK and UI (assuming the UI
user opts to continue with the transaction), the quantity on hand for the specified assembly
changes to a negative value.
N
OTE
When assembly items appear on a UI form (for example, a
sales receipt or an invoice) or a report, their component items
are not displayed. Only the assembly name, description, and
price are displayed.
Notice that if you modify the component list of an assembly and build that assembly while
you still have a quantity of a previous version in stock, QuickBooks cannot distinguish
between these two versions at the time you make a sale. The typical recommendation is to
either sell out of one version before building another version, or “disassemble” the on hand
inventory of the previous build. We’ll show you how to do that shortly.
Either approach enables a QB user or integrated application to track the versions by the sale
date, if the user or application keeps track of this date.
Disassembling Inventory Assemblies
As noted previously, in some instances you may need to disassemble inventory assemblies,
for example, if you are changing the component list and want to maintain only one version
of the assembly in inventory.
There are several ways to disassemble inventory assemblies and return component items to
inventory. You can:
•Open the build transaction that built the assembly you want to disassemble and reduce
the quantity to build in the Build Assemblies window. The result is the same as if you
had only built the smaller number of assemblies in the first place. The quantity of
assembly units in inventory decreases, and the quantity of component inventory parts is
increased accordingly.
Note: Build transactions with changed amounts will display on the audit
trail report.
•Adjust Quantity/Value on Hand for each assembly component and the assembly item.
•Delete the build transaction. The quantity of assembly units in inventory is decreased
and the quantity of component inventory parts is increased accordingly. This method
completely removes the build transaction from QuickBooks and should not be used if
you want to maintain a record of the transaction.

Adding an Inventory Assembly Item
365
(c) 2013 Intuit Inc. All rights reserved.
Getting BuildAssembly and Assembly Item Reports
You can use the SDK’s CustomSummaryReportQuery or CustomDetailReportQuery to get
BuildAssembly and item assembly reports. To get BuildAssembly reports, use the
ReportTxnTypeFilter with the TxnFilter set to BuildAssembly. To get assembly item
reports, use the ReportItemFilter with the ItemTypeFilter set to InventoryAndAssembly.
Adding an Inventory Assembly Item
To get an idea of how to add an assembly item in the SDK, take a look at how it’s done in
the UI (see Figure 28-2 on page 366). The UI supplies the New Item form that allows the
user to add a new assembly item. You can get there in the UI from the main QuickBooks
menubar by selecting Lists->Item List->Item->New.
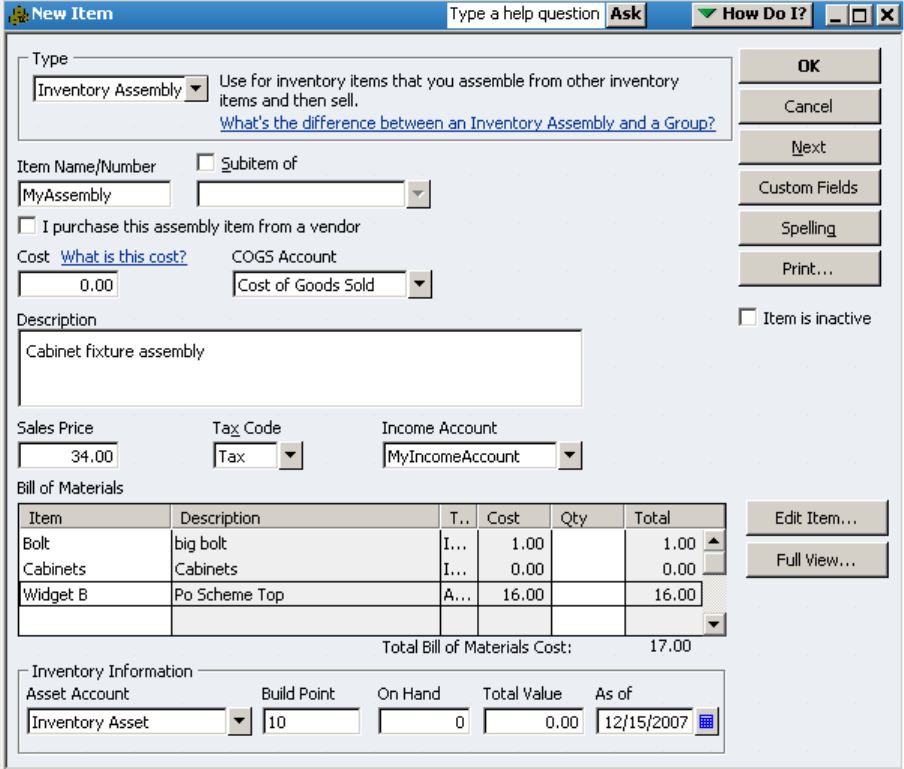
366
Chapter 28: Using Assembly Item and BuildAssembly Functionality
(c) 2013 Intuit Inc. All rights reserved.
Figure 28-2 Understanding the New Assembly item form
In the upper left of the form, notice the item Type pulldown provided for the user to select
from the various supported types: assembly item is shown as the chosen type in the figure.
In the SDK however, if you want to add an assembly item, you use a request specific to
assembly item: ItemInventoryAssemblyAdd.
The OSR listing for ItemInventoryAssemblyAdd is shown in Figure 28-3 on page 367.
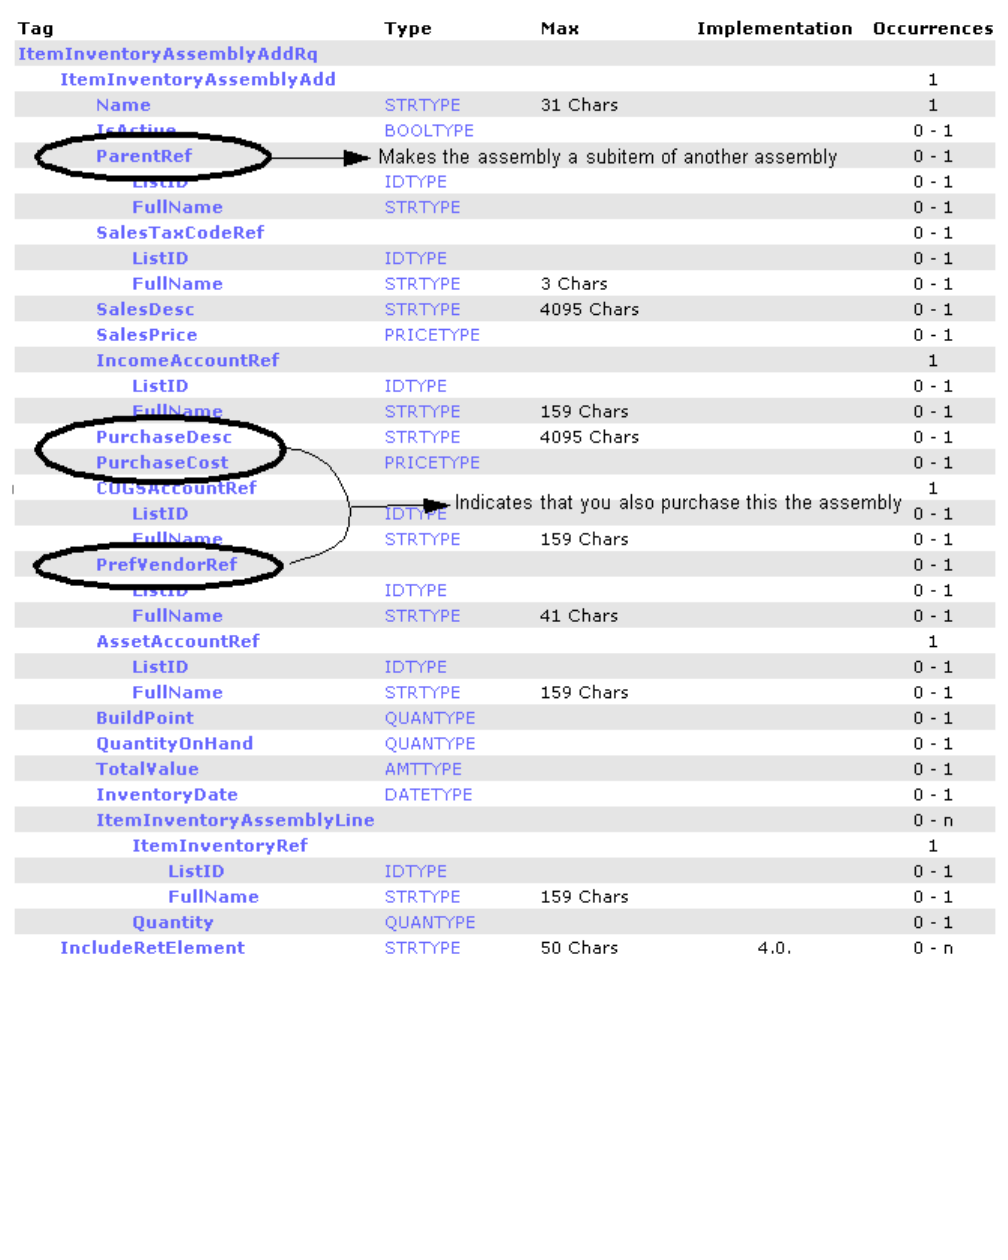
Adding an Inventory Assembly Item
367
(c) 2013 Intuit Inc. All rights reserved.
Figure 28-3 ItemInventoryAssemblyAdd OSR Listing
The SDK tags shown in the OSR listing for ItemInventoryAssemblyAdd provide the same
functionality as the UI’s New Item form for assembly items. Most of these are
straightforward: Name maps to the UI’s Item Name/Number, IsActive maps to the UI’s
Item is Inactive checkbox, BuildPoint, QuantityOnHand, TotalValue, InventoryDate map to
the Build Point, On Hand, Total Value, and As Of values in the UI, respectively.
Some other SDK elements might need a bit more explanation, so we’ll describe some of the
less obvious elements in the following sections.
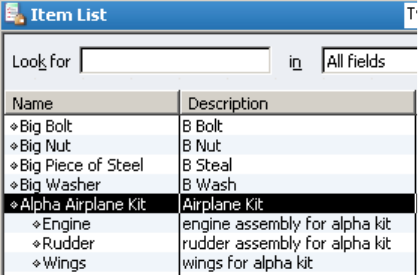
368
Chapter 28: Using Assembly Item and BuildAssembly Functionality
(c) 2013 Intuit Inc. All rights reserved.
About the “Subitem Of” (ParentRef)
The ParentRef in the qbXML for adding an assembly item is the equivalent of the Subitem
Of checkbox and its related item pulldown menu, which is activated when the user checks
the checkbox. The difference is that the ParentRef (containing either the ListID or the
FullName of the parent assembly) represents the choice of a parent assembly as well as the
choice to make the new assembly a subitem of another assembly in the first place.
What is a subitem? It is simply a way to include your assembly in an assembly hierarchy
that you want to be visible in QuickBooks lists and reports. For example, if you want the
QuickBooks item list to display a main item listing of “Alpha Airplane Kit” with subitems
of “Wings”, “Engine”, “Rudder” and so forth (see Figure 28-4 on page 368), you would
make the Wings assembly a subitem of Alpha Airplane Kit, the Engine assembly a subitem
of “Alpha Airplane Kit, and so forth.
Figure 28-4 Making assemblies visible as hierarchies in QB Lists
The main point to keep in mind is that checking “Subitem Of” or the (SDK equivalent
ParentRef) is strictly used for list and report visibility purposes, to show logical
arrangements of assemblies that, to QuickBooks, are otherwise internally unrelated
assemblies. It does NOT make your new assembly a component of the another assembly.
(We’ll show you how to do that shortly.) Your BuildAssembly of the parent assembly will
not result in the building of any subitem assemblies.
About the “I purchase...” Checkbox (PrefVendorRef, etc.)
The “I purchase this...from a vendor” checkbox is used if you have an assembly item you
normally build, but occasionally need to purchase from a vendor, for example if you are
short quantities of that assembly and need to acquire more quickly.
If you supply any one or any combination of the PrefVendorRef, the PurchaseDesc, or the
PurchaseCost tags, you cause the same thing to happen in QuickBooks as occurs in the UI
when a user checks the “I purchase this assembly item from a vendor” checkbox.

Adding an Inventory Assembly Item
369
(c) 2013 Intuit Inc. All rights reserved.
When the user does this in the UI, a frame appears that allows the purchase cost, purchase
description, and preferred vendor to be specified. The tags already mentioned in the
preceding paragraph allow you to fill out this same information in the SDK. Notice that you
need not supply the purchase cost when you create the assembly item, since it can be added
later when you receive the actual cost.
Adding an ItemInventoryAssembly in qbXML
Listing 28-1 shows how to create a new assembly item. In the listing, the assembly named
Widget G has a component list of the two existing items (Lrge Bolt and Lrge Nut) listed
under the two ItemInventoryAssemblyLine tags. Our sample happens to use the optional
sales tax tag and the default COGS account.
______Listing 28-1 Adding an ItemInventoryAssembly
<?qbxml version="5.0"?>
<QBXML>
<QBXMLMsgsRq onError = "stopOnError">
<ItemInventoryAssemblyAddRq requestID = "2">
<ItemInventoryAssemblyAdd>
<Name>Widget G</Name>
<SalesTaxCodeRef>
<FullName>Tax</FullName>
</SalesTaxCodeRef>
<SalesDesc>Misc Widgets</SalesDesc>
<SalesPrice>10.00</SalesPrice>
<IncomeAccountRef>
<FullName>Sales Income</FullName>
</IncomeAccountRef>
<COGSAccountRef>
<FullName>Cost Of Goods Sold</FullName>
</COGSAccountRef>
<AssetAccountRef>
<FullName>Inventory Asset</FullName>
</AssetAccountRef>
<BuildPoint>10</BuildPoint>
<ItemInventoryAssemblyLine>
<ItemInventoryRef>
<FullName>Lrge Bolt</FullName>
</ItemInventoryRef>
<Quantity>2</Quantity>
</ItemInventoryAssemblyLine>
<ItemInventoryAssemblyLine>
<ItemInventoryRef>
<FullName>Lrge Nut</FullName>
</ItemInventoryRef>
<Quantity>2</Quantity>
</ItemInventoryAssemblyLine>
</ItemInventoryAssemblyAdd>
</ItemInventoryAssemblyAddRq>
</QBXMLMsgsRq>
</QBXML>

370
Chapter 28: Using Assembly Item and BuildAssembly Functionality
(c) 2013 Intuit Inc. All rights reserved.
Adding an Assembly Item in QBFC
Listing 28-2 shows a self-contained procedure that opens a connection with QuickBooks,
adds an assembly item to the currently open company, shows the results, and closes the
connection.
The sample is straightforward except for one tricky part, which is appending the component
items in the line item object as per the following lines:
Dim AssemblyLineItem As IItemInventoryAssemblyLine
'Append each line item of the component list separately. Append returns
'the line item object, which you then set with the values you want
Set AssemblyLineItem =
ItemAssemblyAdd.ItemInventoryAssemblyLineList.Append
Notice that the Append method returns the line item object, which you then fill its key
fields ItemRef and Quantity. What happens if you were to try it this way:
ItemAssemblyAdd.ItemInventoryAssemblyLineList.Append.Quantity.setValue(2)
ItemAssemblyAdd.ItemInventoryAssemblyLineList.Append.Quantity.setValue(2)
‘NOPE! Invalid.
you’ll get a runtime error because you just added two line items to the list, one of which has
a valid ItemInventoryRef, and one that doesn’t--with the faulty line having only a Quantity
field. If you were print out the XML from this faulty attempt (using ToXMLString on the
IMsgSetRequest object), here’s what the resulting bad XML would look like:
<ItemInventoryAssemblyLine>
<ItemInventoryRef>
<FullName>Big Bolt</FullName>
</ItemInventoryRef>
</ItemInventoryAssemblyLine>
<ItemInventoryAssemblyLine>
<Quantity>2</Quantity>
</ItemInventoryAssemblyLine>
which won’t work at all. Instead, as shown below (and in Listing 28-2), what you need to
do is invoke Append on the Line Item list with the Append method returning the line item
object. Then just set the ItemRef and Quantity properties on that line item.
Dim AssemblyLineItem As IItemInventoryAssemblyLine
'Append each line item of the component list separately. Append returns
'the line item object, which you then set with the values you want
Set AssemblyLineItem = ItemAssemblyAdd.ItemInventoryAssemblyLineList.Append
AssemblyLineItem.ItemInventoryRef.FullName.setValue ("Big Bolt")
AssemblyLineItem.Quantity.setValue (2)
Set AssemblyLineItem = ItemAssemblyAdd.ItemInventoryAssemblyLineList.Append
AssemblyLineItem.ItemInventoryRef.FullName.setValue ("Big Nut")
AssemblyLineItem.Quantity.setValue (2) '

Adding an Inventory Assembly Item
371
(c) 2013 Intuit Inc. All rights reserved.
______Listing 28-2 Adding Assembly Items in QBFC
Public Sub QBFC_AddItemInvAssembly()
Dim SessionManager As QBSessionManager
Set SessionManager = New QBSessionManager
SessionManager.OpenConnection "", "IDN Add Item Inventory Assembly Sample"
SessionManager.BeginSession "", omDontCare
Dim requestMsgSet As IMsgSetRequest
Set requestMsgSet = SessionManager.CreateMsgSetRequest("US", 5, 0)
' Initialize the message set request's attributes
requestMsgSet.Attributes.OnError = roeStop
' Add the request to the message set request object
Dim ItemAssemblyAdd As IItemInventoryAssemblyAdd
Set ItemAssemblyAdd = requestMsgSet.AppendItemInventoryAssemblyAddRq
'Set the properties in the assembly object
ItemAssemblyAdd.Name.setValue ("Widget Y")
ItemAssemblyAdd.SalesTaxCodeRef.FullName.setValue ("Tax")
ItemAssemblyAdd.SalesDesc.setValue ("Misc Widgets")
ItemAssemblyAdd.SalesPrice.setValue (10#)
ItemAssemblyAdd.IncomeAccountRef.FullName.setValue ("Sales Income")
ItemAssemblyAdd.COGSAccountRef.FullName.setValue ("Cost of Goods Sold")
ItemAssemblyAdd.AssetAccountRef.FullName.setValue ("Inventory Asset")
ItemAssemblyAdd.BuildPoint.setValue (10)
Dim AssemblyLineItem As IItemInventoryAssemblyLine
'Append each line item of the component list separately. Append returns
'the line item object, which you then set with the values you want
Set AssemblyLineItem = ItemAssemblyAdd.ItemInventoryAssemblyLineList.Append
AssemblyLineItem.ItemInventoryRef.FullName.setValue ("Big Bolt")
AssemblyLineItem.Quantity.setValue (2)
Set AssemblyLineItem = ItemAssemblyAdd.ItemInventoryAssemblyLineList.Append
AssemblyLineItem.ItemInventoryRef.FullName.setValue ("Big Nut")
AssemblyLineItem.Quantity.setValue (2) '
Perform the request and obtain a response from QuickBooks
Dim responseMsgSet As IMsgSetResponse
Set responseMsgSet = SessionManager.DoRequests(requestMsgSet)
‘Show the results
MsgBox responseMsgSet.ToXMLString
' Close the session and connection with QuickBooks.
SessionManager.EndSession
SessionManager.CloseConnection
End Sub

372
Chapter 28: Using Assembly Item and BuildAssembly Functionality
(c) 2013 Intuit Inc. All rights reserved.
Modifying an Existing Inventory Assembly Item
An assembly item, as mentioned earlier in this chapter can be edited at any time via the UI
or the SDK, but any modifications to the assembly are not tracked. Accordingly, if you are
making changes to the component list used, you may want to consider ways to make it
easier to track the revision history yourself, perhaps by selling out of the existing stock first,
or disassembling the existing assemblies before changing the component list.
Modifying an Assembly Item in qbXML
Listing 28-3 shows a mod request that changes the BuildPoint of the specified assembly
item.
_____ Listing 28-3 Constructing an ItemInventoryAssemblyMod request in qbXML
<?xml version="1.0" ?>
<?qbxml version="5.0"?>
<QBXML>
<QBXMLMsgsRq onError = "stopOnError">
<ItemInventoryAssemblyModRq requestID = "0">
<ItemInventoryAssemblyMod>
<ListID>1B0000-1130277147</ListID>
<EditSequence>1130433150</EditSequence>
<BuildPoint>20</BuildPoint>
</ItemInventoryAssemblyMod>
</ItemInventoryAssemblyModRq>
</QBXMLMsgsRq>
</QBXML>
Modifying an Assembly Item in QBFC
Listing 28-4 shows a self-contained procedure that
•Opens a connection with QuickBooks
•Queries for all inactive and active assembly items that contain “Panel” in the FullName,
and that were modified within the specified date range.
•Arbitrarily picks the first assembly item from the query and saves its ListID and edit
sequence for the upcoming mod request
•Issues a mod request using the ListID and edit sequence obtained in the query,
modifying the memo and the quantity
•Shows the results, and closes the connection.
Notice that the query specifies that only ListID and EditSequence (via IncludeRetElement)
is to be returned in the response because that is all we need from the query.

Modifying an Existing Inventory Assembly Item
373
(c) 2013 Intuit Inc. All rights reserved.
______Listing 28-4 Constructing an ItemInventoryAssemblyMod request in QBFC
Public Sub QBFC_ModItemAssembly()
Dim SessionManager As QBSessionManager
Set SessionManager = New QBSessionManager
SessionManager.OpenConnection "", "IDN Mod Item Assembly Sample"
SessionManager.BeginSession "", omDontCare
Dim requestMsgSet As IMsgSetRequest
Set requestMsgSet = SessionManager.CreateMsgSetRequest("US", 5, 0)
' Initialize the message set request's attributes
requestMsgSet.Attributes.OnError = roeStop
'First we query QB for active and intactive assemblies within
‘a date range with the fullname containing “Panel”
Dim ItemAssmblyQuery As IItemInventoryAssemblyQuery
Set ItemAssmblyQuery = requestMsgSet.AppendItemInventoryAssemblyQueryRq
ItemAssmblyQuery.IncludeRetElementList.Add ("EditSequence")
ItemAssmblyQuery.IncludeRetElementList.Add ("ListID")
ItemAssmblyQuery.ORListQuery.ListFilter.ActiveStatus.setValue (asAll)
ItemAssmblyQuery.ORListQuery.ListFilter.FromModifiedDate.
setValue "2005-10-01", True
ItemAssmblyQuery.ORListQuery.ListFilter.ToModifiedDate.
setValue "2005-10-27", True
ItemAssmblyQuery.ORListQuery.ListFilter.ORNameFilter.NameFilter.
MatchCriterion.setValue (mcContains)
ItemAssmblyQuery.ORListQuery.ListFilter.ORNameFilter.NameFilter.
Name.setValue ("Panel")
Dim responseMsgSet As IMsgSetResponse
Set responseMsgSet = SessionManager.DoRequests(requestMsgSet)
Dim response As IResponse
' Response list contains one response, because we made one request
Set response = responseMsgSet.ResponseList.GetAt(0)
'make sure there is data first
If response.Detail Is Nothing Then
MsgBox "No Detail available"
Exit Sub
End If
'This is a query, so the Detail is a ret list
Dim ItemAssmblyRetList As IItemInventoryAssemblyRetList
Dim ItemAssmblyRet As IItemInventoryAssemblyRet
Set ItemAssmblyRetList = response.Detail
'Potentially many assemblies in the retlist: we get the first one
'for convenience: you'll do something smarter or let the user pick
Set ItemAssmblyRet = ItemAssmblyRetList.GetAt(0)

374
Chapter 28: Using Assembly Item and BuildAssembly Functionality
(c) 2013 Intuit Inc. All rights reserved.
'Save the ListID and EditSequence: we need 'em for our mod request
Dim ListID As String
Dim EditSeq As String
ListID = ItemAssmblyRet.ListID.getValue
EditSeq = ItemAssmblyRet.EditSequence.getValue
‘Clear out the message set so we can re-stuff it with our mod request
requestMsgSet.ClearRequests
'Add the request to the message set request object
Dim ItemAssmblyMod As IItemInventoryAssemblyMod
Set ItemAssmblyMod = requestMsgSet.AppendItemInventoryAssemblyModRq
'Set the properties in the BuildAssembly mod object
ItemAssmblyMod.ListID.setValue (ListID)
ItemAssmblyMod.EditSequence.setValue (EditSeq)
ItemAssmblyMod.BuildPoint.setValue (20)
'Perform the request and obtain a response from QuickBooks
Set responseMsgSet = SessionManager.DoRequests(requestMsgSet)
MsgBox responseMsgSet.ToXMLString
'Close the session and connection with QuickBooks.
SessionManager.EndSession
SessionManager.CloseConnection
End Sub
Querying for Inventory Assembly Items
Figure 28-5 shows the query filters you can use. If you’re familiar with SDK queries, there
is nothing special or tricky about this particular query. If you’re not familiar with SDK
queries, you might want to take a quick look at Chapter 4, “Specifying Authorization
Preferences,” which provides general information on queries, such as using iterators for
large query returns, using IncludeRetElement to get only the data you need, using various
types of filters, and so on.
The ActiveStatus filter is useful if you need to make your query retrieve any inactive
assembly items. (By default only active items are returned in the query.) Specify the value
“All” to get all assemblies, both active or inactive, or “InactiveOnly” to get only inactive
items.
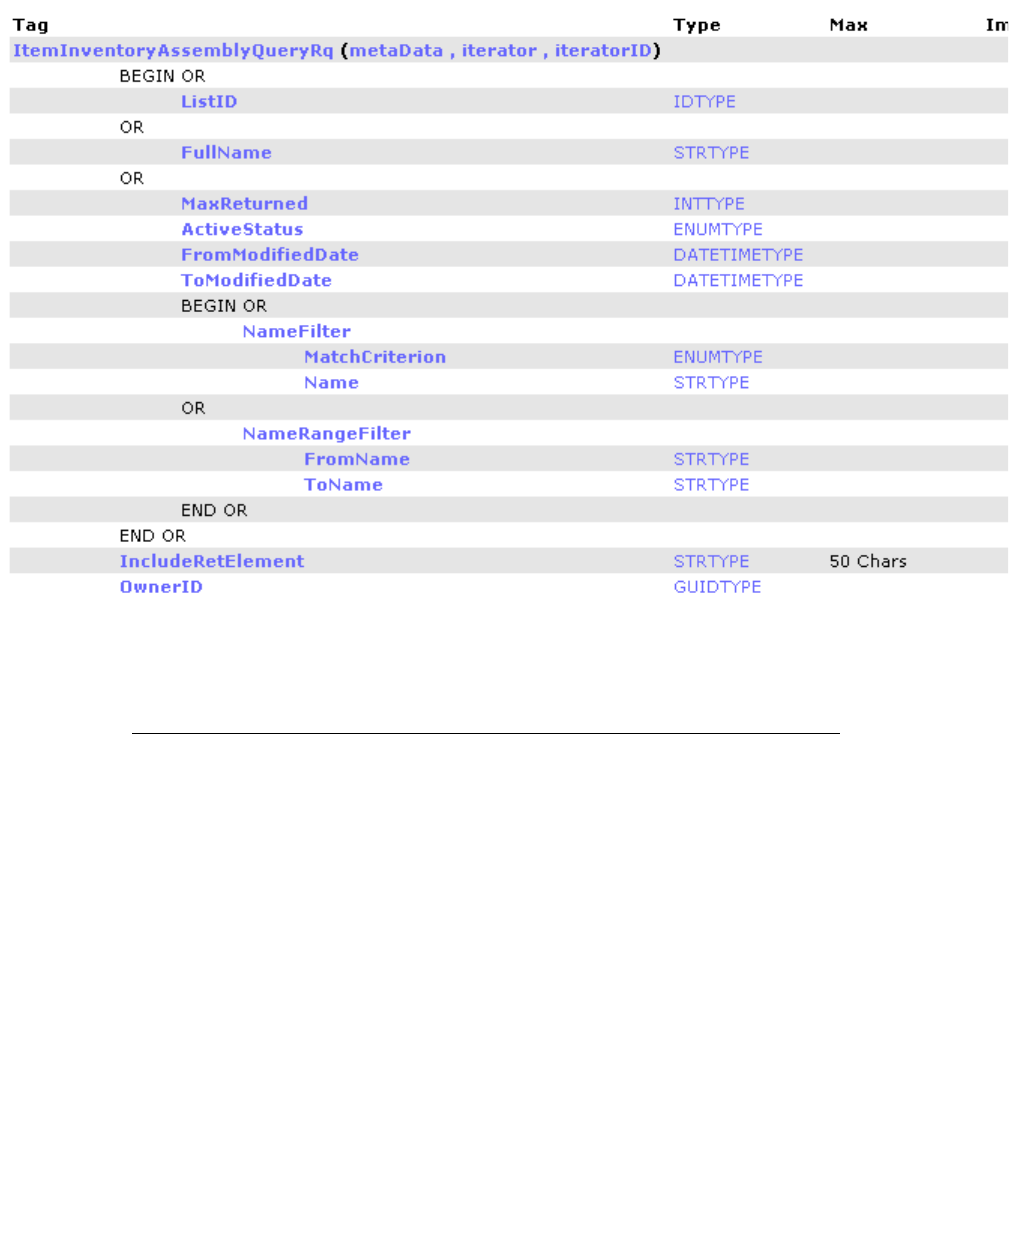
Querying for Inventory Assembly Items
375
(c) 2013 Intuit Inc. All rights reserved.
Figure 28-5 ItemInventoryAssemblyQuery OSR listing
Querying for Assembly Items in qbXML
Listing 28-5 shows a sample query in qbXML, where we search for all active and inactive
item assemblies that contain the name “Panel”, and that were last modified in the specified
date range,
______Listing 28-5 Constructing an ItemInventoryAssemblyQuery Request in qbXML
<?xml version="1.0" ?>
<?qbxml version="5.0"?>
<QBXML>
<QBXMLMsgsRq onError = "stopOnError">
<ItemInventoryAssemblyQueryRq requestID = "0">
<ActiveStatus>All</ActiveStatus>
<FromModifiedDate>2005-10-01</FromModifiedDate>
<ToModifiedDate>2005-10-27</ToModifiedDate>
<NameFilter>
<MatchCriterion>Contains</MatchCriterion>
<Name>Panel</Name>
</NameFilter>
</ItemInventoryAssemblyQueryRq>
</QBXMLMsgsRq>
</QBXML>
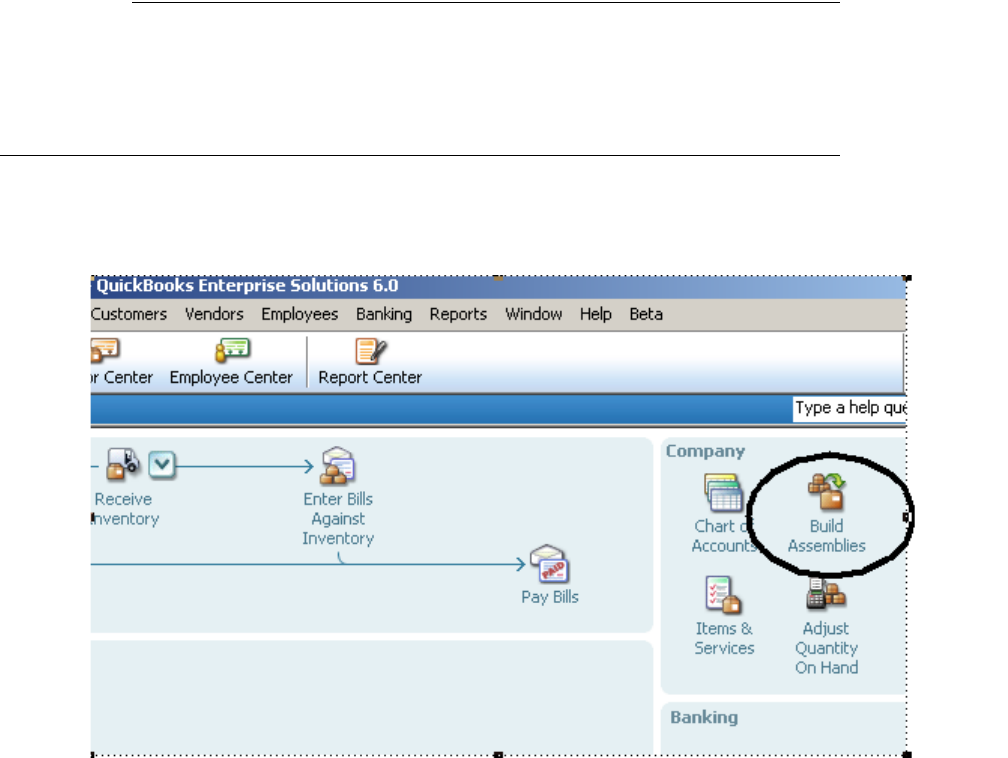
376
Chapter 28: Using Assembly Item and BuildAssembly Functionality
(c) 2013 Intuit Inc. All rights reserved.
Querying for Assembly Items in QBFC
We’ve already shown an example of constructing an ItemInventoryAssemblyQuery and
processing some of its response data in Listing 28-4.
Adding a BuildAssembly Transaction
Adding new BuildAssembly transactions are supported in QuickBooks Premier and
Enterprise. In the QuickBooks UI for these editions, you add a new BuildAssembly by
clicking on the Build Assembly icon in the main navigator (Figure 28-6):
Figure 28-6 The Build Assemblies UI icon
Clicking on the icon displays the Build Assemblies form (Figure 28-7):
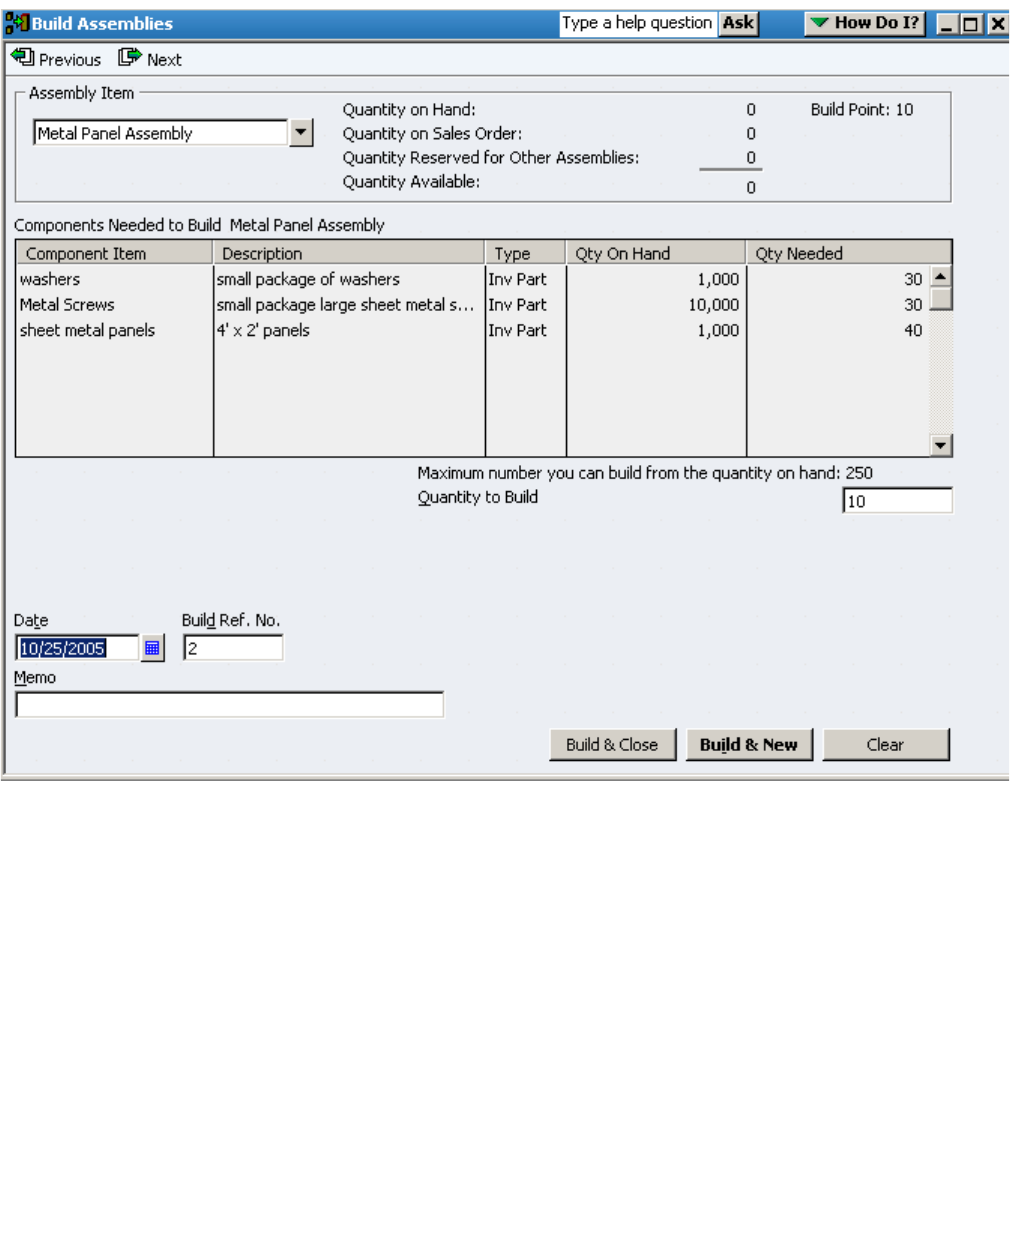
Adding a BuildAssembly Transaction
377
(c) 2013 Intuit Inc. All rights reserved.
Figure 28-7 The UI Build Assemblies form
In the upper left of Figure 28-7, notice the assembly item pulldown, from which the user
selects the assembly to build. In the figure, the Metal Panel Assembly has been selected.
Notice that the quantity data about this item is automatically filled in on the form. The user
supplies only the quantity to build, possibly also the build reference number (if the user
doesn’t want the default number), the transaction date and any build notes in the Memo
field.
The SDK provides functionality to duplicate most of the features on this particular form:
•BuildAssemblyQuery can be used in a selection list like the one here, with the quantity
data (along with other data) returned in the query response for a selected assembly.
•ItemAssembliesCanBuildQuery returns the number of units you can build for the
specified assembly.
•BuildAssemblyAdd causes the actual Build Assembly transaction to occur, once the
required data is supplied.
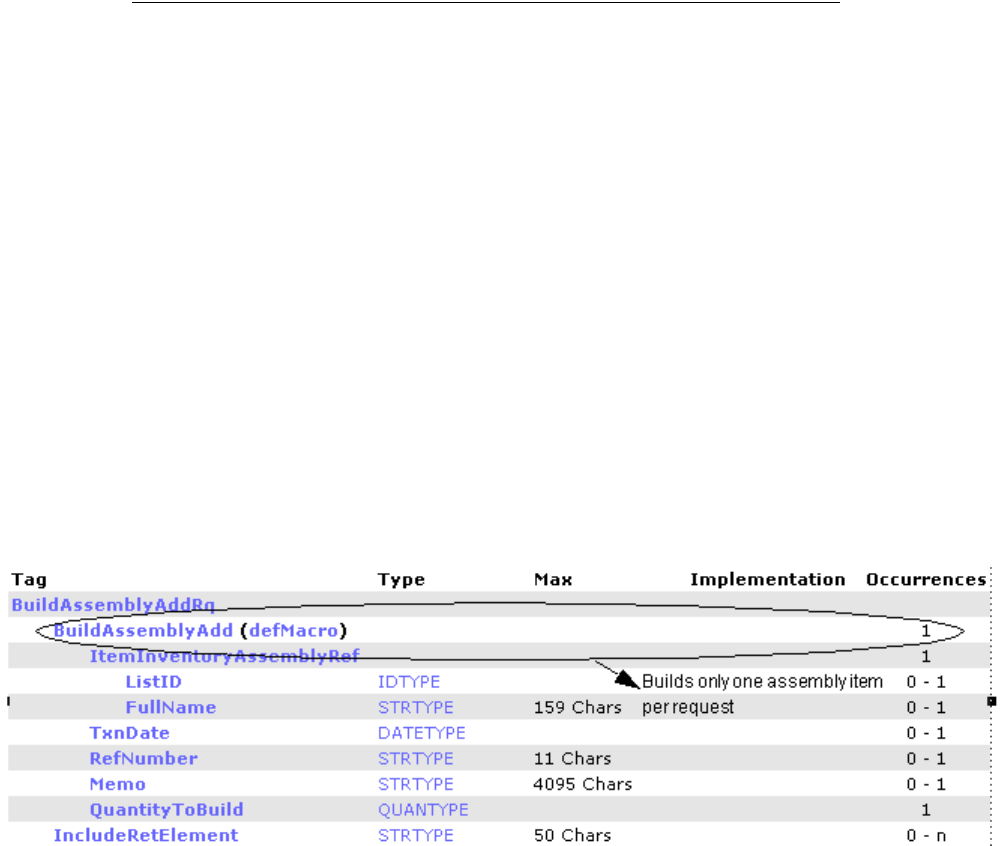
378
Chapter 28: Using Assembly Item and BuildAssembly Functionality
(c) 2013 Intuit Inc. All rights reserved.
However, as noted in the overview section of this chapter, the UI lets you do a pending
build if there are not enough components to build the quantities specified, and in the SDK
you can use the MarkPendingIfRequired to do the same thing. If you must use qbXML 6.0
or less because your application must work on versions of QuickBooks older than QB 2008,
you can alternatively use the ItemAssembliesCanBuildQuery request before you attempt to
invoke BuildAssemblyAdd.
Be careful when supplying your own Ref numbers when creating or editing the
BuildAssembly. QuickBooks does not prevent the same Ref number from being assigned to
more than one BuildAssembly.
Adding a BuildAssembly Transaction in qbXML
Listing 28-6 shows a typical qbXML for building an assembly. The listing shows all of the
possible tags used, if you take a look at the OSR listing for BuildAssemblyAdd (see Figure
28-8).
_____ Listing 28-6 QBXML Sample: Adding A BuildAssembly
<?qbxml version="5.0"?>
<QBXML>
<QBXMLMsgsRq onError="continueOnError">
<BuildAssemblyAddRq>
<BuildAssemblyAdd>
<ItemInventoryAssemblyRef>
<FullName>Metal Panel Assembly</FullName>
</ItemInventoryAssemblyRef>
<TxnDate>2005-10-26</TxnDate>
<Memo>Built from component list 1</Memo>
<QuantityToBuild>2</QuantityToBuild>
</BuildAssemblyAdd>
</BuildAssemblyAddRq>
</QBXMLMsgsRq>
</QBXML>
Figure 28-8 OSR listing for BuildAssemblyAdd
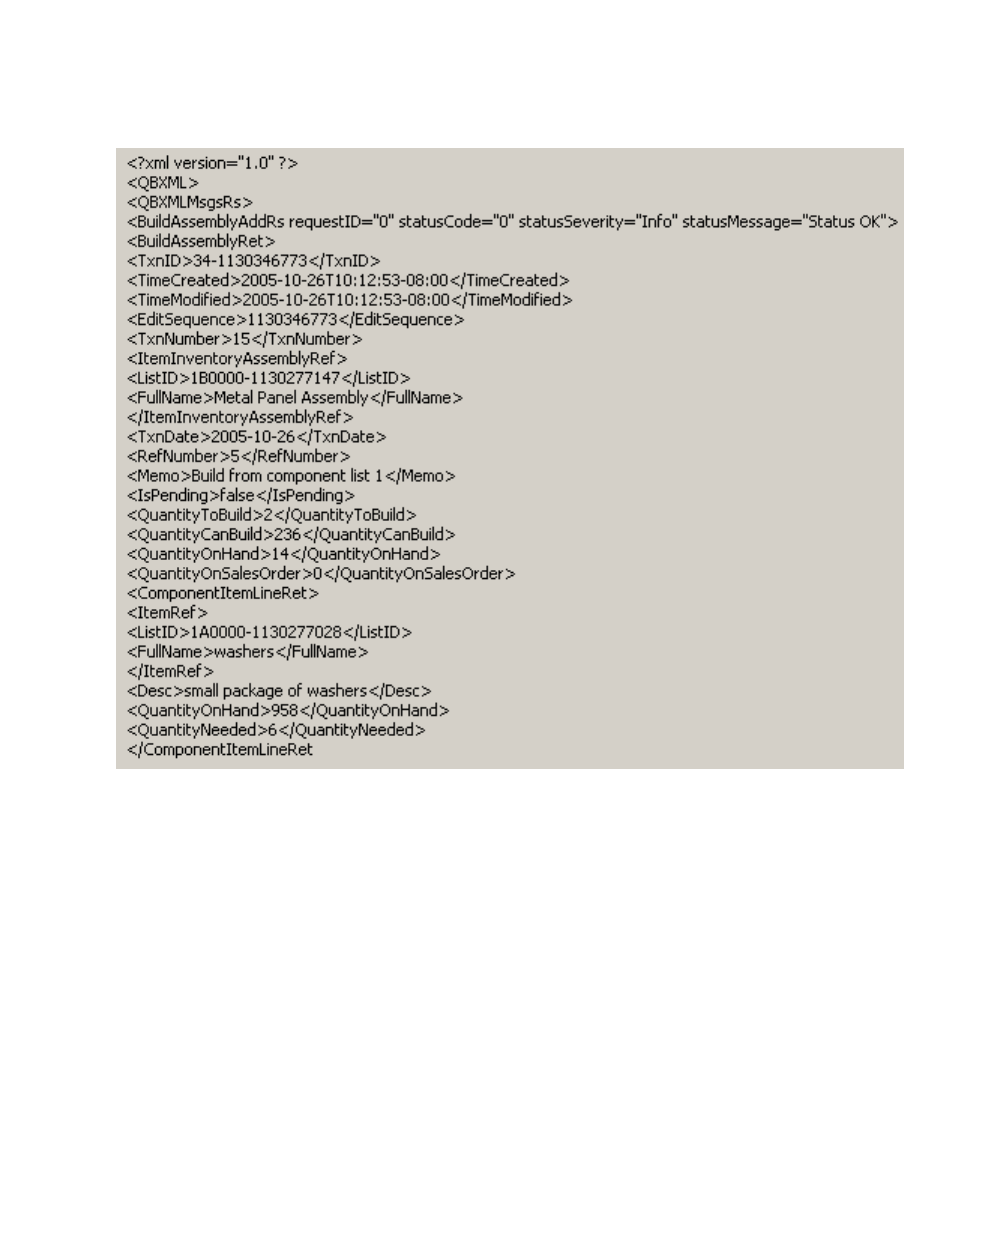
Adding a BuildAssembly Transaction
379
(c) 2013 Intuit Inc. All rights reserved.
Notice that you can perform a build of only one assembly item per BuildAssemblyAddRq,
as indicated in the figure above.
The response from the qbXML sample above would be as shown in Figure 28-9. (Only part
of the response is shown.)
Figure 28-9 Sample Response from BuildAssemblyAdd
Notice that the response contains the component list showing all the inventory items and
assemblies, along with the quantities used in the built assembly transaction. Notice also that
the IsPending field is set to False. It will always be False when you do a
BuildAssemblyAdd because pending builds are not supported in this request.
Finally, notice the various Quantity fields: QuantityToBuild (what you just built in the
BuildAssemblyAdd request), QuantityCanBuild (the max number that you could build of
this assembly), QuantityOnHand, and QuantityOnSalesOrder. These last two quantities are
important for determining how many assembly units are actually available: you subtract the
on-sales order quantity from the on-hand quantity to get the number of units that are
actually available, with all quantities snapshotted as of the TxnDate specified in the request.

380
Chapter 28: Using Assembly Item and BuildAssembly Functionality
(c) 2013 Intuit Inc. All rights reserved.
Adding a BuildAssembly Transaction in QBFC
Listing 28-7 shows a complete self-contained procedure that opens a connection with
QuickBooks, builds the specified assembly item in the currently open company, shows the
results, and closes the connection. The sample accepts the default ref number that will be
assigned by QuickBooks, but specifies the build date.
_____ Listing 28-7 Building an Assembly in QBFC
Public Sub QBFC_AddBuildAssembly()
Dim SessionManager As QBSessionManager
Set SessionManager = New QBSessionManager
SessionManager.OpenConnection "", "IDN Add Build Assembly Sample"
SessionManager.BeginSession "", omDontCare
Dim requestMsgSet As IMsgSetRequest
Set requestMsgSet = SessionManager.CreateMsgSetRequest("US", 5, 0)
' Initialize the message set request's attributes
requestMsgSet.Attributes.OnError = roeStop
' Add the request to the message set request object
Dim BuildAssmblyAdd As IBuildAssemblyAdd
Set BuildAssmblyAdd = requestMsgSet.AppendBuildAssemblyAddRq
'Set the properties in the BuildAssembly add object
BuildAssmblyAdd.ItemInventoryAssemblyRef.FullName.setValue ("Metal Panel Assembly")
BuildAssmblyAdd.TxnDate.setValue ("2005-10-26")
BuildAssmblyAdd.Memo.setValue ("Build from component list 1")
BuildAssmblyAdd.QuantityToBuild.setValue (2)
' Perform the request and obtain a response from QuickBooks
Dim responseMsgSet As IMsgSetResponse
Set responseMsgSet = SessionManager.DoRequests(requestMsgSet)
MsgBox responseMsgSet.ToXMLString
' Close the session and connection with QuickBooks.
SessionManager.EndSession
SessionManager.CloseConnection
End Sub
Modifying an Existing BuildAssembly Transaction
The OSR listing below (Figure 28-10) shows the available modifications you can make to a
BuildAssembly transaction.
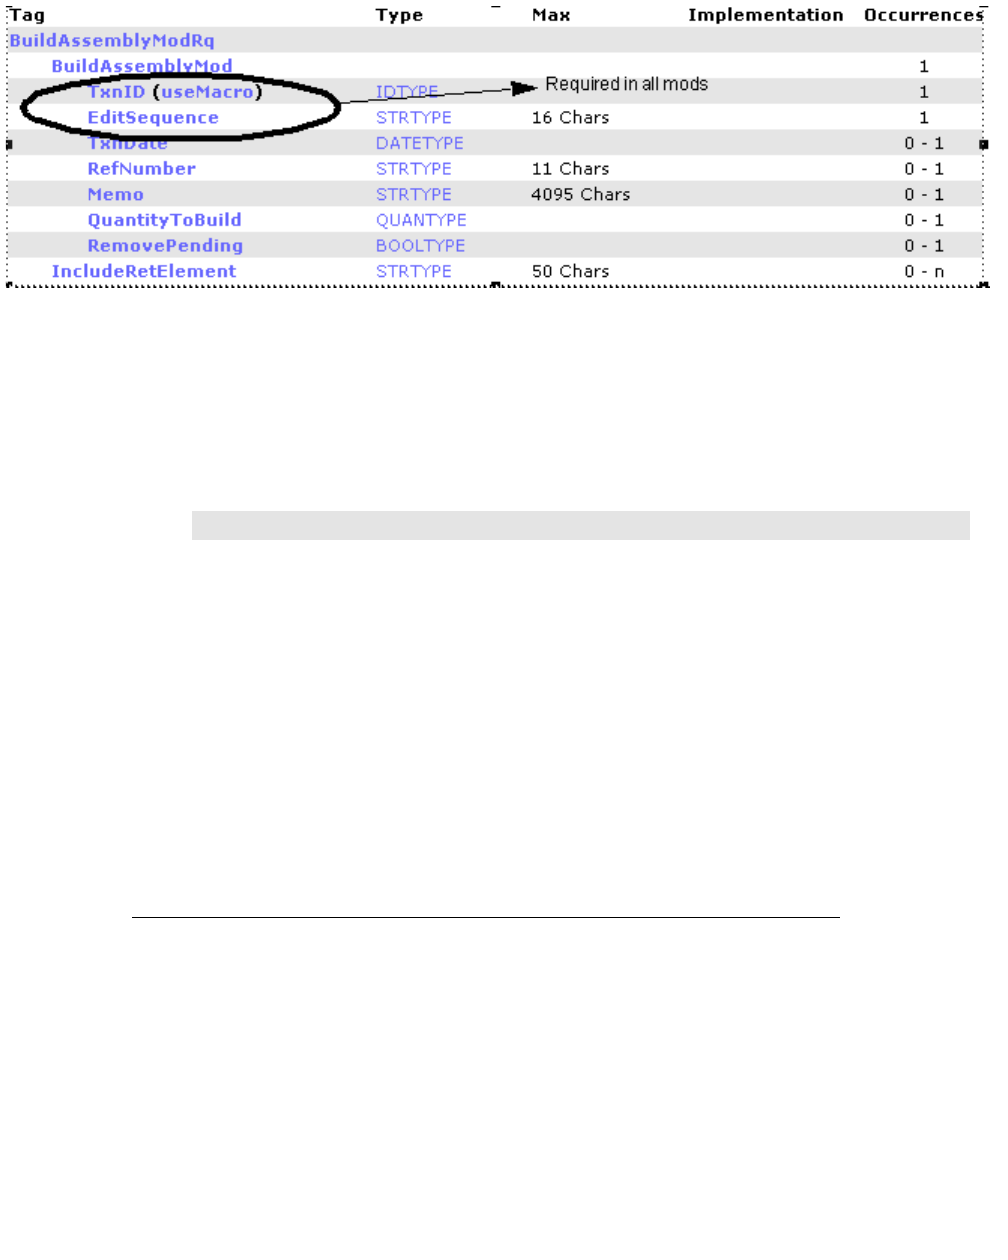
Modifying an Existing BuildAssembly Transaction
381
(c) 2013 Intuit Inc. All rights reserved.
Figure 28-10 BuildAssemblyMod OSR Listing
Notice that along with TxnID, every BuildAssemblyMod requires the edit sequence, which
prevents accidental overwrites to data by ensuring you are saving the most recent version of
the data. This means that before modifying any existing BuildAssembly transaction, you
must first do a BuildAssemblyQuery--even if you already have the TxnID--to get the
current EditSequence.
I
MPORTANT
You’ll also want to check for status code 3200 in the response
to your mod request. This code indicates that someone has
modified the transaction since you last retrieved the
transaction from QuickBooks. You’ll have to re-retrieve that
transaction and apply your mods to that newer version.
If the transaction is pending, you can remove the pending status, effectively performing the
build. This mod will work in the SDK only if there are sufficient components for the build
on the TxnDate.
Any fields not explicitly modified in the BuildAssemblyMod request keep their existing
values.
Modifying a BuildAssembly in qbXML
Listing 28-8 shows a BuildAssemblyMod request that sets new values for the Memo and
QuantityToBuild fields. The edit sequence was obtained from a previous
BuildAssemblyQuery.
382
Chapter 28: Using Assembly Item and BuildAssembly Functionality
(c) 2013 Intuit Inc. All rights reserved.
_____ Listing 28-8 Constructing a BuildAssemblyMod in qbXML
<?qbxml version="5.0"?>
<QBXML>
<QBXMLMsgsRq onError="continueOnError">
<BuildAssemblyModRq>
<BuildAssemblyMod>
<TxnID>25-1130282678</TxnID>
<EditSequence>1130282678</EditSequence>
<Memo>Built from component list 2</Memo>
<QuantityToBuild>4</QuantityToBuild>
</BuildAssemblyMod>
</BuildAssemblyModRq>
</QBXMLMsgsRq>
</QBXML>

Modifying an Existing BuildAssembly Transaction
383
(c) 2013 Intuit Inc. All rights reserved.
Modifying a BuildAssembly in QBFC
Listing 28-9 shows a self-contained procedure that
•Opens a connection with QuickBooks
•Queries for build assembly transactions that fall within the specified date range
•Arbitrarily picks the first transaction from the query and saves its TxnID and edit
sequence for the upcoming mod request
•Issues a mod request using the TxnID and edit sequence obtained in the query,
modifying the memo and the quantity
•Shows the results, and closes the connection.
Notice that the query specifies that only TxnID and EditSequence (via IncludeRetElement)
is to be returned in the response because that is all we need from the query.
______Listing 28-9 Querying for a BuildAssembly Transaction and modifying it
Public Sub QBFC_ModBuildAssembly()
Dim SessionManager As QBSessionManager
Set SessionManager = New QBSessionManager
SessionManager.OpenConnection "", "IDN Mod Build Assembly Sample"
SessionManager.BeginSession "", omDontCare
Dim requestMsgSet As IMsgSetRequest
Set requestMsgSet = SessionManager.CreateMsgSetRequest("US", 5, 0)
' Initialize the message set request's attributes
requestMsgSet.Attributes.OnError = roeStop
'First we query QB for build assembly transactions within a date range
Dim BuildAssmblyQuery As IBuildAssemblyQuery
Set BuildAssmblyQuery = requestMsgSet.AppendBuildAssemblyQueryRq
BuildAssmblyQuery.IncludeRetElementList.Add ("EditSequence")
BuildAssmblyQuery.IncludeRetElementList.Add ("TxnID")
BuildAssmblyQuery.ORBuildAssemblyQuery.BuildAssemblyFilter.
ORDateRangeFilter.TxnDateRangeFilter.ORTxnDateRangeFilter.
TxnDateFilter.FromTxnDate.setValue ("2005-10-25")
BuildAssmblyQuery.ORBuildAssemblyQuery.BuildAssemblyFilter.
ORDateRangeFilter.TxnDateRangeFilter.ORTxnDateRangeFilter.
TxnDateFilter.ToTxnDate.setValue ("2005-10-26")
Dim responseMsgSet As IMsgSetResponse
Set responseMsgSet = SessionManager.DoRequests(requestMsgSet)
Dim response As IResponse
' Responselist contains one response, because we made one request
Set response = responseMsgSet.ResponseList.GetAt(0)

384
Chapter 28: Using Assembly Item and BuildAssembly Functionality
(c) 2013 Intuit Inc. All rights reserved.
'Make sure there is data first
If response.Detail Is Nothing Then
MsgBox "No Detail available"
Exit Sub
End If
'This is a query, so the response detail is a ret list
Dim BuildAssemblyRetList As IBuildAssemblyRetList
Dim BuildAssemblyRet As IBuildAssemblyRet
Set BuildAssemblyRetList = response.Detail
'Potentially many transactions in the retlist: we get the first one
'for our convenience: you'll do something smarter or let the user pick
Set BuildAssemblyRet = BuildAssemblyRetList.GetAt(0)
'Save the TxnID and EditSequence: we need 'em for our mod request
Dim TransID As String
Dim EditSeq As String
TransID = BuildAssemblyRet.TxnID.getValue
EditSeq = BuildAssemblyRet.EditSequence.getValue
‘clear the message set so we can re-stuff it with the mod request
requestMsgSet.ClearRequests
' Add the request to the message set request object
Dim BuildAssmblyMod As IBuildAssemblyMod
Set BuildAssmblyMod = requestMsgSet.AppendBuildAssemblyModRq
'Set the properties in the BuildAssembly mod object
BuildAssmblyMod.TxnID.setValue (TransID)
BuildAssmblyMod.EditSequence.setValue (EditSeq)
BuildAssmblyMod.TxnDate.setValue ("2005-10-25")
BuildAssmblyMod.Memo.setValue ("Build from component list 4")
BuildAssmblyMod.QuantityToBuild.setValue (5)
' Perform the request and obtain a response from QuickBooks
Set responseMsgSet = SessionManager.DoRequests(requestMsgSet)
MsgBox responseMsgSet.ToXMLString
' Close the session and connection with QuickBooks.
SessionManager.EndSession
SessionManager.CloseConnection
End Sub
Querying for BuildAssembly Transactions
The BuildAssemblyQuery request provides functionality similar to the functionality found
in the UI advanced Find feature, which is accessed by selecting (from the main QuickBooks
menubar) Edit->Find->Advanced Find.
If you are familiar with QuickBooks queries in general, there is nothing tricky or special
about this one. Notice however, that by default the component line items are included with
each returned build assembly transaction.

Querying for BuildAssembly Transactions
385
(c) 2013 Intuit Inc. All rights reserved.
Querying For BuildAssembly Transactions in qbXML
Listing 28-10shows a simple example of constructing a query in qbXML that queries for
BuildAssembly transactions that were builds of the specified assembly item, that were built
with the date range specified and that are currently not pending. For more information on
building queries, including using iterators to manage large query returns, see Chapter 8,
“Creating Queries.”
_____ Listing 28-10 A simple BuildAssemblyQuery in qbXML
<?xml version="1.0" ?>
<?qbxml version="5.0"?>
<QBXML>
<QBXMLMsgsRq onError = "stopOnError">
<BuildAssemblyQueryRq requestID = "0">
<TxnDateRangeFilter>
<FromTxnDate>2005-10-26</FromTxnDate>
<ToTxnDate>2005-10-26</ToTxnDate>
</TxnDateRangeFilter>
<ItemFilter>
<FullName>Metal Panel Assembly</FullName>
</ItemFilter>
<PendingStatus>NotPendingOnly</PendingStatus>
</BuildAssemblyQueryRq>
</QBXMLMsgsRq>
</QBXML>
Querying For BuildAssembly Transactions in QBFC
We’ve already shown an example of constructing a BuildAssemblyQuery and processing
some of its response data in Listing 28-9.
386
Chapter 28: Using Assembly Item and BuildAssembly Functionality
(c) 2013 Intuit Inc. All rights reserved.

Calculating Sales Tax
387
(c) 2013 Intuit Inc. All rights reserved.
C
HAPTER
29 1
T
AXES
AND
D
ISCOUNTS
(US V
ERSIONS
)1
This chapter presents detailed information on how QuickBooks (United States) calculates
sales tax. It also discusses how discounts (both taxable and nontaxable) are applied to sales
tax calculations.
Calculating Sales Tax
You can create a Sales Tax Group when you have one or more sales tax items to add to the
group. When a Sales Tax Group is used for a transaction, the tax percentage displayed is the
sum of all the tax percentages. However, using that group tax percentage to calculate sales
tax doesn’t necessarily reflect the correct total tax amount because of rounding that occurs
when individual taxes are calculated. The following example illustrates this point.
As an example, suppose you have a state tax of 4 percent and a county tax of 1 percent. You
create a Sales Tax Group to include both taxes. When that Sales Tax Group is used on an
invoice, it is displayed as 5 percent.
Assume an invoice’s taxable items total $38.66. If you were to use the 5 percent tax value,
you’d expect the tax to be $1.9330, which would be rounded down to $1.93. However, the
invoice will actually show $1.94, which is the correct amount. This number is correct
because the state tax of 4 percent is $1.5464, which rounds up to $1.55. The county tax of 1
percent is $0.3866, which rounds up to $0.39. Adding the two taxes together, the total tax is
$1.94, which is the amount shown on the invoice.
Consequently, if your application computes sales tax, be sure to calculate each individual
tax in a Sales Tax Group individually, then sum the individual results to obtain the correct
total.
Applying Multiple Taxes
This section discusses multiple taxes and invoices, but the discussion also applies to taxes
on sales receipts.
In general, it’s best to assign a tax item or tax group to an invoice and allow QuickBooks to
apply the same tax to all taxable items on the invoice. In some situations, however, multiple
taxes are required, so this method doesn’t work. In such cases, you’ll need to use techniques
to apply the taxes as line items, and there are several important details to be aware of.
When you are applying taxes as line items, you can use only single tax items. Tax groups
can be used only for the invoice as a whole. If you have multiple taxes that apply to all
taxable items, plus one or more other taxes that apply only to some of the items on an
invoice, it’s better to use a tax group that applies to the entire invoice for the taxes that
388
Chapter 29: Taxes and Discounts (US Versions)
(c) 2013 Intuit Inc. All rights reserved.
apply to all taxable items. You can then apply the other taxes as line items within the
invoice. Use the ItemSalesTaxRef aggregate to apply a tax or tax group to the entire
invoice.
You can use subtotals to apply a single tax line to multiple items in an invoice, but the tax is
only applied automatically for the first tax line after the subtotal line. You need to manually
supply the tax amount for any other tax lines that need to be applied to the subtotal line. If
you don’t supply an amount, the amount comes out as zero and the tax line is useless. When
you do supply an amount, the amount of tax on the subtotal also shows up in the rate
column for that tax line. There isn’t any way for the rate to show up as anything other than
the amount of the tax.
For example, in the following invoice, Tax 1 (5%) is applied automatically. The rate shows
up as 5% and the amount is calculated as $15.00. Tax 2 (6%), however, is provided by you
as an amount of $18.00 (in the third column). The Rate also shows up as $18.00, and is
filled in by QuickBooks. There is no visual representation of the rate for the second tax
(6%).
I
MPORTANT
If you have a complicated tax situation where no single tax applies to
all taxable items on the invoice, you must choose a zero percent tax to
apply to the entire invoice. It is recommended that you name such a tax
item “Tax Calculated on Invoice” so that it’s clear that the tax is not
being applied by QuickBooks to the entire invoice.
Applying Discounts
Flat discounts are applied differently than percentage discounts are applied. In addition,
nontaxable discounts are applied differently than taxable discounts are applied.
Item Rate Amount
Item 1
$100.00 $100.00
Item 2
$200.00 $200.00
Subtotal
$300.00
Tax 1
5% $15.00
Tax 2 $18.00
(QuickBooks
fills in this
value)
$18.00

Applying Discounts
389
(c) 2013 Intuit Inc. All rights reserved.
Flat vs. Percentage Discounts
A percentage discount applies only to the line directly above it. As a result, all of the tax
implications for a percentage discount apply only to that line. In contrast, flat discounts
apply to all lines recorded above the discount. Flat discounts are pro-rated among the items
they apply to.
In the following example, the $20.00 discount is properly distributed to be half taxable and
half nontaxable. The taxable amount for the discount is only $10.00.
The following discussion shows how QuickBooks calculates both taxable and nontaxable
flat discounts. A nontaxable discount is applied after sales tax. A taxable discount is
applied before sales tax. Both taxes are prorated among the items they apply to.
Nontaxable Flat Discount
Consider an invoice with the following items:
The sales tax (5%) in this example is calculated by QuickBooks as the sum of each
(line item * tax)
which equals a total of $315.00. The discount of $30.00 is then subtracted, which yields a
total due of $285.
N
OTE
Do not use nontaxable discounts unless discounts in your
state are never applied to sales tax.
Item Amount Taxable?
Item 1
$100.00 Nontaxable
Item 2
$100.00 Taxable
Discount
$20.00 Taxable
Item Amount Taxable?
Item 1
$100.00 Taxable
Item 2
$200.00 Taxable
Discount
$30.00 Nontaxable

390
Chapter 29: Taxes and Discounts (US Versions)
(c) 2013 Intuit Inc. All rights reserved.
Taxable Flat Discount
A taxable discount is applied before sales tax is calculated. Using the previous example, the
tax is calculated as follows:
($100 - $10) *.05 + ($200 - $20)*.05 = $13.50 sales tax
which equals a total due of $283.50 on this invoice after discount and tax are applied.
•

What is Remote Data Sharing?
391
(c) 2013 Intuit Inc. All rights reserved.
C
HAPTER
30 1
R
EMOTE
D
ATA
S
HARING
AND
Y
OUR
A
PPLICATION
1
This chapter describes what QuickBooks Remote Data Sharing (RDS) is, how to support it,
and how to distribute it.
What is Remote Data Sharing?
QuickBooks Remote Data Sharing is software that allows an integrated application to
communicate transparently with QuickBooks company files on another machine in a
network (typically a LAN). The communication is transparent because the application itself
is not aware that it is accessing QuickBooks remotely.
The RDS software must be distributed with your application. It consists of two
components: the RDS server and the RDS client. The RDS server must be installed on a
machine on which QuickBooks is installed. (QuickBooks need not be running, depending
on the access mode selected at the RDS server.) The RDS client must be installed on the
machine that is running your application.
Using RDS Client for Remote Access with QuickBooks Installed
Locally
Beginning with qbXML 4.0, the RDS client can be running on a machine that also has
QuickBooks installed. In this scenario, your application can access either the local
QuickBooks or the remote RDS server, depending on how you invoke the
OpenConnection2 call (available starting with qbXML 4.0).
OpenConnection2 accepts an additional parameter titled connType which has possible
value of ctUnknown, ctLocalQBD, ctRemoteQBD, or ctLocalQBDLaunchUI. If your
application is in a machine that runs RDS Client it could use ctRemoteQBD to set its
connection to RDS Client. For QuickBooks, the value would be ctLocalQBD.
RDS and Event Notification
RDS does not support event notification. That is, remote applications are not notified about
events occuring at the remote company files. For more information, please see the chapter
“Event Notification” elsewhere in this document.

392
Chapter 30: Remote Data Sharing and Your Application
(c) 2013 Intuit Inc. All rights reserved.
Compatibility with Older Versions of RDS
The SDK provides RDS installers for both the RDS 2.1 client and the RDS 3.0 client. The
3.0 client uses the new Request Processor QBXMLRP2 which supports the new
QuickBooks SDK 3.0 features. The 2.1 client is provided to support developers who
continue to use QBXMLRP.
About the RDS Server
The RDS server sits along side QuickBooks and acts as its gatekeeper. Any integrated
application on another machine (called a “remote application” in this chapter) that wants to
access QuickBooks must first pass through the RDS server.
Installation and Setup
The RDS server must be installed on the machine where QuickBooks resides. (See
“Distributing RDS” for more information on how to install the RDS server.)
After the RDS server has been installed, it must be configured via the Setup dialog. This
dialog can be displayed either automatically by the installer or manually by the user. (See
“Distributing RDS” for more information on installation options.)
The Setup dialog enables the user to establish an RDS login and password. The RDS login
and password, which are distinct from QuickBooks logins, serve to protect the user from
unknown applications gaining access to QuickBooks. Only remote applications for which
the user supplies the correct RDS login and password will have their requests forwarded on
to QuickBooks. (See “Using the RDS Client” for information on entering the RDS login
and password.)
N
OTE
After setting up the initial RDS login/password pair, the user
can create additional login pairs, or make changes to existing
pairs, from the RDS server user interface.
Access Rights Within QuickBooks
The RDS server acts as a proxy for all remote applications that access QuickBooks. As a
result, the RDS server, itself, is considered an integrated application by QuickBooks. So,
the first time the RDS server is started with a particular QuickBooks company file, it must
be granted permission to access that file by the QuickBooks user.
In the process of granting the RDS server access to QuickBooks, the user also indicates
whether or not to permit access to certain personal data, such as social security numbers.
Since the RDS server acts on behalf of all remote applications, the access rights granted by
the user to the RDS server apply to all remote applications.

What is Remote Data Sharing?
393
(c) 2013 Intuit Inc. All rights reserved.
N
OTE
RDS access to some of this personal data can be limited in
QuickBooks itself by unchecking the checkbox labeled “Allow
this application to access Social Security numbers and other
personal data.” Notice that this setting will apply to all
applications that access this QuickBooks company file via
RDS.
Access Modes and Company Files
The RDS server supports two access modes: one that uses the currently open company file
with QuickBooks running and one that uses one or more specified company files directly,
without QuickBooks running. You choose the access mode from the RDS server console by
clicking Change Options and then selecting the desired access mode.
In the access mode where any of the list of specified company files can be used, one or
more company files must be added to the list before remote applications can access them.
The process of adding a company file to the list requires that company file to be open in
QuickBooks and the RDS server must then be granted automatic login rights in that
company file. (The company file name must be unique in that list.) Subsequent to this
addition process, QuickBooks does not run, but remote applications use any company file
in the list directly. In this access mode, the RDS server can be set up to start automatically
whenever Windows starts.
Using the RDS Server
If the access mode in effect is the one that requires a currently open QuickBooks company
file, the user must explicitly start QuickBooks and open a company file, and then start the
RDS server, (the user must have already authorized RDS access to the currently open
QuickBooks company file) before the RDS server can begin handling requests from remote
applications.
If the access mode in effect is the one that uses company files from the specified list
without QuickBooks running, the RDS server must be running and then automatically
provides access to any of the company files upon requests from remote applications.
Once the RDS server has been successfully started, it listens at the established port for
incoming requests from remote applications until the user explicitly stops it. Notice that the
port value can be changed (by the user). However, the use of the default is recommended.
N
OTE
The default port address is the port officially registered for
RDS. However, if the user must change the default port for
some reason, such as conflicts, the user can change it to any
available value.

394
Chapter 30: Remote Data Sharing and Your Application
(c) 2013 Intuit Inc. All rights reserved.
If a remote application has specified the company file name in the Request Processor’s
BeginSession method, this name must match the name of the currently running company
file, although the paths can be different, if the first access mode is in effect. If the second
access mode is in effect, the company file name specified in the Request Processor’s
BeginSession method must match the name of a company file in the RDS server’s list of
company files.
About the RDS Client
The RDS client enables the user to set attributes needed for the integrated applications on
this machine to access QuickBooks on a remote machine. Furthermore, it makes sure that
these integrated applications don’t have to change in order to access QuickBooks remotely.
Installation and Setup
The RDS client must be installed on each machine where your application is installed and
running. For SDK 3.0 and greater, the RDS client can be installed on machines that have
QuickBooks installed: for SDK 2.1, the RDS client installation continues to disallow
installation if QuickBooks is installed on the same machine. For 2.1 RDS clients, if the user
installs QuickBooks on the same machine after installing the RDS client, all integrated
applications on this machine will simply use the local copy of QuickBooks, not the one on
the remote machine.
N
OTE
If QuickBooks Basic is installed, RDS will automatically be
used, not QuickBooks Basic.
If the SDK 3.0 or greater RDS client is installed on a machine with QuickBooks, and the
qbXML supported is 4.0 or greater, either the local QuickBooks can be used or RDS,
depending on the connType parameter supplied in the call to OpenConnection2. (See
“Using RDS Client for Remote Access with QuickBooks Installed Locally” (page 391) for
more information.) If qbXML 4.0 and greater is not supported, the local QuickBooks will
automatically be used.
After the RDS client is installed, it must be configured via the Setup dialog. This dialog
can be displayed either automatically by the installer or manually by the user. (See
“Distributing RDS” for more information on installation options.)
The Setup dialog enables the user to supply the network machine name and port of the
machine where QuickBooks and the RDS server are running. If the RDS server is started,
the user can try to retrieve this information by using the built-in server discovery
mechanism. Or, this information can also be found on the RDS server’s main window.

Distributing RDS
395
(c) 2013 Intuit Inc. All rights reserved.
N
OTE
The server port field contains a default value matching the
default value in the RDS server installation. The user can
change this, but shouldn’t unless required to by conflicts or
other such considerations.
Using the RDS Client
Before the RDS client can be used by your application to send remote requests to
QuickBooks, the user must start the RDS server on the host machine. In addition, if the
access mode selected at the RDS server is for the “currently open company file” then the
user must also start QuickBooks and open the company file.
Unlike the RDS server, however, the RDS client does not have to be started explicitly by
the user. Instead, once the Setup dialog has been completed, the user simply runs your
application. Then, when your application makes its initial call to QuickBooks, the user will
be prompted to enter the RDS login and password.
If the user chooses to always allow access, then no further interaction with the RDS client is
required. The exception to this is if the user changes any relevant information, such as the
password. In a case like this, the user would have to enter the new information the next
time your application calls QuickBooks, or before.
On the other hand, if the user chooses to allow access this time only, then a prompt to enter
the RDS login and password will be displayed each time your application is run and it calls
QuickBooks for the first time.
Although it’s normally not the case, there are a few situations in which the user would want
to explicitly run the RDS client, including:
•Changing the login and/or password to match a change on the RDS server.
•Changing the server name and/or port to reflect a change on the RDS server or a change
of the server machine, itself.
•Changing the access level of a particular application (for example, from always allow
access to prompt each time).
Distributing RDS
The material on how to distribute your application is divided into two main sections:
•Background information on the SDK installers and merge modules, including legal
requirements you must be aware of.
•Recommended and required features of your own implementation.
Please read both of these sections carefully before implementing your installation.

396
Chapter 30: Remote Data Sharing and Your Application
(c) 2013 Intuit Inc. All rights reserved.
How to Use the SDK Installers and Merge Modules
There are only two supported ways in which you can redistribute RDS components:
1. You can use the RDS standalone compressed-image installers that we provide.
2. You can use the RDS merge modules that we provide.
N
OTE
You can mix these methods if you want; for example, you can
use the supplied RDS standalone installer for the server and
the supplied merge module for the client, or vice versa.
I
MPORTANT
It is a violation of your qbXML license agreement to
redistribute RDS without using either our standalone installers
or our merge modules.
Automatic installation programs and packaging wizards, such as the wizard in Microsoft
®
Visual Studio
®
, will not do the right thing (even if you are using .NET). They will
redistribute the qbxmlrp.dll file, which is against your license agreement and could also
cause significant problems for your users.
Using the Standalone Installers
If your install process does not support merge modules, you will need to use the standalone
installers provided with the SDK. These installers will automatically do the right thing.
Using the Merge Modules
I
MPORTANT
Make sure you have the Microsoft VC (VC_CRT.msm), VC++
(VC_STL.msm), and VC I/O (VC_CRT_IO.msm) runtime
library merge modules, which are required because the SDK
merge modules install components that depend on the Visual
C and C++ version 7 runtime libraries. These Microsoft merge
modules are included with most MSI-based install builders, or
you can get them directly from Microsoft. When you add the
VC_CRT.msm, VC_STL.msm, and VC_CRT_IO.msm modules
to the installer you are responsible for configuring them to set
their target directory to the Windows system directory.
If your install process supports Microsoft merge modules, you can use the merge modules
that are provided with SDK.

Distributing RDS
397
(c) 2013 Intuit Inc. All rights reserved.
What Is a Merge Module?
The Microsoft Installer (MSI) service is built into Windows 2000 and XP. MSI solves a
number of installation problems, such as getting clean uninstalls and protecting system
components, and includes redistributable install engines that support Win98, WinNT, and
Win ME. To get a “Designed for Windows” logo, your application must be installed using
MSI.
Merge modules are a key part of MSI. They encode the logic and files needed to correctly
redistribute shared components, which aren’t removed from a system until all of the
applications that installed them are removed.
Any installation that is built for an MSI-engine installer can use merge modules. Many
proprietary install tools that are not strictly based on MSI (for example, newer versions of
InstallShield Professional) can also take advantage of merge modules.
How Do I Use a Merge Module from the SDK?
The SDK merge modules are located in the ../tools/MergeModules folder. Here’s how to
use them:
1. Set your installation development tool to include the SDK’s MergeModules directory in
the MergeModule search path.
2. Each MSI “feature” refers to components and/or merge modules. For any feature that
installs components of your application that depend on the SDK capabilities provided
by a merge module, specify that particular merge module as part of that feature.
If a merge module is dependent on some other module, the other module will be added
to your installer automatically.
3. Build your installation as usual. All the logic from the included merge modules will be
merged into your install.
What Installation Logic Is Built into the Provided Merge Modules?
The RDS merge modules do five things:
1. They provide the appropriate DLL files and executable files for the RDS Server or
Client (as two separate merge modules) and register them appropriately.
2. They install a link to their configuration utility on the desktop and in the QuickBooks
area of the Windows Start menu.
3. They check whether QuickBooks is installed.
> If the RDS Server is being installed, a version of QuickBooks that supports the
SDK must already be installed.
> If the 2.1 RDS Client is being installed, QuickBooks must not be installed: for 3.0
RDS clients, the installation is performed whether QuickBooks is installed or not.
4. They verify that their counterpart (RDS Server or RDS Client) is not installed. (If it
were possible to install both the RDS Server and Client, the user could create an infinite
data-sharing loop that would never leave the system.)
5. The RDS merge modules contain a custom action to invoke the appropriate
configuration UI for the RDS Server or Client but DO NOT add that custom action to
the install sequence itself. If you create your own MSI installer that uses an RDS merge

398
Chapter 30: Remote Data Sharing and Your Application
(c) 2013 Intuit Inc. All rights reserved.
module, you may want may to add the configuration custom action to the install
sequence or to invoke the action as the result of a button push in the install wizard. For
example, the QBSDK installer invokes the appropriate configuration UI via a
“DoAction” event when the “Finish” button is pressed if the “Configure RDS”
checkbox on the final dialog is checked.
Choices in Implementing Your Installer
You can use either the simple method, which is to use the standalone installers supplied
with the QuickBooks SDK, or you can use the more flexible merge modules, which are also
supplied with the SDK.
Simplest Method: Using the Standalone RDS Installers
The simplest way to install RDS for users is for your installer to invoke the RDS client
installer from your own application installer because the RDS client is installed on the same
system as your application. Also, you should provide the RDS server installer on your own
distribution CD with instructions for running the RDS server install on a machine running
QuickBooks.
More Flexibility: Using the RDS Merge Modules
If you require more flexibility than using the prebuilt standalone installers, and you are
using a modern install tool such as InstallShield Express, InstallShield Developer, Wise
Installer, and so on, you can use the RDS MSI merge modules provided in the SDK. Unlike
many merge modules which simply install and register COM servers, the RDS merge
modules offer considerably more pre-built capabilities as described in the following
subsection.
All of the merge module behavior described is mirrored in the standalone installers.
Furthermore, the .msi database for each standalone installer can be extracted from the
RDSClient.exe or RDSServer.exe files and the tables can be examined to see precisely how
the capabilities of the merge module are leveraged by the standalone installers.
Verifying Presence/Absence of QuickBooks
For the RDS server install, the merge modules verify whether QuickBooks is already
installed on the system. For the 3.0 client, there is no check for QuickBooks, as the
installation succeeds whether QuickBooks is installed or not. For the 2.1 RDS client install
there is a check to determine whether QuickBooks is already installed on the system:
installation of the 2.1 client is not allowed if QuickBooks is installed. This is a mandatory
step that the merge module forces into the install sequence. If the client and/or server merge
module is included in an installer, then the QuickBooks verification custom action will set
the property “QuickBooksInstalled” to 1 if QuickBooks is installed, otherwise it will either
not be present at all or will not be set to 1.

Supporting RDS
399
(c) 2013 Intuit Inc. All rights reserved.
Accordingly, an installer using either (or both) RDS merge module can determine whether
QuickBooks is installed by checking the condition “QuickBooksInstalled=1” (to verify
QuickBooks is there) or “NOT QuickBooksInstalled=1” (to verify QuickBooks is NOT
there.
Informing Users of Error Conditions via Error Dialogs
The merge modules include dialogs explaining why the client or server cannot be installed
because QuickBooks is (not) already installed. These are named
“ClientQuickBooksInstalled” and “ServerQuickBooksNotInstalled,” respectively.
These dialogs should be inserted into the install UI sequence so that they appear either just
before the main wizard sequence begins or just after. The “Next” button performs an
EndDialog action with the return argument allowing the sequence to proceed normally,
while the “Cancel” button performs an EndDialog action with the exit argument that
reflects the user’s desire to quit the installation at that point.
Using Custom Actions to Invoke Setup Dialogs
The merge modules provide custom actions to invoke the client or server initialization/
setup dialogs. These are called “ClientInitialize” and “ServerInitialize,” respectively. The
intent here is for the “Finish” button on the last dialog of an install wizard sequence to
include a “DoAction” event that conditionally (see “Verifying Presence/Absence of
QuickBooks” above) invokes the appropriate custom action.
Supporting RDS
In order to support RDS, you need to distribute it with your application, inform your
customers about it, and be aware of certain new messages that appear with the use of RDS
for existing QuickBooks HRESULTs.
What Your Application Must Do to Use RDS
Applications need not be aware that they are using QuickBooks locally or remotely.
Accordingly, you are not required to code your applications differently to use RDS.
However, if you want your application to support a user’s choice of either accessing
QuickBooks remotely (via the RDS server) or the local QuickBooks on the same machine,
you can check for the user’s choice and invoke OpenConnection2 accordingly, as described
under “Using RDS Client for Remote Access with QuickBooks Installed Locally” (page
391). Of course, using OpenConnection2 is only possible with QuickBooks 2005 and
greater versions.
You must be aware that RDS is not made available directly to users. Instead, you must
include the RDS software with your own application when you distribute it. Pre-built
installation merge modules and standalone installers are included with the QuickBooks
SDK for this purpose.

400
Chapter 30: Remote Data Sharing and Your Application
(c) 2013 Intuit Inc. All rights reserved.
For more information on how to use the merge modules and installers, see “Distributing
RDS.”
N
OTE
Although no HRESULTs values have changed with the use of
RDS, some of the HRESULTs may be slightly different when
RDS is used. See “RDS-Specific HRESULTs Messages” in this
chapter.
Which Versions of QuickBooks Support RDS?
Any version of QuickBooks that supports the QuickBooks SDK will also support RDS.
What You Need to Tell Your Customers about RDS
You should be aware that although your customers know about your application, they may
not know about RDS. You may want to include mention of RDS and its behaviors in your
documentation and online help. Otherwise, they may be confused when they see the RDS
dialogs during the installation and use of your products.
In particular, you should be careful to warn them about the access granted to the RDS
server and that it grants to all RDS clients the same QuickBooks access as that possessed by
the logged in QuickBooks server, potentially to sensitive data such as payroll or other
personal data.
RDS-Specific HRESULTs Messages
The following table lists the existing HRESULTs that have new messages if the error occurs
when RDS is being used. The table shows the existing HRESULT and the new messages
for RDS.
HRESULTs New RDS-Specific Messages
0x80040402 Remote QuickBooks access failed unexpectedly.
0x80040407 Error retrieving the QuickBooks remote server name and port.
0x8004040D Remote QuickBooks access failed because the remote server name and/or port have
changed.
0x80040414 A modal dialog box is showing in the QuickBooks Remote Data Sharing Client user
interface. The application cannot access QuickBooks until the dialog is dismissed.
0x8004041A Remote QuickBooks access failed because login and/or password do not match those
on the server.
0x8004041D The RDS server was not enabled to allow remote access for the requested company
file.

Supporting RDS
401
(c) 2013 Intuit Inc. All rights reserved.
0x80040420 The user has denied remote access to QuickBooks.
0x80040421 Unable to establish a remote connection to QuickBooks.
HRESULTs New RDS-Specific Messages
402
Chapter 30: Remote Data Sharing and Your Application
(c) 2013 Intuit Inc. All rights reserved.

The General Error Recovery Mechanism
403
(c) 2013 Intuit Inc. All rights reserved.
C
HAPTER
31 1
Error Recovery
1
This chapter provides details on the general error recovery mechanism provided by the QB
SDK. The easiest recovery method is available via QBFC, if you are using that. QBFC
automates most of what you need to do. However, in this chapter we’ll cover both QBFC
and qbXML methods.
The General Error Recovery Mechanism
If your application adds, deletes, voids, or modifies data in the QuickBooks company file,
you need to implement an error recovery routine. This routine enables your application to
respond to and recover from conditions that interrupt normal processing of requests and
responses. Examples of such error conditions include system crashes and power outages as
well as internal system errors and out-of-memory conditions.
A simple error recovery routine asks QuickBooks to save its state, so that when a
processing error occurs, you can ask QuickBooks to check its state and it can return status
information to you about the request in question. For example, suppose your application
sends a CheckAdd request to QuickBooks. The ProcessRequest method (or DoRequests
method for QBFC) fails to return a response or result code. What should your application
do? Does it assume the check was created? Does it assume the check wasn’t created? Either
assumption, if incorrect, will cause problems. The correct approach is for your application
to invoke an error recovery routine that checks the status of the CheckAdd request and
determines whether processing succeeded or failed before it asks QuickBooks to add the
check a second time.
If your application is a read-only application (that is, the only requests it sends are query
requests), then you do not need to implement an error recovery routine.
When to Invoke Error Recovery
When you receive an error from QuickBooks that indicates an error in processing a request,
or when you do not receive a response from QuickBooks at all, your application needs to
invoke its error recovery routine. In addition, if your application adds, deletes, modifies, or
voids data in the QuickBooks company file, it should invoke its error recovery routine upon
startup, in case the previous session terminated before all outstanding requests were
successfully processed.
HRESULTs Returned by QuickBooks
Applications integrating with QuickBooks should invoke their error recovery routine when
any of the following error conditions occurs:

404
Chapter 31: Error Recovery
(c) 2013 Intuit Inc. All rights reserved.
•Your application did not receive a response from QuickBooks.
•Your application received one of the following
HRESULTS
:
>
0x80040402
(Unexpected error. Check the
qbsdklog.txt
file for possible,
additional information.)
> 0x8004040E (There is not enough memory to complete the request.)
>
0x8004041C
(An internal QuickBooks error occurred while trying to access the
company data file.)
•Your application received a response, but it did not include the qbXML response text
stream that was expected.
Automated Error Recovery in QBFC
QBFC automates the SDK error-recovery mechanism described later in this chapter (see
“Using Error Recovery in qbXML-based Applications”) by automatically managing the
new MessageSetID and oldMessageSetID attributes and by saving the request message set
to disk. This enables your application to determine which request corresponds to the
response status that the error-recovery feature returns.
For QuickBooks, QBFC error-recovery information is unique to a given integrated
application (via a GUID specified by ErrorRecoveryID) and company file. As a result, a
session must be started before certain QBFC error-recovery functions can be executed.
(Only EnableErrorRecovery, ErrorRecoveryID, and SaveAllMsgSetRequestInfo can be
executed before a session is started.)
N
OTE
QBFC automated error recovery is available only for data
message sets (not for subscription and event messages).
Implementing Automated Error Recovery
In general, these are the steps you need to follow to use QBFC’s automated error recovery
in your application:
1. Set the error recovery ID, using the ErrorRecoveryID function.
2. Set EnableErrorRecovery to
true
to enable error recovery.
3. Set SaveAllMsgSetRequestInfo to
true
so the entire contents of the MsgSetRequest
will be saved to disk. If Save All MsgSetRequestInfo is
false
(the default), only the
NewMessageSetID will be saved.
4. Use IsErrorRecoveryInfo to check whether an unprocessed response exists. If
IsErrorRecoveryInfo is
true
:
a. Get the response status, using GetErrorRecoveryStatus.
b. Get the saved request, using GetSavedMsgSetRequest.
c. Process the response, possibly using the saved request.
d. Clear the response status, using ClearErrorRecovery.

Using Error Recovery in qbXML-based Applications
405
(c) 2013 Intuit Inc. All rights reserved.
5. Send the current request set.
6. Process the response from the current request.
7. Clear the response status, using ClearErrorRecovery.
Error Recovery and Query Requests
Generally, error recovery is not used with query requests. If your application does not
receive a response from a query request, you would usually just resubmit the query. We
recommend that your application disable error recovery before querying, and then re-enable
it before starting other requests.
Using Error Recovery in qbXML-based Applications
If your application doesn’t use QBFC, you’ll have to do more work in implementing error
recovery. You’ll need to know a few things that are simply done automatically and behind
the scenes for QBFC.
Error Recovery Using Old and New Message IDs
The QuickBooks SDK error recovery mechanism employs two attributes:
newMessageSetID and oldMessageSetID. Message set IDs need to be unique strings and are
limited to 23 characters. (The colon, backward slash, and forward slash cannot be used in
these IDs.) The newMessageSetID identifies the current message and enables the error
recovery mechanism by signaling to QuickBooks that you want it to save the state of this
message.
When you are sure QuickBooks has successfully processed a given message set, you send
the message ID as the oldMessageSetID attribute, which has the effect of asking
QuickBooks to clear that ID and associated data from its saved state.
Your application is responsible for generating the message set IDs, which must be unique
within your application space. How you generate the value for the message ID is
application-specific. For instance, you might use a language-dependent tool to generate the
value. (The tool should ensure a unique value, not just a randomly generated one.)
How to Clear All Error Recovery Information
In some circumstances, you may need to delete all error recovery information that applies
to your applications. To do this, simply set the oldMessageSetID value to
ClearAllMessageSets. (oldMessageSetID = ClearAllMessageSets).
Steps for Using Error Recovery in qbXML-based Applications
The following steps outline a general procedure for implementing error recovery within
your application. First, steps 1 through 6 describe what your application needs to do during
normal, successful processing of a request.

406
Chapter 31: Error Recovery
(c) 2013 Intuit Inc. All rights reserved.
1. Create a unique newMessageSetID.
2. Create the request message set, including the newMessageSetID attribute, and save the
request message set in some persistent form. (Be sure to encrypt company file data or
otherwise ensure that it is secure and not accessible from the file system.)
3. Send the request message set.
4. Receive the response and process it.
5. If the response is successfully processed, delete the persistent copy of the request
message set.
6. Clear the oldMessageSetID (this is the “newMessageSetID” you used in Step 2).
If a crash or other processing error occurs, you will need to invoke your error recovery
routine. Here are the general steps:
1. At startup, check for a saved request message set. (If the request message set is still
save on disk—step 2, above—it was never cleared. This condition indicates some
problem with normal processing outlined in steps 1 through 6.)
If a saved request message set is present, resend the request set. This action has the
effect of performing a status check for the message set. (See Table 31-2.) If
QuickBooks has already processed all or some of the request, it will return the status
for it. If QuickBooks has not already processed the request, it will process it and send a
response.
2. Based on the response from QuickBooks, you will need to fix the problem, if there is
one. (If you just keep sending the same request without fixing problems, you’ll be in an
endless loop.) After you’ve fixed or identified the problem, you need to generate a new
newMessageSetID.
3. Repeat steps 2 through 6, (sending the revised request with its new newMessageSetID
to QuickBooks).
Example
Listing 31-1 shows an example of a CheckAdd request that includes a newMessageSetID.
If an error in processing occurred and no response was received, the error recovery routine
could send this same request again. If the request had been previously received,
QuickBooks would interpret this second, identical request as a status check and would send
back the response shown in Listing 31-2.

Using Error Recovery in qbXML-based Applications
407
(c) 2013 Intuit Inc. All rights reserved.
______Listing 31-1 CheckAdd request with error recovery (newMessageSetID)
<QBXMLMsgsRq newMessageSetID = "DE9437D9-AA85-21E4-D643"
onError="continueOnError">
<CheckAddRq requestID = "1">
<CheckAdd>
<AccountRef>
<FullName>Checking</FullName>
</AccountRef>
<PayeeEntityRef>
<FullName>East Bayshore Auto Mall</FullName>
</PayeeEntityRef>
<TxnDate>2001-10-14</TxnDate>
<Memo>Installment check</Memo>
<ExpenseLineAdd>
<AccountRef>
<FullName>Automobile</FullName>
</AccountRef>
<Amount>520.00</Amount>
</ExpenseLineAdd>
</CheckAdd>
</CheckAddRq>
</QBXMLMsgsRq>
______Listing 31-2 Response to status check for CheckAdd request with error recovery (newMessageSetID)
<?xml version="1.0" ?>
<QBXML>
<QBXMLMsgsRs newMessageSetID="DE9437D9-AA85-21E4-D643"
messageSetStatusCode="0">
<CheckAddRs requestID="1" statusCode="0" statusSeverity="Info"
statusMessage="Status OK"/>
</QBXMLMsgsRs
</QBXML>
Message Set Status Code
A
messageSetStatusCode
is returned to your application in response to an error
recovery request, such as a status check or a clear status. It is also returned if some specific
error recovery operation is invoked and fails, such as a standard check for a valid
message
set ID
; if the call fails, then a
messageSetStatusCode
is returned.
A
messageSetStatusCode
is not returned, for instance, if your application issues a
check status request that returns successfully. It is good practice to test for this status code,
regardless of the fact that in some cases it is not returned.

408
Chapter 31: Error Recovery
(c) 2013 Intuit Inc. All rights reserved.
Table 31-1 shows the error recovery status codes and their meaning.
Request ID
If you include a request ID in a request message, that ID will be returned in a status check
request. This is a handy way to identify a request that was sent earlier. (See Listing 31-1
and Listing 31-2.)
Comparing Requests (Performing a Checksum)
In certain cases when you send multiple requests with the same newMessageSetID,
QuickBooks compares the two versions of the messages themselves by performing a
checksum on them. If the messages do not match, QuickBooks returns an error (9001)
because, even though the newMessageSetIDs were the same, the messages were different,
so your intent is not clear. (If the messages match, then QuickBooks assumes you’re
performing a status check.)
Status for Individual Requests within a Message Set
When a message set contains multiple requests, some of the requests may have been
processed successfully before the error condition occurred. When error recovery is
implemented (through use of newMessageSetID), applications integrating with QuickBooks
receive individual status codes for each request within the message set, as shown in Listing
31-3.
Table 31-1 Error recovery status codes returned in messageSetStatusCode
Code Meaning
0
Success
600 The oldMessageSetID does not match any stored IDs, and no
newMessageSetID is provided.
9001
Invalid checksum. The
newMessageSetID
specified matches
the
currently stored ID, but the checksum fails.
9002
No stored response was found.
9003
(Not used)
9004
Invalid
MessageSetID
(message set ID), greater than 24
characters was given.
9005 Unable to store response.

Using Error Recovery in qbXML-based Applications
409
(c) 2013 Intuit Inc. All rights reserved.
______Listing 31-3 Content of error recovery processing record returned by a status check
<QBXML>
<QBXMLMsgsRs newMessageSetID="DE9437D9-AA85-21E4=D643"
messageSetStatusCode="0">
<CheckAddRs requestID="345" statusCode="510"
statusSeverity="Warning"
statusMessage="Unable to return all data" />
<AccountAddRs requestID = ”346” statusCode = "0"
statusSeverity = "Info"
statusMessage = "Status OK" />
<CustomerModRs requestID = ”347” statusCode = "0"
statusSeverity = "Info"
statusMessage = "Status OK" />
<CheckAddRs requestID="348" statusCode="3231"
statusSeverity="error"
statusMessage="This request has not been processed" />
</QBXMLMsgsRs>
</QBXML>
Listing 31-3 contains the following status information:
•The
messageSetStatusCode
is 0, indicating that the status check for the request
message set was successful.
•The response message set contains four response messages.
>
CheckAddRs
returned with a warning status (510).
>
AccountAddRs
completed successfully with a status code of 0 (success).
>
CustomerModRs
also completed with a status code of 0 (success).
> An error condition occurred while the last message in the request message set was
being processed. Thus, the final
CheckAddRs
request was not processed.
QuickBooks returned a status code of
3231
(with a status severity of
Error
). The
associated message text explains that the request was not processed, so you know
you would need to resend that request only.
Clearing State (oldMessageSetID)
Once you know that a particular request has been processed successfully, you’ll want to
delete your saved copy of the request and send a message to QuickBooks to clear the old
message set ID and associated status information that has been stored. Listing 31-4 shows
one way to clear the oldMessageSetID and status information.
______Listing 31-4 Clearing the oldMessageSetID
<QBXML>
<QBXMLMsgsRq oldMessageSetID = "DE9437D9-AA85-21E4-D643"
onError = "continueOnError"/>
</QBXML>

410
Chapter 31: Error Recovery
(c) 2013 Intuit Inc. All rights reserved.
Table 31-2 Summary: Use of New and Old Message Set IDs
Maintaining State within Your Application
What constitutes an application’s internal state in regard to error recovery will vary from
one application to another based on how the application uses and stores request and
response data. For instance, many applications maintain temporarily the following
information:
•A message ID of the most recent request message set sent
•Contents of the most recent message request
•The most recently received response
Although QuickBooks allocates the memory for the response object on behalf of the
application, the application processes the content and then uses it according to its
implementation and features. It may discard the response, it may preserve it in a
database, it may display it to the user in some form. In any case, it is the application’s
responsibility to release the memory used for the response data.
If your request includes . . . QuickBooks does this
messageSetStatusCode
returned . . .
A brand new
newMessageSetID.
Executes the request and
stores state for this message
ID
status=0.
A newMessageSetID that has
already been sent in a previous
message.
Status check. (Also does
checksum on the two
messages that use the same
newMessageSetID.)
If checksum is OK, returns
status=0.
If checksum fails, returns
status=9001.
oldMessageSetID =
newMessageSetID
(Both are included in same
request; ID has already been
sent in a previous message.)
Status check. status=0
(If ID can’t be found,
returns status 9002).
Only an oldMessageSetID. Clears state for this message
ID.
status=0
(If old ID can’t be found,
returns status=600;).
oldMessageSetID =
ClearAllMessageSets
If you receive status code
9005, issue this request, which
deletes all recovery records for
this application.
status=0 if the records are
deleted. (If no records
exist to be deleted or an
error occurs during
deletion, returns
status=600.)
oldMessageSetID = XXX
newMessageSetID = YYY
(oldMessageSetID was sent
previously and newMessageSetID
is new.)
Clears state for the
oldMessageSetID.
Executes the request.
Stores state for the
newMessageSetID
status=0;

Using Error Recovery in qbXML-based Applications
411
(c) 2013 Intuit Inc. All rights reserved.
The only hard and fast guideline is that you should not clear state too early in your process.
Be certain that your application is finished with the request to which the internal state to be
cleared pertains. Here are more extensive ideas:
•An application should preserve the
newMessageSetID
of a request message set until it
has received a response from QuickBooks and processed the results of that response.
Even though an error condition might not have occurred, for other reasons you might
deem it useful for your application to check status in a request message set. In this case,
you might want the application to avoid disposing of the message ID until just before it
exits its error recovery routine.
•Recall that whenever a
ProcessRequest
(or DoRequests or Post) call is made to
QuickBooks, it is subject to the possibility of an interruptive error condition. For this
reason, some applications might consider preserving the message ID until after the
clear state request returns successfully. An application not deleting the message ID until
after clearing the processing state in QuickBooks would need to be careful not to
misinterpret the message ID. That is, it must not mistakenly handle that message ID as
if it were meaningful in any other context before actually deleting it.
•After sending a processing request, your application should always check returned
status. If the returned status indicates problems, an application might call its handler
routine for the condition.
If the
ProcessRequest
call completed successfully, an application should process the
returned response, handling all status codes and data.
Clearing Error Recovery Records Maintained by QuickBooks
QuickBooks maintains a finite number of error recovery processing records for your
application in association with the company file that your application is modifying. If an
error condition occurs that interrupts processing, your application can retrieve this stored
information because it is associated with the message ID you specified along with the
request message set to be processed.
The best practice to follow is to always clear error recovery processing state information
from QuickBooks when your application is entirely finished with the response to the
request.
For all requests except the one during which the error condition occurred, an application
should already have complete information on the processing state of the request. The
application might either have received that information in a normal response from
QuickBooks or it might have sent QuickBooks a check status request to obtain the
information. Thus, the information stored in QuickBooks for these requests is no longer
needed for error recovery.
If your application does not regularly clear the processing state for requests maintained by
QuickBooks, QuickBooks will eventually delete older records to allow for addition of new
ones. Just as an operating system must clear memory from time to time to free up system
resources, QuickBooks must ensure that resources are available for addition of new error
recovery processing state records to accommodate new requests.
412
Chapter 31: Error Recovery
(c) 2013 Intuit Inc. All rights reserved.

Understanding QBFC Objects
413
(c) 2013 Intuit Inc. All rights reserved.
C
HAPTER
32 1
H
OW
TO
U
SE
THE
QBFC C
ONVENIENCE
L
IBRARY
1
If you are comfortable using XML simply using the qbXML requests may be the way for
you to implement your application. However, for many programmers, QBFC provides a
faster and easier way to write an application.
This chapter describes the QBFC objects and methods you need to use to create and send
requests to QuickBooks and to process the data returned. It points you to the OSR for the
details you need and also mentions how to use the OSR to look up this information.
Although the important objects and methods not covered in the OSR are described in this
chapter, you’ll notice that this chapter does not list every possible object, property, and
method. There are a couple of reasons for this approach:
•First, there is really no need to do this: the objects and methods are available in the type
library and can be seen via an object browser (such as Microsoft’s OLEView included
with Visual Studio).
•Second, much of the information is redundant: most of what you need to know is
already documented in the OSR or in the relevant chapters in this programming guide.
•Third, such an approach is confusing, due to the plethora of objects in QBFC.
Understanding QBFC Objects
If you try to understand the QBFC object model from the lengthy list of available objects,
you’re in for a long day’s work. The QBFC library is a thin wrapper, which means there are
a great many objects to wade through if you are just looking at objects.
Objects, Objects Everywhere: Where Do I Start?
The best way to understand the QBFC objects is to consider the way in which the objects
are used, starting with the central QBFC object: QBSessionManager. This object is used for
all communication with QuickBooks, including:
•Making the initial QuickBooks connection
•Beginning the QuickBooks session,
•Creating requests
•Sending the requests to QuickBooks
•Returning responses from QuickBooks.
In this chapter, we are concerned mainly with the QBSessionManager’s role in creating and
sending requests and returning responses because most of the QBFC objects and data
processing via those objects are exercised during these activities.
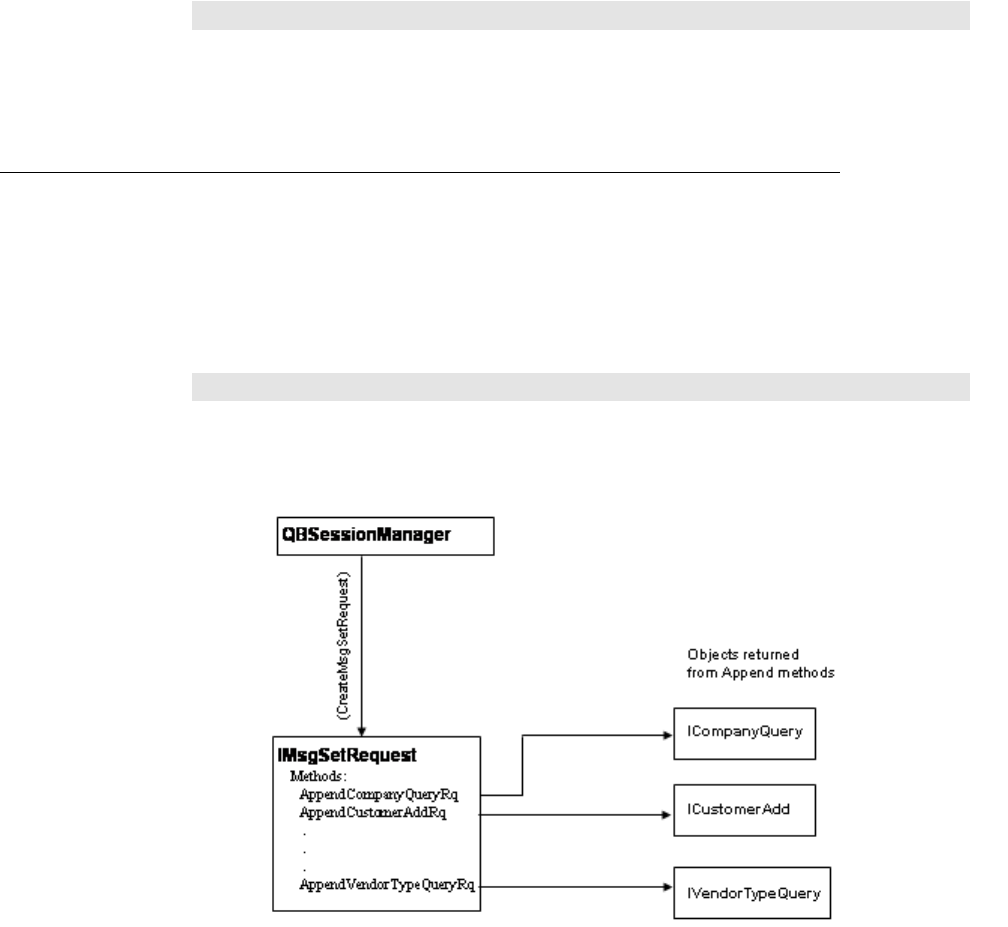
414
Chapter 32: How to Use the QBFC Convenience Library
(c) 2013 Intuit Inc. All rights reserved.
N
OTE
For more information on QBSessionManager, see Chapter 3,
“The Communication Model and Ways of Implementing It.”
Which Objects Do I Need to Create a Request?
As shown in Figure 32-1 on page 414, you use the QBSessionManager’s
CreateMsgSetRequest method to create an IMsgSetRequest object that will contain one or
more requests that you want to send to QuickBooks. You add an empty request object to
that IMsgSetRequest object via an Append method. As indicated in the figure,
IMsgSetRequest has one Append method for each SDK request. (The OSR for QBFC lists
all of the SDK requests, if you don’t have an object browser handy.)
I
MPORTANT
Only invoke an Append method once for each desired request!
Each time you invoke an Append method, you are adding a
new and separate request object to the request set.
Figure 32-1 Objects used to build requests
In Figure 32-1 on page 414, notice that when you invoke an Append method, it returns you
an empty object that you subsequently need to fully construct prior to sending the message
set to QuickBooks. For example, AppendCustomerAddRq returns the ICustomerAdd
object. Once you have this object, you can go to work constructing your request by filling
in the properties for this object.
Notice that the various Append methods are not listed in the OSR. If your programming
environment supports Intellisense, you can see all of the Append methods in your code
editor when you instantiate an IMsgSetRequest object. If you don’t have this, and don’t
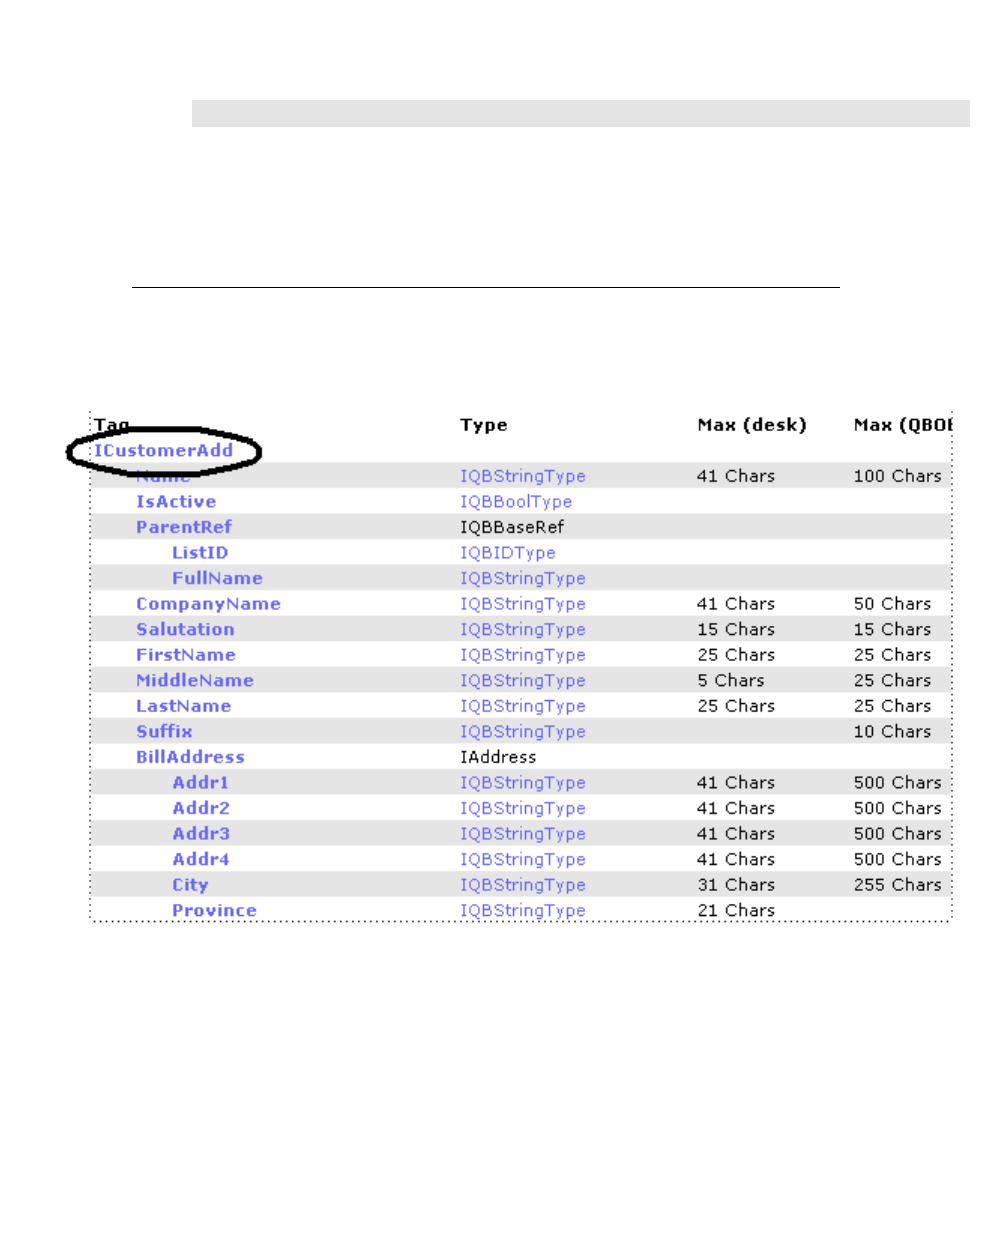
Which Objects Do I Need to Create a Request?
415
(c) 2013 Intuit Inc. All rights reserved.
have an object browser that can look into the QBFC library, you can easily construct the
Append method name simply by looking at the request names listed in the OSR: just put
“Append” in front of each request name and “Rq” at the end of the request name.
N
OTE
For each request in the OSR, the OSR provides code samples
that show the construction in VB or VB.Net code. Simply click
on the VB6 Code or VB.NET Code tabs in the OSR.
How Do I Use the OSR to Fully Construct the Request?
You need to use the OSR to program in QBFC, both to get an idea of what properties are
required/available for a given request or response object, and for documentation of those
properties. Figure 32-2 on page 415shows the OSR listing for the CustomerAdd request.
Figure 32-2 OSR listing for CustomerAdd request
Notice the name directly under the Tag heading, circled in this figure, ICustomerAdd. This
is the name of the QBFC object for the request or response, depending on whether the OSR
is showing requests or responses.
In your code, you need to create an object of this type by invoking the corresponding
Append method that returns it, and then fill its fields as you want, using the field names
listed under that object in the OSR. For example, for a new customer, you would set the
first name field like this if you were coding in Visual Basic:
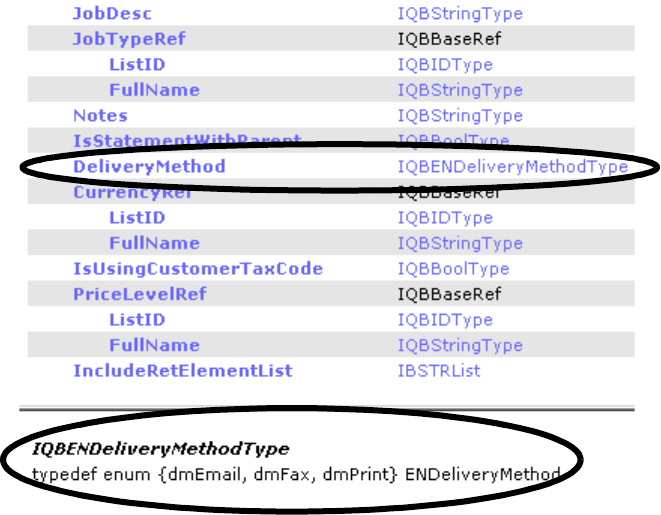
416
Chapter 32: How to Use the QBFC Convenience Library
(c) 2013 Intuit Inc. All rights reserved.
Dim MyICustomerAdd as ICustomerAdd
Set MyICustomerAdd = MyRequestMsgSet.AppendCustomerAddRq
MyICustomerAdd.FirstName.SetValue("Fred")
The OSR Has Everything You Need to Set Request Values
The OSR contains all the information you need to set request object values, including any
available enumerated values. Figure 32-3 on page 416 shows the delivery method field for a
customer, which is an enumerated value. To see the available values, click on the field type
to the left of the field name. In our example, this would be
IQBENDeliveryMethodType
Clicking on the type displays the enumerated values, as in the circled area in the figure
where the values displayed are
dmEmail, dmFax, dmPrint
.
Figure 32-3 Looking up enumerated values in the OSR

Which Objects Do I Need to Create a Request?
417
(c) 2013 Intuit Inc. All rights reserved.
Other Useful IMsgSetRequest Methods
The IMsgSetRequest Append methods are already covered in this document and in the
OSR. However, the request message set object has other methods you need to know about.
IMsgSetRequest
Method/Property Parameters Description
HRESULT Attributes
([out, retval]
IAttributesRqSet**pVal);
-pVal
Pointer to the returned
IAttributeRqSet object
This property returns the IAttributeRqSet object,
which you would need if you wanted to determine
the current attribute settings in the request set.
IAttributeRqSet contains the attributes that are
currently in effect for all requests in the message
set.
QuickBooks supports several attributes, which are
documented in the OSR under the Attributes link
in the main OSR page.
HRESULT
ClearRequests();
NA Removes all requests currently appended to the
request message set.
HRESULT RequestList
([out, retval]
IRequestList* *pVal);
pVal
Pointer to the returned
IRequestList object
You probably will seldom use this property. You
would use this property if you wanted to get one
or more requests from the request message set.
The IRequestList object returned has a count and
a GetAt method for returning individual IRequest
objects from the list.
Once you have the IRequest object, you can use
its RequestID, Type, or Detail methods as desired.
The Detail is processed exactly like its IResponse
counterpart, which is thoroughly covered in
Chapter 7, “Handling Responses Using QBFC or
qbXML.”
HRESULT
ToXMLString([out, retval]
BSTR* qbXMLRequest);
-qbXMLRequest
Pointer to the returned
string containing the
request message set in
qbXML format.
This method is very handy during diagnostics
where you need to examine the complete XML
representation of the requests that were built in
QBFC. Useful for making sure you are getting the
requests you expect.
HRESULT Verify([out]
BSTR* errorMsg,
[out, retval]
VARIANT_BOOL* isOK)
errorMsg
Contains an error message
for every request that
failed validation. If there is
no failure, this string is
empty.
isOk
Returns True in VB and
Variant_True in C++ if all
the requests are valid.
Returns False in VB and
Variant_False in C++
otherwise.
The DoRequests method causes validation to be
run automatically. However, if you need to validate
the requests for proper construction before you
invoke DoRequests, you can use this method.
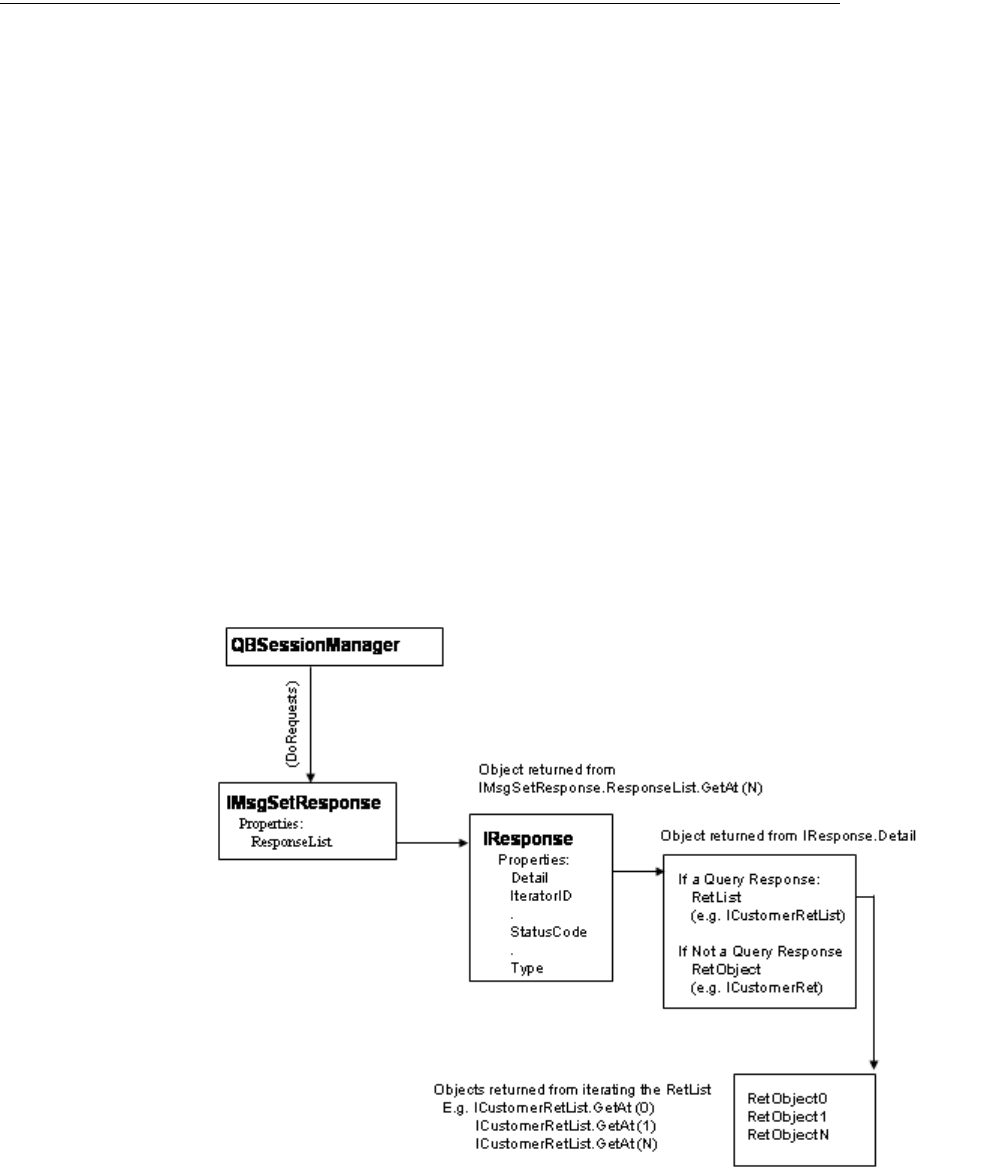
418
Chapter 32: How to Use the QBFC Convenience Library
(c) 2013 Intuit Inc. All rights reserved.
Which Objects Do I Need to Process a Response?
As shown in Figure 32-4 on page 418, you use the QBSessionManager’s DoRequests
method to send a request message set to QuickBooks. The input to this method is the
IMsgSetRequest described earlier in this chapter. The return from this method is an
IMsgSetResponse object.
The IMsgSetResponse has a property called ResponseList that returns the IResponseList
object containing all of the responses to the requests that were made in the IMsgSetRequest.
If all of the requests were successful, the number of responses will match the number of
requests in the corresponding IMsgSetRequest, but this won’t always be the case, due to the
possible request errors.
Notice that the DoRequest method returns successfully without errors even if any or all of
the requests fail. You can’t use the method return to get information on whether requests
were successful. To do this, you need to process the individual request objects (IResponse)
contained in the ResponseList. Once you have the individual IResponse, you can query it
for the StatusCode and StatusMessage you need to determine success or failure and get
some idea of the nature of the failure.
We’ll describe the IResponse methods later. But in the figure, notice the methods that are
listed, such as Detail, StatusCode, and Type. You will use those every time your process a
Response: you need to check the StatusCode for success, then you need to check the Type.
You need the type because this determines what kind of object you need to use to receive
the response Detail, and, in some languages, make an upcast to that type.
Figure 32-4 Objects used to process data from a response
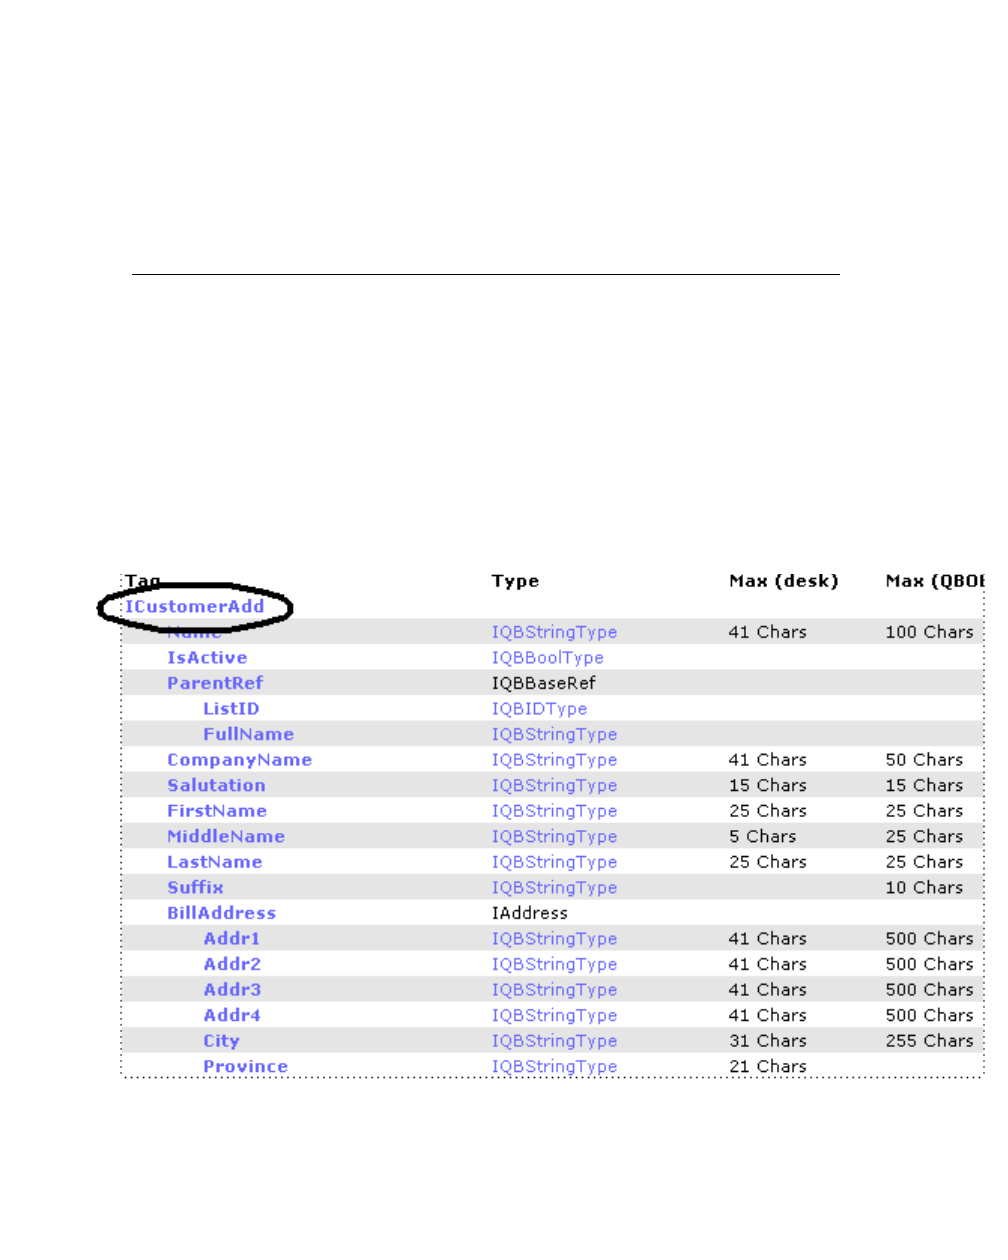
Which Objects Do I Need to Process a Response?
419
(c) 2013 Intuit Inc. All rights reserved.
As shown in the figure, the response Detail differs for queries. For non-query requests, the
Detail contains a Ret object with the actual field values you are interested in. For query
requests, the Detail contains a Ret list that contains the individual Ret objects.
An explanation of how to process Ret objects from this Ret list is described in Chapter 7,
“Handling Responses Using QBFC or qbXML.” It is fairly straightforward, using the
RetList object’s Count property to get the number of Ret objects and then using the GetAt
method to return the individual Ret object from the RetList.
Getting Data from the Ret Object
You can see the Ret object for each request in the OSR by clicking on the Response link in
the upper right of the OSR page.
Figure 32-5 on page 419 shows the Ret object for the ICustomer object in the OSR, with
the object name circled. Remember that the OSR contains primarily information about each
request and Ret object property (field).
If you click on the VB6 or VB.Net links at the upper right of the OSR, you’ll get context-
sensitive source code samples that show how to get data from a response message set
(IMsgSetResponse) that contains a customer Ret object.
Figure 32-5 The OSR Response object (Ret object) for Customer

420
Chapter 32: How to Use the QBFC Convenience Library
(c) 2013 Intuit Inc. All rights reserved.
Just like the request object described earlier, the properties listed for each Ret object in the
OSR are the actual property names you need to supply in order to get the data for that
property. For example, to get the Notes data from the customer Ret, you’d use this code in
VB:
MycustomerRet.Notes.GetValue
Objects and Methods Used in Processing Response Data
The following tables list the objects described in the previous paragraphs, along with the
their methods and properties. The request and Ret objects are not listed here because they
are documented fully in the OSR.
IMsgSetResponse
The following table shows the properties and methods for the message set response object:
IResponseList
The following table shows the properties and methods for the IResponseList object.
IMsgSetResponse
Method/Property Parameters Description
HRESULT ResponseList
([out, retval]
IResponseList* *pVal)
-pVal
Pointer to the returned
IResponseList object.
You need to invoke this on every
IMsgSetResponse object to get the
response list.
HRESULT ToXMLString
([out, retval] BSTR*
qbXMLResponse);
-qbXMLResponse
Pointer to the returned string
containing the response
message set in qbXML format.
This method is very handy during
diagnostics where you need to examine the
complete XML representation of the
responses that were returned from
QuickBooks. Useful for making sure you
are getting the results you expect.
IResponseList Method/
Property Parameters Description
HRESULT Count
([out, retval] long *pVal)
-pVal
Pointer to the returned number
of IResponse objects contained
in the list.
Useful for setting up a loop, with Count
used as the loop limit.
RESULT GetAt
(long index, [out,retval]
IResponse** retVal);
-index
The supplied index specifying
which IResponse object in the
list is to be returned.
-retVal
Pointer pointer to the returned
IResponse object.
The index is zero based, so the first
IResponse on the list has the index of 0.

Which Objects Do I Need to Process a Response?
421
(c) 2013 Intuit Inc. All rights reserved.
IResponse
The following table shows the properties and methods for the IResponse object.
IResponse Method/Property Parameters Description
HRESULT Detail
([out, retval] IQBBase** pVal);
-pVal
Pointer pointer to the
response contents
This returned value must be upcast in
most languages. For example, in VB.NET,
for example, you would get the Response
detail data into an ItemInventoryRet
object like this:
itemInventoryRet = response.Detail as
itemInventoryRet
HRESULT iteratorID
([out, retval] BSTR *pVal);
-pVal The iteratorID is returned only for queries
that use iterators to manage the amount
of data returned. You would need to get
this ID from the first reponse, then use it
in the succeeding iterations of the query.
HRESULT
iteratorRemainingCount
([out, retval] long *pVal);
-pVal This property indicates the number of
objects remaining to be iterated through.
This is helpful in optimizing the
MaxReturned value, among other things.
HRESULT retCount
([out, retval] long *pVal);
-pVal This value is available if the response is a
query response. It indicates the count of
Ret objects in the list.
HRESULT StatusCode
([out, retval] long *pVal);
-pVal Indicates success or the nature of any
failure. The value 0 indicates success.
HRESULT StatusMessage
([out, retval] BSTR *pVal);
-pVal A text message that provides more
information than just the status code
regarding the nature of the failure
HRESULT StatusSeverity
([out, retval] BSTR *pVal);
-pVal The severity level of the error.
HRESULT Type
([out, retval] IResponseType**
pVal);
-pVal The type of RetList or Ret object
contained in the IResponse. You need this
to specify the object to receive the
IResponse.Detail data.
422
Chapter 32: How to Use the QBFC Convenience Library
(c) 2013 Intuit Inc. All rights reserved.

QBSessionManager Object and Methods
423
(c) 2013 Intuit Inc. All rights reserved.
C
HAPTER
33 1
QBFC L
ANGUAGE
R
EFERENCE
1
This chapter is a brief language reference for the main objects and object methods in the
QBFC library. If you are not yet comfortable with QBFC programming, you should also
read Chapter 32, “How to Use the QBFC Convenience Library,” Chapter 6, “Building
Requests In QBFC and in qbXML,” and Chapter 7, “Handling Responses Using QBFC or
qbXML.”
QBSessionManager Object and Methods
The following table lists the QBSessionManager methods by functional area.
Table 33-1 QBSessionManager Methods/Properties Grouped by Functional Area
Functionality Supporting Methods/Properties Notes
Connection and
session
management.
BeginSession
CloseConnection
CommunicateOutOfProcess
EndSession
OpenConnection2
QBAuthPreferences
You need to invoke OpenConnection2
followed by BeginSession before you can
send requests to QB. (When you’re
finished, you need to invoke EndSession
to release resources.)
The optional QBAuthPreferences
property returns the IQBAuthPreferences
object that you can set to indicate the
level of QB access that your application
requires and the QB editions that your
application supports.
The use of CommunicateOutOfProcess
method is no longer recommended.
QuickBooks and the QBSDK are not
designed to run as a service and should
be run in the context of a user.
An alternate implementation to the
above is to implement a web service
designed to communicate with
QuickBooks via the QuickBooks Web
Connector
Create message set
request object.
CreateMsgSetRequest
CreateSubscriptionMsgSetRequest
CreateMsgSetRequest creates an empty
IMsgSetRequest object to which you
then append your desired request
objects.
CreateSubscriptionMsgSetRequest does
a similar thing, but creates the special
ISubscriptionMsgSetRequest object to
which you append event subscription
requests.

424
Chapter 33: QBFC Language Reference
(c) 2013 Intuit Inc. All rights reserved.
Send requests to the
request processor.
DoRequests
DoRequestsFromXMLString
DoSubscriptionRequests
DoSubscriptionRequestsFromXMLString
DoRequests sends the fully constructed
IMsgSetRequest object to QB.
DoRequestsFromXMLString does the
same thing, but uses a fully constructed
qbXML message set instead of QBFC
objects.
DoSubscriptionRequests and
DoSubscriptionRequestsFromXMLString
are used only for event subscription.
Convert qbXML to
QBFC objects
ToEventsMsgSet
ToMsgSetRequest
ToMsgSetResponse
ToSubscriptionMsgSetResponse
All of these are convenience methods
that take fully constructed qbXML
message sets and constructs the
appropriate QBFC objects.
Get context
information.
ConnectionType
GetCurrentCompanyFileName
GetVersion
QBXMLVersionsForSession
QBXMLVersionsForSubscription
The optional ConnectionType property
returns an indicator describing how the
application is connected to QB: local QB,
remote QB (RDS), or local QB with the
UI launched.
Error recovery ClearErrorRecovery
EnableErrorRecovery
ErrorRecoveryID
GetErrorRecoveryStatus
GetSavedMsgSetRequest
IsErrorRecoveryInfo
SaveAllMsgSetRequestInfo
Optional, but recommended properties
and methods used to implement
automated error recovery.
Functionality Supporting Methods/Properties Notes

QBSessionManager.BeginSession
425
(c) 2013 Intuit Inc. All rights reserved.
QBSessionManager.BeginSession
IDL: HRESULT BeginSession ([in] BSTR qbFile, [in] ENOpenMode openMode)
VB: BeginSession(qbFile As String, openMode As ENOpenMode)
C#: void BeginSession ( System.String qbFile , Interop.QBFC5.ENOpenMode
openMode )
Starts a session with the specified QuickBooks company file.
Parameters
qbFile Full Pathname of the specified QuickBooks company file.
QuickBooks need not be running if your application has been
authorized for automatic logins. Supply qbFile as NULL or an empty
string if you need to access the company file currently open in
QuickBooks. The qbFile param must be supplied.
openMode The desired access mode. It can be one of three values:
omSingleUser (specifies single-user mode)
omMultiUser (specifies multi-user mode)
omDontCare (accept whatever mode is currently in effect, or single-
user mode if no other mode is in effect)
Notice that if the company file is already open in one mode, your
application won’t be able to specify a different mode in
BeginSession. For this reason, you may want to consider the
omDontCare param, unless you really need single-user mode.
For background information on these modes, see Chapter 3, “The
Communication Model and Ways of Implementing It.”
I
MPORTANT
If QuickBooks is currently running one company file, you
cannot access a different company file with BeginSession. If
one company file is already open in QB and you try to specify
a different company file name in the call to BeginSession you
will get an exception thrown or an HRESULT, depending on
your programming environment
Usage
Before invoking this method to start the session, your application must first invoke
QBSessionManager.OpenConnection2 followed by BeginSession to open communication
with QuickBooks. After successfully invoking OpenConnection2 and BeginSession, your
application can then invoke DoRequests to access company data.
If you’re in multi-user mode you may want to invoke this once and leave the session open
for subsequent accesses of the company data. If you’re in single-user mode, you may want
to close the session when you’re done with the current access, since no other application

426
Chapter 33: QBFC Language Reference
(c) 2013 Intuit Inc. All rights reserved.
will be able to access the current company file until you end your session. (Desktop
editions of QuickBooks do not limit the number of times a company file can be accessed in
a single session or the length of time a session can exist.)
Your application can change the mode from single user to multi-user if it is the only
application accessing the file including the QuickBooks UI. Changing the file mode means
that QuickBooks must close the file and re-open it. So if your app is the only one accessing
it, you would call EndSession from one mode, wait a moment for the file to close down,
then call BeginSession in the other mode.
Notice that your application must be authorized to access the specified company file. An
unauthorized application requires the specified QuickBooks company file to be currently
open in QuickBooks with the QuickBooks administrative user logged on, so that user can
perform the required authorization. (If an application is not yet authorized, and QuickBooks
is not running, BeginSession will fail.)
In auto-login mode it takes several seconds to start QuickBooks and return from a
BeginSession call.
Table 33-2 HRESULT Error Codes
BeginSession Code Sample
The following code sample shows a complete session life cycle. Every application needs to
use the QBSessionManager object as shown to open a connection and begin a session.
Every application needs to create an IMsgSetRequest object as shown, fill it with requests,
invoke DoRequests, and get the results from the returned IMsgSetResponse object.
Notice that this sample uses an empty customer query, which returns all customers, to keep
the sample short and sweet. For most requests, appended to the IMsgSetRequest object, you
would normally set more properties on the request. Also, the sample does nothing with the
response object, which is not trivial to traverse and process. However, processing response
data is covered in detail in Chapter 7, “Handling Responses Using QBFC or qbXML,” so
we won’t cover it here.
Error Code Meaning
0x8004040A Returned if there is already a company
data file open and it is different from the
requested one.
0x800040410 Returned if the company data file is
currently open in a mode other than the
one specified by your application.
0x80040414 Returned if QuickBooks is currently locked
in a modal state and cannot be accessed.
0x8004041B Returned if QuickBooks is unable to lock
the necessary information to allow your
application to access the specified
company data file. Try again later.
0x80040422 Returned if your application is trying to
access QuickBooks in single-user mode,
but there is another application already
accessing the specified company data file.

QBSessionManager.BeginSession
427
(c) 2013 Intuit Inc. All rights reserved.
Finally, we end the session and close the connection. You don’t have to do this after every
DoRequest, in fact, it is not efficient to program this way. But it does point out the necessity
of ending the session and closing the connection at some point, at the very least when your
application is shut down. If you don’t end session and close connection when you close
your application, the QuickBooks user will not be able to close the QuickBooks company.
Dim qbFile As String
qbFile = "C:\Program Files\Intuit\QuickBooks 2006\sample_product-based business.qbw"
Dim SessionManager As QBSessionManager
Set SessionManager = New QBSessionManager
SessionManager.OpenConnection2 "123", "Hello World", ctLocalQBDLaunchU
SessionManager.BeginSession qbFile, omDontCare
Dim RqMessageSet As IMsgSetRequest
Dim RespMessageSet As IMsgSetResponse
Set RqMessageSet = SessionManager.CreateMsgSetRequest("US", 5, 0)
RqMessageSet.AppendCustomerQueryRq
Set RespMessageSet = SessionManager.DoRequests(RqMessageSet)
SessionManager.EndSession
SessionManager.CloseConnection

428
Chapter 33: QBFC Language Reference
(c) 2013 Intuit Inc. All rights reserved.
QBSessionManager.ClearErrorRecovery
HRESULT ClearErrorRecovery();
This method is more or less a “Big Hammer” that clears the error table stored in the
QuickBooks company file. This clear method impacts all integrated applications using the
company file, not just the application invoking it. For that reason, this method should be
called ONLY if you know or strongly suspect that the QuickBooks error table has become
corrupted and therefore must be cleared. (For more information, see Chapter 31, “Error
Recovery.”)

QBSessionManager.CloseConnection
429
(c) 2013 Intuit Inc. All rights reserved.
QBSessionManager.CloseConnection
HRESULT CloseConnection ()
Closes the connection with QuickBooks. When the QBSessionManager object goes out of
scope, QBFC will automatically call CloseConnection if it wasn’t called explicitly before.
(It also calls EndSession, if necessary.)
CloseConnection Code Sample
See the sample provided under “BeginSession Code Sample.”

430
Chapter 33: QBFC Language Reference
(c) 2013 Intuit Inc. All rights reserved.
QBSessionManager.CommunicateOutOfProcess
HRESULT CommunicateOutOfProcess(VARIANT_BOOL useOutOfProc)
Parameters
useOutOfProc Specify True to communicate with QuickBooks out-of-process, or
False for in-process communication.
The use of CommunicateOutOfProcess method is no longer recommended. QuickBooks
and the QBSDK are not designed to run as a service and should be run in the context of a
user.
This call is useful if your application must run as part of a windows service process and
therefore does not communicate with QuickBooks in-process (the normal type of
QuickBooks communication. You call this method prior to calling OpenConnection2 so the
SDK knows which request processor to use (qbXMLRP2e, in this case).
I
MPORTANT
In order for this call to work, you must install and register (in
the Windows registry) the redistributable program
QBXMLRP2e.exe. This is located in the SDK install
subdirectory \tools\access\QBXMLRP2e
Usage
You cannot call this method if you currently have a connection open, as this will return an
error (HRESULT 0x80040313).
If this method is invoked and there is some problem creating the COM component required
for out-of-process communication, the error HRESULT 0x80040314 is returned.
You do not instantiate or reference QBXMLRP2E! All needed work is done for you simply
by making this call.

QBSessionManager.ConnectionType
431
(c) 2013 Intuit Inc. All rights reserved.
QBSessionManager.ConnectionType
HRESULT ConnectionType([out, retval] QBXMLRPConnectionType* pVal);
Parameters
ConnectionType Pointer to the returned connection type indicating the currently
opened connection. The type returned will be one of the following
values: ctUnknown, ctLocalQBD, ctRemoteQBD, or
ctLocalQBDLaunchUI.
The type returned will be one of the following values that reflect the way the connection
was first opened:
•ctLocalQBD (local QuickBooks)
•ctRemoteQBD (RDS connection)
•ctLocalQBDLaunchUI (SDK application launched QuickBooks in interactive mode)
•ctUnknown

432
Chapter 33: QBFC Language Reference
(c) 2013 Intuit Inc. All rights reserved.
QBSessionManager.CreateMsgSetRequest
HRESULT CreateMsgSetRequest ([in] BSTR country,
[in] short qbXMLMajorVersion,
[in] short qbXMLMinorVersion,
[out, retval] IMsgSetRequest** request)
Tells QBFC which version of qbXML your application is using, and receives the request
message set object in return. Notice that starting with QBFC3, CreateMsgSetRequest
requires all three parameters.
Parameters
country The country of the edition of QuickBooks to be used by your
application. There are three valid values:
"US"
,
"CA"
, and
""
(empty string). There is no default! so you must supply a value.
qbXMLMajorVersion The major version of qbXML to be used by your application. (For
example, if the version is 2.1, the major version is
2
.)
qbXMLMinorVersion The minor version of qbXML to be used by your application. (For
example, if the version is 2.1, the minor version is
1
.)
request The request message set object, to which you will add one or more
request messages.
N
OTE
QBFC4 supports qbXML versions 1.0, 1.1, 2.0, 2.1, 3.0, and
4.0 for the U.S. QBFC4 supports versions 2.0 and 3.0 for
Canada.
Usage
It is important to set the qbXML version appropriately:
•Make sure all your end-users have a version of QuickBooks installed on their
computers that supports the qbXML version you specify.
•Note that you cannot use any qbXML functionality that was added since the version
you specify.
HRESULT Error Codes
•An error code of 0x8004030A will be returned if the given version of qbXML is not
supported by the version of QBFC being used.
Code Sample
See the code sample provided under “BeginSession Code Sample.”

QBSessionManager.CreateSubscriptionMsgSetRequest
433
(c) 2013 Intuit Inc. All rights reserved.
QBSessionManager.CreateSubscriptionMsgSetRequest
HRESULT CreateSubscriptionMsgSetRequest(
short qbXMLMajorVersion,
short qbXMLMinorVersion,
[out, retval] ISubscriptionMsgSetRequest** request);
Creates and returns an interface pointer to ISubscriptionMsgSetRequest.
Parameters
qbXMLMajorVersion The major version of qbXML to be used by your application. (For
example, if the version is 4.0, the major version is
4
.)
qbXMLMinorVersion The minor version of qbXML to be used by your application. (For
example, if the version is 4.0, the minor version is
0
.)
request The request message set object, to which you will add one or more
subscription request messages.

434
Chapter 33: QBFC Language Reference
(c) 2013 Intuit Inc. All rights reserved.
QBSessionManager.DoRequests
HRESULT DoRequests ([in] IMsgSetRequest* request,
[out, retval] IMsgSetResponse** responseSet)
Sends the specified XML request to QuickBooks and returns a response.
Parameters
request The request message set object containing any number of requests to
be processed by QuickBooks.
responseSet The parsed response message set object, which will contain a list of
responses, one for every request in the request message set.
Usage
Before sending the request set to QuickBooks for processing, this method verifies the given
request message set to make sure that all the mandatory fields in each of its requests have
been set and that no two mutually exclusive fields have been set.
HRESULT Error Codes
•An error code of 0x80040307 will be returned if there is an error verifying the requests
in the request set.
•An error code of 0x8004040C will be returned if no valid session currently exists.
•An error code of 0x80040423 will be returned if the given version of qbXML is not
supported by the QuickBooks SDK.
For more errors that DoRequests can return, see Appendix A, “Error Codes.”
DoRequests Code Sample
What is difficult about DoRequests is the constructing of the request message set required
prior to invoking DoRequests and the processing of the response that is returned from it.
These are covered in Chapter 6, “Building Requests In QBFC and in qbXML,” and Chapter
7, “Handling Responses Using QBFC or qbXML.”
A code sample showing the invocation of this method is provided under “BeginSession
Code Sample.”

QBSessionManager.DoRequestsFromXMLString
435
(c) 2013 Intuit Inc. All rights reserved.
QBSessionManager.DoRequestsFromXMLString
HRESULT DoRequestsFromXMLString([in] BSTR qbXMLRequest,
[out, retval] IMsgSetResponse** responseSet);
Sends an XML request as a string rather than in an IMsgSetRequest object (as happens in
DoRequests).
Parameters
qbXMLRequest The request is not validated before it is sent. Any requestIDs within
the request must start with 0 and continue with 1, 2, and so on.
responseSet A parsed list of responses, one for every request in the request
message set. The responseSet will contain errors if the
qbXMLRequest string contains nonsequential requestIDs.

436
Chapter 33: QBFC Language Reference
(c) 2013 Intuit Inc. All rights reserved.
QBSessionManager.DoSubscriptionRequests
HRESULT DoSubscriptionRequests(
ISubscriptionMsgSetRequest* request,
[out, retval] ISubscriptionMsgSetResponse** responseSet);
Sends the subscription request to the request processor and returns a response.
Parameters
request The request message set object containing any number of
subscription requests to be processed by QuickBooks.
responseSet The parsed response message set object, which will contain a list of
responses, one for every subscription request in the message set.
Usage
Before sending the request set to QuickBooks for processing, this method verifies the given
request message set to make sure that all the mandatory fields in each of its requests have
been set and that no two mutually exclusive fields have been set.

QBSessionManager.DoSubscriptionRequestsFromXMLString
437
(c) 2013 Intuit Inc. All rights reserved.
QBSessionManager.DoSubscriptionRequestsFromXMLString
HRESULT DoSubscriptionRequestsFromXMLString(
BSTR qbXMLSubscriptionRequest,
[out, retval] ISubscriptionMsgSetResponse** responseSet);
Sends an XML request as a string rather than in an ISubscriptionMsgSetRequest object (as
happens in DoSubscriptionRequests).
Parameters
qbXMLSubscriptionRequest
Contains the subscription XML request. The request is not validated
before it is sent.
responseSet A parsed list of responses, one for every request in the request
message set.

438
Chapter 33: QBFC Language Reference
(c) 2013 Intuit Inc. All rights reserved.
QBSessionManager.EnableErrorRecovery
HRESULT EnableErrorRecovery([in] VARIANT_BOOL bEnable);
HRESULT EnableErrorRecovery([out,retval] VARIANT_BOOL* bEnable);
Turns the automated error-recovery feature of QBFC on or off. (By default, the error
recovery feature is off.)
If error recovery is off (the default), requests are sent to QuickBooks without first checking
if a response from a previous request was not processed. If error recovery is on, requests
will not be sent to QuickBooks if an unprocessed response exists for a previous request.

QBSessionManager.EndSession
439
(c) 2013 Intuit Inc. All rights reserved.
QBSessionManager.EndSession
HRESULT EndSession ()
Terminates the session with the current company data file. When the QBSessionManager
object goes out of scope, QBFC will automatically call EndSession if it wasn’t called
explicitly before. (It also calls CloseConnection, if necessary.)
If a company file was opened in auto-login mode, EndSession will close the file and enable
an interactive user to start QuickBooks on that computer.
EndSession Code Sample
A code sample showing the invocation of this method is provided under “BeginSession
Code Sample.”

440
Chapter 33: QBFC Language Reference
(c) 2013 Intuit Inc. All rights reserved.
QBSessionManager.ErrorRecoveryID
HRESULT ErrorRecoveryID([out, retval] IQBGUIDType* *pVal);
Returns this application’s error-recovery ID, which will be used to store the application’s
error-recovery information to disk.

QBSessionManager.GetCurrentCompanyFileName
441
(c) 2013 Intuit Inc. All rights reserved.
QBSessionManager.GetCurrentCompanyFileName
HRESULT GetCurrentCompanyFileName ([out, retval] BSTR* pFileName)
Returns the name (including path) of the QuickBooks company data file being accessed in
the current session.
HRESULT Error Codes
•An error code of 0x8004040C will be returned if no valid session currently exists.
For more errors that GetCurrentCompanyFileName can return, see Appendix A, “Error
Codes.”

442
Chapter 33: QBFC Language Reference
(c) 2013 Intuit Inc. All rights reserved.
QBSessionManager.GetErrorRecoveryStatus
HRESULT GetErrorRecoveryStatus(
[out, retval] IMsgSetResponse** responseSet);
Gets the response status of an unprocessed response. Sends a status check request to
QuickBooks to get the status of the request that was stored to disk. The status check
response will be returned in an IMsgSetResponse object.

QBSessionManager.GetSavedMsgSetRequest
443
(c) 2013 Intuit Inc. All rights reserved.
QBSessionManager.GetSavedMsgSetRequest
HRESULT GetSavedMsgSetRequest( [out, retval] IMsgSetRequest** requestSet);
Reads the error recovery information (the original message request) that was stored to disk
into an IMsgSetRequest object and returns this object.

444
Chapter 33: QBFC Language Reference
(c) 2013 Intuit Inc. All rights reserved.
QBSessionManager.GetVersion
HRESULT GetVersion ([out] short* majorVersion,
[out] short* minorVersion, [out] ENReleaseLevel* releaseLevel,
[out] short* releaseNumber)
Returns version and release information for the QBFC Library.
Parameters
majorVersion The major version for the QBFC Library. For example, for QBFC6
the major version is
6
.
minorVersion The minor version for the QBFC Library. For example, for QBFC6
the minor version is
0
.)
releaseLevel The release level for the QBFC Library. It can be one of four values:
rlPreAlpha, rlAlpha, rlBeta, or rlRelease.
releaseNumber The release number for the QBFC Library. It corresponds to a
specific build of the product software.

QBSessionManager.IsErrorRecoveryInfo
445
(c) 2013 Intuit Inc. All rights reserved.
QBSessionManager.IsErrorRecoveryInfo
]
HRESULT IsErrorRecoveryInfo(
[out, retval] VARIANT_BOOL* bIsErrorRecoveryInfo);
Returns true or false depending on whether error-recovery information is stored on the disk
for this application/company-file pair.

446
Chapter 33: QBFC Language Reference
(c) 2013 Intuit Inc. All rights reserved.
QBSessionManager.OpenConnection2
HRESULT OpenConnection2 ([in] BSTR appID, [in] BSTR appName, [in]
ENConnectionType connType)
Establishes a connection between QuickBooks and the client application.
Parameters
appID Normally not assigned. Use an empty string for appID.
appName The application name used in the log file, in the authorization dialog
box, and in menu extensions. This parameter cannot be NULL or an
empty string.
connType Specify a value of ctUnknown, ctLocalQBD, ctRemoteQBD, or
ctLocalQBDLaunchUI.
Usage
During the connection process, QuickBooks checks whether your application contains a
valid digital signature, which indicates that the application has been certified as trusted.
Each call to OpenConnection2 has a small performance cost, so your application, when
appropriate, should allow its users to run multiple sessions in a single connection.
QuickBooks does not limit the number of consecutive sessions that can be held in a single
connection or the length of time a connection can exist.
HRESULT Error Codes
•An error code of 0x80040308 will be returned if QBFC cannot communicate with the
QuickBooks SDK.
•An error code of 0x80040309 will be returned if the QuickBooks SDK is a pre-release
version.
For more errors that OpenConnection2 can return, see Appendix A, “Error Codes.”
OpenConnection2 Code Sample
A code sample showing the invocation of this method is provided under “BeginSession
Code Sample.”

QBSessionManager.QBAuthPreferences
447
(c) 2013 Intuit Inc. All rights reserved.
QBSessionManager.QBAuthPreferences
HRESULT QBAuthPreferences([out, retva] IQBAuthPreferences**
ppAuthPreferences)
Returns the IQBAuthPreferences object to be used to set or get authorization preferences.
Parameters
**ppAuthPreferences
Pointer pointer to the returned preferences object.
You cannot call this on remote connections, such as via RDS. An error (0x8004042A)
results if you attempt it.

448
Chapter 33: QBFC Language Reference
(c) 2013 Intuit Inc. All rights reserved.
QBSessionManager.QBXMLVersionsForSession
HRESULT QBXMLVersionsForSession
([out, retval] SAFEARRAY (BSTR)* ppsa);
Indicates which versions of the qbXML specification are supported by the QuickBooks
program to which your application is connected in this session. Note that this information
might be different from the information returned by a HostQuery request, as described in
the Concepts Manual. HostQuery returns the complete list of all qbXML versions
supported by the currently open connection, which is usually the information your
application will require.
Parameters
ppsa Array of qbXML version numbers that the QuickBooks Request
Processor supports. For example, the array contains
1.0
,
1.1
,
2.0
,
2.1
,
3.0, 4.0, 5.0,
and
6.0
if your application is using the
Request Processor from QuickBooks 2007 (U.S. edition). It contains
CA2.0
if your application is using the Request Processor from the
2003 Canadian edition of QuickBooks.
Usage
Your application is responsible for freeing the memory used for the ppsa array. For
example, to release the memory for the array when using the C++ language, call
SafeArrayDestroy(ppsa).
For sample code and a description of how to use QBXMLVersionsForSession, see Chapter
37, “Making Your Application Robust.”

QBSessionManager.QBXMLVersionsForSubscription
449
(c) 2013 Intuit Inc. All rights reserved.
QBSessionManager.QBXMLVersionsForSubscription
HRESULT QBXMLVersionsForSubscription([out, retval] SAFEARRAY (BSTR)**
ppsa);
Returns an array containing a list of qbXML versions that are available for subscription
requests.
Parameters
ppsa Pointer pointer to an array of binary strings that specify the versions
of the qbXML specifications that support the SDK event subscription
feature. Currently the possible values are 3.0 and 4.0.
Usage
Your application is responsible for freeing the memory used for the ppsa array. For
example, to release the memory for the array when using the C++ language, call
SafeArrayDestroy(ppsa).

450
Chapter 33: QBFC Language Reference
(c) 2013 Intuit Inc. All rights reserved.
QBSessionManager.SaveAllMsgSetRequestInfo
HRESULT SaveAllMsgSetRequestInfo([in] VARIANT_BOOL bSaveAll);
HRESULT SaveAllMsgSetRequestInfo([out,retval] VARIANT_BOOL* bSaveAll);
Indicates whether the error-recovery feature of QBFC should save the entire set of
information for a MsgSetRequest:
•If SaveAllMsgSetRequestInfo is true, the entire contents of the MsgSetRequest is saved
to disk for error recovery.
•If SaveAllMsgSetRequestInfo is false (the default), only the NewMessageSetID is
saved.
Get/Set – VARIANT_BOOL which specifies whether to save the entire MsgSetRequest
information.
Return – HRESULT

QBSessionManager.ToEventsMsgSet
451
(c) 2013 Intuit Inc. All rights reserved.
QBSessionManager.ToEventsMsgSet
HRESULT ToEventsMsgSet(
BSTR qbXMLEventsResponse,
short qbXMLMajorVersion,
short qbXMLMinorVersion,
[out, retval] IEventsMsgSet** responseSet);
Parses the XML response and returns it in an IEventMsgSetResponse object.
I
MPORTANT
This method performs no version or qbXML validation. You are
responsible for supplying a valid qbXML string.
Parameters
qbXMLEventsResponse
The qbXML response document (as a string) sent from QuickBooks
after a subscribed event occurs.
qbXMLMajorVersion The major version of qbXML to be used for this operation. (For
example, if the version is 4.0, the major version is
4
.)
qbXMLMinorVersion The minor version of qbXML to be used for this operation. (For
example, if the version is 4.0, the minor version is
0
.)
responseSet The response message set object, which will contain a list of
responses, one for every request in the request message set.

452
Chapter 33: QBFC Language Reference
(c) 2013 Intuit Inc. All rights reserved.
QBSessionManager.ToMsgSetRequest
HRESULT ToMsgSetRequest(
[in] BSTR qbXMLRequest,
[out, retval] IMsgSetRequest** requestSet);
Takes qbXML request text and parses it into an IMsgSetRequest object. Reads the qbXML
major and minor version numbers from the request.

QBSessionManager.ToMsgSetResponse
453
(c) 2013 Intuit Inc. All rights reserved.
QBSessionManager.ToMsgSetResponse
HRESULT ToMsgSetResponse ([in] BSTR qbXMLResponse,
[in] BSTR country,
[in] short qbXMLMajorVersion,
[in] short qbXMLMinorVersion,
[out, retval] IMsgSetResponse** responseSet)
Parses the XML response and returns it in a response message set object.
I
MPORTANT
This method performs NO version or qbXML validation of the
supplied XML string. You are responsible for supplying a valid
string to this method call.
Parameters
country The country of the edition of QuickBooks.
qbXMLResponse The qbXML response document (as a string) that gets returned from
QuickBooks after processing a request message set sent via the
qbXML request processor. Each response in the qbXMLResponse
string must have a requestID attribute, and these requestIDs must be
consecutive, starting at 0.
qbXMLMajorVersion The major version of qbXML to be used for this operation. (For
example, if the version is 6.0, the major version is
6
.)
qbXMLMinorVersion The minor version of qbXML to be used for this operation. (For
example, if the version is 6.0, the minor version is
0
.)
responseSet The response message set object, which will contain a list of
responses, one for every request in the request message set.
N
OTE
QBFC6 supports qbXML versions 1.0, 1.1, 2.0, 2.1, 3.0, 4.0,
5.0 and 6.0.
HRESULT Error Codes
•An error code of 0x80040301 will be returned if there is an internal error interpreting
qbXMLResponse.
•An error code of 0x8004030A will be returned if the given version of qbXML is not
supported by QBFC.

454
Chapter 33: QBFC Language Reference
(c) 2013 Intuit Inc. All rights reserved.
QQBSessionManager.ToSubscriptionMsgSetResponse
HRESULT ToSubscriptionMsgSetResponse(
BSTR qbXMLSubscriptionResponse,
short qbXMLMajorVersion,
short qbXMLMinorVersion,
[out, retval] ISubscriptionMsgSetResponse** responseSet);
Parses the XML response and returns it in an ISubscriptionMsgSetResponse object.
I
MPORTANT
This method performs no version or qbXML validation. You are
responsible for supplying a valid qbXML string.
Parameters
qbXMLSubscriptionResponse
The qbXML response document (as a string) that gets returned from
QuickBooks after processing a subscription request message.
qbXMLMajorVersion The major version of qbXML to be used for this operation. (For
example, if the version is 6.0, the major version is
6
.)
qbXMLMinorVersion The minor version of qbXML to be used for this operation. (For
example, if the version is 4.0, the minor version is
0
.)
responseSet The response message set object, which will contain a list of
responses, one for every request in the request message set.

IQBAuthPreferences Object and Properties
455
(c) 2013 Intuit Inc. All rights reserved.
IQBAuthPreferences Object and Properties
The QBSessionManager has a QBAuthPreferences property that returns the
IQBAuthPreferences object that you can set to indicate the level of QB access that your
application requires and the QB editions that your application supports. The following table
shows the properties you can use.
Table 33-3 IQBAuthPreferences Properties
Functionality Property Notes
Specify which QuickBooks
editions your application
supports.
PutAuthFlags By default, QB Pro, Premier, and
Enterprise are supported. If you
want your application to support a
subset of these, or support QB
Simple Start edition, you need to set
this property accordingly.
Is your application read-only,
or does it also write to QB?
GetIsReadOnly
PutIsReadOnly
Does your application need
to run in unattended mode?
GetUnattendedModePref
PutUnattendedModePref
Does your application need
access to personal data in
QB?
GetPersonalDataPref
PutPersonalDataPref
Is the IQBAuthPreferences
object and properties
supported by the QuickBooks
currently running?
WasAuthPreferencesObeyed

456
Chapter 33: QBFC Language Reference
(c) 2013 Intuit Inc. All rights reserved.
IQBAuthPreferences.GetIsReadOnly
HRESULT GetIsReadOnly(VARIANT_BOOL *pIsReadOnly)
Returns the application’s read-only access requirements from the IQBAuthPreferences
object.
Parameters
**pIsReadOnly Pointer to the returned read-only preferences.

IQBAuthPreferences.GetPersonalDataPref
457
(c) 2013 Intuit Inc. All rights reserved.
IQBAuthPreferences.GetPersonalDataPref
HRESULT GetPersonalDataPref(ENPersonalDataPrefType *pPersonalDataPref)
Returns the application’s personal data access requirements from the IQBAuthPreferences
object.
Parameters
pPersonalDataPref
Pointer to the returned preferences setting. Returns pdptRequired,
pdptOptional, or pdptNotNeeded.
A value of pdptRequired means that your application will not run unless the administrative
user grants access to personal data. A value of pdptOptional means that the application may
use personal data, but can still run if the user does not grant it that access.
A value of pdptNotNeeded means that your application does not use personal data and the
user will not have the opportunity to grant it that access. If your application attempts to
access personal data, any personal data will be automatically filtered out and will not
appear in the responses to requests.

458
Chapter 33: QBFC Language Reference
(c) 2013 Intuit Inc. All rights reserved.
IQBAuthPreferences.GetUnattendedModePref
HRESULT GetUnattendedModePref(ENUnattendedModePrefType
*pUnattendedModePref)
Returns the application’s unattended mode requirements from the IQBAuthPreferences
object.
Parameters
*pUnattendedModePref
Pointer to the returned setting, which will be either umptRequired or
umptOptional.


460
Chapter 33: QBFC Language Reference
(c) 2013 Intuit Inc. All rights reserved.
IQBAuthPreferences.PutIsReadOnly
HRESULT PutIsReadOnly(VARIANT_BOOL isReadOnly)
Invoked on the IQBAuthPreferences object to specify whether your application needs read-
only access to the company file.
Parameters
isReadOnly Specify True if your application accesses QuickBooks only in read
mode. Specify False if your application needs to write data to
QuickBooks.
If your application specifies True, then the user must authorize read-only access (and
whatever other preferences are currently specified in the IQBAuthPreferences object). If
your application subsequently attempts to write data to QuickBooks, it will not be allowed
to write and an error will be returned in the responses that attempts to write data.

IQBAuthPreferences.PutPersonalDataPref
461
(c) 2013 Intuit Inc. All rights reserved.
IQBAuthPreferences.PutPersonalDataPref
HRESULT PutPersonalDataPref(ENPersonalDataPrefType personalDataPref)
Invoked on the QBAuthPreferences object to specify your application’s requirements
regarding access to personal data in the company file.
Parameters
personalDataPref
Specify pdptRequired, pdptOptional, or pdptNotNeeded.
A value of pdptRequired means that your application will not run unless the administrative
user grants access to personal data. A value of pdptOptional means that the application may
use personal data, but can still run if the user does not grant it that access.
A value of pdptNotNeeded means that your application does not use personal data and the
user will not have the opportunity to grant it that access. If your application attempts to
access personal data, any personal data will be automatically filtered out and will not
appear in the responses to requests.

462
Chapter 33: QBFC Language Reference
(c) 2013 Intuit Inc. All rights reserved.
IQBAuthPreferences.PutUnattendedModePref
HRESULT PutUnattendedModePref(ENUnattendedModePrefType UnattendedModePref)
Invoked on the QBAuthPreferences object to specify whether your application needs
unattended mode (auto-login) access to the company file.
Parameters
UnattendedModePref
Specify umptRequired or umptOptional.
Specify umptRequired if your application must be able to run in unattended mode or
umptOptional if such access is not required.

IQBAuthPreferences.WasAuthPreferencesObeyed
463
(c) 2013 Intuit Inc. All rights reserved.
IQBAuthPreferences.WasAuthPreferencesObeyed
HRESULT WasAuthPreferencesObeyed(VARIANT_BOOL *pWasAuthPreferencesObeyed)
Returns verification whether the current version of QuickBooks supports the
IQBAuthPreferences object property and methods.
Parameters
pWasAuthPreferencesObeyed
Pointer to the returned value. True means there is support for
IQBAuthPreferences, False means there is no support.
This method is useful for determining whether the QuickBooks currently being accessed is
capable of supporting the authorization preferences feature.

464
Chapter 33: QBFC Language Reference
(c) 2013 Intuit Inc. All rights reserved.
IMsgSetRequest Object and Methods
The IMsgSetRequest object contains the requests to be processed by QuickBooks and is
supplied in a QBSessionManager.DoRequests method invocation. The individual requests
are appended to this object via the appropriate Append method.
Table 33-4 IMsgSetRequest Methods/Properties
Functionality
Supporting Methods/
Properties Notes
Append request to the
message set.
AppendARRefundCreditCard
AddRq
.
.
.
AppendVendorTypeQueryRq
This object has one Append* method for each
request listed in the OSR for QBFC.
The append method for a request appends an
empty request object and returns that request
object so that you can set its properties (fully
construct it) as you want.
For example, AppendARRefundCreditCardAddRq
returns the object
IAppendARRefundCreditCardAdd, which is the top
level object listed in the OSR. The OSR provides
information on each property for that request
object.
Set message set-level
attributes that apply to
all requests in the
message set.
Attributes This property returns the IAttributeRqSet object,
which you would need if you wanted to determine
the current attribute settings in the request set.
IAttributeRqSet contains the attributes that are
currently in effect for all requests in the message
set.
QuickBooks supports several attributes, which
are documented in the OSR under the Attributes
link in the main OSR page.
Empty the message set
so it can be re-used.
ClearRequests Removes all requests currently appended to the
request message set.
Get the requests
contained in a message
set object.
RequestList You probably will seldom use this property. You
would use this property if you wanted to get one
or more requests from the request message set.
The IRequestList object returned has a count and
a GetAt method for returning individual IRequest
objects from the list.
Once you have the IRequest object, you can use
its RequestID, Type, or Detail methods as
desired. The Detail is processed exactly like its
IResponse counterpart, which is thoroughly
covered in Chapter 7, “Handling Responses Using
QBFC or qbXML.”

IMsgSetRequest Object and Methods
465
(c) 2013 Intuit Inc. All rights reserved.
Dump out the contents
of the message set in
qbXML.
ToXMLString This method is very handy during diagnostics
where you need to examine the complete XML
representation of the requests that were built in
QBFC. Useful for making sure you are getting the
requests you expect.
Check the message set
for validity.
Verify The DoRequests method causes validation to be
run automatically. However, if you need to
validate the requests for proper construction
before you invoke DoRequests, you can use this
method.
Functionality
Supporting Methods/
Properties Notes

466
Chapter 33: QBFC Language Reference
(c) 2013 Intuit Inc. All rights reserved.
IMsgSetRequest.Append*
HRESULT PutUnattendedModePref(ENUnattendedModePrefType UnattendedModePref)
Invoked on the QBAuthPreferences object to specify whether your application needs
unattended mode (auto-login) access to the company file.
Parameters
UnattendedModePref
Specify umptRequired or umptOptional.
Specify umptRequired if your application must be able to run in unattended mode or
umptOptional if such access is not required.

IMsgSetRequest.Attributes
467
(c) 2013 Intuit Inc. All rights reserved.
IMsgSetRequest.Attributes
HRESULT Attributes([out, retval] IAttributesRqSet**pVal);
Invoked on the QBAuthPreferences object to specify whether your application needs
unattended mode (auto-login) access to the company file.
Parameters
UnattendedModePref
Specify umptRequired or umptOptional. Specify umptRequired if
your application must be able to run in unattended mode or
umptOptional if such access is not required.

468
Chapter 33: QBFC Language Reference
(c) 2013 Intuit Inc. All rights reserved.
IMsgSetResponse Object and Methods
The IMsgSetRequest object contains the requests to be processed by QuickBooks and is
supplied in a QBSessionManager.DoRequests method invocation. The individual requests
are appended to this object via the appropriate Append method.
Table 33-5 .IMsgSetResponse Methods/Properties
IRequest Object and Methods
Unlike the IResponse object, which is processed after the DoRequest invocation, the
IResponse object is normally seldom processed. However several properties are available
for your use if you need to process an IRequest. We won’t describe the processing of an
IRequest as it is nearly identical to processing an IResponse, which is covered in detail in
Chapter 7, “Handling Responses Using QBFC or qbXML.”
Functionality
Supporting Methods/
Properties Notes
Get the message set-level
attributes that apply to all
responses in the message
set.
Attributes This property returns the IAttributeRqSet object,
which you would need if you wanted to determine
the current attribute settings in the response set.
IAttributeRqSet contains the attributes that are
currently in effect for all requests in the message
set.
QuickBooks supports several attributes, which
are documented in the OSR under the Attributes
link in the main OSR page.
Get the responses
contained in a message
set object.
ResponseList You need to invoke this on every
IMsgSetResponse object returned from the
DoRequests call to get the response list and
begin processing the responses from QB.
You need to get the individual IResponse objects
from this response list, which contain the actual
data. This entire process is thoroughly covered in
Chapter 7, “Handling Responses Using QBFC or
qbXML.”
Dump out the contents of
the message set object in
qbXML format.
ToXMLString This method is very handy during diagnostics
where you need to examine the complete qbXML
representation of the responses that were built in
QBFC. Useful for making sure you are getting the
responses you expect.

IResponse Object and Methods
469
(c) 2013 Intuit Inc. All rights reserved.
Table 33-6 IRequest Methods and Properties
IResponse Object and Methods
Each IResponse object contained in the IResponseList is normally processed after the
DoRequest invocation. The processing of IResponse is covered in detail in Chapter 7,
“Handling Responses Using QBFC or qbXML.”
Table 33-7 IResponse Methods and Properties
Functionality Method/Property Notes
Get the RequestID RequestID
Determine the request type. Type This property indicates the request type. For
example, a customer query request would have the
response type rtCustomerQueryRq.
It should not be confused with the Detail object’s
Type property, which indicates the detail object
type.
Return the data in IRequest
to the proper object type.
Detail
Functionality Method/Property Notes
Did the request succeed? If
not, why not?
StatusCode
StatusSeverity
StatusMessage
You need to check every IResponse for success
before proceeding. A status code of 0 means the
request succeeded.
Determine the response
type.
Type This property indicates the response type. For
example, a customer query request would have the
response type rtCustomerQueryRs.
It should not be confused with the Detail object’s
Type property, which indicates the detail object
type.
Return the data in
IResponse to the proper Ret
object type.
Detail The response detail should always be checked for
the presence of data BEFORE you do any further
processing (in VB terms, response.Detail must not
be Nothing). Attempts to process an empty Detail
object can result in a runtime crash.
Iterate through a large set
of query results.
iteratorID
iteratorRemainingCou
nt
Supports the recommended method for iterating
through a large set of query results. See Chapter 8,
“Creating Queries.”
Get the approximate count
of objects returned from a
query.
retCount The count is approximate because additions and
deletions could occur after the time of the query
that would affect the accuracy of the count.
470
Chapter 33: QBFC Language Reference
(c) 2013 Intuit Inc. All rights reserved.

Can I Sign ActiveX or Java Applications?
471
(c) 2013 Intuit Inc. All rights reserved.
C
HAPTER
34 1
D
IGITALLY
S
IGNING
Y
OUR
C
ODE
1
The QuickBooks SDK checks for the existence and validity of a digital code signature
when your application undergoes the authorization process that is invoked whenever your
application accesses QuickBooks.
This authorization process is implemented using Microsoft’s Authenticode technology to
determine the status of an application’s code signature. Obtaining an Authenticode
compatible certificate from an authority is described later in this chapter. Any certificate
authority should work; however, we have had good results using Verisign, Equifax, and
Thawte.
Can I Sign ActiveX or Java Applications?
No. You cannot digitally sign ActiveX or Java applications. QuickBooks looks for the
executable process that is connecting to it via COM and will not be able to find the
signature. For example, if you use a java to COM bridge such as JACOB, you are going
through a .dll so when QuickBooks traces back it's going to find the java virtual machine
and not your signature.
About Microsoft Authenticode
An application signed using Authenticode provides security to the QuickBooks user in two
ways:
•Authenticity: the user can be confident that the code has indeed originated from you,
the software publisher.
•Integrity: the code contained in your application has not been tampered with after it was
published.
Notice that Authenticode does not guarantee to end users that it is safe to run the code
signed and contained in your application. Neither does Authenticode provide copy
protection for your software.
What is a Digital Certificate?
A digital certificate is a set of data, which uniquely identifies you, an entity, and is issued
by a certification authority (CA) only after that authority has verified your identity. It
contains information including your (the owner’s) public key, your name, an expiration
date, the name of the Certification Authority that issued the certificate, and a serial number.

472
Chapter 34: Digitally Signing Your Code
(c) 2013 Intuit Inc. All rights reserved.
The data set includes your public cryptographic key. When you sign your code,
Authenticode reads the public key that is retrieved from the certificate information
contained in your signed code. This public key is used to verify your identity. (More
information on the public key is provided later in this appendix.)
A digital certificate can come in various formats. Of these, the X.509 certificate format is
an emerging standard that has been widely used for many years.
The Certificate Authority
A Certificate Authority is an entity that is entrusted to issue certificates asserting that the
recipient individual, machine or organization requesting the certificate fulfills the
conditions of an established policy. The CA could be an external commercial CA, or it
could be a CA run by your company.
Simply put, it is the Certificate Authority that issues digital certificates. A certificate
authority such as VeriSign or Thawte can provide digital certificates.
Code Signing
Once you develop and test your code, you can run it through a one-way hash function that
produces a fixed-length "digest." The digest is then encrypted with your private key; and
combined into a signature block with the name of the hash algorithm and the certificate.
As mentioned previously, the certificate holds information such as your name, the public
key, and the name of the CA’s certificate. This signature block is then inserted back into the
portable-executable file format under a reserved section, and the code is then distributed.
When your application attempts to access QuickBooks, the authorization process that uses
Authenticode is invoked. In this process, the signature is extracted, the CA that
authenticated the certificate is determined and your public key distributed by that CA is
read. Using this public key, the digest is decrypted. The specified digest is run on the code
again, creating a new digest. If the code has not been modified since it was signed, the new
digest should match the old one. If the two digests don’t match, it implies that either the
code was modified, or the public and private keys aren’t a matched pair. In either case, the
code becomes suspect and the QuickBooks user is warned about this fact.
The Internet Client Software Developer’s Kit (Microsoft’s Authenticode toolkit) provides
the necessary utilities to make it easy to follow the code-signing process.
Obtaining a Digital Certificate
You need to apply for a Software Publisher’s Certificate from an appropriate Certificate
Authority. As mentioned earlier, make sure that you are asking for a Software Publisher’s
Certificate that is compatible with Microsoft Authenticode technology. The actual
application process may differ depending on which Certificate Authority you use.

Signing Your Code
473
(c) 2013 Intuit Inc. All rights reserved.
Along with your application, you need to submit the details such as your company
registration and organizational information to the Certificate Authority. This is required by
the Certificate Authority to verify your identity.
Commercial CA Entities You Can Use
The following are well-known Certificate Authorities that issue digital certificates
compatible with Authenticode:
•VeriSign : http://www.verisign.com
•Thawte:http://www.thawte.com
Obtaining the Certificate
When the Certificate Authority verifies the information that you submitted, it will inform
you of this fact and provide you with guidelines to download the certificate. It may take
about 3 to 5 days for the Certificate Authority to complete this step.
At this stage, you will have obtained the Certificate as a Software Publishing Certificate
(.spc) file.
Signing Your Code
This section describes the process of using a digital certificate to sign application code. It
describes the process using QuickBooks, a sample application to be signed, and Microsoft’s
Internet Client Software Developer’s Kit.
To perform code signing, you will be using the following:
•The private key stored as a .pvk file, generated during the certificate application
process.
•The Software Publishing Certificate (.spc) file received from the Certificate Authority.
You may sign your code at a stage just preceding your code distribution process. Code
signing is a quick process, not lasting more than a few minutes. You need to only sign your
code once each time you rebuild or distribute your application.
Do You Have Everything You Need?
The following is a checklist of the items you will need to sign your application:
•A Software Publisher’s Certificate compatible with Microsoft Authenticode.
•Internet Explorer (IE) version 4.0 or above.
•The Internet Client Software Developer’s Kit downloaded from Microsoft’s web site
and installed on your system.
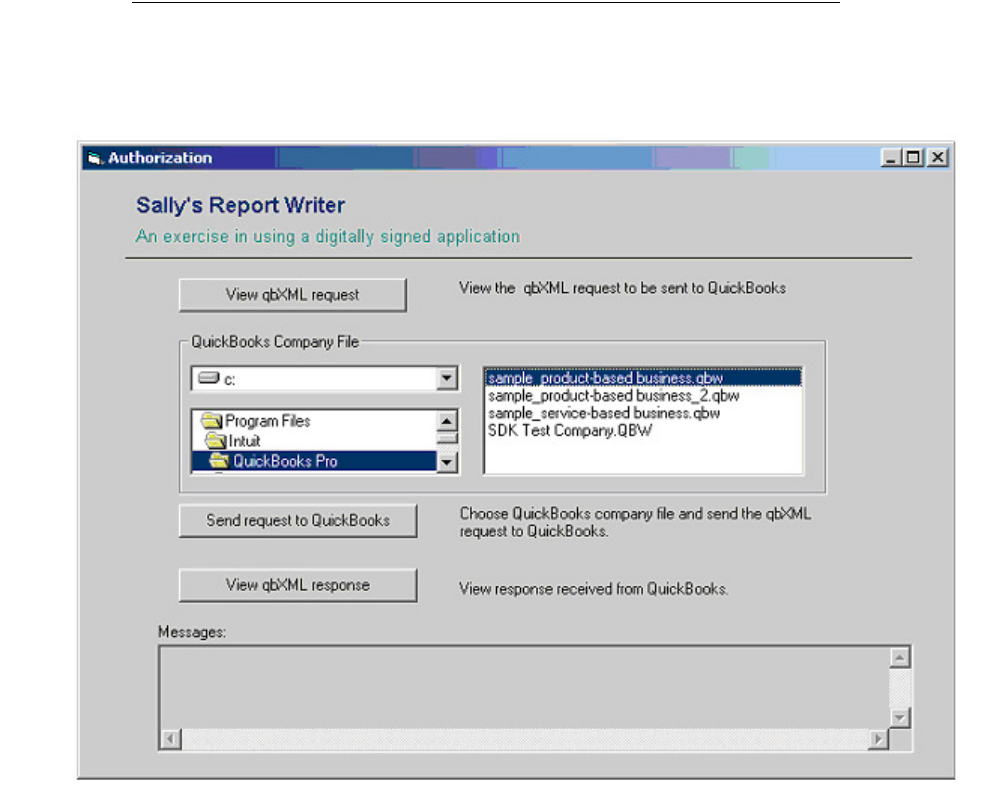
474
Chapter 34: Digitally Signing Your Code
(c) 2013 Intuit Inc. All rights reserved.
An Example Using a Test Application
Suppose we have an application called Sally’s Report Writer, represented by TestApp.exe,
This application sends a qbXML request to QuickBooks, which contains a request for
querying vendor information for reporting. Suppose the UI looks like this:
When "Send request to QuickBooks" is selected, QuickBooks goes through the
authorization process. QuickBooks then displays the following information about the
application:
The Application calls itself "Test Application". This application does not have a certificate.
QuickBooks cannot verify the developer’s identity.
This information is displayed in a dialog box to the QuickBooks user, as shown below:
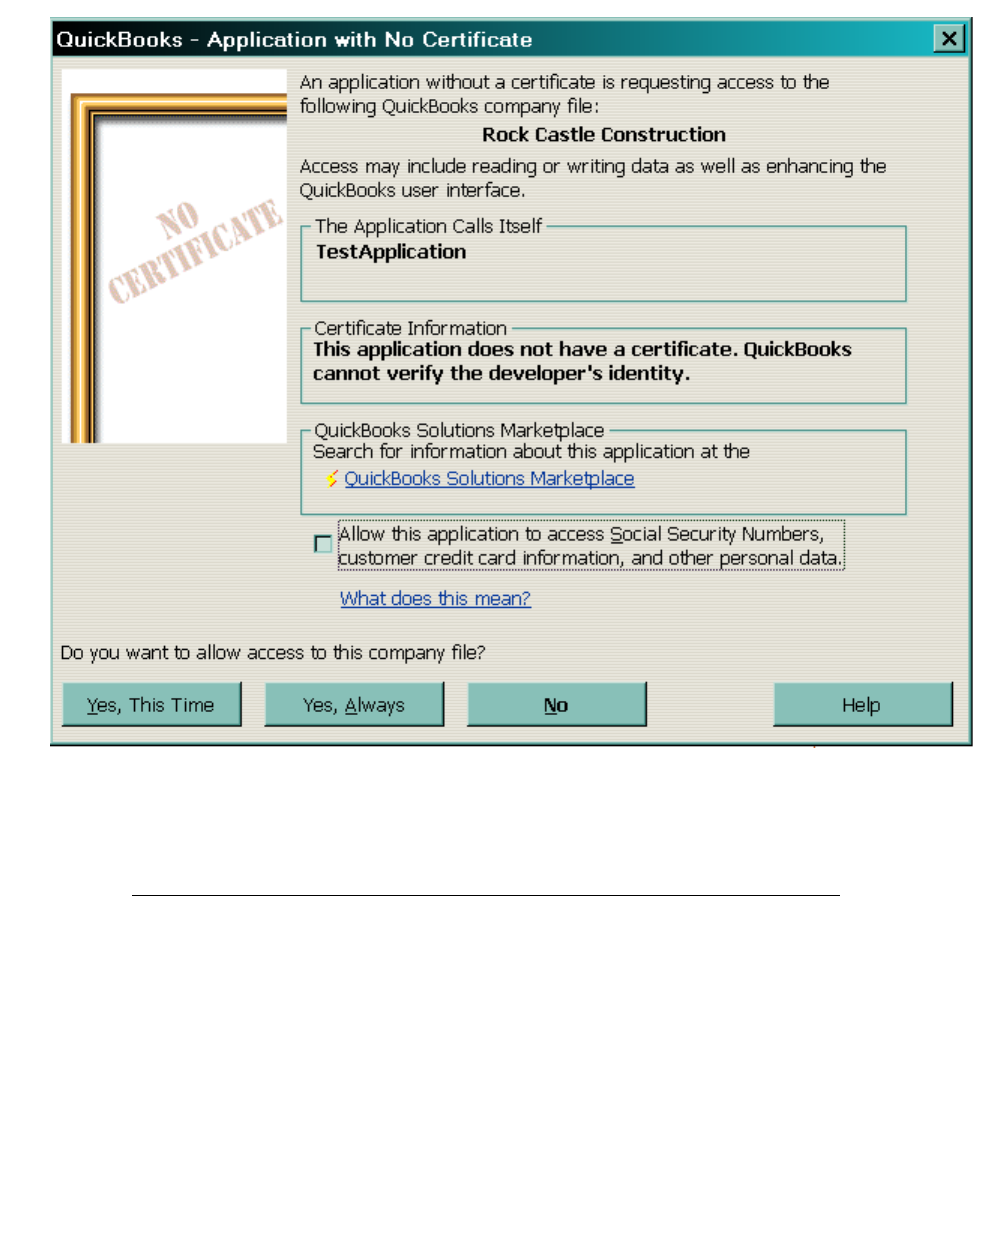
Signing Your Code
475
(c) 2013 Intuit Inc. All rights reserved.
Now, lets see what happens after we digitally sign this application and observe how
QuickBooks displays information about the certification to the user.
Signing Code With the Internet Client Software Developer’s Kit
You use Internet Client Software Developer’s Kit to sign the application. Notice that the
following programs are installed as part of the Internet Client Software Developer’s Kit
(working with IE-5.X):
• MakeCert, which creates a test X.509 certificate.
• Cert2SPC, which creates a test SPC.
• SignCode, which signs a file.
• ChkTrust, which checks the validity of the file.
• MakeCTL, which creates a certificate-trust list.
• CertMgr, which manages certificates, certificate-trust lists, and certificate-revocation
lists.
476
Chapter 34: Digitally Signing Your Code
(c) 2013 Intuit Inc. All rights reserved.
• SetReg, which sets registry keys that control the certificate-verification process.
• MakeCat, which creates a combined catalog of files to avoid multiple trust dialogs.
The installation process places these programs in \inetsdk\bin by default. The only one of
these application that you absolutely need to use is SignCode.
However, if you want to familiarize yourself with the signing process, you can create a test
digital certificate and use this to sign your code. You may perform this test even before you
apply for a digital certificate from a Certificate Authority of your choice, or while waiting
for your request to be processed.
To create a test certificate, use the MakeCert, and Cert2SPC components of the Internet
Client Software Developer’s Kit. For additional information on creating a test certificate,
refer to the Microsoft documentation.
Signing the test application
Let us incorporate digital code signing in our application "Sally’s report Writer",
represented by TestApp.exe. We accomplish this by using the program SignCode. Follow
these steps:
1. Run SignCode. This brings up the Digital Signature wizard.
2. In the wizard, click Next.
3. In the file selection dialog, browse for TestApp.exe, select it, and click Next.
4. In the next dialog, select Custom and then click Next.
5. Specify the location of the certificate file (.spc), then browse to the private key file
(.pvk) when prompted.
6. Provide the private key password when prompted.
7. Select the "SHA1" Hash algorithm when prompted.
8. Select "All certificates in the certificate path including root" and "No additional
certificates" when prompted.
9. Select "Select from Store" to display the list of certificates. You should see the
certificate received from the Certificate Authority in the list.
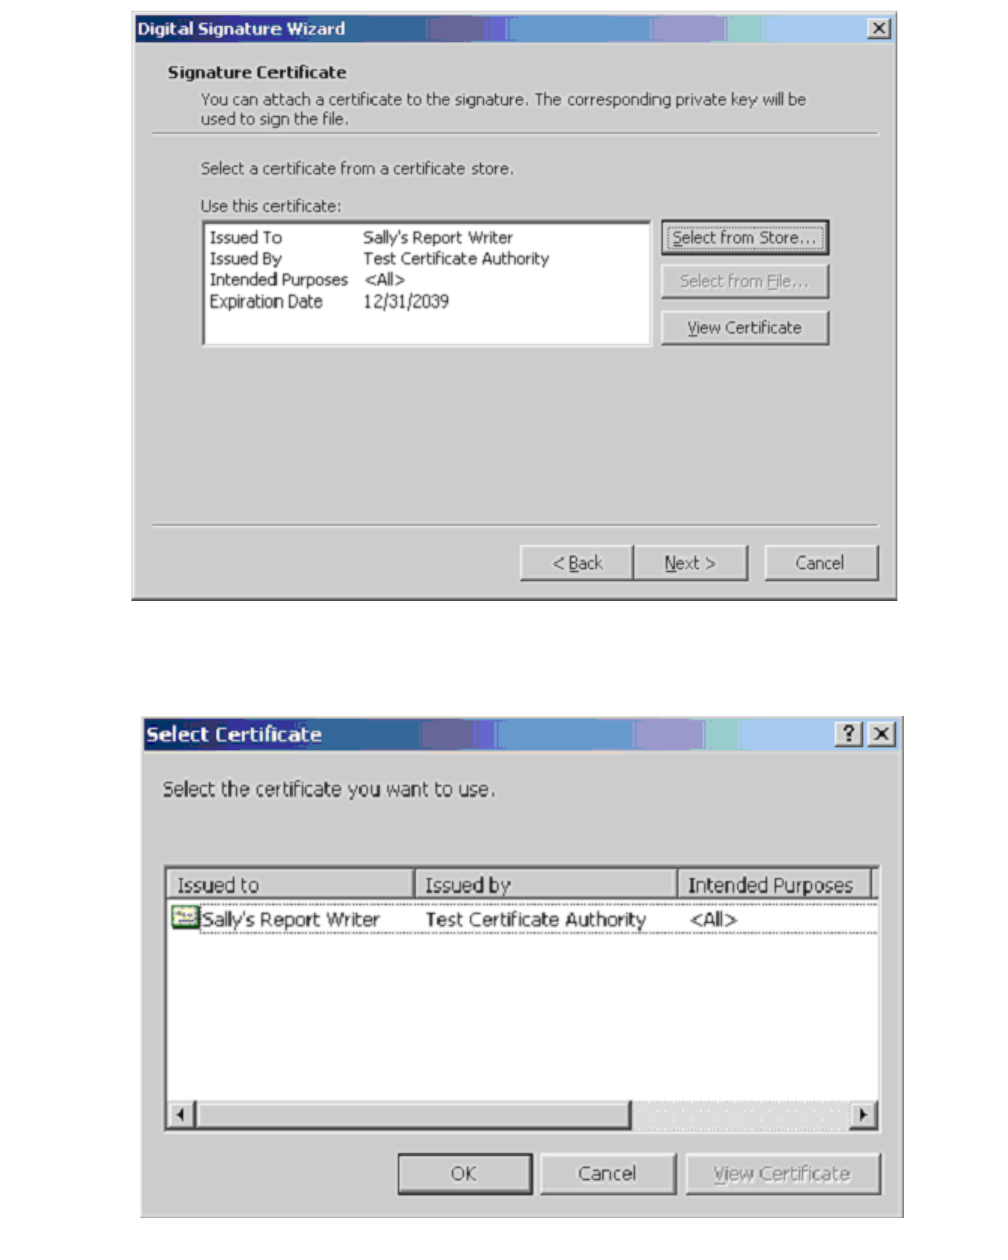
Signing Your Code
477
(c) 2013 Intuit Inc. All rights reserved.
10. Select the desired certificate and click OK.
11. Click Next to display details for this certificate.
12. Click View Certificate to view the details for the certificate.
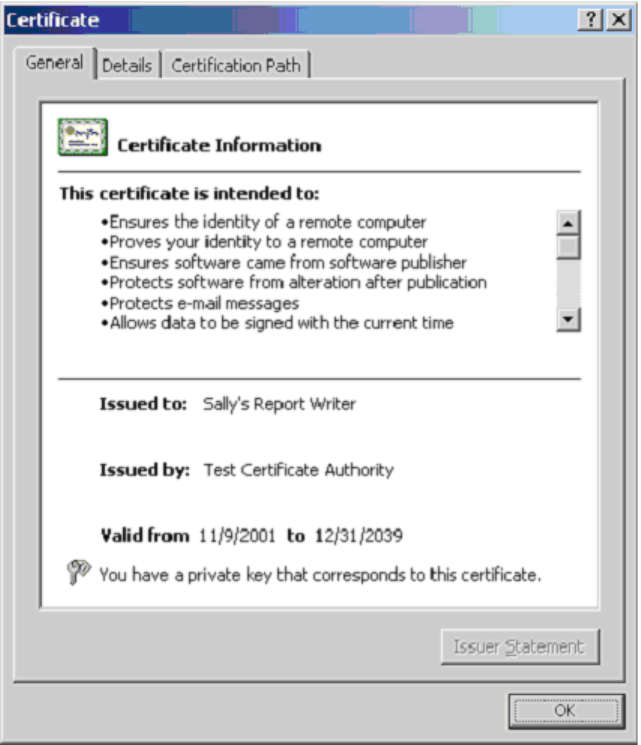
478
Chapter 34: Digitally Signing Your Code
(c) 2013 Intuit Inc. All rights reserved.
13. Click Next. This is where you must specify an appropriate description of your
application for display to the QuickBooks user. This value must match exactly the
application name you supply in the AppName parameter of the OpenConnection2
call! For our purpose, let us specify the description as "Report Writer for QuickBooks
Vendor Information", and the web URL as "http://www.SallysReports.com".
14. Click Next.
15. Leaving the timestamp box unchecked, click Next.
16. Click Finish. SignCode displays the message: “The Digital Signing wizard was
completed successfully.”
Testing the Digitally Signed Application
At this stage you have a digitally signed application TestApp.exe. If you run this with
QuickBooks, you can observe the change in the User Interface for the authorization process
in QuickBooks.
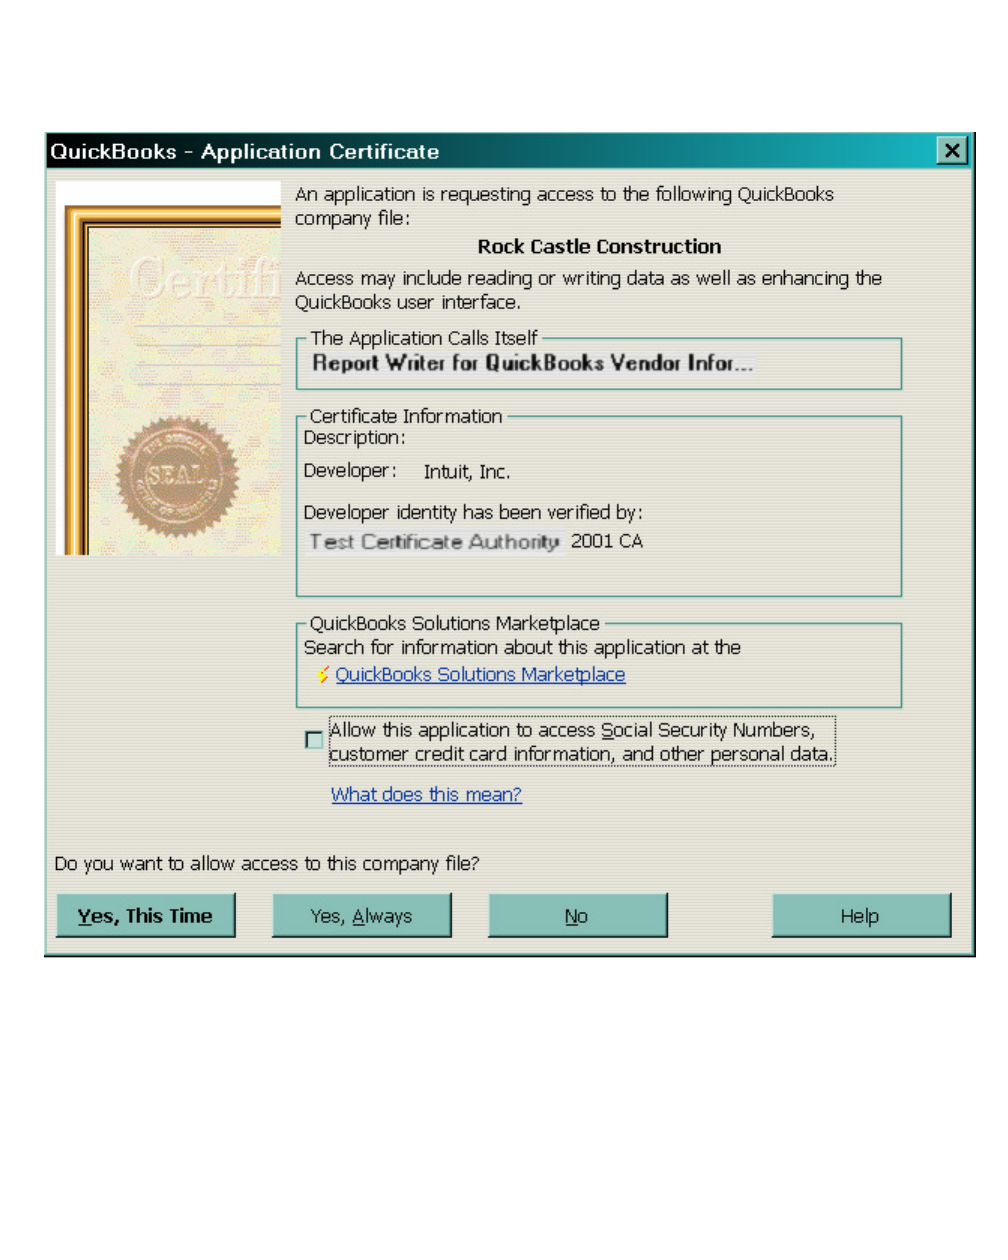
Signing Your Code
479
(c) 2013 Intuit Inc. All rights reserved.
The certification information is displayed to the QuickBooks user. QuickBooks displays the
Application Name "Report Writer for QuickBooks Vendor Information" and the
Developer’s Name "Sally’s Report Writer". The fact that the Certificate Authority "Test
Certificate Authority" has verified your identity is also displayed.
Useful web site links
You may find the following web site links useful for additional reference:
Certificate Authorities:
•http://www.verisign.com
•http://www.thawte.com
Information on Authenticode
•http://www.microsoft.com
480
Chapter 34: Digitally Signing Your Code
(c) 2013 Intuit Inc. All rights reserved.
Where to Obtain the Internet Client Software Developer’s Kit
•http://msdn.microsoft.com

Best Practices
481
(c) 2013 Intuit Inc. All rights reserved.
C
HAPTER
35 1
T
IPS
AND
T
ECHNIQUES
1
This chapter describes “best practices” for programming with the QuickBooks SDK. It also
suggests what to do when you encounter problems before you contact QuickBooks Intuit
Partner Platform (IPP) Developer Support.
Best Practices
This section offers some friendly advice in the form of best practices with these intentions:
to help safeguard your application against possible security exposures, errors, excessive
data transport (how to use filters and purposeful construction of messages); and possibly to
improve application performance. These best practices are suggestions, not requirements.
They are the outcome of developer experience and are offered in the spirit of
encouragement:
•Sign your code (using the digital signing process).
The QuickBooks SDK provides for application authentication through use of a digital
signature within the application. A signed application offers your user greater
confidence in the authenticity of your application. Your signed application is more
secure from the users’ perspective in relation to their QuickBooks company file data.
•Store company file data in a secure manner.
For applications that store company file data, be certain to store the data in a secure
manner using an internal database or file. If practical, encrypt data. Do not store
QuickBooks company file data in the regular file system, exposing it to security
breaches. Also, if you save qbXML text streams or discrete object requests between
calls, store them in a secure manner. For instance, some applications integrate storage
of qbXML within their databases removing the text stream only after they complete
processing the response code and exit their message recovery routines.
•Be purposeful in your construction of messages:
> Use well-defined filters in query requests. Consider this maxim: the briefer the
request, the more verbose the response.
If an application is sending a query request and you don’t want all of the data
of a certain type returned to you, use filters to limit the number of response
objects returned and the data transported. The more verbose the request (the
more filters), the briefer (more pertinent) the response.
> For multiple, unbounded queries, issue separate requests to limit the amount of data
transmitted in one request. Alternatively, use the
MaxReturned
filter in the query
to limit the number of objects returned by a single call. See Chapter 8, “Creating
Queries.”
> Do not include empty elements in requests without express intention and only in
Modify requests or certain Add requests to clear the element value (see Chapter 10,
482
Chapter 35: Tips and Techniques
(c) 2013 Intuit Inc. All rights reserved.
“Modifying and Deleting Transactions and List Objects,” on which values can be
cleared in an Add request).
> If you are using qbXML, pay attention to encoding issues. Be aware of your use of
special characters, including ampersand (&), single quotes (‘), double quotes (“),
greater-than (>), and less-than (<) characters.
•Always run the qbXML Validator on your qbXML requests as you develop the code.
Better yet, incorporate your own qbXML request validation routines in your code. For
QBFC, use the Verify method to check the validity of your messages.
•Call GetCurrentCompanyFileName after BeginSession with qbCompanyFileName set
to
NULL
.
If you pass in
NULL
for the company file name qbCompanyFileName in BeginSession
because the file is already open, call GetCurrentCompanyFileName immediately after
calling BeginSession to determine the identity of the file. Under these circumstances,
before you modify any data in that company file, verify the company file name with the
user through your application interface to ensure that your application acts on the
intended company data file.
•Provide a mechanism for your user to run your application without having to provide a
company file name to the BeginSession call.
This technique is useful in troubleshooting certain application problems and allows the
user to continue using the software while a software problem is being investigated and
resolved.
•Always parse the received response and analyze the status code and status severity for
every response object.
•If you are using qbXML, provide your application with the ability to write application-
generated qbXML routinely to a file for debugging purposes. Also, enable it with a
debug switch that could be used during production time by your technical support
organization to write application-generated qbXML to a file.
•Implement application features that provide your technical support organization with
means of helping your users resolve problems. For instance, add a routine to compress
and e-mail the log file to you.
•In your user interface, provide your users with a Browse button so that they may
browse to select the company file. This approach is less prone to error than is entering
the company file name and path by typing it in a window field.
•It is always good practice to test your application on a system equivalent to the machine
and system you assess to be most like the target system of your customer. To ensure
that your application is robust, run the application against a complex and large
company data file. Use a target system that has an average amount of memory. Check
your use of queries and filters against the company data file on that system. If the
system thrashes or QuickBooks returns an out-of-memory error, enhance your
application’s use of queries with additional, appropriate filters.
•Your code should always test for the status code, not the status message, since status
messages are more likely to change from one release to the next.

Validating Requests
483
(c) 2013 Intuit Inc. All rights reserved.
Validating Requests
The QuickBooks SDK includes an external Validator tool (qbXMLValidator.exe) that allows
you to validate qbXML documents to ensure that their grammar and syntax adheres to the
requirements of the qbXML specification. Similarly, the QBFC Library contains a Verify
method for IMsgSetRequest, which allows you to verify requests before DoRequests is
called.) The Validator tool is useful during the development cycle, since it helps you isolate
invalid requests before you send them to be processed. The request format is also validated
automatically when the call to ProcessRequest (or, in the case of QBFC, DoRequests) is
made.
If you want more control over validating requests before they are sent to QuickBooks, you
can build your own validator into your application. Be sure to validate your document
before you report any problems to Intuit Developer Support.
Investigating the Problem Thoroughly
In most cases, you will have undergone various processes in attempting to solve your
development problem before you consider contacting IPP Developer Support. However,
here are some troubleshooting strategies to include in your investigation that you might not
have considered. Try these approaches before you contact IPP developer support:
•If you are using qbXML, write out to a file the portion of qbXML that is causing the
problem and check it thoroughly.
•Check the
qbsdklog.txt
file for additional detailed information pertaining to the
error condition. This file is written to the directory where the QuickBooks executable
file is installed.
•Ensure that you can recreate the problem using the SDKTest program. (The developer
support engineer will want to know that this can be done and perhaps will also want to
recreate the problem to investigate it further.)
Building a Test Case to Make Available to Developer Support
Here are the guidelines to follow in building a test case:
•Create the smallest possible test case that will embody the problem. Let the test case
simply point out the problem.
•Make the test case complete. If it requires the creation of any particular customers,
vendors, accounts, invoices, and so on, create a setup file in addition to the one that
shows the problem.
•Run the test case against one of the standard QuickBooks sample company files, and
make the test case run successfully, if possible.

484
Chapter 35: Tips and Techniques
(c) 2013 Intuit Inc. All rights reserved.
Sending a Test Case and the Log File to Developer Support
If you must contact IPP Developer Support, the developer support engineer will ask you to
build a test case according to the guidelines. See “Building a Test Case to Make Available
to Developer Support” for details. To proceed speedily in solving the problem, have the test
case ready when you contact developer support. Send the test case as qbXML files to
QuickBooks via the SDKTest program. Also send the portion of the log file (qbsdklog.txt)
that pertains to the problem. (You do not have to send the entire qbsdklog.txt file.)

Using the SDKDiag Tool to Support Your User
485
(c) 2013 Intuit Inc. All rights reserved.
C
HAPTER
36 1
S
UPPORTING
Y
OUR
U
SER
1
This chapter suggests ways you can help users troubleshoot and resolve some problems
without contacting technical support. In particular, it deals with ways your application can
respond to error messages when it attempts to open a connection with QuickBooks and
begin a session working on a company file. In many cases, your application can present
windows that help users handle these problems themselves. Additional tips to help users
avoid common pitfalls, which you may want to include in your documentation, are also
outlined here.
Using the SDKDiag Tool to Support Your User
For help with communication problems with QuickBooks, check out the IPP Developer
website for more information and a useful diagnostic tool called qbSDKDiag.
The qbSDKDiag tool turns on the maximum logging capability of QuickBooks and the
SDK, gathers important registry data about QuickBooks, starts QuickBooks, and attempts
to establish a connection with QuickBooks in interactive mode using QBXMLRP and
QBXMLRP2.
Having successfully connected in interactive mode, the user is then asked to enable
unattended access for the diagnostic tool and to close QuickBooks. The diagnostic tool then
attempts to connect with both QBXMLRP and QBXMLRP2 using unattended mode.
Finally, all the log files (qbsdklog.txt, qbinstancefinder.log, qbwin.log, and the diagnostic
log itself) are zipped up for you to email to support personnel at a later time.
Helping Users Troubleshoot and Resolve Problems
The most commonly occurring error conditions not resolvable by your application are
•Version incompatibility between the running version of QuickBooks and the version of
QuickBooks your application requires
•Version incompatibility between the company data file and QuickBooks
In these cases, your application might need to inform the user about the nature of the
problem and recommend an approach to its resolution. Otherwise, the user might wait for
your application to recover from a situation it cannot resolve.
This section describes some of the kinds of problems your application should monitor for
and the responsive actions it should take.

486
Chapter 36: Supporting Your User
(c) 2013 Intuit Inc. All rights reserved.
Multiple Installed Versions of QuickBooks
If multiple versions of QuickBooks are installed, either of the following two cases might
prevail:
•No version of QuickBooks is open.
No problem: In this case, when the user opens your application and your application
attempts to connect to QuickBooks to begin processing, the Request Processor will
locate and successfully launch the correct version of QuickBooks.
•A version of QuickBooks that is incompatible with the application is open.
Problem: In this case, when the user launches your application and your application
calls the BeginSession method to connect to QuickBooks in response to a user action,
your application will receive result code
0x80040404
, which indicates that the version
of QuickBooks currently running does not support the QuickBooks SDK.
Response: Your application should present the user with a window informing the user
of the problem and the version of QuickBooks required. The window content should
direct the user to quit the currently open version of QuickBooks and launch the correct
version.
Incompatible Versions: QuickBooks and Company File
Problem: The correct version of QuickBooks is installed and open, but the company data
file specified by the user is incompatible with the current version of QuickBooks. Result
code
0x80040409
is returned, which indicates that the version of QuickBooks currently
running cannot work with the provided data file.
Response:
Your application should present the user with a window describing the problem
and direct the user to open the same company file in the correct version of QuickBooks
(which will cause it to be converted to the correct format).
Different Company File Is Already Open
Problem: If the user specifies the name of a company file that is different from the one
already open in QuickBooks, your application will receive an error. QuickBooks returns a
result code of
0x8004040A
for the BeginSession method, which indicates that the data file
already open is different from the requested one.
Responses:
Your application should present the user with a window describing the problem.
There are two possible resolutions, depending on the intention of the user. The resolution
you recommend depends on your application.
•Response 1: If the user truly wanted to work in the new specified file, you could
recommend that the user close the currently open company file and then repeat the
action or command in your application, specifying the new company file name.
•Response 2: If the user meant to work in the currently open file, your application could
allow the user to omit the company file name and use the currently open company file

Helping Users Troubleshoot and Resolve Problems
487
(c) 2013 Intuit Inc. All rights reserved.
by default. In this case, your application would specify NULL as the company file
name in the BeginSession call. Then it would call GetCurrentCompanyFileName to
obtain the name of the currently open file.
Warn Your Users to Complete Error Recovery
before Upgrading
Use of QuickBooks error recovery features allows you to protect against data loss and data
duplication in the event of an error condition. This features requires that
•The version of QuickBooks that is currently running is the same as the version that was
running when the error occurred (that is, the user has not upgraded QuickBooks).
•The version of your application that is currently running is the same version that was
running when the error occurred (that is, the user has not installed a new version of
your application).
If the user installed a new version of your application and it has the same name as the one
used when the error condition occurred, error recovery is still possible.
The user might consider some problems more serious than others and think it is safer to
replace a down-level version of an application with a new, improved one in the event of a
serious condition such as a crash. It is important to convey to users that they must first start
the installed versions of QuickBooks and your application and allow your application to
restore its own data and the data it has modified in the QuickBooks company file. Then, if
they want to, they can install the new software.
In addition to a window warning users of this requirement, you will probably also want to
include a note in your documentation about this topic.
Versions of Integrated Applications
An integrated application may be revised in between releases of QuickBooks. The name of
the application may also be changed with each new release to differentiate the feature sets
of each successive revision.
If your application changes its name, be aware that it may be represented as multiple
applications in the QuickBooks preferred integrated applications list. Also, should an error
condition exist, users should complete error recovery in one version of the application
before they upgrade to the next version.
Provide a Means for Breaking Out of Error Recovery
It is possible for an application to get locked into a error recovery loop, sending the same
message repeatedly to QuickBooks. This condition might occur, for instance, if an
application sent a request that caused an error condition to occur and in sending the request
again as part of error recovery, the request caused the error condition to occur yet again.

488
Chapter 36: Supporting Your User
(c) 2013 Intuit Inc. All rights reserved.
With each recurrence, QuickBooks would respond with the same error recovery status
response. Though perhaps an uncommon event, when this kind of loop occurs, there is no
way for the user to interrupt the process. Therefore, as a safeguard, it is a good idea to put a
“back door” into your application—a hidden keystroke sequence, perhaps—and inform
your technical support organization about it.
You might also provide support for a control key set—Ctrl+<shift>+1 (for example)—that
allows your user to break out of the loop and recover control of the application. You would
tell your user support organization about this control key set. Your documentation might
also mention it.
Topics to Include in Your Documentation
The following sections suggest topics you may want to include in the documentation to
help users avoid common pitfalls concerning permissions and error recovery.
Permissions Required for Auto-Login
The auto-login option allows your application to integrate and run QuickBooks in
unattended mode. Auto-login without the QuickBooks user interface can be efficient if your
application needs to avoid the costly overhead entailed in updating the user interface
management of lists and messages. For complete details on auto-login, see Chapter 3, “The
Communication Model and Ways of Implementing It.”
You can use the AuthPreferences property and its PutUnattendedModePref method to
specify whether your application needs auto-login (unattended mode) permissions. The
appropriate authorization dialog will be presented to the user the next time your application
calls BeginSession. (Notice that only the QuickBooks administrator can authorize this.)
However, in order for your application to run using the auto-login option, the QuickBooks
administrator must firs define the auto-login user in QuickBooks; see Chapter 3, “The
Communication Model and Ways of Implementing It.” The administrator can specify that
your application run under any user, including the administrator.
QuickBooks User Permissions
The QuickBooks administrator must configure each QuickBooks user that your application
will log in under to have the permissions your application requires. For example, if your
application deals with time sheets and time reports in QuickBooks, the administrator must
grant your user Time Tracking permissions in QuickBooks when the administrator sets up
the name and password for the new user.
Check the QuickBooks documentation to determine what permissions your application
requires. Then, to ensure that things work properly, use the AuthPreferences property and
its methods to prompt the user for the correct permissions. Also, include explicit directions
in your documentation on how to set these permissions and why they are necessary.

Topics to Include in Your Documentation
489
(c) 2013 Intuit Inc. All rights reserved.
Application Access to Personal Data
The QuickBooks administrator must authorize an application to deal with personal data
such as employee social security numbers, any field directly related to an employee’s
salary, and anything related to credit card numbers or bank account numbers. Click the
Integrated Applications icon in QuickBooks, then Company Preferences, then Properties
and be sure the administrator checks the box for allowing the application to access personal
data.
I
MPORTANT
The application can use the AuthPreferences property and the
property method PutPersonalDataPref to specify whether this
access is required, optional, or not needed. This will cause the
appropriate authorization dialog to be displayed to the user.
Complete Error Recovery before Upgrading
As described in “Warn Your Users to Complete Error Recovery before Upgrading” (page
487), it is important that you include directions to your users to complete error recovery
within the same version of the application used when the problems occurred. You should
include this information in installation notes to upgrades of your product. If you find it
warranted, you might also include it in your more formal documentation.
490
Chapter 36: Supporting Your User
(c) 2013 Intuit Inc. All rights reserved.

Types of Error Codes
491
(c) 2013 Intuit Inc. All rights reserved.
C
HAPTER
37 1
M
AKING
Y
OUR
A
PPLICATION
R
OBUST
1
This chapter describes how to create a robust application that responds appropriately to
result codes and status codes received from QuickBooks. It covers the following major
topics:
•Types of error codes: HRESULTs, HTTP errors, status codes
•Log file: using the qbsdklog.txt file to obtain more information on request processing
•Software versions: writing applications that run with all versions of QuickBooks
•Error recovery: dealing with error conditions where normal processing may have been
interrupted
•Synchronization: dealing with status codes that indicate data synchronization problems
between your application and QuickBooks
Types of Error Codes
Your application needs to deal with two main categories of error codes:
•Error codes related to passing messages to and from QuickBooks
•Message set status code, which is a status code for the message as a whole
•Response status for each request sent to QuickBooks (status code, status message, and
status severity)
To help you create an application that integrates successfully with QuickBooks, this chapter
provides some pointers on particular result codes and status codes that are especially
important to monitor. This material is meant to be a starting point for how your application
should handle certain error conditions. Beyond that, of course, are many application-
specific concerns that cannot be anticipated here.
Appendix A for Status Code Information
Appendix A contains relevant error/status codes. It lists the status codes, status messages,
and status severity, which are all returned as attributes in the response message for every
request, and lists the HRESULTs that are returned by the COM API that enables your
application to communicate with QuickBooks. Finally, the appendix lists the HRESULTs
returned by the QBFC COM API, which are very similar to those sent by the qbXML
Request Processor API.

492
Chapter 37: Making Your Application Robust
(c) 2013 Intuit Inc. All rights reserved.
Monitoring HRESULTs and HTTP Errors
Error codes related to communicating with QuickBooks must be monitored and handled
appropriately. The section in this chapter called “Synchronizing Data between Your
Application and Quickbooks” describes a general strategy for implementing an error
recovery routine that is invoked each time your application starts up. The error recovery
routine checks for possible processing problems in the previous session. It is also invoked
whenever certain error codes having to do with processing or communication problems are
generated.
An example of an HRESULT returned by the qbXML Request Processor is:
0x80040416
If QuickBooks is not running, the company data file name must be supplied
to BeginSession.
Monitoring Message Set Status Codes
This status code deals with the message set as a whole and is returned in response to a
status check or clear status. It is also returned if some specific error recovery operation is
invoked and fails, such as a standard check for a valid message set ID.
Monitoring Status Codes
Status codes (and their accompanying status message and status severity) are included in
the response for each request. This chapter provides special sections describing how your
application might deal with status codes related to versioning issues, and with status codes
related to problems in synchronizing company data between your application and
QuickBooks.
An example of a status code is:
<CustomerAddRs requestID=”2” status code=”3231” statusSeverity=”Error”
statusMessage=”The request has not been processed.”/>

Using the Log File
493
(c) 2013 Intuit Inc. All rights reserved.
Using the Log File
When your application integrates with QuickBooks, QuickBooks creates a log file
(qbsdklog.txt) in the Common Files directory. As your application interacts with
QuickBooks, three categories of information are logged:
•Informational entries (I) report on activities, such as events beginning and ending.
•Warning entries (W) provide additional information about troublesome circumstances
that have not stopped processing but should be addressed.
•Error entries (E) report on errors. They can also elaborate on errors returned to your
program through qbXML COM HRESULT codes or status code errors, and messages
returned in the attributes in the response message in the qbXML response text stream.
In some cases, the log file can help you to identify specific problematic fields (elements) in
a request that raised an error. Sometimes the message will refer to a field or element that
borders an area in error. This log information might occur, for instance, if the error occurred
because a required field is missing. Table 37-1 shows an example of a log file.
Table 37-1 Example log file
Date and time Level PID SDK component Event message
20011107.145109 I 1884 RequestProcessor Started Connection
20011107.145109 I 1884 RequestProcessor Connection opened by app named
'SdkTest'
20011107.145109 I 1884 CertVerifier The file does not contain an
Authenticode signature.
20011107.145109 I 1884 RequestProcessor Opening the file in the DoNotCare
mode.
20011107.145120 I 1936 QBSDKProcessRequest Application named 'SdkTest' starting
requests (process 1884).
20011107.145122 I 1936 QBSDKMsgSetHandler QUERY: Invoice
20011107.145128 I 1936 QBSDKMsgSetHandler Request 234578 completed
successfully.
20011107.145128 I 1936 MsgSetHandler Finished.
20011107.145128 I 1936 QBSDKProcessRequest Application named 'SdkTest' finishing
requests (process 1884), ret = 0.
20020219.144648 I 393 SpecVersion Current version of qbXML in use: 3.0
20011107.145129 I 1884 RequestProcessor Connection closed by app named
'SdkTest'
20011107.145129 I 1884 RequestProcessor Ended Connection

494
Chapter 37: Making Your Application Robust
(c) 2013 Intuit Inc. All rights reserved.
Software Versions
The Technical Overview answers frequently asked questions about how to write an
application that supports multiple versions of QuickBooks. See that document for a list of
the different versions of QuickBooks and corresponding versions of the qbXML
specification that are supported by QuickBooks.
Checklist
The following checklist summarizes important tasks your application must address in order
to work with multiple versions of QuickBooks:
1. Handle an error creating the qbXML Request Processor object (for example, an
HRESULT of 0x80040404: The version of QuickBooks currently running does not
support qbXML.).
2. After a session has begun, check the qbXML specification supported by the qbXML
Request Processor object. (See “Checking the QuickBooks Version.”)
3. Reference the appropriate qbXML prolog for that specification. (See “Checking the
QuickBooks Version.”)
4. Guard newer features to prevent their running against an older QuickBooks version. Be
sure to consider both requests and responses. (Note that the prolog applies to all
requests contained within the XML stream. You can’t mix 1.0, 1.1, 2.0, 2.1, and 3.0
requests in one stream.) (See “Dealing with Unsupported Features.”)
Checking the QuickBooks Version
At runtime, your application needs to determine what versions of qbXML are supported by
the version of QuickBooks that is processing your requests. Once it determines the current
version, it should then load the appropriate prolog citing the correct version of the qbXML
specification. (Or, if your application is using QBFC, it should create a message set request
that corresponds to the correct version of the QuickBooks Request Processor.) The
following two code examples (one for qbXML and one for QBFC) illustrate the tasks your
application must complete in order to accommodate any version of QuickBooks that might
be running when your application is launched.
Example 1: qbXML
The following code excerpt contains two functions. The first function
(qbXMLLatestVersion) shows using the HostQuery function to obtain the supported
versions of the QuickBooks Request Processor that are currently running. It then loops
through the versions to determine the highest supported version.
The second function (qbXMLAddProlog) then adds the qbXML prolog that corresponds to
this latest version of the QuickBooks Request Processor.

Software Versions
495
(c) 2013 Intuit Inc. All rights reserved.
Function qbXMLLatestVersion(rp As requestProcessor, ticket As String)
As String
Dim strXMLVersions() As String
'Create a DOM document object for creating our request.
Dim xml As New DOMDocument
'Create the QBXML aggregate
Dim rootElement As IXMLDOMNode
Set rootElement = xml.createElement("QBXML")
xml.appendChild rootElement
'Add the QBXMLMsgsRq aggregate to the QBXML aggregate
Dim QBXMLMsgsRqNode As IXMLDOMNode
Set QBXMLMsgsRqNode = xml.createElement("QBXMLMsgsRq")
rootElement.appendChild QBXMLMsgsRqNode
Dim onErrorAttr As IXMLDOMAttribute
Set onErrorAttr = xml.createAttribute("onError")
onErrorAttr.Text = "stopOnError"
QBXMLMsgsRqNode.Attributes.setNamedItem onErrorAttr
'Add the HostQuery aggregate to QBXMLMsgsRq aggregate
Dim HostQuery As IXMLDOMNode
Set HostQuery = xml.createElement("HostQueryRq")
QBXMLMsgsRqNode.appendChild HostQuery
'Add a lowest-common-denominator prolog'
Dim strXMLRequest As String
strXMLRequest = _
"<?xml version=""1.0"" ?>" & _
"<!DOCTYPE QBXML PUBLIC '-//INTUIT//DTD QBXML QBD 1.0//EN'_
'http://developer.intuit.com'>" _
& rootElement.xml
Dim strXMLResponse As String
strXMLResponse = rp.ProcessRequest(ticket, strXMLRequest)
Dim QueryResponse As New DOMDocument
'Parse the response XML
QueryResponse.async = False
QueryResponse.loadXML (strXMLResponse)
496
Chapter 37: Making Your Application Robust
(c) 2013 Intuit Inc. All rights reserved.
Dim supportedVersions As IXMLDOMNodeList
Set supportedVersions =
QueryResponse.getElementsByTagName("SupportedQBXMLVersion")
Dim VersNode As IXMLDOMNode
Dim i As Long
Dim vers As Double
Dim LastVers As Double
LastVers = 0
For i = 0 To supportedVersions.length - 1
Set VersNode = supportedVersions.Item(i)
vers = VersNode.firstChild.Text
If (vers > LastVers) Then
LastVers = vers
qbXMLLatestVersion = VersNode.firstChild.Text
End If
Next i
End Function
'Get an XML prolog that is appropriate for the latest version of qbXML
Function qbXMLAddProlog(supportedVersion As String, xml As String) As
String
Dim qbXMLVersionSpec As String
If (Val(supportedVersion) >= 2) Then
qbXMLVersionSpec = "<?qbxml version=""" & supportedVersion & """?>"
ElseIf (supportedVersion = "1.1") Then
qbXMLVersionSpec= "<!DOCTYPE QBXML PUBLIC '-//INTUIT//DTD QBXML QBD " _
& supportedVersion & "//EN' 'http://developer.intuit.com'>"
Else
MsgBox "You are apparently running QuickBooks 2002 Release 1, we
strongly recommend that you use QuickBooks' online update feature to obtain
the latest fixes and enhancements", vbExclamation
qbXMLVersionSpec = "<!DOCTYPE QBXML PUBLIC '-//INTUIT//DTD QBXML QBD "
_
& supportedVersion & "//EN' 'http://developer.intuit.com'>"
End If
qbXMLAddProlog = "<?xml version=""1.0""?>" & vbCrLf & qbXMLVersionSpec &
xml
End Function
Example 2: QBFC
This example parallels Example 1 but uses QBFC syntax. The first function
(QBFCLatestVersion) determines the highest version of QuickBooks that is currently
running. The second function (GetLatestMsgSetRequest) creates a message set request for
the current version of QuickBooks.
Function QBFCLatestVersion(SessionManager As QBSessionManager) As String
Dim strXMLVersions() As String
Dim msgset As IMsgSetRequest
'Use oldest version to ensure that we work with any QuickBooks (US)

Software Versions
497
(c) 2013 Intuit Inc. All rights reserved.
Set msgset = SessionManager.CreateMsgSetRequest(1, 0)
msgset.AppendHostQueryRq
Dim QueryResponse As QBFC2Lib.IMsgSetResponse
Set QueryResponse = SessionManager.DoRequests(msgset)
Dim response As QBFC2Lib.IResponse
' The response list contains only one response,
' which corresponds to our single HostQuery request
Set response = QueryResponse.ResponseList.GetAt(0)
Dim HostResponse As IHostRet
Set HostResponse = response.Detail
Dim supportedVersions As IBSTRList
Set supportedVersions = HostResponse.SupportedQBXMLVersionList
Dim i As Long
Dim vers As Double
Dim LastVers As Double
LastVers = 0
For i = 0 To supportedVersions.Count - 1
vers = Val(supportedVersions.GetAt(i))
If (vers > LastVers) Then
LastVers = vers
QBFCLatestVersion = supportedVersions.GetAt(i)
End If
Next i
End Function
'QBFC: Get a MsgSetRequest that supports the latest possible version 'of qbXML
Public Function GetLatestMsgSetRequest(SessionManager As QBSessionManager) As IMsgSetRequest
Dim supportedVersion as String
supportedVersion = QBFCLatestVersion(SessionManager)
If (Val(supportedVersion) >= 3) Then
Set GetLatestMsgSetRequest = SessionManager.CreateMsgSetRequest("US", 3, 0)
addr4supported = True
ElseIf (Val(supportedVersion) >= 2) Then
Set GetLatestMsgSetRequest = SessionManager.CreateMsgSetRequest("US", 2, 0)
addr4supported = True
ElseIf (Val(supportedVersion) = 1.1) Then
Set GetLatestMsgSetRequest = SessionManager.CreateMsgSetRequest("US", 1, 1)
Else
MsgBox "You are apparently running QuickBooks 2002 Release 1, we strongly recommend
that you use QuickBooks' online update feature to obtain the latest fixes and
enhancements", vbExclamation
Set GetLatestMsgSetRequest = SessionManager.CreateMsgSetRequest("US", 1, 0)
End If

498
Chapter 37: Making Your Application Robust
(c) 2013 Intuit Inc. All rights reserved.
Dealing with Unsupported Features
If your application takes advantage of features added in later versions of QuickBooks that
are unsupported in earlier versions (for example, transaction Modify requests), it needs to
control what will happen when it is running against one of the earlier versions of
QuickBooks that does not contain the later functionality.
Branching When Versions Differ
The following QBFC function is an example of a useful way to test for support of a
particular version and then branch according to the version support currently available. For
example, you could place this function at the beginning of the application and then check
the Boolean value set by the function when support for Version 2.0 is required. The
CustomerAdd example included in the QuickBooks SDK uses this function to check
whether Version 2.0 is supported. If it is, the application sets the value for Addr4 (a 2.0
feature). If not, it does not set the Addr4 value.
Dim booSupports2dot0 as boolean
booSupports2dot0 = False
Dim supportedVersion As String
supportedVersion = QBFCLatestVersion(SessionManager)
If (val(supportedVersion) >= 2.0) Then
booSupports2dot0 = True
Set requestSet = SessionManager.CreateMsgSetRequest("US",3,0)
End If
Alerting the User of Version Issues
If your application requires use of a new feature, it should display an appropriate error
message and deal gracefully with earlier versions of QuickBooks that do not contain the
feature. The following qbXML example shows checking the version and exiting when
appropriate QuickBooks support is unavailable.
Dim supportedVersion As String
supportedVersion = qbXMLLatestVersion(qbXMLRP, ticket)
If (val(supportedVersion) < 2.0) Then
MsgBox "This sample requires support for qbXML 2.0 or later (QuickBooks
2003 or later) " & _
"Expect a parsing error when attempting to send requests to QuickBooks",
_
vbExclamation
End If
In most cases, an actual application would not need to take the drastic measure of exiting; it
would deal gracefully with the version issues and alert the user that it cannot integrate
successfully with QuickBooks.

Error Recovery
499
(c) 2013 Intuit Inc. All rights reserved.
Error Recovery
An important feature of every robust application is error recovery. Details on implementing
error recovery are provided in Chapter 31, “Error Recovery.”
Synchronizing Data between Your Application and Quickbooks
If your application maintains a database or internal file that stores portions of data from the
QuickBooks company file, the application needs to ensure that the two sets of data are
synchronized with each other. Event notification, described in Chapter 14, “Event
Notification,” is a useful way to maintain synchronization.
There are two main actions that lead to a lack of synchronization:
•The user restored the QuickBooks company file to an earlier version.
•The user pruned the company file, removing obsolete data and, possibly, data in the
QuickBooks company file that had been modified by your application.
In the first case, your application might need to update the QuickBooks version of the
company file to reflect the changes made by your application to that data. Before you
update the QuickBooks file, be sure to query the user and obtain his or her approval.
In the second case, your application would need to update its own database to reflect the
changes made in the QuickBooks company file.
Monitor Status Codes
The following status codes indicate a problem with data synchronization. Your application
also needs to check for these status codes and take appropriate action if it receives them.
>
3120 Object not found. Object <value> specified in the
request cannot be found.
Your application attempted to modify an object that it previously added to
QuickBooks or that it obtained using a Query request, and the application
received an error stating that the object doesn’t exist. At this point, your
application might enter its synchronization routine to attempt to determine
whether the object was intentionally deleted by the user or whether the
company file was restored.
>
3140 Reference not found
or
3130 Parent reference not found
If your application received one of these messages and it had previously
referenced the object successfully, there is the possibility that the object was
intentionally deleted or that the company file was restored. Your application
would need to take some action to ensure that the error condition didn’t occur
again because the referenced object no longer exists.
>
3240 Time creation mismatch. File has been restored.

500
Chapter 37: Making Your Application Robust
(c) 2013 Intuit Inc. All rights reserved.
If the company file was restored, your application could receive this
message, for example, after issuing a modify request for an object that it
previously added, specifying the
ListID
assigned to the object and returned
by QuickBooks. Because the user restored a version the company file that
pre-dates addition of the object, the
ListID
(and the object it pertains to) do
not exist. This message unambiguously indicates that the user restored the
company file. Your application needs to take appropriate action to re-sync its
data with QuickBooks.
Example of Synchronizing Data with QuickBooks
The following example outlines a useful procedure for keeping data in sync, based on the
following requests:
•CompanyActivityQueryRq, which returns the date and time of the most recent restore
of the QuickBooks company file
•The FromModifiedDate field of any list or transaction request, which returns the
elements that have been added or modified
•The FromDeletedDate of the ListDeletedQueryRq or TxnDeletedQueryRq, which
returns the elements that have been deleted.
Figure 37-1 summarizes the steps involved in this synchronization process.
Suppose an application requires a list of active customers and needs to keep this list in sync
with the list contained in the QuickBooks company file. The application uses the ListID as
the primary key of the customer records because the ListID, unlike the FullName, is
guaranteed not to change.
The first time the application connects to QuickBooks, it needs to obtain the entire active
customer list. Listing 37-1 shows this request. Immediately before this request, the
application needs to obtain and record the date and time of this action. In this example, this
date/time is referred to as the “last sync datetime.”
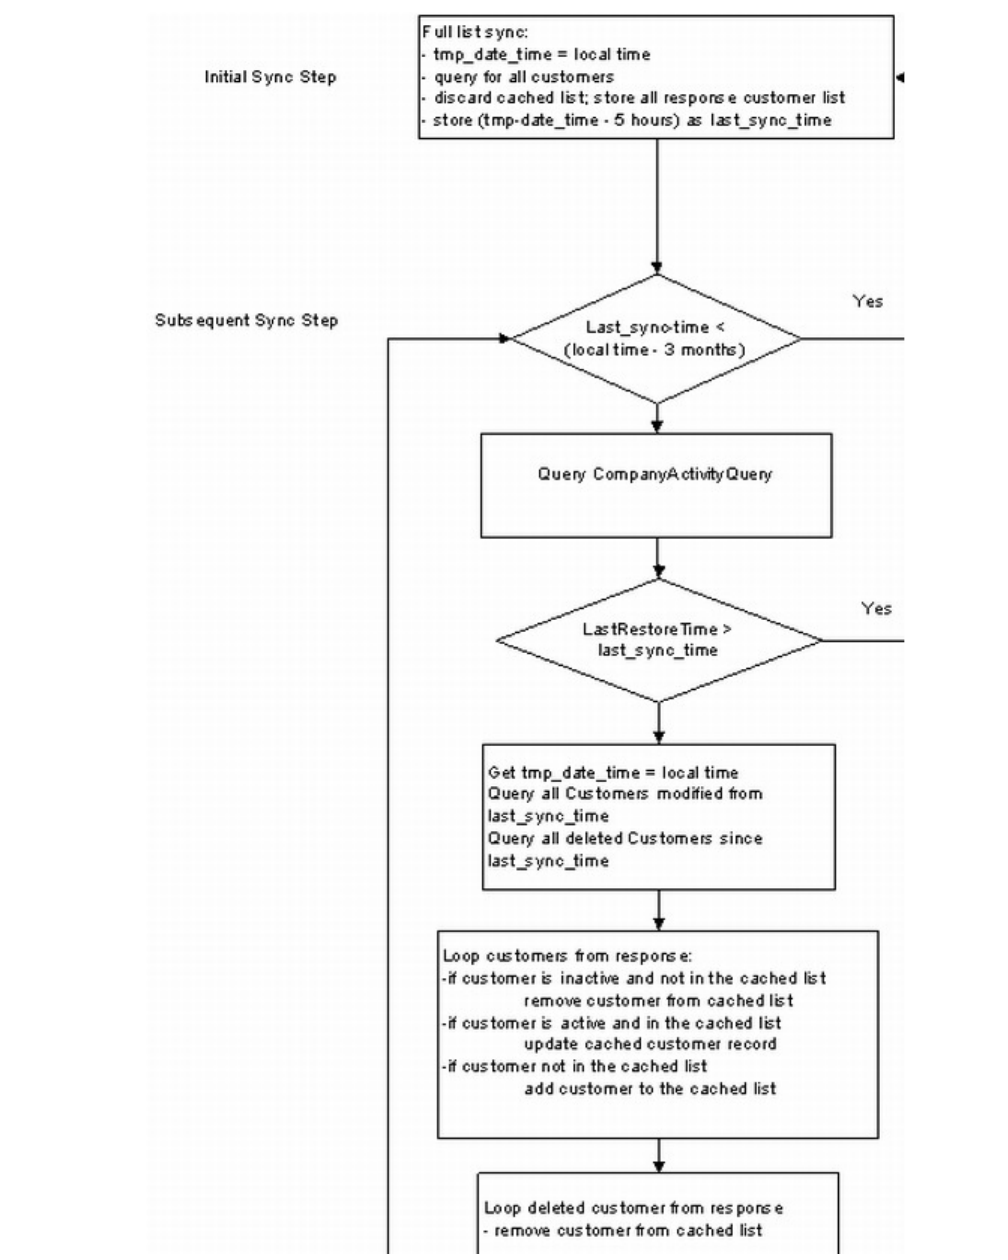
Synchronizing Data between Your Application and Quickbooks
501
(c) 2013 Intuit Inc. All rights reserved.
502
Chapter 37: Making Your Application Robust
(c) 2013 Intuit Inc. All rights reserved.
Figure 37-1 Steps for synchronizing application data with QuickBooks data
_____ Listing 37-1 Obtaining the list of active customers
<CustomerQueryRq requestID = "UUIDTYPE">
<ActiveStatus>ActiveOnly</ActiveStatus>
</CustomerQueryRq>
(Since the default ActiveStatus value is Active Only, that field could actually have been
omitted from Listing 37-1.)
Periodically, the application needs to re-sync its data with QuickBooks. To do so, it first
issues a Company ActivityQueryRq to obtain the LastRestoreTime:
•If the LastRestoreTime is more recent than the “last sync datetime,” then the
application should refresh the entire cached list by querying for the entire list of active
customers.
•If the LastRestoreTime is less recent than the “last sync datetime,” then the application
should issue a request set with two requests to filter for the customers that have been
added, modified, or deleted. Listing 37-2 shows an example of this request. Before
sending this request, the application needs to obtain and record the date and time of the
new “last sync datetime.”
_____ Listing 37-2 Checking for customers that have been added, modified, or deleted
CustomerQueryRq requestID = "1">
<ActiveStatus>All</ActiveStatus>
<FromModifiedDate> last sync datetime</FromModifiedDate>
</CustomerQueryRq>
<ListDeletedQueryRq requestID = "2">
<ListDelType>Customer</ListDelType>
<DeletedDateRangeFilter>
<FromDeletedDate> last sync datetime </FromDeletedDate>
</DeletedDateRangeFilter>
</ListDeletedQueryRq>
Based on the CustomerQuery response, the application needs to add or refresh existing
customer records, matching ListIDs from the response to the cached list. Note that the
response also contains the Inactive customers so that the customers that have changed status
from Active to Inactive can be taken out of the list. The Inactive customers that are returned
and not found in the cached list should be ignored, since the sample shows keeping the
active customer list in sync. Next, based on the ListDeletedQuery response, the application
needs to remove customer records that are no longer necessary.

Synchronizing Data between Your Application and Quickbooks
503
(c) 2013 Intuit Inc. All rights reserved.
Three-Month Limit for ListDeletedQueryRq
There are a few considerations and limitations to the synchronization process described
above. Be aware that ListDeletedQueryRq returns only elements deleted for the previous
three months. If the most recent re-sync happened more than three months ago, a full
synchronization is necessary.
Modification Time
Unlike single-user mode, in multi-user mode, the QuickBooks recorded modification time
is the time of the system where the data file resides, not the time of the system where
QuickBooks is running. The clocks on these two systems (that is, the clock on the system
where the data file resides and the clock on the system that runs the QuickBooks executable
file and runs the SDK requests) may be out of sync. To account for such differences, it is
strongly recommended that you expand the query time range and move the “last sync
datetime” a few hours in the past. The application needs to be prepared to deal with
response duplicates that have already been taken into account in the previous sync as a
result of this time overlap.
Cases Needing Complete Re-Sync
Depending on what data you want to keep in sync, you may need to re-fetch the entire list
every time you want to re-sync because the list of list objects or transactions that have been
modified since the given “last sync datetime” is not accurate. Examples are:
•Account balances are changed by different transactions, but these transactions don’t
result in marking the affected account as modified at the time the transaction occurred.
•Quantity on hand for inventory items: Merging two inventory items modifies the
quantity on hand for the remaining item, but the item doesn’t get marked as modified at
the time of the merge. Transactions can also modify the quantity on hand, but the
affected items are not marked as modified at the time of the transaction.
•Transaction line items: Merging two items causes changes to all the existing transaction
line items to refer to the remaining item of the merge. However, the transactions are not
marked modified at the time of the merge.
Check with the User
Your application should always interact with the user before modifying the QuickBooks
version of the company file as a result of synchronization problems. How you do this is
application-dependent.
504
Chapter 37: Making Your Application Robust
(c) 2013 Intuit Inc. All rights reserved.
If your application ascertains that the QuickBooks company file has been restored, then you
might want to prompt the user further to inquire whether the user would like you to update
the company file in QuickBooks to reflect the more recent changes stored in your
application’s database.This interaction lets the user know about new information that might
otherwise be confusing.
For instance, you might present a window that includes a question similar to this one:
Do you want to reinstate the changes made to the company file by
this application before you restored it?
If the user answers yes, your application can update the QuickBooks company file to
synchronize with its data.

Using the Installers and Merge Modules
505
(c) 2013 Intuit Inc. All rights reserved.
C
HAPTER
38 1
R
EDISTRIBUTING
SDK C
OMPONENTS
W
ITH
Y
OUR
A
PPLICATION
1
The QuickBooks SDK provides optional redistributable components for your application to
distribute, either as separate installers or as merge modules that can be run within your own
application install. These are optional because you need only to distribute the component
that your application actually uses, for example, if you are using only QBFC you
redistribute the QBFC component, not any of the others.
Any of the installers or merge modules within the QB SDK install subdirectory
tools\Installers or tools\MergeModules can be redistributed. Currently these include QBFC,
RDS, the QBO connector, and the web connector.
I
MPORTANT
You can never redistribute the request processor DLL
(qbxmlrp.dll or qbxmlrp2.dll). This violates the license
agreement and can lead to undesirable user experiences.
Using the Installers and Merge Modules
If you are using the QBFC API, the Remote Data Sharing (RDS) feature, the QBO
connector or the web connector in your application, there are only two supported ways in
which you can distribute our redistributable components:
1. You can use the stand-alone compressed-image installers that we provide.
2. You can use the merge modules that we provide.
N
OTE
It is a violation of your qbXML license agreement to
redistribute QBFC, RDS, the QBO connector, or the web
connector without using either our stand-alone installers or
our merge modules.
Do not use automatic installation programs and packaging wizards, such as the wizard in
Microsoft
®
Visual Studio
®
. These will not install properly (even if you are using .NET), for
the following reasons:
•Automatic solutions will redistribute the qbxmlrp.dll file. Redistributing this file is
against your license agreement, and could also cause significant problems for your end
users.
•Automatic solutions will redistribute the QBFC DLL file or files, but not the Xerces
files that must go with them.

506
Chapter 38: Redistributing SDK Components With Your Application
(c) 2013 Intuit Inc. All rights reserved.
I
MPORTANT
The QBFC library requires the Microsoft system DLL
ShFolder.dll to be installed on the system. Newer Microsoft
operating systems (Windows ME, Windows XP, etc.) have this
DLL pre-installed. This DLL is installed if needed by
QuickBooks and by the QBFC stand-alone installer using the
SHFolder.exe redistributable installer from Microsoft. If you
plan to use the QBFC merge module in your installer and you
want your application to work with RDS (where QuickBooks
may not be installed on the machine where your application is
installed) then your installer must include and execute the
SHFolder.exe installer from Microsoft. Technical issues prevent
us from including this action in the QBFC merge module itself.
Using the Stand-Alone Installers
If your install process does not support merge modules, you will need to use the stand-alone
installers provided with the SDK. These installers will automatically perform a proper
installation.
To install the QBFC Library on your end-users’ machines:
•Distribute the QBFC installer, QBFC*_0Installer.exe, located in the
SDK install subdirectory /tools/installers. (Merge modules are in the SDK install
subdirectory /tools/MergeModules.)
•Call the installer. Exactly how you call it depends on the underlying technology you are
using to drive your installation.
QBFC1, QBFC2, QBFC2CA, QBFC2_1, QBFC3, QBFC4, and QBFC5 can be installed
side-by-side on the same computer. The stand-alone installer for QBFC4 will install
QBFC4 and QBXMLRP2. (For more information about QBXMLRP2, see the Technical
Overview.)
Using the Merge Modules
If your install process supports Microsoft merge modules, you can use the merge modules
that are provided.
What Is a Merge Module?
The Microsoft Installer (MSI) service is built into Windows 2000 and XP. MSI solves a
number of installation problems, such as getting clean uninstalls and protecting system
components, and includes redistributable install engines that support Win98, WinNT, and
Win ME. To get a “Designed for Windows” logo, your application must be installed using
MSI.

Using the Installers and Merge Modules
507
(c) 2013 Intuit Inc. All rights reserved.
“Merge modules” are a key part of MSI. They encode the logic and files needed to correctly
redistribute shared components, which aren’t removed from a system until all of the
applications that installed them are removed.
Any installation that is built for an MSI-engine installer can use merge modules. Many
proprietary install tools that are not strictly based on MSI (for example, newer versions of
InstallShield Professional) can also take advantage of merge modules.
How Do I Use a Merge Module from the SDK?
The SDK merge modules are located in the /tools/MergeModules folder. Here’s how to use
them:
1. Make sure you have the Microsoft VC (VC_CRT.msm) and VC++ (VC_STL.msm)
runtime library merge modules, which are required because the SDK merge modules
install components that depend on the Visual C and C++ version 7 runtime libraries.
These Microsoft merge modules are included with most MSI-based install builders, or
you can get them directly from Microsoft. When the VC_CRT.msm and VC_STL.msm
modules are added to the installer, the install author is responsible for configuring them
to set their target directory to the windows system directory.
2. Set your installation development tool to include the SDK MergeModules directory in
the MergeModule search path.
3. Each MSI “feature” refers to components and/or merge modules. For any feature that
installs components of your application that depend on the SDK capabilities provided
by a merge module, specify that particular merge module as part of that feature.
If a merge module is dependent on some other module, the other module will be added
to your installer automatically. (For example, the various versions of the QBFC merge
modules depend on various versions of Xerces, which are packaged in separate merge
modules: the correct one is automatically added to the installation.)
4. Build your installation as usual. All the logic from the included merge modules will be
merged into your install.
What Installation Logic Is Built Into the Provided Merge Modules?
The QBFC merge modules provide QBFC DLL files and COM registration information for
QBFC. The QBFC merge modules depend on the Xerces XML parser module and on the
QBXMLRP2 merge module—in other words, installing QBFC installs the Xerces files and
QBXMLRP2.
508
Chapter 38: Redistributing SDK Components With Your Application
(c) 2013 Intuit Inc. All rights reserved.

Status Code Ranges
509
(c) 2013 Intuit Inc. All rights reserved.
A
PPENDIX
A 1
S
TATUS
C
ODES
FOR
qbXML R
ESPONSES
1
This appendix lists the status codes returned in the qbXML
statusCode
attribute. This
information is used by developers using qbXML for applications integrating with either
QuickBooks, QuickBooks Canada, and QuickBooks UK.
Table A-1 shows the status code ranges and identifies their types.
Table A-2 lists the status code, gives its meaning, and explains the condition that the code
represents.
Table A-1 Ranges of status codes and levels of severity
Status Code Range
General Meaning of Codes in
Range
0–499
Info
500–999
Warnings
1000–1999
General Errors
2000–2999
Not Supported for QuickBooks.
3000
and beyond Specific Errors

510
Appendix A: Status Codes for qbXML Responses
(c) 2013 Intuit Inc. All rights reserved.
Table A-2 Status codes and conditions under which they appear
Code Meaning Explanation
0
The QuickBooks server
processed the request
successfully.
Status OK
1 No match. A query request did not find a matching
object in QuickBooks.
500 One or more objects cannot be
found
The query request has not been fully
completed. There was a required element
(“fieldValue”) that could not be found in
QuickBooks.
501 Object not in this qbXML
specification
Unable to represent objectName
“fieldValue” in this version of the qbXML
spec.
510 Object cannot be returned Unable to return object.
530 Unsupported field The field “fieldName” is not supported by
this implementation.
531 Unsupported enum value
The enum value “fieldValue” in the field
“fieldName” is not supported by this
implementation.
550 Unable to save notes
The “objectName” object was saved
successfully, but its corresponding Notes
record could not be saved.
560 Deprecated field used.
Use of this field is no longer
recommended. Although it is currently
supported, it may be removed from a
future release.
570 Cannot link to transaction Unable to link to transaction “fieldValue”
because it has already been closed.
600 No cleared state to return (For error recovery; no message is
returned.)
1000 Internal error There has been an internal error when
processing the request.
1010 System not available System not available
1030 Unsupported message This request is not supported by this
implementation.
1060 Invalid request ID The request ID “fieldValue” is invalid,
possibly too long, max 50 chars.
2000 Authentication failed Signon failed. QuickBooks error message:
fieldValue
2010 Access not authorized Not authorized to access the server.
3000 Invalid object ID The given object ID “fieldValue” in the
field “fieldName” is invalid.
3010 Invalid Boolean
There was an error when converting the
boolean value “fieldValue” in the field
“fieldName”

Status Codes and Meanings
511
(c) 2013 Intuit Inc. All rights reserved.
3020 Invalid date
There was an error when converting the
date value “fieldValue” in the field
“fieldName”
3030 Invalid date range Invalid date range: From date is greater
than To date.
3031 Invalid string range The “From” or “To” values in the provided
fieldName are invalid.
3035 Invalid time interval
There was an error when converting the
time interval “fieldValue” in the field
“fieldName”
3040 Invalid amount
There was an error when converting the
amount “fieldValue” in the field
“fieldName”
3045 Invalid price There was an error when converting the
price “fieldValue” in the field “fieldName”
3050 Invalid percentage
There was an error when converting the
percent “fieldValue” in the field
“fieldName”
3060 Invalid quantity
There was an error when converting the
quantity “fieldValue” in the field
“fieldName”
3065 Invalid value for GUIDTYPE There was an error when converting the
GUID value XXX in the field “fieldName”
3070 String too long The string “fieldValue” in the field
“fieldName” is too long.
3080 Invalid string The string “fieldValue” is invalid.
3085 Invalid number
There was an error when converting the
number “fieldValue” in the field
“fieldName”
3090 Invalid object name There was an error when storing
“fieldValue” in the “fieldName” field.
3100 Name is not unique The name “fieldValue” of the list element
is already in use.
3101 Resulting amount too large
Multiplying the rate and the quantity
results in an amount that exceeds the
maximum allowable amount.
3110 Invalid enum value
The enumerated value “fieldValue” in the
field “fieldName” is unknown or invalid for
the qbXML version in use.
3120 Object not found Object “fieldValue” specified in the
request cannot be found.
3121 OwnerID not found
Data Extension Definitions specified by
OwnerID fieldValue not found for this
object type.
Table A-2 Status codes and conditions under which they appear (continued)
Code Meaning Explanation

512
Appendix A: Status Codes for qbXML Responses
(c) 2013 Intuit Inc. All rights reserved.
3130 Parent reference not found There is an invalid reference to a parent
“fieldValue” in the objectName list.
3140 Reference not found
There is an invalid reference to
QuickBooks fieldName “fieldValue” in the
objectName.
3150 Missing required element There is a missing element “fieldName.”
3151 Invalid element for request Cannot use the element “fieldName” in
this request.
3152 Invalid enum value for this
request
The enumerated value “fieldValue” may
not be used in the element “fieldName” in
this request.
3153 Element conflict in request
This error is returned whenever there is a
conflict in the elements in the request.
Each element has valid value, but their
combination becomes invalid.
3160 Object cannot be deleted Cannot delete the object specified by the
id = “fieldValue.”
3161 Cannot delete before closing
date
An attempt was made to delete a
fieldValue with a date that is on or before
the closing date of the company. If you
are sure you really want to do this, please
ask a user with Admin privileges to
remove the password for editing
transactions on or before to closing date
(this setting is in the Accounting
Company Preferences), then try again.
3162 Not allowed in multi-user mode This operation is not allowed in multi-user
mode.
3170 Object cannot be modified There was an error when modifying a
fieldValue.
3171 Cannot modify before closing
date
An attempt was made to modify a
fieldValue with a date that is on or before
the closing date of the company. If you
are sure you really want to do this, please
ask a user with Admin privileges to
remove the password for editing
transactions on or before to closing date
(this setting is in the Accounting
Company Preferences), then try again.
3172 Cannot modify prior to last
condense
An attempt was made to modify a
fieldValue with a date that is on or before
the last inventory condensed date.
3173 Related object deleted or
modified
The related fieldName transaction object
fieldValue was deleted or modified.
Table A-2 Status codes and conditions under which they appear (continued)
Code Meaning Explanation

Status Codes and Meanings
513
(c) 2013 Intuit Inc. All rights reserved.
3175 Object is in use
There was an error adding, modifying or
deleting fieldValue because it is already in
use.
3176
A related “object_type/
transaction” is already in use,
or failed to acquire the lock for
this object.
This error occurs if an object is already in
use or if QuickBooks is in a mode that
prohibits any data modification requests.
(In QuickBooks, certain features are
“single-user” features, which lock out
other add and modify requests. An
example of a single-user feature is
opening the “Adjust Quantity/Value on
Hand” window within QuickBooks.)
3177 Duplicate AppliedToTxn IDs The transaction object “fieldValue” may
only be provided once in this request.
3180 Object cannot be added There was an error when saving a
fieldValue.
3185 Object cannot be voided Cannot void the object specified by the id
= “fieldValue”
3190 Cannot clear required element Cannot clear the element in the
fieldName field.
3200 Outdated edit sequence The provided edit sequence “fieldValue” is
out-of-date.
3205 Invalid address There was an error when composing an
address in “fieldValue”
3210 Other validation error The “fieldName” field has an invalid value
“fieldValue”
3220 Not authorized to perform this
operation
There is no permission to perform this
request, or the feature has been turned
off in QuickBooks
3230 Status rollback The request has been rolled-back.
3231 Status unprocessed The request has not been processed.
3240 Time creation mismatch Object "fieldValue" specified in the
request cannot be found.
3250 Feature not enabled This feature is not enabled or not
available in this version of QuickBooks.
3260 Insufficient permissions Insufficient permission level to perform
this action.
3261 Application has no sensitive
data permission
The integrated application has no
permission to access sensitive data.
3262 Requires payroll subscription
In order to complete this request, the
company data file has to be subscribed to
the Intuit Payroll Service.
Table A-2 Status codes and conditions under which they appear (continued)
Code Meaning Explanation

514
Appendix A: Status Codes for qbXML Responses
(c) 2013 Intuit Inc. All rights reserved.
3263 Not authorized for write access.
This request cannot be completed
because the integrated application had
requested read-only access. Have the
integrated application request read/write
access, and have the QuickBooks
administrator grant this access.
3270 Missing posting account Missing posting account.
3280 Item type mismatch
The item “fieldValue” cannot be used in
this line item. It does not have a correct
type.
3290 Item line out of order The item lines in the request cannot be
reordered.
3300 Could not open the window or
form
Could not open the requested
“formname” form or window
3301 Not allowed in unattended
mode
Cannot perform this request unless an
interactive QuickBooks user is logged in.
3310 Failed to save the Time
Tracking transaction.
The employee “fieldName” provided in
the TimeTrackingAdd request has the
checkbox “Use time data to create
paychecks” set to the Unknown state.
Have your application ask the user
whether or not to set time tracking for
this employee. Then issue an
EmployeeMod request to set this option
to either UseTimeData or
DoNotUseTimeData. If UseTimeData,
activities will be transferred to paychecks.
3320 Could not create report The required report could not be
generated.
3330 GUID used in request is invalid Cannot use the value XXX in the
“fieldname” field in this request.
3340
This request cannot be
processed from within a data
event callback procedure
This request cannot be processed from
within a data event callback procedure.
3350 Custom field list is full
Unable to define a new public data
extension; the list of public extension
definitions is full.
3351 Invalid type for custom field
The value or values provided for
AssignToObject or RemoveFromObject
may not be used for public data extension
requests.
3352 Previously defined custom field
definition can’t be reused
The data extension named XXX was
previously defined with a different,
incompatible AssignToObject. Unable to
use the AssignedToObject type in this
request.
Table A-2 Status codes and conditions under which they appear (continued)
Code Meaning Explanation
Status Codes and Meanings
515
(c) 2013 Intuit Inc. All rights reserved.
HRESULTS from qbXML COM Methods
The qbXML COM methods return an HRESULT value. If the HRESULT variable does not
specify S_OK on return, then one of the result codes listed in Table A-1 is returned. These
result codes report several kinds of errors: connection, parsing, or file I/O errors.
N
OTE
N
OTE
The QuickBooks qbXML COM interface supports the IErrorInfo
interface, which allows you to obtain further information on
error codes.
3360 Callback application cannot be
found
The callback application cannot be found
from the CLSID or ProgID provided in the
subscription request.
9000 Host processing request. Try
later.
(For error recovery; no message is
returned.)
9001 Invalid checksum (For error recovery; no message is
returned.)
9002 No stored response found (For error recovery; no message is
returned.)
9003 Reinitialization problem (For error recovery; no message is
returned.)
9004 Invalid message ID (For error recovery; no message is
returned.)
9005 Unable to store response. The error recovery message cannot be
saved.
9100 Macro name not unique The macro name “fieldValue” is already in
use; it may only be defined once.
9101 Macro name too long The macro name “fieldValue” is too long.
9102 Macro name invalid The macro name “fieldValue” contains
invalid characters.
9103 Macro substitution failure
The request was unable to use a macro
value, probably due to an earlier error
encountered when defining the macro.
HRESULT error code Message
0x80040400 QuickBooks found an error when parsing the provided XML text stream.
0x80040401 Could not access QuickBooks (Failure in attempt to connection).
0x80040402 Unexpected error. Check the qbsdklog.txt file for possible additional
information.
0x80040403 Could not open the specified QuickBooks company data file.
0x80040404 The version of QuickBooks currently running does not support qbXML.
0x80040405 qbXML components have not been installed.
Table A-2 Status codes and conditions under which they appear (continued)
Code Meaning Explanation

516
Appendix A: Status Codes for qbXML Responses
(c) 2013 Intuit Inc. All rights reserved.
0x80040406 Could not determine the version of the QuickBooks company data file, or the
data file has been modified and requires a newer version of QuickBooks.
0x80040407 The installation of QuickBooks appears to be incomplete. Please reinstall
QuickBooks.
0x80040408 Could not start QuickBooks.
0x80040409 The current version of QuickBooks cannot work with the specified company
data file.
0x8004040A QuickBooks company data file is already open and it is different from the one
requested.
0x8004040B Could not get the name of the current QuickBooks company data file.
0x8004040C BeginSession method has not been called or it did not succeed.
0x8004040D The ticket parameter is invalid.
0x8004040E There is not enough memory to complete the request.
0x8004040F The OpenConnection method has not been called.
0x80040410 The QuickBooks company data file is currently open in a mode other than the
one specified by your application.
0x80040411 Before calling the BeginSession method, you must call the EndSession
method to terminate the current session.
0x80040412 You cannot make multiple successive calls to the OpenConnection method.
Call CloseConnection before calling OpenConnection again.
0x80040413 QuickBooks does not support the rollbackOnError value of the onError
attribute.
0x80040414 A modal dialog box is showing in the QuickBooks user interface. Your
application cannot access QuickBooks until the user dismisses the dialog box.
0x80040415 A call to the OpenConnection method must include the name of your
application.
0x80040416 If QuickBooks is not running, a call to the BeginSession method must include
the name of the QuickBooks company data file.
0x80040417 If the QuickBooks company data file is not open, a call to the BeginSession
method must include the name of the data file.
0x80040418 This application has not accessed this QuickBooks company data file before.
Only the QuickBooks administrator can grant an application permission to
access a QuickBooks company data file for the first time.
0x80040419 This application’s certificate is invalid. An application must have a valid
certificate to access QuickBooks company data files.
0x8004041A This application does not have permission to access this QuickBooks
company data file. The QuickBooks administrator can grant access
permission through the Integrated Application preferences.
0x8004041B Unable to lock the necessary information to allow this application to access
this company data file. Try again later.
0x8004041C An internal QuickBooks error occurred while trying to access the QuickBooks
company data file.
0x8004041D This application is not allowed to log into this QuickBooks company data file
automatically. The QuickBooks administrator can grant permission for
automatic login through the Integrated Application preferences.
HRESULT error code Message

Status Codes and Meanings
517
(c) 2013 Intuit Inc. All rights reserved.
0x8004041E This application’s certificate is expired. If you want to allow the application to
log into QuickBooks automatically, log into QuickBooks and try again. Then
click
Allow Always when you are notified that the certificate has expired.
0x8004041F QuickBooks Basic cannot accept XML requests. Another product in the
QuickBooks line, such as QuickBooks Pro or Premier, 2002 or later, is
required.
0x80040420 The QuickBooks user has denied access.
0x80040421 The returned text is passed via the qbXML COM Request Processor directly
from QuickBooks to your application and is not issued by the qbXML COM
Request Processor itself. You may find it useful to copy the text verbatim to
your message window.
0x80040422 This application requires Single User file access mode and there is already
another application sharing data with this QuickBooks company data file.
0x80040423 The version of qbXML that was requested is not supported or is unknown.
0x80040424 QuickBooks did not finish its initialization. Please try again later.
0x80040425 Invalid parameter.
0x80040426 Scripts are not allowed to call QBXMLRP.
0x80040427 The QuickBooks application needs to be registered.
0x80040428 The version of QBXML that was requested is not supported by this version of
the QBXMLRP library.
0x80040429 The message set requested cannot be processed through the API that was
called.
0x8004042A This call may not be made from a remote system.
0x8004042B Unsupported interface.
0x8004042C Certificate has been revoked.
0x8004042D QuickBooks did not finish opening the data file while launching its UI, and we
decided to give up. Perhaps the user did not complete the QuickBooks login
process.
0x8004042E This call cannot be made after calling "BeginSession" and before calling
"EndSession".
0x8004042F The requested connection type could not be found.
HRESULT error code Message
518
Appendix A: Status Codes for qbXML Responses
(c) 2013 Intuit Inc. All rights reserved.
Objects/Operations Supported by Desktop Editions 519
(c) 2013 Intuit Inc. All rights reserved.
A
PPENDIX
B 1
Q
UICK
B
OOKS
D
ATA
A
CCESSIBLE
V
IA
SDK O
BJECTS
/O
PERATIONS
1
This appendix lists the operations and queries that are supported by the various editions of
QuickBooks. It also lists some limitations that are in effect for some of these operations.
Objects/Operations Supported by Desktop Editions
The following table lists the objects/operations supported by desktop editions, excluding
Simple Start, which is listed later in this appendix.
Table B-1 Supported QB objects/ops for desktop versions
Object Type Query Add Modify Delete Void
Account List yes yes yes yes no
AgingReport Report yes no no no no
ARRefundCreditCard
(not Canada/UK
Txn yes yes no yes yes
Bill Txn yes yes yes yes yes
Bill payment check Txn yes yes yes yes yes
Bill payment credit
card
Txn yes yes yes yes yes
Bill to pay Txn yes no no no no
BillingRate List yes yes no yes no
BudgetSummary-
Report
Report yes no no no no
BuildAssembly (not
Canada/UK
Txn yes yes yes yes yes
Charge Txn yes yes yes yes yes
Check Txn yes yes no yes yes
Class List yes yes yes yes no
Company Special yes no no no no
CompanyActivity Special yes no no no no
Credit card charge Txn yes yes yes yes yes
Credit card credit Txn yes yes yes yes yes
Credit memo Txn yes yes yes yes yes
Currency List yes yes yes yes no
CustomDetailReport Report yes no no no no
Customer List yes yes yes yes no
Customer message List yes yes no yes no

520
Appendix B: QuickBooks Data Accessible Via SDK Objects/Operations
(c) 2013 Intuit Inc. All rights reserved.
Customer type List yes yes no yes no
CustomSummary-
Report
Report yes no no no no
DataEventRecovery-
Info
Event
Notif.
yes no no yes no
DataEventSubscrip-
tion
Event
Notif.
yes yes no yes no
DataExt Special no yes yes yes no
DataExtDef Special yes yes yes yes no
Date-driven terms List yes yes no yes no
Deposit Txn yes yes yes yes yes
Discount item List yes yes yes yes no
Employee List yes yes yes yes no
Entity List yes no no no no
Estimate Txn yes yes yes yes no
Fixed asset item List yes yes yes yes no
GeneralDetailReport Report yes no no no no
GeneraSumaryReport Report yes no no no no
Group item List yes yes yes yes no
Host application Special yes no no no no
Inventory adjustment Txn yes yes no yes no
Inventory assembly
item
List yes yes yes yes no
Inventory item List yes yes yes yes no
Invoice Txn yes yes yes yes yes
Item List yes no no no no
Item Receipt Txn yes yes yes yes yes
Job type List yes yes no yes no
JobReport Report yes no no no no
Journal entry Txn yes yes yes yes yes
ListDisplay UI
Integra-
tion
no yes yes no no
Non-inventory item List yes yes yes yes no
Non-wage payroll item
(see Note at end of table)
List yes no no no no
Other charge item List yes yes yes yes no
Other name List yes yes yes yes no
Payment item List yes yes yes yes no
Payment method List yes yes no yes no
PayrollDetailReport
(See Note below)
Report yes no no no no
Object Type Query Add Modify Delete Void

Objects/Operations Supported by Desktop Editions
521
(c) 2013 Intuit Inc. All rights reserved.
PayrollSummary
Report
(See Note below)
Report yes no no no no
Preferences Special yes no no no no
PriceLevel List yes yes yes yes no
Purchase order Txn yes yes yes yes no
Receive payment Txn yes yes yes yes no
Receive payment to
deposit
Txn yes no no no no
Sales order (US
Premier Edition and
above)
Txn yes yes yes yes no
Sales receipt Txn yes yes yes yes yes
Sales rep List yes yes yes yes no
Sales tax code List yes yes yes yes no
Sales tax group item List yes yes yes yes no
Sales tax item List yes yes yes yes no
Sales tax payment
check
Txn yes no no no no
Service item List yes yes yes yes no
Ship method List yes yes no yes no
SpecialAccount List yes yes no yes no
SpecialItem List yes yes no yes no
Standard terms List yes yes no yes no
Subtotal item List yes yes yes yes no
Template List yes no no no no
Terms List yes no no no no
Time tracking Txn yes yes no yes no
TimeReport Report yes no no no no
To do List yes yes no yes no
TransactionQuery Txn yes no no no no
TxnDisplay UI
Integra-
tion
no yes yes no no
UIEventSubscription Event
Notif.
yes yes no yes no
UIExtensionSubscrip-
tion
Event
Notif.
yes yes no yes no
UnitOfMeasureSet List yes add no yes no
Vendor List yes yes yes yes no
Vendor credit Txn yes yes yes yes yes
Vendor type List yes yes no yes no
Wage payroll item List yes yes no no no
WorkersCompCode List yes yes yes no no
Object Type Query Add Modify Delete Void

522
Appendix B: QuickBooks Data Accessible Via SDK Objects/Operations
(c) 2013 Intuit Inc. All rights reserved.
N
OTE
NOTE Requires that the company file being accessed is
currently subscribed to a payroll service.
SDK Requests Supported in QuickBooks Simple Start Edition
The following table lists all of the SDK requests for the US desktop editions of
QuickBooks, and indicates whether each request is supported by QB Simple Start.
Additional notes follow the table.

SDK Requests Supported in QuickBooks Simple Start Edition
523
(c) 2013 Intuit Inc. All rights reserved.
Table B-2 SDK Requests Supported by QB Simple Start (US editions, desktop)
Request Supported by QB Simple Start?
ARRefundCreditCardAdd (5.0) Yes
ARRefundCreditCardQuery (5.0) Yes
AccountAdd Yes
AccountMod (6.0) Yes
AccountQuery Yes
AgingReportQuery (2.0) Yes
BillAdd No
BillMod (3.0) Yes
BillPaymentCheckAdd (2.0) No
BillPaymentCheckMod (6.0) Yes
BillPaymentCheckQuery (2.0) Yes
BillPaymentCreditCardAdd (2.0) No
BillPaymentCreditCardQuery (2.0) Yes
BillQuery Yes
BillToPayQuery (2.0) Yes
BillingRateAdd (6.0) No
BillingRateQuery (6.0) Yes
BudgetSummaryReportQuery (3.0) Yes
BuildAssemblyAdd (5.0) No
BuildAssemblyMod (5.0) Yes
BuildAssemblyQuery (5.0) Yes
ChargeAdd (2.0) No
ChargeMod (3.0) Yes
ChargeQuery (2.0) Yes
CheckAdd Yes
CheckMod (6.0) Yes
CheckQuery Yes
ClassAdd Yes
ClassQuery Yes
ClearedStatusMod (2.0) Yes
CompanyActivityQuery (2.0) Yes
CompanyQuery Yes
CreditCardChargeAdd Yes
CreditCardChargeMod (6.0) Yes
CreditCardChargeQuery Yes
CreditCardCreditAdd Yes
CreditCardCreditMod (6.0) Yes
CreditCardCreditQuery Yes
CreditMemoAdd Yes
CreditMemoMod (3.0) Yes

524
Appendix B: QuickBooks Data Accessible Via SDK Objects/Operations
(c) 2013 Intuit Inc. All rights reserved.
CreditMemoQuery Yes
CustomDetailReportQuery (2.0) Yes
CustomSummaryReportQuery (2.0) Yes
CustomerAdd Yes
CustomerMod Yes
CustomerMsgAdd Yes
CustomerMsgQuery Yes
CustomerQuery Yes
CustomerTypeAdd Yes
CustomerTypeQuery Yes
DataEventRecoveryInfoDel (3.0) No
DataEventRecoveryInfoQuery (3.0) No
DataExtAdd (2.0) Yes
DataExtDefAdd (2.0) Yes
DataExtDefDel (2.0) Yes
DataExtDefMod (2.0) Yes
DataExtDefQuery (2.0) Yes
DataExtDel (2.0) Yes
DataExtMod (2.0) Yes
DateDrivenTermsAdd Yes
DateDrivenTermsQuery Yes
DepositAdd (2.0) Yes
DepositQuery (2.0) Yes
EmployeeAdd No
EmployeeMod Yes
EmployeeQuery Yes
EntityQuery Yes
EstimateAdd Yes
EstimateMod (3.0) Yes
EstimateQuery Yes
GeneralDetailReportQuery (2.0) Yes
GeneralSummaryReportQuery (2.0) Yes
HostQuery Yes
InventoryAdjustmentAdd (2.0) No
InventoryAdjustmentQuery (2.0) Yes
InvoiceAdd Yes
InvoiceMod (2.1) Yes
InvoiceQuery Yes
ItemAssembliesCanBuildQuery (5.0) Yes
ItemDiscountAdd No
ItemDiscountMod (3.0) Yes
Request Supported by QB Simple Start?

SDK Requests Supported in QuickBooks Simple Start Edition
525
(c) 2013 Intuit Inc. All rights reserved.
ItemDiscountQuery Yes
ItemFixedAssetAdd (3.0) No
ItemFixedAssetMod (3.0) Yes
ItemFixedAssetQuery (3.0) Yes
ItemGroupAdd No
ItemGroupMod (3.0) Yes
ItemGroupQuery Yes
ItemInventoryAdd No
ItemInventoryAssemblyAdd (2.0) No
ItemInventoryAssemblyMod (3.0) Yes
ItemInventoryAssemblyQuery (2.0) Yes
ItemInventoryMod Yes
ItemInventoryQuery Yes
ItemNonInventoryAdd No
ItemNonInventoryMod Yes
ItemNonInventoryQuery Yes
ItemOtherChargeAdd Yes
ItemOtherChargeMod (3.0) Yes
ItemOtherChargeQuery Yes
ItemPaymentAdd No
ItemPaymentMod (3.0) Yes
ItemPaymentQuery Yes
ItemQuery Yes
ItemReceiptAdd (4.0) No
ItemReceiptMod (4.0) Yes
ItemReceiptQuery (3.0) Yes
ItemSalesTaxAdd No
ItemSalesTaxGroupAdd No
ItemSalesTaxGroupMod (3.0) Yes
ItemSalesTaxGroupQuery Yes
ItemSalesTaxMod (3.0) Yes
ItemSalesTaxQuery Yes
ItemServiceAdd No
ItemServiceMod Yes
ItemServiceQuery Yes
ItemSubtotalAdd No
ItemSubtotalMod (3.0) Yes
ItemSubtotalQuery Yes
JobReportQuery (2.0) Yes
JobTypeAdd No
JobTypeQuery Yes
Request Supported by QB Simple Start?

526
Appendix B: QuickBooks Data Accessible Via SDK Objects/Operations
(c) 2013 Intuit Inc. All rights reserved.
JournalEntryAdd Yes
JournalEntryMod (6.0) Yes
JournalEntryQuery Yes
ListDel (1.1) Yes
ListDeletedQuery (2.0) Yes
ListDisplayAdd (3.0) Yes
ListDisplayMod (3.0) Yes
OtherNameAdd Yes
OtherNameMod Yes
OtherNameQuery Yes
PaymentMethodAdd Yes
PaymentMethodQuery Yes
PayrollDetailReportQuery (3.0) Yes
PayrollItemNonWageQuery (3.0) Yes
PayrollItemWageAdd (2.0) No
PayrollItemWageQuery Yes
PayrollSummaryReportQuery (3.0) Yes
PreferencesQuery (1.1) Yes
PriceLevelAdd (4.0) No
PriceLevelMod (4.0) Yes
PriceLevelQuery (4.0) Yes
PurchaseOrderAdd No
PurchaseOrderMod (2.1) Yes
PurchaseOrderQuery Yes
ReceivePaymentAdd (1.1) Yes
ReceivePaymentMod (6.0) Yes
ReceivePaymentQuery (1.1) Yes
ReceivePaymentToDepositQuery (2.0) Yes
SalesOrderAdd (2.1) No
SalesOrderMod (3.0) Yes
SalesOrderQuery (2.1) Yes
SalesReceiptAdd Yes
SalesReceiptMod (5.0) Yes
SalesReceiptQuery Yes
SalesRepAdd No
SalesRepMod (3.0) Yes
SalesRepQuery Yes
SalesTaxCodeAdd Yes
SalesTaxCodeQuery Yes
SalesTaxPaymentCheckQuery (2.0) Yes
ShipMethodAdd No
Request Supported by QB Simple Start?

SDK Requests Supported in QuickBooks Simple Start Edition
527
(c) 2013 Intuit Inc. All rights reserved.
ShipMethodQuery Yes
SpecialAccountAdd (6.0) Yes, but only the following accounts can be added:
AccountsReceivable
UncategorizedExpenses
UncategorizedIncome
SpecialItemAdd (6.0) No
StandardTermsAdd Yes
StandardTermsQuery Yes
TemplateQuery (3.0) Yes
TermsQuery Yes
TimeReportQuery (2.0) Yes
TimeTrackingAdd No
TimeTrackingMod (6.0) Yes
TimeTrackingQuery Yes
ToDoAdd No
ToDoQuery Yes
TransactionQuery (4.0) Yes
TxnDel (1.1) Yes
TxnDeletedQuery (2.0) Yes
WorkersCompCodeAdd (7.0) No
WorkersCompCodeMod (7.0) No
WorkersCompCodeQuery (7.0) No
UnitOfMeasureSetAdd (7.0) No
UnitOfMeasureSetQuery (7.0) No
Request Supported by QB Simple Start?

528
Appendix B: QuickBooks Data Accessible Via SDK Objects/Operations
(c) 2013 Intuit Inc. All rights reserved.
TxnDisplayAdd (3.0) Yes, with some caveats. You can invoke this only on
transaction types supported by QB Simple Start, because QB
Simple Start lacks the UI components for the unsupported
types.
Supported transaction types:
Check
CreditMemo
Deposit
Estimate
Invoice
JournalEntry
ReceivePayment
SalesReceipt
SalesTaxPaymentCheck
Unsupported transaction types:
Bill
BillPayment
BuildAssembly
Charge
CreditCardCharge
CreditCardCredit
InventoryAdjustment
ItemReceipt
PurchaseOrder
SalesOrder
VendorCredit
Important: For the unsupported Bill, BuildAssembly, Charge,
CreditCardCharge, CreditCardCredit, InventoryAdjustment, and
ItemReceipt requests, invoking TxnDisplayAdd results in
QuickBooks displaying the appropriate Add form to the user,
which the user can fill out, but the user’s attempt to save the
data (perform the transaction) will fail with an error message
stating that this feature is not available for this edition.
For the unsupported BillPayment transaction, the above
behavior is the same, but there is a differentd and potentially
misleading error message. That is, the form is displayed in
QuickBooks, but whether you do a payment by check or credit
card, the transaction fails and the message simply says “there
was a problem recording the bill payment for …”.
Also, the attempt to display the add form for PurchaseOrder,
SalesOrder, doesn’t display any form in QuickBooks at all.
Instead the TransactionDisplayAdd fails with a message stating
that this feature is not supported by this edition (Simple Start).
Request Supported by QB Simple Start?

Additional Differences for SDK Support of QB Simple Start
529
(c) 2013 Intuit Inc. All rights reserved.
Additional Differences for SDK Support of QB Simple Start
The Inventory Stock Status by Vendor report is not accessible through the Simple Start UI.
But when an end-user with Simple Start runs the report via SDK requests on a company file
created by Premier or Enterprise that has inventory, the user will not be able to retrieve the
TxnDisplayMod (3.0) Yes, with some caveats. You can invoke this only on
transaction types supported by QB Simple Start, because QB
Simple Start lacks the UI components for the unsupported
types.
Supported transaction types:
Bill
BuildAssembly
Charge
Check
CreditCardCharge
CreditCardCredit
CreditMemo
Deposit
Estimate
InventoryAdjustment
Invoice
ItemReceipt
JournalEntry
ReceivePayment
SalesReceipt
SalesTaxPaymentCheck
VendorCredit
Unsupported transaction types:
BillPaymentCheck, BillPaymentCreditCard, fail with an error
stating that the check has been deleted, possibly by another
user. However, doing a query on that same txnID is successful,
and that txn is displayed in the simple start check register (bill
payment check).
PurchaseOrder and SalesOrder for Mod fail with the error
message stating this is not available for this edition (simple
start)
TxnVoid (1.1) Yes
VehicleAdd (6.0) No
VehicleMod (6.0) Yes
VehicleQuery (6.0) Yes
VehicleMileageAdd (6.0) No
VehicleMileageQuery (6.0) Yes
VendorAdd Yes
VendorCreditAdd No
VendorCreditQuery Yes
VendorMod Yes
VendorQuery Yes
VendorTypeAdd Yes
VendorTypeQuery Yes
Request Supported by QB Simple Start?
530
Appendix B: QuickBooks Data Accessible Via SDK Objects/Operations
(c) 2013 Intuit Inc. All rights reserved.
columns QuantityOnSalesOrder and QuantityAvailable. The Inventory Stock Status by
Vendor report does not have columns QuantityOnSalesOrder and QuantityAvailable for
SimpleStart.
Also, if you do a PreferencesQueryRq against Simple Start, the PreferencesRet will contain
elements that cannot be directly controlled by the user. The preferences UI in SimpleStart
is very different from the other editions.

Notes for QB CA/UK 2008 and Newer 531
(c) 2013 Intuit Inc. All rights reserved.
A
PPENDIX
C 1
qbXML S
PECIFICATION
FOR
THE
C
ANADIAN
AND
UK E
DITIONS
1
This appendix contains CA and UK specific information. It is broken into two main parts:
QB CA/UK and newer, and QB CA/UK 2007 and Older.
The reason for this division is that CA/UK 2007 and older versions support only up to CA/
UK3.0 spec, while QB CA/UK 2008/2009 supports ONLY the new unified 6.0 spec, with
newer specs (7.0, 8.0, etc) expected to be supported by subsequent new versions of QB for
Canada and UK.
Notes for QB CA/UK 2008 and Newer
The following items apply to Canada or UK as indicated.
Canada
Instead of accepting US states in the various “States” fields, only Canadian provinces are
accepted in the SDK. The list of allowed values will be:
AB, BC, MB, NB, NL, NS, NT, NU, ON, PE, QC, SK, YT
These will be input via the <State> field provided in the spec.
Canada accepts a Social Insurance Number (SIN) in the <SSN> field provided in the spec.
The following transactions types are not supported
•SalesTaxPayment
•ARRefundCreditCard
The following fields are not supported:
Tax1Total, Tax2Total, Tax1Rate, Tax2Rate, Tax1Number, Tax2Number, ChargeTax1,
ChargeTax2, TrackTax1Expenses, TrackTax2Expenses, Tax1ReportingPeriod,
Tax2ReportingPeriod, AllowCustomerTaxCodes, AmountIncludesVAT, IsTax1Exempt and
IsTax2Exempt
PST and GST taxes will need to be used, similar to the way the US handles taxes.
UK
TBD.

532
Appendix C: qbXML Specification for the Canadian and UK Editions
(c) 2013 Intuit Inc. All rights reserved.
Notes for QB CA/UK 2007 and Older
All of the information in the following sections apply only to pre-QB CA and UK versions,
which support the CA/UK2.0 and CA/UK3.0 specs.
I
MPORTANT
While CA QB 2003-2007 supports qbXML CA3.0 & CA2.0 and
the UK QB 2003-2006 supports qbXML UK 3.0 & UK2.0, these
qbXML specs are NOT be supported by QB CA/UK 2008 and
later. Instead those future releases will support only qbXML
6.0 and later.
The 2004 through 2007 Canadian and UK editions do not support the new functionality
provided in the qbXML specs 4.0, 5.0, or 6.0. They do, however, support the v3.0 qbXML
spec.
The v3.0 qbXML specification exists in several slightly different forms, one supported by
Canadian editions of QuickBooks, one supported by U.S. editions, and one supported by
UK editions of QuickBooks. See the QB SDK Release Notes for complete information on
supported versions.
N
OTE
In the future we hope to provide a way for applications to
make a single set of QuickBooks SDK calls that will work with
U.S., Canadian and UK versions of QuickBooks. This may
imply that code written to work with current or past versions
of Canadian or UK editions of QuickBooks (e.g. to deal with
with sales tax and/or multi-currency support) may need to be
rewritten in the future before it can be used with future
versions of these products.
Differences Between the Canadian and UK Specs
The following table lists some of the spec differences.
Notes for QB CA/UK 2007 and Older
533
(c) 2013 Intuit Inc. All rights reserved.
Table C-1 Canadian and UK Spec differences
N
OTE
Althought TaxCodeAdd/Mod/Ret have TaxType in the UK spec,
(not in the Canadian spec), this field is not supported in the
current UK implementation.
Canadian Spec UK Spec
EmployeeAdd/Mod/Ret have SIN and Gender EmployeeAdd/Mod/Ret have NiNumber,
MaritalStatus, and Sex
VacationHours is made up of VacationPayAvailable,
VacationPayUsed, RetainOrPayEveryPeriod,
VacationPercentage, and a repeating
PayrollItemVacationRef
VacationHours is made up of HoursAvailable,
AccrualPeriod, HoursAccrued, MaximumHours,
and IsResettingHoursEachNewYear
WageType has HourlyRegular, SalaryRegular, Bonus,
and Commission
WageType has Commission, HourlyRegular,
HourlySick, HourlyVacation, SalaryRegular,
SalarySick, and SalaryVacation in the UK spec
Address, ShipAddress, LegalAddress, BillAddress,
VendorAddress, OtherNameAddress, and
CompanyAddressForCustomer have Province
Address, ShipAddress, LegalAddress,
BillAddress, VendorAddress, OtherNameAddress,
and CompanyAddressForCustomer have County.
CustomerAdd/Mod/Ret have TaxCodeRef in a different
location within the XML in the Canadian spec compared
to the UK spec
CustomerAdd/Mod/Ret have TaxCodeRef in a
different location within the XML in the Canadian
spec compared to the UK spec
CompanyRet has BusinessNumber CompanyRet does not have BusinessNumber
CustomerAdd/Mod/Ret and VendorAdd/Mod/Ret does
not have BusinessNumber
CustomerAdd/Mod/Ret and VendorAdd/Mod/Ret
have BusinessNumber
ExpenseLineMod/Ret and ItemLineMod/Ret does not
have Tax1Amount
ExpenseLineMod/Ret and ItemLineMod/Ret have
Tax1Amount
ReportsPreferences does not have
ReportAmountsIncludeVAT
ReportsPreferences has
ReportAmountsIncludeVAT
AmountIncludesVAT is not in any of the following:
ItemServiceAdd/Mod/Ret, ItemNonInventoryAdd/Mod/
Ret, ItemOtherChargeAdd/Mod/Ret, ItemInventoryAdd/
Mod/Ret, ItemInventoryAssemblyAdd/Mod/Ret,
ItemDiscountAdd/Mod/Ret, InvoiceAdd/Mod/Ret,
EstimateAdd/Mod/Ret, SalesReceiptAdd/Ret,
CreditMemoAdd/Mod/Ret, PurchaseOrderAdd/Mod/
Ret, BillAdd/Mod/Ret, ItemReceiptAdd/Ret,
VendorCreditAdd/Ret, CheckAdd/Ret,
CreditCardChargeAdd/Ret, and CreditCardCreditAdd/
Ret
AmountIncludesVAT appears in all of the
following
ItemServiceAdd/Mod/Ret, ItemNonInventoryAdd/
Mod/Ret, ItemOtherChargeAdd/Mod/Ret,
ItemInventoryAdd/Mod/Ret,
ItemInventoryAssemblyAdd/Mod/Ret,
ItemDiscountAdd/Mod/Ret, InvoiceAdd/Mod/Ret,
EstimateAdd/Mod/Ret, SalesReceiptAdd/Ret,
CreditMemoAdd/Mod/Ret, PurchaseOrderAdd/
Mod/Ret, BillAdd/Mod/Ret, ItemReceiptAdd/Ret,
VendorCreditAdd/Ret, CheckAdd/Ret,
CreditCardChargeAdd/Ret, and
CreditCardCreditAdd/Ret

534
Appendix C: qbXML Specification for the Canadian and UK Editions
(c) 2013 Intuit Inc. All rights reserved.
Differences Between the US and Canadian qbXML Spec
The Canadian/UK and U.S. forms of the qbXML specification are nearly identical. The
biggest ways in which they differ is that the Canadian version accommodates Canadian/UK
tax structures and the use of multiple currencies:
•Canadian/UK editions of QuickBooks include a Tax Code list that makes it easier to
work with Canada or UK-specific taxes. Through the SDK you can add taxes to this
list, modify the list, query the list, and delete tax codes from the list (using
TaxCodeAdd, TaxCodeMod, TaxCodeQuery, and ListDel messages). You can also
assign these tax codes to transactions (using TaxCodeRef and CustomerTaxCodeRef
object references).
•Canadian/UK editions of QuickBooks include a Currency list that is available when the
user has turned on the multicurrency preference. Through the SDK you can add
currencies to this list, modify the list, query the list, and delete currencies from the list
(using CurrencyAdd, CurrencyMod, CurrencyQuery, and ListDel messages). You can
also include currency-related information in list and transaction objects.
The Canadian/UK and U.S. forms of the qbXML specifications differ in a number of other
ways, too. The following tables summarize the differences.
N
OTE
For details about new elements and objects shown here, and
information about how to use them, see the QBFC Onscreen
Reference (for Canadian/UK editions of QuickBooks) online at
http://developer-static.intuit.com/qbsdk-current/common/
newosr/index.html

Notes for QB CA/UK 2007 and Older
535
(c) 2013 Intuit Inc. All rights reserved.
Canada qbXML
does not include
Instead, Canada qbXML
includes
• any information
related to sales
taxes or sales
tax codes.
• two new types of taxes, Tax 1 and Tax 2. Tax 1 is used for Goods and Services Tax,
or GST; Tax 2 is used for Provincial Sales Taxes, or PST. (U.K. editions of
QuickBooks use Tax 1 for Value Added Tax (VAT) and do not use Tax 2 at all.)
• the means to access the Tax Code list.
Related new qbXML messages
TaxCodeAdd
TaxCodeMod
TaxCodeQuery
Related new qbXML object references
TaxCodeRef
CustomerTaxCodeRef
DefaultCustomerTaxCodeRef
Tax1AgencyRef
Tax2AgencyRef
Related new qbXML elements
Tax1Rate and Tax2Rate
Tax1Total and Tax2Total
Tax1Number and Tax2Number
ChargeTax1 and ChargeTax2
TrackTax1Expenses and TrackTax2Expenses
Tax1ReportingPeriod and Tax2ReportingPeriod
AllowCustomerTaxCodes
AmountIncludesVAT
IsTax1Exempt and IsTax2Exempt
(Boolean values that are true for items
exempt from Tax 1 or Tax 2)
IsPiggyBackRate
(Boolean value that is true when Tax 2
is partly determined by Tax 1)
• information
about social
security
numbers
(SNNs).
• information about social insurance numbers (SINs).
Related new qbXML element
SIN
• state information
in addresses.
• province information in addresses.
Related new qbXML element
Province
• information
about 1099
forms.
• information about statement of income (T4A) forms.
Related new qbXML element
IsVendorEligibleForT4A

536
Appendix C: qbXML Specification for the Canadian and UK Editions
(c) 2013 Intuit Inc. All rights reserved.
Installation
The correct (country-specific) SDK-support files are installed automatically along with
Canadian/UK and U.S. editions of QuickBooks. No extra installation is needed.
About Units of Measure
A Units of Measure feature is available in Canadian/UK editions of QuickBooks, but you
currently can’t access it through the SDK. The SDK does already give you a way to find out
whether a QuickBooks file has the Units of Measure preference turned on, however. To find
out:
Canada qbXML includes
• a new data type, FLOATTYPE, used to describe international exchange rates.
• means to access the Currency list and also to include currency information in some list and transaction
objects.
Related new qbXML messages
CurrencyAdd
CurrencyMod
CurrencyQuery
Related new qbXML elements
ExchangeRate
Symbol
Code
CurrencyHotKey
SymbolPos
DecimalSep
DecimalPlaces
ThousandSep
ForeignPrice
Related new qbXML object references
CurrencyRef
HomeCurrencyRef (returned by PreferencesQuery message)
ForeignCurrencyRef (returned by PreferencesQuery message)
• new currency information returned by PreferencesQuery messages.
Related new qbXML elements
IsUsingForeignPricesOnItems
IsUsingMulticurrency
IsUsingUnitsOfMeasure (See “About Units of Measure.”)
Related qbXML object references
HomeCurrencyRef
ForeignCurrencyRef
• a few U.K.-specific elements related to European currencies.
Related new qbXML elements
IsECVatCode
IsEmu
EmuRate

Notes for QB CA/UK 2007 and Older
537
(c) 2013 Intuit Inc. All rights reserved.
1. Send a PreferencesQuery request to QuickBooks.
2. Examine the returned PreferencesRet object. In the PurchasesAndVendorsPreferences
aggregate, check whether the IsUsingUnitsOfMeasure element is
true
.
If the Units of Measure preference is turned on, an interactive user might specify inventory
units, sales units, and purchasing units for inventory and assembly items, even though you
cannot retrieve any of this information through the SDK. For example, imagine a
QuickBooks file that has an inventory item called
soup
and is set up with this Units of
Measure information:
•Inventory unit: case
•Sales unit: can, at 12 cans/case
•Purchasing unit: flat, at 2 cases/flat
Given this set up, an invoice selling 3 cans of soup would reduce inventory by .25 cases
(based on the relationship of 12 cans per case). Purchasing 1 flat would increase inventory
by 2 cases. But your application could not make sense of this data without the
(irretrievable) background information about inventory units, sales units, and purchasing
units. This means an SDK query on transactions and items might return unpredictable
results.
For this reason, if your application relies on this kind of data from transactions, we
recommend that you do the following:
1. Design your application to check (as described above) whether the Units of Measure
preference is turned on.
2. If the Units of Measure feature is on, consider sending a message that asks your users
not to use it.
About UI Integration
If you have two versions of your application, one for Canadian/UK editions of QuickBooks
and one for U.S. editions of QuickBooks, and you are integrating with the QuickBooks user
interface, note these important limitations:
•It is possible that a user who selects your UI extension from within a Canadian/UK
edition of QuickBooks will be taken to the U.S. version of your application, and vice
versa. You cannot create a subscription on one machine such that a UI item added to
U.S. editions of QuickBooks will invoke the U.S. version of your application while that
same UI item in Canadian/UK editions of QuickBooks will invoke the Canadian/UK
version of your application. Instead, each version of the application will overwrite any
existing subscription, so that the last one installed “wins.”
•If you have a U.S.-only application, you cannot prevent your UI items from showing up
in Canadian/UK editions of QuickBooks. Conversely, if you have a Canada-only
application, you cannot have a UI item that only shows up in Canadian/UK editions of
QuickBooks. UI extensions show up in all editions of QuickBooks.
538
Appendix C: qbXML Specification for the Canadian and UK Editions
(c) 2013 Intuit Inc. All rights reserved.

539
(c) 2013 Intuit Inc. All rights reserved.
A
PPENDIX
D 1
qbXML R
EQUEST
P
ROCESSOR
M
ETHOD
R
EFERENCE
1
This chapter provides alphabetical reference pages for the methods included in the qbXML
Request Processor COM API. These methods can be grouped into the following main
categories:
•Methods used to establish and break down the communication between QuickBooks
and your application
•Methods used to set and get preference information from the AuthPreferences property
of the request processor (beginning in SDK 4.0).
•Methods used to query the Request Processor about its current state (for example, what
version of the Request Processor is running and what company file is currently open).
Table D-1 on page 539 and Table D-2 on page 540 summarize the methods that are
included in this reference chapter.
•Methods used for event subscription activity.
Table D-1 Communication Methods and Properties for RequestProcessor2
Name Description
AuthPreferences This property returns the AuthPreferences object,
on which you can invoke the various set/get
methods described in Table D-2, “Authorization
Preferences Methods for IAuthPreferences,” on
page 540.
OpenConnection2 Opens a connection between your application and
QuickBooks, as specified in the connection type
parameter.
The older OpenConnection method used prior to
SDK 4.0 is still supported for backward
compatibility.
BeginSession Begins a session operating on a specific company
file
ProcessRequest Sends a request message set to QuickBooks and
returns with a response message set from
QuickBooks
EndSession Ends the session for a specific company file
CloseConnection Closes the connection between your application
and QuickBooks

540
Appendix D: qbXML RequestProcessor Method Reference
(c) 2013 Intuit Inc. All rights reserved.
Table D-2 Authorization Preferences Methods for IAuthPreferences
Table D-3 Query Methods
Name Description
WasAuthPreferencesObeyed Indicates whether the version of
QuickBooks supports
AuthPreferences.
GetUnattendedModePref Retrieves the current
AuthPreferences setting for
unattended mode.
PutUnattendedModePref Specifies whether your application
requires unattended mode.
GetPersonalDataPref Retrieves the current
AuthPreferences setting for
personal data requirement.
PutPersonalDataPref Specifies whether your application
requires access to personal data.
GetIsReadOnly Retrieves the current
AuthPreferences setting for read-
only access
PutIsReadOnly Specifies whether your application
is a read-only application.
PutAuthFlags Specifies the AuthFlags for your
applications, such as which
QuickBooks editions it supports
and optionally forces the display
of the Auth dialog to the end user.
Name Description
GetCurrentCompanyFileName Returns the name of the company file that is
currently open (requires a ticket)
QBXMLVersionsForSession Returns the versions of the qbXML specification
supported by the QuickBooks product your
application is currently connected to (requires a
ticket)
ReleaseLevel Returns the release description of the qbXML
Request Processor (for example, alpha, beta, or
release)
ReleaseNumber Returns the release number of the qbXML Request
Processor (for example, the release number for
version 2.0 is 1)
MajorVersion Returns the major version number of the qbXML
Request Processor (for version 2.0, the major
version number is 2)
MinorVersion Returns the minor version number of the qbXML
Request Processor (for version 2.0, the minor
version number is 0)

541
(c) 2013 Intuit Inc. All rights reserved.
Table D-4 Subscription Activity Methods
Name Description
QBXMLVersionsForSubscription Identifies the qbXML spec versions supported for
subscription activity.
ProcessSubscription Sends the supplied qbXML subscription request
(add, delete, query) to the request processor.

542
Appendix D: qbXML RequestProcessor Method Reference
(c) 2013 Intuit Inc. All rights reserved.
AuthPreferences
HRESULT AuthPreferences([out, retval] IAuthPreferences**
ppAuthPreferences);
Returns the AuthPreferences property object.
Parameters
ppAuthPreferences Pointer pointer to the returned IAuthPreferences object.
Usage
This method is invoked on the RequestProcessor2 object to return the AuthPreference property
object, in order for subsequent querying or setting of its preferences.
Example (Visual Basic)
Dim qbXMLRP as QBXMLRP2Lib.RequestProcessor2
Dim prefs As qbXMLRP.AuthPreferences
Set prefs = qbXMLCOM.AuthPreferences

BeginSession
543
(c) 2013 Intuit Inc. All rights reserved.
BeginSession
HRESULT BeginSession([in] BSTR qbCompanyFileName,
[in] QBFileMode qbOpenFileMode,
[out, retval] BSTR* ticket);
After a QuickBooks connection has been established, this method begins a session working on the
specified QuickBooks company file in the specified mode. The returned session ticket is passed in
to subsequent calls to ProcessRequest.
Parameters
qbCompanyFileName Pathname of the specified QuickBooks company file.
If QuickBooks is already launched with an open company file, this
value can be NULL or an empty string and your application will
attach to this open company file. If no file is open, an error occurs.
(If this call succeeds with NULL or an empty string for this
parameter, you can obtain the name of the currently open company
file by calling the GetCurrentCompanyFileName method.)
qbOpenFileMode Mode in which to open the company file:
qbFileOpenSingleUser
Single-user mode; grants your application exclusive access to QuickBooks for this
company file.
qbFileOpen
Multi-user mode; allows your application to share access to the specified company
file with other applications as well as with a user who is interacting directly with
the company file through QuickBooks.
qbFileOpenDoNotCare
Allows either single-user or multi-user mode. If the specified company file is
already open, QuickBooks allows the authentication process to proceed. If no
company file is open, QuickBooks opens the company file in multi-user mode. If a
different company file is already open, an error is returned.
ticket Pointer to the returned session ticket. Your application must save this
ticket (store it or keep it in memory) and pass it to any
ProcessRequest, GetCurrentCompanyFileName, and
QBXMLVersionsForSession calls made in this session only. When
you are finished with the session for a specified company file, you
release the ticket by passing it to the EndSession call that terminates
the session. QuickBooks frees the memory allocated for the ticket
when you return it.

544
Appendix D: qbXML RequestProcessor Method Reference
(c) 2013 Intuit Inc. All rights reserved.
Usage
The qbCompanyFileName parameter can be specified explicitly for this method, or you can pass in
NULL (or an empty string) to see if a company file is already open. If it is, you can call
GetCurrentCompanyFileName to obtain the file name. If no company file is currently open (and
you did not specify a company file), BeginSession fails and you will need to query the user to
determine which company file to open.
Using the SDKDiag Tool to Troubleshoot Connection Problems
For help with communication problems with QuickBooks, check out the IPP Developer
website for more information and a useful diagnostic tool called qbSDKDiag.
The qbSDKDiag tool turns on the maximum logging capability of QuickBooks and the
SDK, gathers important registry data about QuickBooks, starts QuickBooks, and attempts
to establish a connection with QuickBooks in interactive mode using QBXMLRP and
QBXMLRP2.
Having successfully connected in interactive mode, the user is then asked to enable
unattended access for the diagnostic tool and to close QuickBooks. The diagnostic tool then
attempts to connect with both QBXMLRP and QBXMLRP2 using unattended mode.
Finally, all the log files (qbsdklog.txt, qbinstancefinder.log, qbwin.log, and the diagnostic
log itself) are zipped up for you to email to support personnel at a later time.
Example (Visual Basic)
Dim qbXMLRP as QBXMLRP2Lib.RequestProcessor2
strTicket = qbXMLRP.BeginSession("",QBXMLRP2Lib.qbFileOpenDoNotCare)
Who started QuickBooks Mode Who may obtain access
Integrated Application Single-user No one else
Integrated Application Multi-user QB user on same machine = no access
All other integrated applications =
access
QB users on other machines = access
QuickBooks User Single-user QB user already logged in
Only one integrated application =
access
QuickBooks User Multi-user QB users = access
Integrated applications = access

CloseConnection
545
(c) 2013 Intuit Inc. All rights reserved.
CloseConnection
HRESULT CloseConnection();
Closes the connection with QuickBooks.
Example (Visual Basic)
Dim qbXMLRP as QBXMLRP2Lib.RequestProcessor2
qbXMLRP.CloseConnection

546
Appendix D: qbXML RequestProcessor Method Reference
(c) 2013 Intuit Inc. All rights reserved.
EndSession
HRESULT EndSession([in] BSTR ticket);
Frees resources, closes the company file, and ends the session.
Parameters
ticket Handle for the current session. This method releases the memory
allocated for the ticket, and the ticket can no longer be used.
Example (Visual Basic)
Dim qbXMLRP as QBXMLRP2Lib.RequestProcessor2
qbXMLRP.EndSession strTicket

GetCurrentCompanyFileName
547
(c) 2013 Intuit Inc. All rights reserved.
GetCurrentCompanyFileName
HRESULT GetCurrentCompanyFileName([in] BSTR ticket,
[out, retval] BSTR* pFileName);
Returns the name of the currently open company file.
Parameters
ticket Handle for the current session.
pFileName Pointer to the returned name of the currently open company file.
Usage
This method can be used any time the application needs to display the name of the company file—
for example, when it asks the user to confirm modification of the data contained in a particular
company file. If you call BeginSession and do not explicitly specify a company file name (and the
call succeeds), you should then call GetCurrentCompanyFileName to obtain the name of the
company file that is currently open.
Example (Visual Basic)
Dim qbXMLRP as QBXMLRP2Lib.RequestProcessor2
Dim strQBFileName as String
strQBFileName = qbXMLRP.GetCurrentCompanyFileName(strTicket)

548
Appendix D: qbXML RequestProcessor Method Reference
(c) 2013 Intuit Inc. All rights reserved.
GetIsReadOnly
HRESULT GetIsReadOnly
([in] BSTR ticket,
[out, retval] VARIANT_BOOL* pIsReadOnly);
Gets the read-only preference currently in effect for the application.
Parameters
ticket Valid ticket returned from call to BeginSession.
pIsReadOnly Pointer to the returned value.
Usage
This method can be used only after the call to BeginSession.
Example (Visual Basic)
Dim qbXMLCOM as QBXMLRP2Lib.RequestProcessor2
Dim prefs As QBXMLRP2Lib.AuthPreferences
Set prefs = qbXMLCOM.AuthPreferences
strTicket = qbXMLCOM.BeginSession(strCompanyFilename, openMode)
Dim BoolVal As Boolean
BoolVal = prefs.GetIsReadOnly(strTicket)

GetPersonalDataPref
549
(c) 2013 Intuit Inc. All rights reserved.
GetPersonalDataPref
HRESULT GetPersonalDataPref
([in] BSTR ticket,
[out, retval] QBXMLRPPersonalDataPrefType* pPersonalDataPref);
Returns the personal data access preference currently in effect for the application.
Parameters
ticket Valid ticket returned from call to BeginSession.
pPersonalDataPref Pointer to the returned preference value. Possible values to be
returned are: pdpRequired, pdpOptional, pdpNotNeeded.
Usage
This method can be used after the call to BeginSession.
Example (Visual Basic)
Dim qbXMLCOM as QBXMLRP2Lib.RequestProcessor2
Dim prefs As QBXMLRP2Lib.AuthPreferences
Set prefs = qbXMLCOM.AuthPreferences
strTicket = qbXMLCOM.BeginSession(strCompanyFilename, openMode)
Dim PrefType As QBXMLRPPersonalDataPrefType
PrefType = prefs.GetPersonalDataPref(strTicket)
If (PrefType = pdpNotNeeded) Then
MsgBox "personal data not needed"
End If
If (PrefType = pdpRequired) Then
MsgBox "personal data required"
End If
If (PrefType = pdpOptional) Then
MsgBox "personal data optional"
End If

550
Appendix D: qbXML RequestProcessor Method Reference
(c) 2013 Intuit Inc. All rights reserved.
GetUnattendedModePref
HRESULT GetUnattendedModePref(
[in] BSTR ticket,
[out, retval] QBXMLRPUnattendedModePrefType* pUnattendedModePref);
Returns the unattended mode access preference currently in effect for the application.
Parameters
ticket Valid ticket returned from call to BeginSession.
pUnattendedModePref
Pointer to the returned mode setting. Possible values to be returned
are: umpRequired, umpOptional.
Usage
This method can be used after the call to BeginSession.
Example (Visual Basic)
Dim qbXMLCOM as QBXMLRP2Lib.RequestProcessor2
Dim prefs As QBXMLRP2Lib.AuthPreferences
Set prefs = qbXMLCOM.AuthPreferences
strTicket = qbXMLCOM.BeginSession(strCompanyFilename, openMode)
Dim PrefType As QBXMLRPUnattendedModePrefType
PrefType = prefs.GetUnattendedModePref(strTicket)
If (PrefType = umpOptional) Then
MsgBox "Unattended Mode optional"
End If
If (PrefType = umpRequired) Then
MsgBox "Unattended Mode required"
End If

WasAuthPreferencesObeyed
551
(c) 2013 Intuit Inc. All rights reserved.
WasAuthPreferencesObeyed
HRESULT WasAuthPreferencesObeyed
([in] BSTR ticket,
[out, retval] VARIANT_BOOL* pWasAuthPreferencesObeyed);
Determines whether the QuickBooks version supports AuthPreferences.
Parameters
ticket Valid ticket returned from call to BeginSession.
pWasAuthPreferencesObeyed
Pointer to the returned value. Returns True if the version of
QuickBooks supports AuthPreferences, False if it does not.
Usage
In QuickBooks 2005 and later, the preferences set in AuthPreferences cause a corresponding
QuickBooks authorization dialog to be displayed. If the administrative user does not respond by
authorizing the requested access modes, then the application will not be able to access the
QuickBooks company.
That is, the call to BeginSession will not succeed. If the authorization is granted, then the call to
BeginSession will succeed. Notice that if you call WasAuthPreferencesObeyed, you must call it
after you call BeginSession, hence, this method will always return True for QuickBooks 2005 and
later. However, in QuickBooks versions prior to 2005, the AuthPreferences are ignored, and will
always return False.
Example (Visual Basic)
Dim qbXMLCOM as QBXMLRP2Lib2.RequestProcessor2
Dim prefs As QBXMLRP2Lib.AuthPreferences
Set prefs = qbXMLCOM.AuthPreferences
strTicket = qbXMLCOM.BeginSession(strCompanyFilename, openMode)
Dim WasObeyed As Boolean
WasObeyed = prefs.WasAuthPreferencesObeyed(strTicket)
If (WasObeyed = True) Then
MsgBox "Preferences are supported"
End If
If (WasObeyed = False) Then
MsgBox "Preferences not supported"
End If

552
Appendix D: qbXML RequestProcessor Method Reference
(c) 2013 Intuit Inc. All rights reserved.
PutAuthFlags
HRESULT PutAuthFlags([in] long authFlags);
Specifies the AuthFlags for your application.
Parameters
authFlags Specified as per below under “Usage”.
Usage
This method is used before the call to BeginSession.
Internally, the editions are represented by the following enumerated value:
The ForceAuthDialog value is included as a convenience: if you including it when you construct
your AuthFlags, you cause QuickBooks to display the authorization dialog again for the user to
change the permissions they may have already set for your application.
To specify support for each edition, you simply OR the values for each edition you are supporting.
In the following VB snippet, we specify support for all of the QuickBooks editions and force the
display of the auth dialog.
Example (Visual Basic)
Dim authFlags As Long
authFlags = 0
authFlags = authFlags Or &H8&
authFlags = authFlags Or &H4&
authFlags = authFlags Or &H2&
authFlags = authFlags Or &H1&
authFlags = authFlags Or &H80000000
Dim qbXMLCOM As QBXMLRP2Lib.RequestProcessor2
Dim prefs As QBXMLRP2Lib.AuthPreferences
Set prefs = qbXMLCOM.AuthPreferences
prefs.PutAuthFlags (authFlags)
Behavior Needed Value
SupportQBSimpleStart 0x1
SupportQBPro 0x2
SupportQBPremier 0x4
SupportQBEnterprise 0x8
ForceAuthDialog 0x80000000

PutIsReadOnly
553
(c) 2013 Intuit Inc. All rights reserved.
PutIsReadOnly
HRESULT PutIsReadOnly([in] VARIANT_BOOL isReadOnly);
Specifies the read and write access requirements for your application.
Parameters
pIsReadOnly Specify a value of True if your application requires read-only access.
Specify False if your application requires read and write access to
QuickBooks.
Usage
This method is used before the call to BeginSession.
Example (Visual Basic)
Dim qbXMLCOM as QBXMLRP2Lib2.RequestProcessor2
Dim prefs As QBXMLRP2Lib.AuthPreferences
Set prefs = qbXMLCOM.AuthPreferences
prefs.PutIsReadOnly True

554
Appendix D: qbXML RequestProcessor Method Reference
(c) 2013 Intuit Inc. All rights reserved.
PutPersonalDataPref
HRESULT PutPersonalDataPref([in] QBXMLRPPersonalDataPrefType
personalDataPref);
Specifies the personal data access requirements for your application.
Parameters
personalDataPref Specify pdpRequired if access to personal data is required,
pdpOptional if you can use the data but don’t require it, or
pdpNotNeeded if you do not use personal data. Notice that if you
specify pdpRequired, and your customer does not authorize that type
of access, then your application will not be able to access
QuickBooks.
Usage
This method is used before the call to BeginSession.
Example (Visual Basic)
Dim qbXMLCOM as QBXMLRP2Lib2.RequestProcessor2
Dim prefs As QBXMLRP2Lib.AuthPreferences
Set prefs = qbXMLCOM.AuthPreferences
prefs.PutPersonalDataPref pdpOptional

PutUnattendedModePref
555
(c) 2013 Intuit Inc. All rights reserved.
PutUnattendedModePref
HRESULT PutUnattendedModePref([in] QBXMLRPUnattendedModePrefType
unattendedModePref);
Specifies the unattended mode access requirements for your application.
Parameters
unattendedModePref
Specify umpRequired if your application must be able to run in
unattended mode, umpOptional if it does not need to run in that
mode. Notice that if you specify umpRequired, and your customer
does not authorize that access, then your application will not be able
to access QuickBooks.
Usage
This method is used before the call to BeginSession.
Example (Visual Basic)
Dim qbXMLCOM as QBXMLRP2Lib2.RequestProcessor2
Dim prefs As QBXMLRP2Lib.AuthPreferences
Set prefs = qbXMLCOM.AuthPreferences
prefs.PutUnattendedModePref umpOptional

556
Appendix D: qbXML RequestProcessor Method Reference
(c) 2013 Intuit Inc. All rights reserved.
MajorVersion
HRESULT MajorVersion([[out, retval] short* pMajorVersion);
Returns the major version number of the qbXML Request Processor.
Parameters
pMajorVersion Pointer to the returned major version number of the qbXML Request
Processor.
Usage
For version 4.0, the major version number of the qbXML Request Processor is 4.
Example (Visual Basic)
Dim qbXMLRP as QBXMLRP2Lib.RequestProcessor2
Dim iMajorVersion as integer
iMajorVersion = qbXMLRP.MajorVersion

MinorVersion
557
(c) 2013 Intuit Inc. All rights reserved.
MinorVersion
HRESULT MinorVersion([out, retval] short* pMinorVersion);
Returns the minor version number of the qbXML Request Processor.
Parameters
pMinorVersion Pointer to the returned minor version number of the qbXML Request
Processor.
Usage
For version 4.0, the minor version number of the qbXML Request Processor is 0.
Example (Visual Basic)
Dim qbXMLRP as QBXMLRP2Lib.RequestProcessor2
Dim iMinorVersion as integer
iMinorVersion = qbXMLRP.MinorVersion

558
Appendix D: qbXML RequestProcessor Method Reference
(c) 2013 Intuit Inc. All rights reserved.
OpenConnection2
HRESULT OpenConnection2([IN], BSTR appID,
[IN], BSTR appName,
[IN], BSTR connPref);
Opens a connection of the specified type between QuickBooks and the client application. During
this process, QuickBooks checks whether your application contains a valid digital signature, which
indicates that the application has been certified as trusted. Depending on whether the application is
certified or not, QuickBooks presents a different login interface to the user.
Parameters
appId The appID enables QuickBooks to identify your application. This
value can also be NULL or an empty string.
appName Name that identifies the application. This parameter cannot be NULL
or an empty string. The application name is always used in the log
file.
connPref The type of connection that is to be made. Specify localQBD if the
connection is to QuickBooks running locally. Specify
localQBDLaunchUI to launch the QuickBooks user interface (a user
will be required to log in, if passwording is in effect). Specify
remoteQBD if using RDS (this also allows you to force an RDS
connection even if QuickBooks Pro or Premier is installed locally).
Usage
For QuickBooks 2005 and later, QuickBooks uses the application name to identify your application
during the QuickBooks authentication process whether your application is signed or unsigned.
N
OTE
QuickBooks always uses the application name in the
qbsdklog.txt log file, regardless of whether your application is
certified.
For QuickBooks versions earlier than QuickBooks 2004, if your application does not have a
digitally signed certificate, QuickBooks uses the application name to identify your application
during the QuickBooks authentication process. If your application does have a certificate,
QuickBooks instead uses the description from the certification whenever it needs to refer to your
application.
When you are finished with all QuickBooks operations, you must call CloseConnection.
Example (Visual Basic)
Set qbXMLCOM = New QBXMLRP2Lib.RequestProcessor2
qbXMLCOM.OpenConnection2 “MyAppID”, “MyAppName”, localQBD

ProcessRequest
559
(c) 2013 Intuit Inc. All rights reserved.
ProcessRequest
HRESULT ProcessRequest([in] BSTR ticket,
[in] BSTR qbXMLIn,
[out, retval] BSTR* qbXMLOut);
Sends the request message set to QuickBooks for processing and receives the corresponding
response message set from QuickBooks.
Parameters
ticket Handle for the current session. (This ticket is returned by the
BeginSession method.)
qbXMLIn Text stream containing the qbXML request message set to be
processed by QuickBooks.
qbXMLOut Pointer to the returned qbXML response message set from
QuickBooks. The memory for this string is allocated on behalf of
your application; however, it is your application’s responsibility to
release the memory when it is finished using it.
Usage
The ProcessRequest method sends the request message set to QuickBooks. It waits while
QuickBooks validates your qbXML document, processes the requests, and creates the response
qbXML document. Upon successful return of this method, the qbXMLOut parameter contains the
response from QuickBooks.
You may want to validate the qbXML text stream contained in the qbXMLIn parameter before you
issue this request. The SDK contains an example of an external qbXML validation tool that you can
use during the design and development phases of your application. Later, you may want to build a
qbXML validator into your application.
Example (Visual Basic)
Dim qbXMLRP as QBXMLRP2Lib.RequestProcessor2
Dim strXMLResponse as String
strXMLResponse = qbXMLRP.ProcessRequest(strTicket, strXMLRequest)

560
Appendix D: qbXML RequestProcessor Method Reference
(c) 2013 Intuit Inc. All rights reserved.
ProcessSubscription
HRESULT ProcessSubscription([in] BSTR qbXMLIn,
[out, retval] BSTR* qbXMLOut);
Sends the request message set to QuickBooks for processing and receives the corresponding
response message set from QuickBooks.
Parameters
qbXMLIn Text stream containing the qbXML subscription request message set
to be processed by QuickBooks. For information on how to build
subscriptions, refer to the Onscreen Reference (OSR) and the
Concepts manual.
qbXMLOut Pointer to the qbXML response message set returned from
QuickBooks. The memory for this string is allocated on behalf of
your application; however, it is your application’s responsibility to
release the memory when it is finished using it.
Usage
The ProcessSubscription method does not require a session ticket because it does not require
QuickBooks to be running. (But you must call OpenConnection or OpenConnection2 before you
call ProcessSubscription.) The subscription goes into effect the next time QuickBooks is started.
This method sends the subscription request message set to QuickBooks. It waits while QuickBooks
validates your qbXML document, processes the requests, and creates the response qbXML
document. Upon successful return of this method, the qbXMLOut parameter contains the response
from QuickBooks.
You may want to validate the qbXML text stream contained in the qbXMLIn parameter before you
issue this request. The SDK contains an example of an external qbXML validation tool that you can
use during the design and development phases of your application. Later, you may want to build a
qbXML validator into your application.
Example (Visual Basic)
Dim qbXMLRP as QBXMLRP2Lib.RequestProcessor2
Dim strXMLResponse as String
strXMLResponse = qbXMLRP.ProcessSubscription(qbXMLIn)

QBXMLVersionsForSession
561
(c) 2013 Intuit Inc. All rights reserved.
QBXMLVersionsForSession
HRESULT QBXMLVersionsForSession([in] BSTR ticket,
[out, retval] SAFEARRAY (BSTR)** ppsa);
Returns an array containing the version numbers of the DTDs supported by the Request Processor.
Note that this information may be different from the information returned by a Host Query request,
as described in the Concepts Manual. HostQuery returns the complete list of all qbXML versions
supported by the currently open connection, which is usually the information your application will
require.
Parameters
ticket Session ticket (returned by BeginSession).
ppsa Pointer pointer to an array of binary strings that specify the versions
of the qbXML specification that are supported by the QuickBooks
Request Processor. For example, the array contains 1.0, 1.1, 2.0, and
2.1, 3.0, 4.0, and 5.0 if your application is using QBXMLRP2 from
QuickBooks 2006, U.S. edition. It contains “CA3.0” if it is using the
Request Processor from the latest Canadian edition of QuickBooks.
Usage
Your application is responsible for freeing the memory used for the ppsa array. For example, to
release the memory for the array when using the C++ language, call SafeArrayDestroy(ppsa).
Example (Visual Basic)
Dim qbXMLRP as QBXMLRP2Lib.RequestProcessor2
Dim strXMLVersionsArray() as String
strXMLVersionsArray = qbXMLRP.QBXMLVersionsForSession(strTicket)

562
Appendix D: qbXML RequestProcessor Method Reference
(c) 2013 Intuit Inc. All rights reserved.
QBXMLVersionsForSubscription
HRESULT QBXMLVersionsForSubscription([out, retval] SAFEARRAY (BSTR)**
ppsa);
Returns an array containing a list of the qbXML versions that are available for a subscription
request.
Parameters
ppsa Pointer pointer to an array of binary strings that specify the versions
of the qbXML specification that are supported by QBXMLRP2. For
example, QBXMLRP2 for QuickBooks 2005 would return 3.0 and
4.0. It contains “CA2.0” if it is using the Request Processor from the
Canadian edition of QuickBooks version 2.0.
Usage
See the Onscreen Reference (OSR) and the Concepts manual for details about subscription
versioning.
Your application is responsible for freeing the memory used for the ppsa array. For example, to
release the memory for the array when using the C++ language, call SafeArrayDestroy(ppsa).
Example (Visual Basic)
Dim qbXMLRP as QBXMLRP2Lib.RequestProcessor2
Dim strXMLVersionsArray() as String
strXMLVersionsArray = qbXMLRP.QBXMLVersionsForSession()

ReleaseLevel
563
(c) 2013 Intuit Inc. All rights reserved.
ReleaseLevel
HRESULT ReleaseLevel
([out, retval] QBXMLRPReleaseLevel* pReleaseLevel);
Returns the release level of the qbXML Request Processor.
Parameters
pReleaseLevel Pointer to the returned release level. This value can be preAlpha,
alpha, beta, or release.
Example (Visual Basic)
Dim qbXMLRP as QBXMLRP2Lib.RequestProcessor2
Dim ReleaseLevel as QBXMLRP2Lib.QBXMLRPReleaseLevel
ReleaseLevel = qbXMLRP.ReleaseLevel

564
Appendix D: qbXML RequestProcessor Method Reference
(c) 2013 Intuit Inc. All rights reserved.
ReleaseNumber
HRESULT ReleaseNumber([out, retval] short* pReleaseNumber);
Returns the release number of the qbXML Request Processor.
Parameters
pReleaseNumber Pointer pointer to the number that identifies the release of the
qbXML Request Processor.
Usage
The release number varies with each build of the product software. A major bug fix or a new feature
might be reflected in the release number. Your application may need to check the release number to
determine if a certain feature is supported.
Example (Visual Basic)
Dim qbXMLRP as QBXMLRP2Lib.RequestProcessor2
Dim iReleaseNumber as integer
iReleaseNumber = qbXMLRP.ReleaseNumber

Enterprise Features Requiring Single User Mode 565
(c) 2013 Intuit Inc. All rights reserved.
A
PPENDIX
E 1
E
NTERPRISE
E
DITION
AND
S
INGLE
/M
ULTI
-U
SER
I
SSUES
1
This appendix lists the Enterprise features that require single mode, and those that support
multuser mode.
Enterprise Features Requiring Single User Mode
The following table lists single mode features:
Backup
Condense
Accountant Review (import/export, create/merge, Use/continue/
cancel)
Easy Step interview
Rebuild
IIF Import/Export
Change Employee List Sort
Change company info
Regen Item History
Timer Import/Export
Changing Company Prefs
Using TaxLink
Change Check Logo
Print 1099’s
Setting Employee defaults
Finance charge settings
Online banking migration
Payroll checkup
Payroll payserv signup
Payroll payserv payroll setup
Common payroll setup
Change email/fax message template
HR signup
Create or restore Portable company file

566
Appendix E: Enterprise Edition and Single/Multi-User Issues
(c) 2013 Intuit Inc. All rights reserved.
Enterprise List Operations Requiring Single User Mode
The following table shows the List operations that require single user mode:
Enterprise Multi User Features
The following features support multiuser mode:
Validate
Resort
Change sublevel
Change parent
Custom fields
Changes COGS account
Change post account
Change bal sheet account
Change inventory account
Change reimbursement account
Change expense account
Change payitem account
Change tax agency
Rearrange order
Change name
Select subcontractor for service
Make an account a subaccount
Change email/fax message template
Budgets
Forecasts
Make deposits
Payroll
Print statements
Pay bills
Pay taxes
Assess finance charges
Online banking
Place standing txns
Write letters
Download payments
Inventory change
Reconcile by account
Print checks by account
Select PO by vendor

Enterprise Multi User Features
567
(c) 2013 Intuit Inc. All rights reserved.
Item history by item
Select estimate by customer
Select sales order by customer
Change inventory acct
Item adjustment (i.e. Change QOH for inventory)
Change sales tax rate
List deletes
Verify
(unless verifying a single user feature)
Budgets
568
Appendix E: Enterprise Edition and Single/Multi-User Issues
(c) 2013 Intuit Inc. All rights reserved.
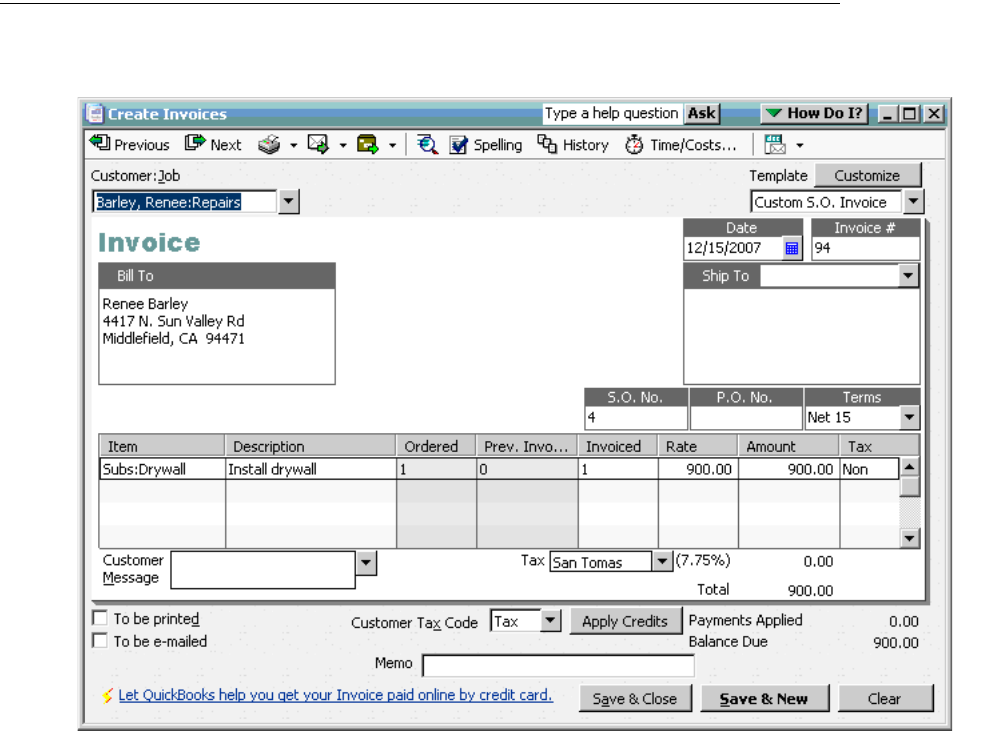
Overpayments and Refunds 569
(c) 2013 Intuit Inc. All rights reserved.
A
PPENDIX
F 1
O
VERPAYMENTS
AND
R
EFUNDS
1
This appendix contains an AlphaGeek article that contains information we think would be
useful to repeat here in the Programmer’s Guide. Enjoy!
Overpayments and Refunds
Here’s the scenario: Your client owns Rock Castle Construction. Renee Barley hired your
client to do $900 of work (installing drywall: a tedious job that she was happy to hire out ).
Renee pays $1000. Whoops, that’s a $100 overpayment:

570
Appendix F: Overpayments and Refunds
(c) 2013 Intuit Inc. All rights reserved.
Notice that QuickBooks points out the overpayment! We don’t know what Renee had in
mind, so we’ll leave the overpayment as a credit. Notice that QuickBooks will offer to print
a credit memo. It would be the right thing to do, but notice that even if you do choose to
print a Credit Memo for Renee, you won’t be able to find a credit memo transaction for
Renee, what gets printed is just something that we can give Renee to ensure that she can
remind us that she overpaid us by $100.
That’s because a QuickBooks credit memo transaction is, in the words of the QuickBooks
help file for when a customer returns items for which you have already recorded an invoice,
customer payment, or sales receipt and you or the customer wish to retain the value of the
returned goods as a credit for use in future transactions (as opposed to refunding
immediately). That’s not the situation we have here, nothing is being returned. So
regardless of how we respond to the following dialog:

Overpayments and Refunds
571
(c) 2013 Intuit Inc. All rights reserved.
Renee winds up with a $100 credit:
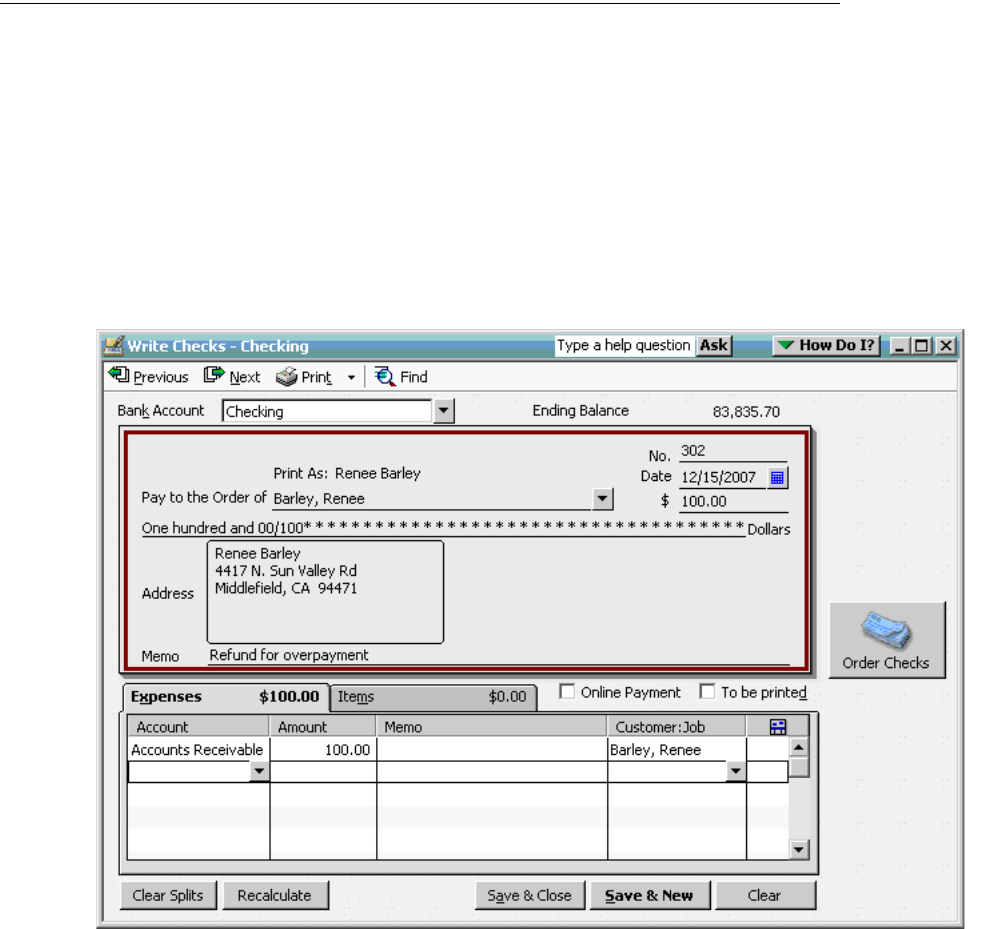
572
Appendix F: Overpayments and Refunds
(c) 2013 Intuit Inc. All rights reserved.
The Manual Solution
Rock Castle Construction now must refund this overpayment manually. In our example the
payment is already deposited, so we can’t delete the overpayment and try to correct the
problem.
If you were to guess, you might guess that you could just create a credit memo now, after
all it was the failure to do that which resulted in this problem. BUT, that’s not the right
answer. Doing so would give you a $200 credit! That would be double the problem.
So instead, we go to the Write Checks window. Create a check to Renee Barley for
$100.00. Use an expense line with Account = Accounts Receivable and Customer:Job =
Renee Barley.
This will do the right thing with the balance on Renee’s account (it will return to $0.00).
However that this doesn’t update the credit on the original payment transaction. Let’s look
at that payment:
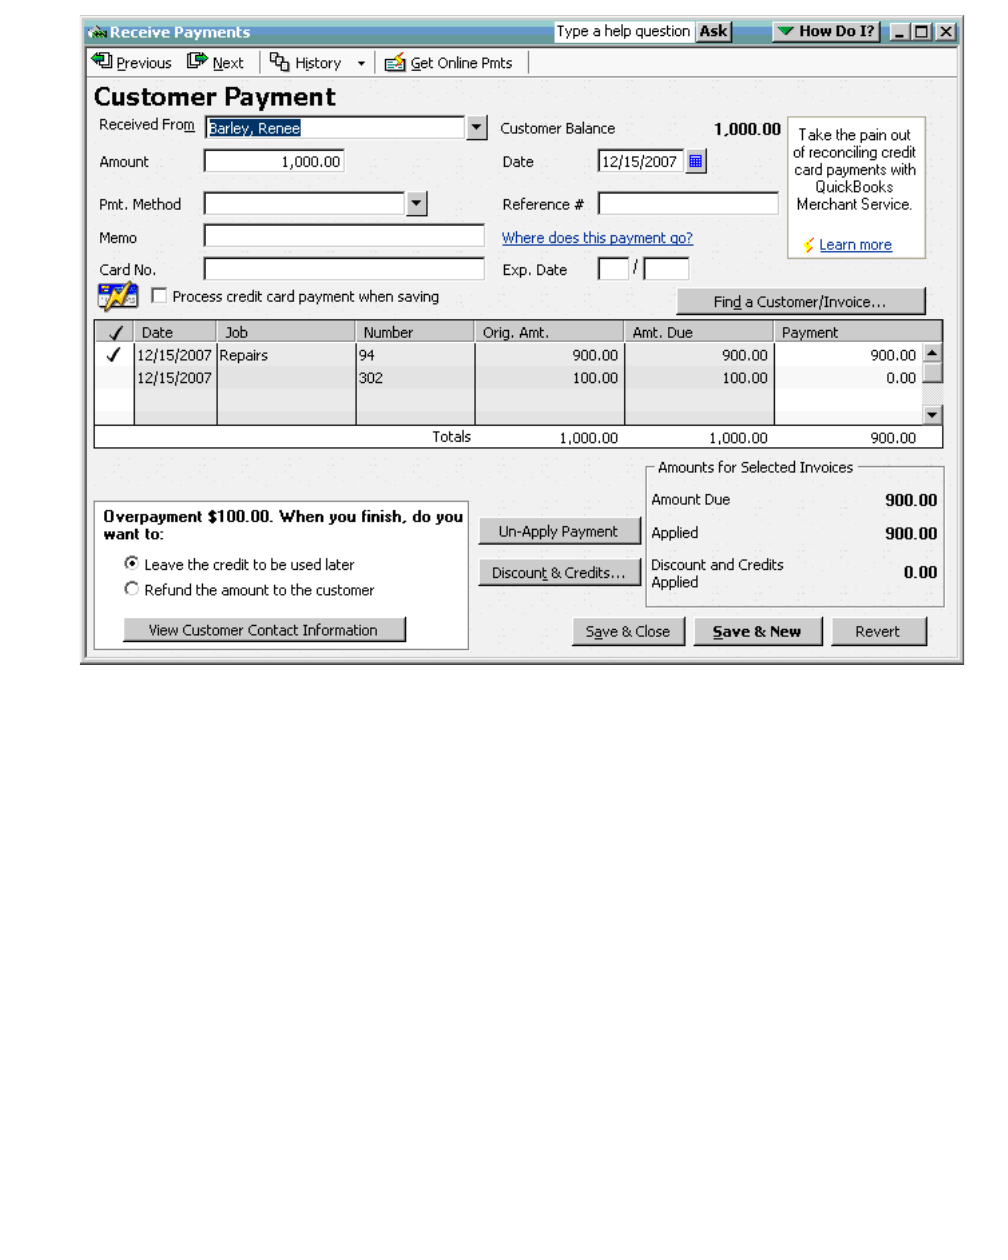
The Manual Solution
573
(c) 2013 Intuit Inc. All rights reserved.
Here in the QuickBooks user interface, what we really want is to apply the payment to the
check transaction we see there by adding it to the payment receipt we have. We can just add
a check mark to the refund check line in this payment receipt, but if the payment has
already been deposited some accountants may take issue with the modification of this
payment receipt.
So there’s another way to patch up the QuickBooks confusion here by clearing out the
discounts & credits. We start by creating a new Payment Receipt for Renee:
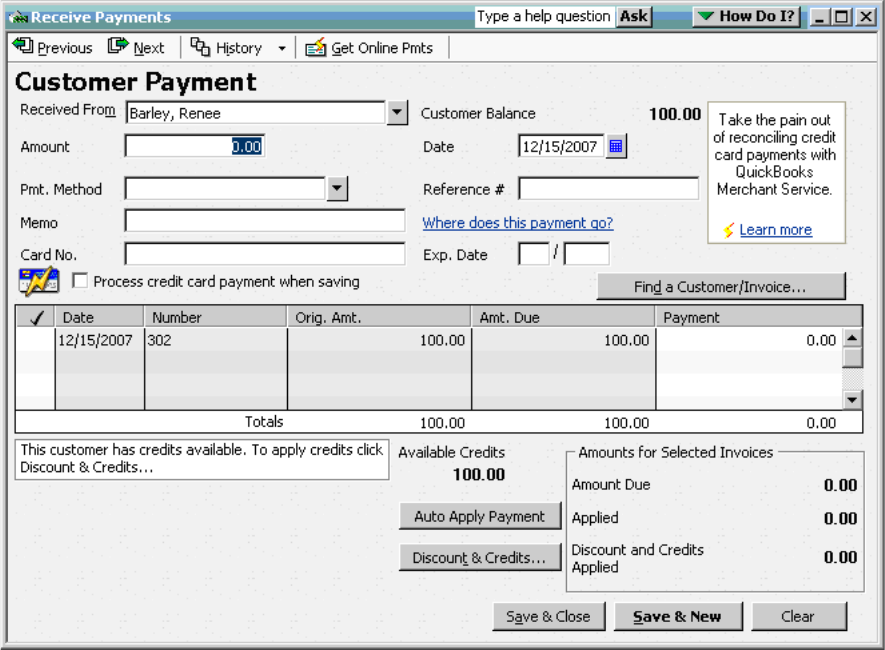
574
Appendix F: Overpayments and Refunds
(c) 2013 Intuit Inc. All rights reserved.
Note that QuickBooks correctly sees the refund check we wrote earlier for the Accounts
Receivable expense. We want to apply the overpayment credit to this refund check so we
click Discount & Credits:
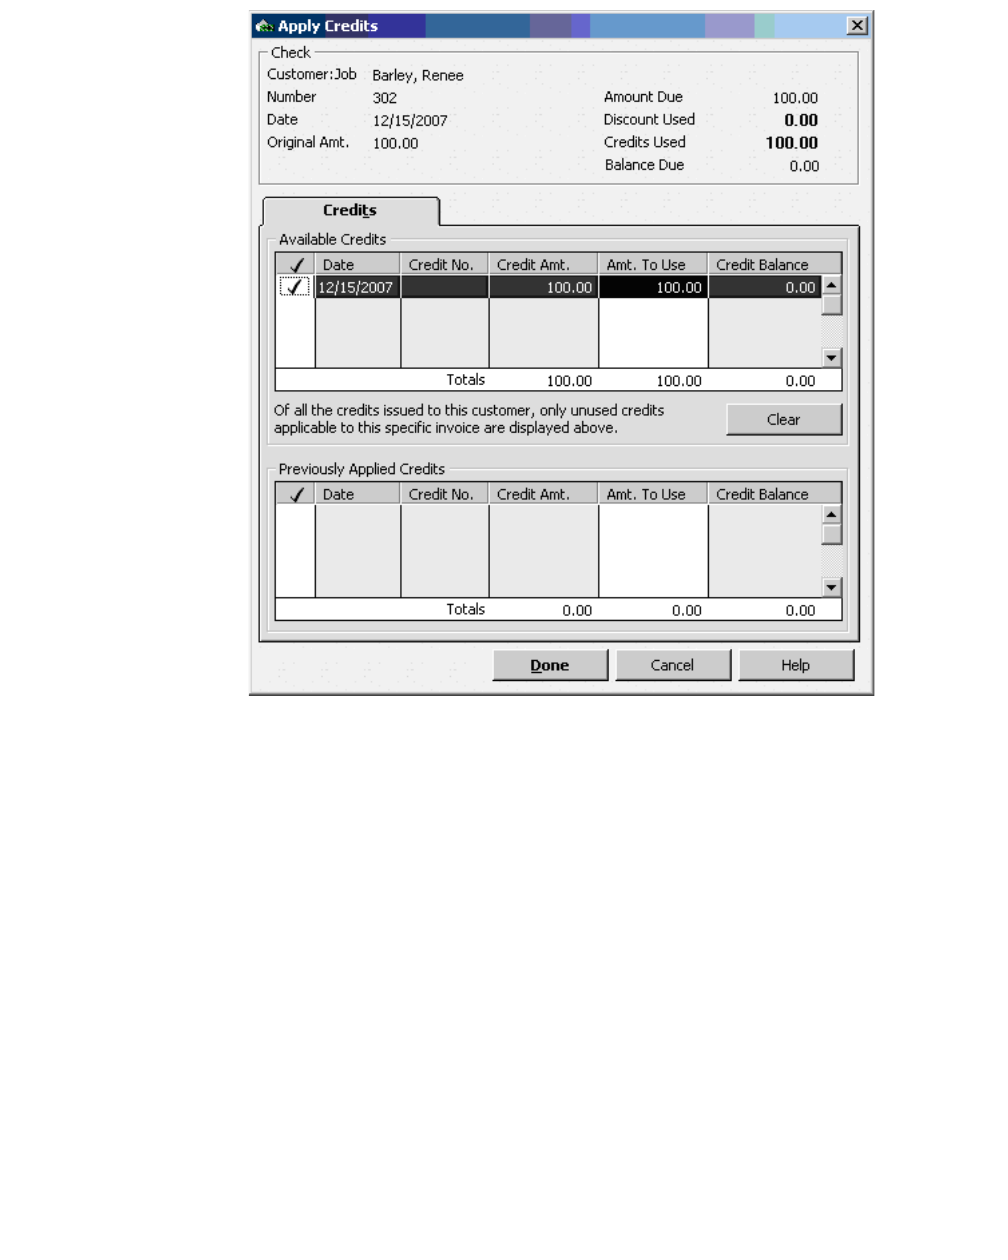
The Manual Solution
575
(c) 2013 Intuit Inc. All rights reserved.
The credit is already selected, so we just click Done.
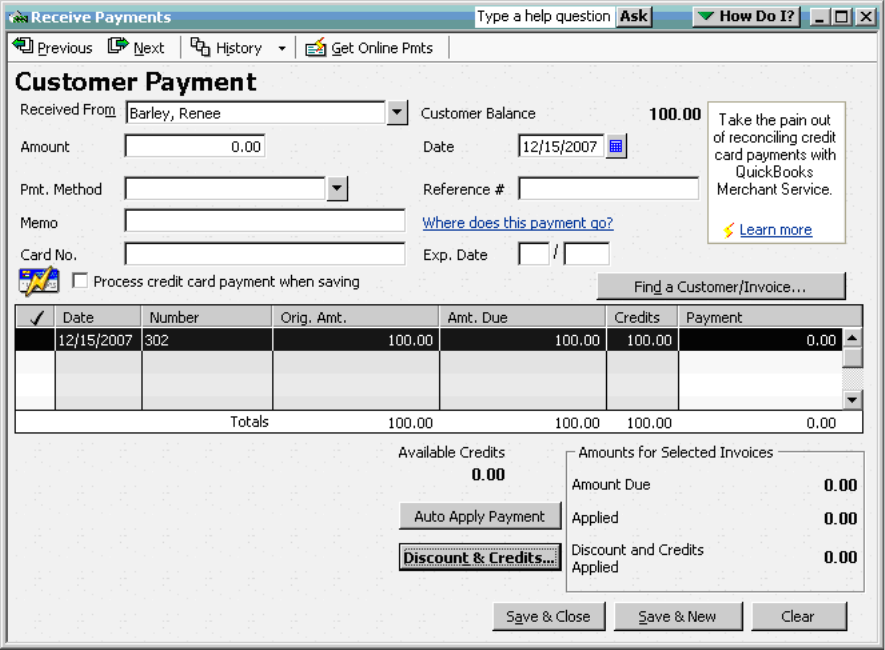
576
Appendix F: Overpayments and Refunds
(c) 2013 Intuit Inc. All rights reserved.
We now have a payment for $0 that applies to nothing, but notice that the Customer has
credits available message is no longer present. Click Save & Close because this is a
transaction for $0.00 nothing actually posts, just like no credit memo was created earlier, no
new payment receipt is created, but if we check the original transaction again, we can see
that the credit that we refunded is now cleaned up:
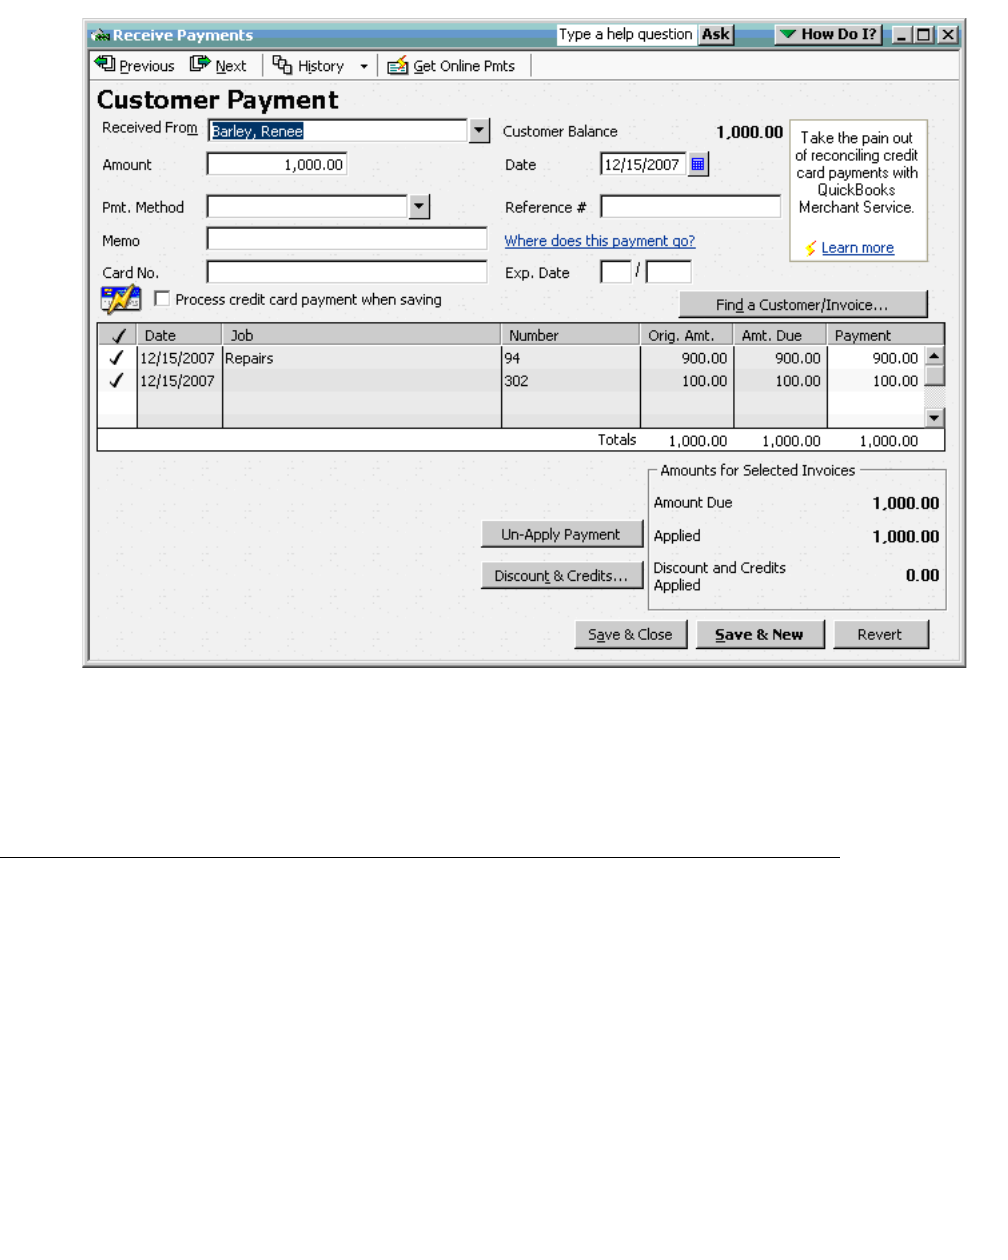
Taking it to the SDK
577
(c) 2013 Intuit Inc. All rights reserved.
Excellent, the overpayment portion is gone. Even more importantly, that extra receive
payment we just did, which wasn’t really a payment receipt won’t show up on any
transaction lists, it really just cleaned up a quirk of the QuickBooks business logic.
Taking it to the SDK
Blissfully you think you’ve got this problem licked, so you charge into writing an
application to solve this for your client. But the details of doing this programmatically are a
little more exposed. And the functionality in this area has improved which means you need
different solutions if you need to support older versions of QuickBooks L.
Lets start with QuickBooks 2005 since a good number of clients would have access to this
functionality by now.. In QB2005 we have ARRefundCreditCardAdd (for credit card
refund) and CheckAdd (for check refund). Let’s see what happens when we use those.
578
Appendix F: Overpayments and Refunds
(c) 2013 Intuit Inc. All rights reserved.
<?xml version="1.0" ?>
<?qbxml version="2.0"?>
<QBXML>
<QBXMLMsgsRq onError="stopOnError">
<CheckAddRq>
<CheckAdd>
<AccountRef>
<FullName>Checking</FullName>
</AccountRef>
<PayeeEntityRef>
<FullName>Barley, Renee</FullName>
</PayeeEntityRef>
<TxnDate>2007-12-15</TxnDate>
<Memo>Refund for overpayment</Memo>
<IsToBePrinted>1</IsToBePrinted>
<ExpenseLineAdd>
<AccountRef>
<FullName>Accounts Receivable</FullName>
</AccountRef>
<Amount>100.00</Amount>
<CustomerRef>
<FullName>Barley, Renee</FullName>
</CustomerRef>
</ExpenseLineAdd>
</CheckAdd>
</CheckAddRq>
</QBXMLMsgsRq>
</QBXML>
When we send this to the request processor with QB 2005 or greater we get:
<?xml version="1.0" ?>
<QBXML>
<QBXMLMsgsRs>
<CheckAddRs statusCode="0" statusSeverity="Info" statusMessage="Status OK">
<CheckRet>
<TxnID>5BBE-1197738754</TxnID>
<TimeCreated>2007-12-15T09:12:34-08:00</TimeCreated>
<TimeModified>2007-12-15T09:12:34-08:00</TimeModified>
<EditSequence>1197738754</EditSequence>
<TxnNumber>1261</TxnNumber>
<AccountRef>
<ListID>20000-933270541</ListID>
<FullName>Checking</FullName>
</AccountRef>
<PayeeEntityRef>
<ListID>920000-1071506140</ListID>
<FullName>Barley, Renee</FullName>
</PayeeEntityRef>
<TxnDate>2007-12-15</TxnDate>
<Amount>100.00</Amount>
<Memo>Refund for overpayment</Memo>
<Address>

Taking it to the SDK
579
(c) 2013 Intuit Inc. All rights reserved.
<Addr1>Renee Barley</Addr1>
<Addr2>4417 N. Sun Valley Rd</Addr2>
<City>Middlefield</City>
<State>CA</State>
<PostalCode>94471</PostalCode>
</Address>
<IsToBePrinted>true</IsToBePrinted>
<ExpenseLineRet>
<TxnLineID>5BC0-1197738754</TxnLineID>
<AccountRef>
<ListID>40000-933270541</ListID>
<FullName>Accounts Receivable</FullName>
</AccountRef>
<Amount>100.00</Amount>
<CustomerRef>
<ListID>920000-1071506140</ListID>
<FullName>Barley, Renee</FullName>
</CustomerRef>
</ExpenseLineRet>
</CheckRet>
</CheckAddRs>
</QBXMLMsgsRs>
</QBXML>
But look at the Customer Payment:
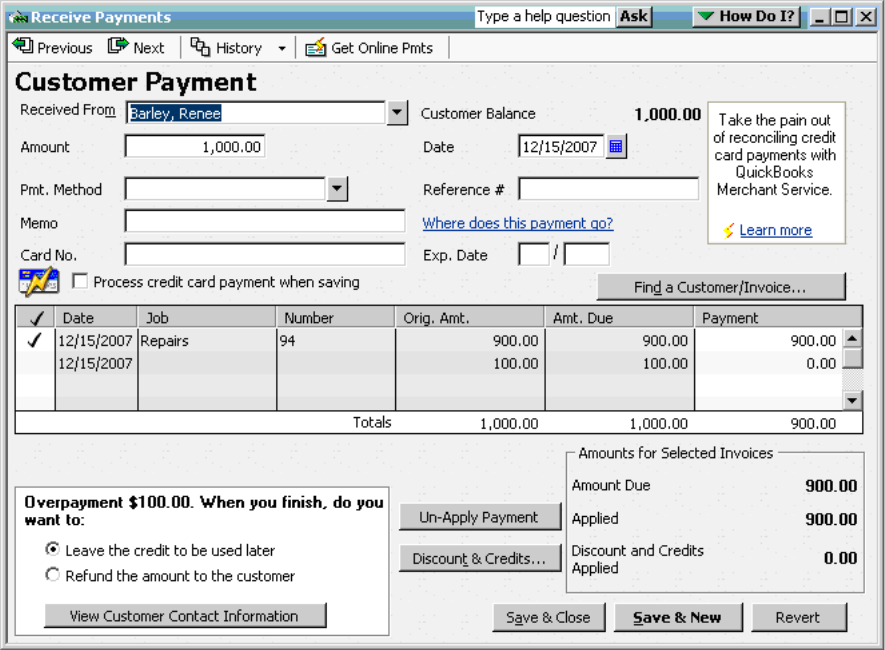
580
Appendix F: Overpayments and Refunds
(c) 2013 Intuit Inc. All rights reserved.
Whoa! Look at that! Someone could still come along and issue a refund! The problem is the
same as when we did it manually. It turns up we need that Apply Credits magic.
Those of you who remember our discussion of this situation in the QuickBooks UI will see
that the problem for the SDK is that there’s actually no transaction for that credit, even if
we printed a credit memo, that means there’s no TxnID we can use in the
ReceivePaymentAdd request’s SetCredit aggregate.
Before QuickBooks 2007, we really have only two options.
Option 1: Prevent the situation from happening in the first place by recognizing an
overpayment before we recording it from our application and generate a refund check first,
then record the payment receipt, applying the payment to the original invoice and the
refund check all at once (note that in the example below we’re also recording the invoice,
that’s just to provide a functional request that doesn’t require the AlphaGeek to magically
anticipate the TxnID of the invoice ):
<?xml version="1.0" ?>
<?qbxml version="4.0" ?>
<QBXML>
<QBXMLMsgsRq onError = "stopOnError">
<InvoiceAddRq requestID = "0">
<InvoiceAdd defMacro="TxnID:INV1">

Taking it to the SDK
581
(c) 2013 Intuit Inc. All rights reserved.
<CustomerRef>
<FullName>Barley, Renee</FullName>
</CustomerRef>
<InvoiceLineAdd>
<ItemRef>
<FullName>Install Drywall</FullName>
</ItemRef>
<Quantity>1</Quantity>
<Rate>900.00</Rate>
<SalesTaxCodeRef>
<FullName>Non</FullName>
</SalesTaxCodeRef>
</InvoiceLineAdd>
</InvoiceAdd>
</InvoiceAddRq>
<CheckAddRq>
<CheckAdd defMacro="TxnID:Check1">
<AccountRef>
<FullName>Checking</FullName>
</AccountRef>
<PayeeEntityRef>
<FullName>Barley, Renee</FullName>
</PayeeEntityRef>
<Memo>Refund</Memo>
<ExpenseLineAdd>
<AccountRef>
<FullName>Accounts Receivable</FullName>
</AccountRef>
<Amount>100.00</Amount>
<CustomerRef>
<FullName>Barley, Renee</FullName>
</CustomerRef>
</ExpenseLineAdd>
</CheckAdd>
</CheckAddRq>
<ReceivePaymentAddRq>
<ReceivePaymentAdd>
<CustomerRef>
<FullName>Barley, Renee</FullName>
</CustomerRef>
<TotalAmount>1000.00</TotalAmount>
<AppliedToTxnAdd>
<TxnID useMacro="TxnID:INV1" />
<PaymentAmount>900.00</PaymentAmount>
</AppliedToTxnAdd>
<AppliedToTxnAdd>
<TxnID useMacro="TxnID:Check1" />
<PaymentAmount>100.00</PaymentAmount>

582
Appendix F: Overpayments and Refunds
(c) 2013 Intuit Inc. All rights reserved.
</AppliedToTxnAdd>
</ReceivePaymentAdd>
</ReceivePaymentAddRq>
</QBXMLMsgsRq>
</QBXML>
Option 2. Recognize the situation has occurred and guide the user through fixing it by
adding the refund check to QuickBooks, then use TxnDisplayMod to bring up the payment
receipt in the QuickBooks user interface and ask the user to add a check mark next to the
refund check in the apply to transaction list of the payment form.
QuickBooks 2007 to the Rescue!
While the first solution proposed is reasonable if it is feasible for your application to detect
the overpayment situation when its happening, the reality is that many times your
application won’t have the omniscient view of QuickBooks data and the user’s intent that is
required to apply it reliably.
Fortunately, the situation gets considerably better with QuickBooks 2007, we can record the
payment as usual, applying it to the invoice and getting stuck with a $100 credit balance for
Renee:
<?xml version="1.0" ?>
<?qbxml version="6.0" ?>
<QBXML>
<QBXMLMsgsRq onError = "stopOnError">
<ReceivePaymentAddRq>
<ReceivePaymentAdd>
<CustomerRef>
<FullName>Barley, Renee</FullName>
</CustomerRef>
<TotalAmount>1000.00</TotalAmount>
<AppliedToTxnAdd>
<TxnID useMacro="TxnID:INV1" />
<PaymentAmount>900.00</PaymentAmount>
</AppliedToTxnAdd>
</ReceivePaymentAdd>
</ReceivePaymentAddRq>
</QBXMLMsgsRq>
</QBXML>
Then at some later time we can record a check to refund Renee:
<?xml version="1.0" ?>
<?qbxml version="4.0" ?>
<QBXML>
<QBXMLMsgsRq onError = "stopOnError">
<CheckAddRq>

QuickBooks 2007 to the Rescue!
583
(c) 2013 Intuit Inc. All rights reserved.
<CheckAdd defMacro="TxnID:Check1">
<AccountRef>
<FullName>Checking</FullName>
</AccountRef>
<PayeeEntityRef>
<FullName>Barley, Renee</FullName>
</PayeeEntityRef>
<Memo>Refund</Memo>
<ExpenseLineAdd>
<AccountRef>
<FullName>Accounts Receivable</FullName>
</AccountRef>
<Amount>100.00</Amount>
<CustomerRef>
<FullName>Barley, Renee</FullName>
</CustomerRef>
</ExpenseLineAdd>
</CheckAdd>
</CheckAddRq>
</QBXMLMsgsRq>
</QBXML>
A quick TransactionQuery request shows us the situation as it stands with Renee at this
point:
<QBXML>
<QBXMLMsgsRs>
<TransactionQueryRs statusCode="0" statusSeverity="Info" statusMessage="Status OK">
<TransactionRet>
<TxnType>Invoice</TxnType>
<TxnID>5C29-1197706889</TxnID>
<TimeCreated>2007-12-15T00:21:29-08:00</TimeCreated>
<TimeModified>2007-12-15T00:21:29-08:00</TimeModified>
<EntityRef>
<ListID>920000-1071506140</ListID>
<FullName>Barley, Renee</FullName>
</EntityRef>
<AccountRef>
<ListID>40000-933270541</ListID>
<FullName>Accounts Receivable</FullName>
</AccountRef>
<TxnDate>2007-12-15</TxnDate>
<RefNumber>94</RefNumber>
<Amount>900.00</Amount>
</TransactionRet>
<TransactionRet>
<TxnType>ReceivePayment</TxnType>
<TxnID>5C2D-1197706923</TxnID>
584
Appendix F: Overpayments and Refunds
(c) 2013 Intuit Inc. All rights reserved.
<TimeCreated>2007-12-15T00:22:03-08:00</TimeCreated>
<TimeModified>2007-12-15T00:22:03-08:00</TimeModified>
<EntityRef>
<ListID>920000-1071506140</ListID>
<FullName>Barley, Renee</FullName>
</EntityRef>
<AccountRef>
<ListID>80000-933270541</ListID>
<FullName>Undeposited Funds</FullName>
</AccountRef>
<TxnDate>2007-12-15</TxnDate>
<Amount>1000.00</Amount>
</TransactionRet>
<TransactionRet>
<TxnType>Check</TxnType>
<TxnID>5C32-1197706965</TxnID>
<TimeCreated>2007-12-15T00:22:45-08:00</TimeCreated>
<TimeModified>2007-12-15T00:22:45-08:00</TimeModified>
<EntityRef>
<ListID>920000-1071506140</ListID>
<FullName>Barley, Renee</FullName>
</EntityRef>
<AccountRef>
<ListID>20000-933270541</ListID>
<FullName>Checking</FullName>
</AccountRef>
<TxnDate>2007-12-15</TxnDate>
<RefNumber>304</RefNumber>
<Amount>-100.00</Amount>
</TransactionRet>
</TransactionQueryRs>
</QBXMLMsgsRs>
</QBXML>
The set of transactions above get us into this situation:
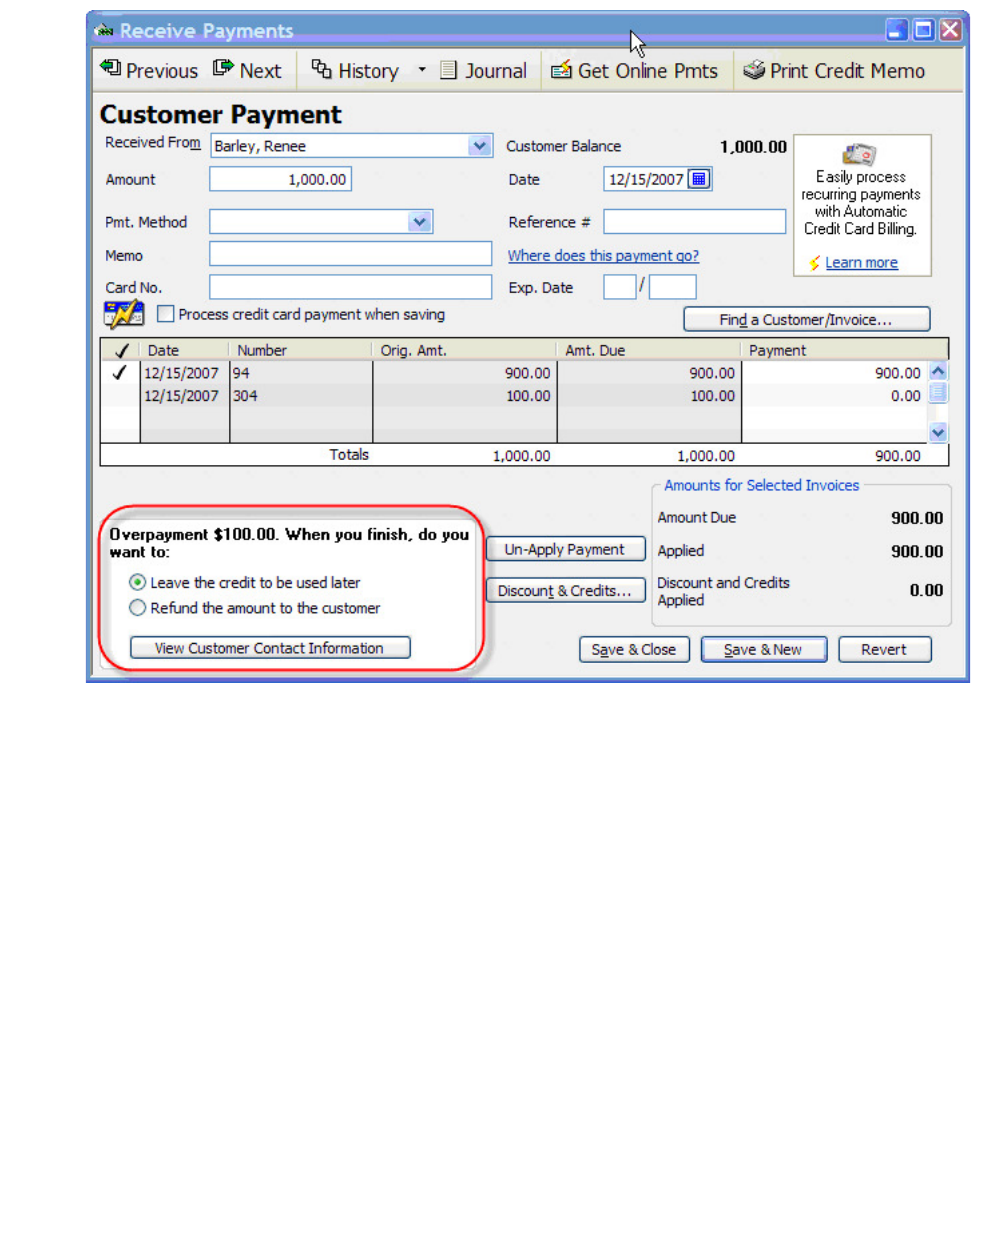
QuickBooks 2007 to the Rescue!
585
(c) 2013 Intuit Inc. All rights reserved.
QuickBooks 2007 and SDK 6.0 add a number of transaction mod requests, including,
fortunately, ReceivePaymentMod, so we can use the SDK to modify that payment receipt
(TxnID 5C2D-1197706923) to apply it to the check as well:l:
<?xml version="1.0"?>
<?qbxml version="6.0"?>
<QBXML>
<QBXMLMsgsRq onError="continueOnError">
<ReceivePaymentModRq requestID="1">
<ReceivePaymentMod>
<TxnID>5C2D-1197706923</TxnID>
<EditSequence>1197706923</EditSequence>
<AppliedToTxnMod>
<TxnID>5C29-1197706889</TxnID>
<PaymentAmount>900.00</PaymentAmount>
</AppliedToTxnMod>
<AppliedToTxnMod>
<TxnID>5C32-1197706965</TxnID>
<PaymentAmount>100.00</PaymentAmount>
</AppliedToTxnMod>
</ReceivePaymentMod>
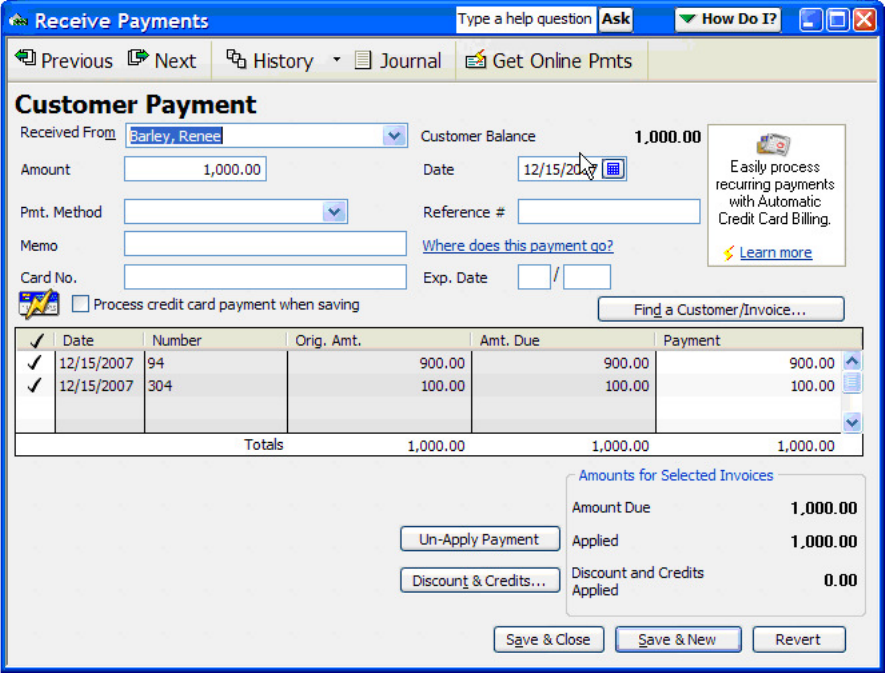
586
Appendix F: Overpayments and Refunds
(c) 2013 Intuit Inc. All rights reserved.
</ReceivePaymentModRq>
</QBXMLMsgsRq>
</QBXML>
Checking the QuickBooks UI we see that we got exactly what we were after:
Which we can also see in the response from the ReceivePaymentMod request:
<QBXML>
<QBXMLMsgsRs>
<ReceivePaymentModRs requestID="1" statusCode="0" statusSeverity="Info"
statusMessage="Status OK">
<ReceivePaymentRet>
<TxnID>5C2D-1197706923</TxnID>
<TimeCreated>2007-12-15T00:22:03-08:00</TimeCreated>
<TimeModified>2007-12-15T01:01:10-08:00</TimeModified>
<EditSequence>1197709270</EditSequence>
<TxnNumber>1266</TxnNumber>
<CustomerRef>
<ListID>920000-1071506140</ListID>
<FullName>Barley, Renee</FullName>

Conclusion
587
(c) 2013 Intuit Inc. All rights reserved.
</CustomerRef>
<ARAccountRef>
<ListID>40000-933270541</ListID>
<FullName>Accounts Receivable</FullName>
</ARAccountRef>
<TxnDate>2007-12-15</TxnDate>
<TotalAmount>1000.00</TotalAmount>
<DepositToAccountRef>
<ListID>80000-933270541</ListID>
<FullName>Undeposited Funds</FullName>
</DepositToAccountRef>
<UnusedPayment>0.00</UnusedPayment>
<UnusedCredits>0.00</UnusedCredits>
<AppliedToTxnRet>
<TxnID>5C29-1197706889</TxnID>
< TxnType>Invoice</TxnType>
<TxnDate>2007-12-15</TxnDate>
<RefNumber>94</RefNumber>
<BalanceRemaining>0.00</BalanceRemaining>
<Amount>900.00</Amount>
</AppliedToTxnRet>
<AppliedToTxnRet>
<TxnID>5C32-1197706965</TxnID>
<TxnType>Check</TxnType>
<TxnDate>2007-12-15</TxnDate>
<RefNumber>304</RefNumber>
<BalanceRemaining>0.00</BalanceRemaining>
<Amount>100.00</Amount>
</AppliedToTxnRet>
</ReceivePaymentRet>
</ReceivePaymentModRs>
</QBXMLMsgsRs>
</QBXML>
Conclusion
The handling of overpayments has long been a topic of confusion for QuickBooks users
and developers alike (not to mention the AlphaGeek). We hope that this in-depth
exploration of the issues associated with overpayments in QuickBooks and how to handle
them in the SDK will be helpful to everyone. ReceivePaymentMod is but one of many new
requests from SDK 6.0, the AlphaGeek says Check it Out!
588
Appendix F: Overpayments and Refunds
(c) 2013 Intuit Inc. All rights reserved.

Index
1
(c) 2013 Intuit Inc. All rights reserved.
A
Access Rights window
54
access, to personal data
489
account balances
503
account filter
example of
88
account filters
166
account/subaccount elements
164
AccountAdd object
168
AccountAddRq
31, 168
AccountAddRs
168
AccountRet object
168
AccountType filter
85
accrual basis
107
ActiveStatus
502
ActiveStatus filter
82
Add request
example
168
Add response
example
169
adding objects
168
administrator, QuickBooks
and application authorization
35
and permissions
488
and personal data
489
advantages, of single-user mode
55
aggregate
31
aggregates
31
Aging reports
95, 104
valid options for
115
AllowCustomerTaxCodes elements
535
AmountIncludesVAT elements
535
API
choice of
19, 31
appID parameter (application ID)
in OpenConnection
446
application
error handling
491
log file for
491
name
558
AppliedToTxnAdd
219
AppliedToTxnAdd aggregate
218, 220
AppliedToTxnRet aggregate
221
AppliedToTxnRet object
219, 227
lean vs. full forms of
219
applying credits
217
applying discounts
217
applying payments
217
applying payments automatically
220
appName parameter
in OpenConnection
446
attributes
31
responseData
171
Attributes. See also oldMessageSetID, newMes-
sageSetID, onError, responseData, messageSet-
StatusCode
audience
for this manual
19
authentication
543
auto-applying payments
220
auto-login
limitations for
53
permissions for
53, 488
user
488
auto-login to QuickBooks
51
automated error recovery
about
404
and query requests
405
steps for using
404
B
balance
169
bank account number, allowing access to
54
basis
for reports
107
BeginSession method
541
checks and tasks
47
best practices
481
bill
225
bill credit objects
218
bill payment
example of an error in
228
examples of
227
bill payment objects
225
bill payment transactions
217, 224
BillPaymentCheckAdd
225
BillPaymentCheckAdd request
217
BillPaymentCreditCardAdd
225
BillPaymentCreditCardAdd request
217
bills
218
paying
224
BillToPayQuery
90, 217, 225
example of
225
BillTxnList
227
BudgetSummaryReportQueryRq
99, 114
C
Canadian edition, of QuickBooks
561, 562
about
532
Currency list in
536
Tax Code list in
535
Canadian editions of QuickBooks
about
532
Tax Code list in
535
Canadian form of qbXML
536
2
Index
(c) 2013 Intuit Inc. All rights reserved.
Canadian version
subscribing to UI events
200
cash basis
107
ChargeTax1 elements
535
ChargeTax2 elements
535
check
224
CheckAdd request
with error recovery
406
CheckAdd response
status check
407
checking the version of QuickBooks
23
checklist
for working with multiple versions of Quick-
Books
494
checks
220
checksum
408
children
of list elements
160
class/subclass elements
164
cleared status
157
ClearedStatus column
110
clearing error recovery records
411
clearing state
409
in QuickBooks
405
CloseConnection method
545
closed transactions
135
closing a bill
227
closing date
135
Code elements (currency code)
536
ColData field
109
column descriptor
107, 108
column ID
107, 109
column types
108
and corresponding data types (table)
105
columns
number of
107
COM API
for QBFC
31
COM interface
45
communicating with QuickBooks
methods for
539
company
159
company file
543, 547
problems opening
486
restoring
499, 500
storing data securely
481
CompanyActivityQuery
90
CompanyActivityQueryRq
500
CompanyQuery
90
comparing requests
408
comparison of Balance and TotalBalance
169
comparison of SDK APIs
24
concepts
for QuickBooks SDK
31
contents
of this manual
19
continueOnError
171
CreateMsgSetRequest method
432
creating links
219
example of
222
credit
225
applying
223
credit card
224
credit card numbers, allowing access to
54
credit memos
218
credits
217, 219, 225
applying
217
creating vs. setting
218
setting
226
credits, setting
221
Currency list objects
536
CurrencyHotKey elements
536
Custom Detail reports
104
custom reports
101
summary and detail
98
CustomDetailReportQueryRq
98
customer list
example of
165
customer/job elements
164
CustomerRef
219
CustomSummaryReportQueryRq
98
D
data
synchronizing between QuickBooks and your
application
499
data row
in reports
109
data types
and corresponding column types (table)
105
DataEventSubscriptionAddRq
178
DataExtAddRq
147
DataExtDefDelRq
148
DataExtDelRq
148
DataExtModRq
147
dataType
108
date element
in custom reports
98
date filters
for transactions
86
date macro
in filters
87
date range filter
example of
87, 89

Index
3
(c) 2013 Intuit Inc. All rights reserved.
dates range
for reports
100
debits
general journal
220
DecimalPlaces elements
536
DecimalSep elements
536
default reports
98
deleting objects
134
DepositAdd request
217, 230
deposits
217, 230
DepositToAccountRef element
231
differences in time
503
digital signature
481, 558
digital signing
for an application
481
disadvantages, of single-user mode
55
discount
applying
223
DiscountAccountRef
221
DiscountAmount
221
discounts
217, 219
applying
217
setting
227
discounts, setting
221
display conditions
209
DisplayCondition
multiple criteria
210
visible vs. enabled states
210
distributing payments
219
distributing your application
396, 505
documentation
for your application
488
provided with the SDK
23
documentation roadmap
19
DoRequests method
403, 411, 483
DoRequestsFromXMLString method
435
E
editing
135
EditSequence
125, 168
element
31
elements
optional vs. required
168
that use macros
157
employee’s salary, fields for
54
EmuRate elements
536
encryption
481
endless loop
406
EndSession method
439, 546
end-users
and error recovery process
486
informing of errors needing intervention
485
entity filter
115
example of
87, 89
entity filters
87, 166
error codes
491
error codes (HRESULTs)
515
error conditions
403
error entries
in log file
493
error recovery
169, 489
attributes for
172
clearing records for
411
completing before upgrading
487
example of
406
loop, breaking out of
487
rationale for including
403
routine
403
status codes and
408
steps for using
405
summary of
410
when to invoke
403
error recovery (QBFC)
about
404
and query requests
405
steps for using
404
error status message
173
European currencies
536
ExchangeRate elements
536
exclusive access, to QuickBooks
55
F
file access mode
47
filters
76, 166, 170, 481
AccountType
85
ActiveStatus
82
by date modified
82
date
86
date macro in
87
date range
89
entity
87, 89
for lists
81
for reports
103, 104
for transactions
86
FullName
81
ListID
81
modification date
86
multiple
170
PaidStatus
90
reference number
89
TotalBalance
85
FLOATTYPE data type
536
ForeignPrice elements
536
FromModifiedDate
4
Index
(c) 2013 Intuit Inc. All rights reserved.
in filters
82
FromModifiedDate field
500
FromReportDate field
100
full version
AppliedToTxnRet
219
FullName
162, 164
example of queries for
166
format of
164
in entity filters
87
maximum length of
164
vs. ListID
166
FullName filter
81
FullNameWithChildren
166
functional groupings
for lists
160
for transactions
161
G
General Detail reports
96, 101, 104
valid options for
117
general journal
227
general journal debits
220
General Summary reports
94
valid options for
118
generating reports
practical approach
99
GetCurrentCompanyFileName
482
GetCurrentCompanyFileName method
441, 487,
547
GetVersion method
444
H
helper queries
217
helper query
225
hierarchical lists
164, 165
hierarchical relationships
167
history
of a transaction
218
host
159
HostQuery
90
HostQuery request
170
HRESULT error codes table
515
HRESULTs
491
requiring error recovery
403
I
identifiers
162
identifying requests
408
IDs
for transactions
161
IErrorInfo interface
515
IncludeColumn field
104
IncludeLineItems flag
90
IncludeLinkedTxns flag
90, 218, 223
IncludeSubcolumns field
100, 101
incompatible versions
of QuickBooks and application
485
QuickBooks and company file
486
informational entries
in log file
493
informative status message
172
Integrated Applications icon, in QuickBooks
489
integrated applications, changing name of
487
integrating with QuickBooks
19
interactive login to QuickBooks
51
Intuit Developer Support
483
inventory items
503
inventory units, not supported via SDK
537
invoice query
example of
87
InvoiceAddRq
244, 347, 364
InvoiceModRq
347
InvoiceQueryRq
218
InvoiceRet
218
invoices
218, 220
by customer list
165
invoking error recovery routine
403
IsAutoApply
219
IsAutoApply flag
220
IsECVatCode elements
536
IsEmu elements
536
IsPiggyBackRate elements
535
IsTax1Exempt elements
535
IsTax2Exempt elements
535
IsUsingForeignPricesOnItems elements
536
IsUsingMulticurrency elements
536
IsUsingUnitsOfMeasure elements
536
IsVendorEligibleForT4A elements
535
item filters
166
item inventory query
example of
87
ItemGroupAddRq
345
ItemGroupModRq
345
ItemGroupQueryRq
345
ItemInventoryAddRq
345
ItemInventoryAssemblyAddRq
345
ItemInventoryAssemblyModRq
345
ItemInventoryAssemblyQueryRq
345
ItemInventoryModRq
345
ItemInventoryQueryRq
345
ItemNonInventoryAddRq
345
ItemNonInventoryModRq
345
ItemNonInventoryQueryRq
345
ItemReceiptAddRq
347
ItemReceiptModRq
347

Index
5
(c) 2013 Intuit Inc. All rights reserved.
ItemServiceAddRq
345
ItemServiceModRq
345
ItemServiceQueryRq
345
J
Job reports
95
default vaues for
102
valid options for
115
job/subjob elements
164
JobEstimatesVsActualsDetail report
105
JobProfitabilityDetail report
105
JournalEntryQueryRq
223
K
Kristy Abercrombie
165
L
lean AppliedToTxnRet object
227
lean version
AppliedToTxnRet
219
line items
90
linked transaction
90
linked transactions
135, 218
LinkedTxn aggregate
218
links
creating
219, 222
list elements
names for
164
list filters
81
example of
82
list IDs
unique groupings for
162
ListDeletedQueryRq
500, 503
ListID
125, 134, 162, 168
in entity filters
87
vs. FullName
166
ListID filter
81
ListIDWithChildren
166
lists
159
hierarchical
164, 165
identifiers for
162
parent-child elements in
160
separate groupings for
164
types of
160
locked transactions
135
lockout
55
log file
493
using
493
logging in, problems related to
48
login
mode access
55
modes
488
login modes
488
login modes (in QuickBooks)
51
M
macros
155, 167
elements that use
157
example of defining
156
example of using
155, 156
format of names for
155
name for
156
storage of
155
tagname for
156
MajorVersion
170
MajorVersion method
556
match criterion
used in a query
88
matching name strings
in queries
83
MaxReturned
481
memory
546
freeing
449, 561, 562
merge modules
396, 397, 506
message aggregate
31
message set
30
status code for
491
message set IDs
405
messages
30
messageSetStatusCode
407, 409
methods, API reference for
539
MinorVersion
170
MinorVersion method
557
MissingChecks report
105
mode
single-user
135
modes
login
488
single-user vs. multi-user
54
specifying in BeginSession
543
modification date
in filters
86
modification time
in multi-user mode
503
Modify request
deleting element value in
125
modifying objects
125
monitoring
HRESULTs
492
HTTPS errors
492
MSI (Microsoft Installer)
397, 506
multicurrency
534
multiple filters
170
multiple sessions
versus single session
48
6
Index
(c) 2013 Intuit Inc. All rights reserved.
when to use
49
multi-user mode
and modification time
503
effects of
54
specifying in BeginSession
543
multi-user session
53
N
name
for macros
156
name, for application
558
NameFilter
83
NameRangeFilter
83
names
165
filters for
83
newMessageSetID
171, 405, 408
preserving
411
O
object
31
definition of
159
object references
adding or modifying
167
purposes of
167
object type
134
objects
adding
168
deleting
134
modifying
125
querying for
170
voiding
136
oldMessageSetID
171, 405
onError attribute
171
online banking
224
Onscreen Reference
19, 24, 31, 76, 217
OpenConnection method
446, 486
operation
31
operations
supported by SDK
167
optional elements
168
Order column
in reports
113
out-of-memory conditions
403
overpayment
example of
227
Owner ID
81
P
packaging your application
396, 505
PaidStatus filter
90
parent references
167
password
135
paying a bill
227
paying bills
224
paying two bills
example of
229
payment
225
applying
223
unused
223
payment amounts
and TotalAmount
220
payment method
225
payments
217
applying
217
applying automatically
220
distributing explicitly
219
PaymentTxnID element
230
PaymentTxnLineID elements
230
Payroll Detail reports
101, 104
PayrollDetailReportQueryRq
97
PayrollItemNonWageQueryRq
114
PayrollItemWageQueryRq (
114
PayrollSummaryReportQueryRq
97, 114
permissions
48, 488
for auto-login
488
personal data
application access to
54, 489
in reports
113
Post
411
power outages
403
preferences
135, 159
PreferencesQuery
90
PreferencesQueryRq
135
prerequisites
for reading this manual
19
preset reports
in QuickBooks
93
PreviousPeriod subcolumn
in reports
103
PreviousYear subcolumn
in reports
103
problems
helping users to troubleshoot
485
logging in
48
opening company file
486
processing state
171
ProcessRequest method
403, 411, 483, 559
ProductName
170
Profit and Loss report
109
Profit and Loss Standard report
99
prolog
qbXML document
494
Province elements
535
PurchaseByVendorSummary report
105, 115
PurchaseOrderAddRq
347

Index
7
(c) 2013 Intuit Inc. All rights reserved.
PurchaseOrderModRq
347
purchasing units, not supported via SDK
537
Q
QBFC API
24
QBFC Library
31
qbsdklog.txt file
483
qbsdklog.txt log file
493
qbsdklog.txt log file
558
qbXML
31
Canadian form of
536
setting which version a request will use
432
text stream, validating
559, 560
qbXML Request Processor
45
See also Request Processor
qbXML Request Processor API
491
qbXML Request Processor Interface
23, 24
qbXML specification
23
qbxmlops20.xml
217
qbxmlops20.xml sample file
23
qbXMLValidator.exe
483
QBXMLVersionsForSession method
561, 562
queries
159
example with FullName
166
filters for rname ranges
83
for transactions
86
helper
217
match criterion for names
83
requesting additional data
90
ToDo
85
query requests, disabling error recovery before
405
querying for objects
170
querying the Request Processor, methods for
539
QuickBooks
Canadian editions of
532, 561, 562
checking version of
23
company file
45
integrating with
19
multiple installed versions of
486
version
47
QuickBooks administrator
and application authorization
35
and permissions
488
and personal data
489
QuickBooks Foundation Class (QBFC) Library
23
QuickBooks Foundation Class (QBFC) Library.
See QBFC Library
QuickBooks Intuit Parner Platform (IPP) Devel-
oper Support
481
QuickBooks Report Finder
93
R
ranges of names
filtering for in queries
83
RD
client
394
RDS
and new HRESULT messages
400
described
176, 391
distributing applications with
395
no special coding required
399
port
393
QuickBooks support for
400
server
392
what customers need to know
400
RDS (Remote Data Sharing
Remote Data Sharing (RDS)
397
read-only application
403
receive payment
219
receive payment transactions
217, 219
ReceivePaymentAdd object
220, 222
ReceivePaymentAdd request
217, 219
ReceivePaymentAddRq
156, 347
ReceivePaymentModRq
347
ReceivePaymentRet object
223
ReceivePaymentToDeposit
230
ReceivePaymentToDeposit helper query
217
ReceivePaymentToDepositQuery
90
recommended practices
481
redistributing SDK components
396, 505
reference number filters
89
reference numbers
for transactions
161
missing
89
references
parent
167
RefNumber
86, 136, 162
RefNumberFilter
89
RefNumberRangeFilter
89
ReleaseLevel method
563
ReleaseNumber method
564
Remote Data Sharing. See RDS
391
report request fields
correspondence with QuickBooks user inter-
face
99
ReportAccountFilter
103
ReportCalendar field
100
ReportClassFilter
103
ReportDateMacro field
100
ReportEntity filter
105
ReportEntityFilter
103
reporting
167
ReportItemFilter
103
8
Index
(c) 2013 Intuit Inc. All rights reserved.
reports
75, 107, 159
a practical approach to generating
99
Aging
95, 104, 115
calculating subcolumn values in
101
categories of
93
column titles in
107
custom
101
Custom Detail
104
data row
109
date range for
100
default
98
example of a request for
105
example of a response
109
example of field names in UI
108
example of transaction detail report
111
filters for
104
General Detail
96, 101, 104, 117
General Summary
94, 118
how to begin using
93
including personal data in
113
Job
95, 115
JobEstimatesVsActualsDetail
105
JobProfitabilityDetail
105
meta-data in responses
107
MissingChecks
105
Payroll Detail
104
problems with data in
114
problems with data returned
101
PurchaseByVendorSummary
105
PurchseByVendorSummary
115
report basis
107
response data
107
responses for
107
setting up filters for
103
subcolumns in
101
text row
109
Time
95
time
116
title for
107
valid options for requests‹tables›
115
ReportTxnTypeFilter
104
request ID
31, 169, 408
request message set
resending for error recovery
406
saving persistent copy of
406
Request Processor
45
COM API, methods for
539
release level of
563
release number of
564
Request Validator utility
24
requesting additional data
in queries
90
requests
30, 49
comparing
408
identifying
408
validating
483
required elements
168
response status
491
responseData
171
responses
30
restoring the company file
499, 500
result codes
515
ReturnColumns field
100
ReturnRows field
100
roadmap
for documentation set
19
RowData field
109
rows
number of
107
Rq suffix
31
rules
for applying payments automatically
220
for appying credits and discounts
227
S
Sales By ItemSummary report
103
sales units, not supported via SDK
537
SalesOrderAddRq
347
SalesOrderModRq
347
SalesReceiptAddRq
255, 347, 364
SalesReceiptModRq
266, 347
SalesReceiptQueryRq
273
sample applications for SDK
24
saving state
in QuickBooks
405
SDK, sample applications in
24
SDKTest program
483
SDKTest utility
24
session
23
multi-user
53
ticket
543
SetCredit aggregate
218
setting credits
219, 221
setting discounts
219, 221
SIN elements
535
single session, versus multiple sessions
48
single-user mode
135
advantages and disadvantages of
55
effects of
54
specifying in BeginSession
543
social security numbers, allowing access to
54
software libraries included in the SDK
23
special-character restrictions on menu-item
names
208

Index
9
(c) 2013 Intuit Inc. All rights reserved.
SSNOrTaxID data
113
stand-alone installers
396, 506
startup
403, 406
state
171
clearing
405, 409
maintaining within your application
410
saving
403, 405
statement charges
220
applying discounts to
221
status check
example of
409
status code
172, 482
status code 3120
499
status code 3130
499
status code 3140
499
status code 3151
114
status code 3152
115
status code 3161
135
status code 3175
135
status code 3231
171, 409
status code 3240
500
status code 3260
136
status code 3261
113
status code 600
410
status code 9001
408, 410
status code 9002
410
status code information
in Appendix A
491
status codes
491
in messageSetStatusCode attribute
408
table of
509
status codes, error recovery
listed
408
status codes, qbXML
table of
509
status information
types of
172
status message
173
status severity
172
stopOnError
171
subcolumns
calculating values for in reports
101
in reports
101
subelements
for lists
160
SubscriptionDelRq
180
subscriptions
to UI events
200
subtitle
for reports
107
subtitle for
107
subtotal row
in reports
109
SummarizeColumnsBy field
100
SummarizeRowsBy field
101
Summary reports
default values for
102
SupportedQBXMLVersion
170
Symbol elements
536
SymbolPos elements
536
synchronization
special cases
503
synchronization problems
status codes to monitor
499
synchronizing data
499
synchronous processing
49
system crashes
403
T
tagname
for macros
156
Tax1Number elements
535
Tax1Rate elements
535
Tax1ReportingPeriod elements
535
Tax1Total elements
535
Tax2Number elements
535
Tax2Rate elements
535
Tax2ReportingPeriod elements
535
Tax2Total elements
535
TaxCode objects list
535
Technical Overview
134, 136, 494
test case
how to build
483
text row
in reports
109
ThousandSep elements
536
ticket
547, 559, 561
time differences
503
Time reports
95
default values for
102
valid options for
116
Time Tracking permissions
488
TimeCreated
136, 168
TimeModified
136, 168
title
for reports
107
ToDo query
85
ToModifiedDate
in filters
82
ToMsgSetResponse method
453
tools
for installing your application
397, 506
ToReportDate field
100
total row
10
Index
(c) 2013 Intuit Inc. All rights reserved.
in reports
109
TotalAmount
219
and payment amounts
220
TotalBalance
169
TotalBalance filter
85
TrackTax1Expenses elements
535
TrackTax2Expenses elements
535
transaction detail report
example of
111
transaction filter
example of
87
transaction history
218
transaction ID
155, 219
transaction line items
503
transaction queries
filters for
86
transaction type
219
transactions
159
closed
135
date filters for
86
functional groupings for
161
general description of
161
identifiers for
162
linked
90, 218
locked
135
persistent IDs for
161
receive payment
219
reference numbers for
161
TxnDeletedQueryRq
500
TxnID
86, 134, 136, 162, 219, 221, 232
obtaining using reports
105
TxnLineID
231
TxnVoidRq
136
TxnVoidRq message
136
TxnVoidRs message
136
TxnVoidType element
136
types of lists
160
U
U.K.-specific elements
536
UI extensions
local support only
200
UIEventSubscriptionAddRq
178
UIExtensionSubscriptionAddRq
178, 206
unattended mode (of QuickBooks login)
51
Undeposited Funds account
230
units of measure feature, not supported via SDK
536
unused payment
223
user
notifying before changing company file data
503
user interface in QuickBooks
and report request fields
99
user, auto-login
488
using the stand-alone installers
396, 506
V
validating qbXML text stream
559, 560
validating requests
483
Validator
482
Validator tool
483
Validator utility
24
vendor
paying multiple bills from same
224
Verify method
483
version incompatibility
485
version, of QuickBooks
47, 486
versions
of QuickBooks
494
of the QuickBooks SDK
494
voiding objects
136
W
warning status message
173
warnings
in log file
493
WorkersCompCodeMod-Modifying workers comp
codes
125
X
XML stream
494
