ProgrammersManual Master Programmers Manual
User Manual:
Open the PDF directly: View PDF ![]() .
.
Page Count: 240 [warning: Documents this large are best viewed by clicking the View PDF Link!]
- Installation
- Getting Started
- Introduction
- Programming Techniques
- Introduction
- Using the VPE DLL / Shared Object
- Preview
- The Object-Oriented Style
- Dynamic Positioning
- Rotation of Text, Images and Barcodes
- Pictures
- RTF - Rich Text Format
- Barcodes (1D)
- Code 39 (3 of 9)
- Code 39 extended (3 of 9 extended)
- Code 93 (9 of 3)
- Code 93 extended
- Code-128 and GS1-128 / EAN-128 / UCC-128
- Code 2 of 5 Interleaved
- Code 2 of 5 Industrial
- Code 2 of 5 Matrix
- EAN - (European-Article-Numbering)
- EAN-2 and EAN-5 Add-On Codes for EAN and UPC
- UPC (Universal Product Code)
- Codabar
- Code 11
- MSI Barcode
- Telepen-A
- Intelligent Mail
- Postnet - Postal Numeric Encoding Technique
- RM4SCC - Royal Mail 4 State Customer Code
- ISBN (International Standard Book Number)
- Identcode Deutsche Post
- Leitcode Deutsche Post AG
- PZN (Pharma Zentral Nummer) Code
- Barcodes (2D)
- FormFields
- Important Note About Pens, Lines, Frames, Circles and Ellipses
- Unicode
- Multipage Documents
- Watermarks
- Multi-Threading
- Embedded Flag-Setting
- Predefined Color Constants
- Printer Control
- Printing From A Service Like IIS (Internet Information Server)
- WYSIWYG
- Positioning On the Printer
- Fonts and Font Handling
- VPE Document Files
- VPE View: The Document Viewer
- Standards
- dycodoc Template Processing
- Interactive Documents
- The PDF Export Module
- The HTML Export Module
- Redistributing VPE
- Redistributing dycodoc
- Important Notes, Tips & Troubleshooting
- Standard Terms and Conditions of Use
- Allgemeine Nutzungsbedingungen
- Acknowledgements and Copyrights
- Index

IDEAL Software
Programmer's Manual
Programmer's
Manual

Programmer's Manual
Virtual Print Engine
Copyright 2015IDEAL Software®. All rights reserved.
www.idealsoftware.com
support@idealsoftware.com
Information in this document is subject to change without notice and does not represent a commitment on
the part of IDEAL Software. The software described in this document is furnished under a license
agreement or nondisclosure agreement. The software may be used or copied only in accordance with the
terms of the agreement. It is against the law to copy the software on any medium except as specifically allowed
in the license or nondisclosure agreement. No part of this documentation may be reproduced or transmitted
in any form or by any means, electronic or mechanical, including photocopying and recording, for any
purpose without the prior express written permission of IDEAL Software.
IDEAL Software, the IDEAL Software logo, DYCODOC and Virtual Print Engine are
registered trademarks, FieldStudio is a trademark of IDEAL Software,Neuss/Germany.
Microsoft, MS, Windows, Visual C++, Visual Basic, Visual FoxPro, MFC, ActiveX and .NET are
trademarks or registered trademarks of Microsoft Corporation in the United States and other countries.
Borland, the Borland Logo, C++Builder and Delphi are trademarks or registered trademarks of Borland
Software Corporation in the United States and other countries.
Adobe, Acrobat and PostScript are registered trademarks of Adobe Systems Inc.
Other product and company names mentioned herein may be the trademarks of their respective owners.
Contents
1 Installation 1
1.1 System Requirements .....................................................................................................................1
1.2 Windows Installation......................................................................................................................1
1.2.1 Installing Different Versions Or Editions ................................................................................3
1.2.2 Demo Source Codes ...............................................................................................................3
1.2.3 64-bit Development................................................................................................................3
1.2.4 How is the Windows System Directory affected by SETUP?...................................................3
1.2.5 Installing the VPE .NET Component ......................................................................................3
1.2.6 Installing the VPE -ActiveX ..................................................................................................4
1.2.7 Installing the VPE VCL for RAD Studio / Delphi / C++ Builder .............................................5
1.3 Non-Windows Installation ..............................................................................................................7
1.3.1 Uninstalling VPE on Non-Windows Platforms........................................................................8
2 Getting Started 9
2.1 VPE Control (.NET / ActiveX / VCL).............................................................................................9
2.2 VPE Control (Java).......................................................................................................................10
2.3 VPE DLL on Windows.................................................................................................................12
2.4 VPE Shared Object / Dylib ...........................................................................................................13
3 Introduction 14
3.1 Overview......................................................................................................................................14
3.1.1 VPE In Short (all Editions)...................................................................................................15
3.1.2 Community Edition..............................................................................................................16
3.1.3 Enhanced Edition .................................................................................................................17
3.1.4 Professional Edition .............................................................................................................18
3.1.5 Enterprise Edition.................................................................................................................19
3.1.6 Interactive Edition................................................................................................................19
3.2 The Demo VPEDEMO.EXE.........................................................................................................20
4 Programming Techniques 21
4.1 Introduction..................................................................................................................................21
4.1.1 Note on Source Codes Shipped with VPE.............................................................................21
4.1.2 Basics ..................................................................................................................................21
4.2 Using the VPE DLL / Shared Object.............................................................................................22
4.3 Preview........................................................................................................................................24
4.3.1 The GUI is themeable...........................................................................................................27
4.4 The Object-Oriented Style ............................................................................................................29
4.4.1 VPE knows the following objects: ........................................................................................29
4.4.2 The inheritance order is ........................................................................................................30
4.4.3 Assigning Styles and Properties to Objects............................................................................31
4.5 Dynamic Positioning ....................................................................................................................33
4.5.1 The Basic Conception -Absolute Coordinates.......................................................................33
4.5.2 Dynamic Positioning............................................................................................................34
4.5.3 Dynamic Text.......................................................................................................................35
4.5.4 Page Margins .......................................................................................................................38
4.5.5 Advanced Dynamic Positioning............................................................................................41
4.5.6 Rendering Objects................................................................................................................42
4.5.7 Automatic Text Break ..........................................................................................................44
4.6 Rotation of Text, Images and Barcodes .........................................................................................46
4.7 Pictures ........................................................................................................................................48
4.7.1 Scaling.................................................................................................................................50
4.7.2 Image Type Identification.....................................................................................................51
4.7.3 Image Cache ........................................................................................................................51
4.7.4 Using BLOB's or other Temporary Images / Memory Streams ..............................................53
4.7.5 Scale-to-Gray Technology....................................................................................................54
4.7.6 Remarks...............................................................................................................................55
4.8 RTF -Rich Text Format ...............................................................................................................56
4.8.1 Features of VPE ...................................................................................................................56
4.8.2 Introduction to RTF..............................................................................................................58
4.8.3 Controlling RTF from VPE –‘Easy RTF’.............................................................................60
4.8.4 Overloading Mechanism.......................................................................................................65
4.8.5 RTF Demo Source Code.......................................................................................................65
4.8.6 Some Notes About VPE and RTF.........................................................................................66
4.8.7 RTF Properties processed by VPE ........................................................................................67
4.9 Barcodes (1D) ..............................................................................................................................71
4.9.1 Code 39 (3 of 9) ...................................................................................................................73
4.9.2 Code 39 extended (3 of 9 extended)......................................................................................74
4.9.3 Code 93 (9 of 3) ...................................................................................................................75
4.9.4 Code 93 extended.................................................................................................................76
4.9.5 Code-128 and GS1-128 / EAN-128 / UCC-128.....................................................................77
4.9.6 Code 2 of 5 Interleaved.........................................................................................................80
4.9.7 Code 2 of 5 Industrial...........................................................................................................81
4.9.8 Code 2 of 5 Matrix ...............................................................................................................82
4.9.9 EAN -(European-Article-Numbering)..................................................................................83
4.9.10 EAN-2 and EAN-5 Add-On Codes for EAN and UPC.........................................................87
4.9.11 UPC (Universal Product Code) ...........................................................................................88
4.9.12 Codabar..............................................................................................................................90
4.9.13 Code 11..............................................................................................................................91
4.9.14 MSI Barcode ......................................................................................................................92
4.9.15 Telepen-A ..........................................................................................................................93
4.9.16 Intelligent Mail...................................................................................................................94
4.9.17 Postnet -Postal Numeric Encoding Technique ....................................................................95
4.9.18 RM4SCC -Royal Mail 4 State Customer Code ...................................................................96
4.9.19 ISBN (International Standard Book Number)......................................................................97
4.9.20 Identcode Deutsche Post.....................................................................................................98
4.9.21 Leitcode Deutsche Post AG ..............................................................................................100
4.9.22 PZN (Pharma Zentral Nummer) Code...............................................................................102
4.10 Barcodes (2D) ..........................................................................................................................103
4.10.1 Data Matrix......................................................................................................................104
4.10.2 QR Code ..........................................................................................................................106
4.10.3 MaxiCode ........................................................................................................................107
4.10.4 PDF417............................................................................................................................108
4.10.5 Aztec................................................................................................................................109
4.11 FormFields...............................................................................................................................110
4.11.1 Using FormFields.............................................................................................................111
4.11.2 Using Alternative Dividers ...............................................................................................112
4.12 Important Note About Pens, Lines, Frames, Circles and Ellipses................................................114
4.13 Unicode....................................................................................................................................115
4.14 Multipage Documents...............................................................................................................116
4.14.1 Generating a Document while the Preview is open ............................................................116
4.14.2 Headers and Footers .........................................................................................................117
4.15 Watermarks..............................................................................................................................120
4.16 Multi-Threading .......................................................................................................................121
4.17 Embedded Flag-Setting.............................................................................................................122
4.18 Predefined Color Constants.......................................................................................................126
4.19 Printer Control..........................................................................................................................128
4.19.1 Printer Setup.....................................................................................................................128
4.19.2 Sophisticated Device Control............................................................................................130
4.20 Printing From A Service Like IIS (Internet Information Server).................................................130
4.21 WYSIWYG..............................................................................................................................131
4.22 Positioning On the Printer.........................................................................................................131
4.22.1 Correcting Possible Misaligned Printer Output..................................................................132
4.23 Fonts and Font Handling...........................................................................................................133
4.23.1 Base 14 Post Script Fonts .................................................................................................134
4.23.2 True-Type / OpenType Fonts............................................................................................135
4.23.3 Font Substitution ..............................................................................................................136
4.23.4 Making a Decision, Which Type of Font to Use ................................................................137
4.24 VPE Document Files ................................................................................................................138
4.24.1 Assembling VPE Document Files .....................................................................................138
4.24.2 Editing VPE Document Files............................................................................................139
4.24.3 Memory Streams ..............................................................................................................139
4.24.4 Pictures and VPE Document Files.....................................................................................140
4.24.5 UDO's and VPE Document Files ......................................................................................140
4.24.6 On-Disk Document Files ..................................................................................................141
4.25 VPE View: The Document Viewer............................................................................................142
4.25.1 Faxing Documents with the MailDoc() Method.................................................................143
4.26 Standards..................................................................................................................................143
5dycodoc Template Processing 144
5.1 dycodoc Template Processing .....................................................................................................144
5.1.1 Providing the Data..............................................................................................................145
5.2 Template Structure .....................................................................................................................147
5.2.1 Template Object -TVPETemplate......................................................................................148
5.2.2 Template Page Object -TVPETemplatePage ......................................................................148
5.2.3 VPE Object -TVPEObject .................................................................................................149
5.2.4 Data Source Object -TVPEDataSource ..............................................................................149
5.2.5 Field Object -TVPEField...................................................................................................150
5.3 Template Processing Tutorial......................................................................................................151
5.3.1 Dumping a Template..........................................................................................................152
5.4 VPE Object Processing...............................................................................................................157
5.4.1 Modifying VPE Objects in a Template................................................................................157
5.4.2 Modifying VPE Objects in a Document ..............................................................................158
5.4.3 Note for VPE-DLL Users ...................................................................................................163
5.4.4 Important Note for VPE-VCL Users ...................................................................................163
5.5 Analysing and Modifying Templates by Code.............................................................................165
5.5.1 Analysing and Modifying the Layout Structure...................................................................165
5.5.2 Analysing the DataSource Structure....................................................................................167
5.6 Path-and File Names in Templates .............................................................................................169
5.7 Modifying the VPE Document....................................................................................................170
5.8 Validating the Template Authenticity Key...................................................................................171
5.8.1 Using the Authenticity Key.................................................................................................172
5.9 Advanced Programming .............................................................................................................174
5.9.1 Inserting (dumping) a Template at a specific position in a VPE Document ..........................174
6 Interactive Documents 175
6.1 Interactive Documents................................................................................................................175
6.2 Creating Interactive Templates With dycodoc .............................................................................176
6.3 Using Interactive Templates With VPE.......................................................................................177
6.3.1 Example.............................................................................................................................177
6.4 The Focus...................................................................................................................................183
6.5 The Tab-Index............................................................................................................................183
6.6 Exchanging Values With Controls ..............................................................................................184
6.7 Using Events For Interaction.......................................................................................................186
6.8 Accessing Controls.....................................................................................................................187
6.8.1 Example: Enabling and Disabling Controls.........................................................................187
6.9 Advanced Programming .............................................................................................................188
6.9.1 Notes, Hints and Tips .........................................................................................................188
6.9.2 How TAB-and Group ID's are resolved..............................................................................188
6.9.3 Simulating Buttons, Listboxes and Comboboxes.................................................................189
6.9.4 Keyboard Accelerators .......................................................................................................189
7 The PDF Export Module 190
7.1 PDF Export Introduction.............................................................................................................190
7.2 Restrictions ................................................................................................................................192
7.3 Using the PDF Export Module....................................................................................................192
7.4 Embedded Images ......................................................................................................................192
7.5 Objects Marked As Non-Printable...............................................................................................193
7.6 Transparent Backgrounds ...........................................................................................................193
7.7 Color Space................................................................................................................................193
8 The HTML Export Module 194
8.1 HTML Export Introduction.........................................................................................................194
8.2 HTML Export Restrictions .........................................................................................................194
8.3 HTML Export Options................................................................................................................195
8.4 Printing Exported HTML Documents..........................................................................................195
9 Redistributing VPE 197
9.1 Module Dependencies.................................................................................................................197
9.2 Basic Structure of the Binaries....................................................................................................199
9.3 Server Licenses ..........................................................................................................................201
9.4 Installing The VPE ActiveX On Target Machines .......................................................................202
9.4.1 Installing the VPE ActiveX -The Demo Banners Are Still Shown.......................................202
9.5 Redistribution of VPE View .......................................................................................................203
10 Redistributing dycodoc 204
11 Important Notes, Tips & Troubleshooting 205
11.1 Tips 205
11.2 FAQ 207
11.3 Printer Troubleshooting ............................................................................................................209
11.4 Video Troubleshooting .............................................................................................................210
11.5 Known Problems ......................................................................................................................211
11.6 If You Need Technical Assistance.............................................................................................212
12 Standard Terms and Conditions of Use 214
12.1 IDEAL Software GmbH’s Standard Terms and Conditions of Use.............................................214
13 Allgemeine Nutzungsbedingungen 221
13.1 Allgemeine Nutzungsbedingungen der IDEAL Software GmbH................................................221
14 Acknowledgements and Copyrights 229
14.1 Acknowledgements and Copyrights ..........................................................................................229
15 Index 230

Virtual Print Engine -Programmer's Manual Installation • 1
1Installation
1.1 System Requirements
•VPE needs at least a 486 processor with a numeric co-processor present. VPE is optimized
for Pentium and higher processors.
•For users of the ActiveX and VB 6: VB 6 Service Pack 1 is required!
1.2 Windows Installation
The installer requires administrative privileges. Run the setup program VPE*.EXE (the name
depends on the Edition and supported platform) and follow the instructions on the screen. SETUP
will install the following directories / files in the directory you specified:
File / Directory Meaning
asp.net\directory with demo sources for ASP.NET, using the VpeWebControl
There is an important Readme.txt file explaining the proper import of the demo project!
C#\directory with demo sources for C#
C++\directory with header-files and demo sources for use with C/C++ compilers
cbuilder\directory with VCL as souce code for Borland C++ Builder (installation see below)
delphi\directory with VCL as souce code and demo sources for use with Borland Delphi
(installation see below)
demos\directory with demo executables
deploy\directory with redistributable files (see "License Agreement" in this manual)
deploy\VpeCtrl71.dep dependency file for the VPE ActiveX Control; used by some install utilities, so they can
automatically determine, which DLL's are needed by the ActiveX
deploy\VpeCtrl71.ocx VPE ActiveX Control [only 32-bit versions]
deploy\vpe<?>3271.dll the engine DLL –where the <?> is to be substituted depending on the edition with:
‘C’ for the Community Edition
‘S’ for the Standard Edition
‘X’ for the Enhanced Edition
‘P’ for the Professional Edition
‘E’ for the Enterprise Edition
‘I’ for the Interactive Edition
deploy\Vpe*.dll the Winforms .NET Component -where the * is to be substituted depending on the edition
with:
‘Community’ for the Community Edition
‘Standard’ for the Standard Edition

2 • Installation Virtual Print Engine -Programmer's Manual
‘Enhanced’ for the Enhanced Edition
‘Professional’ for the Professional Edition
‘Enterprise’ for the Enterprise Edition
‘Interactive’ for the Interactive Edition
deploy\VpeWeb*.dll the VPE .NET WebServerControl -where the * is to be substituted depending on the
edition with:
‘Community’ for the Community Edition
‘Standard’ for the Standard Edition
‘Enhanced’ for the Enhanced Edition
‘Professional’ for the Professional Edition
‘Enterprise’ for the Enterprise Edition
‘Interactive’ for the Interactive Edition
deploy\vpe.jar Non-GUI version of the Java class library, to use VPE with Java
deploy\vpejni<?>3271.dll the Non-GUI Java Native Interface (JNI) DLL –where the <?> is to be substituted
depending on the edition with:
‘C’ for the Community Edition
‘S’ for the Standard Edition
‘X’ for the Enhanced Edition
‘P’ for the Professional Edition
‘E’ for the Enterprise Edition
‘I’ for the Interactive Edition
deploy\vpegui.jar GUI version of the Java class library, to use VPE with Java (Windows only)
deploy\vpejnigui<?>3271.dll the GUI Java Native Interface (JNI) DLL –where the <?> is to be substituted depending on
the edition with:
‘C’ for the Community Edition
‘S’ for the Standard Edition
‘X’ for the Enhanced Edition
‘P’ for the Professional Edition
‘E’ for the Enterprise Edition
‘I’ for the Interactive Edition
images\contains bitmaps, RTF and VPE documents used by the demos
images\DCD dycodoc sample files (Enterprise Edition and above only)
imp_libs\import libraries for C++ and other compilers, see readme.txt in this directory
internet\HTML demo sources which show the use of the ActiveX within Internet Explorer.
The HTML file contains detailed instructions on how to use the VPE ActiveX.
Progress\directory with demo sources for use with Progress 4GL
vb\directory with demo sources for use with Microsoft Visual Basic (only 32-bit version)
vb net\directory with demo sources for use with Microsoft Visual Basic .NET
orderinf.html [Trial-Version only] order informations
relnotes.html release notes, contains a list of changes for users of previous versions
uninstal.exe uninstall executable
uninstal.inf uninstall information file
ProgrammersManual.chm helpfile, VPE Programmer's Manual
VPE Control Reference.chm helpfile for the control, i.e. VPE .NET / ActiveX / VCL Control Reference
VPE DLL Reference.chm helpfile, VPE DLL Reference
vpeview.exe VPE Document File Viewer
All directories may contain important README.TXT files!

Virtual Print Engine -Programmer's Manual Installation • 3
1.2.1 Installing Different Versions Or Editions
Starting with VPE version 3.60, you can install all versions and editions in parallel, as long as the
version number is greater or equal to 3.60.
Installing different editions of one and the same version in parallel has one side-effect to the
ActiveX: only the highest installed edition can be used. If you want to return to a lower edition,
you must uninstall any higher edition. This only applies to the ActiveX and does not affect the
.NET or VCL components, nor the DLL.
In addition you may install in parallel one edition of v3.50 as well as one edition of one version
between 3.00 -3.20 as well as one version prior to v3.00.
1.2.2 Demo Source Codes
VPE includes a large amount of demo source codes for several programming languages.
NOTE: Before compiling or modifying the demo source codes, you will need to copy them
to a directory with write-permissions.
1.2.3 64-bit Development
IDEs like Visual Studio or Delphi are 32-bit executables. You can use their compilers to generate
64-bit code, but the 64-bit VPE ActiveX, .NET and VCL components can not be used on forms
during design-time, i.e. when developing an application. The 32-bit IDEs are not able to load 64-
bit code. You will require additionally the 32-bit version of VPE, in order to use the components
at design-time in a 32-bit IDE.
1.2.4 How is the Windows System Directory affected by SETUP?
Without version checking, SETUP installs VPE and all related files in the target directory you
specify. With version checking, all DLL's -except the .NET component DLL -and the ActiveX
are additionally copied to the Windows System32 directory (on 64-bit Vista / Windows 7 / 8 / 8.1
/ 2012 and higher: \windows\SysWOW64). Version checking means: SETUP does not overwrite
files, which have higher version numbers in their version information resource.
1.2.5 Installing the VPE .NET Component
After SETUP has been executed successfully, the .NET component is already installed on system
level. It is then available for all .NET development applications.
In order to place the VpeControl component onto the Toolbox of Visual Studio .NET, do the
following: Click onto the Toolbox, then "Components". Afterwards right click and choose
"Add/Remove Items". In newer versions of Visual Studio the menu entry is labeled "Choose
Items". A dialog will appear. Scroll down until you see "VpeControl". Click the checkbox to

4 • Installation Virtual Print Engine -Programmer's Manual
activate it. Afterwards click "Ok" to close the dialog. The VpeControl icon will appear in the
Toolbox under the "Components" category.
1.2.6 Installing the VPE -ActiveX
After SETUP has been executed successfully, the ActiveX (32 bit) is already installed on system
level. It is then available for all container applications. Nevertheless most containers (like Visual
Basic or Visual FoxPro) require that you additionally register the ActiveX inside of the container,
so it can be used by your application. How to register an ActiveX in a specific container is shown
in the manual of the container application.
For Example: In Visual Basic 6.0 you select the menu entry "Project" and then "Components". A
dialog box appears, with a list of all available ActiveX's installed on your system. Scroll the list
down until "VPEngine ActiveX Control Library" is listed. Click at the line so that it is checked,
then click on "Ok". The VPE-ActiveX will be ready for use with Visual Basic.
NOTE: Some Containers (like for example Visual FoxPro) do not import the constants (like
VFREE, ALIGN_LEFT, etc.) defined in the ActiveX.
For some Containers we included definition files for import, please check the source code
directories.
The constants and their values are listed in this manual -and in the "Control Reference Manual"
(which is VPECTRL.HLP) -with the description of each function. Also the C-Header files ("*.H")
in the installation subdirectory "C" contain those definitions.

Virtual Print Engine -Programmer's Manual Installation • 5
1.2.7 Installing the VPE VCL for RAD Studio / Delphi / C++ Builder
The VPE VCL component is distributed as source code and must be compiled with your version of
RAD Studio / Delphi / C++ Builder.
After SETUP has been executed successfully, you will find the source codes in the following two
directories:
•CBuilder
•Delphi
NOTE: Copy the directories to a place on your hard drive, where you have write
permissions (in the following called <vpe-source-path>).
RAD Studio XE2 -XE6:
IMPORTANT: Run the RAD Studio application, not Delphi or C++ Builder standalone!
Use the "File | Open..." menu item of the IDE to open the VpevclXe2.dproj project file in the
directory named 'delphi'.
In the Project Manager, right-click on "VpevclXe2.bpl"
In the popup-menu chose "Install"
IMPORTANT: Now update in "Tools | Options | Environment Options | Delphi Options | Library |
Library Path" the "Search Path" string to include the file path of the VPE component. Otherwise
your projects using VPE will not compile. In regular, the path is where the DPROJ file resides,
i.e. "<vpe-source-path> \delphi". IMPORTANT: It is NOT the path to the compiled DCU file.
For C++ Builder Projects, the IDE inserts a line like "#pragma link "VPE_VCL"" to your source
codes. When having compile or link errors, change this line to "#pragma link "VPEVCL.LIB""
The component is installed in the "System" Tab of the Tool-Palette.
64-Bit:
Up to XE6 the RAD Studio IDE is only available as 32-bit executable.
You can use the compilers to generate 64-bit code, but the 64-bit VCL components can not be
used on forms during design-time, i.e. when developing an application. You will require
additionally the 32-bit version of VPE, in order to use the components at design-time.
Other versions of Delphi / C++ Builder:
Please consult the readme file located accordingly in one of the above directories.
Uninstalling the VPE VCL component:
•Select "Component | Install Packages" from the main menu.
•Select the "Virtual Print Engine Component" package and click the "Remove" button. After the
package was removed, click the "Ok" button to confirm your changes.

6 • Installation Virtual Print Engine -Programmer's Manual
•Now remove in "Tools | Environment Options" under the "Library" tab either the
VPE_VCL.DCU (for Delphi) or VPE_VCL.hpp (for C++Builder) file path from the "Library
Path" string.

Virtual Print Engine -Programmer's Manual Installation • 7
1.3 Non-Windows Installation
To install VPE on a non-Windows operating system, perform the following steps:
•Open a shell
•Extract the VPE archive with "tar xvf <archive>"
On some platforms (like Mac OS X and Solaris) it is required to unzip the archive first with
"gunzip <archive>"
•cd into the directory "vpe", which has been created by extracting the archive
•Execute the installer with "./install". The installer requires root privileges.
The installer will ask you, whether you wish to install the trial version or the full version. In the
latter case it will ask you for your license key.
In the following explanation ".so" has to substituted with ".dylib" for Mac OS X platforms.
The installer copies libvpe<?>.so.<version> to the according lib directory at /usr.
This is the engine shared object -where the ? is to be substituted depending on the edition with:
‘c’ for the Community Edition
‘s’ for the Standard Edition
‘x’ for the Enhanced Edition
‘p’ for the Professional Edition
‘e’ for the Enterprise Edition
‘i’ for the Interactive Edition
Depending on the platform and processor, for which VPE is compiled, the target lib directory is
one of the following: lib, lib32, lib64, sparcv9, amd64.
In addition two symbolic links are created, namely:
•libvpe<?>.so.<ver_major>.<ver_minor>
•libvpe<?>.so
You should link your executables against libvpe<?>.so.
The SDK itself is installed into the directory /opt/vpe<edition>-<processor>.<version>:
File / Directory Meaning
bin Directory with utility software for licensing and uninstalling VPE, as well as demo
executables
bin/uninstall Utility to uninstall VPE
bin/insthlp Version and license manager called by the installer and the license and uninstall utilities,
do not use.
bin/vpedemo and vppdemo Demo executables (vpedemo demonstrates the features of the Standard Edition, vppdemo
demonstrates the features of the Professional Edition).
include Directory with headers for VPE
c++ Directory with demo sources for use with C/C++ compilers
for each .cpp file there is a shell script (starting with the letter ‘b’) to build the executable
8 • Installation Virtual Print Engine -Programmer's Manual
e.g. with "./bvpedemo" you can build the vpedemo executable
deploy/ Directory with redistributable files (see "License Agreement" in this manual)
deploy/libvpe<?> so.7.10.0 or
deploy/libvpe<?>. dylib.7.10.0
The engine shared object -where the ? is to be substituted depending on the edition with:
‘C’ for the Community Edition
‘S’ for the Standard Edition
‘X’ for the Enhanced Edition
‘P’ for the Professional Edition
‘E’ for the Enterprise Edition
‘I’ for the Interactive Edition
deploy/LicenseTool Server License Tool -use this tool to activate server licenses on target servers
(only Professional Edition or higher; only Solaris, OpenSolaris, Aix, AS/400)
doc Directory with documentation files
doc/orderinf.html [Trial-Version only] order information
doc/relnotes.html Release notes, contains a list of changes for users of previous versions
doc/ProgrammersManual.pdf Helpfile, VPE Programmer's Manual
doc/VPE DLL Reference.pdf Helpfile, VPE DLL / Shared Object Reference
images/Contains bitmaps, RTF and VPE documents used by the demos
images/dcd dycodoc sample files (Enterprise Edition and above only)
1.3.1 Uninstalling VPE on Non-Windows Platforms
Open a shell and enter: /opt/bin/vpe<edition>-<processor>.<version>/bin/uninstall
e.g. "/opt/vpep-x86.5.0/bin/uninstall"
(do not cd into this directory, because the uninstaller can not delete it then)

Virtual Print Engine -Programmer's Manual Getting Started • 9
2Getting Started
2.1 VPE Control (.NET / ActiveX / VCL)
Place a VPE component onto a form and change its name to "Doc".
Place a button onto the form. In the OnClick() handler of the button, insert the following code:
Doc.OpenDoc()
Doc.WriteBox(1, 1, 5, 1.5, "Hello World!")
Doc.Line(1.5, 3, 5, 6.5)
Doc.WriteDoc("hello world.pdf")
Doc.Preview()
Congratulations, this is your first program using VPE! Depending on the programming language
you are using, you must add semicolons ";" at the end of each line, or leave out the empty
parentheses "( )".
The source code is self-explanatory, the only thing to explain are the numbers in the calls to
WriteBox() and Line(): these are the coordinates in centimeters relative to the upper left corner of
the page. The coordinates are organized as (left, top, right, bottom).
Note: you can also switch to inch units, so the coordinates are not in centimeters, but in inches.
Please note that this is a very very simple demo. For example, VPE can compute the width and
height of a text object depending on the text-length and the chosen font. So you can position
objects dynamically at runtime relative to each other, in contrast to a static layout.
We recommend to continue with the tutorial created by running the "vpedemo" executable, which
comes with VPE. The demo named "Capabilities + Precision" creates a document with a handy 5-
page tutorial (beginning on page 2 of the document).
The very detailed and in-depth explanation of all aspects and features of VPE can be found in this
document in the chapter “Programming Techniques” on page 21.

10 • Getting Started Virtual Print Engine -Programmer's Manual
2.2 VPE Control (Java)
VPE does only provide a preview window for displaying, browsing and printing documents on the
Windows platform. Therefore there are two versions of the VPE Control: a GUI and a Non-GUI
version.
The GUI version is only available for Windows and can be found in the file
<vpe-installation-directory> / deploy / vpegui.jar
The Non-GUI version is available for all platforms and can be found in the file
<vpe-installation-directory> / deploy / vpe.jar
The Non-GUI version is also useful on Windows, when used in a server application, or if no
preview Window is required. Please note that a common way of using VPE is to export a created
document to PDF and to use a PDF Reader (like Adobe Acrobat) for displaying and printing the
document. The API of both JAR files is identical. Only methods and properties related to
previewing and printing are left out in the Non-GUI version.
Make sure that any of the two VPE JAR files is in your classpath.
Create a file named “VpeTest.java” with the following code:
import com.idealSoftware.vpe.*;
import com.idealSoftware.vpe.events.*;
class VpeTest {
public static void main(String[] args) {
VpeControl doc = new VpeControl();
doc.openDoc();
doc.writeBox(1, 1, 5, 1.5, "Hello World!");
doc.line(1.5, 3, 5, 6.5);
doc.writeDoc("hello world.pdf");
doc.closeDoc();
}
}
Compile with: javac -classpath ..\deploy\vpe.jar VpeTest.java
Execute with: java -cp .;../deploy/vpe.jar VpeTest
Make sure to adjust the classpath, so that it points to the VPE JAR file in your environment.

Virtual Print Engine -Programmer's Manual Getting Started • 11
For the Windows platform, here is a version which shows a preview window:
Please note that the major difference to the previous version is one additional line of code with a
call to “Doc.preview()” (and a method pause()).
Create a file named “VpeGuiTest.java” with the following code:
import com.idealSoftware.vpe.*;
import com.idealSoftware.vpe.events.*;
import java.io.*;
class VpeGuiTest {
static void pause()
{
try
{
System.out.printf("\n\n Press ENTER...");
System.in.read();
while (System.in.available() > 0)
System.in.read(); // flush the buffer
}
catch (IOException e)
{
System.out.printf("Error\n");
}
}
public static void main(String[] args) {
VpeControl doc = new VpeControl();
doc.openDoc();
doc.print(1, 1, "Hello World!");
doc.preview();
doc.writeDoc("hello world.pdf");
pause();
doc.closeDoc();
}
}
Compile with: javac -classpath ..\deploy\vpegui.jar VpeGuiTest.java
Execute with: java -cp .;../deploy/vpegui.jar VpeGuiTest
Make sure to adjust the classpath, so that it points to the VPE JAR file in your environment.
Congratulations, this is your first Java program using VPE! The source code is self-explanatory,
the only thing to explain are the numbers in the calls to writeBox() and line(): these are the
coordinates in centimeters relative to the upper left corner of the page. The coordinates are
organized as (left, top, right, bottom).
Note: you can also switch to inch units, so the coordinates are not in centimeters, but in inches.
Please note that this is a very very simple demo. For example, VPE can compute the width and
height of a text object depending on the text-length and the chosen font. So you can position
objects dynamically at runtime relative to each other, in contrast to a static layout.
We recommend to continue with the tutorial created by running the "vpedemo"executable, which
comes with VPE. The demo named "Capabilities + Precision" creates a document with a handy 5-
page tutorial (beginning on page 2 of the document).

12 • Getting Started Virtual Print Engine -Programmer's Manual
The very detailed and in-depth explanation of all aspects and features of VPE can be found in this
document in the chapter “Programming Techniques” on page 21.
2.3 VPE DLL on Windows
The following example is in C/C++, but can be easily translated to any other programming
language. Write the following function and call it from an event-handler of your application, for
example from an event-handler for a menu-or button-click:
void MakeDoc(HWND hWndParent)
{
// hWndParent is the window handle of your application window
VpeHandle hDoc = VpeOpenDoc(hWndParent, "Test", 0);
VpeWriteBox(hDoc, 1, 1, 5, 1.5, "Hello World!");
VpeLine(hDoc, 1.5, 3, 5, 6.5);
VpeWriteDoc(hDoc, "hello world.pdf");
VpePreviewDoc(hDoc, NULL, VPE_SHOW_NORMAL);
}
You must link your application against the VPE library. For example, in Visual Studio put the
library into your solution. The library can be found in the installation directory of VPE, in the
subdirectory "imp_libs"under the name "vpe<version>.lib".
Congratulations, this is your first program using VPE! The source code is self-explanatory, the
only thing to explain are the numbers in the calls to WriteBox() and Line(): these are the
coordinates in centimeters relative to the upper left corner of the page. The coordinates are
organized as (left, top, right, bottom).
Note: you can also switch to inch units, so the coordinates are not in centimeters, but in inches.
Please note that this is a very very simple demo. For example, VPE can compute the width and
height of a text object depending on the text-length and the chosen font. So you can position
objects dynamically at runtime relative to each other, in contrast to a static layout.
We recommend to continue with the tutorial created by running the "vpedemo"executable, which
comes with VPE. The demo named "Capabilities + Precision" creates a document with a handy 5-
page tutorial (beginning on page 2 of the document).
The very detailed and in-depth explanation of all aspects and features of VPE can be found in this
document in the chapter “Programming Techniques” on page 21.

Virtual Print Engine -Programmer's Manual Getting Started • 13
2.4 VPE Shared Object / Dylib
The following example is in C/C++, but can be easily translated to any other programming
language. Write the following function and call it from the main() function of your application:
void MakeDoc(HWND hWndParent)
{
VpeHandle hDoc = VpeOpenDoc(NULL, "Test", 0);
VpeWriteBox(hDoc, 1, 1, 5, 1.5, "Hello World!");
VpeLine(hDoc, 1.5, 3, 5, 6.5);
VpeWriteDoc(hDoc, "hello world.pdf");
VpeCloseDoc(hDoc);
}
You must link your application against the VPE library, please consult the manuals of your linker
on how to do this. On Linux for example, provide to the linker the switch "-lvpep" (vpep for the
Professional Edition, vpex for the Enhanced Edition, vpes for the Standard Edition and vpec for
the Community Edition).
Congratulations, this is your first program using VPE! The source code is self-explanatory, the
only thing to explain are the numbers in the calls to WriteBox() and Line(): these are the
coordinates in centimeters relative to the upper left corner of the page. The coordinates are
organized as (left, top, right, bottom).
Note: you can also switch to inch units, so the coordinates are not in centimeters, but in inches.
Please note that this is a very very simple demo. For example, VPE can compute the width and
height of a text object depending on the text-length and the chosen font. So you can position
objects dynamically at runtime relative to each other, in contrast to a static layout.
We recommend to continue with the tutorial created by running the "vpedemo"executable, which
comes with VPE. The demo named "Capabilities + Precision" creates a document with a handy 5-
page tutorial (beginning on page 2 of the document).
The very detailed and in-depth explanation of all aspects and features of VPE can be found in this
document in the chapter “Programming Techniques” on page 21.

14 • Introduction Virtual Print Engine -Programmer's Manual
3Introduction
3.1 Overview
Congratulations on your purchase of Virtual Print Engine! With VPE you acquired a product of
superior quality in terms of performance, stability, well tought-out programming interface, multi-
platform support, in-depth documentation and support.
VPE is a very fast and powerful tool for the dynamic creation of documents. It offers broad
support in creating just any kind of document, like complex reports and lists, forms, diagrams,
drawings, labels and barcodes.
VPE provides a well thought-out set of functions to place objects (i.e. lines, text, images, etc.)
freely in a document. The basic conception is that your application calls these functions during
runtime to create dynamically the layout of entire documents.
VPE supports you by computing automatically word-breaks as well as page breaks, splitting up
long text over multiple pages. You can make objects like text, rich text and images dynamic, so
they extend accordingly to their content. You can pre-compute (render) the dimensions of such
dynamic objects before inserting them into a document and you can position other objects
relatively to the extents of such dynamic objects. You can add at any time new pages and you can
move at any time to any page to add new objects.
All this is done through a simple and intuitive API (Application Programming Interface). Whilst
the API is very extensive to provide full control over every aspect of the document creation
process, you only need to know a handful of methods and properties to start generating high-level
documents within minutes.
Since you control the layout of each object by code, there is no limit for the complexity of a
document: each object is positioned in a high resolution coordinate system with an internal
precision of 0.0001 mm.
VPE helps increasing your productivity by many times, having its position in the list of your tools
at the point, where you can't go further with standard report generators.

Virtual Print Engine -Programmer's Manual Introduction • 15
3.1.1 VPE In Short (all Editions)
•Using special, optimized algorithms (since 1993 under development), VPE is really fast!
•Unlimited number of pages per document and unlimited number of simultaneously open
documents (only limited by available memory / harddisk space)
•VPE allows true Multi-Tier application development: it is database independent, since your
applications supply and layout the data.
•Use colors, lines, frames, boxes, ellipses, bitmaps, and -of course -text.
•All drawing coordinates can be specified in centimeter or inch units, with an internal precision
of 0.0001 mm.
•Compute the width and height of text and image objects depending on their content.
•Create for example 100 pages and move to any other page to draw additional objects.
•Specify the page dimensions and orientation (portrait or landscape) for each page separately.
•BMP import
•High quality PDF export
Windows platform:
•Built-in, zoomable preview with true WYSIWYG vector-graphics. In fact, VPE renders all
objects in a virtual high resolution and then transforms it to the specified device, be it the
screen, a printer, a fax or whatsoever. This gives best possible WYSIWYG results.
•The preview can be shown -and the user can scroll through it -while you are still generating a
document. Works with and without multi-threading!
•Direct printing and printer access. Enumerate all available printers, select a specific printer by
code, and modify nearly all possible printer properties by code. Specify the printer's paper bin
for each page separately.
•Don't worry about the printer, its resolution, or printing-offset (this is the part of the page the
printer cannot print on). Your documents will look the same on every printer as much as it is
technically possible.
•Send VPE-or PDF documents and other attachments by e-mail and fax easily through
Extended-or Simple MAPI. A royalty-free document viewer for VPE document files is
included.
NOTE: The Community Edition does only support Simple MAPI.
•The ActiveX offers full FTP-/ HTTP-support to create server based reports. Therefore you can
plug it into browsers on the intra-and internet and even reference image and RTF files with for
example "ftp://ftp.my-server.com/image1.gif" in your source code (VB Script or Java(-script)).
On the other hand, you can create a VPE Document file in your native programming language
on the server (or transfer it there) and instruct the ActiveX in the browser to load and display a
specific document file from the server in the intra-or internet. Moreover the images contained
in the document may be linked to image files stored on the server.
•VPE's user interface (GUI) "speaks"eleven languages: VPE selects the right language for all
tooltips and dialogs automatically -depending on the country setting in the control panel of the
system VPE is currently running on. Supported languages are: English, Spanish, German,
French, Italian, Dutch, Danish, Swedish, Finnish, Norwegian, Portuguese. Optional you can
select the language by code. In addition you can define all text of the GUI elements by code, so
you can use any language.

16 • Introduction Virtual Print Engine -Programmer's Manual
•WMF and EMF (Metafiles and Enhanced Metafiles) import
3.1.2 Community Edition
Basically, the Community Edition is identical to the Standard Edition, with the following
exceptions:
•Compression for generated PDF files and native VPE document files is not supported.
Compressed documents are in regular 4 –5 times smaller.
•True-Type font embedding for PDF files is not supported. The higher editions of VPE are
capable to embed all used True-Type fonts into the generated PDF file. When sending a PDF
document to a receiver which doesn’t have the used fonts installed on her / his machine, those
fonts are not displayed.
•The PrintDoc() method is not provided. The preview must be shown, so the user can click onto
the print-button in the toolbar. Therefore batch printing is not possible.
•Embedding the preview into a host window of the calling application is not supported.
•The preview can not be customized. All other editions offer to selectively hide any elements of
the GUI, like the toolbar, each toolbar button, the rulers, the statusbar, etc.
•No Open / Save and Help buttons in the toolbar.
•The preview is not themeable, i.e. the “Whidbey” theme is the only available theme.
•The scale and scale mode of the preview can not be modified by code.
•No Device Control Properties, i.e. there are no methods to specify by code the page range,
number of copies, collation or duplex printing, etc. or to enumerate and select a specific printer,
paper bin, etc. Of course the user can make selections in the printer setup dialog shown before
printing.
•No special printer setup function. All other editions offer to show a separate printer setup
dialog, so the user can make all selections for page range, copies, collation, duplex printing,
output device etc. and those selections are stored permanently in a file for later automatic re-
use.
•The paper bin can not be set by code for individual pages.
•No e-mail API , i.e. receivers, CC’s, BCC’s, attachments, etc. can not be set by code.
•Hatching, Gradients and Rounded Corners are not implemented.
•The rotation of text and images is not supported.
•The image cache for fast loading and management of images is not implemented.
•WMF / EMF import is not implemented, the Community Edition can read BMP images only.
•Many functions to customize the behavior of VPE have been removed.

Virtual Print Engine -Programmer's Manual Introduction • 17
3.1.3 Enhanced Edition
•Enhanced image import functionality, reads the following image file formats:
•enhanced BMP's (supports the OS/2 BMP format)
•TIFF 6.0 (Fax G3 & G4, grayscale, LZW, packbits, multipage)
•GIF
•JPEG
•PNG
•PCX
•ICO (Windows Icon)
•JNG (JPEG Network Graphics)
•KOA (C64 Koala Graphics)
•IFF/LBM (Interchangeable File Format -Amiga/Deluxe Paint)
•MNG (Multiple-Image Network Graphics)
•PBM (Portable Bitmap, ASCII or RAW)
•PCD (Kodak PhotoCD, reads always the 768 x 512 pixel image)
•PGM (Portable Greymap, ASCII or RAW)
•PPM (Portable Pixelmap, ASCII or RAW)
•RAS (Sun Raster Image)
•TGA/TARGA (Truevision Targa)
•WAP/WBMP/WBM (Wireless Bitmap)
•PSD (Adobe Photoshop, only 24-bit RGB or 24-bit RGB RLE)
•CUT (Dr. Halo)
•XBM (X11 Bitmap Format)
•XPM (X11 Pixmap Format)
•DDS (DirectX Surface)
•HDR (High Dynamic Range Image)
•G3 (Raw fax format CCITT G.3)
•SGI (SGI Image Format)
•Rotation of Images in 90 degree steps (except metafiles)
•Generates 39 different barcode types
EAN-13, EAN-13+2, EAN-13+5, EAN-8, EAN-8+2, EAN-8+5, GS1-128 / UCC-128 / EAN-
128A, EAN-128B, EAN-128C, EAN-2, EAN-5, UPC-A, UPC-A+2, UPC-A+5, UPC-E, UPC-
E+2, UPC-E+5, Codabar, Code 11, Code 39, Code 39 extended, Code 93, Code 93 extended, 2
of 5, Interleaved 2 of 5, 2 of 5 Matrix, Telepen-A, Intelligent Barcode, POSTNET (1.20),
Code-128A, Code-128B, Code-128C, Royal Mail, Msi, ISBN, ISBN + EAN 5, Identcode,
Leitcode, Pharma Zentral Code

18 • Introduction Virtual Print Engine -Programmer's Manual
3.1.4 Professional Edition
•Renders RTF (Rich Text Format) and imports RTF files.
VPE supports a subset of RTF (see “RTF -Rich Text Format” on page 56 for details)
•Charts -VPE supports all basic types of charts using SmartChart technology
•2D Barcodes –Generates 2D barcodes of the types: PDF417, DataMatrix, QR Code, Maxicode
and Aztec
•HTML Export –Exports VPE documents into the HTML file format
•Character Placement -You can specify a constant offset from one character to another for text
objects (not RTF) in 0.0001 mm resolution. This is very good for filling in forms that have pre-
printed columns for each letter.
•Object Visibility -Objects (like text, images, barcodes, etc.) can be set to printable only, i.e.
they are not shown in the preview but they are printed. Vice versa objects can be set to
viewable only, i.e. they are shown in the preview (for example as hint or comment) but they are
not printed.
•Pages can be cleared (i.e. all objects of a page are deleted), pages can be removed and pages
can be inserted between existing pages (lower editions can only add new pages at the end of a
document).
Windows platform:
•UDO -Powerful User Defined Objects -This allows to print and preview any kind of drawing
or object, including OLE/COM objects!
•Clickable Objects -Objects can be made clickable. If the user clicksonto such an object your
application receives an event. This allows to implement drill-down reports or to show a
separate dialog, with more detailed information about the clicked text or image.
•Export of single pages or parts of pages as:
•BMP
•WMF (Windows platform only)
•EMF (Windows platform only)
•JPEG (compression ratio can be set freely)
•PNG (ZIP compressed)
•TIFF 6.0 (Fax G3, Fax G4, LZW, Packbits, Deflate, JPEG, Multipage)
•GIF (Multipage)
•For all bitmap formats you can specify the color depth and the resolution (in DPI). Additionally
dithering is possible.
•Scale-To-Gray Technology - a 300 or 600 DPI image scaled to a 96 DPI device (the screen) is
looking bad due to its nature. The Scale-To-Gray Technology uses 2 different images, one for
the screen (preview) and one for printing. The screen image is scaled down to 96 DPI while the
loss of visual information is transformed to gray-values. This means perfect readability of such
images on a 96 DPI device.
•PrintScale -The output to the printing device can be scaled

Virtual Print Engine -Programmer's Manual Introduction • 19
3.1.5 Enterprise Edition
•Ships with dycodoc the visual designer to layout form templates by point-and-click
•Extended VPE API to process the templates generated by dycodoc
•Additional FormField Object
•Allows to query and modify an object's properties even after it has been inserted into a VPE
Document
3.1.6 Interactive Edition
•Supports interactive objects such as text and buttons. This way you can design document
templates which can be filled out electronically on the user’s computer screen with VPE.

20 • Introduction Virtual Print Engine -Programmer's Manual
3.2 The Demo VPEDEMO.EXE
Welcome
An introduction.
Capabilities + Precision
This demo shows text formatting features, drawing features, bitmap handling, form filling and of
course printing. Important: the VPE-DLL "docks” its view inside of the window owned by
vpedemo.exe! This is very easily done by a few lines of C code!
The menu entry "Background” shows how to print without showing a preview and no setup-
dialog (default printer is used). The Preview sends the VPE_HELP message to the calling
application instead of showing the standard help dialog, so you see the message box "User
requested help" on the screen.
Speed + Tables
Here you can see how fast VPE builds a report with a size of about 110 -130 pages:
A text file with random data is generated (journal.rpt). vpedemo.exe reads the text file line by line,
interpreting it and instructing VPE how to build the report.
Since it is random data, the number of pages differs from 110 -130 pages. Note, this demo prints
the number of generated pages finally on the FIRST page of the report in the upper left corner.
This is done by the virtual processing of the document, where you can move to any page at any
time to draw on it. In this case the demo generates all pages and then jumps to the first page to
draw the message.
Colors
There you can see a fixed scaled window. Also, the toolbar has only the print and the e-mail
button, and the status bar is hidden. The user cannot close the document; it can only be closed
through vpedemo.exe by selecting the "Close Preview” menu entry. If you print the page to a color
printer, you will get a true-color result.
Report
This is another report, showing various colors and a pie chart on the second page. The source
code shows very fine, how easy creating reports is by encapsulating the different parts of the
report into functions.

Virtual Print Engine -Programmer's Manual Programming Techniques • 21
4Programming Techniques
4.1 Introduction
The following chapters explain all features of VPE and the VPE API (Application Programming
Interface).
If you are using the VPE Enterprise or Interactive Edition, you might want to skip this chapter and
jump directly to the introduction of “dycodoc Template Processing” on page 144. However, we
recommend to return to this chapter later in order to make yourself familiar with the underlying
VPE API. It will help you in getting a better insight into the internals of VPE and to make use of
the powerful VPE API.
4.1.1 Note on Source Codes Shipped with VPE
VPE is shipped with detailed source codes for several programming languages like C/C++, Visual
Basic, Delphi, etc. The demo sources are installed in the respective subdirectories of the VPE
installation directory.
The source codes of the several demonstration programs have been created very carefully,
considering the specific characteristics of each programming language. They show all basic and
advanced techniques of how to use and control VPE.
Source code tells much more in less time, than abstract descriptions do, and we understand it as a
substantial part of the documentation. So we strongly recommend that you study the
documentation as well as the source codes.
4.1.2 Basics
All objects of VPE are positioned and sized with an internal precision of 0.0001 mm. You can
select programmatically, whether you supply coordinates to VPE in centimeter or inch units by
setting the property:
VPE.UnitTransformation = VUNIT_FACTOR_CM // centimeters
VPE.UnitTransformation = VUNIT_FACTOR_INCH // inch
Throughout this manual -as well as the reference manuals and the demo source codes -all
examples are using the centimeter unit coordinate system.
Most output functions need a starting coordinate (x, y) which specifies the upper left corner, and
some need an ending coordinate (x2, y2) for the lower right corner of an object -for example a
line or some text. X and X2 specify the offset to the left page margin. Y and Y2 specify the offset
to the top page margin.

22 • Programming Techniques Virtual Print Engine -Programmer's Manual
To draw a line starting at 1.58cm from the right and 2.5cm from the top of a page, ending at 5cm
from the right and 5cm from the top of a page, you would enter:
Line(1.58, 2.5, 5, 5)
4.2 Using the VPE DLL / Shared Object
Note: For the VPE Control (.NET / ActiveX / VCL) there are examples for the first basic
steps in using VPE in the "Control Reference" (VPE Control Reference.chm).
Please read the introductory sections there and continue with the section
“Preview” on page 24 in this manual.
The common sequence of function calls is:
1. Open a document with the function VpeOpenDoc()
2. Use all possible methods to insert VPE objects (like text., etc.)
3. Use VpePageBreak() to generate new pages
4. Use VpePreviewDoc() to show the preview to the user, this is optional
5. Use VpePrintDoc() to print the document, or WriteDoc() to export it to PDF, HTML, etc.
6. Close the document with VpeCloseDoc()
NOTE: Preview and printing is only available for the Windows platform. On all other platforms
you can generate VPE document files, as well as PDF and HTML (HTML output requires
the Professional Edition or above).
You may open as many documents simultaneously as you like. The documents are identified by a
unique handle (VpeHandle, which is a 32-bit integer on 32-bit platforms and a 64-bit integer on
64-bit platforms) with a value different from NULL, which is returned by VpeOpenDoc(). Use this
handle in successive calls to the output functions.
Each document might send messages. The messages are received by the window, which is
specified as parent-window in the first parameter of VpeOpenDoc(). On non-Windows platforms
you can install a message callback function.

Virtual Print Engine -Programmer's Manual Programming Techniques • 23
Example in C, which can be easily translated to other programming languages:
Windows platform:
void MakeDoc(HWND hWndParent)
{
VpeHandle hDoc;
hDoc = VpeOpenDoc(hWndParent, "Test", 0);
VpeLine(hDoc, 1, 1, 5, 5);
VpePreviewDoc(hDoc, NULL, VPE_SHOW_NORMAL);
}
A VPE document can exist without showing a preview. But if a preview is shown, the document is
closed and removed from memory by default, when the preview is closed by the user or when the
parent window is closed. If you call VpeEnableAutoDelete(hDoc, false), the document is not
closed when the preview is closed.
The code above will bring up the preview window (without the "Monthly Report" text) shown in
the next chapter.
All other platforms:
void MakeDoc()
{
VpeHandle hDoc;
hDoc = VpeOpenDoc(NULL, "Test", 0);
VpeLine(hDoc, 1, 1, 5, 5);
VpeWriteDoc(hDoc, "test.pdf");
VpeCloseDoc(hDoc);
}
Generates a PDF file named "test.pdf". On non-Windows platforms you must always call
VpeCloseDoc() to remove a document from memory.
24 • Programming Techniques Virtual Print Engine -Programmer's Manual
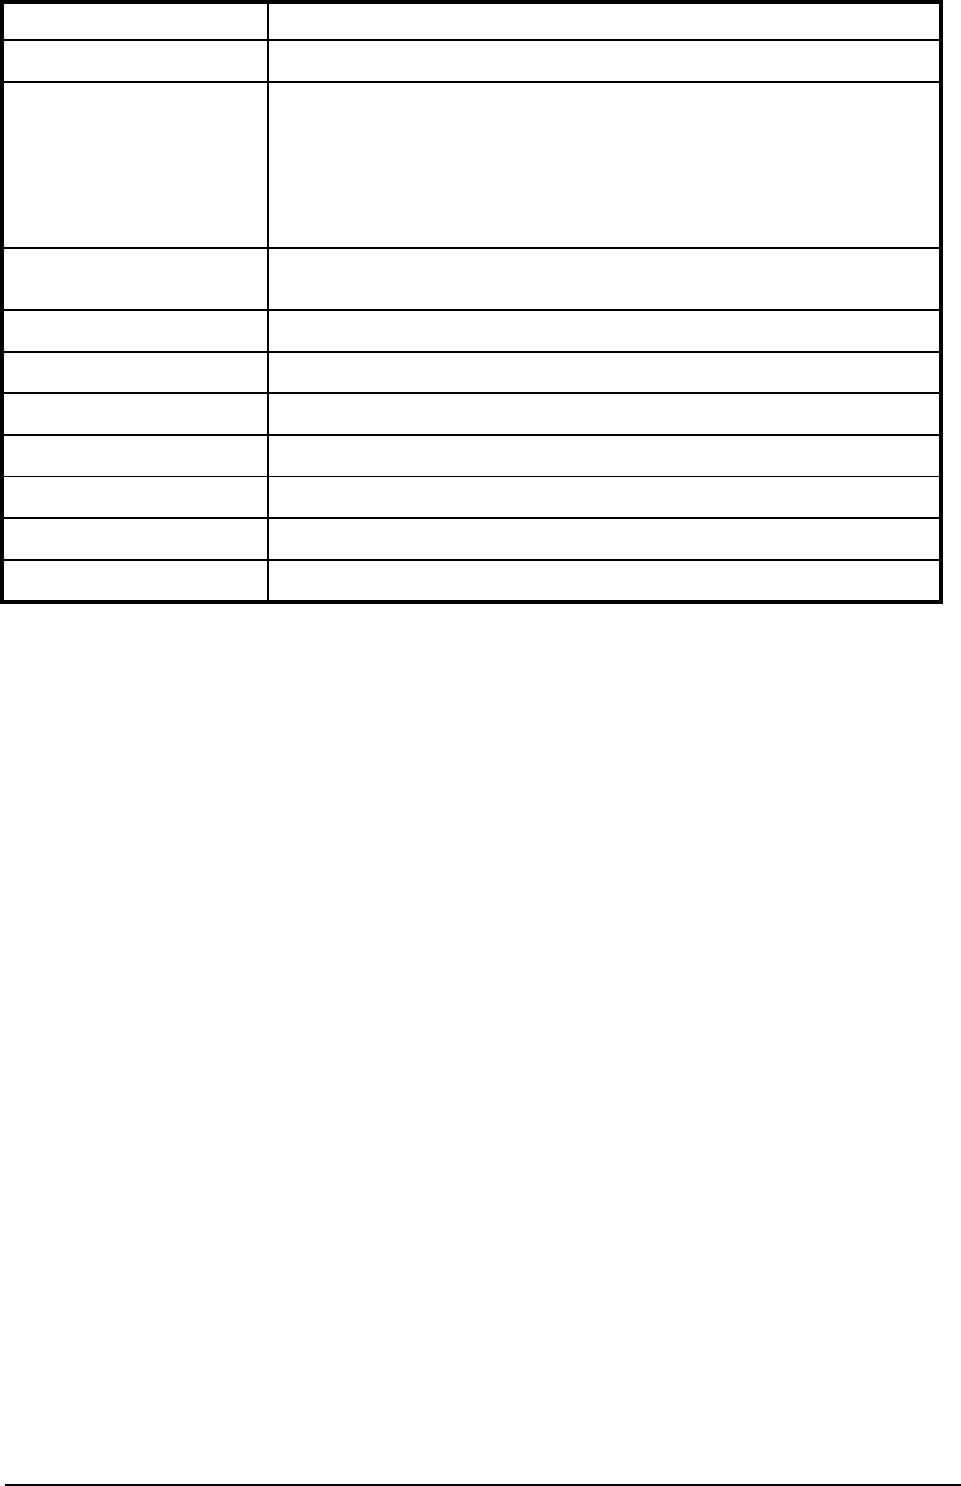
4.3 Preview
Screenshot on Windows Vista (Whidbey Theme):
Mouse Operation and Keyboard Accelerators:
•Left mousebutton: magnify view (in Zoom-Tool mode)
•Right mousebutton: reduce view (in Zoom-Tool mode)
•Middle mousebutton: turn Zoom-Tool mode on / off
•Ctrl + Middle mousebutton: fit page-width mode
•Shift + Middle mousebutton: fit whole page mode
•Ctrl + MouseWheel: magnify / reduce view
•Insert: turn Zoom-Tool mode on / magnify view
•Ctrl + Insert: fit whole page mode
•Delete: reduce view
•Ctrl + Delete: fit page-width mode
•Home: top of page
•End: bottom of page
•Ctrl + Page Up: first page
•Ctrl + Page Down: last page
•Page Up: one page back
•Page Down: one page forward
•Arrow Up: scroll up
•Ctrl + Arrow Up: scroll visible part up

Virtual Print Engine -Programmer's Manual Programming Techniques • 25
•Arrow Down: scroll down
•Ctrl + Arrow Down: scroll visible part down
•Arrow Right: scroll right
•Ctrl + Arrow Right: scroll visible part right
•Arrow Left: scroll left
•Ctrl + Arrow Left: scroll visible part left
The Zoom-Tool:
When activating the Zoom-Tool by clicking onto the zoom-tool button in the toolbar or by
pressing the Insert key, the mouse cursor changes to the zoom-tool icon and you have several
options:
•You can click with the left mouse button somewhere into the preview. This will zoom in by one
level and center the preview at the point you had clicked. You can also press the Insert key, this
will zoom in by one level using the current center of the preview.
•You can click with the left mouse button somewhere into the preview, hold the button down
and drag the mouse. In this case a rubber band will appear. When you release the mouse button,
the area covered by the rubber band will be zoomed into the preview.
•You can click with the right mouse button somewhere into the preview. This will zoom out by
one level and center the preview at the point you had clicked.
•You can end the zoom tool mode by either pressing the ESC key or by clicking once again onto
the zoom-tool button in the toolbar.
Special Keys:
•Ctrl + O: Open
•Ctrl + S: Save
•F1: Help
•F2: Print
•F3: Mail
•'g': Turn Grid on / off (only, if the grid button in the toolbar is enabled)
•'i': Info Dialog
•ENTER: enter a page number to preview
All keys listed above can be re-defined by your application, i.e. you can define by code, what key
will cause a specific action.

26 • Programming Techniques Virtual Print Engine -Programmer's Manual
Interactive Edition only:
•Tab: move the focus to the next enabled Control -if no Control currently owns the focus, the
focus is set to the Control with the lowest Tab-ID
•Shift + Tab: move the focus to the previous enabled control
•ESC: remove the focus, if the focus is currently owned by an Interactive Text or an Interactive
Form Field
The preview window can be customized in many ways: all keyboard accelerators can be redefind.
You can hide buttons and button groups or even the whole toolbar. You can also hide the rulers
and the statusbar, or specific controls of the statusbar. For details see "Management Functions" in
the reference help files.
The closing of the document fires the event AfterDestroyWindow() (VCL: OnDestroyWindow();
DLL: VPE_DESTROYWINDOW) to your application, which can be used in several ways to have
control over what is happening. For example you can disable menu entries and buttons in your
application, which start report generation -so a report isn't generated a second time -and re-enable
them after receiving this event.

Virtual Print Engine -Programmer's Manual Programming Techniques • 27
4.3.1 The GUI is themeable
The Office 2000 theme on Windows 2000:
The Whidbey theme on Windows 2000:
The Whidbey theme on Windows XP:
The Office 2003 Blue theme on Windows XP:

28 • Programming Techniques Virtual Print Engine -Programmer's Manual
The Office 2003 Olive theme on Windows XP:
The Office 2003 Silver theme on Windows XP:
Each theme can be used on any supported Windows version, except the Office 2003 Blue, Olive
und Silver themes, which are especially adapted to the predefined themes of Windows XP.

Virtual Print Engine -Programmer's Manual Programming Techniques • 29
4.4 The Object-Oriented Style
The objects of VPE, like lines, boxes, text, images, etc. are organized in a hierarchical structure,
where the properties of one object are inherited to other objects.
The following sections show the dependencies between the different objects and explain how to
set the properties.
4.4.1 VPE knows the following objects:
1. Pen Style-Object
2. Background Style-Object
3. Hatch Style-Object
4. Foreground Style-Object (accessed with VpeSetTextColor())
5. Line
6. Polyline
7. Polygon
8. Ellipse
9. Frame
10. Picture
11. Box
12. Barcode
13. Text
14. Rich Text Format (RTF) [Professional Edition and above]
15. Chart [Professional Edition and above]
16. User Defined Object (UDO) [Professional Edition and above]
17. FormField [Enterprise Edition and above]
Attributes for one object inherit to the others.
Examples:
•The frame is inherited from the pen. Therefore the border of a frame is drawn with the size,
style and color you use for the pen.
•Boxes, framed text, barcodes, and bitmaps are inherited from the frame. Their surrounding
rectangle is drawn with the size, style and color you use for the pen.
•Also the box implements a backgound mode (BkgMode), so the inner area of a box can be:
•filled with a solid color and optionally hatched
•transparent and optionally hatched
•one of the gradient styles
•The box of a text-box is drawn with the settings for the box.
So if you set the pensize to 0, no frame is drawn around any object.
30 • Programming Techniques Virtual Print Engine -Programmer's Manual
NOTE: "Frame" is a virtual object, you cannot access it (i.e. there is no function VpeFrame or
so). To draw a frame, use the method Box() and set the background transparency to
"on" with "BkgMode = VBKG_TRANSPARENT".
4.4.2 The inheritance order is
Pen Background + Hatch
Line
Frame
Polyline
Picture
Barcode
Foreground
Polygon Ellipse
Text
Box
RTF
UDO
Chart FormField
Virtual Print Engine -Programmer's Manual Programming Techniques • 31
4.4.3 Assigning Styles and Properties to Objects
Before you insert an object into a document -for example a text -you may specify all its
properties (i.e. its style). Once the properties are set, all objects created afterwards will inherit this
style, until you change a property.
Examples:
FontName = "Times New Roman"
FontSize = 12
Print(1, 1, "Hello World!")
Will print the text "Hello World!" with the font Times New Roman in 12 pt. size.
FontName = "Times New Roman"
FontSize = 12
Print(1, 1, "Hello World!")
TextBold = True
Print(1, 2, "What a nice day!")
TextItalic = True
Print(1, 3, "Hello Everybody!")
Will print the text "Hello World!" with the font Times New Roman in 12 pt. size and the text
“What a nice day!” with the same font and font-size but in bold, and afterwards the text "Hello
Everybody!" with the same font and font-size, but in bold and italic.
FontName = "Arial"
FontSize = 10
PenSize = 0.06
BkgMode = VBKG_GRD_LINE
BkgGradientStartColor = COLOR_LTYELLOW
BkgGradientEndColor = COLOR_ORANGE
PrintBox(1, 1, "Hello World!")
Will print the text "Hello World!" with the font Arial in 10 pt. size, surrounded by a box drawn
with a 0.6mm thick pen and filled with a gradient running from light yellow to orange.
Note that the text object was inserted with the method "PrintBox" instead of "Print()" in the
previous examples. You will also notice that font sizes are given in Point, whilst positions and
the line thickness are given in metric units (inch units can also be used).
The examples above show VPE's basic principle for assigning properties to objects:
First, you set all global properties to the desired values and then you insert an object. When
inserted, an object will automatically use all related global properties. After an object has been
inserted into the document, its properties can not be modified (except in the Enterprise and
Interactive Edition).
The global properties keep their values until they are changed. When opening a document, each
global property has a default value which is indicated in the reference help files.
Each VPE document keeps and manages independently its own set of global properties.
NOTE: In the examples above we used the True-Type fonts "Times New Roman" and "Arial".
These fonts are not available by default on other platforms than Windows and Mac OS.

Virtual Print Engine -Programmer's Manual Programming Techniques • 33
4.5 Dynamic Positioning
VPE's conception of "Dynamic Positioning" is very important for its efficient use.
It's a very powerful conception, which helps to position and size objects relative to each other.
Since dimensions of images and variable text can not be known in advance, VPE offers you
several mechanisms to determine them during the creation of the document -that is: during
runtime.
We strongly recommend that you read the following sections careful to understand them.
4.5.1 The Basic Conception -Absolute Coordinates
Objects can be positioned and sized with absolute coordinates. There are mostly two coordinate
pairs left, top and right, bottom to set the position of the top left corner and the bottom right corner
of an object:
Rectangle example for a circle, which is a rectangular object in VPE
left, top left, top
right, bottom right, bottom
NOTE: You must specify all coordinates in normalized form, this means, the following conditions
have to be met:
left <= right and top <= bottom, otherwise the object will not display correctly.
Example:
Box(1, 1, 5, 5) is correct
Box(5, 5, 1, 1) is incorrect
Box(1, 5, 5, 1) is incorrect
Instead of specifying the bottom right corner in absolute coordinates, you can use negative values
for the right and bottom coordinates. These values are then interpreted as width and height of the
object.
Example:
Box(1, 1, 7, 9)
Uses absolute coordinates and draws a box with the top left corner at 1, 1 and the bottom right
corner at 7, 9.
Box(1, 1, -6, -8)
Draws exactly the same box whilst specifying the width and the height of the box.

34 • Programming Techniques Virtual Print Engine -Programmer's Manual
4.5.2 Dynamic Positioning
The central text output functions Write, Print (and also the RTF output functions) and the Picture
functions are able to compute their object's height -or height and width -when being inserted into
a document. But how large is the height / width? How can you position the next object relative to
the last inserted?
The following constants called V-Flags will help:
Flag Meaning
VFREE A flag for indicating that VPE shall compute a coordinate dynamically. For text and images it can be
used for the right coordinate (width) as well as the bottom coordinate (height). For text it means that
the coordinate shall be computed due to the text-length and font size when a text object is inserted.
For images the coordinate will be computed based on the resolution and dimensions found in the
image file. For Rich Text (RTF) you may only set the bottom coordinate to VFREE, the right
coordinate can not be dynamic.
VLEFT the left coordinate of the last inserted object on the current page
VRIGHT the right coordinate of the last inserted object on the current page
VTOP the top coordinate of the last inserted object on the current page
VBOTTOM the bottom coordinate of the last inserted object on the current page
Note that VPE keeps track of these coordinates for each page separately.
NOTE: In .NET you have to prefix the V-Flags with the class name VpeControl, e.g.:
Report.Print(VpeControl.VLEFT, VpeControl.VBOTTOM, "Hello")
As an alternative you can use the instance name of the control followed by an
n-Property, e.g.:
Report.Print(Report.nLeft, Report.nBottom, "Hello")
which is the recommended way.
Examples:
Write(1, 1, -6, VFREE, "long text.....")
Inserts a text object without frame at position 1cm, 1cm with a width of 6 cm.
Its height is calculated and depends on the length of the text and the font size used.
StorePos()
This will store the coordinates (left, top, right, bottom) of the last inserted object on a dynamic
stack. The stack is limited in size only by available memory.
Write(VRIGHT, VTOP, -4, VFREE, "another text")
This inserts the next text object at position left = 7cm (the right-coord. of the last inserted
object [1 + 6]), top = 1cm (the top-coord. of the last inserted object); with a width of 4cm.
The height is computed (VFREE).
RestorePos()
This will now restore the last stored coords from the stack.
Virtual Print Engine -Programmer's Manual Programming Techniques • 35
Write(VLEFT, VBOTTOM, VRIGHT, VFREE, "another text2")
This inserts the next text object at position left = 1cm (the left-coord. of the restored coords),
top = ?cm (the bottom-coord. of the restored coords, we use a ‘?’ here, because we do not
know the exact value, since VPE did compute it), with a width of 6cm (the right-coord. of the
restored coords), the height is calculated.
4.5.3 Dynamic Text
In the following (left, top, right bottom) is written as (x, y, x2, y2).
For Text and Rich Text, VPE computes automatically word-breaks according to the setting of the
object's right coordinate (x2). If text reaches the right coordinate, it is broken at the next possible
word boundary to the next line, and text output is continued at the left coordinate (x) of the object
until all text has been drawn, or the bottom coordinate of the object is reached.
Fig. 1: (x, y) and (x2, y2) are fixed coordinates.
A word-break occurs at the object’s right boundary (x2).
If the bottom coordinate is not dynamic (i.e. not VFREE) and there is not enough room to output
all text, remaining text will be clipped.
Fig. 2:(x, y) and (x2, y2) are fixed coordinates. A word-break occurs at x2.
The bottom coordinate is not large enough, so remaining text is clipped.
36 • Programming Techniques Virtual Print Engine -Programmer's Manual
If the right coordinate is dynamic, text will extend to the right.
NOTE: for Rich Text (RTF) x2 can not be set dynamic.
Fig. 3:(x, y) and y2 are fixed coordinates. x2 is dynamic, the text extends to the right.
The right coordinate is computed accordingly.
In the following example the right and bottom coordinates are dynamic, watch the difference of
the bottom coordinate in contrast to the previous example.
Fig. 4:(x, y) are fixed coordinates. (x2, y2) are dynamic, the text extends to the right.
The right and bottom coordinates are computed accordingly.
If the bottom coordinate is dynamic (i.e. it is VFREE), the object will grow downwards until all
text has been output. If the bottom margin is reached and there is still text remaining which needs
to be drawn, VPE can break the text automatically to the next page, depending on the settings of
the property AutoBreakMode (see “Automatic Text Break” on page 44).
Fig. 5:(x, y) and x2 are fixed coordinates. y2 is dynamic, the text extends to the bottom.
The bottom coordinate is computed accordingly.

Virtual Print Engine -Programmer's Manual Programming Techniques • 37
If you use VFREE for the right coordinate (x2) of a text object, the right page margin (see the next
chapter "Page Margins"), will be used as the maximum possible coordinate to which the dynamic
coordinate may extend. If the right border of the object reaches the right margin, a word-break will
be computed and text is continued on the next line at the left coordinate (x) of the object.
NOTE: If text is positioned to the right of the right margin, the right page border has the same
effect as the right margin.
Fig. 6:(x, y) are fixed coordinates. (x2, y2) are dynamic, the text extends to the right until the
right margin is reached. The right and bottom coordinates are computed accordingly.

38 • Programming Techniques Virtual Print Engine -Programmer's Manual
4.5.4 Page Margins
The page margins of VPE are virtual margins. That means, you can place text and other objects
outside of them.
Nevertheless the margins play an important role for the behavior of some methods:
•The bottom margin tells VPE, where to start with the Automatic Text Break, which means that
text exceeding the bottom margin is automatically skipped to the next page. You can change
this by modifying the property AutoBreakMode (see “Automatic Text Break” on page 44).
•The top margin tells VPE, where to start with automatically broken text on successive pages.
•The right margin is important for text output, as explained in the previous chapter "Dynamic
Text".
You set the margins for the current page by setting the properties nLeftMargin, nTopMargin,
nRightMargin and nBottomMargin. But this only helps for the current page. A new page,
generated either with a call to PageBreak(), or by an Automatic Text Break will use DEFAULT
values.
Why? Well, perhaps you want on successive pages other margins, especially if an Automatic Text
Break occurs. How else could you change the layout of successive automatically generated pages?
The method provided by VPE for setting the default margins, which are used for newly generated
pages is:
SetDefOutRect(LeftMargin, TopMargin, RightMargin, BottomMargin)
Keep in mind that there is a difference between the properties for the margins, which are only
valid for the current page you're working on, and the default-margins for newly generated pages.
By default, VPE defines the margins and default margins 2cm from the paper edges. The right and
bottom paper edge is defined by the property 'PageFormat', which may be 'DIN_A4', 'US_Letter',
etc. or 'User_Defined'. In the latter case the page dimensions are specified individually through the
properties 'PageWidth' and 'PageHeight'.
The page dimensions can be set for each page individually.
You can access (read / write) the margins with the properties nLeftMargin, nTopMargin,
nRightMargin and nBottomMargin (DLL: use the methods VpeGet() and VpeSet() with the flags
VLEFTMARGIN, VTOPMARGIN, VRIGHTMARGIN, VBOTTOMMARGIN).
So they can work as placeholders for you, holding the definitions of the current page / document.
Example:
Write(1, 15, nRightMargin, VFREE, "long text.....")
In the above example, the “long text” will extend to the right margin of the current page.
If you need to change the margins later during the development process, and your calls to VPE are
considering them like in the example above, you will have no problems with the new layout.
As you can place text and other objects outside of the margins, the rectangle defined by the
margins is also called "Output Rectangle". There are two related methods to define the margins -
or output rectangle -at once: SetOutRect() and SetDefOutRect().

Virtual Print Engine -Programmer's Manual Programming Techniques • 39
Calling SetOutRect() sets all four margin coordinates at once. Both, the nMargin properties and
this method modify the margins on the current page you are working on.
In contrast, the DefOutRect defines the margins that will be used for a newly generated page. This
is very helpful, if you want to place a text that is automatically broken to the next page with the
auto break feature in a completely different rectangle.
Margins: Summary
VPE knows an output rectangle on each page. This can be compared to the printable area or page-
margins.
The output-rectangle is only for your own orientation purposes when positioning objects. In
addition text output functions use the output-rectangle to consider the maximum right border.
You're still able to place objects outside the output-rectangle.
•The output rectangle can be defined and retrieved.
•Each page in a document can have its individual output rectangle.
•You can define a default output rectangle, which will be used for newly generated pages.
•The values for margins are specified in coordinates relative to the top / left paper border, e.g. if
the right margin shall be 2cm away from the right paper border, set it to ‘page_width -2’. If
you would set the right margin = 2, it would be 2cm away from the left border.
•After creating a Document with OpenDoc() the default-rectangle is set to:
left = 2, top = 2, right = page_width -2, bottom = page_height - 2
•The properties to access the output rectangle are:
nLeftMargin, nTopMargin, nRightMargin and nBottomMargin
(DLL: VLEFTMARGIN, VRIGHTMARGIN, VTOPMARGIN, VBOTTOMMARGIN)
•The default output rectangle is set with:
SetDefOutRect(LeftMargin, TopMargin, RightMargin, BottomMargin)
•On an initial blank page, VLEFT is VLEFTMARGIN, VRIGHT is VRIGHTMARGIN, VTOP
is VTOPMARGIN and VBOTTOM is VTOPMARGIN (!).
All explained V-Flags except VFREE can be used for ALL objects.
Examples:
DLL:
VpeSet(hDoc, VLEFTMARGIN, 3 );
Control:
<Object>.nLeftMargin = 3;
Sets the left margin of the output rectangle for the current page to 3 cm.
Write(nLeftMargin, nTopMargin, -5, VFREE, "Hello World!")
Inserts the text "Hello World!" at the top left corner of the margins.

40 • Programming Techniques Virtual Print Engine -Programmer's Manual
Write(16, nTopMargin, nRightMargin, VFREE, "Hello world!")
Text is placed with the right border equal to the right page margin.
Line(VLEFTMARGIN, VTOPMARGIN, VRIGHTMARGIN, VBOTTOMMARGIN)
Draws a line from the upper left to the lower right corners of a page.
Write(VLEFTMARGIN, VTOPMARGIN, VRIGHTMARGIN, VFREE, "long text.....")
This inserts a text object at position (left margin, top margin) with a width up to the right
margin. Its height (y2) is calculated and depends on the length of the text and the font size
used.
Virtual Print Engine -Programmer's Manual Programming Techniques • 41
4.5.5 Advanced Dynamic Positioning
Imagine, you created a report. Later you want to change the width of one field in a table. Would
you really want to edit all coordinates of all other fields next to it?
What, if you want to place an object relative to another, but with a gap between them?
You can retrieve and set all coordinates with the functions VpeGet and VpeSet.
Instead of the DLL functions VpeGet and VpeSet, the ActiveX, VCL and .NET Controls offer you
the following n-Properties:
nLeft, nTop, nRight, nBottom, nWidth, nHeight
nLeftMargin, nTopMargin, nRightMargin, nBottomMargin
They relate to the V-Flags, but you can directly use them for offset computations.
They make the use of Dynamic Positioning much more easy and transparent.
The .NET and Java controls offer one additional n-Property: nFree, which is equal to VFREE
Examples:
DLL:
VpeWrite(hDoc, VLEFT, VpeGet(hDoc, VBOTTOM) + 1, VRIGHT, VFREE, "text3");
ActiveX / VCL:
Doc.Write(VLEFT, Doc.nBottom + 1, VRIGHT, VFREE, "text3");
.NET:
Doc.Write(Doc.nLeft, Doc.nBottom + 1, Doc.nRight, Doc.nFree, "text3");
Java:
Doc.Write(Doc.getNLeft(), Doc.getNBottom() + 1, Doc.nRight, Doc.nFree,
"text3");
Inserts the next text object 1cm below the bottom border of the last inserted object. The left
coordinate and the width of the newly inserted text will be exactly the same of the previously
inserted object, the height of the new text will be computed by VPE.

42 • Programming Techniques Virtual Print Engine -Programmer's Manual
4.5.6 Rendering Objects
In addition to the VFREE-flag, which instructs VPE to render the size of objects when they are
inserted into the document, the rendering methods help to compute the size of text and images
without inserting them into a document. The methods compute the size of text and images in
metric or inch units. The text or image is NOT inserted into the document.
The properties nRenderWidth and nRenderHeight (DLL: VRENDERWIDTH and
VRENDERHEIGHT) contain the appropriate values after the rendering has been executed.
Examples:
RenderWriteBox(VLEFTMARGIN, VTOPMARGIN, VRIGHTMARGIN, VFREE, "a long text
...")
Computes the height of the string "a long text …". The computed height can be retrieved in
nRenderHeight (DLL: VpeGet(hDoc, VRENDERHEIGHT)). You supply all four coordinates to
the RenderWriteBox() method, because the method will also return information, if the text will
fit onto the current page, or if a page break will happen when the text is inserted at the
specified coordinates.
Doc.RenderPicture(VFREE, VFREE, "..\images\fruits.bmp")
Computes the height and width of the "fruits.bmp" image file. The computed width can be
retrieved in nRenderWidth (DLL: VpeGet(hDoc, VRENDERWIDTH)) and the height can be
retrieved in nRenderHeight (DLL: VpeGet(hDoc, VRENDERHEIGHT)).
The Picture-Flags like PictureCache, PictureBestFit, etc. are also active.
The following command would then insert the image in the center of the page:
Doc.NoPen
Doc.Picture((Doc.PageWidth -Doc.nRenderWidth) / 2, (Doc.PageHeight -
Doc.nRenderHeight) / 2, VFREE, VFREE, "..\images\fruits.bmp")
IMPORTANT NOTE:
If the text-output functions are used with VFREE to calculate widths and / or heights, the
calculations need time. The more VPE has to calculate, the slower it works.
If you have for example to output a lot of broken text into single lines with equal fonts and font
sizes -like in a table -it is a good idea to render the height of the line once and to use the
rendered height instead of VFREE.

Virtual Print Engine -Programmer's Manual Programming Techniques • 43
Example:
RenderPrint(0, 0, "X")
height = nRenderHeight
for page = 1 to 1000
for line = 1 to 18
for column = 1 to 17 step 2
Write(column, line, -2, height, "Hello")
next column
next line
PageBreak()
next page
is much faster than
for page = 1 to 1000
for line = 1 to 18
for column = 1 to 17 step 2
Write(column, line, -2, VFREE, "Hello")
next column
next line
PageBreak()
next page
where the height of each "Hello" text is computed over and over again.
NOTE: A text drawn with a frame around it requires more width and height than a text without a
frame. Therefore you need to render the width and height of a framed text separately
from text, which is not framed -even if the used fonts and font sizes are the same. Also
a text that is printed in two (or more) lines has a different height than simply multiplying
the height rendered for a single line with the total number of lines, especially if the text is
framed. Therefore you would need to render a text separately, if one or more of the
following properties change:
•PenSize (text without a frame has a PenSize of zero)
•FontSize
•FontName
•Number of lines of text to output
The "Report" and "Speed + Tables" demos make use of the technique described above.

44 • Programming Techniques Virtual Print Engine -Programmer's Manual
4.5.7 Automatic Text Break
This is a very powerful feature! VPE is able to render text to the bottom margin (i.e. the defined
bottom of the output rectangle) and to insert the remaining text automatically onto successive
pages. If there is no successive page, VPE will generate a new blank page.
The AutoBreak does only work for Text and RichText, not for images, boxes or any other objects.
Text / RTF is broken to the next page only if
nBottom of the object > nBottomMargin
NOTE: Due to round-off problems, VPE allows for Text and RTF a possible maximum tolerance
of 0.3 mm by which nBottom may exceed nBottomMargin without firing an auto break.
VPE knows the following different Auto Break Modes:
AUTO_BREAK_ON
Auto Break is activated. An Auto Break will happen if y2 = VFREE or y > VBOTTOMMARGIN.
Remaining text is broken onto the next page(s) with the following coordinates:
x = the original x coordinate of the inserted object
x2 = the original x2 coordinate of the inserted object
y = top of the Output Rectangle of the successive page -if a new page is generated, it will be
the top of the Default Output Rectangle
y2 = VFREE
AUTO_BREAK_OFF
Same behavior as AUTO_BREAK_ON (limited positioning / rendering to the bottom of the
output rectangle is active), but remaining text is NOT broken onto next page(s). It is cut
instead.
AUTO_BREAK_NO_LIMITS
Remaining text is NOT broken onto the next page(s), it can be placed anywhere on the paper
with no limits.
AUTO_BREAK_FULL
Auto Break is activated. An Auto Break will happen if y2 = VFREE or y > VBOTTOMMARGIN.
Remaining text is broken onto the next page(s) with the following coordinates:
x
=
left margin of the Output Rectangle
x2
=
right margin of the Output Rectangle
y
=
top margin of the Output Rectangle
y2
=
VFREE
NOTE: If a new blank page is added by VPE, the Default Output Rectangle will be used to set
x, x2 and y. Otherwise if the next page is already existing, the Output Rectangle of the
existing page is used. You can modify the Output Rectangle of an existing page at any
time.
By using the AutoBreakMode feature in conjunction with the Default Output Rectangle, you can
control on what position broken text is placed on successive pages.

Virtual Print Engine -Programmer's Manual Programming Techniques • 45
Examples:
DLL:
VpeSetAutoBreak( hDoc, AUTO_BREAK_OFF );
Control:
<Object>.AutoBreakMode = AUTO_BREAK_OFF
The default after calling OpenDoc() is AUTO_BREAK_ON. For a detailed example take a
look at the Auto Render Demo in the source code of VPEDEMO.
For RTF AutoBreak features, see "Build-In Paragraph Setting: RTF Auto Page Break" on page 63.
VPE fires also an event, if an AutoBreak occurs. This gives you additional control over the layout.
When the event is fired, VPE already moved to the next page (or generated one) and you can
modify the Output Rectangle (NOT the Default Output Rectangle) to control the layout, or insert
manually Headers and Footers, etc. (see also "Headers and Footers" on page 117).
The event is named:
DLL: VPE_AUTOPAGEBREAK
Control: AfterAutoPageBreak
VCL: OnAutoPageBreak
NOTE: VPE might enter an endless loop, if you specify the page dimensions and or the page
margins in a way, so that the output rectangle is smaller than the space required for at
least one line of text. If you output text in such case, VPE can not print a single line of
the text on the current page and creates an auto break. On the new page the output
rectangle is again too small (there is no additional space) and VPE fires again an auto
break, and so forth.
Especially if you are printing on labels, change the margins accordingly. Best, you set
the margins to the page boundaries, or set AutoBreakMode = AUTO_BREAK_OFF while
processing the event.
Enterprise and Interactive Editions Only:
The Enterprise and Interactive Editions do also break all other objects as whole to the next page if
-and only if -they are dumped from a template.
In addition, the DumpTemplate()-methods do not make any differences between the
AutoBreakModes AUTO_BREAK_ON and AUTO_BREAK_FULL, i.e. objects are always
inserted into the current VPE Document with the given left and right coordinates if one of both
modes is set.
If a template object is defined with Top = dynamic, it will not be broken backwards to previous
pages. Also, an object with Top = dynamic is not broken to the next page, if the bottom of the
object runs below the bottom margin. Therefore use the Top = dynamic setting with care, it is
always better to use bottom = dynamic within a dependency chain. In contrast it is no problem to
use Top = dynamic if Bottom = fixed.
46 • Programming Techniques Virtual Print Engine -Programmer's Manual
4.6 Rotation of Text, Images and Barcodes
VPE is able to rotate text, images and barcodes freely in 90 degree steps. RTF can not be rotated.
Some charts can be rotated by 90 degrees only to the right (with the property ChartGridRotation).
Rotation is done clockwise, the <angle> parameter is specified in 1/10 degrees. So the value for
rotating an object by 90 degrees to the right would be 900.
Examples:
DLL:
VpeSetRotation( hDoc, 900 );
Control:
<Object>.Rotation = 900
IMPORTANT:
When images or text are rotated, the given starting coordinate (x, y) remains unchanged. But x2
and y2 are transformed into x2’, y2’.
Look at the following simple example for images:
0 degrees: 90 degrees: 180 degrees: 270 degrees:
x, y x, y x, y x, y
x2, y2 X2’, y2’ x2’, y2’ x2’, y2’
This example is simple, because the width and the height is the same, so rotation doesn’t matter.
The same for text, but now width and height aren’t identical:
0 degrees: 90 degrees: 180 degrees: 270 degrees:
x, y x, y x, y x, y
x2, y2 x2’, y2’
x2’, y2’ x2’, y2’

Virtual Print Engine -Programmer's Manual Programming Techniques • 47
How rotation is performed:
Say, you insert the text above at position (0, 0, 1, 0.5). The command would be:
VpeWriteBox(hdoc, 0, 0, 1, 0.5, "Hello World!")
Now you want to rotate it by 90 degrees. The commands would be:
VpeSetRotation(hdoc, 900)
VpeWriteBox(hdoc, 0, 0, 1, 0.5, "Hello World!")
Why the same coordinates? -Because VPE transforms them! Before rotating an object, VPE
computes the width and the height of the object.
Regardless of the angle, the width and height will always stay the same. This makes rotation for
you much easier (especially if you let VPE render the height of a text / image object), if you keep
this in mind and use only relative coordinates for x2, y2 (negative signs).
Now the same example again, but with relative coordinates and the starting position (3.5, 2.2):
VpeSetRotation(hdoc, 900)
VpeWriteBox(hdoc, 3.5, 2.2, -1, -0.5, "Hello World!")
Do you get the idea? The "-1" is always the width, and the "-0.5" is always the height.
What about the rendering features of VPE? Of course it will work! The command:
VpeWriteBox(hdoc, 3.5, 2.2, -1, VFREE, "Hello World!") will do fine with every rotation angle.
Now, after this explanation, keep the following two rules in mind:
1. As x2 and y2 are transformed, the best way to use rotation is, not to use absolute coordinates
for x2, y2 but relative = width and height (this means: with a negative sign).
2. x2’ / y2’ is the final right / bottom position of the rotated object. These are the coordinates you
will retrieve with VRIGHT / VBOTTOM.
See Also: “Dynamic Positioning” on page 33

48 • Programming Techniques Virtual Print Engine -Programmer's Manual
4.7 Pictures
VPE can import many different image file formats:
•Windows Bitmaps (2 / 16 / 256 / HiColor / True Color, RLE)
VPE Standard Edition and above:
•Windows WMF (Placeable Metafile Format, Windows only)
•Windows EMF (Enhanced Metafile Format, Windows only)
EMF and WMF is only supported on Windows platforms. If you should have problems importing
metafiles (WMF), make sure you import a Placeable Metafile. A placeable metafile has a header
with some additional information, which is required by VPE. See the Windows-SDK
documentation on how the file header is structured.
In addition, the VPE Enhanced Edition and above support:
•OS/2 Bitmaps (2 / 16 / 256 / HiColor / True Color)
•TIFF 6.0 (2 / 16 / 256 / HiColor / True Color
LZW, PackBits, Fax G3, Fax G4, Multipage, RGBA, CMYK, RGB and Grayvalue with 16
Bits/Sample, JPEG compression v7, not the old 6.0 specification)
•GIF (2 / 16 / 256 Color, Multipage)
•PCX (2 / 16 / 256 / True Color)
•JPG (256 / True Color, RGB / CMYK, Standard and Progressive JPEG)
•PNG (all possible formats)
•ICO (Windows Icon)
•JNG (JPEG Network Graphics)
•KOA (C64 Koala Graphics)
•IFF/LBM (Interchangeable File Format -Amiga/Deluxe Paint)
•MNG (Multiple-Image Network Graphics)
•PBM (Portable Bitmap [ASCII])
•PBM (Portable Bitmap [RAW])
•PCD (Kodak PhotoCD, reads always the 768 x 512 pixel image)
•PGM (Portable Greymap [ASCII])
•PGM (Portable Greymap [RAW])
•PPM (Portable Pixelmap [ASCII])
•PPM (Portable Pixelmap [RAW])
•RAS (Sun Raster Image)
•TGA/TARGA (Truevision Targa)
•WAP/WBMP/WBM (Wireless Bitmap)
•PSD (Adobe Photoshop, only 24-bit RGB or 24-bit RGB RLE, no layers / masks)
•CUT (Dr. Halo)

Virtual Print Engine -Programmer's Manual Programming Techniques • 49
•XBM (X11 Bitmap Format)
•XPM (X11 Pixmap Format)
•DDS (DirectX Surface)
•HDR (High Dynamic Range Image)
•G3 (Raw fax format CCITT G.3)
•SGI (SGI Image Format)
Images are imported and placed into a document by calling the method Picture().
VPE is a WYSIWYG system. Therefore, if you are using VFREE for x2 and/or y2 in the call to
the method Picture(), VPE will read the image header (this is much faster than reading the whole
image, like most other tools do) to determine the picture's dimensions in metric coordinates. The
dimensions are computed based on the resolution information found in the image and its size in
pixels.
This means, it computes the width and height of an image by extracting the DPI information
included in the image file. For example a width of 96 pixels and a resolution of 96 DPI mean that
the image is "in reality" one inch wide. A width of 900 pixels and a resolution
of 300 DPI mean that the image is "in reality" three inch wide, etc.
Examples:
DLL:
VpeSetPenSize(hDoc, 0); // no frame drawn around the picture
VpePicture(hDoc, 1, 1, VFREE, VFREE, "test.jpg");
ActiveX / VCL:
Doc.PenSize = 0 // no frame drawn around the picture
Doc.Picture(1, 1, VFREE, VFREE, "test.jpg")
.NET:
Doc.PenSize = 0; // no frame drawn around the picture
Doc.Picture(1, 1, Doc.nFree, Doc.nFree, "test.jpg")
Java:
Doc.setPenSize(0); // no frame drawn around the picture
Doc.Picture(1, 1, Doc.nFree, Doc.nFree, "test.jpg")
Inserts the image "test.jpg" at the position (1, 1). The width and height of the image are
computed by VPE.
If an image should be drawn incorrectly in size, this results from wrong resolution and / or size
information stored in the image file. You have two options to workaround this problem:
•Use a good image processing software, where you can change the DPI
resolution in the image-file to a reasonable value
•You can stretch the images in VPE by using absolute values for x2 / y2
NOTE: Special care must be taken, when creating VPE document files that contain pictures. By
default, images are embedded into VPE document files, but you can turn this behavior
off. For details, please see “Pictures and VPE Document Files” on page 140.

50 • Programming Techniques Virtual Print Engine -Programmer's Manual
4.7.1 Scaling
As explained above, you are able to let VPE compute the x2 and y2 coordinates of an image by
setting both to VFREE.
Picture(1, 1, VFREE, VFREE, "image1.tif")
You can also set only one of both coordinates to VFREE. Depending on the property
PictureKeepAspect, VPE is able to compute this coordinate so that the image is not distorted
(PictureKeepAspect = True) or VPE will use the original size of the image (PictureKeepAspect =
False).
PictureKeepAspect = True (this property is by default True)
Picture(1, 1, -5, VFREE, "image1.tif")
In this example, the width of the image will be 5cm. If the image had an original size of 15 x 21
cm, the width is now 1/3 of the original size. Because PictureKeepAspect is True, VPE will
compute the height to the same aspect ratio = 1/3 of the original height, which would then be 7
cm. (This example assumes that the image's resolution is the same for the width and the
height. Otherwise the computations performed by VPE are slightly more difficult.)
Another option is, to let VPE compute the largest possible image size within a given rectangle
without distorting the image. This is done by setting the property PictureBestFit = true.
PictureBestFit = true
Picture(1, 1, -10, -10, "image1.tif")
In the example, the given rectangle is 10 x 10 cm wide. VPE uses the largest dimension as a
reference to compute the other dimension. If the image had an original size of 15 x 21 cm,
VPE would use the image height (21 cm) as the reference to compute the largest possible
width. (If the image was 21 x 15 cm, VPE would use the width as the reference to compute the
best fitting height). The height is now scaled to 10cm (the height of the given rectangle) which
is a scaling factor of 10 cm / 21 cm = about 0.476. The width is then scaled with the same
factor: 15 * 0.476 = about 7.14 cm. (This example assumes that the image's resolution is the
same for the width and the height. Otherwise the computations performed by VPE are slightly
more difficult.)
NOTE: The use of the property PictureBestFit requires that all coordinates of the rectangle
are specified. You can not use VFREE.
You can scale an image also to absolute coordinates regardless of its original metric size.
Picture(1, 1, 15, 20, "image1.tif")
NOTE: In addition to the above ways of scaling images, there is also the option to render the
size of an image without inserting it into a document (see “Rendering Objects” on
page 42).

Virtual Print Engine -Programmer's Manual Programming Techniques • 51
4.7.2 Image Type Identification
VPE identifies the type of an image by checking the file suffix (i.e. ".tif" or ".jpg", etc.).
If the property PictureType is set to PIC_TYPE_AUTO (which is the default), VPE is also able to
determine the image type not only by looking at the file suffix, but by examining the file header
itself. So PIC_TYPE_AUTO will work in most cases even if the file suffix does not describe the
image type. Example: you try to import a JPEG image with the name "test.001" and have set
PictureType = PIC_TYPE_AUTO, even then VPE will detect that this is a JPEG file!
For technical reasons, VPE can not identify automatically the following formats by analyzing the
file content: CUT, PCD, TARGA and WBMP. These formats have simply no identifyable header.
Of course VPE will identify them correctly by the suffix of their file name.
In addition you can specify an image type explicitly by setting the property PictureType.
4.7.3 Image Cache
To increase performance, VPE has a build-in dynamic image cache.
(Note: the Community Edition has no image cache)
VPE manages images in an intelligent cache, so that the most frequently used images are held in
memory. VPE holds as much images in memory as possible, restricted by the property
PictureCacheSize. If an image fell out of the cache and it is required again (i.e. an image is
displayed or printed), VPE loads the image with high performance back into the cache.
The cache guarantees maximum performance, whilst allowing the import of an unlimited number
of images into a document. The cache is per process, i.e. it is shared between all documents /
threads of a single process, but it is not shared between different processes.
Set the property PictureCache = true (this is the default) to move images into the dynamic cache
area. This only works for pictures inserted by filename (not for resources or DIB's). Each calling
application has its own cache, but the cache is shared by all open documents of one application.
Images are also held in the cache when a document is closed. The cache memory is only freed
when VPE is unloaded from memory, i.e. when your application terminates.
We recommend to set PictureCache = true always.
If you set it to false, an image is loaded into memory each time it is displayed, printed or exported
(for example to PDF).
By default, the image cache is 64 MB in size. You can set the cache size with:
DLL:VpeSetPictureCacheSize( <KB> )
Control:PictureCacheSize = <KB>
where <KB> is the size of the cache in kilobytes.
Example:
PictureCacheSize = 4096
sets the cache size to 4 megabytes

52 • Programming Techniques Virtual Print Engine -Programmer's Manual
The cache can be flushed (emptied) by the following sequence:
old_value = PictureCacheSize
PictureCacheSize = 0
PictureCacheSize = old_value
The size of the picture cache is a virtual size. That means VPE does not reserve memory for the
cache in advance. Instead, if a picture is read into memory VPE will reserve as much memory as
needed to hold the image in memory. If the amount of memory needed for all cached images
together becomes bigger than the specified image cache size, VPE will remove as much images
from memory that were accessed less often, until there is enough space to keep the newly read
image in memory.
Therefore, VPE will keep at least the last read image in the cache, even if it is larger than the
maximum possible cache size.
Example:
PictureCacheSize = 4096
Image cache is 4 MB now
Picture(1, 1, VFREE, VFREE, "image1.tif")
Image1 is read into memory, it needs 2 MB and is cached.
Picture(1, 1, VFREE, VFREE, "image2.jpg")
Image2 is read into memory, it needs 1 MB and is also cached. Now 3 MB of the cache are
used.
Picture(1, 1, VFREE, VFREE, "image2.tif")
Image1 is taken from the cache without loss of performance
Picture(1, 1, VFREE, VFREE, "image3.bmp")
Image3 is read into memory, it needs 1.5 MB. Because the cache is not large enough to store
it also in the cache, the least frequent used image is removed from the cache. This is
"image2.jpg". Now 3.5 MB of the cache are used (2MB for image1 and 1.5 MB for image3).
Picture(1, 1, VFREE, VFREE, "image2.tif")
Image1 is still taken from the cache without loss of performance
NOTE: In fact VPE has a multi-level associative cache and on the top-level it stores meta
information about images (for example type, width, height and resolution) together with
their path-and file names. This top-level cache can not be flushed. It removes itself
entries when an internally hardcoded threshold-value is reached. On the low level the
cache stores the binary image data, i.e. the bitmap data, which is deleted when flushing
the cache.
The cache has some implications for the design of your application: since the cache only
holds as much binary image data (i.e. the bitmap data) in memory, as allowed by the
cache size, VPE might load at any time image files from disk as desired.

Virtual Print Engine -Programmer's Manual Programming Techniques • 53
Therefore you may not delete or overwrite image files, which are currently used in
anyopen document of your application.
It must also be noted that the cache of VPE is still active, after you have closed a VPE
document. This makes sense, because if you create another VPE document which uses
the same images (for example company logos), they can be used extremely fast. The
whole cache –including the top-level cache –is only deleted from memory, after your
application has terminated.
If an image file is not used within any open document of the same process, you can
safely delete or overwrite it.
4.7.4 Using BLOB's or other Temporary Images / Memory Streams
If you want to import images which are for example BLOB's from a database, we recommend to
write these BLOB's as temporary files to harddisk and to import them into VPE using the standard
Picture() method. For editions below the Professional Edition, this is the best solution, because
this way the dynamic image cache of VPE will be used and no memory and / or performance
problems will occur.
IMPORTANT:
You may not delete or overwrite image files, which are currently used in anyopen
document of your application.For a detailed explanation, please see “Image Cache” on page
51.
If you are using the Professional Edition or higher, you can also use Memory Streams to import
images from BLOB’s by using the PictureStream() method. This is faster since it does not involve
any disk I/O overhead. But in order to keep memory consumption as low as possible, you should
always supply the SAME memory stream to the PictureStream() method for the same picture. If
you do so, VPE can also make use of its image cache, i.e. identical memory streams will be moved
into the cache only once. VPE creates internally copies of a memory streams, so it cannot remove
memory stream based images from the cache as long as a document is open (it can not reload the
image), you should only make use of this technique, if the amount of images (and their size) is not
too large. Otherwise too much memory is consumed and the technique of using temporary files is
the better choice.
The usage of Memory Streams is explained in the Reference Manuals.
54 • Programming Techniques Virtual Print Engine -Programmer's Manual
4.7.5 Scale-to-Gray Technology
[Professional Edition and above]
A high resolution image (with for example 300 or 600 DPI) scaled down to the screen preview
(which is usually a 96 DPI device) is looking bad due to the nature of the scaling algorithm. The
reason is that pixels are left out when drawing such a high resolution image to the screen.
Example:
If you draw a 300 DPI image to a 96 DPI screen, the image is scaled down by a factor of 96 / 300
= 0.32. This means, only 32% of all pixels are drawn, the rest is left out. (i.e. after each pixel that
is drawn, 2 pixels are left out)
What the Scale-to-Gray Technology does:
The Scale-to-Gray Technology is especially useful for displaying forms on the screen, because a
grayscale image is scaled down to the low screen resolution, while the loss of visual information
(the pixels that are left out) is transformed to gray-values of different intensity (brightness). This
produces perfect readability for the human eye.
Additionally, together with the Scale-to-Gray Technology you can use two different images for the
same page: one for the screen (preview) in low resolution, and one for printing in the original high
resolution. Therefore you gain perfect readability on the screen as well as on the printouts.
Example, normal scaled image:
Example, image scaled with Scale-To-Gray Technology:

Virtual Print Engine -Programmer's Manual Programming Techniques • 55
Souce Code Example:
NoPen()
// Insert original image on page 1:
Picture(0, 0, VFREE, VFREE, "..\\images\\gew300g4.tif")
PageBreak()
// Insert the scaled images now invisible for printing:
SetPrintable(FALSE)
// PIC_SCALE2GRAY is the choice, if you need best readability only for a 1:1
// Preview Scaling. The scaled image is only computed once and then held in
// the dynamic cache (if the property PictureCache is set to true, which is
// the recommended default).
// This gives the best balance between required CPU time and memory usage.
// The scaled image will only be re-computed, if it falls out of the dynamic
// cache and needs to be re-created from file again.
PictureScale2Gray = true
Picture(0, 0, VFREE, VFREE, "..\\images\\gew300g4.tif")
PageBreak()
// The floating Scale-to-Gray image is computed each time when it is
// displayed. Setting PictureScale2GrayFloat will disable Scale2Gray
// and vice versa.
PictureScale2GrayFloat = true
Picture(0, 0, VFREE, VFREE, "..\\images\\gew300g4.tif")
// Insert the high resolution images now invisibly for previewing, but
// visible for printing:
PictureScale2GrayFloat = false
SetPrintable(TRUE)
SetViewable(FALSE)
GotoPage(2)
Picture(0, 0, VFREE, VFREE, "..\\images\\gew300g4.tif")
GotoPage(3)
Picture(hDoc, 0, 0, VFREE, VFREE, "..\\images\\gew300g4.tif")
Note that the four images in the document share only ONE "gew300g4.tif" image in memory. The
four images that share one memory-image are: The three high resolution images and the
PIC_SCALE2GRAY_FLOAT image (which uses the original "gew300g4.tif" to compute the
grayscale image from it).
4.7.6 Remarks
When displaying multiple bitmaps at the same time in the preview, VPE tries to balance the color-
palette between these bitmaps. Sometimes this can lead to wrong color representation on 16-or
256- color displays. Printing will always work without problems.
Frames around bitmaps may make problems, because there is always the possibility of a one-
pixel-error (see “WYSIWYG” on page 131). A gap may occur between the picture and the frame.
If you use frames that are too thick, they will overlap the picture (see “Important Note About Pens,
Lines, Frames, Circles and Ellipses” on page 114). This doesn't matter if you have pictures with a
white background, but the best solution is to have the frame in the image-files itself. Or -because
of the problem with the gap -make the frame a bit thicker, so that a possible gap will be hidden.
You can turn off the frame around pictures by setting PenSize = 0.

56 • Programming Techniques Virtual Print Engine -Programmer's Manual
4.8 RTF -Rich Text Format
[Professional Edition and above]
4.8.1 Features of VPE
•Version independent and error tolerant RTF parser. This means: no termination, if unknown or
erroneous formats are processed, instead they are ignored and skipped until the next known
keyword is found.
•Any font-types, -sizes and -attributes (bold, italic, underlined, strikeout, super-subscript) can
be used even in a single line or word
•Text-and background color can be set for each letter
•unlimited number of paragraphs (only limited by available memory)
•Automatic text break over multiple pages
The following attributes can be set separately for each paragraph:
•Text alignment (left, right, centered or justified)
•Space before and after a paragraph
•Space between lines
•Default-Tab positions
•Individual tab positions
•Hanging indent
•left and right indent
VPE is not able to process style-sheets, auto-bulleting or numbering itself, but it manages correctly
style-sheets, bulleting and numbering emitted for example by Word or AmiPro, which results in a
correct representation of:
•Headlines, and numbered paragraphs of any kind
•Bulleted-Lists

Virtual Print Engine -Programmer's Manual Programming Techniques • 57
Important Feature!
VPE processes the three most important RTF paragraph styles, to have the best control over the
behavior when automatic page breaks occur:
Keep paragraph intact. A page break may not occur between the lines of
a paragraph. Instead, the whole paragraph is moved to the next page.
Keep paragraph with the next paragraph. A page break may not occur
between the following paragraphs. Instead, the paragraphs are moved to the
next page.
Paragraph control. A page break may not occur, if only the first line of a
paragraph would remain on the current page, or if only the last line of a
paragraph would be placed on the next page.
RTF Properties Not Supported by VPE
•OLE objects
•Cross References
•Table of Contents, Index
•Embedded Images
•Tables
•Right-, center and decimal aligned tabs
•Headers, Footers, Footnotes
•Auto numbering / auto bulleting, style-sheets
58 • Programming Techniques Virtual Print Engine -Programmer's Manual
4.8.2 Introduction to RTF
4.8.2.1 General
The following is a short introduction into RTF. For a complete description, we recommend the
RTF specification white-paper of Microsoft, which can be found for example at
www.microsoft.com.
RTF can be seen as a layout description language. RTF knows a large set of keywords for
controlling the layout. Some of the keywords may be followed by a parameter or a group of
parameters. VPE does not support all RTF keywords -but the most important to have powerful
control over the appearance and layout of text. For a complete list of supported keywords by VPE
see "RTF Properties processed by VPE".
The most important on the RTF syntax is the use of nested groups. Groups are nested by { }. For
example, to make a few words bold, the RTF stream would look like that:
"Hello, {\b this is bold text} and this is normal text."
The "\b" is the RTF command to set the bold property to on. By nesting it, only the text between
the { } is shown in bold.
There is no restriction in the depth of nesting. Example:
"Hello, {\b this is bold text{\fs48 and this is 24pt. bold text {\i 24pt.,
bold, italic} 24pt. bold} only bold} and this is normal text."
Note that font-sizes in RTF are specified in 0.5 pt. sizes. VPE computes them internally into full
point sizes. If the number of braces is unbalanced, VPE will not process the RTF text.
Instead of using nested structures, there is also the possibility of working with parameters."\b0" for
example means "turn bold off". So the last example above could be implemented as follows:
"Hello, \b this is bold text\fs48 and this is 24pt. bold text \i 24pt.,
bold, italic \i0 24pt. bold \fs20 only bold \b0 and this is normal text."
4.8.2.2 Global Structure
RTF text begins with an opening brace and the keyword "\rtf", example: "{\rtf ".
Then it is followed by two global parts: the header and the body. The header may consist of
several tables: a font-table describing all the fonts used later in the document, a color table, style-
sheets and more. VPE supports the font-and the color-table.

Virtual Print Engine -Programmer's Manual Programming Techniques • 59
4.8.2.3 Font-Table structure
The structure is:
{\fonttbl {<font1>}{<font2>}...{<fontN>}}
where <fontN> is a set of describing RTF keywords and the font name. There may not be spaces
between the closing brace of one group and the opening brace of the next group.
The keywords reflected by VPE are:
•"\f<number>" declares this entry to have the ID <number>.
•"\fcharset<number>" assigns a charset (default is ANSI_DEFAULT) [for charset numbers see:
property CharSet)
•the font name followed by a semicolon
For example:
"{\fonttbl {\f1 Times New Roman;}{\f2 Arial;}{\f3 Wingdings \fcharset2}}"
declares the font table entry with ID 1 to use "Times New Roman", with ID 2 to use "Arial" and
with ID 3 to use Wingdings which is a Symbol Charset (= 2).
Later in the document you reference these fonts with "\f<number>", for example:
"\f1 Hello \f2 World!"
where "Hello" is shown in "Times New Roman" and "World!" in "Arial".
4.8.2.4 Color-Table structure
The structure is:
{\colortbl; color1; color2; ... colorN;}
where <colorN> is a set of describing RTF keywords:
•"\red<number>" declares the red amount of an RGB value
•"\green<number>" declares the green amount of an RGB value
•"\blue<number>" declares the blue amount of an RGB value
For example:
{\colortbl; \red0\green0\blue0; \red0\green0\blue255; \red0\green255\blue0;}
Declares three colors (black, blue and green), which can be referenced later in the document with:
•"\cf<index>" specifies the foreground color
•"\cb<index>" specifies the background color
•"\cf1\cb2 Hello \cf3\cb1 World!"
"Hello" is shown black on blue and "World!" green on black.
Note that the first entry in the color-table has the index 1.

60 • Programming Techniques Virtual Print Engine -Programmer's Manual
4.8.2.5 The structure of the body:
The body consists of the text to output and a set of keywords describing the paragraph formatting
(like indent, tabs, etc.) and font-attributes (like font, font size, bold, italic, etc.).
All paragraph settings must be done at the beginning of a new paragraph. They must not occur in
the middle of a paragraph.
The following is a complete example, showing some features:
{\rtf {\fonttbl {\f1Times New Roman;}{\f2 Arial;}}
{\colortbl; \red0\green0\blue0; \red0\green0\blue255; \red0\green255\blue0;}
\li1440\ri1440\sb720\sa720 Hello World! \cf2 This is a wonderful day!
\par\pard\plain How do you do?}
The meaning of the keywords can be found in the chapter “RTF Properties processed by VPE” on
page 67.
If you think, this looks a bit complicated, just read the next sections, describing how to use RTF
with VPE and its "Easy RTF" features.
4.8.3 Controlling RTF from VPE –‘Easy RTF’
VPE’s conception has a lot of methods and properties to make the use of RTF much easier. We
call this: "Easy RTF"!
Inserting RTF text into the document
First of all, RTF text is in VPE not page oriented, but object oriented -like Print() or Write() you
insert RTF text at specific positions with specific sizes. The methods are:
long WriteRTF(long x, long y, long x2, long y2, String rtf_text)
long WriteBoxRTF(long x, long y, long x2, long y2, String rtf_text)
long WriteRTFFile(long x, long y, long x2, long y2, String file_name)
long WriteBoxRTFFile(long x, long y, long x2, long y2, String file_name)
WriteRTF() and WriteBoxRTF() work exactly the same as Write() and WriteBox(). With
WriteRTFFile() and WriteBoxRTFFile() you specify a (path-and) filename that contains RTF
text. This is very useful for processing text already created by your end user with an RTF editor.

Virtual Print Engine -Programmer's Manual Programming Techniques • 61
4.8.3.1 Relaxed structure
For easier and faster use, you may leave out the heading "{\rtf" and the ending "}". Next, you may
leave out the font table and the color table. For example "Hello \b World!" is a valid RTF text for
VPE!
How does it work? Well, if the RTF text doesn’t specify anything else, VPE works like Print() or
Write() and uses the current font, font-attributes and alignment.
Code-Example:
SetFont("Arial", 12)
WriteRTF(1, 1, -5, VFREE, "Hello \b World!")
SetFont("Times New Roman", 16)
TextUnderline = True
WriteRTF(VLEFT, VBOTTOM, VRIGHT, VFREE, "Hello \b World!")
Produces the following output:
Hello World!
Hello World!
4.8.3.2 Built-In Font Table
Moreover, VPE has built-in a predefined font table.
\f1 is predefined as "Arial" on Windows and Mac OS X, and as "Helvetica" on all other platforms
\f2 is predefined as "Times New Roman", on Windows and Mac OS X, and as "Times" on all
other platforms
You can modify the table with the method:
void SetRTFFont(
long ID,
String name
)
For example, replace \f1 with Wingdings:
CharSet = SYMBOL_CHARSET
SetRTFFont(1, "Wingdings")
or you can add as many fonts to the table as you like, for example:
CharSet = SYMBOL_CHARSET
SetRTFFont(3, "Wingdings")

62 • Programming Techniques Virtual Print Engine -Programmer's Manual
4.8.3.3 Build-In Color Table
VPE has build-in a predefined color table. The colors are pre-defined as:
color1 BLACK RGB(0, 0, 0)
color2 DKGRAY RGB(128, 128, 128)
color3 GRAY RGB(192, 192, 192)
color4 LTGRAY RGB(230, 230, 230)
color5 WHITE RGB(255, 255, 255)
color6 DKRED RGB(128, 0, 0)
color7 RED RGB(192, 0, 0)
color8 LTRED RGB(255, 0, 0)
color9 DKORANGE RGB(255, 64, 0)
color10 ORANGE RGB(255, 128, 0)
color11 LTORANGE RGB(255, 192, 0)
color12 DKYELLOW RGB(224, 224, 0)
color13 YELLOW RGB(242, 242, 0)
color14 LTYELLOW RGB(255, 255, 0)
color15 DKGREEN RGB(0, 128, 0)
color16 GREEN RGB(0, 192, 0)
color17 LTGREEN RGB(0, 255, 0)
color18 HIGREEN RGB(0, 255, 128)
color19 BLUEGREEN RGB(0, 128, 128)
color20 OLIVE RGB(128, 128, 0)
color21 BROWN RGB(128, 80, 0)
color22 DKBLUE RGB(0, 0, 128)
color23 BLUE RGB(0, 0, 255)
color24 LTBLUE RGB(0, 128, 255)
color25 LTLTBLUE RGB(0, 160, 255)
color26 HIBLUE RGB(0, 192, 255)
color27 CYAN RGB(0, 255, 255)
color28 DKPURPLE RGB(128, 0, 128)
color29 PURPLE RGB(192, 0, 192)
color30 MAGENTA RGB(255, 0, 255)
You can modify the table with the method:
void SetRTFColor(
long ID,
COLORREF rtf_color
)
For example change color1 with:
SetRTFColor(1, RGB(10, 10, 10))
Or you can add as many colors to the table as you like, for example:
SetRTFColor(31, RGB(10, 20, 30))

Virtual Print Engine -Programmer's Manual Programming Techniques • 63
NOTE: RTF offers no way to set a transparent background mode, like VPE does. So we
decided, to set the background mode to transparent, in the case you use WHITE =
RGB(255, 255, 255) as background color.
4.8.3.4 Build-In Paragraph Setting
VPE has build-in a predefined paragraph setting. Note, as in RTF text the values for paragraph
settings are in twips (= 1 / 1440 inch), all values for the properties and methods are specified in
metric or inch units.
The properties and methods that can be accessed by code are:
•FirstIndent
•LeftIndent
•RightIndent
•SpaceBefore
•SpaceAfter
•SpaceBetween
•DefaultTabSize
•SetTab()
•ClearTab()
•ClearAllTabs()
•ResetParagraph()
4.8.3.5 Build-In Paragraph Setting: RTF Auto Page Break
VPE processes the three most important RTF paragraph styles, to have the best control over the
behavior when automatic page breaks occur. Auto Page Breaks only occur if VFREE is used for
Y2 and if the property AutoBreakMode is set to AUTO_BREAK_ON or AUTO_BREAK_FULL.
KeepLines
Keep paragraph intact. A page break may not occur between the lines of a paragraph. Instead,
the whole paragraph is moved to the next page. Note: Page breaks may occur between the lines of
paragraphs, e.g. at their exact borders (see KeepNextPar). KeepLines, KeepNextPar and
ParControl may be used together.
KeepNextParagraph
Keep paragraph with the next paragraph. A page break may not occur between the following
paragraphs. This means, one paragraph may not stand alone at the top of a new page. Instead, the
paragraphs are moved to the next page. Note: Page breaks may occur between the lines of
paragraphs (see KeepLines). KeepLines, KeepNextPar and ParControl may be used together.

64 • Programming Techniques Virtual Print Engine -Programmer's Manual
ParagraphControl
Keep paragraph intact, a single line may not remain on the current page or on the next page.
A page break may not occur for a following paragraph, if only the first line of the paragraph would
remain on the current page, or if only the last line of the paragraph would be placed on the next
page. Instead, the whole paragraph is moved to the next page. KeepLines, KeepNextPar and
ParControl may be used together.
NOTE: If a set of paragraphs is locked together in a way (for example by using KeepLines and
KeepNextParagraph together), so that all paragraphs together don’t fit onto the current
page and may not be broken, VPE checks, if it is possible to place them all together on
the next page. (Remember that VPE offers the possibility to set the margins for the
current page and a default output rectangle for succeeding pages.) If the succeeding
page has enough room to place all paragraphs there, VPE will move them to the next
page. Otherwise VPE will start to place as much paragraphs as possible onto the
current page, trying to break them at a paragraph border if possible; but maybe there is
only one large paragraph, which needs to be broken in between.
Example:
Imagine you have two paragraphs in a single RTF text. The margins of the current page and of the
default output rectangle are set to a width of 18 cm and a height of 25 cm. The two paragraphs
together need a height of 8 cm and you set KeepLines = True and KeepNextParagraph = True, so
that they must not be broken.
If you insert this object at x = 1 and y = 2 nothing unusual happens: the size of the output rectangle
is large enough to hold both paragraphs, and they are positioned there.
But if you insert this object at x = 1 and y = 25 an Auto Break will occur. As the paragraphs may
not be broken, VPE checks, if there is enough room for both paragraphs on the next page. Due to
our example, there is enough space, and VPE decides not to insert an RTF object on the current
page. Instead VPE moves to the next page (or adds one) and places the RTF object containing both
paragraphs there.

Virtual Print Engine -Programmer's Manual Programming Techniques • 65
4.8.4 Overloading Mechanism
Since VPE offers both, setting properties by code and immediately within the RTF text, VPE
needs a mechanism to resolve possible conflicts. VPE does it as follows: each property specified
in the RTF text overrides the same predefined setting done through code.
So the RTF text is overloading the predefined properties set through code. This is done separately
for each object. The predefined settings are kept unchanged and are not influenced by settings
specified inside of an RTF text.
Example:
If you set \f1 to "Arial" with SetRTFFont(1, "Arial") and in the RTF text is a font table which
instructs VPE to use "Times New Roman" as \f1, VPE will use "Times New Roman" as \f1 for this
single object only.
4.8.5 RTF Demo Source Code
The following short program reads the file dmodocXx.rtf and generates a multi-page output.
OpenDoc
Rem Set the page borders for the current and all following pages
Rem to exactly the same values, the original document has
nLeftMargin = 2.54
nTopMargin = 2.50
nRightMargin = 19.10
nBottomMargin = 27.20
Rem Specify the setting of the current page also for all
Rem succeeding pages, which are generated by Auto Break
SetDefOutRectSP(2.54, 2.50, 19.10, 27.20)
WriteRTFFile(VLEFTMARGIN, VTOPMARGIN, VRIGHTMARGIN, VFREE, "dmodoc32.rtf")
Preview
Note, how fast and accurate VPE works:
While the hourglass is shown, VPE parses the RTF file and compiles its internal data structures.
The next short pause -until the preview is shown -is the time, VPE needs to render the whole
document onto its virtual ultra-high resolution device and to compute the page breaks. In this short
time, the demo generates a 72 page document!

66 • Programming Techniques Virtual Print Engine -Programmer's Manual
4.8.6 Some Notes About VPE and RTF
4.8.6.1 Justified Text Alignment of the last Paragraph
If the alignment of an RTF object's last paragraph is justified, the last line is printed justified, too.
To avoid this, finish the last paragraph with a "\par" command.
4.8.6.2 When to use RTF and when to avoid it
The RTF support of VPE is a very powerful option. Nevertheless compared to the plain text
methods like Print() or Write(), RTF is slower and needs more memory. So whenever possible,
you should use the plain text methods.
4.8.6.3 Line-and Page Breaks not 100% the same compared to the RTF Editor
RTF Editors like Word render the RTF text immediately to the selected printer device (the default
printer) and try to copy the resulting layout onto the screen.
Since VPE guarantees to be printer independent, it uses another technology: It renders RTF text to
a virtual high-resolution device (that’s, why it’s called "Virtual Print Engine") and copies the
resulting layout to the output device (be it the screen, printer, fax or whatsoever).
As an implication, line-and page breaks may be on other positions than in the RTF editor that
created the document. Since you have powerful control about paragraph breaks (see KeepLines,
KeepNextPar, ParControl, \keep, \keepn, \widowctl), this shouldn’t be of any interest.
On the contrary. Whilst RTF editors re-render the whole document, if another printer (output
device) is chosen, and often documents get a complete different layout, the layout with VPE will
always be the same with every printer!
Virtual Print Engine -Programmer's Manual Programming Techniques • 67
4.8.7 RTF Properties processed by VPE
4.8.7.1 Font Table
Keyword Description
\fonttbl Declares font table; may only occur once at the beginning of the document
\f <index> Declare font number
\fcharset <number> Assign Charset (default is ANSI_DEFAULT)
<Text>; Declare font name related to font number
Example:
{\fonttbl {\f1 Arial;} {\f2 Times New Roman;} {\f3 \fcharset2 Wingdings;} }
4.8.7.2 Color Table
Remark: ( <num> is a value between 0 -255)
Keyword Description
\colortbl Declares color table; may only occur once at the beginning of the document
\red <num> Red value
\green <num> Green value
\blue <num> Blue value
Example:
{\colortbl; \red0\green0\blue255; \red128\green0;\blue128}
68 • Programming Techniques Virtual Print Engine -Programmer's Manual
4.8.7.3 Character Processing
Character / Keyword Description
hex encoded text char e.g. \'c7, \'d3
special escaped text char e.g. \{, \}, \:, \\
control symbol e.g. \_, \-, \|, \<10>
\par End of paragraph
\line Line break without starting a new paragraph
\n End of paragraph
\r End of paragraph
\sect End of section
\page End of page
\pagebb Page break before the paragraph, interpreted by VPE as \page
\sect New section, interpreted by VPE as \page
\tab Tab character
\emdash Em-dash (—)
\endash En-dash (–)
\bullet Bullet character
\lquote Left single quotation mark
\rquote Right single quotation mark
\ldblquote Left double quotation mark
\rdblquote Right double quotation mark
Virtual Print Engine -Programmer's Manual Programming Techniques • 69
4.8.7.4 Character Properties
Remark: ( <num> is a value in twips, 1440 twips = 1 inch = 2.54 cm)
Keyword Description
\f <index> Font selection <index into font table>
\fs <num> Font size in 0.5 pt. (e.g. 24 = 12 pt.)
\b bold on
\b0 bold off
\i italic on
\i0 italic off
\ul underlined on
\ul0 underlined off
\ulnone underlined off
\strike strike through
\sub subscript
\super superscript
\nosupersub turn off subscript or superscript
\v invisible text (helpful, if documents contain instructions for the end user, which are visible in the
RTF editor, but not in VPE)
\cf <index> Forecolor <index into color table>
\cb <index> Backcolor <index into color table>
\highlight <index> Backcolor <index into color table>
\plain Resets all character Properties to the following default values:
Bold (off)
Italic (off)
Underlined (off)
FontSize (12 pt.)
ForeColor (black)
BackColor (white)
Invisible (off)
Strikeout (off)
Subscript (off)
Superscript (off)

70 • Programming Techniques Virtual Print Engine -Programmer's Manual
4.8.7.5 Paragraph Properties
Remark: ( <num> is a value in twips, 1440 twips = 1 inch = 2.54 cm)
Keyword Description
\ql Left-aligned (default)
\qr Right-aligned
\qc Centered
\qj Justified
\fi <num> First-Line indent. Specifies the left indent of the first line of a new paragraph (the default is 0)
\ri <num> Left indent (the default is 0)
\li <num> Right indent (the default is 0)
\sb <num> Space before (the default is 0)
\sa <num> Space after (the default is 0)
\sl <num> Space between lines; if this control word is missing or if \sl1000 is used, the line spacing is
automatically determined by the tallest character in the line; else this size is used only if it is taller
than the tallest character
\deftab <num> Default tab width (the default is 708 = about 1.25 cm)
\tx <num> Tab position from the left margin
\keep Keep paragraph intact. A page break may not occur between the lines of the following paragraphs.
Instead, the whole paragraph is moved to the next page. Note: Page breaks may occur between
paragraphs, e.g. at their exact borders (see \keepn; \keepn, \keep and \widctlpar; may be used together)
\nokeep no \keep-setting (default)
\keepn Keep paragraph with the next paragraph. A page break may not occur between the following
paragraphs. Instead, the paragraphs are moved to the next page.
Note: Page breaks may occur between the lines of paragraphs (see \keep; \keepn, \keep and \widctlpar;
may be used together)
\nokeepn no \keepn-setting (default)
\widctlpar Stands for "widowcontrol": A page break may not occur for a following paragraph, if only the first
line of the paragraph would remain on the current page, or if only the last line of the paragraph would
be placed on the next page.
\nowidctlpar no \widctlpar-setting (default)
\pard resets all paragraph settings to their default
\pntextparagraph bulleting and numbering, emitted for example by Word or AmiPro; VPE is not able to do
auto-bulleting or numbering itself, but compensates this very well by processing pntext-groups
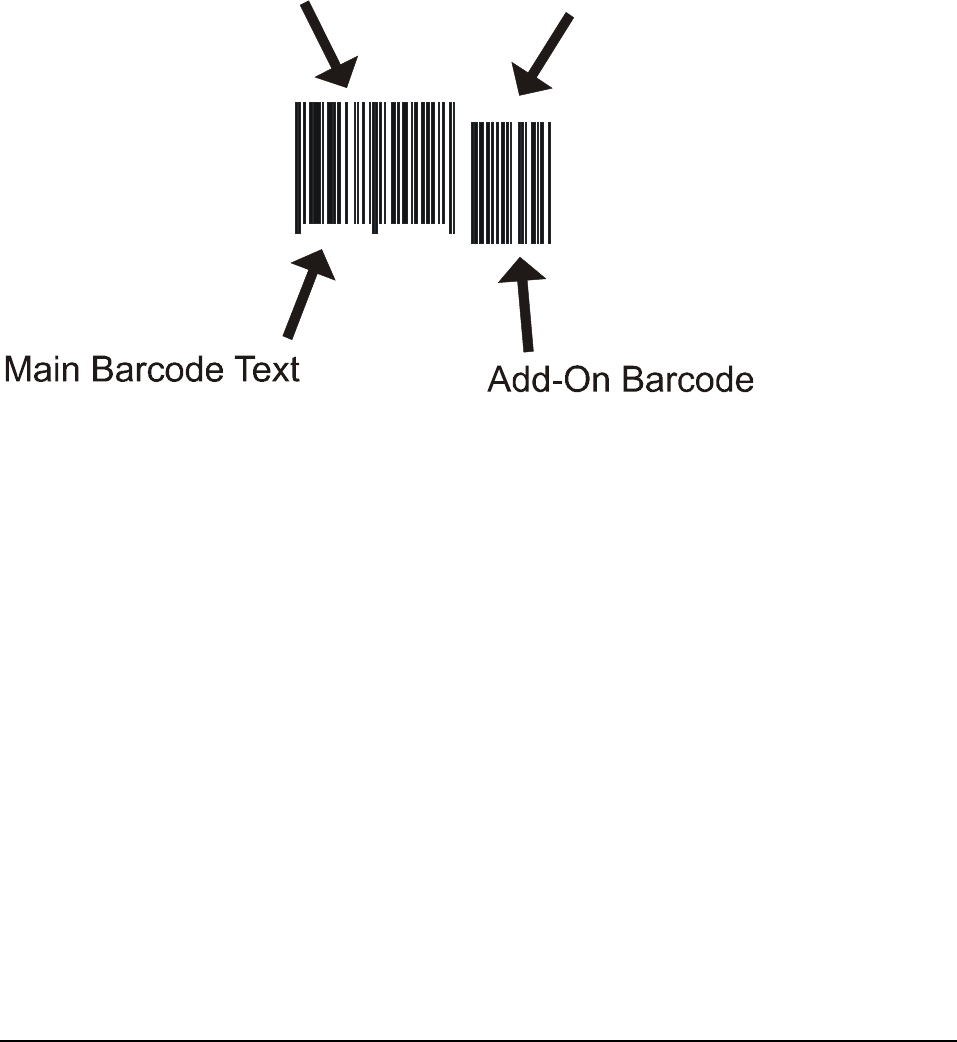
Virtual Print Engine -Programmer's Manual Programming Techniques • 71
4.9 Barcodes (1D)
[Enhanced Edition and above]
VPE is shipped with a sophisticated barcode library, which allows to create a total of 38 different
1D barcode types.
You can specify whether the labels (i.e. the barcode text in clear) are printed or not and on what
position (at the top or the bottom of the barcode).
The library supports automatic checkdigit generation for all barcode types that make use of
checkdigits.
Moreover you can specify the aspect ratio between thin and thick modules.
1 234567 890128
1
2
3
4
5
Main Barcode
Add-On Barcode Text
Modules and Sizing Barcodes
Modules are the black and white lines. The widths of the thin and thick modules have fixed ratios,
for example 1:2. This means, thin lines are half as wide as thick lines.
Since there is a fixed aspect ratio, it is obvious that a barcode needs a fixed amount of space
depending on its coding scheme and the number of coded characters. A barcode can not be sized
freely! It can only be sized in compliance with the aspect ratio.
Example: a given barcode has 63 modules, 43 thick and 20 thin modules, and shall be painted into
a rectangle which has a width of 10 cm.
The VPE barcode library now computes the maximum width of a single module, so that all
modules will best fit into the given rectangle, while considering the rule that the thin / thick ratio is
1:2. It can happen then that there are wide gaps at the end of the barcode, because it can not fill the
given rectangle. The computations are done on pixel level, so the computation is based on the
resolution (in DPI) of the output device. Therefore in some cases (for uneven ratios) the width of a
printed barcode might differ between output devices with different resolutions.
The preview displays barcodes always drawn in the full rectangle that was supplied, because when
drawing to the preview, the barcode library ignores the ratio rule, otherwise -due to the low
resolution of the screen -sometimes a barcode would not be shown at all or only in part.

72 • Programming Techniques Virtual Print Engine -Programmer's Manual
Quiet Zone
To the right and left of a barcode is a quiet zone required in the color of the barcode background
(normally white). As a rule the minimum value should be the tenfold of a module.
Frames Around Barcodes
By default, VPE has selected a pen of 0.3mm width. This causes a frame drawn around barcodes.
In order to draw barcodes without a frame, set the PenSize = 0. It is highly recommended to turn
off the frame for barcodes.

Virtual Print Engine -Programmer's Manual Programming Techniques • 73
4.9.1 Code 39 (3 of 9)
CODE39
BCT_CODE39
Field of Application
Code 3 of 9 is a universal barcode with many applications in the industry.
Each character is represented by 9 elements (5 bars and 4 gaps), where 3 elements are wide and 6
are small. This aspect allows the self-checking of the barcode.
The advantage of the barcode is its huge character set. The disadvantage is the small information-
density as well as the low tolerance.
Charset / Number of Characters
The charset comprises the digits 0..9, the upper-case letters A..Z and the symbols minus, period,
blank, dollar sign, slash, plus and the percent character.
The number of characters is not limited. However the code is not very dense and needs much
space.
Checkdigit
The use of a checkdigit is optional. The barcode library can generate it automatically.
Characteristics
•The Code 3 of 9 is very common
•The aspect ratio between thin and thick modules can be adjusted using the properties
BarcodeThinBar and BarcodeThickBar. To adjust for example a ratio of 1 : 2,5 set
BarcodeThinBar = 2 and BarcodeThickBar = 5.
•The Code 39 is the basis for the Code 39 Extended and Code BCT_PZN (Pharma Zentral
Nummer).
Additional Information
If sending parcels with UPS you should take care that codes of type 39 are not visible on the
outside of the parcel, otherwise they could be mismatched by automated systems with the UPS
parcel-labels.

74 • Programming Techniques Virtual Print Engine -Programmer's Manual
4.9.2 Code 39 extended (3 of 9 extended)
C o d e 3 9
BCT_CODE39EXT
Field of Application
Code 3 of 9 extended is a universal barcode with many applications in the industry.
It uses the same coding as Code 39, but allows the usage of all 127 characters of the ASCII
character set by coding the characters not available in Code 39 into special control codes.
The advantage of the barcode is its huge character set. The disadvantage is the small information-
density as well as the low tolerance.
Charset / Number of Characters
The charset comprises all 127 ASCII characters.
The number of characters is not limited. However the code is not very dense and needs much
space.
Checkdigit
The use of a checkdigit is optional. The barcode library can generate it automatically.
Characteristics
•The Code 3 of 9 extended is out-of-date. If possible we recommend to use Code128 instead,
which is also capable to represent all 127 characters of the ASCII character set.
•The aspect ratio between thin and thick modules can be adjusted using the properties
BarcodeThinBar and BarcodeThickBar. To adjust for example a ratio of 1 : 2,5 set
BarcodeThinBar = 2 and BarcodeThickBar = 5.

Virtual Print Engine -Programmer's Manual Programming Techniques • 75
4.9.3 Code 93 (9 of 3)
C O D E 9 3
BCT_CODE93
Field of Application
Code 93 is a universal barcode with many applications in the industry. Conceptual it is based on
Code 39, but it needs less space.
Charset / Number of Characters
The charset comprises the digits 0..9, the upper-case letters A..Z and the symbols minus, period,
blank, dollar sign, slash, plus and the percent character.
The number of characters is not limited. However the code is not very dense and needs much
space.
Checkdigit
Code 93 uses two checkdigits. The use of the checkdigits is optional. The barcode library can
generate them automatically.
Characteristics
•The Code 93 is based on Code 39.
•The Code 93 uses two checkdigits.
•The aspect ratio between thin and thick modules can be adjusted using the properties
BarcodeThinBar and BarcodeThickBar. To adjust for example a ratio of 1 : 2,5 set
BarcodeThinBar = 2 and BarcodeThickBar = 5.

76 • Programming Techniques Virtual Print Engine -Programmer's Manual
4.9.4 Code 93 extended
Code 93
BCT_CODE93EXT
Field of Application
Code 9 of 3 extended is a universal barcode with many applications in the industry.
It uses the same coding as Code 93, but allows the usage of all 127 characters of the ASCII
character set by coding the characters not available in Code 93 into special control codes.
The advantage of the barcode is its huge character set. The disadvantage is the small information-
density as well as the low tolerance.
Charset / Number of Characters
The charset comprises all 127 ASCII characters.
The number of characters is not limited. However the code is not very dense and needs much
space.
Checkdigit
Code 93 extended uses two checkdigits. The use of the checkdigits is optional. The barcode
library can generate them automatically.
Characteristics
•The Code 93 extended is out-of-date. If possible we recommend to use Code128 instead, which
is also capable to represent all 127 characters of the ASCII character set.
•The Code 93 extended uses two checkdigits.
•The aspect ratio between thin and thick modules can be adjusted using the properties
BarcodeThinBar and BarcodeThickBar. To adjust for example a ratio of 1 : 2,5 set
BarcodeThinBar = 2 and BarcodeThickBar = 5.

Virtual Print Engine -Programmer's Manual Programming Techniques • 77
4.9.5 Code-128 and GS1-128 / EAN-128 / UCC-128
Code-128 EAN-128
C o d e 1 2 8 E a n 1 2 8
BCT_CODE128 BCT_EAN128
Field of Application
Code-128 is a universal barcode with many applications in the industry.
GS1-128 / EAN-128 / UCC-128 are a variation of the Code-128, with a special control code
(FNC1) after the startcode that identifies the barcode uniquely worldwide. To use GS1-128, EAN-
128 / UCC-128 use the code type BCT_EAN128. Please note that no FNC1 control code is
inserted automatically when using BCT_EAN128 (neither after the startcode). You need to insert
the FNC1 control code yourself according to your requirements, please see below on how to insert
control codes.
Charset / Number of Characters
The charset comprises all 127 ASCII characters. The number of characters is not limited.
Checkdigit
The use of a checkdigit is required. The barcode library can generate it automatically.
Characteristics
The length of the code is variable, but the maximum width of the barcode should not exceed
165mm. A maximum of 48 characters is allowed (including GS1-128 Application Identifiers and
FNC codes).
Internal Character Representation
The Code 128 represents characters in three different character sets called A, B and C.
A: ASCII 0-96 : control characters (TAB, CR/LF, etc.), special characters and upper-case letters
B: ASCII 32-127 : special characters, upper-case and lower-case letters, but no control characters
C: Digits 0..9 : encoded in pairs
The barcode library switches between the character sets (A/B/C) automatically, in order to
optimize the length of the barcode to the shortest possible representation. Normally, you do
not need to switch between character sets yourself.
The character set C represents two consecutive digits at a time as a single character. This creates
very compact code. The number of consecutive digits should be even for best optimization.
Otherwise the barcode library needs to insert a control code to switch to another character set.

78 • Programming Techniques Virtual Print Engine -Programmer's Manual
Therefore a code with an even number of digits (e.g. "0000") can be represented more efficient
than a code with an odd number of digits (e.g. "000").
If required, the character set can be switched within the code by inserting special control codes
accordingly (see below). The switch may happen for a single character or for the rest of the code.
Virtual Print Engine -Programmer's Manual Programming Techniques • 79
Reflections Regarding the Code Width
•Because the width of the Code 128 depends on the number of used characters, your application
must reserve enough space.
•If no control characters with ASCII values < 32 (Tabs, Linefeed, ...) are used, the code will
never become wider than a code which consists of letters only.
•If control characters are used, in the worst case the code will be made up of alternating control
characters and lower-case letters.
Inserting FNC1 -FNC4 Control Codes
The FNC control codes can be inserted by using <FNC1>, <FNC2>, <FNC3> or <FNC4> within
the barcode text, or one of the following special characters:
Control Code Decimal Hex
FNC1 134 0x86
FNC2 129 0x81
FNC3 128 0x80
FNC4 132 0x84
Example: "3022<FNC1>21123456789012"
Forced Switching of Character Sets
Whilst the barcode library switches the character sets (A/B/C) automatically as required, it is also
possible to force characters to be coded in a given character set by using the following values as
code selectors within the barcode text:
Character Set Decimal Hex
CODE A 192 0xC0
CODE B 193 0xC1
CODE C 194 0xC2
NOTE: For code C, two digits must follow, since digits in code C are encoded in pairs. If a code C
selector is not followed by at least two digits, no barcode is drawn.
Example (C/C++ notation): "\xC0" "1" "\xC0" "2" "\xC0" "3"
Here, the CODE A is put in front of each digit (1, 2 and 3), so each digit is coded in the character
set A.
Additional Information
If sending parcels with UPS you should take care that codes of type 128 are not visible on the
outside of the parcel, otherwise they could be mismatched by automated systems with the UPS
parcel-labels.

80 • Programming Techniques Virtual Print Engine -Programmer's Manual
4.9.6 Code 2 of 5 Interleaved
BCT_INTERLEAVED2OF5
Field of Application
Code 2 of 5 interleaved is a universal barcode with many applications in the industry.
Charset / Number of Characters
The charset comprises the digits 0..9.
The number of digits is not limited, but you need to specify always 2 digits in pairs, i.e. the
number of digits has to be even.
Checkdigit
The use of a checkdigit is optional. The barcode library can generate it automatically.
Is the automatic checkdigit generation activated, the number of used digits has to be odd.
Additional Information
If sending parcels with Deutsche Post AG you should take care that codes of type 2 of 5
interleaved with 12 or 14 digits are not visible on the outside of the parcel, otherwise they could be
mismatched by automated systems with the Leitcode or Identcode parcel-labels.

Virtual Print Engine -Programmer's Manual Programming Techniques • 81
4.9.7 Code 2 of 5 Industrial
BCT_2OF5
Field of Application
Code 2 of 5 industrial is a universal barcode with many applications in the industry.
Charset / Number of Characters
The charset comprises the digits 0..9. The number of digits is not limited.
Checkdigit
The use of a checkdigit is optional. The barcode library can generate it automatically.
Characteristics
•The aspect ratio between thin and thick modules can be adjusted using the properties
BarcodeThinBar and BarcodeThickBar. To adjust for example a ratio of 1 : 2,5 set
BarcodeThinBar = 2 and BarcodeThickBar = 5.

82 • Programming Techniques Virtual Print Engine -Programmer's Manual
4.9.8 Code 2 of 5 Matrix
12345
BCT_2OF5MATRIX
Field of Application
Code 2 of 5 matrix is a universal barcode with many applications in the industry.
Charset / Number of Characters
The charset comprises the digits 0..9. The number of digits is not limited.
Checkdigit
The use of a checkdigit is optional. The barcode library can generate it automatically.
Characteristics
•The aspect ratio between thin and thick modules can be adjusted using the properties
BarcodeThinBar and BarcodeThickBar. To adjust for example a ratio of 1 : 2,5 set
BarcodeThinBar = 2 and BarcodeThickBar = 5.
•The Code 2 of 5 matrix is with the exception of the very broad bars in the start-and stop
characters a two-width-code. In the barcode library the width of the start / stop bars is adjusted
fix to the double width of the BarcodeThickBar.
Virtual Print Engine -Programmer's Manual Programming Techniques • 83
4.9.9 EAN -(European-Article-Numbering)
EAN-8 EAN-13 EAN-13 + EAN2 Addon EAN-13 + EAN5 Addon
1 2 3 4 5 6 7 0 1 234567 890128 1 234567 890128
1 2
1 234567 890128
1 2 3 4 5
BCT_EAN8 BCT_EAN13 BCT_EAN13_2 BCT_EAN13_5
Field of Application
The European-Article-Numbering was initially developed as european-wide unambiguous system
for article numbering. In the meantime it has grown to theworldwide unambiguous standard for
article numbering.
The idea of the EAN-system is that an article number is worldwide unique for one product of
one manufacturer.
Charset / Number of Characters
The charset for all EAN-Barcodes is limited to the digits 0..9. The number of digits is fixed:
EAN-8 7 digits + 1 checkdigit
EAN-8 + EAN2 Addon 7 digits + 1 checkdigit + 2 digits add-on
EAN-8 + EAN5 Addon 7 digits + 1 checkdigit + 5 digits add-on
EAN-13 12 digits + 1 checkdigit
EAN-13 + EAN2 Addon 12 digits + 1 checkdigit + 2 digits add-on
EAN-13 + EAN5 Addon 12 digits + 1 checkdigit + 5 digits add-on
Checkdigit
A checkdigit is required and is also included in the label. The barcode library can generate it
automatically.
Special Rules
•Labels are required and contain the checkdigit. The label's font has to be OCR-B. Such a font is
not shipped with Windows, nor with VPE.
•There are recommended dimensions for the EAN-Barcodes (see below).
•In no case EAN-Barcodes may be used on product packages without being officially assigned.
For other internal purposes you can use the intended prefix (see below).
Notes
•Code EAN-128 is a special case of Code-128.
•The EAN code is known in Japan as JAN, with the prefix 49.
•The barcode library also allows to create EAN8 + EAN2 and EAN8 + EAN5 barcodes.

84 • Programming Techniques Virtual Print Engine -Programmer's Manual
The EAN Numbering System
The first digits of an EAN-Barcode specify a prefix, as a rule a country code, for example 400-440
identify Germany, 90-91 Austria.. Special prefixes allow the use of EAN-Barcodes for internal
purposes, ISBN numbering, etc.
Within each country a specific organisation assigns the numbers. In Germany this is for example
the CCG (Central for Coorganisation), which assigns a number range to a manufacturer.
Example Germany:
Prefix 400-440 identifies "Germany / CCG" 3-digits 400
Manufacturer Code, assigned by the CCG 4-digits 9993
Article Number assigned by the Manufacturer himself 5-digits 10505
Checkdigit 1-digit 7
EAN-Prefixcodes
00 - 09 UCC (USA and Kanada)
20 - 29 Identifies numberings for internal use
30 - 37 GENCOD (France)
380 CCI Bulgaria (Bulgaria)
383 SANA (Slowenia)
385 CRO-EAN (Croatia)
387 EAN-BIH (Bosnia-Herzegowina)
400 - 440 CCG (Germany)
460 - 469 UNISCAN (Russian Federation)
471 CAN (Taiwan)
474 EAN Estonia
475 EAN Latvia
477 EAN Lithunia
479 EAN Sri Lanka
480 PANC (Philippines)
482 EAN Ukraine
484 EAN Moldova
489 HKANA (Hong Kong)
45+49 DCC (Japan)
50 ANA-UK (Great Britain)
520 HELLCAN (Greece)
529 EAN Cyprus
531 EAN-MAC (Mazedonia)
535 MANA (Malta)
539 ANAI (Ireland)
54 ICODIF (Belgium and Luxembourg)
560 CODIPOR (Portugal)
569 EAN Iceland
57 EAN Denmark
590 EAN Poland
594 EAN Romania
599 HAPMH Hungaria
600-601 SAANA (South Africa)

Virtual Print Engine -Programmer's Manual Programming Techniques • 85
609 EAN Mauritius
611 EAN Maroc
613 EAN Algerie
619 TUNICODE (Tunisia)
64 Central Chamber of Commerce (Finland)
690-691 ANCC (China)
70 EAN Norge (Norway)
729 Israel Coding Association
73 EAN Sweden (Sweden)
740 - 745 ICCC (Guatemala, El Salvador, Honduras, Nicaragua, Costa Rica, Panama)
746 EAN Dominican Republic
750 AMECOP (Mexico)
759 EAN Venezuela
76 EAN Suisse (Schwitzerland)
770 IAC (Columbia)
773 CUNA (Uruguay)
775 APC (Peru)
777 EAN Bolivia
779 CODIGO (Argentinia)
780 EAN Chile
784 EAN Paraguay
786 ECOP (Ecuador)
789 EAN-Brazil (Brasilia)
80 - 83 INDICOD (Italy)
84 AECOC (Spain)
850 Camera de Comercio de la Republica de Cuba
858 EAN Slovakia
859 EAN Czech
860 YANA (Jugoslawia)
869 UCCET (Turkey)
87 EAN Nederland
880 EAN Korea (South Korea)
885 TANC (Thailand)
888 SANC (Singapore)
890 EAN India
893 EAN Vietnam
899 EAN Indonesia
90-91 EAN-Austria
93 EAN Australia
94 EAN New Zealand
955 MANC (Malaysia)
977 Magazines -ISSN
978-979 Books -ISBN
980 Reimbursement Confirmations
99 Coupons

86 • Programming Techniques Virtual Print Engine -Programmer's Manual
Standardized Code Dimensions
Name Scaling Factor Module
Width in mm EAN 13
Width in mm EAN 13
Height in mm EAN 8
Width in mm EAN 8
Height in mm
SC 0 0.82 0,27 30,58 12,53 21,92 17,74
SC 1 0,91 0,30 33,93 23,90 24,32 19,69
SC 2 1,00 0,33 37,29 26,26 26,73 21,64
SC 3 1,10 0,36 41,02 28,88 29,40 23,80
SC 4 1,21 0,40 45,12 31,78 32,34 26,19
SC 5 1,36 0,45 50,71 35,71 36,35 29,43
SC 6 1,52 0,50 56,68 39,91 40,63 32,89
SC 7 1,67 0,55 62,27 43,85 44,64 36,14
SC 8 1,82 0,60 67,87 47,79 48,65 39,38
SC 9 1,97 0,65 73,73 51,46 52,66 42,63
According to DIN 66236
Addresses
EAN INTERNATIONAL HEAD OFFICE
Rue Royale 145, 1000 Brussels -BELGIUM -Tel : 32.2.227.10.20, Fax : 32.2.227.10.21
E-mail: info@ean.be
Germany: Centrale für Coorganisation (CCG)
Maarweg 133, 50825 Köln -Tel : 49 221 947 14 0, Fax : 49 221 947 14 190
E-mail: info@ccg.de
Web site: http://www.ccg.de
AUSTRIA -EAN-AUSTRIA Gesellschaft für kooperative Logistik GmbH
Mayerhofgasse 1/15, A -1040 Vienna -Tel : 43 1 505 86 01, Fax : 43 1 505 86 01-22
E-mail: o_ce@ean.co.at
Web site: http://www.wk.or.at/ean/barcode/

Virtual Print Engine -Programmer's Manual Programming Techniques • 87
4.9.10 EAN-2 and EAN-5 Add-On Codes for EAN and UPC
EAN-2 EAN-5
1 2 1 2 3 4 5
BCT_EAN2 BCT_EAN5
Field of Application
In conjunction with the main barcodes EAN and UPC you can use add-on barcodes with 2 and 5
digits. The 2-digit code is often used for the issue number of magazines. The 5-digit code is often
used as quotation of prices for books in conjunction with the ISBN barcode (the ISBN-barcode is
an application of the EAN-13).
Charset / Number of Characters
The charset for both barcodes is limited to the digits 0..9. The number of digits is fixed:
EAN-2: 2 digits
EAN-5: 5 digits
Checkdigit
The add-on codes EAN-2 and EAN-5 have no checkdigit.
Characteristics
•Between the EAN main barcode and the add-on code a quiet zone of at least the tenfold of a
module width is required.
•It is possible to generate with the barcode library add-on codes without a main code, but
barcode scanners can not process standalone add-on codes.

88 • Programming Techniques Virtual Print Engine -Programmer's Manual
4.9.11 UPC (Universal Product Code)
UPC-A UPC-A + EAN 2 UPC-A + EAN 5
0 12345 67890 5 0 12345 67890 5
1 2
0 12345 67890 5
12345
BCT_UPCA BCT_UPCA_2 BCT_UPCA_5
UPC-E UPC-E + EAN 2 UPC-E + EAN 5
0 1 2 3 4 5 6 5 0 1 2 3 4 5 6 5
1 2
0 123456 5
1 2 3 4 5
BCT_UPCE BCT_UPCE_2 BCT_UPCE_5
Field of Application
Similar to the EAN-Codes the UPC codes are used for the unambiguous identification of articles
with a country-wide uniquely article number, the Universal Product Code. Though its use is
almost restricted to the USA, sometimes you will find products labeled with UPC codes in Europe.
The UPC-A Code is the normal 12-digit version of the UPC-Codes and is similar to the EAN-13
Code.
The UPC-E Code is the smaller 8-digit variation and is similar to the EAN-8 code. The UPC-E
code only offers 6 usable digits, since the first digit is always a zero.
Charset / Number of Characters
The charset for all UPC barcodes is limited to the digits 0..9. The number of digits is fixed:
UPC-A: 11 digits + 1 checkdigit
UPC-E: 1 system digit '0' + 6 digits + 1 checkdigit
Checkdigit
A checkdigit is required and is also included in the label. The barcode library can generate it
automatically.
Special Rules
•Labels are required and contain the checkdigit. The label's font has to be OCR-B. Such a font is
not shipped with Windows, nor with VPE.
•In no case UPC-Barcodes may be used on product packages without being officially assigned.
For other internal purposes you can use the intended prefix (see below).
Virtual Print Engine -Programmer's Manual Programming Techniques • 89
Notes
The UPC Numbering System
Prefix Codes: the first digit of the UPC-A code is a prefix to identify the meaning of the remaining
digits:
Prefix Codes for UPC-A
0Regular UPC-Article Number
1Reserved (possibly for later use)
2Products, which are charged for by weight, e.g. meat or natural products.
The barcode is created immediately in the shop and the product is labeled with it.
3National Drug Code (NDC) and National Health Related Items Code (HRI)
4UPC Code, which may be used without format restrictions
5Coupon
6Regular UPC-Article Number
7Regular UPC-Article Number
8Reserved (possibly for later use)
9Reserved (possibly for later use)
Structure of the UPC Article Number
1Prefix Code
2 - 6 Manufacturer of the product (UPC ID Number).
The ID-Numbers are assigned by the
Uniform Code Council (UUC)
7051 Corporate Way -Suite 201
Dayton, OH 45359-4292
USA
7 - 11 Article Number assigned by manufacturer
12 Checkdigit

90 • Programming Techniques Virtual Print Engine -Programmer's Manual
4.9.12 Codabar
A 1 2 3 4 C
BCT_CODABAR
Field of Application
Codabar is a universal barcode with many applications in the industry. It is particularly used in the
field of medical applications.
In Japan this code is also known as NW-7
Charset / Number of Characters
The charset comprises the digits 0..9 and the symbols minus, dollar sign, colon, slash, period and
plus. The number of characters is not limited.
Codabar supports four different start / stop characters: A, B, C, D. Each code must begin and end
with A, B, C or D. These characters may no be used within the barcode itself.
Checkdigit
The use of a checkdigit is optional. The barcode library can generate it automatically.
Characteristics
•The aspect ratio between thin and thick modules can be adjusted using the properties
BarcodeThinBar and BarcodeThickBar. To adjust for example a ratio of 1 : 2,5 set
BarcodeThinBar = 2 and BarcodeThickBar = 5.
•Codabar does not code all characters in the same width. The special characters ":", "$", "/", "."
and "+" require one module more than the digits 0..9 and the "-" sign. Therefore your
applications need to reserve enough space.

Virtual Print Engine -Programmer's Manual Programming Techniques • 91
4.9.13 Code 11
1 2 3 4
BCT_CODE11
Field of Application
Code 11 is a dense numeric code with one special character.
Charset / Number of Characters
The charset comprises the digits 0..9 and the symbol minus. The number of characters is not
limited.
Checkdigit
The use of a checkdigit is optional. Two different procedures are common for the checkdigit
generation. The barcode library can generate the checkdigit automatically according to the
procedure that creates two checkdigits.
Characteristics
•The aspect ratio between thin and thick modules can be adjusted using the properties
BarcodeThinBar and BarcodeThickBar. To adjust for example a ratio of 1 : 2,5 set
BarcodeThinBar = 2 and BarcodeThickBar = 5.
•Code 11 does not code all characters in the same width. The special characters "0", "9", and "-"
have one module less than the other characters. Therefore your applications need to reserve
enough space.

92 • Programming Techniques Virtual Print Engine -Programmer's Manual
4.9.14 MSI Barcode
1 2 3 4 5 6 7
BCT_MSI
Field of Application
MSI is a universal barcode with many applications in the industry.
Charset / Number of Characters
The charset comprises the digits 0..9. The number of characters is not limited.
Checkdigit
The use of a checkdigit is optional. The barcode library can generate the checkdigit automatically.
Characteristics
•The code is a modified verion of the "Plessey" barcode.
•The aspect ratio between thin and thick modules can be adjusted using the properties
BarcodeThinBar and BarcodeThickBar. To adjust for example a ratio of 1 : 2,5 set
BarcodeThinBar = 2 and BarcodeThickBar = 5.

Virtual Print Engine -Programmer's Manual Programming Techniques • 93
4.9.15 Telepen-A
Telepen-A
BCT_TELEPENA
Field of Application
The code Telepen-A is often used in libraries.
Charset / Number of Characters
The charset comprises all 127 ASCII characters.
The charset comprises all the ASCII codes 1..127. The number of characters is not limited.
Checkdigit
The use of a checkdigit is optional. The barcode library can generate the checkdigit automatically.
Characteristics
•In addition to he Full-ASCII-Code Telepen-A exists a numeric variation of the Telepen-A code.
This is currently not supported.

94 • Programming Techniques Virtual Print Engine -Programmer's Manual
4.9.16 Intelligent Mail
BCT_INTELLIGENT_MAIL
Field of Application
The code is used in the USA by the United States Postal Services for bulk mailings. It is the
successor of the POSTNET barcode and replaces it.
Charset / Number of Characters
The charset comprises the digits 0..9.
The barcode is build from two separate parameters:
The Tracking Code (20 digits) and the Routing Code (Delivery Point ZIP Code: 0, 5, 9 or 11
digits).
When calling the Barcode method of VPE, both strings must be concatenated, separated by a ‘-‘.
For example, if the Tracking Code is “12345678901234567890” and the Routing Code is
“12345”, then the resulting string which must be provide as the “code” parameter to the Barcode
method is “12345678901234567890-12345”.
If the Routing Code is empty, then the string is just the Tracking Code, without a trailing ‘-‘.
Checkdigit
This barcode has no checkdigit. A CRC is encoded within the barcode pattern.
Characteristics
The height of the Intelligent Barcode should be between 0.125 –0.165 inch (0.3175 –0.4191 cm).
The width must be between 2.667 –3.225 inch (6.774 –8.192 cm).
The correct creation of bulk mailings requirescompliance with a lot of specifications about the
position of barcodes and addresses, paper types, font types, font sizes and many more.
The complete specification for the Intelligent Barcode can be downloaded from the web-server of
the United States Postal Services.
Virtual Print Engine -Programmer's Manual Programming Techniques • 95
4.9.17 Postnet -Postal Numeric Encoding Technique
(12345)
BCT_POSTNET
Field of Application
The code is used in the USA by the United States Postal Services for bulk mailings. From May
2010 on, this barcode may not be used.
Charset / Number of Characters
The charset comprises the digits 0..9.
POSTNET Code Variations:
Type Number of Digits Recommended Width
ZIP Code 5 digits + checkdigit 1.466 inch (3.72364 cm)
ZIP Code + 4 9 digits + checkdigit 2.382 inch (6.05028 cm)
ZIP Code + 4 + Delivery Point 11 digits + checkdigit 2.840 inch (7.21360 cm)
Checkdigit
The use of a checkdigit is required. The barcode library can generate the checkdigit automatically.
Characteristics
The height of a POSTNET barcode should be 0.125 inch (0.3175 cm).
The correct creation of bulk mailings requirescompliance with a lot of specifications about the
position of barcodes and addresses, paper types, font types, font sizes and many more.
The complete specification for POSTNET can be downloaded from the web-server of the United
States Postal Services.

96 • Programming Techniques Virtual Print Engine -Programmer's Manual
4.9.18 RM4SCC -Royal Mail 4 State Customer Code
(SN3 4RD 1A)
BCT_RM4SCC
Field of Application
The code is used by the english Royal Mail to code the postcode for the bulk mailing systems
"Cleanmail" and "Mailsort".
Examples:
SN3 4RD 1A
B1 5AJ 6T
LU17 8XE 2B
Charset / Number of Characters
Royal Mail postcodes comprise digits and letters. Therefore the charset comprises the digits 0..9
and the upper-case letters A..Z. The blank is not included.
The barcode includes either the postcode only (e.g. LU17 8XE), or the postcode with an additional
"Delivery Point" (e.g. LU17 8XE 2B). The maximum number of usable digits is therefore limited
to 9 characters.
Checkdigit
The use of a checkdigit is required. The barcode library can generate the checkdigit automatically.
Characteristics
The correct creation of bulk mailings according to the guidelines of "Cleanmail" and "Mailsort"
require compliance with a lot of specifications about the position of barcodes and addresses, paper
types, font types, font sizes and many more.
The complete "Cleanmail and Mailsort Information Pack" can be obtained from the Royal Mail
free of charge:
"Technical Specifications for Mailsort 700, Mailsort 120 and Cleanmail"
"Product Specification for Mailsort 700, Mailsort 120 and Cleanmail"
Royal Mail
Headquarters 49
Featherstone Street
London EC1Y 8SY
Telephone: 0345-950950
http://www.royalmail.co.uk

Virtual Print Engine -Programmer's Manual Programming Techniques • 97
4.9.19 ISBN (International Standard Book Number)
ISBN ISBN + EAN 5
ISBN 3-518-10012-2
9 783518 100127
ISBN 3-518-10012-2
9 783518 100127
0 1 9 8 0
BCT_ISBN BCT_ISBN_5
Field of Application
ISBN-Numbers are international order numbers for books. For books they have a similar
importance as the EAN Code for food. They are managed in Germany by "Börsenverein des
deutschen Buchhandels" (Tel. 069/13060).
A ISBN code is created by using an EAN-13 code with the prefix "978".
Charset / Number of Characters
ISBNs are made up of the prefix "978" plus 9 usable digits 0..9 and a checkdigit. The checkdigit
can be the digit 0..9 or the character "X". The character "-" is used to separate country code,
publishers code, book number and checkdigit. The separator is ignored by the barcode library.
Checkdigit
A checkdigit is required and is also included in the label. The barcode library can generate the
checkdigit automatically. If an erroneous checkdigit is provided, the barcode library treats this as
an error and no barcode is painted.
The algorithms for the checkdigit generation are differently between EAN and ISBN. With the
ISBN algorithm it can happen that the checkdigit "10" is computed, which is represented by an
"X", for example "3-928444-00-X". The barcode library does not allow to leave out the "X" or to
replace it by another character.
Characteristics
•The label below the barcodes contain the ISBN coded as EAN-13 and above the barcode as text
in clear, including the checkdigit.
•The ISBN barcode is a special variation of the EAN-13 code. Often it is used in conjunction
with the EAN-5 add-on code, for example for the quotation of prices. In the example above it is
DM 19.80 (or whatever currency).
98 • Programming Techniques Virtual Print Engine -Programmer's Manual
4.9.20 Identcode Deutsche Post
56.310 243031 3
BCT_IDENTCODE
This code is only used inside Germany, therefore the description is in german language.
Anwendungsgebiet
Anwendung durch Kunden der Deutschen Post AG, die ihre Frachtsendungen zur automatischen
Verteilung in Frachtpostzentren der Deutschen Post AG mit Strichcodes versehen möchten.
Der Identcode dient zur eindeutigen, individuellen Kennzeichnung eines Postpakets. Mit Hilfe der
Kennzeichnung wird der Lauf eines Postpakets von der Annahme bis zur Auslieferung verfolgt
(Tracking und Tracing). Rückfragen zum Sendungsablauf sind möglich. Dazu dient ein Doppel
des Identcodes, welches beim Kunden verbleibt.
Der Code ist eine Anwendung des Codes 2 aus 5 interleaved, bei dem jedoch ein besonderes
Verfahren zur Berechnung der Prüfziffer und zur Beschriftung des Strichcodes zur Anwendung
kommen.
Aufbau eines Identcodes:
Stellen Bedeutung Beispiel
1 - 2 Abgangsfrachtpostzentrum 56
3 - 5 Kundenkennung 310
6 - 11 Einlieferungsnummer (vom Kunden vergeben) 243031
12 Prüfziffer 3
Die Zuteilung der Kundenkennung erfolgt durch die Deutsche Post AG und richtet sich nach dem
zu versendenden Paketvolumen, d.h. für diese Nummer können 1 bis 5 Stellen benutzt werden,
entsprechend stehen für die Einlieferungsnummer dann 8 bis 4 Stellen zur Verfügung.
Zeichensatz / Stellenanzahl
Der Zeichensatz umfaßt die Ziffern 0..9. Es werden 11 Nutzziffern und 1 Ziffer Prüfsumme
übertragen.
Prüfziffer
Die Verwendung einer Prüfziffer ist für diesen Code vorgeschrieben. Die Barcode-Library erzeugt
die Prüfziffer auf Wunsch automatisch. Falls die Prüfziffer nicht automatisch erzeugt wird, prüft
die Barcode-Library ob eine korrekte Prüfziffer von der Anwendung übergeben wurde.
Obwohl der Identcode ansonsten eine normgerechter 2 aus 5 Interleaved Code ist, weicht die
Prüfsummenberechnung von der Norm für 2 aus 5 interleaved ab. Anstelle der bei 2 auf 5
verwendeten Gewichte 3 und 1 werden die Stellen mit den Werten 4 und 9 gewichtet.

Virtual Print Engine -Programmer's Manual Programming Techniques • 99
Prüfziffernberechnung beim Identcode
Identcodeziffer: 56310243031
Faktor: 49494949494
Ergebnis: 20 +54 +12 +9 +0 +18 +16 +27 +0 +27 +4 = 187
187 Modulo 10 = 7, Ergänzung zu 10 = 3
Beschriftung
Die Beschriftung bei Identcodes ist erforderlich. Die Deutsche Post AG hat vorgesehen, dass die
einzelnen Datenfelder in der Beschriftung durch Punkte und Leerzeichen voneinander getrennt
werden. Da die Post AG keine Angabe macht, wo die Trennung zwischen Kundenkennung und
Einlieferungsnummer erfolgen muss, erlaubt Ihnen die Barcode-Library die Punkte und
Leerzeichen im String selbst angeben, z.B. als "56.310 243031 3".
Weitere Vorgaben zum Identcode
•Breite des schmalen Moduls minimal 0,375 mmaximal 0,5 mm
•Verhältnis schmales Modul zu breitem Modul mindestens 1:2, maximal 1:3. Einstellbar durch
die Properties BarcodeThinBar und BarcodeThickBar. Um z.B. ein Verhältnis von 1 : 2,5
einzustellen, muss BarcodeThinBar = 2 und BarcodeThickBar = 5 gesetzt werden.
•Länge des Strichcodes (einschliesslich Ruhezone)
42,00 bis 68,50 mm
•Barcodehöhe
mindestens 25 mm
•Empfohlene Druckverfahren
Thermodirekt, Thermotransfer, Laser oder gleichwertige
•Ruhezone (oder Hellzone)
links und rechts von jedem Strichcode mindestens 5 mm
•Plazierung
links oder oberhalb des Leitcodes
Weitere Informationen
•"Infopost und Kataloge -National", Deutsche Post AG
•"Gut in Form. Ganz automatisch.", Deutsche Post AG
•"Identcode und Leitcode für Postpakete", Deutsche Post AG
MatNr (=Bestellnummer) 671-677
•"Postleitdaten Anwenderhandbuch", Deutsche Post AG, MatNr 672-609-800
Deutsche Post AG -Generaldirektion Dienststelle 221b-1 Telefon 06151-9084735
Deutsche Post AG -Direktion Erfurt Zentrallager Post Privatkundenvertrieb
99081 Erfurt -Telefon 03643-239260 Telefax 03643-239269
100 • Programming Techniques Virtual Print Engine -Programmer's Manual
4.9.21 Leitcode Deutsche Post AG
21348.075.016.40 1
BCT_LEITCODE
This code is only used inside Germany, therefore the description is in german language.
Anwendungsgebiet
Anwendung durch Kunden der Deutschen Post AG, die ihre Frachtsendungen zur automatischen
Verteilung in Frachtpostzentren der Deutschen Post AG mit Strichcodes versehen möchten.
Der Code ist eine Anwendung des Codes 2 aus 5 interleaved, bei dem jedoch ein besonderes
Verfahren zur Berechnung der Prüfziffer und zur Beschriftung des Strichcodes zur Anwendung
kommen.
Codiert werden: Postleitzahl, Strasse und Hausnummer des Zielortes einer Sendung
Aufbau eines Leitcodes:
Stellen Bedeutung Beispiel
1-5 Postleitzahl 21348
6-8 Straßenkennzahl 075
9-11 Hausnummer 016
12-13 Produktcode 40
14 Prüfziffer 1
Zeichensatz / Stellenanzahl
Der Zeichensatz umfasst die Ziffern 0..9. Es werden 13 Nutziffern und 1 Ziffer Prüfsumme
übertragen.
Prüfziffer
Die Verwendung einer Prüfziffer ist für diesen Code vorgeschrieben. Die Barcode-Library erzeugt
die Prüfziffer auf Wunsch automatisch. Falls die Prüfziffer nicht automatisch erzeugt wird, prüft
die Barcode-Library ob eine korrekte Prüfziffer von der Anwendung übergeben wurde.
Obwohl der Leitcode ansonsten eine normgerechter 2 aus 5 Interleaved Code ist, weicht die
Prüfsummenberechnung von der Norm für 2 aus 5 interleaved ab. Anstelle der bei 2 auf 5
verwendeten Gewichte 3 und 1 werden die Stellen mit den Werten 4 und 9 gewichtet.

Virtual Print Engine -Programmer's Manual Programming Techniques • 101
Prüfziffernberechnung beim Leitcode
Leitcodeziffer: 2134807501640
Faktor: 4949494949494
Ergebnis: 8+9 +12 +36 +32 +0 +28 +45 +0 +9 +24 +36 +0 = 239
239 Modulo 10 = 9, Ergänzung zu 10 = 1
Beschriftung
Die Beschriftung bei Leitcodes ist erforderlich. Die Deutsche Post AG hat vorgesehen, dass die
einzelnen Datenfelder in der Beschriftung durch Punkte und Leerzeichen voneinander getrennt
werden. Die Barcode-Library gestattet Ihnen die Angabe der Daten mit oder ohne Punkte.
Weitere Vorgaben zum Leitcode
•Breite des schmalen Moduls minimal 0,375 mmmaximal 0,5 mm
•Verhältnis schmales Modul zu breitem Modul mindestens 1:2, maximal 1:3. Einstellbar durch
die Properties BarcodeThinBar und BarcodeThickBar. Um z.B. ein Verhältnis von 1 : 2,5
einzustellen, muss BarcodeThinBar = 2 und BarcodeThickBar = 5 gesetzt werden.
•Länge des Strichcodes (einschliesslich Ruhezone)
47,25 mm bis 77,50 mm
•Barcodehöhe
mindestens 25 mm
•Empfohlene Druckverfahren
Thermodirekt, Thermotransfer, Laser oder gleichwertige
•Ruhezone (oder Hellzone)
links und rechts von jedem Strichcode mindestens 5 mm
•Plazierung
rechts oder unterhalb des Identcodes
Weitere Informationen
•"Infopost und Kataloge -National", Deutsche Post AG
•"Gut in Form. Ganz automatisch.", Deutsche Post AG
•"Identcode und Leitcode für Postpakete", Deutsche Post AG
MatNr (=Bestellnummer) 671-677
•"Postleitdaten Anwenderhandbuch", Deutsche Post AG, MatNr 672-609-800
Deutsche Post AG -Generaldirektion Dienststelle 221b-1 Telefon 06151-9084735
Deutsche Post AG -Direktion Erfurt Zentrallager Post Privatkundenvertrieb
99081 Erfurt -Telefon 03643-239260 Telefax 03643-239269

102 • Programming Techniques Virtual Print Engine -Programmer's Manual
4.9.22 PZN (Pharma Zentral Nummer) Code
PZN-123456
BCT_PZN
This code is only used inside Germany, therefore the description is in german language.
Anwendungsgebiet
Der Code PZN wird zur Kennzeichnung von Medikamenten verwendet. Pharma Zentral Nummern
werden vergeben von der "Informationsstelle für Arzneispezialitäten IfA GmbH", Hamburger
Allee 26, 60486 Frankfurt, Tel. (069) 979919-0.
Der PZN Strichcode ist eine Anwendung des Codes 3 aus 9. Als besonderes Kennzeichen beginnt
der Strichcode mit einem "-" und das Prüfzeichen wird anders bestimmt als beim Code 39 sonst
üblich.
Zeichensatz / Stellenanzahl
Der Zeichensatz umfasst die Ziffern 0..9. Es werden 6 Nutzzeichen und eine Prüfziffer codiert.
Prüfziffer
Die Verwendung einer Prüfziffer ist für diesen Code vorgeschrieben. Die Barcode-Library erzeugt
die Prüfziffer auf Wunsch automatisch. Falls die Prüfziffer nicht automatisch erzeugt wird, prüft
die Barcode-Library ob eine korrekte Prüfziffer von der Anwendung übergeben wurde.
Besonderheiten
Die Eingabedaten für den PZN-Code müssen an die Barcode-Library so übergeben werden, wie
die Beschriftung später erfolgen soll. D.h. einschliesslich der Ziffernfolge "PZN-".
•Das Verhältnis schmales Modul ist einstellbar durch die Properties BarcodeThinBar und
BarcodeThickBar. Um z.B. ein Verhältnis von 1 : 2,5 einzustellen, muss BarcodeThinBar = 2
und BarcodeThickBar = 5 gesetzt werden.

Virtual Print Engine -Programmer's Manual Programming Techniques • 103
4.10 Barcodes (2D)
[Professional Edition and above]
VPE is shipped with a sophisticated barcode library, which allows to create the following two-
dimensional barcodes:
•Data Matrix
•QR Code
•MaxiCode (UPS)
•PDF417
•Aztec
Modules and Sizing 2D-Barcodes
Modules are the black and white squares. The width of the thin and thick modules have fixed
ratios, for example 1:2. This means, thin modules are half as wide as thick modules.
Since there is a fixed aspect ratio, it is obvious that a barcode needs a fixed amount of space
depending on its coding scheme and the number of coded characters. A barcode can not be sized
freely! It can only be sized in compliance with the aspect ratio.
Example: a given barcode has 63 modules, 43 thick and 20 thin modules, and shall be painted into
a rectangle which has a width of 10 cm.
The barcode library now computes the maximum width of a single module, so that all modules
will best fit into the given rectangle, while considering the rule that the thin / thick ratio is 1:2. It
can happen then that a barcode can not be drawn, because the space is too small, or that there are
wide gaps at the end of the barcode, because it can not fill the given rectangle.
If there is not enough space to draw the barcode, a place holder is drawn (a box with two crossing
lines). VPE offers rendering-methods to compute the required size of a given 2D-barcode.
Frames Around Barcodes
By default, VPE has selected a pen of 0.3mm width. This causes a frame drawn around barcodes.
In order to draw barcodes without a frame, set the PenSize = 0. It is highly recommended to turn
off the frame for barcodes, so the quiet zone is not overpainted.

104 • Programming Techniques Virtual Print Engine -Programmer's Manual
4.10.1 Data Matrix
Data Matrix was developed by International Data Matrix, Inc. The original type (ECC000 –
ECC140) is only available for closed system applications where a single party controls symbol
production and reading. For new applications ECC200 is recommended, which employs Reed-
Solomon error correction. Typical applications include small component and silicon wafer
marking in the electronic industry, pharmaceutical unit dose and product marking.
Valid ECC Types other than ECC200: ECC000, ECC050, ECC080, ECC100 and ECC140.
Encodable character set: ASCII (ISO 646 IRV) (0 –127) and ISO 8859-1 (128 –256). Alternative
character sets encodable using ECI protocol.
Matrix Sizes: ECC000 –ECC140: 9x9 to 49x49 (odd combinations only)
ECC200: Square:
from 10x10 to 144x144 (even combinations only)
Rectangular: 8x18 to 16x48
Quiet Zone: 1 module on each side
Maximal Data Per Symbol (ECC200):
Numeric: 3116 digits
Alphanumeric:2335 characters
Full & Extended ASCII: Not directly calculable
Byte: 1556 bytes
Data Matrix escape sequences using ~ (ASCII 126, tilde)
~X is shift character for control characters,
e.g. ~@ = NUL, ~G = BEL
~1 through ~6 for Function Characters
~1 : FNC1 is followed by normal data
FNC1 at second codeword position, the input data before '~1'
shall be, between 'A' and 'Z', or between 'a' and 'z'
or 2-digit between '01' and '99'
Notes: To encode data to conform to specific industry standard,
it needs to be authorized by AIM International.
~2 : Structured Append must be followed by three 3-digit,
numbers between 1 and 254, representing the symbol sequence and
file identifier. For example, symbol 3 of 7 with file ID 001015 is
represented by ~2042001015
~3 : Reader Programming is followed by normal data
~4 : Upper Shift is not alowed in the input data
~5 : MH10.8.3 Abbreviated format 05 header
for Application Identifier is followed by normal data
~6 : MH10.8.3 Abbreviated format 06 header
for Data Identifier is followed by normal data
~7NNNNNN is Extended Channel NNNNNN where NNNNNN is 6-digit EC
value (000000 -999999).
e.g. Extended Channel 9 is represented by ~7000009
~dNNN creates ASCII decimal value NNN for a codeword (must be 3 digits)
~ in data is encoded by ~~

Virtual Print Engine -Programmer's Manual Programming Techniques • 105
106 • Programming Techniques Virtual Print Engine -Programmer's Manual
4.10.2 QR Code
The QR Code (short for Quick Response) was developed by Denso-Wave in 1994.
The QR Code provides four different encoding modes, the user data capacity depends on the
encoding and error correction level:
Encoding Modes and Data Capacity
Numeric code only max. 7,089 characters
Alphanumeric max. 4,296 characters
Binary (8 bits) max. 2,953 bytes
Kanji/Kana max. 1,817 characters
VPE chooses automatically the best encoding. Only for Kanji you need to specify that the Kanji
encoding shall be used.
Error Correction Capacity
Level L 7% of codewords can be restored
Level M 15% of codewords can be restored
Level Q25% of codewords can be restored
Level H 30% of codewords can be restored
QR codes use the Reed–Solomon error correction.
The following features are not supported:
•ECI and FNC1 mode
•Micro QR Code
•QR Code model 1 (deprecated)

Virtual Print Engine -Programmer's Manual Programming Techniques • 107
4.10.3 MaxiCode
MaxiCode has been developed by United Parcel Service (UPS). The primary application is
transportation, and in particular the sorting, handling, and tracking of packages by carriers.
MaxiCode symbols have a unique appearance due to their hexagonal modules and overall fixed
size (28.14 mm x 26.91 mm). They have a distinct “bull’s eye” finder pattern of concentric circles.
Encodable character set: ASCII (ISO 646 IRV) (0 –127) and ISO (8859-1) (128 –255).
Alternative character sets encodable using ECI protocol.
Matrix Sizes: 33 rows x 30/29 columns (interleaved): 884 hexagonal modules (cells)
Dimensions: 28.14 mm wide x 26.91 mm high (nominally)
Quiet Zone: 1W (0.88 mm) on the left and right, 1Y (0.76 mm) on the top and bottom
Maximal Data Per Symbol:
Numeric: 138 digits
Alphanumeric: 93 characters

108 • Programming Techniques Virtual Print Engine -Programmer's Manual
4.10.4 PDF417
PDF417 has been designed to provide a symbol with high data capacity. It has been specified as
the symbology for shipping data in ISO 15394 and for “portable database” applications. In
California, drivers’ licenses contain personal identification data encoded as PDF417.
Encodable character set: US ASCII (ISO 646) (0 –127) plus PC 437 values (128 –255). Numeric
and byte data may also be encoded efficiently.
No. of rows: 3–90 subject to ([No. of rows] x [No. of columns]) <= 928
No. of columns: 1 – 30 subject to ([No. of rows] x [No. of columns]) <= 928
Quiet Zone: 2X (where X = 1 module width) on each of the four sides
Maximal Data Per Symbol (@ error correction level 0):
Numeric: 2710 digits
Alphanumeric: 1850 characters
Full & Extended ASCII: Not directly calculable
Byte: 1108 bytes

Virtual Print Engine -Programmer's Manual Programming Techniques • 109
4.10.5 Aztec
Encodable character set: ASCII (ISO 646 IRV) (0 –127) and ISO 8859-1 (128 –256). Alternative
character sets encodable using ECI protocol.
Matrix Sizes: “compact” 15x15 to 27x27 increasing in 4x4 steps
“full range” 19x19 to 151x151
“runes” fixed size 11x11
Quiet Zone: none required
Maximal Data Per Symbol: Full-range (Compact) Symbols
Numeric: 3832 (110) digits
Alphanumeric:3067 (89) characters
Byte: 1914 (53) bytes
Runes store 1 byte
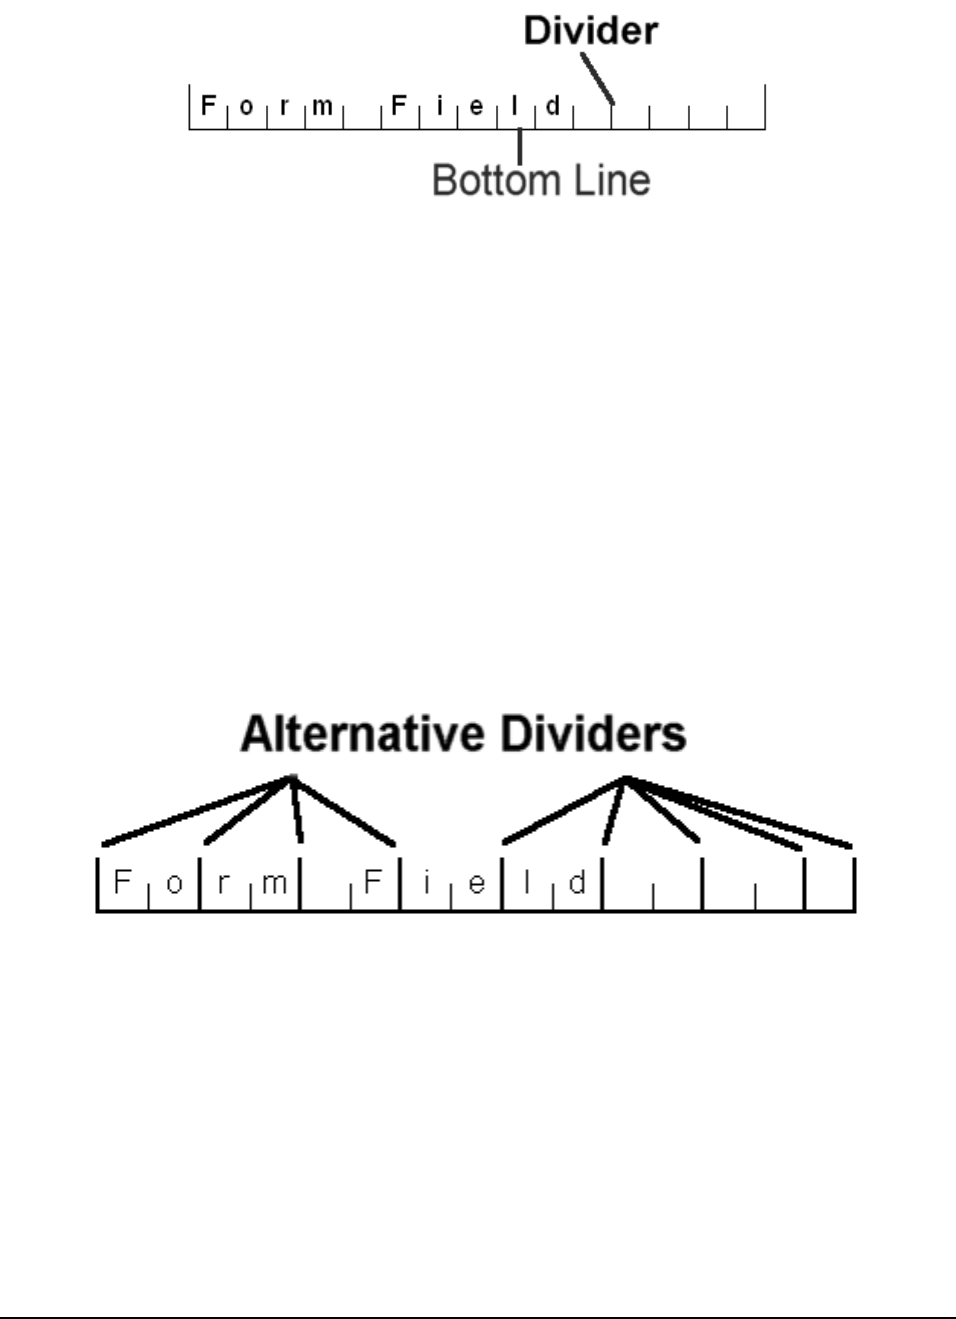
110 • Programming Techniques Virtual Print Engine -Programmer's Manual
4.11 FormFields
[Enterprise Edition and above]
You are familiar to such kind of fields from the many paper forms that are used today:
In the above graphic, the Form Field is divided into 15 character cells. You specify the number of
character cells with the property "CharCount".
The cells are divided by Dividers, these are the lines that separate each cell from another. You
may specify the height, color and thickness of Dividers.
Forthermore, Form Fields have a bottom line. You can specify the bottom line's pen color and
thickness. The bottom line will only be drawn, if the normal PenSize (used for lines, frames, etc.)
is zero. Otherwise a FormField will have a frame as if VpeWriteBox() was used. In the graphic
below, the bottom line has been made thicker than in the example above.
In addition to Dividers, VPE offers the optional usage of Alternative Dividers, for which you may
specify a separate height, color and thickness. You can also specifiy every n-th position they shall
appear and / or if they shall appear at the very first and / or very last position. In the graphic above
they are drawn with full height at the very first and very last position, whilst the Dividers are
drawn at ½ height.
In the graphic below they appear on every second position (AltDividerNPosition = 2), their
thickness is 0.6 mm and they appear on the first and last position, too.
Notes:
•Do not misunderstand FormFields, they can't be used for data input by the user. They are
intended to be used to display data (the VPE Interactive Edition offers objects for data input).
•A Form Field can only consist of one single line of text, it can not have multiple lines.
•The text alignment can only be left or right.
•Form Fields can not be rotated.
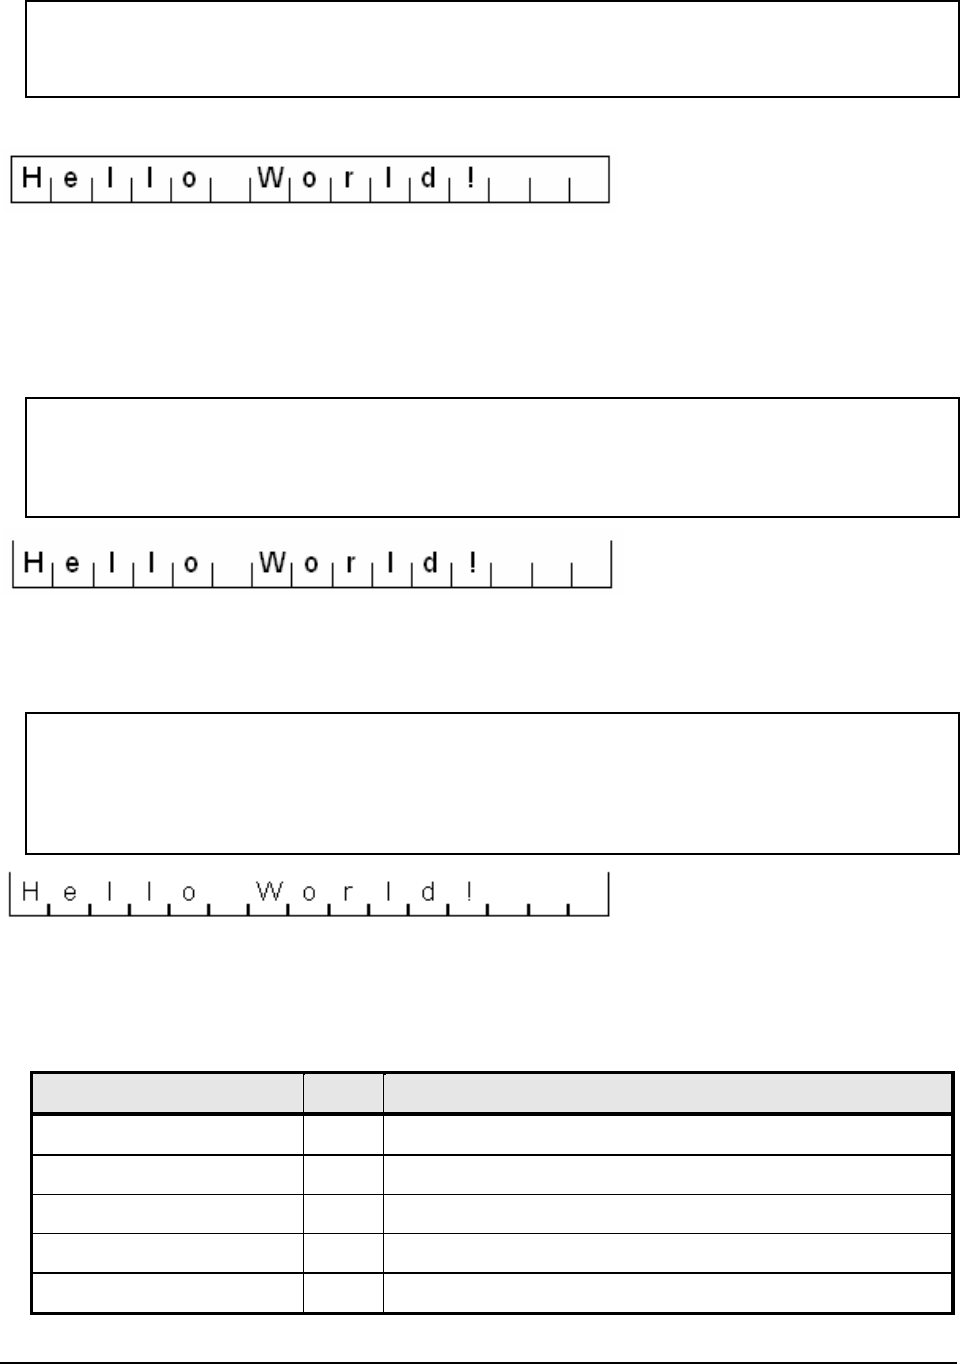
Virtual Print Engine -Programmer's Manual Programming Techniques • 111
4.11.1 Using FormFields
The following code
VPE.OpenDoc
VPE.CharCount = 15
VPE.FormField(1, 1, -10, VFREE, "Hello World!")
VPE.Preview
will produce
As you can see, the font size is computed by VPE automatically in a way that the characters will
fit best into the given width.
The FormField is surrounded by a rectangle, because after calling OpenDoc() VPE sets the
PenSize by default to 0.3 mm.
In order to remove the surrounding rectangle, use the following code:
VPE.OpenDoc
VPE.PenSize = 0
VPE.CharCount = 15
VPE.FormField(1, 1, -10, VFREE, "Hello World!")
VPE.Preview
The following code will set the pen size of the dividers to 0.06 (0.6mm, the default is 0.1mm) and
reduce the height of the dividers to ¼ (which is by default at ½):
VPE.OpenDoc
VPE.CharCount = 15
VPE.DividerPenSize = 0.06
VPE.DividerStyle = VFF_STYLE_1_4
VPE.FormField(1, 1, -10, VFREE, "Hello World!")
VPE.Preview
Please note that the font size (and therefore also the automatically computed height of the
FormField!) had changed a bit, because due to the thicker dividers there is less space for the
characters.
Possible styles are:
Style Value Comment
VFF_STYLE_NONE 0no dividers
VFF_STYLE_1_4 11/4 height
VFF_STYLE_1_3 21/3 height
VFF_STYLE_1_2 31/2 height (default)
VFF_STYLE_2_3 42/3 height
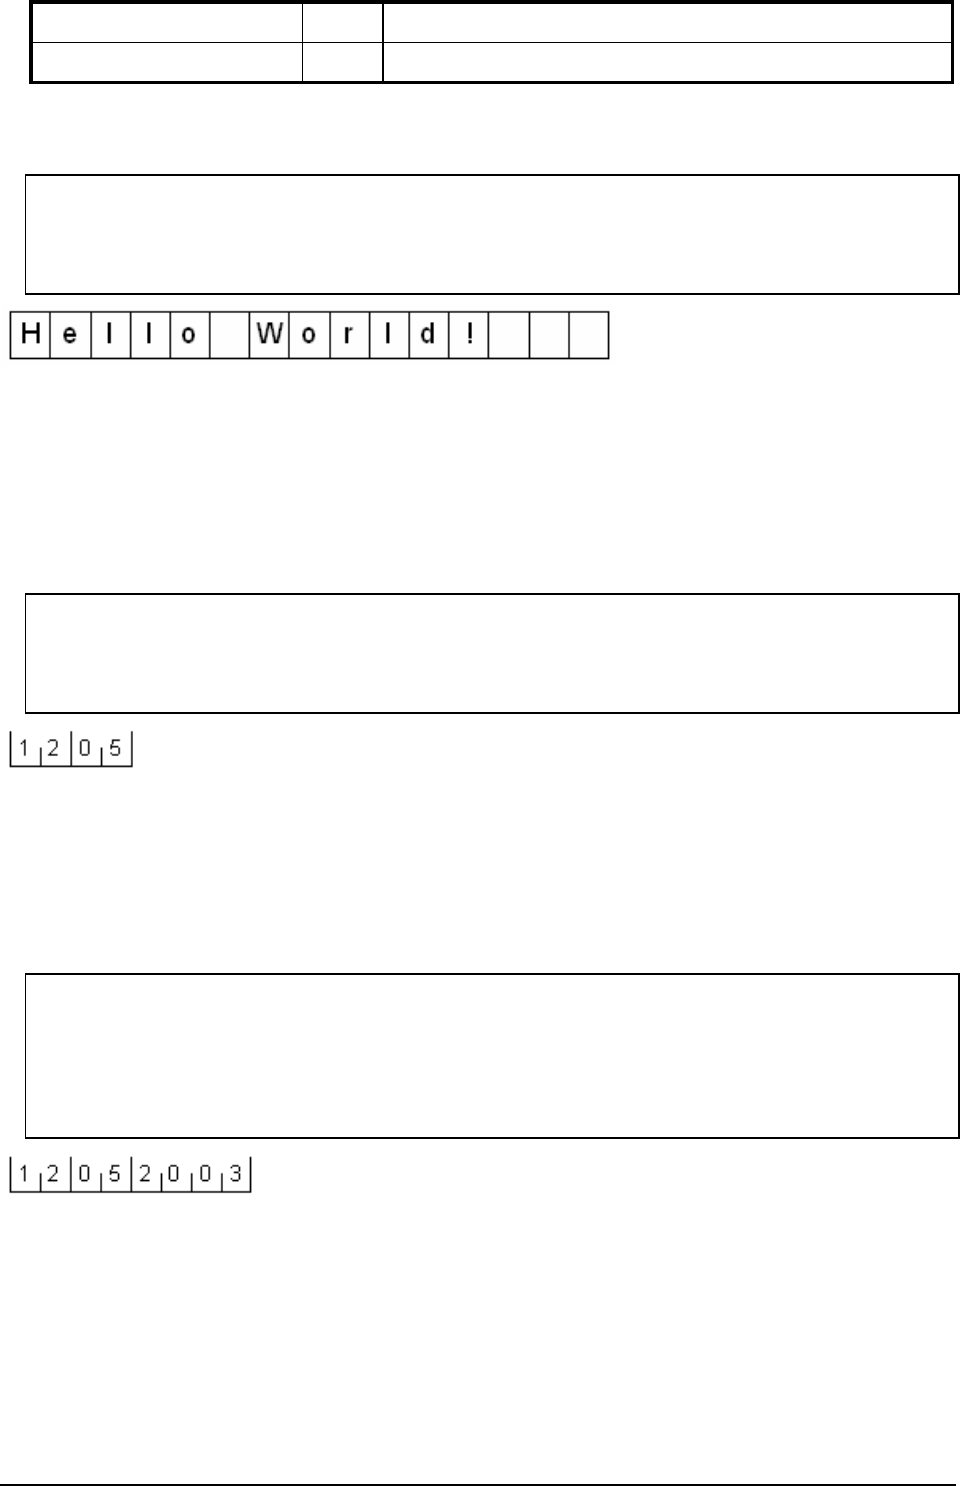
112 • Programming Techniques Virtual Print Engine -Programmer's Manual
VFF_STYLE_3_4 53/4 height
VFF_STYLE_1_1 6full height (default for AltDivider)
Take a look at the following code sample:
VPE.OpenDoc
VPE.CharCount = 15
VPE.DividerStyle = VFF_STYLE_1_1
VPE.FormField(1, 1, -10, VFREE, "Hello World!")
VPE.Preview
4.11.2 Using Alternative Dividers
VPE can handle two types of dividers within one and the same FormField -each type having its
own height, color and thickness: Dividers and Alternative Dividers
In the following code sample we will display the date May 12th in the notation DD/MM:
VPE.OpenDoc
VPE.CharCount = 4
VPE.AltDividerNPosition = 2
VPE.FormField(1, 1, -2, VFREE, "1205")
VPE.Preview
The code VPE.AltDividerNPosition = 2 did instruct VPE to treat every second divider as
Alternative Divider. By default, AltDividerNPosition is zero (no Alternative Dividers are drawn)
and Alternative Dividers are drawn at full height (AltDividerStyle = VFF_STYLE_1_1) with the
default PenSize of 0.3 mm.
To add the four digit year value "2003" to the above sample, add another FormField to the right of
the previous one:
VPE.OpenDoc
VPE.CharCount = 4
VPE.AltDividerNPosition = 2
VPE.FormField(1, 1, -2, VFREE, "1205")
VPE.AltDividerNPosition = 0 // turn alternative dividers off
VPE.FormField(VRIGHT, VTOP, -2, VFREE, "2003")
VPE.Preview
Virtual Print Engine -Programmer's Manual Programming Techniques • 113
You might have noticed that the first and last dividers are not treated as normal dividers. In fact
they belong by default to the Alternative Dividers.
The behavior of the first and last divider as well as other settings are controlled by the property
FormFieldFlags. Possible values of FormFieldFlags are a combination of:
FormFieldFlags Value Comment
VFF_FLAG_DIV_FIRST 1first divider is painted (only, if no frame)
VFF_FLAG_DIV_LAST 2last divider is painted (only, if no frame)
VFF_FLAG_ALT_FIRST 4(default) first divider is painted as AltDivider (overrides
_DIV_FIRST) (only, if no frame)
VFF_FLAG_ALT_LAST 8(default) last divider is painted as AltDivider (overrides
_DIV_LAST) (only, if no frame)
VFF_FLAG_AUTO_FONTSIZE 16 (default) font size is computed automatically
The default value of FormFieldFlags is:
FormFieldFlags = VFF_FLAG_ALT_FIRST + VFF_FLAG_ALT_LAST +
VFF_FLAG_AUTO_FONTSIZE
For example, if you don't want the first divider to be painted:
VPE.OpenDoc
VPE.CharCount = 4
VPE.AltDividerNPosition = 2
VPE.FormFieldFlags = VFF_FLAG_ALT_LAST + VFF_FLAG_AUTO_FONTSIZE
VPE.FormField(1, 1, -2, VFREE, "1205")
VPE.Preview
If you want the first and last divider to be painted in the style of the normal dividers:
VPE.OpenDoc
VPE.CharCount = 4
VPE.AltDividerNPosition = 2
VPE.FormFieldFlags = VFF_FLAG_DIV_FIRST + VFF_FLAG_DIV_LAST +
VFF_FLAG_AUTO_FONTSIZE
VPE.FormField(1, 1, -2, VFREE, "1205")
VPE.Preview
NOTE: The first and last divider is not drawn, if the FormField has a frame.
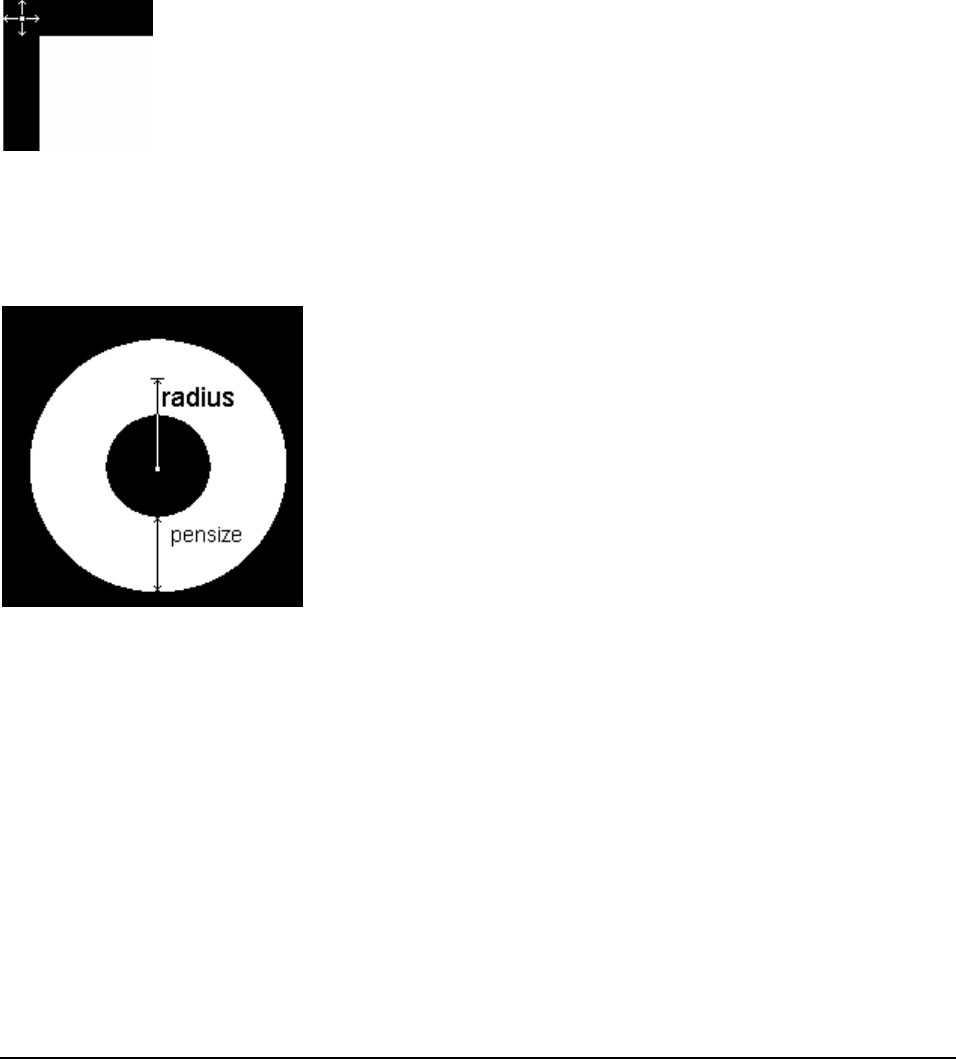
114 • Programming Techniques Virtual Print Engine -Programmer's Manual
4.12 Important Note About Pens, Lines, Frames, Circles
and Ellipses
Pens always draw with their thickness (i.e. using the property PenSize) around the given
coordinates. All objects using the pen, have this behavior. So the coordinates for an object you
insert are in the centerof the lines, or in other words, lines are drawn around the coordinates you
give (as this is needed in most cases).
For example: Imagine you have a 1cm bold frame. The frame will be drawn 0.5 cm to the left and
0.5cm to the right (also 0.5cm to the top and 0.5cm to the bottom) of the given coordinates.
In the following drawing the white dot in the middle of the arrows is the x, y starting coordinate.
The arrows show the extent by the pensize.
The sense is that if you draw a table (as in the demo "Speed + Tables"), the lines of two
neighboring boxes will exactly overlap, so that no doubled (bold) lines will appear.
For circles and ellipses this means that the radius has an extent by ½ of the pensize:

Virtual Print Engine -Programmer's Manual Programming Techniques • 115
4.13 Unicode
The VPE API is Unicode enabled, but does not fully support Unicode. This means that the whole
text of a single text object may only use a single character set, for example cyrillic. Before using a
string with specific characters, you must set the property CharSet to the appropriate value. E.g. for
cyrillic characters, set CharSet = VCHARSET_ISO_CYRILLIC.
For a complete list of available character sets, please see the property CharSet in the Control
Reference (for the DLL: VpeSetCharset). Arabic, Hebrew, Vietnamese and Thai can not be used.
One of the next major releases of VPE will fully support Unicode.
When using C/C++, it is important that you include the normal VPE header files first, and the
Unicode headers afterwards, e.g.:
#include <vpecomon.h>
#include <vpiface.h>
#include <vpifaceu.h>
#include <vppiface.h>
#include <vppifaceu.h>
The “u” at the end of the file name indicates the Unicode header.

116 • Programming Techniques Virtual Print Engine -Programmer's Manual
4.14 Multipage Documents
With VPE you can create documents with an unlimited number of pages (only limited by available
memory / disk space).
Normally, you will create an invisible VPE document by calling OpenDoc, and afterwards
generate invisibly the report by inserting objects (like text, bitmaps, etc.) and adding pages with
PageBreak. Then, after the report generation has finished, you will print it immediately, or show
the Preview to the user.
VPE offers also a way to generate a report and let the user simultaneously scroll through the same
document. This is very useful, if your report is very large or needs a lot of time to be generated.
The following sections describe, how this behavior can be implemented.
4.14.1 Generating a Document while the Preview is open
This section describes the technique of generating a report asynchronous to an open preview
without multi-threading.
"Asynchronous preview" means that your application is still creating a report (i.e. adding objects
and pages), while the preview is already open and the user may scroll through the document.
To make this possible, VPE uses internally two pages:
•one that is shown in the preview (called VisualPage)
•and one your application can work with, i.e. insert objects like text, bitmaps, etc. (called
CurrentPage)
General Implementation:
•Open the document with OpenDoc
•Open the Preview with Preview()
•Do output calls and call DispatchAllMessages() regularly. DispatchAllMessages() allows VPE
to do necessary updates in the preview, to react onto user actions and to send messages to your
application. In other words: it keeps the preview AND your application "alive".
•Check the return value of DispatchAllMessages(). If it returns TRUE, the preview or the parent
window of the preview are closed by the user: so perform the necessary cleanup (for example
close tables and databases) and exit the function that creates the report immediately.
NEVER CALL ANY VPE-Function if the document is not (or no longer) open!
NOTE: If you insert objects on the VisualPage (that means, VisualPage = CurrentPage) with an
open preview and you move the CurrentPage to another page, the updates in the
preview become automatically visible. Otherwise you need to call the method Refresh
(DLL: VpeRefreshDoc), to make the changes visible in the preview.

Virtual Print Engine -Programmer's Manual Programming Techniques • 117
Example:
OpenDoc()
Preview()
for n = 1 to 1000
while objects to insert on CurrentPage
... insert objects on the CurrentPage ...
if DispatchAllMessages() = True then
exit this function
end if
end while
PageBreak()
next n
In the example above, the method DispatchAllMessages() is called periodically, so the preview
and the calling application can react onto user action (keeps "alive").
For a complete example, please take a look at the provided demo source codes. The
technique described here is used in the "Speed + Tables" demo.
4.14.2 Headers and Footers
VPE offers the methods DefineHeader() and DefineFooter() to create simple headers and footers
whose text is the same for each page, except that the current page number can be inserted.
If you need more complex headers / footers which change their contents and layout from page to
page depending on the contents of the page, VPE offers several techniques to do so.
4.14.2.1 The <page> of <total pages> technique
This is very easy to implement, because with VPE you can insert objects on any page at any time:
after you have finished generating a document, you can retrieve its number of pages in the
property PageCount. Then simply move from the first to the last page and insert a text object
which contains the current and the total page number.
Example:
OpenDoc
... generate document ...
for n = 1 to PageCount
CurrentPage = n // move to the n-th page
text = "Page" + Str(n) + "of" + Str(PageCount)
VpePrint(nRightMargin -5, nBottomMargin -1, text)
next n
Note that VPE stores the setting of the margins (and also the positions of the last inserted object)
for each page separately. So, if you have pages with different margins, the above example will
still work!!! For source code see the demo "Speed + Tables".
Be careful if you want to insert such headers / footers below the bottom margin! If you have the
AutoBreak option activated (see “Automatic Text Break” on page 44), this might result in
unwanted page breaks. Turn AutoBreakMode off in such case.
The example does also work, if you are using a SwapFile based document (DLL: if you are using
VpeOpenDocFile).

118 • Programming Techniques Virtual Print Engine -Programmer's Manual
4.14.2.2 Manual Creation of Complex Headers and Footers
Your application knows very well, when it creates a new page, because it calls the method
PageBreak (DLL: VpePageBreak). At this point you can easily insert complex headers and
footers, even change the margins, etc.
The Event AfterAutoPageBreak() (DLL: VPE_AUTOPAGEBREAK)
To perform the manual insertion of complex headers and footers when VPE adds new pages by an
AutoBreak (see “Automatic Text Break” on page 44), VPE fires the event AfterAutoPageBreak()
(DLL: VPE_AUTOPAGEBREAK).
In reaction to this event you can insert headers and footers, change the page margins (see “Page
Margins” on page 38), etc.
Be careful if you want to insert such headers / footers below the bottom margin! If you have the
AutoBreak option activated, this might result into unwanted page breaks. Turn AutoBreakMode
off in such case. VPE will crash due to a stack overflow, if you create an AutoBreak while
processing this event, because VPE is re-entered and fires the event again and again before the
processing of any of such event was finished.
NOTE: There is one restriction for changing the page margins (see “Page Margins” on page 38)
in response to the AutoBreak-Event:
If the AutoBreak-Event was caused by an RTF Object using one of the following
properties:
•Keep paragraph intact
•Keep paragraph with the next paragraph
•Paragraph control
the modification of the page margins might lead into wrong results of the output, because
in such case VPE needs to know the dimensions of the margins of the next page before
the event is fired. Normally this is not a problem, if you are sure your modifications of the
margins will not affect the space needed by the broken RTF text (i.e. if the OutRect stays
large enough to hold the broken text).

Virtual Print Engine -Programmer's Manual Programming Techniques • 119
Example:
For the VPE-Control: Private Sub PictureExport_AfterAutoPageBreak()
For the VPE-VCL: procedure OnAutoPageBreak(Sender: TObject);
// goto previous page
CurrentPage = CurrentPage – 1
// turn AutoBreak off, to avoid possible recursive stack overflow
AutoBreakMode = AUTO_BREAK_NO_LIMITS
// print a text below the last inserted object on this page
VpePrint(VLEFT, VBOTTOM, "to be continued...")
// turn AutoBreak on again
AutoBreakMode = AUTO_BREAK_ON
// go back to the current page
CurrentPage = CurrentPage + 1
// modify the top margin
nTopMargin = 5
// Print some header
VpePrint(1, 1, "some header...")
For the VPE-DLL:
case VPE_AUTOPAGEBREAK:
// goto previous page
VpeGotoPage(lParam, VpeGetCurrentPage(lParam) -1);
// turn AutoBreak off, to avoid possible recursive stack overflow
VpeSetAutoBreak(lParam, AUTO_BREAK_NO_LIMITS);
// print a text below the last inserted object on this page
VpePrint(lParam, VLEFT, VBOTTOM, "to be continued...");
// turn AutoBreak on again
VpeSetAutoBreak(lParam, AUTO_BREAK_ON);
// go back to the current page
VpeGotoPage(lParam, VpeGetCurrentPage(lParam) + 1);
// modify the top margin
VpeSet(lParam, VTOPMARGIN, 5);
// Print some header
VpePrint(hDoc, 1, 1, "some header...");
break;

120 • Programming Techniques Virtual Print Engine -Programmer's Manual
4.15 Watermarks
By default, new objects are added at the top of the z-order. This means newly added objects are
drawn above all previously added objects. For the Professional Edition and higher you can set the
property InsertAtBottomZOrder = True to add new objects at the bottom of the z-order, i.e. newly
added objects are drawn below all previously added objects.
This way you can easily add watermarks to a document.
Example: let’s assume you have created and printed a document. The document is still in memory
and you wish to add a watermark, in order to print a copy:
Doc.InsertAtBottomZOrder = true
Doc.TextColor = COLOR_LTGRAY
Doc.FontSize = 28
for page = 1 to Doc.PageCount
Doc.CurrentPage = page
Doc.Print(8, 13, "COPY")
end for
Doc.PrintDoc(true)
The above example places a watermark with the text “COPY” in light gray on each page.
Afterwards the document is printed.
The following example assumes you have already created a document and stored it to a file using
the method WriteDoc(“mydoc.vpe”). The example code reads the file into memory and places a
watermark with the text “COPY” in light gray on each page. Afterwards the document is written
to the file “mydoc_copy.vpe”.
Doc.OpenDoc()
Doc.ReadDoc("mydoc.vpe")
Doc.InsertAtBottomZOrder = true
Doc.TextColor = COLOR_LTGRAY
Doc.FontSize = 28
for page = 1 to Doc.PageCount
Doc.CurrentPage = page
Doc.Print(8, 13, "COPY")
end for
Doc.WriteDoc("mydoc_copy.vpe")
Doc.CloseDoc()

Virtual Print Engine -Programmer's Manual Programming Techniques • 121
4.16 Multi-Threading
By default, VPE is not thread-safe. For the Professional Edition and higher you can activate the
thread-safe code of VPE by setting the property EnableMultiThreading = True.
Please note that on the platforms Solaris, OpenSolaris, Aix and AS/400 a separate server license
for each server is required, in order to execute VPE on a server -be it in thread-safe mode or not.
Once the thread-safe code has been activated, it is activated for all VPE documents that are
currently open -and that will be opened later -by the calling application instance. Furthermore the
thread-safe code can not be deactivated by the application instance.
The trial versions of VPE -as well as the PDF Export Module -allow to activate the thread-safe
code for testing purposes.
NOTE: VPE documents must be created and used separately per thread, i.e. each thread
must create a VPE document itself by calling OpenDoc(), and one thread must not
use the document object of another thread for calls to the VPE API.

122 • Programming Techniques Virtual Print Engine -Programmer's Manual
4.17 Embedded Flag-Setting
VPE knows many flags and settings for text-output. To reduce development time and the code-
size of your EXE, most of the settings cannot be done only by calling functions, but by embedding
them within the text you want to output.
Example:
You want to print the text "Hello, World!" in bold and italic. The string you would supply to one
of the text-output functions would be:
"[B I]Hello, World!"
Remarks:
The "[" will only be interpreted at the very first position within the string. All following characters
will be interpreted as flag-settings, until a "]" is encountered. A "[[" sequence will be interpreted
as one "[" that will be printed.
Avoid using NoHold of the embedded flags, it eats a lot of performance (as the parsing of the
embedded flags, too). To gain maximum performance we suggest not to use the embedded flags at
all. If performance is not an issue, they are of course a very comfortable way to modify properties.
You can turn the Embedded Flag Parser off, so text beginning with a "[" will not be interpreted as
embedded flags. Instead the "[" and all following text will be inserted into the document. See the
property EmbeddedFlagParser in the Reference Manuals.
The flags:
Each flag can be given in a long or a short form. Uppercase or lowercase-forms are not significant,
i.e., "NoHold" can also be written as "nOhoLd". Some flags must be followed by one or more
numeric parameters.
The following fixed colors are defined and can be used as parameters for the color-flag
settings:
Black, DkGray, Gray,LtGray, White
DkRed, Red, LtRed
DkOrange, Orange, LtOrange
DkYellow, Yellow, LtYellow
DkGreen, Green, LtGreen, HiGreen, BlueGreen
Olive, Brown
DkBlue, Blue, LtLtBlue, HiBlue, Cyan
DkPurple, Purple, Magenta

Virtual Print Engine -Programmer's Manual Programming Techniques • 123
NoHold, N
If used, this flag must be used as the first in the sequence. This means that the setting is not
permanently stored within the engine. If you don’t use this flag, all further output-calls will use
the settings you have specified.
Avoid using NoHold of the embedded flags, it eats a lot of performance.
PenSize, PS <pensize>
Sets the pensize. <pensize> is the size of the pen in the current units, i.e. in cm, inch or
1/10mm –depending on the setting for the property UnitTransformation. You can also use
double values, e.g. "PS 0.001".
PenColor, PC <color-name>
Sets the pencolor. <color-name> is one of the color-strings above.
PenColorRGB, PCRGB <red> < green> <blue>
Sets the pencolor with RGB-values <red> < green> <blue>. Example: "PCRGB 200 210 30”
PSSolid, PSS
Sets the pen to solid drawing mode.
PSDash, PSDA
Sets the pen to dash drawing mode.
PSDot, PSDO
Sets the pen to dot drawing mode.
PSDashDot, PSDADO
Sets the pen to dash-dot drawing mode.
PSDashDotDot, PSDADODO
Sets the pen to dash-dot-dot drawing mode.
BkgColor, BC <color-name>
Sets the background color. <color-name> is one of the color-strings above.
BkgColorRGB, BCRGB <red> < green> <blue>
Sets the background color with RGB-values of <red> < green> <blue>.
Transparent, T
Sets the background mode to transparent.
TransparentOff, TO
Sets the background mode to solid.
GradientLine, GRDL
Sets the background mode to gradient line.
GradientRect, GRDR
Sets the background mode to gradient rect.
GradientEllipse, GRDE
Sets the background mode to gradient ellipse.
GradientTwoColor, GRDTWO <color-name>
Use 2-color gradient (gradient from start color to end color).
GradientTriColor, GRDTRI <color-name>
Use 3-color gradient (gradient from start color over middle color to end color).
GradientStartColor, GRDSC <color-name>
Sets the gradient start color. <color-name> is one of the color-strings above.

124 • Programming Techniques Virtual Print Engine -Programmer's Manual
GradientStartColorRGB, GRDSC <red> < green> <blue>
Sets the gradient start color with RGB-values of <red> < green> <blue>.
GradientMiddleColor, GRDMC <color-name>
Sets the gradient middle color. <color-name> is one of the color-strings above.
GradientMiddleColorRGB, GRDMCRGB <red> < green> <blue>
Sets the gradient middle color with RGB-values of <red> < green> <blue>.
GradientEndColor, GRDEC <color-name>
Sets the gradient end color. <color-name> is one of the color-strings above.
GradientEndColorRGB, GRDECRGB <red> < green> <blue>
Sets the gradient end color with RGB-values of <red> < green> <blue>.
HSNone, HSN
HSHorizontal, HSH
HSVertical, HSV
HSFDiagonal, HSFD
HSBDiagonal, HSBD
HSCross, HSC
HSDiagCross, HSDC
Sets the hatch-style.
HatchColor, HC <color-name>
Sets the hatchcolor. <color-name> is one of the color-strings above.
HatchColorRGB, HCRGB <red> < green> <blue>
Sets the hatchcolor with RGB-values <red> < green> <blue>. Example: "HCRGB 200 210 30”
‘ [it’s a single quote!]
Use the font specified within single quotes. Example: [ 'Arial' ]
FontSize, S <fontsize>
Sets the fontsize. <fontsize> is the size of the font in points (NOT 1/10mm!).
Color, C <color-name>
Sets the text color. <color-name> is one of the color-strings above.
ColorRGB, RGB <red> < green> <blue>
Sets the text color with RGB-values of <red> < green> <blue>.
Justified, J
Sets the text alignment to justified.
Right, R
Sets the text alignment to right.
Left, L
Sets the text alignment to left.
Center, CE
Sets the text alignment to centered.
AutoBreak, A
Sets the AutoPageBreak-Mode to ON.
AutoBreakOff, AO
Sets the AutoPageBreak-Mode to OFF.
AutoBreakNoLimits, ANL
Sets the AutoPageBreak-Mode to NO LIMITS.

Virtual Print Engine -Programmer's Manual Programming Techniques • 125
AutoBreakFull, AF
Sets the AutoPageBreak-Mode to FULL.
Rotate, Rot <angle>
Sets rotation to the specified angle. (clockwise, currently only 90 degree steps allowed, angle
in 1/10 degrees) Example: "Rotate 900" = Rotate by 90 degrees clockwise
Bold, B
Sets the font setting to bold.
BoldOff, BO
Sets the font setting to bold off.
Underline, U
Sets the font setting to underlined.
UnderlineOff, UO
Sets the font setting to underlined off.
Italic, I
Sets the font setting to italic.
ItalicOff, IO
Sets the font setting to italic off.
StrikeOut, ST
Sets the font setting to strikeout.
StrikeOutOff, STO
Sets the font setting to strikeout off.
Additionally the following flags are available in the Professional Edition and above:
Shadowed, SH
Sets shadow drawing on.
ShadowedOff, SHO
Sets shadow drawing off.
Viewable, VA
Sets the viewable mode to on.
ViewableOff, VAO
Sets the viewable mode to off.
Streamable, SA
Sets the streamable mode to on.
StreamableOff, SAO
Sets the streamable mode to off.
Printable, PA
Sets the printable mode to on.
PrintableOff, PAO
Sets the printable mode to off.

126 • Programming Techniques Virtual Print Engine -Programmer's Manual
4.18 Predefined Color Constants
The following constants are defined for the .NET Control, ActiveX, VCL and the DLL:
COLOR_BLACK = RGB(0, 0, 0)
COLOR_DKGRAY = RGB(128, 128, 128)
COLOR_GRAY = RGB(192, 192, 192)
COLOR_LTGRAY = RGB(230, 230, 230)
COLOR_WHITE = RGB(255, 255, 255)
COLOR_DKRED = RGB(128, 0, 0)
COLOR_RED = RGB(192, 0, 0)
COLOR_LTRED = RGB(255, 0, 0)
COLOR_DKORANGE = RGB(255, 64, 0)
COLOR_ORANGE = RGB(255, 128, 0)
COLOR_LTORANGE = RGB(255, 192, 0)
COLOR_DKYELLOW = RGB(224, 224, 0)
COLOR_YELLOW = RGB(242, 242, 0)
COLOR_LTYELLOW = RGB(255, 255, 0)
COLOR_DKGREEN = RGB(0, 128, 0)
COLOR_GREEN = RGB(0, 192, 0)
COLOR_LTGREEN = RGB(0, 255, 0)
COLOR_HIGREEN = RGB(0, 255, 128)
COLOR_BLUEGREEN = RGB(0, 128, 128)
COLOR_OLIVE = RGB(128, 128, 0)
COLOR_BROWN = RGB(128, 80, 0)
COLOR_DKBLUE = RGB(0, 0, 128)
COLOR_BLUE = RGB(0, 0, 255)
COLOR_LTBLUE = RGB(0, 128, 255)
COLOR_LTLTBLUE = RGB(0, 160, 255)
COLOR_HIBLUE = RGB(0, 192, 255)
COLOR_CYAN = RGB(0, 255, 255)
COLOR_DKPURPLE = RGB(128, 0, 128)
COLOR_PURPLE = RGB(192, 0, 192)
COLOR_MAGENTA = RGB(255, 0, 255)
The COLOR_xyz constants are also defined in the VPE Control to make it easier to port existing
source code to different programming languages.
ActiveX / VCL:
Just use the constants as they are, e.g.: Report.PenColor = COLOR_RED
You can assign any RGB value to a color property.
.NET:
For the .NET Control the constants must be prefixed with the class name VpeControl, e.g.:
Report.PenColor = VpeControl.COLOR_RED
Of course you can use any other member of the .NET Color enumeration, for example
Report.PenColor = Color.Aquamarine

Virtual Print Engine -Programmer's Manual Programming Techniques • 127
Java:
The constants are defined in the class Colors.
Example: Report.PenColor = Colors.COLOR_RED
Of course you can use any other member of the Java Color enumeration, for example
Report.PenColor = Color.white
PHP / Python / Ruby:
The constants are defined in the class Colors.
Example: Report.PenColor = Colors.COLOR_RED
128 • Programming Techniques Virtual Print Engine -Programmer's Manual
4.19 Printer Control
4.19.1 Printer Setup
VPE offers to display a printer properties dialog to your end-users. After the user has made his
settings, you can store all settings persistently to file for permanent usage.
Your end-user may make individual printer-setups for each kind of document. So the user can not
only specify an individual printer for each different type of document, but also the number of
copies, page dimensions and everything else. Just let him do these definitions in an extra part of
your application (say: "Printer Setup") and store the different settings in different files. Use these
settings later after a call to OpenDoc() by calling SetupPrinter() with a hidden dialog and the
filename of the file where you had stored the desired settings.
Example:
The user selects the menu entry of your application for printer setup. You then need to open a
document to have access to the printer setup method:
OpenDoc
SetupPrinter("my_setup.prs", PRINTDLG_ALWAYS)
CloseDoc
NOTE: Printer Setup files always should have the suffix ".PRS".
The call to SetupPrinter() above does the following: first, VPE tries to load the file
"my_setup.prs". If it is found, the old settings are loaded and the appropriate dialog is shown.
Otherwise a setup dialog for the default printer with default settings is shown -there, the user can
select the printer he wants. The user can make his settings and after pushing the Ok-button, the
settings are stored back to the file "my_setup.prs".
Whenever your application is later generating a document, you should execute the following code:
OpenDoc
SetupPrinter("my_setup.prs", PRINTDLG_ONFAIL)
CloseDoc
With the call to SetupPrinter(), VPE tries to load the file "my_setup.prs". If it is found, the old
settings are loaded.
Only in case of a problem (e.g. VPE couldn't load the file, or there was a problem of loading the
data into the device driver), the setup dialog will be shown.
There is also the property EnablePrintSetupDialog. If it is False, no setup dialog will be shown,
when the user pushes the print button in the Preview.
NOTE: The settings of the printer setup do not influence the VPE document. For example the
settings for the Paper Orientation or the Paper Size is independently of the settings for
the document. But you can read a printer setup with the method ReadPrinterSetup() and
retrieve all settings with the Device Control Properties. Afterwards you can set the
properties of the VPE document (e.g. Paper Orientation, Paper Size) to the properties of
the device.

Virtual Print Engine -Programmer's Manual Programming Techniques • 129
Important Note:
The setup files contain private device driver data. This has the big advantage that special
settings, options and features of a specific printer can be set and stored to file (for example some
printers offer to select an output paper bin, which is not known by the Windows API).
But -because of the private driver data - if the user replaces the printer by another model (or
manufacturer) or possibly if just the driver version is changed, the setup file needs to be deleted
and newly created.
If you want to gain a driver independent format stored to file (accepting that specific properties of
a printer are not supported), it is very simple to create your own file format by using the Device
Control Properties and writing / reading them to / from file.
The following device properties are not stored in a VPE printer setup file for technical reasons:
•DevFromPage
•DevToPage
•DevPrintToFile
•DevFileName
•DevJobName
The VPE Setup-File has the following format:
DWORD v30_flag; // = (hex) 0xffffffff
DWORD Magic; // = (hex) 0x38673042
DWORD Version; // = 0 in VPE v3.0 and all higher versions
WORD Platform; // 0 = 16-Bit; 1 = 32 Bit; 2 = 64 Bit
WORD Reserved; // unused, should be NULL
DWORD Collate; // 0 = no, 1 = yes
DWORD DevNameSize; // size of the immediately following DEVNAMES structure, including its strings
DEVNAMES-Structure, which is:
* devnames-structure (see Windows SDK)
+ 3 zero-terminated strings
* 1. string = Drivername (MSDOS filename)
* 2. string = Devicename
* 3. string = Output port
DWORD DevModeSize; // size of the immediately following devmode-structure
Devmode-Structure (see Windows SDK),
including appended private Device-Driver Data.
The Devmode-Structure also contains the Landscape-flag in the field
dmOrientation.

130 • Programming Techniques Virtual Print Engine -Programmer's Manual
4.19.2 Sophisticated Device Control
In addition to the printer setup technique described above, VPE offers a large set of properties and
methods to give you all control over the printing device: the Device Control Properties.
By default, VPE selects automatically the default (standard) output device after a call to
OpenDoc(). You may also read an existing printer setup file to choose a different printer and / or a
different setting.
Later you can at any time modify these settings by code with the Device Control Properties and
methods. You can also select a different printing device by code.
4.20 Printing From A Service Like IIS
(Internet Information Server)
If you are using VPE within a service, it may happen that printing, as well as calling the Device
Control Properties (like DevOrientation, etc.), will fail.
The cause is that the system-account used by the service does not have access to printers.
The Microsoft Knowledgebase article Q184291 describes how to solve this problem
(http://support.microsoft.com/support/kb/articles/Q184/2/91.ASP).
We experienced that the described procedure in the Knowledgebase article might not solve the
problem completely. If this is the case for you, check in the Registry under HKEY_USERS the
entries for each single user (these are the cryptic entries, like S-2-7-41-842474936-8463930876-
098386783-2373). If under <user>\Software\Microsoft\Windows NT\CurrentVersion\Windows
the value "Device" is present, but empty (or contains invalid data), copy there the original value of
HKEY_CURRENT_USER\Software\Microsoft\Windows NT\CurrentVersion\Windows\Device.

Virtual Print Engine -Programmer's Manual Programming Techniques • 131
4.21 WYSIWYG
WYSIWYG means "What You See Is What You Get;" in other words: "The output displayed on
the screen will be the same as on the printer".
VPE is such a system. But due to some technical circumstances, there are limitations of these
facilities. The main point is that the resolution of the screen is rather poor compared to a printer.
Usually a display has the defined resolution of 96 x 96 DPI, whilst today printers have usually a
resolution of 600 x 600 DPI, which is over 6 times higher. This leads to the possibility of a "one-
pixel-error". This means that a pixel difference can always happen due to rounding problems in
calculations. Sometimes it might be more than one pixel, especially when using a different scaling
than 1:1 in the preview, because of performance reasons. But be assured: VPE is a system that
does its best to be WYSIWYG. This chapter is only for people who want it quite perfectly.
(Also some problems arise out of printer-or video-driver bugs, see “Important Notes, Tips &
Troubleshooting” on page 205.)
4.22 Positioning On the Printer
Most printers have an unprintable area, this is a gap from the paper borders, where the printer can
not print for technical reasons. The gap at the top-left corner of a page is called the "printing-
offset", because the output starting coordinate (0, 0) for printers is exactly the first printable
position after the gap. So the starting coordinate (0, 0) is shifted by the gap.
Fortunately printer-drivers can be queried for their printing-offset, so VPE can take it into account,
otherwise the printout would always be misaligned (displaced) by the size of this unprintable area.
As a result, positioned objects (for example text) will always be printed exactly on the given
absolute position. This is ideal for printing labels and forms or filling in pre-printed forms. But if
you specify coordinates that are within the unprintable area, objects can not be printed or they are
clipped.
We know of no printer, which has an unprintable area bigger than 1cm from the top and 1cm from
the left, so it is a good idea to use no coordinate smaller than (1, 1) as starting coordinate.
The same applies to the unprintable area to the right and to the bottom of a page. We know of no
printer which has an unprintable area bigger than 1cm fromthe right and 1cm from the bottom, so
you should not insert any objects at positions that fall into this area.

132 • Programming Techniques Virtual Print Engine -Programmer's Manual
4.22.1 Correcting Possible Misaligned Printer Output
The correctly positioned output depends also on the mechanical capabilities and quality of the
printer. When paper is fed into the printer, there are tolerances of about 1 mm where the paper is
misplaced in the y-direction. Also there are tolerances of about 0.1mm to 0.5mm in the x-
direction.
But if a printer-driver is bad -or has a lax implementation -it might return a wrong printing offset,
which results in misaligned output of VPE. This is definitely a problem of the driver (discuss it
with the printer driver vendor).
You can solve this problem by calibrating VPE to the specific printer:
This can be done with ONE single printout by your end user. Simply create a document with a
vertical line with Line(2, 2, 2, 5) and a horizontal line with Line(2, 2, 5, 2). Print it to the printer
and let the user measure the real offset of the printed lines to the paper margins and let him enter
the values into a small dialog.
Store these values into a file and retrieve them when starting your app or starting a report. Then,
after calling OpenDoc(), provide the calibration values to VPE with:
SetPrintOffset(2 -x_measured_value, 2 -y_measured_value)
Et Voila! Your printout looks exactly the same as on the preview and as desired!
Example:
For the HP 5P under WinNT 4.0 SP3, we measured an offset of 2cm for the vertical line drawn in
parallel to the left page margin, therefore, this value is correct (x-offset). But we measured an
offset of 1.7cm for the horizontal line drawn in parallel to the top page margin (y-offset). So the y-
offset is misaligned by 3 mm and we call:
SetPrintOffset(2 -2, 2 –1.7)
to correct the problem.
If you know the printer(s) your users will be using in advance -and there is a model which makes
such problems -you could also perform the measuring by yourself and store the measured values
in a database, so the user is not required to do the measuring himself.
NOTE: This is a problem of the printer driver. The described method above of manual calibration
is the only way to solve the problem. There will be no printing / reporting tool that could
eliminate the problem by itself -except it had stored the calibration values already in its
own database (which is nearly impossible, regarding the count of available printers that
would need to be tested).

Virtual Print Engine -Programmer's Manual Programming Techniques • 133
4.23 Fonts and Font Handling
You can instruct VPE to print text using a specific font and character set. Especially when creating
PDF documents, it is important that you have some basic knowledge about the font handling
mechanisms provided by VPE.
The font manager of VPE supports the following character sets:
Constant Name Comment
VCHARSET_DEFAULT Windows: Chooses the VCHARSET_WIN_ character set that fits
to the localization settings of the current user.
All other platforms: sets the charset to ISO_ANSI
VCHARSET_SYMBOL Required for using Symbol Fonts, like WingDings
VCHARSET_MAC_ROMAN Macintosh Roman
Character sets compatible to the character sets of the Windows operating system:
VCHARSET_WIN_ANSI Western character set: Afrikaans, Basque, Catalan, Danish,
Dutch, English, Esperanto, Faroese, Finnish, French, Frisian,
Galician, German, Icelandic, Indonesian, Interlingua, Irish, Italian,
Latin, Malay, Maltese, Norwegian, Pilipino, Portuguese, Spanish,
Swahili, Swedish, Welsh
VCHARSET_WIN_HEBREWHebrew
VCHARSET_WIN_ARABIC Arabic
VCHARSET_WIN_GREEK Greek
VCHARSET_WIN_TURKISH Turkish
VCHARSET_WIN_VIETNAMESE Vietnamese
VCHARSET_WIN_THAI Thai
VCHARSET_WIN_EAST_EUROPE Albanian, Belarusian, Croatian, Czech, Hungarian, Polish,
Romanian, Serbian, Slovak, Slovenian
VCHARSET_WIN_CYRILLIC Bulgarian, Russian, Serbian and Ukrainian (Cyrillic)
VCHARSET_WIN_BALTIC Estonian, Latvian and Lithuanian
Character sets compatible to the ISO character sets (taken from unicode.org):
VCHARSET_ISO_LATIN_1 Latin-1, Western character set (ISO-8859-1)
VCHARSET_ISO_LATIN_2 Latin-2, East European (ISO-8859-2)
VCHARSET_ISO_LATIN_3 Latin-3, South European (ISO-8859-3)
VCHARSET_ISO_LATIN_4 Latin-4, Baltic (ISO-8859-4)
VCHARSET_ISO_CYRILLIC Cyrillic (ISO-8859-5)
VCHARSET_ISO_ARABIC Arabic (ISO-8859-6)
VCHARSET_ISO_GREEK Greek (ISO-8859-7)
VCHARSET_ISO_HEBREW Hebrew (ISO-8859-8)
VCHARSET_ISO_LATIN_5 Latin-5, Turkish (ISO-8859-9)
VCHARSET_ISO_LATIN_6 Latin-6, Nordic (ISO-8859-10)
VCHARSET_ISO_THAI Thai (ISO-8859-11)
134 • Programming Techniques Virtual Print Engine -Programmer's Manual
VCHARSET_ISO_LATIN_7 Latin-7, Baltic (ISO-8859-13)
VCHARSET_ISO_LATIN_8 Latin-8, Celtic (ISO-8859-14)
VCHARSET_ISO_LATIN_9 Latin-9, Western (ISO-8859-15)
IMPORTANT:
When using symbol fonts, like for example "WingDings", you must set the property CharSet =
SYMBOL_CHARSET first!
There are two possible types of fonts that can be used, which are explained in the next chapters.
4.23.1 Base 14 Post Script Fonts
These 14 fonts are Post Script fonts for PDF Readers (like Acrobat Reader). The PDF
specification says that standard PDF readers must support these fonts –and most of them do. That
means, all good PDF readers have those 14 fonts built-in. You do not need to care, if the fonts are
installed on target machines and there is no need to ship them with your documents or to embed
them into your documents -which keeps the generated PDF documents as small as possible.
The Base 14 fonts are:
Base 14 Font True-Type Equivalent
Helvetica Arial
Times Times New Roman
Courier Courier New
Symbol None (this is a symbol font)
ZapfDingbats None (this is a symbol font)
This makes up 14 fonts, because each attribute (bold, italic, bold-italic) for Helvetica, Times and
Courier is counted as one additional font.
Advantages of using the Base 14 fonts:
•No need to care, if the fonts are installed, no need to ship them with your documents or to
embed them into your PDF documents.
•Generated PDF documents are as small as possible.

Virtual Print Engine -Programmer's Manual Programming Techniques • 135
Disadvantages of using the Base 14 fonts:
•Some character sets are not supported. Supported character sets are: WinAnsi, WinEastEurope,
WinTurkish, WinBaltic, IsoLatin1, IsoLatin2, IsoLatin5, IsoLatin7, IsoLatin9. MacRoman is
nearly fully supported, but the following characters are missing:
unicode 221e (ansi code 176) INFINITY
unicode 220f (ansi code 184) GREEK CAPITAL LETTER PI
unicode 03c0 (ansi code 185) GREEK SMALL LETTER PI
unicode 222b (ansi code 186) INTEGRAL
unicode 03a9 (ansi code 189) GREEK CAPITAL LETTER OMEGA
unicode 2248 (ansi code 197) ALMOST EQUAL TO (asymptotic to)
unicode f8ff (ansi code 240) Apple Logo
•Windows Platform only. When previewing or printing a VPE document (not a PDF document!)
that uses the Base 14 fonts (note: this applies currently only to the Windows version, for the
other platforms there is no preview / direct printing capability): The metrics of the base 14 fonts
are nearly identical to their True-Type pendants, but they are not 100% identical. When using
an on-screen preview, or if printing directly via VPE, the Windows font manager will choose
the True-Type font counterparts of the post script fonts for the output device (this is called font-
substitution), and documents render quite well, but you can not expect 100% perfectness. This
means, in regular (99,99%) you will not be able to detect any visible flaws. Text might be
rendered slightly a bit more dense than it would, if a True-Type font was used directly for
rendering a document (without substitution).
By the way: Acrobat Reader for Windows itself substitutes the Helvetica, Times and Courier
fonts with its True-Type pendants.
•The PDF/A standard, which defines documents for long-time archival, says that even the base
14 fonts (i.e. the postscript data) must be embedded into PDF documents in order to make them
PDF/A compliant. Currently VPE is not capable of creating PDF/A documents, but a future
version will. However, at the time of this writing we can not guarantee that VPE will be able to
embed the base 14 fonts into PDF documents, because of technical as well as for licensing
issues.
4.23.2 True-Type / OpenType Fonts
VPE accesses, analyzes and evaluates directly the binary data of True-Type / OpenType fonts (in
the following called TT fonts), including an internal cache for high performance rendering.
VPE can embed TT fonts into PDF documents. The Enterprise Edition of the PDF Module can
also embed subsetted TT fonts, which means that VPE generates and embeds on-the-fly a newly
generated TT font, which only contains the used characters. This reduces the size of the embedded
fonts and therefore the overall size of generated PDF documents.
NOTE: Some TT fonts have set flags, so the font creator does not allow to embed or subset a
font. VPE respects the font licensing specifications and will deny to embed / subset such
fonts.
Using TT fonts on Windows and Mac OS X platforms is very transparent and easy (for you as a
user). Both platforms have a built-in font manager, which is used by VPE. For example, if you
instruct VPE to use the Arial font for a portion of text, VPE will call the font managers of either
Windows or Max OS X and ask them to provide the font. The font managers themselves care for
the list of available fonts on the current machine and which font file at what location needs to be
selected and loaded into memory.

136 • Programming Techniques Virtual Print Engine -Programmer's Manual
On all other platforms (Linux, Unix, Solaris, etc.) VPE uses its own font manager for handling TT
fonts. When deploying VPE on a certain machine, you must inform VPE's font manager where to
find TT fonts. This is done by setting the environment variable VPE_FONTPATH. It may contain
a list of paths separated by semicolons where VPE shall scan for available TT font files (with the
suffix .ttf, e.g. arial.ttf).
On each startup, i.e. when VPE is loaded into your application, it will search for a file named
„font.catalog“. VPE's font manager stores information about available TT fonts in this file. If the
file is not present, VPE will create it by scanning for TT font files in the search path(s) specified
by VPE_FONTPATH. If VPE_FONTPATH is not set, VPE will not perform such a scan and
therefore no font.catalog file will be generated.
The resulting font.catalog file will be written to the directory location specified by a second
environment variable: VPE_CATALOGPATH. If this variable is not set, VPE will use the first
directory specified in VPE_FONTPATH as output directory. Make sure that in either case the
output directory has write-permissions, so the catalog file can be written.
If you add TT font files later to the system, or if you move files to different locations, you must
delete the font.catalog file in order to let VPE rebuild it with the most current information.
Advantagesof True-Type / OpenType fonts:
•Much greater selection of available fonts than the base 14 fonts
•PDF/A compliant font embedding supported (yet not implemented by VPE)
•Windows version only: no font substitution takes place to substitute post script fonts with TT
fonts for the preview and printing
Disadvantagesof True-Type / OpenType fonts
•You can not assume that receivers of your PDF documents have the TT fonts used in the
document installed on their systems, so you need to embed all TT fonts into the generated PDF
documents, which makes the PDF documents larger in size. In addition embedding / subsetting
requires slightly more CPU time.
•On Linux / Unix / Solaris the font management must be initialized by yourself, by setting the
environment variables VPE_FONTPATH and VPE_CATALOGPATH properly. It might also
be neccessary to ship and install required TT fonts with your application (take care of the
licensing!).
4.23.3 Font Substitution
For PDF export VPE offers a method for font substitution. By using the method SetFontControl()
you can instruct VPE to substitute a given font with another. This is especially helpful for
developing Windows applications: You can use the Arial, Times New Roman and Courier New
TT fonts for the preview and printing, and for PDF export you instruct VPE to use the Base 14
counterparts.
Whilst SetFontControl() is only active during the export to PDF, there is a second generic method
to substitute fonts: SetFontSubstitution()
By using this method, VPE will substitute fonts immediately when creating a document. This is
especially useful on Non-Windows platforms when importing RTF (Rich Text) documents. Often
RTF documents are created on Windows platforms and use Windows specific True-Type fonts.

Virtual Print Engine -Programmer's Manual Programming Techniques • 137
With this method you can instruct VPE to substitute for example the True-Type font "Arial" with
the Base 14 font "Helvetica", so Helvetica is used in place of Arial.
4.23.4 Making a Decision, Which Type of Font to Use
If you are developing for the Windows or Mac platforms only,and if you are sure that all receivers
of created PDF documents (for example by e-mail) are using a Windows or Mac machine, and you
are using only the basic three TT fonts which are installed by default on any Windows machine
(i.e. Arial, Times New Roman, Courier New), then you can safely use TT fonts.
For Windows application development you can also use font substitution, in order to use TT fonts
for the preview and printing and Base 14 fonts for PDF export.
If you are developing for the Windows or Mac platforms only,and if you are using other TT fonts,
or if receivers of created PDF documents might be using other platforms than Windows or Mac
machines, you can not assume that even the basic three Windows TT fonts are present on the
receiver's machine. In this case you need to embed the TT fonts into the PDF document (which
increases its size), or you use the Base 14 fonts.
If you are doing cross-platform development, e.g. your application shall run on Windows, Mac OS
X and Linux, you either better use the Base 14 fonts only, or you must make sure that the used TT
fonts are present on each target machine (and platform) of your application, because for the
creation of documents VPE requires to have access to the fonts. This might require that you
license the fonts for distribution. In addition you should embed the TT fonts into created PDF
documents.
Adobe recommends to embed TT fonts always into PDF documents.
The demo executables shipped with VPE are compiled for each supported platform, so they are
using the Base 14 fonts only.

138 • Programming Techniques Virtual Print Engine -Programmer's Manual
4.24 VPE Document Files
VPE has its own native document file format for reading and writing VPE document files from / to
disk or memory streams.
VPE document files can either be created by the user, when he/she clicks on the “Save” toolbar
button in the preview, or programmatically by calling the method WriteDoc().
VPE document files can be read into memory either by the user, when he/she clicks on the “Open”
toolbar button in the preview, or programmatically by calling the method ReadDoc().
VPE Document Files in Short:
•The suffix for VPE document files is ".vpe".
•The maximum size of a VPE document file is 2 ^ 63 bytes.
•VPE document files are written by default compressed, using Flate compression(Zlib).
(Note: the Community Edition does not support compression.)
•VPE document files are platform independent. They can be transparently read and written on
Little Endian as well as on Big Endian machines and on 32-bit platforms as well as on 64-bit
platforms. Also the embedded file names of referenced pictures are translated to the specific
platform (i.e. correct slash and backslash handling). However, since Windows is case
insensitive for file names, special care must be taken that you provide the file names for
documents and pictures in the correct case sensitive way on all platforms!
•You can use VPE document files for archive purposes, the format is guaranteed to be upward
compatible to new versions of VPE. But VPE document files can not be seen like PDF/A files,
because VPE does not embed fonts into VPE document files, nor color profiles.
•If you created documents with the trial-version of VPE, they will have set a flag, so if you open
such a document, the demo banner will be shown, even if you are using the licensed engine.
4.24.1 Assembling VPE Document Files
If you call WriteDoc() with the file name of an existing file, VPE will append the current
document to the end of the existing one. This allows to assemble multiple documents together. For
the assembly process, there is no additional memory required.
If you do not want to append a document to an existing VPE document file, you must delete the
existing document file first, before calling WriteDoc().
In addition the Professional Edition and higher allow to read and write specific page ranges to /
from a VPE document file.
Care must be taken, when merging documents: if you use @PAGE in headers or footers, the
numbers will not be correct, since they are already computed and stored in the document files. The
best solution is, not to use the @PAGE function in such case, but to store the documents without
any page-number information. Then, after you have merged all required documents together, you
can use the standard page numbering algorithm to number the pages.
You can also call WriteDoc() for disk-based documents, so you can append a disk based document
to another existing VPE document file. This guarantees minimum memory usage, since disk-based
documents require only memory for a single page.

Virtual Print Engine -Programmer's Manual Programming Techniques • 139
4.24.1.1 VPE Document Files of Different Editions
Higher editions of VPE offer types and properties of objects, which are not available in lower
editions. Therefore higher editions can read document files which have been created with lower
editions, but it is not possible to write to existing files, which have been created with a different
edition, and it is not possible to read with a lower edition from files, which have been created with
a higher edition.
The following rule applies on principle: if a VPE Document file was created with an Edition A, it
can be read without any problems with any higher Edition B. You can not write to an existing file,
which was created with a different edition.
If you wish to write with a higher edition to an existing file, which has been created with a lower
edition, you need to read the file first as a whole into memory using ReadDoc(). Then delete the
file and afterwards write it using WriteDoc(). As an alternative –and to save memory for huge
files –you can convert an existing file to the format of a higher edition by opening the existing file
as On-Disk file and writing it under a different name to a new file using WriteDoc().
4.24.2 Editing VPE Document Files
VPE Document files can be read, modified and graphically edited by point-and-click with the
mouse and saved using the visual designer dycodoc.
If you want to protect your files from being edited, use the property EditProtection.
4.24.3 Memory Streams
You can read VPE documents, Pictures and RTF from memory-streams, and also write all
exportable document types to memory-streams (currently VPE, PDF, HTML, XML, ODT), as
well as export images to memory-streams. Therefore you can read (VPE and XML only) / write
such documents plus images from / to databases as BLOBS. Moreover server based applications
can create documents like PDF or HTML very fast in memory (without disk I/O overhead), and
stream them for example via HTTP to web browsers.

140 • Programming Techniques Virtual Print Engine -Programmer's Manual
4.24.4 Pictures and VPE Document Files
By default, Pictures are embedded into VPE document files. If you turn the embedding off, paths
to picture files are stored as relative paths within VPE document files. This means, the paths are
converted to positions relative to the VPE document itself. This technique makes VPE document
files better portable, for example to another directory location.
Example:
A VPE document is created at c:\projects\docs\mydoc.vpe
The document includes a picture from c:\projects\images\logo.jpg
VPE will convert the image path to a path relative to the position of the VPE document,
i.e. to: ..\images\logo.jpg
This allows to move the VPE document file to a different location, as long as the image is moved
to the same relative position (i.e. ..\images\).
A better example would be that the VPE document file is created at:
c:\projects\docs\mydoc.vpe and the picture is located in the same directory, i.e.
c:\projects\docs\logo.jpg. In this case the resulting relative path would be logo.jpg
NOTE: A path can only be converted into a relative path, if the picture file and the VPE
document file are on the same drive / device. E.g. if a picture is on “c:\tmp\test.jpg” and
the document is on “d:\doc\sample.vpe”, no relative path can be constructed!
The file names stored in VPE document files are translated to the specific platform (i.e. correct
slash and backslash handling) when reading a document file.
NOTE: When you read one or more VPE document files into the current document using
ReadDoc(), and those files have embedded images, you may NOT delete or modify the
source document files, while the current document is open! This is, because VPE loads
the embedded images directly out of the source document files each time they are not
found in the image cache.
4.24.5 UDO's and VPE Document Files
Since your application is responsible for the graphical content of a UDO (User Defined Object),
VPE can not store the graphical content of UDO's in VPE document files. However, VPE stores
the lParam parameter -which is the numeric ID to identify the UDO during the UDO-Paint event -
within the VPE document file. Therefore if you read a VPE document file with your application,
VPE fires as usual the UDO-Paint event and in that moment you can paint it. As a result you can
not use the common VPE file viewer VPEViewto display or print files which contain UDO's.
Instead you need to write your own viewer application which considers and displays the UDO's
graphical contents. On our website you can download the full source code of VPEView in order to
modify it.
As an alternative we propose not to use UDO's, but to create Metafiles or Bitmaps instead of
UDO's and to import those into the VPE document.

Virtual Print Engine -Programmer's Manual Programming Techniques • 141
4.24.6 On-Disk Document Files
Another option to open / create a VPE document file is to use a special on-disk mode.
NOTE: On-Disk files are always written compressed.
For the VPE Control this is done by setting the property SwapFileName before calling OpenDoc(),
for the VPE DLL this is done by calling the function VpeOpenDocFile() instead of
VpeOpenDoc().
In the on-disk mode only the current page is held in memory, all other pages are swapped to a
VPE document file. This implies minimum memory usage at very high performance and allows to
create huge documents. VPE's on-disk mode is VERY fast.
Even for file-based documents you can add new pages to the end of a document at any point in
time.
Editions below the Professional Edition: after a page has been swapped to file, you can not modify
the page, i.e. add new objects to it.
The Professional Edition and higher allow to add new objects to pages which have already been
written to file and to clear, insert and delete pages at any position in a document file.
A page is swapped to file after:
•Adding a new blank page by calling PageBreak()
•Moving to a different page by modifying the property CurrentPage
DLL: by calling VpeGotoPage()
On-disk document files can become fragmented, if you are adding a lot of new objects to a page
which has already been written to disk. Especially if you are adding objects in multiple steps, i.e.
you add some objects, seek to another page, seek back and add again objects and so on, or open
and close the document file repeatedly while adding each time new objects. This will result in
decreased performance when reading pages of document files.
Defragmenting document files:
Open the document file with SwapFileName (DLL: use VpeOpenDocFile())
Call WriteDoc(<new file name>)
The file <new file name> is defragmented, whilst requiring nearly no memory for the operation.
With SwapFileName / VpeOpenDocFile() you can also open an existing file, VPE first checks if
the given file already exists. If so, the first page is loaded into memory. If you want to add pages
to the end of an existing document file, open it and call PageBreak() first, so that a new empty
page is added to the end of the document . If the document doesn't contain any pages, then the first
page is an empty page.

142 • Programming Techniques Virtual Print Engine -Programmer's Manual
4.25 VPE View: The Document Viewer
VPE View can be used to browse documents created with VPE -e.g. with the method WriteDoc() -
which is for example very useful, in case documents are sent by e-mail.
In addition, if a VPE document was created with the VPE Interactive Edition, and the property
EditProtection of the document was set to false, users can edit the controls of such documents
within VPEView. If a user changes a document and closes it, VPEView will ask for confirmation if
the changes shall be written back to the original file. This way forms can be sent for example by e-
mail, the receiver can fill them out, print them optionally, and he can also send them back by e-
mail.
Please note that VPE View may be distributed royalty-free to end users. You need to include the
Engine DLL found in the directory "Deploy" as well, because VPE View loads the Engine DLL.
If your documents contain objects that make use of additional DLL's from the directory "Deploy",
you need to include these DLL's, too. For example if your documents contain barcodes, you need
to ship VPE View with the Engine DLL and the Barcode DLL, and so on.
See “Redistributing VPE” on page 197 for an exact explanation of the dependencies between the
Engine and the other DLL's that are shipped with your Edition.
If you click the e-mail button in VPE View, it will open your Simple MAPI mail client (in any
installed) and automatically attach the VPE document to the e-mail. Depending on the licensing
when a VPE document was created -VPEView will mail the attached document as:
1) Trial-Version: attachment is a non-licensed (demo) PDF file.
2) VPE license applied, but no PDF license: attachment is a licensed (non-demo) VPE file.
3) VPE license and PDF license applied: attachment is a licensed (non-demo) PDF file.
Exception: if the property EditProtection is activated, the VPE document file must have been
created using the PDF Export Module Enterprise Edition. In this case VPEViewwill attach a PDF
document which can only be printed, but not modified. If EditProtection is activated and the PDF
Export Module Standard Edition has been licensed, VPEView will not attach a PDF file, but a VPE
document file.
Remarks:
VPEViewopens files always write protected (i.e. in read-only mode).
If you created documents with the trial-version of VPE, they will have set a flag, so VPE View will
display the demo banner if such a file is viewed.
For documents that were created with the Licensed Version it is not necessary -and forbidden -
that the end users of VPE View use your License Key to view the documents without demo
banners. VPE View is designed in a way that it recognizes if a document was created with a
licensed version of VPE and will then hide the demo banners automatically.
VPE View examines the VPE Document it shall open and tries first to load the according Edition
of the VPE DLL with which the document was created. This will avoid possible document version
mismatches, if multiple Editions of VPE are installed on the same machine in different versions.
For further information about VPE document files, please see “VPE Document Files” on page
138.
VPEView can be distributed royalty-free. For details about redistribution, please see
“Redistribution of VPE View” on page 203.

Virtual Print Engine -Programmer's Manual Programming Techniques • 143
4.25.1 Faxing Documents with the MailDoc() Method
You need to distribute VPE View with your application, if your application shall be able to fax
documents. This is, because MS-Fax (or whatever Simple MAPI based fax server you will be
using) will open and spool the document by running the associated file viewer for the document
type, and VPE View is associated with the suffix ".VPE" on system level.
4.26 Standards
•For standardization, the suffix of document files created with VPE has to be ".vpe". From v3.0
on we deliver a standard VPE document viewer that may be distributed royalty-free. This
browser is associated with the suffix ".VPE". The browser is for example very useful if you
send VPE-Documents via e-mail, so the recipient can read the document easily.
•Also for standardization, the suffix of printer-setup files created with SetupPrinter() /
WritePrinterSetup() should be ".PRS".

144 • dycodoc Template Processing Virtual Print Engine -Programmer's Manual
5dycodoc Template Processing
5.1 dycodoc Template Processing
[Enterprise Edition and above]
dycodoc is the visual designer shipped with the Enterprise and Interactive Editions of VPE. Please
refer to the "dycodoc Guided Tour" for details on using dycodoc.
With dycodoc you can edit the layout of a document by point and click with the mouse. dycodoc
helps to save a lot of work for coding the layout, but even more important: it gives your end users
the capability to modify layouts.
The layouts you create with dycodoc can be stored to file. These document files have the suffix
DCD, which stands for Dynamic Content Document. Each time you save a DCD to file, dycodoc
writes also a template file with the same name -but the suffix TPL -to disk. Template files
contain the compiled layout of a DCD, which can be loaded and processed with VPE at the
runtime of your application.
When you load a template file, VPE will create a Template Object from it in memory. Using the
VPE API, you can query the layout-and data source structure from a template. In addition you are
able to perform several operations and modifications on a Template Object by code, including the
assignment of values to fields (i.e. variables).
After you have done all necessary modifications on a template and assigned values to the fields
used in the template, you finally dump the template into a VPE Document, i.e. the template with
the resolved field values is inserted into a document.
Of course you may use the VPE API (see “Programming Techniques” on page 21) to insert at any
time -before and after dumping a template -any number of additional objects by code into a VPE
Document.
Moreover it is also possible to retrieve and modify the objects that have already been inserted into
a VPE Document.

Virtual Print Engine -Programmer's Manual dycodoc Template Processing • 145
5.1.1 Providing the Data
VPE and dycodoc are database independent; i.e. they do not access themselves any databases nor
do they include any database drivers. Instead your applications -or rather you as developer -are
responsible for providing the data to VPE.
Using the FieldStudio you define DataSources (this is similar to an SQL View). DataSources
consist of any number of Fields (i.e. variables). DataSource files have the suffix FLD.
In dycodoc you may embed DataSources into documents in order to define the set of available
fields for a specific document. You and / or your end users may then insert any of the available
fields into text objects, pictures, barcodes, etc.
The used DataSources and the used fields from each DataSource are stored together with the
layout information in the template file.
However, the fields are just placeholders for some kind of data your application will provide to a
template when processing / printing it. For VPE it doesn't play a role from where or how you
retrieve the data.
VPE simply offers a set of methods to assign values to fields. In most cases your applications
might retrieve data from a database and assign it to fields, but in practise you might retrieve or
generate the data from any data source you wish.
The advantages are obvious:
•Support of true multi-tier programming models, the data is completely independent of the view
•No database drivers are installed nor used by VPE on the target system
•Increased performance, because you can optimize database accesses and computations
•Easy concatenation of different data sources, for example databases and internal computed
variables
•Work with very rarely databases is possible
•Work without existence of any database is possible, data may come from any data source, for
example a TCP/IP stream via the internet, a plain text file or whatsoever
•Flexibility, since you have exact control over the provided data
Disadvantage:
•You need to program something, i.e. you need to provide the data by code to VPE. But this is
done in a very easy way and usually requires very little coding.
146 • dycodoc Template Processing Virtual Print Engine -Programmer's Manual
In the example below three DataSources are used:
•customers.fld
•providers.fld
•articles.fld
They are used in conjunction with the dycodoc DCD document "request.dcd".
The graphics below shows the file structures and how the template "request.tpl" is used by your
application in interaction with Virtual Print Engine.
Application
VPE
API
DBMS
…
Windows API
Runtime Library
Fiel dSt udio
DYCODOC
Vi rtual Pr int Engine
request.dcd
request.tpl
customers.fld
providers.fld
articles.fld

Virtual Print Engine -Programmer's Manual dycodoc Template Processing • 147
5.2 Template Structure
The logical structure of a Template Object can be divided into two main parts: Layout and Data
Below you see the complete structure of a Template Object when it is loaded into memory.
Template
Data
Data Source 0
Field 0
Field n
Field 2
Field 1
.
.
.
Data Source 1
Field 0
Field n
Field 2
Field 1
.
.
.
Data Source 2
Field 0
Field n
Field 2
Field 1
.
.
.
. . .
Data Source n
Field 0
Field n
Field 2
Field 1
.
.
.
Layout
Page 0
VPE Object 0
VPE Object n
VPE Object 2
VPE Object 1
.
.
.
. . .
Page 1
.
.
.
Page 2
VPE Object 0
VPE Object n
VPE Object 2
VPE Object 1
.
.
.
Page n
VPE Object 0
VPE Object n
VPE Object 2
VPE Object 1
.
.
.
VPE Object 0
VPE Object n
VPE Object 2
VPE Object 1
In the following sections we will give a brief overview about the several objects which belong to
the template structure.

148 • dycodoc Template Processing Virtual Print Engine -Programmer's Manual
5.2.1 Template Object -TVPETemplate
The method LoadTemplate() loads a template file and creates a Template Object in memory. A
Template Object is the anchor for any operation you perform on a template.
Properties:
•Master
Specifies, if the page settings (page dimensions, margins, orientation, paper bin) of the template
shall be used when dumping the whole template or a single page of the template into a VPE
document.
•DataSourceCount
The number of data sources used in the template
•DataSourceObject [0...n]
The Data Source objects within the template
•PageCount
The number of pages of the template
•PageObject [0...n]
The page objects within in the template
The objects described in the following are encapsulated by a Template Object.
5.2.2 Template Page Object -TVPETemplatePage
This is the visual content of a template. A template consists of a set of pages you had created in
dycodoc. A template may contain any number of pages.
Properties:
•PageWidth, PageHeight
The page width and height for the Template Page as defined in dycodoc.
•Orientation
The orientation (landscape or portrait) for the Template Page as defined in dycodoc.
•PaperBin
The output paper bin for the Template Page as defined in dycodoc.
•nLeftMargin, nRightMargin, nTopMargin, nBottomMargin
The margins for the Template Page as defined in dycodoc.
•VpeObjectCount
The number of graphical VPE Objects (i.e. lines, text, pictures, etc.) within the Template Page.
•VpeObject [0...n]
The VPE Objects within the Template Page. The properties of each VPE object can be read
and / or modified.

Virtual Print Engine -Programmer's Manual dycodoc Template Processing • 149
5.2.3 VPE Object -TVPEObject
VPE objects are the graphical objects themselves, like lines, text, pictures, etc.
Depending on the kind of object, they have special properties like PenSize, FontSize, Text, etc. -
see also “The Object-Oriented Style” on page 29.
VPE Objects can either reside in a template or directly in a VPE Document.
5.2.4 Data Source Object -TVPEDataSource
Data Source Objects describe the data sources which are used in a template. For example a
database table can be understood as data source. Data Source Objects are a multi-tier abstraction
layer for your real data. They can not be connected directly to a database, instead your application
must retrieve the data from an underlying data source (be it a database, a textfile, a network stream
or whatsoever) and feed the data by code to VPE's Data Source Objects.
A template may contain any number of Data Source Objects. Data Sources are defined in the
FieldStudio. With dycodoc you insert Data Sources into a document during design-time.
Properties:
•Prefix
The prefix of the DataSource as defined in the FieldStudio. The prefix will be used to access
the Data Source within the VPE API. For example you set a field of a Data Source with the
method SetFieldAsString(prefix, field_name, value)
•FileName
The file name of the FieldStudio .FLD file
•Description
The description of the DataSource as defined in the FieldStudio. This is a text you may define
for your end-users as a description of the Data Source.
•FieldCount
The number of fields of the Data Source which are used in the current template.
•FieldObject [0...n]
The Field Objects within the Data Source.

150 • dycodoc Template Processing Virtual Print Engine -Programmer's Manual
5.2.5 Field Object -TVPEField
The Field Object describes a single field within a Data Source Object. A field is the same as a
variable. It is a placeholder for a value which is inserted into an object. For example the field
"Name" can have the value "IDEAL Software".
Fields are VARIANTS that can hold either a string or an integer value (in later versions they will
also be able to hold floating point and date / time values). Fields are defined in the FieldStudio.
Using dycodoc you insert fields into a document during design-time.
Properties:
•AsString
Set / retrieve the field's value as string
•AsInteger
Set / retrieve the field's value as integer
•Name
The name of the field as defined in FieldStudio.
•Description
The description of the field as defined in FieldStudio.
•DataSourceObject
The Data Source Object the field belongs to.
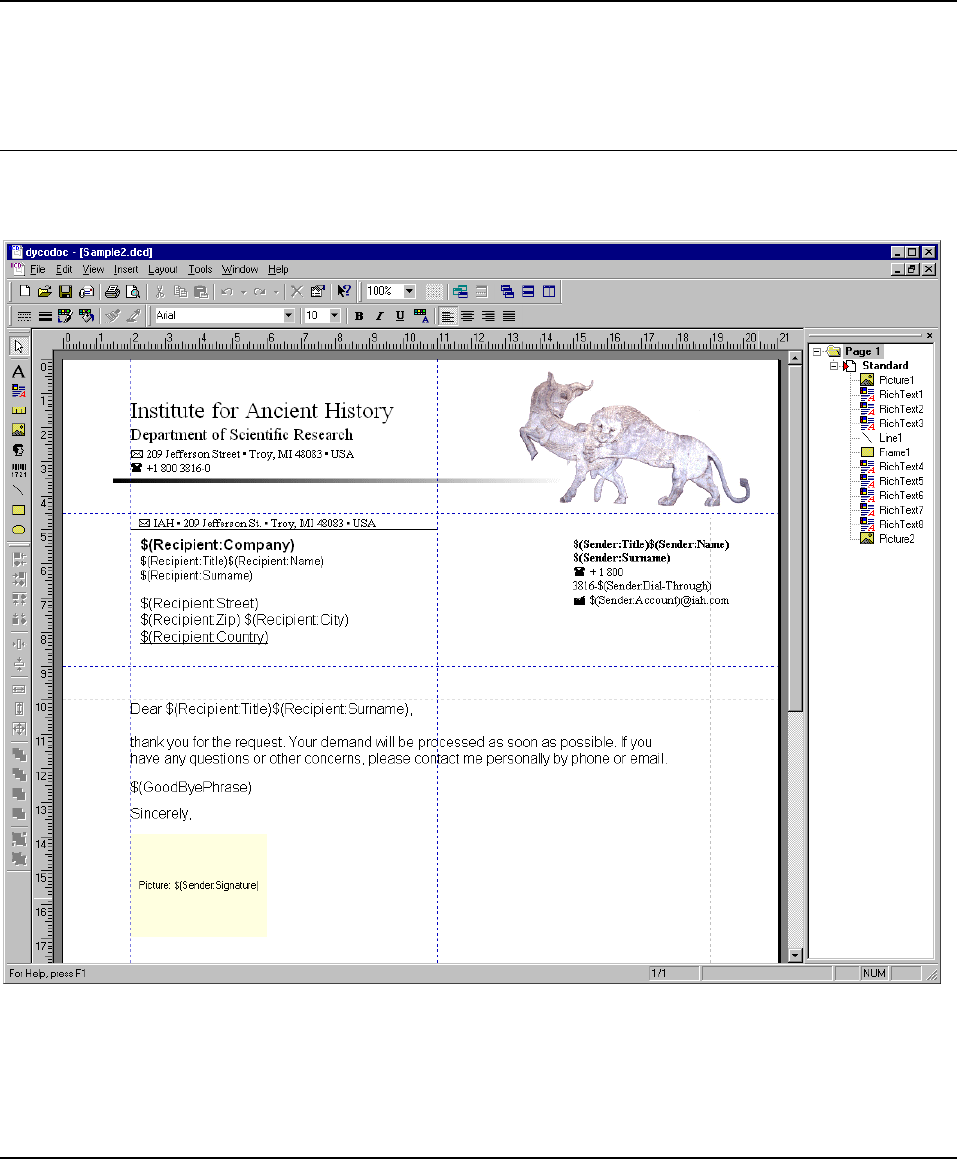
Virtual Print Engine -Programmer's Manual dycodoc Template Processing • 151
5.3 Template Processing Tutorial
In the following sections we demonstrate step by step how to use templates with VPE. All code
samples use the "sample2.dcd" located in the subdirectory "\dycodoc\samples".
The source code samples require that your application is running on the same drive where dycodoc
is installed. Otherwise insert the correct drive letter into the file name parameter of the
LoadTemplate() call, for example if you had installed dycodoc on drive X: you would change the
LoadTemplate() statement to: LoadTemplate("X:\dycodoc\samples\sample2.tpl").
VPE ActiveX and VCL only:
the samples require that you insert a VPE Control named "VPE" into the current form.
VCL only:
"Dim <variable> as <TVPE-Type>" needs to be translated to "<TVPE-Type>:
<variable>". For example "Dim tpl as TVPETemplatePage" à"tpl: TVPETemplatePage"
The dycodoc DCD file "sample2.dcd":
If you are yet not familiar on how to use dycodoc and how to create DCD, FLD and TPL files,
please consult the "dycodoc Manual".

152 • dycodoc Template Processing Virtual Print Engine -Programmer's Manual
The FieldStudio field definition file "sample2.fld":
5.3.1 Dumping a Template
"Dumping a Template" means that a template will be inserted into a VPE document. The
following is the most simple approach.
Some notes:
•You may set the values for any field, even if a field is not used in a template -and therefore is
not present. No error will occur.
•A template can only be dumped into the document into which it had been loaded, e.g.
report1.LoadTemplate("some.tpl"), report2.DumpTemplate() is not possible, only
report1.DumpTemplate() is allowed.
•You can dump one and the same template as often into a document as you like. Each time
before you call DumpTemplate() you can assign new values to fields.
Call the VPE API method PageBreak(), before dumping a template a second time, to ensure
that the template is dumped into a new page at the end of the document.
•VPE is case insensitive regarding Field and Data Source names, e.g. "Sender:Name" and
"sender:name" are the same Fields for VPE.

Virtual Print Engine -Programmer's Manual dycodoc Template Processing • 153
Sample Code for the VPE Control
// The following procedure will be used for many of the following samples.
// It sets the values of the sample2.fld to some dummy data:
Private Sub SetFields(tpl As TVPETemplate)
tpl.SetFieldAsString "Sample2", "Recipient:Company", "IDEAL Software"
tpl.SetFieldAsString "Sample2", "Recipient:Title", "Mr. "
tpl.SetFieldAsString "Sample2", "Recipient:Surname", "Miller"
tpl.SetFieldAsString "Sample2", "Recipient:Title", "Carl"
tpl.SetFieldAsString "Sample2", "Recipient:Street", "Helmholtzstr. 6"
tpl.SetFieldAsString "Sample2", "Recipient:ZIP", "41464"
tpl.SetFieldAsString "Sample2", "Recipient:City", "Neuss"
tpl.SetFieldAsString "Sample2", "Recipient:Country", "Germany"
tpl.SetFieldAsString "Sample2", "Sender:Account", "pakzadeh"
tpl.SetFieldAsString "Sample2", "Sender:Dial-Through", "742"
tpl.SetFieldAsString "Sample2", "Sender:Surname", "Pakzadeh"
tpl.SetFieldAsString "Sample2", "Sender:Name", "Paymand"
tpl.SetFieldAsString "Sample2", "Sender:Signature",
"\dycodoc\samples\pakzadeh.jpg"
tpl.SetFieldAsString "Sample2", "Sender:Title", "Dr. "
tpl.SetFieldAsString "Sample2", "GoodByePhrase",
"You will be informed about the further progress."
End Sub
// Main Program
// First of all, we declare an object variable for a template object:
Dim tpl as TVPETemplate
// Next, you create a VPE Document with a single blank page:
VPE.OpenDoc
// Afterwards we load the template file into memory:
tpl = VPE.LoadTemplate("\dycodoc\samples\sample2.tpl")
// If the LoadTemplate() call had failed, an exception would have
// occurred... Now the template has been loaded into memory and is ready to
// be processed. Fill the Fields with values:
SetFields(tpl)
// Dump the template into the VPE Document
VPE.DumpTemplate(tpl)
// We can show now the preview for the VPE Document we just created:
VPE.Preview

154 • dycodoc Template Processing Virtual Print Engine -Programmer's Manual
Sample Code for the VPE DLL (C/C++)
// The following function will be used for many of the following samples.
// It sets the values of the sample2.fld to some dummy data:
void SetFields(VpeHandle hTpl)
{
VpeSetTplFieldAsString(hTpl, "Sample2", "Recipient:Company",
"IDEAL Software");
VpeSetTplFieldAsString(hTpl, "Sample2", "Recipient:Title", "Mr. ");
VpeSetTplFieldAsString(hTpl, "Sample2", "Recipient:Surname", "Miller");
VpeSetTplFieldAsString(hTpl, "Sample2", "Recipient:Name", "Carl");
VpeSetTplFieldAsString(hTpl, "Sample2", "Recipient:Street",
"Helmholtzstr. 6");
VpeSetTplFieldAsString(hTpl, "Sample2", "Recipient:ZIP", "41464");
VpeSetTplFieldAsString(hTpl, "Sample2", "Recipient:City", "Neuss");
VpeSetTplFieldAsString(hTpl, "Sample2", "Recipient:Country", "Germany");
VpeSetTplFieldAsString(hTpl, "Sample2", "Sender:Account", "pakzadeh");
VpeSetTplFieldAsString(hTpl, "Sample2", "Sender:Dial-Through", "742");
VpeSetTplFieldAsString(hTpl, "Sample2", "Sender:Surname", "Pakzadeh");
VpeSetTplFieldAsString(hTpl, "Sample2", "Sender:Name", "Paymand");
VpeSetTplFieldAsString(hTpl, "Sample2", "Sender:Signature",
"\\dycodoc\\samples\\pakzadeh.jpg");
VpeSetTplFieldAsString(hTpl, "Sample2", "Sender:Title", "Dr. ");
VpeSetTplFieldAsString(hTpl, "Sample2", "GoodByePhrase",
"You will be informed about the further progress.");
}
// Main Program
// First of all, we declare an object handle for a template object:
VpeHandle hTpl;
// Next, you create a VPE Document with a single blank page:
VpeHandle hDoc = VpeOpenDoc(hWnd, "Sample", 0);
// Afterwards we load the template file into memory:
hTpl = VpeLoadTemplate(hDoc, "\\dycodoc\\samples\\Sample2.tpl");
if (hTpl == NULL)
return; // an error had occurred, e.g. the file was not found
// Now the template has been loaded into memory and is ready to be
// processed. Fill the Fields with values:
SetFields(hTpl);
// Dump the template into the VPE Document
VpeDumpTemplate(hDoc, hTpl);
// We can show now the preview for the VPE Document we just created:
VpePreviewDoc(hDoc, NULL, VPE_SHOW_NORMAL);
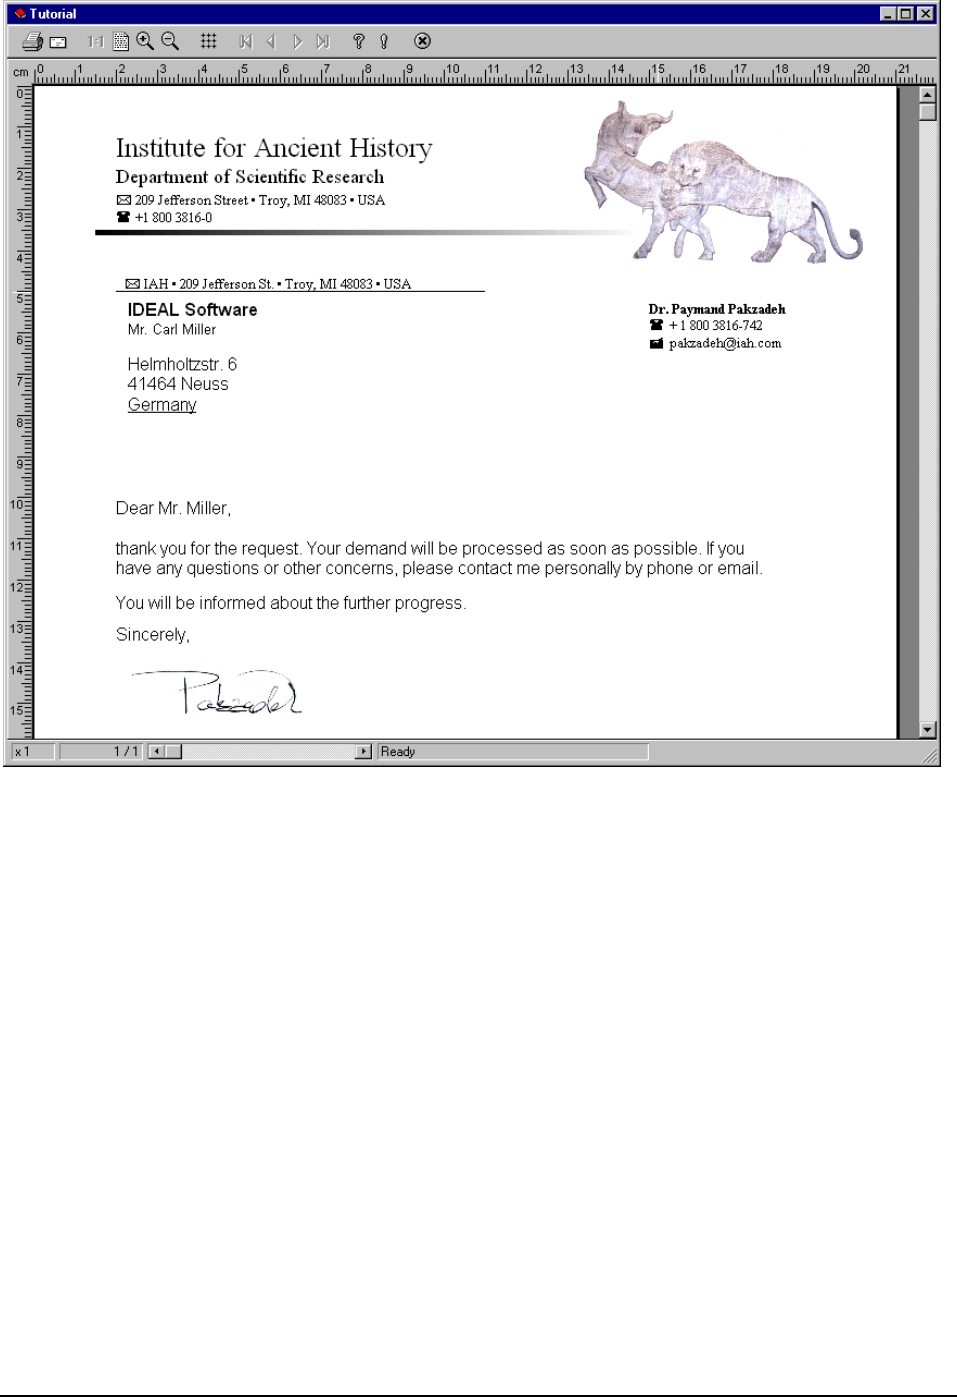
Virtual Print Engine -Programmer's Manual dycodoc Template Processing • 155
The resulting VPE Preview will look like this:

156 • dycodoc Template Processing Virtual Print Engine -Programmer's Manual
5.3.1.1 Summary
The basic steps to use a template are:
1. Create a VPE Document with OpenDoc()
2. Load the template file with LoadTemplate()
3. Fill the Fields with values using SetFieldAsString() or SetFieldAsInteger()
4. Dump the template into the VPE Document with DumpTemplate()
5. Show the preview for the VPE Document with Preview(), or print it without showing a
preview by calling PrintDoc() instead

Virtual Print Engine -Programmer's Manual dycodoc Template Processing • 157
5.4 VPE Object Processing
The VPE Enterprise and Interactive Editions allow to modify VPE Objects by code which reside
in a template that has been loaded into memory.
Additionally both editions allow to modify VPE Objects after they have been inserted into a VPE
document (!).
5.4.1 Modifying VPE Objects in a Template
VPE Objects in a template are addressed by their names.
NOTE: Do not mismatch names of VPE objects with names of fields. VPE Objects are the
graphical objects like lines, text and pictures. You can assign a unique name to each
object in dycodoc by using the object's "properties" dialog or in the "Pages & Layers"
treeview. In contrast, fields are the variables of DataSources that can be filled with
values.
In the dycodoc file "sample2.dcd", the object named "Text1" contains the field $(GoodByePhrase).
With the following code sample we will retrieve this object and set its BkgMode to solid and paint
it in red color. The object is modified within the template.
Sample Code for the VPE Control
// Declare an object variable for a VPE object:
Dim obj as TVPEObject
Dim tpl as TVPETemplate
VPE.OpenDoc
tpl = VPE.LoadTemplate("\dycodoc\samples\sample2.tpl")
SetFields(tpl) // this procedure had been declared in the very first
// sample
// Retrieve the object named "Text1" from the template:
obj = tpl.FindVpeObject("Text1")
// Change its properties:
obj.BkgMode = VBKG_SOLID
obj.BkgColor = COLOR_RED
// Dump the template and show the preview:
VPE.DumpTemplate(tpl)
VPE.Preview

158 • dycodoc Template Processing Virtual Print Engine -Programmer's Manual
Sample Code for the VPE DLL (C/C++)
// Declare an object variable for a VPE object:
VpeHandle hObj;
VpeHandle hTpl;
VpeHandle hDoc = VpeOpenDoc(hWnd, "Sample", 0);
hTpl = VpeLoadTemplate(hDoc, "\\dycodoc\\samples\\Sample2.tpl");
if (hTpl == NULL)
return; // an error had occurred, e.g. the file was not found
SetFields(hTpl); // this procedure had been declared in the very first sample
// Retrieve the object named "Text1" from the template:
hObj = VpeFindTplVpeObject(hTpl, "Text1")
if (hObj)
{// The object is present, change its properties:
VpeSetBgkMode(hObj, VBKG_SOLID);
VpeSetBkgColor(hObj, COLOR_RED);
}
// Dump the template and show the preview:
VpeDumpTemplate(hDoc, hTpl);
VpePreviewDoc(hDoc, NULL, VPE_SHOW_NORMAL);
5.4.2 Modifying VPE Objects in a Document
Example, which makes the background of an object -which already has been inserted into a VPE
Document -drawn in red color. In the following sample, we insert a VPE Text Object (with the
text "Hello World!") into a document by calling the VPE API directly.
We retrieve the VPE Object handle from the document with the property "LastInsertedObject".
Sample Code for the VPE Control
Dim obj as TVPEObject
// Insert an object into the document:
VPE.Write 1, 1, VFREE, VFREE, "Hello World!"
// Retrieve the Object-Handle of the last inserted object:
obj = VPE.LastInsertedObject
// Now modify the object:
obj.BkgMode = VBKG_SOLID
obj.BkgColor = COLOR_RED
// Refresh the preview (only neccessary, if the modified object is
// on the visible page and the preview is shown):
VPE.Refresh

Virtual Print Engine -Programmer's Manual dycodoc Template Processing • 159
Sample Code for the VPE DLL (C/C++)
// Insert an object into the document:
VpePrint(hDoc, 1, 1, "Hello World!");
// Retrieve the Object-Handle:
long hObj = VpeGetLastInsertedObject(hDoc);
// Now modify the object:
VpeSetBkgMode(hObj, VBKG_SOLID);
VpeSetBkgColor(hObj, COLOR_RED);
// Refresh the preview (only neccessary, if the modified object is
// on the visible page and the preview is shown):
VpeRefreshDoc(hDoc);
In addition to the property LastInsertedObject VPE provides the property FirstObject which
retrieves the first VPE Object of the current page of the VPE Document you are working on. VPE
Objects themselves own the property NextObject. Both properties together allow to iterate
through all objects of a page / document.
Looking at the previous sample you will ask youself "So far so good, but if I dumped a template
into a document, how can I retrieve VPE object handles from the inserted objects? The property
'LastInsertedObject' won't help me, since it references only the last inserted object and not the
whole group of template objects. The properties FirstObject / NextObject provide all objects on a
page, but I need discrete informations about the objects that have been created from a template."
You are right. But VPE offers a special method to retrieve for each template object the
corresponding objects that were inserted into the VPE document.
We speak about multiple corresponding objects, because a single Text Object or Rich Text
Object might have been split over multiple pages. This can happen if it contains huge parts of text
or if its position was very near to the bottom margin. When an object is split over multiple pages,
each splitted object is a new distinct object.
In the following sample we will dump the template into a VPE Document. Afterwards we search
the template VPE Objects "RichText5" and "Picture2". We will then retrieve the coordinates of the
correspondingVPE Objects which had been inserted into the document. Having their
coordinates, we will draw two crossing lines above these objects, calling the VPE API directly.
The whole strikeout process is done in the procedure "StrikeOutObject".

160 • dycodoc Template Processing Virtual Print Engine -Programmer's Manual
Sample Code for the VPE Control
// Search an object in the template by a given name.
// Then the corresponding objects which already have been inserted into the
// VPE document are stroke out by two crossing lines.
Private Sub StrikeOutObject(Doc As VPE, tpl As TVPETemplate, obj_name As
String)
Dim TplObj, DocObj As TVPEObject
Dim left, top, right, bottom As Long
Dim i As Integer
// Find the object in the template
Set TplObj = tpl.FindVpeObject(obj_name)
// Did we find it?
If TplObj.ObjectHandle <> 0 Then
// Yes, found it. Due to a possible auto break the object could have
// been inserted multiple times into the VPE document.
// Find ALL inserted objects and strike them through
For i = 0 To TplObj.InsertedVpeObjectCount
// Get the i-th object and its coordinates:
Set DocObj = TplObj.InsertedVpeObject(i)
left = DocObj.nLeft
top = DocObj.nTop
right = DocObj.nRight
bottom = DocObj.nBottom
// Go to the page where the i-th object has been inserted:
Doc.CurrentPage = TplObj.InsertedVpeObjectPageNo(i)
// Draw two crossing lines into the object's rectangle:
Call Doc.VpeLine(left, top, right, bottom)
Call Doc.VpeLine(right, top, left, bottom)
Next i
End If
End Sub
// Main Program
Dim tpl as TVPETemplate
Dim obj as TVPEObject
VPE.OpenDoc
tpl = VPE.LoadTemplate("\dycodoc\samples\sample2.tpl")
SetFields(tpl) // this procedure had been declared in the very first
sample
VPE.DumpTemplate(tpl)
StrikeOutObject(VPE, tpl, "RichText5")
StrikeOutObject(VPE, tpl, "Picture2")
VPE.Preview

Virtual Print Engine -Programmer's Manual dycodoc Template Processing • 161
Sample Code for the VPE DLL (C/C++)
// Search an object in the template by a given name.
// Then the corresponding objects which already have been inserted into the
// VPE document are stroke out by two crossing lines.
void StrikeOutObject(VpeHandle hDoc, VpeHandle hTpl, char *obj_name)
{// Find the object in the template
VpeHandle hTplObj = VpeFindTplVpeObject(hTpl, obj_name);
if (!hTplObj)
return;
// We found it:
// Due to a possible auto break the object could have been
// inserted multiple times into the VPE document.
// Find ALL inserted objects and strike them through
for (long i = 0; i < VpeGetInsertedVpeObjectCount(hTplObj); i++)
{
RECT rc;
// Get the i-th object and its coordinates:
VpeHandle hObj = VpeGetInsertedVpeObject(hTplObj, i);
rc.left = VpeGetObjLeft(hObj);
rc.top = VpeGetObjTop(hObj);
rc.right = VpeGetObjRight(hObj);
rc.bottom = VpeGetObjBottom(hObj);
// Go to the page where the i-th object has been inserted:
VpeGotoPage(hDoc, VpeGetInsertedVpeObjectPageNo(hTplObj, i));
// Draw two crossing lines into the object's rectangle:
VpeLine(hDoc, rc.left, rc.top, rc.right, rc.bottom);
VpeLine(hDoc, rc.right, rc.top, rc.left, rc.bottom);
}
}
// Main Program
VpeHandle hTpl;
VpeHandle hDoc = VpeOpenDoc(hWnd, "Sample", 0);
hTpl = VpeLoadTemplate(hDoc, "\\dycodoc\\samples\\Sample2.tpl");
if (hTpl == NULL)
return; // an error had occurred, e.g. the file was not found
SetFields(hTpl); // this procedure had been declared in the very first sample
VpeDumpTemplate(hDoc, hTpl);
StrikeOutObject(hDoc, hTpl, "RichText5")
StrikeOutObject(hDoc, hTpl, "Picture2")
VpePreviewDoc(hDoc, NULL, VPE_SHOW_NORMAL);

162 • dycodoc Template Processing Virtual Print Engine -Programmer's Manual
5.4.2.1 Important Note
It is possible to modify an object's property, even if the object does not provide this property. In
this case the call will have simply no effect.
Example:
Your object handle belongs to a Line Object. Lines have no background color property. So the
following call is possible, but will have no effect: BkgColor = COLOR_RED
There are no methods to modify a VPE object's text content or text properties. Workaround: for
VPE objects that reside in a document (the following said is not possible if they reside in a
template!) you can use the following workaround: simply delete the object from the document
(call VpeDeleteObject()) adjust the document properties as required and insert a new text object
into the document.
WARNING: Modifying any of the following properties for Text-, RTF-and FormField-Objects that
reside already in a VPE Document might cause that the text does not fit anymore
into the object's rectangle, since the object is not re-rendered. Text will be clipped
(i.e. skipped) then!
•PenSize
•FontName
•FontSize
•Charset
•Bold
•Italic
•Rotation (works only for VPE Objects which reside in a template!)
For FormFields, the above rule extends in addition to the following properties:
•CharCount
•DividerPenSize
•AltDividerNPosition
•AltDividerPenSize
•BottomLinePenSize
•FormFieldFlags
NOTE: You can modify without problems any of the above properties for objects which reside
in a template before dumping it, if nRight and nBottom of the object are set to VFREE.

Virtual Print Engine -Programmer's Manual dycodoc Template Processing • 163
5.4.3 Note for VPE-DLL Users
As you already might have noticed from the previous examples, you can call one and the same
function one time with a document handle and the other time with an object handle instead.
For example: VpeSetPenSize(hDoc, 3) and also VpeSetPenSize(hObj, 3).
This is only possible for discrete functions. The online help lists for each function whether it
accepts only a document handle, or an object handle as well.
Do not call a function with a VPE Object handle, if the function does not accept it!
5.4.4 Important Note for VPE-VCL Users
There is a problem in Object Pascal: It does not manage references to objects with garbage
collection, like Java or COM do. Garbage collection means that Object Pascal itself would keep
track how often an object is referenced and that it would free automatically the object if it is no
longer referenced.
Because Object Pascal does not provide garbage collection, it is impossible for the VPE-VCL to
create each time a new object when you retrieve one -or you would be responsible to destroy it
each time.
Example:
var Tpl: TVPETemplate;
SomeObject: TVPEObject;
SomeObject := Tpl.FindVpeObject('some object');
The above code retrieves a VPE Object from the template. Internally, the VPE-VCL calls the
VPE-DLL, retrieves a handle (this is a LongInteger) of the VPE Object in the DLL and stores
the handle in a permanent TVPEObject.
Afterwards we execute the following code:
SomeObject := Tpl.FindVpeObject('some other object');
Another VPE Object is retrieved from the template and the handle retrieved from the VPE-DLL
is stored internally again in the same permanent TVPEObject as above.
We decided to do so, because if the VPE-VCL would create each time a new object instead of
using the same object, you would need to keep yourself track of all objects and you would need to
destroy each yourself when it is no longer needed.
This is no problem, as long as you keep the following in mind:
•Each TVPE class encapsulates an object of the VPE-DLL by storing and using its
DLL-Object-Handle.
•Methods and properties of a TVPE class which return any TVPE object use internally one and
the same permanent TVPE object to encapsulate a DLL-Object-Handle.
•The above rule applies to all TVPE classes except for the TVPEngine class when it returns a
TVPETemplate Object, i.e. the method LoadTemplate(). Each call to LoadTemplate() creates a
new object. Template Objects are destroyed when the associated VPE Document is closed or
when the VPE Object is destroyed.

164 • dycodoc Template Processing Virtual Print Engine -Programmer's Manual
Implication: the following code is not correct.
var Tpl: TVPETemplate;
SomeObject: TVPEObject;
SomeOtherObject: TVPEObject;
SomeObject := Tpl.FindVpeObject('some object');
SomeOtherObject := Tpl.FindVpeObject('some other object');
SomeObject.PenColor := COLOR_GREEN;
Due to the mechanisms explained above, SomeObject and SomeOtherObject keep a reference to
one and the same TVPEObject in memory: the first call to Tpl.FindVpeObject('some object') did
set the DLL-Object-Handle of the TVPEObject to the value of SomeObject. The second call to
Tpl.FindVpeObject('some other object') did set its DLL-Object-Handle of the TVPEObject to the
value of SomeOtherObject. As a result SomeObject and SomeOtherObject both hold the reference
to one and the same VPE Object in the DLL.
Therefore SomeObject.PenColor := COLOR_GREEN will set the color of 'some other object' to
COLOR_GREEN, which is not intended.
The following code is correct:
var Tpl: TVPETemplate;
SomeObject: TVPEObject;
SomeOtherObject: TVPEObject;
SomeObject := Tpl.FindVpeObject('some object').PenColor := COLOR_GREEN;
SomeOtherObject := Tpl.FindVpeObject('some other object');
In the above code we work immediately with SomeObject and later with SomeOtherObject.
But of course this will not satisfy all of your needs, for example the following code would be
impossible to realize:
SomeObject.PenColor := SomeOtherObject.PenColor;
In order to solve this problem, we implemented a CreateCopy Constructor for each kind of TVPE
class (except TVPEngine and TVPETemplate). The following code is correct :
var Tpl: TVPETemplate;
SomeObject: TVPEObject;
SomeOtherObject: TVPEObject;
SomeObject := Tpl.FindVpeObject('some object').CreateCopy;
SomeOtherObject := Tpl.FindVpeObject('some other object');
SomeObject.PenColor := COLOR_GREEN;
.
.
.
SomeObject.Free; // do it by code, copies are not destroyed automatically
In the above example we create a copy of the TVPEObject and assign its reference to
SomeObject. So SomeObject references a different separate object and the code
SomeObject.PenColor := COLOR_GREEN will work as expected.
Please note that we call "SomeObject.Free" at the bottom of the above procedure in order to avoid
memory leaks. This is very important.
NOTE: You need to destroy each object created with "CreateCopy" yourself when it is no longer
needed!

Virtual Print Engine -Programmer's Manual dycodoc Template Processing • 165
5.5 Analysing and Modifying Templates by Code
The VPE API offers methods and properties to retrieve and access complete template structures
from the global page layout information down to each single VPE Object (with all its properties,
like position, color and content).
5.5.1 Analysing and Modifying the Layout Structure
The following is a schematic overview, more detailed and complete source codes for C/C++,
Visual Basic and Delphi are shipped with VPE.
The sample code demonstrates how to retrieve the complete layout structure from a template. In
addition each object is modified, so that a frame is drawn around it.
Sample Code for the VPE Control
Dim tpl as TVPETemplatePage
Dim tpl_page As TVPETemplatePage
Dim obj as TVPEObject
VPE.OpenDoc
tpl = VPE.LoadTemplate("\dycodoc\samples\sample2.tpl")
SetFields(tpl) // this procedure had been declared in the very first
sample
// In order to analyse the complete layout structure of a template, you need
// to iterate over each page
For i = 0 To tpl.PageCount - 1
// Get the Page Object (i) from the template
Set tpl_page = tpl.PageObject(i)
// Show how to retrieve the page dimensions and orientation
width = tpl_page.PageWidth
height = tpl_page.PageHeight
// Show how to retrieve the orientation and output paper bin
orientation = tpl_page.Orientation
paper_bin = tpl_page.PaperBin
// Show how to retrieve the margins as the user had defined in dycodoc
left_margin = tpl_page.nLeftMargin
top_margin = tpl_page.nTopMargin
right_margin = tpl_page.nRightMargin
bottom_margin = tpl_page.nBottomMargin
// Now iterate over all VPE Objects in this template page
For n = 0 To tpl_page.VpeObjectCount - 1
// Get the VPE Object (n) from the template page
Set obj = tpl_page.VpeObject(n)
// Make each object framed, except lines
If obj.Kind <> VOBJID_LINE Then
obj.PenSize = 0.03
End If
Next n
Next i
// Dump the template and show the preview
VPE.DumpTemplate(tpl)
VPE.Preview

166 • dycodoc Template Processing Virtual Print Engine -Programmer's Manual
Sample Code for the VPE DLL (C/C++)
VpeHandle hDoc = VpeOpenDoc(hWnd, "Sample", 0);
VpeHandle hTpl = VpeLoadTemplate(hDoc, "\\dycodoc\\samples\\Sample2.tpl");
if (hTpl == NULL)
return; // an error had occurred, e.g. the file was not found
SetFields(hTpl); // this procedure had been declared in the very first sample
// In order to analyse the complete layout structure of a template, you need
// to iterate over each page
for (long page = 0; page < VpeGetTplPageCount(hTpl); page++)
{// Show how to retrieve the page dimensions and orientation
width = VpeGetTplPageWidth(hTpl, page);
height = VpeGetTplPageHeight(hTpl, page);
// Show how to retrieve the orientation and output paper bin
orientation = VpeGetTplPageOrientation(hTpl, page);
paper_bin = VpeGetTplPaperBin(hTpl, page);
// Show how to retrieve the margins as the user had defined in dycodoc
left_margin = VpeGetTplLeftMargin(hTpl, page);
top_margin = VpeGetTplTopMargin(hTpl, page);
right_margin = VpeGetTplRightMargin(hTpl, page);
bottom_margin = VpeGetTplBottomMargin(hTpl, page)
// Now iterate over all VPE Objects in this template page
for (n = 0; n < VpeGetTplVpeObjectCount(hTpl, page); n++)
{// Get the VPE Object (n) from the template page
VpeHandle hVpeObject = VpeGetTplVpeObject(hTpl, page, n);
// Make each object framed, except lines
if (VpeGetObjKind(hVpeObject) != VOBJID_LINE)
VpeSetPenSize(hVpeObject, 0.03);
}
}
// Dump the template and show the preview
VpeDumpTemplate(hDoc, hTpl);
VpePreviewDoc(hDoc, NULL, VPE_SHOW_NORMAL);

Virtual Print Engine -Programmer's Manual dycodoc Template Processing • 167
5.5.2 Analysing the DataSource Structure
The following is a schematic overview, more detailed and complete source codes for C/C++,
Visual Basic and Delphi are shipped with VPE.
The sample code demonstrates how to retrieve the complete data source structure from a template.
In addition each field is set to the value "Hello World!".
Sample Code for the VPE Control
Dim tpl as TVPETemplatePage
Dim data_source As TVPEDataSource
Dim field As TVPEField
VPE.OpenDoc
tpl = VPE.LoadTemplate("\dycodoc\samples\sample2.tpl")
// In order to analyse the complete layout structure of a template, you need
// to iterate over each data source
For i = 0 To tpl.DataSourceCount - 1
// Get the DataSource Object (i) from the template
Set data_source = tpl.DataSourceObject(i)
// Show how to retrieve the Prefix, FileName and Description
prefix = data_source.Prefix
file_name = data_source.FileName
description = data_source.Description
// Now iterate over all Field Objects in this DataSource
For n = 0 To data_source.FieldCount - 1
// Get the Field Object (n) from the DataSource
Set field = data_source.FieldObject(n)
// Show how to retrieve the field name and description
field_name = field.Name
field_description = field.Description
// Set the field to "Hello World!", except for the field
// "Sender:Signature", because this is set to the file name of the
// signature JPEG file
If field.Name = "Sender:Signature" Then
field.AsString = "\dycodoc\samples\pakzadeh.jpg"
Else
field.AsString = "Hello World!"
End If
Next n
Next i
// Dump the template and show the preview
VPE.DumpTemplate(tpl)
VPE.Preview

168 • dycodoc Template Processing Virtual Print Engine -Programmer's Manual
Sample Code for the VPE DLL (C/C++)
VpeHandle hDoc = VpeOpenDoc(hWnd, "Sample", 0);
VpeHandle hTpl = VpeLoadTemplate(hDoc, "\\dycodoc\\samples\\Sample2.tpl");
if (hTpl == NULL)
return; // an error had occurred, e.g. the file was not found
// In order to analyse the complete layout structure of a template, you need
// to iterate over each data source
for (i = 0; i < VpeGetTplDataSourceCount(hTpl); i++)
{
char text[256]; // make sure the buffer is large enough...
UINT size;
// Get the DataSource Object (i) from the template
VpeHandle hDataSource = VpeGetTplDataSourceObject(hTpl, i);
// Show how to retrieve the Prefix, FileName and Description
// Each time the information is copied to the string "text"
size = sizeof(text); // initalize "size"
VpeGetDataSourcePrefix(hDataSource, text, &size);
size = sizeof(text); // reset "size", since it has been modified
// by the previous call
VpeGetDataSourceFileName(hDataSource, text, &size);
size = sizeof(text); // reset "size"
VpeGetDataSourceDescription(hDataSource, text, &size);
// Now iterate over all Field Objects in this DataSource
for (n = 0; n < VpeGetDataSourceFieldCount(hDataSource); n++)
{// Get the Field Object (n) from the DataSource
VpeHandle hField = VpeGetDataSourceFieldObject(hDataSource, n);
// Show how to retrieve the description and the field name
size = sizeof(text); // reset "size"
VpeGetFieldDescription(hField, n, text, &size);
size = sizeof(text); // reset "size"
VpeGetFieldName(hField, n, text, &size);
// Set the field to "Hello World!", except for the field
// "Sender:Signature", because this is set to the file name of the
// signature JPEG file
if (stricmp(text, "Sender:Signature" == 0)
VpeSetFieldAsString(hField, "\\dycodoc\\samples\\pakzadeh.jpg");
else
VpeSetFieldAsString(hField, "Hello World!");
}
}
// Dump the template and show the preview
VpeDumpTemplate(hDoc, hTpl);
VpePreviewDoc(hDoc, NULL, VPE_SHOW_NORMAL);

Virtual Print Engine -Programmer's Manual dycodoc Template Processing • 169
5.6 Path-and File Names in Templates
When a template file is created with dycodoc, the paths to pictures and external RTF files are
stored relative to the position of the template file itself.
Example 1:
You create test.dcd and therefore test.tpl in "c:\templates\test.tpl". Within the document you have
placed a picture object from the location "c:\templates\logo.bmp". In this case dycodoc will make
the path relative to the location of the template, and therefore the path-and file name will be
"logo.bmp", since the file logo.bmp is in the same directory as test.tpl.
Example 2:
You create test.dcd and therefore test.tpl in "c:\templates\test.tpl". Within the document you have
placed a picture object from the location "c:\templates\images\logo.bmp".
In this case the relative path-and file name will be "images\logo.bmp".
Of course dycodoc can not create a relative path, if a referenced image (or external RTF file) is
located on a different drive or on a different server than the template.
As a template is loaded into VPE using LoadTemplate(), the relative path name is converted back
to an absolute path, with the position of the template file as reference point. So if the template
"c:\templates\test.tpl" from the above example #2 was copied to "f:\programs\templates\test.tpl",
the path name for the image will be expanded to "f:\programs\templates\images\logo.bmp".
In order to be able to transport template files from one location to another, especially in client-
server environments, we recommend to keep external files on the same drive or server as the
template and to use UNC (Universal Naming Code) for LoadTemplate() as well as for pictures and
external RTF files used within templates. UNC is a naming convention for files which provides a
machine-independent means of locating the file. A UNC name will usually include a reference to a
shared folder and file name accessible over a network rather than specifying a drive letter and
path. For example, to access an image named logo.bmp on a shared directory named Samples on
the computer called MyWorkstation, you could use the UNC name
\\MyWorkstation\Samples\logo.bmp.
NOTE: If you enter in dycodoc a relative path for a picture or external RTF file, it will be stored
unchanged in the template, e.g. "..\images\logo.bmp" or "images\logo.bmp".

170 • dycodoc Template Processing Virtual Print Engine -Programmer's Manual
5.7 Modifying the VPE Document
Except using templates to create VPE Documents, you can modify document properties directly
by code (for example page size, paper bins, orientation, etc.) and you are able to insert VPE
Objects directly by code into documents.
For example: under special conditions you need to insert some annotating text (and perhaps other
graphical objects) below a template. You can call the VPE API directly to create such structures.
For example the call:
VPE.Write 1, 1, VFREE, VFREE, "Annotation"
will place the text "Annotation" directly onto the current page of the VPE Document at the
position 1cm from the left page margin and 1cm from the top page margin.
The demo programs "VPE Demo" and "VPE Professional Demo", which are shipped with VPE,
create their documents solely by calling the VPE API directly. They make no use of templates.
The source codes for these demos are installed with VPE. They are a good resource and
demonstrate all important programming techniques. We recommend that you have a look at them.
Details on using the VPE API directly can be found in the chapter “Programming Techniques” on
page 21 ff.
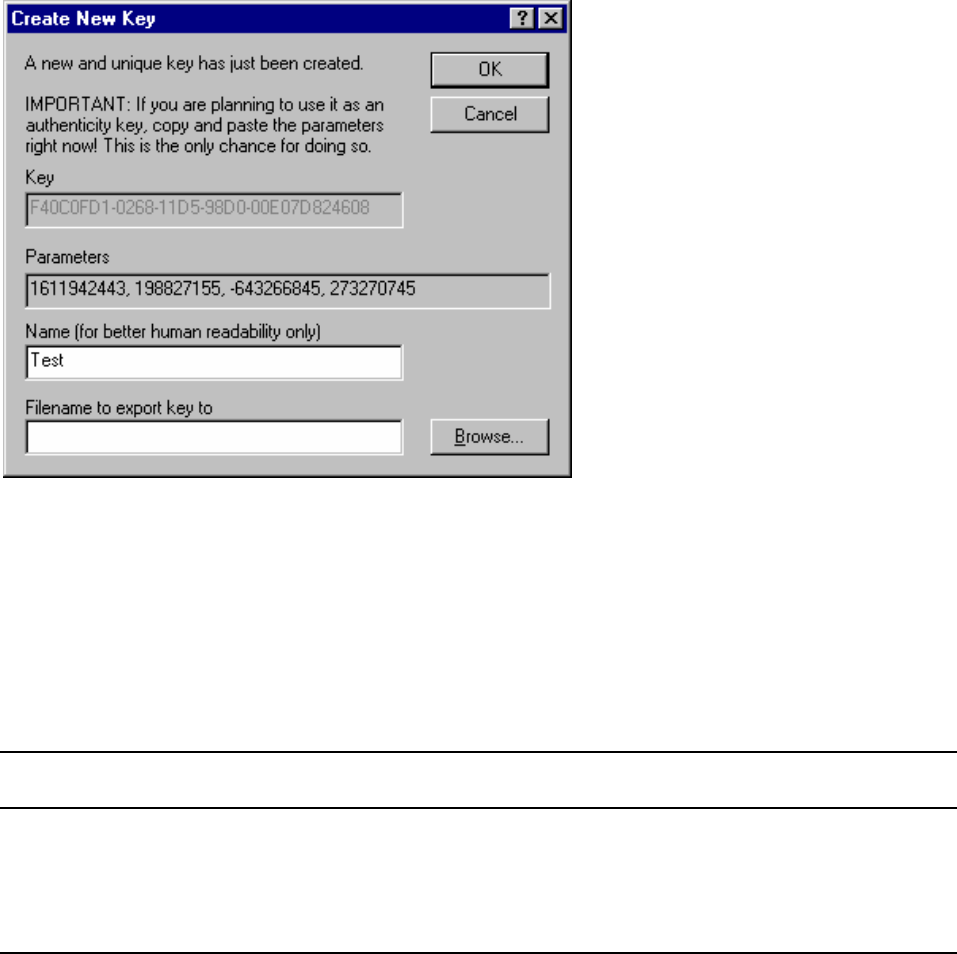
Virtual Print Engine -Programmer's Manual dycodoc Template Processing • 171
5.8 Validating the Template Authenticity Key
The Authenticity Key can be used to:
•Verify that your template has not been modified, i.e. it is in the original form.
It may be important for your software to make sure that the template files you are using are in
the original form. Since an end user could purchase dycodoc and create his own template files
with the same names like your templates, dycodoc offers a function to generate special
Authenticity Keys with which you can sign DCD and TPL files.
The VPE API offers methods to verify such Authenticity Keys.
•Protect your templates, so no other person is able to use and dump them.
You might want to protect the work you had invested into the creation of templates. No other
person will be able to use any of your templates, unless the correct Authenticity Key is
provided.
Please consult the dycodoc manual for details on how to create Authenticity Keys and how to
assign them to DCD and TPL files.
When creating a new Authenticity Key, dycodoc presents the following dialog:
The line with the Parameters "1611942443, 198827155, -643266845, 273270745" is the
Authenticity Key in decimal coded form. You will need these parameters later in your source code
in order to verify the Authenticity Key by calling the VPE API method LoadTemplateAuthKey().
It is important that you copy immediately the Parameters using Copy & Paste from the dialog to a
text file or into your source code. You can do so by highlighting the line "1611942443,
198827155, -643266845, 273270745" and pressing Ctrl-C on your keyboard. Then open a text or
your source code editor and paste the parameters by pressing Ctrl-V on your keyboard.
Please keep in mind: Once you have closed the above dialog, you will never again be able to
retrieve the Authenticity Key Parameters!

172 • dycodoc Template Processing Virtual Print Engine -Programmer's Manual
5.8.1 Using the Authenticity Key
If you have signed a DCD file with a key using dycodoc, the template file is signed at the same
time at the moment you save the DCD document. You need to validate a signed template using the
VPE API method LoadTemplateAuthKey(), otherwise you -nor anyone else -can load the signed
template.
Example:
Run dycodoc, open sample2.dcd, and create a key by chosing from the menu "Tools | Keys" and
pushing the button "Create" in the "Keys" dialog. Copy the parameters to the clipboard with
Ctrl-C and close the dialog.
Now assign the key as authentication key to sample2.dcd by chosing from the menu "File | Access
Rights", activating the tab "Keys" in the "Access Rights for Document" dialog and pushing the
upper "Assign" button (which is responsible for the authentication key). Close the dialog and save
the document in order to assign the key to the template file, too.
Now enter the example source code below and replace the text "<your key goes here>" with the
parameters you had copied into the clipboard (use Ctrl-V).
Sample Code for the VPE Control
Dim tpl as TVPETemplate
VPE.OpenDoc
On Error Goto ErrorHandler 'Enable error-handling routine
' example: VPE.LoadTemplateAuthKey("\dycodoc\samples\sample2.tpl",
1611942443, 198827155, -643266845,
273270745)
tpl = VPE.LoadTemplateAuthKey("\dycodoc\samples\sample2.tpl", <your key
here>)
SetFields(tpl)
VPE.DumpTemplate(tpl)
VPE.Preview
Exit Sub 'Exit to avoid handler
ErrorHandler: 'Error-handling routine
Select Case Err.Number
case VPE_E_APIFAILED + vbOBJECTERROR 'Error caused by VPE API
If VPE.LastError = VERR_TPL_AUTHENTICATION Then
MsgBox("'sample2.dcd' has been modified.", "Error:", MB_OK);
ElseIf VPE.LastError = VERR_FILE_OPEN Then
MsgBox("'sample2.dcd' not found or no access rights.", "Error:",
MB_OK);
Else
MsgBox("'sample2.dcd' could not be read.", "Error:", MB_OK);
End If
Case Else
'Handle other situations here...
End Select
End Sub

Virtual Print Engine -Programmer's Manual dycodoc Template Processing • 173
Sample Code for the VPE DLL (C/C++)
VpeHandle hDoc = VpeOpenDoc(hWnd, "Sample", 0);
// example: VpeLoadTemplateAuthKey(hDoc, "\\dycodoc\\samples\\Sample2.tpl",
1611942443, 198827155, -643266845, 273270745)
hTpl = VpeLoadTemplateAuthKey(hDoc, "\\dycodoc\\samples\\Sample2.tpl",
<your key goes here>);
if (hTpl == NULL)
{
switch (VpeGetLastError(hDoc))
{
case VERR_TPL_AUTHENTICATION:
MessageBox(hWnd, "'sample2.dcd' has been modified.", "Error:",
MB_OK);
break;
case VERR_FILE_OPEN:
MessageBox(hWnd, "'sample2.dcd' not found or no access rights.",
"Error:", MB_OK);
break;
default:
MessageBox(hWnd, "'sample2.dcd' could not be read.", "Error:",
MB_OK);
}
}
else
{
SetFields(hTpl);
VpeDumpTemplate(hDoc, hTpl);
VpePreviewDoc(hDoc, NULL, VPE_SHOW_NORMAL);
}
The above code validates the Authentication Key when loading the template. If the key is wrong
an error message is displayed, otherwise the template is dumped into the VPE Document.

174 • dycodoc Template Processing Virtual Print Engine -Programmer's Manual
5.9 Advanced Programming
5.9.1 Inserting (dumping) a Template at a specific position in a VPE
Document
As you design the layout of a template in dycodoc, you specify the positions of the objects on a
page. Sometimes it can be neccessary to dump the complete template at a different position in a
VPE Document.
You can use a trick in order to do so: first of all, as you layout a template, make the topmost object
dependent to the top margin of the document. All other objects of the template should also be
made dependent either relative to the first object, or to the top margin or to another object which is
dependent to the top margin. In other words: all objects need to be dependent directly -or
indirectly -to the top margin. Make sure that the lowest object is the last object in the template.
Afterwards create the following program code (schematic):
call LoadTemplate()
set TemplateMaster = False
for i = 1 to 100
set the Fields to the desired values
call DumpTemplate()
set VPE.nTopMargin = VPE.nBottom + 0.50 // add 0.5cm
Next i
The above code will insert 100 times the same template into the VPE Document, where each
template has an offset of 0.5cm to the previous dumped template.

Virtual Print Engine -Programmer's Manual Interactive Documents • 175
6Interactive Documents
6.1 Interactive Documents
[Interactive Edition only]
This section describes the methods and properties related to Interactive Documents and Objects.
Using Interactive Objects -which we call in the following Controls,by analogy to the Windows
Operating System terminology - you can design document templates which can be filled out
electronically by end users with the keyboard and mouse in the preview.
The VPE Interactive Edition introduces the following Controls in the form of additional objects:
•Interactive FormField Control
The same as a FormField (see “FormFields” on page 110), enhanced with the capabilities of
being editable
•Interactive Text Control
This pure text edit control with the capability of being multi-line editable and freely selectable
text justification (left, right, centered, justified).
The multi-line edit capability is limited to the visual area of the control, i.e. it is not possible to
attach a scrollbar to an Interactive Text Control, so that more text can be entered, than can be
visualized (and therefore couldn't be printed).
•Checkbox Control
A box with a checkmark. The state of the checkbox can be "checked" or "unchecked". For
example the attribute "Is Hungry" can be true or false and therefore can be represented very
well with a checkbox.
•Radiobutton Control
This is a group of checkboxes which are related to each other. Only one button within its group
can be checked, all other buttons are automatically unchecked.
Therefore the name: as with a radio, only one station can be received at a time.
For example, if for the attribute "Most Preferred Food" the options "Meat", "Fish" and "Salad"
were possible, each item could be represented as a single Radiobutton within a group. While
each Radiobutton is a checkbox with the state "checked" or "unchecked", you assign during
creation each button a unique integer value within its group, in order to identify the state of the
whole group (see below for a further explanation).

176 • Interactive Documents Virtual Print Engine -Programmer's Manual
•Radiobutton Group Control
This is a logical object, i.e. it is not visible, but it is required as the Group Object for the
Radiobuttons within the group. The Radiobutton Group Object communicates automatically
with each contained Radiobutton: if a button is checked, the button informs the Group Object
that its state did change. The Group Object will then inform the button which was checked
before that its state needs to be changed to "unchecked".
The Radiobutton Group also holds the value of the whole Group, for example, if the assigned
unique values for the Radiobuttons are "Meat = 1", "Fish = 2" and "Salad = 3", and the
Radiobutton "Fish" is currently selected, the Group's value is "2".
Your application always communicates with the Radiobutton Group, not with any contained
Radiobutton, i.e. you read the current value of the Group by reading the value of the Group
Object (in the above example it is the value "2") and if you want to change the state of the
group, you change the value of the Radiobutton Group Object also.
For example, if you set the value of the Group = 3, then the Radiobutton "Fish" becomes
automatically "unchecked" and the Radiobutton "Salad" becomes checked.
If you assign a value to a group, which is not defined by any Radiobutton, no Radiobutton is
selected, i.e. the visual state of the group is undefined. This feature can be used to reflect NULL
values, for example from databases.
6.2 Creating Interactive Templates With dycodoc
The VPE API offers several methods to create Controls (i.e. Interactive Objects) by code, so your
application has the capability to create Controls during runtime by calling functions.
But the preferred way of creating interactive documents should be to use dycodoc, since it makes
things much easier and more transparent.
Any of the Controls described in the previous section can be placed in a template using dycodoc.
Of course you may use Fields within Controls, but with one obvious limitation in contrast to the
non-Controls objects: you may only use one Field per Control. E.g. if you are using an
Interactive Text Control, only one Field, for example "$(Name)", may be used within this Control.
This rule applies to every kind of Control implemented by VPE.
Another important point is, how dycodoc manages Radiobuttons and Radiobutton-
Groups:
You can not create yourself Radiobutton Groups within dycodoc. Instead, these are created by
dycodoc itself automatically and invisibly, while you are placing Radiobuttons on a form.
But how does dycodoc know, which buttons belong to one and the same group?
Well, you can assign each Radiobutton a "Group Name / Associated Field" (in the properties
dialog, which will appear when you double-click onto a Radiobutton). There you can insert a Field
name you had defined in the FieldStudio before, for example "$(PreferredFood)".
dycodoc keeps track of all Radiobuttons which use the same Field, and creates for each of such
Fields a corresponding Radiobutton Group. Each button is automatically associated with its
Group. As the Template File is written, dycodoc will also write the Group Object into the
Template.

Virtual Print Engine -Programmer's Manual Interactive Documents • 177
6.3 Using Interactive Templates With VPE
Basically, the handling of Templates which contain Controls (i.e. Interactive Objects) is the same
as for normal Templates (see also: "
dycodoc Template Processing" on page 144):
•Open a VPE Document
•Load the Template
•Set the Fields as required
•Dump the Template
•Show the Preview
The above will display the Template in the Preview, with the controls showing the values you had
assigned to the Fields. However, you will realize that you can not make use of the Controls, i.e.
they don't react on mouse clicks or keyboard input. The reason is that interaction is disabled by
default. In order to activate the Controls, you need to:
•Enable Interaction
By doing so, the controls will then react on mouse and keyboard input. Furthermore, you can set
the Input Focus to any Control, so the user may start directly with editing the document.
6.3.1 Example
The following example demonstrates the basic steps of loading a template, setting the fields,
enabling interaction, setting the focus and showing the form in the preview.
We are using the sample DCD "iForm.dcd", which is shipped with VPE and installed in
"<VPE Install Dir>\images\DCD\iForm.dcd".
You will find the complete source code, which demonstrates all the techniques that are
explained throughout the following sections of this manual, at:
•C / C++: subdirectory "C\iform.cpp"
•Visual Basic: subdirectory "VB\vpeidemo\iForm.vbp"
•Delphi: subdirectory "Delphi\vpeidemo\iFormPrj.dpr"
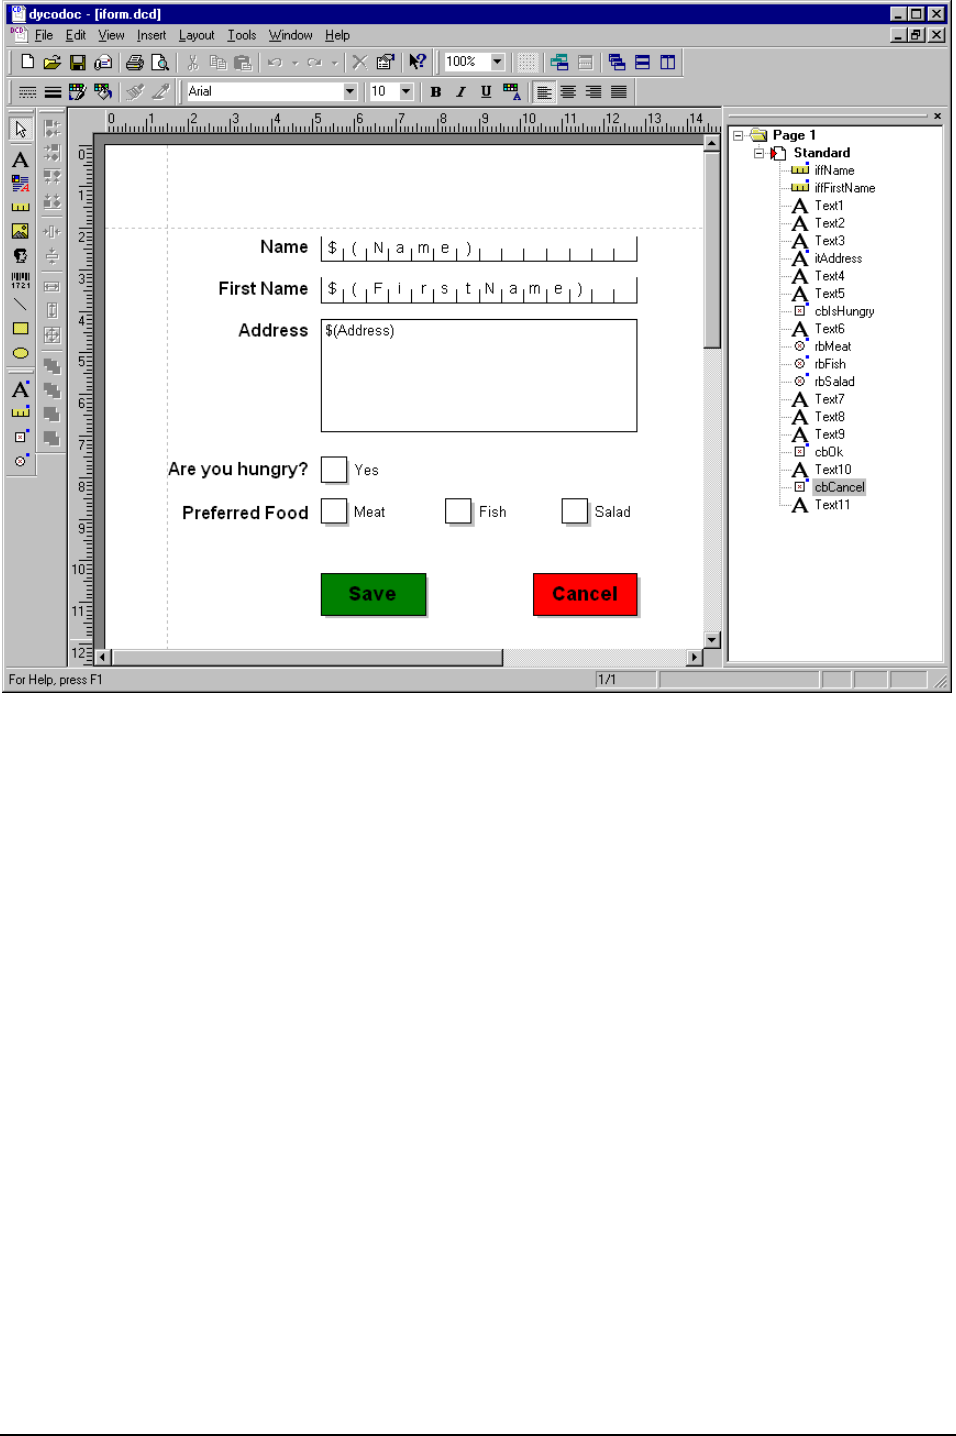
178 • Interactive Documents Virtual Print Engine -Programmer's Manual
The dycodoc DCD file "iForm.dcd":
Note the two Save and Cancel "Buttons" at the bottom of the form. They are synthesized by using
a Checkbox and overlaying a Text Object. The Checkboxes and Texts of the synthesized buttons
are marked as "Do not include in Prints", so they are only visible in the preview, but they are not
printed.
We also used a special naming convention, in order to identify objects by their names:
•The prefix "iff" is used for Interactive Form Fields (e.g. "iffName").
•The prefix "it" is used for Interactive Texts (e.g. "itAddress").
•The prefix "cb" is used for Checkboxes (e.g. "cbIsHungry").
•The prefix "rb" is used for Radiobuttons (e.g. "rbMeat").
The names of Controls are important to identify them later during runtime by code. For example a
Control is enabled or disabled -or the focus is set to a Control -by specifiying its name.
Furthermore VPE sends events to your application, with informations about several actions that
are currently performed by the user regarding a specific control. While processing such an event,
you identify the related Control by inquiring its name.

Virtual Print Engine -Programmer's Manual Interactive Documents • 179
The FieldStudio field definition file "iForm.tpl":
Note that the size information (for example for the Field "Name", the size is 80), has no effect in
the current version of VPE. But entering the size when creating an FLD makes sense, because
designers, which use the FLD in dycodoc, immediately have an imagination of how huge the
content of the Field is and therefore know how to choose the dimensions of any associated
Control.
Sample Code for the VPE Control:

180 • Interactive Documents Virtual Print Engine -Programmer's Manual
' Sets the fields of the Template "iForm.tpl"
' Integer Fields are by default zero, so we do not set them here
Private Sub SetFields(tpl As TVPETemplate)
tpl.SetFieldAsString "iForm", "Name", "Smith"
tpl.SetFieldAsString "iForm", "FirstName", "Walter"
tpl.SetFieldAsString "iForm", "Address", "12 Some Street" + Chr(10) +
Chr(13) + "Any State, ST 123456" + Chr(10) + Chr(13) + "USA"
tpl.SetFieldAsInteger "iForm", "PreferredFood", 1
End Sub
' Main Program -Create the VPE Interactive Form
' Open the VPE document
Doc.OpenDoc
' Load the template
Set tpl = Doc.LoadTemplate("..\..\images\dcd\iForm.tpl")
' Set the fields
SetFields tpl
' insert the template into the VPE Document
Doc.DumpTemplate tpl
' Enable the whole form for user interaction
' (by default user interaction is always disabled)
Doc.Interaction = True
' show the preview
Doc.Preview
' Set the focus to the first control
' (i.e. the control with the lowest Tab Index)
Doc.SetFocusToFirstControl

Virtual Print Engine -Programmer's Manual Interactive Documents • 181
Sample Code for the VPE DLL (C/C++):
// Sets the fields of the Template "iForm.tpl"
// Integer Fields are by default zero, so we do not set them here
void SetFields(VpeHandle hTpl)
{
VpeSetTplFieldAsString (hTpl, "iForm", "Name", "Smith");
VpeSetTplFieldAsString (hTpl, "iForm", "FirstName", "Walter");
VpeSetTplFieldAsString (hTpl, "iForm", "Address", "12 Some
Street\r\nAny State, ST 123456\r\nUSA");
VpeSetTplFieldAsInteger(hTpl, "iForm", "PreferredFood", 1);
}
// Create the Form
void CreateForm()
{// Open the VPE document
VpeHandle hDoc = VpeOpenDoc(hMainWindow, "Template Usage Demo",
VPE_EMBEDDED);
// Load the template
hTplForm = VpeLoadTemplate(hDoc, "..\\images\\dcd\\iForm.tpl");
if (hTplForm)
{// Set the fields
SetFields(hTplForm);
// insert the template into the VPE Document
VpeDumpTemplate(hDoc, hTplForm);
// Enable the whole form for user interaction
//(by default user interaction is always disabled)
VpeEnableInteraction(hDoc, TRUE);
// show the preview
hDocForm = hDoc;
VpePreviewDoc(hDoc, NULL, VPE_SHOW_MAXIMIZED);
// Set the focus to the first control
// (i.e. the control with the lowest Tab Index)
VpeSetFocusToFirstControl(hDoc);
}
else
{
Msg("Template file could not be loaded! (file not found or wrong
version / edition)");
VpeCloseDoc(hDoc);
}
}
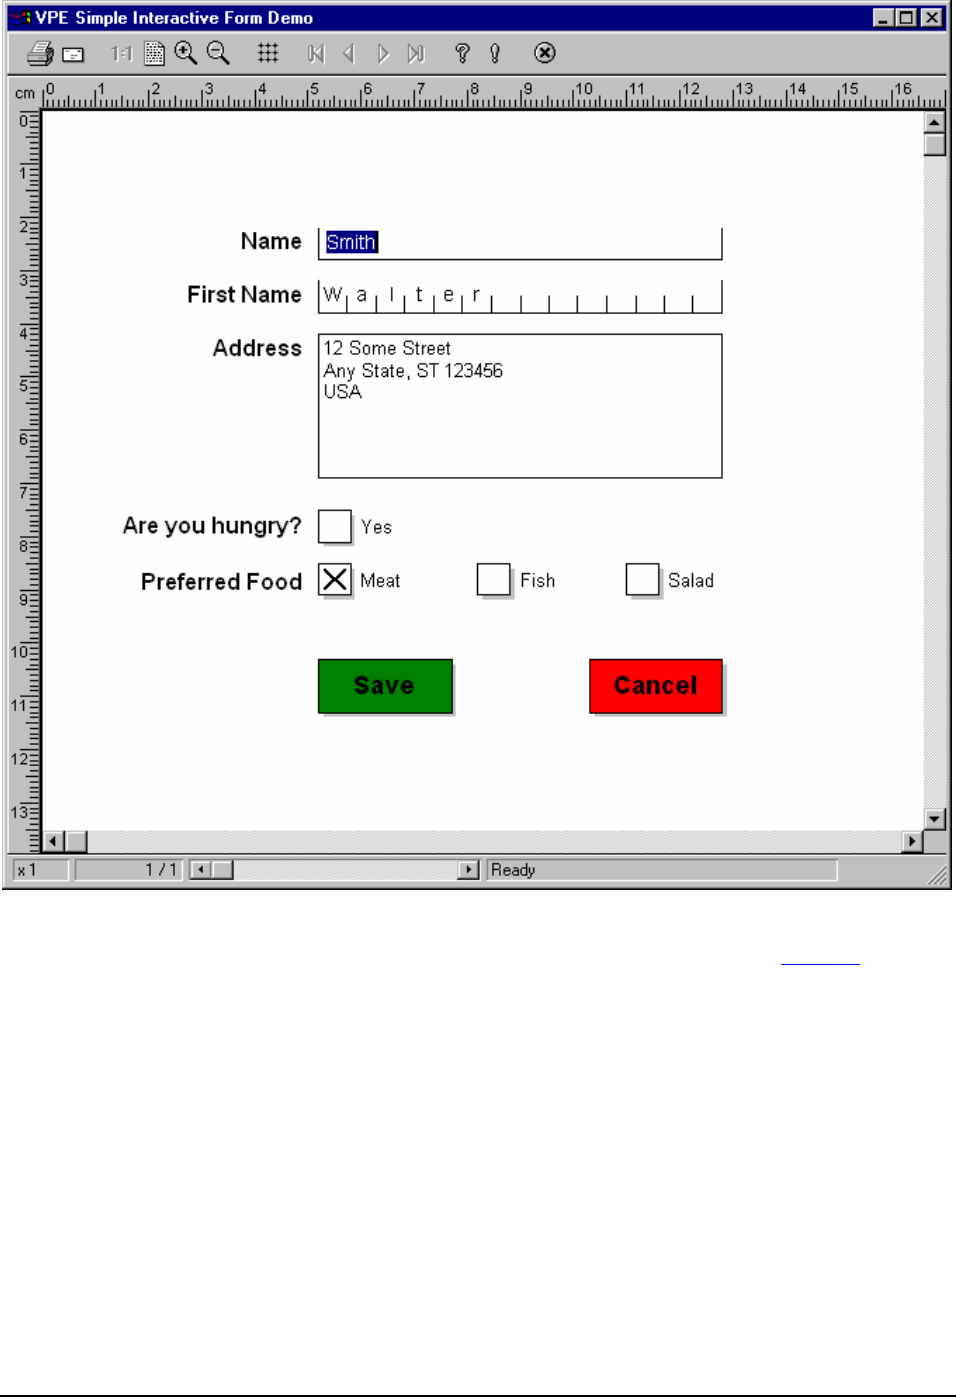

Virtual Print Engine -Programmer's Manual Interactive Documents • 183
6.4 The Focus
The term "Focus" (or sometimes called "Input Focus") means that a control is currently selected
for user input. All keyboard input is performed in the control which has the focus. It is only
possible that one control within a document can have the focus at a time.
A focused control gives a visual feedback, informing the user that it owns the focus. E.g. an
Interactive Text contains a blinking caret and Checkboxes or Radiobuttons display a dotted
rectangle inside.
The focus can be moved forward from one Control to the next by pressing the Tab key on the
keyboard and it can be moved backwards from one Control to the previous by pressing Shift + Tab
(also known as "Backtab").
In addition, the focus can be set explicitly by clicking with the mouse directly onto a Control.
VPE offers methods to inquire which Control currently owns the focus, as well as methods to
explicitly set the focus by code onto a specifc Control.
6.5 The Tab-Index
Using the Tab key, the focus is switched from one control to another along the Tab-Index.
Each control in a VPE Document has assigned a unique Tab-Index, which is an integer value. The
Tab-Index determines the order in which the user can Tab through the controls: if the user presses
the Tab key on the keyboard, VPE will search the whole document for the control with the next
higher Tab-Index and set the focus on it. The reverse is done, if the user presses Shift + Tab
("Backtab").
If you are using templates, the Tab-Index can be assigned to each object using dycodoc (in the
object's properties dialog). If you are creating the controls by code (e.g. by calling
VpeFormFieldControl(), VpeCheckbox(), etc.), VPE assigns automatically a Tab-Index to each
object in the order of creation.
VPE offers to read and also to change the Tab-Index property of each object by code, so your
application can modify the Tab-Order of a document at runtime. But special care must be taken:
make sure that you don't assign one and the same Tab-Index to more than one object. The Tab-
Index must be unique.
184 • Interactive Documents Virtual Print Engine -Programmer's Manual
6.6 Exchanging Values With Controls
When using dycodoc to create interactive templates, you should always associate fields with the
Controls you placed in a document. This is the easiest way to exchange values between the
Controls and your application. (VPE offers in addition an API to access the values of Controls
directly, but using Fields is -from the programmer's view and source code logic -more efficient.)
Fields which are associated with Controls work as a two-way data exchange point:
if your application sets Field values, the associated Controls will visualize these values.
Vice versa, if a user does edit a Control, the underlying Field will change its value accordingly.
Application
Fields
Controls
Data
Data
User
Data
Example for setting a Field's value:
tpl.SetFieldAsString "iForm", "Name", "Smith"
Sets the Field "Name" which is a member of the table "iForm" to the value "Smith", i.e. one
could read this as "iForm.Name = Smith".
Example for retrieving a Field's value:
Dim data As String
data = tpl.GetFieldAsString "iForm", "Name"
Retrieves the value of the Field "Name" and assigns it to the variable "data".
The Basic Rule is:
Fields are used to exchange data between your application and any associated Controls.

Virtual Print Engine -Programmer's Manual Interactive Documents • 185
Note, the TVPETemplate Object itself offers a set of simple methods to access Field values
directly, i.e. without using a TVPEField object. In the sample code above, we used a method of the
Template Object to set and retrieve the value of the Field (see also "Example" on page 177).
For a further description of Fields and the Field Object TVPEField, please see “Field Object -
TVPEField” on page 150.
In the following section we will explain, how VPE fires events which will notify your application
about changes of Controls due to a user editing the control with the keyboard and mouse.

186 • Interactive Documents Virtual Print Engine -Programmer's Manual
6.7 Using Events For Interaction
As explained in the previous section, Fields are used to exchange data between your application
and Controls. You can set Field values before displaying an interactive form and you can retrieve
values from the Fields, for example when the preview is closed.
However, this is a very basic interaction between the user and your application.
To allow a much more sophisticated interaction between the user and your application, VPE sends
several events (notification messages) to your application. These events will inform you about
actions that are currently performed by the user. Some events allow to control, whether a specific
action of the user may take place or not.
The Events:
Event: AfterControlEnter
A Control received the focus.
Normally, this event is sent if the user presses the Tab or Backtab key, or clicks with the mouse
onto a control. This event can be used to re-format the content of a control.
Event: RequestControlExit
The user wishes to remove the focus from the currently focused Control.
In response to this event your application can evalute the value of the Control and decide, whether
the current value is valid and the Control may lose the focus or not.
Event: AfterControlExit
The currently focused Control lost the focus.
Normally, this event is sent if the user presses the Tab or Backtab key, or clicks with the mouse
onto another control. When receiving this message, it is possible for you to force the focus to be
set explicitly to a specific control by calling SetFocusControlByName() or SetFocus(). It is also
possible to enable and disable other controls of the current form while processing this event.
In addition this event can be used to re-format the content of a control.
Event: AfterControlChange
A Control changed its value, i.e. the content of a Control was edited by the user or the value
of an associated Field was changed by code.
Evaluating this event means that your application is informed about every single keystroke or
mouse-click, which modifies a Control's content.
If you are working with Fields that are associated with controls -as recommended -your
application should not take care of this event.
This is one of the few events where CloseDoc() may be called while processing the event.
The event is not fired, if you set the value of a Control by code.
Event: AfterFieldChange
A Field (not a control!) changed its value, because the associated Control was edited by the
user or the content of any associated Control was changed by code.
This event is very interesting, because a Field will change its value each time the user makes a
change. Evaluating this event means that your application is informed about every single
keystroke or mouse-click, which modifies a Control's content.

Virtual Print Engine -Programmer's Manual Interactive Documents • 187
This is one of the few events where CloseDoc() may be called while processing the event.
The event is not fired, if you set the value of a Field by code.
NOTE: If you change the value of a Control by code, the AfterControlChange event is not fired.
But if the Control is associated with a Field, the event AfterFieldChange is fired.
Vice versa, if you change the value of a Field by code, the AfterFieldChange event is not
fired, but any Controls associated with the Field will fire the event AfterControlChange.
The demo program "VPE Interactive Demo" (vpeidemo.exe) shipped with VPE gives a very good
overview about the event structure. It shows what events are fired in response to specific user
actions. To run the demo, choose "Demos | Enhanced Template Processing" from the menu.
6.8 Accessing Controls
At runtime the method FindControl() can be used to access the properties of a Control, which has
been dumped into a VPE Document.
FindControl() uses the name of a control (as assigned in dycodoc) in order to identify it.
6.8.1 Example: Enabling and Disabling Controls
At runtime you can enable and disable Controls. A disabled Control can not receive the focus and
therefore the user can't change its content.
Example on how to disable a control, which is already dumped into a VPE Document:
tpl.FindControl("rbMeat").ControlEnabled = False
Example on how to enable a control, which is already dumped into a VPE Document:
tpl.FindControl("rbMeat").ControlEnabled = True
Do not mismatch Field-Objects and Control-Objects:
Field-Objects are used to exchange data between your application and Controls.
Control-Objects are used to identify Controls, in order to handle their events, to access and
modify their properties and to steer the focus handling.

188 • Interactive Documents Virtual Print Engine -Programmer's Manual
6.9 Advanced Programming
6.9.1 Notes, Hints and Tips
•The interaction for a document can not be enabled, if the document is stream based, i.e. it is
opened using SwapFileName. Stream based documents are not editable. If you want the user to
edit a .VPE document file, open a memory based document (i.e. use OpenDoc) and read the
document file into memory using ReadDoc().
•A template which contains Controls can only be dumped once into a VPE Document. If you
wish to dump it more than once into one and the same VPE Document, you need to load the
same template as often into memory as you want to dump it. Otherwise DumpTemplate() will
return the error code VERR_TPL_PAGE_ALREADY_DUMPED. A template which does not
contain Controls can be dumped as often into one and the same VPE Document as you like.
•Avoid to spread Radio Buttons which belong to the same group over multiple pages. First of
all, this is a bad design for a user interface, but in addition the use of DumpTemplatePage() will
not work correctly, if you dump a single page which contains some Radio Buttons which
belong to a Radio Button Group that is defined on a different page. (dycodoc defines invisible
Radio Button Groups always on the page with the first occurrence of a corresponding Radio
Button)
6.9.2 How TAB-and Group ID's are resolved
If you dump a template which contains Controls into a VPE Document, which already contains
Controls, the TAB-and Group ID's you had assigned in dycodoc might conflict with Controls that
already exist in the VPE Document.
VPE takes care of that and resolves conflicts in the following way:
It keeps track of the highest TAB ID as well as the highest Group ID currently used in the VPE
Document. If a new tenplate is dumped into the document, VPE offsets each TAB-and Group ID
of the template with the currently highest value that is in use.
Therefore TAB-and Group ID's might change, if you dump several templates into one and the
same VPE Document.

Virtual Print Engine -Programmer's Manual Interactive Documents • 189
6.9.3 Simulating Buttons, Listboxes and Comboboxes
VPE does not provide objects like Buttons, List-and Comboboxes. However, you can simulate
them in the following way:
For buttons which shall also be able to receive the focus (so the user can reach them with the TAB
key), like the Ok-and Cancel buttons, use checkboxes as done in the iForm demo (sources are
shipped with VPE for C/C++, Visual Basic and Delphi).
For other buttons, create a Clickable Object as described in the "DLL-Reference Manual" and the
"Control Manual (.NET / ActiveX / VCL)".
If you wish to display a list-or combobox, just show a dialog with a list box as the user clicked
onto a button. Let the user make his selection and afterwards destroy or hide the dialog, so the user
can continue to work with the document.
Since in regular you don't want to print the "buttons" (i.e. the checkboxes or Clickable Objects
which function as buttons), set the property "Printable" of these objects to False. Therefore the
buttons will be visible and usable in the preview, but they will not be printed.
6.9.4 Keyboard Accelerators
If you wish to use keyboard accelerators (as for example Alt-S in order to save a document), you
need to catch and process the Keydown Event of the parent form or window.
190 • The PDF Export Module Virtual Print Engine -Programmer's Manual
7The PDF Export Module
7.1 PDF Export Introduction
The PDF Export Module is available in all editions of VPE.
The trial versions of VPE allow to use all features of the PDF Export Module. In this case the
exported PDF Document will have demo banners and is always compressed.
The handling is trivial, you can create a complete PDF file from a VPE document with only one
line of source code:
VPE.WriteDoc("My Document.pdf")
NOTE: For important information about fonts and font handling, please see “Fonts and Font
Handling” on page 133.
The PDF Export Module of the VPE Community Edition:
•Offers unrestricted 1:1 export of VPE documents to PDF, everything is written as true PDF
vector graphics
•Optional creation of PDF files compliant to Acrobat Reader version 4, 5 or higher.
Acrobat Reader versions prior to version 4 are not supported.
•If one and the same image (i.e. a bitmap) is used multiple times within a document, for example
on multiple pages, VPE will detect such multi-references and embeds the image only once into
the PDF file.
•Compression is not supported. Compressed documents are in regular 4 –5 times smaller.
•True-Type font embedding is not supported. The higher editions of VPE are capable to embed
all used True-Type fonts into the generated PDF file. When sending a PDF document to a
receiver which doesn’t have the used fonts installed on her / his machine, those fonts are not
displayed.

Virtual Print Engine -Programmer's Manual The PDF Export Module • 191
The PDF Export Module of the VPE Standard and Enhanced Editions:
•Offers unrestricted 1:1 export of VPE documents to PDF. Gradients, rounded corners,
barcodes, etc. are written as true PDF vector graphics
•Optional creation of compressed PDF documents
•Optional embedding of True-Type fonts
•Embedded images (except JPEG files) can be converted automatically to a lower resolution to
save space. JPEG files are always copied with their original RAW binary data to PDF.
The PDF Export Module of the VPE Professional Edition and higher:
•Offers unrestricted 1:1 export of VPE documents to PDF. Rich Text, charts and 2D-barcodes
are written as true PDF vector graphics
•Supports export to thePDF/A format for long-term archival, according to ISO standard ISO
19005-1:2005, PDF/A-1b.
•Encryption with a variable key length between 40 and 128-bit.
•Selective protection of documents and password protection
(e.g. protect a document against printing, copy & paste, modifications, etc.)
•Creation of Linearized PDF ("Fast Web View")
An enhanced PDF file format especially for the Internet. It allows to view any given page on a
client site as fast as possible without downloading the whole document from a server.
•True-Type Font Subsetting
Font Subsetting means that VPE assembles on-the-fly a new font from the source font, which
contains only the characters that are used in the document. A subsetted font is in regular much
smaller than the original font, which results in significantly smaller documents.
•Font Substitution
Supports the optional usage of PostScript fonts by Font Substitution, e.g. the font 'Arial' can be
used in VPE for the preview and for printing, but the PDF document will be created using the
PostScript font 'Helvetica' instead.
•If embedded images are converted to lower resolutions, their quality can be increased by
applying automatically the Scale2Gray algorithm (see “Scale-to-Gray Technology” on page
54). This feature requires the VPE Professional Edition or higher.
•Creation of Bookmarks
A PDF document may optionally display a document outline on the screen, allowing the user to
navigate interactively from one part of the document to another. The outline consists of a tree-
structured hierarchy of bookmark items, which serve as a "visual table of contents" to display
the document’s structure to the user. Bookmarks are displayed in the left tree-view of Acrobat
Reader.
The trial versions of VPE allow using all features of the PDF Export Module, including all
methods of VPE Professional Edition.
NOTE: The trial version always creates compressed PDF files.

192 • The PDF Export Module Virtual Print Engine -Programmer's Manual
7.2 Restrictions
Metafiles (EMF and WMF) and UDO's (User Defined Objects) are written as bitmaps to PDF.
VPE Interactive Edition: currently Interactive FormFields, Checkboxes and Radiobuttons are
exported as normal graphical objects, they are not editable in PDF documents.
7.3 Using the PDF Export Module
A VPE Document is exported to a PDF Document with one single call to:
VPE.WriteDoc("sample.pdf")
If VPE detects the suffix ".pdf", it will write the document automatically as PDF file.
In order to control the PDF document creation, VPE provides many properties and methods you
may change prior to calling WriteDoc().
Please consult the section "PDF Export" either in the "DLL Reference" help file or in the
"Control Reference (.NET / ActiveX / VCL)" help file for details.
7.4 Embedded Images
VPE automatically embeds all images into PDF files.
The following rules apply:
Metafiles (WMF) and Enhanced Metafiles (EMF) are converted into true-color (24-bit) bitmaps,
since the PDF file format does not support metafiles. Note: metafiles contain also resolution
information, similar to the DPI resolution information in bitmaps. VPE analyses their resolution
information and creates bitmaps of the same resolution. Many metafiles are written in a very high
resolution, which causes VPE to create huge bitmaps, which causes high temporary memory
consumption. We recommend to care for the resolution information of metafiles and to keep it
low, say between 96 and 300 DPI, or to use the DocExportPictureResolution property in order to
force all images embedded into PDF documents to be scaled down automatically to a fixed
resolution.
JPEG images are embedded with their original JPEG compression and in their original RGB or
CMYK format, i.e. VPE analyses JPEG files and copies their relevant data directly and
unmodified -without uncompression and/or re-compression -into the PDF file.
Black and White bitmap images -regardless of their file type, e.g. BMP, PNG, TIFF CCITT FAX
G3 or G4, etc. -are written as black and white (1-bit) images into the PDF files. They are always
re-compressed using flate compression (i.e. ZLIB compression).
Palette images with 256 –or less –colors are written as palette images, using flate compression.
All other bitmap images are converted to true-color (24-bit) bitmaps and are then flate
compressed.

Virtual Print Engine -Programmer's Manual The PDF Export Module • 193
7.5 Objects Marked As Non-Printable
By default, objects which are marked as non-printable by setting the property Printable = false
(Professional Edition and above), are not exported to external file formats, like PDF documents or
image files. Vice versa, objects marked as non-viewable for the Preview are exported to external
file formats.
VPE understands an export operation as a different way of printing. The reason is that for example
PDF’s are sent most often by e-mail as a replacement for sending printed copies of documents by
postal mail. So printed documents and e-mailed documents should be the same.
You can override this default behavior with the property ExportNonPrintableObjects. By setting
this property to True, all objects of a document -which are marked as non-printable -will be
exported to external file formats, too.
Note: Because VPE understands an export operation as a different way of printing, the properties
PrintOffsetX and PrintOffsetYare also in effect during PDF export.
7.6 Transparent Backgrounds
For all objects -except pictures/images/bitmaps! -transparent backgrounds are also exported to
PDF, with the following exception:
UDO’s (User Defined Objects), WMF and EMF files are not exported with transparent
backgrounds. The reason is that those objects are exported as bitmaps into PDF documents, which
overlay underlying objects.
7.7 Color Space
Virtual Print Engine creates PDF documents in the RGB color space. It can not create CMYK
documents. The exception is that JPEG images are embedded into PDF documents in their
original format without any changes. This way VPE can embed CMYK JPEG images into PDF
documents.

194 • The HTML Export Module Virtual Print Engine -Programmer's Manual
8The HTML Export Module
8.1 HTML Export Introduction
Virtual Print Engine Professional Edition and higher can export documents to HTML. Because
HTML has many restrictions, a perfect export like into the PDF format is not possible. Also each
HTML browser has its own ways of displaying and handling HTML instructions, which may lead
to different appearances and individual problems, when viewing or printing one and the same
HTML document with different browsers.
VPE exports to HTML using XHTML 1.1 and CSS 2.0. It has ben validated to comply to XHTML
1.1 and CSS 2.0 using the W3C Markup Validation Service (http://validator.w3.org).
The handling of the HTML export module is trivial, you can create a complete HTML file from a
VPE document with only one line of source code:
VPE.WriteDoc("My Document.html")
The file suffix may either be ".html" or ".htm".
See also “Objects Marked As Non-Printable” on page 193.
8.2 HTML Export Restrictions
HTML does not support several objects types and attributes, which are handled by VPE.
Objects unsupported by HTML are: Lines, Polylines, Polygons, Ellipses, Pies, Rounded
Rectangles, Charts, Barcodes, FormFields
Attributes unsupported by HTML are: Gradients, Shadows, Hatched Fill Styles, Rotated Text
On Windows platforms VPE will export the unsupported objects as PNG images. It will also
export rotated text as PNG images. If there are multiple overlapping objects, which are exported as
bitmaps, the result will be that only the topmost object will be visible, the others are blanked out.
This can be seen in the “Capabilities + Precision Demo” when looking at the graph on page 8 or in
the “Report Demo” when looking at the pies on page 2 (this is NOT a chart object, but multiple,
manually drawn pies). Objects exported as bitmaps to HTML do not have a transparent
background.
Gradients, Shadows and Hatched Fill Styles are not applied to objects (except they are exported as
bitmaps).
On non-Windows platforms the unsupported objects will not be exported, they are skipped.
Some browsers, for example Firefox, do not display symbol fonts correctly.
Different browsers use different line spacings as well as word spacings to display text.

Virtual Print Engine -Programmer's Manual The HTML Export Module • 195
8.3 HTML Export Options
VPE offers several properties to control the appearance of exported HTML documents, for
example the scale of the document, which is important for printing, and a property to make
documents with RTF objects compatible to browsers, which have a larger line spacing (for
example Firefox).
In addition, the settings for DocExportPictureQuality and DocExportPictureResolution are applied
to converted bitmap images (i.e. where a source image is not in a browser-compatible format, for
example TIFF and is converted to PNG).
Objects which are exported as bitmaps –like barcodes, charts, polygons, etc. –are using the
properties DocExportPictureResolution, PictureExportColorDepth and PictureExportDither.
We recommend to set DocExportPictureResolution to 96 DPI for HTML export, which is the
resolution for screens. This also creates smaller images (regarding their size in bytes).
The property CopyImages specifies, whether images are copied to a target directory,or if HTML
links to their original locations are written.
Please see the reference manuals for further details.
8.4 Printing Exported HTML Documents
VPE is using CSS to create HTML documents. This is the only way to create documents, which
approximate to what can be done with VPE. Because the HTML objects are positioned absolutely
by VPE, this will cause page overflows when printing in browsers, because they add headers and
footers but do not rescale the HTML objects accordingly to make them fit into a page. For this
reason you must apply a scale below 1.0 to the HTML Export Module, by setting the property
HtmlScale. This property is by default 0.75 which equals 75% of the original scale. If the specified
scale is too low, it can happen on some browsers that text will overflow on the right side of
objects, especially on Firefox. In this case you can use the property HtmlWordSpacing to fix the
problem.
If the scale is too low, it can also happen that for example barcodes or lines are not exported
correctly, because the available number of pixels is too low or odd. In this case you must increase
the value for the property DocExportPictureResolution.
Results viewing / printing with different browsers:
•Internet Explorer 6 and 7 on Windows display and print ok
•Netscape 8.1.3 on Windows displays and prints ok
•Netscape 7.1 on Windows displays and prints ok (HtmlScale = 0.70)
•The Safari browser on Mac OS X displays and prints ok
•Konqueror on Linux displays and prints ok
•Mozilla 1.7.12 on Linux displays and prints ok
•Mozilla 1.7. on Solaris 10 prints ok, but has problems with the HTML display (succeeding
pages are drawn over previous pages)
•Opera 9.20 displays ok and prints nearly ok (HtmlScale = 0.80), but chooses a font which is a
bit too large. This can lead into extra line breaks.

196 • The HTML Export Module Virtual Print Engine -Programmer's Manual
•Firefox (all platforms) requires HtmlScale = 0.80, displays ok, but has a bug in printing the
HTML documents generated by VPE. Firefox does not handle the page breaks correctly. You
can print single-page documents well, but multi-page documents do not work. Mozilla has
confirmed this to be a bug, see https://bugzilla.mozilla.org/show_bug.cgi?id=154892.
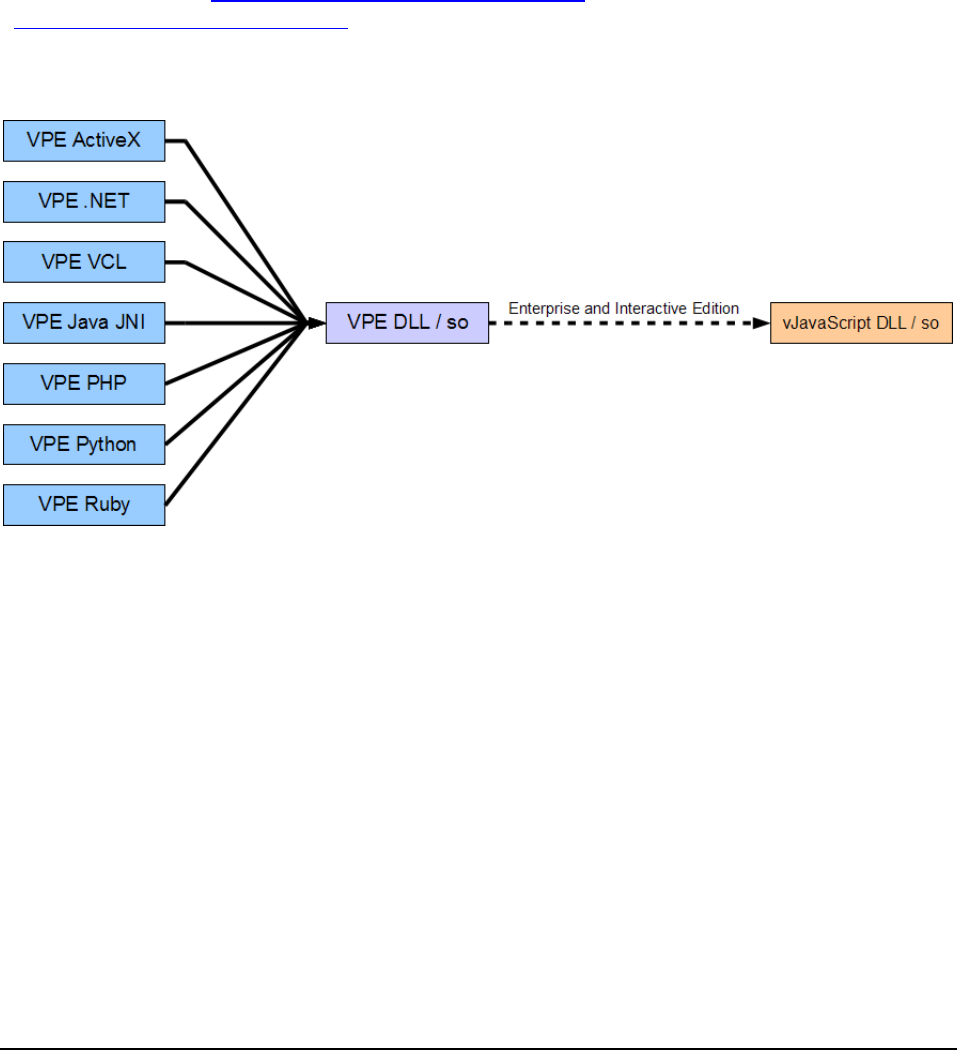
Virtual Print Engine -Programmer's Manual Redistributing VPE • 197
9Redistributing VPE
9.1 Module Dependencies
Except the VPE Interactive Edition and dycodoc, VPE can be redistributed royalty-free with your
applications. Please note that the VPE Interactive Edition and dycodoc are not redistributable
without license fees for each license. The license details and the list of redistributable files can be
found in the chapter "Standard Terms and Conditions of Use" on page 214, deutsche Fassung
“Allgemeine Nutzungsbedingungen” on page 221.
The redistributable files are located in the folder "Deploy" in the installation directory of VPE.
The following diagram gives an overview about the dependencies between the modules:
Explanation:
•Each high level component -the ActiveX, the.NET component, the Delphi VCL component
and the Java Native Interface component –load and use the VPE DLL or on non-Windows
platforms the VPE.so (shared object).
•The Enterprise Edition and Interactive Edition do load internally the Java Script engine.
Please keep in mind that the DLLs you are shipping have to be accessible by your application.
This means: they need to be located either in the directory of your application, or they are located
in a directory which is included in the PATH environment variable (for example Windows /
System32). If you copy them to Windows / System32 (or SysWOW64), you must treat them as
shared DLLs and update the registry with their usage-counters accordingly. Most installers
provide the functionality of handling shared DLL reference-counting without problems.

198 • Redistributing VPE Virtual Print Engine -Programmer's Manual
Except for .NET (please see below) we recommend to install the DLLs in the local directory of
your application.
Installation in the System-Directory on 32-bit versus 64-bit Windows Versions
For 32-bit Windows, the system-directory was always "Windows / system32". For 64-bit
Windows, the Microsoft developers made the decision, to keep the names of system DLLs
identical for either platform. I.e. the kernel is named kernel32.dll on 32-bit Windows as well as on
64-bit Windows. This makes things easier, when porting existing code from 32-bit to 64-bit. To
distinguish on 64-bit Windows the CPU architecture, for which a binary system DLL is built, it is
either placed in the path "Windows / system32" (ironically for 64-bit binaries), or in the path
"Windows / SysWOW64" (for 32-bit binaries).
For the same reasons, the names of the VPE DLLs are also identical for both platforms. If you
wish to install VPE to the Windows system-directory on 64-bit Windows, you need to install VPE
accordingly to "Windows / system32" or "Windows / SysWOW64".
For .NET special considerations must be taken:
If the processor architecture of your .NET application is set to "Any CPU", you need to install the
32-bit and 64-bit versions of VPE. Because your application is either executed as 32-bit binary
code on 32-bit Windows, or as 64-bit binary code on 64-bit Windows. In this case you need to
install the VPE DLLs in the Windows system directories "Windows / system32" and "Windows /
SysWOW64", please see the section above for details.
As an alternative, you can configure your Visual Studio application projects to always generate
either x86 or x64 code.

Virtual Print Engine -Programmer's Manual Redistributing VPE • 199
9.2 Basic Structure of the Binaries
Virtual Print Engine is made up of several modules.
•VPE DLL / SO -The core engine itself is a DLL (Dynamic Link Library) or SO (shared
object) which can be called from any programming language for Windows that supports
standard DLL/SO calls (such as C/C++, Pascal, etc.). The VPE DLL provides all the core
functionality, including layout functions, fast scaleable vector graphics, previewing, printing,
printer-setup, storing/retrieving a document to/from file in VPE's native Document file format,
and more.
Depending on the edition you acquired the name of the DLL/SO is:
•CommunityEdition:vpec3271.dll / libvpec.so.6.0.0
•Standard Edition: vpes3271.dll / libvpes.so.6.0.0
•Enhanced Edition: vpex3271.dll / libvpex.so.6.0.0
•Professional Edition: vpep3271.dll / libvpep.so.6.0.0
•Enterprise Edition: vpee3271.dll / libvpee.so.6.0.0
•Interactive Edition: vpei3271.dll / libvpei.so.6.0.0
•Add-On DLL's / SO’s -Depending on the edition you are using, several add-on DLL's are
called internally by the core engine. DLLs listed for a lower edition are also included in all
higher editions, for example the Enterprise Edition includes all DLL's of the Enhanced and
Professional Edition.
•CommunityEdition:none
•Standard Edition: none
•Enhanced Edition: none
•Professional Edition: none
•Enterprise Edition: vJavaScript3271.dll Java Script Engine
•Interactive Edition: none
•.NET Component (Windows only) -To be used with Visual Basic .Net, C#, Delphi 8 and
many other programming languages based on the .NET environment
Depending on the edition you acquired the name of the component DLL is:
•CommunityEdition: IDEALSoftware.VpeCommunity.dll
•Standard Edition: IDEALSoftware.VpeStandard.dll
•Enhanced Edition: IDEALSoftware.VpeEnhanced.dll
•Professional Edition: IDEALSoftware.VpeProfessional.dll
•Enterprise Edition: IDEALSoftware.VpeEnterprise.dll
•Interactive Edition: IDEALSoftware.VpeInteractive.dll
•.NET WebServer Component (Windows only) -To be used with ASP.NET.
Depending on the edition you acquired the name of the component DLL is:
•CommunityEdition:IDEALSoftware.VpeWebCommunity.dll
•Standard Edition: IDEALSoftware.VpeWebStandard.dll
•Enhanced Edition: IDEALSoftware.VpeWebEnhanced.dll

200 • Redistributing VPE Virtual Print Engine -Programmer's Manual
•Professional Edition: IDEALSoftware.VpeWebProfessional.dll
•Enterprise Edition: IDEALSoftware.VpeWebEnterprise.dll
•Interactive Edition: IDEALSoftware.VpeWebInteractive.dll
•ActiveX Control (Windows only) -To be used with Visual Basic, Visual FoxPro, Progress and
many other programming languages that support the binding of ActiveX controls.
The VPE ActiveX can also be used within Internet Explorer to create, display and print VPE
Document files through the internet and intranet.
The ActiveX Control encapsulates the core engine DLL, i.e. internally it loads and calls the
functions provided by the core engine DLL. The name of the file is VpeCtrl71.ocx.
•VCL Control (Windows only) -To be used with Delphi and C++ Builder. The VCL Control
encapsulates the core engine DLL, i.e. internally it loads and calls the functions provided by the
core engine DLL.
•VPEView (Windows only, for details, see “VPE View: The Document Viewer” on page 142) -
This add-on is a small stand-alone viewer application to view and print VPE Document files.
VPEViewis freeware and therefore can be distributed freely. A ready-made setup package of
VPEViewis available for download on our websites at www.IdealSoftware.com. The name of
the file is vpeview.exe.
•dycodoc -[Windows only, Enterprise and Interactive Editions only] In addition to the print
engine the Enterprise and Interactive Editions ship with dycodoc -a visual design tool to create
form and document templates by point and click.
Please note that dycodoc is not royalty-free and therefore not freely distributable.
Another main feature of dycodoc is its ability to edit VPE Document files: using dycodoc your
end users are able to post-edit VPE Document files you already have stored to file.
It is possible that your end users purchase dycodoc in order to modify templates and/or to post-
edit VPE Document files.
dycodoc offers several security options so that you can protect templates and VPE Document
files from being modified. For templates it is even possible to lock only specific objects from
being modified (for example a company logo).
Please note: for security reasons, dycodoc can not read VPE Document files which have been
created with any release prior to VPE v3.20.

Virtual Print Engine -Programmer's Manual Redistributing VPE • 201
9.3 Server Licenses
This chapter does only apply to the platforms: Solaris, OpenSolaris, Aix and AS/400.
If any product is executed on servers, a special Server License per server must be acquired. The
prices are scaled upon the number of concurrent users. For details, please visit our websites at
www.IdealSoftware.com.
Definition of "server": a system for electronic data processing, which provides services for other
electronic data processing systems.
Definition of "execute": at least one of the redistributable files is executed by a CPU (processor) in
the memory of a server.
If a product is licensed as Server Version, its thread-safe code can be activated, which is essential
for server based multi-threaded applications (see also: “Multi-Threading” on page 121).
For the following products Server Licenses are not available:
•VPE Community Edition
•VPE Standard Edition
•VPE Enhanced Edition
IMPORTANT NOTE:
In order to protect VPE from misuse in server environments without a server license, the engine
keeps track of the number of calling threads and processes for each license key.
In environments without server licenses, a maximum of three processes or threads may use VPE
simultaneously with the same license key. If more than three processes try to open a VPE
document with the same license key, the licensing fails and VPE will behave like the trial version
and demo banners are shown.
Since VPE tracks the usage separately per license key, applications of different manufacturers
(which are using therefore different license keys) do not conflict with each other.
Important: the limitation only applies to different processes or threads. A single process or thread
may open and create an unlimited number of VPE documents simultaneously with the same
license key. If your application shall show multiple documents at the same time, do not use
different processes or threads, or limit the number of simultaneously running processes or
threads to 3.
Because the VPE .NET WebControl is intended to be used with ASP.NET on servers only, a
server license is required for this type of control. Without a server license demo banners will be
shown in created documents.
VPE also detects, if it is executed within the context of a Windows Service. As the name already
suggests, the main reason to execute VPE within a Service is to serve something. Therefore, if
VPE is executed within the context of a Windows Service, a server license is required. Without a
server license demo banners will be shown in created documents.

202 • Redistributing VPE Virtual Print Engine -Programmer's Manual
9.4 Installing The VPE ActiveX On Target Machines
Most installers will work with the VPECTRL71.DEP file which is shipped with VPE. It contains
the dependency information between the ActiveX and the supplement DLLs. You might want to
edit the DEP file in order to change the dependencies: for example if you are using the VPE
Enhanced Edition -or higher -and you don't make use of barcodes, you can remove the
dependency for the barcode DLL.
If you install the VPE ActiveX with an installer which doesn't use the DEP file, or which is unable
to register the ActiveX, you need to register the ActiveX by code. This can be done by calling
"regsvr32 VpeCtrl71.ocx". REGSVR32.EXE is a command-line tool from Microsoft which
registers the ActiveX on the target machine.
9.4.1 Installing the VPE ActiveX -The Demo Banners Are Still Shown
Q: I use the VPE ActiveX and it works fine. But when I install my application on my end user's
client machines, the demo banners are shown or I get OLE / COM Licensing errors.
A: The COM Licensing Mechanism works as follows:
As you enter your License Key in the VPE setup software in order to install the VPE SDK
(Software Develeopment Kit) on your machine, the VPE ActiveX is automatically supplied
with your License Key.
You can not call the method License() at runtime to override this mechanism. For the VPE
ActiveX the License() method can only be used, to register add-on modules, like for example
the PDF Export Module. The reason is that the VPE DLL is loaded immediately in the
moment the VPE ActiveX is loaded by your application. Since for each edition of VPE there
is a different VPE DLL (named for example VPES3235.DLL for the Standard Edition,
VPEX3235.DLL for the Enhanced Edition, etc.), the ActiveX must know at startup which
DLL to load and license.
When you place a VPE ActiveX at design time on a form in your application -i.e. when you
are developing your application -the server (your programming tool) requests your personal
VPE License Key from the ActiveX client and stores it together with the form.
If you later build your executable or deliverable application for shipment to your clients, the
encrypted VPE License Key is automatically stored by your development tool within your
application. Furthermore, the License Key is marked as "executable only", this means the
ActiveX can not be used on the target machine for development purposes.
If you get the demo banner in VPE or any OLE License error codes regarding VPE when
running your application, then something with the COM Licensing went wrong.
Visual Basic has no such problems, but we experienced that VB.NET, Visual FoxPro,
Progress and Centura request the License Key only once from a newly inserted ActiveX and
then keep it. This means that if you use the VPE ActiveX with the trial-version or with a
specific VPE Edition(Standard, Enhanced, Professional, etc.), and install later the full version
or another Edition, you need to delete the ActiveX controls from your application and re-
insert them, so the new License Key is updated by your development tool. This is solely a
problem of the development tool you are using -as mentioned before, Visual Basic for
example has no such problems.
Please note that the VPE ActiveX needs to be registered on each client machine. This is done
automatically by most installers. If you are not using an installer, call -for example from the
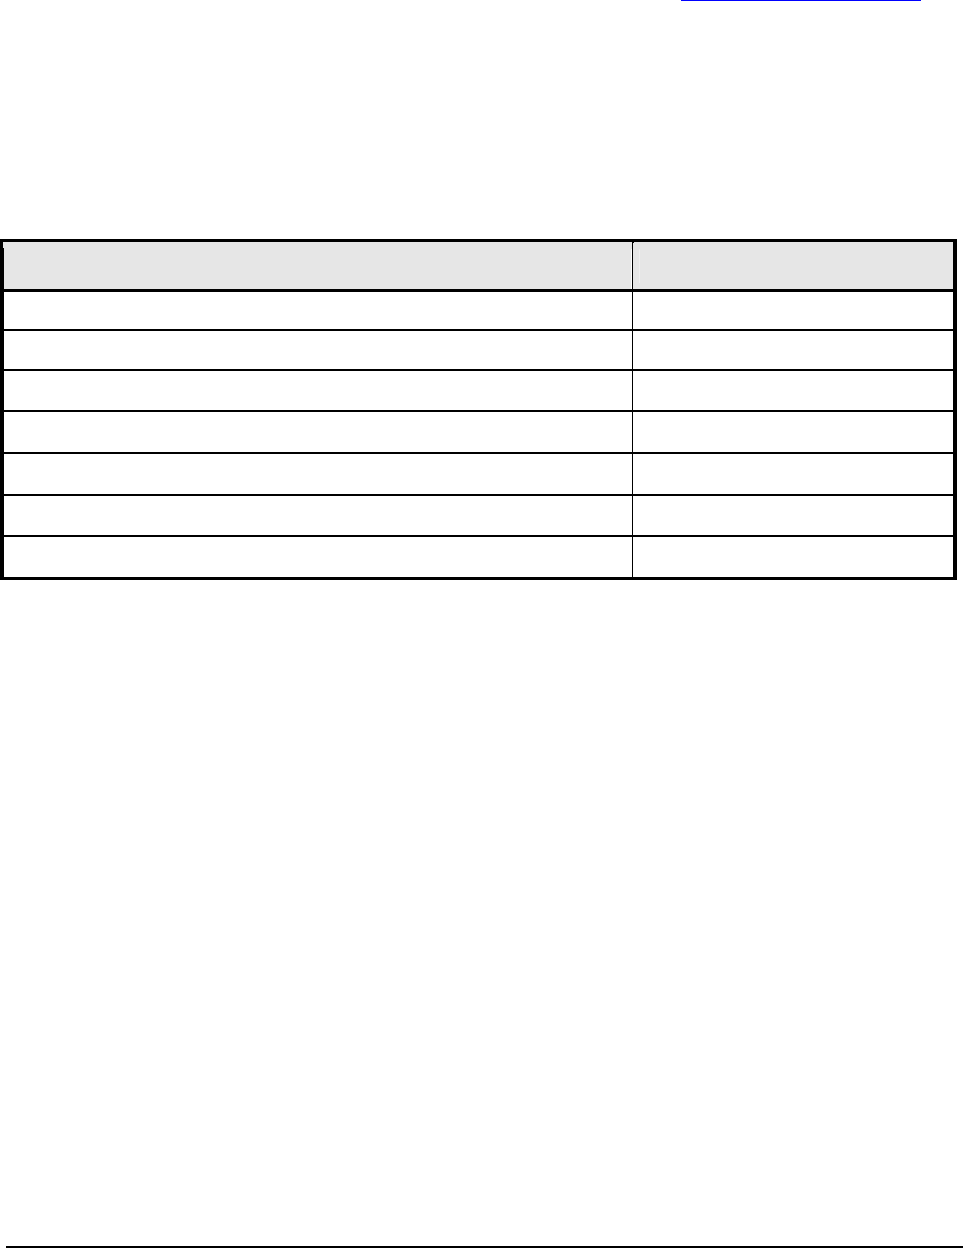
Virtual Print Engine -Programmer's Manual Redistributing VPE • 203
command-line prompt -"regsvr32.exe VpeCtrl71.ocx" (regsvr32.exe is a tool, which is freely
available from Microsoft).
9.5 Redistribution of VPE View
You may distribute vpeview.exe freely with your applications. However, we recommend to ship
the "VPE View Setup", which can be downloaded from our websites www.IdealSoftware.com.
If you need for whatever reasons to ship VPE View directly with your application or with your
own installation software, here are the internals:
VPE View is associated with the suffix ".VPE" on system level, so files with the suffix ".VPE"
have the VPE Document Icon in the Windows Explorer, and a double-click onto such a file will
automatically start VPE View.
To gain this behavior on the target machines you distribute VPE View to, you have to create the
following keys in the Registry:
Key Value
HKEY_CURRENT_USER\Software\IDEAL Software\VPE View\Settings none, just the key is required
HKEY_CLASSES_ROOT\.vpe "vpedoc"
HKEY_CLASSES_ROOT\vpedoc "VPE Document"
HKEY_CLASSES_ROOT\vpedoc\DefaultIcon "<path>\vpeview.exe,1"
HKEY_CLASSES_ROOT\vpedoc\Shell\open\command "<path>\vpeview.exe %1"
HKEY_CLASSES_ROOT\vpedoc\Shell\print\command "<path>\vpeview.exe /p %1"
HKEY_CLASSES_ROOT\vpedoc\Shell\printto\command "<path>\vpeview.exe /t %1|%2"
Where <path> is the installation directory of VPE View on the target machine.
The key "HKEY_CURRENT_USER\Software\IDEAL Software\VPE View\Settings" in the first line
is required, because VPE View will store there the last position and size of its window.
Please note the "|" in the value string of the last line.

204 • Redistributing dycodoc Virtual Print Engine -Programmer's Manual
10 Redistributing dycodoc
If you acquired a license for VPE Enterprise or Interactive Edition, you may distribute dycodoc in
an unlimited number without any additional fees.
To do so, you should pass on to your customers the MSI setup file of dycodoc. You can also
include the MSI setup file of dycodoc within your own setup, so it is installed automatically
together with your own application.
After executing the MSI, dycodoc is by default in TRIAL mode, i.e. it is not fully licensed. To
license dycodoc, please do the following:
On your development machine –where the VPE SDK is installed –open a command shell and
navigate to “<VPE installation directory> \deploy”. Execute the tool “dcdkey.exe” (on non-
Windows platforms, execute “dcdkey” without “.exe”), this will generate a key file. The key file
contains your personal license key.
Example:
dcdkey –c d:\mydir\dcd.key
Will generate a key file named “dcd.key” on your drive d:\in the directory “mydir”.
Include this key file together with “dcdkey.exe” in your own application setup. During the setup,
you can install the key file by executing:
dcdkey -i dcd.key
Will install the key file named “dcd.key” on the current machine. This requires administrative
privileges.
After the key file is installed, dycodoc is licensed. The key file may be deleted on the target
machine afterwards.

Virtual Print Engine -Programmer's Manual Important Notes, Tips & Troubleshooting • 205
11 Important Notes, Tips &
Troubleshooting
11.1 Tips
•Frames drawn around objects (Barcodes, Pictures, etc.) can be eliminated by setting the
PenSize to zero
•For users of programming languages, which don’t provide some data types:
•VpeHandle is a 32-bit integer on 32-bit platforms and a 64-bit integer on 64-bit
platforms
•VpeCoord is of type double
•TRUE is the value 1 and FALSE is the value 0.
•COLORREF is a 32-bit integer.
•1 inch is 2.54cm, so 5 inch = 5 * 2.54 cm = 12.7cm
•If you are using different font-sizes in a row, and you want to draw a box or grid around them,
do as followed: use VpeWrite() with y2=VFREE, or VpePrint(). After each Write / Print
determine the highest computed y2 coordinate for the whole row. So you can draw boxes (or a
grid) later around the row and between columns, and you can position the next row closely
beyond.
•If you want to create tables or lists with groupings and controlled page breaks, you need to
control page breaks by code:
To break detail lines to new pages, first compute the space you will need at least
for one new detail line including the Group or Sub-footer (if any).
Before inserting a detail line, check the available space on the current page with:
available_space = VPE.nBottomMargin -VPE.nBottom
if available_space < space_needed then
PrintMyGroupFooter()
VPE.PageBreak()
PrintMyGroupHeader()
end if
<output the next detail line here>
•The "Speed + Tables" demo source code demonstrates the above code in detail.
•Computing page breaks for images
Call RenderPicture() with the same parameters as if you were calling Picture().
Determine the size if the image with nRenderWidth and nRenderHeight. Add both values to the
position (x, y) where you want to place the picture. If the resulting bottom coordinate exceeds
the bottom margin (see nBottomMargin, SetOutRect and SetDefOutRect) you need to create a
page break and insert the picture on the new page.

206 • Important Notes, Tips & Troubleshooting Virtual Print Engine -Programmer's Manual
•Generating a Table of Contents (TOC)
VPE does not allow to insert pages into a document, it is only possible to append pages to the
end. The solution is, to create the main document and the TOC using two different VPE
documents at the same time: in the first document (docMain) you create the main document and
in the second document (docTOC) the TOC at the same time.
After the creation of the main document is finished, you write it to file using
docMain.WriteDoc("tmpfile.vpe"). Afterwards close the main document.
Then call docTOC.ReadDoc("tmpfile.vpe") to append the main document to the TOC
document.
The above explanation assumes that the page numbering for the main document starts with
"page 1". It is also possible to start the first page of the TOC with "page 1", however, this
makes things a bit more complicated:
Do not build docTOC while generating docMain. Instead while creating docMain build
internally a list which holds the titles and their corresponding page numbers. Do not number the
pages of docMain. Having docMain created, save it to file, close it and create docTOC in two
passes:
In the first pass you build docTOC with the titles and page numbers from your list. Having
done so, you will know how many pages docTOC needs. Afterwards destroy docTOC by
closing the document.
In the second pass open docTOC newly. You know now how many pages your TOC has (and
therefore how many pages the complete document has). Update the list of titles with page
numbers by adding the number of pages required by the TOC to each page number. Then create
the TOC and append the main document with docTOC.ReadDoc("tmpfile.vpe"). Afterwards
you can start numbering the pages of the main document and that's it.
Not really difficult at all.
Did you experience a new technique on how to program VPE?
Did you write re-usable code or a class which does something very useful?
Or do you create brilliant or complex (or just weird) documents by using VPE?
Send us your tips, sources and VPE document files.
Show us what one can do with VPE!
We will be happy to make your impressing work available on our website or
to incorporate it into VPE.

Virtual Print Engine -Programmer's Manual Important Notes, Tips & Troubleshooting • 207
11.2 FAQ
Q: The export of images does not work correctly, what is the cause?
A: It might be a buggy video card driver (for example we heared that the original Viper 770
drivers cause malfunctions during picture export). Try to obtain a newer or compatible driver.
Q: The picture export to Metafile (WMF) does not work under Win9x. The VPE function
PictureExportPage() returns "failure", what is going wrong?
A: We experienced that the Windows API function CreateMetaFile() -which is used internally
by VPE -can not work with long file names. Accordingly you can not create a Metafile when
having long file names within the target directory structure or if the file name itself is a long
file name.
Workaround: use the Windows API function GetShortPathName() to convert the long target
path / file name into the short form and provide the result to PictureExport[Page]().
NOTE: this problem is only related to Win9x (WinNT 4 SP4 showed no such problems) and
only to Metafiles (WMF). All other image types, like Enhanced Metafiles (EMF) and the
bitmap file types like BMP, PNG, JPEG, etc. work ok.
Q: If I call VPE.SetupPrinter() the window of our main application is not disabled, it is still
running. I would have expected that it is disabled, because if the user pushes a second time
onto the "Setup" button in our application, we call a second time VPE.SetupPrinter(). Because
VPE is already executing the printer setup dialog, our application crashes. Why isn't the
window of our main application disabled automatically?
A: Because VPE fires events during the setup process to inform your application about the status
of the setup, the main window of your application is not disabled by VPE. Solution: disable
any GUI element which could cause that VPE.SetupPrinter() is called a second time while the
printer setup dialog is shown or disable your application before calling VPE.SetupPrinter()
and enable it after the call returns.
Q: We create huge numbers of VPE documents in a batch process. This means, in a loop of
hundreds of iterations we permanently call OpenDoc(), export for example the document
contents to image files and call CloseDoc() afterwards. Under Win9x we notice that the User
resources are shrinking continuously until no resources are left over. Is this a bug in VPE,
does VPE have a memory leak?
A: No, this is not a problem of VPE. It is caused by the design of Win9x: with every call to
OpenDoc(), VPE creates internally the invisible windows (Frame, Client, Toolbar, Statusbar,
etc.) which are needed for the preview. When calling CloseDoc() all those windows are
destroyed and therefore the allocated space on the User Heap is freed.
However, Windows itself does not compact the User Heap unless process control is returned
to the Windows subsystem. After deep investigation of this issue, we encountered that you
should execute the following code in order to let Windows shrink the User Heap:
VpeCloseDoc();
MSG msg;
while (PeekMessage(&msg, NULL, 0, 0, PM_REMOVE))
{
TranslateMessage(&msg);
DispatchMessage(&msg);
}
Immediately after calling VpeCloseDoc(), the code above yields process control back to
Windows, which will make Windows compact its User Heap. Calling

208 • Important Notes, Tips & Troubleshooting Virtual Print Engine -Programmer's Manual
VpeDispatchAllMessages() or Sleep() does NOT help.
NOTE: The problem described above does only occur, if you are running a batch process
which does not interact event driven with the user and which executes hundreds of
OpenDoc() / CloseDoc() sequences without yielding process control regularly back to
Windows. If you are using VPE normally in a GUI application which is driven by events -as
all the demos shipped with VPE are -there will no such problem arise, because process
control is automatically returned to Windows after each document has been created.
Q: A barcode is displayed correctly in the preview, but is not of the same size when printed. Is
this a bug?
A: VPE prints the bar codes in correct size. You need to know the following about barcodes, to
understand it:
The width of the thin and thick modules (the black and white lines) have ratios, for example
1:2. This means, thin lines are half as thick as thick lines.
Example: a given barcode has 63 modules, 43 thick and 20 thin modules, and shall be painted
into a rectangle which has a width of 10 cm.
The barcode library now computes the maximum width of a single module, so that all
modules will best fit into the given rectangle while considering the rule that the thin / thick
ratio is 1:2. It can happen then that there are wide gaps at the end of the barcode, because it
can not fill the given rectangle.
The preview shows the barcode in the full rectangle, because when drawing to the preview,
the barcode library ignores the ratio rule, otherwise -due to the low resolution of the screen -
sometimes a barcode would not be shown at all or only in part.
Q: One and the same barcode is printed in different widths on different printers. Is this a bug,
how can I avaoid it?
A: See the question and answer above. This is caused by different printer resolutions.
Workaround: set the printer's resolution of the different printers to the same value, e.g. 300
DPI.
Q: I embedded the VPE Preview in a window of my own application, but now VPE does not
react on keypresses and / or the mouse wheel (and in the Interactive Edition the focus
handling does not work properly, if my application looses / receives the focus).
A: If embedded, the VPE Preview window is a child window of your application's window.
Therefore you need to set the focus to the VPE Preview window explicitly everytime the
parent window of VPE (this is your application's window) receives the focus (and -of course
-if VPE is the active control within that window). Another solution is that you forward all
messages of interest (WM_KEYDOWN, WM_MOUSEWHEEL, WM_SETFOCUS,
WM_KILLFOCUS) to the VPE Preview window.

Virtual Print Engine -Programmer's Manual Important Notes, Tips & Troubleshooting • 209
11.3 Printer Troubleshooting
Some printer drivers have bugs. If you cover a problem with printing, please try another printer
driver or another printer first. There are sometimes problems with HP Laserjet 4 drivers. Please
report bugs regarding HP Laserjet Drivers to Microsoft or HP.
As a replacement for HP PCL drivers you can for example use compatible Lexmark PCL printer
drivers, which are very good.
If your output looks garbaged: enable the option "Print True-Type as graphics" in the printer-
options dialog or with the DevTTOption property by code.
Problems with clipping: Some drivers cause problems with text clipping. The drivers are not
able to clip letters, so they print the whole letters instead. The y2 border of VpeWrite(Box) might
be crossed by letters, which should be printed only in part. You might experience this problem
when using VpeWrite(Box) with a fixed y2 coordinate. If y2 has a value other than VFREE and
the last line of the text is printed in part on the screen, this last line might be printed completely on
the printer.
The solution is to set y2 smaller, so that the whole line is clipped.
Printing colors: Some printer drivers may not print colored text, printing nothing instead. This
may also occur with lines and all other graphics depending on the chosen color.
Printing hatch styles: Some printer drivers may not print hatch styles correctly.
Problems with HP 4 Plus printer-drivers,and maybe other PCL printer drivers for HP 4 series.
(NOT: II, III, 5, 6):
The True-Type technology fails here, which might lead into the following problem under special
circumstances: If there is long text with no or only one or two gaps (blanks) the gaps are
eliminated, and text is drawn close together. This happens, because VPE works device
independent and renders the text size (in pixels) onto a virtual UHR (Ultra High Resolution)
device. Sadly the HP4 Plus driver returns very slightly different sizes, to what it should.
Possible workarounds:
1. The best way is, to activate in the options dialog of the printer-setup the checkbox "Print True-
Type as bitmap" or "Print True-Type as graphics". This can also be done by code with
TTOption = VTT_BITMAP.
2. We internally implemented a workaround which will solve the problem, if you use Write() or
WriteBox() and set a bit (about 1mm) larger object widths than needed for other printers.
3. Use a Lexmark PCL driver, they are very good, or use the HP Laserjet III driver

210 • Important Notes, Tips & Troubleshooting Virtual Print Engine -Programmer's Manual
11.4 Video Troubleshooting
Some video card drivers do not work correctly. Symptoms are:
•layout incorrect (wrong positioning of text and lines)
•the moving markers in the rulers might be drawn incorrectly
•colors of bitmaps are shown incorrectly
•scrolling objects with hatch styles may lead into misalignment of the hatching
•bitmaps are not shown when color-resolution of video-adapter is higher than the bitmap-
resolution (i.e., video-adapter = true-color, bitmap=256 colors)
•in multiple-colored bitmaps, text colors are damaged and texts not drawn / half drawn / drawn
incorrectly
•driver crashes when using bitmaps
•driver may crash under other circumstances
Discuss bugs with the video-card manufacturer, unless you also experience these problems with
the standard VGA driver by Microsoft (in which case VPE is the problem -and this is not known
until now).

Virtual Print Engine -Programmer's Manual Important Notes, Tips & Troubleshooting • 211
11.5 Known Problems
•On Win 9x/Me the GDI has 16-bit coordinates, so the dimensions of a page may not exceed
32.7 cm (12.9 inch) when using the version 4 renderer, and 138.7 cm (54.6 inch) when using
the version 3 renderer. Those values apply to the preview. For other output devices, e.g.
printers, the dimensions of a page may not exceed (32767 / DPI) * 2.54 cm, where DPI = the
resolution of the output device.
Example: for a printer with 1200 DPI resolution, the maximum page dimensions may be
(32767 / 1200) * 2.54 cm = 69.35 cm.
•On Win 9x/Me objects with rounded corners may not have a gradient. Gradients are drawn
outside the rounded corners on Win 9x/Me.
Please note that VPE v4.0 and higher do not officially support Windows platforms below
Windows 2000.

212 • Important Notes, Tips & Troubleshooting Virtual Print Engine -Programmer's Manual
11.6 If You Need Technical Assistance
IDEAL Software’s technical support policy is as follows:
•As a general rule, IDEAL Software will provide free standard support for questions, which can
be answered quickly (i.e. in less than 5 minutes and without further mail traffic).
•For broad premium support it is possible to acquire Support Units (current prices can be found
on our website). Each Support Unit equals 5 minutes of working time.
•With every support inquiry please provide us your support account number. With every support
incident we will notify you by e-mail about the charges to your support account as well as your
final account balance.
•Questions related to bugs in VPE are always free, if your inquiry should indeed be related to a
bug in VPE. You are only charged for “how-to” questions, questions that are covered in the
documentation, questions related to misuse of VPE or questions related to bugs in printer
drivers or other third party software.
Make sure you are a registered user of VPE. When you contact IDEAL Software for support,
please provide your License Key as well as your Support Account Number.
Please send your support requests via e-mail to Support@IdealSoftware.com. Please include
“VPE” in the subject of your e-mails. Normally, help will be provided within 24 hours (due to
possible time zone differences). Support is not available on weekends and local holidays.
Please provide the following information:
•Your complete License Key and Support Account Number
•The operating system your are using, including installed service packs.
•Are you using the DLL / Shared Object, .NET, ActiveX or VCL component?
•The version no. of VPE (if used, also the version no. of the .NET / ActiveX / VCL component).
•With what language / programming tool (C++, C#, VB, Delphi, ...) and version are you
working?
•If it is a problem related to printing:
•On what printer? (manufacturer, model, printer-driver version -can be found in
print-setup dialog by pushing the "info-button")
•Printer type (ink, laser, dot-matrix, ...)
•Printer resolution (300 DPI, 600 DPI, ...)
•Printer color resolution (b/w, color)
•If it is a problem with the preview: what Video-Card (manufacturer / driver version) are you
using?
•Describe the problem exactly. If possible, add source code fragments so we can reproduce the
problem. If you have problems importing images, please add an example image, so we can
reproduce the problem.
PLEASE SEND ALL FILES ZIPPED!
Latest versions, up-to-date information and our support forum are available on our
internet site:


214 • Standard Terms and Conditions of Use Virtual Print Engine -Programmer's Manual
12 Standard Terms and
Conditions of Use
12.1 IDEAL Software GmbH’s Standard Terms and
Conditions of Use
Dear customer,
IDEAL Software's Standard Terms and Conditions of Use printed here regulate various legal aspects of the
business relationship with you. We have endeavoured to formulate the Terms and Conditions of Use as
clearly and comprehensibly as possible. If you nevertheless have any queries, please do not hesitate to
contact IDEAL Software, who will of course be happy to answer them.
A. Subject-Matter of the Contract; Definitions
The product manufactured by IDEAL Software and the documentation to this product are the exclusive
subject-matter of the contract concluded between IDEAL Software and you. The documentation shall be
made available exclusively in English. The source code of the product is not subject-matter of the contract.
IDEAL Software shall not be required to hand over or make available this source code.
Please note that the software runs only under the operating systems:
Windows XP, 2003, Vista, Win 2008, Win 7, Win 8 / 8.1, Win 10, Win 2012 / 2012 R2
Linux Kernel 2.4.x / 2.6.x / 3.x and LibC6, X86 or X64 Processors
Mac OS X 10.4.x, X86 or Power-PC Processors
Solaris 10, Sparc 64-bit or X86 Processors
Please note that this contract does not cover and is not applicable to third-party software such as operating
systems, nor printer driversor other drivers or application programs.
The definitions given below apply to the following terms in our Standard Terms and Conditions of Use:
Product:
the programs and/or software developed by IDEAL Software GmbH and for which you
are granted a right of use.
Use: pe
rmanent or temporary reproduction, installation, storage, loading, calling, displaying,
running and/or transmission of the product in whole or in part by any means and in any
form. Each individual permissible form of use and its limits are explicitly speci
fied in the
following provisions.
SDK licence:
(Software Development Kit) licence for the product, which is envisaged for use
exclusively by users who are for their part developers of programs.
Run-time licence: right of use for installing, calling and o
perating the product on the data processing
system of a developer's customer (end-
user licence). For details, refer to "Integration"
below.

Virtual Print Engine -Programmer's Manual Standard Terms and Conditions of Use • 215
Server:
system for electronic data processing which provides services for other electronic data
processing systems (for example creating data files, printing out data, etc.).
The following provisions relate to the scope of the rights granted to you by IDEAL Software, what may and
may not be done with the software and what to do in the event of a problem, as well as several general
issues.
B. Grant of Rights of Use / Licensing
1. Grant of Rights of Use
IDEAL Software is exclusively entitled to the copyright to products from IDEAL Software (including the
computer software, associated storage media, printed material and "online" documentation or electronic
documentation). The products are protected under the Copyright Act [Urheberrechtsgesetz] and the
International Copyright Treaty. Therefore, you shall be obliged to treat this product just like any other work /
material protected by copyright. The products are licensed, not sold.
2. Type of Right of Use
2.1 IDEAL Software transfers to you a non-exclusive non-transferable right, unlimited as to time and
geographical area, to use the software acquired by you for the purpose of operation by a single
person (user/developer). Delivery of various storage media (for example 3.5" disks, CD-ROM or
DVD) shall not establish a licence for multiple use of the software.
The non-exclusive right of use only entitles to use the software by a single person
(user/developer). This shall apply, even if the right of use is acquired by a company or some other
body of persons. If you wish to use the product directly or indirectly by multiple persons
(users/developers), you must acquire a licence for each user. In this connection, IDEAL Software
GmbH offers the special reduced Site-License.
If the computer, on which the product has been installed, becomes defect or is not used anymore
for other reasons or is replaced by another computer, you are entitled to uninstall (respectively
delete) the product on the first computer and to install it on a new computer.
>The product shall be deemed to be used indirectly, if a developer prepares instructions of
any kind (e.g. by programming, writing or giving instructions through a graphical user
interface), which cause the product to be called at the end of the processing chain.
Examples: The licensed software is integrated into an intermediate interface or layer (for
example a library, class library, component, control, executable program or the like), a
developer uses this intermediate interface, and the use causes the licensed software to be
called at the end of the processing chain. Amongst other things, this also includes the
preparation of control files that are evaluated or interpreted by a separate application.
Please note that one licence for every user must always be acquired in order to operate an SDK
version on a developer server, i.e. for using the product in your network. This regulation does not
apply, if you have acquired an SDK-Site-License. The SDK-Site-License gives you the right to
install and use the product in an unlimited number at a single physical, respectively postal,
address.
2.1.1 A license may require an online activation. The online activation limits the number of simultaneous
installations. For this purpose, a Hardware-ID is generated from the hardware, on which the license
is activated. The online activation limits the number of simultaneous installations by the formula:
<number of acquired licenses> + 2. If you have for example acquired two licenses of the same
product with the same version and edition, it is possible to perform four simultaneous installations.
Please note that the multiple installationsof a single license do not entitle its use by multiple
persons (users/developers). Each license may only be used by a single user (developer) at the
same time. When a license is uninstalled, it is deactivated online, so that it may be installed on a
different computer.
2.2 If you have received a licence key for a product from IDEAL Software upon the acquisition of a
user licence, please keep this licence key in a safe place.

216 • Standard Terms and Conditions of Use Virtual Print Engine -Programmer's Manual
The licence key releases the product for use. Moreover, an offer for an upgrade or update of the
product on possibly reduced terms can only be obtained upon sending the licence key to IDEAL
Software. You shall be solely responsible for the licence key. If the licence key or an installation
package is lost, IDEAL Software shall not be obliged to replace it.
The licence key sent by IDEAL Software shall be treated with strict confidentiality and may not be
passed on to third parties. If this prohibition is breached, a contractual penalty of EUR 10,000.-
shall be due for every case of breach. The right of IDEAL Software to claim compensatory
damages shall remain unaffected.
When installing the product, a licensing confirmation is generated and sent for verification
purposes to IDEAL Software. The licensing confirmation contains exclusively a serial number and
a hardware-id, but no personal data, and is not given away to third parties. However, with approval
of these Terms and Conditions of Use you declare precautionary your consent with the registration
and storage of the licensing confirmation in the sense of section 4a paragraph 1 of the German
Data Protection Act [BDSG].
If IDEAL Software operates a webportal, you are responsible to keep your e-mail addresses and
passwords for the webportal permanently up-to-date. If a person with access authorization leaves
your company and acquires discounted products, this behaviour is ascribed to you as contractual
partner, i.e. you lose the right to obtain (again) the discounted products.
3. Limits of the Right of Use
Except where otherwise agreed expressly and in written form upon between you and IDEAL Software, you
shall not be entitled to modify, translate, hire out, sublicense, use on a time-share basis or electronically
transmit or receive the software. This shall apply accordingly to storage media and documentation.
4. Data Files Envisaged / Intended for Relicensing to your Customers -Run-Time Licence
4.1 The following data files are excluded from the above limitation regarding sublicensing (section 3).
With respect to these data files, you acquired upon purchase of this software package the right to
pass these on to third parties, embedded in your products. This authorization to pass on the
aforementioned data files implies exclusively the permission to use the data files integrated into
your products / applications. Depending upon the licence granted and the platform support, the
following data files are envisaged for passing on to your customers.
WindowsOperating Systems:
vpe<?>3271.dll
vJavaScript3271.dll
IDEALSoftware.Vpe<*>.dll and IDEALSoftware.VpeWeb<*>.dll
vpejni<?>3271.dll and vpejnigui<?>3271.dll
VpeCtrl71.ocx
VPE View Setup.exe
dycodoc.msi
dcdkey.exe
Mac OS X:
libvpe<?>.dylib.7.10.0 / LicenseTool
Other Operating Systems:
libvpe<?>.so.7.10.0 / LicenseTool
where "?" is to be replaced by the following letter depending upon the edition:
'C’ for the Community Edition
'S' for the standard edition
'X' for the enhanced edition

Virtual Print Engine -Programmer's Manual Standard Terms and Conditions of Use • 217
'P' for the professional edition
'E' for the enterprise edition
'I' for the interactive edition
and the "*" is to be replaced by the following word depending upon the edition:
'Community’ for the community Edition
'Standard' for the standard edition
'Enhanced' for the enhanced edition
'Professional' for the professional edition
'Enterprise' for the enterprise edition
'Interactive' for the interactive edition
The term "passing on" means: making available one or more of the aforementioned data files to
third parties and/or calling these data files. These data files may be distributed free of run-time
licences ("royalty-free") in an unlimited number.
4.2 If you acquired a license for the VPE SDK Enterprise Edition, you may distribute dycodoc
Enterprise Edition without limitation as to numbers and free of runtime licences. If you acquired a
license for the VPE SDK Interactive Edition, you may distribute dycodoc Interactive Edition without
limitation as to numbers and free of runtime licences.
4.3This licence gives you the right to integrate the IDEAL Software product (in the form of the
aforementioned data files -depending upon the licence granted) into your applications and to pass
on the product to third parties in this form. However, these third parties shall not have the right to
pass on these data files again to other third parties (sublicensing) in any form whatsoever. If you
have such needs, please contact IDEAL Software directly. You may not in any way modify
distributable data files.
4.4For the platforms Solaris / OpenSolaris, AS/400, AIX : In order to use run-time licences on a
server, a separate server licence must be acquired for each server. Use by way of executing at
least one of the aforementioned data files in the memory of a server shall not be permitted without
a server licence, regardless of the number of users. If you have acquired a Server Gold License,
you are entitled to pass on the files listed in section 4.1 to your customers for the use on any
number of servers. The current prices of server licences can be found on the website of IDEAL
Software at www.IdealSoftware.com.
4.5VPE View Setup.exe may be passed on without limitation as to numbers and free of runtime
licences.
4.6IDEAL Software shall disclaim any warranty in relation to third parties in the event that data files
are passed on. You alone shall be responsible for support, service, upgrades / updates and/or
technical assistance or other assistance in relation to every recipient of your programs. You shall
indemnify IDEAL Software, its associated companies and suppliers against all claims and liability
of any kind in connection with the use, reproduction or distribution of programs and shall
compensate for all damages resulting from this.
5. Updates / Upgrades
Where you have acquired, or acquire, an update or upgrade of a software, this shall constitute an
inseparable unit together with the original software from IDEAL Software GmbH. Except with the written
permission of IDEAL Software, an update or upgrade and the original software may not be used on two
different computers at the same time.

218 • Standard Terms and Conditions of Use Virtual Print Engine -Programmer's Manual
6. Naming of the Author / Copyright Notice
Whenever you use software from IDEAL Software, your software must in any event bear a copyright notice.
By hiding the info button or the toolbar, or by working without a preview, you agree to include a copyright
notice such as "Virtual Print Engine Copyright © IDEAL Software®" in your "About" dialog or in the help file
or -if neither exists -in your documentation.
7. Integration
The IDEAL Software product is designed to be integrated into your software. The functions of your software
must differ significantly from those of the IDEAL Software product. This means that your software must not
be a competing product identical or similar to our product. The product may only be used for printing and
previewing. Only application-specific data directly associated with your application may be used with the
product. This means that there must not be a universal interface to our product which enables your
application or its end-user to process any data sources (for example ODBC).
>Examples of applications into which the product may not be integrated: report generators, barcode
printing applications, graphics presentation software, database engines, universal print servers and
any possible combinations of these product categories, etc.
The product may not be used in programs or libraries that can be used for the development of programs,
where this enables end-users to control the content or layout of created documents.
>Examples: software development tools, software development kits, programming languages, script
languages, etc..
If you wish to create software of the aforementioned kind, a special license is required. In such case,
please contact IDEAL Software.
Apart from this, your applications may generate reports, print barcodes or create (graphic) presentations
with the product.
C. Provisions in the Event of Impairments to Performance
1. Warranty: Type and Duration
1.1 IDEAL Software warrants -under exclusion of the VPE Community Edition (see 1.4) -that, for one
year from delivery of the software, the storage media and documentation shall be free from defects
in materials and workmanship, and the software shall essentially function in accordance with the
accompanying documentation. Where you the customer are a consumer within the meaning of
section 13 of the German Civil Code [BGB], a two-year warranty period shall apply.
However, IDEAL Software does not warrant that the software or the documentation shall be "free
from defects", nor does it warrant that your standards shall be attained or your needs shall be
satisfied. Only a defect that considerably impairs the functionality of the software and was caused
by IDEAL Software with intent or in violation of the average standard of care exercised by a
prudent programmer (ordinary negligence) shall bring the warranty into effect. Therefore, IDEAL
Software shall not be liable for defects caused by slight negligence, even where these considerably
impair the functionality of the software. Additionally, no warranty shall come into effect, unless the
defect can be reproduced.
1.2 The warranty shall, at the option of IDEAL Software, consist in either
(a) the reimbursement of the price paid (cancellation) or
(b) the rectification of defects or the replacement of defective software that has been returned
to IDEAL Software together with a copy of your receipt (supplementary performance). If
such supplementary performance fails, you shall have the right to claim a reduction of the
price or cancellation.

Virtual Print Engine -Programmer's Manual Standard Terms and Conditions of Use • 219
1.3 IDEAL Software shall not accept any warranty, if a defect or malfunction of the software is due to
incorrect application, misuse or an accident. IDEAL Software warrants for a replacement-software
only for the remainder of the original warranty period or for a 30-day period, whichever period is
longer.
1.4Please note that the above warranty regulations do not apply to the free VPE Community Edition.
For deficiencies of the VPE Community Edition IDEAL Software does not provide any warranties at
all.
2. Your Obligations in the Event of a Warranty Claim
If a defect in the software becomes apparent, you must report this to IDEAL Software in writing without
undue delay, indicating your licence key. If you fail to report the defect without undue delay, you shall lose
the warranty claim. The notice of defects should be sent to IDEAL Software together with a description of
the defect or malfunction.
Do not send in the product before you have contacted IDEAL Software.
3. Disclaimer of Further Warranty and Liability
3.1 IDEAL Software disclaims for itself any further warranty and liability in respect of the software and
documentation, except where the defect / damage was caused by IDEAL Software with intent or by
gross negligence. In the event of loss of life, injury to body or injury to health, however, IDEAL
Software shall be liable for any negligence.
3.2 Neither IDEAL Software nor its suppliers shall be liable to pay compensation for damages
(including damages based on lost profit, operational interruption, loss of information or data and
other pecuniary losses) arising due to use of the product acquired by you or impossibility to use
this product. IDEAL Software shall not be liable for damages not normally foreseeable.
3.3 The aforementioned warranty is definitive in principle. With respect to scope, it shall be limited to
replacement of the defective storage medium or incorrect documentation. Compensation for
damages or losses over and above this shall be excluded. This shall particularly apply to lost profit,
loss of data and impossibility of use of the software as well as to indirect damages or
consequential damages caused by a defect.
3.4 IDEAL Software shall be liable, with respect to the amount, only up to the sum of the list price or
the amount actually paid, whichever amount is lower.
3.5 IDEAL Software does not give a guarantee of any kind. Conflicting terms and conditions are
invalid. Assurances or other extensions of the warranty provisions laid down here shall only be
effective, if expressly given and/or agreed upon in writing.
3.6 Claims against IDEAL Software for compensatory damages, supplementary performance,
reduction of price or cancellation of contract shall be subject to a one-year limitation period from
the time of delivery or download. The limitation period in respect of claims against IDEAL Software
shall be suspended only by express and written acknowledgement on the part of IDEAL Software.
Except where otherwise expressly specified, verbal, written or other comments by IDEAL Software
in response to complaints shall be on a goodwill basis and shall not be deemed to be negotiation
within the meaning of section 203 of the German Civil Code [BGB].
D. Other Provisions
1. Reservation of the Right to Amend and Adapt
IDEAL Software reserves the right to amend and/or adapt the Standard Terms and Conditions of Use in
accordance with the general development of the market and technology. These Terms and Conditions shall
always apply as amended at the time of the conclusion of the contract.
2. Written Form

220 • Standard Terms and Conditions of Use Virtual Print Engine -Programmer's Manual
Agreements deviating from these Standard Terms and Conditions of Use, including this clause, must be in
writing and must be signed by you and a representative of IDEAL Software.
3. Choice of Law
The entire legal relations between IDEAL Software and you shall be governed by the laws of the Federal
Republic of Germany. Except where otherwise stipulated in these explanatory notes, IDEAL Software
expressly retains all other rights.
4. Note to Consumers
If you are a consumer in the sense of section 13 of the German Civil Code [BGB], we would like to point out
the following: for distance selling businesses (contracts, which are concluded where not all contractual
parties are physically present, e.g. over the internet) you have basically the right of revocation according to
section 312d of the German Civil Code [BGB] in conjuction with section 312b. and 312c. of the German
Civil Code [BGB]. But the right of revocation does not exist according to section 312d paragraph 4 no. 2 of
the German Civil Code [BGB] for software, if the delivered data storage medias or license keys are
unsealed by the consumer. Since IDEAL Software does not ship data storage medias, but provides
instantaneously online the software and license key, this regulation does also apply to the software
obtained by you. After receipt of the software / license key you have no right for revocation.
5. Notes According to Section 312e German Civil Code [BGB] and BGB-InfoVO
5.1 If you wish to purchase online a product of IDEAL Software, the contract between you and IDEAL
Software is made (on behalf of yourself or others, e.g. for your company), when you click the
"Submit Order" button. After receipt of your order, IDEAL Software will send to your supplied e-mail
address an ordering confirmation.
5.2 After accomplishment of the contract, IDEAL Software will store the following informations:
-Name, Address, Telephone, Fax, Contact, e-mail Adresses; VAT-ID (where applicable)
-Acquired Products and Date of Purchase
Those informations are solely used for internal controlling tasks of IDEAL Software and are strictly
not available to clients.
5.3 For online orders you have the option to make corrections before the final submission. The data
you have entered is displayed before the binding order is submitted and you are asked to review
your data for possible typing and other errors and to correct them, if required.
5.4 The conclusion of the contract is made in english language.
6. Place of Performance and Jurisdiction
The place of performance and jurisdiction for all disputes arising directly or indirectly from the contractual
relationship shall be the city Neuss (Germany).
7. Severability Clause
If individual or several provisions in these "Standard Terms and Conditions of Use" are or become
ineffective or contain an omission or loophole, the parties to the contract shall enter into negotiations with
the aim of replacing or supplementing the ineffective or incomplete provision by an appropriate individual
agreement commensurate, in far as possible, with the commercial purpose of the intended provision. This
shall not affect the validity of the other provisions.

Virtual Print Engine -Programmer's Manual Allgemeine Nutzungsbedingungen • 221
13 Allgemeine
Nutzungsbedingungen
13.1 Allgemeine Nutzungsbedingungen der IDEAL
Software GmbH
Sehr geehrte Kundin,
sehr geehrter Kunde,
in den hier abgedruckten Allgemeinen Nutzungsbedingungen der IDEAL Software werden verschiedene
rechtliche Aspekte der Geschäftsbeziehung zu Ihnen geregelt. Wir haben uns bemüht, die
Nutzungsbedingungen so klar und verständlich wie möglich zu formulieren. Sollten Sie dennoch Fragen
haben, so steht Ihnen die IDEAL Software zur Beantwortung natürlich gerne zur Verfügung.
A. Vertragsgegenstand und Definitionen
Gegenstand des zwischen IDEAL Software und Ihnen geschlossenen Vertrages ist allein das von IDEAL
Software hergestellte Produkt sowie die Dokumentation zu diesem Produkt; die Dokumentation wird
ausschließlich in englischer Sprache zur Verfügung gestellt. Der Quellcode des Produkts ist nicht
Vertragsgegenstand; seine Herausgabe oder Zurverfügungsstellung wird nicht geschuldet.
Bitte beachten Sie, daß die Software ausschließlich unter den folgenden Betriebssystemen lauffähig ist:
Windows XP, 2003, Vista, Win 2008, Win 7, Win 8 / 8.1, Win 10, Win 2012 / R2
Linux Kernel 2.4.x / 2.6.x / 3.x and LibC6, X86 oder X64 Prozessoren
Mac OS X 10.4.x, X86 oder Power-PC Prozessoren
Solaris 10, Sparc 64-bit oder X86 Prozessoren
Bitte beachten Sie, daß dieser Vertrag nicht die bei Ihnen bereits vorhandene Software, wie z.B.
Betriebssystem, Drucker-oder sonstige Treiber oder Anwendungsprogramme umfaßt oder darauf
anwendbar ist.
In unseren Allgemeinen Nutzungsbedingungen gelten für die folgende Begriffe die hier genannten
Definitionen:
Produkt:
Das bzw. die Programme und/oder die Software, die von der IDEAL Software GmbH
entwickelt wurde und an der Ihnen ein Nutzungsrecht eingeräumt wird.
Nutzung:
Die dauerhafte oder vorübergehende Vervielfältigung, das Installieren, Speichern,
Laden, sich Anzeigenlassen, das Anzeigen, Laufenlassen und das Übertragen des
Produkts, ganz oder teilweise, gleich mit welc
hem Mittel und in welcher Form. Die
einzelnen zulässigen Formen der Nutzung und ihre Grenzen werden in den folgenden
Regelungen jeweils ausdrücklich aufgeführt.
SDK-Lizenz:
(Software Development Kit) Lizenz für das Produkt, die ausschließlich für die

222 • Allgemeine Nutzungsbedingungen Virtual Print Engine -Programmer's Manual
Verwendung durch Nutzer vorgesehen ist, die ihrerseits Programme entwickeln.
Runtime-Lizenz:
Nutzungsrecht zur Installation, zum Aufruf und zum Betrieb des Produkts auf dem
Datenverarbeitungssystem des Kunden eines Entwicklers (Endnutzerlizenz).
Zu
Einzelheiten siehe unten bei "Integration".
Server:
System zur elektronischen Datenverarbeitung, das für andere elektronische
Datenverarbeitungsysteme Dienste erbringt (z.B. Erstellung von Dateien, Ausdruck
von Daten, etc.).
Die folgenden Regelungen betreffen die Punkte, in welchem Umfang IDEAL Software Ihnen Rechte
einräumt, was mit der Software getan werden darf und was nicht, wie bei Problemen zu verfahren ist sowie
einige allgemeine Fragen.
B. Einräumung von Nutzungsrechten/Lizensierung
1. Einräumung von Nutzungsrechten
Das Urheberrecht an den Produkten der IDEAL Software (einschließlich der Computer Software,
assoziierter Speichermedien, gedruckter Materialien und "online" oder elektronischer Dokumentation) steht
ausschließlich der IDEAL Software zu. Die Produkte genießen den Schutz des Urheberrechtsgesetzes und
des Internationalen Urheberrechtsabkommens. Daher sind Sie verpflichtet, dieses Produkt wie jedes
andere urheberrechtsgeschützte Werk/Material zu behandeln. Die Produkte werden lizenziert, nicht
verkauft.
2. Art des Nutzungsrechts
2.1 IDEAL Software überträgt Ihnen ein einfaches, räumlich und zeitlich nicht beschränktes
unübertragbares Nutzungsrecht an der von Ihnen erworbenen Software zum Zwecke der Nutzung
durch eine Person (Nutzer/Entwickler). Die Übergabe verschiedener Speichermedien
(beispielsweise 3,5" Disketten, CD-ROM oder DVD) begründet keine Erlaubnis für eine
Mehrfachnutzung der Software.
Das einfache Nutzungsrecht berechtigt nur zur Nutzung durch eine Person (Nutzer/Entwickler);
dies gilt auch dann, wenn das Nutzungsrecht durch eine Gesellschaft oder durch eine sonstige
Personenmehrheit erworben wird. Wenn Sie das Produkt unmittelbar oder mittelbar durch mehrere
Personen (Nutzer/Entwickler) nutzen wollen, so müssen Sie für jeden Nutzer eine Lizenz
erwerben. Hierfür bietet die IDEAL Software GmbH die vergünstigte Site-Lizenz an.
Wenn der Computer, auf dem das Produkt installiert wurde, defekt wird oder aus sonstigen
Gründen nicht mehr benutzt und durch einen anderen ersetzt wird, sind Sie berechtigt, das
Produkt auf dem ersten Computer zu deinstallieren bzw. zu löschen und auf dem neuen Computer
zu installieren.
>Eine mittelbare Nutzung des Produkts liegt dann vor, wenn ein Entwickler Anweisungen
gleich welcher Art verfasst (z.B. programmiert, schreibt, oder durch eine graphische
Oberfläche eingibt), die am Ende der Verarbeitungskette in Aufrufe des Produkts münden.
Beispiele hierfür sind: Die lizenzierte Software wird in eine Zwischenschicht (z.B.
Bibliothek, Klassenbibliothek, Komponente, Control, ausführbares Programm, o.ä.)
integriert, und ein Entwickler nutzt diese Zwischenschicht und die Nutzung mündet am
Ende der Verarbeitungskette in Aufrufe der lizenzierten Software. Dazu zählt u.a. auch das
Verfassen von Steuerdateien, die von einer separaten Anwendung ausgewertet oder
interpretiert werden.
Bitte beachten Sie, daß zum Betrieb einer SDK-Version auf einem Entwickler-Server, dh. für die
Nutzung des Produkts in Ihrem Netzwerk,stets der Erwerb einer SDK Lizenz je Nutzer erforderlich
ist. Dies gilt dann nicht, wenn Sie sich für den Erwerb einer SDK-Site-Lizenz entschieden haben.
Die SDK-Site-Lizenz berechtigt Sie dazu, das Produkt in einer unbegrenzten Zahl von
Installationen und Nutzern an einer räumlich bzw. postalisch definierten Adresse zu nutzen.

Virtual Print Engine -Programmer's Manual Allgemeine Nutzungsbedingungen • 223
2.1.1 Eine Lizenz kann eine Online-Aktivierung erfordern. Die Online-Aktivierung begrenzt die Anzahl
möglicher gleichzeitiger Installationen. Zu diesem Zweck wird bei der Online-Aktivierung eine
Hardware-ID von der Hardware erzeugt, auf der die Lizenz aktiviert wird. Die Online-Aktivierung
begrenzt die Anzahl möglicher gleichzeitiger Installationen mittels der Formel: <Anzahl erworbener
Lizenzen> + 2. Haben Sie also z.B. zwei Lizenzen für das gleiche Produkt in der gleichen Version
und Edition erworben, so sind maximal vier gleichzeitige Installationen möglich. Bitte beachten Sie
jedoch, dass die Mehrfachinstallation einer Lizenz nicht zur Mehrfachnutzung berechtigt. Je Lizenz
darf nur ein Nutzer gleichzeitig mit dieser Lizenz arbeiten. Durch Deinstallation wird eine Lizenz
online deaktiviert, so dass sie anschließend auf einem anderen Rechner installiert werden kann.
2.2 Wenn Sie mit dem Erwerb einer Nutzungslizenz für ein Produkt von IDEAL Software einen
Lizenzschlüssel erhalten haben, so bewahren Sie diesen bitte gut auf.
Der Lizenzschlüssel schaltet das Produkt zur Nutzung frei. Die Übermittlung des Lizenzschlüssels
an IDEAL Software ist darüber hinaus Voraussetzung dafür, ein möglicherweise vergünstigtes
Angebot für ein Upgrade oder Update des Produktes erwerben zu können. Sie allein sind für den
Lizenzschlüssel verantwortlich. Im Falle eines Verlustes des Lizenzschlüssels oder der
Installations-Software („Setup“) des Produktes ist IDEAL Software nicht zum Ersatz verpflichtet.
Die von IDEAL Software übermittelten Lizenzschlüssel sind streng vertraulich zu behandeln und
dürfen nicht an Dritte weitergegeben werden. Wird gegen dieses Verbot verstoßen, so wird für
jeden Fall der Zuwiderhandlung eine Vertragsstrafe von EUR 10.000,-fällig. Das Recht der IDEAL
Software zur Geltendmachung von Schadensersatz bleibt unberührt.
Bei der Installation des Produktes wird zur Verifizierung automatisch eine
Lizensierungsbestätigung generiert und an IDEAL Software versandt. Die
Lizensierungsbestätigung enthält ausschliesslich eine Seriennummer und eine Hardware-ID,
jedoch keine personenbezogenen Daten und wird nicht an andere Stellen weitergegeben. Mit
Anerkennung dieser Allgemeinen Nutzungsbedingungen erklären Sie jedoch vorsorglich Ihr
Einverständnis mit der Erhebung und Speicherung dieser Lizensierungsbestätigung im Sinne des
§ 4a Abs. 1 Bundesdatenschutzgesetz.
Betreibt IDEAL Software ein Webportal, sind Sie dafür verantwortlich, die im Webportal
hinterlegten e-Mail Adressen und Zugangspaßwörter ständig aktualisiert zu halten. Wenn ein
Zugangsberechtigter aus Ihrem Unternehmen ausscheidet und mit seinen Zugangsdaten
vergünstigte Produkte bezieht, wird dieses Verhalten Ihnen als Vertragspartner der IDEAL
Software zugerechnet, dh. Sie verlieren Ihrerseits das Recht auf den (nochmaligen) Bezug der
vergünstigten Produkte.
3. Grenzen des Nutzungsrechts
Wenn zwischen Ihnen und IDEAL Software nicht ausdrücklich und schriftlich etwas anderes vereinbart
wurde, sind Sie nicht berechtigt, die Software zu ändern, bearbeiten, zu übersetzen, zu vermieten,
unterzulizensieren, im Timeshare-Verfahren zu nutzen oder elektronisch zu übertragen oder zu
empfangen; dies gilt entsprechend für die Speichermedien und für die Dokumentation.
4. Zur Relizensierung an Ihre Kunden vorgesehene/bestimmte Dateien -Runtime Lizenz
4.1 Ausgenommen von der obigen Beschränkung betreffend die Unterlizensierung (Ziff. 3) sind
folgende Dateien, für die Sie mit Kauf dieses Software-Pakets das Recht erworben haben, diese
eingebettet in Ihre Produkte an Dritte weiterzugeben. Diese Erlaubnis zur Weitergabe beinhaltet
ausschließlich die Erlaubnis zur Nutzung der genannten Dateien integriert in Ihre
Produkte/Anwendungen. Abhängig von der erteilten Lizenz und Plattform-Unterstützung sind
folgende Dateien für die Weitergabe an Ihre Kunden vorgesehen:
Windows Betriebssysteme:
vpe<?>3271.dll
vJavaScript3271.dll
IDEALSoftware.Vpe<*>.dll und IDEALSoftware.VpeWeb<*>.dll
vpejni<?>3271.dll und vpejnigui<?>3271.dll
VpeCtrl71.ocx
VPE View Setup.exe

224 • Allgemeine Nutzungsbedingungen Virtual Print Engine -Programmer's Manual
dycodoc.msi
dcdkey.exe
Mac OS X:
libvpe<?>.dylib.7.10.0 / LicenseTool
Andere Betriebssysteme:
libvpe<?>.so.7.10.0 / LicenseTool
Wobei das ? abhängig von der Edition durch folgenden Buchstaben zu ersetzen ist:
'C' für die Community Edition
'S' für die Standard Edition
'X' für die Enhanced Edition
'P' für die Professional Edition
'E' für die Enterprise Edition
'I' für die Interactive Edition
und der * abhängig von der Edition durch folgendes Wort zu ersetzen ist:
'Community' für die Community Edition
'Standard' für die Standard Edition
'Enhanced' für die Enhanced Edition
'Professional' für die Professional Edition
'Enterprise' für die Enterprise Edition
'Interactive' für die Interactive Edition
Der Begriff "Weitergabe" bedeutet: das Zurverfügungstellen einer oder mehrerer der o.g. Dateien
an Dritte und/oder das Aufrufen dieser Dateien. Diese Dateien können frei von Laufzeitlizenzen in
unbegrenzter Stückzahl verteilt werden.
4.2Sofern Sie eine Lizenz des VPE SDK Enterprise Edition erworben haben, darf dycodoc Enterprise
Edition in unbegrenzter Zahl und frei von Laufzeitlizenzen weitergegeben werden. Sofern Sie eine
Lizenz des VPE SDK Interactive Edition erworben haben, darf dycodoc Interactive Edition in
unbegrenzter Zahl und frei von Laufzeitlizenzen weitergegeben werden.
4.3Diese Lizenz gibt Ihnen das Recht, das Produkt der IDEAL Software (in Form der vorgenannten
Dateien -abhängig von der erteilten Lizenz) in Ihre Anwendungen zu integrieren und an Dritte in
dieser Form weiterzugeben. Aber diese Dritten haben kein Recht, diese Dateien an wieder andere
Dritte weiterzugeben (Sublizenzierung), gleich in welcher Form. Wenn Sie solche Bedürfnisse
haben, so wenden Sie sich bitte direkt an IDEAL Software. Sie dürfen die verteilbaren Dateien in
keiner Weise modifizieren.
4.4Für die Plattformen Solaris / OpenSolaris, AS/400, AIX: Zur Verwendung der Runtime-Lizenzen
auf Servern sind gesonderte Serverlizenzen je Server zu erwerben. Die Nutzung in Form der
Ausführung mindestens einer der o.g. Dateien im Speicher eines Servers ist ohne Serverlizenz -
unabhängig von der Anzahl der Nutzer -nicht gestattet. Sollten Sie sich für den Erwerb einer
Server Gold Lizenz entschieden haben, so gilt die in Satz 1 genannte Einschränkung nicht. Mit
Erwerb der Server Gold Lizenz sind Sie berechtigt, die in Ziff. 4.1 aufgeführten, zur Weitergabe
bestimmten Dateien an Ihre Kunden auch zur Nutzung auf beliebigen Servern weiterzugeben. Die
aktuellen Preise für Serverlizenzen finden Sie auf der Website von IDEAL Software unter
www.IdealSoftware.com.
4.5VPE View Setup.exe darf in unbegrenzter Zahl und frei von Laufzeitlizenzen weitergegeben
werden.
4.6IDEAL Software schließt im Falle der Weitergabe von Dateien jede Gewährleistung gegenüber
Dritten aus. Sie alleine sind gegenüber jedem Empfänger Ihrer Programme verantwortlich für

Virtual Print Engine -Programmer's Manual Allgemeine Nutzungsbedingungen • 225
Unterstützung, Service, Upgrades/Updates oder technischen oder sonstigen Beistand. Sie stellen
IDEAL Software und mit ihr verbundene Unternehmen und Zulieferer von jeglichen Ansprüchen
und jeglicher Haftung in Verbindung mit der Nutzung, der Vervielfältigung oder dem Vertrieb der
Programme frei und ersetzen jeden daraus resultierenden Schaden.
5. Updates / Upgrades
Soweit Sie ein Update oder Upgrade einer Software erworben haben oder erwerben, stellt dieses eine
untrennbare Einheit mit der ursprünglichen Software von IDEAL Software GmbH dar. Ein Update oder
Upgrade und die Ursprungssoftware dürfen nicht ohne schriftliche Erlaubnis von IDEAL Software auf mehr
als einem Computer zur gleichen Zeit genutzt werden.
6. Urheberbenennung / Copyrightvermerk
Wenn Sie die Software von IDEAL Software benutzen, muß Ihre Software in jedem Fall einen
Copyright-Vermerk tragen. Wenn Sie den Info-Button oder die Toolbar unsichtbar machen, oder ohne
Preview arbeiten, erklären Sie sich damit einverstanden, einen Copyright-Vermerk wie: "Virtual Print
Engine Copyright © IDEAL Software®" in Ihren "About" Dialog oder der Hilfedatei (Helpfile) oder -wenn
beides nicht vorhanden -in Ihrer Dokumentation einzufügen.
7. Integration
Das Produkt der IDEAL Software ist zur Integration in Ihre Software konzipiert. Ihre Software muß einen
signifikant abweichenden Einsatzzweck von derjenigen von IDEAL Software haben, d.h. sie darf kein
konkurrierendes Produkt darstellen, das unserem gleich oder ähnlich ist. Das Produkt darf nur zum
Drucken und zur Darstellung von Previews benutzt werden. Es dürfen nur applikationsspezifische Daten
mit dem Produkt verarbeitet werden, die unmittelbar mit Ihrer Applikation assoziiert sind, d.h. es darf keine
Universalschnittstelle zu unserem Produkt geben, mit deren Hilfe Ihre Applikation oder dessen
Endbenutzer beliebige Datenquellen (z.B. ODBC) verarbeiten können.
>Beispiele für Anwendungen, in die das Produkt nicht integriert werden darf: Report-Generatoren,
Barcode Druck Anwendungen, Grafik-Präsentations-Software, Datenbank-Engines, Universelle
Print-Server und jegliche Kombinationen dieser Produktkategorien, etc..
Das Produkt darf nicht in Programmen oder Bibliotheken verwendet werden die der Entwicklung von
Programmen dienen, sofern Endbenutzer dadurch den Inhalt oder das Layout der erstellten Dokumente
steuern können.
>Beispiele dafür sind: Software Entwicklungswerkzeuge, Software Development Kits,
Programmiersprachen, Scriptsprachen, etc..
Wenn Sie eine Software der vorgenannten Art erstellen möchten, benötigen Sie eine Spezial-Lizenz.
Setzen Sie sich hierfür bitte mit IDEAL Software in Verbindung.
Ansonsten dürfen Ihre Anwendungen mit dem Produkt Reports generieren, Barcodes drucken und
(grafische) Präsentationen erstellen.
C. Regelungen bei Leistungsstörungen
1. Gewährleistung: Art und Dauer
1.1 IDEAL Software leistet für ein Jahr nach Übergabe der Software –mit Ausnahme der VPE
Community Edition (siehe hierzu 1.4) –Gewähr dafür, daß die Speichermedien und die
Dokumentation frei von Material-und Verarbeitungsfehlern sind, und daß die Software im
wesentlichen gemäß der begleitenden Dokumentation arbeitet. Sofern Sie als Kunde Verbraucher
im Sinne des § 13 BGB sind, gilt eine Gewährleistungsfrist von zwei Jahren.
IDEAL Software übernimmt jedoch keine Gewähr für die "Fehlerfreiheit" der Software oder der
Dokumentation und steht auch nicht für das Erreichen Ihrer Standards oder für die Befriedigung
Ihrer Bedürfnisse ein. Ein die Gewährleistung begründender Mangel ist nur ein solcher, der die

226 • Allgemeine Nutzungsbedingungen Virtual Print Engine -Programmer's Manual
Funktionsfähigkeit der Software in erheblicher Weise beeinträchtigt und der von IDEAL Software
vorsätzlich oder unter Mißachtung der durchschnittlichen Sorgfalt eines ordentlichen
Programmierers verursacht wurde (einfache Fahrlässigkeit); IDEAL Software haftet mithin nicht für
leicht fahrlässig verursachte Mängel, selbst wenn diese die Funktionsfähigkeit der Software in
erheblicher Weise beeinträchtigen. Voraussetzung für jede Gewährleistung ist außerdem die
Reproduzierbarkeit des Fehlers.
1.2 Die Gewährleistung besteht nach Wahl von IDEAL Software entweder
(a) in der Rückerstattung des bezahlten Preises (Rückabwicklung) oder
(b) in der Fehlerbeseitigung oder dem Ersatz der Software, die mangelhaft ist und zusammen
mit einer Kopie Ihrer Quittung an IDEAL Software zurückgegeben wird (Nacherfüllung);
sollte diese Nacherfüllung fehlschlagen, so haben Sie das Recht, den Preis zu mindern
oder die Rückabwicklung zu verlangen.
1.3 IDEAL Software leistet keine Gewähr, wenn der Fehler bzw. Ausfall der Software auf eine
fehlerhafte Anwendung, auf Mißbrauch oder auf einen Unfall zurückzuführen ist. Für eine
Ersatz-Software leistet IDEAL Software nur für den Rest der ursprünglichen Gewährleistungsfrist
oder für 30 Tage Gewähr, wobei der längere Zeitraum maßgebend ist.
1.4 Bitte beachten Sie, daß die vorstehenden Regelungen zur Gewährleistung nicht für die kostenfrei
zur Verfügung gestellte VPE Community Edition gelten. Für Mängel der Community Edition leistet
IDEAL Software keinerlei Gewähr.
2. Ihre Obliegenheiten im Gewährleistungsfall
Tritt ein Mangel an der Software auf, so müssen Sie diesen unverzüglich schriftlich und unter Angabe Ihres
Lizenzschlüssels der IDEAL Software anzeigen. Zeigen Sie den Mangel nicht unverzüglich an, so verlieren
Sie den Anspruch auf Gewährleistung. Die Mängelanzeige soll zusammen mit einer Beschreibung des
Fehlers bzw. der Fehlfunktion an IDEAL Software geschickt werden.
Senden Sie das Produkt nicht ein, bevor Sie sich mit IDEAL Software in Verbindung gesetzt haben.
3. Ausschluß weitergehender Gewährleistung und Haftung
3.1 IDEAL Software schließt für sich jede weitere Gewährleistung und Haftung bezüglich der Software
und der Dokumentation aus, es sei denn, der Mangel/Schaden wurde von IDEAL Software
vorsätzlich oder grob fahrlässig verursacht. Im Falle einer Verletzung des Lebens, des Körpers
oder der Gesundheit haftet IDEAL Software jedoch für jede Fahrlässigkeit.
3.2 Weder IDEAL Software noch deren Lieferanten sind für Schäden (einschließlich solcher wegen
entgangenem Gewinn, Betriebsunterbrechung, Verlust von Informationen oder von Daten sowie
sonstiger Vermögensschäden) ersatzpflichtig, die aufgrund der Nutzung des von Ihnen
erworbenen Produktes oder der fehlenden Möglichkeit, dieses Produkt zu nutzen, entstehen. Für
Schäden, die bei normalem Verlauf nicht vorhersehbar sind, haftet die IDEAL Software nicht.
3.3 Die vorgenannte Gewährleistung ist dem Grunde nach abschließend. Dem Umfang nach ist sie auf
den Ersatz des fehlerhaften Speichermediums oder der fehlerhaften Dokumentation begrenzt. Der
Ersatz eines weitergehenden Schadens ist ausgeschlossen. Dies gilt insbesondere für
entgangenen Gewinn, für Datenverlust oder für fehlende Benutzbarkeit der Software sowie für
mittelbare oder Mangelfolgeschäden.
3.4 IDEAL Software haftet betragsmäßig nur bis zur Höhe des Listenpreises oder des tatsächlich
gezahlten Betrages, wobei jeweils der geringere Betrag maßgeblich ist.
3.5 IDEAL Software gibt eine Garantie, gleich welcher Art, nicht ab. Entgegenstehende Bedingungen
sind ungültig. Zusicherungen oder sonstige Erweiterungen der hier getroffenen
Gewährleistungsbestimmungen sind nur dann wirksam, wenn sie ausdrücklich und schriftlich erteilt
bzw. vereinbart werden.
3.6 Ansprüche gegen IDEAL Software auf Schadensersatz, Nacherfüllung, Minderung oder auf
Rücktritt vom Vertrag verjähren innerhalb von einem Jahr nach Übergabe bzw. nach Download.
Die Verjährung der Ansprüche gegen IDEAL Software wird nur durch ein ausdrückliches und

Virtual Print Engine -Programmer's Manual Allgemeine Nutzungsbedingungen • 227
schriftliches Anerkenntnis seitens IDEAL Software gehemmt. Mündliche, schriftliche oder sonstige
Äußerungen von IDEAL Software zu Beanstandungen erfolgen, wenn nicht ausdrücklich anders
bezeichnet, kulanzhalber und gelten nicht als Verhandlung im Sinne des § 203 BGB.
D. Sonstige Bestimmungen und Hinweise
1. Änderungs-und Anpassungsvorbehalt
IDEAL Software behält sich das Recht vor, ensprechend der allgemeinen Entwicklung des Marktes und der
Technik die Allgemeinen Nutzungsbedingungen zu ändern oder anzupassen. Diese Bedingungen gelten
stets in der Fassung, die zum Zeitpunkt des Vertragsschlusses aktuell ist.
2. Schriftform
Vereinbarungen, die von diesen Allgemeinen Nutzungsbedingungen -einschließlich dieser Klausel -
abweichen bedürfen der Schriftform und müssen von Ihnen und einem Vertreter von IDEAL Software
unterzeichnet sein.
3. Rechtswahl
Für die gesamten Rechtsbeziehungen zwischen IDEAL Software und Ihnen gilt das Recht der
Bundesrepublik Deutschland. Mangels abweichender Regelung in diesen Erläuterungen behält sich IDEAL
Software alle weiteren Rechte ausdrücklich vor.
4. Hinweis für Verbraucher
Sollten Sie Verbraucher im Sinne des § 13 BGB sein, möchten wir Sie auf folgendes hinweisen:
Grundsätzlich steht Ihnen bei sogenannten Fernabsatzgeschäften (Verträgen, die nicht bei gleichzeitiger
körperlicher Anwesenheit aller Vertragsparteien zustandekommen, sondern zB. über das Internet) ein
Widerrufsrecht gemäß § 312d BGB in Verbindung mit §§ 312b. und 312c. BGB zu. Das Widerrufsrecht
besteht jedoch gemäß § 312d Abs. 4 Nr. 2 BGB nicht für Software, sofern die mitgelieferten Datenträger
bzw. Lizenzschlüssel von dem Verbraucher entsiegelt worden sind. Da die IDEAL Software Ihnen keinen
Datenträger, sondern online sogar unmittelbar die Software und einen Lizenzschlüssel zur Verfügung stellt,
gilt diese Bestimmung auch für die von Ihnen erworbene Software. Nach Erhalt der Software / des
Lizenzschlüssels steht Ihnen also kein Widerrufsrecht zu.
5. Mitteilungen nach § 312e BGB und nach der BGB-InfoVO
5.1 Wenn Sie ein Produkt der IDEAL Software online erwerben möchten, kommt der Vertrag zwischen
Ihnen und IDEAL Software dadurch zustande, daß Sie (für eigene oder fremde Rechnung, zB. für
Ihr Unternehmen) den "Bestellen"-Button betätigen. Nach Zugang Ihrer Bestellung schickt Ihnen
IDEAL Software an die von Ihnen angegebene e-Mail Adresse eine Bestellungsbestätigung.
5.2Nach Zustandekommen des Vertrages werden von IDEAL Software folgende Informationen
gespeichert:
-Name, Anschrift, Telefon, Fax, Ansprechpartner, e-Mail Adressen; ggf. USt-ID
-erworbene Produkte und Kaufdatum
Diese Informationen dienen ausschließlich internen Controllingzwecken der IDEAL Software und
stehen ihren Kunden grundsätzlich nicht zur Verfügung.
5.3 Bei einer Online-Bestellung steht Ihnen vor der endgültigen Bestellungsbestätigung eine
Korrekturmöglichkeit zur Verfügung. Der von Ihnen eingegebene Text wird vor verbindlicher
Bestellung wiedergegeben und Sie werden aufgefordert, ihn auf eventuelle Eingabefehler
durchzusehen und diese ggf. zu korrigieren.
5.4 Der Vertragsschluß erfolgt in deutscher Sprache.

228 • Allgemeine Nutzungsbedingungen Virtual Print Engine -Programmer's Manual
6. Erfüllungsort und Gerichtsstand
Erfüllungsort und Gerichtsstand für alle sich aus dem Vertragsverhältnis unmittelbar oder mittelbar
ergebenden Streitigkeiten ist Neuss.
7. Salvatorische Klausel
Sollten einzelne oder mehrere Bestimmungen dieser "Allgemeinen Nutzungsbedingungen" unwirksam sein
oder werden oder eine Regelungslücke enthalten, so verpflichten sich die Vertragsparteien, in
Verhandlungen mit dem Ziel einzutreten, die unwirksame oder unvollständige Bestimmung durch eine
angemessene Individualabrede zu ersetzen oder zu ergänzen, die dem wirtschaftlichen Zweck der
gewollten Regelung weitestgehend entspricht. Die Gültigkeit der übrigen Bestimmungen bleibt davon
unberührt.

Virtual Print Engine -Programmer's Manual Acknowledgements and Copyrights • 229
14 Acknowledgements and
Copyrights
14.1 Acknowledgements and Copyrights
VPE uses source code of ZLIB, written by Jean-Loup Gailly & Mark Adler.
Enhanced Edition and higher:
VPE uses for one-dimensional barcodes the BarVision Barcode Library (C)1996-2007 licensed
from the author Dipl. Ing. Bernd Herd Software Entwicklung, http://www.herdsoft.com.
VPE uses the FreeImage open source image library. See http://freeimage.sourceforge.net for
details. FreeImage is used under the license FIPL, version 1.0.
VPE uses LibPNG, Copyright (c) 1998-2006 Glenn Randers-Pehrson, Copyright (c) 1996-1997
Andreas Dilger, Copyright (c) 1995-1996 Guy Eric Schalnat, Group 42, Inc.
VPE uses LibTIFF, Copyright (c) 1988-1997 Sam Leffler, Copyright (c) 1991-1997 Silicon
Graphics, Inc.
VPE uses LibMNG, written by Gerard Juyn.
This software is based in part on the work of the Independent JPEG Group.
Enterprise Edition and higher:
VPE uses SpiderMonkey, licensed under the terms of the Mozilla Public License Version 1.1.
15 Index
6
64-bit Development 3
A
Accessing Controls 187
Acknowledgements and Copyrights 229
Advanced Dynamic Positioning 41
Advanced Programming 174, 188
Allgemeine Nutzungsbedingungen der IDEAL
Software GmbH 221
Analysing and Modifying Templates by Code 165
Analysing and Modifying the Layout Structure 165
Analysing the DataSource Structure 167
asp.net 1
Assembling VPE Document Files 138
Assigning Styles and Properties to Objects 31
AUTO_BREAK_FULL 44
AUTO_BREAK_NO_LIMITS 44
AUTO_BREAK_OFF 44
AUTO_BREAK_ON 44
AutoBreakMode 44
Automatic Text Break 44
Aztec 109
B
b 69
b0 69
Barcodes (1D) 71
Barcodes (2D) 103
Base 14 Post Script Fonts 134
Basic Structure of the Binaries 199
Basics 21
bin 7
BLACK 62
blue 67
BLUE 62
BLUEGREEN 62
BROWN 62
Build-In Color Table 62
Build-In Paragraph Setting 63
Build-In Paragraph Setting: RTF Auto Page Break 63
Built-In Font Table 61
bullet 68
C
C 1, 7
C# 1
calibrating 132
cb 69
cbuilder 1
centimeter 21
cf 69
Character Processing 68
Character Properties 69
Checkbox 175
CMYK 193
Codabar 90
Code 11 91
Code 2 of 5 Industrial 81
Code 2 of 5 Interleaved 80
Code 2 of 5 Matrix 82
Code 39 (3 of 9) 73
Code 39 extended (3 of 9 extended) 74
Code 93 (9 of 3) 75
Code 93 extended 76
CODE A 77
CODE B 77
CODE C 77
Code-128 77
Code-128 and GS1-128 / EAN-128 / UCC-128 77
Color Space 193
Color Table 67
COLOR_ 126
COLOR_BLUE 126
COLOR_BLUEGREEN 126
COLOR_BROWN 126
COLOR_CYAN 126
COLOR_DKBLUE 126
COLOR_DKGRAY 126
COLOR_DKGREEN 126
COLOR_DKORANGE 126
COLOR_DKPURPLE 126
COLOR_DKRED 126
COLOR_DKYELLOW 126
COLOR_GRAY 126
COLOR_GREEN 126
COLOR_HIBLUE 126
COLOR_HIGREEN 126
COLOR_LTBLUE 126
COLOR_LTGRAY 126
COLOR_LTGREEN 126
COLOR_LTLTBLUE 126
COLOR_LTORANGE 126
COLOR_LTRED 126
COLOR_LTYELLOW 126
COLOR_MAGENTA 126
COLOR_OLIVE 126
COLOR_ORANGE 126
COLOR_PURPLE 126
COLOR_RED 126
COLOR_WHITE 126
COLOR_YELLOW 126
Color-Table structure 59
colortbl 67
COM Licensing Mechanism 202
Community Edition 16
compression 138
control symbol 68
Controlling RTF from VPE -`Easy RTF' 60
Correcting Possible Misaligned Printer Output 132
Creating Interactive Templates With dycodoc 176
CYAN 62
D
Data Matrix 104
Data Source Object -TVPEDataSource 149
DCD 1, 7
dcdkey 204
deftab 70
delphi 1
Demo Source Codes 3
demos 1
deploy 1, 7
deploy/libvpe<?>. 7
DKBLUE 62
DKGRAY 62
DKGREEN 62
DKORANGE 62
DKPURPLE 62
DKRED 62
DKYELLOW 62
doc 7
Dumping a Template 152
dycodoc Template Processing 144
dylib.7.10.0 7
Dynamic Positioning 33, 34
Dynamic Text 35
E
EAN -(European-Article-Numbering) 83
EAN-128 77
EAN-13 83
EAN2 Addon 83
EAN-2 and EAN-5 Add-On Codes for EAN and UPC
87
EAN5 Addon 83
EAN-8 83
Editing VPE Document Files 139
Embedded Flag-Setting 122
Embedded Images 192
emdash 68
endash 68
Enhanced Edition 17
Enterprise Edition 19
Example 177
Example: Enabling and Disabling Controls 187
Exchanging Values With Controls 184
F
f 67, 69
FAQ 207
Faxing Documents with the MailDoc() Method 143
fcharset 67
Features of VPE 56
fi 70
Field Object -TVPEField 150
FNC1 77
FNC2 77
FNC3 77
FNC4 77
Font Substitution 136
Font Table 67
Fonts and Font Handling 133
Font-Table structure 59
fonttbl 67
FormFields 110
fs 69
G
General 58
Generating a Document while the Preview is open 116
Global Structure 58
GRAY 62
green 67
GREEN 62
GS1-128 77
H
Headers and Footers 117
hex encoded text char 68
HIBLUE 62
highlight 69
HIGREEN 62
How is the Windows System Directory affected by
SETUP? 3
How TAB-and Group ID's are resolved 188
HTML Export Introduction 194
HTML Export Options 195
HTML Export Restrictions 194
I
i 69
i0 69
IDEAL Software GmbH's Standard Terms and
Conditions of Use 214
Identcode Deutsche Post 98
If You Need Technical Assistance 212
Image Cache 51
Image Type Identification 51
images 1, 7
imp_libs 1
Important Note 162
Important Note About Pens, Lines, Frames, Circles
and Ellipses 114
Important Note for VPE-VCL Users 163
inch 21
include 7
Inserting (dumping) a Template at a specific position
in a VPE Document 174
Installation 1, 7
Installing Different Versions Or Editions 3
Installing the VPE -ActiveX 4
Installing the VPE .NET Component 3
Installing the VPE ActiveX -The Demo Banners Are
Still Shown 202
Installing The VPE ActiveX On Target Machines 202
Installing the VPE VCL for RAD Studio / Delphi /
C++ Builder 5
Intelligent Mail 94
Interactive 175
Interactive Documents 175
Interactive Edition 19
Interactive FormField 175
Interactive Text 175
Internet 2
Introduction 21
Introduction to RTF 58
ISBN (International Standard Book Number) 97
ISO-8859-1 133
ISO-8859-10 133
ISO-8859-11 133
ISO-8859-13 133
ISO-8859-14 133
ISO-8859-15 133
ISO-8859-2 133
ISO-8859-3 133
ISO-8859-4 133
ISO-8859-5 133
ISO-8859-6 133
ISO-8859-7 133
ISO-8859-8 133
ISO-8859-9 133
J
Justified Text Alignment of the last Paragraph 66
K
keep 70
keepn 70
Keyboard Accelerators 189
Known Problems 211
L
ldblquote 68
Leitcode Deutsche Post AG 100
li 70
libvpe<?> 7
LicenseTool 7
line 68
Line-and Page Breaks not 100% the same compared
to the RTF Editor 66
lquote 68
LTBLUE 62
LTGRAY 62
LTGREEN 62
LTLTBLUE 62
LTORANGE 62
LTRED 62
LTYELLOW 62
M
Macintosh 133
MAGENTA 62
Making a Decision, Which Type of Font to Use 137
Manual Creation of Complex Headers and Footers
118
MaxiCode 107
Memory Streams 53, 139
misaligned 132
Modifying the VPE Document 170
Modifying VPE Objects in a Document 158
Modifying VPE Objects in a Template 157
Module Dependencies 197
MSI Barcode 92
Multipage Documents 116
Multi-Threading 121
N
n 68
nBottom 41
nBottomMargin 39, 41
nHeight 41
nLeft 41
nLeftMargin 39, 41
nokeep 70
nokeepn 70
Non-Windows Installation 7
Note for VPE-DLL Users 163
Note on Source Codes Shipped with VPE 21
Notes, Hints and Tips 188
nowidctlpar 70
nRight 41
nRightMargin 39, 41
nTop 41
nTopMargin 39, 41
nWidth 41
O
Objects Marked As Non-Printable 193
OLIVE 62
On-Disk Document Files 141
ORANGE 62
orderinf.html 1, 7
Overloading Mechanism 65
Overview 14
P
page 68
Page Margins 38
pagebb 68
par 68
Paragraph Properties 70
pard 70
Path-and File Names in Templates 169
PDF Export Introduction 190
PDF/A 191
PDF417 108
PDFA 191
Pictures 48
Pictures and VPE Document Files 140
plain 69
pntext 70
Positioning On the Printer 131
Postnet -Postal Numeric Encoding Technique 95
Predefined Color Constants 126
Preview 24
Printer Control 128
Printer Setup 128
Printer Troubleshooting 209
Printing Exported HTML Documents 195
Printing From A Service Like IIS (Internet
Information Server) 130
Professional Edition 18
ProgrammersManual.chm 1
ProgrammersManual.pdf 7
Progress 2
Providing the Data 145
PURPLE 62
PZN (Pharma Zentral Nummer) Code 102
Q
qc 70
qj 70
ql 70
qr 70
QR Code 106
R
r 68
Radiobutton 175
rdblquote 68
ReadDoc 138
red 67
RED 62
Redistribution of VPE View 203
Relaxed structure 61
relnotes.html 1, 7
Remarks 55
Rendering Objects 42
Restrictions 192
RGB 193
ri 70
RM4SCC -Royal Mail 4 State Customer Code 96
Rotation of Text, Images and Barcodes 46
rquote 68
RTF -Rich Text Format 56
RTF Demo Source Code 65
RTF Properties processed by VPE 67
S
sa 70
sb 70
SC 0 83
SC 1 83
SC 2 83
SC 3 83
SC 4 83
SC 5 83
SC 6 83
SC 7 83
SC 8 83
SC 9 83
Scale-to-Gray Technology 54
Scaling 50
sect 68
Server Licenses 201
Simulating Buttons, Listboxes and Comboboxes 189
sl 70
so.7.10.0 7
Some Notes About VPE and RTF 66
Sophisticated Device Control 130
special escaped text char 68
Standards 143
Summary 156
System Requirements 1
T
tab 68
Telepen-A 93
Template Object -TVPETemplate 148
Template Page Object -TVPETemplatePage 148
Template Processing Tutorial 151
Template Structure 147
The <page> of <total pages> technique 117
The Basic Conception -Absolute Coordinates 33
The Demo VPEDEMO.EXE 20
The Focus 183
The GUI is themeable 27
The inheritance order is 30
The Object-Oriented Style 29
The structure of the body: 60
The Tab-Index 183
Tips 205
Transparent Backgrounds 193
True-Type / OpenType Fonts 135
tx 70
U
UCC-128 77
UDO's and VPE Document Files 140
ul 69
ul0 69
ulnone 69
Unicode 115
uninstal.exe 1
uninstal.inf 1
uninstall 7
Uninstalling VPE on Non-Windows Platforms 8
UPC (Universal Product Code) 88
Using Alternative Dividers 112
Using BLOB's or other Temporary Images / Memory
Streams 53
Using Events For Interaction 186
Using FormFields 111
Using Interactive Templates With VPE 177
Using the Authenticity Key 172
Using the PDF Export Module 192
Using the VPE DLL / Shared Object 22
V
v 69
Validating the Template Authenticity Key 171
vb 2
vb net 2
VBOTTOM 34
VBOTTOMMARGIN 39
VCHARSET_DEFAULT 133
VCHARSET_ISO_ARABIC 133
VCHARSET_ISO_CYRILLIC 133
VCHARSET_ISO_GREEK 133
VCHARSET_ISO_HEBREW 133
VCHARSET_ISO_LATIN_1 133
VCHARSET_ISO_LATIN_2 133
VCHARSET_ISO_LATIN_3 133
VCHARSET_ISO_LATIN_4 133
VCHARSET_ISO_LATIN_5 133
VCHARSET_ISO_LATIN_6 133
VCHARSET_ISO_LATIN_7 133
VCHARSET_ISO_LATIN_8 133
VCHARSET_ISO_LATIN_9 133
VCHARSET_ISO_THAI 133
VCHARSET_MAC_ROMAN 133
VCHARSET_SYMBOL 133
VCHARSET_WIN_ANSI 133
VCHARSET_WIN_ARABIC 133
VCHARSET_WIN_BALTIC 133
VCHARSET_WIN_CYRILLIC 133
VCHARSET_WIN_EAST_EUROPE 133
VCHARSET_WIN_GREEK 133
VCHARSET_WIN_HEBREW 133
VCHARSET_WIN_THAI 133
VCHARSET_WIN_TURKISH 133
VCHARSET_WIN_VIETNAMESE 133
VFF_ 111
VFF_FLAG_ALT_FIRST 112
VFF_FLAG_ALT_LAST 112
VFF_FLAG_AUTO_FONTSIZE 112
VFF_FLAG_DIV_FIRST 112
VFF_FLAG_DIV_LAST 112
VFF_STYLE_1_1 111
VFF_STYLE_1_2 111
VFF_STYLE_1_3 111
VFF_STYLE_1_4 111
VFF_STYLE_2_3 111
VFF_STYLE_3_4 111
VFREE 34
Video Troubleshooting 210
VLEFT 34
VLEFTMARGIN 39
VPE Control (.NET / ActiveX / VCL) 9
VPE Control (Java) 10
VPE Control Reference.chm 1
VPE DLL on Windows 12
VPE DLL Reference.chm 1
VPE DLL Reference.pdf 7
VPE Document Files 138
VPE Document Files of Different Editions 139
VPE In Short (all Editions) 15
VPE knows the following objects: 29
VPE Object -TVPEObject 149
VPE Object Processing 157
VPE Shared Object / Dylib 13
VPE View: The Document Viewer 142
Vpe*.dll 1
vpe.jar 1
vpe<?>3271.dll 1
VpeCtrl71.dep 1
VpeCtrl71.ocx 1
VpeGet 41
vpegui.jar 1
vpejni<?>3271.dll 1
vpejnigui<?>3271.dll 1
VpeSet 41
vpeview.exe 1
VpeWeb*.dll 1
VRIGHT 34
VRIGHTMARGIN 39
VTOP 34
VTOPMARGIN 39
W
Watermarks 120
When to use RTF and when to avoid it 66
WHITE 62
widctlpar 70
Windows Installation 1
WingDings 133
WriteDoc 138
WYSIWYG 131
Y
YELLOW 62
Z
ZLIB 229
Zoom-Tool 24
z-order 120
