Programming Guide
ProgrammingGuide
ProgrammingGuide
ProgrammingGuide
ProgrammingGuide
ProgrammingGuide
User Manual:
Open the PDF directly: View PDF ![]() .
.
Page Count: 43
- Introduction
- Using SEXTANTE algorithms
- Programming geoalgorithms
- Developing bindings
- Setting up Eclipse to work with SEXTANTE and gvSIG

SEXTANTE Programming Guide
V´ıctor Olaya
Edition 1.0 — Rev. December 19, 2011

ii
SEXTANTE Programming Guide
Copyright c
2008 Victor Olaya
Edici´on 1.0
Rev. December 19, 2011
Permision is granted to copy, distribute and modify this work according to the terms of the Cre-
ative Common Attritution license under which it is distributed. More information can be found at
www.creativecommons.org. License applies to the text, as well as to the images created by the author,
which are all the ones contained in this text except when otherwise stated.
This text can be downloaded in several formats, including editable ones, at http://www.sextantegis.
com.

Contents
1 Introduction 1
1.1 Introduction...................................... 1
1.2 GettingSEXTANTE................................. 1
1.3 The architecture of SEXTANTE . . . . . . . . . . . . . . . . . . . . . . . . . . 2
2 Using SEXTANTE algorithms 5
2.1 Introduction. Initial settings . . . . . . . . . . . . . . . . . . . . . . . . . . . . . 5
2.2 Executing a geoalgorithm . . . . . . . . . . . . . . . . . . . . . . . . . . . . . . 6
3 Programming geoalgorithms 11
3.1 Introduction. Initial settings . . . . . . . . . . . . . . . . . . . . . . . . . . . . . 11
3.2 The GeoAlgorithm class. Creating a geoalgorithm . . . . . . . . . . . . . . . . 12
3.2.1 Defining the characteristics of the algorithm . . . . . . . . . . . . . . . . 12
3.2.2 Implementing the process . . . . . . . . . . . . . . . . . . . . . . . . . . 20
3.3 Anotherexample ................................... 25
3.4 More about raster output characteristics . . . . . . . . . . . . . . . . . . . . . . 28
3.5 More about vector output characteristics . . . . . . . . . . . . . . . . . . . . . . 29
3.6 Usingtemporarylayers................................ 29
3.7 Deploying and using the algorithm . . . . . . . . . . . . . . . . . . . . . . . . . 29
3.8 Internationalization.................................. 30
3.9 Calling geoalgorithms from another geoalgorithm . . . . . . . . . . . . . . . . . 30
4 Developing bindings 33
4.1 Introduction...................................... 33
4.2 Bindingthedatamodel ............................... 33
4.3 Using SEXTANTE graphical elements . . . . . . . . . . . . . . . . . . . . . . . 34
5 Setting up Eclipse to work with SEXTANTE and gvSIG 37
5.1 Introduction...................................... 37
5.2 SettingupgvSIG................................... 37
5.3 SettingupSEXTANTE ............................... 37
5.4 Developing and testing your algorithms . . . . . . . . . . . . . . . . . . . . . . 38
iii
iv CONTENTS

Chapter 1
Introduction
1.1 Introduction
SEXTANTE is a platform for geospatial analysis which makes it easy to implement and use
geoalgorithms. This programming guide is targeted at programmers who want to incorpo-
rate SEXTANTE–based capabilities into their sofware, and also at those who would like to
implement new algorithms using the SEXTANTE framework.
To follow this guide, you must have a basic knowledge of the Java programming language.
Knowledge of fundamental GIS concepts is also assumed. Examples are based on the Eclipse
IDE, but they can be easily adapted to other development environments.
It is recommended to read the Introduction to SEXTANTE document before reading this
text. It can be downloaded from the same website from which you downloaded this guide.
Basic ideas about SEXTANTE are covered on that text and will not be included here.
1.2 Getting SEXTANTE
Whether you want to add new algorithms to the SEXTANTE library or use those geoalgo-
rithms already developed, you need to have SEXTANTE and add it to your project. From
the SEXTANTE website you can download binary files, and the source code is available via
the SVN repository. Using binary files is recommended, unless, of course, you want to extend
the library and add new features (not necessarily new algorithms).
The zip file that can be downloaded from the SEXTANTE website contains a folder named
core which includes the following jar files. A short description of each of them is given, in
order to explain the role it plays.
•Base SEXTANTE files: these constitute the minimum set of files that you have to add
to your project if you want to work with SEXTANTE.
–sextante.jar: SEXTANTE core classes.
–jts-1.12.jar Java Topology Suite library, used to handle vector geometries.
–jcommons-1.0.0.jar: Base elements for the JFreeChart library.
–jfreechart-1.0.1.jar: JFreeChart library, used for generating charts as output
of geoalgorithms.
–kxml2.jar. XML library.
–libMath.jar. Additional SEXTANTE library for mathematical operations.
1
2CHAPTER 1. INTRODUCTION
•Geoalgorithms: sextante algorithms.jar.
•Graphical elements and dependencies.
–sextante gui.jar: SEXTANTE GUI elements.
–jgraph.jar. Used for the graphical modeler interface.
–japura-1.14.0.jar. Graphical components for paramaters dialogs
–bsh-2.0b4.jar. Bean Shell, used for the command–line interface.
–Other libraries used by GUI elements.
•Additional files for particular geoalgorithms (all the remaining files).
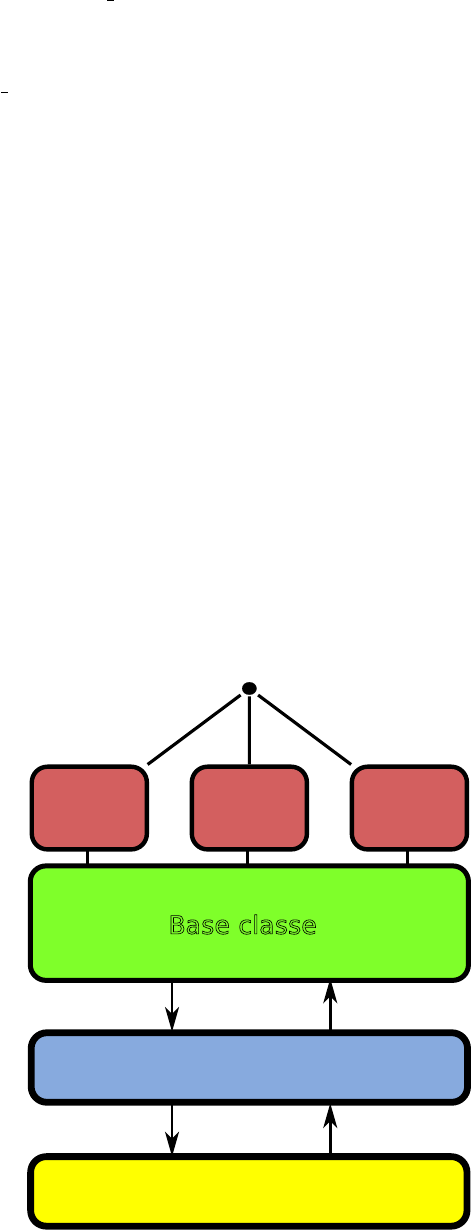
1.3 The architecture of SEXTANTE
Before doing any programming, it is important to understand the architecture of SEXTANTE
and the main elements that comprise it. There are three basic components:
•A set of base classes which define a process API
•A set of algorithms based on those classes.
•Bindings that connect algorithms with data sources.
This can be summarized in the following picture:
Bindings
Base classes
Geoalgorithms
Data
Data bindings are the mechanism used by SEXTANTE to conect the algorithms to differ-
ents data sources. Using this, SEXTANTE can run on many different GIS and can provide
geospatial analysis capabilities to different applications, regardless of the data model they
1.3. THE ARCHITECTURE OF SEXTANTE 3
use. Some applications are based on popular geodata libraries such as GeoTools, while others
have their own classes for accesing data files in both raster and vector format. In any case,
SEXTANTE algorithms can be used, as long as bindings between the SEXTANTE data model
and the data model used in the application exist.
In this programming guide we will see how to use some of the existing bindings, as well as
how to create your own ones for your particular application.
SEXTANTE provides three base interfaces that have to be implemented to allow the
algorithms to access the data:
•IRasterLayer
•IVectorLayer
•ITable
This interfaces provides the most common methods that are needed to access data objects
(for example, getting the value at a given cell in a raster layer, or a geometry from a vector
layer) or create new ones (like setting the value at a given cell or adding a new geometry).
These interfaces are designed to be simple and to contain just the basic methods needed for
performing analysis, and are not designed as general interfaces for those data types.
SEXTANTE itself does not provide any independent implementation of those interfaces.
That means that, if you do not rely on a geodata access library, you cannot run SEXTANTE
algorithms, because you are not going to have a way of opening data files and creating data
objects.
Bindings are just wrappers for your data objects, and SEXTANTE accesses data through
them. In this programming guide we will use the GeoTools bindings for the examples, which
are available for download from the SEXTANTE website and also from the SVN repository
(in the jar file the you have downloaded form the SEXTANTE website you will find a folder
named bindings, which includes several bindings, among them the ones to be used with the
GeoTools library). That means that you have to use GeoTools to access data sources, and
once you have a Java object representing some data element, wrap it with the corresponding
SEXTANTE binding, so SEXTANTE algorithms can make use of that data element.
In the next chapter we will see more about bindings and how to use them.
Regarding base classes, it is necessary to have a good understanding of them if you want
to implement your own geoalgorithms, but not if you just want to use any of the algorithms
already developed. Development of new algorithms is covered in chapter ??.
4CHAPTER 1. INTRODUCTION

Chapter 2
Using SEXTANTE algorithms
2.1 Introduction. Initial settings
You can use SEXTANTE geoalgorithms from your application with just a few lines of code.
This chapter covers how to use individual algorithms and execute them programmatically,
whether from a GIS application or any other application that needs to perform some kind of
geospatial analysis.
Don’t forget that SEXTANTE also contains graphical elements that can also be integrated
into a GIS, incorporating the necessary tools to call geoalgorithms from a graphical user
interface. Chapter ?? covers this topic and shows in detail how to integrate these elements
into a GIS. Although those graphical components will take care of calling geoalgorithms and
handling their results (which is what we are going to see in this chapter), reading this chapter
is recommended before moving to chapter ??, since it introduces the fundamental ideas that
have to be known before doing any integration with those SEXTANTE elements.
To work through the examples of this chapter you need to follow the following steps to
configure you workspace.
First, make sure that your system fulfills the following requirements:
•It has a Java 1.6.0 SDK installed 1.
•JAI2and JAI Image I/O3libraries are installed on this SDK.
Now, create a new workspace in Eclipse and do the following
•Check out the geotools bindings folder from the sextante lib/bindings folder in the
SEXTANTE SVN as a new project in Eclipse. This will download the bindings between
SEXTANTE and GeoTools 2.7 and create a project named geotools bindings. You
can download these bindings also in a jar file from the SEXTANTE website, but in this
case we will use the source code directly, since it contains some examples that will be
useful and that we will analyze in this chapter.
•Download the SEXTANTE core files and put them in a folder named lib/sextante, also
in the geotools bindings folder. In the zip file you will also find a folder named bind-
ings/geotools. Here is where you can find the jar file with the bindings between SEX-
TANTE and GeoTools, but, as it has been said, we will not use them.
1http://java.sun.com/javase/downloads/index_jdk5.jsp
2https://jai.dev.java.net/binary-builds.html
3https://jai-imageio.dev.java.net/binary-builds.html
5
6CHAPTER 2. USING SEXTANTE ALGORITHMS
•Download GeoTools 2.7 from the GeoTools website4. Put all the jar files in a folder
named lib/geotools-2.7.0, in the geotools bindings folder. The geotools bindings project
has SEXTANTE 0.6 jar files and GeoTools jar files already included in its build path. If
you are using a different version of SEXTANTE or GeoTools, or you have put those files
in a different folder, you will have to change the build path and add the corresponding
files instead of the ones already added.
•Refresh the geotools bindings project in your Eclipse IDE.
Once you have done this, you already have SEXTANTE, GeoTools and the bindings to
link both of them, and also a few examples that we will soon review. Data needed to run this
examples can be downloaded from the SEXTANTE website in a single zip file.
Do not worry if you are not familiar with GeoTools, since we are not going to get deep
into it. If you are an advanced GeoTools user, you will be able to make a better use of the
library to access your data sources, but if not, the examples just use a few methods that are
easy to understand, and are primarily focused on using SEXTANTE, so you should have no
problems at all.
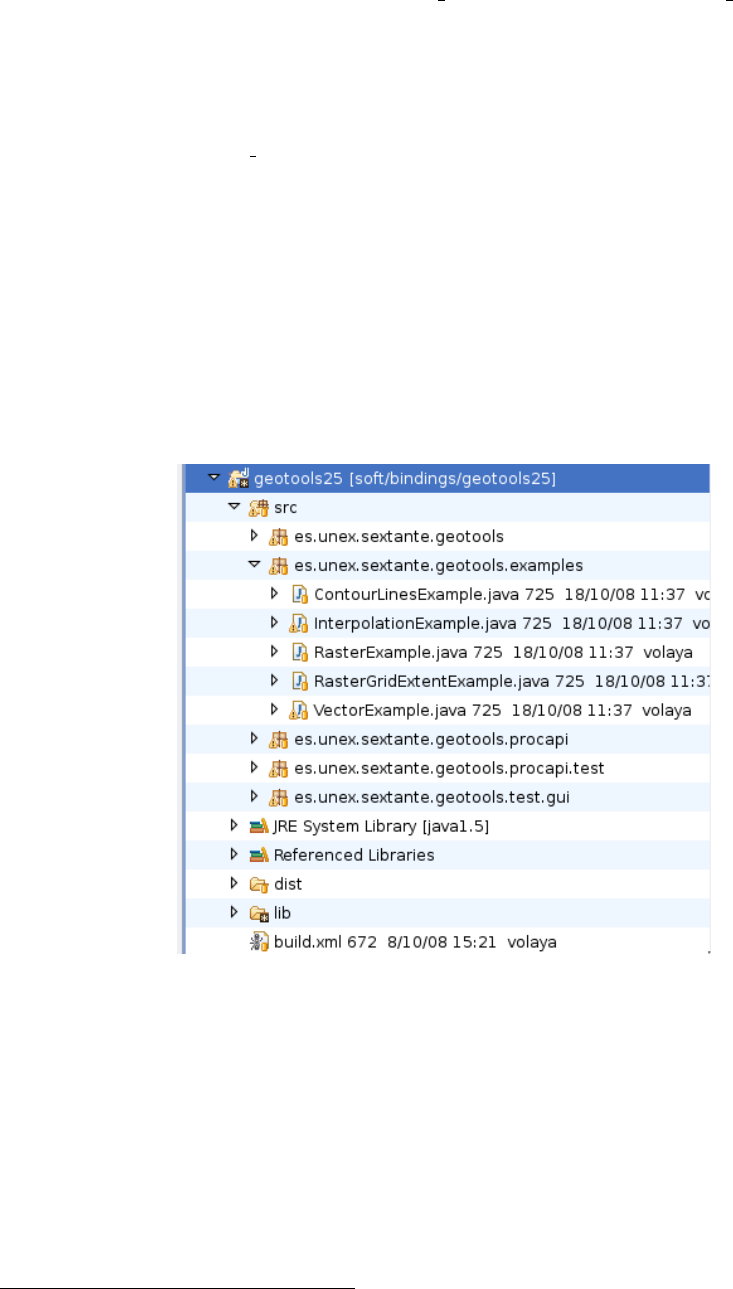
Examples are located in the es.unex.sextante.geotools.examples package.
2.2 Executing a geoalgorithm
Let’s open the file named VectorExample.java. This example will open a shapefile con-
taining lines and convert them into points using the Lines to equispaced points algorithm in
SEXTANTE. The code of the example is fully commented, but for the sake of space we will
not copy comments here, but just the fundamental code snippets, showing the main steps that
have to be followed to execute a SEXTANTE geoalgorithm.
Here is what you have to do:
•Initialize the library. That will load the algorithms and start the text engine.
4http://geotools.codehaus.org
2.2. EXECUTING A GEOALGORITHM 7
Sextante.initialize();
•Wrap you data objects. All data objects used by SEXTANTE (whether as input or
as output) must implement the interfaces that were mentioned in the previous chapter.
SEXTANTE does not provide a stand–alone implementation of those interfaces, so you
have to rely on some geodata library. As it has been said, we will use GeoTools as our
data access library.
Let’s assume that we have a vector layer in a GeoTools DataStore (In the example, this
is done in the openShapefile() method). SEXTANTE cannot understand that object,
so we have to wrap it before passing it to the geoalgorithm. The GeoTools bindings
include a class named GTVectorLayer, which wraps a DataStore and implements the
IVectorLayer interface.
DataStore ds = ...;
GTVectorLayer layer =GTVectorLayer.createLayer(ds, ds.getTypeNames()[0]);
ADataStore might contain several layers, and this method takes the first layer from the
DataStore. The inner base object is not really the DataStore itself, but a FeatureStore.
layer is already an object we can use. We do not need more layers for this example, so
let’s do something with that layer.
We create an instance of the algorithm we want to use, in this case an algorithm that
converts a line layer into a layer of equispaced points.
LinesToEquispacedPointsAlgorithm alg = new LinesToEquispacedPointsAlgorithm();
•Set the input parameters. These parameters can be layers (there we will use the
GTVectorLayer that we have created), or simple values such as string or numerical
ones. In this case we need to set an input layer and a distance between points.
ParametersSet params = alg.getParameters();
params.getParameter(LinesToEquispacedPointsAlgorithm.LINES)
.setParameterValue(layer);
params.getParameter(LinesToEquispacedPointsAlgorithm.DISTANCE)
.setParameterValue(new Double(5000));
The ParametersSet class represents a parameter container, and each algorithm has an
object of this class that you can get using the getParameters() method.
•Create an output factory. Output factories tell SEXTANTE how to create new data
objects. These new data object will also implement the corresponding SEXTANTE
interfaces (that means that, for instance, a vector layer will implement the IVectorLayer
interface that we already know).
Once again, SEXTANTE does not provide a standalone output factory, but there are
several ones already developed, each one of them based on some geodata library. The
GTOutputFactory included in the GeoTools binding generates objects based on GeoTools
data objects.
OutputFactory outputFactory = new GTOutputFactory();
8CHAPTER 2. USING SEXTANTE ALGORITHMS
Using this factory means that the algorithm will create wrapped GeoTools objects as
output layers.
•Set the output filenames. The outputs generated by the algorithm using the output
factory are file–based (particularly, in this case it generates shapefiles), so a filename is
needed. If you don’t set one, the output factory will create a temporary filename. Some
output factories might not use that filename, for example if they store everything in
memory.
OutputObjectsSet outputs = alg.getOutputObjects();
Output contours = outputs.getOutput(LinesToEquispacedPointsAlgorithm.RESULT);
contours.setFilename("/home/my_user_name/points.shp");
•Execute the algorithm. We pass the output factory to the algorithm, so it knows how
to create the resulting objects. The first parameter is an object implementing the
ITaskMonitor interface, used to monitor the activity of the algorithm. If we pass a null
value, then it will use a silent monitor. SEXTANTE provides a DefaultTaskMonitor
as well, which just shows a simple Java progress monitor with a cancel button.
alg.execute(null, outputFactory);
•Get the results. The OutputObjectsSet class used to retrieve the outputs and set the
filename for each of them (see last point) can be used to get the resulting data as well.
The Output object that we retrieved contained a null object then, but now it should
have been replaced by a valid output object.
IVectorLayer result = (IVectorLayer) contours.getOutputObject();
Since we used aGTOutputFactory, it will be a GTVectorLayer object. We can take
the internal base data object it is based on, which in this case will be a GeoTools
FeatureStore
FeatureStore fs = (FeatureStore) result.getBaseDataObject();
And now we have a resulting object and we have succesfully used a SEXTANTE geoalgo-
rithm.
Let’s try now another another algorithm, in this case one that works with raster layers.
Open the RasterGridExtentExample. This is the code of its doProcessing() method, where
all the actual processing takes place:
GridCoverage2D gc = openRasterLayer("/home/my_user_name/dem.asc");
GTRasterLayer dem = new GTRasterLayer();
dem.create(gc);
SlopeAlgorithm alg = new SlopeAlgorithm();
ParametersSet params = alg.getParameters();
params.getParameter(SlopeAlgorithm.DEM).setParameterValue(dem);
params.getParameter(SlopeAlgorithm.METHOD).setParameterValue(
2.2. EXECUTING A GEOALGORITHM 9
SlopeAlgorithm.METHOD_ZEVENBERGEN);
params.getParameter(SlopeAlgorithm.UNITS).setParameterValue(
SlopeAlgorithm.UNITS_RADIANS);
OutputObjectsSet outputs = alg.getOutputObjects();
Output out = outputs.getOutput(SlopeAlgorithm.SLOPE);
out.setFilename("/home/my_user_name/slope.tif");
AnalysisExtent ge = dem.getLayerGridExtent();
ge.setCellSize(100.);
alg.setAnalysisExtent(ge);
alg.execute(null, m_OutputFactory);
IRasterLayer slope = (IRasterLayer) out.getOutputObject();
System.out.println("The output cellsize is "
+ Double.toString(slope.getLayerGridExtent().getCellSize())
+ " m");
Most of the code looks quite similar to the one in the vector example, and it follows the
steps described above. This time, a GridCoverage2D is used as the base data object, and it
is wrapped with a GTRasterLayer object, since it is a raster layer instead of a vector one.
The main difference, however, is found just before the algorithm execution, in the lines
shown next.
AnalysisExtent ge = dem.getLayerGridExtent();
ge.setCellSize(100.);
alg.setAnalysisExtent(ge);
Whenever a SEXTANTE geoalgorithm generates new layers, the extent (and cellsize if it is
a raster layer) of the resulting layers can be selected before executing the algorithm. Using this,
you can, for instance, take a raster layer covering a large area as the input of a geoalgorithm,
and generate output layers that cover just a small part of that area and not necessarily all
of it. If you do not explicitly set the characteristics of output layers, SEXTANTE will infere
them from input layers. In this case, since there is only a single input raster layer, commenting
out the above three lines will cause the resulting slope layer to have the same characteristics
as the input DEM.
Some algorithms do not allow the user to select the analysis extent used to analize input
layers and generate new ones. In that case, calling the setAnalysisExtent method makes
no difference at all, since the algorithm is not going to use the information provided through
that method.
To set the characteristics of output layers, the setAnalysisExtent(AnalysisExtent)
method has to be used. An AnalysisExtent contain information about the extent and the
cellsize to use (even if the algorithm deals only with vector layers, the AnalysisExtent has a
cell size, though it is not used), and also some additional methods to handle and create this
information.
In the proposed example, the extent of the input DEM is taken (all object of class
IRasterLayer have one, a copy of which can be retrieved using the getLayerGridExtent()
10 CHAPTER 2. USING SEXTANTE ALGORITHMS
method), and its cellsize changed to 100. The original cellsize of the input DEM is 25 meters,
so we are telling SEXTANTE to create a resulting layer with a coarser resolution.
In some cases, setting the analysis extent is mandatory, since there are algorithms that
generate layers but do not take other layers of that kind as input. This happens, for instance,
in all the interpolation algorithms. In the InterpolationExample class you will find the
following code:
AnalysisExtent extent = new AnalysisExtent(layer);
extent.setCellSize(25.);
alg.setAnalysisExtent(extent);
A new AnalysisExtent object is created, passing a layer (a vector layer in this case) to
the constructor. The full extent (the area to cover) of the vector layer is used, but since vector
layers do not have a cellsize value, the cellsize must be set manually afterwards.
In this case, commenting out these lines will cause the algorithm to throw an exception
when executed, since it will not have enough information to produce any output (the cellsize
of the ouput layer cannot be taken from the input layer, since the latter is a vector one, and
vector layers do not have a cellsize value).

Chapter 3
Programming geoalgorithms
3.1 Introduction. Initial settings
This chapter introduces the fundamental ideas needed to implement a new geoalgorithm based
on SEXTANTE. Using the SEXTANTE framework to create a new geoalgorithm will allow it
to be used in any of the components of SEXTANTE (toolbox, graphical modeler, etc.), and
in any of the applications that integrate SEXTANTE, without any modification at all.
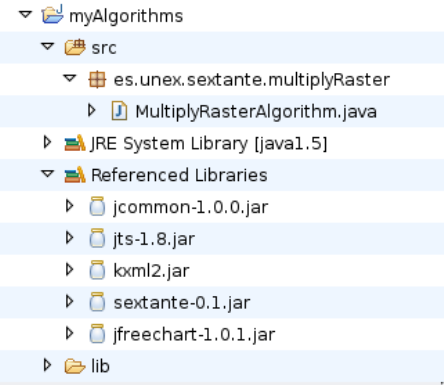
The first thing to do to create your own SEXTANTE geoalgorithm is to create a project.
Let’s create a new project named MyAlgorithms:
Since it will depend on SEXTANTE base classes, the next thing to do is to add the
SEXTANTE jar files to the list of referenced libraries. Create a folder named “lib” in your
project and add the following files:
•sextante.jar: The SEXTANTE core classes
•jts-1.12.jar: Java Topology Suite, used for handling geometries
•kxml2.jar
•jfreechart-1.0.1.jar: JFreeChart library, used for generating charts as output of
geoalgorithms
•jcommons-1.0.0.jar: Base elements for the JFreeChart library.
Add this files to the build path of the project.
Now create a new package to put your first geoalgorithm on it. You can use any name you
want, but here we will stick to the naming conventions used in the SEXTANTE library.
Create a package and name it es.unex.sextante.multiplyRaster. Usually, a new pack-
age is created for each single algorithm, which will contain all the necessary files to describe
and implement that algorithm. As we will see, this is usually done using a single file.
Let’s add the file that will contain our algorithm. The class name will be used to generate
the command–line name of the algorithm, and the file containing the algorithm has to end
with the suffix “Algorithm”. For this reason, you should try to give your class a descriptive
name, so when using it from the command–line it is easy to understand what it does. In this
case we will name it MultiplyRasterAlgorithm, so later we could call it from the command
line using the command multiplyraster.
You should have something like this:
11
12 CHAPTER 3. PROGRAMMING GEOALGORITHMS
3.2 The GeoAlgorithm class. Creating a geoalgorithm
All geoalgorithms must extend the GeoAlgorithm class, which provides the foundation for all
the operations needed to perform any kind of geospatial analysis.
To implement your geoalgorithm you just have to implement two methods:
•defineCharacteristics()
•processAlgorithm()
The first of them should be used to define the characteristics of the algorithm. These
characteristics will be used for such things as defining the user interface or selecting the
correct way of linking it with other algorithms within a model. Basically, this method should
give an answer to the following questions:
•Which inputs are needed to run the algorithm?
•Which outputs will this algorithm generate?
•Basic characteristics of the algorithm (name, group it belongs to, etc.)
The processAlgorithm() method is where you have to implement the algorithm itself,
adding all the calculations and processes that constitute it.
We are going to create a simple algorithm that takes a raster layer and a numerical value,
and generates a new raster layer which is the result of multiplying the input raster layer and
the value (i.e. multiplying the value of each cell in the raster layer and the numerical vale).
3.2.1 Defining the characteristics of the algorithm
To set the characteristics of the algorithm you have to add all necessary definitions in the
defineCharacteristics() method. This method is called upon construction of the geoalgo-
rithm.
For our first example, we will add the following code to this method:
public void defineCharacteristics() {

3.2. THE GEOALGORITHM CLASS. CREATING A GEOALGORITHM 13
this.setName("Multiply raster");
this.setGroup("My algorithms");
this.setUserCanDefineOutputExtent(false);
try {
m_Parameters.addInputRasterLayer("INPUT", "Raster layer", true);
m_Parameters.addNumericalValue("VALUE",
"Value",
1,
AdditionalInfoNumericalValue.NUMERICAL_VALUE_DOUBLE);
addOutputRasterLayer("RESULT", "Result");
} catch (RepeatedParameterNameException e) {
e.printStackTrace();
}
}
Let’s analyze this code.
The first line sets the name of the algorithm. When using the toolbox or the graphical
modeler, this will be the name that will identify the algorithm. The setGroup(String)
method is used to set the group the algorithm belongs to.
In case you want to, you can give the user the option to select the characteristics of the
output layers (extent for vector layers or extent and cellsize for raster ones). This will cause
SEXTANTE to add anew tab in the algorithm dialog. The information entered by the user
in this tab can later be retrieved and used as the analysis region, restricting the area anayzed
by the algorithm or the extent of the output layer it generates. In our case, we are going to
generate a new raster layer with exactly the same characteristics as the input layer, so there
is no need to let the user select a different extent or cellsize.
Whenever you do not want the user to be able to select output layer characteristics, you
can add the following line
setGeneratesUserDefinedOutput(false);
to indicate that SEXTANTE should not show the output tab, even though the algorithm
generates new layers.
We will see how to deal with output extents (whether they have been set by the user or
not) in a different section, so now you do not really have to worry about that.
To tell SEXTANTE that our algorithm needs a raster layer and a numerical value, we
will use the m Parameters field of the GeoAlgorithm class. This field is an object of class
ParametersSet, which is basically a container of objects of class Parameters. This parameters
define the inputs needed by the algorithm, and describe the particular characteristics of each
one them.
the ParametersSet class has several method to easily add parameters to it. Here is a list
of the main ones, along with the kind of parameters that they add:
•To add a raster layer,
public void addInputRasterLayer(String sName,
String sDescription,
boolean bIsMandatory)}

14 CHAPTER 3. PROGRAMMING GEOALGORITHMS
The two first arguments appear on every method that we are going to see in this section.
The first one is the name used to identify the parameter, and it has to be unique. The
second one is the description (human–readable) of the algorithm. This will be the one
used to name the algorithm in the parameters window.
As an example, here is the line that can be found in the Slope algorithm to indicate that
a raster layer (a DEM) is needed to run it:
m_Parameters.addInputRasterLayer(DEM, Sextante.getText("DEM"), true);
DEM is defined as a String constant within that same class.
public static final String DEM = "DEM";
This is a good practice, since it makes it easier to call algorithms from other classes. For
this reason, you should always create public constants when defining parameter names,
as this will make your algorithms easier to reuse.
The Sextante.getText() method is a static method used to support internationaliza-
tion. We will see how to use that in a different section in this same chapter.
•To add a vector Layer,
public void addInputVectorLayer(String sName,
String sDescription,
int iShapeType,
boolean bIsMandatory)
This method is similar to the one used to add raster layers, except for an additional
parameter that indicates the type of vector layer that is needed. Values for this parameter
can be any of the following constants. Names are pretty self–explanatory.
–AdditionalInfoVectorLayer.SHAPE TYPE POINT:
–AdditionalInfoVectorLayer.SHAPE TYPE LINE:
–AdditionalInfoVectorLayer.SHAPE TYPE POLYGON:
–AdditionalInfoVectorLayer.SHAPE TYPE ANY:
We find an example of this method in those algorithms that perform some kind of
interpolation, which take a points layer as input
m_Parameters.addInputVectorLayer(LAYER, Sextante.getText("Points_Layer"),
AdditionalInfoVectorLayer.SHAPE_TYPE_POINT,
true);
•To add a table
public void addInputTable(String sName,
String sDescription,
boolean bIsMandatory)

3.2. THE GEOALGORITHM CLASS. CREATING A GEOALGORITHM 15
•To add a numerical value
There are two methods that can be used. The first one will not restrict the values that
the user can enter.
public void addNumericalValue(String sName,
String sDescription,
double dDefaultValue,
int iType)
The last argument is used to indicate whether the value is a floating point or an integer
one. Use one of the following constants:
–AdditionalInfoNumericalValue.NUMERICAL VALUE INTEGER:
–AdditionalInfoNumericalValue.NUMERICAL VALUE DOUBLE:
For our first algorithm, the value to be used to multiply the input raster layer can take
any value. We will set a default value of 1. The line to add to the defineCharacteristics()
will be the next one.
m_Parameters.addNumericalValue("VALUE",
"Value",
1,
AdditionalInfoNumericalValue.NUMERICAL_VALUE_DOUBLE);
In some cases, however, it is necessary to define a range of valid values. If so, the next
method should be used instead of the previous one.
public void addNumericalValue(String sName,
String sDescription,
double dDefaultValue,
int iType,
double dMinValue,
double dMaxValue)
No matter what the type of the value (integer or double), minimum and maximum values
are always entered as double ones.
Here is an example, from the Density algorithm, which needs a search radius that has
to be non–negative.
m_Parameters.addNumericalValue("DIST", Sextante.getText("Search_radius"),
AdditionalInfoNumericalValue.NUMERICAL_VALUE_DOUBLE,
100, 0, Double.MAX_VALUE);
•To add a string
public void addString(String sName,
String sDescription,
String sDefaultString)
16 CHAPTER 3. PROGRAMMING GEOALGORITHMS
If no default value is needed, you can pass an empty string or use the following simplified
method.
public void addString(String sName,
String sDescription)
For example, this line can be found in the Raster calculator algorithm.
m_Parameters.addString(FORMULA, Sextante.getText("F´ormula"));
•To add a boolean parameter.
public void addBoolean(String sName,
String sDescription)
•To add a selection.
It is common to request the user to select from a list of valid values. To do so, use the
following method:
public void addSelection(String sName,
String sDescription,
String[] sValues)
where sValues is an array of strings with the names of all the possible options.
For example, if you would like the user to select a method from a list of three available
ones.
String[] sMethod = {"Method 1", "Method 2", "Method 3"};
m_Parameters.addSelection("METHOD", "Method", sMethod);
•to add an editable table
Although we have already seen how to add a table to the parameters list, there is another
kind of tables that SEXTANTE can use as input. In some cases you might require a
small table such as a look–up table or a 3×3 table to be used as a kernel for convolution
operation. In this case, SEXTANTE will show the table and the user will define its
values when executing the algorithm, instead of using an existing table.
The following method is used to incorporate this kind of parameter to the algorithm.
public void addFixedTable(String sName,
String sDescription,
String[] sColumnNames,
int iRows,
boolean bIsNumberOfRowsFixed)
The number of columns is fixed, and is defined by the length of the sColumnNames
argument. The number of rows is defined using the iRows argument, but it does not
have to be fixed. In some cases, it is interesting to let the user add new rows or remove
them according to his needs. In other cases (like, for instance, when defining a 3 ×3
kernel), the initial number of rows should not be modified. To set how SEXTANTE
should behave, the last argument of the method is used.
In the aforementioned convolution algorithm, we find the following line:
3.2. THE GEOALGORITHM CLASS. CREATING A GEOALGORITHM 17
String sColumnNames[] = {"1", "2", "3"};
m_Parameters.addFixedTable(KERNEL, Sextante.getText("Kernel"),
sColumnNames, 3, true);
•To add a point.
public void addPoint(String sName,
String sDescription)
•To add a multiple input
When you do not need a single layer, but a list of them, the addInputRasterLayer()
method that we already know is not enough. The ParametersSet class contains a
method to add a multiple input that can be an array of vector layers, raster layers or
tables.
public void addMultipleInput(String sName,
String sDescription,
int iDataType,
boolean bIsMandatory)
Like single inputs, multiple inputs can be mandatory or optional.
Using the iDataType argument, the type of input can be set, using one of the following
constants:
–AdditionalInfoMultipleInput.DATA TYPE RASTER
–AdditionalInfoMultipleInput.DATA TYPE VECTOR POINT
–AdditionalInfoMultipleInput.DATA TYPE VECTOR LINE
–AdditionalInfoMultipleInput.DATA TYPE VECTOR POLYGON
–AdditionalInfoMultipleInput.DATA TYPE VECTOR ANY
–AdditionalInfoMultipleInput.DATA TYPE VECTOR TABLE
–AdditionalInfoMultipleInput.DATA TYPE BAND
An example of this can be found in the Merge raster layers algorithm.
m_Parameters.addMultipleInput(INPUT, Sextante.getText("Layers_to_merge"),
AdditionalInfoMultipleInput.DATA_TYPE_RASTER);
Apart from these ones, two other parameters can be added, which are not independent
but depend on some other parameter previously introduced.
1. To add a field from a vector layer or a table.
The same method is used in both cases, since the attributes table of a layer is handled
just as independent table.
public void addTableField(String sName,
String sDescription,
String sParentParameterName)
18 CHAPTER 3. PROGRAMMING GEOALGORITHMS
The key argument here is the last one, which indicates the name of the parameter that
acts as the parent parameter of this one. It has to be a vector layer or table, and its
name (the value passed to the sName argument when adding that layer) has to be used
to select it.
Here is an example, where a table parameter is defined and then two parameters repre-
senting two fields from that table are added.
m_Parameters.addInputTable("TABLE", "Table", true);
m_Parameters.addTableField("XFIELD", "X coordinate", "TABLE");
m_Parameters.addTableField("YFIELD", "Y coordinate", "TABLE");
2. To add a band from a raster layer.
The syntax of the method is identical to the previous one.
public void addBand(String sName,
String sDescription,
String sParentParameterName)
And here is an example from the NDVI algorithm
m_Parameters.addInputRasterLayer("LAYERRED", "Red layer", true);
m_Parameters.addBand("BANDRED", "Red band", "LAYERRED");
All this should be enough to define the requirements of the algorithm. The outputs of the
algorithm also have to be defined, in order to have enough information to use it in the graphical
modeler. If output results are not defined, we will be able to execute the algorithm, but the
grammar of the process will not be complete, and other operations will not be available.
Adding outputs is similar to adding input parameters. There are a few convenience meth-
ods in the GeoAlgorithm class that can be used for this purpose. These are used to add the
six types of outputs supported by SEXTANTE: raster layers, vector layers, tables, numerical
values, graphs and texts.
•To add a raster layer
protected void addOutputRasterLayer(String sName,
String sDescription,
int iBands) {
Just like input parameters, outputs need a name and a description, the first one being
unique and used to identify them (we will later see why this is important) and the second
one to show to the user in the corresponding parameters window.
In the case of raster layers, the number of bands expected for the output layer has to
be entered using the iBands argument. In case this cannot be known in advance, the
OutputRasterLayer provides a constant to indicate it:
OutputRasterLayer.NUMBER_OF_BANDS_UNDEFINED
3.2. THE GEOALGORITHM CLASS. CREATING A GEOALGORITHM 19
For the most usual case of adding a single–band raster layer, a simplified method exists.
protected void addOutputRasterLayer(String sName,
String sDescription,
int iBands) {
•To add a vector layer
protected void addOutputVectorLayer(String sName,
String sDescription,
int iType) {
In this case, instead of setting the number of bands, the type of vector layer that is
expected has to be entered. The following constants can be used for the corresponding
argument.
OutputVectorLayer.SHAPE_TYPE_POLYGON
OutputVectorLayer.SHAPE_TYPE_POINT
OutputVectorLayer.SHAPE_TYPE_LINE
OutputVectorLayer.SHAPE_TYPE_UNDEFINED
The last one should be used when the type of layer cannot be known in advance and is
selected at run time.
•To add a text output.
protected void addOutputText(String sName,
String sDescription) {
•To add a text output.
protected void addOutputChart(String sName,
String sDescription) {
protected void addOutputChart(String sName,
String sDescription) {
In these three last cases, no information apart from the name and the description is
needed about the outputs.
Numerical values are a particular type of output. Usually these values are presented
in a simple text to the user. However, you can also declare them and that will add
extra information to the semantics of the algorithm. By doing this, numerical values
generated by an algorithm could be used as input to any other algorithm that takes a
numerical value as input, when combinign them in the graphical modeller. Other than
that, numerical values themselves are not shown to the user (unless you explicitly put
them into a text output).
20 CHAPTER 3. PROGRAMMING GEOALGORITHMS
3.2.2 Implementing the process
As it has been said, the algorithm itself has to be implemented in the processAlgorithm()
method, which will be called when the algorithm is executed. Before executing the process,
input parameters have to be given valid values. This is done by SEXTANTE when the user
selects those values in the parameters window, or is done programmatically before executing
the algorithm, as we saw in chapter ??.
Here is the code of the method, which we will discuss next.
public boolean processAlgorithm() {
int x,y;
int iNX, iNY;
double dValue;
double dConstant;
IRasterLayer layer ;
layer = m_Parameters.getParameterValueAsRasterLayer("INPUT");
dConstant = m_Parameters.getParameterValueAsDouble("VALUE");
AnalysisExtent outputExtent = new AnalysisExtent(layer);
IRasterLayer result = getNewRasterLayer("RESULT", "Result",
IRasterLayer.RASTER_DATA_TYPE_FLOAT,
outputExtent);
layer.setWindowExtent(outputExtent);
iNX = outputExtent.getNX();
iNY = outputExtent.getNY();
for(y = 0; y < iNY && setProgress(y, iNY);; y++){
for(x = 0; x < iNX; x++){
dValue = window.getCellValueAsDouble(x, y);
result.setCellValue(x, y, dValue * dConstant);
}
}
return !m_Task.isCanceled();
}
There are three main task to accomplish when implementing the algorithm.
•Retrieve values from input parameters. Values have to be recovered and put into vari-
ables to make them easier to use for the algorithm process.
•Operate with those variables. Of course, we are not going to tell you how to perform
this second task, since it is up to you to implement your own algorithm. However, we
will see some examples about how to use the basic interfaces for raster layers, vector
layers and tables, which are the ones that you will be using to access the input data.
•Create output results. Outputs are the most important part of the algorithm (they are
the reason to execute it!), and have to be correctly defined, so SEXTANTE can use those
outputs in other algorithms and deal with them.

3.2. THE GEOALGORITHM CLASS. CREATING A GEOALGORITHM 21
To retrieve parameter values, we have to use the m Parameters object once again. When we
added parameters using its methods in the defineCharacteristics() method, new objects
of class Parameter were added with a null value. Now they contain a value and that is the
value that we have to retrieve.
The ParametersSet class contains several methods with a similar syntax, which should be
used depending of the type of value to be retrieved. Here is a list of all the available methods.
public int getParameterValueAsInt(String sParameterName)
public double getParameterValueAsDouble(String sParameterName)
public Point2D getParameterValueAsPoint(String sParameterName)
public boolean getParameterValueAsBoolean(String sParameterName)
public ArrayList getParameterValueAsArrayList(String sParameterName)
public String getParameterValueAsString(String sParameterName)
public FLyrVect getParameterValueAsVectorLayer(String sParameterName)
public FLyrRaster getParameterValueAsRasterLayer(String sParameterName)
public DataSource getParameterValueAsTable(String sParameterName)
They all take one string, which is the name of the parameter from which to retrieve the
value. This is the name that was used to define the parameter when it was added to the
defineCharacteristics() method.
For most cases, it is easy to figure out the method to use. Using a wrong method
will cause a WrongParameterTypeException. exception to be thrown. For example, it
does not make sense to get the value of a numerical parameter as a raster layer using the
getParameterValueAsRasterLayer() method.
If the parameter does not have a value assigned, calling any of the above methods will
throw a NullParameterValueException exception. Layers and tables can be optional, and
in this case the null value is a valid one, so it can be returned. If the parameter is mandatory,
however, the exception is thrown.
The getParameterValueAsInt(String) method is used not only to get the value of a
numerical parameter, but also the value of a selection (returns the zero–based index of the
selected element), a band (the zero–based index of the chosen band) or a table field (the
zero–based index of the field).
You can always use the getParameterValueAsObjectInt(String) and then cast the re-
turned object to the corresponding class. For fixed tables, added using the addFixedTable
method, the value is returned as an object of class FixedTableModel, which is a class extend-
ing the Java AbstractTableModel class.
Here is an example:
FixedTableModel lut = (FixedTableModel) m_Parameters.
getParameterValueAsObject("LUT");
With the above methods, we can easily understand how the raster layer and the numerical
value needed for our algorithm are retrieved.
Once we have those values, it is time to create the output layer. In this case, we will
generate a new raster layer and later on set the corresponding values in its cells.
To generate a new output you can create a new instance of the corresponding class (in
this case it would be a OutputRasterLayer) and then add it to the set of output object using
methods in the OutputObjectsSet class. We will use this approach when generating charts
or texts as results, but in the case of layers or tables it is much more practical to use some of
the methods provided by the GeoAlgorithm class. This is not only easier but also safer, and
it is the recommended way of doing it.
Here is a short list of the methods available for creating new layers and tables.
22 CHAPTER 3. PROGRAMMING GEOALGORITHMS
protected IVectorLayer getNewVectorLayer(String sName,
String sDescription,
int iShapeType,
Class[] types,
String[] sFields);
protected IRasterLayer getNewRasterLayer(String sName,
String sDescription,
int iDataType,
int iBands){
protected IRasterLayer getNewRasterLayer(String sName,
String sDescription,
int iDataType,
AnalysisExtent extent,
int iBands){
protected IRasterLayer getNewRasterLayer(String sName,
String sDescription,
int iDataType,
IRasterLayer layer,
int iBands){
protected ITable getNewTable(String sName,
String sDescription,
Class [] types,
String[] sFields)
You can see that there are three different methods for creating raster layer, but only one for
vector layers or tables. This is because raster layers need to be configured setting their extent
and cellsize, and those methods make it easier to adjust this depending on the characteristics
of the algorithm and the preferences of the programmer. We will see this shortly, once we
reach the section dedicated to raster output characteristics.
By now, let’s just focus on the method used in our algorithm, which is the second one of
the methods that return a new raster layer.
You will see that it is not exactly that method, since it does not take the iBands parameter,
which indicates the number of bands the resulting layer should have. Since most of the times
you will create a single-band layer, there are three additional convenience methods that do
not take that argument and generate single–band layers.
The first thing to mention is that we must supply a name and a description for the layer we
are about to create. We added an output object in the describeCharacteristics() method,
and gave it the name RESULT. This layer we are creating now is that output layer, so we have
to identify it as such, using the same name when calling the method used to create it.
The description does not have to be the same one provided when adding the ouput object.
The description used then will be shown before the algorithm is executed (for instance, when
creating the parameters window to prompt the user for a filename for that output), while the
one we pass when creating the layer is the actual name that the layer will have (which will be
the one used to identify it in the TOC when adding it to the GUI of the GIS we are using). In
this last case, you can use a name based on the input layers or on any other input parameter.
3.2. THE GEOALGORITHM CLASS. CREATING A GEOALGORITHM 23
For example, we are describing the output layer simply as Result, but we could use a more
descriptive name substituting the corresponding line with the following two lines of code:
String sDescription = layer.getName() + " * " + Double.toString(dConstant);
IRasterLayer result = getNewRasterLayer("RESULT", sDescription,
RasterMemoryDriver.RASTER_DATA_TYPE_FLOAT,
extent);
The type of data that the raster layer is going to contain is defined with one of the following
constants from the IRasterLayer interface.
IRasterLayer.RASTER_DATA_TYPE_DOUBLE;
IRasterLayer.RASTER_DATA_TYPE_FLOAT;
IRasterLayer.RASTER_DATA_TYPE_INT;
IRasterLayer.RASTER_DATA_TYPE_SHORT;
IRasterLayer.RASTER_DATA_TYPE_BYTE;
The last argument we are passing to the getNewRasterLayer() method is an AnalysisExtent
object, which means that we are telling the method how we want the output raster layer to be
(its extent and cellsize). Notice that by doing this we are ignoring the settings that the user
might have done in the parameters window (in this case, the output tab it is not shown since
we added the corresponding line to the defineCharacteristics() method, but it could be
shown otherwise) or using the setAnalysisExtent(AnalysisExtent) method if calling the
algorithm programmatically. We will see in the next section how to create new raster layers
using the characteristics selected by the user.
After creating the raster output layer, it is time to set the corresponding values for all
its cells. What we are going to scan the raster layer row by row, get the value in each cell,
multiply that value by the constant introduced by the user, and finally set the resulting value
in the same cell of the output raster layer.
Before accessing values in a raster layer, you need to define the query window you want to
use on that layer. Every raster layer has its own number of rows and columns, and normally
you can get the value of any of its cells simply selecting the desired row and column. In
SEXTANTE, however, this is done through a query window, that meaning that you will refer
to a cell with coordinates (x, y) in the query window, and those coordinates are not actual
cell coordinates of the layer.
A query window is defined with a AnalysisExtent, and you can use any extent and cellsize,
regardless of the extent and cellsize of the raster layer you are querying. SEXTANTE will
convert query window coordinates into actual layer coordinates, and return the corresponding
value.
To set a query window, you can use the setWindowGridExtent( AnalysisExtent ) method.
In the algorithm we are developing, we found the following lines of code:
layer.setWindowGridExtent(outputExtent);
iNX = outputExtent.getNX();
iNY = outputExtent.getNY();
What we are doing here is to select the current layer extent as the query window, so no
conversion is really performed. However, as it has been said, we can set any query window,
and in fact it can even fall outside the extent of the layer or have a different cellsize. When
querying those window cells outside of the layer, the corresponding methods will return the
no–data value of the layer.
24 CHAPTER 3. PROGRAMMING GEOALGORITHMS
When the query window does not “fit” into the original grid of the layer (a cell in the
query window does not match an actual cell in the layer), SEXTANTE will perform some
kind of interpolation to return the exact value for the queried cell. You can set the interpola-
tion method to use with the setInterpolationMethod(int) method from the ILayerRaster
interface, passing one of the following constants.
IRasterLayer.INTERPOLATION_NearestNeighbour
IRasterLayer.INTERPOLATION_Bilinear
IRasterLayer.INTERPOLATION_InverseDistance
IRasterLayer.INTERPOLATION_BicubicSpline
IRasterLayer.INTERPOLATION_BSpline
The grid extent we are using for the query window is the same as the one we used to
create the result raster layer. That means that both will have the same number of cells, and
cell (x, y) in the query window correspond to cell (x, y) in the output layer, so we can take its
value, multiply it by the constant and put the resulting value in that same cell in the output
layer.
All that is is done in the nested loops that follow, which constitute the core of the algorithm
itself. The number of rows and columns is taken from the grid extent and each cell value
is retrieved using the getCellValueAsDouble(int,int) method of the raster layer. The
resulting value is put on the output layer using the setCellValue(double) layer.
for(y = 0; y < iNY && setProgress(y, iNY);; y++){
for(x = 0; x < iNX; x++){
dValue = window.getCellValueAsDouble(x, y);
result.setCellValue(x, y, dValue * dConstant);
}
}
As the algorithm progresses and we scan from the first to the last row, it is a good idea to
show this progress to the user, so he knows how much is left before the execution is finished.
If you remember from chapter 2, when executing a SEXTANTE algorithm we pass an object
that implements the ITaskMonitor interface. Now we can use it to tell the user about the
progress of the algorithm.
There are two methods in the GeoAlgorithm class to do this:
protected boolean setProgress(int iStep, int iTotalNumberOfSteps);
protected void setProgressText(String sText);
The first one updates the progress indicator to show the amount of process that has already
been performed. It returns false if the user has canceled the algorithm, so we can use it to
know if we should exit the processAlgorithm() method or continue its execution.
In some cases, the number of steps needed to complete the execution of the algorithm
cannot be known in advance, so using this method is not a good way of informing the user.
In those cases, you should add the following line to the defineCharacteristics() method:
setIsDeterminatedProcess(false);
Using the second method you can change the text shown to the user, so you can inform
him about the different stages the algorithm might go through.
The last thing to do in the algorithm is to return a value at the end of the method. If
everything went fine, it should return true. If the execution of the algorithm was canceled, it
3.3. ANOTHER EXAMPLE 25
should return false. If any problem was encountered during execution, you should not return
false, but throw an GeoalgorithmExecutionException exception instead. Exceptions thrown
by methods that retrieve input parameter values, they all extend this class.
At the end of example, we find the following line:
return !m_Task.isCanceled();
This can be found in most of the SEXTANTE geoalgorithms, and is a standard way of
finishing the processAlgorithm() method.
At this point, we have finished the creation of our first algorithm, which is now fully
functional and could already be used to perform analysis.
3.3 Another example
The previous example showed the main ideas about programming geoalgorithms with SEX-
TANTE, introducing the main blocks of code and the basic structure that all algorithms should
follow. However, it just uses raster data both as input and as output, and no vector data is
used at all. Let’s create a new algorithm that does something similar, but this time taking a
vector layer as input and generating a vector layer as well.
This algorithm will just take a vector layer, a field in its attribute table and a constant
and generate a new vector layer which is exactly the same at the input one but values in the
selected field will be equal to the corresponding values in the input layer multiplied by the
constant.
Create a new package named es.unex.sextante.multiplyVectorField. Add a new class to the
package and name it MultiplyVectorFieldAlgorithm.
Starting with the defineCharacteristics() method, here is the code of this new class.
public void defineCharacteristics() {
this.setName("Multiply vector field");
this.setGroup("My algorithms");
this.setGeneratesUserDefinedRasterOutput(false);
try {
m_Parameters.addInputVectorLayer("INPUT", "Vectorlayer",
IVectorLayer.SHAPE_TYPE_ANY,
true);
m_Parameters.addTableField("FIELD", "Field", "INPUT");
m_Parameters.addNumericalValue("VALUE",
"Value",
1,
AdditionalInfoNumericalValue.NUMERICAL_VALUE_DOUBLE);
addOutputVectorLayer("RESULT", "Result");
} catch (RepeatedParameterNameException e) {
e.printStackTrace();
}catch (UndefinedParentParameterNameException e) {
e.printStackTrace();
} catch (OptionalParentParameterException e) {
e.printStackTrace();
}
26 CHAPTER 3. PROGRAMMING GEOALGORITHMS
}
Notice that there are more exceptions that can be thrown when adding the parameters to
the input parameters set. The OptionalParentParameterException one is thrown when you
try to add a table field that depends on an optional vector layer, since parents layers always
have to be mandatory ones. Apart from that, there is really nothing worth mentioning in this
part,n and with the information given at the beginning of the chapter you should be able to
understand this code without difficulties.
The processAlgorithm() method, however, is slightly different to the one found in the
raster example.
public boolean processAlgorithm()
throws GeoalgorithmExecutionException{
int iField;
double dValue;
double dConstant;
IVectorRaster layer ;
layer = m_Parameters.getParameterValueAsVectorLayer("INPUT");
iField = m_Parameters.getParameterValueAsInt("FIELD");
dConstant = m_Parameters.getParameterValueAsDouble("VALUE");
Class clazz = layer.getFieldType(iField);
if !(Number.isAsignableFrom(clazz)){
throw new GeoalgorithmExecutionException(
"Selected field is not numeric");
}
Class[] fieldTypes = layer.getFieldTypes();
Class[] outputFieldTypes = new Class[fieldTypes.length];
for(int i = 0; i < fieldTypes.length; i++){
if (i == iField){
outputFieldTypes[i] = Double.class;
}
else{
outputFieldTypes[i] = fieldTypes[i];
}
}
IVectorLayer output = getNewVectorLayer("RESULT",
layer.getName(),
layer.getShapeType(),
outputFieldTypes,
layer.getFieldNames());
int i =0;
int iShapeCount = m_Layer.getShapesCount();
IFeatureIterator iter = m_Layer.iterator();
while(iter.hasNext() && setProgress(i, iShapeCount)){

3.3. ANOTHER EXAMPLE 27
IFeature feature = iter.next();
Object[] values = feature.getRecord().getValues();
Object[] outputValues = new Object[values.length];
for(int j = 0; j < fieldTypes.length; j++){
if (j == iField){
if (values[j] == null){
outputValues[j] = null;
}
else{
dValue = Double.parseDouble(values[j].toString());
outputValues[j] = new Double(dValue * dConstant);
}
}
else{
outputValues[j] = values[j];
}
}
Geometry geom = feature.getGeometry();
ouput.addFeature(geometry, outputValues);
i++;
}
}
After retrieving parameter values, we do some checking to see that the user selected a
valid numeric field. If not, we exit throwing an exception. If the field is valid, we continue
and create the ouput vector layer.
The attributes table in this layer is identical to the table in the input layer, with the
exception of the field we are going to edit, which should be of type double (the input one can
be an integer field, but since our constant is a double, resulting values will be double values).
We are not going to create new geometries or alter the input ones, so the resulting layer will
have the same shape type as the input one. Field names should remain unchanged, so we just
take the ones from the input layer and pass them directly to the method that cretes the new
layer.
To access features in a vector layer, we must get an iterator from the layer and then iterate
through it. Each element we get from the layer will implement the IFeature interface, which
has just two methods:
public Geometry getGeometry();
public IRecord getRecord();
The first one will return the geometry corressponding to the given feature. Geometries
are stored as JTS geometries. JTS (Java Topology Suite) is a powerful library for handling
geometric primitives, which is used in many Java GIS application, becoming the standard
choice for this tasks. JTS fundamentals are not covered in this text, but you can find plenty
of information in the JTS website1. Using methods from the JTS library you can create new
geometries or modify existing ones, and also perform computational geometry tasks such as
calculating buffers or convex hulls.
The getRecord() method returns an object implementing the IRecord interface. You can
get an array of objects with all the values of the record calling its getValues() method.
1http://www.vividsolutions.com/jts/jtshome.htm

28 CHAPTER 3. PROGRAMMING GEOALGORITHMS
In the code above, we just copy all values to a new array which will be used to create
the new record in the output layer, except in the case of the selected field, where we multiply
the value by the constant. We get the string representation of the field and parse it to a new
double value. If we succeed, then we multiply it by the constant and put the resulting value
in the array of output values for that record. Records can have null values, so we check that
as well before parsing its value.
Once we have done this, we already have the output record ready to be added to the
output layer. A feature is comprised of a geometry and a set of attributes, so we also need
a geometry. In this case, we just take the input geometry, making no changes to it. To add
a new feature, we call the addFeature() method, passing whether a IFeature object or a
geometry and a set of attributes.
3.4 More about raster output characteristics
The algorithm in our raster example creates a new raster layer with the same characteristics
of the input layer, not using the settings made by the user. Most of the times, however, you
will want you algorithm to use those settings, so the user can adjust the behaviour of the
algorithm to suit his needs.
There are several ways of doing this, and SEXTANTE features a flexible mechanism to
create raster layers according the particular characteristics of each algorithm.
Along with the one that we already know, there is an additional version of the getNewRasterLayer()
method, which was already presented.
protected IRasterLayer getNewRasterLayer(String sName,
String sDescription,
int iDataType,
int iBands)
It differs from the one we already used in that it takes no extent. The extent used to create
the new raster layer is selected from the user settings.
We could adapt our example and make it use this new method, rewriting a few lines of
code:
IRasterLayer result = getNewRasterLayer("RESULT", "Result",
RasterMemoryDriver.RASTER_DATA_TYPE_FLOAT);
AnalysisExtent gridExtent = result.getLayerGridExtent();
layer.setWindowGridExtent(gridExtent);
Notice how we have changed not only the line that creates the layer itself, but also the one
that sets the query window on the input layer. Now we are not using the extent and cellsize
of the input layer as the query window, but the extent and cellsize of the output one, so we
can query the input layer and the cells we will query will match the ones in the output layer,
making it possible to assign them new values.
The output characteristics selected by the user are stored in a protected variable named
m AnalysisExtent. The above block of code can be substituted by the following one, which
uses the first method that we saw for creating raster layers.
IRasterLayer result = getNewRasterLayer("RESULT", "Result",
RasterMemoryDriver.RASTER_DATA_TYPE_FLOAT,
3.5. MORE ABOUT VECTOR OUTPUT CHARACTERISTICS 29
m_AnalysisExtent);
layer.setWindowGridExtent(m_AnalysisExtent);
3.5 More about vector output characteristics
We can also use the output extent entered by the user when creating vector layers. It can
also be used even if no layers are generated, just to restrict the geometries that we use from
the input layer. To do so, you can apply a spatial filter to any of the vector layers you are
working with. The BoundingBoxFilter class can be used for that. Here is an example:
layer.addFilter(new BoundingBoxFilter(getAnalysisExtent());
layer being a vector layer.
When you now iterate that vector layer, you will only get those features that intersect the
rectangle defined by the ouput extent.
3.6 Using temporary layers
Using any of the methods that we have seen to create new layers will cause them to be added
automatically to the set of output results, and SEXTANTE will deal with them as such, adding
them to the GIS GUI or doing whatever the particular bindings you are using do with output
layers. In some cases, however, you might need to create a temporary layer which should not
be added to the set of output results.
To create a new layer that is temporary and not a final result, you can use one of the
following methods.
protected IRasterLayer getTempRasterLayer(int iDataType,
AnalysisExtent extent,
int iBands)
protected IRasterLayer getTempRasterLayer(int iDataType,
AnalysisExtent extent)
protected IVectorLayer getTempVectorLayer(int iShapeType,
Class[] types,
String[] sFields)
As you can see, they are similar to the methods that we already know, but they do not
take a name and a description, since those are not needed in this case.
3.7 Deploying and using the algorithm
The algorithm has already been created and that means that we can already use it. You can
put all the .class files in a jar file and then add that file to the other ones included in the
SEXTANTE library.
To make sure that SEXTANTE will find your algorithm and put it in the toolbox along
with the all the other ones, you must follow two simple naming conventions:
•Algorithm classes (the ones extending the GeoAlgorithm class) must have a name with
the suffix Algorithm.

30 CHAPTER 3. PROGRAMMING GEOALGORITHMS
•Jar file containing algorithms must have a name with the prefix sextante .
3.8 Internationalization
SEXTANTE provides a simple mechanism to internationalize your algorithms, so they appear
in the right language when they are included in the list of available ones as we saw before.
There is just one method that you have to use for that, the static method getText(String)
in the SEXTANTE class.
You have to create Java properties files with the translation of the different strings you are
using in your algorithm and put them in the jar files that contain the algorithms themselves.
Then just call that method and it will return the string corresponding to the given key in the
current language (which does not have to be necessarily the one of the current locale, but the
one of the GIS app SEXTANTE is running onto).
As it happened with algorithms, you have to make SEXTANTE aware of the properties
files to use. To do so, just add the properties file to the jar file, putting them in a folder named
i18n. That will be enough.
Say you want to translate your two algorithms into english and spanish, setting the former
as the default language. Then you would have to create two new files and name them something
like myalgorithms.properties and myalgorithms es.properties.
3.9 Calling geoalgorithms from another geoalgorithm
All the ideas that we saw on the previous chapter can be applied when implementing your
own algorithms. Any algorithm from the SEXTANTE library can be used within another
algorithm, so you can reuse them to create more complex processes, without needing to rewrite
them.
As an example, we will create a new algorithm that simplifies the raster algorithm that
we created. It will multiply the input layer by a constant, but instead of giving the user the
chance of selecting the value of that constant, it will use a fixed, hard–coded one.
Here is the code of the processAlgorithm() method (the description of the characteristics
is almost obvious, and is left as an exercise for the reader)
public boolean processAlgorithm() {
final double CONSTANT = 5.;
IRasterLayer layer ;
layer = m_Parameters.getParameterValueAsRasterLayer("INPUT");
RasterMultiplyAlgorithm alg = new RasterMultiplyAlgorithm();
ParametersSet params = alg.getParameters();
params.getParameter("INPUT").setParameterValue(layer);
OutputObjectsSet outputs = alg.getOutputObjects();
String sFilename = getOutputFilename(m_OutputObjects.getOutput("RESULT"))
outputs.getOutput("RESULT").setFilename(sFilename);
if (alg.execute(m_Task, m_OutputFactory)){
IRasterLayer result = (IRasterLayer) outputs.getOutput(
"RESULT").getOutputObject();

3.9. CALLING GEOALGORITHMS FROM ANOTHER GEOALGORITHM 31
m_OutputObjects.getOutput("RESULT").setOutputObject(result);
return true;
}
else{
return false;
}
}
To execute an algorithm you need an ITaskMonitor and an OutputFactory, since the
execute() method takes both of them. We are already running an algorithm, so we can pass
the same ones that we are using for the current process. These are stored in the protected
variables m Task and m OutputFactory.
To set the filename associated with the output layer of the algorithm we are calling, so
it is the same filename of the parent algorithm (the filename introduced by the user for that
ouput layer), we use the
32 CHAPTER 3. PROGRAMMING GEOALGORITHMS

Chapter 4
Developing bindings
4.1 Introduction
Although bindings for some popular GIS like gvSIG or OpenJUMP already exist, you might
want to add SEXTANTE to your own application, or to any other software using some different
data model. In this chapter we will see how to do that, so you can create the corresponding
bindings between SEXTANTE and your software.
There are to different parts in the process of creating those bindings, both of which we
will review in detail.
•Bind the SEXTANTE data model with your data model. This will allow SEXTANTE
to access your data. This is the only thing you need to do if you want to use SEX-
TANTE programatically or you plan to develop you own GUI for accessing SEXTANTE
algorithms
•Incorporate SEXTANTE graphical elements into your application. Apart from using the
geoalgorithms included in SEXTANTE from your source code, you can easily integrate
them into you GIS app, using some graphical elements that make part of the SEXTANTE
library as well. Of course, you can develop your own GUI elements and call SEXTANTE
geoalgorithms from them, but that is a hard work. A better solution is to use the
graphical elements included in SEXTANTE, which will help users of your application to
get the best out of the set of algorithms provided by SEXTANTE.
4.2 Binding the data model
Bindings are basically wrappers for your data classes, so SEXTANTE can access those data
classes through them. Wrapper classes implement the interfaces that we already know, and
that are designed to wrap raster layers, vector layers and tables.
•IRasterLayer
•ILayer
•ITable
Instead of implementing this interfaces directly, there are three additional classes that
should be extended, and that make the creation of bindings much easier.
33
34 CHAPTER 4. DEVELOPING BINDINGS
•AbstractRasterLayer
•AbstractVectorLayer
•AbstractTable
For all of them, creating the corresponding binding class should include implement the
following capabilities:
•Construction of the object from an object of your data model. Methods used for this
will be used when passing data objects to a SEXTANTE algorithm, and will do the
actual wrapping of an already existing object that does not implement the required
SEXTANTE interfaces.
•Construction of the object from scratch, using arguments defining the characteristics of
the object to create. This is used when creating output objects. Methods responsible
of this should create a data object using the data model that you are binding, and then
wrapping it with the methods or techniques mentioned in the previous item.
•Providing the logic for data access through the binding classes, so once the data objects
are wrapped the data they contain can be accessed by SEXTANTE algorithms
For vector layers and tables, additional interfaces have to be implemented to deal with
features and table record, which are accessed through iterators.
•IRecordsetIterator
•IFeatureIterator
Those iterators return objects implementing the IRecord and IFeature interfaces. This
interfaces are, however, very simple, and code from other bindings can easily be reused. Two
simple implementations already exist and are included in the SEXTANTE source code, namely
FeatureImpl and RecordImpl.
Another important part of bindings is the output factory. We already know about it, since
it was needed to execute SEXTANTE algorithms, as we saw in chapter 2. Creating the corre-
sponding output factory for your bindings is easy. You just have to extend the OutputFactory
abstract class, and implement its methods so they return you particular wrappers.
Having a look at some already developed binding is the best way of understanding how
to create your new bindings. The OpenJUMP data model is very simple, and its bindings
are thus very simple as well. You can checkout the bindings/openjump folder from the SVN
repository and starting exploring them.
Javadocs for the SEXTANTE main classes are available for download from the SEXTANTE
website. Check the description of each one of the methods of each interface and class to get
more information.
4.3 Using SEXTANTE graphical elements
Once you have created the bindings for your data model, you can already call SEXTANTE
algorithms programmatically. You could also create a nice GUI to get parameter values from
the user and then execute algorithms with those values. Although you can do all that work
from scratch, SEXTANTE also includes some graphical elements that you can reuse, and
incorporating them into your application is much easier than doing all the work yourself.
These elements include:
4.3. USING SEXTANTE GRAPHICAL ELEMENTS 35
•A toolbox
•A graphical modeler, to link several processes and create a workflow
•A batch processing interface
•A command-line interface
•A history manager
•A results manager, to manage results others than layers or tables, which might not fit
into the data model of a traditional GIS.
To include these in your GIS, you must follow the following steps:
1. Create an input factory. An input factory implements the IInputFactory interface, and
will be used by SEXTANTE to get the data objects currently available in the GIS. That
means that, when you load a layer and then want to execute an algorithm, SEXTANTE
must know that you have that layer (and maybe other ones), in order to show you a list
of them to choose from, and then pass the chosen one(s) to the algorithm. The input
factory turns your GIS data into data that fit into the SEXTANTE data model (making
use of the data model bindings), and acts as a source of valid data for SEXTANTE
graphical elements and algorithms.
The input factory also has to be able to create valid data objects not from other java
objects representing layers or tables, but from files. If you want to use the batch pro-
cessing interface (and you probably will), it will need to open files directly, since it does
not take it inputs from the GIS.
Instead of implementing the IInputFactory interface, extending the AbstractInputFactory
class is recommended.
2. Create a post–process task factory and a post–process task. Once an algorithm has
created its output objects, you must do something with them. This usually includes
adding them to a view in your GIS, but maybe you want some other operations to
be performed on those objects. The post–processing task is responsible of browsing
the outputs generated by an algorithm and managing them. The post–processing task
factory just returns a suitable post-processing task for a given algorithm.
There is an interface for the post–process task factory:IPostProcessTaskFactory. The
task itself is just a Java Runnable.
The post-processing task should also add all data objects created to the input factory
(using its add(IDataObject) method), so they are available for the next algorithm
without having to rebuild the set of SEXTANTE data objects from the ones currently
in the GIS.
3. Once you have created this classes, you have to set them as the current input factory and
process task factory. The SextanteGUI class is the one used for that, and it centralizes
all the GUI elements and the additional classes needed.
There are three methods that you have to use:
SextanteGUI.setOutputFactory(OutputFactory);
SextanteGUI.setInputFactory(IInputFactory);
SextanteGUI.setPostProcessTaskFactory(IPostProcessTaskFactory);
36 CHAPTER 4. DEVELOPING BINDINGS
The first one is needed to execute algorithm with the right output factory. You should
have an output factory in your bindings, according to what we saw in the last section.
Before using them, you should call the initialize() method.
SextanteGUI.initialize();
This will load all configuration parameters that the user might have setted in a previous
session using any of the corresponding SEXTANTE GUI elements.
And before all that, do not forget to initialize the library, so the list of available algo-
rithms is created. Otherwise, you will see no algorithms at all.
Sextante.initialize()
4. And now, you can use methods from the GUIFactory class to show up the SEXTANTE
tools. For example, to show the toolbox dialog, call the showToolboxDialog() method
SextanteGUI.showToolboxDialog(Frame parent);
This will show the toolbox, which is already fully functional. That means that you can
already use it to execute an algorithm, and it will create the corresponding interface to
set the parameter values (if the algorithm requires layers, they will be taken from the
input factory) and generate new layers (which will be created using the selected output
factory and managed using the post–process task), and you do not have to do anything
but adding that single line.
Use the plug–in mechanism of your GIS application to create an extension that calls
the corresponding method of the GUIFactory class when a button is clicked or a menu
selected.

Chapter 5
Setting up Eclipse to work with SEX-
TANTE and gvSIG
5.1 Introduction
All examples presented in this text are based on Geotools as the geodata library supporting
SEXTANTE operations. However, SEXTANTE runs on several GIS, being linked to their
underlying data handling libraries. GvSIG is one of them, and probably the most popular
platform for using SEXTANTE, so developers might want to develop and test their algorithms
in gvSIG instead of using the Geotools–based configuration shown in other chapters of this
manual. Also, gvSIG has a graphical interface, so graphic elements of SEXTANTE can be
tested as well.
This chapter shows how to set up an Eclipse environment using the source code of gvSIG
and the source code from SEXTANTE. From it, you will be able to develop and test your new
geoalgorithms in gvSIG, and even to deploy a modified version of SEXTANTE including your
own algorithms and enhancements.
GvSIG fundamentals are not described in this chapter, and you are supposed to be familiar
with them.
5.2 Setting up gvSIG
Although setting up gvSIG is not difficult, the process will not be describe here. To know
more about how to to this, have a look at the documentation in gvSIG website1. Following
those instructions, you will get a working copy of gvSIG (you just need a minimum gvSIG
to run SEXTANTE, so there is no need to download and set up all the extensions currently
available). Once you are done with gvSIG, a few additional steps must be taken if we want
to integrate SEXTANTE with it.
5.3 Setting up SEXTANTE
The next step is to download the source code of SEXTANTE from the SVN repository. Select
Import... in the File menu and then Checkout Project from SVN.
Use the following URL:
https://svn.forge.osor.edu/svn/sextante
1gvsig.org
37
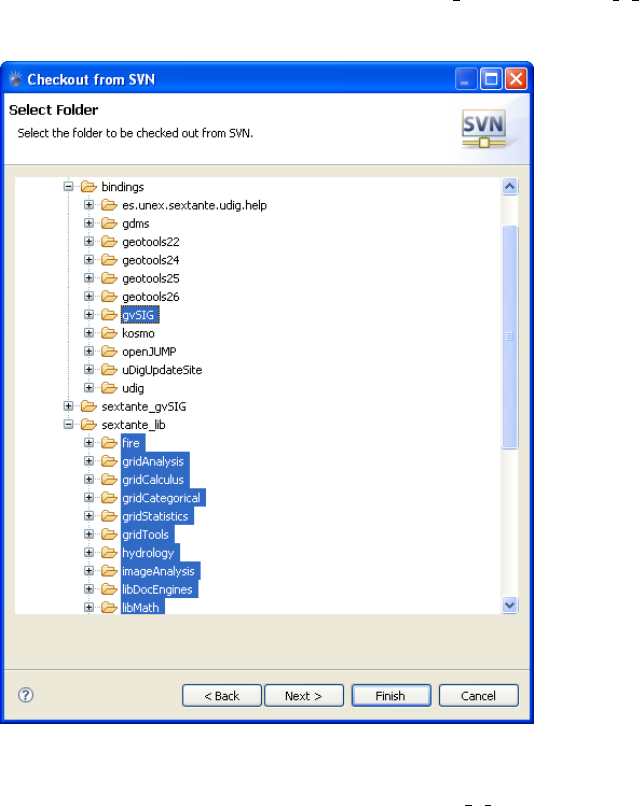
38 CHAPTER 5. SETTING UP ECLIPSE TO WORK WITH SEXTANTE AND GVSIG
Expand the trunk branch to work with the latest version, or tags to work with the latest
stable version (1.0 is the current one)
Expand the soft branch and select all the folders under sextante lib and the gvsig 1 x folder
under bindings.
Press Finish.
To build SEXTANTE, you will find a build.xml in the gvsig 1 x project (this project
contains the gvSIG bindings). This build file will compile SEXTANTE (both the core and
the algorithms), creating all necessary jar files and moving them to a new folder named dist.
After that, it will move the content of that folder to the corresponding folder from which
gvSIG can load them upon starting. Also, it will compile the bindings needed to connect
SEXTANTE and gvSIG, and copy them to a new folder under the extensions folder.
Now you can run gvSIG and SEXTANTE icons will appear in the toolbar giving you full
access to SEXTANTE.
5.4 Developing and testing your algorithms
To develop a new algorithm you have two options:
•To put it into one of the already existing projects. For instance, if you develop an algo-
rithm for terrain analysis, you might find interesting to include it in the geomorphometry
project, along with others such as slope or aspect. In this case, once you have finished
your algorithm, you just have to run then build.xml file once again, and it will be ready
to use the next time you run gvSIG.
5.4. DEVELOPING AND TESTING YOUR ALGORITHMS 39
•To put it into a new project. In this case, a little bit more of work os required. First, you
have to create the project. Using one of the existing ones as a template is recommended.
Second, running the build.xml file will not include your algorithm (or any one in that
new project) in gvSIG. You have to make sure that the corresponding jar file is in the
dist folder before running it. Create an ant build file to do this (once again, have a
look at the build file in an existing project, they all do that), and call it manually before
running the build file in the gvSIG project, or modify the latter to do it automatically.
Developing the algorithm itself is done as it was explained in chapter 3. There is no
difference between creating a SEXTANTE geoalgorithm using a gvSIG–based workspace or
any other one such as the GeoTools–based one that we used then.
