Prolin SDK Operating Guide Guide(V2.8.2)
User Manual:
Open the PDF directly: View PDF ![]() .
.
Page Count: 82
PAX Computer Technology(Shenzhen)Co., Ltd.
Prolin SDK Operating Guide
V 2.8.2
I
Copyright © 2000-2016 PAX Computer Technology (Shenzhen) Co., Ltd.
All rights reserved. No part of the contents of this document may be reproduced or
transmitted in any form without the written permission of PAX Computer Technology
(Shenzhen) Co., Ltd.
The information contained in this document is subject to change without notice. Although
PAX Computer Technology (Shenzhen) Co., Ltd. has attempted to ensure the accuracy of the
contents of this document, this document may include errors or omissions. The examples and
sample programs are for illustration only and may not be suited for your purpose. You should
verify the applicability of any example or sample program before placing the software into
productive use.

II
Revision History
Date
Version
Note
Author
2012.8.1
V1.0
1. SDK V1.0 released.
2. First release.
Lu Xue
2012.8.31
V2.0
1. SDK V2.0 released.
2. Add a lot of details for this
document.
Lu Xue
2012.9.18
V2.1
1. SDK V2.1 released.
2. Add instructions according to
users’ response for this
document.
Lu Xue
2012.10.9
V2.2
1. SDK V2.2 released.
2. Adjust the frame size of register
and update interface.
3. Auto-scan dynamic libraries and
add them to the link options.
No longer relying on
PaxPayPro software when
check license.
Lu Xue
2012.10.24
V2.3
1. SDK V2.3 released.
2. Way to download SDK is
changed from FTP downloading
to sending email to “support
team”.
3. Add a lot of details.
Lu Xue
2012.11.13
V2.4
1. SDK V2.4 released.
2. Now support GDB debugging on
the physical machine.
3. The app template does not use
minigui library any more, but
exsoal library.
Lu Xue
2012.11.28
V2.5
1. SDK v2.5 released.
2. Now support both TCP and
serial port debugging on the
Lu Xue

III
physical machine.
3. Show current version and
expired date in the eclipse title
area.
4. Auto-check upgrades info and
prompt users to do update
operation when SDK is opened.
5. Auto-add standard C library path
for the newly-created project.
2012.12.12
V2.6
1. SDK V2.6 released.
2. Update emulator to v1.5.
Lu Xue
2013.8.12
V2.7
1. SDK V2.7 released.
2. New version of OSAL library.
3. Update to Eclipse Juno S2.
4. Increase SDK start-up speed.
5. Add “Show Line Number”
chapter for this doc
Lu Xue
2013.11.6
V2.8
1. SDK V2.7.06 released
2. Add XCB module.
3. Add XUI module.
4. SDK support displaying Logcat.
5. Support Crash report.
Lu Xue
2015.12.7
V2.8.1
1. SDK V2.8.7 released.
2. Add more emulators and update
the emulator skins.
3. Fix some mistakes about
interface and spelling.
Lu Xue
Wang Fen
Liu Jing
Ma Liwen
2016.3.14
V2.8.2
1. SDK V2.8.8 released.
2. Add a static analysis tool for
C/C++ code: Cppcheck.
3. Add new emulator: D200.
Lu Xue
Wang Fen
IV
Contents
1 Introduction ......................................................................................................................... 1
1.1 Purpose .................................................................................................................. 1
1.2 Features ................................................................................................................. 1
1.3 OS Supported ........................................................................................................ 2
1.4 Environment Requirements ................................................................................... 2
1.5 User Requirements ................................................................................................ 3
1.6 Abbreviation .......................................................................................................... 3
2 Download and Install .......................................................................................................... 7
2.1 Download SDK ..................................................................................................... 7
2.2 Install SDK ............................................................................................................ 7
2.3 SDK Structure ....................................................................................................... 7
3 Open and Register SDK ...................................................................................................... 9
3.1 Activate SDK ........................................................................................................ 9
3.2 Eclipse Launch ...................................................................................................... 9
3.3 Set Workspace ..................................................................................................... 10
3.4 Register SDK ....................................................................................................... 10
4 Eclipse Preview ................................................................................................................. 13
4.1 Eclipse Main Interface ........................................................................................ 13
4.1.1 Main Menu of PAX ...................................................................................... 14
4.1.2 Toolbar of PAX ............................................................................................ 15
5 Application Developments ................................................................................................ 17
5.1 Create Project ...................................................................................................... 17
5.2 Edit code .............................................................................................................. 20
5.3 Build Project ........................................................................................................ 21
5.4 Generate Package ................................................................................................ 23
5.5 Install Package ..................................................................................................... 24
5.6 Import Project ...................................................................................................... 27
5.7 Project Settings .................................................................................................... 30
6 Library Developments ....................................................................................................... 33
V
6.1 Create Project ...................................................................................................... 33
6.2 Build Project ........................................................................................................ 34
6.3 Use Library .......................................................................................................... 35
6.3.1 Copy LIB to Project ..................................................................................... 35
6.3.2 Modify Link Option ..................................................................................... 36
6.3.3 Rebuild Project ............................................................................................. 37
7 Code Edit Help .................................................................................................................. 39
7.1 Query Functions or Keywords ............................................................................ 39
7.2 Query Details from Documents ........................................................................... 39
7.3 Input Prompts ...................................................................................................... 40
8 Emulator ............................................................................................................................ 42
8.1 Open Emulator Manager ..................................................................................... 42
8.2 Start Emulator ..................................................................................................... 44
9 Logcat ................................................................................................................................ 46
9.1 Add log ................................................................................................................ 46
9.2 Show Log ............................................................................................................ 46
10 Cppcheck .................................................................................................................... 48
10.1 Install Cppcheck .................................................................................................. 48
10.2 Configure Cppcheck Environment ...................................................................... 49
10.3 Use Cppcheck ...................................................................................................... 51
11 Debug ......................................................................................................................... 52
11.1 Preparation .......................................................................................................... 52
11.1.1 Set Debug Content ....................................................................................... 52
11.1.2 Toggle Breakpoint ........................................................................................ 52
11.1.3 Build and Install APP ................................................................................... 53
11.2 Debug Steps ......................................................................................................... 54
11.2.1 Open Debug Configurations Page ................................................................ 54
11.2.2 Debug Configuration Settings ...................................................................... 55
11.2.3 Run debug .................................................................................................... 57
12 User Help .................................................................................................................... 60
VI
12.1 About SDK .......................................................................................................... 60
13 Update SDK ............................................................................................................... 62
13.1 Update Wizard ..................................................................................................... 62
13.2 Check Update ...................................................................................................... 63
13.3 Download Update Data ....................................................................................... 65
14 Customize ................................................................................................................... 67
14.1.1 Set Code Font ............................................................................................... 67
14.1.2 Show Line Number ...................................................................................... 68
15 Keyboard Shortcuts .................................................................................................... 69
VII
Figure List
Figure 1.1 Windows console command ............................................................................. 3
Figure 2.1 SDK files ........................................................................................................... 8
Figure 3.1 Eclipse launching .............................................................................................. 9
Figure 3.2 Set workspace ................................................................................................. 10
Figure 3.3Figure 3.4 Register dialog ................................................................................ 10
Figure 3.5 Save user key .................................................................................................. 11
Figure 3.6 Import license result ........................................................................................ 11
Figure 4.1 Eclipse main interface ..................................................................................... 13
Figure 4.2 PAX menu ....................................................................................................... 14
Figure 4.3 Close welcome page ....................................................................................... 15
Figure 4.4 PAX toolbar .................................................................................................... 15
Figure 5.1 Create project .................................................................................................. 18
Figure 5.2 Project wizard ................................................................................................. 19
Figure 5.3 Open associated perspective ........................................................................... 19
Figure 5.4 Project explorer interface ................................................................................ 20
Figure 5.5 Edit code ......................................................................................................... 21
Figure 5.6 Build project ................................................................................................... 22
Figure 5.7 Build project ................................................................................................... 22
Figure 5.8 Build project ................................................................................................... 23
Figure 5.9 Building process and result ............................................................................. 23
Figure 5.10 Generate package .......................................................................................... 24
Figure 5.11 Emulator ........................................................................................................ 24
Figure 5.12 Installer ......................................................................................................... 25
Figure 5.13 Add device .................................................................................................... 25
Figure 5.14 Installer ......................................................................................................... 26
Figure 5.15 Installer ......................................................................................................... 26
Figure 5.16 Running result ............................................................................................... 27
Figure 5.17 Import project ............................................................................................... 28
Figure 5.18 Import wizard ................................................................................................ 28
VIII
Figure 5.19 Import wizard ................................................................................................ 29
Figure 5.20 Project explorer ............................................................................................. 29
Figure 5.21 Project settings .............................................................................................. 30
Figure 5.22 Compile options ............................................................................................ 31
Figure 5.23 Link options .................................................................................................. 31
Figure 6.1 Project wizard ................................................................................................. 34
Figure 6.2 Building result................................................................................................. 35
Figure 6.3 Copy library .................................................................................................... 36
Figure 6.5 Project properties ............................................................................................ 37
Figure 6.6 Input library name ........................................................................................... 37
Figure 6.7 Building console ............................................................................................. 38
Figure 7.1 Query result ..................................................................................................... 39
Figure 7.2 Query result ..................................................................................................... 40
Figure 7.3 Function detail ................................................................................................ 40
Figure 7.4 Input prompts .................................................................................................. 41
Figure 8.1 Emulator directory .......................................................................................... 43
Figure 8.2 Open emulator manager .................................................................................. 43
Figure 8.3 Emulator manager ........................................................................................... 43
Figure 8.4 Create PVD ..................................................................................................... 44
Figure 8.5 Emulator list .................................................................................................... 44
Figure 8.6 Launch options ................................................................................................ 45
Figure 8.7 Emulator .......................................................................................................... 45
Figure 9.1 Add log ........................................................................................................... 46
Figure 9.2 Logcat view ..................................................................................................... 47
Figure 10.1 Cppcheck ...................................................................................................... 48
Figure 10.2 Install Cppcheck ........................................................................................... 49
Figure 10.3 Check Cppcheck ........................................................................................... 49
Figure 10.4 Configure Cppcheck ..................................................................................... 50
Figure 10.5 Set Cppcheck binary path ............................................................................. 50
Figure 10.6 Run Cppcheck ............................................................................................... 51
IX
Figure 10.7 Cppcheck running result ............................................................................... 51
Figure 11.1 Add debug code ............................................................................................ 52
Figure 11.2 Toggle breakpoint ......................................................................................... 53
Figure 11.3 Breakpoint ..................................................................................................... 53
Figure 11.4 App halts ....................................................................................................... 54
Figure 11.5 Open debug configurations page .................................................................. 54
Figure 11.6 Create a new debug configuration ................................................................ 55
Figure 11.7 Debug settings ............................................................................................... 56
Figure 11.8 Choose device ............................................................................................... 56
Figure 11.9 Generate commands ...................................................................................... 57
Figure 11.10 Console message ......................................................................................... 58
Figure 11.11 Confirm switch ........................................................................................... 58
Figure 11.12 Debug perspective ....................................................................................... 59
Figure 11.13 Debug perspective ....................................................................................... 59
Figure 12.1 PAX help menu ............................................................................................. 60
Figure 12.2 About SDK ................................................................................................... 61
Figure 13.1 Update wizard window ................................................................................. 62
Figure 13.2 Update history ............................................................................................... 63
Figure 13.3 Update window ............................................................................................. 64
Figure 13.4 Check update ................................................................................................. 65
Figure 13.5 Update process .............................................................................................. 66
Figure 14.1 Set code font ................................................................................................. 67
Figure 14.2 Show line number ......................................................................................... 68

Introduction
PAX Computer Technology (Shenzhen) Co., Ltd. 1
1 Introduction
Prolin SDK is a software development kit customized for the Prolin POS machine, such as
S300, S800, and S900. It is used to develop and build POS applications. It provides various
functions such as code editing, debugging, building and emulating.
This document mainly introduces the SDK in Windows OS. Users who have problems with
the SDK are welcome to send an email to support@paxsz.com.
1.1 Purpose
This manual provides instructions of how to use Prolin SDK for application developers.
1.2 Features
Base on Eclipse IDE platform and CDT plug-in. It is more convenient if you are familiar
with Eclipse
Run on both Windows and Linux computers
Support C/C++ development, contains GCC/G++ compile environment
Integrated environment to develop and build application
You can quickly create an APP/LIB project via a step-by-step instruction
Colorful interfaces to show project architecture and source code. Easy to edit, debug and
search for help
Prolin SDK Operating Guide
2 PAX Computer Technology (Shenzhen) Co., Ltd.
True-to-original emulator in which you can install you APP to instantly check the running
result
1.3 OS Supported
Both windows and Linux (Ubuntu) OS are supported.
OS
Version
32bit
64bit
Windows
Xp/Win7/Win8
Ubuntu
10.04 or higher
1.4 Environment Requirements
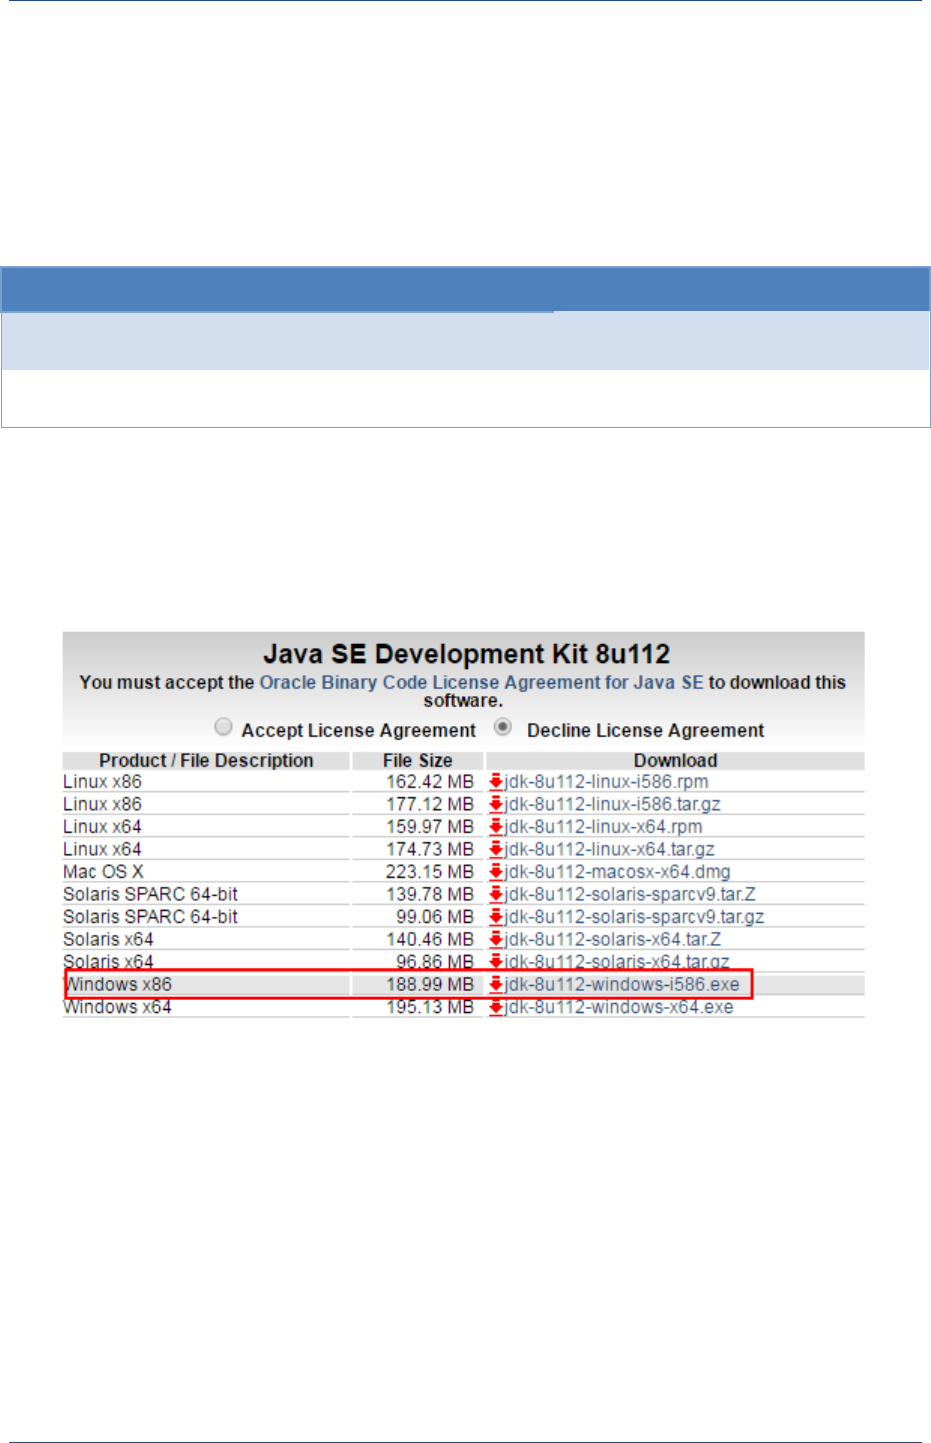
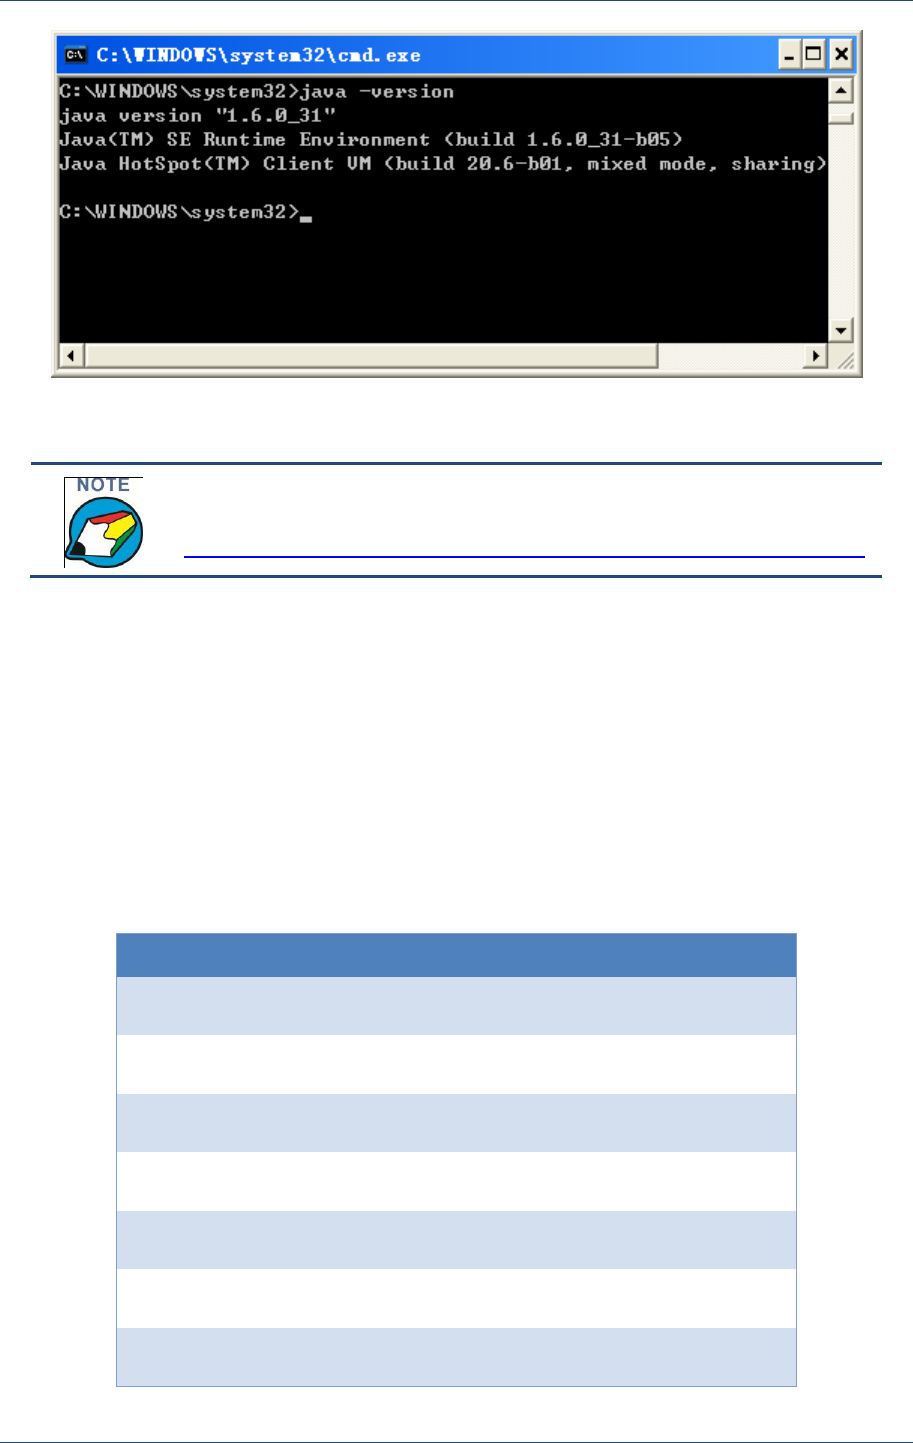
JDK (Java development kit) or JRE (Java runtime environment) is required to be installed in
your personal computer. Check if JRE exists in your PC by typing java –version command.
Figure 1.1 JDK Download Page
Please note that the SDK (specially the Eclipse) is only a 32bit version. So you should
download 32bit JDK/JRE even though your system is 64bit.
Introduction
PAX Computer Technology (Shenzhen) Co., Ltd. 3
Figure 1.2 Windows console command
JDK/JRE downloading address:
http://www.oracle.com/technetwork/java/javase/downloads/index.html
1.5 User Requirements
You should be familiar with C/C++ programming. And it would be better to have experience
in using the Linux OS and the Eclipse tool.
1.6 Abbreviation
Table 1 Abbreviation
Abbreviation
Description
ADB
Android Debug Bridge
APP
Application
CDMA
Code Division Multiple Access
CDT
C/C++ Development Tooling
COM
Cluster Communication Port
DOC
Document
FAQ
Frequently Asked Question

Prolin SDK Operating Guide
4 PAX Computer Technology (Shenzhen) Co., Ltd.
FTP
File Transfer Protocol
GCC
GNU Compiler Collection
GDB
GNU Project Debugger
GPRS
General Packet Radio Service
LCD
Liquid Crystal Display
IC Card
Integrated Circuit Card
IDE
Integrated Development Environment
JRE
Java Runtime Environment
LIB
Library
OS
Operating System
PC
Personal Computer
PED
PIN Entry Device
PIN
Personal Identification Number
POS
Point Of Sale
PVD
Prolin Virtual Device
RF Card
Radio Frequency Card
RTM
Release To Manufacturing
SDK
Software Development Kit
TCP
Transmission Control Protocol
TM
Terminal Manager
UDP
User Datagram Protocol
UI
User Interface
WAN
Wide Area Network

Introduction
PAX Computer Technology (Shenzhen) Co., Ltd. 5
XCB
Xos Communication Bridge

Download and Install
PAX Computer Technology (Shenzhen) Co., Ltd. 7
2 Download and Install
2.1 Download SDK
To download SDK, please contact PAX support team or send an email to
support@paxsz.com.
2.2 Install SDK
After downloading, extract the file prolin_sdk_win-xxx.zip or prolin_sdk_linux-xxx.tar.gz
and use it directly. No additional installation or registration steps required.
It is not recommended that the absolute path of your SDK contains blank space or Chinese
characters; otherwise it will cause unexpected error.
2.3 SDK Structure
The following picture shows the extracted files. Please read file readme.txt to get more
information.

Prolin SDK Operating Guide
8 PAX Computer Technology (Shenzhen) Co., Ltd.
Figure 2.1 SDK files

Open and Register SDK
PAX Computer Technology (Shenzhen) Co., Ltd. 9
3 Open and Register SDK
3.1 Activate SDK
Go to the root directory of SDK and double click sdk.exe to activate SDK.
3.2 Eclipse Launch
Wait for the eclipse to launch.
Figure 3.1 Eclipse launching
Prolin SDK Operating Guide
10 PAX Computer Technology (Shenzhen) Co., Ltd.
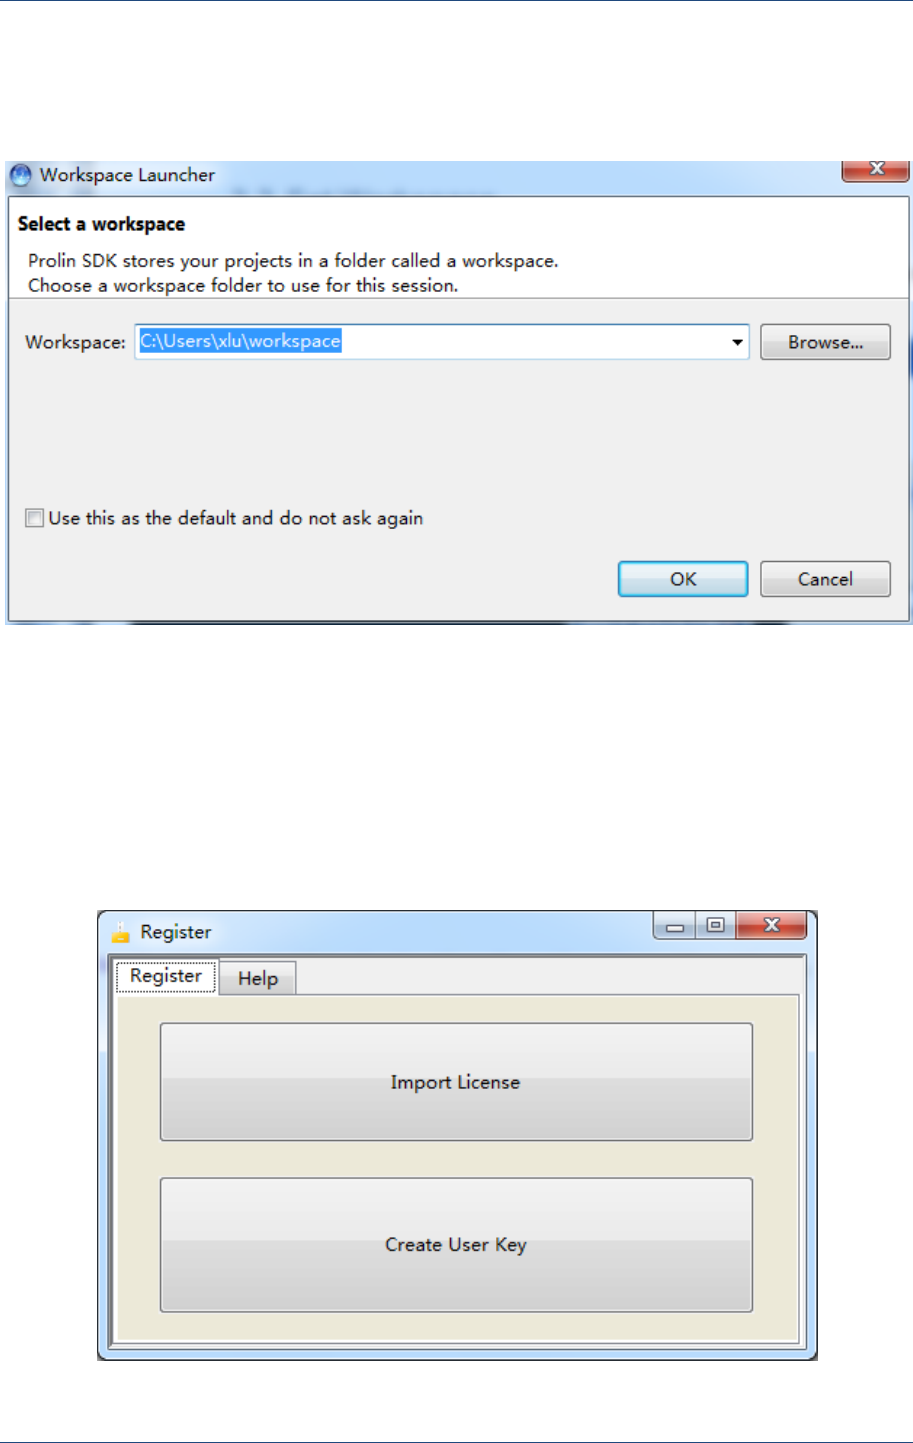
3.3 Set Workspace
Set path of workspace at wherever you want。
Figure 3.2 Set workspace
Press OK button and wait for the SDK to start up.
3.4 Register SDK
If you have not registered, a register window will pop up automatically after eclipse start-ups.
Figure 3.3Figure 3.4 Register dialog
Open and Register SDK
PAX Computer Technology (Shenzhen) Co., Ltd. 11
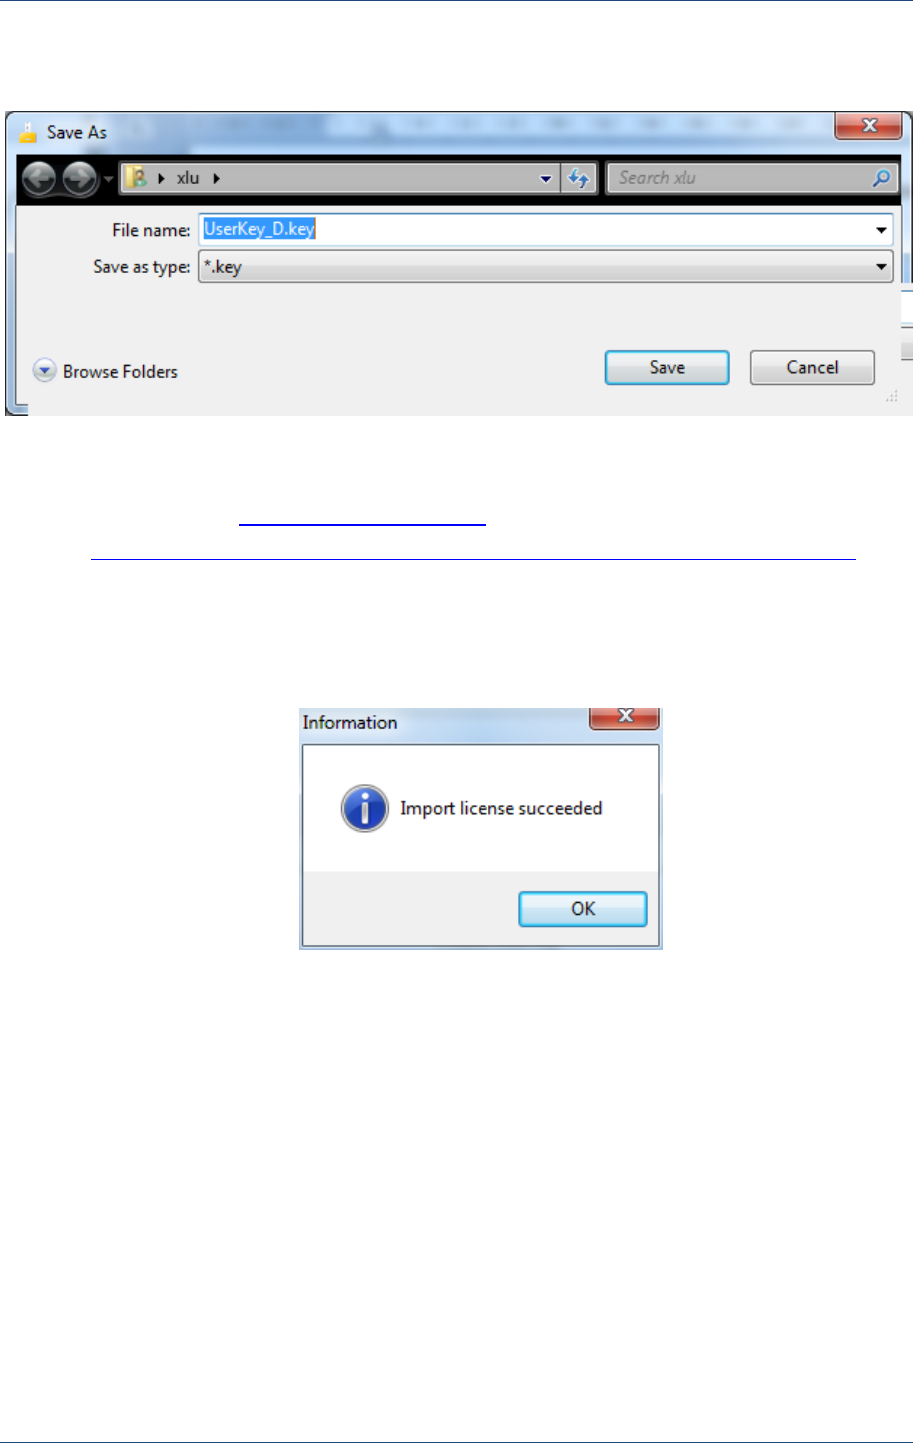
Click Create User Key button and wait for a moment. Then a dialog appears and shows
you to save the created user key named UserKey_X.key.
Figure 3.5 Save user key
Now login on the PPN (https://support.paxsz.com) and upload the user key. For more guides,
just visit https://support.paxsz.com/QuestionAnswer/QuestionAnswerDetail.aspx?ID=53.
When the license is issued, download it and import. Click Import License button to load the
license to the SDK.
A dialog will show you the importing result.
Figure 3.6 Import license result
Eclipse Preview
PAX Computer Technology (Shenzhen) Co., Ltd. 13
4 Eclipse Preview
4.1 Eclipse Main Interface
As integrated development software, Eclipse is customized to support Prolin application and
library development. The following is the main interface of customized eclipse.
Figure 4.1 Eclipse main interface

Prolin SDK Operating Guide
14 PAX Computer Technology (Shenzhen) Co., Ltd.
4.1.1 Main Menu of PAX
Under the PAX menu, there are four sub menus: Generate Package, Install Package,
Emulator Manager, and Help. And Under the Help sub menu, there are two children:
About SDK and Update SDK.
The functions of each menu:
Menu name
Function
Generate Package
Gather the project built files and compress
them into the target .aip file.
Install Package
Install the .aip file into the POS.
Emulator Manager
Create a new emulator, open an emulator, etc.
About SDK
Show SDK information
Update SDK
Update the SDK, such as the development
files, the emulator.
Figure 4.2 PAX menu

Eclipse Preview
PAX Computer Technology (Shenzhen) Co., Ltd. 15
4.1.2 Toolbar of PAX
Close the Welcome page.
Figure 4.3 Close welcome page
There are three toolbar icons appear: Generate Package, Install Package, and Emulator
Manager.
Figure 4.4 PAX toolbar
Move the mouse pointer above the toolbar icon, tips of function will
pop up.

Application Developments
PAX Computer Technology (Shenzhen) Co., Ltd. 17
5 Application
Developments
SDK can be used to develop your own APPs which can only run on emulator or POS which
requests no application signatures.
If you want to sign your APPs, please contact PAX support team for help.
5.1 Create Project
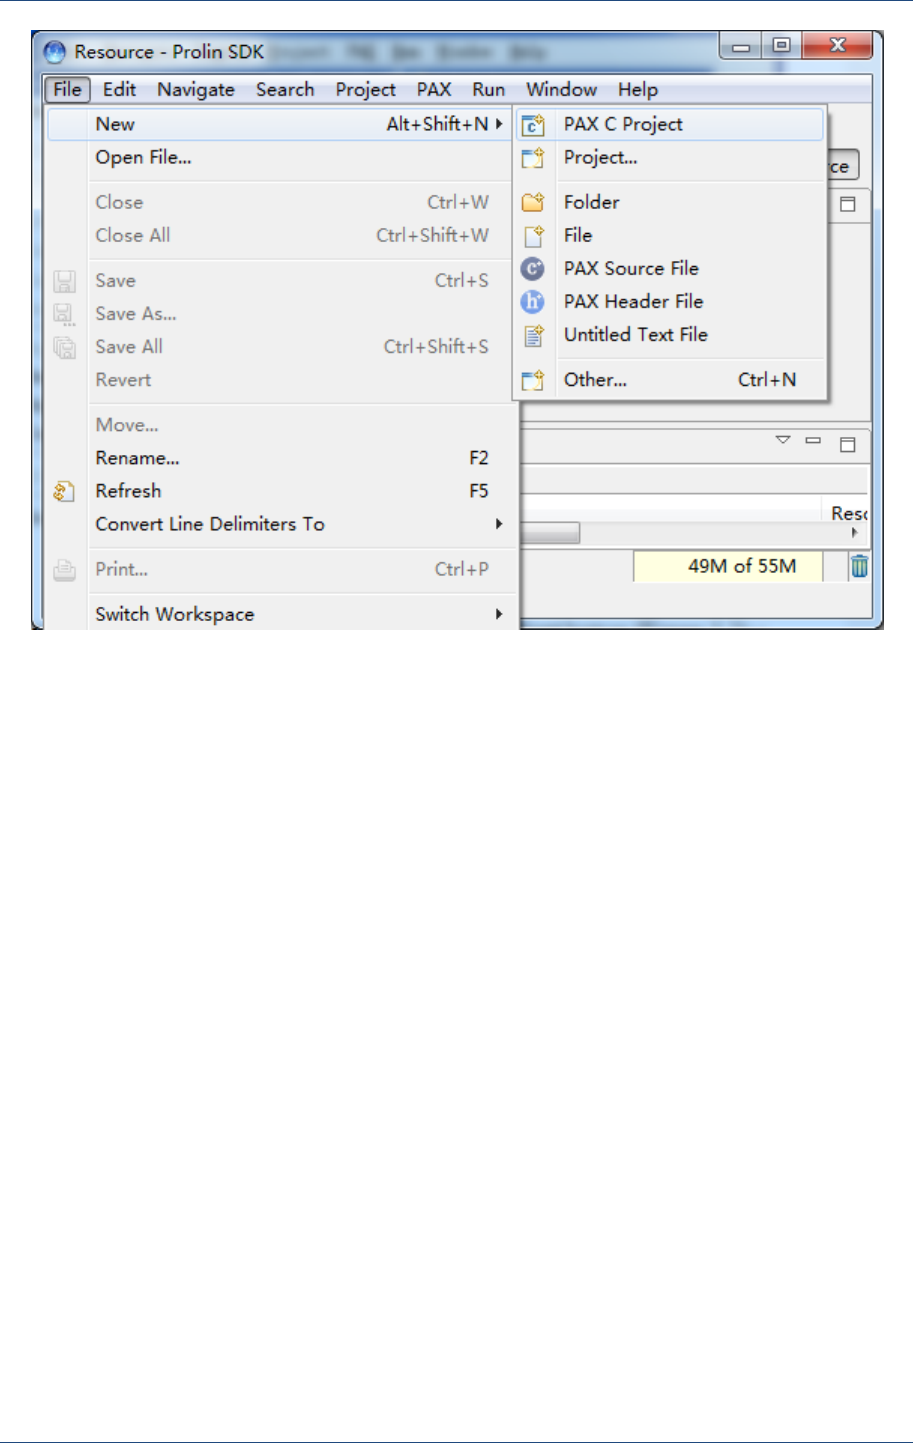
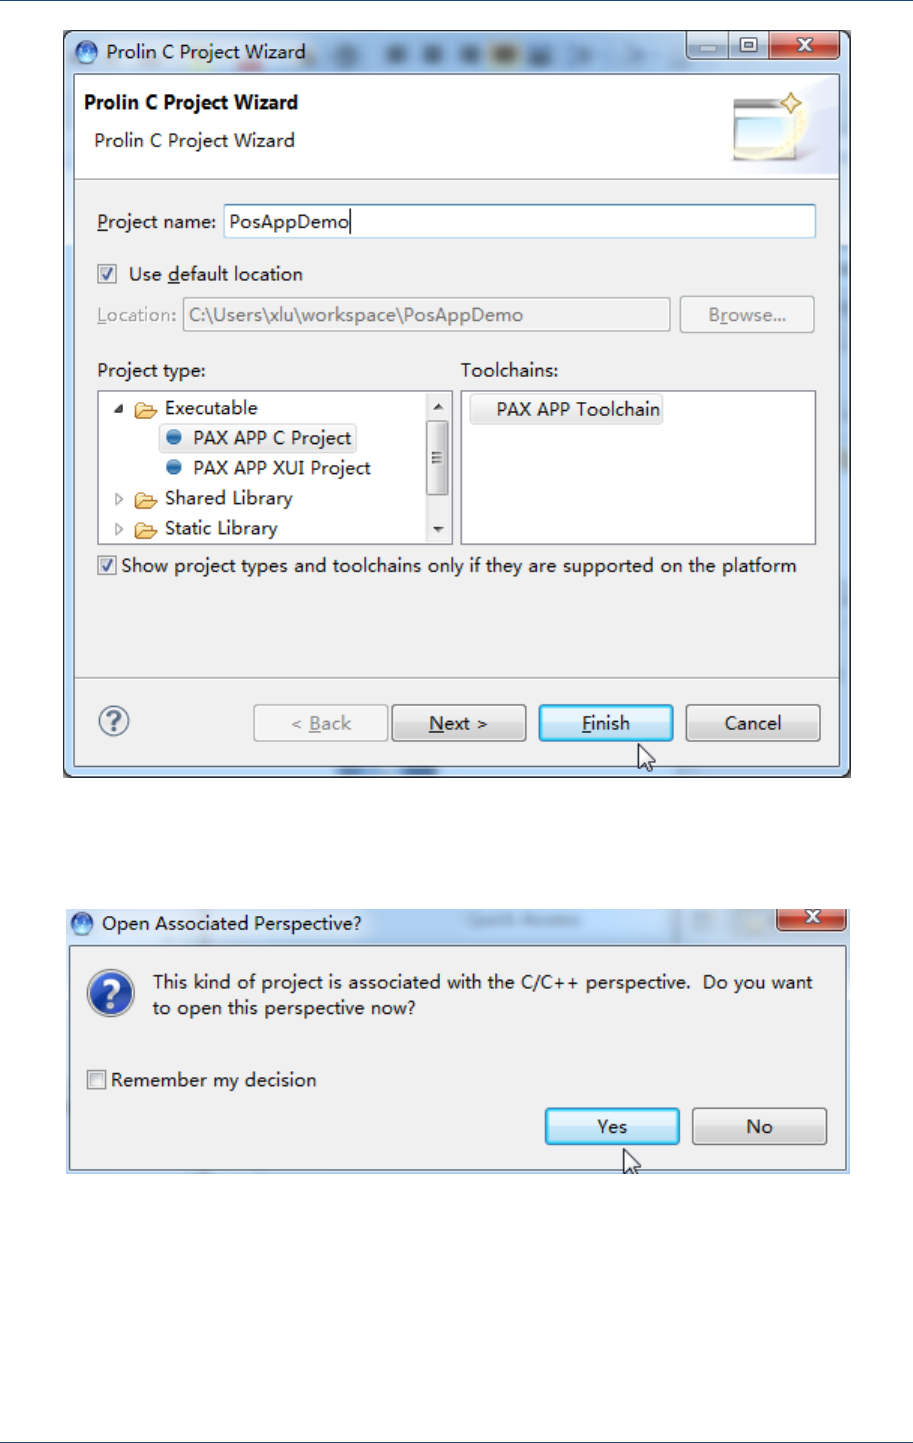
Select menu FileNewPAX C Project, New Project Wizard will be open.
Prolin SDK Operating Guide
18 PAX Computer Technology (Shenzhen) Co., Ltd.
Figure 5.1 Create project
In the next wizard page, input Project name, choose Project type, and then click Finish
button.
Application Developments
PAX Computer Technology (Shenzhen) Co., Ltd. 19
Figure 5.2 Project wizard
When asked to open the associated perspective, click Yes.
Figure 5.3 Open associated perspective
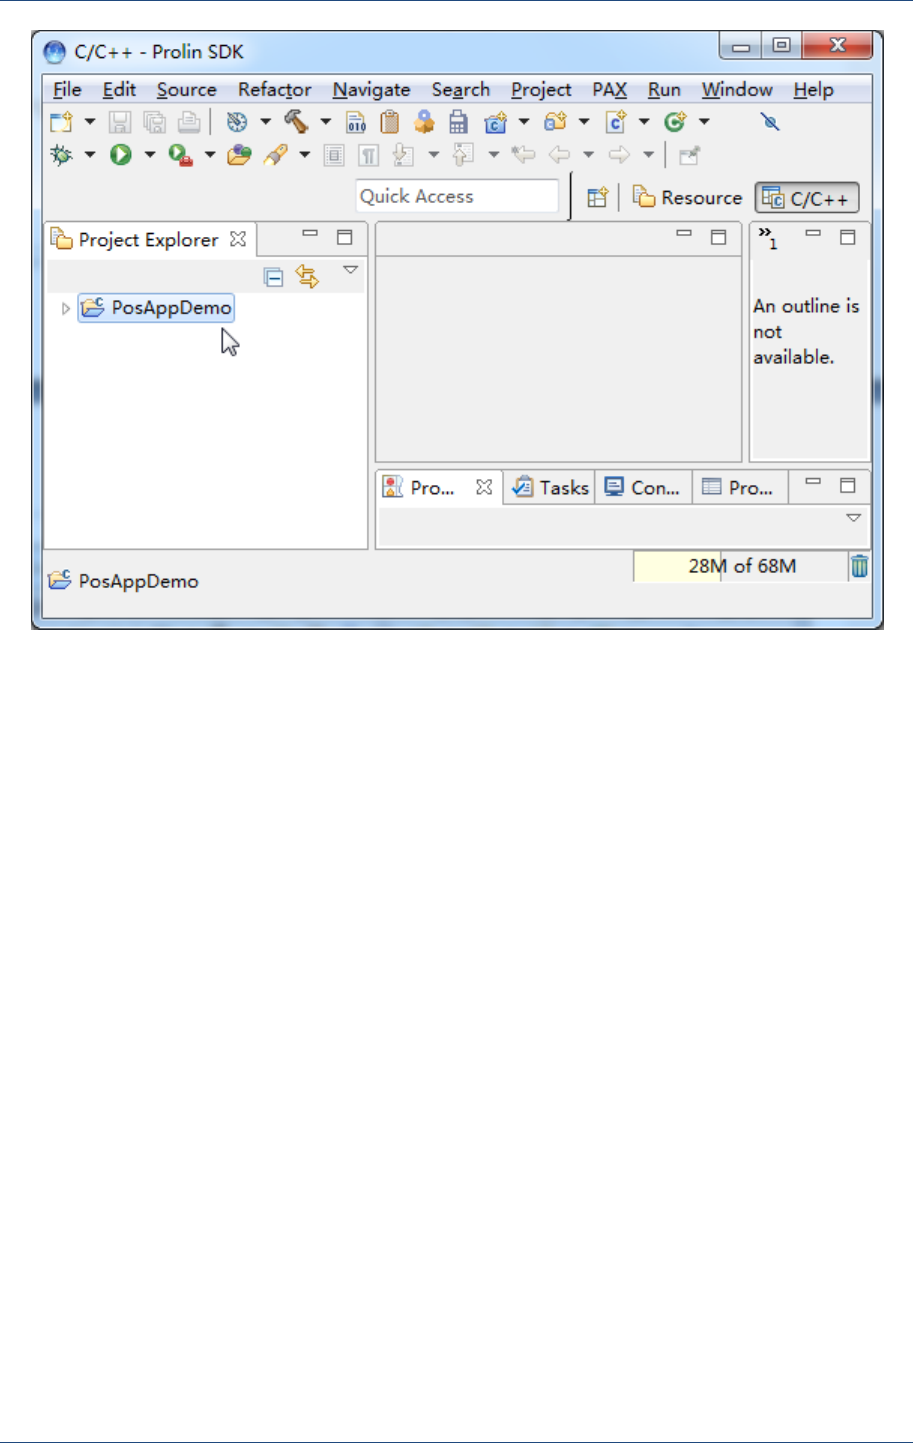
Now a new project is created. You can see it in the Project Explorer.
Prolin SDK Operating Guide
20 PAX Computer Technology (Shenzhen) Co., Ltd.
Figure 5.4 Project explorer interface
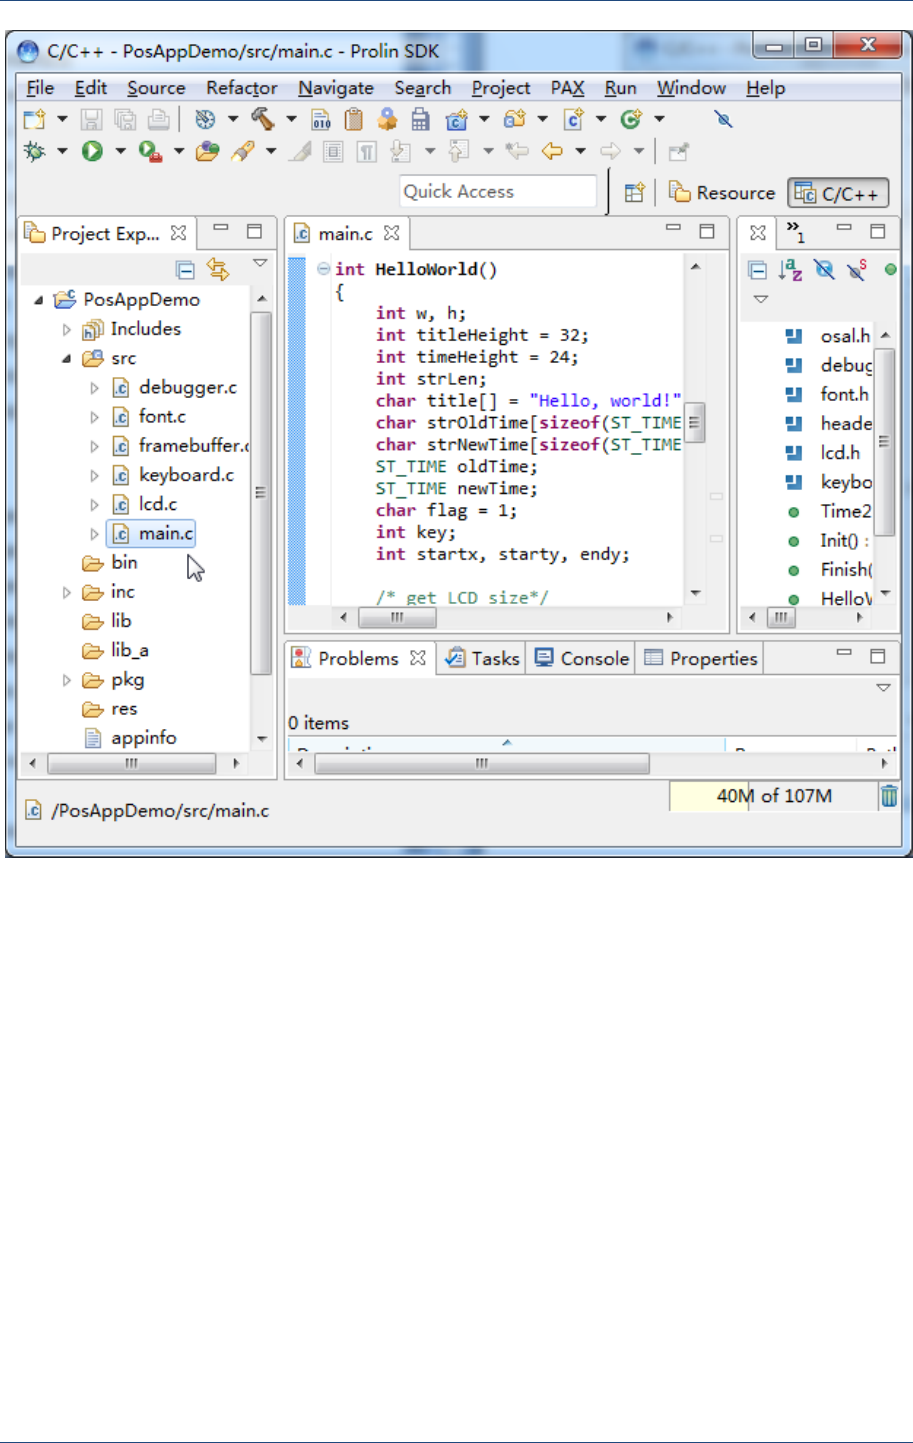
5.2 Edit code
The project just created is a simple Hello World demo. You can edit it or just go through to
the next step.
If you want to edit the project, just double click the file you want in the project explorer.
Application Developments
PAX Computer Technology (Shenzhen) Co., Ltd. 21
Figure 5.5 Edit code
5.3 Build Project
There are several ways to build a project.
1st, select target project, and click Build Project in the menu Project.
2nd, select target project, and click Build icon in toolbar.
3rd, select target project and right click on the mouse. Select Build Project in the popup
context menu.
Prolin SDK Operating Guide
22 PAX Computer Technology (Shenzhen) Co., Ltd.
Figure 5.6 Build project
Figure 5.7 Build project
Wait for building the project.
Application Developments
PAX Computer Technology (Shenzhen) Co., Ltd. 23
Figure 5.8 Build project
You can check the building process (GCC compile, link, and strip) and the result in the
Console window.
Figure 5.9 Building process and result
5.4 Generate Package
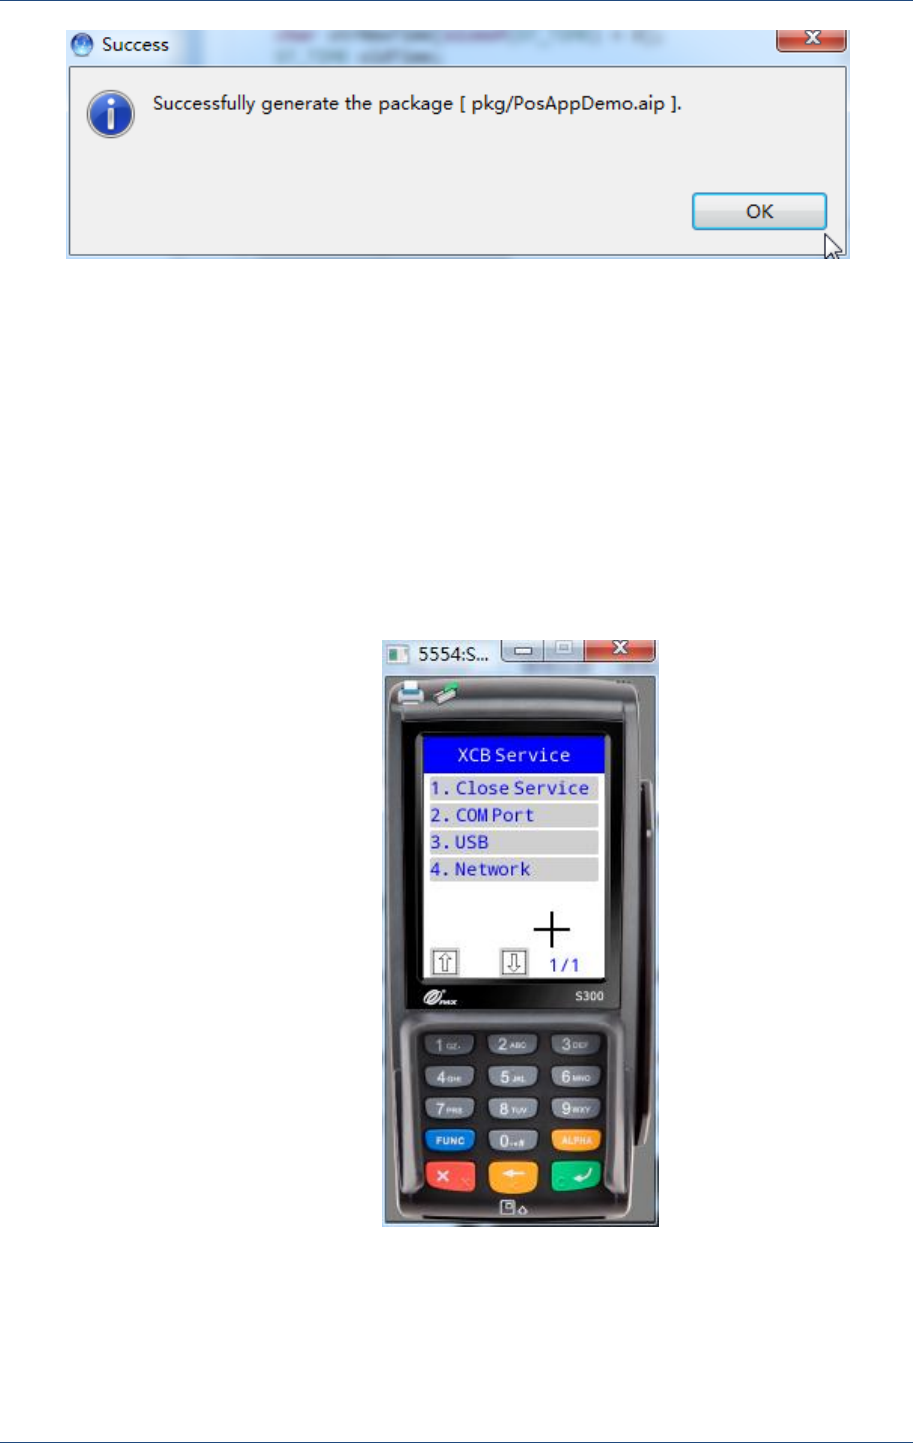
If building successfully, you can start to generate the final package (the .aip file). Select menu
PAXGenerate Package and wait, a dialog will pop up to tell you the generating result.
Prolin SDK Operating Guide
24 PAX Computer Technology (Shenzhen) Co., Ltd.
Figure 5.10 Generate package
5.5 Install Package
The .aip package can be installed to the emulator or physical POS machine by SDK, and can
also be installed by TermAssist tool.
Before installing package, there must be at least an emulator or a physical POS machine
running. Now we just open an emulator (Refer to the Emulator Manager chapter to learn
how to open an emulator).
Figure 5.11 Emulator
Click the Install Package icon in the main page, the installer dialog will pop up.
Application Developments
PAX Computer Technology (Shenzhen) Co., Ltd. 25
Figure 5.12 Installer
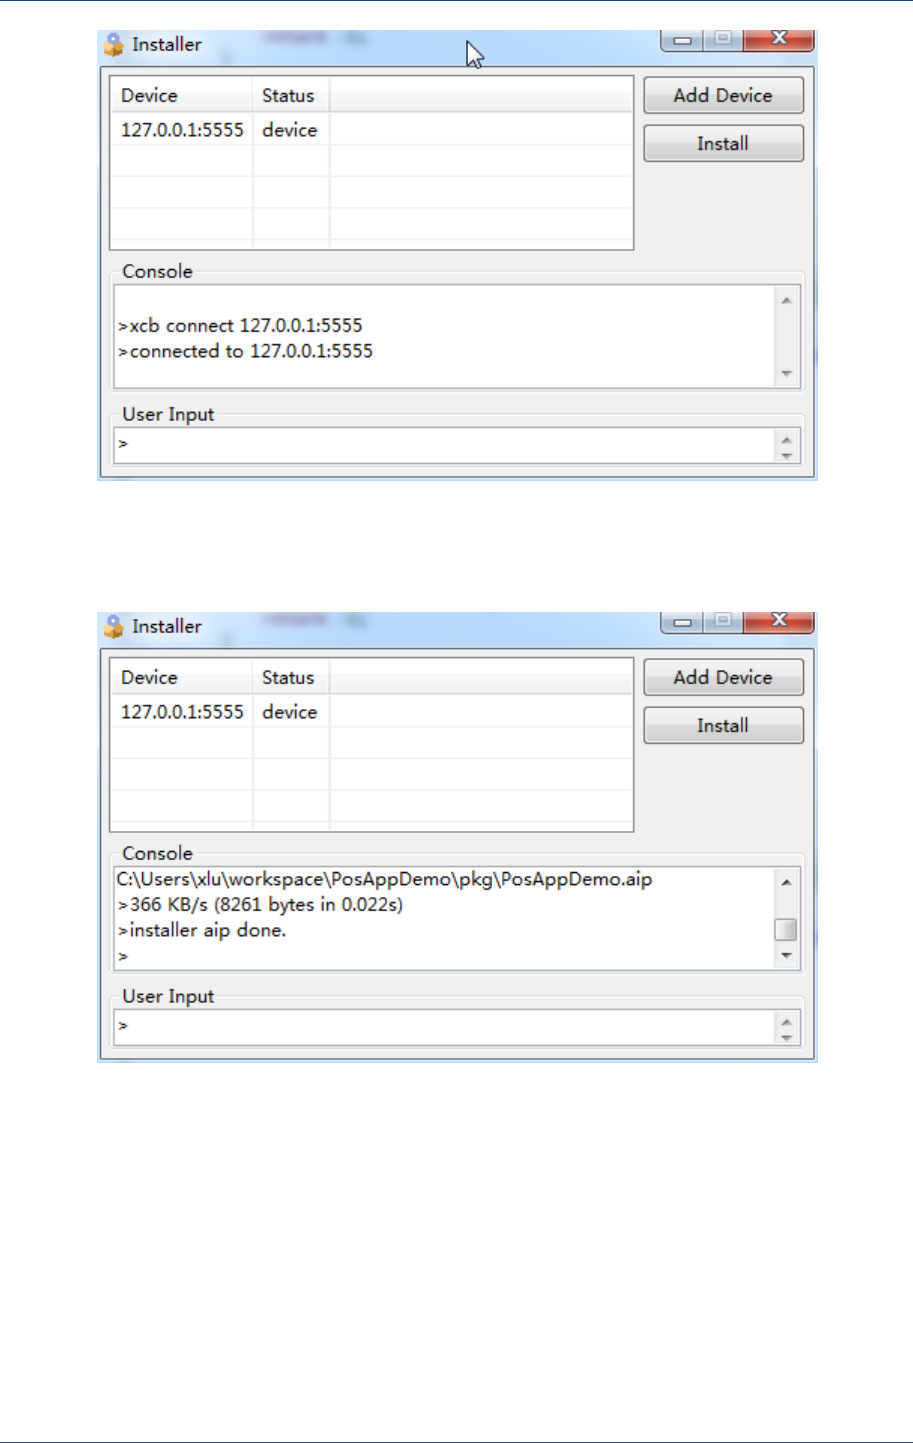
Click Add Device button to add a new device. Input connection parameters in Add Device
dialog and press Connect button.
Figure 5.13 Add device
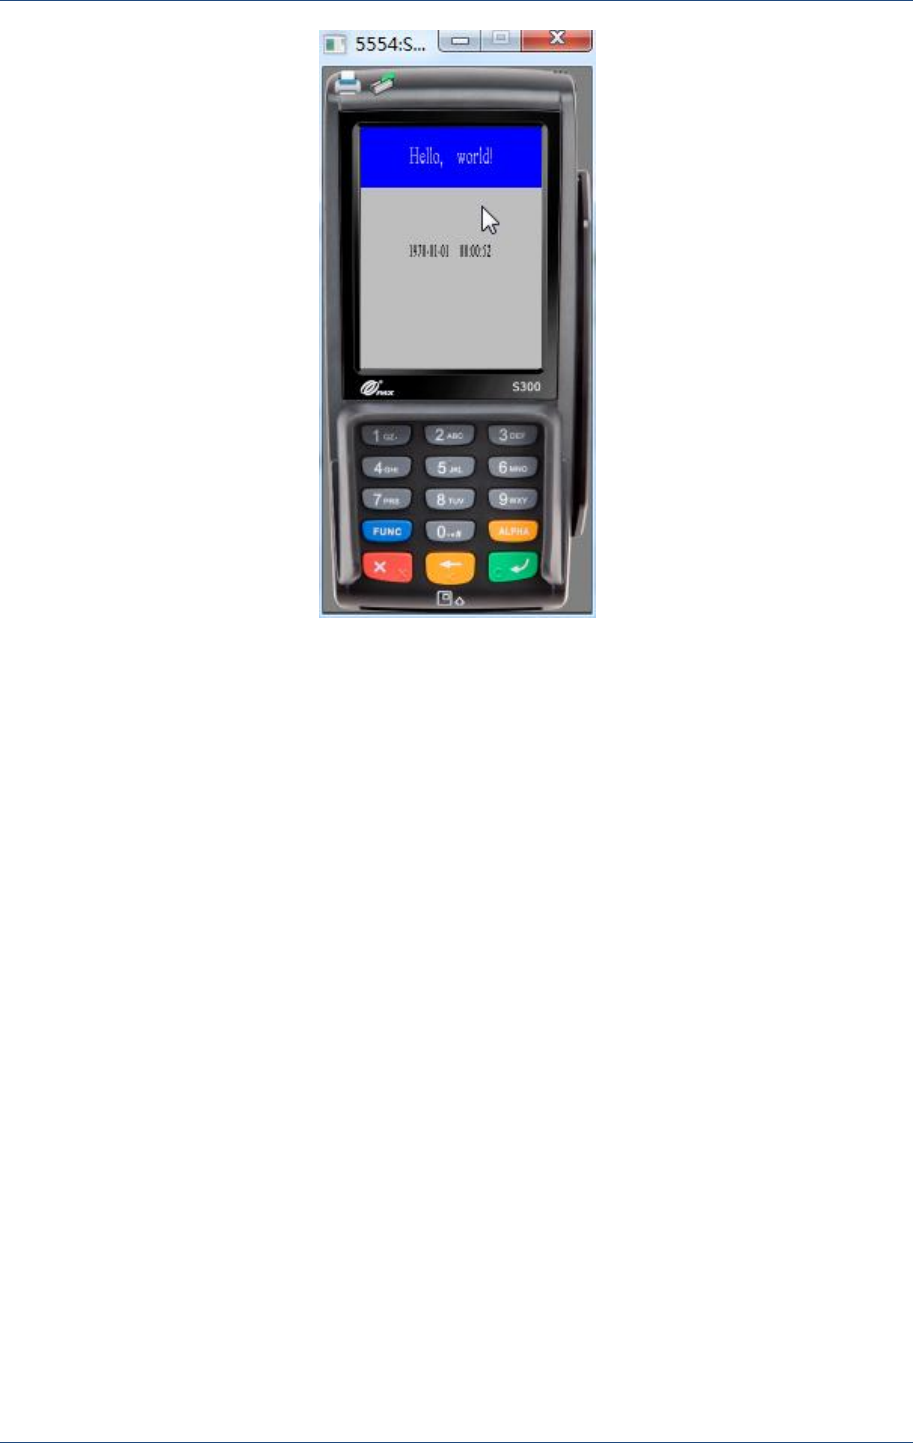
When a connection is established, the connected device will be shown in the list of the
installer dialog.
Prolin SDK Operating Guide
26 PAX Computer Technology (Shenzhen) Co., Ltd.
Figure 5.14 Installer
Choose a device and press Install button. Check the installing result in the console area
Figure 5.15 Installer
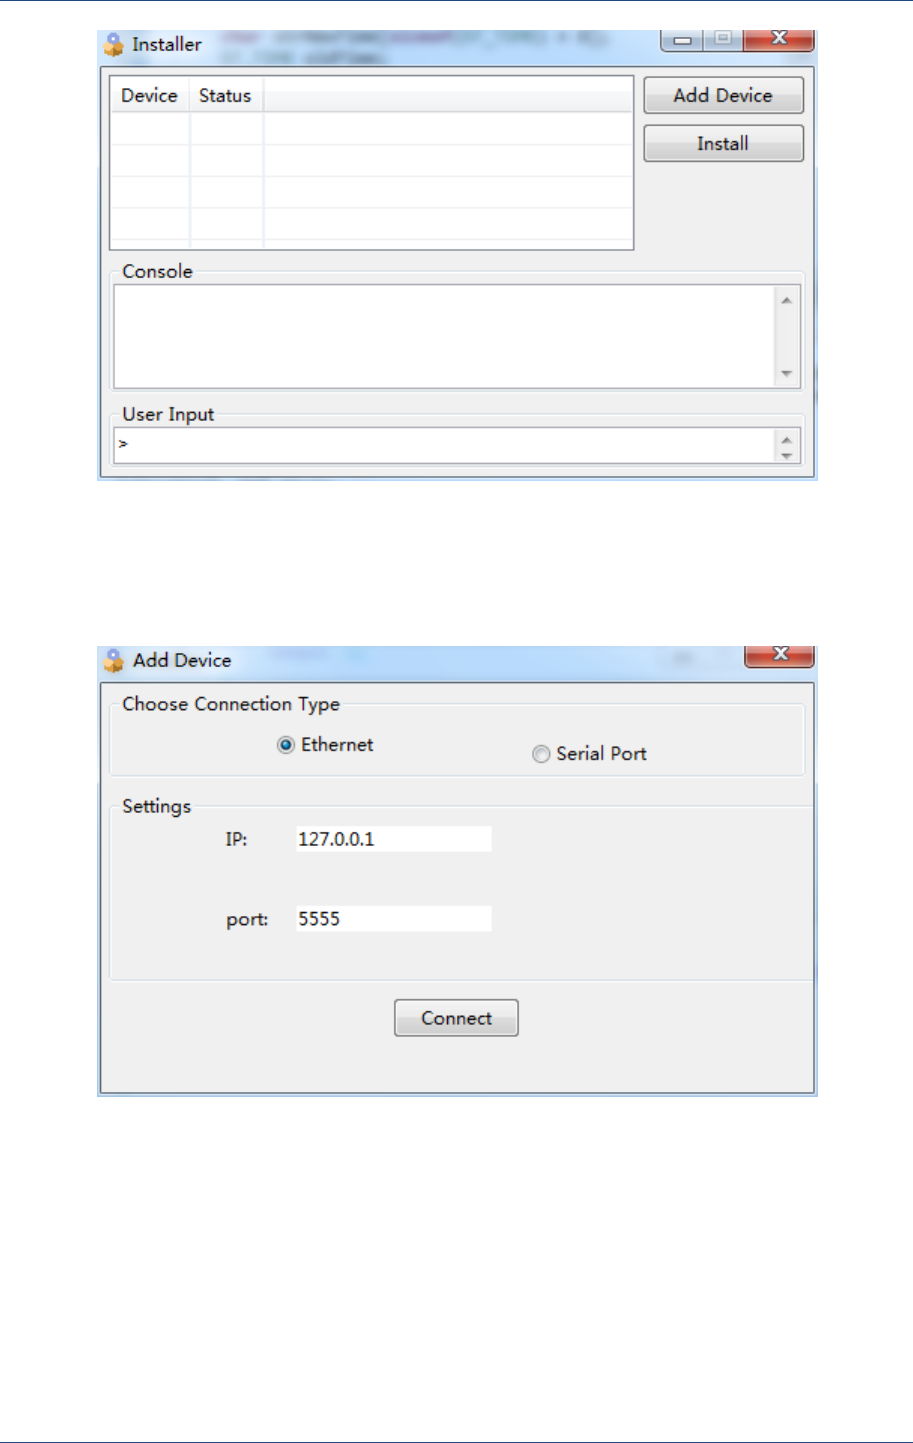
Press cancel button in the TM of POS machine and the running result is shown as below.
Application Developments
PAX Computer Technology (Shenzhen) Co., Ltd. 27
Figure 5.16 Running result
Up to now, you have learned the basic process of application development.
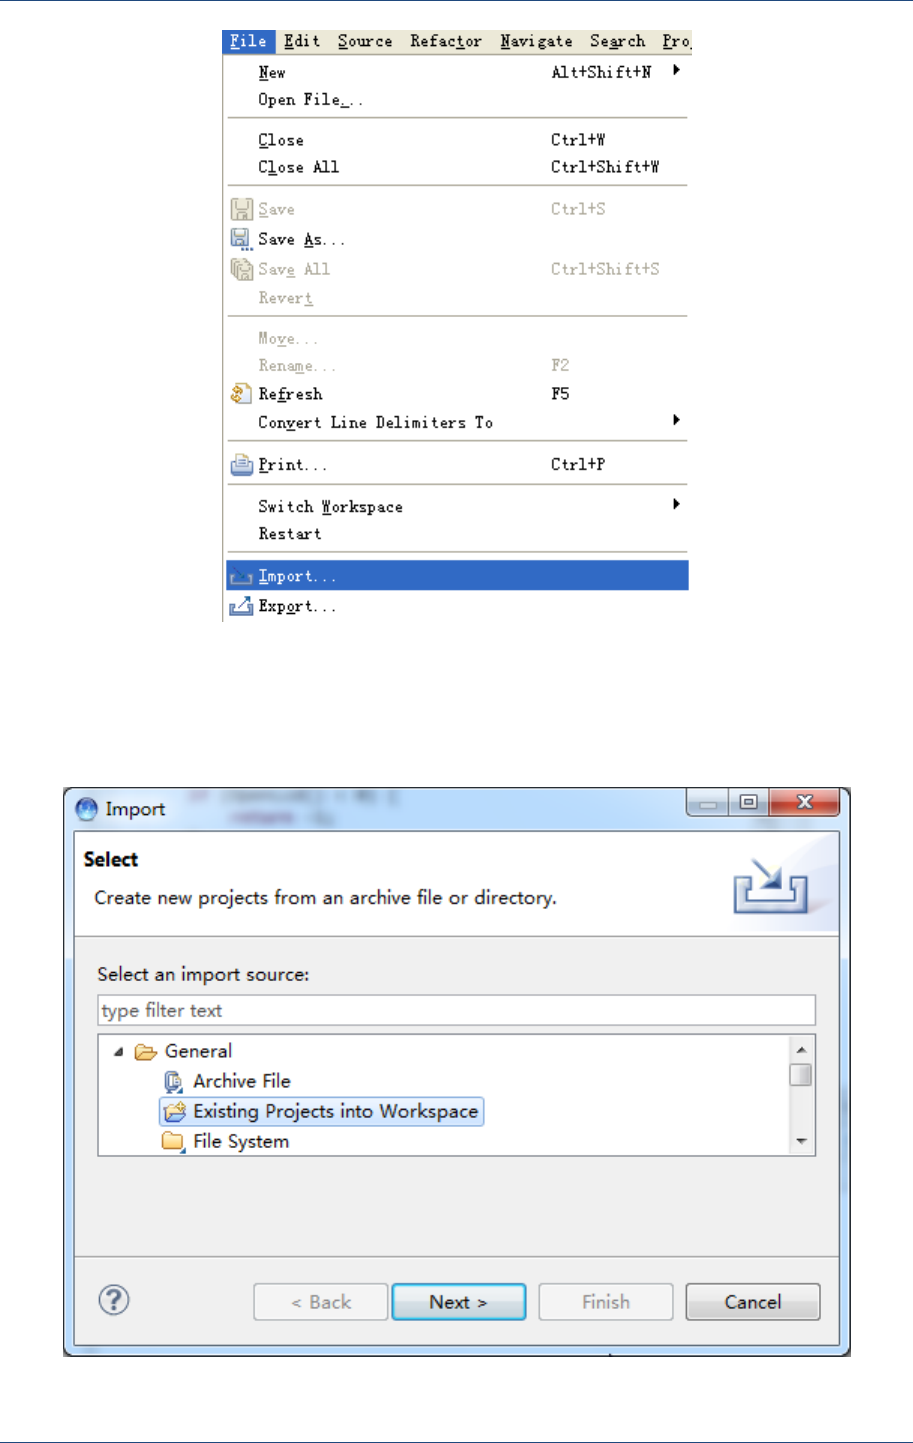
5.6 Import Project
Existing project can be imported into the Project Explorer. Select menu FileImport and
Import wizard page will pop up.
Prolin SDK Operating Guide
28 PAX Computer Technology (Shenzhen) Co., Ltd.
Figure 5.17 Import project
In the Import wizard page, select GeneralExisting Projects into Workspace, and then
click on Next button.
Figure 5.18 Import wizard
Application Developments
PAX Computer Technology (Shenzhen) Co., Ltd. 29
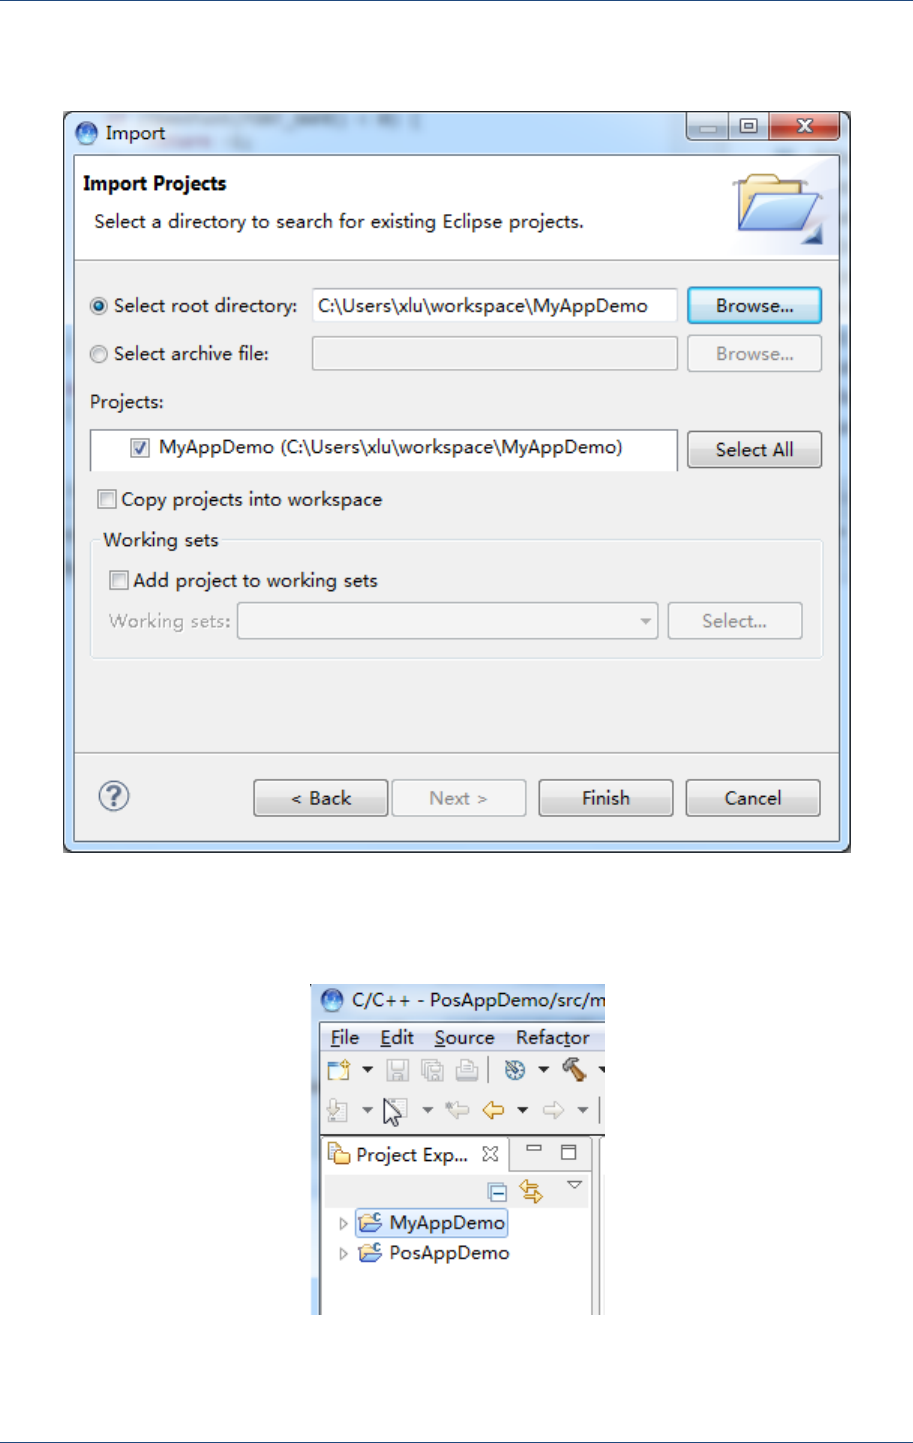
In the second wizard page of Import, set the root directory of the imported project, and then
click Finish button.
Figure 5.19 Import wizard
Now, the project is added to the Project Explorer.
Figure 5.20 Project explorer
Prolin SDK Operating Guide
30 PAX Computer Technology (Shenzhen) Co., Ltd.
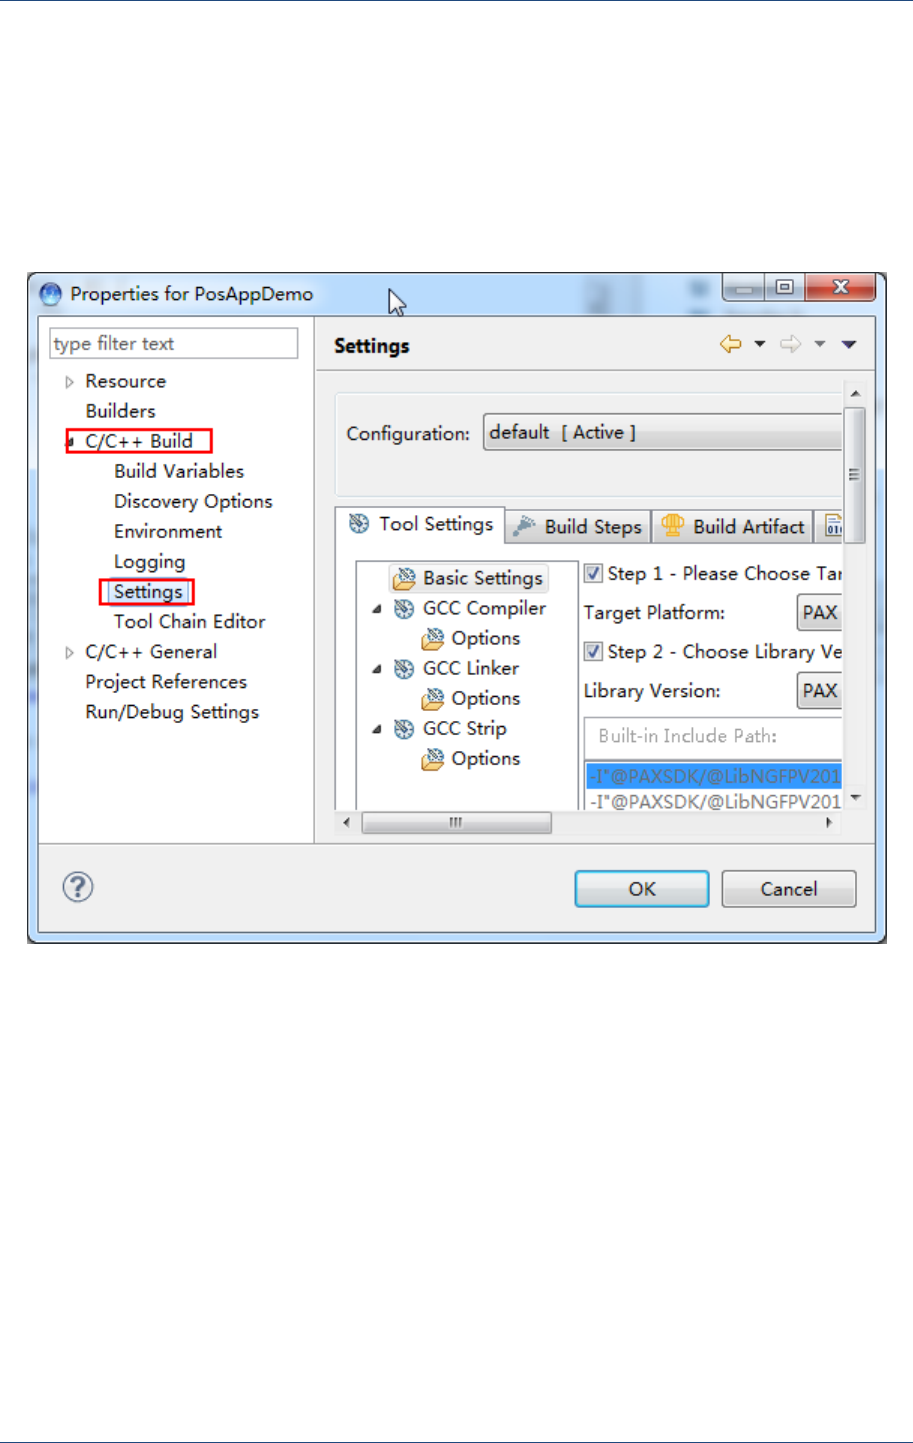
5.7 Project Settings
By default, the project environment meets most of development requirements, while it can be
edited according to your requirements.
Select ProjectPropertiesC/C++ BuildSettings, project compiler and linker options
will be displayed. This chapter mainly introduces GCC Compiler and GCC Linker.
Figure 5.21 Project settings
All the compiler options are listed in GCC Compiler. Select GCC Compiler->Options to
set Optimization Level, Debug Level, Compiler misc flags, etc according to your
preferences.
Application Developments
PAX Computer Technology (Shenzhen) Co., Ltd. 31
Figure 5.22 Compile options
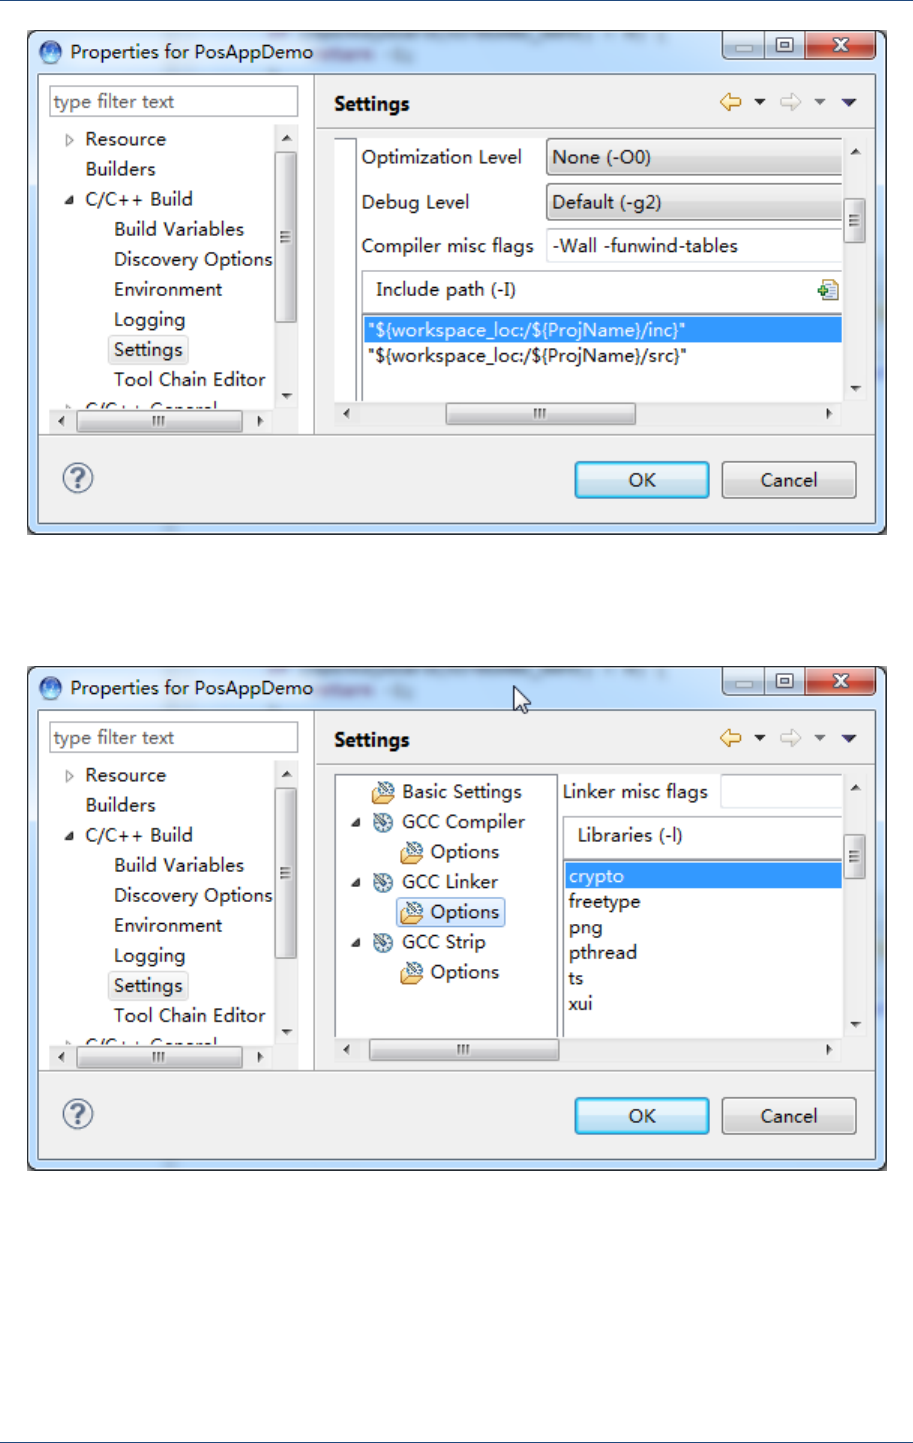
Click on the Options under GCC Linker to customize link commands.
Figure 5.23 Link options

Library Developments
PAX Computer Technology (Shenzhen) Co., Ltd. 33
6 Library Developments
Both shared LIB and static LIB development are available. This chapter shows how to build a
shared LIB.
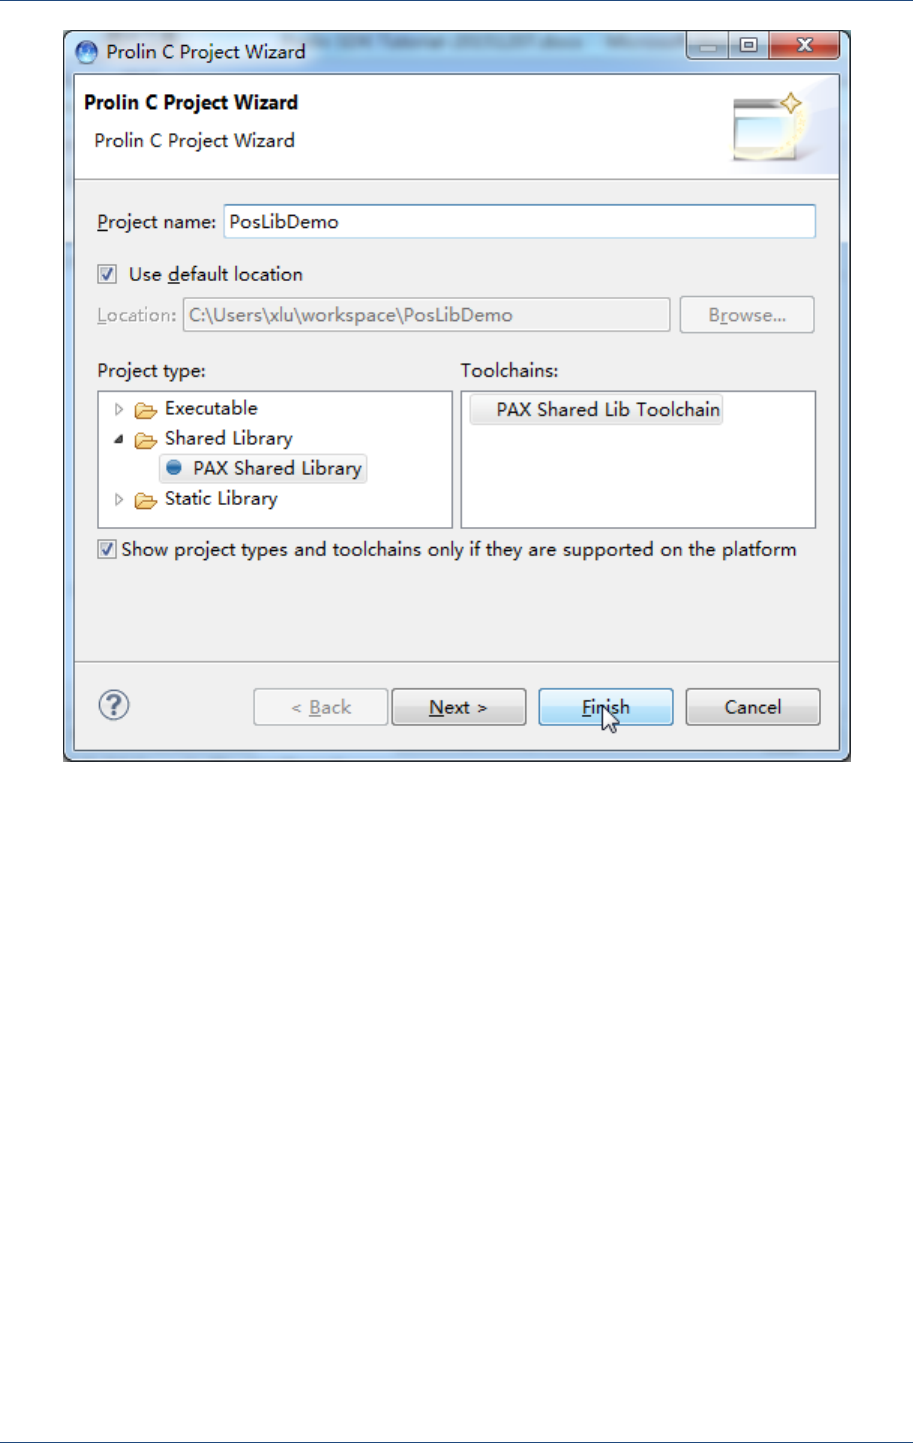
6.1 Create Project
Create a new PAX C Project, and in the Prolin C Project Wizard page, write PosLibDemo
in Project name and select Project type as PAX Shared Library. Press Finish to complete
the wizard.
Prolin SDK Operating GuideOperating Guide
34 PAX Computer Technology (Shenzhen) Co., Ltd.
Figure 6.1 Project wizard
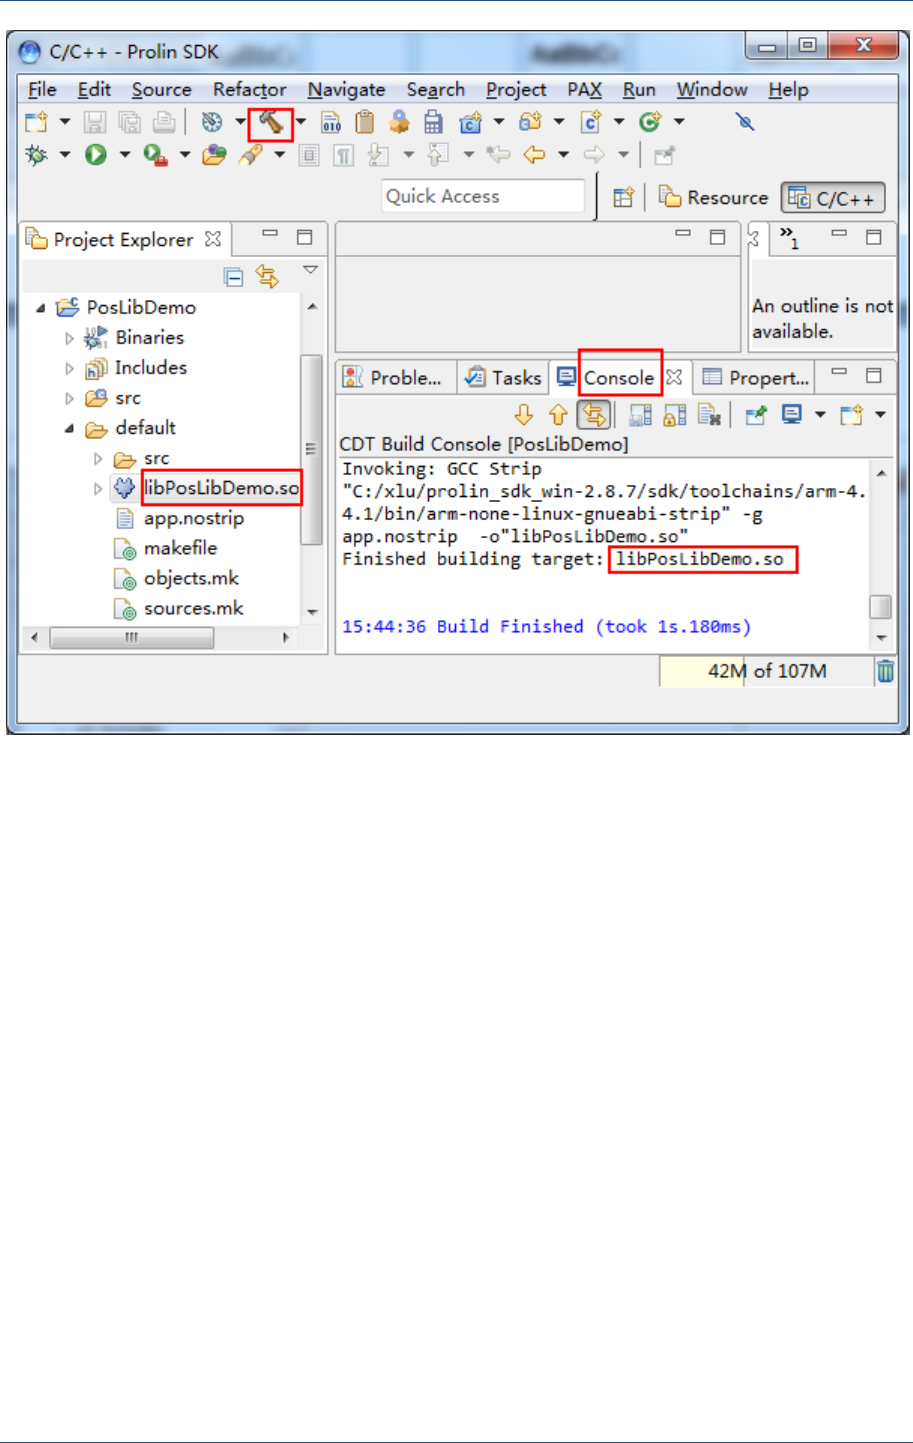
6.2 Build Project
Build the project and Binaries will be created. The target library is LibPosLibDemo.so in the
folder default.
Library Developments
PAX Computer Technology (Shenzhen) Co., Ltd. 35
Figure 6.2 Building result
6.3 Use Library
LibPosLibDemo.so can be used as a common .so file. The following shows how to add
LibPosLibDemo.so to project PosAppDemo you just created.
6.3.1 Copy LIB to Project
Copy LibPosLibDemo.so to lib_so folder.

Prolin SDK Operating GuideOperating Guide
36 PAX Computer Technology (Shenzhen) Co., Ltd.
Figure 6.3 Copy library
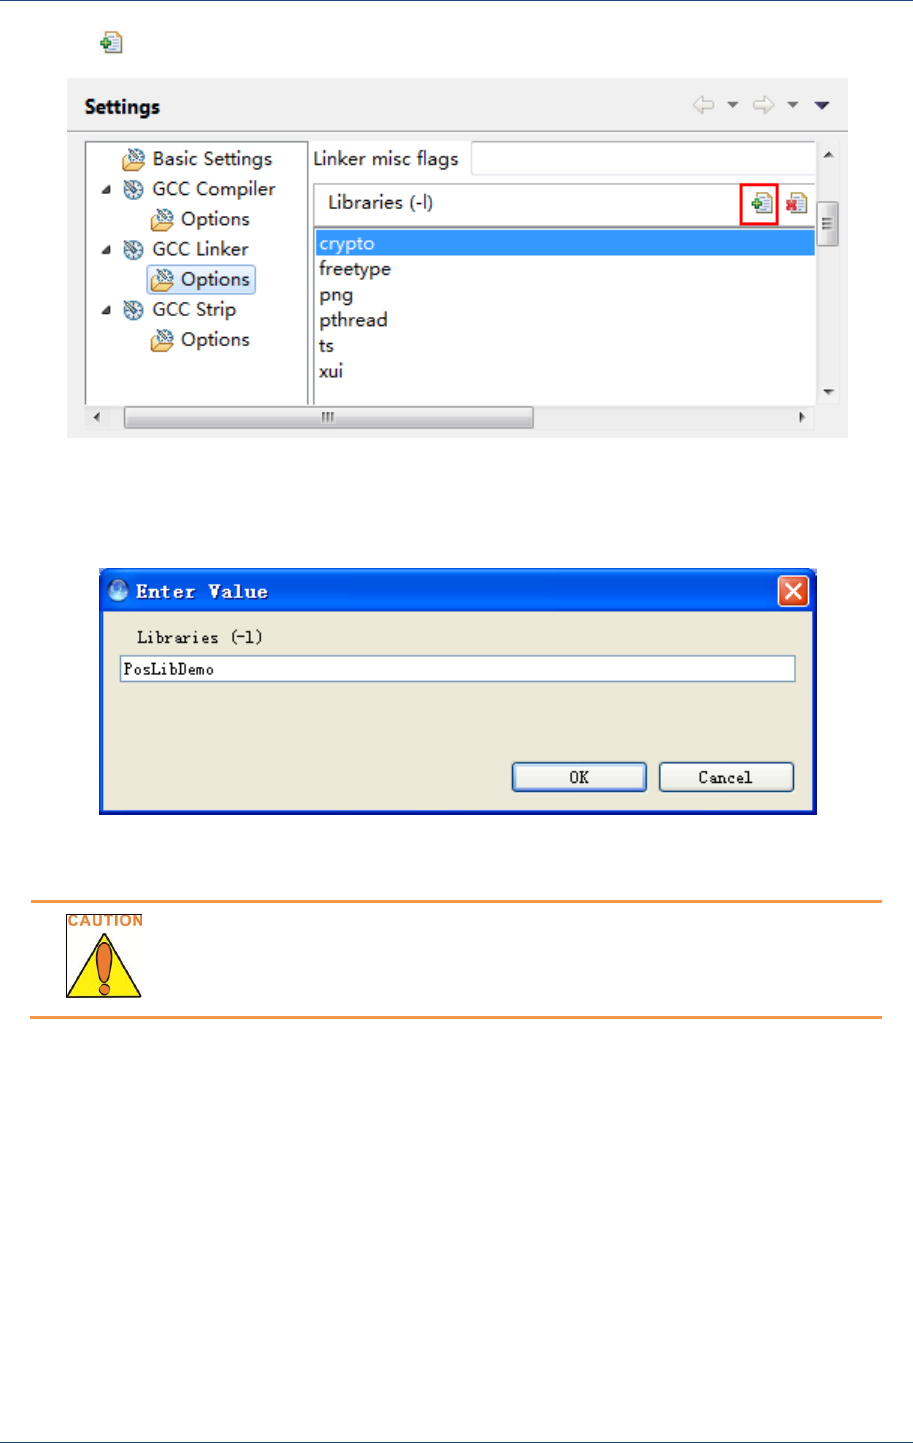
6.3.2 Modify Link Option
Select the PosAppDemo project and open its properties page. In the Properties page, select
C/C++ BuildSettings. In the Settings sub page, select GCC LinkerOptions.
Figure 6.4 Project properties
Library Developments
PAX Computer Technology (Shenzhen) Co., Ltd. 37
Click on (Add) icon.
Figure 6.5 Project properties
Input library name PosLibDemo in the popup dialog Enter Value.
Figure 6.6 Input library name
No needs to input prefix (Lib) and suffix (.so) of the library name.
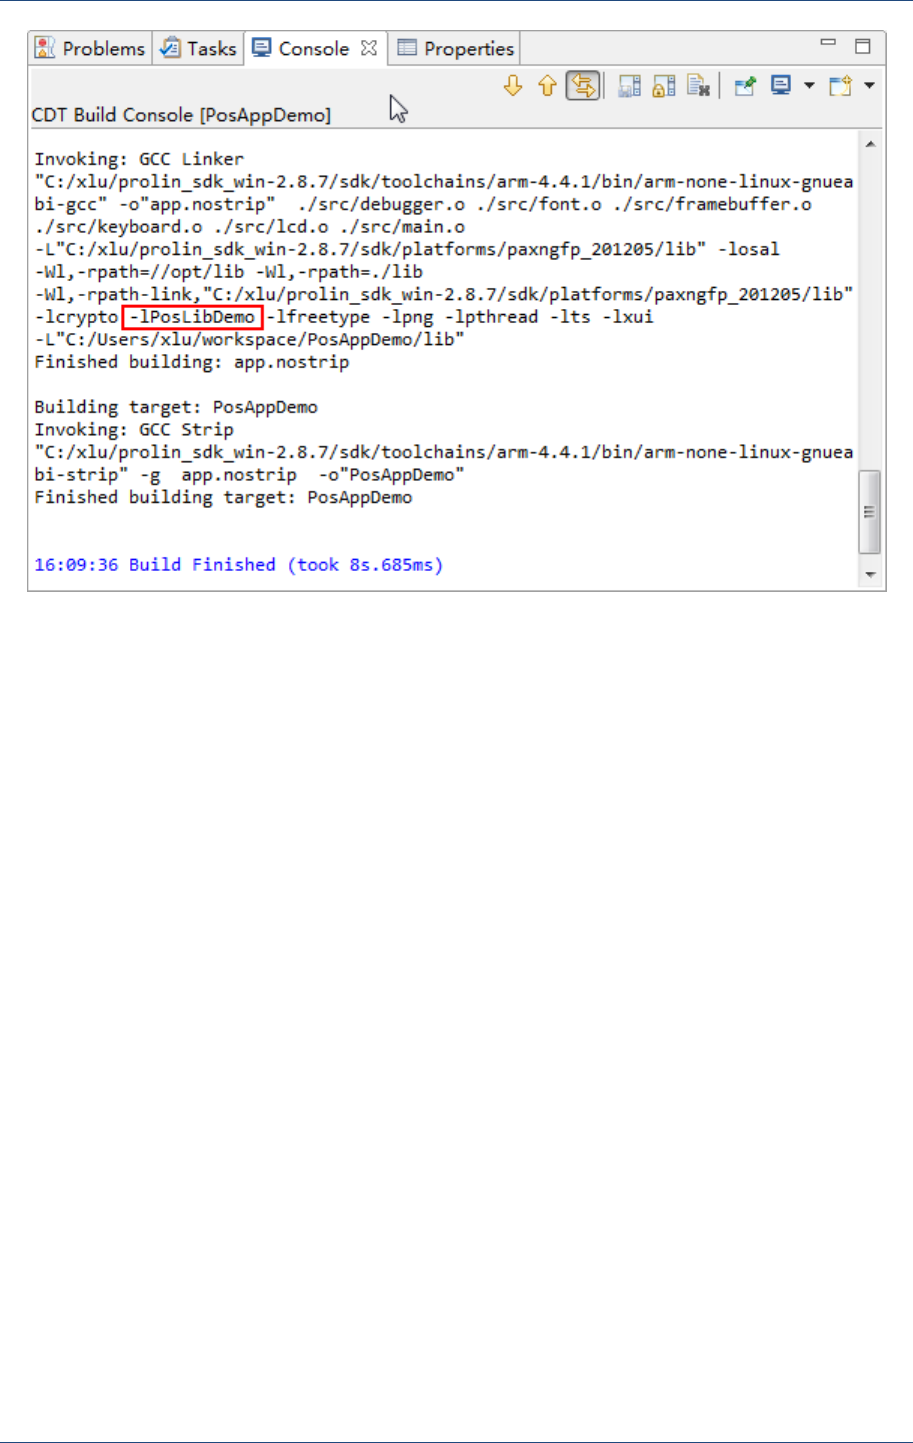
6.3.3 Rebuild Project
Clean the whole project and rebuild.
Prolin SDK Operating GuideOperating Guide
38 PAX Computer Technology (Shenzhen) Co., Ltd.
Figure 6.7 Building console
Code Edit Help
PAX Computer Technology (Shenzhen) Co., Ltd. 39
7 Code Edit Help
7.1 Query Functions or Keywords
Put the mouse pointer above a function or keyword, a prototype will be shown.
Figure 7.1 Query result
7.2 Query Details from Documents
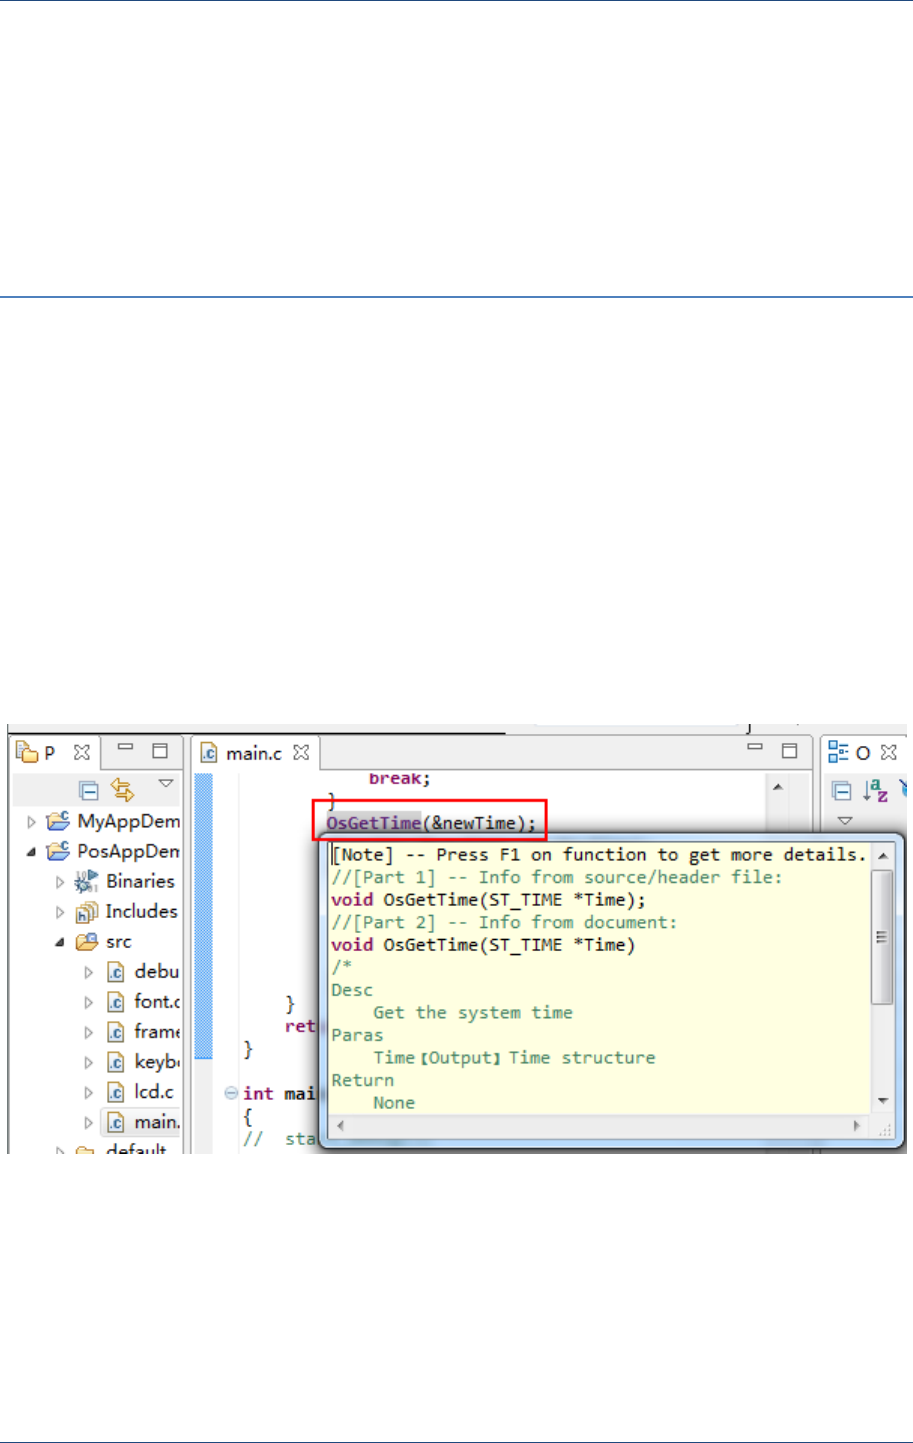
Put the mouse pointer above a function or keyword, press F1 on the keyboard, and then
search result will be shown.
Prolin SDK Operating GuideOperating Guide
40 PAX Computer Technology (Shenzhen) Co., Ltd.
Figure 7.2 Query result
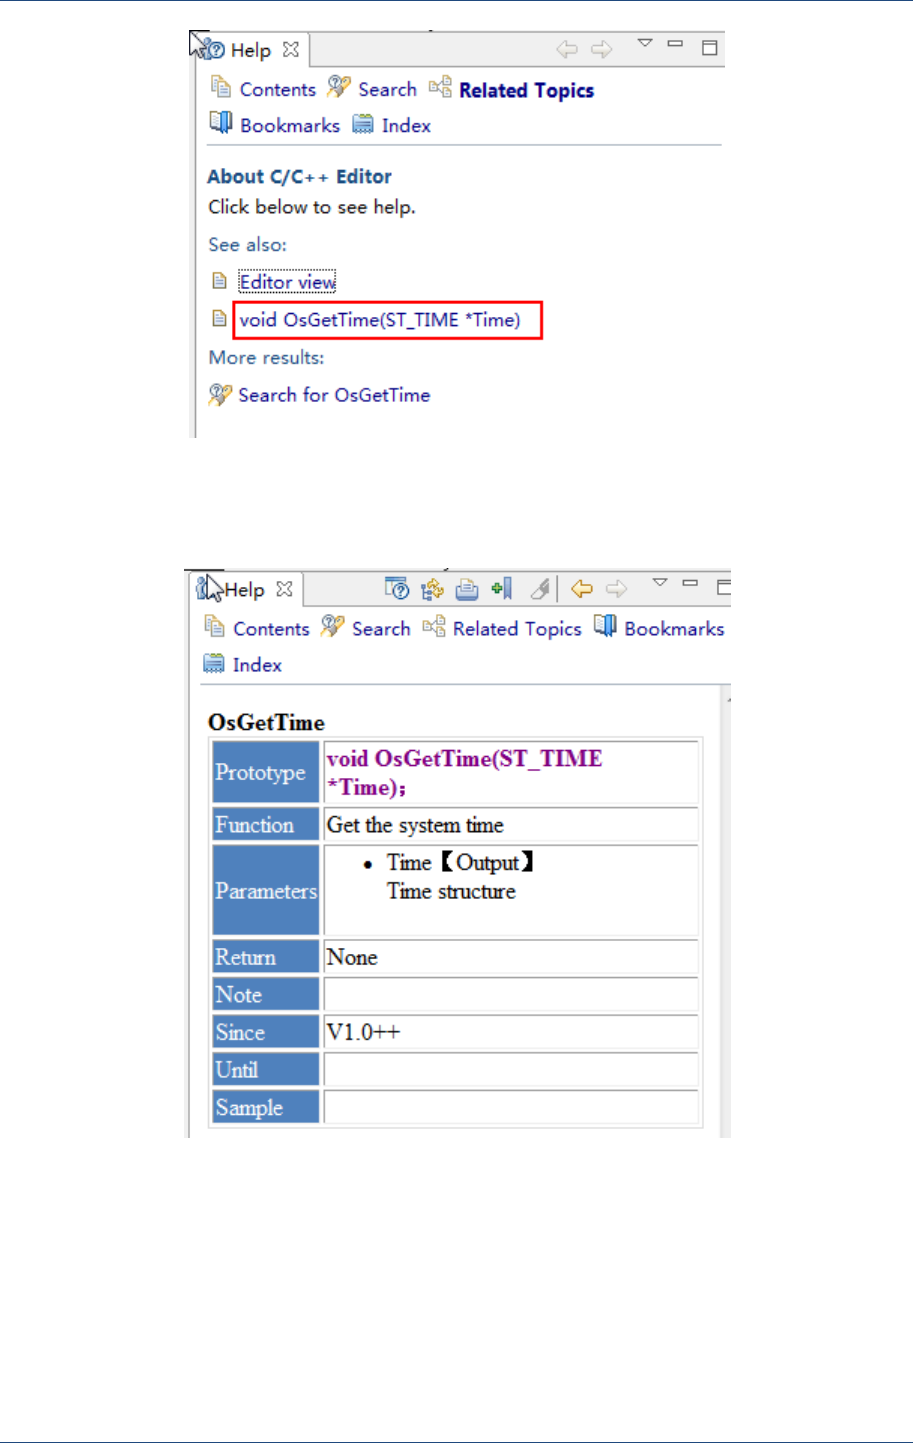
Go to the link that you need, more details will be displayed.
Figure 7.3 Function detail
7.3 Input Prompts
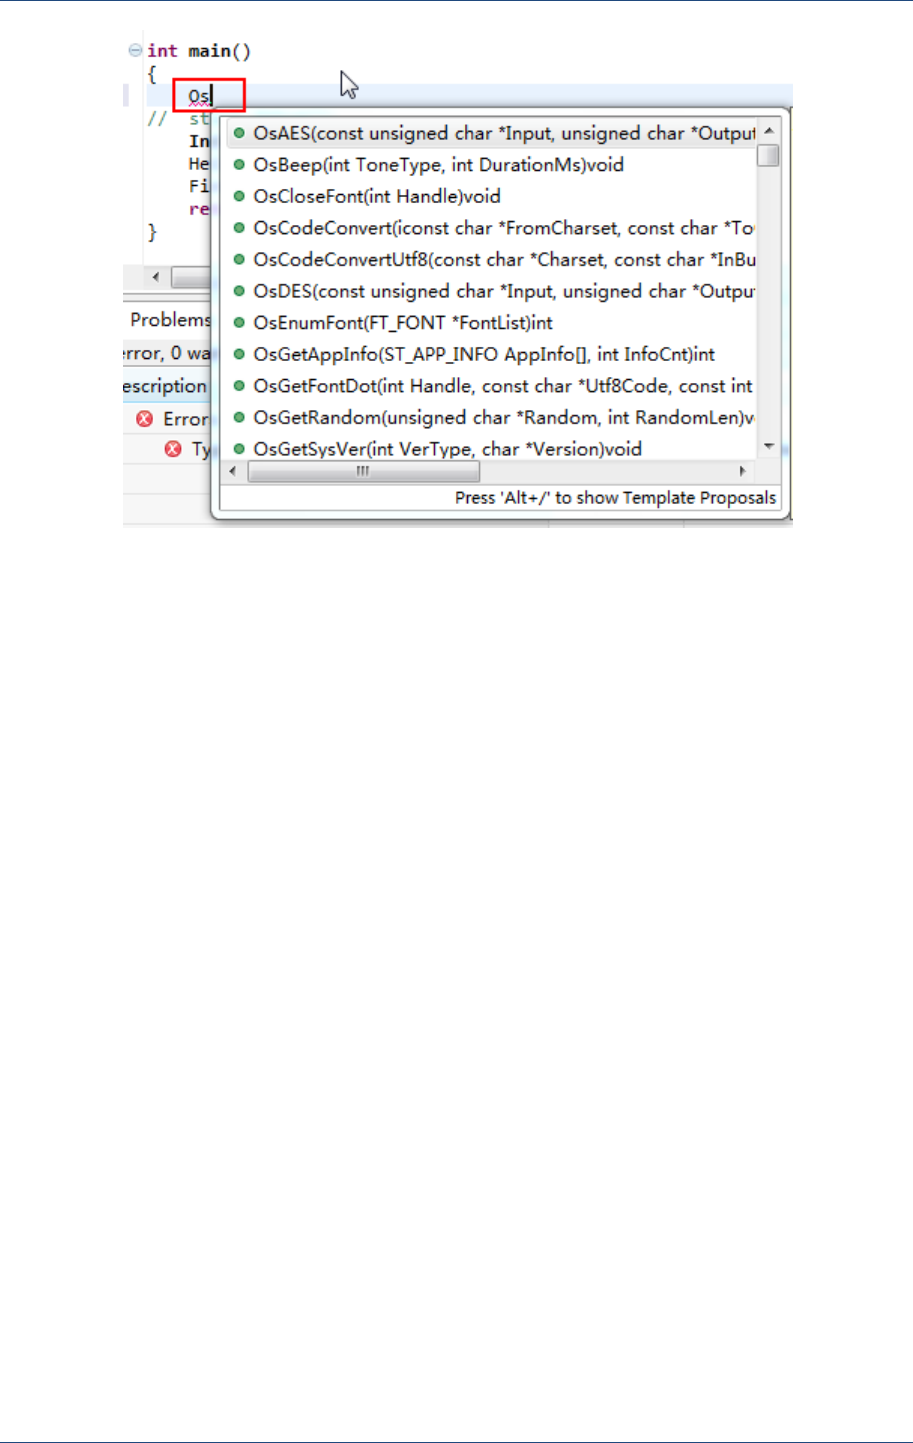
Input prefix of a word, and press Alt+/, all the functions with the prefix will be shown.
Code Edit Help
PAX Computer Technology (Shenzhen) Co., Ltd. 41
Figure 7.4 Input prompts
Prolin SDK Operating GuideOperating Guide
42 PAX Computer Technology (Shenzhen) Co., Ltd.
8 Emulator
Prolin emulator is a Linux virtual machine which emulates the Prolin system environment.
With Prolin emulator, users can install unsigned APPs to have a quick view of execution
results. However, the emulator cannot execute all the functions like a real machine. So, the
final applications must be verified on a real POS machine.
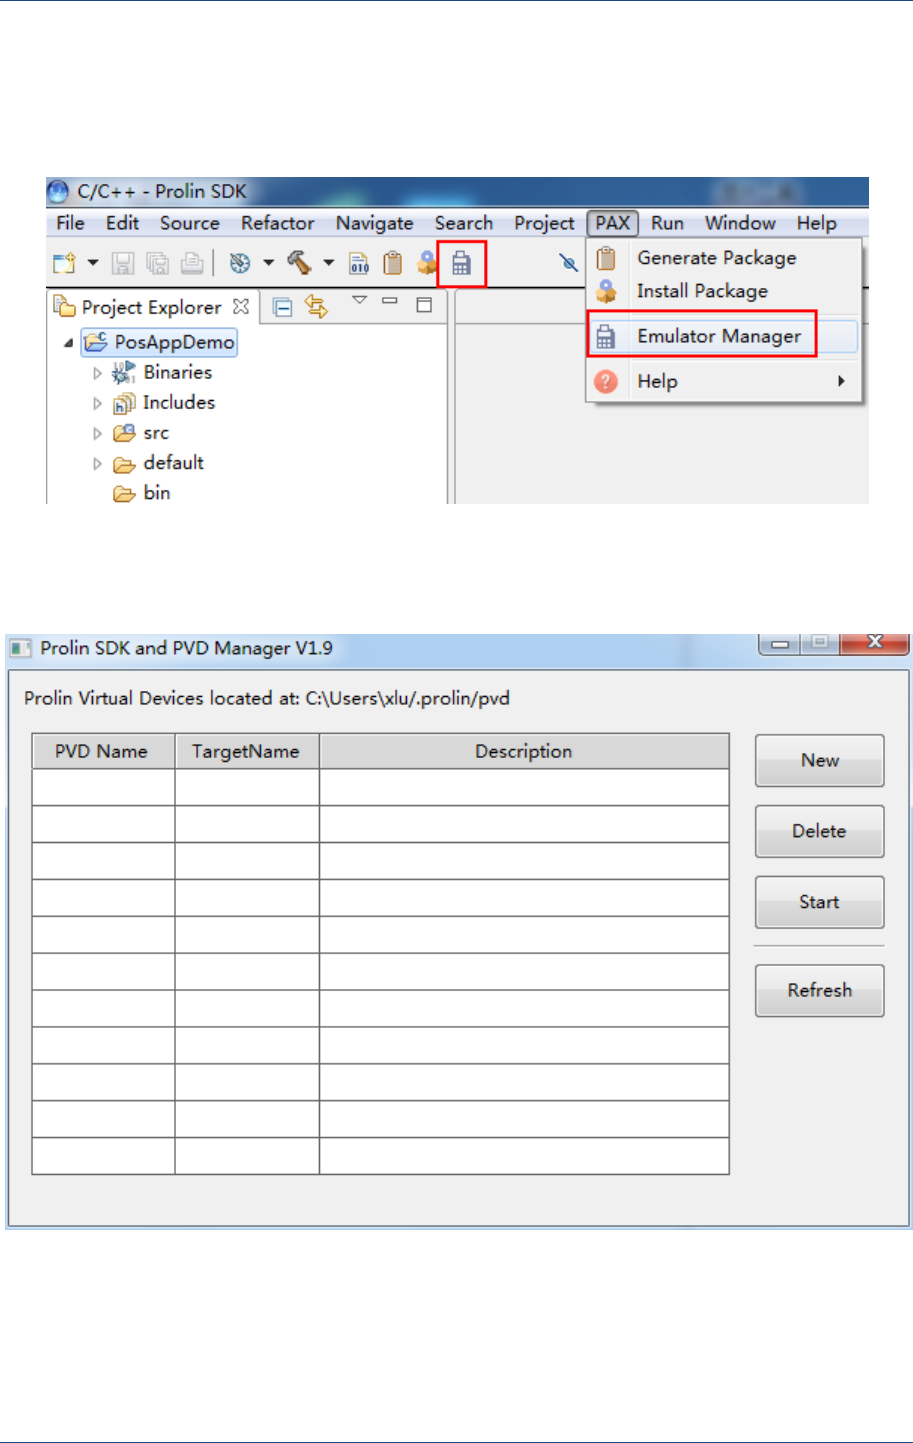
8.1 Open Emulator Manager
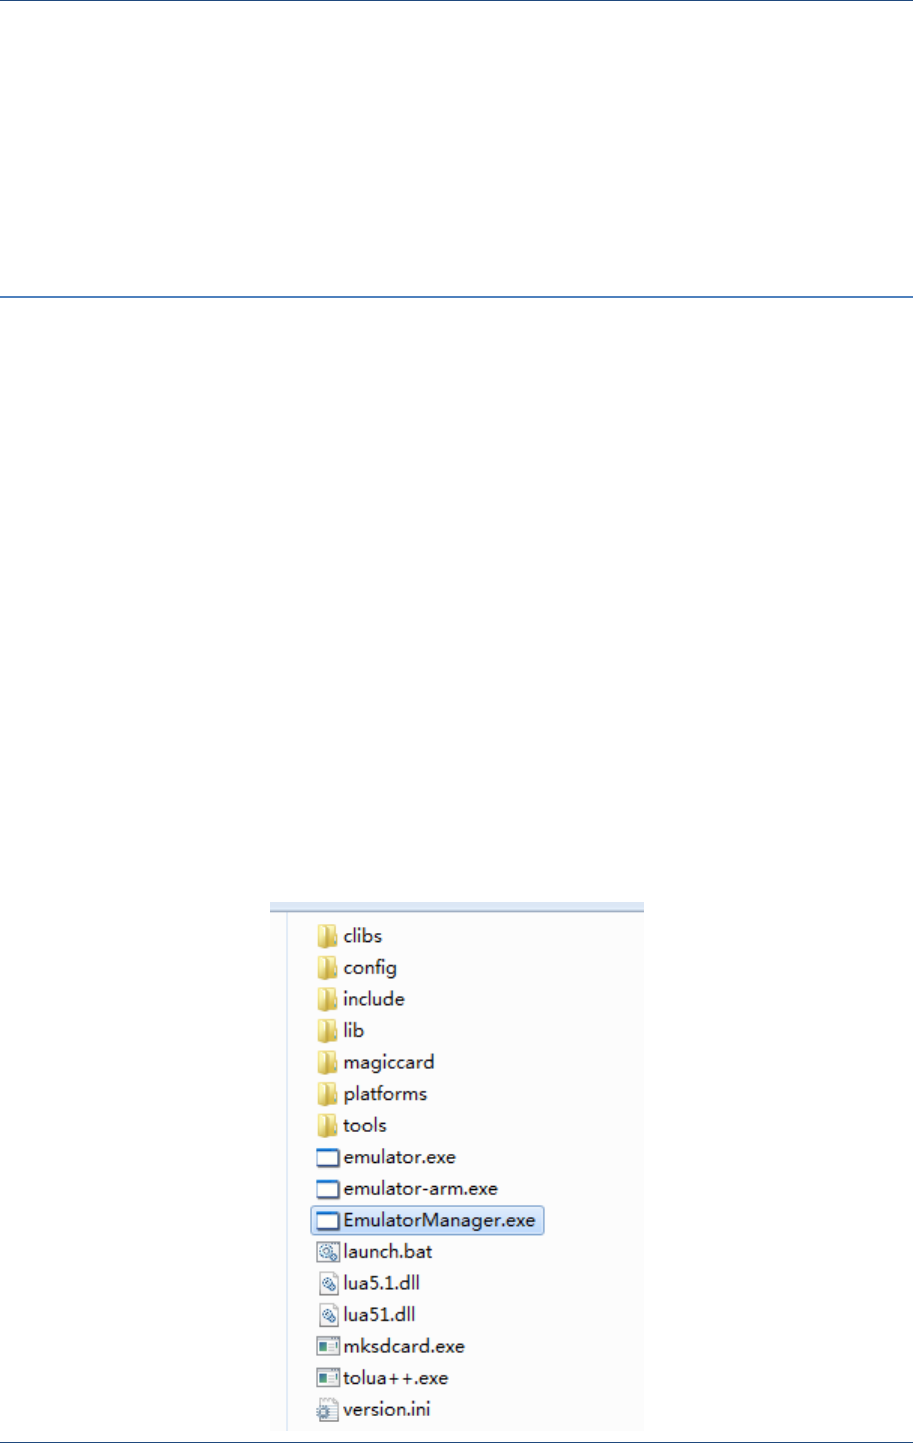
Prolin emulator is integrated in the Prolin SDK. Please check the SDK root directory.
Emulator
PAX Computer Technology (Shenzhen) Co., Ltd. 43
Figure 8.1 Emulator directory
Open EmulatorManager.exe in emulator directory, or select menu PAXEmulator
Manager to start up the emulator manager.
Figure 8.2 Open emulator manager
The emulator manager shows as below.
Figure 8.3 Emulator manager
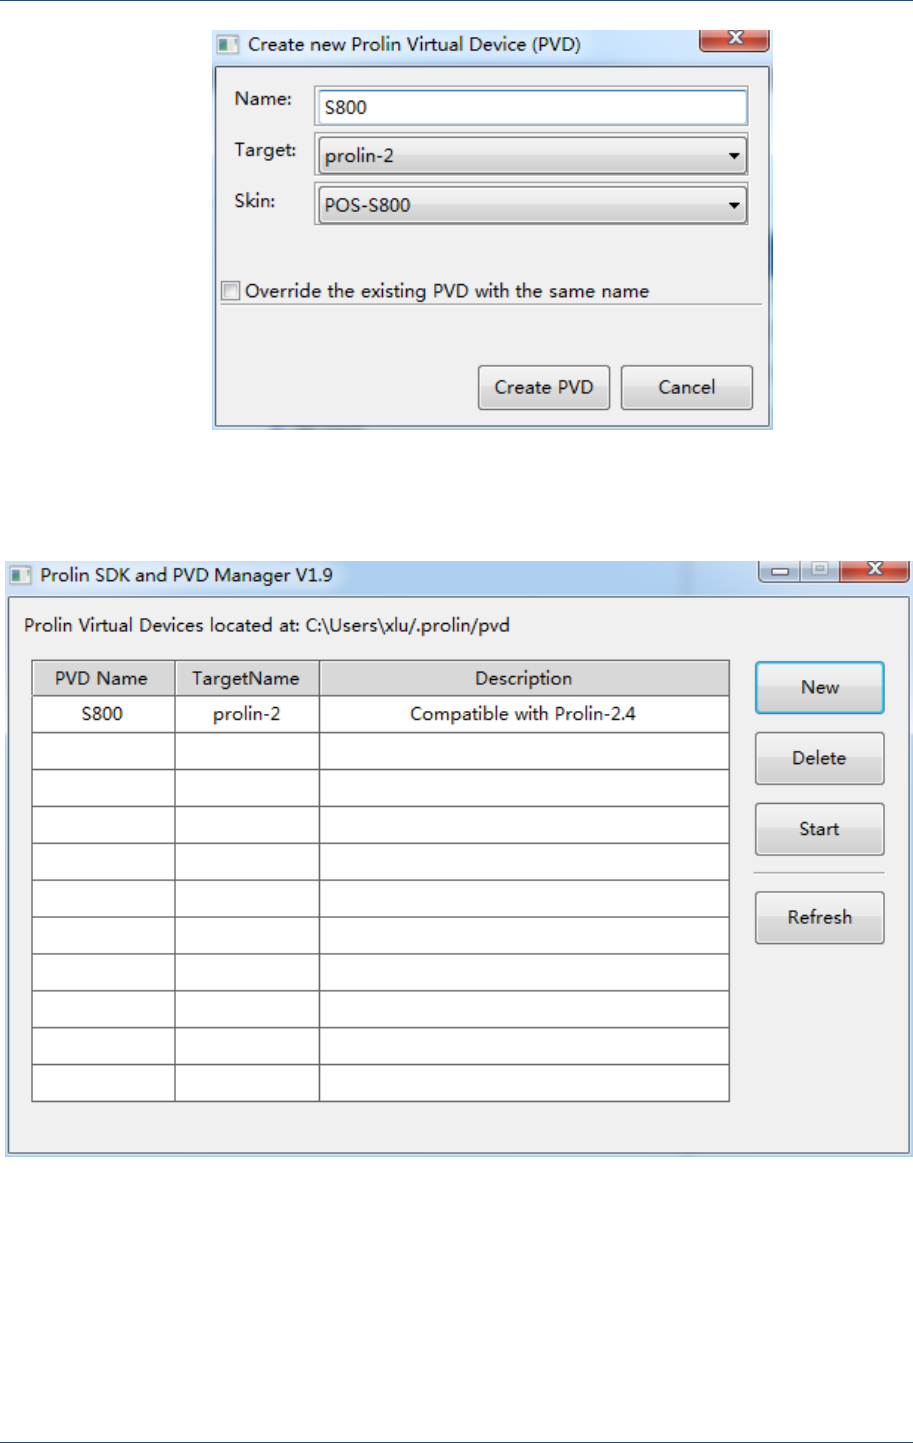
Click New button to create a new PVD. In the new page, input device name. Select Target as
prolin-2 and Skin as POS-S800.
Prolin SDK Operating GuideOperating Guide
44 PAX Computer Technology (Shenzhen) Co., Ltd.
Figure 8.4 Create PVD
The newly created emulator will be listed in the Prolin SDK and PVD Manager page.
Figure 8.5 Emulator list
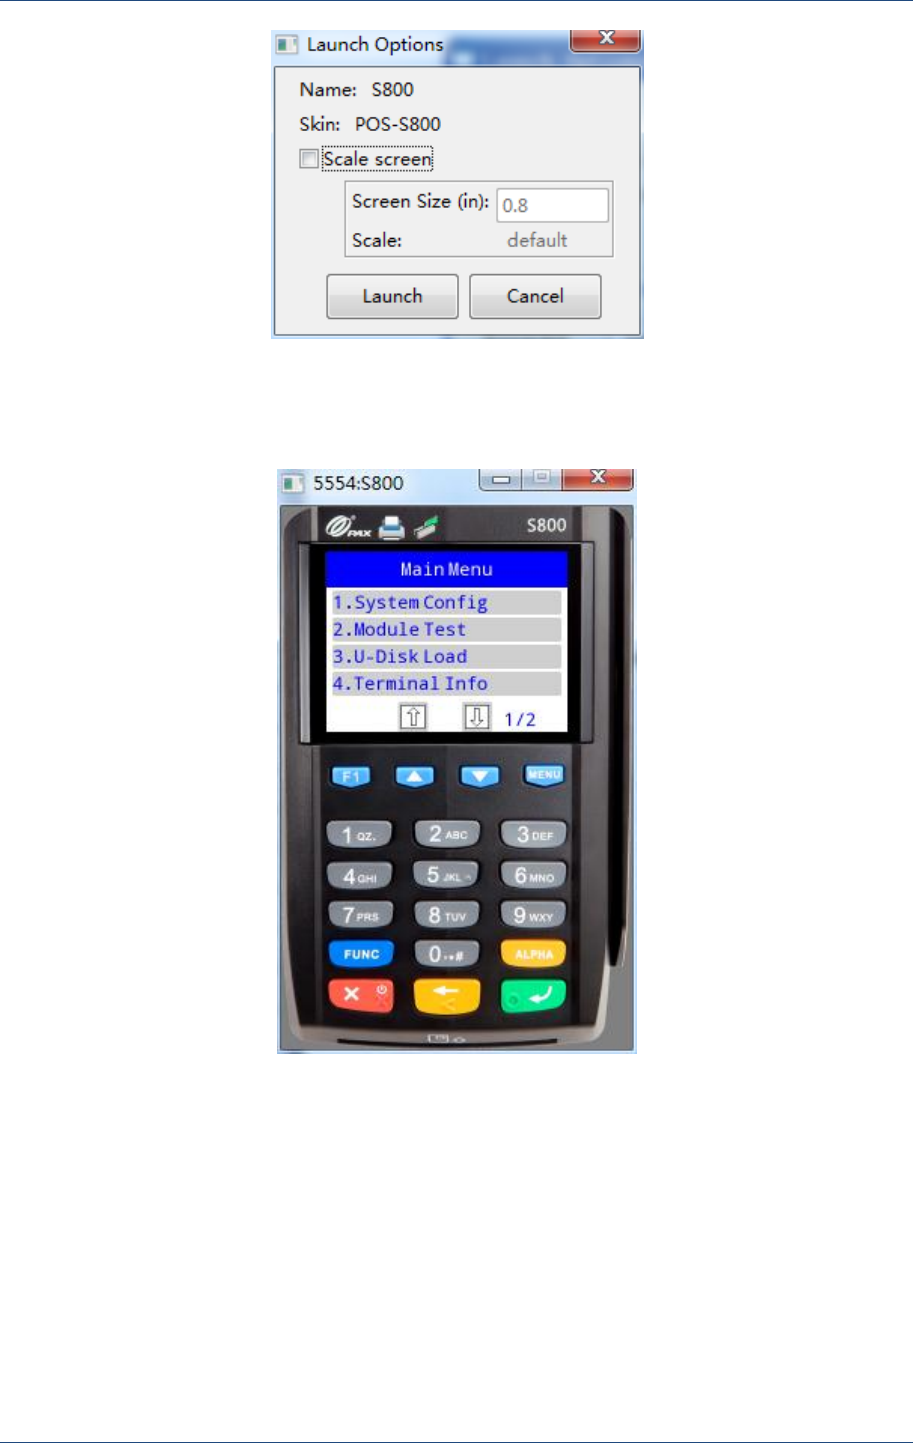
8.2 Start Emulator
In the Prolin SDK and PVD Manager page, select a PVD and press Start button to start
emulator.
Emulator
PAX Computer Technology (Shenzhen) Co., Ltd. 45
Figure 8.6 Launch options
Click Launch button in the Launch Options page. The emulator looks like this:
Figure 8.7 Emulator
Prolin SDK Operating GuideOperating Guide
46 PAX Computer Technology (Shenzhen) Co., Ltd.
9 Logcat
This chapter introduces how to write logs in the source code and how to use Logcat to show
logs.
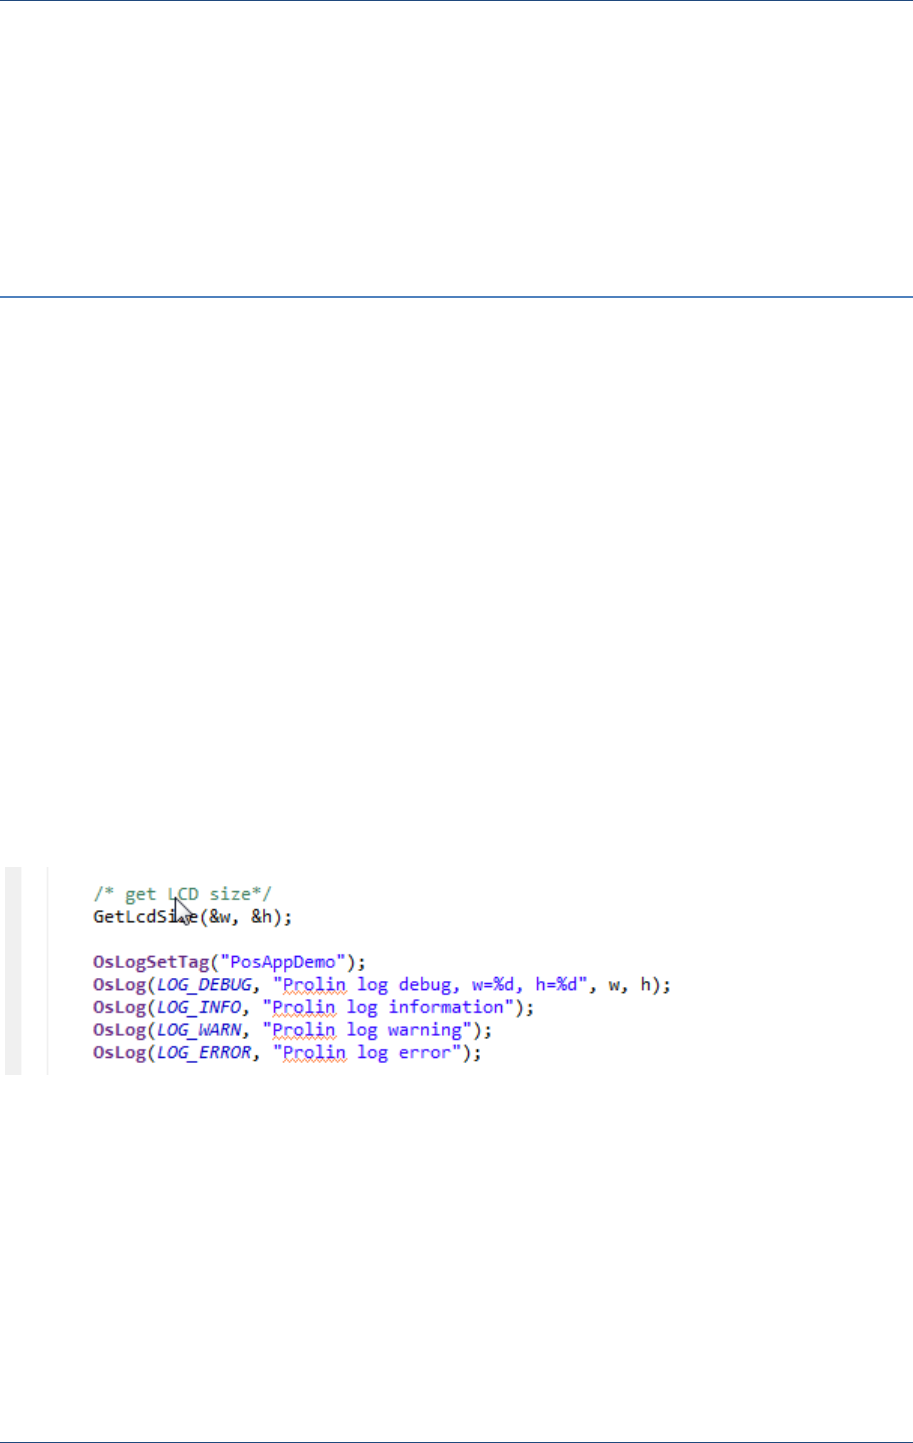
9.1 Add log
There are two APIs, OsLogSetTag and OsLog. Use them as the following example. Then
rebuilt the project, install the package and run the application.
Figure 9.1 Add log
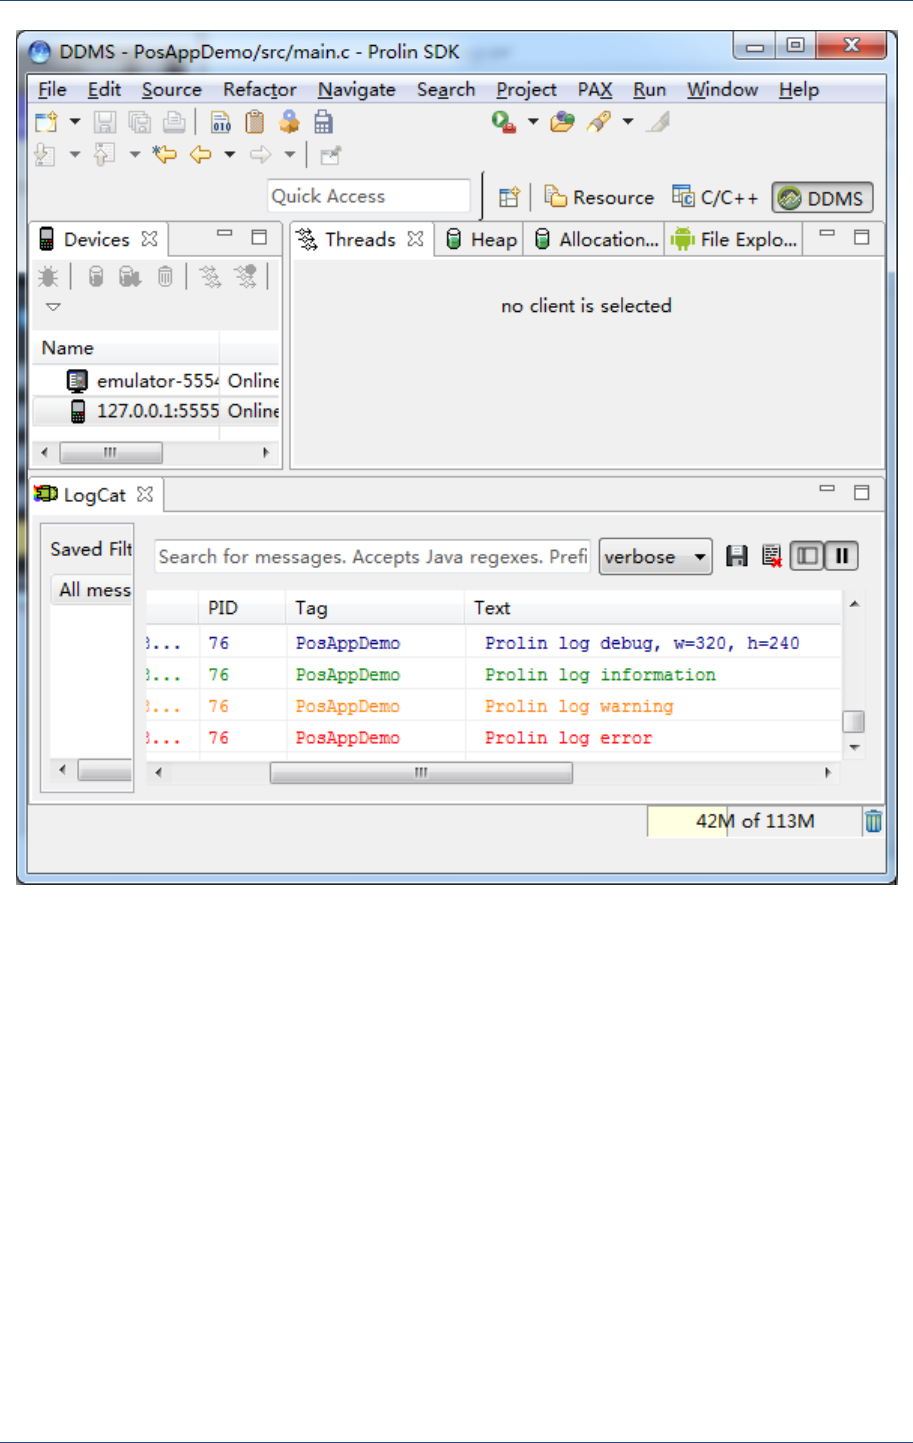
9.2 Show Log
Run the APP. Then select menu Window Open Perspective Other…-> DDMS. The
DDMS perspective will be open. In this perspective, choose a connected device and its log
will display.
Logcat
PAX Computer Technology (Shenzhen) Co., Ltd. 47
Figure 9.2 Logcat view
The Logcat is the most helpful function for developers to check their application source code.
Please enjoy using it.
Prolin SDK Operating GuideOperating Guide
48 PAX Computer Technology (Shenzhen) Co., Ltd.
10 Cppcheck
Cppcheck is a static analysis tool for C/C++ code. Unlike C/C++ compilers and many other
analysis tools it does not detect syntax errors in the code. Cppcheck primarily detects the
types of bugs that the compilers normally do not detect. The goal is to detect only real errors
in the code (i.e. have zero false positives).
The official website of Cppcheck is http://cppcheck.sourceforge.net/.
This chapter introduces how to install and use Cppcheck in the Prolin SDK.
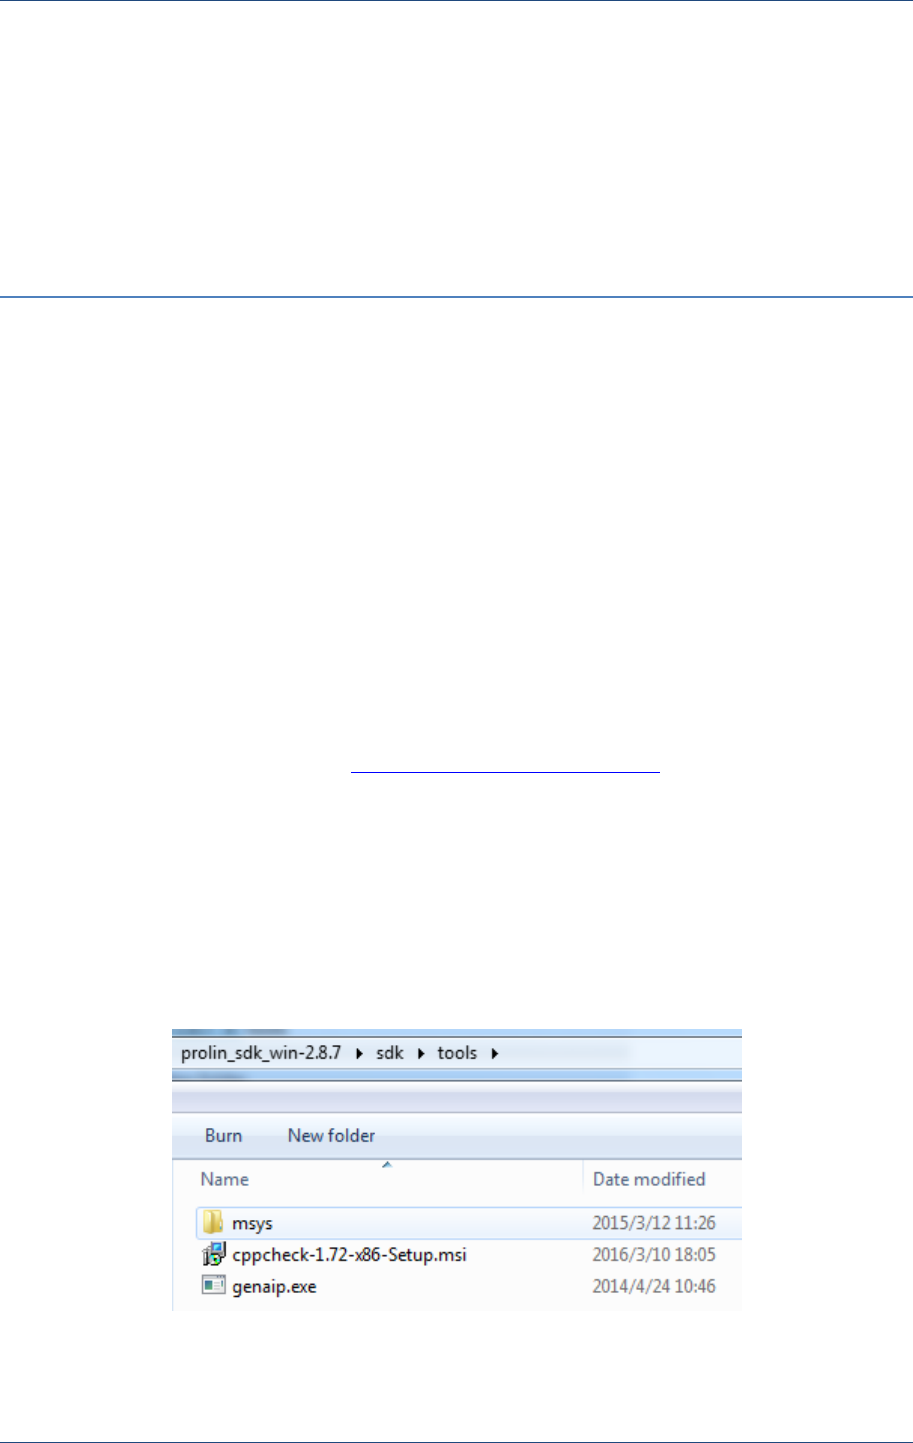
10.1 Install Cppcheck
Open the sdk/tools directory of the Prolin SDK and double click the installation package
cppcheck-xxx-Setup.msi.
Figure 10.1 Cppcheck
Cppcheck
PAX Computer Technology (Shenzhen) Co., Ltd. 49
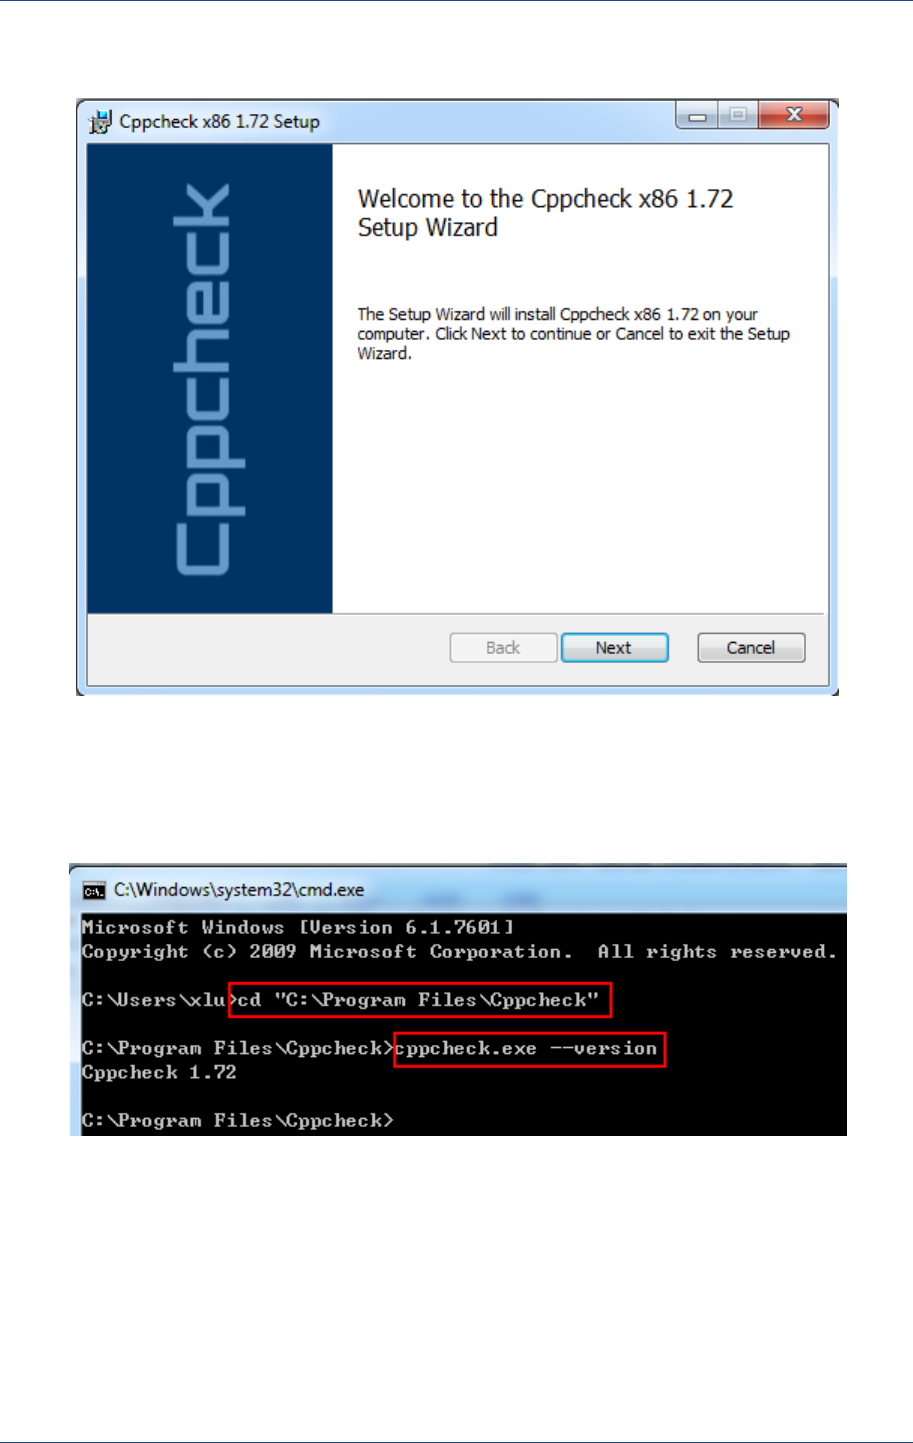
Follow the installation wizard, until installation is complete.
Figure 10.2 Install Cppcheck
Type the command cppcheck --version on the command prompt. If version information
appears, indicates a successful installation.
Figure 10.3 Check Cppcheck
10.2 Configure Cppcheck Environment
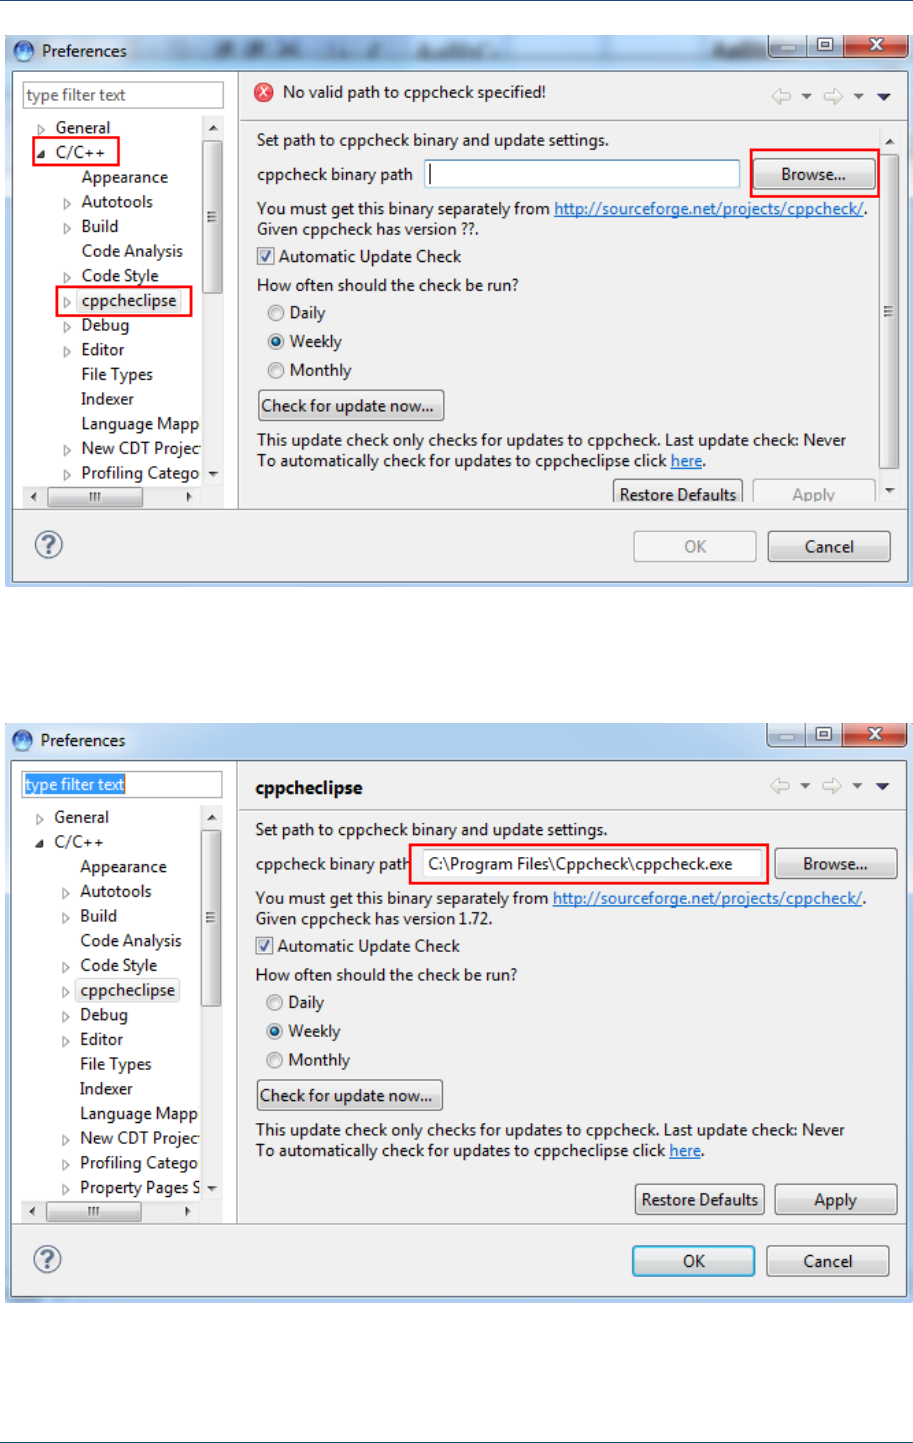
Open the Prolin SDK and select menu Window->Preferences. In the Preferences page,
select C/C++->cppcheclipse. Now the configure view about Cppcheck appears.
Prolin SDK Operating GuideOperating Guide
50 PAX Computer Technology (Shenzhen) Co., Ltd.
Figure 10.4 Configure Cppcheck
Click on the Browser… button and set Cppcpheck binary path to Cppcheck installation.
Figure 10.5 Set Cppcheck binary path
Cppcheck
PAX Computer Technology (Shenzhen) Co., Ltd. 51
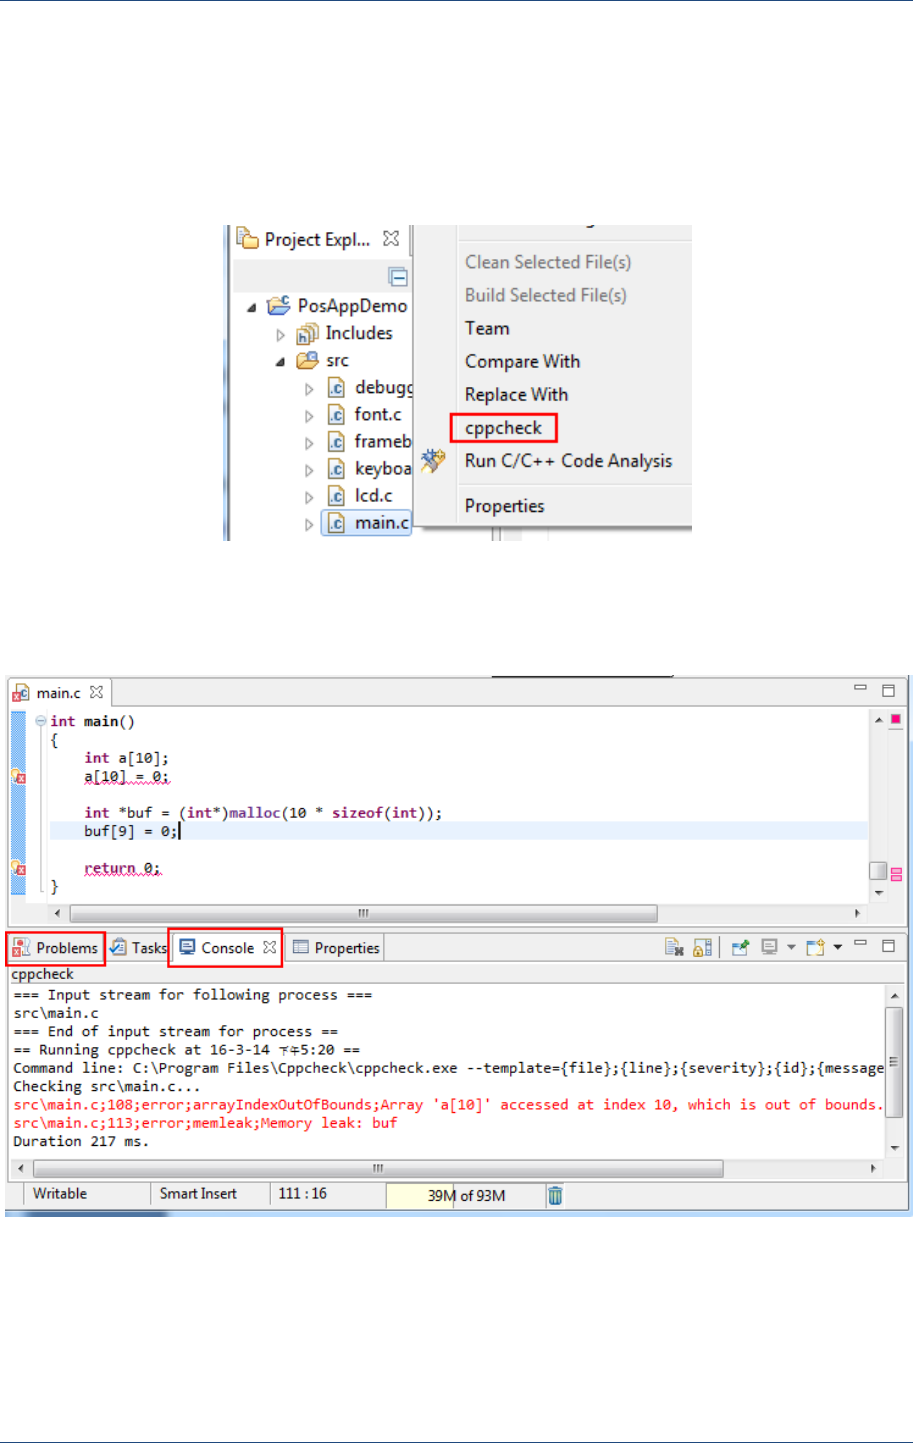
10.3 Use Cppcheck
In the Project Explorer, right-click on the file or directory which needs to be checked and
choose cppcheck menu.
Figure 10.6 Run Cppcheck
The errors detected by Cppcheck will be displayed in the Console window.
Figure 10.7 Cppcheck running result

Prolin SDK Operating GuideOperating Guide
52 PAX Computer Technology (Shenzhen) Co., Ltd.
11 Debug
It is necessary to read this chapter carefully before you start to debug your source code. Also,
as always, feel free to ask questions to Prolin support team.
11.1 Preparation
Before debugging, breakpoint should be added to source code in order to run single-step
debug. Then generate and install .aip package.
11.1.1 Set Debug Content
Add start_debug function in the program entry.
Figure 11.1 Add debug code
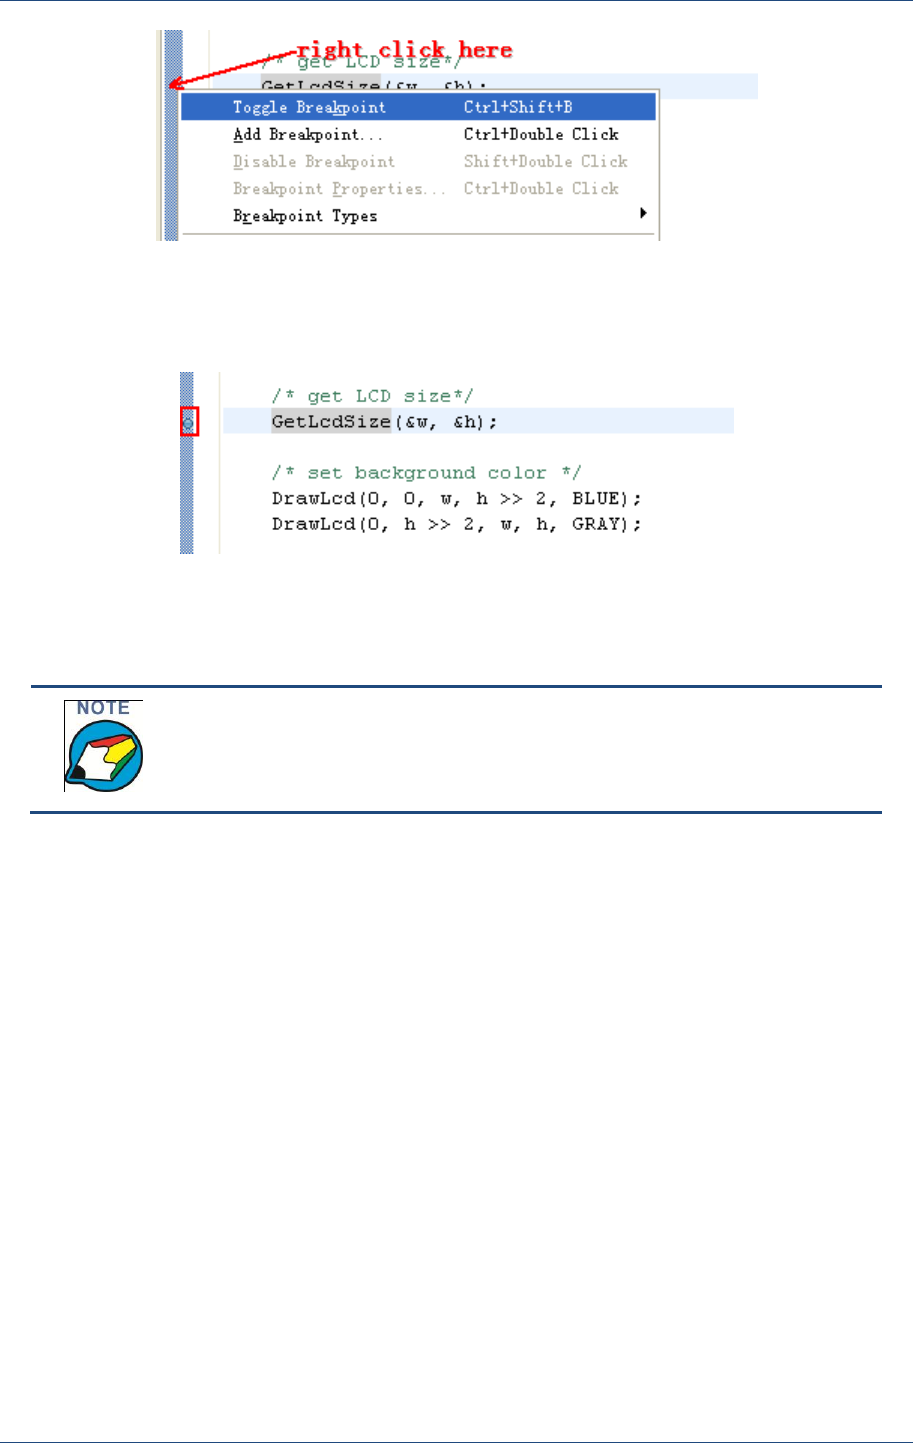
11.1.2 Toggle Breakpoint
Select the Toggle Breakpoint command to add a new breakpoint at any location you want.
Debug
PAX Computer Technology (Shenzhen) Co., Ltd. 53
Figure 11.2 Toggle breakpoint
Figure 11.3 Breakpoint
Double click the line to add/remove breakpoints.
11.1.3 Build and Install APP
Build and generate an .aip file. Select menu PAXInstall Package to install the .aip file.
Run the APP. The execution will halt at the position of the first breakpoint, and at this time
you cannot operate the device.
Prolin SDK Operating GuideOperating Guide
54 PAX Computer Technology (Shenzhen) Co., Ltd.
Figure 11.4 App halts
11.2 Debug Steps
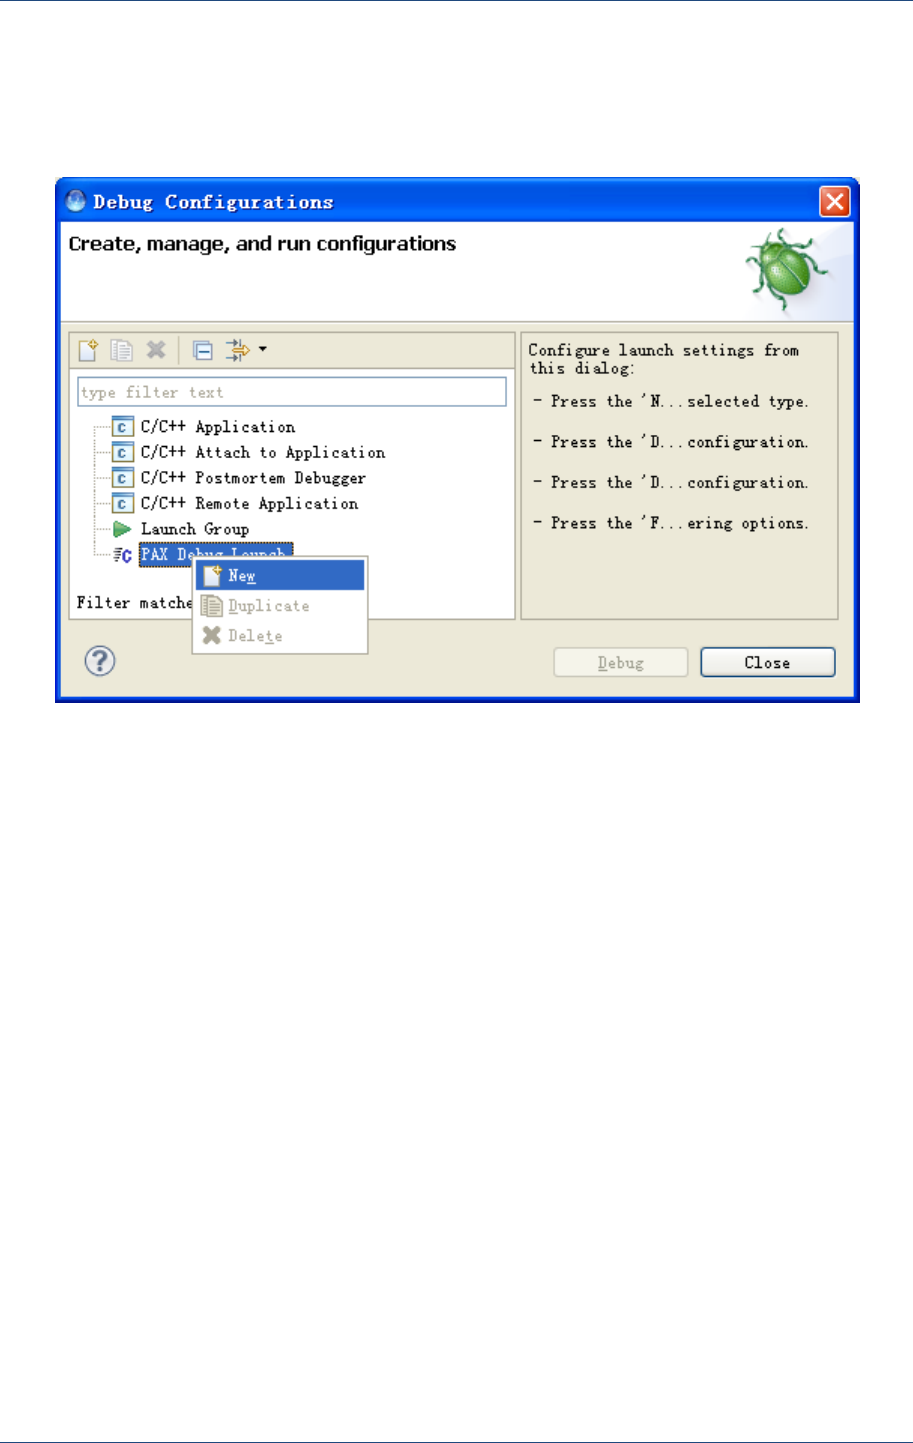
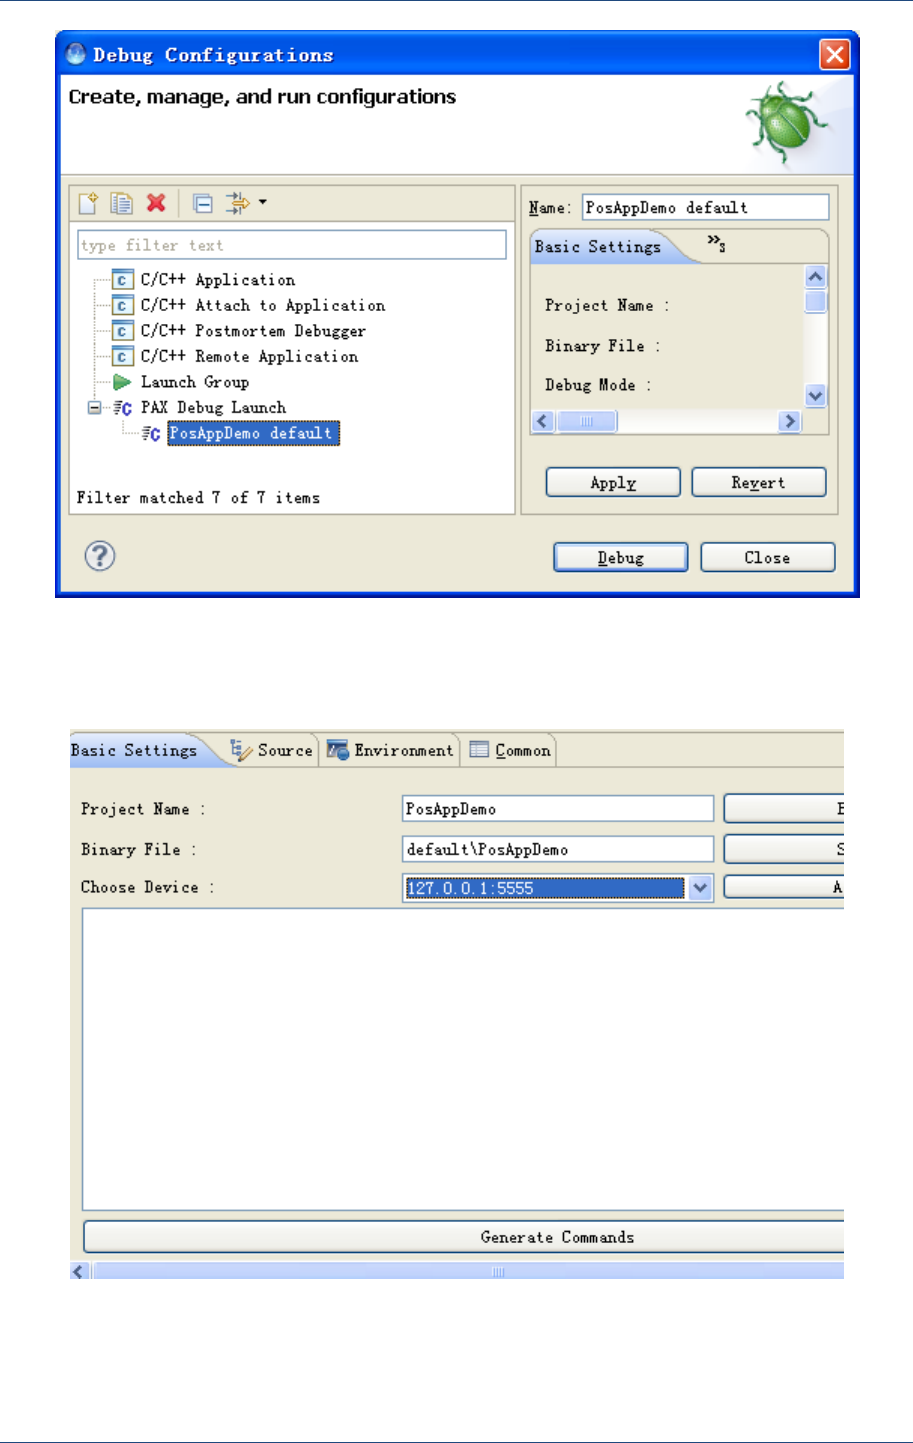
11.2.1 Open Debug Configurations Page
When the APP halts and waits for debugging, open Debug Configurations page from the
system menu RunDebug Configurations.
Figure 11.5 Open debug configurations page
Debug
PAX Computer Technology (Shenzhen) Co., Ltd. 55
11.2.2 Debug Configuration Settings
In Debug Configuration page, double click or right click on PAX Debug Launch and select
New item.
Figure 11.6 Create a new debug configuration
A new debug configuration instance is created. It will connect with the emulator or the
physical machine by network or serial port.
Prolin SDK Operating GuideOperating Guide
56 PAX Computer Technology (Shenzhen) Co., Ltd.
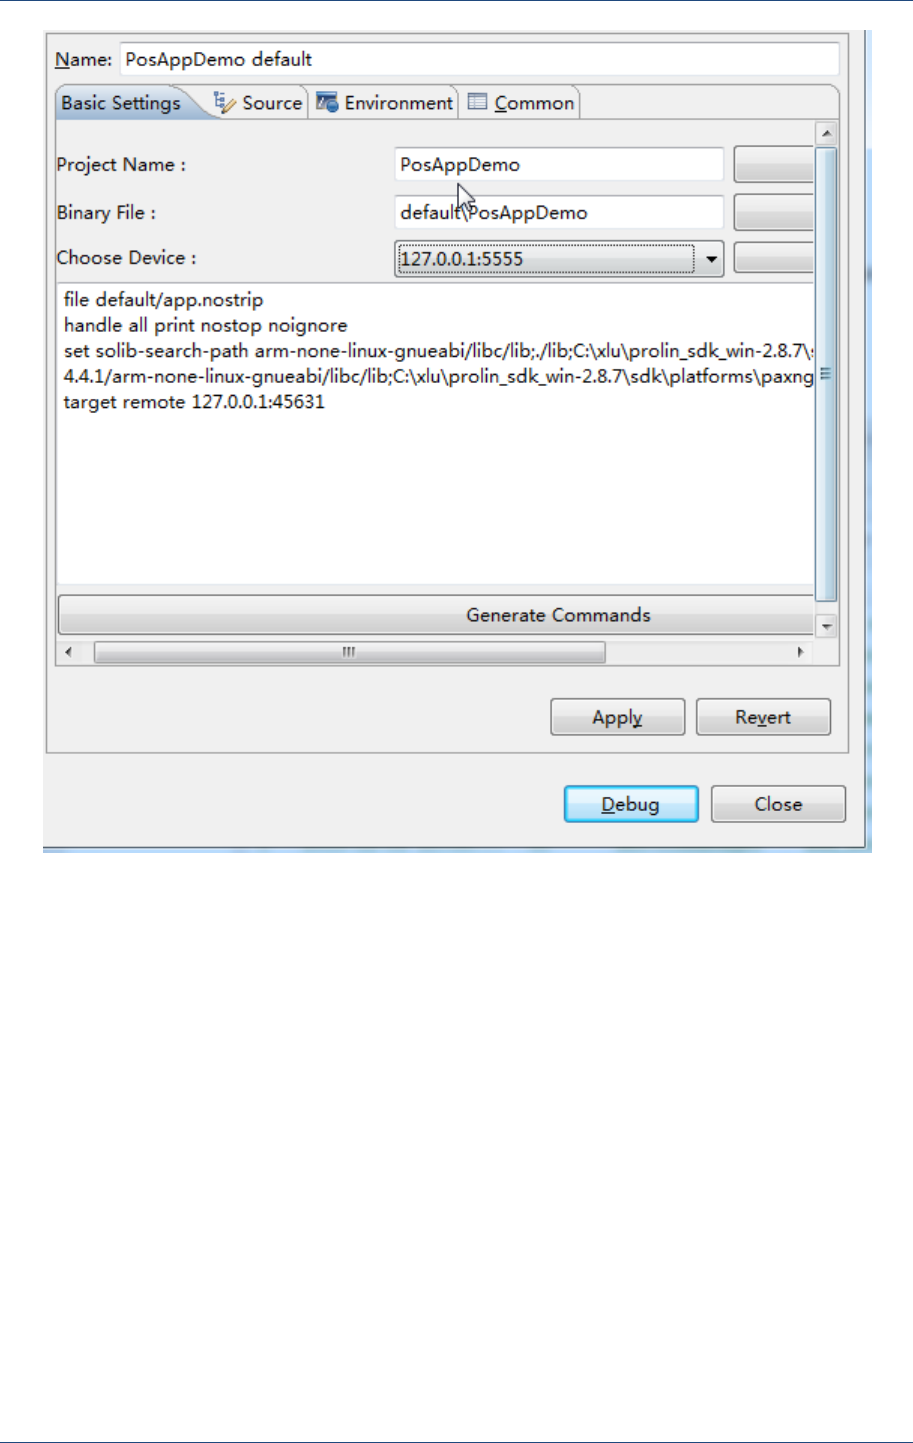
Figure 11.7 Debug settings
Choose a device which you want to debug. Click on Generate Commands button.
Figure 11.8 Choose device
Debug
PAX Computer Technology (Shenzhen) Co., Ltd. 57
Figure 11.9 Generate commands
11.2.3 Run debug
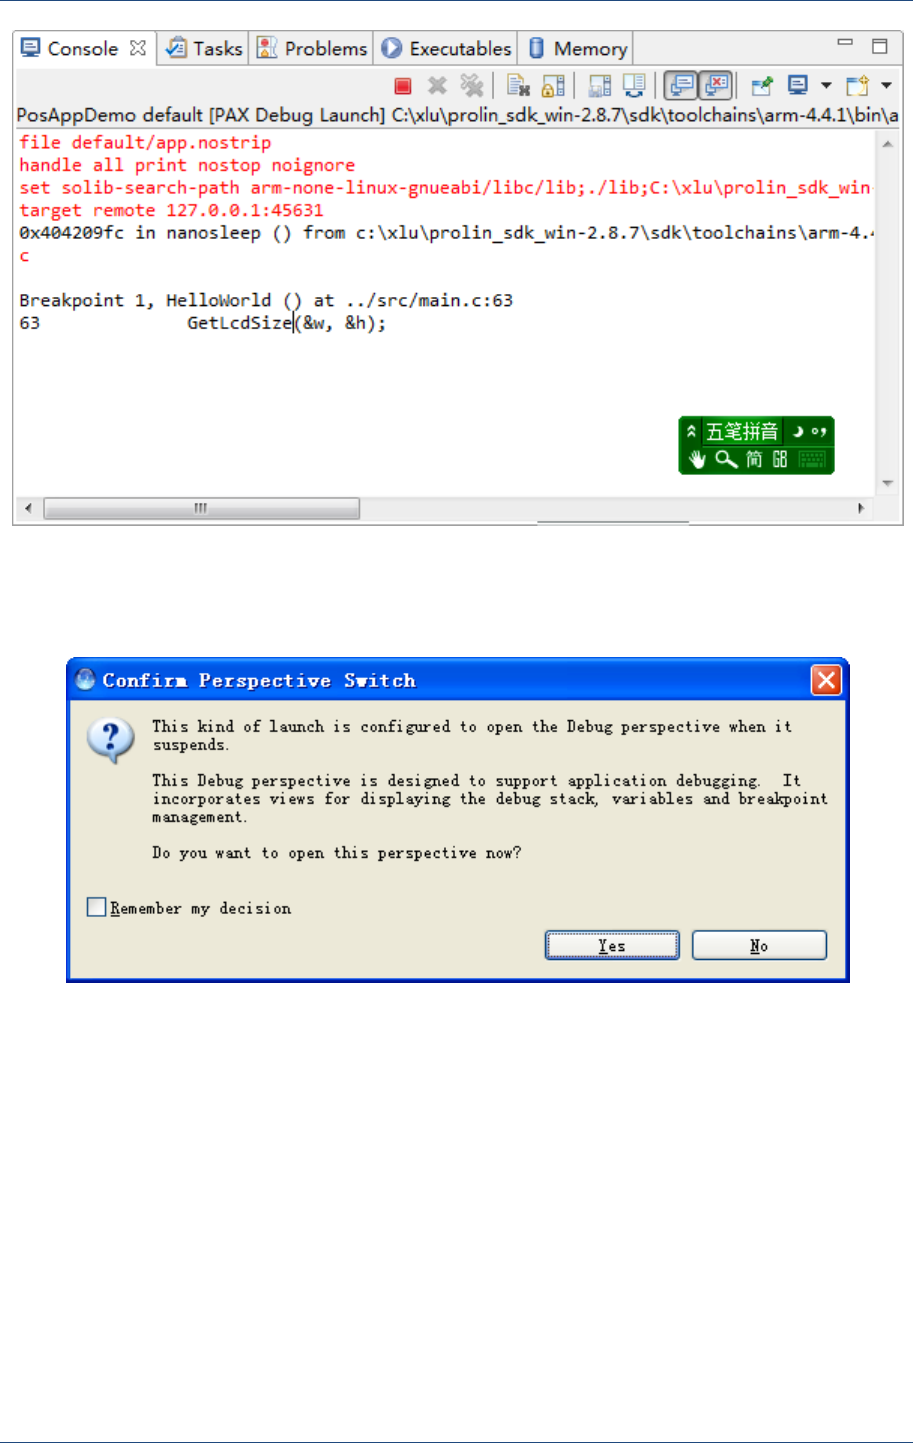
Click Debug button to start Debugging. Check the console area which at the bottom of SDK
main page. If the information in Console is as below, the GDB is connected successfully.
Prolin SDK Operating GuideOperating Guide
58 PAX Computer Technology (Shenzhen) Co., Ltd.
Figure 11.10 Console message
When GDB is connected, you are required to switch to the Debug perspective.
Figure 11.11 Confirm switch
Select Yes to open the debug perspective. And the application will stop at the first break point
location.
Debug
PAX Computer Technology (Shenzhen) Co., Ltd. 59
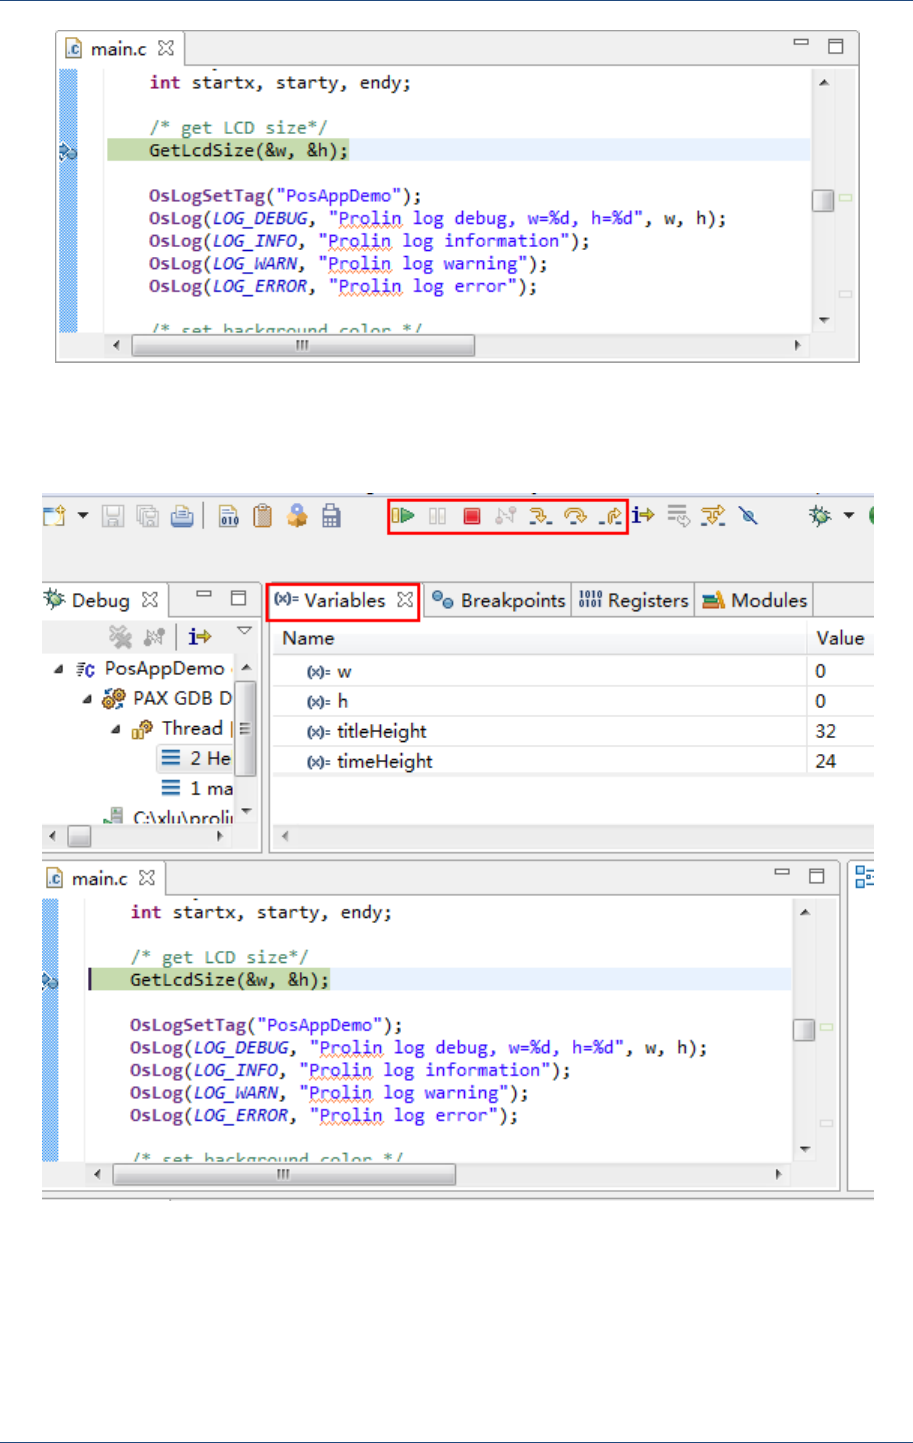
Figure 11.12 Debug perspective
Single-step debugging, checking variable value, etc, is available.
Figure 11.13 Debug perspective
Prolin SDK Operating GuideOperating Guide
60 PAX Computer Technology (Shenzhen) Co., Ltd.
12 User Help
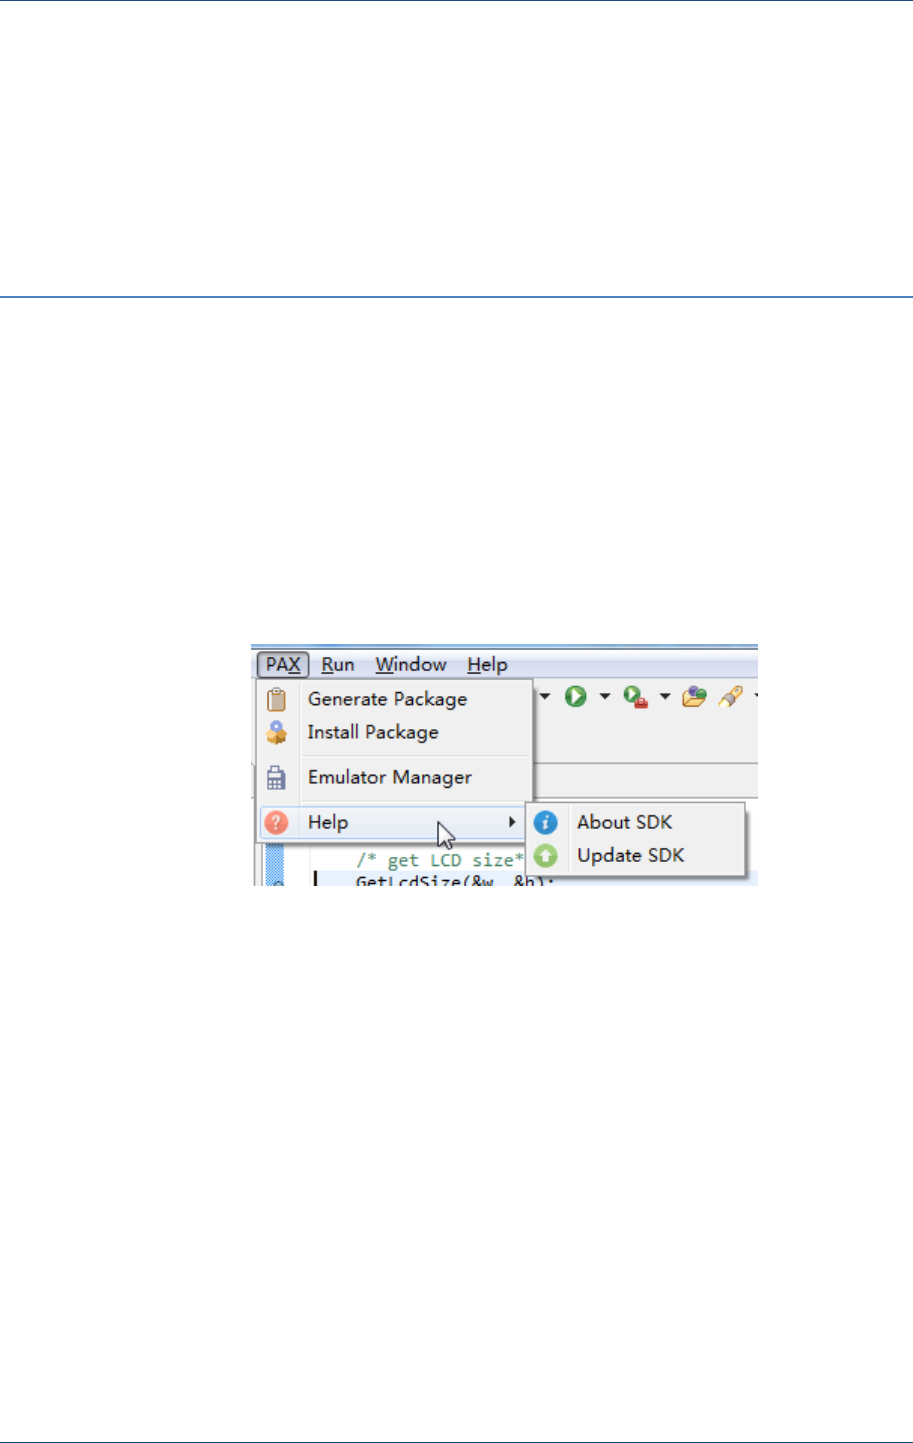
Select menu PAXHelp. It has two sub menus: About SDK and Update SDK.
Figure 12.1 PAX help menu
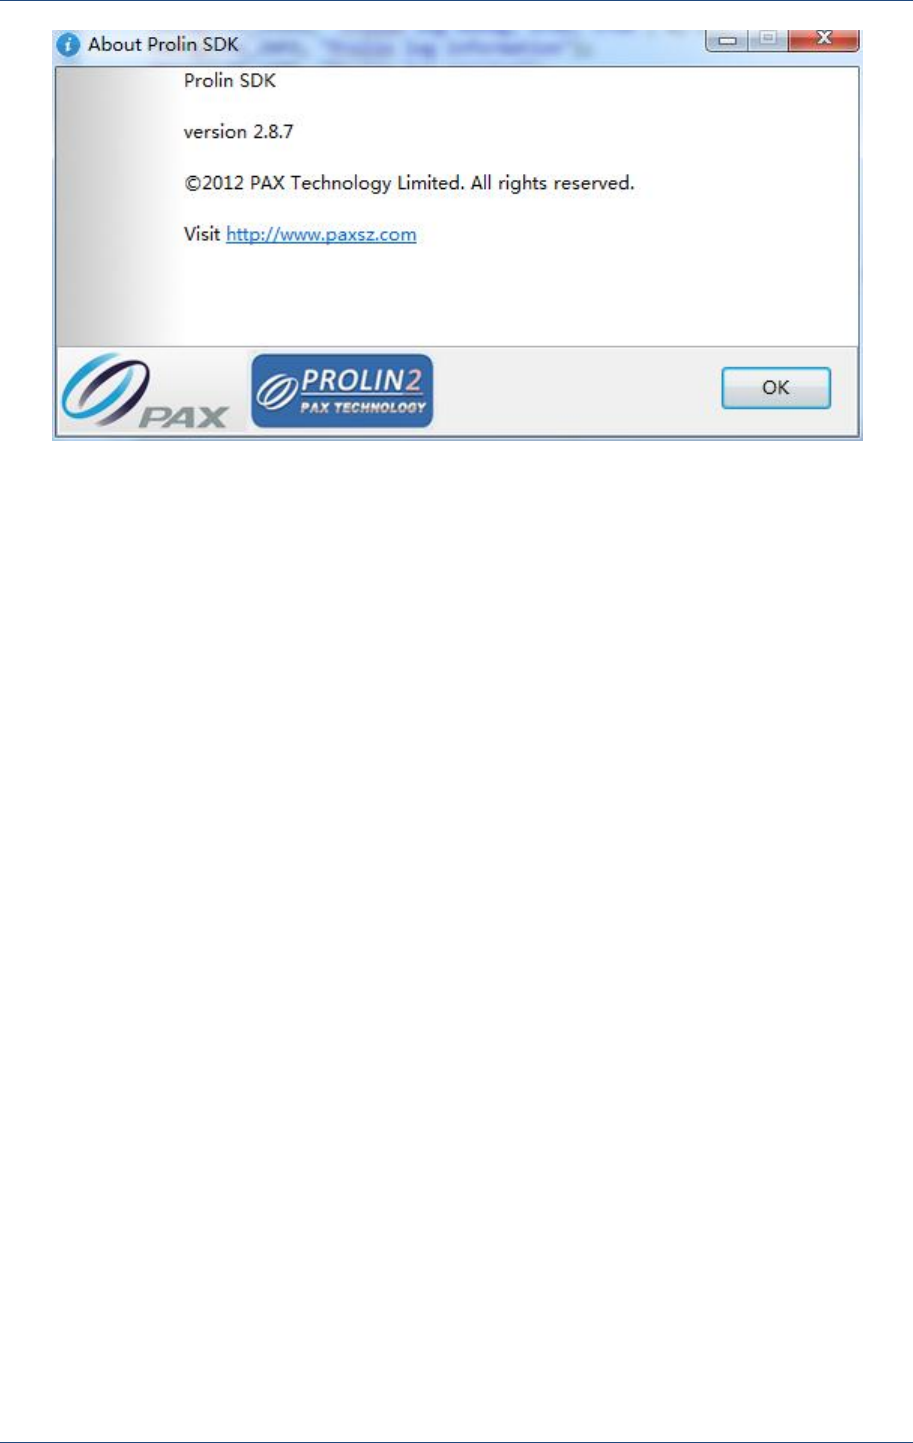
12.1 About SDK
Select sub menu About SDK. About Prolin SDK dialog will be open.
User Help
PAX Computer Technology (Shenzhen) Co., Ltd. 61
Figure 12.2 About SDK
Prolin SDK Operating GuideOperating Guide
62 PAX Computer Technology (Shenzhen) Co., Ltd.
13 Update SDK
SDK can be updated online.
13.1 Update Wizard
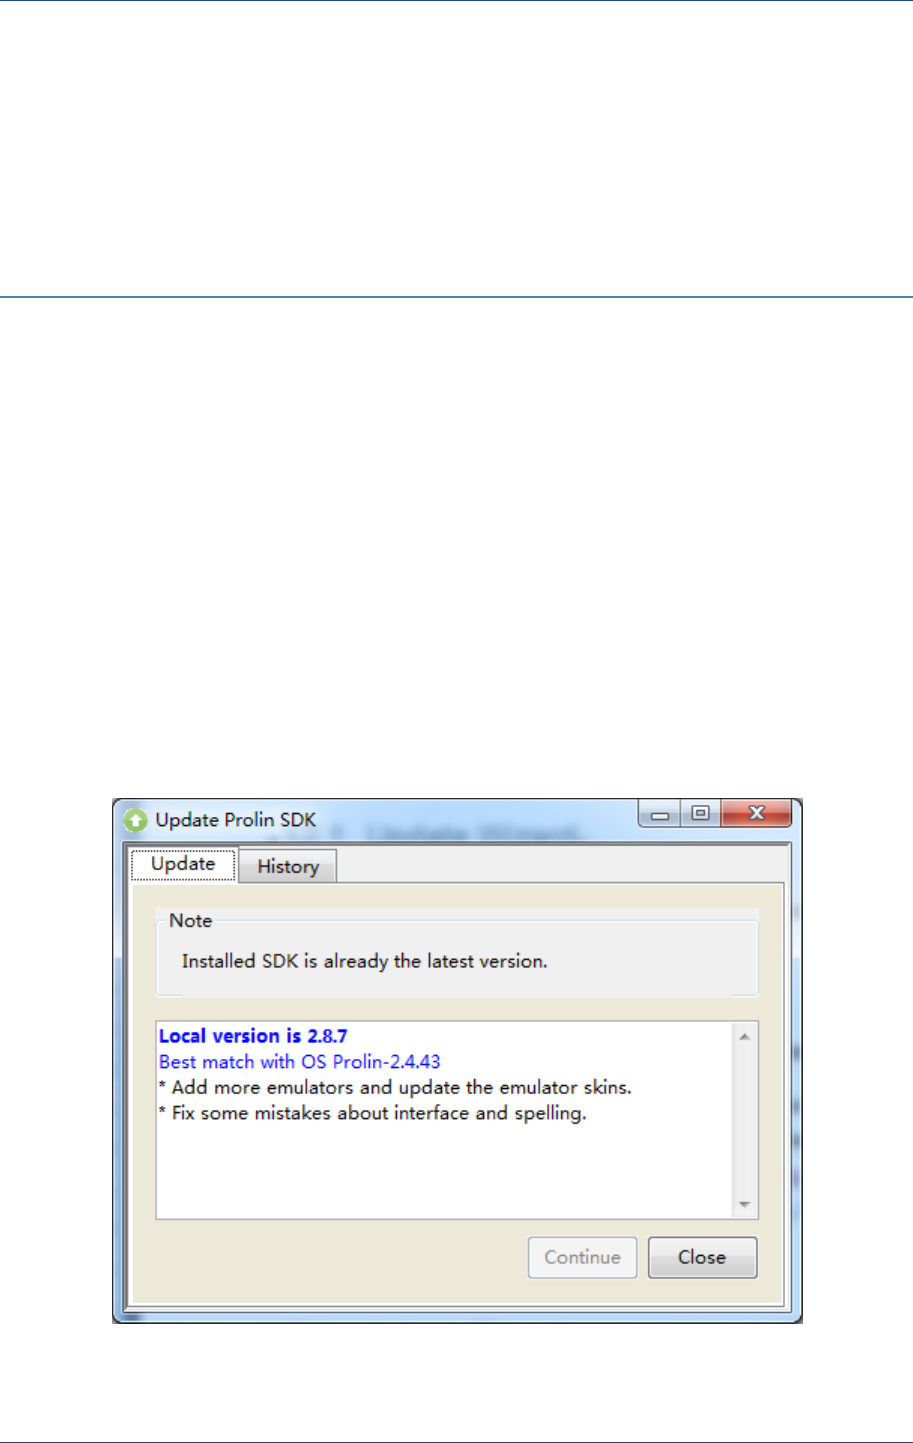
Select menu PAXHelpUpdate SDK, and then update wizard window will pop up.
Figure 13.1 Update wizard window
Update SDK
PAX Computer Technology (Shenzhen) Co., Ltd. 63
There are two tabs. The first tab is update which shows current SDK version and best
matched libraries. The Continue button will be invalid if current SDK is the latest version.
If a newer version is available, the Continue button will be in activated state.
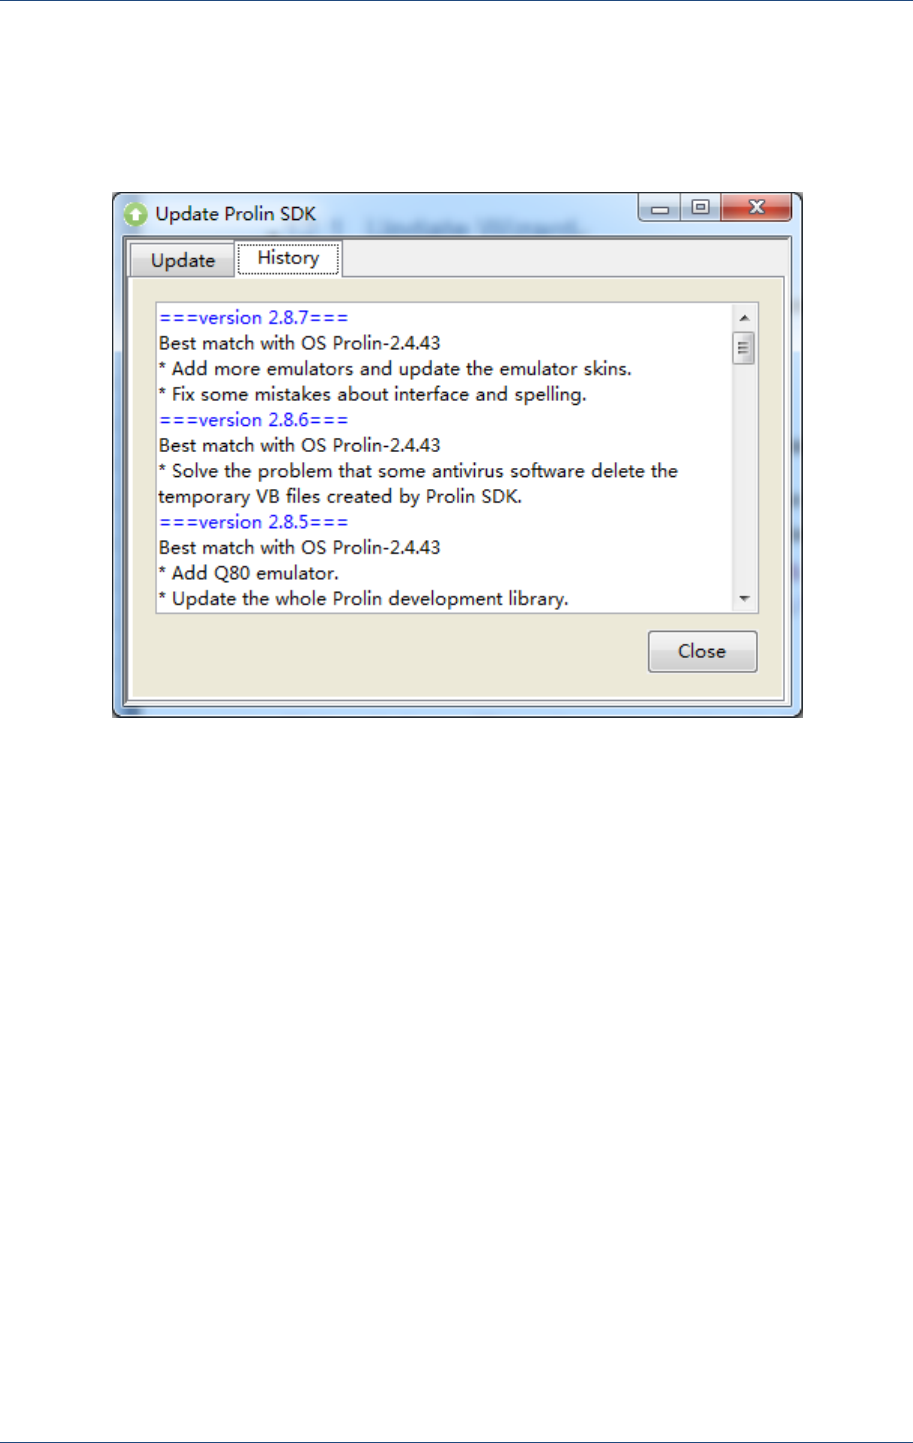
The second tab is History which shows all the update history.
Figure 13.2 Update history
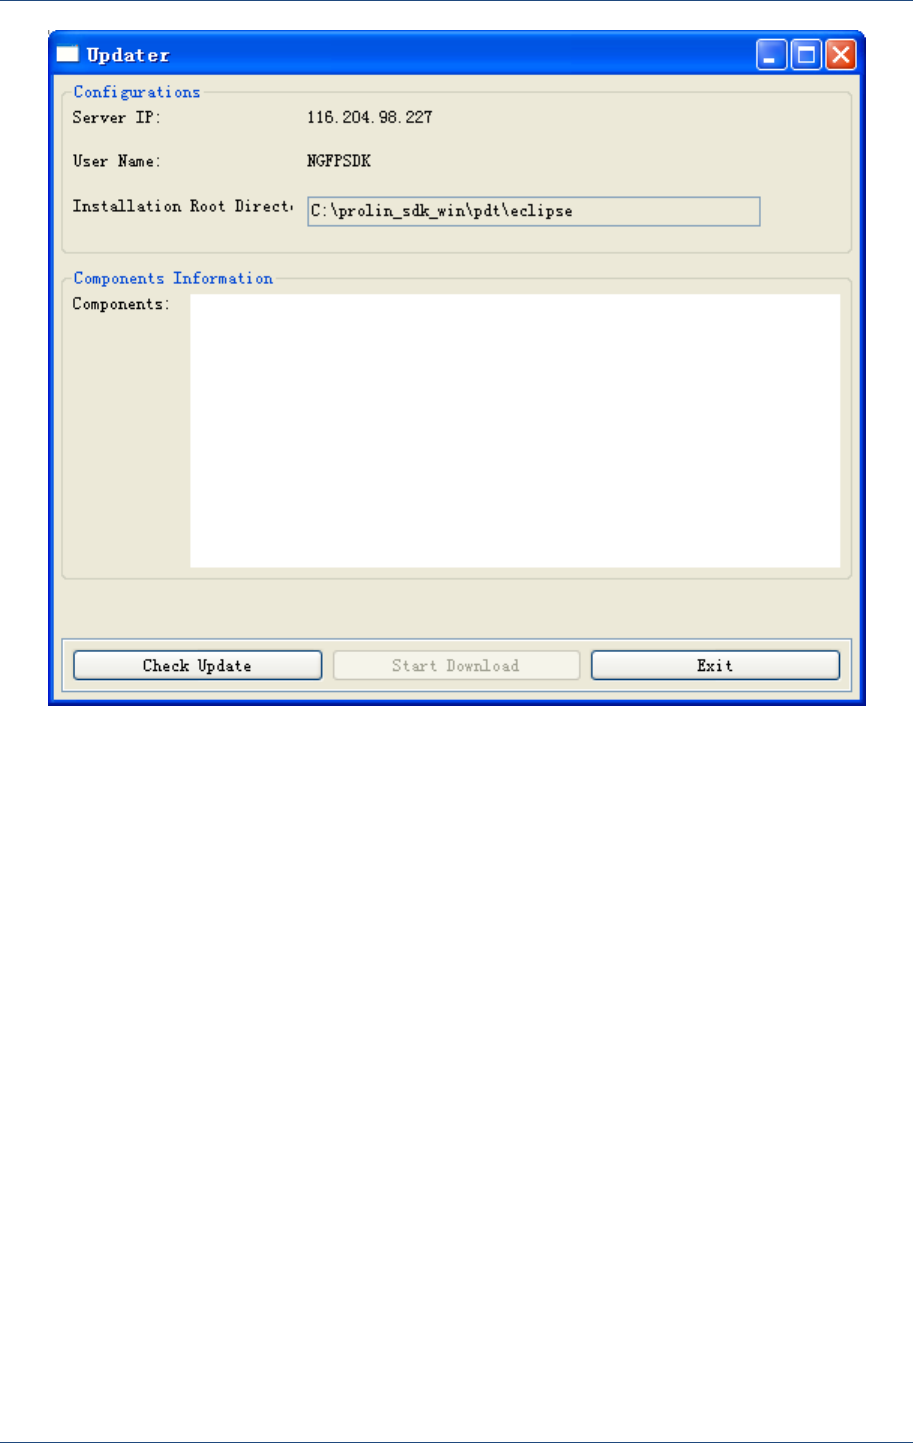
13.2 Check Update
Click Continue button (if it is active) in the Update tab to start updating.
Prolin SDK Operating GuideOperating Guide
64 PAX Computer Technology (Shenzhen) Co., Ltd.
Figure 13.3 Update window
Click Check Update button to get update information. Update list will be shown in
Components Information.

Update SDK
PAX Computer Technology (Shenzhen) Co., Ltd. 65
Figure 13.4 Check update
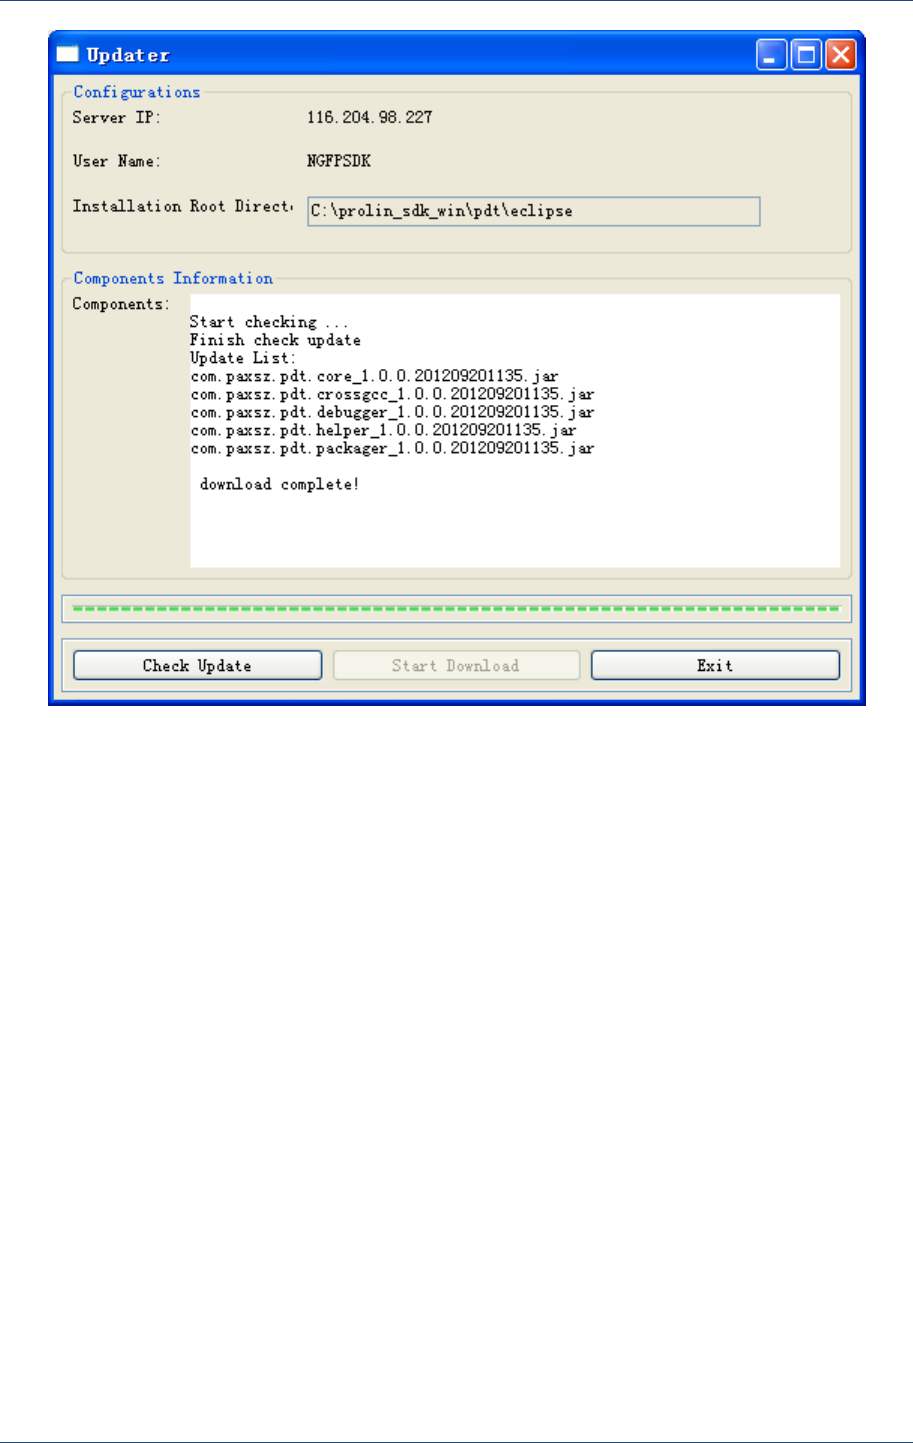
13.3 Download Update Data
Click Start Download button to start components download.
Prolin SDK Operating GuideOperating Guide
66 PAX Computer Technology (Shenzhen) Co., Ltd.
Figure 13.5 Update process
Downloading results will be shown in Components Information.
Customize
PAX Computer Technology (Shenzhen) Co., Ltd. 67
14 Customize
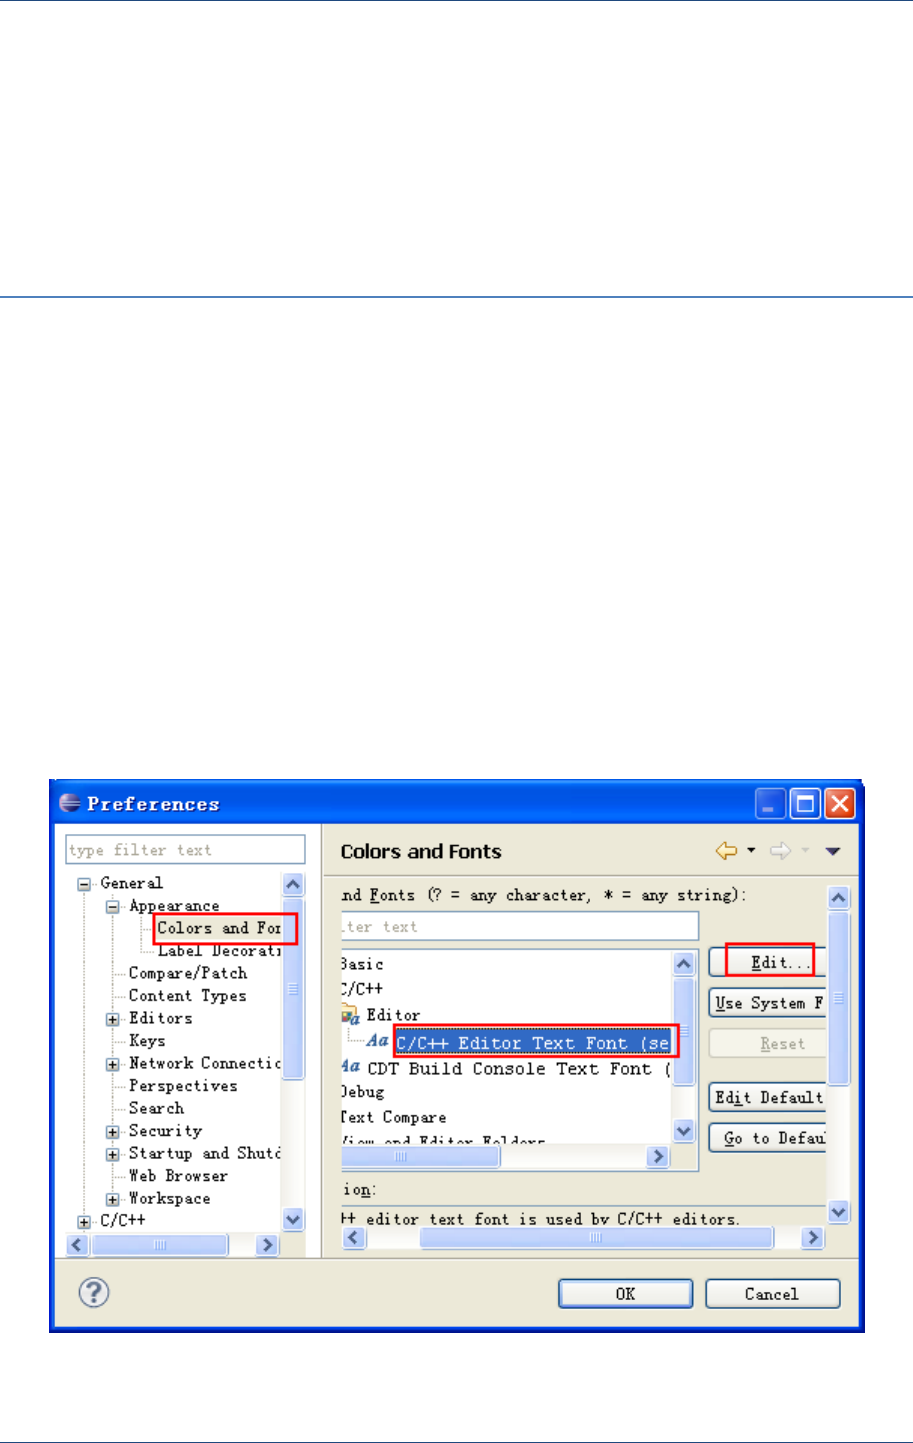
14.1.1 Set Code Font
Select menu WindowsPreferencesGeneralAppearanceColors and Fonts. In the
Colors and Fonts page, select C/C++EditorC/C++ Editor Text Font…. Click on Edit
button to set font.
Figure 14.1 Set code font
Prolin SDK Operating GuideOperating Guide
68 PAX Computer Technology (Shenzhen) Co., Ltd.
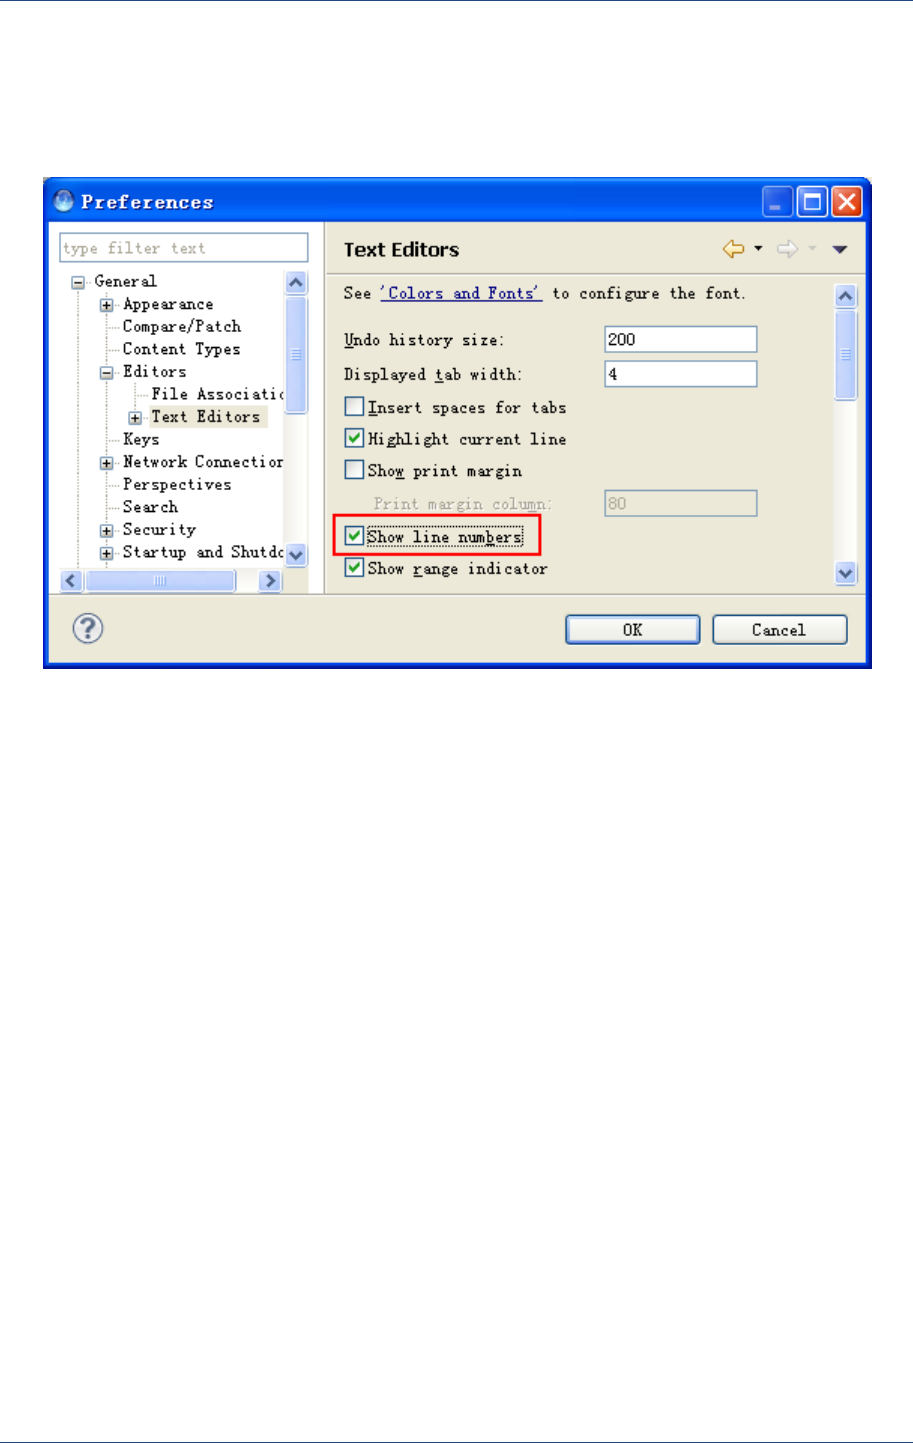
14.1.2 Show Line Number
Select menu WindowsPreferencesGeneralEditorsText Editors, and then tick
Show line numbers check box.
Figure 14.2 Show line number

Keyboard Shortcuts
PAX Computer Technology (Shenzhen) Co., Ltd. 69
15 Keyboard Shortcuts
To view all the keyboard shortcuts, select menu windowPreferences, and then select
Generalkeys. For instance:
Ctrl(+Shift)+/: Add block comment.
Ctrl+D: Delete current line.
Ctrl+Alt+Up(Down): Copy current lines to the previous (next) lines.
Alt+Up(Down): Move the current line to the previous(next) line.
Shift+Enter: Insert line below current line.
Ctrl+Shift+Enter: Insert line above current line.
Ctrl+L: Jump to the specific line number.
Ctrl+Shift+F: Format the code of current file.

Prolin SDK Operating Guide
