QIS MANUAL AND ATION
User Manual:
Open the PDF directly: View PDF ![]() .
.
Page Count: 70

QUEST
INFORMATION
SYSTEM

Table of Contents
ABSTRACT .................................................................................................................................... 4
INTRODUCTION .......................................................................................................................... 4
STATEMENT OF THE PROBLEM ............................................................................................. 5
OBJECTIVE .................................................................................................................................. 5
DELIMITATIONS ......................................................................................................................... 5
RECOMMENDATIONS ................................................................................................................ 6
VERSIONS ..................................................................................................................................... 7
VERSION 1 - SYSTEM OUTPUT AND DESIGN .......................................................... 7
Figure 1: Sign up form ...................................................................................................... 7
Figure 2: Login/Sign in Form ........................................................................................... 8
Figure 3: Physical Examination Form ............................................................................. 9
Figure 4: Medical Certificate Form ................................................................................ 10
A. ACCOUNT CASHIER MODULE .............................................................................. 11
Figure 5: Home (Make a Sale for Accounts) .................................................................. 11
Figure 6: Choose Transaction Type ............................................................................... 12
Figure 7: Account Transaction Type .............................................................................. 13
Figure 8: Account Receipt ............................................................................................... 14
Figure 9: HMO Record .................................................................................................... 15
Figure 10: Generate Sales .............................................................................................. 16
Figure 11: End of the day Report ................................................................................... 17
Figure 12: Package .......................................................................................................... 18
Figure 13: Add Package .................................................................................................. 19
B. NURSE MODULE ...................................................................................................... 20
Figure 14: Home .............................................................................................................. 20
Figure 15: Register Patient ............................................................................................ 21
Figure 16: View/Add Record ........................................................................................... 22
Figure 17:Add Record ...................................................................................................... 23
Figure 18:Update Medical History / Vital Signs / PE .................................................. 24
Figure 19: View Patient Record ..................................................................................... 25
Figure 20: Patient Summary .......................................................................................... 26
Figure 21: Patient Info List ............................................................................................ 27
Figure 22: Update Patient Info ...................................................................................... 28

C. IMAGING MODULE .................................................................................................. 29
Figure 23: Home .............................................................................................................. 29
Figure 24: X-ray Summary ............................................................................................. 30
Figure 25: View/Add Radiology Record List .................................................................. 31
Figure 26: View Radiology Report ................................................................................. 32
Figure 27: Add Radiology Report ................................................................................... 33
Figure 28: Update Radiology Report ............................................................................. 34
D. LABORATORY MODULE ......................................................................................... 35
Figure 29: Home .............................................................................................................. 35
Figure 30: Laboratory Summary.................................................................................... 36
Figure 31: Laboratory Sections ...................................................................................... 37
Figure 32: Laboratory Industrial ................................................................................... 38
Figure 33: View Laboratory Record .............................................................................. 39
Figure 34: Add Laboratory Record ................................................................................ 40
Figure 35: Update Record .............................................................................................. 41
E. PE MODULE .............................................................................................................. 42
Figure 36: Home .............................................................................................................. 42
Figure 37: PE Summary ................................................................................................. 43
Figure 38: Class Summary ............................................................................................. 44
Figure 39: Classification List ......................................................................................... 45
Figure 40: Classify Patients ........................................................................................... 46
F. QC MODULE .............................................................................................................. 47
Figure 41: Home .............................................................................................................. 47
Figure 42: QCList ............................................................................................................ 48
Figure 43: Add / Update QC ........................................................................................... 49
Figure 44: Summary Report ........................................................................................... 50
G. CASH CASHIER MODULE ...................................................................................... 51
Figure 45: SCROLL BAR for Items ............................................................................... 51
Figure 46: ADD ITEMS TO TRANSACTION LIST AND COMPUTE ....................... 52
Figure 47:SCROLL BAR SEARCH for Patient Records .............................................. 53
Figure 48: ADD New Patient Record ............................................................................. 54
Figure 49: TRANSACT Cash & PRINT RECEIPT CASH ........................................... 56
MANUAL START-UP APPLICATION .......................................................................... 57

ABSTRACT
The Quest Info System is a system developed for Quest Phil Diagnostics. Its purpose is to
give its patients, corporate clientele and medical/allied professional to achieve diagnostics
test conducted at the facility in the following advantages: To have 0% error in details of
patient record and to give the latest format of the Medical Examination Report and
Physical Examination form. Also, to have an easy access and available summary report for
corporate clientele, human resource development, and finance department. To have real
time result available, anytime and anywhere and to have 100% medical archiving facility.
INTRODUCTION
Information system, an integrated set of components for collecting, storing,
and processing data and for providing information, knowledge, and digital products.
Business firms and other organizations rely on information systems to carry out and
manage their operations, interact with their customers and suppliers, and compete
in the marketplace. Information systems are used to run interorganizational supply
chains and electronic markets. For instance, corporations use information systems to
process financial accounts, to manage their human resources, and to reach their
potential customers with online promotions. Many major companies are built entirely
around information systems.
DIS (Diagnostics Information System) is a technology solution was specifically
designed for immediate use by all test results data users in physician offices, hospital
inpatient facilities and outpatient clinics and community health centers. Its
implementation will depend on collaborative innovation among a number of
interdependent stakeholders. These include all the test results data providers in
hospital and community-based clinical laboratories and in imaging and other testing
facilities and the vendors of EHRs and PHRs, as well as the vendors of HIE data
integration and exchange platforms and the RHIOs/HIEs that they serve. Patented
technology solution that provides detailed specifications for a clinically integrated,
comprehensive and standard format for displaying patient test results in the same
way across all points of care. DIS also a universal interface that can be easily
embedded in the presentation layer of any ambulatory or hospital electronic health
record (EHR), personal health record (PHR) or health information exchange (HIE). It
is ideally suited for the development of customized, event-driven clinical decision
support system (CDSS) applications. As the decades passed, the most commonly
implemented systems were those designed to automate transactions, either in a
clinical or administrative context. An obvious result of more transaction systems
installations was the dramatic increase in readily available digitized data

STATEMENT OF THE PROBLEM
a) Errors in the patient records is inevitable because of the manual handwritten
process.
b) Latest accomplished Medical Examination Reports and forms of the patients
cannot be provided immediately because of the manual process.
c) Manual generation or processing of summary reports is time consuming and
can give inaccurate results.
d) Results are only available on print outs, thus, results can only be viewed or
access once delivered to the client/patient.
e) Manual archiving takes time and space.
OBJECTIVE
The main objective of the “Quest Info System” is to provide every patient consistent,
fast and reliable service. Specifically, the facility would like:
a) To have 0% error in details of patient record.
b) To give the latest format of the Medical Examination Report and Physical
Examination form.
c) To have an easy access and available summary report.
d) To have real time result available anytime and anywhere.
e) To have 100% medical archiving facility.
DELIMITATIONS
1. The facility uses the QuickBooks pos to transact cash/payments. The system
can only do the account transactions.
2. The system generates manual pdf results for uploading of results to designated
google drives for each company.
3. The system is not directly connected to the website(www.questphil.com.ph).

RECOMMENDATIONS
1. For the Cashier Module, additional code for transacting cash. The system must
able to have this to do all the transactions and to generate reports/sales within
the system to avoid conflict/confusion.
2. For uploading and distribution of results, the system must have a
button/function to automatically generate single or batch pdf results for lesser
work.
3. Also, for uploading and distribution of results, the system must be available
offline/online. Online, to connect it to the quest website so that available
results can be downloaded by the clients from it.
VERSIONS
VERSION 1 - SYSTEM OUTPUT AND DESIGN
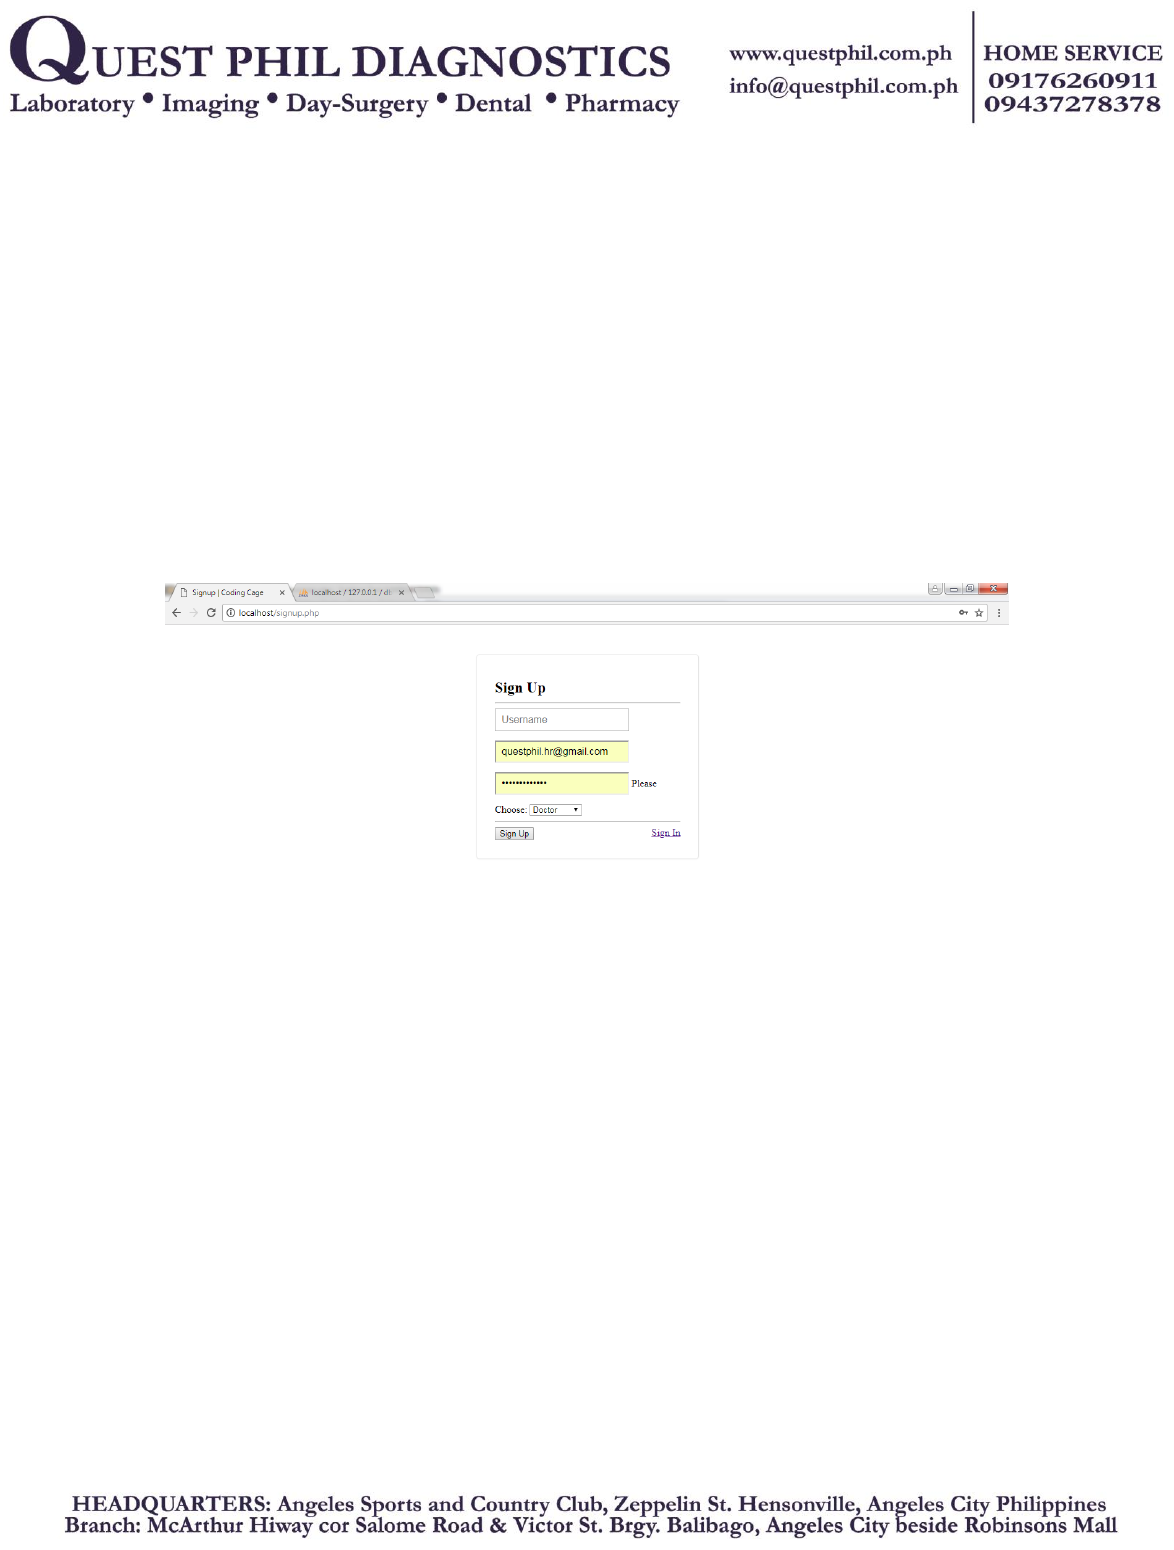
Figure 1: Sign up form
This figure is for creating accounts. Username, email for the verification and password for
security purposes. On the last module, you will choose what position you’re employed
because every position has an exclusive feature for them.
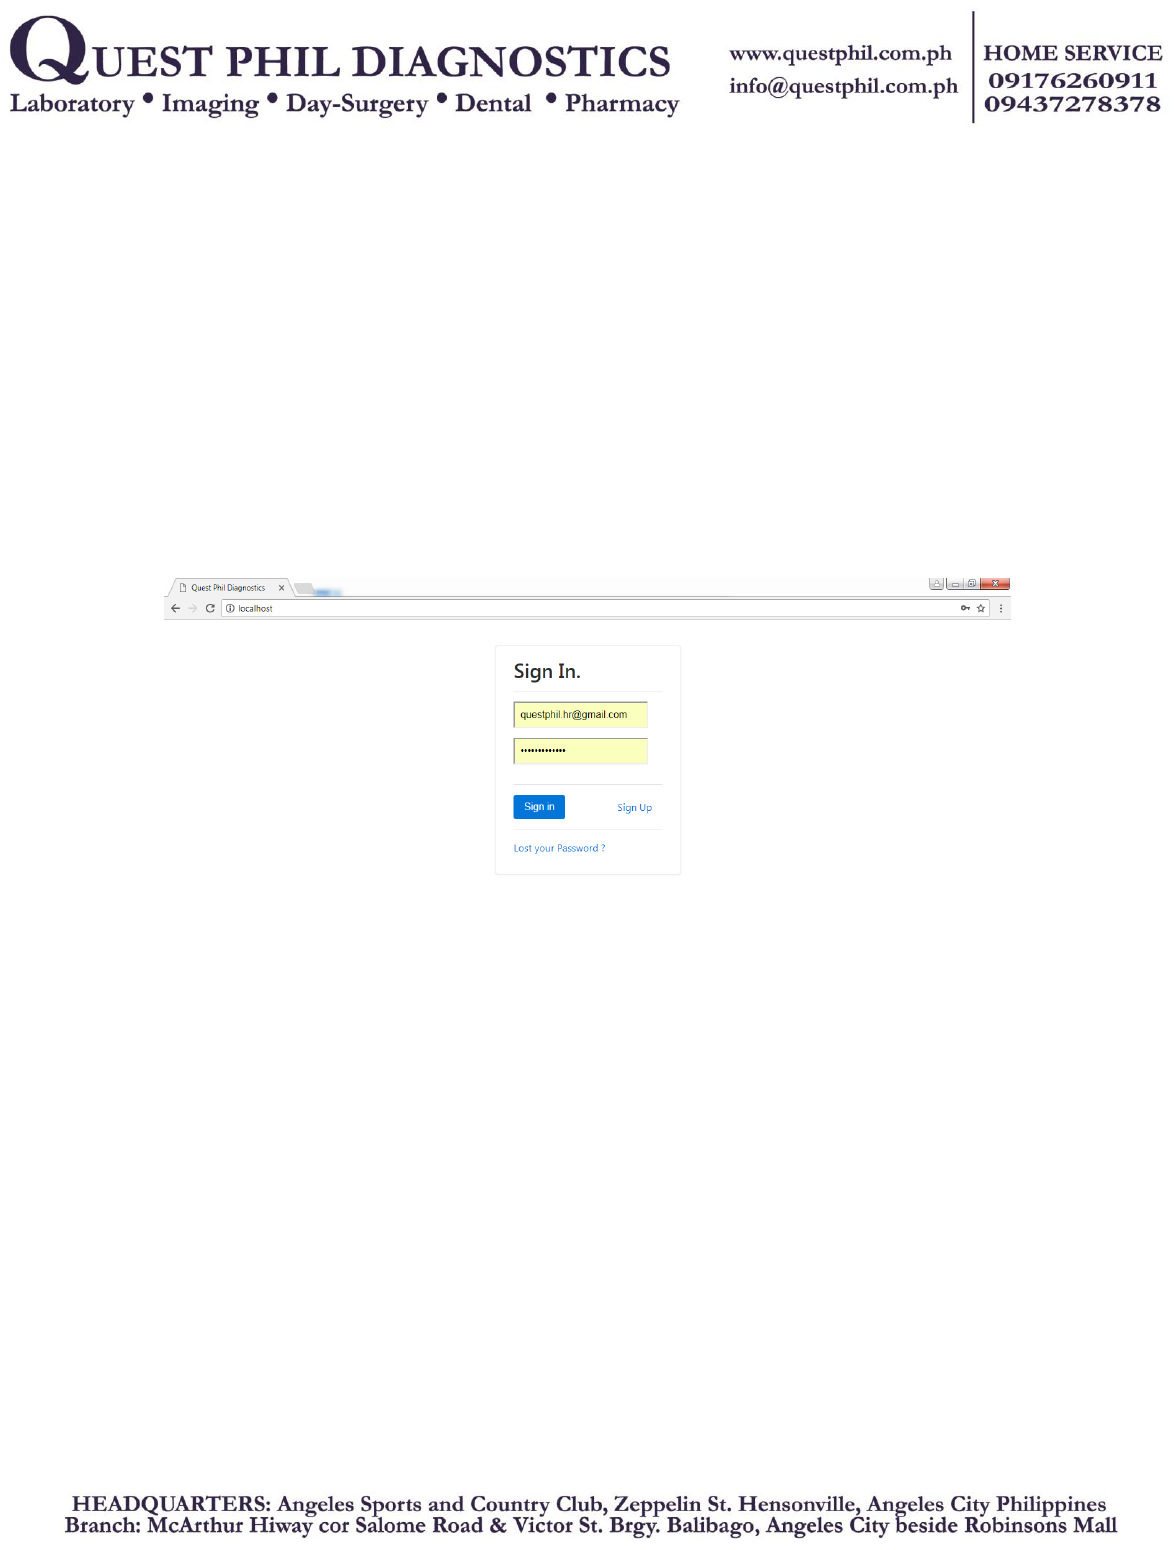
Figure 2: Login/Sign in Form
This figure is for the login interface. Now in this part, those data (information) that you
inputted when you sign up will be needed according to what the field (textbox) demands.
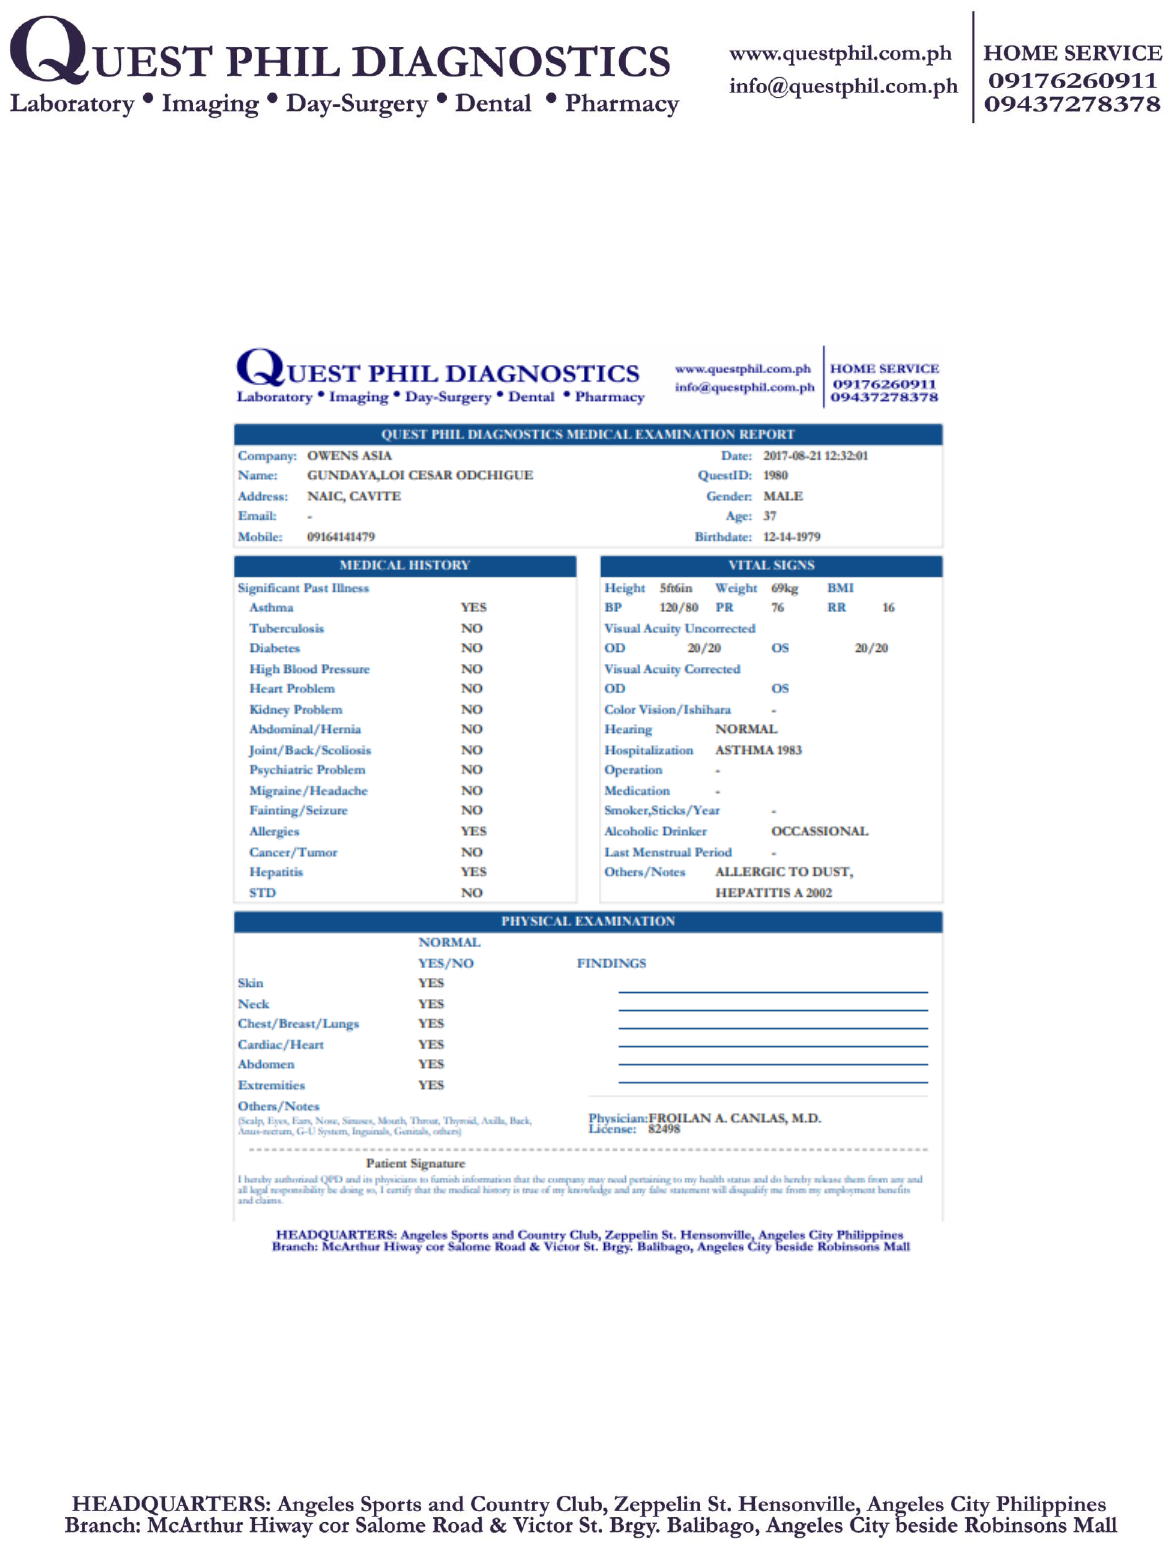
Figure 3: Physical Examination Form
Sample Physical Examination Form. This part is for the result of physical examination and
it collected into one page, and then the user (employee) will print it or send it via email to
the patient.
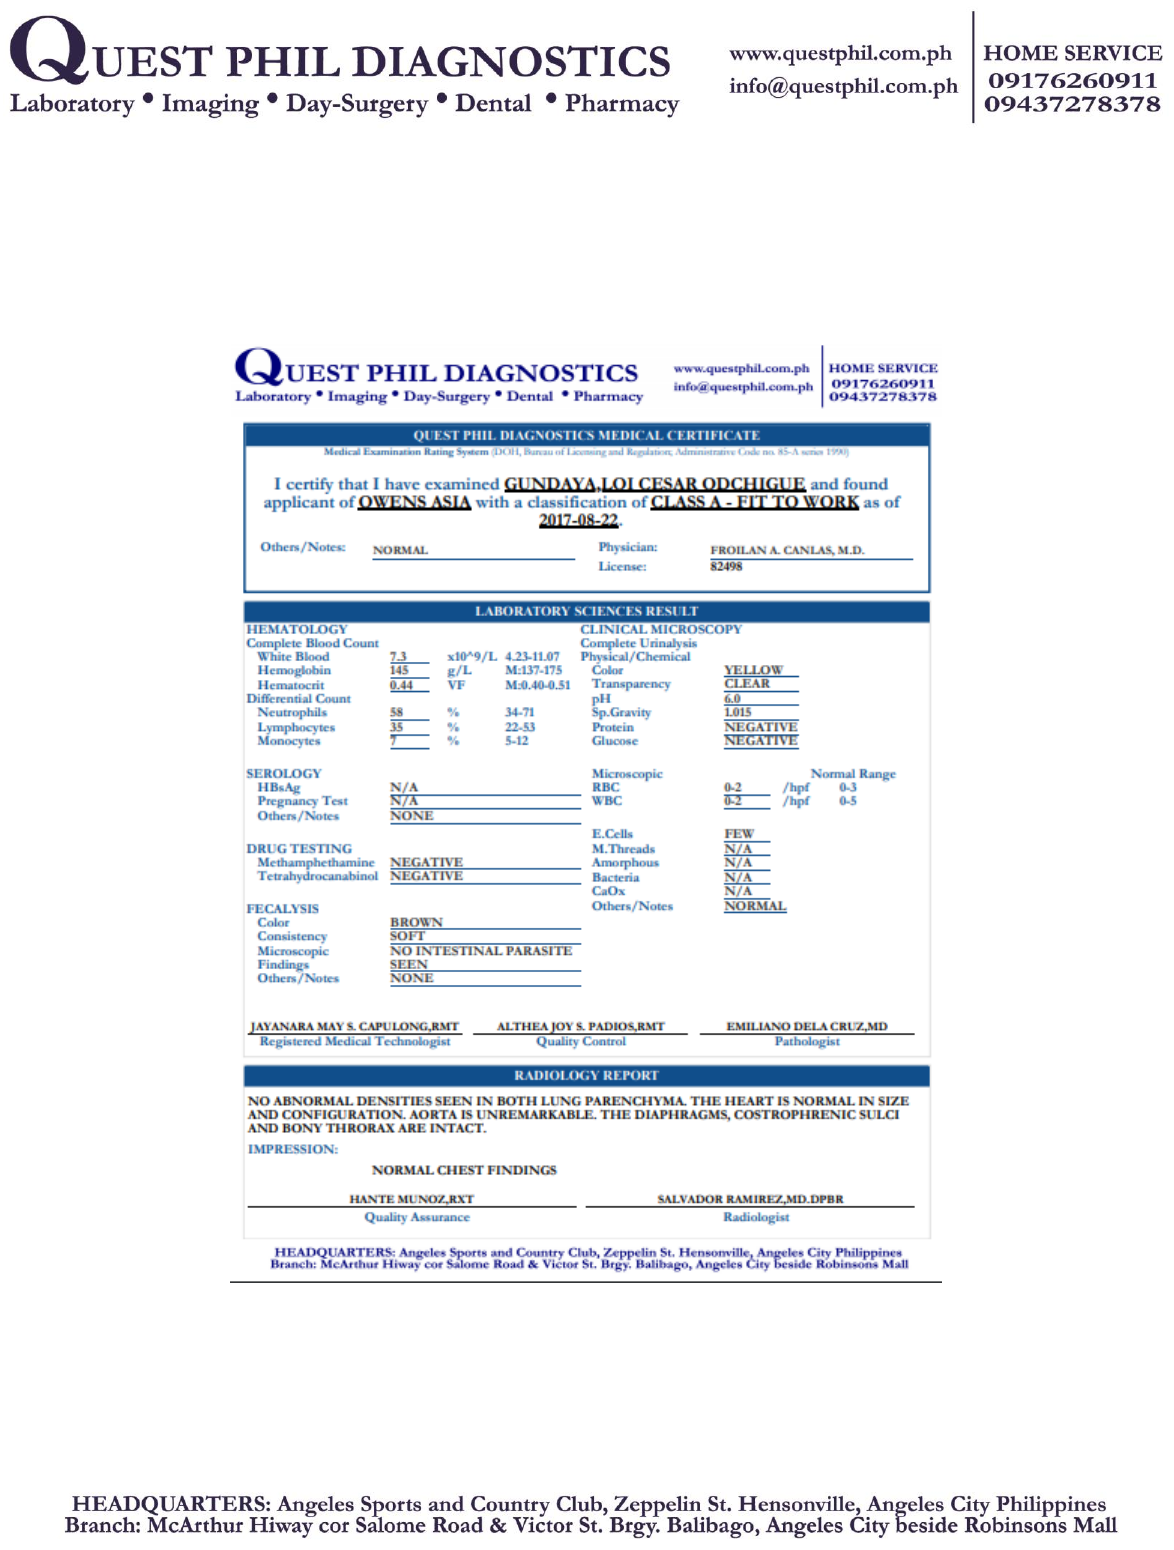
Figure 4: Medical Certificate Form
Sample Medical Certificate. This part is for the medical certificate of the patient, it is same
with the other one. It displays all result into a page.

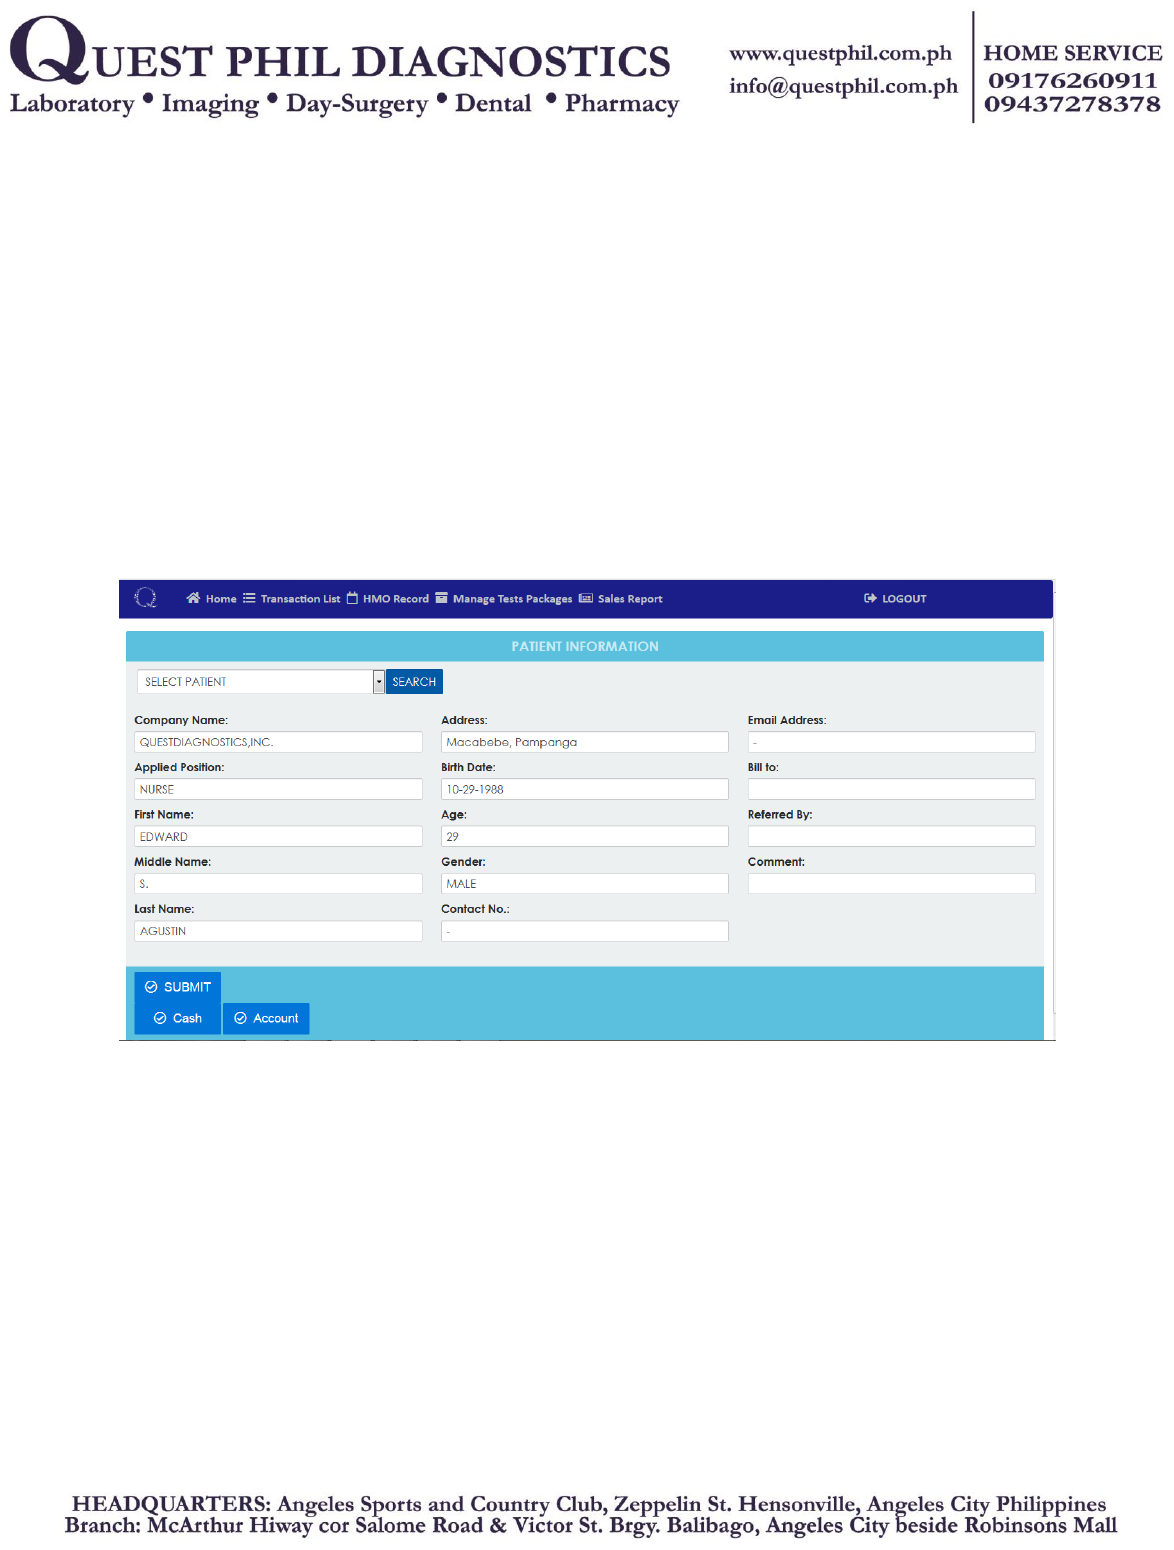
A. ACCOUNT CASHIER MODULE
Figure 5: Home (Make a Sale for Accounts)
This figure is where the cashier will make a sale by filling up the form. If the patient didn’t
have record yet then the user (employee) will proceed with this page which is inputting the
personal information of the patient before to proceed to the purpose of the patient.
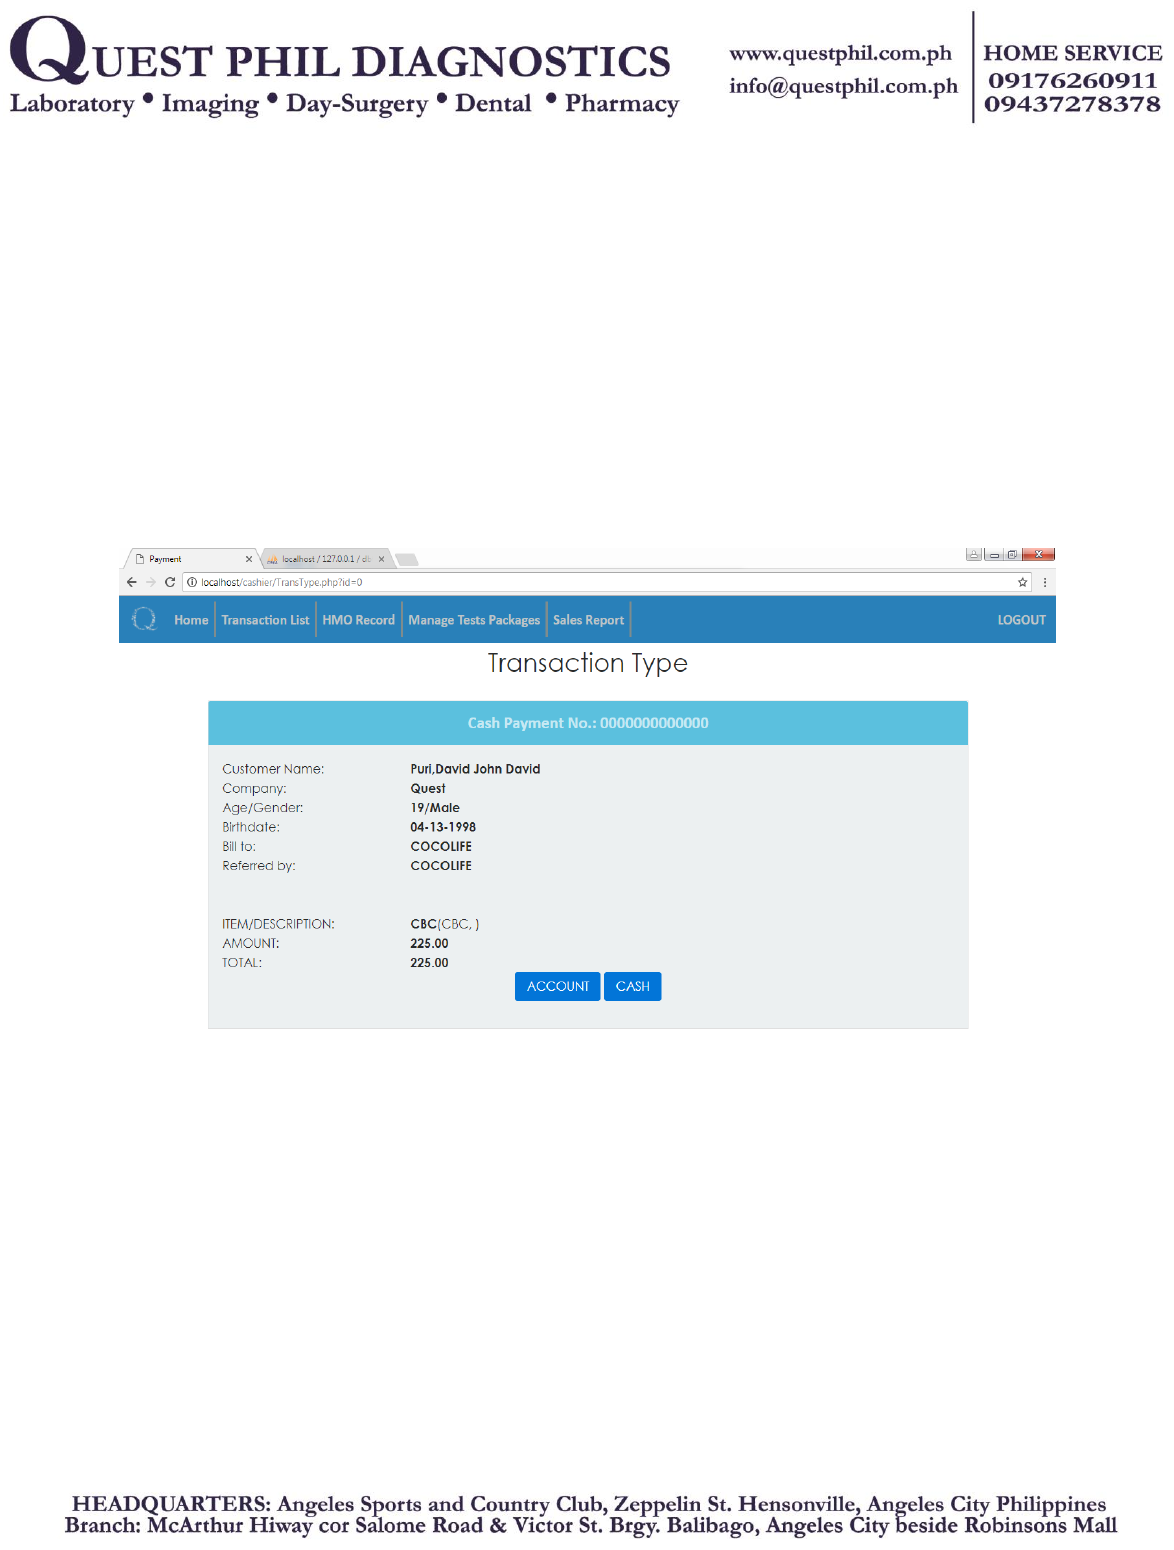
Figure 6: Choose Transaction Type
This is where the cashier will choose which transaction type for the payment. After
inputting personal info of the patient, the page will proceed to the Transaction Type which
you have two choices to choose what kind of transaction did the patient choose.
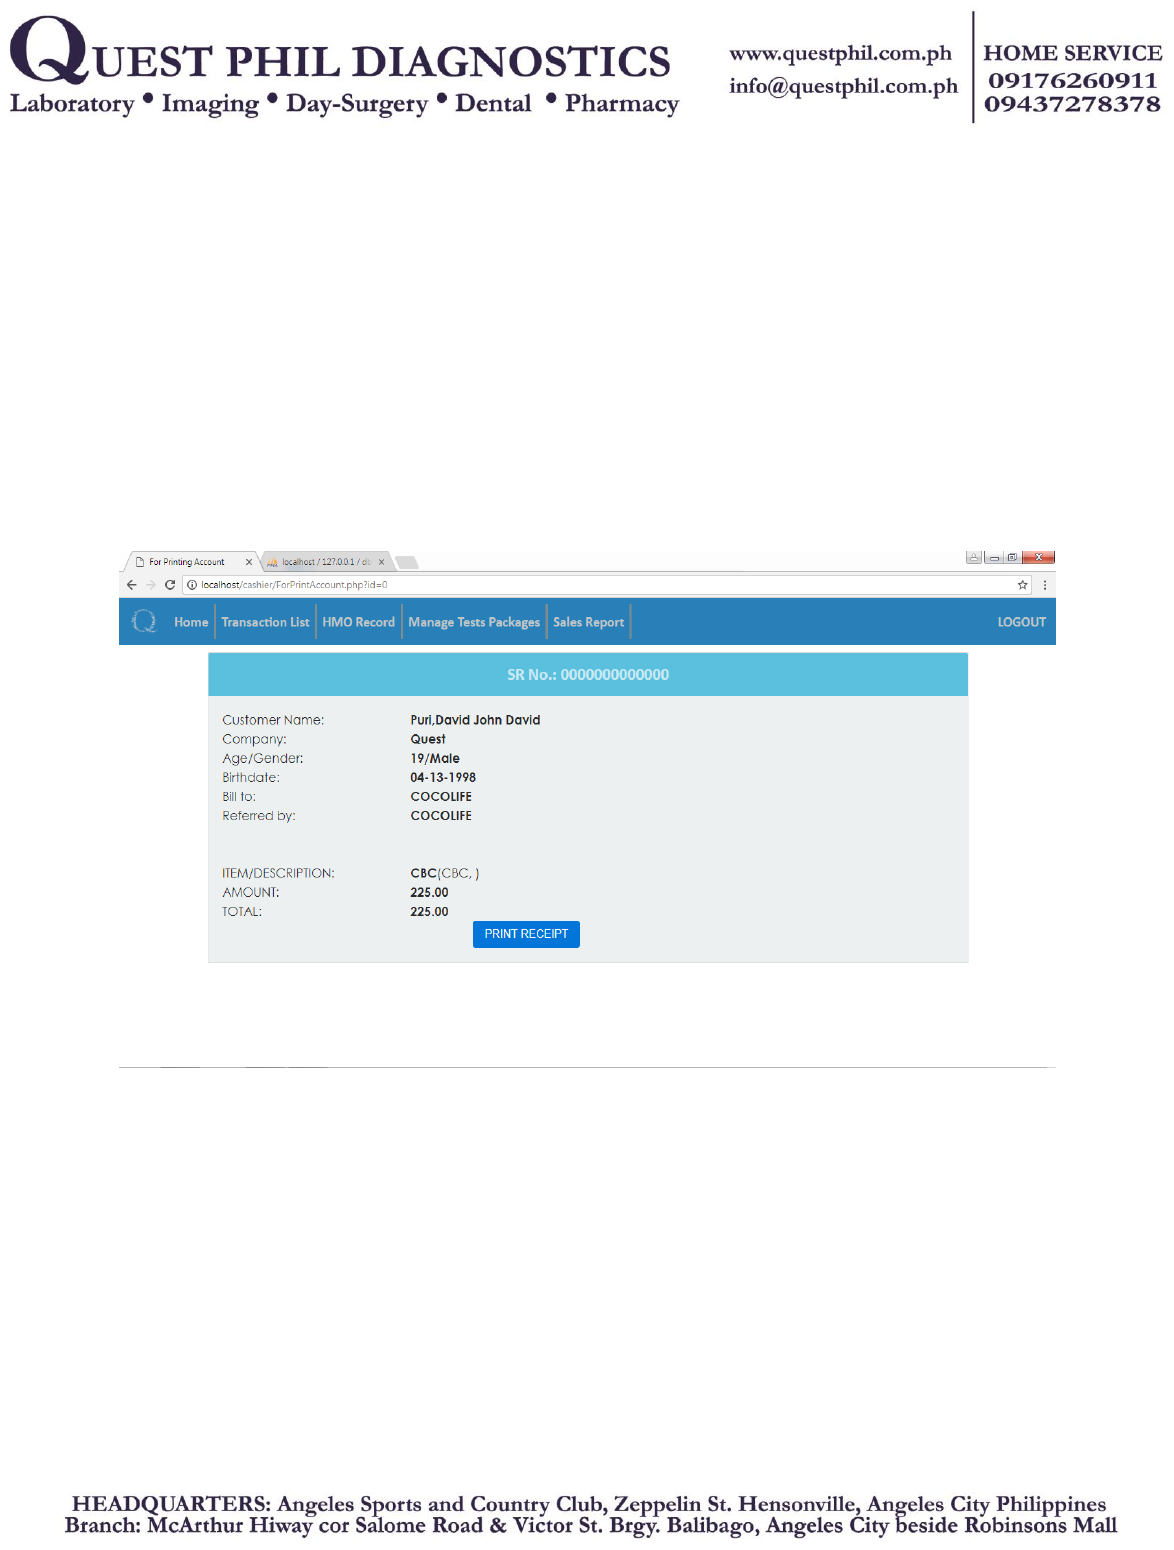
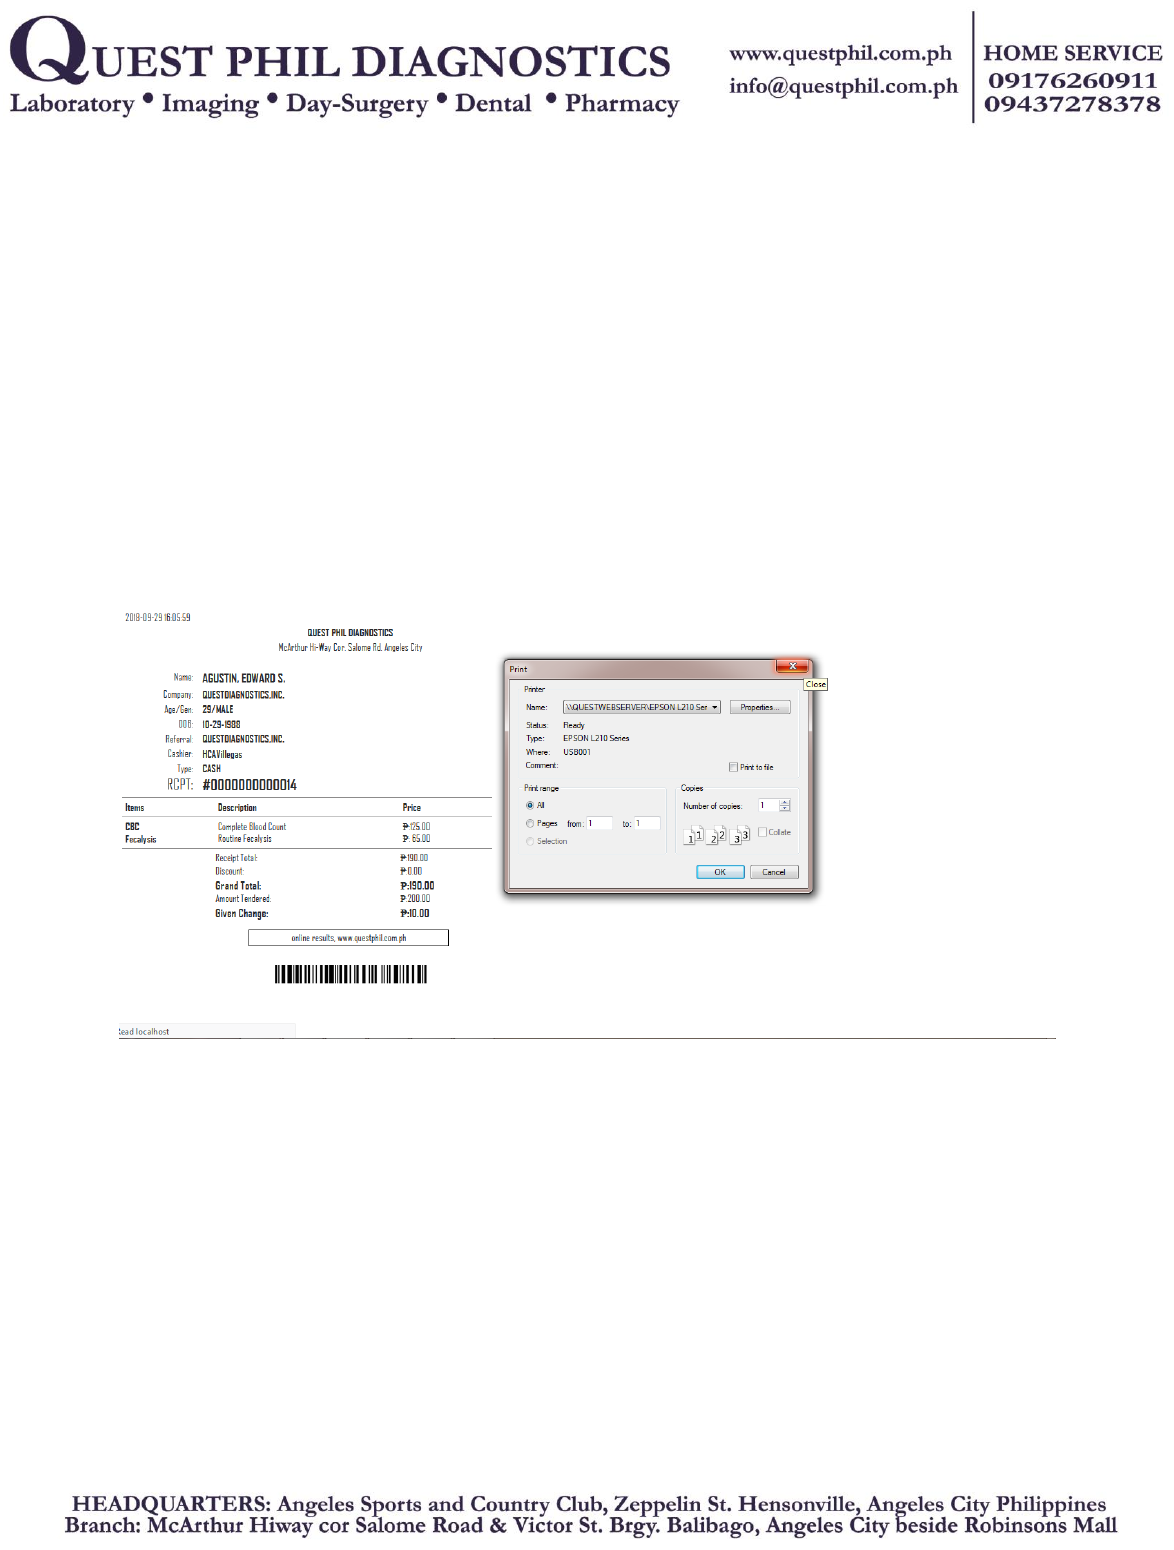
Figure 7: Account Transaction Type
This is where the cashier will print account receipt. After choosing what kind of
transaction, it will proceed to the next page for collecting all data (information) to print it as
a receipt.

Figure 8: Account Receipt
Sample account receipt. Layout or appearance of receipt and then it will be printed.

Figure 9: HMO Record
This figure is where the cashier can view and update HMO record. In this part, you will see
all the patient information that you inputted. You can also view them and update if there’s
a mistake or need to add on it.
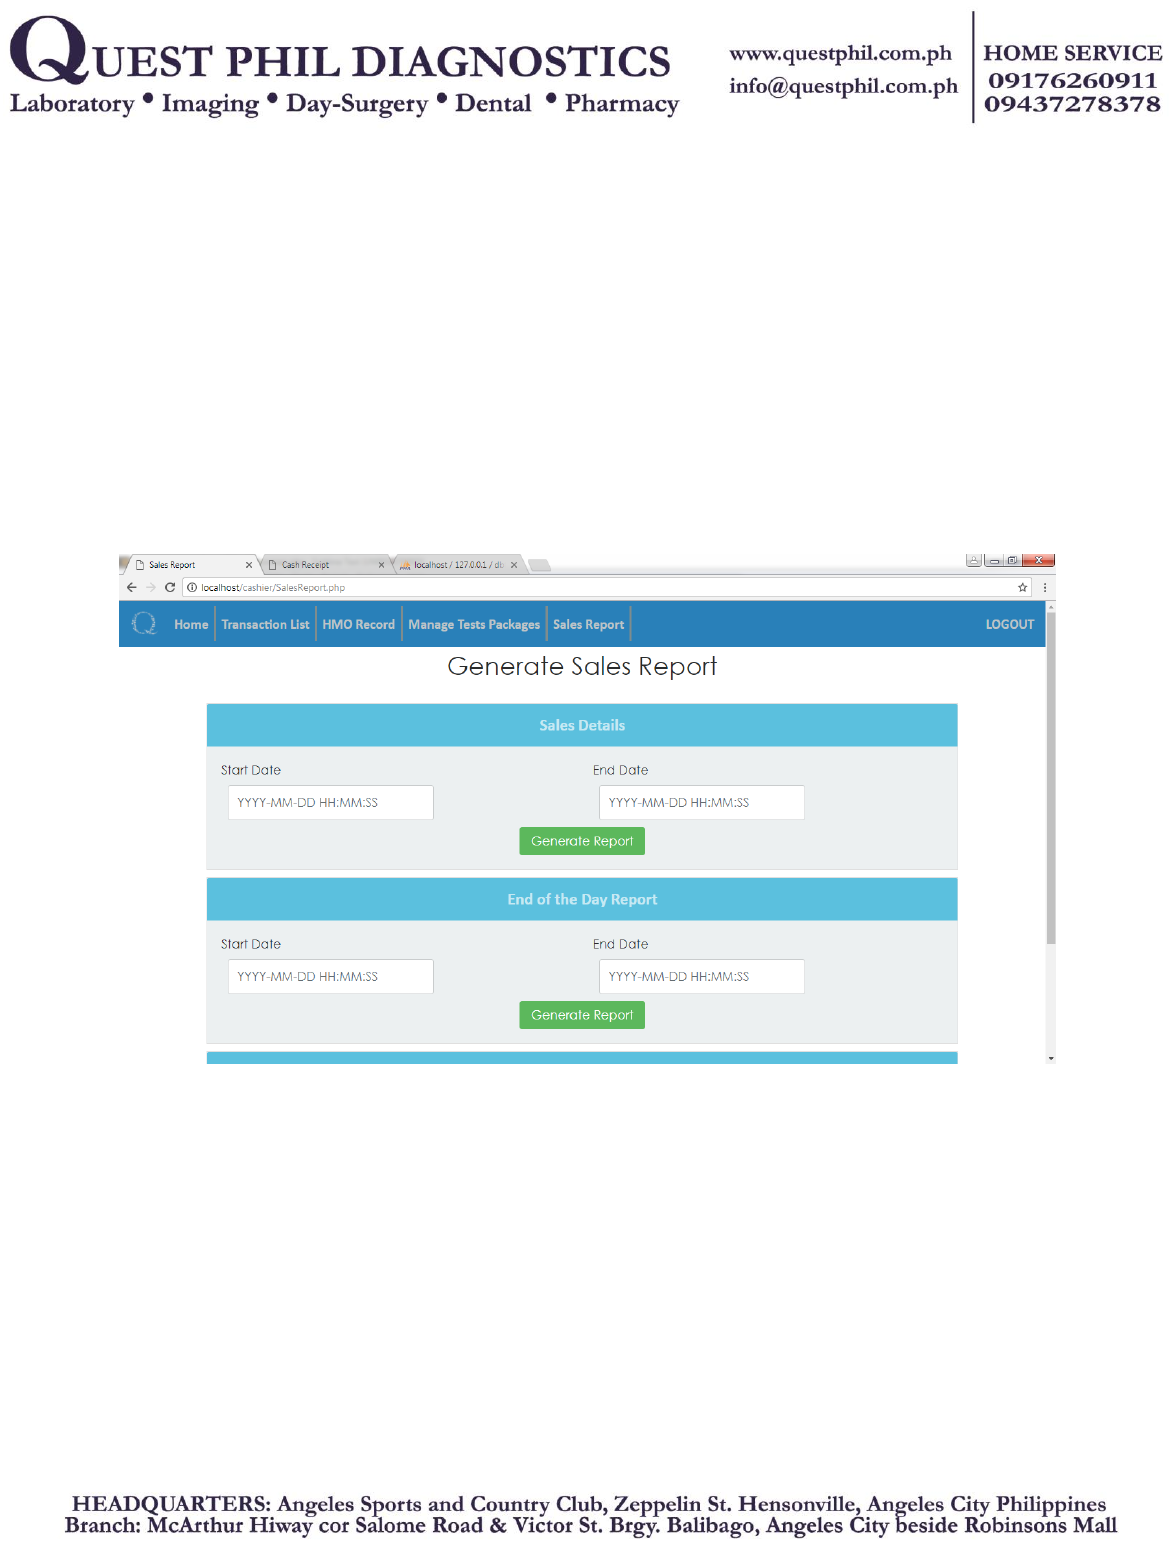
Figure 10: Generate Sales
This figure is where the cashier can generate and print sales in excel format or in printable
receipt format.
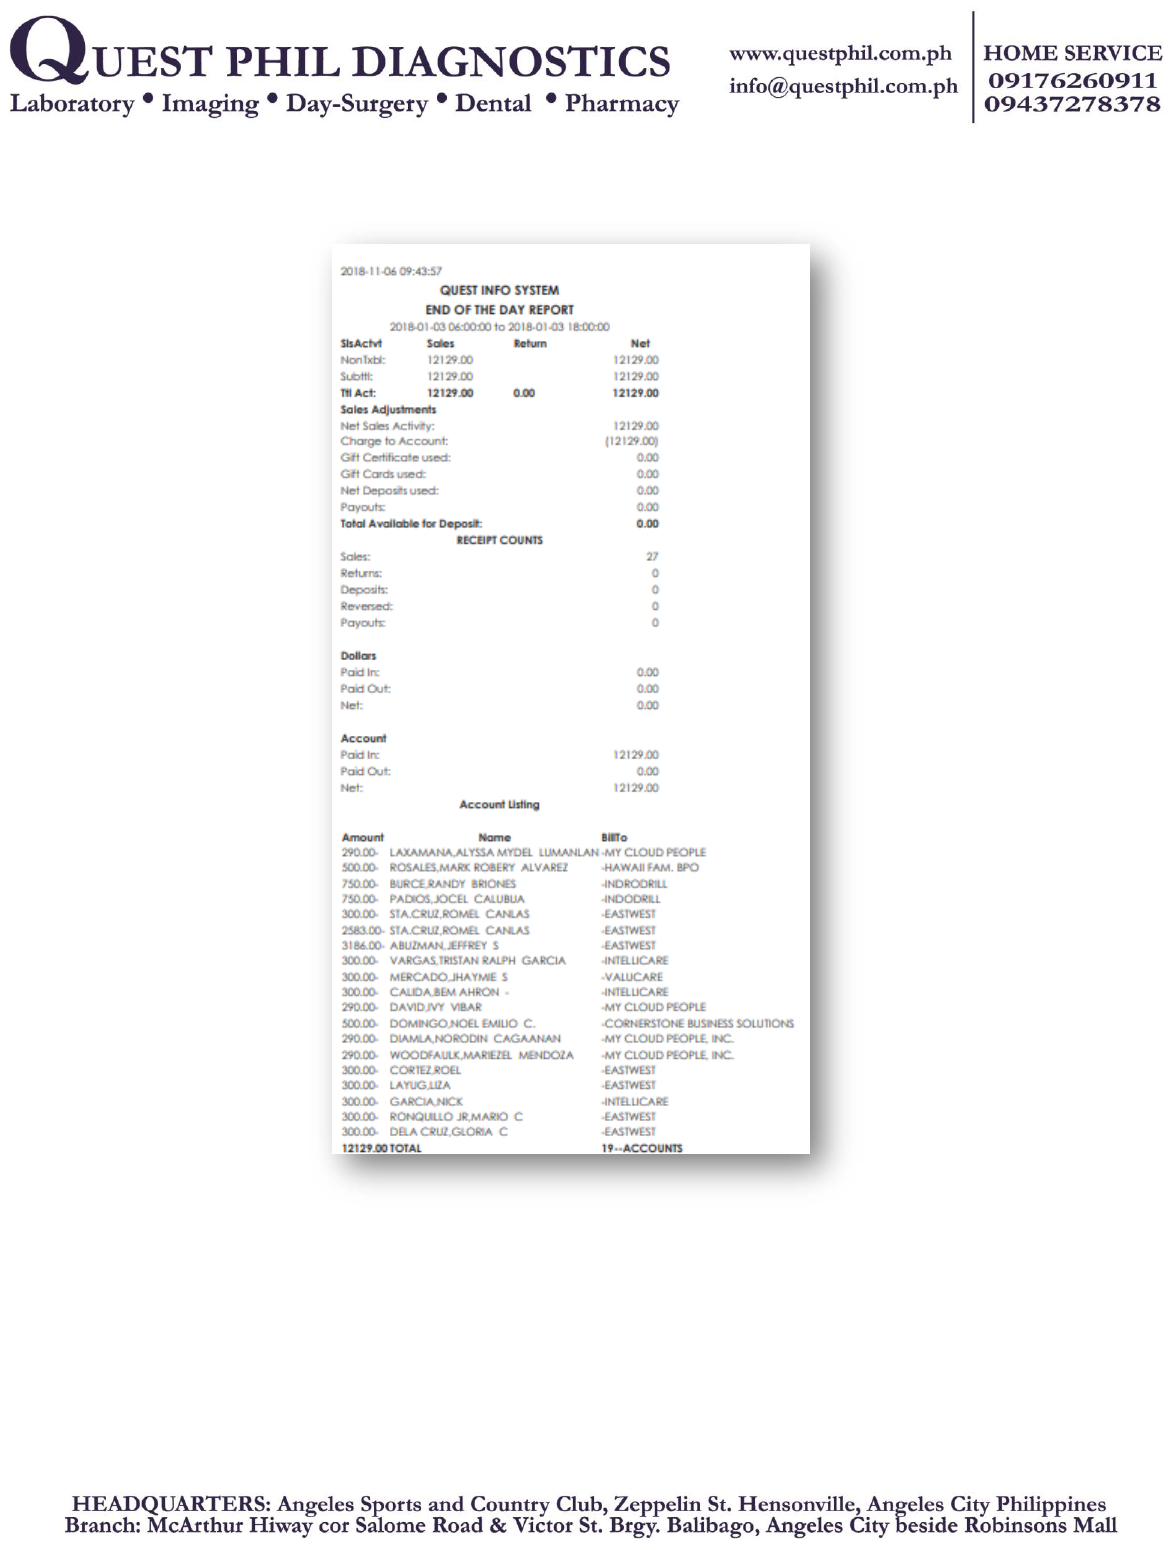
Figure 11: End of the day Report
Sample end of the day report. In this figure, you will see the total of all transaction of
specific day, it can print for backup purposes.
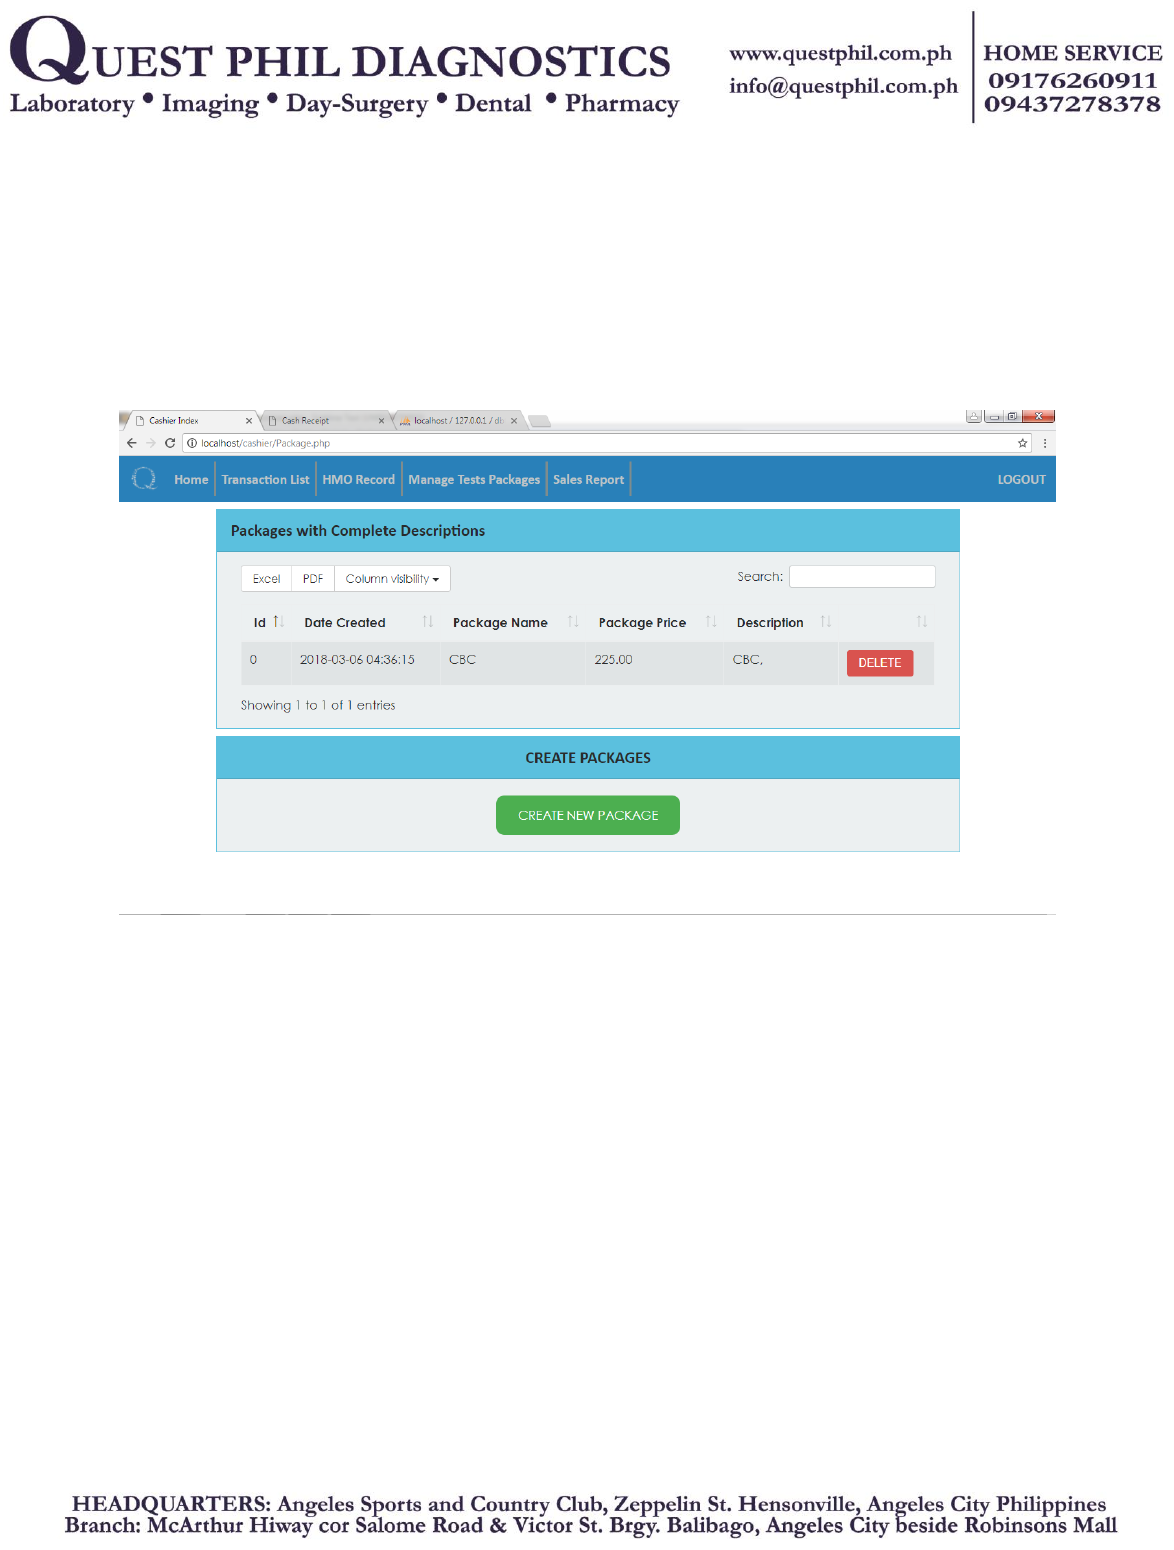
Figure 12: Package
This figure is where the cashier can create and delete package. The inside of every packages
has a set of tests of a patient, it depends on what company.
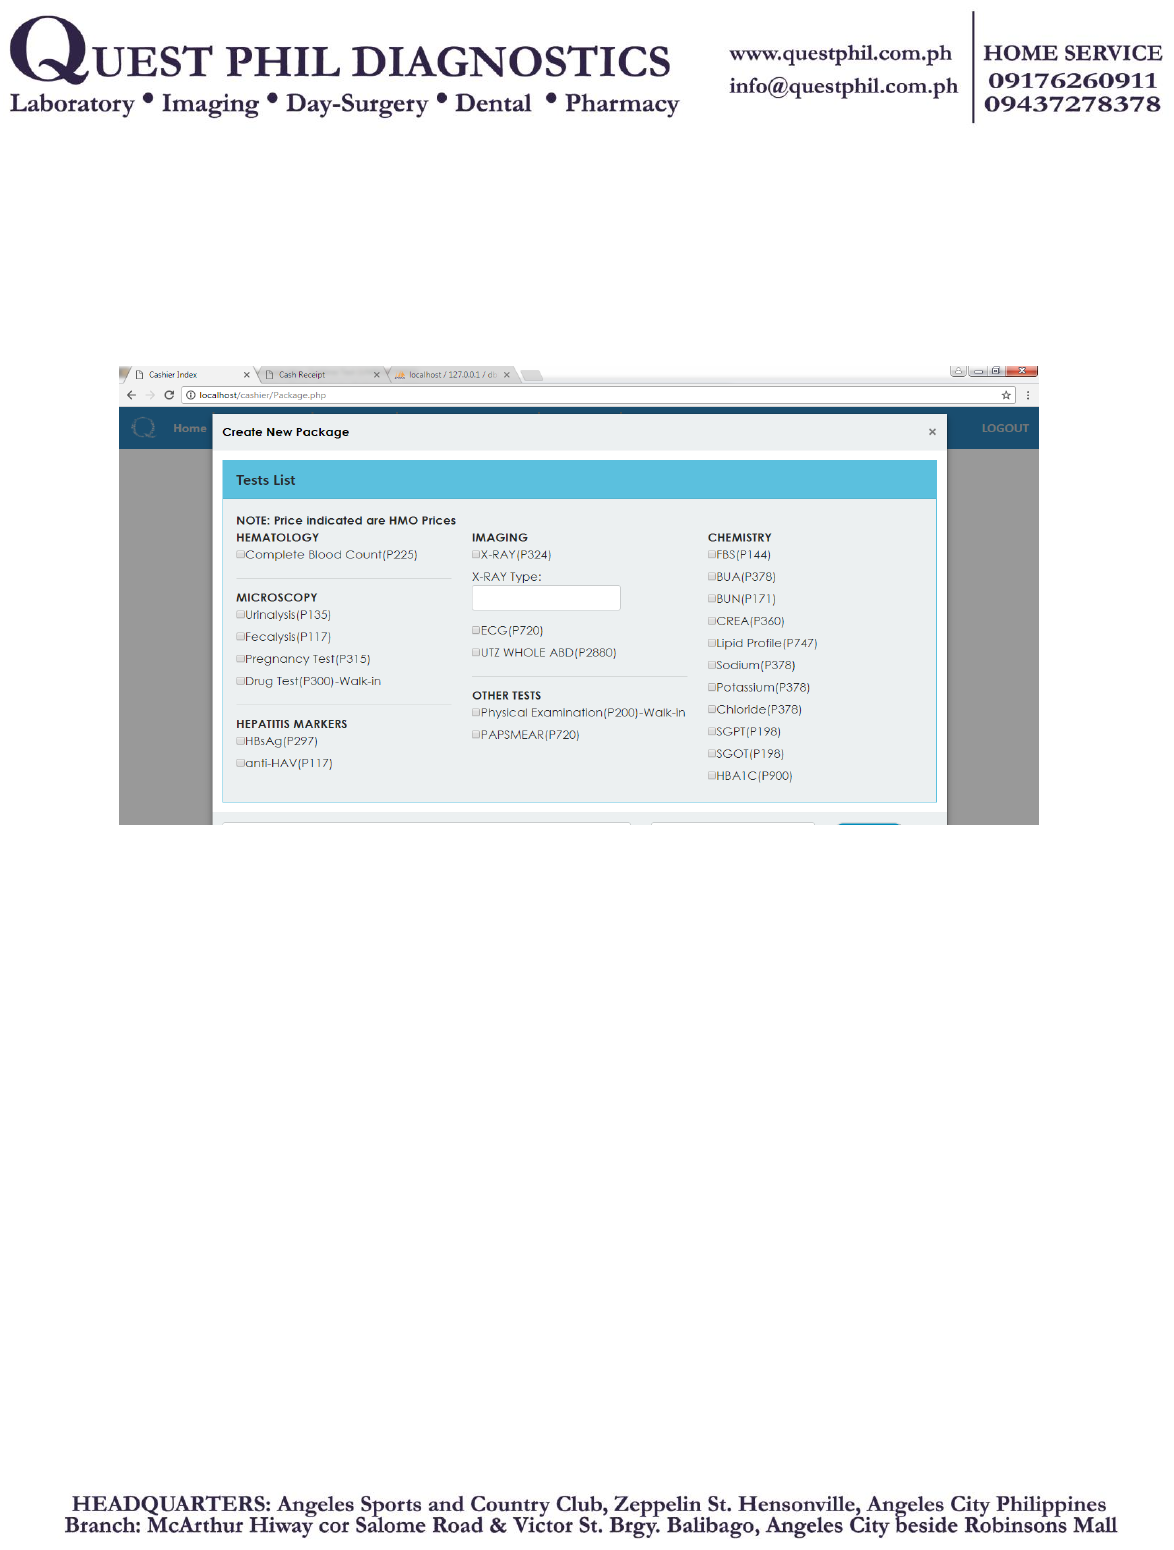
Figure 13: Add Package
This is where the cashier creates packages.
B. NURSE MODULE
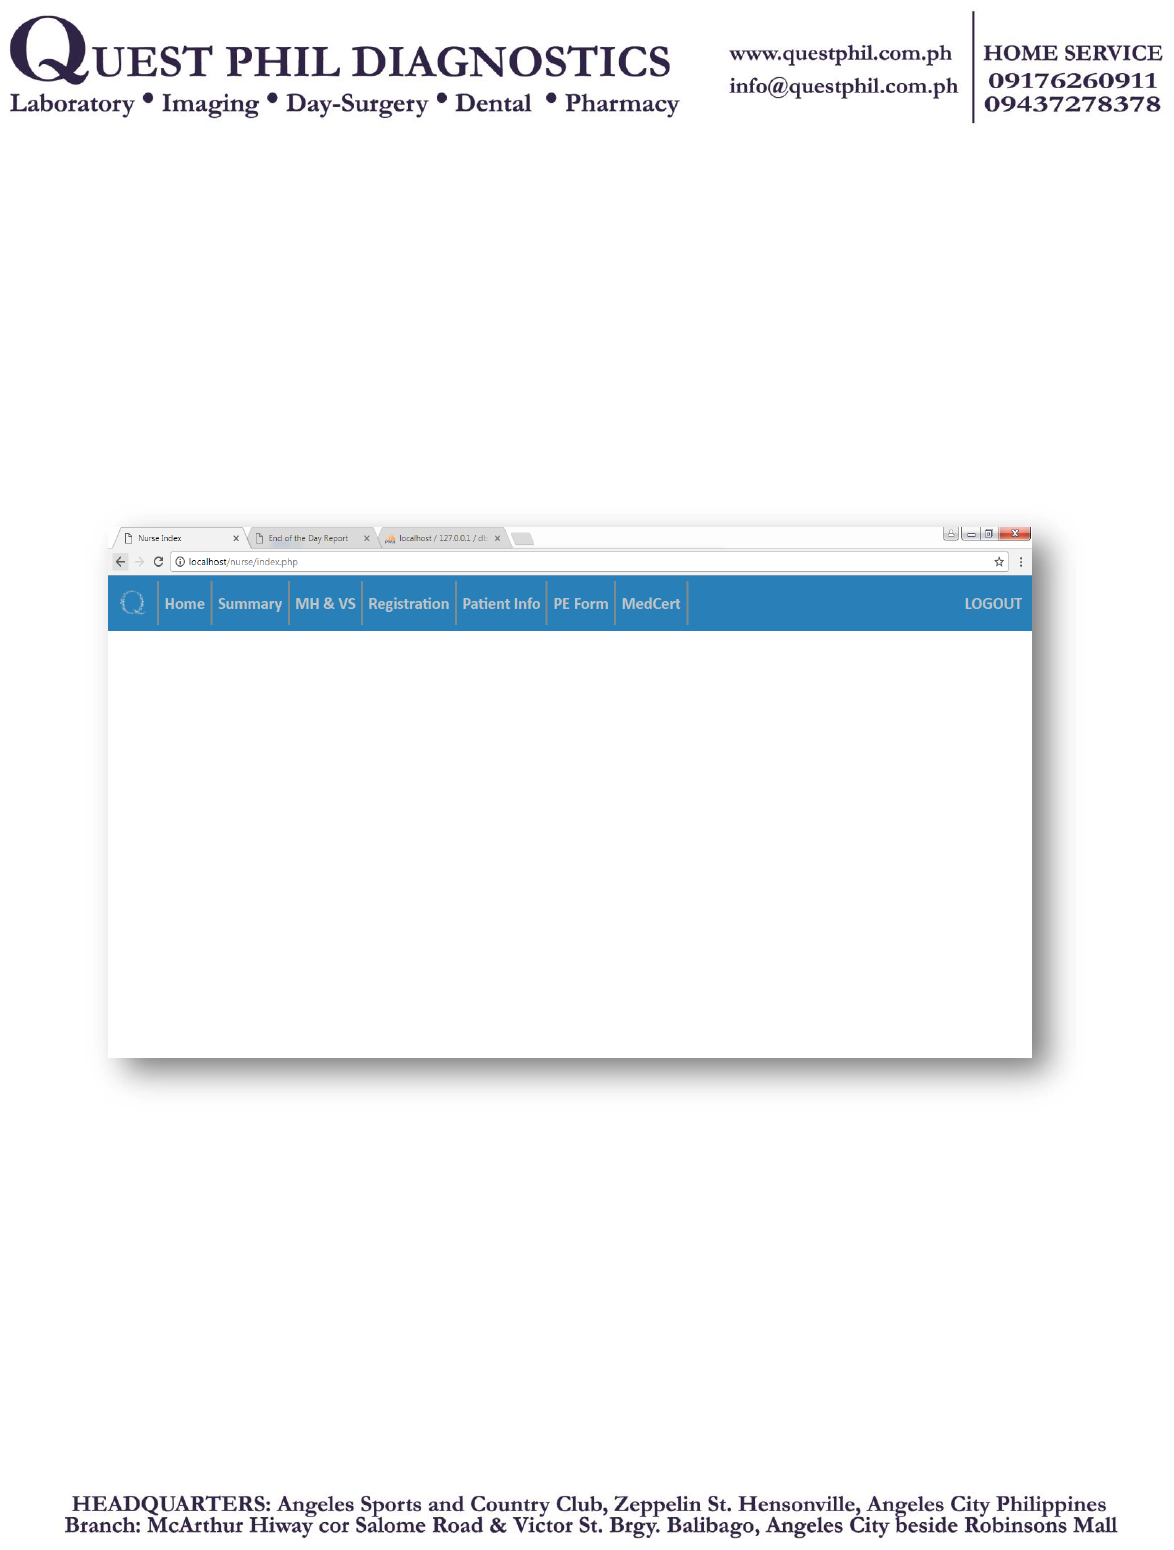
Figure 14: Home
Index of the nurse module.
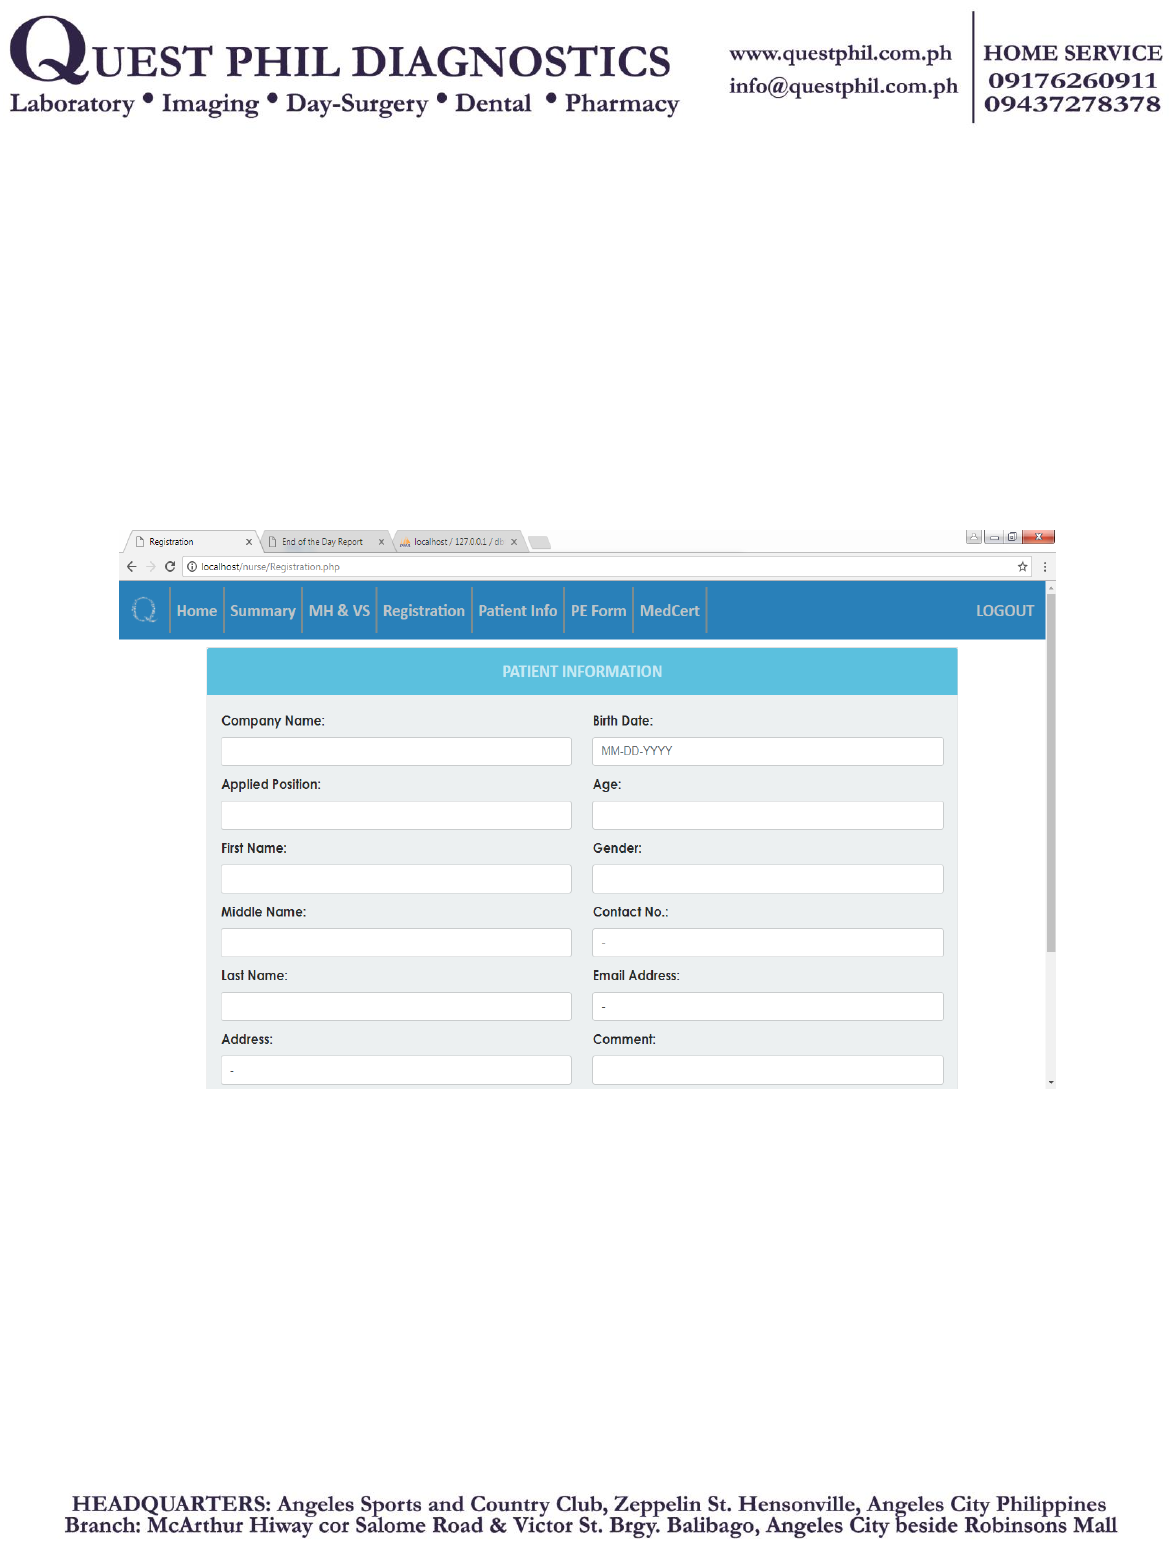
Figure 15: Register Patient
This figure is where the nurse can register a patient.
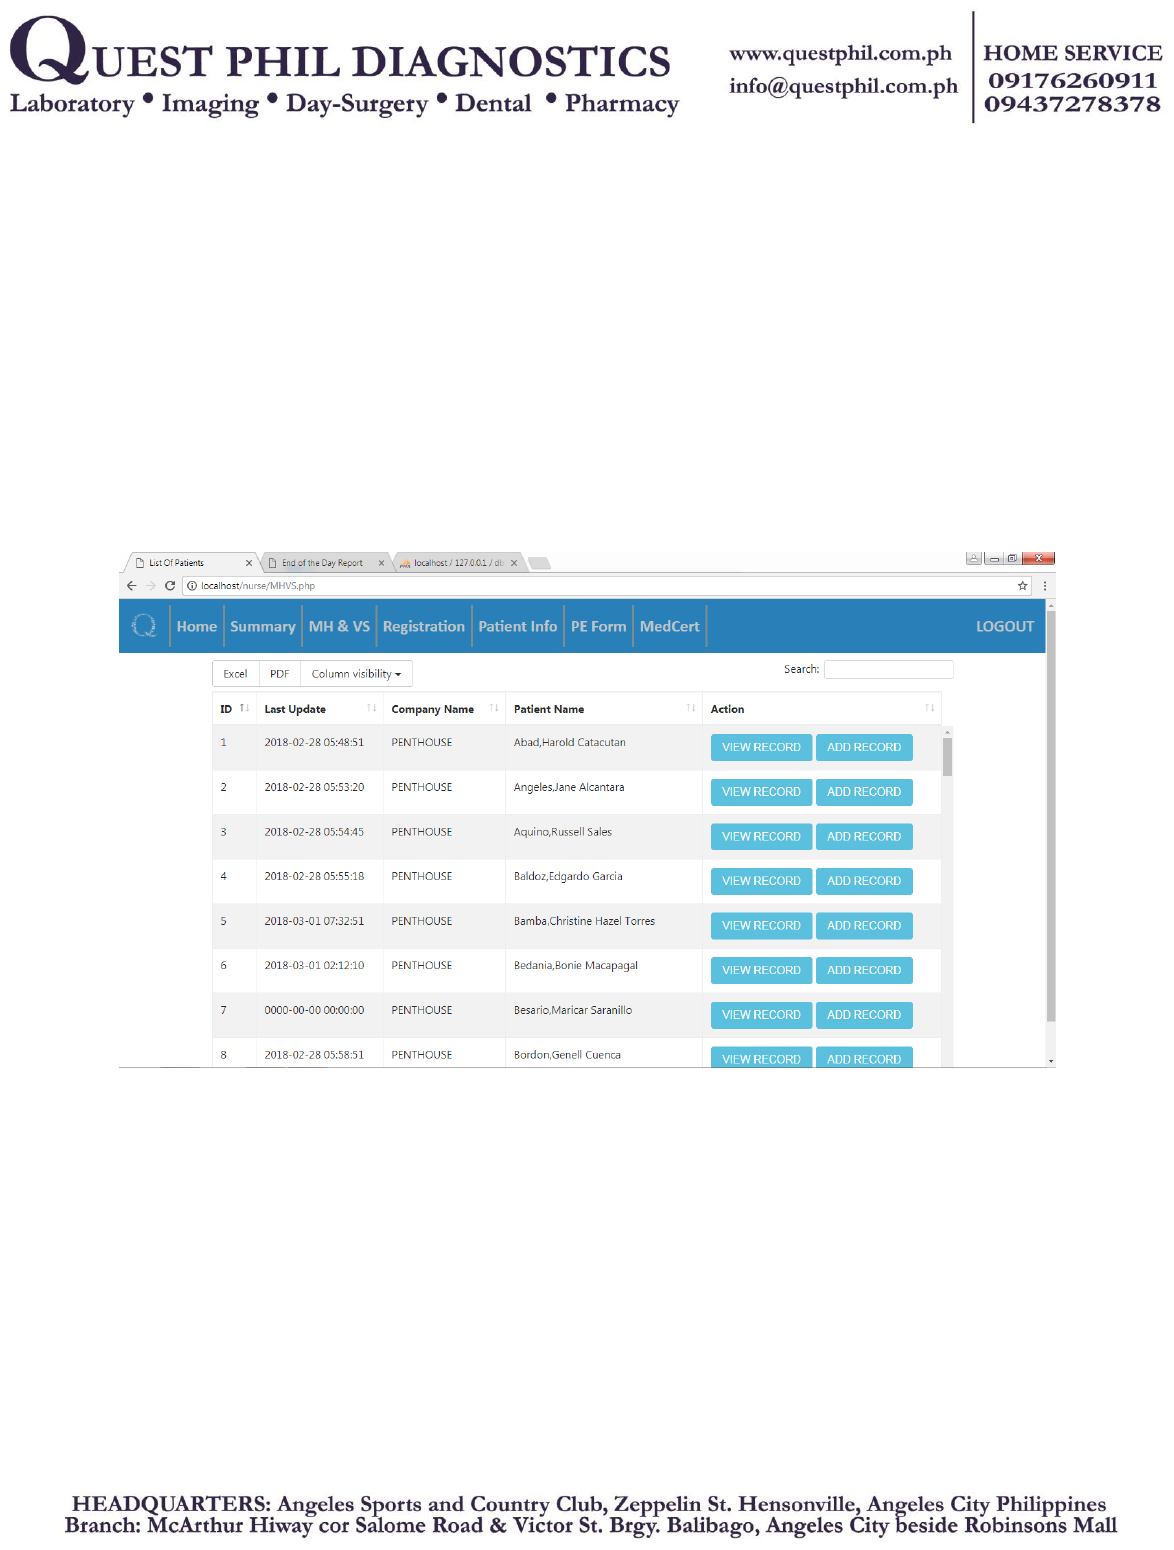
Figure 16: View/Add Record
The list of patients you want to view or add record.
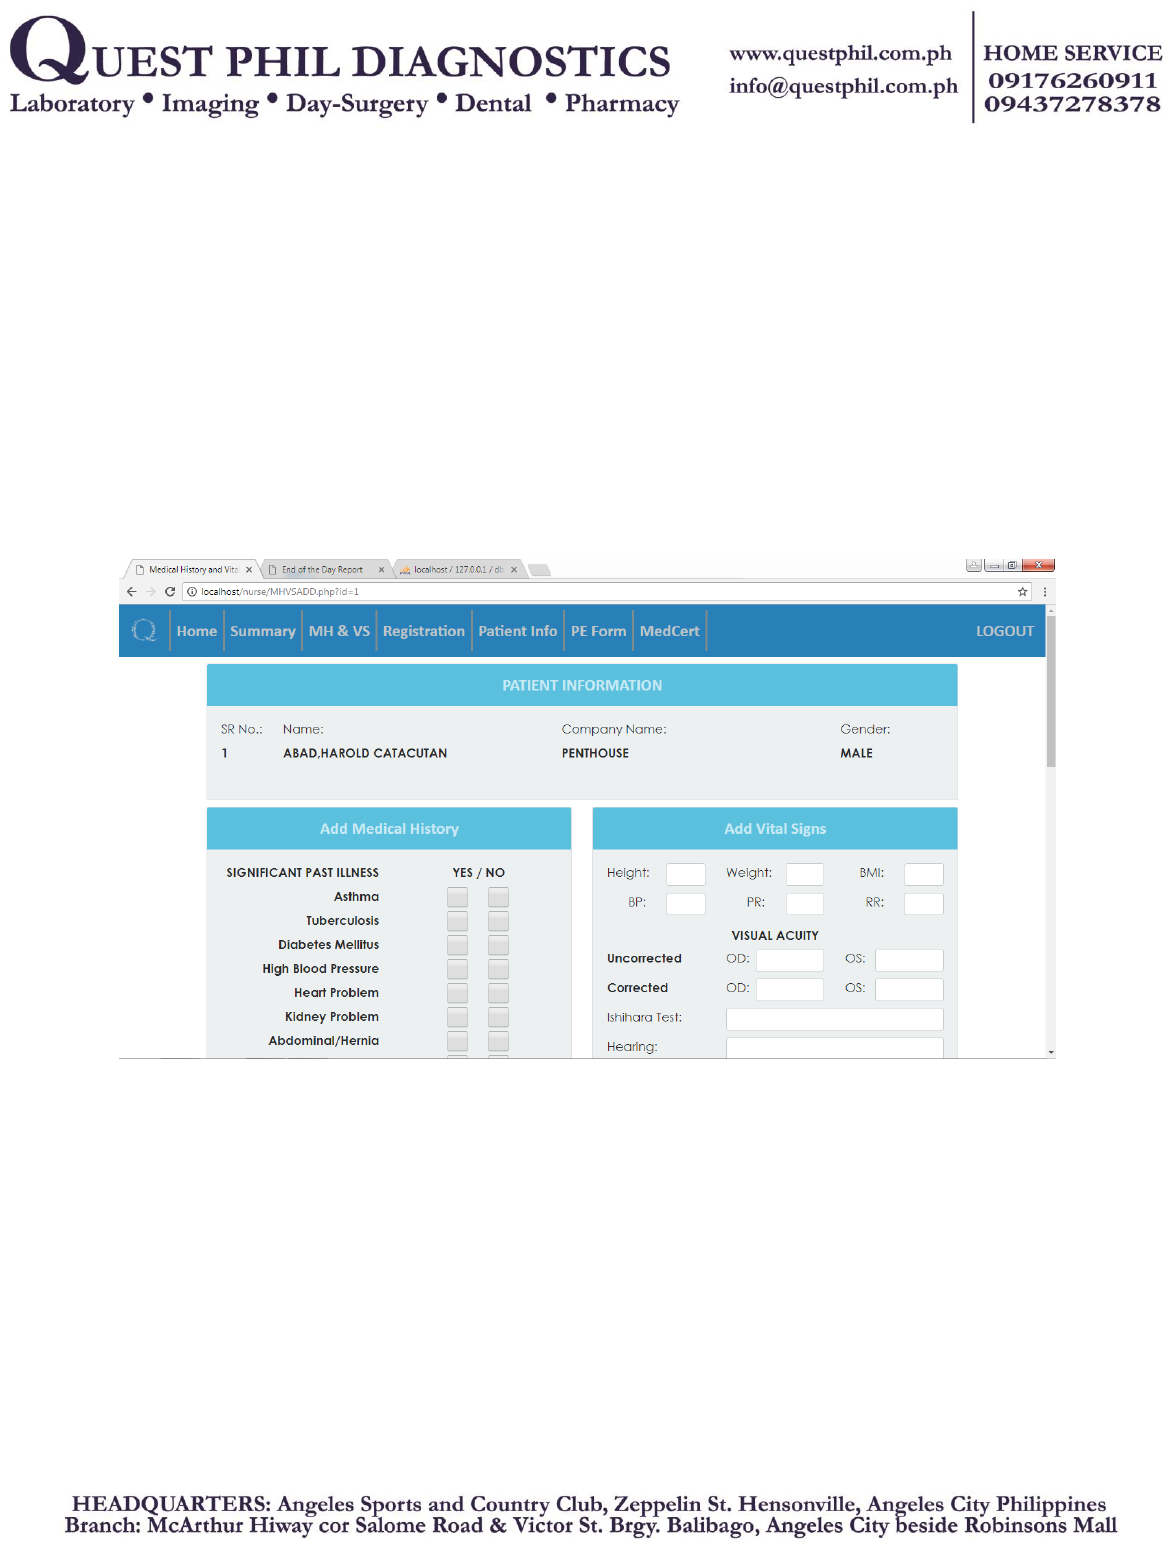
Figure 17:Add Record
This figure is where the nurse can insert Medical History, Vital Signs and PE results of a
patient.
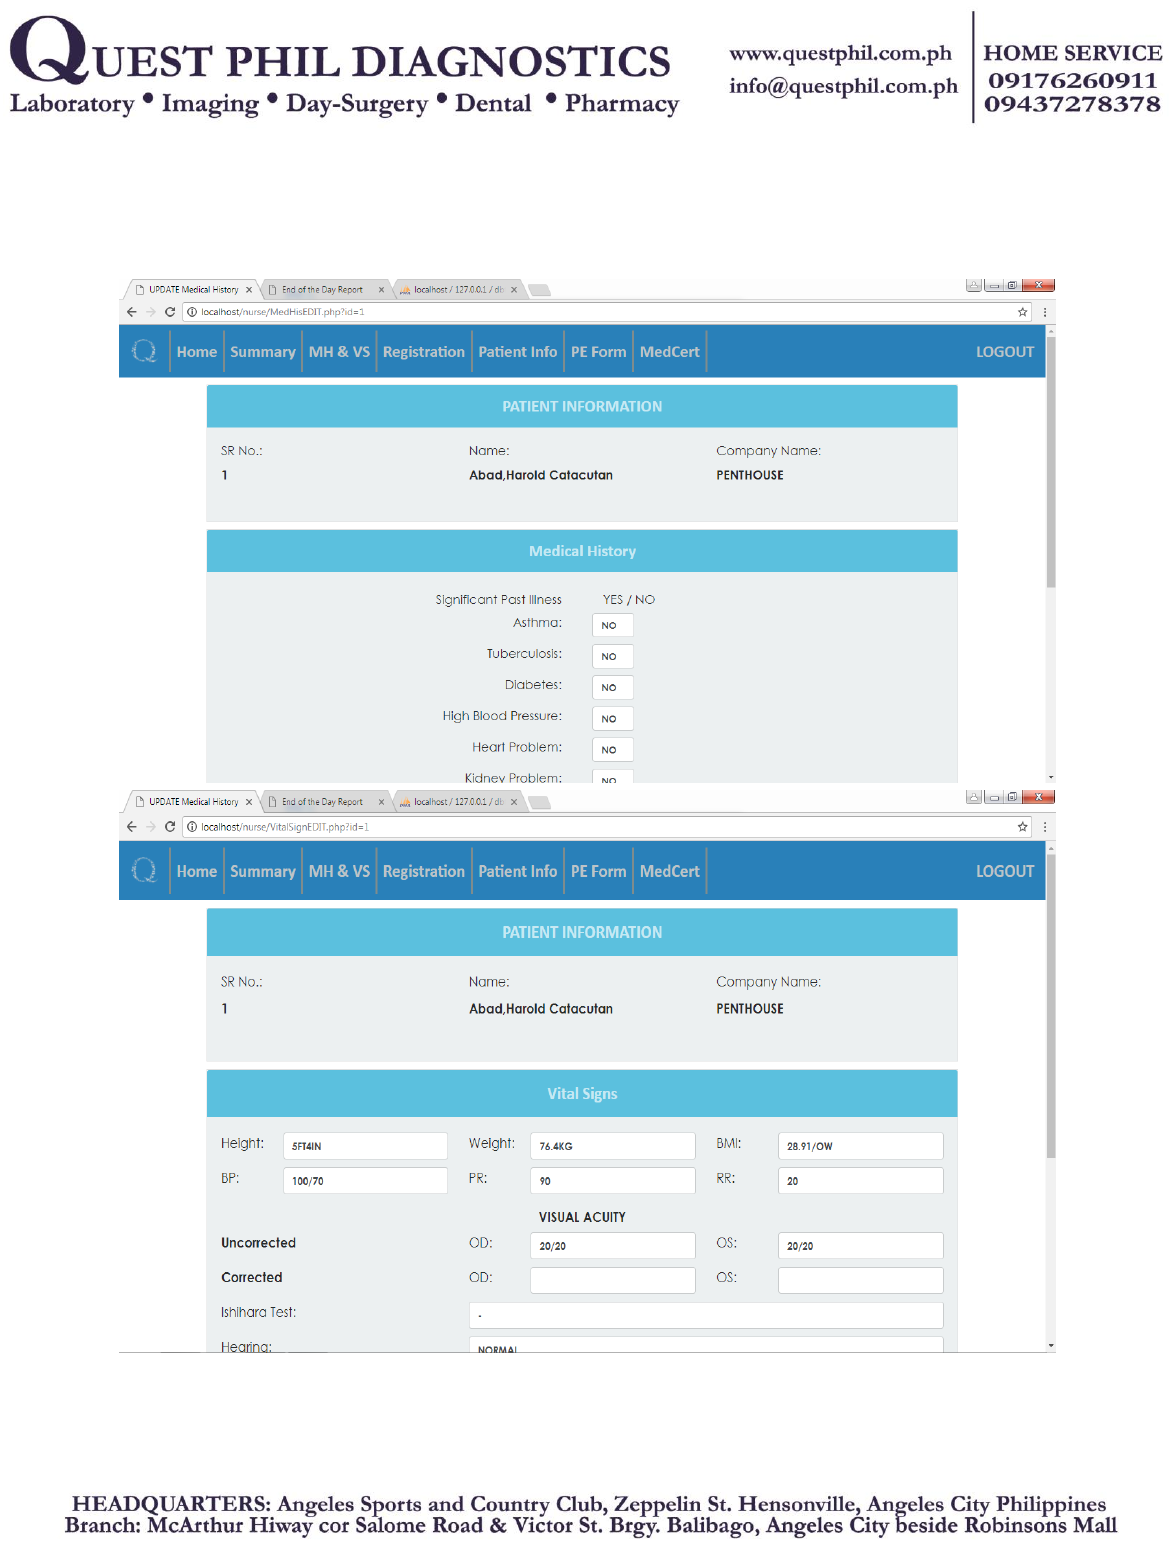
Figure 18:Update Medical History / Vital Signs / PE
These figures are where the nurse can update records.
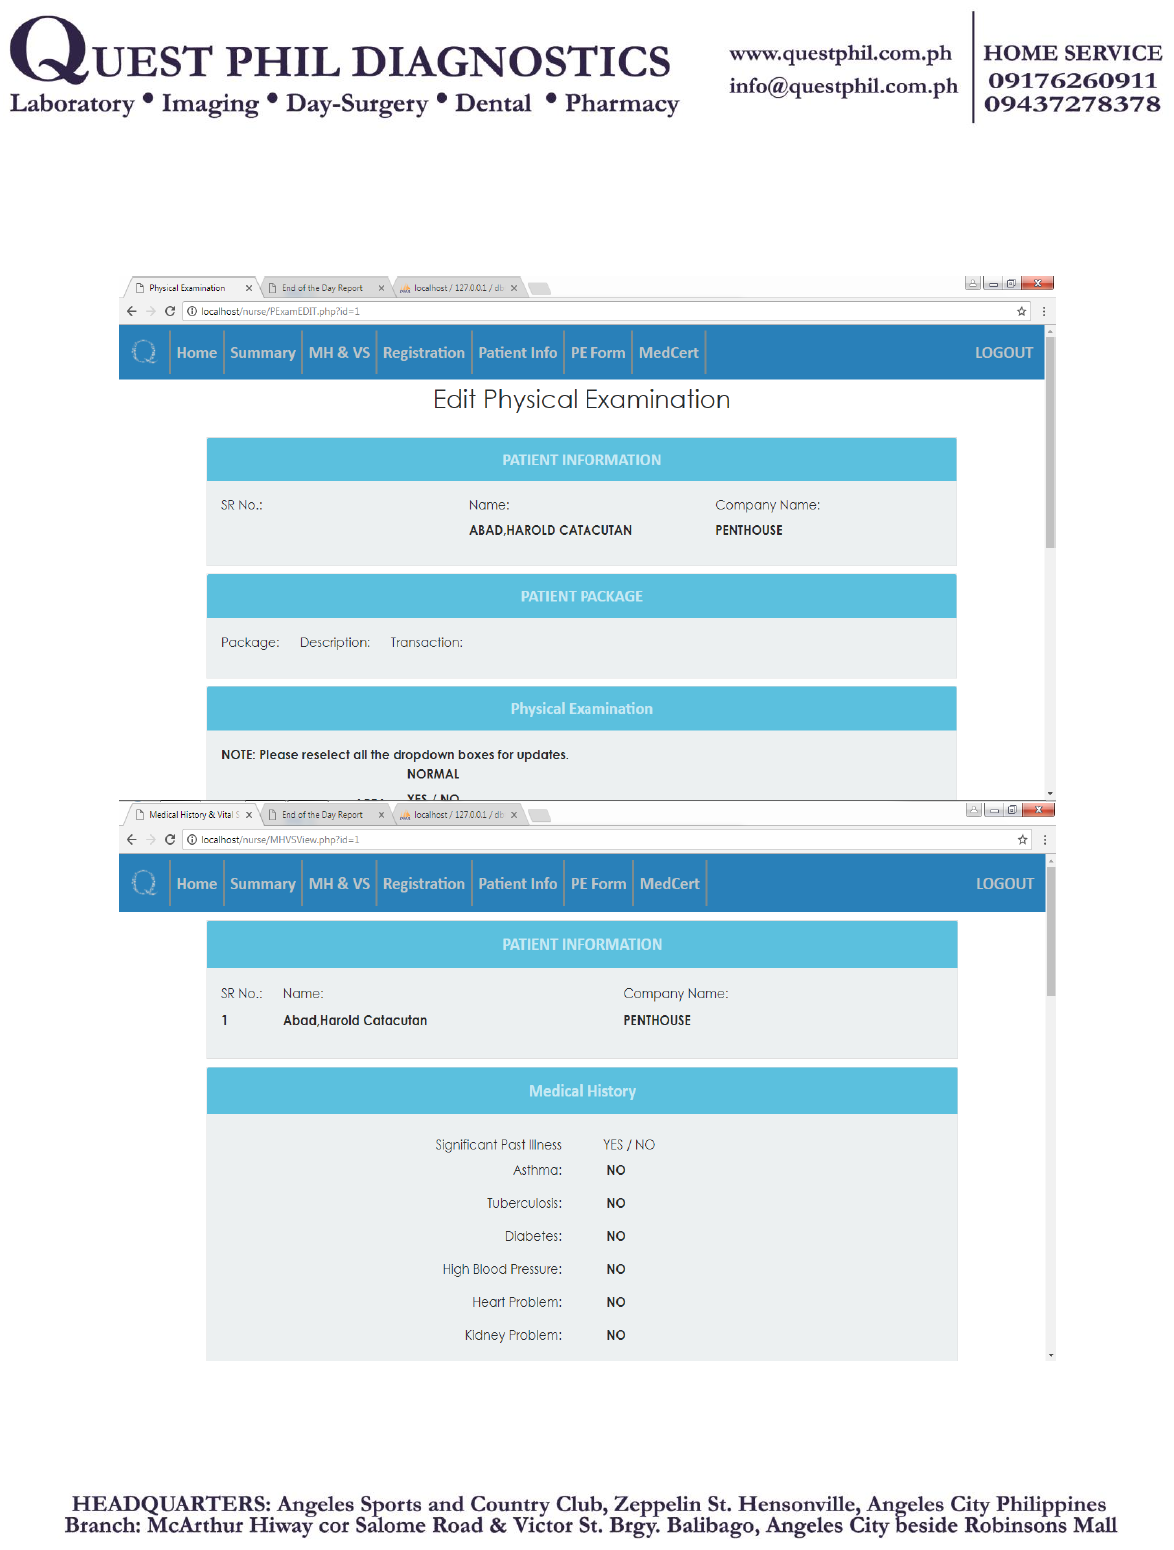
Figure 19: View Patient Record
To view patient’s record
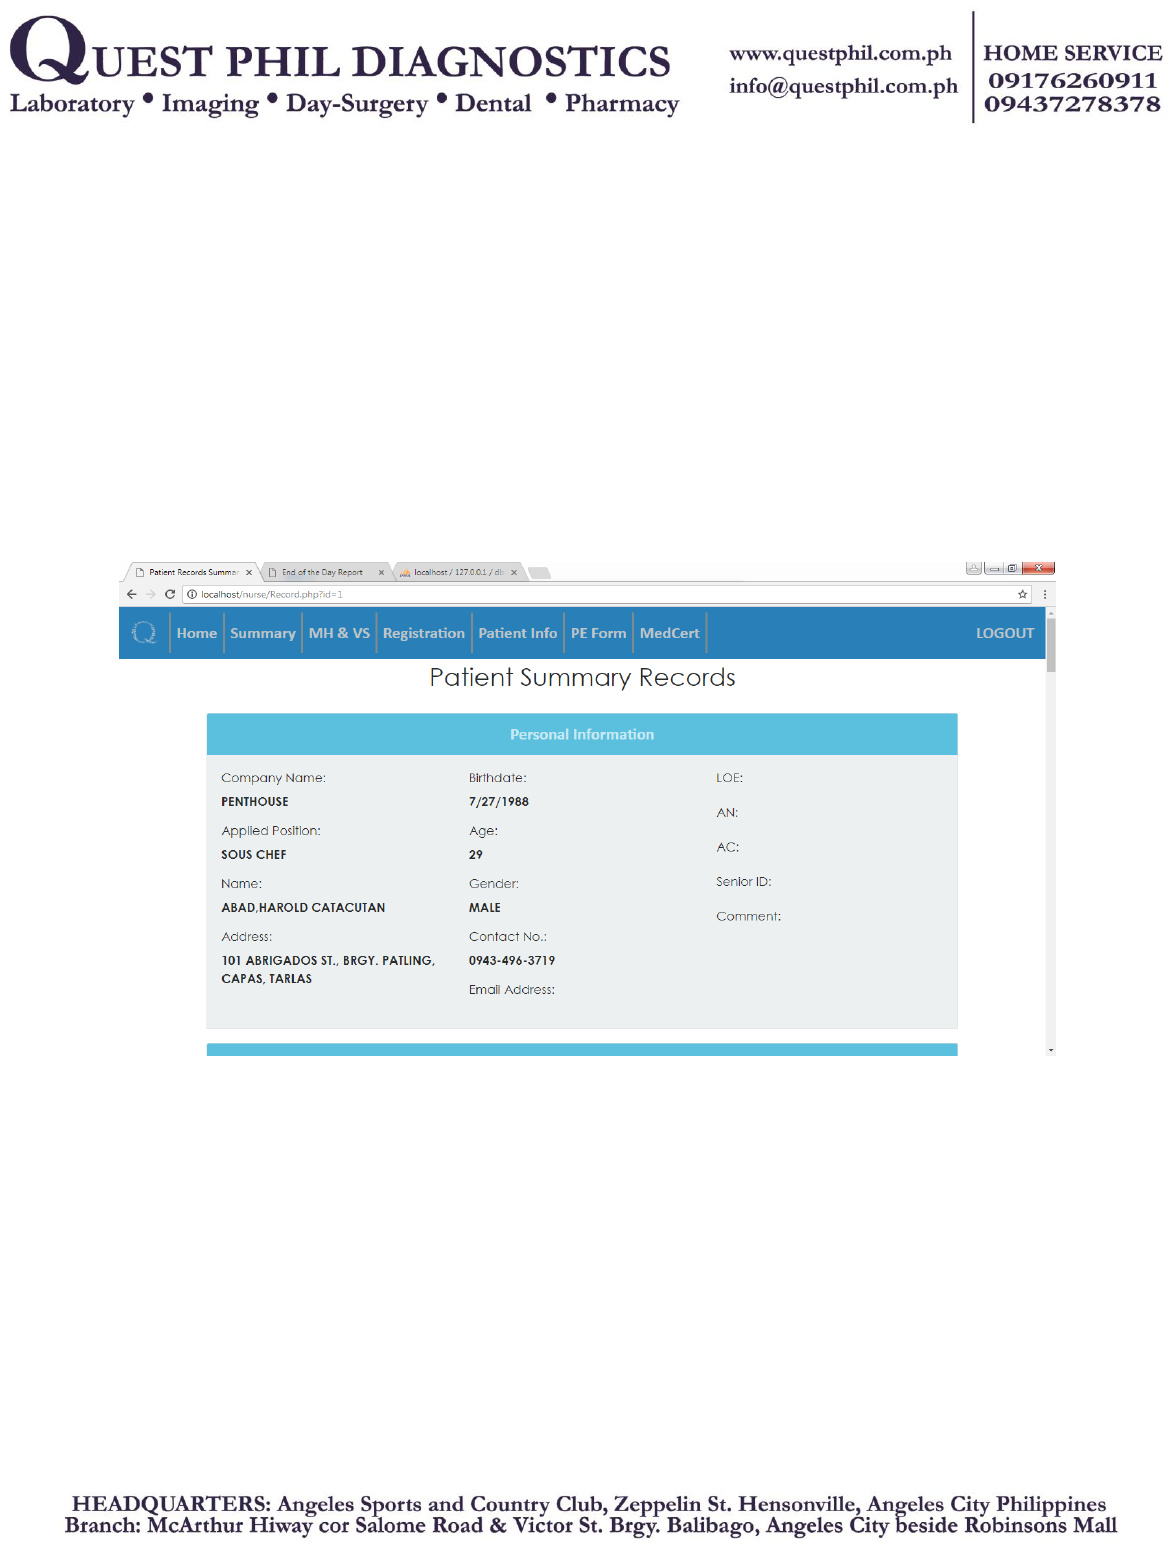
Figure 20: Patient Summary
To view patient summary records.
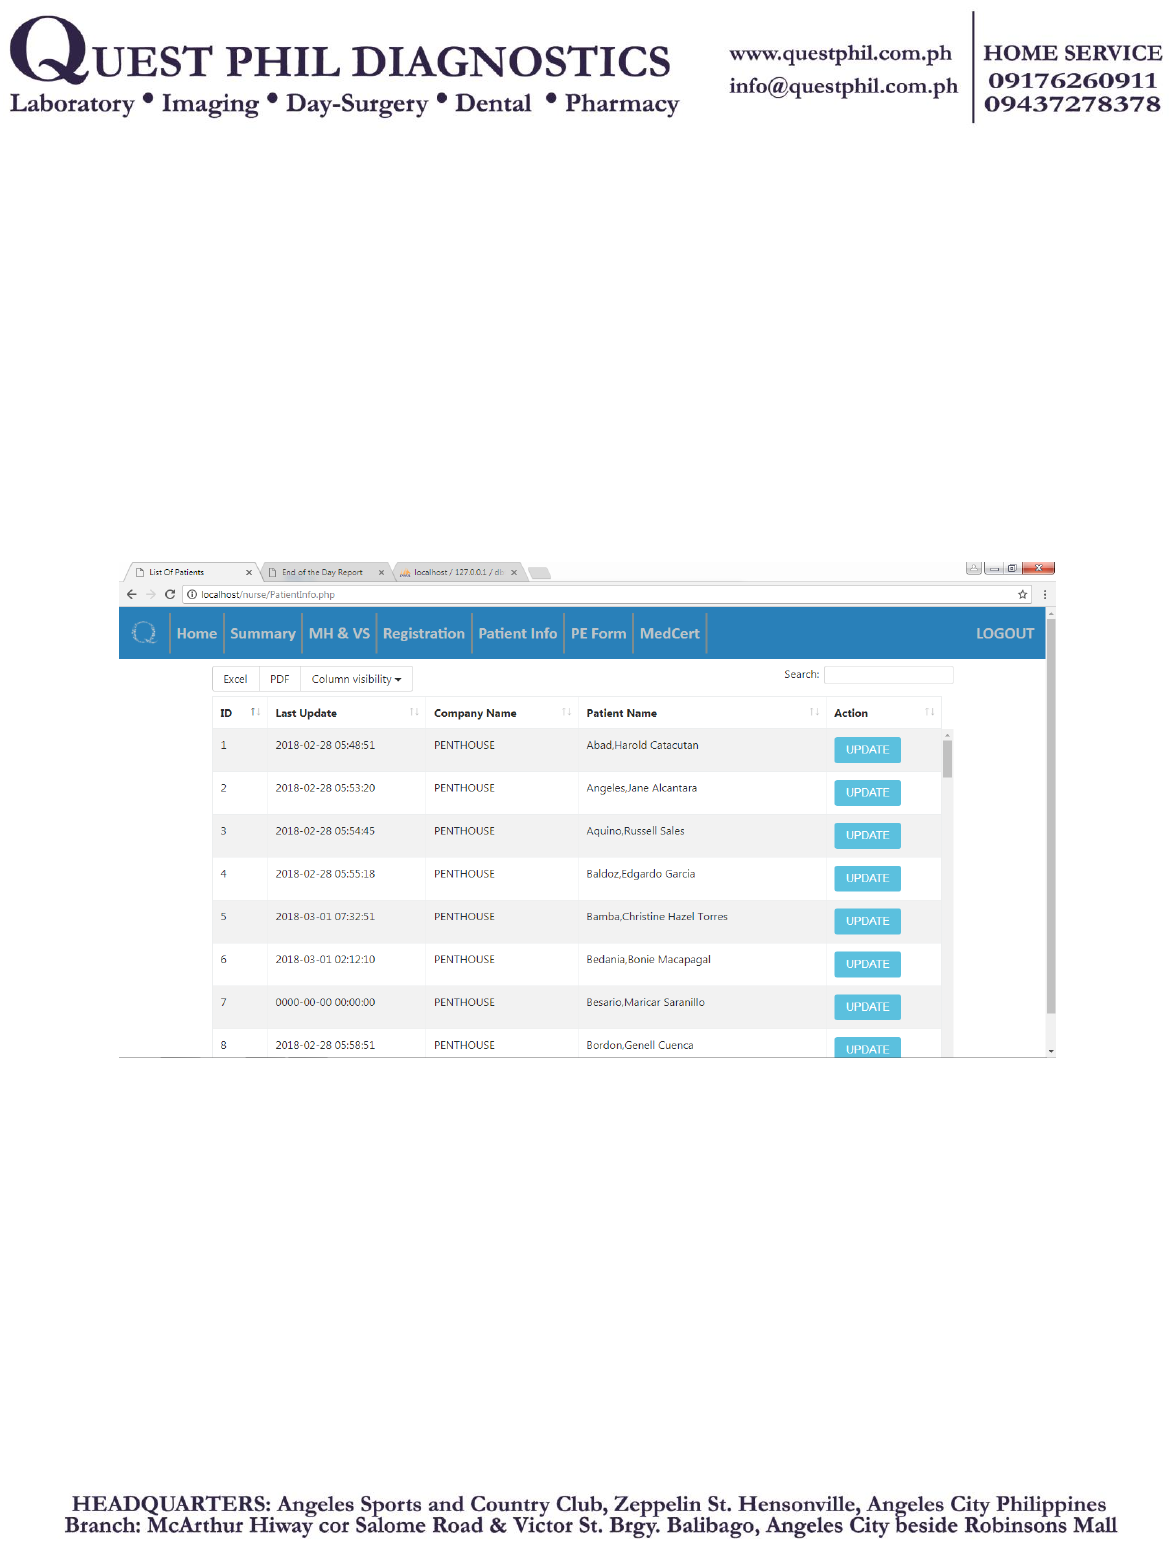
Figure 21: Patient Info List
The list of patients you want to update record.
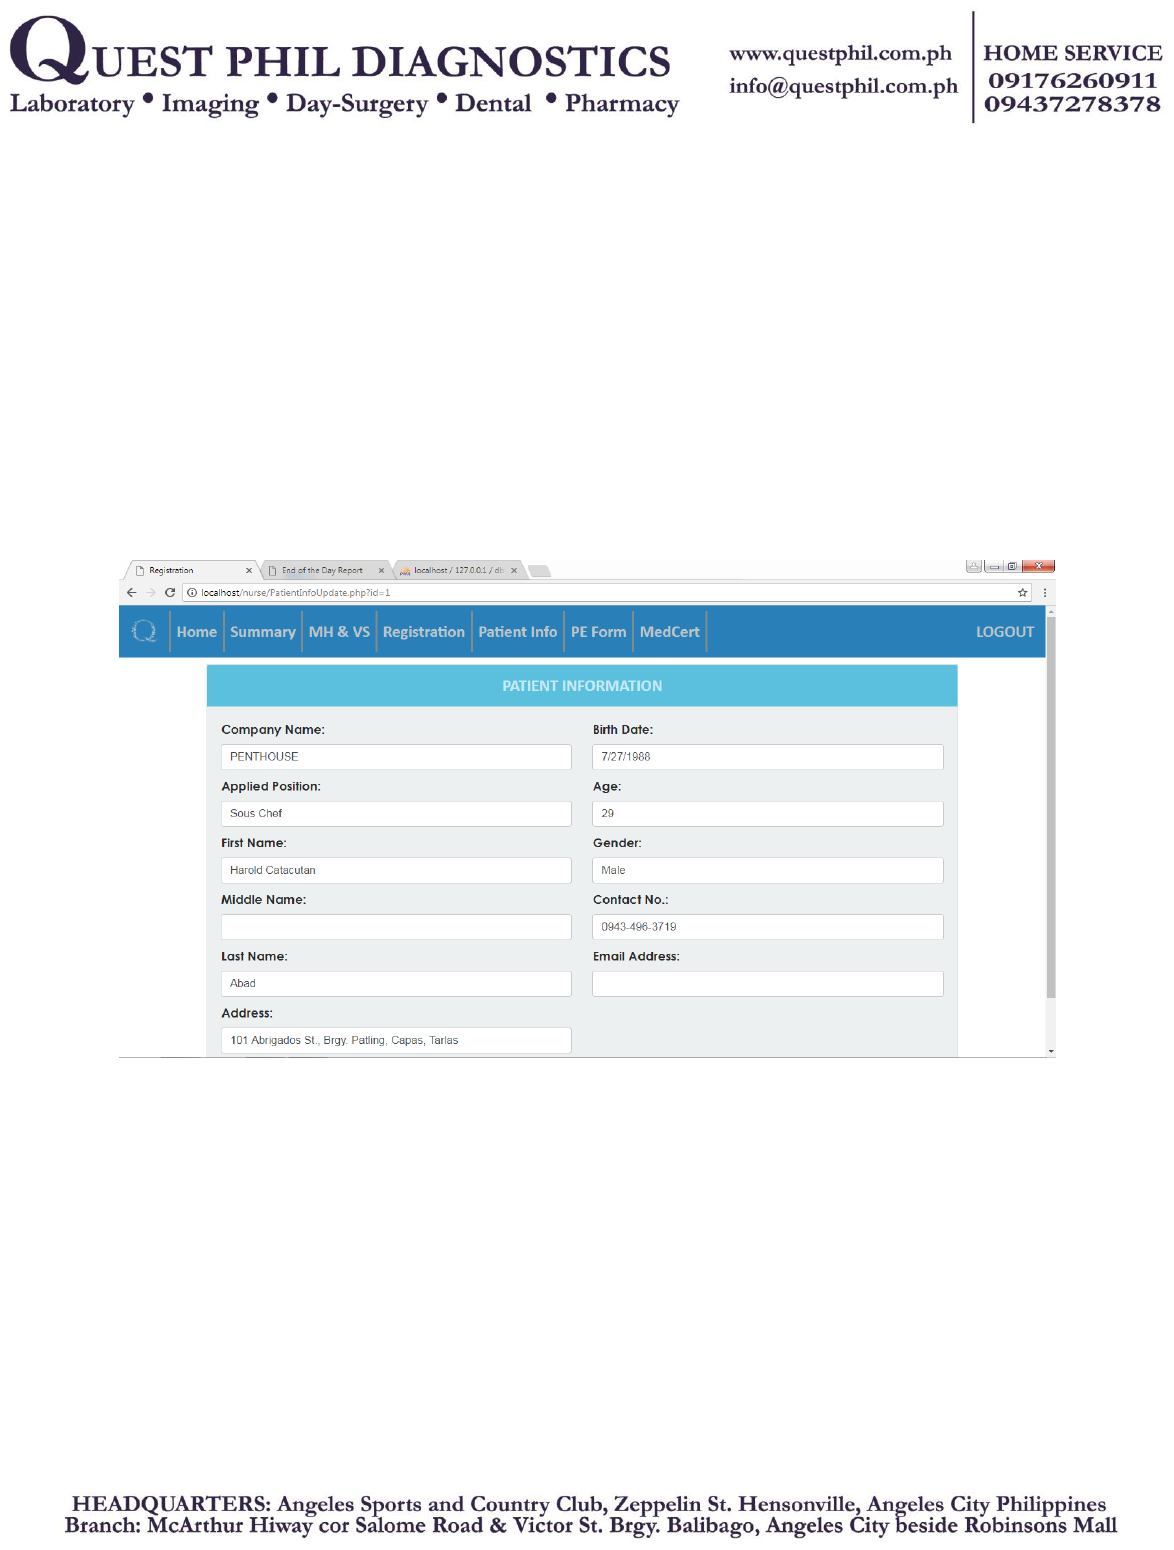
Figure 22: Update Patient Info
This is where the nurse can update the patient’s record.

C. IMAGING MODULE
Figure 23: Home
Index of imaging module.
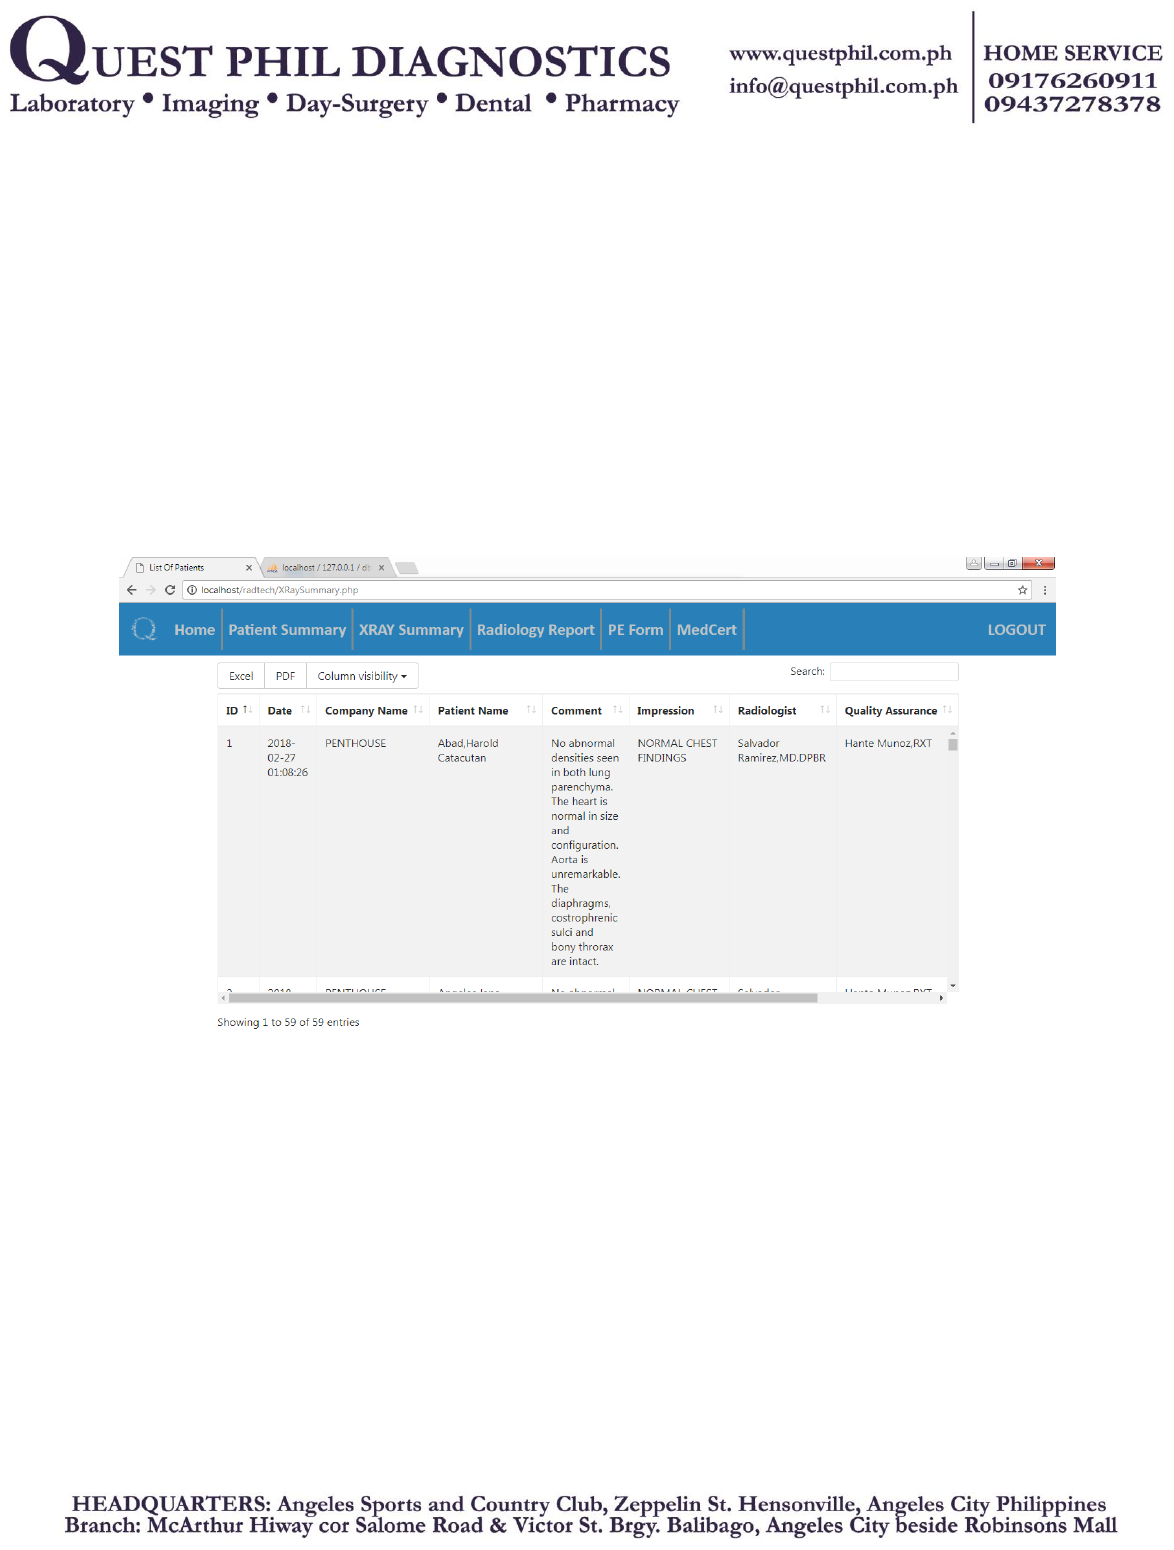
Figure 24: X-ray Summary
To view patient x-ray summary record.
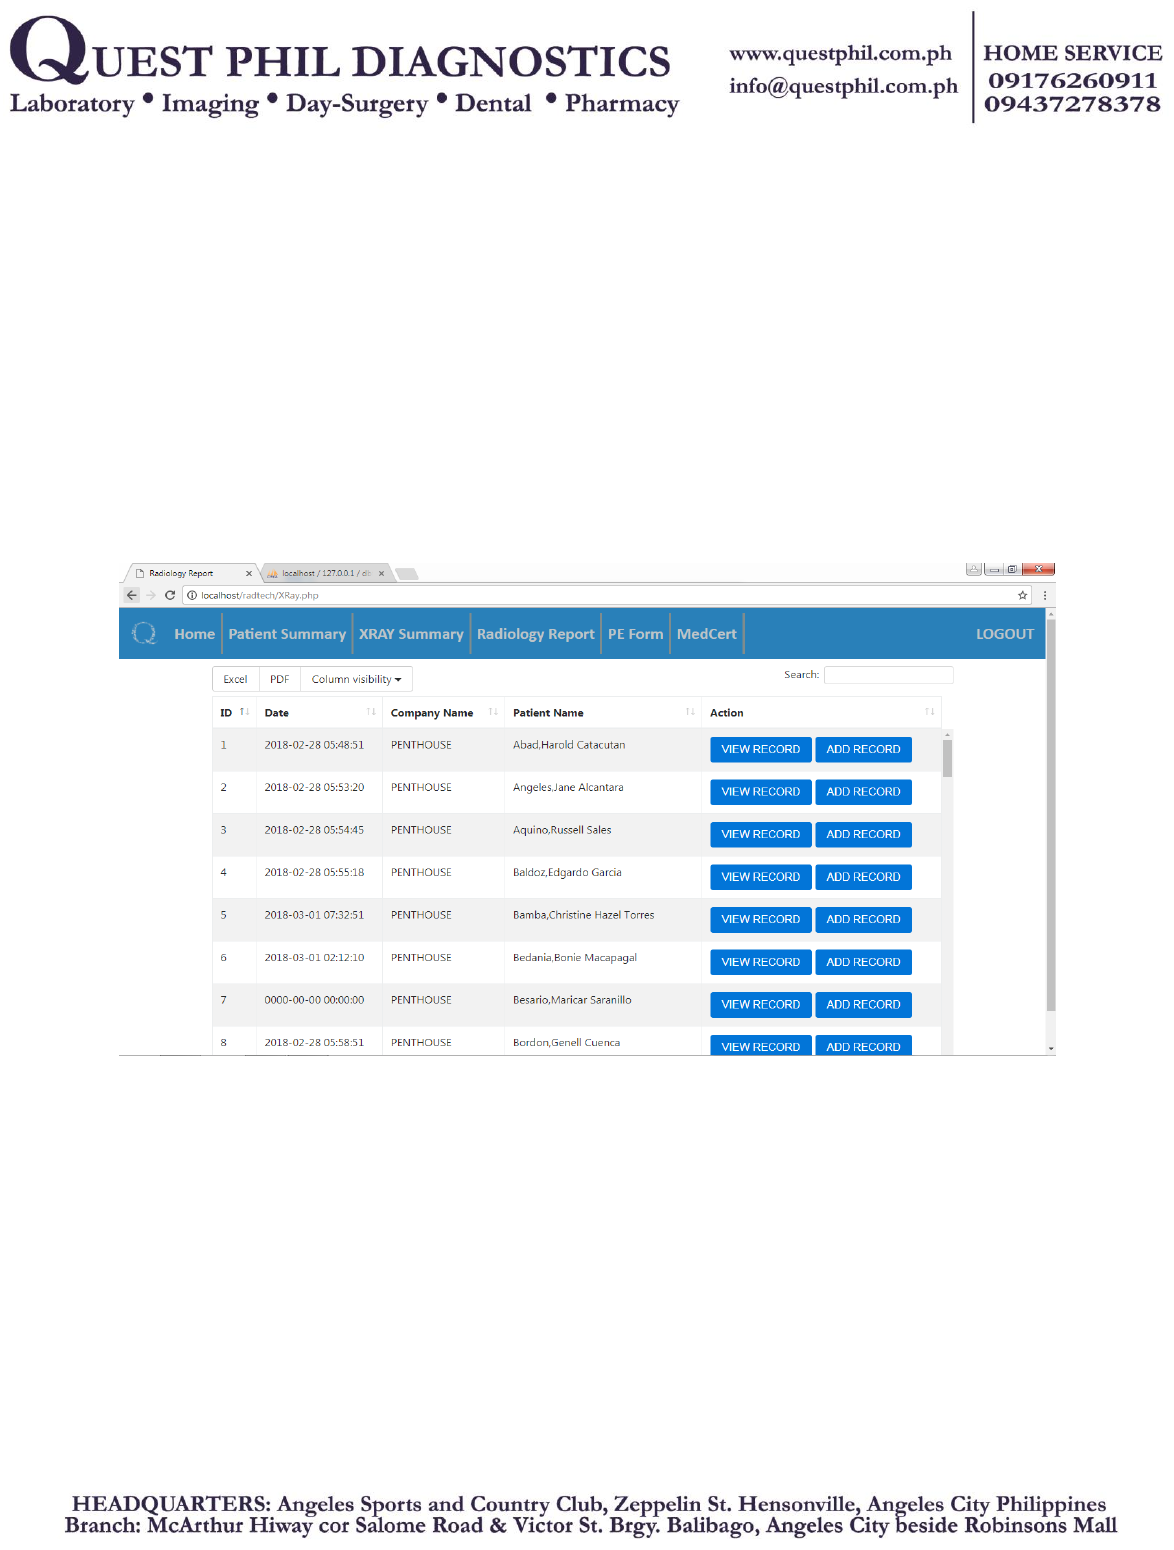
Figure 25: View/Add Radiology Record List
The list of patients you want to view or add radiology result.

Figure 26: View Radiology Report
To view patient radiology report.
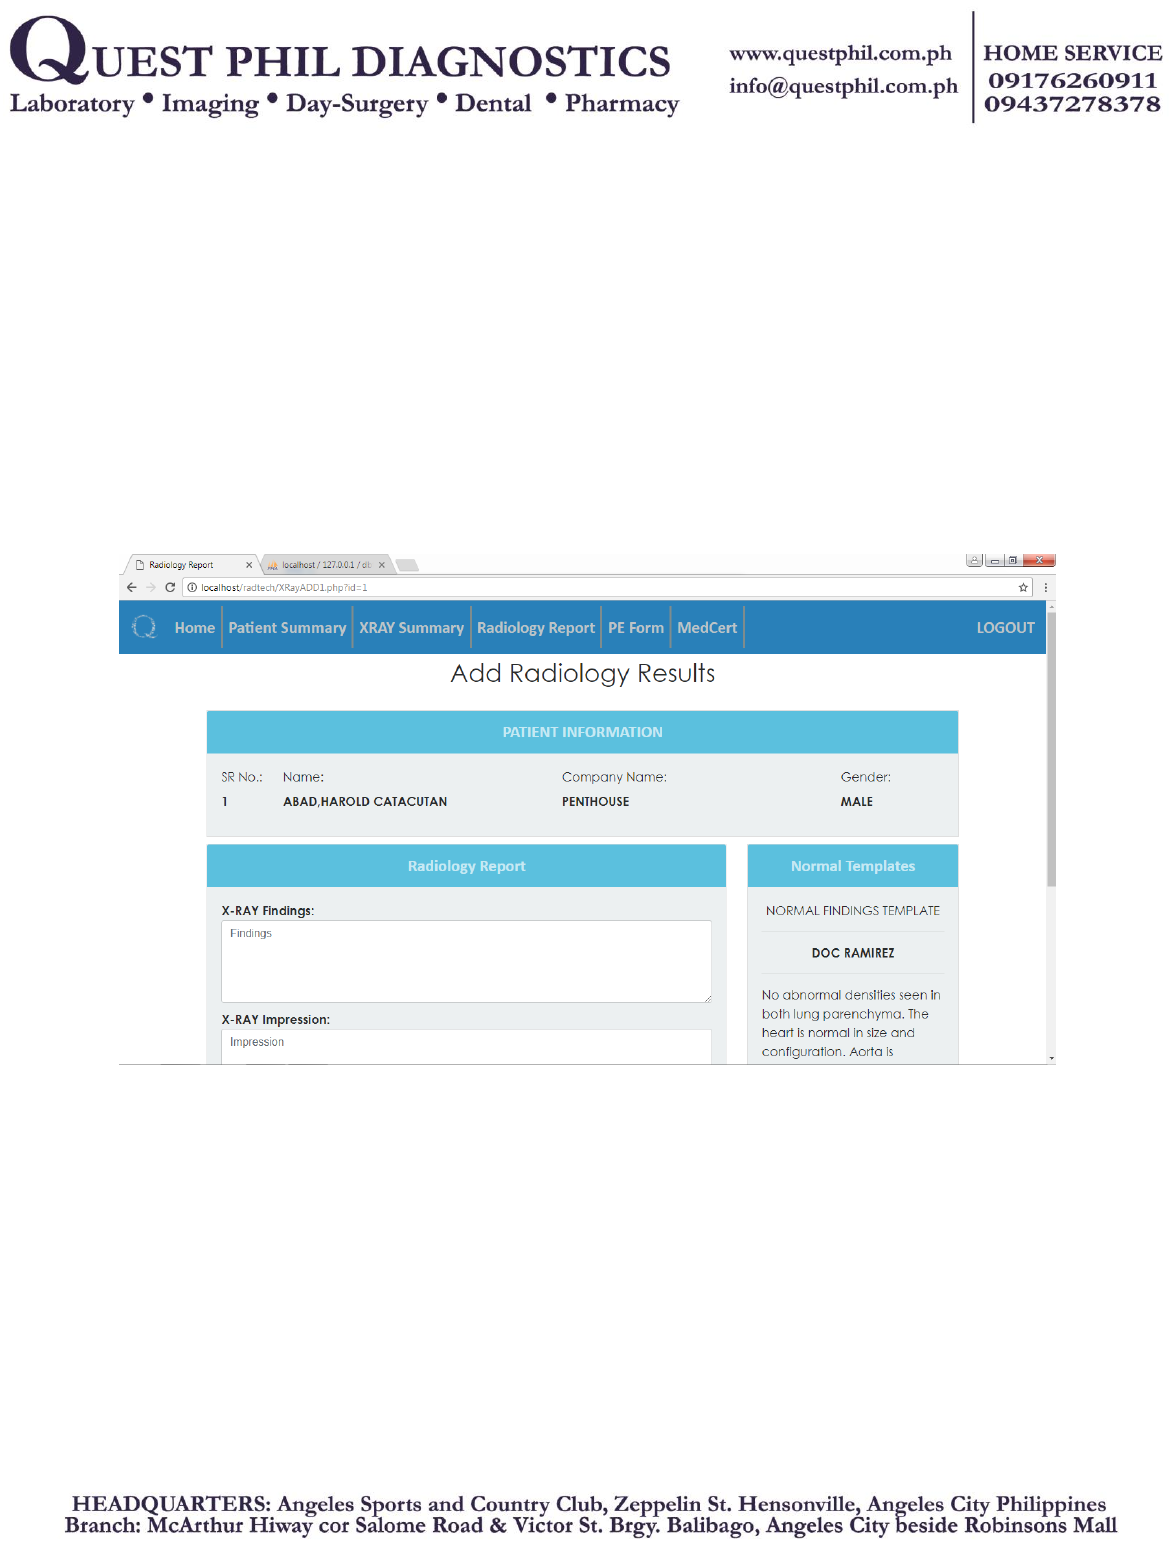
Figure 27: Add Radiology Report
This figure is where you can insert patient’s radiology report.
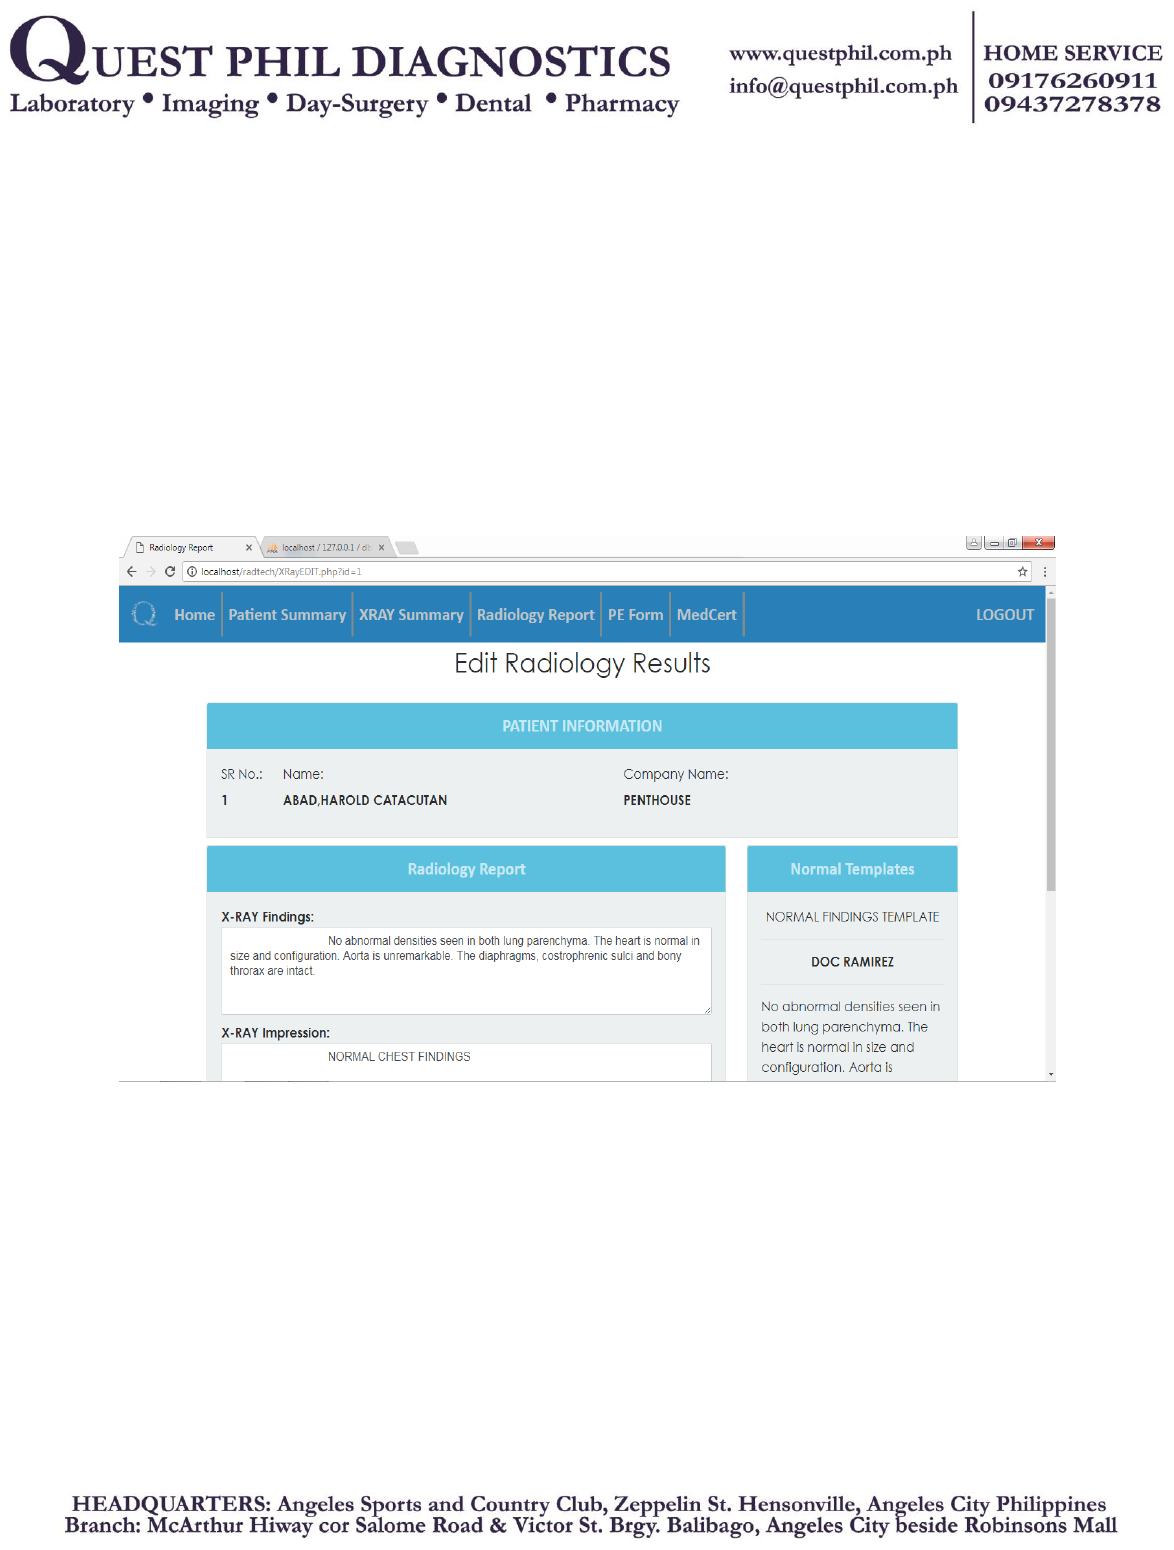
Figure 28: Update Radiology Report
This is where you can update patient’s radiology report.
D. LABORATORY MODULE
Figure 29: Home
Index of laboratory module.
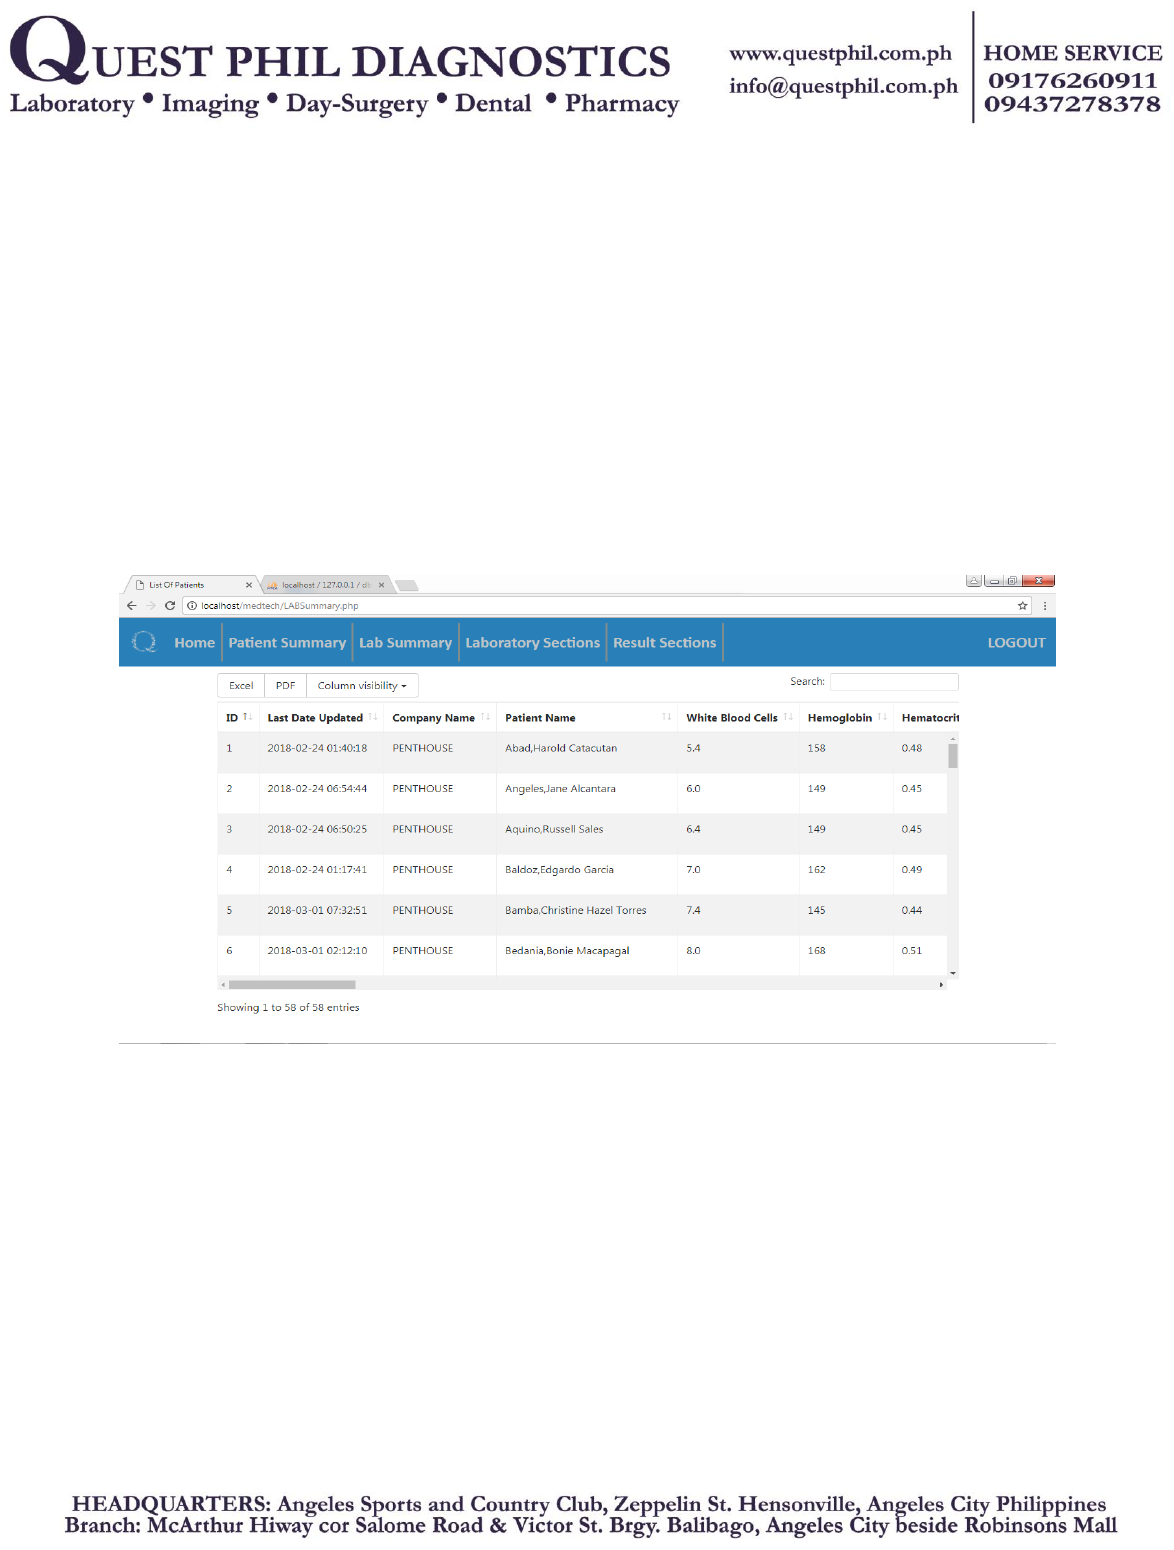
Figure 30: Laboratory Summary
This is where the medical technologist can view the patient’s laboratory summary.

Figure 31: Laboratory Sections
This is where the medical technologist will choose which lab section for the inserting of
results.
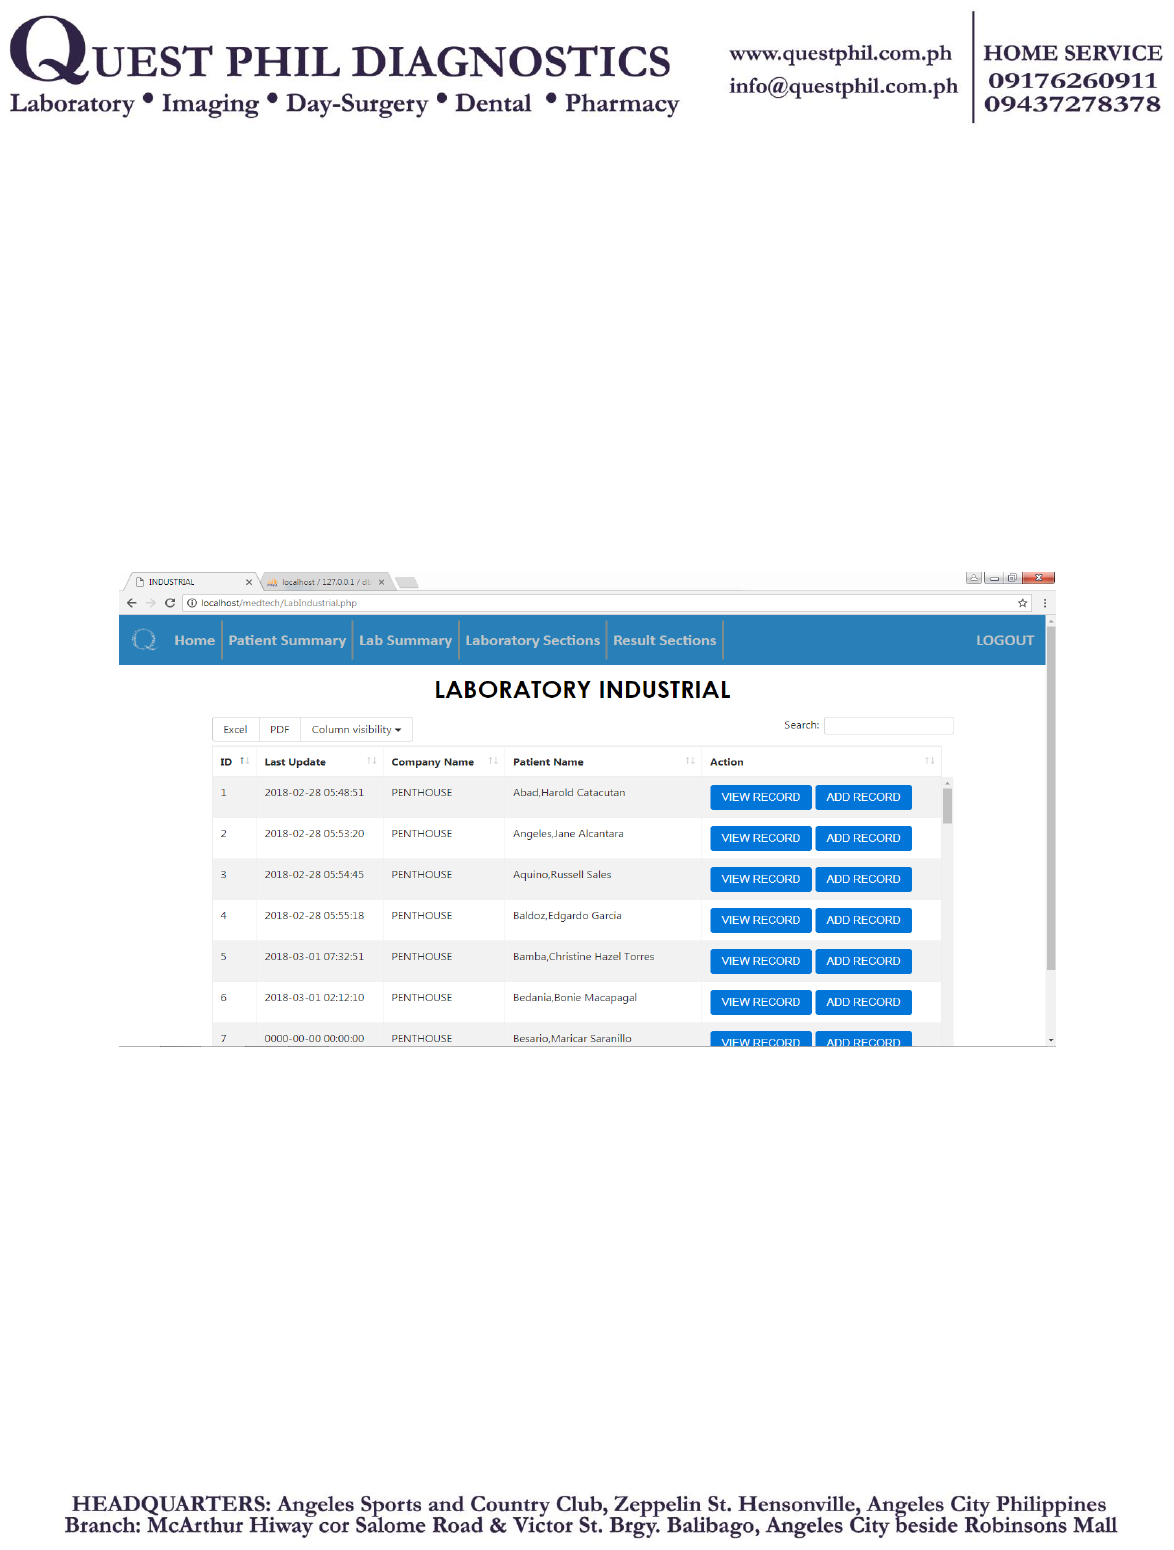
Figure 32: Laboratory Industrial
The list of patients you want to view or add laboratory industrial results.
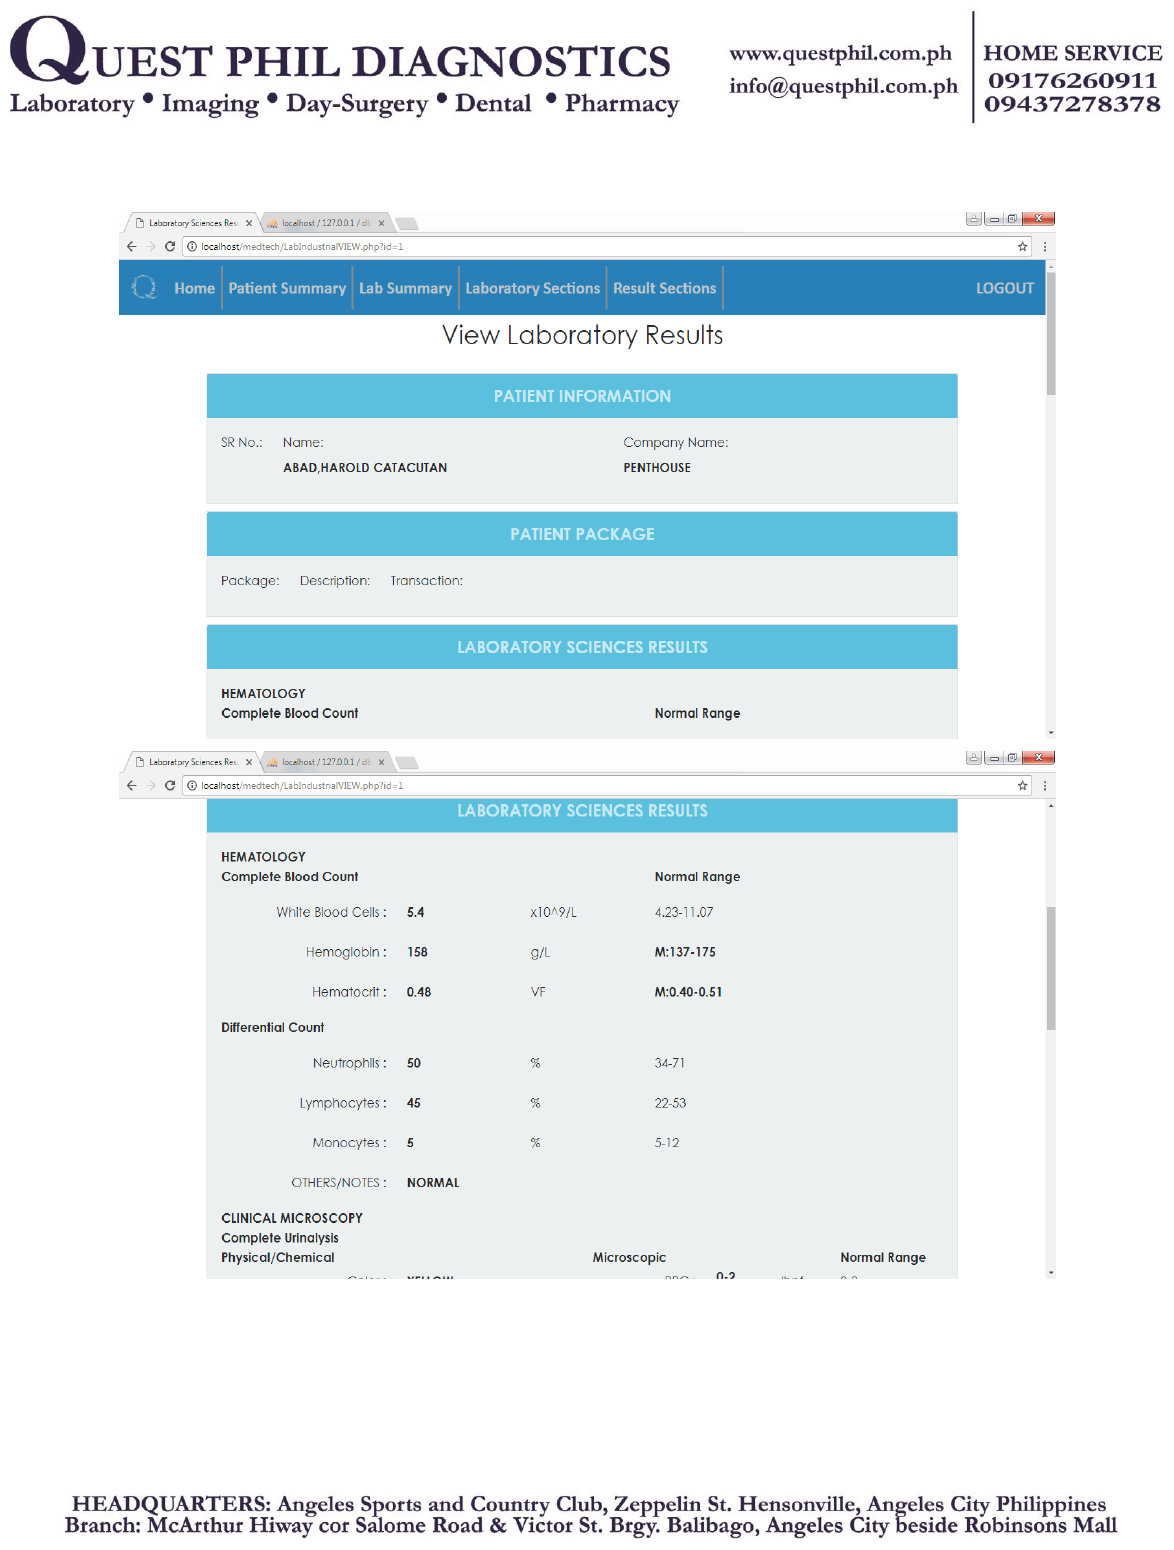
Figure 33: View Laboratory Record
This is where the medical technologist can view the patient’s industrial laboratory results.
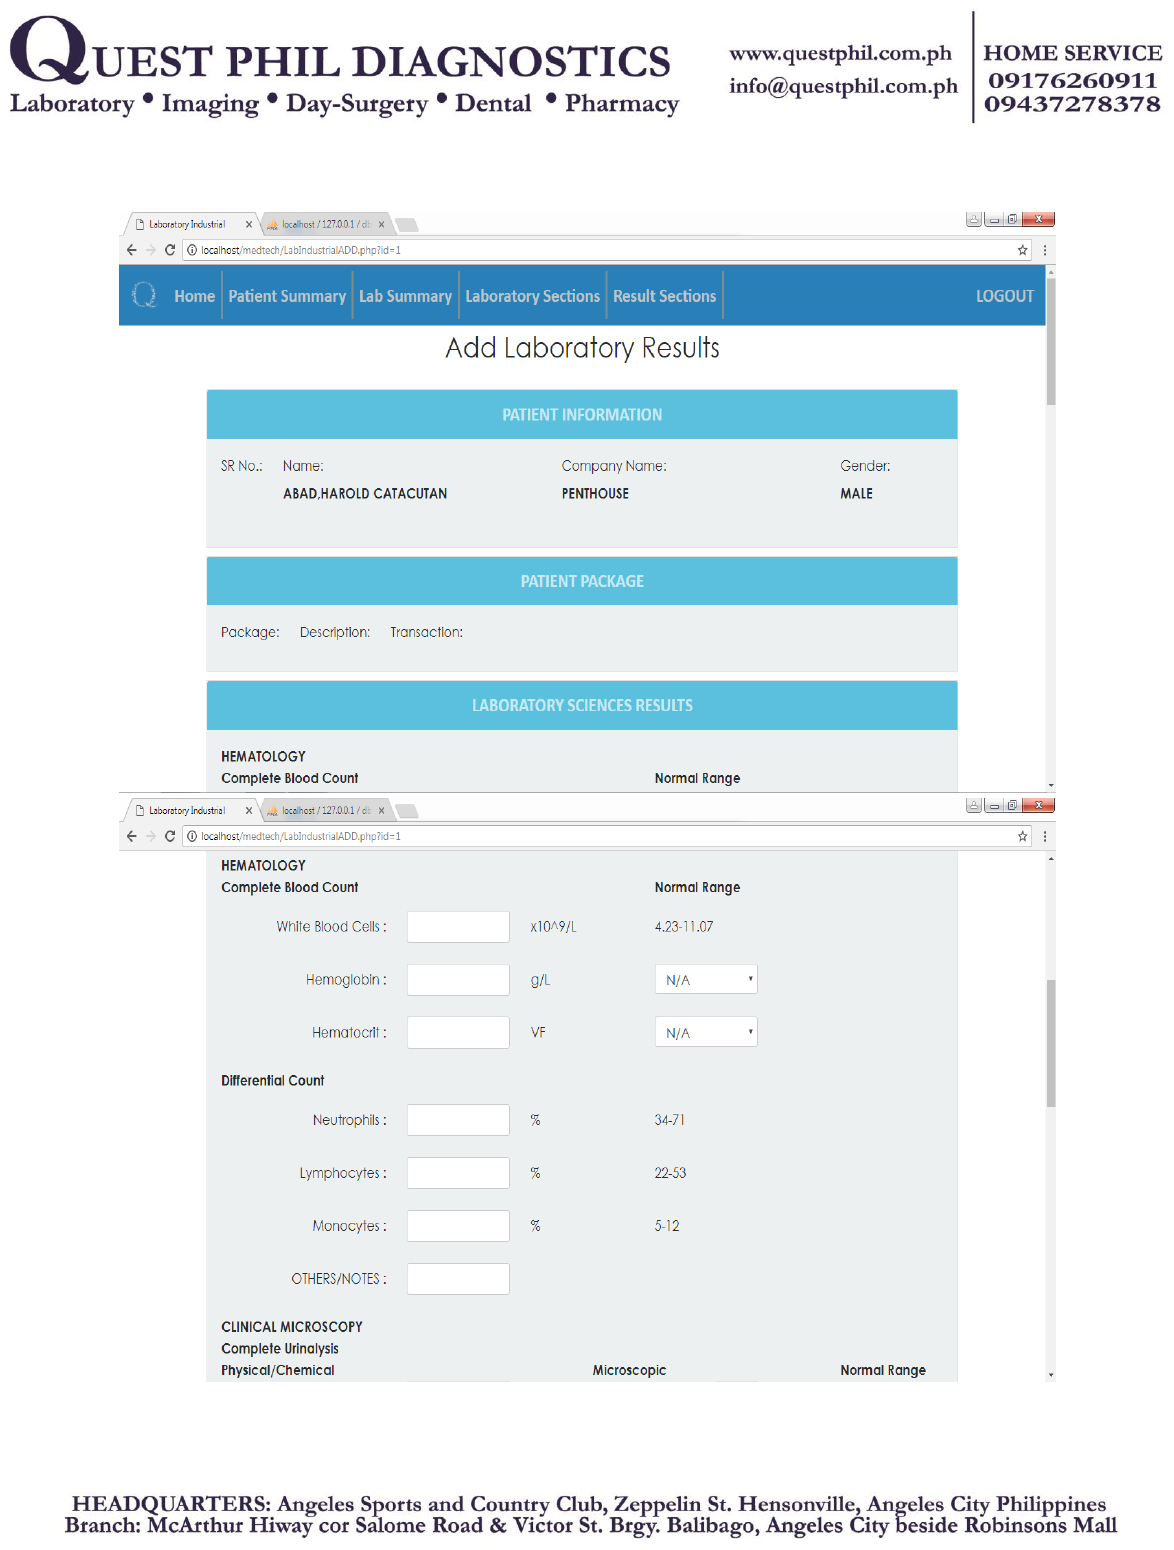
Figure 34: Add Laboratory Record
This is where the medical technologist can insert the patient’s industrial laboratory results.
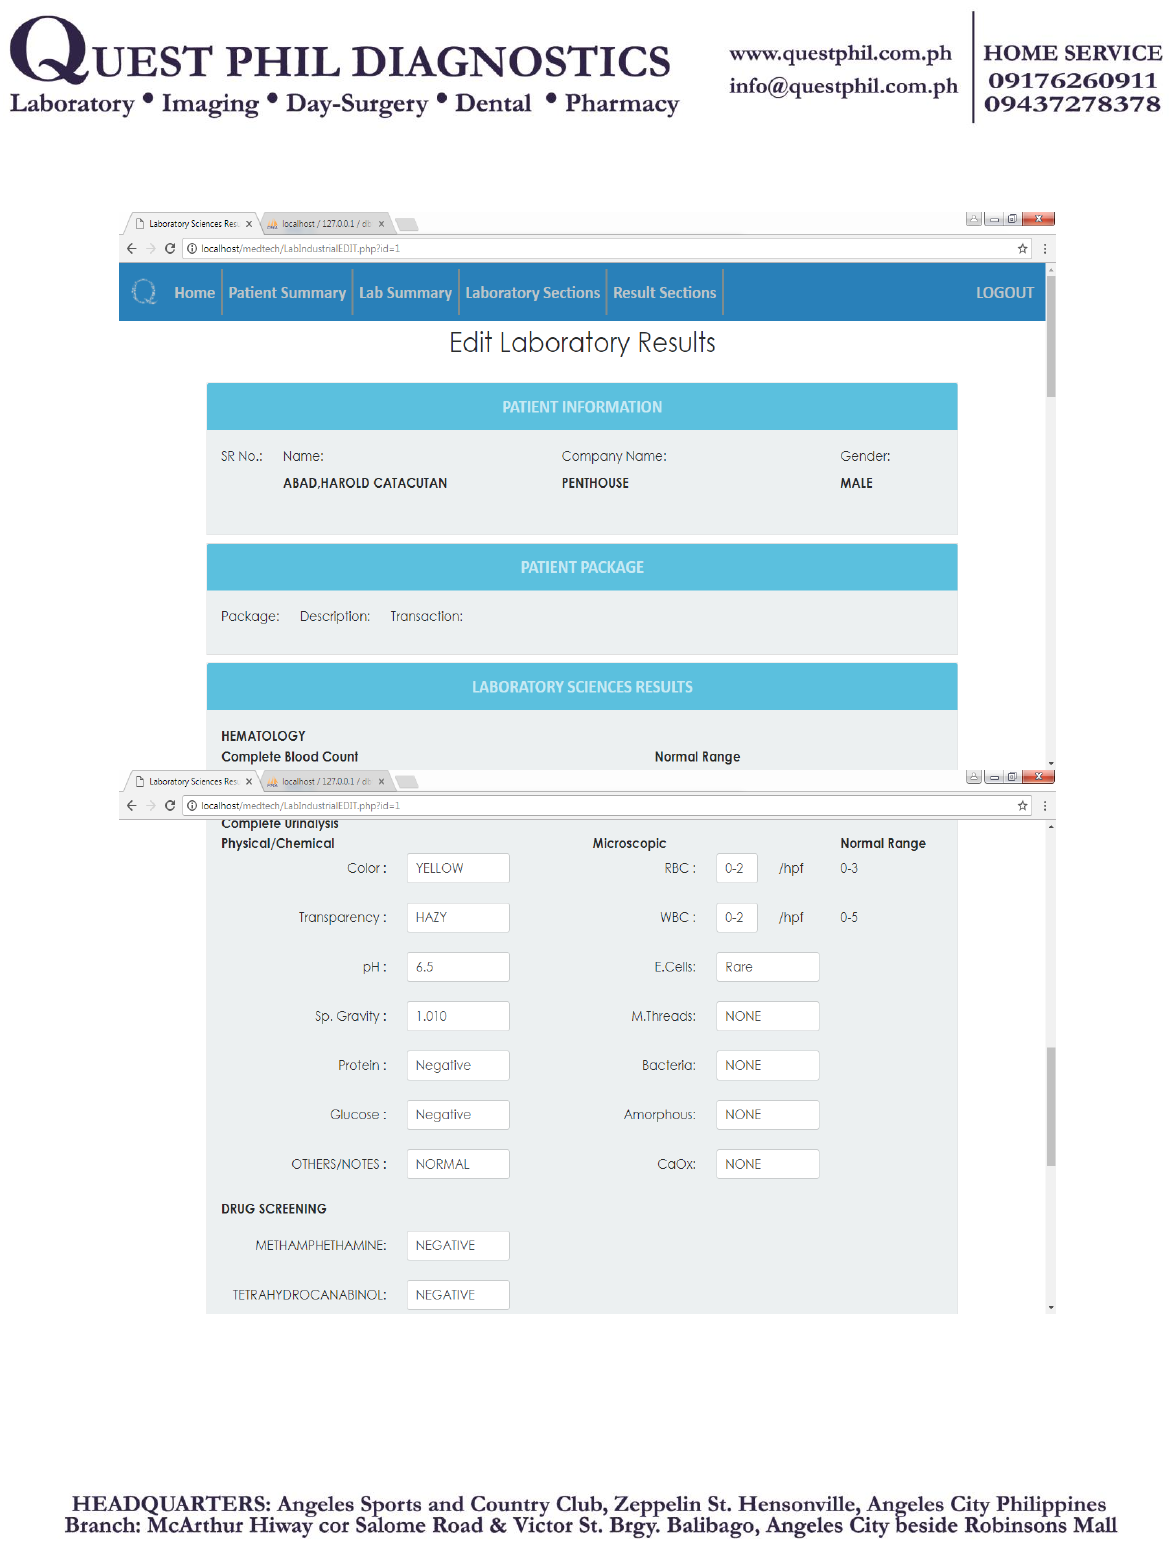
Figure 35: Update Record
This is where the medical technologist can update the patient’s industrial laboratory
results.

E. PE MODULE
Figure 36: Home
Index of PE Module.
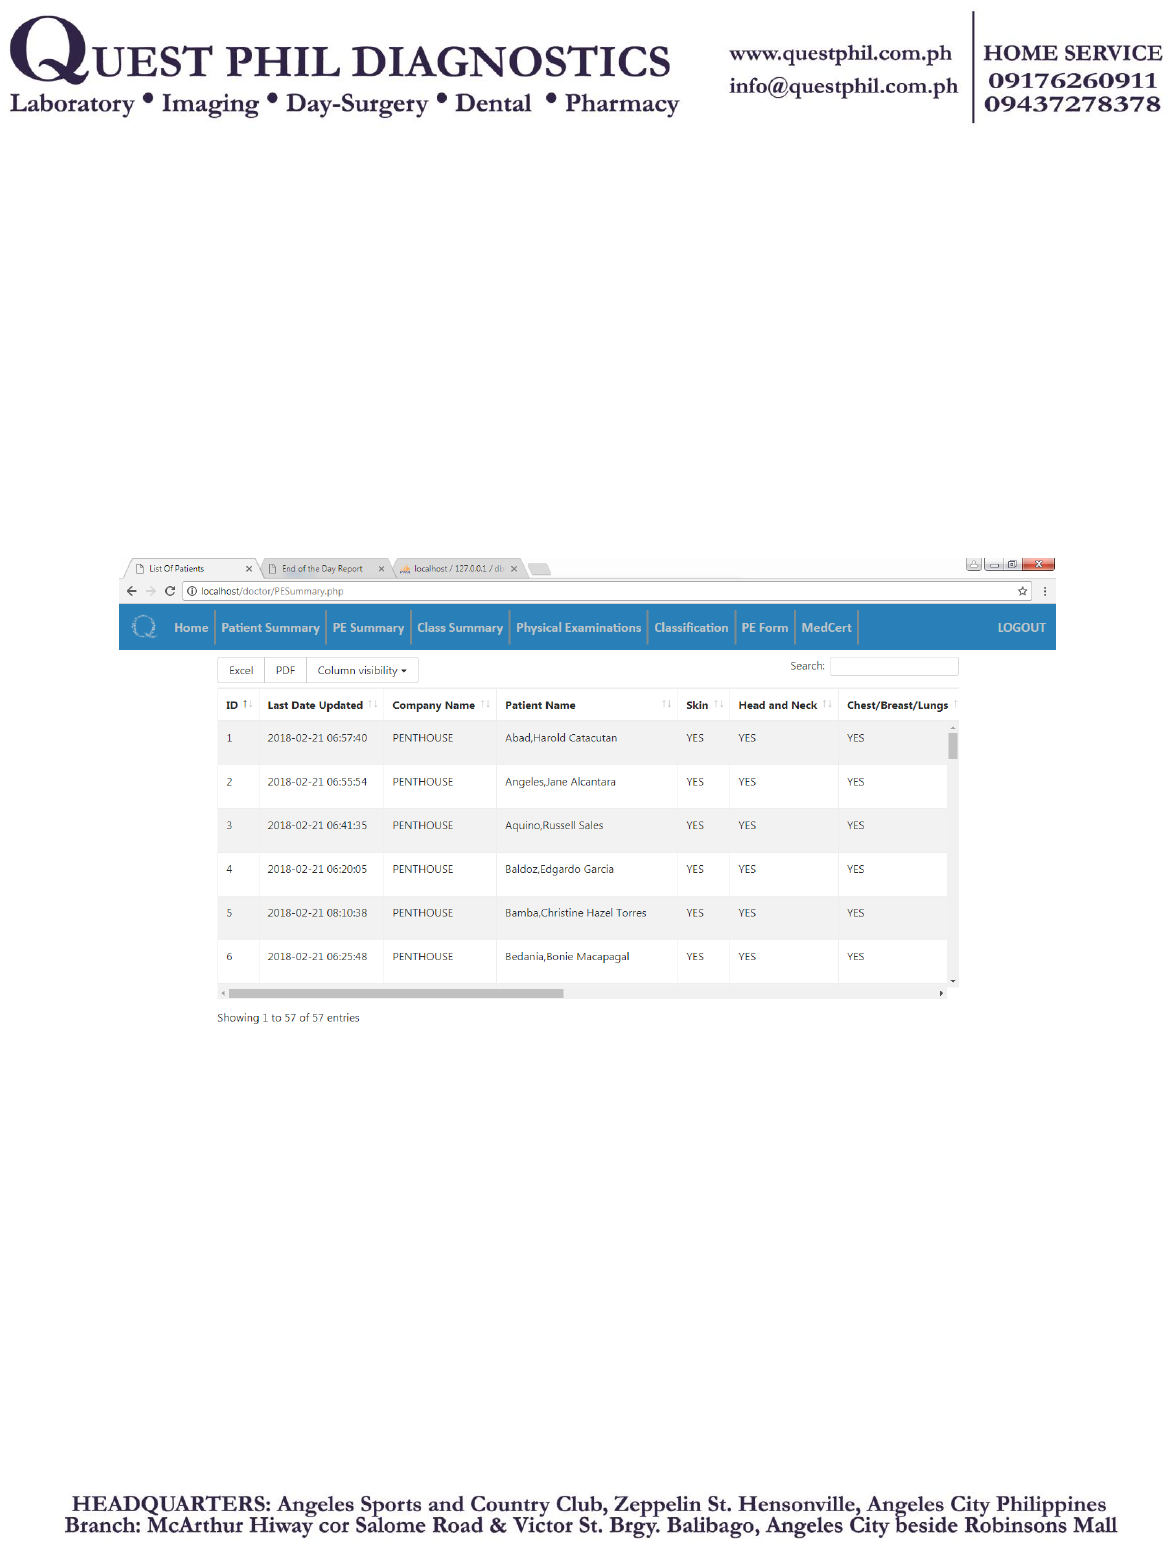
Figure 37: PE Summary
This is where the doctor can view patient’s pe summary.

Figure 38: Class Summary
This is where the doctor can view patient’s class summary.
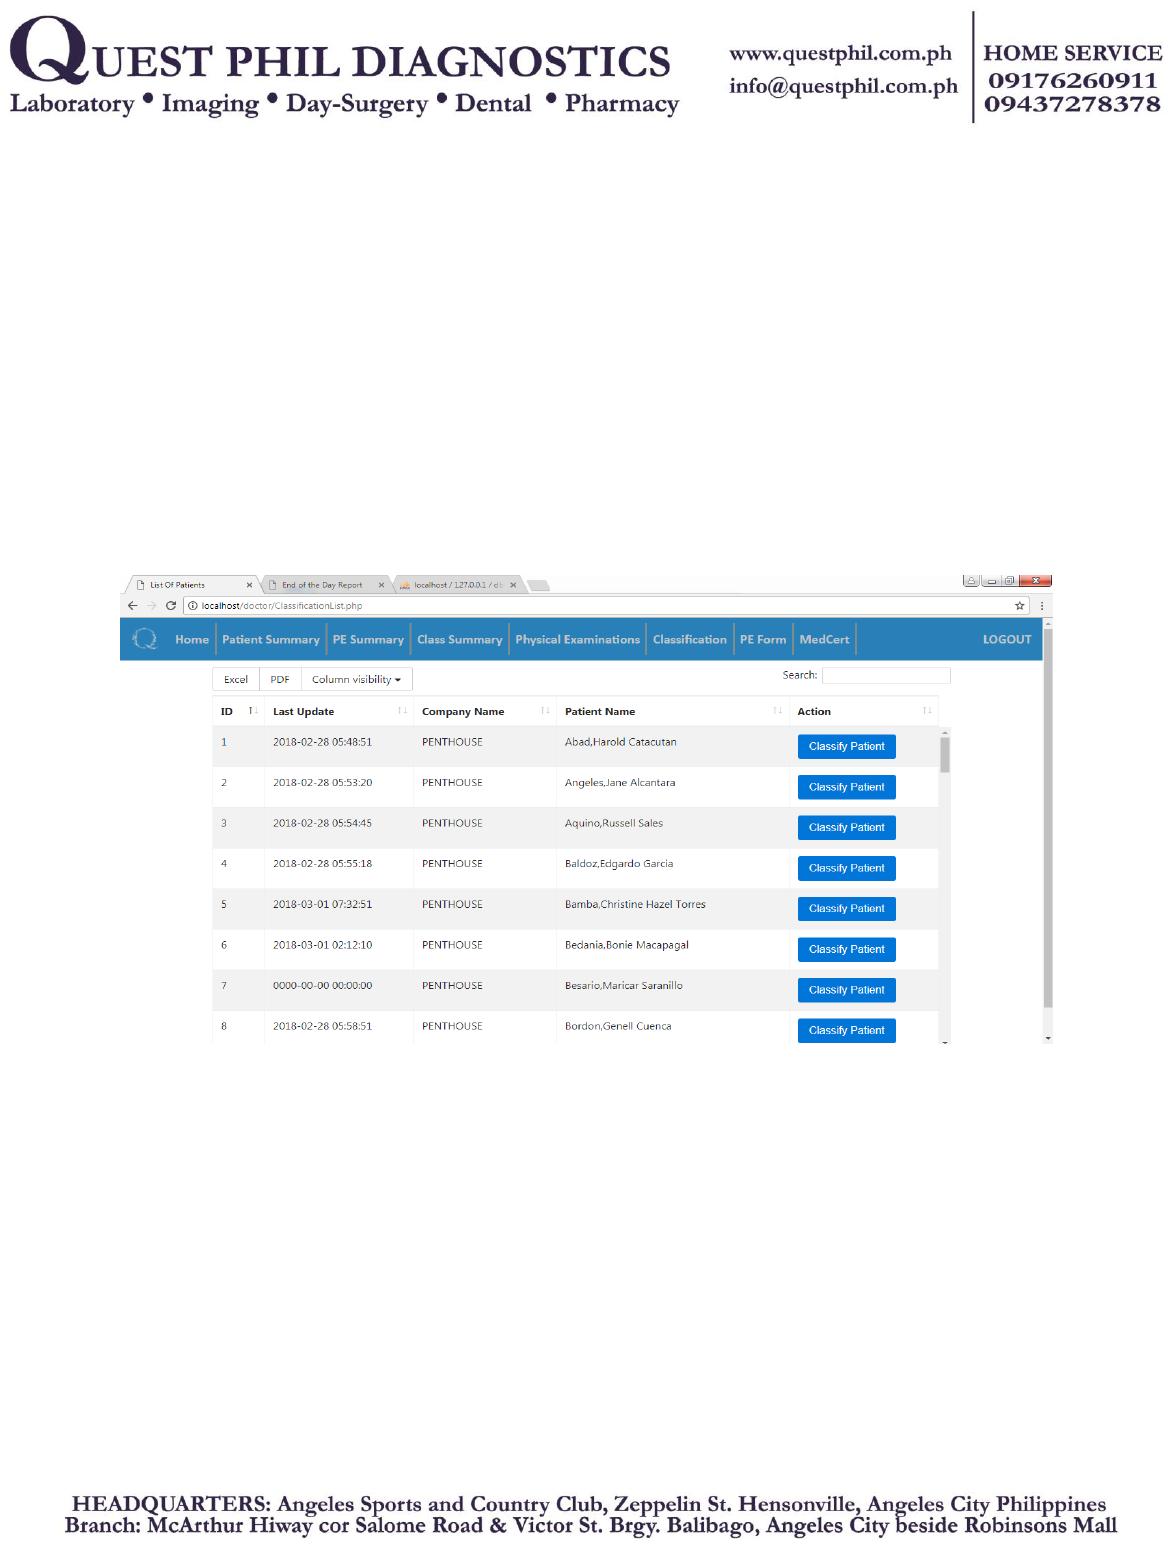
Figure 39: Classification List
The list of patients for classification.

Figure 40: Classify Patients
This is the doctor can classify a patient based on the all the results.
F. QC MODULE
Figure 41: Home
Index of Quality Control Module.
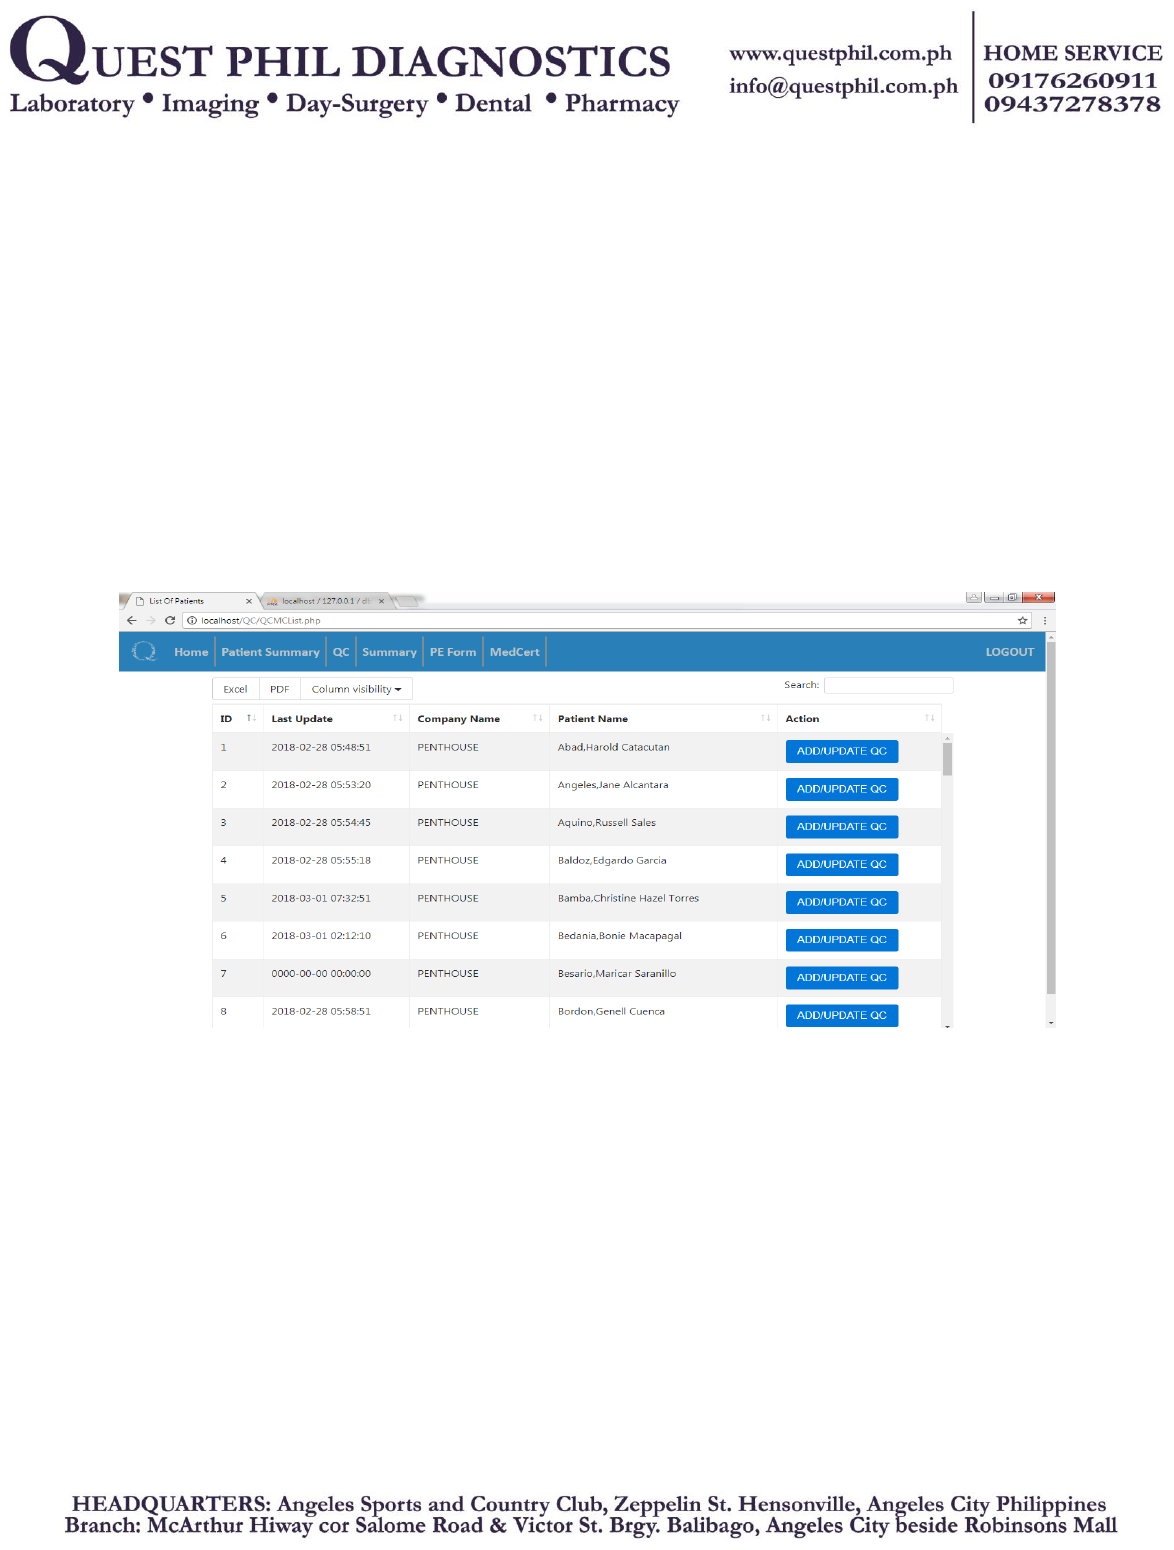
Figure 42: QCList
The list of patients for add/update QC.
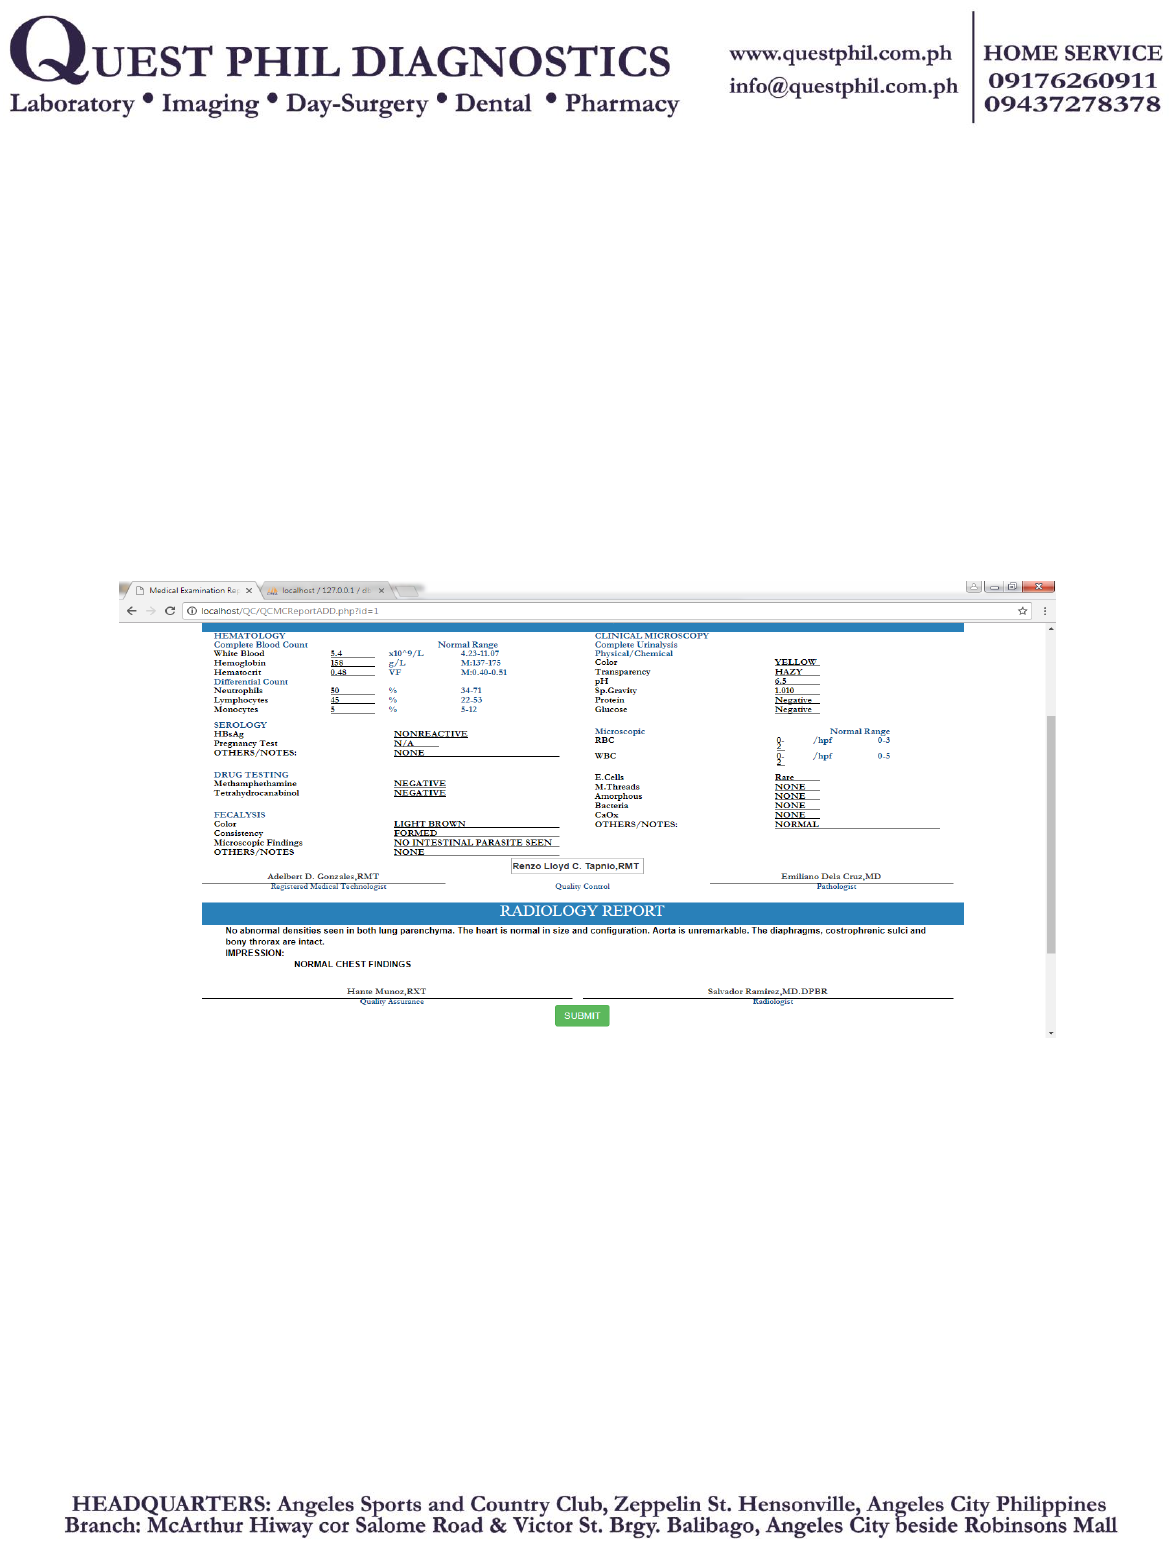
Figure 43: Add / Update QC
This is where you can add/update QC Person.
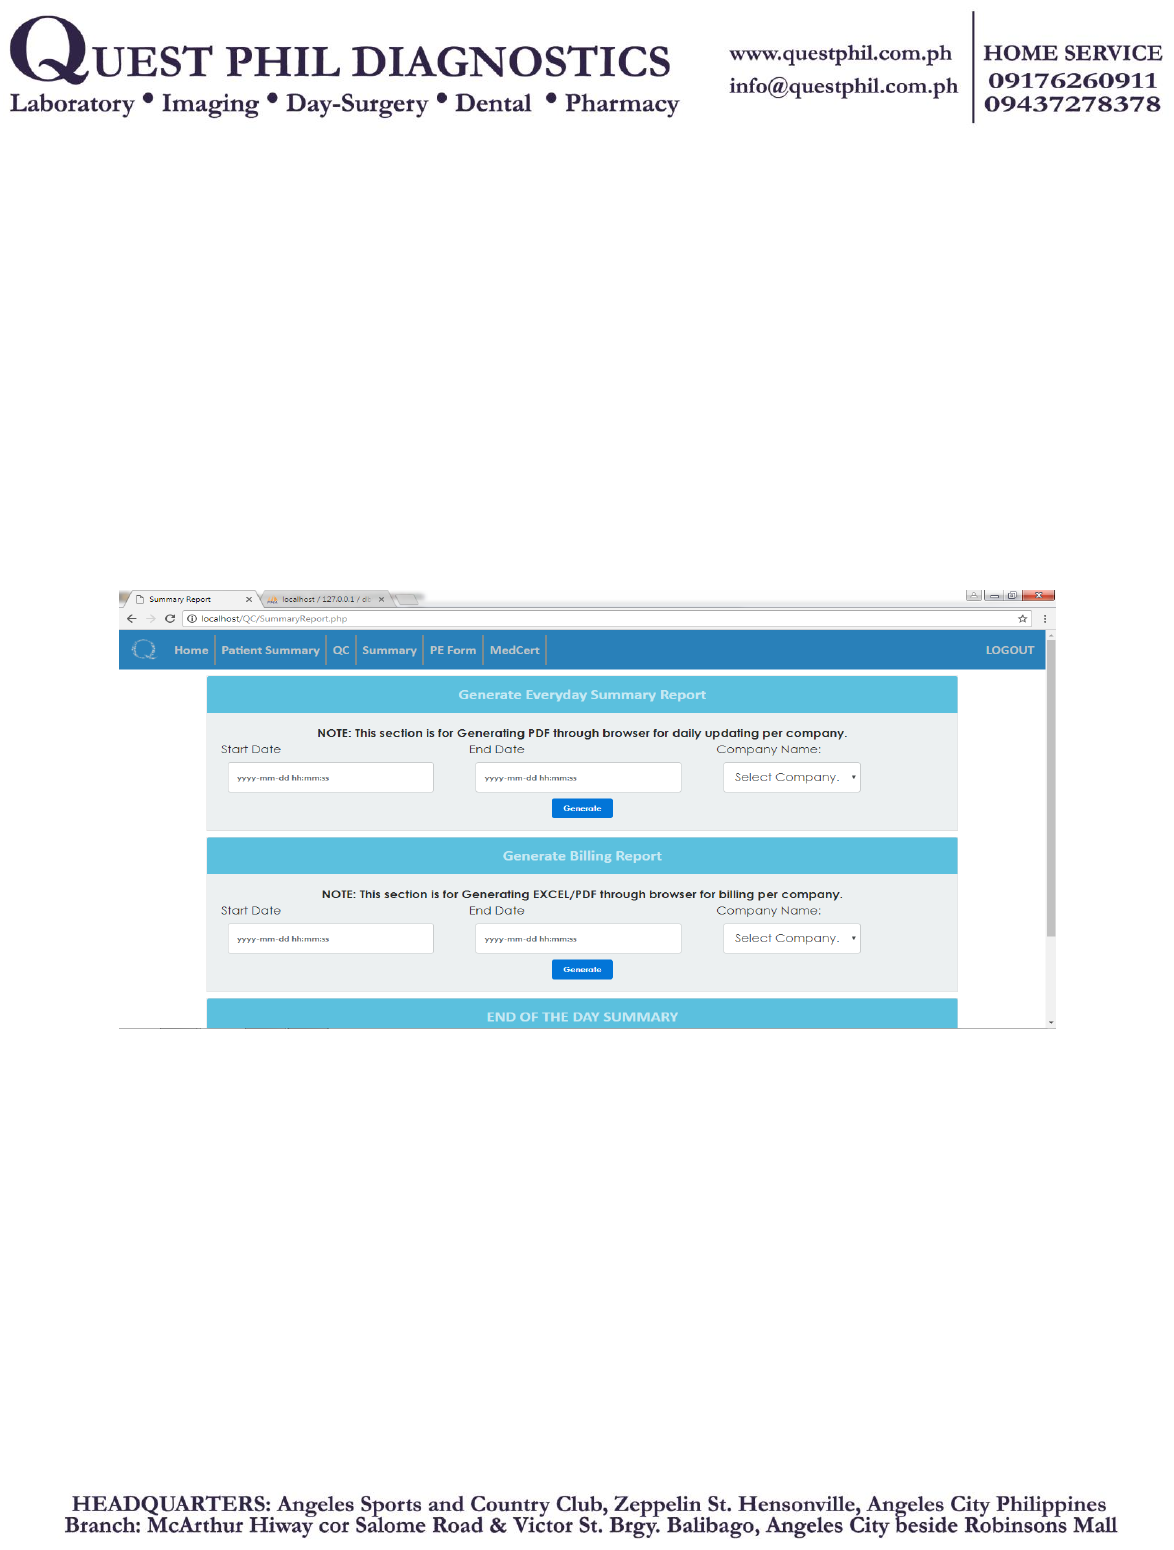
Figure 44: Summary Report
To generate summary reports.

G. CASH CASHIER MODULE
Figure 45: SCROLL BAR for Items
This function enables the user to pick any item included in the list one at a time.
After choosing and clicking what ITEM to avail, the user needs to click the ADD
button to add the chosen item on the transaction form.
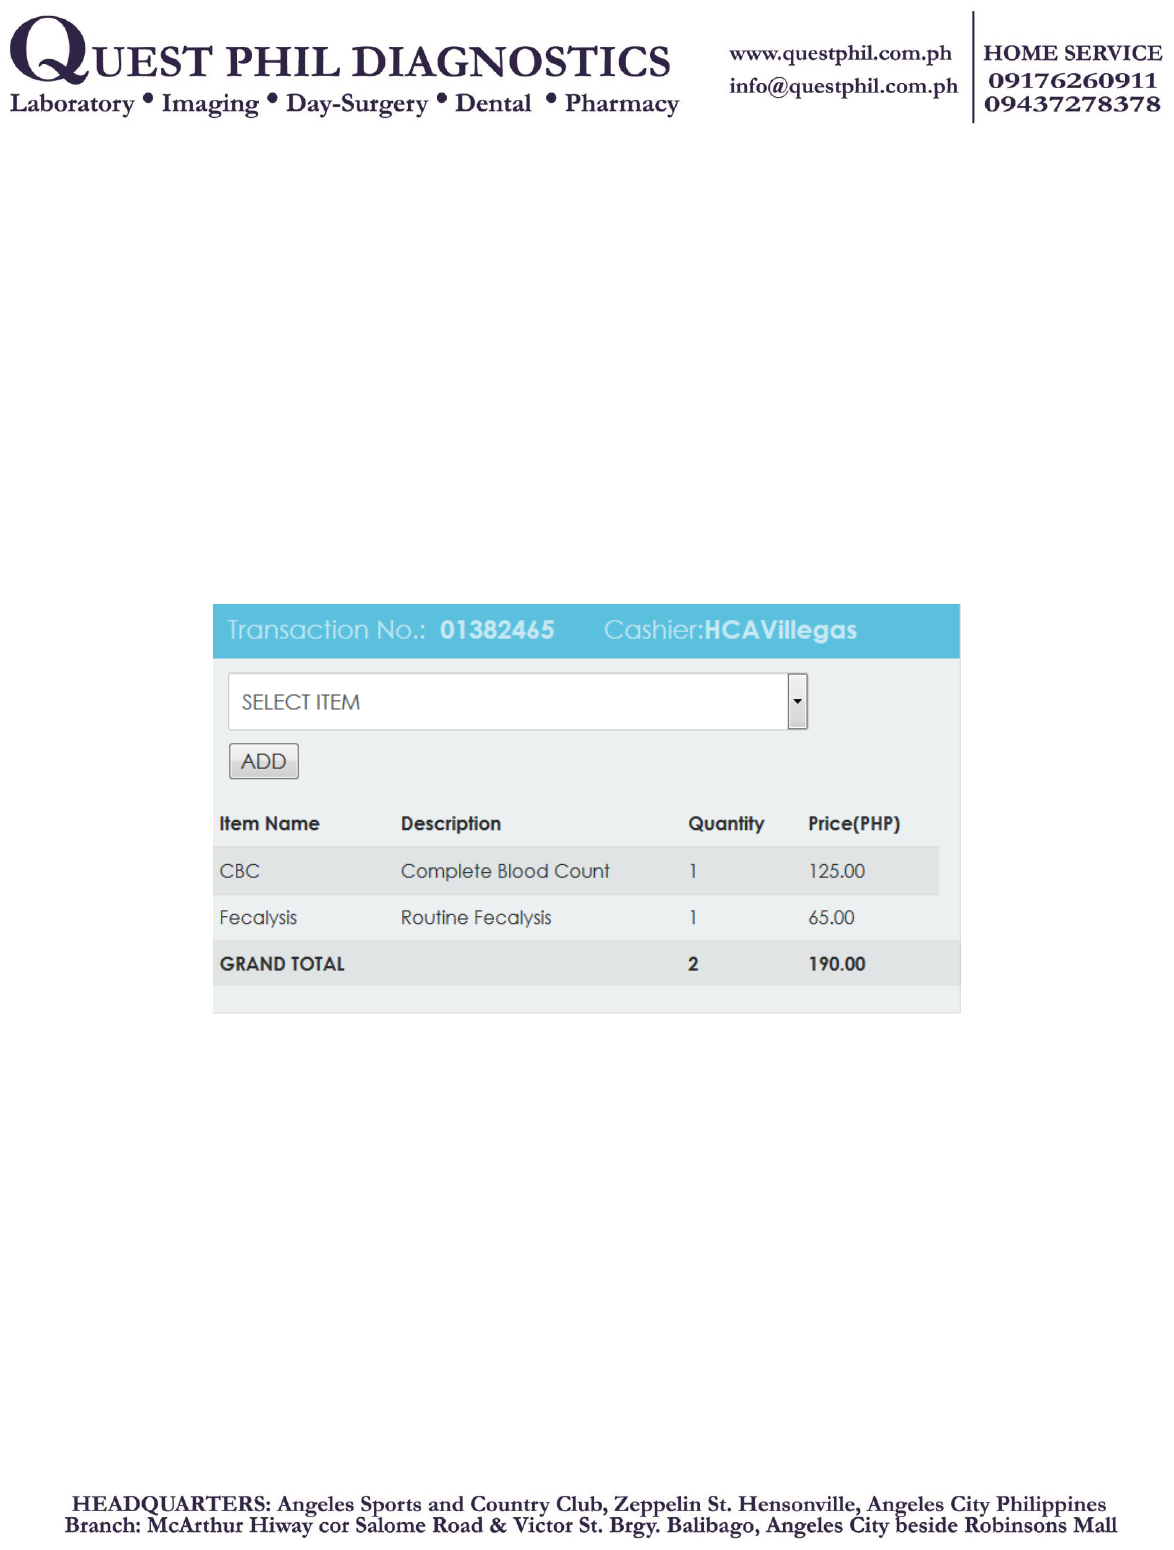
Figure 46: ADD ITEMS TO TRANSACTION LIST AND COMPUTE
The above image is the Transaction From. It shows all the chosen items from the
SCROLL BAR in listed format and with TOTAL AMOUNT computation.
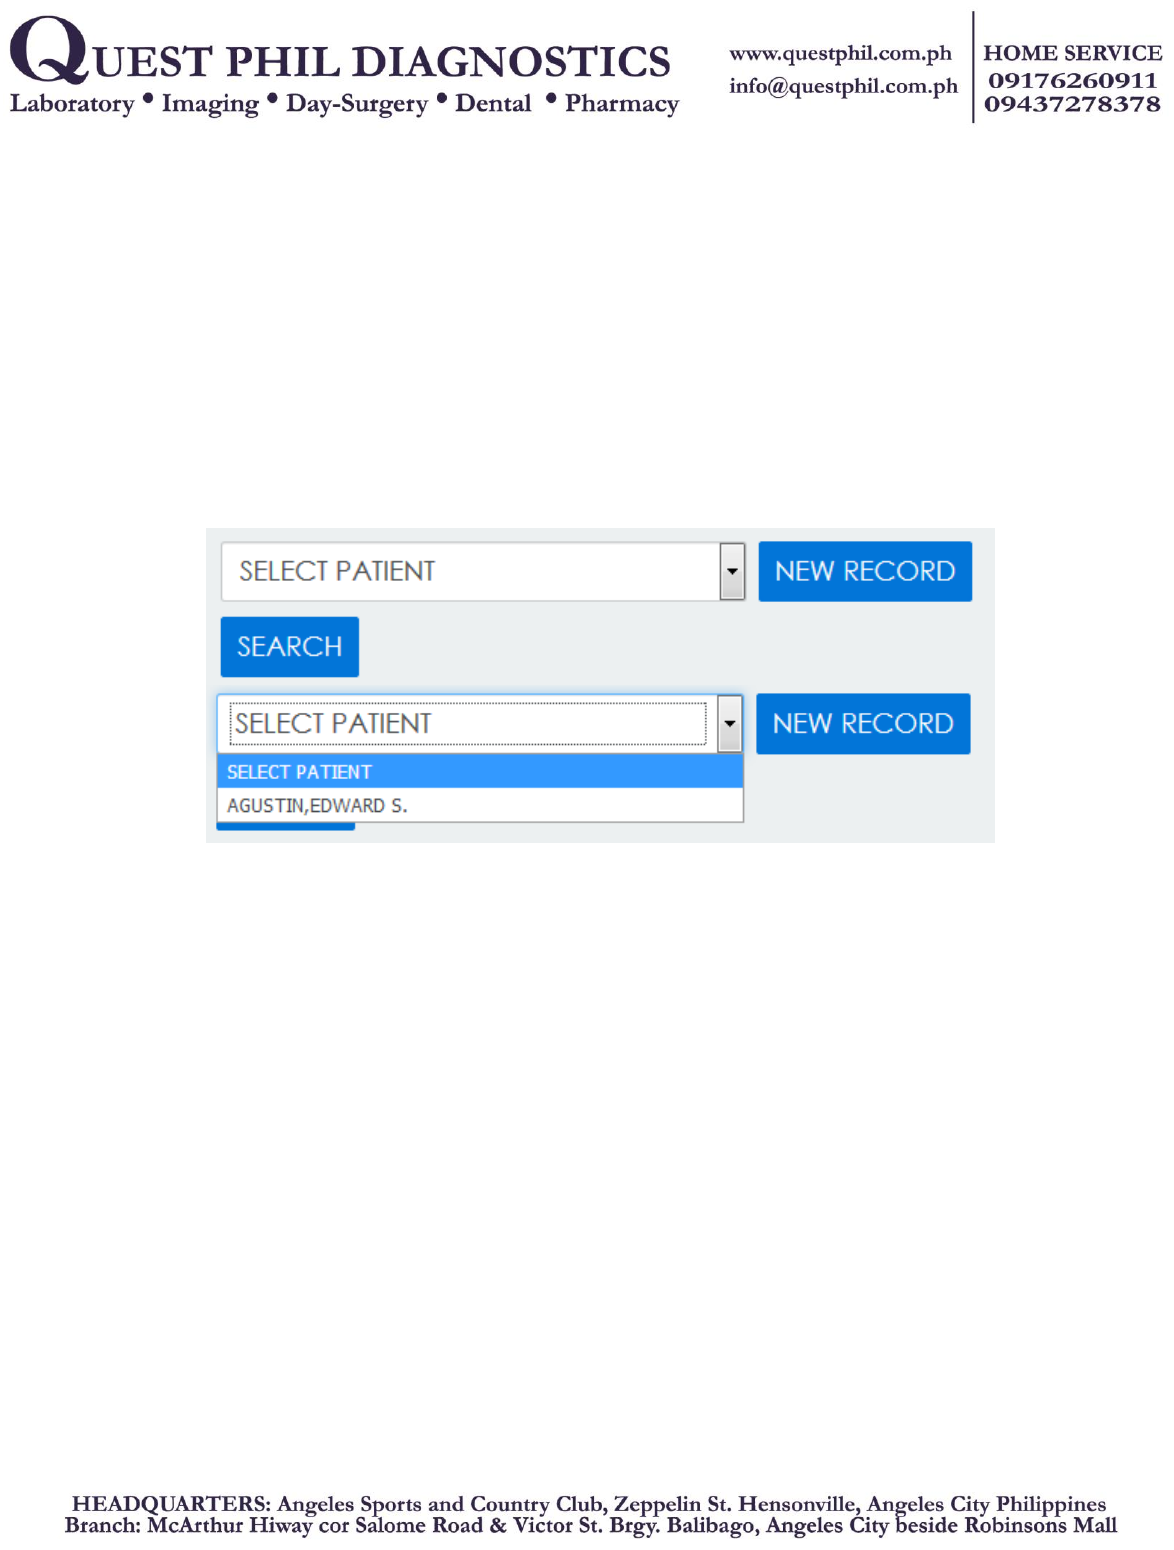
Figure 47:SCROLL BAR SEARCH for Patient Records
This function enables the user to ADD NEW PATIENT RECORD or SEARCH FOR
EXISTING PATIENT RECORD. If the user wanted to SEARCH FOR EXISTING
PATIENT RECORD, he/she needs to choose from the listed names in the SCROLL
BAR then click the SEARCH button. The information of the chosen data will be
shown in the text fields of PATIENT INFO FORM. See image below.
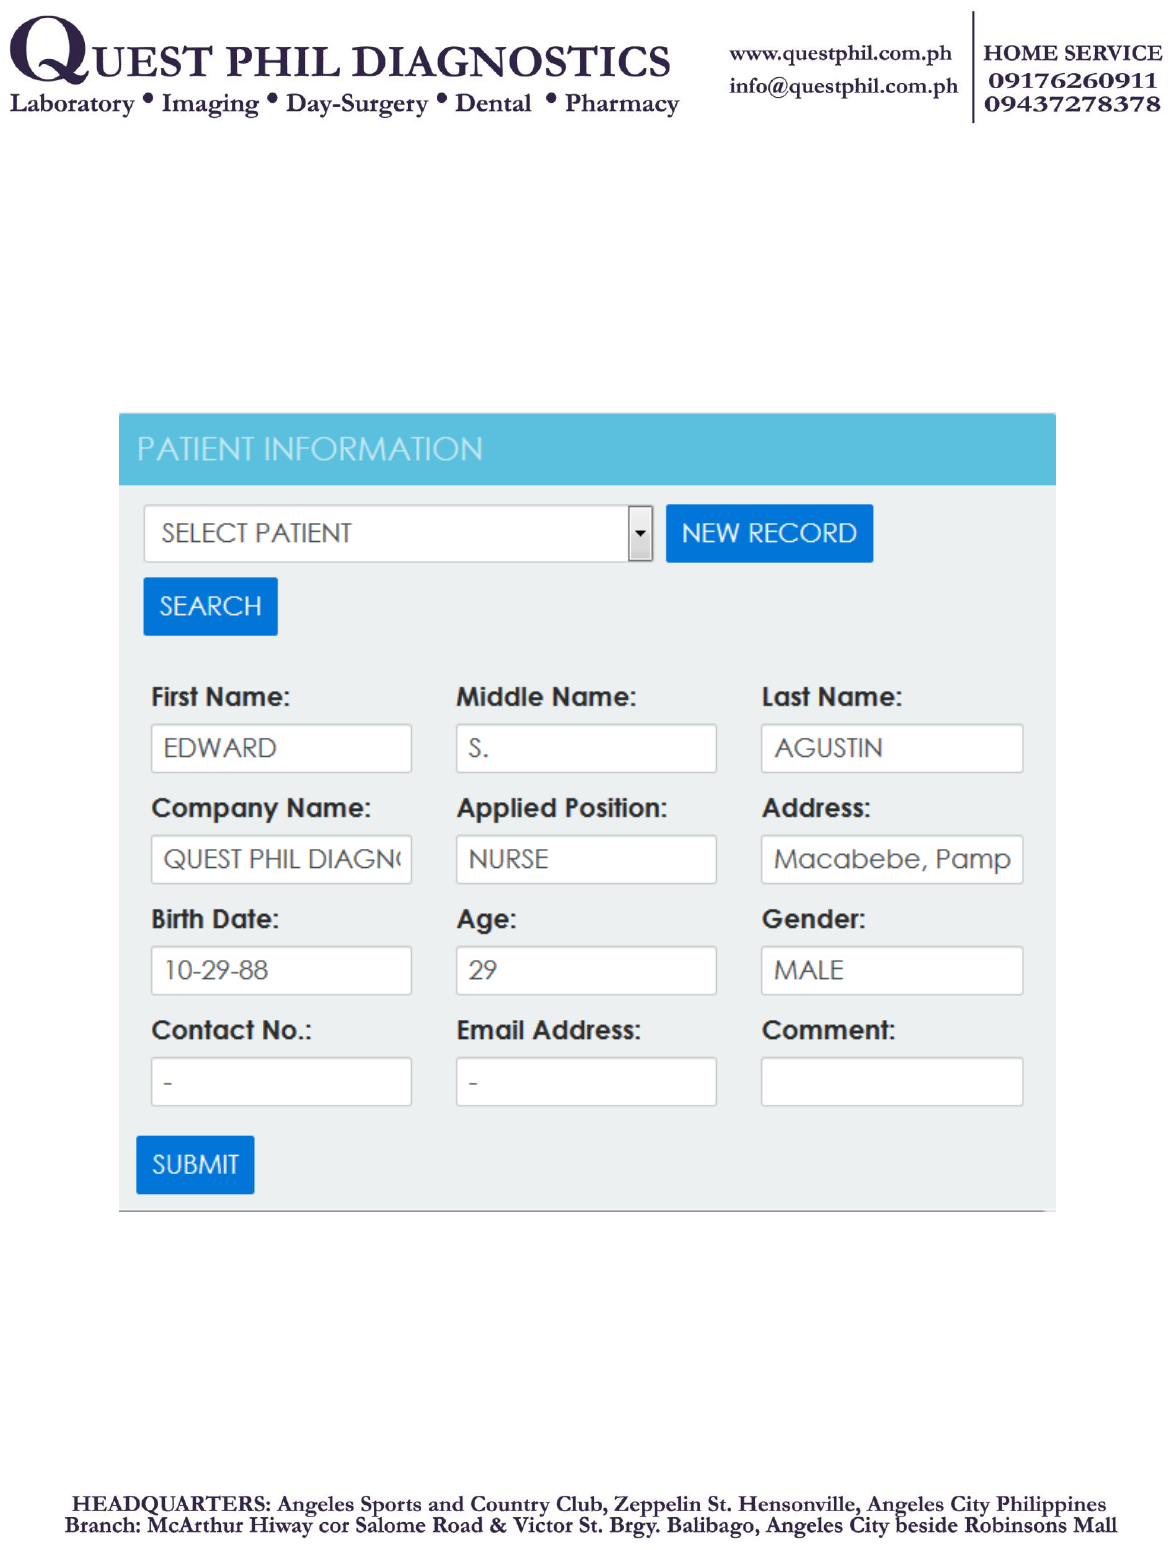
Figure 48: ADD New Patient Record
If the user wanted to ADD NEW PATIENT RECORD, he/she needs to click the NEW
RECORD button if the text fields has data but if all the fields are already clear there is no
need to click the button. The user can now input the data of the new record. Once done
inputting, the user needs to click the SUBMIT button.
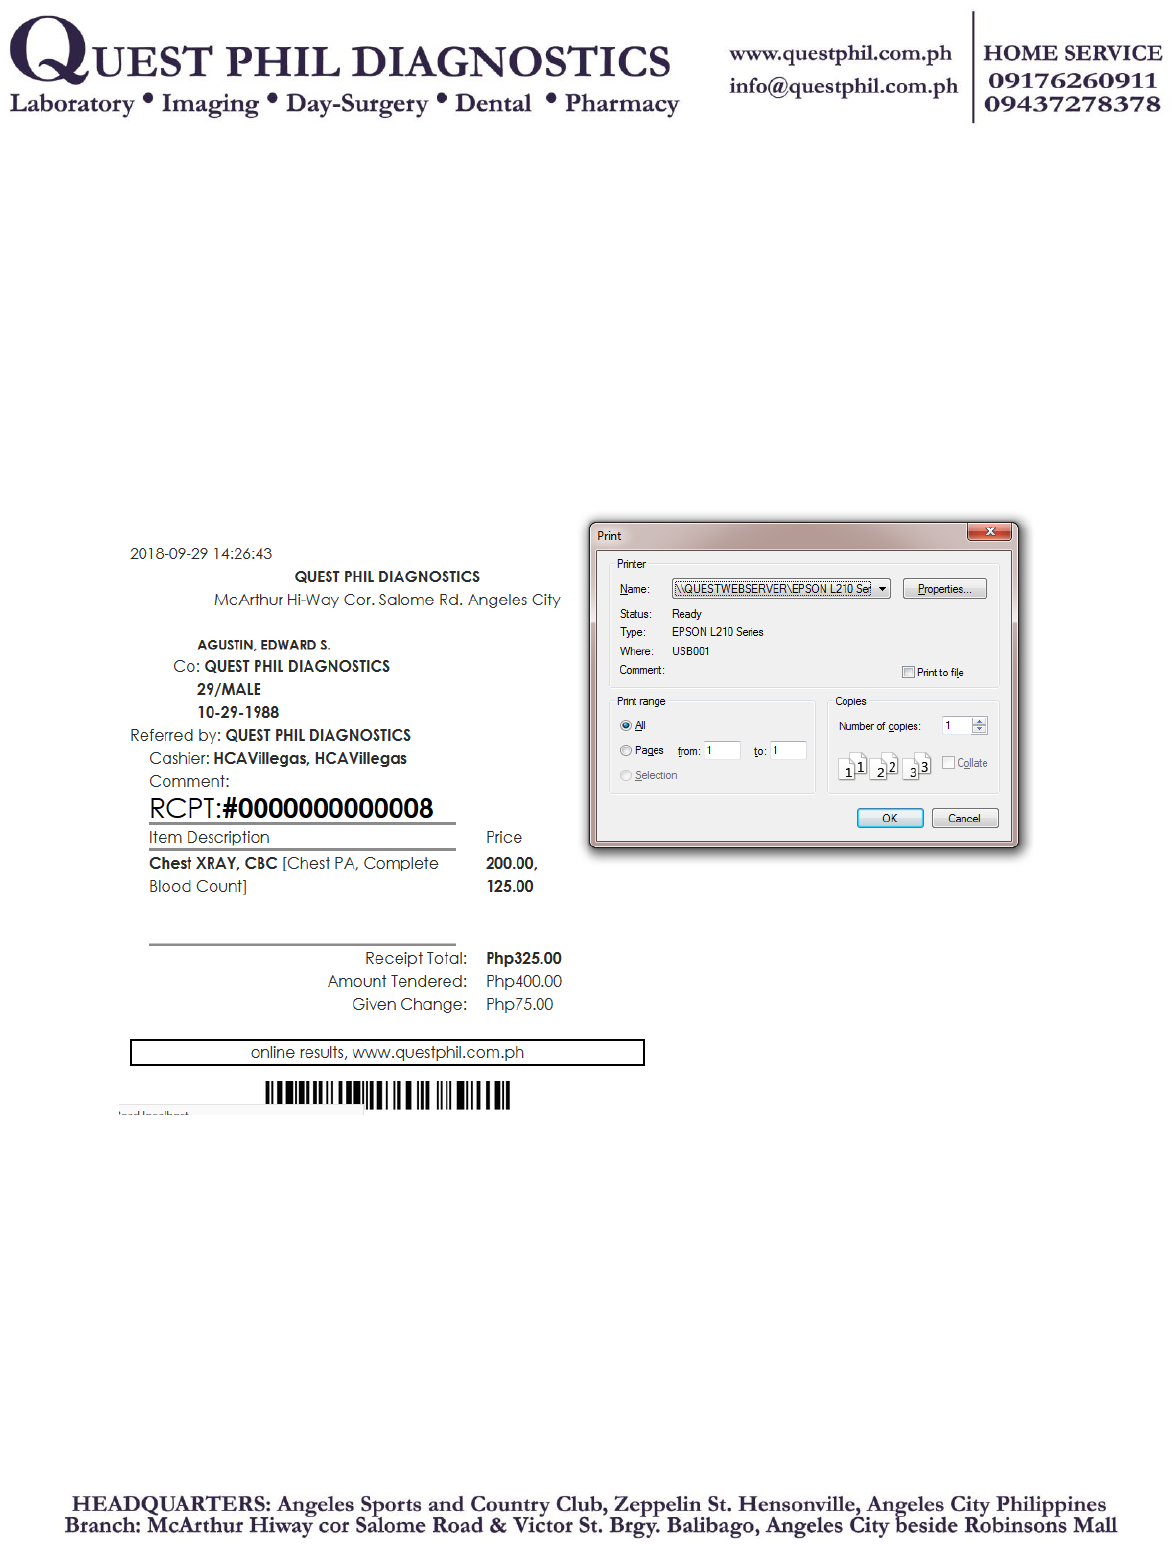
Figure 49: TRANSACT Cash & PRINT RECEIPT CASH
Once the user clicked the SUBMIT button, the page will automatically transact (store data
to the final transaction table in the database) and redirect to another tab that shows the
receipt format and printing of CASH RECEIPT.

MANUAL START-UP APPLICATION
STEP #1
Search for XAMPP Control Panel in the START button of the SERVER. Double click the
icon and start the first two modules (Apache and MySQL). After starting the modules, close
the XAMPP control panel in this action, all computer connected in the network can now
access the QIS.
STEP #2
Open the MOZILLA FIREFOX browser then type in the URL
QUESTWEBSERVER:8080/QUEST
STEP #3
In the landing page, if not yet registered, click the SIGN-UP button and fill out the required
field such as username, email address, password and choose what type of account you need.
If you already registered, click the SIGN IN button then login.
FOR NURSE and RECEP ACCOUNT TYPE
STEP #4
After logging in, click the sidebar icon then search for the ADD PATIENT then click the
REFERRAL.
STEP #5
Fill out all the fields in patient registration form the click submit at the bottom.
STEP #6
After registration, click again the sidebar the search and click the patient records button
then click the MEDICAL HISTORY.
STEP #7
Choose the name of the patient then click ADD RECORD. Complete the checking of boxes
in line with the illnesses then click submit at the bottom.
STEP #8
After adding records to medical history, click again the sidebar the search and click the
patient records button then click the VITAL SIGNS.
STEP #9
Choose the name of the patient then click ADD RECORD. Fill out all the fields then click
submit at the bottom.
STEP #10
After inputting all the data, you can now view the SUMMARY OF RECORDS of the
patient, click the sidebar then search and click for the Patient List. In the Patient List,

there were the list of patients registered. Click VIEW SUMMARY RECORD in line with the
patient name if you want to see his/her complete records. You can also view the Medical
Certificate and Physical Examination Form in the CERTIFICATE button on the sidebar.
STEP #11
Click LOGOUT in the sidebar under your username if you are finished.
FOR MEDICAL TECHNOLOGIST
STEP #4
After logging in, click the sidebar icon then search for the PATIENT RECORD then click
the Laboratory Results. Choose the name of the patient then click ADD RECORD.
STEP #5
Fill out all the field then click submit at the bottom.
STEP #6
After inputting all the data, you can now view the SUMMARY OF RECORDS of the
patient, click the sidebar then search and click for the Patient List. In the Patient List,
there were the list of patients registered. Click VIEW SUMMARY RECORD in line with the
patient name if you want to see his/her complete records. You can also view the Medical
Certificate and Physical Examination Form in the CERTIFICATE button on the sidebar.
STEP #7
Click LOGOUT in the sidebar under your username if you are finished.
FOR RADIOLOGIC TECHNOLOGIST
STEP #4
After logging in, click the sidebar icon then search for the PATIENT RECORD then click
the Radiology Report. Choose the name of the patient then click ADD RECORD.
STEP #5
Fill out all the field then click submit at the bottom.
STEP #6
After inputting all the data, you can now view the SUMMARY OF RECORDS of the
patient, click the sidebar then search and click for the Patient List. In the Patient List,
there were the list of patients registered. Click VIEW SUMMARY RECORD in line with the
patient name if you want to see his/her complete records. You can also view the Medical
Certificate and Physical Examination Form in the CERTIFICATE button on the sidebar.
STEP #7
Click LOGOUT in the sidebar under your username if you are finished.

FOR DOCTORS
STEP #4
After logging in, click the sidebar icon then search for the PATIENT RECORD then click
the Physical Examination. Choose the name of the patient then click ADD RECORD.
STEP #5
Fill out all the field then click submit at the bottom.
STEP #6
If all the needed records were complete, you can now add the CLASSIFICATION of the
patient. Click the sidebar icon then search for the PATIENT RECORD then click the
Patient Classification. Choose the name of the patient then click ADD RECORD.
STEP #7
Review the patient records then choose his/her classification at the bottom part of the form
then click submit.
STEP #8
After inputting all the data, you can now view the SUMMARY OF RECORDS of the
patient, click the sidebar then search and click for the Patient List. In the Patient List,
there were the list of patients registered. Click VIEW SUMMARY RECORD in line with the
patient name if you want to see his/her complete records. You can also view the Medical
Certificate and Physical Examination Form in the CERTIFICATE button on the sidebar.
STEP #9
Click LOGOUT in the sidebar under your username if you are finished.
FOR QUALITY CONTROL
STEP #4
After logging in, click the sidebar icon then search for the PATIENT RECORD then click
the QC-Medical Certificate. Choose the name of the patient then click ADD RECORD.
STEP #5
Fill out all the field then click submit at the bottom.
STEP #6
If all the needed records were complete and already reviewed by the QC, you can now print
the patient’s Medical Certificate. Click the sidebar icon then search for the PATIENT
RECORD then click the QC-Medical Certificate. Choose the name of the patient then click
VIEW CERTIFICATE then click the setting icon of the browser at the upper-right screen
then choose PRINT. This button will show you the print preview of the certificate. Click
CTRL+P if you want to print the Certificate.

STEP #7
After inputting all the data, you can now view the SUMMARY OF RECORDS of the
patient, click the sidebar then search and click for the Patient List. In the Patient List,
there were the list of patients registered. Click VIEW SUMMARY RECORD in line with the
patient name if you want to see his/her complete records. You can also view the Medical
Certificate and Physical Examination Form in the CERTIFICATE button on the sidebar.
STEP #8
For printing of SUMMARY REPORT for a company, click the SUMMARY REPORT button
at the sidebar. There you can filter the report by inputting the START DATE, END DATE
and COMPANY NAME in the filter then click GENERATE REPORT.
STEP #9
Click the setting icon of the browser at the upper-right screen then choose PRINT. This
button will show you the print preview of the summary report. Click ctrl+P if you want to
print the summary report.
STEP #10
Click LOGOUT in the sidebar under your username if you are finished.
FOR THE ADMIN (APE)
STEP #1
Prepare the excel file (the lists of persons to take the medical) that will be imported to the
system. (Make sure that it is saved in .csv file extension)
STEP #2
After logging in, look for the ‘MANAGE PATIENTS’ on the header/menu and click it.
STEP #3
Click the ‘CHOOSE FILE BUTTON’. When the modal appears, select your excel file you
want to import in to the system.
STEP #4
Lastly, click the ‘IMPORT’ button to import your excel file.
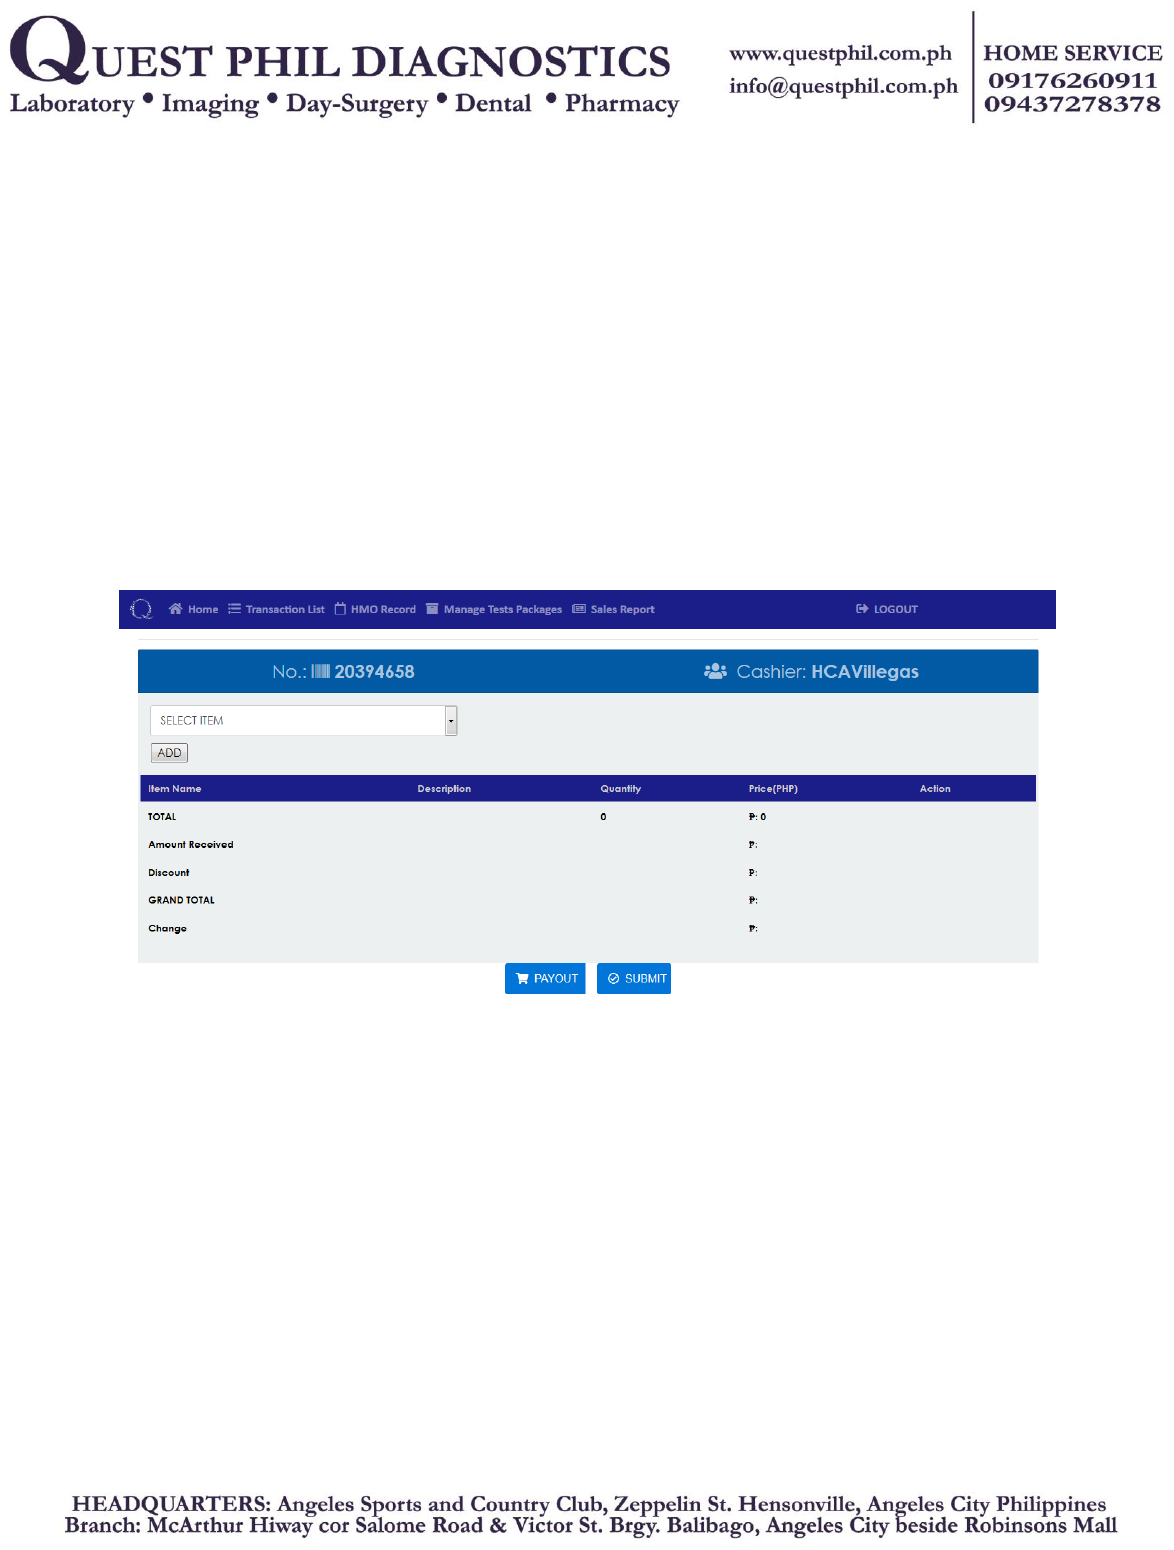
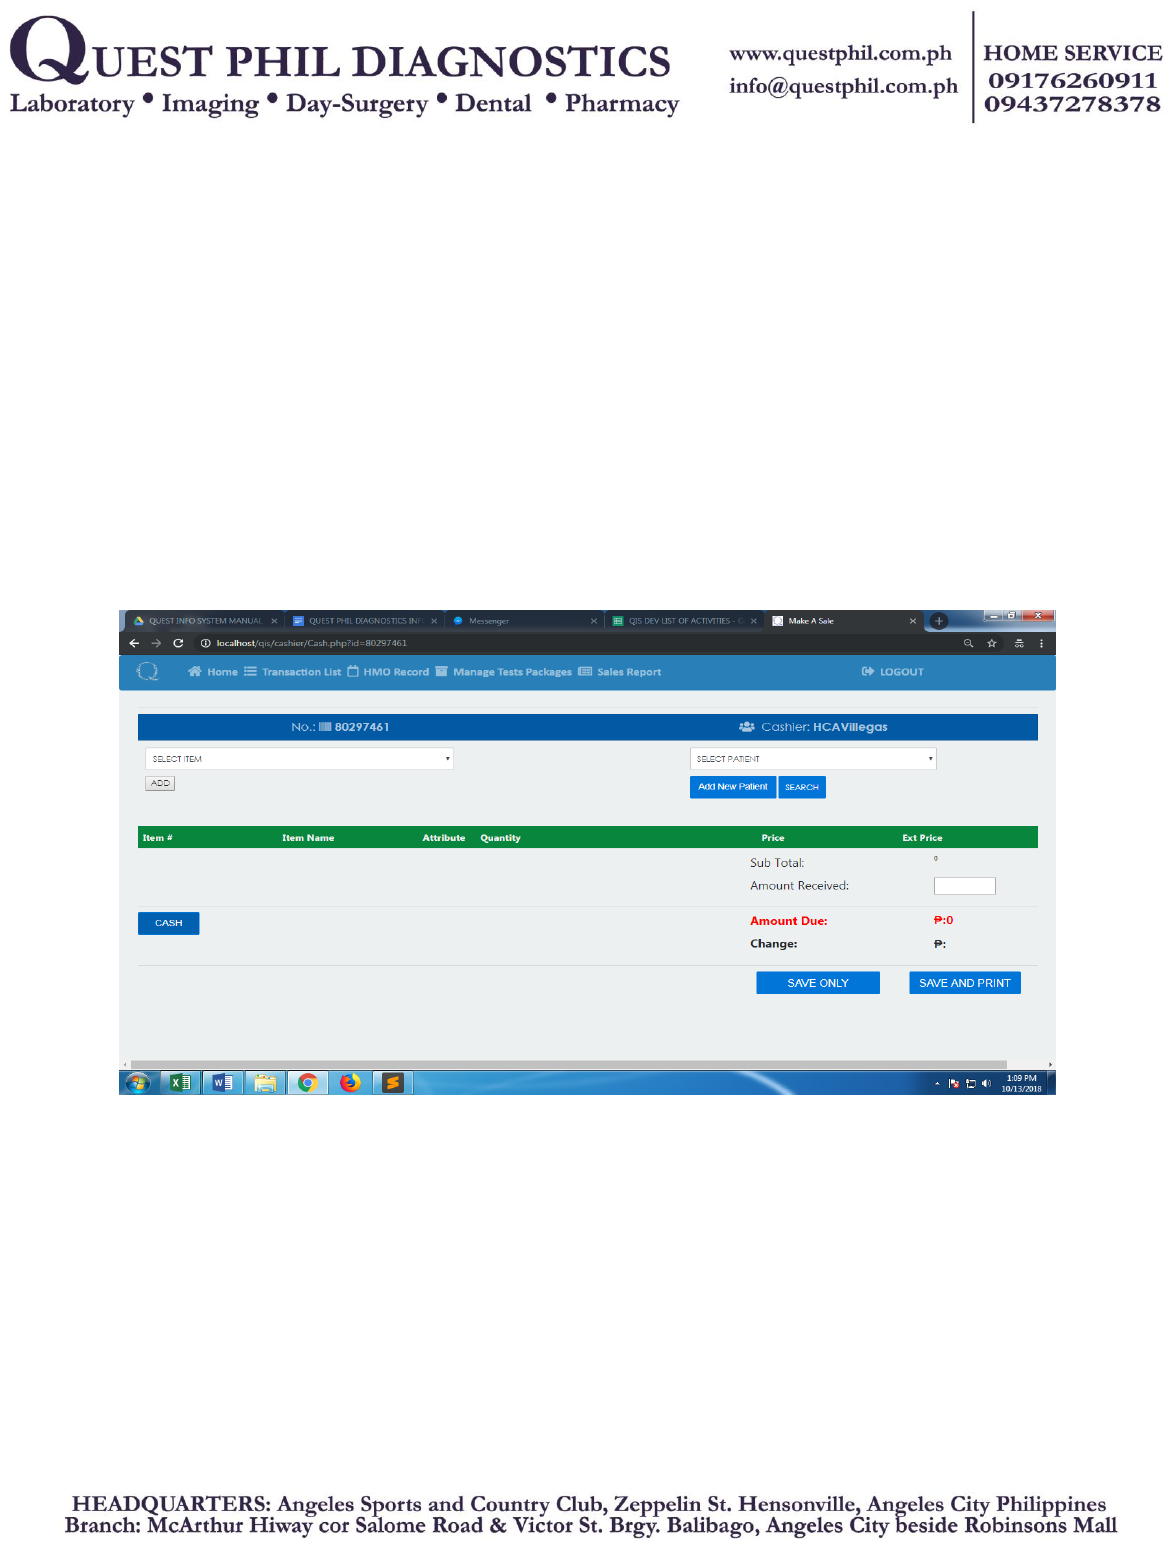
REVISION #1 CASH CASHIER MODULE CHANGES/PROGRESS AS OF 09/29/2018
RE: CASH TRANSACTION
New User Interface Design
The new user interface design only shows the Transaction Form and Item Scroll Bar unlike
the 1st Version where both Patient Scrollbar/Form and Transaction Form / Item Scroll Bar
where on the same page. The PAYOUT button was also added.
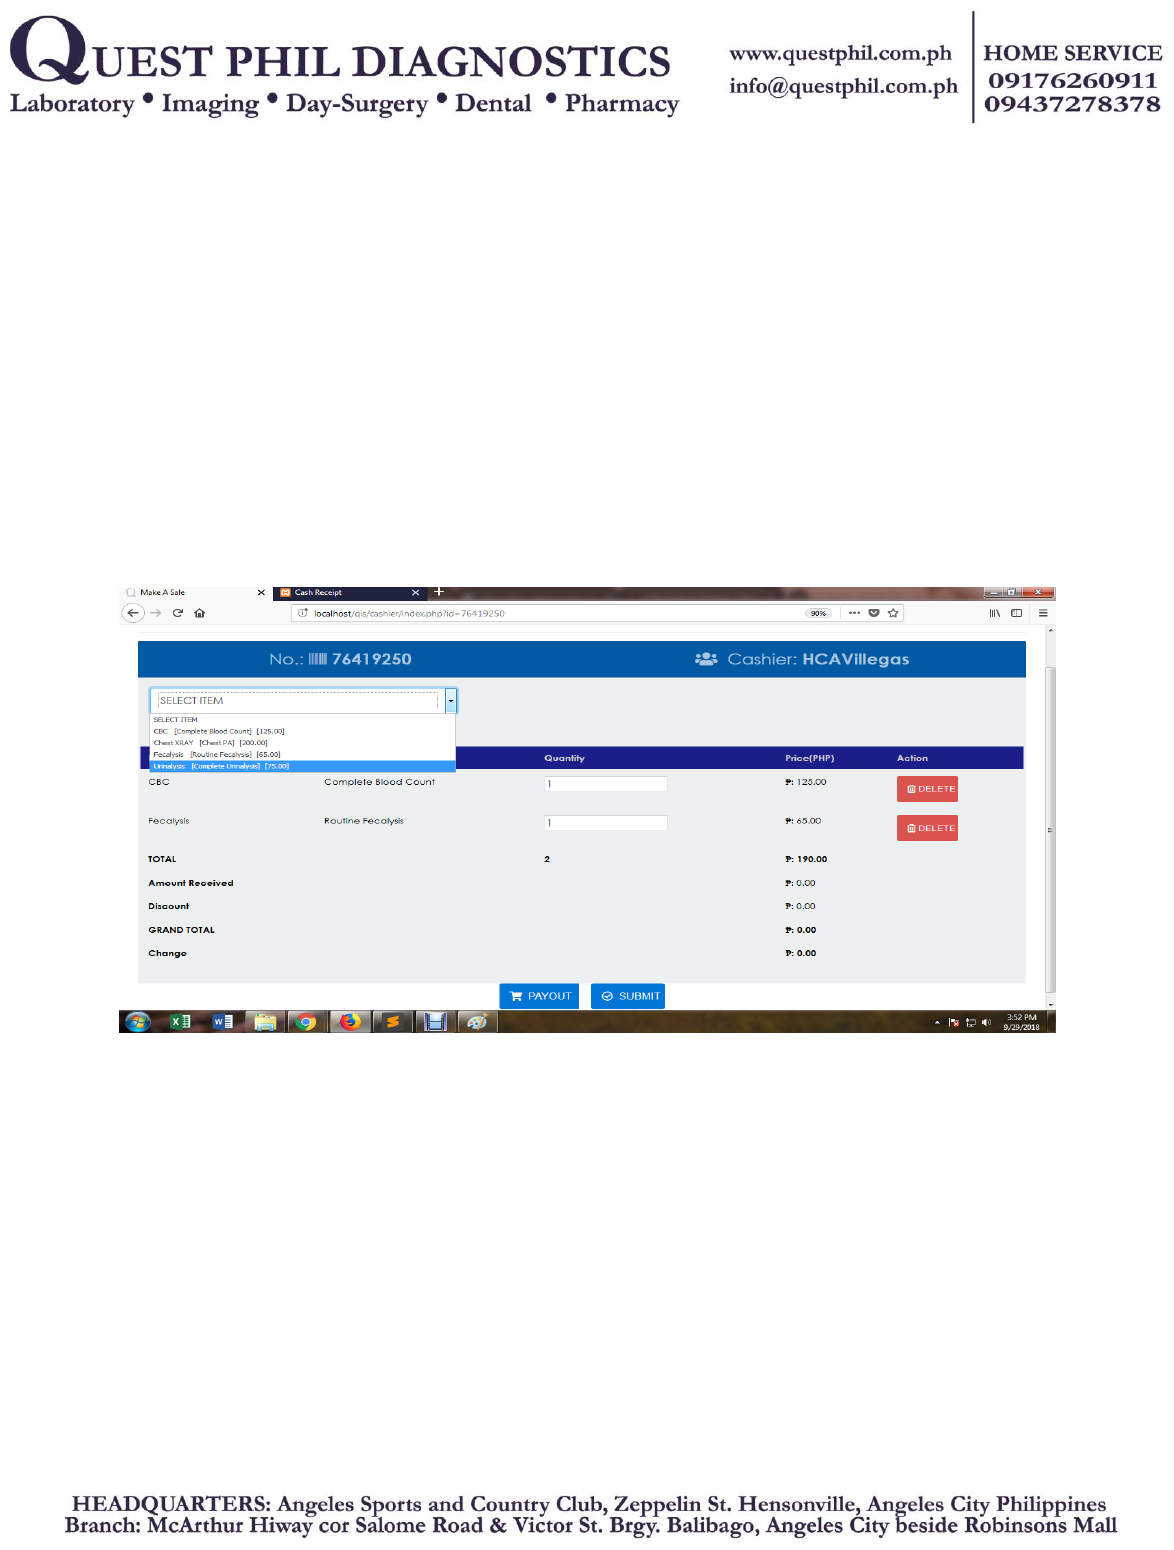
Choose Item, Add to Transaction Form, Edit Quantity, Delete Item
After choosing and adding items from the ITEM SCROLLBAR and once added in the
Transaction Form, the user can edit the ITEM QTY per item by modifying the default QTY
per item shown in a text field. The user can also DELETE ITEM in the Transaction Form
by simply clicking the DELETE button located in the right side of the screen.
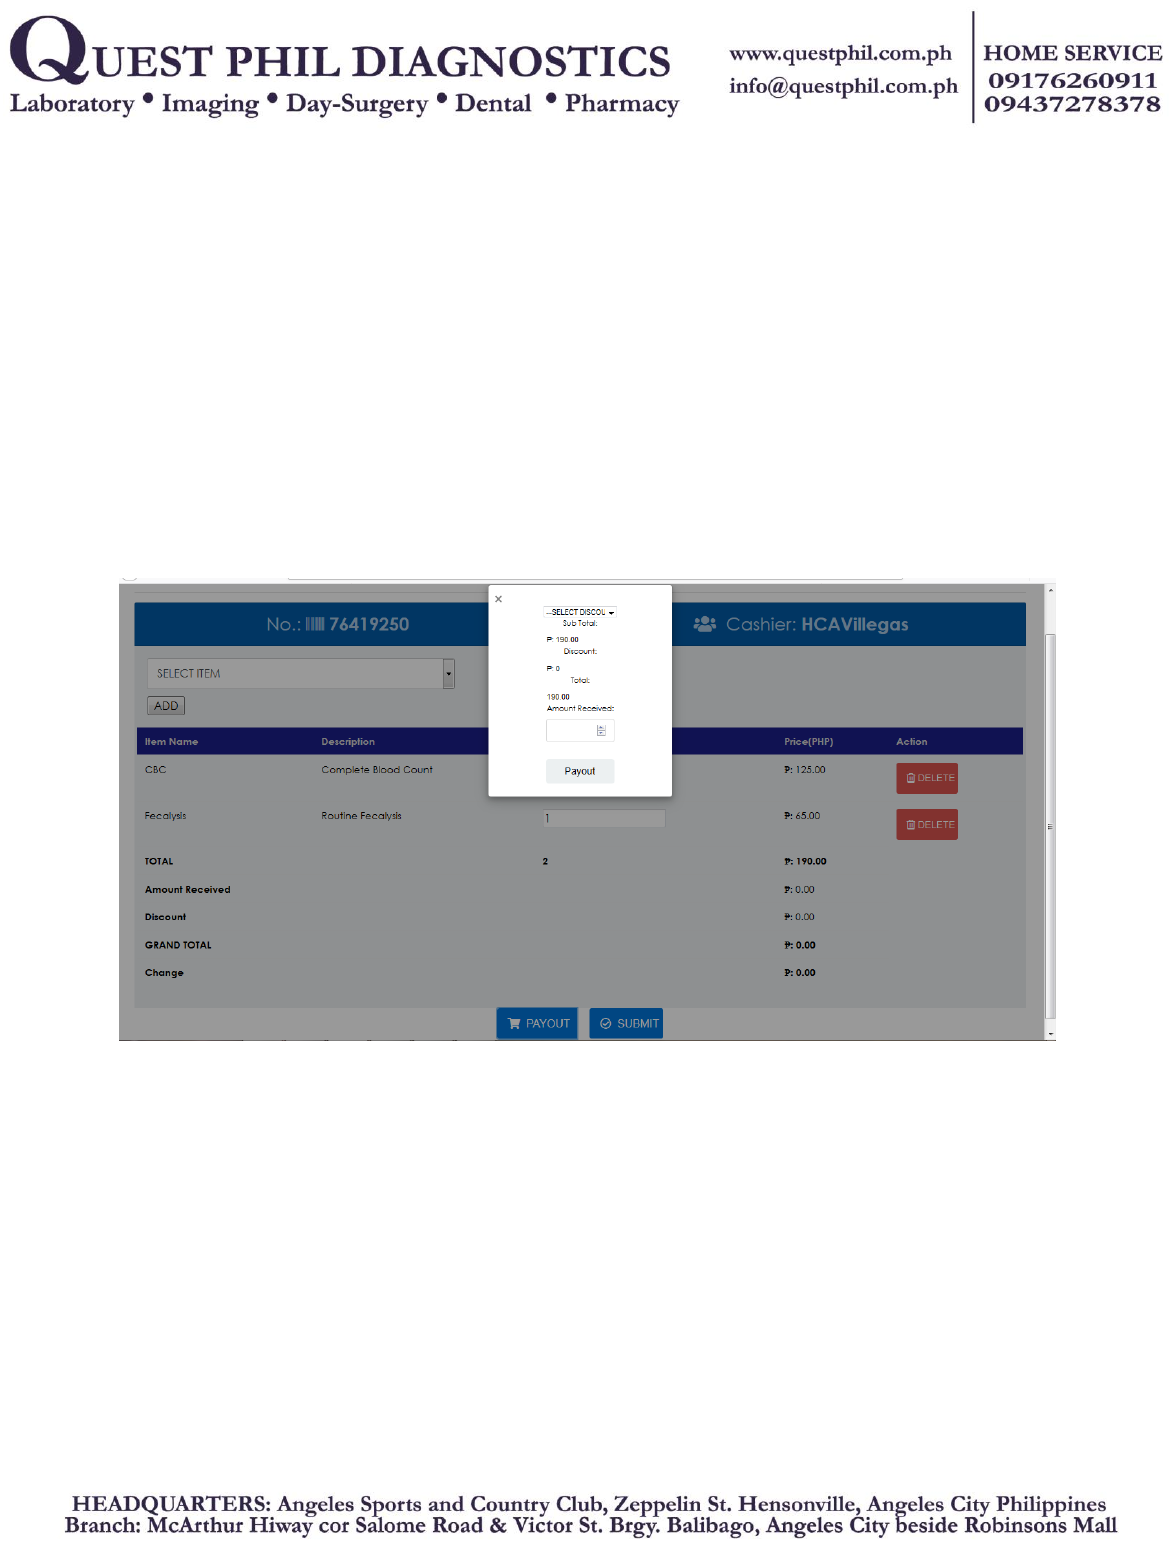
PAYOUT
After finalizing all items to avail, the user must click the PAYOUT button. PAYOUT button
enables the user to select discount and input amount received from the customer/patient.
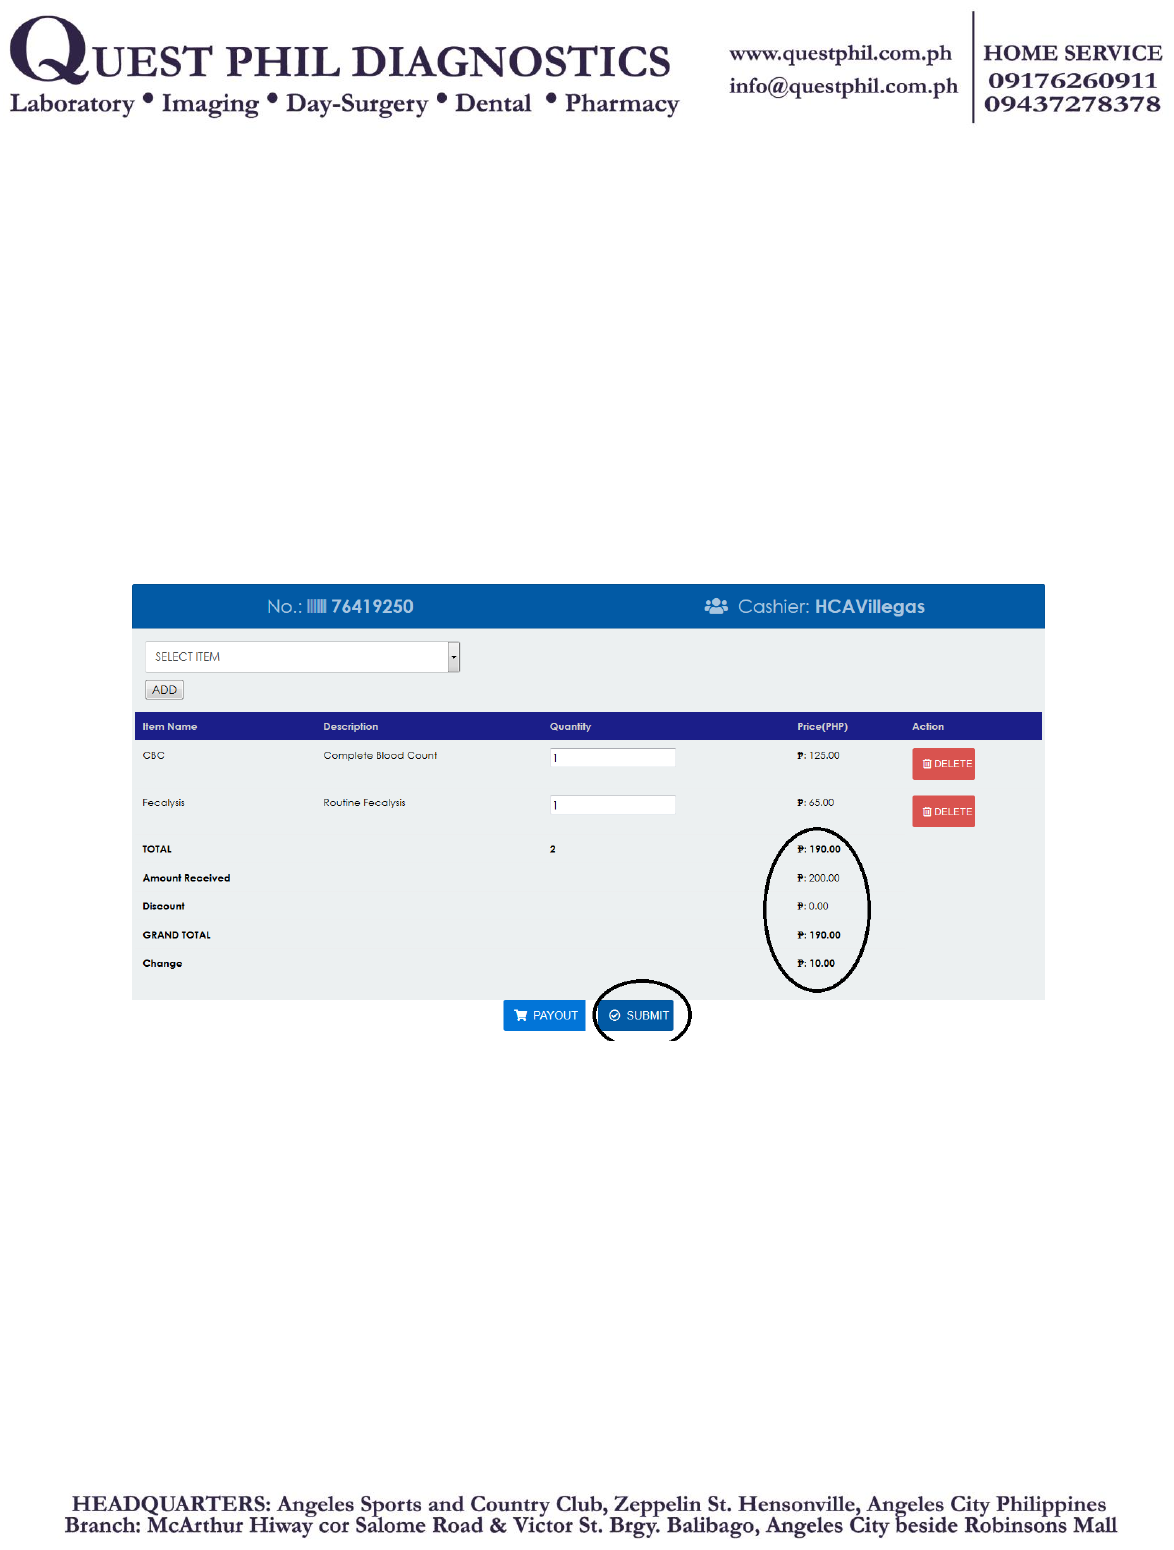
SUBMIT
After PAYOUT has been done, the computation of the input will be shown under the
amount of the Items. Click submit to finalize transaction.
ADD/SEARCH NEW PATIENT
After the submission of the items to avail, the page will redirect to a new page where the
user can SEARCH then MODIFY or ADD NEW RECORD of patient. Once done, click
submit to save all new information of Patient.
TRANSACT CASH and PRINT RECEIPT.
Once the user clicked the CASH button, the page will automatically transact CASH and
redirect to another tab that shows the receipt format and printing of CASH RECEIPT.
REVISION #2 CASHIER MODULE CHANGES/PROGRESS AS OF 10/13/2018
RE: CASH TRANSACTION
INTERFACE
Unlike the previous revision, this look was based from the QuickBooks POS v.11 which
Quest Phil Staffs are used to.
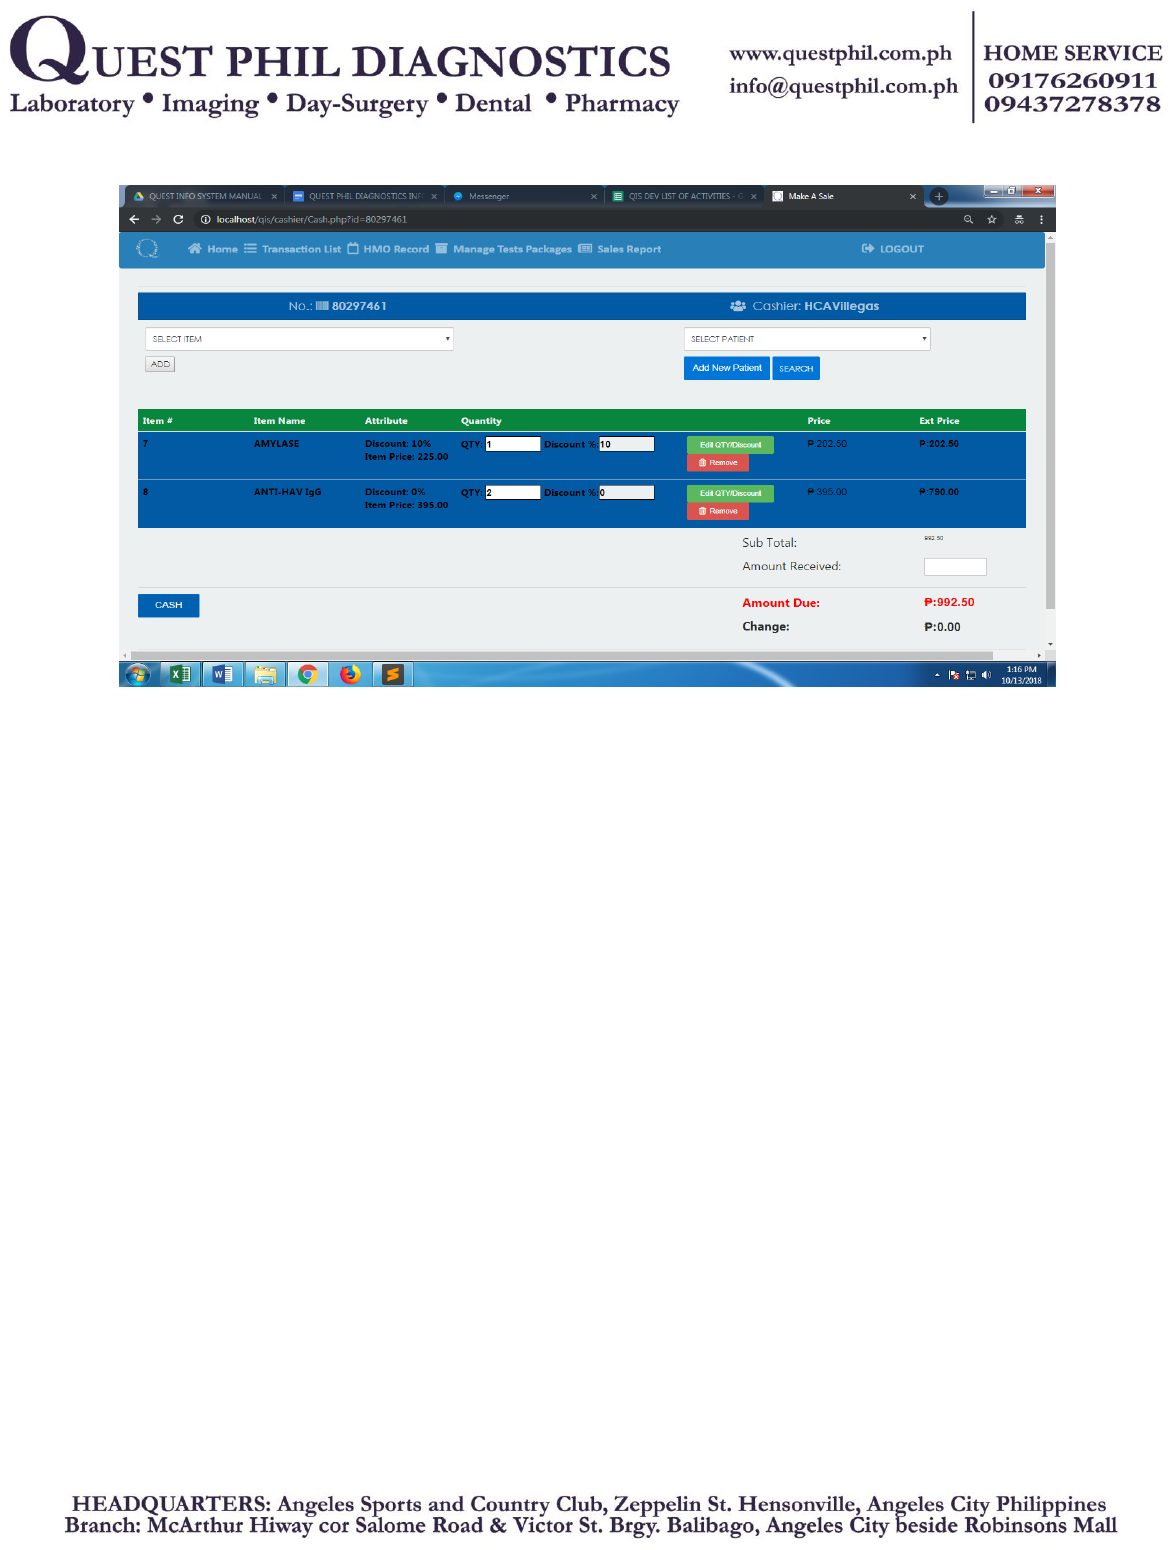
EDIT QUANTITY
We have added input box for the modification of QTY. The user can now edit the quantity of
an item by simply changing the default value of 1 inside the input box beside the QTY label.
Once the input was changed, the user can now click the “Edit Quantity/Discount” button to
apply and compute the changes. The result of the computation will be displayed under the
“Ext Price” header, which stands for EXTENDED PRICE. The formula for this would be:
Price x QTY = Ext Price.
EDIT DISCOUNT %
We have added input box for the modification of Discount %. The user can now edit the
discount percentage of an item by simply changing the default value of 0 inside the input
box beside the “Discount %” label. Once the input was changed, the user can now click the
“Edit Quantity/Discount” button to apply and compute the changes. The result of the
computation will be displayed under the “Price” header. The formula for this would be: In
getting the discount amount, Discount Total = Discount Percentage / 100 x Item Price.
In computing for the Price: Price = Item Price - Discount Total
COLORED ITEM ROW
To highlight the chosen items, we have colored each item row like in the POS.
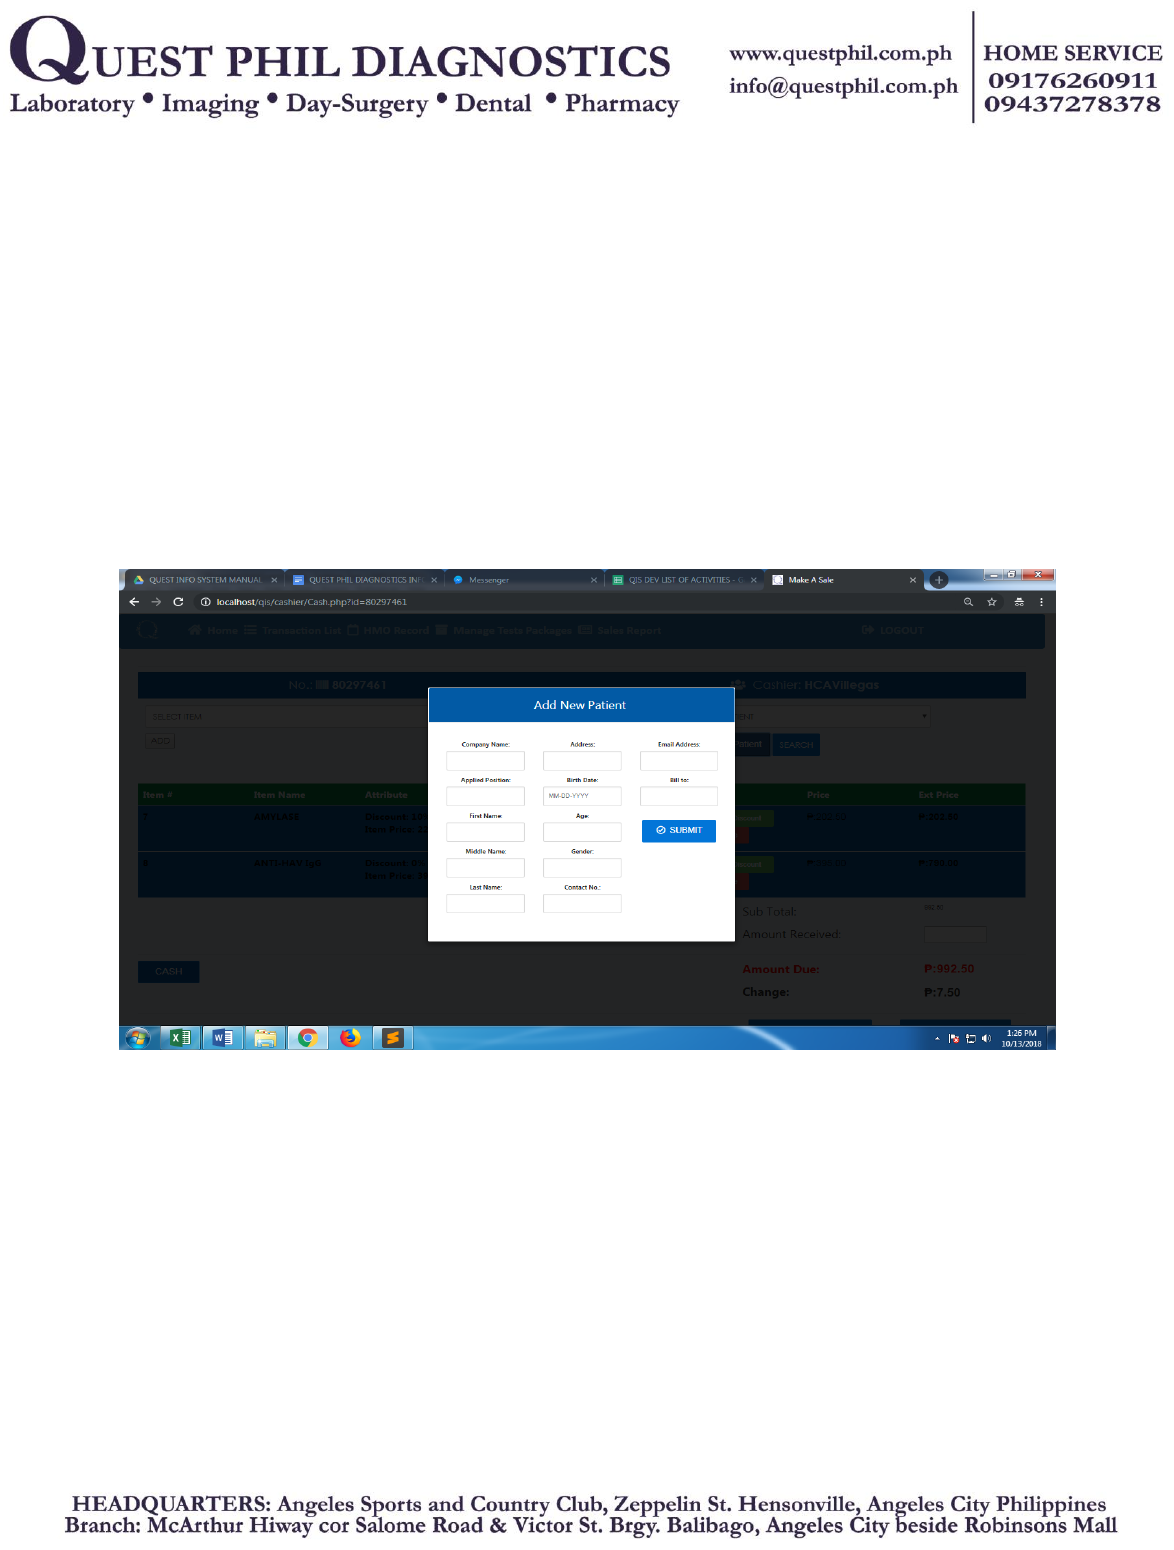
ADD NEW PATIENT MODAL
We have changed this feature back from its original form because it is easier for the user to
do the transaction simultaneously when it is in the same page as the transaction list before
the final submit

AMOUNT DUE AND CHANGE POP-UP MESSAGE
Like in the POS transaction, we have added this feature for the cashier to see the final
amount and change to be given back to the customer/patient before submitting and printing
the receipt.
