QS Guide Configuring GNX Devices V2
User Manual:
Open the PDF directly: View PDF ![]() .
.
Page Count: 15

Quick Start Guide for Configuring
GenX Mobile Devices

Quick Start Guide for Configuring
GenX Devices
Page 2 of 15
GenX Mobile Proprietary & Confidential 2011
GenX Mobile reserves the right to change specifications and content without notice
Introduction 3
Predetermining Settings 3
Preparing the GenX Mobile Device (GMD) 3
Setting Parameters Via Serial 4
Setting Parameters Via SMS 6
Downloading the Quick Start Configuration 6
Data Structure 7
Removing the GMD from Power 8
Appendix A - Configuring Manually 9
Appendix B - GenX 5p Wiring Schematic 9
Appendix C - Green and Red LED Reference 9
Quick Start Guide for Configuring
GenX Devices
Page 3 of 15
GenX Mobile Proprietary & Confidential 2011
GenX Mobile reserves the right to change specifications and content without notice
Introduction:
This guide is intended to get GenX Mobile Devices (GMD)s up and running in the quickest most simplistic way to
facilitate evaluation. This consists of a basic configuration file hosted by GenX Mobile on a TFTP server.
Configurations can be modified in a myriad of ways once the unit(s) are reliably reporting to data server(s).
Application Service Providers (ASP) will commonly host the configuration files themselves once evaluation and
implementation is complete. A TFTP or FTP server is a very common, simple, inexpensive and yet effective tool for
managing the creation and editing of device configurations. GenX recommends Filezilla FTP server and Winagents
TFTP server for windows platforms. Once the GMD comes on-line it will instantaneously contact the GenX TFTP
server. In order to safeguard changes implemented during testing and evaluation, the file retrieved at the GenX
server initially contains no parameter settings.
Predetermining Settings:
There are a few basics that must be known before the GMD can be programmed
1) APN (for GSM units only)
2) IP address and port of server to send data
3) Protocol for the data sent (UDP or TCP)
4) Update rate at which the GMD will regularly transmit data when ignition is on and off.
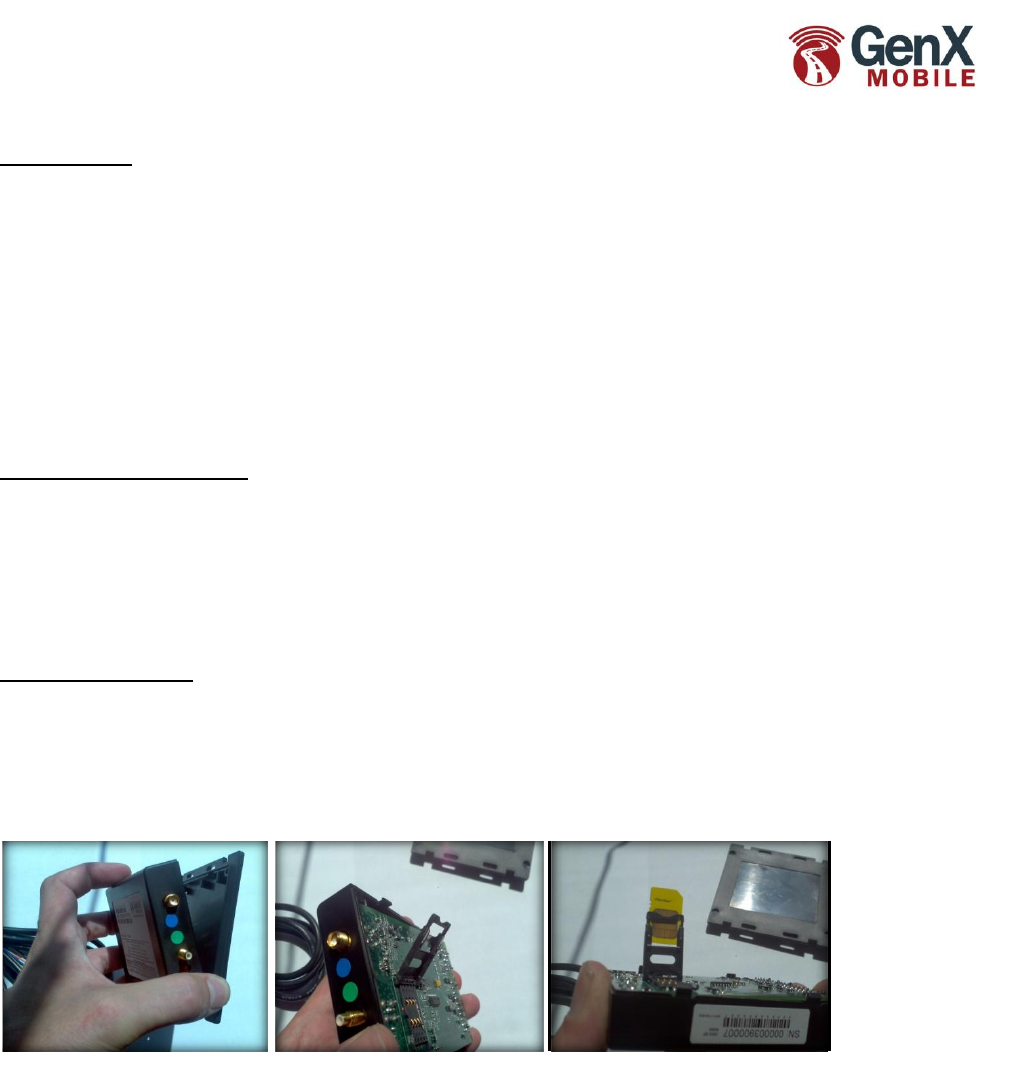
Preparing the GMD
1. Step 1) (for GSM 5p units only - CDMA units will ordinarily activate over the air)
Open the GMD by squeezing the longer sides of the enclosure to disengage the tabs. Locate and open the
sim door and insert the sim card as pictured below. Shut and lock the sim door and reassemble the
enclosure.
Please *
Step 2) Connect the GPS and Cellular Antenna.
Step 3) Connect the serial cable to the GMD and then to your PC. You will need to use a terminal emulator
program such as Tera Term to enter in a few parameters.
Note: GenX 20,
10, and legacy
10L GSM devices
may have a sim
drawer or require
removal of screws
to access sim
card. Contact
GenX Mobile for
more information
if needed.
Quick Start Guide for Configuring
GenX Devices
Page 4 of 15
GenX Mobile Proprietary & Confidential 2011
GenX Mobile reserves the right to change specifications and content without notice
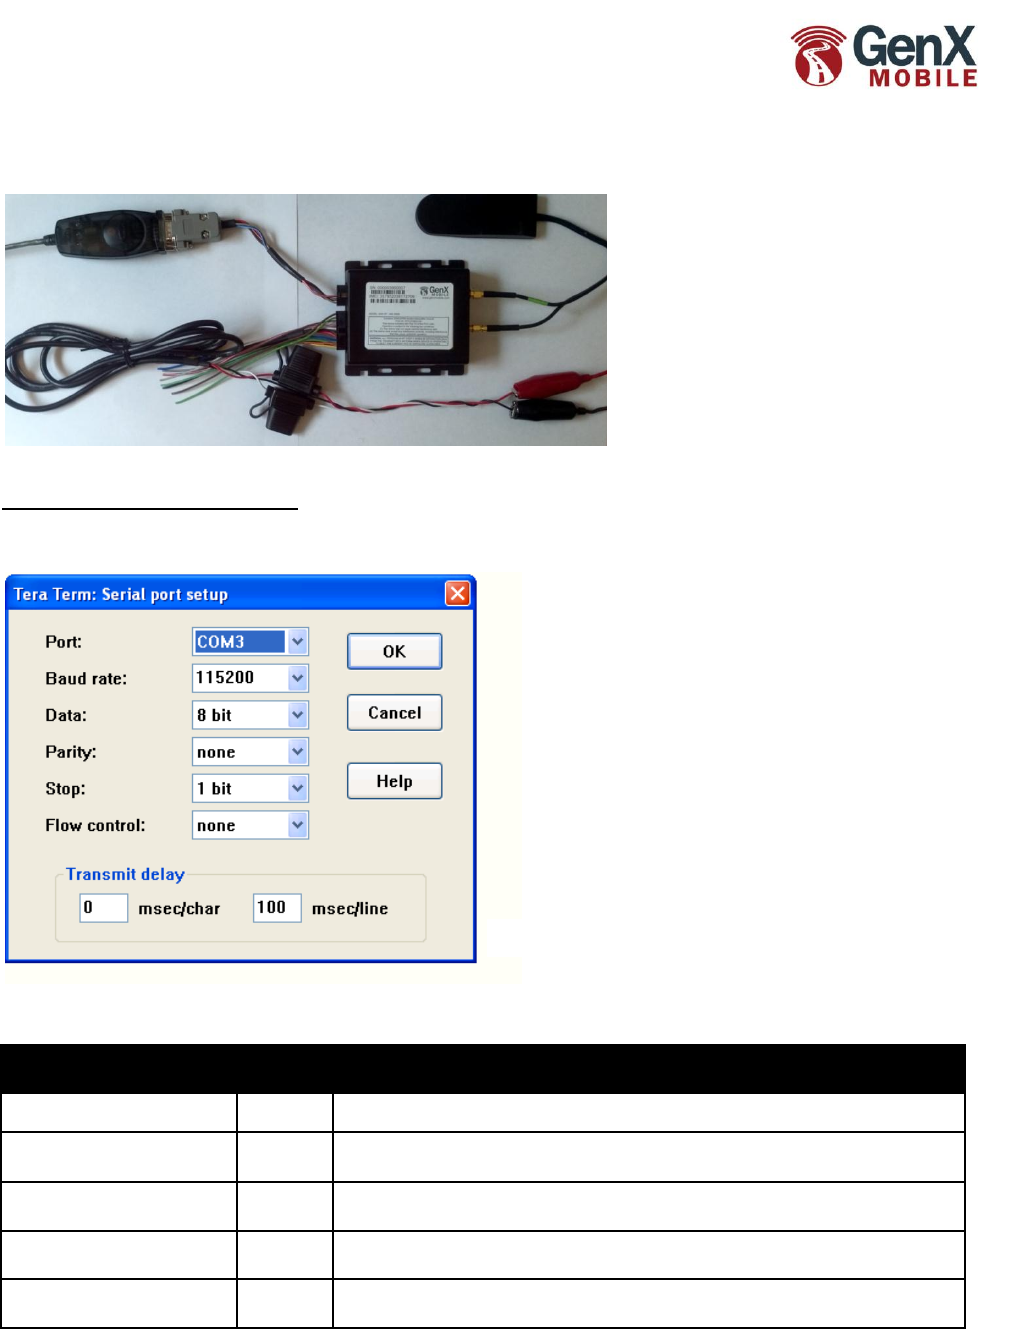
Step 4) Connect the GenX power harness to the unit and power up the GenX Mobile Device by supplying 12 Volt+
to the RED constant wire and to the WHITE Ignition wire. Connect the BLACK ground wire to ground.
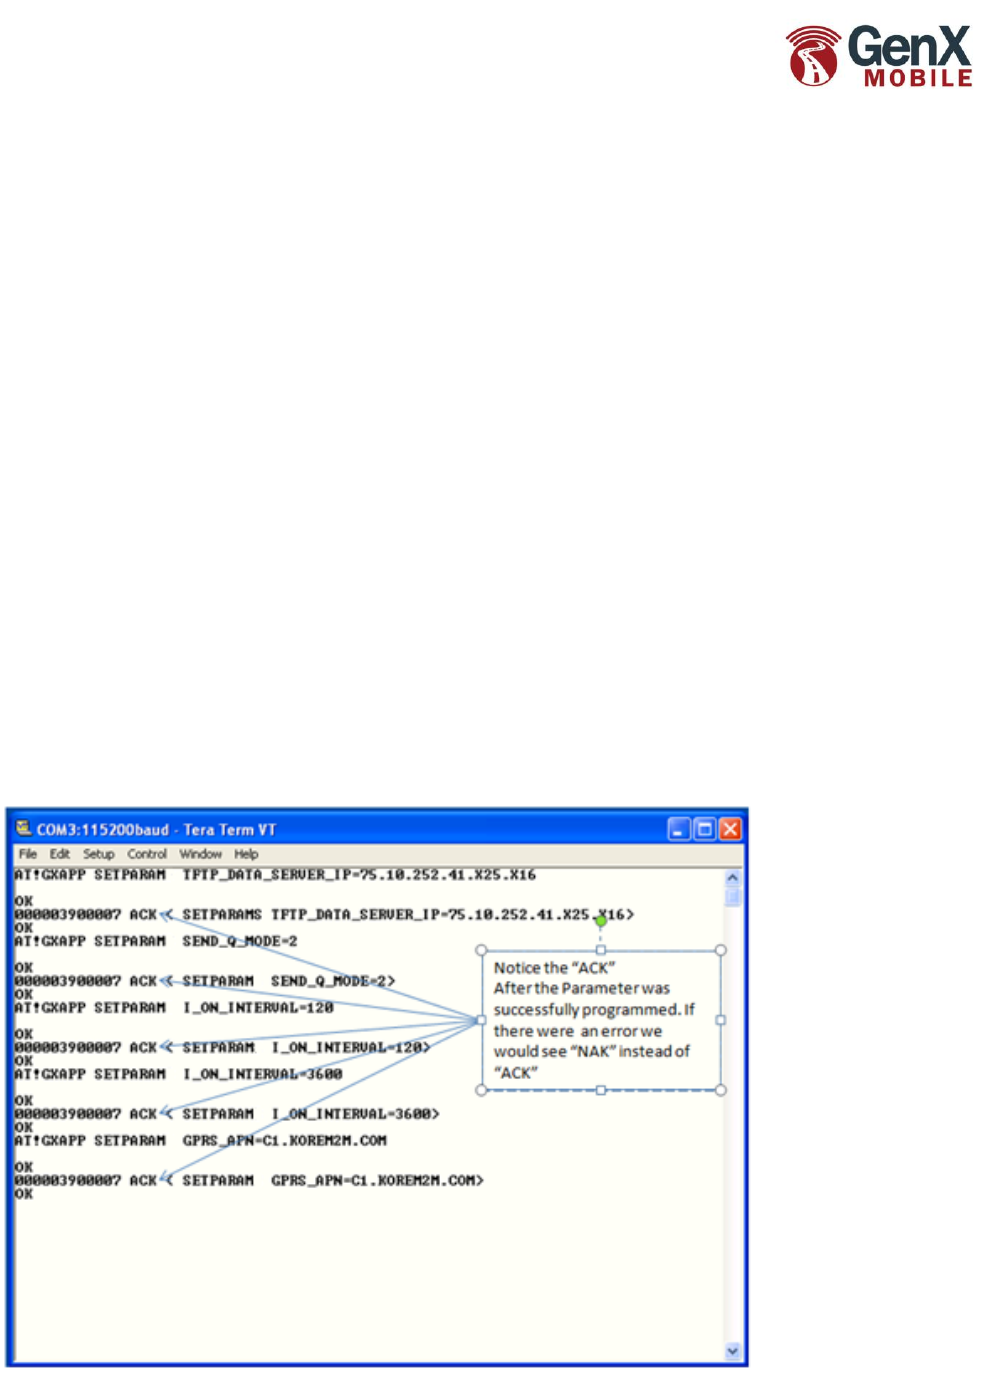
Setting Parameters Via Serial:
Start the terminal emulator (HyperTerminal, tera term etc.) running at 115200 baud, 8 data bits,1 stop bit, no
parity, no flow control. Set the line delay to 100 msec/line. As pictured here:
There are only 4 to 5 Parameters that will need to be set to get the unit up and running with the Quick Start
Configuration. They are as follows:
Parameter: ASCII Tag
(Numeric Tag)
Range
Description
TFTP_DATA_SERVER_IP
(30)
IP
address
IP address of data server and port of data server.
SEND_Q_MODE(5)
BYTE
bitmap
The mode used for sending data to server UDP=2, TCP=32
I_ON_INTERVAL(101)
0-2^32-1
0-disabled, else interval in seconds between recording position when ignition is
on.
I_OFF_INTERVAL(102)
0-2^32-1
0-disabled, else interval in seconds between recording position when ignition is
off.
GPRS_APN (18)*
Short
string
This parameter can be modified to force the GMD to use a custom APN, or for
Mobile networks for which the GNX does not have a default APN.
Tera Term screen shot
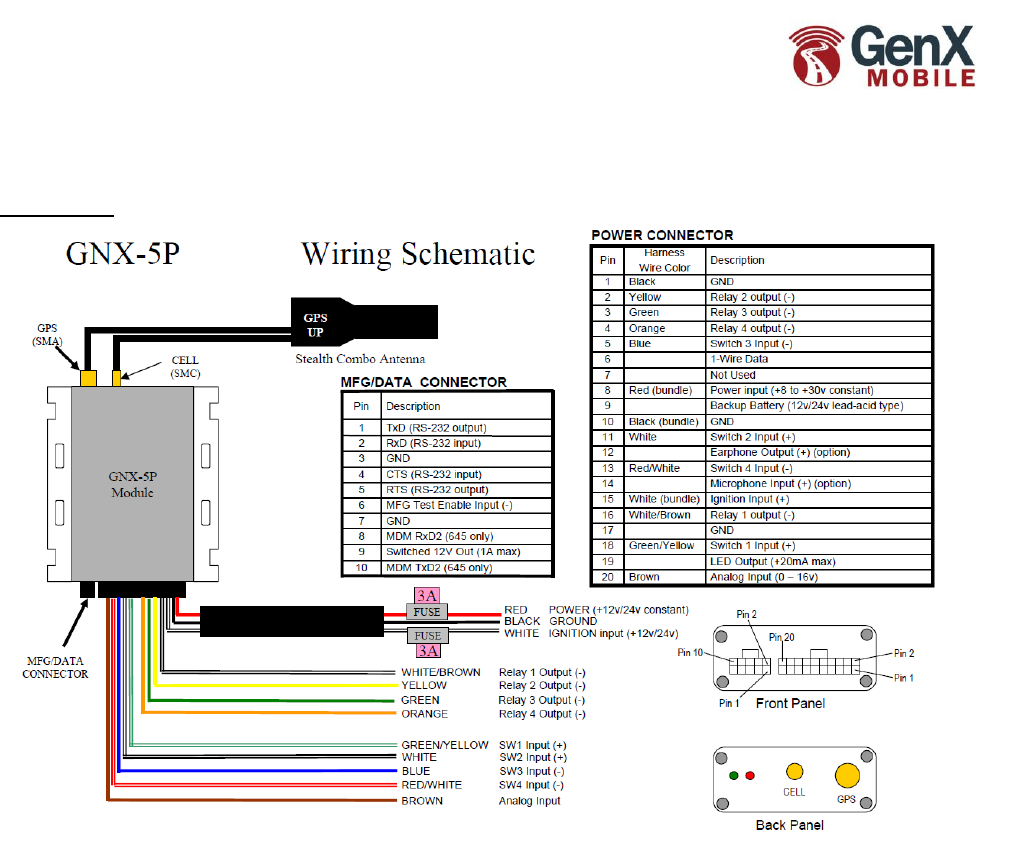
GenX 5p connected to power,
dual antenna and serial cable.
See Appendix B for full wiring
diagram
ee
Quick Start Guide for Configuring
GenX Devices
Page 5 of 15
GenX Mobile Proprietary & Confidential 2011
GenX Mobile reserves the right to change specifications and content without notice
*The GMD will attempt to set the APN automatically based on the sim's International Mobile Subscriber Identity
(IMSI). If the APN is private or the sim is from a Mobile Virtual Network Operator(MVNO) then it may be required
to set the APN manually.
In this exercise below, we will set the GMD for a KORE sim with an APN of C1.KOREM2M.COM, UDP mode, Ignition
On interval of 120 seconds (2 minutes),Ignition off interval of 3600 (hourly) and to report to IP 75.10.252.41 port
9494 Here are the AT commands used with a terminal emulator connected to the GMD via serial:
AT!GXAPP SETPARAM TFTP_DATA_SERVER_IP=75.10.252.41.X25.X16
AT!GXAPP SETPARAM SEND_Q_MODE=2
AT!GXAPP SETPARAM I_ON_INTERVAL=120
AT!GXAPP SETPARAM I_OFF_INTERVAL=3600
AT!GXAPP SETPARAM GPRS_APN=C1.KOREM2M.COM
AT!GXAPP BACKUPNVRAM
Note: the port is represented with 2 additional bytes at the end of the TFTP_DATA_SERVER_IP parameter. It may
be formatted in Hex to aid legibility. So to find the setting for port 9494 we convert 9494 to hex which is 2516
(x25.x16). Alternatively, we can take the port of 9494 and divide by 256 which equals 37 with a remainder of 22.
Therefore the setting of the last 2 bytes is 37.22. Either setting of .x25.x16 or .37.22 will work.
e.g. AT!GXAPP SETPARAM TFTP_DATA_SERVER_IP=75.10.252.41.X25.X16 or
AT!GXAPP SETPARAM TFTP _DATA_SERVER_IP=75.10.252.41.37.22
The BACKUPNVRAM command will Copy non-volatile settings to FLASH memory so that they are recovered in the
event of power failure. BACKUPNVRAM should be used after setting parameters. The Quick Start Configuration will
set PERIODIC_BACKUP (69) to 60 minutes to automatically back up parameters as well.
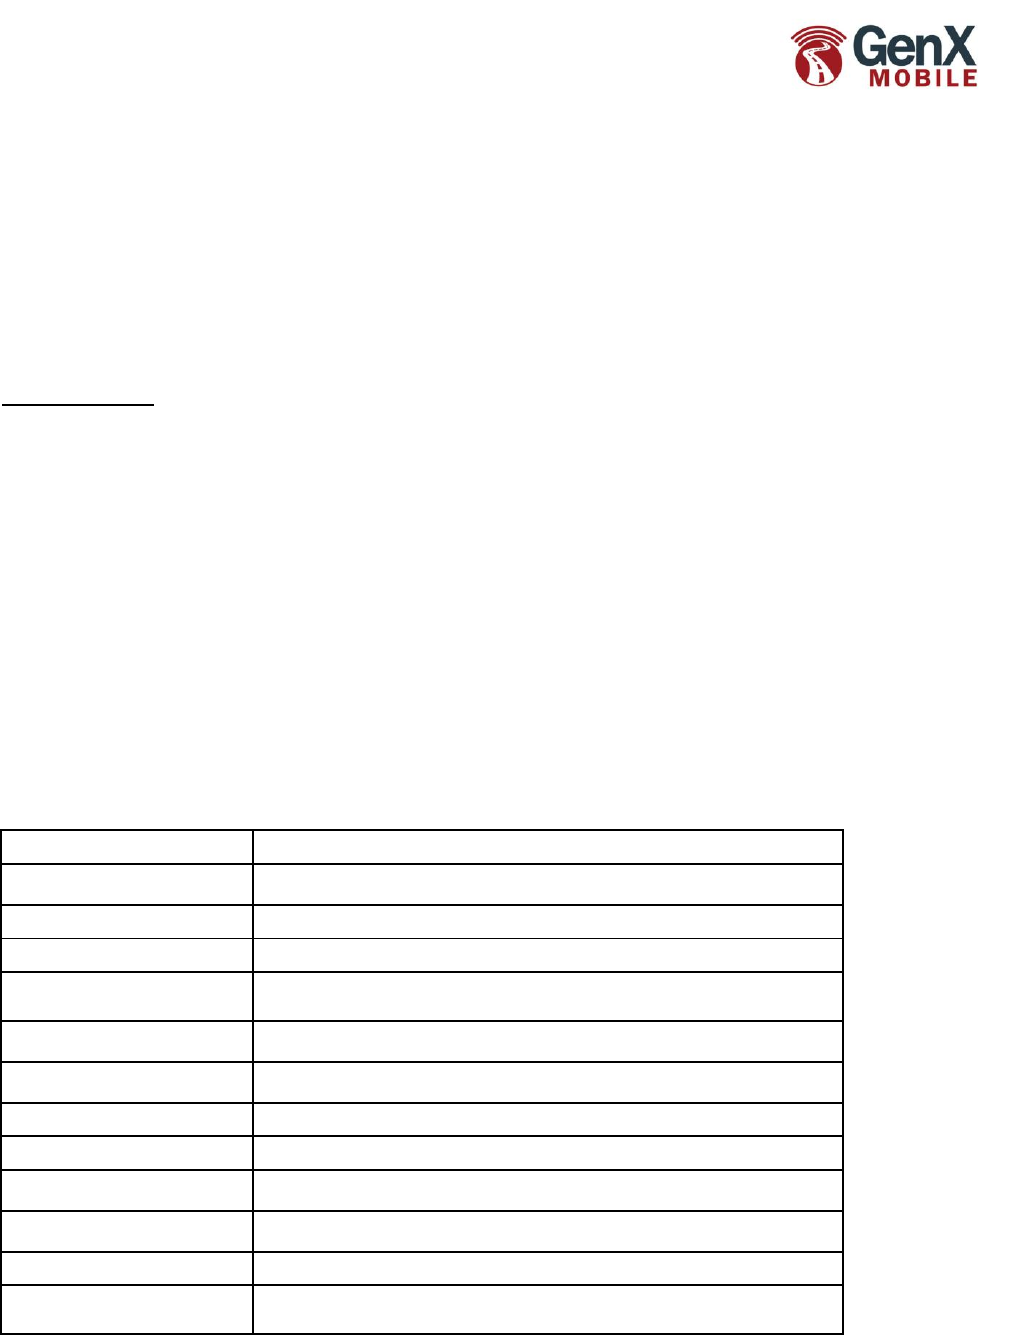
Below is an example of the above AT Command parameters copied from a .txt file and then pasted into Tera Term:

Quick Start Guide for Configuring
GenX Devices
Page 6 of 15
GenX Mobile Proprietary & Confidential 2011
GenX Mobile reserves the right to change specifications and content without notice
Any parameter can be checked by entering AT!GXAPP DIAG PARAMS=<PARAMETER>
e.g.
AT!GXAPP DIAG PARAMS=GPRS_APN
OK
PARAMETERS
18=C1.KOREM2M.COM;
OK
Setting Parameters Via SMS
Parameters can also be set remotely via sms. Text messages must be sent in upper case. Here is an
example of what would be sent (in seperate SMS Messages) to the GMD to set the Parameters.
SETPARAM TFTP_DATA_SERVER_IP=75.10.252.41.X25.X16
SETPARAM SEND_Q_MODE=2
SETPARAM I_ON_INTERVAL=120
SETPARAM I_OFF_INTERVAL=3600
SETPARAM GPRS_APN=C1.KOREM2M.COM
BACKUPNVRAM
Parameters can also be checked by sending an sms to the unit's phone number as demonstrated below.
Please note that a leading 1 must be included for the SMS to be sent back to a US SIM.
DIAG PARAMS=GPRS_APN VIASMS 15555551212
In this example the GMD will send a SMS response to 15555551212 like this:
PARAMETERS 18=C1.KOREM2M.COM;
Downloading the Quick Start Configuration
Once the unit is On-line you will need to have the unit download the quick start configuration. Do this by
entering:
AT!GXAPP GETFILE VIATFTP 75.10.252.41 FILENAME GMI_CFG_QS_v2.cfg;
Or by sms, send:
GETFILE VIATFTP 75.10.252.41 FILENAME GMI_CFG_QS_v2.cfg;
This will cause the unit to visit the GenX TFTP server, get and configure the Quick Start Configuration.
The unit will NOT automatically RESYNC to this file on a regular basis. This is so that parameters can be
changed without the risk of them being overwritten. However, it is reccomended that unit(s) download
a full configuration file or check for changes periodically once integration is complete. (e.g. every 24
hours, see PARAM_RESYNC_TIME in Reference Manual) See 'VER Tag' in the Reference Manual for more
information on configuring only changes. The file server can be hosted either by GenX Mobile or the
ASP. Please contact GenX Mobile for more information or refer to GenX Doc "GNXConfig_10.pdf."
NOTE: The configuration can be manually loaded via serial connection if desired. See appendix A.
Quick Start Guide for Configuring
GenX Devices
Page 7 of 15
GenX Mobile Proprietary & Confidential 2011
GenX Mobile reserves the right to change specifications and content without notice
To confirm that the GMD has succesfuly downloaded and configured the Quick Start file enter:
AT!GXAPP DIAG PARAMS=PARAM_VERSION
The response should be "QucicStartConfig_<version date>"
e.g.
500=QuickStartConfig_12_14_11;
Data Structure:
Data should now start arriving to the server IP and Port. Please note that if using UDP; the QuickStart
configuration does not have the acknowledge parameter (UDP_MAX_RETIRIES) active. Therefore the
data is not required to be acknowledged. This is soley for the purpoeses of getting data flow to a server
quickly for evaluation wothout the UDPACK requirement. Acknowledgemnts are recomened to prevent
data loss. See GenX Doc "GNXACK_01.pdf," for more on impelemting UDP Acknowledgements.
Below is sample data sent to the data server by the GMD with the Quick Start Configuration:
3900007,33.26495,-111.68707,27,0,3,0,0,2.41,1318365252,00000
3900007,33.26501,-111.68706,28,0,28,3,253,2.41,1318365282,00000
3900007,33.26631,-111.68737,29,0,29,15,30,2.58,1318365317,00000
3900007,33.27548,-111.68999,30,0,2,0,0,5.34,1318365598,00000
<UnitName(SerialNumber),Latitude,Longitude,UniqueID,LocAge(mins),ResonCode,Speed(km/h),VehHdg,Odometer,EventTime(GMTUnix),Switc
hes>
The data received is set by the parameter REPORT_COLUMNS. The Quick Start configuration is set to:
REPORT_COLUMNS=1.3.4.7.8.10.13.17.23.36.65.11;
Column Name (numeric identifier)
Description
UnitName (1)
Textual name tag assigned to the GNX by the user for ease of reference. This is the
Serial Number of the GMD with the Quick Start Configuration
Latitude (3)
Latitude of event in fractional degrees, -90 to 90
Longitude (4)
Longitude of event in fractional degrees, -180(W) to 180(E)
UniqueID(7)
A 32 bit unsigned integer that increments with each position sent, to allow unique
identification (and reference) of each position. Very useful for troubleshooting.
LocAge(mins) (8)
Age of the position fix at the time of recording the event, in minutes, 0-240. 0-position
fix was current and good.
ReasonCode (10)
The reason that caused the GNX to queue this event, see section 4.7 of the reference
manual. This is the Numeric code.
Speed(km/h) (13)
The speed of the GNX in km/h at the time the event was recorded.
VehHdg (17)
Heading in degrees.
Odometer(km) (23)
GNX odometer in km. (Piecewise linear approximation, with maximum resolution of 1
second of travel).
EventTime(GMTUnix) (36)
UNIX epoch timestamp of event. This is a 32 bit unsigned integer second count,
starting on Jan 1st 1970. No GMT offset is applied.
Switches (65)
State 0/1 of all 5 (12 for GenX 20) PTO switches (12345)eg 00000 11111
Ign (11)
“ON” or “OFF”. The state of the true or pseudo-ignition at the time the event was
recorded.

Quick Start Guide for Configuring
GenX Devices
Page 8 of 15
GenX Mobile Proprietary & Confidential 2011
GenX Mobile reserves the right to change specifications and content without notice
Removing the GMD (without back up battery) from Power
Turn the ignition off by removing the white wire from power. Issue the command PWROFFGNX
(example below). This will perform a controlled shutdown of the GMD and store vital parameters to non
volatile flash memory. The ignition must be off for the GMD to accept the PWROFFGNX command.
AT!GXAPP PWROFFGNX
OK
Powerdown(1818) 10070mins WM:F5
Powering down CPU 604800 00FD 0656..LPM
IMPORTANT: It is vital that a GenX unit with a back up battery is powered down with this specific
routine:
- with power and ignition connected
- Type AT!GXPOWERDOWN
- Wait for +POWERDOWN:READY
- Remove from power
The GMD will power back on once the constant (RED) and ignition (WHITE) wires are supplied with
+12VDC.
Please note that this quick start configuration is inteneded to get units reporriting data to a server in a
speedy fashion. Device configurations can be modified in a vast amount of ways. Please refer to the full
GenX Reference Manual for all command references and parameter defintions or contact GenX Mobile
for more information.

Quick Start Guide for Configuring
GenX Devices
Page 9 of 15
GenX Mobile Proprietary & Confidential 2011
GenX Mobile reserves the right to change specifications and content without notice
Appendix A
Loading the Quick Start Configuration manually over serial connection with a terminal emulator.
If desired, the Quck Start Configuration can be loading directly to the unit opposed to doing it over the
air via TFTP or FTP. To accomplish this, a .txt file (also known as a script) with AT commands is sent to
the unit using a terminla emulator. All commands on the external UART must be preceded by:
at!gxapp
Please contact GenX mobile for a copy of the SCRIPT_ GMI_CFG_QS_v2 file if needed.
The SCRIPT_GMI_CFG_QS_v2.txt file contains the follwong parameter setting commands:
AT!GXAPP SETPARAM ACCEL_CONFIG=20.15.200.200.200.1000;
AT!GXAPP SETPARAM ALARM_MODE=x00;
AT!GXAPP SETPARAM ALARM_INTERVAL=10;
AT!GXAPP SETPARAM ALARM_DURATION=5;
AT!GXAPP SETPARAM DEAD_CALL_DETECT=2.4;
AT!GXAPP SETPARAM PKT_CALL_INTERVAL=300;
AT!GXAPP SETPARAM PKT_CALL_IDLE=300;
AT!GXAPP SETPARAM RSSI_HYSTERESIS_TIME=600;
AT!GXAPP SETPARAM WATCHDOG_ENABLE=100;
AT!GXAPP SETPARAM GPS_CYCLING_PERIOD=5;
AT!GXAPP SETPARAM IGNORE_GPS_I_OFF=1000.4;
AT!GXAPP SETPARAM START_NAPPING=300;
AT!GXAPP SETPARAM NAP_ON_TIME=10;
AT!GXAPP SETPARAM NAP_OFF_TIME=50;
AT!GXAPP SETPARAM LANDMARK_ALERT_DISTANCE=300;
AT!GXAPP SETPARAM LANDMARK_ALERT_TIME=2;
AT!GXAPP SETPARAM LANDMARK_ALERT_IGN=0;
AT!GXAPP SETPARAM MAX_LANDMARK_DIST=0;
AT!GXAPP SETPARAM POWER_OFF_TIME=86400;
AT!GXAPP SETPARAM POWER_DOWN_VOLTAGE=0;
AT!GXAPP SETPARAM MOVE_INTERVAL=0;
AT!GXAPP SETPARAM STOP_INTERVAL=86400;
AT!GXAPP SETPARAM DISTANCE_INTERVAL=0;
AT!GXAPP SETPARAM REPORT_INTERVAL=0;
AT!GXAPP SETPARAM ALERT_EMAIL=;
AT!GXAPP SETPARAM REPORT_EMAIL=;
AT!GXAPP SETPARAM
PVT_QUALIFIER=5.5.5.5.5.5.5.5.5.5.5.5.5.5.5.5.5.5.5.5.5.5.5.5.5.5.5.5.5.5.5.5.5.5.5.5.5.5.5.5.5.5
.5.5.5.5.5.5.5.5.5.5.5.5.5.5.5.5.5.5.5.5.5.5.5.5.5.5.5.5.5.5.5.5.5.5.5.5.5.5.5.5.5.5.5.5.5.5.5.5.
5.5.5.5.5.5.5.5.5.5.5.5.5.5;
AT!GXAPP SETPARAM SEND_ALERT_MODE=16;
AT!GXAPP SETPARAM UDP_MAX_RETRIES=0;
AT!GXAPP SETPARAM REPORT_FORMAT=0;
AT!GXAPP SETPARAM REPORT_COLUMNS=1.3.4.7.8.10.13.17.23.36.65.11;
AT!GXAPP SETPARAM HIGH_SPEED_ALERT_THRESHOLD=100;
AT!GXAPP SETPARAM LOW_SPEED_ALERT_THRESHOLD=90;
AT!GXAPP SETPARAM SPEED_HYSTERESIS_TIME=10;
AT!GXAPP SETPARAM IDLE_TIMER=0;
AT!GXAPP SETPARAM PARK_TIMER=0;
AT!GXAPP SETPARAM MAP_HTTP_LINK=maps.google.com/maps?q=%%LAT--%%+%%LON--%%;
Quick Start Guide for Configuring
GenX Devices
Page 10 of 15
GenX Mobile Proprietary & Confidential 2011
GenX Mobile reserves the right to change specifications and content without notice
AT!GXAPP SETPARAM STOP_SPEED=5;
AT!GXAPP SETPARAM MOVE_SPEED=15;
AT!GXAPP SETPARAM STOP_TIMER=90;
AT!GXAPP SETPARAM MOVE_TIMER=20;
AT!GXAPP SETPARAM SWITCH_ON_TIME=1.1.1.1.0;
AT!GXAPP SETPARAM SWITCH_OFF_TIME=1.1.1.1.0;
AT!GXAPP SETPARAM PARAM_RESYNC_TIME=86400;
AT!GXAPP SETPARAM UNIT_NAME=%SNNLZ%;
AT!GXAPP SETPARAM PARAM_VERSION=QuickStartConfig_06_07_12;
AT!GXAPP SETPARAM PERIODIC_BACKUP=3600;
AT!GXAPP BACKUPNVRAM;
Below is an example with screen shots (using Tera Term) of the process of sending the
SCRIPT_GMI_CFG_QS_v2.txt file to a connected GMD.
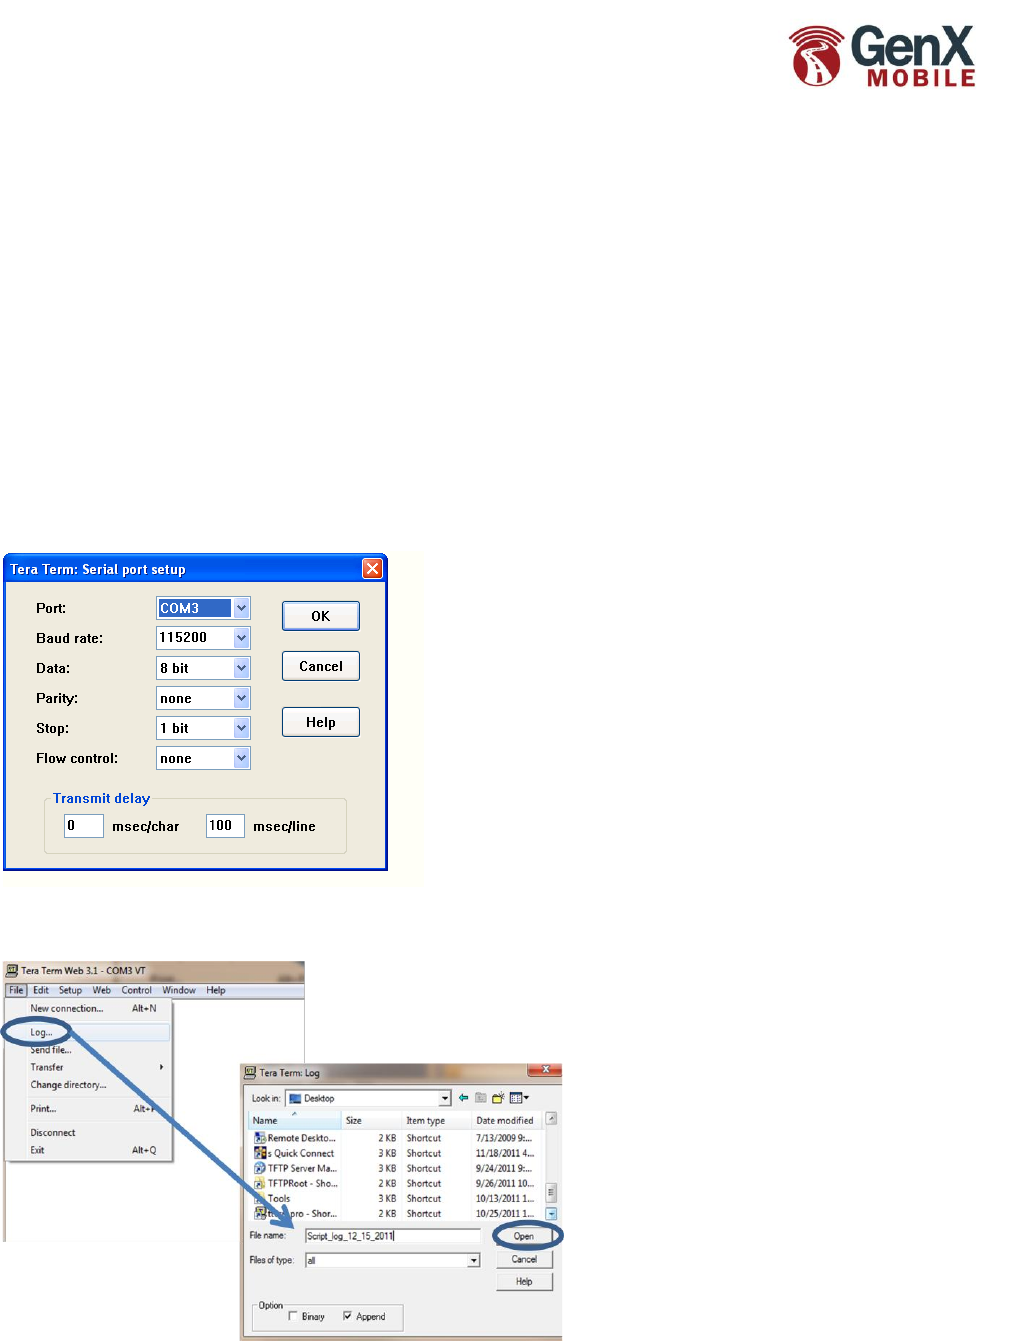
Start the terminal emulator (hyperterminal, tera term etc.) running at 115200 baud, 8 data bits,1 stop
bit, no parity, no flow control. Set the line delay to 100 msec/line. As pictured here:
Create a log so that it can be reviewed for errors (NAK's) after running the script:
Tera Term screen shot
Quick Start Guide for Configuring
GenX Devices
Page 11 of 15
GenX Mobile Proprietary & Confidential 2011
GenX Mobile reserves the right to change specifications and content without notice
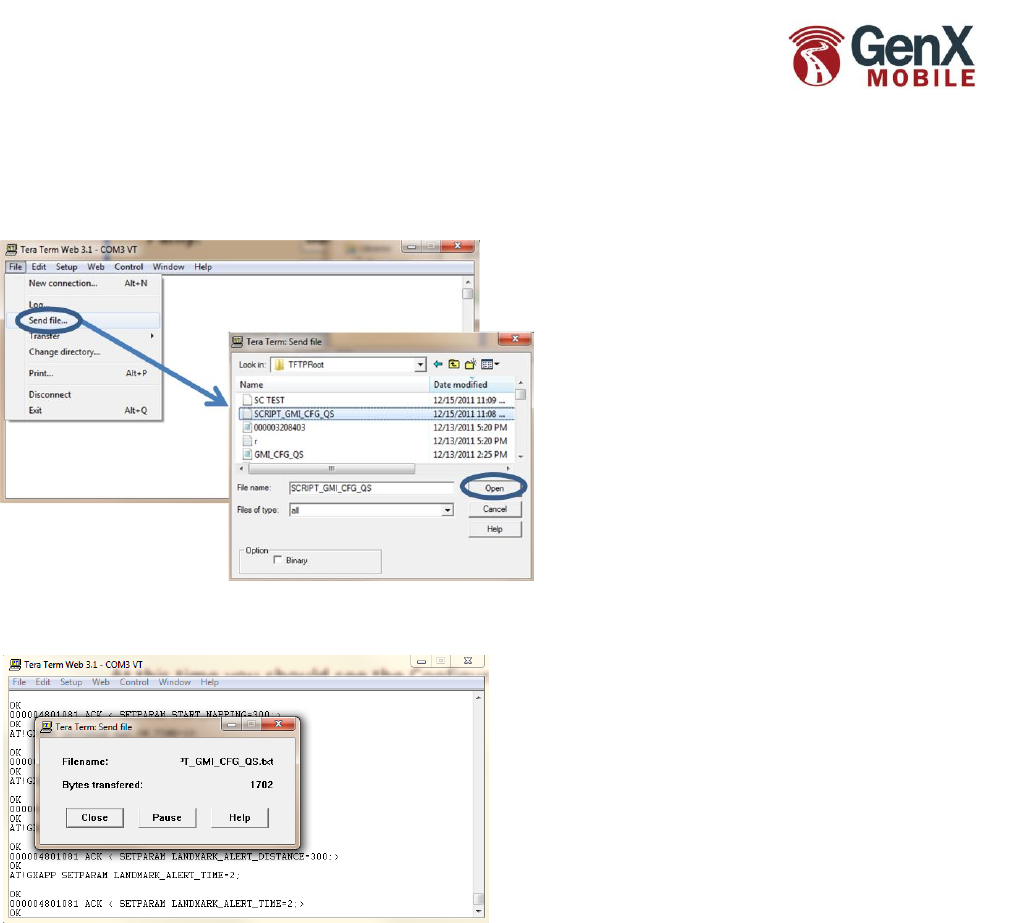
Send the file:
At this time you should see the configuration taking place:
All Parameters should be Acknowledged and this will show after every successful parameter setting as
shown below:
AT!GXAPP SETPARAM PARAM_RESYNC_TIME=86400;
OK
000004801081 ACK < SETPARAM PARAM_RESYNC_TIME=86400;>
OK
AT!GXAPP SETPARAM UNIT_NAME=%SNNLZ%;
OK
000004801081 ACK < SETPARAM UNIT_NAME=4801081;>
OK
AT!GXAPP SETPARAM PARAM_VERSION=QuickStartConfig_12_14_11;
OK
000004801081 ACK < SETPARAM PARAM_VERSION=QUICKSTARTCONFIG_12_14_11;>
OK
AT!GXAPP BACKUPNVRAM;
Open the log file created to check that all parameter setting has been ACKed and there are no NAK's.
Quick Start Guide for Configuring
GenX Devices
Page 12 of 15
GenX Mobile Proprietary & Confidential 2011
GenX Mobile reserves the right to change specifications and content without notice
Paramters within the .txt file (script) can be edited, added or omitted as needed.
Appendix B

Quick Start Guide for Configuring
GenX Devices
Page 13 of 15
GenX Mobile Proprietary & Confidential 2011
GenX Mobile reserves the right to change specifications and content without notice
Appendix C
Green & Red LED reference
The green and red LEDs are intended to troubleshoot installations. Below is a summary of
their behavior.
Green LED
When the ignition is first turned on the GNX will power up. The Green LED will show solid
for approximately 30 seconds (there may be some brief flickers initially while the processor
initializes). At no other time should the green LED remain on solid for such a long period.
After 30 seconds the green LED will start to flash at the following rates :
- 25 times on-off every 10 seconds when the ignition is on (this is quite rapid)
- 8 times on-off every 10 seconds when the ignition is off (this is quite slow)
- Very short blip once every 3 seconds when in sleep mode
The green LED will also show if there is a PTO active by flashing a number of times
corresponding to the PTO (1,2,3,4). For example if PTO 4 is active then there will be 4
short flashes every 3 seconds.
Red LED
The RED LED flashes 2-digit codes. Roughly speaking the first digit tells you what general
area is having a problem (hardware, modem, GPS, end-end service). The second digit
gives specific error information. Since there can be more than one error condition the
GNX rotates through the error codes (for example if GPS is tracking no satellites and the
modem is not registered).
1 – X error codes : GNX specific errors
1-1 The GNX has an expired license key due to failure to resync. with the GenX Mobile
configuration server. Contact GenX with the serial number of the device.
1-2 Low supply voltage. This could be caused by a true low voltage condition (<8v) or a
high impedance supply that dips in voltage when the current draw spikes due to modem
transmit. This feature was introduced in 1.x.53 firmware.
1-3 Allocated data usage exhausted. Resync the unit to restore (see MAXDATAUSAGE)
2 – X error codes: Modem related error codes
2-1 Modem module fault. RMA unit to GenX Mobile for failure analysis and repair.
2-2 No SIM inserted. Make sure SIM drawer contains SIM and is correctly seated in the
socket. If it is then RMA unit to GenX Mobile for failure analysis and repair.
2-3 No signal. Check that the cellular antenna is correctly attached. Try to substitute a
known-good cellular antenna to see if the antenna may be broken. If this cures the
problem then reinstall new antenna. If not then RMA unit to GenX Mobile for failure

Quick Start Guide for Configuring
GenX Devices
Page 14 of 15
GenX Mobile Proprietary & Confidential 2011
GenX Mobile reserves the right to change specifications and content without notice
analysis and repair.
2-4 Network not found. For GSM remove the SIM card and try in a known-good GNX. If
that GNX displays the same problem then the SIM card or account may be the source of
the problem. For CDMA check that the account is still active. If it is then RMA the unit and
transfer the account to the new ESN.
2-5 Last data session failed. This means that an attempt to establish a data session
(GPRS, CDMA1x) failed. This could be because of an account problem, an incorrect
APN, username or password, or simply due to network loading, temporary network
outage, or poor radio coverage. This failure will occasionally happen in a working unit, but
if the problem is persistent then further investigation is required.
2-6 GPRS is not attached, or CDMA 1xRTT data is not available.
3 – X error codes: GPS related error codes
3-1 GPS module fault: RMA the GNX to GenX Mobile for failure analysis.
3-2 GPS antenna fault: Try replacing the GPS antenna with a known good antenna. If the
condition is not corrected (wait 2 minutes for the LED to update) then RMA to GenX Mobile
for failure analysis.
3-3 GPS not tracking any satellites. Check that the GPS antenna has a clear, unobstructed
view of the sky, and has been operating for at least 5 minutes. Check that the GPS
antenna is facing the correct way up. If the condition persists RMA to GenX Mobile for
failure analysis.
3-4 GPS no fix (<3 satellites). If antenna has only partial view of sky due to the position of
the vehicle (under a cover, close proximity to a building) then try to move the vehicle to
ensure that it will be able to make fixes when standing in the open. If the vehicle has a full
view of the sky and the error condition persists then try to reposition the GPS antenna to
get les obstructed view of the sky.
3-5 GPS has no time. The GPS receiver sets its internal clock from the satellite signals. If
the GPS receiver has no time then it has never seen a single satellite since the GNX5/10
was last power cycled.
4 - X error codes : end-end application error codes
4-2 Data transfer failed. This could be a TFTP, FTP, SMTP file transfer or a data transfer
via TCP or UDP socket. It could indicate a failure to resync with the GenX Mobile server,
or a failure to upload position data to the customer server. If the condition persists then
contact GenX with the serial number and the phone number or IP. Note that since mobile
data communication is inherently unreliable this code can appear from time to time even
on a perfectly healthy GNX, and is not necessarily indicative of a hardware, firmware, or

Quick Start Guide for Configuring
GenX Devices
Page 15 of 15
GenX Mobile Proprietary & Confidential 2011
GenX Mobile reserves the right to change specifications and content without notice
installation problem.
