QXmlEdit 0.9.13 User Manual QXml Edit
User Manual:
Open the PDF directly: View PDF ![]() .
.
Page Count: 113 [warning: Documents this large are best viewed by clicking the View PDF Link!]
- Contents
- Welcome to QXmlEdit
- Overview of QXmlEdit User Interface
- Operation with XML
- Startup
- Main Functionality
- Working with XML Files
- Opening Files
- Opening Files in New or Same Window
- Using only One Window or One Window per File
- Saving files
- Creating a File From Clipboard Contents
- Creating specialized files
- Reloading last saved version
- Exporting the XML
- Avoiding modifications
- Loading the Last Edited Files
- Working With Preferred Directories
- Viewing Elements and Attributes
- Filtering Attributes
- Working with name spaces and prefixes
- Prefix operations
- Namespace operations
- XML Schema management
- Inserting XML Schema References
- Using the XSD Edit Mode
- Edit an annotation
- Editing Enumeration or Facets
- This panel edits a single facet item.
- Editing XML Schema Attributes
- Help and information
- Tasks
- Preferences
- Customization
- Choosing a Display Style
- Editing Elements
- Navigating Elements
- Editing Elements and Attributes
- Copying Selected Text Into the Clipboard
- Using the Bookmarks
- Viewing and editing info and DTD
- Working with Base64 Coded Content
- Working With Inner XML Content
- Inserting an XML prolog on document creation
- Formatting a document
- Validating an XML Document
- Counting Children Elements and Measuring Their Size
- Finding Text
- XPath syntax
- Browsing the search results
- Replacing text
- Comparing Files
- Anonymizing data
- Anonymizing a file
- Filling data
- Cloning Elements
- This picture shows the result of the clone operation with the insert of an index using the “id” attribute:
- Working with Snippets
- Executing XSL style sheet
- Metadata
- Working With XML Schema Files (XSD)
- Get information about a character
- Code Pages explorer
- Visually Comparing XML Schema files
- Binary files viewer
- Command Line arguments
- Appendix

QXmlEdit
User Manual
Editing and exploring XML data
with QXmlEdit.
Version 0.9.13
Clicking on the files
opens them in the editor
Clicking on the folder,
opens it in the open file dialog
Load XML file
Data Map
Measure type
Zoom Color Map
Numeric values
Options for Calucation
Differences report
Items, with different colors depending on state
Tools menu
Compare options
Status
Recent les Browse le
Select encoding
Search box

Contents
2 Contents
4 Welcome to QXmlEdit
4 View and Navigate XML Data in Unusual Modes
4 Information About QXmlEdit
4 Before You Begin
4 What You Will Learn
5 Finding Out More
5 What's New in This Version
6 Overview of QXmlEdit User Interface
7 Operation with XML
8 Startup
10 Main Functionality
10 Working with XML Files
10 Opening Files
10 Opening Files in New or Same Window
11 Using only One Window or One Window per File
11 Saving files
11 Creating a File From Clipboard Contents
11 Creating specialized files
12 Reloading last saved version
12 Exporting the XML
12 Avoiding modifications
12 Loading the Last Edited Files
12 Working With Preferred Directories
13 Viewing Elements and Attributes
16 Filtering Attributes
18 Working with name spaces and prefixes
18 Prefix operations
18 Assigning a prefix
18 Removing a prefix
19 Replacing a prefix
19 Namespace operations
20 Assigning a namespace
20 Removing a namespace
21 Replacing a namespace
21 Normalizing a namespace
23 Choosing an Editing Mode
25 Using XSLT Edit Mode
25 Specific display style
25 Specific edit panels
26 A specific context menu
27 Navigate templates and functions
28 Using SCXML Edit Mode
28 Specific display style
28 Specific edit panels
28 Navigate states
30 XML Schema management
31 Inserting XML Schema References
31 Using the XSD Edit Mode
31 Editing or inserting a type, attribute or element
33 Edit an annotation
33 Single annotation panel
35 Annotation list edit panel
36 Editing Enumeration or Facets
36 Edit facet panel
36 This panel edits a single facet item.
37 Editing XML Schema Attributes
37 Inserting the Schema Instance “nil” Attribute
37 Removing the Schema Instance “nil” Attribute
37 Inserting the Schema Instance “type” Attribute
37 Removing the Schema Instance “type” Attribute
38 Help and information
38 Show keyboard shortcuts
39 Tasks
39 Adjust Display Detail
40 Preferences
41 General
42 Style
43 Editor colors
44 Validation
45 Sessions
46 Edit Modes
47 XML
49 Customization
49 Choosing a Display Style
50 Editing Elements
50 Navigating Elements
51 Editing Elements and Attributes
53 Copying Selected Text Into the Clipboard
54 Namespaces
56 Using the Bookmarks
58 Viewing and editing info and DTD
59 Working with Base64 Coded Content
59 Working With Inner XML Content
59 Inserting an XML prolog on document creation
59 Formatting a document
60 Formatting Presets
60 Validating an XML Document
60 Counting Children Elements and Measuring Their Size
61 Finding Text
62 Search results
63 XPath syntax
64 Search results
64 Browsing the search results
QXmlEdit user manual, page 2 of 113.
Clicking on the files
opens them in the editor
Clicking on the folder,
opens it in the open file dialog
Load XML file
Data Map
Measure type
Zoom Color Map
Numeric values
Options for Calucation
Differences report
Items, with different colors depending on state
Tools menu
Compare options
Status
Recent les Browse le
Select encoding
Search box

65 Replacing text
65 Replace panel
65 Comparing Files
68 Anonymizing data
68 Data and business rules
69 Options
71 Configuring the anonymization
71 Format of the CSV for importing and exporting the
exceptions
73 Anonymizing a file
74 Filling data
75 Cloning Elements
75 This picture shows the result of the clone operation with
the insert of an index using the “id” attribute:
76 Working with Snippets
78 Executing XSL style sheet
78 XSLT Execution panel
80 Metadata
80 Introduction
80 Metadata types
80 Updatable Metadata
80 Static metadata
80 Metadata implementation
80 Operation
80 Creating a document
80 Reading a document
81 Saving a document
81 Editing metadata
81 Metadata summary
81 Updatable Metadata
81 Static Metadata
81 Editing metadata
83 Working With XML Schema Files (XSD)
84 Visualization Types
84 Changing the background color and pattern.
85 Exporting XSD Graphical view
86 Working With Big XML Files
86 Searching in Files and counting elements
88 Split a XML file
88 Decide if you want to extract information or browse it
88 Choose the file and how to fragment it
89 Limit the extracted fragments number
89 Decide the output folder and the naming
90 Go and examine data
92 Life With Sessions
93 The session user interface
93 Sessions Management Dialog
94 Session Properties
95 Managing sessions data
96 Sessions configuration
96 Viewing data
97 User Interface
98 3D Visualization
98 Measurement types
98 Size
98 Payload size
99 Attributes count
99 Children Elements count
99 Structure
99 Commands available in the contextual menu of the map
99 Visualize Relationship
101 Attributes summary
101 Base 64 Explorer
101 Encoding tools
102 Explore how a string will be coded in a specific encoding
102 Explore how binary values are recognized by different
encoding
103 Explore how a string will be translated when written in
some encoding and read in another one
105 Get information about a character
106 Code Pages explorer
107 Visually Comparing XML Schema files
108 Binary files viewer
109 Command Line arguments
110 Appendix
110 Note on “Single Application” Mode
110 Style file format
110 Root Tag:
110 Element “styles”
110 Element “default”
110 Element “style”
111 Element “keywords”
111 Element “keyword”
111 Element “ruleSet”
111 Element “rule” (inner)
112 Element “ids”
112 Element “id”
113 Installation of new styles
QXmlEdit user manual, page 3 of 113.
Clicking on the files
opens them in the editor
Clicking on the folder,
opens it in the open file dialog
Load XML file
Data Map
Measure type
Zoom Color Map
Numeric values
Options for Calucation
Differences report
Items, with different colors depending on state
Tools menu
Compare options
Status
Recent les Browse le
Select encoding
Search box
Welcome to QXmlEdit
View and Navigate XML Data in Unusual Modes
QXmlEdit oers you the possibility to view, navigate and edit XML data as few other editors. It is
like a Swiss army knife. It is multi platform and, more, it is Libre Software; that means that it gives
to the user the freedom to adapt it to its needs and it comes with complete source code.
Information About QXmlEdit
QXmlEdit is an XML editor and its main features are:
•Hierarchical customizable view of XML elements.
•Fast XML hierarchy navigation.
•Handling of base 64 coded text and XML inserted as data.
•Powerful search.
•XML snippets.
•XML compare utility.
•XML Schema viewer.
•Visual compare of XML schema.
•Flex code generation from Balsamiq source.
•Session handling.
•XSL specialized mode.
•Split of big XML les.
•Data anonymizer.
Before You Begin
QXmlEdit is an XML editor. To use it with prociency you need to be accustomed with XML. It is a
technical tool oriented toward software developers.
What You Will Learn
Following this manual you will learn to:
•Examine XML data in details.
•Applying dierent views to XML data to examining them under dierent points of view.
•Customize QXmlEdit to ease your work.
•Navigate and inspect XML data.
QXmlEdit user manual, page 4 of 113.
Clicking on the files
opens them in the editor
Clicking on the folder,
opens it in the open file dialog
Load XML file
Data Map
Measure type
Zoom Color Map
Numeric values
Options for Calucation
Differences report
Items, with different colors depending on state
Tools menu
Compare options
Status
Recent les Browse le
Select encoding
Search box
Finding Out More
On the QXmlEdit Internet site you will nd the up to date documentation and tutorials. The site
address is: http://qxmledit.org. The link for the source code is: https://github.com/lbellonda/qxmledit.
To get help while using the program you can use the menu Help > Help on QXmlEdit.
What's New in This Version
Only xed in this version.
QXmlEdit user manual, page 5 of 113.
Clicking on the files
opens them in the editor
Clicking on the folder,
opens it in the open file dialog
Load XML file
Data Map
Measure type
Zoom Color Map
Numeric values
Options for Calucation
Differences report
Items, with different colors depending on state
Tools menu
Compare options
Status
Recent les Browse le
Select encoding
Search box
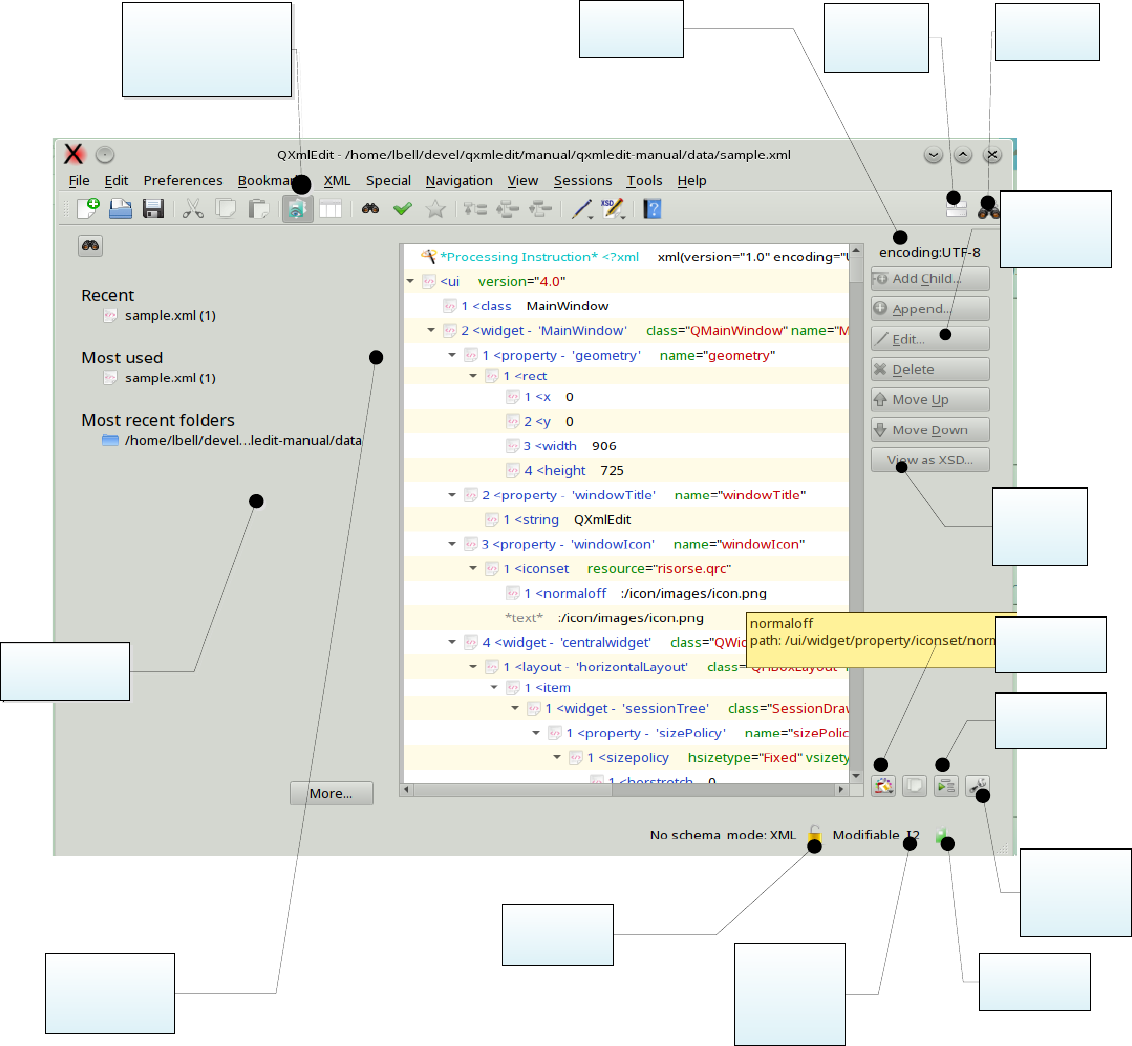
Overview of QXmlEdit User Interface
The user interface is very simple and consists of a main panel where all the functions of the
program can be controlled.
QXmlEdit user manual, page 6 of 113.
Copy selected
data into the
clipboard
Copy selected
data into the
clipboard
Encoding
indicator
Data
modification
indicator
Working
mode
indicator
Main edit
functions
XSD
viewer
Sessions
data panel
Sessions
data panel
Clicking on the files
opens them in the editor
Clicking on the folder,
opens it in the open file dialog
Load XML file
Data Map
Measure type
Zoom Color Map
Numeric values
Options for Calucation
Differences report
Items, with different colors depending on state
Tools menu
Compare options
Status
Recent les Browse le
Read only
status
Select encoding
Search box
Session
status
Styles
selector
Indentation
View
settings
Show
keyboard
shortcuts
Search
commands
Operation with XML
This is a small abstract of the common operations grouped by purpose:
•Navigation:
◦Go to parent element (menu Navigation, shortcut F12).
◦Go to next sibling (Navigation, F10).
◦Go to previous sibling (Navigation, F9).
•Data modication:
◦Insert or append an element.
◦Insert or append a comment.
◦Insert or append a processing instruction.
◦Change the position of a node.
◦Paste a node as child or sibling.
◦Copy or paste a set of attributes.
◦Operation on containers:
▪Insert a parent
▪Insert a child container that enclose all the current children
▪Remove the parent of a node.
◦Transform a node into a comment and viceversa.
◦Insert prolog and namespace declarations.
◦Edit base 64 coded text blocks.
◦Edit base 64 coded attributes.
◦Transform les into base 64 text blocks.
•View Data:
◦Hide all the siblings of a node.
◦Hide all the children of all the sibling of a node.
◦Filter the visible attributes.
◦Hide all the elements that have no children.
◦Show the children count and the size of a node.
◦Close all the siblings of a node.
For a complete description of each operation go to the specic section of this document. Here you
will nd a small reminder of the commands.
QXmlEdit user manual, page 7 of 113.
Clicking on the files
opens them in the editor
Clicking on the folder,
opens it in the open file dialog
Load XML file
Data Map
Measure type
Zoom Color Map
Numeric values
Options for Calucation
Differences report
Items, with different colors depending on state
Tools menu
Compare options
Status
Recent les Browse le
Select encoding
Search box
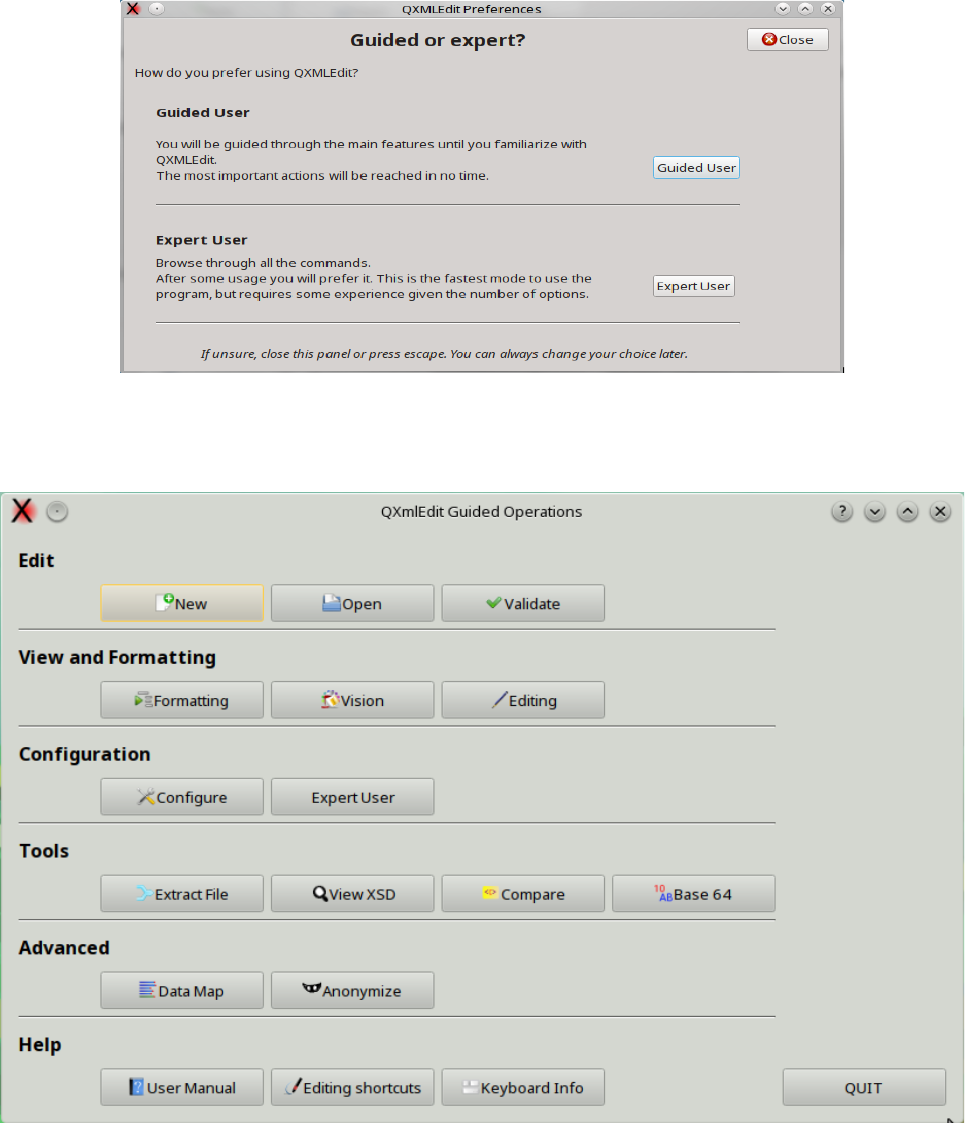
Startup
The rst time QXMLEdit is started, it asks the user if a simplied user interface should be activated.
Through a panel it is possible to access the main features but there are no restrictions about what
QXMLEdit can perform. At any time, using the Preferences menu, the choice can be reverted.
If the choice is “guided user”, the following panel is open:
QXmlEdit user manual, page 8 of 113.
Clicking on the files
opens them in the editor
Clicking on the folder,
opens it in the open file dialog
Load XML file
Data Map
Measure type
Zoom Color Map
Numeric values
Options for Calucation
Differences report
Items, with different colors depending on state
Tools menu
Compare options
Status
Recent les Browse le
Select encoding
Search box
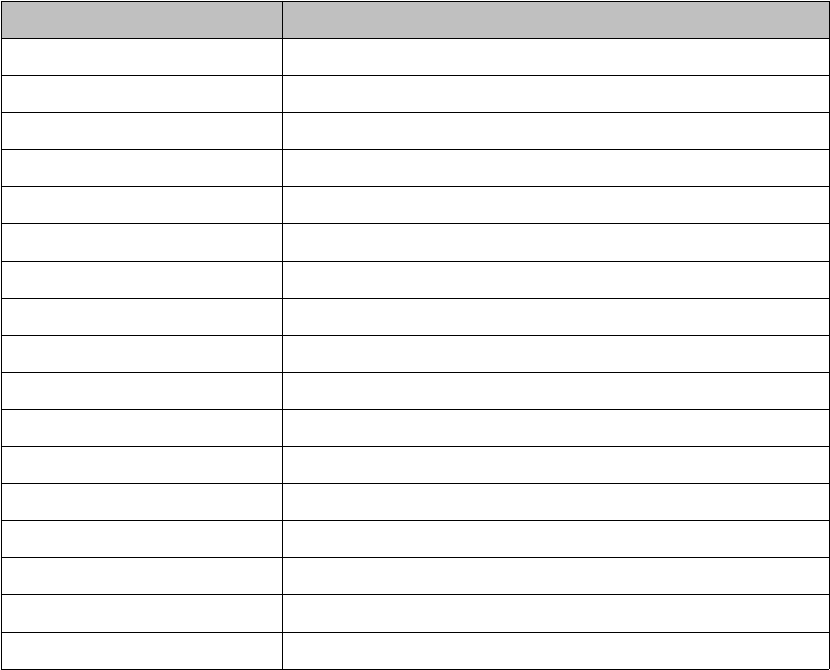
From above panel the following operations can be started:
Item Description
New Open a new editor.
Open Load an XML le.
Validate Validate XML using XSD.
Formatting Formatting and indentation options.
Vision View Options.
Editing Editing options.
Configure Open the main preferences panel.
Expert User Switch to “Expert User” mode.
Extract File Extract fragments from an XML.
View XSD View an XSD le as a diagram.
Compare Compare XML les.
Base 64 Open the Base64 operations panel.
View Data Map View XML le statistics.
Anonymize Anonymize a le using previously created proles.
User Manual Open the user manual.
Editing Shortcuts Show the editing shortcuts.
Keyboard Info Show the panel that list keyboard shortcuts.
QXmlEdit user manual, page 9 of 113.
Clicking on the files
opens them in the editor
Clicking on the folder,
opens it in the open file dialog
Load XML file
Data Map
Measure type
Zoom Color Map
Numeric values
Options for Calucation
Differences report
Items, with different colors depending on state
Tools menu
Compare options
Status
Recent les Browse le
Select encoding
Search box

Main Functionality
Menus are divided in main functional groups; the most used commands are kept visible in main
dialog as a button on the right.
The menus are described here:
Menu Functionality
File XML document creation and saving
Edit clipboard handling; nd command and conguration options
Tasks common tasks, grouping other menu commands
Bookmarks all about bookmarks
XML XML tree manipulation (insertion, deletion, etc)
Special special XML operations
Navigation XML tree navigation
View view commands and options
Sessions Session related commands
Tools plugins and tools
Help help
Working with XML Files
The QXmlEdit goal is to view and edit small XML les. It is not intended to handle data of hundred
of megabytes, since it works completely in memory.
Opening Files
1. Open les using the File > Open menu.
2. In the Open Files dialog choose the le type you are looking for.
Opening Files in New or Same Window
This feature lets you override the settings by opening a le in a new window, if open new les in
same window is selected as a global option. If the congured behavior is to open les using new
windows, the option lets you reuse the current editor window.
•Use the menu File > Open in New Window if behavior is to open les reusing same
window.
•Use the menu File > Open in Same Window if behavior is to open les using new
windows.
QXmlEdit user manual, page 10 of 113.
Clicking on the files
opens them in the editor
Clicking on the folder,
opens it in the open file dialog
Load XML file
Data Map
Measure type
Zoom Color Map
Numeric values
Options for Calucation
Differences report
Items, with different colors depending on state
Tools menu
Compare options
Status
Recent les Browse le
Select encoding
Search box

Using only One Window or One Window per File
This setting can be congured in the preferences dialog.
•Menu Edit > Configure
•Select General tab
•Check “Open in new window” option.
Saving files
You can save the le using this menu commands:
To save the le with the same name:
•Save the le using the File > Save menu.
To save the le with another name
•Save the le using the File > Save As... menu.
To save a copy of the le with another name, but continue to work in the original le:
•Open les using the File > Save a Copy As... menu.
Note: using this last option you make a copy of the le as it is in its current state. The original
le is not modied and the editor retains the current state.
Creating a File From Clipboard Contents
Sometimes you can create a new le by pasting an XML text from the clipboard. For example you
can cut a block from a database client or a PDF or HTML page.
Use the menu File > New From Clipboard.
Creating specialized files
Using the File > New Specialized item, you can create new documents of a particular kind.
•XSL-FO
•XML Schema
•XSLT
•Maven POM.xml
•SCXML
The documents are created with the predened namespaces and declarations.
Creating Documents from Snippets
Using the File > New Specialized > New from Snippet item, you can create new documents from
a previously saved snippet.
QXmlEdit user manual, page 11 of 113.
Clicking on the files
opens them in the editor
Clicking on the folder,
opens it in the open file dialog
Load XML file
Data Map
Measure type
Zoom Color Map
Numeric values
Options for Calucation
Differences report
Items, with different colors depending on state
Tools menu
Compare options
Status
Recent les Browse le
Select encoding
Search box
Reloading last saved version
Using the menu File > Reload the last saved version. The modications to the current le will be
lost.
Exporting the XML
The following export methods are available from the File > Export menu:
•Export Element to File
•Copy all to the clipboard
•Export as Java/JavaScript
•Export as C/C++
Avoiding modifications
The document can be put in read only mode using the menu Edit > Read Only
Loading the Last Edited Files
Using the menu File > Recent Files you can load the last edited les.
Working With Preferred Directories
Usually, working with les, there are some directories that are accessed often. QXmlEdit gives you
the possibility to remember these places and to quick recall them when opening les.
To add the directory of the current open le to the preferred ones:
•Use the menu File > Preferred Directories > Add Current Directory to Preferred Ones
To edit the directory list in a separate window:
•Use the menu File > Preferred Directories > Edit Preferred Directories...
A dialog will open
QXmlEdit user manual, page 12 of 113.
Clicking on the files
opens them in the editor
Clicking on the folder,
opens it in the open file dialog
Load XML file
Data Map
Measure type
Zoom Color Map
Numeric values
Options for Calucation
Differences report
Items, with different colors depending on state
Tools menu
Compare options
Status
Recent les Browse le
Select encoding
Search box
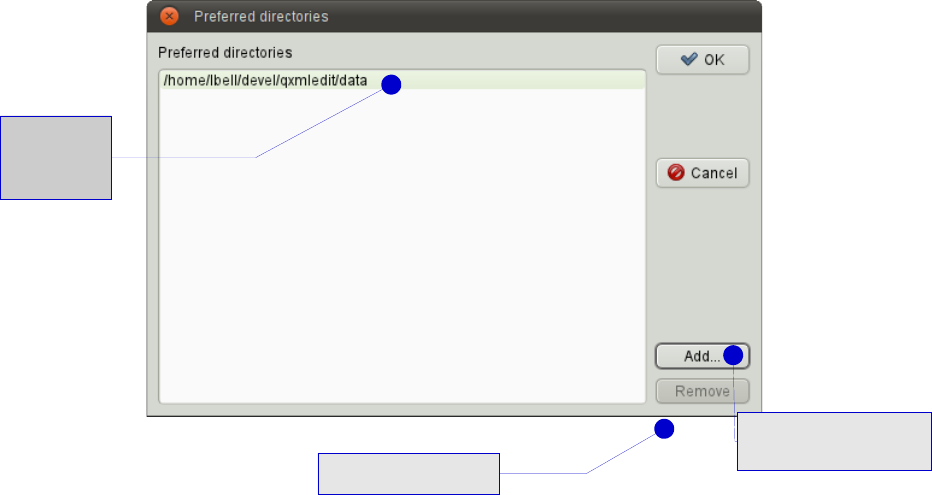
To add a new link to a preferred directory
•Push the Add... button.
To remove a link to a directory
•Push the Remove button.
To conrm the directory list press OK.
To open a le into a preferred directory:
Use the menu File > Preferred Directories, then select the directory.
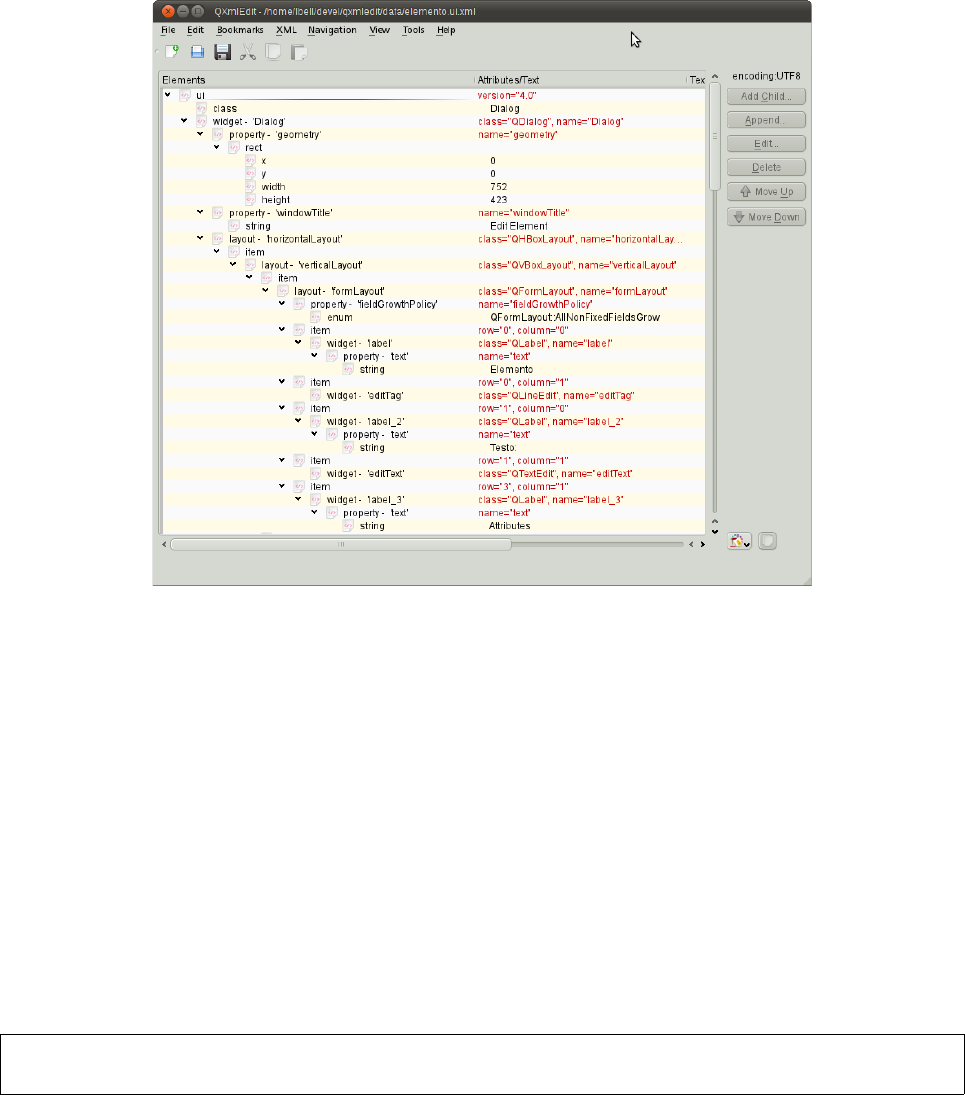
Viewing Elements and Attributes
After having loaded XML data, there are many modes to view elements and attributes. The main
view uses a tree representation, mapped on XML data, however you can highlight some data
aspect:
To view one element attribute on a separate line (very readable if you are looking for attribute
values):
•Select the menu View > Show One Attribute per Line
QXmlEdit user manual, page 13 of 113.
Preferred
directories
Insert a new link to
directory
Remove a link
Clicking on the files
opens them in the editor
Clicking on the folder,
opens it in the open file dialog
Load XML file
Data Map
Measure type
Zoom Color Map
Numeric values
Options for Calucation
Differences report
Items, with different colors depending on state
Tools menu
Compare options
Status
Recent les Browse le
Select encoding
Search box
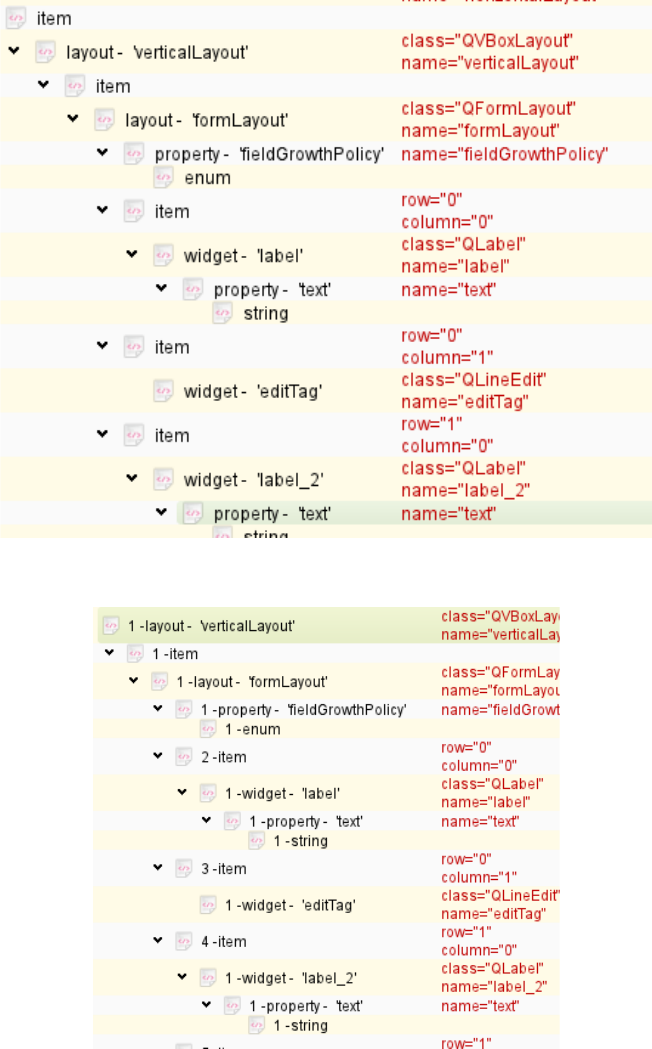
To show the ordinal position of each child relative to their parent:
•Select the menu View > Show Child Index
To show a more compact view:
•select the menu View > Compact View
QXmlEdit user manual, page 14 of 113.
Clicking on the files
opens them in the editor
Clicking on the folder,
opens it in the open file dialog
Load XML file
Data Map
Measure type
Zoom Color Map
Numeric values
Options for Calucation
Differences report
Items, with different colors depending on state
Tools menu
Compare options
Status
Recent les Browse le
Select encoding
Search box
To show the attribute length near to their name:
•Select the menu View > Show Attributes Length.
To show attribute contents using a xed size font, to better discover the presence of spaces:
•Select the menu View > Show Attributes Length.
To show in a separate column the text length of the elements:
•Select the menu View > Show Text Length.
To show the number and size of the children of each element:
•Select the menu View > Show Element Size.
To show the text contained into elements as base 64 encoded:
•Select the menu View > Show Text as Base 64 Coded.
Note: this option can have an impact on visualization speed.
To expand all the closed branches of the XML tree:
•Select the menu View > Expand
To enlarge or reduce the size of the character used to display the data:
•Select the menu View > Zoom In or View > Zoom Out.
or
•Use the Control key while scrolling with the mouse wheel.
QXmlEdit user manual, page 15 of 113.
Clicking on the files
opens them in the editor
Clicking on the folder,
opens it in the open file dialog
Load XML file
Data Map
Measure type
Zoom Color Map
Numeric values
Options for Calucation
Differences report
Items, with different colors depending on state
Tools menu
Compare options
Status
Recent les Browse le
Select encoding
Search box
To view only the structural components of the XML (the elements that have other elements as
children):
•Select the menu View > Hide All the Leaf Children
To undo the eect of the previous command:
•Select the menu View > Show All the Leaf Children.
To show or hide on the basis of individual node, rst select the node, then, to hide:
•Select the menu View > Hide Leaf Children.
To show:
•Select the menu View > Show Leaf Children.
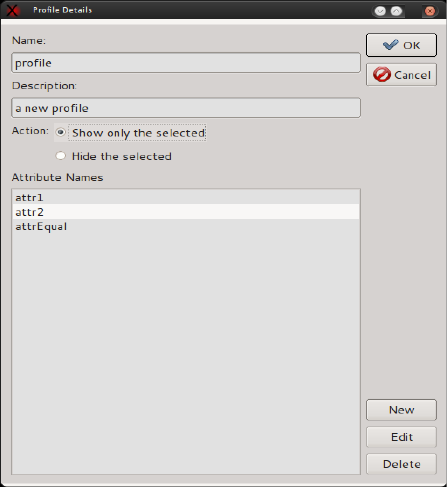
Filtering Attributes
It is possible to lter the display of the attributes. A prole can show only a set of attributes or hide
a given list of attributes. When an element has some hidden attributes, a lter icon appears.
It is possible to manage the attributes that can be shown or hidden in each element using the menu
View > Filter attributes > Manage Profiles...
In the management section it is possible to create delete or apply proles.
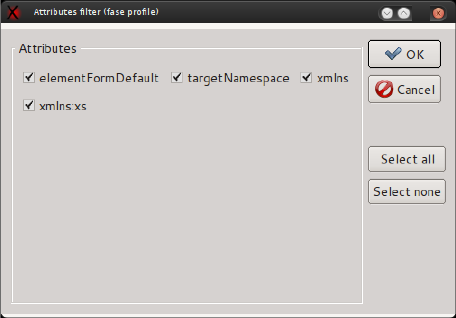
To apply a temporary prole, based on the current element:
1. Select an element.
2. Use the menu View > Filter attributes > Apply a Temporary Profile.
QXmlEdit user manual, page 16 of 113.
Clicking on the files
opens them in the editor
Clicking on the folder,
opens it in the open file dialog
Load XML file
Data Map
Measure type
Zoom Color Map
Numeric values
Options for Calucation
Differences report
Items, with different colors depending on state
Tools menu
Compare options
Status
Recent les Browse le
Select encoding
Search box
It is possible to transform the temporary prole into a regular one using the menu Use the menu
View > Filter attributes > Save the current Profile.
QXmlEdit user manual, page 17 of 113.
Clicking on the files
opens them in the editor
Clicking on the folder,
opens it in the open file dialog
Load XML file
Data Map
Measure type
Zoom Color Map
Numeric values
Options for Calucation
Differences report
Items, with different colors depending on state
Tools menu
Compare options
Status
Recent les Browse le
Select encoding
Search box

Working with name spaces and prefixes
Namespaces and prexes commands can be accessed from the XML > Namespaces menu item. Both
oer prex manipulation, but only namespaces comamnds are aware of namespace concepts. Prex
related items do not know about namespaces at all, they simply manipulate prexes.
Prefix operations
The operations that can be performed on prexes are:
•Assign a prex.
•Remove a prex.
•Replace a prex.
Assigning a prefix
This operation sets the same prex to all the elements on which it is applied. No considerations
about namespace declarations are made.
Panel:
Items:
Item Description
Prefix to set The prex to apply
Apply to Elements involved.
Removing a prefix
The remove option removes the selected prex from all the items, only from the selected item or
from the selected item and all its descendants, from tags and attributes. Choosing a If there is a
selection, the prexes found recursively in the selection are shown in the prexes combo. No
attention is payed to the namespaces in this operation.
QXmlEdit user manual, page 18 of 113.
Clicking on the files
opens them in the editor
Clicking on the folder,
opens it in the open file dialog
Load XML file
Data Map
Measure type
Zoom Color Map
Numeric values
Options for Calucation
Differences report
Items, with different colors depending on state
Tools menu
Compare options
Status
Recent les Browse le
Select encoding
Search box
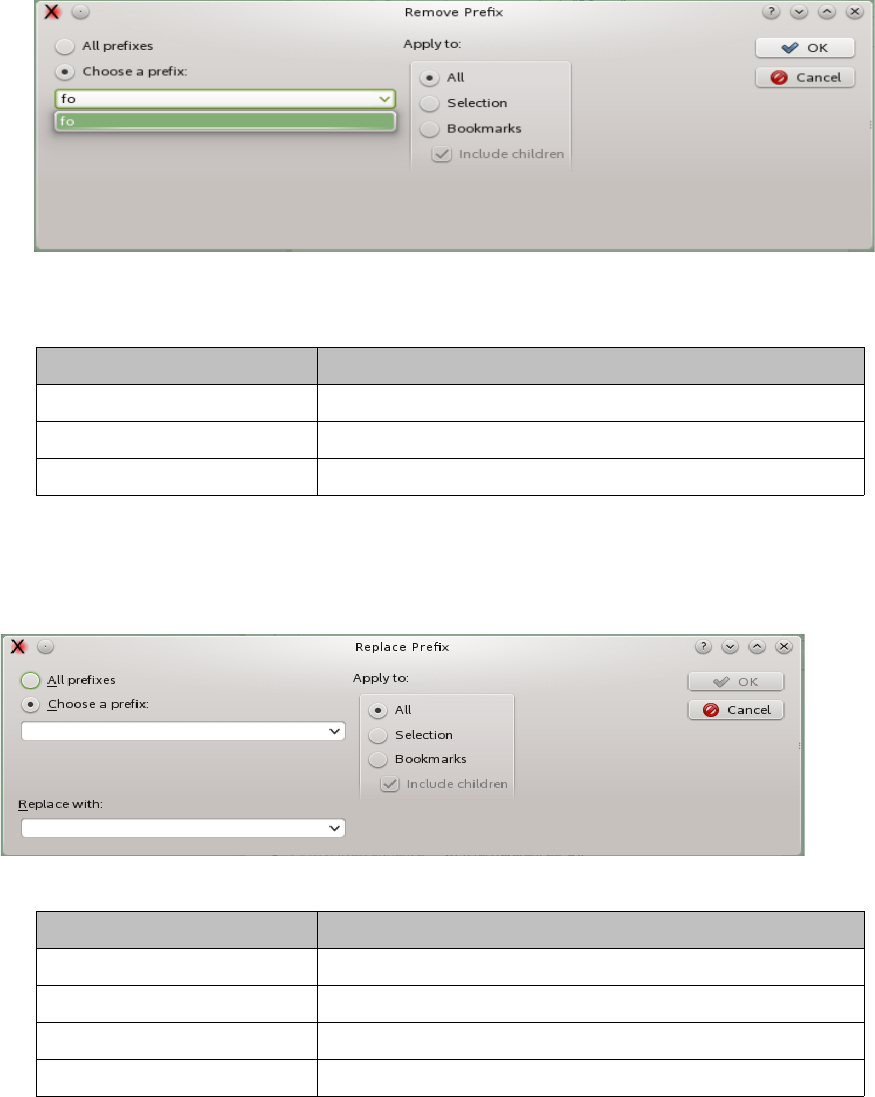
Items:
Item Description
All prefixes Choose to remove all the prexes.
Choose a prefix Removes a single prex.
Apply to Elements involved.
Replacing a prefix
This operation replaces one or all the prexes with another one.
Items:
Item Description
All prefixes Choose to replace all the prexes.
Choose a prefix Replace a single prex.
Replace with The prex that will be inserted.
Apply to Elements involved.
Namespace operations
The operations that can be performed on namespaces are:
•Assign a namespace.
•Remove a namespace.
•Replace a namespace.
•Normalize a namespace.
QXmlEdit user manual, page 19 of 113.
Clicking on the files
opens them in the editor
Clicking on the folder,
opens it in the open file dialog
Load XML file
Data Map
Measure type
Zoom Color Map
Numeric values
Options for Calucation
Differences report
Items, with different colors depending on state
Tools menu
Compare options
Status
Recent les Browse le
Select encoding
Search box
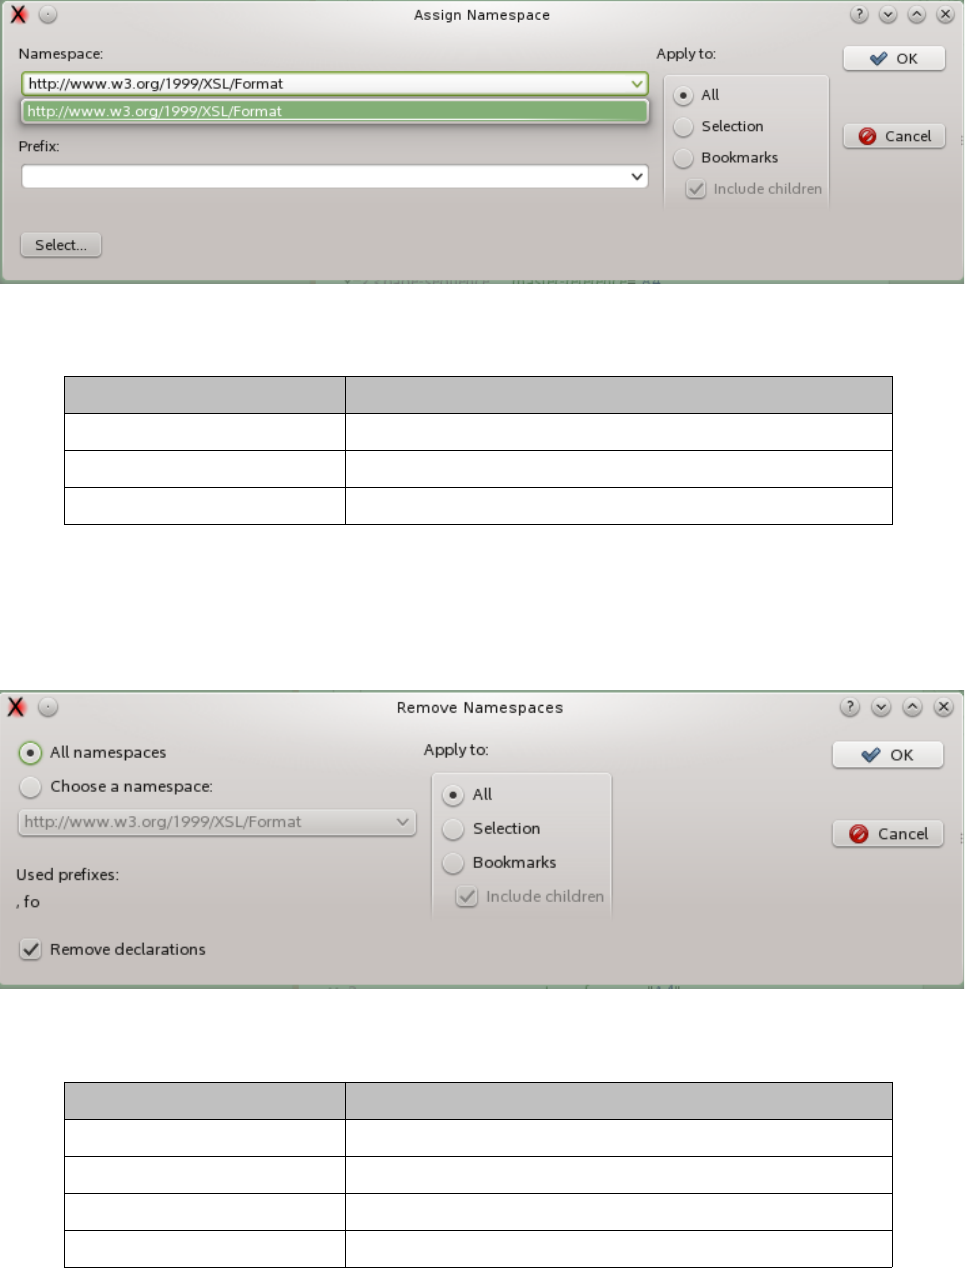
Assigning a namespace
This operation assigns a namespace to a tree or to all the document. The selected namespace will
be declared if not existent.
Items:
Item Description
Namespace The namespace to set.
Prefix The prex to set.
Apply to Elements involved.
Removing a namespace
Remove one or all the namepaces. The declarations of the removed namespace can be optionally
removed.
Items:
Item Description
All namespaces If chosen, all the namespaces will be removed.
Choose a namespace Select only one namespace to remove.
Remove declarations With this option even the namespace declaration will be removed.
Apply to Elements involved.
QXmlEdit user manual, page 20 of 113.
Clicking on the files
opens them in the editor
Clicking on the folder,
opens it in the open file dialog
Load XML file
Data Map
Measure type
Zoom Color Map
Numeric values
Options for Calucation
Differences report
Items, with different colors depending on state
Tools menu
Compare options
Status
Recent les Browse le
Select encoding
Search box

Replacing a namespace
This operation replaces a selected namespace with another one. All the namespace elements will be
translated, even if declared with dierent prexes.
Items:
Item Description
Namespace to replace The namespace to be replaced.
Namespace The namespace that will be assigned.
Prefix Prex of the new namespace.
Select Recalls the namespace selection panel.
Normalizing a namespace
This operation sets the same prex on all the elements and attributes belonging to a namespace.
The prexes of the namespace other than the selected one are lost and their declarations removed.
The normalization operation assumes that the XML is well formed and valid, so the chosen
namespace must be legally declared. This said, it will not be declared anew on the children if the
option “Declare namespace on root” is selected.
This option removes all the declaration from the inner of the selection tree and forces a declaration
on root of the selection tree. If the apply zone is only a part of the tree, only this part will be
checked. If there is no namespace declared, a declaration on root will be created if the option is
enabled.
Using this option it is possible to manage a namespace in only a branch of the XML tree.
Panel:
QXmlEdit user manual, page 21 of 113.
Clicking on the files
opens them in the editor
Clicking on the folder,
opens it in the open file dialog
Load XML file
Data Map
Measure type
Zoom Color Map
Numeric values
Options for Calucation
Differences report
Items, with different colors depending on state
Tools menu
Compare options
Status
Recent les Browse le
Select encoding
Search box
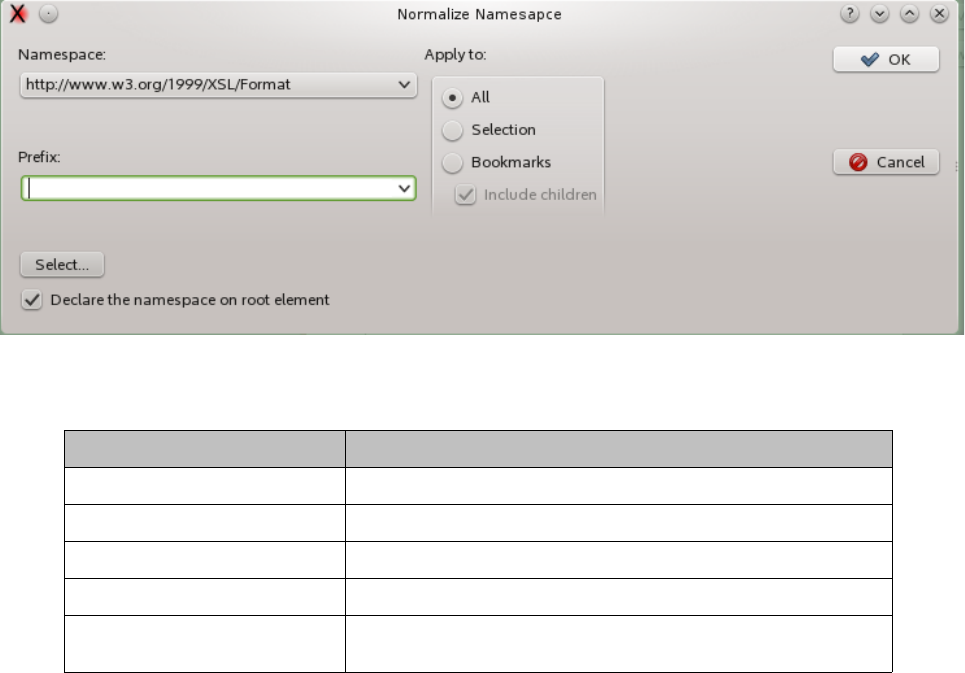
Items:
Item Description
Namespace The namespace to normalize.
Prefix The prex to apply to normalized namespace.
Select Opens a namespace selection panel.
Apply to Elements involved.
Declare namespace on root The declaration of the namespace is moved to the root element
only, any other inner declaration will be removed.
QXmlEdit user manual, page 22 of 113.
Clicking on the files
opens them in the editor
Clicking on the folder,
opens it in the open file dialog
Load XML file
Data Map
Measure type
Zoom Color Map
Numeric values
Options for Calucation
Differences report
Items, with different colors depending on state
Tools menu
Compare options
Status
Recent les Browse le
Select encoding
Search box
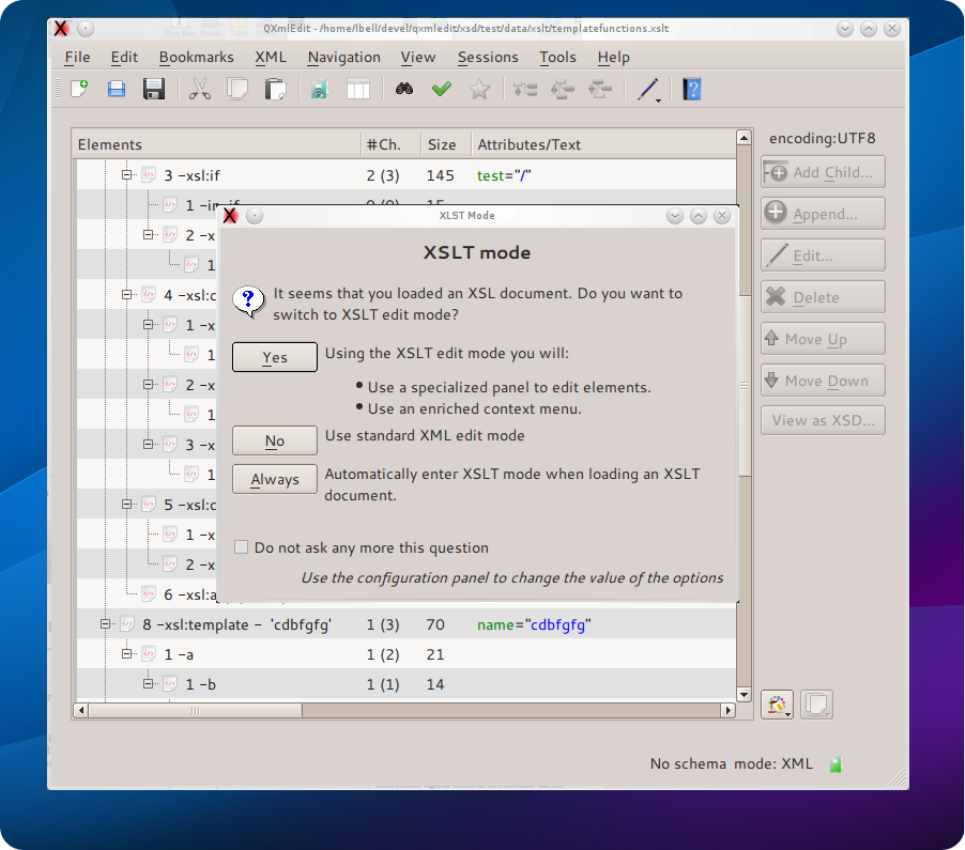
Choosing an Editing Mode
Using the XML > XSLT Edit Mode menu item you can switch to XSLT edit mode. When loading a
le with "xsl" extension or containing a reference to XSLT namespace a panel will open.
1. To activate the XSLT mode simply answer "Yes" or use the return key.
2. To have the mode always activated without answering the panel any more, select "Auto".
The settings can be also changed using the preferences.
QXmlEdit user manual, page 23 of 113.
Clicking on the files
opens them in the editor
Clicking on the folder,
opens it in the open file dialog
Load XML file
Data Map
Measure type
Zoom Color Map
Numeric values
Options for Calucation
Differences report
Items, with different colors depending on state
Tools menu
Compare options
Status
Recent les Browse le
Select encoding
Search box
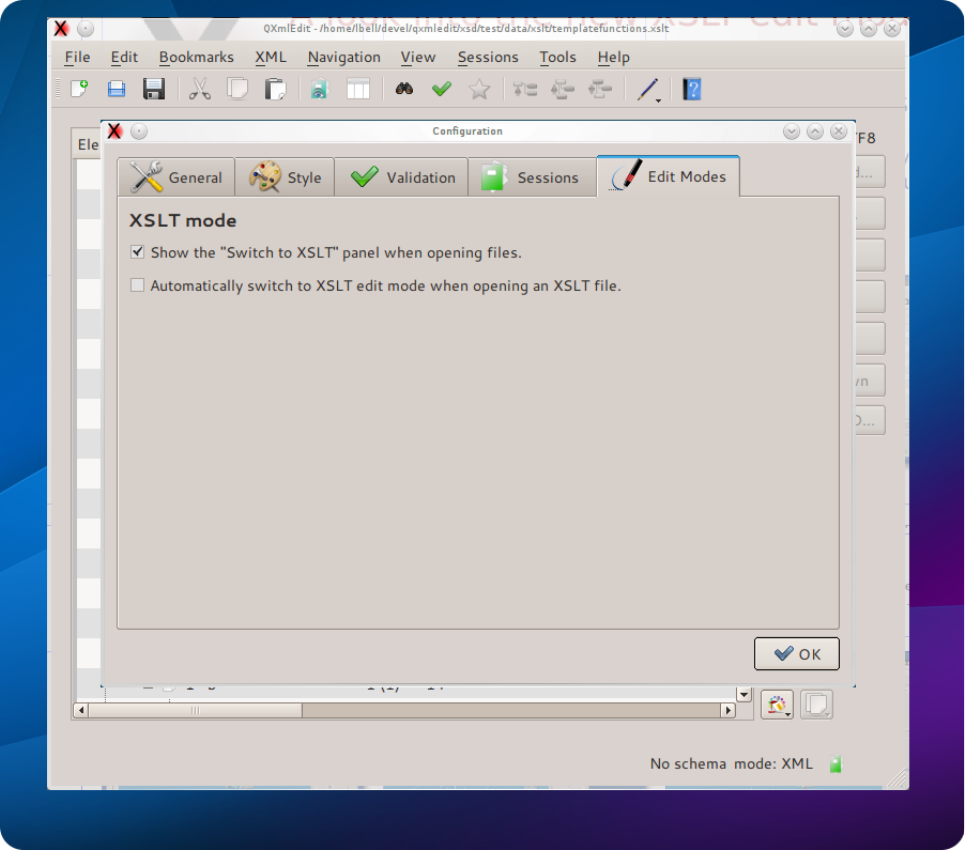
1. From the Edit menu choose "Congure", then "Edit modes".
2. Set if the XSLT edit mode should automatically engage.
3. You can hide the panel if you do not care to enter this mode.
QXmlEdit user manual, page 24 of 113.
Clicking on the files
opens them in the editor
Clicking on the folder,
opens it in the open file dialog
Load XML file
Data Map
Measure type
Zoom Color Map
Numeric values
Options for Calucation
Differences report
Items, with different colors depending on state
Tools menu
Compare options
Status
Recent les Browse le
Select encoding
Search box
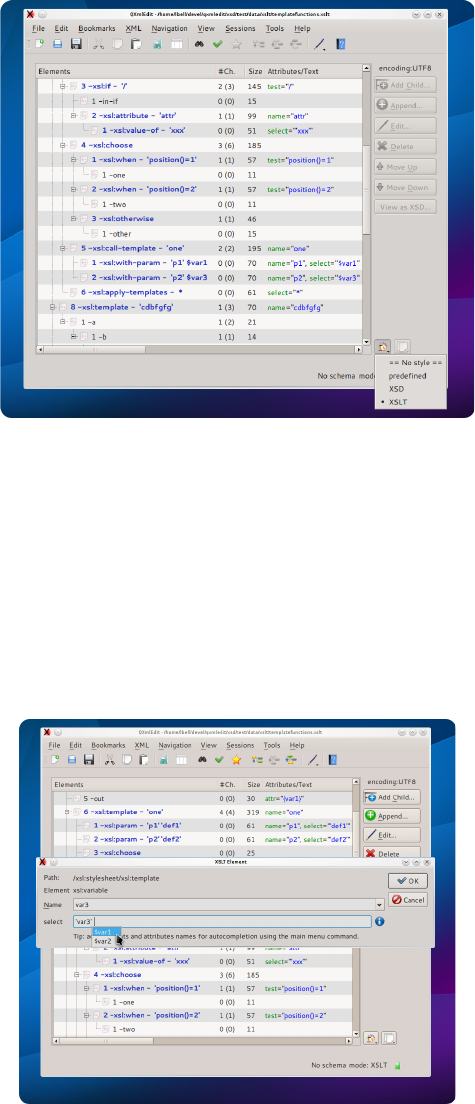
Using XSLT Edit Mode
Specific display style
A specic display style will be applied only to XSLT elements. The intermixed non XSLT elements
will not be touched, to reveal the XSL structure at a glance.
Specific edit panels
1- Double click an XSL element in the editor.
2- A special panel will open.
3- When you edit the "select" attribute, the autocompletion function will list the relevant variables.
4- When invoking templates or parameters, you will see their names in the combo.
5- To return to the usual property panel use CTRL-double click.
QXmlEdit user manual, page 25 of 113.
Clicking on the files
opens them in the editor
Clicking on the folder,
opens it in the open file dialog
Load XML file
Data Map
Measure type
Zoom Color Map
Numeric values
Options for Calucation
Differences report
Items, with different colors depending on state
Tools menu
Compare options
Status
Recent les Browse le
Select encoding
Search box

A specific context menu
A new context menu appears on the editor elements. The menu propose to you the most used XSL
elements giving you the choice to append them to the current element as sibling, or to insert them
as a child.
The proposed elements are sync with the context, that is in a "call-template", the only "with-
parameter" element is proposed as a child.
Using names for auto-completion
When XSTL mode is acting, you can scan the target XML le to extract names to be used with the
auto-completion feature of the edit panel.
Use the menu XML > Target XML
QXmlEdit user manual, page 26 of 113.
Clicking on the files
opens them in the editor
Clicking on the folder,
opens it in the open file dialog
Load XML file
Data Map
Measure type
Zoom Color Map
Numeric values
Options for Calucation
Differences report
Items, with different colors depending on state
Tools menu
Compare options
Status
Recent les Browse le
Select encoding
Search box
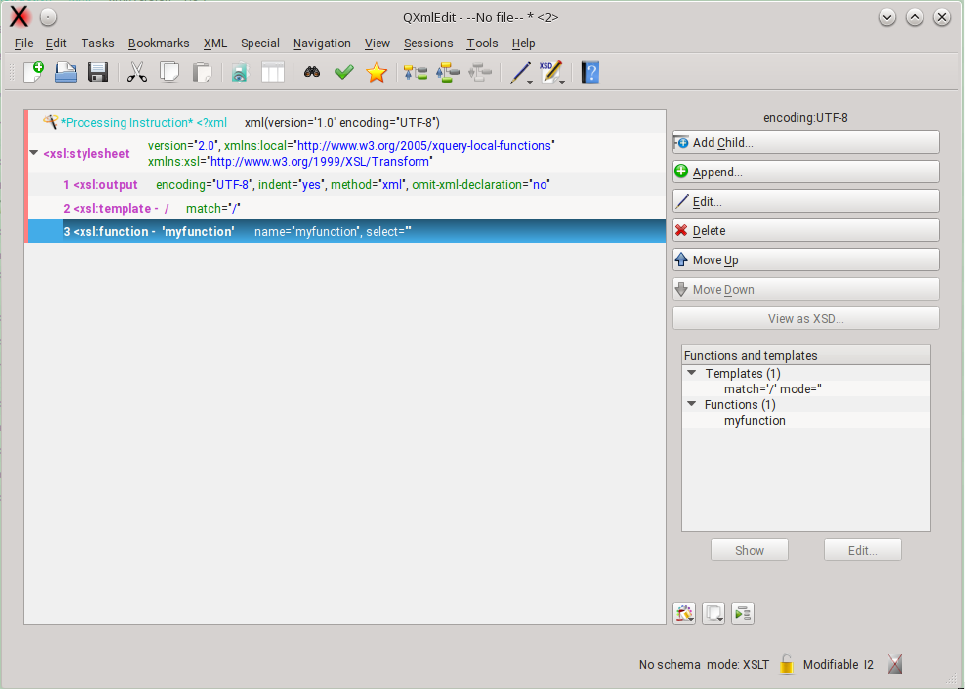
Navigate templates and functions
A XSL navigator for functions and templates will open automatically in the editor when choosing
XSL edit mode. The navigator can be shown or hidden using the menu Navigation > Show XSL
Navigator. A double click will lead you to the template or function denition in the editor.
QXmlEdit user manual, page 27 of 113.
Clicking on the files
opens them in the editor
Clicking on the folder,
opens it in the open file dialog
Load XML file
Data Map
Measure type
Zoom Color Map
Numeric values
Options for Calucation
Differences report
Items, with different colors depending on state
Tools menu
Compare options
Status
Recent les Browse le
Select encoding
Search box
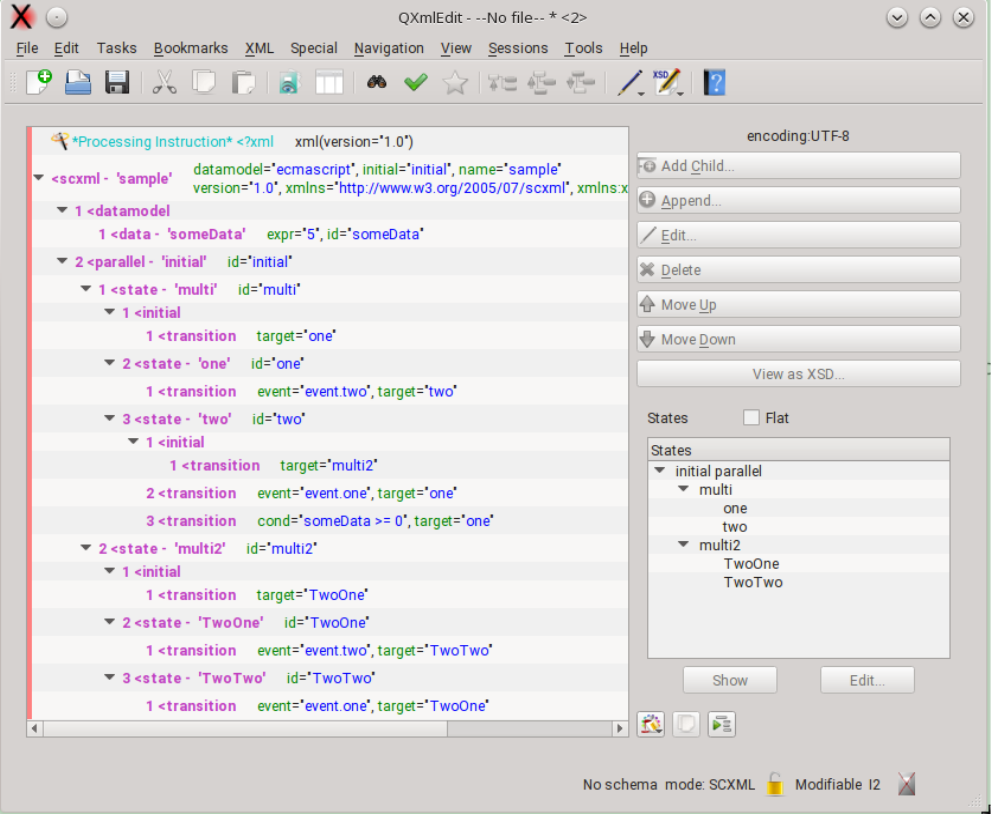
Using SCXML Edit Mode
Specific display style
A specic display style will be applied only to SCXML elements. The intermixed non SCXML
elements will not be touched, to reveal the SCXML structure at a glance.
Specific edit panels
With SCXML edit mode enabled:
1- Double click an SCXML element in the editor.
2- A special panel will open.
3- When selecting a state name, a combo will reveal the list of states dened in the le..
5- To use to the usual element edit panel use CTRL or ALT while double clicking.
If the SCXML edit mode is not enabled, the double click modiers are reversed.
Navigate states
A SCXML navigator for states will open automatically in the editor when choosing SCXML edit
mode. The navigator can be shown or hidden using the menu Navigation > Show SCXML
Navigator. A click will lead you to the state denition in the editor, a double click will open the edit
properties window.
The list of states can be at or hierarchical.
QXmlEdit user manual, page 28 of 113.
Clicking on the files
opens them in the editor
Clicking on the folder,
opens it in the open file dialog
Load XML file
Data Map
Measure type
Zoom Color Map
Numeric values
Options for Calucation
Differences report
Items, with different colors depending on state
Tools menu
Compare options
Status
Recent les Browse le
Select encoding
Search box
QXmlEdit user manual, page 29 of 113.
Clicking on the files
opens them in the editor
Clicking on the folder,
opens it in the open file dialog
Load XML file
Data Map
Measure type
Zoom Color Map
Numeric values
Options for Calucation
Differences report
Items, with different colors depending on state
Tools menu
Compare options
Status
Recent les Browse le
Select encoding
Search box
XML Schema management
QXmlEdit user manual, page 30 of 113.
Clicking on the files
opens them in the editor
Clicking on the folder,
opens it in the open file dialog
Load XML file
Data Map
Measure type
Zoom Color Map
Numeric values
Options for Calucation
Differences report
Items, with different colors depending on state
Tools menu
Compare options
Status
Recent les Browse le
Select encoding
Search box
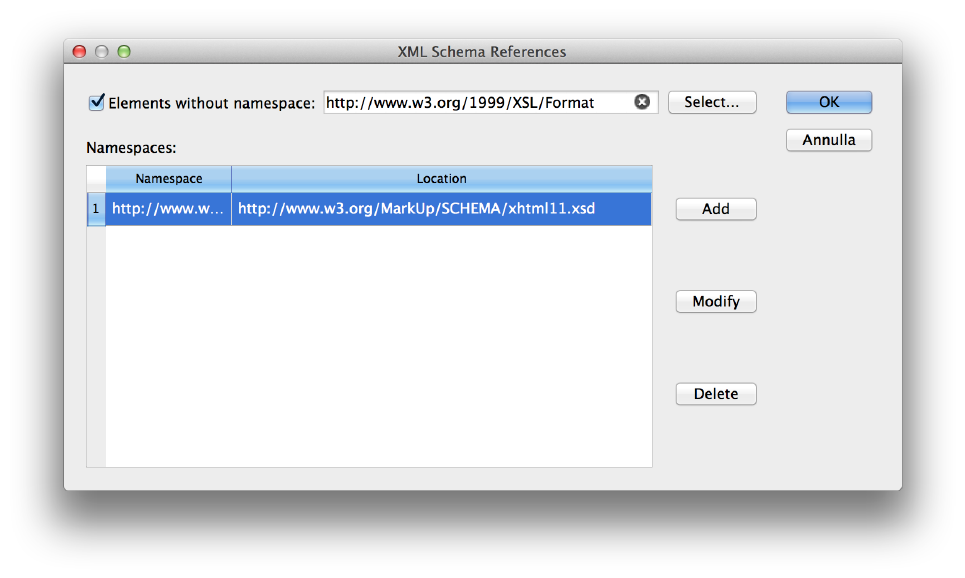
Inserting XML Schema References
It is possible insert references to an XML Schema set of les. Using the menu XML > Schema
Instance > XML Schema References the “Insert Xml Schema References” dialog will appear.
In this dialog you can insert
•a schema reference for elements without namespace
•for each namespace, a schema reference
The references will be inserted in the root element using the xsi namespace dened as
http://www.w3.org/2001/XMLSchema-instance namespace. If the namespace is already declared in
the root element, it will be used, else the namespace declaration will be inserted. If the prex xsi is
already used, a new prex will be created.
Using the XSD Edit Mode
There is a facility for edit XML Schema documents in the editor a set of menu commands:
XML Schema > Insert No Namespace Schema Reference Attributes : insert a no namespace
attribute for the target schema to complete.
XML Schema > Insert Schema Reference Attributes : insert a namespace attribute for the target
schema to complete.
Editing or inserting a type, attribute or element
Using the XML Schema menu items it is possible to edit or insert XSD types.
QXmlEdit user manual, page 31 of 113.
Clicking on the files
opens them in the editor
Clicking on the folder,
opens it in the open file dialog
Load XML file
Data Map
Measure type
Zoom Color Map
Numeric values
Options for Calucation
Differences report
Items, with different colors depending on state
Tools menu
Compare options
Status
Recent les Browse le
Select encoding
Search box
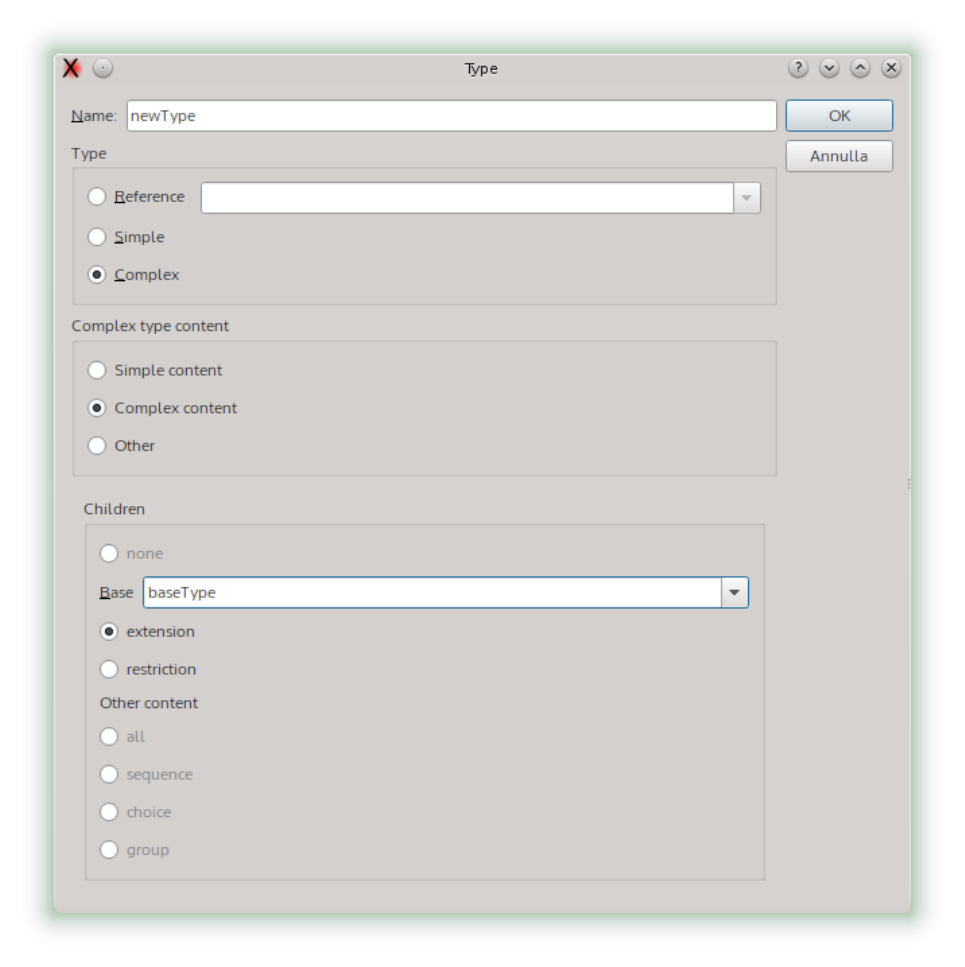
Operations in the dialog:
Choosing the type
•Reference: will set a reference to a type.
•Simple: inner simple type.
•Complex: inner complex type.
When choosing a complex type, it is possible to choose the content type.
If it is an update of existing data, the existent children that are not compatible with the selected
type will be deleted, but the children that are compatible will be preserved.
QXmlEdit user manual, page 32 of 113.
Clicking on the files
opens them in the editor
Clicking on the folder,
opens it in the open file dialog
Load XML file
Data Map
Measure type
Zoom Color Map
Numeric values
Options for Calucation
Differences report
Items, with different colors depending on state
Tools menu
Compare options
Status
Recent les Browse le
Select encoding
Search box
Edit an annotation
The annotation of XSD objects can be edited using the menu:
XML > XML Schema > Edit XSD Annotation
If the element has no annotation one annotation is automatically created and the edit panel is open.
From this panel is it possible open the complete edit annotations panel where more than one
annotation can be inserted for the given element. If the element has already more than one
annotation item, the full annotation panel is open.
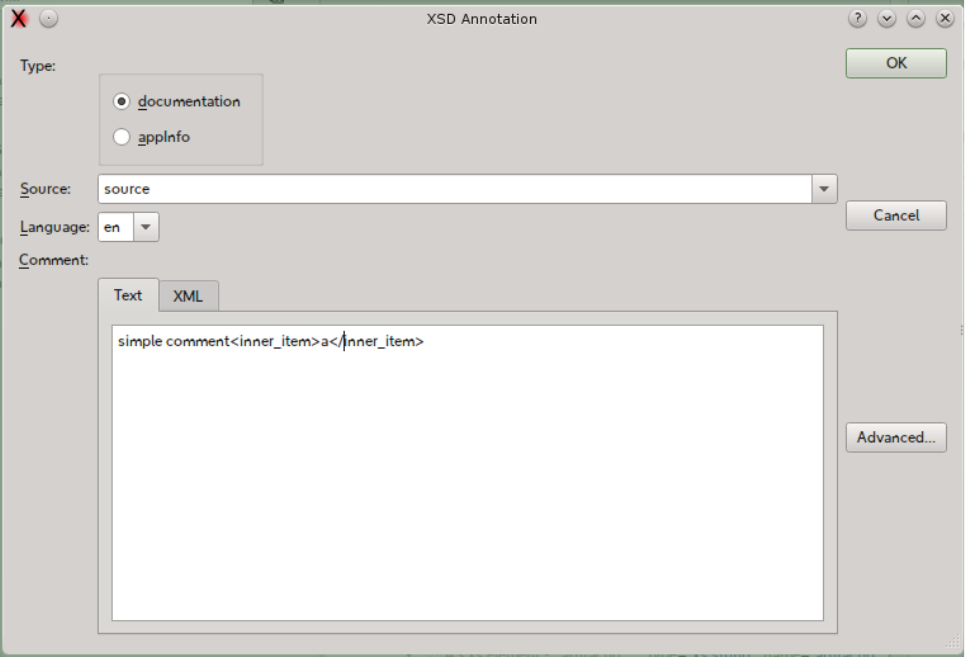
Single annotation panel
This panel congures a single annotation item.
The panel can show the inner contents of the annotation when containing XML mixed to text.
QXmlEdit user manual, page 33 of 113.
Clicking on the files
opens them in the editor
Clicking on the folder,
opens it in the open file dialog
Load XML file
Data Map
Measure type
Zoom Color Map
Numeric values
Options for Calucation
Differences report
Items, with different colors depending on state
Tools menu
Compare options
Status
Recent les Browse le
Select encoding
Search box
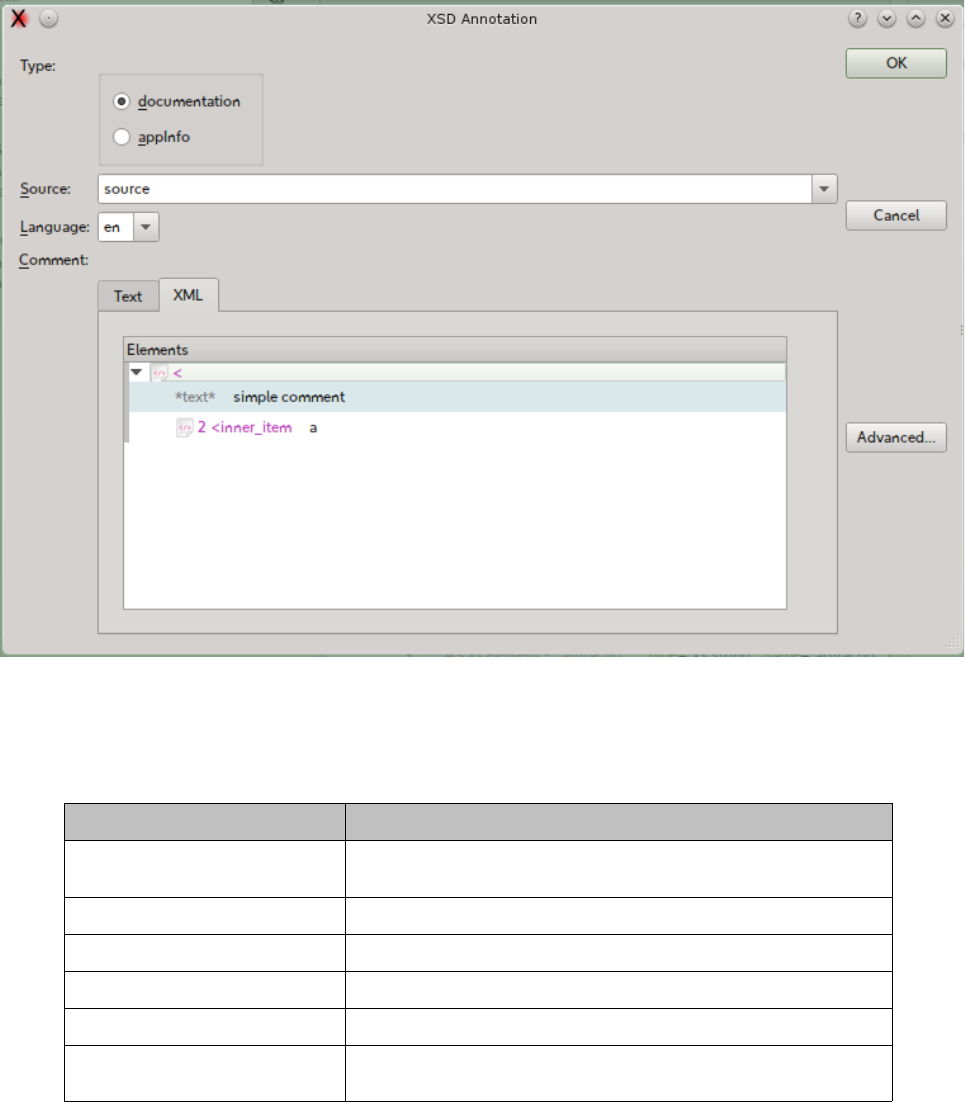
Available options:
Command Functionality
Type Switch the type of the annotation item between documentation and
appinfo.
Source Set the source of the item.
Language Valid only for documentation type.
Comment/text Edit eld for the annotation item
Comment/XML XML view of the annotation item. This view is read only.
Advanced When the panel opens and the parent element has no items or only
one, this button opens the advanced edit panel.
QXmlEdit user manual, page 34 of 113.
Clicking on the files
opens them in the editor
Clicking on the folder,
opens it in the open file dialog
Load XML file
Data Map
Measure type
Zoom Color Map
Numeric values
Options for Calucation
Differences report
Items, with different colors depending on state
Tools menu
Compare options
Status
Recent les Browse le
Select encoding
Search box
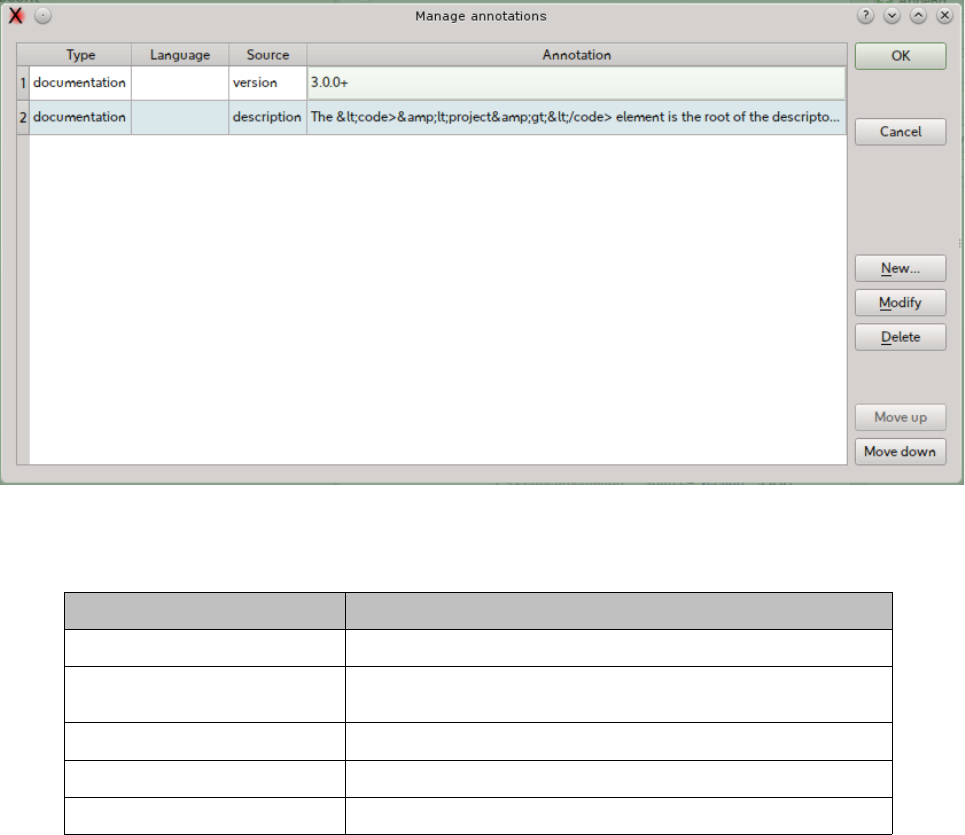
Annotation list edit panel
This panel shows a list of annotation items. Form here the items can be created, edited and deleted.
Available options:
Command Functionality
New Create a new item.
Modify Edit the selected item. This option can be triggered also by a double
click on the list.
Delete Delete the selected item.
Move Up Move the item one position up in the list.
Move Down Move the item one position down in the list.
QXmlEdit user manual, page 35 of 113.
Clicking on the files
opens them in the editor
Clicking on the folder,
opens it in the open file dialog
Load XML file
Data Map
Measure type
Zoom Color Map
Numeric values
Options for Calucation
Differences report
Items, with different colors depending on state
Tools menu
Compare options
Status
Recent les Browse le
Select encoding
Search box
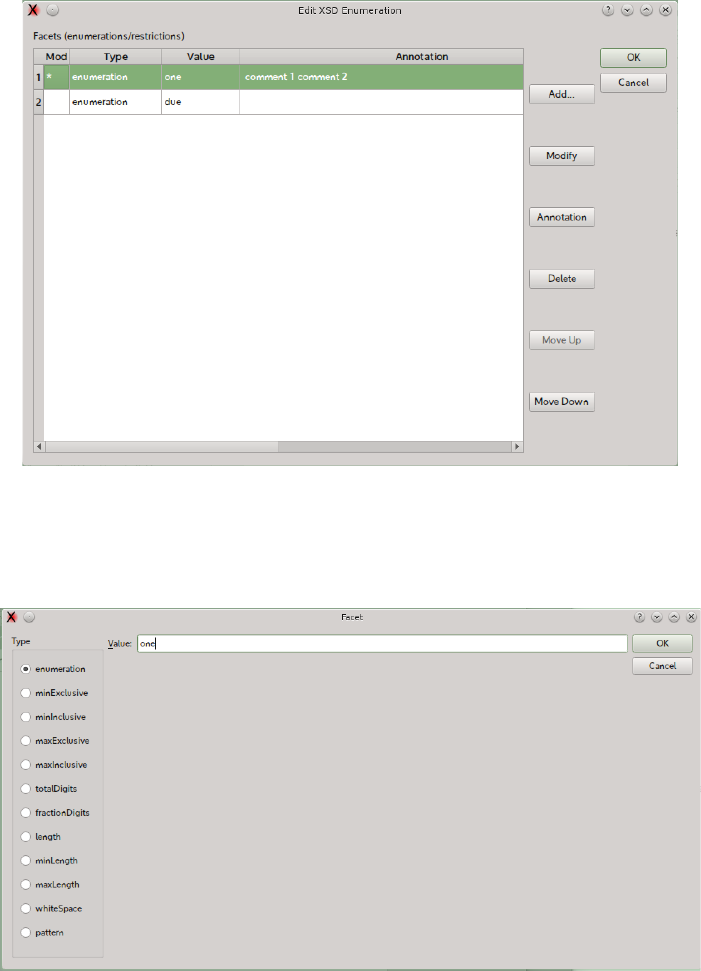
Editing Enumeration or Facets
The factes can be edited selecting the restriction element ad using the menu item:
XML > XML Schema > Edit Enumeration or Facet
The panel list all the facets. The items can be reorder, edited and annotated. Not legal elements are
discarded.
Edit facet panel
This panel edits a single facet item.
QXmlEdit user manual, page 36 of 113.
Clicking on the files
opens them in the editor
Clicking on the folder,
opens it in the open file dialog
Load XML file
Data Map
Measure type
Zoom Color Map
Numeric values
Options for Calucation
Differences report
Items, with different colors depending on state
Tools menu
Compare options
Status
Recent les Browse le
Select encoding
Search box
Editing XML Schema Attributes
Inserting the Schema Instance “nil” Attribute
Select an element and use the menu “XML>Schema Instance>Insert “nil” Attribute” to insert the
Schema Instance (XSI) “nil” attribute. If the namespace “xsi” is not present, it will be inserted in the
element, changing the prex if the same prex is already used; after that the attribute is inserted.
Removing the Schema Instance “nil” Attribute
Select an element containing the Schema Instance “nil” attribute and use the menu “XML>Schema
Instance>Remove “nil” Attribute” to remove the XSI “nil” attribute. If the XSI namespace is
declared in the elements and it is not used in the same element or its children, the namespace is
removed too.
Inserting the Schema Instance “type” Attribute
Select an element and use the menu “XML>Schema Instance>Insert “type” Attribute” to insert
the Schema Instance (XSI) “type” attribute. If the namespace “xsi” does not exist, it will be inserted
in the element, changing the prex if the same prex is already used; after that the attribute is
inserted. The type can be chosen by using a dialog.
Removing the Schema Instance “type” Attribute
Select an element containing the Schema Instance “nil” attribute and use the menu “XML>Schema
Instance>Remove “type” Attribute” to remove the XSI “type” attribute. If the XSI namespace is
declared in the elements and it is not used in the same element or its children, the namespace is
removed too.
QXmlEdit user manual, page 37 of 113.
Clicking on the files
opens them in the editor
Clicking on the folder,
opens it in the open file dialog
Load XML file
Data Map
Measure type
Zoom Color Map
Numeric values
Options for Calucation
Differences report
Items, with different colors depending on state
Tools menu
Compare options
Status
Recent les Browse le
Select encoding
Search box
Help and information
There are some facilities to discover and search commands
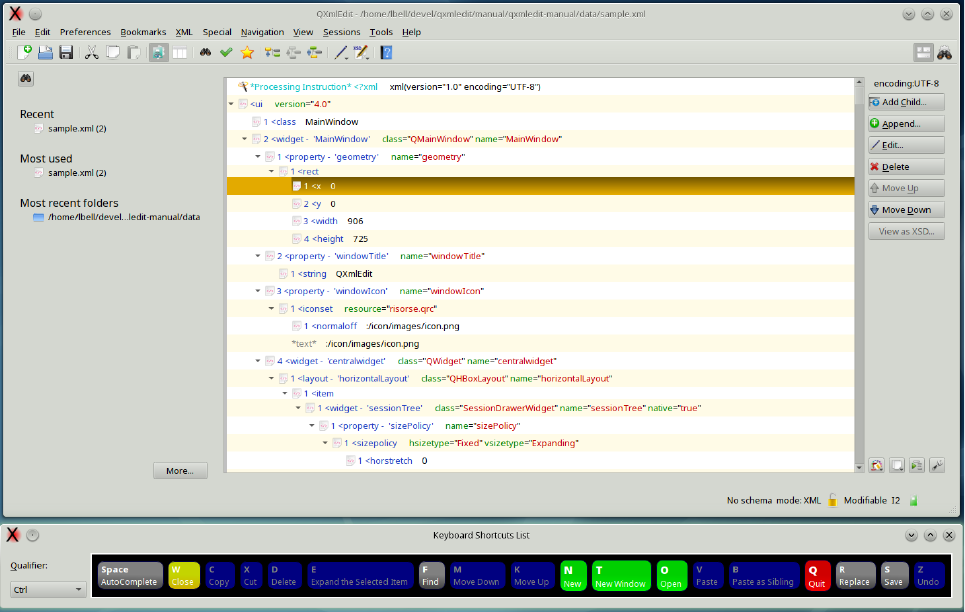
Show keyboard shortcuts
With the toolbar button or the menu Help>Show Keyboard Shortcuts the shortcuts bound to the
current editor window can be visible listed by ket qualier.
Changing the qualier key in the combo the shortcuts introduced by that qualied are reported. The
buttons can be pressed using the mouse.
QXmlEdit user manual, page 38 of 113.
Clicking on the files
opens them in the editor
Clicking on the folder,
opens it in the open file dialog
Load XML file
Data Map
Measure type
Zoom Color Map
Numeric values
Options for Calucation
Differences report
Items, with different colors depending on state
Tools menu
Compare options
Status
Recent les Browse le
Select encoding
Search box
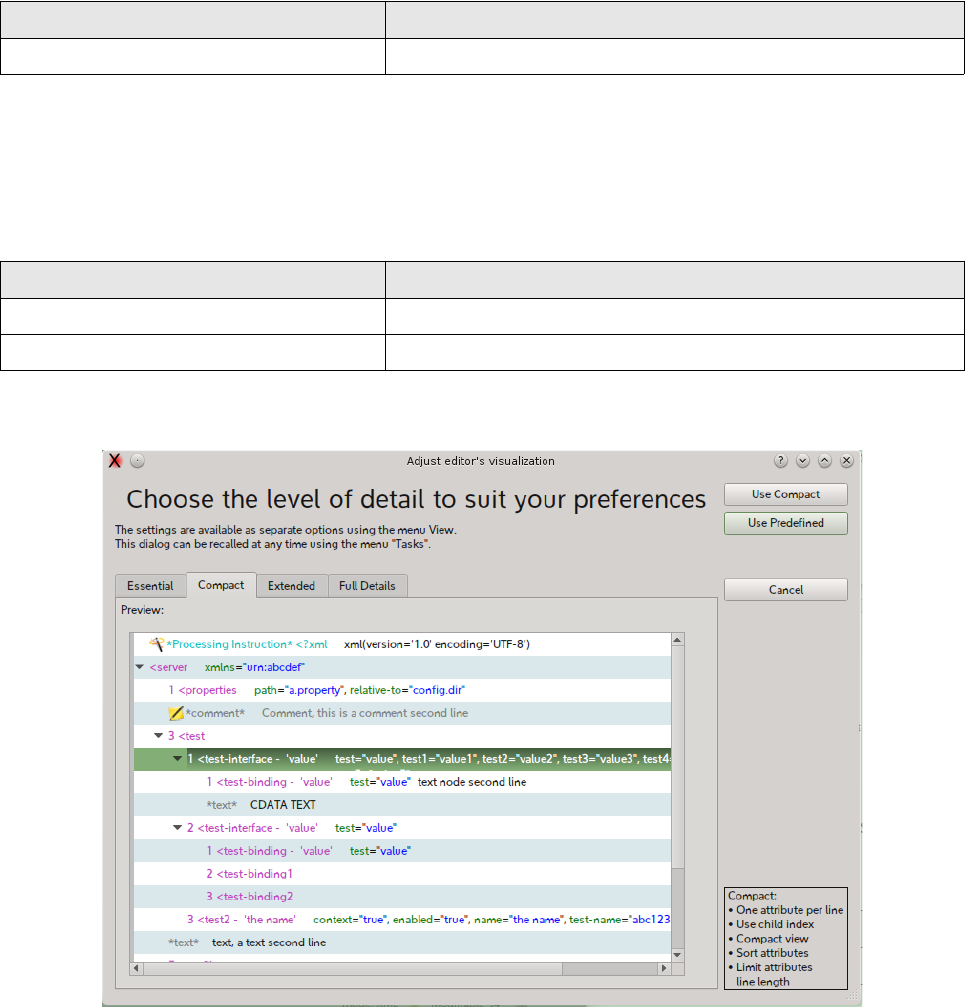
Tasks
Tasks are operations than can be accomplished using dierent commands. They are a sort of macro,
The following tasks are predened:
Task Description
Adjust Display Detail Set the editor view options.
Adjust Display Detail
With this task the level of detail of the editor is set. You can choose between some predened
settings and have a preview of each one.
Options:
Command Description
Use Predefined Use the predened settings.
Use (value) Use the style shown in the selected tab.
QXmlEdit user manual, page 39 of 113.
Clicking on the files
opens them in the editor
Clicking on the folder,
opens it in the open file dialog
Load XML file
Data Map
Measure type
Zoom Color Map
Numeric values
Options for Calucation
Differences report
Items, with different colors depending on state
Tools menu
Compare options
Status
Recent les Browse le
Select encoding
Search box
Preferences
The preferences panel can be opened using the menu Edit > Configuration.
The panel allows the conguration of the following categories:
Information Description
General General options.
Style Management of display style in the editor.
Editor Colors The name says all.
Validation Option related to XML and XML Schema validation.
Sessions Management of sessions data.
Edit Modes Activation of special modes in the editor (e.g. XSLT).
XML XML management.
Here a detailed explanation of the options:
QXmlEdit user manual, page 40 of 113.
Clicking on the files
opens them in the editor
Clicking on the folder,
opens it in the open file dialog
Load XML file
Data Map
Measure type
Zoom Color Map
Numeric values
Options for Calucation
Differences report
Items, with different colors depending on state
Tools menu
Compare options
Status
Recent les Browse le
Select encoding
Search box
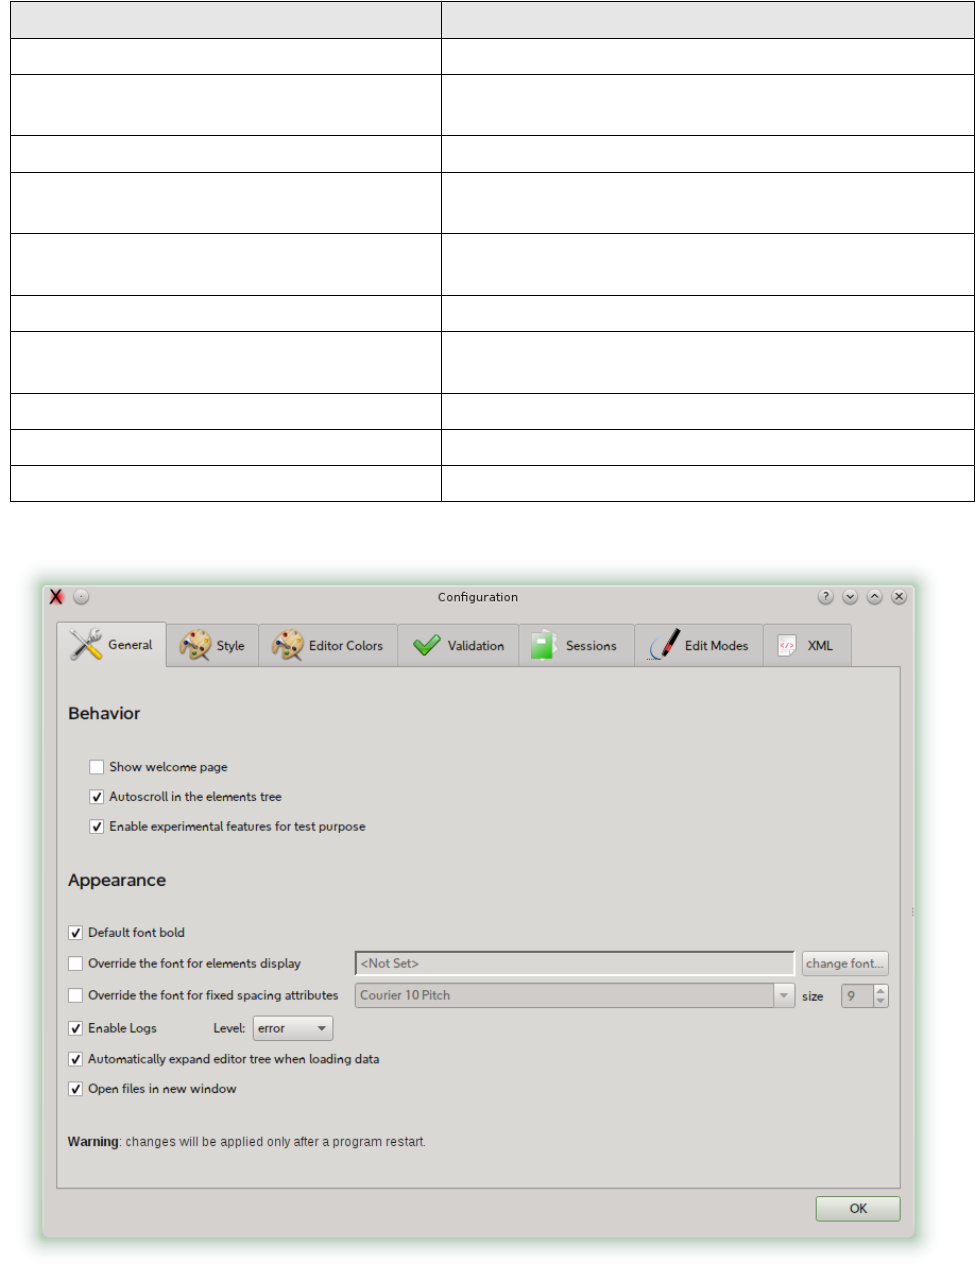
General
Option Description
Show welcome page Shows the welcome page at program start up.
Enable experimental features for
test purpose
Enables experimental feature in development editions.
Default font bold Use bold font weight for elements.
Override the font for elements
display
Use a user chosen family in the editor.
Override the font for fixed
spacing attributes
Use a custom font when rendering attributes with mono spaced
font.
Enable Logs Enable logging.
Automatically expand editor tree
when loading data
Expands (open) the whole tree after loang a new le.
Autoscroll in the elements tree Enable autoscroll when dragging items
Open files in new window A new window is used each time a le is loaded.
Limit attributes length The maximum length of the attributes lines in XML visualization.
QXmlEdit user manual, page 41 of 113.
Clicking on the files
opens them in the editor
Clicking on the folder,
opens it in the open file dialog
Load XML file
Data Map
Measure type
Zoom Color Map
Numeric values
Options for Calucation
Differences report
Items, with different colors depending on state
Tools menu
Compare options
Status
Recent les Browse le
Select encoding
Search box
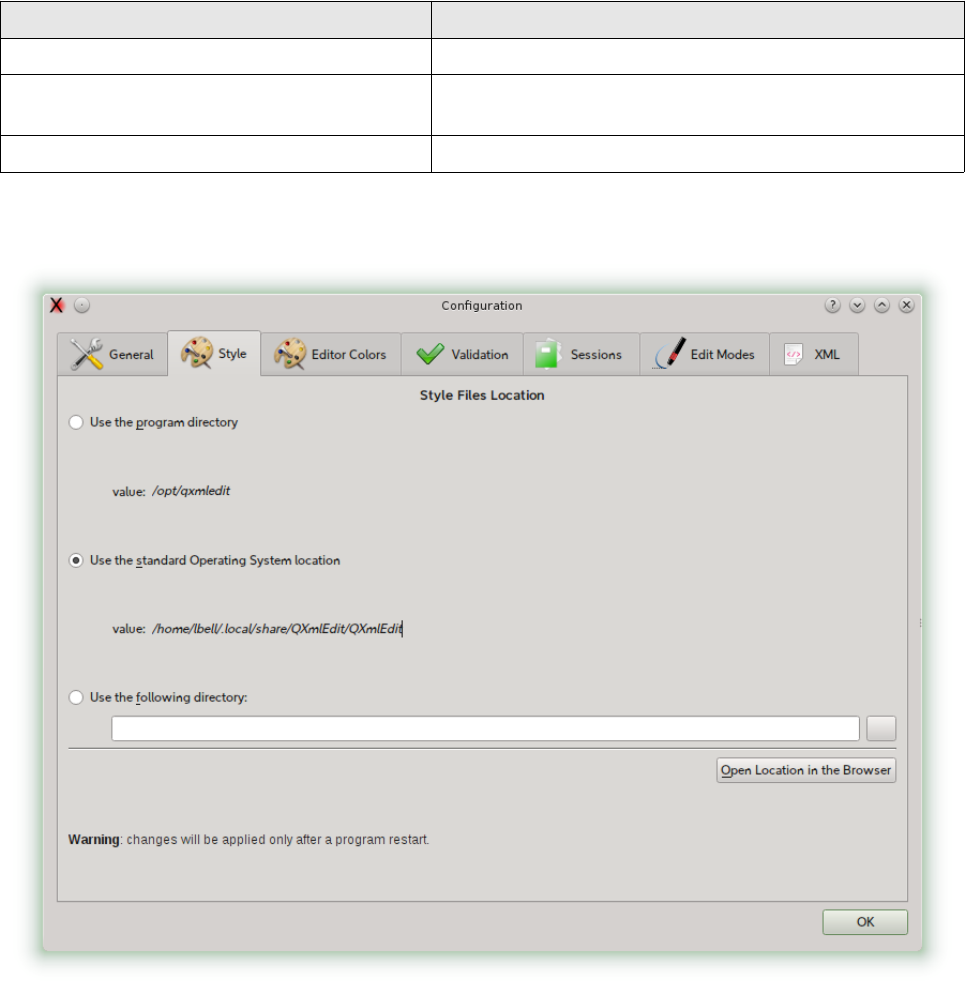
Style
This panel lets you choose the location for user dened styles les.
Option Description
Use the program directory Use the installation folder
Use the standard Operating System
location
Use the default location for data.
Use the following directory Use a user dened folder.
QXmlEdit user manual, page 42 of 113.
Clicking on the files
opens them in the editor
Clicking on the folder,
opens it in the open file dialog
Load XML file
Data Map
Measure type
Zoom Color Map
Numeric values
Options for Calucation
Differences report
Items, with different colors depending on state
Tools menu
Compare options
Status
Recent les Browse le
Select encoding
Search box
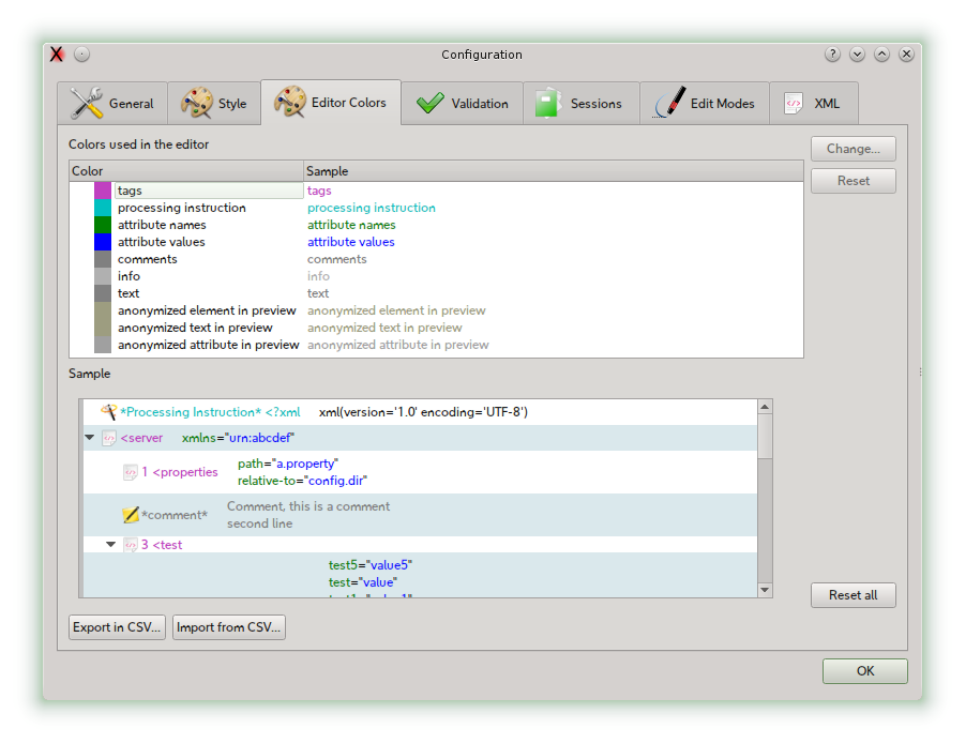
Editor colors
This dialog is described in details in the Style section. You can customize the colors of the editor.
QXmlEdit user manual, page 43 of 113.
Clicking on the files
opens them in the editor
Clicking on the folder,
opens it in the open file dialog
Load XML file
Data Map
Measure type
Zoom Color Map
Numeric values
Options for Calucation
Differences report
Items, with different colors depending on state
Tools menu
Compare options
Status
Recent les Browse le
Select encoding
Search box
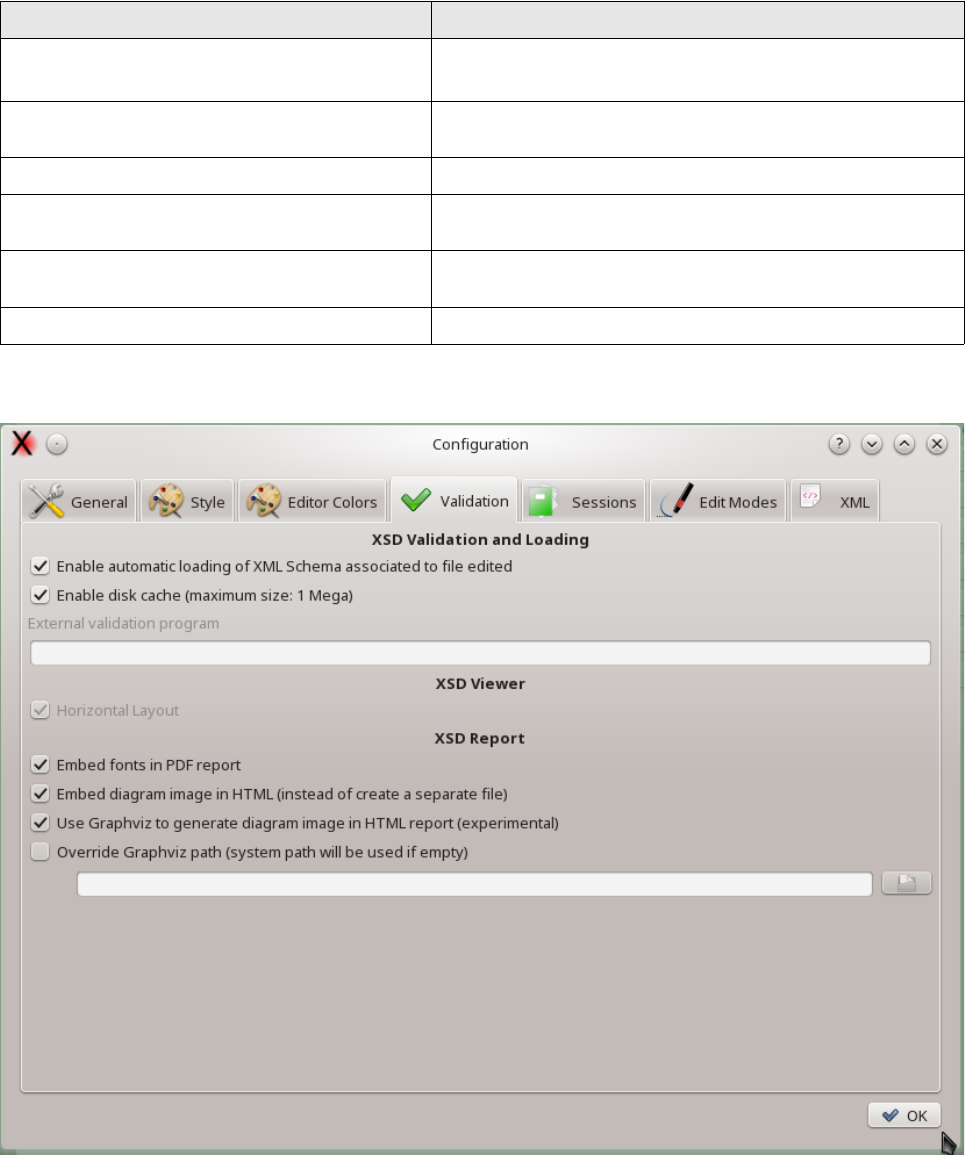
Validation
Option Description
Enable automatic loading of XML Schema
associated to file edited
Automatically loads referenced XML schema les in the
background at the XML le loading.
Enable disk cache (maximum size: 1 Mega) Enable cache for XML schema les to avoid unnecessary network
trac.
Embed fonts in PDF report Option to embed fonts in PDF report
Embed diagram image in HTML If the diagram image in HTML report should be inlined or
generated as external le.
Use Graphviz to generate diagrams in HTML Use GraphViz (not included in QXmlEdit) to generate the diagram
image. This option is experimental
Override GraphViz path Custom path to dot executable.
QXmlEdit user manual, page 44 of 113.
Clicking on the files
opens them in the editor
Clicking on the folder,
opens it in the open file dialog
Load XML file
Data Map
Measure type
Zoom Color Map
Numeric values
Options for Calucation
Differences report
Items, with different colors depending on state
Tools menu
Compare options
Status
Recent les Browse le
Select encoding
Search box
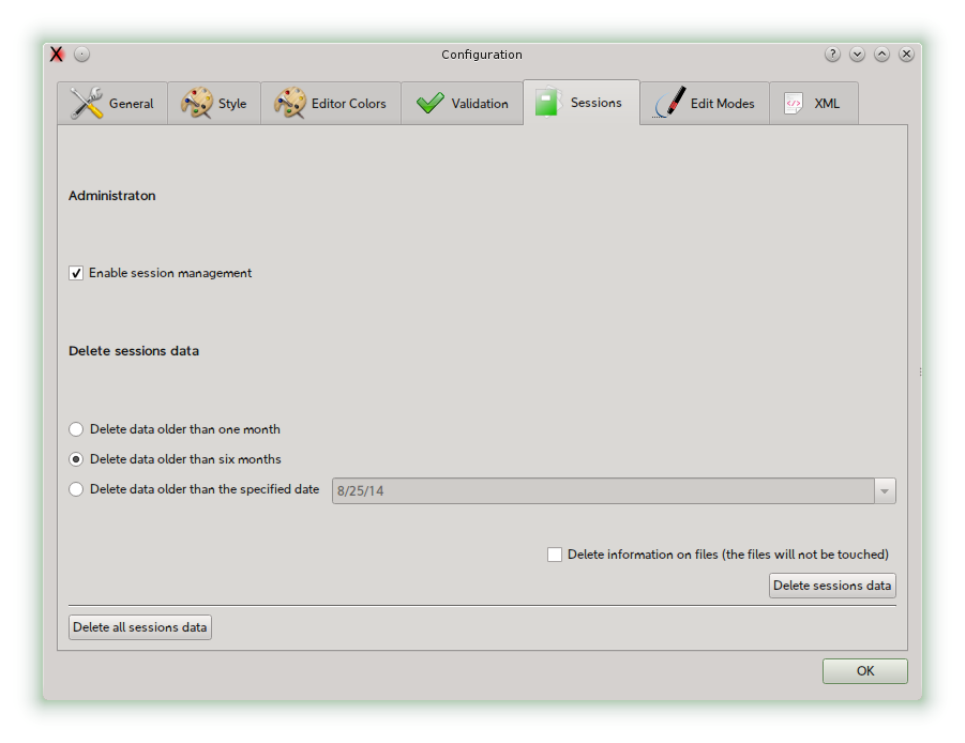
Sessions
Session options described in the Session section.
QXmlEdit user manual, page 45 of 113.
Clicking on the files
opens them in the editor
Clicking on the folder,
opens it in the open file dialog
Load XML file
Data Map
Measure type
Zoom Color Map
Numeric values
Options for Calucation
Differences report
Items, with different colors depending on state
Tools menu
Compare options
Status
Recent les Browse le
Select encoding
Search box
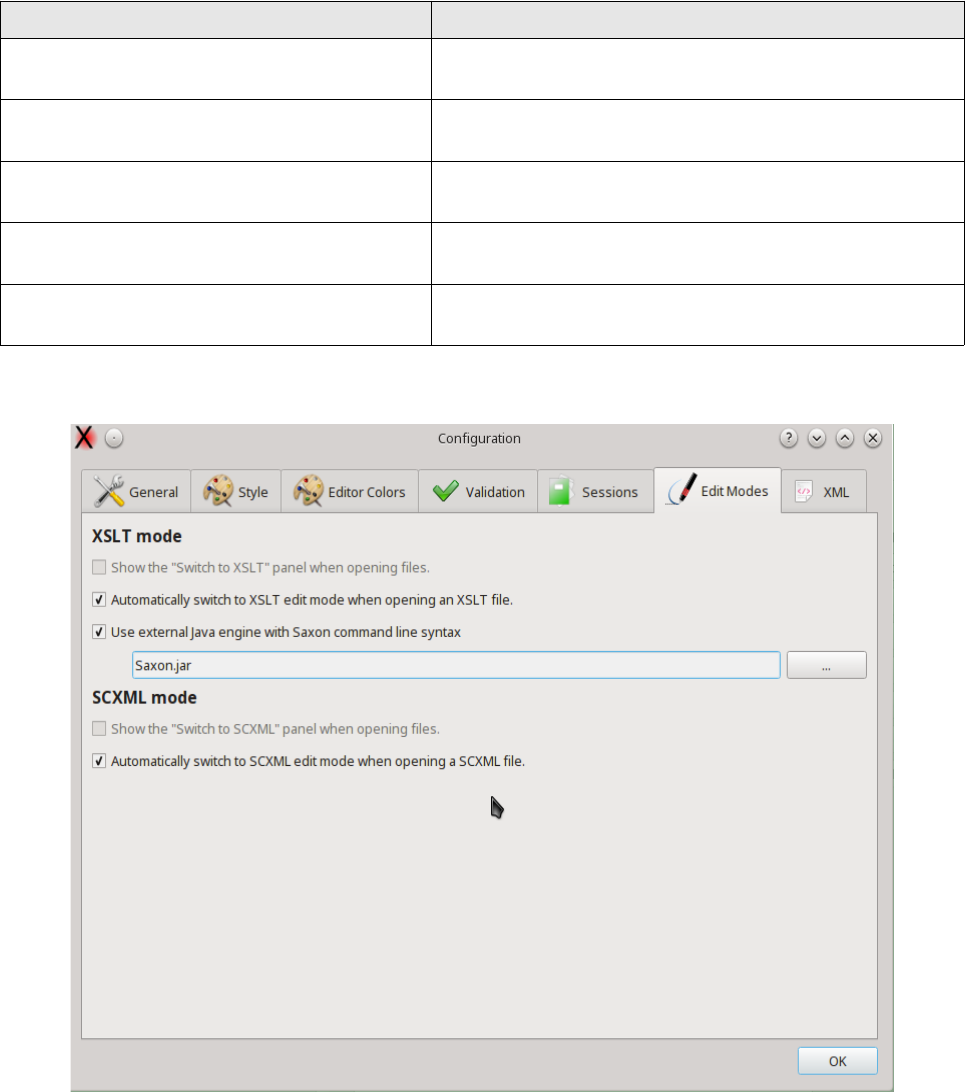
Edit Modes
This panel for the options related to specialized edit modes.
Option Description
Automatically switch to XSLT edit
mode when opening an XSLT file.
When loading a new le, if it is recognized as a XSLT documents,
XSLT edit mode is automatically enabled.
Show the "Switch to XSLT" panel
when opening files.
When loading a new le, if it is recognized as a XSLT documents,
open the XSLT edit mode panel.
Use external Java engine with
Saxon command line syntax
If you want to use an external XSLT Java engine having the same
command line interface as Saxon, insert here the path of the jar.
Automatically switch to SCXML edit
mode when opening a SCXML file.
When loading a new le, if it is recognized as a SCXML
documents, SCXML edit mode is automatically enabled.
Show the "Switch to SCXML" panel
when opening files.
When loading a new le, if it is recognized as a SCXML
documents, open the SCXML edit mode panel.
QXmlEdit user manual, page 46 of 113.
Clicking on the files
opens them in the editor
Clicking on the folder,
opens it in the open file dialog
Load XML file
Data Map
Measure type
Zoom Color Map
Numeric values
Options for Calucation
Differences report
Items, with different colors depending on state
Tools menu
Compare options
Status
Recent les Browse le
Select encoding
Search box
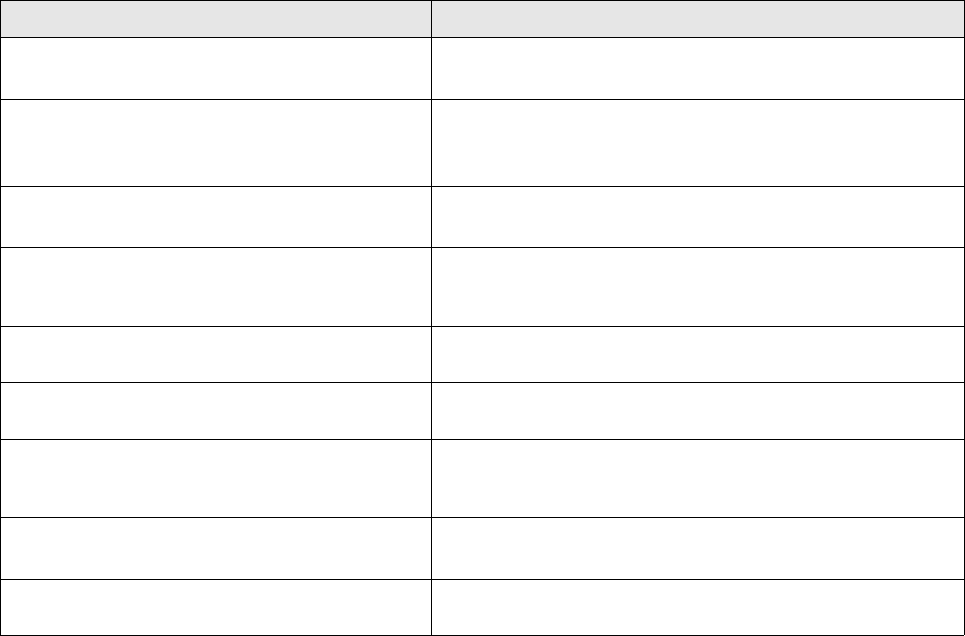
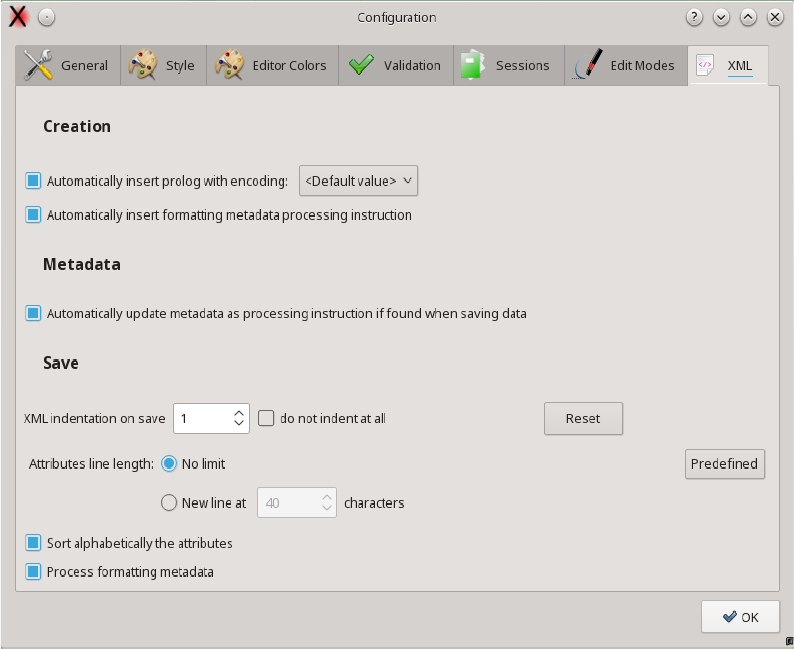
XML
XML management options
Option Description
Automatically insert prolog with
encoding
When creating new les, insert XML prolog with optional
encoding specication.
Automatically update metadata as
processing instruction if found
when saving data
Enable the update of QXmlEdit specic metadata in the le when
saving.
Automatically insert formatting
metadata process instruction
When creating a new XML document insert a processing
instruction that holds formatting settings (indentation, ...)
XML indentation on save Enable or disable XML indentation when saving. A value of 0 still
saves on element per row. You have to disable it explicitly if you
want only one output text line.
Save using stream instead of DOM Enabled by default. Allow a ner control on input and output.
DTD declarations are not handled if this option is unchecked.
Sort alphabetically the attributes On saving the attributes will be sorted alphabetically on their
name.
Attributes line length It limits the start column of the attributes. If a limit is set, if the
attribute start at a column that is greater than the distance from
the tag end than the limit, a new line is started.
Limit attribute length to X
columns
Limits the length of the attribute zone when saving the le.
Process formatting metadata When reading a document, if formatting metadata are fouund,
they will be applied.
QXmlEdit user manual, page 47 of 113.
Clicking on the files
opens them in the editor
Clicking on the folder,
opens it in the open file dialog
Load XML file
Data Map
Measure type
Zoom Color Map
Numeric values
Options for Calucation
Differences report
Items, with different colors depending on state
Tools menu
Compare options
Status
Recent les Browse le
Select encoding
Search box
QXmlEdit user manual, page 48 of 113.
Clicking on the files
opens them in the editor
Clicking on the folder,
opens it in the open file dialog
Load XML file
Data Map
Measure type
Zoom Color Map
Numeric values
Options for Calucation
Differences report
Items, with different colors depending on state
Tools menu
Compare options
Status
Recent les Browse le
Select encoding
Search box
Customization
Choosing a Display Style
QXmlEdit can use a dierent display style, the font used, its dimensions and the color, to represent
dierent XML structures. The style description can be created by the user and applied on demand.
QXmlEdit comes with some predened styles.
The style can display the value of some attribute near to the element tag to highlight the element
type.
To apply a style:
•In the main window, click the styles popup ( ), then choose the desired style.
To remove a style:
•In the main window, click the styles popup ( ), then choose the ”== No Style ==“ item
The style les location can be congured using the menu item Edit > Configure.
In the appendix there is the complete style reference.
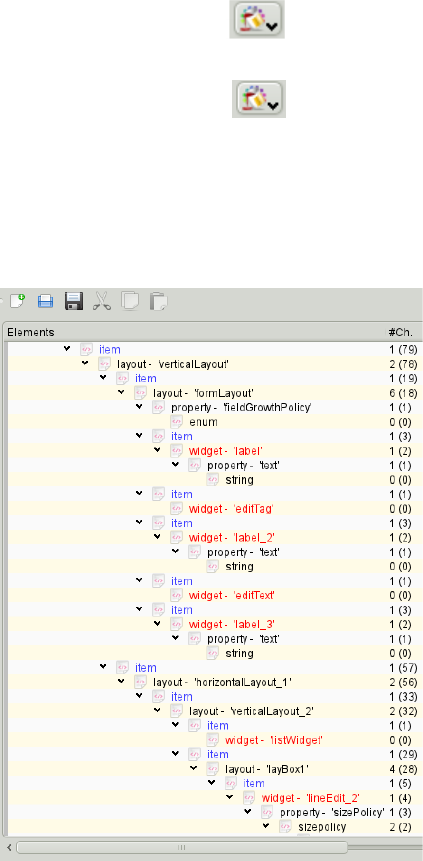
An example of style applied to an XML Schema le is represented in the following screenshot:
The style can be used to highlight the elements.
QXmlEdit user manual, page 49 of 113.
Clicking on the files
opens them in the editor
Clicking on the folder,
opens it in the open file dialog
Load XML file
Data Map
Measure type
Zoom Color Map
Numeric values
Options for Calucation
Differences report
Items, with different colors depending on state
Tools menu
Compare options
Status
Recent les Browse le
Select encoding
Search box
The Style can be based on rules, in the appendix there is the full detail.
Editing Elements
Basically you can use the tree view to insert child nodes or append nodes as brothers of the current
one. There is a separate input panel for each node type you can manipulate: elements, comments,
processing instructions.
To insert an element as a child of some other node:
•Select the XML > Add a Child Element menu.
or
•Click the button Add Child... on the main window.
To append a node as brother of the current selection:
•Select the XML > Append a Brother Element menu.
or
•Click the button Append... on the main window.
To work with attributes:
•open the element edit panel and start editing
To insert a processing instruction as a child of some other node:
•select the XML > Add Processing Instruction as a Child menu
To append a processing instruction as a brother of some other node:
•select the XML > Add Processing Instruction as Brother menu
To remove a node of any type (element, attribute, comment, processing instruction):
•click the button Delete on the main view
Navigating Elements
There are some shortcuts to move from one element to another one using the relationship between
the two. These shortcut are handful especially when the data tree is very tall, and avoid you the
necessity to continually scroll the window while examining data.
To rise from an element to its parent:
•select the element, then press F11
To jump to the next element at the same level of the current one:
•select the element, then press F10
To jump to the previous element at the same level of the current one:
QXmlEdit user manual, page 50 of 113.
Clicking on the files
opens them in the editor
Clicking on the folder,
opens it in the open file dialog
Load XML file
Data Map
Measure type
Zoom Color Map
Numeric values
Options for Calucation
Differences report
Items, with different colors depending on state
Tools menu
Compare options
Status
Recent les Browse le
Select encoding
Search box
•select the element, then press F9
To close all the children of an element and all the children of their brothers (it gives you a compact
view of the tree level in one operation):
•select the element, then press F12
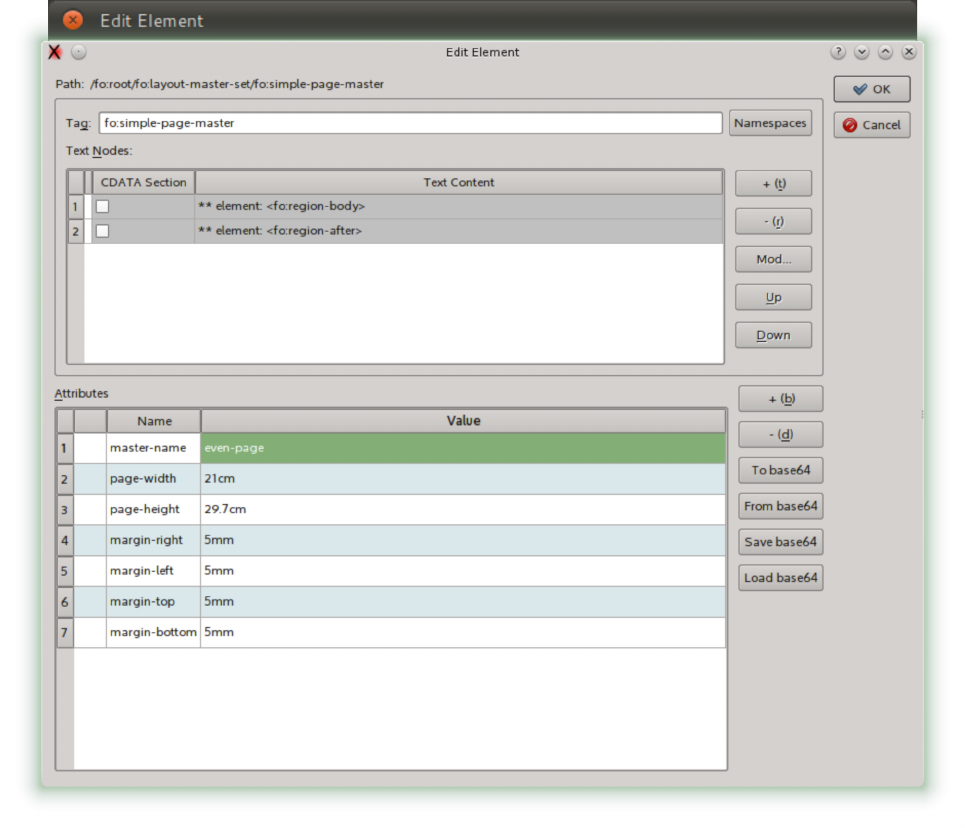
Editing Elements and Attributes
To edit the selected object:
•double click on the selected element
or
•press the Edit... button in the main window
When editing elements a panel will open. In the panel the current element path is shown; it is
possible to manage namespaces by recalling a library of user dened data. It is possible to manage
base 64 coded attributes.
QXmlEdit user manual, page 51 of 113.
Clicking on the files
opens them in the editor
Clicking on the folder,
opens it in the open file dialog
Load XML file
Data Map
Measure type
Zoom Color Map
Numeric values
Options for Calucation
Differences report
Items, with different colors depending on state
Tools menu
Compare options
Status
Recent les Browse le
Select encoding
Search box
In the panel you can insert the following information:
Name Information
Tag The tag of the element
Text Nodes You can insert or remove text nodes as element children
Attributes You can edit the element attributes
To insert a text node:
•press the + button in the text nodes section
To insert a CDATA text node:
•press the + button in the text nodes section then activate the CDATA check box on the text
nodes table
To modify text node content:
•Select the text node, then press the Mod... button. A panel will open.
Note: you cannot edit child element nodes in this panel, only text nodes.
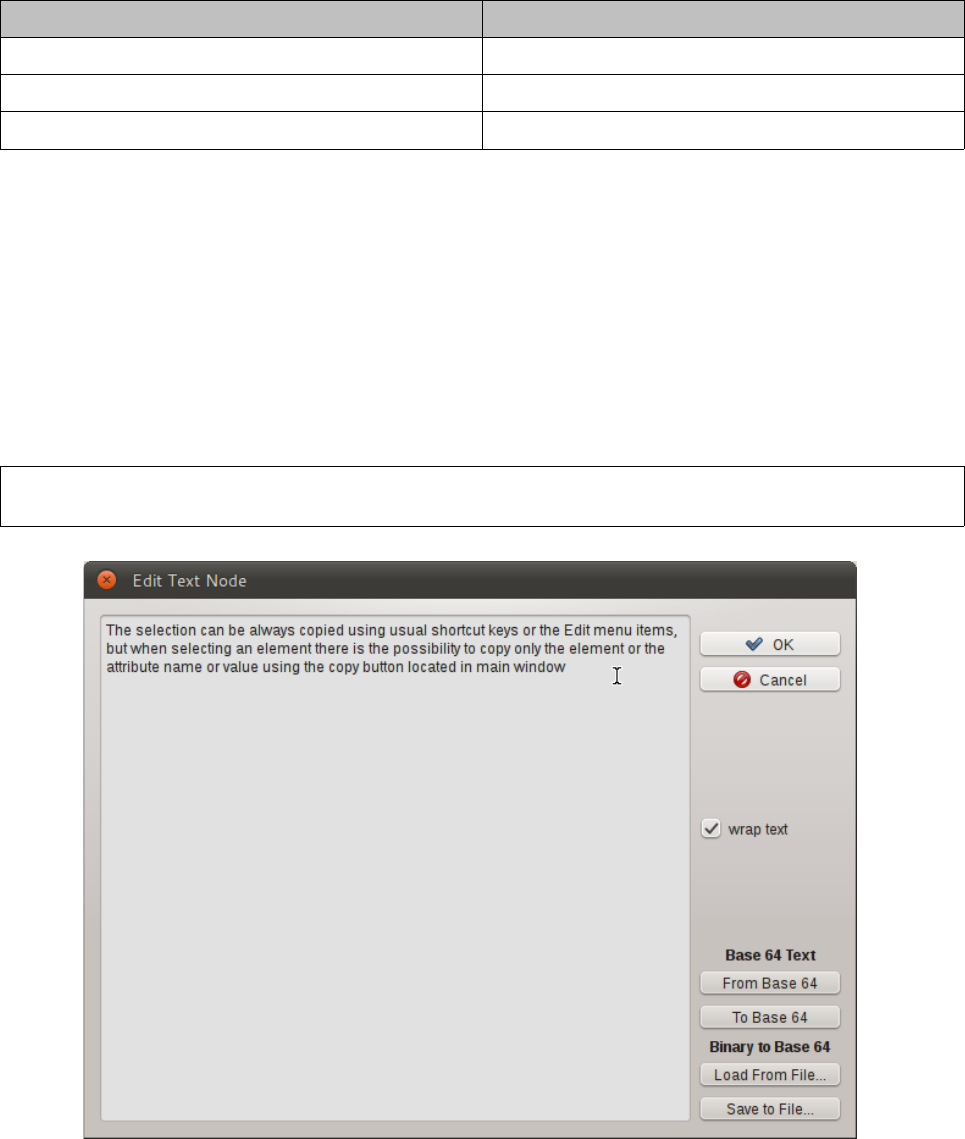
To insert a base 64 coded text:
•Insert the text, then press To Base 64 button, then save the text.
To modify a base 64 coded text:
•Press the From Base 64 button, the text will be decoded, modify the text, then press To
Base 64 button, then save the text.
QXmlEdit user manual, page 52 of 113.
Clicking on the files
opens them in the editor
Clicking on the folder,
opens it in the open file dialog
Load XML file
Data Map
Measure type
Zoom Color Map
Numeric values
Options for Calucation
Differences report
Items, with different colors depending on state
Tools menu
Compare options
Status
Recent les Browse le
Select encoding
Search box
To view the text on more lines even it is a single line:
•Activate the wrap text check box.
To load a binary le as base 64 coded text:
•Press the Load from file... button, then browse to the le in the le dialog.
To save current base 64 coded text into a binary le, decoding the values:
•Press the Save to file... button.
Deleting siblings
The menu XML>Siblings lets you
•Delete the siblings before the selected element.
•Delete the siblings after the selected element.
•Delete all the siblings of the selected element.
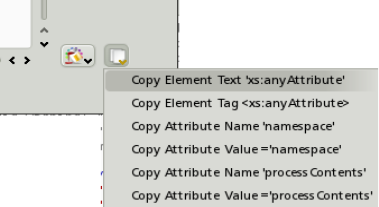
Copying Selected Text Into the Clipboard
The selection can be always copied using usual shortcut keys or the Edit menu items, but when
selecting an element there is the possibility to copy only the element or the attribute name or value
using the copy button located in main window:
to copy the selected element tag:
•click the Copy Element Tag item
to copy the selected element content:
•click the Copy Element Text item
For each attribute of the selected element:
to copy the attribute name:
•click the Copy Attribute Name item
to copy the selected attribute value:
•click the Copy Attribute Value item
QXmlEdit user manual, page 53 of 113.
Clicking on the files
opens them in the editor
Clicking on the folder,
opens it in the open file dialog
Load XML file
Data Map
Measure type
Zoom Color Map
Numeric values
Options for Calucation
Differences report
Items, with different colors depending on state
Tools menu
Compare options
Status
Recent les Browse le
Select encoding
Search box
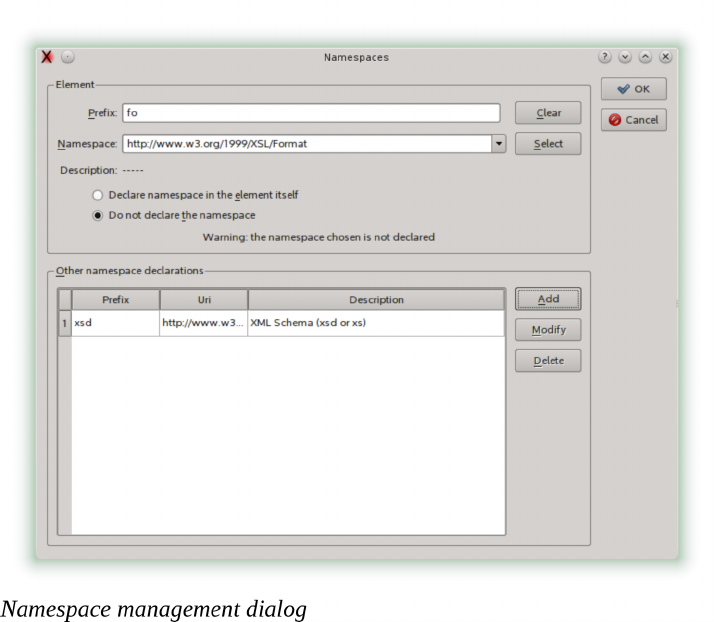
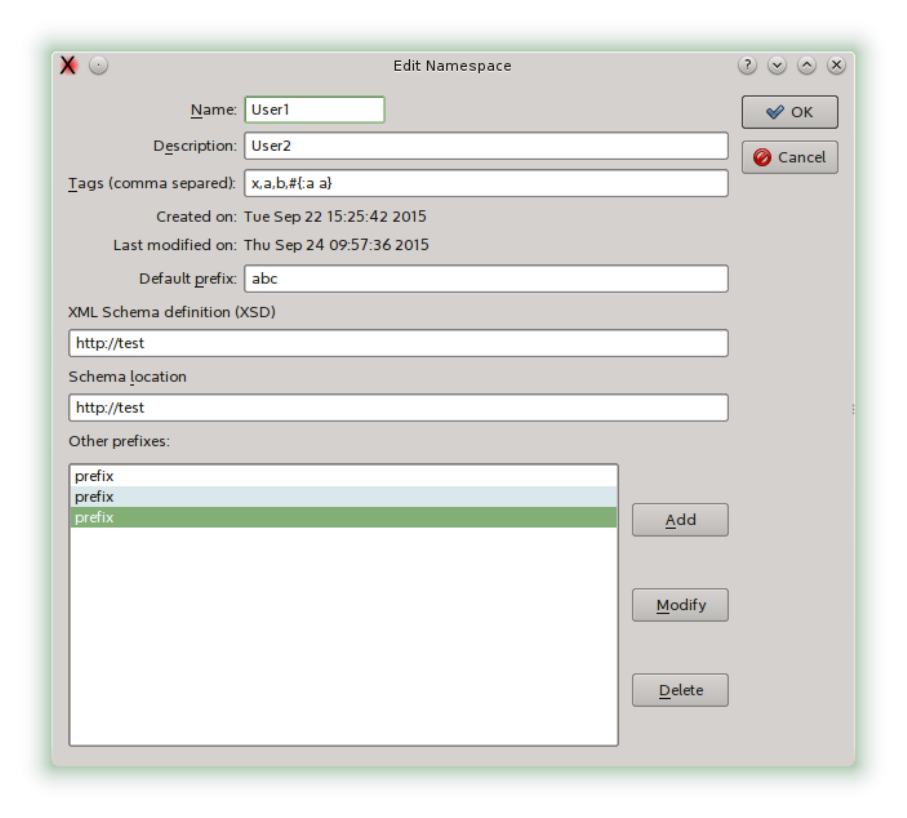
Namespaces
In the edit element window it is possible to recall the namespaces management dialog.
In this dialog it is possible insert namespace references recalling the namespace selection dialog.
QXmlEdit user manual, page 54 of 113.
Clicking on the files
opens them in the editor
Clicking on the folder,
opens it in the open file dialog
Load XML file
Data Map
Measure type
Zoom Color Map
Numeric values
Options for Calucation
Differences report
Items, with different colors depending on state
Tools menu
Compare options
Status
Recent les Browse le
Select encoding
Search box
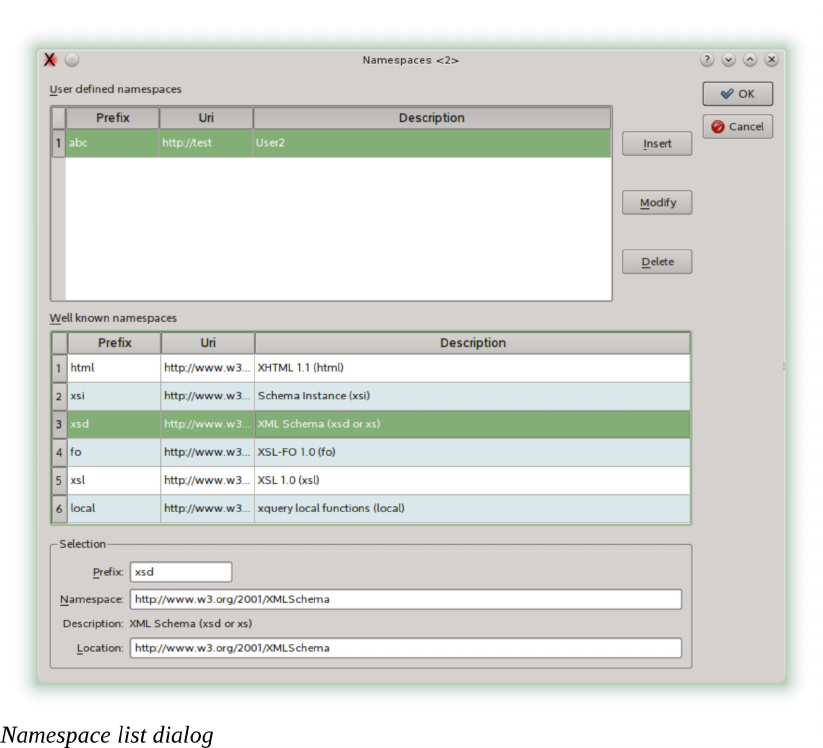
I n this panel it is possible to select a system dened namespace or choose a user dened
namespace. The user dened namespaces are managed in a separate dialog, stored permanently
and are available to successive sessions of QXmlEdit.
QXmlEdit user manual, page 55 of 113.
Clicking on the files
opens them in the editor
Clicking on the folder,
opens it in the open file dialog
Load XML file
Data Map
Measure type
Zoom Color Map
Numeric values
Options for Calucation
Differences report
Items, with different colors depending on state
Tools menu
Compare options
Status
Recent les Browse le
Select encoding
Search box
Using the Bookmarks
You can mark the elements with bookmarks for easy retrieval and navigation.
To set a bookmark:
•select an element, then use the menu Bookmarks > Toggle Bookmark (CTRL-F2)
To remove a bookmark:
•navigate to the bookmark, then use the menu Bookmarks > Toggle Bookmark (CTRL-F2)
To remove all the bookmarks:
•use the menu Bookmarks > Remove All Bookmarks
To move to the next bookmark:
•Press F2
or
•use the menu Bookmarks > Go to Next Bookmark
To move to the previous bookmark:
QXmlEdit user manual, page 56 of 113.
Clicking on the files
opens them in the editor
Clicking on the folder,
opens it in the open file dialog
Load XML file
Data Map
Measure type
Zoom Color Map
Numeric values
Options for Calucation
Differences report
Items, with different colors depending on state
Tools menu
Compare options
Status
Recent les Browse le
Select encoding
Search box
•Press Shift-F2
or
•use the menu Bookmarks > Go to Previous Bookmark
QXmlEdit user manual, page 57 of 113.
Clicking on the files
opens them in the editor
Clicking on the folder,
opens it in the open file dialog
Load XML file
Data Map
Measure type
Zoom Color Map
Numeric values
Options for Calucation
Differences report
Items, with different colors depending on state
Tools menu
Compare options
Status
Recent les Browse le
Select encoding
Search box
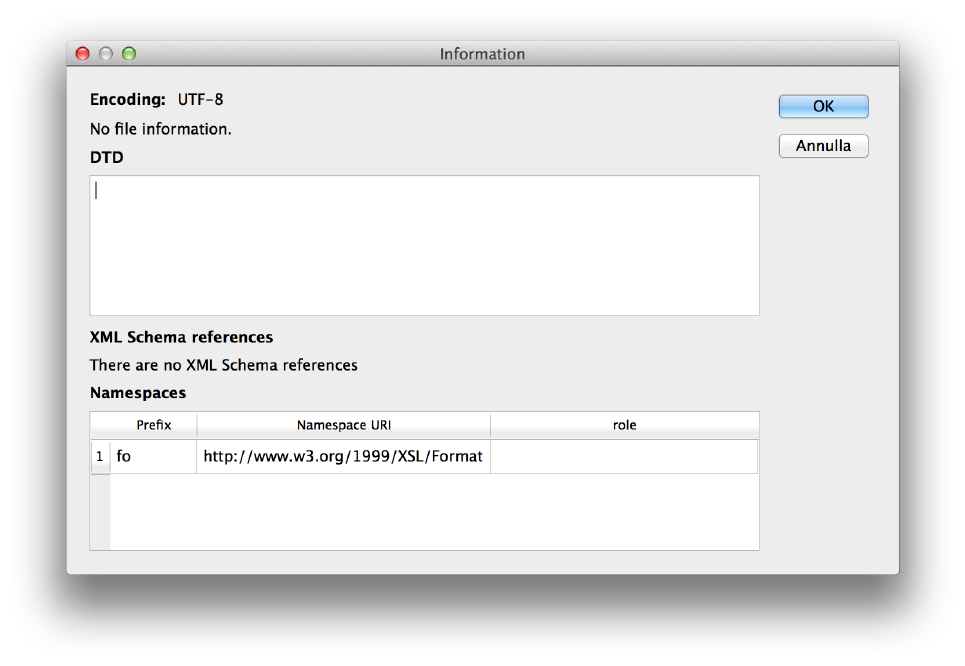
Viewing and editing info and DTD
Basic information about the le can be shown using the menu Edit > Info
The information is relative to:
•Encoding.
•XML Schema references embedded into the le.
•Declared name spaces.
•DTD.
•File information.
Here an “Info” panel:
Please note that some namespace prex can be used in more than one place with dierent
references.
The “role” column will list well known namespaces.
The DTD of the document can be edited in this panel if the le is not read only. The manually edited
DTD is not checked against syntax errors.
QXmlEdit user manual, page 58 of 113.
Clicking on the files
opens them in the editor
Clicking on the folder,
opens it in the open file dialog
Load XML file
Data Map
Measure type
Zoom Color Map
Numeric values
Options for Calucation
Differences report
Items, with different colors depending on state
Tools menu
Compare options
Status
Recent les Browse le
Select encoding
Search box
Working with Base64 Coded Content
Sometimes the data of an element are text nodes or binary data base 64 coded. QXmlEdit can
display decoded base 64 coded text near to the literal content in the main window, and permit you
to edit directly the content.
To edit directly the base 64 coded text of an element:
1. select the element, then right click to make the context menu appear and select Edit Inner
base 64 Text.
2. Write directly the text into the edit box of the panel that appears.
The text will be automatically encoded and decoded as needed.
Working With Inner XML Content
Sometimes the data of an element is an XML payload registered as text, or a base 64 coded XML.
QXmlEdit can edit directly both the types of contents.
To edit directly the XML data stored as payload of an element:
1. select the element, then right click to make the context menu appear and select Edit Inner
XML.
2. Another QXmlEdit Window will appear; you can use it to edit the inner XML.
The XML will be automatically encoded and decoded as needed.
To edit directly a base 64 coded XML used as element payload:
1. select the element, then right click to make the context menu appear and select Edit Inner
XML Base 64 Coded.
2. Another QXmlEdit Window will appear; you can use it to edit the inner XML.
The XML will be automatically encoded and decoded as needed.
Inserting an XML prolog on document creation
You can insert an XML prolog XML using the menu XML > Insert prolog. You can insert
automatically a prolog on document creation using an option in the conguration panel. In the panel
you can also select the encoding to be used.
Formatting a document
QXmlEdit can use a processing instruction to store and retrieve formatting settings for indentation,
attributes display and so on.
If the processing of the instruction is enabled, the settings are read and applied at the next saving.
If some formatting options is changed and the instruction exists in data, the instruction is
automatically updated before saving.
The instruction processing can be enabled in preferences, XML section.
To insert a formatting processing instruction use the menu item Edit>Formatting>Add
QXmlEdit user manual, page 59 of 113.
Clicking on the files
opens them in the editor
Clicking on the folder,
opens it in the open file dialog
Load XML file
Data Map
Measure type
Zoom Color Map
Numeric values
Options for Calucation
Differences report
Items, with different colors depending on state
Tools menu
Compare options
Status
Recent les Browse le
Select encoding
Search box

Formatting Info. To remove it us the same menu, and the Remove Formatting Info item.
To enable or disable the management for a single document, use the formatting panel with the
toolbar or the menu item Formatting>Formatting…
The preferences panel has an option to automatically insert the instruction at each document
creation.
The processing instruction is transparent to XML management, however should you want to avoid
it, you can disable it in preferences panel.
Formatting Presets
In the menu Edit>Formatting there are some common (hopefully) presets. The name of the items
gives a clue about its settings.
Validating an XML Document
An XML Schema validation option is available, but it uses the Qt XML validation facility, that is
rather limited at the moment. The validation is made by default using schema references contained
in the XML document, if any. You can use an external XML Schema le; after this assignment the
validation is performed using the assigned le until an explicit command to use the document
references is given.
If an external schema le is used, its path is visible In the tool tip of the toolbar “Validate”
command.
To validate using the last assigned schema:
•select the menu XML > Validate
To validate a document using self referenced XSD, if any:
•select the menu XML > Validate Using Document References
To use a dierent an XML Schema le:
•select the menu XML > Validate Using New Schema File
NB: the validation option is available only if compiling at least with the Qt 4.4. It uses the Qt
XML validation facility, that is rather limited at the moment.
Counting Children Elements and Measuring Their Size
It is possible to display the sum of the number of elements children and the element total size,
calculated on the canonical element form ( i. e. counting stating and ending tags ). The size
calculated is only an approximation of the real value, given that there are many modes to write the
same XML data.
To activate the option:
•select the menu View > Show Element Size
QXmlEdit user manual, page 60 of 113.
Clicking on the files
opens them in the editor
Clicking on the folder,
opens it in the open file dialog
Load XML file
Data Map
Measure type
Zoom Color Map
Numeric values
Options for Calucation
Differences report
Items, with different colors depending on state
Tools menu
Compare options
Status
Recent les Browse le
Select encoding
Search box
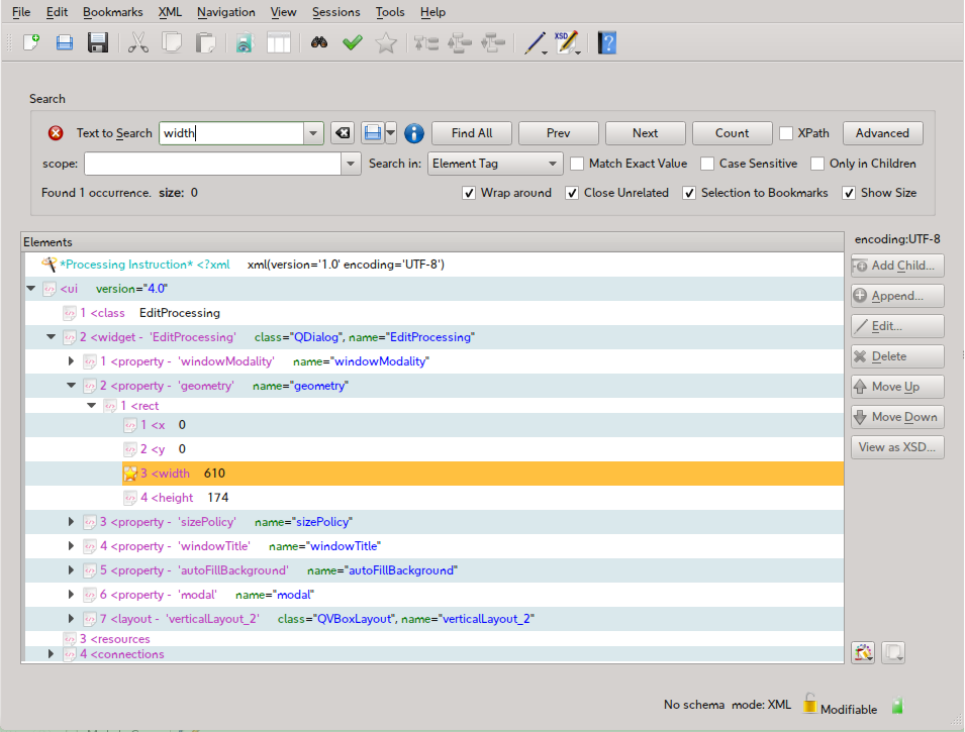
Finding Text
It is possible to execute searches in the editor. To open the search panel:
•use the Edit > Find menu
or
•press Control+F
In the panel you can do the following operations:
To start a search:
•insert the text in the edit box and press Enter key or press the Find button
To limit the search to a particular kind of XML components, use the Search In option box:
•All the types of components
•Element tags only
•Attribute names only
•Attribute values only
•Text nodes
•Base 64 coded text
The elements that match the search rules will be highlighted, but you can act on the display in the
QXmlEdit user manual, page 61 of 113.
Clicking on the files
opens them in the editor
Clicking on the folder,
opens it in the open file dialog
Load XML file
Data Map
Measure type
Zoom Color Map
Numeric values
Options for Calucation
Differences report
Items, with different colors depending on state
Tools menu
Compare options
Status
Recent les Browse le
Select encoding
Search box
following manners:
Name of the Option Information
close unrelated close all the branches that does not contain any occurrence of the search text.
selection to bookmarks adds all occurrences found to the bookmarks collection.
match exact value executes the search of the exact value of text (opposed to regard the text as a
substring)
case sensitive the search will be case sensitive
find all mark all the occurrences of the search pattern with a background pattern to
ease the reading, elsewhere the search will stop to rst match.
only in children the search can be limited only to children of the selected item or to the whole
tree.
scope can limit the search to a set of elements or attributes. This eld can contain a
path in XPath like syntax. For example to search a value in the “id” elements
children of “resource”, the eld must contains “resource/id”. If the search has to
be performed only on “name” attribute of the “window” element, write
“window/@name”. To include any elements between “window” and “widget”
tags, simply omit it as in “window//widget”
XPath Activates the XPath syntax (see below for details). If unchecked the text
entered in the search box is used as pure text.
The number of matches is reported in a box at the bottom of the search panel.
It is possible to nd the next occurrence starting the search from the selected item. You can use the
command buttons in the panel or activate it using the following command:
•use the Edit > Find Next menu
or
•Use the key F3
Search results
The matching items are highlighted and, in combination with other options, non matching items are
closed.
QXmlEdit user manual, page 62 of 113.
Clicking on the files
opens them in the editor
Clicking on the folder,
opens it in the open file dialog
Load XML file
Data Map
Measure type
Zoom Color Map
Numeric values
Options for Calucation
Differences report
Items, with different colors depending on state
Tools menu
Compare options
Status
Recent les Browse le
Select encoding
Search box
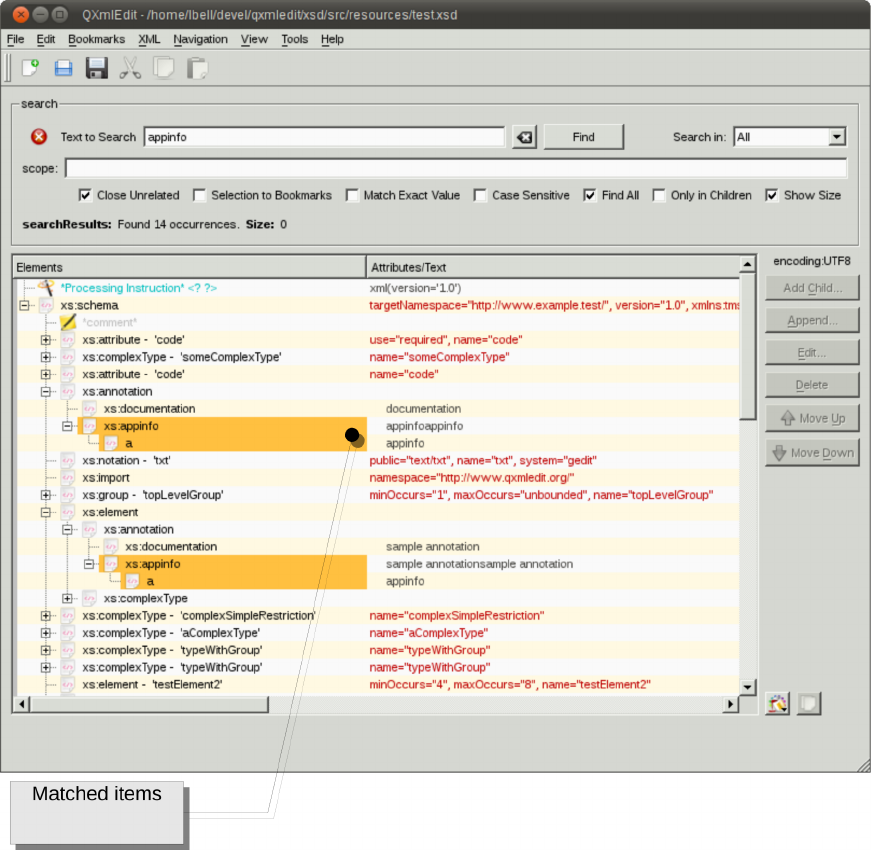
XPath syntax
In the panel you can do the following operations:
To start a search:
•select the “XPath” check box
•insert the text in the edit box using XPath syntax and press Enter key or press the Find
button
A small note will indicate the XPath mode activation.
If “Only in Children” check box is selected the root of the search is the current element, if not the
search starts at the document root.
Some of the options available to the text search are hidden because their operation can be carried
on using XQuery and XPath.
The elements that match the search rules will be highlighted, but you can act on the display in the
following manners:
QXmlEdit user manual, page 63 of 113.
Clicking on the files
opens them in the editor
Clicking on the folder,
opens it in the open file dialog
Load XML file
Data Map
Measure type
Zoom Color Map
Numeric values
Options for Calucation
Differences report
Items, with different colors depending on state
Tools menu
Compare options
Status
Recent les Browse le
Select encoding
Search box

Name of the Option Information
close unrelated closes all the branches that does not contain any occurrence of the search text.
selection to bookmarks adds all occurrences found to the bookmarks collection.
only in children the search can be limited only to children of the selected item or to the whole
tree.
scope can limit the search to a set of elements or attributes. This eld can contain a
path in XPath like syntax. For example to search a value in the “id” elements
children of “resource”, the eld must contains “resource/id”. If the search has to
be performed only on “name” attribute of the “window” element, write
“window/@name”. To include any elements between “window” and “widget”
tags, simply omit it as in “window//widget”
The number of matches is reported in a box at the bottom of the search panel.
Search results
The matching items are highlighted and, in combination with other options, non matching items are
closed.
The following screen shot shows a search using XPath:
Browsing the search results
You can open a search results panel using the button “Open panel” in the nd panel.
The new panel will show only the search results, giving the possibility to browse directly the XPath
QXmlEdit user manual, page 64 of 113.
Clicking on the files
opens them in the editor
Clicking on the folder,
opens it in the open file dialog
Load XML file
Data Map
Measure type
Zoom Color Map
Numeric values
Options for Calucation
Differences report
Items, with different colors depending on state
Tools menu
Compare options
Status
Recent les Browse le
Select encoding
Search box
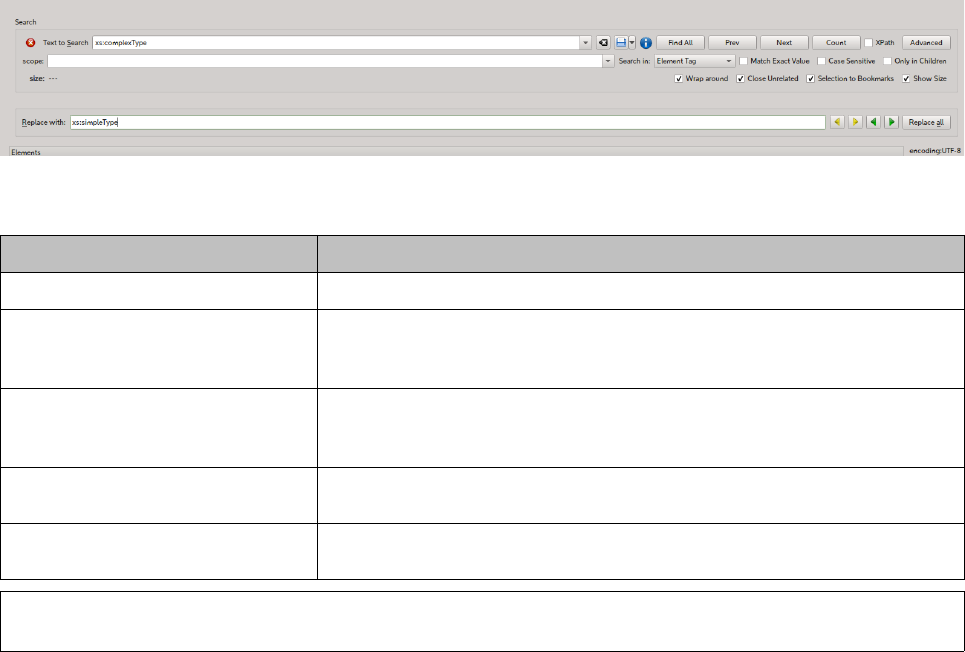
queries elements or the text search results.
Replacing text
Replace uses the search feature to nd text that can match and replace it all at once or one at time.
Replace is triggered by the menu Edit > Replace.
Replace panel
The following commands are available:
Command Behavior
Replace All Replaces all the occurrences of the search pattern.
Replace and find next If there is a selection, a replacement is applied if there is a match; then the next
element that matches is selected. If no selection was existing, the next match is
selected.
Replace and find previous If there is a selection, a replacement is applied if there is a match; then the
previous element that matches is selected. If no selection was existing, the
previous match is selected.
Skip and find next If there is a selection then the next element that matches is selected. If no
selection was existing, the next match is selected.
Skip and find previous If there is a selection then the next element that matches is selected. If no
selection was existing, the previous match is selected.
Note: replace operation cannot use XQuery search.
Comparing Files
The purpose of the comparison as implemented is to give a compact view of changes, comparing
the current editor content with another le. The sense of the comparison is to show what
transformations are needed to the chosen le to become the current loaded one.
To compare a le against the current:
1. select the menu File > Compare with...
2. choose a le
In the panel that opens you have the following information:
•The current le in XML format with elements and attributes that are dierent between the
les with highlighted colors (Synthetic View).
•A structure comparison side by side of the two les (Analytical view).
•The list of the dierences with the path of elements (Dierence list).
QXmlEdit user manual, page 65 of 113.
Clicking on the files
opens them in the editor
Clicking on the folder,
opens it in the open file dialog
Load XML file
Data Map
Measure type
Zoom Color Map
Numeric values
Options for Calucation
Differences report
Items, with different colors depending on state
Tools menu
Compare options
Status
Recent les Browse le
Select encoding
Search box
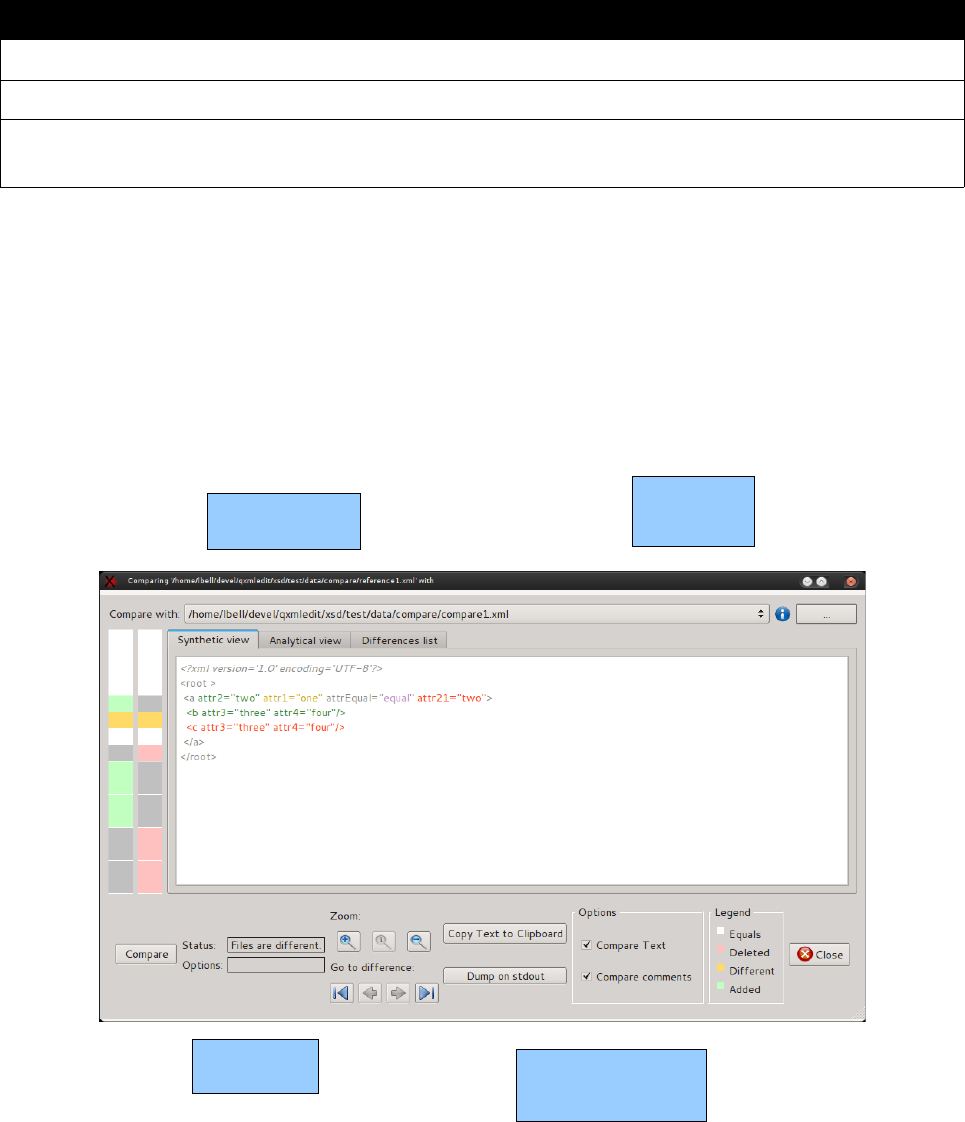
The following options can be set:
Option Meaning
Compare text Compare even the text nodes
Compare comments Take into account the comments
Denormalize EOL In CDATA nodes do not transform the CR LF sequences into LF as stated
by specs.
In the panel that opens you have the following options:
•Compare only elements or comments and mixed content too.
•Copy the comparison result to the clipboard.
•Retry the comparison, after changing some option.
To start a comparison, load a recent le from the relative combo box or select another one using
the browse button.
User interface
Analytical view
QXmlEdit user manual, page 66 of 113.
Clicking on the files
opens them in the editor
Clicking on the folder,
opens it in the open file dialog
Load XML file
Data Map
Measure type
Zoom Color Map
Numeric values
Options for Calucation
Differences report
Items, with different colors depending on state
Tools menu
Compare options
Status
Recent les Browse le
Select encoding
Search box
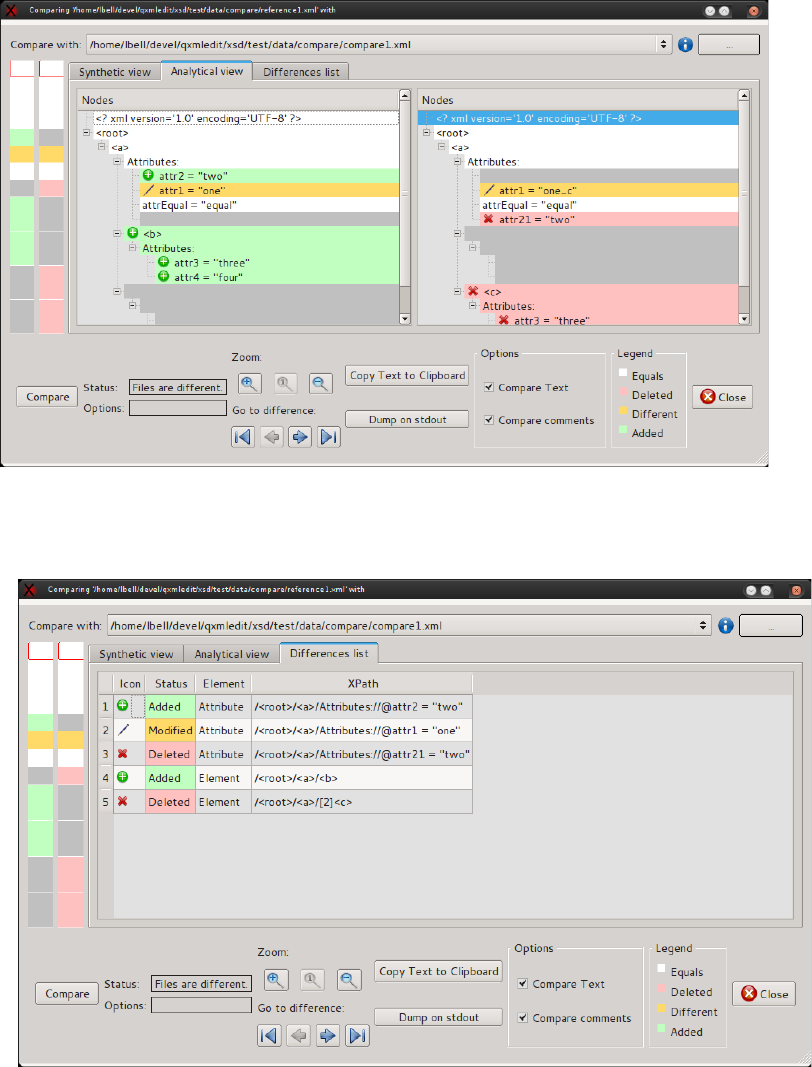
Dierences list
QXmlEdit user manual, page 67 of 113.
Clicking on the files
opens them in the editor
Clicking on the folder,
opens it in the open file dialog
Load XML file
Data Map
Measure type
Zoom Color Map
Numeric values
Options for Calucation
Differences report
Items, with different colors depending on state
Tools menu
Select encoding
Search box
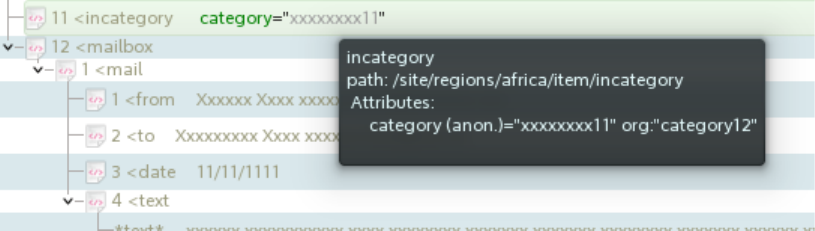
Anonymizing data
The menu Special > Anonymize recalls a dialog to anonymize the data contained in attributes and
text of the XML.
This feature can be useful if the XML le should be sent to technical sta for debugging purposes
avoiding the disclosure of personal information.
Using this feature the text and the attributes can be altered using a xed character or using a
dierent letter for each input character by preserving the case of the original letters.
The original data structure is preserved replacing only letters and digits with altered text,
preserving the case of the letters and the reserved XML attributes. The tags and attribute names
are not changed.
Data and business rules
Often the les contain not only personal information, but also data for business rules. Modifying all
the contained text or attributes will end in a useless le transporting no information at all.
To avoid that result, manipulating the parameters that belong to the business rules, two features
can be used:
•A lter to avoid the anonymization of values consisting of less than 4 characters (the length
of many codes).
•The use of exceptions.
The exceptions can be bound to any element, attribute or text node and force the subject to be
anonymized or not; if anonymized, a user dened value can be used to replace the original one.
The exceptions can be hierarchical and extended to the children of the subject. It is possible to
isolate data from business rules from personal data. When applying more expressions, the more
specic wins; for example if an element has been forced to be anonymized with children, and one of
its children has another exception of reverse meaning, the child exception is applied.
Each time an exception is modied, the anonymization operation results are shown in a preview
pane. The original values can be seen in the tooltips of the elements of the preview.
Since creating rules and exceptions is a time expensive process, it is possible to save them using a
prole and recall them later in other anonymization processes.
QXmlEdit user manual, page 68 of 113.
Clicking on the files
opens them in the editor
Clicking on the folder,
opens it in the open file dialog
Load XML file
Data Map
Measure type
Zoom Color Map
Numeric values
Options for Calucation
Differences report
Items, with different colors depending on state
Tools menu
Select encoding
Search box
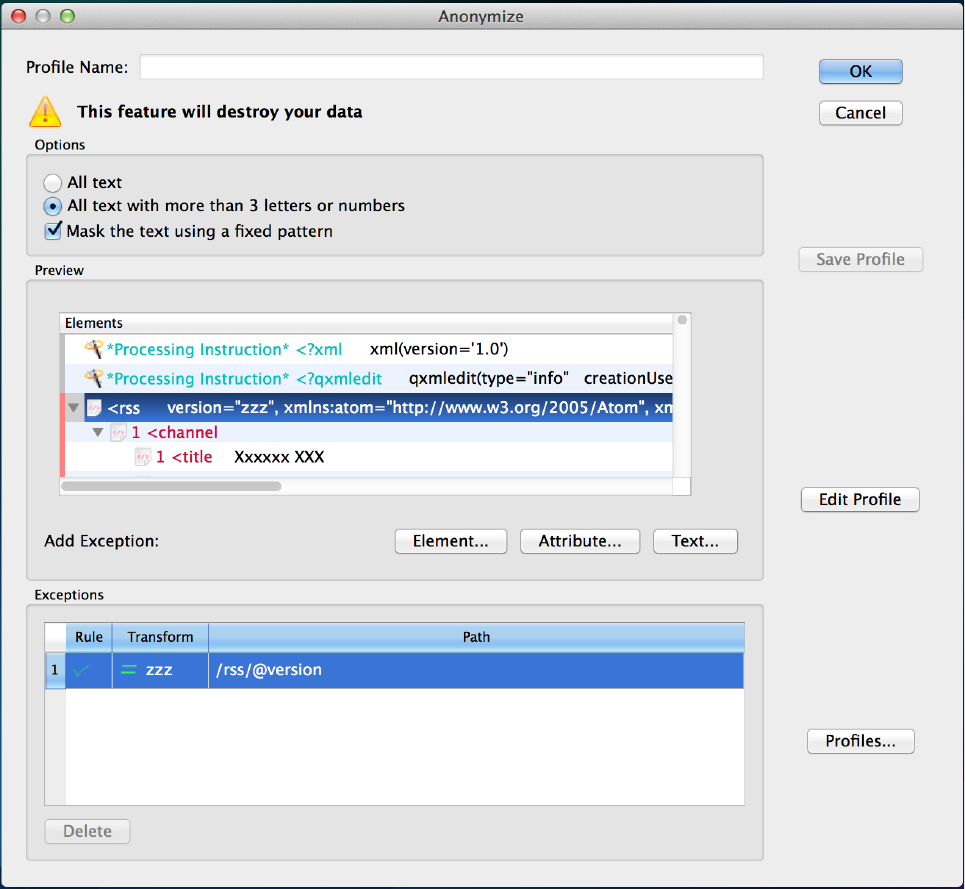
Options
The options are:
•All text: all the text will be changed.
•Text with more than 3 letters or digit: only the text that is composed by more than 3 letters
or digits will be changed. This to skip codes that usually have a limited length.
The check box “xed pattern” determines how the text is transformed.
•If checked: letters are replaced by 'x' and numbers by '1'.
•If unchecked: the letters and the numbers are replaced by a succession of letters or
numbers in alphabetical order.
The exceptions can be entered selecting the element and using the contextual menu.
QXmlEdit user manual, page 69 of 113.
Clicking on the files
opens them in the editor
Clicking on the folder,
opens it in the open file dialog
Load XML file
Data Map
Measure type
Zoom Color Map
Numeric values
Options for Calucation
Differences report
Items, with different colors depending on state
Tools menu
Select encoding
Search box
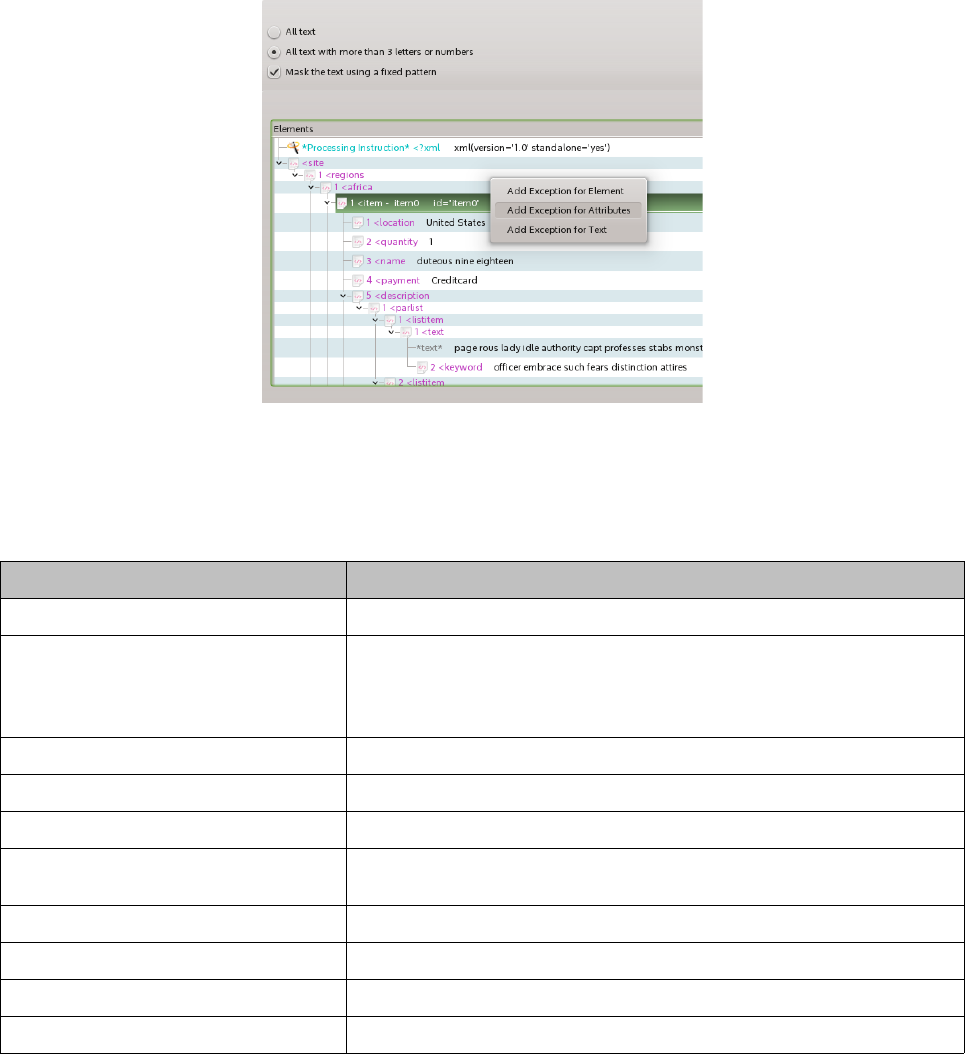
Information in the panel:
Name Information
Profile Name Name of the prole (read only)
Options Options to anonymize data:
•anonymize all the text
•anonymize only the text with more than 3 letters or numbers
As an option it is possible to use a xed pattern to replace the text.
Preview It shows the nal result of the operation on the current data
Add Exception You can add exceptions when an element is selected in the preview.
Exceptions The list of the exceptions
Save Profile Saves the current prole data. If the prole has not been created, a creation
panel will appear.
Edit Profile Edits the prole data.
Profiles Manages the proles.
Import Import a list of exception in CSV format (see below for details)
Export Export the exception list to the clipboard in CSV format
To insert an exception:
1. Select an element in the preview pane
2. Use one of the buttons in the “Add exception” row
To remove an exception:
1. Select an exception in the exception list
2. Press “Delete” in the exception group.
To save the exception list in a prole:
•Press “Save profile”
QXmlEdit user manual, page 70 of 113.
Clicking on the files
opens them in the editor
Clicking on the folder,
opens it in the open file dialog
Load XML file
Data Map
Measure type
Zoom Color Map
Numeric values
Options for Calucation
Differences report
Items, with different colors depending on state
Tools menu
Select encoding
Search box
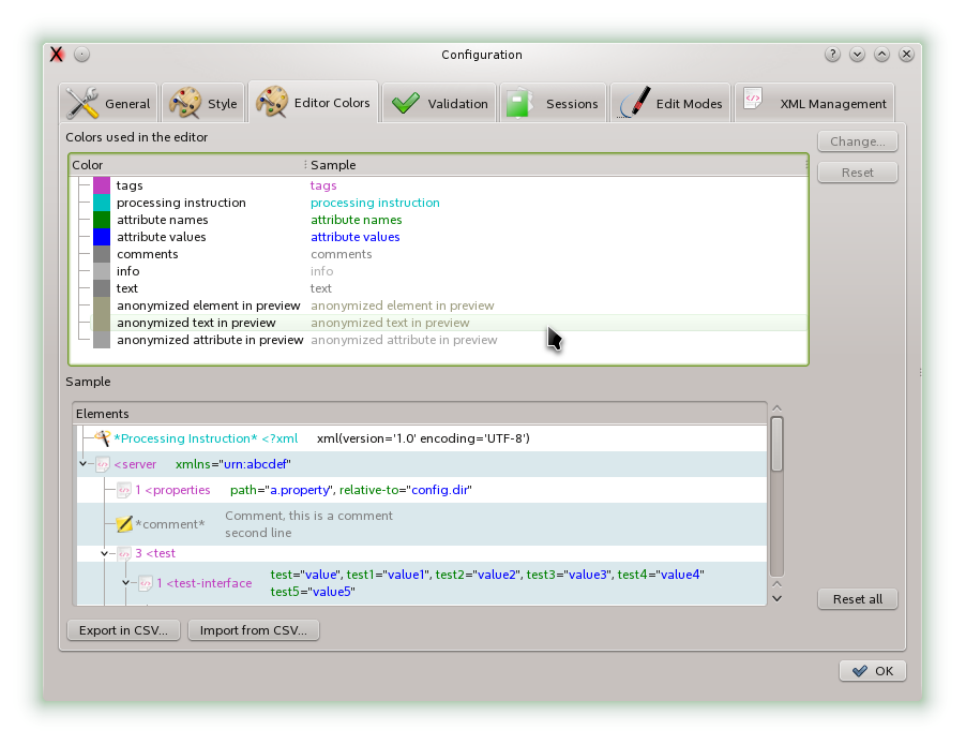
If the prole has not be created, a prole creation panel will appear.
To mange proles:
•press “Profiles...”
A list of proles, grouped by tags will appear. Selecting a prole and exiting with “Ok” will load the
prole in the caller dialog. It is possible also creating and deleting proles.
Configuring the anonymization
The colors of anonymized items can be congured using the “Editor Colors” panel.
Format of the CSV for importing and exporting the exceptions
The CSV elds used to exchange the exception list are:
1. The XPath of the exception.
2. The inclusion criteria as integer:
I. 0: exclude (default)
II. 1: exclude with children
III. 2: include
IV. 3: include with children
QXmlEdit user manual, page 71 of 113.
Clicking on the files
opens them in the editor
Clicking on the folder,
opens it in the open file dialog
Load XML file
Data Map
Measure type
Zoom Color Map
Numeric values
Options for Calucation
Differences report
Items, with different colors depending on state
Tools menu
Select encoding
Search box
3. Type of data mask used:
I. Use default.
II. Use a xed value.
4. A string value if the xed value replacement is chosen.
5. A numeric ag for processing namespaces.
I. 0: do not process namespaces
II. 1: process namespaces
QXmlEdit user manual, page 72 of 113.
Clicking on the files
opens them in the editor
Clicking on the folder,
opens it in the open file dialog
Load XML file
Data Map
Measure type
Zoom Color Map
Numeric values
Options for Calucation
Differences report
Items, with different colors depending on state
Tools menu
Select encoding
Search box
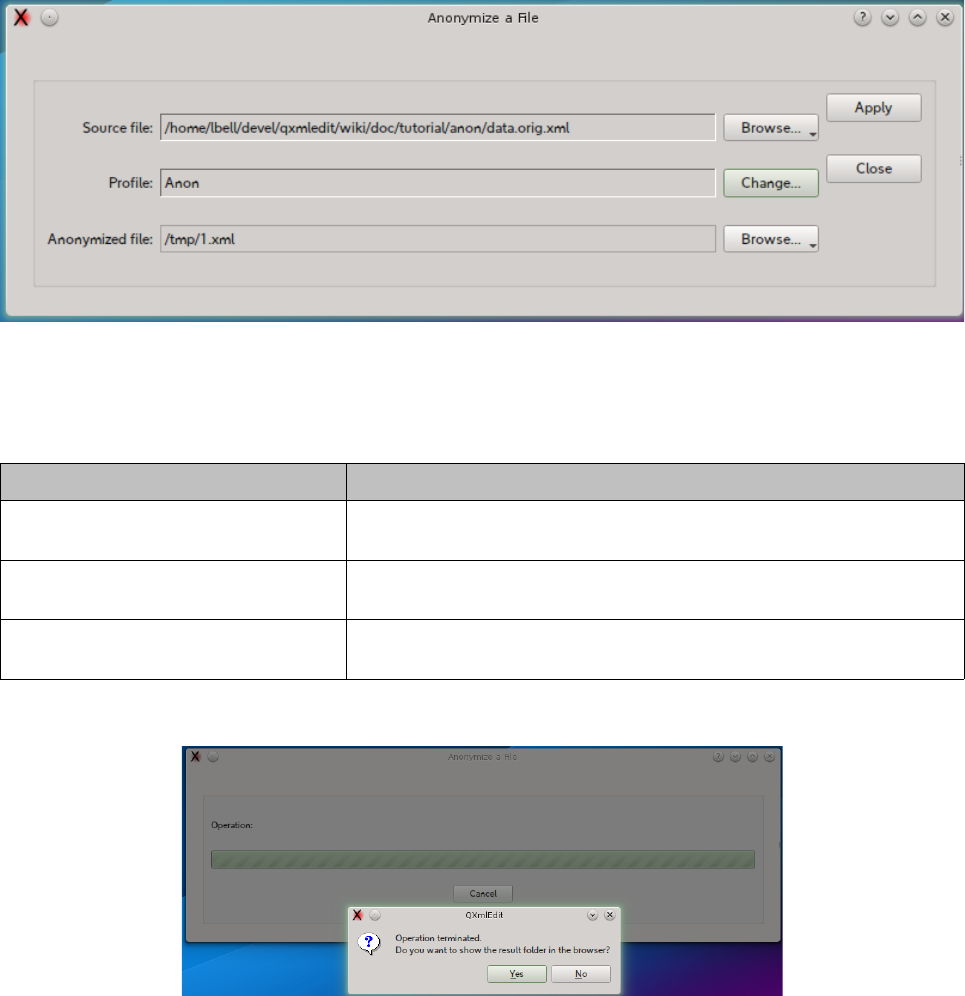
Anonymizing a file
When a prole has been created in the interactive anonymized dialog the prole can be used to
process a le without loading it into the editor.
To activate the function use the menu Tools > Anonymize File...
In the anonymize panel you have the following options:
Name Option
Source file Name of the source le to anonymize. Use the “Browse...” button to
select it
Profile The name of the anonymizing prole. Use the “Change...” button to select
it among the previuosly saved proles.
Anonymized file Name of the anonymized le. Use the “Browse...” button to select it.
Note that this function will overwrite the le.
At the end of the operation the destination folder can be opened by the panel.
QXmlEdit user manual, page 73 of 113.
Clicking on the files
opens them in the editor
Clicking on the folder,
opens it in the open file dialog
Load XML file
Data Map
Measure type
Zoom Color Map
Numeric values
Options for Calucation
Differences report
Items, with different colors depending on state
Tools menu
Select encoding
Search box
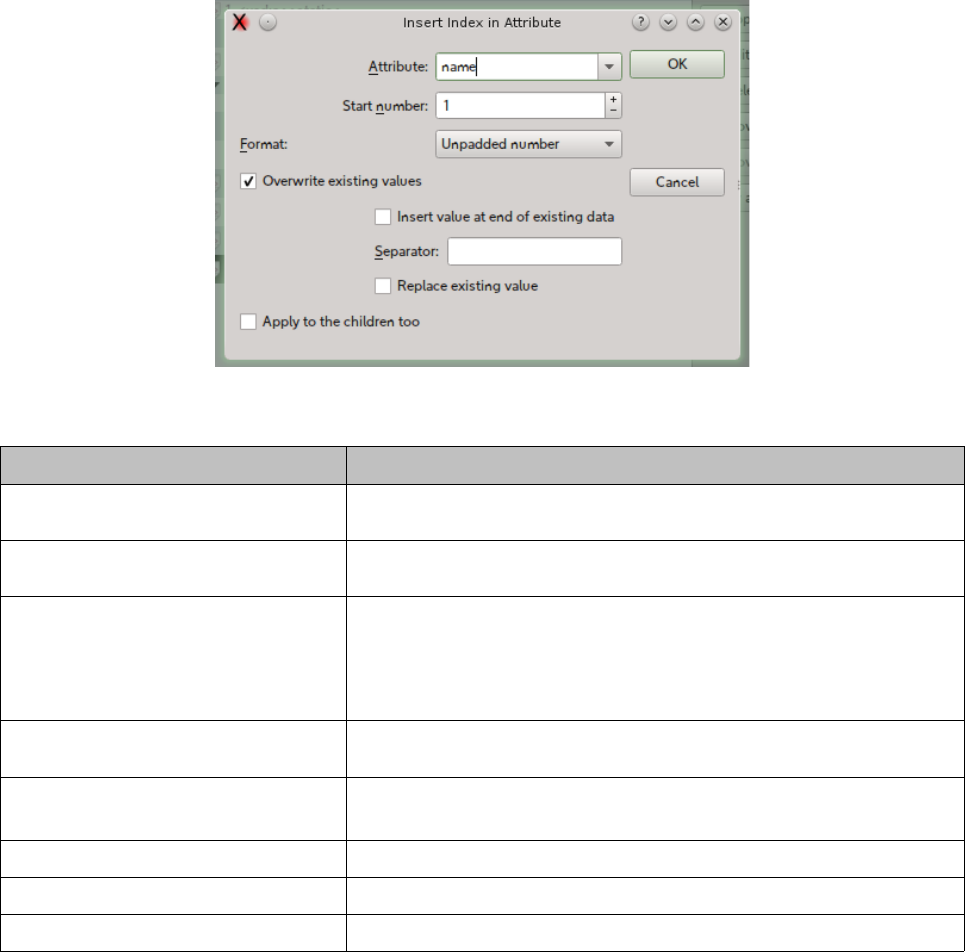
Filling data
It is possible to insert a progressive number or alphabetic sequence selecting an element and
triggering the menu “Tools > Fill Serie...”. A dialog box will allow to choose the attribute name
that will contain the progression index.
This is the dialog and below each option is explained:
Options:
Name Information
Attribute Name Name of the attribute that will contain the progression index. If the attribute
does no exists in the element, it will be created.
Start number The index of the series ll. For the alphabetic enumeration '0' is equivalent to
'A'.
Format The format of the index. The possible predened formats are:
Unpadded number (1,2,3)
Padded number ( 01, 02, 03)
Padded alpha (AA, AB, AC)
Unpadded Alpha (A, B, C)
Overwrite existing values This option allow the modication of an existing attribute. Without this
authorization, the existing attributes are left untouched.
Insert values at the end of existing
data
If the attribute for the index is existing and overwrite is enabled, the index
will be written before or after the current data.
Replace existing value Replaces an existing value of the attribute.
Separator This separator is used when inserting the index into existing data.
Apply to the children too. Apply recursively the index. Each series restarts from 0.
QXmlEdit user manual, page 74 of 113.
Clicking on the files
opens them in the editor
Clicking on the folder,
opens it in the open file dialog
Load XML file
Data Map
Measure type
Zoom Color Map
Numeric values
Options for Calucation
Differences report
Items, with different colors depending on state
Tools menu
Select encoding
Search box
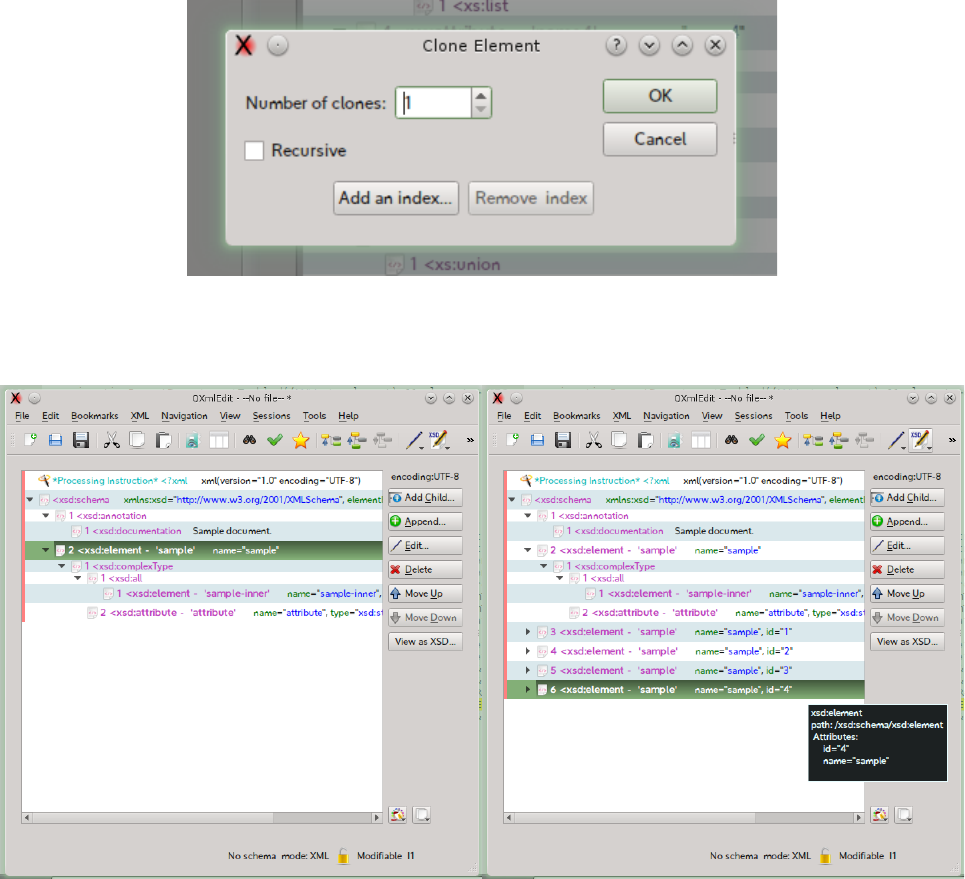
Cloning Elements
Cloning or replicating elements in the editor using an existing sample is activated by using the menu
Tools > Clone Elements in the 0.9.2 version. Any element can be used as a sample except the root
one.
The only options available to this feature is if to clone only the selected element or even its children
recursively, the number of cloned objects and the use of a counter.
The counter that can be insert in an attribute, existing or created while cloning, is the same that can
be recalled by the “Fill Serie” dialog,
This picture shows the result of the clone operation with the insert of an index using the “id”
attribute:
QXmlEdit user manual, page 75 of 113.
Clicking on the files
opens them in the editor
Clicking on the folder,
opens it in the open file dialog
Load XML file
Data Map
Measure type
Zoom Color Map
Numeric values
Options for Calucation
Differences report
Items, with different colors depending on state
Tools menu
Select encoding
Search box
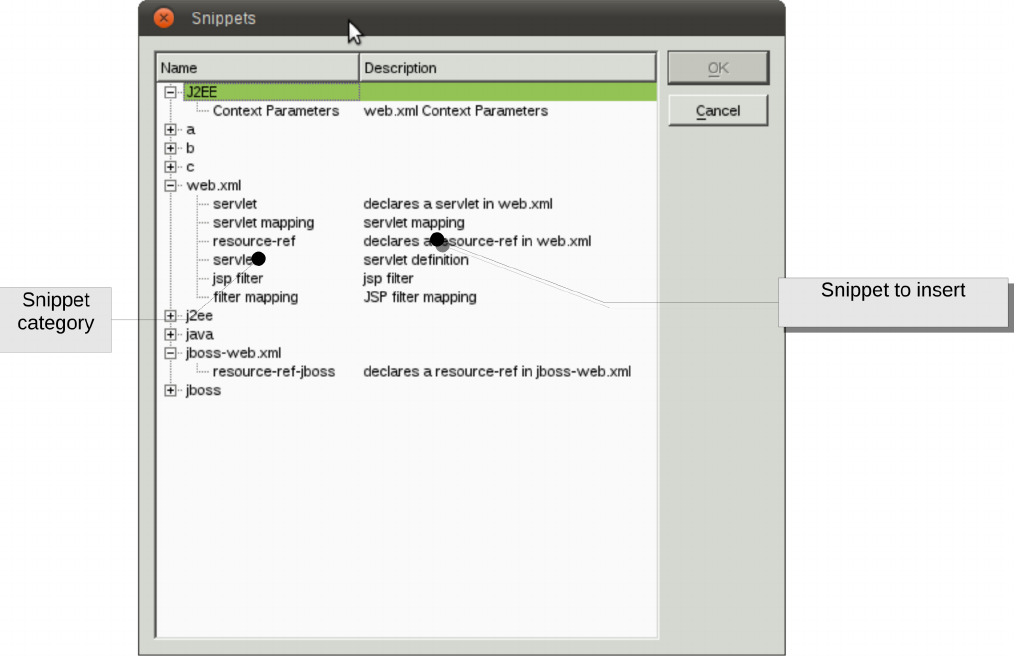
Working with Snippets
Snippets are pre-congured XML fragments that can be categorized and inserted in the main XML
text. A snippet example can be a resource reference in a J2EE component.
To create a snippet:
select an XML element, then:
•select Transform in Snippet from the context menu
or
•select the XML > Transform in Snippet menu
To insert a snippet in the XML you are editing:
select an XML element that will be the father of the snippet, then:
select the menu XML > Insert Snippet.
in the panel that will appear chose the snippet category from the left, then choose the snippet to
insert.
To edit the snippets and their categories:
1. Select the menu Edit > Configure Snippets
QXmlEdit user manual, page 76 of 113.
Clicking on the files
opens them in the editor
Clicking on the folder,
opens it in the open file dialog
Load XML file
Data Map
Measure type
Zoom Color Map
Numeric values
Options for Calucation
Differences report
Items, with different colors depending on state
Tools menu
Select encoding
Search box

2. In the panel that will open, insert, modify or delete a snippet at time.
To assign snippets values:
In the edit snippet panel you can supply the following informations:
Name Information
Name The name of the snippet
Description The description that will be shown when choosing a
snippet
Tags Set of comma separated values that will be used as snippet
categories. A snippet can have more than one category
QXmlEdit user manual, page 77 of 113.
Clicking on the files
opens them in the editor
Clicking on the folder,
opens it in the open file dialog
Load XML file
Data Map
Measure type
Zoom Color Map
Numeric values
Options for Calucation
Differences report
Items, with different colors depending on state
Tools menu
Select encoding
Search box

Executing XSL style sheet
You have three options:
•Executing a XSLT using the current editor content as source.
•Use the menu Special > XSLT > Execute XSLT using this as source.
•Executing a XSLT using the current editor content as Style Sheet.
•Use the menu Special > XSLT > Execute XSLT using this as source.
•Using a panel to specify the source, the style sheet and the output.
•Use the menu Tools > XSL Executor.
XSLT Execution panel
Using the menu Tools > XSL Executor brings a panel from which you can specify all the details of
the XSL execution.
In this panel you can specify:
•The source XML.
•The XSL template.
•The output.
When selecting the XSL template, the parameters, if any, are shown in the list.
If the internal engine has been selected as the XSL engine, you can choose the editors as source, if
the external engine has been congured, only les are allowed.
QXmlEdit user manual, page 78 of 113.
Clicking on the files
opens them in the editor
Clicking on the folder,
opens it in the open file dialog
Load XML file
Data Map
Measure type
Zoom Color Map
Numeric values
Options for Calucation
Differences report
Items, with different colors depending on state
Tools menu
Select encoding
Search box

Note: the support to XSL-T 2.0 in Qt is currently not complete.
You can use SAXON or another Java jar with same command line syntax (not part of QXmlEdit) if
you congure it in preferences.
QXmlEdit user manual, page 79 of 113.
Clicking on the files
opens them in the editor
Clicking on the folder,
opens it in the open file dialog
Load XML file
Data Map
Measure type
Zoom Color Map
Numeric values
Options for Calucation
Differences report
Items, with different colors depending on state
Tools menu
Select encoding
Search box
Metadata
Introduction
The metadata records carry information about the data in which it is located without modify the
data itself. QXmlEdit supports descriptive metadata implementing it using an XML processing
instruction whose target is “qxmledit”.
Metadata types
There are two types of metadata: updatable and static.
Updatable Metadata
This kind of metadata carries information about the current state of the document and it can be
automatically updated at each document modication if the relative option is enabled. The data that
can be automatically updated consists of: document creation user and date and the document
revision.
Static metadata
The values contain semantic information and cannot be automatically updated without explicit user
intervention. Some data are predened, others can be inserted by the user when needed.
Metadata implementation
The metadata lives on the root level of the XML document. Each metadata record consists of a
Processing Instruction composed by pseudo attributes. The rst attribute is always “type”and
denotes the metadata role. The updatable metadata is composed by pseudo attributes that live all
together in a single “info” type. Other metadata uses a single processing instruction having the
attribute “value” for the real data. No entities will be resolved in a metadata pseudo-attribute
except the characters “double quote”, “single quote”, “greater than” and “minor than”, that are
escaped using usual XML entities notation.
Operation
Creating a document
The updatable metadata record is inserted manually via menu command. The editable ones are
inserted using a command that insert the updatables ones too.
Reading a document
No metadata is automatically inserted on read.
QXmlEdit user manual, page 80 of 113.
Clicking on the files
opens them in the editor
Clicking on the folder,
opens it in the open file dialog
Load XML file
Data Map
Measure type
Zoom Color Map
Numeric values
Options for Calucation
Differences report
Items, with different colors depending on state
Tools menu
Select encoding
Search box

Saving a document
When saving, if the option is active, the updatable data are modied. If the metadata record does
not exist in the XML document, it will be inserted if the user gives permission. If only partial
compiled metadata exists, QXmlEdit will complete it. Other unknown metadata information in the
same processing instruction will be preserved for future compatibility. If no creation data exists, the
data will be taken from the le data if available, else they will be created anew.
Editing metadata
The metadata can be inserted in an XML document using a menu command or by using a dialog. The
user dened metadata can be handled using the dialog user interface. Malformed data inserted by
hand will be overwritten.
Metadata summary
Updatable Metadata
Name Value
creationUser The login name of the user
creationDate The date of the creation
updateUser The login name of the user
updateDate The date of the modication
revision A progressive value incremented at each
writing operation
Static Metadata
The values have no special meaning respect to the user dened metadata, however they can be
presented to the user in a conguration dialog.
Predened data:
Name Value
project
name
copyright
domain
version
Editing metadata
Using the menu Edit > Edit Metadata you can open the metadata edit panel. Only updatable
metadata whose check box is selected will be written into the document.
QXmlEdit user manual, page 81 of 113.
Clicking on the files
opens them in the editor
Clicking on the folder,
opens it in the open file dialog
Load XML file
Data Map
Measure type
Zoom Color Map
Numeric values
Options for Calucation
Differences report
Items, with different colors depending on state
Tools menu
Select encoding
Search box
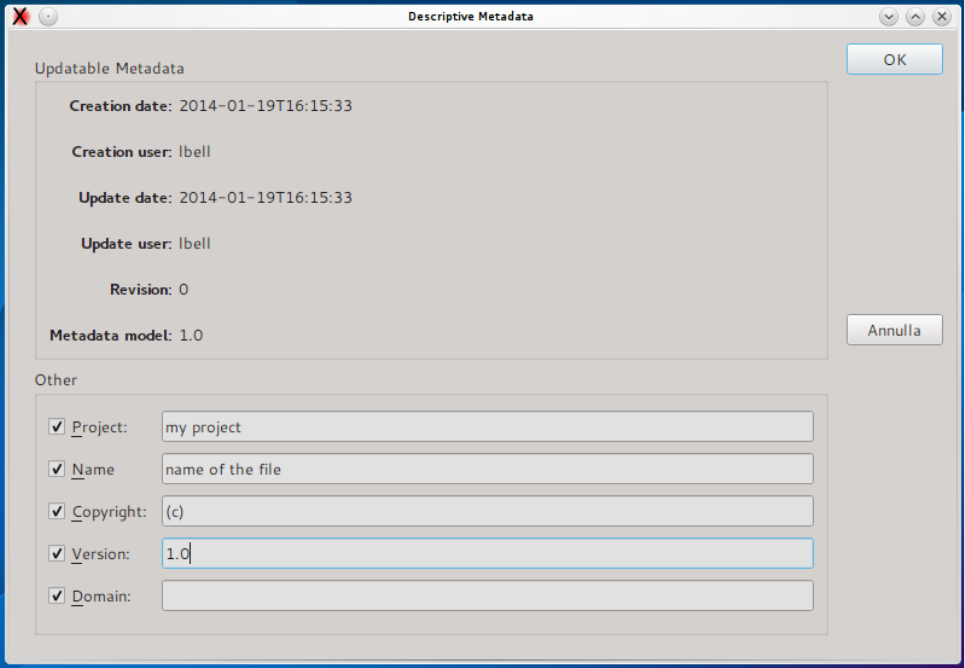
QXmlEdit user manual, page 82 of 113.
Clicking on the files
opens them in the editor
Clicking on the folder,
opens it in the open file dialog
Load XML file
Data Map
Measure type
Zoom Color Map
Numeric values
Options for Calucation
Differences report
Items, with different colors depending on state
Tools menu
Select encoding
Search box
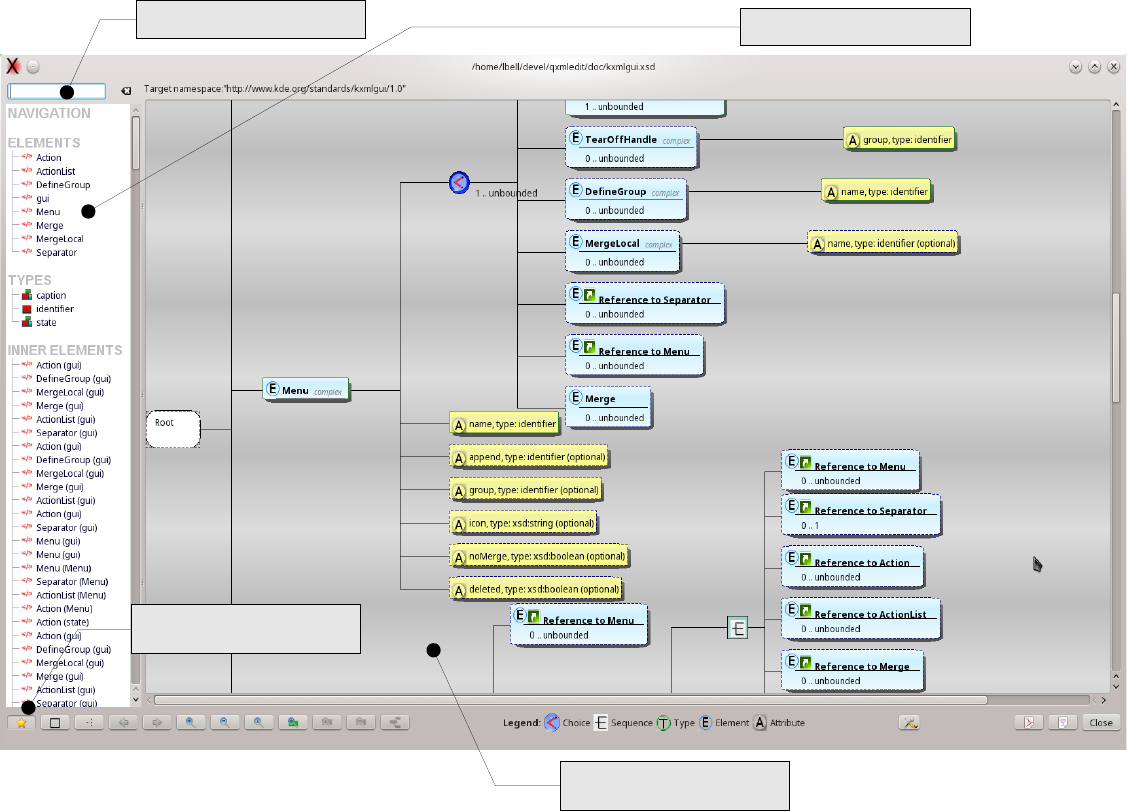
Working With XML Schema Files (XSD)
When the le in editing declares itself as a XML Schema (XSD) through the root element and its
namespace, the button View as XSD in the main window is enabled. This button leads to a window
that display a graphic view of the le contents.
Alternatively you can display the current XSD le in this manner:
1. Load the XSD le as a normal XML le.
2. Use the menu Tools > Plugins > XsdPlugin
A window will open with the graphical representation of the data:
The symbols denote:
•E: element
•T: type
QXmlEdit user manual, page 83 of 113.
Shows or hides the
navigation bar
Navigation bar
Search box
Graphical view of XSD
types and elements
Clicking on the files
opens them in the editor
Clicking on the folder,
opens it in the open file dialog
Load XML file
Data Map
Measure type
Zoom Color Map
Numeric values
Options for Calucation
Differences report
Items, with different colors depending on state
Tools menu
Select encoding
Search box
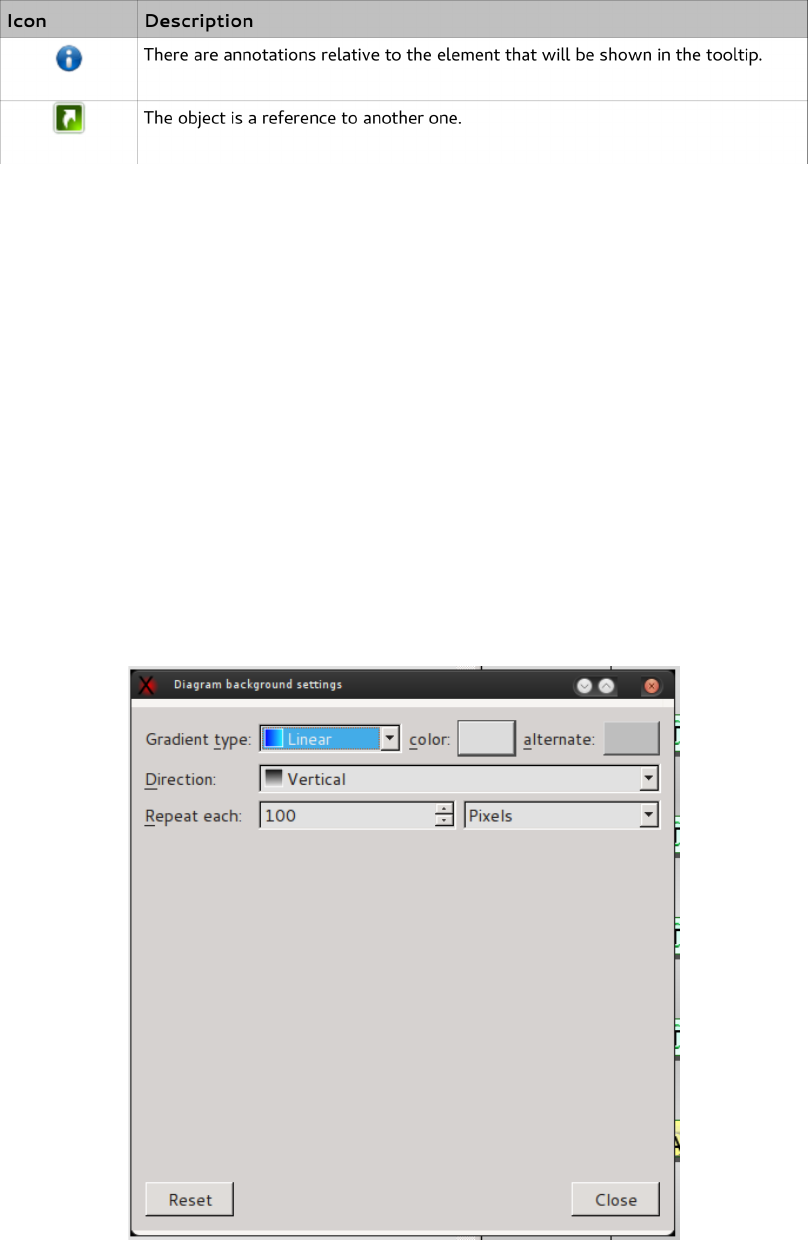
•A: attribute
The icons in the elements represent:
Visualization Types
The visualization modes are two:
•regular: allows to view all the schema entities (low level view)
•outline: allows to view the resulting structure hiding details like restrictions and extensions
The selection of the view mode is done using the “Ouline” button.
Changing the background color and pattern.
In the tools button there is the menu command to open the diagram background inspector. The
settings are immediately applied and saved.
To open the inspector:
Tools button > Configure aspect...
QXmlEdit user manual, page 84 of 113.
Clicking on the files
opens them in the editor
Clicking on the folder,
opens it in the open file dialog
Load XML file
Data Map
Measure type
Zoom Color Map
Numeric values
Options for Calucation
Differences report
Items, with different colors depending on state
Tools menu
Select encoding
Search box
Exporting XSD Graphical view
In the window there are buttons that permit to export the view as PDF, HTML or SVG le. The
reports can be:
•physical: the children of the entities that refer to other entities are expanded inline,
•logical: (default) the references to other objects are kept.
Command Description
HTML Report Open a panel where a report of the XSD diagram is shown.
Save as HTML A HTML report of the XSD, with the diagram image, is saved to a le.
Save as PDF A PDF report of the XSD, with the diagram image, is saved to a le.
Export as SVG A SVG image of diagram is exported.
The preferences panel in the “Validation” tab has some option to customize the report generation.
QXmlEdit user manual, page 85 of 113.
Clicking on the files
opens them in the editor
Clicking on the folder,
opens it in the open file dialog
Load XML file
Data Map
Measure type
Zoom Color Map
Numeric values
Options for Calucation
Differences report
Items, with different colors depending on state
Tools menu
Select encoding
Search box
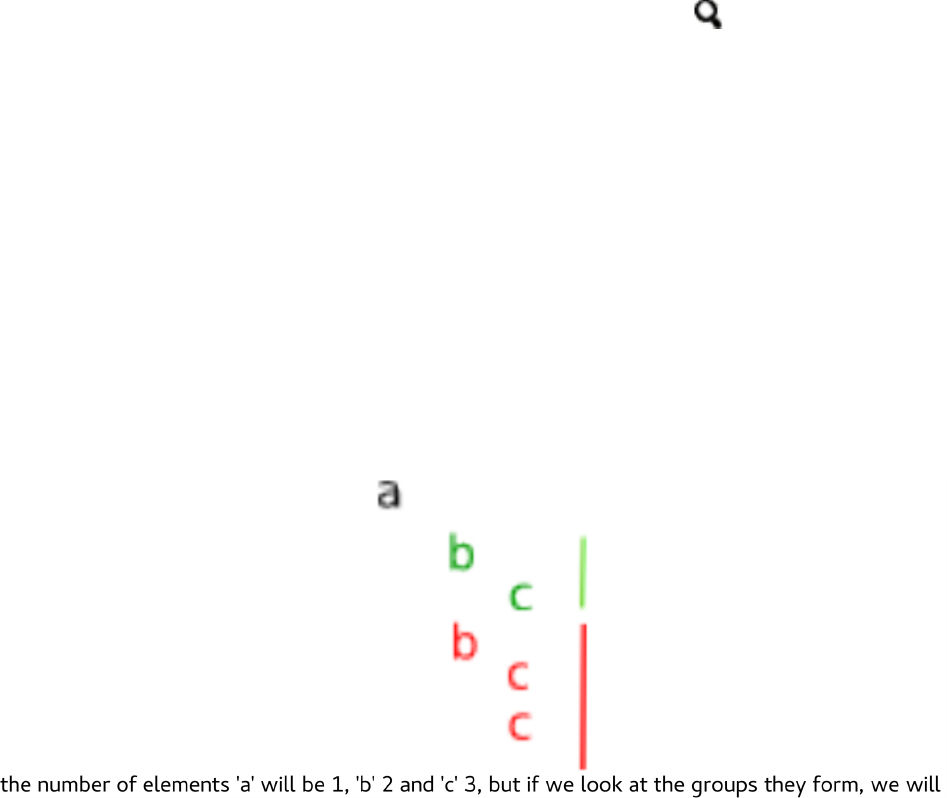
Working With Big XML Files
QXmlEdit is targeted to les with dimensions not too big (< 100 MB). If you need to explore les
very big les, you can enter “Explore Mode” where only the element structure is loaded, without
data and attributes. In this mode, denoted by this icon in the status bar: . You cannot edit the
XML document, but you can search in it as usual.
To activate Explore Mode:
•Select the menu File > Explore Structure...
To exit from Explore Mode:
•Load another XML le or start a new document.
Searching in Files and counting elements
It is possible to search in external les the occurrences of a given pattern using a fast parser or
group and count elements.
The occurrence count will simply count how many of the elements stated in the search pattern exist
in the le. The grouping show the aggregation occurrences of the elements.
Let's do an example; if the input XML le is like that:
have 1 group composed of one 'a' element (the root one), one group of 'b' elements (the children of
a ) and two groups of 'c' elements: one composed by one item (indicated by the green color), and
the other one composed by two items (red color).
To search in les:
•Select the menu Tools > Search in Files...
The search window will open:
QXmlEdit user manual, page 86 of 113.
Clicking on the files
opens them in the editor
Clicking on the folder,
opens it in the open file dialog
Load XML file
Data Map
Measure type
Zoom Color Map
Numeric values
Options for Calucation
Differences report
Items, with different colors depending on state
Tools menu
Select encoding
Search box
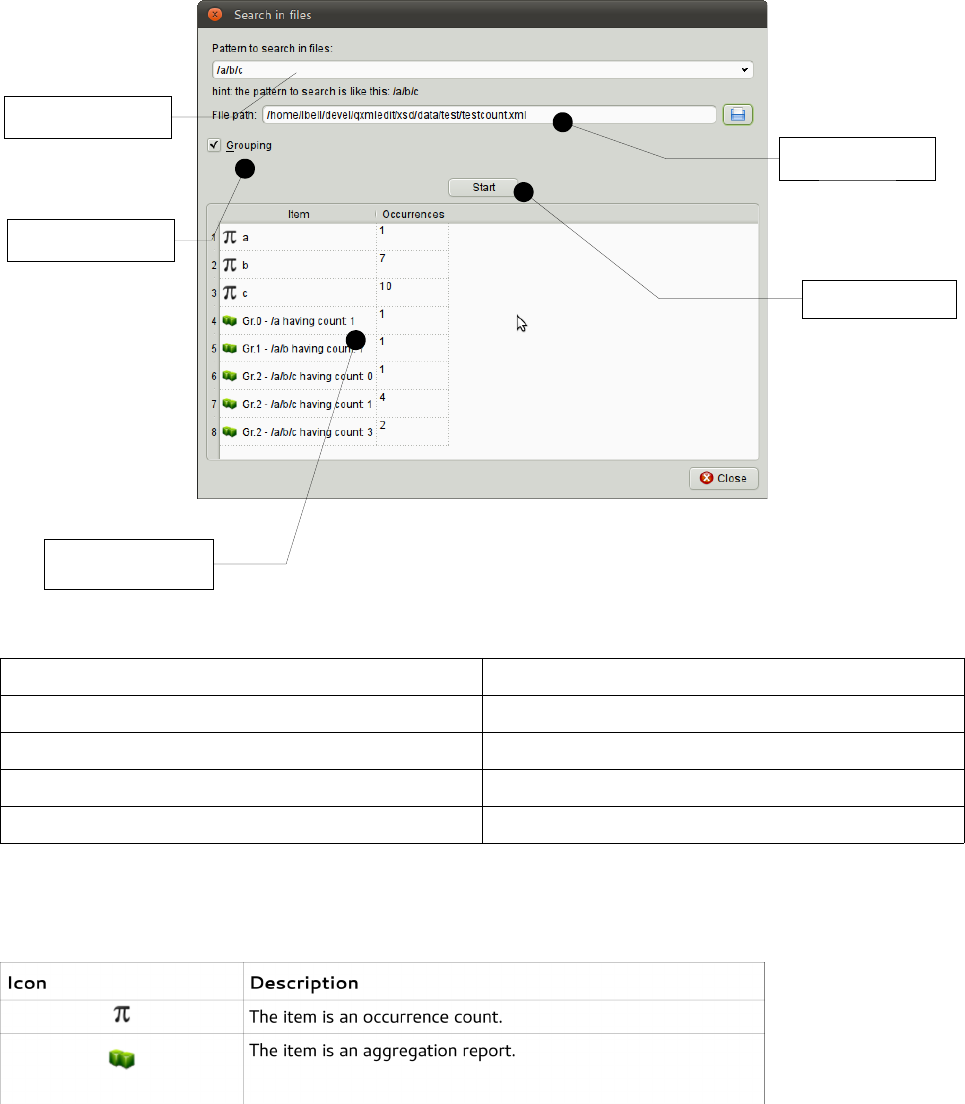
In this window you can insert the following informations:
Information Description
Pattern to search The pattern as XPath (elements only) for example: /a/b/c
File Path Path of the le to search into.
Grouping The scan operation will calculate element groups too.
Start Starts the search operation.
The icons in the result grid have these meanings:
QXmlEdit user manual, page 87 of 113.
Pattern to search
File to look into
Start the search
Results
Aggregation
Clicking on the files
opens them in the editor
Clicking on the folder,
opens it in the open file dialog
Load XML file
Data Map
Measure type
Zoom Color Map
Numeric values
Options for Calucation
Differences report
Items, with different colors depending on state
Tools menu
Select encoding
Search box
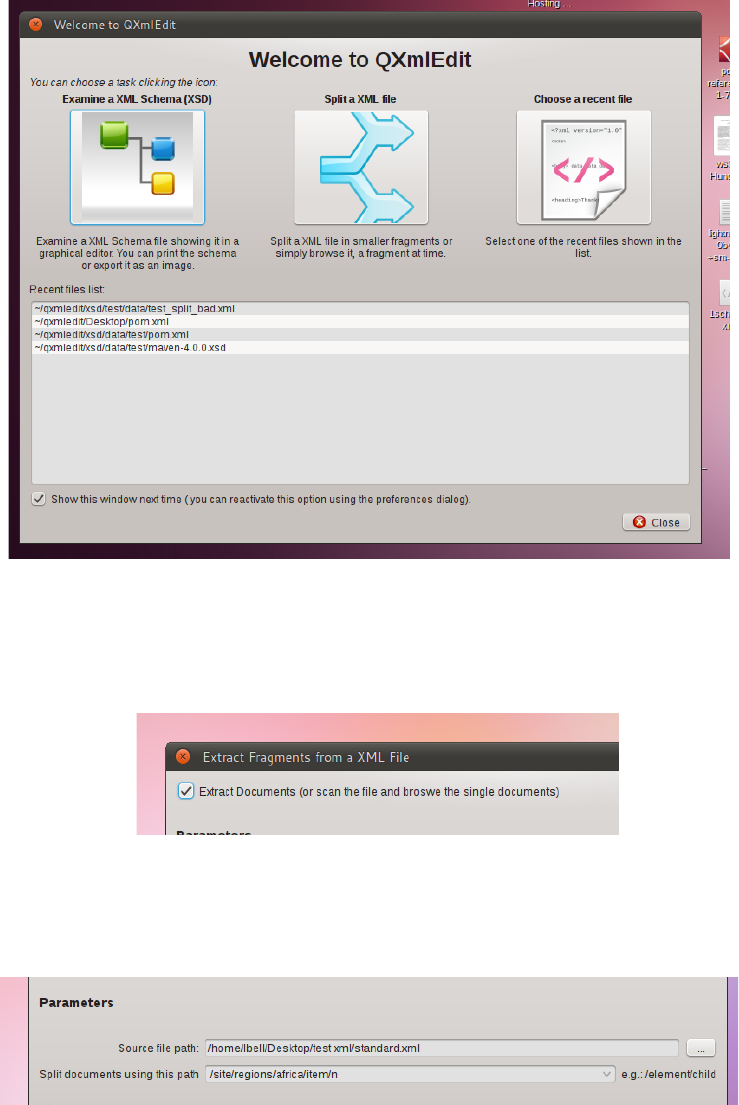
Split a XML file
There is the possibility to split a XML le in smaller fragments and/or to examine the fragments
directly in the editor. This feature is handy mainly to explore very big les that does not even t in
memory.
When starting, the program will open a welcome dialog leading to the most common operations.
Choose “Split a file”. If you choose to hide the dialog next time the program restart and change
your mind, you can reactivate it in the conguration panel. You can access this feature also from the
menu Tools.
Decide if you want to extract information or browse it
If you want only navigate the data without creating any le, do not check 'Extract Documents'.
Even if you don't extract the XML fragments into smaller le, QXmlEdit scans the le and records
the information for an interactive review.
Choose the file and how to fragment it
Browse to the le to examine, the insert the XPath that identies a fragment. Insert a string of the
QXmlEdit user manual, page 88 of 113.
Clicking on the files
opens them in the editor
Clicking on the folder,
opens it in the open file dialog
Load XML file
Data Map
Measure type
Zoom Color Map
Numeric values
Options for Calucation
Differences report
Items, with different colors depending on state
Tools menu
Select encoding
Search box
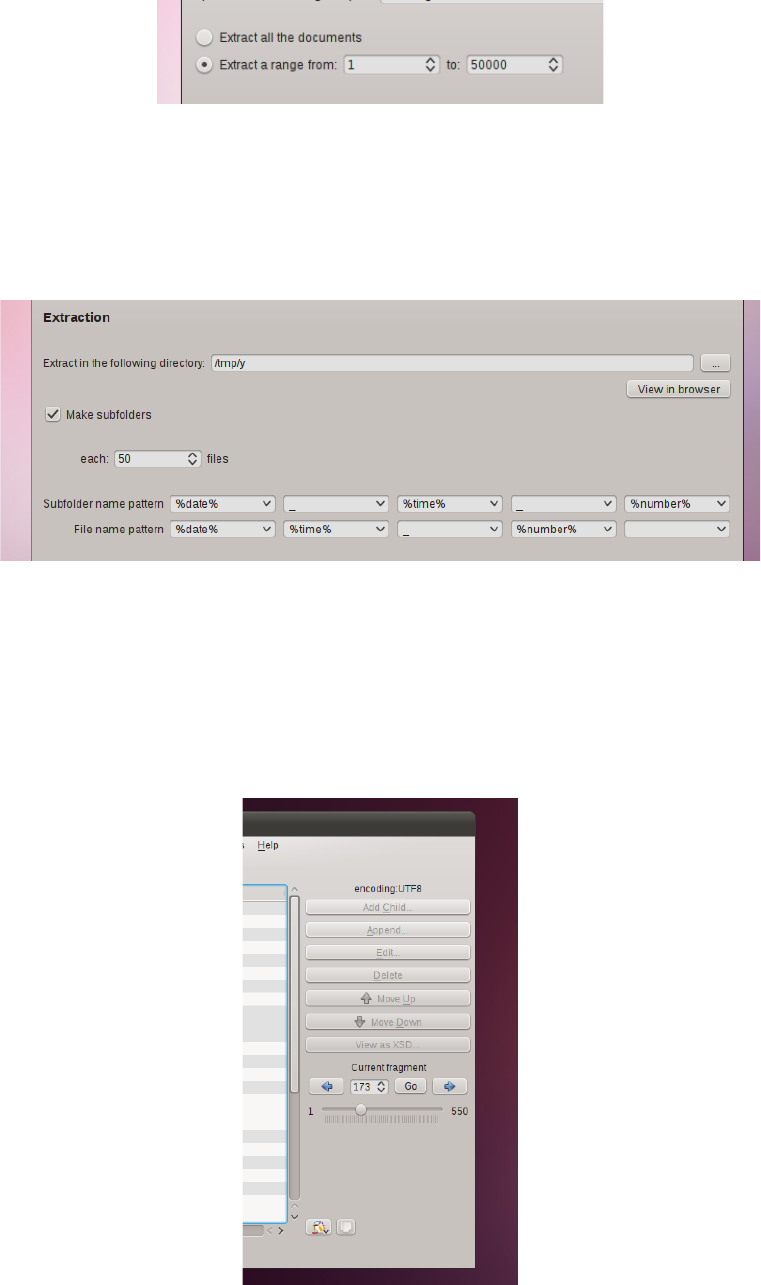
form /ROOT/DATA and so on.
Limit the extracted fragments number
Selecting a range permits to extract only a small subset of the original le. You are not obliged to
waste space on your disk if you want only a single fragment.
Decide the output folder and the naming
Enter the location where write the extracted fragments and decide if you want to create a folder
each N les. Decide also how to name the les and the folders. The combo boxes have some
predened values to ease the task, like a timestamp, or a progressive counter.
QXmlEdit user manual, page 89 of 113.
Clicking on the files
opens them in the editor
Clicking on the folder,
opens it in the open file dialog
Load XML file
Data Map
Measure type
Zoom Color Map
Numeric values
Options for Calucation
Differences report
Items, with different colors depending on state
Tools menu
Select encoding
Search box

Go and examine data
After the start of the operation, in the the main window a navigation box appears. The fragments
found in the input le are accessible directly with a random access using the information collected
in the previous phases. If you choose to split the le in fragments, you can examine them in the
extraction directory.
Information in this panel:
Information Description
Extract documents (or scan the file and browse
the single documents)
If selected the fragments found in the input le will be
written to les as XML documents, one per fragment
Speed up the processing. No information will be
shown in the user interface.
If selected, the extraction process will be faster, but after
the extraction, it will not possible to browse the input le
fragments in real time using the user interface.
Use it if you need the output les only.
Source file path The path of the input le
Split documents using this path The XPath used to nd the XML fragments in the input le.
The path must be entered using a syntax like this:
/root/element/element
Split using the depth Use the depth of the element as criterion. Root element has
depth one. Note: the elements will be extracted
independently from their tag.
QXmlEdit user manual, page 90 of 113.
Clicking on the files
opens them in the editor
Clicking on the folder,
opens it in the open file dialog
Load XML file
Data Map
Measure type
Zoom Color Map
Numeric values
Options for Calucation
Differences report
Items, with different colors depending on state
Tools menu
Select encoding
Search box
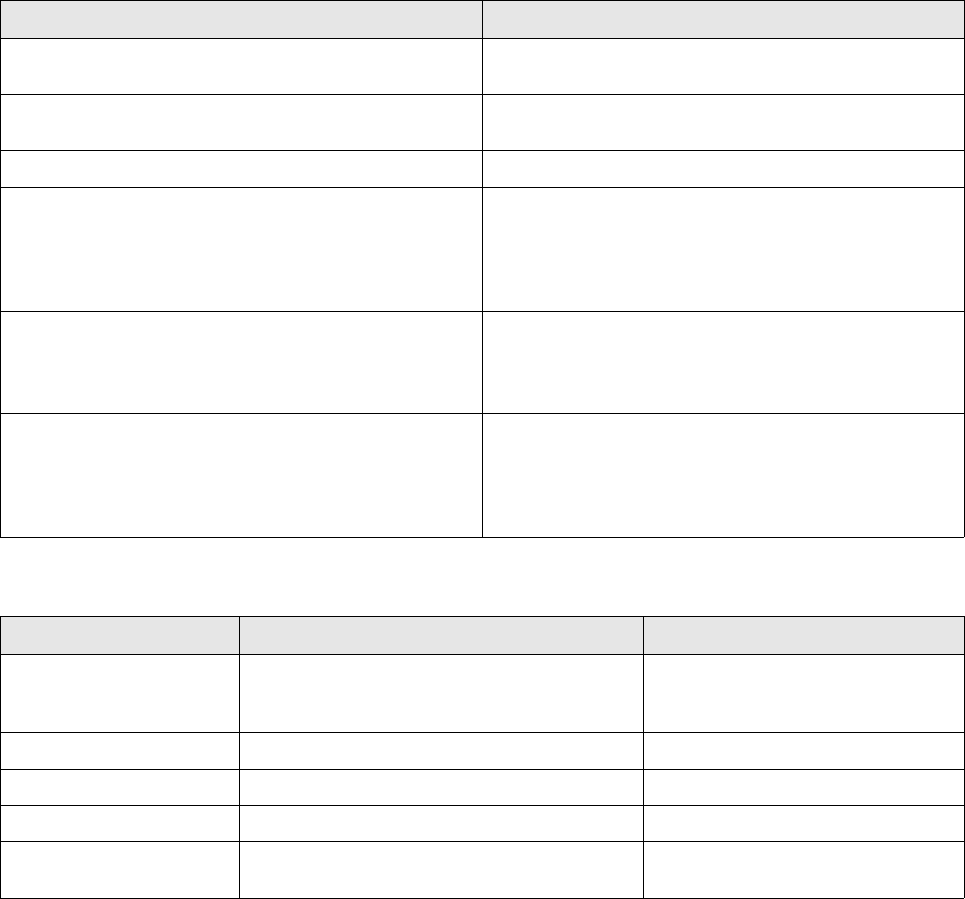
Information Description
Extract all the documents If selected causes the extraction of all the documents
found in the input le.
Extract a range If selected, only the documents that fall in the specied
range will be extracted.
Extract in the following directory The destination directory for the fragments.
Make subfolders With this option the extracted les are created in a
subdirectory when their number exceeds the congured
threshold. Use it when the input le contains thousand of
fragments that will make impossible the browse of the
destination directory if all the les are in a single place.
Subfolder name pattern The naming to assign to the subdirectories created in the
extraction process.
You can use a predened token that will be expanded at
run time or any other thing you like.
File name pattern The naming to assign to the les created in the extraction
process. The les will have a '.xml' sux automatically
apposed.
You can use a predened token that will be expanded at
run time or any other thing you like.
Token that can be used in the name pattern section:
Information Description Example Output
%counter% The counter of the object created. This is an
unique number that can be used to identify the
object
1
"%date%" The current date in the YYYY_MM_DD format 2011_10_07
"%time%" The current time in HH_MM_SS_millis format 10_43_30_560
"%timestamp%" The current date and time in a numeric format 123456789
"%space%" A blank space used a separator
Since 0.6 version.
“ ”
Flex Code Generation From Balsamiq Source
There is a plugin to generate Flex code from Balsamiq mockup program source. You can choose a
set of source les that will be transformed to a Flex application in the output directory.
Only a subset of Balsamiq controls are supported, controls not supported are converted to
mx:Label
List of supported controls:
•Button
•Label
•LinkBar
•DataGrid
•List
QXmlEdit user manual, page 91 of 113.
Clicking on the files
opens them in the editor
Clicking on the folder,
opens it in the open file dialog
Load XML file
Data Map
Measure type
Zoom Color Map
Numeric values
Options for Calucation
Differences report
Items, with different colors depending on state
Tools menu
Select encoding
Search box
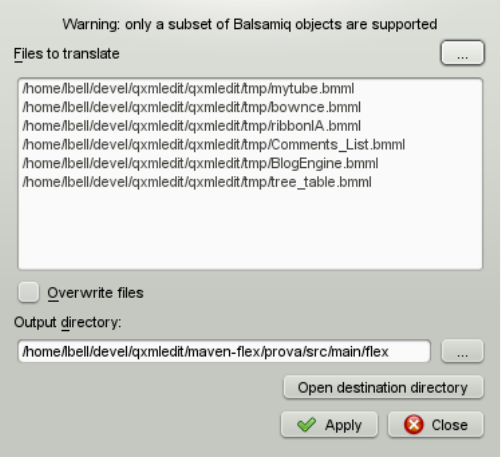
•TabBar
•Vrule
•Hrule
•TextInput
•ComboBox
•TextArea
•Paragraph
•CheckBox
•RadioButton
•Tree
Life With Sessions
Sessions are information about a set of les and access dates, related to a work or an activity than
can be recalled if needed. A le can be shared among dierent sessions, with dierent accesses.
The sessions can automatically collect information of the les that the program access. Only one
session can be active at time and there is no need to have a session active for QXmlEdit to work.
A session can be active (collecting information), paused or closed.
When sessions are active, there is the possibility to view the most used or recent les or folders in
a list in the main view.
In the main menu the following commands are available:
QXmlEdit user manual, page 92 of 113.
Clicking on the files
opens them in the editor
Clicking on the folder,
opens it in the open file dialog
Load XML file
Data Map
Measure type
Zoom Color Map
Numeric values
Options for Calucation
Differences report
Items, with different colors depending on state
Tools menu
Select encoding
Search box
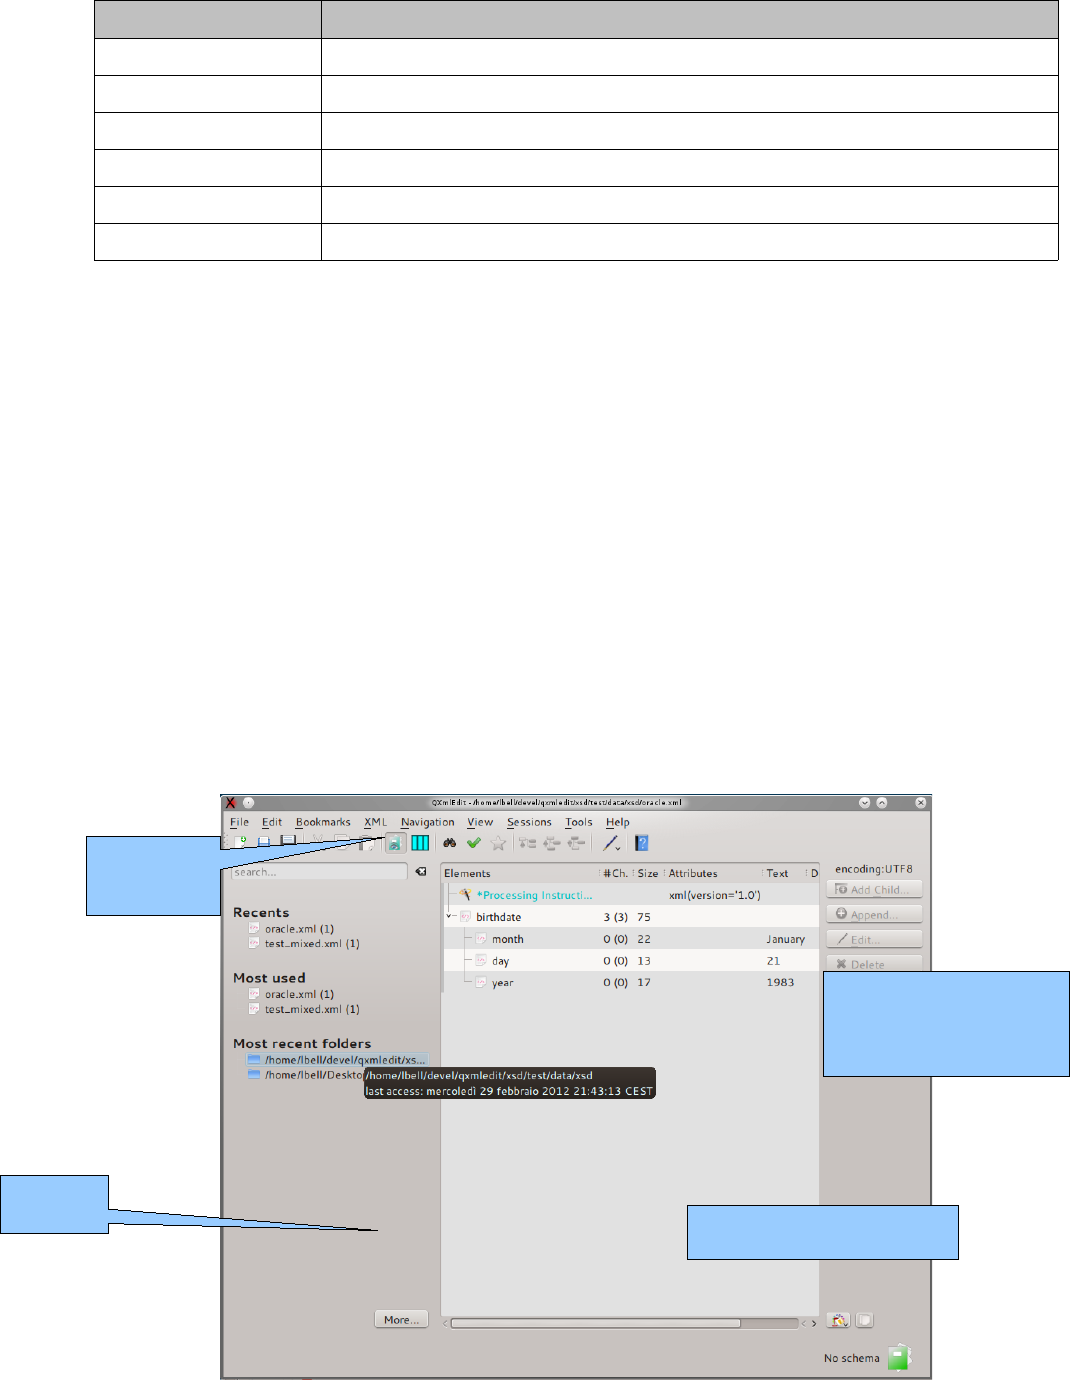
Command Information
New Creates a new session. The current one, if existing, is closed.
Pause Pauses the current session when active. Paused sessions does not collect information.
Resume Resumes a paused session.
Close Closes the current session. No session is active, then.
Details Opens a dialog with information on the current session.
Manage Opens a dialog where have information about all the sessions.
The session user interface
The session panel can be shown or hidden using the toolbar button or the command in the View
menu.
The following lists are shown:
•Recent: the most recent les accessed in the session. Double clicking a le opens it in the
editor.
•Most used: the most used les of the session. Double clicking a le opens it in the editor.
•Most recent folders: the most recently used folders containing session related les.
Double clicking a folder entry shows the open le dialog on that folder.
Sessions Management Dialog
QXmlEdit user manual, page 93 of 113.
Clicking on the files
opens them in the editor
Clicking on the folder,
opens it in the open file dialog
Show or hide
the browser
Session data
browser
Load XML file
Data Map
Measure type
Zoom Color Map
Numeric values
Options for Calucation
Differences report
Items, with different colors depending on state
Tools menu
Select encoding
Search box

In this dialog you can view the sessions list. From here you can activate a session or manage
sessions, creating, deleting or editing them. When a session is selected, its accesses and les are
shown in the lower half of the dialog. The list of les can be copied in the clipboard. Double clicking
on a le loads it in the editor.
The following commands are available:
Command Information
Activate Activates the selected session, closing automatically the current one, if any.
New Creates a new session.
Edit Opens the session detail dialog of the currently selected session.
Delete Delete the currently selected session.
Edit file Loads in the editor the le selected in the lower pane.
Export file data Put in the clipboard the path of the les.
Session Properties
In this dialog you can set the session properties and examine its accesses to les. The name and the
description of a session can be changed and saved.
QXmlEdit user manual, page 94 of 113.
Load XML file
Data Map
Measure type
Zoom Color Map
Numeric values
Options for Calucation
Differences report
Items, with different colors depending on state
Tools menu
Select encoding
Search box
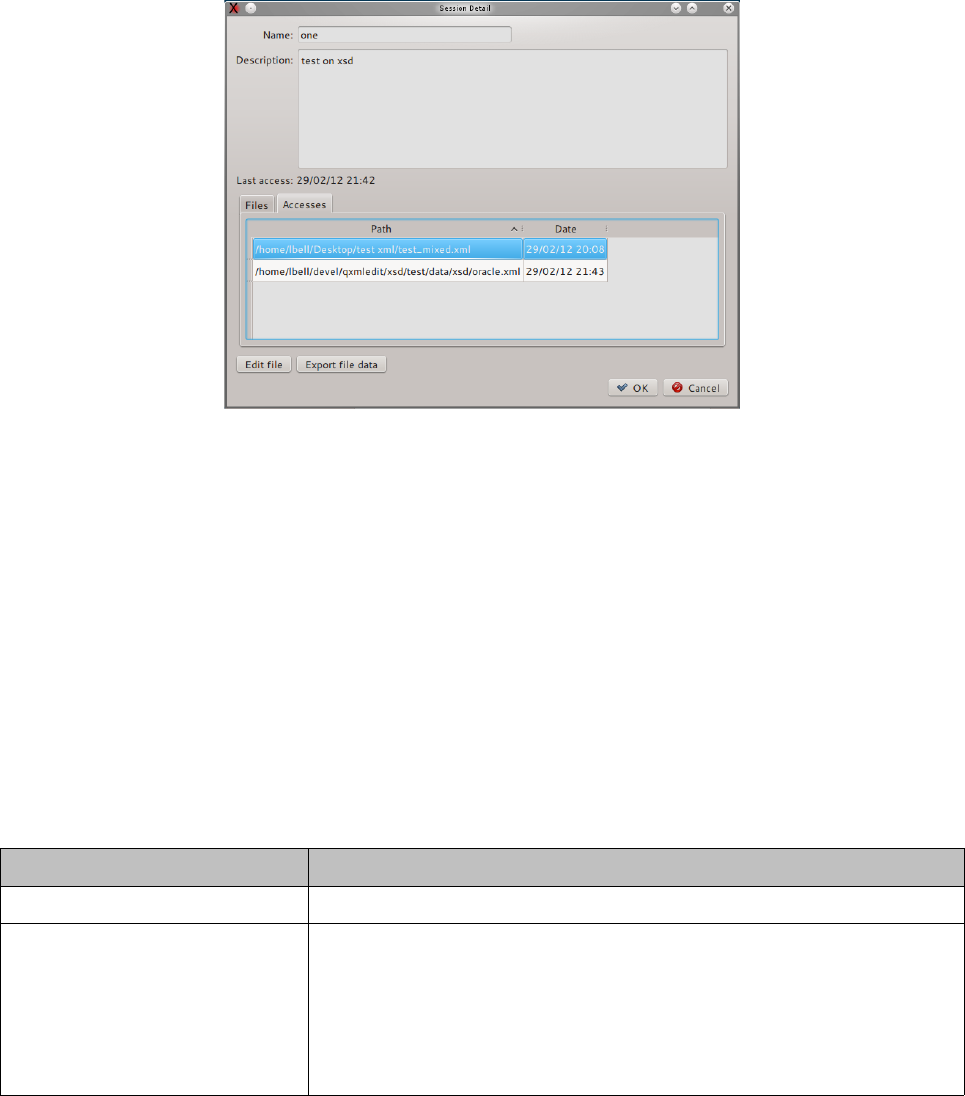
You can set or change the session name and description. The list of les can be copied in the
clipboard. Double clicking on a le loads it in the editor.
Managing sessions data
Sessions data are stored in the user data folder as indicated by the operating system using a sqlite
database le. To reduce sessions data le dimensions use the conguration dialog. The cleaning
procedure operates as follows:
•Completely erase the data.
•Erase sessions data on date criteria.
The following table explains in detail the options:
Option Operation
Delete all sessions data Completely erase the sessions data.
Delete data older than... Delete the data older than the specied date. The data are deleted as follows:
- all the accesses to a le registration older than the specied date.
- all the sessions that have last access date older than the specied date and
have no access data.
If the delete files information is selected, the les information without
access data are deleted. The le themselves are not altered, the operation is done
only on session registration inside QXmlEdit.
QXmlEdit user manual, page 95 of 113.
Load XML file
Data Map
Measure type
Zoom Color Map
Numeric values
Options for Calucation
Differences report
Items, with different colors depending on state
Tools menu
Select encoding
Search box
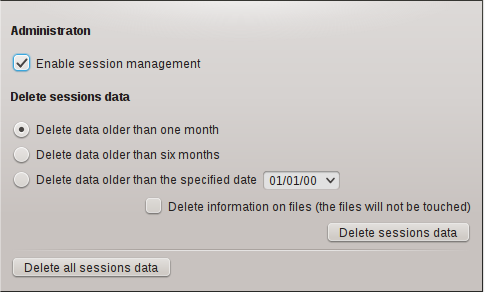
Sessions configuration
The session conguration panel allows to enable or disable session handling. There is the
possibility to clean session data as explained in details in the paragraph “Managing sessions data”.
Viewing data
Use the Visualization feature to graphically visualize the composition or the structure of an XML
le. The le can be view as a map; only the summary data are loaded in the program main memory,
so the consumed memory is of the order of magnitude of the data itself.
The data that can be shown are:
1. Size: size of the elements, attributes and text nodes.
2. Elements: number of children elements.
3. Attributes: number of attributes.
4. Structure: the data can be split on their depth from the root.
5. Payload: the size of the text nodes children of the elements.
The data values can be cumulative or relative. The cumulative measuring shows the sum of the
quantity associated with a given element and all its children. This kind of measurement gives an idea
of how the hierarchy is structured. The non cumulative measurement spots what elements have the
most relevant values.
The data relevance is underlined using a color map, shown in the dialog itself.
QXmlEdit user manual, page 96 of 113.
Load XML file
Data Map
Measure type
Zoom Color Map
Numeric values
Options for Calucation
Differences report
Items, with different colors depending on state
Tools menu
Select encoding
Search box
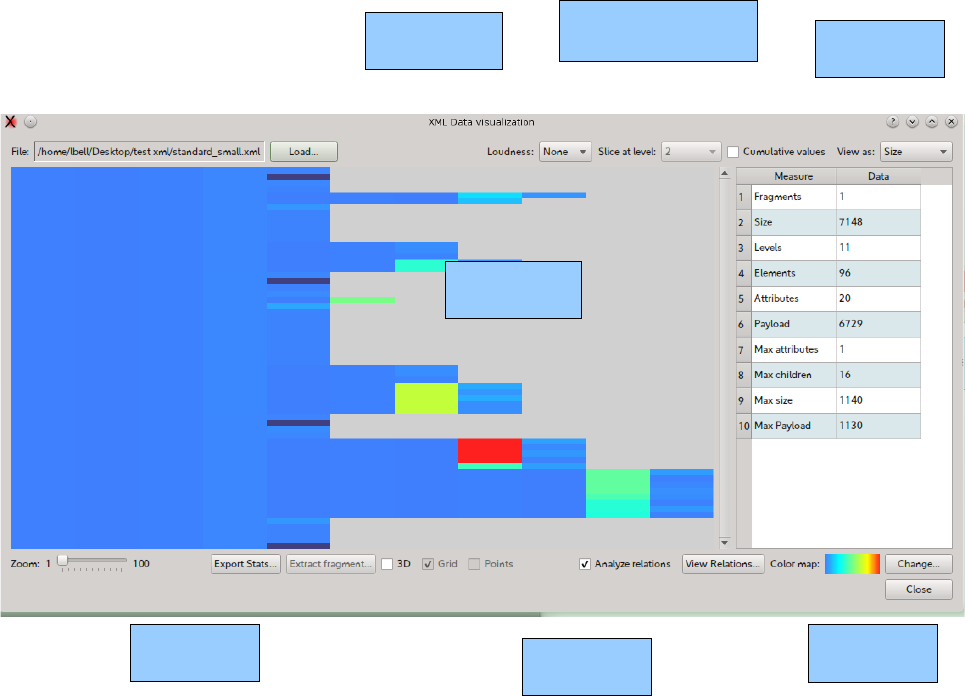
User Interface
To access to the Visualization use:
1. The welcome dialog.
2. The Tools > View Data menu.
The operation sequence is as follows:
1. Load a le using the Load file... button.
2. Choose the measurement type from the View as combo box.
3. Select the Cumulative values if you want to display cumulative values.
4. The data are now show.
5. Select the zoom level.
6. Explore data hovering with the mouse on the interest points, a tool tip will appear.
7. Use the context menu (right mouse button) to export data.
Checking the “Analyze relations“ button will give access to the relations explorer dialog.
QXmlEdit user manual, page 97 of 113.
Load XML file
Data Map
Measure type
Zoom Color Map
Numeric values
Options for Calucation
Differences report
Items, with different colors depending on state
Tools menu
Select encoding
Search box
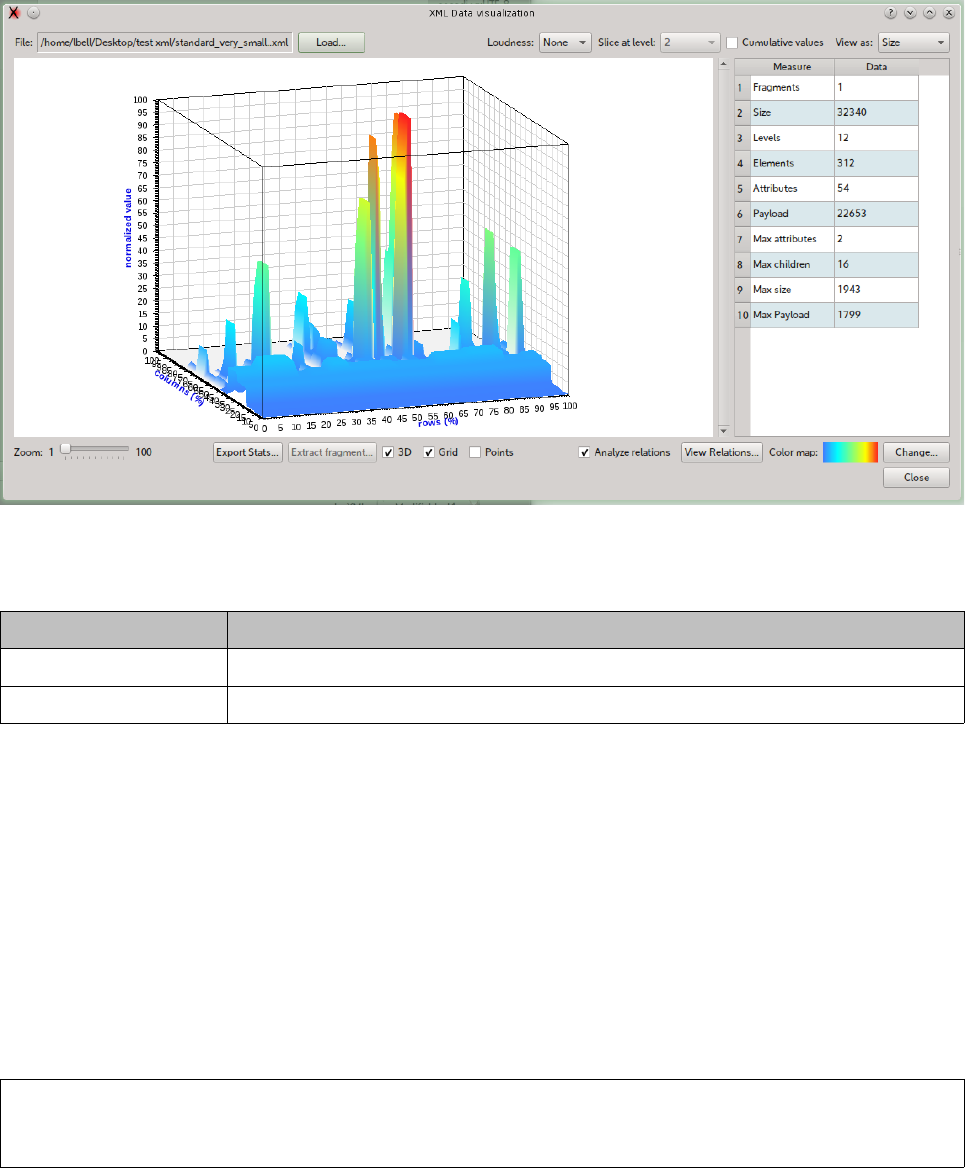
3D Visualization
If QXmlEdit is compiled with 3D support, a 3D view can be enabled using “3D” check box.
The available options are:
Command Information
Grid Show a grid in the back walls.
Points Show only points, do not draw surfaces.
Measurement types
The following measurement types are available:
Size
The size is the size in bytes of the element, its attributes and its text nodes. The cumulative
measurement is the sum of the size of the element and all its children. The root element in the
cumulative mode has the maximum size of all the tree.
To activate the size measurement select Size in the View As combo box.
Note: the calculated size can dier from the physical le because when the data are loaded, the
formatting is discarded.
Payload size
The payload size is the size in bytes of the text nodes children of an element. The cumulative
measurement is the sum of the payload size of the element and all its children. The root element in
QXmlEdit user manual, page 98 of 113.
Differences report
Items, with different colors depending on state
Tools menu
Select encoding
Search box

the cumulative mode has the maximum size of all the tree.
To activate the size measurement select Payload in the View As combo box.
Attributes count
The attributes counting is the number of the attributes of each element. The cumulative
measurement is the sum of the number of the attributes of the element and all its children. The root
element in the cumulative mode has the maximum total of all the tree.
To activate the attributes count measurement select Attributes in the View As combo box.
Children Elements count
The children element counting is the number of the children of each element. The cumulative
measurement is the sum of the number of the children of the element and all its children. The root
element in the cumulative mode has the maximum total of all the tree.
To activate the elements count measurement select Elements in the View As combo box.
Structure
The structure view shows how the elements are divided in blocks using the depth from the root
information independently from the element tag. It shows the relative width of each element at a
given level. There is no cumulative option.
To activate the structure measurement select Structure in the View As combo box.
To change the depth level, use Slice At Level combo box.
Commands available in the contextual menu of the map
The map exposes the following features in the contextual menu or with mouse hovering.
Command Information
Copy Data to Clipboard Copies the current measurement data, relative to the portion of the visible map to
the clipboard. The data consist of an header and the values ordered by row.
Extract this fragment Opens the extraction dialog with depth and fragment numbers information relative
to the current point.
Copy Path to the Clipboard Inserts into the clipboard the current element XML path.
Show current element
information
Implemented as a tool tip that appears hovering with the mouse on a point of the
map.
Visualize Relationship
The relations panel shows in graphical form and using a table, the relationship between the nodes.
Graphic view: show the elements existing in the le and their relationships. The elements that are
in relation father-child are connected by a line.
The elements are disposed on the canvas in random position at each invocation. The nodes are
QXmlEdit user manual, page 99 of 113.
Differences report
Items, with different colors depending on state
Tools menu
Select encoding
Search box
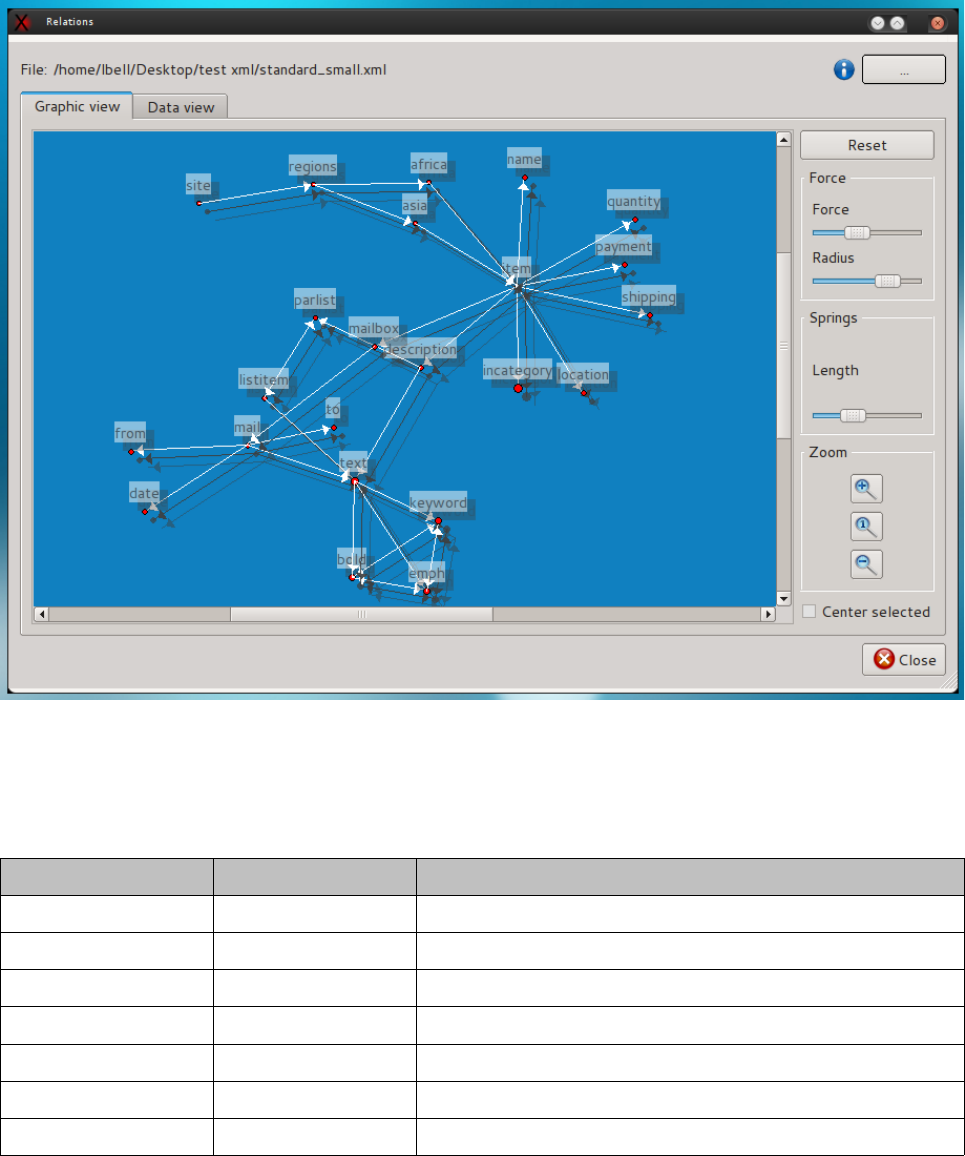
subject to a repulsive force and tend to be distribute evenly in the view.
Data view: show a table of nodes and the number and the type of connected elements.
Options:
Panel Option Description
Force Force The value of the repulsive force between the nodes.
Force Radius The eective radius of the force.
Spring Length The length of the spring.
Reset Reset the position of the nodes.
Zoom Zoom in Execute a zoom in
Zoom Zoom 1:1 Restore the view to the default size.
Zoom Zoom out Executes a zoom out
The relation panel can be accessed in the following modes:
•To show the data relative to the le loaded in the editor: View->View Relations...
QXmlEdit user manual, page 100 of 113.
Differences report
Items, with different colors depending on state
Tools menu
Select encoding
Search box

•To show the data relative to a le: Tools->Relations...
•To show the data in the map view: check “Analyze relations”, load a le then “View
relations”
Attributes summary
In the same panel in the “Attributes View” tab a detail of the attributes is shown. The allowed
options are:
Option Description
Load Whitelist Load a whitelist of attributes XPATH.
Load Blacklist Load a blacklist of attributes XPATH.
Reset Lists Clear whitelist and blacklist.
The behavior is as follows:
•if there is no whitelist and no blacklist all the attributes are included in the same summary,
•if there is a whitelist only, the attributes in the whitelist are grouped together and the
remaining form another group,
•if there is a blacklist only, the attributes non in the blacklist are grouped,
•if there is a blacklist and a whitelist, the attributes in the whitelist form a group, then all the
other attributes non in the blacklist are added to the group.
Base 64 Explorer
This dialog permits to encode and decode text from and to base 64 coding, using one of the
common character encodings.
To access Base 64 Explorer:
Menu > Tools > Base 64 Tools...
•To encode text in base 64:
◦Write text into the “text” panel. The base 64 coding will appear in the base 64 panel.
•To decode from base 64:
◦Choose an encoding using the “encoding” combo box.
◦Write or paste the base 64 coded text in the “Base 64” panel. The text will
automatically appear using the selected encoding.
Encoding tools
This dialog will permit to see how the text is transformed from unicode to dierent encodings.
To access the dialog:
Menu > Tools > Encoding Tools...
QXmlEdit user manual, page 101 of 113.
Differences report
Items, with different colors depending on state
Tools menu
Select encoding
Search box
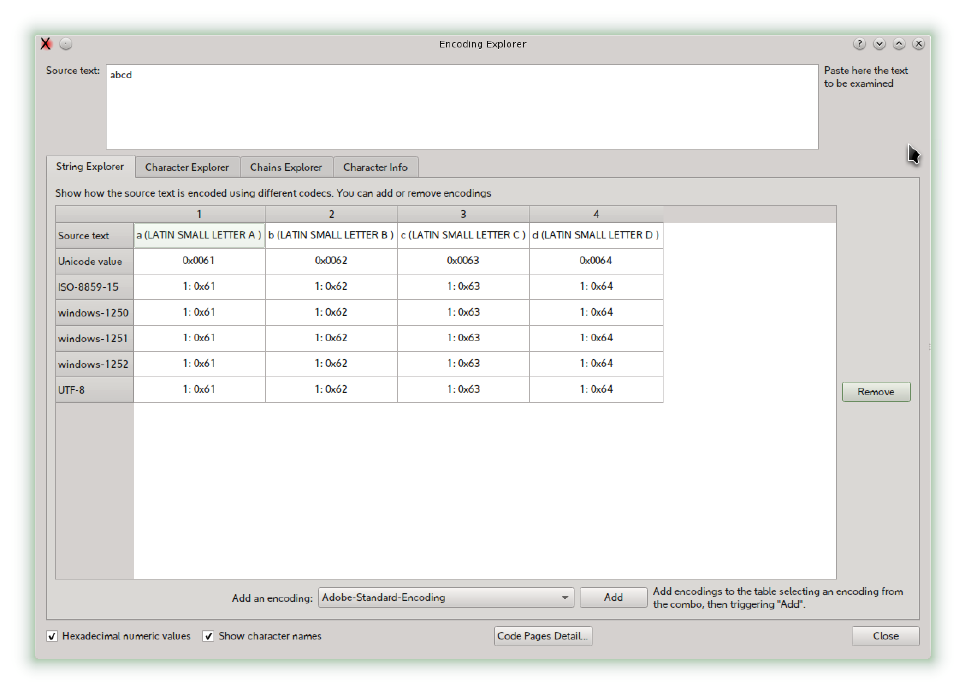
Explore how a string will be coded in a specific encoding
To explore how a string will be coded in different encodings:
1. Select the tab “String Explorer”.
2. Write the text into the Source Text box.
The encoded text will be displayed in the grid, character by character along its Unicode
value.
To add an encoding to the grid:
•Select an encoding in the encoding combo box, then trigger add button.
To remove an encoding:
•Select the encoding row, then press Remove button.
Explore how binary values are recognized by different encoding
You can insert numeric values and examine how they are interpreted by dierent encoding.
To access this feature:
•Select the “Character Explorer” tab.
QXmlEdit user manual, page 102 of 113.
Differences report
Items, with different colors depending on state
Tools menu
Select encoding
Search box
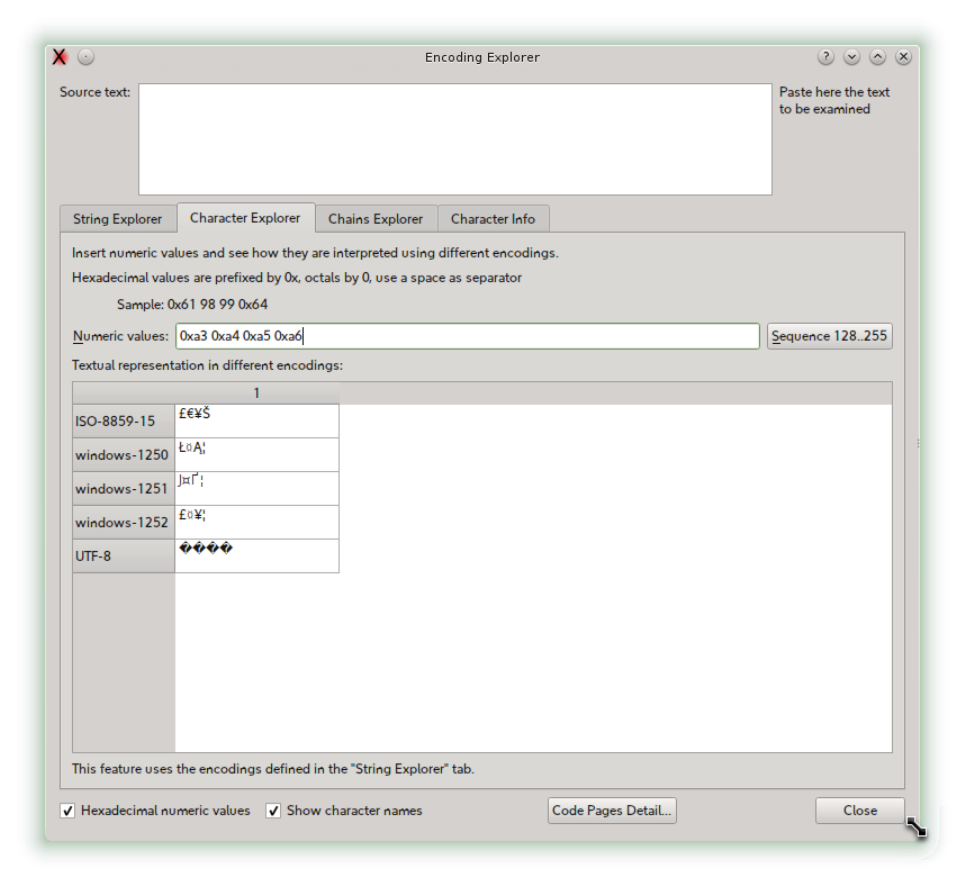
Insert the numeric values in the input box, using the prex “0x” for hexadecimal numbers, “0” for
octal.
To add or remove encodings, use the “String Explorer” tab.
Use “Sequence” button to insert a sequence of 128-255 characters; if you press the Control key
with the “Sequence” button, the characters from range 32-127 will be inserted.
Explore how a string will be translated when written in some encoding
and read in another one
Select the Chains Explorer tab, select an encoding (up to three are available), then write the
string into source text box.
QXmlEdit user manual, page 103 of 113.
Differences report
Items, with different colors depending on state
Tools menu
Select encoding
Search box
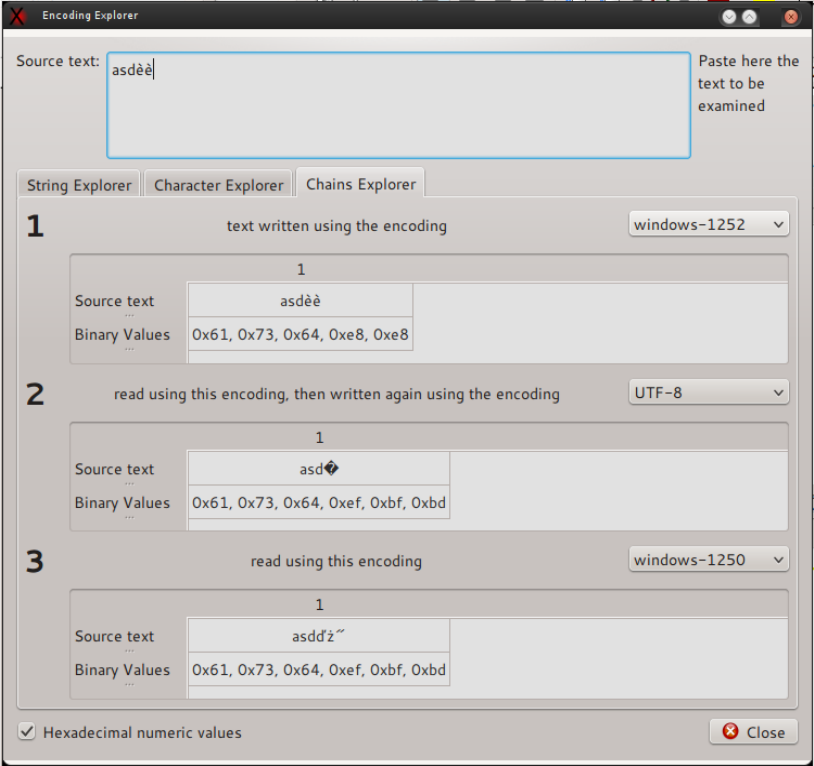
The grid will show the string transformation up to three steps.
QXmlEdit user manual, page 104 of 113.
Differences report
Items, with different colors depending on state
Tools menu
Select encoding
Search box
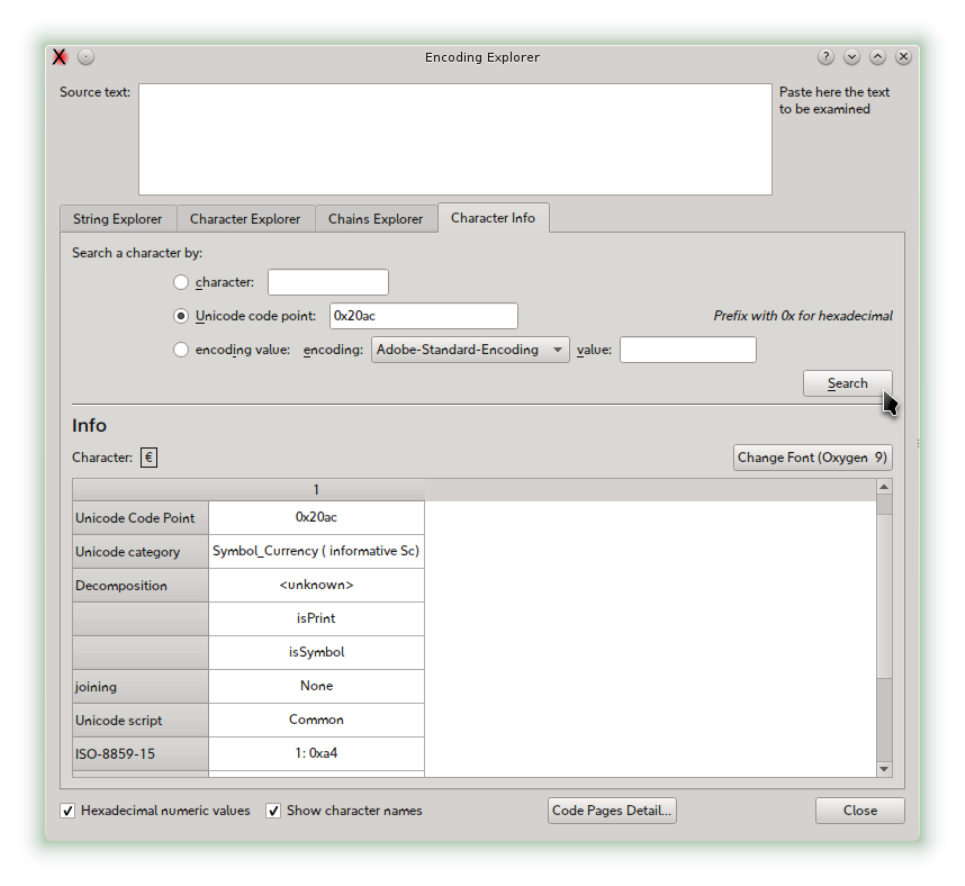
Get information about a character
Select the Character Info tab, select a character using one of the methods:
•Literal character typed in a box.
•Unicode code point written in decimal or hexadecimal.
•A value of a given encoding.
You can change the character display using the “Change Font” button.
QXmlEdit user manual, page 105 of 113.
Differences report
Items, with different colors depending on state
Tools menu
Select encoding
Search box
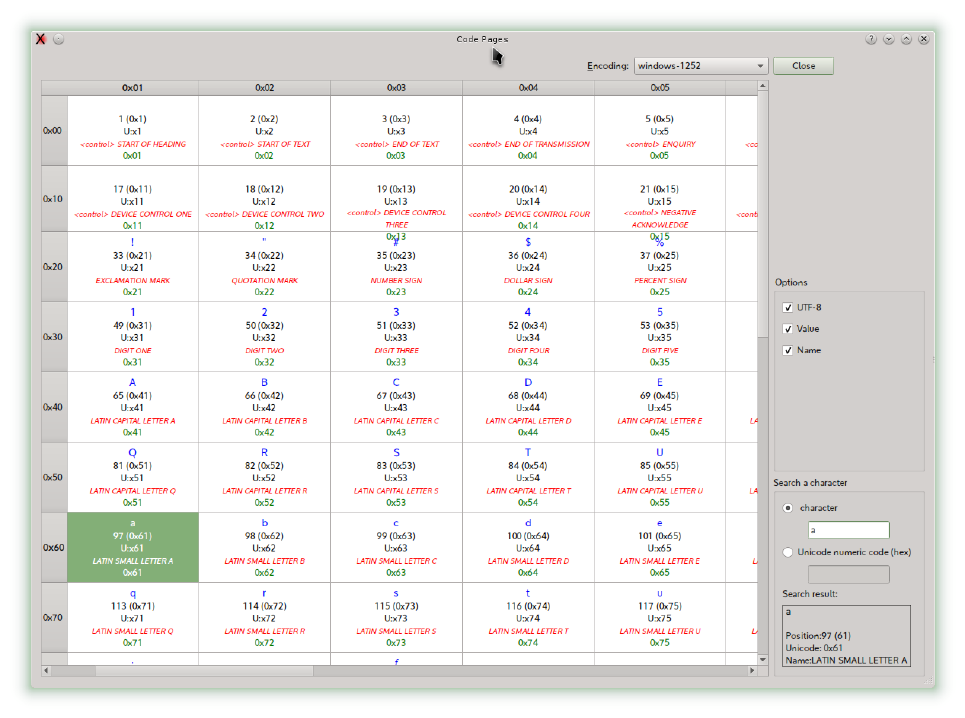
Code Pages explorer
Using the menu “Tools” > “Code Pages” you can open the code page explorer where you can
examine the code pages supported by QXmlEdit.
The possible operations are:
Change the encoding using the “Encoding” combo box.
Search a character using:
•The literal value.
•The Unicode code point.
The search result will be highlighted in the table and reported in a box.
Option for display of the characters:
Show the UTF-8 encoding.
Show the Unicode name of the character.
Show the value of the character.
QXmlEdit user manual, page 106 of 113.
Differences report
Items, with different colors depending on state
Tools menu
Select encoding
Search box
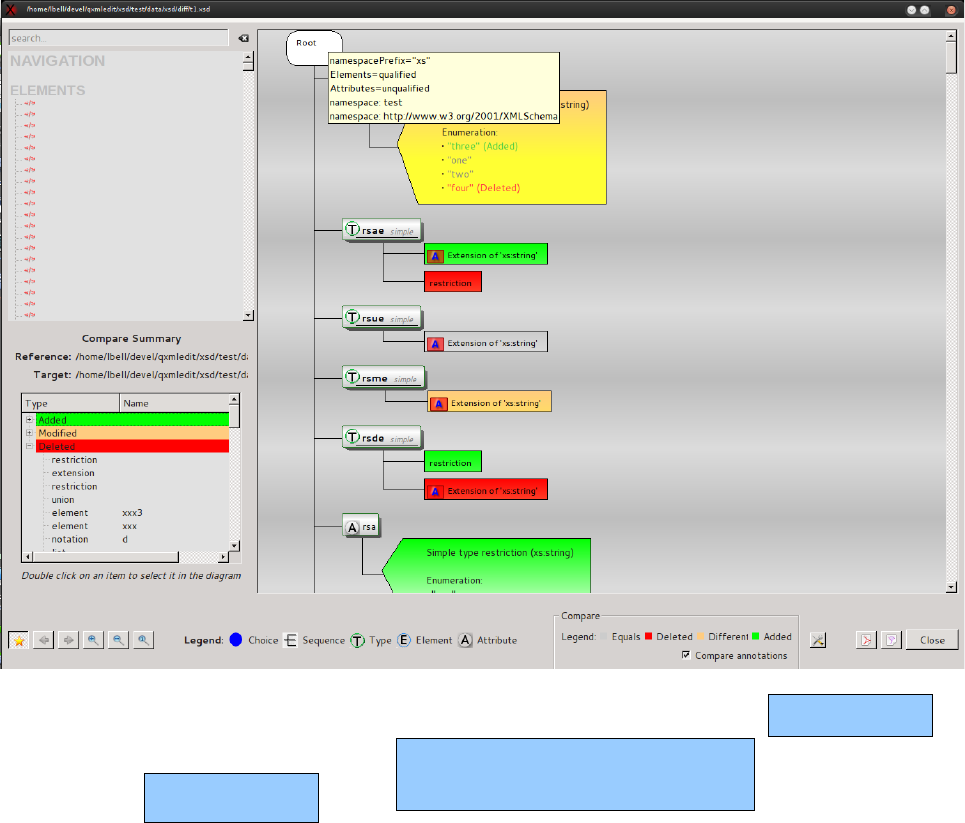
Visually Comparing XML Schema files
The compare operation is started loading a XML Schema le, then selecting the menu operation.
After the compare a window will open, showing the elements with dierent colors depending on
their state. The comparison can be done taking into account the annotations or not. Even the single
items of restriction enumerators values are shown.
To start the compare operation:
Menu > File > Compare XSD...
Options available: exchange source and reference and compare annotations or not.
QXmlEdit user manual, page 107 of 113.
Differences report
Items, with different colors depending on state
Tools menu
Select encoding
Search box
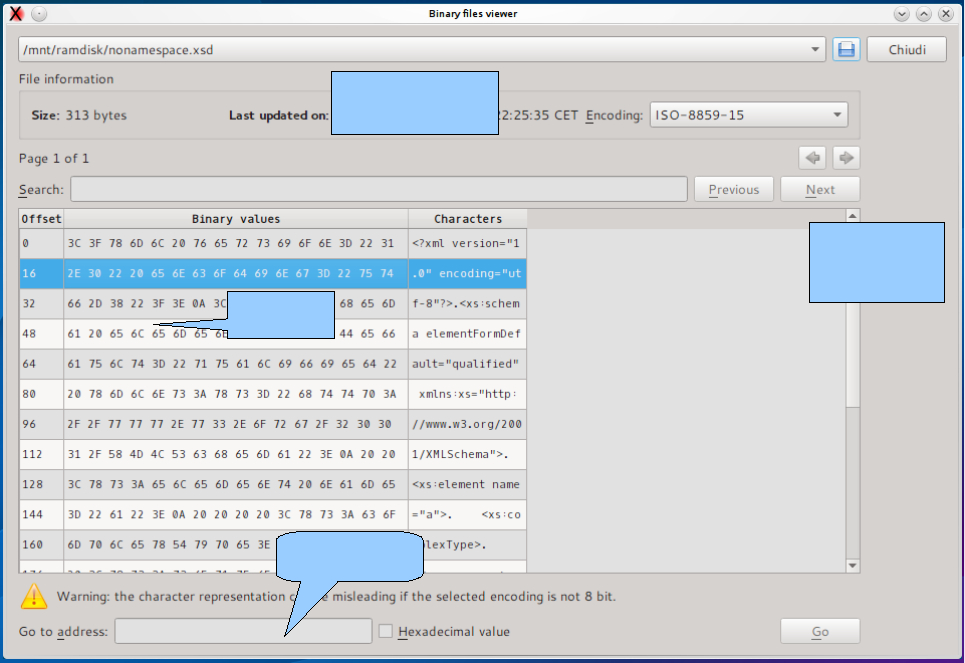
Binary files viewer
Using the menu Tools > Binary files viewer you can view the raw data of a le. The data can be
decoded in text using one of the supported encoding, but each row of 16 bites is decoded
separately. The input le is divided in pages to not overloading the memory. In this panel you can:
•View the raw data using a text encoding.
•Search text using the selected encoding .
•Go to an oset into the le.
QXmlEdit user manual, page 108 of 113.
Select encoding
Search box
Raw value
Jump to offset
Command Line arguments
QXmlEdit can be started with the following arguments:
Option Operation
-vis <le> Opens the data visualization panel
-anonymize <inputle> <prole> <outputle> Anonymizes a le and exit
-xsl [-saxon] -xsl=<xslFile> -output=<outputle>
{-p<name>=<value>}* <inputle>
Executes XSL transformation and exit.
Parameters can be supplied using the ‘-p’
options.
any other argument is used as a le to open.
QXmlEdit user manual, page 109 of 113.

Appendix
Note on “Single Application” Mode
The single application mode is enabled by default, but can be disabled using an option in the
Options panel.
It consists in opening a local server when starting, After that, if a command line argument is used by
the shell (e.g. the “Open With” in Windows Exlporer), the arguments are sent to the existing
instance via the local socket.
Style file format
This section describes the structure of a style le.
A style le is an XML le with the following structure:
Root Tag:
Tag name Attributes Child elements
style: •“name” style name as shown in the
user interface
•“description”: a description
•“namespace”: an optional namespace
•“keywords”
•“styles”
•“ids”
Element “styles”
This element is simply a collection of “style” elements plus one optional “default” that will be used
as default style, if existing.
Element “default”
It contains one “style” element.
Element “style”
Tag name Attributes Child elements
style •“id” unique identier of the style. It is a
string
•“color”: hexadecimal representation of
a color used to paint the text.
Example: “FF0000”
•“backColor”: optional, the background
color in hexadecimal format with
optional alpha at the end.
Example: FF0000 or FF000080
•“family”: font family if dierent from
default.
•“size”: font size if dierent from
default.
•“bold” set to 'true' or a numeric value
QXmlEdit user manual, page 110 of 113.

dierent from zero to force bold style
on font
•“italic”: same of bold, but for italic
style
The only mandatory attribute is id, the others
are activated if set.
Element “keywords”
This element is simply a collection of “keyword” and “rule” elements
Element “keyword”
A keyword, with associated style. Each element tag in the data le that is enrolled in this section
will be printed with the indicated style
Tag name Attributes Child elements
keyword •“keyword” the name of the element to
mark
•“idStyle”: the identier of the
associated style
Element “ruleSet”
Contains a set of “rule” and “ruleSet” using implicit AND connector
Tag name attributes Child elements
ruleSet •“connector” the connector of the
children
◦and (default)
◦or
•“idStyle”: for a top level rule identify
the style to be used
“rule”, “ruleSet”
Element “rule” (inner)
Tag name attributes Child elements
rule •“entity”: denotes and attribute or an
element, default: attribute
◦attribute
◦element
•“name”: if attribute, the name of the
attribute or element
•“op”: denotes the comparison operator
◦EQ: equals
◦NE: not equals
◦EX: value exists
◦NX: value non existent
◦GT: greater than
none
QXmlEdit user manual, page 111 of 113.

◦LT: less than
◦GE: greater or equal
◦LE: less or equal
◦SS: substring (string only)
◦ST: starts with (string only)
•“type”: type of comparison, optional,
default: string
◦s: string
◦n: number
◦p: position
•“value”: the comparison value. If
position, the value should be:
◦numeric
◦rst (literal)
◦last (literal)
•“case”: if the comparisons take the
case of the strings into account,
default: true
◦true: case sensitive
◦false: not case sensitive
Element “ids”
This element is simply a collection of “id” elements
Element “id”
This element contains the name of attributes whose content will be printed next to element tag
Tag name attributes Child elements
id •“id” name of the attribute that is
considered as an identier.
•“alpha”: if true, force the enclosing of
the value between quotes.
This is a complete sample style le:
<?xml version="1.0" encoding="UTF-8"?>
<!-- this is a sample QXmlEdit style file -->
<style name="Log" description="log test style">
<keywords>
<keyword keyword="resource" idStyle="1"/>
<ruleSet idStyle="2">
<ruleSet connector="and">
<rule entity="element" op="eq" type="s" value="event"/>
<rule entity="attribute" name="level" op="eq" type="s" value="fatal" case="false" />
</ruleSet>
</ruleSet>
<ruleSet idStyle="3">
<ruleSet connector="or">
<rule name="level" op="eq" type="s" value="ERROR" />
<ruleSet connector="and">
<rule entity="attribute" name="level" op="eq" type="s" value="INFO" case="true" />
<rule name="pri" op="gt" type="n" value="12"/>
</ruleSet>
QXmlEdit user manual, page 112 of 113.
</ruleSet>
</ruleSet>
<ruleSet idStyle="4">
<rule name="level" op="eq" value="WARNING" case="true" />
</ruleSet>
<ruleSet idStyle="5">
<rule name="level" op="eq" type="s" value="INFO" case="true" />
</ruleSet>
</keywords>
<styles>
<style id="1" color="2080FF" />
<!-- fatal -->
<style id="2" color="FF0000" size="12" family="Arial" bold="true" italic="false" icon=":E:" />
<!-- error -->
<style id="3" color="FF4080" size="10" family="Arial" bold="true" italic="false" icon=":E:"/>
<!-- warning -->
<style id="4" color="C0C080" size="10" family="Arial" bold="false" italic="false" icon=":W:"/>
<!-- info -->
<style id="5" color="000000" size="8" family="Arial" bold="false" italic="true" icon=":I:"/>
<default>
<style id="default" color="C0C0C0" size="8" family="Arial" bold="false" italic="true"/>
</default>
</styles>
<ids>
<id id="name" alpha="true"/>
<id id="id" alpha=""/>
</ids>
</style>
Installation of new styles
Given that styles are so simple, they can be created by the user with a simple text editor. Styles are
searched in a directory congured via 'Configure...' menu.
QXmlEdit user manual, page 113 of 113.
