Quectel QNavigator User Guide V1.4
User Manual:
Open the PDF directly: View PDF ![]() .
.
Page Count: 38

QNavigator User Guide
GSM/GPRS&UMTS/HSPA Module Series
Rev. QNavigator_User_Guide_V1.4
Date: 2016-03-25
www.quectel.com

GSM/GPRS&UMTS/HSPA Module Series
QNavigator User Guide
QNavigator_User_Guide Confidential / Released 1 / 37
Our aim is to provide customers with timely and comprehensive service. For any
assistance, please contact our company headquarters:
Quectel Wireless Solutions Co., Ltd.
Office 501, Building 13, No.99, Tianzhou Road, Shanghai, China, 200233
Tel: +86 21 5108 6236
Mail:info@quectel.com
Or our local office, for more information, please visit:
http://www.quectel.com/support/salesupport.aspx
For technical support, to report documentation errors, please visit:
http://www.quectel.com/support/techsupport.aspx
Or Email: Support@quectel.com
GENERAL NOTES
QUECTEL OFFERS THIS INFORMATION AS A SERVICE TO ITS CUSTOMERS. THE INFORMATION
PROVIDED IS BASED UPON CUSTOMERS’ REQUIREMENTS. QUECTEL MAKES EVERY EFFORT
TO ENSURE THE QUALITY OF THE INFORMATION IT MAKES AVAILABLE. QUECTEL DOES NOT
MAKE ANY WARRANTY AS TO THE INFORMATION CONTAINED HEREIN, AND DOES NOT ACCEPT
ANY LIABILITY FOR ANY INJURY, LOSS OR DAMAGE OF ANY KIND INCURRED BY USE OF OR
RELIANCE UPON THE INFORMATION. ALL INFORMATION SUPPLIED HEREIN IS SUBJECT TO
CHANGE WITHOUT PRIOR NOTICE.
COPYRIGHT
THIS INFORMATION CONTAINED HERE IS PROPRIETARY TECHNICAL INFORMATION OF
QUECTEL CO., LTD. TRANSMITTABLE, REPRODUCTION, DISSEMINATION AND EDITING OF THIS
DOCUMENT AS WELL AS UTILIZATION OF THIS CONTENTS ARE FORBIDDEN WITHOUT
PERMISSION. OFFENDERS WILL BE HELD LIABLE FOR PAYMENT OF DAMAGES. ALL RIGHTS
ARE RESERVED IN THE EVENT OF A PATENT GRANT OR REGISTRATION OF A UTILITY MODEL
OR DESIGN.
Copyright © Quectel Wireless Solutions Co., Ltd. 2016. All rights reserved.
Quectel
Confidential

GSM/GPRS&UMTS/HSPA Module Series
QNavigator User Guide
QNavigator_User_Guide Confidential / Released 2 / 37
About the Document
History
Revision
Date
Author
Description
1.0
2012-01-08
Clare CHEN
Initial
1.1
2013-08-01
Karen REN/
Yolanda YAO/
Harvey HE
1. Added the QuecLocator test function.
2. Updated Figures and their corresponding
description.
3. Added QNavigator installation’s user guide.
1.2
2014-01-07
Lucky DOU/
Dishon ZHOU
Added the UMTS/HSPA function.
1.3
2015-03-27
Hunter LV
Updated QNavigator Version to 1.4
1.4
2016-03-25
Hunter LV
Updated QNavigator Version to 1.5
Quectel
Confidential

GSM/GPRS&UMTS/HSPA Module Series
QNavigator User Guide
QNavigator_User_Guide Confidential / Released 3 / 37
Contents
About the Document ................................................................................................................................... 2
Contents ....................................................................................................................................................... 3
Table Index ................................................................................................................................................... 4
Figure Index ................................................................................................................................................. 5
1 Introduction .......................................................................................................................................... 6
1.1. Supported OS ............................................................................................................................ 6
2 Software Interface ................................................................................................................................ 8
2.1. User Guidance ........................................................................................................................... 8
2.2. The Main Software Interface ................................................................................................... 12
2.3. Toolbar ..................................................................................................................................... 13
2.4. Menu Bar ................................................................................................................................. 14
3 Main Parameters Configuration ....................................................................................................... 15
3.1. UART Parameter Setting ......................................................................................................... 15
3.2. System Parameter Setting ....................................................................................................... 16
4 Brief Introduction ............................................................................................................................... 17
4.1. Home Page .............................................................................................................................. 17
4.2. SMS ......................................................................................................................................... 18
4.3. Voice Call ................................................................................................................................. 21
4.4. TCP/UDP ................................................................................................................................. 23
4.5. PPP .......................................................................................................................................... 26
4.6. QuecLocator ............................................................................................................................ 28
4.7. GNSS ....................................................................................................................................... 28
4.8. AT Command ........................................................................................................................... 31
4.9. QCOM ...................................................................................................................................... 35
5 Auxiliary Tools ................................................................................................................................... 36
5.1. Manually Send Data to UART ................................................................................................. 36
Quectel
Confidential

GSM/GPRS&UMTS/HSPA Module Series
QNavigator User Guide
QNavigator_User_Guide Confidential / Released 4 / 37
Table Index
Table 1: Introduction of Icon Button ........................................................................................................... 13
Table 2: Introduction of Submenu of Tool ................................................................................................... 14
Table 3: Introduction of System Parameter ................................................................................................ 16
Table 4: Functions of SMS ......................................................................................................................... 19
Quectel
Confidential

GSM/GPRS&UMTS/HSPA Module Series
QNavigator User Guide
QNavigator_User_Guide Confidential / Released 5 / 37
Figure Index
Figure 1: Select the Properties .................................................................................................................... 6
Figure 2: Run This Program as an Administrator ......................................................................................... 7
Figure 3: Welcome to Use QNavigator ........................................................................................................ 8
Figure 4: Select the Module Type ................................................................................................................ 9
Figure 5: Connect to EVB ............................................................................................................................ 9
Figure 6: Confirm the Port Number ............................................................................................................ 10
Figure 7: Serial Port Setting ....................................................................................................................... 10
Figure 8: Connect to Module .......................................................................................................................11
Figure 9: Serial Port Parameter Configuration ............................................................................................11
Figure 10: Main Interface ........................................................................................................................... 12
Figure 11: Toolbar ....................................................................................................................................... 13
Figure 12: Submenu of Tool ....................................................................................................................... 14
Figure 13: UART Parameter Setting .......................................................................................................... 15
Figure 14: System Parameter Setting ........................................................................................................ 16
Figure 15: Home Page ............................................................................................................................... 17
Figure 16: Switch View ............................................................................................................................... 18
Figure 17: SMS-Read All ............................................................................................................................ 19
Figure 18: SMS-Send Message ................................................................................................................. 20
Figure 19: MO Call ..................................................................................................................................... 21
Figure 20: MT Call ...................................................................................................................................... 22
Figure 21: TCP/UDP-PDP ACT .................................................................................................................. 23
Figure 22: TCP/UDP-Connect .................................................................................................................... 24
Figure 23: TCP/UDP-Send ......................................................................................................................... 25
Figure 24: PPP-DIAL .................................................................................................................................. 26
Figure 25: PPP-Terminate .......................................................................................................................... 27
Figure 26: Show in Map ............................................................................................................................. 28
Figure 27: Show in Map(HSPA,LTE) .......................................................................................................... 29
Figure 28: Satellite Signal State(HSPA,LTE) ............................................................................................. 30
Figure 29: Show NMEA Data(HSPA,LTE) .................................................................................................. 30
Figure 30: AT Command-1 ......................................................................................................................... 31
Figure 31: AT Command-2 ......................................................................................................................... 32
Figure 32: AT Command-3 ......................................................................................................................... 33
Figure 33: AT Command-4 ......................................................................................................................... 34
Figure 34: QCOM Test Page ...................................................................................................................... 35
Figure 35: Hand Control ............................................................................................................................. 36
Figure 36: Hand Control-AT Command Edit/Select ................................................................................... 37
Quectel
Confidential
GSM/GPRS&UMTS/HSPA Module Series
QNavigator User Guide
QNavigator_User_Guide Confidential / Released 6 / 37
1 Introduction
This user guide provides a guidance of using the QNavigator tool step-by-step.
QNavigator tool is only used to test Quectel modules. By using this tool, you can be familiar with the
working process of main functions like Call, SMS, TCP/UDP, PPP and QuceLocator even when you do
not know any AT commands. It will show you the details of how each function works. Referenced
documents can be found in the Help menu of the Toolbar.
This document is applicable to all GSM and UMTS modules.
1.1. Supported OS
The tool can work with the OS of PC as follows:
- Windows XP
- Windows 7
- Windows 8
- Windows Vista
- Windows 10
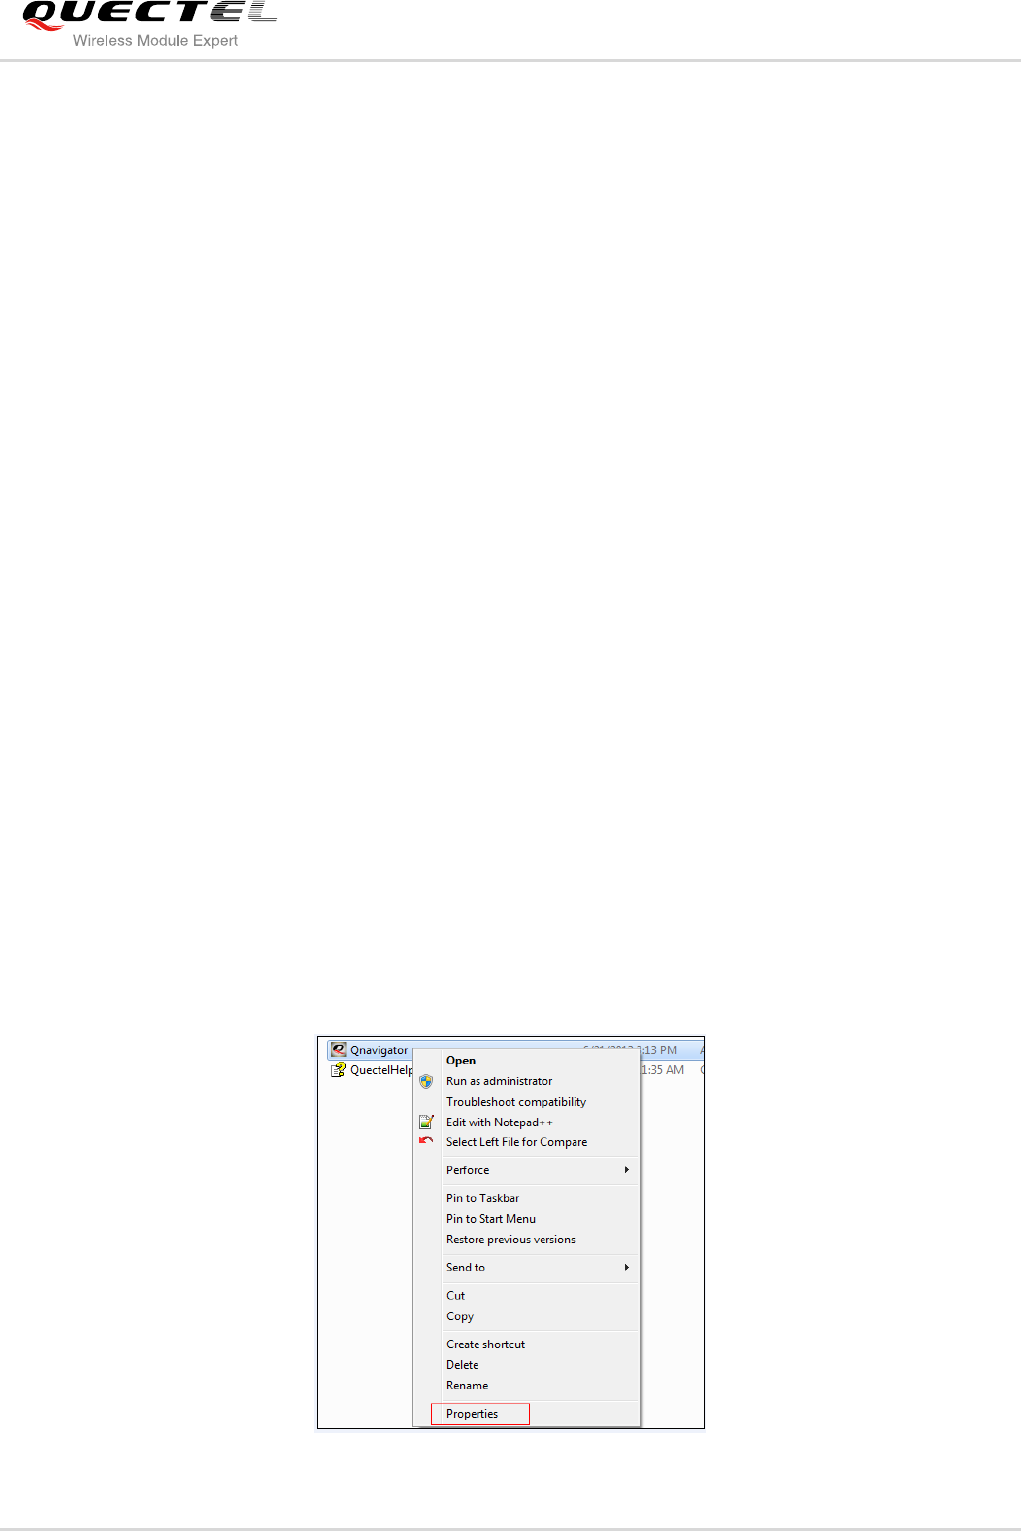
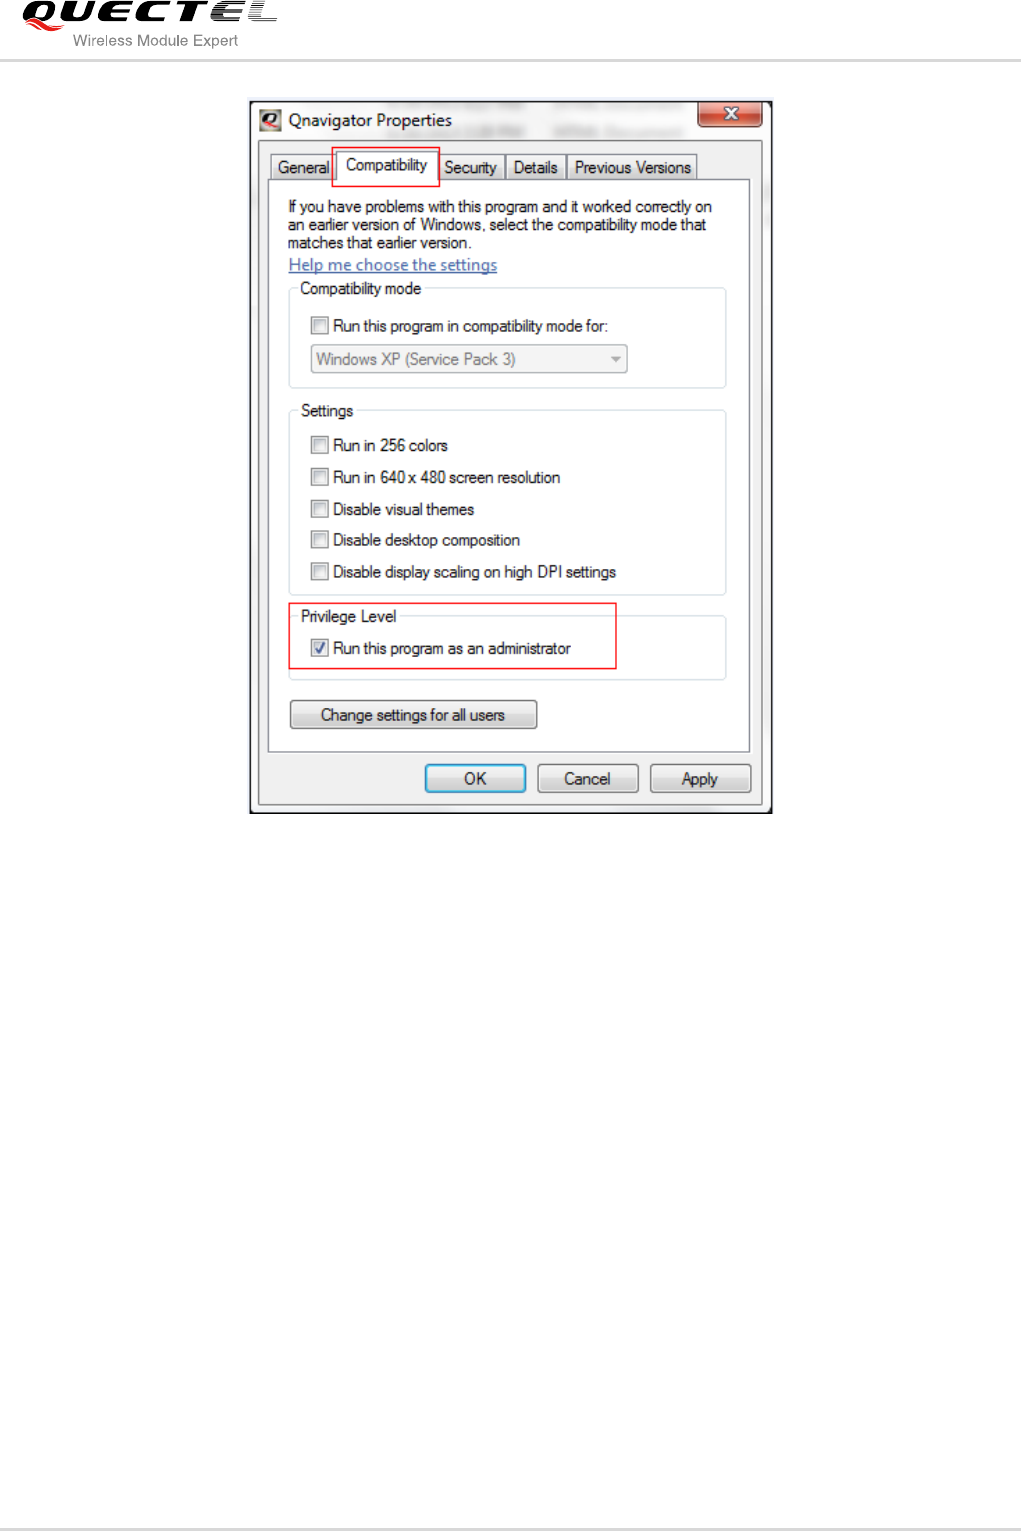
If the tool is installed on Windows 7 or Vista, please first set the Compatibility and then click Run this
program as an administrator before using it. The detailed procedure is shown as below:
Figure 1: Select the Properties
Quectel
Confidential
GSM/GPRS&UMTS/HSPA Module Series
QNavigator User Guide
QNavigator_User_Guide Confidential / Released 7 / 37
Figure 2: Run This Program as an Administrator
Quectel
Confidential

GSM/GPRS&UMTS/HSPA Module Series
QNavigator User Guide
QNavigator_User_Guide Confidential / Released 8 / 37
2 Software Interface
2.1. User Guidance
If it is the first time to use this software, the user guidance would pop up as below. You can also click ESC
button on the keyboard to skip it.
Step 1: Click the Next button to enter the next step.
Figure 3: Welcome to Use QNavigator
Quectel
Confidential

GSM/GPRS&UMTS/HSPA Module Series
QNavigator User Guide
QNavigator_User_Guide Confidential / Released 9 / 37
Step 2: Choose the right module and Click the Next button to enter the next step.
Figure 4: Select the Module Type
Step 3: Click the Next button to enter the next step. You can also click the Prev button to go back to the
previous step.
Figure 5: Connect to EVB
Quectel
Confidential
GSM/GPRS&UMTS/HSPA Module Series
QNavigator User Guide
QNavigator_User_Guide Confidential / Released 10 / 37
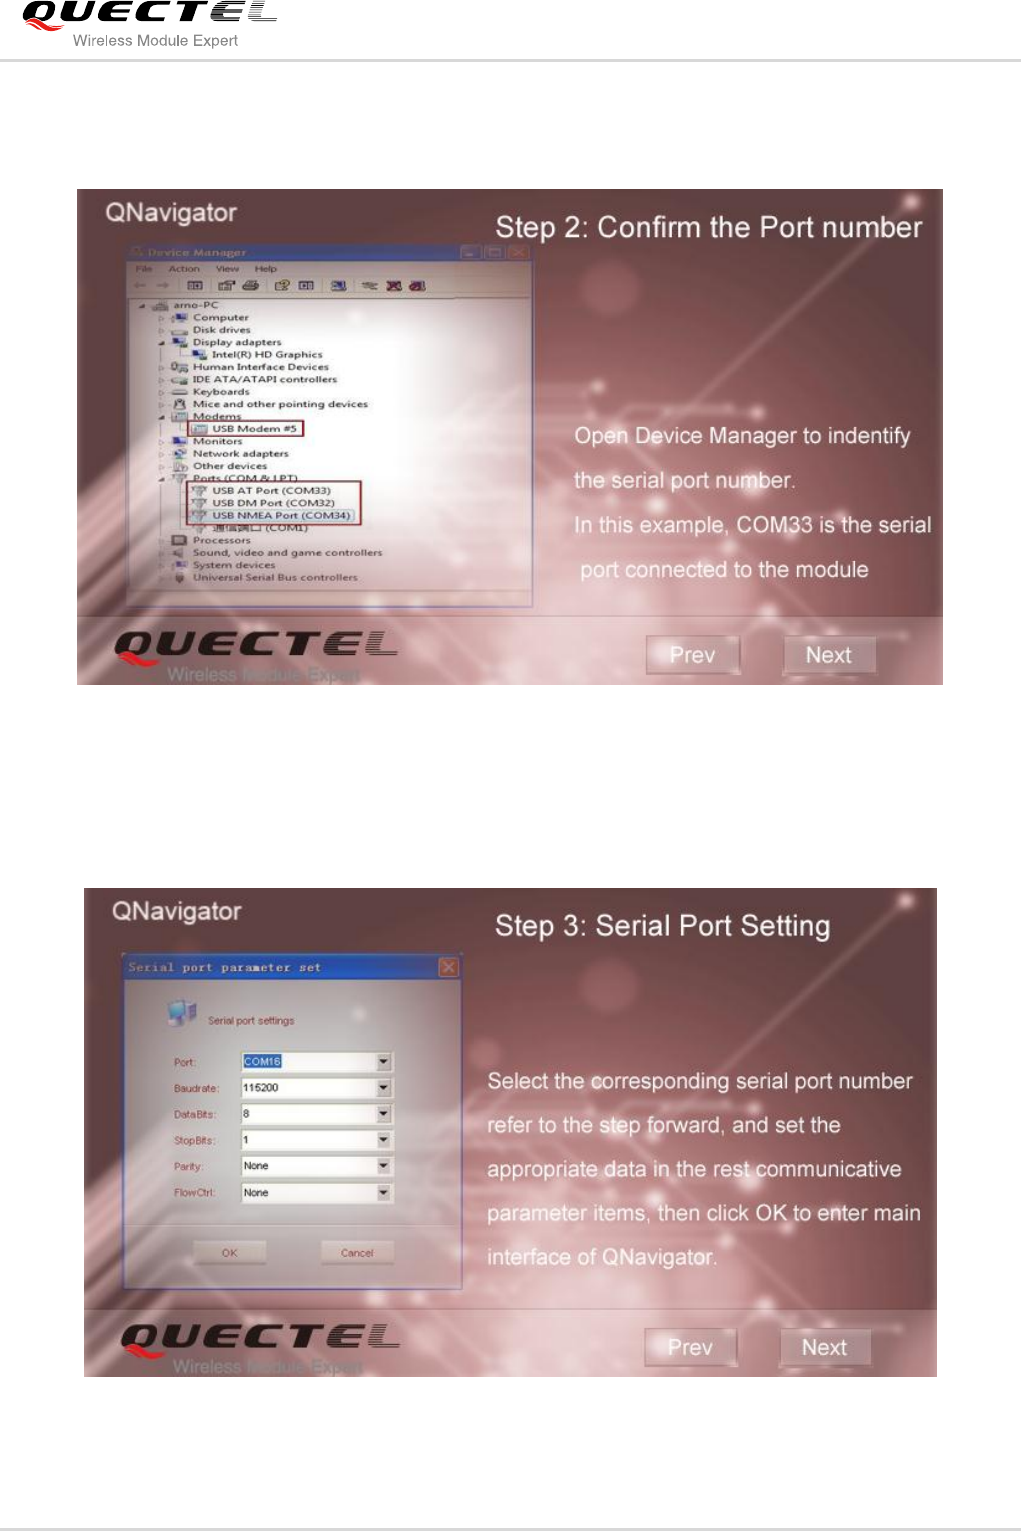
Step 4: Click the Next button to enter the next step. You can also click the Prev button to go back to the
previous step.
Figure 6: Confirm the Port Number
Step 5: Click the Next button to enter the next step. You can also click the Prev button to go back to the
previous step.
Figure 7: Serial Port Setting
Quectel
Confidential
GSM/GPRS&UMTS/HSPA Module Series
QNavigator User Guide
QNavigator_User_Guide Confidential / Released 11 / 37
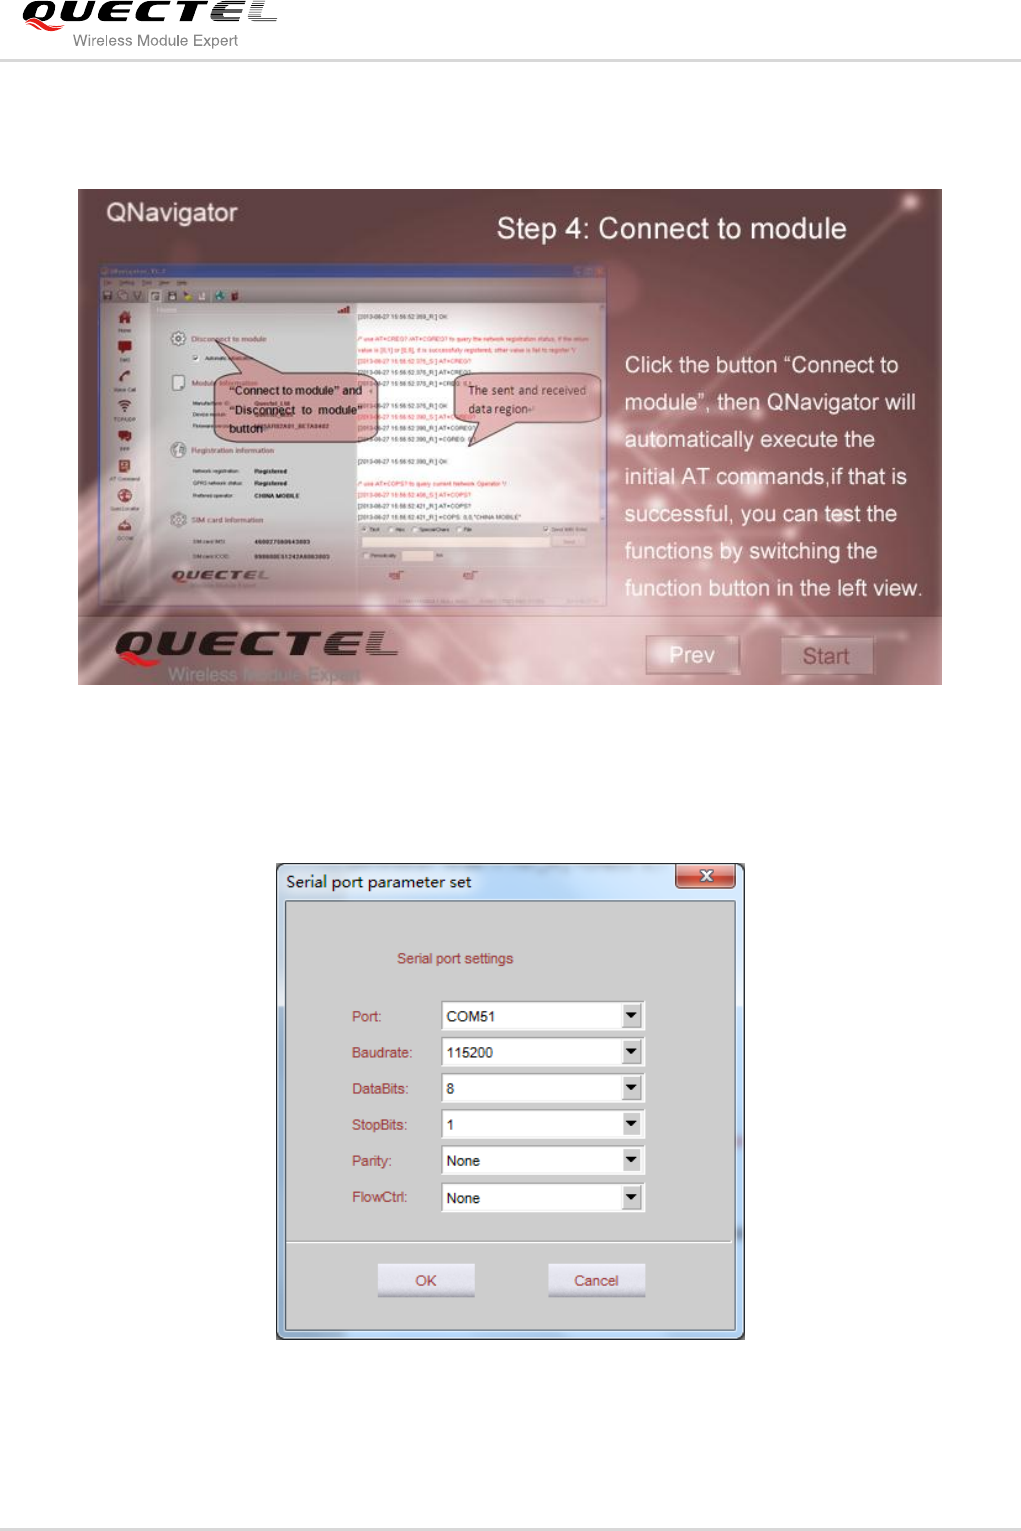
Step 6: Click the Next button to enter the next step. You can also click the Prev button to go back to the
previous step.
Figure 8: Connect to Module
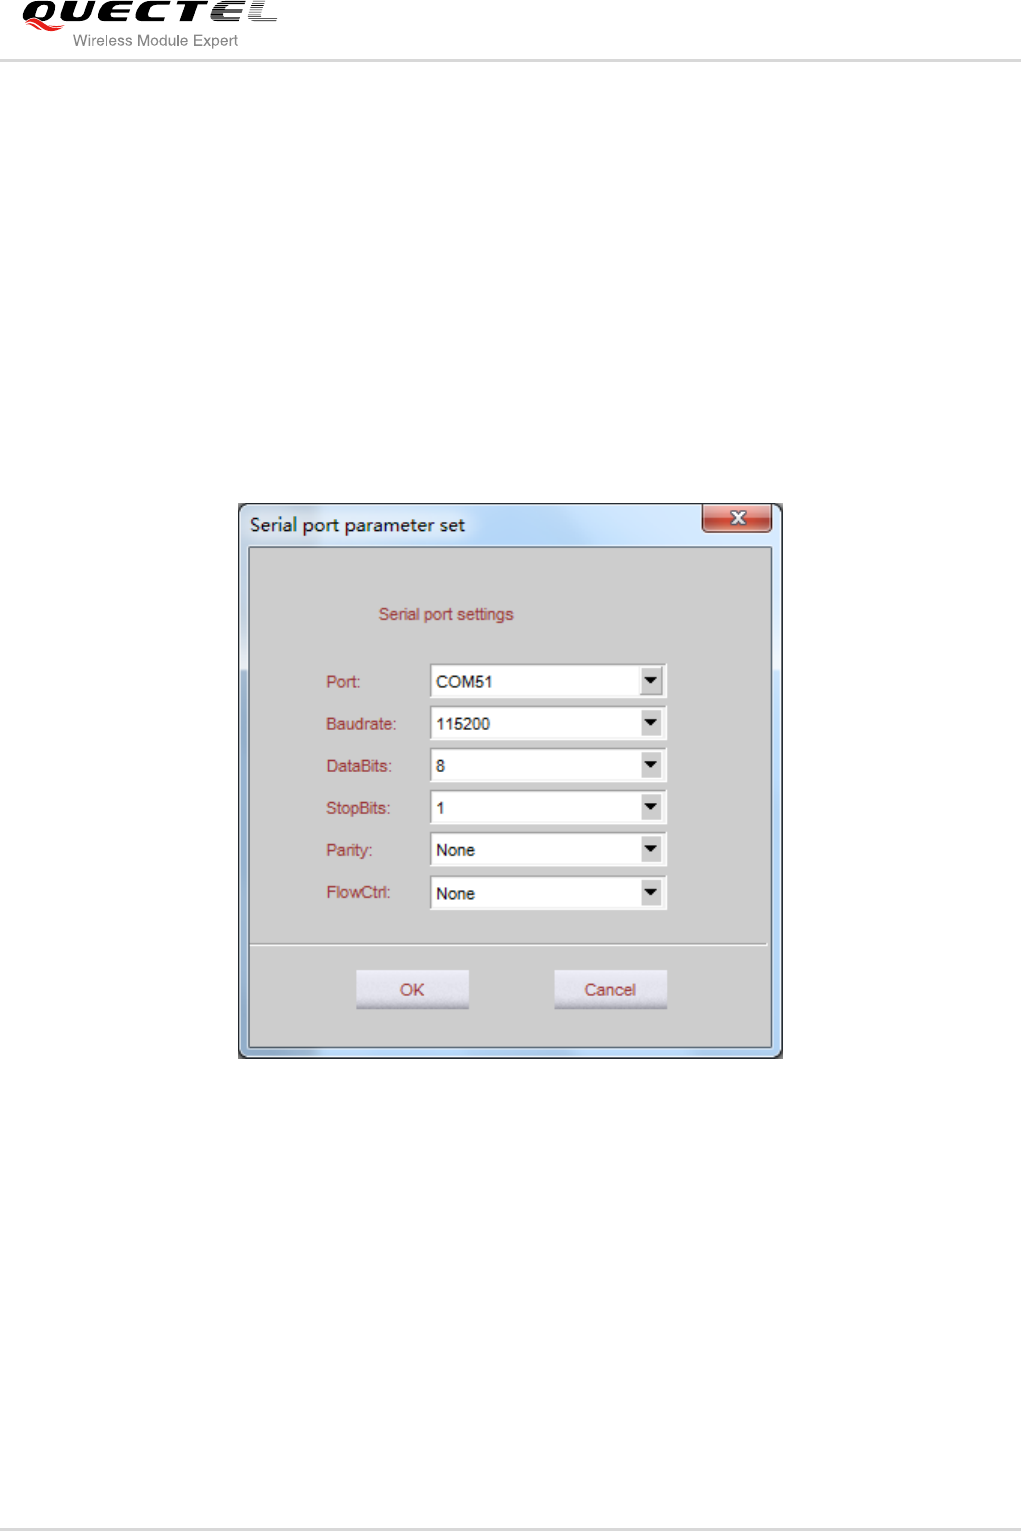
Then select the Serial port parameter set, as shown in the following figure.
Figure 9: Serial Port Parameter Configuration
Click the OK button to enter the main interface after parameter settings are completed.
Quectel
Confidential
GSM/GPRS&UMTS/HSPA Module Series
QNavigator User Guide
QNavigator_User_Guide Confidential / Released 12 / 37
The user guidance can be found again by clicking Help->Guidance button in the Menu.
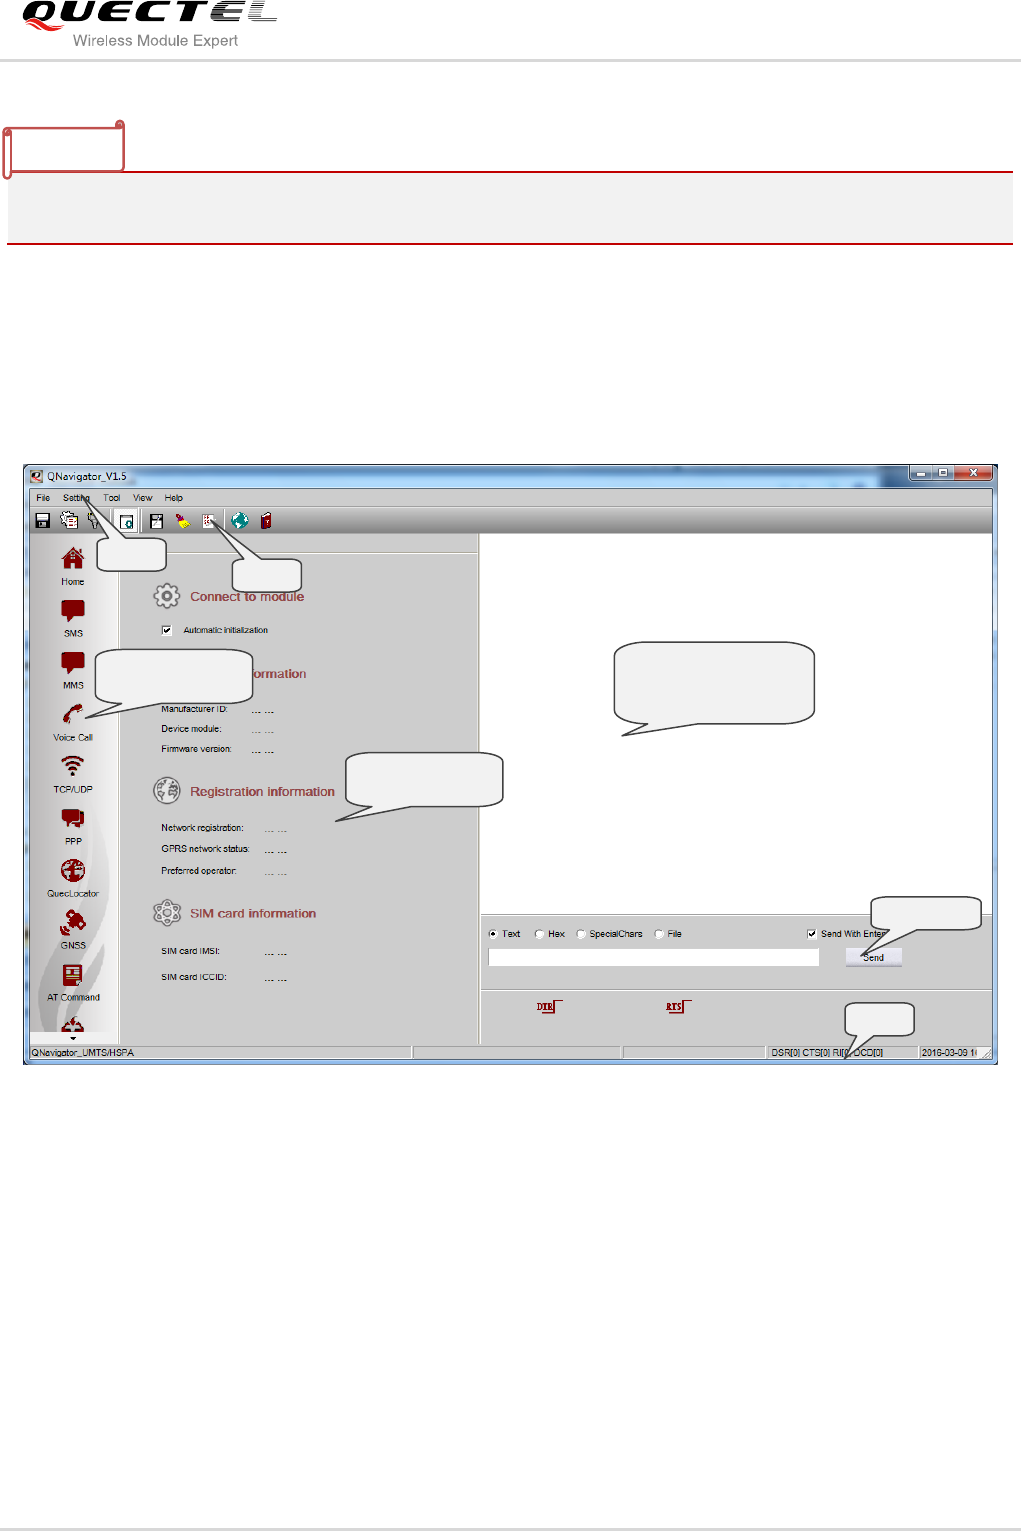
2.2. The Main Software Interface
Enter the program interface shown as below:
Figure 10: Main Interface
The main interface of the program contains seven parts: Menu, Toolbar, Selection for module test function,
Functional interface of the module test, Display area for the data sent and received via serial port, Status
and Hand control.
Display area for the data
sent and received via
serial port
Toolbar
Menu
Hand control
Status
Functional interface
of the module
Selection for
module test function
NOTE
Quectel
Confidential
GSM/GPRS&UMTS/HSPA Module Series
QNavigator User Guide
QNavigator_User_Guide Confidential / Released 13 / 37
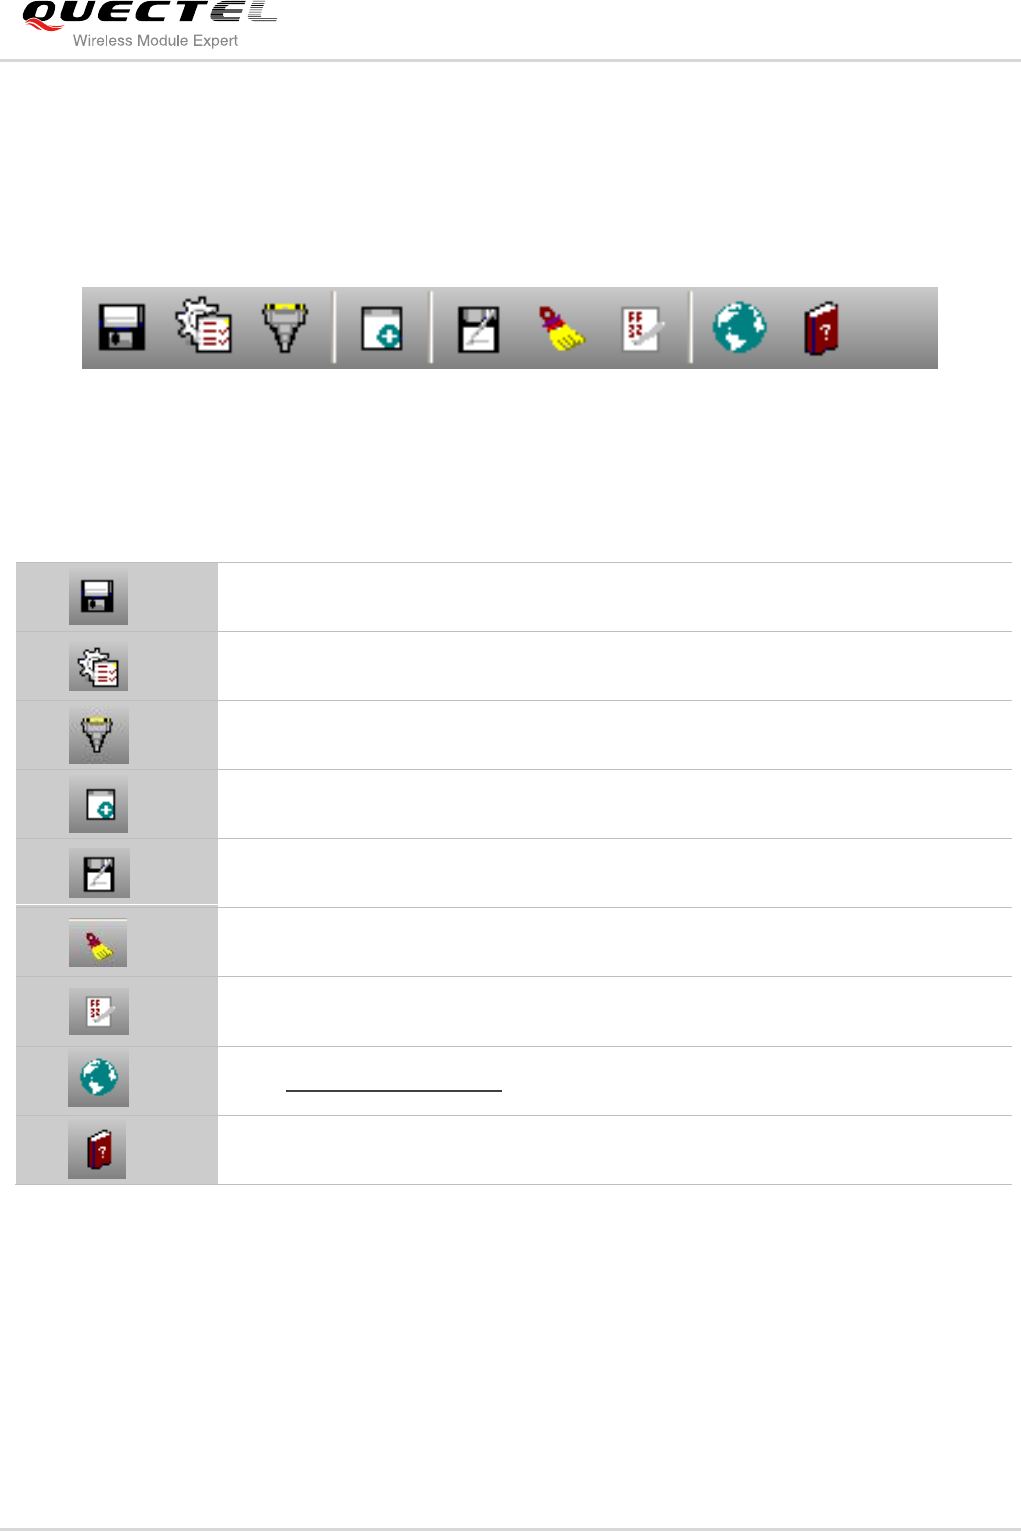
2.3. Toolbar
The Toolbar provides operation buttons for convenience and there is corresponding operation in the
menu.
Figure 11: Toolbar
Table 1: Introduction of Icon Button
Save the editable parameter after modification
System parameters setting, including the size of main window, color of sent and
received data, and the log file
UART parameter setting (it is not allowed if UART has opened)
Manually sending data interface displayed in the lower right part of the main
interface
Save the current data in display area
Empty the current data in display area
Display current data in HEX mode
Open http://www.quectel.com
Pop-up documentation window
Quectel
Confidential
GSM/GPRS&UMTS/HSPA Module Series
QNavigator User Guide
QNavigator_User_Guide Confidential / Released 14 / 37
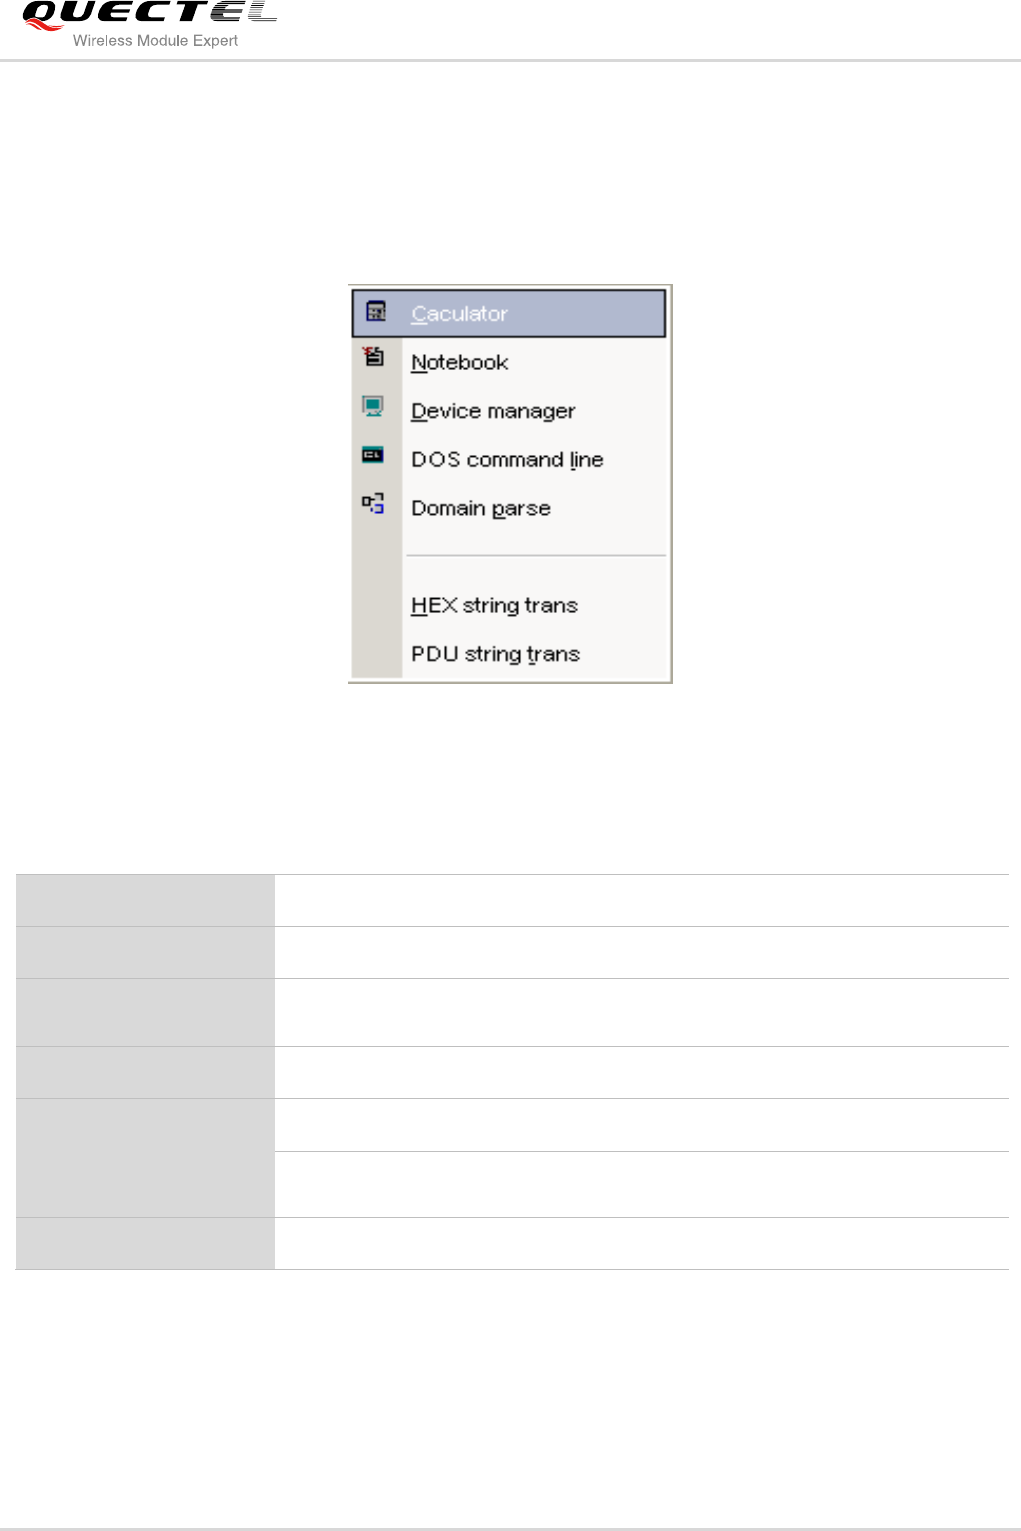
2.4. Menu Bar
Here is the introduction on submenu of Tool, as shown in the following Figure (The operations shown in
the menu are mainly used to assist testing).
Figure 12: Submenu of Tool
Table 2: Introduction of Submenu of Tool
Calculator
Open the calculator of the operating system
Notebook
Open a Notepad program
Device Manager
Open the Device Manager of the operating system where the port can be
checked
DOS Command Line
Open a DOS command line window
Domain Parse
Convert Domain name into IP address
HEX String Trans
The conversion between ACSII character and HEX string, as well as Chinese
character and UNICODE character
PDU String Trans
Generate the PDU strings of SMS content
Quectel
Confidential
GSM/GPRS&UMTS/HSPA Module Series
QNavigator User Guide
QNavigator_User_Guide Confidential / Released 15 / 37
3 Main Parameters Configuration
Necessary parameters must be configured correctly before taking a test.
3.1. UART Parameter Setting
Figure 13: UART Parameter Setting
Before testing, necessary parameters must be configured first, including Port Number/Baud Rate/Data
Bits/Stop Bits/Parity/Flow Control. Each time you click the drop-down box and select a new one, the
information of current UART would be automatically updated by system.
Quectel
Confidential
GSM/GPRS&UMTS/HSPA Module Series
QNavigator User Guide
QNavigator_User_Guide Confidential / Released 16 / 37
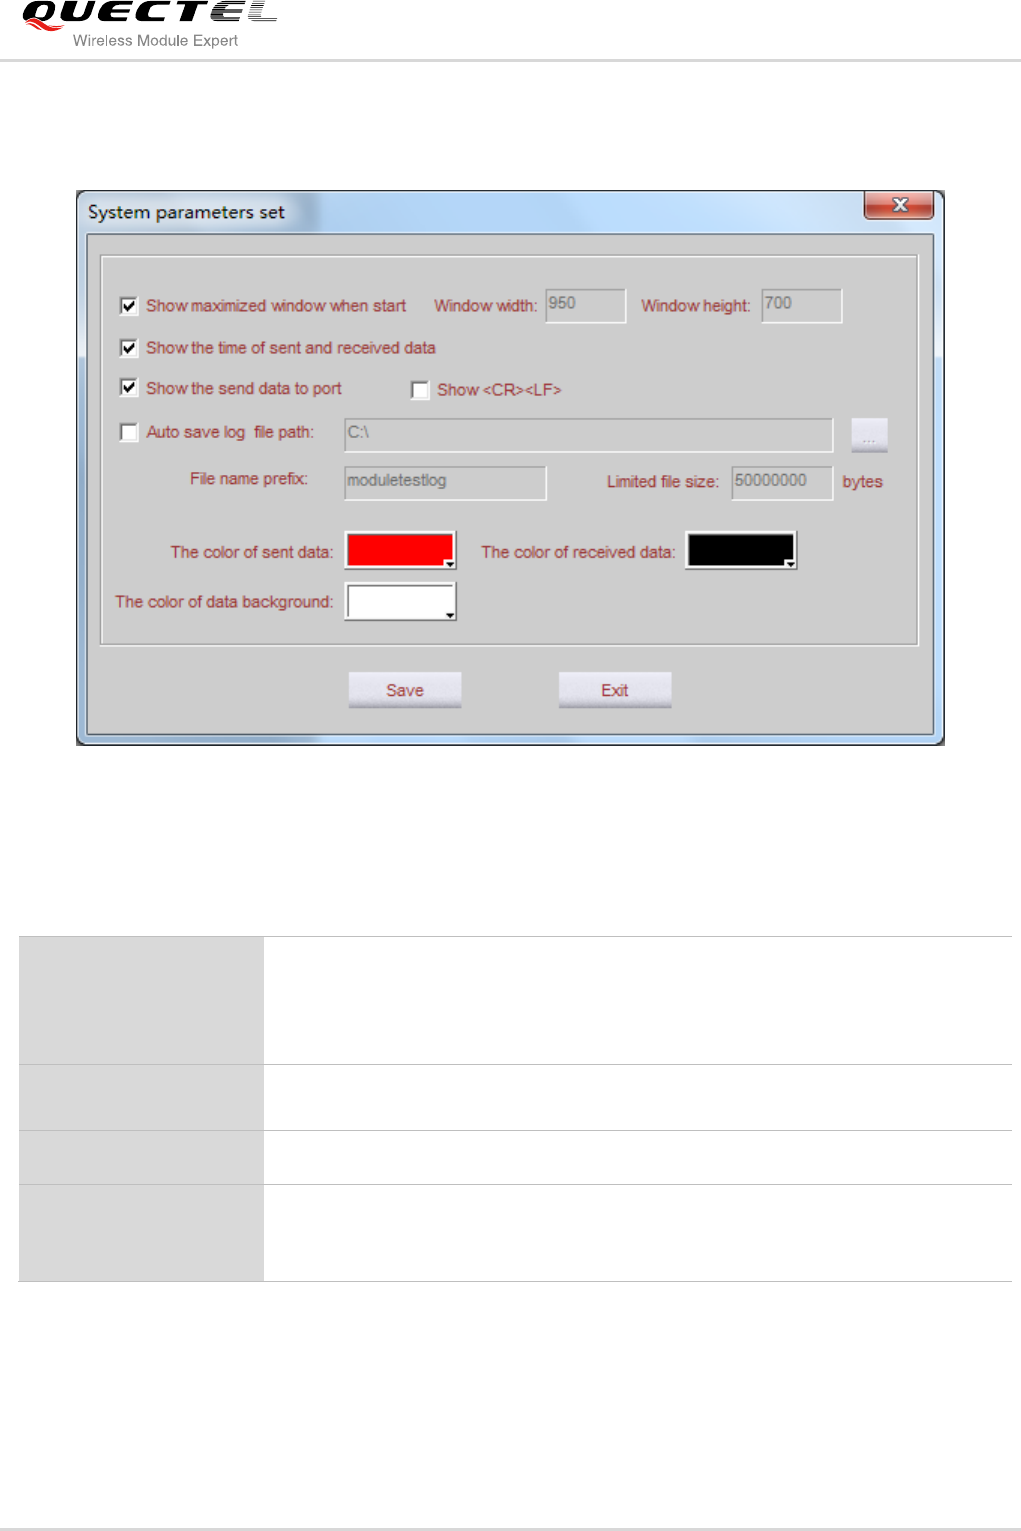
3.2. System Parameters Setting
Figure 14: System Parameters Setting
Table 3: Introduction of System Parameters
Show Maximized
If this option has been chosen, the main window would display in maximal
size. The size of the window depends on the value of the width and height of
text boxes (If the value in these two boxes is too small, the size of the main
window would just show all the information automatically).
Show the Time
If this option has been chosen, time information would be displayed for each
sent or received data.
Show the Sent Data
If this option has been chosen, the data sent to port will be displayed.
Auto Save Log
If this option has been chosen, the data that have been sent and received
would be saved into a text file automatically. You can set the log file name, file
path and limited file size.
Quectel
Confidential
GSM/GPRS&UMTS/HSPA Module Series
QNavigator User Guide
QNavigator_User_Guide Confidential / Released 17 / 37
4 Brief Introduction
QNavigator has eight functions: Home, SMS, Voice Call, TCP/UDP, PPP, AT Command, QuecLocator and
QCOM. Click the menu to switch to the appropriate page.
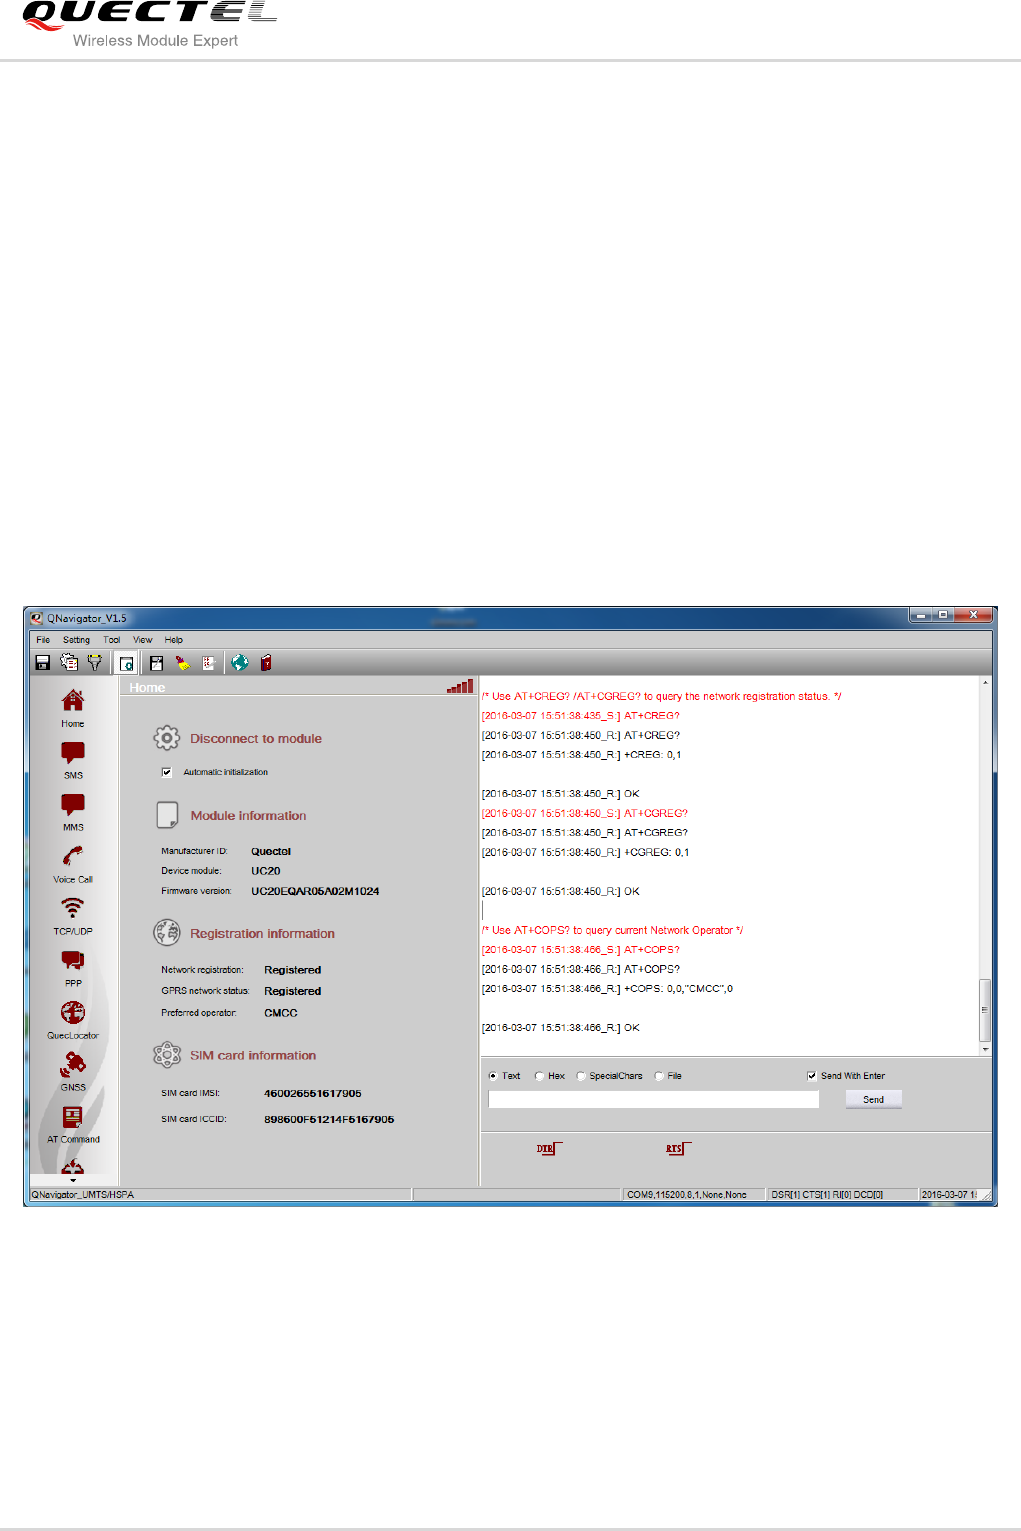
4.1. Home Page
It will automatically go to Home page after running the software, as shown below:
Figure 15: Home Page
Module can be connected by clicking the Connect to module button. It will go to initialization progress.
Automatic initialization option is selected by default.
Quectel
Confidential

GSM/GPRS&UMTS/HSPA Module Series
QNavigator User Guide
QNavigator_User_Guide Confidential / Released 18 / 37
Module initialization process includes querying the baud rate, version number, SIM card status, signal
quality, Network registration status and Network operator.
4.2. SMS
SMS function is used to test SMS messages which have been sent and received under various modes, as
well as read, and delete SMS messages in the SIM card.
The program will automatically check the network status to ensure the SMS function can work normally.
The SMS function can be executed once the module has been connected with PC successfully. Then you
will enter into the SMS function interface as shown below:
Figure 16: Switch View
If the network status is abnormal, Send message button will be unavailable. You should check the
network status, the SMS settings or the CSCA number.
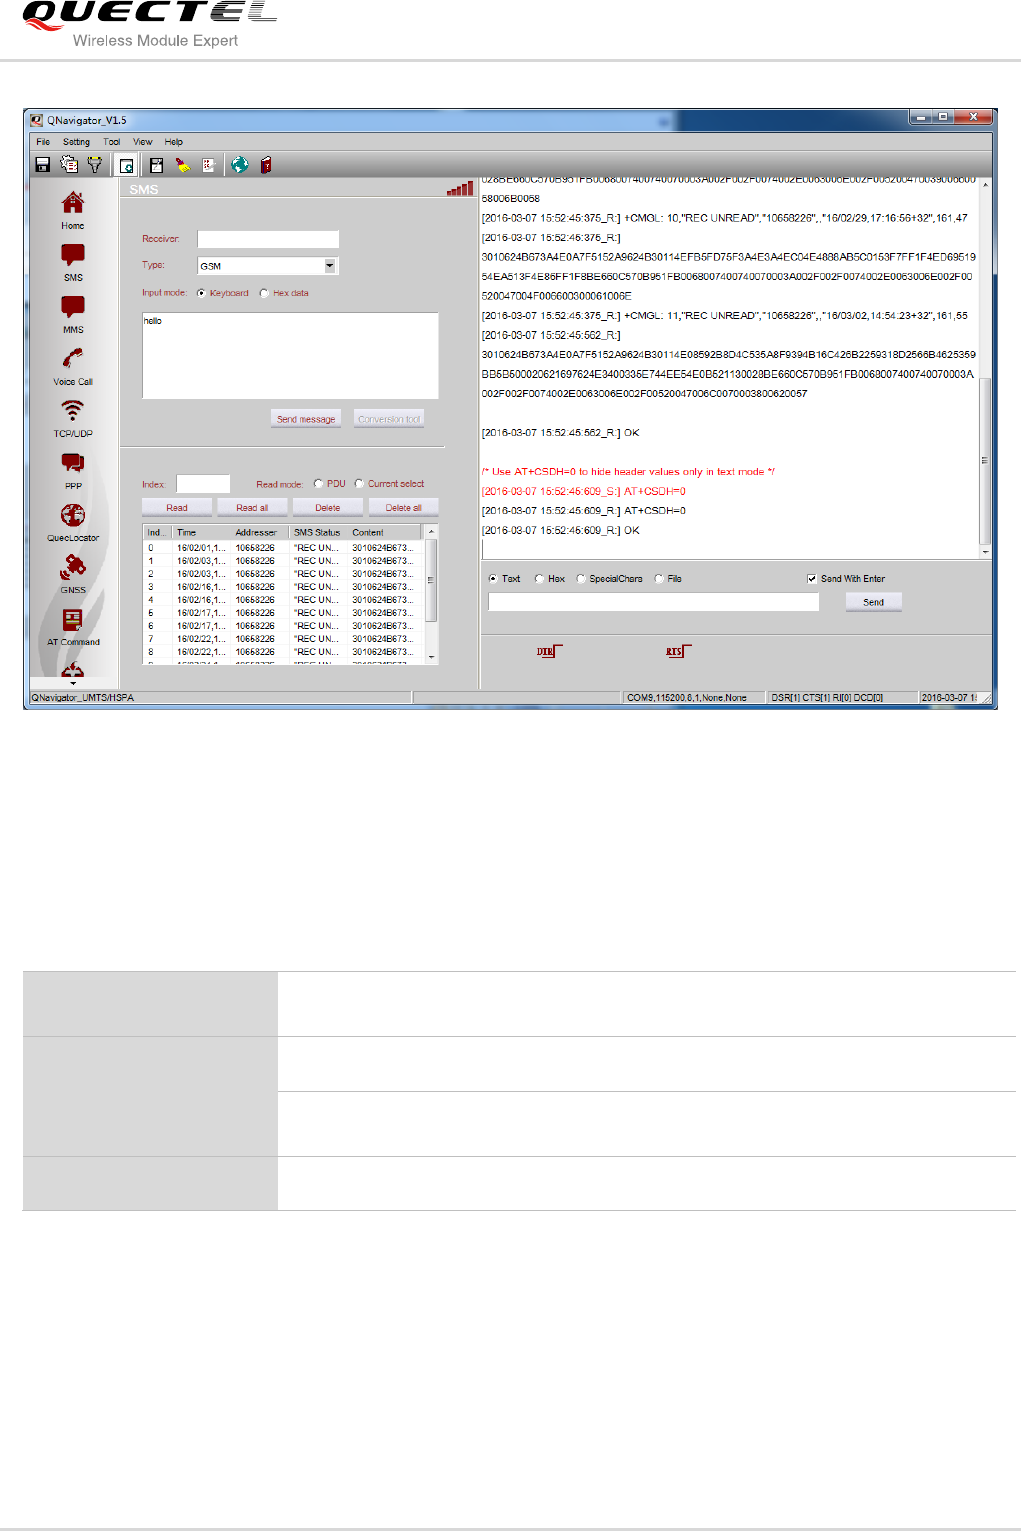
To read all SMS messages, click Read all button, as shown in the following figure:
NOTE
Quectel
Confidential
GSM/GPRS&UMTS/HSPA Module Series
QNavigator User Guide
QNavigator_User_Guide Confidential / Released 19 / 37
Figure 17: SMS-Read All
The data area displays the corresponding comments of each operation step.
Table 4: Functions of SMS
There are two read modes: PDU (default) and Current Select. You can choose any of the modes that you
want by selecting the corresponding option. The current selected mode depends on the type of selected
mode.
Read a Message
Select an existing SMS in the list or input the index of a message, then click
Read button
Read all Messages
Read all messages (click Read all button)
Delete a Message
Select an existing SMS in the list or input the index of a message, then click
Delete button
Delete all Messages
Delete all messages (click Delete all button)
Quectel
Confidential
GSM/GPRS&UMTS/HSPA Module Series
QNavigator User Guide
QNavigator_User_Guide Confidential / Released 20 / 37
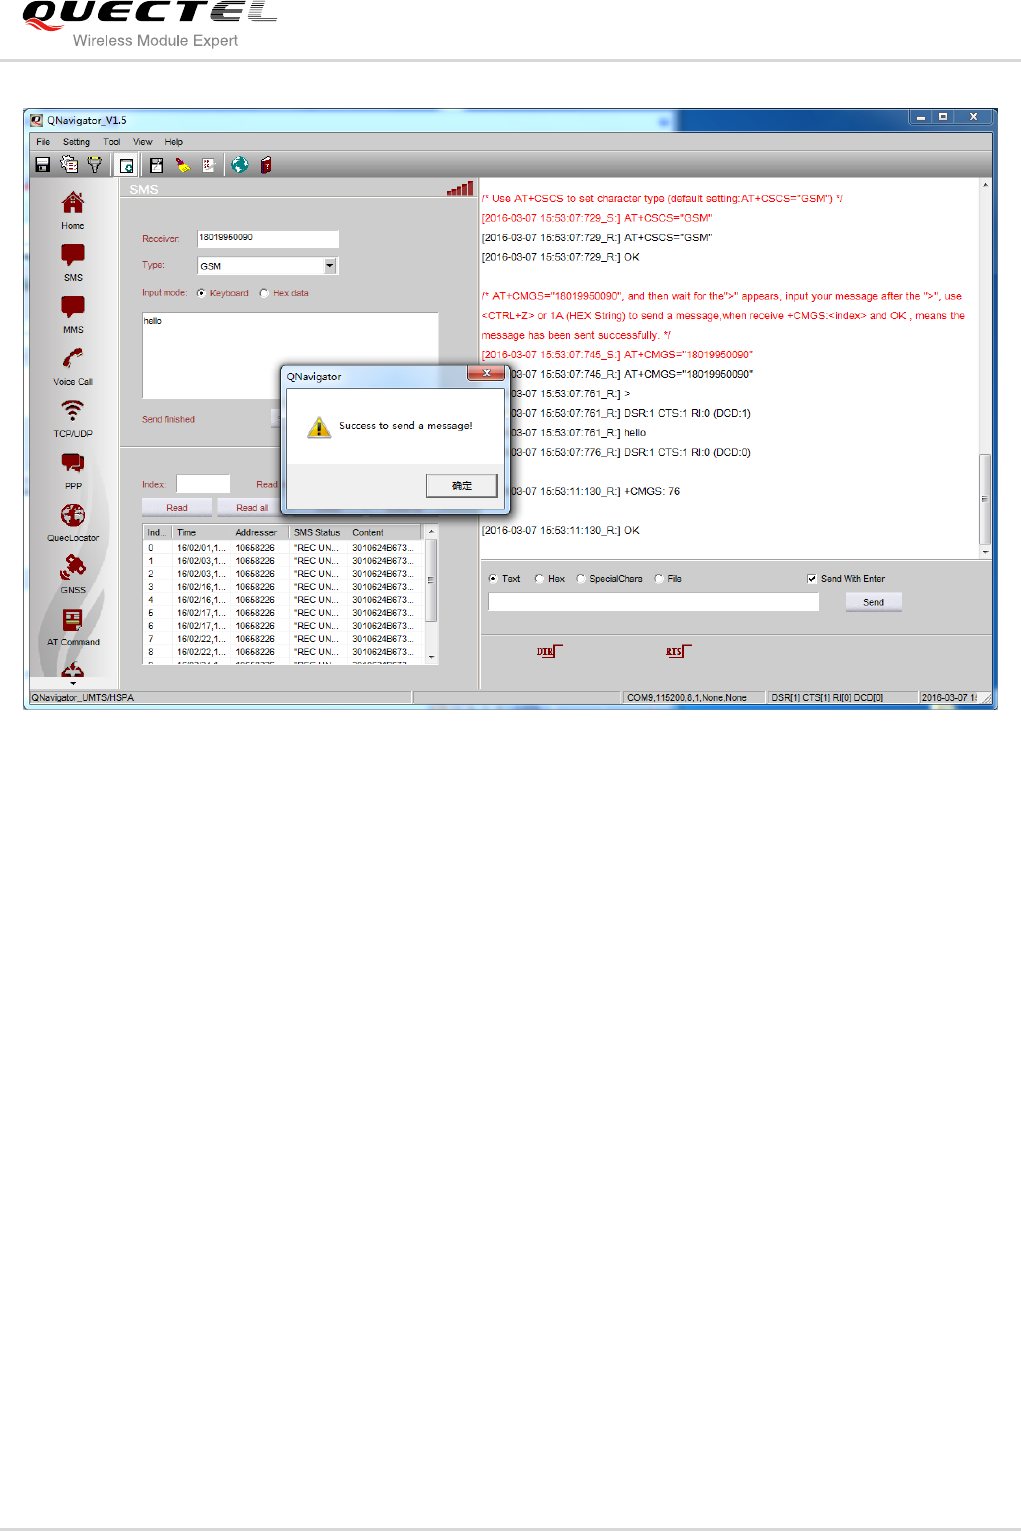
Figure 18: SMS-Send Message
The upper display area shows the steps to send a message.
Quectel
Confidential
GSM/GPRS&UMTS/HSPA Module Series
QNavigator User Guide
QNavigator_User_Guide Confidential / Released 21 / 37
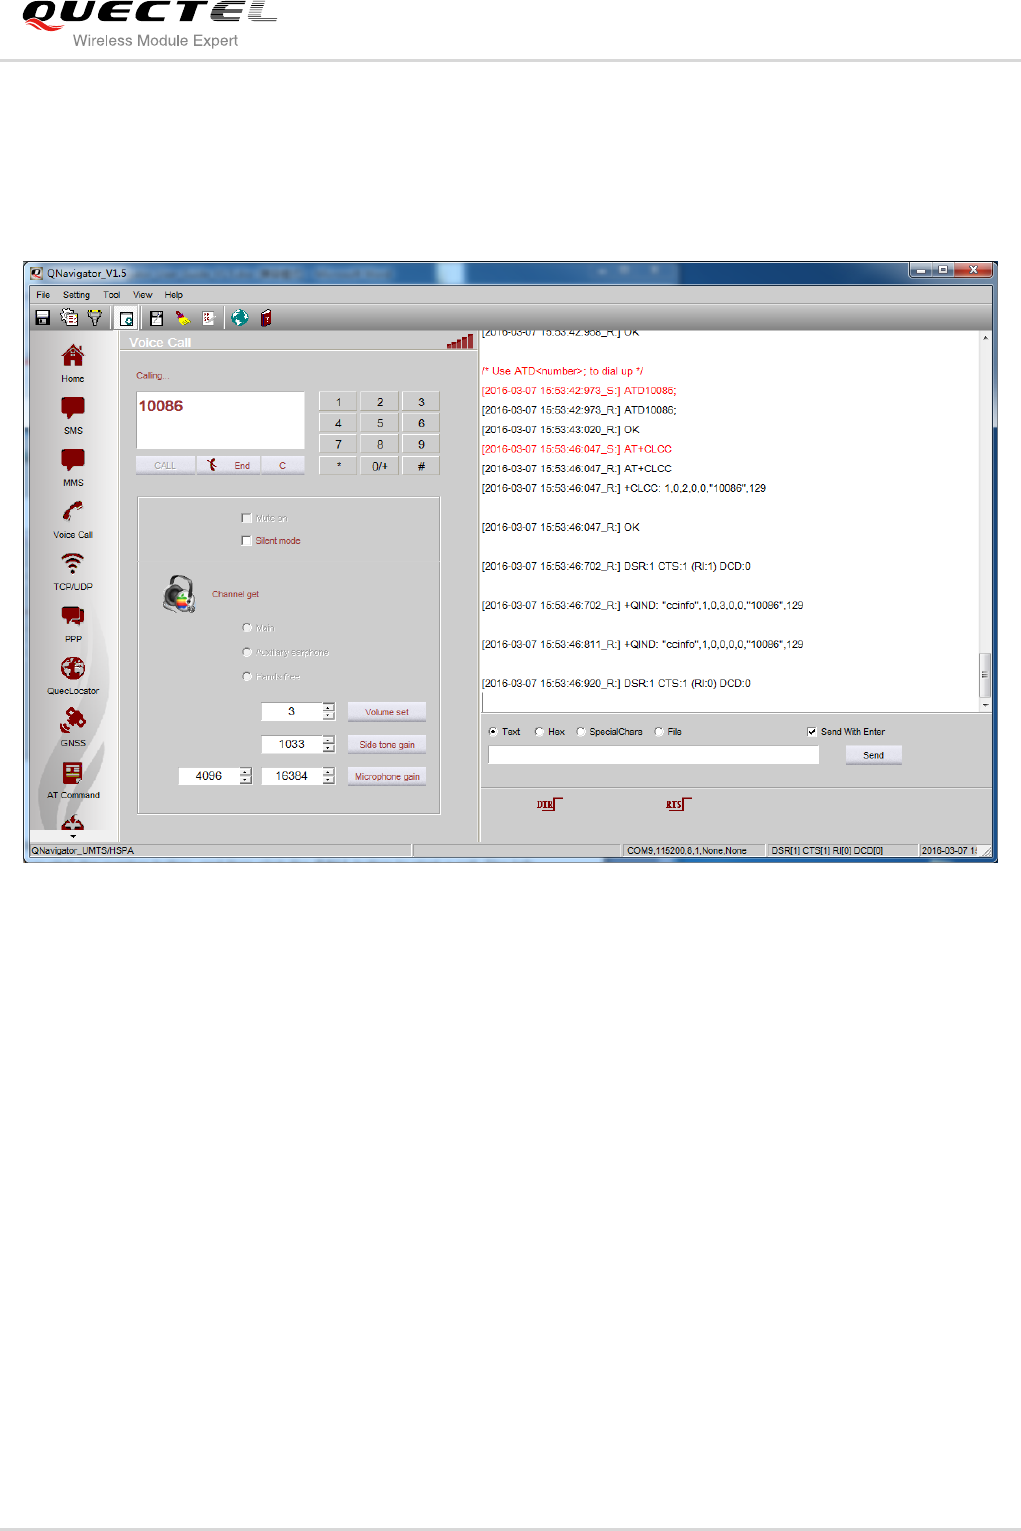
4.3. Voice Call
Voice Call function is used to dial or answer a call, and set related audio parameters, as shown below.
Figure 19: MO Call
Take calling China Mobile’s customer service phone 10086 as an example. You can input the phone
number by keyboard or click the number button, and then click the CALL button to start a call. The talk
time will be displayed at the top area of the phone number. The data area shows the operation process of
AT commands. (It will auto send “AT+CLCC” command to check the call status). If you want to dial
extension number, you only need to continuously click the number button.
At the end of the call, the program will automatically end operation process, and you can also use OVER
button to hang up the call.
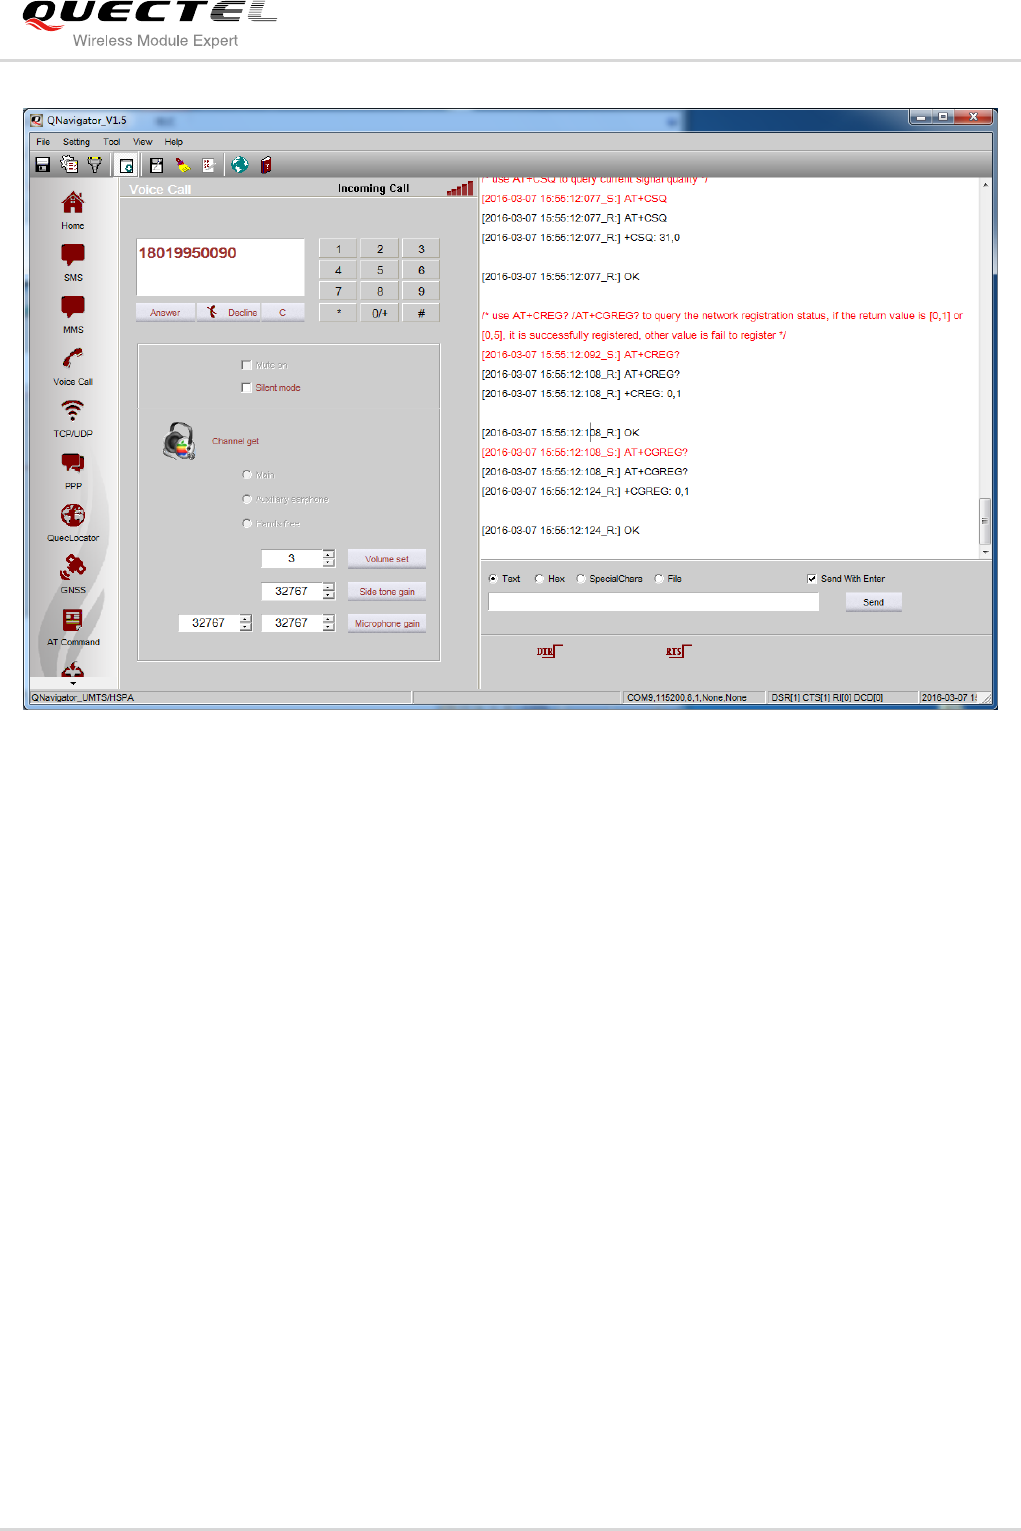
When a call comes in, RING message will be displayed in the data area and the button CALL and OVER
will automatically change to Answer and Decline; you can answer the phone by clicking the button of
Answer, as shown below:
Quectel
Confidential
GSM/GPRS&UMTS/HSPA Module Series
QNavigator User Guide
QNavigator_User_Guide Confidential / Released 22 / 37
Figure 20: MT Call
Quectel
Confidential
GSM/GPRS&UMTS/HSPA Module Series
QNavigator User Guide
QNavigator_User_Guide Confidential / Released 23 / 37
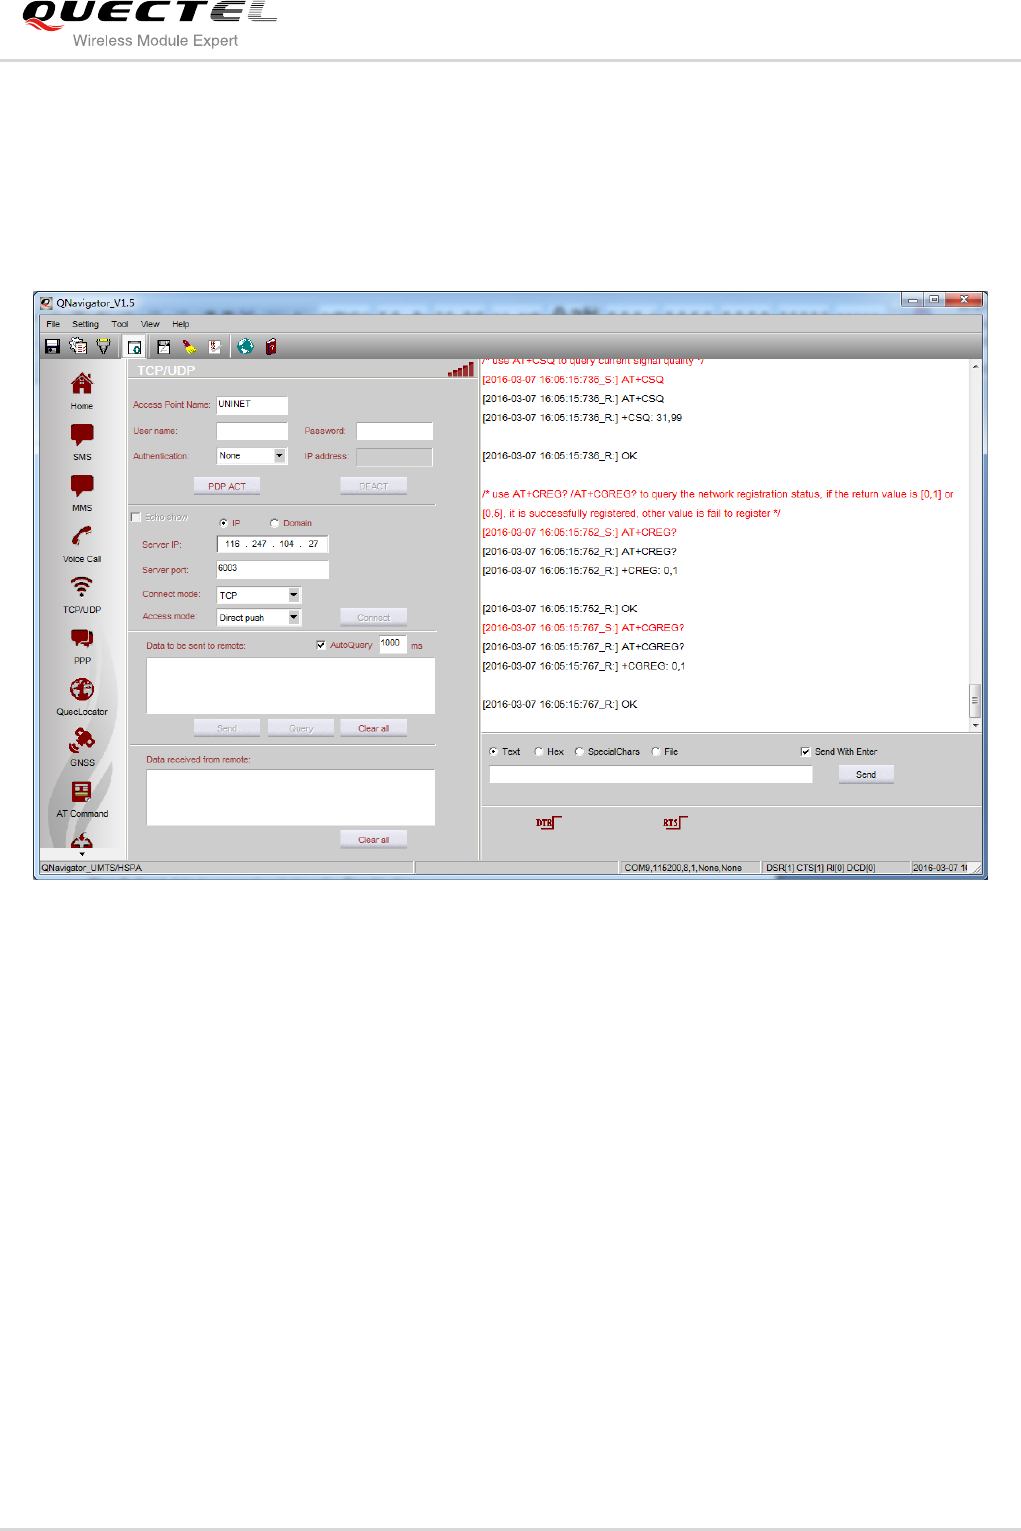
4.4. TCP/UDP
TCP/UDP function is used to establish connections between TCP and UDP. After being connected
successfully, data can be transferred between the server and the module, as shown below:
Figure 21: TCP/UDP-PDP ACT
Quectel
Confidential

GSM/GPRS&UMTS/HSPA Module Series
QNavigator User Guide
QNavigator_User_Guide Confidential / Released 24 / 37
Step 1: Activate the PDP (click the PDP ACT button).
Step 2: Click the Connect button after activating PDP successfully.
Step 3: Send data to server by clicking the Send button.
Figure 22: TCP/UDP-Connect
Quectel
Confidential
GSM/GPRS&UMTS/HSPA Module Series
QNavigator User Guide
QNavigator_User_Guide Confidential / Released 25 / 37
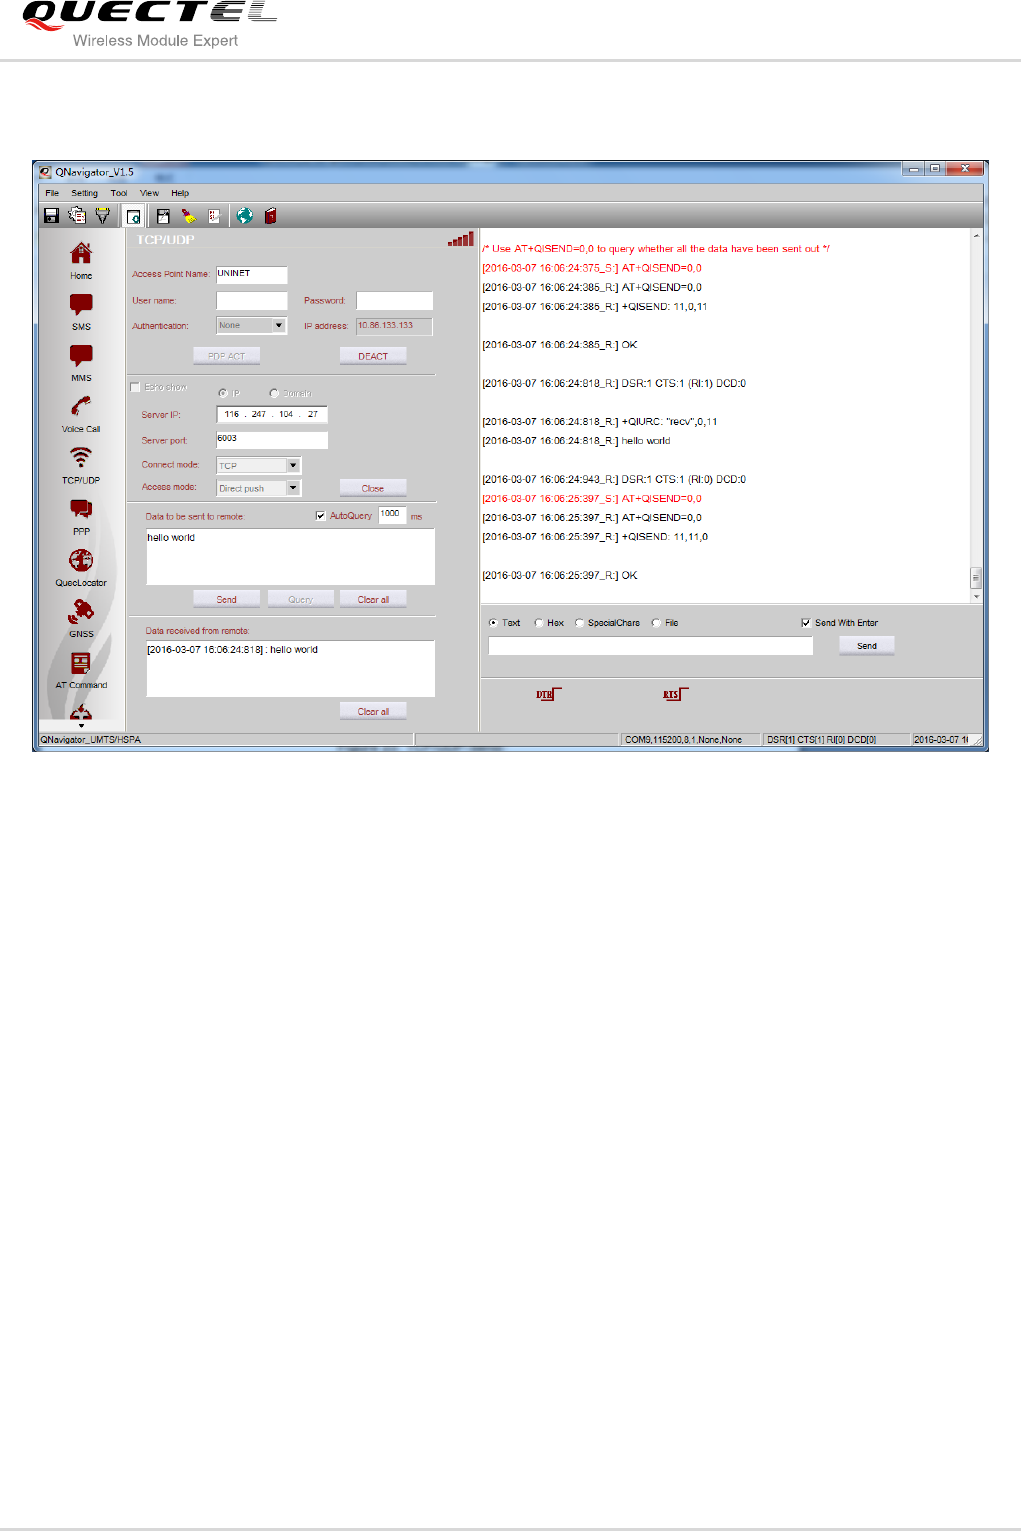
The detailed operation after connection is shown as below:
Figure 23: TCP/UDP-Send
It is not allowed to switch to another page or exit from the program without clicking DEACT.
Quectel
Confidential
GSM/GPRS&UMTS/HSPA Module Series
QNavigator User Guide
QNavigator_User_Guide Confidential / Released 26 / 37
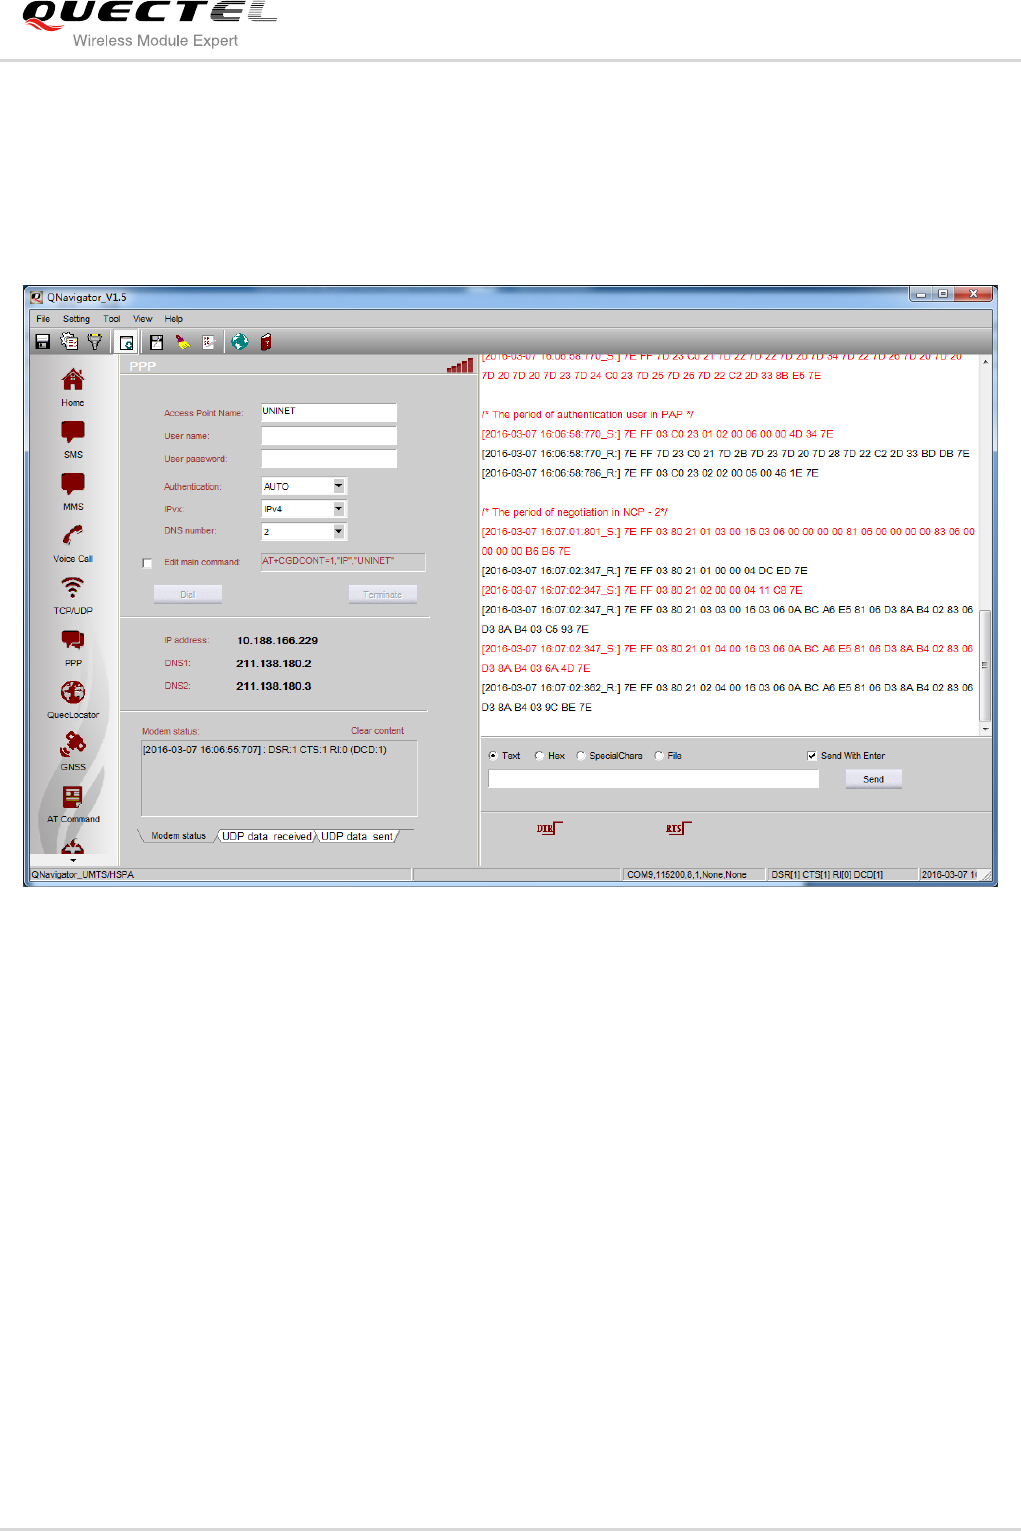
4.5. PPP
PPP test page provides a PPP dial-up test as shown below:
Figure 24: PPP-DIAL
About the number of negotiated DNS, you can choose it from 0 to 2. Click the DIAL button to dial.
Negotiated IP address and DNS will be displayed after successful dial-up. In the process of PPP dialing, a
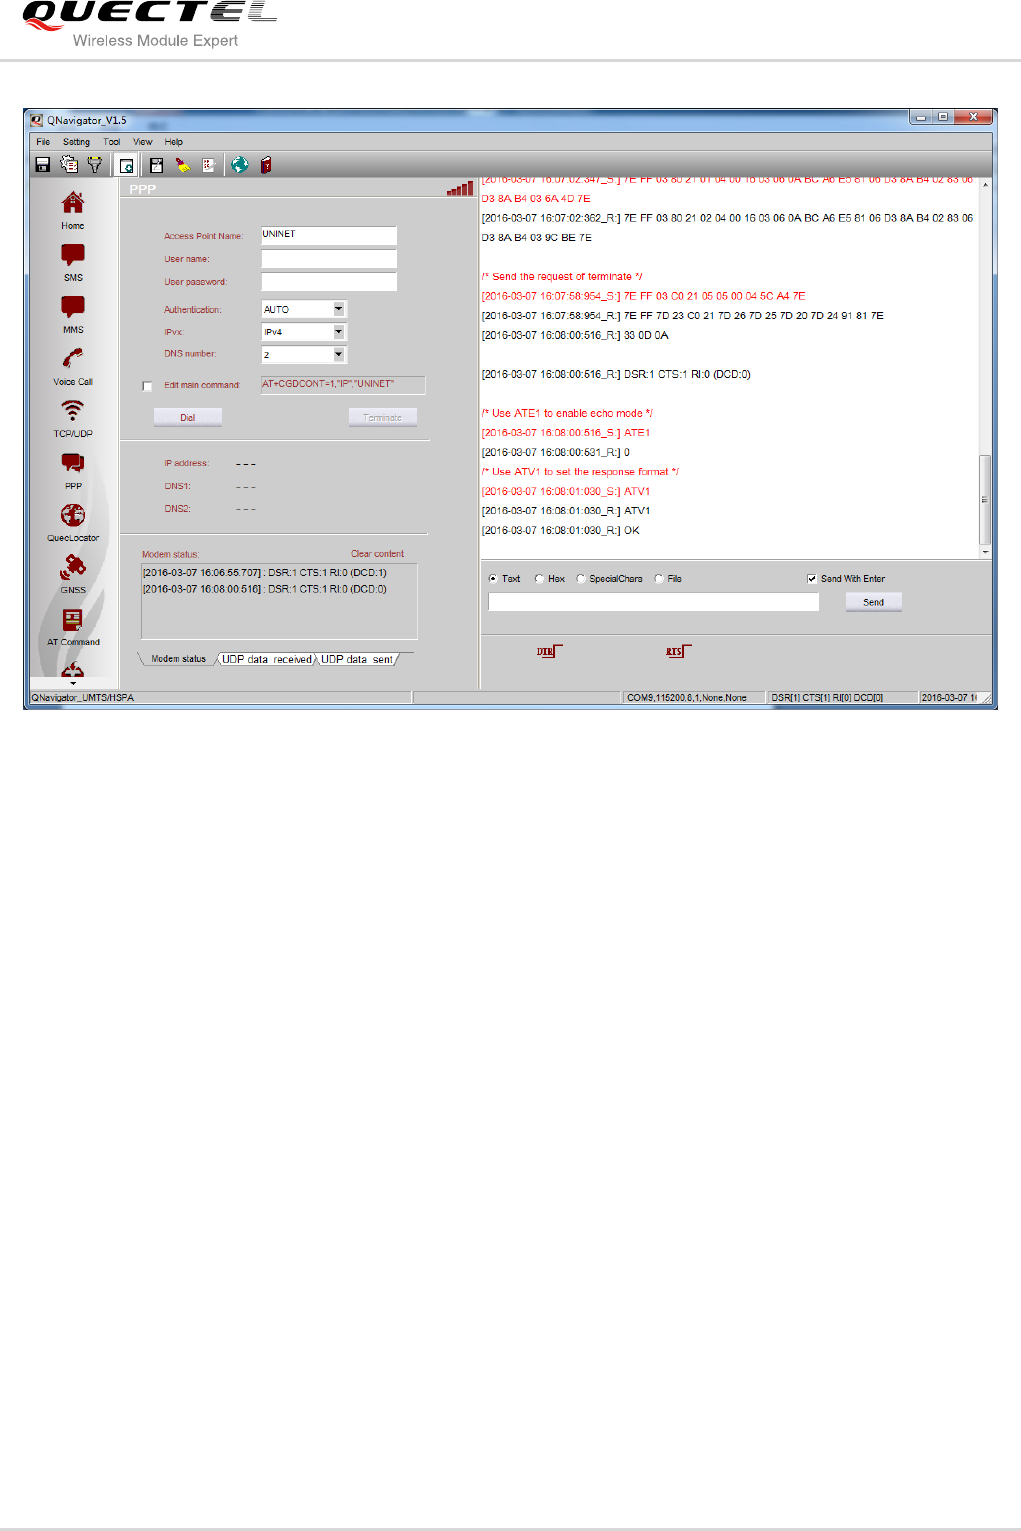
click of the Stop button can cancel the PPP dialing. After PPP dial is succeeded, click the Terminate
button to disconnect the dial, as shown below:
Quectel
Confidential
GSM/GPRS&UMTS/HSPA Module Series
QNavigator User Guide
QNavigator_User_Guide Confidential / Released 27 / 37
Figure 25: PPP-Terminate
After PPP dial is succeeded, you cannot go to any other pages until you terminate the PPP dialing.
Quectel
Confidential
GSM/GPRS&UMTS/HSPA Module Series
QNavigator User Guide
QNavigator_User_Guide Confidential / Released 28 / 37
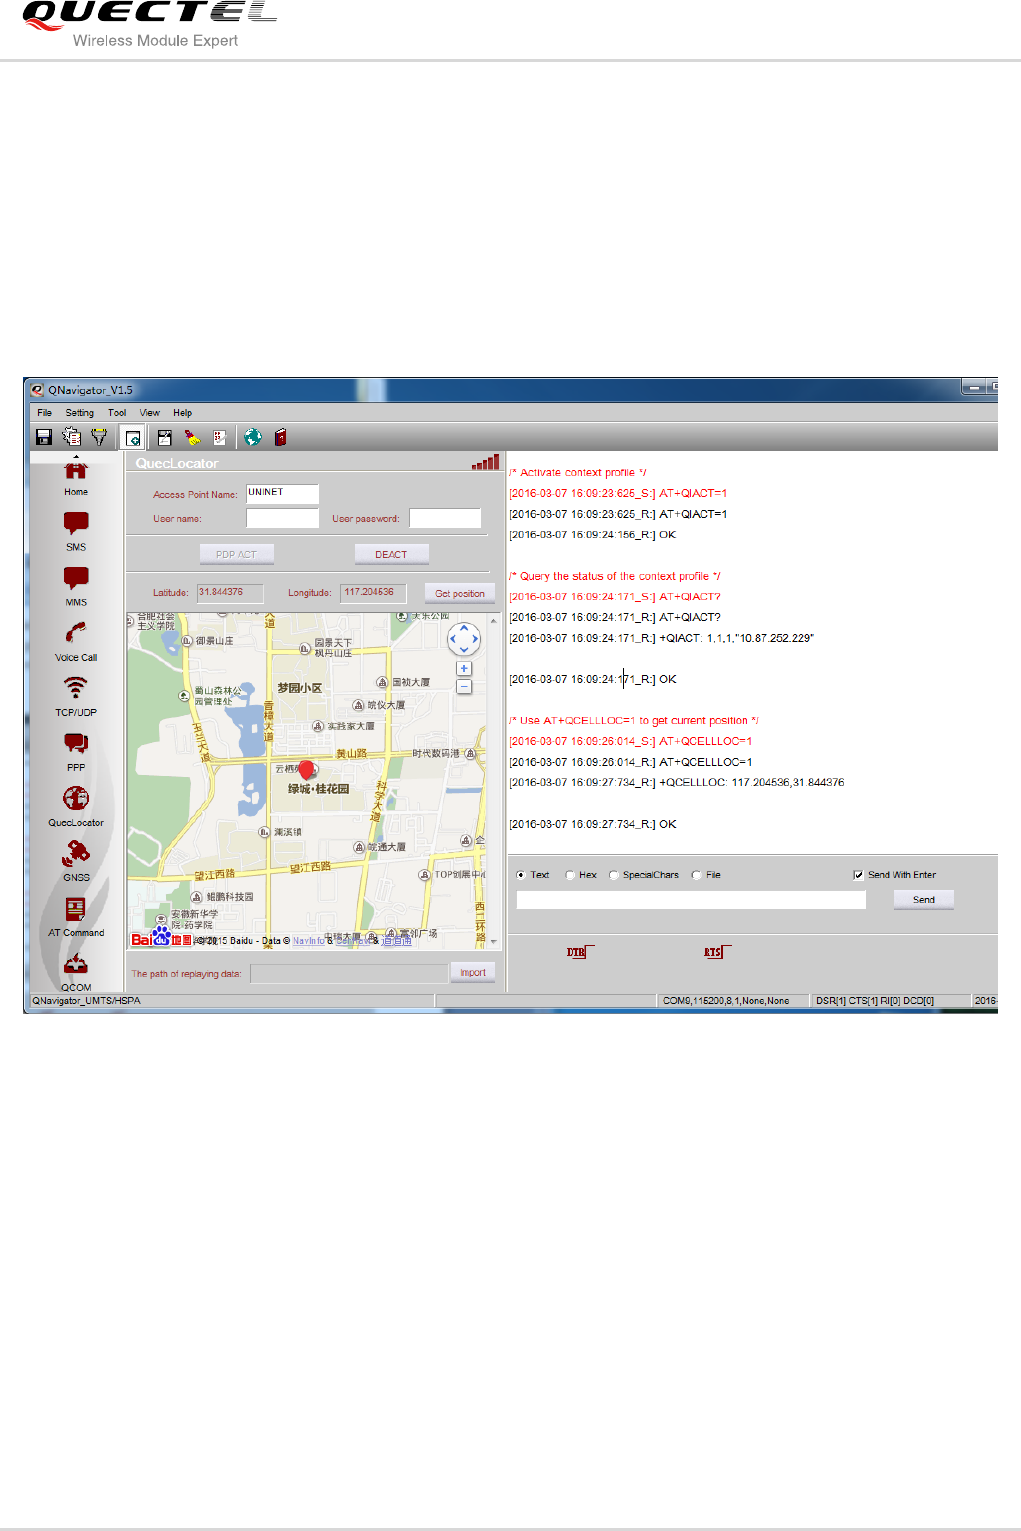
4.6. QuecLocator
QuecLocator allows Quectel wireless modules to provide positioning service to the cell base stations
nearby the position you want to fix. You can get the current position and show it in the map. Before that,
you must set an APN and activate the PDP environment by clicking PDP ACT button. The demonstration
of getting position is shown as below:
Figure 26: Show in Map
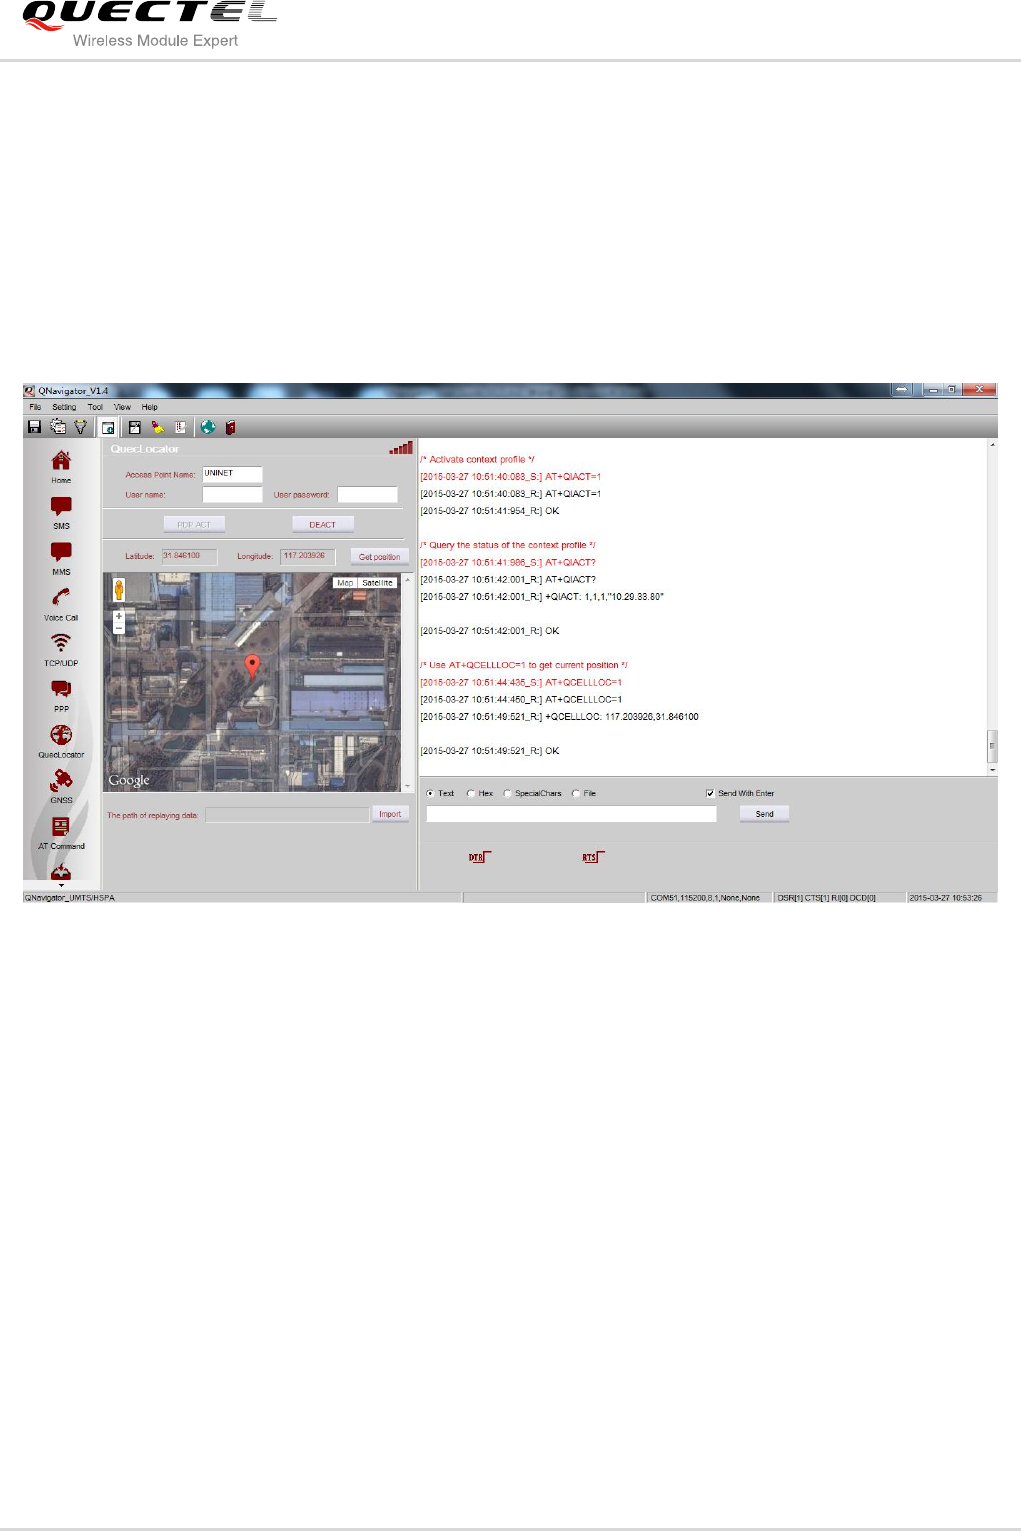
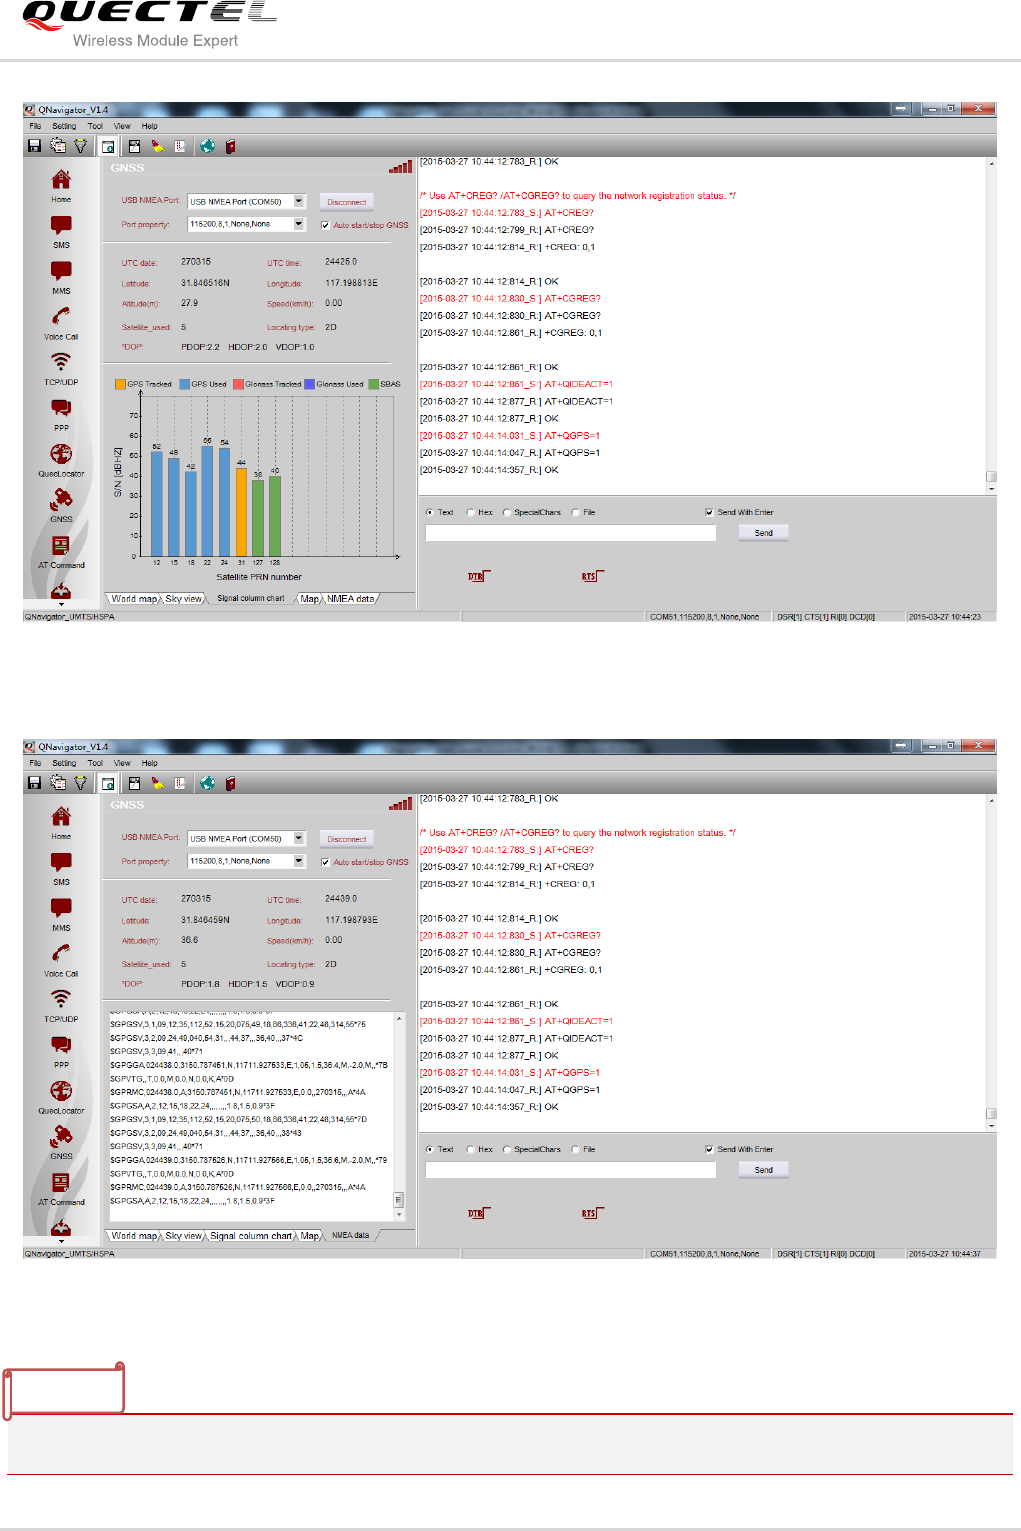
4.7. GNSS
GNSS provides a graphical presentation of satellite positioning information retrieved from the module.
Open USB NMEA port (NMEA port is the default port; and you can change the port by
AT+QGPSCFG=“OUTPUT” command) first. Choose the port number, and then click “Connect”. The
module will not report the location information automatically even after the NMEA port is opened. You
must send “AT+QGPS=1” command on the AT port. If you have selected the “Auto start/stop GNSS” here,
“AT+QGPS=1” will be sent automatically from the AT port which is connected to the HOME page after
Quectel
Confidential
GSM/GPRS&UMTS/HSPA Module Series
QNavigator User Guide
QNavigator_User_Guide Confidential / Released 29 / 37
clicking “Connect”.
When the module has reported the location information, the system will automatically parse and classify
the location result, and demonstrate them graphically. The module will only report the GPS location
information by default. You can send AT+QGPSCFG=“GLONASSENABLE” on the AT port to let the
module report GPS and GLONASS location information simultaneously. The main interface shows the
current location of the module, such as latitude, longitude, and so on. You can query the map location,
satellite azimuth and elevation angle, histogram of satellite signal and original NMEA data, etc. by
switching the tabs on the bottom, shown as below:
Figure 27: Show in Map
Quectel
Confidential
GSM/GPRS&UMTS/HSPA Module Series
QNavigator User Guide
QNavigator_User_Guide Confidential / Released 30 / 37
Figure 28: Satellite Signal State
Figure 29: Show NMEA Data
GNSS function applies to UMTS/HSPA and LTE modules.
NOTE
Quectel
Confidential

GSM/GPRS&UMTS/HSPA Module Series
QNavigator User Guide
QNavigator_User_Guide Confidential / Released 31 / 37
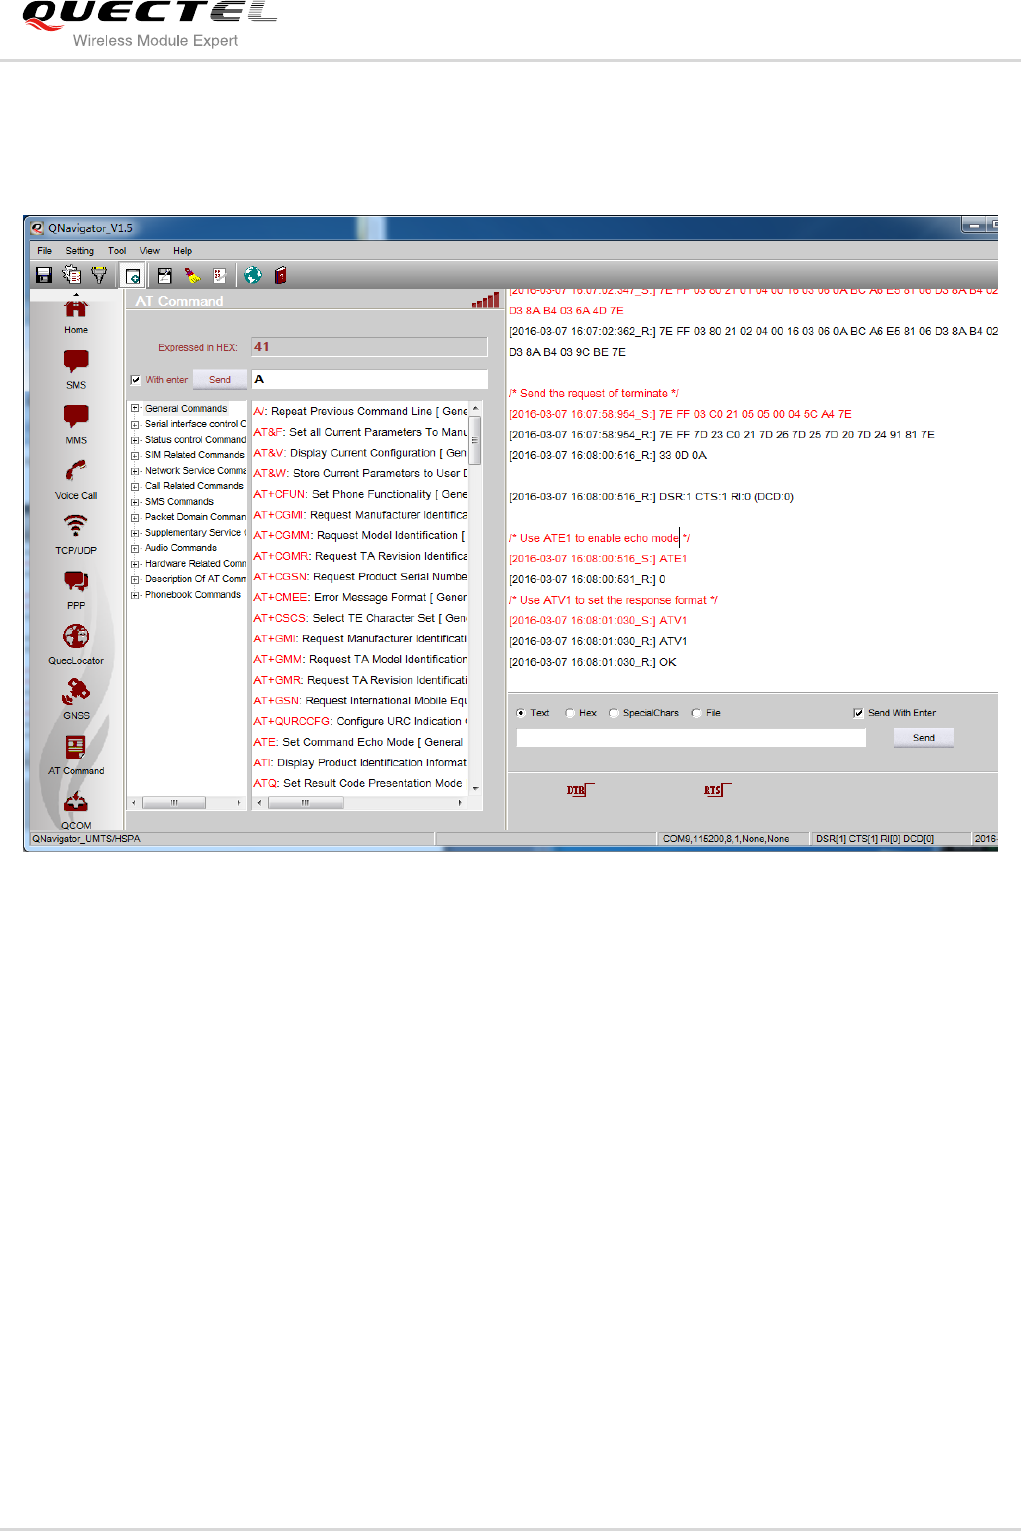
4.8. AT Command
AT Command function provides AT commands for user to query, test, and learn, as shown below.
Figure 30: AT Command-1
Quectel
Confidential
GSM/GPRS&UMTS/HSPA Module Series
QNavigator User Guide
QNavigator_User_Guide Confidential / Released 32 / 37
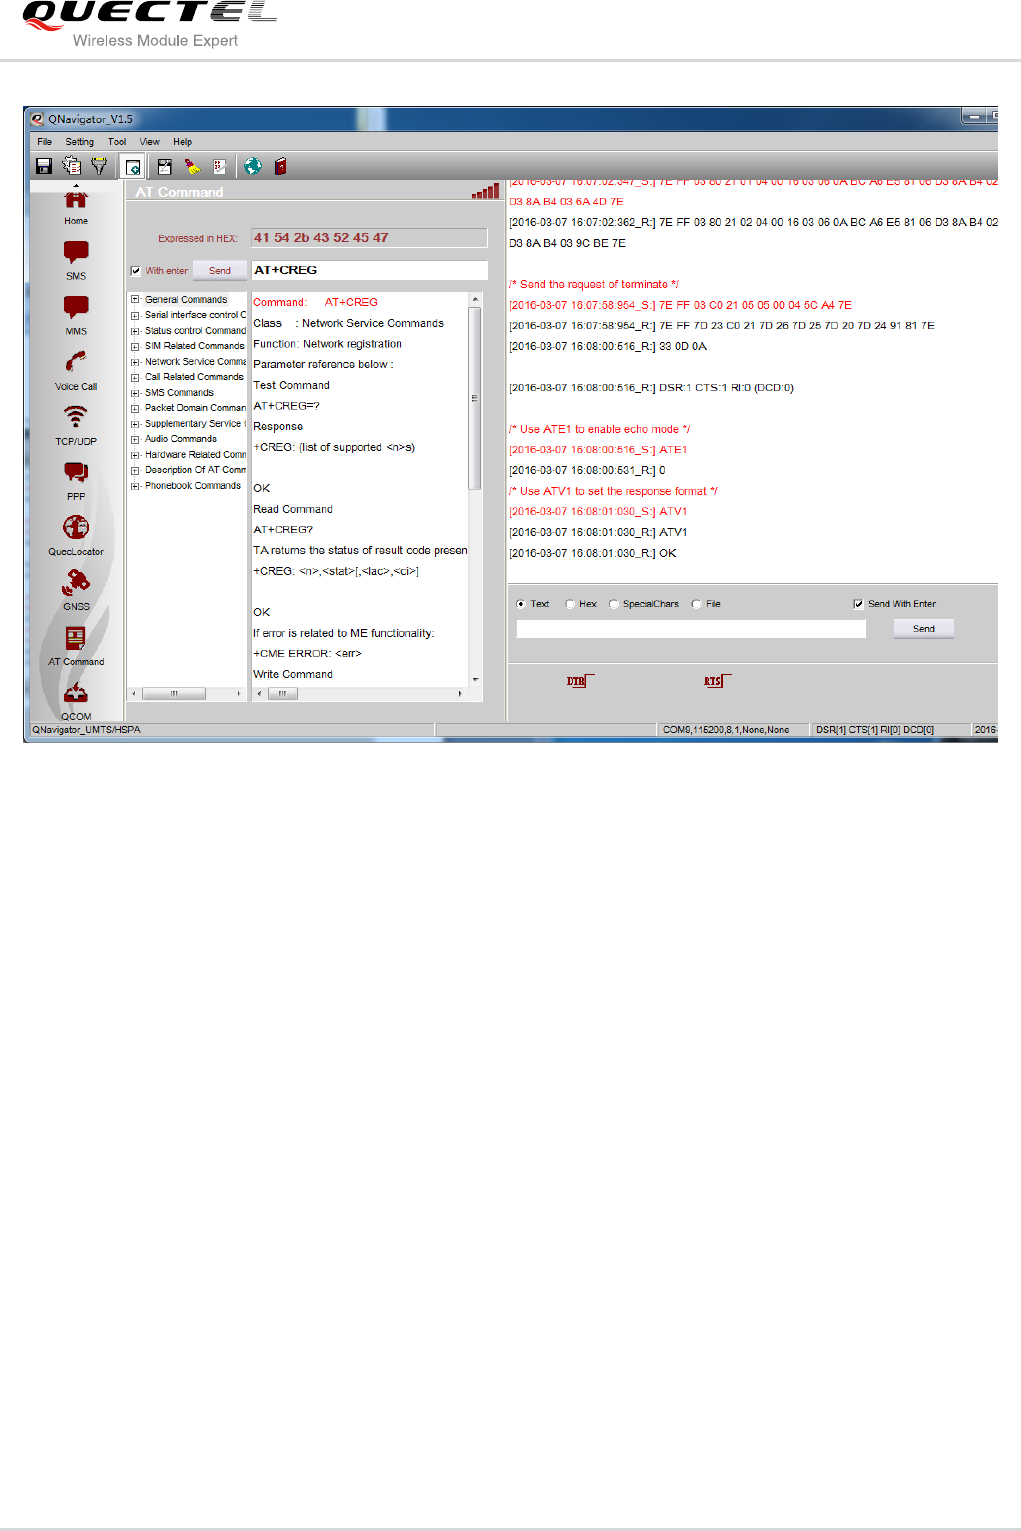
Input the keywords in the Send column to query AT commands. The results including the keywords will be
displayed. You can drag the dividing strip to see the complete details of these AT commands, as shown
below:
Figure 31: AT Command-2
If the query returns only one result, all the information will be displayed, as shown below:
Quectel
Confidential
GSM/GPRS&UMTS/HSPA Module Series
QNavigator User Guide
QNavigator_User_Guide Confidential / Released 33 / 37
Figure 32: AT Command-3
Quectel
Confidential
GSM/GPRS&UMTS/HSPA Module Series
QNavigator User Guide
QNavigator_User_Guide Confidential / Released 34 / 37
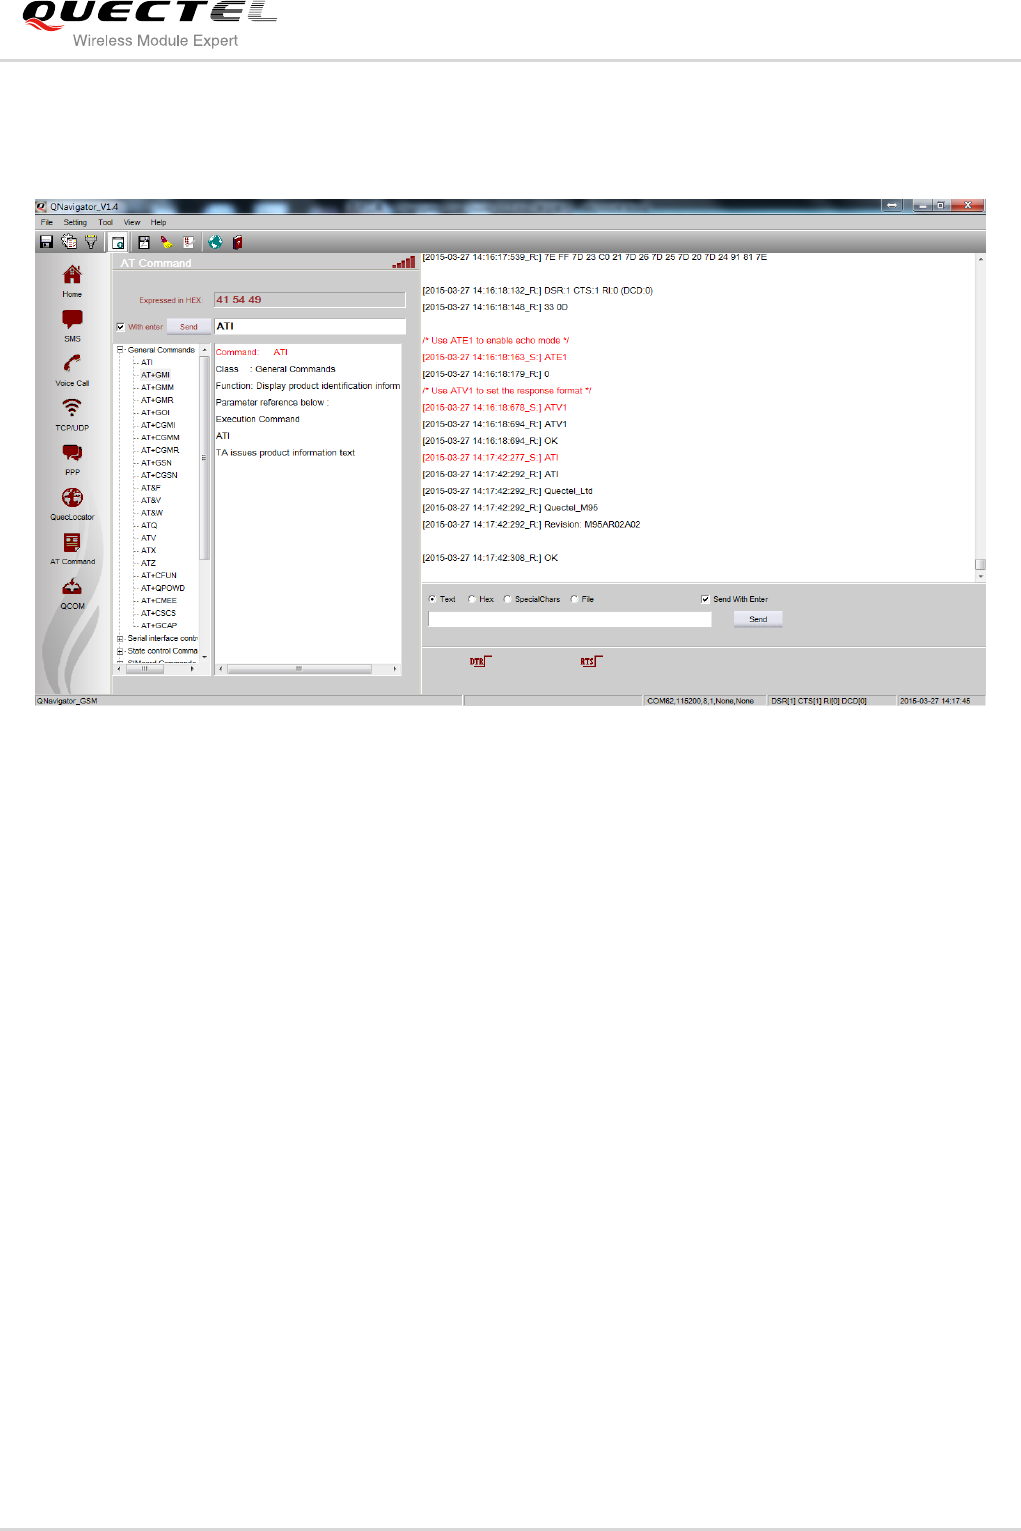
At this time, if the UART is successfully opened, you can click the Send button and all information about
this command will be displayed, as shown below:
Figure 33: AT Command-4
Quectel
Confidential

GSM/GPRS&UMTS/HSPA Module Series
QNavigator User Guide
QNavigator_User_Guide Confidential / Released 35 / 37
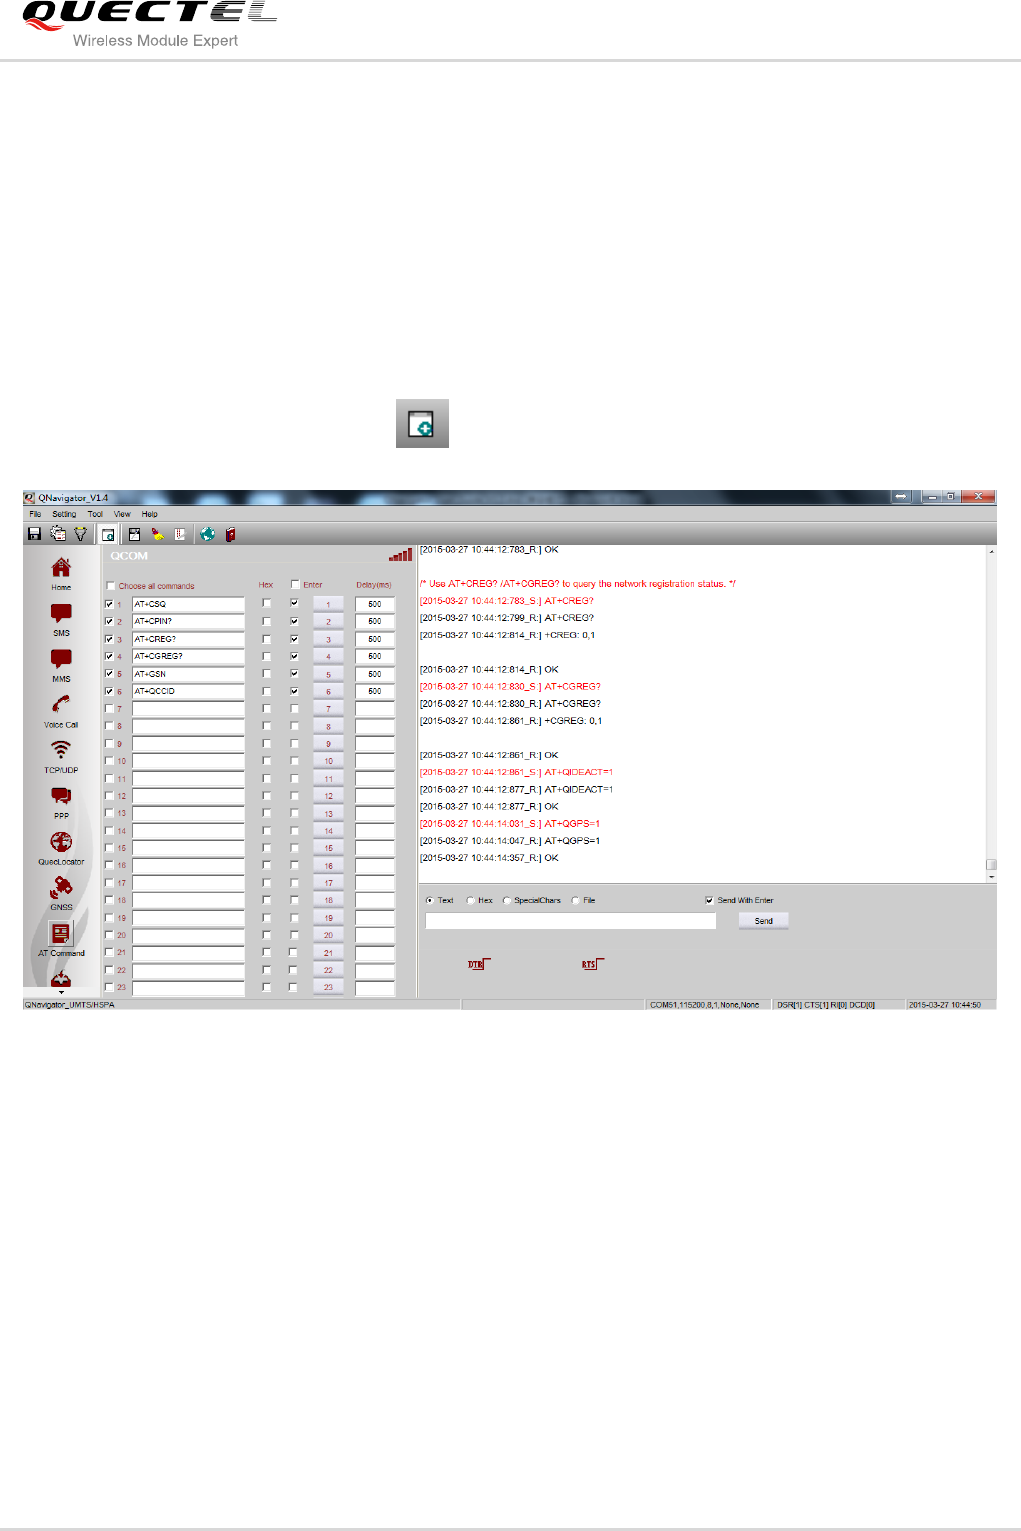
4.9. QCOM
AT command’s pressure testing can be performed under the QCOM test page, as shown below:
Figure 34: QCOM Test Page
Quectel
Confidential
GSM/GPRS&UMTS/HSPA Module Series
QNavigator User Guide
QNavigator_User_Guide Confidential / Released 36 / 37
5 Auxiliary Tools
5.1. Manually Send Data to UART
In the process of pressure testing, click , you can send AT command manually, as shown below:
Figure 35: Hand Control
Quectel
Confidential
GSM/GPRS&UMTS/HSPA Module Series
QNavigator User Guide
QNavigator_User_Guide Confidential / Released 37 / 37
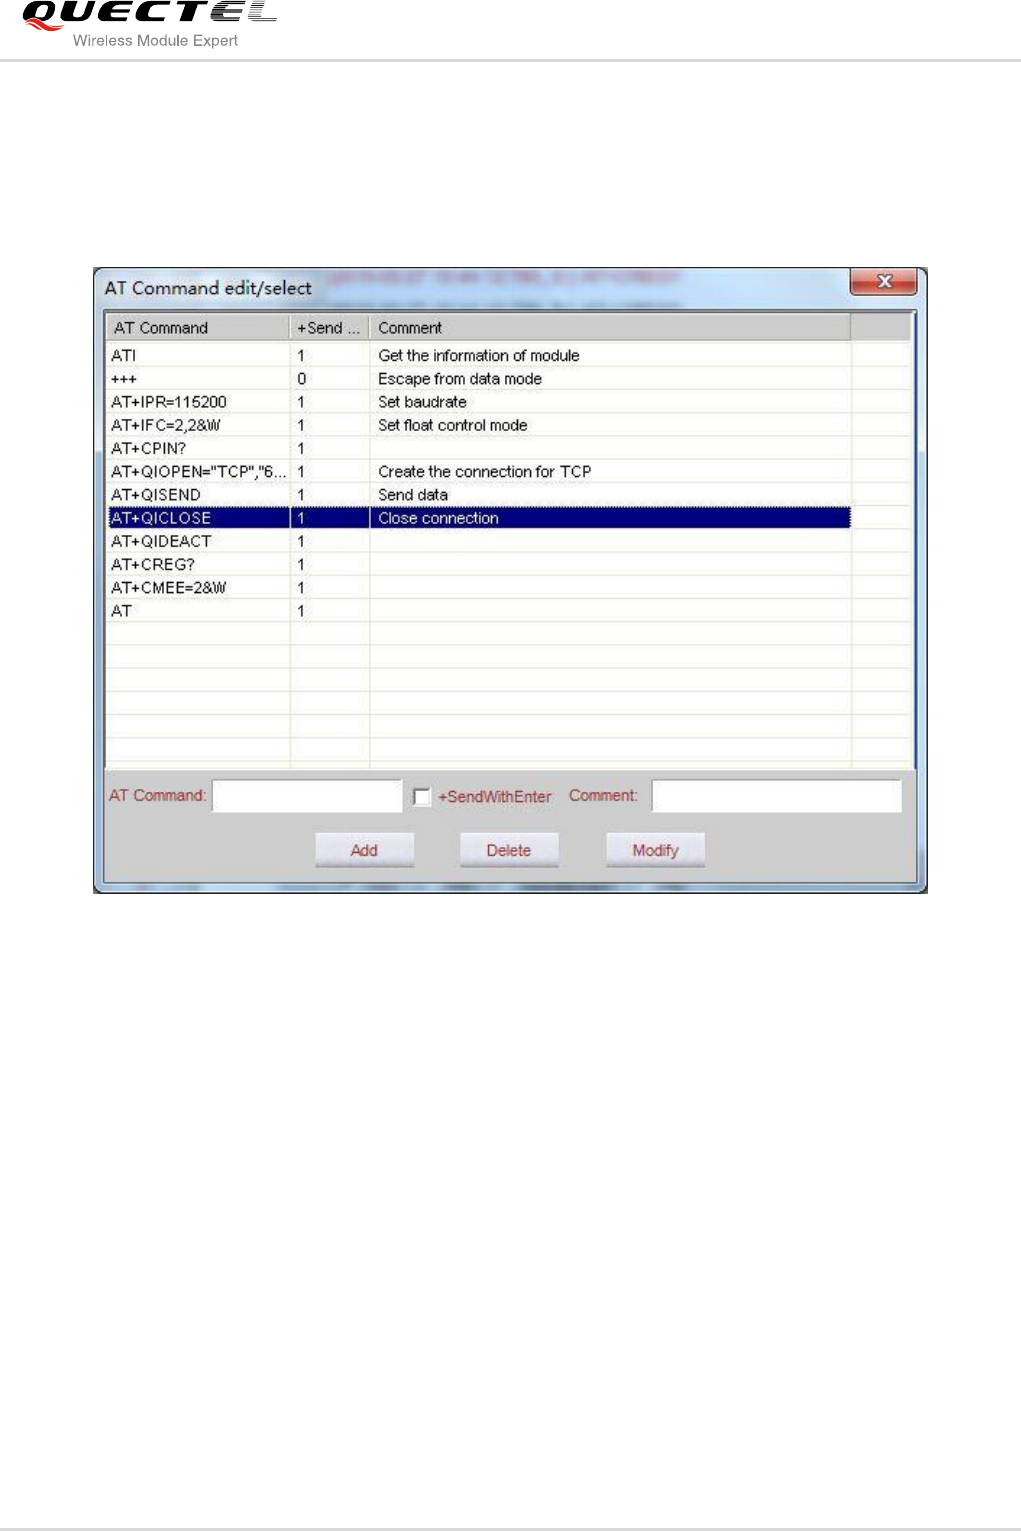
AT commands can be sent in Text and Hex modes. Enter an AT command in the text box which is on the
right of Content. When you double-click this text box, a dialog box would pop up, in which the same AT
commands are shown in a list. You can add a new command in the list, or modify or delete a selected
command. Also you can copy a command to the text box of the parent window by double-clicking the
corresponding row in the list. The AT commands dialog box is shown as below:
Figure 36: Hand Control-AT Command Edit/Select
Special characters can be sent in SpecialChars page and the file operation can be executed in File page.
Quectel
Confidential
