Quick Apps For SharePoint Configuration Editor Guide Version 6.4 Appsfor Share Point_6.8_Configuration User Point 6.8
User Manual: QuickAppsforSharePoint_6.8_ConfigurationEditorUserGuide
Open the PDF directly: View PDF ![]() .
.
Page Count: 20

QuickApps for SharePoint® 6.8
Configuration Editor Guide

© 2017 Dell Inc.
ALL RIGHTS RESERVED.
This guide contains proprietary information protected by copyright. The software described in this guide is furnished under a
software license or nondisclosure agreement. This software may be used or copied only in accordance with the terms of the
applicable agreement. No part of this guide may be reproduced or transmitted in any form or by any means, electronic or
mechanical, including photocopying and recording for any purpose other than the purchaser’s personal use without the written
permission of Dell Inc.
The information in this document is provided in connection with Dell products. No license, express or implied, by estoppel or
otherwise, to any intellectual property right is granted by this document or in connection with the sale of Dell products. EXCEPT
AS SET FORTH IN THE TERMS AND CONDITIONS AS SPECIFIED IN THE LICENSE AGREEMENT FOR THIS PRODUCT, DELL ASSUMES NO
LIABILITY WHATSOEVER AND DISCLAIMS ANY EXPRESS, IMPLIED OR STATUTORY WARRANTY RELATING TO ITS PRODUCTS
INCLUDING, BUT NOT LIMITED TO, THE IMPLIED WARRANTY OF MERCHANTABILITY, FITNESS FOR A PARTICULAR PURPOSE, OR
NON-INFRINGEMENT. IN NO EVENT SHALL DELL BE LIABLE FOR ANY DIRECT, INDIRECT, CONSEQUENTIAL, PUNITIVE, SPECIAL OR
INCIDENTAL DAMAGES (INCLUDING, WITHOUT LIMITATION, DAMAGES FOR LOSS OF PROFITS, BUSINESS INTERRUPTION OR LOSS
OF INFORMATION) ARISING OUT OF THE USE OR INABILITY TO USE THIS DOCUMENT, EVEN IF DELL HAS BEEN ADVISED OF THE
POSSIBILITY OF SUCH DAMAGES. Dell makes no representations or warranties with respect to the accuracy or completeness of
the contents of this document and reserves the right to make changes to specifications and product descriptions at any time
without notice. Dell does not make any commitment to update the information contained in this document.
If you have any questions regarding your potential use of this material, contact:
AgreeYa Solutions, Inc.
605 Coolidge Dr.
Folsom, CA 95630
USA
Refer to our web site (www.agreeya.com) for regional and international office information.
Trademarks
Dell, the Dell logo are trademarks of Dell Inc. and/or its affiliates. Microsoft, Internet Explorer, SharePoint, Windows, Windows
Server, SQL Server are either registered trademarks or trademarks of Microsoft Corporation in the United States and/or other
countries. Salesforce and Salesforce.com are trademarks of Salesforce.com. K2, K2BlackPearl are registered trademarks of
Sourcecode Technology Holdings Inc. in the United States and/or other countries. Domino is a registered trademark of
International Business Machines Corporation. Telerik is a registered trademark of Telerik AD in the United States and either a
registered trademark or trademark of Telerik AD in other countries. Oracle and Java are registered trademarks of Oracle and/or
its affiliates. Nintex and its product logos are registered trademarks owned by Nintex USA LLC and Nintex Pty Ltd. SAP is the
trademark(s) or registered trademark(s) of SAP AG in Germany and in several other countries. Google and Google Chrome is a
trademark or registered trademark of Google Inc. Netscape Navigator is a registered trademark of AOL Inc. Other trademarks
and trade names may be used in this document to refer to either the entities claiming the marks and names or their products.
Dell disclaims any proprietary interest in the marks and names of others.
QuickApps for SharePoint Configuration Editor Guide
Updated - June 2017
Software Version - 6.8
Legend
CAUTION: A CAUTION icon indicates potential damage to hardware or loss of data if instructions are not followed.
WARNING: A WARNING icon indicates a potential for property damage, personal injury, or death.
IMPORTANT NOTE, NOTE, TIP, MOBILE, or VIDEO: An information icon indicates supporting information.

Contents
QuickApps for SharePoint® 6.8
Configuration Editor Guide 3
www.agreeya.com
About this Guide . . . . . . . . . . . . . . . . . . . . . . . . . . . . . . . . . . . . . . . . . . . . . . . . 4
Configuration Editor . . . . . . . . . . . . . . . . . . . . . . . . . . . . . . . . . . . . . . . . . . . . . . 4
Configuring the Web.Config file . . . . . . . . . . . . . . . . . . . . . . . . . . . . . . . . . . . . . . . 4
Opening the Web.Config file . . . . . . . . . . . . . . . . . . . . . . . . . . . . . . . . . . . . . . 5
Configuring the SI Configuration File . . . . . . . . . . . . . . . . . . . . . . . . . . . . . . . . . . . .10
Adding a New System . . . . . . . . . . . . . . . . . . . . . . . . . . . . . . . . . . . . . . . . . . .10
Configuring System Provider Properties . . . . . . . . . . . . . . . . . . . . . . . . . . . . . . .10
Adding a New Service . . . . . . . . . . . . . . . . . . . . . . . . . . . . . . . . . . . . . . . . . . .11
Connecting to External Systems . . . . . . . . . . . . . . . . . . . . . . . . . . . . . . . . . . . .11
Managing Web Parts in the Configuration Editor . . . . . . . . . . . . . . . . . . . . . . . . . . . .15
Creating the Complex Category Indexer List . . . . . . . . . . . . . . . . . . . . . . . . . . . . . . .16
Managing Licenses in the Configuration Editor . . . . . . . . . . . . . . . . . . . . . . . . . . . . .18
About AgreeYa . . . . . . . . . . . . . . . . . . . . . . . . . . . . . . . . . . . . . . . . . . . . . . . . . 20
Contacting AgreeYa . . . . . . . . . . . . . . . . . . . . . . . . . . . . . . . . . . . . . . . . . . . . . . .20
Technical support resources . . . . . . . . . . . . . . . . . . . . . . . . . . . . . . . . . . . . . . . . .20
QuickApps for SharePoint® 6.8
Configuration Editor Guide
1
4
www.agreeya.com
About this Guide
This guide allows you to use Configuration Editor to properly use QuickApps for SharePoint®. For detailed
information required to use QuickApps for SharePoint in a commercial environment, see QuickApps for
SharePoint User Guide.
This guide is intended for network administrators, consultants, analysts, and any other IT professionals who use
the product.
Configuration Editor
QuickApps for SharePoint® require a few modifications in the Web.Config file to operate properly. The
Configuration Editor can help you make modifications easily and to prevent errors while doing so.
You can perform the following functions using the Configuration Editor:
•Configuring the Web.Config file
•Configuring the SI Configuration File
•Managing Web Parts in the Configuration Editor
•Creating the Complex Category Indexer List
•Managing Licenses in the Configuration Editor
Configuring the Web.Config file
The Web.Config file is edited in the Web.Config tab of the Configuration Editor. This tab contains the following
sections:
NOTE: Many of the required modifications can be done automatically through the “QuickApps for
SharePoint - Configuration” feature accessible from the SharePoint Central Administration page. The
required web.config changes happen automatically during feature activation and the changes are
removed upon feature de-activation. This method does not support System Integration metadata
configuration and other advanced features available in the Configuration Editor tool.
Table 1. Web.Config sections
Section Description
Drop down Menu Contains menu items to execute operations inside the Configuration Editor. You can also
active certain menu item using the shortcut key specified in the menu item, such as
Ctrl+O to open the Web.Config file.
Toolbar Gives you shortcuts to frequently used actions within the Configuration Editor.
File Tabs Enable you to switch between the Web.Config file and the System Integration
Configuration file.

QuickApps for SharePoint® 6.8
Configuration Editor Guide 5
www.agreeya.com
Opening the Web.Config file
To open the Web.Config file
1 Open the Web.Config file.
2 Browse to the root folder of your SharePoint application and select the Web.Config file. You can find out
the physical path of the root folder of your SharePoint application by following these steps:
aSelect Start | Control Panel | Administrative Tools | Internet Information Services (IIS)
Manager.
b Expand the node with your computer name.
c Expand the Web Sites folder.
d Find the node that represents your site. The SharePoint site should contain _layouts, _vti_bin and
_wpresources underneath it.
e Right-click on the node and select Properties.
fSelect Home Directory tab. The value in the Local path tells you the physical path of your root
folder.
The file opens in the web.config tab of the editor.
Depending on the state of your Web.Config file, you might see one or more messages in the Message
Window. To fix the error or to add the missing element specified by the message, select the message and
click the Fix button. To undo the fix, select the message that describes the fix and click the Undo
button.
Enabling Session State
You must enable the session state in your Web.Config for the QuickApps for SharePoint to operate properly. If
the session state functionality is turned off, you see the following message in the Message Window:
You must enable session state in your web.config.
To turn the session state functionality on
•Select this message in the window and click Fix.
The following line is edited:
<pages enableSessionState="false" enableViewState="true"
enableViewStateMac="true" validateRequest="false" />
The value of enableSessionState is changed from false to true. The resulting line looks like:
<pages enableSessionState="true" enableViewState="true"
Message Window Informs you if there is an error or missing entries in your configuration file. To fix the
error or to add the missing entries, select the error message and click the Fix button. To
undo the fix, select the message that describes the fix and click the Undo button
Edit Pane Shows you the content of the file and enables you to edit the content of the file
manually
Table 1. Web.Config sections
Section Description

QuickApps for SharePoint® 6.8
Configuration Editor Guide 6
www.agreeya.com
Enabling Session
In addition to enabling the session state, you must enable the SessionStateModule. If the SessionStateModule is
not enabled, the editor displays the following n the Message Window:
The session state module element in the web.config file is missing or invalid.
To enable the SessionStateModule
•Select this message in the window and click Fix.
The following line is added and highlighted:
<add name="Session" type="System.Web.SessionState.SessionStateModule" />
Defining Custom Settings Editor
QuickApps for SharePoint refers to some settings in the Custom Settings Editor in the Web.Config file. Before
adding the Custom Settings Editor section, define the Custom Settings Editor section group.
If this section group does not exist in your web.config file, the editor displays the following in the Message
Window:
Your web.config file has no Custom Settings Editor section group defined in
<configSections>.
To define the Custom Settings Editor section group
•Select the above message in the window and click Fix.
The following lines are added and highlighted:
<sectionGroup name="Custom Settings Editor">
<section name="MailSettings"
type="System.Configuration.SingleTagSectionHandler, System,
Version=1.0.5000.0, Culture=neutral, PublicKeyToken=b77a5c561934e089" />
<section name="SystemIntegration"
type="System.Configuration.SingleTagSectionHandler, System,
Version=1.0.5000.0, Culture=neutral, PublicKeyToken=b77a5c561934e089" />
</sectionGroup>
Defining Custom Settings Editor Section
QuickApps for SharePoint refers to some settings in the Custom Settings Editor section in the Web.Config file. If
this section does not exist in your web.config file, the editor displays the following in the Message window:
Your web.config file has no <Custom Settings Editor> section defined.
To define the Custom Settings Editor section
•Select this message in the window and click Fix.
OR
Select Edit | Custom Settings Editor.
The Custom Settings Editor window appears.
The Custom Settings Editor contains the following:
QuickApps for SharePoint® 6.8
Configuration Editor Guide 7
www.agreeya.com
Table 2. Custom Settings Editor tabs
Tab Description
General •Do not display the QuickApps Ribbon: If selected, the Ribbon is not shown.
By default, the Ribbon is shown. For more information on the Ribbon, see
the Ribbon Group Help chapter of the QuickApps for SharePoint User
Guide.
•In List-mode queries, limit the ‘People or Group’ field to Users and Groups
in the current site: This option affects how the ‘People or Group’ field is
populated in List-mode queries. When selected, only Users and Groups in
the current site are included. When not selected (the default), Users and
Groups in the Site Collection are included. This option does not affect how
users are selected in the People Picker.
Email The computer name or IP address of your outgoing SMTP server. This setting is
used by the qListView and qListForm web part’s email panel.
Rollup and Query •Max Rollup Depth: This attribute defines the maximum number of
recursive rollup levels that the data viewer web parts can do. The data
viewer web parts include qListView, qCalendarView, qChartView, and
qExcelViewer. The recursive rollup happens when you set the
IncludeSubSites attribute in the Viewed Lists property to true. By default,
this causes the data viewer web parts to traverse all the subsites under
the site specified by the SiteUrl attribute. If you define a number bigger
than 0 in the MaxRollupDepth attribute, the data viewer web part only
goes down as many levels as the specified number. Say you have the
following site structure:
Site 1
Site 1.1
Site 1.1.1
If you specify MaxRollupDepth of 2 and you start the recursive rollup from
Site 1, only Site 1 and Site 1.1 are included in the rollup.
•Max Rollup List Count: This attribute defines the maximum number of lists
that can be included in the rollup operation by the data viewer web parts.
The data viewer web parts include qListView, qCalendarView, qChartView
and qExcelViewer. The value for this attribute must be a number bigger
than 0. For example, if you specify MaxRollupListCount of 2, the data
viewer web part only rolls up the first 2 lists that are specified in the
Viewed Lists property if there are more. This is true regardless what rollup
method you use in the Viewed Lists property (specifying the lists manually,
recursive rollup or rollup list).
•Max Query Row Count: This attribute defines the maximum number of
rows that can be retrieved during any query to the SharePoint server. The
default value is 2000. Entering another value will override the default
value and if you enter 0 then it will show all the list values.
•Query All Fields: If selected, Web Parts will query all fields, except Lookup
Fields. If cleared, the Web Part will use the Query All Fields setting in
ezEdit to decide how to query the fields.
Editor •Maximum Image Size: the maximum file size in bytes allowed when
inserting images using the rich text editor.
•Supported File Extensions: The list of file extensions allowed when
uploading and adding documents using the enhanced rich text editor. The
list of extensions need to be separated by commas. If no input is given, the
default file extensions are used; these are *.doc, *.txt, *.docx, *.xls,
*.xlsx, *.pdf.

QuickApps for SharePoint® 6.8
Configuration Editor Guide 8
www.agreeya.com
System Integration •SI Config File: The full path to the system integration configuration file.
The relative path does not work. If the file has not been created, select
the path as to which you would like it to reside.
•Dynamic Assembly Path: During its operation, the SI Web Parts need to
generate proxy DLLs for the Web Services (if you connect to your external
service using Web Services). By default, these DLLs are generated in
c:\Windows\Temp folder. If you want the DLLs to be generated in another
location, you can specify the full path of the folder name here. The user
identity that you specify in the web application pool in IIS must have full
access to this folder.
•Enable Trace: If you turn this on, the SI Web Parts generate additional
information when an error occurred during its operation.
Once the above fields are filled out, select OK.
If the SI Configuration file specified in the Editor does not exist, the editor
displays the following error in the Message Window:
"The SI Configuration file specified in the metadata attribute does not exist.
Select this message and click Fix to create it.”
To create the file, select this message in the window and click Fix.
Table 2. Custom Settings Editor tabs
Tab Description

QuickApps for SharePoint® 6.8
Configuration Editor Guide 9
www.agreeya.com
Complex Category The category name is case sensitive: If this setting is checked, "CATEGORY" and
"category" are considered two different categories. If not defined, the default
value of this setting is false.
Trim the white spaces in the category name: If this setting is checked, "Category",
" Category", "Category " and " Category " are considered identical categories. If
not defined, the default value of this setting is false.
Default Blank Category Name: This entry displays in the qDiscussionView when it
encounters a discussion with a blank category name. The default for this field is
“(Not Categorized)” if it is not set in the web.config.
The first two settings affect how the qDiscussionView and qListForm match the
values of the complex category field with the categories that are defined in the
index list. It also affects the creation of the new category. For example:
•If the category name is case sensitive, the user cannot create a new
category called "Category1" if "CATEGORY1" already exists in the index list.
This setting does not modify the new category name that you enter when
saving it. It does not modify the name that you enter into all lower case or
upper case. This setting affects the comparison with the existing category
name in the index list.
If the trim white spaces is set to true, the user cannot create a new category
called " Category1 " if "Category1" already exists in the index list. This setting
trims the leading and trailing white spaces from the category name that you enter
when saving it.
How the qDiscussionView and the qListForm handles white spaces in the category
name is important when the "Trim White Spaces" settings is set to false and
multiple categories are specified in the complex category field. Consider the
following examples and see how the qDiscussionView and the qListForm web parts
tokenize the complex category values:
1 Category1,Category2 (there is not a space after the comma)
The category names are "Category1" and "Category2"
2 Category1, Category2 (there is one space after the comma)
The category names are "Category1" and "Category2". This means the first
space after the comma is ignored because it is customary that people put
one space after the comma for readability purpose.
3 Category1, Category2 (there are two spaces after the comma)
The category names are "Category1" and " Category2" (there is one space
in front of Category2). This is because the first space after comma is
ignored. This means that if you have three spaces after the comma, the
category name has two spaces in front of it, and so on.
4 Category1\Category2 (there is not a space after the back slash)
The first level category name is "Category1" and the second level category
name is "Category2"
5 Category1\ Category2 (there is one space after the back slash)
The first level category name is "Category1" and the second level category
name is " Category2". Unlike the spaces after the comma, all the spaces
after the back slash counts.
The option, Delete the existing categories from the index list, controls whether
all the list items in the Complex Category Index List are deleted or just reset
(clear or reset Discussions and Discussion Count field). This option is not saved to
the web.config.
Table 2. Custom Settings Editor tabs
Tab Description

QuickApps for SharePoint® 6.8
Configuration Editor Guide 10
www.agreeya.com
Configuring the SI Configuration File
The SI Configuration file contains the information about the external systems you want to integrate with and
the services that are available within the systems. The SI configuration file may contain one or more System
elements. A System may consist of one or more Service elements.
The SI Configuration File is automatically opened when you open a Web.Config file that contains the full path to
the SI Configuration File in its System Integration Config Settings, or by selecting File | Open | SI Configuration
File.
This tab contains the following sections:
Adding a New System
To add a new system
1 Right-click the Systems node in the Tree Panel.
2Click Add System. The new System node is highlighted.
When you create a new SI Configuration file, a new System node called Untitled is created automatically.
3 Use the default built-in system provider to use the services provided by the System type configured in
the web.config file
OR
Clear this check box to specify your own custom provider implementation. See the System Integration
Developer Guide for more information.
Configuring System Provider Properties
The DAOProvider Property Name, Property Type, and Property Value are automatically filled in when you select
a system. You can add properties from your custom provider.
To add new properties
1 Right-click the Properties node in the Tree Panel.
2Click Add Property. The new Property node is highlighted.
For each property node, you must define:
•Property Name: The name of the property as dictated by your DAO Provider.
•Property Type: The type of the property as dictated by your DAO Provider, for example.:
System.String.
•Property Value: The value of the property as dictated by your DAO Provider.
Table 3. SI Configuration File sections
Section Description
Design and XML Tabs Enable you switch between the Design mode and XML mode when editing the SI
Configuration file. The Design mode provides a graphical user interface to edit you SI
Configuration file. The XML mode shows you the content of your SI Configuration file
and lets you edit the content manually
Tree Panel Shows the tree representation of the content of your SI Configuration file.
Property Panel Shows you the properties of the selected element. For example, when you select a
System node in the tree panel, the Property Panel shows you the properties for that
system.

QuickApps for SharePoint® 6.8
Configuration Editor Guide 11
www.agreeya.com
Adding a New Service
To add a new service
1 Right-click the Services node in the Tree Panel.
2Click Add Service.
The services available depend on the system type you have selected.
Connecting to External Systems
You can connect to the following system types:
•SQL Server®
•WebServices
•DominoXMLOverHTTP
•Oracle®
•K2®Server
•Salesforce®
•Custom
SQL Server®
Use this system type to connect to SQL Server using ADO.NET. You must specify the Connection String in the
Service Settings when you use this type.
The service settings available with the SQL Server system type include:
WebServices
Use this system type to connect to a web service interface in your external system. You must define the system
settings and proxy settings for the WebServices system type. Use this system type if you are integrating with
Dell Boomi™. For more information, see the SI Developer Guide.
Table 4. SQL Server Service Settings
Service Settings Description
Service Name The name for the service
Connection
String A connection string that includes the source database name, and other parameters needed
to establish a connection.
NOTE: If you want to connect to SQL Server with a specific user name and password, enter
the following as the Connection String: Data Source=serverName;Initial
Catalog=databaseName. Afterward, enter the User ID and Password.
NOTE: If you want to connect to SQL Server using the credential of the logged in user to
connect to SQL Server 2005, enter the following as the Connection String: Data
Source=serverName;Initial Catalog=databaseName;Integrated Security=SSPI;. You should
leave the User ID and Password blank for the trusted connection string. If your SharePoint
server is installed in a separate computer than your SQL Server, you must have Kerberos
setup in your network environment and SharePoint. Otherwise, you cannot connect to the
SQL Server due to the double hop issue.
User ID The User ID of your SQL Server login account.
Password The password of your SQL Server login account.
QuickApps for SharePoint® 6.8
Configuration Editor Guide 12
www.agreeya.com
Table 5. WebServices System Properties
System Settings Description
Authentication Mode The authentication mode that is used when the DAO Provider connects to the external
system. Can be:
•Passthrough: The credential of the current user is used to authenticate to the
external system.
•WindowsCredential: If you select this option, you must define the Domain, User
and Password that is used to authenticate to the external system. The
Password is encrypted in your SI Configuration File.
Domain Domain of the external system account
User The user name of the external system account
Password The password of the external system account
Table 6. WebServices Proxy Settings
Proxy Settings Description
Proxy Server Address The computer name or IP address of your proxy server, for example.:
proxy.mydomain.com
Proxy Server Port The port number to connect to your proxy server, for example: 8080
Domain Domain of the proxy server account
User The User name of the proxy server account
Password The password of the proxy server account
Table 7. WebServices Service Settings
Service Settings Description
Service Name The name for the service
WSDL The URL to get the Web Service Definition Language (WSDL) document. You need to
specify this if you select the System Type of WebServices. The value is normally in this
format: http://....?WSDL. You can test the validity of the URL by clicking the Test
Connection button. If the WSDL and the Authentication Mode in the System are
specified correctly, you should see Connection Successful message.
Protocol Select either SOAP for SOAP 1.1 or SOAP12 for SOAP 1.2.
NOTE: For Boomi, select SOAP.
Table 8. WebServices Advanced Settings
Advanced Setting Description
Generate Dynamic
Proxy Automatically This is the default behavior to automatically generate the proxy assembly for a web
services system. To manually generate the proxy assembly, clear this check box. If
cleared, the following are shown:
•Proxy Assembly Path - the web services proxy assembly path. To browse to the
assembly path, click the Browse button. You can also build the proxy manually
by clicking the Generate Proxy Assembly button. This builds the proxy
assembly similar to the dynamic proxy assembly building.
When Generate Dynamic Proxy Automatically is cleared and a valid path to the proxy
assembly DLL is specified, the SI system/service is invoked using the specified DLL
instead of being dynamically generated.
NOTE: If you want to change the proxy assembly path, you can specify a different
path by selecting Edit | Custom Settings Editor. Select the System Integration tab.
Enter a different path in the Dynamic Assembly Path field.
QuickApps for SharePoint® 6.8
Configuration Editor Guide 13
www.agreeya.com
DominoXMLOverHTTP
Use this system type to connect to the Domino® Server using XML over HTTP protocol. You must specify the URL
to your Domino Server in the Service Settings when you use this type.
Oracle®
Use this system to connect to Oracle using dotConnect for Oracle. You must specify the Connection String in the
Service Settings when you use Oracle.
Table 9. DominoXMLOverHTTP System Settings
System Settings Description
Authentication Mode The authentication mode that is used when the DAO Provider connects to the
external system. Can be:
•Passthrough: The credential of the current user is used to authenticate to the
external system.
•WindowsCredential: If you select this option, you must define the Domain,
User and Password that is used to authenticate to the external system. The
Password is encrypted in your SI Configuration File.
Domain Domain of the external system account
User The User name of the external system account
Password The password of the external system account
Table 10. DominoXMLOverHTTP Proxy Settings
Proxy Setting Description
Proxy Server Address The computer name or IP address of your proxy server, for example.:
proxy.agreeya.com
Proxy Server Port The port number to connect to your proxy server, for example: 8080
Domain Domain of the proxy server account
User The User name of the proxy server account
Password The password of the proxy server account
Table 11. DominoXMLOverHTTP Service Settings
Service Settings Description
Service Name The name for the service
URL The URL for the Domino server. You do not have to enter the full URL. You only have
to enter the static part of your URL., for example: http://mydomino.net/Invoice.
The remainder of the URL (the dynamic part) is specified in the Catalog property of
your SI Web Parts.
QuickApps for SharePoint® 6.8
Configuration Editor Guide 14
www.agreeya.com
K2®Server
Use this system type to integrate with K2 blackpearl® - a platform which allows you to create comprehensive
business process applications for SharePoint without coding. For more information on configuring SI web parts
with the K2, see the SI Developer Guide.
Salesforce®
Use this system type to integrate with Salesforce.com®. For more information on configuring SI web parts with
the Salesforce, see the System Integration Developer Guide.
Table 12. Oracle Service Settings
Service Settings Description
Service Name The name for the service
Connection String A connection string that includes the source database name, and other parameters
needed to establish a connection.
NOTE: If you want to connect to Oracle with a specific user name and password,
enter the following as the Connection String: Host=xxx;SID=xxx;Direct=true.
Afterwards, enter the User ID and Password. If you have the Oracle client installed,
you can use the "Direct=false" flag. If you do not have the Oracle client installed,
make sure "Direct=true" is specified in the connection string.
NOTE: If you want to connect to Oracle using Windows® authentication, you may
use the same connection string as above and leave the User ID and Password blank.
User ID The User ID of your Oracle login account.
Password The password of your Oracle login account.
NOTE: The K2Server system type is available on SharePoint 2010 only.
Table 13. K2 Service Settings
Service Settings Description
Service Name The name for the service
Server Name The K2 Server name.
Table 14. Salesforce Proxy Settings
Proxy Setting Description
Proxy Server Address The computer name or IP address of your proxy server, for example.:
proxy.agrreya.com
Proxy Server Port The port number to connect to your proxy server, for example: 8080
Domain Domain of the proxy server account
User The User name of the proxy server account
Password The password of the proxy server account
Table 15. Salesforce Service Settings
Service Settings Description
Service Name The name for the service
User ID The user ID for the Salesforce account
Password The password for the Salesforce account
QuickApps for SharePoint® 6.8
Configuration Editor Guide 15
www.agreeya.com
Custom
Use this system type to add your own custom system and services. You must add the custom system provider and
a service name.
Managing Web Parts in the Configuration
Editor
By default, when you install QuickApps for SharePoint and activate the QuickApps for SharePoint - Web Parts
Library, we add Web Parts to the web part gallery making it available for site designers to use. All web parts
that are allowed by the user license are available.
As the Farm Administrator, you can further refine what Web Parts are available using the Web Parts Manager.
You can access the Web Parts Manager from Tools | Web Parts Manager.
Security Token The security token tied to your Salesforce account. This is optional. See the System
Integration Developer Guide for more information.
Enterprise WSDL The Enterprise Web Services Description Language (WSDL) document generated from
Salesforce.
Table 16. Salesforce Advanced Settings
Advanced Settings Description
Generate Dynamic Proxy
Automatically This is the default behavior to automatically generate the proxy assembly for a
Salesforce system. To manually generate the proxy assembly, clear this check box. If
cleared, the following are shown:
•Proxy Assembly Path - the web services proxy assembly path. To browse to
the assembly path, click the Browse button. You can also build the proxy
manually by clicking the Generate Proxy Assembly button. This builds the
proxy assembly similar to the dynamic proxy assembly building but it fixes
issues with systems such as SAP web services.
When Generate Dynamic Proxy Automatically is cleared and a valid path to the
proxy assembly DLL is specified, the SI system/service is invoked using the specified
DLL instead of being dynamically generated.
NOTE: If you want to change the proxy assembly path, you can specify a different
path by selecting Edit | Custom Settings Editor. Select the System Integration tab.
Enter a different path in the Dynamic Assembly Path field.
Table 15. Salesforce Service Settings
Service Settings Description

QuickApps for SharePoint® 6.8
Configuration Editor Guide 16
www.agreeya.com
Creating the Complex Category Indexer List
The goals of the Complex Category Indexer are to:
1 Create the initial complex category index list for the new discussion lists that were migrated from
another system, such as Lotus Notes.
2 Repair the complex category index list (deletes the existing contents of the index list and repopulates
it).
The Indexer is accessed from the top menu Tools | Complex Category Indexer.
The Complex Category Indexer menu item allows you to create or repair the index list. Clicking the Complex
Category Indexer menu item opens the Complex Category Indexer wizard.
The Search tab walks you through the steps of selecting the discussion lists from SharePoint that need to be
included in the complex category index and creating the index. The Tasks tab allows you to rerun an index that
was previously defined in order to recreate or repair the existing index.
To use the Complex Category Indexer
1 From the Search tab, select the starting URL of the site collection or web application that contains the
discussion lists to be indexed. You can either select from the SharePoint web application dropdown list or
from the site collection dropdown list.
2 Enter the search criteria to match the list names on. Select one of the operators in the dropdown:
"equals to" and "contains".
3 Enter text to match the list name. This search criteria is optional.
Table 17. Web Parts Manager Options
Options Description
Manage Web Parts by Web
Application Allows you to control what web parts become available to the selected
SharePoint Web Application. If you clear all the web parts, none of the
web parts is available to the specified SharePoint Web Application and all
its site collections and subsites. Even though the QuickApps for SharePoint
- Web Parts Library is still displayed in the Site Feature list, activating it
does not make these web parts available to the site designer.
Manage Web Parts by Site
Collection Allows you to manage web parts at the Web Application/Site Collection
level. You need to pick the SharePoint Web Application first, then pick the
site collections. The display shows you what web parts are available based
on your license type and bundle. The checked web parts are the ones
available to the site designer. If you chose the option ‘Manage Web Parts
by Site Collection’, select which SharePoint Web Application and Site
Collection you want to use. Once you have made your selection, you can
configure QuickApps for SharePoint now or later.
Manage Web Parts by Multiple Site
Collections Allows you to manage web parts at the Web Application/Site Collection
level. You need to pick the SharePoint Web Application first, then pick the
site collections. The display shows you what web parts are available based
on your license type and bundle. The checked web parts are the ones
available to the site designer. If you chose the option ‘Manage Web Parts
by Multiple Site Collection’, select which SharePoint Web Application and
Site Collections you want to use. Once you have made your selections, you
can configure QuickApps for SharePoint now or later.
Backup QuickApps for SharePoint -
Web Parts Library Allows you to backup and save your existing site collections. When you
uninstall QuickApps for SharePoint, all features are deactivated. After you
upgrade or install a new version of QuickApps for SharePoint, your
features are reactivated when you deploy QuickApps for SharePoint. If you
choose this option, you can choose a file name and location of where to
save your site collections.

QuickApps for SharePoint® 6.8
Configuration Editor Guide 17
www.agreeya.com
4Click Next.
All matched lists in a tree hierarchical structure are displayed. From the top of the tree is the SharePoint
web application node, then site collection node, then site and subsite and matched discussion lists
nodes.
5 Select the lists that need to be added to the index. You can select the parent node which automatically
selects all child nodes. You can check and clear nodes to make your final selection.
6Click Next.
7 Select your options.
•The category name is case sensitive: If this setting is checked, "CATEGORY" and "category" are
considered two different categories. If not defined, the default value of this setting is false.
•Trim the white spaces in the category name: If this setting is checked, "Category", " Category",
"Category " and " Category " are considered identical categories. If not defined, the default
value of this setting is false.
•Default Blank Category Name: This entry displays in the qDiscussionView when it encounters a
discussion with a blank category name. The default for this field is “(Not Categorized)” if it is not
set in the web.config.
•These three settings are saved into the DellSoftware\ComplexCategory section of the web.config.
•Delete the existing categories from the index list: controls whether all the list items in the
Complex Category Index List are deleted or just reset (clear or reset Discussions and Discussion
Count field). This option is not saved to the web.config.
•For more detailed information on these settings, see Configuring the SI Configuration File on page
10.
8Click Next.
Discussion lists display, as well as the options you have chosen.
9 Review your selections before proceeding. Use the Back button to go back and make any changes. Once
you are satisfied with your selections, click Next to continue.
10 Either:
•Click Start Now to index all of the lists now.
OR
Click Schedule to run it at a later date/time.
You may make changes in this list by clicking the "Action" column. Depending on the current status of the
list, you can choose "Create", "Repair" or "None". "None" means bypass the action and do not perform a
"Create" or "Repair" on the selected discussion list.
If you choose to schedule the job to run at a later time by clicking Schedule, the Index Schedule window
appears.
The Scheduled Task(s) tab allows you to view index processes that are already scheduled.
The Completed Task(s) tab allows you to view index processes that have already been run.
You can view the process log by clicking the link in the Result column.
The Log tab of the Indexer Log Viewer, shows the log and its details.
The Search tab of the Indexer Log Viewer, allows you to search for logs using several different criteria.
NOTE: If you close the Configuration Editor and there is a scheduled job pending, the application
minimizes to the system tray icon with a tool tip indicating that the application is still running. You
may click the context menu of the system tray icon to "Restore" or "Exit". When "Exit" is clicked,
the application exits and the scheduled job does not run. When "Restore" is clicked, it displays
information about the job (running, completed).
QuickApps for SharePoint® 6.8
Configuration Editor Guide 18
www.agreeya.com
Managing Licenses in the Configuration
Editor
You can import multiple license files or single license file to a farm and apply licenses to your servers within
that farm.
NOTE: If no license is provided, you will automatically have a 30-day trial license. QuickApps for SharePoint will
work for 30 days from the installation date as a fully bundled package. After 30 days QuickApps for SharePoint
will display a “License Expired” message.
When removing a license, you can either revoke the license from a server and reapply it later, or remove the
license file from the farm.
NOTE: An iisreset occurs automatically every time you apply, revoke, or remove a QuickApps for SharePoint
license. These actions will cause SharePoint applications running on the concerned servers in the farm to go
down for a while. This may cause a downtime for SharePoint applications during these licensing activities.
To import a valid license file
1 You can access the QuickApps for SharePoint License Management window from Tools | License
Manager.
The License window opens and contains two tabs:
•the License View tab which allows you to import a multi-license file or a single license file to a
farm, and then select which servers are licensed with the license file
•Server View tab which allows you to view the licenses applied to a server. You can remove or
revoke licenses from either tab.
2 Search for and select a license file (*.dlv), then click Import.
3 Select the license file from the drop-down list.
4 Select which servers you want to license or select the Servers available to be licensed check box to
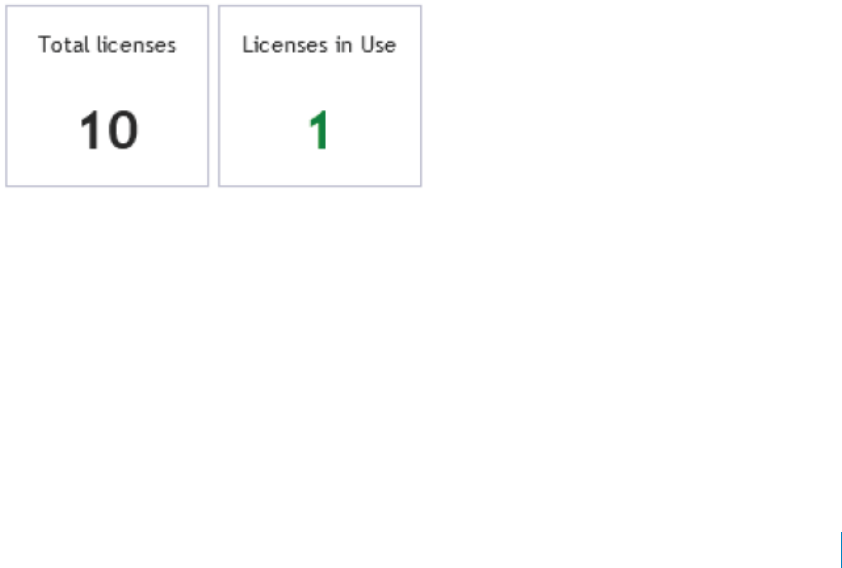
select all servers listed. Click Apply.
You can see the total number of licenses within the selected license file and the number of servers that
have a license (from the selected license file) applied.
Figure 1. Total Number of Licenses vs Licenses in Use
To revoke a license from a server
1 From the License View tab, select the server whose license you want to remove, or select the Servers
licensed with this file check box to select all servers which currently use the license file.
2Click Revoke.
OR
1 From the Server View tab, select a server.
2Click Revoke from the license details section.
If you have multiple licenses, you will see all the licenses in the farm. Click Revoke on any or all of the
licenses.

QuickApps for SharePoint® 6.8
Configuration Editor Guide 19
www.agreeya.com
To remove a license file
1 From the License View tab, select a license file from the drop-down list.
2Click Remove License File.
The license file and associated licenses within that file are removed from all servers in the farm.

QuickApps for SharePoint® 6.8
Configuration Editor Guide 20
www.agreeya.com
About AgreeYa
AgreeYa Solutions is a global provider of software, solutions, and services focused on deploying business-driven,
technology-enabled solutions that create next-generation competitive advantages for customers.
Headquartered in Folsom, California, AgreeYa is a growing and dynamic organization with 15 offices in 8
countries employing more than 1,300 professionals. Over the last 15 years, AgreeYa has worked with 200+
companies ranging from Fortune 100 firms to small and large businesses, delivering solutions for variety of
industries including telecommunications, BFSI, healthcare, high-tech, manufacturing, utility and government.
AgreeYa’s software portfolio includes SocialXtend (intranet and enterprise social collaboration), VDIXtend
(Desktop-on-Cloud), Onvelop (enterprise mobility productivity suite), Edvelop (single window collaboration and
communication solution for 21st century learning) and Cogent (comprehensive end-to-end case management
solution for collections agencies and law firms). As part of its solutions and services offerings, AgreeYa provides
intranet and enterprise collaboration on SharePoint, cloud and infrastructure, enterprise mobility, product
engineering, application development and management, independent software testing, and staffing (IT and
risk/compliance) solutions. For more information visit www.agreeya.com
Contacting AgreeYa
Technical support:
Online support
Product questions and sales:
1-800-AGREEYA
Email:
quickapps@agreeya.com
Technical support resources
Technical support is available to customers who have purchased AgreeYa software with a valid maintenance
contract and to customers who have trial versions. To access the Support Portal, go to
http://www.quickapps.agreeya/support/.
The Support Portal provides self-help tools you can use to solve problems quickly and independently, 24 hours a
day, 365 days a year. In addition, the portal provides direct access to product support engineers through an
online Service Request system.
The site enables you to:
•Create, update, and manage Service Requests (cases)
•View Knowledge Base articles
•Obtain product notifications
•Download software. For trial software, go to Trial Downloads.
•View how-to videos
•Engage in community discussions
•Chat with a support engineer
