Presentation Quick Start Guide WTX 2.0.1
QuickStart%20Guide%20-%20WTX%202.0.1
User Manual:
Open the PDF directly: View PDF ![]() .
.
Page Count: 20

Version 2.0.1
Connection via Modbus TCP
WTX120

HBM: public 2
1. Prerequisites
1.Hardware
2.Software
2. Step-by-Step
1. Run Example Applications
2. Programing own Window App Using the API
1. Overview Structure & Communication Flow
2. Code Example Using the API
3. Change Settings of the WTX120
4. Calibration
3. Outlook & Link Collection
Agenda :

© HBM
•HBM WTX120 weighing terminal
•Supply voltage for WTX120 (12V-30V, DC)
• RJ45 Cable (“LAN” Cable)
•A weighing sensor, e.g. HBM PW6C
•Computer with LAN-port or which is connected to the same
network as the WTX
•Visual Studio 2017 hardware requirements:
•Min. 1.8 GHz processor (dual-core recommended)
•Min. 2 GB RAM (4 GB recommended)
•Around 20-50 GB hard disk space
1.1 Prerequisites – Hardware
3

© HBM
•Windows operating system, min. Win7 SP1
(for programming also macOS possible)
•Min. Visual Studio (VS) 2013
•.Net Version 4.5.2
1.2 Prerequisites – Software
4

© HBM
“For organizations
An unlimited number of users within an organization can use Visual
Studio Community for the following scenarios: in a classroom learning
environment, for academic research, or for contributing to open
source projects
For all other usage scenarios:
In non-enterprise organizations, up to five users can use Visual Studio
Community. In enterprise organizations (meaning those with >250 PCs
or >$1 Million US Dollars in annual revenue)
For individuals
Any individual developer can use Visual Studio Community to create
their own free or paid apps.”
From https://www.visualstudio.com/vs/community/ (02/14/2018)
After 30 days you have to log in with a Microsoft account to unlock the
test version
Everyone else needs another license!
1.2 VS Community License - Extract
5
© HBM
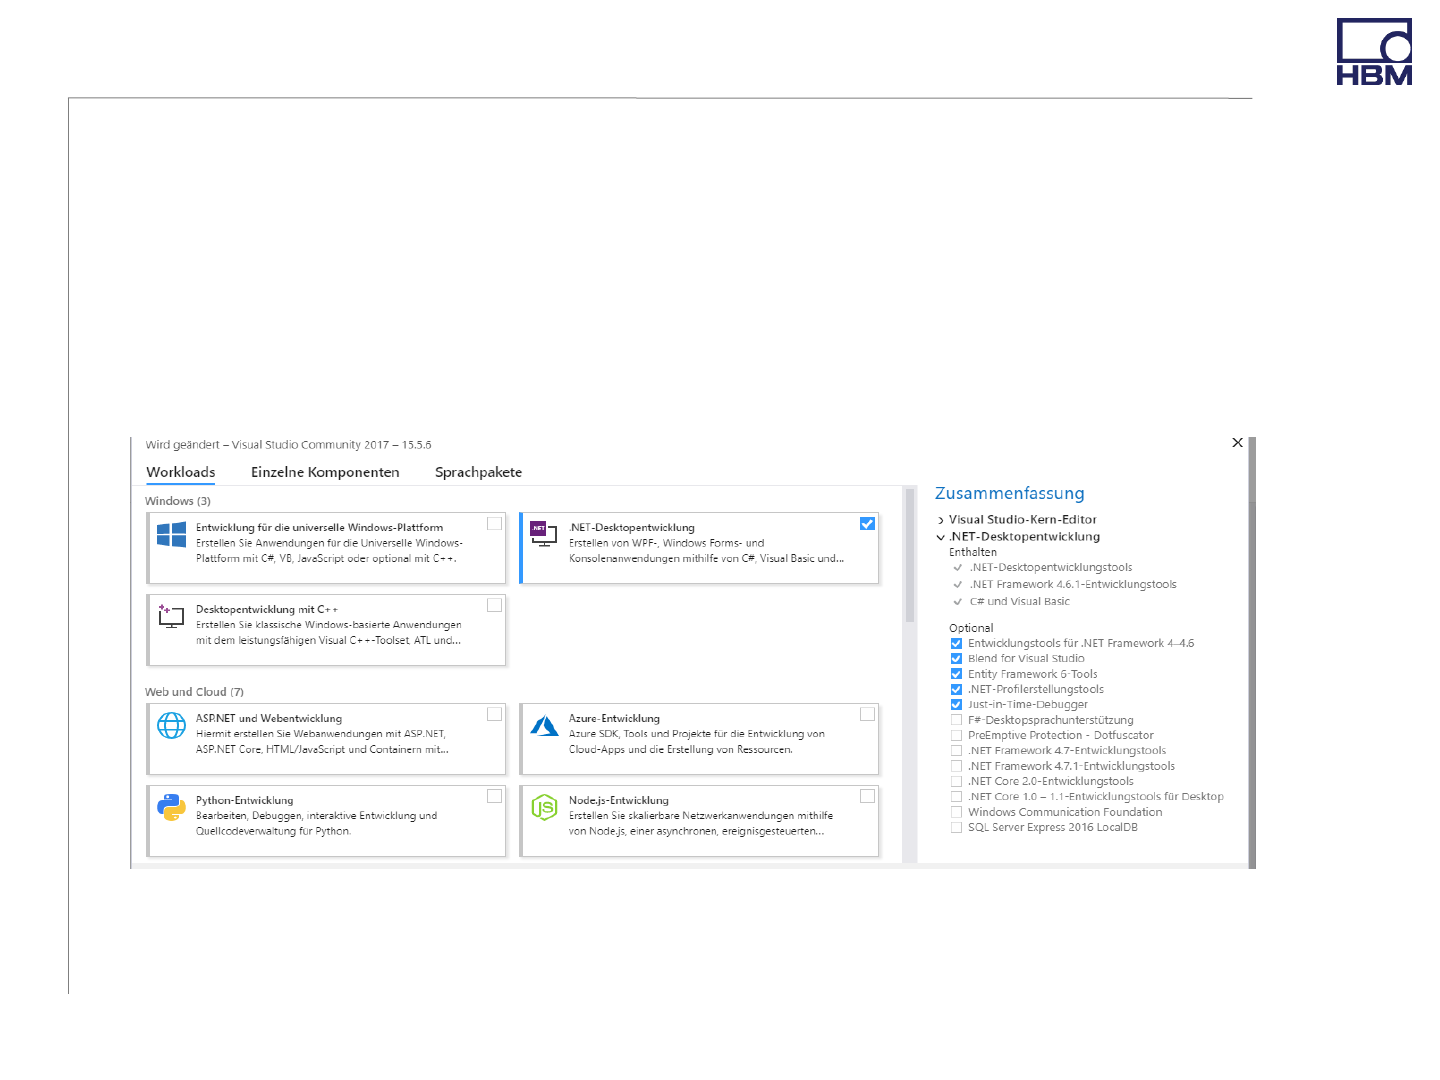
Picture: VS Required Tools and Features
•You can find all required links for downloads in the Link-Collection
•Install VS with .NET-Development extension or basic version and
install required packages afterwards
•Download ModbusTCP_WTX from GitHub
2 Step-by-Step - Installation
6
© HBM
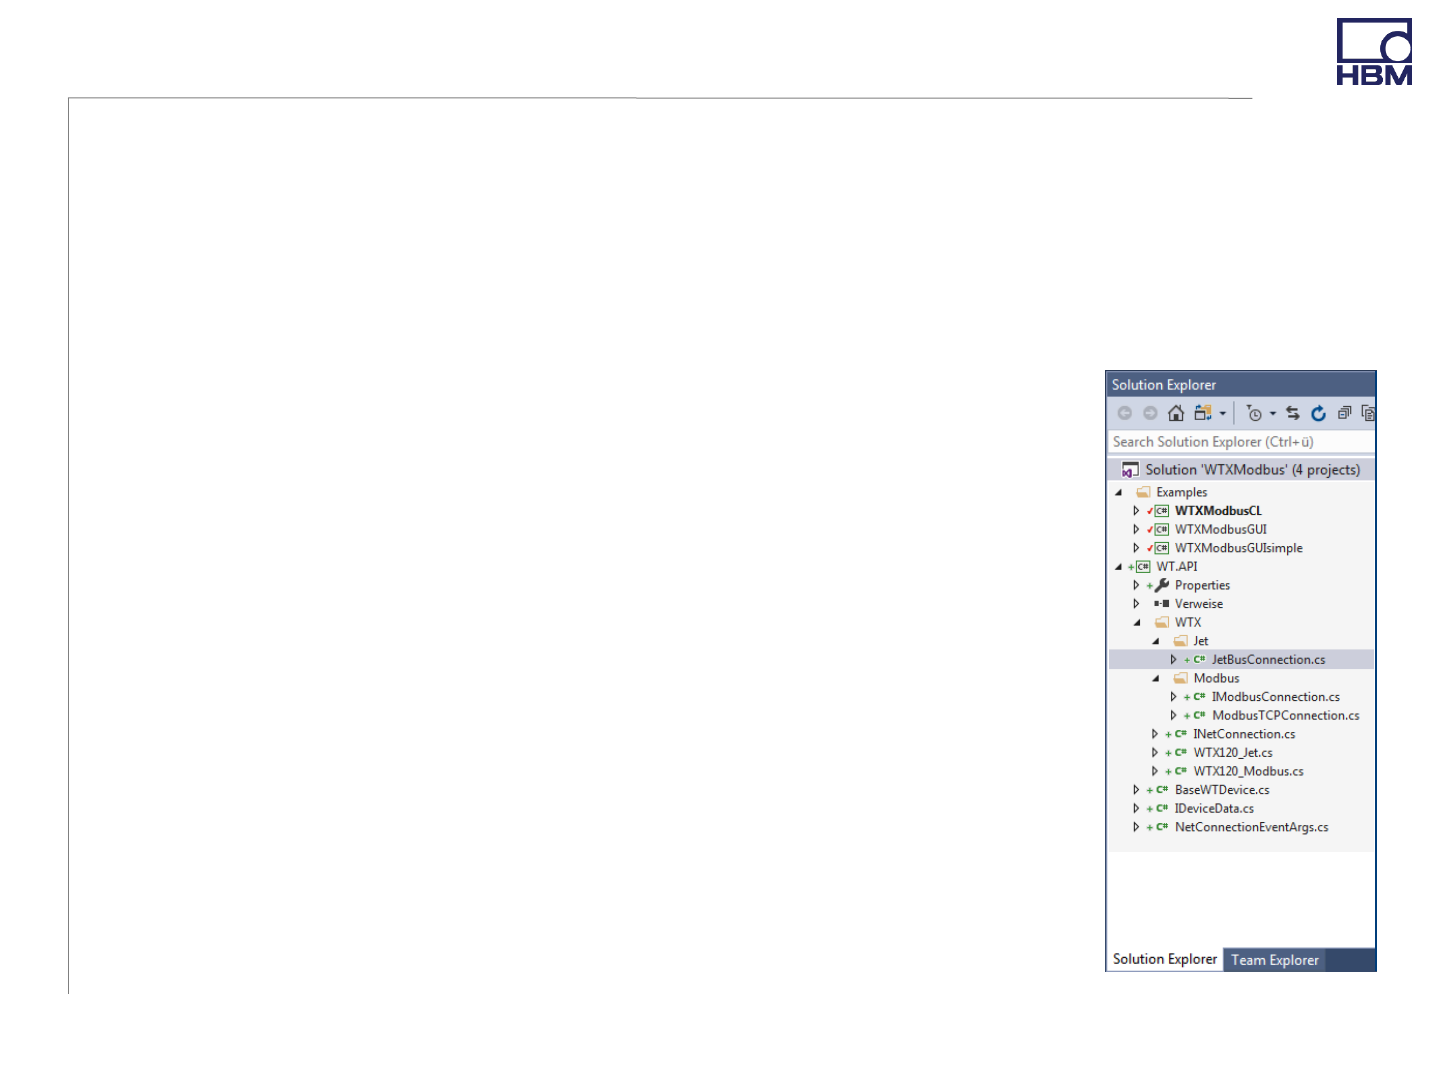
Picture: Project overview– Solution explorer
•Connect WTX120 with the same network as your PC
Note: WTX does not support DHCP currently, only fixed IP
•Or connect directly to your PC, the IP-address in WTX
must be the same, where the subnet-mask is 255,
and different, where it is 0.
•Open WTXModbus.sln in the WTXModbus folder in the
downloaded folder
Note: You need internet access during the first build,
because WTXModbus downloads 2 NuGet- packages
one-time
•Project overview: 3 example applications: one command
line application (CL), two graphic applications (GUI),
and the API WT.API
2 Step-by-Step - Connect WTX & Get Started
7
© HBM
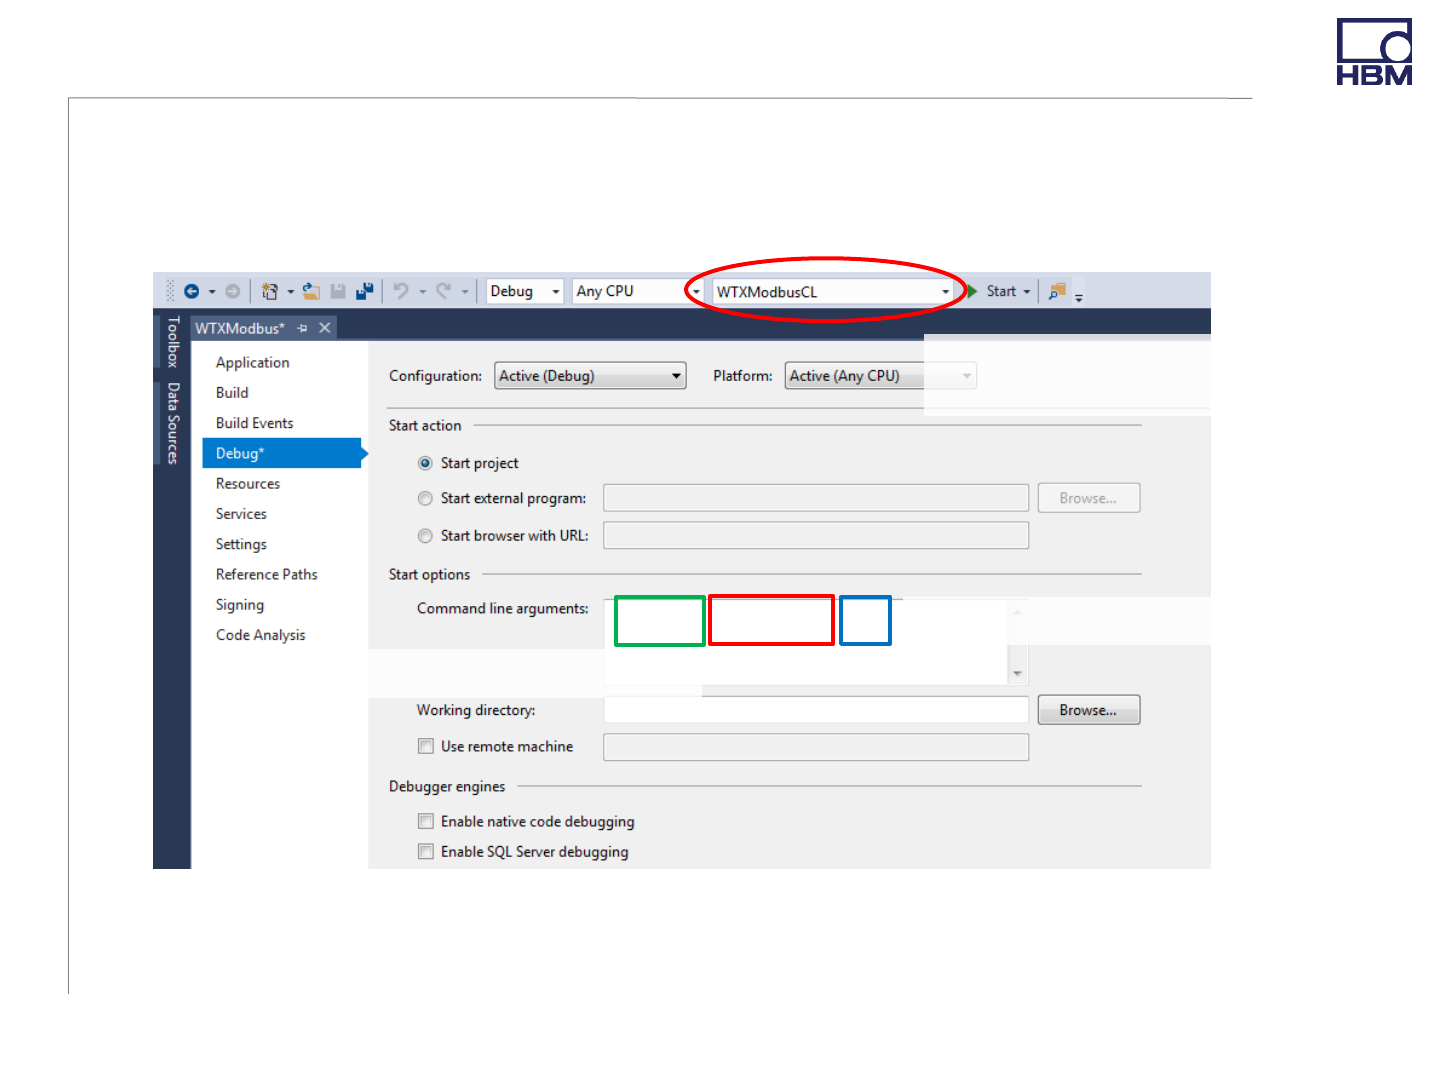
•Start a demo example: Choose an app
Note: If you choose WTXModbusCL, you have to set the IP in the VS project
properties menu as an argument. Connection establishs automatically after start.
2.1 Step-by-Step - Example Application
8
•If a failure occurs during build, probably you have not installed all
required VS packages
Picture: WTXModbusCL Project Menu (Project-> WTXModbusCL Properties… -> Debug)
Insert the IP of your WTX
Choose command line (CL)
or a graphic version (GUI)
modbus 192.168.21.1 200 Insert update interval in ms
Choose connection mode
© HBM
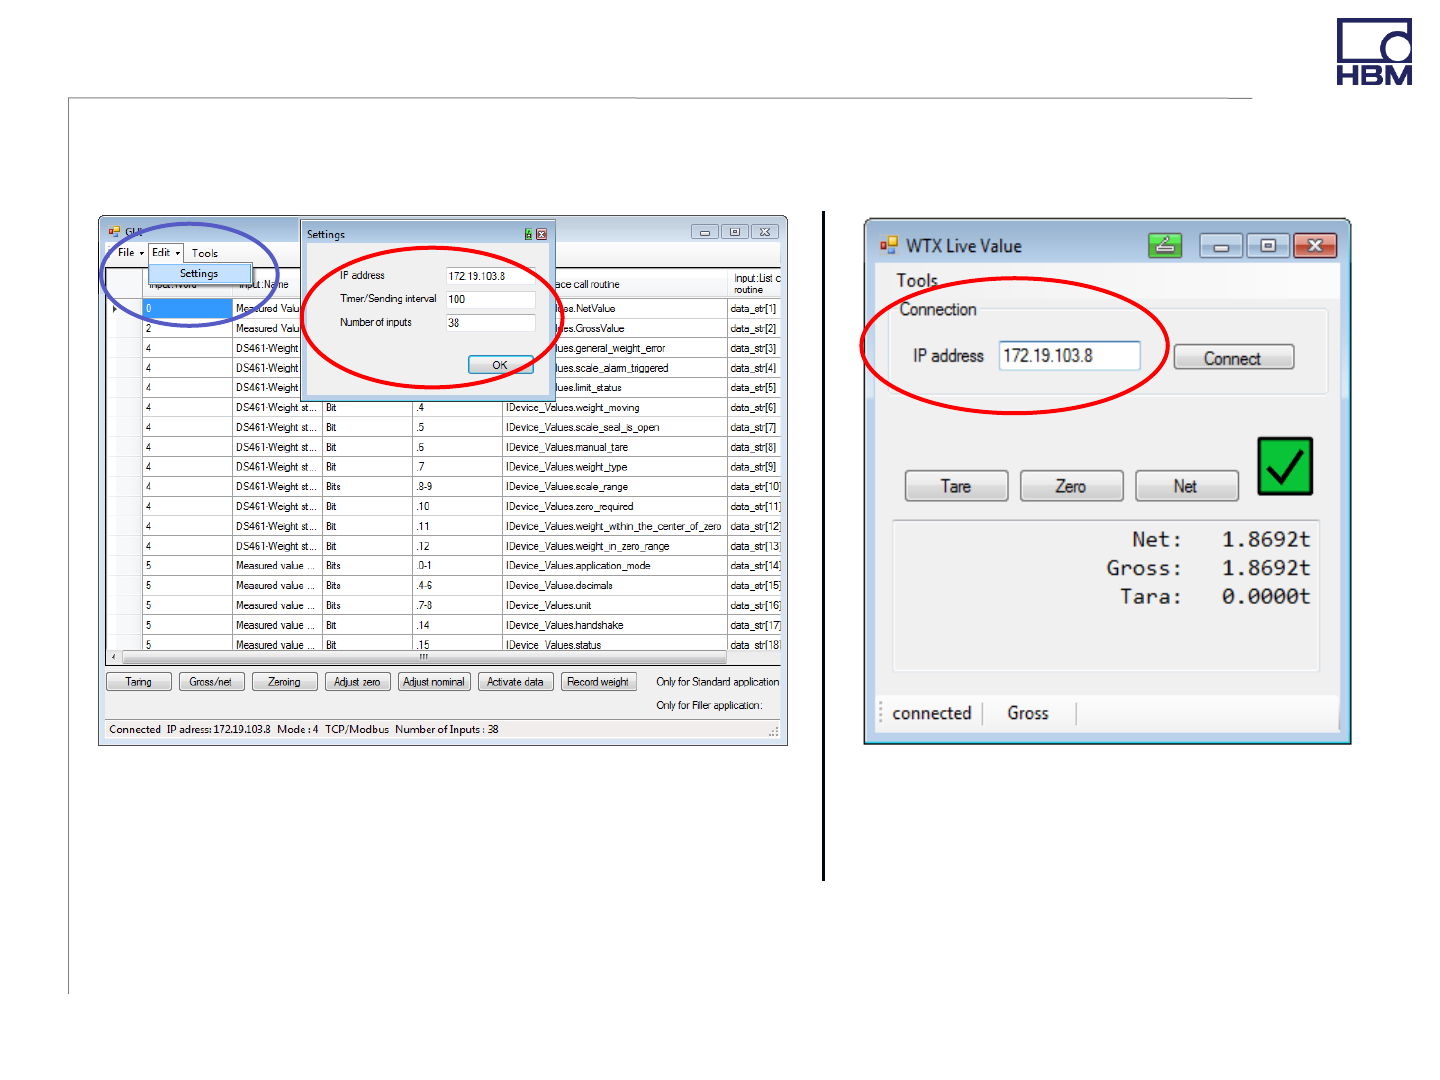
•GUI example apps can change their IP graphically, also during a run
2.1 Step-by-Step - Example Application: GUIs
9
WTXModbusGUIsimple:
Start by clicking Connect
WTXModbusGUI:
Start by clicking File -> Start
Picture: Example User Interface “WTXModbus GUI” Picture: Example User Interface “WTXModbus GUIsimple”
© HBM
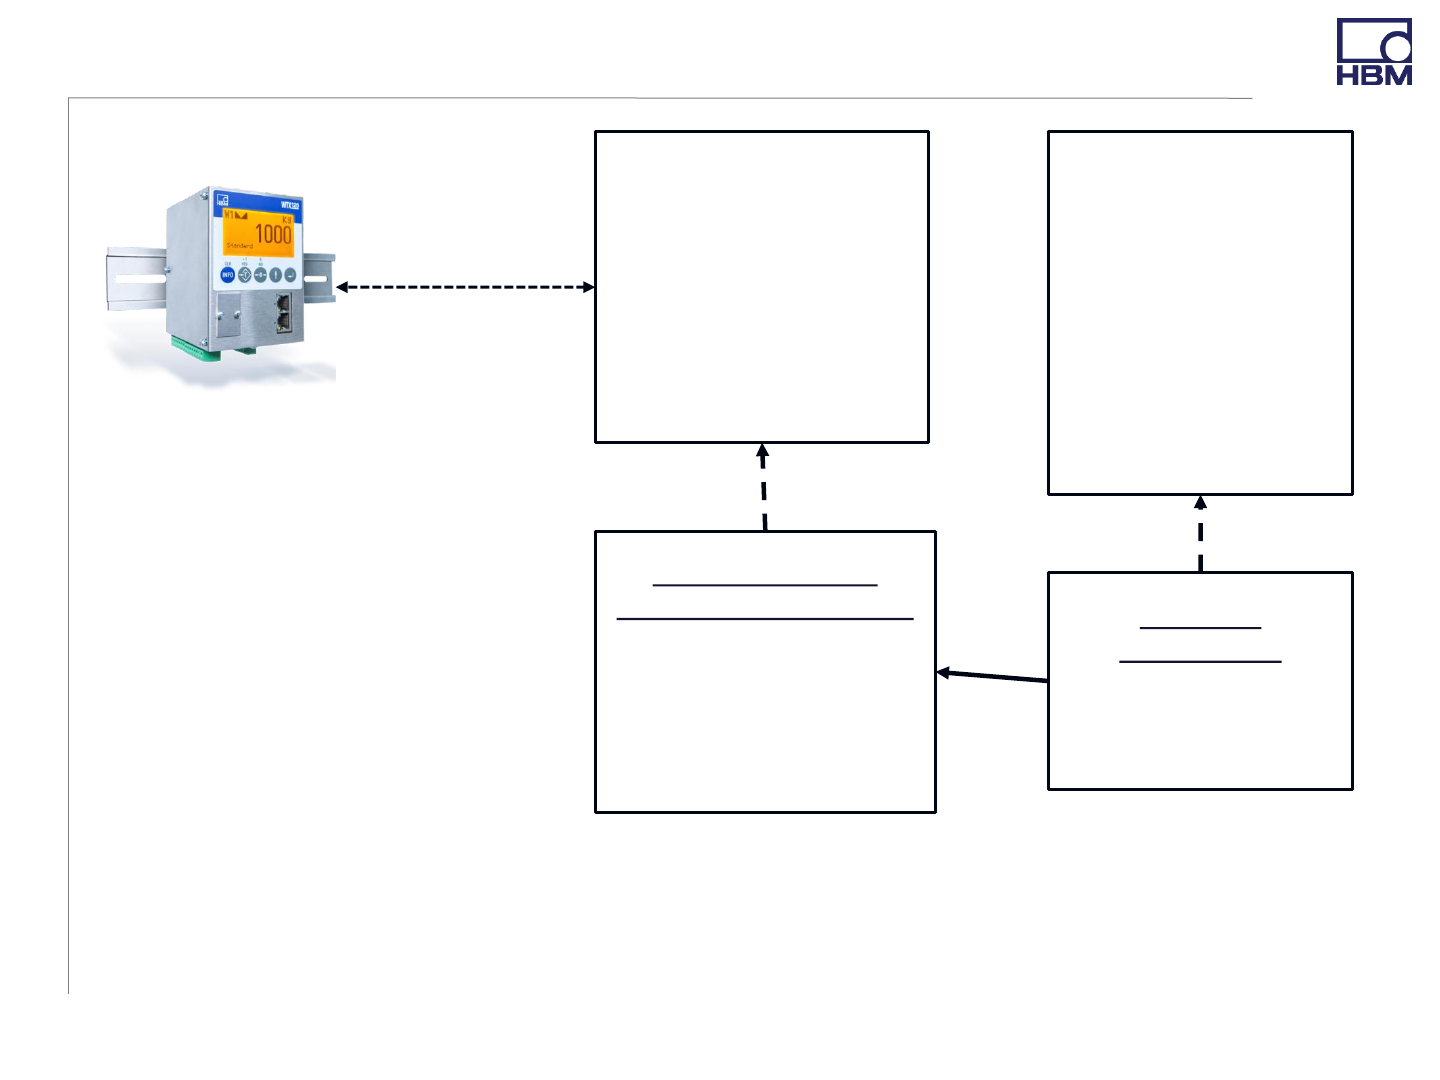
2.2.1 Step-by-Step - Use the API: Overview Structure
10
1
•ModbusTCPConnection
uses an event handler
to signalize that data
has been read
<<interface>>
INetConnection
___________________
___________________
+Connect():void
+Write(…):void
+Read(…):void
<<interface>>
IDeviceData
_________________
~NetValue:int
~GrossValue:int
~status:int
~handshake:int
….
~DataUpdateEvent:
event EventHandler
ModbusConnObj :
ModbusTCPConnection
____________________
+RaiseDataEvent :
event EventHandler
<NetConnectionEvent
Args<ushort[]>>
WTXObj :
WTXModbus
_________________
-ModbusConnObj:
ModbusConnection
communicates
via Modbus/TCP
protocol
implements
implements
has
•IDeviceData defines the properties (attributes) for values from the
WTX device and an eventhandler to check if new data has been read
and converted afterwards
© HBM
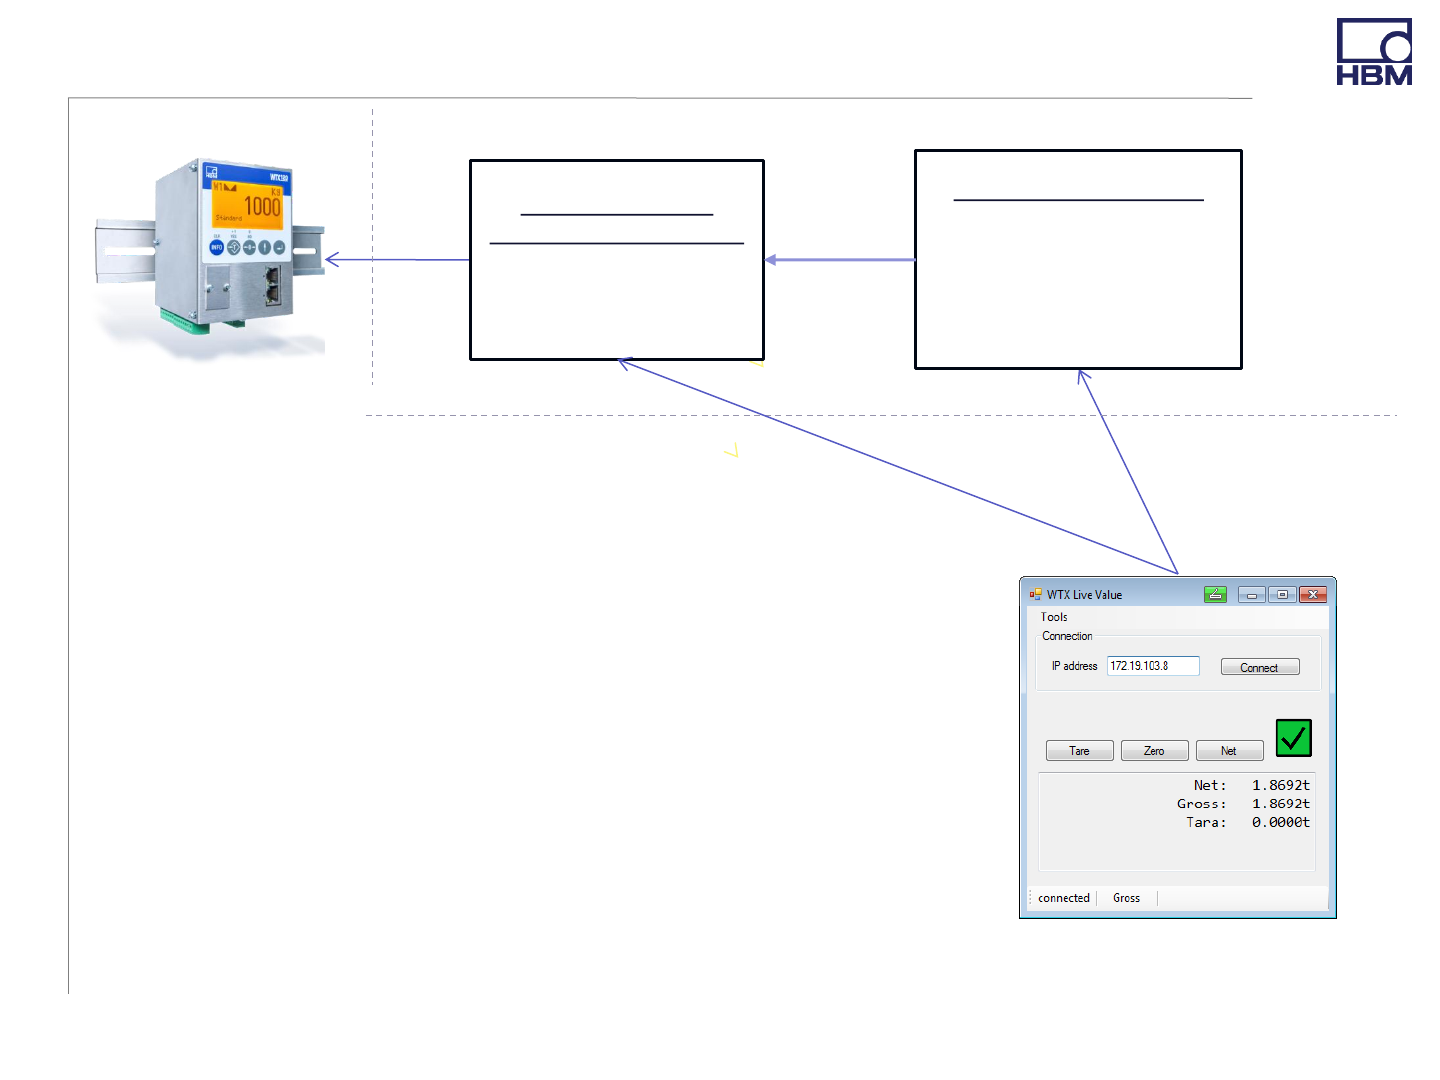
2.2.1 Step-by-Step - Use the API: Overview Communication Flow (1)
11
3. Connect()
1. Create an object ModbusConnObj of class ModbusTCPConnection
with an IP-address as a parameter
2. Create an object WTXObj of class WTXModbus with
ModbusConnObj and a timer interval as a parameter
3. Call Connect() on ModbusConnObj
Note: Code example see slide 14
Real World API
API
User Interface (Application)
Picture: Example User Interface
“WTXModbus GUIsimple”
ModbusConnObj :
ModbusTCPConnection
___________________
+is_connected:bool
+IP_Adress:String
WTXObj : WTXModbus
______________________
-aTimer:Timer
______________________
+WTX120Modbus
(connection, timerInterval)
has
1. Create
2. Create
© HBM
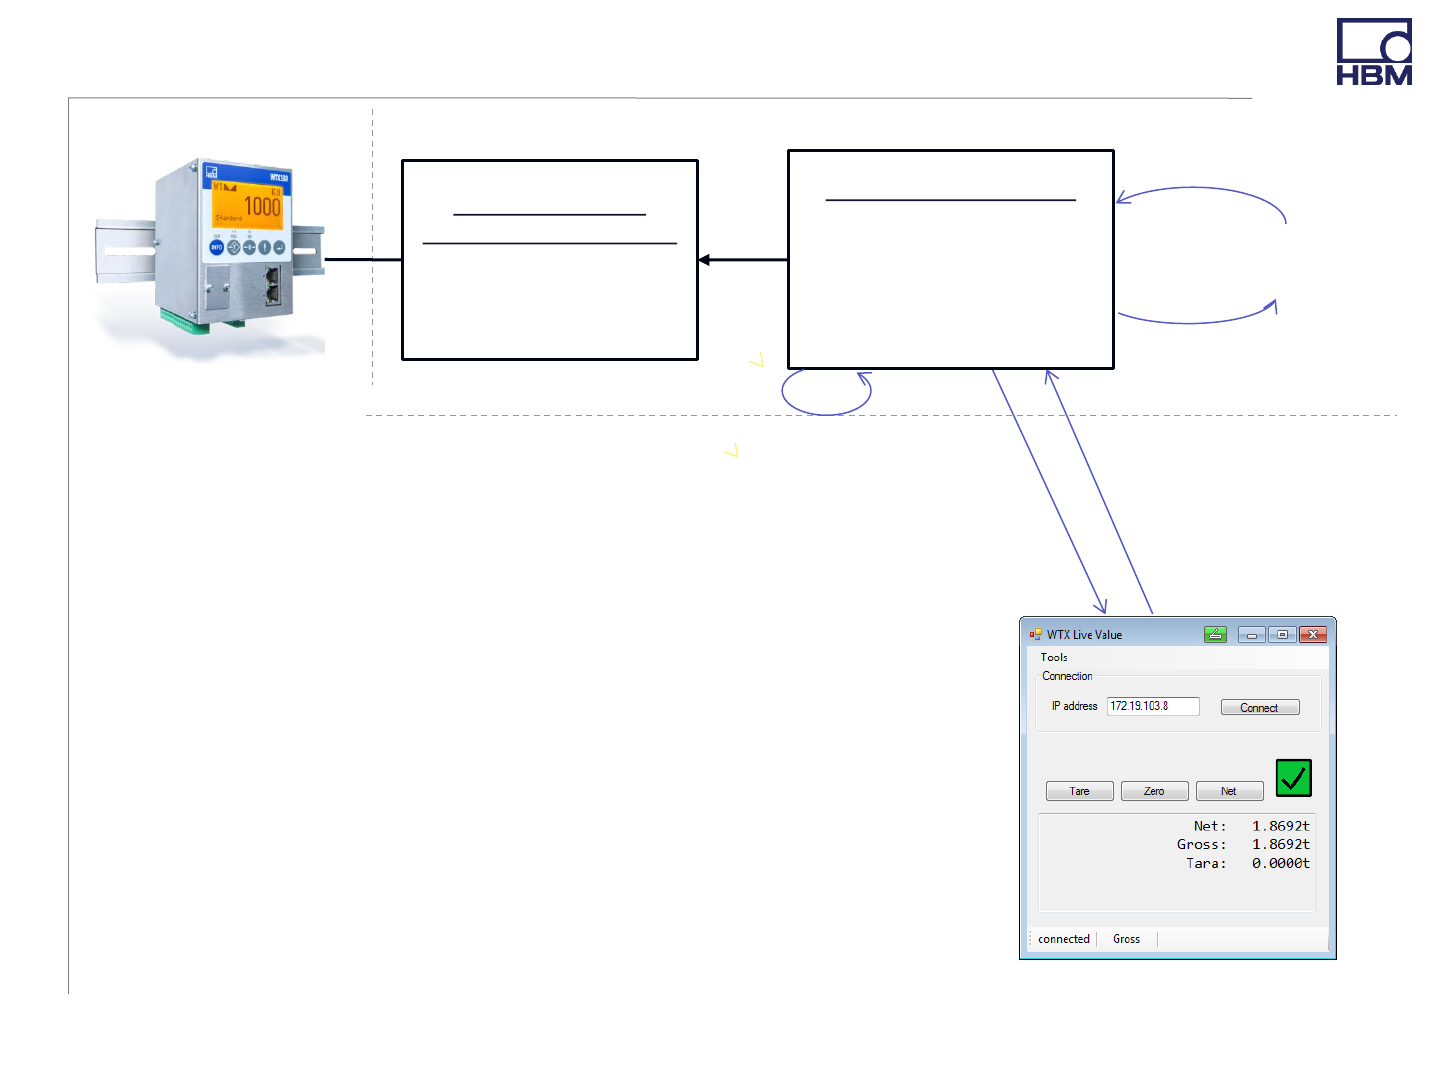
2.2.1 Step-by-Step - Use the API: Overview Communication Flow (2)
12
3. Async_Call(Opcode,
DataReceivedTimer)
1. Register your method DoSomething() to the eventhandler:
WTXObj.DataUpdateEvent += DoSomething
2. aTimer calls periodically Async_Call()
3. The method Async_Call() updates the values in WTXObj via
ModbusConnObj ’s method Read()
4. DataRecievedTimer() in WTXObj is executed as soon as the
values are up-to-date
5. The data is called up after .Invoke() in WTX120Modbus within
method UpdateEvent() and fetched
6. DoSomething() is executed.
Steps 3-6 are repeated periodically.
Real World API
API
User Interface (Application)
5. UpdateEvent(sender, e)
1. WTXObj.DataUpdateEvent
+= DoSomething
Picture: Example User Interface
“WTXModbus GUIsimple”
ModbusConnObj :
ModbusTCPConnection
____________________
+is_connected:bool
+IP_Adress:String
WTXObj : WTXModbus
______________________
-aTimer:Timer
______________________
+WTX120Modbus
(connection, timerInterval)
has
2. OnTimedEvent()
4. DataReceivedTimer()
6. DoSomething()
© HBM
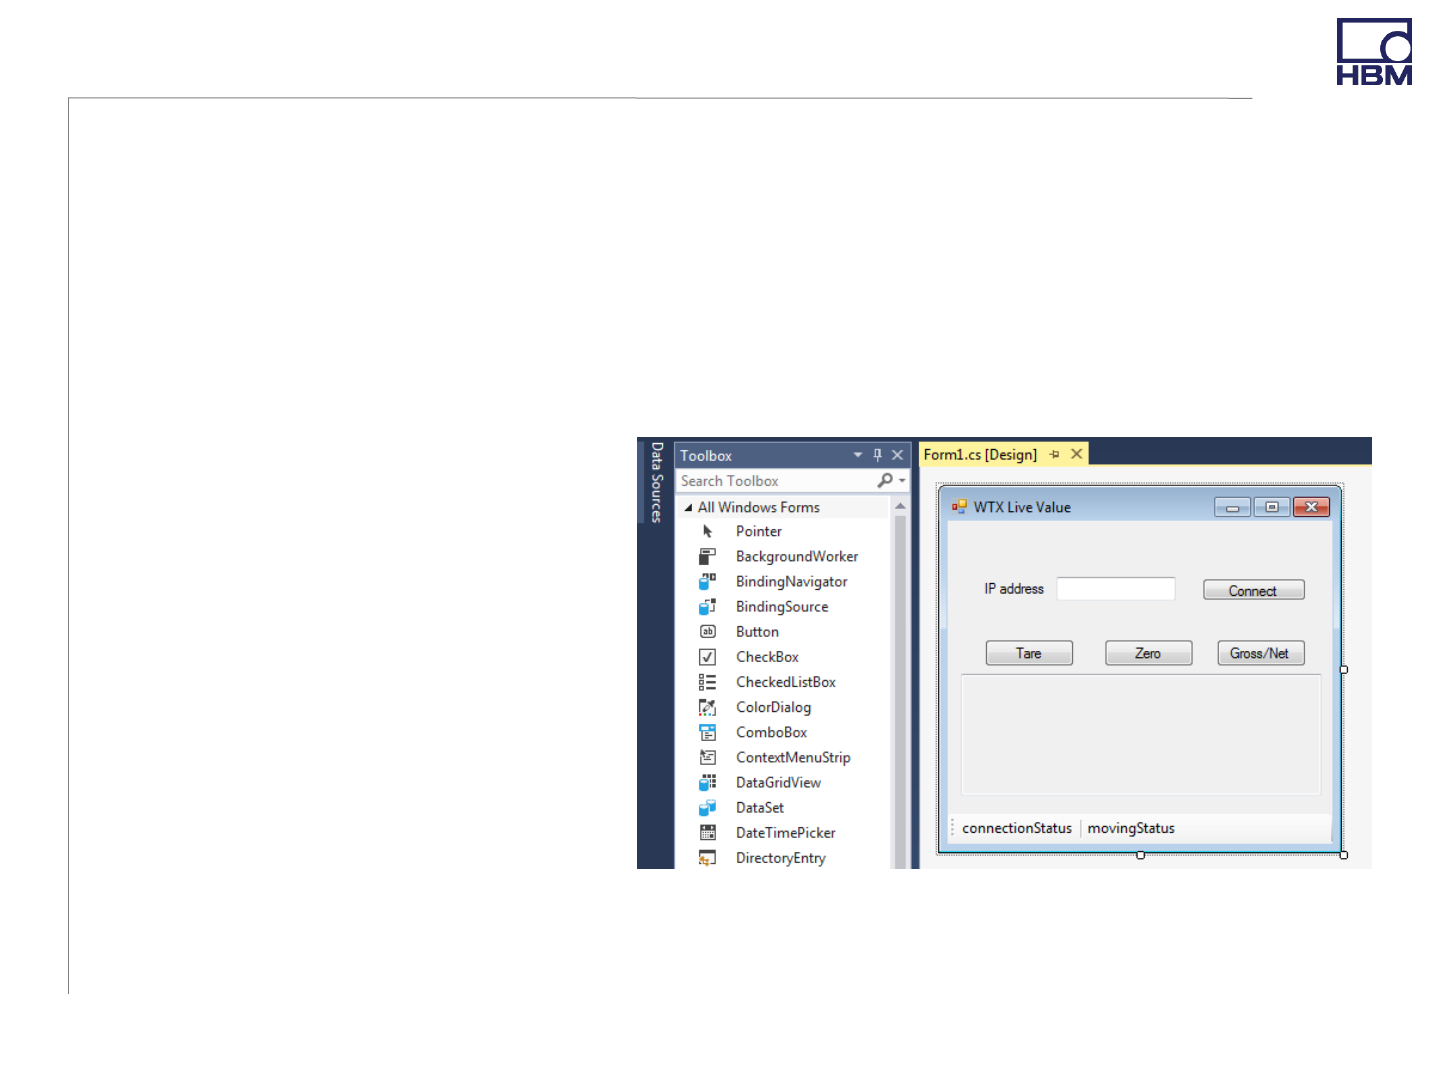
For GUI
•Add a new Windows Forms App project to the Solution
•Use the VS Toolbox to create a display window (drag & drop)
•Double-click on buttons or timer to create empty methods in code
•Use F7 to switch to the programming view
For CL
•Use Console App project
For both
•Use methods as mentioned
on the previous slides to
create your program
2.2.2 Step-by-Step - Use the API: Create your own Application
13
Picture: VS Toolbox with an Example Window

© HBM
Description
1) Required imports
2) IPAddress is a string like
“192.168.21.1” and interval is in
milliseconds
3) Create an object of
ModbusTCPConnection with an IP
address of the WTX device and an
object of WTX120Modbus with the
created ModbusTCPConnection object
and a timer interval
4) Connect your device
5) Add your method DoSomething () to
the Eventhandler DataUpdateEvent
6) The method is called from the API
once the data is read from your WTX
device and stored in WTXObj
7) Here DoSomething updates the
console with the newly arrived net and
gross values. Write your specific code
here!
See next slide for another example of
DoSomething
2.2.2 Step-by-Step - Use the API: Code Example (1)
14
Code Example
using Hbm.Devices.WTXModbus; // 1)
using WTXModbus;
namespace CodeExample
{
public class ClassExample
{
private ModbusTCPConnection ModbusObj;
private WTXModbus WTXObj;
public ClassExample()
{
int interval=1000;
ModbusObj = new ModbusTCP(IPAddress); // 2) 3)
WTXObj = new WTXModbus(ModbusObj, interval);
WTXObj.getConnection.Connect(); // 4)
// equal to ModbusObj.Connect();
ModbusObj.DataUpdateEvent += DoSomething; // 5)
}
private void DoSomething(object sender, // 6)
NetConnectionEventArgs<ushort[]> e)
{
//Print Values on Console
Console.WriteLine(WTXObj.NetValue); // 7)
Console.WriteLine(WTXObj.GrossValue);
}
}
}

© HBM
Description
ValuesOnConsole() updates the console
with the newly arrived values from your
WTX device
The values like WTX120.NetValue and
WTX120.GrossValue have ushort as
type. To convert them to strings there
are properties available
WTX120.PropertyNameString like
WTX120.NetValueString
2.2.2 Step-by-Step - Use the API: Code Example (2)
15
Code Example
…
ModbusObj.DataUpdateEvent += ValuesOnConsole;
}
private void ValuesOnConsole(object sender,
NetConnectionEventArgs<ushort[]> e)
{
Console.WriteLine(“Some example values from WTX:”);
// To print the net value as a string:
Console.WriteLine(WTXObj.NetValueString);
// To print the gross value as a string:
Console.WriteLine(WTXObj.GrossValueString);
// To print the limit status as a string:
Console.WriteLine(WTXObj.limitStatusString);
// As ushort or integer values:
Console.WriteLine(WTXObj.NetValue);
Console.WriteLine(WTXObj.GrossValue);
Console.WriteLine(WTXObj.limitStatus);
}
© HBM
•Establish a connection
•Call WTXObj.Async_Call(OpCode, CallbackMethod)
•The callback method is called once the writing is completed to the
WTX120. Choose the content by yourself.
2.2.3 Step-by-Step: Writing into the WTX120 device
16
OpCode
Meaning
0x1
Taring
0x2
Switch Gross
/ NET
0x40
Zeroing
0x80
Adjust zero
0x100
Adjust
nominal
0x800
Activate data
0x1000
Manual taring
0x4000
Weight storage
(For more see WTX
manual,
chapter PLC link)
•Choose the function with OpCode
according to the table on the right.
Code Example
private void buttonTare_Clicked(object sender,
EventArgs e)
{
WTX_obj.AsyncCall(0x1, WriteDataReceived);
}
private void WriteDataReceived(IDeviceValues_obj)
{
textBoxAusgabe.Text = “Write executed”;
}

© HBM
There are two possibilities:
•Calculate the values for a dead load and a nominal load in a ratio in mV/V
and write in into the WTX registers
•Call WTXObj.Calculate(preload, capacity) on your WTX120 object with
preload and capacity as double in mV/V
•Calibration with a reference weight
•Call WTXObj.MeasureZero() with unloaded scale
•Calculate a normalized weight by
weightin_current_unit * 10WTXObj.decimals
•Call WTXObj.Calibrate(normalizedWeight) with normalizedWeight
2.2.4 Step-by-Step: Calibration
17
Code Example
// Unload scale
WTXObj.MeasureZero();
// put reference weight e.g. 2kg on the scale. WTX display shows weights in kg (WTXObj.unit=0)
Int weight = 2;
Int normalizedWeight = weight * Math.pow(10, WTXObj.decimals);
WTXObj.Calibrate(normalizedWeight);

© HBM
•If you want to implement an own application, it is recommended to
be guided by the interfaces IDeviceDataand
IModbusTCPConnection. The latter represents the connection with
TCP/Modbus to the WTX and IDeviceData represents the available
values, which can be called via the interface from your application.
•For more details or functions have a look at the WTX120 manual or
at the example app descriptions (coming soon)
•An API with Jetbus and Modbus together is in work to get more
information from the WTX as well as easy and similar access to the
WTX
3 Outlook
18

© HBM
•WTX120 Website:
https://www.hbm.com/en/6304/wtx120-industrial-and-legal-for-
trade-weighing-terminal/
•WTX120 Manual:
https://www.hbm.com/fileadmin/mediapool/hbmdoc/technical/a450
0.pdf
•ModbusTCP API on Github: (currently unofficial)
https://github.com/FelixHuettlatHBM/ModbusTCP_WTX
•Microsoft Visual Studio:
https://www.visualstudio.com/vs/
3 Link Collection
19

measure and predict with confidence
www.hbm.com
