Quick Start Guide
QuickStartGuide
QuickStartGuide
QuickStartGuide
QuickStartGuide
QuickStartGuide
User Manual:
Open the PDF directly: View PDF ![]() .
.
Page Count: 17
- Introduction
- Demo Scenes
- Quick Start
- Beautify parameters
- Scripting support (C#)
- FAQ (Frequent Asked Questions)
- Can Beautify work with other image effects?
- Skybox banding is not completely removed. What can I do?
- What differences exist between the Best Performance and Quality settings?
- When I launch a build, it takes lot of time to complete. What can I do?
- Can I exclude my UI from Beautify?
- I get shader error on Playstation 4!
- I get shader error on Xbox One!
- Can I make bloom affect only emissive materials?
- How to enable Orthographic Camera support?
- Is it possible to disable core effects like vibrance, dithering or sharpen?
- Bloom burns/saturates the lights, can I spread it or make it softer?
- I need to improve performance on mobile. Is it possible?
- Support
- Feedback & Review!

www.kronnect.com
Copyright 2016, 2017, 2018 All Rights Reserved
Contents
Introduction ................................................................................................................................. 3
Demo Scenes ............................................................................................................................... 4
Quick Start ................................................................................................................................... 4
Beautify parameters ..................................................................................................................... 5
General Settings ................................................................................................................................................... 5
Image Enhancements Options ............................................................................................................................. 5
Color Grading Options .......................................................................................................................................... 6
Lens & Lighting Effects ......................................................................................................................................... 7
Artistic Choices ..................................................................................................................................................... 9
Advanced Settings .............................................................................................................................................. 10
Using Profiles ...................................................................................................................................................... 11
Scripting support (C#) ................................................................................................................. 12
FAQ (Frequent Asked Questions) ................................................................................................. 13
Can Beautify work with other image effects? .................................................................................................... 13
Skybox banding is not completely removed. What can I do? ............................................................................ 13
What differences exist between the Best Performance and Quality settings? ................................................. 13
When I launch a build, it takes lot of time to complete. What can I do? .......................................................... 14
Can I exclude my UI from Beautify? ................................................................................................................... 14
I get shader error on Playstation 4! ................................................................................................................... 15
I get shader error on Xbox One! ......................................................................................................................... 15
Can I make bloom affect only emissive materials? ............................................................................................ 15
How to enable Orthographic Camera support? ................................................................................................. 15
Is it possible to disable core effects like vibrance, dithering or sharpen? ......................................................... 15
Bloom burns/saturates the lights, can I spread it or make it softer? ................................................................ 16
I need to improve performance on mobile. Is it possible? ................................................................................ 16
Support ..................................................................................................................................... 17
Feedback & Review! ................................................................................................................... 17
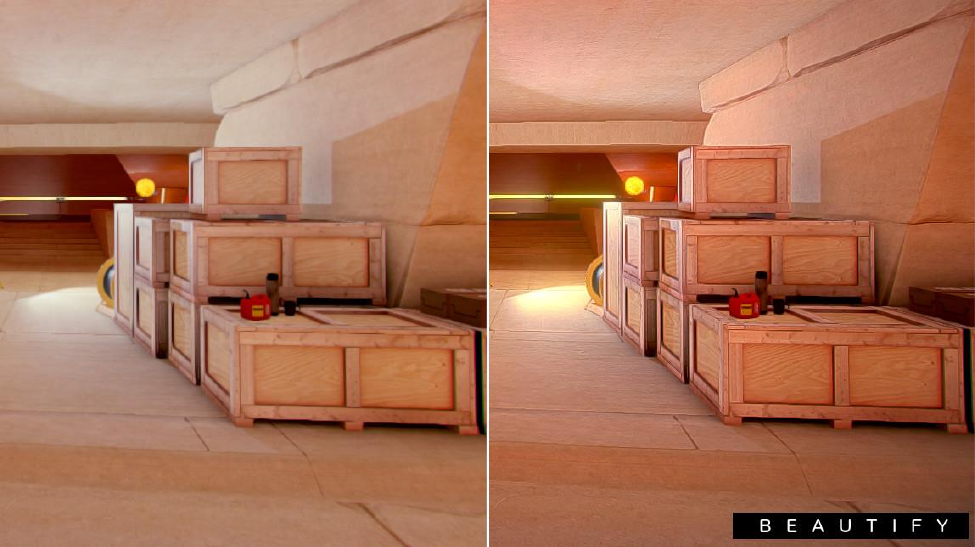
Introduction
Thanks for purchasing!
Beautify is a full-screen image processing effect that improves the image quality in real
time producing incredibly crisp and vivid scenes.
Beautify uses several algorithms in a single-pass resulting in a very fast image effect:
- Analyses local pixel contrast, enhancing visual features and producing sharp images.
- Reduces or completely removes banding in gradients, usually seen in sky boxes due
to color quantization.
- Adjusts pixel saturation, boosting pixel color without over saturating the image.
- Factory presets or global effect slider, which takes care of all effect details in one step.
In addition to this unique image enhancement technology, Beautify provides state
of the art filmic ACES tonemap operator and high quality extra effects which you can
combine just enabling them in the inspector. These are high quality effects which are
combined in the same render passes providing superior performance.
Beautify is very easy to use, just add the image effect to your camera, choose a preset
and that's all.
It works with forward and deferred rendering paths as well as linear and gamma color
spaces.
3 shader variants are included: a High Quality version that should be the preferred
choice, a Best Performance version which sacrifices some fidelity in favour of
performance and a Basic version which just comes with basic effects (sharpen, color
adjustment, dithering)..
Demo Scenes
A few demo scenes are included to quickly play with the different presets. Just open
and play with them to learn about Beautify possibilities.
Quick Start
1. Add the Beautify script to your main camera in your scene.
2. Choose one of the preset and that’s all!
You can of course customize any of its parameters to match your game mood and
requirements.
Beautify parameters
General Settings
- Quality: chooses the shader variant. The “Best performance” variant uses less
texture fetches and includes some extra optimizations which results in a faster
performance with less accuracy making it suitable for mobile devices (real
performance depends on device GPU power and the number of enabled
effects).
- Preset: quickly choose a factory combination of values for the parameters
below.
- Profile: assign or create a Beautify profile. A profile is a custom file that stores
current configuration. You can have multiple profile and assign them either in
Editor or at runtime. Jump to “Using Profiles” for more details.
- Compare Mode: shows a side by side comparison of Beautify effect.
Image Enhancements Options
- Sharpen: sharpen intensity. A higher value will produce a dramatic result but
can show some undesired artifacts with thin objects or whitish backgrounds.
Use the following extra settings to control those artifacts:
o Min/Max depth: allows you to choose the depth range where sharpen
will be applied. Decrease max depth to remain skybox untouched.
Increase min depth to cause an effect similar to depth of field.
o Max Depth: will compute depth difference around pixels to detect edges.
When the depth delta is greater than this value, sharpen will not occur.
This will protect thin objects like standalone wires or lines.
o Luminance Relaxation: sharpen is subtler on high contrasted areas. This
parameter tunes this relaxation. Reduce this value to preserve thin edges
or bright areas.
o Clamp: irrespective of sharpen intensity or above params, clamp controls
the maximum effect applied over a single pixel.
o Motion Sensibility: reduces sharpen effect while camera moves/rotates.
This option can reduce flickering and produce a cheap motion blur effect.
Set this value to 0 to disable this option.
- Dither: dither function shifts pixel RGB values according to a pseudo-random
pattern to reduce banding.
o Min Depth: by default, dither is applied to entire image. Use this
parameter to make dithering only occur beyond given depth (set this
value near 0.99 to make it only affect sky).
Color Grading Options
- Tonemapping: default is Linear which means no tonemap operator is applied.
Choose ACES (Academy Color Encoding System) to map HDR colors into LDR
space. Use only with HDR enabled on your camera.
- LUT (Look-up Texture) Transform: switches colors according to the provided
lookup texture. A sample LUT Sepia texture can be found inside
Beautify/Resources/Textures folder.
- Vibrance: controls the intensity of adaptative saturation. This algorithm
considers current saturation of each pixel, so low saturated pixels receive more
importance than high saturated pixels.
- Tint: multiplies scene pixels by a given color. Alpha controls the transparency of
the tint effect.
- Daltonize: similar to vibrance but mostly accentuate primary red, green and blue
colors to compensate protanomaly (red deficiency), deuteranomaly (green
deficiency) and tritanomaly (blue deficiency). This effect does not shift color hue
hence it won't help completely red, green or blue color blindness. The effect will
vary depending on each subject so this effect should be enabled on user
demand.
- Contrast & Brightness: these two paramters adds a final contrast + brightness
adjustment to the image.
Lens & Lighting Effects
them to create very nifty results!
- Bloom: produces fringes of light extending from the borders of bright areas,
contributing to the illusion of an extremely bright light overwhelming the
camera or eye capturing the scene. Use intensity and threshold (light sensibility)
to adjust bloom effect. Layer mask option allows you to specify which objects
are subject to bloom.
- Anamorphic Flares: also known as JJ Abrams flares, they add a sci-fi look to the
scene. This effect is only available for Best Quality settings. It’s similar to bloom
but also can be assigned a tint color (use alpha to blend between original and
tint color) and an orientation (horizontal or vertical).
- Sun Flares: beautiful, fast and procedural lens flares produced by the bright light
of the Sun. There’re lot of options to customize from sun disk size and intensity,
corona rays, ray diffraction and ghosts.
- Lens Dirt: adds dust and dirt effect to your camera when looking to a light
source. You can control the intensity and the brightness threshold (brightness
sensibility). If you want to use different dirt textures, just assign your own
texture into the Dirt Texture slot (several textures are provided in this asset
inside the Textures folder).
- Depth of Field with Bokeh: depth of field is the distance between the nearest
and the furthest objects giving a focused image. Enable this option to produce a
photography effect where the target object remains focused while the the
backgorund and foreground looks blurred.
o Autofocus / Focus target / Focus distance: allows you to specify where is
the focus plane. For autofocus it’s recommended to reduce the focus
speed as it will produce a more pleasant effect between changes.
o Focus speed: the speed between current focus and a focus change. For
example, if the target focus is moving a focus speed of 1 will update the
focus instantly whereas a lower value will make the focus more
progressive.
o Focal Length and Aperture: these two parameters are used to simulate
the virtual camera. Focal Lenth is the distance between the lens and the
image sensor. Aperture is referred to the effective apertura or diameter
of the pupil through which the outside light enters.
o Foreground Blur: enable to allow foreground objects to be blurred. Use
offset to adjust the foreground blur distance.
o Downsampling: reduces the screen buffer size to improve performance.
Can produce some artifacts.
o Sample count: referes to the maximum samples that will be gathered. The
algorithm is optimized to produce adequate results with a value of 4. A
lower value will be faster but the results will look incorrect. A greater
value will increase the quality of the blur, which can be appreciated when
using a higher focal length value.
o Transparency Support: enabling this option will render a depth pass over
transparent objects and take into account their depth into the Circle of
Confusion computation. Use only if you really need this.
o Exclusion Layer: this option enables you to exclude certain objects on the
scene from the Depth of Field effect. Useful to focus attention on specific
areas or objects.
o Exclusion Layer Bias: this is an offset value used in the exclusion layer
computation. Modify it if the excluded objects show DoF effect applied
over some areas.
- Eye Adaptation: simulates eye reaction to quick luminance changes in the
scene. You can customize the eye adaptation to light or to dark, either min/max
exposure changes and adaptation speeds.
- Purkinje: this effect simulates the achromatic vision in the dark plus a spectrum
shift to blue tones. You can customize the shift amount and the effect luminance
threshold.
Artistic Choices
This re optional mean combine many of them to create complex results!
- Vignetting: darkens or tints with a custom color the border of the scene. The
alpha component controls the effect intensity. This effect can be combined with
Night Vision or others to add great depth and special feeling to your scene.
Optionally assign a mask texture whose alpha component will be overlaid over
the image. You can find a sample grungeBorder texture inside
Resources/Textures folder.
Frame: adds a white or colored border to the screen. The alpha component
controls the size of the border. Optionally assign a frame texture. You can find a
sample grungeBorder texture inside Resources/Textures folder.
- Outline: adds a white or colored border around objetcts in the scene. The alpha
component controls the edge detection threshold.
- Night Vision: the night vision effect will allow you to see in complete dark. You
can customize the color (greenish by default) and the luminance using the alpha
component of the color picker. This effect is completed by noise and scan line
effect. Works great with vignetting enabled (set a black vignette with an alpha
of 32).
- Thermal Vision: this effect is similar to night vision but just shift color hues to
simulate termal sensitivity. It also distorts the image to give the impression of
temperature. This effect is also completed with noise and scan lines.
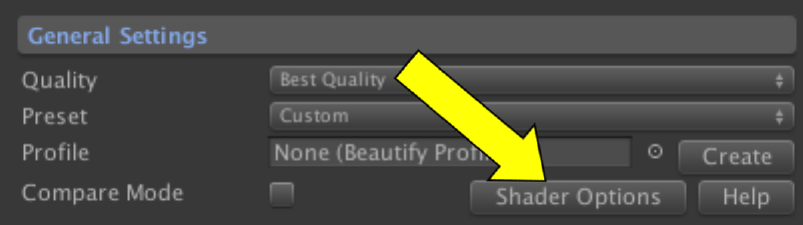
Advanced Settings
Some advanced options can be found inside the BeautifyAdvancedParams.cginc file
located in Resources/Shaders folder. This file contains some parameters that are
specific to custom scenarios and are shown in the “Advanced Option” section when
you click “Shader Options” button in Beautify’s inspector.
The file is self-described and it’s recommended that you don’t modify it directly but
instead use Beautify’s inspector tool to configure these shader defines.
Examples:
#define BEAUTIFY_ORTHO
Enables orthographic camera support. Only enable it if your camera is set to
orthographic projection.
#define BEAUTIFY_ENABLE_CORE_EFFECTS
By default, this option is enabled meaning that Sharpen, Brightness, Contrast and
Vibrance will be always used. If you’re just interested in one specific effect, like bloom
or depth of field and don’t want to use the core effects, comment out this line.
…
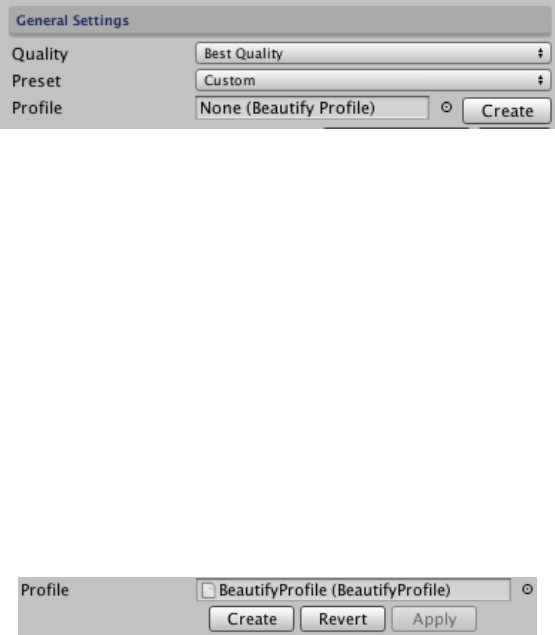
Using Profiles
A profile is a special file that stores all settings in Beautify inspector. You can have
multiple profiles in your project and assign them in Editor or at runtime.
Profiles are useful to:
- Store and load multiple configurations with ease.
- Duplicate existing settings and create variations.
- Apply custom styles to different scenes (eg. main menu, custom levels, …)
- Along the global Quality setting, they can be used to provide different
performance options by using or not specific effect parameters (eg. depth of
field downsampling).
To create a new profile: click “Create” next to Profile field in Beautify’s inspector. A
new file wil be created in the root of your project. This file contains a copy of all settings
of Beautify. Rename this file and move it to any folder you wish. The new profile will
automatically be assigned so any change you do to the profile will also affect Beautify.
To assign a profile: just drag & drop the profil file to the “Profile” field shown above.
It can also be assigned using script:
Beautify.instance.profile = Resources.Load<BeautifyProfile>(“path-to-profile”).
To unassign a profile: click on the profile field and hit “DELETE” key. To completely
remove the profile file, your delete the file from the project.
Once a profile is assigned: if you change any parameter on Beautify’s inspector, it
won’t change the profile! To apply your changes (to update the profile), click “Apply”.
Or click “Revert” to load the profile settings again and replace any change you did:
Scripting support (C#)
All properties of Beautify are exposed through Beautify component. A convenient way
to access Beautify’s properties attached to the main camera is using:
Beautify.instance.xxx = new value;
Where xxx is the name of the property. For example, Beautify.instance.sharpen = 6f
will change the power of sharpening to 6.
You can also trigger a blink effect calling: Beautify.instance.Blink method.
FAQ (Frequent Asked Questions)
Can Beautify work with other image effects?
Yes – however you need to experiment with image effects order. Beautify works better
after Antialias as it can remove the extra blur it can add (especially FXAA).
Skybox banding is not completely removed. What can I do?
Enable HDR in your camera to improve dithering effect and banding removal.
What differences exist between the Best Performance and Quality settings?
Beautify includes two main shader variants – one for desktop with all the goodies and
best algorithms and one for mobile.
The mobile version (Best Performance) has reduced quality across the shader. It’s a
little bit less accuarate with regards to the sharpen effect although unnoticieable.
Bloom and anamorphic flares is simplified in this mode.
Depth of Field effect has its own performance options, since this is a very complex
effect. Irrespective of desktop or mobile setting, ensure you set the appropiate
downsampling and sample count.
When I launch a build, it takes lot of time to complete. What can I do?
Beautify makes use of several shader keywords (using multi_compile directive) to
ensure only the useful code in shaders is executed. Multi_compile are directives that
are included in the shader files that make the compiler create different variants for
each shader, mixing different shader options in each variant. This way, when you
enable one option or another (eg. outline, night vision, …) Unity will pick up the
appropiate variant which has optimized code for that combination of features.
To reduce the build time, just open the Build Options section and disable the effects
you are not interested to include in your build. Disabled effects in this section won’t
be available in the shader (the shader itself is modified automatically by Beautify) so
Unity does not have to generate those variants hence reducing build time and resulting
binary size.
(Check out our Shader Control asset to manage other shader keywords in your project)
Can I exclude my UI from Beautify?
Yes, you need to edit Beautify.cs script and add [ImageEffectOpaque] just before the
method OnRenderImage, so it reads:
[ImageEffectOpaque]
void OnRenderImage(…)
I get shader error on Playstation 4!
Use the High Quality setting mode and remove BeautifyMobile.shader from
Beautify/Resources/Shaders folder.
I get shader error on Xbox One!
This error occur because the shader compiler provided with XBox DevKit only accepts
Windows file encondings. To solve this issue, create a new text file per each file found
in Beautify/Resources/Shaders folder and copy/past the contents, replacing the old
files with the new ones.
Can I make bloom affect only emissive materials?
Unity does not render emission separately from lighting when HDR is enabled so this
is not possible. But as emissive materials are also affected by lighting, the resulting
brightness value will always be higher that other non-emissive materials, so a
workaround is setting the threshold high enough so only emissive materials are
affected. You can also use the Layer Mask option to restrict bloom to emissive objects
How to enable Orthographic Camera support?
To enable support for orthographic camera, locate and edit the file
“BeautifyAdvancedParams.cginc” located inside the folder
“Beautify/Resources/Shaders”.
You will see a self-explanatory configuration file with a global shader define which is
commented out by default:
// Uncomment this one to support Orthographic Camera
//#define BEAUTIFY_ORTHO
Is it possible to disable core effects like vibrance, dithering or sharpen?

Yes, they are heavily optimized at the core but you can disable them if you just want
to use any other effect (for optimization purposes for example).
To disable the core effects, locate and edit the file “BeautifyAdvancedParams.cginc”
located inside the folder “Beautify/Resources/Shaders”.
// Comment out this one to disable sharpen, dithering, brightness, contrast and vibrance eff
ects
#define BEAUTIFY_ENABLE_CORE_EFFECTS
Bloom burns/saturates the lights, can I spread it or make it softer?
Yes, in addition to adjusting threshold and intensity, you can try the “Customize”
option (in Best Quality mode). This option will allow you to adjust the weight for each
one of the 6 hdr bloom layers. Reduce the weight for the first 3 layers. Also try the
“Boost” sliders for layers 5 and 6.
I need to improve performance on mobile. Is it possible?
Mobile devices vary in GPU power a lot. Old devices simply don’t have enough power
to maintain a decent frame rate while using image effects. Even a simple image effect
can reduce FPS a lot on older devices. Medium and high-end devices should be able to
run most of the effects fine – the result depends also on the number of effects and
options enabled.
Depth of Field is one of the most complex effects and here’s a video showing it running
at near 60 FPS along with bloom, sharpen and other core effects on iPhone 7+:
https://www.youtube.com/watch?v=53i1jXwiKQQ
Consider the following configuration tips to provide a nice quality/performance
balance to your users:
1. Always provide a set of minimum options in your game menu so your users can
enable or disable visual effects according to their preferences. Some users with
powerful devices will want to enable all of the effects, while others will want to
reduce them or even disable them completely so the game can have a
minimum FPS.
2. Use “Best Performance” mode. This mode uses less texture fetches and render
passes.
3. Consider reducing some options under specific effects, like “bloom blur” or
“depth of field sample count”.
4. Edit BeautifyAdvancedParams.cginc file inside Resources/Beautify/Shaders
folder and take a look at the different options. You can perhaps disable
dithering to gain some GPU cycles.
5. The “Basic” mode provides a very basic set of options (sharpen, brightness,
contrast, vibrance) and does not use depth. This mode can be used as a
fallback for even better performance in some cases.
6. You game menu should contain the following quality options related to
Beautify: “No Effects”, “Basic” (the basic mode), “Normal”, “Great”, … each
one can include one or more effects according to your design/preferences.
Support
Please visit kronnect.com for questions, support and more info.
Feedback & Review!
We take a lot of effort to optimize and maintain Beautify. If you like it, please rate or
review it on the Asset Store, or send us an email telling your story/project/issues. We’ll
help asap!
