Quintity Getting Started Guide
Quintity%20Getting%20Started%20Guide
Quintity%20Getting%20Started%20Guide
User Manual:
Open the PDF directly: View PDF ![]() .
.
Page Count: 11

The Quintity TestFramework – Getting Started Guide
Page 1 of 11
The Quintity TestFramework
Getting Started Guide
The Quintity TestFramework – Getting Started Guide
Page 2 of 11
Table of Contents
...................................................................................................................................................................... 1
Introduction .................................................................................................................................................. 3
Creating an automated test .......................................................................................................................... 3
1. Install the Quintity TestFramework .................................................................................................. 3
2. Building a test assembly .................................................................................................................... 3
3. Configuring project properties for use with the TestEngineer ......................................................... 4
4. Creating a test suite .......................................................................................................................... 5
4. Adding a test case ......................................................................................................................... 6
5. Adding a test step ......................................................................................................................... 6
5. Executing the test suite ..................................................................................................................... 7
6. What’s next? ..................................................................................................................................... 8
Key Concepts ................................................................................................................................................. 8
The Quintity Test Framework ........................................................................................................... 8
The Test Project ................................................................................................................................ 8
The Test Class .................................................................................................................................... 9
The Test Method ............................................................................................................................... 9
Elements of a Test Method ........................................................................................................... 9
Test Properties ................................................................................................................................ 10
The Quintity TestFramework – Getting Started Guide
Page 3 of 11
Introduction
The purpose of this “Getting Started Guide” is to provide some working familiarity to testers and
automation engineers’ of the Quintity TestFramework, its components and the mechanics of writing test
automation using it. It is not an in depth user’s guide of the framework, its toolset or object mode.
This document assumes the reader has a working knowledge of software testing, its terminology and
structures. Additionally, for those writing test methods, a working knowledge of Visual Studio (2010 or
2012) and a Microsoft .NET compliant language is required (Note: all subsequent examples are in C#).
Creating an automated test
1. Install the Quintity TestFramework
To setup your Quintity TestFramework, perform the following steps:
1.1. Select the Quintity.TestEngineer.Setup.msi program. Right click and select “Install”.
Alternatively, double-click the *.msi.
1.2. The initial installer dialog will appear, press the “Next >” button to continue to proceed to the
install folder selection dialog.
1.3. Enter or browse to the target installation folder. Recommended that you use the suggested
default folder. Press “Next >” to proceed to the final confirmation dialog.
1.4. Press “Next >” to confirm installation, “Cancel” otherwise.
1.5. The installer will proceed to setup the Quintity TestFramework. Note: If you have Visual Studio
2012 or 2013, the installer requires several minutes to install and update the respective
development environments (i.e., the installer is not “hung”).
1.6. Upon successful installation, the final screen is displayed. Click “Close” to exit the application.
2. Building a test assembly
2.1. Creating a QTF test assembly project is very similar to creating any other project within Visual
Studio. Test project and item templates have been added to the development environment to
facilitate development. To create the test assembly:
2.2. Launch Visual Studio 2010 or 2012.
2.3. Navigate to Visual Studio’s main menu and select “File > New > Project…” and the “New
Project” dialog will appear.
2.4. In the “New Project” dialog’s left pane, open the “Installed > Templates > Visual C#” selections.
2.5. Select the “Quintity” item under “Visual C#” and in the center pane, you will see two project
types:
2.5.1. Basic Test Project for creating a Quintity test project.
2.5.2. Test Listener Project for creating Quintity runtime execution listener.
2.6. Select the “Basic Test Project” template.
2.7. Complete the balance of the dialog fields accordingly (e.g., “Name”, “Location” and “Solution
name”, “Add to source control”, etc.) and press “OK”.
2.8. To check for correct project construction, build the solution or project within Visual Studio. The
build should succeed without issue.
The Quintity TestFramework – Getting Started Guide
Page 4 of 11
An example of a new created test project
3. Configuring project properties for use with the TestEngineer
1.1. Once the test project is successfully created, its properties must be updated to incorporate the
Quintity TestEngineer as its driver. Update the test project with these following steps.
1.1.1. Change the test configuration file to point to the current environment.
1.1.1.1. The projects default configuration file is located in the projects “TestConfigs”
folder. The default name is “BasicTestProject.config”; this can be changed to
something more meaningful to the user.
1.1.1.2. Open the configuration file and locate the
“<TestHome>c:\MySolutionPath</TestHome>“entry and change the path to the
current solution’s folder. Updating this entry provides the TestEngineer and the
Quintity runtime engine the necessary navigational information to locate test
artifacts (e.g., test suites, test assemblies, etc.). This avoids having “hardcoded”
paths in the test code.
Example: “<TestHome>C:\MyTestProjects\MyBasicTestProject</TestHome>“
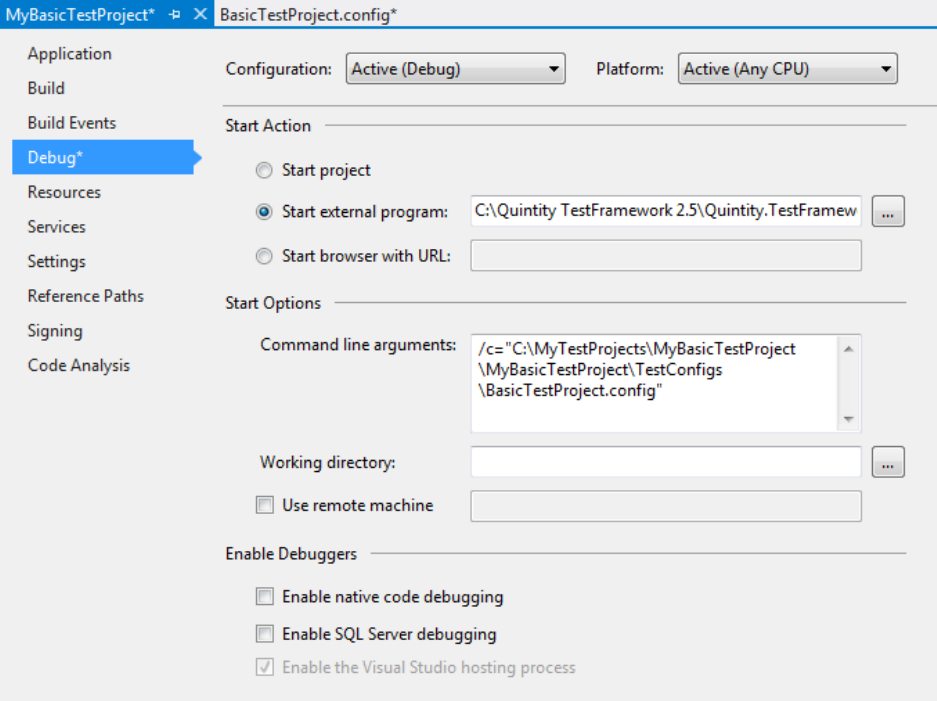
1.1.2. Configuring the test project’s properties.
1.1.2.1. In Visual Studio, select the newly created test project, right click and select the
popup menu item “Properties”. The project properties window will be displayed in
the Visual Studio workspace.
1.1.2.2. In the property window, select the “Debug” tab.
1.1.2.3. In the “Start Action” section, select the “Start external program” option. Enter
the path or browse to the installed “Quintity.TestFramework.TestEngineer.exe”
The Quintity TestFramework – Getting Started Guide
Page 5 of 11
1.1.2.4. In the “Start Options” edit box, add a command-line entry pointing to the
projects test configuration file in the following format:
“/c=“C:\PathToYourTestProjectsConfigurationFile.config”
An example of completed Test Project properties
1.2. To verify the configuration, select and start a new instance of the test project. The Quintity
TestEngineer application should come up without error and display the name of the
configuration file in the lower left corner of the status bar (Hint: hover the mouse over the
name and the full path will be displayed).
4. Creating a test suite
In order to drive the project test methods, a fully formed test suite will need to be created. The test
suite provides the data and linkage information to drive the test library’s test code. To create a linked
test suite, do the following:
1. Launch an instance of the TestEngineer as described above.
2. Select “File > New” or click on the “New” toolbar button. A “Save As” dialog should appear with the
Explorer path set to the projects “TestSuites” folder (If not, the configuration file may not have
correct pathing information).
The Quintity TestFramework – Getting Started Guide
Page 6 of 11
3. Enter the name of the new test suite in the “File name:” textbox. Note the default “Save as type”
setting is with the “*.ste” extension. Save the new suite. The dialog will close and the newly named
suite will appear in the TestEngineer’s suite viewer pane.
4. Adding a test case
To be operational, each suite must contain at least one test case which must, in turn, contain at
least one test step.
4.1. To add a test case, select the target test suite in the test suite viewer, right click and choose
“Add New Test Case” from the popup menu. A test case is automatically added to the test
suite. To change its name, select the test case and either press F2 to rename or double-click to
bring the test case editor dialog.
5. Adding a test step
5.1. A test step joins the test logic to the underlying test code (contained in the test class’s test
methods). The test step is setup up to call the test method and to provide the necessary
runtime arguments. To add a test step, select the target test case and choose “Add New Test
Step” from the popup menu. A new untitled test step is added to the test case.
5.2. At this point, now automation has been associated with the test step. The test step still needs
to be configured for automation (it is a manual step).
5.3. Double click on the test step or right mouse click and select “Open” and the test step editor
dialog appears.
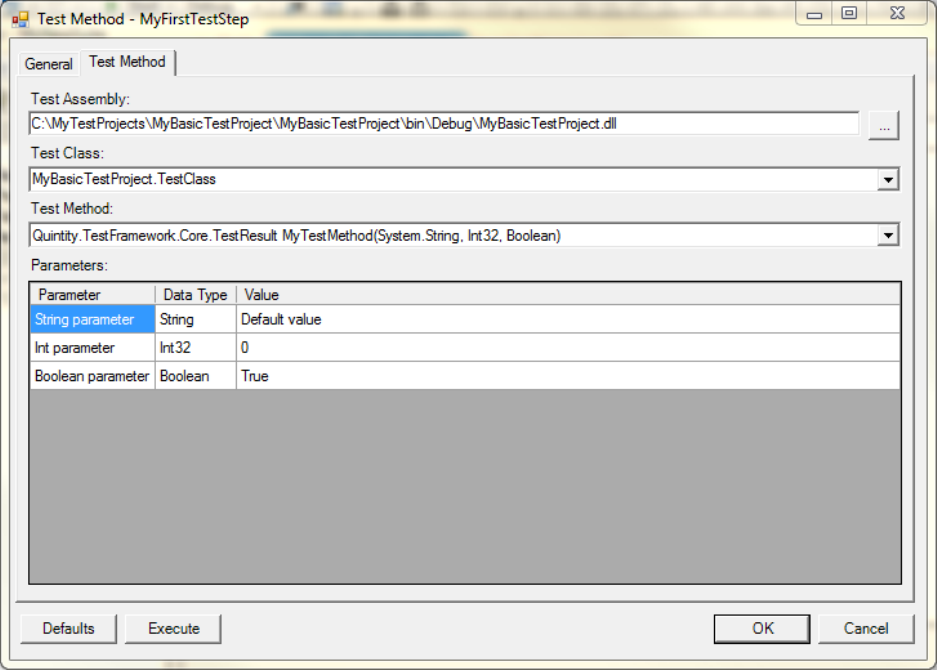
5.4. Check the “Automation” checkbox in the lower left corner of the dialog. A “Test Method” tab
has been added to the dialog and selected. Here we need to associate the test code to the test
step.
5.5. Test Assembly – Browse to the projects test assembly (click the Browse button). Select the
project’s test assembly. If the project library is not in the dropdown selection, the project
configuration may not be configured properly.
5.6. Test Class – Once a test assembly has been selected, the “Test Class” dropdown is loaded with
available test classes (the test classes attribute is set to “QTF.TestClass”). Select the desired
test class.
5.7. Test Method – Once the test class has been selected, the “Test Method” dropdown is
populated with all available test methods (The test methods attribute is set to
“QTF.TestMethod” and its signature is correct). Select the desired test method.
5.8. Parameters – If the test method selected accepts arguments, the parameters grid will populate
with each parameter’s name, its data type and default values. Change the values as desired.
Note, the values can be changed and the test method can be reused to support easy generation
of additional test cases.
The Quintity TestFramework – Getting Started Guide
Page 7 of 11
An example of a completed automated test step
6. Upon completion, press the dialog’s “OK” button and the test step has been updated. To complete
the process, select the automated test step and change its “Test Status” in the TestEngineer’s
property pane to “Active”.
5. Executing the test suite
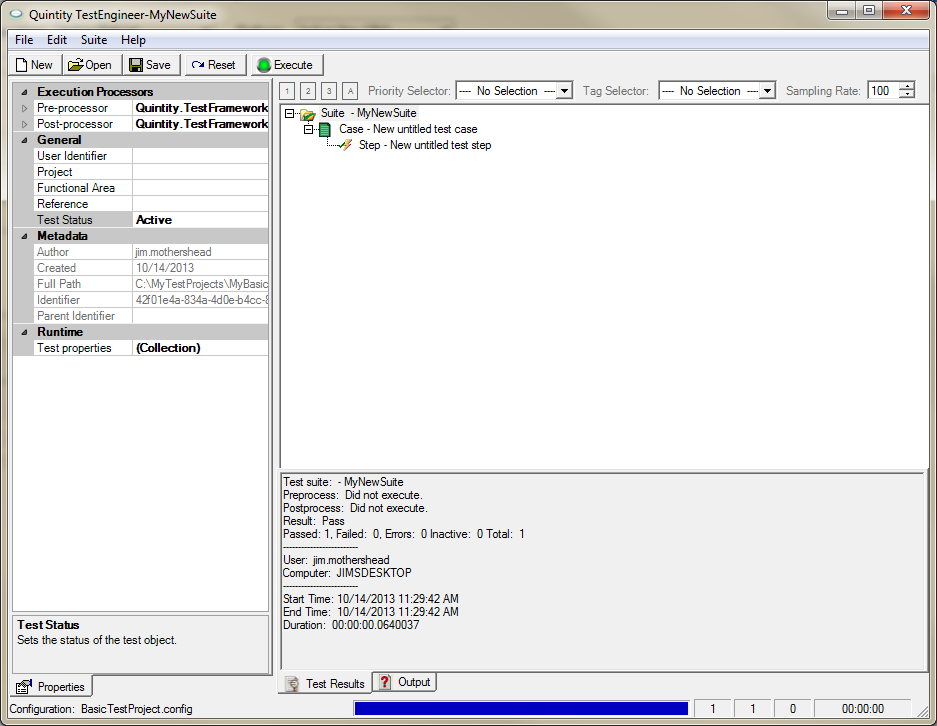
Using the setup described above, a user merely selects the test project and initiates a debug session.
The TestEngineer will display. Within the TestEngineer, open the desired test suite and press
“Execute” on the toolbar.
A note about debugging: if a breakpoint has been set in the test method or in subsequent code,
execution will stop at the breakpoint. There is nothing inherently different in debugging source
code in this scenario.
The Quintity TestFramework – Getting Started Guide
Page 8 of 11
An example of a successful test run
6. What’s next?
Upon successful completion of the above steps, a fully functional automated test has been created.
Clearly the default test method is not a viable test as it does not contain meaningful test logic. This
is where the automation engineer and software tester collaborate to define and implement tests
specific to their test problem domain.
Key Concepts
The Quintity Test Framework – The framework is .NET assembly,
Quintity.TestFramework.Core.dll, typically residing in the host’s Global Assembly Cache (the
GAC). This core assembly contains a consistent and predictable library of structures and objects
representing test concepts (e.g., test suite, test case, test step, test result, etc.) and related
components. The framework assembly also contains the Quintity runtime engine which
executes test suites and cases and produces results in a reliable manner.
The Test Project – A Quintity test project is a class library project. A usable test project
contains one or more viable test classes containing executable test code. A test project must
reference the test framework core assembly (i.e., Quintity.TestFramework.Core.dll).
The Quintity TestFramework – Getting Started Guide
Page 9 of 11
The Test Class – A Quintity test class contains one or more compliant Test Methods and is a
member of a properly marked-up test project. The class itself must reference the
“Quintity.TestFramework.Core” namespace and be derived, directly or indirectly, from the
framework’s TestClass object.
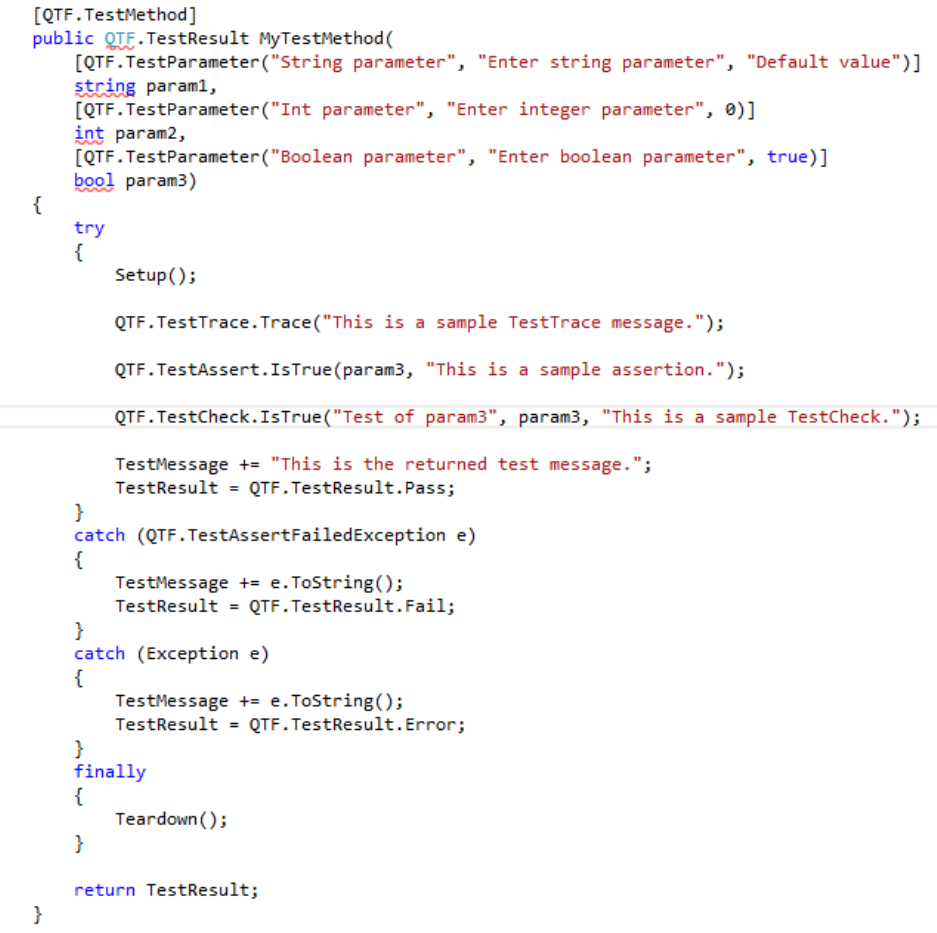
The Test Method – The test method is where the application specific test code is placed. A
framework compliant test method is a member of a properly marked-up test class. A test
method is a public method which always returns a QTF TestResult value and a TestMethod
attribution.
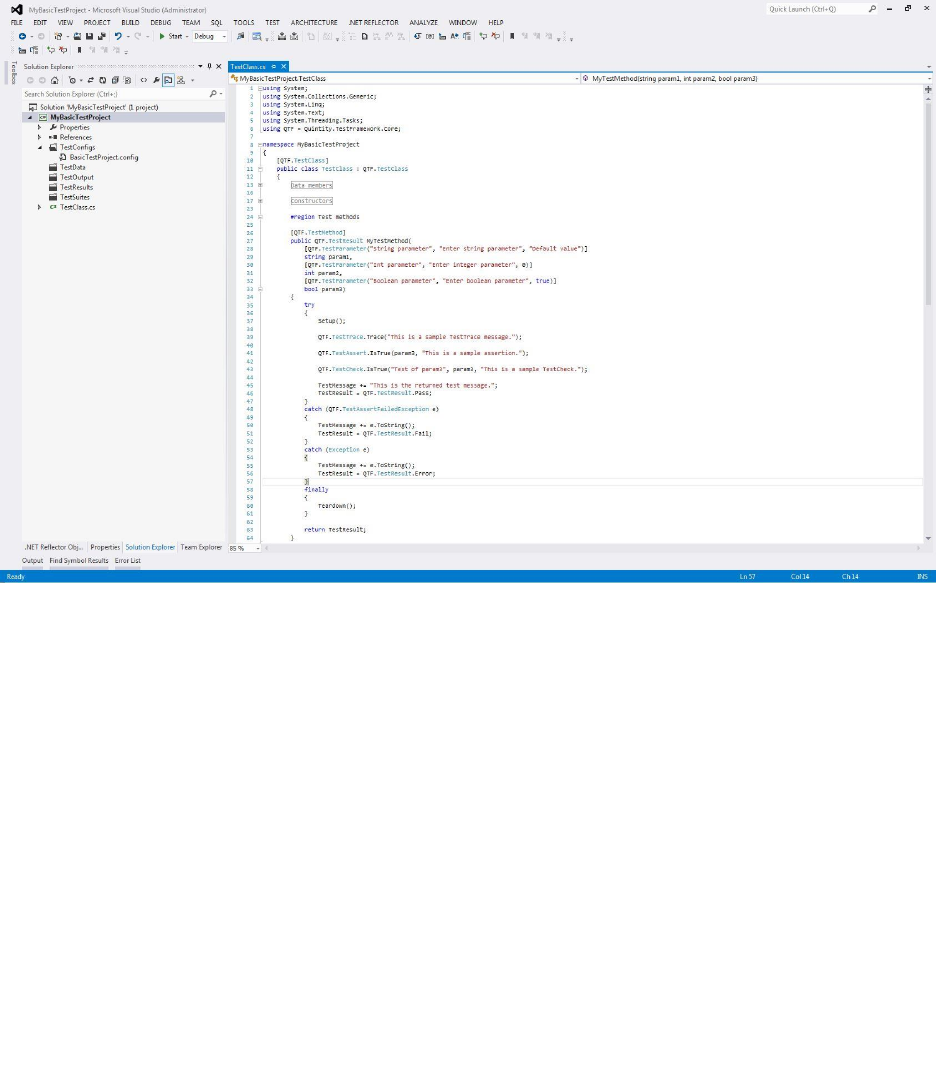
Example of a typical test method
Elements of a Test Method

The Quintity TestFramework – Getting Started Guide
Page 10 of 11
Setup and Teardown methods – The class virtual methods provide convenient a means of
sharing setup routines among test methods. Teardown is the post-execution equivalent.
These methods are optional for the test method
TestResult – Each QTF derived test class has a member property TestResult which is of type
TestResult enumeration (i.e., “Pass”, “Fail”, “Error”, “DidNotExecute” or “Unknown”).. A
coded test method sets the property or return value which subsequently determines the
test step’s test result. Each call to a test method resets the property to its default value of
“Pass”.
TestMessage – In addition to a TestResult value, each test class has TestMessage property.
It is a string value that is reset prior to each test method execution. The message is
available to return meaningful execution information to the test client (e.g., the
TestEngineer).
TestAssert static methods – The framework contains an Assert class with multiple
verification methods to test true/false propositions (e.g., IsTrue, IsFalse, IsNull, etc.). The
TestAssert class throws a TestAssertFailedException should the assertion fail.
Example: QTF.TestAssert.IsTrue(param3, "This is a sample assertion.");
TestCheck static methods – The TestCheck static methods (e.g., IsTrue, IsFalse, IsNull, etc.)
provide a means of verifying multiple conditions while continuing to execute the test code
(Unlike an TestAssert which can immediately stop execution). TestCheck objects are
collected during execution. A single TestCheck failure within the collection will always cause
the test method to fail regardless of whether the TestResult property is value is proactively
set subsequently in the method.
Example: QTF.TestCheck.IsTrue("Test of param3", param3, "This is a sample
TestCheck.");
TestTrace static methods – The class TestTrace contains methods that generate runtime
trace information that can be captured by listening clients for further processing.
Example: TestTrace("Connection to web service...");
Test Properties – The TestProperties object is a dictionary collection of key/value properties.
A property’s value can be accessed at runtime by its unique name (the key). The TestProperties
collection is globally accessible; however the scope of any given property is dependent upon
where the property is declared. A property can be declared at a number of locations:
The test configuration file – All properties set in the test configuration are globally
accessible during runtime execution of the initial test suite.
Test suite definition - Properties can be set as part of the test suite definition. These
property values are visible to all child test suites and test cases of the suite. Properties
The Quintity TestFramework – Getting Started Guide
Page 11 of 11
set as part of a test suite definition are not visible to parent suites (upon return from
child suite execution) or sibling suites.
Test case definition – Similarly to properties set during test suite definition, properties
set during test case definition are visible to all the test case’s child test steps. Upon
completion of the test cases execution, the properties are no longer visible to parent
test suite or sibling test cases.
Runtime definition – Properties can also be set at execution runtime. All test classes
inherit the base class’s SetProperty method which adds the key/value property pair to
the TestProperties collection. The property is only visible to sibling test steps.
