Installation Instructions: R And RStudio Guide
User Manual:
Open the PDF directly: View PDF ![]() .
.
Page Count: 10
Installation Instructions: R and RStudio
Pieter C. Schoonees & Andreas Alfons
06 September 2018
Overview
This document walks you through installing the required software on your laptop before the first lecture.
We will use the statistical programming environment R(R Core Team 2018), together with the integrated
development environment (IDE) RStudio Desktop (RStudio Team 2018), in this course. Both of these are
available for free from their respective websites. Additionally, there are some add-on packages that will need
to be installed on your system.
You have to install both R and RStudio before the first class. Preferably, check that you have the latest
versions of both of these. Below you will find instructions on installing these components. Please make sure
you go through these steps before attending the first class. In case you are not able to complete the steps
below successfully, please come to the first class 15 minutes earlier so that we can try to sort it out.
Existing Installations
Skip this section if this is the first time you are installing R.
If you have already installed R and/or RStudio earlier, it is better to upgrade to the latest versions of all
software mentioned here. One caveat with upgrading your version of R is that upgrading to the latest major
version may require you to reinstall your packages. For example, when upgrading from R 3.4.4 to R 3.5.0 you
will need to reinstall add-on packages, but not when upgrading from R 3.4.3 to R 3.4.4. If you have (say) the
second latest version of R and is currently busy using it for an important project, it may be best to wait
until you have finished your project.
There are generally no downsides to updating RStudio.
At the time of writing, the latest versions are R 3.5.1 (nicknamed “Feather Spray”) and version 1.1.456 of
the RStudio Desktop IDE. If you have a much older version of R installed, you may have issues installing
new packages since these often require the latest version of R. We are going to be installing several add-on
packages during this course, and there will not be time in class to troubleshoot installation issues. If you
want to be sure that you won’t fall behind because of such issues, take the time to make sure you have the
latest versions.
In case you are not able to obtain the latest versions, for example because you are not the administrator
of your laptop, you are advised to check whether you can install the required add-on R packages before
coming to each class. For troubleshooting, contact your system administrator timeously, and see the section
Administrative Rights below.
1

You can update the packages you have already installed using the ‘Update’ button under RStudio’s ‘Packages’
tab.
Quick Version
If you don’t want to read the detailed installation instructions that follow, install R and RStudio Desktop
now directly using:
•https://cloud.r-project.org/
•https://www.rstudio.com/products/rstudio/download/
Thereafter, continue from the section Installing Packages to verify that you are ready for class.
Installing R
Open the R homepage by browsing to https://www.r-project.org/. You should see the web page resembling
Figure 1:
Figure 1: The R Project home page.
To download R, click on the ‘CRAN’ link on the top left of the sidebar (Figure 1) to access the Comprehensive
R Archive Network (CRAN), which is how R and the majority of its packages are distributed. You may see
the webpage page as in Figure 2asking you to choose a CRAN mirror, which is just a server containing a
copy of CRAN.
Simply click the first link under 0-Cloud (https://cloud.r-project.org/) as in Figure 2:
2
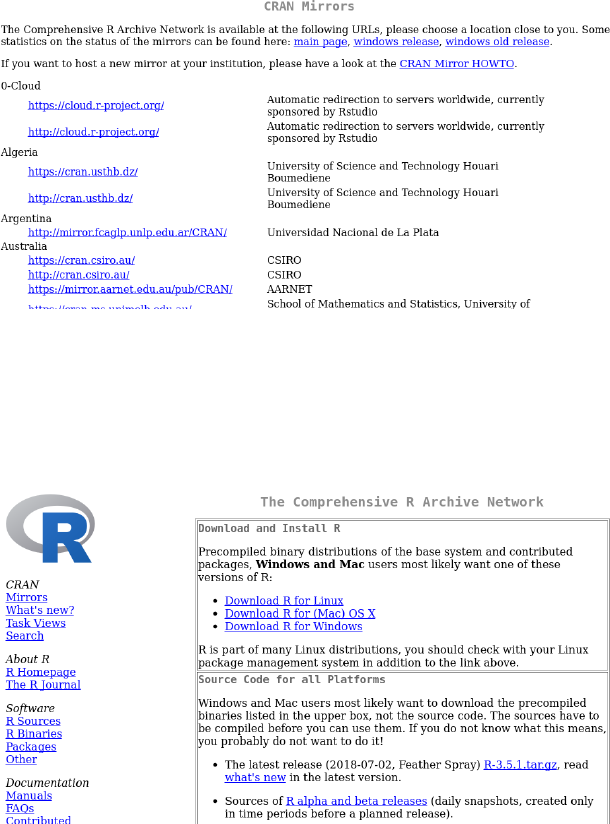
Figure 2: Webpage listing all CRAN mirrors.
This leads you to the download page for the R installer, displayed in Figure 3. Choose the download link for
your respective platform (either Linux, Mac OS X or Windows):
Figure 3: The main download page on CRAN.
Click on the appropriate download link for your operating system. Separate instructions for the different
operating systems follow below.
Windows
After clicking on the ‘Download R for Windows’ link, you will see the page in Figure 4:
3
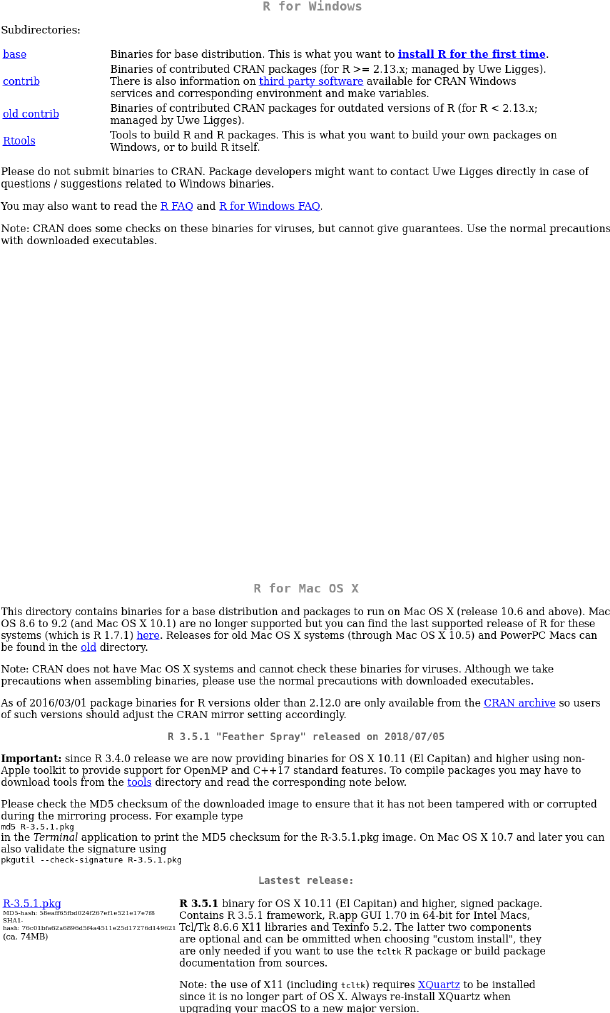
Figure 4: The Windows download page on CRAN.
Click on the ‘base’ (or ‘install R for the first time’) link, download the ‘.exe’ Windows installer and install R
as you would normally install a Windows program (the installation defaults will suffice). Once the process
has completed, proceed to installing RStudio (see below).
Mac OS X
On Mac OS X, follow the link ‘Download R for (Mac) OS X’. You will land on the page listed in Figure 5:
Figure 5: The Mac OS X download page on CRAN.
Download the ‘.pkg’ binary file and install it by double-clicking on it and working through the prompts as
usual. Once the process has completed, proceed to installing RStudio (see below).
4
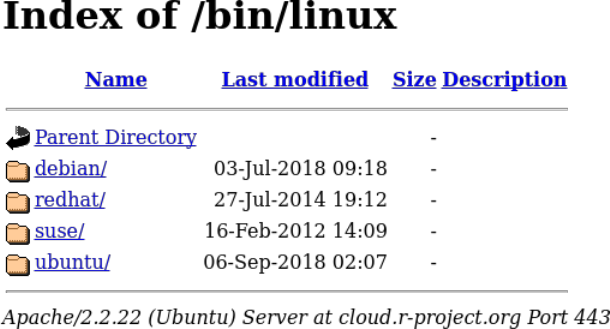
Linux
If you are running Linux, click on the ‘Download R for Linux’ link. You will land on the page shown in
Figure 6:
Figure 6: The Linux download page on CRAN.
Pick the appropriate Linux flavour and proceed accordingly. You should be able to proceed on your own from
here using the instructions provided on the respective web pages. Once the process has completed, proceed
to installing RStudio (see below).
Installing RStudio Desktop
RStudio is an IDE that integrates with R to provide a more user-friendly interface and additional functionality.
To install RStudio Desktop on your laptop for free, visit https://www.rstudio.com. You should see the page
displayed in Figure 7:
5
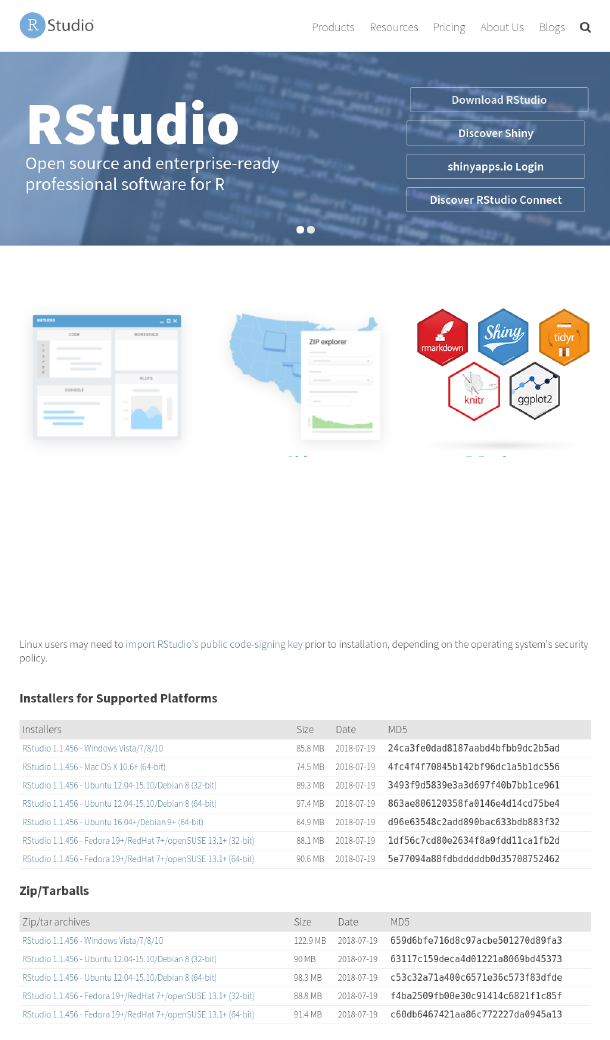
Figure 7: The RStudio home page.
Click on ‘Download RStudio’ and scroll down until you see the available installers for RStudio Desktop, as in
Figure 8:
Figure 8: The RStudio download page after scrolling down.
Choose the correct installer link for your operating system from the top list (most modern computers are
64-bit), and save the installer to disk. Open this installer and follow the prompts to complete the installation
of RStudio Desktop.
Once your installation has finished, you can open RStudio as you would any other application. In the console
pane on the left, next to the ‘>’ (shown here but not typed), type the following and hit Enter to see that
6
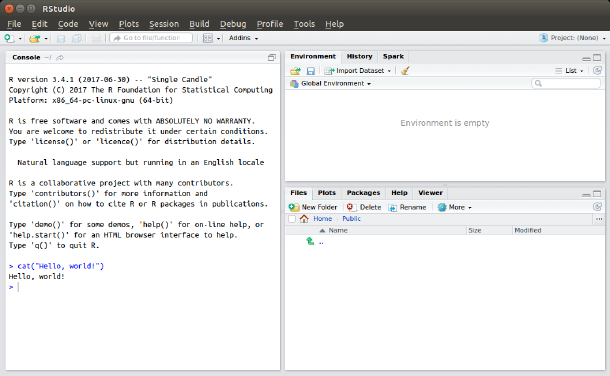
everything works:
> cat("Hello, world!")
Your view should look something like that shown in Figure 9(there will be small unimportant differences
depending on your platform and R version). You have just executed your first R command!
Figure 9: A typical RStudio window after executing the code from the text.
Installing Packages
R packages are collections of code that extend the capabilities of the standard R installation. They form a
very important part of the R ecosystem, and we will make use of extension packages throughout this course.
Packages are typically installed from CRAN by default (which requires an internet connection), but you can
also install packages from other sources (local files, GitHub, and so forth).
To verify that you are able to install packages when required, we will install a popular collection of packages
known as the
tidyverse
. Proceed by selecting the ‘Packages’ tab in the bottom right pane in RStudio, and
click on the ‘Install’ button. At the prompt, type ‘tidyverse’ as in Figure 10 and click ‘Install’.
The first time you install a package, you may be asked whether you want to compile the packages from its
sources or not. You are advised
not
to compile packages upon installation unless you have a good reason
to do so. In software terms, using the binary (pre-compiled) versions are advised. You may also encounter
a prompt asking whether you would like to create a personal library (folder / directory) for installing the
packages in. You should click ‘Yes’ to proceed.
Once you have started installing the packages, you should see several lines of output in your console flashing
by as the packages are installed. When the installation has finished, you will see that the console again
displays the command prompt ‘>’.
7
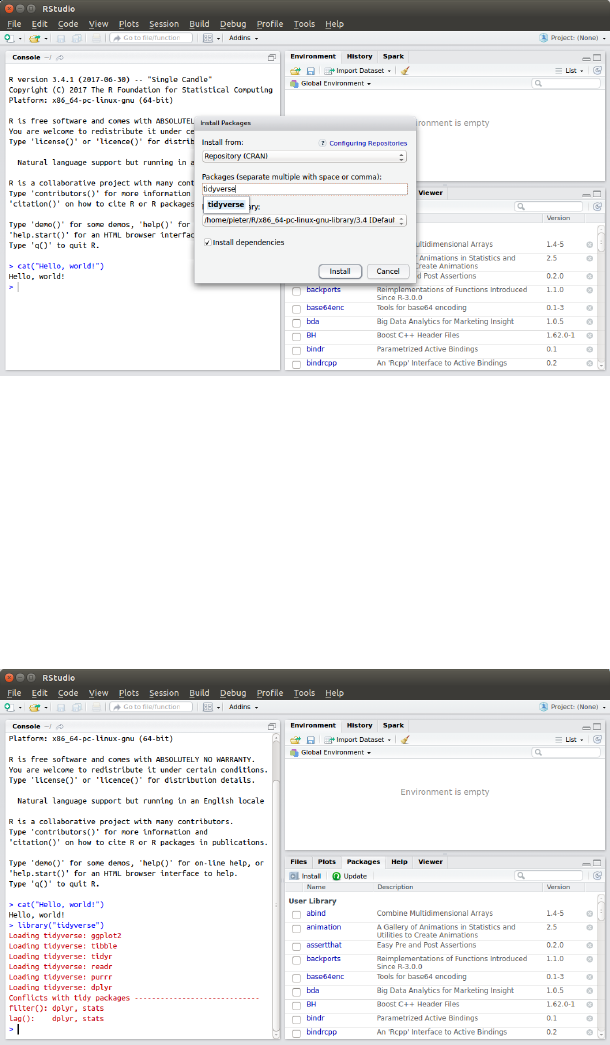
Figure 10: Installing the tidyverse collection of packages.
To verify that the packages have been installed successfully, type the following code in the console next to
the prompt, and hit Enter.
> library("tidyverse")
You should see output similar to that in Figure 11 (your exact output may differ depending on your operating
system and software versions). That is it: The tidyverse packages have been successfully installed!
Figure 11: RStudio after loading the tidyverse collection of packages.
Installing from Local Files
It is also possible to install packages from local archive files. To do that, select ‘Package Archive File’ in the
‘Install from:’ box in the RStudio window, browse to the required file, and click ‘Install’ – see Figure 12. The
archive file will have a ‘.zip’ extension on Windows, ‘.tgz’ on Mac OS X, and ‘.tar.gz’ on Linux. You only need
8
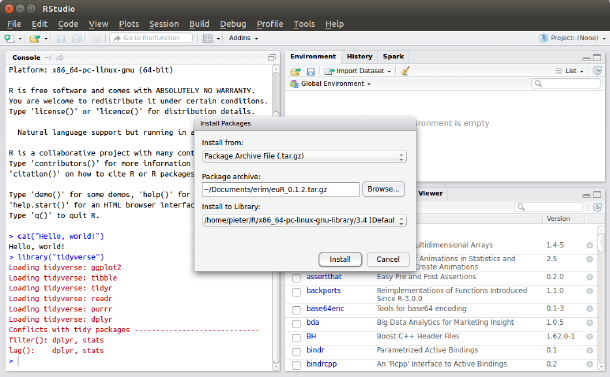
to use the single correct archive file to install the package on your computer, and you should
not
extract
(unzip) the archive file before following the installation procedure outlined in Figure 12.
Figure 12: Installing packages from local archive files using RStudio.
When installing from a local archive file, all the packages that the new package depends on must already be
installed on your system. This means that you may need to install several other packages before you can
install such a package. Therefore, you should only install packages in this manner which we have supplied to
you (if any) in this format.
Downloading Files Through a Browser
Note that some browsers (Safari, Chrome, . . . ) will open and resave files when you click on them for download
without you being aware of it. This is not ideal, since the file may be changed in the process. It is advisable
to always download files by right-clicking and selecting “Save link as” instead of simply clicking on them.
This is to avoid confusing errors that can result on some computers. It applies to files downloaded from
systems such as Canvas or Blackboard, including package source code and CSV data files.
Administrative Rights
To install packages, you must have administrative rights allowing you to make changes to your computer’s file
system. If you are using a computer you own, that is almost certainly the case, although on some Windows
systems R must be ‘Run as Administrator’ when installing packages. In case your university or company
issued the computer to you, you might not have the rights needed to install packages, or the default settings
may not work. This may require you to customize the location to which packages are installed the first time
that you install a package. If the package installation method above fails, and you cannot resolve it yourself
or with the help of a system administrator, please come to class 15 minutes earlier so that we can help you
out, if indeed it is possible.
9
One thing to try would be to explicitly state where you want to install the package on the file system. This
can be done when installing the package from the command line, as in executing the following code from the
R console in RStudio:
> install.packages("tidyverse", lib = "/path/to/directory")
Here
/path/to/directory
must be replaced by the path of a location on your file system where you are
allowed to make changes (such as to your Documents directory). Always use
/
and not
\
, especially on
Windows.
References
R Core Team (2018). R: A language and environment for statistical computing. R Foundation for Statistical
Computing, Vienna, Austria. URL https://www.R-project.org/.
RStudio Team (2018). RStudio: Integrated Development for R. RStudio, Inc., Boston, MA URL http:
//www.rstudio.com/.
10
