RAPTOR Installation Instructions
User Manual:
Open the PDF directly: View PDF ![]() .
.
Page Count: 6

RAPTOR Phase 1 Proof of Concept Installation Page 1 of 6
SAN Business Consultants Open-source VA Project
Basic RAPTOR Installation Instructions
Last updated 20120321 by Frank Font of SAN Business Consultants
Contents
Baseline Equipment ...................................................................................................................................... 2
Inventory for Installation .............................................................................................................................. 2
Core Framework Software ........................................................................................................................ 2
Recommended Installer for Core Framework Software ....................................................................... 2
RAPTOR Application Software for Installation .......................................................................................... 2
Additional Recommendations for Developers .......................................................................................... 3
Installation Procedure ................................................................................................................................... 3
Developer Tools Installation ..................................................................................................................... 3
Framework Installation ............................................................................................................................. 4
Application Installation ............................................................................................................................. 4
RAPTOR Database ................................................................................................................................. 4
RAPTOR Application Code ..................................................................................................................... 5
RAPTOR Sample Protocol Library .......................................................................................................... 5
Configuration Adjustments ....................................................................................................................... 5
Basic Tips and Tests....................................................................................................................................... 6
How to Create an Installation Image ............................................................................................................ 6

RAPTOR Phase 1 Proof of Concept Installation Page 2 of 6
SAN Business Consultants Open-source VA Project
Baseline Equipment
The RAPTOR phase 1 proof of concept application has been installed and successfully demonstrated in
the following equipment configurations:
VA provided Windows XP laptop environment – The RAPTOR developer environment is a
Windows XP laptop running IE7 already installed with a MDWS web service on a locally hosted
virtual machine. The MDWS webservice is available at its own IP address.
o RAPTOR Application launch-able as http://localhost/raptor/
VA provided Windows XP Cloud sandbox – The RAPTOR developer environment is a state-full
virtual Windows XP session running IE8 with access to a shared MDWS web service not hosted
on the virtual machine. The MDWS webservice is available on localhost port 80.
o RAPTOR Application launch-able as http://localhost:8080/raptor/
Inventory for Installation
The RAPTOR software is still under development. The following sections identify the basic elements and
tools of a developer configuration.
Core Framework Software
The following core environment software is open-source and freely available for download. The
versions tested with RAPTOR are those shown here, but newer versions should generally work too
unless they break backward compatibility.
Drupal 7.9
My SQL 5.5.x
PHP 5.3.x
Recommended Installer for Core Framework Software
bitnami-drupal-7.9-x-windows-installer to install Drupal 7.9, My SQL 5.5, and PHP 5.3
RAPTOR Application Software for Installation
The RAPTOR application is installed into an appropriately configured environment by installing the
contents of the files described in Table 1.
Table 1 - Application Installation Files
Filename
Nickname
Description
raptor_r1_app_files20120319h.7z
RAPTOR_app_files.7z
Core RAPTOR phase 1 proof of concept
application files

RAPTOR Phase 1 Proof of Concept Installation Page 3 of 6
SAN Business Consultants Open-source VA Project
Filename
Nickname
Description
Entire_raptor_db20120316b.sql
RAPTOR_db.sql
The entire raptor_db database needed by
the RAPTOR phase 1 proof of concept
application.
protocolLibrary20120317a.7z
ProLib.7z
A sample Protocol Library website for use
by the RAPTOR protocol library. Contains
a few sample scanned protocols.
The nickname in the table above is referenced elsewhere in this document instead of the actual
filename.
Additional Recommendations for Developers
These items are not required to run RAPTOR on a machine. However, they are useful to have during
development and refinement of the application on a developer machine.
Filezilla 3.5.x
Mozilla Firefox 8.0
Netbeans 7.0.1 IDE with PHP support
7-Zip 9.20
Paint.NET 3.5.x
Installation Procedure
If you are configuring a laptop just for a RAPTOR user, then you can skip the Developer Tools Installation
section and go straight to Application Installation section.
Developer Tools Installation
Unless otherwise specified, take the default options during installation of each tool and component.
1. Install FileZilla via windows installer
2. Install the Netbeans IDE via windows installer
a. After installation, run Tools->Plugins and install the following…
i. PHP
ii. PHP Documentor Tag Help
iii. PHP-Manual
iv. PHP Symfony Framework
v. PHP Zend Framework
3. Install 7-Zip via 7z920.exe installer
a. This tool can open the *.7z files.
4. Install Mozilla Firefox
a. Do not set it as the default browser when prompted
5. Install Paint.NET via the windows installer
RAPTOR Phase 1 Proof of Concept Installation Page 4 of 6
SAN Business Consultants Open-source VA Project
Framework Installation
Install Drupal, MySQL, and PHP by any means you wish. However, phase 1 developer team did so by
running the by running the open-source BITNAMI 7.9 installer for convenience. The instructions in this
document assume you have installed the tools the same way the RAPTOR team did.
1. Follow wizard prompts until completion
a. Login
i. admin
ii. apass
b. Site name
i. RAPTOR
c. Email support (No)
2. Verify that BITNAMI welcome page shows up with following URL
a. http://localhost
b. On the Welcome screen, click the link for phpMyAdmin and verify you can log in as
admin/apass
3. IMPORTANT: Create a backup of the following file:
i. C:\Program Files\BitNami Drupal
Stack\apps\drupal\htdocs\sites\default\settings.php
b. This file has the privileged database access password which you will need later!
i. Open the file and write down the password for the bitnami database login.
(Usually a random string of 10 characters.)
Application Installation
The application can be run in a properly configured environment after installing the raptor_db database,
the raptor web application, and a suitable protocol library such as the sample provided as part of this
project.
RAPTOR Database
1. Save the RAPTOR_ db.sql file to the c:\temp folder
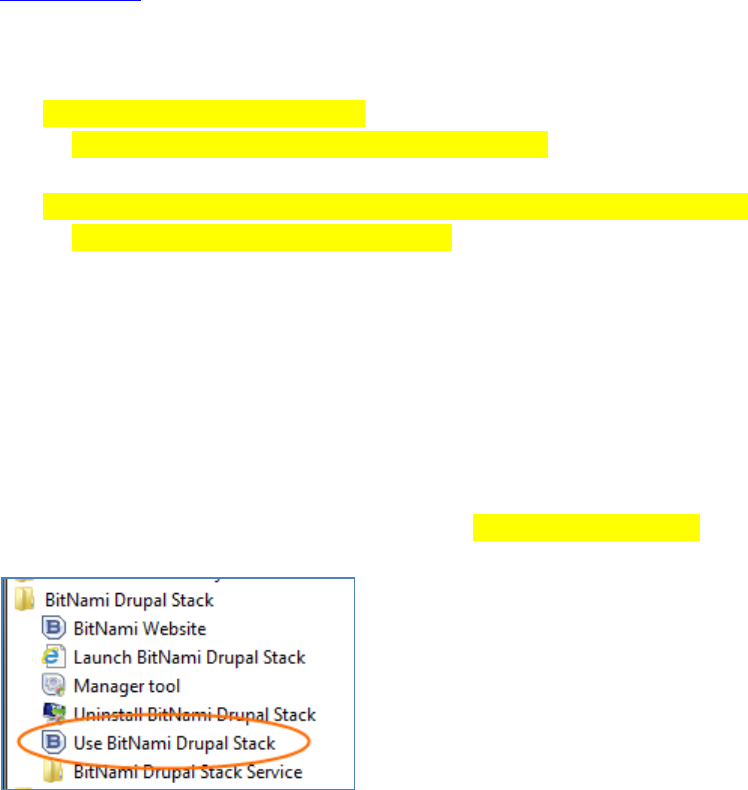
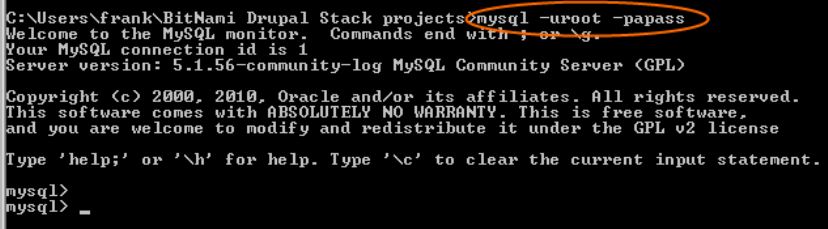
2. Next we will import the new database and its data using the command line mysql tool. (The
SQL files are too big to load using phpMyAdmin tool.)
a. Login to mysql tool as root with password apass
RAPTOR Phase 1 Proof of Concept Installation Page 5 of 6
SAN Business Consultants Open-source VA Project
b. We will DROP the existing database (CAUTION: Do this ONLY if you have already
installed the raptor_db database and want to replace it from scratch – all existing data
WILL be lost!)…
i. drop database raptor_db
c. We will IMPORT the new database…
i. source c:\temp\RAPTOR_ db.sql
RAPTOR Application Code
Install the RAPTOR application code so that it creates a raptor folder
1. Extract all contents of RAPTOR_app_files.7z into the following folder:
a. C:\Program Files\BitNami Drupal Stack\apps\
b. Make sure the files are installed into an raptor folder
RAPTOR Sample Protocol Library
Install a RAPTOR protocol library so that it creates a protocolLibrary folder
1. Extract all contents of ProLib.7z into the following folder:
a. C:\Program Files\BitNami Drupal Stack\apps\
b. Make sure the files are installed into an protocolLibrary folder
Configuration Adjustments
C:\Program Files\BitNami Drupal Stack\apache2\conf\httpd.conf
o Add these entries…
Include "C:/Program Files/BitNami Drupal Stack/apps/raptor/conf/drupal.conf"
Include "C:/Program Files/BitNami Drupal
Stack/apps/protocolLibrary/conf/content.conf"
C:\Program Files\BitNami Drupal
Stack\apps\raptor\htdocs\sites\all\modules\raptor_blocks\datalayer\config.php
o Point to the appropriate MDWS webservices
C:\Program Files\BitNami Drupal
Stack\apps\raptor\htdocs\sites\all\modules\raptor_blocks\datalayer\config\general.cfg
o Point to the appropriate MDWS web services and protocolLibrary
RAPTOR Phase 1 Proof of Concept Installation Page 6 of 6
SAN Business Consultants Open-source VA Project
Basic Tips and Tests
Raptor will prompt you for a login if you clear the session and cache tables.
use raptor_db;
delete from cache;
delete from sessions;
The login appears at the bottom of the webpage in the “Developer Area”. Because of single sign-on the
production RAPTOR will NEVER prompt a user for a login.
Ensure the basic Drupal admin panel works by logging into it as admin with password apass
Recommend using Firefox so you can use IE to log into RAPTOR
Ensure the basic PHPMyAdmin works by logging into it as root with password apass
Log into RAPTOR as a Radiologist DemoVAUser with password demo.
Standard VA browser for the application is IE
How to Create an Installation Image
An installation image is simply an installable copy of the files and database from a working RAPTOR
system. This is how to create the files so the above instruction can be used to install it.
1. Create a compressed file of the entire apps raptor folder into a file called RAPTOR_app_files.7z
2. Create an extract of the raptor_db into a file called RAPTOR_db.sql using phpMySQL
3. Create a compressed file of the entire apps protocolLibrary folder into a file called
RAPTOR_app_files.7z
