Mills Partitions Revit Families Overview README Bradley Partition Instructions
User Manual:
Open the PDF directly: View PDF ![]() .
.
Page Count: 12
1 8/16/2010
Mills Partitions Revit Families Overview
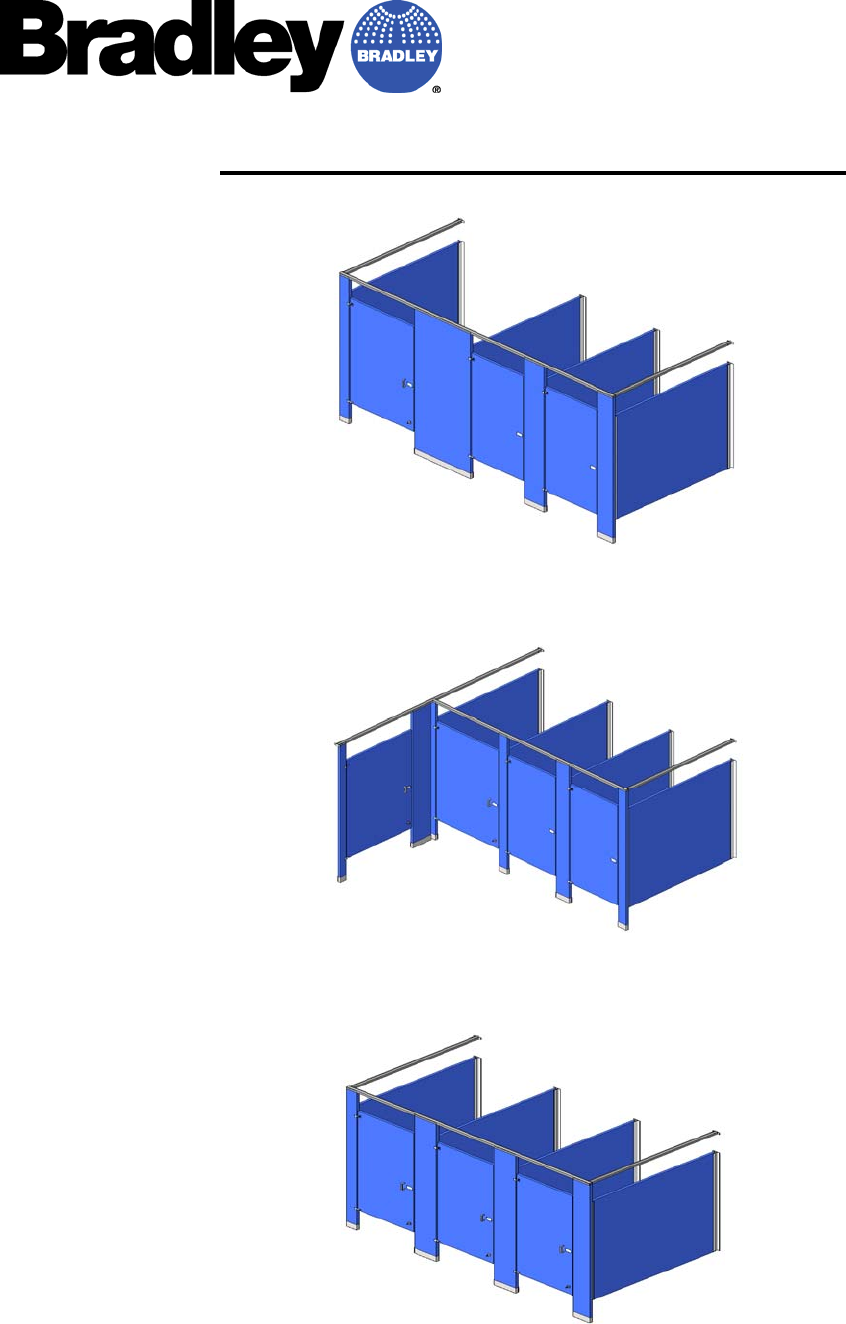
ADA and Standard Stalls Family
Alcove ADA, Optional AMB, and Standard Stalls Family
Standard Stalls Family

2 8/16/2010
***The Mills partitions Revit family files are designed to accommodate general partition restroom layouts
which can be used in a Building Information Model (BIM). This can be best accomplished by combining one or
more families and controlling several parameters within each family model until the desired result is achieved.
This document provides several common example layouts and the parameters used to create the project layout.
This document should be used as reference guide only as actual layout configurations may vary from those
shown below. The baked enamel overhead braced partition families are shown in this document. Other
partition Revit families behave similarly when adjusting parameters.***
Overview:
Bradley currently provides three different Autodesk Revit families (per material and style) to facilitate the
general construction of partition layouts:
1. ADA and Standard Stalls for layouts requiring an ADA accessible stall and standard stalls.
2. Alcove ADA, Optional AMB, and Standard Stalls for layouts requiring an ADA accessible stall in an alcove
configuration, an ambulatory stall, and standard stalls.
3. “n Stalls” for layouts requiring only standard stalls or layouts not requiring ADA accessible stalls.
Within each family, the following construction parameters can be controlled:
(Note: Each of the three families contain their own unique parameters. One family may not have the exact same
parameters listed as another. For example, the n Stalls family will not have parameter options such as AMB
stall).
Right Panel: When this is selected, a panel will be visible at the rightmost end of the partitions. When
unselected, the panel disappears allowing space for a wall structure.
Left Panel: When this is selected, a panel will be visible at the leftmost end of the partitions. When unselected,
the panel disappears allowing space for a wall structure.
Standard Stalls: This changes the number of standard stalls in a given layout. The number of stalls includes the
ambulatory stall when the AMB Stall parameter is selected (see below).
Continuous brackets: When this is selected, full height continuous brackets appear in the family model. When
not selected, standard stirrup brackets appear in the family model.
AMB Stall: When this is selected, a 36” clear ambulatory stall with an outswinging door appears adjacent to the
ADA alcove compartment. When not selected, the ambulatory stall is changed to a standard stall.
Outswing Door ADA: When this is selected, the alcove ADA door will swing outward. When not selected, the
door swings inward.
Door opening Angle: Door angles can be controlled by changing this value. All doors in a given family will
update to the same angle value. Setting the value to 0 degrees makes all doors closed.
Outswing Door: When this is selected, the standard door(s) will swing outward. When not selected, the door(s)
swing inward.
3 8/16/2010
In addition to the construction parameters, the dimension parameters may be adjusted to facilitate sizes specific
to your partition stall dimensions. Stall width, stall depths, and door width parameter values may be all is
adjusted.
Examples:
Listed below are several 2-D top view layout examples and the steps/parameters used to create them.
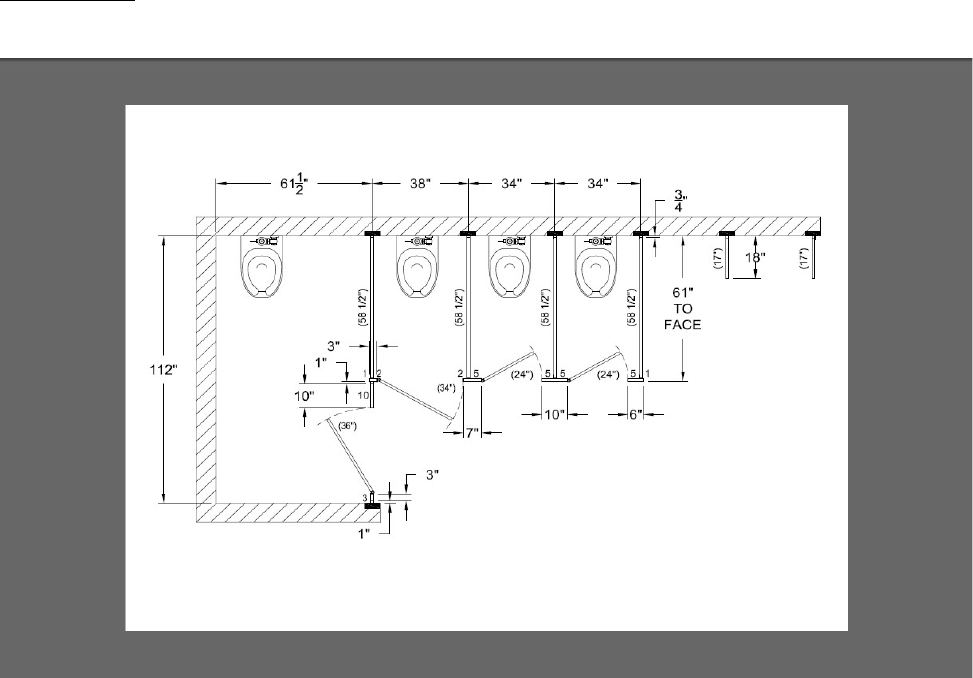
Layout Example 1: Handicap alcove, ambulatory, and two standard stalls:
1. Establish walls of appropriate size and dimensions in your Autodesk Revit project.
2. Load/insert the Partition-Overhead_Braced-Bradley_Corp-Baked_Enamel-
Series_400_Alcove_ADA_Optional_AMB_And_Standard_Stalls.rfa file.
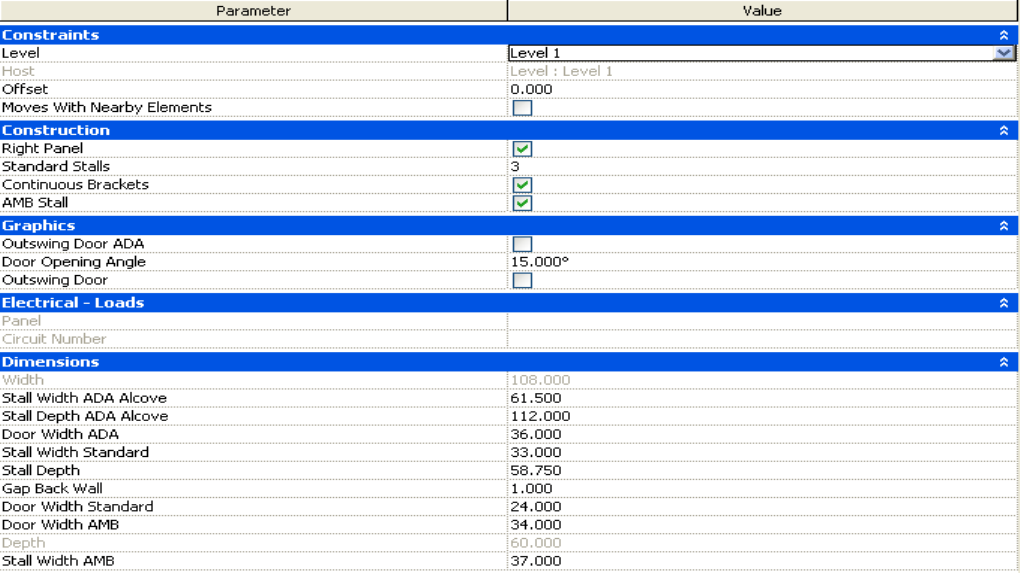
3. Select instance properties and ensure the following are selected:
4 8/16/2010
5 8/16/2010
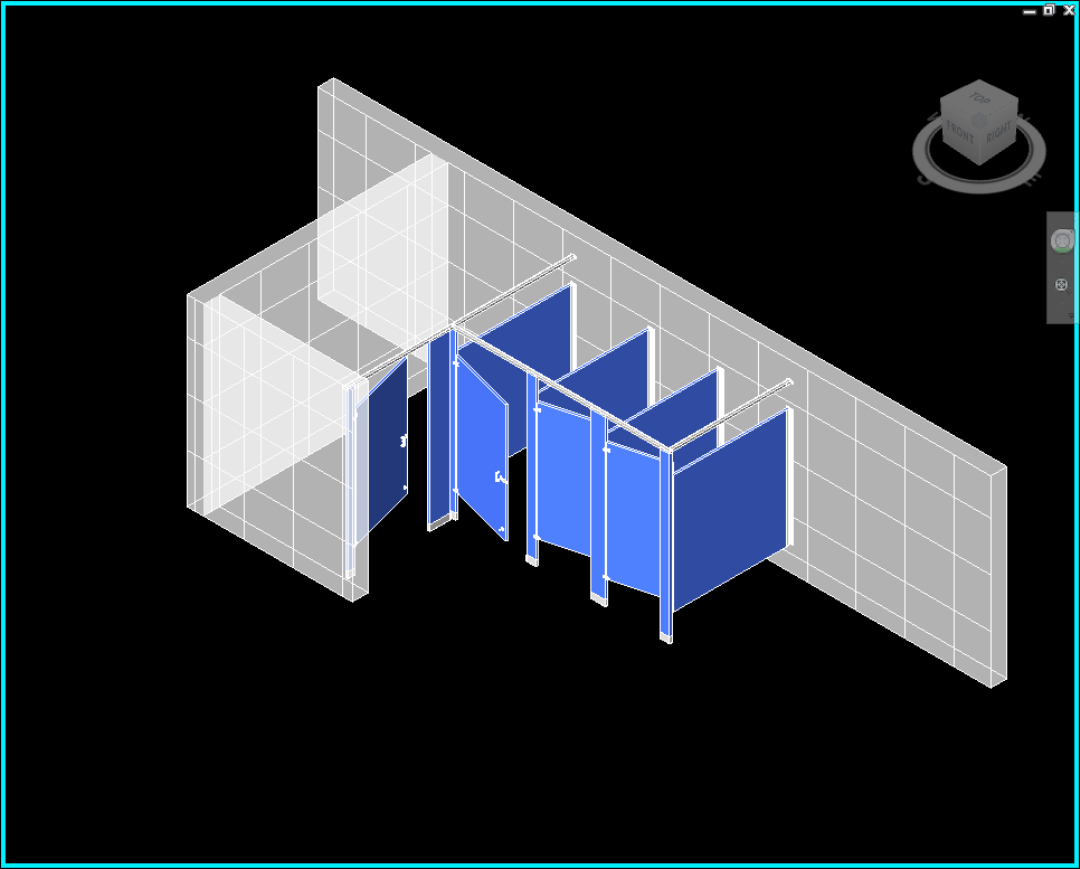
Resulting 3-D view of Revit family for handicap alcove, ambulatory, and two standard stalls:
6 8/16/2010
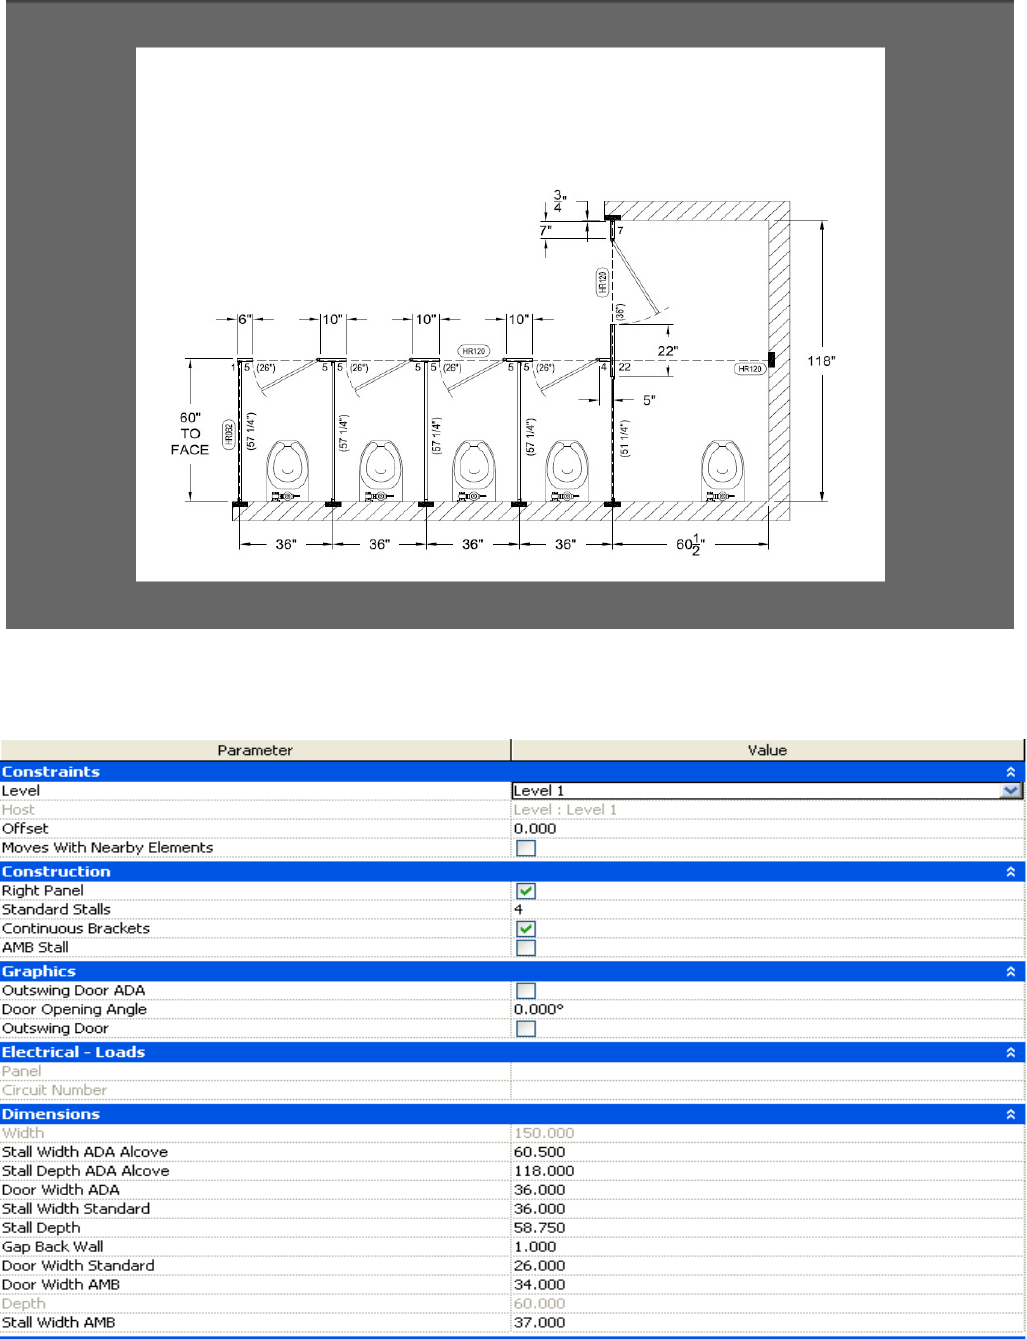
Layout Example 2: Handicap alcove, and four standard stalls:
1. Establish walls of appropriate size and dimensions in your Autodesk Revit project.
2. Load/insert the Partition-Overhead_Braced-Bradley_Corp-Baked_Enamel-
Series_400_Alcove_ADA_Optional_AMB_And_Standard_Stalls.rfa file.
3. Select instance properties and ensure the following are selected:
7 8/16/2010
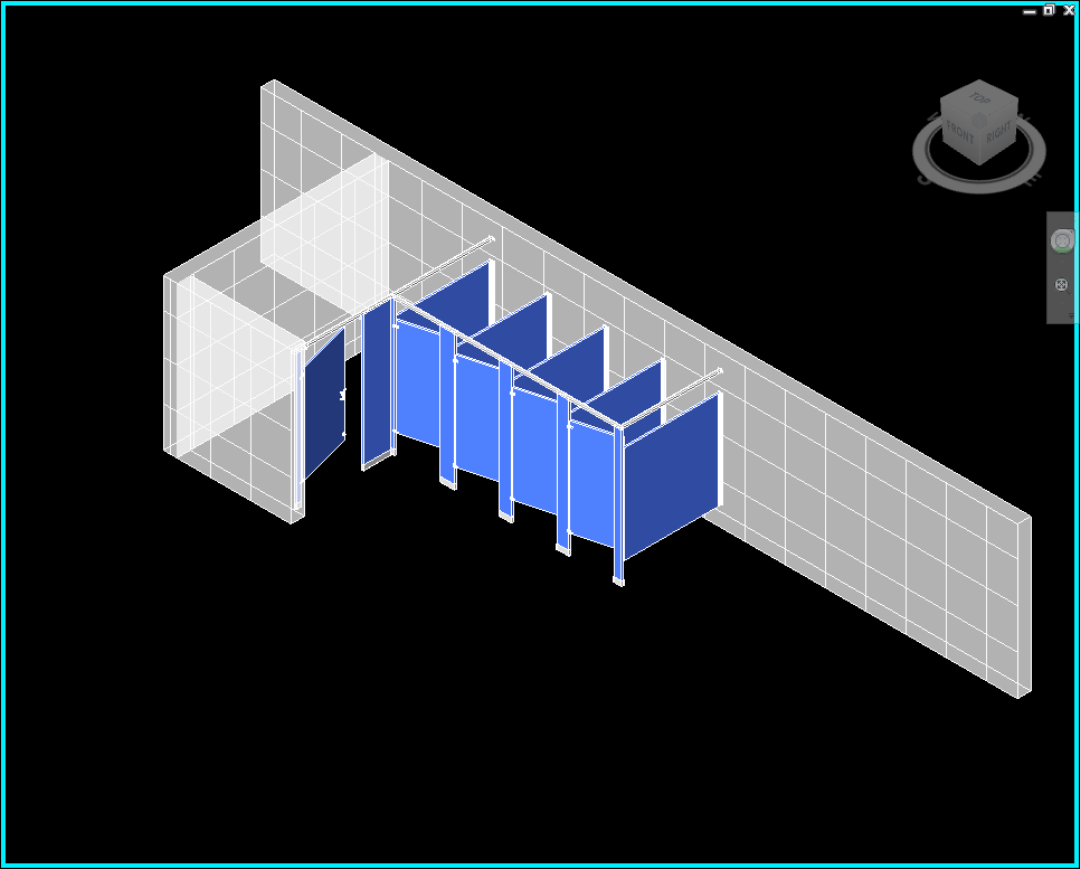
Resulting 3-D view of Revit family for handicap alcove and four standard stalls:
8 8/16/2010
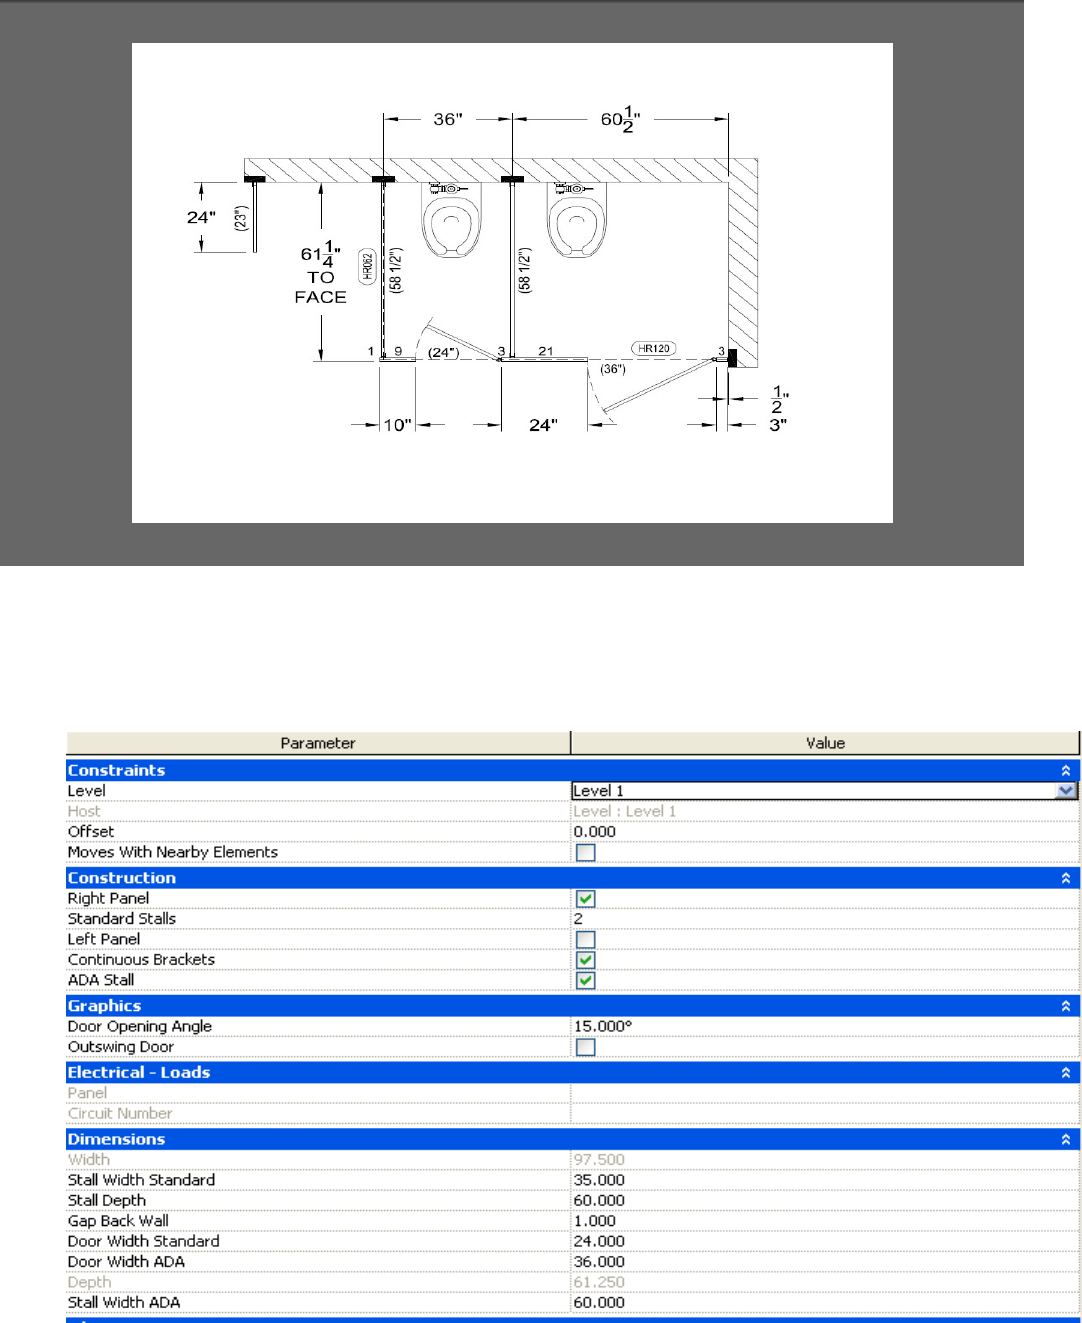
Layout Example 3: Inline handicap and one standard stall open end:
1. Establish walls of appropriate size and dimensions in your Autodesk Revit project.
2. Load/insert the Partition-Overhead_Braced-Bradley_Corp-Baked_Enamel-Series_400 ADA_
And_Standard_Stalls.rfa file.
3. Mirror the family in the project to obtain the correct orientation.
4. Select instance properties and ensure the following are selected:
9 8/16/2010
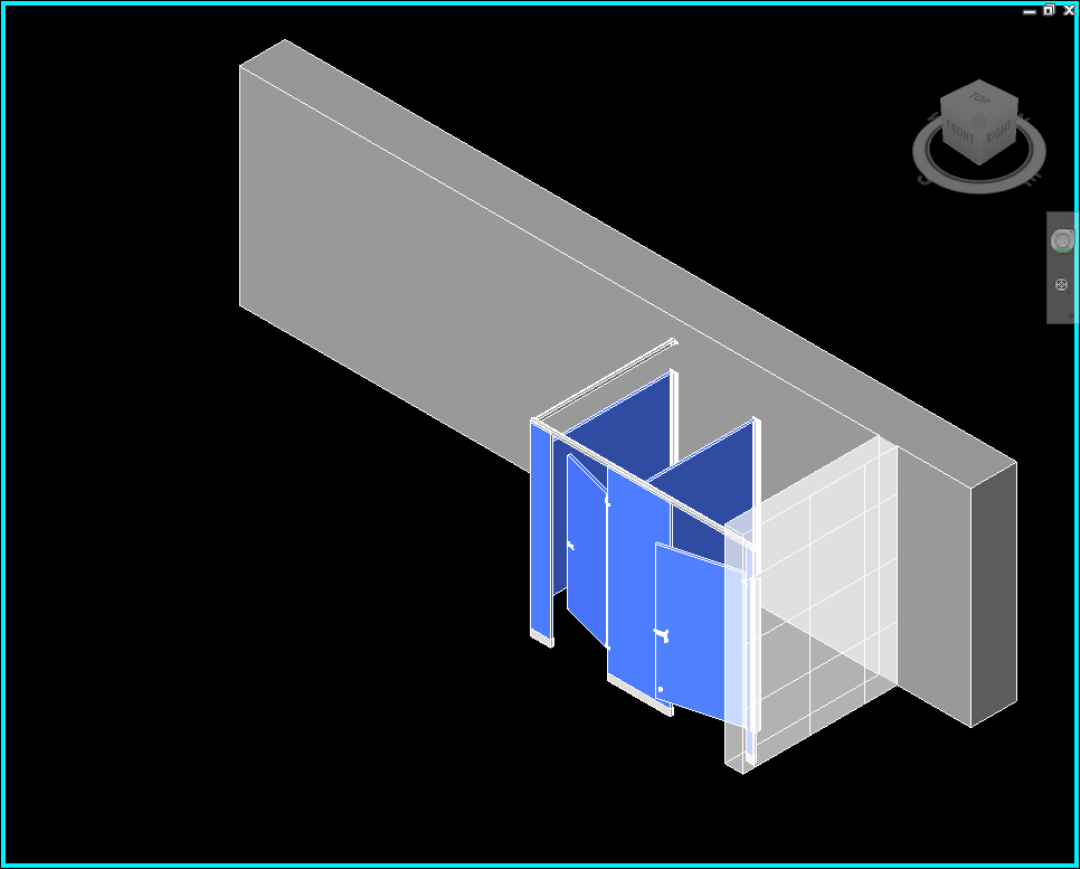
Resulting 3-D view of Revit family for inline handicap, and one standard stall open end:
10 8/16/2010
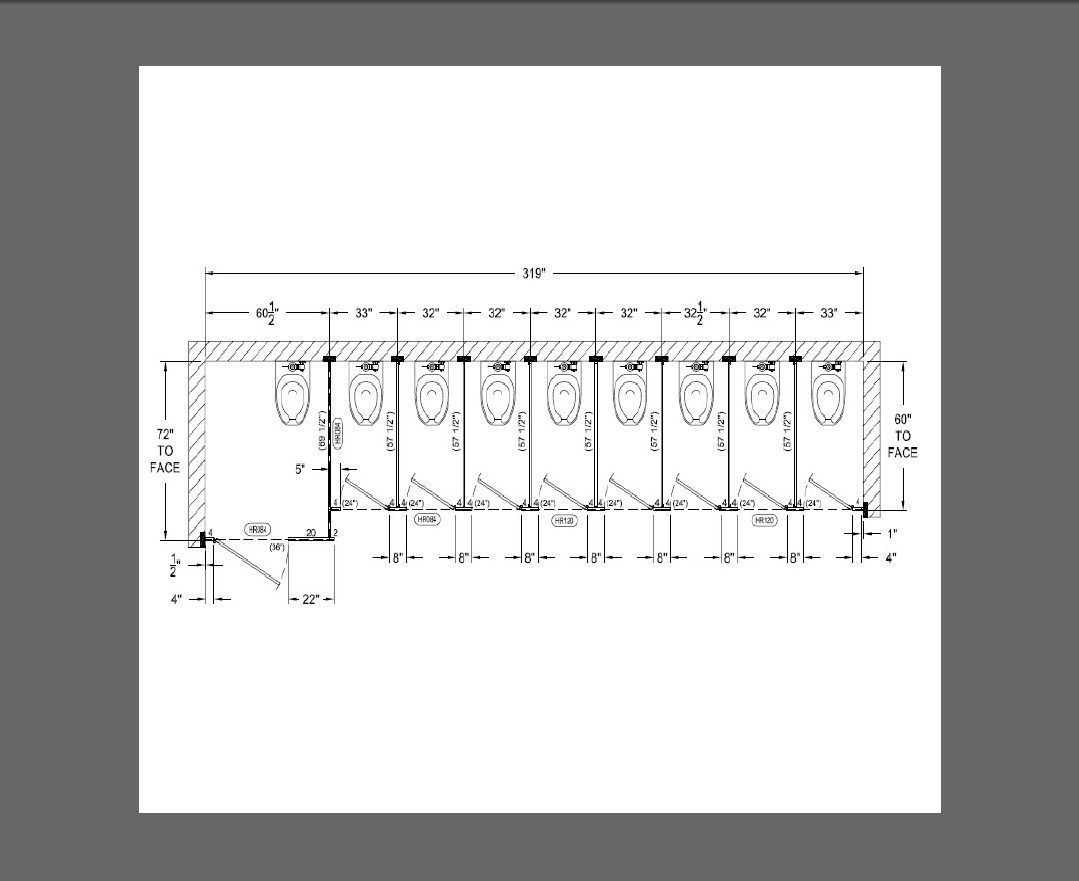
Layout Example 4: Offset handicap with eight standard stalls between walls:
1. Establish walls of appropriate size and dimensions in your Autodesk Revit project.
2. Load/insert the Partition-Overhead_Braced-Bradley_Corp-Baked_Enamel-Series_400 ADA_
And_Standard_Stalls.rfa file. This family is used twice since there is no offset support built
in for the ADA accessible stall.
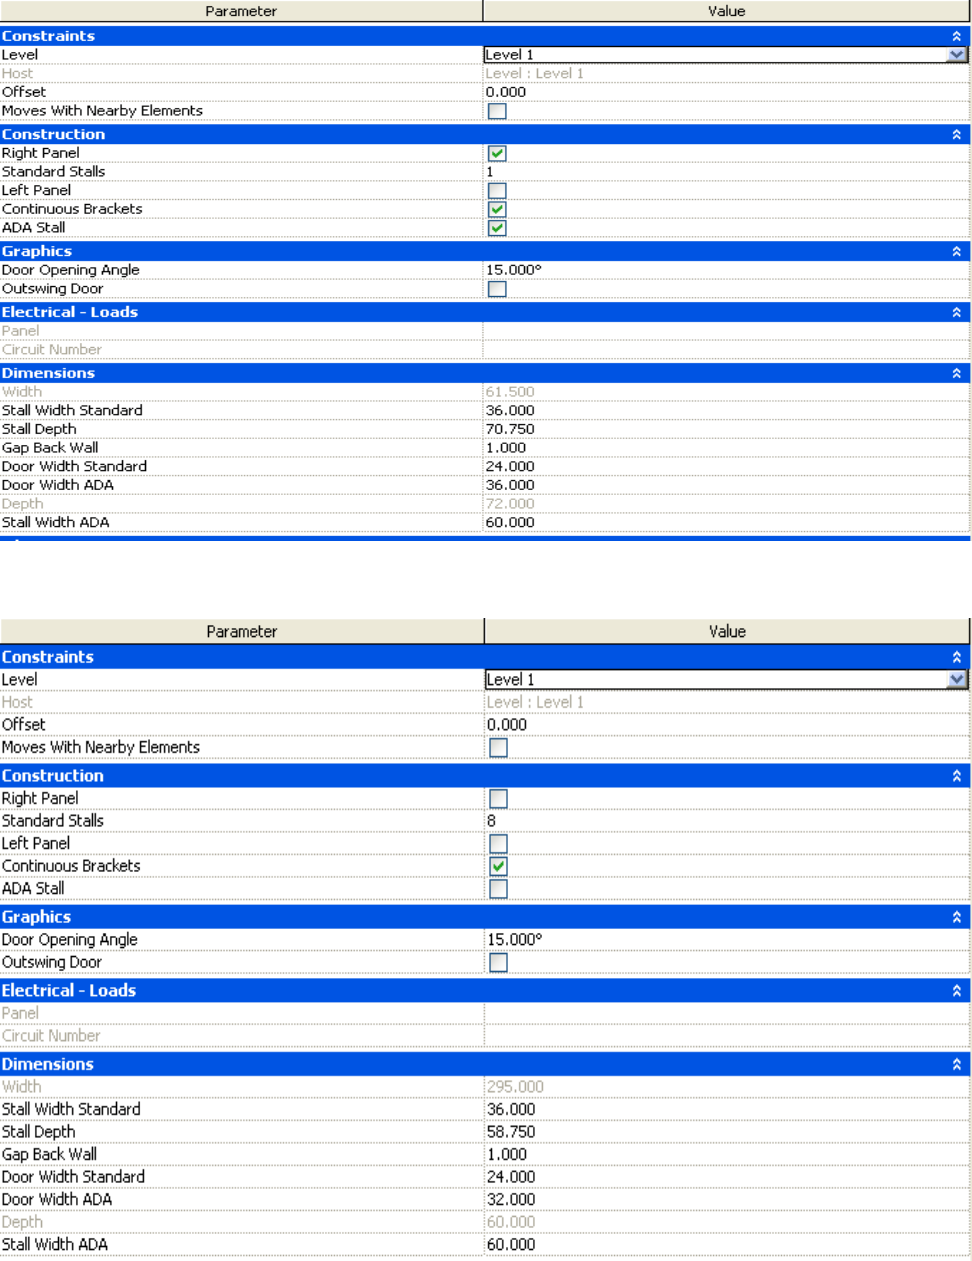
3. Establish the first instance as a single ADA stall with the correct dimensions and left panel
turned off (see instance properties below).
4. Establish the second instance with the ADA stall turned off, as well as the left and right
panels. Place this second instance next to the previous instance.
11 8/16/2010
First Instance - Single ADA Parameters
Second Instance – Non ADA Parameters
12 8/16/2010
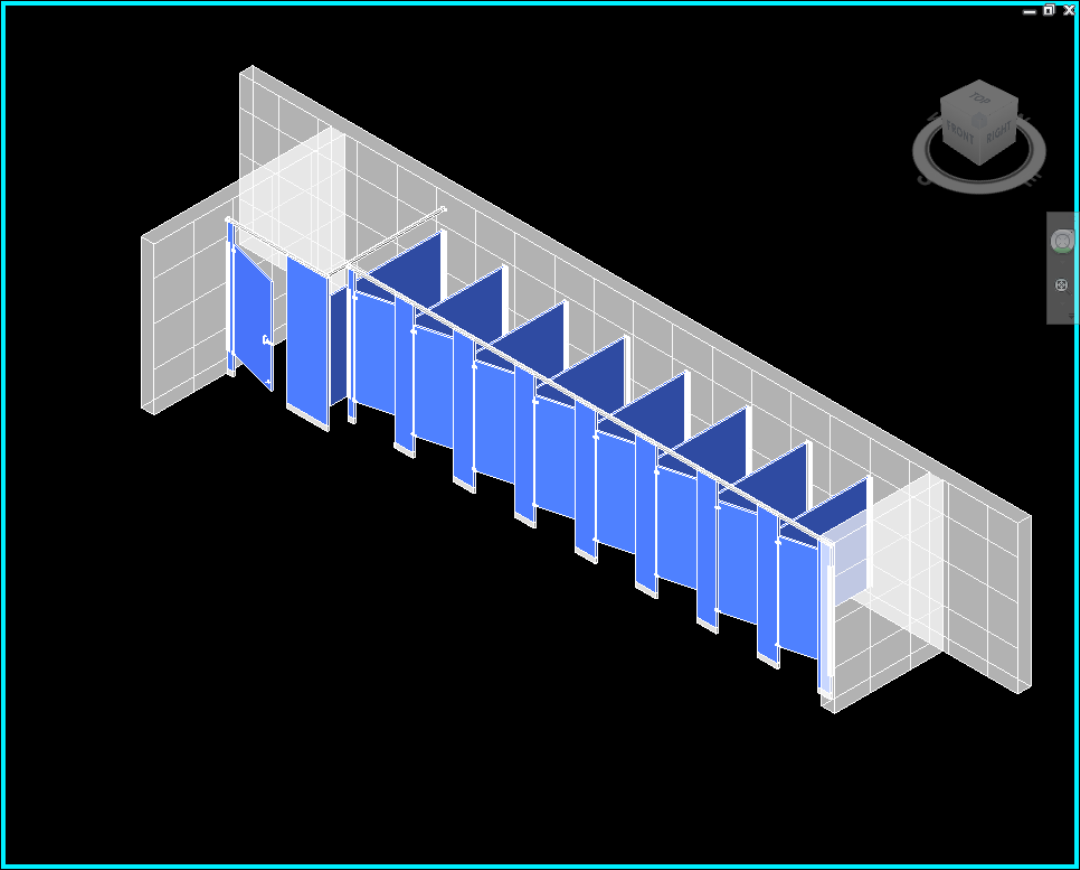
Resulting 3-D view of Revit family for offset handicap with eight standard stalls between walls:
