Backup And Recovery User's Guide RMAN 04 PDF 18c Users E83709 02
User Manual:
Open the PDF directly: View PDF ![]() .
.
Page Count: 909 [warning: Documents this large are best viewed by clicking the View PDF Link!]
- Contents
- Preface
- Changes in This Release for Backup and Recovery User's Guide
- Part I Overview of Backup and Recovery
- 1 Introduction to Backup and Recovery
- 1.1 Purpose of Backup and Recovery
- 1.2 Oracle Backup and Recovery Solutions
- 1.3 Comparison of Oracle Backup Techniques
- 1.4 About Oracle Flashback Technology
- 1.5 About Data Recovery Advisor
- 1.6 RMAN and Oracle Enterprise Manager Cloud Control
- 1.7 About Zero Data Loss Recovery Appliance
- 1.8 Backup and Recovery Documentation Roadmap
- 2 Getting Started with RMAN
- 2.1 Overview of the RMAN Environment
- 2.2 Starting RMAN and Connecting to a Database: Quick Start
- 2.3 Showing the Default RMAN Configuration
- 2.4 Backing Up a Database: Quick Start
- 2.4.1 About Typical RMAN Backup Options
- 2.4.2 Backing Up a Database in ARCHIVELOG Mode
- 2.4.3 Backing Up a Database in NOARCHIVELOG Mode
- 2.4.4 Making Incremental Backups: Quick Start
- 2.4.5 Making Incrementally Updated Backups
- 2.4.6 Validating Database Files and Backups: Quick Start
- 2.4.7 Scripting RMAN Operations
- 2.5 Reporting on RMAN Operations: Quick Start
- 2.6 Maintaining RMAN Backups
- 2.7 Diagnosing and Repairing Failures with Data Recovery Advisor: Quick Start
- 2.8 Rewinding a Database with Flashback Database: Quick Start
- 2.9 Restoring and Recovering Database Files: Quick Start
- 1 Introduction to Backup and Recovery
- Part II Starting and Configuring RMAN and Flashback Database
- 3 Recovery Manager Architecture
- 3.1 About the RMAN Environment
- 3.2 About RMAN Command-Line Client
- 3.3 About RMAN Channels
- 3.4 About the RMAN Repository
- 3.5 About Media Management Using RMAN
- 3.6 About the Fast Recovery Area
- 3.7 About RMAN in a Data Guard Environment
- 3.8 About RMAN in a Recovery Appliance Environment
- 4 Starting and Interacting with the RMAN Client
- 4.1 Starting and Exiting RMAN
- 4.2 Making Database Connections with RMAN
- 4.2.1 About RMAN Database Connection Types
- 4.2.2 About Authentication for RMAN Database Connections
- 4.2.3 Making Database Connections from the RMAN Prompt
- 4.2.4 Making RMAN Database Connections from the Operating System Command Line
- 4.2.5 Making RMAN Connections to a CDB
- 4.2.6 Making RMAN Database Connections Within Command Files
- 4.2.7 Connecting RMAN to an Auxiliary Database
- 4.2.8 Diagnosing RMAN Connection Problems
- 4.3 Specifying the Location of RMAN Output
- 4.4 Setting Globalization Support Environment Variables for RMAN
- 4.5 Entering RMAN Commands
- 4.6 Using the RMAN Pipe Interface
- 5 Configuring the RMAN Environment
- 5.1 About Configuring the Environment for RMAN Backups
- 5.2 Configuring RMAN to Make Backups to a Media Manager
- 5.2.1 Prerequisites for Using a Media Manager with RMAN
- 5.2.2 Determining the Location of the Media Management Library
- 5.2.3 Configuring Media Management Software for RMAN Backups
- 5.2.4 Testing Whether the Media Manager Library Is Integrated Correctly
- 5.2.5 Configuring SBT Channels for Use with a Media Manager
- 5.3 Configuring RMAN to Make Backups to Recovery Appliance
- 5.4 Configuring the Fast Recovery Area
- 5.5 Configuring the Backup Retention Policy
- 5.6 Backup Optimization and the CONFIGURE command
- 5.7 Configuring an Archived Redo Log Deletion Policy
- 5.8 Configuring RMAN in a Data Guard Environment
- 6 Configuring the RMAN Environment: Advanced Topics
- 6.1 Configuring Advanced Channel Options
- 6.2 Configuring Advanced Backup Options
- 6.3 Configuring Auxiliary Instance Data File Names
- 6.4 Configuring the Snapshot Control File Location
- 6.5 Configuring RMAN for Use with a Shared Server
- 6.6 Enabling Lost Write Detection
- 6.7 Enabling Shadow Lost Write Protection
- 7 Using Flashback Database and Restore Points
- 7.1 Overview of Flashback Database, Restore Points and Guaranteed Restore Points
- 7.2 About Logging for Flashback Database and Guaranteed Restore Points
- 7.3 Prerequisites for Flashback Database and Restore Points
- 7.4 Using Normal and Guaranteed Restore Points
- 7.5 Using Flashback Database
- 3 Recovery Manager Architecture
- Part III Backing Up and Archiving Data
- 8 RMAN Backup Concepts
- 8.1 About Consistent and Inconsistent RMAN Backups
- 8.2 About Online Backups and Backup Mode
- 8.3 About Backup Sets
- 8.3.1 About Backup Sets and Backup Pieces
- 8.3.2 About RMAN Block Compression for Backup Sets
- 8.3.3 About Binary Compression for RMAN Backup Sets
- 8.3.4 About RMAN Backup Undo Optimization
- 8.3.5 About Encryption for RMAN Backup Sets
- 8.3.6 About File Names for RMAN Backup Pieces
- 8.3.7 About Number and Size of RMAN Backup Pieces
- 8.3.8 About Number and Size of RMAN Backup Sets
- 8.3.9 About Multiplexed RMAN Backup Sets
- 8.3.10 About RMAN Proxy Copies
- 8.4 About RMAN Image Copies
- 8.5 About Sparse Backups
- 8.6 About Preplugin Backups
- 8.7 About Multiple Copies of RMAN Backups
- 8.8 About RMAN Control File and Server Parameter File Autobackups
- 8.9 About RMAN Incremental Backups
- 8.10 About Backup Retention Policies
- 9 Backing Up the Database
- 9.1 Overview of RMAN Backups
- 9.2 Specifying Backup Output Options
- 9.2.1 Specifying the Device Type for an RMAN Backup
- 9.2.2 Specifying Backup Set or Copy for an RMAN Backup to Disk
- 9.2.3 Specifying a Format for RMAN Backups
- 9.2.4 Specifying Tags for an RMAN Backup
- 9.2.5 Making Compressed Backups
- 9.2.6 Specifying Multisection Incremental Backups
- 9.2.7 Making Multisection Backups Using Image Copies
- 9.3 Backing Up Database Files with RMAN
- 9.4 Backing Up CDBs and PDBs
- 9.4.1 About Backing Up CDBs and PDBs
- 9.4.2 Backing Up a Whole CDB
- 9.4.3 Backing Up the Root with RMAN
- 9.4.4 Backing Up the Root with Oracle Enterprise Manager Cloud Control
- 9.4.5 Backing Up PDBs with RMAN
- 9.4.6 Creating Preplugin Backups of PDBs Using RMAN
- 9.4.7 Backing Up PDBs with Oracle Enterprise Manager Cloud Control
- 9.4.8 Backing Up Tablespaces and Data Files in a PDB
- 9.4.9 Example: Creating a Preplugin Backup of a PDB with RMAN
- 9.5 Backing Up Application Containers
- 9.6 Backing Up Sparse Databases with RMAN
- 9.7 Backing Up Archived Redo Logs with RMAN
- 9.7.1 About Backups of Archived Redo Logs for non-CDBs
- 9.7.2 About Backup of Archived Redo Logs in CDBs
- 9.7.3 Backing Up Archived Redo Log Files in non-CDBs
- 9.7.4 Backing Up Only Archived Redo Logs That Need Backups in non-CDBs
- 9.7.5 Backing Up Archived Redo Logs in CDBs
- 9.7.6 Deleting Archived Redo Logs After Backups in non-CDBs
- 9.7.7 Deleting Archived Redo Logs After Backups in CDBs
- 9.8 Making and Updating RMAN Incremental Backups
- 9.8.1 Purpose of RMAN Incremental Backups
- 9.8.2 Planning an Incremental Backup Strategy
- 9.8.3 Making Incremental Backups
- 9.8.4 Incrementally Updating Backups
- 9.8.5 Using Block Change Tracking to Improve Incremental Backup Performance
- 9.9 Making Database Backups for Long-Term Storage
- 9.10 Backing Up RMAN Backups
- 10 Backing Up the Database: Advanced Topics
- 8 RMAN Backup Concepts
- Part IV Managing RMAN Backups
- 11 Reporting on RMAN Operations
- 11.1 Overview of RMAN Reporting
- 11.2 Listing Backups and Recovery-Related Objects
- 11.3 Reporting on Backups and Database Schema
- 11.4 Reporting in CDBs and PDBs
- 11.5 Using V$ Views to Query Backup Metadata
- 11.6 Querying Recovery Catalog Views
- 12 Maintaining RMAN Backups and Repository Records
- 12.1 Overview of RMAN Backup and Repository Maintenance
- 12.2 Maintaining the Control File Repository
- 12.3 Maintaining the Fast Recovery Area
- 12.3.1 Deletion Rules for the Fast Recovery Area
- 12.3.2 Monitoring Fast Recovery Area Space Usage
- 12.3.3 Managing Space for Flashback Logs in the Fast Recovery Area
- 12.3.4 Responding to a Full Fast Recovery Area
- 12.3.5 Changing the Fast Recovery Area to a New Location
- 12.3.6 Disabling the Fast Recovery Area
- 12.3.7 Responding to an Instance Crash During File Creation
- 12.4 Updating the RMAN Repository
- 12.5 Deleting RMAN Backups and Archived Redo Logs
- 12.5.1 Overview of Deleting RMAN Backups
- 12.5.2 Deleting All Backups and Copies
- 12.5.3 Deleting Specified Backups and Copies
- 12.5.4 Deleting Expired RMAN Backups and Copies
- 12.5.5 Deleting Obsolete RMAN Backups Based on Retention Policies
- 12.5.6 Deleting Backups of Dropped PDBs
- 12.5.7 Deleting Preplugin Backups
- 12.6 Dropping a Database
- 13 Managing a Recovery Catalog
- 13.1 Overview of the RMAN Recovery Catalog
- 13.2 Creating a Recovery Catalog
- 13.3 Registering a Database in the Recovery Catalog
- 13.4 Cataloging Backups in the Recovery Catalog
- 13.5 Creating and Managing Virtual Private Catalogs
- 13.5.1 Overview of Virtual Private Catalogs
- 13.5.2 About Using the VPD Model for Virtual Private Catalogs
- 13.5.3 Creating Virtual Private Catalogs
- 13.5.4 Registering a Database with a Virtual Private Catalog
- 13.5.5 Revoking Privileges from a Virtual Private Catalog Owner
- 13.5.6 Upgrading Virtual Private Catalogs
- 13.6 Protecting the Recovery Catalog
- 13.7 Managing Stored Scripts
- 13.7.1 About Stored Scripts
- 13.7.2 Creating Stored Scripts
- 13.7.3 Replacing Stored Scripts
- 13.7.4 Executing Stored Scripts
- 13.7.5 Creating and Executing Dynamic Stored Scripts
- 13.7.6 Printing Stored Scripts
- 13.7.7 Listing Stored Script Names
- 13.7.8 Deleting Stored Scripts
- 13.7.9 Executing a Stored Script at RMAN Startup
- 13.8 Maintaining a Recovery Catalog
- 13.8.1 About Recovery Catalog Maintenance
- 13.8.2 Resynchronizing the Recovery Catalog
- 13.8.3 Updating the Recovery Catalog After Changing a DB_UNIQUE_NAME
- 13.8.4 Unregistering a Target Database from the Recovery Catalog
- 13.8.5 Resetting the Database Incarnation in the Recovery Catalog
- 13.8.6 Upgrading the Recovery Catalog
- 13.8.7 Importing and Moving a Recovery Catalog
- 13.9 Dropping a Recovery Catalog
- 11 Reporting on RMAN Operations
- Part V Diagnosing and Responding to Failures
- 14 RMAN Data Repair Concepts
- 15 Diagnosing and Repairing Failures with Data Recovery Advisor
- 15.1 Overview of Data Recovery Advisor
- 15.1.1 Purpose of Data Recovery Advisor
- 15.1.2 Basic Concepts of Data Recovery Advisor
- 15.1.3 Basic Steps of Diagnosing and Repairing Failures
- 15.1.4 Diagnosing and Repairing Failures in CDBs
- 15.2 Listing Failures
- 15.3 Checking for Block Corruptions by Validating the Database
- 15.4 Determining Repair Options
- 15.5 Repairing Failures
- 15.6 Changing Failure Status and Priority
- 15.1 Overview of Data Recovery Advisor
- 16 Validating Database Files and Backups
- 17 Performing Complete Database Recovery
- 17.1 Overview of Complete Database Recovery
- 17.2 Preparing for Complete Database Recovery
- 17.2.1 Identifying the Database Files to Restore or Recover
- 17.2.2 Determining the DBID of the Database
- 17.2.3 Previewing Backups Used in Restore Operations
- 17.2.4 Validating Backups Before Restoring Them
- 17.2.5 Restoring Archived Redo Logs Needed for Recovery
- 17.2.6 Providing the Password Required to Decrypt Encrypted Backups
- 17.3 Performing Complete Database Recovery
- 17.4 Performing Complete Recovery of CDBs
- 17.4.1 Performing Complete Recovery of a Whole CDB
- 17.4.2 Performing Complete Recovery of the Root
- 17.4.3 Performing Complete Recovery of PDBs with RMAN
- 17.4.4 Performing Complete Recovery of PDBs with Cloud Control
- 17.4.5 Performing Complete Recovery Using Preplugin Backups
- 17.4.6 Performing Complete Recovery of Tablespaces or Data Files in a PDB with RMAN
- 17.4.7 Performing Complete Recovery of Tablespaces in a PDB with Cloud Control
- 17.4.8 Performing Complete Recovering of CDBs After Switching to a Copy
- 17.5 Performing Complete Recovery of Application Containers
- 17.6 Performing Complete Recovery of Sparse Databases with RMAN
- 18 Performing Flashback and Database Point-in-Time Recovery
- 18.1 Overview of Oracle Flashback Technology and Database Point-in-Time Recovery
- 18.1.1 Purpose of Flashback and Database Point-in-Time Recovery
- 18.1.2 Basic Concepts of Point-in-Time Recovery and Flashback Features
- 18.1.3 Basic Concepts of Performing Flashback Database for CDBs and PDBs
- 18.2 Rewinding a Table with Flashback Table
- 18.3 Rewinding a DROP TABLE Operation with Flashback Drop
- 18.4 Rewinding a Database with Flashback Database
- 18.5 Performing Database Point-in-Time Recovery
- 18.6 Flashback and Database Point-in-Time Recovery Scenarios
- 18.1 Overview of Oracle Flashback Technology and Database Point-in-Time Recovery
- 19 Performing Block Media Recovery
- 20 Performing RMAN Recovery: Advanced Scenarios
- 20.1 Recovering a NOARCHIVELOG Database with Incremental Backups
- 20.2 Restoring the Server Parameter File
- 20.3 Performing Recovery with a Backup Control File
- 20.4 Performing Disaster Recovery
- 20.5 Restoring a Database on a New Host
- 20.6 Restoring Backups Created Using Older Versions of RMAN
- 20.7 Restoring and Recovering Files Over the Network
- 21 Performing RMAN Tablespace Point-in-Time Recovery (TSPITR)
- 21.1 Overview of RMAN TSPITR
- 21.2 TSPITR Restrictions, Special Cases, and Limitations
- 21.3 Planning and Preparing for TSPITR
- 21.4 Performing Fully Automated RMAN TSPITR
- 21.5 Overriding Defaults for RMAN TSPITR with an RMAN-Managed Auxiliary Database
- 21.5.1 Renaming TSPITR Recovery Set Data Files with SET NEWNAME
- 21.5.2 Naming TSPITR Auxiliary Set Data Files
- 21.5.3 Using Image Copies for Faster RMAN TSPITR Performance
- 21.5.4 Customizing Initialization Parameters for the Automatic Auxiliary Database in TSPITR
- 21.6 Performing RMAN TSPITR Using Your Own Auxiliary Database
- 21.7 Troubleshooting RMAN TSPITR
- 22 Recovering Tables and Table Partitions
- 22.1 Overview of Recovering Tables and Table Partitions
- 22.1.1 Purpose of Recovering Tables and Table Partitions from RMAN Backups
- 22.1.2 RMAN Backups Required to Recover Tables and Table Partitions
- 22.1.3 Basic Concepts of Recovering Tables and Table Partitions from RMAN Backups
- 22.1.3.1 Steps Performed By RMAN to Recover Tables and Table Partitions
- 22.1.3.2 About the Location of Auxiliary Database Files During RMAN Table Recovery
- 22.1.3.3 About the Data Pump Export Dump File Used During RMAN Table Recovery
- 22.1.3.4 About Importing Recovered Tables and Table Partitions into the Target Database
- 22.1.3.5 About Renaming Recovered Tables and Table Partitions During RMAN Recovery
- 22.1.3.6 About Recovering Tables and Partitions Into a New Schema
- 22.1.4 Limitations of Recovering Tables and Table Partitions from RMAN Backups
- 22.2 Preparing to Recover Tables and Table Partitions
- 22.3 Recovering Tables and Table Partitions
- 22.4 Recovering Tables and Table Partitions in PDBs
- 22.5 Examples: Recovering Tables and Table Partitions From RMAN Backups
- 22.1 Overview of Recovering Tables and Table Partitions
- Part VI Tuning and Troubleshooting
- 23 Tuning RMAN Performance
- 23.1 Purpose of RMAN Performance Tuning
- 23.2 Basic Concepts of RMAN Performance Tuning
- 23.3 Using V$ Views to Diagnose RMAN Performance Problems
- 23.4 Tuning RMAN Backup Performance
- 24 Troubleshooting RMAN Operations
- 24.1 Interpreting RMAN Message Output
- 24.2 Using V$ Views for RMAN Troubleshooting
- 24.3 Testing the Media Management API
- 24.4 Terminating an RMAN Command
- 23 Tuning RMAN Performance
- Part VII Transferring Data with RMAN
- 25 Duplicating Databases
- 25.1 Overview of RMAN Database Duplication
- 25.1.1 Purpose of Database Duplication
- 25.1.2 Basic Concepts of Database Duplication
- 25.1.3 Types of Database Duplication
- 25.1.3.1 Overview of Backup-Based Duplication
- 25.1.3.2 Techniques for Performing Backup-Based Duplication
- 25.1.3.3 Overview of Active Database Duplication
- 25.1.3.4 Techniques for Performing Active Database Duplication
- 25.1.3.5 Factors that Determine Whether Backup Sets or Image Copies Are Used for Active Database Duplication
- 25.1.4 How RMAN Duplicates a Database
- 25.1.5 Contents of a Duplicate Database
- 25.1.6 About the Destination Host for Database Duplication
- 25.1.7 About Duplicate Database File Names
- 25.1.8 About Duplicating a Database to a Past Point-in-Time
- 25.1.9 Prerequisites for Duplicating a Database
- 25.2 Planning to Duplicate a Database
- 25.3 Preparing the Auxiliary Instance
- 25.3.1 Creating Directories for the Duplicate Database
- 25.3.2 Creating an Initialization Parameter File for the Auxiliary Instance
- 25.3.3 Creating a Password File for the Auxiliary Instance
- 25.3.4 Establishing Oracle Net Connectivity Between the Source Database and Auxiliary Instance
- 25.3.5 Starting the Auxiliary Instance
- 25.3.6 Making the Oracle Keystore Available to the Destination Host
- 25.4 Duplicating a Database
- 25.4.1 Duplicating the Whole Database
- 25.4.2 Duplicating a Subset of the Source Database Tablespaces
- 25.4.3 Duplicating an Oracle RAC Database
- 25.4.4 Duplicating Sparse Databases
- 25.4.5 Configuring RMAN Channels for Use in Duplication
- 25.4.6 Placing the Source Database in a Proper State
- 25.4.7 Starting RMAN and Connecting to Databases
- 25.4.8 Using the DUPLICATE Command to Duplicate Databases
- 25.5 Duplicating CDBs and PDBs
- 25.6 Duplicating Databases to Oracle Cloud
- 25.7 Duplicating an Oracle Cloud Database as an On-premise Database
- 25.8 Restarting DUPLICATE After a Failure
- 25.9 Examples: Duplicating Databases
- 25.9.1 Example: Duplicating a Database to a Remote ASM Host by Using Active Database Duplication with Backup Sets
- 25.9.2 Example: Duplicating a Database to a Remote Host by Using Active Database Duplication with Image Copies
- 25.9.3 Example: Duplicating a Database to a Remote Host by Using Backup-based Duplication without a Target Connection or Recovery Catalog
- 25.9.4 Example: Duplicating a Database to a Remote Host by Using Backup-Based Duplication with a Recovery Catalog
- 25.9.5 Example: Duplicating a Database to a Remote Host by Using Backup-based Duplication with a Target Connection
- 25.9.6 Example: Duplicating a Database to the Local Host by Using Active Database Duplication
- 25.9.7 Example: Duplicating PDBs to a New CDB by Using Active Database Duplication
- 25.9.8 Example: Duplicating a PDB to an Existing CDB by Using Active Duplication
- 25.9.9 Example: Performing Backup-based Duplication by Using Encrypted Backups
- 25.10 Example: Script to Duplicate a Database Using Backup-based Duplication
- 25.1 Overview of RMAN Database Duplication
- 26 Duplicating Databases: Advanced Topics
- 26.1 Specifying Alternative Names for Duplicate Database Files
- 26.1.1 Specifying Non-OMF or Non-ASM Alternative Names for Duplicate Database Files
- 26.1.2 Specifying OMF or ASM Alternative Names for Duplicate Database Files
- 26.1.2.1 Settings and Restrictions for OMF Initialization Parameters
- 26.1.2.2 Setting Initialization Parameters for ASM
- 26.1.2.3 Examples: Duplicating Databases to ASM
- 26.1.2.4 Using the SET NEWNAME Command to Create OMF or ASM Files
- 26.1.2.5 Using the DB_FILE_NAME_CONVERT Parameter to Generate Names for Non-OMF or ASM Data Files
- 26.1.2.6 Using the LOG_FILE_NAME_CONVERT Parameter to Generate Names for Non-OMF or ASM Log Files
- 26.2 Making Disk Backups Accessible Without Shared Disk
- 26.1 Specifying Alternative Names for Duplicate Database Files
- 27 Creating Transportable Tablespace Sets
- 27.1 Overview of Creating Transportable Tablespace Sets
- 27.2 Customizing Initialization Parameters for the Auxiliary Instance
- 27.3 Creating a Transportable Tablespace Set
- 27.4 Troubleshooting the Creation of Transportable Tablespace Sets
- 27.5 Transportable Tablespace Set Scenarios
- 28 Transporting Data Across Platforms
- 28.1 About Cross-Platform Data Transport
- 28.2 Overview of Cross-Platform Data Transport Using Image Copies
- 28.3 Performing Cross-Platform Tablespace Conversion with Image Copies
- 28.4 Performing Cross-Platform Data File Conversion with Image Copies
- 28.5 Performing Cross-Platform Database Conversion with Image Copies
- 28.6 Overview of Cross-Platform Data Transport Using Backup Sets
- 28.6.1 Basic Terms Used in Cross-Platform Data Transport Using Backup Sets
- 28.6.2 About Backing Up Data on the Source Database for Cross-Platform Data Transport
- 28.6.3 About the Data Pump Export Dump File Used for Cross-Platform Tablespace Transport
- 28.6.4 About Restoring Data on the Destination Host During Cross-Platform Data Transport
- 28.6.5 About Selecting Objects to Be Restored from Cross-Platform Backups
- 28.6.6 About Names and Locations for Restored Objects on the Destination Database
- 28.6.7 About Importing the Data Pump Export Dump File Created During Cross-Platform Tablespace Transport
- 28.7 Performing Cross-Platform Database Transport with Backup Sets
- 28.8 Performing Cross-Platform Transport of Read-Only Tablespaces Using Backup Sets
- 28.9 Overview of Cross-Platform Transport of Tablespaces Using Inconsistent Backups
- 28.10 Performing Cross-Platform Transport of Tablespaces Using Inconsistent Backups
- 28.11 Performing Cross-Platform Transport of Data Files Over the Network
- 28.12 Performing Cross-Platform Data Transport in CDBs and PDBs
- 28.12.1 About Cross-Platform Transport of PDBs
- 28.12.2 Performing Cross-Platform Transport of a Whole CDB
- 28.12.3 Performing Cross-Platform Transport of a Closed PDB
- 28.12.4 Performing Cross-Platform Transport of a PDB Using Inconsistent Backups
- 28.12.5 Performing Cross-Platform Transport of Tablespaces in a PDB
- 25 Duplicating Databases
- Part VIII Performing User-Managed Backup and Recovery
- 29 Making User-Managed Database Backups
- 29.1 Querying V$ Views to Obtain Backup Information
- 29.2 Making User-Managed Backups of the Whole Database
- 29.3 Making User-Managed Backups of CDBs and PDBs
- 29.4 Making User-Managed Backups of Tablespaces and Data Files
- 29.4.1 Making User-Managed Backups of Offline Tablespaces and Data Files
- 29.4.2 Making User-Managed Backups of Online Tablespaces and Data Files
- 29.5 Making User-Managed Backups of Tablespaces in CDBs
- 29.6 Making User-Managed Backups of the Control File
- 29.7 Making User-Managed Backups of Archived Redo Logs
- 29.8 Making User-Managed Backups in SUSPEND Mode
- 29.9 Making User-Managed Backups to Raw Devices
- 29.10 Making Backups with Third-Party Snapshot Technologies
- 29.11 Verifying User-Managed Data File Backups
- 30 Performing User-Managed Database Flashback and Recovery
- 30.1 Performing Flashback Database with SQL*Plus
- 30.2 Overview of User-Managed Media Recovery
- 30.2.1 About User-Managed Restore and Recovery
- 30.2.2 Automatic Recovery with the RECOVER Command
- 30.2.3 Recovery When Archived Logs Are in the Default Location
- 30.2.4 Recovery When Archived Logs Are in a Nondefault Location
- 30.2.5 Recovery Using Storage Snapshot Optimization
- 30.2.6 Recovery Cancellation During User-Managed Recovery
- 30.2.7 Parallel Media Recovery
- 30.3 Performing Complete Database Recovery Using SQL*Plus
- 30.4 Performing Incomplete Database Recovery
- 30.5 Recovering a Database in NOARCHIVELOG Mode
- 30.6 Troubleshooting Media Recovery
- 30.6.1 About User-Managed Media Recovery Problems
- 30.6.2 Investigating the Media Recovery Problem: Phase 1
- 30.6.3 Trying to Fix the Recovery Problem Without Corrupting Blocks: Phase 2
- 30.6.4 Deciding Whether to Allow Recovery to Mark as Corrupt Blocks: Phase 3
- 30.6.5 Allowing Recovery to Corrupt Blocks: Phase 4
- 30.6.6 Performing Trial Recovery
- 31 Performing User-Managed Recovery: Advanced Scenarios
- 31.1 Responding to the Loss of a Subset of the Current Control Files
- 31.2 Recovering After the Loss of All Current Control Files
- 31.3 Re-Creating a Control File
- 31.4 Re-Creating Data Files When Backups Are Unavailable
- 31.5 Recovering NOLOGGING Tables and Indexes
- 31.6 Recovering Transportable Tablespaces
- 31.7 Recovering After the Loss of Online Redo Log Files
- 31.8 Recovering from a Dropped Table Without Using Flashback Features
- 31.9 Dropping a Database with SQL*Plus
- 29 Making User-Managed Database Backups
- Glossary
- active database duplication
- ancestor incarnation
- application container
- application PDB
- application root
- archival backup
- archived redo log
- archived redo log deletion policy
- archived redo log failover
- ARCHIVELOG mode
- archiving
- asynchronous I/O
- automatic channel allocation
- Automatic Diagnostic Repository (ADR)
- Automatic Storage Management (ASM)
- automatic undo management mode
- auxiliary channel
- auxiliary database
- auxiliary destination
- auxiliary instance
- auxiliary set
- backup
- backup and recovery
- backup-based duplication
- backup control file
- backup encryption
- backup mode
- backup optimization
- backup piece
- backup retention policy
- backup set
- backup undo optimization
- backup window
- base recovery catalog
- binary compression
- block change tracking
- block change tracking file
- block media recovery
- breaking a mirror
- CDB
- CDB restore point
- channel
- channel parallelism
- checkpoint
- checksum
- circular reuse records
- closed backup
- cold backup
- command file
- common user
- complete recovery
- consistent backup
- consistent shutdown
- control file autobackup
- convert script
- copy
- corrupt block
- crash recovery
- cross-platform backup
- crosscheck
- cumulative incremental backup
- current incarnation
- current online redo log
- data integrity check
- data repair
- Data Recovery Advisor
- database area
- database checkpoint
- database identifier
- database point-in-time recovery (DBPITR)
- database registration
- data file checkpoint
- data file media recovery
- DBID
- destination database
- destination host
- destination platform
- differential incremental backup
- direct ancestral path
- disaster recovery
- disk controller
- disk group
- disk quota
- duplexed backup set
- duplicate database
- expired backup
- export
- export dump file
- failure
- failure priority
- failure status
- fast recovery area
- file section
- flashback data archive
- flashback database window
- flashback logs
- flashback retention target
- foreign archived redo log
- foreign data file
- foreign data file copy
- foreign tablespace
- fractured block
- full backup
- full resynchronization
- fuzzy file
- guaranteed restore point
- hot backup
- hot backup mode
- image copy
- incarnation
- incomplete recovery
- inconsistent backup
- incremental backup
- incremental forever
- incrementally updated backup
- instance failure
- instance recovery
- interblock corruption
- intrablock corruption
- level 0 incremental backup
- level of multiplexing
- local user
- LogMiner
- log sequence number
- log switch
- logical backup
- logical corruption
- logical flashback features
- long-term backup
- lost write
- mean time to recover (MTTR)
- media failure
- media management catalog
- media management library
- media management software
- media manager multiplexing
- media recovery
- mirroring
- MTTR
- multiplexed backup set
- multiplexing
- multisection backup
- multitenant architecture
- multitenant container database (CDB)
- native transfer rate
- NOARCHIVELOG mode
- non-CDB
- noncircular reuse records
- normal restore point
- obsolete backup
- offline normal
- offsite backup
- online backup
- online redo log
- online redo log group
- online redo log member
- operating system backup
- operating system backup and recovery
- Oracle Enterprise Manager Cloud Control
- Oracle Flashback Database
- Oracle Flashback Technology
- Oracle managed file
- Oracle Managed Files (OMF)
- Oracle Secure Backup
- Oracle-suggested backup strategy
- Oracle VSS writer
- orphaned backups
- parallel recovery
- parent incarnation
- partial resynchronization
- password file
- PDB
- PDB restore point
- physical backup
- physical corruption
- physical schema
- physical standby database
- pluggable database (PDB)
- point-in-time recovery
- problem
- proxy copy
- raw device
- recover
- recovery
- recovery catalog
- recovery catalog database
- recovery catalog schema
- Recovery Manager (RMAN)
- recovery set
- recovery window
- recycle bin
- redo log
- redo log group
- redo thread
- redundancy
- redundancy set
- registration
- repair
- repair option
- RESETLOGS
- resilver a split mirror
- restartable backup
- restore
- restore failover
- restore optimization
- restore point
- resynchronization
- retention policy
- reverse resynchronization
- RMAN
- RMAN backup job
- RMAN client
- RMAN job
- RMAN maintenance commands
- RMAN repository
- RMAN session
- rollback segments
- rolling back
- rolling forward
- root
- RUN block
- SBT
- shadow copy
- snapshot control file
- source database
- source host
- source platform
- sparse backup
- sparse database
- sparse data file
- split mirror backup
- stored script
- synchronous I/O
- system change number (SCN)
- tablespace destination
- tablespace point-in-time recovery (TSPITR)
- tag
- target database
- target host
- target instance
- temp file
- transport script
- transportable tablespace
- transportable tablespace set
- trial recovery
- undo retention period
- undo tablespace
- unused block compression
- user-managed backup
- user-managed backup and recovery
- validation
- virtual private catalog
- Volume Shadow Copy Service (VSS)
- whole database backup
- Zero Data Loss Recovery Appliance (Recovery Appliance)
- Index

Oracle® Database
Backup and Recovery User's Guide
18c
E83709-02
April 2018
Oracle Database Backup and Recovery User's Guide, 18c
E83709-02
Copyright © 2003, 2018, Oracle and/or its affiliates. All rights reserved.
Primary Author: Padmaja Potineni
Contributors: K. Weill, L. Ashdown, T. Bednar, A. Beldalker, T. Chien, M. Dilman, S. Fogel, R. Guzman, S.
Haisley, W. Hu, A. Hwang, A. Joshi, V. Krishnaswamy, J. W. Lee, V. Moore, M. Olagappan, V. Panteleenko,
S. Ranganathan, F. Sanchez, V. Srihari, M. Susairaj, M. Stewart, S. Wertheimer, W. Yang, R. Zijlstra
This software and related documentation are provided under a license agreement containing restrictions on
use and disclosure and are protected by intellectual property laws. Except as expressly permitted in your
license agreement or allowed by law, you may not use, copy, reproduce, translate, broadcast, modify,
license, transmit, distribute, exhibit, perform, publish, or display any part, in any form, or by any means.
Reverse engineering, disassembly, or decompilation of this software, unless required by law for
interoperability, is prohibited.
The information contained herein is subject to change without notice and is not warranted to be error-free. If
you find any errors, please report them to us in writing.
If this is software or related documentation that is delivered to the U.S. Government or anyone licensing it on
behalf of the U.S. Government, then the following notice is applicable:
U.S. GOVERNMENT END USERS: Oracle programs, including any operating system, integrated software,
any programs installed on the hardware, and/or documentation, delivered to U.S. Government end users are
"commercial computer software" pursuant to the applicable Federal Acquisition Regulation and agency-
specific supplemental regulations. As such, use, duplication, disclosure, modification, and adaptation of the
programs, including any operating system, integrated software, any programs installed on the hardware,
and/or documentation, shall be subject to license terms and license restrictions applicable to the programs.
No other rights are granted to the U.S. Government.
This software or hardware is developed for general use in a variety of information management applications.
It is not developed or intended for use in any inherently dangerous applications, including applications that
may create a risk of personal injury. If you use this software or hardware in dangerous applications, then you
shall be responsible to take all appropriate fail-safe, backup, redundancy, and other measures to ensure its
safe use. Oracle Corporation and its affiliates disclaim any liability for any damages caused by use of this
software or hardware in dangerous applications.
Oracle and Java are registered trademarks of Oracle and/or its affiliates. Other names may be trademarks of
their respective owners.
Intel and Intel Xeon are trademarks or registered trademarks of Intel Corporation. All SPARC trademarks are
used under license and are trademarks or registered trademarks of SPARC International, Inc. AMD, Opteron,
the AMD logo, and the AMD Opteron logo are trademarks or registered trademarks of Advanced Micro
Devices. UNIX is a registered trademark of The Open Group.
This software or hardware and documentation may provide access to or information about content, products,
and services from third parties. Oracle Corporation and its affiliates are not responsible for and expressly
disclaim all warranties of any kind with respect to third-party content, products, and services unless otherwise
set forth in an applicable agreement between you and Oracle. Oracle Corporation and its affiliates will not be
responsible for any loss, costs, or damages incurred due to your access to or use of third-party content,
products, or services, except as set forth in an applicable agreement between you and Oracle.

Contents
Preface
Audience xxxiv
Documentation Accessibility xxxiv
Related Documentation xxxiv
Conventions xxxv
Changes in This Release for Backup and Recovery User's Guide
Changes in Oracle Database Release 18c, Version 18.1 xxxvi
Changes in Oracle Database 12c Release 2 (12.2.0.1) xxxvii
Changes in Oracle Database 12c Release 1 (12.1.0.2) xl
Changes in Oracle Database 12c Release 1 (12.1.0.1) xl
Part I Overview of Backup and Recovery
1 Introduction to Backup and Recovery
1.1 Purpose of Backup and Recovery 1-1
1.1.1 About Data Protection 1-2
1.1.2 About Failures that Require Database Recovery 1-3
1.1.3 About Data Archival 1-4
1.1.4 About Data Transfer 1-4
1.2 Oracle Backup and Recovery Solutions 1-5
1.3 Comparison of Oracle Backup Techniques 1-5
1.4 About Oracle Flashback Technology 1-6
1.4.1 Logical Flashback Features 1-7
1.4.2 Flashback Database 1-8
1.5 About Data Recovery Advisor 1-9
1.6 RMAN and Oracle Enterprise Manager Cloud Control 1-9
1.6.1 About Oracle Enterprise Manager Cloud Control 1-10
1.6.2 Accessing the Database Home Page Using Cloud Control 1-10
1.6.3 Performing Backup and Recovery Tasks with Cloud Control 1-11
iii

1.7 About Zero Data Loss Recovery Appliance 1-11
1.7.1 Using RMAN with Recovery Appliance 1-12
1.8 Backup and Recovery Documentation Roadmap 1-12
1.8.1 Recovery Manager Documentation Roadmap 1-14
1.8.2 User-Managed Backup and Recovery Documentation Roadmap 1-14
2 Getting Started with RMAN
2.1 Overview of the RMAN Environment 2-1
2.2 Starting RMAN and Connecting to a Database: Quick Start 2-2
2.3 Showing the Default RMAN Configuration 2-4
2.4 Backing Up a Database: Quick Start 2-4
2.4.1 About Typical RMAN Backup Options 2-5
2.4.2 Backing Up a Database in ARCHIVELOG Mode 2-6
2.4.3 Backing Up a Database in NOARCHIVELOG Mode 2-6
2.4.4 Making Incremental Backups: Quick Start 2-7
2.4.5 Making Incrementally Updated Backups 2-8
2.4.6 Validating Database Files and Backups: Quick Start 2-9
2.4.7 Scripting RMAN Operations 2-10
2.5 Reporting on RMAN Operations: Quick Start 2-10
2.5.1 Listing Backups: Quick Start 2-11
2.5.2 Reporting on Database Files and Backups: Quick Start 2-12
2.6 Maintaining RMAN Backups 2-13
2.6.1 Cross-checking Backups: Quick Start 2-13
2.6.2 Deleting Obsolete Backups: Quick Start 2-13
2.7 Diagnosing and Repairing Failures with Data Recovery Advisor: Quick Start 2-14
2.7.1 Listing Failures and Determining Repair Options 2-14
2.7.2 Repairing Failures: Quick Start 2-16
2.8 Rewinding a Database with Flashback Database: Quick Start 2-16
2.9 Restoring and Recovering Database Files: Quick Start 2-17
2.9.1 Preparing to Restore and Recover Database Files: Quick Start 2-18
2.9.2 Recovering the Whole Database: Quick Start 2-18
2.9.3 Recovering Tablespaces: Quick Start 2-19
2.9.4 Recovering Individual Data Blocks: Quick Start 2-20
Part II Starting and Configuring RMAN and Flashback Database
3 Recovery Manager Architecture
3.1 About the RMAN Environment 3-1
3.2 About RMAN Command-Line Client 3-3
iv

3.3 About RMAN Channels 3-3
3.3.1 About RMAN Channels and Devices 3-4
3.3.2 About RMAN Automatic and Manual Channels 3-5
3.4 About the RMAN Repository 3-5
3.5 About Media Management Using RMAN 3-6
3.5.1 About RMAN Interaction with a Media Manager 3-7
3.5.2 About RMAN and Oracle Secure Backup 3-7
3.5.3 About the Backup Solutions Program 3-7
3.6 About the Fast Recovery Area 3-8
3.7 About RMAN in a Data Guard Environment 3-8
3.7.1 About RMAN Configuration in a Data Guard Environment 3-9
3.7.2 About RMAN File Management in a Data Guard Environment 3-9
3.7.2.1 About Interchangeability of Backups in a Data Guard Environment 3-9
3.7.2.2 About Association of Backups in a Data Guard Environment 3-10
3.7.2.3 About Accessibility of Backups in a Data Guard Environment 3-10
3.8 About RMAN in a Recovery Appliance Environment 3-11
3.8.1 Creating RMAN Backups to Recovery Appliance 3-11
4 Starting and Interacting with the RMAN Client
4.1 Starting and Exiting RMAN 4-1
4.2 Making Database Connections with RMAN 4-2
4.2.1 About RMAN Database Connection Types 4-2
4.2.2 About Authentication for RMAN Database Connections 4-2
4.2.2.1 Authentication Using the Operating System 4-3
4.2.2.2 Authentication Using a Password File 4-4
4.2.3 Making Database Connections from the RMAN Prompt 4-5
4.2.4 Making RMAN Database Connections from the Operating System
Command Line 4-6
4.2.5 Making RMAN Connections to a CDB 4-7
4.2.5.1 About Performing Operations on CDBs and PDBs 4-7
4.2.5.2 Restrictions When Connected to a PDB 4-8
4.2.5.3 Connecting as Target to the Root 4-9
4.2.5.4 Connecting as Target to a PDB 4-9
4.2.6 Making RMAN Database Connections Within Command Files 4-10
4.2.7 Connecting RMAN to an Auxiliary Database 4-11
4.2.8 Diagnosing RMAN Connection Problems 4-12
4.2.8.1 Diagnosing Target and Auxiliary Database Connection Problems 4-12
4.2.8.2 Diagnosing Recovery Catalog Connection Problems 4-12
4.3 Specifying the Location of RMAN Output 4-12
4.4 Setting Globalization Support Environment Variables for RMAN 4-13
4.5 Entering RMAN Commands 4-13
v

4.5.1 Entering RMAN Commands at the RMAN Prompt 4-14
4.5.2 Using Command Files with RMAN 4-14
4.5.3 Entering Comments in RMAN Command Files 4-15
4.5.4 Using Substitution Variables in Command Files 4-15
4.5.5 Checking RMAN Syntax 4-16
4.5.5.1 Checking RMAN Syntax at the Command Line 4-17
4.5.5.2 Checking RMAN Syntax in Command Files 4-17
4.6 Using the RMAN Pipe Interface 4-18
4.6.1 Executing Multiple RMAN Commands in Succession Through a Pipe:
Example 4-19
4.6.2 Executing RMAN Commands in a Single Job Through a Pipe: Example 4-20
5 Configuring the RMAN Environment
5.1 About Configuring the Environment for RMAN Backups 5-1
5.1.1 Showing and Clearing Persistent RMAN Configurations 5-2
5.1.2 Configuring the Default Device for Backups: Disk or SBT 5-3
5.1.3 Configuring the Default Type for Backups: Backup Sets or Copies 5-4
5.1.4 Configuring Channels 5-5
5.1.4.1 About Channel Configuration 5-5
5.1.4.2 Configuring Channels for Disk 5-5
5.1.4.3 Configuring Parallel Channels for Disk and SBT Devices 5-6
5.1.4.4 Manually Overriding Configured Channels 5-7
5.1.5 Configuring Control File and Server Parameter File Autobackups 5-8
5.1.5.1 Configuring the Control File Autobackup Format 5-8
5.1.5.2 Overriding the Configured Control File Autobackup Format 5-10
5.2 Configuring RMAN to Make Backups to a Media Manager 5-10
5.2.1 Prerequisites for Using a Media Manager with RMAN 5-11
5.2.2 Determining the Location of the Media Management Library 5-11
5.2.3 Configuring Media Management Software for RMAN Backups 5-13
5.2.4 Testing Whether the Media Manager Library Is Integrated Correctly 5-13
5.2.4.1 Testing ALLOCATE CHANNEL on the Media Manager 5-13
5.2.4.2 Testing Backup and Restore Operations on the Media Manager 5-14
5.2.5 Configuring SBT Channels for Use with a Media Manager 5-15
5.2.5.1 About Media Manager Backup Piece Names 5-16
5.2.5.2 Configuring Automatic SBT Channels 5-17
5.3 Configuring RMAN to Make Backups to Recovery Appliance 5-17
5.3.1 Prerequisites for Using Recovery Appliance 5-18
5.3.2 Steps to Configure RMAN for Backups to Recovery Appliance 5-18
5.3.3 Determining the Location of the Recovery Appliance Backup Module 5-19
5.3.4 Specifying Recovery Appliance Configuration Settings for RMAN
Backups 5-19
vi

5.4 Configuring the Fast Recovery Area 5-20
5.4.1 Overview of Files in the Fast Recovery Area 5-20
5.4.1.1 Fast Recovery Area with Oracle Managed Files and Automatic
Storage Management 5-22
5.4.1.2 How Oracle Manages Disk Space in the Fast Recovery Area 5-22
5.4.2 Enabling the Fast Recovery Area 5-23
5.4.2.1 Considerations When Setting the Size of the Fast Recovery Area 5-24
5.4.2.2 Considerations When Setting the Location of the Fast Recovery
Area 5-25
5.4.2.3 Setting the Fast Recovery Area Location and Initial Size 5-25
5.4.3 Disabling the Fast Recovery Area 5-27
5.4.4 Configuring Locations for Control Files and Redo Logs 5-28
5.4.4.1 Configuring Online Redo Log Locations 5-28
5.4.4.2 Configuring Control File Locations 5-28
5.4.4.3 Configuring Archived Redo Log Locations 5-29
5.4.5 Configuring RMAN File Creation in the Fast Recovery Area 5-30
5.5 Configuring the Backup Retention Policy 5-30
5.5.1 Configuring a Redundancy-Based Retention Policy 5-31
5.5.2 Configuring a Recovery Window-Based Retention Policy 5-31
5.5.3 Disabling the Retention Policy 5-32
5.6 Backup Optimization and the CONFIGURE command 5-32
5.6.1 Overview of Backup Optimization 5-33
5.6.2 Effect of Retention Policies on Backup Optimization for SBT Backups 5-34
5.6.2.1 About Backup Optimization for SBT Backups with Recovery
Window Retention Policy 5-35
5.6.2.2 About Backup Optimization for SBT Backups With Redundancy
Retention Policy 5-35
5.6.3 Configuring Backup Optimization 5-36
5.7 Configuring an Archived Redo Log Deletion Policy 5-37
5.7.1 About Archived Redo Log Deletion Policies 5-37
5.7.1.1 When the Archived Redo Log Deletion Policy Is Disabled 5-37
5.7.1.2 When the Archived Redo Log Deletion Policy Is Enabled 5-38
5.7.2 Enabling an Archived Redo Log Deletion Policy 5-38
5.8 Configuring RMAN in a Data Guard Environment 5-39
6 Configuring the RMAN Environment: Advanced Topics
6.1 Configuring Advanced Channel Options 6-1
6.1.1 About Channel Control Options 6-1
6.1.2 Configuring Specific Channel Parameters 6-2
6.1.2.1 Configuring Specific Channels: Examples 6-3
6.1.2.2 Relationship Between CONFIGURE CHANNEL and Parallelism
Setting 6-3
vii

6.2 Configuring Advanced Backup Options 6-4
6.2.1 Configuring the Maximum Size of Backup Sets 6-4
6.2.2 Configuring the Maximum Size of Backup Pieces 6-5
6.2.3 Configuring Backup Duplexing 6-5
6.2.4 Configuring Tablespaces for Exclusion from Whole Database Backups 6-6
6.2.5 Configuring Compression Options 6-7
6.2.5.1 About RMAN Precompression Block Processing 6-7
6.2.5.2 About RMAN Supported Compression Levels 6-8
6.2.6 Configuring Backup Encryption 6-9
6.2.6.1 About Backup Encryption 6-10
6.2.6.2 Configuring RMAN Backup Encryption Modes 6-13
6.2.6.3 Configuring the Backup Encryption Algorithm 6-14
6.3 Configuring Auxiliary Instance Data File Names 6-14
6.4 Configuring the Snapshot Control File Location 6-15
6.4.1 Viewing the Configured Location of the Snapshot Control File 6-15
6.4.2 Setting the Location of the Snapshot Control File 6-15
6.5 Configuring RMAN for Use with a Shared Server 6-16
6.6 Enabling Lost Write Detection 6-17
6.7 Enabling Shadow Lost Write Protection 6-18
7 Using Flashback Database and Restore Points
7.1 Overview of Flashback Database, Restore Points and Guaranteed Restore
Points 7-1
7.1.1 About Flashback Database 7-2
7.1.2 About Flashback Database Window 7-3
7.1.3 Limitations of Flashback Database 7-3
7.1.4 About Normal Restore Points 7-4
7.1.5 About Guaranteed Restore Points 7-5
7.1.5.1 Guaranteed Restore Points versus Storage Snapshots 7-6
7.1.6 Overview of Restore Points in a Multitenant Environment 7-6
7.1.6.1 About CDB Restore Points 7-7
7.1.6.2 About Restore Points in PDBs 7-7
7.1.6.3 About the Namespace for PDB Restore Points 7-8
7.2 About Logging for Flashback Database and Guaranteed Restore Points 7-9
7.2.1 Guaranteed Restore Points and Fast Recovery Area Space Usage 7-9
7.2.2 About Logging for Guaranteed Restore Points with Flashback Logging
Disabled 7-10
7.2.3 About Logging for Flashback Database with Guaranteed Restore Points
Defined 7-11
7.3 Prerequisites for Flashback Database and Restore Points 7-11
7.4 Using Normal and Guaranteed Restore Points 7-12
viii

7.4.1 Creating Normal and Guaranteed Restore Points in non-CDBs 7-12
7.4.2 Creating CDB Restore Points 7-13
7.4.3 Creating PDB Restore Points 7-14
7.4.4 Listing Restore Points Using the LIST Command 7-15
7.4.5 Listing Restore Points Using the V$RESTORE_POINT View 7-16
7.4.6 Dropping Restore Points 7-17
7.5 Using Flashback Database 7-18
7.5.1 Enabling Flashback Database 7-18
7.5.2 Disabling Flashback Database Logging 7-19
7.5.3 Configuring the Environment for Optimal Flashback Database
Performance 7-20
7.5.4 Monitoring the Effect of Flashback Database on Performance 7-20
7.5.5 About Flashback Writer (RVWR) Behavior with I/O Errors 7-21
Part III Backing Up and Archiving Data
8 RMAN Backup Concepts
8.1 About Consistent and Inconsistent RMAN Backups 8-1
8.1.1 About Consistent RMAN Backups 8-2
8.1.2 About Inconsistent RMAN Backups 8-2
8.2 About Online Backups and Backup Mode 8-2
8.3 About Backup Sets 8-3
8.3.1 About Backup Sets and Backup Pieces 8-4
8.3.2 About RMAN Block Compression for Backup Sets 8-4
8.3.2.1 About Unused Block Compression 8-5
8.3.2.2 About Null Block Compression 8-5
8.3.3 About Binary Compression for RMAN Backup Sets 8-5
8.3.4 About RMAN Backup Undo Optimization 8-6
8.3.5 About Encryption for RMAN Backup Sets 8-6
8.3.6 About File Names for RMAN Backup Pieces 8-6
8.3.7 About Number and Size of RMAN Backup Pieces 8-7
8.3.8 About Number and Size of RMAN Backup Sets 8-8
8.3.9 About Multiplexed RMAN Backup Sets 8-8
8.3.10 About RMAN Proxy Copies 8-10
8.4 About RMAN Image Copies 8-11
8.4.1 About RMAN-Created Image Copies 8-11
8.4.2 About User-Managed Image Copies 8-12
8.5 About Sparse Backups 8-13
8.6 About Preplugin Backups 8-14
8.7 About Multiple Copies of RMAN Backups 8-14
ix

8.7.1 About Duplexed Backup Sets 8-14
8.7.2 About Backups of RMAN Backups 8-15
8.7.2.1 Backups of Backup Sets 8-15
8.7.2.2 Backups of Image Copies 8-16
8.8 About RMAN Control File and Server Parameter File Autobackups 8-17
8.8.1 When RMAN Performs Control File Autobackups 8-17
8.8.2 How RMAN Performs Control File Autobackups 8-18
8.9 About RMAN Incremental Backups 8-18
8.9.1 About Multilevel Incremental Backups 8-19
8.9.1.1 About Differential Incremental Backups 8-19
8.9.1.2 About Cumulative Incremental Backups 8-20
8.9.2 About Block Change Tracking 8-21
8.9.3 About the Incremental Backup Algorithm 8-22
8.9.4 About Recovery with Incremental Backups 8-23
8.9.5 About the Incremental-Forever Backup Strategy for Recovery Appliance 8-23
8.10 About Backup Retention Policies 8-23
8.10.1 About the Recovery Window 8-25
8.10.2 About Backup Redundancy 8-27
8.10.3 About Batch Deletes of Obsolete Backups 8-27
8.10.4 About Backup Retention Policy and Fast Recovery Area Deletion
Rules 8-28
9 Backing Up the Database
9.1 Overview of RMAN Backups 9-1
9.1.1 Purpose of RMAN Backups 9-1
9.1.2 Basic Concepts of RMAN Backups 9-2
9.2 Specifying Backup Output Options 9-2
9.2.1 Specifying the Device Type for an RMAN Backup 9-3
9.2.2 Specifying Backup Set or Copy for an RMAN Backup to Disk 9-3
9.2.3 Specifying a Format for RMAN Backups 9-4
9.2.3.1 Specifying Multiple Formats for Disk Backups 9-5
9.2.4 Specifying Tags for an RMAN Backup 9-5
9.2.4.1 About Backup Tags 9-5
9.2.4.2 Specifying Tags for Backup Sets and Image Copies 9-6
9.2.5 Making Compressed Backups 9-7
9.2.6 Specifying Multisection Incremental Backups 9-8
9.2.7 Making Multisection Backups Using Image Copies 9-9
9.3 Backing Up Database Files with RMAN 9-10
9.3.1 Backing Up a Whole Database with RMAN 9-10
9.3.2 Backing Up Tablespaces and Data Files with RMAN 9-11
9.3.3 Backing Up Control Files with RMAN 9-12
x

9.3.3.1 About Manual Backups of the Control File 9-13
9.3.3.2 Making a Manual Backup of the Control File 9-13
9.3.4 Backing Up Server Parameter Files with RMAN 9-15
9.3.5 Backing Up a Database in NOARCHIVELOG Mode 9-15
9.3.6 Creating a Preplugin Backup of the Whole Database 9-16
9.4 Backing Up CDBs and PDBs 9-17
9.4.1 About Backing Up CDBs and PDBs 9-17
9.4.2 Backing Up a Whole CDB 9-18
9.4.3 Backing Up the Root with RMAN 9-19
9.4.4 Backing Up the Root with Oracle Enterprise Manager Cloud Control 9-19
9.4.5 Backing Up PDBs with RMAN 9-19
9.4.6 Creating Preplugin Backups of PDBs Using RMAN 9-20
9.4.7 Backing Up PDBs with Oracle Enterprise Manager Cloud Control 9-22
9.4.8 Backing Up Tablespaces and Data Files in a PDB 9-22
9.4.9 Example: Creating a Preplugin Backup of a PDB with RMAN 9-23
9.5 Backing Up Application Containers 9-24
9.5.1 About Backing Up Application Containers 9-24
9.5.2 Backing Up the Application Root 9-25
9.5.3 Backing Up the Application Root and its Application PDBs 9-25
9.5.4 Backing Up Application PDBs 9-26
9.6 Backing Up Sparse Databases with RMAN 9-26
9.6.1 Backing Up a Sparse Database with RMAN 9-27
9.6.2 Backing Up Sparse Tablespaces and Data Files with RMAN 9-28
9.6.3 Backing Up a Sparse CDB with RMAN 9-29
9.6.4 Backing Up a Sparse PDB with RMAN 9-30
9.7 Backing Up Archived Redo Logs with RMAN 9-31
9.7.1 About Backups of Archived Redo Logs for non-CDBs 9-31
9.7.1.1 About Archived Redo Log Failover 9-31
9.7.1.2 About Online Redo Log Switching 9-32
9.7.2 About Backup of Archived Redo Logs in CDBs 9-33
9.7.3 Backing Up Archived Redo Log Files in non-CDBs 9-33
9.7.4 Backing Up Only Archived Redo Logs That Need Backups in non-CDBs 9-34
9.7.5 Backing Up Archived Redo Logs in CDBs 9-35
9.7.6 Deleting Archived Redo Logs After Backups in non-CDBs 9-36
9.7.7 Deleting Archived Redo Logs After Backups in CDBs 9-37
9.8 Making and Updating RMAN Incremental Backups 9-37
9.8.1 Purpose of RMAN Incremental Backups 9-37
9.8.2 Planning an Incremental Backup Strategy 9-38
9.8.3 Making Incremental Backups 9-39
9.8.3.1 Making Incremental Backups of a VSS Snapshot 9-40
9.8.4 Incrementally Updating Backups 9-40
xi

9.8.4.1 Incrementally Updating Backups: Basic Example 9-41
9.8.4.2 Incrementally Updated Backups: Advanced Example 9-43
9.8.5 Using Block Change Tracking to Improve Incremental Backup
Performance 9-44
9.8.5.1 About Block Change Tracking 9-44
9.8.5.2 Enabling and Disabling Block Change Tracking 9-46
9.8.5.3 Disabling Block Change Tracking 9-46
9.8.5.4 Checking Whether Change Tracking Is Enabled 9-47
9.8.5.5 Changing the Location of the Block Change Tracking File 9-47
9.9 Making Database Backups for Long-Term Storage 9-48
9.9.1 Purpose of Archival Backups 9-48
9.9.2 Basic Concepts of Archival Backups 9-49
9.9.3 Making an Archival Backup for Long-Term Storage 9-50
9.9.3.1 Making an Archival Backup 9-50
9.9.4 Making a Temporary Archival Backup 9-51
9.10 Backing Up RMAN Backups 9-52
9.10.1 About Backups of RMAN Backups 9-52
9.10.1.1 About Multiple Copies of RMAN Backup Sets 9-52
9.10.1.2 Viewing the Effect of a Backup Retention Policy on Backups of
Backups 9-53
9.10.2 Backing Up Backup Sets with RMAN 9-54
9.10.3 Backing Up Image Copy Backups with RMAN 9-55
10
Backing Up the Database: Advanced Topics
10.1 Limiting the Size of RMAN Backup Sets 10-1
10.1.1 About Backup Set Size 10-2
10.1.2 Limiting the Size of Backup Sets with BACKUP ... MAXSETSIZE 10-2
10.1.3 Dividing the Backup of a Large Data File into Sections 10-3
10.2 Using Backup Optimization to Skip Files 10-4
10.2.1 Optimizing a Daily Archived Log Backup to a Single Tape: Scenario 10-5
10.2.2 Optimizing a Daily Archived Log Backup to Multiple Media Families:
Scenario 10-5
10.2.3 Creating a Weekly Secondary Backup of Archived Logs: Example 10-6
10.3 Skipping Offline, Read-Only, and Inaccessible Files 10-7
10.4 Duplexing Backup Sets 10-8
10.4.1 Duplexing Backup Sets with CONFIGURE BACKUP COPIES 10-8
10.4.2 Duplexing Backup Sets with BACKUP ... COPIES 10-9
10.5 Making Split Mirror Backups with RMAN 10-10
10.6 Encrypting RMAN Backups 10-11
10.6.1 About RMAN Backup Encryption Settings 10-11
10.6.2 Making Transparent-Mode Encrypted Backups 10-13
xii

10.6.3 Making Password-Mode Encrypted Backups 10-13
10.6.4 Making Dual-Mode Encrypted Backups 10-14
10.7 Restarting RMAN Backups 10-14
10.7.1 About Restartable Backups 10-14
10.7.2 Restarting a Backup After It Partially Completes 10-15
10.8 Managing Backup Windows 10-16
10.8.1 About Backup Windows 10-16
10.8.2 Specifying a Backup Duration 10-16
10.8.3 Permitting Partial Backups in a Backup Window 10-17
10.8.4 Minimizing Backup Load and Duration 10-17
Part IV Managing RMAN Backups
11
Reporting on RMAN Operations
11.1 Overview of RMAN Reporting 11-1
11.1.1 Purpose of RMAN Reporting 11-1
11.1.2 Basic Concepts of RMAN Reporting 11-1
11.1.3 Reporting in a Data Guard Environment 11-3
11.2 Listing Backups and Recovery-Related Objects 11-3
11.2.1 About the LIST Command 11-4
11.2.2 Listing All Backups and Copies 11-6
11.2.3 Listing Selected Backups and Copies 11-8
11.2.4 Listing Preplugin Backups 11-9
11.2.5 Listing Database Incarnations 11-10
11.3 Reporting on Backups and Database Schema 11-11
11.3.1 About Reports of RMAN Backups 11-11
11.3.2 Reporting on Files Needing a Backup Under a Retention Policy 11-12
11.3.2.1 Using RMAN REPORT NEED BACKUP with Different Retention
Policies 11-13
11.3.2.2 Using RMAN REPORT NEED BACKUP with Tablespaces and
Data Files 11-13
11.3.2.3 Using REPORT NEED BACKUP with Backups on Tape or Disk
Only 11-13
11.3.3 Reporting on Data Files Affected by Unrecoverable Operations 11-14
11.3.4 Reporting on Obsolete Backups 11-14
11.3.5 Reporting on the Database Schema 11-15
11.4 Reporting in CDBs and PDBs 11-16
11.4.1 Reporting in CDBs 11-17
11.4.2 Reporting in PDBs 11-17
11.4.2.1 Listing Backups of Dropped PDBs 11-18
xiii

11.5 Using V$ Views to Query Backup Metadata 11-18
11.5.1 Querying Details of Past and Current RMAN Jobs 11-18
11.5.2 Determining the Encryption Status of Backup Pieces 11-20
11.6 Querying Recovery Catalog Views 11-21
11.6.1 About Recovery Catalog Views 11-21
11.6.1.1 About Unique Identifiers for Registered Databases 11-22
11.6.1.2 About Unique Identifiers in a Data Guard Environment 11-22
11.6.2 Querying Catalog Views for the Target DB_KEY or DBID Values 11-23
11.6.3 Querying RC_BACKUP_FILES 11-24
12
Maintaining RMAN Backups and Repository Records
12.1 Overview of RMAN Backup and Repository Maintenance 12-1
12.1.1 Purpose of Backup and Repository Maintenance 12-1
12.1.2 Basic Concepts of Backup and Repository Maintenance 12-2
12.1.2.1 About Maintenance Commands and RMAN Repository Metadata
12-2
12.1.2.2 About Maintenance Commands in a Data Guard Environment 12-2
12.2 Maintaining the Control File Repository 12-4
12.2.1 About Control File Records 12-4
12.2.1.1 About Fast Recovery Area and Control File Records 12-5
12.2.2 Preventing the Loss of Control File Records 12-6
12.2.3 Protecting the Control File 12-6
12.3 Maintaining the Fast Recovery Area 12-7
12.3.1 Deletion Rules for the Fast Recovery Area 12-7
12.3.2 Monitoring Fast Recovery Area Space Usage 12-8
12.3.3 Managing Space for Flashback Logs in the Fast Recovery Area 12-9
12.3.4 Responding to a Full Fast Recovery Area 12-10
12.3.5 Changing the Fast Recovery Area to a New Location 12-11
12.3.6 Disabling the Fast Recovery Area 12-11
12.3.7 Responding to an Instance Crash During File Creation 12-12
12.4 Updating the RMAN Repository 12-12
12.4.1 Crosschecking the RMAN Repository 12-12
12.4.1.1 About RMAN Crosschecks 12-12
12.4.1.2 Crosschecking All Backups and Copies 12-14
12.4.1.3 Crosschecking Specific Backup Sets and Copies 12-15
12.4.1.4 Crosschecking Preplugin Backups 12-15
12.4.2 Changing the Repository Status of Backups and Copies 12-16
12.4.2.1 Updating a Backup to Status AVAILABLE or UNAVAILABLE 12-16
12.4.2.2 Changing the Status of an Archival Backup 12-17
12.4.2.3 Changing the Status of Backups for Dropped PDBs 12-18
12.4.2.4 Changing the Status of Preplugin Backups 12-18
xiv

12.4.3 Adding Backup Records to the RMAN Repository 12-19
12.4.3.1 About Cataloging Operations 12-19
12.4.3.2 Cataloging User-Managed Data File Copies 12-20
12.4.3.3 Cataloging Backup Pieces 12-20
12.4.3.4 Cataloging All Files in a Disk Location 12-21
12.4.3.5 Cataloging Preplugin Archived Redo Logs 12-22
12.4.4 Removing Records from the RMAN Repository 12-22
12.4.4.1 About Uncataloging Operations in the RMAN Repository 12-22
12.4.4.2 Removing Records for Files Deleted with Operating System
Utilities 12-23
12.5 Deleting RMAN Backups and Archived Redo Logs 12-23
12.5.1 Overview of Deleting RMAN Backups 12-23
12.5.1.1 About RMAN Deletion Commands 12-24
12.5.1.2 About Deletion of Archived Redo Logs 12-25
12.5.2 Deleting All Backups and Copies 12-26
12.5.3 Deleting Specified Backups and Copies 12-26
12.5.3.1 Deleting Specified Files with BACKUP ... DELETE 12-28
12.5.4 Deleting Expired RMAN Backups and Copies 12-28
12.5.5 Deleting Obsolete RMAN Backups Based on Retention Policies 12-28
12.5.5.1 DELETE OBSOLETE Behavior When KEEP UNTIL TIME
Expires 12-29
12.5.6 Deleting Backups of Dropped PDBs 12-29
12.5.7 Deleting Preplugin Backups 12-29
12.6 Dropping a Database 12-30
13
Managing a Recovery Catalog
13.1 Overview of the RMAN Recovery Catalog 13-1
13.1.1 Purpose of the RMAN Recovery Catalog 13-1
13.1.2 Basic Concepts for the RMAN Recovery Catalog 13-2
13.1.2.1 About Database Registration in an RMAN Recovery Catalog 13-2
13.1.2.2 About Centralization of Metadata in a Base RMAN Recovery
Catalog 13-3
13.1.2.3 About RMAN Recovery Catalog Resynchronization 13-3
13.1.2.4 About Stored Scripts 13-3
13.1.2.5 Recovery Catalog in a Data Guard Environment 13-4
13.1.3 Basic Steps of Managing a Recovery Catalog 13-4
13.2 Creating a Recovery Catalog 13-5
13.2.1 Configuring the Recovery Catalog Database 13-5
13.2.1.1 Planning the Size of the Recovery Catalog Schema 13-6
13.2.1.2 Allocating Disk Space for the Recovery Catalog Database 13-6
13.2.2 Creating the Recovery Catalog Schema Owner 13-7
xv

13.2.3 Executing the CREATE CATALOG Command 13-8
13.3 Registering a Database in the Recovery Catalog 13-9
13.3.1 About Registration of a Database in the Recovery Catalog 13-9
13.3.1.1 About Standby Database Registration 13-9
13.3.2 Registering a Database with the REGISTER DATABASE Command 13-10
13.4 Cataloging Backups in the Recovery Catalog 13-11
13.5 Creating and Managing Virtual Private Catalogs 13-12
13.5.1 Overview of Virtual Private Catalogs 13-12
13.5.2 About Using the VPD Model for Virtual Private Catalogs 13-12
13.5.3 Creating Virtual Private Catalogs 13-13
13.5.4 Registering a Database with a Virtual Private Catalog 13-15
13.5.5 Revoking Privileges from a Virtual Private Catalog Owner 13-15
13.5.6 Upgrading Virtual Private Catalogs 13-16
13.6 Protecting the Recovery Catalog 13-17
13.6.1 Backing Up the Recovery Catalog 13-17
13.6.1.1 Backing Up the Recovery Catalog Frequently 13-17
13.6.1.2 Choosing the Appropriate Technique for Physical Backups 13-17
13.6.1.3 Separating the Recovery Catalog from the Target Database 13-18
13.6.1.4 Exporting the Recovery Catalog Data for Logical Backups 13-19
13.6.2 Recovering the Recovery Catalog 13-19
13.7 Managing Stored Scripts 13-20
13.7.1 About Stored Scripts 13-20
13.7.2 Creating Stored Scripts 13-21
13.7.3 Replacing Stored Scripts 13-22
13.7.4 Executing Stored Scripts 13-22
13.7.5 Creating and Executing Dynamic Stored Scripts 13-23
13.7.6 Printing Stored Scripts 13-24
13.7.7 Listing Stored Script Names 13-25
13.7.8 Deleting Stored Scripts 13-26
13.7.9 Executing a Stored Script at RMAN Startup 13-26
13.8 Maintaining a Recovery Catalog 13-27
13.8.1 About Recovery Catalog Maintenance 13-27
13.8.2 Resynchronizing the Recovery Catalog 13-27
13.8.2.1 About Resynchronization of the Recovery Catalog 13-27
13.8.2.2 Deciding When to Resynchronize the Recovery Catalog 13-28
13.8.2.3 Manually Resynchronizing the Recovery Catalog 13-31
13.8.3 Updating the Recovery Catalog After Changing a DB_UNIQUE_NAME 13-31
13.8.4 Unregistering a Target Database from the Recovery Catalog 13-32
13.8.4.1 Unregistering a Target Database When Not in a Data Guard
Environment 13-32
13.8.4.2 Unregistering a Standby Database 13-33
xvi

13.8.4.3 Unregistering a Target Database in a Recovery Appliance
Environment 13-34
13.8.5 Resetting the Database Incarnation in the Recovery Catalog 13-35
13.8.6 Upgrading the Recovery Catalog 13-36
13.8.6.1 About Recovery Catalog Upgrades 13-37
13.8.6.2 Determining the Schema Version of the Recovery Catalog 13-37
13.8.6.3 Using the UPGRADE CATALOG Command 13-38
13.8.7 Importing and Moving a Recovery Catalog 13-39
13.8.7.1 About Recovery Catalog Imports 13-40
13.8.7.2 About Importing Recovery Catalogs in a Recovery Appliance
Environment 13-40
13.8.7.3 Prerequisites for Importing a Recovery Catalog 13-40
13.8.7.4 Importing a Recovery Catalog 13-41
13.8.7.5 Moving a Recovery Catalog 13-42
13.9 Dropping a Recovery Catalog 13-42
Part V Diagnosing and Responding to Failures
14
RMAN Data Repair Concepts
14.1 Overview of RMAN Data Repair 14-1
14.1.1 About Problems Requiring Data Repair 14-1
14.1.1.1 About User Errors 14-1
14.1.1.2 About Application Errors 14-1
14.1.1.3 About Media Failures 14-1
14.1.2 About RMAN Data Repair Techniques 14-1
14.2 About RMAN Restore Operations 14-3
14.2.1 About RMAN Backup Selection 14-3
14.2.2 About RMAN Restore Failover 14-4
14.2.3 About RMAN Restore of Encrypted Backups 14-4
14.2.4 About RMAN Restore Operations and ASM 14-5
14.2.5 About RMAN Restore Optimization 14-6
14.3 About RMAN Media Recovery 14-6
14.3.1 About Selection of Incremental Backups and Archived Redo Logs 14-7
14.3.2 About Database Incarnations 14-7
14.3.2.1 About RMAN OPEN RESETLOGS Operations 14-7
14.3.2.2 Relationship Among Database Incarnations 14-8
14.3.2.3 About Incarnations of PDBs 14-10
14.3.2.4 About Orphaned Backups 14-10
14.3.2.5 About Orphaned PDB Backups 14-10
xvii

15
Diagnosing and Repairing Failures with Data Recovery Advisor
15.1 Overview of Data Recovery Advisor 15-1
15.1.1 Purpose of Data Recovery Advisor 15-1
15.1.2 Basic Concepts of Data Recovery Advisor 15-2
15.1.2.1 User Interfaces to Data Recovery Advisor 15-2
15.1.2.2 About Data Integrity Checks 15-2
15.1.2.3 About Failures 15-3
15.1.2.4 About Manual Actions and Automatic Repair Options 15-5
15.1.2.5 About Supported Database Configurations for Data Recovery
Advisor 15-6
15.1.3 Basic Steps of Diagnosing and Repairing Failures 15-7
15.1.4 Diagnosing and Repairing Failures in CDBs 15-8
15.2 Listing Failures 15-8
15.2.1 Listing All Failures 15-8
15.2.2 Listing a Subset of Failures 15-9
15.3 Checking for Block Corruptions by Validating the Database 15-10
15.4 Determining Repair Options 15-12
15.4.1 Determining Repair Options for All Failures 15-12
15.4.2 Determining Repair Options for a Subset of Failures 15-14
15.5 Repairing Failures 15-15
15.5.1 About Repairing Failures 15-15
15.5.2 Repairing a Failure 15-16
15.6 Changing Failure Status and Priority 15-17
16
Validating Database Files and Backups
16.1 Overview of RMAN Validation 16-1
16.1.1 Purpose of RMAN Validation 16-1
16.1.2 Basic Concepts of RMAN Validation 16-1
16.1.2.1 About Checksums and Corrupt Blocks 16-2
16.1.2.2 About Physical and Logical Block Corruption 16-2
16.1.2.3 About Limits for Corrupt Blocks in RMAN Backups 16-3
16.1.2.4 About Detecting Block Corruption 16-3
16.2 Checking for Block Corruption with the VALIDATE Command 16-4
16.3 Validating Database Files with BACKUP VALIDATE 16-6
16.4 Validating Backups Before Restoring Them 16-8
16.5 Validating CDBs and PDBs 16-9
16.5.1 Validating a Whole CDB 16-9
16.5.2 Validating PDBs 16-9
xviii

17
Performing Complete Database Recovery
17.1 Overview of Complete Database Recovery 17-1
17.1.1 Purpose of Complete Database Recovery 17-1
17.1.2 Scope of This Chapter 17-1
17.1.3 About Real-time Redo Transport for Recovery Appliance 17-2
17.2 Preparing for Complete Database Recovery 17-3
17.2.1 Identifying the Database Files to Restore or Recover 17-3
17.2.1.1 Identifying a Lost Control File 17-3
17.2.1.2 Identifying Data Files Requiring Media Recovery 17-4
17.2.2 Determining the DBID of the Database 17-6
17.2.3 Previewing Backups Used in Restore Operations 17-7
17.2.3.1 Recalling Off-site Backups 17-8
17.2.4 Validating Backups Before Restoring Them 17-9
17.2.5 Restoring Archived Redo Logs Needed for Recovery 17-10
17.2.5.1 Restoring Archived Redo Logs to a New Location 17-10
17.2.5.2 Restoring Archived Redo Logs to Multiple Locations 17-11
17.2.6 Providing the Password Required to Decrypt Encrypted Backups 17-11
17.3 Performing Complete Database Recovery 17-12
17.3.1 About Complete Database Recovery 17-12
17.3.1.1 About Restoring Data Files to a Nondefault Location 17-13
17.3.2 Performing Complete Recovery of the Whole Database 17-13
17.3.3 Performing Complete Recovery of a Tablespace 17-16
17.3.4 Performing Complete Recovery After Switching to a Copy 17-18
17.3.4.1 Performing Recovery After Switching to a Data File Copy 17-19
17.3.4.2 Performing Complete Recovery After Switching to a Database
Copy 17-20
17.4 Performing Complete Recovery of CDBs 17-20
17.4.1 Performing Complete Recovery of a Whole CDB 17-21
17.4.2 Performing Complete Recovery of the Root 17-22
17.4.3 Performing Complete Recovery of PDBs with RMAN 17-23
17.4.4 Performing Complete Recovery of PDBs with Cloud Control 17-25
17.4.5 Performing Complete Recovery Using Preplugin Backups 17-26
17.4.5.1 About Complete Recovery of PDBs Using PrePlugin Backups 17-26
17.4.5.2 Performing Complete Recovery of PDBs Using Preplugin
Backups 17-27
17.4.5.3 Example: Performing Complete Recovery of PDBs Using
Preplugin Backups 17-28
17.4.6 Performing Complete Recovery of Tablespaces or Data Files in a PDB
with RMAN 17-29
17.4.7 Performing Complete Recovery of Tablespaces in a PDB with Cloud
Control 17-31
17.4.8 Performing Complete Recovering of CDBs After Switching to a Copy 17-32
xix

17.5 Performing Complete Recovery of Application Containers 17-32
17.5.1 Performing Complete Recovery of the Application Root 17-33
17.5.2 Performing Complete Recovery of the Application Root and Application
PDBs 17-34
17.5.3 Performing Complete Recovery of Application PDBs 17-35
17.6 Performing Complete Recovery of Sparse Databases with RMAN 17-36
17.6.1 Performing Complete Recovery of a Sparse Database 17-36
17.6.2 Performing Complete Recovery of a Sparse CDB 17-37
17.6.3 Performing Recovery of a Sparse PDB with RMAN 17-37
18
Performing Flashback and Database Point-in-Time Recovery
18.1 Overview of Oracle Flashback Technology and Database Point-in-Time
Recovery 18-1
18.1.1 Purpose of Flashback and Database Point-in-Time Recovery 18-1
18.1.2 Basic Concepts of Point-in-Time Recovery and Flashback Features 18-1
18.1.2.1 Basic Concepts of Database Point-in-Time Recovery for non-
CDBs 18-2
18.1.2.2 Basic Concepts of Point-in-Time Recovery for PDBs 18-3
18.1.2.3 Basic Concepts of Flashback Technology 18-3
18.1.3 Basic Concepts of Performing Flashback Database for CDBs and
PDBs 18-5
18.1.3.1 About Flashback Database and PITR for PDBs 18-6
18.1.3.2 About Undo and Flashback Database Operations for PDBs 18-7
18.1.3.3 About Managing Redo Corruption in CDBs 18-7
18.2 Rewinding a Table with Flashback Table 18-8
18.2.1 Prerequisites for Flashback Table 18-8
18.2.2 Performing a Flashback Table Operation 18-9
18.2.2.1 Keeping Triggers Enabled During Flashback Table 18-11
18.3 Rewinding a DROP TABLE Operation with Flashback Drop 18-11
18.3.1 About Flashback Drop 18-12
18.3.2 Prerequisites of Flashback Drop 18-12
18.3.3 Performing a Flashback Drop Operation 18-13
18.3.3.1 Retrieving Objects Using Flashback Drop When Multiple Objects
Share the Same Original Name 18-15
18.4 Rewinding a Database with Flashback Database 18-16
18.4.1 Prerequisites of Flashback Database 18-17
18.4.2 Performing a Flashback Database Operation 18-17
18.4.3 Performing a Flashback Database Operation for a Whole CDB 18-21
18.4.4 Performing a Flashback Database Operation for PDBs 18-24
18.4.5 Monitoring Flashback Database 18-25
18.5 Performing Database Point-in-Time Recovery 18-26
18.5.1 Prerequisites of Database Point-in-Time Recovery 18-26
xx

18.5.2 Performing Database Point-in-Time Recovery 18-27
18.5.3 Performing Point-in-Time Recovery of CDBs and PDBs 18-29
18.5.3.1 Performing Point-in-Time Recovery of a Whole CDB 18-30
18.5.3.2 Performing Point-in-Time Recovery of PDBs 18-31
18.5.4 Performing Point-in-Time Recovery of Application PDBs 18-33
18.5.5 Performing Point-in-Time Recovery of Sparse Databases 18-34
18.6 Flashback and Database Point-in-Time Recovery Scenarios 18-36
18.6.1 Rewinding an OPEN RESETLOGS Operation with Flashback
Database 18-36
18.6.1.1 About Undoing an OPEN RESETLOGS on Standby Databases
with Flashback Database 18-37
18.6.2 Rewinding the Database to an SCN in an Abandoned Incarnation
Branch 18-37
18.6.3 Recovering the Database to an Ancestor Incarnation 18-39
19
Performing Block Media Recovery
19.1 Overview of Block Media Recovery 19-1
19.1.1 Purpose of Block Media Recovery 19-1
19.1.2 Basic Concepts of Block Media Recovery 19-2
19.1.2.1 About Block Recovery and Standby Databases 19-2
19.1.2.2 About Identifying Corrupt Blocks 19-3
19.1.2.3 About Missing Redo During Block Recovery 19-4
19.2 Prerequisites for Block Media Recovery 19-5
19.3 Recovering Individual Blocks 19-5
19.3.1 Recovering Individual Blocks Using the RECOVER...BLOCK
Command 19-6
19.3.2 Example: Recovering Individual Blocks Using the Data Recovery
Advisor 19-6
19.4 Recovering All Blocks in V$DATABASE_BLOCK_CORRUPTION 19-8
20
Performing RMAN Recovery: Advanced Scenarios
20.1 Recovering a NOARCHIVELOG Database with Incremental Backups 20-1
20.2 Restoring the Server Parameter File 20-2
20.2.1 Restoring the Server Parameter File from a Control File Autobackup 20-4
20.2.2 Creating an Initialization Parameter File with RMAN 20-4
20.3 Performing Recovery with a Backup Control File 20-5
20.3.1 About Recovery with a Backup Control File 20-5
20.3.1.1 About Control File Locations During RMAN Restore 20-6
20.3.1.2 About RMAN Recovery With and Without a Recovery Catalog 20-6
20.3.1.3 About RMAN Recovery When Using a Fast Recovery Area 20-7
xxi

20.3.2 Performing Recovery with a Backup Control File and No Recovery
Catalog 20-8
20.4 Performing Disaster Recovery 20-10
20.4.1 Prerequisites of Disaster Recovery 20-10
20.4.2 Recovering the Database After a Disaster 20-10
20.5 Restoring a Database on a New Host 20-12
20.5.1 Preparing to Restore a Database on a New Host 20-13
20.5.2 Restoring Disk Backups to a New Host 20-14
20.5.3 Testing the Restore of a Database on a New Host 20-15
20.6 Restoring Backups Created Using Older Versions of RMAN 20-19
20.7 Restoring and Recovering Files Over the Network 20-22
20.7.1 About Restoring Files Over the Network 20-22
20.7.2 About Recovering Files Over the Network 20-23
20.7.3 Scenarios for Restoring and Recovering Files Over the Network 20-23
20.7.4 Restoring Data Files Over the Network 20-24
20.7.5 Rolling Forward a Physical Standby Database Using the RECOVER
Command 20-24
20.7.5.1 Steps to Refresh a Physical Standby Database with Changes
Made to the Primary Database 20-25
21
Performing RMAN Tablespace Point-in-Time Recovery (TSPITR)
21.1 Overview of RMAN TSPITR 21-1
21.1.1 Purpose of RMAN TSPITR 21-1
21.1.2 Basic Concepts of RMAN TSPITR 21-2
21.1.2.1 Common Terms for RMAN TSPITR 21-2
21.1.2.2 Modes of RMAN TSPITR 21-3
21.1.2.3 How RMAN TSPITR Works With an RMAN-Managed Auxiliary
Database 21-4
21.2 TSPITR Restrictions, Special Cases, and Limitations 21-5
21.2.1 Limitations of TSPITR 21-6
21.2.2 About Special Considerations When Not Using a Recovery Catalog 21-6
21.3 Planning and Preparing for TSPITR 21-7
21.3.1 Selecting the Right Target Time for TSPITR 21-7
21.3.2 Determining the Recovery Set 21-8
21.3.2.1 Identify and Resolve Dependencies on the Primary Database 21-8
21.3.3 Identifying and Preserving Objects That Are Lost After TSPITR 21-9
21.4 Performing Fully Automated RMAN TSPITR 21-10
21.5 Overriding Defaults for RMAN TSPITR with an RMAN-Managed Auxiliary
Database 21-12
21.5.1 Renaming TSPITR Recovery Set Data Files with SET NEWNAME 21-12
21.5.2 Naming TSPITR Auxiliary Set Data Files 21-13
xxii

21.5.2.1 Considerations When Renaming OMF Auxiliary Set Files in
TSPITR 21-14
21.5.2.2 Using SET NEWNAME to Name Auxiliary Set Data Files During
TSPITR 21-15
21.5.2.3 Using DB_FILE_NAME_CONVERT to Name Auxiliary Set Data
Files During TSPITR 21-16
21.5.3 Using Image Copies for Faster RMAN TSPITR Performance 21-17
21.5.3.1 Using SET NEWNAME with Recovery Set Image Copies 21-18
21.5.3.2 Using SET NEWNAME and CONFIGURE AUXNAME with
Auxiliary Set Image Copies 21-18
21.5.3.3 Performing TSPITR with CONFIGURE AUXNAME and Image
Copies: Scenario 21-19
21.5.4 Customizing Initialization Parameters for the Automatic Auxiliary
Database in TSPITR 21-20
21.5.4.1 Specifying the Auxiliary Database Control File Location in
TSPITR 21-21
21.5.4.2 Specifying the Auxiliary Database Archived Logs in TSPITR 21-21
21.5.4.3 Specifying the Auxiliary Database Online Log Location in
TSPITR 21-21
21.6 Performing RMAN TSPITR Using Your Own Auxiliary Database 21-22
21.6.1 Preparing Your Own Auxiliary Database for RMAN TSPITR 21-22
21.6.1.1 Step 1: Create an Oracle Password File for the Auxiliary
Database 21-23
21.6.1.2 Step 2: Create an Initialization Parameter File for the Auxiliary
Database 21-23
21.6.1.3 Step 3: Check Oracle Net Connectivity to the Auxiliary Database 21-25
21.6.2 Preparing RMAN Commands for TSPITR with Your Own Auxiliary
Database 21-25
21.6.2.1 Planning Channels for TSPITR with Your Own Auxiliary
Database 21-26
21.6.2.2 Planning Data File Names with Your Own Auxiliary Database:
SET NEWNAME 21-26
21.6.3 Executing TSPITR with Your Own Auxiliary Database 21-26
21.6.3.1 Step 1: Start the Auxiliary Database in NOMOUNT Mode 21-27
21.6.3.2 Step 2: Connect the RMAN Client to Target and Auxiliary
Databases 21-27
21.6.3.3 Step 3: Execute the RECOVER TABLESPACE Command 21-27
21.6.4 Performing TSPITR with Your Own Auxiliary Database: Scenario 21-28
21.7 Troubleshooting RMAN TSPITR 21-29
21.7.1 Troubleshooting File Name Conflicts During TSPITR 21-30
21.7.2 Troubleshooting the Identification of Tablespaces with Undo Segments
During TSPITR 21-30
21.7.3 Troubleshooting the Restart of a Manual Auxiliary Database After
TSPITR Failure 21-30
xxiii

22
Recovering Tables and Table Partitions
22.1 Overview of Recovering Tables and Table Partitions 22-1
22.1.1 Purpose of Recovering Tables and Table Partitions from RMAN
Backups 22-1
22.1.2 RMAN Backups Required to Recover Tables and Table Partitions 22-2
22.1.3 Basic Concepts of Recovering Tables and Table Partitions from RMAN
Backups 22-2
22.1.3.1 Steps Performed By RMAN to Recover Tables and Table
Partitions 22-3
22.1.3.2 About the Location of Auxiliary Database Files During RMAN
Table Recovery 22-4
22.1.3.3 About the Data Pump Export Dump File Used During RMAN
Table Recovery 22-5
22.1.3.4 About Importing Recovered Tables and Table Partitions into the
Target Database 22-5
22.1.3.5 About Renaming Recovered Tables and Table Partitions During
RMAN Recovery 22-5
22.1.3.6 About Recovering Tables and Partitions Into a New Schema 22-6
22.1.4 Limitations of Recovering Tables and Table Partitions from RMAN
Backups 22-7
22.2 Preparing to Recover Tables and Table Partitions 22-7
22.2.1 Prerequisites for Recovering Tables and Table Partitions from RMAN
Backups 22-8
22.2.2 Determining the Point-in-time to Which Tables and Table Partitions
Must be Recovered 22-8
22.3 Recovering Tables and Table Partitions 22-9
22.4 Recovering Tables and Table Partitions in PDBs 22-10
22.5 Examples: Recovering Tables and Table Partitions From RMAN Backups 22-11
22.5.1 Example: Recovering Tables to a Specified Point in Time 22-11
22.5.2 Example: Recovering Table Partitions to a Specified Log Sequence
Number 22-12
22.5.3 Example: Recovering a Table into a New Schema 22-12
Part VI Tuning and Troubleshooting
23
Tuning RMAN Performance
23.1 Purpose of RMAN Performance Tuning 23-1
23.2 Basic Concepts of RMAN Performance Tuning 23-1
23.2.1 Read Phase 23-3
23.2.1.1 Allocation of Input Disk Buffers 23-4
23.2.1.2 Synchronous and Asynchronous Disk I/O 23-5
23.2.1.3 Disk I/O Slaves 23-5
xxiv

23.2.1.4 RATE Channel Parameter 23-6
23.2.2 Copy Phase 23-6
23.2.3 Write Phase for System Backup Tape (SBT) 23-7
23.2.3.1 RMAN Component of the Write Phase for SBT 23-7
23.2.3.2 Media Manager Component of the Write Phase for SBT 23-10
23.2.4 Write Phase for Disk 23-11
23.3 Using V$ Views to Diagnose RMAN Performance Problems 23-12
23.3.1 Monitoring RMAN Job Progress with V$SESSION_LONGOPS 23-12
23.3.2 Identifying Bottlenecks with V$BACKUP_SYNC_IO and
V$BACKUP_ASYNC_IO 23-14
23.3.2.1 Identifying Bottlenecks with Synchronous I/O 23-15
23.3.2.2 Identifying Bottlenecks with Asynchronous I/O 23-15
23.4 Tuning RMAN Backup Performance 23-16
23.4.1 Removing the RATE Parameter from Channel Settings 23-16
23.4.2 Setting DBWR_IO_SLAVES to Simulate Asynchronous I/O 23-17
23.4.3 Setting LARGE_POOL_SIZE to Resolve Shared Memory Issues 23-17
23.4.4 Tuning the Read, Write, and Copy Phases 23-18
23.4.4.1 Using Backup Validation To Distinguish Between Read and
Write Bottlenecks 23-18
23.4.4.2 Tuning the Read Phase 23-19
23.4.4.3 Tuning the Copy and Write Phases 23-20
24
Troubleshooting RMAN Operations
24.1 Interpreting RMAN Message Output 24-1
24.1.1 Identifying Types of RMAN Message Output 24-1
24.1.2 Troubleshooting Long-Running RMAN Operations 24-2
24.1.3 Recognizing RMAN Error Message Stacks 24-3
24.1.4 Identifying RMAN Error Codes 24-3
24.1.4.1 RMAN Error Message Numbers 24-4
24.1.4.2 ORA-19511: Media Manager Errors 24-5
24.1.5 Interpreting RMAN Error Stacks 24-7
24.1.5.1 Interpreting RMAN Errors: Example 24-7
24.1.5.2 Interpreting Server Errors: Example 24-8
24.1.5.3 Interpreting SBT 2.0 Media Management Errors: Example 24-8
24.1.5.4 Interpreting SBT 1.1 Media Management Errors: Example 24-9
24.1.6 Identifying RMAN Return Codes 24-9
24.2 Using V$ Views for RMAN Troubleshooting 24-10
24.2.1 Monitoring RMAN Interaction with the Media Manager 24-10
24.2.2 Correlating Server Sessions with RMAN Channels 24-11
24.2.2.1 Matching Server Sessions with Channels When One RMAN
Session Is Active 24-12
xxv

24.2.2.2 Matching Server Sessions with Channels in Multiple RMAN
Sessions 24-12
24.3 Testing the Media Management API 24-14
24.3.1 Obtaining the sbttest Utility 24-14
24.3.2 Obtaining Online Documentation for the sbttest Utility 24-14
24.3.3 Using the sbttest Utility 24-15
24.4 Terminating an RMAN Command 24-16
24.4.1 Terminating the Session with ALTER SYSTEM KILL SESSION 24-16
24.4.2 Terminating the Session at the Operating System Level 24-17
24.4.3 Terminating an RMAN Session That Is Not Responding in the Media
Manager 24-17
24.4.3.1 Components of an RMAN Session 24-17
24.4.3.2 Process Behavior During a Suspended Job 24-18
24.4.3.3 Terminating an RMAN Session: Basic Steps 24-18
Part VII Transferring Data with RMAN
25
Duplicating Databases
25.1 Overview of RMAN Database Duplication 25-1
25.1.1 Purpose of Database Duplication 25-1
25.1.2 Basic Concepts of Database Duplication 25-2
25.1.2.1 Initialization Parameters for the Auxiliary Instance 25-3
25.1.2.2 About Parallelizing Backup Set Creation During Active Database
Duplication 25-5
25.1.2.3 About Encrypting Backup Sets During Active Database
Duplication 25-5
25.1.2.4 About Compressing Backup Sets During Active Database
Duplication 25-5
25.1.3 Types of Database Duplication 25-6
25.1.3.1 Overview of Backup-Based Duplication 25-6
25.1.3.2 Techniques for Performing Backup-Based Duplication 25-7
25.1.3.3 Overview of Active Database Duplication 25-9
25.1.3.4 Techniques for Performing Active Database Duplication 25-10
25.1.3.5 Factors that Determine Whether Backup Sets or Image Copies
Are Used for Active Database Duplication 25-12
25.1.4 How RMAN Duplicates a Database 25-12
25.1.5 Contents of a Duplicate Database 25-13
25.1.5.1 About Duplicating a Subset of the Source Database 25-13
25.1.6 About the Destination Host for Database Duplication 25-14
25.1.7 About Duplicate Database File Names 25-15
25.1.8 About Duplicating a Database to a Past Point-in-Time 25-15
xxvi

25.1.9 Prerequisites for Duplicating a Database 25-15
25.2 Planning to Duplicate a Database 25-16
25.2.1 Choosing a Duplication Technique 25-16
25.2.2 Choosing a Strategy for Naming Duplicate Database Files 25-17
25.2.2.1 Using the Same Names for Database Files in the Source
Database and Duplicate Database 25-17
25.2.2.2 Using Different Names for the Database Files in the Source
Database and Duplicate Database 25-18
25.2.2.3 Methods of Generating Database File Names for the Duplicate
Database 25-18
25.2.3 Installing the Oracle Database Software on the Destination Host 25-20
25.2.4 Deciding the State of the Duplicate Database 25-21
25.2.5 Making Backups Accessible to the Duplicate Instance 25-21
25.2.5.1 Making SBT Backups Accessible to the Auxiliary Instance 25-22
25.2.5.2 Making Disk Backups Accessible to the Auxiliary Instance 25-22
25.3 Preparing the Auxiliary Instance 25-24
25.3.1 Creating Directories for the Duplicate Database 25-24
25.3.2 Creating an Initialization Parameter File for the Auxiliary Instance 25-24
25.3.2.1 Steps to Create an Initialization Parameter File for the Auxiliary
Instance 25-25
25.3.2.2 Copying the Server Parameter File from the Source Database 25-27
25.3.3 Creating a Password File for the Auxiliary Instance 25-27
25.3.4 Establishing Oracle Net Connectivity Between the Source Database
and Auxiliary Instance 25-28
25.3.5 Starting the Auxiliary Instance 25-29
25.3.6 Making the Oracle Keystore Available to the Destination Host 25-30
25.4 Duplicating a Database 25-31
25.4.1 Duplicating the Whole Database 25-31
25.4.2 Duplicating a Subset of the Source Database Tablespaces 25-32
25.4.3 Duplicating an Oracle RAC Database 25-34
25.4.4 Duplicating Sparse Databases 25-34
25.4.5 Configuring RMAN Channels for Use in Duplication 25-35
25.4.5.1 Configuring Channels for Backup-based Duplication 25-36
25.4.5.2 Configuring Channels for Active Database Duplication 25-37
25.4.6 Placing the Source Database in a Proper State 25-37
25.4.7 Starting RMAN and Connecting to Databases 25-38
25.4.8 Using the DUPLICATE Command to Duplicate Databases 25-39
25.5 Duplicating CDBs and PDBs 25-40
25.5.1 Duplicating CDBs 25-40
25.5.2 Duplicating Sparse CDBs 25-41
25.5.3 Duplicating PDBs 25-42
25.5.3.1 About Duplicating PDBs 25-43
xxvii

25.5.3.2 Restrictions on Duplicating a PDB to an Existing CDB 25-44
25.5.3.3 Duplicating a PDB to an Existing CDB 25-45
25.5.3.4 Duplicating a PDB to a New CDB 25-46
25.5.3.5 Duplicating Sparse PDBs 25-47
25.5.4 Duplicating Tablespaces Within a PDB to a New CDB 25-48
25.6 Duplicating Databases to Oracle Cloud 25-49
25.7 Duplicating an Oracle Cloud Database as an On-premise Database 25-50
25.8 Restarting DUPLICATE After a Failure 25-52
25.9 Examples: Duplicating Databases 25-53
25.9.1 Example: Duplicating a Database to a Remote ASM Host by Using
Active Database Duplication with Backup Sets 25-53
25.9.2 Example: Duplicating a Database to a Remote Host by Using Active
Database Duplication with Image Copies 25-55
25.9.3 Example: Duplicating a Database to a Remote Host by Using Backup-
based Duplication without a Target Connection or Recovery Catalog 25-57
25.9.4 Example: Duplicating a Database to a Remote Host by Using Backup-
Based Duplication with a Recovery Catalog 25-59
25.9.5 Example: Duplicating a Database to a Remote Host by Using Backup-
based Duplication with a Target Connection 25-61
25.9.6 Example: Duplicating a Database to the Local Host by Using Active
Database Duplication 25-63
25.9.7 Example: Duplicating PDBs to a New CDB by Using Active Database
Duplication 25-64
25.9.8 Example: Duplicating a PDB to an Existing CDB by Using Active
Duplication 25-66
25.9.9 Example: Performing Backup-based Duplication by Using Encrypted
Backups 25-67
25.10 Example: Script to Duplicate a Database Using Backup-based Duplication 25-69
26
Duplicating Databases: Advanced Topics
26.1 Specifying Alternative Names for Duplicate Database Files 26-1
26.1.1 Specifying Non-OMF or Non-ASM Alternative Names for Duplicate
Database Files 26-1
26.1.1.1 Using the SET NEWNAME Command to Name File System
Data Files and Temp Files 26-2
26.1.1.2 Using the CONFIGURE AUXNAME Command to Name File
System Data Files and OMF or ASM Target Data Files 26-5
26.1.2 Specifying OMF or ASM Alternative Names for Duplicate Database
Files 26-5
26.1.2.1 Settings and Restrictions for OMF Initialization Parameters 26-6
26.1.2.2 Setting Initialization Parameters for ASM 26-7
26.1.2.3 Examples: Duplicating Databases to ASM 26-7
26.1.2.4 Using the SET NEWNAME Command to Create OMF or ASM
Files 26-8
xxviii

26.1.2.5 Using the DB_FILE_NAME_CONVERT Parameter to Generate
Names for Non-OMF or ASM Data Files 26-9
26.1.2.6 Using the LOG_FILE_NAME_CONVERT Parameter to Generate
Names for Non-OMF or ASM Log Files 26-10
26.2 Making Disk Backups Accessible Without Shared Disk 26-10
27
Creating Transportable Tablespace Sets
27.1 Overview of Creating Transportable Tablespace Sets 27-1
27.1.1 Purpose of Creating Transportable Tablespace Sets 27-1
27.1.2 Basic Concepts of Transportable Tablespace Sets 27-2
27.1.3 Basic Steps of Creating Transportable Tablespace Sets 27-4
27.2 Customizing Initialization Parameters for the Auxiliary Instance 27-5
27.2.1 About Setting Initialization Parameters for the RMAN Auxiliary Instance
27-5
27.2.2 Setting the Location of the Auxiliary Instance Parameter File 27-6
27.3 Creating a Transportable Tablespace Set 27-7
27.4 Troubleshooting the Creation of Transportable Tablespace Sets 27-9
27.5 Transportable Tablespace Set Scenarios 27-9
27.5.1 Creating a Transportable Tablespace Set at a Specified Time or SCN 27-9
27.5.2 Specifying Locations for Data Pump Files 27-10
27.5.3 Specifying Auxiliary File Locations with Transportable Tablespaces 27-11
27.5.3.1 Using SET NEWNAME for Auxiliary Data Files 27-12
27.5.3.2 Using CONFIGURE AUXNAME for Auxiliary Data Files 27-12
27.5.3.3 Using AUXILIARY DESTINATION to Specify a Location for
Auxiliary Files 27-13
27.5.3.4 Using Initialization Parameters to Name Auxiliary Files 27-13
28
Transporting Data Across Platforms
28.1 About Cross-Platform Data Transport 28-1
28.1.1 Purpose of Cross-Platform Data Transport 28-1
28.1.2 Methods of Transporting Data Across Platforms 28-2
28.1.3 Platforms that Support Cross-Platform Data Transport 28-2
28.2 Overview of Cross-Platform Data Transport Using Image Copies 28-3
28.2.1 Overview of Tablespace and Data File Conversion Using Image
Copies 28-3
28.2.2 Overview of Database Conversion Using Image Copies 28-4
28.3 Performing Cross-Platform Tablespace Conversion with Image Copies 28-5
28.4 Performing Cross-Platform Data File Conversion with Image Copies 28-7
28.4.1 About Renaming Output Files During RMAN Cross-Platform Data File
Conversion 28-7
xxix

28.4.2 Performing Tablespace Transportation on the Destination Host Using
RMAN CONVERT DATAFILE 28-8
28.5 Performing Cross-Platform Database Conversion with Image Copies 28-10
28.5.1 Checking the Database Before Cross-Platform Database Conversion 28-10
28.5.2 Converting Data Files on the Source Host When Transporting a
Database 28-13
28.5.3 Converting Data Files on the Destination Host When Transporting a
Database 28-16
28.5.3.1 Performing Preliminary Data File Conversion Steps on the
Source Host 28-16
28.5.3.2 Running the Conversion Scripts on the Destination Host 28-18
28.6 Overview of Cross-Platform Data Transport Using Backup Sets 28-20
28.6.1 Basic Terms Used in Cross-Platform Data Transport Using Backup
Sets 28-22
28.6.2 About Backing Up Data on the Source Database for Cross-Platform
Data Transport 28-23
28.6.3 About the Data Pump Export Dump File Used for Cross-Platform
Tablespace Transport 28-24
28.6.4 About Restoring Data on the Destination Host During Cross-Platform
Data Transport 28-24
28.6.5 About Selecting Objects to Be Restored from Cross-Platform Backups 28-25
28.6.6 About Names and Locations for Restored Objects on the Destination
Database 28-26
28.6.7 About Importing the Data Pump Export Dump File Created During
Cross-Platform Tablespace Transport 28-26
28.7 Performing Cross-Platform Database Transport with Backup Sets 28-27
28.7.1 Steps to Transport a Database to a Different Platform Using Backup
Sets 28-28
28.8 Performing Cross-Platform Transport of Read-Only Tablespaces Using
Backup Sets 28-30
28.8.1 Steps to Transport Read-Only Tablespaces to a Different Platform
Using Backup Sets 28-31
28.9 Overview of Cross-Platform Transport of Tablespaces Using Inconsistent
Backups 28-34
28.10 Performing Cross-Platform Transport of Tablespaces Using Inconsistent
Backups 28-35
28.10.1 Steps to Transport Inconsistent Tablespaces to a Different Platform 28-36
28.10.1.1 Creating Files Required to Transport Tablespaces to a Different
Platform 28-37
28.10.1.2 Transferring Files Created on the Source Host to the
Destination Host 28-37
28.10.1.3 Restoring Tablespaces and Plugging them in to the Destination
Database 28-38
28.10.2 Example: Performing Cross-Platform Inconsistent Tablespace
Transport Using Backup Sets 28-39
28.11 Performing Cross-Platform Transport of Data Files Over the Network 28-42
xxx

28.12 Performing Cross-Platform Data Transport in CDBs and PDBs 28-43
28.12.1 About Cross-Platform Transport of PDBs 28-43
28.12.2 Performing Cross-Platform Transport of a Whole CDB 28-44
28.12.3 Performing Cross-Platform Transport of a Closed PDB 28-45
28.12.4 Performing Cross-Platform Transport of a PDB Using Inconsistent
Backups 28-46
28.12.5 Performing Cross-Platform Transport of Tablespaces in a PDB 28-49
28.12.5.1 Example: Transporting a Tablespace in a PDB 28-49
Part VIII Performing User-Managed Backup and Recovery
29
Making User-Managed Database Backups
29.1 Querying V$ Views to Obtain Backup Information 29-1
29.1.1 Listing Database Files Before a Backup 29-1
29.1.2 Determining Data File Status for Online Tablespace Backups 29-2
29.2 Making User-Managed Backups of the Whole Database 29-3
29.3 Making User-Managed Backups of CDBs and PDBs 29-4
29.4 Making User-Managed Backups of Tablespaces and Data Files 29-5
29.4.1 Making User-Managed Backups of Offline Tablespaces and Data Files 29-5
29.4.2 Making User-Managed Backups of Online Tablespaces and Data Files 29-6
29.4.2.1 Making User-Managed Backups of Online Read/Write
Tablespaces 29-7
29.4.2.2 Making Multiple User-Managed Backups of Online Read/Write
Tablespaces 29-8
29.4.2.3 Ending a Backup After an Instance Failure or SHUTDOWN
ABORT 29-9
29.4.2.4 Making User-Managed Backups of Read-Only Tablespaces 29-12
29.5 Making User-Managed Backups of Tablespaces in CDBs 29-13
29.5.1 Making User-Managed Backups of Offline Tablespaces and Data Files
in CDBs 29-13
29.5.2 Making User-Managed Backups of Online Tablespaces in CDBs and
PDBs 29-14
29.6 Making User-Managed Backups of the Control File 29-14
29.6.1 Backing Up the Control File to a Binary File 29-15
29.6.2 Backing Up the Control File to a Trace File 29-15
29.7 Making User-Managed Backups of Archived Redo Logs 29-16
29.8 Making User-Managed Backups in SUSPEND Mode 29-16
29.8.1 About the Suspend/Resume Feature 29-16
29.8.2 Making Backups in a Suspended Database 29-17
29.9 Making User-Managed Backups to Raw Devices 29-19
29.9.1 Backing Up to Raw Devices on Linux and UNIX 29-19
xxxi

29.9.1.1 Backing Up with the dd Utility on Linux and UNIX: Examples 29-20
29.9.2 Backing Up to Raw Devices on Windows 29-21
29.9.2.1 Backing Up with OCOPY: Example 29-21
29.9.2.2 Specifying the -b and -r Options for OCOPY: Example 29-22
29.10 Making Backups with Third-Party Snapshot Technologies 29-22
29.11 Verifying User-Managed Data File Backups 29-23
29.11.1 Testing the Restoration of Data File Backups 29-23
29.11.2 Running the DBVERIFY Utility 29-24
30
Performing User-Managed Database Flashback and Recovery
30.1 Performing Flashback Database with SQL*Plus 30-1
30.1.1 Performing Flashback Database of non-CDBs with SQL*Plus 30-2
30.1.2 Performing Flashback Database of CDBs with SQL*Plus 30-3
30.1.3 Performing Flashback Database of PDBs with SQL*Plus 30-4
30.2 Overview of User-Managed Media Recovery 30-5
30.2.1 About User-Managed Restore and Recovery 30-5
30.2.2 Automatic Recovery with the RECOVER Command 30-7
30.2.2.1 Automatic Recovery with SET AUTORECOVERY 30-7
30.2.2.2 Automatic Recovery with the AUTOMATIC Option of the
RECOVER Command 30-8
30.2.3 Recovery When Archived Logs Are in the Default Location 30-8
30.2.4 Recovery When Archived Logs Are in a Nondefault Location 30-9
30.2.4.1 Resetting the Archived Log Destination 30-9
30.2.4.2 Overriding the Archived Log Destination 30-10
30.2.5 Recovery Using Storage Snapshot Optimization 30-10
30.2.6 Recovery Cancellation During User-Managed Recovery 30-11
30.2.7 Parallel Media Recovery 30-12
30.3 Performing Complete Database Recovery Using SQL*Plus 30-12
30.3.1 Performing Closed Database Recovery 30-13
30.3.2 Performing Open Database Recovery 30-17
30.3.3 Performing Crash and Instance Recovery of CDBs 30-19
30.4 Performing Incomplete Database Recovery 30-20
30.4.1 Performing Cancel-Based Incomplete Recovery 30-21
30.4.2 Performing Time-Based or Change-Based Incomplete Recovery 30-23
30.5 Recovering a Database in NOARCHIVELOG Mode 30-24
30.6 Troubleshooting Media Recovery 30-25
30.6.1 About User-Managed Media Recovery Problems 30-26
30.6.2 Investigating the Media Recovery Problem: Phase 1 30-28
30.6.3 Trying to Fix the Recovery Problem Without Corrupting Blocks: Phase
2 30-28
xxxii

30.6.4 Deciding Whether to Allow Recovery to Mark as Corrupt Blocks: Phase
3 30-30
30.6.5 Allowing Recovery to Corrupt Blocks: Phase 4 30-31
30.6.6 Performing Trial Recovery 30-32
30.6.6.1 How Trial Recovery Works 30-32
30.6.6.2 Executing the RECOVER... TEST Statement 30-33
31
Performing User-Managed Recovery: Advanced Scenarios
31.1 Responding to the Loss of a Subset of the Current Control Files 31-1
31.1.1 Copying a Multiplexed Control File to a Default Location 31-1
31.1.2 Copying a Multiplexed Control File to a Nondefault Location 31-2
31.2 Recovering After the Loss of All Current Control Files 31-2
31.2.1 Recovering with a Backup Control File in the Default Location 31-3
31.2.2 Recovering with a Backup Control File in a Nondefault Location 31-4
31.2.3 Recovering Through an Added Data File with a Backup Control File 31-6
31.2.4 Recovering Read-Only Tablespaces with a Backup Control File 31-7
31.3 Re-Creating a Control File 31-7
31.3.1 Recovering Through a RESETLOGS with a Created Control File 31-9
31.3.2 Recovery of Read-Only Files with a Re-Created Control File 31-10
31.4 Re-Creating Data Files When Backups Are Unavailable 31-10
31.5 Recovering NOLOGGING Tables and Indexes 31-11
31.6 Recovering Transportable Tablespaces 31-12
31.7 Recovering After the Loss of Online Redo Log Files 31-13
31.7.1 Recovering After Losing a Member of a Multiplexed Online Redo Log
Group 31-13
31.7.2 Recovering After Losing All Members of an Online Redo Log Group 31-14
31.7.2.1 Losing an Inactive Online Redo Log Group 31-15
31.7.2.2 Losing an Active Online Redo Log Group 31-17
31.7.2.3 Loss of Multiple Redo Log Groups 31-18
31.8 Recovering from a Dropped Table Without Using Flashback Features 31-18
31.9 Dropping a Database with SQL*Plus 31-19
Glossary
Index
xxxiii

Preface
This preface contains the following topics:
•Audience
•Documentation Accessibility
•Related Documentation
•Conventions
Audience
Backup and Recovery User's Guide is intended for database administrators who
perform the following tasks:
•Back up, restore, and recover Oracle databases
•Perform maintenance on backups of database files
•Transfer data between a file system and Oracle Automatic Storage Management
or between platforms when installing Oracle Database
To use this document, you must know the following:
•Relational database concepts and basic database administration as described in
Oracle Database Concepts and the Oracle Database Administrator's Guide
•The operating system environment under which you run the database
Documentation Accessibility
For information about Oracle's commitment to accessibility, visit the Oracle
Accessibility Program website at http://www.oracle.com/pls/topic/lookup?
ctx=acc&id=docacc.
Access to Oracle Support
Oracle customers that have purchased support have access to electronic support
through My Oracle Support. For information, visit http://www.oracle.com/pls/topic/
lookup?ctx=acc&id=info or visit http://www.oracle.com/pls/topic/lookup?ctx=acc&id=trs
if you are hearing impaired.
Related Documentation
For more information about backup and recovery, see these Oracle resources:
•Oracle Database Backup and Recovery Reference
Preface
xxxiv

•Oracle Database Utilities
•Oracle Automatic Storage Management Administrator's Guide
You can access information about the Backup Solutions Program (BSP) at
http://www.oracle.com/technetwork/database/features/availability/bsp-088814.html
Many books in the documentation set use the sample schemas of the seed database,
which is installed by default when you install Oracle Database. Refer to Oracle
Database Sample Schemas for information about how these schemas were created
and how you can use them yourself.
Conventions
The following text conventions are used in this document:
Convention Meaning
boldface Boldface type indicates graphical user interface elements
associated with an action, or terms defined in text or the
glossary.
italic Italic type indicates book titles, emphasis, or placeholder
variables for which you supply particular values.
monospace
Monospace type indicates commands within a paragraph,
URLs, code in examples, text that appears on the screen, or
text that you enter.
Preface
xxxv

Changes in This Release for Backup and
Recovery User's Guide
This preface contains:
•Changes in Oracle Database Release 18c, Version 18.1
•Changes in Oracle Database 12c Release 2 (12.2.0.1)
•Changes in Oracle Database 12c Release 1 (12.1.0.2)
•Changes in Oracle Database 12c Release 1 (12.1.0.1)
Changes in Oracle Database Release 18c, Version 18.1
The following are changes in Oracle Database Backup and Recovery User’s Guide for
Oracle Database release 18c, version 18.1.
New Features
•Duplicate PDBs into an existing CDB
The
DUPLICATE
command can be used to duplicate a PDB to an existing CDB.
See Also:
–About Duplicating PDBs
–Duplicating a PDB to an Existing CDB
•Duplicate databases to Oracle Cloud
An on-premise Oracle database can be duplicated to Oracle Cloud Infrastructure
Classic. Similarly, you can duplicate an Oracle database in Oracle Cloud
Infrastructure Classic as an on-premise database.
See Also:
–Duplicating Databases to Oracle Cloud
–Duplicating an Oracle Cloud Database as an On-premise Database
•Roll forward a physical standby
Improvements to the functionality for rolling forward a standby database result in a
simplified procedure for performing this task.
Changes in This Release for Backup and Recovery User's Guide
xxxvi

See Also:
Steps to Refresh a Physical Standby Database with Changes Made to
the Primary Database
•RMAN backups usable after migration
RMAN backups of a non-CDB or PDB that were created before the non-CDB or
PDB was migrated and plugged in to a different CDB can be used for recovery
operations in the new CDB.
See Also:
–Creating a Preplugin Backup of the Whole Database
–Creating Preplugin Backups of PDBs Using RMAN
–Performing Complete Recovery of PDBs Using Preplugin Backups
•Shadow lost write protection
Data loss is minimized by fast detection and immediate response to data block lost
rewrites.
See Also:
Enabling Shadow Lost Write Protection
Changes in Oracle Database 12c Release 2 (12.2.0.1)
The following are changes in the Oracle Database Backup and Recovery User’s Guide
for Oracle Database 12c Release 2 (12.2.0.1).
New Features
•Support for restore points in PDBs
You can create a PDB restore point, which is a restore point that is specific to a
single pluggable database (PDB). Creating a PDB restore point for a particular
PDB ensures that there are no name conflicts with restore points defined for other
PDBs in the multitenant container database (CDB).
Changes in This Release for Backup and Recovery User's Guide
xxxvii

See:
–Overview of Restore Points in a Multitenant Environment
–Creating CDB Restore Points
–Creating PDB Restore Points
–Listing Restore Points Using the V$RESTORE_POINT View
•Flashback Database support for PDBs
You can perform a Flashback Database operation for a single PDB without
impacting other PDBs in the multitenant container database (CDB). This enables
you to rewind only the specified PDB, instead of the entire CDB, to a previous
point in time. A Flashback Database operation on a particular PDB does not
impact other PDBs in the CDB.
In Oracle Database 12c Release 1 (12.1), to perform a flashback database
operation for a CDB across PDB point-in-time recovery (PITR), you had to make
all data files in the PDB for which PITR was performed offline. This restriction is
now removed. You can perform a flashback database operation on a CDB across
PDB PITR or PDB flashback with
COMPATIBLE
set to 12.2 or higher.
See:
–Basic Concepts of Performing Flashback Database for CDBs and
PDBs
–Performing a Flashback Database Operation for a Whole CDB
–Performing a Flashback Database Operation for PDBs
–Performing Flashback Database with SQL*Plus
•Enhancements to recovering tables and table partitions
Before performing table recovery, RMAN checks if there is sufficient space on the
target host to create the auxiliary instance that is used during recovery. You can
also recover tables and table partitions into a schema that is different from the
source schema in which they originally existed.
See:
–Steps Performed By RMAN to Recover Tables and Table Partitions
–About Recovering Tables and Partitions Into a New Schema
–Example: Recovering a Table into a New Schema
•Enhancements to cross-platform transport
Changes in This Release for Backup and Recovery User's Guide
xxxviii

You can perform cross-platform transport of a PDB into a new CDB. Encrypted
tablespaces can be transported across platforms. You can also restore and
recover files across platforms and over the network.
See:
–Performing Cross-Platform Transport of a Closed PDB
–Performing Cross-Platform Transport of a PDB Using Inconsistent
Backups
–Steps to Transport Read-Only Tablespaces to a Different Platform
Using Backup Sets
–Steps to Transport Inconsistent Tablespaces to a Different Platform
–Performing Cross-Platform Transport of Data Files Over the Network
•Enhancements to database duplication
You can use the
DUPLICATE
command to create an Oracle Data Guard far sync
instance.
See Duplicating the Whole Database.
•Backup and recovery support for application containers
You can use RMAN to perform backup, complete recovery, and point-in-time
recovery of application containers. This includes the application root and one or
more application PDBs.
See:
–Backing Up Application Containers
–Performing Complete Recovery of Application Containers
–Performing Point-in-Time Recovery of Application PDBs
•Backup and Recovery of Sparse Databases
RMAN enables you to perform backup, recovery, and backup-based duplication
for sparse databases with the
COMPATIBLE
initialization parameter set to 12.2 or
higher. You can also backup and recover individual sparse data files, tablespaces,
CDBs, and PDBs.
Changes in This Release for Backup and Recovery User's Guide
xxxix

See:
–About Sparse Backups
–Backing Up Sparse Databases with RMAN
–Performing Complete Recovery of Sparse Databases
–Performing Point-in-Time Recovery of Sparse Databases
–Duplicating Sparse Databases
Changes in Oracle Database 12c Release 1 (12.1.0.2)
The following are changes in Backup and Recovery User's Guide for Oracle Database
12c Release 1 (12.1.0.2).
New Features
The following are the new features in this release:
•Oracle Virtual Private Database (VPD) for RMAN virtual private catalog
The RMAN recovery catalog is created and managed using VPD. This provides
better performance and scalability when a large number of virtual private catalogs
are created.
See:
"Creating and Managing Virtual Private Catalogs"
Changes in Oracle Database 12c Release 1 (12.1.0.1)
The following are changes in Backup and Recovery User's Guide for Oracle Database
12c Release 1 (12.1.0.1).
New Features
The following are new features in this release:
•Support for multitenant container databases and pluggable databases
RMAN provides backup and recovery of multitenant container databases (CDBs),
which are introduced in Oracle Database 12c Release 1 (12.1). This support
includes backup and point-in-time recovery of specified pluggable databases
(PDBs).
Changes in This Release for Backup and Recovery User's Guide
xl

See:
–"Backing Up CDBs and PDBs"
–"Performing Point-in-Time Recovery of CDBs and PDBs"
–"Performing Crash and Instance Recovery of CDBs"
•
SYSBACKUP
Privilege
The
SYSBACKUP
administrative privilege encompasses the permissions required for
backup and recovery, including the ability to connect to a closed database. System
administrators can grant
SYSBACKUP
instead of
SYSDBA
to users who perform backup
and recovery, thus reducing the proliferation of the
SYSDBA
privilege. In contrast to
SYSDBA
,
SYSBACKUP
does not include data access privileges such as
SELECT ANY
TABLE
.
See:
"Making Database Connections with RMAN"
•Storage Snapshot Optimization
Storage Snapshot Optimization enables you to use third-party technologies to take
a storage snapshot of your database without putting the database in
BACKUP
mode.
You can then use the snapshot to recover all or part of the database.
See:
–"Making Backups with Third-Party Snapshot Technologies"
–"Recovery Using Storage Snapshot Optimization"
•SQL Interface Improvements
You can now issue most SQL commands in RMAN without preceding the
command with the SQL keyword. For a few commands that exist in both RMAN
and SQL and have very different uses, you can specify the
SQL
keyword to
eliminate ambiguity. You no longer need to enclose the SQL command in quotes,
which greatly simplifies the syntax when the SQL command itself requires
quotation marks. The SQL
ALTER
command replaces the RMAN command.
The new RMAN
DESCRIBE
command provides the functionality of the SQL*Plus
DESCRIBE
command.
See:
Oracle Database Backup and Recovery Reference
•Multisection Backup Improvements
Changes in This Release for Backup and Recovery User's Guide
xli

RMAN provides multisection backup support for incremental backups and image
copies. Wherever possible, unused block compression and Block Change
Tracking are used in conjunction with multisection incremental backups. This
improves backup and restore performance.
See:
–"Specifying Multisection Incremental Backups"
–"Making Multisection Backups Using Image Copies"
•Restoring and Recovering Files Over a Network
You can now restore or recover a database, data files, tablespaces, or control files
by using backup sets from a physical standby database. RMAN transfers the
backup sets, over the network, to the destination host. This is useful in a Data
Guard environment when you want to synchronize the standby and primary
databases.
See:
"Restoring and Recovering Files Over the Network"
•Active Database Duplication Improvements
RMAN can now perform active database duplication using backup sets. When
sufficient auxiliary channels are allocated, the auxiliary instance connects to the
target instance and retrieves the backup sets over the network, thus reducing the
processing load on the target instance. Unused block compression can be used
during the duplication process, thus reducing the size of backups transported over
the network. You can specify the binary compression level to be used. You can
also encrypt backups and use multisection backups while performing active
database duplication.
See:
"About Active Database Duplication with RMAN"
•Cross-Platform Backup and Restore Improvements
You can transport data across platforms by using full and incremental backup sets.
Incremental backups can reduce overall application downtime during cross-
platform data migration.
See:
Transporting Data Across Platforms
•Recovering Tables and Table Partitions from RMAN Backups
Changes in This Release for Backup and Recovery User's Guide
xlii

RMAN can recover tables and table partitions to a specified point in time from
previously-created RMAN backups.
See:
Recovering Tables and Table Partitions from RMAN Backups
•Unified auditing and RMAN
Unified auditing consolidates all the Oracle Database audit records into one single
audit trail. To use unified auditing, you must first upgrade your database to Oracle
Database 12c Release 1 (12.1) and then migrate your database to use unified
auditing.
See:
–Oracle Database Upgrade Guide for details about migrating your
database to use unified auditing
–Oracle Database Security Guide for details about how to locate
RMAN unified auditing information
•
DUPLICATE
enhancements
You can specify that the duplicate database must not be opened using
RESETLOGS
after it is created. You may prefer not to open the duplicate database if you want to
change the initialization parameters of the duplicate database or if opening the
duplicate database may start services in the duplicate database that will conflict
with the source database.
See:
"Specifying the State of the Duplicate Database"
Changes in This Release for Backup and Recovery User's Guide
xliii


1
Introduction to Backup and Recovery
This chapter explains Oracle Database backup and recovery and summarizes the
Oracle solutions. This chapter contains the following topics:
•Purpose of Backup and Recovery
•Oracle Backup and Recovery Solutions
•About Oracle Flashback Technology
•About Data Recovery Advisor
•RMAN and Oracle Enterprise Manager Cloud Control
•About Zero Data Loss Recovery Appliance
•Backup and Recovery Documentation Roadmap
Note:
To get started with Recovery Manager (RMAN) right away, proceed to
Getting Started with RMAN.
1.1 Purpose of Backup and Recovery
As a backup administrator, your principal duty is to devise, implement, and manage a
backup and recovery strategy.
In general, the purpose of a backup and recovery strategy is to protect the database
against data loss and reconstruct the database after data loss. Typically, backup
administration tasks include the following:
•Planning and testing responses to different kinds of failures
•Configuring the database environment for backup and recovery
•Setting up a backup schedule
•Monitoring the backup and recovery environment
•Troubleshooting backup problems
•Recovering from data loss if the need arises
As a backup administrator, you may also be asked to perform other duties that are
related to backup and recovery:
•Data archival, which involves creating a database copy for long-term storage
•Data transfer, which involves moving data from one database or one host to
another
The purpose of this manual is to explain how to perform the preceding tasks.
1-1

1.1.1 About Data Protection
As a backup administrator, your primary job is making and monitoring backups for data
protection.
A backup is a copy of data of a database that you can use to reconstruct data. A
backup can be either a physical backup or a logical backup.
Physical backups are copies of the physical files used in storing and recovering a
database. These files include data files, control files, and archived redo logs.
Ultimately, every physical backup is a copy of files that store database information to
another location, whether on disk or on offline storage media such as tape.
Logical backups contain logical data such as tables and stored procedures. You can
use Oracle Data Pump to export logical data to binary files, which you can later import
into the database. The Data Pump command-line clients
expdp
and
impdp
use the
DBMS_DATAPUMP
and
DBMS_METADATA
PL/SQL packages.
Physical backups are the foundation of any sound backup and recovery strategy.
Logical backups are a useful supplement to physical backups in many circumstances
but are not sufficient protection against data loss without physical backups.
Unless otherwise specified, the term backup as used in the backup and recovery
documentation refers to a physical backup. Backing up a database is the act of making
a physical backup. The focus in the backup and recovery documentation set is almost
exclusively on physical backups.
Most of this manual focuses on RMAN-based backup and recovery. The most
noteworthy are the following:
•Incremental backups
An incremental backup stores only blocks changed since a previous backup. Thus,
they provide more compact backups and faster recovery, thereby reducing the
need to apply redo during data file media recovery. If you enable block change
tracking, then you can improve performance by avoiding full scans of every input
data file. You use the
BACKUP INCREMENTAL
command to perform incremental
backups.
•Block media recovery
You can repair a data file with only a small number of corrupt data blocks without
taking it offline or restoring it from backup. You use the
RECOVER BLOCK
command to
perform block media recovery.
•Binary compression
A binary compression mechanism integrated into Oracle Database reduces the
size of backups.
•Encrypted backups
RMAN uses backup encryption capabilities integrated into Oracle Database to
store backup sets in an encrypted format. To create encrypted backups on disk,
the database must use the Advanced Security Option. To create encrypted
backups directly on tape, RMAN must use the Oracle Secure Backup SBT
interface, but does not require the Advanced Security Option.
•Automated database duplication
Chapter 1
Purpose of Backup and Recovery
1-2

Easily create a copy of your database, supporting various storage configurations,
including direct duplication between ASM databases.
•Cross-platform data conversion
Whether you use RMAN or user-managed methods, you can supplement physical
backups with logical backups of schema objects made with Data Pump Export utility.
You can later use Data Pump Import to re-create data after restore and recovery.
Logical backups are mostly beyond the scope of the backup and recovery
documentation.
See Also:
•Backing Up the Database
•Performing User-Managed Backup and Recovery
1.1.2 About Failures that Require Database Recovery
Although several problems can halt the normal operation of an Oracle Database or
affect database I/O operations, not all of them require DBA intervention.
The following problems typically require DBA intervention and data recovery: media
failure, user errors, and application errors. Other failures may require DBA intervention
without causing data loss or requiring recovery from backup. For example, you may
need to restart the database after an instance failure or allocate more disk space after
statement failure because of a full data file.
Media Failures
A media failure is a physical problem with a disk that causes a failure of a read from or
write to a disk file that is required to run the database. Any database file can be
vulnerable to a media failure. The appropriate recovery technique following a media
failure depends on the files affected and the types of backup available.
One particularly important aspect of backup and recovery is developing a disaster
recovery strategy to protect against catastrophic data loss, for example, the loss of an
entire database host.
User Errors
User errors occur when, either due to an error in application logic or a manual mistake,
data in a database is changed or deleted incorrectly. User errors are estimated to be
the greatest single cause of database downtime.
Data loss due to user error can be either localized or widespread. An example of
localized damage is deleting the wrong person from the employees table. This type of
damage requires surgical detection and repair. An example of widespread damage is
a batch job that deletes the company orders for the current month. In this case, drastic
action is required to avoid a extensive database downtime.
While user training and careful management of privileges can prevent most user
errors, your backup strategy determines how gracefully you recover the lost data when
user error does cause data loss.
Chapter 1
Purpose of Backup and Recovery
1-3

Application Errors
Sometimes a software malfunction can corrupt data blocks. In a physical corruption,
which is also called a media corruption, the database does not recognize the block at
all: the checksum is invalid, the block contains all zeros, or the header and footer of
the block do not match. If the corruption is not extensive, then you can often repair it
easily with block media recovery.
See Also:
Oracle Database Utilities to learn how to use Data Pump
1.1.3 About Data Archival
Data archival, although related to data protection, serves a different purpose. An
archival backup is exempted from the normal backup and recovery strategy. These
backups are typically archived onto separate storage media and retained for long
periods.
For example, you may need to preserve a copy of a database as it existed at the end
of a business quarter. This backup is not part of the disaster recovery strategy. The
media to which these backups are written are often unavailable after the backup is
complete. You may send the tape into fire storage or ship a portable hard drive to a
testing facility. RMAN provides a convenient way to create a backup and exempt it
from your backup retention policy. This type of backup is known as an archival backup.
See Also:
Making Database Backups for Long-Term Storage
1.1.4 About Data Transfer
RMAN backups can be used to transport databases and tablespaces across different
platforms.
In some situations you may need to take a backup of a database or database
component and move it to another location. For example, you can use Recovery
Manager (RMAN) to create a database copy, create a tablespace copy that can be
imported into another database, or move an entire database from one platform to
another. These tasks are not strictly speaking part of a backup and recovery strategy,
but they do require the use of database backups, and so may be included in the duties
of a backup administrator.
See Also:
The chapters in Transferring Data with RMAN
Chapter 1
Purpose of Backup and Recovery
1-4

1.2 Oracle Backup and Recovery Solutions
Oracle provides multiple solutions for performing backup and recovery.
The following solutions are available when implementing a backup and recovery
strategy:
•Recovery Manager (RMAN)
Recovery Manager is fully integrated with the Oracle Database to perform a range
of backup and recovery activities, including maintaining an RMAN repository of
historical data about backups. You can access RMAN through the command line
or through Oracle Enterprise Manager.
•Oracle Enterprise Manager Cloud Control
Oracle Enterprise Manager Cloud Control (Cloud Control) provides a graphical
front end and scheduling facilities for RMAN. You enter job parameters, specify a
job schedule, and Cloud Control runs RMAN to conduct the backup and recovery
operations.
•Zero Data Loss Recovery Appliance (Recovery Appliance)
Recovery Appliance is a cloud-scale Engineered System that provides data
protection for all Oracle Databases in the enterprise. Integrated with RMAN and
Cloud Control, the Recovery Appliance provides a single repository for backups of
multiple databases as described in "About Zero Data Loss Recovery Appliance".
•User-managed backup and recovery
In this solution, you perform backup and recovery with a mixture of host operating
system commands and SQL*Plus recovery commands. You are responsible for
determining all aspects of when and how backups and recovery are done.
These solutions are supported by Oracle and are fully documented, but RMAN is the
preferred solution for database backup and recovery. RMAN provides a common
interface for backup tasks across different host operating systems, and offers several
backup techniques not available through user-managed methods.
See Also:
"RMAN and Oracle Enterprise Manager Cloud Control"
1.3 Comparison of Oracle Backup Techniques
You can use multiple techniques to create backups of the Oracle Database. This
section compares the Recovery Manager (RMAN), user-managed backups, and Data
Pump techniques.
Table 1-1 summarizes the features of the different backup techniques.
Chapter 1
Oracle Backup and Recovery Solutions
1-5

Table 1-1 Feature Comparison of Backup Techniques
Feature Recovery Manager User-Managed Data Pump
Export
Closed database
backups
Supported. Requires instance to be
mounted.
Supported. Not supported.
Open database
backups
Supported. No need to use
BEGIN
/
END
BACKUP
statements.
Supported. Must use
BEGIN
/
END
BACKUP
statements.
Requires rollback
or undo
segments to
generate
consistent
backups.
Incremental
backups
Supported. Not supported. Not supported.
Corrupt block
detection
Supported. Identifies corrupt blocks
and logs in
V$DATABASE_BLOCK_CORRUPTION
.
Not supported. Supported.
Identifies corrupt
blocks in the
export log.
Automatic
specification of
files to include in
a backup
Supported. Establishes the name
and locations of all files to be backed
up (whole database, tablespaces,
data files, control files, and so on).
Not supported. Files to be backed up
must be located and copied
manually.
Not applicable.
Backup
repository
Supported. Backups are recorded in
the control file, which is the main
repository of RMAN metadata.
Additionally, you can store this
metadata in a recovery catalog,
which is a schema in a different
database.
Not supported. DBA must keep own
records of backups.
Not supported.
Backups to a
media manager
Supported. Interfaces with a media
management software. RMAN also
supports proxy copy, a feature that
enables a media manager to
manage completely the transfer of
data between disk and backup
media.
Supported. Backup to tape is manual
or controlled by a media manager.
Not supported.
Backup of
initialization
parameter file
Supported. Supported. Not supported.
Backup of
password and
networking files
Not supported. Supported. Not supported.
Platform-
independent
language for
backups
Supported. Not supported. Supported.
1.4 About Oracle Flashback Technology
Oracle Flashback technology provides a set of features that complements your
physical backup and recovery strategy.
Chapter 1
About Oracle Flashback Technology
1-6

Oracle Flashback Technology provides an additional layer of data protection.
Specifically, you can use the various features of Oracle Flashback to view past states
of data and rewind your database without restoring backups or performing point-in-
time recovery. In general, flashback features are more efficient and less disruptive
than media recovery in most situations in which they apply.
Oracle Flashback Technology enables you to use the following functionality:
•Logical Flashback Features
•Flashback Database
1.4.1 Logical Flashback Features
The logical-level flashback features of Oracle Database do not depend on RMAN and
are available whether or not RMAN is part of your backup strategy.
Most of the flashback features of Oracle operate at the logical level, enabling you to
view and manipulate database objects. Except for Oracle Flashback Drop, the logical
flashback features rely on undo data, which are records of the effects of each
database update and the values overwritten in the update.
Oracle Database includes the following logical flashback features:
•Oracle Flashback Query
You can specify a target time and run queries against a database, viewing results
as they would appear at the target time. To recover from an unwanted change like
an update to a table, you could choose a target time before the error and run a
query to retrieve the contents of the lost rows. Oracle Database Development
Guide explains how to use this feature.
•Oracle Flashback Version Query
You can view all versions of all rows that ever existed in one or more tables in a
specified time interval. You can also retrieve metadata about the differing versions
of the rows, including start and end time, operation, and transaction ID of the
transaction that created the version. You can use this feature to recover lost data
values and to audit changes to the tables queried. Oracle Database Development
Guide explains how to use this feature.
•Oracle Flashback Transaction Query
You can view changes made by a single transaction, or by all the transactions
during a specific time period. Oracle Database Development Guide explains how
to use this feature.
•Oracle Flashback Transaction
You can reverse a transaction. Oracle Database determines the dependencies
between transactions and in effect creates a compensating transaction that
reverses the unwanted changes. The database rewinds to a state as if the
transaction, and any transactions that could be dependent on it, had never
happened. Oracle Database Development Guide explains how to use this feature.
•Oracle Flashback Table
You can recover a table or set of tables to a specified point in time earlier without
taking any part of the database offline. In many cases, Flashback Table eliminates
the need to perform more complicated point-in-time recovery operations.
Flashback Table restores tables while automatically maintaining associated
Chapter 1
About Oracle Flashback Technology
1-7

attributes such as current indexes, triggers, and constraints, and in this way
enabling you to avoid finding and restoring database-specific properties.
"Rewinding a Table with Flashback Table" explains how to use this feature.
•Oracle Flashback Drop
You can reverse the effects of a
DROP
TABLE
statement. "Rewinding a DROP
TABLE Operation with Flashback Drop" explains how to use this feature.
A flashback data archive enables you to use some logical flashback features to access
data from far back in the past. A flashback data archive consists of one or more
tablespaces or parts of tablespaces. When you create a flashback data archive, you
specify the name, retention period, and tablespace. You can also specify a default
flashback data archive. The database automatically purges old historical data the day
after the retention period expires.
You can turn flashback archiving on and off for individual tables. By default, flashback
archiving is turned off for every table.
See Also:
•Performing Flashback and Database Point-in-Time Recovery to learn
how to perform Flashback Table and Flashback Drop
•Oracle Database Development Guide for more information on the logical
flashback features
1.4.2 Flashback Database
Flashback Database enables you to revert an Oracle Database to a previous point in
time.
At the physical level, Oracle Flashback Database provides a more efficient data
protection alternative to database point-in-time recovery (DBPITR). If the current data
files have unwanted changes, then you can use the RMAN command
FLASHBACK
DATABASE
to revert the data files to their contents at a past time. The end product is
much like the result of a DBPITR, but is generally much faster because it does not
require restoring data files from backup and requires less redo than media recovery.
Flashback Database uses flashback logs to access past versions of data blocks and
some information from archived redo logs. Flashback Database requires that you
configure a fast recovery area for a database because the flashback logs can only be
stored there. Flashback logging is not enabled by default. Space used for flashback
logs is managed automatically by the database and balanced against space required
for other files in the fast recovery area.
Oracle Database also supports restore points along with Flashback Database and
backup and recovery. A restore point is an alias corresponding to a system change
number (SCN). You can create a restore point at any time if you anticipate needing to
return part or all of a database to its contents at that time. A guaranteed restore point
ensures that you can use Flashback Database to return a database to the time of the
restore point.
Chapter 1
About Oracle Flashback Technology
1-8

See Also:
"Rewinding a Database with Flashback Database" to learn how to perform
Flashback Database with the
FLASHBACK DATABASE
command
1.5 About Data Recovery Advisor
The Data Recovery Advisor provides a single point of entry for Oracle backup and
recovery solutions. It is a tool that automatically diagnoses persistent data failures,
presents appropriate repair options, and executes repairs at your request.
You can use the Data Recovery Advisor through Oracle Enterprise Manager or
through the RMAN command-line client.
A database failure usually manifests itself as a set of symptoms: error messages,
alerts, trace files and dumps, and failed data integrity checks. Data Recovery Advisor
automatically diagnoses and informs you of these failures. For Data Recovery Advisor,
a failure is a persistent data corruption that can be directly mapped to a set of repair
actions. Each failure has a status of open or closed. Each failure also has a priority of
critical, high, or low.
Failures are detected by data integrity checks, which are diagnostic procedures
executed to assess the health of the database or its components. If a data integrity
check reveals a failure, then Data Recovery Advisor automatically assesses the effect
of a set of failures and maps it to a set of repair options. Usually, Data Recovery
Advisor presents both automated and manual repair options.
Data Recovery Advisor determines the best automated repair option and its effect on
the database. The repair option may include repairs such as data file restore and
recovery, media recovery, Flashback Database, and so on. Before presenting an
automated repair option, Data Recovery Advisor validates it for the specific
environment and the availability of media components required to complete the
proposed repair.
If you choose an automated repair option, then RMAN coordinates sessions on the
Oracle Database to perform the repair for you. The Data Recovery Advisor tool verifies
the repair success and closes the appropriate failures.
See Also:
Diagnosing and Repairing Failures with Data Recovery Advisor, to learn how
to use Data Recovery Advisor
1.6 RMAN and Oracle Enterprise Manager Cloud Control
RMAN functionality can also be accessed using Oracle Enterprise Manager Cloud
Control.
This section contains:
•About Oracle Enterprise Manager Cloud Control
Chapter 1
About Data Recovery Advisor
1-9

•Accessing the Database Home Page Using Cloud Control
•Performing Backup and Recovery Tasks with Cloud Control
1.6.1 About Oracle Enterprise Manager Cloud Control
Oracle Enterprise Manager Cloud Control (Cloud Control) is a browser-based
management interface for Oracle Database.
Cloud Control provides a graphical front end and scheduling facilities for RMAN. You
enter job parameters, specify a job schedule, and Cloud Control runs RMAN at the
designated time or designated repeat interval to conduct the backup and recovery
operations. Cloud Control provides access to RMAN through a set of wizards. These
wizards lead you through a variety of recovery procedures based on an analysis of
your database, your available backups, and your data recovery objectives.
By using Cloud Control, you can perform the simpler restore and recovery scenarios
outlined in this documentation. You can also use more sophisticated restore and
recovery techniques such as point-in-time recovery and Oracle Flashback operations,
which allow for efficient repair of media failures and user errors. Using Cloud Control is
often simpler than the RMAN command-line client.
To use Cloud Control, you start by accessing the Database Home page as described
in Accessing the Database Home Page Using Cloud Control.
Performing Backup and Recovery Tasks with Cloud Control describes how to use
Cloud Control for backup and recovery.
1.6.2 Accessing the Database Home Page Using Cloud Control
The Database Home page is the main database management page in Oracle
Enterprise Manager Cloud Control (Cloud Control).
After you log in to Cloud Control, you go to the Database Home page for the target
database for backup and recovery tasks.
To access the Database Home page in Cloud Control:
1. Start Cloud Control.
The URL for accessing Cloud Control has the following syntax:
http://hostname.domain:portnumber/em
Obtain the URL from your Oracle Enterprise Manager administrator or your
database administrator.
2. On the Welcome page, enter your Cloud Control user name and password, and
then click Login.
3. From the Targets menu, select Databases.
4. On the Databases page, if not already selected, select Search List to display a list
of the available target databases.
5. Select the target database that you want to modify by clicking the database name.
The home page for the target database appears. The first time that you interact
with the database (for example, by selecting from the menu options), the Database
Login page appears.
Chapter 1
RMAN and Oracle Enterprise Manager Cloud Control
1-10

6. On the login page for the target database, log in as a user with the appropriate
privileges. For example, to log in as user
SYS
with the
SYSDBA
privilege:
•User Name: Enter
SYS
.
•Password: Enter the
SYS
user's password.
•Connect As: From the list, select Sysdba Role.
1.6.3 Performing Backup and Recovery Tasks with Cloud Control
You can perform a variety of both simple and advanced backup and recovery tasks
with Oracle Enterprise Manager Cloud Control (Cloud Control).
To perform backup and recovery tasks with Cloud Control:
1. Access the Database Home page for the target database as described in
Accessing the Database Home Page Using Cloud Control.
2. From the Availability menu, select Backup and Recovery, and then select an
option.
1.7 About Zero Data Loss Recovery Appliance
Zero Data Loss Recovery Appliance (Recovery Appliance) is a cloud-scale
Engineered System that is designed to protect all the Oracle Databases in your
enterprise. It achieves significant efficiencies in performance and manageability of
backups by offloading most Oracle Database backup and restore processing to a
centralized Recovery Appliance.
Recovery Appliance stores and manages backups of multiple databases on a unified
disk pool, using an incremental-forever backup strategy described in "About the
Incremental-Forever Backup Strategy for Recovery Appliance". It continually
compresses, deduplicates, and validates backups at the Oracle block level, while
quickly creating full virtual backups on demand.
See Also:
Zero Data Loss Recovery Appliance Protected Database Configuration
Guide for information about the advantages of Recovery Appliance
Multiple client databases—known as protected databases—share a single, centrally-
managed Recovery Appliance catalog that resides on the Recovery Appliance. All
protected databases that send backups to Recovery Appliance must use this catalog.
Virtual private catalog technology enforces separation of duties among the protected
database DBAs and the Recovery Appliance administrator.
Real-time redo transport minimizes the window of potential data loss that exists
between successive archived log backups. Redo data from the protected database is
written directly to the recovery appliance as it is generated.
Recovery Appliance is integrated with Cloud Control and RMAN. An accompanying
media management library is used for communication between RMAN and Recovery
Appliance. Cloud Control enables administrators to centrally manage and monitor the
data protection of all protected databases in the enterprise.
Chapter 1
About Zero Data Loss Recovery Appliance
1-11

Oracle Secure Backup, the tape management component of Recovery Appliance, is
preinstalled on Recovery Appliance. For disaster recovery, Recovery Appliance can
replicate backups to other Recovery Appliances. A single Recovery Appliance can
service multiple protected databases of different versions and from different platforms.
See Also:
•Zero Data Loss Recovery Appliance Administrator's Guide
•Zero Data Loss Recovery Appliance Protected Database Configuration
Guide
1.7.1 Using RMAN with Recovery Appliance
You can use most RMAN commands to back up to and recover from Zero Data Loss
Recovery Appliance (Recovery Appliance).
To make backups to Recovery Appliance, you must first set the required configuration
parameters and allocate one or more SBT channels.
See Also:
•About RMAN in a Recovery Appliance Environment
•About Real-time Redo Transport for Recovery Appliance
•About the Incremental-Forever Backup Strategy for Recovery Appliance
•Configuring RMAN to Make Backups to Recovery Appliance
•Zero Data Loss Recovery Appliance Protected Databases Configuration
Guide for information about RMAN commands with modified behavior in
Recovery Appliance
1.8 Backup and Recovery Documentation Roadmap
The backup and recovery documentation roadmap is divided into two main paths:
RMAN and user-managed backup and recovery. Optional paths are shown as splitting
off and then rejoining each main path.
Figure 1-1 illustrates the recommended way to navigate the backup and recovery
documentation. You can either implement your backup and recovery strategy with
RMAN, which is recommended, or with user-managed tools.
Chapter 1
Backup and Recovery Documentation Roadmap
1-12
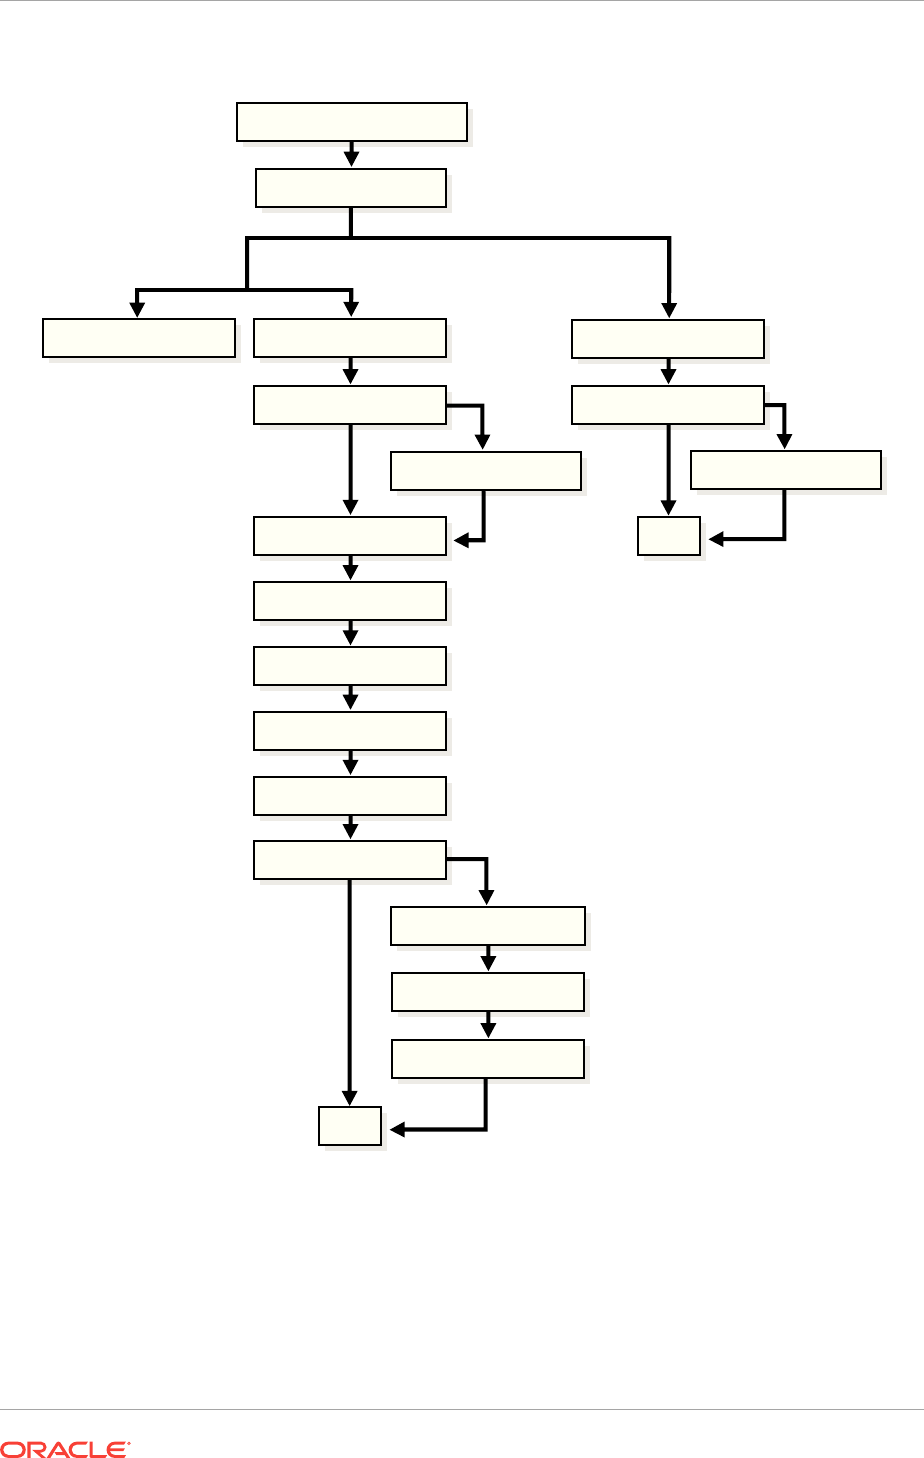
Figure 1-1 Backup and Recovery Documentation Roadmap
Introduction to
Backup and Recovery
User-Managed
Path
Backup and Recovery Concepts
(in Database Concepts)
Performing Database
Recovery: Advanced
Performing Block
Media Recovery
Performing Database
Flashback and Recovery
Backing Up the Database
Getting Started
Starting RMAN
Managing the
Recovery Catalog
Configuring the
RMAN Environment
Reporting on RMAN
Operations
Using the Data
Recovery Advisor
Performing Flashback
and DBPITR
Backing Up the Database End
RMAN
Path
Maintaining RMAN
Backups
Performing Advanced
RMAN Recovery
Tuning RMAN
Performance
End
Performing Complete
Database Recovery
If you are new to Oracle Database and want to learn about backup recovery, then the
best entry point is the discussion of basic backup and recovery principles in Oracle
Database Concepts.
Chapter 1
Backup and Recovery Documentation Roadmap
1-13

1.8.1 Recovery Manager Documentation Roadmap
This section provides a roadmap for navigating the backup and recovery
documentation when using RMAN as your principal backup and recovery solution.
Begin by reading "Getting Started with RMAN". This brief chapter, which explains the
most basic RMAN techniques, may be adequate for your purposes. For a more
comprehensive explanation of how to implement a backup and recovery strategy with
RMAN, read the chapters in the following order (optional chapters are not listed):
1. Read " Starting and Interacting with the RMAN Client".
This chapter explains how to start the RMAN client and connect to databases.
2. Read " Configuring the RMAN Environment".
This chapter explains how to perform basic tasks such as configuring a fast
recovery area, backup retention policy, and archived redo log deletion policy.
3. Read " Backing Up the Database".
This chapter explains how to implement a basic backup strategy.
4. Read "Reporting on RMAN Operations".
This chapter explains how to monitor RMAN backup and recovery operations.
Specifically, the chapter explains how to use the reporting commands (
LIST
,
REPORT
, and
SHOW
) and the relevant V$ and recovery catalog views.
5. Read " Maintaining RMAN Backups and Repository Records".
This chapter explains how to verify the existence of backups, change the
repository status of backups, delete backups, and perform other maintenance
tasks.
6. Read " Diagnosing and Repairing Failures with Data Recovery Advisor".
This chapter explains how to use the Data Recovery Advisor tool. You can use it
to list failures, obtain advice about to respond to these failures, and in some cases
automatically repair the failures.
7. Read " Performing Flashback and Database Point-in-Time Recovery".
This chapter explains how to use the
FLASHBACK DATABASE
command and perform
point-in-time recovery with the
RECOVER DATABASE
command.
8. Read " Performing Complete Database Recovery".
This chapter explains how to recover individual tablespaces or the database.
1.8.2 User-Managed Backup and Recovery Documentation Roadmap
This section provides a roadmap for navigating the backup and recovery
documentation when you do not use RMAN as your principal backup and recovery
solution.
In this case, you must use third-party tools to make your backups and SQL or
SQL*Plus commands to perform recovery. Read the chapters in the following order:
1. Read Making User-Managed Database Backups.
This chapter explains how to make backups with third-party tools.
Chapter 1
Backup and Recovery Documentation Roadmap
1-14

2. Read Performing User-Managed Database Flashback and Recovery.
This chapter explains how to use the SQL statement
FLASHBACK DATABASE
and to
perform recovery with the SQL*Plus
RECOVER
command.
3. Read Performing User-Managed Recovery: Advanced Scenarios.
This chapter explains various recovery scenarios.
Chapter 1
Backup and Recovery Documentation Roadmap
1-15

2
Getting Started with RMAN
This chapter is intended for new users who want to start using RMAN right away
without first reading the more detailed chapters in this book. This chapter provides the
briefest possible digest of the most important RMAN concepts and tasks. It is not a
substitute for the rest of the backup and recovery documentation set.
This chapter contains the following topics:
•Overview of the RMAN Environment
•Starting RMAN and Connecting to a Database
•Showing the Default RMAN Configuration
•Backing Up a Database
•Reporting on RMAN Operations
•Maintaining RMAN Backups
•Diagnosing and Repairing Failures with Data Recovery Advisor
•Rewinding a Database with Flashback Database
•Restoring and Recovering Database Files
2.1 Overview of the RMAN Environment
Recovery Manager (RMAN) is an Oracle Database client that performs backup and
recovery tasks on your databases and automates administration of your backup
strategies. It greatly simplifies backing up, restoring, and recovering database files.
The RMAN environment consists of the utilities and databases that play a role in
backing up your data. At a minimum, the environment for RMAN must include the
following components:
•A target database
An Oracle Database to which RMAN is connected with the
TARGET
keyword. A
target database is a database on which RMAN is performing backup and recovery
operations. RMAN always maintains metadata about its operations on a database
in the control file of the database. The RMAN metadata is known as the RMAN
repository.
•The RMAN client
An Oracle Database executable that interprets commands, directs server sessions
to execute those commands, and records its activity in the target database control
file. The RMAN executable is automatically installed with the database and is
typically located in the same directory as the other database executables. For
example, the RMAN client on Linux is located in
$ORACLE_HOME/bin
.
Some environments use the following optional components:
•A fast recovery area
2-1

A disk location in which the database can store and manage files related to
backup and recovery. You set the fast recovery area location and size with the
DB_RECOVERY_FILE_DEST
and
DB_RECOVERY_FILE_DEST_SIZE
initialization parameters.
•A media management software
An application required for RMAN to interact with sequential media devices such
as tape libraries. A media manager controls these devices during backup and
recovery, managing the loading, labeling, and unloading of media. Media
management devices are sometimes called SBT (system backup to tape) devices.
•A recovery catalog
A separate database schema used to record RMAN activity against one or more
target databases. A recovery catalog preserves RMAN repository metadata if the
control file is lost, making it much easier to restore and recover following the loss
of the control file. The database may overwrite older records in the control file, but
RMAN maintains records forever in the catalog unless the records are deleted by
the user.
This chapter explains how to use RMAN in the most basic configuration, which is
without a recovery catalog or media manager.
See Also:
•Recovery Manager Architecture for a more detailed overview of the
RMAN environment
•Oracle Database Backup and Recovery Reference for
BACKUP
command
syntax and semantics
2.2 Starting RMAN and Connecting to a Database: Quick
Start
Before you perform any operations using RMAN, you must connect to a target
database.
The RMAN client is started by issuing the
rman
command at the command prompt of
your operating system. RMAN displays a prompt for your commands as shown in the
following example:
% rman
RMAN>
RMAN connections to a database are specified and authenticated in the same way as
SQL*Plus connections to a database. The only difference is that RMAN connections to
a target or auxiliary database require either the
SYSDBA
or
SYSBACKUP
privilege. Any user
can be granted this privilege.
Chapter 2
Starting RMAN and Connecting to a Database: Quick Start
2-2

Caution:
Good security practice requires that you not enter passwords in plain text on
the command line. Enter passwords in RMAN only when requested by an
RMAN prompt. See Oracle Database Security Guide to learn about
password protection.
You can connect to a database with command-line options or by using the
CONNECT
TARGET
command. The following example starts RMAN and then connects to a target
database through Oracle Net as user
sbu
, which is created with the
SYSBACKUP
privilege.
RMAN prompts for a password.
% rman
RMAN> CONNECT TARGET "sbu@prod AS SYSBACKUP"
target database Password: password
connected to target database: PROD (DBID=39525561)
When using the multitenant architecture, you can connect to the root or to a specified
pluggable database (PDB) as described in "Making RMAN Connections to a CDB".
To quit the RMAN client, enter
EXIT
at the RMAN prompt:
RMAN> EXIT
Syntax of Common RMAN Command-line Options
RMAN
[ TARGET connectStringSpec
| { CATALOG connectStringSpec }
| LOG ['] filename ['] [ APPEND ]
.
.
.
]...
connectStringSpec::=
['] [userid] [/ [password]] [@net_service_name] [']
The following example appends the output from an RMAN session to a text file
at
/tmp/msglog.log
% rman TARGET / LOG /tmp/msglog.log APPEND
See Also:
Starting and Interacting with the RMAN Client, to learn more about starting
and using the RMAN client
Chapter 2
Starting RMAN and Connecting to a Database: Quick Start
2-3

2.3 Showing the Default RMAN Configuration
The RMAN backup and recovery environment is preconfigured for each target
database. The configuration is persistent and applies to all subsequent operations on
this target database, even if you exit and restart RMAN.
RMAN configuration settings can specify backup devices, set up connections to those
devices (known as channels), set policies affecting backup strategy, and more.
To show the current configuration for a database:
1. Start RMAN and connect to a target database as described in "Starting RMAN and
Connecting to a Database".
2. Run the
SHOW ALL
command.
For example, enter the command at the RMAN prompt as follows:
RMAN> SHOW ALL;
The output lists the
CONFIGURE
commands to re-create this configuration.
See Also:
Configuring the RMAN Environment, and Configuring the RMAN
Environment: Advanced Topics, to learn how to configure the RMAN
environment
2.4 Backing Up a Database: Quick Start
Use the BACKUP command to back up files. RMAN backs up data to the configured
default device for the type of backup requested.
By default, RMAN creates backups on disk. If a fast recovery area is enabled, and if
you do not specify the
FORMAT
parameter (see Table 2-1), then RMAN creates backups
in the recovery area and automatically gives them unique names.
By default, RMAN creates backup sets rather than image copies. A backup set
consists of one or more backup pieces, which are physical files written in a format that
only RMAN can access. A multiplexed backup set contains the blocks from multiple
input files. RMAN can write backup sets to disk or tape.
If you specify
BACKUP
AS
COPY
, then RMAN copies each file as an image copy, which is a
bit-for-bit copy of a database file created on disk. Image copies are identical to copies
created with operating system commands like
cp
on Linux or
COPY
on Windows, but are
recorded in the RMAN repository and so are usable by RMAN. You can use RMAN to
make image copies while the database is open.
The following sections describe backing up databases in different modes:
•About Typical RMAN Backup Options
•Backing Up a Database in ARCHIVELOG Mode
•Backing Up a Database in NOARCHIVELOG Mode
Chapter 2
Showing the Default RMAN Configuration
2-4

•Making Incremental Backups
•Making Incrementally Updated Backups
•Scripting RMAN Operations
See Also:
•RMAN Backup Concepts, to learn concepts relating to RMAN backups
•Backing Up the Database, to learn how to back up database files with
RMAN
•Oracle Database Backup and Recovery Reference for
BACKUP
command
syntax and semantics
2.4.1 About Typical RMAN Backup Options
The
BACKUP
command includes a host of options, parameters, and clauses that control
backup output.
Table 2-1 lists some typical backup options.
Table 2-1 Common Backup Options
Option Description Example
FORMAT
Specifies a location and name for backup
pieces and copies. You must use substitution
variables to generate unique file names.
The most common substitution variable is
%U
,
which generates a unique name. Others include
%d
for the DB_NAME,
%t
for the backup set time
stamp,
%s
for the backup set number, and
%p
for
the backup piece number.
BACKUP
FORMAT 'AL_
%d/%t/%s/%p'
ARCHIVELOG LIKE
'%arc_dest%';
TAG
Specifies a user-defined string as a label for the
backup. If you do not specify a tag, then RMAN
assigns a default tag with the date and time.
Tags are always stored in the RMAN repository
in uppercase.
BACKUP
TAG
'weekly_full_db_bkup
'
DATABASE
MAXSETSIZE 10M;
See Also:
•"Specifying Backup Output Options"
•Oracle Database Backup and Recovery Reference for information about
the format options
Chapter 2
Backing Up a Database: Quick Start
2-5

2.4.2 Backing Up a Database in ARCHIVELOG Mode
If a database runs in
ARCHIVELOG
mode, then you can back up the database while it is
open.
A backup is called an inconsistent backup if it contains changes after its checkpoint. If
you have the archived redo logs needed to recover the backup, open database
backups are as effective for data protection as consistent backups.
To back up the database and archived redo logs while the database is open:
1. Start RMAN and connect to a target database as described in "Starting RMAN and
Connecting to a Database".
2. Run the
BACKUP DATABASE
command.
For example, enter the following command at the RMAN prompt to back up the
database and all archived redo log files to the default backup device:
RMAN> BACKUP DATABASE PLUS ARCHIVELOG;
2.4.3 Backing Up a Database in NOARCHIVELOG Mode
If a database runs in
NOARCHIVELOG
mode, then the only valid database backup is a
consistent backup.
For the backup to be consistent, the database must be mounted after a consistent
shutdown. Recovery is not specifically required after restoring the backup, but you
would lose any transactions made after the backup. You can recover with archived
logs from a consistent backup to minimize data loss.
To make a consistent database backup:
1. Start RMAN and connect to a target database as described in "Starting RMAN and
Connecting to a Database".
2. Shut down the database consistently and then mount it.
For example, enter the following commands to guarantee that the database is in a
consistent state for a backup:
RMAN> SHUTDOWN IMMEDIATE;
RMAN> STARTUP FORCE DBA;
RMAN> SHUTDOWN IMMEDIATE;
RMAN> STARTUP MOUNT;
3. Run the
BACKUP DATABASE
command.
For example, enter the following command at the RMAN prompt to back up the
database to the default backup device:
RMAN> BACKUP DATABASE;
The following variation of the command creates image copy backups of all data
files in the database:
RMAN> BACKUP AS COPY DATABASE;
4. Open the database and resume normal operations.
The following command opens the database:
Chapter 2
Backing Up a Database: Quick Start
2-6

RMAN> ALTER DATABASE OPEN;
2.4.4 Making Incremental Backups: Quick Start
Incremental backups capture block-level changes to a database made after a previous
incremental backup.
If you specify
BACKUP
INCREMENTAL
, then RMAN creates an incremental backup of a
database. Incremental backups are generally smaller and faster to make than full
database backups. Recovery with incremental backups is faster than using redo logs
alone.
The starting point for an incremental backup strategy is a level 0 incremental backup,
which backs up all blocks in the database. An incremental backup at level 0 is identical
in content to a full backup, however, unlike a full backup the level 0 backup is
considered a part of the incremental backup strategy.
A level 1 incremental backup contains only blocks changed after a previous
incremental backup. If no level 0 backup exists in either the current or parent database
incarnation when you run a level 1 backup, then RMAN makes a level 0 backup
automatically.
Note:
You cannot make incremental backups when a
NOARCHIVELOG
database is
open, although you can make incremental backups when the database is
mounted after a consistent shutdown.
A level 1 backup can be a cumulative incremental backup, which includes all blocks
changed since the most recent level 0 backup, or a differential incremental backup,
which includes only blocks changed since the most recent incremental backup.
Incremental backups are differential by default.
During a restore operation, RMAN will first restore a level 0 backup, then automatically
apply incremental backups and redo logs as needed. This will re-apply the changes
that were made to the database since the start of the backup.
To make incremental backups of the database:
1. Start RMAN and connect to a target database as described in "Starting RMAN and
Connecting to a Database".
2. Run the
BACKUP INCREMENTAL
command.
The following example creates a level 0 incremental backup to serve as a base for
an incremental backup strategy:
BACKUP INCREMENTAL LEVEL 0 DATABASE;
The following example creates a level 1 cumulative incremental backup:
BACKUP INCREMENTAL LEVEL 1 CUMULATIVE DATABASE;
The following example creates a level 1 differential incremental backup:
BACKUP INCREMENTAL LEVEL 1 DATABASE;
Chapter 2
Backing Up a Database: Quick Start
2-7

See Also:
"About RMAN Incremental Backups" for a more detailed conceptual overview
of incremental backups and "Making and Updating RMAN Incremental
Backups"
2.4.5 Making Incrementally Updated Backups
Incrementally updated backups enable you to implement an efficient incremental
forever backup strategy.
The RMAN incrementally updated backup feature has the following main features:
•The strategy requires a level 0 data file copy as a base. This copy has either a
system-defined or user-defined tag.
•Periodically, level 1 differential backups are created with the same tag as the level
0 data file copy. The
BACKUP FOR RECOVER OF COPY
command specifies that an
incremental backup contains only blocks changed since the most recent
incremental backup with the same tag.
•Periodically, the incremental backups are applied to the level 0 data file copy.
Because the data file copy has been updated with more recent changes, it now
requires less media recovery.
Table 2-2 explains which options to use with
FOR RECOVER OF COPY
to implement an
incrementally updated backup strategy.
Table 2-2 FOR RECOVER OF COPY Options
BACKUP
Option
Description Example
FOR RECOVER
OF COPY WITH
TAG
'tag_name'
Use
TAG
to identify the tag of the data file copy serving as basis
for the backup strategy. RMAN automatically assigns the same
tag to every level 1 backup of this copy.
If no level 0 data file copy with the specified tag exists in either
the current or parent database incarnation, then RMAN creates a
level 0 data file copy with the specified tag.
BACKUP
INCREMENTAL LEVEL 1
FOR RECOVER OF COPY
WITH TAG 'incr_update'
DATABASE;
FOR RECOVER
OF COPY
DATAFILECOPY
FORMAT
'format'
Specifies where RMAN creates the data file copy if a copy does
not exist. If you add a new data file to the database, then you do
not need to change your script, because RMAN automatically
creates the level 0 copy required by the incremental backup
routine.
BACKUP
INCREMENTAL LEVEL 1
FOR RECOVER OF COPY
DATAFILECOPY FORMAT
'/disk2/df1.cpy'
DATABASE;
To implement an incrementally updated backup strategy:
1. Start RMAN and connect to a target database as described in "Starting RMAN and
Connecting to a Database".
2. Run the
RECOVER COPY
and
BACKUP INCREMENTAL
commands.
The following script, run on a regular basis, is all that is required to implement a
strategy based on incrementally updated backups.
Chapter 2
Backing Up a Database: Quick Start
2-8

RECOVER COPY OF DATABASE
WITH TAG 'incr_update';
BACKUP
INCREMENTAL LEVEL 1
FOR RECOVER OF COPY WITH TAG 'incr_update'
DATABASE;
See Also:
"Incrementally Updating Backups"
2.4.6 Validating Database Files and Backups: Quick Start
RMAN validation checks a backup to determine whether it can be restored. Validation
also checks for corrupt blocks and missing files.
Use the
VALIDATE
command to confirm that all database files exist, are in their correct
location, and are free of physical corruption. The
CHECK LOGICAL
option also checks for
logical block corruption.
To validate database files:
1. Start RMAN and connect to a target database as described in "Starting RMAN and
Connecting to a Database".
2. Run the
BACKUP VALIDATE ...
command for the desired files.
For example, enter the following commands to validate all database files and
archived redo log files for physical and logical corruption:
BACKUP VALIDATE CHECK LOGICAL
DATABASE ARCHIVELOG ALL;
You can also use the
VALIDATE
command to check individual data blocks, as shown
in the following example:
VALIDATE DATAFILE 4 BLOCK 10 TO 13;
You can also validate backup sets, as shown in the following example:
VALIDATE BACKUPSET 3;
You specify backup sets by primary key, which is shown in the output of the
LIST
BACKUP
command.
See Also:
•Validating Database Files and Backups
•Oracle Database Backup and Recovery Reference for
VALIDATE
command syntax and semantics
Chapter 2
Backing Up a Database: Quick Start
2-9

2.4.7 Scripting RMAN Operations
RMAN supports the use of command files to manage recurring tasks such as weekly
backups.
A command file is a client-side text file containing RMAN commands, exactly as you
enter them at the RMAN prompt. You can use any file extension.
Stored scripts are an alternative to command files that allow scripts to be available to
any RMAN client that can connect to the target database and its recovery catalog.
To create and run a command file:
1. Use a text editor to create a command file.
For example, create a command file with the following contents:
# my_command_file.txt
CONNECT TARGET /
BACKUP DATABASE PLUS ARCHIVELOG;
LIST BACKUP;
EXIT;
2. Start RMAN and then execute the contents of a command file by running the
@
command at the RMAN prompt:
@/
my_dir
/
my_command_file.txt
# runs specified command file
You can also start RMAN with a command file to run, as shown here:
% rman @/
my_dir
/
my_command_file.txt
See Also:
•"Using Command Files with RMAN" to learn more about command files
•"Using Substitution Variables in Command Files" to learn how to use
substitution variables in command files and pass parameters at run time
2.5 Reporting on RMAN Operations: Quick Start
RMAN can use the information stored in the RMAN repository to generate reports on
backup activities.
Use the RMAN
LIST
and
REPORT
commands for reporting on backup operations. Use
the
SHOW ALL
command to display the current RMAN configuration. In addition, RMAN
provides a comprehensive set of views for generating custom reports.
This section contains the following topics:
•Listing Backups
•Reporting on Database Files and Backups
Chapter 2
Reporting on RMAN Operations: Quick Start
2-10

2.5.1 Listing Backups: Quick Start
The
LIST
BACKUP
and
LIST
COPY
commands display information about backups and data
file copies listed in the repository.
For backups, you can control the format of
LIST
output with the options in Table 2-3
and Table 2-4.
Table 2-3 LIST Options for Backups
Option Example Explanation
BY
BACKUP LIST
BACKUP
OF
DATABASE
BY
BACKUP
Organizes the output by backup set. This is
the default mode of presentation.
BY
FILE LIST
BACKUP
BY
FILE
Lists the backups according to which file was
backed up.
SUMMARY LIST
BACKUP
SUMMARY
Displays summary output.
For both backups and copies you have additional options shown in Table 2-4.
Table 2-4 Additional LIST Options
Option Example Explanation
EXPIRED LIST
EXPIRED
COPY
Lists backups that are recorded in the RMAN
repository but that were not present at the
expected location on disk or tape during the last
CROSSCHECK
command. An expired backup may
have been deleted by an operating system utility.
RECOVERAB
LE
LIST
BACKUP
RECOVERABLE
Lists data file backups or copies that have status
AVAILABLE
in the RMAN repository and that can
be restored and recovered.
To list backups and copies:
1. Start RMAN and connect to a target database as described in "Starting RMAN and
Connecting to a Database".
2. Run the
LIST
command at the RMAN prompt.
You can display specific objects, as in the following examples:
LIST BACKUP OF DATABASE;
LIST COPY OF DATAFILE 1, 2;
LIST BACKUP OF ARCHIVELOG FROM SEQUENCE 10;
LIST BACKUPSET OF DATAFILE 1;
Chapter 2
Reporting on RMAN Operations: Quick Start
2-11

See Also:
•"Listing Backups and Recovery-Related Objects" to learn more about the
LIST
command
•Oracle Database Backup and Recovery Reference for
LIST
command
syntax
2.5.2 Reporting on Database Files and Backups: Quick Start
The
REPORT
command performs more complex reporting analysis than the
LIST
command.
Table 2-5 displays some of the main options of the REPORT command.
Table 2-5 REPORT Options
Option Example Explanation
NEED
BACKUP REPORT
NEED
BACKUP
DATABASE
Shows which files need backing up under current
retention policy. Use optional
REDUNDANCY
and
RECOVERY
WINDOW
parameters to specify different
criteria.
OBSOLETE REPORT
OBSOLETE
Lists backups that are obsolete under the configured
backup retention policy. Use the optional
REDUNDANCY
and
RECOVERY
WINDOW
parameters to override the
default.
SCHEMA REPORT
SCHEMA
Reports the tablespaces and data files in the
database at the current time (default) or a different
time.
UNRECOVERA
BLE
REPORT
UNRECOVERABLE
Lists all data files for which an unrecoverable
operation has been performed against an object in
the data file since the last backup of the data file.
To generate reports of database files and backups:
1. Start RMAN and connect to a target database as described in "Starting RMAN and
Connecting to a Database".
2. Run the
REPORT
command at the RMAN prompt.
The following example reports backups that are obsolete according to the currently
configured backup retention policy:
REPORT OBSOLETE;
The following example reports the data files and temp files in the database:
REPORT SCHEMA;
Chapter 2
Reporting on RMAN Operations: Quick Start
2-12

See Also:
"Reporting on Backups and Database Schema" to learn how to use the
REPORT
command for RMAN reporting
2.6 Maintaining RMAN Backups
RMAN repository metadata is always stored in the control file of the target database.
The RMAN maintenance commands use this metadata when managing backups.
This section contains the following topics:
•Cross-checking Backups
•Deleting Obsolete Backups
2.6.1 Cross-checking Backups: Quick Start
Use the
CROSSCHECK
command to synchronize the logical records of RMAN backups
and copies with the files on storage media.
If a backup is on disk, then
CROSSCHECK
determines whether the header of the file is
valid. If a backup is on tape, then RMAN queries the RMAN repository for the names
and locations of the backup pieces. It is a good idea to crosscheck backups and
copies before deleting them.
To crosscheck all backups and copies on disk:
1. Start RMAN and connect to a target database as described in "Starting RMAN and
Connecting to a Database".
2. Run the
CROSSCHECK
command, as shown in the following example:
CROSSCHECK BACKUP;
CROSSCHECK COPY;
See Also:
"Crosschecking the RMAN Repository" to learn how to crosscheck RMAN
backups
2.6.2 Deleting Obsolete Backups: Quick Start
The DELETE command removes RMAN backups and copies from disk and tape,
updates the status of the files to
DELETED
in the control file repository, and removes the
records from the recovery catalog (if you use a catalog).
If you run RMAN interactively, and if you do not specify the
NOPROMPT
option, then
DELETE
displays a list of files and prompts for confirmation before deleting any file in the
list. The
DELETE OBSOLETE
command is particular useful because RMAN deletes
backups and data file copies recorded in the RMAN repository that are obsolete, that
Chapter 2
Maintaining RMAN Backups
2-13

is, no longer needed. You can use options on the
DELETE
command to specify what is
obsolete or use the configured backup retention policy.
To delete obsolete backups and copies:
1. Start RMAN and connect to a target database as described in "Starting RMAN and
Connecting to a Database".
2. Run the
DELETE OBSOLETE
command, as shown in the following example:
DELETE OBSOLETE;
See Also:
"Deleting RMAN Backups and Archived Redo Logs" to learn how to use the
DELETE
command
2.7 Diagnosing and Repairing Failures with Data Recovery
Advisor: Quick Start
Data Recovery Advisor is an Oracle Database tool that provides an infrastructure for
diagnosing persistent data failures, presenting repair options to the user, and executes
repairs at the user’s request.
This section contains the following topics:
•Listing Failures and Determining Repair Options
•Repairing Failures
See Also:
"Overview of Data Recovery Advisor"
2.7.1 Listing Failures and Determining Repair Options
A failure is a persistent data corruption detected by the Health Monitor. Examples
include physical and logical data block corruptions and missing data files.
Each failure has a failure priority and failure status. The priority can be
CRITICAL
,
HIGH
,
or
LOW
. The status can be
OPEN
or
CLOSED
.
You can run the
LIST
FAILURE
command to show all known failures. If failures exist,
then run the
ADVISE FAILURE
command in the same session to determine repair options.
The
ADVISE FAILURE
output shows both manual and automated repair options. First try
to fix the problem manually. If you cannot fix the problem manually, then review the
automated repair section.
An automated repair option describes a server-managed repair for one or more
failures. Repairs are consolidated when possible so that a single repair can fix multiple
Chapter 2
Diagnosing and Repairing Failures with Data Recovery Advisor: Quick Start
2-14

failures. The repair option indicates which repair is performed and whether data is lost
by performing the repair operation.
See Also:
"Listing Failures" and "Determining Repair Options"
Listing Failures and Determining Repair Options illustrates the commands to list
failures and determine repair options. The output indicates the file name of a repair
script containing RMAN commands. If you do not want to use Data Recovery Advisor
to repair the failure automatically, then you can use the script as the basis of your own
recovery strategy.
Example 2-1 LIST FAILURE and ADVISE FAILURE
RMAN> LIST FAILURE;
Database Role: PRIMARY
List of Database Failures
=========================
Failure ID Priority Status Time Detected Summary
---------- -------- --------- ------------- -------
142 HIGH OPEN 23-APR-13 One or more non-system datafiles are missing
101 HIGH OPEN 23-APR-13 Datafile 1: '/disk1/oradata/prod/system01.dbf'
contains one or more corrupt blocks
RMAN> ADVISE FAILURE;
Database Role: PRIMARY
List of Database Failures
=========================
Failure ID Priority Status Time Detected Summary
---------- -------- --------- ------------- -------
142 HIGH OPEN 23-APR-13 One or more non-system datafiles are missing
101 HIGH OPEN 23-APR-13 Datafile 1: '/disk1/oradata/prod/system01.dbf'
contains one or more corrupt blocks
analyzing automatic repair options; this may take some time
using channel ORA_DISK_1
analyzing automatic repair options complete
Mandatory Manual Actions
========================
no manual actions available
Optional Manual Actions
=======================
1. If file /disk1/oradata/prod/users01.dbf was unintentionally renamed or moved, restore it
Automated Repair Options
========================
Option Repair Description
------ ------------------
1 Restore and recover datafile 28; Perform block media recovery of
block 56416 in file 1
Strategy: The repair includes complete media recovery with no data loss
Repair script: /disk1/oracle/log/diag/rdbms/prod/prod/hm/reco_660500184.hm
Chapter 2
Diagnosing and Repairing Failures with Data Recovery Advisor: Quick Start
2-15

2.7.2 Repairing Failures: Quick Start
Use the RMAN
REPAIR FAILURE
command to repair failures that were detected.
After running
LIST FAILURE
and
ADVISE FAILURE
in an RMAN session, you can run
REPAIR FAILURE
to execute a repair option. If you execute
REPAIR FAILURE
with no other
command options, then RMAN uses the first repair option of the most recent
ADVISE
FAILURE
command in the current session. Alternatively, specify the repair option
number obtained from the most recent
ADVISE FAILURE
command. The following
example illustrates how to repair the failures identified in Example 2-1.
RMAN> REPAIR FAILURE;
By default,
REPAIR FAILURE
prompts for confirmation before it begins executing. After
executing a repair, Data Recovery Advisor reevaluates all existing failures on the
possibility that they may also have been fixed. Data Recovery Advisor always verifies
that failures are still relevant and automatically closes fixed failures. If a repair fails to
complete because of an error, then the error triggers a new assessment and re-
evaluation of existing failures and repairs.
See Also:
"Repairing Failures"
2.8 Rewinding a Database with Flashback Database: Quick
Start
You can use the Oracle Flashback Database to rewind the whole database to a past
time. Unlike media recovery, you do not need to restore data files to return the
database to a past state.
To use the RMAN
FLASHBACK DATABASE
command, your database must have been
previously configured to generate flashback logs. This configuration task is described
in "About Flashback Database". Flashback Database works by rewinding changes to
the data files that exist at the moment that you run the command. You cannot use the
flashback database to repair media failures or missing data files.
The database must be mounted when you issue
FLASHBACK DATABASE
. You can
flashback to any time within the flashback database window. If you have previously
created a restore point, that is a convenience, but not required.
To rewind a database with Flashback Database:
1. Start RMAN and connect to a target database as described in "Starting RMAN and
Connecting to a Database".
2. Ensure that the database is in a mounted state.
The following commands shut down and then mount the database:
SHUTDOWN IMMEDIATE;
STARTUP MOUNT;
Chapter 2
Rewinding a Database with Flashback Database: Quick Start
2-16

3. Run the
FLASHBACK DATABASE
command.
The following examples illustrate different forms of the command:
FLASHBACK DATABASE TO SCN 861150;
FLASHBACK DATABASE
TO RESTORE POINT BEFORE_CHANGES;
FLASHBACK DATABASE
TO TIMESTAMP TO_DATE(04-DEC-2009 03:30:00','DD-MON-YYYY HH24:MI:SS');
4. After performing the Flashback Database, open the database read-only in
SQL*Plus and run some queries to verify the database contents.
Open the database read-only as follows:
ALTER DATABASE OPEN READ ONLY;
5. If satisfied with the results, then issue the following sequence of commands to shut
down and then open the database:
SHUTDOWN IMMEDIATE;
STARTUP MOUNT;
ALTER DATABASE OPEN RESETLOGS;
See Also:
"Rewinding a Database with Flashback Database"
2.9 Restoring and Recovering Database Files: Quick Start
Use the
RESTORE
and
RECOVER
commands for RMAN restore and recovery of physical
database files.
Restoring data files is retrieving them from backups as needed for a recovery
operation. Media recovery is the application of changes from redo logs and
incremental backups to a restored data file to bring the data file forward to a desired
SCN or point in time.
This section contains the following topics:
•Preparing to Restore and Recover Database Files
•Recovering the Whole Database
•Recovering Tablespaces
•Recovering Individual Data Blocks
See Also:
Performing Complete Database Recovery
Chapter 2
Restoring and Recovering Database Files: Quick Start
2-17

2.9.1 Preparing to Restore and Recover Database Files: Quick Start
To recover the database because a media failure damages database files, then first
ensure that you have the necessary backups.
You can use the
RESTORE ... PREVIEW
command to report, but not restore, the backups
that RMAN can use to restore to the specified time. RMAN queries the metadata and
does not actually read the backup files. The database can be open when you run this
command.
To preview a database restore and recovery:
1. Start RMAN and connect to the target database as described in "Starting RMAN
and Connecting to a Database".
2. Optionally, list the current tablespaces and data files, as shown in the following
command:
RMAN> REPORT SCHEMA;
3. Run the
RESTORE DATABASE
command with the
PREVIEW
option.
The following command specifies
SUMMARY
so that the backup metadata is not
displayed in verbose mode (sample output included):
RMAN> RESTORE DATABASE PREVIEW SUMMARY;
Starting restore at 21-MAY-13
allocated channel: ORA_DISK_1
channel ORA_DISK_1: SID=80 device type=DISK
List of Backups
===============
Key TY LV S Device Type Completion Time #Pieces #Copies Compressed Tag
------- -- -- - ----------- --------------- ------- ------- ---------- ---
11 B F A DISK 18-MAY-13 1 2 NO TAG20070518T181114
13 B F A DISK 18-MAY-13 1 2 NO TAG20070518T181114
using channel ORA_DISK_1
List of Archived Log Copies for database with db_unique_name PROD
=====================================================================
Key Thrd Seq S Low Time
------- ---- ------- - ---------
47 1 18 A 18-MAY-13
Name: /disk1/oracle/dbs/db1r_60ffa882_1_18_0622902157.arc
Media recovery start SCN is 586534
Recovery must be done beyond SCN 587194 to clear datafile fuzziness
validation succeeded for backup piece
Finished restore at 21-MAY-13
2.9.2 Recovering the Whole Database: Quick Start
Use the
RESTORE
DATABASE
and
RECOVER
DATABASE
commands to recover the whole
database.
You must have previously made backups of all needed files. This scenario assumes
that you can restore all data files to their original locations. If the original locations are
inaccessible, then use the
SET NEWNAME
command as described in "About Restoring
Data Files to a Nondefault Location".
Chapter 2
Restoring and Recovering Database Files: Quick Start
2-18

To recover the whole database:
1. Prepare for recovery as explained in "Preparing to Restore and Recover Database
Files".
2. Place the database in a mounted state.
The following example terminates the database instance (if it is started) and
mounts the database:
RMAN> STARTUP FORCE MOUNT;
3. Restore the database.
The following example uses the preconfigured disk channel to restore the
database:
RMAN> RESTORE DATABASE;
4. Recover the database, as shown in the following example:
RMAN> RECOVER DATABASE;
5. Open the database, as shown in the following example:
RMAN> ALTER DATABASE OPEN;
2.9.3 Recovering Tablespaces: Quick Start
Use the
RESTORE
TABLESPACE
and
RECOVER
TABLESPACE
commands on individual
tablespaces when the database is open. In this case, you must take the tablespace
that needs recovery offline, restore and then recover the tablespace, and bring the
recovered tablespace online.
If you cannot restore a data file to its original location, then use the RMAN
SET NEWNAME
command within a
RUN
block to specify the new file name and location. Afterward, use
a
SWITCH DATAFILE ALL
command, which is equivalent to using the SQL statement
ALTER
DATABASE RENAME FILE
, to update the control file to reflect the new names for all data
files for which a
SET NEWNAME
has been issued in the
RUN
command.
Unlike user-managed media recovery, you do not place an online tablespace in
backup mode. RMAN does not require extra logging or backup mode because it
knows the format of data blocks.
To recover an individual tablespace when the database is open:
1. Prepare for recovery as explained in "Preparing to Restore and Recover Database
Files".
2. Take the tablespace to be recovered offline.
The following example takes the
USERS
tablespace offline:
RMAN> ALTER TABLESPACE users OFFLINE;
3. Restore and recover the tablespace.
The following
RUN
command, which you execute at the RMAN prompt, sets a new
name for the data file in the
USERS
tablespace:
RUN
{
SET NEWNAME FOR DATAFILE '/disk1/oradata/prod/users01.dbf'
Chapter 2
Restoring and Recovering Database Files: Quick Start
2-19

TO '/disk2/users01.dbf';
RESTORE TABLESPACE users;
SWITCH DATAFILE ALL; # update control file with new file names
RECOVER TABLESPACE users;
}
4. Bring the tablespace online, as shown in the following example:
RMAN> ALTER TABLESPACE users ONLINE;
You can also use
RESTORE DATAFILE
and
RECOVER DATAFILE
for recovery at the data file
level.
See Also:
•"Performing Complete Recovery of a Tablespace"
•"About Online Backups and Backup Mode"
2.9.4 Recovering Individual Data Blocks: Quick Start
RMAN can recover individual corrupted data file blocks.
When RMAN performs a complete scan of a file for a backup, any corrupted blocks
are listed in
V$DATABASE_BLOCK_CORRUPTION
. Corruption is usually reported in alert logs,
trace files, or results of SQL queries.
To recover data blocks:
1. Start RMAN and connect to the target database as described in "Starting RMAN
and Connecting to a Database".
2. Obtain the block numbers of the corrupted blocks if you do not have this
information.
RMAN> SELECT NAME, VALUE FROM V$DIAG_INFO;
3. Run the
RECOVER
command to repair the blocks.
The following RMAN command recovers all corrupted blocks:
RMAN> RECOVER CORRUPTION LIST;
You can also recover individual blocks, as shown in the following example:
RMAN> RECOVER DATAFILE 1 BLOCK 233, 235 DATAFILE 2 BLOCK 100 TO 200;
See Also:
Performing Block Media Recovery
Chapter 2
Restoring and Recovering Database Files: Quick Start
2-20

Part II
Starting and Configuring RMAN and
Flashback Database
The chapters in this part explain the basic components of the RMAN environment and
how to configure it. This part contains the following chapters:
•Recovery Manager Architecture
•Starting and Interacting with the RMAN Client
•Configuring the RMAN Environment
•Configuring the RMAN Environment: Advanced Topics
•Using Flashback Database and Restore Points

3
Recovery Manager Architecture
This chapter describes the Recovery Manager (RMAN) interface and the basic
components of the RMAN environment. This chapter contains the following topics:
•About the RMAN Environment
•About RMAN Command-Line Client
•About RMAN Channels
•About the RMAN Repository
•About Media Management Using RMAN
•About the Fast Recovery Area
•About RMAN in a Data Guard Environment
•About RMAN in a Recovery Appliance Environment
3.1 About the RMAN Environment
The Recovery Manager environment consists of the various applications and
databases that play a role in a backup and recovery strategy.
Table 3-1 lists some components in a typical RMAN environment.
Table 3-1 Components of the RMAN Environment
Component Description
RMAN client The client application that manages backup and recovery
operations for a target database. The RMAN client can use
Oracle Net to connect to a target database, so it can be
located on any host that is connected to the target host
through Oracle Net.
target database A database containing the control files, data files, and optional
archived redo logs that RMAN backs up or restores. RMAN
uses the target database control file to gather metadata about
the target database and to store information about its own
operations. The work of backup and recovery is performed by
server sessions running on the target database.
recovery catalog database A database containing a recovery catalog, which contains
metadata that RMAN uses to perform backup and recovery.
You can create one recovery catalog that contains the RMAN
metadata for multiple target databases. Unless you are using
RMAN with a physical standby database, a recovery catalog is
optional when using RMAN because RMAN stores its
metadata in the control file of each target database.
3-1

Table 3-1 (Cont.) Components of the RMAN Environment
Component Description
recovery catalog schema The user within the recovery catalog database that owns the
metadata tables maintained by RMAN. RMAN periodically
propagates metadata from the target database control file into
the recovery catalog.
physical standby database A copy of the primary database that is updated with redo
generated by the primary database. You can fail over to the
standby database if the primary database becomes
inaccessible.
RMAN can create, back up, or recover a standby database.
Backups that you make at a physical standby database are
usable at the primary database or another physical standby
database for the same production database. The recovery
catalog is required when you use RMAN to back up a physical
standby database.
Note: A logical standby database is treated as a separate
database by RMAN because it has a different DBID from its
primary database.
See Also: Oracle Data Guard Concepts and Administration to
learn how to use RMAN in a Data Guard environment
fast recovery area A disk location that you can use to store recovery-related files
such as control file and online redo log copies, archived redo
logs, flashback logs, and RMAN backups. Oracle Database
and RMAN manage the files in the fast recovery area
automatically.
media management software A vendor-specific application that enables RMAN to back up to
a storage system such as tape
media management catalog A vendor-specific repository of metadata about a media
management application
Oracle Enterprise Manager A browser-based interface to the database, including backup
and recovery through RMAN
The only required components in an RMAN environment are a target database and
RMAN client, but most real-world configurations are more complicated. For example,
you use an RMAN client connecting to multiple media managers and multiple target
databases, all accessed through Enterprise Manager.
Figure 3-1 illustrates components in a possible RMAN environment. The figure shows
that the primary database, standby database, and recovery catalog databases all
reside on different computers. The primary and standby database hosts use a locally
attached tape drive. The RMAN client and Enterprise Manager console run on a
separate computer.
Chapter 3
About the RMAN Environment
3-2
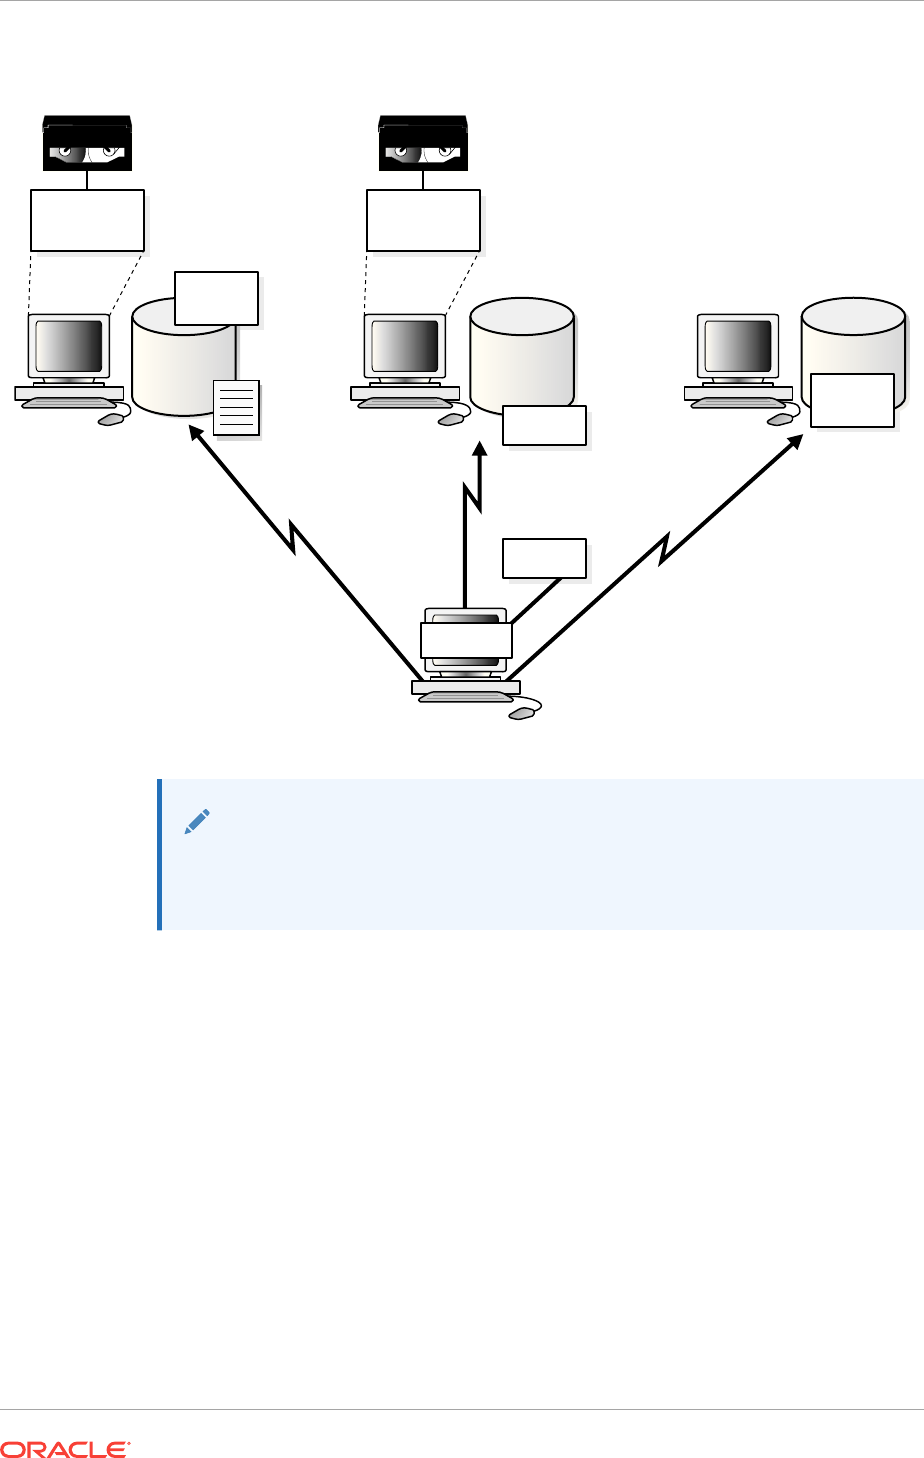
Figure 3-1 Sample RMAN Environment
Recovery
Catalog
Duplicate
or
Standby
Database
Target
Database
Control
File
Tape Drive
Recovery
Catalog
Schema
RMAN
Executable
Auxiliary
Instance
Media
Management
Subsystem
Tape Drive
Media
Management
Subsystem
Flash
Recovery
Area
Enterprise
Manager
See Also:
Oracle Database Net Services Administrator's Guide to learn about Oracle
Net
3.2 About RMAN Command-Line Client
Use the RMAN command-line client to enter commands that you can use to manage
all aspects of backup and recovery operations.
RMAN uses a command language interpreter that can execute commands in
interactive or batch mode.
3.3 About RMAN Channels
An RMAN channel represents one stream of data to a device, and corresponds to one
database server session. During a backup or restore operation, the channel reads
data from the input device, processes it, and writes it to the output device.
The RMAN client directs database server sessions to perform all backup and recovery
tasks. What constitutes a session depends on the operating system. For example, on
Chapter 3
About RMAN Command-Line Client
3-3

Linux, a server session corresponds to a server process, whereas on Windows it
corresponds to a thread within the database service. The RMAN client itself does not
perform backup, restore, or recovery operations.
Most RMAN commands are executed by channels, which must be either configured to
persist across RMAN sessions, or manually allocated in each RMAN session. As
illustrated in Figure 3-2, a channel establishes a connection from the RMAN client to a
target or auxiliary database instance by starting a server session on the instance.
Figure 3-2 Channel Allocation
Recovery Manager
channel ch1
Oracle
Recovery
Catalog
Target
database
Disk
Server
session
See Also:
"Basic Concepts of RMAN Performance Tuning for a low-level description of
how channels work"
3.3.1 About RMAN Channels and Devices
The RMAN-supported device types are DISK and SBT (system backup to tape).
An SBT device is controlled by a third-party media management software. Typically,
SBT devices are tape libraries and tape drives.
If you use a DISK channel for a backup, then the channel creates the backup on disk
in the file name space of the target database instance creating the backup. You can
make a backup on any device that can store a data file. RMAN does not call a media
manager when making DISK backups.
To create backups on non-disk media, you must use media management software
such as Oracle Secure Backup and allocate channels supported by this software.
RMAN contacts the media manager whenever the channel type allocated is not DISK.
How and when the SBT channels cause the media manager to allocate resources is
vendor-specific. Some media managers allocate resources when you issue the
command; others do not allocate resources until you open a file for reading or writing.
Chapter 3
About RMAN Channels
3-4

See Also:
"Configuring the Default Device for Backups: Disk or SBT"
3.3.2 About RMAN Automatic and Manual Channels
RMAN can use automatic channels or manual channels for backup and recover
operations.
You can use the
CONFIGURE CHANNEL
command to configure channels for use with disk
or tape across RMAN sessions. This technique is known as automatic channel
allocation. RMAN comes preconfigured with one
DISK
channel that you can use for
backups to disk.
When you run a command that can use automatic channels, RMAN automatically
allocates the channels with the options that you specified in the
CONFIGURE
command.
For the
BACKUP
command, RMAN allocates only the type of channel required to back up
to the specified media. For the
RESTORE
command and RMAN maintenance commands,
RMAN allocates all necessary channels for the device types required to execute the
command. RMAN determines the names for automatic channels.
You can also manually allocate channels. Each manually allocated channel uses a
separate connection to the database. When you manually allocate a channel, you give
it a user-defined name such as
dev1
or
ch2
.
The number of channels available for use with a device when you run a command
determines whether RMAN reads from or write to this device in parallel while
performing the command. When the work is done in parallel, the backup of the files is
done by multiple channels. Each channel may back up multiple files, but unless a
multisection backup is performed, no file is backed up by more than one channel.
See Also:
•Oracle Database Backup and Recovery Reference for
ALLOCATE
CHANNEL
syntax
•Oracle Database Backup and Recovery Reference on
ALLOCATE
CHANNEL
FOR
MAINTENANCE
•"Configuring Channels for Disk" and "Configuring SBT Channels for Use
with a Media Manager"
3.4 About the RMAN Repository
The RMAN repository is a collection of metadata about the target databases that
RMAN uses for backup, recovery, and maintenance.
RMAN always stores its metadata in the control file. The version of this metadata in
the control file is the authoritative record of RMAN backups of your database. This is
one reason why protecting your control file is an important part of your backup
strategy. RMAN can conduct all necessary backup and recovery operations using just
Chapter 3
About the RMAN Repository
3-5

the control file to store the RMAN repository information, and maintains all records
necessary to meet your configured retention policy.
You can also create a recovery catalog, which is a repository of RMAN metadata
stored in an Oracle Database schema. The control file has limited space for records of
backup activities, whereas a recovery catalog can store a much longer history. You
can simplify backup and recovery administration by creating a single recovery catalog
that contains the RMAN metadata for all of your databases.
The owner of a recovery catalog can grant or revoke restricted access to the catalog to
other database users. Each restricted user has full read/write access to his own
metadata, which is called a virtual private catalog. When one or more virtual private
catalogs exist in a database, the database contains just one set of catalog tables.
These tables are owned by the base recovery catalog owner. The owner of the base
recovery catalog controls which databases each virtual private catalog user can
access.
Some RMAN features only function when you use a recovery catalog. For example,
you can create a stored script in the recovery catalog and use this script to execute
RMAN jobs. Other RMAN commands are specifically related to managing the recovery
catalog and so are not available (and not needed) if RMAN is not connected to a
recovery catalog.
The recovery catalog is maintained solely by RMAN. A target database instance never
accesses the catalog directly. RMAN propagates information about the database
structure, archived redo logs, backup sets, and data file copies into the recovery
catalog from the target database control file after any operation that updates the
repository, and also before certain operations.
See Also:
Maintaining RMAN Backups and Repository Records and Managing a
Recovery Catalog
3.5 About Media Management Using RMAN
The Oracle Media Management Layer (MML) API lets third-party vendors build media
management software that works with RMAN to allow backups to sequential media
devices such as tape drives.
Media management software handles loading, unloading, and labeling of sequential
media such as tapes. You must install media management software to use RMAN with
sequential media devices.
When backing up or restoring, the RMAN client connects to a target database instance
and directs the instance to send requests to its media manager. No direct
communication occurs between the RMAN client and the media manager.
This section contains the following topics:
•About RMAN Interaction with a Media Manager
•About RMAN and Oracle Secure Backup
•About the Backup Solutions Program
Chapter 3
About Media Management Using RMAN
3-6

3.5.1 About RMAN Interaction with a Media Manager
Before performing backup or restore to a media manager, you must allocate one or
more channels to handle the communication with the media manager. You can also
configure default channels for the media manager. The default channels are used for
all backup and recovery tasks that employ the media manager and for which you have
not explicitly allocated channels.
RMAN does not issue specific commands to load, label, or unload tapes. When
backing up, RMAN gives the media manager a stream of bytes and associates a
unique name with this stream. When RMAN must restore the backup, it asks the
media manager to retrieve the byte stream. All details of how and where that stream is
stored are handled entirely by the media manager. For example, the media manager
labels and keeps track of the tape and names of files on each tape, and automatically
loads and unloads tapes, or signals an operator to do so.
Some media managers support proxy copy functionality, in which they handle the
entire data movement between data files and the backup devices. These products
may use technologies such as high-speed connections between storage and media
subsystems to reduce the load on the primary database server. RMAN provides a list
of files requiring backup or restore to the media manager, which in turn makes all
decisions regarding how and when to move the data.
See Also:
"Configuring SBT Channels for Use with a Media Manager"
3.5.2 About RMAN and Oracle Secure Backup
Oracle Secure Backup is a media manager that provides reliable and secure data
protection through file system backup to tape. All major tape drives and tape libraries
in SAN, Gigabit Ethernet, and SCSI environments are supported.
Although Oracle Secure Backup has no specialized knowledge of database backup
and recovery algorithms, it can serve as a media management layer for RMAN
through the SBT interface. In this capacity, Oracle Secure Backup provides the same
services for RMAN as other supported third-party SBT libraries. Oracle Secure Backup
has some features, however, that are not available in other media managers.
See Also:
Oracle Secure Backup Administrator's Guide to learn how to use Oracle
Secure Backup
3.5.3 About the Backup Solutions Program
The Oracle Backup Solutions Program (BSP), part of the Oracle PartnerNetwork, is a
group of media manager vendors whose products are compliant with Oracle's MML
Chapter 3
About Media Management Using RMAN
3-7

specification. Several products may be available for your platform from media
management vendors.
For more information, contact your Oracle representative for a list of available
products, contact individual vendors to ask them if they participate, or access the
Backup Solutions Program website at:
http://www.oracle.com/technetwork/database/features/availability/bsp-088814.html
Oracle does not certify media manager vendors for compatibility with RMAN.
Questions about availability, version compatibility, and functionality can only be
answered by the media manager vendor, not Oracle.
3.6 About the Fast Recovery Area
The fast recovery area is an optional disk location that can be used to store recovery-
related files.
The components that create different backup and recovery-related files have no
knowledge of each other or of the size of the file systems where they store their data.
With automatic disk-based backup and recovery, you can create a fast recovery area
(also called the recovery area), which automates management of backup-related files.
A fast recovery area minimizes the need to manually manage disk space for backup-
related files and balance the use of space among the different types of files. In this
way, a fast recovery area simplifies the ongoing administration of your database.
Oracle recommends that you enable a recovery area to simplify backup management.
When you create a recovery area, you choose a location on disk and set an upper
bound for storage space. You also set a backup retention policy that governs how long
backup files are needed for recovery. The database manages the storage used for
backups, archived redo logs, and other recovery-related files for the database within
this space. Files no longer needed are eligible for deletion when RMAN must reclaim
space for new files.
See Also:
"Configuring the Fast Recovery Area" to learn about the fast recovery area
and how to configure it
3.7 About RMAN in a Data Guard Environment
Data Guard maintains standby databases as transactionally consistent copies of
production database. A standby database can be either a physical standby database
or a logical standby database.
A database in a Data Guard environment is uniquely identified by the
DB_UNIQUE_NAME
parameter in the initialization parameter file. For RMAN to work correctly in a Data
Guard environment, the
DB_UNIQUE_NAME
must be unique across all the databases with
the same DBID.
When using RMAN in a Data Guard environment, a recovery catalog is required. The
recovery catalog can store the metadata for all primary and standby databases.
Chapter 3
About the Fast Recovery Area
3-8

This section contains the following topics:
•About RMAN Configuration in a Data Guard Environment
•About RMAN File Management in a Data Guard Environment
See Also:
Oracle Data Guard Concepts and Administration to learn how to use RMAN
in a Data Guard environment
3.7.1 About RMAN Configuration in a Data Guard Environment
To simplify ongoing use of RMAN for backup and recovery, you can set some
persistent configuration settings for each primary and physical standby database in a
Data Guard environment. These settings control many aspects of RMAN behavior. For
example, you can configure the backup retention policy, default destinations for
backups to tape or disk, or default backup device type.
You can use the
CONFIGURE
command with the
FOR DB_UNIQUE_NAME
clause to create a
persistent configuration for a database in a Data Guard environment without
connecting to the standby database or primary database as
TARGET
. For example, you
connect RMAN to the recovery catalog, run the
SET DBID
command, and then can
create a configuration for a physical standby database before its creation so that the
RMAN configuration applies when the database is created.
RMAN updates the control file of the database when connected to it as
TARGET
during a
recovery catalog resynchronization. If you use
FOR DB_UNIQUE_NAME
for a database
without being connected as
TARGET
to this database, however, then RMAN changes
configurations in the recovery catalog only.
See Also:
"Configuring RMAN in a Data Guard Environment"
3.7.2 About RMAN File Management in a Data Guard Environment
RMAN uses a recovery catalog to track file names for all database files in a Data
Guard environment.
The catalog also records where the online redo log files, standby redo log files, temp
files, archived redo log files, backup sets, and image copies are created.
3.7.2.1 About Interchangeability of Backups in a Data Guard Environment
RMAN commands use the recovery catalog metadata to function transparently across
different physical databases in the Data Guard environment. For example, you can
back up a tablespace on a physical standby database and restore and recover it on
the primary database. Similarly, you can back up a tablespace on a primary database
and restore and recover it on a physical standby database.
Chapter 3
About RMAN in a Data Guard Environment
3-9

Backups of standby control files and nonstandby control files are interchangeable. For
example, you can restore a standby control file on a primary database and a primary
control file on a physical standby database. This interchangeability means that you can
offload control file backups to one database in a Data Guard environment. RMAN
automatically updates the file names for database files during restore and recovery at
the databases.
Note:
Backups of logical standby databases are not usable at the primary
database.
3.7.2.2 About Association of Backups in a Data Guard Environment
The recovery catalog tracks the files in the Data Guard environment by associating
every database file or backup file with a
DB_UNIQUE_NAME
. The database that creates a
file is associated with the file.
For example, if RMAN backs up the database with the unique name of
standby1
, then
standby1
is associated with this backup. A backup remains associated with the
database that created it unless you use the
CHANGE
...RESET DB_UNIQUE_NAME
command
to associate the backup with a different database.
3.7.2.3 About Accessibility of Backups in a Data Guard Environment
The accessibility of a backup is different from its association. In a Data Guard
environment, the recovery catalog considers disk backups as accessible only to the
database with which they are associated, whereas tape backups created on one
database are accessible to all databases.
If a backup file is not associated with any database, then the row describing it in the
recovery catalog view shows
null
for the
SITE_KEY
column. By default, RMAN
associates a file whose
SITE_KEY
is
null
with the database to which they are connected
as
TARGET
.
RMAN commands such as
BACKUP
,
RESTORE
, and
CROSSCHECK
work on any accessible
backup. For example, for a
RECOVER COPY
operation, RMAN considers only image
copies that are associated with the database as eligible to be recovered. RMAN
considers the incremental backups on disk and tape as eligible to recover the image
copies. In a database recovery, RMAN considers only the disk backups associated
with the database and all files on tape as eligible to be restored.
To illustrate the differences in backup accessibility, assume that databases
prod
and
standby1
reside on different hosts. RMAN backs up data file
1
on
prod
to
/prmhost/
disk1/df1.dbf
on the production host and also to tape. RMAN backs up data file
1
on
standby1
to
/sbyhost/disk2/df1.dbf
on the standby host and also to tape. If RMAN is
connected to database
prod
, then you cannot use RMAN commands to perform
operations with the
/sbyhost/disk2/df1.dbf
backup located on the standby host.
However, RMAN does consider the tape backup made on
standby1
as eligible to be
restored.
Chapter 3
About RMAN in a Data Guard Environment
3-10

Note:
You can transfer a backup from a standby host to a primary host or vice
versa, connect as
TARGET
to the database on this host, and then use the
CATALOG
command to catalog the backup. After a file is cataloged by the
target database, the file is associated with the target database.
See Also:
•Oracle Data Guard Concepts and Administration to learn how to perform
RMAN backup and recovery in a Data Guard environment
•"About Maintenance Commands in a Data Guard Environment"
•Managing a Recovery Catalog to learn how to manage a recovery
catalog in a Data Guard environment
•Oracle Database Backup and Recovery Reference for
CONFIGURE
syntax
3.8 About RMAN in a Recovery Appliance Environment
RMAN is fully-integrated with Zero Data Loss Recovery Appliance (Recovery
Appliance) and RMAN commands can be used to back up protected databases to
Recovery Appliance.
See Also:
Creating RMAN Backups to Recovery Appliance
3.8.1 Creating RMAN Backups to Recovery Appliance
Recovery Appliance provides a centralized remote repository for backups of all target
databases in the enterprise. Backups and backup metadata for all target databases is
managed by a central recovery catalog (the Recovery Appliance catalog) on Recovery
Appliance.
Before you use Recovery Appliance to manage backups of your target database, you
must perform some configuration steps both on the Recovery Appliance and on the
target database.
To back up a target database to Recovery Appliance:
1. Ensure that the target database meets the requirements for protected databases
in Recovery Appliance environments.
Chapter 3
About RMAN in a Recovery Appliance Environment
3-11

See Also:
Zero Data Loss Recovery Appliance Administrator's Guide for
information about the supported Oracle Database releases
2. Install the Recovery Appliance backup module on the target database. This
backup module is a shared library that is used by the target database to transfer
backups to Recovery Appliance.
See Also:
Zero Data Loss Recovery Appliance Protected Database Configuration
Guide for the steps to install the Recovery Appliance backup module
3. Enroll the target database as a protected database with the Recovery Appliance.
This step includes creating a protection policy, configuring a Recovery Appliance
database user that will be used by protected databases to authenticate with
Recovery Appliance, and registering the protected database with the Recovery
Appliance catalog.
See Also:
•Zero Data Loss Recovery Appliance Administrator's Guide for the
enrolment steps on the Recovery Appliance
•Zero Data Loss Recovery Appliance Protected Database
Configuration Guide for the enrolment steps on the protected
database
4. (Optional) Configure backup and recovery settings for the target database. These
settings will be used when you perform backup and recovery operations with
Recovery Appliance.
The
CONFIGURE
command is used to configure backup and recovery settings for
protected databases.
See Also:
•Configuring the RMAN Environment
•Zero Data Loss Recovery Appliance Protected Database
Configuration Guide for information about configuring settings in a
Recovery Appliance environment
5. Start RMAN and connect as
TARGET
to the protected database and as
CATALOG
to
the Recovery Appliance catalog.
Chapter 3
About RMAN in a Recovery Appliance Environment
3-12

The connection to the target database must be as a user with the
SYSDBA
or
SYSBACKUP
privilege. The connection to the Recovery Appliance is as the Recovery
Appliance user that has privileges required to perform backup and recovery
operations for the protected database.
See Also:
Zero Data Loss Recovery Appliance Protected Database Configuration
Guide for information about creating connections using RMAN
6. Allocate one or more RMAN SBT channels that point to the Recovery Appliance
backup module. These channels are used to transfer data to the Recovery
Appliance.
See Also:
"Configuring RMAN to Make Backups to Recovery Appliance"
7. Back up the target database to Recovery Appliance. You use the regular RMAN
commands to back up the database to Recovery Appliance.
See Also:
Zero Data Loss Recovery Appliance Protected Database Configuration
Guide for the steps to back up protected databases
Chapter 3
About RMAN in a Recovery Appliance Environment
3-13

4
Starting and Interacting with the
RMAN Client
This chapter explains how to start the RMAN command-line interface and make
database connections. This chapter contains the following topics:
•Starting and Exiting RMAN
•Making Database Connections with RMAN
•Specifying the Location of RMAN Output
•Setting Globalization Support Environment Variables for RMAN
•Entering RMAN Commands
•Using the RMAN Pipe Interface
4.1 Starting and Exiting RMAN
The RMAN executable is automatically installed with the database and is typically
located in the same directory as the other database executables. For example, the
RMAN client on Linux is located in
$ORACLE_HOME/bin
.
You have the following basic options for starting RMAN:
•Start the RMAN executable at the operating system command line without
specifying any connection options, as in the following example:
% rman
See "Making Database Connections from the RMAN Prompt".
•Start the RMAN executable at the operating system command line, as in the
following examples:
% rman TARGET /
% rman TARGET sbu@prod NOCATALOG
See "Making RMAN Database Connections from the Operating System Command
Line".
To quit RMAN and terminate the program, enter
EXIT
or
QUIT
at the RMAN prompt:
RMAN> EXIT
See Also:
Oracle Database Backup and Recovery Reference for RMAN command-line
syntax
4-1

4.2 Making Database Connections with RMAN
You can create database connections from the RMAN client or the operating system
command line. These database connection can be authenticated using a password file
or with operating system authentication.
This section contains the following topics:
•About RMAN Database Connection Types
•About Authentication for RMAN Database Connections
•Making Database Connections from the RMAN Prompt
•Making RMAN Database Connections from the Operating System Command Line
•Connecting RMAN to an Auxiliary Database
•Making RMAN Connections to a CDB
•Making RMAN Database Connections Within Command Files
•Diagnosing RMAN Connection Problems
4.2.1 About RMAN Database Connection Types
To perform useful work, the RMAN client must connect to a database.
Table 4-1 describes the types of database connections that you can make with RMAN.
Table 4-1 Overview of RMAN Database Connections
Type of Database
Connection
Keyword Description
target database
TARGET
A database to be backed up or recovered by RMAN
recovery catalog
database
CATALOG
A database that provides an optional backup store for
the RMAN repository in addition to the control file.
auxiliary instance or
auxiliary database
AUXILIARY
A physical standby database, or a database instance
created for performing a specific task such as
creating a duplicate database, transporting
tablespaces, or performing tablespace point-in-time
recovery (TSPITR).
For many tasks that use an auxiliary database,
RMAN creates an automatic auxiliary instance for use
during the task, connects to it, performs the task, and
then destroys it when the task is completed. You do
not give any explicit command to connect to
automatic auxiliary instances.
4.2.2 About Authentication for RMAN Database Connections
Users connecting with RMAN to a target or auxiliary database require either the
SYSDBA
or
SYSBACKUP
system privilege.
These privileges are not required when connecting to the recovery catalog. You must
grant the
RECOVERY_CATALOG_OWNER
role to the catalog schema owner. Users can also
Chapter 4
Making Database Connections with RMAN
4-2

connect to the recovery catalog using the VPC credentials that have been created by
the recovery catalog owner.
The same authentication options that are available with SQL*Plus are available with
RMAN. The most common ways to authenticate with the target and auxiliary
databases are:
•Operating system authentication
The prerequisites for connecting using operating system authentication are
described in "Authentication Using the Operating System".
•Password file authentication
The prerequisites for connecting using password file authentication are described
in "Authentication Using a Password File".
Neither of these methods requires the database to be open. Operating system
authentication is used only to connect locally. Password file authentication can be
used to connect locally or remotely.
See Also:
•Oracle Database Administrator’s Guide to learn about database
connection options when using SQL*Plus
•Oracle Database Security Guide for details about the
SYSDBA
and
SYSBACKUP
system privileges
4.2.2.1 Authentication Using the Operating System
RMAN connections to a target or auxiliary database can be made using operating
system authentication.
The following are the prerequisites for connecting to a database using operating
system authentication (OS authentication):
•You must set the
ORACLE_SID
environment variable, specifying the system identifier
(SID) for the database.
For example, to set the SID to
prod
in some UNIX shells, you enter:
% ORACLE_SID=prod; export ORACLE_SID
•You must be a member of the OSDBA operating system group to connect with the
SYSDBA
privilege or the OSBACKUPDBA operating system group to connect with
the
SYSBACKUP
privilege.
On UNIX and Linux, the OSDBA group is typically named
dba
, and the
OSBACKUPDBA group is typically named
backupdba
. These names are assigned
during database installation.
The following examples illustrate how to connect to a target database with operating
system authentication.
Chapter 4
Making Database Connections with RMAN
4-3

See Also:
Oracle Database Administrator's Guide for a discussion of operating system
groups
Example 4-1 OS Authentication with the SYSDBA Privilege - Explicit
% rman target '"/ as sysdba"'
Example 4-2 OS Authentication with the SYSBACKUP Privilege - Explicit
% rman target '"/ as sysbackup"'
Example 4-3 OS Authentication with the SYSDBA Privilege - Implicit
rman target /
If neither
AS SYSBACKUP
nor
AS SYSDBA
is specified in the connection string, then the
default used is
AS SYSDBA
.
4.2.2.2 Authentication Using a Password File
Use a password file for either local or remote access. If a database uses a password
file to authenticate administrative users, then RMAN can connect using a password.
The database must use a password file for you to connect remotely using a net service
name.
Caution:
Good security practice requires that passwords not be entered in plain text
on the command line. Enter passwords in RMAN only when requested by an
RMAN prompt. See Oracle Database Security Guide to learn about
password protection.
The database creates an entry in the password file when you grant the
SYSDBA
or
SYSBACKUP
privilege to a user. You can then connect to the target or auxiliary database
as this user even if the database is not open.
To support connecting through the password file with the
SYSBACKUP
privilege, the
password file must be created in or upgraded to the format for Oracle Database 12c
Release 1 (12.1) or later.
If neither
AS SYSBACKUP
nor
AS SYSDBA
is specified in the connection string, then the
default used is
AS SYSDBA
. In this case, no enclosing quotes are required.
See Also:
Oracle Database Administrator's Guide to learn about password files
Chapter 4
Making Database Connections with RMAN
4-4

Example 4-4 Password File Authentication as SYSDBA - Explicit
In this example, the
sdba
user has been granted the
SYSDBA
privilege:
% rman target '"sdba@prod1 as sysdba"'
target database Password: password
connected to target database: PROD1 (DBID=39525561)
Example 4-5 Password File Authentication as SYSBACKUP - Explicit
In this example, the
sbu
user is granted the
SYSBACKUP
privilege in the target database:
% rman target '"sbu@prod1 as sysbackup"'
target database Password: password
connected to target database: PROD1 (DBID=39525561)
Example 4-6 Password File Authentication as SYSDBA - Implicit
% rman target sbu@prod1
target database Password: password
connected to target database: PROD1 (DBID=39525561)
4.2.3 Making Database Connections from the RMAN Prompt
If you start RMAN without a connect string on the operating system command line,
then you must issue a
CONNECT TARGET
command at the RMAN prompt to connect to a
target database.
To make a database connection from the RMAN prompt:
1. On the operating system command line, start the RMAN client without making a
database connection.
% rman
RMAN>
2. At the RMAN prompt, enter one or more
CONNECT
commands.
Example 4-7 Connecting With OS Authentication - Implicit
RMAN> connect target /
Because no system privilege is specified,
ASSYSDBA
is assumed.
Example 4-8 Connecting with OS Authentication - Explicit
RMAN> connect target "/ as sysdba"
When including a system privilege, the enclosing quotation marks (single or double)
are required.
Example 4-9 Connecting with Password File Authentication
RMAN> connect target "sbu@prod AS SYSBACKUP"
target database Password: password
connected to target database: PROD (DBID=39525561)
Chapter 4
Making Database Connections with RMAN
4-5

Example 4-10 Connecting to Target and a Recovery Catalog
In this example, the target connection uses operating system authentication, and the
recovery catalog database connection uses a net service name and password file
authentication. The recovery catalog owner is user
rco
. RMAN prompts for the
password of the recovery catalog user.
RMAN> connect target /
RMAN> connect catalog rco@catdb
recovery catalog database Password: password
connected to recovery catalog database
See Also:
Oracle Database Backup and Recovery Reference to learn about the
CONNECT
command
4.2.4 Making RMAN Database Connections from the Operating
System Command Line
To connect to a target database from the operating system command line, enter the
rman
command followed by the connection information. You can begin executing
commands after the RMAN prompt is displayed.
Use the
CATALOG
keyword to connect to a recovery catalog. You can also start RMAN
without specifying
NOCATALOG
or
CATALOG
. If you do not specify
NOCATALOG
on the
command line, and if you do not specify
CONNECT CATALOG
after RMAN has started, then
RMAN defaults to
NOCATALOG
mode the first time that you run a command that requires
the use of the RMAN repository.
Note:
After you have executed a command that uses the RMAN repository in
NOCATALOG
mode, you must exit and restart RMAN to be able to connect to a
recovery catalog.
If you connect to the target database on the operating system command line, then you
can begin executing commands after the RMAN prompt is displayed.
Example 4-11 Connecting to a Target Database from the System Prompt
This example illustrates a connection to a target database that uses operating system
authentication. The
NOCATALOG
option indicates that a recovery catalog is not used in
the session.
% rman TARGET / NOCATALOG
connected to target database: PROD (DBID=39525561)
using target database control file instead of recovery catalog
Chapter 4
Making Database Connections with RMAN
4-6

RMAN>
Example 4-12 Connecting to a Target Database from the System Prompt by
Using Net Service Names
This example illustrates a connection to a target database that uses a net service
name and password file authentication. RMAN prompts for the password.
% rman TARGET sbu@prod NOCATALOG
target database Password: password
connected to target database: PROD (DBID=39525561)
RMAN>
Example 4-13 Connecting to Target and a Recovery Catalog from the System
Prompt
This example illustrates a connection that uses Oracle Net authentication for the target
and recovery catalog databases. In both cases RMAN prompts for a password.
% rman TARGET sbu@prod CATALOG rco@catdb
target database Password: password
connected to target database: PROD (DBID=39525561)
recovery catalog database Password: password
connected to recovery catalog database
RMAN>
4.2.5 Making RMAN Connections to a CDB
You can connect the RMAN client to multitenant container databases (CDBs) and
pluggable databases (PDBs).
This section contains the following topics:
•About Performing Operations on CDBs and PDBs
•Restrictions When Connected to a PDB
•Connecting as Target to the Root
•Connecting as Target to a PDB
4.2.5.1 About Performing Operations on CDBs and PDBs
You can perform RMAN operations on a whole CDB, the root only, or one or more
PDBs.
Make RMAN connections to CDBs according to the following rules:
•To perform operations on the whole CDB (for example, to back up the whole CDB)
you connect as target to the root.
•To perform operations on the root only (for example, to back up the root) you
connect as target to the root.
•To perform operations on a single PDB, you can connect as target either to the
root or directly to the PDB.
Chapter 4
Making Database Connections with RMAN
4-7

–If you connect to the root, you must use the
PLUGGABLE
DATABASE
syntax in your
RMAN commands. For example, to back up a PDB, you use the
BACKUP
PLUGGABLE
DATABASE
command.
–If instead you connect directly to a PDB, you can use the same commands
that you would use when connecting to a non-CDB. For example, to back up a
PDB, you would use the
BACKUP
DATABASE
command.
•To perform operations on two or more PDBs with a single command, you connect
as target to the root.
For example, to back up both the
sales
and
hr
PDBs, you connect to the root and
submit the following command:
BACKUP PLUGGABLE DATABASE sales, hr;
Note:
If you connect as target to a CDB with operating system authentication, you
are connected to the root.
4.2.5.2 Restrictions When Connected to a PDB
Certain restrictions apply when you connect directly to a pluggable database (PDB):
The following operations are not available when you connect as target directly to a
PDB:
•Back up archived logs
•Delete archived logs
•Delete archived log backups
•Restore archived logs (RMAN does restore archived logs when required during
media recovery.)
•Point-in-time recovery (PITR) when using shared undo mode
•TSPITR
•Table recovery
•Duplicate database
•Flashback operations when using shared undo mode
•Running Data Recovery Advisor
•Report/delete obsolete
•Register database
•Import catalog
•Reset database
•Configuring the RMAN environment (using the
CONFIGURE
command)
Chapter 4
Making Database Connections with RMAN
4-8

Note:
When you connect as
TARGET
to a PDB, you cannot connect to a recovery
catalog.
4.2.5.3 Connecting as Target to the Root
There are several ways to connect as target to the root.
The three most common ways are as follows:
•Connecting locally as a common user, as shown in Example 4-14
•Connecting with operating system authentication, as shown in Example 4-15
•Connecting as a common user through Oracle Net Services, using a net service
name, as shown in Example 4-16
In all cases, you must connect as a user with the
SYSDBA
or
SYSBACKUP
privilege.
Example 4-14 Connecting Locally to the Root
This example connects locally to the root using the
SYS
user, which is a common user.
The connection is established using the
SYSDBA
privilege.
rman target sys
target database Password: password
connected to target database: CDB (DBID=659628168)
Example 4-15 Connecting to the Root with Operating System Authentication
This example connects locally to the root using operating system authentication. The
connection is established as the
SYS
user with
SYSDBA
privilege.
rman target /
connected to target database: CDB (DBID=659628168)
Example 4-16 Connecting to the Root with a Net Service Name
This example assumes that there is a
sales
net service name that resolves to a
database service for the root, and that there is a common user named
c##bkuser
that
has the
SYSBACKUP
privilege.
rman target c##bkuser@sales
target database Password: password
connected to target database: CDB (DBID=659628168)
4.2.5.4 Connecting as Target to a PDB
You can connect to a PDB either from the RMAN prompt or the operating system
command line.
To connect as target to a PDB, you must:
•Connect with a net service name that resolves to a database service for that PDB.
Chapter 4
Making Database Connections with RMAN
4-9

•Connect as a local user or common user with the
SYSDBA
privilege.
Example 4-17 Connecting As Target to a PDB
This example illustrates a connection to a PDB. It assumes the following
•You want to perform RMAN operations on a PDB named
hrpdb
.
•The net service name
hrpdb
resolves to a database service for the
hrpdb
PDB.
•The local user
hrbkup
was created in the
hrpdb
PDB and granted the
SYSDBA
privilege.
rman target hrbkup@hrpdb
target database Password: password
connected to target database: CDB (DBID=659628168)
4.2.6 Making RMAN Database Connections Within Command Files
You can make a database connection by creating an RMAN command file containing
a
CONNECT
command..
If you create an RMAN command file that uses a
CONNECT
command with database
level credentials (user name and password), then anyone with read access to this file
can learn the password. There is no secure way to incorporate a
CONNECT
string with a
password into a command file.
If you create an RMAN command file that uses a
CONNECT
command, then RMAN does
not echo the connect string when you run the command file with the
@
command. This
behavior prevents connect strings from appearing in any log files that contain RMAN
output. For example, suppose that you create a command file
listbkup.rman
as
follows:
cat > listbkup.rman << EOF
CONNECT TARGET /
LIST BACKUP;
EOF
You execute this script by running RMAN with the
@
command line option as follows:
% rman @listbkup.rman
When the command file executes, RMAN replaces the connection string with an
asterisk, as shown in the following output:
RMAN> CONNECT TARGET *
2> LIST BACKUP;
3>
connected to target database: RDBMS (DBID=771530996)
using target database control file instead of recovery catalog
List of Backup Sets
===================
. . .
Chapter 4
Making Database Connections with RMAN
4-10

4.2.7 Connecting RMAN to an Auxiliary Database
To use the
DUPLICATE
command, you must connect to an auxiliary instance. Performing
tablespace point-in-time recovery (TSPITR) may also require a connection to an
auxiliary instance.
The form of an auxiliary connection is identical to a target database connection, except
that you use the
AUXILIARY
keyword instead of the
TARGET
keyword.
Note:
When you use the
DUPLICATE ... FROM ACTIVE DATABASE
command, a net
service name is required. See "Creating an Initialization Parameter File for
the Auxiliary Instance" for more details.
See Also:
•Duplicating a Database for more details on using the
DUPLICATE
command
•Performing RMAN Tablespace Point-in-Time Recovery (TSPITR) for
more details on performing TSPITR
Example 4-18 Connecting to Target and Auxiliary Databases from the RMAN
Prompt
This example illustrates a connection to a target database using operating system
authentication, and the auxiliary database connection uses a net service name and
password file authentication.
% rman
RMAN> CONNECT TARGET /
RMAN> CONNECT AUXILIARY sbu@aux
auxiliary database Password: password
connected to auxiliary database: AUX (DBID=30472568)
Example 4-19 Connecting to Target and Auxiliary Databases from the System
Prompt
This example illustrates a connection to a target database and an auxiliary database
from the system prompt. The target connection uses operating system authentication
and the auxiliary connection uses a net service name and password file authentication.
% rman target / auxiliary sbu@aux
auxiliary database Password: password
connected to auxiliary database: AUX (DBID=30472568)
Chapter 4
Making Database Connections with RMAN
4-11

4.2.8 Diagnosing RMAN Connection Problems
When you are diagnosing errors that RMAN encounters in connecting to the target,
catalog and auxiliary databases, consider using SQL*Plus to connect to the databases
directly. This action can reveal underlying problems with the connection information or
the databases.
This section contains the following topics:
•Diagnosing Target and Auxiliary Database Connection Problems
•Diagnosing Recovery Catalog Connection Problems
4.2.8.1 Diagnosing Target and Auxiliary Database Connection Problems
RMAN connects to target and auxiliary databases using the
SYSDBA
or
SYSBACKUP
privilege. Thus, when you use SQL*Plus to diagnose connection problems to the
target or auxiliary databases, request a
SYSDBA
or
SYSBACKUP
connection to reproduce
RMAN behavior.
For example, suppose that the following RMAN command encountered connection
errors:
RMAN> CONNECT TARGET /
You reproduce the preceding connection attempt with the SQL*Plus command as
follows:
SQL> CONNECT / AS SYSBACKUP
4.2.8.2 Diagnosing Recovery Catalog Connection Problems
Use SQL*Plus to diagnose recovery catalog connection problems.
When RMAN connects to the recovery catalog database, it does not use the
SYSDBA
or
SYSBACKUP
privilege. When you use SQL*Plus to diagnose connection problems to the
recovery catalog database, you must enter the database connect string exactly as it
was entered into RMAN. Do not specify
AS SYSBACKUP
or
AS SYSDBA
.
4.3 Specifying the Location of RMAN Output
By default, RMAN writes command output to standard output. To redirect output to a
log file, enter the
LOG
parameter on the command line when you start RMAN.
The following example writes RMAN command output to the file
rman.log:
% rman LOG /tmp/rman.log
In this case, RMAN displays command input but does not display the RMAN output.
The easiest way to send RMAN output both to a log file and to standard output is to
use the Linux
tee
command or its equivalent. For example, the following technique
enables both input and output to be visible in the RMAN command-line interface:
% rman | tee rman.log
RMAN>
Chapter 4
Specifying the Location of RMAN Output
4-12

See Also:
Oracle Database Backup and Recovery Reference to learn about RMAN
command-line options
4.4 Setting Globalization Support Environment Variables for
RMAN
Before invoking RMAN, it may be useful to set the
NLS_DATE_FORMAT
and
NLS_LANG
environment variables. These variables determine the format used for the time
parameters in RMAN commands such as
RESTORE
,
RECOVER
, and
REPORT
.
The following example shows typical language and date format settings:
NLS_LANG=american
NLS_DATE_FORMAT='Mon DD YYYY HH24:MI:SS'
If you are going to use RMAN to connect to an unmounted database and mount the
database later while RMAN is still connected, then set the
NLS_LANG
environment
variable so that it also specifies the character set used by the database.
A database that is not mounted assumes the default character set, which is
US7ASCII
. If
your character set is different from the default, then RMAN returns errors after the
database is mounted. For example, if the character set is
WE8DEC
, then to avoid errors,
you can set the
NLS_LANG
variable as follows:
NLS_LANG=american_america.we8dec
For the environment variable
NLS_DATE_FORMAT
to be applied and override the defaults
set for the server in the server initialization file, the environment variable
NLS_LANG
must
also be set.
See Also:
•Oracle Database Reference for more information about the
NLS_LANG
and
NLS_DATE_FORMAT
parameters
•Oracle Database Globalization Support Guide
4.5 Entering RMAN Commands
You can enter RMAN commands either directly from the RMAN prompt or read them
in from a text file.
This section contains the following topics:
•Entering RMAN Commands at the RMAN Prompt
•Using Command Files with RMAN
•Entering Comments in RMAN Command Files
Chapter 4
Setting Globalization Support Environment Variables for RMAN
4-13

•Using Substitution Variables in Command Files
•Checking RMAN Syntax
4.5.1 Entering RMAN Commands at the RMAN Prompt
When the RMAN client is ready for your commands, it displays the command prompt
The following is an example of the RMAN command prompt:
RMAN>
Enter commands for RMAN to execute. For example:
RMAN> CONNECT TARGET
RMAN> BACKUP DATABASE;
Most RMAN commands take several parameters and must end with a semicolon.
Some commands, such as
STARTUP
,
SHUTDOWN
, and
CONNECT
, can be used with or without
a semicolon.
When you enter a line of text that is not a complete command, RMAN prompts for
continuation input with a line number. For example:
RMAN> BACKUP DATABASE
2> INCLUDE CURRENT
3> CONTROLFILE
4> ;
4.5.2 Using Command Files with RMAN
For repetitive tasks, you can create a text file containing RMAN commands, and start
the RMAN client with the
@
argument, followed by a file name.
For example, create a text file
cmdfile1
in the current directory containing one line of
text as shown here:
BACKUP DATABASE PLUS ARCHIVELOG;
You can run this command file from the command line as shown in this example, and
the command contained in it is executed:
% rman TARGET / @cmdfile1
After the command completes, RMAN exits.
You can also use the
@
command at the RMAN command prompt to execute the
contents of a command file during an RMAN session. RMAN reads the file and
executes the commands in it. For example:
RMAN> @cmdfile1
After the command file contents have been executed, RMAN displays the following
message:
RMAN> **end-of-file**
Unlike the case where a command file is executed from the operating system
command line, RMAN does not exit.
Chapter 4
Entering RMAN Commands
4-14

See Also:
Oracle Database Backup and Recovery Reference for RMAN command-line
syntax
4.5.3 Entering Comments in RMAN Command Files
The comment character in RMAN is a pound sign (
#
). All text from the pound sign to
the end of the line is ignored.
For example, the contents of the following command file back up the database and
archived redo log files and include comments:
# Command file name: mybackup.rman
# The following command backs up the database
BACKUP DATABASE;
# The following command backs up the archived redo logs
BACKUP ARCHIVELOG ALL;
The following example shows how you can break a single RMAN command across
multiple lines:
RMAN> BACKUP # this is a comment
2> SPFILE;
4.5.4 Using Substitution Variables in Command Files
When running a command file, you can specify one or more values in a
USING
clause
for use in substitution variables in a command file. In this way, you can make your
command files dynamic.
As in SQL*Plus,
&1
indicates where to place the first value,
&2
where to place the
second value, and so on. The substitution variable syntax is
&integer
followed by an
optional period, for example,
&1.3
. The optional period is part of the variable and
replaced with the value, thus enabling the substitution text to be immediately followed
by another integer. For example, if you pass the value
mybackup
to a command file
containing the variable
&1.3
, then the result of the substitution is
mybackup3
.
The following procedure explains how to create and use a dynamic shell script that
calls a command file containing substitution variables.
To create and use a dynamic shell script:
1. Create an RMAN command file that uses substitution variables.
The following example shows the contents of a command file named
quarterly_backup.cmd
, which is run every quarter. The script uses substitution
variables for the name of the tape set, for a string in the
FORMAT
specification, and
for the name of the restore point to be created.
# quarterly_backup.cmd
CONNECT TARGET /
RUN
{
ALLOCATE CHANNEL c1
DEVICE TYPE sbt
Chapter 4
Entering RMAN Commands
4-15

PARMS 'ENV=(OB_MEDIA_FAMILY=&1)';
BACKUP DATABASE
TAG &2
FORMAT '/disk2/bck/&1%U.bck'
KEEP FOREVER
RESTORE POINT &3;
}
EXIT;
2. Create a shell script that you can use to run the RMAN command file created in
the previous step.
The following example creates a shell script named
runbackup.sh
. The example
creates shell variables for the format and restore point name and accepts the
values for these variables as command-line arguments to the script.
#!/bin/tcsh
# name: runbackup.sh
# usage: use the tag name and number of copies as arguments
set media_family = $argv[1]
set format = $argv[2]set restore_point = $argv[3]
rman @'/disk1/scripts/quarterly_backup.cmd'
USING $media_family $format $restore_point
3. Execute the shell script created in the previous step, specifying the desired
arguments on the command line.
The following example runs the
runbackup.sh
shell script and passes it
archival_backup
as the media family name,
bck0906
as the format string, and
FY06Q3
as the restore point name.
% runbackup.sh archival_backup bck0906 FY06Q3
See Also:
Oracle Database Backup and Recovery Reference for
@
syntax
4.5.5 Checking RMAN Syntax
You can test RMAN commands for syntactic correctness without executing them. Use
the command-line argument
CHECKSYNTAX
to start the RMAN client in a mode in which it
only parses the commands that you enter and returns an
RMAN-00558
error for
commands that are not legal RMAN syntax.
You can check the syntax of RMAN commands either at the command line or in
command files.
See Also:
Oracle Database Backup and Recovery Reference to learn about the
CHECKSYNTAX
command-line option
Chapter 4
Entering RMAN Commands
4-16

4.5.5.1 Checking RMAN Syntax at the Command Line
You can check the syntax of RMAN commands interactively without actually executing
the commands.
To check RMAN syntax at the command line:
1. Start RMAN with the
CHECKSYNTAX
parameter:
% rman CHECKSYNTAX
2. Enter the RMAN commands to be tested.
The following example shows a sample interactive session, with user-entered text in
bold.
RMAN> run [ backup database; ]
RMAN-00571: ===========================================================
RMAN-00569: =============== ERROR MESSAGE STACK FOLLOWS ===============
RMAN-00571: ===========================================================
RMAN-00558: error encountered while parsing input commands
RMAN-01006: error signaled during parse
RMAN-02001: unrecognized punctuation symbol "["
RMAN> run { backup database; }
The command has no syntax errors
RMAN>
4.5.5.2 Checking RMAN Syntax in Command Files
To test commands in a command file, start RMAN with the
CHECKSYNTAX
parameter and
use the
@
command to name the command file to be passed.
To test commands in a command file:
1. Use a text editor to create a command file.
Assume that you create the
/tmp/goodcmdfile
with the following contents:
# command file with legal syntax
RESTORE DATABASE;
RECOVER DATABASE;
Assume that you create another command file,
/tmp/badcmdfile
, with the following
contents:
# command file with bad syntax commands
RESTORE DATABASE
RECOVER DATABASE
2. Run the command file from the RMAN prompt in the following format, where
filename
is the name of the command file:
% rman CHECKSYNTAX @filename
Example 4-20 Checking the Syntax of a Command File with Correct Syntax
This example shows the output when you run
/tmp/goodcmdfile
with
CHECKSYNTAX
:
Chapter 4
Entering RMAN Commands
4-17

RMAN> # command file with legal syntax
2> restore database;
3> recover database;
4>
The cmdfile has no syntax errors
Recovery Manager complete.
Example 4-21 Checking the Syntax of a Command File with Bad Syntax
This example shows the output when you run
/tmp/badcmdfile
with
CHECKSYNTAX
:
RMAN> #command file with syntax error
2> restore database
3> recover
RMAN-00571: ===========================================================
RMAN-00569: =============== ERROR MESSAGE STACK FOLLOWS===============
RMAN-00571: ===========================================================
RMAN-00558: error encountered while parsing input commands
RMAN-01005: syntax error: found "recover": expecting one of: "archivelog,
channel, check, controlfile, clone, database, datafile, device,
from, force, high, (, preview, ;, skip, spfile, standby, tablespace,
until, validate"
RMAN-01007: at line 3 column 1 file: /tmp/badcmdfile
Example 4-22 Checking the Syntax of a Command File that Contains
Substitution Variables
You make your command files dynamic by including substitution variables. When you
check the syntax of a command file that contains substitution variables, RMAN
prompts you to enter values. This example illustrates what happens if you enter invalid
values when checking the syntax of a dynamic command file. The text in bold
indicates text entered at the prompt.
RMAN> CONNECT TARGET *
2> BACKUP TAG
Enter value for 1: mybackup
abc COPIES
Enter value for 2: mybackup
abc
RMAN-00571: ===========================================================
RMAN-00569: =============== ERROR MESSAGE STACK FOLLOWS ===============
RMAN-00571: ===========================================================
RMAN-00558: error encountered while parsing input commands
RMAN-01009: syntax error: found "identifier": expecting one of: "integer"
RMAN-01008: the bad identifier was: mybackup
RMAN-01007: at line 2 column 25 file: /tmp/whole_db.cmd
RMAN indicates a syntax error because the string
mybackup
is not a valid argument for
COPIES
.
4.6 Using the RMAN Pipe Interface
The RMAN pipe interface is an alternative method for issuing commands to RMAN
and receiving the output from those commands. Using this interface, it is possible to
write a portable programmatic interface to RMAN.
With the pipe interface, RMAN obtains commands and sends output by using the
DBMS_PIPE
PL/SQL package instead of the operating system shell. The pipe interface is
Chapter 4
Using the RMAN Pipe Interface
4-18

invoked by using the
PIPE
command-line parameter for the RMAN client. RMAN uses
two private pipes: one for receiving commands and the other for sending output. The
names of the pipes are derived from the value of the
PIPE
parameter. For example, you
can invoke RMAN with the following command:
% rman PIPE abc TARGET /
RMAN opens the two pipes in the target database:
ORA$RMAN_ABC_IN
, which RMAN uses
to receive user commands, and
ORA$RMAN_ABC_OUT
, which RMAN uses to send all output
back to RMAN. All messages on both the input and output pipes are of type
VARCHAR2
.
RMAN does not permit the pipe interface to be used with public pipes, because they
are a potential security problem. With a public pipe, any user who knows the name of
the pipe can send commands to RMAN and intercept its output.
If the pipes are not initialized, then RMAN creates them as private pipes. If you want to
put commands on the input pipe before starting RMAN, you must first create the pipe
by calling
DBMS_PIPE.CREATE_PIPE
. Whenever a pipe is not explicitly created as a private
pipe, the first access to the pipe automatically creates it as a public pipe, and RMAN
returns an error if it is told to use a public pipe.
Note:
If multiple RMAN sessions can run against the target database, then you
must use unique pipe names for each RMAN session. The
DBMS_PIPE.UNIQUE_SESSION_NAME
function is one method that you can use to
generate unique pipe names.
This section contains the following topics:
•Executing Multiple RMAN Commands in Succession Through a Pipe: Example
•Executing RMAN Commands in a Single Job Through a Pipe: Example
4.6.1 Executing Multiple RMAN Commands in Succession Through a
Pipe: Example
This example assumes that the application controlling RMAN wants to run multiple
commands in succession. After each command is sent down the pipe and executed
and the output returned, RMAN pauses and waits for the next command.
To execute RMAN commands through a pipe:
1. Start RMAN by connecting to a target database (required) and specifying the
PIPE
option. For example, enter:
% rman PIPE abc TARGET /
You can also specify the
TIMEOUT
option, which forces RMAN to exit automatically if
it does not receive any input from the input pipe in the specified number of
seconds. For example, enter:
% rman PIPE abc TARGET / TIMEOUT 60
Chapter 4
Using the RMAN Pipe Interface
4-19

2. Connect to the target database and put the desired commands on the input pipe
by using
DBMS_PIPE.PACK_MESSAGE
and
DBMS_PIPE.SEND_MESSAGE
. In pipe mode, RMAN
issues message
RMAN-00572
when it is ready to accept input instead of displaying
the standard RMAN prompt.
3. Read the RMAN output from the output pipe by using
DBMS_PIPE.RECEIVE_MESSAGE
and
DBMS_PIPE.UNPACK_MESSAGE
.
4. Repeat Steps 2 and 3 to execute further commands with the same RMAN instance
that was started in Step 1.
5. If you used the
TIMEOUT
option when starting RMAN, then RMAN terminates
automatically after not receiving any input for the specified length of time. To force
RMAN to terminate immediately, send the
EXIT
command.
4.6.2 Executing RMAN Commands in a Single Job Through a Pipe:
Example
This example assumes that the application controlling RMAN wants to run one or more
commands as a single job. After running the commands that are on the pipe, RMAN
exits.
To execute RMAN commands in a single job through a pipe:
1. After connecting to the target database, create a pipe (if it does not already exist
under the name
ORA$RMAN_
pipe
_IN
).
2. Put the desired commands on the input pipe. In pipe mode, RMAN issues
message
RMAN-00572
when it is ready to accept input instead of displaying the
standard RMAN prompt.
3. Start RMAN with the
PIPE
option, and specify
TIMEOUT
0
. For example, enter:
% rman PIPE abc TARGET / TIMEOUT 0
4. RMAN reads the commands that were put on the pipe and executes them by using
DBMS_PIPE.PACK_MESSAGE
and
DBMS_PIPE.SEND_MESSAGE
. When it has exhausted the
input pipe, RMAN exits immediately.
5. Read RMAN output from the output pipe by using
DBMS_PIPE.RECEIVE_MESSAGE
and
DBMS_PIPE.UNPACK_MESSAGE
.
See Also:
Oracle Database PL/SQL Packages and Types Reference for
documentation on the
DBMS_PIPE
package
Chapter 4
Using the RMAN Pipe Interface
4-20

5
Configuring the RMAN Environment
This chapter explains the most basic tasks involved in configuring RMAN. This chapter
contains the following topics:
•About Configuring the Environment for RMAN Backups
•Configuring RMAN to Make Backups to a Media Manager
•Configuring RMAN to Make Backups to Recovery Appliance
•Configuring the Fast Recovery Area
•Configuring the Backup Retention Policy
•Backup Optimization and the CONFIGURE command
•Configuring an Archived Redo Log Deletion Policy
•Configuring RMAN in a Data Guard Environment
See Also:
•Configuring the RMAN Environment: Advanced Topics to learn about
configuration options not covered in this chapter, including backup
compression and encryption
•Appendix C in the Oracle Database Backup and Recovery Reference for
information about configuring RMAN for the Oracle Secure Backup
(OSB) Cloud Module.
5.1 About Configuring the Environment for RMAN Backups
RMAN provides sensible defaults for most parameters required to perform basic
backup and recovery. You can modify the value of default parameters or override
these values for a particular session.
When implementing an RMAN-based backup strategy, you can use RMAN more
effectively if you understand the most common configurations.
To simplify ongoing use of RMAN, you can set several persistent configuration settings
for each target database. These settings control many aspects of RMAN behavior. For
example, you can configure the backup retention policy, default destinations for
backups, default backup device type, and so on. You can use the
SHOW
and
CONFIGURE
commands to view and change RMAN configurations.
This section explains what an RMAN configuration is and how you can use the
CONFIGURE
command to change RMAN default behavior for your backup and recovery
environment. This section also introduces the major settings available to you and their
more common values.
5-1

Note:
If you plan to back up to tape, refer to Configuring RMAN to Make Backups
to a Media Manager.
See Also:
Oracle Database Backup and Recovery Reference for
CONFIGURE
syntax
5.1.1 Showing and Clearing Persistent RMAN Configurations
You can use the
SHOW
command to display the current value of RMAN configured
settings for the target database. You can also view whether these commands are
currently set to their default values.
To view or change your CONFIGURE command settings:
1. Start RMAN and connect to a target database and a recovery catalog (if used).
2. Run the RMAN
SHOW
command.
For example, run
SHOW ALL
as shown in the following example (sample output
included). The output includes both parameters that you have changed and those
that are set to the default. The configuration is displayed as the series of RMAN
commands required to re-create the configuration. You can save the output in a
text file and use this command file to re-create the configuration on the same or a
different database.
SHOW ALL;
RMAN configuration parameters for database with db_unique_name PROD1 are:
CONFIGURE RETENTION POLICY TO RECOVERY WINDOW OF 3 DAYS;
CONFIGURE BACKUP OPTIMIZATION ON;
CONFIGURE DEFAULT DEVICE TYPE TO DISK; # default
CONFIGURE CONTROLFILE AUTOBACKUP ON; # default
CONFIGURE CONTROLFILE AUTOBACKUP FORMAT FOR DEVICE TYPE SBT_TAPE TO '%F'; #
default
CONFIGURE CONTROLFILE AUTOBACKUP FORMAT FOR DEVICE TYPE DISK TO '%F'; # default
CONFIGURE DEVICE TYPE 'SBT_TAPE' PARALLELISM 2 BACKUP TYPE TO COMPRESSED
BACKUPSET;
CONFIGURE DEVICE TYPE DISK PARALLELISM 1 BACKUP TYPE TO BACKUPSET; # default
CONFIGURE DATAFILE BACKUP COPIES FOR DEVICE TYPE SBT_TAPE TO 1; # default
CONFIGURE DATAFILE BACKUP COPIES FOR DEVICE TYPE DISK TO 1; # default
CONFIGURE ARCHIVELOG BACKUP COPIES FOR DEVICE TYPE SBT_TAPE TO 1; # default
CONFIGURE ARCHIVELOG BACKUP COPIES FOR DEVICE TYPE DISK TO 1; # default
CONFIGURE CHANNEL DEVICE TYPE 'SBT_TAPE' PARMS 'ENV=(OB_DEVICE=tape1)';
CONFIGURE MAXSETSIZE TO UNLIMITED; # default
CONFIGURE ENCRYPTION FOR DATABASE OFF; # default
CONFIGURE ENCRYPTION ALGORITHM 'AES128'; # default
CONFIGURE COMPRESSION ALGORITHM 'BASIC' AS OF RELEASE 'DEFAULT' OPTIMIZE FOR
LOAD TRUE ; # default
CONFIGURE RMAN OUTPUT TO KEEP FOR 7 DAYS; # default
CONFIGURE ARCHIVELOG DELETION POLICY TO NONE; # default
CONFIGURE SNAPSHOT CONTROLFILE NAME TO '/disk1/oracle/dbs/snapcf_ev.f'; # default
Chapter 5
About Configuring the Environment for RMAN Backups
5-2

You can also use the
SHOW
command with the name of a particular configuration.
For example, you can view the retention policy and default device type as follows:
SHOW RETENTION POLICY;
SHOW DEFAULT DEVICE TYPE;
3. Optionally, use the
CONFIGURE ... CLEAR
command to return any configuration to its
default value, as shown in the following examples:
CONFIGURE BACKUP OPTIMIZATION CLEAR;
CONFIGURE RETENTION POLICY CLEAR;
CONFIGURE CONTROLFILE AUTOBACKUP FORMAT FOR DEVICE TYPE DISK CLEAR;
See Also:
Oracle Database Backup and Recovery Reference for
SHOW
syntax
5.1.2 Configuring the Default Device for Backups: Disk or SBT
Backups for which no destination device type is specified are directed to the
configured default device. RMAN is preconfigured to use disk as the default device
type. No additional configuration is necessary.
You may need to change the default device type from disk to tape, or change it back
from tape to disk. Table 5-1 shows the commands that configure the default device.
Table 5-1 Commands to Configure the Default Device Type
Command Explanation
CONFIGURE DEFAULT DEVICE
TYPE TO DISK
Specifies that backups go to disk by default.
If a recovery area is enabled, then the backup location defaults
to the fast recovery area. Otherwise, the backup location
defaults to an operating system-specific directory on disk.
When backing up to disk, the logical block size of the database
file must be an even multiple of the physical block size of the
destination device. For example, a device of type DISK with a
block size of 2 kilobytes can only be used as a destination for
backups of database files with logical block sizes of 2 KB, 4
KB, 6 KB, and so on. Most disk drives have physical block
sizes of 512 bytes, so this limitation rarely affects backup to
disk drives. Nevertheless, you can encounter this limitation
when backing up to a writable DVD or a device that has a
larger physical block size.
CONFIGURE DEFAULT DEVICE
TYPE TO sbt
Specifies that backups go to tape by default.
"Configuring RMAN to Make Backups to a Media Manager"
explains how to set up RMAN for use with a media manager.
When RMAN can communicate with the media manager, you
can configure RMAN to make backups to tape and specify
SBT as the default device type.
You can always override the default device by using the
DEVICE
TYPE
clause of the
BACKUP
command, as shown in the following examples:
Chapter 5
About Configuring the Environment for RMAN Backups
5-3

BACKUP DEVICE TYPE sbt DATABASE;
BACKUP DEVICE TYPE DISK DATABASE;
To change the configured default device type:
1. Start RMAN and connect to a target database and a recovery catalog (if used).
2. Run the
SHOW ALL
command to show the currently configured default device.
3. Run the
CONFIGURE DEFAULT DEVICE TYPE
command, specifying either
TO DISK
or
TO
sbt
.
See Also:
Oracle Database Backup and Recovery Reference for more details on using
the
BACKUP
command with the
DEVICE
TYPE
clause
5.1.3 Configuring the Default Type for Backups: Backup Sets or
Copies
The
BACKUP
command can create either backup sets or image copies. For disk, you can
configure RMAN to create either backup sets or image copies as its default backup
type with the
CONFIGURE DEVICE TYPE DISK BACKUP TYPE TO
command.
Note:
Because RMAN can write an image copy only to disk, the backup type for
tape can only be a backup set.
The default backup type for disk is an uncompressed backup set.
RMAN can create backup sets using binary compression. You can configure RMAN to
use compressed backup sets by default on a device type by specifying the
COMPRESSED
option in the
BACKUP TYPE TO ... BACKUPSET
clause. To disable compression, use the
CONFIGURE DEVICE TYPE
command with arguments specifying your other desired
settings, but omit the
COMPRESSED
keyword.
To configure the default type of backup:
1. Start RMAN and connect to a target database and a recovery catalog (if used).
2. Configure backup sets or image copies as the default backup type.
The following examples configure the backup type for disk backups to copies and
backup sets:
CONFIGURE DEVICE TYPE DISK BACKUP TYPE TO COPY; # image copies
CONFIGURE DEVICE TYPE DISK BACKUP TYPE TO BACKUPSET; # uncompressed
The following examples configure compression for backup sets:
CONFIGURE DEVICE TYPE DISK BACKUP TYPE TO COMPRESSED BACKUPSET;
CONFIGURE DEVICE TYPE sbt BACKUP TYPE TO COMPRESSED BACKUPSET;
Chapter 5
About Configuring the Environment for RMAN Backups
5-4

See Also:
•About Backup Sets
•Making Compressed Backups
5.1.4 Configuring Channels
An RMAN channel is a connection to a database server session. RMAN uses
channels to perform most tasks.
This section contains the following topics:
•About Channel Configuration
•Configuring Channels for Disk
•Configuring Parallel Channels for Disk and SBT Devices
•Manually Overriding Configured Channels
5.1.4.1 About Channel Configuration
Use the
CONFIGURE
CHANNEL
command to configure options for disk or SBT channels.
You can configure generic channel settings for a device type, that is, a template that is
used for any channels created based on configured settings for that device.
Note:
This section explains configuration of disk channels. To learn how to
configure channels for tape, see Configuring SBT Channels for Use with a
Media Manager.
CONFIGURE
CHANNEL
takes the same options used to specify one-time options with the
ALLOCATE CHANNEL
command.
If you use
CONFIGURE
CHANNEL
to specify generic channel settings for a device, any
previous settings are discarded, even if the settings are not in conflict. For example,
after the second
CONFIGURE
CHANNEL
command, which specifies only the
FORMAT
for
configured disk channels, the
MAXPIECESIZE
for the disk channel is returned to its
default value:
CONFIGURE CHANNEL DEVICE TYPE DISK MAXPIECESIZE 2G;
CONFIGURE CHANNEL DEVICE TYPE DISK FORMAT /tmp/%U;
5.1.4.2 Configuring Channels for Disk
By default, RMAN allocates one disk channel for all operations. You can specify
different options for this channel, for example, a new default location for backups.
Chapter 5
About Configuring the Environment for RMAN Backups
5-5

Example 5-1 Configuring a Nondefault Backup Location
This example configures RMAN to write disk backups to the
/disk1
directory and
specifies a nondefault format for the relative file name.
CONFIGURE CHANNEL DEVICE TYPE DISK FORMAT '/disk1/ora_df%t_s%s_s%p';
RMAN automatically replaces the format specifier
%t
with a four byte time stamp,
%s
with the backup set number, and
%p
with the backup piece number.
Note:
When you configure an explicit format for disk channels, RMAN does not
create backups by default in the fast recovery area. In this case, you lose the
disk space management capabilities of the fast recovery area.
Example 5-2 Configuring an ASM Disk Location
This example demonstrates how to configure an ASM disk location.
CONFIGURE CHANNEL DEVICE TYPE DISK FORMAT '+dgroup1';
See Also:
Backing Up Database Files with RMAN to learn how to make backups
5.1.4.3 Configuring Parallel Channels for Disk and SBT Devices
The number of channels available for a device type when you run a command
determines whether RMAN reads or writes in parallel. As a rule, the number of
channels used in executing a command should match the number of devices
accessed.
For tape backups, allocate one channel for each tape drive. For disk backups, allocate
one channel for each physical disk, unless you can optimize the backup for your disk
subsystem architecture with multiple channels. Failing to allocate the right number of
channels adversely affects RMAN performance during I/O operations.
You can configure channel parallelism settings, binary compression for backup sets,
and other options for an SBT device with
CONFIGURE
DEVICE
TYPE
sbt
. You set the
configuration for the device type independently of the channel configuration.
Example 5-3 Configuring Parallelism for an SBT Device
This example changes the SBT device (sample output included) so that RMAN can
back up to a media manager using two tape drives in parallel. Each configured SBT
channel backs up approximately half the total data.
RMAN> CONFIGURE DEVICE TYPE sbt PARALLELISM 2;
old RMAN configuration parameters:
CONFIGURE DEVICE TYPE 'SBT_TAPE' BACKUP TYPE TO COMPRESSED BACKUPSET PARALLELISM 1;
new RMAN configuration parameters:
Chapter 5
About Configuring the Environment for RMAN Backups
5-6

CONFIGURE DEVICE TYPE 'SBT_TAPE' PARALLELISM 2 BACKUP TYPE TO COMPRESSED BACKUPSET;
new RMAN configuration parameters are successfully stored
Example 5-4 Configuring the Backup Type for an SBT Device
This example changes the default backup type for the SBT device to an
uncompressed backup set (sample output included).
The
CONFIGURE DEVICE TYPE
commands used in this example only affect parallelism and
backup type and do not affect the values of settings not specified. In Example 5-3, the
default backup type of compressed backup set was not changed by changing the
parallelism setting. In this example, the ability to use multiple tape drives in parallel is
not affected by changing the default backup type.
RMAN> CONFIGURE DEVICE TYPE sbt BACKUP TYPE TO BACKUPSET;
old RMAN configuration parameters:
CONFIGURE DEVICE TYPE 'SBT_TAPE' PARALLELISM 2 BACKUP TYPE TO COMPRESSED BACKUPSET;
new RMAN configuration parameters:
CONFIGURE DEVICE TYPE 'SBT_TAPE' BACKUP TYPE TO BACKUPSET PARALLELISM 2;
new RMAN configuration parameters are successfully stored
See Also:
•Specifying Multiple Formats for Disk Backups to learn how to make disk
backups in parallel
•Oracle Database Backup and Recovery Reference for reference material
on the
CHANNEL
parameter of the
BACKUP
command
•Oracle Real Application Clusters Administration and Deployment Guide
for information about taking advantage of parallel operations in an Oracle
Real Application Clusters (Oracle RAC) configuration
5.1.4.4 Manually Overriding Configured Channels
If you manually allocate a channel during a job, then RMAN disregards any configured
channel settings.
To manually override configured channels:
•Assume that the default device type is SBT. Run the following command to
override the default configuration.
RUN
{
ALLOCATE CHANNEL c1 DEVICE TYPE DISK;
BACKUP TABLESPACE users;
}
In this case, RMAN uses only the disk channel that you manually allocated within
the
RUN
command, overriding any defaults set by using
CONFIGURE
DEVICE
TYPE
,
CONFIGURE
DEFAULT
DEVICE
, or
CONFIGURE
CHANNEL
settings.
Chapter 5
About Configuring the Environment for RMAN Backups
5-7

See Also:
•About RMAN Channels to learn about configured and allocated channels
•Oracle Database Backup and Recovery Reference for
ALLOCATE CHANNEL
syntax
•Oracle Database Backup and Recovery Reference for
CONFIGURE
syntax
5.1.5 Configuring Control File and Server Parameter File Autobackups
You can configure RMAN to automatically back up the control file and server
parameter file. The autobackup occurs whenever a backup record is added.
If the database runs in
ARCHIVELOG
mode, then an autobackup is also taken whenever
the database structure metadata in the control file changes. A control file autobackup
enables RMAN to recover the database even if the current control file, recovery
catalog, and server parameter file are lost.
Because the file name for the autobackup follows a well-known format, RMAN can
search for it without access to a repository and then restore the server parameter file.
After you have started the instance with the restored server parameter file, RMAN can
restore the control file from an autobackup. After you mount the control file, the RMAN
repository is available, and RMAN can restore the data files and find the archived redo
logs.
To enable the autobackup feature:
CONFIGURE CONTROLFILE AUTOBACKUP ON;
To disable the autobackup feature:
CONFIGURE CONTROLFILE AUTOBACKUP OFF;
By default, control file autobackups are turned on for CDBs and standalone databases
that have the
COMPATIBLE
initialization parameter set to 12.2 or higher.
See Also:
•About RMAN Control File and Server Parameter File Autobackups
•Oracle Database Backup and Recovery Reference for
CONFIGURE
syntax
5.1.5.1 Configuring the Control File Autobackup Format
By default, the format of the autobackup file for all configured devices is the
substitution variable
%F
in the FORMAT clause.
The
%F
variable format translates into
c-IIIIIIIIII-YYYYMMDD-QQ
, with the placeholders
defined as follows:
•
IIIIIIIIII
stands for the DBID.
Chapter 5
About Configuring the Environment for RMAN Backups
5-8

•
YYYYMMDD
is a time stamp of the day the backup is generated.
•
QQ
is the hexadecimal sequence that starts with
00
and has a maximum of
FF
.
To change the default format for the autobackup file:
•Use the following command, where
deviceSpecifier
is any valid device type, and
'
string
' must contain the substitution variable
%F
(and no other substitution
variables) and is a valid handle for the specified device:
CONFIGURE CONTROLFILE AUTOBACKUP FORMAT
FOR DEVICE TYPE deviceSpecifier TO 'string';
For example, you can run the following command to specify a nondefault file name
for the control file autobackup. In the file name,
?
stands for
ORACLE_HOME
.
CONFIGURE CONTROLFILE AUTOBACKUP FORMAT
FOR DEVICE TYPE DISK TO '?/oradata/cf_%F';
The following example configures the autobackup to write to an Automatic Storage
Management disk group:
CONFIGURE CONTROLFILE AUTOBACKUP FORMAT
FOR DEVICE TYPE DISK TO '+dgroup1/%F';
Note:
The valid formats for control file autobackups are:
%D
,
%I
,
%M
,
%Y
,
%F
,
%T
,
%d
,
and
%n
. If you use formats other than these, you may not be able to restore
the control file autobackup.
To clear control file autobackup formats for a device:
•, Use the following commands:
CONFIGURE CONTROLFILE AUTOBACKUP FORMAT FOR DEVICE TYPE DISK CLEAR;
CONFIGURE CONTROLFILE AUTOBACKUP FORMAT FOR DEVICE TYPE sbt CLEAR;
If you have set up a fast recovery area for the database, then you can direct control file
autobackups to the fast recovery area by clearing the control file autobackup format for
disk.
Note:
All files in the fast recovery area are maintained by Oracle Database and
associated file names are maintained in the Oracle Managed Files (OMF)
format.
Chapter 5
About Configuring the Environment for RMAN Backups
5-9

5.1.5.2 Overriding the Configured Control File Autobackup Format
The
SET CONTROLFILE AUTOBACKUP FORMAT
command, which you can specify either within
a
RUN
command or at the RMAN prompt, overrides the configured autobackup format in
the current session only.
The order of precedence is:
1.
SET CONTROLFILE AUTOBACKUP FORMAT
(within a
RUN
block
)
2.
SET CONTROLFILE AUTOBACKUP FORMAT
(at
RMAN
prompt)
3.
CONFIGURE CONTROLFILE AUTOBACKUP FORMAT
The following example shows how the two forms of
SET
CONTROLFILE
AUTOBACKUP
FORMAT
interact:
SET CONTROLFILE AUTOBACKUP FORMAT FOR DEVICE TYPE DISK TO 'controlfile_%F';
BACKUP AS COPY DATABASE;
RUN
{
SET CONTROLFILE AUTOBACKUP FORMAT FOR DEVICE TYPE DISK TO '/tmp/%F.bck';
BACKUP AS BACKUPSET
DEVICE TYPE DISK
DATABASE;
}
The first
SET CONTROLFILE AUTOBACKUP FORMAT
controls the name of the control file
autobackup until the RMAN client exits, overriding any configured control file
autobackup format. The
SET CONTROFILE AUTOBACKUP FORMAT
in the
RUN
block overrides
the
SET CONTROLFILE AUTOBACKUP FORMAT
outside the
RUN
block for the duration of the
RUN
block.
5.2 Configuring RMAN to Make Backups to a Media
Manager
On most platforms, to back up to and restore from sequential media such as tape you
must integrate a media management software with your Oracle database. You can use
Oracle Secure Backup, which supports both database and file system backups to
tape, as your media manager.
Note:
You can also use a third-party media manager. This section describes the
generic steps for configuring RMAN for use with a third-party media
manager. The actual steps depend on the media management product that
you install and the platform on which you run the database. If you opt to use
RMAN with a media manager other than Oracle Secure Backup, then you
must obtain all product-specific information from the vendor.
To configure RMAN for use with a media manager:
Chapter 5
Configuring RMAN to Make Backups to a Media Manager
5-10

1. Ensure that the prerequisites for using a media manager are met as described in
"Prerequisites for Using a Media Manager with RMAN"
2. Determine the location of the media management library used to communicate
with the sequential media as described in "Determining the Location of the Media
Management Library"
3. Configure the media management software as described in "Configuring Media
Management Software for RMAN Backups"
4. Check if RMAN can create backups using the media manager as described in
"Testing Whether the Media Manager Library Is Integrated Correctly"
5. Configure an RMAN channel that can be used as a default for all tape backups as
described in "Configuring SBT Channels for Use with a Media Manager"
See Also:
•About Media Management Using RMAN for an overview of media
management software and its implications for RMAN
•Oracle Secure Backup Administrator's Guide to learn how to set up
RMAN for use specifically with Oracle Secure Backup
5.2.1 Prerequisites for Using a Media Manager with RMAN
Before you can begin using RMAN with a third-party media manager, you must install
the media manager and ensure that RMAN can communicate with it. Refer to the
media management vendor's software documentation for instructions.
In general, you begin by installing and configuring the media management software on
the target host or production network. Ensure that you can make non-RMAN backups
of Hi operating system files on the target database host. This step makes later
troubleshooting much easier by confirming that the basic integration of the media
manager with the target host has been successful. Refer to your media management
documentation to learn how to back up files to the media manager without using
RMAN.
Then, obtain and install the third-party media management module for integration with
the database server. This module contains the media management library that the
Oracle database loads and uses when accessing the media manager. It is generally a
third-party product that must be purchased separately. Contact your media
management vendor for details.
5.2.2 Determining the Location of the Media Management Library
Before attempting to use RMAN with a media manager, determine the location of the
media management library.
When allocating or configuring a channel for RMAN to use to communicate with a
media manager, you must specify the
SBT_LIBRARY
parameter in an
ALLOCATE CHANNEL
or
CONFIGURE CHANNEL
command. The
SBT_LIBRARY
parameter specifies the path to the
library.
Chapter 5
Configuring RMAN to Make Backups to a Media Manager
5-11

When RMAN allocates channels to communicate with a media manager, it attempts to
load the library indicated by the
SBT_LIBRARY
parameter. If you do not provide a value
for the
SBT_LIBRARY
parameter in an allocated or preconfigured channel, then RMAN
looks in a platform-specific and secured default location.
On Linux and UNIX, the SBT library is loaded from:
/opt/oracle/extapi/[32,64]/{SBT}/{VENDOR}/{VERSION}/libobk.so
The SBT library file name extension name varies according to platform:
•
.so
,
.sl
on HP-UX,
•
.a
on AIX,
On Windows, the SBT library is loaded from:
%SYSTEM_DRIVE%\oracle\extapi\[32,64]\{SBT}\{VENDOR}\{VERSION}\orasbt.dll
If RMAN cannot use the secured default location or if you are using Oracle Database
11g or earlier, then RMAN loads the SBT library from the location designated by the
environment variables
PATH
or
LIBPATH
.
In some cases, your organization may have security or regulatory compliance
requirements that prohibit the use of environment variables
PATH
or
LIBPATH
to
designate a library directory. To disable this behavior, set the
PARMS
string to
SBT_SECURE=1
.
Note:
The default media management library file is not part of the standard
database installation. It is present only if you install third-party media
management software.
See Also:
Your operating system-specific database documentation and the
documentation supplied by your media vendor for instructions on how to
achieve media manager integration on your platform
Example: Configuring the Media Management Library Location
The following example shows the channel syntax, where pathname is the absolute file
name of the library:
CONFIGURE CHANNEL DEVICE TYPE sbt
PARMS 'SBT_LIBRARY=pathname';
Chapter 5
Configuring RMAN to Make Backups to a Media Manager
5-12

5.2.3 Configuring Media Management Software for RMAN Backups
After installing the media management software, perform the configuration required by
your vendor so that the software can accept RMAN backups.
Depending on the type of media management software that you installed, you may
have to define media pools, configure users and classes, and so on. Consult your
media management vendor documentation for the appropriate RMAN settings. The
PARMS
parameter sends instructions to the media manager. If
PARMS
values are needed
for the
ALLOCATE CHANNEL
or the
CONFIGURE CHANNEL
command, or if a
FORMAT
string is
recommended for the
BACKUP
or
CONFIGURE
command, then refer to the vendor
documentation for this information.
Example 5-5 PARMS Setting for Oracle Secure Backup
This example shows a
PARMS
setting for Oracle Secure Backup. This
PARMS
settings
instructs the media manager to back up to a family of tapes called
datafile_mf
. The
PARMS
settings are always vendor-specific.
CONFIGURE CHANNEL DEVICE TYPE 'SBT_TAPE'
PARMS 'ENV=(OB_MEDIA_FAMILY=datafile_mf)';
See Also:
•Oracle Database Backup and Recovery Reference for
ALLOCATE
CHANNEL
syntax
•Oracle Database Backup and Recovery Reference for channel control
options
•Oracle Secure Backup Reference for RMAN-specific parameter settings
for Oracle Secure Backup
5.2.4 Testing Whether the Media Manager Library Is Integrated
Correctly
After you have confirmed that the database server can load the media management
library, test to ensure that RMAN can back up to the media manager.
You can perform the following tasks:
•Testing ALLOCATE CHANNEL on the Media Manager
•Testing Backup and Restore Operations on the Media Manager
5.2.4.1 Testing ALLOCATE CHANNEL on the Media Manager
The
ALLOCATE CHANNEL
command is used to perform a basic test of RMAN
communication with the media manager.
To test channel allocation on the media manager:
1. Start RMAN and connect to a target database and a recovery catalog (if used).
Chapter 5
Configuring RMAN to Make Backups to a Media Manager
5-13

2. Run the
ALLOCATE
CHANNEL
command with the
PARMS
required by your media
management software.
The following
RUN
command shows sample vendor-specific
PARMS
settings:
RUN
{
ALLOCATE CHANNEL c1 DEVICE TYPE sbt
PARMS 'SBT_LIBRARY=/mydir/lib/libobk.so,
ENV=(OB_DEVICE=drive1,OB_MEDIA_FAMILY=datafile_mf)';
}
3. Examine the RMAN output.
If you do not receive an error message, then the database successfully loaded the
media management library. If you receive the
ORA-27211
error, the media
management library could not be loaded:
RMAN-00571: ===========================================================
RMAN-00569: =============== ERROR MESSAGE STACK FOLLOWS ===============
RMAN-00571: ===========================================================
RMAN-03009: failure of allocate command on c1 channel at 11/30/2007 13:57:18
ORA-19554: error allocating device, device type: SBT_TAPE, device name:
ORA-27211: Failed to load Media Management Library
Additional information: 25
In this case, check the media management installation to ensure that the library is
correctly installed, and recheck the value for the
SBT_LIBRARY
parameter as
described in Determining the Location of the Media Management Library.
If the database cannot locate a media management library in the location specified
by the
SBT_LIBRARY
parameter or the default location, then RMAN issues an
ORA-27211
error and exits.
Whenever channel allocation fails, the database writes a trace file to the
trace
subdirectory in the Automatic Diagnostic Repository (ADR) home directory. The
following shows sample output:
SKGFQ OSD: Error in function sbtinit on line 2278
SKGFQ OSD: Look for SBT Trace messages in file /oracle/rdbms/log/sbtio.log
SBT Initialize failed for /oracle/lib/libobk.so
See Also:
Oracle Database Administrator’s Guide to learn how to use the Automatic
Diagnostic Repository to monitor database operations
5.2.4.2 Testing Backup and Restore Operations on the Media Manager
After testing a channel allocation on the media manager, create and restore a test
backup.
Use the
BACKUP
and
RESTORE
commands to perform backup and recovery operations on
the media manager. If the backup and restore operations succeed, then you are ready
to use the media manager with RMAN.
Possible reasons for failures include the following cases:
Chapter 5
Configuring RMAN to Make Backups to a Media Manager
5-14

•The backup hangs.
A hanging backup usually indicates that the media manager is waiting to mount a
tape. Check if there are any media manager jobs in tape mount request mode and
fix the problem. Ensure that the steps in Configuring RMAN to Make Backups to a
Media Manager are correctly done.
•The backup fails with
ORA-27211: Failed to load Media Management Library
.
This error indicates that the media management software is not correctly
configured. Ensure that the steps in Configuring RMAN to Make Backups to a
Media Manager are correctly done. Also, ensure that you have the
PARMS
and
FORMAT
strings required by your media management software.
See Also:
Testing the Media Management API and Troubleshooting RMAN Operations
Example 5-6 Backing Up the Server Parameter File to Tape
You can use the command in this example (substituting the channel settings required
by your media management vendor) to test whether a backup can be created on the
media manager. If your database does not use a server parameter file, then back up
the current control file instead.
RUN
{
ALLOCATE CHANNEL c1 DEVICE TYPE sbt
PARMS 'SBT_LIBRARY=/mydir/lib/libobk.so,
ENV=(OB_DEVICE=drive1,OB_MEDIA_FAMILY=datafile_mf)';
BACKUP SPFILE;
# If your database does not use a server parameter file, use:
# BACKUP CURRENT CONTROLFILE;
}
Example 5-7 Restoring the Server Parameter File from Tape
This example restores the backup created in Example 5-6 to a temporary directory. If
the backup to the media manager succeeds, then attempt to restore the server
parameter file as an initialization parameter file.
RUN
{
ALLOCATE CHANNEL c1 DEVICE TYPE sbt
PARMS 'SBT_LIBRARY=/mydir/lib/libobk.so,
ENV=(OB_DEVICE=drive1,OB_MEDIA_FAMILY=datafile_mf)';
RESTORE SPFILE TO PFILE '/tmp/test_restore.f';
# If your database does not use a server parameter file, use:
# RESTORE CURRENT CONTROLFILE TO '/tmp/test_restore.f';
}
5.2.5 Configuring SBT Channels for Use with a Media Manager
Configuring SBT channels creates a persistent setting that is the default used for
backup and recovery operations with a media manager.
Chapter 5
Configuring RMAN to Make Backups to a Media Manager
5-15

Note:
•Configuring Advanced Channel Options
•About Media Manager Backup Piece Names
•Configuring Automatic SBT Channels
5.2.5.1 About Media Manager Backup Piece Names
A backup piece name is determined by the
FORMAT
string specified in the
BACKUP
command,
CONFIGURE
CHANNEL
command, or
ALLOCATECHANNEL
command.
The media manager considers the backup piece name as the name of the backup file,
so every backup piece must have a unique name in the media management catalog.
You can use the substitution variables in a
FORMAT
parameter to generate unique
backup piece names. For example,
%d
specifies the name of the database, whereas
%t
specifies the backup time stamp. For most purposes, you can use
%U
, in which case
RMAN automatically generates a unique file name. The backup piece name
12i1nk47_1_1
is an example. If you do not specify the
FORMAT
parameter, then RMAN
automatically generates a unique file name with the
%U
substitution variable.
Your media manager may impose restrictions on file names and sizes. In this case,
you may need more control over the naming of backup pieces so that they obey media
manager restrictions. For example, some media managers only support a 14-character
backup piece name, and some require special
FORMAT
strings. The unique names
generated by the
%U
substitution variable do not exceed 14 characters.
Some media managers may have limits on the maximum size of files that they can
back up or restore. You must ensure that RMAN does not produce backup sets larger
than those limits. To limit backup piece sizes, use the parameter
MAXPIECESIZE
, which
you can set in the
CONFIGURE CHANNEL
and
ALLOCATE CHANNEL
commands.
See Also:
•Oracle Database Backup and Recovery Reference
•About Number and Size of RMAN Backup Pieces to learn how to set
MAXPIECESIZE
•Oracle Database Backup and Recovery Reference for the complete list
of variables allowable in format strings with the
BACKUP
command
•Your media management documentation to determine the string
character limit for the media manager
Chapter 5
Configuring RMAN to Make Backups to a Media Manager
5-16

5.2.5.2 Configuring Automatic SBT Channels
The easiest technique for backing up to a media manager is to configure automatic
SBT channels
As explained in "Configuring the Default Device for Backups: Disk or SBT", you can
use a tape device as your default backup destination.
To configure channels for use with a media manager:
1. Configure a generic SBT channel.
In the configuration, enter all parameters that you tested in "Testing Backup and
Restore Operations on the Media Manager". The following example configures
vendor-specific channel parameters and sets the default device:
CONFIGURE CHANNEL DEVICE TYPE sbt
PARMS 'ENV=(OB_RESOURCE_WAIT_TIME=1minute,OB_DEVICE=tape1)';
2. Configure the default device type to SBT, as shown in the following command:
CONFIGURE DEFAULT DEVICE TYPE TO sbt;
If you use multiple tape devices, then you must specify the channel parallelism as
described in "Configuring Parallel Channels for Disk and SBT Devices". The
following configuration enables you to back up to two tape drives in parallel:
CONFIGURE DEVICE TYPE sbt PARALLELISM 2;
Optionally, check your channel configuration by running the following command:
SHOW CHANNEL FOR DEVICE TYPE sbt;
3. Make a test backup to tape.
The following command backs up the server parameter file to tape:
BACKUP SPFILE;
4. List your backups to ensure that the test backup went to the media manager:
LIST BACKUP OF SPFILE;
5.3 Configuring RMAN to Make Backups to Recovery
Appliance
RMAN commands can be used to back up target databases to Zero Data Loss
Recovery Appliance (Recovery Appliance). Certain configuration steps are required to
use the Recovery Appliance as a centralized repository for the target database
backups.
To configure RMAN to create backups to Recovery Appliance:
1. Ensure that the prerequisites described in "Prerequisites for Using Recovery
Appliance " are met.
2. Complete the steps listed in "Steps to Configure RMAN for Backups to Recovery
Appliance".
Chapter 5
Configuring RMAN to Make Backups to Recovery Appliance
5-17

See Also:
Zero Data Loss Recovery Appliance Protected Database Configuration
Guide
5.3.1 Prerequisites for Using Recovery Appliance
Before you can use RMAN to back up a target database to Zero Data Loss Recovery
Appliance (Recovery Appliance), you must install the Recovery Appliance backup
module in the Oracle home of the target database.
The backup module can be installed in the default location or a user-specified location.
Installing the Recovery Appliance backup module creates the shared library used to
transfer backups to the Recovery Appliance and the Oracle wallet containing
credentials used to authenticate the target database with Recovery Appliance.
See Also:
Zero Data Loss Recovery Appliance Protected Database Configuration
Guide for information about installing the Recovery Appliance backup
module
5.3.2 Steps to Configure RMAN for Backups to Recovery Appliance
RMAN configuration is required before you can back up Oracle databases to Zero
Data Loss Recovery Appliance (Recovery Appliance).
1. Determine the location of the Recovery Appliance backup module as described in
"Determining the Location of the Recovery Appliance Backup Module".
2. Specify Recovery Appliance configuration parameters that must be used by RMAN
to create backups to Recovery Appliance as described in "Specifying Recovery
Appliance Configuration Settings for RMAN Backups".
3. Allocate one or more RMAN channels that will be used by RMAN to backup the
database to Recovery Appliance.
You must specify the
SBT_LIBRARY
and the
ENV
parameters while using Recovery
Appliance.
SBT_LIBRARY
provides the location of the Recovery Appliance backup
module and
ENV
provides the configuration parameters.
Instead of allocating RMAN channels, you can also configure an RMAN SBT
channel that will be used to back up to Recovery Appliance. In this case, the
channel configuration is persistent and the settings are applicable until they are
reset (using
CONFIGURE
command) or overridden for a particular operation using an
ALLOCATE
statement.
Chapter 5
Configuring RMAN to Make Backups to Recovery Appliance
5-18

See Also:
•Example 5-8 and Example 5-9 for examples on configuring RMAN
for Recovery Appliance.
•Zero Data Loss Recovery Appliance Protected Database
Configuration Guide for information about allocating RMAN channels
5.3.3 Determining the Location of the Recovery Appliance Backup
Module
Before using RMAN to back up target databases to Zero Data Loss Recovery
Appliance (Recovery Appliance), you need to determine the location of the Recovery
Appliance backup module on the target database host. This location is used while
configuring or allocating RMAN channels for Recovery Appliance.
The
SBT_LIBRARY
parameter in the
CONFIGURE
or
ALLOCATE
command specifies the
location of the Recovery Appliance backup module. When RMAN attempts to back up
to Recovery Appliance, it loads the shared library indicated by the
SBT_LIBRARY
parameter.
You can specify an absolute path name or a file name for the
SBT_LIBRARY
parameter. If
you specify a file name, then RMAN searches for the file in an operating system-
specific location. By default, the Recovery Appliance backup module is located
in
$ORACLE_HOME/lib/libra.so
on UNIX/Linux and in
%ORACLE_HOME\database\lib
\libra.sso
on Windows.
Example 5-8 Specifying the Recovery Appliance Backup Module Location
During Channel Configuration
The following command configures an RMAN SBT channel by specifying the absolute
path name of the Recovery Appliance backup module on Linux:
CONFIGURE CHANNEL DEVICE TYPE sbt PARAMS 'SBT_LIBRARY=/u01/oracle/lib/libra.so';
5.3.4 Specifying Recovery Appliance Configuration Settings for RMAN
Backups
The client configuration file, stored on the protected database, contains the
configuration settings that are used by the Zero Data Loss Recovery Appliance
(Recovery Appliance) backup module to communicate with the Recovery Appliance.
This file is created automatically when the Recovery Appliance backup module is
installed.
The client configuration file must contain the location of the Oracle wallet that stores
credentials required to authenticate the target database with Recovery Appliance.
Other optional settings may be included.
When using Recovery Appliance, you can include the client configuration settings in
an RMAN command. Use the
ENV
parameter of the RMAN
CONFIGURE CHANNEL
or
ALLOCATE CHANNEL
command to directly specify client configuration parameters for
Recovery Appliance.
Chapter 5
Configuring RMAN to Make Backups to Recovery Appliance
5-19

See Also:
Zero Data Loss Recovery Appliance Protected Database Configuration
Guide
Example 5-9 Specifying Recovery Appliance Client Configuration Settings
The following command specifies the Recovery Appliance client configuration settings
directly as part of the
CONFIGURE CHANNEL
command:
CONFIGURE CHANNEL DEVICE TYPE 'SBT_TAPE' PARAMS 'SBT_LIBRARY= libra.so,
ENV=(BA_WALLET=location=file:/home/oracle/product/12.1.0/dbhome_1/wallet
credential_alias=ra-scan:1521/zdlra5:dedicated)';
In this example,
ra-scan
is the SCAN of the Recovery Appliance and
zdlra5
is the
service name of the Recovery Appliance metadata database.
5.4 Configuring the Fast Recovery Area
The fast recovery area feature enables you to set up a disk area where the database
can create and manage a variety of files related to backup and recovery. Use of the
fast recovery area is strongly recommended. Consider configuring a fast recovery area
as a first step in implementing a backup strategy.
This section outlines the functions of the fast recovery area, identifies the files stored
there, explains the rules for file management, and introduces the most important
configuration options. This section contains the following topics:
•Overview of Files in the Fast Recovery Area
•Enabling the Fast Recovery Area
•Disabling the Fast Recovery Area
•Configuring Locations for Control Files and Redo Logs
•Configuring RMAN File Creation in the Fast Recovery Area
See Also:
"Maintaining the Fast Recovery Area"
5.4.1 Overview of Files in the Fast Recovery Area
The fast recovery area can contain control files, online redo logs, archived redo logs,
flashback logs, and RMAN backups.
Files in the recovery area are permanent or transient. Permanent files are active files
used by the database instance. All files that are not permanent are transient. In
general, Oracle Database eventually deletes transient files after they become obsolete
under the backup retention policy or have been backed up to tape.
Chapter 5
Configuring the Fast Recovery Area
5-20

The fast recovery area is an Oracle Database managed space that can be used to
hold RMAN disk backups, control file autobackups and archived redo log files. The
files placed in this location are maintained by Oracle Database and the generated file
names are maintained in Oracle Managed Files (OMF) format.
"Table 5-2" describes the files in the recovery area, the classification of each file as
permanent or temporary, and how database availability is affected.
Table 5-2 Files in the Fast Recovery Area
Files Type Database Behavior When Fast Recovery Area Is
Inaccessible
Multiplexed copies of the
current control file
Permanent The instance fails if the database cannot write to a multiplexed
copy of the control file stored in the fast recovery area. Failure
occurs even if accessible multiplexed copies are located outside
the recovery area.
See Also: "Configuring Control File Locations" to learn how to
configure control files in the recovery area
Online redo log files Permanent Instance availability is not affected if a mirrored copy of the
online redo log exists in an accessible location outside the fast
recovery area. Otherwise, the instance fails.
See Also: "Configuring Online Redo Log Locations" to learn how
to configure online redo logs in the recovery area
Archived redo log files Transient Instance availability is not affected if the log is archived to an
accessible location outside the fast recovery area. Otherwise,
the database eventually halts because it cannot archive the
online redo logs.
See Also: "Configuring Archived Redo Log Locations" to learn
how to configure archived redo logs in the recovery area
Foreign archived redo log files Transient Instance availability is not affected.
Note: Foreign archived redo logs are received by a logical
standby database for a LogMiner session. Unlike a normal
archived log, a foreign archived redo log is associated with a
different DBID. For this reason, it cannot be backed up or
restored on a logical standby database.
Image copies of data files and
control files
Transient Instance availability is not affected.
Backup pieces Transient Instance availability is not affected.
Flashback logs Transient Instance availability is not affected if guaranteed restore points
are not defined. In this case, the database automatically disables
Flashback Database, writes a message to the alert log, and
continues with database processing. If guaranteed restore points
are configured, the instance fails because of interdependencies
on the flashback logs.
The Oracle Flashback Database feature, which provides a
convenient alternative to database point-in-time recovery
(DBPITR), generates flashback logs. These logs are transient
files and must be stored in the fast recovery area. Unlike other
transient files, flashback logs cannot be backed up to other
media. If the fast recovery area has insufficient space to store
flashback logs and meet other backup retention requirements,
then the recovery area may delete flashback logs.
See Also: "Enabling Flashback Database" to learn how to
enable flashback logging
Chapter 5
Configuring the Fast Recovery Area
5-21

If you are on a Windows platform, then you can use the Volume Shadow Copy Service
(VSS) with the Oracle VSS writer. In this case, the fast recovery area automates
management of files that are backed up in a VSS snapshot and deletes them as
needed.
See Also:
•Performing Flashback and Database Point-in-Time Recovery
•Oracle Database Platform Guide for Microsoft Windows to learn about
making backups in a VSS environment
5.4.1.1 Fast Recovery Area with Oracle Managed Files and Automatic Storage
Management
The fast recovery area can be used with Oracle Managed Files (OMF) and Automatic
Storage Management (ASM)
Because the fast recovery area is built on top of OMF, it can be stored anywhere that
Oracle Managed Files can. You can also use the recovery area with ASM.
Even if you choose not to set up the fast recovery area in ASM storage, you can still
use Oracle Managed Files to manage your backup files in an ASM disk group.
However, you lose a major benefit of the fast recovery area: the automatic deletion of
files no longer needed to meet your recoverability goals as space is needed for more
recent backups. Nevertheless, the other automatic features of OMF still function.
When your store backups, using OMF on top of ASM without using a fast recovery
area is supported but discouraged. It is awkward to directly manipulate files under
ASM.
5.4.1.2 How Oracle Manages Disk Space in the Fast Recovery Area
Space in the fast recovery area is balanced among backups and archived logs that
must be kept according to the retention policy, and other files that may be subject to
deletion.
Oracle Database does not delete eligible files from the fast recovery area until the
space must be reclaimed for some other purpose. Files recently moved to tape are
often still available on disk for use in recovery. The recovery area can thus serve as a
cache for tape. When the fast recovery area is full, Oracle Database automatically
deletes eligible files to reclaim space in the recovery area as needed.
See Also:
•Deletion Rules for the Fast Recovery Area
•Responding to a Full Fast Recovery Area
Chapter 5
Configuring the Fast Recovery Area
5-22

5.4.2 Enabling the Fast Recovery Area
You enable the fast recovery area by setting two initialization parameters. These
parameters enable the fast recovery area with or without having to shut down and
restart the database instance.
You set the size of the fast recovery area with the parameter
DB_RECOVERY_FILE_DEST_SIZE
first, and then you set the physical location of the flash
recovery files with the parameter
DB_RECOVERY_FILE_DEST
.
Table 5-3 discusses both the mandatory and optional parameters for enabling the fast
recovery area.
In an Oracle Real Application Clusters (Oracle RAC) database, all instances must
have the same values for these initialization parameters. The location must be on a
cluster file system, ASM, or a shared directory.
Table 5-3 Initialization Parameters for the Fast Recovery Area
Initialization Parameter Required Description
DB_RECOVERY_FILE_DEST_SIZE
Yes Specifies the disk quota, which is maximum
storage in bytes of data to be used by the
recovery area for this database. You must set
this parameter before
DB_RECOVERY_FILE_DEST
.
The
DB_RECOVERY_FILE_DEST_SIZE
setting does
not include the following kinds of disk overhead:
•Block 0 or the operating system block
header of each Oracle Database file is not
included.
Allow an extra 10% for this data when
computing the actual disk usage required
for the fast recovery area.
•
DB_RECOVERY_FILE_DEST_SIZE
does not
indicate the real size occupied on disk
when the underlying file system is mirrored,
compressed, or affected by overhead not
known to Oracle Database.
For example, if the recovery area is on a
two-way mirrored ASM disk group, each file
of x bytes occupies 2x bytes on the ASM
disk group. In this case, set
DB_RECOVERY_FILE_DEST_SIZE
to no more
than half the size of the disks for the ASM
disk group. Likewise, when using a three-
way mirrored ASM disk group,
DB_RECOVERY_FILE_DEST_SIZE
must be no
more than one third the size of the disks in
the disk group, and so on.
DB_RECOVERY_FILE_DEST
Yes Specifies the recovery area location, which can
be a file system directory or ASM disk group,
but not a raw disk. The location must be large
enough for the disk quota.
Chapter 5
Configuring the Fast Recovery Area
5-23

Table 5-3 (Cont.) Initialization Parameters for the Fast Recovery Area
Initialization Parameter Required Description
DB_FLASHBACK_RETENTION_TARGET
No Specifies the upper limit (in minutes) on how far
back in time the database may be flashed back.
This parameter is required only for Flashback
Database.
This parameter indirectly determines how much
flashback log data is kept in the recovery area.
The size of flashback logs generated by the
database can vary considerably depending on
the database workload. If more blocks are
affected by database updates during a given
interval, then more disk space is used by the
flashback log data generated for that interval.
See Also:
•Oracle Database SQL Language Reference for
ALTER
SYSTEM
syntax
•Oracle Database Administrator’s Guide for details on setting and
changing database initialization parameters
5.4.2.1 Considerations When Setting the Size of the Fast Recovery Area
The larger the fast recovery area is, the more useful it becomes. Ideally, the fast
recovery area is large enough to contain the control files, online redo logs, archived
redo logs, and flashback logs. It should be able to contain a copy of all data files in the
database and the incremental backups used by your chosen backup strategy.
If providing this much space is impractical, then it is best to create an area large
enough to keep a backup of the most important tablespaces and all the archived logs
not yet on tape. At an absolute minimum, the fast recovery area must be large enough
to contain the archived redo logs not yet on tape. If the recovery area has insufficient
space to store new flashback logs and meet other backup retention requirements, then
to make room, the recovery area may delete older flashback logs.
Formulas for estimating a useful fast recovery area size depend on whether:
•Your database has a small or large number of data blocks that change frequently
•You store backups only on disk, or on disk and tape
•You use a redundancy-based backup retention policy, or a recovery window-
based retention policy
•You plan to use Flashback Database or a guaranteed restore point as alternatives
to point-in-time recovery in response to logical errors
If you plan to enable flashback logging, then the volume of flashback log generation is
approximately the same order of magnitude as redo log generation. For example, if
you intend to set
DB_FLASHBACK_RETENTION_TARGET
to 24 hours, and if the database
generates 20 gigabytes of redo in a day, then a general rule of thumb is to allow 20
GB to 30 GB of disk space for the flashback logs. The same rule applies to guaranteed
Chapter 5
Configuring the Fast Recovery Area
5-24

restore points when flashback logging is enabled. For example, if the database
generates 20 GB of redo every day, and if the guaranteed restore point is kept for a
day, then plan to allocate 20 to 30 GB.
Suppose that you want to determine the size of a fast recovery area when the backup
retention policy is set to
REDUNDANCY 1
and you intend to follow Oracle's suggested
strategy of using an incremental forever. In this example, you use the following formula
to estimate the disk quota, where n is the interval in days between incremental
updates and y is the delay in applying the foreign archived redo logs on a logical
standby database:
Disk Quota =
Size of a copy of database +
Size of an incremental backup +
Size of (n+1) days of archived redo logs +
Size of (y+1) days of foreign archived redo logs (for logical standby) +
Size of control file +
Size of an online redo log member * number of log groups +
Size of flashback logs (based on DB_FLASHBACK_RETENTION_TARGET value)
5.4.2.2 Considerations When Setting the Location of the Fast Recovery Area
Place the fast recovery area on a separate disk from the database area, where the
database maintains active database files such as data files, control files, and online
redo logs. Keeping the fast recovery area on the same disk as the database area
exposes you to loss of both your live database files and backups if a media failure
occurs.
Oracle recommends that
DB_RECOVERY_FILE_DEST
be set to a different value from
DB_CREATE_FILE_DEST
or any of the
DB_CREATE_ONLINE_LOG_DEST_n
initialization
parameters. The database writes a warning to the alert log if
DB_RECOVERY_FILE_DEST
equals these parameters.
Multiple databases can have the same value for
DB_RECOVERY_FILE_DEST
, but one of the
following must be true:
•No two databases for which the
DB_UNIQUE_NAME
initialization parameters are
specified have the same value for
DB_UNIQUE_NAME
.
•For those databases where no
DB_UNIQUE_NAME
is provided, no two databases have
the same value for
DB_NAME
.
When databases share a single recovery area in this way, the location should be large
enough to hold the files for all databases. Add the values for
DB_RECOVERY_FILE_DEST_SIZE
for the databases, then allow for overhead such as
mirroring or compression.
5.4.2.3 Setting the Fast Recovery Area Location and Initial Size
Use database initialization parameters to set the location and size of the fast recovery
area.
Table 5-3 lists the initialization parameters that you must set to enable the fast
recovery area. This section explains how to specify a location for the recovery area
and set its initial size.
Chapter 5
Configuring the Fast Recovery Area
5-25

To determine the optimum size for the fast recovery area and set the recovery
area location:
1. If you plan to use flashback logging or guaranteed restore points, then query
V$ARCHIVED_LOG
to determine how much redo the database generates in the time to
which you intend to set
DB_FLASHBACK_RETENTION_TARGET
.
2. Set the recovery area size.
If you plan to use flashback logging or guaranteed restore points, then ensure that
the size value obtained from Step 1 is incorporated into the setting. Set the
DB_RECOVERY_FILE_DEST_SIZE
initialization parameter by any of the following means:
•Shut down the database and set the
DB_RECOVERY_FILE_DEST_SIZE
parameter in
the initialization parameter file of the database, as shown in the following
example:
DB_RECOVERY_FILE_DEST_SIZE = 10G
•Specify the parameter with the SQL statement
ALTER
SYSTEM
SET
when the
database is open, as shown in the following examples:
ALTER SYSTEM SET
DB_RECOVERY_FILE_DEST_SIZE = 10G
SCOPE=BOTH SID='*';
Note:
The
DB_RECOVERY_FILE_DEST_SIZE
and
DB_RECOVERY_FILE_DEST
settings
must be persistent across database startup and shutdown. If a
server parameter file is used, then setting
SCOPE=BOTH
results in the
settings being persistent. However, if a server parameter file is not
used, then the changes made by the
ALTER SYSTEM
command are not
persistent. You must also add these parameters to the initialization
parameter file.
•Use the Database Configuration Assistant to set the size.
3. Set the recovery area location.
Set the initialization parameters by any of the following means:
•Set
DB_RECOVERY_FILE_DEST
in the parameter file of the database, as shown in
the following example:
DB_RECOVERY_FILE_DEST = '/u01/oradata/rcv_area'
•Specify
DB_RECOVERY_FILE_DEST
with the SQL statement
ALTER
SYSTEM
SET
when
the database is open.
The following example sets the fast recovery area to an Automatic Storage
Management (ASM) disk group named
disk1
:
ALTER SYSTEM SET
DB_RECOVERY_FILE_DEST = '+disk1'
SCOPE=BOTH SID='*';
The following example sets the fast recovery area to the file system directory
/
disk1/fast_recovery_area
:
Chapter 5
Configuring the Fast Recovery Area
5-26

ALTER SYSTEM SET
DB_RECOVERY_FILE_DEST = '/disk1/fast_recovery_area'
SCOPE = BOTH SID = '*';
•Use the Database Configuration Assistant to set the location.
If you do not plan to use flashback logging, then open the database (if it is closed)
and do not complete the rest of the steps in this procedure.
4. If flashback logging is enabled, then run the database under a normal workload for
the time period specified by
DB_FLASHBACK_RETENTION_TARGET
.
In this way, the database can generate a representative sample of flashback logs.
5. Query the
V$FLASHBACK_DATABASE_LOG
view as follows:
SELECT ESTIMATED_FLASHBACK_SIZE
FROM V$FLASHBACK_DATABASE_LOG;
The result is an estimate of the disk space needed to meet the current flashback
retention target, based on the database workload since Flashback Database was
enabled.
6. If necessary, adjust the flashback log space requirement based on the actual size
of flashback logs generated during the time period specified by
DB_FLASHBACK_RETENTION_TARGET
.
See Also:
"Managing Space for Flashback Logs in the Fast Recovery Area"
5.4.3 Disabling the Fast Recovery Area
You can use the
ALTER SYSTEM
command to disable the fast recovery area.
If you have enabled Flashback Database or use the fast recovery area for archive
logs, then take the appropriate steps from those that follow below. Otherwise, skip to
Step 3:
1. If Flashback Database is enabled, then disable it before you disable the fast
recovery area.
ALTER DATABASE FLASHBACK OFF;
2. If you are using the fast recovery area for archive logs, then set the initialization
parameter
LOG_ARCHIVE_DEST_
n to use a non-fast recovery area location.
For example, to change the fast recovery area for
LOG_ARCHIVE_DEST_1
to a non-fast
recovery area location, use the command
ALTER SYSTEM SET
:
LOG_ARCHIVE_DEST_1='LOCATION=USE_DB_RECOVERY_FILE_DEST'
ALTER SYSTEM SET LOG_ARCHIVE_DEST_1='LOCATION=/ORACLE/DBS/';
3. Disable the fast recovery area initialization parameter.
ALTER SYSTEM SET DB_RECOVERY_FILE_DEST='';
Chapter 5
Configuring the Fast Recovery Area
5-27

5.4.4 Configuring Locations for Control Files and Redo Logs
Use initialization parameters to configure the default locations for control files and redo
logs.
See Also:
•Overview of Files in the Fast Recovery Area
•Configuring Online Redo Log Locations
•Configuring Control File Locations
•Configuring Archived Redo Log Locations
5.4.4.1 Configuring Online Redo Log Locations
The initialization parameters that determine where online redo log files are created are
DB_CREATE_ONLINE_LOG_DEST_n
,
DB_RECOVERY_FILE_DEST
, and
DB_CREATE_FILE_DEST
.
The following SQL statements can create online redo logs in the fast recovery area:
•
CREATE DATABASE
•
ALTER DATABASE ADD LOGFILE
•
ALTER DATABASE ADD STANDBY LOGFILE
•
ALTER DATABASE OPEN RESETLOGS
The default size of an online log created in the fast recovery area is 100 megabytes.
The log member file names are automatically generated by the database.
See Also:
Description of the
LOGFILE
clause of the
CREATE
DATABASE
statement in Oracle
Database SQL Language Reference for details of the effect of combinations
of the initialization parameters on online redo log creation
5.4.4.2 Configuring Control File Locations
The initialization parameters
CONTROL_FILES
,
DB_CREATE_ONLINE_LOG_DEST_n
,
DB_RECOVERY_FILE_DEST
, and
DB_CREATE_FILE_DEST
all interact to determine the location
where the database control files are created.
If the database creates an Oracle managed control file, and if the database uses a
server parameter file, then the database sets the
CONTROL_FILES
initialization parameter
in the server parameter file. If the database uses a client-side initialization parameter
file, then you must set the
CONTROL_FILES
initialization parameter manually in the
initialization parameter file.
Chapter 5
Configuring the Fast Recovery Area
5-28

See Also:
The "Semantics" section of the description of
CREATE CONTROLFILE
in Oracle
Database SQL Language Reference for a full description of how these
parameters interact
5.4.4.3 Configuring Archived Redo Log Locations
Oracle recommends that you the use fast recovery area as an archiving location
because the archived logs are automatically managed by the database.
The generated file names for the archived logs in the fast recovery area are for Oracle-
managed files and are not determined by the parameter
LOG_ARCHIVE_FORMAT
. Whatever
archiving scheme you choose, it is always advisable to create multiple copies of
archived redo logs.
You have the following basic options for archiving redo logs, listed from most to least
recommended:
1. Enable archiving to the fast recovery area only and use disk mirroring to create the
redundancy needed to protect the archived redo logs.
If
DB_RECOVERY_FILE_DEST
is specified and no
LOG_ARCHIVE_DEST_n
is specified, then
LOG_ARCHIVE_DEST_10
is implicitly set to the recovery area. You can override this
behavior by setting
LOG_ARCHIVE_DEST_10
to an empty string.
2. Enable archiving to the fast recovery area and set other
LOG_ARCHIVE_DEST_n
initialization parameter to locations outside the fast recovery area.
If a fast recovery area is configured, then you can add the fast recovery area as an
archiving destination by setting any
LOG_ARCHIVE_DEST_n
parameter to
LOCATION=USE_DB_RECOVERY_FILE_DEST
.
3. Set
LOG_ARCHIVE_DEST_n
initialization parameters to archive only to non-fast
recovery area locations.
If you use the fast recovery area, then you cannot use the
LOG_ARCHIVE_DEST
and
LOG_ARCHIVE_DUPLEX_DEST
initialization parameters. Using either of these parameters
prevents you from starting the instance. Instead, set the
LOG_ARCHIVE_DEST_n
parameters. After your database is using
LOG_ARCHIVE_DEST_n
, you can configure a
recovery area.
Note also that if you enable archiving but do not set any value for
LOG_ARCHIVE_DEST
,
LOG_ARCHIVE_DEST_n
, or
DB_RECOVERY_FILE_DEST
, then the redo logs are archived to a
default location that is platform-specific. For example, on Solaris the default is
?/dbs
.
See Also:
Oracle Database Reference for details on the semantics of the
LOG_ARCHIVE_DEST_n
parameters
Chapter 5
Configuring the Fast Recovery Area
5-29

5.4.5 Configuring RMAN File Creation in the Fast Recovery Area
Certain RMAN commands or implicit actions (such as control file autobackups) can
create files in the fast recovery area.
This section explains how to control whether a command creates files in the fast
recovery area or in another destination. The commands are:
•
BACKUP
If you do not specify the
FORMAT
clause for disk backups, then RMAN creates
backup pieces and image copies in the fast recovery area, with names in Oracle
Managed Files (OMF) format. If a fast recovery area is enabled, and if you do
specify
FORMAT
on
BACKUP
or a channel, then RMAN creates the backup in a
platform-specific location rather than in the recovery area.
•Control File Autobackup
RMAN can create control file autobackups in the fast recovery area. Use the
RMAN command
CONFIGURE
CONTROLFILE AUTOBACKUP FORMAT FOR DEVICE TYPE DISK
CLEAR
to clear any configured format option for the control file autobackup location
on disk. RMAN creates control file autobackups in the fast recovery area when no
other destination is configured.
•
RESTORE
ARCHIVELOG
Explicitly or implicitly set a
LOG_ARCHIVE_DEST_n
parameter to
LOCATION=USE_DB_RECOVERY_FILE_DEST
. If you do not specify
SET
ARCHIVELOG
DESTINATION
to override this behavior, then RMAN restores archived redo log files
to the fast recovery area.
•
RECOVER
DATABASE
or
RECOVER TABLESPACE
,
RECOVER ... BLOCK
, and
FLASHBACK DATABASE
These commands restore archived redo log files from backup for use during media
recovery, as required by the command. RMAN restores any redo log files needed
during these operations to the fast recovery area and deletes them after they are
applied during media recovery.
To direct the restored archived logs to the fast recovery area, set a
LOG_ARCHIVE_DEST_n
parameter to
LOCATION = USE_DB_RECOVERY_FILE_DEST
. Verify that
you are not using
SET ARCHIVELOG DESTINATION
to direct restored logs to some other
destination.
5.5 Configuring the Backup Retention Policy
The backup retention policy specifies which backups must be retained to meet your
data recovery requirements.
This policy can be based on a recovery window or redundancy. Use the
CONFIGURE
RETENTION POLICY
command to specify the retention policy.
This section contains the following topics:
•Configuring a Redundancy-Based Retention Policy
•Configuring a Recovery Window-Based Retention Policy
•Disabling the Retention Policy
Chapter 5
Configuring the Backup Retention Policy
5-30

See Also:
•About Backup Retention Policies
•Oracle Database Backup and Recovery Reference for
CONFIGURE
syntax
5.5.1 Configuring a Redundancy-Based Retention Policy
The
REDUNDANCY
parameter of the
CONFIGURE
RETENTION
POLICY
command specifies how
many full or level 0 backups of each data file and control file that RMAN keeps. The
default retention policy is
REDUNDANCY 1
.
If the number of full or level 0 backups for a specific data file or control file exceeds the
REDUNDANCY
setting, then RMAN considers the extra backups as obsolete. As you
produce more backups, RMAN keeps track of which ones to retain and which are
obsolete. RMAN retains all archived logs and incremental backups that are needed to
recover the nonobsolete backups.
Assume that you make a full backup of data file 7 on Monday, Tuesday, Wednesday,
and Thursday. You now have four full backups of this data file. If
REDUNDANCY
is
2
, then
the Monday and Tuesday backups are obsolete. If you make another backup on
Friday, then the Wednesday backup of data file 7 becomes obsolete.
Assume a different case in which
REDUNDANCY
is
1
. You run a level 0 database backup at
noon on Monday, a level 1 cumulative backup at noon on Tuesday and Wednesday,
and a level 0 backup at noon on Thursday. Immediately after each daily backup you
run the command
DELETE OBSOLETE
. The Wednesday
DELETE
command does not remove
the Tuesday level 1 backup because this backup is not redundant: the Tuesday level 1
backup could be used to recover the Monday level 0 backup to a time between noon
on Tuesday and noon on Wednesday. However, the
DELETE
command on Thursday
removes the previous level 0 and level 1 backups.
Run the
CONFIGURE
RETENTION
POLICY
command at the RMAN prompt, as in the following
example:
CONFIGURE RETENTION POLICY TO REDUNDANCY 3;
See Also:
Deleting Obsolete RMAN Backups Based on Retention Policies
5.5.2 Configuring a Recovery Window-Based Retention Policy
The
RECOVERY
WINDOW
parameter of the
CONFIGURE
command specifies the number of
days between the current time and the earliest point of recoverability.
RMAN does not consider any full or level 0 incremental backup as obsolete if it falls
within the recovery window. Additionally, RMAN retains all archived logs and level 1
incremental backups that are needed to recover to a random point within the window.
Use the
CONFIGURE
RETENTION
POLICY
command at the RMAN prompt to configure a
recovery window-based retention policy.
Chapter 5
Configuring the Backup Retention Policy
5-31

The following example ensures that you can recover the database to any point within
the last week:
CONFIGURE RETENTION POLICY TO RECOVERY WINDOW OF 7 DAYS;
RMAN does not automatically delete backups rendered obsolete by the recovery
window. Instead, RMAN shows them as
OBSOLETE
in the
REPORT
OBSOLETE
output and in
the OBSOLETE
column of
V$BACKUP_FILES
. RMAN deletes obsolete files if you run the
DELETE
OBSOLETE
command.
See Also:
Deleting Obsolete RMAN Backups Based on Retention Policies
5.5.3 Disabling the Retention Policy
When you disable the retention policy, RMAN does not consider any backup as
obsolete.
To disable the retention policy, run this command:
CONFIGURE RETENTION POLICY TO NONE;
Configuring the retention policy to
NONE
is different from clearing it. Clearing returns the
default setting of
REDUNDANCY 1
, whereas
NONE
disables it.
If you disable the retention policy and run
REPORT OBSOLETE
or
DELETE OBSOLETE
commands without passing a retention policy option to the command, then RMAN
issues an error because no retention policy exists to determine which backups are
obsolete.
Caution:
If you are using a fast recovery area, then do not run your database with the
retention policy disabled. If files are never considered obsolete, then a file
can only be deleted from the fast recovery area if it has been backed up to
some other disk location or to a tertiary storage device such as tape. This
action is likely to use all of the space in your recovery area, which interferes
with the normal operation of your database. See "How Oracle Manages Disk
Space in the Fast Recovery Area"
5.6 Backup Optimization and the CONFIGURE command
Run the RMAN
CONFIGURE
command to enable and disable backup optimization.
Backup optimization skips the backup of files in certain circumstances if the identical
file or an identical version of the file has been backed up.
This section contains the following topics:
•Overview of Backup Optimization
Chapter 5
Backup Optimization and the CONFIGURE command
5-32

•Effect of Retention Policies on Backup Optimization for SBT Backups
•Configuring Backup Optimization
5.6.1 Overview of Backup Optimization
When you enable backup optimization, the
BACKUP
command skips backing up files
when the identical file has been backed up to the specified device type.
Table 5-4 describes criteria that RMAN uses to determine whether a file is identical to
a file that it already backed up.
Table 5-4 Criteria to Determine an Identical File
Type of File Criteria to Determine an Identical File
Data file The data file must have the same DBID, checkpoint SCN,
creation SCN, and
RESETLOGS
SCN and time as a data file in a
backup. The data file must be offline-normal, read-only, or
closed normally.
Archived log Same DBID, thread, sequence number, and
RESETLOGS
SCN
and time
Backup set Same DBID, backup set record ID, and stamp
If RMAN determines that a file is identical and it has been backed up, then it is a
candidate to be skipped. RMAN must do further checking to determine whether to skip
the file, however, because both the retention policy and the backup duplexing feature
are factors in the algorithm that determines whether RMAN has sufficient backups on
the specified device type.
RMAN uses backup optimization when the following conditions are true:
•The
CONFIGURE
BACKUP
OPTIMIZATION
ON
command has been run to enable backup
optimization.
•You run
BACKUP
DATABASE
,
BACKUP
ARCHIVELOG
with
ALL
or
LIKE
options, or
BACKUP
BACKUPSET
ALL
,
BACKUP RECOVERY AREA
,
BACKUP RECOVERY FILES
, or
BACKUP
DATAFILECOPY
.
Note:
When
TO DESTINATION
is used with
BACKUP RECOVERY AREA
or
BACKUP
RECOVERY FILES
, RMAN only skips backups of files that have identical
backups in the
TO DESTINATION
location that you provide.
•Only one type of channel is allocated, do not mix disk and SBT channels in the
same backup command.
Chapter 5
Backup Optimization and the CONFIGURE command
5-33

Note:
In backup undo optimization, RMAN excludes undo changes (that are not
needed for recovery of a backup) for transactions that have been committed.
You can enable and disable backup optimization, but backup undo
optimization is built-in behavior.
For example, assume that you have configured backup optimization. These
commands back up to tape the database, all archived logs, and all backup sets:
BACKUP DEVICE TYPE sbt DATABASE PLUS ARCHIVELOG;
BACKUP DEVICE TYPE sbt BACKUPSET ALL;
If no backed-up file has changed since the last backup, then RMAN does not back up
the files again. RMAN also does not signal an error if it skips all files specified in the
command because the files have already been backed up.
You can override optimization at any time by specifying the
FORCE
option on the
BACKUP
command. For example, you can run:
BACKUP DATABASE FORCE;
BACKUP ARCHIVELOG ALL FORCE;
See Also:
The
CONFIGURE
entry in Oracle Database Backup and Recovery Reference for
a complete description of the backup optimization rules
5.6.2 Effect of Retention Policies on Backup Optimization for SBT
Backups
Backup optimization is not always applied when backing up to SBT devices.
The exceptions to normal backup optimization behavior for recovery window-based
and redundancy-based retention policies are described in the following sections.
•About Backup Optimization for SBT Backups with Recovery Window Retention
Policy
•About Backup Optimization for SBT Backups With Redundancy Retention Policy
•Configuring Backup Optimization
Chapter 5
Backup Optimization and the CONFIGURE command
5-34

Note:
Use caution when enabling backup optimization if you use a media manager
with its own internal expiration policy. Run the
CROSSCHECK
command
periodically to synchronize the RMAN repository with the media manager.
Otherwise, RMAN may skip backups due to optimization without recognizing
that the media manager has discarded backups stored on tape.
5.6.2.1 About Backup Optimization for SBT Backups with Recovery Window
Retention Policy
Suppose that backup optimization is enabled, and a recovery window backup retention
policy is in effect. In this case, when performing SBT backups RMAN always backs up
data files whose most recent backup is older than the recovery window.
For example, assume the following scenario:
•Today is February 21.
•The recovery window is 7 days.
•The most recent backup of tablespace
tools
to tape is January 3.
•Tablespace
tools
is read-only.
On February 21, when you issue a command to back up tablespace
tools
to tape,
RMAN backs it up even though it did not change after the January 3 backup (because
it is read-only). RMAN makes the backup because no backup of the tablespace exists
within the 7-day recovery window.
This behavior enables the media manager to expire old tapes. Otherwise, the media
manager is forced to keep the January 3 backup of tablespace
TOOLS
indefinitely. By
making a more recent backup of tablespace
tools
on February 21, RMAN enables the
media manager to expire the tape containing the January 3 backup.
5.6.2.2 About Backup Optimization for SBT Backups With Redundancy
Retention Policy
Assume that you configure a retention policy for redundancy. In this case, RMAN only
skips backups of offline or read-only data files to SBT when there are
r
+ 1 backups of
the files, where
r
is set in
CONFIGURE
RETENTION
POLICY
TO
REDUNDANCY
r
.
For example, assume that you enable backup optimization and set the following
retention policy:
CONFIGURE DEFAULT DEVICE TYPE TO sbt;
CONFIGURE BACKUP OPTIMIZATION ON;
CONFIGURE RETENTION POLICY TO REDUNDANCY 2;
With these settings, RMAN only skips backups when three identical files are backed
up. Also assume that you have never backed up the
users
tablespace, which is read/
write, and that you perform the actions described in Table 5-5 over the course of the
week.
Chapter 5
Backup Optimization and the CONFIGURE command
5-35

Table 5-5 Effect of Redundancy Setting on Backup Optimization
Day Action Result Redunda
nt
Backup
Monday Take
users
offline
normal.
Tuesday
BACKUP
DATABASE
The
users
tablespace is backed
up.
Wednesday
BACKUP
DATABASE
The
users
tablespace is backed
up.
Thursday
BACKUP
DATABASE
The
users
tablespace is backed
up.
Tuesday
backup
Friday
BACKUP
DATABASE
The
users
tablespace is not
backed up.
Tuesday
backup
Saturday
BACKUP
DATABASE
The
users
tablespace is not
backed up.
Tuesday
backup
Sunday
DELETE
OBSOLETE
The Tuesday backup is deleted.
Monday
BACKUP
DATABASE
The
users
tablespace is backed
up.
Wednesd
ay backup
The backups on Tuesday, Wednesday, and Thursday back up the offline
users
tablespace to satisfy the condition that three backups must exist (one more than
redundancy setting). The Friday and Saturday backups do not back up the
users
tablespace because of backup optimization. The Tuesday backup of
users
is obsolete
beginning on Thursday.
On Sunday, you delete all obsolete backups, which removes the Tuesday backup of
users
. The Tuesday backup is obsolete because of the retention policy setting. The
whole database backup on Monday then backs up the
users
tablespace to satisfy the
condition that three backups must exist (one more than redundancy setting). In this
way, you can recycle your tapes over time.
See Also:
"Backup Optimization and the CONFIGURE command"
5.6.3 Configuring Backup Optimization
By default, backup optimization is configured to
OFF
. You can use the
SHOW BACKUP
OPTIMIZATION
command to view the current settings of backup optimization.
To configure backup optimization:
1. Start RMAN and connect to a target database and a recovery catalog (if used).
2. Run the
SHOW
BACKUP
OPTIMIZATION
command to determine whether optimization is
currently enabled.
For example, enter the following command:
Chapter 5
Backup Optimization and the CONFIGURE command
5-36

SHOW BACKUP OPTIMIZATION;
Sample output for
SHOW
BACKUP
OPTIMIZATION
follows:
RMAN configuration parameters for database with db_unique_name PROD1 are:
CONFIGURE BACKUP OPTIMIZATION OFF;
3. Enable backup optimization by running the following command:
CONFIGURE BACKUP OPTIMIZATION ON;
See Also:
"Using Backup Optimization to Skip Files" for examples of how to optimize
RMAN backups
5.7 Configuring an Archived Redo Log Deletion Policy
You can use RMAN to create a persistent configuration that governs when archived
redo logs are eligible for deletion from disk.
This section contains the following topics:
•About Archived Redo Log Deletion Policies
•Enabling an Archived Redo Log Deletion Policy
5.7.1 About Archived Redo Log Deletion Policies
You can use the
CONFIGURE ARCHIVELOG DELETION POLICY
command to specify when
archived redo logs are eligible for deletion.
This deletion policy applies to all archiving destinations, including the fast recovery
area.
Archived redo logs can be deleted automatically by the database or by user-initiated
RMAN commands. Only logs in the fast recovery area can be deleted automatically by
the database. For archived redo log files in the fast recovery area, the database
retains them as long as possible and automatically deletes eligible logs when
additional disk space is required. You can manually delete eligible logs from any
location, whether inside or outside the fast recovery area, when you issue
BACKUP
...
DELETE INPUT
or
DELETE ARCHIVELOG
commands.
5.7.1.1 When the Archived Redo Log Deletion Policy Is Disabled
By default, there is no archived redo log deletion policy and this is why the archive
redo log policy is set to the
NONE
clause.
In this particular case, the fast recovery area considers archived redo log files in the
recovery area as eligible for deletion if they have been backed up at least once to disk
or SBT or the logs are obsolete according to the backup retention policy. The backup
retention policy considers logs obsolete only if the logs are not needed by a
guaranteed restore point and the logs are not needed by Oracle Flashback Database.
Archived redo logs are needed by Flashback Database if the logs were created later
than
SYSDATE-'DB_FLASHBACK_RETENTION_TARGET'
.
Chapter 5
Configuring an Archived Redo Log Deletion Policy
5-37

See Also:
•The
CONFIGURE ARCHIVELOG DELETION POLICY
entry in Oracle Database
Backup and Recovery Reference for detailed information about policy
options
•Oracle Data Guard Concepts and Administration to learn how to
configure an archived log deletion policy in a Data Guard environment
5.7.1.2 When the Archived Redo Log Deletion Policy Is Enabled
You can use the
CONFIGURE ARCHIVELOG DELETION POLICY BACKED UP integer
TIMES TO
DEVICE TYPE
command to enable an archived log deletion policy. This configuration
specifies that archived logs are eligible for deletion only when the specified number of
archived log backups exist on the specified device type.
If the deletion policy is configured with the
BACKED UP integer
TIMES
clause, then a
BACKUP ARCHIVELOG
command copies the logs unless
integer
backups exist on the
specified device type. If
integer
backups of the logs exist, then the
BACKUP ARCHIVELOG
command skips the logs. In this way, the archived log deletion policy functions as a
default
NOT BACKED UP
integer
TIMES
clause on the
BACKUP ARCHIVELOG
command. You
can override the deletion policy by specifying the
FORCE
option on the
BACKUP
command.
The archived log deletion policy also has options specific to a Data Guard
environment. For example, if you specify the
APPLIED ON STANDBY
clause, then RMAN
can delete logs after they have been applied at all mandatory remote destinations. If
you specify
SHIPPED TO STANDBY
, then RMAN can delete logs when they have been
transferred to all mandatory standby destinations.
See Also:
•The
CONFIGURE ARCHIVELOG DELETION POLICY
entry in Oracle Database
Backup and Recovery Reference for detailed information about policy
options
•Oracle Data Guard Concepts and Administration to learn how to
configure an archived log deletion policy in a Data Guard environment
5.7.2 Enabling an Archived Redo Log Deletion Policy
By default the archived redo log deletion policy is set to
NONE
.
To enable an archived redo log deletion policy:
1. Start RMAN and connect to a target database and a recovery catalog (if used).
2. Run the
CONFIGURE ARCHIVELOG DELETION POLICY
command with the desired options.
The following example specifies that archived redo logs are eligible to be deleted
from the fast recovery area and all local archiving destinations when logs have
been backed up at least twice to tape:
Chapter 5
Configuring an Archived Redo Log Deletion Policy
5-38

CONFIGURE ARCHIVELOG DELETION POLICY
TO BACKED UP 2 TIMES TO SBT;
See Also:
•Deleting Archived Redo Logs After Backups in non-CDBs
•Oracle Data Guard Concepts and Administration to learn how to manage
archived redo logs in a Data Guard environment
•Oracle Database Backup and Recovery Reference for a complete
explanation of the
CONFIGURE ARCHIVELOG DELETION POLICY
command and
the conditions under which archived logs are eligible for deletion
5.8 Configuring RMAN in a Data Guard Environment
If you use RMAN in a Data Guard environment, then you can use the
CONFIGURE
command to register and configure settings for the physical databases in this
environment.
RMAN uses the
DB_UNIQUE_NAME
initialization parameter to distinguish one database
from another. Thus, it is critical that you maintain the uniqueness of the
DB_UNIQUE_NAME
in the Data Guard environment.
RMAN must be connected to a recovery catalog when you create or alter a
configuration for a database in the Data Guard environment. If you use the
SET DBID
command to set the DBID in the RMAN session, then you can configure a standby
database even when RMAN is not connected as
TARGET
to a database in the Data
Guard environment. You can even create a configuration for a standby database that
has not yet been created.
You can use the following forms of the
CONFIGURE
command:
•
CONFIGURE DB_UNIQUE_NAME
defines a connection to a physical standby database and
implicitly registers the new database.
New standby databases are also automatically registered when RMAN connects
as
TARGET
to a standby database for the first time.
•
CONFIGURE FOR DB_UNIQUE_NAME
configures settings for a database in the Data Guard
environment.
For example, you can configure channels, default devices, and so on for a
specified database or for all databases in the environment. You can use
SHOW ALL
FOR DB_UNIQUE_NAME
to show the configuration for a specific standby database or
SHOW ALL FOR DB_UNIQUE_NAME ALL
to show configurations for all known databases.
A Data Guard environment involves many considerations that are only relevant for
Data Guard. For example, you can configure an archived redo log deletion policy
based on whether archived logs are transferred to or applied on a standby database.
Chapter 5
Configuring RMAN in a Data Guard Environment
5-39

See Also:
•Oracle Data Guard Concepts and Administration to learn how to
configure the RMAN environment for use with a standby database
•Oracle Database Backup and Recovery Reference for a complete
explanation of the
CONFIGURE ARCHIVELOG DELETION POLICY
command and
the conditions under which archived logs are eligible for deletion
Chapter 5
Configuring RMAN in a Data Guard Environment
5-40

6
Configuring the RMAN Environment:
Advanced Topics
This chapter describes how to perform setup and configuration tasks. This chapter
contains the following topics:
•Configuring Advanced Channel Options
•Configuring Advanced Backup Options
•Configuring Auxiliary Instance Data File Names
•Configuring the Snapshot Control File Location
•Configuring RMAN for Use with a Shared Server
•Enabling Lost Write Detection
6.1 Configuring Advanced Channel Options
The
CONFIGURE CHANNEL
command is used to configure RMAN channel options.
This section contains the following topics about advanced channel option:
•About Channel Control Options
•Configuring Specific Channel Parameters
See Also:
•About RMAN Channels for a conceptual overview of configured and
allocated channels
•Configuring Channels the basics for configuring channels
•Oracle Database Backup and Recovery Reference for
CONFIGURE
syntax
6.1.1 About Channel Control Options
Whether you allocate channels manually or use automatic channel allocation, you can
use channel commands and options to control behavior.
Table 6-1 summarizes the ways in which you can control channel behavior. Unless
noted, all channel parameters are supported in both
CONFIGURE CHANNEL
and
ALLOCATE
CHANNEL
commands.
6-1

Table 6-1 Channel Control Options
Type of Channel Control Commands
Limit I/O bandwidth
consumption
Use the
RATE
channel parameter to act as a throttling
mechanism for backups.
Limit backup sets and
pieces
Use the
MAXPIECESIZE
channel parameter to set limits on the
size of backup pieces. You can also use the
MAXSETSIZE
parameter on the
BACKUP
and
CONFIGURE
commands to set a limit
for the size of backup sets.
Vendor-specific instructions Use the
PARMS
channel parameter to specify vendor-specific
information for a media management software. You can also use
the
SEND
command to send vendor-specific commands to a
media manager.
Channel parallel backup and
restore operations
Use
CONFIGURE DEVICE TYPE ... PARALLELISM
for persistent
channel parallelism or multiple
ALLOCATE CHANNEL
commands for
job-level parallelism.
Connection settings for
database instances
Specify which instance performs an operation with the
CONNECT
channel parameter.
See Also:
•Oracle Database Backup and Recovery Reference for
ALLOCATE
CHANNEL
syntax
•Oracle Database Backup and Recovery Reference for
CONFIGURE
syntax
6.1.2 Configuring Specific Channel Parameters
In addition to configuring parameters that apply to all channels of a particular type, you
can also use the
CONFIGURE
command to configure parameters that apply to one
specific channel.
Configure specific channels by number when it is necessary to control the parameters
set for each channel separately. This technique is necessary in the following
situations:
•When running an Oracle Real Application Clusters (Oracle RAC) database in
which individual nodes do not have access to the full set of backups. Each channel
must be configured with a node-specific connect string so that all backups are
accessible by at least one channel.
•When using a media manager that requires different
PARMS
settings on each
channel.
To configure specific channel parameters:
•Run the
CONFIGURE CHANNEL
n
command (where
n
is a positive integer less than 255)
to configure a specific channel.
When manually numbering channels, you must specify one or more channel
options (for example,
MAXPIECESIZE
or
FORMAT
) for each channel. When you use that
Chapter 6
Configuring Advanced Channel Options
6-2

specific numbered channel in a backup, the configured settings for that channel
are used instead of the configured generic channel settings.
See Also:
Oracle Real Application Clusters Administration and Deployment Guide to
learn about RMAN backups in an Oracle RAC environment
6.1.2.1 Configuring Specific Channels: Examples
Example 6-1 Configuring Channel Parallelism for Disk Devices
This example sends disk backups to two different disks. Configure disk channels as
follows:
CONFIGURE DEFAULT DEVICE TYPE TO disk; # backup goes to disk
CONFIGURE DEVICE TYPE disk PARALLELISM 2; # two channels used in parallel
CONFIGURE CHANNEL 1 DEVICE TYPE DISK FORMAT '/disk1/%U' # 1st channel to disk1
CONFIGURE CHANNEL 2 DEVICE TYPE DISK FORMAT '/disk2/%U' # 2nd channel to disk2
BACKUP DATABASE; # backup - first channel goes to disk1 and second to disk2
Example 6-2 Configuring Channel Parallelism for Tape Devices
This example configures channels to create parallel database backups. You have two
tape drives and want each drive to use tapes from a different tape media family. The
backup data is divided between the two tape devices. Each configured channel backs
up approximately half the total data.
CONFIGURE DEFAULT DEVICE TYPE TO sbt; # backup goes to sbt
CONFIGURE DEVICE TYPE sbt PARALLELISM 2; # two sbt channels allocated by default
# Configure channel 1 to pool named first_pool
CONFIGURE CHANNEL 1 DEVICE TYPE sbt
PARMS 'ENV=(OB_MEDIA_FAMILY=first_pool)';
# configure channel 2 to pool named second_pool
CONFIGURE CHANNEL 2 DEVICE TYPE sbt
PARMS 'ENV=(OB_MEDIA_FAMILY=second_pool)';
BACKUP DATABASE; # first stream goes to 'first_pool' and second to 'second_pool'
6.1.2.2 Relationship Between CONFIGURE CHANNEL and Parallelism Setting
The
PARALLELISM
setting is not constrained by the number of specifically configured
channels.
For example, if you back up to 20 different tape devices, then you can configure 20
different SBT channels, each with a manually assigned number (from 1 to 20) and
each with a different set of channel options. In such a situation, you can set
PARALLELISM
to any value up to the number of devices, in this instance 20.
RMAN always numbers parallel channels starting with
1
and ending with the
PARALLELISM
setting. For example, if the default device is SBT and parallelism is set to
3, then RMAN names the channels as follows:
ORA_SBT_TAPE_1
ORA_SBT_TAPE_2
ORA_SBT_TAPE_3
Chapter 6
Configuring Advanced Channel Options
6-3

RMAN always uses the name
ORA_SBT_TAPE_
n even if you configure
DEVICE
TYPE
sbt
(not
the synonymous
sbt_tape
). RMAN always allocates the number of channels specified
in
PARALLELISM
, using specifically configured channels if you have configured them and
generic channels if you have not. If you configure specific channels with numbers
higher than the parallelism setting, then this setting prevents RMAN from using them.
See Also:
About RMAN Channels to learn about channels
6.2 Configuring Advanced Backup Options
Backup options enable you to control aspects such as backup size, backup
compression, and backup encryption.
"About Configuring the Environment for RMAN Backups" explains the basics for
configuring RMAN to make backups. This section explains more advanced
configuration options. This section contains the following topics:
•Configuring the Maximum Size of Backup Sets
•Configuring the Maximum Size of Backup Pieces
•Configuring Backup Duplexing
•Configuring Tablespaces for Exclusion from Whole Database Backups
•Configuring Compression Options
•Configuring Backup Encryption
6.2.1 Configuring the Maximum Size of Backup Sets
The
CONFIGURE MAXSETSIZE
command limits the size of backup sets created on a
channel. This
CONFIGURE
setting applies to any channel, whether manually allocated or
configured, when the
BACKUP
command is used to create backup sets. The default
value is given in bytes and is rounded down to the lowest kilobyte value.
In tape backups, it is possible for a multiplexed backup set to span multiple tapes,
which means that blocks from each data file in the backup set are written to multiple
tapes. If one tape of a multivolume backup set fails, then you lose the data on all the
tapes rather than just one. If a backup is not a multisection backup, then a backup set
always includes a whole data file rather than a partial data file. You can use
MAXSETSIZE
to specify that each backup set fits on one tape rather than spanning multiple tapes.
The value set by the
CONFIGURE MAXSETSIZE
command is a default for the given channel.
You can override the configured
MAXSETSIZE
value by specifying a
MAXSETSIZE
option for
an individual
BACKUP
command.
Assume that you issue the following commands at the RMAN prompt:
CONFIGURE DEFAULT DEVICE TYPE TO sbt;
CONFIGURE CHANNEL DEVICE TYPE sbt PARMS 'ENV=(OB_MEDIA_FAMILY=first_pool)';
CONFIGURE MAXSETSIZE TO 7500K;
BACKUP TABLESPACE users;
BACKUP TABLESPACE tools MAXSETSIZE 5G;
Chapter 6
Configuring Advanced Backup Options
6-4

The results are as follows:
•The backup of the
users
tablespace uses the configured SBT channel and the
configured default
MAXSETSIZE
setting of
7500K
.
•The backup of the
tools
tablespace uses the
MAXSETSIZE
setting of
5G
specified in
the
BACKUP
command.
See Also:
•Limiting the Size of Backup Sets with BACKUP ... MAXSETSIZE
•Oracle Database Backup and Recovery Reference for
BACKUP
syntax
6.2.2 Configuring the Maximum Size of Backup Pieces
Backup piece size is an issue when it exceeds the maximum file size permitted by the
file system or media management software. You can use the
MAXPIECESIZE
parameter
of the
CONFIGURE
CHANNEL
or
ALLOCATE
CHANNEL
command to limit the size of backup
pieces.
For example, to limit the backup piece size to 2 gigabytes or less, you can configure
the automatic
DISK
channel as follows and then run
BACKUP
DATABASE
:
CONFIGURE CHANNEL DEVICE TYPE DISK MAXPIECESIZE 2G;
BACKUP DATABASE;
Note:
In version 2.0 of the media management API, media management vendors
can specify the maximum size of a backup piece that can be written to their
media manager. RMAN respects this limit regardless of the settings that you
configure for
MAXPIECESIZE
.
See Also:
Oracle Database Backup and Recovery Reference to learn about the
CONFIGURE CHANNEL ... MAXPIECESIZE
command
6.2.3 Configuring Backup Duplexing
Use the
CONFIGURE ... BACKUP COPIES
command to specify how many copies of each
backup piece are created on the specified device type for the specified type of file.
This type of backup is known as a duplexed backup set.
RMAN can duplex backups to either disk or tape, but cannot duplex backups to tape
and disk simultaneously. When backing up to tape, ensure that the number of copies
does not exceed the number of available tape devices. The
CONFIGURE
settings for
Chapter 6
Configuring Advanced Backup Options
6-5

duplexing only affect backups of data files, control files, and archived logs into backup
sets, and do not affect image copies.
Note:
A control file autobackup is never duplexed.
By default,
CONFIGURE
...
BACKUP
COPIES
is set to
1
for each device type.
The following examples show possible duplexing configurations:
# Makes 2 disk copies of each data file and control file backup set
# (autobackups excluded)
CONFIGURE DATAFILE BACKUP COPIES FOR DEVICE TYPE DISK TO 2;
# Makes 3 copies of every archived redo log backup to tape
CONFIGURE ARCHIVELOG BACKUP COPIES FOR DEVICE TYPE sbt TO 3;
To return a
BACKUP
COPIES
configuration to its default value, run the same
CONFIGURE
command with the
CLEAR
option, as in the following example:
CONFIGURE DATAFILE BACKUP COPIES FOR DEVICE TYPE sbt CLEAR;
Note:
If you do not want to create a persistent copies configuration, then you can
specify copies with the
BACKUP
COPIES
and the
SET BACKUP COPIES
commands.
See Also:
•About Multiple Copies of RMAN Backups for an overview of duplexed
backups
•Duplexing Backup Sets to learn how to create duplexed backups
•Oracle Database Backup and Recovery Reference for
BACKUP
syntax
•Oracle Database Backup and Recovery Reference for
CONFIGURE
syntax
•Oracle Database Backup and Recovery Reference for
SET
syntax
6.2.4 Configuring Tablespaces for Exclusion from Whole Database
Backups
Sometimes you may want to omit a specified tablespace from part of the regular
backup schedule. Use the
CONFIGURE
command to configure tablespace exclusion.
Here are some possible scenarios to consider:
•A tablespace is easy to rebuild, so it is more cost-effective to rebuild it than back it
up every day.
Chapter 6
Configuring Advanced Backup Options
6-6

•A tablespace contains temporary or test data that you do not need to back up.
•A tablespace does not change often and therefore should be backed up on a
different schedule from other backups.
You can run
CONFIGURE EXCLUDE FOR TABLESPACE
to exclude the specified tablespace
from the
BACKUP DATABASE
command. The exclusion condition applies to any data files
that you add to this tablespace in the future.
For example, you can exclude testing tablespaces
cwmlite
and
example
from whole
database backups as follows:
CONFIGURE EXCLUDE FOR TABLESPACE cwmlite;
CONFIGURE EXCLUDE FOR TABLESPACE example;
If you run the following command, then RMAN backs up all tablespaces in the
database except
cwmlite
and
example
:
BACKUP DATABASE;
You can still back up the configured tablespaces by explicitly specifying them in a
BACKUP
command or by specifying the
NOEXCLUDE
option on a
BACKUP
DATABASE
command.
For example, you can enter one of the following commands:
BACKUP DATABASE NOEXCLUDE; #backs up database, including cwmlite and example
BACKUP TABLESPACE cwmlite, example; # backs up only cwmlite and example
You can disable the exclusion feature for
cwmlite
and
example
as follows:
CONFIGURE EXCLUDE FOR TABLESPACE cwmlite CLEAR;
CONFIGURE EXCLUDE FOR TABLESPACE example CLEAR;
RMAN includes these tablespaces in future whole database backups.
See Also:
•Oracle Database Backup and Recovery Reference for
BACKUP
and
CONFIGURE
syntax
6.2.5 Configuring Compression Options
RMAN supports precompression processing and binary compression of backup sets.
The
CONFIGURE COMPRESSION ALGORITHM
command enables you to configure compression
options.
This following topics contain additional information about compression:
•About RMAN Precompression Block Processing
•About RMAN Supported Compression Levels
6.2.5.1 About RMAN Precompression Block Processing
Better backup compression ratios are achieved by consolidating the free space in
each data block, and setting that free space to binary zeroes. This precompression
processing stage has the most benefit for data blocks that have been the subject of
Chapter 6
Configuring Advanced Backup Options
6-7

many deletes and inserts operations. Conversely, it has no effect on data blocks that
are still in their initial loaded state.
The
OPTIMIZE FOR LOAD
option controls precompression processing. By specifying the
default,
OPTIMIZE FOR LOAD TRUE
, you ensure that RMAN optimizes CPU usage and
avoids precompression block processing. By specifying
OPTIMIZE FOR LOAD FALSE
,
RMAN uses additional CPU resources to perform precompression block processing.
See Also:
•Oracle Database Backup and Recovery Reference for
CONFIGURE
and
SET
syntax
6.2.5.2 About RMAN Supported Compression Levels
Oracle Database provides two categories of compression algorithms: a default
compression algorithm and a group of compression algorithms available with the
Oracle Advanced Compression option.
The default algorithm is a standard feature of Oracle Database while the Oracle
Advanced Compression option is a separately purchased option.
See Also:
•About RMAN Default Compression
•About Oracle Advanced Compression Option
6.2.5.2.1 About RMAN Default Compression
Use the CONFIGURE command to configure the default compression algorithm, which
does not require the Oracle Advanced Compression option.
Example 6-3 Configuring Basic Compression for Backup
The following example configures basic compression for RMAN backups..
CONFIGURE COMPRESSION ALGORITHM 'BASIC';
6.2.5.2.2 About Oracle Advanced Compression Option
If you have enabled the Oracle Advanced Compression option, you can choose from
the compression levels listed in the following table.
Compression Level Performance Benefits and Trade-Offs
HIGH
Best suited for backups over slower networks where the
limiting factor is network speed.
MEDIUM
Recommended for most environments. Good
combination of compression ratios and speed.
Chapter 6
Configuring Advanced Backup Options
6-8

Compression Level Performance Benefits and Trade-Offs
LOW
Least effect on backup throughput.
The compression ratio generally increases from low to high, with a trade-off of
potentially consuming more CPU resources.
Because the performance of the various compression levels depends on the nature of
the data in the database, network configuration, system resources and the type of
computer system and its capabilities, Oracle cannot document universally applicable
performance statistics. Which level is best for your environment depends on how
balanced your system is regarding bandwidth into the CPU and the actual speed of the
CPU. It is highly recommended that you run tests with the different compression levels
on the data in your environment. Choosing a compression level based on your
environment, network traffic characteristics (workload), and data set is the only way to
ensure that the backup set compression level can satisfy your organization's
performance requirements and applicable service level agreements.
Note:
Restoring a compressed backup is performed inline, and does not require
decompression.
See Also:
•See Oracle Database Licensing Information for more information about
the Oracle Advanced Compression option.
•If you are backing up to tape and your tape device performs its own
compression, then do not use both RMAN backup set compression and
the media manager vendor's compression. See the discussion of tuning
RMAN's tape backup performance in Tuning RMAN Performance.
6.2.6 Configuring Backup Encryption
For improved security, you can configure backup encryption for RMAN backup sets.
Encrypted backups cannot be read if they are obtained by unauthorized users.
This section contains the following topics:
•About Backup Encryption
•Configuring RMAN Backup Encryption Modes
•Configuring the Backup Encryption Algorithm
Chapter 6
Configuring Advanced Backup Options
6-9

6.2.6.1 About Backup Encryption
The
V$RMAN_ENCRYPTION_ALGORITHMS
view contains a list of encryption algorithms
supported by RMAN. If no encryption algorithm is specified, then the default encryption
algorithm is 128-bit Advanced Encryption Standard (AES).
RMAN encryption requires the
COMPATIBLE
initialization parameter at a target database
to be at least 10.2.0.
The Oracle Secure Backup media management software is the only supported
interface for making encrypted RMAN backups directly to tape. RMAN issues an
ORA-19919
error if you attempt to create encrypted RMAN backups using a media
manager other than Oracle Secure Backup.
When you use the
BACKUP
BACKUPSET
command with encrypted backup sets, the backup
sets are backed up in encrypted form. Because
BACKUP BACKUPSET
copies an already-
encrypted backup set to disk or tape, no decryption key is needed during
BACKUP
BACKUPSET
. The data is never decrypted during any part of the operation. The
BACKUP
BACKUPSET
command can neither encrypt nor decrypt backup sets.
Encrypted backups are decrypted automatically during restore and recovery, if the
required decryption keys are available. Each backup set gets a separate key. The key
is stored in encrypted form in the backup piece. The backup is decrypted with keys
obtained by a user-supplied password or the Oracle software keystore.
RMAN Encryption Modes
RMAN offers the following encryption modes:
•Transparent encryption
This is the default mode and uses the Oracle software keystore. A keystore is a
password-protected container used to store a Transparent Data Encryption (TDE)
key. In previous releases, this container was referred to as a wallet.
•Password encryption
This mode uses only password protection. You must provide a password when
creating and restoring encrypted backups.
•Dual mode encryption
This mode requires either the keystore or a password.
Note:
Keystore-based encryption is more secure than password-based encryption
because no passwords are involved. Use password-based encryption only
when it is absolutely necessary because your backups must be
transportable.
Chapter 6
Configuring Advanced Backup Options
6-10

See Also:
•Transparent Encryption of Backups
•Password Encryption of Backups
•Dual Mode Encryption of Backups
•Oracle Database Advanced Security Guide for details about configuring
the Oracle keystore
6.2.6.1.1 Transparent Encryption of Backups
Transparent encryption can create and restore encrypted backups with no DBA
intervention, if the required Oracle key management infrastructure is available.
Transparent encryption is best suited for day-to-day backup operations, where
backups are restored to the same database from which they were created.
Transparent encryption is the default for RMAN encryption.
When you use transparent encryption, you must first configure an Oracle software
keystore for each database. Transparent backup encryption supports both the auto-
login software keystore and password-based software keystore. When you use the
auto-login software keystore, encrypted backup operations can be performed at any
time, because the auto-login keystore is always open. When you use the password-
based software keystore, the keystore must be opened before you can perform
backup encryption.
Caution:
If you use an auto-login keystore, do not back it up along with your encrypted
backup data, because users can read the encrypted backups if they obtain
both the backups and the autologin keystore. It is safe to back up the Oracle
keystore because that form of the keystore cannot be used without the
keystore password.
After the Oracle keystore is configured, encrypted backups can be created and
restored with no further DBA intervention. If some columns in the database are
encrypted with Transparent Data Encryption (TDE) column encryption, and if those
columns are backed up using backup encryption, then those columns are encrypted a
second time during the backup. When the backup sets are decrypted during a restore
operation, the encrypted columns are returned to their original encrypted form.
Because the Oracle key management infrastructure archives all previous master keys
in the Oracle keystore, changing or resetting the current database master key does not
affect your ability to restore encrypted backups performed with an older master key.
You can reset the database master key at any time. RMAN can restore all encrypted
backups that were ever created by this database.
Chapter 6
Configuring Advanced Backup Options
6-11

Caution:
If you lose your Oracle keystore, then you are unable to restore any
transparently encrypted backups.
Note:
Oracle Database Advanced Security Guide for information about configuring
an Oracle software keystore
6.2.6.1.2 Password Encryption of Backups
Password encryption requires that the DBA provide a password when creating and
restoring encrypted backups. Restoring a password-encrypted backup requires the
same password that was used to create the backup.
Password encryption is useful for backups that are restored at remote locations, but
which must remain secure in transit. Password encryption cannot be persistently
configured. You do not need to configure an Oracle keystore if password encryption is
used exclusively.
Caution:
If you forget or lose the password that you used to encrypt a password-
encrypted backup, then you are unable to restore the backup.
To use password encryption, use the
SET
ENCRYPTION ON IDENTIFIED BY
password ONLY
command in your RMAN scripts.
6.2.6.1.3 Dual Mode Encryption of Backups
Dual-mode encrypted backups can be restored either transparently or by specifying a
password.
Dual-mode encrypted backups are useful when you create backups that are normally
restored on-site using the Oracle keystore, but which occasionally must be restored
offsite, where the Oracle keystore is not available.
When restoring a dual-mode encrypted backup, you can use either the Oracle
keystore or a password for decryption.
Caution:
If you forget or lose the password that you used to encrypt a dual-mode
encrypted backup and you also lose your Oracle keystore, then you are
unable to restore the backup.
Chapter 6
Configuring Advanced Backup Options
6-12

To create dual-mode encrypted backup sets, specify the
SET ENCRYPTION ON IDENTIFIED
BY
password
command in your RMAN scripts.
6.2.6.2 Configuring RMAN Backup Encryption Modes
You can use the
CONFIGURE
command to persistently configure transparent encryption
of backups.
You can use the command to specify the following:
•Whether to use transparent encryptions for backups of all database files
•Whether to use transparent encryptions for backups of specific tablespaces
•Which algorithm to use for encrypting backups
You can also use the
SET
ENCRYPTION
command to perform the following actions:
•Override the encryption settings specified by the
CONFIGURE
ENCRYPTION
command.
For example, you can use
SET
ENCRYPTION
OFF
to create an unencrypted backup,
even though a database is configured for encrypted backups.
•Set a password for backup encryption, persisting until the RMAN client exits.
Because of the sensitive nature of passwords, RMAN does not permit
configuration of passwords that persist across RMAN sessions.
Using or not using persistent configuration settings controls whether archived redo log
backups are encrypted. Backup sets containing archived redo log files are encrypted if
any of the following are true:
•
SET
ENCRYPTION
ON
is in effect when the archive log backup is being created.
•Encryption is configured for backups of the whole database or at least one
tablespace.
This behavior ensures that the redo associated with any encrypted backup of a data
file is also encrypted.
To configure the environment so that all RMAN backups are encrypted:
1. Set up the Oracle keystore as explained in Oracle Database Advanced Security
Guide.
2. Issue the following RMAN command:
CONFIGURE ENCRYPTION FOR DATABASE ON;
At this stage, all RMAN backup sets created by this database use transparent
encryption by default.
You can explicitly override the persistent encryption configuration for an RMAN
session with the following command:
SET ENCRYPTION ON;
The encryption setting remains in effect until you issue the
SET
ENCRYPTION
OFF
command during an RMAN session, or change the persistent setting again with the
following command:
CONFIGURE ENCRYPTION FOR DATABASE OFF;
Chapter 6
Configuring Advanced Backup Options
6-13

6.2.6.3 Configuring the Backup Encryption Algorithm
You can use the
CONFIGURE
command to persistently configure the default algorithm to
use for encryption when writing backup sets.
Possible values are listed in
V$RMAN_ENCRYPTION_ALGORITHMS
. The default algorithm is
AES 128-bit.
To configure the default backup encryption algorithm:
1. Start RMAN and connect to a target database and a recovery catalog (if used).
2. Ensure that the target database is mounted or open.
3. Execute the
CONFIGURE ENCRYPTION ALGORITHM
command, specifying a valid value
from
V$RMAN_ENCRYPTION_ALGORITHMS.ALGORITHM_NAME
.
The following example configures the algorithm to AES 256-bit encryption:
CONFIGURE ENCRYPTION ALGORITHM TO 'AES256';
6.3 Configuring Auxiliary Instance Data File Names
You may want to set the names of data files in the auxiliary instance when performing
operations such as data file tablespace point-in-time recovery (TSPITR) or data
transfer with RMAN. You set these names before starting the TSPITR or database
duplication.
The command is as follows, where
datafileSpec
identifies some data file by its original
name or data file number, and
filename
is the new path for the specified file:
CONFIGURE AUXNAME FOR datafileSpec TO '
filename
';
For example, you might configure a new auxiliary name for data file
2
as follows:
CONFIGURE AUXNAME FOR DATAFILE 2 TO '/newdisk/datafiles/df2.df';
As with other settings, the
CONFIGURE
command setting persists across RMAN sessions
until cleared with
CONFIGURE ...
CLEAR
, as shown in the following example:
CONFIGURE AUXNAME FOR DATAFILE 2 CLEAR;
If you are performing TSPITR or running the
DUPLICATE
command, then by using
CONFIGURE AUXNAME
you can preconfigure the file names for use on the auxiliary
database without manually specifying the auxiliary file names during the procedure.
When renaming files with the
DUPLICATE
command,
CONFIGURE AUXNAME
is an alternative
to
SET NEWNAME
command. The difference is that after you set the
AUXNAME
the first time,
you do not need to reset the file name when you issue another
DUPLICATE
command;
the
AUXNAME
setting remains in effect until you issue
CONFIGURE AUXNAME
...
CLEAR
. In
contrast, you must reissue the
SET NEWNAME
command every time you rename files.
Chapter 6
Configuring Auxiliary Instance Data File Names
6-14

See Also:
•Performing RMAN Tablespace Point-in-Time Recovery (TSPITR) for
more details on using
CONFIGURE AUXNAME
for TSPITR
•Duplicating Databases for more details on using
CONFIGURE AUXNAME
in
performing database duplication
6.4 Configuring the Snapshot Control File Location
When RMAN needs a read-consistent version of the control file, it creates a temporary
snapshot control file. RMAN needs a snapshot control file when resynchronizing with
the recovery catalog or when making a backup of the current control file.
The default location for the snapshot control file is platform-specific and depends on
the Oracle home of each target database. For example, the default file name on some
Linux platforms is
$ORACLE_HOME/dbs/snapcf_@.f
. If a fast recovery area is configured for
a target database, then the default location for the snapshot control file is not the fast
recovery area.
This section contains the following topics:
•Viewing the Configured Location of the Snapshot Control File
•Setting the Location of the Snapshot Control File
6.4.1 Viewing the Configured Location of the Snapshot Control File
You can see the current snapshot location by running the
SHOW
command.
This example shows a snapshot location that is determined by the default rule:
RMAN> SHOW SNAPSHOT CONTROLFILE NAME;
CONFIGURE SNAPSHOT CONTROLFILE NAME TO '/oracle/dbs/snapcf_trgt.f'; # default
This example shows a snapshot control file that has a nondefault file name:
RMAN> SHOW SNAPSHOT CONTROLFILE NAME;
CONFIGURE SNAPSHOT CONTROLFILE NAME TO '/oracle/oradata/trgt/snap_trgt.ctl';
6.4.2 Setting the Location of the Snapshot Control File
Use the
CONFIGURE SNAPSHOT CONTROLFILE NAME TO 'filepath'
command to change the
name and path of the snapshot control file. Subsequent snapshot control files that
RMAN creates use the specified name and path.
In an Oracle Real Application Clusters (Oracle RAC) environment, the snapshot
control file location must be on shared storage—that is, storage that is accessible to all
Oracle RAC instances.
For example, start RMAN, connect to the target database, and then enter:
CONFIGURE SNAPSHOT CONTROLFILE NAME TO '/oracle/oradata/trgt/snap_trgt.ctl';
You can also set the snapshot control file name to a raw device.
Chapter 6
Configuring the Snapshot Control File Location
6-15

To reset the snapshot control file location to the default, run the
CONFIGURE SNAPSHOT
CONTROLFILE NAME CLEAR
command.
See Also:
•Resynchronizing the Recovery Catalog
•Oracle Real Application Clusters Administration and Deployment Guide
for details about handling snapshot control files in Oracle RAC
configurations
6.5 Configuring RMAN for Use with a Shared Server
RMAN cannot connect to a target database through a shared server dispatcher.
RMAN requires a dedicated server process.
If your target database is configured for a shared server, then you must modify your
Oracle Net configuration to provide dedicated server processes for RMAN
connections.
To ensure that RMAN does not connect to a dispatcher when a target database is
configured for a shared server, the net service name used by RMAN must include
(SERVER=DEDICATED)
in the
CONNECT_DATA
attribute of the connect string.
Oracle Net configuration varies greatly from system to system. The following
procedure illustrates only one method. This scenario assumes that the following
service name in
tnsnames.ora
file connects to a target database using the shared
server architecture, where
inst1
is a value of the
SERVICE_NAMES
initialization parameter:
inst1_shs =
(DESCRIPTION=
(ADDRESS=(PROTOCOL=tcp)(HOST=inst1_host)(port=1521))
(CONNECT_DATA=(SERVICE_NAME=inst1)(SERVER=shared))
)
To use RMAN with a shared server:
1. Create a net service name in the
tnsnames.ora
file that connects to the nonshared
SID. For example, enter:
inst1_ded =
(DESCRIPTION=
(ADDRESS=(PROTOCOL=tcp)(HOST=inst1_host)(port=1521))
(CONNECT_DATA=(SERVICE_NAME=inst1)(SERVER=dedicated))
)
2. Start SQL*Plus and then connect using both the shared server and dedicated
server service names to confirm the mode of each session.
For example, connect with
SYSBACKUP
or
SYSDBA
privilege to
inst1_ded
and then
execute the following
SELECT
statement (sample output included):
SQL> SELECT SERVER
2 FROM V$SESSION
3 WHERE SID = (SELECT DISTINCT SID FROM V$MYSTAT);
SERVER
Chapter 6
Configuring RMAN for Use with a Shared Server
6-16

---------
DEDICATED
1 row selected.
To connect to a shared server session, connect with
SYSBACKUP
or
SYSDBA
privilege
to
inst1_shs
and then execute the following
SELECT
statement (sample output
included):
SQL> SELECT SERVER
2 FROM V$SESSION
3 WHERE SID = (SELECT DISTINCT SID FROM V$MYSTAT);
SERVER
---------
SHARED
1 row selected.
3. Start RMAN and connect to the target database using the dedicated service name.
Optionally, connect to a recovery catalog.
See Also:
Your platform-specific Oracle documentation and the Oracle Database
Net Services Reference for a complete description of Oracle Net connect
string syntax
6.6 Enabling Lost Write Detection
A data block lost write occurs when an I/O subsystem acknowledges the completion of
the block write, but the write did not occur in the persistent storage. On a subsequent
block read, the I/O subsystem returns the stale version of the data block, which might
be used to update other blocks of the database, thereby corrupting it.
You can set the
DB_LOST_WRITE_PROTECT
initialization parameter to
TYPICAL
or
FULL
so
that a database records buffer cache block reads in the redo log. The default setting is
NONE
. When the parameter is set to
TYPICAL
, the instance logs buffer cache reads for
read/write tablespaces in the redo log, but not read-only tablespaces. When set to
FULL
, the instance also records reads for read-only tablespaces. The performance
overhead for
TYPICAL
mode is approximately 5 to 10% and potentially higher for
FULL
mode.
Lost write detection is most effective when used with Data Guard. In this case, you set
DB_LOST_WRITE_PROTECT
in both primary and standby databases. When a standby
database applies redo during managed recovery, it reads the corresponding blocks
and compares the SCNs with the SCNs in the redo log. If the block SCN on the
primary database is lower than on the standby database, then it detects a lost write on
the primary database and throws an external error (
ORA-752
). If the SCN is higher, it
detects a lost write on the standby database and throws an internal error (
ORA-600
[3020]
). In either case, the standby database writes the reason for the failure in the
alert log and trace file.
To repair a lost write on a primary database, you must initiate failover to the standby
database. To repair a lost write on a standby database, you must re-create the entire
standby database or restore a backup of only the affected files.
Chapter 6
Enabling Lost Write Detection
6-17

Enabling lost write detection is also useful when you are not using Data Guard. In this
case, you can encounter a lost write in two ways: during normal database operation or
during media recovery. In the first case, there is no direct way to detect the error.
Indirect symptoms such as inconsistent tables cannot be unambiguously traced to the
lost write. If you retained a backup made before the suspected lost write, however,
then you can restore this backup to an alternative location and recover it. To diagnose
the problem, recover the database or tablespace to the SCN of the stale block read,
which then generates the lost write error (
ORA-752
).
If a lost write error is encountered during media recovery, the only response is to open
the database with the
RESETLOGS
option. The database is in a consistent state, but all
data after the
RESETLOGS
SCN is lost. If you recover a backup made after database
creation, you have no guarantee that other stale blocks have not corrupted the
database. This possibility exists because the restored backup may have been made
after an earlier lost write. To guarantee that no lost writes have corrupted the
database, you must perform media recovery from database creation, which is not a
practical strategy for most database environments.
See Also:
•Oracle Data Guard Concepts and Administration to learn how to use a
standby database for lost write detection and repair
•Oracle Database Reference to learn about the
DB_LOST_WRITE_PROTECT
initialization parameter
6.7 Enabling Shadow Lost Write Protection
Shadow lost write protection provides fast detection and immediate response to a data
block lost rewrite thereby minimizing data loss and database repair time. A standby
database is not mandatory for using shadow lost write protection.
A data block lost write occurs when an I/O subsystem acknowledges the completion of
a block write, but the write did not occur in the storage. Subsequent block reads will
return the stale version of the data block, which may be used to update other data
blocks, thus corrupting data. Shadow lost write protection uses shadow tablespaces to
store only SCNs for the tracked data files. When a tracked data block is read from
disk, shadow lost write protection detects lost writes by comparing the SCN for the
block in the shadow tablespace with the SCN of the most recent write in the block
being read.
Shadow lost write protection can be enabled at the database level, PDB level,
tablespace level, or data file level. The database compatibility level must be 18.0.0 or
higher.
To use shadow lost write protection:
•Create one or more shadow tablespaces for shadow lost write protection using the
CREATE BIGFILE TABLESPACE
command with the
LOST WRITE PROTECTION
clause.
•Enable shadow lost write protection at the required level (database, PDB,
tablespace, or data file). Use the
ALTER
command with the
ENABLE LOST WRITE
PROTECTION
clause to enable shadow lost write protection.
Chapter 6
Enabling Shadow Lost Write Protection
6-18

When shadow lost write protection is enabled, RMAN checks the blocks being read for
lost writes. If any lost writes are found, an error is displayed and the backup operation
is aborted.
Note:
Shadow lost write protection is not related to lost write protection that is
configured using the
DB_LOST_WRITE_PROTECT
initialization parameter.
Related Topics
•Oracle Database Administrator’s Guide
Chapter 6
Enabling Shadow Lost Write Protection
6-19

7
Using Flashback Database and Restore
Points
This chapter explains Flashback Database and restore points. It discusses configuring,
monitoring, and maintaining these features as part of an overall data protection
strategy.
This chapter contains the following topics:
•Overview of Flashback Database, Restore Points and Guaranteed Restore Points
•About Logging for Flashback Database and Guaranteed Restore Points
•Prerequisites for Flashback Database and Guaranteed Restore Points
•Using Normal and Guaranteed Restore Points
•Using Flashback Database
Note:
Detailed information on recovery scenarios that use Flashback Database and
normal and guaranteed restore points can be found in Performing Flashback
and Database Point-in-Time Recovery.
7.1 Overview of Flashback Database, Restore Points and
Guaranteed Restore Points
Oracle Flashback Database and restore points are related data protection features
that enable you to rewind data back in time to correct any problems caused by logical
data corruption or user errors within a designated time window.
These features provide a more efficient alternative to point-in-time recovery and does
not require a backup of the database to be restored first. The effects are similar to
database point-in-time recovery (DBPITR). Flashback Database and restore points are
not only effective in traditional database recovery situations but can also be useful
during database upgrades, application deployments and testing scenarios when test
databases must be quickly created and re-created. Flashback Database also provides
an efficient alternative to rebuilding a failed primary database after a Data Guard
failover.
Restore points provide capabilities related to Flashback Database and other media
recovery operations. In particular, a guaranteed restore point created at a system
change number (SCN) ensures that you can use Flashback Database to rewind the
database to this SCN. You can use restore points and Flashback Database
independently or together.
7-1

Flashback Database is accessible through both RMAN and SQL as
FLASHBACK
DATABASE
. You can use either language to quickly recover the database from logical
data corruption or user errors. The following examples return the database to a
specified SCN or restore point:
FLASHBACK DATABASE TO RESTORE POINT 'before_upgrade';
FLASHBACK DATABASE TO SCN 202381;
See Also:
Oracle Data Guard Concepts and Administration
7.1.1 About Flashback Database
Flashback Database is similar to conventional point-in-time recovery in its effects. It
enables you to return a database to its state at a time in the recent past. Flashback
Database is much faster than point-in-time recovery because it does not require
restoring data files from backup and requires applying fewer changes from the
archived redo logs.
You can use Flashback Database to reverse most unwanted changes to a database if
the data files are intact. You can return a database to its state in a previous
incarnation, and undo the effects of an
ALTER DATABASE OPEN RESETLOGS
statement.
"Rewinding a Database with Flashback Database" explains how to use the
FLASHBACK
DATABASE
command to reverse database changes.
Flashback Database uses its own logging mechanism, creating flashback logs and
storing them in the fast recovery area. You can only use Flashback Database if
flashback logs are available. To take advantage of this feature, you must set up your
database in advance to create flashback logs.
To enable Flashback Database, you configure a fast recovery area and set a
flashback retention target. This retention target specifies how far back you can rewind
a database with Flashback Database.
From that time onwards, at regular intervals, the database copies images of each
altered block in every data file into the flashback logs. These block images can later be
reused to reconstruct the data file contents for any moment at which logs were
captured.
When you use Flashback Database to rewind a database to a past target time, the
command determines which blocks changed after the target time and restores them
from the flashback logs. The database restores the version of each block that is
immediately before the target time. The database then uses redo logs to reapply
changes that were made after these blocks were written to the flashback logs.
Redo logs on disk or tape must be available for the entire time period spanned by the
flashback logs. For example, if the flashback retention target is 1 week, then you must
ensure that online and archived redo logs that contain all changes for the past week
are accessible. In practice, redo logs are typically needed much longer than the
flashback retention target to support point-in-time recovery.
Chapter 7
Overview of Flashback Database, Restore Points and Guaranteed Restore Points
7-2

7.1.2 About Flashback Database Window
The range of SCNs for which there is currently enough flashback log data to support
the
FLASHBACK DATABASE
command is called the flashback database window. The
flashback database window cannot extend further back than the earliest SCN in the
available flashback logs.
You cannot back up flashback logs to locations outside the fast recovery area. To
increase the likelihood that enough flashback logs are retained to meet the flashback
database window, you can increase the space in your fast recovery area (see
"Table 5-3").
If the fast recovery area is not large enough to hold the flashback logs and files such
as archived redo logs and other backups needed for the retention policy, then the
database may delete flashback logs from the earliest SCNs forward to make room for
other files. Consequently, the flashback database window can be shorter than the
flashback retention target, depending on the size of the fast recovery area, other
backups that must be retained, and how much flashback logging data is needed. The
flashback retention target is a target, not a guarantee that Flashback Database is
available.
If you cannot use
FLASHBACK DATABASE
because the flashback database window is not
long enough, then usually you can use database point-in-time recovery (DBPITR) to
achieve a similar result. Guaranteed restore points are the only way to ensure that you
can use Flashback Database to return to a specific point in time or guarantee the size
of the flashback window.
Note:
Some database operations, such as dropping a tablespace or shrinking a
data file, cannot be reversed with Flashback Database. See "Limitations of
Flashback Database" for details.
See Also:
•Rewinding a Database with Flashback Database to learn about
Flashback Database
•Performing Database Point-in-Time Recovery to learn about DBPITR
7.1.3 Limitations of Flashback Database
Because Flashback Database works by undoing changes to the data files that exist at
the moment when you run the command, it has certain limitations.
Following are the limitations of Flashback Database:
•Flashback Database can only undo changes to a data file made by Oracle
Database. It cannot be used to repair media failures, or to recover from accidental
deletion of data files.
Chapter 7
Overview of Flashback Database, Restore Points and Guaranteed Restore Points
7-3

•You cannot use Flashback Database to undo a shrink data file operation.
However, you can take the shrunken file offline, flash back the rest of the
database, and then later restore and recover the shrunken data file.
•You cannot use Flashback Database alone to retrieve a dropped data file. If you
flash back a database to a time when a dropped data file existed in the database,
only the data file entry is added to the control file. You can only recover the
dropped data file by using RMAN to fully restore and recover the data file.
•If the database control file is restored from backup or re-created, all accumulated
flashback log information is discarded. You cannot use
FLASHBACK DATABASE
to
return to a point in time before the restore or re-creation of a control file.
•When using Flashback Database with a target time at which a
NOLOGGING
operation
was in progress, block corruption is likely in the database objects and data files
affected by the
NOLOGGING
operation. For example, if you perform a direct-path
INSERT
operation in
NOLOGGING
mode, and that operation runs from 9:00 to 9:15 on
April 3, 2005, and you later use Flashback Database to return to the target time
09:07 on that date, the objects and data files updated by the direct-path
INSERT
may be left with block corruption after the Flashback Database operation
completes.
If possible, avoid using Flashback Database with a target time or SCN that
coincides with a
NOLOGGING
operation. Also, perform a full or incremental backup of
the affected data files immediately after any
NOLOGGING
operation to ensure
recoverability to points in time after the operation. If you expect to use Flashback
Database to return to a point in time during an operation such as a direct-path
INSERT
, consider performing the operation in
LOGGING
mode.
See Also:
Oracle Database SQL Language Reference for more information about
operations that support
NOLOGGING
mode.
7.1.4 About Normal Restore Points
Creating a normal restore point assigns a restore point name to an SCN or specific
point in time.
Thus, a restore point functions as a bookmark or alias for this SCN. Before performing
any operation that you may have to reverse, you can create a normal restore point.
The control file stores the name of the restore point and the SCN.
If you use flashback features or point-in-time recovery, then you can use the name of
the restore point instead of a time or SCN. The following commands support this use
of restore points:
•The
RECOVER DATABASE
and
FLASHBACK DATABASE
commands in RMAN
•The
FLASHBACK TABLE
statement in SQL
Creating a normal restore point eliminates manually recording an SCN in advance or
determine the correct SCN after the fact by using features such as Flashback Query.
Normal restore points are lightweight. The control file can maintain a record of
thousands of normal restore points with no significant effect on database performance.
Chapter 7
Overview of Flashback Database, Restore Points and Guaranteed Restore Points
7-4

Normal restore points eventually age out of the control file if not manually deleted, so
they require no ongoing maintenance.
See Also:
Oracle Database Development Guide to learn how to use Flashback Query
7.1.5 About Guaranteed Restore Points
Like a normal restore point, a guaranteed restore point serves as an alias for an SCN
in recovery operations. A principal difference is that guaranteed restore points never
age out of the control file and must be explicitly dropped.
In general, you can use a guaranteed restore point as an alias for an SCN with any
command that works with a normal restore point. Except as noted, the information
about where and how to use normal restore points applies to guaranteed restore
points as well.
A guaranteed restore point ensures that you can use Flashback Database to rewind a
database to its state at the restore point SCN, even if the generation of flashback logs
is disabled. If flashback logging is enabled, then a guaranteed restore point enforces
the retention of flashback logs required for Flashback Database to any SCN after the
earliest guaranteed restore point. Thus, if flashback logging is enabled, you can rewind
the database to any SCN in the continuum rather than to a single SCN only.
Note:
If flashback logging is disabled, then you cannot
FLASHBACK DATABASE
directly
to SCNs between the guaranteed restore points and the current time. You
can, however, flashback to the guaranteed restore point first and then
recover to SCN's between the guaranteed restore point and current time.
If the recovery area has enough disk space to store the needed logs, then you can use
a guaranteed restore point to rewind a whole database to a known good state days or
weeks ago. As with Flashback Database, even the effects of
NOLOGGING
operations like
direct load inserts can be reversed with guaranteed restore points.
Chapter 7
Overview of Flashback Database, Restore Points and Guaranteed Restore Points
7-5

Note:
Limitations that apply to Flashback Database also apply to guaranteed
restore points. For example, shrinking a data file or dropping a tablespace
can prevent flashing back the affected data files to the guaranteed restore
point. See "Limitations of Flashback Database" for details. In addition, when
there are guaranteed restore points in the database, the database
compatibility parameter cannot be set to a higher database version. An
attempt to do so results in an error. This restriction exists because flashback
database is currently unable to reverse the effects of increasing the database
version with the compatibility initialization parameter.
7.1.5.1 Guaranteed Restore Points versus Storage Snapshots
In practice, guaranteed restore points provide a useful alternative to storage
snapshots.
Storage snapshots are often used to protect a database before risky operations such
as large-scale database updates or application patches or upgrades. Rather than
creating a snapshot or duplicate database to test the operation, you can create a
guaranteed restore point on a primary or physical standby database. You can then
perform the risky operation with the certainty that the required flashback logs are
retained.
7.1.6 Overview of Restore Points in a Multitenant Environment
You can create both normal and guaranteed restore points in a multitenant
environment.
The basic concepts of restore points for databases are also applicable to restore
points in a multitenant environment. You can create the following types of restore
points in a multitenant environment:
•CDB restore point
•PDB restore point
•Clean PDB restore point
See Also:
•Overview of Flashback Database, Restore Points and Guaranteed
Restore Points
•About CDB Restore Points
•About Restore Points in PDBs
•About the Namespace for PDB Restore Points
Chapter 7
Overview of Flashback Database, Restore Points and Guaranteed Restore Points
7-6

7.1.6.1 About CDB Restore Points
A CDB restore point serves as an alias for an SCN or a point in time in a multitenant
container database (CDB). It can be a normal restore point or a guaranteed restore
point.
CDB restore points are similar to restore points in a non-CDB, except that you need to
connect to the root as a common user with the
SYSDBA
or
SYSBACKUP
privilege to create
them. You can create CDB restore points starting with Oracle Database 12c Release 1
(12.1). CDB restore points are accessible to every pluggable database (PDB) within
the CDB. However, a CDB restore point does not reflect the PDB sub-incarnation of
any of its PDBs.
CDB restore points are useful in the following scenarios:
•The whole CDB needs to be recovered to a particular point in time
•Multiple PDBs in a CDB need to be recovered to a particular point in time
See Also:
•Overview of Restore Points in a Multitenant Environment
•About Restore Points in PDBs
•Basic Concepts of Performing Flashback Database for CDBs and PDBs
•Performing a Flashback Database Operation for a Whole CDB
7.1.6.2 About Restore Points in PDBs
You can create normal and guaranteed restore points in a pluggable database (PDB).
PDB restore points are accessible only to the PDB in which they are defined.
PDB Restore Points
A PDB restore point is a bookmark to a point in time or an SCN in a particular
pluggable database (PDB). It pertains only to the PDB for which it is created and is
only usable for operations on that PDB. A PDB restore point represents the PDB sub-
incarnation of the point in time at which it was created.
PDB restore points can be normal restore points or guaranteed restore points. A
guaranteed PDB restore point guarantees that you can perform a flashback operation
for the PDB to this restore point.
A PDB restore point can be used to perform Flashback Database operations or point-
in-time recovery only for the PDB in which it was created.
Chapter 7
Overview of Flashback Database, Restore Points and Guaranteed Restore Points
7-7

Note:
Creating a guaranteed PDB restore point requires careful consideration
because such a restore point can prevent required flashback logs in the
multitenant container database (CDB) from being reused. This can
potentially impact CDB functioning because the fast recovery area could run
out of space.
Clean PDB Restore Points
A clean PDB restore point is a PDB restore point that is created when the PDB is
closed and when there are no outstanding transactions for that PDB. Clean PDB
restore points are only applicable to CDBs that use shared undo.
Clean PDB restore points can be normal or guaranteed restore points. Use the
CREATE
CLEAN RESTORE POINT
command to explicitly create a clean PDB restore point. For a
CDB that uses shared undo, if a PDB is closed and it has no outstanding transactions,
any PDB restore point created is marked as a clean PDB restore point.
If you anticipate that you may need to rewind a PDB to a particular point in time, for
example, to a state just before an application upgrade, then it is recommended that
you create a clean PDB guaranteed restore point.
For CDBs that use shared undo, a Flashback Database operation to a clean PDB
restore point is faster than a Flashback Database operation to an SCN or other restore
points that are not clean PDB restore points. This is because RMAN does not need to
restore any backups while performing a flashback operation to a clean PDB restore
point.
See Also:
•About the Namespace for PDB Restore Points
•About CDB Restore Points
•Basic Concepts of Performing Flashback Database for CDBs and PDBs
•Performing a Flashback Database Operation for PDBs
•About Incarnations of PDBs
7.1.6.3 About the Namespace for PDB Restore Points
Each pluggable database (PDB) has its own namespace for restore points. Therefore,
you can define a PDB restore point with the same name in more than one PDB.
In a multitenant environment, when you use a restore point name in a PDB or for a
PDB operation, the name is first interpreted as a PDB restore point for the concerned
PDB. If a PDB restore point with the specified name is not found, then it is interpreted
as a CDB restore point.
Chapter 7
Overview of Flashback Database, Restore Points and Guaranteed Restore Points
7-8

See Also:
About Restore Points in PDBs
7.2 About Logging for Flashback Database and Guaranteed
Restore Points
Logging for Flashback Database and guaranteed restore points involves capturing
images of data file blocks before changes are applied. The
FLASHBACK DATABASE
command can use these images to return the data files to their previous state.
The chief differences between normal flashback logging and logging for guaranteed
restore points are related to when blocks are logged and whether the logs can be
deleted in response to space pressure in the fast recovery area. These differences
affect space usage for logs and database performance.
Your recoverability goals partially determine whether to enable logging for flashback
database, or use guaranteed restore points, or both. The implications in performance
and in space usage for these features, separately and when used together, also factor
into your decision.
7.2.1 Guaranteed Restore Points and Fast Recovery Area Space
Usage
Certain rules govern the usage of space in the fast recovery area.
When you create a guaranteed restore point, with or without enabling full flashback
database logging, you must monitor the space available in your fast recovery area.
"Managing Space for Flashback Logs in the Fast Recovery Area" explains how to
monitor fast recovery area disk space usage.
The following rules govern creating, retaining, overwriting and deleting of flashback
logs in the fast recovery area:
•If the fast recovery area has enough space, then a flashback log is created
whenever necessary to satisfy the flashback retention target.
•If a flashback log is old enough that it is no longer needed to satisfy the flashback
retention target, then a flashback log is reused.
•If the database must create a flashback log and the fast recovery area is full or
there is no disk space, then the oldest flashback log is reused instead.
Note:
Reusing the oldest flashback log shortens the flashback database
window. If enough flashback logs are reused due to a lack of disk space,
then the flashback retention target may not be satisfied.
Chapter 7
About Logging for Flashback Database and Guaranteed Restore Points
7-9

•If the fast recovery area is full, then an archived redo log that is reclaimable
according to the fast recovery area rules may be automatically deleted by the fast
recovery area to make space for other files. In this case, any flashback logs that
require the use of that redo log file for the use of
FLASHBACK DATABASE
are also
deleted.
Note:
According to fast recovery area rules, a file is reclaimable when one of
the following criteria is true:
–The file is reported as obsolete and not needed by the flashback
database. For example, the file is outside the
DB_FLASHBACK_RETENTION_TARGET
parameters.
–The file is backed up to tape.
•Files in the fast recovery area are not eligible for deletion if they are required to
satisfy a guaranteed restore point. However, archived redo logs required to satisfy
a guaranteed restore point may be deleted after they are backed up to disk or
tape. When you use the RMAN
FLASHBACK DATABASE
command, if the archived redo
logs required to satisfy a specified guaranteed restore point are not available in the
fast recovery area, they are restored from the backups.
Retention of flashback logs and other files required to satisfy the guaranteed
restore point, in addition to files required to satisfy the backup retention policy, can
cause the fast recovery area to fill completely. Consult "Responding to a Full Fast
Recovery Area" if your fast recovery area becomes full.
Caution:
If no files are eligible for deletion from the fast recovery area because of the
requirements imposed by your retention policy and the guaranteed restore
point, then the database performs as if it has encountered a disk full
condition. In many circumstances, this causes your database to halt. See
"Responding to a Full Fast Recovery Area".
7.2.2 About Logging for Guaranteed Restore Points with Flashback
Logging Disabled
Assume that you create a guaranteed restore point when logging for Flashback
Database is disabled. In this case, the first time a data file block is modified after the
time of the guaranteed restore point, the database stores an image of the block before
the modification in the flashback logs. Thus, the flashback logs preserve the contents
of every changed data block when the guaranteed restore point was created. Later
modifications to the same block do not cause the contents to be logged again unless
another guaranteed restore point was created after the block was last modified or a
subsequent flashback database operation has restored the original contents of the
block. When you use Flashback Database to restore a database multiple times to the
same restore point, it is common practise to drop and recreate the guaranteed restore
Chapter 7
About Logging for Flashback Database and Guaranteed Restore Points
7-10

point each time. This deletes the old flashback logs and also ensures that the space
quota for the fast recovery area is not exceeded.
This method of logging has the following important consequences:
•
FLASHBACK DATABASE
can re-create the data file contents at the time of a guaranteed
restore point by using the block images.
•For workloads that repeatedly modify the same data, disk space usage can be
less than normal flashback logging. Less space is needed because each changed
block is only logged once. Applications with low volume inserts may benefit from
this disk space saving. This advantage is less likely for applications with high
volume inserts or large batch inserts. The performance overhead of logging for a
guaranteed restore point without flashback database logging enabled can also be
lower.
Assume that your primary goal is the ability to return your database to the time at
which the guaranteed restore point was created. In this case, it is usually more
efficient to turn off flashback logging and use only guaranteed restore points. For
example, suppose that you are performing an application upgrade on a database host
over a weekend. You could create a guaranteed restore point at the start of the
upgrade. If the upgrade fails, then reverse the changes with the
FLASHBACK DATABASE
command.
7.2.3 About Logging for Flashback Database with Guaranteed Restore
Points Defined
If you enable Flashback Database and define one or more guaranteed restore points,
then the database performs normal flashback logging.
In this case, the recovery area retains the flashback logs required to flash back to any
arbitrary time between the present and the earliest currently defined guaranteed
restore point. Flashback logs are not deleted in response to space pressure if they are
required to satisfy the guarantee.
Flashback logging causes some performance overhead. Depending upon the pattern
of activity on your database, it can also cause significant space pressure in the fast
recovery area. Thus, you should monitor space used in the fast recovery area.
7.3 Prerequisites for Flashback Database and Restore
Points
To ensure successful operation of Flashback Database and guaranteed restore points,
you must first set some key database options.
Flashback Database
Configure the following database settings before enabling Flashback Database:
•Your database must be running in
ARCHIVELOG
mode, because archived logs are
used in the Flashback Database operation.
•You must have a fast recovery area enabled, because flashback logs can only be
stored in the fast recovery area.
Chapter 7
Prerequisites for Flashback Database and Restore Points
7-11

•For Oracle Real Application Clusters (Oracle RAC) databases, the fast recovery
area must be in a clustered file system or in ASM.
•For creating restore points in CDBs, the
COMPATIBLE
initialization parameter must
be set to 12.1.0 or higher.
Guaranteed Restore Points
To use guaranteed restore points, the database must satisfy the following additional
prerequisite: the
COMPATIBLE
initialization parameter must be set to 10.2.0 or greater.
Note:
There are no special prerequisites to set before using normal restore points.
Restore Points in PDBs
To create restore points in a pluggable database (PDB), the
COMPATIBLE
initialization
parameter must be set to 12.2.0 or higher.
7.4 Using Normal and Guaranteed Restore Points
You can create, monitor, and drop both normal and guaranteed restore points.
This section contains the following topics:
•Creating Normal and Guaranteed Restore Points in non-CDBs
•Listing Restore Points Using the LIST Command
•Dropping Restore Points
7.4.1 Creating Normal and Guaranteed Restore Points in non-CDBs
To create normal or guaranteed restore points, use the
CREATE RESTORE POINT
SQL
statement, providing a name for the restore point and specifying whether it is to be a
guaranteed restore point or a normal one (the default).
To create a restore point:
1. Connect SQL*Plus to a target database.
See Also:
Oracle Database Administrator’s Guide for using SQL*Plus to connect to
a database
2. Ensure that the database is open or mounted. If the database is mounted, then it
must have been shut down cleanly (unless it is a physical standby database).
3. Run the
CREATE RESTORE POINT
statement.
The following example shows how to create a normal restore point in SQL*Plus:
Chapter 7
Using Normal and Guaranteed Restore Points
7-12

SQL> CREATE RESTORE POINT before_upgrade;
This example shows how to create a guaranteed restore point:
SQL> CREATE RESTORE POINT before_upgrade GUARANTEE FLASHBACK DATABASE;
See Also:
•Oracle Database SQL Language Reference for reference information
about the SQL
CREATE RESTORE POINT
statement
•"Listing Restore Points Using the LIST Command" to learn how to list
restore point
•"Dropping Restore Points" to learn how to delete restore points
7.4.2 Creating CDB Restore Points
The
CREATE RESTORE POINT
SQL command enables you to create normal and
guaranteed restore points in a multitenant container database (CDB).
To create a CDB restore point:
1. Ensure that the prerequisites described in Prerequisites for Flashback Database
and Restore Points are satisfied.
2. Connect SQL*Plus to the root as a common user with the
SYSDBA
or
SYSBACKUP
privilege.
3. Ensure that the CDB is open or mounted. If the CDB is mounted, then it must have
been shut down cleanly (unless it is a physical standby database).
4. Run the
CREATE RESTORE POINT
statement to create a CDB restore point.
The following command creates a normal CDB restore point:
SQL> CREATE RESTORE POINT cdb_before_upgrade;
The following command creates a guaranteed CDB restore point:
SQL> CREATE RESTORE POINT cdb_grp_before_upgrade GUARANTEE FLASHBACK DATABASE;
See Also:
•About CDB Restore Points
•Creating PDB Restore Points
•Listing Restore Points Using the V$RESTORE_POINT View
•Oracle Database Administrator’s Guide for the steps to connect
SQL*Plus to the root
Chapter 7
Using Normal and Guaranteed Restore Points
7-13

7.4.3 Creating PDB Restore Points
You use the
CREATE RESTORE POINT
SQL statement to create restore points in a
pluggable database (PDB).
The restore point can be a normal PDB restore point, guaranteed PDB restore point,
or clean PDB restore point. You can create PDB restore points either when connected
to the PDB or to the root.
When a PDB uses shared undo, you can create a clean restore point only if the PDB
does not have any outstanding transactions.
To create a PDB restore point when connected to the PDB:
1. Ensure that the prerequisites described in Prerequisites for Flashback Database
and Restore Points are met.
2. Connect SQL*Plus to the PDB as a common user or local user with the
SYSDBA
or
SYSBACKUP
privilege.
3. If you are creating a clean PDB restore point in a CDB that uses shared undo,
then the PDB must be closed.
The following command displays the state of the PDB:
SQL> SELECT name, open_mode FROM V$PDBs;
Use the following command to close the PDB:
SQL> ALTER PLUGGABLE DATABASE CLOSE;
4. If the multitenant container database (CDB) is in mounted state, then it must have
been shut down consistently (unless it is a physical standby database).
5. Set the current container to the PDB.
The following command sets to current container to the PDB
my_pdb
:
SQL> ALTER SESSION SET CONTAINER=my_pdb;
6. Create a PDB restore point by using the
CREATE RESTORE POINT
command.
The following command creates a normal PDB restore point:
SQL> CREATE RESTORE POINT before_patching;
The following command creates a guaranteed PDB restore point:
SQL> CREATE RESTORE POINT before_upgrade GUARENTEE FLASHBACK DATABASE;
The following command explicitly creates a clean PDB restore point. If a clean
restore point cannot be created, then an error is returned.
SQL> CREATE CLEAN RESTORE POINT before_patching;
To create a PDB restore point when connected to the CDB:
1. Ensure that the prerequisites described in Prerequisites for Flashback Database
and Restore Points are met.
2. Connect SQL*Plus to the root as a common user with the
SYSDBA
or
SYSBACKUP
privilege.
Chapter 7
Using Normal and Guaranteed Restore Points
7-14

3. If you are creating a clean PDB restore point in a CDB that uses shared undo,
then the PDB must be closed.
The following command closes the PDB
my_pdb
:
SQL> ALTER PLUGGABLE DATABASE my_pdb CLOSE;
4. The CDB that contains the PDB can be open or mounted. If the CDB is mounted,
then it must have been shut down consistently (unless it is a physical standby
database).
The following commands place the CDB in a mounted state:
SQL> SHUTDOWN IMMEDIATE;
SQL> STARTUP MOUNT;
5. Set the current container to the root.
SQL> ALTER SESSION SET CONTAINER = CDB$ROOT;
6. Create a PDB restore point by using the
CREATE RESTORE POINT
command with the
FOR PLUGGABLE DATABASE
clause.
The following command creates a normal PDB restore point:
SQL> CREATE RESTORE POINT mypdb_before_patching FOR PLUGGABLE DATABASE my_pdb;
The following command creates a guaranteed PDB restore point:
SQL> CREATE RESTORE POINT mypdb_grp_before_upgrade FOR PLUGGABLE DATABASE my_pdb
GUARANTEE FLASHBACK DATABASE;
The following command explicitly creates a clean PDB restore point (when the
PDB is closed and has no pending transactions). If the restore point cannot be
created, then an error is displayed.
SQL> CREATE CLEAN RESTORE POINT mypdb_crp_before_patching FOR PLUGGABLE DATABASE
my_pdb;
See Also:
•About Undo and Flashback Database Operations for PDBs
•About Restore Points in PDBs
•Creating CDB Restore Points
•Oracle Database Administrator’s Guide for the steps to connect
SQL*Plus to the root
•Listing Restore Points Using the V$RESTORE_POINT View
7.4.4 Listing Restore Points Using the LIST Command
You can use the
LIST
command to list either a specific restore point or all restore
points known to the RMAN repository. The variations of the command are as follows:
LIST RESTORE POINT restore_point_name;
LIST RESTORE POINT ALL;
Chapter 7
Using Normal and Guaranteed Restore Points
7-15

RMAN indicates the SCN and time of the restore point, the type of restore point, and
the name of the restore point. The following example shows sample output:
RMAN> LIST RESTORE POINT ALL;
using target database control file instead of recovery catalog
SCN RSP Time Type Time Name
---------------- --------- ---------- --------- ----
341859 28-APR-15 28-APR-15 NORMAL_RS
343690 28-APR-15 GUARANTEED 28-APR-15 GUARANTEED_RS
Note:
The
LIST
command does not display details such as the PDB incarnation
number and whether a restore point is a PDB restore point. To view
additional details about restore points in a multitenant environment, see
Listing Restore Points Using the V$RESTORE_POINT View.
See Also:
"Rewinding a Database with Flashback Database"
7.4.5 Listing Restore Points Using the V$RESTORE_POINT View
You can use the
V$RESTORE_POINT
control file view to obtain information about all
currently-defined restore points (normal and guaranteed), including CDB restore points
and PDB restore points.
The
V$RESTORE_POINT
view contains additional information about restore points in a
multitenant environment that is not displayed by the
LIST RESTORE POINT
command.
This includes details such as the incarnation of the pluggable database (PDB) in which
a PDB restore point was created and whether a restore point is a PDB restore point or
clean PDB restore point.
The following steps display information about PDB restore points for all PDBs in the
CDB:
1. Connect SQL*Plus to the target database. If the target database is a multitenant
container database (CDB), then connect to the root.
•To view restore points for all PDBs, you must connect to the root as a common
use with the
SYSDBA
or
SYSBACKUP
privilege.
•To view the restore points in a particular PDB, you can connect to that PDB as
a common user or local user with the
SYSDBA
or
SYSBACKUP
privilege.
2. Query the
V$RESTORE_POINT
view to display information about restore points.
Example 7-1 Displaying Restore Points in a Multitenant Environment
The following query displays details about all restore points in a multitenant
environment (query output formatted to fit in the page):
Chapter 7
Using Normal and Guaranteed Restore Points
7-16

SELECT name, guarantee_flashback_database, pdb_restore_point,
clean_pdb_restore_point, pdb_incarnation#, storage_sizeFROM v$restore_point;
NAME GUARANTEE_ PDB_RESTORE_POINT CLEAN_PDB_RESTORE_POINT
STORAGE_SIZE
-------- ---------- ---------------- -----------------------
------------
CDB_GRP_BEFORE_PATCH YES NO
NO 84586
PDB_GRP_BEFORE_UPGRADE_TEMP YES YES
NO 4562
CDB_RP1 NO NO
NO 0
PDB1_BEFORE_PATCHING NO YES
NO 0
MYPDB_CLEAN_GRP_BEFORE_UPGRADE NO YES
YES 0
For normal restore points,
STORAGE_SIZE
is zero. For guaranteed restore points,
STORAGE_SIZE
indicates the approximate number of bytes of disk space in the fast
recovery area that is tied up retaining logs required to guarantee
FLASHBACK
DATABASE
to
that restore point.
See Also:
•Oracle Database Reference for information about
V$RESTORE_POINT
•Listing Restore Points Using the LIST Command
•Rewinding a Database with Flashback Database
•Performing a Flashback Database Operation for a Whole CDB
•Performing a Flashback Database Operation for PDBs
7.4.6 Dropping Restore Points
When you are satisfied that you do not need an existing restore point, or when you
want to create a restore point with the name of an existing restore point, you can drop
the restore point, using the
DROP RESTORE POINT
SQL*Plus statement.
For example:
SQL> DROP RESTORE POINT before_app_upgrade;
Restore point dropped.
The same statement is used to drop both normal and guaranteed restore points.
Chapter 7
Using Normal and Guaranteed Restore Points
7-17

Note:
Normal restore points eventually age out of the control file, even if not
explicitly dropped. The rules governing retention of restore points in the
control file are:
•The most recent 2048 restore points are always kept in the control file,
regardless of their age.
•Any restore point more recent than the value of
CONTROL_FILE_RECORD_KEEP_TIME
is retained, regardless of how many
restore points are defined.
Normal restore points that do not meet either of these conditions may age
out of the control file.
Guaranteed restore points never age out of the control file. They remain until they are
explicitly dropped.
See also:
Oracle Database SQL Language Reference for reference information about
the SQL
DROP RESTORE POINT
statement
7.5 Using Flashback Database
To use flashback logging for a target database, you must enable Flashback Database.
Certain guidelines can be followed to ensure optimal performance of Flashback
Database.
This section contains the following topics:
•Enabling Flashback Database
•Disabling Flashback Database Logging
•Configuring the Environment for Optimal Flashback Database Performance
•Monitoring the Effect of Flashback Database on Performance
•About Flashback Writer (RVWR) Behavior with I/O Errors
7.5.1 Enabling Flashback Database
Use the
ALTER DATABASE
command to enable Flashback Database
To enable flashback logging:
1. Configure the recovery area as described in "Enabling the Fast Recovery Area".
2. Ensure the database instance is open or mounted. If the instance is mounted, then
the database must be shut down cleanly unless it is a physical standby database.
Other Oracle Real Application Clusters (Oracle RAC) instances can be in any
mode.
Chapter 7
Using Flashback Database
7-18

3. Optionally, set the
DB_FLASHBACK_RETENTION_TARGET
to the length of the desired
flashback window in minutes:
ALTER SYSTEM SET DB_FLASHBACK_RETENTION_TARGET=4320 SCOPE=BOTH; # 3 days
By default
DB_FLASHBACK_RETENTION_TARGET
is set to 1 day (1440 minutes).
Note:
This setting must be persistent across database startup and shutdown.
4. Enable the Flashback Database feature for the whole database:
ALTER DATABASE FLASHBACK ON;
5. Optionally, disable flashback logging for specific tablespaces.
By default, flashback logs are generated for all permanent tablespaces. You can
reduce overhead by disabling flashback logging for specific tablespaces as in the
following example:
ALTER TABLESPACE tbs_3 FLASHBACK OFF;
You can re-enable flashback logging for a tablespace later with this command:
ALTER TABLESPACE tbs_3 FLASHBACK ON;
If you disable Flashback Database for a tablespace, then you must take its data
files offline before running
FLASHBACK
DATABASE
.
When you enable Flashback Database while the database is open, there is a very
small chance the command may not be able to obtain the memory it needs. If the
command fails because of that reason, retry the command after a while or retry after a
shutdown and restart of the instance.
When you enable Flashback Database on a physical standby database, you can flash
back a standby database. Flashback Database of standby databases has some
applications in the Data Guard environment.
See Also:
Oracle Data Guard Concepts and Administration for details about standby
databases
7.5.2 Disabling Flashback Database Logging
Use the
ALTER DATABASE
command to disable Flashback Database.
On a database instance that is either in mount or open state, issue the following
command:
ALTER DATABASE FLASHBACK OFF;
Chapter 7
Using Flashback Database
7-19

7.5.3 Configuring the Environment for Optimal Flashback Database
Performance
Maintaining flashback logs imposes comparatively limited overhead on an database
instance. Changed blocks are written from memory to the flashback logs at relatively
infrequent, regular intervals, to limit processing and I/O overhead.
To achieve good performance for large production databases with Flashback
Database enabled, Oracle recommends the following:
•Use a fast file system for your fast recovery area, preferably without operating
system file caching.
Files that the database creates in the fast recovery area, including flashback logs,
are typically large. Operating system file caching is typically not effective for these
files, and may actually add CPU overhead for reading from and writing to these
files. Thus, it is recommended to use a file system that avoids operating system
file caching, such as Automatic Storage Management (ASM).
•Configure enough disk spindles for the file system that holds the fast recovery
area.
For large production databases, multiple disk spindles may be needed to support
the required disk throughput for the database to write the flashback logs
effectively.
•If the storage system used to hold the fast recovery area does not have nonvolatile
RAM, then try to configure the file system on striped storage volumes.
Use a relatively small stripe size such as 128 KB. This technique enables each
write to the flashback logs to be spread across multiple spindles, improving
performance.
•For large databases, set the initialization parameter
LOG_BUFFER
to at least 8 MB.
The overhead of logging for Flashback Database depends on the mixture of reads and
writes in the database workload. When you have a write-intensive workload, the
Flashback Database logging overhead is high since it must log all those database
changes. Queries do not change data and thus do not contribute to logging activity for
Flashback Database.
7.5.4 Monitoring the Effect of Flashback Database on Performance
Several data analysis methods are available to monitor the Flashback Database
workload on your system.
•AWR reports
The Automatic Workload Repository (AWR) automates database statistics
gathering by collecting, processing, and maintaining performance statistics for
database problem detection and self-tuning. You can compare AWR reports from
before and after the Flashback Database was turned on to monitor performance
effects.
•AWR snapshots
You can review AWR snapshots to pinpoint system usage caused by flashback
logging. For example, if
flashback buf free by RVWR
is the top wait event, then you
Chapter 7
Using Flashback Database
7-20

know that Oracle Database cannot write flashback logs very quickly. Therefore,
you might want to tune the file system and storage used by the fast recovery area,
possibly using a technique described in "Configuring the Environment for Optimal
Flashback Database Performance"
•
V$FLASHBACK_DATABASE_STAT
view
The
V$FLASHBACK_DATABASE_STAT
view shows the bytes of flashback data logged by
the database. Each row in the view shows the statistics accumulated (typically
over the course of an hour). The
FLASHBACK_DATA
and
REDO_DATA
columns describe
bytes of flashback data and redo data written respectively during the time interval,
while the
DB_DATA
column describes bytes of data blocks read and written. The
columns
FLASHBACK_DATA
and
REDO_DATA
correspond to sequential writes, whereas
DB_DATA
column corresponds to random reads and writes.
•
V$SYSSTAT
view
Because of the difference between sequential I/O and random I/O, a better
indication of I/O overhead is the number of I/O operations issued for flashback
logs. The
V$SYSSTAT
statistics shown in Table 7-1 can tell you the number of I/O
operations that your instance has issued for various purposes.
Table 7-1 V$SYSSTAT Statistics
Column Name Column Meaning
Physical write I/O request The number of write operations issued for writing data blocks
Physical read I/O request The number of read operations issued for reading data blocks
Redo writes The number of write operations issued for writing to the redo log
Flashback log writes The number of write operations issued for writing to flashback
logs
Flashback log write bytes Total size in bytes of flashback database data written from this
instance
See Also:
•Oracle Database Reference for more details on columns in the
V$SYSSTAT
view
•Oracle Database Performance Tuning Guide to learn about AWR
•Oracle Database 2 Day + Performance Tuning Guide for more
information about AWR reports
7.5.5 About Flashback Writer (RVWR) Behavior with I/O Errors
When flashback is enabled or when there are guaranteed restore points, the
background process RVWR writes flashback data to flashback database logs in the
fast recovery area.
If RVWR encounters an I/O error, then the following behavior is expected:
•If there are any guaranteed restore points defined, then the instance fails when
RVWR encounters I/O errors.
Chapter 7
Using Flashback Database
7-21

•If no guaranteed restore points are defined, then the instance remains unaffected
when RVWR encounters I/O errors. Note the following cases:
–On a primary database, Oracle Database automatically disables Flashback
Database while the database is open. All existing transactions and queries
proceed unaffected. This behavior is expected for both single-instance and
Oracle RAC databases.
–On a physical or logical standby, RVWR appears to have stopped responding,
retrying the I/O periodically. This may eventually cause the logical standby or
the managed recovery of the physical standby to suspend. (Oracle Database
does not cause the standby instance to fail because it does not want to cause
the primary database to fail in maximum protection mode.) To resolve the
issue, you can issue either a
SHUTDOWN ABORT
or an
ALTER DATABASE FLASHBACK
OFF
command.
Chapter 7
Using Flashback Database
7-22

Part III
Backing Up and Archiving Data
The chapters in this part describe how to use the RMAN utility to perform advanced
backup and recovery operations, and explain RMAN performance tuning and
troubleshooting.
This part contains these chapters:
•RMAN Backup Concepts
•Backing Up the Database
•Backing Up the Database: Advanced Topics

8
RMAN Backup Concepts
This chapter describes the general concepts that you must understand to make any
type of RMAN backup. This chapter contains the following topics:
•About Consistent and Inconsistent RMAN Backups
•About Online Backups and Backup Mode
•About Backup Sets
•About RMAN Image Copies
•About Multiple Copies of RMAN Backups
•About RMAN Control File and Server Parameter File Autobackups
•About RMAN Incremental Backups
•About Backup Retention Policies
8.1 About Consistent and Inconsistent RMAN Backups
Use the RMAN
BACKUP
command to create both consistent and inconsistent backups.
The RMAN
BACKUP
command supports backing up the following types of files:
•Data files and control files
•Server parameter file
•Archived redo logs
•RMAN backups
Although the database depends on other types of files, such as network configuration
files, password files, and the contents of the Oracle home, you cannot back up these
files with RMAN. Likewise, some features of Oracle Database, such as external tables,
may depend upon files other than the data files, control files, and redo log. RMAN
cannot back up these files. Use general-purpose backup software such as Oracle
Secure Backup to protect files that RMAN does not support.
When you execute the
BACKUP
command in RMAN, the output is always either one or
more backup sets or one or more image copies. A backup set is an RMAN-specific
proprietary format, whereas an image copy is a bit-for-bit copy of a file. By default,
RMAN creates backup sets.
See Also:
•About Consistent RMAN Backups
•About Inconsistent RMAN Backups
8-1

8.1.1 About Consistent RMAN Backups
A consistent backup occurs when the database is in a consistent state. You can use
the
BACKUP
command to make consistent backups of the database.
A database is in a consistent state after being shut down with the
SHUTDOWN
NORMAL
,
SHUTDOWN IMMEDIATE
, or
SHUTDOWN TRANSACTIONAL
commands. A consistent shutdown
guarantees that all redo has been applied to the data files. If you mount the database
and make a backup at this point, then you can restore the database backup later and
open it without performing media recovery. But you will, of course, lose all transactions
that occurred after the backup was created.
8.1.2 About Inconsistent RMAN Backups
Any database backup that is not consistent is an inconsistent backup. A backup made
when the database is open is inconsistent, as is a backup made after an instance
failure or
SHUTDOWN ABORT
command.
When a database is restored from an inconsistent backup, Oracle Database must
perform media recovery before the database can be opened, applying changes from
the redo logs that took place after the backup was created.
Note:
RMAN does not permit you to make inconsistent backups when the database
is in
NOARCHIVELOG
mode. If you employ user-managed backup techniques for
a
NOARCHIVELOG
database, then you must not make inconsistent backups of
this database.
If the database runs in
ARCHIVELOG
mode, and you back up the archived redo logs and
data files, inconsistent backups can be the foundation for a sound backup and
recovery strategy. Inconsistent backups offer superior availability because you do not
have to shut down the database to make backups that fully protect the database.
8.2 About Online Backups and Backup Mode
You can create RMAN backups or user-managed backups.
When performing a user-managed backup of an online tablespace or database, an
operating system utility can back up a data file at the same time that the database
writer (DBWR) is updating the file. It is possible for the utility to read a block in a half-
updated state, so that the block that is copied to the backup media is updated in its
first half, while the second half contains older data. This type of logical corruption is
known as a fractured block, that is, a block that is not consistent with an SCN. If this
backup must be restored and the block requires recovery, then recovery fails because
the block is not usable.
For third-party snapshot technologies, you must use one of the following techniques to
eliminate the risk of creating fractured blocks:
Chapter 8
About Online Backups and Backup Mode
8-2

•Ensure that the snapshot technology complies with Oracle requirements for online
backups
•Take the database or data files offline
•Place the database in backup mode before using a third-party snapshot backup
See Also:
•Making Backups with Third-Party Snapshot Technologies.
•Recovery Using Storage Snapshot Optimization
Unlike user-managed tools, RMAN does not require extra logging or backup mode
because it knows the format of data blocks. RMAN is guaranteed not to back up
fractured blocks. During an RMAN backup, a database server session reads each data
block and checks whether it is fractured by comparing the block header and footer. If a
block is fractured, then the session rereads the block. If the same fracture is found,
then the block is considered permanently corrupt. Also, RMAN does not need to freeze
the data file header checkpoint because it knows the order in which the blocks are
read, which enables it to capture a known good checkpoint for the file.
See Also:
Making User-Managed Backups of Online Tablespaces and Data Files to
learn how to back up online tablespaces when not using RMAN
8.3 About Backup Sets
When you execute the
BACKUP
command in RMAN, you create one or more backup
sets or image copies. By default, RMAN creates backup sets regardless of whether
the destination is disk or a media manager.
Note:
Data file backup sets are typically smaller than data file image copies and
take less time to write.
This section contains the following topics:
•About Backup Sets and Backup Pieces
•About RMAN Block Compression for Backup Sets
•About Binary Compression for RMAN Backup Sets
•About RMAN Backup Undo Optimization
•About Encryption for RMAN Backup Sets
Chapter 8
About Backup Sets
8-3

•About File Names for RMAN Backup Pieces
•About Number and Size of RMAN Backup Pieces
•About Number and Size of RMAN Backup Sets
•About Multiplexed RMAN Backup Sets
•About RMAN Proxy Copies
8.3.1 About Backup Sets and Backup Pieces
RMAN can store backup data in a logical structure called a backup set, which is the
smallest unit of an RMAN backup.
A backup set contains the data from one or more data files, archived redo logs, control
files, or server parameter file. Backup sets, which are only created and accessed
through RMAN, are the only form in which RMAN can write backups to media
managers such as tape drives and tape libraries.
A backup set contains one or more binary files in an RMAN-specific format. Each of
these files is known as a backup piece. A backup set can contain multiple data files.
For example, you can back up 10 data files into a single backup set consisting of a
single backup piece. In this case, RMAN creates one backup piece as output. The
backup set contains only this backup piece.
If you specify the
SECTION SIZE
parameter on the
BACKUP
command, then RMAN
produces a multisection backup. This is a backup of a single large file, produced by
multiple channels in parallel, each of which produces one backup piece. Each backup
piece contains one file section of the file being backed up.
For non-multisection backups, RMAN only records backup sets in the repository that
complete successfully. There is no such thing as a partial backup set. This differs from
an unsuccessful multisection backup, where it is possible for RMAN metadata to
contain a record for a partial backup set. In the latter case, you must use the
DELETE
command to delete the partial backup set.
Note:
RMAN never considers partial backups as candidates for restore and
recovery.
See Also:
Backing Up the Database
8.3.2 About RMAN Block Compression for Backup Sets
RMAN can use block compression when creating backup sets.
The following types of block compression are available:
Chapter 8
About Backup Sets
8-4

•Unused Block Compression (Supports disk backup and Oracle Secure Backup
tape backup)
•Null Block Compression (Supports all backups)
RMAN block compression is not traditional binary compression. Rather, it is a set of
techniques that RMAN uses to altogether avoid backing up certain blocks that are not
needed in this backup.
8.3.2.1 About Unused Block Compression
When employing unused block compression, RMAN skips reading, and backing up,
any database blocks that are not currently allocated to some database object. This is
regardless of whether those blocks had previously been allocated.
So if a database table is dropped, RMAN will not back up the space that was occupied
by that table until new objects are created in that space.
Unused block compression is used automatically when the following conditions are
true:
•The
COMPATIBLE
initialization parameter is set to 10.2 or higher.
•There are currently no guaranteed restore points defined for the database.
•The data file is locally managed.
•The data file is being backed up to a backup set as part of a full backup or a level
0 incremental backup.
•The backup set is created on disk, or Oracle Secure Backup is the media
manager.
8.3.2.2 About Null Block Compression
When employing null block compression, RMAN omits from its output any block that
has never contained data.
Null block compression is always used with level 0 or full backups that are created in
backup set format.
8.3.3 About Binary Compression for RMAN Backup Sets
RMAN supports binary compression of backup sets. Binary compression is only
enabled when you specify
AS COMPRESSED BACKUPSET
in the
BACKUP
command, or one-
time with the
CONFIGURE DEVICE TYPE [DISK | SBT] BACKUP TYPE TO COMPRESSED BACKUPSET
command.
You have two binary compression options:
•You can use the
BASIC
compression algorithm, which does not require the Oracle
Advanced Compression option. This setting offers a compression ratio comparable
to
MEDIUM
, at the expense of additional CPU consumption.
•If you have enabled the Oracle Advanced Compression option, you can choose
from the compression levels outlined in "About Oracle Advanced Compression
Option".
Chapter 8
About Backup Sets
8-5

See Also:
•Configuring Compression Options
•Oracle Database Backup and Recovery Reference to learn about
BACKUP
AS BACKUPSET
and
CONFIGURE COMPRESSION ALGORITHM
8.3.4 About RMAN Backup Undo Optimization
In backup undo optimization, RMAN excludes undo not needed for recovery of a
backup, that is, for transactions that have been committed.
Backup undo optimization works for disk backups and Oracle Secure Backup tape
backups. Unlike backup optimization, backup undo optimization is not configurable.
8.3.5 About Encryption for RMAN Backup Sets
RMAN supports backup encryption for backup sets. You can use keystore-based
transparent encryption, password-based encryption, or both.
You can use the
CONFIGURE ENCRYPTION
command to configure persistent transparent
encryption. Use the
SET ENCRYPTION
command at the RMAN session level to specify
password-based encryption.
Note:
Keystore-based encryption is more secure than password-based encryption
because no passwords are involved. Use password-based encryption only
when it is absolutely necessary because your backups must be
transportable.
To create encrypted backups on disk with RMAN, the database must use the
Advanced Security Option. For encrypted RMAN backups directly to tape, the Oracle
Secure Backup SBT is the only supported interface.
See Also:
•Configuring Backup Encryption
•Encrypting RMAN Backups
8.3.6 About File Names for RMAN Backup Pieces
You can either let RMAN determine a unique name for backup pieces or use the
FORMAT
clause to specify a name.
Chapter 8
About Backup Sets
8-6

If you do not specify the
FORMAT
parameter, then RMAN automatically generates a
unique file name with the
%U
substitution variable in the default backup location.
An example of RMAN generating an SBT backup piece name by
%U
is:
2i1nk47_1_1
An example of a non- Oracle Managed File (OMF) backup piece on disk is:
/backups/TEST/2i1nk47_1_1
The
FORMAT
clause supports substitution variables other than
%U
for generating unique
file names. For example, you can use
%d
to generate the name of the database,
%I
for
the DBID,
%t
for the time stamp, and so on.
You can specify up to four
FORMAT
parameters. If you specify multiple
FORMAT
parameters, then RMAN uses the multiple
FORMAT
parameters only when you specify
multiple copies. You can create multiple copies by using the
BACKUP ... COPIES
,
SET
BACKUP COPIES
, or
CONFIGURE ... BACKUP COPIES
commands.
Note:
If you use a media manager, then check your vendor documentation for
restrictions on
FORMAT
, such as the size of the name, the naming conventions,
and so on.
See Also:
•Specifying a Format for RMAN Backups
•Oracle Database Backup and Recovery Reference for descriptions of the
FORMAT
clause and the substitution variables
8.3.7 About Number and Size of RMAN Backup Pieces
By default a backup set contains one backup piece. To restrict the size of each backup
piece, specify the
MAXPIECESIZE
option of the
CONFIGURE CHANNEL
or
ALLOCATE CHANNEL
commands.
The
MAXPIECESIZE
option limits backup piece size to the specified number of bytes. If
the total size of the backup set is greater than the specified backup piece size, then
RMAN creates multiple physical pieces to hold the backup set contents.
You can use this option for media managers that cannot manage a backup piece that
spans multiple tapes. For example, if a tape can hold 10 GB, but the backup set being
created must hold 80 GB of data, then you must instruct RMAN to create backup
pieces of 10 GB, small enough to fit on the tapes used with the media manager. In this
case, the backup set media consists of eight tapes. Media managers supporting SBT
2.0 can return a value to RMAN indicating the largest supported backup piece size,
which RMAN uses in planning backup activities.
Chapter 8
About Backup Sets
8-7

If you specify the
SECTION SIZE
parameter on the
BACKUP
command, then RMAN can
create a multisection backup. In this case, a single backup set can contain multiple
backup pieces, each containing a file section. The purpose of multisection backups is
to enable multiple channels to back up a large file in parallel.
See Also:
•Configuring the Maximum Size of Backup Pieces
•Oracle Database Backup and Recovery Reference for
ALLOCATE
CHANNEL
syntax
•Oracle Database Backup and Recovery Reference for
CONFIGURE
syntax
8.3.8 About Number and Size of RMAN Backup Sets
You use the
backupSpec
clause of the
BACKUP
command to specify the objects to be
backed up. Each
backupSpec
clause produces at least one backup set.
The total number and size of backup sets depends mostly on an internal RMAN
algorithm. However, you can influence RMAN behavior with the
MAXSETSIZE
parameter
in the
CONFIGURE
or
BACKUP
command. By limiting the size of the backup set, the
parameter indirectly limits the number of files in the set and can possibly force RMAN
to create additional backup sets. Also, you can specify
BACKUP ... FILESPERSET
to
specify the maximum number of files in each backup set.
See Also:
•About Backup Set Size
•Tuning RMAN Performance to learn about RMAN buffer management
•Oracle Database Backup and Recovery Reference to learn the syntax
for the
backupSpec
clause
8.3.9 About Multiplexed RMAN Backup Sets
When creating backup sets, RMAN can simultaneously read multiple files from disk
and then write their blocks into the same backup set. For example, RMAN can read
from two data files simultaneously, and then combine the blocks from these data files
into a single backup piece. The combination of blocks from multiple files is called
backup multiplexing.
Image copies, by contrast, are never multiplexed.
Chapter 8
About Backup Sets
8-8
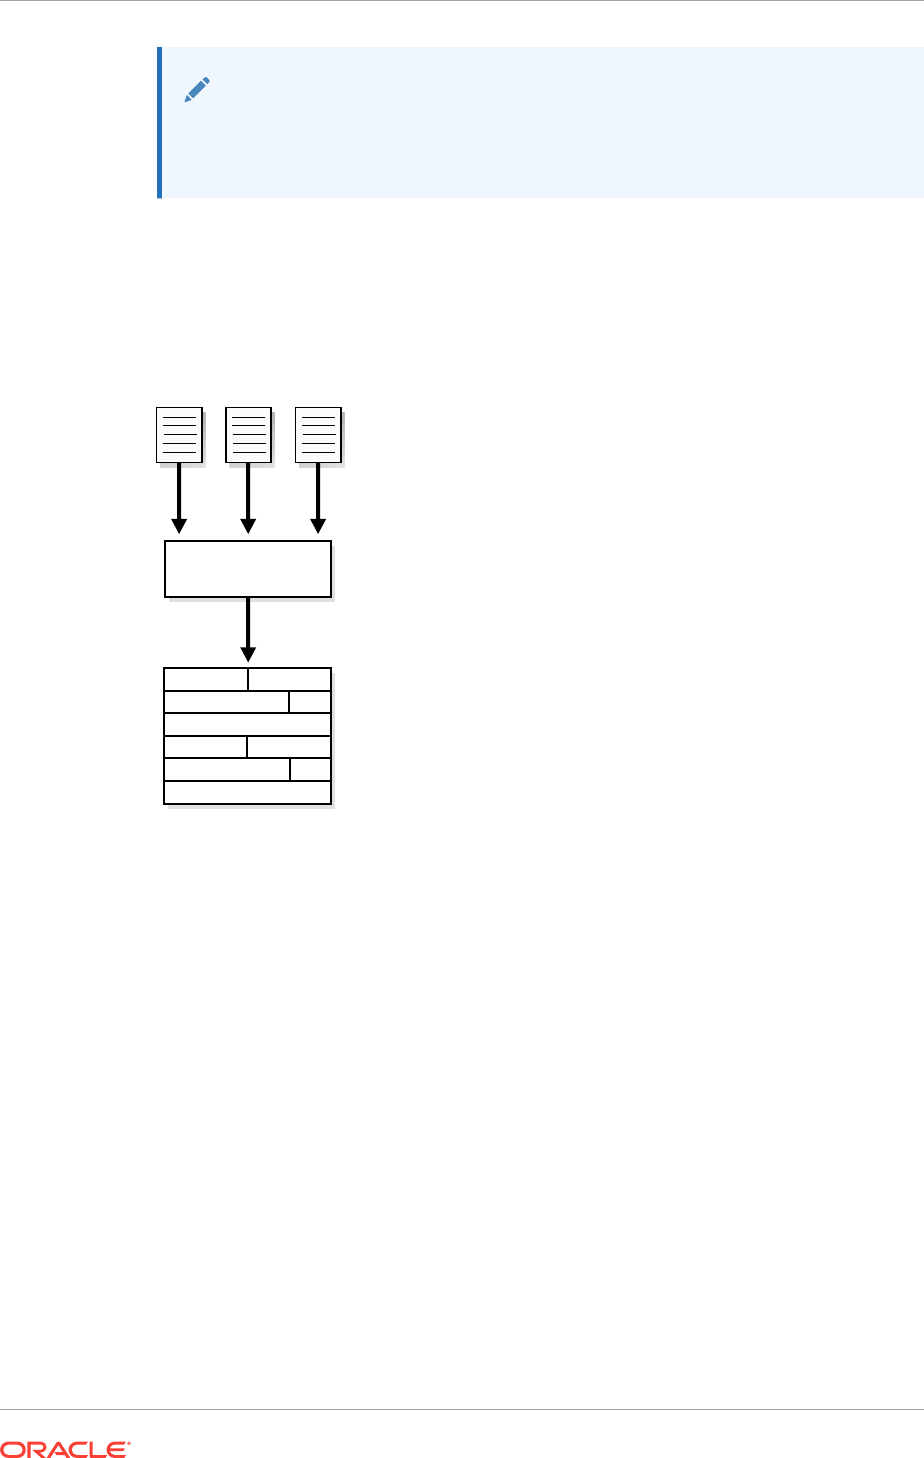
Note:
If RMAN creates a multisection backup of a data file, then the data file is not
multiplexed with any other data file or file section.
As Figure 8-1 illustrates, RMAN can back up three data files into a backup set that
contains only one backup piece. This backup piece contains the intermingled data
blocks of the three input data files.
Figure 8-1 Data File Multiplexing
Server session
File 2
Backup set
File 3File 1
1 2
3 1
2
3 1
2 3
1
RMAN multiplexing is determined by several factors. For example, the
FILESPERSET
parameter of the
BACKUP
command determines how many data files to put in each
backup set. The
MAXOPENFILES
parameter of
ALLOCATE CHANNEL
or
CONFIGURE CHANNEL
defines how many data files RMAN can read from simultaneously. The basic
multiplexing algorithm is as follows:
•Number of files in each backup set
This number is the minimum of the
FILESPERSET
setting and the number of files
read by each channel. The
FILESPERSET
default is 64.
•The level of multiplexing
This is the number of input files simultaneously read and then written into the
same backup piece. The level of multiplexing is the minimum of
MAXOPENFILES
and
the number of files in each backup set. The
MAXOPENFILES
default is 8.
Suppose that you back up 12 data files with one channel when
FILEPERSET
is set to 4.
The level of multiplexing is the lesser of this number and 8. Thus, the channel
simultaneously writes blocks from 4 data files into each backup piece.
Now suppose that you back up 50 data files with one channel. The number of files in
each backup set is 50. The level of multiplexing is the lesser of this number and 8.
Chapter 8
About Backup Sets
8-9

Thus, the channel simultaneously writes blocks from 8 data files into each backup
piece.
RMAN multiplexing of backup sets is different from media manager multiplexing. One
type of media manager multiplexing occurs when the media manager writes the
concurrent output from multiple RMAN channels to a single sequential device. Another
type occurs when a backup mixes database files and non-database files on the same
tape.
Note:
Oracle recommends that you never use media manager multiplexing for
RMAN backups.
See Also:
•Allocation of Input Disk Buffers to learn how multiplexing affects
allocation of disk buffers during backups
•Oracle Database Backup and Recovery Reference for
BACKUP
syntax
8.3.10 About RMAN Proxy Copies
During a proxy copy, RMAN turns over control of the data transfer to a media manager
that supports this feature. Proxy copy can only be used with media managers that
support it and cannot be used with channels of type
DISK
. The
PROXY
option of the
BACKUP
command specifies that a backup is a proxy copy.
For each file that you attempt to back up with the
BACKUP
PROXY
command, RMAN
queries the media manager to determine whether it can perform a proxy copy. If the
media manager cannot proxy copy the file, then RMAN backs up the file as if the
PROXY
option had not been used. (Use the
PROXY
ONLY
option to force RMAN to fail if a proxy
copy cannot be performed.)
Control files are never backed up with proxy copy. If the
PROXY
option is specified on an
operation backing up a control file, then it is silently ignored for the purposes of
backing up the control file.
See Also:
•Oracle Database Reference for more information about the
V$PROXY_DATAFILE
view
•Oracle Database Reference for more information about the
V$PROXY_ARCHIVEDLOG
view
•Oracle Database Backup and Recovery Reference for the
BACKUP
command and the
PROXY
option
Chapter 8
About Backup Sets
8-10

8.4 About RMAN Image Copies
An image copy is an exact copy of a single data file, archived redo log file, or control
file.
Image copies are not stored in an RMAN-specific format. They are identical to the
results of copying a file with operating system commands. RMAN can use image
copies during RMAN restore and recover operations, and you can also use image
copies with non-RMAN restore and recovery techniques.
This section contains the following topics:
•About RMAN-Created Image Copies
•About User-Managed Image Copies
8.4.1 About RMAN-Created Image Copies
To create image copies and have them recorded in the RMAN repository, you run the
RMAN
BACKUP
AS
COPY
command.
Alternatively, you can configure the default backup type for disk as image copies. A
database server session is used to create the copy. The server session also performs
actions such as validating the blocks in the file and recording the image copy in the
RMAN repository.
As with backup pieces,
FORMAT
variables are used to specify the names of image
copies. The default format
%U
, which was explained in "About File Names for RMAN
Backup Pieces", is defined differently for image copies. The following example shows
the name for data file
2
generated by
%U
:
/d1/oracle/work/orcva/RDBMS/datafile/o1_mf_sysaux_2qylngm3_.dbf
When creating image copies, you can also name the output copies with the
DB_FILE_NAME_CONVERT
parameter of the
BACKUP
command. This parameter works
identically to the
DB_FILE_NAME_CONVERT
initialization parameter. Pairs of file name
prefixes are provided to change the names of the output files. If a file is not converted
by any of the pairs, then RMAN uses the
FORMAT
specification: if no
FORMAT
is specified,
then RMAN uses the default format
%U
.
Example 8-1 Specifying File Names with DB_FILE_NAME_CONVERT
This example copies the data files whose file name is prefixed with
/maindisk/oradata/
users
so that they are prefixed with
/backups/users_ts
.
BACKUP AS COPY
DB_FILE_NAME_CONVERT ('/maindisk/oradata/users',
'/backups/users_ts')
TABLESPACE users;
If you run a
RESTORE
command, then by default RMAN restores a data file or control file
to its original location by copying an image copy backup to that location. Image copies
are chosen over backup sets because of the extra overhead of reading through an
entire backup set in search of files to be restored.
If you must restore and recover a current data file, and if you have an image copy
available on disk, then you do not need to have RMAN copy the image copy back to its
Chapter 8
About RMAN Image Copies
8-11

old location. Instead, you can use the image copy in place as a replacement for the
data file to be restored. "Performing Complete Recovery After Switching to a Copy"
explains how to perform this task.
See Also:
•Configuring the Default Type for Backups: Backup Sets or Copies to
learn how to make either backup sets or image copies the default type of
RMAN backups
•Specifying Backup Set or Copy for an RMAN Backup to Disk
•Oracle Database Backup and Recovery Reference to learn about the
meaning of
%U
for image copies
8.4.2 About User-Managed Image Copies
RMAN can use image copies created by mechanisms outside of RMAN, such as
native operating system file copy commands or third-party utilities that leave image
copies of files on disk. This type of copy is known as a user-managed backup or
operating system backup.
You can use the
CATALOG
command to inspect an existing image copy and enter its
metadata into the RMAN repository. However, the
CATALOG
command does not do the
following:
•Read all blocks in the data file copy to ensure there are no corruptions
•Guarantee that the image copy was correctly made in backup mode
After you catalog these files, you can use them with the
RESTORE
or
SWITCH
commands
just as you can for RMAN-generated image copies.
Some sites store their data files on mirrored disk volumes, which permit the creation of
image copies by breaking a mirror. After you have broken the mirror, you can notify
RMAN of the existence of a new user-managed copy, thus making it eligible for a
backup. You must notify RMAN when the copy is no longer available by using the
CHANGE
...
UNCATALOG
command.
See Also:
•Making User-Managed Database Backups
•Adding Backup Records to the RMAN Repository to learn how to catalog
data file and archived log image copies
•Making Split Mirror Backups with RMAN
•Oracle Database Backup and Recovery Reference for
CHANGE
syntax
Chapter 8
About RMAN Image Copies
8-12

8.5 About Sparse Backups
You can use the RMAN
BACKUP
command to back up data blocks from sparse data
files, tablespaces containing sparse data files, sparse pluggable databases (PDBs),
and multitenant container databases (CDBs) containing sparse PDBs.
A sparse data file is a logical Oracle object that is created as a shadow of a base data
file object and is stored in a physical storage space known as delta space. For
instance, consider a sparse database
DB0
that is created from a base database
DB
. In a
sparse environment, it is mandatory that the base objects must be read-only. Unlike
the base database, sparse databases are read-write databases. In this case,
DB
, a
read-only database, consists of 5 data files.
DB0
recreates the logical versions of each
of these 5 base data files and assigns a separate delta storage space for each
individual file. When the sparse database
DB0
updates a data block in one of the
sparse data files, only the updated block is logically stored in the delta space of that
modified data file. When you choose to perform a sparse backup on
DB0
, the operation
will copy data only from the delta storage space of the database and the delta space of
the sparse data files. A sparse backup can either be in the backup set format (default)
or the image copy format. RMAN restores sparse data files from sparse backups and
then recovers them from archive and redo logs. You can perform a complete or a
point-in-time recovery on sparse data files.
To perform sparse backup and recovery operations, your database must have the
COMPATIBLE
initialization parameter set to 12.2 or higher.
If your database has the
COMPATIBLE
initialization parameter as 12.2 and you perform a
full or level 0 incremental backup on a non-sparse (normal) data file, then RMAN
performs a traditional full or level 0 incremental backup of the specified data file. On
the other hand, if you perform a full or level 0 incremental backup on a sparse data file,
then RMAN performs a backup only of all the latest changes from the delta storage
space of that particular data file.
For a database with the
COMPATIBLE
initialization parameter less than 12.2, RMAN
continues to perform the backup and recovery operations as before and are not
influenced by the sparseness of a data file.
Sparse backups help in efficiently managing storage space and facilitate faster backup
and recovery.
Note:
The base (read-only) data files in a sparse database are not encrypted.
Ensure that the base data files are stored in a protected storage and
accessed using secured communications.
See Also:
Backing Up Sparse Databases with RMAN
Chapter 8
About Sparse Backups
8-13

8.6 About Preplugin Backups
A preplugin backup is an RMAN backup of a non-CDB or a PDB that was created
before the non-CDB or PDB was plugged in to a different CDB.
The CDB into which the non-CDB or PDB is plugged in is referred to as the destination
CDB. Preplugin backups can be used for PDB restore and recovery operations in
destination CDB. To perform media recovery, all the required archive redo logs must
be included in the preplugin backup.
For preplugin backups to be usable in the destination CDB, metadata about the
preplugin backups must be exported to the RMAN repository of the destination CDB.
When a PDB is unplugged from a source CDB, the required metadata is stored in the
XML file created during the unplug operation. With non-CDBs, metadata required to
make preplugin backups usable in the destination CDB is added to the non-CDB’s
data dictionary using the
DBMS_PDB.EXPORTRMANBACKUP()
procedure.
Preplugin backups are usable only on the destination CDB into which the source non-
CDB or PDB are plugged in. For example, assume that you migrate a PDB from the
CDB
src_cdb
to the CDB
stage_cdb
. Subsequently, you migrate the source PDB from
the CDB
stage_cdb
to the CDB
prod_cdb
. The PDB backups created on the CDB
src_pdb
are accessible to CDB
stage_pdb
. However, the CDB
prod_cdb
can only access
the PDB backups created on the CDB
stage_cdb
, not the PDB backups created on the
CDB
src_cdb
.
See Also:
•Creating Preplugin Backups of PDBs Using RMAN
•Creating a Preplugin Backup of the Whole Database
8.7 About Multiple Copies of RMAN Backups
RMAN enables you to make multiple, identical copies of backups.
Use one of the following ways:
•Duplex backups with the
BACKUP
... COPIES
command, in which case RMAN
creates multiple copies of each backup set
See About Duplexed Backup Sets.
•Back up your files as backup sets or image copies, and then back up the backup
sets or image copies with the RMAN
BACKUP
BACKUPSET
or
BACKUP COPY OF
commands
See About Backups of RMAN Backups.
8.7.1 About Duplexed Backup Sets
When backing up data files, archived redo log files, server parameter files, and control
files into backup pieces, RMAN can create a duplexed backup set, producing up to
Chapter 8
About Preplugin Backups
8-14

four identical copies of each backup piece in the backup set on different backup
destinations with one
BACKUP
command. Duplexing is not supported for backup
operations that produce image copies.
You can use the
COPIES
parameter in the
CONFIGURE
,
SET
, or
BACKUP
commands to
specify duplexing of backup sets when using the
BACKUP
command. RMAN can duplex
backups to either disk or tape, but cannot duplex backups to tape and disk
simultaneously. When backing up to tape, ensure that the number of copies does not
exceed the number of available tape devices.
The
FORMAT
parameter of the
BACKUP
command specifies the destinations for duplexed
backups. The following example creates three copies of the backup of data file 7:
BACKUP DEVICE TYPE DISK COPIES 3 DATAFILE 7
FORMAT '/disk1/%U','?/oradata/%U','?/%U';
RMAN places the first copy of each backup piece in
/disk1
, the second in
?/oradata
,
and the third in the Oracle home. RMAN does not produce three backup sets, each
with a different unique backup set key. Rather, RMAN produces one backup set with a
unique key, and generates three identical copies of each backup piece in the set.
See Also:
•"Configuring Backup Duplexing"
•"Duplexing Backup Sets"
•Oracle Database Backup and Recovery Reference for
CONFIGURE
syntax
•Oracle Database Backup and Recovery Reference for
SET
syntax
8.7.2 About Backups of RMAN Backups
You can use the
BACKUP
command to back up existing backup sets and image copies.
Backing up existing backups enables you to make multiple, identical copies of RMAN
backups.
The following sections provide more information about the methods of creating
backups up backups:
•Backups of Backup Sets
•Backups of Image Copies
8.7.2.1 Backups of Backup Sets
The RMAN
BACKUP BACKUPSET
command backs up backup sets that were created on
disk. The command is a useful way to spread backups among multiple media.
If RMAN discovers that one copy of a backup set is corrupted or missing, then it
searches for other copies of the same backup set. This behavior is similar to the
behavior of RMAN when backing up archived redo logs that exist in multiple archiving
destinations.
Chapter 8
About Multiple Copies of RMAN Backups
8-15

Starting with Oracle Database Release 18c, while backing up backup sets, you can
compress backup sets that were not previously compressed by using the
BACKUP AS
COMPRESSED BACKUPSET
command.
RMAN enables you to create encrypted backups of unencrypted backup sets. Before
you back up the unencrypted backup sets, use the
SET ENCRYPTION FOR DATABASE ON
command to enable encryption. Note that the
SET
command enables encryption for the
current RMAN session. If encryption is not required for subsequent operations, then
turn off encryption for the database.
Example 8-2 Backing Up Backup Sets to Tape
This example shows how you might run the
BACKUP
command weekly as part of the
production backup schedule. In this way, you ensure that all your backups exist on
both disk and tape.
BACKUP DEVICE TYPE DISK AS BACKUPSET
DATABASE PLUS ARCHIVELOG;
BACKUP
DEVICE TYPE sbt
BACKUPSET ALL; # copies backup sets on disk to tape
Note:
Backups to
sbt
that use automatic channels require that you first run the
CONFIGURE
DEVICE
TYPE
sbt
command.
Example 8-3 Managing Space Allocation
You can also use
BACKUP
BACKUPSET
to manage backup space allocation. This example
backs up backup sets that were created more than a week ago from disk to tape, and
then deletes them from disk.
BACKUP
DEVICE TYPE sbt
BACKUPSET COMPLETED BEFORE 'SYSDATE-7'
DELETE INPUT;
DELETE
INPUT
here is equivalent to
DELETE
ALL
INPUT
: RMAN deletes all existing copies of
the backup set. If you duplexed a backup to four locations, then RMAN deletes all four
copies of the pieces in the backup set.
See Also:
"Backing Up RMAN Backups"
8.7.2.2 Backups of Image Copies
You can use the
BACKUP COPY OF
command to back up existing image copies of
database files either as backup sets or as image copies. When using this command,
an image copy of every data file specified in the command must exist. If there are
multiple copies of a data file, then the latest one is used. If you specify a tablespace or
Chapter 8
About Multiple Copies of RMAN Backups
8-16

the whole database, then RMAN issues an error if there are data files in the database
or tablespace for which there are no image copy backups.
8.8 About RMAN Control File and Server Parameter File
Autobackups
Having recent backups of your control file and server parameter file is extremely
valuable in many recovery situations. To ensure that you have backups of these files,
the database supports control file and server parameter file autobackups.
The autobackup occurs independently of any backup of the current control file
explicitly requested as part of your
BACKUP
command. With a control file autobackup,
RMAN can recover the database even if the current control file, recovery catalog, and
server parameter file are inaccessible. Because the path used to store the autobackup
follows a well-known format, RMAN can search for and restore the server parameter
file from that autobackup. After you have started the instance with the restored server
parameter file, RMAN can restore the control file from the autobackup. After you
mount the control file, use the RMAN repository in the mounted control file to restore
the data files.
It is recommended that you turn on control file autobackups. Otherwise, RMAN
database point-in-time recovery (DBPITR) and point-in-time recovery (PITR) for PDBs
may not work effectively when PITR needs to undo data file additions or deletions.
This section contains the following topics:
•When RMAN Performs Control File Autobackups
•How RMAN Performs Control File Autobackups
8.8.1 When RMAN Performs Control File Autobackups
Depending on the configuration of the target database, RMAN can perform
autobackups of the control file and server parameter file.
For non-CDBs, if
CONFIGURE CONTROLFILE AUTOBACKUP
is
ON
, then RMAN automatically
backs up the control file and the current server parameter file (if used to start the
database) after a successful
BACKUP
command. For CDBs and standalone databases
with the
COMPATIBLE
initialization parameter set to 12.0 or higher, by default, the control
file autobackup is turned on.
If the database runs in
ARCHIVELOG
mode, RMAN makes control file autobackups when
a structural change to the database affects the contents of the control file.
Note:
Beginning with Oracle Database Release 11g Release 2, RMAN takes only
one control file autobackup when multiple structural changes contained in a
script (for example, adding tablespaces, altering the state of a tablespace or
data file, adding a new online redo log, renaming a file, and so on) have
been applied.
Chapter 8
About RMAN Control File and Server Parameter File Autobackups
8-17

8.8.2 How RMAN Performs Control File Autobackups
The first channel allocated during the backup job creates the autobackup and places it
into its own backup set. For autobackups after database structural changes, the server
process associated with the structural change makes the backup.
If a server parameter file is in use by the database, then RMAN backs it up in the
same backup set as the control file autobackup. After the autobackup completes, the
database writes a message containing the complete path of the backup piece and the
device type to the alert log located in the Automatic Diagnostic Repository (ADR).
Note:
Control file autobackups are never duplexed.
The control file autobackup file name has a default format of
%F
for all device types, so
that RMAN can determine the file location and restore it without a repository. You can
specify a different format with the
CONFIGURE CONTROLFILE AUTOBACKUP FORMAT
command,
but all autobackup formats must include the
%F
variable. If you do not use the default
format, then during disaster recovery you must specify the format that was used to
generate the autobackups. Otherwise, RMAN cannot restore the autobackup.
See Also:
•Configuring Control File and Server Parameter File Autobackups
•Oracle Database Backup and Recovery Reference for
CONFIGURE
syntax
•Oracle Database Backup and Recovery Reference for
BACKUP
syntax
•Oracle Database Backup and Recovery Reference to learn about the
substitution variable
%F
8.9 About RMAN Incremental Backups
An incremental backup copies only those data blocks that have changed since a
previous backup. You can use RMAN to create incremental backups of data files,
tablespaces, or the whole database.
By default, RMAN makes full backups. A full backup of a data file includes every
allocated block in the file being backed up. A full backup of a data file can be an image
copy, in which case every data block is backed up. It can also be stored in a backup
set, in which case data file blocks not in use may be skipped.
A full backup has no effect on subsequent incremental backups. Image copies are
always full backups because they include every data block in a data file. A backup set
is by default a full backup because it can potentially include every data block in a data
file, although unused block compression means that blocks never used are excluded
and, in some cases, currently unused blocks are excluded (see "About RMAN Block
Compression for Backup Sets").
Chapter 8
About RMAN Incremental Backups
8-18

A full backup cannot be part of an incremental backup strategy; that is, it cannot be the
parent for a subsequent incremental backup.
See Also:
•About Multilevel Incremental Backups
•About the Incremental Backup Algorithm
8.9.1 About Multilevel Incremental Backups
RMAN can create multilevel incremental backups. Each incremental level is denoted
by a value of 0 or 1.
A level 0 incremental backup, which is the base for subsequent incremental backups,
copies all blocks containing data. The only difference between a level 0 incremental
backup and a full backup is that a full backup is never included in an incremental
strategy. Thus, an incremental level 0 backup is a full backup that happens to be the
parent of incremental backups whose level is greater than 0.
A level 1 incremental backup can be either of the following types:
•A differential incremental backup, which backs up all blocks changed after the
most recent incremental backup at level 1 or 0
See About Differential Incremental Backups.
•A cumulative incremental backup, which backs up all blocks changed after the
most recent incremental backup at level 0
See About Cumulative Incremental Backups.
Incremental backups are differential by default.
Incremental backups at level 0 can be either backup sets or image copies, but
incremental backups at level 1 can only be backup sets.
Note:
Cumulative backups are preferable to differential backups when recovery
time is more important than disk space, because fewer incremental backups
must be applied during recovery.
The size of the backup file depends solely upon the number of blocks modified, the
incremental backup level, and the type of incremental backup (differential or
cumulative).
8.9.1.1 About Differential Incremental Backups
In a differential level 1 backup, RMAN backs up all blocks that have changed since the
most recent incremental backup at level 1 (cumulative or differential) or level 0.
Chapter 8
About RMAN Incremental Backups
8-19
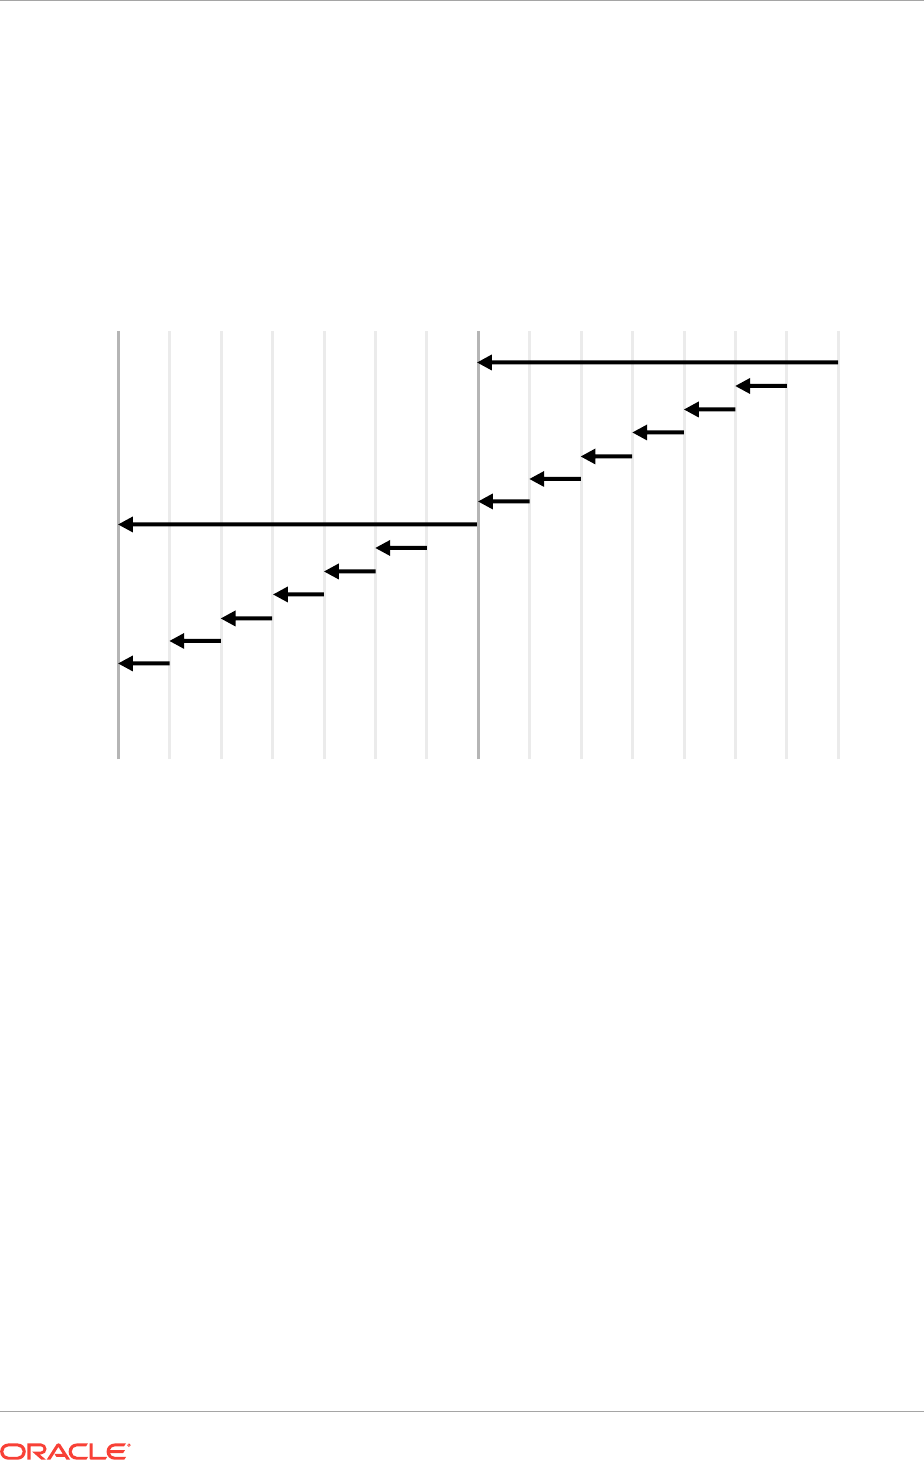
For example, in a differential level 1 backup, RMAN determines which level 1 backup
occurred most recently and backs up all blocks modified after that backup. If no level 1
is available, then RMAN copies all blocks changed since the base level 0 backup.
If no level 0 backup is available in either the current or parent incarnation, then the
behavior varies with the compatibility mode setting. If compatibility is >=10.0.0, RMAN
copies all blocks that have been changed since the file was created. Otherwise, RMAN
generates a level 0 backup.
Figure 8-2 Differential Incremental Backups
Sun
Day
Backup
level
Mon Tues Wed Thur Fri Sat Sun
01111110
Mon Tues Wed Thur Fri Sat Sun
1111110
In the example shown in Figure 8-2, the following activity occurs each week:
•Sunday
An incremental level 0 backup backs up all blocks that have ever been in use in
this database.
•Monday through Saturday
On each day from Monday through Saturday, a differential incremental level 1
backup backs up all blocks that have changed since the most recent incremental
backup at level 1 or 0. The Monday backup copies blocks changed since Sunday
level 0 backup, the Tuesday backup copies blocks changed since the Monday
level 1 backup, and so forth.
8.9.1.2 About Cumulative Incremental Backups
In a cumulative level 1 backup, RMAN backs up all blocks used since the most recent
level 0 incremental backup in either the current or parent incarnation.
Cumulative incremental backups reduce the work needed for a restore operation by
ensuring that you only need one incremental backup from any particular level.
Chapter 8
About RMAN Incremental Backups
8-20
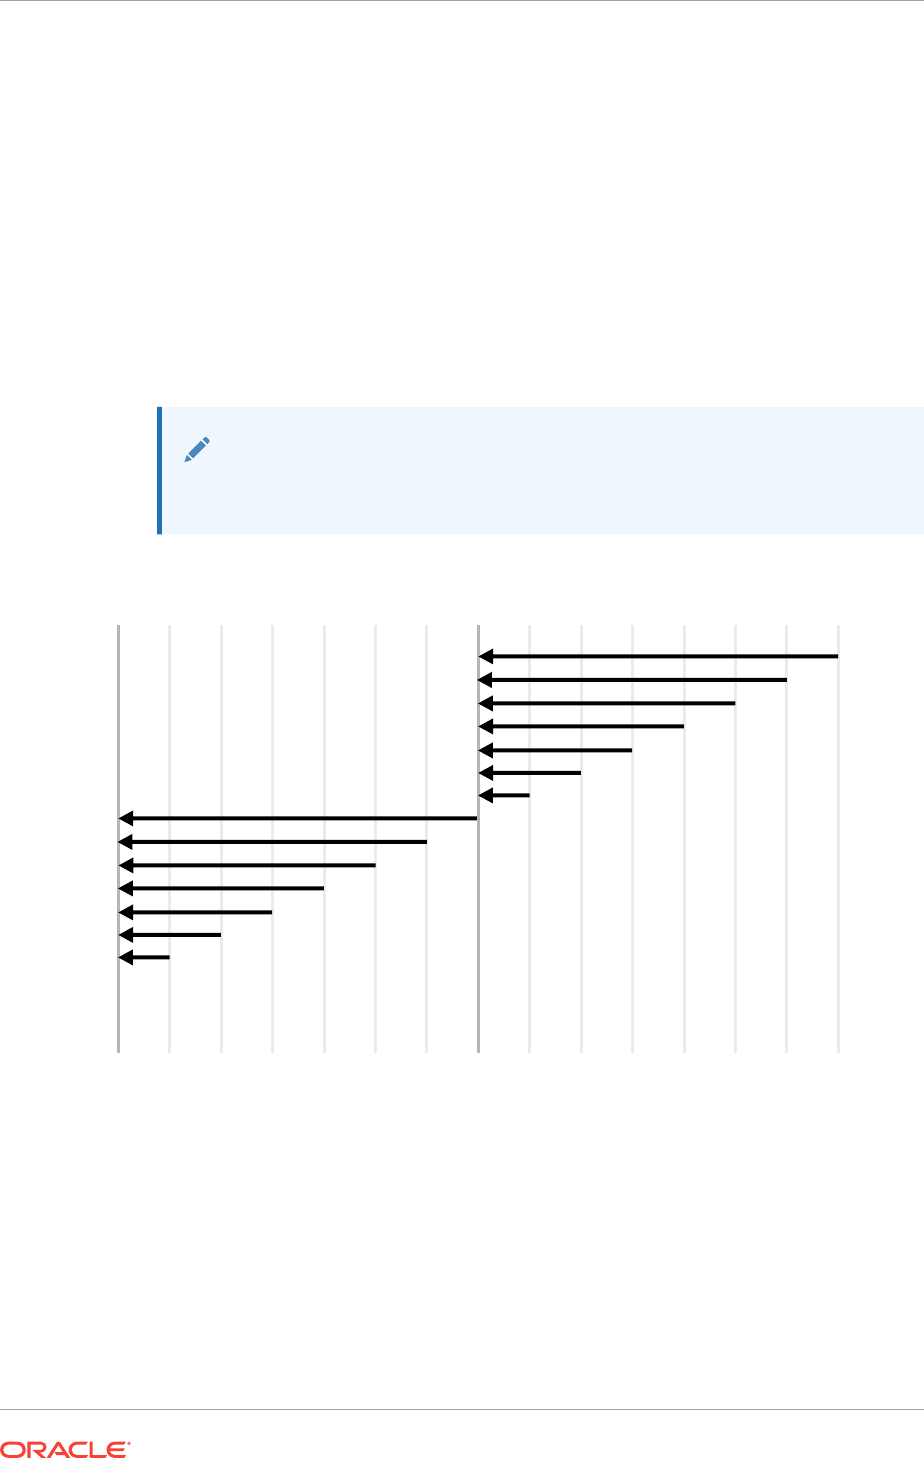
Cumulative backups require more space and time than differential backups because
they duplicate the work done by previous backups at the same level.
In the example shown in Figure 8-3, the following occurs each week:
•Sunday
An incremental level 0 backup backs up all blocks that have ever been in use in
this database.
•Monday - Saturday
A cumulative incremental level 1 backup copies all blocks changed since the most
recent level 0 backup. Because the most recent level 0 backup was created on
Sunday, the level 1 backup on each day Monday through Saturday backs up all
blocks changed since the Sunday backup.
See Also:
Making and Updating RMAN Incremental Backups
Figure 8-3 Cumulative Incremental Backups
Sun
Day
Backup
level
Mon Tues Wed Thur Fri Sat Sun
01111110
Mon Tues Wed Thur Fri Sat Sun
1111110
8.9.2 About Block Change Tracking
The block change tracking feature for incremental backups improves incremental
backup performance by recording changed blocks in each data file in a block change
tracking file.
The block change tracking file is a small binary file stored in the database area. RMAN
tracks changed blocks as redo is generated.
Chapter 8
About RMAN Incremental Backups
8-21

If block change tracking is enabled, then RMAN uses the change tracking file to
identify changed blocks for incremental backups, thus avoiding the need to scan every
block in the data file. RMAN only uses block change tracking when the incremental
level is greater than 0, because a level 0 incremental backup includes all blocks.
See Also:
Using Block Change Tracking to Improve Incremental Backup Performance
8.9.3 About the Incremental Backup Algorithm
The following concepts are essential for understanding the algorithm that RMAN uses
to make incremental backups:
•Checkpoint SCN
Every data file has a data file checkpoint SCN, which you can view in
V$DATAFILE.CHECKPOINT_CHANGE#
. All changes with an SCN lower than this SCN are
guaranteed to be in the file. When a level 0 incremental backup is restored, the
restored data file contains the checkpoint SCN that it had when the level 0 was
created. When a level 1 incremental backup is applied to a file, the checkpoint
SCN of the file is advanced to the checkpoint SCN that the file had when the
incremental level 1 backup was created.
•Incremental start SCN
This SCN applies only to level 1 incremental backups. All blocks whose SCN is
greater than or equal to the incremental start SCN are included in the backup.
Blocks whose SCN is lower than the incremental start SCN are not included in the
backup. The incremental start SCN is most often the checkpoint SCN of the parent
of the level 1 backup.
•Block SCN
Every data block in a data file records the SCN at which the most recent change
was made to the block.
When RMAN makes a level 1 incremental backup of a file, RMAN reads the file,
examines the SCN of every block, and backs up blocks whose SCN is greater than or
equal to the incremental start SCN for this backup. If the backup is differential, then
the incremental start SCN is the checkpoint SCN of the most recent level 1 backup. If
the backup is cumulative, then the incremental start SCN is the checkpoint SCN of the
most recent level 0 backup.
When block change tracking is enabled, RMAN uses bitmaps to avoid reading blocks
that have not changed during the range from incremental start SCN to checkpoint
SCN. RMAN still examines every block that is read and uses the SCN in the block to
decide which blocks to include in the backup.
One consequence of the incremental backup algorithm is that RMAN applies all blocks
containing changed data during recovery, even if the change is to an object created
with the
NOLOGGING
option. Thus, if you restore a backup made before
NOLOGGING
changes were made, then incremental backups are the only way to recover these
changes.
Chapter 8
About RMAN Incremental Backups
8-22

8.9.4 About Recovery with Incremental Backups
During media recovery, RMAN examines the restored files to determine whether it can
recover them with an incremental backup. If it has a choice, then RMAN always
chooses incremental backups over archived redo logs because applying changes at a
block level is faster than applying redo.
RMAN does not need to restore a base incremental backup of a data file to apply
incremental backups to the data file during recovery. For example, you can restore
data file image copies and recover them with incremental backups.
See Also:
About Selection of Incremental Backups and Archived Redo Logs
8.9.5 About the Incremental-Forever Backup Strategy for Recovery
Appliance
The incremental-forever backup strategy eliminates the need for creating recurring full
backups when backing up to Zero Data Loss Recovery Appliance (Recovery
Appliance). Although Recovery Appliance supports other RMAN backup strategies, the
recommended method for ongoing backups is the incremental-forever backup
strategy.
With the incremental-forever backup strategy, you need to create only one initial level
0 full backup and subsequent level 1 incremental backups. The initial backup and the
subsequent incrementals must be RMAN backup sets and not image copies.
Note that the Recovery Appliance incremental-forever backup strategy is different from
the incrementally updated backup strategy in a conventional RMAN setup. With
RMAN, incrementally updated backups use an initial image copy, followed by
incremental backups which are eventually merged into the full backup. Therefore,
there is always at least one full image copy, a few incremental backups, and some
archived redo logs.
See Also:
•About Real-time Redo Transport for Recovery Appliance
•Zero Data Loss Recovery Appliance Protected Database Configuration
Guide for information about the incremental-forever backup strategy
8.10 About Backup Retention Policies
You can use the
CONFIGURE RETENTION POLICY
command to create a persistent and
automatic backup retention policy.
Chapter 8
About Backup Retention Policies
8-23

When a backup retention policy is in effect, RMAN considers a backup of data files or
control files as an obsolete backup, that is, no longer needed for recovery, according
to criteria specified in the
CONFIGURE
command. You can use the
REPORT OBSOLETE
command to view obsolete files and the
DELETE OBSOLETE
command to delete them.
As you produce backups over time, older backups become obsolete as they are no
longer needed to satisfy the retention policy. RMAN can identify the obsolete files for
you, but it does not automatically delete them. You must use the
DELETE
OBSOLETE
command to delete files that are no longer needed to satisfy the retention policy.
If a fast recovery area is configured, then the database automatically deletes files that
are either obsolete or backed up to tape when more recovery area space is needed for
new files. The disk quota rules are distinct from the retention policy rules, but the
database never deletes files in violation of the retention policy to satisfy the disk quota.
Refer to "Responding to a Full Fast Recovery Area".
A backup is obsolete when
REPORT
OBSOLETE
or
DELETE
OBSOLETE
determines, based on
the user-defined retention policy, that it is not needed for recovery. A backup is
considered an expired backup only when RMAN performs a crosscheck and cannot
find the file. In short, obsolete means a file is not needed, whereas expired means it is
not found.
A backup retention policy applies only to full or level 0 data file and control file
backups. For data file copies and proxy copies, if RMAN determines that the copy or
proxy copy is not needed, then the copy or proxy copy can be deleted. For data file
backup sets, RMAN cannot delete the backup set until all data file backups within the
backup set are obsolete.
The retention policy is not responsible for deleting or rendering obsolete archived redo
logs and incremental level 1 backups. Rather, these files become obsolete when no
full backups exist that need them. Besides affecting full or level 0 data file and control
file backups, the retention policy affects archived redo logs and level 1 incremental
backups. First, RMAN decides which data file and control file backups are obsolete.
Then, RMAN considers as obsolete all archived logs and incremental level 1 backups
that are not needed to recover the oldest data file or control file backup that must be
retained.
Note:
RMAN cannot implement an automatic retention policy if backups are
deleted by non-RMAN techniques, for example, through the media
manager's tape retention policy. The media manager must never expire a
tape until all RMAN backups on that tape have been removed from the
media manager's catalog.
There are two mutually exclusive options for implementing a retention policy:
redundancy and recovery window.
This section contains the following topics:
•About the Recovery Window
•About Backup Redundancy
•About Batch Deletes of Obsolete Backups
Chapter 8
About Backup Retention Policies
8-24

•About Backup Retention Policy and Fast Recovery Area Deletion Rules
8.10.1 About the Recovery Window
A recovery window is a period that begins with the current time and extends backward
in time to the point of recoverability. The point of recoverability is the earliest time for a
hypothetical point-in-time recovery, that is, the earliest point to which you can recover
following a media failure.
For example, if you implement a recovery window of 1 week, then RMAN retains full
backups and required incremental backups and archived logs so that the database
can be recovered up to 7 days in the past. You implement this retention policy as
follows:
CONFIGURE RETENTION POLICY TO RECOVERY WINDOW OF 7 DAYS;
This command ensures that for each data file, one backup that is older than the point
of recoverability is retained. For example, if the recovery window is
7
, then there must
always exist one backup of each data file that satisfies the following condition:
SYSDATE - BACKUP CHECKPOINT TIME >= 7
All backups older than the most recent backup that satisfied this condition are
obsolete.
Assume the retention policy illustrated in Figure 8-4. The retention policy has the
following aspects:
•The recovery window is 7 days.
•Database backups are scheduled every two weeks on these days:
–January 1
–January 15
–January 29
–February 12
•The database runs in
ARCHIVELOG
mode, and archived logs are saved on disk only if
needed for the retention policy.
Chapter 8
About Backup Retention Policies
8-25
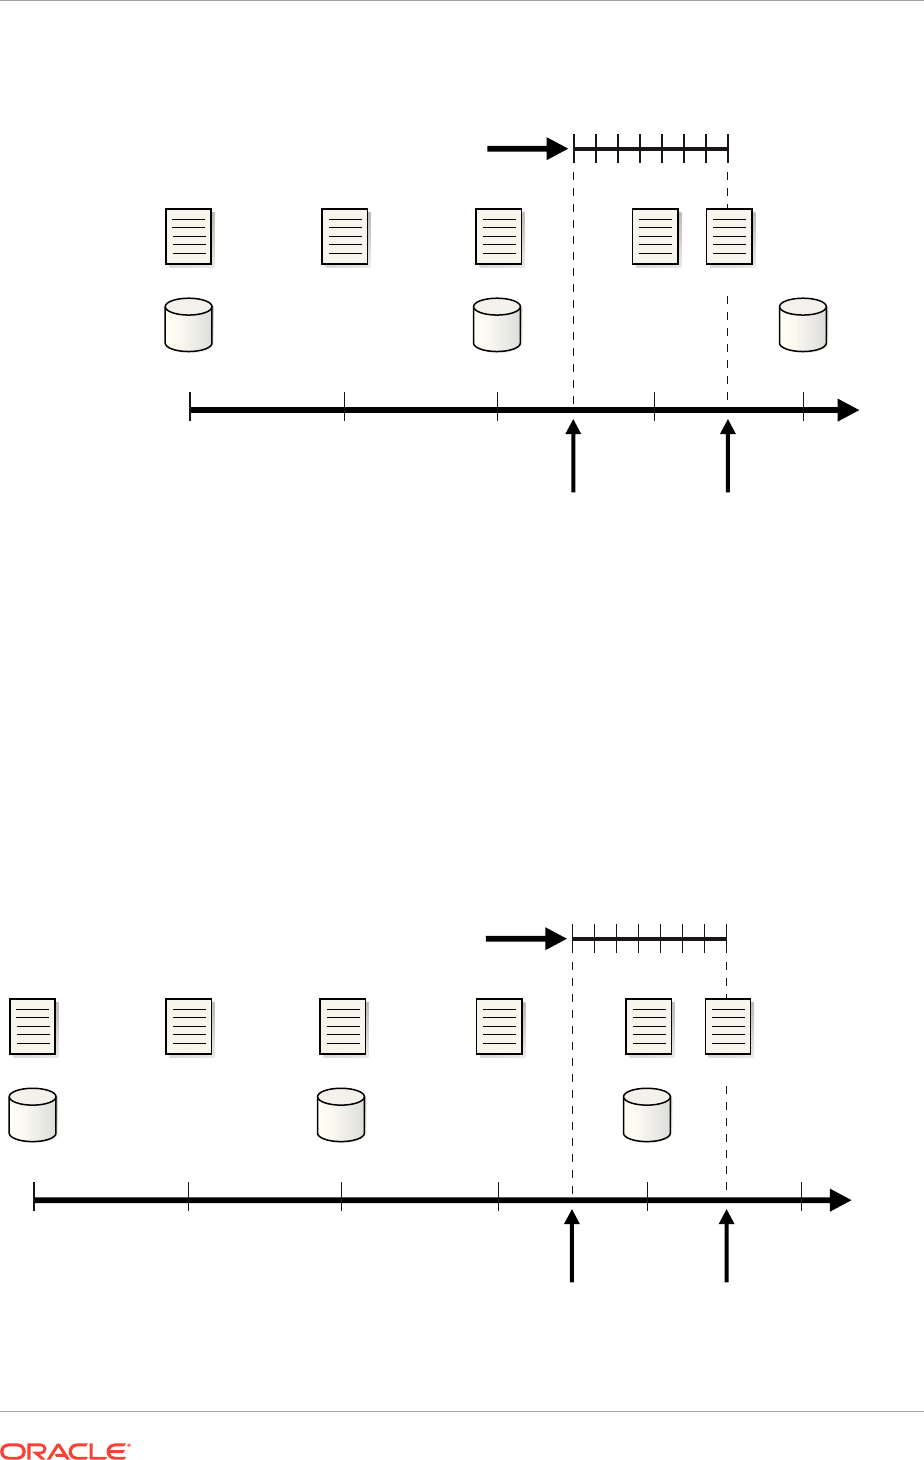
Figure 8-4 Recovery Window, Part 1
Jan 1 Jan 8 Jan 15 Jan 22 Jan 29
Recovery Window = 7
Backup Backup
Log 100
Jan 16
Point of
Recoverability
Jan 23
Current
Time
Log 250 Log 750 Log 850Log 500
Backup
As illustrated in Figure 8-4, the current time is January 23 and the point of
recoverability is January 16. Hence, the January 15 backup is needed for recovery,
and so are the archived logs from log sequence 500 through 850. The logs before 500
and the January 1 backup are obsolete because they are not needed for recovery to a
point within the window.
Assume the same scenario a week later, as depicted in Figure 8-5.
Figure 8-5 Recovery Window, Part 2
Jan 1 Jan 8 Jan 15 Jan 22 Jan 29
Recovery Window = 7
Feb 5
Backup Backup
Log 100
Jan 23
Point of
Recoverability
Jan 30
Current
Time
Log 250 Log 750 Log 1150Log 500
Backup
Log 1000
Chapter 8
About Backup Retention Policies
8-26

In this scenario, the current time is January 30 and the point of recoverability is
January 23. Note how the January 15 backup is not obsolete even though a more
recent backup (January 29) exists in the recovery window. This situation occurs
because restoring the January 29 backup does not enable you to recover to the
earliest time in the window, January 23. To ensure recoverability to any point in the
window, you must save the January 15 backup and all archived logs from sequence
500 to 1150.
See Also:
Configuring a Recovery Window-Based Retention Policy
8.10.2 About Backup Redundancy
In some cases using a recovery window can complicate disk space planning because
the number of backups that must be retained is not constant and depends on the
backup schedule. In contrast, a redundancy-based retention policy specifies how
many backups of each data file must be retained.
For example, you can configure a redundancy of 2 as follows:
CONFIGURE RETENTION POLICY TO REDUNDANCY 2;
The default retention policy is configured to
REDUNDANCY
1
.
See Also:
Configuring a Redundancy-Based Retention Policy
8.10.3 About Batch Deletes of Obsolete Backups
You can run the
REPORT OBSOLETE
command to determine which backups are currently
obsolete according to the retention policy.
A companion command,
DELETE OBSOLETE
, deletes all files that are obsolete according
to the retention policy. You can run
DELETE OBSOLETE
periodically to minimize space
wasted by storing obsolete backups. For example, you can run
DELETE OBSOLETE
in a
weekly script.
You can also override the configured retention policy by specifying the
REDUNDANCY
or
RECOVERY
WINDOW
options on the
REPORT
or
DELETE
commands. Using
DELETE OBSOLETE
with
a recovery window shorter than the configured recovery window effectively reduces
the window of recoverability. For example, if the configured window is 14 days, but you
execute
DELETE OBSOLETE RECOVERY WINDOW OF 7 DAYS
, then you no longer have the
ability to recover to a time between 7 and 14 days ago.
Chapter 8
About Backup Retention Policies
8-27

See Also:
•Reporting on RMAN Operationsto learn how to generate reports and
delete backups
•Oracle Database Backup and Recovery Reference for
DELETE
syntax
•Oracle Database Backup and Recovery Reference for
REPORT
syntax
8.10.4 About Backup Retention Policy and Fast Recovery Area
Deletion Rules
If you configure a fast recovery area, then the database uses an internal algorithm to
select files in the fast recovery area that are no longer needed to meet the configured
retention policy.
The retention policy is never violated when determining which files to delete from the
fast recovery area to satisfy the disk quota rules. These backups have status
OBSOLETE
and are eligible for deletion to satisfy the disk quota rules.
The RMAN status
OBSOLETE
is always determined in reference to a retention policy. For
example, if a database backup is considered
OBSOLETE
in the RMAN repository, then it
is because it is either not needed for recovery to a point within the recovery window, or
it is redundant.
There is one important difference between the fast recovery area rules for
OBSOLETE
status and the disk quota rules for deletion eligibility. Assume that archived logs 1000
through 2000, which are on disk, are needed for the current recovery window and so
are not obsolete. If you back up these logs to tape, then the retention policy considers
the disk logs as required, that is, not obsolete. Nevertheless, the fast recovery area
disk quota algorithm considers the logs on disk as eligible for deletion because they
have been backed up to tape. The logs on disk do not have
OBSOLETE
status in the
repository, but they are eligible for deletion by the fast recovery area.
See Also:
Deletion Rules for the Fast Recovery Area
Chapter 8
About Backup Retention Policies
8-28

9
Backing Up the Database
This chapter explains how to perform the most basic backup tasks and implement
backup strategies using RMAN. This chapter contains the following topics:
•Overview of RMAN Backups
•Specifying Backup Output Options
•Backing Up Database Files with RMAN
•Backing Up CDBs and PDBs
•Backing Up Application Containers
•Backing Up Sparse Databases with RMAN
•Backing Up Archived Redo Logs with RMAN
•Making and Updating RMAN Incremental Backups
•Making Database Backups for Long-Term Storage
•Backing Up RMAN Backups
See Also:
•Backing Up the Database: Advanced Topics to learn about more
advanced topics such as backup optimization, duplexing, backup
encryption, and restartable backups
•Oracle Data Guard Concepts and Administration to learn how to perform
RMAN backup and recovery in a Data Guard environment
9.1 Overview of RMAN Backups
RMAN backups are created using the
BACKUP
command.
This section provides an overview of RMAN backups.
9.1.1 Purpose of RMAN Backups
The primary purpose of RMAN backups is to protect your data. If a media failure or
disaster occurs, then you can restore your backups and recover lost changes.
You can also make backups to preserve data for long-time archival, as explained in
"Making Database Backups for Long-Term Storage", and to transfer data, as explained
in the chapters included in Transferring Data with RMAN.
9-1

9.1.2 Basic Concepts of RMAN Backups
You can back up all or part of your database with the
BACKUP
command from within the
RMAN client.
In many cases, after your database has been configured in accordance with your
backup strategy, you can back up the database by entering the following command at
the RMAN prompt:
RMAN> BACKUP DATABASE;
RMAN uses the configured settings, the records of previous backups, and the control
file record of the database structure to determine an efficient set of steps for the
backup. RMAN then performs these steps.
As explained in "About RMAN File Management in a Data Guard Environment", you
can run RMAN backups at any database in a Data Guard environment. Any backup of
any database in the environment is usable for recovery of any other database if the
backup is accessible. You can offload all backups of database files, including control
file backups, to a physical standby database and thereby avoid consuming resources
on the primary database.
See Also:
•Oracle Database Backup and Recovery Reference to learn about the
BACKUP
command
•Oracle Data Guard Concepts and Administration to learn how to back up
a standby database with RMAN
9.2 Specifying Backup Output Options
You can provide arguments to the
BACKUP
command to override the default backup
options.
If you specify only the minimum required options for an RMAN command such as
BACKUP DATABASE
, then RMAN automatically determines the destination device,
locations for backup output, and a backup tag based on your configured environment
and built-in RMAN defaults.
The most typical backup options are described in the following sections:
•Specifying the Device Type for an RMAN Backup
•Specifying Backup Set or Copy for an RMAN Backup to Disk
•Specifying a Format for RMAN Backups
•Specifying Tags for an RMAN Backup
•Making Compressed Backups
•Specifying Multisection Incremental Backups
•Making Multisection Backups Using Image Copies
Chapter 9
Specifying Backup Output Options
9-2

See Also:
Backing Up the Database: Advanced Topics to learn about advanced backup
options such as duplexing and restarting backups
9.2.1 Specifying the Device Type for an RMAN Backup
The
BACKUP
command takes a
DEVICE TYPE
clause that specifies whether to back up to
disk or tape device.
When you run
BACKUP
without a
DEVICE TYPE
clause, RMAN stores the backup on the
configured default device (disk or SBT). You set the default device with the
CONFIGURE
DEFAULT DEVICE TYPE
command.
Example 9-1 Specifying Device Type DISK
This example illustrates a backup to disk.
BACKUP
DEVICE TYPE DISK
DATABASE;
See Also:
Configuring the Default Device for Backups: Disk or SBT for information
about configuring the default device
9.2.2 Specifying Backup Set or Copy for an RMAN Backup to Disk
RMAN can create backups on disk as image copies or as backup sets.
"Configuring the Default Type for Backups: Backup Sets or Copies" explains how to
configure the default disk device. You can override this default with the
AS
COPY
or
AS
BACKUPSET
clauses.
Example 9-2 Making Image Copies
This example uses
BACKUP AS COPY
to back up to disk as image copies.
BACKUP AS COPY
DEVICE TYPE DISK
DATABASE;
Example 9-3 Making Backup Sets
To back up your data into backup sets, use the
AS BACKUPSET
clause. This example
illustrates how you can allow backup sets to be created on the configured default
device, or direct them specifically to disk or tape.
BACKUP AS BACKUPSET
DATABASE;
BACKUP AS BACKUPSET
Chapter 9
Specifying Backup Output Options
9-3

DEVICE TYPE DISK
DATABASE;
BACKUP AS BACKUPSET
DEVICE TYPE SBT
DATABASE;
9.2.3 Specifying a Format for RMAN Backups
RMAN provides a range of options to name the files generated by the
BACKUP
command.
RMAN uses the following set of rules to determine the format of the output files, which
are listed in order of precedence:
1. If a
FORMAT
parameter is specified on the
BACKUP
command, then this setting
controls the generated file name.
For example, you can direct the output to a specific location, as shown in the
following command:
BACKUP DATABASE
FORMAT "/disk1/backup_%U"; # specifies a location on the file system
In this case, backups are stored with generated unique file names with the prefix
/
disk1/backup_
. The
%U
substitution variable, used to generate a unique string at this
point in the file name, is required.
You can also use the
FORMAT
parameter to name an ASM disk group as the backup
destination, as shown in the following example:
BACKUP DATABASE
FORMAT '+dgroup1'; # specifies an ASM disk group
No
%U
is required in this case because Automatic Storage Management (ASM)
generates unique file names as needed. However, you can specify
%U
if desired.
Note:
If you specify
FORMAT
when a fast recovery area is enabled, then RMAN
obeys the
FORMAT
setting. If no location is specified in the
FORMAT
clause,
then RMAN creates the backup in a platform-specific location.
2. If a
FORMAT
setting is configured for the specific channel used for the backup, then
this setting controls the generated file name.
3. If a
FORMAT
setting is configured for the device type used for the backup, then this
setting controls the generated file name.
4. If a fast recovery area is enabled during a disk backup, and if
FORMAT
is not
specified, then RMAN creates the backup with an automatically generated name in
the fast recovery area.
5. If no other conditions in this list apply, then the default location and file name
format of the backup are platform-specific.
Chapter 9
Specifying Backup Output Options
9-4

See Also:
Oracle Database Backup and Recovery Reference to learn about the
FORMAT
clause, and the installation guides in the Oracle Database documentation
library to learn about the default file locations for your platform
9.2.3.1 Specifying Multiple Formats for Disk Backups
When backing up to disk, you can specify a format to spread the backup across
several drives for improved performance.
•To back up a database to multiple disk drives, allocate one
DISK
channel for each
disk drive and specify the format string on the
ALLOCATE CHANNEL
command so that
the file names are on different disks.
RUN
{
ALLOCATE CHANNEL disk1 DEVICE TYPE DISK FORMAT '/disk1/%d_backups/%U';
ALLOCATE CHANNEL disk2 DEVICE TYPE DISK FORMAT '/disk2/%d_backups/%U';
ALLOCATE CHANNEL disk3 DEVICE TYPE DISK FORMAT '/disk3/%d_backups/%U';
BACKUP AS COPY DATABASE;
}
•To create a default configuration that distributes backups to multiple disk drives by
default, configure multiple disk channels.
CONFIGURE DEVICE TYPE DISK PARALLELISM 3;
CONFIGURE DEFAULT DEVICE TYPE TO DISK;
CONFIGURE CHANNEL 1 DEVICE TYPE DISK FORMAT '/disk1/%d_backups/%U';
CONFIGURE CHANNEL 2 DEVICE TYPE DISK FORMAT '/disk2/%d_backups/%U';
CONFIGURE CHANNEL 3 DEVICE TYPE DISK FORMAT '/disk3/%d_backups/%U';
BACKUP AS COPY DATABASE;
Typically, you do not need to specify a format when backing up to tape because the
default
%U
variable generates a unique file name for tape backups.
9.2.4 Specifying Tags for an RMAN Backup
RMAN attaches a character string called a tag to every backup it creates, as a way of
identifying the backup. You can either accept the default tag or specify your own with
the
TAG
parameter of the
BACKUP
command.
This section contains the following topics:
•About Backup Tags
•Specifying Tags for Backup Sets and Image Copies
9.2.4.1 About Backup Tags
User-specified tags are a useful way to indicate the purpose or usage of different
classes of backups or copies.
You can tag backup sets, proxy copies, data file copies, or control file copies. For
example, you can tag data file copies that you intend to use in a
SWITCH
command as
Chapter 9
Specifying Backup Output Options
9-5

for_switch_only
and file copies to use only for a
RESTORE
command as
for_restore_only
.
Tags do not need to be unique, so multiple backup sets or image copies can have the
same tag (for example,
weekly_backup
). Assume that you specify that a data file be
restored from backups that have a specific tag. If multiple backups of the requested file
have the desired tag, then RMAN restores the most recent backup that has the
desired tag, within any constraints on the
RESTORE
command.
In practice, tags are often used to distinguish a series of backups created as part of a
single strategy, such as an incremental backup strategy. For example, you might
create a weekly incremental backup with a tag like
BACKUP TAG weekly_incremental
.
Many forms of the
BACKUP
command let you associate a tag with a backup, and many
RESTORE
and
RECOVER
commands let you specify a tag to restrict which backups to use in
the
RESTORE
or
RECOVER
operation.
If you do not explicitly specify a tag with the
TAG
parameter of the
BACKUP
command,
then RMAN implicitly creates a default tag for backups (except for control file
autobackups). The format of the tag is
TAGYYYYMMDDTHHMMSS
, where
YYYY
is the year,
MM
is
the month,
DD
is the day,
HH
is the hour (in 24-hour format),
MM
is the minutes, and
SS
is
the seconds. For example, a backup of data file
1
may get the tag
TAG20070208T133437
.
The date and time refer to when RMAN started the backup in the time zone of the
instance performing the backup. If multiple backup sets are created by one
BACKUP
command, then each backup piece has the same default tag.
Tags are stored in uppercase, regardless of the case used when entering them. The
maximum length of a backup tag is 30 bytes. Tags cannot use operating system
environment variables or use special formats such as
%T
or
%D
.
See Also:
Oracle Database Backup and Recovery Referencefor the default format
description in
BACKUP...TAG
9.2.4.2 Specifying Tags for Backup Sets and Image Copies
Use the
TAG
parameter with the
BACKUP
command to specify tags for backup sets and
image copies.
The characters in a tag must be limited to the characters that are legal in file names on
the target database file system. For example, Automatic Storage Management (ASM)
does not support the use of the hyphen (
-
) in the file names it uses internally, so a tag
including a hyphen (such as
weekly-incr
) is not a legal tag name for backups in ASM
disk groups.
When you tag a backup set, the tag is an attribute of each backup piece in a given
copy of a backup set. If you create a multiplexed backup set, then each copy of the
backup set is assigned the same tag.
Example 9-4 Applying a Tag to a Backup Set
This example creates one backup set with the tag
MONDAYBKP
.
BACKUP AS BACKUPSET
COPIES 1
Chapter 9
Specifying Backup Output Options
9-6

DATAFILE 7
TAG mondaybkp;
Example 9-5 Applying Tags to Image Copies
This example shows that copies of data files in tablespaces
users
and
tools
are
assigned the tag
MONDAYCPY
. When you specify a tag for image copies, the tag applies
to each individual copy.
BACKUP AS COPY
TABLESPACE users, tools
TAG mondaycpy;
Example 9-6 Assigning Tags to Output Copies
This example creates new copies of all image copies of the database that have the tag
full_cold_copy
and gives the new copies the tag
new_full_cold_copy
. You can use
FROM
TAG
to copy an image copy with a specific tag, and then use
TAG
to assign the output
copy a different tag.
BACKUP AS COPY
COPY OF DATABASE
FROM TAG full_cold_copy
TAG new_full_cold_copy;
9.2.5 Making Compressed Backups
When creating backup sets, you can use RMAN support for binary compression of
backup sets by including the
AS COMPRESSED BACKUPSET
option to the
BACKUP
command.
RMAN compresses the backup set contents before writing them to disk. The details of
which binary compression level is used are automatically recorded in the backup set.
There is no need to explicitly mention the type of compression used or how to
decompress the backup set in the recovery operation.
Binary compression creates some performance overhead during backup and restore
operations. Binary compression consumes CPU resources, so do not routinely
schedule compressed backups when CPU usage is high. However, the following
circumstances may warrant paying the performance penalty:
•You are using disk-based backups when disk space in your fast recovery area or
other disk-based backup destination is limited.
•You are performing your backups to some device over a network when reduced
network bandwidth is more important than CPU usage.
•You are using some archival backup media such as CD or DVD, where reducing
backup sizes saves on media costs and archival storage.
See Also:
•About Binary Compression for RMAN Backup Sets
•
AS COMPRESSED BACKUPSET
option of the
BACKUP
command in Oracle
Database Backup and Recovery Reference for performance details
regarding backup sets
Chapter 9
Specifying Backup Output Options
9-7

Example 9-7 Making Compressed Backups
This example backs up the entire database and archived logs to the configured default
backup destination (disk or tape), producing compressed backup sets.
BACKUP
AS COMPRESSED BACKUPSET
DATABASE PLUS ARCHIVELOG;
9.2.6 Specifying Multisection Incremental Backups
A multisection backup enables large data files to be divided into sections that can be
backed up in parallel across multiple channels. This provides faster backup
performance and better recovery times.
A multisection backup contains multiple backup pieces. During a multisection backup
operation, RMAN writes to each backup piece, in parallel, by using a separate channel
for each backup piece.
Multisection full backups of databases and data files are supported starting with Oracle
Database 11g Release 1. Starting with Oracle Database 12c Release 1 (12.1), RMAN
supports multisection incremental backups. Wherever applicable, RMAN also uses
unused block compression and block change tracking while creating multisection
incremental backups. When backup sets are used, you can create multisection full or
incremental backups.
To create level 0 multisection incremental backups, the
COMPATIBLE
parameter must be
set to 11.0 or higher. However, to create multisection incremental backups of level 1 or
higher, you must set the
COMPATIBLE
parameter to 12.0.0 or higher. RMAN always
creates multisection incremental backups with
FILESPERSET
set to 1.
Use the
SECTION SIZE
clause of the
BACKUP
command to create multisection backups.
The
SECTION SIZE
clause specifies the size of each backup section. If you specify a
section size that is larger than the size of the file, then RMAN does not use
multisection backups for that file. If you specify a small section size that would produce
more than 256 sections, then RMAN increases the section size to a value that results
in exactly 256 sections.
Views to Identify Multisection Backups
Use the
MULTI_SECTION
column of the
V$BACKUP_SET
view or the recovery catalog view
RC_BACKUP_SET
to determine if a backup is a multisection backup. For multisection
backups, the
MULTI_SECTION
column contains YES.
Views That Contain Metadata for Multisection Backups
The
V$BACKUP_DATAFILE
and
RC_BACKUP_DATAFILE
views provide information about the
number of blocks in each section of a multisection backup. The
BLOCKS
column
specifies the number of blocks in each multisection backup.
Example 9-8 Multisection Incremental Backup of Database as Backup Sets
The following example creates a multisection level 1 incremental backup of the data
file as backup sets.
1. Ensure that the initialization parameter
COMPATIBLE
of the target database is set to
12.0.0 or higher.
Chapter 9
Specifying Backup Output Options
9-8

2. Start RMAN and connect to a target database as a user with the
SYSBACKUP
or
SYSDBA
privilege.
See Also:
Making Database Connections with RMAN for information about
connecting to a target database
3. If required, configure RMAN to write in parallel to the backup device.
The following example configures RMAN to use two disk channels in parallel.
CONFIGURE DEVICE TYPE disk PARALLELISM 2;
4. Execute
BACKUP
with
SECTION SIZE
to indicate that a multisection backup must be
created.
The following example creates a multisection section level 1 backup of the data file
users_df.dbf
using backup sets. Each backup piece is 100MB.
BACKUP
INCREMENTAL LEVEL 1
SECTION SIZE 100M
DATAFILE '/oradata/datafiles/users_df.dbf';
See Also:
•About Unused Block Compression
•Using Block Change Tracking to Improve Incremental Backup
Performance
9.2.7 Making Multisection Backups Using Image Copies
While an image copy is being created, RMAN uses multiple channels to write files
sections. However, the output of this operation is one copy for each data file.
Multisection backups provide better performance by using multiple channels to back
up large files in parallel. Starting with Oracle Database 12c Release 1 (12.1), you can
create multisection full backups that are stored as image copies.
Use the
SECTION SIZE
clause to create multisection backups. If the section size that you
specify is larger than the size of the file, then RMAN does not use multisection
backups for that file. If you specify a small section size that would produce more than
256 sections, then RMAN increases the section size to a value that results in exactly
256 sections
Example 9-9 Multisection Backup of Data File as Image Copies
Use the following steps to create a multisection backup of a database as image
copies:
1. Ensure that the
COMPATIBLE
parameter for the target database is set to 12.0.0 or
higher.
Chapter 9
Specifying Backup Output Options
9-9

2. Start RMAN and connect to a target database as a user with the
SYSBACKUP
or
SYSDBA
privilege.
3. If required, configure channel parallelism so that RMAN can perform the backup
operation using multiple drives in parallel.
4. Execute
BACKUP
with
SECTION SIZE
and
AS COPY
to indicate that a multisection
backup must be created using image copies.
The following command creates a multisection incremental backup of the entire
database using image copies. Each backup piece is 500MB.
BACKUP
AS COPY
SECTION SIZE 500M
DATABASE;
See Also:
•Making Database Connections with RMAN for information about
connecting to a target database
•Specifying Multisection Incremental Backups for information about the
views that contain information about multisection backups.
9.3 Backing Up Database Files with RMAN
This section contains the following topics:
•Backing Up a Whole Database with RMAN
•Backing Up Tablespaces and Data Files with RMAN
•Backing Up Control Files with RMAN
•Backing Up Server Parameter Files with RMAN
•Backing Up a Database in NOARCHIVELOG Mode
9.3.1 Backing Up a Whole Database with RMAN
You can perform a whole database backup with the database mounted or open.
To perform a whole database backup, from the RMAN prompt, use the
BACKUP
DATABASE
command.
You may want to exclude specified tablespaces from a whole database backup. You
can persistently skip tablespaces across RMAN sessions by executing the
CONFIGURE
EXCLUDE
command for each tablespace that you always want to skip. You can override
the configured setting with
BACKUP ... NOEXCLUDE
.
To back up the database:
1. Start RMAN and connect to a target database and a recovery catalog (if used) as
described in "Making Database Connections with RMAN".
2. Ensure that the database is mounted or open.
Chapter 9
Backing Up Database Files with RMAN
9-10

3. Issue the
BACKUP DATABASE
command at the RMAN prompt.
The simplest form of the command requires no options or parameters:
BACKUP DATABASE;
The list of files (data files, control file, server parameter file) backed up depends on
the keyword used with the
BACKUP
command.
The following example backs up the database, switches the online redo logs, and
includes archived logs in the backup:
BACKUP DATABASE PLUS ARCHIVELOG;
By archiving the logs immediately after the backup, you ensure that you have a full
set of archived logs through the time of the backup. In this way, you guarantee that
you can perform media recovery after restoring this backup.
See Also:
•Oracle Database Backup and Recovery Reference to learn about the
BACKUP
command and
CONNECT
command
•"Skipping Offline, Read-Only, and Inaccessible Files" to learn how to use
BACKUP ... SKIP
to skip inaccessible data files or data files that are in
offline or read-only tablespaces
9.3.2 Backing Up Tablespaces and Data Files with RMAN
You can back up one or more tablespaces with the
BACKUP TABLESPACE
command or
one or more data files with the
BACKUP DATAFILE
command.
When you specify tablespaces, RMAN translates the tablespace name internally into a
list of data files. The database can be mounted or open. Tablespaces can be read/
write or read-only.
Note:
Transportable tablespaces do not have to be in read/write mode for backup
as in previous releases.
RMAN automatically backs up the control file and the server parameter file (if the
instance was started with a server parameter file) when data file
1
is included in the
backup. If control file autobackup is enabled, then RMAN writes the current control file
and server parameter file to a separate autobackup piece. Otherwise, RMAN includes
these files in the backup set that contains data file
1
.
To back up tablespaces or data files:
1. Start RMAN and connect to a target database and a recovery catalog (if used).
Chapter 9
Backing Up Database Files with RMAN
9-11

See Also:
Making Database Connections with RMAN for information about
connecting to a target database
2. If the database instance is not started, then either mount or open the database.
3. Run the
BACKUP
TABLESPACE
command or
BACKUP DATAFILE
command at the RMAN
prompt.
The following example backs up the
users
and
tools
tablespaces to tape:
BACKUP
DEVICE TYPE sbt
TABLESPACE users, tools;
The following example uses an SBT channel to back up data files
1
through
4
and a
data file copy stored at
/tmp/system01.dbf
to tape:
BACKUP
DEVICE TYPE sbt
DATAFILE 1,2,3,4
DATAFILECOPY '/tmp/system01.dbf';
9.3.3 Backing Up Control Files with RMAN
You can back up the control file when the database is mounted or open. RMAN uses a
snapshot control file to ensure a read-consistent version.
If the
CONFIGURE CONTROLFILE AUTOBACKUP
command is set to
ON
(by default it is
OFF
), then
RMAN automatically backs up the control file and server parameter file after every
backup and after database structural changes. The control file autobackup contains
metadata about the previous backup, which is crucial for disaster recovery.
Note:
You can restore a backup of a control file made on one Data Guard database
to any other database in the environment. Primary and standby control file
backups are interchangeable. See Oracle Data Guard Concepts and
Administration to learn how to use RMAN to restore files on a standby
database.
If the autobackup feature is not set, then you must manually back up the control file in
one of the following ways:
•Run
BACKUP
CURRENT
CONTROLFILE
.
•Include a backup of the control file within any backup by using the
INCLUDE
CURRENT
CONTROLFILE
option of the
BACKUP
command.
•Back up data file
1
, because RMAN automatically includes the control file and
server parameter file in backups of data file
1
.
Chapter 9
Backing Up Database Files with RMAN
9-12

Note:
If the control file block size is different from the block size for data file
1
,
then the control file cannot be written into the same backup set as the
data file. RMAN writes the control file into a backup set by itself if the
block size is different. The
V$CONTROLFILE.BLOCK_SIZE
column indicates
the control file block size, whereas the
DB_BLOCK_SIZE
initialization
parameter indicates the block size of data file
1
.
9.3.3.1 About Manual Backups of the Control File
A manual backup of the control file is different from a control file autobackup. RMAN
makes a control file autobackup after the files specified in the
BACKUP
command are
backed up.
Thus, the autobackup—unlike a manual control file backup—contains metadata about
the backup that just completed. Also, RMAN can automatically restore autobackups
without the use of a recovery catalog.
You can make a manual backup of the current control file either as a backup set or as
an image copy. For a backup set, RMAN first creates a snapshot control file for read
consistency. You can configure the file name and location of the snapshot control file.
A snapshot control file is not needed for an image copy.
In an Oracle Real Application Clusters (Oracle RAC) environment, the following
restrictions apply:
•The snapshot control file location must be on shared storage—that is, storage that
is accessible by all Oracle RAC instances.
•The destination of an image copy of the current control file must be shared
storage.
See Also:
•Configuring the Snapshot Control File Location
•Making a Manual Backup of the Control File
9.3.3.2 Making a Manual Backup of the Control File
To make a manual backup, you can either specify
INCLUDE CURRENT CONTROLFILE
when
backing up other files or specify
BACKUP CURRENT CONTROLFILE
.
You can also back up control file copies on disk by specifying the
CONTROLFILECOPY
parameter.
To manually back up the control file:
1. Start RMAN and connect to a target database and a recovery catalog (if used) as
described in Making Database Connections with RMAN.
2. Ensure that the target database is mounted or open.
Chapter 9
Backing Up Database Files with RMAN
9-13

3. Execute the
BACKUP
command with the desired control file clause.
Example 9-10 Backing Up a Tablespace and Current Control File to Tape
This example backs up tablespace
users
to tape and includes the current control file in
the backup:
BACKUP DEVICE TYPE sbt
TABLESPACE users
INCLUDE CURRENT CONTROLFILE;
Example 9-11 Backing Up Current Control File to Fast Recovery Area
This example backs up the current control file to the fast recovery area as a backup
set:
BACKUP CURRENT CONTROLFILE;
RMAN first creates a snapshot control file.
Example 9-12 Backing Up the Current Control File as Image Copy
This example backs up the current control file to the default disk device as an image
copy:
BACKUP AS COPY
CURRENT CONTROLFILE
FORMAT '/tmp/control01.ctl';
Example 9-13 Backing Up a Control File Copy
This example backs up the control file copy created in the previous example to tape:
BACKUP AS COPY
CURRENT CONTROLFILE
FORMAT '/tmp/control01.ctl';
BACKUP DEVICE TYPE sbt
CONTROLFILECOPY '/tmp/control01.ctl';
A snapshot control file is not needed when backing up a control file copy.
If the control file autobackup feature is enabled, then RMAN makes two control file
backups in these examples: the explicit backup of the files specified in the
BACKUP
command and the control file and server parameter file autobackup.
See Also:
Oracle Database Backup and Recovery Reference to learn about the
CONFIGURE CONTROLFILE AUTOBACKUP
command
Chapter 9
Backing Up Database Files with RMAN
9-14

9.3.4 Backing Up Server Parameter Files with RMAN
RMAN automatically backs up the current server parameter file in certain cases. The
BACKUP
SPFILE
command backs up the parameter file explicitly. The server parameter
file that is backed up is the one currently in use by the instance.
To back up the server parameter file:
1. Start RMAN and connect to a target database and a recovery catalog (if used) as
described in Making Database Connections with RMAN.
2. Ensure that the target database is mounted or open.
The database must have been started with a server parameter file. If the instance
is started with a client-side initialization parameter file, then RMAN issues an error
if you execute
BACKUP ... SPFILE
.
3. Execute the
BACKUP ... SPFILE
command.
The following example backs up the server parameter file to tape:
BACKUP DEVICE TYPE sbt SPFILE;
See Also:
Backing Up Control Files with RMAN
9.3.5 Backing Up a Database in NOARCHIVELOG Mode
You can only back up a database in
NOARCHIVELOG
mode when the database is closed
and in a consistent state.
The script shown in Example 9-14 puts the database into the correct mode for a
consistent, whole database backup and then backs up the database. The script
assumes that control file autobackup is enabled for the database.
You can skip tablespaces, such as read-only tablespaces, but any skipped tablespace
that has not been offline or read-only since its last backup is lost if the database has to
be restored from a backup.
Example 9-14 Backing Up a Database in NOARCHIVELOG Mode
SHUTDOWN IMMEDIATE;
# Start the database in case it suffered instance failure or was
# closed with SHUTDOWN ABORT before starting this script.
STARTUP FORCE DBA;
SHUTDOWN IMMEDIATE;
STARTUP MOUNT;
# this example uses automatic channels to make the backup
BACKUP
INCREMENTAL LEVEL 0
MAXSETSIZE 10M
DATABASE
TAG 'BACKUP_1';
# Now that the backup is complete, open the database.
ALTER DATABASE OPEN;
Chapter 9
Backing Up Database Files with RMAN
9-15

9.3.6 Creating a Preplugin Backup of the Whole Database
Preplugin backups ensure that an RMAN backup is usable after a non-CDB is plugged
in as a PDB into a CDB.
Starting with Oracle Database Release 18c, you can create preplugin backups of non-
CDBs. The preplugin backups are used for restore and recover operations after this
non-CDB is plugged in as a PDB in a destination CDB. Preplugin backups can be
either tape and disk backups.
To create a preplugin backup of a non-CDB:
1. Start RMAN and connect to the target database (non-CDB) as a user with the
SYSDBA
or
SYSBACKUP
privilege as described in "Making Database Connections with
RMAN".
Connect to a recovery catalog if one is used.
2. Ensure that the required prerequisites are met as described in Oracle Database
Backup and Recovery Reference.
3. (Optional) Configure autobackups for the database control file and server
parameter file as described in "Configuring Control File and Server Parameter File
Autobackups".
4. Perform a full backup of the non-CDB, including archived redo log files.
If backups of the non-CDB already exist, then you can just create backups of the
archived redo log files. All existing RMAN backups are usable after their metadata
is exported into the data dictionary by using the
dbms_pdb.exportrmanbackup()
procedure.
Although it is not mandatory to backup archived redo log files, it is recommended
that you do so. By archiving the logs immediately after the backup, you ensure that
you have a full set of archived logs through the time of the backup. This enables
you to perform media recovery after restoring this backup.
The following command backs up a non-CDB including all archived redo log files.
The
TAG
clause specifies the backup tag that is used to identify this RMAN backup.
RMAN> BACKUP DATABASE PLUS ARCHIVELOG ALL TAG for_migration;
5. Exit RMAN.
6. In the target database, connect to SQL*Plus as a user with the
SYSDBA
or
SYSBACKUP
privilege.
7. Export the RMAN backup metadata for the non-CDB into its data dictionary by
using the
DBMS_PDB.EXPORTRMANBACKUP
procedure.
SQL> EXECUTE DBMS_PDB.EXPORTRMANBACKUP();
While plugging the non-CDB as a PDB in a destination CDB, this backup metadata
of the source non-CDB is copied into the data dictionary of the destination CDB.
Chapter 9
Backing Up Database Files with RMAN
9-16

See Also:
About Preplugin Backups
9.4 Backing Up CDBs and PDBs
Use the
BACKUP
command to back up multitenant container databases (CDBs) and
pluggable databases (PDBs).
This section contains the following topics:
•About Backing Up CDBs and PDBs
•Backing Up a Whole CDB
•Backing Up the Root with RMAN
•Backing Up the Root with Oracle Enterprise Manager Cloud Control
•Backing Up PDBs with RMAN
•Backing Up PDBs with Oracle Enterprise Manager Cloud Control
•Backing Up Tablespaces and Data Files in a PDB
Note:
Backups of a non-CDB are not usable after the non-CDB is plugged in as a
PDB into another CDB.
See Also:
Oracle Database Concepts for an introduction to PDBs
9.4.1 About Backing Up CDBs and PDBs
RMAN and Oracle Enterprise Manager Cloud Control provide full support for backup
and recovery in a multitenant environment.
The multitenant architecture enables an Oracle Database to function as a CDB. You
can back up and recover a whole CDB, the root only, or one or more pluggable
databases (PDBs). You can also back up and recover individual tablespaces and data
files in a PDB.
You might want to perform nightly backups of the whole multitenant container
database (CDB) by using an incremental backup strategy, or you might want to make
frequent separate backups of individual PDBs and do less frequent backups of either
the whole CDB or of the root.
In terms of the ability to recover from data loss, separately backing up the root and all
PDBs, including the CDB seed, is equivalent to backing up the whole CDB. The main
Chapter 9
Backing Up CDBs and PDBs
9-17

difference is in the number of RMAN commands that you must enter and the time to
recover. Recovering a whole CDB requires less time than recovering the root plus all
PDBs.
If the compatibility parameter for CDBs and PDBs is set to 12.2 or higher, RMAN also
enables you to perform sparse backups on your CDB and PDB. These backups copy
the latest updates from the delta storage space assigned to each database.
See Also:
About Sparse Backups for more information on sparse backups
9.4.2 Backing Up a Whole CDB
Backing up a whole multitenant container database (CDB) is similar to backing up a
non-CDB. When you back up a whole CDB, RMAN backs up the root, all the pluggable
databases (PDBs), and the archived redo logs.
The
BACKUP
command is used to back up CDBs. You can then recover either the whole
CDB, the root only, or one or more PDBs from the CDB backup.
To backup up a whole CDB:
1. Start RMAN and connect to the root as a common user with the
SYSBACKUP
or
SYSDBA
privilege and to a recovery catalog (if used) as described in Making
Database Connections with RMAN.
2. Ensure that the database is mounted or open.
3. Issue the
BACKUP DATABASE
command at the RMAN prompt.
The simplest form of the command requires no options or parameters:
BACKUP DATABASE;
The list of files backed up depends on the keyword used with the
BACKUP
command.
The following example backs up the CDB, switches the online redo logs, and
includes archived logs in the backup:
BACKUP DATABASE PLUS ARCHIVELOG;
By archiving the logs immediately after the backup, you ensure that you have a full
set of archived logs through the time of the backup. In this way, you guarantee that
you can perform media recovery after restoring this backup.
Note:
Proxy PDBs are not backed up while backing up a CDB.
Chapter 9
Backing Up CDBs and PDBs
9-18

9.4.3 Backing Up the Root with RMAN
You can use RMAN to make a backup of only the root. Because the root contains
critical metadata for the whole CDB, Oracle recommends that you back up the root or
back up the whole CDB at regular intervals.
To back up the root with RMAN:
1. Start RMAN and connect to the root as a common user with the
SYSBACKUP
or
SYSDBA
privilege as described in Connecting as Target to the Root.
2. Enter the following command:
BACKUP DATABASE ROOT;
9.4.4 Backing Up the Root with Oracle Enterprise Manager Cloud
Control
Oracle Enterprise Manager Cloud Control (Cloud Control) can be used to back up the
root.
Use the following steps to back up the root with Cloud Control:
1. From the Database Home page, select Backup & Recovery from the Availability
menu, and then select Schedule Backup.
2. If you have not logged in to the database previously, then the Database Login
page is displayed. Log in to the database using Named or New credentials and
then click Login.
Cloud Control displays the Schedule Backup page.
3. From the Customized Backup section, choose Container Database Root, and
then click Schedule Customized Backup.
The Schedule Backup Wizard appears and displays the Options page.
4. Complete the wizard by navigating the remainder of the pages to back up the root.
For more information about each page of the wizard, click Help.
See Also:
Accessing the Database Home Page Using Cloud Control
9.4.5 Backing Up PDBs with RMAN
RMAN enables you to back up one or more PDBs in a CDB using the
BACKUP
command.
There are two approaches to backing up a PDB with RMAN:
•Connect to the root and then use the
BACKUP PLUGGABLE DATABASE
command. This
approach enables you to back up multiple PDBs with a single command.
Chapter 9
Backing Up CDBs and PDBs
9-19

When you connect to the root and back up a PDB, this backup is visible to the root
and to that particular PDB but not to the other PDBs.
•Connect to the PDB and use the
BACKUP DATABASE
command. This approach backs
up only a single PDB and enables you to use the same commands used for
backing up non-CDBs.
Backups created when connected to any PDB are visible when connected to the
root.
When you back up individual PDBs, the archived redo logs are not backed up.
To back up one or more PDBs while connected to the root:
1. Start RMAN and connect to the root as a common user with the
SYSBACKUP
or
SYSDBA
privilege as described in Connecting as Target to the Root.
2. Issue a
BACKUP PLUGGABLE DATABASE
command at the RMAN prompt.
The following example backs up the PDBs
sales
and
hr
:
BACKUP PLUGGABLE DATABASE sales, hr;
To back up one PDB while connected to the PDB:
1. Start RMAN and connect to the PDB as a local user with the
SYSBACKUP
or
SYSDBA
privilege as described in Connecting as Target to a PDB.
2. Issue a
BACKUP DATABASE
command at the RMAN prompt.
BACKUP DATABASE;
Note:
Backing up a proxy PDB using RMAN is not supported.
Note:
PDB backups can be used to perform media recovery only if the backups
include all the archived redo log files that contain changes for this PDB.
When creating a backup while connected to the PDB, there may be some
situations in which all the required logs are not backed up.
9.4.6 Creating Preplugin Backups of PDBs Using RMAN
Preplugin backups of a PDB can be used to perform restore and recover operations
after the PDB is migrated and plugged in to a different destination CDB.
Starting with Oracle Database Release 18c, you can create preplugin backups of
PDBs to disk and tape.
Chapter 9
Backing Up CDBs and PDBs
9-20

Note:
The destination CDB does not manage backups created on the source CDB
after it has been plugged in to the destination CDB.
To create preplugin backups of a PDB:
1. Ensure that the required prerequisites are met as described in Oracle Database
Backup and Recovery Reference.
2. Start RMAN and connect using one of the following techniques as described in
"Making Database Connections with RMAN":
•Connect to the root as a common user with the
SYSDBA
or
SYSBACKUP
privilege.
•Connect to the PDB as a local user or common user with the
SYSDBA
or
SYSBACKUP
privilege.
3. (Optional) Configure control file and server parameter file autobackups for the
target database as described in "Configuring Control File and Server Parameter
File Autobackups".
4. Create a full backup of the PDB including the archived redo log files.
If RMAN backups of the PDB already exist, then these backups are usable after
the PDB is migrated to another destination CDB. However, it is recommended that
you back up the archived redo log files.
The following command backs up the PDB when you are connected to the PDB as
a local user with the
SYSDBA
or
SYSBACKUP
privilege:
RMAN> BACKUP DATABASE PLUS ARCHIVELOG ALL TAG for_migration;
The following command backs up the PDB
my_pdb
when connected to the
ROOT
as a
common user with the
SYSDBA
or
SYSBACKUP
privilege:
RMAN> BACKUP PLUGGABLE DATABASE my_pdb PLUS ARCHIVELOG ALL TAG for_migration;
Note:
When you use
BACKUP PLUGGABLE DATABASE
, all the required archived redo
logs are backed up only when the CDB uses local undo.
The metadata that is required for these preplugin backups to be usable in a destination
CDB is included in the XML file created when the PDB is unplugged from the source
CDB.
See Also:
About Preplugin Backups
Chapter 9
Backing Up CDBs and PDBs
9-21

9.4.7 Backing Up PDBs with Oracle Enterprise Manager Cloud Control
Oracle Enterprise Manager Cloud Control (Cloud Control) can be used to perform
backups of pluggable databases (PDBs).
To back up one or more PDBs with Cloud Control, complete the following steps:
1. From the Database Home page, select Backup & Recovery from the Availability
menu, and then select Schedule Backup.
2. If you have not logged in to the database previously, then the Database Login
page is displayed. Log in to the database using Named or New credentials and
then click Login.
Cloud Control displays the Schedule Backup page.
3. From the Customized Backup section, select Pluggable Databases, and then
click Schedule Customized Backup.
The Schedule Backup Wizard appears and displays the Pluggable Databases
page.
4. Select the PDBs that you want to back up by following these steps:
a. Click Add to display the Available Pluggable Databases page.
b. From the list of PDBs shown, click in the Select column to designate the PDBs
you want to back up. Optionally, you can click Select All to turn on the Select
option for all available PDBs. Click Select None to deselect all PDBs.
c. Click the Select button to return to the Pluggable Databases page.
d. Optionally, you can remove PDBs from the table by clicking in the Select
column for each PDB that you want to remove and then clicking Remove.
5. Click Next to move to the Options page of the wizard.
6. Complete the wizard by navigating the remainder of the pages to back up the
PDBs. For more information about each page of the wizard, click Help.
See Also:
Accessing the Database Home Page Using Cloud Control
9.4.8 Backing Up Tablespaces and Data Files in a PDB
Because tablespaces in different PDBs can have the same name, to eliminate
ambiguity you must connect directly to a PDB to back up one or more of its
tablespaces.
Ensure that the CDB is open or mounted. Tablespaces can be read-only or read-write.
In contrast, because data file numbers and paths are unique across the CDB, you can
connect to either the root or a PDB to back up PDB data files. If you connect to the
root, you can back up data files from multiple PDBs with a single command. If you
connect to a PDB, you can back up only data files in that PDB.
Chapter 9
Backing Up CDBs and PDBs
9-22

To back up tablespaces in a PDB:
1. Start RMAN and connect to the PDB as a local user with the
SYSBACKUP
or
SYSDBA
privilege as described in Connecting as Target to a PDB.
2. Issue a
BACKUP TABLESPACE
command.
The following example backs up the tablespaces
users
and
examples
to the
configured default device.
BACKUP TABLESPACE users, examples;
To back up data files in a PDB:
1. Do one of the following:
•Start RMAN and connect to the root as a common user with the
SYSBACKUP
or
SYSDBA
privilege.
•Start RMAN and connect to the PDB as a local user with the
SYSBACKUP
or
SYSDBA
privilege.
2. Issue a
BACKUP
DATAFILE
command.
BACKUP DATAFILE 10, 13;
See Also:
•Connecting as Target to the Root
•Connecting as Target to a PDB
9.4.9 Example: Creating a Preplugin Backup of a PDB with RMAN
This example creates a preplugin backup of the PDB
my_pdb
that is contained in CDB
cdb_prod
. The CDB uses shared undo and is open in read-write mode.
1. Ensure that the prerequisites required for creating preplugin backups are met as
described in Oracle Database Backup and Recovery Reference.
2. Start RMAN and connect to the root as a common user with the
SYSBACKUP
privilege.
The following command uses password file authentication to connect to the root.
cdb_prod
is the net service name of the CDB.
CONNECT TARGET "sbu@cdb_prod AS SYSBACKUP";
Enter the password for the
sbu
user when prompted.
3. Enable control file autobackup for the CDB.
CONFIGURE CONTROLFILE AUTOBACKUP ON;
4. Back up the PDB using the
BACKUP PLUGGABLE DATABASE
command. Include archived
redo logs in the backup so that you can use this backup to perform media
recovery, if required.
Chapter 9
Backing Up CDBs and PDBs
9-23

The following command creates a preplugin backup of
my_pdb
, including the
archived redo log files. The tag used when naming the backups is
mypdb_bkup
.
BACKUP PLUGGABLE DATABASE my_pdb PLUS ARCHIVELOG TAG mypdb_bkup;
9.5 Backing Up Application Containers
RMAN enables you to use the
BACKUP
command to perform backup operations on the
application root, one or more application PDBs, and the application container.
Note:
•About Backing Up Application Containers
•Backing Up the Application Root
•Backing Up the Application Root and its Application PDBs
•Backing Up Application PDBs
9.5.1 About Backing Up Application Containers
RMAN can back up application containers, application PDBs, and the application root.
An application container is an optional component of a CDB that stores data for one or
more applications and shares application metadata and common data. A CDB can
contain zero or more application containers. An application container consists of
exactly one application root (different from the root in its CDB) and one or more
application PDBs. The application root serves as the parent container to all the
application PDBs plugged into it.
An application container typically contains one or more application common users. An
application common user can only connect to the application root in which it was
created or a PDB that is plugged in to this application root. An application root has its
own service name, and you can connect to the application root in the same way that
you connect to a PDB.
To perform backup and recovery tasks for the application root or application PDBs,
you connect either to the application root or CDB root.
See Also:
•Oracle Database Concepts for conceptual information about application
containers
•Oracle Database Administrator’s Guide for information about creating
application containers
Chapter 9
Backing Up Application Containers
9-24

9.5.2 Backing Up the Application Root
RMAN provides multiple ways of backing up the application root using the
BACKUP
command.
Use one of the following approaches to back up the application root:
•Connect to the application root and use the
BACKUP DATABASE ROOT
command
•Connect to the CDB root and use the
BACKUP PLUGGABLE DATABASE
command
The
COMPATIBLE
parameter for the CDB must be set to 12.2 or higher.
To connect to and back up the application root:
1. Start RMAN and connect to the application root as an application common user
with the
SYSDBA
or
SYSBACKUP
privilege.
The application root has its own service name and you can connect to the
application root in the same way that you connect to a PDB.
2. Use the following
BACKUP
command to back up the application root.
BACKUP DATABASE ROOT;
To back up the application root when connected to the root in a CDB
1. Start RMAN and connect to the CDB root as a common user with the
SYSDBA
or
SYSBACKUP
privilege.
2. Use the
BACKUP PLUGGABLE DATABASE
command to back up the application root.
The following example backs up an application root named
hr_appcont
:
BACKUP PLUGGABLE DATABASE hr_appcont;
See Also:
Making RMAN Connections to a CDB
9.5.3 Backing Up the Application Root and its Application PDBs
Use the
BACKUP
command to back up an application container, which consists of the
application root and all the application PDBs that belong to the application root.
The
COMPATIBLE
parameter for the CDB must be set to 12.2 or higher.
To back up the application root and all its application PDBs:
1. Start RMAN and connect to the application root as an application common user
with the
SYSDBA
or
SYSBACKUP
privilege.
The application root has its own service name and you can connect to the
application root in the same way that you connect to a PDB.
2. Use the following command to back up the application container:
BACKUP DATABASE;
Chapter 9
Backing Up Application Containers
9-25

See Also:
Making RMAN Connections to a CDB
9.5.4 Backing Up Application PDBs
The
BACKUP
command is used to back up one or more application PDBs.
The
COMPATIBLE
parameter for the CDB must be set to 12.2 or higher.
To back up one or more application PDBs:
1. Start RMAN and establish one of the following types of connections:
•Connect to the application root as an application common user with the
SYSDBA
or
SYSBACKUP
privilege.
The application root has its own service name and you can connect to the
application root in the same way that you connect to a PDB.
•Connect to the CDB root as a common user with the
SYSDBA
or
SYSBACKUP
privilege.
2. Use the
BACKUP PLUGGABLE DATABASE
command to back up the application PDB. To
back up multiple application PDBs, use a comma-separated list of application PDB
names.
The following command backs up an application PDB named
hr_app_pdb
:
BACKUP PLUGGABLE DATABASE hr_app_pdb;
See Also:
Making RMAN Connections to a CDB
9.6 Backing Up Sparse Databases with RMAN
Use the
BACKUP
command to back up sparse databases.
This section contains the following topics:
•Backing Up a Sparse Database with RMAN
•Backing Up Sparse Tablespaces and Data Files with RMAN
•Backing Up a Sparse CDB with RMAN
•Backing Up a Sparse PDB with RMAN
Chapter 9
Backing Up Sparse Databases with RMAN
9-26

Note:
The base (read-only) data files in a sparse database are not encrypted.
Ensure that the base data files are stored in a protected storage and
accessed using secured communications.
9.6.1 Backing Up a Sparse Database with RMAN
RMAN enables you to back up a sparse database, using steps similar to backing up a
whole database, in the backup set or image copy format.
The difference while backing up a sparse database is that RMAN backs up data only
from the delta storage space of the database, which contains the latest changes made
to the data blocks within the sparse database.
Ensure you meet the following requirements before backing up a sparse database:
•The base database for your sparse database must be read-only
•The
COMPATIBLE
initialization parameter of the database being backed up must be
set to 12.2 or higher.
To back up a sparse database
1. Start RMAN and connect to a target database as described in Making Database
Connections with RMAN.
2. Ensure that the database is mounted or open.
3. Issue the
BACKUP
command with the
AS SPARSE
option. To specify your backup
format, use one of the following options:
•To create your backup in the backup set format, use the
AS SPARSE BACKUPSET
option. The following example performs a sparse backup in the backup set
format:
BACKUP AS SPARSE BACKUPSET DATABASE PLUS ARCHIVELOG;
•To create your backup in the image copy format use the
AS SPARSE COPY
option.
The following example performs a backup in the image copy format:
BACKUP AS SPARSE COPY DATABASE PLUS ARCHIVELOG;
•To create your backup in the compressed backup set format use the
COMPRESSED BACKUPSET
option. The following example performs a backup in the
compressed backups set format:
BACKUP AS SPARSE COMPRESSED BACKUPSET DATABASE;
Chapter 9
Backing Up Sparse Databases with RMAN
9-27

See Also:
•About Sparse Backups for more information on sparse backups
•Backing Up a Whole Database with RMAN for more information on
how to perform a traditional backup on a normal database
•Backing Up Sparse Tablespaces and Data Files with RMAN
•Performing Complete Recovery of a Sparse Database
See Also:
Oracle Database Backup and Recovery Reference for more information
on the options to back up sparse databases
9.6.2 Backing Up Sparse Tablespaces and Data Files with RMAN
You can back up one or more tablespaces containing sparse data files or individual
sparse data files using the
BACKUP
command.
While backing up tablespaces, RMAN translates the
BACKUP
command to individual
data files that are sparse compatible. Similarly, only data files containing sparse data
blocks are eligible for a sparse backup. RMAN creates sparse backups of sparse data
files and non-sparse backups of non-sparse data files.
Ensure that the database containing the sparse tablespace or data file has the
COMPATIBLE
initialization parameter set to 12.2 or higher.
To back up sparse tablespaces or data files:
1. Start RMAN and connect to a target database. For tablespaces and data files in
CDB, you must connect to the root as a user with the
SYSDBA
or
SYSBACKUP
privilege.
See Also:
Making Database Connections with RMAN for information about
connecting to a target database
2. Ensure that the database instance is mounted or open.
3. Run the
BACKUP
command for the tablespace or data file with the
AS SPARSE
option.
Specify whether you want the backup in the backup set format, image copy format,
or compressed backup set format. To do this, state one of the following options:
•To create your backup in the backup set format, use the
AS SPARSE BACKUPSET
option. The following example performs a sparse backup in the backup set
format:
BACKUP AS SPARSE BACKUPSET TABLESPACE MYTBS1;
Chapter 9
Backing Up Sparse Databases with RMAN
9-28

•To create your backup in the image copy format use the
AS SPARSE COPY
option.
The following example performs a backup in the image copy format:
BACKUP AS SPARSE COPY DATAFILE 8,9,10;
•To create your backup in the compressed backup set format use the
COMPRESSED BACKUPSET
option. The following example performs a backup in the
compressed backups set format:
BACKUP AS SPARSE COMPRESSED BACKUPSET TABLESPACE MYTBS3;
See Also:
•Backing Up a Sparse Database with RMAN
•Oracle Database Backup and Recovery Reference
9.6.3 Backing Up a Sparse CDB with RMAN
You can back up a sparse multitenant container database (CDB) or a CDB containing
some sparse pluggable databases (PDBs) by performing a backup operation similar to
backing up a sparse database using the
BACKUP
command.
Ensure that the
COMPATIBLE
initialization parameter of your CDB is set to 12.2 or higher.
To back up a sparse CDB:
1. Start RMAN and connect to root as a common user with the
SYSBACKUP
or
SYSDBA
privilege.
2. Ensure that the CDB is mounted or open and in
ARCHIVELOG
mode.
3. Enter the
BACKUP
command with the
AS SPARSE
option. Specify which format you
want to create your backup in:
•To create your backup in the backup set format, use the
AS SPARSE BACKUPSET
option. The following example performs a backup on the sparse CDB in the
backup set format:
BACKUP AS SPARSE BACKUPSET DATABASE;
•To create your backup in the image copy format use the
AS SPARSE COPY
option.
The following example performs a backup on the sparse CDB in the image
copy format:
BACKUP AS SPARSE COPY DATABASE;
•To create your backup in the compressed backup set format use the
COMPRESSED BACKUPSET
option. The following example performs a backup on the
sparse CDB in the compressed backups set format:
BACKUP AS SPARSE COMPRESSED BACKUPSET DATABASE;
Chapter 9
Backing Up Sparse Databases with RMAN
9-29

See Also:
•Backing Up a Sparse Database with RMAN
•Performing Complete Recovery of a Sparse CDB
9.6.4 Backing Up a Sparse PDB with RMAN
RMAN enables you to back up one or more sparse PDBs in a CDB.
Ensure that the
COMPATIBLE
initialization parameter is set to 12.2 or higher.
To back up a sparse PDB while connected to root:
1. Start RMAN and connect to the root as a common user with the
SYSBACKUP
or
SYSDBA
privilege as described in Connecting as Target to the Root.
2. Run the
BACKUP
command for the pluggable database. Specify the format for your
backup:
•To create your backup in the backup set format, use the
AS SPARSE BACKUPSET
option. The following example performs a sparse backup in the backup set
format:
BACKUP AS SPARSE BACKUPSET PLUGGABLE DATABASE PDB1;
•To create your backup in the image copy format use the
AS SPARSE COPY
option.
The following example performs a backup in the image copy format:
BACKUP AS SPARSE COPY PLUGGABLE DATABASE PDB1;
•To create your backup in the compressed backup set format use the
COMPRESSED BACKUPSET
option. The following example performs a backup in the
compressed backups set format:
BACKUP AS SPARSE COMPRESSED BACKUPSET PLUGGABLE DATABASE PDB1;
To back up a sparse PDB while connected to the PDB:
1. Start RMAN. Connect to the sparse PDB as a local user with the
SYSBACKUP
or
SYSDBA
privilege as described in Connecting as Target to a PDB.
2. Run the
BACKUP
command at the RMAN prompt, with the
AS SPARSE
option and the
format required. To specify the format for your backup, use one of the following
commands:
•To create your backup in the backup set format, use the
AS SPARSE BACKUPSET
option. The following example performs a sparse backup in the backup set
format:
BACKUP AS SPARSE BACKUPSET DATABASE;
•To create your backup in the image copy format use the
AS SPARSE COPY
option.
The following example performs a backup in the image copy format:
BACKUP AS SPARSE COPY DATABASE;
Chapter 9
Backing Up Sparse Databases with RMAN
9-30

•To create your backup in the compressed backup set format use the
COMPRESSED BACKUPSET
option. The following example performs a backup in the
compressed backups set format:
BACKUP AS SPARSE COMPRESSED BACKUPSET DATABASE;
3. To back up a tablespace from a sparse PDB, connect to the selected PDB directly
and then run the
BACKUP
command with the
AS SPARSE
option, the appropriate
backup format, and the tablespace name.
4. To back up a data file from a sparse PDB, you can either connect to root or
directly to the PDB. Run the
BACKUP
command with the
AS SPARSE
option, the
backup format, and the data file name, to back up an individual data file.
See Also:
Backing Up PDBs with RMAN
Performing Recovery of a Sparse PDB with RMAN
9.7 Backing Up Archived Redo Logs with RMAN
Archived redo logs are the key to successful media recovery. You should back them
up regularly.
This section contains the following topics:
•About Backups of Archived Redo Logs for non-CDBs
•About Backup of Archived Redo Logs in CDBs
•Backing Up Archived Redo Log Files in non-CDBs
•Backing Up Only Archived Redo Logs That Need Backups in non-CDBs
•Backing Up Archived Redo Logs in CDBs
•Deleting Archived Redo Logs After Backups in non-CDBs
•Deleting Archived Redo Logs After Backups in CDBs
9.7.1 About Backups of Archived Redo Logs for non-CDBs
Several features of RMAN backups are specific to archived redo logs. For example,
you can use
BACKUP ... DELETE
to delete one or all copies of archived redo logs from
disk after backing them up to backup sets.
This section contains the following topics:
•About Archived Redo Log Failover
•About Online Redo Log Switching
9.7.1.1 About Archived Redo Log Failover
Even if your redo logs are being archived to multiple destinations and you use RMAN
to back up archived redo logs, RMAN selects only one copy of the archived redo log
Chapter 9
Backing Up Archived Redo Logs with RMAN
9-31

file to include in the backup set. Because logs with the same log sequence number are
identical, RMAN does not need to include more than one log copy.
The archived redo log failover feature enables RMAN to complete a backup even
when some archiving destinations are missing logs or contain logs with corrupt blocks.
If at least one log corresponding to a given log sequence and thread is available in the
fast recovery area or any of the archiving destinations, then RMAN tries to back it up.
If RMAN finds a corrupt block in a log file during backup, it searches other destinations
for a copy of that log without corrupt blocks.
For example, assume that you archive logs 121 through 124 to two destinations:
/
arch1
and
/arch2
. Table 9-1 shows the archived redo log records in the control file.
Table 9-1 Sample Archived Redo Log Records
Sequence File Name in /arch1 File Name in /arch2
121
/arch1/archive1_121.arc /arch2/archive1_121.arc
122
/arch1/archive1_122.arc /arch2/archive1_122.arc
123
/arch1/archive1_123.arc /arch2/archive1_123.arc
124
/arch1/archive1_124.arc /arch2/archive1_124.arc
However, unknown to RMAN, a user deletes logs 122 and 124 from the
/arch1
directory. Afterward, you run the following backup:
BACKUP ARCHIVELOG
FROM SEQUENCE 121
UNTIL SEQUENCE 125;
With failover, RMAN completes the backup, using logs 122 and 124 in
/arch2
.
9.7.1.2 About Online Redo Log Switching
Automatic online redo log switching is an important RMAN feature.
To make an open database backup of archived redo logs that includes the most recent
online redo log, you can execute the
BACKUP
command with any of the following
clauses:
•
PLUS ARCHIVELOG
•
ARCHIVELOG ALL
•
ARCHIVELOG FROM ...
Before beginning the backup, RMAN switches out of the current redo log group, and
archives all online redo logs that have not yet been archived, up to and including the
redo log group that was current when the command was issued. This feature ensures
that the backup contains all redo generated before the start of the command.
An effective way of backing up archived redo logs is the
BACKUP
...
PLUS
ARCHIVELOG
command, which causes RMAN to do the following:
1. Run the
ALTER SYSTEM
ARCHIVE
LOG
CURRENT
statement.
2. Run
BACKUP ARCHIVELOG ALL
. If backup optimization is enabled, then RMAN skips
logs that it has already backed up to the specified device.
3. Back up the rest of the files specified in the
BACKUP
command.
Chapter 9
Backing Up Archived Redo Logs with RMAN
9-32

4. Run the
ALTER SYSTEM ARCHIVE LOG CURRENT
statement.
5. Back up any remaining archived logs generated during the backup. If backup
optimization is not enabled, then RMAN backs up the logs generated in Step 1
plus all the logs generated during the backup.
The preceding steps guarantee that data file backups taken during the command are
recoverable to a consistent state. Also, unless the online redo log is archived at the
end of the backup,
DUPLICATE
is not possible with the backup.
9.7.2 About Backup of Archived Redo Logs in CDBs
In a CDB, archived redo logs can be backed up only when you connect to the root as a
common user with the
SYSDBA
or
SYSBACKUP
privilege.
When you connect to a PDB as a local user with
SYSDBA
or
SYSBACKUP
privilege, you
cannot back up or delete archived redo logs.
If your archived redo logs are being copied to multiple destinations, when you connect
to the root and backup archived redo log files, RMAN includes only one copy of the
archived redo log files in a backup. You can switch archived redo log files when you
connect to root of a CDB. Therefore, the information in "About Archived Redo Log
Failover" and "About Online Redo Log Switching" is applicable when you connect to
the root. However, you cannot backup or switch archived redo log files when
connected to a PDB.
See Also:
Backing Up Archived Redo Logs in CDBs
9.7.3 Backing Up Archived Redo Log Files in non-CDBs
To back up archived logs, use the
BACKUP
ARCHIVELOG
command.
If backup optimization is enabled, then RMAN skips backups of archived logs that
have already been backed up to the specified device.
To back up archived redo log files:
1. Start RMAN and connect to a target database and a recovery catalog (if used) as
described in Making Database Connections with RMAN.
2. Ensure that the target database is mounted or open.
3. Execute the
BACKUP ARCHIVELOG
or
BACKUP ... PLUS ARCHIVELOG
command.
The following example backs up the database and all archived redo logs:
BACKUP DATABASE PLUS ARCHIVELOG;
The following example uses a configured disk or SBT channel to back up one copy
of each log sequence number for all archived redo logs:
BACKUP ARCHIVELOG ALL;
Chapter 9
Backing Up Archived Redo Logs with RMAN
9-33

You can also specify a range of archived redo logs by time, SCN, or log sequence
number, as in the following example:
BACKUP ARCHIVELOG
FROM TIME 'SYSDATE-30'
UNTIL TIME 'SYSDATE-7';
9.7.4 Backing Up Only Archived Redo Logs That Need Backups in
non-CDBs
You can indicate that RMAN should automatically skip backups of archived redo logs.
Use one of the following techniques:
•Configure backup optimization.
If you enable backup optimization, then the
BACKUP ARCHIVELOG
command skips
backing up files when an identical archived log has been backed up to the
specified device type. An archived log is considered identical to another when it
has the same DBID, thread, sequence number, and
RESETLOGS
SCN and time.
•Configure an archived redo log deletion policy.
If the deletion policy is configured with the
BACKED UP
integer
TIMES
clause, then a
BACKUP ARCHIVELOG
command copies the logs unless
integer
backups exist on the
specified device type. If
integer
backups of the logs exist, then the
BACKUP
ARCHIVELOG
command skips the logs.
The
BACKUP ... NOT BACKED UP
integer
TIMES
command specifies that RMAN backs up
only those archived log files that have not been backed up at least
integer
times to the
specified device. To determine the number of backups for a file, RMAN only considers
backups created on the same device type as the current backup.
The
BACKED UP
clause is a convenient way to back up archived logs to a specified
device type. For example, you can specify that RMAN should keep two copies of each
archived redo log on tape and skip additional backups.
To back up archived redo logs that need backups:
1. Start RMAN and connect to a target database and a recovery catalog (if used) as
described in Making Database Connections with RMAN.
2. Ensure that the target database is mounted or open.
3. Ensure that appropriate channels are configured for the backup.
4. Execute the
BACKUP ARCHIVELOG
command with the
NOT BACKED UP
clause.
BACKUP ARCHIVELOG ALL NOT BACKED UP 2 TIMES;
See Also:
•Backup Optimization and the CONFIGURE command
•Configuring an Archived Redo Log Deletion Policy
•Using Backup Optimization to Skip Files for scenarios using
NOT BACKED
UP
Chapter 9
Backing Up Archived Redo Logs with RMAN
9-34

9.7.5 Backing Up Archived Redo Logs in CDBs
You can back up archived redo logs in a multitenant container database (CDB) by
using the
BACKUP ARCHIVELOG
command.
To back up archived redo logs in a CDB:
1. Start RMAN and connect to the root as a user with the
SYSDBA
or
SYSBACKUP
privilege as described in Connecting as Target to the Root.
2. Ensure that the target CDB is mounted or open.
3. Execute the
BACKUP ARCHIVELOG
or
BACKUP ... PLUS ARCHIVELOG
command.
The following example backs up the database and all archived redo logs:
BACKUP DATABASE PLUS ARCHIVELOG;
The following example uses a configured disk or SBT channel to back up one copy
of each log sequence number for all archived redo logs:
BACKUP ARCHIVELOG ALL;
To back up only archived redo logs that need backup in a CDB:
1. Start RMAN and connect to the root as a common user with the
SYSDBA
or
SYSBACKUP
privilege.
2. Ensure that the target CDB is mounted or open.
3. Ensure that appropriate channels are configured for the backup.
4. Configure RMAN to automatically skip backups of archived redo logs. Use one of
the following techniques:
•Configure backup optimization so that the
BACKUP ARCHIVELOG
command skips
backing up files when an identical archived log has been backed up to the
specified device type.
•Configure an archived redo log retention policy using the
BACKED UP
integer
TIMES
clause. A
BACKUP ARCHIVELOG
command will copy the logs unless integer
backups exist on the specified device type.
5. Execute the
BACKUP ARCHIVELOG
command with the
NOT BACKED UP
clause.
BACKUP ARCHIVELOG ALL NOT BACKED UP 2 TIMES;
See Also:
•About Backup of Archived Redo Logs in CDBs
•Backing Up Only Archived Redo Logs That Need Backups in non-CDBs
Chapter 9
Backing Up Archived Redo Logs with RMAN
9-35

9.7.6 Deleting Archived Redo Logs After Backups in non-CDBs
The
BACKUP ARCHIVELOG
... DELETE INPUT
command deletes archived log files after they
are backed up. This command eliminates the separate step of manually deleting
archived redo logs.
With
DELETE INPUT
, RMAN deletes only the specific copy of the archived log chosen for
the backup set. With
DELETE ALL INPUT
, RMAN deletes each backed-up archived redo
log file from all log archiving destinations.
The
BACKUP ... DELETE INPUT
and
DELETE ARCHIVELOG
commands obey the archived
redo log deletion policy for logs in all archiving locations. For example, if you specify
that logs be deleted only when backed up at least twice to tape, then
BACKUP ...
DELETE
honors this policy.
For the following procedure, assume that you archive to
/arc_dest1
,
/arc_dest2
, and
the fast recovery area.
To delete archived redo logs after a backup:
1. Start RMAN and connect to a target database and a recovery catalog (if used) as
described in Making Database Connections with RMAN.
2. Ensure that the target database is mounted or open.
3. Run the
BACKUP
command with the
DELETE INPUT
clause.
Assume that you run the following
BACKUP
command:
BACKUP DEVICE TYPE sbt
ARCHIVELOG ALL
DELETE ALL INPUT;
In this case, RMAN backs up only one copy of each log sequence number in these
archiving locations. RMAN deletes all copies of any log that it backed up from both
the fast recovery area and the other archiving destinations.
If you specify
DELETE
INPUT
rather than
DELETE
ALL
INPUT
, then RMAN only deletes
the specific archived redo log files that it backed up. For example, RMAN deletes
the logs in
/arc_dest1
if these files were used as the source of the backup, but
leave the contents of the
/arc_dest2
intact.
See Also:
•Configuring an Archived Redo Log Deletion Policy
•Oracle Data Guard Concepts and Administration to learn about archived
redo log management with standby databases
•Oracle Database Backup and Recovery Reference to learn about the
CONFIGURE ARCHIVELOG DELETION POLICY
and
DELETE ARCHIVELOG
commands
•Deleting RMAN Backups and Archived Redo Logs
Chapter 9
Backing Up Archived Redo Logs with RMAN
9-36

9.7.7 Deleting Archived Redo Logs After Backups in CDBs
In a CDB, you can delete archived redo logs after they are backed up by using the
BACKUP ARCHIVELOG ... DELETE INPUT
command.
To delete archived redo logs in a CDB after they are backed up:
1. Start RMAN and connect to the root as a user with the
SYSDBA
or
SYSBACKUP
privilege as described in Making Database Connections with RMAN.
2. Ensure that the target database is mounted or open.
3. Run the
BACKUP
command with the
DELETE INPUT
clause.
See Also:
Oracle Database Backup and Recovery Reference for information about the
BACKUP
command
9.8 Making and Updating RMAN Incremental Backups
An incremental backup copies only data file blocks that have changed since a
specified previous backup. Use the
BACKUP
command to create incremental backups.
An incremental backup is either a cumulative incremental backup or a differential
incremental backup.
Although the content of the backups is the same,
BACKUP DATABASE
and
BACKUP
INCREMENTAL LEVEL 0 DATABASE
are different. A full backup is not usable as part of an
incremental strategy, whereas a level 0 incremental backup is the basis of an
incremental strategy. No RMAN command can change a full backup into a level 0
incremental backup.
As with full backups, RMAN can make incremental backups of an
ARCHIVELOG
mode
database that is open. If the database is in
NOARCHIVELOG
mode, then RMAN can make
incremental backups only after a consistent shutdown.
This section contains the following topics:
•Purpose of RMAN Incremental Backups
•Planning an Incremental Backup Strategy
•Making Incremental Backups
•Incrementally Updating Backups
•Using Block Change Tracking to Improve Incremental Backup Performance
9.8.1 Purpose of RMAN Incremental Backups
RMAN incremental backups provide multiple benefits.
The primary reasons for making incremental backups part of your strategy are:
Chapter 9
Making and Updating RMAN Incremental Backups
9-37

•Faster daily backups if block change tracking is enabled (see "Using Block
Change Tracking to Improve Incremental Backup Performance")
•Ability to roll forward data file image copies, thereby reducing recovery time and
avoiding repeated full backups
•Less bandwidth consumption when backing up over a network
•Improved performance when the aggregate tape bandwidth for tape write I/Os is
much less than the aggregate disk bandwidth for disk read I/Os
•Possibility of recovering changes to objects created with the
NOLOGGING
option
For example, direct load inserts do not create redo log entries, so their changes
cannot be reproduced with media recovery. Direct load inserts do change data
blocks, however, and these blocks are captured by incremental backups.
•Ability to synchronize a physical standby database with the primary database
You can use the RMAN
BACKUP INCREMENTAL FROM SCN
command to create a backup
on the primary database that starts at the current SCN of the standby database,
which you can then use to roll forward the standby database. See Oracle Data
Guard Concepts and Administration to learn how to apply incremental backups to
a standby database.
See Also:
Oracle Database Administrator’s Guide for more information about
NOLOGGING
mode
9.8.2 Planning an Incremental Backup Strategy
Choose a backup strategy according to an acceptable MTTR (mean time to recover).
For example, you can implement a three-level backup scheme so that a level 0 backup
is taken monthly, a cumulative level 1 is taken weekly, and a differential level 1 is
taken daily. In this strategy, you never have to apply more than a day of redo for
complete recovery.
When deciding how often to take level 0 backups, a general rule is to take a new level
0 backup whenever 20% or more of the data has changed. If the rate of change to
your database is predictable, then you can observe the size of your incremental
backups to determine when a new level 0 backup is appropriate. The following SQL
query determines the number of blocks written to an incremental level 1 backup of
each data file with at least 20% of its blocks backed up:
SELECT FILE#, INCREMENTAL_LEVEL, COMPLETION_TIME,
BLOCKS, DATAFILE_BLOCKS
FROM V$BACKUP_DATAFILE
WHERE INCREMENTAL_LEVEL > 0
AND BLOCKS / DATAFILE_BLOCKS > .2
ORDER BY COMPLETION_TIME;
Compare the number of blocks in level 1 backups to a level 0 backup. For example, if
you create only level 1 cumulative backups, then take a new level 0 backup when the
most recent level 1 backup is about half the size of the level 0 backup.
Chapter 9
Making and Updating RMAN Incremental Backups
9-38

An effective way to conserve disk space is to make incremental backups to disk, and
then offload the backups to tape with the
BACKUP
AS
BACKUPSET
command. Incremental
backups are generally smaller than full backups, which limits the space required to
store them until they are moved to tape. When the incremental backups on disk are
backed up to tape, the tape is more likely to stream because all blocks of the
incremental backup are copied to tape. There is no possibility of delay due to time
required for RMAN to locate changed blocks in the data files.
Another strategy is to use incrementally updated backups, as explained in
"Incrementally Updating Backups". In this strategy, you create an image copy of each
data file, and then periodically roll forward this copy by making and then applying a
level 1 incremental backup. In this way you avoid the overhead of making repeated full
image copies of your data files, but enjoy all of the advantages.
In a Data Guard environment, you can offload incremental backups to a physical
standby database. Incremental backups of a standby and primary database are
interchangeable. Thus, you can apply an incremental backup of a standby database to
a primary database, or apply an incremental backup of a primary database to a
standby database.
See Also:
Oracle Data Guard Concepts and Administration to learn how to back up a
standby database with RMAN. In particular, consult Chapter 10, "Managing
Physical and Snapshot Standby Databases"
9.8.3 Making Incremental Backups
After starting RMAN, run the
BACKUP
INCREMENTAL
command at the RMAN prompt. By
default incremental backups are differential.
To make an incremental backup:
1. Start RMAN and connect to a target database and a recovery catalog (if used).
See Also:
Making Database Connections with RMAN
2. Ensure that the target database is mounted or open.
3. Execute the
BACKUP INCREMENTAL
command with the desired options.
Use the
LEVEL
parameter to indicate the incremental level. The following example
makes a level 0 incremental database backup.
BACKUP
INCREMENTAL LEVEL 0
DATABASE;
The following example makes a differential incremental backup at level 1 of the
SYSTEM
and
tools
tablespaces. It only backs up those data blocks changed since
the most recent level 1 or level 0 backup.
Chapter 9
Making and Updating RMAN Incremental Backups
9-39

BACKUP
INCREMENTAL LEVEL 1
TABLESPACE SYSTEM, tools;
The following example makes a cumulative incremental backup at level 1 of the
tablespace
users
, backing up all blocks changed since the most recent level 0
backup.
BACKUP
INCREMENTAL LEVEL 1 CUMULATIVE
TABLESPACE users;
9.8.3.1 Making Incremental Backups of a VSS Snapshot
You can use the Volume Shadow Copy Service (VSS) with the Oracle VSS writer to
make a shadow copy or snapshot of files in a database.
You must use a third-party backup program other than RMAN to make VSS snapshots
with the Oracle VSS writer. In this case, the fast recovery area automates
management of files that are backed up in a VSS snapshot and deletes them as
needed.
You can use the
BACKUP INCREMENTAL LEVEL 1 ... FROM SCN
command in RMAN to
create incremental backups in the fast recovery area. Thus, you can use this
command to create an incremental level 1 backup of a VSS shadow copy. RMAN can
apply incremental backups during recovery transparently.
See Also:
Oracle Database Platform Guide for Microsoft Windows to learn how to make
VSS backups with RMAN
9.8.4 Incrementally Updating Backups
By incrementally updating backups, you can avoid the overhead of making full image
copy backups of data files, while also minimizing time required for media recovery of
your database. For example, if you run a daily backup script, then you never have
more than 1 day of redo to apply for media recovery.
To incrementally update data file backups:
1. Create a full image copy backup of a data file with a specified tag.
2. At regular intervals (such as daily), make a level 1 differential incremental backup
of the data file and use the same tag as the base data file copy.
3. Apply the incremental backup to the most recent backup with the same tag.
This technique rolls forward the backup to the time when the level 1 incremental
backup was made. RMAN can restore this incremental forever and apply changes
from the redo log. The result equals restoring a data file backup taken at the SCN of
the most recently applied incremental level 1 backup.
Chapter 9
Making and Updating RMAN Incremental Backups
9-40

Note:
If you run
RECOVER COPY
daily without specifying an
UNTIL TIME
, then a
continuously updated image copy cannot satisfy a recovery window of more
than a day. The incrementally updated backup feature is an optimization for
fast media recovery.
9.8.4.1 Incrementally Updating Backups: Basic Example
To create incremental backups for use in an incrementally updated backup strategy,
use the
BACKUP ...
FOR
RECOVER
OF
COPY
WITH
TAG
form of the
BACKUP
command. The
command is best understood in a sample script that implements the strategy.
The script in Example 9-15, run regularly, is all that is required to implement a strategy
based on incrementally updated backups.
Example 9-15 Basic Incremental Update Script
RUN
{
RECOVER COPY OF DATABASE
WITH TAG 'incr_update';
BACKUP
INCREMENTAL LEVEL 1
FOR RECOVER OF COPY WITH TAG 'incr_update'
DATABASE;
}
To understand the script and the strategy, you must understand the effects of these
two commands when no data file copies or incremental backups exist. Note two
important features:
•The
BACKUP
command in Example 9-15 does not always create a level 1
incremental backup.
•The
RECOVER
command in Example 9-15 causes RMAN to apply any available
incremental level 1 backups with the specified tag to a set of data file copies with
the same tag.
Table 9-2 shows the effect of the script when it is run once per day starting on
Monday.
Table 9-2 Effect of Basic Script When Run Daily
Command Monday Tuesday Wednesday Thursday Onward
RECOVER
Because no incremental
backup or data file copy
exists, the command
generates a message
(but not an error). That
is, the command has no
effect.
A database copy now
exists, but no
incremental level 1
backup exists with
which to recover it.
Thus, the
RECOVER
command has no effect.
The level 1 incremental
backup made on
Tuesday is applied to
the database copy,
bringing the copy up to
the checkpoint SCN of
the level 1 incremental
backup.
The level 1 incremental
backup made yesterday
is applied to the
database copy, bringing
the copy up to the
checkpoint SCN of the
level 1 incremental
backup.
Chapter 9
Making and Updating RMAN Incremental Backups
9-41

Table 9-2 (Cont.) Effect of Basic Script When Run Daily
Command Monday Tuesday Wednesday Thursday Onward
BACKUP
No level 0 image copy
exists, so the command
creates an image copy
of the database and
applies the tag
incr_update
. This copy
is needed to begin the
cycle of incremental
updates.
Note: If the script sets
DEVICE
TYPE
sbt
, then
the first run creates the
copy on disk, not on
tape. Subsequent runs
make level 1 backups
on tape.
The command makes
an incremental level 1
backup and assigns it
the tag
incr_update
.
This backup contains
blocks that changed
between Monday and
Tuesday.
The command makes
an incremental level 1
backup and assigns it
the tag
incr_update
.
This backup contains
blocks that changed
between Tuesday and
Wednesday.
The command makes
an incremental level 1
backup and assigns it
the tag
incr_update
.
This backup contains
blocks that changed
between now and the
most recent backup with
the tag
incr_update
.
Note the following additional details about Example 9-15:
•Each time a data file is added to the database, an image copy of the new data file
is created the next time the script runs. The next run makes the first level 1
incremental for the added data file. On all subsequent runs the new data file is
processed like any other data file.
•You must use tags to identify the data file copies and incremental backups in this
strategy so that they do not interfere with other backup strategies. If you use
multiple incremental backup strategies, then RMAN cannot unambiguously create
incremental level 1 backups unless you tag level 0 backups.
The incremental level 1 backups to apply to those image copies are selected
based upon the tag of the image copy data files and the available incremental
level 1 backups. The tag is essential in the selection of the incremental level
backups.
•After the third run of the script, the following files are available for a point-in-time
recovery:
–An image copy of the database, as of the checkpoint SCN of the preceding run
of the script, 24 hours earlier
–An incremental backup for the changes after the checkpoint SCN of the
preceding run
–Archived redo logs including all changes between the checkpoint SCN of the
image copy and the current time
If you must restore and recover your database during the following 24 hours, then
you can restore the data files from the incrementally updated data file copies. You
can then apply changes from the most recent incremental level 1 and the redo
logs to reach the desired SCN. At most, you have 24 hours of redo to apply, which
limits how long point-in-time recovery takes to finish.
Chapter 9
Making and Updating RMAN Incremental Backups
9-42

9.8.4.2 Incrementally Updated Backups: Advanced Example
You can extend the basic script in Example 9-15 to provide fast recoverability to a
window greater than 24 hours. Example 9-16 shows how to maintain a window of 7
days by specifying the beginning time of your window of recoverability in the
RECOVER
command.
Example 9-16 Advanced Incremental Update Script
RUN
{
RECOVER COPY OF DATABASE
WITH TAG 'incr_update'
UNTIL TIME 'SYSDATE - 7';
BACKUP
INCREMENTAL LEVEL 1
FOR RECOVER OF COPY WITH TAG 'incr_update'
DATABASE;
}
Table 9-3 shows the effect of the script when it is run once per day starting on
Monday, January 1.
Table 9-3 Effect of Advanced Script When Run Daily
Command Monday 1/1 Tuesday 1/2 - Monday
1/8
Tuesday 1/9 Wednesday 1/10
Onward
RECOVER
Because no incremental
backup or data file copy
exists, the command
generates a message
(but not an error). That
is, the command has no
effect.
A database copy exists,
but
SYSDATE-7
specifies
a time before the base
copy was created. For
example, on
Wednesday
SYSDATE-7
specifies the
Wednesday before
Monday 1/1. Thus, the
RECOVER
command has
no effect.
SYSDATE-7
now
specifies a date after
the base copy was
created. The database
copy made on Monday
1/1 is updated with the
incremental backup
made on Tuesday 1/2,
bringing the copy up to
the checkpoint SCN of
the level 1 incremental
backup.
The database copy is
updated with the
incremental backup
made 7 days ago,
bringing the copy up to
the checkpoint SCN of
the level 1 incremental
backup.
BACKUP
No level 0 image copy
exists, so the command
creates an image copy
of the database and
applies the tag
incr_update
. This copy
is needed to begin the
cycle of incremental
updates.
Note: If the script sets
DEVICE
TYPE
sbt
, then
the first run creates the
copy on disk, not on
tape. Subsequent runs
make level 1 backups
on tape.
The command makes
an incremental level 1
backup and assigns it
the tag
incr_update
.
This backup contains
blocks that changed
between yesterday and
today.
The command makes
an incremental level 1
backup and assigns it
the tag
incr_update
.
This backup contains
blocks that changed
between Monday 1/8
and Tuesday 1/9.
The command makes
an incremental level 1
backup and assigns it
the tag
incr_update
.
This backup contains
blocks that changed
between yesterday and
today.
Chapter 9
Making and Updating RMAN Incremental Backups
9-43

As with the basic script in Example 9-15, you have fast recoverability to any point in
time between the SCN of the data file copies and the present. RMAN can use both
block changes from the incremental backups and individual changes from the redo
logs. Because you have the daily level 1 incremental backups, you never need to
apply more than 1 day of redo.
See Also:
Oracle Database Backup and Recovery Reference to learn about the
RECOVER
command
9.8.5 Using Block Change Tracking to Improve Incremental Backup
Performance
The block change tracking feature for incremental backups improves backup
performance by recording changed blocks for each data file.
This section contains the following topics:
•About Block Change Tracking
•Enabling and Disabling Block Change Tracking
•Disabling Block Change Tracking
•Checking Whether Change Tracking Is Enabled
•Changing the Location of the Block Change Tracking File
9.8.5.1 About Block Change Tracking
If block change tracking is enabled on a primary or standby database, then RMAN
uses a block change tracking file to identify changed blocks for incremental backups.
By reading this small bitmap file to determine which blocks changed, RMAN avoids
having to scan every block in the data file that it is backing up.
Block change tracking is disabled by default. Nevertheless, the benefits of avoiding full
data file scans during backup are considerable, especially if only a small percentage of
data blocks are changed between backups. If your backup strategy involves
incremental backups, then block change tracking is recommended. Block change
tracking does not change the commands used to perform incremental backups. The
block change tracking file requires no maintenance after initial configuration.
You can only enable block change tracking at a physical standby database if a license
for the Oracle Active Data Guard option is enabled.
9.8.5.1.1 About Space Management in the Block Change Tracking File
Oracle Database automatically manages space in the change tracking file to retain
block change data that covers the eight most recent backups. After the maximum of
eight bitmaps is reached, the oldest bitmap is overwritten by the bitmap that tracks the
current changes.
Chapter 9
Making and Updating RMAN Incremental Backups
9-44

The block change tracking file maintains bitmaps that mark changes in the data files
between backups. The database performs a bitmap switch before each backup.
The first level 0 incremental backup scans the entire data file. Subsequent incremental
backups use the block change tracking file to scan only the blocks that have been
marked as changed since the last backup. An incremental backup can be optimized
only when it is based on a parent backup that was made after the start of the oldest
bitmap in the block change tracking file.
Consider the eight-bitmap limit when developing your incremental backup strategy. For
example, if you make a level 0 database backup followed by seven differential
incremental backups, then the block change tracking file now includes eight bitmaps. If
you then make a cumulative level 1 incremental backup, then RMAN cannot optimize
the backup, because the bitmap corresponding to the parent level 0 backup is
overwritten with the bitmap that tracks the current changes.
9.8.5.1.2 Location of the Block Change Tracking File
By default, the block change tracking file is created as an Oracle managed file in the
destination specified by the
DB_CREATE_FILE_DEST
initialization parameter. You can also
place the block change tracking file in any location that you choose, by specifying its
name when enabling block change tracking.
One block change tracking file is created for the whole database. Oracle recommends
against using a raw device (that is, a disk without a file system) as a change tracking
file.
Note:
In an Oracle Real Application Clusters (Oracle RAC) environment, the
change tracking file must be located on shared storage accessible from all
nodes in the cluster.
RMAN does not support backup and recovery of the change tracking file. The
database resets the change tracking file when it determines that the change tracking
file is invalid. If you restore and recover the whole database or a subset, then the
database resets the block change tracking file and starts tracking changes again. After
you make a level 0 incremental backup, the next incremental backup can use change
tracking data.
9.8.5.1.3 About the Size of the Block Change Tracking File
The size of the block change tracking file is proportional to the size of the database
and the number of enabled threads of redo.
The size of the block change tracking file can increase and decrease as the database
changes. The size is not related to the frequency of updates to the database.
Typically, the space required for block change tracking for a single instance is
approximately 1/30,000 the size of the data blocks to be tracked. For an Oracle RAC
environment, it is 1/30,000 of the size of the database, times the number of enabled
threads.
The following factors that may cause the file to be larger than this estimate suggests:
Chapter 9
Making and Updating RMAN Incremental Backups
9-45

•To avoid the overhead of allocating space as your database grows, the block
change tracking file size starts at 10 megabytes. New space is allocated in 10 MB
increments. Thus, for any database up to approximately 300 gigabytes, the file
size is no smaller than 10 MB, for up to approximately 600 gigabytes the file size is
no smaller than 20 megabytes, and so on.
•For each data file, a minimum of 320 kilobytes of space is allocated in the block
change tracking file, regardless of the size of the data file. Thus, if you have a
large number of relatively small data files, the change tracking file is larger than for
databases with a smaller number of larger data files containing the same data.
9.8.5.2 Enabling and Disabling Block Change Tracking
You can enable block change tracking when the database is either open or mounted.
This section assumes that you intend to create the block change tracking file as an
Oracle managed file in the database area, which is where the database maintains
active database files such as data files, control files, and online redo log files. See
"Overview of Files in the Fast Recovery Area" to learn about the database area and
fast recovery area.
To enable block change tracking:
1. Start SQL*Plus and connect to a target database with administrator privileges.
2. Ensure that the
DB_CREATE_FILE_DEST
initialization parameter is set.
SHOW PARAMETER DB_CREATE_FILE_DEST
If the parameter is not set, and if the database is open, then you can set the
parameter with the following form of the
ALTER SYSTEM
statement:
ALTER SYSTEM SET
DB_CREATE_FILE_DEST = '/disk1/bct/'
SCOPE=BOTH SID='*';
3. Enable block change tracking.
Execute the following
ALTER DATABASE
statement:
ALTER DATABASE ENABLE BLOCK CHANGE TRACKING;
You can also create the change tracking file in a location that you choose yourself
by using the following form of SQL statement:
ALTER DATABASE ENABLE BLOCK CHANGE TRACKING
USING FILE '/mydir/rman_change_track.f' REUSE;
The
REUSE
option tells Oracle Database to overwrite any existing block change
tracking file with the specified name.
9.8.5.3 Disabling Block Change Tracking
When you disable block change tracking, the database removes the block change
tracking file from the operating system.
This section assumes that the block change tracking feature is currently enabled.
Chapter 9
Making and Updating RMAN Incremental Backups
9-46

To disable block change tracking:
1. Start SQL*Plus and connect to a target database with administrator privileges.
2. Ensure that the target database is mounted or open.
3. Disable block change tracking.
Execute the following
ALTER DATABASE
statement:
ALTER DATABASE DISABLE BLOCK CHANGE TRACKING;
9.8.5.4 Checking Whether Change Tracking Is Enabled
You can query the
V$BLOCK_CHANGE_TRACKING
view to determine whether change tracking
is enabled, and if it is, the file name of the block change tracking file.
To determine whether change tracking is enabled:
Enter the following query in SQL*Plus (sample output included):
COL STATUS FORMAT A8
COL FILENAME FORMAT A60
SELECT STATUS, FILENAME
FROM V$BLOCK_CHANGE_TRACKING;
STATUS FILENAME
-------- ------------------------------------------------------------
ENABLED /disk1/bct/RDBMS/changetracking/o1_mf_2f71np5j_.chg
9.8.5.5 Changing the Location of the Block Change Tracking File
To move the change tracking file, use the
ALTER DATABASE RENAME FILE
statement.
The database must be mounted. The statement updates the control file to refer to the
new location and preserves the contents of the change tracking file. If you cannot shut
down the database, then you can disable and enable block change tracking. In this
case, you lose the contents of the existing block change tracking file.
To change the location of the change tracking file:
1. Start SQL*Plus and connect to a target database.
2. If necessary, determine the current name of the change tracking file:
SQL> SELECT FILENAME FROM V$BLOCK_CHANGE_TRACKING;
3. If possible, shut down the database. For example:
SQL> SHUTDOWN IMMEDIATE
If you shut down the database, then skip to the next step. If you choose not to shut
down the database, then execute the following SQL statements and skip all
remaining steps:
SQL> ALTER DATABASE DISABLE BLOCK CHANGE TRACKING;
SQL> ALTER DATABASE ENABLE BLOCK CHANGE TRACKING USING FILE 'new_location';
In this case you lose the contents of the block change tracking file.
Chapter 9
Making and Updating RMAN Incremental Backups
9-47

4. Using host operating system commands, move the block change tracking file to its
new location.
5. Mount the database and move the change tracking file to a location that has more
space. For example:
ALTER DATABASE RENAME FILE
'/disk1/bct/RDBMS/changetracking/o1_mf_2f71np5j_.chg' TO
'/disk2/bct/RDBMS/changetracking/o1_mf_2f71np5j_.chg';
This statement changes the location of the change tracking file while preserving its
contents.
6. Open the database:
SQL> ALTER DATABASE OPEN;
See Also:
Oracle Database SQL Language Reference to learn about the
ALTER
DATABASE
statement and the
ALTER SYSTEM
statement
9.9 Making Database Backups for Long-Term Storage
This section explains the basic concepts and tasks involved in making backups for
long-term storage.
This section contains the following topics:
•Purpose of Archival Backups
•Basic Concepts of Archival Backups
•Making an Archival Backup for Long-Term Storage
•Making a Temporary Archival Backup
9.9.1 Purpose of Archival Backups
You can use
BACKUP... KEEP
to create a backup that is both all-inclusive and exempt
from the backup retention policy.
The backup is all-inclusive because every file needed to restore and recover the
database is backed up to a single disk or tape location. The
KEEP
option also specifies
that the backup is exempt from the retention policy either forever or for a specified
period. The general name for a backup created with
BACKUP ... KEEP
is an archival
backup.
As explained in "About Data Archival", one purpose of a backup and recovery strategy
is to preserve data. You can use
BACKUP ... KEEP
to retain a database backup for
longer than the time dictated by the retention policy. For example, you can back up the
database on the first day of every year to satisfy a regulatory requirement and store
the media off-site. Years after you make the archival backup, you can restore and
recover it to query the data as it appeared at the time of the backup.
Another purpose of an archival backup is to create a backup that you want to restore
for testing purposes and then delete. For example, you can back up the database,
Chapter 9
Making Database Backups for Long-Term Storage
9-48

restore the database in a test environment, and then discard the archival backup after
the test database is operational. A related purpose is to create a self-contained backup
that you can delete after transferring it to another user or host. For example, another
user might want a copy of the database for reporting or testing.
9.9.2 Basic Concepts of Archival Backups
You can exempt a backup from the retention policy by using the
KEEP
option with the
BACKUP
command.
You can also use the
KEEP
and
NOKEEP
options of the
CHANGE
command to change the
status of an existing backup. Backups with
KEEP
attributes are valid backups that can
be recovered like any other backups.
You can specify an end date for an archival backup with the
KEEP UNTIL TIME
clause, or
specify that the backup is kept
FOREVER
. If you specify
UNTIL
, then RMAN marks the
backup as obsolete when the
UNTIL
time has passed, regardless of any configured
retention policy. For example, if you specify
KEEP UNTIL TIME '01-JAN-13'
, then the
backup is obsolete one second after midnight on January 1, 2013. If you specify an
UNTIL TIME
of 9:00 p.m, then the backup is obsolete at 9:01 p.m.
When you specify
KEEP
on the
BACKUP
command, RMAN generates multiple backup
sets. Note the following characteristics of the
BACKUP ... KEEP
command:
•It automatically backs up the data files, control file (even if the control file
autobackup is disabled), and the server parameter file.
•It automatically generates an archived redo log backup to ensure that the
database backup can be recovered to a consistent state.
•If the
FORMAT
,
POOL
, or
TAG
parameters are specified, then they are used for all
backups. For this reason, the
FORMAT
string must allow for the creation of multiple
backup pieces. Specifying the
%U
substitution variable is the easiest way to meet
this requirement.
•It supports an optional
RESTORE POINT
clause that creates a normal restore point,
which is a label for an SCN to which the backup must be recovered to be made
consistent. The SCN is captured just after the data file backups complete. RMAN
resynchronizes restore points with the recovery catalog and maintains the restore
points while the backup exists.
See Also:
•Listing Restore Points Using the LIST Command for information on how
to display restore points
•Oracle Database Backup and Recovery Reference for
CHANGE
syntax
•Oracle Database Backup and Recovery Reference for
BACKUP ... KEEP
syntax
Chapter 9
Making Database Backups for Long-Term Storage
9-49

9.9.3 Making an Archival Backup for Long-Term Storage
Typically, you make an archival backup to tape. Because your data protection backups
are most likely to be on a set of tapes that remain accessible and are recycled, it is
advisable to reserve a set of tapes for the archival backup.
You can write the archival backup to this special set of tapes and then place them in
off-site storage. You can vary the procedure for creating an archival backup by
creating a stored script or shell script that updates dynamically. When you run the
script, you can dynamically set the name of the restore point, backup format, and so
on.
See Also:
•Using Substitution Variables in Command Files
•Creating and Executing Dynamic Stored Scripts to learn how to make
archival backups with RMAN command files
9.9.3.1 Making an Archival Backup
Use the
BACKUP
command with the
KEEP
option to make archival backups.
This scenario makes a long-term archival backup with a backup tag of
QUARTERLY
and
assigns it to a special family of Oracle Secure Backup tapes reserved for long-term
storage. Note the following features of this example:
•The
FOREVER
keyword indicates that this backup is never eligible for deletion by the
backup retention policy.
•The
BACKUP
command creates the restore point named
FY06Q4
to match the SCN at
which point this backup is consistent.
To make a long-term archival backup:
1. Start RMAN and connect to a target database and recovery catalog.
The target database can be open or mounted. A recovery catalog is required for
KEEP FOREVER
, but is not required for any other
KEEP
option.
See Also:
Making Database Connections with RMAN
2. Run
BACKUP ... KEEP
to make the backup.
The following example generates a data file and archived log backup and creates
a normal restore point. The specified restore point must not already exist.
The log backup contains just those archived logs needed to restore this backup to
a consistent state. The database performs an online redo log switch to archive the
redo that is in the current online logs and is necessary to make this new backup
Chapter 9
Making Database Backups for Long-Term Storage
9-50

consistent. The control file autobackup has a copy of the restore point, so it can be
referenced as soon as the control file is restored.
RUN
{
ALLOCATE CHANNEL c1
DEVICE TYPE sbt
PARMS 'ENV=(OB_MEDIA_FAMILY=archival_backup)';
BACKUP DATABASE
TAG quarterly
KEEP FOREVER
RESTORE POINT FY06Q4;
}
The following variation keeps the backup for 365 days instead of keeping it
forever. After a year has passed, the backup becomes obsolete regardless of the
backup retention policy settings.
RUN
{
ALLOCATE CHANNEL c1 DEVICE TYPE sbt
PARMS 'ENV=(OB_MEDIA_FAMILY=archival_backup)';
BACKUP DATABASE
TAG quarterly
KEEP UNTIL TIME 'SYSDATE+365'
RESTORE POINT FY06Q4;
}
See Also:
Overview of Flashback Database, Restore Points and Guaranteed Restore
Points to learn about restore points
9.9.4 Making a Temporary Archival Backup
One purpose of an archival backup is to create a test database.
The technique for making a test database is essentially the same as the technique
described in "Making an Archival Backup for Long-Term Storage". The difference is
that you intend to delete the backup soon after creating it.
You can specify the temporary status of the backup with the
BACKUP ... KEEP UNTIL
parameter. Assume that you want to make a backup and then restore it to a new host
the same day. In this case, you can specify
KEEP UNTIL
TIME SYSDATE+1
to indicate that
RMAN overrides the retention policy for this backup for only one day. After one day,
the backup becomes obsolete, regardless of any configured backup retention policy.
The command in Example 9-17 makes an archival backup on a temporary disk with
the tag
TESTDB
. The example creates a normal restore point, which is a label for the
time to which the backup is recovered. RMAN only backs up the archived redo logs if
the database is open during the backup. Archived logs are not needed for offline
backups and so are not backed up.
Example 9-17 Creating a Temporary Archival Backup
BACKUP DATABASE
FORMAT '/disk1/oraclebck/%U'
Chapter 9
Making Database Backups for Long-Term Storage
9-51

TAG TESTDB
KEEP UNTIL TIME 'SYSDATE+1'
RESTORE POINT TESTDB06;
The recommended technique for restoring an archival backup is to use the
DUPLICATE
command.
9.10 Backing Up RMAN Backups
This section explains how to back up backup sets and image copies and contains the
following topics:
•About Backups of RMAN Backups
•Backing Up Backup Sets with RMAN
•Backing Up Image Copy Backups with RMAN
9.10.1 About Backups of RMAN Backups
You can use the
BACKUP BACKUPSET
command to back up backup sets produced by
other backup jobs. You can also use
BACKUP RECOVERY AREA
to back up recovery files
created in the current and all previous fast recovery area destinations.
Recovery files are full and incremental backup sets, control file autobackups, data file
copies, and archived redo logs. SBT and disk backups are supported for
BACKUP
RECOVERY AREA
. For disk backups of the recovery files, you must use the
TO DESTINATION
option.
The preceding commands are especially useful in the following scenarios:
•Ensuring that all backups exist both on disk and on tape.
•Moving backups from disk to tape and then freeing space on disk. This task is
especially important when the database uses a fast recovery area so that the
space can be reused as needed.
You can also use the
BACKUP COPY OF
command to back up image copies of data files,
control files, and archived redo logs. The output of this command can be either backup
sets or image copies, so you can generate backup sets from image copies. This form
of backup is used to back up a database backup created as image copies on disk to
tape.
Note:
In a multitenant environment, you cannot back up backup sets and image
copies of PDBs that have been dropped. RMAN skips backing up these
backups.
9.10.1.1 About Multiple Copies of RMAN Backup Sets
The
BACKUP BACKUPSET
command creates additional copies of backup pieces in a
backup set, but does not create a new backup set.
Chapter 9
Backing Up RMAN Backups
9-52

Thus,
BACKUP BACKUPSET
is similar to using the
DUPLEX
or
MAXCOPIES
option of
BACKUP
(see
"Duplexing Backup Sets"). The extra copy of a backup set created by
BACKUP BACKUPSET
is not a new backup set, just as copies of a backup set produced by other forms of the
BACKUP
command are not separate backup sets.
9.10.1.2 Viewing the Effect of a Backup Retention Policy on Backups of
Backups
For a backup retention policy based on redundancy, a backup set is counted as one
instance of a backup. This statement is true even if there are multiple copies of the
backup pieces that form the backup set, such as when a backup set has been backed
up from disk to tape.
For a recovery window retention policy, either all of the copies of a backup set are
obsolete, or none of them are. This point is easiest to grasp when viewing the output
of the
LIST
and
REPORT
commands.
To view the effect of a backup retention policy on backups of backups:
1. Back up a data file.
The following example backs up data file 5:
BACKUP AS BACKUPSET DATAFILE 5;
2. Run the
LIST
command for the data file backup from Step 1.
For example, run the following command (sample output included).
LIST BACKUP OF DATAFILE 5 SUMMARY;
List of Backups
===============
Key TY LV S Device Type Completion Time #Pieces #Copies Compressed Tag
------- -- -- - ----------- --------------- ------- ------- ---------- ---
18 B F A DISK 04-AUG-13 1 1 NO
TAG20070804T160 134
3. Use the backup set key from the previous step to back up the backup set.
For example, enter the following command:
BACKUP BACKUPSET 18;
4. Run the same
LIST
command that you ran in Step 2.
For example, run the following command (sample output included).
LIST BACKUP OF DATAFILE 5 SUMMARY;
List of Backups
===============
Key TY LV S Device Type Completion Time #Pieces #Copies Compressed Tag
------- -- -- - ----------- --------------- ------- ------- ---------- ---
18 B F A DISK 04-AUG-13 1 2 NO
TAG20070804T160 134
Only one backup set is shown in this output, but there are now two copies of it.
5. Generate a report to see the effect of these copies under a redundancy-based
backup retention policy.
For example, issue the following command:
Chapter 9
Backing Up RMAN Backups
9-53

REPORT OBSOLETE REDUNDANCY 1;
No copy is reported as obsolete because both copies of the backup set have the
same values for
set_stamp
and
set_count
.
6. Generate a report to see the effect of these copies under a recovery window-
based backup retention policy.
For example, issue the following command:
REPORT OBSOLETE RECOVERY WINDOW OF 1 DAYS;
No copy of the backup set is reported as obsolete or based on the
CHECKPOINT_CHANGE#
of this backup set, with the current time and the availability of
other backups.
See Also:
•Configuring a Redundancy-Based Retention Policy
•Reporting on RMAN Operations to learn how to use the
LIST
and
REPORT
commands
9.10.2 Backing Up Backup Sets with RMAN
Use the
BACKUP BACKUPSET
command to copy backup sets from disk to tape.
The procedure in this section assumes that you have configured an SBT device as
your default device.
To back up backup sets from disk to tape:
1. If you are backing up a subset of available backup sets, then execute the
LIST
BACKUPSET
command to obtain their primary keys.
The following example lists the backup sets in summary form:
RMAN> LIST BACKUPSET SUMMARY;
List of Backups
===============
Key TY LV S Device Type Completion Time #Pieces #Copies Comp Tag
--- -- -- - ----------- --------------- ------- ------- ---- ---
1 B F A DISK 28-MAY-13 1 1 NO TAG20070528T132432
2 B F A DISK 29-MAY-13 1 1 NO TAG20070529T132433
3 B F A DISK 30-MAY-13 1 1 NO TAG20070530T132434
The following example lists details about backup set 3:
RMAN> LIST BACKUPSET 3;
List of Backup Sets
===================
BS Key Type LV Size Device Type Elapsed Time Completion Time
------- ---- -- ---------- ----------- ------------ ---------------
3 Full 8.33M DISK 00:00:01 30-MAY-13
BP Key: 3 Status: AVAILABLE Compressed: NO Tag: TAG20070530T132434
Chapter 9
Backing Up RMAN Backups
9-54

Piece Name: /disk1/oracle/dbs/c-35764265-20070530-02
Control File Included: Ckp SCN: 397221 Ckp time: 30-MAY-13
SPFILE Included: Modification time: 30-MAY-13
SPFILE db_unique_name: PROD
2. Execute the
BACKUP BACKUPSET
command.
The following example backs up all disk backup sets to tape and then deletes the
input disk backups:
BACKUP BACKUPSET ALL
DELETE INPUT;
The following example backs up only the backup sets with the primary key 1 and 2
to tape and then deletes the input disk backups:
BACKUP BACKUPSET 1,2
DELETE INPUT;
3. Optionally, execute the
LIST
command to see a listing of backup sets and pieces.
The output lists all copies, including backup piece copies created by
BACKUP
BACKUPSET
.
9.10.3 Backing Up Image Copy Backups with RMAN
Use the
BACKUP
command to back up image copies to tape.
This section assumes that you have configured an SBT device as your default device.
When you back up image copies that have multiple copies of the data files, specifying
tags for the backups makes it easier to identify the input image copy. All image copies
of data files have tags. The tag of an image copy is inherited by default when the
image copy is backed up as a new image copy.
To back up image copies from disk to tape:
1. Issue the
BACKUP ... COPY OF
or
BACKUP DATAFILECOPY
command.
The following example backs up data file copies that have the tag
DBCopy
:
BACKUP DATAFILECOPY FROM TAG DBCopy;
The following example backs up the latest image copies of a database to tape,
assigns the tag
QUARTERLY_BACKUP
, and deletes the input disk backups:
BACKUP DEVICE TYPE sbt
TAG "quarterly_backup"
COPY OF DATABASE
DELETE INPUT;
2. Optionally, issue the
LIST
command to see a listing of backup sets. The output lists
all copies, including backup piece copies created by the
BACKUP
command with the
BACKUPSET
clause.
Chapter 9
Backing Up RMAN Backups
9-55

10
Backing Up the Database: Advanced
Topics
This chapter explains advanced RMAN backup procedures. This chapter contains the
following topics:
•Limiting the Size of RMAN Backup Sets
•Using Backup Optimization to Skip Files
•Skipping Offline, Read-Only, and Inaccessible Files
•Duplexing Backup Sets
•Making Split Mirror Backups with RMAN
•Encrypting RMAN Backups
•Restarting RMAN Backups
•Managing Backup Windows
See Also:
Backing Up the Database for basic backup procedures
10.1 Limiting the Size of RMAN Backup Sets
You can use the
CONFIGURE
command to create persistent settings that govern backup
set size.
This control is helpful when backing up very large files. If you do not have a backup set
size persistently configured, then you can also use the
BACKUP... MAXSETSIZE
command
to limit the size of backup sets.
You can use the
CONFIGURE
command, but not the
BACKUP
command, to set a limit for the
size of individual backup pieces. This control is especially useful when you use a
media manager that has restrictions on the sizes of files, or when you must back up
very large files.
See Also:
•Configuring the Maximum Size of Backup Sets
•Configuring the Maximum Size of Backup Pieces
This section contains the following topics:
10-1

•About Backup Set Size
•Limiting the Size of Backup Sets with BACKUP ... MAXSETSIZE
•Dividing the Backup of a Large Data File into Sections
10.1.1 About Backup Set Size
The
MAXSETSIZE
parameter of the
BACKUP
command specifies a maximum size for a
backup set in units of bytes (default), kilobytes, megabytes, or gigabytes.
For example, to limit a backup set to 305 MB, specify
MAXSETSIZE 305M
. RMAN attempts
to limit all backup sets to this size.
You can use
BACKUP ... MAXSETSIZE
to limit the size of backup sets so that the
database is divided among multiple backup sets. If the backup fails part way through,
then you can use the restartable backup feature to back up only those files that were
not backed up during the previous attempt.
In some cases the
MAXSETSIZE
value may be too small to contain the largest file that
you are backing up. When determining whether
MAXSETSIZE
is too small, RMAN uses
the size of the original data file rather than the file size after compression. RMAN
displays an error stack such as the following:
RMAN-00571: ===========================================================
RMAN-00569: =============== ERROR MESSAGE STACK FOLLOWS ===============
RMAN-00571: ===========================================================
RMAN-03002: failure of backup command at 11/03/13 14:40:33
RMAN-06182: archive log larger than MAXSETSIZE: thread 1 seq 1
/oracle/oradata/trgt/arch/archive1_1.dbf
See Also:
•Restarting RMAN Backups for information on how to restart RMAN
backups
•Oracle Database Backup and Recovery Reference to learn about the
CONFIGURE MAXSETSIZE
command
10.1.2 Limiting the Size of Backup Sets with BACKUP ...
MAXSETSIZE
Backup piece size is an issue in those situations where it exceeds the maximum file
size of the file system or media management software. Use the
MAXSETSIZE
parameter
of the
CONFIGURE
CHANNEL
or
ALLOCATE
CHANNEL
command to limit the size of backup
pieces.
To limit the size of backup sets:
1. Start RMAN and connect to a target database and recovery catalog (if used).
Chapter 10
Limiting the Size of RMAN Backup Sets
10-2

See Also:
Making Database Connections with RMAN
2. Execute the
BACKUP
command with the
MAXSETSIZE
parameter.
The following example backs up archived logs to tape, limiting the size of each
backup set to 100 MB:
BACKUP DEVICE TYPE sbt
MAXSETSIZE 100M
ARCHIVELOG ALL;
10.1.3 Dividing the Backup of a Large Data File into Sections
If you specify the
SECTION SIZE
parameter on the
BACKUP
command, then RMAN creates
a backup set in which each backup piece contains the blocks from one file section.
A file section is a contiguous range of blocks in a file. This type of backup is called a
multisection backup.
Note:
You cannot specify
SECTION SIZE
with
MAXPIECESIZE
.
The purpose of multisection backups is to enable RMAN channels to back up a single
large file in parallel. RMAN divides the work among multiple channels, with each
channel backing up one file section in a file. Backing up a file in separate sections can
improve the performance of backups of large data files.
If a multisection backup completes successfully, then no backup set generated during
the backup contains a partial data file. If a multisection backup is unsuccessful, then
the RMAN metadata can contain a record for a partial backup set. RMAN does not
consider partial backups for restore and recovery. You must use the
DELETE
command
to delete the partial backup set.
If you specify a section size that is larger than the size of the file, then RMAN does not
use multisection backup for the file. If you specify a small section size that would
produce more than 256 sections, then RMAN increases the section size to a value that
results in exactly 256 sections.
To make a multisection backup:
1. Start RMAN and connect to a target database and recovery catalog (if used).
2. If necessary, configure channel parallelism so that RMAN can make the backup
parallel.
3. Execute
BACKUP
with the
SECTION SIZE
parameter.
For example, suppose that the
users
tablespace contains a single data file of 900
MB. Also assume that three SBT channels are configured, with the parallelism
setting for the SBT device set to 3. You can break up the data file in this
tablespace into file sections as shown in the following example:
Chapter 10
Limiting the Size of RMAN Backup Sets
10-3

BACKUP
SECTION SIZE 300M
TABLESPACE users;
In this example, each of the three SBT channels backs up a 300 MB file section of
the
users
data file.
See Also:
Make Parallel the Validation of a Data File to learn how to validate sections
of a large data file
10.2 Using Backup Optimization to Skip Files
You run the
CONFIGURE BACKUP OPTIMIZATION
command to enable backup optimization.
When certain criteria are met, RMAN skips backups of files that are identical to files
that are already backed up.
For the following scenarios, assume that you configure backup optimization and a
retention policy as shown in the following example.
Example 10-1 Configuring Backup Optimization
CONFIGURE DEFAULT DEVICE TYPE TO sbt;
CONFIGURE BACKUP OPTIMIZATION ON;
CONFIGURE RETENTION POLICY TO RECOVERY WINDOW OF 4 DAYS;
With RMAN configured as shown in Example 10-1, you run the following command
every night to back up the database to tape:
BACKUP DATABASE;
Because backup optimization is configured, RMAN skips backups of offline and read-
only data files only if the most recent backups were made on or after the earliest point
in the recovery window. RMAN does not skip backups when the most recent backups
are older than the window. For example, optimization ensures you do not end up with
a new backup of a read-only data file every night, so long as one backup set
containing this file exists within the recovery window.
See Also:
•Backup Optimization and the CONFIGURE command
•About Backup Optimization for SBT Backups with Recovery Window
Retention Policy for a scenario involving backup optimization and
recovery windows
•Oracle Database Backup and Recovery Reference for a detailed
description of criteria used by
CONFIGURE BACKUP OPTIMIZATION
to
determine whether a file is identical and can potentially be skipped
Chapter 10
Using Backup Optimization to Skip Files
10-4

10.2.1 Optimizing a Daily Archived Log Backup to a Single Tape:
Scenario
Assume that you want to back up all the archived logs every night, but you do not want
to have multiple copies of each log sequence number. With RMAN configured as
shown in Example 10-1, you run the following command in a script nightly at 1 a.m.:
BACKUP DEVICE TYPE sbt
ARCHIVELOG ALL;
RMAN skips all logs except those produced in the last 24 hours. In this way, you keep
only one copy of each archived log on tape.
10.2.2 Optimizing a Daily Archived Log Backup to Multiple Media
Families: Scenario
In Oracle Secure Backup, a media family is a named group of volumes with a set of
shared, user-defined attributes. In this scenario, you back up logs that are not on tape
to one media family, then back up the same logs to a second media family. Finally,
you delete old logs.
With RMAN configured as shown in Example 10-2, run the following script at the same
time every night to back up the logs generated during the previous day to two separate
media families.
Example 10-2 Backing Up Archived Redo Logs to Multiple Media Families
# The following command backs up just the logs that are not on tape. The
# first copies are saved to the tapes from the media family "log_family1".
RUN
{
ALLOCATE CHANNEL c1 DEVICE TYPE sbt
PARMS 'ENV=(OB_MEDIA_FAMILY=log_family1)';
BACKUP ARCHIVELOG ALL;
}
# Make one more copy of the archived logs and save them to tapes from a
# different media family
RUN
{
ALLOCATE CHANNEL c2 DEVICE TYPE sbt
PARMS 'ENV=(OB_MEDIA_FAMILY=log_family2)';
BACKUP ARCHIVELOG
NOT BACKED UP 2 TIMES;
}
If your goal is to delete logs from disk that have been backed up two times to SBT,
then the simplest way to achieve the goal is with an archived redo log deletion policy.
The following one-time configuration specifies that archived redo logs are eligible for
deletion from disk if two archived log backups exist on tape:
CONFIGURE ARCHIVELOG DELETION POLICY
TO BACKED UP 2 TIMES TO DEVICE TYPE sbt;
After running the script in Example 10-2, you can delete unneeded logs by executing
DELETE ARCHIVELOG ALL
.
Chapter 10
Using Backup Optimization to Skip Files
10-5

10.2.3 Creating a Weekly Secondary Backup of Archived Logs:
Example
Assume a more sophisticated scenario in which your goal is to back up the archived
logs to tape every day. You are worried about tape failure, however, so you want to
ensure that you have more than one copy of each log sequence number on a separate
tape before you perform your weekly deletion of logs from disk. This scenario assumes
that the database is not using a fast recovery area.
First, perform a one-time configuration as follows:
CONFIGURE BACKUP OPTIMIZATION ON;
CONFIGURE DEVICE TYPE sbt PARALLELISM 1;
CONFIGURE default DEVICE TYPE TO sbt;
CONFIGURE CHANNEL DEVICE TYPE sbt PARMS 'ENV=(OB_MEDIA_FAMILY=first_copy);
Because you have optimization enabled, you can run the following command every
evening to back up all archived logs to the
first_copy
media family that have not
already been backed up:
BACKUP ARCHIVELOG ALL TAG first_copy;
Every Friday evening you create an additional backup of all archived logs in a different
media family. After the backup, you want to delete all archived logs that have at least
two copies on tape. So you run the following script:
RUN
{
# manually allocate a channel, to specify that the backup run by this
# channel goes to both media families "first_copy" and "second_copy"
ALLOCATE CHANNEL c1 DEVICE TYPE sbt
PARMS 'ENV=(OB_MEDIA_FAMILY=second_copy)';
ALLOCATE CHANNEL c2 DEVICE TYPE sbt
PARMS 'ENV=(OB_MEDIA_FAMILY=first_copy)';
BACKUP
CHANNEL c1
ARCHIVELOG
UNTIL TIME 'SYSDATE'
NOT BACKED UP 2 TIMES # back up only logs without 2 backups on tape
TAG SECOND_COPY;
BACKUP
CHANNEL c2
ARCHIVELOG
UNTIL TIME 'SYSDATE'
NOT BACKED UP 2 TIMES # back up only logs without 2 backups on tape
TAG FIRST_COPY;
}
# now delete from disk all logs that have been backed up to tape at least twice
DELETE
ARCHIVELOG ALL
BACKED UP 2 TIMES TO DEVICE TYPE sbt;
The following table explains the effects of the daily and weekly backup scripts.
Chapter 10
Using Backup Optimization to Skip Files
10-6

Table 10-1 Effects of Daily and Weekly Scripts
Script Tape Contents After Script Disk Contents After Script
Daily Archived logs that have not yet been
backed up are now in media family
first_copy
.
All archived logs created since the last
DELETE
command are still on disk.
Weekly Archived logs that have fewer than two
backups on tape are now in media
families
first_copy
and
second_copy
.
All archived logs that have been backed
up at least twice to tape are deleted.
After the weekly backup, you can send the tape from the media family
second_copy
to
offsite storage. Use this tape backup only if the primary tape from pool
first_copy
is
damaged. Because the secondary tape is offsite, you do not want RMAN to use it for
recovery, so you can mark the backup as unavailable:
CHANGE BACKUP OF ARCHIVELOG TAG SECOND_COPY UNAVAILABLE;
See Also:
•Maintaining RMAN Backups and Repository Records to learn how to
change the status of and delete backups
•Oracle Database Backup and Recovery Reference to learn about the
CHANGE
and
DELETE
commands
10.3 Skipping Offline, Read-Only, and Inaccessible Files
By default, the
BACKUP
command terminates when it cannot access a data file.
You can specify parameters to prevent termination, as listed in Table 10-2.
Table 10-2 BACKUP ... SKIP Options
If you specify... Then RMAN skips...
SKIP
INACCESSIBLE
Data files that RMAN cannot read.
SKIP
OFFLINE
Offline data files. Some offline data files can still be read
because they exist on disk. Others have been deleted or
moved and so cannot be read, making them inaccessible.
SKIP
READONLY
Data files in read-only tablespaces.
The following example uses an automatic channel to back up the database, and skips
all data files that might cause the backup job to terminate.
Example 10-3 Skipping Files During an RMAN Backup
BACKUP DATABASE
SKIP INACCESSIBLE
SKIP READONLY
SKIP OFFLINE;
Chapter 10
Skipping Offline, Read-Only, and Inaccessible Files
10-7

10.4 Duplexing Backup Sets
RMAN can make up to four copies of a backup set simultaneously, each an exact
duplicate of the others.
A copy of a duplexed backup set is a copy of each backup piece in the backup set,
with each copy getting a unique copy number (for example,
0tcm8u2s_1_1
and
0tcm8u2s_1_2
). It is not possible to duplex backup sets to the fast recovery area.
You can use
BACKUP
...
COPIES
or
CONFIGURE
...
BACKUP
COPIES
to duplex backup sets.
RMAN can duplex backups to either disk or tape, but cannot duplex backups to tape
and disk simultaneously. For
DISK
channels, specify multiple values in the
FORMAT
option to direct the multiple copies to different physical disks. For SBT channels, if you
use a media manager that supports Version 2 of the SBT API, then the media
manager automatically writes each copy to a separate medium (for example, a
separate tape). When backing up to tape, ensure that the number of copies does not
exceed the number of available tape devices.
Duplexing applies only to backup sets, not image copies. It is an error to specify the
BACKUP... COPIES
when creating image copy backups, and the
CONFIGURE... BACKUP
COPIES
setting is ignored for image copy backups.
See Also:
About Multiple Copies of RMAN Backups for a conceptual overview of RMAN
backup copies
10.4.1 Duplexing Backup Sets with CONFIGURE BACKUP COPIES
The
CONFIGURE...BACKUP COPIES
command specifies the number of identical backup
sets to create on the specified device type.
This setting applies to all backup sets except control file autobackups (because the
autobackup of a control file always produces one copy) and backup sets when backed
up with the
BACKUP BACKUPSET
command.
To duplex a backup with CONFIGURE ... BACKUP COPIES:
1. Configure the number of copies on the desired device type for data files and
archived redo logs on the desired device types.
By default,
CONFIGURE...BACKUP COPIES
is set to
1
for each device type. The
following example configures duplexing for data files and archived logs on tape
and also duplexing for data files (but not archived redo logs) on disk:
CONFIGURE DEVICE TYPE sbt PARALLELISM 1;
CONFIGURE DEFAULT DEVICE TYPE TO sbt;
CONFIGURE CHANNEL DEVICE TYPE DISK FORMAT '/disk1/%U', '/disk2/%U';
CONFIGURE DATAFILE BACKUP COPIES FOR DEVICE TYPE sbt TO 2;
CONFIGURE ARCHIVELOG BACKUP COPIES FOR DEVICE TYPE sbt TO 2;
CONFIGURE DATAFILE BACKUP COPIES FOR DEVICE TYPE DISK TO 2;
2. Execute the
BACKUP
command.
Chapter 10
Duplexing Backup Sets
10-8

The following command backs up the database and archived logs to tape, making
two copies of each data file and archived log:
BACKUP AS BACKUPSET DATABASE PLUS ARCHIVELOG;
Because of the configured formats for the disk channel, the following command
backs up the database to disk, placing one copy of the backup sets produced in
the
/disk1
directory and the other in the
/disk2
directory:
BACKUP DEVICE TYPE DISK AS BACKUPSET DATABASE;
If the
FORMAT
clause were not configured on
CONFIGURE CHANNNEL
, then you specify
FORMAT
on the
BACKUP
command itself. For example, you issue the following
command:
BACKUP AS BACKUPSET DATABASE
FORMAT '/disk1/%U',
'/disk2/%U';
3. Issue a
LIST
BACKUP
command to see a listing of backup sets and pieces.
For example, enter the following command:
LIST BACKUP SUMMARY;
The
#Copies
column shows the number of backup sets, which may have been
produced by duplexing or by multiple backup commands.
See Also:
•Configuring Backup Duplexing
•Configuring Backup Duplexing to learn about the
CONFIGURE BACKUP
COPIES
command
•About Configuring the Environment for RMAN Backups to learn about
basic backup configuration option
10.4.2 Duplexing Backup Sets with BACKUP ... COPIES
The
COPIES
option of the
BACKUP
command overrides every other
COPIES
or
DUPLEX
setting to control duplexing of backup sets.
To duplex a backup with BACKUP ... COPIES:
1. Specify the number of identical copies with the
COPIES
option of the
BACKUP
command. For example, run the following to make three copies of each backup set
in the default
DISK
location:
BACKUP AS BACKUPSET DEVICE TYPE DISK
COPIES 3
INCREMENTAL LEVEL 0
DATABASE;
Because you specified
COPIES
in the
BACKUP
command, RMAN makes three backup
sets of each data file regardless of the
CONFIGURE DATAFILE COPIES
setting.
Chapter 10
Duplexing Backup Sets
10-9

2. Issue a
LIST BACKUP
command to see a listing of backup sets and pieces (the
#Copies
column shows the number of copies, which may have been produced
through duplexing or through multiple invocations of the
BACKUP
command). For
example, enter:
LIST BACKUP SUMMARY;
10.5 Making Split Mirror Backups with RMAN
Many sites keep a backup of the database stored on disk in case a media failure
occurs on the primary database or an incorrect user action requires point-in-time
recovery. A data file backup on disk simplifies the restore step of recovery, making
recovery much quicker and more reliable.
Caution:
Never make backups, split mirror or otherwise, of online redo logs. Restoring
online redo log backups can create two archived logs with the same
sequence number but different contents. Also, it is best to use the
BACKUP
CONTROLFILE
command rather than a split mirror to make control file backups.
One way of creating a data file backup on disk is to use disk mirroring. For example,
the operating system can maintain three identical copies of each file in the database.
In this configuration, you can split off a mirrored copy of the database to use as a
backup.
RMAN does not automate the splitting of mirrors, but can make use of split mirrors in
backup and recovery. For example, RMAN can treat a split mirror of a data file as a
data file copy, and can also back up this copy to disk or tape. The procedure in this
section explains how to make a split mirror backup with the
ALTER SYSTEM SUSPEND
/
RESUME
functionality.
Some mirroring technology does not require Oracle Database to suspend all I/O
before a mirror can be separated and used as a backup. Refer to your storage
manager, volume manager, or file system documentation for information about
whether you must suspend I/O from the database instance.
To make a split mirror backup of a tablespace by using SUSPEND/RESUME:
1. Start RMAN and then place the tablespaces to back up into backup mode with the
ALTER TABLESPACE ... BEGIN BACKUP
statement. (To place all tablespaces in backup
mode, you can the
ALTER DATABASE BEGIN BACKUP
instead.)
For example, to place tablespace
users
in backup mode, you connect RMAN to a
target database and run the following
SQL
command:
ALTER TABLESPACE users BEGIN BACKUP;
2. Suspend I/O if your mirroring software or hardware requires it. For example, enter
the following command in RMAN:
ALTER SYSTEM SUSPEND;
3. Split the mirrors for the underlying data files contained in these tablespaces.
Chapter 10
Making Split Mirror Backups with RMAN
10-10

4. Take the database out of the suspended state. For example, enter the following
command in RMAN:
ALTER SYSTEM RESUME;
5. Take the tablespaces out of backup mode. For example, enter:
ALTER TABLESPACE users END BACKUP;
You can also use
ALTER DATABASE END BACKUP
to take all tablespaces out of backup
mode.
6. Catalog the user-managed mirror copies as data file copies with the
CATALOG
command. For example, enter:
CATALOG DATAFILECOPY '/dk2/oradata/trgt/users01.dbf'; # catalog split mirror
7. Back up the data file copies. For example, run the
BACKUP
DATAFILECOPY
command
at the prompt:
BACKUP DATAFILECOPY '/dk2/oradata/trgt/users01.dbf';
8. When you are ready to resilver a split mirror, first use the
CHANGE
...
UNCATALOG
command to uncatalog the data file copies you cataloged in Step 6. For example,
enter:
CHANGE DATAFILECOPY '/dk2/oradata/trgt/users01.dbf' UNCATALOG;
9. Resilver the split mirror for the affected data files.
See Also:
•Making User-Managed Backups in SUSPEND Mode
•Oracle Database Administrator’s Guide for more information about
the
SUSPEND
/
RESUME
feature
•Oracle Database SQL Language Reference for the
ALTER SYSTEM
SUSPEND
syntax
10.6 Encrypting RMAN Backups
You can protect RMAN backup sets with backup encryption. Encrypted backups
cannot be read if they are obtained by unauthorized users.
The RMAN backup encryption feature requires the Enterprise Edition of the database.
This section contains the following topics:
•About RMAN Backup Encryption Settings
•Making Transparent-Mode Encrypted Backups
•Making Password-Mode Encrypted Backups
•Making Dual-Mode Encrypted Backups
10.6.1 About RMAN Backup Encryption Settings
Backup encryption is performed based on the specified encryption settings.
Chapter 10
Encrypting RMAN Backups
10-11

Encryption can be set with the following commands:
•
CONFIGURE ENCRYPTION
You can use this command to persistently configure transparent encryption. You
cannot persistently configure dual mode or password mode encryption.
•
SET ENCRYPTION
You can use this command to configure dual mode or password mode encryption
at the RMAN session level.
Note:
Keystore-based encryption is more secure than password-based encryption
because no passwords are involved. Use password-based encryption only
when absolutely necessary because your backups must be transportable.
The database uses a new encryption key for every encrypted backup. The backup
encryption key is then encrypted with either the password, the database master key, or
both, depending on the chosen encryption mode. Individual backup encryption keys or
passwords are never stored in clear text.
A single restore operation can process backups encrypted in different modes. For
each backup piece that it restores, RMAN checks whether it is encrypted.
Transparently encrypted backups need no intervention if the Oracle keystore is open
and available.
If password encryption is detected, then RMAN searches for a matching key in the list
of passwords entered in the
SET DECRYPTION
command. If RMAN finds a usable key,
then the restore operation proceeds. Otherwise, RMAN searches for a key in the
Oracle keystore. If RMAN finds a usable key, then the restore operation proceeds;
otherwise, RMAN signals an error that the backup piece cannot be decrypted.
Note:
If RMAN restores a set of backups created with different passwords, then all
required passwords must be included with
SET DECRYPTION
.
RMAN encryption is a CPU-intensive operation and can affect backup performance.
The actual amount of CPU utilization during encryption depends on whether both input
and output devices for disk and SBT produce and consume data faster than the CPU
can encrypt it. Here are a few guidelines for managing and trying to maximize CPU
performance:
•Because encrypted backups consume more CPU resources than unencrypted
backups, you can improve performance of encrypted backups to disk by using
more RMAN channels. A general rule is to use the same number of channels as
the number of CPU cores in your system. For example, use two channels for a
dual-core processor.
•If both the disk subsystem and SBT-subsystem are fast, you can expect very high
CPU utilization. You may want to consider slowing the rate of the backup by
Chapter 10
Encrypting RMAN Backups
10-12

setting the RMAN
READRATE
parameter. For example, you can set an upper limit for
block reads so that RMAN does not consume excessive disk bandwidth and
thereby degrade online performance.
See Also:
•Performing Complete Database Recovery to learn how to restore
password-encrypted backups
•Determining the Encryption Status of Backup Pieces
•Oracle Database Backup and Recovery Reference to learn about the
ENCRYPTION
and
DECRYPTION
options of the
SET
command
10.6.2 Making Transparent-Mode Encrypted Backups
If you have configured transparent encryption with the
CONFIGURE
command as
explained in "Configuring RMAN Backup Encryption Modes", then no additional
commands are required to create encrypted backups. Make RMAN backups as
normal.
10.6.3 Making Password-Mode Encrypted Backups
You can set an encryption password in an RMAN session by executing the
SET
ENCRYPTION BY PASSWORD
command. If transparent encryption is configured, then specify
the
ONLY
keyword to indicate that the backups are protected with a password and not
with the configured transparent encryption.
Note:
Create a password that is secure. See Oracle Database Security Guide for
more information.
To make password-mode encrypted backups:
1. Start RMAN and connect to a target database and recovery catalog (if used).
2. Execute the
SET ENCRYPTION ON IDENTIFIED BY
password
ONLY
command.
The following example sets the encryption password for all tablespaces (where
password is a placeholder for the actual password that you enter) in the backup
and specifies
ONLY
to indicate that the encryption is password-only:
SET ENCRYPTION IDENTIFIED BY password ONLY ON FOR ALL TABLESPACES;
3. Back up the database.
For example, enter the following command:
BACKUP DATABASE PLUS ARCHIVELOG;
Chapter 10
Encrypting RMAN Backups
10-13

10.6.4 Making Dual-Mode Encrypted Backups
Use the
SET ENCRYPTION BY PASSWORD
command at the RMAN prompt to make
password-protected backups. If transparent encryption is configured, then omit the
ONLY
keyword to indicate that the backups are protected with both a password and the
configured transparent encryption.
Note:
Create a password that is secure. See Oracle Database Security Guide for
more information.
To make dual-mode encrypted backups:
1. Start RMAN and connect to a target database and recovery catalog (if used).
2. Execute the
SET ENCRYPTION BY PASSWORD
command, making sure to omit the
ONLY
keyword.
The following example sets the encryption password for all tablespaces (where
password is a placeholder for the actual password that you enter) in the backup
and omits
ONLY
to indicate dual-mode encryption:
SET ENCRYPTION IDENTIFIED BY password ON FOR ALL TABLESPACES;
3. Back up the database.
For example, enter the following command:
BACKUP DATABASE PLUS ARCHIVELOG;
10.7 Restarting RMAN Backups
With the restartable backup feature, RMAN backs up only those files that were not
backed up after a specified date.
This section contains the following topics:
•About Restartable Backups
•Restarting a Backup After It Partially Completes
10.7.1 About Restartable Backups
The minimum unit of restartability is a data file. However, if a backup set contains one
backup piece, and if this piece contains blocks from multiple data files, then the unit of
restartability is the backup piece. The unit of restartability for image copies is a data
file.
The benefit of restartable backups is that if the backup generates multiple backup sets,
then the backup sets that completed successfully do not have to be rerun. However, if
the entire database is written into one backup set, and if the backup fails halfway
through, then the entire backup has to be restarted.
Chapter 10
Restarting RMAN Backups
10-14

Any I/O errors that RMAN encounters when reading files or writing to the backup
pieces or image copies cause RMAN to terminate the backup job in progress. For
example, if RMAN tries to back up a data file but the data file is not on disk, then
RMAN terminates the backup. If multiple channels are being used or redundant copies
of backups are being created, however, then RMAN may be able to continue the
backup without user intervention.
RMAN can back up only those files that have not been backed up since a specified
date. Use this feature after a backup fails to back up the parts of the database missed
by the failed backup.
You can restart a backup by specifying the
SINCE TIME
clause on the
BACKUP
command.
If the
SINCE
TIME
is later than the completion time, then RMAN backs up the file. If you
use
BACKUP DATABASE NOT BACKED UP
without the
SINCE
TIME
parameter, then RMAN only
backs up files that have never been backed up.
See Also:
Oracle Database Backup and Recovery Reference for
BACKUP ... NOT BACKED
UP
syntax
10.7.2 Restarting a Backup After It Partially Completes
Use the
SINCE
TIME
parameter of the
BACKUP
command to specify a date after which a
new backup is required.
If the
SINCE
TIME
is later than the completion time, then RMAN backs up the file. If you
use
BACKUP DATABASE NOT BACKED UP
without the
SINCE
TIME
parameter, then RMAN only
backs up files that have never been backed up.
To only back up files that were not backed up after a specified date:
1. Start RMAN and connect to a target database and recovery catalog (if used).
2. Execute the
BACKUP ... NOT BACKED UP SINCE TIME
command.
Specify a valid date in the
SINCE
TIME
parameter. The following example uses the
default configured channel to back up all database files and archived redo logs
that have not been backed up in the last two weeks:
BACKUP
NOT BACKED UP SINCE TIME 'SYSDATE-14'
DATABASE PLUS ARCHIVELOG;
See Also:
Oracle Database Backup and Recovery Reference for an example of how to
use the
BACKUP
command to restart a backup that did not complete
Chapter 10
Restarting RMAN Backups
10-15

10.8 Managing Backup Windows
This section explains how to use backup windows to set limits for the time span in
which a backup job can complete.
This section contains the following topics:
•About Backup Windows
•Specifying a Backup Duration
•Permitting Partial Backups in a Backup Window
•Minimizing Backup Load and Duration
10.8.1 About Backup Windows
A backup window is a period of time during which a backup must complete. For
example, you may want to restrict your database backups to a window of time when
user activity on your system is low, such as between 2:00 a.m. and 6:00 a.m.
RMAN backs up the least recently backed up files first. By default, RMAN backs up the
files at the maximum possible speed. Specifying a window does not mean that RMAN
backs up data faster than normal to ensure that the backup completes before the
window ends.
By default, if the backup is not complete within the
DURATION
time, then RMAN
interrupts the backup and reports an error. If the
BACKUP
command is in a
RUN
command, then the
RUN
command terminates. Any completed backup sets are retained
and can be used in restore operations, even if the entire backup is not complete. Thus,
if you retry a job that was interrupted when the available duration expired, each
successive attempt covers more of the files needing backup. Any incomplete backup
sets are discarded.
10.8.2 Specifying a Backup Duration
Use the
DURATION
parameter of the
BACKUP
command to specify how long a given
backup job is allowed to run.
To specify a backup duration:
1. Start RMAN and connect to a target database and recovery catalog (if used).
2. Execute the
BACKUP DURATION
command.
For example, run the following command at 2:00 a.m. to specify that the backup
runs until 6:00 a.m.:
BACKUP
DURATION 4:00
TABLESPACE users;
Chapter 10
Managing Backup Windows
10-16

See Also:
Oracle Database Backup and Recovery Reference for the syntax of the
BACKUP
command
10.8.3 Permitting Partial Backups in a Backup Window
When you specify
PARTIAL
, RMAN does not report an error when a backup is
interrupted because of the end of the backup window. Instead, RMAN displays a
message showing which files are not backed up.
If the
BACKUP
command is part of a
RUN
block, then the remaining commands in the
RUN
block continue to execute.
If you specify
FILESPERSET 1
, then RMAN puts each file into its own backup set. When
a backup is interrupted at the end of the backup window, only the backup of the file
currently being backed up is lost. All backup sets completed during the window are
saved, minimizing the lost work caused by the end of the backup window.
To prevent RMAN from issuing an error when a backup partially completes:
1. Start RMAN and connect to a target database and recovery catalog (if used).
2. Execute the
BACKUP DURATION
command with the
PARTIAL
option.
For example, you run the following command at 2:00 a.m. to specify that the
backup runs until 6:00 a.m. and that each data file is in a separate backup set:
BACKUP
DURATION 4:00 PARTIAL
TABLESPACE users
FILESPERSET 1;
10.8.4 Minimizing Backup Load and Duration
When using
DURATION
you can run the backup with the maximum possible performance,
or run as slowly as possible while still finishing within the allotted time, to minimize the
performance impact of backup tasks.
To maximize performance, use the
MINIMIZE TIME
option with
DURATION
, as shown in
Example 10-4.
Example 10-4 Using MINIMIZE TIME with BACKUP DURATION
BACKUP
DURATION 4:00 PARTIAL
MINIMIZE TIME
DATABASE
FILESPERSET 1;
To extend the backup to use the full time available, use the
MINIMIZE LOAD
option, as in
Example 10-5.
Example 10-5 Using MINIMIZE LOAD with BACKUP DURATION
In this example, RMAN monitors the progress of the running backup, and periodically
estimates how long the backup takes to complete at its present rate. If RMAN
Chapter 10
Managing Backup Windows
10-17

estimates that the backup will finish before the end of the backup window, then it slows
down the rate of backup so that the full available duration is used. This reduces the
overhead on the database associated with the backup.
BACKUP
DURATION 4:00
MINIMIZE LOAD
DATABASE
FILESPERSET 1;
Note these issues when using
DURATION
and
MINIMIZE LOAD
with a tape backup:
•Efficient backup to tape requires tape streaming. If you use
MINIMIZE LOAD
, then
RMAN may reduce the rate of backup to the point where tape streaming is not
optimal.
•RMAN holds the tape resource for the entire duration of the backup window. This
prevents the use of the tape resource for any other purpose during the backup
window.
Because of these concerns, it is not recommended that you use
MINIMIZE LOAD
when
backing up to tape.
See Also:
Media Manager Component of the Write Phase for SBT for more details on
efficient tape handling
Chapter 10
Managing Backup Windows
10-18


11
Reporting on RMAN Operations
This chapter describes how to report on RMAN operations. This chapter contains the
following topics:
•Overview of RMAN Reporting
•Listing Backups and Recovery-Related Objects
•Reporting on Backups and Database Schema
•Using V$ Views to Query Backup Metadata
•Querying Recovery Catalog Views
11.1 Overview of RMAN Reporting
This section explains the purpose and basic concepts of RMAN reporting.
11.1.1 Purpose of RMAN Reporting
As part of your backup and recovery strategy, you should periodically run reports that
indicate what you have backed up. You can determine which data files need backups
or which files were not backed up recently. Also, you can preview which backups
RMAN must restore if a problem occurs.
Another important aspect of backup and recovery is monitoring space usage. If you
back up to disk, then it is possible for the disk to fill, which can create performance
problems or even cause the database to halt. You can use RMAN to determine
whether a backup is an obsolete backup and can therefore be deleted.
You may also need to obtain historical information about RMAN jobs. For example,
you may want to know how many backup jobs have been issued, the status of each
backup job (for example, whether it failed or completed), when a job started and
finished, and what type of backup was performed.
11.1.2 Basic Concepts of RMAN Reporting
RMAN stores metadata of every database on which it performs operations.
RMAN always stores its RMAN repository of metadata in the control file of the target
database. For example, suppose that you use RMAN to back up the
prod1
and
prod2
databases. RMAN stores the metadata for backups of
prod1
in the control file of
prod1
,
and the metadata for backups of
prod2
in the control file of
prod2
.
Optionally, you can use RMAN with a recovery catalog. In this case, RMAN maintains
an additional repository of metadata in a set of tables in a separate recovery catalog
database. For example, you could create a recovery catalog in
prod3
. You can register
multiple target databases in this recovery catalog. For example, if you register
prod1
and
prod2
in the recovery catalog stored in
prod3
, then RMAN stores metadata about
its backups of
prod1
and
prod2
in the recovery catalog schema.
11-1

The following table lists the techniques used to access metadata from the RMAN
repository.
Table 11-1 Techniques for Accessing Data from the RMAN Repository
Technique Description Additional Information
RMAN
LIST
and
REPORT
commands
The RMAN
LIST
and
REPORT
commands provide extensive
information about available
backups and how they can be used
to restore and recover your
database.
•"Listing Backups and
Recovery-Related Objects"
•"Reporting on Backups and
Database Schema"
•
LIST
,
REPORT
, and
RESTORE
commands in Oracle
Database Backup and
Recovery Reference
V$
views When the database is open,
several
V$
views provide direct
access to RMAN repository records
in the control file of each target
database.
Some
V$
views such as
V$DATAFILE_HEADER
,
V$PROCESS
,
and
V$SESSION
contain information
not found in the recovery catalog
views.
Oracle Database Reference
RC_
views If your database is registered in a
recovery catalog, then
RC_
views
provide direct access to the RMAN
repository data stored in the
recovery catalog.
The
RC_
views mostly correspond
to the
V$
views.
Oracle Database Backup and
Recovery Reference
RESTORE ...
PREVIEW
and
RESTORE ...
VALIDATE HEADER
commands
These commands list the backups
that RMAN can restore to the
specified time.
RESTORE ... PREVIEW
queries the
metadata but does not read the
backup files. The
RESTORE ...
VALIDATE HEADER
command
performs the same work, but in
addition to listing the files needed
for restore and recovery
operations, the command validates
the backup file headers to
determine whether the files on disk
or in the media management
catalog correspond to the metadata
in the RMAN repository.
These commands are documented
in "Previewing Backups Used in
Restore Operations"
The RMAN repository can sometimes fail to reflect the reality on disk and tape. For
example, a user may delete a backup with an operating system utility, so that the
RMAN repository incorrectly reports the backup as available. You can use commands
such as
CHANGE
,
CROSSCHECK
, and
DELETE
to update the RMAN repository to reflect the
actual state of available backups. Otherwise, the output of the commands and views
may be misleading, which means that RMAN may not be able to find the backups to
restore and recover your database.
Chapter 11
Overview of RMAN Reporting
11-2

See Also:
•Crosschecking the RMAN Repository to learn how to keep the RMAN
repository current
•Maintaining RMAN Backups and Repository Records
11.1.3 Reporting in a Data Guard Environment
In a Data Guard environment, you can use the
LIST
,
REPORT
, and
SHOW
commands just
as you can when not using Data Guard. You can run these commands with the
FOR
DB_UNIQUE_NAME
clause to show the backups associated with a specified database.
As explained in "About RMAN File Management in a Data Guard Environment", every
backup is associated with the primary or standby database that created it. For
example, if you backed up the database with the
DB_UNIQUE_NAME
of
standby1
, then the
standby1
database is associated with this backup.
For example, the following command lists archived redo logs associated only with
sfstandby
:
LIST ARCHIVELOG ALL FOR DB_UNIQUE_NAME sfstandby;
If you use the
LIST
,
REPORT
, and
SHOW
commands in a Data Guard environment without
specifying the
FOR DB_UNIQUE_NAME
clause, then RMAN shows the files that are
accessible to the target database. "About Association of Backups in a Data Guard
Environment" explains when backups are considered accessible to RMAN.
In a Data Guard environment, you must use RMAN with a recovery catalog. RMAN
stores the metadata for all backup and recovery files in the Data Guard environment in
the recovery catalog. When running the RMAN reporting commands, you can either
connect RMAN as
TARGET
to a mounted or open database, or identify the database with
the
SET DBID
command.
See Also:
Oracle Data Guard Concepts and Administration to report on RMAN
operations in a Data Guard environment
11.2 Listing Backups and Recovery-Related Objects
The
LIST
command uses the information in the RMAN repository to provide lists of
backups and other objects relating to backup and recovery.
This section contains the following topics:
•About the LIST Command
•Listing All Backups and Copies
•Listing Selected Backups and Copies
Chapter 11
Listing Backups and Recovery-Related Objects
11-3

•Listing Preplugin Backups
•Listing Database Incarnations
11.2.1 About the LIST Command
The primary purpose of the
LIST
command is to list backup and copies.
For example, you can list:
•Backups and proxy copies of a database, tablespace, data file, archived redo log,
or control file
•Backups that have expired
•Backups restricted by time, path name, device type, tag, or recoverability
•Archived redo log files and disk copies
Besides backups and copies, RMAN can list other types of data. The following table
summarizes several useful objects that you can list.
Table 11-2 LIST Objects
Contents of List Command Description
Backup sets and
proxy copies
LIST BACKUP
You can list all backup sets, copies, and proxy copies of
a database, tablespace, data file, archived redo log,
control file, or server parameter file.
Image copies
LIST COPY
You can list data file copies and archived redo log files.
By default,
LIST COPY
displays copies of all database
files and archived redo logs. Both usable and unusable
image copies are included in the output, even those that
cannot be restored or are expired or unavailable.
Archived redo log
files
LIST ARCHIVELOG
You can list archive redo log files. You can list all
archive log redo log files or specify individual archive log
files through SCN, time, or sequence number ranges. If
you specify a range you can further restrict the list
returned by specifying an incarnation number.
Preplugin
backups
LIST ...
PREPLUGIN
You can list all preplugin backups and preplugin
archived redo log files.
Database
incarnations
LIST
INCARNATION
You can list all incarnations of a database. A new
database incarnation is created when you open with the
RESETLOGS
option.
Databases in a
Data Guard
environment
LIST
DB_UNIQUE_NAME
A database in a Data Guard environment is
distinguished by its
DB_UNIQUE_NAME
initialization
parameter setting. You can list all databases that have
the same DBID.
Chapter 11
Listing Backups and Recovery-Related Objects
11-4

Table 11-2 (Cont.) LIST Objects
Contents of List Command Description
Backups and
copies for a
primary or
standby database
in a Data Guard
environment
LIST ... FOR
DB_UNIQUE_NAME
You can list all backups and copies for a specified
database in a Data Guard environment or for all
databases in the environment.
RMAN restricts the output to files or objects associated
exclusively with the database with the specified
DB_UNIQUE_NAME
. For example, you can use
LIST
with
FOR DB_UNIQUE_NAME
to display the list of archived redo
log files associated with a particular standby or primary
database. Objects that are not owned by any database
(
SITE_KEY
column in the recovery catalog view is null)
are not listed.
Restore points
LIST RESTORE
POINT
You can list restore points known to the RMAN
repository.
Names of stored
scripts
LIST SCRIPT
NAMES
You can list the names of recovery catalog scripts
created with the
CREATE SCRIPT
or
REPLACE SCRIPT
command. A recovery catalog is required.
Failures for use
with Data
Recovery Advisor
LIST FAILURE
A failure is a persistent data corruption mapped to a
repair option. Diagnosing and Repairing Failures with
Data Recovery Advisor explains how to use
LIST
FAILURE
with the
ADVISE
and
REPAIR
commands.
The
LIST
command supports options that control how output is displayed. Table 11-3
summarizes the most common
LIST
options.
Table 11-3 Most Common LIST Options
LIST Option Description
LIST EXPIRED
Lists backups or copies that are recorded in the RMAN repository but
that were not present at the expected location on disk or tape during
the most recent crosscheck. Such backups may have been deleted
outside of RMAN.
LIST ... BY FILE
Lists backups of each data file, archived redo log file, control file, and
server parameter file. Each row describes a backup of a file.
LIST ... SUMMARY
Provides a one-line summary of each backup.
The
LIST
objects and options are not exhausted by the contents of the preceding
tables. For example, you can list backups restricted by time, path name, device type,
tag, or recoverability.
See Also:
Oracle Database Backup and Recovery Reference for a complete
description of the
LIST
command
Chapter 11
Listing Backups and Recovery-Related Objects
11-5

11.2.2 Listing All Backups and Copies
Specify the desired objects with the
listObjList
or
recordSpec
clause. If you do not
specify an object, then RMAN displays copies of all database files and archived redo
log files.
By default, RMAN serially lists each backup or proxy copy and then identifies the files
included in the backup. You can also list backups by file.
By default, RMAN lists in verbose mode, which means that it provides extensive,
multiline information. You can also list backups in a summary mode if the verbose
mode generates too much output.
To view a summary report of all backups and copies, execute the
LIST
command with
the
SUMMARY
option.
Example 11-1 Summary Listing of All Backups
This example shows a summary of all RMAN backups.
RMAN> list backup summary;
List of Backups
===============
Key TY LV S Device Type Completion Time #Pieces #Copies Compressed Tag
------- -- -- - ----------- --------------- ------- ------- ---------- ---
1 B A A SBT_TAPE 21-OCT-13 1 1 NO TAG20131021T094505
2 B F A SBT_TAPE 21-OCT-13 1 1 NO TAG20131021T094513
3 B A A SBT_TAPE 21-OCT-13 1 1 NO TAG20131021T094624
4 B F A SBT_TAPE 21-OCT-13 1 1 NO TAG20131021T094639
5 B F A DISK 04-NOV-13 1 1 YES TAG20131104T195949
To view verbose output for backups and copies, execute the
LIST
command without
the
SUMMARY
option.
Example 11-2 Verbose Listings of Backups and Copies
This example lists RMAN backups and copies with the default verbose output.
RMAN> list backup;
List of Backup Sets
===================
BS Key Size Device Type Elapsed Time Completion Time
------- ---------- ----------- ------------ ---------------
7 136M DISK 00:00:20 04-NOV-13
BP Key: 7 Status: AVAILABLE Compressed: NO Tag: TAG20071104T200759
Piece Name: /d2/RDBMS/backupset/2013_11_04/
o1_mf_annnn_TAG20071104T200759_ztjxx3k8_.bkp
List of Archived Logs in backup set 7
Thrd Seq Low SCN Low Time Next SCN Next Time
---- ------- ---------- --------- ---------- ---------
1 1 173832 21-OCT-13 174750 21-OCT-13
1 2 174750 21-OCT-13 174755 21-OCT-13
1 3 174755 21-OCT-13 174758 21-OCT-13
BS Key Type LV Size Device Type Elapsed Time Completion Time
------- ---- -- ---------- ----------- ------------ ---------------
8 Full 2M DISK 00:00:01 04-NOV-13
Chapter 11
Listing Backups and Recovery-Related Objects
11-6

BP Key: 8 Status: AVAILABLE Compressed: NO Tag: TAG20071104T200829
Piece Name: /disk1/oracle/dbs/c-774627068-20131104-01
Controlfile Included: Ckp SCN: 631510 Ckp time: 04-NOV-13
SPFILE Included: Modification time: 21-OCT-13
RMAN> list copy;
List of Datafile Copies
=======================
Key File S Completion Time Ckp SCN Ckp Time
------- ---- - --------------- ---------- ---------------
1 7 A 11-OCT-13 360072 11-OCT-13
Name: /work/orcva/RDBMS/datafile/o1_mf_tbs_2_2lv7bf82_.dbf
Tag: DF7COPY
2 8 A 11-OCT-13 360244 11-OCT-13
Name: /work/orcva/RDBMS/datafile/o1_mf_tbs_2_2lv7qmcj_.dbf
Tag: TAG20131011T184835
List of Control File Copies
===========================
Key S Completion Time Ckp SCN Ckp Time
------- - --------------- ---------- ---------------
3 A 11-OCT-13 360380 11-OCT-13
Name: /d2/RDBMS/controlfile/o1_mf_TAG20131011T185335_2lv80zqd_.ctl
Tag: TAG20131011T185335
List of Archived Log Copies for database with db_unique_name RDBMS
=====================================================================
Key Thrd Seq S Low Time
------- ---- ------- - ---------
1 1 1 A 11-OCT-13
Name: /work/arc_dest/arcr_1_1_603561743.arc
2 1 2 A 11-OCT-13
Name: /work/arc_dest/arcr_1_2_603561743.arc
3 1 3 A 11-OCT-13
Name: /work/arc_dest/arcr_1_3_603561743.arc
Example 11-3 Listing Backups By File
This example illustrates how to list backups by file using
LIST
with the
BY FILE
option.
RMAN> list backup by file;
List of Datafile Backups
========================
File Key TY LV S Ckp SCN Ckp Time #Pieces #Copies Compressed Tag
---- ------- - -- - ---------- --------- ------- ------- ---------- ---
1 5 B F A 631092 04-NOV-13 1 1 YES TAG20131104T195949
2 B F A 175337 21-OCT-13 1 1 NO TAG20131021T094513
2 5 B F A 631092 04-NOV-13 1 1 YES TAG20131104T195949
2 B F A 175337 21-OCT-13 1 1 NO TAG20131021T094513
... some rows omitted
List of Archived Log Backups
============================
Chapter 11
Listing Backups and Recovery-Related Objects
11-7

Thrd Seq Low SCN Low Time BS Key S #Pieces #Copies Compressed Tag
---- ------- ---------- --------- ------- - ------- ------- ---------- ---
1 1 173832 21-OCT-13 7 A 1 1 NO TAG20131104T200759
1 A 1 1 NO TAG20131021T094505
1 2 174750 21-OCT-13 7 A 1 1 NO TAG20131104T200759
1 A 1 1 NO TAG20131021T094505
... some rows omitted
1 38 575472 03-NOV-13 7 A 1 1 NO TAG20131104T200759
1 39 617944 04-NOV-13 7 A 1 1 NO TAG20131104T200759
List of Controlfile Backups
===========================
CF Ckp SCN Ckp Time BS Key S #Pieces #Copies Compressed Tag
---------- --------- ------- - ------- ------- ---------- ---
631510 04-NOV-13 8 A 1 1 NO TAG20131104T200829
631205 04-NOV-13 6 A 1 1 NO TAG20131104T200432
List of SPFILE Backups
======================
Modification Time BS Key S #Pieces #Copies Compressed Tag
----------------- ------- - ------- ------- ---------- ---
21-OCT-13 8 A 1 1 NO TAG20131104T200829
21-OCT-13 6 A 1 1 NO TAG20131104T200432
See Also:
Oracle Database Backup and Recovery Reference for an explanation of the
various column headings in the
LIST
output
11.2.3 Listing Selected Backups and Copies
You can specify several different conditions to narrow your
LIST
output.
To list selected backups and copies:
1. Start RMAN and connect to a target database and recovery catalog (if used).
2. Run
LIST COPY
or
LIST BACKUP
with the
listObjList
or
recordSpec
clause. For
example, enter any of the following commands:
# lists backups of all files in database
LIST BACKUP OF DATABASE;
# lists copy of specified datafile
LIST COPY OF DATAFILE 'ora_home/oradata/trgt/system01.dbf';
# lists specified backup set
LIST BACKUPSET 213;
# lists datafile copy
LIST DATAFILECOPY '/tmp/tools01.dbf';
You can also restrict the search by specifying the
maintQualifier
or
RECOVERABLE
clause. For example, enter any of the following commands:
# specify a backup set by tag
LIST BACKUPSET TAG 'weekly_full_db_backup';
# specify a backup or copy by device type
LIST COPY OF DATAFILE 'ora_home/oradata/trgt/system01.dbf' DEVICE TYPE sbt;
# specify a backup by directory or path
LIST COPY LIKE '/tmp/%';
Chapter 11
Listing Backups and Recovery-Related Objects
11-8

# specify a backup or copy by a range of completion dates
LIST COPY OF DATAFILE 2 COMPLETED BETWEEN '10-DEC-2012' AND '17-DEC-2012';
# specify logs backed up at least twice to tape
LIST ARCHIVELOG ALL BACKED UP 2 TIMES TO DEVICE TYPE sbt;
# specify backup sets backed up at least once to disk
LIST BACKUPSET BACKED UP 1 TIMES TO DISK;
# specify backups of PDB backed up at least twice to sbt
LIST BACKUP OF PLUGGABLE DATABASE my_pdb BACKED UP 2 TIMES TO SBT;
3. Examine the output.
The output depends upon the options that you pass to the
LIST
command. For
example, the following lists copies of data file
1
contained in backup sets.
RMAN> LIST BACKUP OF DATAFILE 1;
List of Backup Sets
===================
BS Key Type LV Size Device Type Elapsed Time Completion Time
------- ---- -- ---------- ----------- ------------ ---------------
2 Full 230M SBT_TAPE 00:00:49 21-OCT-13
BP Key: 2 Status: AVAILABLE Compressed: NO Tag: TAG20131021T094513
Handle: 02f4eatc_1_1 Media: /smrdir
List of Datafiles in backup set 2
File LV Type Ckp SCN Ckp Time Name
---- -- ---- ---------- --------- ----
1 Full 175337 21-OCT-13 /oracle/dbs/tbs_01.f
BS Key Type LV Size Device Type Elapsed Time Completion Time
------- ---- -- ---------- ----------- ------------ ---------------
5 Full 233M DISK 00:04:30 04-NOV-13
BP Key: 5 Status: AVAILABLE Compressed: NO Tag: TAG20131104T195949
Piece Name: /disk1/2013_11_04/o1_mf_nnndf_TAG20131104T195949_ztjxfvgz_.bkp
List of Datafiles in backup set 5
File LV Type Ckp SCN Ckp Time Name
---- -- ---- ---------- --------- ----
1 Full 631092 04-NOV-13 /oracle/dbs/tbs_01.f
See Also:
•Oracle Database Backup and Recovery Reference for
listObjList
and
recordSpec
syntax
•Oracle Database Backup and Recovery Reference for an explanation of
the columns in the
LIST
output
11.2.4 Listing Preplugin Backups
Use the
LIST
command to list preplugin backups and preplugin archived redo log files.
The
COMPATIBLE
parameter for the target CDB must be set to 18.0.0 or higher.
1. Start RMAN and connect to the root of the target database as a common user with
the
SYSDBA
or
SYSBACKUP
privilege. Connect to a recovery catalog, if used.
2. Ensure that the target CDB is in read-write or read-only mode.
Chapter 11
Listing Backups and Recovery-Related Objects
11-9

3. Set the current container to the PDB whose backup objects you want to display by
using the
SET
command.
The following command sets the current container to
my_pdb
.
SET PREPLUGIN CONTAINER = my_pdb;
4. Run the
LIST PREPLUGIN
command with the
listObjList
or
recordSpec
clause to
display preplugin backups.
To list preplugin backups of a PDB, use the following command:
LIST PREPLUGIN BACKUP OF PLUGGABLE DATABASE pdb1;
To list all preplugin archived redo log files in the target CDB, use the following
command:
LIST PREPLUGIN ARCHVELOG ALL;
11.2.5 Listing Database Incarnations
Each time an
OPEN
RESETLOGS
operation is performed on a database, this operation
creates a new incarnation of the database.
When performing incremental backups, RMAN can use a backup from a previous
incarnation or the current incarnation as a basis for subsequent incremental backups.
When performing restore and recovery operations, RMAN can use backups from a
previous incarnation just as it can use backups from the current incarnation, if all
archived logs are available.
To list database incarnations:
1. Start RMAN and connect to a target database and recovery catalog (if used).
2. Run the
LIST
INCARNATION
command, as shown in the following example:
LIST INCARNATION;
If you are using a recovery catalog, and if you register multiple target databases in
the same catalog, then you can distinguish them by using the
OF
DATABASE
option:
LIST INCARNATION OF DATABASE prod3;
Following is a sample output of listing the incarnation of a particular database:
RMAN> LIST INCARNATION OF DATABASE rdbms;
List of Database Incarnations
DB Key Inc Key DB Name DB ID STATUS Reset SCN Reset Time
------- ------- -------- ---------------- ------ ---------- ----------
1 1 RDBMS 774627068 PARENT 1 21-OCT-13
2 2 RDBMS 774627068 CURRENT 173832 21-OCT-13
The preceding output indicates that a
RESETLOGS
operation was performed on
database
rdbms
at SCN 173832, resulting in a new incarnation. The incarnation is
distinguished by incarnation key (represented in the
Inc Key
column).
Chapter 11
Listing Backups and Recovery-Related Objects
11-10

See Also:
•Oracle Database Backup and Recovery Reference for an
explanation of the various column headings in the
LIST
output
•About Database Incarnations database incarnations and their effect
on database recovery
11.3 Reporting on Backups and Database Schema
The RMAN
REPORT
command analyzes the available backups and your database.
This section contains the following topics:
•About Reports of RMAN Backups
•Reporting on Files Needing a Backup Under a Retention Policy
•Reporting on Data Files Affected by Unrecoverable Operations
•Reporting on Obsolete Backups
•Reporting on the Database Schema
11.3.1 About Reports of RMAN Backups
The
REPORT
command provides various reports of RMAN backups.
You can use the
REPORT
command to answer important questions, such as:
•Which files need a backup?
•Which files have had unrecoverable operations performed on them?
•Which backups are obsolete and can be deleted?
•What was the physical schema of the target database or a database in the Data
Guard environment at some previous time?
•Which files have not been backed up recently?
Reports enable you to confirm that your backup and recovery strategy is in fact
meeting your requirements for database recoverability. The two major forms of
REPORT
used to determine whether your database is recoverable are:
•
REPORT NEED BACKUP
Reports which database files must be backed up to meet a configured or specified
retention policy
•
REPORT UNRECOVERABLE
Reports which database files require backup because they have been affected by
some
NOLOGGING
operation such as a direct-path
INSERT
The RMAN repository contains other information that you can access with the
REPORT
command. The following table summarizes the
REPORT
options.
Chapter 11
Reporting on Backups and Database Schema
11-11

Table 11-4 REPORT Options
Contents of
Report
Command Description
Obsolete
backups
REPORT OBSOLETE
Full backups, data file copies, and archived redo logs
recorded in the RMAN repository that can be deleted
because they are no longer needed
Database
schema
REPORT SCHEMA
The names of all data files (permanent and temporary)
and tablespaces for the target database at the specified
point in time. If you use RMAN in a Data Guard
environment, then you can report the schema for a
specified
DB_UNIQUE_NAME
.
See Also:
Oracle Database Backup and Recovery Reference for a description of the
REPORT
command
11.3.2 Reporting on Files Needing a Backup Under a Retention Policy
Use the
REPORT NEED BACKUP
command to determine which database files need backup
under a specific retention policy.
With no arguments,
REPORT NEED BACKUP
reports which objects need backup under the
currently configured retention policy. The output for a configured retention policy of
REDUNDANCY 1
is similar to this example:
RMAN> REPORT NEED BACKUP;
RMAN retention policy will be applied to the command
RMAN retention policy is set to redundancy 1
Report of files with less than 1 redundant backups
File #bkps Name
---- ----- -----------------------------------------------------
2 0 /oracle/oradata/trgt/undotbs01.dbf
Note:
If you disable the retention policy using
CONFIGURE RETENTION POLICY TO NONE
,
then
REPORT NEED BACKUP
returns an error message, because without a
retention policy, RMAN cannot determine which files must be backed up.
Chapter 11
Reporting on Backups and Database Schema
11-12

11.3.2.1 Using RMAN REPORT NEED BACKUP with Different Retention
Policies
You can use options of the
REPORT NEED BACKUP
command to specify different retention
policies.
Use one of the following forms to specify different criteria for
REPORT NEED BACKUP
:
•
REPORT NEED BACKUP RECOVERY WINDOW OF n
DAYS
Displays objects requiring backup to satisfy a recovery window-based retention
policy
•
REPORT NEED BACKUP REDUNDANCY n
Displays objects requiring backup to satisfy a redundancy-based retention policy
•
REPORT NEED BACKUP DAYS n
Displays files that require more than
n
days' worth of archived redo log files for
recovery
•
REPORT NEED BACKUP INCREMENTAL n
Displays files that require application of more than
n
incremental backups for
recovery
11.3.2.2 Using RMAN REPORT NEED BACKUP with Tablespaces and Data
Files
The
REPORT NEED BACKUP
command can check the entire database, skip specified
tablespaces, or check only specific tablespaces or data files against different retention
policies.
The following are examples:
REPORT NEED BACKUP RECOVERY WINDOW OF 2 DAYS DATABASE SKIP TABLESPACE TBS_2;
REPORT NEED BACKUP REDUNDANCY 2 DATAFILE 1;
REPORT NEED BACKUP TABLESPACE TBS_3; # uses configured retention policy
REPORT NEED BACKUP INCREMENTAL 2; # checks entire database
See Also:
Oracle Database Backup and Recovery Reference for all possible options for
REPORT NEED BACKUP
and an explanation of the various column headings in the
output
11.3.2.3 Using REPORT NEED BACKUP with Backups on Tape or Disk Only
You can limit the backups tested by the
REPORT NEED BACKUP
command to disk-based or
tape-based backups only.
Following are some examples:
Chapter 11
Reporting on Backups and Database Schema
11-13

REPORT NEED BACKUP RECOVERY WINDOW OF 2 DAYS DATABASE DEVICE TYPE sbt;
REPORT NEED BACKUP DEVICE TYPE DISK;
REPORT NEED BACKUP TABLESPACE TBS_3 DEVICE TYPE sbt;
11.3.3 Reporting on Data Files Affected by Unrecoverable Operations
When a data file has been changed by an unrecoverable operation, such as a direct
load insert, normal media recovery cannot be used to recover the file, because an
unrecoverable operation does not generate redo. You must perform either a full or
incremental backup of affected data files after such operations, to ensure that data
blocks affected by the unrecoverable operation can be recovered using RMAN.
To identify data files affected by an unrecoverable operation:
1. Start RMAN and connect to a target database and recovery catalog (if used).
See Also:
Making Database Connections with RMAN
2. Execute the
REPORT UNRECOVERABLE
command.
The following example includes sample output:
RMAN> REPORT UNRECOVERABLE;
Report of files that need backup due to unrecoverable operations
File Type of Backup Required Name
---- ----------------------- -----------------------------------
1 full /oracle/oradata/trgt/system01.dbf
11.3.4 Reporting on Obsolete Backups
You can report backup sets, backup pieces, and data file copies that are obsolete that
is, not needed to meet a specified retention policy by specifying the
OBSOLETE
keyword.
To report obsolete backups:
1. Start RMAN and connect to a target database and recovery catalog (if used).
See Also:
Making Database Connections with RMAN
2. Execute the
CROSSCHECK
command to update the status of backups in the repository
compared to their status on disk.
In the simplest case, you could crosscheck all backups on disk, tape or both, using
any one of the following commands:
CROSSCHECK BACKUP DEVICE TYPE DISK;
CROSSCHECK BACKUP DEVICE TYPE sbt;
CROSSCHECK BACKUP; # crosschecks all backups on all devices
Chapter 11
Reporting on Backups and Database Schema
11-14

3. Run
REPORT OBSOLETE
to identify which backups are obsolete because they are no
longer needed for recovery.
If you do not specify any other options, then
REPORT OBSOLETE
displays the backups
that are obsolete according to the current retention policy, as shown in the
following example:
RMAN> REPORT OBSOLETE;
RMAN retention policy will be applied to the command
RMAN retention policy is set to redundancy 1
Report of obsolete backups and copies
Type Key Completion Time Filename/Handle
-------------------- ------ ------------------ --------------------
Datafile Copy 44 08-FEB-13 /backup/ora_df549738566_s70_s1
Datafile Copy 45 08-FEB-13 /backup/ora_df549738567_s71_s1
Datafile Copy 46 08-FEB-13 /backup/ora_df549738568_s72_s1
Backup Set 26 08-FEB-13
Backup Piece 26 08-FEB-13 /backup/ora_df549738682_s76_s1
.
.
.
You can also check which backups are obsolete under different recovery window-
based or redundancy-based retention policies, by using
REPORT OBSOLETE
with
RECOVERY WINDOW
and
REDUNDANCY
options, as shown in these examples:
REPORT OBSOLETE RECOVERY WINDOW OF 3 DAYS;
REPORT OBSOLETE REDUNDANCY 1;
See Also:
•Maintaining RMAN Backups and Repository Records for more details on
how to update the RMAN repository record to contain the actual set of
available backups.
•Configuring the Backup Retention Policy for a conceptual overview of
RMAN backup retention policy
•Deleting Expired RMAN Backups and Copies for information about
deleting RMAN backups and deleting records of RMAN backups from
the RMAN repository
11.3.5 Reporting on the Database Schema
The
REPORT
SCHEMA
command lists and displays information about the database files,
tablespaces, and so on.
If you do not specify
FOR DB_UNIQUE_NAME
with
REPORT SCHEMA
, then a recovery catalog
connection is optional, but a target database connection is required. In a Data Guard
environment, you can specify
REPORT SCHEMA FOR DB_UNIQUE_NAME
to report the schema
for a database in the environment. In this case, an RMAN connection to a target
database is not required. You can connect RMAN to the recovery catalog and set the
DBID instead.
Chapter 11
Reporting on Backups and Database Schema
11-15

To report on the database schema:
1. Start RMAN and connect to the desired databases.
See Also:
Making Database Connections with RMAN
2. If you did not connect RMAN to a target database in the previous step, and you
intend to specify the
FOR DB_UNIQUE_NAME
clause on
REPORT SCHEMA
, then set the
database DBID. For example, enter the following command:
RMAN> SET DBID 28014364;
3. Run the
REPORT
SCHEMA
command as shown in the following example:
RMAN> REPORT SCHEMA;
Report of database schema for database with db_unique_name DGRDBMS
List of Permanent Datafiles
===========================
File Size(MB) Tablespace RB segs Datafile Name
---- -------- -------------------- ------- ------------------------
1 450 SYSTEM YES /disk1/oracle/dbs/t_db1.f
2 141 SYSAUX NO /disk1/oracle/dbs/t_ax1.f
3 50 UD1 YES /disk1/oracle/dbs/t_undo1.f
4 50 TBS_11 NO /disk1/oracle/dbs/tbs_111.f
5 50 TBS_11 NO /disk1/oracle/dbs/tbs_112.f
List of Temporary Files
=======================
File Size(MB) Tablespace Maxsize(MB) Tempfile Name
---- -------- -------------------- ----------- --------------------
1 40 TEMP 32767 /disk1/oracle/dbs/t_tmp1.f
If you use a recovery catalog, then you can use the
atClause
to specify a past time,
SCN, or log sequence number, as shown in these examples of the command:
RMAN> REPORT SCHEMA AT TIME 'SYSDATE-14'; # schema 14 days ago
RMAN> REPORT SCHEMA AT SCN 1000; # schema at scn 1000
RMAN> REPORT SCHEMA AT SEQUENCE 100 THREAD 1; # schema at sequence 100
RMAN> REPORT SCHEMA FOR DB_UNIQUE_NAME standby1; # schema for database standby1
See Also:
Oracle Database Backup and Recovery Reference for a description of
the
REPORT SCHEMA
output
11.4 Reporting in CDBs and PDBs
You can view reports on the metadata related to a multitenant container database
(CDB), the root only, or one or more pluggable databases (PDBs).
Chapter 11
Reporting in CDBs and PDBs
11-16

The concepts and practices of reporting on non-CDBs is applicable to CDBs and
PDBs, with the differences described in the following sections.
•Reporting in CDBs
•Reporting in PDBs
11.4.1 Reporting in CDBs
The steps to view reporting information for a CDB are similar to the ones used for a
non-CDB. The only difference is that you must connect to the root as a common user
with the common
SYSBACKUP
or common
SYSDBA
privilege.
The
LIST
and
LIST BACKUP OF
commands will display backups of the whole CDB. The
REPORT NEED BACKUP TABLESPACE
command displays information about the tablespaces in
the root that need backup.
See Also:
Making RMAN Connections to a CDB
The following command, when connected to the root, displays all the data files in the
CDB that need backup:
REPORT NEED BACKUP;
This command, when connected to the root, provides a summary list of backups of the
whole CDB:
LIST BACKUP SUMMARY;
11.4.2 Reporting in PDBs
Use one of the following techniques to view reporting information for PDBs:
•Connect to the root and use the
LIST ... PLUGGABLE DATABASE
or
REPORT PLUGGABLE
DATABASE
commands. This enables you to display information regarding one or
more PDBs.
The following command, when connected to the root, provides a verbose list of
backups in the PDBs
hr_pdb
and
sales_pdb
.
LIST BACKUP OF PLUGGABLE DATABASE hr_pdb, sales_pdb;
•Connect to the PDB and use the
LIST BACKUP
or
REPORT
commands. This approach
displays information for only one PDB and also uses the same commands that are
used for non-CDBs.
The following command, when connected to a particular PDB, displays all the data
files in the PDB that need backup:
REPORT NEED BACKUP;
When connected to a PDB, you cannot view reporting information about obsolete
backups or delete obsolete backups.
Chapter 11
Reporting in CDBs and PDBs
11-17

See Also:
Making RMAN Connections to a CDB
11.4.2.1 Listing Backups of Dropped PDBs
Use the
LIST
command with the
GUID
option to list backups of pluggable databases
(PDBs) that have been dropped from a multitenant container database (CDB).
After a PDB is dropped, you cannot perform operations or query data dictionary views
by using the PDB name. However, you can obtain information about dropped PDBs by
querying using GUID of a PDB.
To list backups of dropped PDBs:
1. Connect to the root as a common user with the
SYSDBA
or
SYSBACKUP
privilege.
2. Query the
DBA_PDB_HISTORY
view to determine the GUID of the PDB that was
dropped.
The following example displays the PDBs that were dropped from the CDB
test_db
:
SELECT pdb_name, pdb_guid FROM dba_pdb_history
WHERE db_name = 'test_db';
3. Use the
LIST
command with the
GUID
option to display backups of a dropped PDB.
The following commands display backup sets and image copies of a dropped PDB
with the specified GUID:
LIST BACKUP GUID 'CDFFD672330A7527D0147204CD0E08D4';
LIST COPY GUID 'CDFFD672330A7527D0147204CD0E08D4';
11.5 Using V$ Views to Query Backup Metadata
In some cases, V$ views supply information that is not available through use of the
LIST
and
REPORT
commands.
This section describes cases in which V$ views are particularly useful and contains the
following topics.
•Querying Details of Past and Current RMAN Jobs
•Determining the Encryption Status of Backup Pieces
11.5.1 Querying Details of Past and Current RMAN Jobs
An RMAN job is the set of commands executed within an RMAN session. Thus, one
RMAN job can contain multiple commands.
For example, you may execute two separate
BACKUP
commands and a
RECOVER COPY
command in a single session. An RMAN backup job is the set of
BACKUP
commands
executed in one RMAN job. For example, a
BACKUP DATABASE
and
BACKUP ARCHIVELOG ALL
command executed in the same RMAN job constitute a single RMAN backup job.
Chapter 11
Using V$ Views to Query Backup Metadata
11-18

The views
V$RMAN_BACKUP_JOB_DETAILS
and
V$RMAN_BACKUP_SUBJOB_DETAILS
and their
corresponding recovery catalog versions provide details of RMAN backup jobs. For
example, the views show how long a backup took, how many backup jobs have been
issued, the status of each backup job (for example, whether it failed or completed),
when a job started and finished, and what type of backup was performed. The
SESSION_KEY
column is the unique key for the RMAN session in which the backup job
occurred.
RMAN backups often write less than they read. Because of RMAN compression, the
OUTPUT_BYTES_PER_SEC
column cannot be used as the measurement of backup speed.
The appropriate column to measure backup speed is
INPUT_BYTES_PER_SEC
. The ratio
between read and written data is described in the
COMPRESSION_RATIO
column.
To query details about past and current RMAN jobs:
1. Connect SQL*Plus to the database whose backup history you intend to query.
2. Query the
V$RMAN_BACKUP_JOB_DETAILS
view for information about the backup type,
status, and start and end time.
The following query shows the backup job history ordered by session key, which is
the primary key for the RMAN session:
COL STATUS FORMAT a9
COL hrs FORMAT 999.99
SELECT SESSION_KEY, INPUT_TYPE, STATUS,
TO_CHAR(START_TIME,'mm/dd/yy hh24:mi') start_time,
TO_CHAR(END_TIME,'mm/dd/yy hh24:mi') end_time,
ELAPSED_SECONDS/3600 hrs
FROM V$RMAN_BACKUP_JOB_DETAILS
ORDER BY SESSION_KEY;
The following sample output shows the backup job history:
SESSION_KEY INPUT_TYPE STATUS START_TIME END_TIME HRS
----------- ------------- --------- -------------- -------------- -------
9 DATAFILE FULL COMPLETED 04/18/07 18:14 04/18/07 18:15 .02
16 DB FULL COMPLETED 04/18/07 18:20 04/18/07 18:22 .03
113 ARCHIVELOG COMPLETED 04/23/07 16:04 04/23/07 16:05 .01
3. Query the
V$RMAN_BACKUP_JOB_DETAILS
view for the rate of backup jobs in an RMAN
session.
The following query shows the backup job speed ordered by session key, which is
the primary key for the RMAN session. The columns
in_sec
and
out_sec
display
the data input and output per second.
COL in_sec FORMAT a10
COL out_sec FORMAT a10
COL TIME_TAKEN_DISPLAY FORMAT a10
SELECT SESSION_KEY,
OPTIMIZED,
COMPRESSION_RATIO,
INPUT_BYTES_PER_SEC_DISPLAY in_sec,
OUTPUT_BYTES_PER_SEC_DISPLAY out_sec,
TIME_TAKEN_DISPLAY
FROM V$RMAN_BACKUP_JOB_DETAILS
ORDER BY SESSION_KEY;
The following sample output shows the speed of the backup jobs:
Chapter 11
Using V$ Views to Query Backup Metadata
11-19

SESSION_KEY OPT COMPRESSION_RATIO IN_SEC OUT_SEC TIME_TAKEN
----------- --- ----------------- ---------- ---------- ----------
9 NO 1 8.24M 8.24M 00:01:14
16 NO 1.32732239 6.77M 5.10M 00:01:45
113 NO 1 2.99M 2.99M 00:00:44
4. Query the
V$RMAN_BACKUP_JOB_DETAILS
view for the size of the backups in an RMAN
session.
If you run
BACKUP DATABASE
, then
V$RMAN_BACKUP_JOB_DETAILS.OUTPUT_BYTES
shows
the total size of backup sets written by the backup job for the database that you
are backing up. To view backup set sizes for all registered databases, query
V$RMAN_BACKUP_JOB_DETAILS
.
The following query shows the backup job size and throughput ordered by session
key, which is the primary key for the RMAN session. The columns
in_size
and
out_size
display the data input and output per second.
COL in_size FORMAT a10
COL out_size FORMAT a10
SELECT SESSION_KEY,
INPUT_TYPE,
COMPRESSION_RATIO,
INPUT_BYTES_DISPLAY in_size,
OUTPUT_BYTES_DISPLAY out_size
FROM V$RMAN_BACKUP_JOB_DETAILS
ORDER BY SESSION_KEY;
The following sample output shows the size of the backup jobs:
SESSION_KEY INPUT_TYPE COMPRESSION_RATIO IN_SIZE OUT_SIZE
----------- ------------- ----------------- ---------- ----------
10 DATAFILE FULL 1 602.50M 602.58M
17 DB FULL 1.13736669 634.80M 558.13M
See Also:
Oracle Database Reference to learn about the
V$RMAN_BACKUP_JOB_DETAILS
view
11.5.2 Determining the Encryption Status of Backup Pieces
The
ENCRYPTED
column of the
V$BACKUP_PIECE
and
V$RMAN_BACKUP_PIECE
views indicates
whether a backup piece is encrypted (
YES
) or unencrypted (
NO
).
For example, you can run the following query in SQL*Plus to determine which backup
pieces are encrypted:
COL BS_REC FORMAT 99999
COL BP_REC FORMAT 99999
COL MB FORMAT 9999999
COL ENCRYPTED FORMAT A7
COL TAG FORMAT A25
SELECT S.RECID AS "BS_REC", P.RECID AS "BP_REC", P.ENCRYPTED,
P.TAG, P.HANDLE AS "MEDIA_HANDLE"
FROM V$BACKUP_PIECE P, V$BACKUP_SET S
Chapter 11
Using V$ Views to Query Backup Metadata
11-20

WHERE P.SET_STAMP = S.SET_STAMP
AND P.SET_COUNT = S.SET_COUNT;
The following sample output shows that the backups are encrypted:
BS_REC BP_REC ENCRYPT TAG
------ ------ ------- -------------------------
MEDIA_HANDLE
--------------------------------------------------------------------------------
1 1 YES TAG20070711T140124
/disk1/c-39525561-20070711-00
2 2 YES TAG20070711T140128
/disk1/c-39525561-20070711-01
3 3 YES TAG20070711T140130
/disk1/c-39525561-20070711-02
See Also:
Oracle Database Reference to learn about the
V$BACKUP_PIECE
view
11.6 Querying Recovery Catalog Views
The
LIST
,
REPORT
, and
SHOW
commands provide the easiest means of accessing the
data in the control file and the recovery catalog.
Nevertheless, you can sometimes also obtain useful information from the recovery
catalog views, which reside in the recovery catalog schema and use the
RC_
prefix.
This section contains the following topics:
•About Recovery Catalog Views
•Querying Catalog Views for the Target DB_KEY or DBID Values
•Querying RC_BACKUP_FILES
11.6.1 About Recovery Catalog Views
RMAN obtains backup and recovery metadata from a target database control file and
stores it in the tables of the recovery catalog. The recovery catalog views are derived
from these tables. The recovery catalog views are not normalized or optimized for user
queries.
In general, the recovery catalog views are not as user-friendly as the RMAN reporting
commands. For example, when you start RMAN and connect to a target database, you
obtain the information for this target database only when you issue
LIST
,
REPORT
, and
SHOW
commands. If you have 10 different target databases registered in the same
recovery catalog, then any query of the catalog views shows the metadata for all
incarnations of all 10 databases. You often must perform complex selects and joins
among the views to extract usable information about a database incarnation.
Most of the catalog views have a corresponding
V$
view in the database. For example,
RC_BACKUP_PIECE
corresponds to
V$BACKUP_PIECE
. The primary difference between the
recovery catalog view and corresponding
V$
view is that each recovery catalog view
Chapter 11
Querying Recovery Catalog Views
11-21

contains metadata about all the target databases registered in the recovery catalog.
The
V$
view contains information only about itself.
See Also:
Oracle Database Backup and Recovery Reference for a description of
recovery catalog views
11.6.1.1 About Unique Identifiers for Registered Databases
Most recovery catalog views contain the columns
DB_KEY
and
DBINC_KEY
. Each
database registered in the recovery catalog can be uniquely identified by either the
primary key, which is the
DB_KEY
column value, or the
DBID
, which is the 32-bit unique
database identifier. Each incarnation of a database is uniquely identified by the
DBINC_KEY
column.
You can use
DB_KEY
and
DBINC_KEY
to retrieve the records of a specific incarnation of a
target database. Then, you can perform joins with most of the other catalog views to
isolate records belonging to this incarnation.
An important difference between catalog and
V$
views is that a different system of
unique identifiers is used for backup and recovery files. For example, many
V$
views
such as
V$ARCHIVED_LOG
use the
RECID
and
STAMP
columns to form a concatenated
primary key. The corresponding recovery catalog view uses a derived value as its
primary keys and stores this value in a single column. For example, the primary key in
RC_ARCHIVED_LOG
is the
AL_KEY
column. The
AL_KEY
column value is the primary key that
RMAN displays in the
LIST
command output.
11.6.1.2 About Unique Identifiers in a Data Guard Environment
Special considerations apply when querying the recovery catalog in a Data Guard
environment.
In a Data Guard environment, multiple databases share the same DBID. Several views
contain a
DB_UNIQUE_NAME
column, which indicates the
DB_UNIQUE_NAME
of the database
incarnation to which the record belongs. All databases in a Data Guard environment
share the same DBID but have different
DB_UNIQUE_NAME
values.
The value of
DB_UNIQUE_NAME
is
null
when the database name is not known to the
catalog, as for Oracle9i databases that are registered in a recovery catalog. Also, the
column value is
null
when a database is upgraded to Oracle Database 11g or later but
the recovery catalog schema has not reconciled the database names for all files.
In the recovery catalog views, the primary database and its associated standby
databases share the same
DB_KEY
. However, every database in a Data Guard
environment has a unique
RC_SITE.SITE_KEY
value. For example, a primary database
prod
and its standby database
standby1
might both have the
DB_KEY
value of 1, whereas
the
SITE_KEY
of
prod
is 3 and the
SITE_KEY
of
standby1
is 30.
Some recovery catalog views do not have a
DB_UNIQUE_NAME
column, but include a
SITE_KEY
column. You can use the
SITE_KEY
column to join with
RC_SITE.SITE_KEY
to
determine the
DB_UNIQUE_NAME
of the database associated with a file. As explained in
"About RMAN File Management in a Data Guard Environment", every file in a Data
Guard environment is associated with the primary or standby database that created it.
Chapter 11
Querying Recovery Catalog Views
11-22

See Also:
Oracle Data Guard Concepts and Administration to learn how to report on
and manage files in a Data Guard environment
11.6.2 Querying Catalog Views for the Target DB_KEY or DBID
Values
The
DB_KEY
value, which is the primary key for a registered database, is used only in
the recovery catalog. The easiest way is to obtain the
DB_KEY
is to use the DBID of the
target database, which is displayed whenever you connect RMAN to a database as
TARGET
.
The DBID distinguishes databases registered in the RMAN recovery catalog.
Assume that you want to obtain information about a database registered in the
recovery catalog.
To query the catalog for information about the current incarnation of a database:
1. Determine the DBID for the database whose records you want to view.
You can obtain the DBID by looking at the output displayed when RMAN connects
to the database, querying
V$RMAN_OUTPUT
, or querying a
V$DATABASE
view. The
following example connects SQL*Plus to the desired database and queries the
DBID:
SQL> CONNECT / AS SYSBACKUP
SQL> SELECT DBID
2 FROM V$DATABASE;
DBID
---------
598368217
2. Start SQL*Plus and connect to the recovery catalog database as the owner of the
recovery catalog.
3. Obtain the database key for the database whose DBID you obtained in Step 1.
To obtain the
DB_KEY
for a database run the following query, where
dbid_of_target
is the DBID obtained in Step 1:
SELECT DB_KEY
FROM RC_DATABASE
WHERE DBID = dbid_of_target;
4. Query the records for the current incarnation of the database whose DBID you
obtained in Step 1.
To obtain information about the current incarnation of a target database, specify
the target database
DB_KEY
value and perform a join with the
RC_DATABASE_INCARNATION
view. Use a
WHERE
condition to specify that the
CURRENT_INCARNATION
column value is set to
YES
. For example, to obtain information
about backup sets in the current incarnation of a target database with the
DB_KEY
value of
1
, query as follows:
Chapter 11
Querying Recovery Catalog Views
11-23

SELECT BS_KEY, BACKUP_TYPE, COMPLETION_TIME
FROM RC_DATABASE_INCARNATION i, RC_BACKUP_SET b
WHERE i.DB_KEY = 1
AND i.DB_KEY = b.DB_KEY
AND i.CURRENT_INCARNATION = 'YES';
See Also:
•Oracle Database Backup and Recovery Reference for details about the
RC_DATABASE_INCARNATION
view
•About Database Incarnations
11.6.3 Querying RC_BACKUP_FILES
You can query the view
RC_BACKUP_FILES
for information about all backups of any
database registered in the recovery catalog. Before querying
RC_BACKUP_FILES
,
however, you must call the
DBMS_RCVMAN.SETDATABASE
procedure.
Specify the DBID of a database registered in the recovery catalog, as shown in the
following example:
SQL> CALL DBMS_RCVMAN.SETDATABASE(null,null,null,2283997583);
The fourth parameter must be the DBID of a database registered in the recovery
catalog. The other parameters must all be
NULL
.
See Also:
•Oracle Database Backup and Recovery Reference for details about the
RC_BACKUP_FILES
view
•Determining the DBID of the Database for techniques for determining the
DBID of a database
Chapter 11
Querying Recovery Catalog Views
11-24

12
Maintaining RMAN Backups and
Repository Records
This chapter describes how to manage the RMAN repository records, and RMAN
backups and copies. This chapter also explains maintenance tasks related to the fast
recovery area. This chapter contains the following topics:
•Overview of RMAN Backup and Repository Maintenance
•Maintaining the Control File Repository
•Maintaining the Fast Recovery Area
•Updating the RMAN Repository
•Deleting RMAN Backups and Archived Redo Logs
•Dropping a Database
See Also:
Managing a Recovery Catalog for RMAN maintenance issues that are
specific to a recovery catalog
12.1 Overview of RMAN Backup and Repository
Maintenance
This section explains the purpose and basic concepts of RMAN repository
maintenance.
12.1.1 Purpose of Backup and Repository Maintenance
The recommended maintenance strategy is to configure a fast recovery area, a
backup retention policy, and an archived redo log deletion policy. In this case, the
database automatically maintains and deletes backups and archived redo logs as
needed. However, manual maintenance of database backups and archived redo logs
is sometimes necessary.
Managing RMAN backups involves the following related tasks:
•Managing the database backups that are stored on disk or tape
•Managing the records of those backups in the RMAN repository
An important part of RMAN maintenance is deleting backups that are no longer
needed. If you configure a fast recovery area, then the database automatically deletes
unneeded files in this area automatically; even so, you may want to delete backups
12-1

and copies from tape. You may even need to delete an entire database. You can use
an RMAN command to perform these tasks.
The fast recovery area may require occasional maintenance. For example, the fast
recovery area may become full, in which case you can add space to it. Alternatively,
you may want to change the location of the recovery area.
It is possible for the RMAN repository to fail to reflect the true state of files on disk or
tape. For example, a user may delete a backup from disk with an operating system
utility. In this case, the RMAN repository shows that the file exists when it does not. In
a similar situation, a tape containing RMAN backups may be corrupted. You can use
RMAN maintenance commands to update the repository with accurate information.
12.1.2 Basic Concepts of Backup and Repository Maintenance
RMAN provides multiple commands to maintain RMAN backups and repository
records.
Following are the RMAN maintenance commands:
•The
CATALOG
command enables you to add records about RMAN and user-
managed backups that are currently not recorded in the RMAN repository, or to
remove records for backups that are recorded.
•The
CHANGE
command enables you to update the status of records in the RMAN
repository.
•The
CROSSCHECK
command enables you to synchronize the logical backup records
with the physical reality of files in backup storage.
•The
DELETE
command enables you to delete backups from the operating system.
12.1.2.1 About Maintenance Commands and RMAN Repository Metadata
RMAN always stores its metadata in the control file of each target database on which it
performs operations. If you register a target database in the recovery catalog, then
RMAN stores the metadata for this target database in the recovery catalog.
All of the RMAN maintenance commands work with or without a recovery catalog.
See Also:
Maintaining a Recovery Catalog
12.1.2.2 About Maintenance Commands in a Data Guard Environment
The database in a Data Guard environment that creates a backup or copy is
associated with the file. For example, if RMAN is connected to target database
standby1
and backs it up, then this backup is associated with
standby1
.
If backups are accessible to RMAN according to the criteria specified in "About RMAN
File Management in a Data Guard Environment", you can use RMAN maintenance
commands such as
CHANGE
,
DELETE
, and
CROSSCHECK
for backups when connected to any
primary or standby database.
Chapter 12
Overview of RMAN Backup and Repository Maintenance
12-2

12.1.2.2.1 About Crosschecks in a Data Guard Environment
For a crosscheck, RMAN can only update the status of a file from
AVAILABLE
to
EXPIRED
when connected to the database associated with the file.
Thus, if RMAN crosschecks a file and does not find it, and if the file is associated with
a database to which it is not connected as
TARGET
, then RMAN prompts you to perform
the crosscheck when connected to the target database associated with the file. RMAN
performs a crosscheck when you run the
CROSSCHECK
or
CHANGE ... AVAILABLE
command.
12.1.2.2.2 About Deletion in a Data Guard Environment
RMAN can delete files when connected to any database. If RMAN is not connected as
TARGET
to the database associated with a file, and if RMAN cannot delete a file
successfully, then RMAN prompts you to connect as
TARGET
to the database
associated with the file. You must then use
DELETE ... FORCE
to delete the file
metadata.
12.1.2.2.3 About Updates to RMAN Metadata in a Data Guard Environment
If a maintenance command changes RMAN metadata only, then you can connect
RMAN as
TARGET
to any database in the Data Guard environment.
Commands that change only metadata include:
•
CHANGE ... UNAVAILABLE
or
CHANGE ... UNCATALOG
•
CHANGE ... KEEP
or
CHANGE ... NOKEEP
•
CHANGE ... RESET DB_UNIQUE_NAME
By default, the
CHANGE
command only operates on files that are accessible according to
the rules specified in "About Accessibility of Backups in a Data Guard Environment".
However, you can change the status of files associated with a database other than the
target database by using the
FOR DB_UNIQUE_NAME
option.
12.1.2.2.4 About Files Not Associated with a Database
A backup remains associated with a database unless you explicitly use the
CHANGE ...
RESET DB_UNIQUE_NAME
to associate the backup with a different database.
In some cases the
DB_UNIQUE_NAME
may not be known for a specific file. For example,
the value of
DB_UNIQUE_NAME
is
null
when the database name is not known to the
recovery catalog, as for Oracle9i databases that are registered in a recovery catalog.
Also, rows can have a
DB_UNIQUE_NAME
of
null
because a database has been upgraded
to the current version, but the recovery catalog schema has not reconciled the
DB_UNIQUE_NAME
values for all files. By default, RMAN associates files whose
SITE_KEY
is
null
with the database to which RMAN is connected as
TARGET
.
Chapter 12
Overview of RMAN Backup and Repository Maintenance
12-3

See Also:
•Oracle Data Guard Concepts and Administration to learn how to use
RMAN to back up and restore files in a Data Guard environment
•Oracle Database Backup and Recovery Reference for a description of
the RMAN
CHANGE
command
12.2 Maintaining the Control File Repository
RMAN is designed to work without a recovery catalog. If you choose not to use a
recovery catalog, however, then the control file of each target database is the
exclusive repository for RMAN metadata.
You must know how information is stored in the control file and ensure that your
backup and recovery strategy protects the control file.
See Also:
Oracle Database Administrator’s Guide for an overview of the control file and
more details about managing control files
12.2.1 About Control File Records
The control file contains two types of records: circular reuse records and noncircular
reuse records.
Circular reuse records contain noncritical information that is eligible to be overwritten if
needed. These records contain information that is continually generated by the
database. When all available record slots are full, the database either expands the
control file to make room for a new record or overwrites the oldest record. The
CONTROL_FILE_RECORD_KEEP_TIME
initialization parameter specifies the minimum age in
days of a record before it can be reused.
Noncircular reuse records contain critical information that does not change often and
cannot be overwritten. Some examples of information in noncircular reuse records
include data files, online redo log files, and redo threads.
As you make backups of a target database, the database records these backups in the
control file. To prevent the control file from growing too large because of the addition of
new records, records can be reused if they are older than a threshold that you specify.
The
CONTROL_FILE_RECORD_KEEP_TIME
initialization parameter determines the minimum
age in days of a record before it can be overwritten:
CONTROL_FILE_RECORD_KEEP_TIME = integer
For example, if the parameter value is
14
, then any record of age 14 days or older is a
candidate for reuse. Information in an overwritten record is lost. The oldest record
available for reuse is used first.
Chapter 12
Maintaining the Control File Repository
12-4

When the database must add new RMAN repository records to the control file, but no
record is older than the threshold, the database attempts to expand the size of the
control file. If the underlying operating system prevents the expansion of the control file
(due to a disk full condition, for instance), then the database overwrites the oldest
record in the control file.
The database records the overwrite in the alert log located in the Automatic Diagnostic
Repository (ADR). For each record that it overwrites, the database records an entry in
the alert log similar to the following:
kccwnc: following control file record written over:
RECID #72 Recno 72 Record timestamp
07/28/06 22:15:21
Thread=1 Seq#=3460
Backup set key: stamp=372031415, count=17
Low scn: 0x0000.3af33f36
07/27/06 21:00:08
Next scn: 0x0000.3af3871b
07/27/06 23:23:54
Resetlogs scn and time
scn: 0x0000.00000001
12.2.1.1 About Fast Recovery Area and Control File Records
When a control file record containing information about a file created in the fast
recovery area is about to be reused, the database attempts to delete the file from the
fast recovery area when the file is eligible for deletion. Otherwise, the database
expands the size of the control file section containing the record for this file.
The database logs the expansion in the alert log with a message like this example,
where
nnnn
is the number of the control file record type:
kccwnc: trying to expand control file section nnnn for Oracle Managed Files
If the control file is at the maximum size supported under the host operating system,
then the database cannot expand the control file. In such a situation, this warning
appears in the alert log:
WARNING: Oracle Managed File filename is unknown to control file. This is the result
of limitation in control file size that could not keep all recovery area files.
The preceding message means that the control file cannot hold a record of all fast
recovery area files needed to satisfy the configured retention policy. The next section
explains how to respond to this situation.
See Also:
Oracle Database Reference for information about the
CONTROL_FILE_RECORD_KEEP_TIME
initialization parameter
Chapter 12
Maintaining the Control File Repository
12-5

12.2.2 Preventing the Loss of Control File Records
The best way to prevent the loss of RMAN metadata because of overwritten control file
records is to use a recovery catalog.
If you cannot use a recovery catalog, then you can take the following measures:
•Set the
CONTROL_FILE_RECORD_KEEP_TIME
value to slightly longer than the oldest file
that you must keep. For example, if you back up the whole database once a week,
then you must keep every backup for at least 7 days. Set
CONTROL_FILE_RECORD_KEEP_TIME
to a value such as
10
or
14
. The default value of
CONTROL_FILE_RECORD_KEEP_TIME
is 7 days.
Caution:
Regardless of whether you use a recovery catalog, never use RMAN
when
CONTROL_FILE_RECORD_KEEP_TIME
is set to 0. If you do, then you may
lose backup records.
•Store the control file in a file system rather than on a raw device so that it can
expand.
•Monitor the alert log to ensure that Oracle Database is not overwriting control file
records. The alert log is located in the Automatic Diagnostic Repository (ADR).
If you use a fast recovery area, then follow these guidelines to avoid a situation in
which the control file cannot hold a record of all fast recovery area files needed to
satisfy the backup retention policy:
•If the block size of the control file is not at its maximum, then use a larger block
size, preferably 32 kilobytes.
To achieve this aim, you must set the
SYSTEM
tablespace block size to be greater
than or equal to the control file block size, and re-create the control file after
changing
DB_BLOCK_SIZE
. The files in the fast recovery area are recataloged, but the
records for files on tape are lost.
•Make the files in the fast recovery area eligible for deletion by backing them up to
tertiary storage such as tape.
For example, you can use
BACKUP RECOVERY AREA
to specifically back up files in the
fast recovery area to a media manager.
•If the backup retention policy is keeping backups and archived logs longer than
your business requirements, then you can make more files in the fast recovery
area eligible for deletion by changing the retention policy to a shorter recovery
window or lower degree of redundancy.
12.2.3 Protecting the Control File
If you are not using a recovery catalog to store RMAN metadata, then it is doubly
important that you protect each target database control file.
You can use the following strategy to protect the control file.
Chapter 12
Maintaining the Control File Repository
12-6

To protect the control file:
1. Create redundant copies of control files through multiplexing or operating system
mirroring.
In this way, the database can survive the loss of a subset of the control files
without requiring you to restore a control file from backup. Oracle recommends
that you use a minimum of two multiplexed or mirrored control files on separate
disks.
2. Configure the control file autobackup feature.
In this case, RMAN automatically backs up the control file when you run certain
RMAN commands. If a control file autobackup is available, RMAN can restore the
server parameter and backup control file, and mount the database. After the
control file is mounted, you can restore the remainder of the database.
3. Keep a record of the database DBID.
If you lose the control files, then you can use the DBID to recover the database.
See Also:
•Backing Up Control Files with RMAN to learn about manual and
automatic control file backups
•About RMAN Control File and Server Parameter File Autobackups
12.3 Maintaining the Fast Recovery Area
Although the fast recovery area is largely self-managing, some situations may require
database administration intervention.
12.3.1 Deletion Rules for the Fast Recovery Area
RMAN uses certain rules to determine when files can be deleted from the fast
recovery area.
The following rules govern when files become eligible for deletion from the recovery
area:
•Permanent files are never eligible for deletion.
•Files that are obsolete under the retention policy are eligible for deletion.
•Transient files that have been copied to tape are eligible for deletion.
•Archived redo logs are not eligible for deletion until all the consumers of the logs
have satisfied their requirements.
Consumers of logs can include RMAN, standby databases, Oracle Streams
databases, and the Flashback Database feature.
•Foreign archived logs that have been mined by a LogMiner session on a logical
standby database are eligible for deletion. Because it is generated from a different
Chapter 12
Maintaining the Fast Recovery Area
12-7

database than the current database, a foreign archived redo log has a different
DBID than the current archived redo logs.
The safe and reliable way to control deletion of files from the fast recovery area is to
configure your retention policy and archived log deletion policy. To increase the
likelihood that files moved to tape are retained on disk, increase the fast recovery area
quota.
See Also:
•"Overview of Files in the Fast Recovery Area" for information about the
contents of the fast recovery area and the difference between permanent
and transient files
•"Configuring an Archived Redo Log Deletion Policy" for information about
how to configure an archived redo log deletion policy that determines
when logs are eligible to be deleted
•Configuring the Backup Retention Policy for information about how to
configure the retention policy
•Oracle Data Guard Concepts and Administration to learn about archived
redo log management in a Data Guard environment
12.3.2 Monitoring Fast Recovery Area Space Usage
You can use the
V$RECOVERY_FILE_DEST
and
V$RECOVERY_AREA_USAGE
views to determine
whether you have allocated enough space for your fast recovery area.
Query the
V$RECOVERY_FILE_DEST
view to discover the current location, disk quota,
space in use, space reclaimable by deleting files, and total number of files in the fast
recovery area. The space columns specify the amount in bytes. Query the
V$RECOVERY_AREA_USAGE
view to discover the percentage of the total disk quota used by
different types of files. Also, you can determine how much space for each type of file
can be reclaimed by deleting files that are obsolete, redundant, or backed up to tape.
When guaranteed restore points are defined on your database, you must monitor the
amount of space used in your fast recovery area for files required to meet the
guarantee. Use the query for viewing guaranteed restore points in "Listing Restore
Points Using the V$RESTORE_POINT View" and see the
STORAGE_SIZE
column to
determine the space required for files related to each guaranteed restore point.
Example 12-1 Fast Recovery Area Space Consumption
The following example displays details about the fast recovery area such as the
location, disk quota, space usage, and number of files.
SELECT * FROM V$RECOVERY_FILE_DEST;
NAME SPACE_LIMIT SPACE_USED SPACE_RECLAIMABLE NUMBER_OF_FILES CON_ID
------------ ----------- ---------- ----------------- --------------- ------
/mydisk/rcva 5368709120 109240320 256000 28 0
Chapter 12
Maintaining the Fast Recovery Area
12-8

Example 12-2 Fast Recovery Area Space Usage Based on Type of Files
The following example displays the percentage of space used, percentage of space
that can be reclaimed, and number of files in the fast recovery area for each type of
file.
SELECT * FROM V$RECOVERY_AREA_USAGE;
FILE_TYPE PERCENT_SPACE_USED PERCENT_SPACE_RECLAIMABLE NUMBER_OF_FILES CON_ID
------------ ------------------ ------------------------- --------------- ------
CONTROLFILE 0 0 0 0
ONLINELOG 2 0 22 0
ARCHIVELOG 4.05 2.01 31 0
BACKUPPIECE 3.94 3.86 8 0
IMAGECOPY 15.64 10.43 66 0
FLASHBACKLOG .08 0 1 0
See Also:
•
V$RECOVERY_AREA_USAGE
in Oracle Database Reference
•
V$RECOVERY_FILE_DEST
in Oracle Database Reference
12.3.3 Managing Space for Flashback Logs in the Fast Recovery Area
You cannot manage the flashback logs in the fast recovery area directly other than by
setting the flashback retention target or using guaranteed restore points.
Nevertheless, you can manage fast recovery area space as a whole to maximize the
space available for retention of flashback logs. In this way you increase the likelihood
of achieving the flashback target.
To make space for flashback logs, back up the other contents of your fast recovery
area to tape with commands such as
BACKUP
RECOVERY
AREA
,
BACKUP
BACKUPSET
, and so
on. Oracle Database automatically removes obsolete files from the fast recovery area.
If offloading backups to tape still does not create enough space to satisfy the backup
retention policy and flashback retention target, then allocate more space in the fast
recovery area.
Note:
You cannot back up flashback logs. Thus, the
BACKUP
RECOVERY
AREA
operation
does not include the flashback logs when backing up the fast recovery area
contents to tape.
See Also:
About Logging for Flashback Database with Guaranteed Restore Points
Defined for the rules for flashback log deletion
Chapter 12
Maintaining the Fast Recovery Area
12-9

12.3.4 Responding to a Full Fast Recovery Area
If the RMAN retention policy requires keeping a set of backups larger than the fast
recovery area disk quota, or if the retention policy is set to
NONE
, then the fast recovery
area can fill completely with no reclaimable space.
The database issues a warning alert when reclaimable space is less than 15% and a
critical alert when reclaimable space is less than 3%. To warn the DBA of this
condition, an entry is added to the alert log and to the
DBA_OUTSTANDING_ALERTS
table
(used by Enterprise Manager). Nevertheless, the database continues to consume
space in the fast recovery area until there is no reclaimable space left.
When the recovery area is completely full, the error displayed is as follows, where
nnnnn is the number of bytes required and mmmmm is the disk quota:
ORA-19809: limit exceeded for recovery files
ORA-19804: cannot reclaim nnnnn bytes disk space from mmmmm limit
You have several choices for how to resolve a full fast recovery area when no files are
eligible for deletion:
•Make more disk space available and increase
DB_RECOVERY_FILE_DEST_SIZE
to
reflect the additional space.
•Move backups from the fast recovery area to tertiary storage such as tape.
One convenient way to back up all of your recovery area files to tape together is
the
BACKUP
RECOVERY
AREA
command. After you transfer backups from the recovery
area to tape, you can delete files from the fast recovery area. Flashback logs
cannot be backed up outside the recovery area and are not backed up by
BACKUP
RECOVERY
AREA
.
•Run
DELETE
for any files that have been removed with an operating system utility.
If you use host operating system commands to delete files, then the database is
not aware of the resulting free space. You can run the RMAN
CROSSCHECK
command to have RMAN recheck the contents of the fast recovery area and
identify expired files, and then use the
DELETE EXPIRED
command to delete every
expired backup from the RMAN repository.
•Ensure that your guaranteed restore points are necessary. If not, delete them.
Flashback logs that are not needed for a guaranteed restore point are deleted
automatically to gain space for other files in the fast recovery area. A guaranteed
restore point forces the retention of flashback logs required to perform Flashback
Database to the restore point SCN.
•Review your backup retention policy and, if using Data Guard, your archived redo
log deletion policy.
Chapter 12
Maintaining the Fast Recovery Area
12-10

See Also:
•Deleting RMAN Backups and Archived Redo Logs
•Dropping Restore Points
•Backing Up the Database to decide on a retention policy
•Oracle Data Guard Concepts and Administrationfor more information
about archived log deletion policy with Data Guard
12.3.5 Changing the Fast Recovery Area to a New Location
Use the
ALTER SYSTEM
command to change the location of the fast recovery area.
If you must move the fast recovery area of your database to a new location, then
follow this procedure:
1. Start SQL*Plus on the target database and change the
DB_RECOVERY_FILE_DEST
initialization parameter. For example, enter the following command to set the
destination to the ASM disk group
disk1
:
ALTER SYSTEM SET DB_RECOVERY_FILE_DEST='+disk1' SCOPE=BOTH SID='*';
After you change this parameter, all new fast recovery area files are created in the
new location.
2. Either leave or move the permanent files, flashback logs, and transient files in the
old flash recovery location.
If you leave the existing files in the flash recovery, then the database deletes the
transient files from the old fast recovery area as they become eligible for deletion.
If you must move the old files to the new fast recovery area, then see the Oracle
Automatic Storage Management Administrator's Guide. The procedure for moving
database files into and out of an ASM disk group with RMAN works when moving
files into and out of a fast recovery area.
12.3.6 Disabling the Fast Recovery Area
The
ALTER SYSTEM
command can be used to disable the fast recovery area.
Before disabling the fast recovery area, you must first drop all guaranteed restore
points and then turn off Flashback Database.
You can then set the
DB_RECOVERY_FILE_DEST
initialization parameter to a null string to
disable the fast recovery area. For example, use the following SQL statement to
change the parameter on a running database:
ALTER SYSTEM SET DB_RECOVERY_FILE_DEST='' SCOPE=BOTH SID='*';
The database no longer provides the space management features of the fast recovery
area for the files stored in the old
DB_RECOVERY_FILE_DEST
location. The files are still
known to the RMAN repository, however, and available for backup and restore
activities.
Chapter 12
Maintaining the Fast Recovery Area
12-11

12.3.7 Responding to an Instance Crash During File Creation
As a rule, the fast recovery area is self-maintaining. When an instance crashes during
the creation of a file in the fast recovery area, however, the database may leave the
file in the fast recovery area.
When this situation occurs, the alert log contains the following error, where
location
is
the location of the fast recovery area:
ORA-19816: WARNING: Files may exist in location that are not known to database.
In such a situation, use the RMAN command
CATALOG RECOVERY AREA
to recatalog any
such files. If the file header of the file in question is corrupted, then delete the file
manually with an operating system utility.
12.4 Updating the RMAN Repository
Several situations can cause a discrepancy between the repository and the files that it
records, including tape or disk failures and user-managed copies or deletions of
RMAN-related files.
This section explains how to ensure that the RMAN repository accurately reflects the
reality of the RMAN-related files stored on disk and tape.
12.4.1 Crosschecking the RMAN Repository
To ensure that data about backups in the recovery catalog or control file is
synchronized with corresponding data on disk or in the media management catalog,
perform a crosscheck. The
CROSSCHECK
command operates only on files that are
currently recorded in the RMAN repository.
If you use a fast recovery area, backup retention policy, and archived redo log deletion
policy, then you do not need to perform crosschecks very often. If you delete files by
means other than RMAN, then you must perform a crosscheck periodically to ensure
that the repository data stays current.
12.4.1.1 About RMAN Crosschecks
Crosschecks update outdated RMAN repository information about backups whose
repository records do not match their physical status. For example, if a user removes
archived logs from disk with an operating system command, the repository still
indicates that the logs are on disk, when in fact they are not.
Figure 12-1 illustrates a crosscheck of a media manager. RMAN queries the RMAN
repository for the names and locations of the four backup sets to be checked. RMAN
sends this information to the target database server, which queries the media
management software about the backups. The media management software then
checks its media catalog and reports back to the server that backup set
3
is missing.
RMAN updates the status of backup set
3
to
EXPIRED
in the repository. The record for
backup set
3
is deleted after you run
DELETE
EXPIRED
.
Chapter 12
Updating the RMAN Repository
12-12
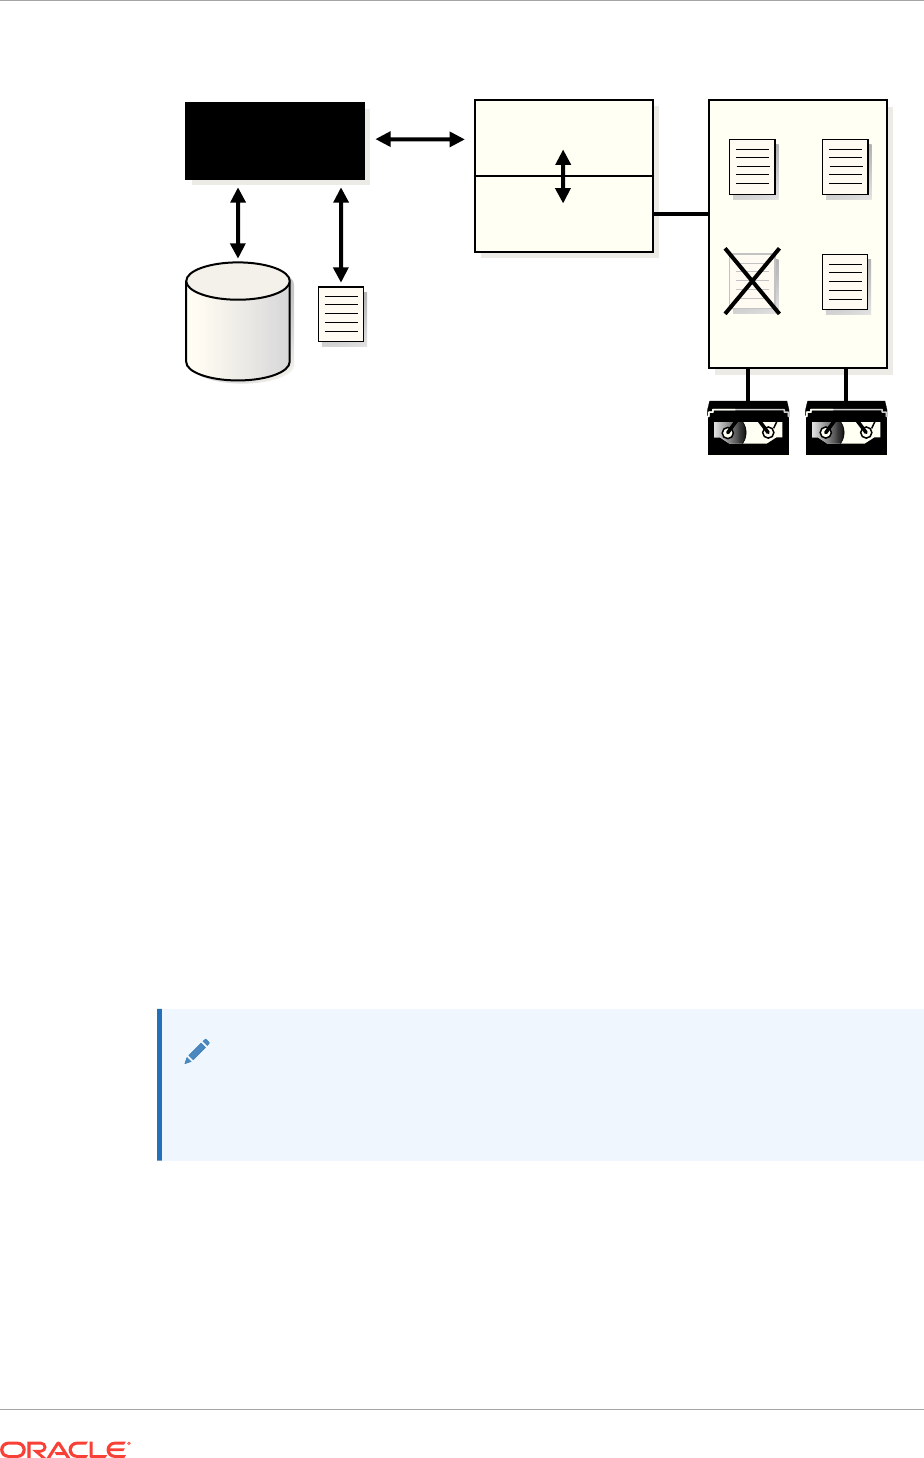
Figure 12-1 Crosschecking a Media Manager
RMAN
Media Management
Library
Oracle Database
Backup
set 3
Backup
set 2
Backup
set 1
Backup
set 4
Media Manager
Recovery
Catalog
Control
file
Crosschecks are useful because they can do the following:
•Update outdated information about backups that disappeared from disk or tape or
became corrupted
•Update the repository if you delete archived redo logs or other files with operating
system commands
Use the crosscheck feature to check the status of a backup on disk or tape. If the
backup is on disk, then
CROSSCHECK
checks whether the header of the file is valid. If a
backup is on tape, then the command checks that the backups exist in the media
management software catalog.
Backup pieces and image copies can have the status
AVAILABLE
,
EXPIRED
, or
UNAVAILABLE
. You can view the status of backups by running the RMAN
LIST
command
or by querying
V$BACKUP_FILES
or recovery catalog views such as
RC_DATAFILE_COPY
or
RC_ARCHIVED_LOG
. A crosscheck updates the RMAN repository so that all of these
techniques provide accurate information. RMAN updates each backup in the RMAN
repository to status
EXPIRED
if the backup is no longer available. If a new crosscheck
determines that an expired backup is available again, then RMAN updates its status to
AVAILABLE
.
Note:
The
CROSSCHECK
command does not delete operating system files or remove
repository records. You must use the
DELETE
command for these operations.
You can issue the
DELETE
EXPIRED
command to delete all expired backups. RMAN
removes the record for the expired file from the repository. If for some reason the file
still exists on the media, then RMAN issues warnings and lists the mismatched objects
that cannot be deleted.
Chapter 12
Updating the RMAN Repository
12-13

See Also:
•Oracle Database Backup and Recovery Reference for
CROSSCHECK
syntax
and a description of the possible status values
•Oracle Database Backup and Recovery Reference for
DELETE
syntax
12.4.1.2 Crosschecking All Backups and Copies
After connecting to the target database and recovery catalog (if you use one), run
CROSSCHECK
commands as needed to verify the status and availability of backups known
to RMAN.
You can configure or manually allocate multiple channels before issuing
CROSSCHECK
or
DELETE
commands. RMAN searches for each backup on all channels that have the
same device type as the channel used to create the backup. The multichannel feature
is primarily intended for use when crosschecking or deleting backups on both disk and
tape within a single command. For example, assume that you have an SBT channel
configured as follows:
CONFIGURE DEVICE TYPE sbt PARALLELISM 1;
CONFIGURE DEFAULT DEVICE TYPE sbt;
In this case you can run the following commands to crosscheck both disk and SBT:
CROSSCHECK BACKUP;
CROSSCHECK COPY;
RMAN uses both the SBT channel and the preconfigured disk channel to perform the
crosscheck. Sample output follows:
allocated channel: ORA_SBT_TAPE_1
channel ORA_SBT_TAPE_1: sid=12 devtype=SBT_TAPE
channel ORA_SBT_TAPE_1: WARNING: Oracle Test Disk API
using channel ORA_DISK_1
crosschecked backup piece: found to be 'AVAILABLE'
backup piece handle=/oracle/dbs/16c5esv4_1_1 recid=36 stamp=408384484
crosschecked backup piece: found to be 'AVAILABLE'
backup piece handle=/oracle/dbs/c-674966176-20000915-01 recid=37 stamp=408384496
crosschecked backup piece: found to be 'AVAILABLE'
backup piece handle=12c5erb2_1_1 recid=32 stamp=408382820
.
.
.
If you do not have an automatic SBT channel configured, then you can manually
allocate maintenance channels on disk and tape.
ALLOCATE CHANNEL FOR MAINTENANCE DEVICE TYPE sbt;
CROSSCHECK BACKUP;
CROSSCHECK COPY;
You do not have to manually allocate a disk channel because RMAN uses the
preconfigured disk channel.
Chapter 12
Updating the RMAN Repository
12-14

12.4.1.3 Crosschecking Specific Backup Sets and Copies
You can use the
LIST
command to report your backups and then use the
CROSSCHECK
command to check that specific backups described in the
LIST
output still exist.
The
DELETE
EXPIRED
command deletes repository records for backups that fail the
crosscheck.
To crosscheck specified backups:
1. Start RMAN and connect to a target database and recovery catalog (if used).
2. Run a
LIST
command to identify the backups to be checked.
For example, run the following command:
LIST BACKUP; # lists all backup sets, proxy copies, and image copies
Crosscheck the desired backups or copies.
The following sample commands illustrate different types of crosschecks:
CROSSCHECK BACKUP; # checks backup sets, proxy copies, and image copies
CROSSCHECK COPY OF DATABASE;
CROSSCHECK BACKUPSET 1338, 1339, 1340;
CROSSCHECK BACKUPPIECE TAG 'nightly_backup';
CROSSCHECK BACKUP OF ARCHIVELOG ALL SPFILE;
CROSSCHECK BACKUP OF DATAFILE "?/oradata/trgt/system01.dbf"
COMPLETED AFTER 'SYSDATE-14';
CROSSCHECK BACKUPSET DEVICE TYPE disk BACKED UP 3 TIMES TO sbt;
CROSSCHECK BACKUP OF DATABASE BACKED UP 2 TIMES TO sbt;
CROSSCHECK CONTROLFILECOPY '/tmp/control01.ctl';
CROSSCHECK DATAFILECOPY 113, 114, 115;
CROSSCHECK PROXY 789;
See Also:
Oracle Database Backup and Recovery Reference for more details on using
CROSSCHECK
to check backups of specific files
12.4.1.4 Crosschecking Preplugin Backups
Use the
CROSSCHECK
command to verify the status and availability of preplugin backups
and preplugin archived redo log files known to RMAN.
Ensure that the preplugin backups and preplugin archived redo log files created on the
source CDB are accessible to the target database.
To crosscheck preplugin backups:
1. Start RMAN and connect to the root of the target database as a common user with
the
SYSDBA
or
SYSBACKUP
privilege. Connect to a recovery catalog, if used.
See "Making Database Connections with RMAN".
2. Ensure that the target CDB is open in read-write mode.
Chapter 12
Updating the RMAN Repository
12-15

The following command displays the open mode of the database:
SELECT OPEN_MODE FROM V$DATABASE;
3. Set the preplugin container to the PDB whose preplugin backups must be
crosschecked.
The following example sets the preplugin container to the PDB
my_pdb
:
SET PREPLUGIN CONTAINER=my_pdb;
4. Run the
CROSSCHECK
command to verify the status and availability of preplugin
backups.
The following command crosschecks the backups for PDB
my_pdb
.
CROSSCHECK PREPLUGIN BACKUP OF PLUGGABLE DATABASE my_pdb;
12.4.2 Changing the Repository Status of Backups and Copies
RMAN provides multiple methods of changing the repository status of backups and
copies.
Perform any of the following tasks to change the repository status of backups and
copies:
•Making backups available or unavailable
You can change the status of a backup if it becomes temporarily available or
unavailable. For example, if a mounted disk undergoes maintenance, then you can
update the records for backups on the disk to status
UNAVAILABLE
.
Updating a Backup to Status AVAILABLE or UNAVAILABLE describes how to
make backups available or unavailable.
•Including or exempting backups from the retention policy
Archival backups can be created by using the
KEEP
clause to exempt backups from
the configured retention policy. You can also change the status of an archival
backup and subsequently include it in the configured retention policy.
Changing the Status of an Archival Backup describes how to change the status of
archival backups.
12.4.2.1 Updating a Backup to Status AVAILABLE or UNAVAILABLE
Run the
CHANGE...UNAVAILABLE
command when a backup cannot be found or has
migrated offsite.
RMAN does not use files with status
UNAVAILABLE
in
RESTORE
or
RECOVER
commands. If
the file is later found or returns to the main site, then you can update its status again
by issuing
CHANGE...AVAILABLE
. The files in the fast recovery area cannot be marked as
UNAVAILABLE
.
To update the status of a file in the repository to UNAVAILABLE or AVAILABLE:
1. Issue a
LIST
command to determine the availability status of RMAN backups. For
example, issue the following command to list all backups:
LIST BACKUP;
2. Run
CHANGE
with the
UNAVAILABLE
or
AVAILABLE
keyword to update its status in the
RMAN repository.
Chapter 12
Updating the RMAN Repository
12-16

The following examples illustrate forms of the
CHANGE
command:
CHANGE DATAFILECOPY '/tmp/control01.ctl' UNAVAILABLE;
CHANGE COPY OF ARCHIVELOG SEQUENCE BETWEEN 1000 AND 1012 UNAVAILABLE;
CHANGE BACKUPSET 12 UNAVAILABLE;
CHANGE BACKUP OF SPFILE TAG "TAG20120208T154556" UNAVAILABLE;
CHANGE DATAFILECOPY '/tmp/system01.dbf' AVAILABLE;
CHANGE BACKUPSET 12 AVAILABLE;
CHANGE BACKUP OF SPFILE TAG "TAG20120208T154556" AVAILABLE;
See Also:
Oracle Database Backup and Recovery Reference for
CHANGE
command
syntax
12.4.2.2 Changing the Status of an Archival Backup
You can designate backups as exempt from the retention policy. This technique is
useful for archiving backups to comply with business requirements.
An archival backup is still a fully valid backup, however, and can be restored just as
any other RMAN backup.
Note:
The
KEEP
FOREVER
clause requires the use of a recovery catalog, because the
control file cannot contain an infinitely large set of RMAN repository data.
You can use the
CHANGE
command to alter the
KEEP
status of an existing backup. For
example, you may decide that you no longer want to keep a long-term backup. The
same options available for
BACKUP...KEEP
are available with
CHANGE...KEEP
.
You cannot set
KEEP
attributes for backup sets or files stored in the fast recovery area.
To alter the KEEP status of an archival backup:
1. Issue a
LIST
command to list the backups. For example, issue the following
command to list all backups:
LIST BACKUP;
2. Issue a
CHANGE...KEEP
command to define a different retention period for this
backup, or a
CHANGE...NOKEEP
command to let the retention policy apply to this file.
This example allows a backup set to be subject to the backup retention policy:
CHANGE BACKUPSET 231 NOKEEP;
This example makes a data file copy exempt from the retention policy for 180
days:
CHANGE DATAFILECOPY '/tmp/system01.dbf' KEEP UNTIL TIME 'SYSDATE+180';
Chapter 12
Updating the RMAN Repository
12-17

See Also:
Making Database Backups for Long-Term Storage
12.4.2.3 Changing the Status of Backups for Dropped PDBs
Use the
CHANGE
command with the
GUID
option to change the status of backups that
correspond to pluggable databases (PDBs) that have been dropped from a multitenant
container database (CDB).
After you drop a PDB, you cannot use the PDB name to change the status of backups
associated with the dropped PDB. Instead, use the GUID to identify the dropped PDB.
1. Connect to the root as a common user with the
SYSDBA
or
SYSBACKUP
privilege.
2. Query the
DBA_PDB_HISTORY
view to determine the GUID of the PDB that was
dropped.
The following example displays the PDBs that were deleted from the CDB
test_db
:
SELECT pdb_name, pdb_guid FROM dba_pdb_history
WHERE db_name = 'test_db';
3. Use the
CHANGE
command with the
GUID
clause to modify the status of a backup
corresponding to a dropped PDB.
The following commands remove RMAN repository records of backup pieces and
image copies associated with a dropped PDB that is identified using its GUID.
CHANGE BACKUPPIECE GUID 'DFCE8C3A437F214EB4230070EC0D294E' UNCATALOG;
CHANGE COPY GUID 'DFCE8C3A437F214EB4230070EC0D294E' UNCATALOG;
12.4.2.4 Changing the Status of Preplugin Backups
Use the
CHANGE
command to modify the repository status of preplugin backups and
preplugin archived redo log files.
Ensure that the preplugin backups and archived redo log files created on the source
CDB are accessible to the target database.
To change the status of preplugin backups:
1. Start RMAN and connect to the root as a common user with the
SYSDBA
or
SYSBACKUP
privilege. Connect to a recovery catalog, if used.
See "Making Database Connections with RMAN".
2. Ensure that the target CDB is open in read-write mode.
The following command displays the open mode of the database:
SELECT OPEN_MODE FROM V$DATABASE;
3. Set the current container to the PDB whose preplugin backups must be
crosschecked.
The following example sets the preplugin container to the PDB
my_pdb
:
SET PREPLUGIN CONTAINER=my_pdb;
Chapter 12
Updating the RMAN Repository
12-18

4. Run the
CHANGE
command to verify the status and availability of preplugin archived
redo log files.
The following command makes all preplugin archived redo log files available.
CHANGE PREPLUGIN BACKUP OF ARCHIVELOG ALL AVAILABLE;
12.4.3 Adding Backup Records to the RMAN Repository
You can use the
CATALOG
command to make RMAN aware of the existence of archived
logs not recorded in the repository or copies of database files that are created through
means other than RMAN.
12.4.3.1 About Cataloging Operations
The target database control file keeps records of all archived redo logs generated by
the target database and all RMAN backups. The purpose of the
CATALOG
command is to
add metadata to the repository when it does not have a record of files for RMAN to
manage.
Run the RMAN
CATALOG
command when:
•You use an operating system utility to make copies of data files, archived logs, or
backup pieces. In this case, the repository has no record of them.
•You perform recovery with a backup control file and you change the archiving
destination or format during recovery. In this situation, the repository does not
have information about archived logs needed for recovery, and you must catalog
these logs.
•You want to catalog data file copy as a level 0 backup, thus enabling you to
perform an incremental backup later by using the data file copy as the base of an
incremental backup strategy.
•You want to catalog user-managed copies of Oracle7 database files created
before you migrated to a higher release, or of Oracle8 and higher database files
created before you started to use RMAN. These data file copies enable you to
recover the database if it fails after migration but before you have a chance to take
a backup of the migrated database.
Whenever you make a user-managed copy, for example, by using the UNIX
cp
command to copy a data file, be sure to catalog it. When making user-managed
copies, you can use the
ALTER TABLESPACE...BEGIN/END BACKUP
statement to make data
file copies off an online tablespace. Although RMAN does not create such data file
copies, you can use the
CATALOG
command to add them to the recovery catalog so that
RMAN is aware of them.
For a user-managed copy to be cataloged, it must be:
•Accessible on disk
•A complete image copy of a single file
•Either a data file copy, control file copy, archived redo log copy, or backup piece
copy
For example, if you store data files on mirrored disk drives, then you can create a
user-managed copy by breaking the mirror. In this scenario, use the
CATALOG
command
to notify RMAN of the existence of the user-managed copy after breaking the mirror.
Chapter 12
Updating the RMAN Repository
12-19

Before reforming the mirror, run a
CHANGE...UNCATALOG
command to notify RMAN that
the file copy no longer exists.
12.4.3.2 Cataloging User-Managed Data File Copies
Use the
CATALOG
command to propagate information about user-managed copies to the
RMAN repository. After the files are cataloged, you can run the
LIST
command or
query
V$BACKUP_FILES
view to confirm the information is contained in the RMAN
repository.
To create and catalog a user-managed copy of a data file:
1. Make a data file copy with an operating system utility.
ALTER TABLESPACE BEGIN/END
BACKUP
is necessary if the database is open and the data files are online while the
backup is in progress. This example backs up an online data file, using the
SQL*Plus
HOST
command to issue an operating system command.
SQL> ALTER TABLESPACE users BEGIN BACKUP;
SQL> HOST CP $ORACLE_HOME/oradata/trgt/users01.dbf /tmp/users01.dbf;
SQL> ALTER TABLESPACE users END BACKUP;
2. Start RMAN and connect to a target database and recovery catalog (if used).
3. Run the
CATALOG
command.
For example, enter the following command to catalog a user-managed data file
copy:
CATALOG DATAFILECOPY '/tmp/users01.dbf';
If you try to catalog a data file copy from a database other than the connected
target database, then RMAN issues an error such as the following:
RMAN-00571: ===========================================================
RMAN-00569: =============== ERROR MESSAGE STACK FOLLOWS ===============
RMAN-00571: ===========================================================
RMAN-03009: failure of catalog command on default channel at 08/29/2013 14:44:34
ORA-19563: datafile copy header validation failed for file /tmp/tools01.dbf
See Also:
Oracle Database Backup and Recovery Reference for
CATALOG
command
syntax
12.4.3.3 Cataloging Backup Pieces
You can catalog backup pieces on disk. This technique is useful if you use an
operating system utility to copy backup pieces from one location to another on the
same host, or from one host to another.
You can even catalog a backup piece from a prior incarnation of the database. RMAN
can determine whether that backup piece can be used during a subsequent restore
and recovery operation.
To catalog a backup piece:
1. Start RMAN and connect to a target database and recovery catalog (if used).
Chapter 12
Updating the RMAN Repository
12-20

2. Catalog the file names of the backup pieces.
For example, enter the following command:
CATALOG BACKUPPIECE '/disk2/09dtq55d_1_2', '/disk2/0bdtqdou_1_1';
3. Optionally, run a
LIST
command or query
V$
views to verify your changes.
Views include
V$BACKUP_PIECE
,
V$BACKUP_SET
,
V$BACKUP_DATAFILE
,
V$BACKUP_REDOLOG
,
and
V$BACKUP_SPFILE
. The following query shows the names of backup pieces:
SELECT HANDLE
FROM V$BACKUP_PIECE;
See Also:
Oracle Database Backup and Recovery Reference for
CATALOG
BACKUPPIECE
restrictions
12.4.3.4 Cataloging All Files in a Disk Location
If you use Automatic Storage Management (ASM), an Oracle Managed Files
framework, or the fast recovery area, then you may want to recatalog files that are
known to the disk management system but are no longer listed in the RMAN
repository. This situation can occur when the intended mechanism for tracking file
names fails due to media failure, software bug, or user error.
The
CATALOG START WITH
command enables you to search through all files in an ASM
disk group, Oracle Managed Files location, or traditional file system directory and
investigate those that are not recorded in the RMAN repository. If the command can
catalog a file, then it does so. If it cannot catalog the file, then it makes its best guess
about the contents of the skipped file.
The
CATALOG RECOVERY AREA
command enables you to catalog all files in the recovery
area. Typically, you do not need to run this command manually because RMAN
automatically runs it as needed, for example, when you restore or create a control file.
You can run this command when files are copied into the fast recovery area by
operating system utilities.
To catalog all files in a disk location:
1. Start RMAN and connect to a target database and recovery catalog (if used).
2. Run the
CATALOG
command, specifying the disk location whose files you want to
catalog.
For example, enter the following commands:
CATALOG START WITH '+disk'; # catalog all files from an ASM disk group
CATALOG START WITH '/fs1/datafiles/'; # catalog all files in directory
Note:
Wildcard characters are not legal in the
START WITH
clause.
Chapter 12
Updating the RMAN Repository
12-21

You can use the
CATALOG RECOVERY AREA
command to catalog all files in the
recovery area. During this operation, any files in the recovery area not listed in the
RMAN repository are added. For example:
CATALOG RECOVERY AREA;
3. Run a
LIST
command to verify that the files were cataloged.
12.4.3.5 Cataloging Preplugin Archived Redo Logs
Use the
CATALOG
command to add preplugin archived redo log files to the RMAN
repository.
Ensure that the preplugin archived redo log files created on the source CDB are
accessible to the target database.
To catalog preplugin backups of archived redo log files:
1. Start RMAN and connect to the root of the target database as a common user with
the
SYSDBA
or
SYSBACKUP
privilege. Connect to a recovery catalog, if used.
See "Making Database Connections with RMAN".
2. Ensure that the target CDB is open in read-write mode.
The following command displays the open mode of the database:
SELECT OPEN_MODE FROM V$DATABASE;
3. Set the current container to the PDB whose preplugin backups must be
crosschecked.
The following example sets the preplugin container to the PDB
my_pdb
:
SET PREPLUGIN CONTAINER=my_pdb;
4. Run the
CATALOG
command to catalog preplugin archived redo log files in the
RMAN repository.
The following command catalogs the specified preplugin archived redo log.
CATALOG PREPLUGIN ARCHIVELOG '/disk1/backups/DB18c/backupset/2017_10_09/
o1_mf_annnn_MYPDB_MIGR_dxq2r45h_.bkp';
12.4.4 Removing Records from the RMAN Repository
You can remove records for files from the RMAN repository.
12.4.4.1 About Uncataloging Operations in the RMAN Repository
Run the
CHANGE...UNCATALOG
command to perform the following actions on RMAN
repository records:
•Update a backup record in the control file repository to status
DELETED
•Delete a specific backup record from the recovery catalog (if you use one)
RMAN does not change the specified physical files: it only alters the repository records
for these files.
You can use this command when you have deleted a backup through a means other
than RMAN. For example, if you delete archived redo logs with an operating system
Chapter 12
Updating the RMAN Repository
12-22

utility, then remove the record for this log from the repository by issuing a
CHANGE
ARCHIVELOG
...
UNCATALOG
command.
12.4.4.2 Removing Records for Files Deleted with Operating System Utilities
You can use the
CHANGE ... UNCATALOG
command to update the RMAN repository for
the absent files.
In some circumstances, users may have removed backups or archived redo logs with
operating system utilities. Unless you run
CROSSCHECK
, RMAN does not know about the
deletion. In such cases, you can use the
CHANGE..UNCATALOG
command.
To remove the catalog record for a backup or archived redo log:
1. Run a
CHANGE
...
UNCATALOG
command for the backups that you deleted from the
operating system with operating system commands. This example deletes
repository references to disk copies of the control file and data file
1
:
CHANGE CONTROLFILECOPY '/tmp/control01.ctl' UNCATALOG;
CHANGE DATAFILECOPY '/tmp/system01.dbf' UNCATALOG;
CHANGE BACKUPSET '/disk1/oradata/backups/db1_full.bkp' UNCATALOG;
2. Optionally, view the relevant recovery catalog view, for example,
RC_DATAFILE_COPY
or
RC_CONTROLFILE_COPY
, to confirm that a given record was removed. This query
confirms that the record of copy
4833
was removed:
SELECT CDF_KEY, STATUS
FROM RC_DATAFILE_COPY
WHERE CDF_KEY = 4833;
CDF_KEY STATUS
---------- ------
0 rows selected.
12.5 Deleting RMAN Backups and Archived Redo Logs
You can use the RMAN
DELETE
command to delete archived redo logs and RMAN
backups.
For backups on disk, deleting backups physically removes the backup file from disk.
For backups on SBT devices, the RMAN
DELETE
command instructs the media
manager to delete the backup pieces or proxy copies on tape. In either case, RMAN
updates the RMAN repository to reflect the deletion.
Note:
In a CDB, you can delete archived logs only when you connect to the root as
a user with the
SYSDBA
or
SYSBACKUP
privilege. Archived redo logs cannot be
deleted when connected to a PDB.
12.5.1 Overview of Deleting RMAN Backups
Every RMAN backup produces a corresponding record in the RMAN repository. This
record is stored in the control file. If a recovery catalog is used, then the record can
Chapter 12
Deleting RMAN Backups and Archived Redo Logs
12-23

also be found in the recovery catalog after the recovery catalog is resynchronized from
the control file.
For example, if you generate a full database backup set, then you can view the record
for this backup set in
V$BACKUP_SET
. If you use a recovery catalog, then you can also
access the record in the
RC_BACKUP_SET
catalog view.
The
V$
control file views and recovery catalog views differ in the way that they store
information, and this affects how RMAN handles repository records. The recovery
catalog RMAN repository is stored in actual database tables, while the control file
version of the repository is stored in an internal structure in the control file.
When you use an RMAN command to delete a backup or archived redo log file, RMAN
does the following:
•Removes the physical file from the operating system (if the file is still present)
•Updates the file records in the control file to status
DELETED
•Removes the file records from the recovery catalog tables (if RMAN is connected
to a recovery catalog)
Because of the way that control file data is stored, RMAN cannot remove the record
from the control file, only update it to
DELETED
status. Because the recovery catalog
tables are ordinary database tables, however, RMAN deletes rows from them in the
same way that rows are deleted from any table.
12.5.1.1 About RMAN Deletion Commands
You can delete backups and recovery catalog records for backups.
The following table describes the RMAN commands that can delete backups.
Table 12-1 RMAN Deletion Commands
Command Purpose
DELETE
To delete backups, update the control file records to status
DELETED
, and remove their records from the recovery catalog
(if a recovery catalog is used).
You can specify that
DELETE
removes backups that are
EXPIRED
or
OBSOLETE
. If you run
DELETE
EXPIRED
on a backup
that exists, then RMAN issues a warning and does not delete
the backup. If you use the
DELETE
command with the optional
FORCE
keyword, then RMAN deletes the specified backups, but
ignores any I/O errors, including those that occur when a
backup is missing from disk or tape. It then updates the RMAN
repository to reflect the fact that the backup is deleted,
regardless of whether RMAN was able to delete the file or
whether the file was missing.
RMAN uses all configured channels to perform the deletion. If
you use
DELETE
for files on devices that are not configured for
automatic channels, then you must first use
ALLOCATE CHANNEL
FOR MAINTENANCE
command. For example, if you made a
backup with the SBT channel, but only a disk channel is
configured, then you must manually allocate an SBT channel
for
DELETE
. An automatic or manually allocated maintenance
channel is required when you use
DELETE
command on a disk-
only file.
Chapter 12
Deleting RMAN Backups and Archived Redo Logs
12-24

Table 12-1 (Cont.) RMAN Deletion Commands
Command Purpose
BACKUP...DELETE [ALL]
INPUT
To back up archived logs, data file copies, or backup sets,
then delete the input files from the operating system after the
successful completion of the backup. RMAN also deletes and
updates repository records for the deleted input files.
If you specify
DELETE
INPUT
(without
ALL
), then RMAN deletes
only the specific files that it backs up. If you specify
ALL INPUT
,
then RMAN deletes all copies of the files recorded in the
RMAN repository.
CHANGE...UNCATALOG
To delete recovery catalog records for specified backups and
change their control file records to status
DELETED
. The
CHANGE...UNCATALOG
command only changes the RMAN
repository record of backups, and does not actually delete
backups.
The RMAN repository record for an object can sometimes fail to reflect the physical
status of the object. For example, you back up an archived redo log to disk and then
use an operating system utility to delete it. If you run
DELETE
without first running
CROSSCHECK
, then the repository erroneously lists the log as
AVAILABLE
.
If you run RMAN interactively, then RMAN asks for confirmation before deleting any
files. You can suppress these confirmations by using the
NOPROMPT
keyword with any
form of the
BACKUP
command:
DELETE NOPROMPT ARCHIVELOG ALL;
See Also:
Oracle Database Backup and Recovery Reference for a description of
DELETE
behavior when mismatches occur between the RMAN repository and
physical media
12.5.1.2 About Deletion of Archived Redo Logs
The recommended maintenance strategy is to configure a fast recovery area, a
backup retention policy, and an archived redo log deletion policy.
By default, the archived redo logs deletion policy is configured to
NONE
. In this case, the
fast recovery area considers the logs eligible for deletion if they have been backed up
at least once to disk or tape or the logs are obsolete according to the backup retention
policy.
Archived redo logs can be deleted automatically by the database or by any of the user-
initiated RMAN commands listed in Table 12-1. For logs in the recovery area, the
database retains them as long as possible and automatically deletes eligible logs
when disk space is required. You can delete eligible logs from any location, inside or
outside the recovery area, with
BACKUP ... DELETE INPUT
or
DELETE ARCHIVELOG
. Both of
these commands obey the archive redo log deletion policy when the policy is any
setting other than
NONE
. You can override the archived redo log deletion policy settings
by using the
FORCE
option in the
DELETE
command.
Chapter 12
Deleting RMAN Backups and Archived Redo Logs
12-25

See Also:
•Basic Concepts of Backup and Repository Maintenance
•Configuring an Archived Redo Log Deletion Policy
•The
CONFIGURE ARCHIVELOG DELETION POLICY
entry in Oracle Database
Backup and Recovery Reference for detailed information about policy
options
12.5.2 Deleting All Backups and Copies
Use the RMAN
DELETE
command to delete backups and image copies.
In some circumstances, you may need to delete all backup sets, proxy copies, and
image copies associated with a database. For example, you no longer need a
database and want to remove all related files from the system. An image copy is a file
generated with
BACKUP AS COPY
command, a log archived by the database, or a file
cataloged with the
CATALOG
command.
To delete all backups and copies:
1. Start RMAN and connect to a target database and recovery catalog (if used).
2. If necessary, allocate maintenance channels for the devices containing the
backups to be deleted.
As explained in Table 12-1, RMAN uses all configured channels to perform the
deletion. If channels are configured, then you do not need to manually allocate
maintenance channels.
3. Crosscheck the backups and copies to ensure that the logical records are
synchronized with the physical media.
CROSSCHECK BACKUP;
CROSSCHECK COPY;
4. Delete the backups and copies.
For example, enter the following commands and then enter
YES
when prompted:
DELETE BACKUP;
DELETE COPY;
If disk and tape channels are configured, then RMAN uses both the configured
SBT channel and the preconfigured disk channel when deleting. RMAN prompts
you for confirmation before deleting any files.
12.5.3 Deleting Specified Backups and Copies
You can use both the
DELETE
and
BACKUP ... DELETE
commands to delete specific
backups and copies.
The
BACKUP ... DELETE
command backs up the files first, typically to tape, and then
deletes the input files afterward.
Chapter 12
Deleting RMAN Backups and Archived Redo Logs
12-26

The
DELETE
command supports a wide range of options to identify objects to delete.
When deleting archived redo logs, RMAN uses the configured settings to determine
whether a log can be deleted.
To delete specified backups and copies:
1. Start RMAN and connect to a target database and recovery catalog (if used).
2. If necessary, allocate maintenance channels for the devices containing the
backups to be deleted.
As explained in Table 12-1, RMAN uses all configured channels to perform the
deletion. If channels are configured, then you do not need to manually allocate
maintenance channels.
3. Delete the specified backups and copies.
The following examples show many of the common ways to specify backups and
archived logs to delete with the
DELETE
command:
•Deleting backups using primary keys from
LIST
output:
DELETE BACKUPPIECE 101;
•Deleting backups by file name on disk:
DELETE CONTROLFILECOPY '/tmp/control01.ctl';
•Deleting archived redo logs:
DELETE NOPROMPT ARCHIVELOG UNTIL SEQUENCE 300;
•Deleting backups based on tags:
DELETE BACKUP TAG 'before_upgrade';
•Deleting backups based on the objects backed up and the media or disk
location where the backup is stored:
DELETE BACKUP OF TABLESPACE users DEVICE TYPE sbt; # delete only from tape
DELETE COPY OF CONTROLFILE LIKE '/tmp/%';
•Deleting archived redo logs from disk based on whether they are backed up
on tape:
DELETE ARCHIVELOG ALL
BACKED UP 3 TIMES TO sbt;
•Deleting backup sets that were backed up twice to tape:
DELETE BACKUPSET DEVICE TYPE disk BACKED UP 2 TIMES TO sbt;
•Deleting backups of the target database that were backed up once to tape:
DELETE BACKUP OF DATABASE DEVICE TYPE disk BACKED UP 1 TIMES TO sbt;
See Also:
•Configuring an Archived Redo Log Deletion Policy
•Oracle Database Backup and Recovery Reference for complete
information about the
DELETE
command options
Chapter 12
Deleting RMAN Backups and Archived Redo Logs
12-27

12.5.3.1 Deleting Specified Files with BACKUP ... DELETE
You can use
BACKUP ... DELETE
to back up archived redo logs, data file copies, or
backup sets and then delete the input files after successfully backing them up.
Specifying the
DELETE INPUT
option is equivalent to issuing the
DELETE
command for the
input files. RMAN uses the configured settings to determine whether an archived redo
log can be deleted.The
ALL
option in the
DELETE ALL INPUT
clause applies only to
archived redo logs. If you run
BACKUP ... DELETE ALL INPUT
, then the command deletes
all copies of corresponding archived redo logs or data file copies that match the
selection criteria in the
BACKUP
command.
See Also:
Configuring an Archived Redo Log Deletion Policy
12.5.4 Deleting Expired RMAN Backups and Copies
If you run
CROSSCHECK
, and if RMAN cannot locate the files, then it updates their records
in the RMAN repository to
EXPIRED
status. You can then use the
DELETE EXPIRED
command to remove records of expired backups and copies from the RMAN
repository.
The
DELETE EXPIRED
command issues warnings if any files marked as
EXPIRED
actually
exist. In rare cases, the repository can mark a file as
EXPIRED
even though it exists. For
example, a directory containing a file is corrupted at the time of the crosscheck, but is
later repaired, or the media manager was not configured properly and reported some
backups as not existing when they really existed.
To delete expired repository records:
1. If you have not performed a crosscheck recently, then issue a
CROSSCHECK
command. For example, issue:
CROSSCHECK BACKUP;
2. Delete the expired backups. For example, issue:
DELETE EXPIRED BACKUP;
12.5.5 Deleting Obsolete RMAN Backups Based on Retention Policies
The RMAN
DELETE
command supports an
OBSOLETE
option, which deletes backups that
are no longer needed to satisfy specified recoverability requirements.
You can delete files that are obsolete according to the configured default retention
policy, or another retention policy that you specify as an option to the
DELETE OBSOLETE
command. As with other forms of the
DELETE
command, the files deleted are removed
from backup media, deleted from the recovery catalog, and marked as
DELETED
in the
control file.
If you specify the
DELETE OBSOLETE
command with no arguments, then RMAN deletes all
obsolete backups defined by the configured retention policy. For example:
Chapter 12
Deleting RMAN Backups and Archived Redo Logs
12-28

DELETE OBSOLETE;
12.5.5.1 DELETE OBSOLETE Behavior When KEEP UNTIL TIME Expires
If the
KEEP UNTIL TIME
period has not expired for an archival backup, RMAN does not
consider the backup as obsolete. As soon as the
KEEP UNTIL
period expires, however,
the backup is immediately considered to be obsolete, regardless of any configured
backup retention policy. Thus,
DELETE OBSOLETE
deletes any backup created with
BACKUP ... KEEP UNTIL TIME
if the
KEEP
time has expired.
See Also:
Oracle Database Backup and Recovery Reference for
keepOption
syntax
12.5.6 Deleting Backups of Dropped PDBs
Use the
DELETE
command with the
GUID
option to delete backups of pluggable
databases (PDBs) that have been dropped from a multitenant container database
(CDB).
The
DELETE BACKUP ... OF PLUGGABLE DATABASE
command deletes backups of the
specified PDB. However, after a PDB is dropped, you cannot use this command
because the a PDB with the specified name no longer exists. In such cases, use the
DELETE BACKUP … GUID
command to delete backups of dropped PDBs. Each PDB has a
globally unique identifier (GUID) which can be used to uniquely identify a PDB. The
GUID of dropped PDBs is available in the
DBA_PDB_HISTORY
view.
To delete backups of a dropped PDB:
1. Connect to the root as a common user with the
SYSDBA
or
SYSBACKUP
privilege.
2. Query the
DBA_PDB_HISTORY
view to determine the GUID of the PDB that was
dropped.
The following example displays the PDBs that were deleted from the CDB
prod_db
:
SELECT pdb_name, pdb_guid FROM dba_pdb_history
WHERE db_name = 'prod_db';
3. Use the
DELETE
command with the
GUID
option to delete backups or copies
associated with the dropped PDB.
The following commands delete backup sets and image copies of a dropped PDB
with the specified GUID:
DELETE BACKUP GUID '100E64EC12445321C0352900AF0FAC93';
DELETE COPY GUID '100E64EC12445321C0352900AF0FAC93';
12.5.7 Deleting Preplugin Backups
Use the
DELETE
command to delete preplugin backups and prelplugin archived redo log
files.
Ensure that the preplugin backups created on the source database are accessible to
the target CDB.
Chapter 12
Deleting RMAN Backups and Archived Redo Logs
12-29

To delete preplugin backups:
1. Start RMAN and connect to the root of the target CDB as a common user with the
SYSDBA
or
SYSBACKUP
privilege. Connect to a recovery catalog, if used.
See "Making Database Connections with RMAN".
2. Ensure that the target CDB is open in read-write mode.
The following command displays the open mode of the database:
SELECT OPEN_MODE FROM V$DATABASE;
3. Set the current container to the PDB whose preplugin backups must be
crosschecked.
The following example sets the preplugin container to the PDB
my_pdb
:
SET PREPLUGIN CONTAINER=my_pdb;
4. Run the
DELETE
command to verify the status and availability of preplugin backups.
The following command deletes preplugin backups of the PDB
my_pdb
.
DELETE PREPLUGIN BACKUP OF PLUGGABLE DATABASE my_pdb;
12.6 Dropping a Database
To remove a database from the operating system, you can use the
DROP
DATABASE
command in RMAN. RMAN removes the server parameter file, all data files, online
redo logs, and control files belonging to the target database.
DROP
DATABASE
requires that RMAN be connected to the target database, and that the
target database be mounted. The command does not require connection to the
recovery catalog. If RMAN is connected to the recovery catalog, and if you specify the
option
INCLUDE
COPIES
AND
BACKUPS
, then RMAN also unregisters the database.
To delete a database:
1. Start RMAN and connect to a target database and recovery catalog (if used).
See Also:
Making Database Connections with RMAN
2. Catalog all backups that are associated with the database. For example, the
following commands catalog files in the fast recovery area, and then in a
secondary archiving destination:
CATALOG START WITH '+disk1'; # all files from recovery area on ASM disk
CATALOG START WITH '/arch_dest2'; # all files from second archiving location
3. Delete all backups and copies associated with the database. For example:
DELETE BACKUPSET; # deletes all backups
DELETE COPY; # deletes all image copies (including archived logs)
4. Remove the database from the operating system.
The following command deletes the database and automatically unregisters it from
the recovery catalog (if used). RMAN prompts for confirmation.
Chapter 12
Dropping a Database
12-30


13
Managing a Recovery Catalog
This chapter explains how to manage an RMAN recovery catalog. The catalog is a
database schema that contains the RMAN repository data for one or more target
databases. This chapter contains the following topics:
•Overview of the RMAN Recovery Catalog
•Creating a Recovery Catalog
•Registering a Database in the Recovery Catalog
•Cataloging Backups in the Recovery Catalog
•Creating and Managing Virtual Private Catalogs
•Protecting the Recovery Catalog
•Managing Stored Scripts
•Maintaining a Recovery Catalog
•Dropping a Recovery Catalog
See Also:
–Maintaining RMAN Backups and Repository Recordsto learn how to
manage the RMAN repository as stored in the control file, without a
recovery catalog
–The compatibility matrix in Oracle Database Backup and Recovery
Reference for descriptions of supported interoperability scenarios
13.1 Overview of the RMAN Recovery Catalog
This section explains the basic concepts related to managing a recovery catalog.
13.1.1 Purpose of the RMAN Recovery Catalog
A recovery catalog is a database schema used by RMAN to store metadata about one
or more Oracle databases. Typically, you store the catalog in a dedicated database.
A recovery catalog provides the following benefits:
•A recovery catalog creates redundancy for the RMAN repository stored in the
control file of each target database. The recovery catalog serves as a secondary
metadata repository. If the target control file and all backups are lost, then the
RMAN metadata still exists in the recovery catalog.
13-1

•A recovery catalog centralizes metadata for all your target databases. Storing the
metadata in a single place makes reporting and administration tasks easier to
perform.
•A recovery catalog can store metadata history much longer than the control file.
This capability is useful if you must do a recovery that goes further back in time
than the history in the control file. The added complexity of managing a recovery
catalog database can be offset by the convenience of having the extended backup
history available.
Some RMAN features function only when you use a recovery catalog. For example,
you can store RMAN scripts in a recovery catalog. The chief advantage of a stored
script is that it is available to any RMAN client that can connect to the target database
and recovery catalog. Command files are only available if the RMAN client has access
to the file system on which they are stored.
A recovery catalog is required when you use RMAN in a Data Guard environment. By
storing backup metadata for all primary and standby databases, the catalog enables
you to offload backup tasks to one standby database while enabling you to restore
backups on other databases in the environment.
13.1.2 Basic Concepts for the RMAN Recovery Catalog
The recovery catalog contains metadata about RMAN operations for each registered
target database. When RMAN is connected to a recovery catalog, RMAN obtains its
metadata exclusively from the catalog.
The catalog includes the following types of metadata:
•Data file and archived redo log backup sets and backup pieces
•Data file copies
•Archived redo logs and their copies
•Database structure (tablespaces and data files)
•Stored scripts, which are named user-created sequences of RMAN commands
•Persistent RMAN configuration settings
13.1.2.1 About Database Registration in an RMAN Recovery Catalog
The process of enrolling of a database in a recovery catalog for RMAN use is called
registration.
The recommended practice is to register every target database in your environment in
a single recovery catalog. For example, you can register databases
prod1
,
prod2
, and
prod3
in a single catalog owned by
rco
in the database
catdb
.
See Also:
Registering a Database in the Recovery Catalog
Chapter 13
Overview of the RMAN Recovery Catalog
13-2

13.1.2.2 About Centralization of Metadata in a Base RMAN Recovery Catalog
The owner of a centralized recovery catalog, which is also called the base recovery
catalog, can grant or revoke restricted access to the catalog to other database users.
Each restricted user has full read/write access to his own metadata, which is called a
virtual private catalog. The RMAN metadata is stored in the schema of the virtual
private catalog owner. The owner of the base recovery catalog determines which
objects each virtual private catalog user can access.
You can use a recovery catalog in an environment in which you use or have used
different versions of Oracle Database. As a result, your environment can have different
versions of the RMAN client, recovery catalog database, recovery catalog schema,
and target database. "Importing and Moving a Recovery Catalog" explains how to
merge multiple recovery catalog schemas into one.
See Also:
Creating and Managing Virtual Private Catalogs
13.1.2.3 About RMAN Recovery Catalog Resynchronization
For RMAN operations such as backup, restore, and crosscheck, RMAN always first
updates the control file and then propagates the metadata to the recovery catalog.
This flow of metadata from the mounted control file to the recovery catalog, which is
known as recovery catalog resynchronization, ensures that the metadata that RMAN
obtains from the control file is current.
See Also:
Resynchronizing the Recovery Catalog
13.1.2.4 About Stored Scripts
You can use a stored script as an alternative to a command file for managing
frequently used sequences of RMAN commands. The script is stored in the recovery
catalog rather than on the file system.
A local stored script is associated with the target database to which RMAN is
connected when the script is created, and can only be executed when you are
connected to this target database. A global stored script can be run against any
database registered in the recovery catalog. A virtual private catalog user has read-
only access to global scripts. Creating or updating global scripts must be done while
connected to the base recovery catalog.
Chapter 13
Overview of the RMAN Recovery Catalog
13-3

See Also:
Managing Stored Scripts
13.1.2.5 Recovery Catalog in a Data Guard Environment
You must use a recovery catalog to manage RMAN metadata for all physical
databases, both primary and standby databases, in the Data Guard environment.
RMAN uses the recovery catalog as the single source of truth for the Data Guard
environment.
RMAN can use the recovery catalog to update a primary or standby control file in a
reverse resynchronization. In this case, the metadata flows from the catalog to the
control file rather than the other way around. RMAN automatically performs
resynchronizations in most situations in which they are needed. Thus, you do not need
to use the
RESYNC
command to manually resynchronize very often.
See Also:
•About RMAN in a Data Guard Environment
•Oracle Data Guard Concepts and Administration to learn how to
configure the RMAN environment for use with a standby database
13.1.3 Basic Steps of Managing a Recovery Catalog
Managing a recovery catalog consists of creating the catalog and then registering your
target databases with the catalog.
The basic steps for setting up a recovery catalog for use by RMAN are as follows:
1. Create the recovery catalog.
"Creating a Recovery Catalog" explains how to perform this task.
2. Register your target databases in the recovery catalog.
This step enables RMAN to store metadata for the target databases in the
recovery catalog. "Registering a Database in the Recovery Catalog" explains this
task.
3. If needed, catalog any older backups whose records are no longer stored in the
target control file.
"Cataloging Backups in the Recovery Catalog" explains how to perform this task.
4. If needed, create virtual private catalogs for specific users and determine the
metadata to which they are permitted access.
"Creating and Managing Virtual Private Catalogs" explains how to perform this
task.
5. Protect the recovery catalog by including it in your backup and recovery strategy.
Chapter 13
Overview of the RMAN Recovery Catalog
13-4

"Protecting the Recovery Catalog" explains how to back up and recover the
catalog, and increase its availability.
See Also:
•"Managing Stored Scripts" for information about how to store RMAN
scripts in the recovery catalog and manage them
•"Reporting on RMAN Operations" explains how to report on RMAN
operations
•"Maintaining a Recovery Catalog" describes a variety of tasks for
ongoing recovery catalog maintenance, including how to import one
recovery catalog into another recovery catalog
•"Dropping a Recovery Catalog" for information about deleting a recovery
catalog
13.2 Creating a Recovery Catalog
Creating a recovery catalog consists of multiple phases that includes configuring the
recovery catalog database, creating the recovery catalog schema owner, and then
creating the catalog.
To create a recovery catalog:
1. Configure the database that contains the recovery catalog, as described in
"Configuring the Recovery Catalog Database".
2. Create the database user that owns the recovery catalog, as described in
"Creating the Recovery Catalog Schema Owner".
3. Create the recovery catalog, as described in "Executing the CREATE CATALOG
Command".
13.2.1 Configuring the Recovery Catalog Database
When you use a recovery catalog, RMAN requires that you maintain a recovery
catalog schema. The recovery catalog is stored in the default tablespace of the
schema. Privileged users such as
SYS
cannot be the owner of the recovery catalog.
Decide which database you will use to install the recovery catalog schema, and also
how you will back up this database. Also, decide whether to operate the catalog
database in
ARCHIVELOG
mode, which is recommended.
Note:
Do not use the target database to be backed up as the database for the
recovery catalog. The recovery catalog must be protected if the target
database is lost.
Chapter 13
Creating a Recovery Catalog
13-5

13.2.1.1 Planning the Size of the Recovery Catalog Schema
You must allocate space to be used by the catalog schema. The size of the recovery
catalog schema depends upon the number of databases monitored by the catalog.
The schema also grows as the number of archived redo log files and backups for each
database increases. Finally, if you use RMAN stored scripts stored in the catalog,
some space must be allocated for those scripts.
For example, assume that the
trgt
database has 100 files, and that you back up the
database once a day, producing 50 backup sets containing 1 backup piece each. If
you assume that each row in the backup piece table uses the maximum amount of
space, then one daily backup consumes less than 170 kilobytes in the recovery
catalog. So, if you back up once a day for a year, then the total storage in this period is
about 62 megabytes. Assume approximately the same amount for archived logs.
Thus, the worst case is about 120 megabytes for a year for metadata storage. For a
more typical case in which only a portion of the backup piece row space is used, 15
MB for each year is realistic.
If you plan to register multiple databases in your recovery catalog, then remember to
add up the space required for each one based on the previous calculation to arrive at
a total size for the default tablespace of the recovery catalog schema.
13.2.1.2 Allocating Disk Space for the Recovery Catalog Database
If you are creating your recovery catalog in an existing database, then add enough
room to hold the default tablespace for the recovery catalog schema.
If you are creating a new database to hold your recovery catalog, then in addition to
the space for the recovery catalog schema itself, allow space for other files in the
recovery catalog database:
•
SYSTEM
and
SYSAUX
tablespaces
•Temporary tablespaces
•Undo tablespaces
•Online redo log files
Most of the space used in the recovery catalog database is devoted to supporting
tablespaces, for example, the
SYSTEM
, temporary, and undo tablespaces. Table 13-1
describes typical space requirements.
Table 13-1 Typical Recovery Catalog Space Requirements for 1 Year
Type of Space Space Requirement
SYSTEM
tablespace 90 MB
Temp tablespace 5 MB
Rollback or undo tablespace 5 MB
Recovery catalog tablespace 15 MB for each database registered in the recovery catalog
Online redo logs 1 MB each (three groups, each with two members)
Chapter 13
Creating a Recovery Catalog
13-6

Caution:
Ensure that the recovery catalog and target databases do not reside on the
same disk. If both your recovery catalog and your target database suffer hard
disk failure, then your recovery process is much more difficult. If possible,
take other measures as well to eliminate common points of failure between
your recovery catalog database and the databases that you are backing up.
13.2.2 Creating the Recovery Catalog Schema Owner
After choosing the recovery catalog database and creating the necessary space, you
are ready to create the owner of the recovery catalog and grant this user necessary
privileges.
Assume the following background information for the instructions in the following
sections:
•A tablespace called
TOOLS
in the recovery catalog database
CATDB
stores the
recovery catalog. If you use an RMAN reserved word as a tablespace name, you
must enclose it in quotes and put it in uppercase.
•A tablespace called
TEMP
exists in the recovery catalog database.
To create the recovery catalog schema in the recovery catalog database:
1. Start SQL*Plus and connect with administrator privileges to the database
containing the recovery catalog. In this example, the database is
catdb
.
2. Create a user and schema for the recovery catalog. For example, you could enter
the following SQL statement (replacing password with a user-defined password):
CREATE USER rco IDENTIFIED BY password
TEMPORARY TABLESPACE temp
DEFAULT TABLESPACE tools
QUOTA UNLIMITED ON tools;
Note:
Create a password that is secure.
3. Grant the
RECOVERY_CATALOG_OWNER
role to the schema owner. This role provides the
user with all privileges required to maintain and query the recovery catalog.
GRANT RECOVERY_CATALOG_OWNER TO rco;
4. (Optional) Enable the VPD model for the recovery catalog by running the
dbmsrmanvpc.sql
script with the
–vpd
option.
The following command enables the VPD model for the recovery catalog owned
by the user
rco
:
SQL> @/$ORACLE_HOME/rdbms/admin/dbmsrmanvpc.sql -vpd rco;
Chapter 13
Creating a Recovery Catalog
13-7

See Also:
•Oracle Database Backup and Recovery Reference for a list of RMAN
reserved words
•Oracle Database Security Guide for information about creating secure
passwords
13.2.3 Executing the CREATE CATALOG Command
After creating the catalog owner, create the catalog tables with the RMAN
CREATE
CATALOG
command. The command creates the catalog in the default tablespace of the
catalog owner.
Note:
Starting with Oracle Database 12c Release 1 (12.1.0.2), the recovery catalog
database must use the Enterprise Edition of Oracle Database.
To create the recovery catalog:
1. Enable Oracle Partitioning for the recovery catalog database.
2. Start RMAN and connect to the database that will contain the catalog. Connect to
the database as the recovery catalog owner.
3. Run the
CREATE
CATALOG
command to create the catalog. The creation of the catalog
can take several minutes. If the catalog tablespace is this user's default
tablespace, then you can run the following command:
RMAN> CREATE CATALOG;
You can specify the tablespace name for the catalog in the
CREATE
CATALOG
command. For example:
RMAN> CREATE CATALOG TABLESPACE cat_tbs;
Note:
If the tablespace name for the recovery catalog is an RMAN reserved
word, then it must be uppercase and enclosed in quotes. For example:
CREATE CATALOG TABLESPACE 'CATALOG';
4. You can check the results by using SQL*Plus to query the recovery catalog to see
which tables were created:
SQL> SELECT TABLE_NAME FROM USER_TABLES;
Chapter 13
Creating a Recovery Catalog
13-8

See Also:
•
GRANT
command syntax in Oracle Database SQL Language Reference
•
CREATE USER
command syntax in Oracle Database SQL Language
Reference
•Oracle Database Backup and Recovery Reference for
CREATE CATALOG
command syntax
13.3 Registering a Database in the Recovery Catalog
Registering a target database in the recovery catalog maintains the database’s
records in the recovery catalog.
13.3.1 About Registration of a Database in the Recovery Catalog
The process of enrolling of a target database in a recovery catalog is called
registration.
If a target database is not registered in the recovery catalog, then RMAN cannot use
the catalog to store metadata for operations on this database. You can still perform
RMAN operations on an unregistered database: RMAN always stores its metadata in
the control file of the target database.
If you are not using the recovery catalog in a Data Guard environment, then use the
REGISTER
command to register each database. Each database must have a unique
DBID. If you use the RMAN
DUPLICATE
command or the
CREATE DATABASE
statement in
SQL, then the database is assigned a unique DBID automatically. If you create a
database by other means, then the copied database may have the same DBID as its
source database. You can change the DBID with the
DBNEWID
utility so that you can
register the source and copy databases in the same catalog.
You can use the
UNREGISTER
command to unregister a database from the recovery
catalog.
13.3.1.1 About Standby Database Registration
In a Data Guard environment, the primary and standby databases share the same
DBID and database name. To be eligible for registration in the recovery catalog, each
database in the Data Guard environment must have different
DB_UNIQUE_NAME
values.
The
DB_UNIQUE_NAME
parameter for a database is set in its initialization parameter file. If
you use RMAN in a Data Guard environment, then you can use the
REGISTER DATABASE
command only for the primary database.
You can use the following techniques to register a standby database in the recovery
catalog:
•When you connect to a standby database as
TARGET
, RMAN automatically registers
the database in the recovery catalog.
Chapter 13
Registering a Database in the Recovery Catalog
13-9

•When you run the
CONFIGURE DB_UNIQUE_NAME
command for a standby database that
is not known to the recovery catalog, RMAN automatically registers this standby
database if its primary database is registered.
See Also:
•Unregistering a Target Database from the Recovery Catalog
•Oracle Database Backup and Recovery Reference for
DUPLICATE
command syntax
•Oracle Database Utilitiesto learn how to use the
DBNEWID
utility to change
the DBID
•Oracle Data Guard Concepts and Administration to learn about using
RMAN in a Data Guard environment
13.3.2 Registering a Database with the REGISTER DATABASE
Command
The first step in using a recovery catalog with a target database is registering the
target database in the recovery catalog. If you use the catalog in a Data Guard
environment, then you can only register the primary database in this way.
Use the following procedure:
1. Start RMAN and connect to a target database and recovery catalog. The recovery
catalog database must be open.
For example, issue the following command to connect to the catalog database with
the net service name
catdb
as user
rco
(who owns the catalog schema):
% rman TARGET / CATALOG rco@catdb;
2. If the target database is not mounted, then mount or open it:
STARTUP MOUNT;
3. Register the target database in the connected recovery catalog:
REGISTER DATABASE;
RMAN creates rows in the catalog tables to contain information about the target
database, then copies all pertinent data about the target database from the control
file into the catalog, synchronizing the catalog with the control file.
4. Verify that the registration was successful by running
REPORT
SCHEMA
:
REPORT SCHEMA;
Report of database schema for database with db_unique_name TRGT
List of Permanent Datafiles===========================
File Size(MB) Tablespace RB segs Datafile Name
---- ---------- ---------------- ------- -------------------
1 307200 SYSTEM NO /oracle/oradata/trgt/system01.dbf
2 20480 UNDOTBS YES /oracle/oradata/trgt/undotbs01.dbf
3 10240 CWMLITE NO /oracle/oradata/trgt/cwmlite01.dbf
Chapter 13
Registering a Database in the Recovery Catalog
13-10

4 10240 DRSYS NO /oracle/oradata/trgt/drsys01.dbf
5 10240 EXAMPLE NO /oracle/oradata/trgt/example01.dbf
6 10240 INDX NO /oracle/oradata/trgt/indx01.dbf
7 10240 TOOLS NO /oracle/oradata/trgt/tools01.dbf
8 10240 USERS NO /oracle/oradata/trgt/users01.dbf
List of Temporary Files
=======================
File Size(MB) Tablespace Maxsize(MB) Tempfile Name
---- -------- -------------------- ----------- --------------------
1 200 TEMP 32767 /oracle/oradata/trgt/tbs_tmp.dbf
13.4 Cataloging Backups in the Recovery Catalog
If you have data file copies, backup pieces, or archived logs on disk, then you can
catalog them in the recovery catalog with the
CATALOG
command. When using a
recovery catalog, cataloging older backups that have aged out of the control file lets
RMAN use the older backups during restore operations.
The following commands illustrate this technique:
CATALOG DATAFILECOPY '/disk1/old_datafiles/01_01_2003/users01.dbf';
CATALOG ARCHIVELOG '/disk1/arch_logs/archive1_731.dbf',
'/disk1/arch_logs/archive1_732.dbf';
CATALOG BACKUPPIECE '/disk1/backups/backup_820.bkp';
You can also catalog multiple backup files in a directory by using the
CATALOG START
WITH
command, as shown in the following example:
CATALOG START WITH '/disk1/backups/';
RMAN lists the files to be added to the RMAN repository and prompts for confirmation
before adding the backups. Be careful when creating your prefix with
CATALOG START
WITH
. RMAN scans all paths for all files on disk that begin with the specified prefix. The
prefix is not just a directory name. Using the wrong prefix can cause the cataloging of
the wrong set of files.
For example, assume that a group of directories /disk1/backups, /disk1/
backups-year2003, /disk1/backupsets, /disk1/backupsets/test and so
on, all contain backup files. The following command catalogs all files in all of these
directories, because /disk1/backups is a prefix for the paths for all of these
directories:
CATALOG START WITH '/disk1/backups';
To catalog only backups in the
/disk1/backups
directory, the correct command is as
follows:
CATALOG START WITH '/disk1/backups/';
See Also:
•Oracle Database Backup and Recovery Reference for
REGISTER
syntax
•Oracle Database Upgrade Guide for issues relating to database
migration
Chapter 13
Cataloging Backups in the Recovery Catalog
13-11

13.5 Creating and Managing Virtual Private Catalogs
RMAN provides multiple commands to create and manage virtual private catalogs.
13.5.1 Overview of Virtual Private Catalogs
By default, all of the users of an RMAN recovery catalog have full privileges to read,
select, insert, update, and delete any metadata in the catalog. For example, if the
administrators of two unrelated databases share the same recovery catalog, each
administrator could, whether inadvertently or maliciously, destroy catalog data for the
other's database. In many enterprises, this situation is tolerated because the same
people manage many different databases and also manage the recovery catalog. But
in other enterprises where clear separation of duty exists between administrators of
various databases, and between the DBA and the administrator of the recovery
catalog, you may desire to restrict each database administrator to modify only backup
metadata belonging to those databases that they are responsible for, while still
keeping the benefits of a single, centrally-managed, RMAN recovery catalog. This goal
can be achieved by implementing virtual private catalogs.
Every RMAN recovery catalog starting with Oracle Database 11g supports virtual
private catalogs, but they are not used unless explicitly created. There is no restriction
on the number of virtual private catalogs that can be created beneath one recovery
catalog. Each virtual private catalog is owned by a database schema user which is
different than the user who owns the recovery catalog.
After you set up a virtual private catalog user, the administrator for the recovery
catalog grants each virtual private catalog the privilege to use that catalog for one or
more databases that are currently registered in the recovery catalog. The administrator
of the recovery catalog can also grant the privilege to register new databases while
using a virtual private catalog.
Note:
Every virtual private catalog has access to all global stored scripts, and those
non-global stored scripts that belong to those databases for which this virtual
private catalog has privileges. Virtual private catalogs cannot access non-
global stored scripts that belong to databases that they do not have
privileges for, and they cannot create global stored scripts.
13.5.2 About Using the VPD Model for Virtual Private Catalogs
RMAN uses the Virtual Private Database (VPD) functionality to implement virtual
private catalogs.
The VPD functionality is not enabled by default when the RMAN base recovery catalog
is created. You need to explicitly enable the VPD model for a base recovery catalog by
running the $ORACLE_HOME/rdbms/admin/dbmsrmanvpc.sql script after
upgrading the base catalog schema.
The format of the
dbmsrmanvpc.sql
script is as follows:
Chapter 13
Creating and Managing Virtual Private Catalogs
13-12

$ORACLE_HOME/rdbms/admin/dbmsrmanvpc.sql [[-vpd | -novpd | -scan ]
base_catalog_schema_name[...]] | -all
The RMAN base catalog schema names are provided as command-line parameters
when running
dbmsrmanvpc.sql
. You can specify a maximum of ten base catalog
schema names each time you run the script.
Table 13-2 describes the options that you can use when running the
dbmsrmanvpc.sql
script. You must use one of the command line options or provide a catalog schema
name.
Table 13-2 dbmsrmanvpc.sql Options
dbmsrmanvpc.sql
Option Name
Description
-vpd
Grants the privileges required to support the VPD protected catalog.
-novpd
Disables VPD functionality by cleaning up the base recovery catalog
schema, revoking grants, and removing database objects.
This option can only be used when there are no existing VPC users
registered in the base recovery catalog.
-scan
Performs a scan of the RMAN base catalog owner schemas and
reports on the roles granted and the status of VPC users.
-all
Automatically detects the RMAN base catalog schemas and upgrades.
Example 13-1 Enabling VPD Model for VPC User Schemas
Connect to SQL*Plus and use the following command to enable the VPD model for all
the virtual private catalogs of the RMAN base catalog
rman_cat
.
SQL> @$ORACLE_HOME/rdbms/admin/dbmsrmanvpc.sql -vpd rman_cat
13.5.3 Creating Virtual Private Catalogs
Creating a virtual private catalog is a multi-step process in which you first create the
database user who will own the virtual private catalog and then create the virtual
private catalog.
Note:
If the recovery catalog is a virtual private catalog, then the RMAN client
connecting to it must be at patch level 10.1.0.6 or 10.2.0.3. Oracle9i RMAN
clients cannot connect to a virtual private catalog. This version restriction
does not affect RMAN client connections to an Oracle Database 11g base
recovery catalog, even if it has some virtual private catalog users.
Assume that the following databases are registered in the base recovery catalog:
prod1
,
prod2
, and
prod3
. The database user who owns the base recovery catalog is
rco
.
You want to create database user
vpc1
and grant this user access privileges only to
prod1
and
prod2
. By default, a virtual private catalog owner has no access to the base
recovery catalog.
Chapter 13
Creating and Managing Virtual Private Catalogs
13-13

The base RMAN recovery catalog must be created before you create virtual private
catalogs.
To create a virtual private catalog:
1. Start SQL*Plus and connect to the recovery catalog database with administrator
privileges.
2. Create the user who will own the virtual private catalog.
For example, if you want database user
vpc1
to own the virtual private catalog,
then execute the following command (replacing password with a user-defined
password):
SQL> CREATE USER vpc1 IDENTIFIED BY password
2 DEFAULT TABLESPACE vpcusers
3 QUOTA UNLIMITED ON vpcusers;
Note:
Create a password that is secure. See Oracle Database Security Guide
for more information.
3. Grant the
CREATE SESSION
privilege to the user who owns the virtual private catalog
and then exit SQL*Plus.
The following example grants the privilege to user
vpc1
:
SQL> GRANT CREATE SESSION TO vpc1;
SQL> EXIT;
4. Start RMAN and connect to the recovery catalog database as the base recovery
catalog owner (not the virtual private catalog owner).
The following example connects to the base recovery catalog as
rco
:
% rman
RMAN> CONNECT CATALOG rco@catdb;
recovery catalog database Password: password
connected to recovery catalog database
5. Grant desired privileges to the virtual private catalog owner.
The following example gives user
vpc1
access to the metadata for
prod1
and
prod2
(but not
prod3
):
RMAN> GRANT CATALOG FOR DATABASE prod1 TO vpc1;
RMAN> GRANT CATALOG FOR DATABASE prod2 TO vpc1;
You can also use a DBID rather than a database name. The virtual private catalog
user does not have access to the metadata for any other databases registered in
the recovery catalog.
You can also grant the user the ability to register new target databases in the
recovery catalog. For example:
RMAN> GRANT REGISTER DATABASE TO vpc1;
Chapter 13
Creating and Managing Virtual Private Catalogs
13-14

See Also:
Oracle Database Backup and Recovery Reference for details about RMAN
version compatibility
13.5.4 Registering a Database with a Virtual Private Catalog
To store backup metadata for a target database in a virtual private catalog, you must
register the database with the virtual private catalog.
Create the virtual private catalog before you register a target database with it.
To register database with a virtual private catalog and store backup metadata:
1. Start RMAN and connect to the recovery catalog database as the virtual private
catalog owner (not the base recovery catalog owner). Connect to the database
that you want to register as
TARGET
.
%rman
RMAN> CONNECT TARGET /
RMAN> CONNECT CATALOG vpc1@catdb;
2. Register the database whose metadata must be stored in the virtual private
catalog.
The following example registers the database with the virtual private catalog owner
vpc1
.
RMAN> REGISTER DATABASE;
3. Back up the database using the
BACKUP
command with the required clauses.
Metadata related to the backup is stored in the virtual private catalog.
13.5.5 Revoking Privileges from a Virtual Private Catalog Owner
After you create a virtual private catalog, you can revoke catalog access privileges as
necessary.
Assume that two databases are registered in the base recovery catalog:
prod1
and
prod2
. As owner of the base recovery catalog, you have granted the
vpc1
user access
privileges to
prod1
. You have also granted this user the right to register databases in
his virtual private catalog. Now you want to revoke privileges from
vpc1
.
To revoke privileges from a virtual private catalog owner:
1. Start RMAN and connect to the recovery catalog database as the recovery catalog
owner (not the virtual private catalog owner).
The following example connects to the recovery catalog as
rco
:
% rman
RMAN> CONNECT CATALOG rco@catdb;
2. Revoke specified privileges from the virtual private catalog owner.
The following command revokes access to the metadata for
prod1
from virtual
private catalog owner
vpc1
:
Chapter 13
Creating and Managing Virtual Private Catalogs
13-15

REVOKE CATALOG FOR DATABASE prod1 FROM vpc1;
You can also specify a DBID rather than a database name. The catalog
vpc1
retains all other granted catalog privileges.
You can also revoke the privilege to register new target databases in the recovery
catalog. For example:
REVOKE REGISTER DATABASE FROM vpc1;
13.5.6 Upgrading Virtual Private Catalogs
This section describes how to use the
UPGRADE CATALOG
command to upgrade a virtual
private catalog.
RMAN uses the Virtual Private Database (VPD) functionality to implement virtual
private catalogs. If you created a recovery catalog and virtual private catalogs by using
a version lower than Oracle Database 12c Release 1 (12.1.0.2) or if your database is
not upgraded to Oracle Database 12c Release 2 (12.2) or higher, then you must
upgrade these virtual private catalogs. RMAN provides scripts, located in
the
$ORACLE_HOME/rdbms/admin
directory, to upgrade virtual private catalogs.
To upgrade virtual private catalogs:
1. Use SQL*Plus to connect to the recovery catalog database as the
SYS
user with
SYSDBA
privilege.
2. Run the
dbmsrmansys.sql
script to grant additional privileges that are required for
the
RECOVERY_CATALOG_OWNER
role.
SQL> @$ORACLE_HOME/rdbms/admin/dbmsrmansys.sql
3. Run the
dbmsmanvpc.sql
script to upgrade virtual private catalog schemas to the
VPD model.
The base recovery catalog schema name must be provided as an input parameter
to this script. You can specify a maximum of 10 schema names. Alternately, you
can use the
-all
option to automatically detect base catalog schemas and
upgrade all associated virtual private catalog schemas.
The following command upgrades the virtual private catalog schemas of the base
recovery catalog owned by
rco
:
SQL> @$ORACLE_HOME/rdbms/admin/dbmsrmanvpc.sql -vpd rco
4. Connect RMAN to the base recovery catalog, upgrade the base recovery catalog,
and then exit RMAN.
Assume that the database user who owns the base recovery catalog is
rco
. The
following command upgrades the base recovery catalog. The
UPGRADE CATALOG
command must be entered twice to confirm the upgrade.
$ rman CATALOG rco@catdb
recovery catalog database password:
RMAN> UPGRADE CATALOG;
RMAN> UPGRADE CATALOG;
RMAN> EXIT;
Chapter 13
Creating and Managing Virtual Private Catalogs
13-16

See Also:
"About Using the VPD Model for Virtual Private Catalogs" for information
about the
dbmsrmanvpc.sql
script and its options
13.6 Protecting the Recovery Catalog
Include the recovery catalog database in your backup and recovery strategy. If you do
not back up the recovery catalog and a disk failure occurs that destroys the recovery
catalog database, then you may lose the metadata in the catalog. Without the recovery
catalog contents, recovery of your other databases is likely to be more difficult.
13.6.1 Backing Up the Recovery Catalog
A single recovery catalog can store metadata for multiple target databases.
Consequently, loss of the recovery catalog can be disastrous. You must back up the
recovery catalog frequently.
This section provides general guidelines for developing a strategy for protecting the
recovery catalog.
13.6.1.1 Backing Up the Recovery Catalog Frequently
The recovery catalog database is a database like any other, and is also a key part of
your backup and recovery strategy. Protect the recovery catalog like any other part of
your database, by backing it up. The backup strategy for your recovery catalog
database is part of an overall backup and recovery strategy.
Back up the recovery catalog with the same frequency that you back up a target
database. For example, if you make a weekly whole database backup of a target
database, then back up the recovery catalog after the backup of the target database.
This backup of the recovery catalog can help you in a disaster recovery scenario.
Even if you must restore the recovery catalog database with a control file autobackup,
you can use the full record of backups in your restored recovery catalog database to
restore the target database.
13.6.1.2 Choosing the Appropriate Technique for Physical Backups
When backing up the recovery catalog database, you can use RMAN to make the
backups.
As illustrated in Figure 13-1, start RMAN with the
NOCATALOG
option so that the
repository for RMAN is the control file in the catalog database.
Chapter 13
Protecting the Recovery Catalog
13-17
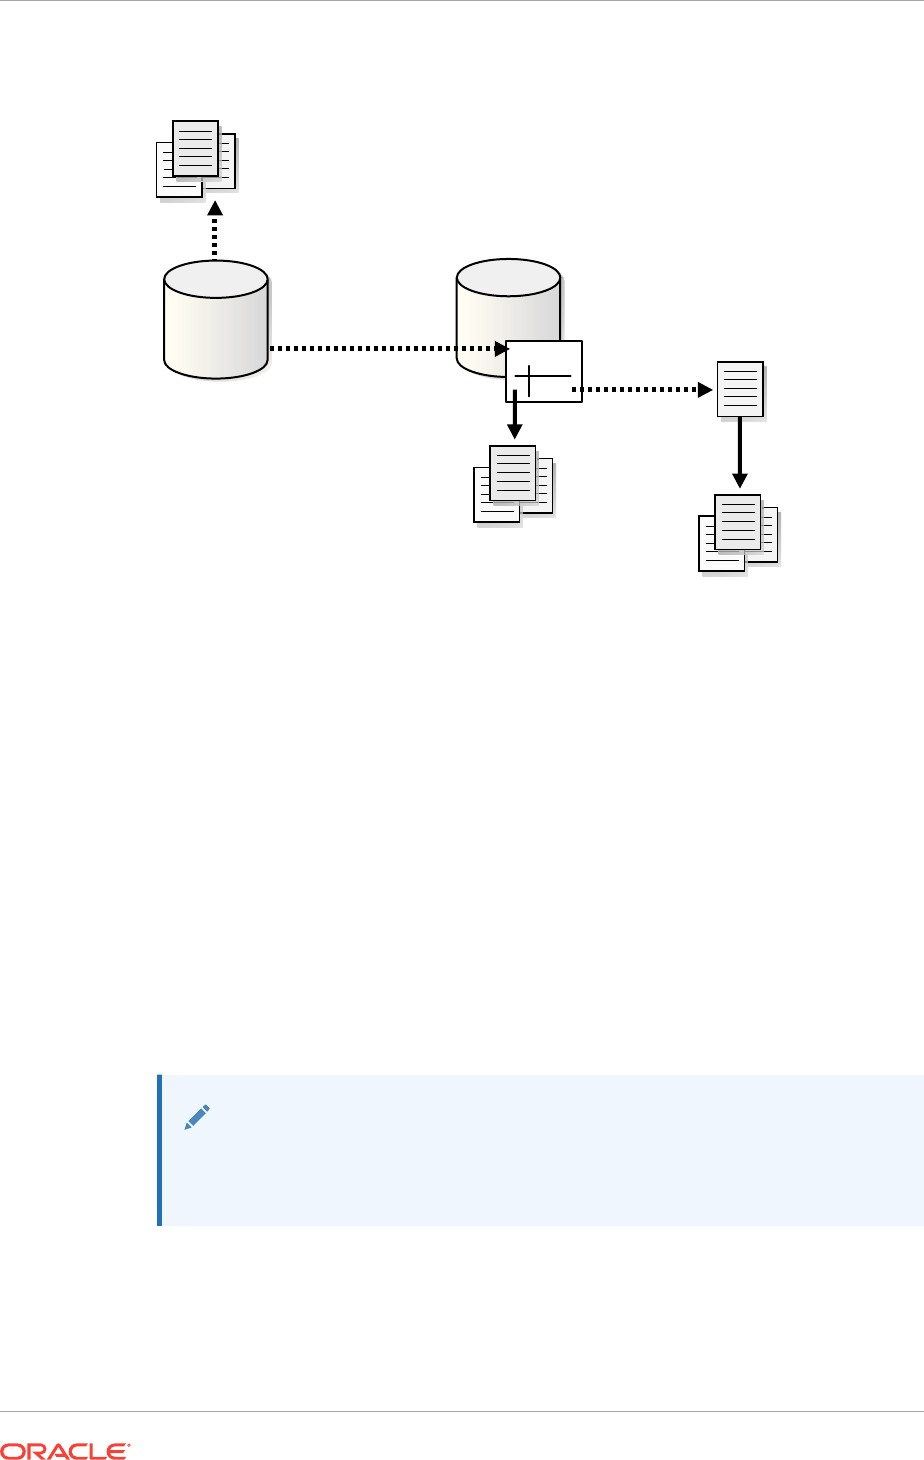
Figure 13-1 Using the Control File as the Repository for Backups of the
Recovery Catalog
Catalog
database
Target
database
Store metadata about
backups of target
catalog
Back up using
RMAN
Control
file
Control file
autobackup
Back up
using RMAN
Target
database Store metadata
about backups
of catalog
Follow these guidelines when developing an RMAN backup strategy for the recovery
catalog database:
•Run the recovery catalog database in
ARCHIVELOG
mode so that you can do point-
in-time recovery if needed.
•Set the retention policy to a
REDUNDANCY
value greater than
1
.
•Back up the database to two separate media (for example, disk and tape).
•Run
BACKUP
DATABASE
PLUS
ARCHIVELOG
at regular intervals, to a media manager if
available, or just to disk.
•Do not use another recovery catalog as the repository for the backups.
•Configure the control file autobackup feature to
ON
.
With this strategy, the control file autobackup feature ensures that the recovery catalog
database can always be recovered, so long as the control file autobackup is available.
See Also:
Performing Disaster Recovery for more information for recovery with a
control file autobackup
13.6.1.3 Separating the Recovery Catalog from the Target Database
A recovery catalog is only effective when separated from the data that it is designed to
protect. Thus, you must never store a recovery catalog containing the RMAN
Chapter 13
Protecting the Recovery Catalog
13-18

repository for a database in the same database as the target database. Also, do not
store the catalog database on the same disks as the target database.
To illustrate why data separation is advised, assume that you store the catalog for
database
prod1
in
prod1
. If
prod1
suffers a total media failure, and if the recovery
catalog for
prod1
is also stored in
prod1
, then if you lose the database you also lose the
recovery catalog. At this point the only option is to restore an autobackup of the control
file for
prod1
and use it to restore and recover the database without the benefit of any
information stored in the recovery catalog.
13.6.1.4 Exporting the Recovery Catalog Data for Logical Backups
Logical backups of the RMAN recovery catalog created with the Data Pump Export
utility can be a useful supplement for physical backups.
For damage to a recovery catalog database, you can use Data Pump Import to quickly
reimport the exported recovery catalog data into another database and rebuild the
catalog.
13.6.2 Recovering the Recovery Catalog
Restoring and recovering the recovery catalog database is much like restoring and
recovering any other database with RMAN.
You can restore the control file and server parameter file for the recovery catalog
database from an autobackup, then restore and perform complete recovery on the rest
of the database. If you are in a situation where you are using multiple recovery
catalogs, then you can also use another recovery catalog to record metadata about
backups of this recovery catalog database.
If recovery of the recovery catalog database through the normal Oracle recovery
procedures is not possible, then you must re-create the catalog. Examples of this
worst-case scenario include:
•A recovery catalog database that has never been backed up
•A recovery catalog database that has been backed up, but cannot be recovered
because the data file backups or archived logs are not available
You have the following options for partially re-creating the contents of the missing
recovery catalog:
•Use the
RESYNC CATALOG
command to update the recovery catalog with any RMAN
repository information from the control file of the target database or a control file
copy. Any metadata from control file records that aged out of the control file is lost.
•Issue
CATALOG START WITH
commands to recatalog any available backups.
To minimize the likelihood of this worst-case scenario, your backup strategy must at
least include backing up the recovery catalog. This technique is described in "Backing
Up the Recovery Catalog".
Chapter 13
Protecting the Recovery Catalog
13-19

See Also:
•Oracle Database Backup and Recovery Reference for information about
the
CATALOG
command
•Oracle Database Backup and Recovery Reference for information about
the
CROSSCHECK
command
13.7 Managing Stored Scripts
You can create and store scripts in the recovery catalog.
See Also:
About Stored Scripts
13.7.1 About Stored Scripts
You can use a stored script as an alternative to a command file for managing
frequently used sequences of RMAN commands. The script is stored in the recovery
catalog rather than on the file system.
Stored scripts can be local or global. A local script is associated with the target
database to which RMAN is connected when the script is created, and can only be
executed when you are connected to that target database. A global stored script can
be run against any database registered in the recovery catalog, if the RMAN client is
connected to the recovery catalog and a target database.
The commands allowable within the brackets of the
CREATE SCRIPT
command are the
same commands supported within a
RUN
block. Any command that is legal within a
RUN
command is permitted in the stored script. The following commands are not legal
within stored scripts:
RUN
,
@
, and
@@
.
When specifying a script name, RMAN permits but generally does not require that you
use quotes around the name of a stored script. If the name begins with a digit or is an
RMAN reserved word, however, then you must put quotes around the name to use it
as a stored script name. Consider avoiding stored script names that begin with
nonalphabetic characters or that are the same as RMAN reserved words.
Consider using a naming convention to avoid confusion between global and local
stored scripts. For the
EXECUTE SCRIPT
,
DELETE SCRIPT
and
PRINT SCRIPT
commands, if
the script name passed as an argument is not the name of a script defined for the
connected target instance, then RMAN looks for a global script by the same name. For
example, if the global script
global_backup
is in the recovery catalog, but no local
stored script
global_backup
is defined for the target database, then the following
command deletes the global script:
DELETE SCRIPT global_backup;
To use commands related to stored scripts, even global scripts, you must be
connected to both a recovery catalog and a target database instance.
Chapter 13
Managing Stored Scripts
13-20

13.7.2 Creating Stored Scripts
You can use the
CREATE SCRIPT
command to create a stored script.
If
GLOBAL
is specified, then a global script with this name must not exist in the recovery
catalog. If
GLOBAL
is not specified, then a local script must not exist with the same name
for the same target database. You can also use the
REPLACE SCRIPT
to create a new
script or update an existing script.
To create a stored script:
1. Start RMAN and connect to a target database and recovery catalog (if used).
See Also:
Making Database Connections with RMAN
2. Run the
CREATE SCRIPT
command.
The following example illustrates creation of a local script:
CREATE SCRIPT full_backup
{
BACKUP DATABASE PLUS ARCHIVELOG;
DELETE OBSOLETE;
}
For a global script, the syntax is similar:
CREATE GLOBAL SCRIPT global_full_backup
{
BACKUP DATABASE PLUS ARCHIVELOG;
DELETE OBSOLETE;
}
Optionally, you can provide a
COMMENT
with descriptive information:
CREATE GLOBAL SCRIPT global_full_backup
COMMENT 'use only with ARCHIVELOG mode databases'
{
BACKUP DATABASE PLUS ARCHIVELOG;
DELETE OBSOLETE;
}
You can also create a script by reading its contents from a text file. The file must
begin with a left brace (
{
) character, contain a series of commands valid within a
RUN
block, and end with a right brace (
}
) character. Otherwise, a syntax error is
signalled, just as if the commands were entered at the keyboard.
CREATE SCRIPT full_backup
FROM FILE '/tmp/my_script_file.txt';
3. Examine the output.
If no errors are displayed, then RMAN successfully created the script and stored in
the recovery catalog.
Chapter 13
Managing Stored Scripts
13-21

See Also:
Oracle Database Backup and Recovery Reference for the list of RMAN
reserved words
13.7.3 Replacing Stored Scripts
To update stored scripts, use the
REPLACE
SCRIPT
command.
If you are replacing a local script, then you must be connected to the target database
that you connected to when you created the script. If the script does not exist, then
RMAN creates it.
To replace a stored script:
1. Start RMAN and connect to a target database and recovery catalog (if used).
2. Execute
REPLACE SCRIPT
.
This following example updates the script
full_backup
with new contents:
REPLACE SCRIPT full_backup
{
BACKUP DATABASE PLUS ARCHIVELOG;
}
You can update global scripts by specifying the
GLOBAL
keyword as follows:
REPLACE GLOBAL SCRIPT global_full_backup
COMMENT 'A script for full backup to be used with any database'
{
BACKUP AS BACKUPSET DATABASE PLUS ARCHIVELOG;
}
As with
CREATE SCRIPT
, you can update a local or global stored script from a text file
with the following form of the command:
REPLACE GLOBAL SCRIPT global_full_backup
FROM FILE '/tmp/my_script_file.txt';
See Also:
Oracle Database Backup and Recovery Reference for
REPLACE SCRIPT
command syntax
13.7.4 Executing Stored Scripts
Use the
EXECUTE SCRIPT
command to run a stored script.
If
GLOBAL
is specified, then a global script with this name must exist in the recovery
catalog; otherwise, RMAN returns error
RMAN-06004
. If
GLOBAL
is not specified, then
RMAN searches for a local stored script defined for the current target database. If no
Chapter 13
Managing Stored Scripts
13-22

local script with this name is found, then RMAN searches for a global script by the
same name and executes it if one is found.
To execute a stored script:
1. Start RMAN and connect to a target database and recovery catalog (if used).
2. If needed, use
SHOW
to examine your configured channels.
Your script uses the automatic channels configured at the time you execute the
script. Use
ALLOCATE CHANNEL
commands in the script if you must override the
configured channels. Because of the
RUN
block, if an RMAN command in the script
fails, subsequent RMAN commands in the script do not execute.
3. Run
EXECUTE SCRIPT
. This command requires a
RUN
block, as shown in the
following example:
RUN
{
EXECUTE SCRIPT full_backup;
}
The preceding command invokes a local script if one exists with the name
specified. If no local script is found, but there is a global script with the name
specified, then RMAN executes the global script.
You can also use
EXECUTE GLOBAL SCRIPT
to control which script is invoked if a local
and a global script have the same name. If there is no local script called
global_full_backup
, the following two commands have the same effect:
RUN
{
EXECUTE GLOBAL SCRIPT global_full_backup;
}
RUN
{
EXECUTE SCRIPT global_full_backup;
}
See Also:
Oracle Database Backup and Recovery Reference for
EXECUTE SCRIPT
command syntax
13.7.5 Creating and Executing Dynamic Stored Scripts
You can specify substitution variables in the
CREATE SCRIPT
command.
When you start RMAN on the command line, the
USING
clause specifies one or more
values for use in substitution variables in a command file. As in SQL*Plus,
&1
indicates
where to place the first value,
&2
indicates where to place the second value, and so on.
To create and use a dynamic stored script:
1. Create a command file that contains a
CREATE SCRIPT
statement with substitution
variables for values that must be dynamically updated.
Chapter 13
Managing Stored Scripts
13-23

The following example uses substitution variables for the name of the tape set, for
a string in the
FORMAT
specification, and for the name of the restore point.
CREATE SCRIPT quarterly {
ALLOCATE CHANNEL c1
DEVICE TYPE sbt
PARMS 'ENV=(OB_MEDIA_FAMILY=&1)';
BACKUP
TAG &2
FORMAT '/disk2/bck/&1%U.bck'
KEEP FOREVER
RESTORE POINT &3
DATABASE;
}
2. Connect RMAN to a target database (which must be mounted or open) and
recovery catalog, specifying the initial values for the recovery catalog script.
For example, enter the following command:
% rman TARGET / CATALOG rco@catdb USING arc_backup bck0906 FY06Q3
A recovery catalog is required for
KEEP FOREVER
, but is not required for any other
KEEP
option.
3. Run the command file created in the first step to create the stored script.
For example, run the
/tmp/catscript.rman
command file as follows:
RMAN> @/tmp/catscript.rman
This step creates but does not execute the stored script.
4. Every quarter, execute the stored script, passing values for the substitution
variables.
The following example executes the recovery catalog script named
quarterly
. The
example specifies
arc_backup
as the name of the media family (set of tapes),
bck1206
as part of the
FORMAT
string and
FY06Q4
as the name of the restore point.
RUN
{
EXECUTE SCRIPT quarterly
USING arc_backup
bck1206
FY06Q4;
}
See Also:
Making Database Backups for Long-Term Storage
13.7.6 Printing Stored Scripts
The
PRINT SCRIPT
command displays a stored script or writes it out to a file.
To print stored scripts:
1. Start RMAN and connect to a target database and recovery catalog.
Chapter 13
Managing Stored Scripts
13-24

2. Run the
PRINT SCRIPT
command as follows:
PRINT SCRIPT full_backup;
To send the contents of a script to a file, use this form of the command:
PRINT SCRIPT full_backup
TO FILE '/tmp/my_script_file.txt';
For global scripts, the analogous syntax is as follows:
PRINT GLOBAL SCRIPT global_full_backup;
PRINT GLOBAL SCRIPT global_full_backup
TO FILE '/tmp/my_script_file.txt';
See Also:
Oracle Database Backup and Recovery Reference for
PRINT
SCRIPT
command syntax
13.7.7 Listing Stored Script Names
Use the
LIST ... SCRIPT NAMES
command to display the names of scripts defined in the
recovery catalog.
LIST GLOBAL SCRIPT NAMES
and
LIST ALL SCRIPT NAMES
are the only commands that work
when RMAN is connected to a recovery catalog without connecting to a target
instance; the other forms of the
LIST ... SCRIPT NAMES
command require a recovery
catalog connection.
To list stored script names:
1. Start RMAN and connect to a target database and recovery catalog.
2. Run the
LIST ... SCRIPT NAMES
command.
For example, run the following command to list the names of all global and local
scripts that can be executed for the currently connected target database:
LIST SCRIPT NAMES;
The following example lists only global script names:
LIST GLOBAL SCRIPT NAMES;
To list the names of all scripts stored in the current recovery catalog, including
global scripts and local scripts for all target databases registered in the recovery
catalog, use the following form of the command:
LIST ALL SCRIPT NAMES;
For each script listed, the output indicates which target database the script is
defined for (or whether a script is global).
Chapter 13
Managing Stored Scripts
13-25

See Also:
Oracle Database Backup and Recovery Reference for
LIST SCRIPT NAMES
command syntax and output format
13.7.8 Deleting Stored Scripts
Use the
DELETE GLOBAL SCRIPT
command to delete a stored script from the recovery
catalog.
To delete a stored script:
1. Start RMAN and connect to a target database and recovery catalog.
2. Enter the
DELETE SCRIPT
command.
If you use
DELETE SCRIPT
without
GLOBAL
, and there is no stored script for the target
database with the specified name, then RMAN looks for a global stored script by
the specified name and deletes the global script if it exists. For example, suppose
you enter the following command:
DELETE SCRIPT 'global_full_backup';
In this case, RMAN looks for a script
global_full_backup
defined for the connected
target database, and if it did not find one, it searches the global scripts for a script
called
global_full_backup
and delete that script.
To delete a global stored script, use
DELETE GLOBAL SCRIPT
:
DELETE GLOBAL SCRIPT 'global_full_backup';
See Also:
Oracle Database Backup and Recovery Reference for
DELETE SCRIPT
command syntax
13.7.9 Executing a Stored Script at RMAN Startup
To run the RMAN client and start a stored script in the recovery catalog on startup, use
the
SCRIPT
argument when starting the RMAN client.
For example, you could enter the following command to execute script /tmp/
fbkp.cmd:
% rman TARGET / CATALOG rco@catdb SCRIPT '/tmp/fbkp.cmd';
You must connect to the recovery catalog, which contains the stored script, and the
target database, to which the script applies, when starting the RMAN client.
If local and global stored scripts are defined with the same name, then RMAN always
executes the local script.
Chapter 13
Managing Stored Scripts
13-26

See Also:
Oracle Database Backup and Recovery Reference for full RMAN client
command line syntax
13.8 Maintaining a Recovery Catalog
Maintaining the recovery catalog consists of tasks such as resynchronizing, updating,
and upgrading the recovery catalog.
This section describes various management and maintenance tasks.
13.8.1 About Recovery Catalog Maintenance
After you have created a recovery catalog and registered your target databases, you
must maintain this catalog.
For example, you must run the RMAN maintenance commands, which are explained
in " Maintaining RMAN Backups and Repository Records", to update backup records
and to delete backups that are no longer needed. You must perform this type of
maintenance regardless of whether you use RMAN with a recovery catalog. Other
types of maintenance, such as upgrading a recovery catalog schema, are specific to
use of RMAN with a recovery catalog.
If you use a recovery catalog in a Data Guard environment, then special
considerations apply for backups and database files recorded in the catalog. See
"About RMAN File Management in a Data Guard Environment" for an explanation of
when backups are accessible to RMAN and how RMAN maintenance commands work
with accessible backups.
13.8.2 Resynchronizing the Recovery Catalog
When RMAN performs a resynchronization, it compares the recovery catalog to either
the current or backup control file of the target database and updates the catalog with
metadata that is missing or changed.
Most RMAN commands perform a resynchronization automatically when the target
control file is mounted and the catalog is available. In a Data Guard environment,
RMAN can perform a reverse resynchronization to update a database control file with
metadata from the catalog.
13.8.2.1 About Resynchronization of the Recovery Catalog
Resynchronization of the recovery catalog ensures that the metadata that RMAN
obtains from the control file stays current. Resynchronizations can be full or partial.
In a partial resynchronization, RMAN reads the current control file of the target
database to update changed metadata about new backups, new archived redo logs,
and so on. RMAN does not resynchronize metadata about the database physical
schema.
In a full resynchronization, RMAN updates all changed records, including those for the
database schema. RMAN performs a full resynchronization after structural changes to
Chapter 13
Maintaining a Recovery Catalog
13-27

database (adding or dropping database files, creating new incarnation, and so on) or
after changes to the RMAN persistent configuration.
RMAN creates a snapshot control file, which is a temporary backup control file, when it
performs a full resynchronization. The database ensures that only one RMAN session
accesses a snapshot control file at any point in time. RMAN creates the snapshot
control file in an operating system-specific location on the target database host. You
can specify the name and location of the snapshot control file, as explained in
"Configuring the Snapshot Control File Location".
This snapshot control file ensures that RMAN has a consistent view of the control file.
Because the control file is intended for short-term use, it is not registered in the
catalog. RMAN records the control file checkpoint in the recovery catalog to indicate
the currency of the catalog.
See Also:
Oracle Database Backup and Recovery Reference for more information
about the
RESYNC
command
13.8.2.1.1 About RMAN Recovery Catalog Resynchronization in a Data Guard
Environment
RMAN only automatically resynchronizes the recovery catalog with a database when
connected to this database as
TARGET
. Thus, RMAN does not automatically
resynchronize every database in a Data Guard environment when connected as
TARGET
to one database in the environment.
You can use the
RESYNC CATALOG FROM DB_UNIQUE_NAME
command to manually
resynchronize the recovery catalog with a database in the Data Guard environment.
For an example of a manual resynchronization, assume that RMAN is connected as
TARGET
to production database
prod
, and that you have used
CONFIGURE
to create a
configuration for
dgprod3
. If you run
RESYNC CATALOG FROM DB_UNIQUE_NAME dgprod3
, then
RMAN resynchronizes the recovery catalog with the
dgprod3
control file. In this case
RMAN performs both a normal resynchronization, in which metadata flows from the
dgprod3
control file to the catalog, and a reverse resynchronization. In a reverse
resynchronization, RMAN uses the persistent configurations in the recovery catalog to
update the
dgprod3
control file.
See Also:
Oracle Data Guard Concepts and Administration
13.8.2.2 Deciding When to Resynchronize the Recovery Catalog
RMAN automatically resynchronizes the recovery catalog when RMAN is connected to
a target database and recovery catalog and you have executed RMAN commands.
Thus, you do not need to manually run the
RESYNC CATALOG
command very often. The
following sections describe situations requiring a manual catalog resynchronization:
Chapter 13
Maintaining a Recovery Catalog
13-28

•Resynchronizing After the Recovery Catalog is Unavailable
•Resynchronizing in ARCHIVELOG Mode When You Back Up Infrequently
•Resynchronizing After Configuring a Standby Database
•Resynchronizing the Recovery Catalog Before Control File Records Age Out
13.8.2.2.1 Resynchronizing After the Recovery Catalog is Unavailable
If the recovery catalog is unavailable when you issue RMAN commands that cause a
partial resynchronization, then open the catalog database later and resynchronize it
manually with the
RESYNC CATALOG
command.
For example, the target database may be in New York while the recovery catalog
database is in Japan. You may not want to make daily backups of the target database
in
CATALOG
mode, to avoid depending on the availability of a geographically distant
database. In such a case you could connect to the catalog as often as feasible and run
the
RESYNC CATALOG
command.
13.8.2.2.2 Resynchronizing in ARCHIVELOG Mode When You Back Up Infrequently
Assume that a target database runs in
ARCHIVELOG
mode. Also assume that you do the
following:
•Back up the database infrequently (for example, hundreds of redo logs are
archived between database backups)
•Generate a high number of log switches every day (for example, 1000 switches
between catalog resynchronizations)
In this case, you may want to manually resynchronize the recovery catalog regularly
because the recovery catalog is not updated automatically when a redo log switch
occurs or when a redo log is archived. The database stores metadata about redo log
switches and archived redo logs only in the control file. You must periodically
resynchronize to propagate this information into the recovery catalog.
How frequently you must resynchronize the recovery catalog depends on the rate at
which the database archives redo logs. The cost of the operation is proportional to the
number of records in the control file that have been inserted or changed since the
previous resynchronization. If no records have been inserted or changed, then the cost
of resynchronization is very low; if many records have been inserted or changed, then
the resynchronization is more time-consuming.
13.8.2.2.3 Resynchronizing After Configuring a Standby Database
You can create or change an RMAN configuration for a standby database even when
not connected to this database as
TARGET
.
You perform this task with the
CONFIGURE DB_UNIQUE_NAME
or
CONFIGURE ... FOR
DB_UNIQUE_NAME
command. As explained in "Manually Resynchronizing the Recovery
Catalog", you can resynchronize the standby database manually to update the control
file of the standby database.
13.8.2.2.4 Resynchronizing the Recovery Catalog Before Control File Records Age Out
Your goal is to ensure that the metadata in the recovery catalog is current. Because
the recovery catalog obtains its metadata from the target control file, the currency of
the data in the catalog depends on the currency of the data in the control file. You
Chapter 13
Maintaining a Recovery Catalog
13-29

must make sure that the backup metadata in the control file is recorded in the catalog
before it is overwritten with new records.
The
CONTROL_FILE_RECORD_KEEP_TIME
initialization parameter determines the minimum
number of days that records are retained in the control file before they are candidates
for being overwritten. Thus, you must ensure that you resynchronize the recovery
catalog with the control file records before these records are erased.
Perform either of the following actions at intervals less than the
CONTROL_FILE_RECORD_KEEP_TIME
setting:
•Make a backup, thereby performing an implicit resynchronization of the recovery
catalog
•Manually resynchronize the recovery catalog with the
RESYNC CATALOG
command
Make sure that
CONTROL_FILE_RECORD_KEEP_TIME
is longer than the interval between
backups or resynchronizations. Otherwise, control file records could be reused before
they are propagated to the recovery catalog. An extra week is a safe margin in most
circumstances.
Caution:
Never set
CONTROL_FILE_RECORD_KEEP_TIME
to
0
. If you do, then backup records
may be overwritten in the control file before RMAN can add them to the
catalog.
One problem can arise if the control file becomes too large. The size of the target
database control file grows depending on the number of:
•Backups that you perform
•Archived redo logs that the database generates
•Days that this information is stored in the control file
If the control file grows so large that it can no longer expand because it has reached
either the maximum number of blocks or the maximum number of records, then the
database may overwrite the oldest records even if their age is less than the
CONTROL_FILE_RECORD_KEEP_TIME
setting. In this case, the database writes a message to
the alert log. If you discover that this situation occurs frequently, then reducing the
value of
CONTROL_FILE_RECORD_KEEP_TIME
and increase the frequency of
resynchronizations.
See Also:
•Oracle Database Reference for more information about the
CONTROL_FILE_RECORD_KEEP_TIME
parameter
•Oracle Database Administrator’s Guide for more detailed information on
other aspects of control file management
•Preventing the Loss of Control File Records to learn how to monitor the
overwriting of control file records
Chapter 13
Maintaining a Recovery Catalog
13-30

13.8.2.3 Manually Resynchronizing the Recovery Catalog
Use
RESYNC CATALOG
to force a full resynchronization of the recovery catalog with a
target database control file.
You can specify a database unique name with
RESYNC CATALOG FROM DB_UNIQUE_NAME
or
ALL
, depending on whether you want to resynchronize a specific database or all
databases in the Data Guard environment. To use
DB_UNIQUE_NAME ALL
, you must
connect to the target database using password file authentication and as the
SYS
user.
Typically, you perform this operation after you run the
CONFIGURE
command for a
standby database, but have not yet connected to this standby database.
1. Start RMAN and connect to a target database and recovery catalog.
2. Mount or open the target database:
STARTUP MOUNT;
3. Resynchronize the recovery catalog.
Run the
RESYNC
CATALOG
command at the RMAN prompt as follows:
RESYNC CATALOG;
The following example resynchronizes the control file of
standby1
:
RESYNC CATALOG FROM DB_UNIQUE_NAME standby1;
The following variation, when connected to the target database as the
SYS
user
and using password file authentication, resynchronizes the control files for all
databases in the Data Guard environment:
RESYNC CATALOG FROM DB_UNIQUE_NAME ALL;
See Also:
•Oracle Database Backup and Recovery Reference for
RESYNC
CATALOG
command syntax
•Oracle Data Guard Concepts and Administration to learn how to
configure the RMAN environment for use with a standby database
13.8.3 Updating the Recovery Catalog After Changing a
DB_UNIQUE_NAME
You may decide to change the
DB_UNIQUE_NAME
of a database in a Data Guard
environment. In this case, you can run the
CHANGE DB_UNIQUE_NAME
command to
associate the metadata stored in recovery catalog for the old
DB_UNIQUE_NAME
to the
new
DB_UNIQUE_NAME
.
The
CHANGE DB_UNIQUE_NAME
command does not actually change the
DB_UNIQUE_NAME
of
the database itself. Instead, it updates the catalog metadata for the database whose
unique name has been or will be changed.
Chapter 13
Maintaining a Recovery Catalog
13-31

The following procedure assumes that the
DB_UNIQUE_NAME
of the primary database is
prodny
, and that you have changed the
DB_UNIQUE_NAME
of a standby database from
prodsf1
to
prodsf2
. You can use the same procedure after changing the
DB_UNIQUE_NAME
of a primary database, except in Step 1 connect RMAN as
TARGET
to a standby
database instead of a primary database.
To update the recovery catalog after DB_UNIQUE_NAME is changed:
1. Connect RMAN to the primary database as
TARGET
and also to the recovery
catalog. For example, enter the following commands:
% rman
RMAN> CONNECT CATALOG rco@catdb
recovery catalog database Password: password
connected to recovery catalog database
RMAN> CONNECT TARGET sbu@prodny
target database Password: password
connected to target database: PRODNY (DBID=39525561)
2. List the
DB_UNQUE_NAME
values known to the recovery catalog.
Run the following
LIST
command:
RMAN> LIST DB_UNIQUE_NAME OF DATABASE;
3. Change the
DB_UNIQUE_NAME
in the RMAN metadata.
The following example changes the database unique name from standby database
prodsf1
to
prodsf2
:
RMAN> CHANGE DB_UNIQUE_NAME FROM prodsf1 TO prodsf2;
13.8.4 Unregistering a Target Database from the Recovery Catalog
You can use the
UNREGISTER DATABASE
command to unregister a database from the
recovery catalog.
When a database is unregistered from the recovery catalog, all RMAN repository
records in the recovery catalog are lost. The database can be registered again, but the
recovery catalog records for that database are then based on the contents of the
control file at the time of reregistration. Records older than the
CONTROLFILE_RECORD_KEEP_TIME
setting in the target database control file are lost. Stored
scripts, which are not stored in the control file, are also lost.
13.8.4.1 Unregistering a Target Database When Not in a Data Guard
Environment
Use the
UNREGISTER DATABASE
command to unregister a target database.
This scenario assumes that you are not using the recovery catalog to store metadata
for primary and standby databases.
To unregister a database:
1. Start RMAN and connect as
TARGET
to the database to unregister. Also connect to
the recovery catalog.
Chapter 13
Maintaining a Recovery Catalog
13-32

It is not necessary to connect to the target database, but if you do not, then you
must specify the name of the target database in the
UNREGISTER
command. If
multiple databases have the same name in the recovery catalog, then you must
create a
RUN
block around the command and use
SET DBID
to set the DBID for the
database.
2. Make a note of the DBID as displayed by RMAN at startup.
For example, RMAN outputs a line of the following form when it connects to a
target database that is open:
connected to target database: PROD (DBID=39525561)
3. As a precaution, it may be useful to list all of the backups recorded in the recovery
catalog using
LIST BACKUP SUMMARY
and
LIST COPY SUMMARY
. This way, you can
recatalog backups not known to the control file if you later decide to reregister the
database.
4. If your intention is to actually delete all backups of the database completely, then
run
DELETE
statements to delete all existing backups. Do not delete all backups if
your intention is only to remove the database from the recovery catalog and rely
on the control file to store the RMAN metadata for this database.
The following commands illustrate how to delete backups:
DELETE BACKUP DEVICE TYPE sbt;
DELETE BACKUP DEVICE TYPE DISK;
DELETE COPY;
RMAN lists the backups that it intends to delete and prompts for confirmation
before deleting them.
5. Run the
UNREGISTER
DATABASE
command. For example:
UNREGISTER DATABASE;
RMAN displays the database name and DBID, and prompts you for a confirmation:
database name is "RDBMS" and DBID is 931696259
Do you really want to unregister the database (enter YES or NO)? yes
When the process is complete, RMAN outputs the following message:
database unregistered from the recovery catalog
13.8.4.2 Unregistering a Standby Database
The
UNREGISTER
command supports a
DB_UNIQUE_NAME
clause for use in a Data Guard
environment. You can use this clause to remove metadata for a specific database.
The recovery catalog associates a backup with a particular database. When you
unregister a database, RMAN updates the database name for these backup files to
null
. Thus, the backups are still recorded but have no owner. You can execute the
CHANGE ... RESET DB_UNIQUE_NAME
command to associate ownership of the currently
ownerless backups to a different database. If you specify
INCLUDING BACKUPS
on the
UNREGISTER
command, then RMAN removes the backup metadata for the unregistered
database as well.
In this scenario, assume that primary database
lnx3
has associated standby database
standby1
. You want to unregister the standby database.
Chapter 13
Maintaining a Recovery Catalog
13-33

To unregister a standby database:
1. Start RMAN and connect as
TARGET
to the primary database. Also, connect RMAN
to a recovery catalog.
For example, enter the following commands:
% rman
RMAN> CONNECT TARGET "sbu@lnx3 AS SYSBACKUP";
target database Password: password
connected to target database: LNX3 (DBID=781317675)
RMAN> CONNECT CATALOG rco@catdb;
2. List the database unique names.
For example, execute the
LIST DB_UNIQUE_NAME
command as follows:
RMAN>
LIST DB_UNIQUE_NAME OF DATABASE;
List of Databases
DB Key DB Name DB ID Database Role Db_unique_name
------- ------- ----------------- --------------- ------------------
1 LNX3 781317675 STANDBY STANDBY1
1 LNX3 781317675 PRIMARY LNX3
3. Run the
UNREGISTER
DB_UNIQUE_NAME
command.
For example, execute the
UNREGISTER
command as follows to unregister database
standby
:
RMAN> UNREGISTER DB_UNIQUE_NAME standby1;
RMAN displays the database name and DBID, and prompts you for a confirmation:
database db_unique_name is "standby1", db_name is "LNX3" and DBID is 781317675
Do you really want to unregister the database (enter YES or NO)? yes
When the process is complete, RMAN outputs the following message:
database with db_unique_name standby1 unregistered from the recovery catalog
13.8.4.3 Unregistering a Target Database in a Recovery Appliance
Environment
In a Zero Data Loss Recovery Appliance (Recovery Appliance) environment, the
UNREGISTER DATABASE
command cannot be used to unregister a protected database from
the Recovery Appliance catalog. Instead, use the
DBMS_RA.DELETE_DB
procedure.
To unregister a target database from the Recovery Appliance recovery catalog:
1. Obtain the
DB_NAME
of the protected database that you want to unregister.
2. (Optional) To delete all the backups associated with this protected database,
perform the following steps:
•Connect to the protected database as a user with the
SYSDBA
or
SYSBACKUP
privilege.
•Use the following commands to delete all backups:
Chapter 13
Maintaining a Recovery Catalog
13-34

DELETE BACKUP DEVICE TYPE sbt;
DELETE BACKUP DEVICE TYPE DISK;
DELETE COPY;
RMAN lists the backups that it intends to delete and prompts for confirmation
before deleting them.
3. Start SQL*Plus and connect to the Recovery Appliance metadata database as
RASYS
(Recovery Appliance catalog owner).
4. Unregister the protected database from Recovery Appliance using the
DBMS_RA.DELETE_DB
procedure.
begin
DBMS_RA.DELETE_DB('TEST_DB');
end;
/
RMAN prompts you to confirm the unregister database operation.
See Also:
Zero Data Loss Recovery Appliance Administrator's Guide for details of the
DBMS_RA.DELETE_DB
procedure
13.8.5 Resetting the Database Incarnation in the Recovery Catalog
You create an incarnation of the database when you open the database with the
RESETLOGS
option. You can access a record of the new incarnation in the
V$DATABASE_INCARNATION
view.
If you open the database with the
RESETLOGS
option, then a new database incarnation
record is automatically created in the recovery catalog. The database also implicitly
and automatically issues a
RESET
DATABASE
command, which specifies that this new
incarnation of the database is the current incarnation. All subsequent backups and log
archiving done by the target database is associated with the new database
incarnation.
Whenever RMAN returns the database to an SCN before the current
RESETLOGS
SCN,
either with
RESTORE
and
RECOVER
or
FLASHBACK DATABASE
, the
RESET DATABASE TO
INCARNATION
command is required. However, you do not need to execute
RESET
DATABASE TO INCARNATION
explicitly in the following scenarios because RMAN runs the
command implicitly with Flashback.
•You use
FLASHBACK DATABASE
to rewind the database to an SCN in the direct
ancestral path.
•You use
FLASHBACK DATABASE
to rewind the database to a restore point.
The following procedure explains how to reset the database incarnation when
recovering through a
RESETLOGS
.
To reset the recovery catalog to an older incarnation for media recovery:
1. Determine the incarnation key of the desired database incarnation. Obtain the
incarnation key value by issuing a
LIST
command:
Chapter 13
Maintaining a Recovery Catalog
13-35

LIST INCARNATION OF DATABASE trgt;
List of Database Incarnations
DB Key Inc Key DB Name DB ID STATUS Reset SCN Reset Time
------- ------- ------- ------ ------- ---------- ----------
1 2 TRGT 1224038686 PARENT 1 02-JUL-12
1 582 TRGT 1224038686 CURRENT 59727 10-JUL-12
The incarnation key is listed in the
Inc Key
column.
2. Reset the database to the old incarnation. For example, enter:
RESET DATABASE TO INCARNATION 2;
3. If the control file of the previous incarnation is available and mounted, then skip to
Step 6 of this procedure. Otherwise, shut down the database and start it without
mounting. For example:
SHUTDOWN IMMEDIATE
STARTUP NOMOUNT
4. Restore a control file from the old incarnation. If you have a control file tagged,
then specify the tag. Otherwise, you can run the
SET UNTIL
command, as in this
example:
RUN
{
SET UNTIL 'SYSDATE-45';
RESTORE CONTROLFILE; # only if current control file is not available
}
5. Mount the restored control file:
ALTER DATABASE MOUNT;
6. Run
RESTORE
and
RECOVER
commands to restore and recover the database files from
the prior incarnation, then open the database with the
RESETLOGS
option. For
example, enter:
RESTORE DATABASE;
RECOVER DATABASE;
ALTER DATABASE OPEN RESETLOGS;
See Also:
•About Database Incarnations
•Oracle Database Backup and Recovery Reference for
RESET
DATABASE
syntax
•Oracle Database Backup and Recovery Reference for
LIST
syntax
13.8.6 Upgrading the Recovery Catalog
This section explains what a recovery catalog upgrade is and when you must do it.
Chapter 13
Maintaining a Recovery Catalog
13-36

13.8.6.1 About Recovery Catalog Upgrades
If you are upgrading to Oracle Database 12c Release 1 (12.1.0.2) or later, then the
recovery catalog database must use the Enterprise Edition of Oracle Database.
If you use a version of the recovery catalog schema that is older than that required by
the RMAN client, then you must upgrade it. The compatibility matrix in Oracle
Database Backup and Recovery Reference explains which schema versions are
compatible with which versions of RMAN. For example, you must upgrade the catalog
if you use an Oracle Database 11g RMAN client with a release 10.2 version of the
recovery catalog schema.
The Oracle Database 10g Release 1 version of the recovery catalog schema requires
the
CREATE TYPE
privilege. If you created the recovery catalog owner in a release before
10gR1, and if you granted the
RECOVERY_CATALOG_OWNER
role when it did not include the
CREATE TYPE
privilege, then you must grant
CREATE TYPE
to this user explicitly before
upgrading the catalog.
You receive an error when issuing
UPGRADE CATALOG
if the recovery catalog is at a
version greater than that required by the RMAN client. RMAN permits the
UPGRADE
CATALOG
command to be run if the recovery catalog is current and does not require
upgrading, however, so that you can re-create packages at any time if necessary.
Check the message log for error messages generated during the upgrade.
13.8.6.1.1 Special Considerations for Upgrading the Recovery Catalog in a Data Guard
Environment
Assume that you upgrade the recovery catalog schema to Oracle Database 11g or
later in a Data Guard environment. When RMAN connects to a standby database, it
automatically registers the new database information and resynchronizes to obtain the
file names from the control file.
During the resynchronization, RMAN associates the names with the target database
name. Because the recovery catalog contains historical metadata, some records in the
catalog are not known to the control file. For example, the
standby1
control file does
not know about all backups made on
primary1
. The database unique name for these
old records is
null
. As explained in "About Recovery Catalog Maintenance", you can
use
CROSSCHECK
to fix these records.
13.8.6.2 Determining the Schema Version of the Recovery Catalog
The schema version of the recovery catalog is stored in the recovery catalog itself.
The information is important in case you maintain multiple databases of different
versions in your production system, and you must determine whether the catalog
schema version is usable with a specific target database version.
To determine the schema version of the recovery catalog:
1. Start SQL*Plus and connect to the recovery catalog database as the catalog
owner.
2. Query the
RCVER
table to obtain the schema version, as in the following example
(sample output included):
SELECT *
FROM rcver;
Chapter 13
Maintaining a Recovery Catalog
13-37

VERSION
------------
12.01.00.01
If the table displays multiple rows, then the highest version in the
RCVER
table is the
current catalog schema version. The table stores only the major version numbers and
not the patch numbers. For example, assume that the
rcver
table displays the
following rows:
VERSION
------------
10.02.00
11.02.00
12.01.00.01
These rows indicate that the catalog was created with a release 10.2.0 executable,
then upgraded to release 11.2.0, and finally upgraded to release 12.1.0.1. The current
version of the catalog schema is 12.1.0.1.
See Also:
Oracle Database Backup and Recovery Reference for the complete set of
compatibility rules governing the RMAN environment
13.8.6.3 Using the UPGRADE CATALOG Command
This scenario assumes that you are upgrading a recovery catalog schema to the
current version.
Note:
Starting with Oracle Database 12c Release 1 (12.1.0.2), the recovery catalog
database must use the Enterprise Edition of Oracle Database.
To upgrade the recovery catalog:
1. Enable Oracle Partitioning for the recovery catalog database.
2. If the recovery catalog database uses the Standard Edition, then use one of the
following techniques:
•Migrate the recovery catalog database from Standard Edition to Enterprise
Edition.
•Move the recovery catalog into an Oracle Enterprise Edition database and
then use the
IMPORT CATALOG
command to import the recovery catalog into this
database.
3. Use SQL*Plus to connect to the recovery catalog database as the
SYS
user with
the
SYSDBA
privilege.
4. Run the
dbmsrmansys.sql
script to grant additional privileges that are required for
the
RECOVERY_CATALOG_OWNER
role.
Chapter 13
Maintaining a Recovery Catalog
13-38

SQL> @$ORACLE_HOME/rdbms/admin/dbmsrmansys.sql
5. (Optional) Enable the VPD model for the recovery catalog by running the
dbmsrmanvpc.sql
script with the
–vpd
option..
The following command enables the VPD model for the recovery catalog owned
by the user
rco
:
SQL> @/$ORACLE_HOME/rdbms/admin/dbmsrmanvpc.sql -vpd rco;
6. Exit SQL*Plus.
7. Start RMAN and connect RMAN to the recovery catalog database.
8. Run the
UPGRADE
CATALOG
command:
RMAN> UPGRADE CATALOG;
recovery catalog owner is rman
enter UPGRADE CATALOG command again to confirm catalog upgrade
9. Run the
UPDATE
CATALOG
command again to confirm:
RMAN> UPGRADE CATALOG;
recovery catalog upgraded to version 12.01.00.01
DBMS_RCVMAN package upgraded to version 12.01.00.01
DBMS_RCVCAT package upgraded to version 12.01.00.01
Note:
To bypass this step, add the
NOPROMPT
option after the
UPGRADE CATALOG
command in step 7.
See Also:
•Oracle Database Backup and Recovery Reference for
UPGRADE
CATALOG
command syntax
•Oracle Database Backup and Recovery Reference for information about
recovery catalog compatibility
•Oracle Database Upgrade Guide for complete compatibility and
migration information
13.8.7 Importing and Moving a Recovery Catalog
You can use the
IMPORT CATALOG
command in RMAN to merge one recovery catalog
schema into another.
This command is useful in the following situations:
•You have multiple recovery catalog schemas for different versions of the
database. You want to merge all existing schemas into one without losing backup
metadata.
•You want to move a recovery catalog from one database to another database.
Chapter 13
Maintaining a Recovery Catalog
13-39

13.8.7.1 About Recovery Catalog Imports
When using
IMPORT CATALOG
, the source catalog schema is the catalog schema to
import into a different schema. The destination catalog schema is the catalog
schema into which you intend to import the source catalog schema.
By default, RMAN imports metadata from all target databases registered in the source
recovery catalog. Optionally, you can specify the list of database IDs to be imported
from the source catalog schema.
By default, RMAN unregisters the imported databases from the source catalog
schema after a successful import. To indicate whether the unregister was successful,
RMAN prints messages before and after unregistering the merged databases. You can
also specify the
NO UNREGISTER
option to specify that the databases is not unregistered
from the source catalog.
A stored script is either global or local. It is possible for global scripts, but not local
scripts, to have name conflicts during import because the destination schema already
contains the script name. In this case, RMAN renames the global script name to
COPY
OF script_name
. For example, RMAN renames
bp_cmd
to
COPY OF bp_cmd
.
If the renamed global script is still not unique, then RMAN renames it to
COPY(2) OF
script_name
. If this script name also exists, then RMAN renames the script to
COPY(3)
OF script_name
. RMAN continues the
COPY(n) OF
pattern until the script is uniquely
named.
13.8.7.2 About Importing Recovery Catalogs in a Recovery Appliance
Environment
In a Recovery Appliance environment, a single, centrally-managed Recovery
Appliance catalog residing on the Recovery Appliance is shared by all the protected
databases. This catalog must be used by all protected databases that send backups to
Recovery Appliance.
When you move protected databases to a data protection strategy that uses Recovery
Appliance, you can choose to migrate existing backups and backup metadata to
Recovery Appliance. To migrate backup metadata, you must import the RMAN
recovery catalog into the Recovery Appliance catalog.
See Also:
•Zero Data Loss Recovery Appliance Administrator's Guide for an
overview of the Recovery Appliance catalog
•Zero Data Loss Recovery Appliance Protected Database Configuration
Guide for the steps to migrate backups and backup metadata
13.8.7.3 Prerequisites for Importing a Recovery Catalog
A target database, recovery catalog database, and recovery catalog schema can be at
different database versions. The recommended practice is to import all existing
Chapter 13
Maintaining a Recovery Catalog
13-40

recovery catalogs into a single recovery catalog at the latest version of the recovery
catalog schema.
"Determining the Schema Version of the Recovery Catalog" explains how to determine
the catalog version. Check the compatibility matrix to determine which schema
versions are compatible in your environment.
When using
IMPORT CATALOG
, the version of the source recovery catalog schema must
be equal to the current version of the RMAN executable with which you run the
command. If the source catalog schema is a lower version, then upgrade it to the
current version before importing the schema. "Upgrading the Recovery Catalog"
explains how to upgrade. If the source recovery catalog schema is a higher version,
then retry the import with a higher version RMAN executable.
No database can be registered in both the source and destination catalog schema. If a
database is currently registered in both catalog schemas, then unregister the database
from source catalog schema before performing the import.
See Also:
Oracle Database Backup and Recovery Reference
13.8.7.4 Importing a Recovery Catalog
When importing one recovery catalog into another, no connection to a target database
is necessary. RMAN only needs connectivity to the source and destination catalogs.
In this example, database
srcdb
contains a 10.2 recovery catalog schema owned by
user
102cat
, while database
destdb
contains an 11.1 recovery catalog schema owned
by user
111cat
.
To import a recovery catalog:
1. Start RMAN and connect as
CATALOG
to the destination recovery catalog schema.
For example:
% rman
RMAN> CONNECT CATALOG 111cat@destdb;
2. Import the source recovery catalog schema, specifying the connection string for
the source catalog.
For example, enter the following command to import the catalog owned by
102cat
on database
srcdb
:
IMPORT CATALOG 102cat@srcdb;
A variation is to import metadata for a subset of the target databases registered in
the source catalog. You can specify the databases by DBID or database name, as
shown in the following examples:
IMPORT CATALOG 102cat@srcdb DBID=1423241, 1423242;
IMPORT CATALOG 102cat@srcdb DB_NAME=prod3, prod4;
3. Optionally, connect to a target database to check that the metadata was
successfully imported. For example, the following commands connect to database
prod1
as
TARGET
and list all backups for this database:
Chapter 13
Maintaining a Recovery Catalog
13-41

CONNECT TARGET "sbu@prod1 AS SYSBACKUP";
LIST BACKUP;
sbu
is a user who is granted the
SYSBACKUP
privilege in the target database.
13.8.7.5 Moving a Recovery Catalog
The procedure for moving a recovery catalog from one database to another is a
variation of the procedure for importing a catalog.
In this scenario, the source database is the database containing the existing recovery
catalog, while the destination database contains the moved recovery catalog.
To move a recovery catalog from the source database to the destination database:
1. Create a recovery catalog on the destination database, but do not register any
databases in the new catalog.
"Creating a Recovery Catalog" explains how to perform this task.
2. Import the source catalog into the catalog created in the preceding step.
"Importing a Recovery Catalog" explains how to perform this task.
13.9 Dropping a Recovery Catalog
The
DROP
CATALOG
command removes those objects that were created by the
CREATE
CATALOG
command. If the user who owns the recovery catalog also owns objects that
were not created by
CREATE CATALOG
, then the
DROP CATALOG
command does not remove
these objects.
If you drop a recovery catalog, and if you have no backups of the recovery catalog
schema, then backups of all target databases registered in this catalog may become
unusable. However, the control file of every target database still retains a record of
recent backups of this database.
The
DROP CATALOG
command is not appropriate for unregistering a single database from
a recovery catalog that has multiple target databases registered. Dropping the
recovery catalog deletes the recovery catalog record of backups for all target
databases registered in the catalog.
To drop a recovery catalog schema:
1. Start RMAN and connect to a target database and recovery catalog. Connect to
the recovery catalog as the owner of the catalog schema to be dropped.
The following example connects to a recovery catalog as user
rco
:
% rman TARGET / CATALOG rco@catdb
2. Run the
DROP CATALOG
command:
DROP CATALOG;
recovery catalog owner is rco
enter DROP CATALOG command again to confirm catalog removal
Chapter 13
Dropping a Recovery Catalog
13-42

Note:
To bypass the next confirmation step, add the
NOPROMPT
option with the
DROP CATALOG
command in this step.
3. Run the
DROP CATALOG
command again to confirm:
DROP CATALOG;
Note:
Even after you drop the recovery catalog, the control file still contains
records about the backups. To purge RMAN repository records from the
control file, re-create the control file.
See Also:
•Oracle Database Backup and Recovery Reference for
DROP CATALOG
command syntax
•Unregistering a Target Database from the Recovery Catalog to learn
how to unregister a database from the catalog
Chapter 13
Dropping a Recovery Catalog
13-43

Part V
Diagnosing and Responding to Failures
The following chapters describe how to diagnose and respond to media failures and
data corruptions. This part of the book contains the following chapters:
•RMAN Data Repair Concepts
•Diagnosing and Repairing Failures with Data Recovery Advisor
•Validating Database Files and Backups
•Performing Complete Database Recovery
•Performing Flashback and Database Point-in-Time Recovery
•Performing Block Media Recovery
•Performing RMAN Recovery: Advanced Scenarios
•Performing RMAN Tablespace Point-in-Time Recovery (TSPITR)
•Recovering Tables and Table Partitions from RMAN Backups

14
RMAN Data Repair Concepts
This chapter describes the general concepts that you must understand to perform data
repair. This chapter contains the following topics:
•Overview of RMAN Data Repair
•About RMAN Restore Operations
•About RMAN Media Recovery
14.1 Overview of RMAN Data Repair
As explained in "About Data Protection", a principal purpose of a backup and recovery
strategy is data protection. The key to an effective, efficient strategy is to understand
the basic options of data repair.
14.1.1 About Problems Requiring Data Repair
While several problems can halt the normal operation of an Oracle database or affect
database I/O operations, only the following typically require DBA intervention and data
repair: user errors, application errors, and media failures.
14.1.1.1 About User Errors
User errors occur when, either due to an error in application logic or a manual mistake,
data in your database is changed or deleted incorrectly.
For example, a user logs in to the wrong database and drops a database table. User
errors are estimated to be the greatest single cause of database downtime.
14.1.1.2 About Application Errors
Sometimes a software malfunction can corrupt data blocks. In a physical corruption,
which is also called a media corruption, the database does not recognize the block.
14.1.1.3 About Media Failures
A media failure occurs when a problem external to the database prevents it from
reading from or writing to a file during normal operations.
Typical media failures include disk failures and the deletion of database files. Media
failures are less common than user or application errors, but your backup and
recovery strategy should prepare for them.
14.1.2 About RMAN Data Repair Techniques
RMAN provides multiple methods of data repair.
14-1

Depending on the situations you anticipate, consider incorporating each of the options
described in the following table into your strategy for responding to data loss, and then
set up your database to make these options possible.
Table 14-1 RMAN Data Repair Techniques
Data Repair Technique Description Additional Information
Data Recovery Advisor This Oracle Database
infrastructure can diagnose
failures, advise you on how to
respond to them, and repair
the failures automatically.
"Overview of Data Recovery
Advisor"
logical flashback features This subset of Oracle
Flashback Technology
features enables you to view
or rewind individual database
objects or transactions to a
past time. These features do
not require use of RMAN.
"Overview of Oracle
Flashback Technology and
Database Point-in-Time
Recovery"
Oracle Flashback Database Flashback Database is a
block-level recovery
mechanism that is similar to
media recovery, but is
generally faster and does not
require a backup to be
restored. You can return your
whole database to a previous
state without restoring old
copies of your data files from
backup, if you have enabled
flashback logging in advance.
You must have a fast recovery
area configured for logging for
flashback database or
guaranteed restore points.
"Basic Concepts of Point-in-
Time Recovery and Flashback
Features"
data file media recovery This form of media recovery
enables you to restore data
file backups and apply
archived redo logs or
incremental backups to
recover lost changes. You can
either recover a whole
database or a subset of the
database. Data file media
recovery is the most general-
purpose form of recovery and
can protect against both
physical and logical failures.
•"Performing Complete
Database Recovery"
•"Performing Database
Point-in-Time Recovery"
block media recovery This form of media recovery
enables you to recover
individual blocks within a data
file rather than the whole data
file.
"Overview of Block Media
Recovery"
Chapter 14
Overview of RMAN Data Repair
14-2

Table 14-1 (Cont.) RMAN Data Repair Techniques
Data Repair Technique Description Additional Information
tablespace point-in-time
recovery (TSPITR)
This is a specialized form of
point-in-time recovery in which
you recover one or more
tablespaces to a time earlier
than the rest of the database.
"Overview of RMAN TSPITR"
In general, the concepts required to use the preceding repair techniques are explained
along with the techniques. This chapter explains concepts that are common to several
RMAN data repair solutions.
14.2 About RMAN Restore Operations
In an RMAN restore operation, you select files to be restored and then run the
RESTORE
command. Typically, you restore files in preparation for media recovery.
You can restore the following types of files:
•Database (all data files)
•Tablespaces
•Control files
•Archived redo logs
•Server parameter files
You can specify either the default location or a new location for restored data files and
control files. If you restore to the default location, then RMAN overwrites any files with
the same name that currently exist in this location. Alternatively, you can use the
SET
NEWNAME
command to specify new locations for restored data files. You can then run a
SWITCH
command to update the control file to indicate that the restored files in their new
locations are now the current data files.
See Also:
•Oracle Database Backup and Recovery Reference for
RESTORE
syntax
and prerequisites
•Oracle Database Backup and Recovery Reference for
SET NEWNAME
syntax
•Oracle Database Backup and Recovery Reference for
SWITCH
syntax
14.2.1 About RMAN Backup Selection
RMAN uses the records of available backup sets or image copies in the RMAN
repository to select the best available backups for use in the restore operation.
The most recent backup available, or the most recent backup satisfying any
UNTIL
clause specified in the
RESTORE
command, is the preferred choice. If two backups are
Chapter 14
About RMAN Restore Operations
14-3

from the same point in time, then RMAN prefers image copies over backup sets
because RMAN can restore more quickly from image copies than from backup sets
(especially those stored on tape).
All specifications of the
RESTORE
command must be satisfied before RMAN restores a
backup. Unless limited by the
DEVICE
TYPE
clause, the
RESTORE
command searches for
backups on all device types of configured channels. If no available backup in the
repository satisfies all the specified criteria, then RMAN returns an error indicating that
the file cannot be restored.
If you use only manually allocated channels, then a backup job may fail if there is no
usable backup on the media for which you allocated channels. Configuring automatic
channels makes it more likely that RMAN can find and restore a backup that satisfies
the specified criteria.
See Also:
"Configuring Advanced Channel Options"
14.2.2 About RMAN Restore Failover
RMAN automatically uses restore failover to skip corrupted or inaccessible backups
and look for usable backups. When a backup is not found, or contains corrupt data,
RMAN automatically looks for another backup from which to restore the desired files.
RMAN generates messages that indicate the type of failover that it is performing. For
example, when RMAN fails over to another backup of the same file, it generates a
message similar to the following:
failover to piece handle=/u01/backup/db_1 tag=BACKUP_031009
If no usable copies are available, then RMAN searches for previous backups. The
message generated is similar to the following example:
ORA-19624: operation failed, retry possible
ORA-19505: failed to identify file "/u01/backup/db_1"
ORA-27037: unable to obtain file status
SVR4 Error: 2: No such file or directory
Additional information: 3
failover to previous backup
RMAN performs restore failover repeatedly until it has exhausted all possible backups.
If all of the backups are unusable or no backups exists, then RMAN attempts to re-
create the data file. Restore failover is also used when there are errors restoring
archived redo logs during
RECOVER
,
RECOVER ... BLOCK
, and
FLASHBACK DATABASE
commands.
14.2.3 About RMAN Restore of Encrypted Backups
RMAN automatically decrypts backup sets that are protected with backup encryption
when their contents are restored. Additional steps, if any, depend on the on the
technique that was used to encrypt the backups.
Chapter 14
About RMAN Restore Operations
14-4

•Transparent backup encryption using an auto-login software keystore requires no
intervention if the Oracle keystore is available.
When restoring a backup on a host that is different from the source host on which
the backup is created, manually copy the Oracle keystore from the source
database to the destination host.
•Transparent backup encryption using a password-based keystore requires the
keystore to be open.
Manually copy the Oracle software keystore to the destination host on which the
backup is being restored and provide the password required to open the keystore.
The
SET DECRYPTION WALLET OPEN IDENTIFIED BY
command to provide the password.
•Password-encrypted backups require the correct password to be entered before
they can be restored.
Use the
SET DECRYPTION IDENTIFIED BY
command to specify the password that must
be used to decrypt the encrypted backup.
•Dual-mode encrypted backups can be restored either transparently, by using the
Oracle software keystore, or by specifying a password for decryption.
TDE Master Keys and Transparently Encrypted Backups
When you reset (or rotate, rekey) a TDE master encryption key, RMAN can still restore
backups that were encrypted using the old TDE master encryption key. This is
possible because the Oracle keystore stores a history of all retired TDE master
encryption keys.
Note:
If the Oracle keystore that contains the TDE master key is lost and needs to
be recreated, then any backups that were encrypted using the old TDE
master keys are invalidated and cannot be used.
See Also:
Oracle Database Advanced Security Guide
14.2.4 About RMAN Restore Operations and ASM
When Automatic Storage Management (ASM) disk groups are used, an RMAN restore
operation creates new copies of data files only if the full name of a data file, including
the incarnation, does not match with the name of an existing data file.
A fully qualified ASM file name is of the form +diskgroup/dbname/filetype/
filetypetag.file.incarnation. When you first restore the control file and then
restore the other database files, the names of the data files in the control file may not
match with the names of the existing data files and therefore the data files are
recreated.
Use one of the following methods to ensure that existing data files are not recreated
during a restore or duplicate operation:
Chapter 14
About RMAN Restore Operations
14-5

•In the control file, use alias names for each data file. The alias must not include
the ASM incarnation number.
•After restoring the control file and before restoring the other database files, use the
CATALOG
command to ensure that the existing data files are cataloged in the
restored control file. Next, use the
SWITCH
command to make the restored control
file point to the existing data files.
•Use
SET NEWNAME
to rename the data files before restoring the data files and after
restoring the control file.
14.2.5 About RMAN Restore Optimization
RMAN uses restore optimization to avoid restoring data files from backup when
possible. If a data file is present in the correct location and its header contains the
expected information, then RMAN does not restore the data file from backup.
Note:
Restore optimization only checks the data file header. It does not the scan
the data file body for corrupted blocks.
You can use the
FORCE
option of the
RESTORE
command to override this behavior and
restore the requested files unconditionally.
Restore optimization is particularly useful when an operation that restores several data
files is interrupted. For example, assume that a full database restore encounters a
power failure after all except one data file has been restored. If you run the same
RESTORE
command again, then RMAN only restores the single data file that was not
restored during the previous attempt.
Restore optimization is also used when duplicating a database. If a data file at the
duplicate is in the correct place with the correct header contents, then the data file is
not duplicated. Unlike
RESTORE
,
DUPLICATE
does not support a
FORCE
option. To force
RMAN to duplicate a data file that is skipped due to restore optimization, delete the
data file from the duplicate before running the
DUPLICATE
command.
See Also:
Oracle Real Application Clusters Administration and Deployment Guide for
description of
RESTORE
behavior in an Oracle RAC configuration
14.3 About RMAN Media Recovery
In media recovery, RMAN applies changes to restored data to roll forward this data in
time.
RMAN can perform either data file media recovery or block media recovery.
Data file media recovery is the application of redo logs or incremental backups to a
restored data file to update it to the current time or some other specified time. As
Chapter 14
About RMAN Media Recovery
14-6

explained in Oracle Database Concepts, you can use RMAN to perform complete
recovery, database point-in-time recovery (DBPITR), or tablespace point-in-time
recovery (TSPITR). You can use the
RESTORE
command to restore backups of lost and
damaged data files or control files and the
RECOVER
command to perform media
recovery.
Block media recovery is the recovery of individual data blocks rather than entire data
files. This section explains data file media recovery only. Block media recovery, which
is a specialized form of media recovery, is explained in "Overview of Block Media
Recovery".
14.3.1 About Selection of Incremental Backups and Archived Redo
Logs
RMAN automates media recovery. RMAN automatically restores and applies both
incremental backups and archived redo logs in whatever combination is most efficient.
If the RMAN repository indicates that no copies of a required log sequence number
exist on disk, then it automatically restores the required log from backup. By default,
RMAN restores the archived logs to the fast recovery area, if an archiving destinations
is set to
USE_DB_RECOVERY_FILE_DEST
. Otherwise, RMAN restores the logs to the first
local archiving destination specified in the initialization parameter file.
See Also:
Oracle Database Backup and Recovery Reference for
CROSSCHECK
syntax
14.3.2 About Database Incarnations
A database incarnation is created whenever you open the database with the
RESETLOGS
option.
After complete recovery, you can resume normal operations without an
OPEN
RESETLOGS
. After a DBPITR or recovery with a backup control file, however, you must
open the database with the
RESETLOGS
option, thereby creating a new incarnation of the
database. The database requires a new incarnation to avoid confusion when two
different redo streams have the same SCNs, but occurred at different times. If you
apply the wrong redo to your database, then you corrupt it.
The existence of multiple incarnations of a single database determines how RMAN
treats backups that are not in the current incarnation path. Usually, the current
database incarnation is the correct one to use. Nevertheless, in some cases resetting
the database to a previous incarnation is the best approach. For example, you may be
dissatisfied with the results of a point-in-time recovery that you have performed and
want to return the database to a time before the
RESETLOGS
. An understanding of
database incarnations is helpful to prepare for such situations.
14.3.2.1 About RMAN OPEN RESETLOGS Operations
RMAN performs certain actions when you open the database with the
RESETLOGS
option.
Chapter 14
About RMAN Media Recovery
14-7

The action performed are as follows:
•Archives the current online redo logs (if they are accessible) and then erases the
contents of the online redo logs and resets the log sequence number to 1.
For example, if the current online redo logs are sequence 1000 and 1001 when
you open
RESETLOGS
, then the database archives logs 1000 and 1001 and then
resets the online redo logs to sequence 1 and 2.
•Creates the online redo log files if they do not currently exist.
•Initializes redo thread records and online redo log records in the control file to the
beginning of the new database incarnation.
More specifically, the database sets the redo thread status to closed, sets the
current thread sequence in the redo thread records to 1, sets the thread
checkpoint of each redo thread to the beginning of log sequence 1, chooses one
redo log from each thread and initialize its sequence to 1, and so on.
•Updates all current data files and online redo logs and all subsequent archived
redo logs with a new
RESETLOGS SCN
and time stamp.
Because the database does not apply an archived redo log to a data file unless the
RESETLOGS SCN
and time stamps match, the
RESETLOGS
requirement prevents you from
corrupting data files with archived logs that are not from direct parent incarnations of
the current incarnation. The relationship among incarnations is explained more fully in
the following section.
In previous releases, it was recommended that you back up the database immediately
after the
OPEN RESETLOGS
. Because you can now easily recover a pre-
RESETLOGS
backup
like any other backup, making a new database backup is optional. To perform
recovery through
RESETLOGS
you must have all archived logs generated after the most
recent backup and at least one control file (current, backup, or created).
14.3.2.2 Relationship Among Database Incarnations
Database incarnations can stand in the following relationships to each other:
•The current incarnation is the one in which the database is currently operating.
•The incarnation from which the current incarnation branched following an
OPEN
RESETLOGS
operation is the parent incarnation of the current incarnation.
•The parent of the parent incarnation is an ancestor incarnation. Any parent of an
ancestor incarnation is also an ancestor of the current incarnation.
•The direct ancestral path of the current incarnation begins with the earliest
incarnation and includes only the branches to an ancestor of the current
incarnation, the parent incarnation, or the current incarnation.
An incarnation number is used to uniquely tag and identify a stream of redo.
Figure 14-1 illustrates a database that goes through several incarnations, each with a
different incarnation number.
Chapter 14
About RMAN Media Recovery
14-8
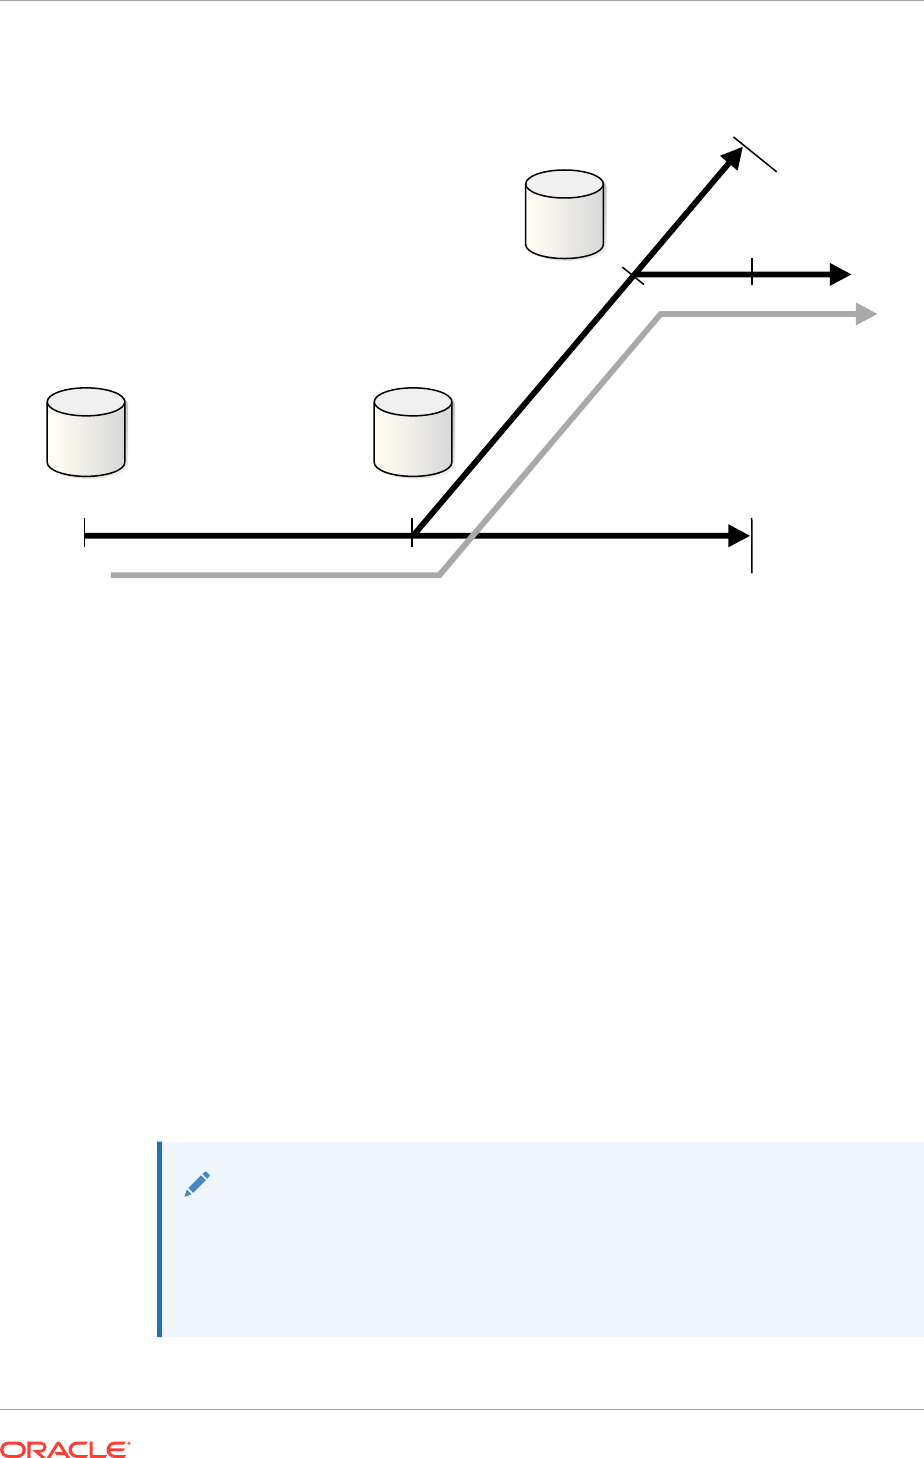
Figure 14-1 Database Incarnation History
Incarnation 3
Incarnation 1
Incarnation 2
SCN 1
SCN 1000
SCN 2000 SCN 3000
SCN 3000
SCN 2000
Direct Ancestral Path
Incarnation 1 of the database starts at SCN 1 and continues through SCN 1000 to
SCN 2000. Suppose that at SCN 2000 in incarnation 1, you perform a point-in-time
recovery back to SCN 1000, and then open the database with the
RESETLOGS
option.
Incarnation 2 now begins at SCN 1000 and continues to SCN 3000. In this example,
incarnation 1 is the parent of incarnation 2.
Suppose that at SCN 3000 in incarnation 2, you perform a point-in-time recovery to
SCN 2000 and open the database with the
RESETLOGS
option. In this case, incarnation 2
is the parent of incarnation 3. Incarnation 1 is an ancestor of incarnation 3.
When DBPITR or Flashback Database has occurred in database, an SCN can refer to
multiple points in time, depending on which incarnation is current. For example, SCN
1500 in Figure 14-1 could refer to an SCN in incarnation 1 or 2.
You can use the
RESET DATABASE TO INCARNATION
command to specify that SCNs are to
be interpreted in the frame of reference of a specific database incarnation. The
RESET
DATABASE TO INCARNATION
command is required when you use
FLASHBACK
,
RESTORE
, or
RECOVER
to return to an SCN in a noncurrent database incarnation. However, RMAN
executes the
RESET DATABASE TO INCARNATION
command implicitly with Flashback, as
explained in "Resetting the Database Incarnation in the Recovery Catalog".
See Also:
•"Recovering the Database to an Ancestor Incarnation"
•Oracle Database Backup and Recovery Reference for details about the
RESET DATABASE
command
Chapter 14
About RMAN Media Recovery
14-9

14.3.2.3 About Incarnations of PDBs
A pluggable database (PDB) incarnation is a subincarnation of the multitenant
container database (CDB) and is expressed as
(database_incarnation,
pdb_incarnation)
.
For example, if the CDB is incarnation
5
, and a PDB is incarnation
3
, then the fully
specified incarnation number of the PDB is
(5, 3)
. The initial incarnation of a PDB is 0.
Subsequent incarnations are unique but not always sequential numbers.
The
V$PDB_INCARNATION
view contains information about all PDB incarnations. Use the
following query to display the current incarnation of a PDB:
SELECT PDB_INCARNATION# FROM V$PDB_INCARNATION
WHERE STATUS = 'CURRENT' AND CON_ID = PDB_container_id;
14.3.2.4 About Orphaned Backups
When a database goes through multiple incarnations, some backups can become
orphaned backups. Orphaned backups are backups created during incarnations of the
database that are not in the direct ancestral path.
Assume the scenario shown in Figure 14-1. If incarnation 3 is the current incarnation,
then the following backups are orphaned:
•All backups from incarnation 1 after SCN 1000
•All backups from incarnation 2 after SCN 2000
In contrast, the following backups are not orphaned because they are in the direct
ancestral path:
•All backups from incarnation 1 before SCN 1000
•All backups from incarnation 2 before SCN 2000
•All backups from incarnation 3
You can use orphaned backups when you intend to restore the database to an SCN
not in the direct ancestral path. RMAN can restore backups from parent and ancestor
incarnations and recover to the current time, even across
OPEN RESETLOGS
operations, if
a continuous path of archived logs exists from the earliest backups to the point to
which you want to recover. If you restore a control file from an incarnation in which the
changes represented in the backups had not been abandoned, then RMAN can also
restore and recover orphaned backups.
14.3.2.5 About Orphaned PDB Backups
Orphan PDB backups can result when you perform point-in-time recovery on a
pluggable database (PDB) and then open the PDB using the
RESETLOGS
option.
After recovering a PDB to a specified point-in-time, when you open the PDB using the
RESETLOGS
option, a new incarnation of the PDB is created. Orphan PDB backups are
backups that were created when the SCN or time value was between the SCN or time
to which the PDB was recovered and the SCN or time at which the PDB was opened
in
RESETLOGS
mode. The
END_RESETLOGS_SCN
column of the
V$PDB_INCARNATION
view
contains the SCN at which the PDB is opened in
RESETLOGS
mode.
Chapter 14
About RMAN Media Recovery
14-10

15
Diagnosing and Repairing Failures with
Data Recovery Advisor
This chapter explains how to use the Data Recovery Advisor tool in RMAN to diagnose
and repair database failures. This chapter contains the following topics:
•Overview of Data Recovery Advisor
•Listing Failures
•Checking for Block Corruptions by Validating the Database
•Determining Repair Options
•Repairing Failures
•Changing Failure Status and Priority
15.1 Overview of Data Recovery Advisor
The Data Recovery Advisor is a tool that helps reduce database recovery time by
determining the best automated repair option for database failures.
15.1.1 Purpose of Data Recovery Advisor
Data Recovery Advisor is an Oracle Database tool that automatically diagnoses data
failures, determines and presents appropriate repair options, and executes repairs at
the user's request.
In this context, a data failure is a corruption or loss of persistent data on disk. By
providing a centralized tool for automated data repair, Data Recovery Advisor
improves the manageability and reliability of an Oracle database and thus helps
reduce the MTTR.
Diagnosing a data failure and devising an optimal strategy for repair requires a high
degree of training and experience. Data Recovery Advisor provides the following
advantages over traditional repair techniques:
•Data Recovery Advisor can potentially detect, analyze, and repair data failures
before a database process discovers the corruption and signals an error. Early
warnings help limit damage caused by corruption.
•Manually assessing symptoms of data failures and correlating them into a problem
statement can be complex, error-prone, and time-consuming. Data Recovery
Advisor automatically diagnoses failures, assesses their impact, and reports these
findings to the user.
•Traditionally, users must manually determine repair options along with the repair
impact. If multiple failures are present, then users must determine the right
sequence of repair execution and try to consolidate repairs. In contrast, Data
Recovery Advisor automatically determines the best repair options and runs
checks to ensure that these options are feasible in your environment.
15-1

•Execution of a data repair can be complex and error-prone. If you choose an
automated repair option, then Data Recovery Advisor executes the repair and
verifies its success.
15.1.2 Basic Concepts of Data Recovery Advisor
You must familiarize yourself with a few concepts before using the Data Recovery
Advisor.
See Also:
•User Interfaces to Data Recovery Advisor
•About Data Integrity Checks
•About Failures
•About Manual Actions and Automatic Repair Options
•About Supported Database Configurations for Data Recovery Advisor
15.1.2.1 User Interfaces to Data Recovery Advisor
Data Recovery Advisor has both a command-line and GUI interface. The GUI interface
is available in Oracle Enterprise Manager Cloud Control.
In the RMAN command-line interface, the Data Recovery Advisor commands are
LIST
FAILURE
,
ADVISE FAILURE
,
REPAIR FAILURE
, and
CHANGE FAILURE
.
A failure is detected either automatically by the database or through a manual check
such as the
VALIDATE
command. You can use the
LIST FAILURE
command to view
problem statements for failures and the effect of these failures on database
operations. Each failure is uniquely identified by a failure number. In the same RMAN
session, you can then use the
ADVISE FAILURE
command to view repair options, which
typically include both automated and manual options.
After executing
ADVISE FAILURE
, you can either repair failures manually or run the
REPAIR FAILURE
command to repair the failures automatically. A repair is an action that
fixes one or more failures. Examples of repairs include block media recovery, data file
media recovery, and Oracle Flashback Database. When you choose an automated
repair option, Data Recovery Advisor verifies the repair success and closes the
relevant repaired failures.
15.1.2.2 About Data Integrity Checks
A checker is a diagnostic operation or procedure registered with the Health Monitor to
assess the health of the database or its components.
The health assessment is known as a data integrity check and can be invoked
reactively or proactively.
Failures are normally detected reactively. A database operation involving corrupted
data results in an error, which automatically invokes a data integrity check that
searches the database for failures related to the error. If failures are diagnosed, then
they are recorded in the Automatic Diagnostic Repository (ADR), which is a directory
Chapter 15
Overview of Data Recovery Advisor
15-2

structure stored outside of the database. You can use Data Recovery Advisor to
generate repair advice and repair failures only after failures have been detected by the
database and stored in ADR.
You can also invoke a data integrity check proactively. You can execute the check
through the Health Monitor, which detects and stores failures in the same way as
when the checks are invoked reactively. You can also check for block corruption with
the
VALIDATE
and
BACKUP VALIDATE
commands, as explained in "Checking for Block
Corruptions by Validating the Database".
See Also:
Oracle Database Administrator’s Guide to learn how to use the Health
Monitor
15.1.2.3 About Failures
A failure is a persistent data corruption that is detected by a data integrity check.
A failure can manifest itself as observable symptoms such as error messages and
alerts, but a failure is different from a symptom because it represents a diagnosed
problem. After a problem is diagnosed by the database as a failure, you can obtain
information about the failure and potentially repair it with Data Recovery Advisor.
Because failure information is not stored in the database itself, the database does not
need to be open or mounted for you to access it. You can view failures when the
database is started in
NOMOUNT
mode. Thus, the availability of the control file and
recovery catalog does not affect the ability to view detected failures, although it may
affect the feasibility of some repairs.
Data Recovery Advisor can diagnose failures such as the following:
•Components such as data files and control files that are not accessible because
they do not exist, do not have the correct access permissions, have been taken
offline, and so on
•Physical corruptions such as block checksum failures and invalid block header
field values
•Inconsistencies such as a data file that is older than other database files
•I/O failures such as hardware errors, operating system driver failures, and
exceeding operating system resource limits (for example, the number of open
files)
The Data Recovery Advisor may detect or handle some logical corruptions. In general,
corruptions of this type require help from Oracle Support Services.
Chapter 15
Overview of Data Recovery Advisor
15-3

See Also:
•About the Failure Status
•About Failure Priority
•About Failure Grouping
15.1.2.3.1 About the Failure Status
Every failure has a failure status:
OPEN
or
CLOSED
.
The status of a failure is
OPEN
until the appropriate repair action is invoked. The status
changes to
CLOSED
after the failure is repaired.
Every time you execute
LIST FAILURE
, Data Recovery Advisor revalidates all open
failures and closes failures that no longer exist. Thus, if you fixed some failures as part
of a separate procedure, or if the failures were transient problems that disappeared by
themselves, running
LIST FAILURE
automatically closes them.
You can use
CHANGE FAILURE
to change the status of an open failure to
CLOSED
if you
have fixed it manually. However, it makes sense to use
CHANGE FAILURE ... CLOSED
only
if for some reason the failure was not closed automatically. If a failure still exists when
you use
CHANGE
to close it manually, then Data Recover Advisor re-creates it with a
different failure ID when the appropriate data integrity check is executed.
15.1.2.3.2 About Failure Priority
Every failure has a failure priority:
CRITICAL
,
HIGH
, or
LOW
. Data Recovery Advisor only
assigns
CRITICAL
or
HIGH
priority to diagnosed failures.
Failures with
CRITICAL
priority require immediate attention because they make the
whole database unavailable. For example, a disk containing a current control file may
fail. Failures with
HIGH
priority make a database partly unavailable or unrecoverable
and usually have to be repaired quickly. Examples include block corruptions and
missing archived redo logs.
If a failure was assigned a
HIGH
priority, but the failure has little impact on database
availability and recoverability, then you can downgrade the priority to
LOW
. A
LOW
priority
indicates that a failure can be ignored until more important failures are fixed.
By default
LIST FAILURE
displays only failures with
CRITICAL
and
HIGH
priority. You can
use the
CHANGE
command to change the status for
LOW
and
HIGH
failures, but you cannot
change the status of
CRITICAL
failures. The main reason for changing a priority to
LOW
is
to reduce the
LIST FAILURE
output. If a failure cannot be revalidated at this time (for
example, because of another failure), then
LIST FAILURE
shows the failure as open.
15.1.2.3.3 About Failure Grouping
For clarity, Data Recovery Advisor groups related failures together.
For example, if 20 different blocks in a file are corrupted, then these failures are
grouped under a single parent failure. By default, Data Recovery Advisor lists
information about the group of failures, although you can specify the
DETAIL
option to
list information about the individual subfailures.
Chapter 15
Overview of Data Recovery Advisor
15-4

A subfailure has the same format as a failure. You can get advice on a subfailure and
repair it separately or in combination with any other failure.
15.1.2.4 About Manual Actions and Automatic Repair Options
The
ADVISE FAILURE
command can present both manual and automatic repair options.
Data Recovery Advisor categorizes manual actions as either mandatory or optional.
In some cases, the only possible actions are manual. Suppose that no backups exist
for a lost control file. In this case, the manual action is to execute the
CREATE
CONTROLFILE
statement. Data Recovery Advisor presents this manual action as
mandatory because no automatic repair is available. In contrast, suppose that RMAN
backups exist for a missing data file. In this case, the
REPAIR FAILURE
command can
perform the repair automatically by restoring and recovering the data file. An optional
manual action is to restore the data file if it was unintentionally renamed or moved.
Data Recovery Advisor suggests optional manual actions if they might prevent a more
extreme form of repair such as data file restore and recovery.
In contrast to manual actions, automated repairs can be performed by Data Recovery
Advisor. The
ADVISE FAILURE
command presents an option ID for each automated
repair option and summarizes the action.
Data Recovery Advisor performs feasibility checks before recommending an
automated repair. For example, Data Recovery Advisor checks that all backups and
archived redo logs needed for media recovery are present and consistent. Data
Recovery Advisor may need specific backups and archived redo logs. If the files
needed for recovery are not available, then recovery is not possible.
Note:
For performance reasons, Data Recovery Advisor does not exhaustively
check every byte in every file. Thus, a feasible repair may still fail because of
a corrupted backup or archived redo log file.
15.1.2.4.1 About Consolidated Repairs
When possible, Data Recovery Advisor consolidates repairs to fix multiple failures into
a single repair. A consolidated repair may contain multiple steps.
Sometimes a consolidated repair is not possible, as when one failure prevents the
creation of repairs for other failures. For example, the feasibility of a data file repair
cannot be determined when the control file is missing. In such cases, Data Recovery
Advisor generates a repair option for failures that can be repaired and prints a
message stating that some selected failures cannot be repaired at this time. After
executing the proposed repair, you can repeat the
LIST
,
ADVISE
, and
REPAIR
sequence
to repair remaining failures.
15.1.2.4.2 About Repair Scripts
Whenever Data Recovery Advisor generates an automated repair option, it creates a
script that explains which commands RMAN intends to use to repair the failure. Data
Recovery Advisor prints the location of this script, which is a text file residing on the
operating system.
Chapter 15
Overview of Data Recovery Advisor
15-5

Example 15-1 shows a sample repair script, which shows how Data Recovery Advisor
plans to repair the loss of data file
27
.
Example 15-1 Sample Repair Script
# restore and recover data file
ALTER DATABASE DATAFILE 27 OFFLINE;
restore datafile 27;
recover datafile 27;
ALTER DATABASE DATAFILE 27 ONLINE;
If you do not want Data Recovery Advisor to automatically repair the failure, then you
can copy the script, edit it, and execute it manually.
15.1.2.5 About Supported Database Configurations for Data Recovery Advisor
Data Recovery Advisor is supported only on some database configurations.
15.1.2.5.1 About Data Recovery Advisor and Oracle Real Application Clusters
Data Recovery Advisor only supports single-instance databases. Oracle Real
Application Clusters (Oracle RAC) databases are not supported.
If a data failure occurs that brings down all Oracle RAC instances, then you can mount
the database in single-instance mode and use Data Recovery Advisor to detect and
repair control file,
SYSTEM
data file, and data dictionary failures. You can also invoke
data recovery checks proactively to test other database components for data failures.
This approach does not detect data failures that are local to other cluster instances, for
example, an inaccessible data file.
15.1.2.5.2 About Data Recovery Advisor and Oracle Data Guard
There are some limitation with Data Recovery Advisor in an Oracle Data Guard
environment.
In a Data Guard environment, Data Recovery Advisor cannot do the following:
•Use files transferred from a physical standby database to repair failures on a
primary database
•Diagnose and repair failures on a standby database
However, if the primary database is unavailable, then Data Recovery Advisor may
recommend a failover to a standby database. After the failover you can repair the old
primary database. If you are using Enterprise Manager Cloud Control in a Data Guard
configuration, then you can initiate a failover through the Data Recovery Advisor
recommendations page.
See Also:
Oracle Data Guard Concepts and Administration to learn how to use RMAN
in a Data Guard configuration
Chapter 15
Overview of Data Recovery Advisor
15-6

15.1.2.5.3 About Data Recovery Advisor and CDBs
Data Recovery Advisor can only be used to diagnose and repair data corruptions in
non-CDBs and the root of a multitenant container database (CDB). Data Recovery
Advisor is not supported for pluggable databases (PDBs).
15.1.3 Basic Steps of Diagnosing and Repairing Failures
The Data Recovery Advisor workflow begins when you either suspect or discover a
failure. You can discover failures in many ways, including error messages, alerts, trace
files, and failed data integrity checks.
As explained in "About Data Integrity Checks", the database can automatically
diagnose failures when errors occur.
To respond to failures, start an RMAN session and perform all of the following steps in
the same session and in the order they are listed:
1. List failures by running the
LIST FAILURE
command.
This task is explained in "Listing Failures".
2. If you suspect that failures exist that have not been automatically diagnosed by the
database, then run
VALIDATE DATABASE
to check for corrupt blocks and missing files.
If
VALIDATE
detects a problem, then RMAN triggers execution of a failure
assessment. If a failure is detected, then RMAN logs it into the Automated
Diagnostic Repository, where is can be accessed by Data Recovery Advisor.
This task is explained in "Checking for Block Corruptions by Validating the
Database".
3. Determine repair options by running the
ADVISE FAILURE
command.
This task is explained in "Determining Repair Options".
4. Choose a repair option. You can repair the failures manually or run the
REPAIR
FAILURE
command to fix them automatically.
This task is explained in "Repairing Failures".
5. Return to the first step to confirm that all failures were repaired or determine which
failures remain.
Performing the steps for diagnosing and repairing failures in an order that is different
from the one listed in this section may result in errors.
If appropriate, you can use
CHANGE FAILURE
command at any time in the Data Recovery
Advisor workflow to change the priority of a failure from
LOW
to
HIGH
or
HIGH
to
LOW
, or
close a failure that has been fixed manually. This task is explained in "Changing
Failure Status and Priority".
See Also:
Oracle Data Guard Concepts and Administration for a complete example on
recovering a database using the Data Recovery Advisor
Chapter 15
Overview of Data Recovery Advisor
15-7

15.1.4 Diagnosing and Repairing Failures in CDBs
You can use the Data Recovery Advisor to automatically diagnose data failures,
determine appropriate repair options, and execute repairs in a CDB.
The steps used for a CDB are similar to the ones that you would use for a non-CDB.
The only difference is that, for a CDB, you connect to the root and then use the steps
described in this chapter to perform repair actions.
You cannot diagnose data failures and execute repairs for individual PDBs in a CDB.
See Also:
"Making RMAN Connections to a CDB"
15.2 Listing Failures
If you suspect or know that one or more database failures have occurred, then use
LIST FAILURE
to obtain information about them.
You can list all or a subset of failures and restrict output in various ways. Failures are
uniquely identified by failure numbers. These numbers are not consecutive, so gaps
between failure numbers have no significance.
The
LIST FAILURE
command does not execute data integrity checks to diagnose new
failures; rather, it lists the results of previously executed assessments. Thus,
repeatedly executing
LIST FAILURE
reveals new failures only if the database
automatically diagnosed them in response to errors that occurred in between
command executions. However, executing
LIST FAILURE
causes Data Recovery
Advisor to revalidate all existing failures. If a user fixed failures manually, or if transient
failures disappeared, then Data Recovery Advisor removes these failures from the
LIST FAILURE
output. If a failure cannot be revalidated at this moment (for example,
because of another failure),
LIST FAILURE
shows the failure as open.
See Also:
•Listing All Failures
•Listing a Subset of Failures
15.2.1 Listing All Failures
The easiest way to determine problems that your database is encountering is to use
the
LIST FAILURE
command.
To list all failures:
1. Start RMAN and connect to a target database. The target database instance must
be started.
Chapter 15
Listing Failures
15-8

2. Execute the
LIST FAILURE
command.
The following example reports all failures known to Data Recovery Advisor (the
output has been reformatted to fit on the page).
RMAN> LIST FAILURE;
List of Database Failures
=========================
Failure ID Priority Status Time Detected Summary
---------- -------- --------- ------------- -------
142 HIGH OPEN 23-APR-13 One or more non-system datafiles are
missing
101 HIGH OPEN 23-APR-13 Datafile 1: '/disk1/oradata/prod/
system01.dbf' contains one or more corrupt blocks
In this example, RMAN reports two different failures: a group of missing data files
and a data file with corrupt blocks. The output indicates the unique identifier for
each failure (142 and 101), the priority, status, and detection time.
3. Optionally, execute
LIST FAILURE ... DETAIL
to list failures individually.
Data Recovery Advisor consolidates failures when possible. Specify the
DETAIL
option to list failures individually. For example, if multiple block corruptions exist in
a file, then specifying the
DETAIL
option lists each of the block corruptions. The
following example lists detailed information about failure 101.
RMAN> LIST FAILURE 101 DETAIL;
List of Database Failures
=========================
Failure ID Priority Status Time Detected Summary
---------- -------- --------- ------------- -------
101 HIGH OPEN 23-APR-13 Datafile 1: '/disk1/oradata/prod/
system01.dbf' contains one or more corrupt blocks
List of child failures for parent failure ID 101
Failure ID Priority Status Time Detected Summary
---------- -------- --------- ------------- -------
104 HIGH OPEN 23-APR-13 Block 56416 in datafile 1: '/disk1/
oradata/prod/system01.dbf' is media corrupt
Impact: Object BLKTEST owned by SYS might be unavailable
4. Proceed to determine how to repair the failures displayed by the
LIST FAILURE
command as described in "Determining Repair Options".
15.2.2 Listing a Subset of Failures
Besides providing more verbose output,
LIST FAILURE
also enables you to restrict
output.
For example, you can execute
LIST FAILURE
with the
CRITICAL
,
HIGH
,
LOW
, or
CLOSED
options to list only failures with a particular status or priority. You can also exclude
specified failures from the output by specifying
EXCLUDE FAILURE
.
To list a subset of failures:
1. Start RMAN and connect to a target database. The target database instance must
be started.
Chapter 15
Listing Failures
15-9

2. Execute
LIST FAILURE
with the desired options.
The following examples illustrate some
LIST FAILURE
commands:
LIST FAILURE LOW;
LIST FAILURE CLOSED;
LIST FAILURE EXCLUDE FAILURE 234234;
See Also:
Oracle Database Backup and Recovery Reference to learn about the
LIST
FAILURE
command
15.3 Checking for Block Corruptions by Validating the
Database
The database invokes data integrity checks reactively when a user transaction is trying
to access corrupted data. In some cases, latent failures can go undetected.
For example, when a data block corruption error occurs, the database reactively
execute a data integrity check that validates the block on which the error occurred and
other blocks in its immediate vicinity. However, blocks outside of the vicinity may be
corrupted. Also, corrupted blocks that are never read by the database are never
detected by a reactive data integrity check.
One effective way to execute a data integrity check proactively is to run the
VALIDATE
or
BACKUP VALIDATE
commands in RMAN. These commands can check data files and
control files for physical and logical corruption. If RMAN discovers block corruptions,
then it logs them into the Automatic Diagnostic Repository and creates one or more
failures. You can then use Data Recovery Advisor to list information about the failures
and repair them.
To validate the database:
1. Start RMAN and connect to a target database. The target database must be
mounted.
2. Validate the desired database files.
The following example uses
VALIDATE DATABASE
to check for physical and logical
corruption in the whole database (partial sample output included). Because
"Listing Failures" indicates that some data files are missing, the
SKIP INACCESSIBLE
clause is specified. The output shows that the
system01.dbf
database file has one
newly corrupt block (Blocks Failing) and no blocks previously marked corrupt by
the database (Marked Corrupt).
RMAN> VALIDATE CHECK LOGICAL SKIP INACCESSIBLE DATABASE;
Starting validate at 23-APR-13
allocated channel: ORA_DISK_1
channel ORA_DISK_1: SID=103 device type=DISK
could not access datafile 28
skipping inaccessible file 28
RMAN-06060: WARNING: skipping datafile compromises tablespace USERS
recoverability
Chapter 15
Checking for Block Corruptions by Validating the Database
15-10

RMAN-06060: WARNING: skipping datafile compromises tablespace USERS
recoverability
channel ORA_DISK_1: starting validation of datafile
channel ORA_DISK_1: specifying datafile(s) for validation
input datafile file number=00001 name=/disk1/oradata/prod/system01.dbf
input datafile file number=00002 name=/disk1/oradata/prod/sysaux01.dbf
input datafile file number=00022 name=/disk1/oradata/prod/undotbs01.dbf
input datafile file number=00023 name=/disk1/oradata/prod/cwmlite01.dbf
input datafile file number=00024 name=/disk1/oradata/prod/drsys01.dbf
input datafile file number=00025 name=/disk1/oradata/prod/example01.dbf
input datafile file number=00026 name=/disk1/oradata/prod/indx01.dbf
input datafile file number=00027 name=/disk1/oradata/prod/tools01.dbf
channel ORA_DISK_1: validation complete, elapsed time: 00:00:25
List of Datafiles
=================
File Status Marked Corrupt Empty Blocks Blocks Examined High SCN
---- ------ -------------- ------------ --------------- ----------
1 FAILED 0 3536 57600 637711
File Name: /disk1/oradata/prod/system01.dbf
Block Type Blocks Failing Blocks Processed
---------- -------------- ----------------
Data 1 41876
Index 0 7721
Other 0 4467
.
.
.
File Status Marked Corrupt Empty Blocks Blocks Examined High SCN
---- ------ -------------- ------------ --------------- ----------
27 OK 0 1272 1280 400914
File Name: /disk1/oradata/prod/tools01.dbf
Block Type Blocks Failing Blocks Processed
---------- -------------- ----------------
Data 0 0
Index 0 0
Other 0 8
validate found one or more corrupt blocks
See trace file /disk1/oracle/log/diag/rdbms/prod/prod/trace/prod_ora_2596.trc
for details
channel ORA_DISK_1: starting validation of datafile
channel ORA_DISK_1: specifying datafile(s) for validation
including current control file for validation
including current SPFILE in backup set
channel ORA_DISK_1: validation complete, elapsed time: 00:00:01
List of Control File and SPFILE
===============================
File Type Status Blocks Failing Blocks Examined
------------ ------ -------------- ---------------
SPFILE OK 0 2
Control File OK 0 512
Finished validate at 23-APR-13
Chapter 15
Checking for Block Corruptions by Validating the Database
15-11

See Also:
•About Data Integrity Checks
•Validating Database Files and Backups
•Oracle Database Backup and Recovery Reference to learn about the
VALIDATE
command
•Oracle Database Administrator’s Guide to learn about how Oracle
Database manages diagnostic data
15.4 Determining Repair Options
Use the
ADVISE FAILURE
command to display repair options after running
LIST FAILURE
in an RMAN session. This command prints a summary of the failures and implicitly
closes all open failures that are repaired.
Where appropriate, the
ADVISE FAILURE
command presents a list of manual and
automated repair options. Manual options, which are categorized as either mandatory
or optional, appear first. In some cases, an optional manual fix can avoid more
extreme actions such as restoring and recovering data files. As a rule, use the repair
technique that has the least effect on the database and the least possibility for error.
See Also:
•Determining Repair Options for All Failures
•Determining Repair Options for a Subset of Failures
15.4.1 Determining Repair Options for All Failures
If one or more failures exist, then you typically use
LIST FAILURE
to show information
about the failures and then
ADVISE FAILURE
in the same RMAN session to obtain a
report of your repair options.
To determine repair options for all failures:
1. List failures as described in "Listing All Failures".
2. In the same RMAN session, execute
ADVISE FAILURE
.
The following example requests repair options for all failures known to Data
Recovery Advisor and includes sample output (reformatted to fit the page).
RMAN> ADVISE FAILURE;
List of Database Failures
=========================
Failure ID Priority Status Time Detected Summary
---------- -------- --------- ------------- -------
142 HIGH OPEN 23-APR-13 One or more non-system datafiles
Chapter 15
Determining Repair Options
15-12

are missing
101 HIGH OPEN 23-APR-13 Datafile 1: '/disk1/oradata/prod/
system01.dbf' contains one or more corrupt blocks
analyzing automatic repair options; this may take some time
using channel ORA_DISK_1
analyzing automatic repair options complete
Mandatory Manual Actions
========================
no manual actions available
Optional Manual Actions
=======================
1. If file /disk1/oradata/prod/users01.dbf was unintentionally renamed or moved,
restore it
Automated Repair Options
========================
Option Repair Description
------ ------------------
1 Restore and recover datafile 28; Perform block media recovery of
block 56416 in file 1
Strategy: The repair includes complete media recovery with no data loss
Repair script: /disk1/oracle/log/diag/rdbms/prod/prod/hm/reco_660500184.hm
In the preceding example,
ADVISE FAILURE
reports two failures: a missing data file
and a data file with corrupt blocks. The command does not list mandatory manual
actions, but it suggests making sure that the missing data file was not accidentally
renamed or removed. The automated repair option involves block media recovery
and restoring and recovering the missing data file.
ADVISE FAILURE
lists the location
of the repair script.
The following variation of the same example shows the output when the RMAN
backups or archived redo logs needed for the automated repair are not available.
The command
ADVISE FAILURE
now shows mandatory manual actions.
RMAN> ADVISE FAILURE;
List of Database Failures
=========================
Failure ID Priority Status Time Detected Summary
---------- -------- --------- ------------- -------
142 HIGH OPEN 23-APR-13 One or more non-system datafiles
are missing
101 HIGH OPEN 23-APR-13 Datafile 1:
'/disk1/oradata/prod/system01.dbf' contains one or more corrupt blocks
analyzing automatic repair options; this may take some time
allocated channel: ORA_DISK_1
channel ORA_DISK_1: SID=103 device type=DISK
analyzing automatic repair options complete
Mandatory Manual Actions
========================
1. If file /disk1/oradata/prod/users01.dbf was unintentionally renamed or
moved, restore it
2. Contact Oracle Support Services if the preceding recommendations cannot be
used, or if they do not fix the failures selected for repair
Chapter 15
Determining Repair Options
15-13

Optional Manual Actions
=======================
no manual actions available
Automated Repair Options
========================
Option Repair Description
------ ------------------
1 Perform block media recovery of block 56416 in file 1
Strategy: The repair includes complete media recovery with no data loss
Repair script: /disk1/oracle/log/diag/rdbms/prod/prod/hm/reco_1863891774.hm
3. Proceed to "Repairing Failures" to determine how to repair the failures shown in
the
LIST FAILURE
output.
15.4.2 Determining Repair Options for a Subset of Failures
You can also request repair options for specific failures. You can specify failures by
status (
CRITICAL
,
HIGH
, or
LOW
) or by failure number. You can also use
EXCLUDE FAILURE
to exclude one or more failures from the report.
To determine repair options for a subset of failures:
1. List failures as described in "Listing All Failures".
2. In the same RMAN session, execute
ADVISE FAILURE
with the desired options.
The following example requests repair options for failure 101 only.
RMAN> ADVISE FAILURE 101;
List of Database Failures
=========================
Failure ID Priority Status Time Detected Summary
---------- -------- --------- ------------- -------
101 HIGH OPEN 23-APR-13 Datafile 1: '/disk1/oradata/prod/
system01.dbf' contains one or more corrupt blocks
analyzing automatic repair options; this may take some time
using channel ORA_DISK_1
analyzing automatic repair options complete
Mandatory Manual Actions
========================
no manual actions available
Optional Manual Actions
=======================
no manual actions available
Automated Repair Options
========================
Option Repair Description
------ ------------------
1 Perform block media recovery of block 56416 in file 1
Strategy: The repair includes complete media recovery with no data loss
Repair script: /disk1/oracle/log/diag/rdbms/prod/prod/hm/reco_708819503.htm
3. Proceed to "Repairing Failures" to determine how to repair the failures displayed
by the
LIST FAILURE
command.
Chapter 15
Determining Repair Options
15-14

See Also:
Oracle Database Backup and Recovery Reference to learn about the
ADVISE
FAILURE
command
15.5 Repairing Failures
You can use Data Recovery Advisor to repair failures automatically.
This section contains the following topics:
•About Repairing Failures
•Repairing a Failure
15.5.1 About Repairing Failures
If
ADVISE FAILURE
suggests manual repairs, then try these first. If manual repairs are
not possible, or if they do not repair all failures, then you can use
REPAIR FAILURE
to
automatically fix failures suggested in the most recent
ADVISE FAILURE
command in
your current RMAN session.
By default,
REPAIR FAILURE
prompts for confirmation before it begins executing. You
can suppress the confirmation prompt by specifying the
NOPROMPT
option. After it starts
executing, the command indicates the current phase of repair. Depending on the
circumstances, RMAN may prompt for a response. After executing a repair, RMAN
reevaluates all existing failures on the chance that they may have been fixed during
this repair.
While repairing a failure, wherever possible, RMAN takes a file online, restores and
recovers it, and then brings it back online again. You can repair failures for a selected
database, tablespace, or data file.
Before performing a repair, it is typically advisable to preview it by specifying the
PREVIEW
option. RMAN does not make any repairs and generates a script with all repair
actions and comments. If you do not specify a particular repair option, then RMAN
uses the first repair option of the most recent
ADVISE FAILURE
command in the current
session. By default the repair script is displayed to standard output. You can use the
SPOOL
command to write the script to an editable file.
See Also:
•Oracle Database Backup and Recovery Reference to learn about the
REPAIR FAILURE
command
•Oracle Database Backup and Recovery Reference to learn about the
SPOOL
command
Chapter 15
Repairing Failures
15-15

15.5.2 Repairing a Failure
By default the script is displayed to standard output. You can use the
SPOOL
command
to write the script to an editable file.
To repair a failure:
1. List failures as described in "Listing All Failures".
2. Display repair options as described in "Determining Repair Options".
3. Optionally, execute
REPAIR FAILURE PREVIEW
.
The following example previews the first repair options displayed by the previous
ADVISE FAILURE
command in the RMAN session.
RMAN> REPAIR FAILURE PREVIEW;
Strategy: The repair includes complete media recovery with no data loss
Repair script: /disk1/oracle/log/diag/rdbms/prod/prod/hm/reco_475549922.hm
contents of repair script:
# restore and recover datafile
sql 'alter database datafile 28 offline';
restore datafile 28;
recover datafile 28;
sql 'alter database datafile 28 online';
# block media recovery
recover datafile 1 block 56416;
4. Execute
REPAIR FAILURE
.
The following repair restores and recovers one data file and performs block media
recovery on one corrupt block. RMAN prompts for confirmation that it should
perform the repair. The user-entered text is in bold.
RMAN> REPAIR FAILURE;
Strategy: The repair includes complete media recovery with no data loss
Repair script: /disk1/oracle/log/diag/rdbms/prod/prod/hm/reco_475549922.hm
contents of repair script:
# restore and recover data file
sql 'alter database datafile 28 offline';
restore datafile 28;
recover datafile 28;
sql 'alter database datafile 28 online';
# block media recovery
recover datafile 1 block 56416;
Do you really want to execute the above repair (enter YES or NO)? YES
executing repair script
sql statement: alter database datafile 28 offline
Starting restore at 23-APR-13
using channel ORA_DISK_1
channel ORA_DISK_1: starting datafile backup set restore
channel ORA_DISK_1: specifying datafile(s) to restore from backup set
channel ORA_DISK_1: restoring datafile 00028 to /disk1/oradata/prod/users01.dbf
channel ORA_DISK_1: reading from backup piece /disk2/PROD/backupset/2013_04_18/
o1_mf_nnndf_TAG20130418T182042_32fjzd3z_.bkp
Chapter 15
Repairing Failures
15-16

channel ORA_DISK_1: piece handle=/disk2/PROD/backupset/2013_04_18/
o1_mf_nnndf_TAG20130418T182042_32fjzd3z_.bkp tag=TAG20130418T182042
channel ORA_DISK_1: restored backup piece 1
channel ORA_DISK_1: restore complete, elapsed time: 00:00:03
Finished restore at 23-APR-13
Starting recover at 23-APR-13
using channel ORA_DISK_1
starting media recovery
media recovery complete, elapsed time: 00:00:01
Finished recover at 23-APR-13
sql statement: alter database datafile 28 online
Starting recover at 23-APR-13
using channel ORA_DISK_1
searching flashback logs for block images until SCN 429690
finished flashback log search, restored 1 blocks
starting media recovery
media recovery complete, elapsed time: 00:00:03
Finished recover at 23-APR-13
repair failure complete
5. Optionally, execute
LIST FAILURE
to confirm
15.6 Changing Failure Status and Priority
In some situations, you may want to use the
CHANGE FAILURE
command to alter the
status or priority of a failure.
For example, if a block corruption has
HIGH
priority, you may want to change it to
LOW
temporarily if the block is in a little-used tablespace.
If you repair a failure by a means other than the
REPAIR FAILURE
command, then Data
Recovery Advisor closes it implicitly the next time you execute
LIST FAILURE
. For this
reason, you do not normally need to execute the
CHANGE FAILURE ... CLOSED
command.
You need to use this command only if the automatic failure revalidation fails, but you
believe the failure no longer exists. If you use
CHANGE FAILURE
to close a failure that still
exists, then Data Recovery Advisor re-creates it with a different failure ID when the
appropriate data integrity check is executed.
Typically, you specify the failures to change by failure number. You can also change
failures in bulk by specifying
ALL
,
CRITICAL
,
HIGH
, or
LOW
. You can change a failure to
CLOSED
or to
PRIORITY HIGH
or
PRIORITY LOW
.
To change the status or priority of a failure:
1. List failures as described in "Listing All Failures".
The following example lists one failure involving corrupt data blocks.
RMAN> LIST FAILURE;
List of Database Failures
=========================
Chapter 15
Changing Failure Status and Priority
15-17

Failure ID Priority Status Time Detected Summary
---------- -------- --------- ------------- -------
142 HIGH OPEN 23-APR-13 One or more non-system datafiles
are missing
101 HIGH OPEN 23-APR-13 Datafile 25: '/disk1/oradata/prod/
example01.dbf' contains one or more corrupt blocks
2. Execute
CHANGE FAILURE
with the desired options.
The following example changes the priority of a block corruption failure from
HIGH
to
LOW
.
RMAN> CHANGE FAILURE 101 PRIORITY LOW;
List of Database Failures
=========================
Failure ID Priority Status Time Detected Summary
---------- -------- --------- ------------- -------
101 HIGH OPEN 23-APR-13 Datafile 25: '/disk1/oradata/prod/
example01.dbf' contains one or more corrupt blocks
Do you really want to change the above failures (enter YES or NO)? YES
changed 1 failures to LOW priority
3. Optionally, execute
LIST FAILURE ALL
to view the change.
If you execute
LIST FAILURE
without
ALL
, then the command lists failures with
LOW
priority only if no
CRITICAL
or
HIGH
priority failures exist.
RMAN> LIST FAILURE ALL;
List of Database Failures
=========================
Failure ID Priority Status Time Detected Summary
---------- -------- --------- ------------- -------
142 HIGH OPEN 23-APR-13 One or more non-system datafiles
are missing
101 LOW OPEN 23-APR-13 Datafile 25: '/disk1/oradata/prod/
example01.dbf' contains one or more corrupt blocks
See Also:
Oracle Database Backup and Recovery Reference to learn about the
CHANGE
command
Chapter 15
Changing Failure Status and Priority
15-18

16
Validating Database Files and Backups
This chapter explains how to check the integrity of database files and backups. This
chapter contains the following topics:
•Overview of RMAN Validation
•Checking for Block Corruption with the VALIDATE Command
•Validating Database Files with BACKUP VALIDATE
•Validating Backups Before Restoring Them
•Validating CDBs and PDBs
16.1 Overview of RMAN Validation
Validation enables you to check the integrity of your backups.
16.1.1 Purpose of RMAN Validation
The main purpose of RMAN validation is to check for corrupt blocks and missing files.
You can also use RMAN to determine whether backups can be restored.
You can use the following RMAN commands to perform validation:
•
VALIDATE
•
BACKUP ... VALIDATE
•
RESTORE ... VALIDATE
See Also:
•Oracle Database Backup and Recovery Reference for
VALIDATE
syntax
•Oracle Database Backup and Recovery Reference for
RESTORE ...
VALIDATE
syntax
16.1.2 Basic Concepts of RMAN Validation
The database prevents operations that result in unusable backup files or corrupted
restored data files.
The database automatically does the following:
•Blocks access to data files while they are being restored or recovered
•Permits only one restore operation for each data file at a time
•Ensures that incremental backups are applied in the correct order
16-1

•Stores information in backup files to allow detection of corruption
•Checks a block every time it is read or written in an attempt to report a corruption
as soon as it has been detected
16.1.2.1 About Checksums and Corrupt Blocks
A corrupt block is a block that has been changed so that it differs from what Oracle
Database expects to find.
Block corruptions can be caused by several different failures including, but not limited
to the following:
•Faulty disks and disk controllers
•Faulty memory
•Oracle Database software defects
DB_BLOCK_CHECKSUM
is a database initialization parameter that controls the writing of
checksums for the blocks in data files and online redo log files in the database (not
backups). If
DB_BLOCK_CHECKSUM
is
typical
, then the database computes a checksum for
each block during normal operations and stores it in the header of the block before
writing it to disk. When the database reads the block from disk later, it recomputes the
checksum and compares it to the stored value. If the values do not match, then the
block is corrupt.
By default, the
BACKUP
command computes a checksum for each block and stores it in
the backup. The
BACKUP
command ignores the values of
DB_BLOCK_CHECKSUM
because
this initialization parameter applies to data files in the database, not backups.
16.1.2.2 About Physical and Logical Block Corruption
In a physical corruption, which is also called a media corruption, the database does
not recognize the block at all: the checksum is invalid, the block contains all zeros, or
the header and footer of the block do not match.
Note:
By default, the
BACKUP
command computes a checksum for each block and
stores it in the backup. If you specify the
NOCHECKSUM
option, then RMAN does
not perform a checksum of the blocks when creating the backup.
In a logical corruption, the contents of the block are logically inconsistent. Examples of
logical corruption include corruption of a row piece or index entry. If RMAN detects
logical corruption, then it logs the block in the alert log and server session trace file.
By default, RMAN does not check for logical corruption. If you specify
CHECK LOGICAL
on
the
BACKUP
command, however, then RMAN tests data and index blocks for logical
corruption, such as corruption of a row piece or index entry, and log them in the alert
log located in the Automatic Diagnostic Repository (ADR). If you use RMAN with the
following configuration when backing up or restoring files, then it detects all types of
block corruption that are possible to detect:
Chapter 16
Overview of RMAN Validation
16-2

•In the initialization parameter file of a database, set
DB_BLOCK_CHECKSUM=typical
so
that the database calculates data file checksums automatically (not for backups,
but for data files in use by the database)
•Do not precede the
BACKUP
command with
SET MAXCORRUPT
so that RMAN does not
tolerate any unmarked block corruptions.
•In a
BACKUP
command, do not specify the
NOCHECKSUM
option so that RMAN
calculates a checksum when writing backups
•In
BACKUP
and
RESTORE
commands, specify the
CHECK
LOGICAL
option so that RMAN
checks for logical and physical corruption
16.1.2.3 About Limits for Corrupt Blocks in RMAN Backups
You can use the
SET MAXCORRUPT
command to set the total number of unmarked
corruptions permitted in a file for RMAN backups. The default is zero, meaning that
RMAN does not tolerate unmarked corrupt blocks of any kind.
If the
MAXCORRUPT
limit is exceeded when RMAN encounters an unmarked corrupt block
during a backup, then RMAN terminates the backup. Otherwise, RMAN writes the
newly detected corrupt block to the backup with a special header indicating that the
block is marked corrupt. You can use the
VALIDATE
command to determine which
blocks are marked as corrupt and to find any unmarked corrupt blocks.
Because RMAN allows marked corrupt blocks in a backup, and because RMAN can
be instructed to allow unmarked corrupt blocks to be marked as corrupt in the backup
(when
MAXCORRUPT
is used), it is possible to restore a data file that has several blocks
marked as corrupt. If you backup this restored data file (assuming no new corruptions
have happened), even without
MAXCORRUPT
setting, the backup succeeds. This is
because the previously marked corruptions do not stop RMAN from completing the
backup.
See Also:
Oracle Database Backup and Recovery Reference for
SET MAXCORRUPT
syntax
16.1.2.4 About Detecting Block Corruption
Oracle Database supports different techniques for detecting, repairing, and monitoring
block corruption.
The technique depends on whether the corruption is interblock corruption or intrablock
corruption. In intrablock corruption, the corruption occurs within the block itself. This
corruption can be either physical or logical. In an interblock corruption, the corruption
occurs between blocks and can only be logical.
For example, the
V$DATABASE_BLOCK_CORRUPTION
view records intrablock corruptions,
while the Automatic Diagnostic Repository (ADR) tracks all types of corruptions.
Table 16-1 summarizes how the database treats different types of block corruption.
Chapter 16
Overview of RMAN Validation
16-3

Table 16-1 Detection, Repair, and Monitoring of Block Corruption
Response Intrablock Corruption Interblock Corruption
Detection All database utilities detect intrablock corruption,
including RMAN (for example, the
BACKUP
command) and the DBVERIFY utility. If a
database process can encounter the
ORA-1578
error, then it can detect the corruption and
monitor it.
Only DBVERIFY and the
ANALYZE
statement
detect interblock corruption.
Tracking The
V$DATABASE_BLOCK_CORRUPTION
view
displays blocks marked corrupt by Oracle
Database components such as RMAN
commands,
ANALYZE
, SQL queries, and so on.
Any process that encounters an intrablock
corruption records the block corruption in this
view and in ADR.
The database monitors this type of block
corruption in ADR.
Repair Repair techniques include block media
recovery, restoring data files, recovering with
incremental backups, and block newing. Block
media recovery can repair physical corruptions,
but not logical corruptions.
Any RMAN command that fixes or detects that a
block is repaired updates
V$DATABASE_BLOCK_CORRUPTION
. For example,
RMAN updates the repository at end of
successful block media recovery. If a
BACKUP
,
RESTORE
, or
VALIDATE
command detects that a
block is no longer corrupted, then it removes the
repaired block from the view.
You must fix interblock corruption using manual
techniques such as dropping an object,
rebuilding an index, and so on.
See Also:
•Performing Complete Database Recovery
•Performing Block Media Recovery
•Oracle Database Administrator’s Guide to learn about ADR
16.2 Checking for Block Corruption with the VALIDATE
Command
You can use the
VALIDATE
command to manually check for physical and logical
corruptions in database files.
This command performs the same types of checks as
BACKUP VALIDATE
, but
VALIDATE
can check a larger selection of objects. For example, you can validate individual
blocks with the
VALIDATE DATAFILE ... BLOCK
command.
To specify a copy number for the backup piece being validated, run the
VALIDATE FROM
COPY NUMBER
command.
Chapter 16
Checking for Block Corruption with the VALIDATE Command
16-4

When validating whole files, RMAN checks every block of the input files. If the backup
validation discovers previously unmarked corrupt blocks, then RMAN updates the
V$DATABASE_BLOCK_CORRUPTION
view with rows describing the corruptions.
Use
VALIDATE BACKUPSET
when you suspect that one or more backup pieces in a backup
set are missing or have been damaged. This command checks every block in a
backup set to ensure that the backup can be restored. If RMAN finds block corruption,
then it issues an error and terminates the validation. The command
VALIDATE BACKUPSET
enables you to choose which backups to check, whereas the
VALIDATE
option of the
RESTORE
command lets RMAN choose.
To use VALIDATE to check database files and backups:
1. Start RMAN and connect to a target database.
See Also:
"Making Database Connections with RMAN"
2. Execute the
VALIDATE
command with the desired options.
For example, to validate all data files and control files (and the server parameter
file if one is in use), execute the following command at the RMAN prompt:
RMAN> VALIDATE DATABASE;
Alternatively, you can validate a particular backup set by using the form of the
command shown in the following example (sample output included).
RMAN> VALIDATE BACKUPSET 22;
Starting validate at 17-AUG-13
using channel ORA_DISK_1
allocated channel: ORA_SBT_TAPE_1
channel ORA_SBT_TAPE_1: SID=89 device type=SBT_TAPE
channel ORA_SBT_TAPE_1: Oracle Secure Backup
channel ORA_DISK_1: starting validation of datafile backup set
channel ORA_DISK_1: reading from backup piece
/disk1/oracle/work/orcva/RDBMS/backupset/2013_08_16/o1_mf_nnndf_
TAG20130816T153034_2g774bt2_.bkp
channel ORA_DISK_1: piece
handle=/disk1/oracle/work/orcva/RDBMS/backupset/2013_08_16/o1_mf_nnndf_
TAG20130816T153034_2g774bt2_.bkp tag=TAG20130816T153034
channel ORA_DISK_1: restored backup piece 1
channel ORA_DISK_1: validation complete, elapsed time: 00:00:01
Finished validate at 17-AUG-13
The following example illustrates how you can check individual data blocks within
a data file for corruption.
RMAN> VALIDATE DATAFILE 1 BLOCK 10;
Starting validate at 17-AUG-13
using channel ORA_DISK_1
channel ORA_DISK_1: starting validation of datafile
channel ORA_DISK_1: specifying datafile(s) for validation
input datafile file number=00001 name=/disk1/oracle/dbs/tbs_01.f
channel ORA_DISK_1: validation complete, elapsed time: 00:00:01
Chapter 16
Checking for Block Corruption with the VALIDATE Command
16-5

List of Datafiles
=================
File Status Marked Corrupt Empty Blocks Blocks Examined High SCN
---- ------ -------------- ------------ --------------- ----------
1 OK 0 2 127 481907
File Name: /disk1/oracle/dbs/tbs_01.f
Block Type Blocks Failing Blocks Processed
---------- -------------- ----------------
Data 0 36
Index 0 31
Other 0 58
Finished validate at 17-AUG-13
Make Parallel the Validation of a Data File
If you must validate a large data file, then RMAN can make the work parallel by
dividing the file into sections and processing each file section in parallel. If multiple
channels are configured or allocated, and if you want the channels to make parallel the
validation, then specify the
SECTION SIZE
parameter of the
VALIDATE
command.
If you specify a section size that is larger than the size of the file, then RMAN does not
create file sections. If you specify a small section size that would produce more than
256 sections, then RMAN increases the section size to a value that results in exactly
256 sections.
To make parallel the validation of a data file:
1. Start RMAN and connect to a target database. The target database must be
mounted or open.
2. Run
VALIDATE
with the
SECTION SIZE
parameter.
The following example allocates two channels and validates a large data file. The
section size is 1200 MB.
RUN
{
ALLOCATE CHANNEL c1 DEVICE TYPE DISK;
ALLOCATE CHANNEL c2 DEVICE TYPE DISK;
VALIDATE DATAFILE 1 SECTION SIZE 1200M;
}
See Also:
•"Dividing the Backup of a Large Data File into Sections"
•Oracle Database Backup and Recovery Reference to learn about the
VALIDATE
command
16.3 Validating Database Files with BACKUP VALIDATE
You can also use the
BACKUP VALIDATE
command to perform validation.
This command can perform the following tasks:
•Check data files for physical and logical block corruption
Chapter 16
Validating Database Files with BACKUP VALIDATE
16-6

•Confirm that all database files exist and are in the correct locations
When you run
BACKUP VALIDATE
, RMAN reads the files to be backed up in their entirety,
as it does during a real backup. RMAN does not, however, actually produce any
backup sets or image copies.
You cannot use the
BACKUPSET
,
MAXCORRUPT
, or
PROXY
parameters with
BACKUP VALIDATE
.
To validate specific backup sets, run the
VALIDATE
command.
To validate files with the BACKUP VALIDATE command:
1. Start RMAN and connect to a target database and recovery catalog (if used).
2. Run the
BACKUP VALIDATE
command.
For example, you can validate that all database files and archived logs can be
backed up by running a command as shown in the following example. This
command checks for physical corruptions only.
BACKUP VALIDATE
DATABASE
ARCHIVELOG ALL;
To check for logical corruptions in addition to physical corruptions, run the
following variation of the preceding command:
BACKUP VALIDATE
CHECK LOGICAL
DATABASE
ARCHIVELOG ALL;
In the preceding examples, the RMAN client displays the same output as when
really backing up the files. If RMAN cannot back up one or more of the files, then it
issues an error message. For example, RMAN may show output similar to the
following:
RMAN-00571: ===========================================================
RMAN-00569: =============== ERROR MESSAGE STACK FOLLOWS ===============
RMAN-00571: ===========================================================
RMAN-03002: failure of backup command at 08/29/2013 14:33:47
ORA-19625: error identifying file /oracle/oradata/trgt/arch/archive1_6.dbf
ORA-27037: unable to obtain file status
SVR4 Error: 2: No such file or directory
Additional information: 3
See Also:
•Oracle Database Backup and Recovery Reference for
BACKUP
syntax
•Performing Block Media Recoveryto learn how to repair corrupt blocks
discovered by
BACKUP
VALIDATE
Chapter 16
Validating Database Files with BACKUP VALIDATE
16-7

16.4 Validating Backups Before Restoring Them
You can run
RESTORE...VALIDATE
to test whether RMAN can restore a specific file or set
of files from a backup. RMAN chooses which backups to use.
The database must be mounted or open for this command. You do not have to take
data files offline when validating the restore of data files, because validation of
backups of the data files only reads the backups and does not affect the production
data files.
When validating files on disk or tape, RMAN reads all blocks in the backup piece or
image copy. RMAN also validates offsite backups. The validation is identical to a real
restore operation except that RMAN does not write output files.
RMAN also allows to specify a copy number for the backup pieces being validated.
Note:
As an additional test measure, you can perform a trial recovery with the
RECOVER ... TEST
command. A trial recovery applies redo in a way similar to
normal recovery, but it is in memory only and it rolls back its changes after
the trial.
To validate backups with the RESTORE command:
1. Run the
RESTORE
command with the
VALIDATE
option.
This following example illustrates validating the restore of the database and all
archived redo logs:
RESTORE DATABASE VALIDATE;
RESTORE ARCHIVELOG ALL VALIDATE;
If you do not see an RMAN error stack, then skip the subsequent steps. The lack
of error messages means that RMAN had confirmed that it can use these backups
successfully during a real restore and recovery.
2. If you see error messages in the output and the
RMAN-06026
message, then
investigate the cause of the problem. If possible, correct the problem that is
preventing RMAN from validating the backups and retry the validation.
The following error means that RMAN cannot restore one or more of the specified
files from your available backups:
RMAN-06026: some targets not found - aborting restore
The following sample output shows that RMAN encountered a problem reading the
specified backup:
RMAN-03009: failure of restore command on c1 channel at 12-DEC-12 23:22:30
ORA-19505: failed to identify file "oracle/dbs/1fafv9gl_1_1"
ORA-27037: unable to obtain file status
SVR4 Error: 2: No such file or directory
Additional information: 3
Chapter 16
Validating Backups Before Restoring Them
16-8

See Also:
Oracle Database Backup and Recovery Reference to learn about the
RESTORE...VALIDATE
command
16.5 Validating CDBs and PDBs
RMAN enables you to validate multitenant container databases (CDBs) and pluggable
databases (PDBs) using the
VALIDATE
command.
You can also choose to specify a copy number for the backup pieces being validated
for both CDBs and PDBs.
All of the procedures in this chapter apply to CDBs, with the differences described in
the following sections:
•Validating a Whole CDB
•Validating PDBs
16.5.1 Validating a Whole CDB
The steps to validate a CDB are similar to the ones used to validate a non-CDB.
The only difference is that you must connect to the root as a common user with the
common
SYSBACKUP
or
SYSDBA
privilege. Then, use the
VALIDATE DATABASE
and
RESTORE
DATABASE VALIDATE
commands.
See Also:
"Making RMAN Connections to a CDB"
The following command, when connected to the root, validates the whole CDB:
VALIDATE DATABASE;
The following command validates the root:
VALIDATE DATABASE ROOT;
16.5.2 Validating PDBs
There are multiple methods to validate PDBs.
Use one of the following techniques to validate PDBs:
•Connect to the root and use the
VALIDATE PLUGGABLE DATABASE
or
RESTORE PLUGGABLE
DATABASE VALIDATE
command. This enables you to validate one or more PDBs.
The following command, when connected to the root, validates the PDBs
hr_pdb
and
sales_pdb
.
VALIDATE PLUGGABLE DATABASE hr_pdb, sales_pdb;
Chapter 16
Validating CDBs and PDBs
16-9

•Connect to the PDB and use the
VALIDATE DATABASE
and
RESTORE DATABASE VALIDATE
commands to validate only one PDB. The commands used here are the same
commands that you would use for a non-CDB.
The following command, when connected to a PDB, validates the restore of the
database.
RESTORE DATABASE VALIDATE;
See Also:
"Making RMAN Connections to a CDB"
Chapter 16
Validating CDBs and PDBs
16-10

17
Performing Complete Database Recovery
This chapter explains how to use RMAN to return your database to normal operation
after the loss of one or more data files. This chapter contains the following topics:
•Overview of Complete Database Recovery
•Preparing for Complete Database Recovery
•Performing Complete Database Recovery
•Performing Complete Recovery of CDBs
•Performing Complete Recovery of Application Containers
•Performing Complete Recovery of Sparse Databases with RMAN
17.1 Overview of Complete Database Recovery
Complete recovery returns your database to normal operation after the loss of one or
more database files.
This section contains the following topics:
•Purpose of Complete Database Recovery
•Scope of This Chapter
•About Real-time Redo Transport for Recovery Appliance
17.1.1 Purpose of Complete Database Recovery
Complete recovery is recovering a database to the most recent point in time, without
the loss of any committed transactions.
This chapter assumes that some or all of your data files are lost or damaged.
Typically, this situation is caused by a media failure or accidental deletion. Your goal is
to return the database to normal operation by restoring the damaged files from RMAN
backups and recovering all database changes.
17.1.2 Scope of This Chapter
The complete recovery operations described in this chapter are subject to certain
conditions.
This chapter makes the following assumptions:
•You have lost some or all data files and your goal is to recover all changes, but
you have not lost all current control files or an entire online redo log group.
•Your database is using the current server parameter file.
•You have the complete set of archived redo logs and incremental backups needed
for recovery of your data file backups. Every data file either has a backup, or a
17-1

complete set of online and archived redo logs goes back to the creation of a data
file with no backup.
RMAN can handle lost data files without user intervention during restore and
recovery. When a data file is lost, the possible cases can be classified as follows:
–The control file knows about the data file, that is, you backed up the control file
after data file creation, but the data file itself is not backed up. If the data file
record is in the control file, then
RESTORE
creates the data file in the original
location or in a user-specified location. The
RECOVER
command can then apply
the necessary logs to the data file.
–The control file does not have the data file record, that is, you did not back up
the control file after data file creation. During recovery, the database detects
the missing data file and reports it to RMAN, which creates a data file and
continues recovery by applying the remaining logs. If the data file was created
in a parent incarnation, then it is created during the restore or recovery phase
as appropriate.
•You are not restoring and recovering an encrypted tablespace.
If you perform media recovery on an encrypted tablespace, then the Oracle
keystore must be open when performing media recovery of this tablespace.
•Your database runs in a single-instance configuration.
Although RMAN can restore and recover databases in Oracle RAC and Data
Guard configurations, these scenarios are beyond the scope of this manual.
•You are using the RMAN client rather than Oracle Enterprise Manager.
See Also:
•" Performing Flashback and Database Point-in-Time Recovery" for
information about recovering some but not all database changes
•"Performing Recovery with a Backup Control File" for information about
recovering the database when all control files are lost
•"Restoring the Server Parameter File" for information about restoring a
backup server parameter file
17.1.3 About Real-time Redo Transport for Recovery Appliance
Zero Data Loss Recovery Appliance (Recovery Appliance) substantially reduces the
window of potential data loss that exists between successive archived redo log
backups. You to recover target databases to within a few subseconds of a database
failure.
When real-time redo transport is configured for a target database, redo data from the
current redo log groups is written asynchronously to Recovery Appliance as it is
generated. As the redo stream is received, it is stored as a complete RMAN archived
redo log. If the target database crashes, the redo data received from the current redo
log group, until the time of the crash, is used during restore and recovery operations.
You must perform certain configuration steps to enable real-time redo transport for the
target database.
Chapter 17
Overview of Complete Database Recovery
17-2

Note:
Real-time redo transport can be used only with Recovery Appliance.
See Also:
Zero Data Loss Recovery Appliance Protected Databases Configuration
Guide for the steps to configure real-time redo transport
17.2 Preparing for Complete Database Recovery
You must plan your database restore and recovery strategy based on your recovery
goal and which database files have been lost.
This section contains the following topics:
•Identifying the Database Files to Restore or Recover
•Determining the DBID of the Database
•Previewing Backups Used in Restore Operations
•Validating Backups Before Restoring Them
•Restoring Archived Redo Logs Needed for Recovery
•Providing the Password Required to Decrypt Encrypted Backups
17.2.1 Identifying the Database Files to Restore or Recover
The techniques for determining which files require restore or recovery depend upon
the type of file that is lost.
This section contains the following topics:
•Identifying a Lost Control File
•Identifying Data Files Requiring Media Recovery
17.2.1.1 Identifying a Lost Control File
The database shuts down immediately when any of the multiplexed control files
become inaccessible.
If you try to start the database without a valid control file at each location specified in
the
CONTROL_FILES
initialization parameter, then the database reports an error.
Loss of some but not all copies of your control file does not require you to restore a
control file from backup. If at least one control file remains intact, then you can either
copy an intact copy of the control file over the damaged or missing control file, or
update the initialization parameter file so that it does not refer to the damaged or
missing control file. After the
CONTROL_FILES
parameter references only present, intact
copies of the control file, you can restart your database.
Chapter 17
Preparing for Complete Database Recovery
17-3

If you restore the control file from backup, then you must perform media recovery of
the whole database and then open it with the
OPEN RESETLOGS
option, even if no data
files must be restored. This technique is described in "Performing Recovery with a
Backup Control File".
17.2.1.2 Identifying Data Files Requiring Media Recovery
The decision about when and how to recover depends on the state of the database
and the location of its data files.
Use RMAN or SQL*Plus to identify data files that require media recovery.
See Also:
•Identifying Data Files with RMAN
•Identifying Data Files with SQL
17.2.1.2.1 Identifying Data Files with RMAN
An easy technique for determining which data files are missing is to run a
VALIDATE
DATABASE
command.
Example 17-1 VALIDATE DATABASE
This example validates the database and tries to read all specified data files (sample
output included).
RMAN> VALIDATE DATABASE;
Starting validate at 20-OCT-13
allocated channel: ORA_DISK_1
channel ORA_DISK_1: SID=90 device type=DISK
could not read file header for datafile 7 error reason 4
RMAN-00571: ===========================================================
RMAN-00569: =============== ERROR MESSAGE STACK FOLLOWS ===============
RMAN-00571: ===========================================================
RMAN-03002: failure of backup command at 10/20/2013 13:05:43
RMAN-06056: could not access datafile 7
The output of
VALIDATE DATABASE
command indicates that data file 7 is inaccessible.
You can then run the
REPORT SCHEMA
command to obtain the tablespace name and file
name for data file 7 as follows (sample output included):
RMAN> REPORT SCHEMA;
Report of database schema for database with db_unique_name RDBMS
List of Permanent Datafiles
===========================
File Size(MB) Tablespace RB segs Datafile Name
---- -------- -------------------- ------- ------------------------
1 450 SYSTEM *** +DATAFILE/tbs_01.f
2 86 SYSAUX *** +DATAFILE/tbs_ax1.f
3 15 UD1 *** +DATAFILE/tbs_undo1.f
4 2 SYSTEM *** +DATAFILE/tbs_02.f
Chapter 17
Preparing for Complete Database Recovery
17-4

5 2 TBS_1 *** +DATAFILE/tbs_11.f
6 2 TBS_1 *** +DATAFILE/tbs_12.f
7 2 TBS_2 *** +DATAFILE/tbs_21.f
List of Temporary Files
=======================
File Size(MB) Tablespace Maxsize(MB) Tempfile Name
---- -------- -------------------- ----------- --------------------
1 40 TEMP 32767 +DATAFILE/tbs_tmp1.f
17.2.1.2.2 Identifying Data Files with SQL
Although
VALIDATE DATABASE
is a good technique for determining whether files are
inaccessible, you may want to use SQL queries to obtain more detailed information.
To determine whether data files require media recovery:
1. Start SQL*Plus and connect to the target database instance with administrator
privileges.
2. Determine the status of the database by executing the following SQL query:
SELECT STATUS FROM V$INSTANCE;
If the status is
OPEN
, then the database is open. Nevertheless, some data files may
require media recovery.
3. Query
V$DATAFILE_HEADER
to determine the status of your data files. Run the
following SQL statements to check the data file headers:
SELECT FILE#, STATUS, ERROR, RECOVER, TABLESPACE_NAME, NAME
FROM V$DATAFILE_HEADER
WHERE RECOVER = 'YES'
OR (RECOVER IS NULL AND ERROR IS NOT NULL);
Each row returned represents a data file that either requires media recovery or has
an error requiring a restore. Check the
RECOVER
and
ERROR
columns.
RECOVER
indicates whether a file needs media recovery, and
ERROR
indicates whether there
was an error reading and validating the data file header.
If
ERROR
is not
NULL
, then the data file header cannot be read and validated. Check
for a temporary hardware or operating system problem causing the error. If there
is no such problem, then you must restore the file or switch to a copy.
If the
ERROR
column is
NULL
and the
RECOVER
column is
YES
, then the file requires
media recovery (and may also require a restore from backup).
Note:
Because
V$DATAFILE_HEADER
only reads the header block of each data file,
it does not detect all problems that require the data file to be restored.
For example, this view cannot tell whether a data file contains corrupt
data blocks.
4. Optionally, query
V$RECOVER_FILE
to list data files requiring recovery by data file
number with their status and error information. For example, execute the following
query:
Chapter 17
Preparing for Complete Database Recovery
17-5

SELECT FILE#, ERROR, ONLINE_STATUS, CHANGE#, TIME
FROM V$RECOVER_FILE;
Note:
You cannot use
V$RECOVER_FILE
with a control file restored from backup
or a control file that was re-created after the time of the media failure
affecting the data files. A restored or re-created control file does not
contain the information needed to update
V$RECOVER_FILE
accurately.
To find data file and tablespace names, you can also perform joins using the data
file number and the
V$DATAFILE
and
V$TABLESPACE
views, as shown in the following
example.
SELECT r.FILE# AS df#, d.NAME AS df_name, t.NAME AS tbsp_name,
d.STATUS, r.ERROR, r.CHANGE#, r.TIME
FROM V$RECOVER_FILE r, V$DATAFILE d, V$TABLESPACE t
WHERE t.TS# = d.TS#
AND d.FILE# = r.FILE#;
The
ERROR
column identifies the problem for each file requiring recovery.
See Also:
•
V$DATAFILE_HEADER
in Oracle Database Reference
•
V$RECOVER_FILE
in Oracle Database Reference
•
V$DATAFILE
in Oracle Database Reference
•
V$TABLESPACE
in Oracle Database Reference
17.2.2 Determining the DBID of the Database
It is recommended that you record the DBID of your database.
In situations requiring the recovery of your server parameter file or control file from
autobackup, you must know the DBID. Be sure to record the DBID along with other
basic information about your database.
If you do not have a record of the DBID of your database, then you can find it in the
following places without opening your database:
•The DBID is used in forming the file name for the control file autobackup. Locate
this file, and then refer to "Configuring the Control File Autobackup Format" to
determine where the DBID appears in the file name.
•If you have any text files that preserve the output from an RMAN session, then the
DBID is displayed by the RMAN client when it starts up and connects to your
database. Typical output follows:
% rman TARGET /
Recovery Manager: Release 12.1.0.1.0 - Production on Wed Jan 16 17:51:30 2013
Chapter 17
Preparing for Complete Database Recovery
17-6

Copyright (c) 1982, 2013, Oracle and/or its affiliates. All rights reserved.
connected to target database: PROD (DBID=36508508)
17.2.3 Previewing Backups Used in Restore Operations
Previewing backups helps you to ensure that all backups required for a restore and
recovery operation are available.
You can apply
RESTORE
...
PREVIEW
to any
RESTORE
operation to create a detailed list of
every backup to be used in the requested
RESTORE
operation, and the necessary target
SCN for recovery after the
RESTORE
operation is complete. This command accesses the
RMAN repository to query the backup metadata, but does not actually read the backup
files to ensure that they can be restored.
As an alternative to
RESTORE ... PREVIEW
, you can use the
RESTORE ... VALIDATE HEADER
command. In addition to listing the files needed for restore and recovery, the
RESTORE ... VALIDATE HEADER
command validates the backup file headers to determine
whether the files on disk or in the media management catalog correspond to the
metadata in the RMAN repository.
When planning your restore and recovery operation, use
RESTORE ... PREVIEW
or
RESTORE ... VALIDATE HEADER
to ensure that all required backups are available or to
identify situations in which you may want to direct RMAN to use or avoid specific
backups.
To preview backups to be used in a restore operation:
1. Run a
RESTORE
command with the
PREVIEW
option.
For example, run one of the following commands:
RESTORE DATABASE PREVIEW;
RESTORE ARCHIVELOG FROM TIME 'SYSDATE-7' PREVIEW;
If the report produced by
RESTORE
...
PREVIEW
provides too much information, then
specify the
SUMMARY
option as shown in the following example:
RESTORE DATABASE PREVIEW SUMMARY;
If you are satisfied with the output, then stop here. If the output indicates that
RMAN will request a backup from a tape that you know is temporarily unavailable,
then continue with this procedure. If the output indicates that a backup is stored
off-site, then skip to "Recalling Off-site Backups".
2. If needed, use the
CHANGE
command to set the backup status of any temporarily
unavailable backups to
UNAVAILABLE
.
"Updating a Backup to Status AVAILABLE or UNAVAILABLE" explains how to
perform this task.
3. Optionally, run
RESTORE ...
PREVIEW
again to confirm that the restore operation
does not attempt to use unavailable backups.
Chapter 17
Preparing for Complete Database Recovery
17-7

See Also:
Oracle Database Backup and Recovery Referencefor details on interpreting
RESTORE
...
PREVIEW
output, which is in the same format as the output of the
LIST
command
17.2.3.1 Recalling Off-site Backups
An offsite backup is stored in a remote location, such as a secure storage facility, and
cannot be restored unless the media manager retrieves the media.
Some media managers provide status information to RMAN about which backups are
off-site. Off-site backups are marked as
AVAILABLE
in the RMAN repository even though
the media must be retrieved from storage before the backup can be restored. If RMAN
attempts to restore an off-site backup, then the restore job fails.
To recall offsite backups:
1. (Optional) Identify the off-site backups using the
RESTORE ... PREVIEW
command.
The command output indicates whether backups are stored off-site, as shown by
the text after the sample output in the following example.
List of Backup Sets
===================
BS Key Size Device Type Elapsed Time Completion Time
------- ---------- ----------- ------------ ---------------
9 2.25M SBT_TAPE 00:00:00 21-MAY-13
BP Key: 9 Status: AVAILABLE Compressed: NO Tag: TAG20130521T144258
Handle: 0aii9k7i_1_1 Media: 0aii9k7i_1_1
List of Archived Logs in backup set 9
Thrd Seq Low SCN Low Time Next SCN Next Time
---- ------- ---------- --------- ---------- ---------
1 1 392314 21-MAY-13 392541 21-MAY-13
1 2 392541 21-MAY-13 392545 21-MAY-13
1 3 392545 21-MAY-13 392548 21-MAY-13
1 4 392548 21-MAY-13 395066 21-MAY-13
1 5 395066 21-MAY-13 395095 21-MAY-13
1 6 395095 21-MAY-13 395355 21-MAY-13
List of remote backup files
============================
Handle: aii9k7i_1_1 Media: 0aii9k7i_1_1
validation succeeded for backup piece
Finished restore at 21-MAY-13
released channel: dev1
You can use
RESTORE
...
PREVIEW
RECALL
to instruct the media manager to make off-
site backups available.
2. If backups are stored offsite, then execute a
RESTORE ... PREVIEW
command with
the
RECALL
option.
The following example initiates recall for the off-site archived log backups shown in
the previous step (sample output included):
Chapter 17
Preparing for Complete Database Recovery
17-8

RESTORE ARCHIVELOG ALL PREVIEW RECALL;
The following sample output indicates that RMAN initiated a recall:
List of Backup Sets
===================
BS Key Size Device Type Elapsed Time Completion Time
------- ---------- ----------- ------------ ---------------
9 2.25M SBT_TAPE 00:00:00 21-MAY-13
BP Key: 9 Status: AVAILABLE Compressed: NO Tag: TAG20130521T144258
Handle: VAULT0aii9k7i_1_1 Media: /tmp,VAULT0aii9k7i_1_1
List of Archived Logs in backup set 9
Thrd Seq Low SCN Low Time Next SCN Next Time
---- ------- ---------- --------- ---------- ---------
1 1 392314 21-MAY-13 392541 21-MAY-13
1 2 392541 21-MAY-13 392545 21-MAY-13
1 3 392545 21-MAY-13 392548 21-MAY-13
1 4 392548 21-MAY-13 395066 21-MAY-13
1 5 395066 21-MAY-13 395095 21-MAY-13
1 6 395095 21-MAY-13 395355 21-MAY-13
Initiated recall for the following list of remote backup files
==========================================================
Handle: VAULT0aii9k7i_1_1 Media: /tmp,VAULT0aii9k7i_1_1
validation succeeded for backup piece
Finished restore at 21-MAY-13
released channel: dev1
3. Run the
RESTORE ...
PREVIEW
command. If necessary, return to the previous step
until no backups needed for the restore operation are reported as off-site.
17.2.4 Validating Backups Before Restoring Them
Validating backups determines if the backups are usable.
Although the output of a restore preview operation indicates which backups will be
restored, the usability of the backups is not actually verified. You can run RMAN
commands to test the availability of usable backups for any
RESTORE
operation, or test
the contents of a specific backup for use in
RESTORE
operations. The contents of the
backups are actually read and checked for corruption.
Use one of the following validation options:
•
RESTORE
...
VALIDATE
to test whether RMAN can restore a specific object from a
backup. RMAN chooses which backups to use.
•
VALIDATE BACKUPSET
to test the validity of a backup set that you specify.
See Also:
Validating Database Files and Backups
Chapter 17
Preparing for Complete Database Recovery
17-9

17.2.5 Restoring Archived Redo Logs Needed for Recovery
RMAN restores archived redo log files from backup automatically as needed to
perform recovery.
You can also restore archived redo logs manually to save the time needed to restore
these files later during the
RECOVER
command, or if you want to store the restored
archived redo log files in some new location. RMAN also gives you the flexibility of
restoring all archive redo log files, the current ones, or archive redo log files from a
specified previous incarnation of the database.
In case of missing archived redo logs during disaster recovery, RMAN enables you to
automate the database recovery till the last available archived redo log, using the
UNTIL AVAILABLE REDO
option. You can use this option only when performing recovery
for a whole database. Using this option for a data file, tablespace, or pluggable
database is not supported. To perform point-in-time recovery for a pluggable
database, you must provide the SCN number as the point of recovery.
By default, RMAN restores archived redo logs with names constructed using the
LOG_ARCHIVE_FORMAT
and the highest
LOG_ARCHIVE_DEST_n
parameters of the target
database. These parameters are combined in a platform-specific fashion to form the
name of the restored archived log.
This section contains the following topics:
•"Restoring Archived Redo Logs to a New Location"
•"Restoring Archived Redo Logs to Multiple Locations"
17.2.5.1 Restoring Archived Redo Logs to a New Location
RMAN enables you to override the default location for restored archived redo log files.
The
SET ARCHIVELOG DESTINATION
command manually stages archived logs to different
locations while a database restore operation is occurring. During recovery, RMAN
knows where to find the newly restored archived logs; it does not require them to be in
the location specified in the initialization parameter file.
To restore archived redo logs to a new location:
1. Start RMAN and connect to a target database, as described in "Making Database
Connections with RMAN".
2. Ensure that the database is mounted or open.
3. Perform the following operations within a
RUN
command:
a. Specify the new location for the restored archived redo logs using
SET
ARCHIVELOG
DESTINATION
.
b. Either explicitly restore the archived redo logs or execute commands that
automatically restore the logs.
The following sample
RUN
command explicitly restores all backup archived logs to a
new location:
RUN
{
SET ARCHIVELOG DESTINATION TO '/oracle/temp_restore';
RESTORE ARCHIVELOG ALL;
Chapter 17
Preparing for Complete Database Recovery
17-10

# restore and recover data files as needed
.
.
.
}
The following example sets the archived log destination and then uses
RECOVER
DATABASE
to restore archived logs from this destination automatically:
RUN
{
SET ARCHIVELOG DESTINATION TO '/oracle/temp_restore';
RESTORE DATABASE;
RECOVER DATABASE; # restores and recovers logs automatically
}
17.2.5.2 Restoring Archived Redo Logs to Multiple Locations
To manage disk space that is used to contain the restored logs, you can specify
restore destinations for archived logs multiple times in one
RUN
block, to distribute
restored logs among several destinations.
Note that you cannot specify multiple destinations simultaneously to produce multiple
copies of the same log during the restore operation.
The following example restores 300 archived redo logs from backup, distributing them
across the directories
/fs1/tmp
,
/fs2/tmp
, and
/fs3/tmp
:
RUN
{
# Set a new location for logs 1 through 100.
SET ARCHIVELOG DESTINATION TO '/fs1/tmp';
RESTORE ARCHIVELOG FROM SEQUENCE 1 UNTIL SEQUENCE 100;
# Set a new location for logs 101 through 200.
SET ARCHIVELOG DESTINATION TO '/fs2/tmp';
RESTORE ARCHIVELOG FROM SEQUENCE 101 UNTIL SEQUENCE 200;
# Set a new location for logs 201 through 300.
SET ARCHIVELOG DESTINATION TO '/fs3/tmp';
RESTORE ARCHIVELOG FROM SEQUENCE 201 UNTIL SEQUENCE 300;
# restore and recover data files as needed
.
.
.
}
When you issue a
RECOVER
command, RMAN finds the needed restored archived logs
automatically across the destinations to which they were restored, and applies them to
the data files.
17.2.6 Providing the Password Required to Decrypt Encrypted
Backups
For backups encrypted using certain techniques, you must provide the password that
will be used to decrypt these backups.
•Backups that were encrypted using transparent encryption with an auto-login
keystore require no intervention to restore, if the keystore is available. RMAN
decrypts these backups while restoring their contents.
Chapter 17
Preparing for Complete Database Recovery
17-11

•For backups that were encrypted using transparent encryption with a password-
based software keystore, the keystore must be available and the keystore
password must be provided before the restore operation is performed. Use the
SET
command with the
DECRYPTION WALLET OPEN IDENTIFIED BY
option to specify the
password that must be used to open the password-based software keystore.
The following command sets the keystore password for a password-based
software keystore (where
password
is a placeholder for the actual password that
you enter):
SET DECRYPTION WALLET OPEN IDENTIFIED BY password;
•Backups created using password-mode encryption require the correct password to
be entered before they can be restored. Use the
SET DECRYPTION
command to
specify the password used to decrypt the backups. If you are restoring from a
group of backups that were created with different passwords, then specify all of
the required passwords on the
SET DECRYPTION
command. RMAN automatically
uses the correct password with each backup set. The
SET
command must be used
before executing the
RESTORE
and
RECOVER
commands.
The following command sets the password used to decrypt backups (where
password
is a placeholder for the actual password that you enter):
SET DECRYPTION IDENTIFIED BY password;
See Also:
Oracle Database Backup and Recovery Reference for additional information
about performing restore operations using encrypted backups
17.3 Performing Complete Database Recovery
During complete recovery RMAN restores one or more data files and then applies all
the redo generated after the restored backup.
This section describes the basic outline of complete database recovery, which is
intended to encompass a wide range of different scenarios.
This section contains the following topics:
•About Complete Database Recovery
•Performing Complete Recovery of the Whole Database
•Performing Complete Recovery of a Tablespace
•Performing Complete Recovery After Switching to a Copy
17.3.1 About Complete Database Recovery
You use the
RESTORE
and
RECOVER
commands to restore and recover the database.
During the recovery, RMAN automatically restores backups of any needed archived
redo logs. If backups are stored on a media manager, then channels must be
configured in advance or a
RUN
block with
ALLOCATE CHANNEL
commands must be used to
enable access to backups stored there.
Chapter 17
Performing Complete Database Recovery
17-12

If RMAN restores archived redo logs to the fast recovery area during a recovery, then
it automatically deletes the restored logs after applying them to the data files.
Otherwise, you can use the
DELETE ARCHIVELOG
command to delete restored archived
redo logs from disk when they are no longer needed for recovery. For example, you
can enter the following command:
RECOVER DATABASE DELETE ARCHIVELOG;
17.3.1.1 About Restoring Data Files to a Nondefault Location
If you cannot restore data files to their default locations, then you must update the
control file to reflect the new locations of the data files.
Use the RMAN
SET NEWNAME
command within a
RUN
command to specify the new file
name. Afterward, use a
SWITCH
command, which is equivalent to using the SQL
statement
ALTER DATABASE RENAME FILE
, to update the names of the data files in the
control file.
SWITCH DATAFILE ALL
updates the control file to reflect the new names for all
data files for which a
SET NEWNAME
has been issued in a
RUN
command.
See Also:
Oracle Database Backup and Recovery Reference for
SWITCH
syntax
17.3.2 Performing Complete Recovery of the Whole Database
This scenario assumes that database
trgt
has lost most or all of its data files. It also
assumes that the database uses a fast recovery area.
After restore and recovery of a whole database, when the database is open, missing
temporary tablespaces that were recorded in the control file are re-created with their
previous creation size,
AUTOEXTEND
, and
MAXSIZE
attributes. Only temporary tablespaces
that are missing are re-created. If a temp file exists at the location recorded in the
RMAN repository but has an invalid header, then RMAN does not re-create the temp
file.
If the temp files were created as Oracle-managed files, then they are re-created in the
current
DB_CREATE_FILE_DEST
location. Otherwise, they are re-created at their previous
locations. If RMAN cannot re-create the file due to an I/O error or some other cause,
then the error is reported in the alert log and the database open operation continues.
See Also:
"Scope of This Chapter" for some of the assumptions used in the recovery
procedures
To restore and recover the whole database:
1. Complete the preparation steps required for your scenario, as described in
"Preparing for Complete Database Recovery".
Chapter 17
Performing Complete Database Recovery
17-13

2. Start RMAN and connect to a target database, as described in "Making Database
Connections with RMAN".
RMAN displays the database status when it connects:
not started
,
not mounted
,
not open
(when the database is mounted but not open), or none (when the
database is open).
3. If the database is not mounted, then mount but do not open the database.
For example, enter the following command:
STARTUP MOUNT;
4. Use the
SHOW
command to see which channels are preconfigured.
For example, enter the following command (sample output is included):
SHOW ALL;
RMAN configuration parameters for database with db_unique_name PROD1 are:
.
.
.
CONFIGURE DEFAULT DEVICE TYPE TO DISK; # default
CONFIGURE DEVICE TYPE DISK PARALLELISM 1 BACKUP TYPE TO BACKUPSET; # default
CONFIGURE DEVICE TYPE SBT_TAPE PARALLELISM 1 BACKUP TYPE TO BACKUPSET; # default
CONFIGURE CHANNEL DEVICE TYPE 'SBT_TAPE' PARMS "SBT_
LIBRARY=/usr/local/oracle/backup/lib/libobk.so";
If the necessary devices and channels are configured, then no action is necessary.
Otherwise, you can use the
CONFIGURE
command to configure automatic channels,
or include
ALLOCATE CHANNEL
commands within a
RUN
block.
5. Restore and recover the database. Do one of the following:
•If you are restoring all data files to their original locations, then execute
RESTORE
DATABASE
and
RECOVER DATABASE
sequentially at the RMAN prompt.
For example, enter the following commands if automatic channels are
configured (sample output included):
RMAN> RESTORE DATABASE;
Starting restore at 20-JUN-13
allocated channel: ORA_DISK_1
channel ORA_DISK_1: SID=35 device type=DISK
allocated channel: ORA_SBT_TAPE_1
channel ORA_SBT_TAPE_1: SID=34 device type=SBT_TAPE
channel ORA_SBT_TAPE_1: Oracle Secure Backup
channel ORA_DISK_1: starting datafile backup set restore
channel ORA_DISK_1: specifying datafile(s) to restore from backup set
channel ORA_DISK_1: restoring datafile 00001 to /disk1/oracle/dbs/tbs_01.f
channel ORA_DISK_1: restoring datafile 00002 to /disk1/oracle/dbs/tbs_ax1.f
.
.
.
Finished restore at 20-JUN-13
RMAN> RECOVER DATABASE;
Starting recover at 20-JUN-13
Chapter 17
Performing Complete Database Recovery
17-14

using channel ORA_DISK_1
allocated channel: ORA_SBT_TAPE_1
channel ORA_SBT_TAPE_1: SID=34 device type=SBT_TAPE
channel ORA_SBT_TAPE_1: Oracle Secure Backup
starting media recovery
channel ORA_DISK_1: starting archived log restore to default destination
channel ORA_DISK_1: restoring archived log
archived log thread=1 sequence=5
channel ORA_DISK_1: restoring archived log
archived log thread=1 sequence=6
.
.
.
channel ORA_DISK_1: reading from backup piece
/disk1/oracle/work/orcva/TKRM/backupset/2013_06_20/o1_mf_annnn_
TAG20130620T113128_29jhr197_.bkp
channel ORA_DISK_1: piece
handle=/disk1/oracle/work/orcva/TKRM/backupset/2013_06_20/o1_mf_annnn_
TAG20130620T113128_29jhr197_.bkp tag=TAG20130620T113128
channel ORA_DISK_1: restored backup piece 1
channel ORA_DISK_1: restore complete, elapsed time: 00:00:02
archived log file name=/disk1/oracle/work/orcva/TKRM/archivelog/2013_06_
20/o1_mf_1_5_29jhv47k_.arc thread=1 sequence=5
channel default: deleting archived log(s)
.
.
.
media recovery complete, elapsed time: 00:00:15
Finished recover at 20-JUN-13
If you manually allocate channels, then you must issue the
RESTORE
and
RECOVER
commands together within a
RUN
block as shown in the following
example:
RUN
{
ALLOCATE CHANNEL c1 DEVICE TYPE sbt;
RESTORE DATABASE;
RECOVER DATABASE;
}
•If you are restoring some data files to new locations, then execute
RESTORE
DATABASE
and
RECOVER DATABASE
sequentially in a
RUN
command. Use the
SET
NEWNAME
command to rename data files, as described in "About Restoring Data
Files to a Nondefault Location".
The following example restores the database, specifying new names for three
of the data files, and then recovers the database:
RUN
{
SET NEWNAME FOR DATAFILE 2 TO '/disk2/df2.dbf';
SET NEWNAME FOR DATAFILE 3 TO '/disk2/df3.dbf';
SET NEWNAME FOR DATAFILE 4 TO '/disk2/df4.dbf';
RESTORE DATABASE;
SWITCH DATAFILE ALL;
RECOVER DATABASE;
}
Chapter 17
Performing Complete Database Recovery
17-15

6. Examine the output to see if media recovery was successful. If so, open the
database.
For example, enter the following command:
ALTER DATABASE OPEN;
17.3.3 Performing Complete Recovery of a Tablespace
Use the
RESTORE
and
RECOVER
commands with the
TABLESPACE
option to perform
complete recovery of a tablespace
Scope of This Chapter for some of the assumptions used in the recovery procedures
In the basic scenario, the database is open, and some but not all of the data files are
damaged. You want to restore and recover the damaged tablespace while leaving the
database open so that the rest of the database remains available. This scenario
assumes that database
TRGT
has lost tablespace
USERS
.
To restore and recover a tablespace:
1. Complete the preparation steps that are required for your recovery scenario as
described in "Preparing for Complete Database Recovery".
2. Start RMAN and connect to a target database as described in "Making Database
Connections with RMAN".
3. If the database is open, then take the tablespace requiring recovery offline.
For example, enter the following command to take
USERS
offline:
ALTER TABLESPACE users OFFLINE IMMEDIATE;
4. Use the
SHOW
command to see which channels are preconfigured.
For example, enter the following command (sample output is included):
SHOW ALL;
RMAN configuration parameters for database with db_unique_name PROD1 are:
.
.
.
CONFIGURE DEFAULT DEVICE TYPE TO DISK; # default
CONFIGURE DEVICE TYPE DISK PARALLELISM 1 BACKUP TYPE TO BACKUPSET; # default
CONFIGURE DEVICE TYPE SBT_TAPE PARALLELISM 1 BACKUP TYPE TO BACKUPSET; # default
CONFIGURE CHANNEL DEVICE TYPE 'SBT_TAPE' PARMS "SBT_
LIBRARY=/usr/local/oracle/backup/lib/libobk.so";
If the necessary devices and channels are configured, then no action is necessary.
Otherwise, you can use the
CONFIGURE
command to configure automatic channels,
or include
ALLOCATE CHANNEL
commands within a
RUN
block.
5. Restore and recover the tablespace. Do one of the following:
•If you are restoring data files to their original locations, then run the
RESTORE
TABLESPACE
and
RECOVER TABLESPACE
commands at the RMAN prompt.
For example, enter the following command if automatic channels are
configured (sample output included):
RMAN> RESTORE TABLESPACE users;
Chapter 17
Performing Complete Database Recovery
17-16

Starting restore at 20-JUN-13
allocated channel: ORA_DISK_1
channel ORA_DISK_1: SID=37 device type=DISK
allocated channel: ORA_SBT_TAPE_1
channel ORA_SBT_TAPE_1: SID=38 device type=SBT_TAPE
channel ORA_SBT_TAPE_1: Oracle Secure Backup
channel ORA_DISK_1: starting datafile backup set restore
channel ORA_DISK_1: specifying datafile(s) to restore from backup set
channel ORA_DISK_1: restoring datafile 00012 to /disk1/oracle/dbs/users01.f
channel ORA_DISK_1: restoring datafile 00013 to /disk1/oracle/dbs/users02.f
channel ORA_DISK_1: restoring datafile 00021 to /disk1/oracle/dbs/users03.f
channel ORA_DISK_1: reading from backup piece
/disk1/oracle/work/orcva/TKRM/backupset/2013_06_20/o1_mf_nnndf_
TAG20130620T105435_29jflwor_.bkp
channel ORA_DISK_1: piece
handle=/disk1/oracle/work/orcva/TKRM/backupset/2013_06_20/o1_mf_nnndf_
TAG20130620T105435_29jflwor_.bkp tag=TAG20130620T105435
channel ORA_DISK_1: restored backup piece 1
channel ORA_DISK_1: restore complete, elapsed time: 00:00:01
Finished restore at 20-JUN-13
RMAN> RECOVER TABLESPACE users;
Starting recover at 20-JUN-13
using channel ORA_DISK_1
using channel ORA_SBT_TAPE_1
starting media recovery
archived log for thread 1 with sequence 27 is on disk as file
/disk1/oracle/work/orcva/TKRM/archivelog/2013_06_20/o1_mf_1_27_29jjmtc9_.arc
archived log for thread 1 with sequence 28 is on disk as file
/disk1/oracle/work/orcva/TKRM/archivelog/2013_06_20/o1_mf_1_28_29jjnc5x_.arc
.
.
.
channel ORA_DISK_1: starting archived log restore to default destination
channel ORA_DISK_1: restoring archived log
archived log thread=1 sequence=5
channel ORA_DISK_1: restoring archived log
archived log thread=1 sequence=6
channel ORA_DISK_1: restoring archived log
archived log thread=1 sequence=7
.
.
.
channel ORA_DISK_1: reading from backup piece
/disk1/oracle/work/orcva/TKRM/backupset/2013_06_20/o1_mf_annnn_
TAG20130620T113128_29jhr197_.bkp
channel ORA_DISK_1: piece
handle=/disk1/oracle/work/orcva/TKRM/backupset/2013_06_20/o1_mf_annnn_
TAG20130620T113128_29jhr197_.bkp tag=TAG20130620T113128
channel ORA_DISK_1: restored backup piece 1
channel ORA_DISK_1: restore complete, elapsed time: 00:00:02
archived log file name=/disk1/oracle/work/orcva/TKRM/archivelog/2013_06_
20/o1_mf_1_5_29jkdvjq_.arc thread=1 sequence=5
channel default: deleting archived log(s)
archived log file name=/disk1/oracle/work/orcva/TKRM/archivelog/2013_06_
20/o1_mf_1_5_29jkdvjq_.arc RECID=91 STAMP=593611179
archived log file name=/disk1/oracle/work/orcva/TKRM/archivelog/2013_06_
Chapter 17
Performing Complete Database Recovery
17-17

20/o1_mf_1_6_29jkdvbz_.arc thread=1 sequence=6
channel default: deleting archived log(s)
.
.
.
media recovery complete, elapsed time: 00:00:01
Finished recover at 20-JUN-13
•If you are restoring some data files to new locations, then execute
RESTORE
TABLESPACE
and
RECOVER TABLESPACE
in a
RUN
command. Use the
SET NEWNAME
command to rename data files, as described in "About Restoring Data Files to
a Nondefault Location".
The following example restores the data files in tablespace
users
to a new
location, and then performs recovery. Assume that the old data files were
stored in the
/disk1
path and the new ones will be stored in the
/disk2
path.
RUN
{
# specify the new location for each datafile
SET NEWNAME FOR DATAFILE '/disk1/oracle/dbs/users01.f' TO
'/disk2/users01.f';
SET NEWNAME FOR DATAFILE '/disk1/oracle/dbs/users02.f' TO
'/disk2/users02.f';
SET NEWNAME FOR DATAFILE '/disk1/oracle/dbs/users03.f' TO
'/disk2/users03.f';
RESTORE TABLESPACE users;
SWITCH DATAFILE ALL; # update control file with new file names
RECOVER TABLESPACE users;
}
6. Examine the output to see if recovery was successful. If so, bring the recovered
tablespace back online.
For example, enter the following command:
ALTER TABLESPACE users ONLINE;
17.3.4 Performing Complete Recovery After Switching to a Copy
You can recover a database by switching to image copies of inaccessible data files.
This technique takes less time than traditional restore and recovery because no
backups need to be restored.
If you have image copies of the inaccessible data files in the fast recovery area, then
you can use the
SWITCH DATAFILE ... TO COPY
command to point the control file at the
data file copy and then use
RECOVER
to recover lost changes. You can also use the
SWITCH DATABASE TO COPY
command to point the control file at a copy of the whole
database.
Note:
A
SWITCH TABLESPACE ... TO COPY
command is also supported for cases when
all data files in a tablespace are lost and copies of all data files exist. The
same restriction exists for
SWITCH DATABASE ... TO COPY
.
Chapter 17
Performing Complete Database Recovery
17-18

See Also:
•Performing Recovery After Switching to a Data File Copy
•Performing Complete Recovery After Switching to a Database Copy
17.3.4.1 Performing Recovery After Switching to a Data File Copy
When one or more data files are damaged, you can perform recovery by switching to
existing image copies of the damaged data files.
"Scope of This Chapter" for some of the assumptions used in the recovery procedures
In the basic scenario, the database is open, and some but not all of the data files are
damaged. During the course of the day, a data file goes missing due to storage failure.
You must repair this file, but cannot afford the time to do a restore and recovery from a
backup. You decide to use a recent image copy backup as the new file, thus
eliminating restore time. This scenario assumes that database
trgt
has lost data file 4.
To switch to a data file copy and perform recovery:
1. Complete the preparation steps required for your scenario, as described in
"Preparing for Complete Database Recovery".
2. Start RMAN and connect to a target database, as described in "Making Database
Connections with RMAN".
3. If the database is open, then take the tablespace requiring recovery offline.
Enter the following command to take data file 4 offline:
ALTER DATABASE DATAFILE 4 OFFLINE;
4. Switch the offline data file to the latest copy.
Enter the following command to point the control file to the latest image copy of
data file 4:
SWITCH DATAFILE 4 TO COPY;
5. Recover the data file with the
RECOVER DATAFILE
command.
Enter the following command:
RECOVER DATAFILE 4;
RMAN automatically restores archived redo logs and incremental backups.
Because the database uses a fast recovery area, RMAN automatically deletes
them after they have been applied.
6. Examine the output to see if recovery was successful. If so, bring the recovered
data file back online.
Enter the following command to bring data file 4 online:
ALTER DATABASE DATAFILE 4 ONLINE;
Chapter 17
Performing Complete Database Recovery
17-19

17.3.4.2 Performing Complete Recovery After Switching to a Database Copy
You can perform complete database recovery by switching to image copies of the
damaged data files instead of restoring these data files.
"Scope of This Chapter" for some of the assumptions used in the recovery procedures
In this scenario, the database is shut down, and all of the data files are damaged. You
have image copies of all the damaged data files and decide to use the existing image
copies as the new data files, thus eliminating restore time.
To switch to a database copy and perform recovery:
1. Complete the preparation steps required for your scenario, as described in
"Preparing for Complete Database Recovery".
2. Start RMAN and connect to a target database, as described in "Making Database
Connections with RMAN".
3. Mount the database.
4. Switch the database to the latest copy.
Enter the following command to point the control file to the latest image copy of the
database:
SWITCH DATABASE TO COPY;
5. Recover the database with the
RECOVER DATABASE
command.
Enter the following command:
RECOVER DATABASE;
RMAN automatically restores archived redo logs and incremental backups.
Because the database uses a fast recovery area, RMAN automatically deletes
them after they have been applied.
6. Examine the output to see if recovery was successful. If so, open the database.
Enter the following command to open the database:
ALTER DATABASE OPEN;
17.4 Performing Complete Recovery of CDBs
RMAN and Oracle Enterprise Manager Cloud Control (Cloud Control) provide full
support for backup and recovery in a multitenant environment.
You can back up and recover a whole multitenant container database (CDB), root
only, or one or more pluggable databases (PDBs).
The section contains the following topics:
•Performing Complete Recovery of a Whole CDB
•Performing Complete Recovery of the Root
•Performing Complete Recovery of PDBs with RMAN
•Performing Complete Recovery of PDBs with Cloud Control
Chapter 17
Performing Complete Recovery of CDBs
17-20

•Performing Complete Recovery Using Preplugin Backups
•Performing Complete Recovery of Tablespaces or Data Files in a PDB with RMAN
•Performing Complete Recovery of Tablespaces in a PDB with Cloud Control
•Performing Complete Recovering of CDBs After Switching to a Copy
17.4.1 Performing Complete Recovery of a Whole CDB
When you recover a whole CDB, you recover the root and all PDBs in a single
operation.
To recover a whole CDB:
1. Complete the preparation steps that are required for your scenario, as described in
"Preparing for Complete Database Recovery"
2. Connect to the root as a common user with the
SYSDBA
or
SYSBACKUP
privilege, as
described in "Connecting as Target to the Root".
3. If the database is not mounted, then mount but do not open the database. Use the
following g command:
STARTUP MOUNT;
4. Use the
SHOW
command to see which channels are preconfigured.
If the necessary devices and channels are configured, then no action is necessary.
Otherwise, you can use the
CONFIGURE
command to configure automatic channels,
or include
ALLOCATE CHANNEL
commands within a
RUN
block.
5. Restore and recover the database. Do one of the following:
•If you are restoring all data files to their original locations, then execute
RESTORE
DATABASE
and
RECOVER DATABASE
sequentially at the RMAN prompt.
For example, enter the following commands if automatic channels are
configured:
RESTORE DATABASE;
RECOVER DATABASE;
If you manually allocate channels, then you must issue the
RESTORE
and
RECOVER
commands together within a
RUN
block as shown in the following
example:
RUN
{
ALLOCATE CHANNEL c1 DEVICE TYPE sbt;
RESTORE DATABASE;
RECOVER DATABASE;
}
•If you are restoring some data files to new locations, then execute
RESTORE
DATABASE
and
RECOVER DATABASE
sequentially in a
RUN
command. Use the
SET
NEWNAME
command to rename data files.
The following example restores the database, specifying new names for three
of the data files, and then recovers the database:
RUN
{
SET NEWNAME FOR DATAFILE 2 TO '/disk2/df2.dbf';
Chapter 17
Performing Complete Recovery of CDBs
17-21

SET NEWNAME FOR DATAFILE 3 TO '/disk2/df3.dbf';
SET NEWNAME FOR DATAFILE 4 TO '/disk2/df4.dbf';
RESTORE DATABASE;
SWITCH DATAFILE ALL;
RECOVER DATABASE;
}
6. Examine the output to see if media recovery was successful. If so, open the
database.
For example, enter the following command:
ALTER DATABASE OPEN;
See Also:
About Restoring Data Files to a Nondefault Location
17.4.2 Performing Complete Recovery of the Root
You might consider recovering only the root if a data corruption or user error occurs
that affects only the root.
However, Oracle strongly recommends that you recover all PDBs after recovering the
root to prevent metadata inconsistencies among the root and the PDBs. In this case, it
might be preferable to perform a complete recovery of the whole CDB.
See Also:
"Scope of This Chapter" for some of the assumptions used in the recovery
procedures
To recover the root:
1. Complete the preparation steps that are required for your recovery scenario, as
described in "Preparing for Complete Database Recovery".
2. Start RMAN and connect to the root as a common user with the
SYSDBA
or
SYSBACKUP
privilege, as described in "Connecting as Target to the Root".
3. Place the CDB in mounted mode.
SHUTDOWN IMMEDIATE;
STARTUP MOUNT;
4. (Optional) Use the
CONFIGURE
command to configure the default device type and
automatic channels.
5. Restore and recover the root with the following commands:
RESTORE DATABASE ROOT;
RECOVER DATABASE ROOT;
6. Examine the output to see if media recovery was successful. If so, proceed to the
next step.
Chapter 17
Performing Complete Recovery of CDBs
17-22

7. (Strongly recommended) Recover all PDBs, including the CDB seed.
a. Issue the
RESTORE PLUGGABLE DATABASE
and
RECOVER PLUGGABLE DATABASE
commands.
The following example recovers the PDBs
sales
and
hr
:
RESTORE PLUGGABLE DATABASE 'PDB$SEED', sales, hr;
RECOVER PLUGGABLE DATABASE 'PDB$SEED', sales, hr;
b. Examine the output to see if media recovery was successful. If so, proceed to
the next step.
8. Open the CDB and all PDBs.
ALTER DATABASE OPEN;
ALTER PLUGGABLE DATABASE ALL OPEN;
See Also:
Performing Complete Recovery of a Whole CDB
17.4.3 Performing Complete Recovery of PDBs with RMAN
You can perform complete recovery of one or more PDBs without affecting operations
of other open PDBs.
See Also:
"Scope of This Chapter" for some of the assumptions used in the recovery
procedures
There are two approaches to recovering a PDB with RMAN:
•Connect to the root and then use the
RESTORE PLUGGABLE DATABASE
and
RECOVER
PLUGGABLE DATABASE
commands. This approach enables you to recover multiple
PDBs with a single command.
•Connect to the PDB and use the
RESTORE DATABASE
and
RECOVER DATABASE
commands. This approach recovers only a single PDB and enables you to use the
same commands used for recovering non-CDB databases.
Video:
unilink:vid_dbbackup_recoverpdb
To recover one or more PDBs while connected to the root:
1. Complete the preparation steps that are required for your recovery scenario, as
described in "Preparing for Complete Database Recovery".
Chapter 17
Performing Complete Recovery of CDBs
17-23

2. Start RMAN and connect to the root as a common user with the
SYSDBA
or
SYSBACKUP
privilege, as described in "Connecting as Target to the Root".
3. Close the PDBs that you want to recover.
ALTER PLUGGABLE DATABASE sales, hr CLOSE;
If any data files are missing, an error occurs and you cannot close a PDB. You
must then connect to the PDB to which the missing data file belongs, take the
missing data file offline, and then close the PDB.
The following command takes the data file 12 offline:
ALTER PLUGGABLE DATABASE DATAFILE 12 OFFLINE;
Note:
If the data files that store the
SYSTEM
tablespace of a PDB are missing,
then follow the recovery steps that are described in "Performing
Complete Recovery of Tablespaces or Data Files in a PDB with RMAN".
4. (Optional) Use the
CONFIGURE
command to configure the default device type and
automatic channels.
5. Issue the
RESTORE PLUGGABLE DATABASE
and
RECOVER PLUGGABLE DATABASE
commands.
The following example recovers the CDB seed,
PDB$SEED
, and the PDBs
sales
and
hr
:
RESTORE PLUGGABLE DATABASE 'pdb$seed', sales, hr;
RECOVER PLUGGABLE DATABASE 'pdb$seed', sales, hr;
6. If any data files were taken offline in Step 2, make these data files online.
Connect to the PDB to which the missing data file belongs and then make the data
file online. The following command makes the data file 12 online:
ALTER DATABASE DATAFILE 12 ONLINE;
7. Examine the output to see if media recovery was successful. If so, open the PDBs.
ALTER PLUGGABLE DATABASE sales, hr OPEN;
To connect to and recover one PDB:
1. Complete the preparation steps that are required for your recovery scenario, as
described in "Preparing for Complete Database Recovery".
2. Start RMAN and connect to the PDB as a local user with the
SYSDBA
system
privilege, as described in "Connecting as Target to a PDB".
3. Close the PDB.
ALTER PLUGGABLE DATABASE CLOSE;
If any data files are missing, an error occurs and you cannot close the PDB. You
must take the missing data file offline and then close the PDB.
The following command takes the data file 12 offline:
ALTER DATABASE DATAFILE 12 OFFLINE;
Chapter 17
Performing Complete Recovery of CDBs
17-24

Note:
If the data files that store the
SYSTEM
tablespace of a PDB are missing,
then follow the recovery steps described in "Performing Complete
Recovery of Tablespaces or Data Files in a PDB with RMAN".
4. (Optional) Use the
CONFIGURE
command to configure the default device type and
automatic channels.
5. Issue the
RESTORE DATABASE
and
RECOVER DATABASE
commands.
RESTORE DATABASE;
RECOVER DATABASE;
6. If any data files were taken offline in Step 2, make these data files online.
The following command makes the data file 12 online:
ALTER DATABASE DATAFILE 12 ONLINE;
7. Open the PDB.
ALTER PLUGGABLE DATABASE OPEN;
17.4.4 Performing Complete Recovery of PDBs with Cloud Control
Enterprise Manager Cloud Control (Cloud Control) provides an interface to recover
PDBs.
To recover one or more PDBs with Cloud Control:
1. From the Database Home page, select Backup & Recovery from the Availability
menu, and then select Perform Recovery.
2. If you have not logged in to the database previously, the Database Login page is
displayed. Log in to the database using Named or New credentials and then click
Login.
Cloud Control displays the Perform Recovery page.
3. From the User Directed Recovery section, select Pluggable Databases from the
Recovery Scope drop-down list, and then click Recover.
The Perform Pluggable Database Recovery Wizard appears and displays the
Pluggable Databases page.
4. Select the PDBs that you want to recover by following these steps:
a. Click Add to display the Available Pluggable Databases page.
b. From the list of PDBs shown, click in the Select column to designate the PDBs
that you want to recover. Optionally, you can click Select All to turn on the
Select option for all available PDBs. Click Select None to deselect all PDBs.
c. Click the Select button to return to the Pluggable Databases page.
d. Optionally, you can remove PDBs from the table by clicking in the Select
column for each PDB that you want to remove and then clicking Remove.
5. Complete the wizard by navigating through the remainder of the pages to recover
the PDBs. For more information about each page of the wizard, click Help.
Chapter 17
Performing Complete Recovery of CDBs
17-25

See Also:
"Accessing the Database Home Page Using Cloud Control"
17.4.5 Performing Complete Recovery Using Preplugin Backups
Use the
RECOVER
command to perform complete recovery using preplugin backups.
This section contains the following topics:
•About Complete Recovery of PDBs Using PrePlugin Backups
•Performing Complete Recovery of PDBs Using Preplugin Backups
•Example: Performing Complete Recovery of PDBs Using Preplugin Backups
17.4.5.1 About Complete Recovery of PDBs Using PrePlugin Backups
Preplugin backups are used to restore and recover a PDB to its state at a time in the
past that was before the PDB was plugged in to the current CDB.
To perform complete recovery using preplugin backups, use the
FROM PREPLUGIN
clause
of the
RESTORE
and
RECOVER
commands. RMAN restores data files using preplugin
backups and then uses the preplugin incremental backups and archived redo logs to
recover data files to a point in time that is before the PDB was plugged in to the
destination CDB.
The metadata for the preplugin backups is migrated to the destination CDB when you
unplug the PDB or use the
DBMS_PDB.EXPORTRMANBACKUP()
procedure with non-CDBs.
Preplugin backups are not automatically migrated to the destination CDB. You must
ensure that the destination CDB has access to the backups created on the source
database.
The location to which RMAN restores preplugin archived redo logs depends on
whether a fast recovery area is configured in the destination CDB. If a fast recovery
area is not the default destination for archived redo log files in the CDB, then RMAN
restores preplugin archived redo logs to the fast recovery area. If the fast recovery
area is the default destination for archived redo log files in the CDB, then you must use
the
SET ARCHIVELOG DESTINATION
command to specify a location for the preplugin
archived redo log files.
See Also:
•About Preplugin Backups
•Performing Complete Recovery of PDBs Using Preplugin Backups
•Example: Performing Complete Recovery of PDBs Using Preplugin
Backups
Chapter 17
Performing Complete Recovery of CDBs
17-26

17.4.5.2 Performing Complete Recovery of PDBs Using Preplugin Backups
RMAN performs complete recovery of a PDB using preplugin backups. These
preplugin backups were created on a source non-CDB or a source CDB before the
PDB was migrated to the current target CDB.
Preplugin backups must include all archived redo logs that are required to recover the
PDB.
To perform complete recovery using preplugin backups of a non-CDB, the non-CDB
backups must be created using the procedure described in "Creating a Preplugin
Backup of the Whole Database".
Note:
You cannot recover a PDB using preplugin backups if the preplugin backup
was created before the PDB was opened with the
RESETLOGS
option.
To perform complete recovery of a PDB using preplugin backups:
1. Ensure that the prerequisites for performing recovery using preplugin backups
described in Oracle Database Backup and Recovery Reference are met.
2. Ensure that the shared location containing preplugin backups of the PDB is
accessible to the destination host.
Note:
Using shared disk is the only method that is supported to share prelugin
backups with the destination host. Manually copying the required
backups to the destination is not supported.
3. Connect to the target CDB using one of the following techniques:
•Connect to the root as a common user with the
SYSDBA
or
SYSBACKUP
privilege
•Connect to the PDB that needs to be recovered as a user with the
SYSDBA
or
SYSBACKUP
privilege.
See "Making Database Connections with RMAN".
4. Close the PDB that is being recovered. For example:
ALTER PLUGGABLE DATABASE pdb1 CLOSE IMMEDIATE;
5. Set the current container to the PDB that is being recovered. For example:
SET PREPLUGIN CONTAINER=pdb1;
6. (Optional) To view the preplugin backups, use the
LIST
command.
LIST PREPLUGIN BACKUP OF PLUGGABLE DATABASE pdb1;
LIST PREPLUGIN ARCHIVELOG ALL;
Chapter 17
Performing Complete Recovery of CDBs
17-27

7. (Optional) To catalog any backups that were not stored in the source database
control file before migration, use the
CATALOG...PREPLUGIN
command.
The
ROOT
must be open in read-write mode for cataloging backups. The following
command catalogs the specified archived redo log:
CATALOG PREPLUGIN ARCHIVELOG '/disk1/o1_mf_annnn_dmy2r45h_.bkp';
8. Restore the PDB using preplugin backups.
RESTORE PLUGGABLE DATABASE pdb1 FROM PREPLUGIN;
9. Recover the PDB using preplugin backups.
The
RECOVER ... FROM PREPLUGIN
command performs preplugin recovery. If the
destination CDB uses the fast recovery area as the archivelog destination, then
use
SET ARCHIVELOG DESTINATION
to specify the destination to which preplugin
backups must be recovered.
RUN
{
SET ARCHIVELOG DESTINATION TO '/disk1/alog_dest';
RECOVER PLUGGABLE DATABASE pdb1 FROM PREPLUGIN;
}
10. Restore any new data files that were added after
pdb1
was plugged in to the
destination CDB and then perform normal recovery of
pdb1
.
RESTORE PLUGGABLE DATABASE pdb1 SKIP PREPLUGIN;
RECOVER PLUGGABLE DATABASE pdb1;
11. Open the recovered PDB.
The following command opens the PDB called
pdb1
.
ALTER PLUGGABLE DATABASE pdb1 OPEN;
See Also:
•Example: Performing Complete Recovery of PDBs Using Preplugin
Backups
•About Complete Recovery of PDBs Using PrePlugin Backups
17.4.5.3 Example: Performing Complete Recovery of PDBs Using Preplugin
Backups
This example performs complete recovery of a PDB
my_pdb
in the destination CDB
prod_cdb
using preplugin backups.
The PDB
my_pdb
was unplugged from the CDB
test_cdb
and then plugged in to the
CDB
prod_cdb
. When this PDB was unplugged from
test_cdb
, its metadata was stored
in the file
mypdb.xml
. This metadata was used to plug
my_pdb
into
prod_cdb
. The backups
of
my_pdb
that were created in the source CDB
test_cdb
are stored in the shared
location
/oracle/database/backups
. The CDB
prod_cdb
uses the fast recovery area to
store archived redo log files.
Chapter 17
Performing Complete Recovery of CDBs
17-28

1. Ensure that the prerequisites for performing recovery using preplugin backups
described in Oracle Database Backup and Recovery Reference are met.
2. Set up a shared disk to share the preplugin backups created on the source with
the destination host.
3. Start RMAN and connect to the root of
prod_cdb
as a common user with the
SYSBABKUP
privilege.
The following command uses password file authentication to connect to the root as
a common user with the
SYSBACKUP
privilege.
CONNECT TARGET sbu@prod_cdb as SYSBACKUP;
4. Close the PDB
my_pdb
.
ALTER PLUGGABLE DATABASE my_pdb CLOSE IMMEDIATE;
5. Set the preplugin container to the PDB that is being recovered.
SET PREPLUGIN CONTAINER=my_pdb;
6. Restore
my_pdb
using the preplugin backups that were created on the source CDB
test_cdb
before
my_pdb
was plugged in to
prod_cdb
.
RESTORE PLUGGABLE DATABASE my_pdb FROM PREPLUGIN;
7. Recover
my_pdb
using preplugin backups. Because the fast recovery area is
configured to store archived redo log files for the destination CDB, you must
specify an alternate destination for the restored preplugin archived redo log files.
RUN
{
SET ARCHIVELOG DESTINATION TO '/disk1/arc_dest/';
RECOVER PLUGGABLE DATABASE my_pdb FROM PREPLUGIN;
}
8. If any data files were added to
my_pdb
after it was plugged in to
prod_cdb
, then
restore these data files and then recover the PDB
my_pdb
.
RESTORE PLUGGABLE DATABASE my_pdb SKIP PREPLUGIN;
RECOVER PLUGGABLE DATABASE my_pdb;
9. Open the PDB
my_pdb
.
ALTER PLUGGABLE DATABASE my_pdb OPEN;
17.4.6 Performing Complete Recovery of Tablespaces or Data Files in
a PDB with RMAN
Because tablespaces in different PDBs can have the same name, to eliminate
ambiguity, you must connect directly to a PDB to recover one or more of its
tablespaces. In contrast, because data file numbers and paths are unique across the
CDB, you can connect either to the root or to a PDB when recovering PDB data files.
If you connect to the root, you can recover data files from multiple PDBs with a single
command. If you connect to a PDB, you can recover only data files in that PDB.
To restore and recover a non-SYSTEM tablespace in a PDB:
1. Complete the preparation steps that are required for your recovery scenario, as
described in "Preparing for Complete Database Recovery".
Chapter 17
Performing Complete Recovery of CDBs
17-29

2. Start RMAN and connect to a target database, as described in "Making Database
Connections with RMAN."
3. If the database is open, then take the tablespace requiring recovery offline.
For example, enter the following command to take
USERS
offline:
ALTER TABLESPACE users OFFLINE IMMEDIATE;
4. Use the
SHOW
command to see which channels are preconfigured.
If the necessary devices and channels are configured, then no action is necessary.
Otherwise, you can use the
CONFIGURE
command to configure automatic channels,
or include
ALLOCATE CHANNEL
commands within a
RUN
block.
5. Restore and recover the tablespace. Do one of the following:
•If you are restoring data files to their original locations, then run the
RESTORE
TABLESPACE
and
RECOVER TABLESPACE
commands at the RMAN prompt.
For example, enter the following commands if automatic channels are
configured:
RMAN> RESTORE TABLESPACE users;
RMAN> RECOVER TABLESPACE users;
•If you are restoring some data files to new locations, then execute
RESTORE
TABLESPACE
and
RECOVER TABLESPACE
in a
RUN
command. Use the
SET NEWNAME
command to rename data files.
6. Examine the output to see if recovery was successful. If so, bring the recovered
tablespace back online.
For example, enter the following command:
ALTER TABLESPACE users ONLINE;
To restore and recover the SYSTEM tablespace in a PDB:
1. Complete the preparation steps that are required for your recovery scenario, as
described in "Preparing for Complete Database Recovery".
2. Start RMAN and connect to the root as a common user with the
SYSDBA
or
SYSBACKUP
privilege, as described in "Connecting as Target to the Root".
3. Shut down the CDB and restart it in mount mode.
SHUTDOWN IMMEDIATE;
STARTUP MOUNT;
4. Restore and recover the data files that store the
SYSTEM
tablespace of the affected
PDB.
RESTORE DATAFILE 2,3;
RECOVER DATAFILE 2,3;
5. Open all the PDBs in the CDB.
ALTER PLUGGABLE DATABASE ALL OPEN READ WRITE;
To recover non-SYSTEM data files in a PDB:
1. Complete the preparation steps that are required for your recovery scenario, as
described in "Preparing for Complete Database Recovery".
2. Do one of the following:
Chapter 17
Performing Complete Recovery of CDBs
17-30

•Start RMAN and connect to the root as a common user with the
SYSDBA
or
SYSBACKUP
privilege, as described in "Connecting as Target to the Root".
•Start RMAN and connect to the PDB as a local user with the
SYSDBA
privilege,
as described in "Connecting as Target to a PDB".
3. Issue the
RESTORE DATAFILE
and
RECOVER DATAFILE
commands.
RESTORE DATAFILE 10, 13;
RECOVER DATAFILE 10, 13;
See Also:
"About Restoring Data Files to a Nondefault Location"
17.4.7 Performing Complete Recovery of Tablespaces in a PDB with
Cloud Control
Oracle Enterprise Manager Cloud Control (Cloud Control) provides an interface to
recover tablespaces within a PDB.
To perform complete recovery of tablespaces in a PDB with Cloud Control:
1. From the Database Home page, select Backup & Recovery from the Availability
menu, and then select Perform Recovery.
2. If you have not logged in to the database previously, the Database Login page is
displayed. Log in to the database using Named or New credentials and then click
Login.
Cloud Control displays the Perform Recovery page.
3. From the User Directed Recovery section, select Tablespaces from the Recovery
Scope drop-down list, and then click Recover.
4. On the Perform Object Level Recovery:Point-in-time page, ensure that Recover to
the current time is selected, and click Next.
5. On the Perform Object Level Recovery: Tablespaces page, select the tablespaces
that you want to recover by completing these steps:
a. Click Add to display the Available Tablespaces page.
The Search Results table shows all available tablespaces and includes the
name of the PDB to which each tablespace belongs.
b. Click Select to designate the tablespaces that you want to recover. Optionally,
you can click Select All to turn on the Select option for all available
tablespaces. Click Select None to deselect all tablespaces.
c. Click the Select button to return to the Perform Object Level Recovery:
Tablespaces page.
d. Optionally, you can remove tablespaces from the table by turning on the
Select option for each tablespace that you want to remove and then clicking
Remove.
6. Click Next to move to the next step in the wizard.
Chapter 17
Performing Complete Recovery of CDBs
17-31

7. Complete the wizard by navigating through the remainder of the pages to recover
the PDB tablespace. For more information about each page of the wizard, click
Help.
See Also:
"Accessing the Database Home Page Using Cloud Control"
17.4.8 Performing Complete Recovering of CDBs After Switching to a
Copy
Recovering a CDB by switching to a copy is faster than traditional restore and
recovery.
If you have image copies of the inaccessible data files in your CDB or PDB, then you
can recover lost changes by using the
SWITCH
command to point the control file at the
data file copies.
See Also:
"Scope of This Chapter" for some of the assumptions used in the recovery
procedures
To switch a data file in a CDB:
•Connect to the root and use the same steps that you would use for a non-CDB as
described in "Performing Recovery After Switching to a Data File Copy".
To switch a data file in a PDB, use one of the following techniques:
•Connect to the root and use the
SWITCH ... PLUGGABLE DATABASE
or
SWITCH DATAFILE
command. This enables you to switch the data files for one or more PDBs.
•Connect to the PDB and use the
SWITCH DATABASE
or
SWITCH DATAFILE
command to
switch data files in that PDB.
See Also:
Making RMAN Connections to a CDB
17.5 Performing Complete Recovery of Application
Containers
RMAN enables you to use the
RESTORE
and
RECOVER
commands to perform complete
recovery of the application containers without impacting the other containers in the
CDB.
Chapter 17
Performing Complete Recovery of Application Containers
17-32

See Also:
•Performing Complete Recovery of the Application Root
•Performing Complete Recovery of the Application Root and Application
PDBs
•Performing Complete Recovery of Application PDBs
17.5.1 Performing Complete Recovery of the Application Root
Use the
RESTORE
and
RECOVER
commands to perform complete recovery of the
application root.
Use one of the following approaches to perform complete recovery of the application
root:
•Connect to the application root and use the
RESTORE DATABASE
and
RECOVER DATABASE
commands
•Connect to the CDB root and use the
RESTORE PLUGGABLE DATABASE
and
RECOVER
PLUGGABLE DATABASE
commands
The
COMPATIBLE
parameter for the CDB must be set to 12.2 or higher.
To connect to and recover the application root:
1. Start RMAN and connect to the application root as an application common user
with the
SYSDBA
or
SYSBACKUP
privilege.
The application root has its own service name and you can connect to the
application root in the same way that you connect to a PDB.
2. Close the application container whose application root needs recovery.
ALTER DATABASE CLOSE;
3. (Optional) Use the
CONFIGURE
command to configure the default device type and
automatic channels.
4. Restore and recover the application root using the following commands:
RESTORE DATABASE ROOT;
RECOVER DATABASE ROOT;
5. Examine the output to see if media recovery was successful. If so, proceed to the
next step.
6. Open the application root.
ALTER DATABASE OPEN;
To recover the application root when connected to the root in a CDB
1. Start RMAN and connect to the CDB root as a common user with the
SYSDBA
or
SYSBACKUP
privilege.
2. Close the application container that must be recovered.
Chapter 17
Performing Complete Recovery of Application Containers
17-33

The following command closes the application container whose application root is
called
hr_appcont
.
ALTER PLUGGABLE DATABASE hr_appcont CLOSE;
3. (Optional) Use the
CONFIGURE
command to configure the default device type and
automatic channels.
4. Restore and recover the application root.
The following commands restore and recover an application root named
hr_appcont:
RESTORE PLUGGABLE DATABASE hr_appcont;
RECOVER PLUGGABLE DATABASE hr_appcont;
5. Examine the output to see if media recovery was successful. If so, proceed to the
next step.
6. Open the application root.
ALTER PLUGGABLE DATABASE hr_appcont OPEN;
See Also:
Making RMAN Connections to a CDB
17.5.2 Performing Complete Recovery of the Application Root and
Application PDBs
You can perform complete recovery of an application container, which includes the
application root and all its application PDBs without impacting the other PDBs within
the CDB.
The
COMPATIBLE
parameter for the CDB must be set to 12.2 or higher.
To perform complete recovery of the application root and all its application
PDBs:
1. Start RMAN and connect to the application root as an application common user
with the
SYSDBA
or
SYSBACKUP
privilege.
The application root has its own service name and you can connect to the
application root in the same way that you connect to a PDB.
2. Close the application container that must be recovered.
ALTER DATABASE CLOSE;
3. (Optional) Use the
CONFIGURE
command to configure the default device type and
automatic channels.
4. Restore and recover the application container (application root and all application
PDBs) using the following commands.
RESTORE DATABASE;
RECOVER DATABASE;
Chapter 17
Performing Complete Recovery of Application Containers
17-34

5. Examine the output to see if media recovery was successful. If so, proceed to the
next step.
6. Open the application root and all the application PDBs.
ALTER DATABASE OPEN;
ALTER PLUGGABLE DATABASE ALL OPEN;
See Also:
Making RMAN Connections to a CDB
17.5.3 Performing Complete Recovery of Application PDBs
Use the
RESTORE
and
RECOVER
commands to perform complete recovery of one or more
application PDBs.
The
COMPATIBLE
parameter for the CDB must be set to 12.2 or higher.
To perform complete recovery of an application PDB:
1. Start RMAN and establish one of the following types of connections:
•Connect to the application root as an application common user with the
SYSDBA
or
SYSBACKUP
privilege.
The application root has its own service name and you can connect to the
application root in the same way that you connect to a PDB.
•Connect to the CDB root as a common user with the
SYSDBA
or
SYSBACKUP
privilege.
2. Close the application PDB for which complete recovery is required.
The following command closes the application PDB called
hr_appcont_pdb1
:
ALTER PLUGGABLE DATABASE hr_appcont_pdb1 CLOSE;
3. (Optional) Use the
CONFIGURE
command to configure the default device type and
automatic channels.
4. Restore and recover the application PDB.
The following commands perform complete recovery of an application PDB called
hr_appcont_pdb1
RESTORE PLUGGABLE DATABASE hr_appcont_pdb1;
RECOVER PLUGGABLE DATABASE hr_appcont_pdb1;
5. Examine the output to see if media recovery was successful. If so, proceed to the
next step.
6. Open the application PDB.
The following commands opens the application PDB called
hr_appcont_pdb1
:
ALTER PLUGGABLE DATABASE hr_appcont_pdb1 OPEN;
Chapter 17
Performing Complete Recovery of Application Containers
17-35

See Also:
Making RMAN Connections to a CDB
17.6 Performing Complete Recovery of Sparse Databases
with RMAN
You can recover sparse databases to the most recent point in time using the
RESTORE
and
RECOVER
commands.
This section contains the following topics:
•Performing Complete Recovery of a Sparse Database
•Performing Complete Recovery of a Sparse CDB
•Performing Recovery of a Sparse PDB with RMAN
Note:
The base (read-only) data files in a sparse database are not encrypted.
Ensure that the base data files are stored in a protected storage and
accessed using secured communications.
17.6.1 Performing Complete Recovery of a Sparse Database
Performing recovery of a database containing sparse data files is very similar to
performing recovery of a whole database.
RMAN first restores the logical data that was backed up from the delta storage space
of the database and then recovers the database by reading from the redo log and
applying the logical data file blocks. You can perform either complete recovery or
point-in-time recovery of a sparse database, tablespace, or data file.
To recover a sparse database:
1. Complete the preparation steps required for your recovery scenario, as described
in "Preparing for Complete Database Recovery".
2. Start RMAN and connect to a target database, as described in "Making Database
Connections with RMAN".
3. If the database is not mounted, then mount but do not open the database.
For example, enter the following command:
STARTUP MOUNT;
4. Use the
SHOW
command to see which channels are preconfigured.
If the necessary devices and channels are configured, then no action is necessary.
Otherwise, you can use the
CONFIGURE
command to configure automatic channels,
or include
ALLOCATE CHANNEL
commands within a
RUN
block.
Chapter 17
Performing Complete Recovery of Sparse Databases with RMAN
17-36

5. Restore and recover the sparse database. The following commands perform
complete recovery of a sparse database:
RESTORE FROM SPARSE DATABASE;
RECOVER DATABASE;
6. To recover a specific tablespace containing sparse data files, use the
RESTORE
and
RECOVER
commands for the tablespace.
The following example restores and recovers the tablespace
MY_TBS
RESTORE FROM SPARSE TABLESPACE MY_TBS;
RECOVER TABLESPACE MY_TBS;
17.6.2 Performing Complete Recovery of a Sparse CDB
Performing recovery of a sparse CDB is very similar to performing the complete
recovery of a sparse database.
To recover a sparse CDB:
1. Complete the preparation steps required for your scenario, as described in
"Preparing for Complete Database Recovery".
2. Start RMAN and connect to the root as a common user with the
SYSDBA
or
SYSBACKUP
privilege, as described in "Making Database Connections with RMAN".
3. If the CDB is not mounted, then mount but do not open the CDB.
For example, enter the following command:
STARTUP MOUNT;
4. Use the
SHOW
command to see which channels are preconfigured.
If the necessary devices and channels are configured, then no action is necessary.
Otherwise, you can use the
CONFIGURE
command to configure automatic channels,
or include
ALLOCATE CHANNEL
commands within a
RUN
block.
5. Restore and recover the sparse CDB. The following commands perform complete
recovery of a sparse CDB:
RESTORE FROM SPARSE DATABASE;
RECOVER DATABASE;
6. To recover a specific tablespace containing sparse data files, use the
RESTORE
and
RECOVER
commands for the tablespace.
The following example restores and recovers the tablespace
MY_TBS
RESTORE FROM SPARSE TABLESPACE MY_TBS;
RECOVER TABLESPACE MY_TBS;
17.6.3 Performing Recovery of a Sparse PDB with RMAN
You can recover a sparse PDB while you are connected at the root level or at the CDB
level.
To recover one or more sparse PDBs while connected to the root:
1. Complete the preparation steps required for your recovery scenario, as described
in "Preparing for Complete Database Recovery".
Chapter 17
Performing Complete Recovery of Sparse Databases with RMAN
17-37

2. Start RMAN and connect to the root as a common user with the
SYSDBA
or
SYSBACKUP
privilege, as described in "Making RMAN Connections to a CDB".
3. Close the PDBs that you want to recover.
ALTER PLUGGABLE DATABASE sales, hr CLOSE;
If any data files are missing, an error occurs and you cannot close a PDB. You
must then connect to the PDB to which the missing data file belongs, take the
missing data file offline, and then close the PDB.
The following command takes the data file 12 offline:
ALTER PLUGGABLE DATABASE DATAFILE 12 OFFLINE;
Note:
If the data files that store the
SYSTEM
tablespace of a PDB are missing,
then follow the recovery steps described in "Performing Complete
Recovery of Tablespaces or Data Files in a PDB with RMAN".
4. (Optional) Use the
CONFIGURE
command to configure the default device type and
automatic channels.
5. Run the
RESTORE
and
RECOVER
commands for the pluggable database.
The following example performs complete recovery of the PDB
HR_PDB
when
connected to the root:
RESTORE FROM SPARSE PLUGGABLE DATABASE HR_PDB;
RECOVER PLUGGABLE DATABASE HR_PDB;
To connect to and recover one sparse PDB:
1. Complete the preparation steps required for your recovery scenario, as described
in "Preparing for Complete Database Recovery".
2. Start RMAN and connect to the PDB as a local user with the
SYSDBA
or
SYSBACKUP
system privilege, as described in "Making RMAN Connections to a CDB".
3. Close the PDB.
ALTER PLUGGABLE DATABASE CLOSE;
If any data files are missing, an error occurs and you cannot close the PDB. You
must take the missing data file offline and then close the PDB.
The following command takes the data file 12 offline:
ALTER DATABASE DATAFILE 12 OFFLINE;
Note:
If the data files that store the
SYSTEM
tablespace of a PDB are missing,
then follow the recovery steps described in "Performing Complete
Recovery of Tablespaces or Data Files in a PDB with RMAN".
Chapter 17
Performing Complete Recovery of Sparse Databases with RMAN
17-38

4. (Optional) Use the
CONFIGURE
command to configure the default device type and
automatic channels.
5. Issue the
RESTORE
and
RECOVER
commands.
The following example restores and recovers the PDB
USERS_PDB
RESTORE FROM SPARSE DATABASE FROM USERS_PDB;
RECOVER DATABASE USERS_PDB;
.
Chapter 17
Performing Complete Recovery of Sparse Databases with RMAN
17-39

18
Performing Flashback and Database Point-
in-Time Recovery
This chapter explains how to investigate unwanted database changes, and select and
perform an appropriate recovery strategy based upon Oracle Flashback Technology
and database backups. It contains the following topics:
•Overview of Oracle Flashback Technology and Database Point-in-Time Recovery
•Rewinding a Table with Flashback Table
•Rewinding a DROP TABLE Operation with Flashback Drop
•Rewinding a Database with Flashback Database
•Performing Database Point-in-Time Recovery
•Flashback and Database Point-in-Time Recovery Scenarios
18.1 Overview of Oracle Flashback Technology and
Database Point-in-Time Recovery
This overview describes the purpose and basic concepts of Oracle Flashback
Technology and database point-in-time recovery.
18.1.1 Purpose of Flashback and Database Point-in-Time Recovery
Certain situations are suited for using point-in-time recovery or flashback features to
return the database or database object to its state at a previous point in time.
Some typical situations include the following:
•A user error or corruption removes needed data or introduces corrupted data. For
example, a user or DBA might erroneously delete or update the contents of one or
more tables, drop database objects that are still needed during an update to an
application, or run a large batch update that fails midway.
•A database upgrade fails or an upgrade script goes awry.
•A complete database recovery after a media failure cannot succeed because you
do not have all of the needed redo logs or incremental backups.
18.1.2 Basic Concepts of Point-in-Time Recovery and Flashback
Features
Database point-in-time recovery (DBPITR) and Flashback features enable you to
recover your database to a prior point in time.
DBPITR is the most basic solution to unwanted database changes. It is sometimes
called incomplete recovery because it does not use all of the available redo or
18-1

completely recover all changes to your database. In this case, you restore a whole
database backup and then apply redo logs or incremental backups to re-create all
changes up to a point in time before the unwanted change.
If unwanted database changes are extensive but confined to specific tablespaces,
then you can use tablespace point-in-time recovery (TSPITR) to return these
tablespaces to an earlier system change number (SCN) while the unaffected
tablespaces remain available.
If unwanted database changes are limited to specific tables or table partitions, then
you can use a previously created RMAN backup to return only these objects to a point
in time before the unwanted changes occurred.
Oracle Database also provides a set of features collectively known as Flashback
Technology that supports viewing past states of data, and winding and rewinding data
back and forth in time, without requiring the restore of the database from backup.
Depending on the changes to your database, Flashback Technology can often reverse
the unwanted changes more quickly and with less impact on database availability.
See Also:
•Performing RMAN Tablespace Point-in-Time Recovery (TSPITR)
•Recovering Tables and Table Partitions
18.1.2.1 Basic Concepts of Database Point-in-Time Recovery for non-CDBs
DBPITR works at the physical level to return the data files to their state at a target time
in the past.
In an RMAN DBPITR operation, you specify a target SCN, log sequence, restore point,
or time. RMAN restores the database from backups created before the target time,
and then applies incremental backups and logs to re-create all changes between the
time of the data file backups and the end point of recovery. When the end point is
specified as an SCN, the database applies the redo logs and stops after each redo
thread or the specified SCN, whichever occurs first. When the end point is specified as
a time, the database internally determines a suitable SCN for the specified time and
then recovers to this SCN.
If your backup strategy is properly designed and your database is running in
ARCHIVELOG
mode, then DBPITR is an option in nearly all circumstances. RMAN
simplifies DBPITR in comparison to the user-managed DBPITR described in
"Performing Incomplete Database Recovery". Given a target SCN, data files are
restored from backup and recovered efficiently with no intervention from the user.
Nevertheless, RMAN DBPITR has the following disadvantages:
•You cannot return selected objects to their earlier state, only the entire database.
•Your entire database is unavailable during the DBPITR.
•DBPITR can be time-consuming because RMAN must restore all data files. Also,
RMAN may need to restore redo logs and incremental backups to recover the data
files. If backups are on tape, then this process can take even longer.
Chapter 18
Overview of Oracle Flashback Technology and Database Point-in-Time Recovery
18-2

18.1.2.2 Basic Concepts of Point-in-Time Recovery for PDBs
RMAN provides support for point-in-time recovery for one or more PDBs. To recover
PDBs, you must connect to the root as a user with
SYSDBA
or
SYSBACKUP
privilege. After
recovery, old backups of the PDB remain valid and can be used if a media failure
occurs.
When you perform PITR of a PDB, all the data files for this PDB are recovered in-
place. However, to recover the PDB to the specified target time, RMAN also needs the
UNDO
tablespace as it existed at the target time. When shared undo is used, the
UNDO
tablespace is shared by all PDBs and therefore it cannot be recovered in-place. RMAN
restores the
UNDO
,
SYSTEM
, and
SYSAUX
tablespaces in the root to an auxiliary database
and then uses the undo information to recover the PDB to the target time.
If a fast recovery area is configured, Oracle Database uses it as the auxiliary
destination. If the fast recovery area is not configured, then you must use the
AUXILIARY
DESTINATION
clause to specify the location used for auxiliary database files. Ensure that
there is sufficient space in the fast recovery area to restore the root tablespaces and
the undo tablespace. If the fast recovery area does not have the required space, use
an alternate location by specifying the
AUXILIARY DESTINATION
clause.
In a Data Guard environment, for the standby database to follow a primary database in
which a PDB was restored to a particular point in time, you may need to either flash
back the entire standby database, restore the PDB, or flash back the PDB.
See Also:
Performing Point-in-Time Recovery of CDBs and PDBs
18.1.2.3 Basic Concepts of Flashback Technology
The flashback features of the Oracle Database are more efficient than media recovery
in most circumstances in which they are available. You can use them to investigate
past states of the database.
18.1.2.3.1 About Physical Flashback Features Useful in Backup and Recovery
Oracle Flashback Database is the most efficient alternative to DBPITR.
Unlike the other flashback features, it operates at a physical level and reverts the
current data files to their contents at a past time. The result is like the result of a
DBPITR, including the
OPEN RESETLOGS
, but Flashback Database is typically faster
because it does not require you to restore data files and requires only limited
application of redo compared to media recovery.
A fast recovery area is required for Flashback Database. To enable logging for
Flashback Database, you must set the
DB_FLASHBACK_RETENTION_TARGET
initialization
parameter and issue the
ALTER DATABASE FLASHBACK ON
statement.
During normal operation, the database periodically writes old images of data file blocks
to the flashback logs. Flashback logs are written sequentially and often in bulk. In
some respects, flashback logging is like a continuous backup. The database
automatically creates, deletes, and resizes flashback logs in the recovery area.
Chapter 18
Overview of Oracle Flashback Technology and Database Point-in-Time Recovery
18-3

Flashback logs are not archived. You need only be aware of flashback logs for
monitoring performance and determining disk space allocation for the recovery area.
When you perform a Flashback Database operation, the database uses flashback logs
to access past versions of data blocks and also uses some data in the archived redo
logs. Consequently, you cannot enable Flashback Database after a failure is
discovered and then use Flashback Database to rewind through this failure. You can
use the related capability of guaranteed restore points to protect the contents of your
database at a fixed point in time, such as immediately before a risky database change.
If any unrecoverable operations are encountered during the small amount of redo
apply required, then logically corrupt data blocks will result. This can lead to Oracle
errors when such blocks are accessed.
See Also:
•Rewinding a Database with Flashback Database
•Configuring the Fast Recovery Area
•Oracle Database Administrator’s Guide
18.1.2.3.2 About Logical Flashback Features Useful in Backup and Recovery
Logical flashback features are used to recover tables and their contents to a past time.
The logical features are as follows:
•Flashback Table
You can recover a table or set of tables to a specified earlier point in time without
taking any part of the database offline. In many cases, Flashback Table eliminates
the need to perform more complicated point-in-time recovery operations.
Flashback Table restores tables while automatically maintaining associated
attributes such as current indexes, triggers, and constraints, and not requiring you
to find and restore application-specific properties.
•Flashback Drop
You can reverse the effects of a
DROP TABLE
statement.
All logical flashback features except Flashback Drop rely on undo data. Used
primarily for providing read consistency for SQL queries and rolling back transactions,
undo records contain the information required to reconstruct data as it existed at a
past time and examine the record of changes since that past time.
Flashback Drop relies on a mechanism called the recycle bin, which the database
uses to manage dropped database objects until the space they occupied is needed for
new data. There is no fixed amount of space allocated to the recycle bin, and no
guarantee regarding how long dropped objects remain in the recycle bin. Depending
on system activity, a dropped object may remain in the recycle bin for seconds or for
months.
Chapter 18
Overview of Oracle Flashback Technology and Database Point-in-Time Recovery
18-4

See Also:
•Rewinding a Table with Flashback Table
•Rewinding a DROP TABLE Operation with Flashback Drop
•Oracle Database Administrator’s Guide for more information about undo
data and automatic undo management
18.1.3 Basic Concepts of Performing Flashback Database for CDBs
and PDBs
You can perform a Flashback Database operation for a whole multitenant container
database (CDB) or for a particular pluggable database (PDB).
Flashback Database for a whole CDB enables you to rewind the entire CDB, including
all its PDBs, to a previous point in time. Flashback Database for a particular PDB
enables you to reverse unwanted changes caused by logical data corruption or user
errors in that PDB. When you perform a Flashback Database operation for a specific
PDB, the other PDBs can be open and operational.
You can perform multiple flashback database operations on a single PDB. However,
you can only perform a flashback operation on a PDB to one of its ancestor
incarnations. A PDB must always stay in a past incarnation that is compatible with the
overall database incarnation.
To perform a Flashback Database operation for a PDB, the desired target point in time
can be specified using a PDB restore point, a CDB restore point, an SCN, or a time
expression. A flashback operation on a PDB to a CDB restore point is equivalent to a
flashback operation on the PDB to the restore point SCN on the CDB incarnation. In
general, for PDBs, a flashback operation to a PDB restore point is more accurate than
a flashback operation to a CDB restore point. This is because a PDB restore point
represents the PDB sub-incarnation of the point in time at which it was created.
You can also perform a Flashback Database operation for a PDB on a physical
standby database.
Backups of a PDB continue to be valid even after a Flashback Database operation is
performed on that PDB. In case of a media failure, you can recover from the failure by
restoring these PDB backups. This type of PDB recovery can recover through
database resetlogs and PDB resetlogs.
Note:
You cannot perform a flashback operation only on the root, you must perform
a flashback operation on the entire CDB.
Chapter 18
Overview of Oracle Flashback Technology and Database Point-in-Time Recovery
18-5

Note:
To perform a flashback operation for an application container, you must
perform flashback operations for the application root and all the individual
application PDBs that are part of the application container. Performing a
flashback operation on the application root reverts only the application root to
the specified point in time.
See Also:
•Performing a Flashback Database Operation for a Whole CDB
•Performing a Flashback Database Operation for PDBs
•Performing Flashback Database with SQL*Plus
18.1.3.1 About Flashback Database and PITR for PDBs
For pluggable databases (PDBs) that use local undo, database point-in-time recovery
(PITR) and flashback operations are independent of each other.
For PDBs that use shared undo, database point-in-time recovery and flashback
operations are independent with the following caveat:
•If you perform a flashback operation for a PDB or recover a PDB to a particular
point in time, Oracle Database may apply undo data during the PDB resetlogs
operation to back out transactions that are not committed at that point in time. If
you subsequently recover the entire multitenant container database (CDB) to a
point in time that is in the middle of the PDB resetlogs operation, then you will
receive a warning that some PDBs may not be opened. For such PDBs, you need
to perform one of the following mutually exclusive actions:
–Recover the entire CDB or perform a flashback operation for the entire CDB to
a different SCN
–Recover all the affected PDBs or perform a flashback database operation for
all the affected PDBs to a different SCN
See Also:
•Basic Concepts of Performing Flashback Database for CDBs and PDBs
•About Undo and Flashback Database Operations for PDBs
•About Managing Redo Corruption in CDBs
Chapter 18
Overview of Oracle Flashback Technology and Database Point-in-Time Recovery
18-6

18.1.3.2 About Undo and Flashback Database Operations for PDBs
A multitenant container database (CDB) can use shared undo or local undo. The
technique used by RMAN to perform flashback database operations depends on the
type of undo configuration for the CDB.
When a CDB uses local undo, performing a flashback database operation on a
pluggable database (PDB) is straight-forward because only data files related to that
PDB need to be modified.
In the case of a CDB that uses shared undo, since one set of tablespaces is shared by
all PDBs, undo data for multiple PDBs may be mixed within the undo tablespaces and
even within individual data blocks. Therefore, to perform a flashback database
operation for a PDB, RMAN automatically uses an auxiliary instance to restore shared
undo tablespaces and certain tablespaces in the root and then recovers data to the
required point in time. This process may involve restoring backups for a relatively
small amount of data. When you perform a flashback database operation on a PDB to
a clean PDB restore point, no auxiliary instance or restoring of backups is required.
By default, the auxiliary instance is created in the fast recovery area. You can use the
AUXILIARY DESTINATION
clause in the
FLASHBACK DATABASE
command to specify an
alternate location for the auxiliary instance.
See Also:
•Basic Concepts of Performing Flashback Database for CDBs and PDBs
•About Flashback Database and PITR for PDBs
•About Managing Redo Corruption in CDBs
•Performing a Flashback Database Operation for a Whole CDB
•Performing a Flashback Database Operation for PDBs
18.1.3.3 About Managing Redo Corruption in CDBs
RMAN provides methods to manage redo corruption to data blocks in a PDB.
In very rare circumstances, the redo logs in a multitenant container database (CDB)
may be corrupted. In such a scenario, if the affected data blocks reside only in one
pluggable database (PDB), then you can do one of the following:
•perform a flashback operation on the PDB to a point in time before the corruption
and then open the PDB with
RESETLOGS
•perform a point-in-time recovery of the PDB to a point in time before the corruption
and then open the PDB with
RESETLOGS
After you perform one of these steps on the primary database, any standby database
of this primary database can also skip the corrupted redo provided you perform the
steps required to enable a standby to follow a primary after a PITR or Flashback on
the PDB.
Chapter 18
Overview of Oracle Flashback Technology and Database Point-in-Time Recovery
18-7

See Also:
•Basic Concepts of Performing Flashback Database for CDBs and PDBs
•Oracle Data Guard Concepts and Administration for steps to enable a
standby to follow a primary
18.2 Rewinding a Table with Flashback Table
Flashback Table uses information in the undo tablespace rather than restored backups
to retrieve the table. When a Flashback Table operation occurs, new rows are deleted
and old rows are reinserted. The rest of your database remains available while the
flashback of the table is being performed.
To rewind a table to a previous point in time:
1. Ensure that the prerequisites described in "Prerequisites for Flashback Table" are
met.
2. Perform a Flashback Table operation on the table, as described in "Performing a
Flashback Table Operation".
See Also:
Oracle Database Administrator’s Guide for more information about automatic
undo management
18.2.1 Prerequisites for Flashback Table
To perform a Flashback Table operation, the table must be eligible to be flashed back
and the user performing the operation must have the required privileges.
You must have the following privileges to use the Flashback Table feature:
•You must have been granted the
FLASHBACK ANY TABLE
system privilege or you must
have the
FLASHBACK
object privilege on the table.
•You must have
READ
or
SELECT
,
INSERT
,
DELETE
, and
ALTER
privileges on the table.
•To flash back a table to a restore point, you must have the
SELECT ANY DICTIONARY
or
FLASHBACK ANY TABLE
system privilege or the
SELECT_CATALOG_ROLE
role.
For an object to be eligible to be flashed back, the following prerequisites must be met:
•The object must not be included the following categories: tables that are part of a
cluster, materialized views, Advanced Queuing (AQ) tables, static data dictionary
tables, system tables, remote tables, object tables, nested tables, or individual
table partitions or subpartitions.
•The structure of the table must not have been changed between the current time
and the target flashback time.
Chapter 18
Rewinding a Table with Flashback Table
18-8

The following Data Definition Language (DDL) operations change the structure of
a table: upgrading, moving, or truncating a table; adding a constraint to a table,
adding a table to a cluster; modifying or dropping a column; adding, dropping,
merging, splitting, coalescing, or truncating a partition or subpartition (except
adding a range partition).
•Row movement must be enabled on the table, which indicates that rowids change
after the flashback occurs.
This restriction exists because if rowids before the flashback were stored by the
application, then there is no guarantee that the rowids correspond to the same
rows after the flashback. If your application depends on rowids, then you cannot
use Flashback Table.
•The undo data in the undo tablespace must extend far enough back in time to
satisfy the flashback target time or SCN.
The point to which you can perform Flashback Table is determined by the undo
retention period, which is the minimal time for which undo data is kept before
being recycled, and tablespace characteristics. The undo data contains
information about data blocks before they were changed. The flashback operation
uses undo to re-create the original data.
To ensure that the undo information is retained for Flashback Table operations,
Oracle suggests setting the
UNDO_RETENTION
parameter to 86400 seconds (24
hours) or greater for the undo tablespace.
Note:
FLASHBACK
TABLE ...
TO
BEFORE
DROP
is a use of the Flashback Drop feature,
not Flashback Table, and therefore is not subject to these prerequisites. See
"Rewinding a DROP TABLE Operation with Flashback Drop" for more
information.
18.2.2 Performing a Flashback Table Operation
To use the Flashback Table feature on one or more tables, use the
FLASHBACK TABLE
SQL statement with a target time or SCN.
Assume that you want to perform a flashback of the
hr.temp_employees
table after a
user made some incorrect updates. Use the following steps:
1. Ensure that the prerequisites that are described in "Prerequisites for Flashback
Table" are met.
2. Connect SQL*Plus to the target database and identify the current SCN.
You cannot roll back a
FLASHBACK TABLE
statement, but you can issue another
FLASHBACK TABLE
statement and specify a time just before the current time.
Therefore, it is advisable to record the current SCN. You can obtain it by querying
V$DATABASE
as follows:
SELECT CURRENT_SCN FROM V$DATABASE;
3. Identify the time, SCN, or restore point to which you want to return the table.
Chapter 18
Rewinding a Table with Flashback Table
18-9

If you have created restore points, then you can list available restore points by
executing the following query:
SELECT NAME, SCN, TIME FROM V$RESTORE_POINT;
4. Ensure that enough undo data exists to rewind the table to the specified target.
If the
UNDO_RETENTION
initialization parameter is set, and the undo retention
guarantee is on, then you can use the following query to determine how long undo
data is being retained:
SELECT NAME, VALUE/60 MINUTES_RETAINED
FROM V$PARAMETER
WHERE NAME = 'undo_retention';
5. Ensure that row movement is enabled for all objects that you are rewinding with
Flashback Table.
You can enable row movement for a table with the following SQL statement:
ALTER TABLE
hr.temp_employees
ENABLE ROW MOVEMENT;
6. Determine whether the table that you intend to flash back has dependencies on
other tables. If dependencies exist, then decide whether to flash back these tables
as well.
You can issue the following SQL query to determine the dependencies, where
schema_name is the schema for the table to be flashed back and table_name is
the name of the table:
SELECT other.owner, other.table_name
FROM sys.all_constraints this, sys.all_constraints other
WHERE this.owner = schema_name
AND this.table_name = table_name
AND this.r_owner = other.owner
AND this.r_constraint_name = other.constraint_name
AND this.constraint_type='R';
7. Execute a
FLASHBACK TABLE
statement for the objects to flash back.
The following SQL statement returns the
hr.temp_employees
table to the restore
point named
temp_employees_update
:
FLASHBACK TABLE hr.temp_employees
TO RESTORE POINT temp_employees_update;
The following SQL statement rewinds the
hr.temp_employees
table to its state when
the database was at the time specified by the SCN:
FLASHBACK TABLE hr.temp_employees
TO SCN 123456;
As shown in the following example, you can also specify the target point in time
with
TO_TIMESTAMP
:
FLASHBACK TABLE hr.temp_employees
TO TIMESTAMP TO_TIMESTAMP('2013-10-17 09:30:00', 'YYYY-MM-DD HH:MI:SS');
Chapter 18
Rewinding a Table with Flashback Table
18-10

Note:
The mapping of time stamps to SCNs is not always exact. When you use
time stamps with the
FLASHBACK
TABLE
statement, the time to which the
table is flashed back can vary by up to approximately 3 seconds of the
time specified for
TO_TIMESTAMP
. If an exact point in time is required, then
use an SCN rather than a time.
8. Optionally, query the table to check the data.
See Also:
Keeping Triggers Enabled During Flashback Table
18.2.2.1 Keeping Triggers Enabled During Flashback Table
By default, the database disables triggers on the affected table before performing a
FLASHBACK TABLE
operation. After the operation, the database returns the triggers to the
state they were in before the operation (enabled or disabled).
To keep triggers enabled during the flashback of the table, add an
ENABLE TRIGGERS
clause to the
FLASHBACK TABLE
statement.
For example, assume that at 17:00 an HR administrator discovers that an employee is
missing from the
hr.temp_employees
table. This employee was included in the table at
14:00, the last time the report was run. Therefore, someone accidentally deleted the
record for this employee between 14:00 and 17:00. The HR administrator uses
Flashback Table to return the table to its state at 14:00, respecting any triggers set on
the
hr.temp_employees
table, by using the SQL statement in the following example:
FLASHBACK TABLE hr.temp_employees
TO TIMESTAMP TO_TIMESTAMP('2013-03-03 14:00:00' , 'YYYY-MM-DD HH:MI:SS')
ENABLE TRIGGERS;
See Also:
•Oracle Database Administrator’s Guide to learn how to recover tables
with the Flashback Table feature
•Oracle Database SQL Language Reference for a simple Flashback
Table scenario
18.3 Rewinding a DROP TABLE Operation with Flashback
Drop
You can retrieve objects from the recycle bin with the
FLASHBACK TABLE ... TO BEFORE
DROP
statement.
Chapter 18
Rewinding a DROP TABLE Operation with Flashback Drop
18-11

This section contains the following topics:
•About Flashback Drop
•Prerequisites of Flashback Drop
•Performing a Flashback Drop Operation
18.3.1 About Flashback Drop
Flashback Drop reverses the effects of a
DROP TABLE
operation. Flashback Drop is
faster than other recovery mechanisms that can be used in this situation, such as
point-in-time recovery, and does not lead to downtime or loss of recent transactions.
When you drop a table, the database does not immediately remove the space
associated with the table. Instead, the table is renamed and, along with any associated
objects, placed in the recycle bin. System-generated recycle bin object names are
unique. You can query objects in the recycle bin, just as you can query other objects.
A flashback operation retrieves the table from the recycle bin. When retrieving dropped
tables, you can specify either the original user-specified name of the table or the
system-generated name.
When you drop a table, the table and all of its dependent objects go into the recycle
bin together. Likewise, when you perform Flashback Drop, the objects are generally all
retrieved together. When you restore a table from the recycle bin, dependent objects
such as indexes do not get their original names back; they retain their system-
generated recycle bin names. Oracle Database retrieves all indexes defined on the
table except for bitmap join indexes, and all triggers and constraints defined on the
table except for referential integrity constraints that reference other tables.
Some dependent objects such as indexes may possibly have been reclaimed because
of space pressure. In such cases, the reclaimed dependent objects are not retrievable
from the recycle bin.
18.3.2 Prerequisites of Flashback Drop
Prerequisites must be met before you perform a Flashback Drop operation.
The user privileges required for the operations related to Flashback Drop and the
recycle bin are as follows:
•
DROP
Any user with
DROP
privileges over an object can drop the object, placing it in the
recycle bin.
•
FLASHBACK TABLE ... TO BEFORE DROP
Privileges for this statement are tied to the privileges for
DROP
. That is, any user
who can drop an object can perform Flashback Drop to retrieve the dropped object
from the recycle bin.
•
PURGE
Privileges for a purge of the recycle bin are tied to the
DROP
privileges. Any user
having
DROP
TABLE
,
DROP
ANY
TABLE
, or
PURGE
DBA_RECYCLE_BIN
privileges can purge the
objects from the recycle bin.
•
READ
or
SELECT
and
FLASHBACK
for objects in the Recycle Bin
Chapter 18
Rewinding a DROP TABLE Operation with Flashback Drop
18-12

Users must have the
READ
or
SELECT
and
FLASHBACK
privileges over an object in the
recycle bin to query the object in the recycle bin. Any users who had the
READ
or
SELECT
privilege over an object before it was dropped continue to have the
READ
or
SELECT
privilege over the object in the recycle bin. Users must have
FLASHBACK
privilege to query any object in the recycle bin, because these are objects from a
past state of the database.
Objects must meet the following prerequisites to be eligible for retrieval from the
recycle bin:
•The recycle bin is only available for non-system, locally managed tablespaces. If a
table is in a non-system, locally managed tablespace, but one or more of its
dependent segments (objects) is in a dictionary-managed tablespace, then these
objects are protected by the recycle bin.
•Tables that have fine-grained auditing (FGA) and Virtual Private Database (VPD)
policies defined over them are not protected by the recycle bin.
•Partitioned index-organized tables are not protected by the recycle bin.
•The table must not have been purged, either by a user or by Oracle Database
during a space reclamation operation.
18.3.3 Performing a Flashback Drop Operation
Use the
FLASHBACK TABLE ... TO BEFORE DROP
statement to recover objects from the
recycle bin. You can specify either the name of the table in the recycle bin or the
original table name.
This section assumes a scenario in which you drop the wrong table. Many times you
have been asked to drop tables in the test databases, but in this case you accidentally
connect to the production database instead and drop
hr.employee_demo
. You decide to
use
FLASHBACK TABLE
to retrieve the dropped object.
To retrieve a dropped table:
1. Ensure that the prerequisites described in "Prerequisites of Flashback Drop" are
met.
2. Connect SQL*Plus to the target database and obtain the name of the dropped
table in the recycle bin.
You can use the SQL*Plus command
SHOW RECYCLEBIN
as follows:
SHOW RECYCLEBIN;
ORIGINAL NAME RECYCLEBIN NAME TYPE DROP TIME
---------------- --------------------------------- ------------ -------------
EMPLOYEE_DEMO BIN$gk3lsj/3akk5hg3j2lkl5j3d==$0 TABLE 2013-04-11:17:08:54
The
ORIGINAL NAME
column shows the original name of the object, whereas the
RECYCLEBIN NAME
column shows the name of the object as it exists in the bin.
Alternatively, you can query
USER_RECYCLEBIN
or
DBA_RECYCLEBIN
to obtain the table
name. The following example queries the
RECYCLEBIN
view to determine the original
names of dropped objects:
SELECT object_name AS recycle_name, original_name, type
FROM recyclebin;
RECYCLE_NAME ORIGINAL_NAME TYPE
-------------------------------- --------------------- ----------
Chapter 18
Rewinding a DROP TABLE Operation with Flashback Drop
18-13

BIN$gk3lsj/3akk5hg3j2lkl5j3d==$0 EMPLOYEE_DEMO TABLE
BIN$JKS983293M1dsab4gsz/I249==$0 I_EMP_DEMO INDEX
If you plan to manually restore original names for dependent objects, then ensure
that you make note of each dependent object's system-generated recycle bin
name before you restore the table.
Note:
Object views such as
DBA_TABLES
do not display the recycle bin objects.
3. Optionally, query the table in the recycle bin.
You must use the recycle bin name of the object in your query rather than the
object's original name. The following example queries the table with the recycle bin
name of
BIN$gk3lsj/3akk5hg3j2lkl5j3d==$0
:
SELECT *
FROM "BIN$gk3lsj/3akk5hg3j2lkl5j3d==$0";
Quotation marks are required because of the special characters in the recycle bin
name.
Note:
If you have the necessary privileges, then you can also use Flashback
Query on tables in the recycle bin, but only by using the recycle bin
name rather than the original table name. You cannot use Data
Manipulation Language (DML) or DDL statements on objects in the
recycle bin.
4. Retrieve the dropped table.
Use the
FLASHBACK TABLE ... TO BEFORE DROP
statement. The following example
restores the
BIN$gk3lsj/3akk5hg3j2lkl5j3d==$0
table, changes its name back to
hr.employee_demo
, and purges its entry from the recycle bin:
FLASHBACK TABLE "BIN$gk3lsj/3akk5hg3j2lkl5j3d==$0" TO BEFORE DROP;
The table name is enclosed in quotation marks because of the possibility of
special characters appearing in the recycle bin object names.
Alternatively, you can use the original name of the table:
FLASHBACK TABLE HR.EMPLOYEE_DEMO TO BEFORE DROP;
You can also assign a new name to the restored table by specifying the
RENAME TO
clause. For example:
FLASHBACK TABLE "BIN$gk3lsj/3akk5hg3j2lkl5j3d==$0" TO BEFORE DROP
RENAME TO hr.emp_demo;
5. Optionally, verify that all dependent objects retained their system-generated
recycle bin names.
The following query determines the names of the indexes of the retrieved
hr.employee_demo
table:
Chapter 18
Rewinding a DROP TABLE Operation with Flashback Drop
18-14

SELECT INDEX_NAME
FROM USER_INDEXES
WHERE TABLE_NAME = 'EMPLOYEE_DEMO';
INDEX_NAME
------------------------------
BIN$JKS983293M1dsab4gsz/I249==$0
6. Optionally, rename the retrieved indexes to their original names.
The following statement renames the index to its original name of
i_emp_demo
:
ALTER INDEX "BIN$JKS983293M1dsab4gsz/I249==$0" RENAME TO I_EMP_DEMO;
7. If the retrieved table had referential constraints before it was placed in the recycle
bin, then re-create them.
This step must be performed manually because the recycle bin does not preserve
referential constraints on a table.
See Also:
Retrieving Objects Using Flashback Drop When Multiple Objects Share the
Same Original Name
18.3.3.1 Retrieving Objects Using Flashback Drop When Multiple Objects
Share the Same Original Name
You can create, and then drop, several objects with the same original name. All
dropped objects are stored in the recycle bin.
For example, consider the SQL statements in the following example:
Example 18-1 Dropping Multiple Objects with the Same Name
CREATE TABLE temp_employees ( ...columns ); # temp_employees version 1
DROP TABLE temp_employees;
CREATE TABLE temp_employees ( ...columns ); # temp_employees version 2
DROP TABLE temp_employees;
CREATE TABLE temp_employees ( ...columns ); # temp_employees version 3
DROP TABLE temp_employees;
Each table
temp_employees
is assigned a unique name in the recycle bin when it is
dropped. You can use a
FLASHBACK TABLE ... TO BEFORE DROP
statement with the
original name of the table, as shown in this example:
FLASHBACK TABLE temp_employees TO BEFORE DROP;
The most recently dropped table with this original name is retrieved from the recycle
bin, with its original name.
The following example shows the retrieval from the recycle bin of all three dropped
temp_employees
tables from the previous example, with each assigned a new name.
Chapter 18
Rewinding a DROP TABLE Operation with Flashback Drop
18-15

Example 18-2 Renaming Dropped Tables
FLASHBACK TABLE temp_employees TO BEFORE DROP
RENAME TO temp_employees_VERSION_3;
FLASHBACK TABLE temp_employees TO BEFORE DROP
RENAME TO temp_employees_VERSION_2;
FLASHBACK TABLE temp_employees TO BEFORE DROP
RENAME TO temp_employees_VERSION_1;
Because the original name in
FLASHBACK
TABLE
refers to the most recently dropped table
with this name, the last table dropped is the first retrieved.
You can also retrieve any table from the recycle bin, regardless of any collisions
among original names, by using the unique recycle bin name of the table. For
example, assume that you query the recycle bin as follows (sample output included):
SELECT object_name, original_name, createtime
FROM recyclebin;
OBJECT_NAME ORIGINAL_NAME CREATETIME
------------------------------ --------------- -------------------
BIN$yrMKlZaLMhfgNAgAIMenRA==$0 TEMP_EMPLOYEES 2013-02-05:21:05:52
BIN$yrMKlZaVMhfgNAgAIMenRA==$0 TEMP_EMPLOYEES 2013-02-05:21:25:13
BIN$yrMKlZaQMhfgNAgAIMenRA==$0 TEMP_EMPLOYEES 2013-02-05:22:05:53
You can use the following command to retrieve the middle table:
FLASHBACK TABLE BIN$yrMKlZaVMhfgNAgAIMenRA==$0 TO BEFORE DROP;
See Also:
•Oracle Database Administrator’s Guide to learn how to use Flashback
Drop and manage the recycle bin
•Oracle Database SQL Language Reference for information about the
FLASHBACK TABLE
statement
18.4 Rewinding a Database with Flashback Database
Flashback Database reverses unwanted changes by returning your database to its
state at a previous point in time.
This section contains the following topics:
•Prerequisites of Flashback Database
•Performing a Flashback Database Operation
•Performing a Flashback Database Operation for a Whole CDB
•Performing a Flashback Database Operation for PDBs
•Monitoring Flashback Database
Chapter 18
Rewinding a Database with Flashback Database
18-16

18.4.1 Prerequisites of Flashback Database
Flashback Database works by undoing changes to the data files that exist at the
moment that you run the command. Prerequisites must be met to perform a Flashback
Database operation.
To use the
FLASHBACK DATABASE
command to return your database contents to points in
time within the flashback window, your database must have been previously
configured for flashback logging. To return the database to a guaranteed restore point,
you must have previously defined a guaranteed restore point.
Note the following important prerequisites:
•No current data files are lost or damaged. You can only use
FLASHBACK DATABASE
to
rewind changes to a data file made by an Oracle database, not to repair media
failures.
•You are not trying to recover from accidental deletion of data files, undo a shrink
data file operation, or undo a change to the database name.
•You are not trying to use
FLASHBACK DATABASE
to return to a point in time before the
restore or re-creation of a control file. If the database control file is restored from
backup or re-created, then all accumulated flashback log information is discarded.
•You are not trying to use
FLASHBACK DATABASE
to undo a compatibility change.
See Also:
•"Overview of Flashback Database, Restore Points and Guaranteed
Restore Points"
•"Using Normal and Guaranteed Restore Points"
•Oracle Database Backup and Recovery Reference for a complete list of
command prerequisites and usage notes for
FLASHBACK DATABASE
18.4.2 Performing a Flashback Database Operation
A Flashback Database operation uses the
FLASHBACK DATABASE
command to rewind the
database to a past point in time.
This topic presents a basic technique for performing a flashback of the database,
specifying the desired target point in time with a time expression, the name of a normal
or guaranteed restore point, or an SCN. It makes the following assumptions:
•You are rewinding the database to a point in time within the current database
incarnation.
•The SCN used in the
FLASHBACK DATABASE
command refers to an SCN in the direct
ancestral path of the database incarnations. An incarnation is in this path if it was
not abandoned after the database was previously opened with the
RESETLOGS
option.
To perform a Flashback Database operation:
Chapter 18
Rewinding a Database with Flashback Database
18-17

1. Ensure that the prerequisites described in "Prerequisites of Flashback Database"
are met.
2. Connect SQL*Plus to the target database and determine the desired SCN, restore
point, or point in time for the
FLASHBACK DATABASE
command.
Obtain the earliest SCN in the flashback database window as follows:
SELECT OLDEST_FLASHBACK_SCN, OLDEST_FLASHBACK_TIME
FROM V$FLASHBACK_DATABASE_LOG;
The most recent SCN that can be reached with Flashback Database is the current
SCN of the database. The following query returns the current SCN:
SELECT CURRENT_SCN FROM V$DATABASE;
You can query available guaranteed restore points as follows (sample output
included):
SELECT NAME, SCN, TIME, DATABASE_INCARNATION#,
GUARANTEE_FLASHBACK_DATABASE
FROM V$RESTORE_POINT
WHERE GUARANTEE_FLASHBACK_DATABASE='YES';
NAME SCN TIME DATABASE_INCARNATION# GUA
--------------- ---------- --------------------- --------------------- ---
BEFORE_CHANGES 5753126 04-MAR-12 12.39.45 AM 2 YES
Note:
If the flashback window does not extend far enough back into the past to
reach the desired target time, and if you do not have a guaranteed
restore point at the desired time, then you can achieve similar results by
using database point-in-time recovery, as described in "Performing
Database Point-in-Time Recovery".
3. Shut down the database consistently, ensure that it is not opened by any instance,
and then mount it:
SHUTDOWN IMMEDIATE;
STARTUP MOUNT;
4. Repeat the query in Step 2 of this procedure.
Some flashback logging data is generated when the database is shut down. If
flashback logs were deleted due to space pressure in the fast recovery area, then
your target SCN may not be reachable.
Note:
If you run
FLASHBACK
DATABASE
when your target SCN is outside the
flashback window, then
FLASHBACK
DATABASE
fails with an
ORA-38729
error.
In this case your database does not change.
5. Start RMAN and connect to the target database, as described in "Making
Database Connections with RMAN".
Chapter 18
Rewinding a Database with Flashback Database
18-18

6. Run the
SHOW
command to see which channels are preconfigured.
During the flashback operation, RMAN may need to restore archived redo logs
from backup. Enter the following command to see whether channels are
configured (sample output is included):
SHOW ALL;
RMAN configuration parameters for database with db_unique_name PROD1 are:
.
.
.
CONFIGURE DEFAULT DEVICE TYPE TO DISK; # default
CONFIGURE DEVICE TYPE DISK PARALLELISM 1 BACKUP TYPE TO BACKUPSET; # default
CONFIGURE DEVICE TYPE SBT_TAPE PARALLELISM 1 BACKUP TYPE TO BACKUPSET; # default
CONFIGURE CHANNEL DEVICE TYPE 'SBT_TAPE' PARMS "SBT_LIBRARY=/usr/local/oracle/
backup/lib/libobk.so";
If the necessary devices and channels are configured, then no action is necessary.
Otherwise, use the
CONFIGURE
command to configure automatic channels, or
include
ALLOCATE CHANNEL
commands within a
RUN
block.
7. Run the RMAN
FLASHBACK DATABASE
command.
You can specify the target time by using a form of the command shown in the
following examples:
FLASHBACK DATABASE TO SCN 46963;
FLASHBACK DATABASE
TO RESTORE POINT BEFORE_CHANGES;
FLASHBACK DATABASE TO TIME
"TO_DATE('09/20/12','MM/DD/YY')";
When the
FLASHBACK DATABASE
command completes, the database is left mounted
and recovered to the specified target time.
8. Open the database read-only in SQL*Plus and run some queries to verify the
database contents.
Open the database read-only as follows:
ALTER DATABASE OPEN READ ONLY;
If you are satisfied with the state of the database, then end the procedure with
Step 9. If you are not satisfied with the state of the database, skip to Step 10.
9. If you are satisfied with the results, then perform either of the following mutually
exclusive actions:
•Make the database available for updates by opening the database with the
RESETLOGS
option. If the database is currently open read-only, then execute the
following commands in SQL*Plus:
SHUTDOWN IMMEDIATE
STARTUP MOUNT
ALTER DATABASE OPEN RESETLOGS;
Chapter 18
Rewinding a Database with Flashback Database
18-19

Note:
After you perform this
OPEN
RESETLOGS
operation, all changes to the
database after the target SCN for
FLASHBACK DATABASE
are
abandoned. Nevertheless, you can use the technique in "Rewinding
the Database to an SCN in an Abandoned Incarnation Branch" to
return the database to that range of SCNs while they remain in the
flashback window.
•Use Oracle Data Pump Export to make a logical backup of the objects whose
state was corrupted. Afterward, use RMAN to recover the database to the
present time:
RECOVER DATABASE;
This step undoes the effect of the Flashback Database by reapplying all
changes in the redo logs to the database, returning it to the most recent SCN.
After reopening the database read/write, you can import the exported objects
with the Data Pump Import utility. See Oracle Database Utilities to learn how
to use Data Pump.
10. If you find that you used the wrong restore point, time, or SCN for the flashback,
then mount the database and perform one of the following mutually exclusive
options:
•If your chosen target time was not far enough in the past, then use another
FLASHBACK DATABASE
command to rewind the database further back in time:
FLASHBACK DATABASE TO SCN 42963; #earlier than current SCN
•If you chose a target SCN that is too far in the past, then use
RECOVER DATABASE
UNTIL
to wind the database forward in time to the desired SCN:
RECOVER DATABASE UNTIL SCN 56963; #later than current SCN
•If you want to completely undo the effect of the
FLASHBACK DATABASE
command,
then you can perform complete recovery of the database by using the
RECOVER
DATABASE
command without an
UNTIL
clause or
SET UNTIL
command:
RECOVER DATABASE;
The
RECOVER DATABASE
command reapplies all changes to the database,
returning it to the most recent SCN.
See Also:
•"Rewinding an OPEN RESETLOGS Operation with Flashback
Database" to return the database to the point in time immediately
before the most recent
OPEN RESETLOGS
operation
•"Rewinding the Database to an SCN in an Abandoned Incarnation
Branch" to retrieve changes in abandoned incarnations
Chapter 18
Rewinding a Database with Flashback Database
18-20

18.4.3 Performing a Flashback Database Operation for a Whole CDB
You can perform a flashback database operation for a whole multitenant container
database (CDB) using the
FLASHBACK DATABASE
command.
When the
COMPATIBLE
initialization parameter is set to 12.1.0, in rare cases, performing
a flashback database operation on a CDB across PDB (pluggable database) point-in-
time recovery (PITR) or PDB flashback may result in the following error:
ORA-39866: Data files for Pluggable Database <PDB_name> must be offline to
flashback across special 12.1 PDB resetlogs
To resolve this error and perform a flashback operation on a CDB across PDB PITR or
PDB flashback, use the steps described in “Performing Flashback Database
Operations on a CDB When a PDB Was Recovered Using DBPITR” in the Oracle
Database Backup and Recovery User’s Guide 12c Release 1 (12.1).
The steps to perform a Flashback Database operation for a CDB are similar to the
ones used for non-CDBs, with the differences described in this topic.
To perform a flashback database operation for a whole CDB:
1. Ensure that the prerequisites described in "Prerequisites of Flashback Database"
are met.
2. Connect SQL*Plus to the target CDB and determine the desired SCN, restore
point, or point in time for the
FLASHBACK DATABASE
command.
Obtain the earliest SCN in the flashback database window as follows:
SELECT OLDEST_FLASHBACK_SCN, OLDEST_FLASHBACK_TIME
FROM V$FLASHBACK_DATABASE_LOG;
The most recent SCN that can be reached with Flashback Database is the current
SCN of the database. The following query returns the current SCN:
SELECT CURRENT_SCN
FROM V$DATABASE;
You can query available guaranteed restore points as follows (sample output
included):
SELECT NAME, SCN, TIME, DATABASE_INCARNATION#,
GUARANTEE_FLASHBACK_DATABASE
FROM V$RESTORE_POINT
WHERE GUARANTEE_FLASHBACK_DATABASE='YES';
NAME SCN TIME DATABASE_INCARNATION# GUA
--------------- ---------- --------------------- --------------------- ---
BEFORE_CHANGES 5753126 04-MAR-12 12.39.45 AM 2 YES
Chapter 18
Rewinding a Database with Flashback Database
18-21

Note:
If the flashback window does not extend far enough back into the past to
reach the desired target time, and if you do not have a guaranteed
restore point at the desired time, then you can achieve similar results by
using database point-in-time recovery, as described in "Performing
Point-in-Time Recovery of a Whole CDB".
3. Shut down the database consistently, ensure that it is not opened by any instance,
and then mount it:
SHUTDOWN IMMEDIATE;
STARTUP MOUNT;
4. Repeat the query in Step 2 of this procedure.
Some flashback logging data is generated when the database is shut down. If
flashback logs were deleted due to space pressure in the fast recovery area, then
your target SCN may not be reachable.
Note:
If you run
FLASHBACK DATABASE
when your target SCN is outside the
flashback window, then
FLASHBACK DATABASE
fails with an
ORA-38729
error.
In this case, your database does not change.
5. Connect to the root as a common user with the
SYSDBA
or
SYSBACKUP
privilege, as
described in "Making Database Connections with RMAN".
6. To see which channels are preconfigured, run the
SHOW
command .
During the flashback operation, RMAN may need to restore archived redo logs
from backup. To see whether channels are configured, enter the following
command (sample output is included):
SHOW ALL;
If the necessary devices and channels are configured, then no action is necessary.
Otherwise, use the
CONFIGURE
command to configure automatic channels, or
include
ALLOCATE CHANNEL
commands within a
RUN
block.
7. Run the
FLASHBACK DATABASE
command to perform a flashback operation for the
whole CDB to a specified point in time.
You can specify the target time by using an SCN, a time expression, or a CDB
restore point.
The following examples perform a flashback database operation for the whole
CDB:
FLASHBACK DATABASE TO SCN 345588;
FLASHBACK DATABASE TO RESTORE POINT cdb_before_upgrade;
8. Open the CDB read-only in SQL*Plus and run some queries to verify the database
contents.
Open the CDB read-only as follows:
Chapter 18
Rewinding a Database with Flashback Database
18-22

ALTER DATABASE OPEN READ ONLY;
If you are satisfied with the state of the database, then end the procedure with
Step 9. If you are not satisfied with the state of the database, skip to Step 10.
9. If you are satisfied with the results, then perform either of the following mutually
exclusive actions:
•Make the database available for updates by opening the database with the
RESETLOGS
option. If the database is open read-only, then execute the following
commands in SQL*Plus:
SHUTDOWN IMMEDIATE
STARTUP MOUNT
ALTER DATABASE OPEN RESETLOGS;
Note:
After you perform this
OPEN RESETLOGS
operation, all changes to the
database after the target SCN for
FLASHBACK DATABASE
are
abandoned. Nevertheless, you can use the technique in "Rewinding
the Database to an SCN in an Abandoned Incarnation Branch" to
return the database to that range of SCNs while they remain in the
flashback window.
•Make a logical backup of the objects whose state was corrupted by using
Oracle Data Pump Export. Afterward, use RMAN to recover the database to
the present time:
RECOVER DATABASE;
This step undoes the effect of the Flashback Database by reapplying all
changes in the redo logs to the database, returning it to the most recent SCN.
After reopening the database read/write, you can import the exported objects
with the Data Pump Import utility. See Oracle Database Utilities to learn how
to use Data Pump.
10. If you find that you used the wrong restore point, time, or SCN for the flashback,
then mount the database and perform one of the following mutually exclusive
options:
•If your chosen target time was not far enough in the past, then use another
FLASHBACK DATABASE
command to rewind the database further back in time:
FLASHBACK DATABASE TO SCN 42963; #earlier than current SCN
•If you chose a target SCN that is too far in the past, then use
RECOVER DATABASE
UNTIL
to wind the database forward in time to the desired SCN:
RECOVER DATABASE UNTIL SCN 56963; #later than current SCN
•If you want to completely undo the effect of the
FLASHBACK DATABASE
command,
then you can perform complete recovery of the database by using the
RECOVER
DATABASE
command without an
UNTIL
clause or
SET UNTIL
command:
RECOVER DATABASE;
The
RECOVER DATABASE
command reapplies all changes to the database,
returning it to the most recent SCN.
Chapter 18
Rewinding a Database with Flashback Database
18-23

11. Since the PDBs are not automatically opened when the CDB is opened, open the
PDBs.
The following command, when connected to the root, opens all the PDBs:
ALTER PLUGGABLE DATABASE ALL OPEN;
If you want to open only some PDBs, then you can open each PDB separately.
The following command, when connected to the root, opens the PDB
my_pdb
.
ALTER PLUGGABLE DATABASE my_pdb OPEN;
See Also:
•About CDB Restore Points
•About Managing Redo Corruption in CDBs
•Performing a Flashback Database Operation for PDBs
18.4.4 Performing a Flashback Database Operation for PDBs
You can perform a flashback database operation for a single pluggable database
(PDB) in a multitenant container database (CDB) using the
FLASHBACK DATABASE
command.
Performing a Flashback Database operation on a particular PDB modifies only data
files related to that PDB. The other PDBs in the CDB are not impacted and are
available for use.
When using restore points, you can perform a flashback database operation either to a
CDB restore point, PDB restore point, PDB clean restore point, or PDB guaranteed
restore point.
To perform a Flashback Database operation for a PDB:
1. Connect to the root as a common user with the
SYSDBA
or
SYSBACKUP
privilege.
See Making Database Connections with RMAN.
2. Ensure that the CDB is open.
The following command, when connected to the root, displays the mode in which
the CDB is open.
SELECT open_mode from V$DATABASE;
3. Determine the desired SCN, restore point, or point in time for the Flashback
Database command.
Query the
V$RESTORE_POINT
view to obtain the list of PDB restore points.
V$FLASHBACK_DATABASE_LOG
displays the oldest SCN to which a flashback operation
can be performed.
4. Ensure that the PDB for which the Flashback Database operation must be
performed is closed. Other PDBs can be open and operational.
When connected to the root, the following
ALTER PLUGGABLE DATABASE
command
closes the PDB
my_pdb
.
Chapter 18
Rewinding a Database with Flashback Database
18-24

ALTER PLUGGABLE DATABASE my_pdb CLOSE;
5. Perform a Flashback Database operation for the specified PDB to the desired
point in time.
The following are some examples of flashback database operations for PDBs.
•For a PDB that uses local undo:
FLASHBACK PLUGGABLE DATABASE my_pdb TO SCN 24368;
FLASHBACK PLUGGABLE DATABASE my_pdb TO RESTORE POINT guar_rp;
FLASHBACK PLUGGABLE DATABASE my_pdb TO CLEAN RESTORE POINT clean_rp;
•For a PDB that uses shared undo, you can optionally include the
AUXILIARY
DESTINATION
clause to specify a location for the auxiliary instance that stores
data files restored as part of the Flashback Database operation. If you omit
this clause, then the auxiliary instance is created in the fast recovery area.
FLASHBACK PLUGGABLE DATABASE my_pdb TO SCN 24368 AUXILIARY DESTINATION
'+data';
FLASHBACK PLUGGABLE DATABASE my_pdb TO RESTORE POINT before_appl_changes
AUXILIARY DESTINATION '/temp/aux_dest';
FLASHBACK PLUGGABLE DATABASE my_pdb TO TIME "TO_DATE('03/20/15','MM/DD/YY')";
6. Open the PDB with
RESETLOGS
.
The following command opens the PDB named
my_pdb
with
RESETLOGS
:
ALTER PLUGGABLE DATABASE my_pdb OPEN RESETLOGS;
Note:
Flashback operations are not supported for proxy PDBs.
Note:
•About Restore Points in PDBs
•Listing Restore Points Using the V$RESTORE_POINT View
•About Undo and Flashback Database Operations for PDBs
•Basic Concepts of Performing Flashback Database for CDBs and PDBs
•Performing a Flashback Database Operation for a Whole CDB
18.4.5 Monitoring Flashback Database
Data dictionary views contain information that is used to monitor flashback database.
When you use Flashback Database to rewind a database to a past target time,
Flashback Database determines which blocks changed after the target time and
Chapter 18
Rewinding a Database with Flashback Database
18-25

restores them from the flashback logs. This is called the restore phase. After this
phase completes, Flashback Database then uses redo logs to reapply changes that
were made after these blocks were written to the flashback logs. This is called the
recovery phase.
The progress of Flashback Database during the restore phase can be monitored by
querying the
V$SESSION_LONGOPS
view. The
opname
is
Flashback Database
. Under the
column
TOTALWORK
is the number of megabytes of flashback logs that must be read. The
column
SOFAR
in the following example lists the number of megabytes that have been
currently read.
Example 18-3 Tracking Flashback Database Progress - Restore Phase
SQL> SELECT sofar, totalwork, units FROM v$session_longops WHERE opname = 'Flashback
Database';
SOFAR TOTALWORK UNITS
----- ---------- --------------------------------
17 60 Megabytes
The progress of Flashback Database during the recovery phase can be monitored by
querying the view
V$RECOVERY_PROGRESS
.
See Also:
The Oracle Database Reference for information about the view
V$RECOVERY_PROGRESS
18.5 Performing Database Point-in-Time Recovery
RMAN DBPITR restores the database from backups before the target time for
recovery, then uses incremental backups and redo to roll the database forward to the
target time. You can recover to an SCN, time, log sequence number, or restore point.
Oracle recommends that you create restore points at important times to make point-in-
time recovery more manageable if it ever becomes necessary.
Oracle recommends that you perform Flashback Database rather than database point-
in-time recovery if possible. Media recovery with backups are the last option when
flashback technologies cannot be used to undo the most recent changes.
This section contains the following topics:
•Prerequisites of Database Point-in-Time Recovery
•Performing Database Point-in-Time Recovery
•Performing Point-in-Time Recovery of CDBs and PDBs
•Performing Point-in-Time Recovery of Application PDBs
•Performing Point-in-Time Recovery of Sparse Databases
18.5.1 Prerequisites of Database Point-in-Time Recovery
Certain prerequisites must be met to perform database point-in-time recovery
(DBPITR).
Chapter 18
Performing Database Point-in-Time Recovery
18-26

This includes the following:
•Your database must be running in
ARCHIVELOG
mode.
•You must have backups of all data files from before the target SCN for DBPITR
and archived logs for the period between the SCN of the backups and the target
SCN.
•If the backups were created using transparent encryption, and if a password-
based software keystore was used, then the keystore password must be provided
before the restore operation is performed. Use the
SET
command with the
DECRYPTION WALLET OPEN IDENTIFIED BY
option to specify the password that must be
used to open the password-based keystore. Note that this command is not
required when an auto-login software keystore is used.
•If the backups were created using password-mode encryption, then you must
provide the password used to decrypt backups before you run the
RESTORE
and
RECOVER
commands. Use the
SET DECRYPTION IDENTIFIED BY
command to specify the
password used to decrypt the backups.
See Also:
•
SET
command in Oracle Database Backup and Recovery Reference for
the syntax and usage of this command
•
RECOVER
command in Oracle Database Backup and Recovery Reference
for a complete account of command prerequisites and usage notes
18.5.2 Performing Database Point-in-Time Recovery
Use the
RESTORE
and
RECOVER
commands to perform DBPITR.
When performing DBPITR, you can avoid errors by using the
SET UNTIL
command to
set the target time at the beginning of the procedure, rather than specifying the
UNTIL
clause on the
RESTORE
and
RECOVER
commands individually. This ensures that the data
files restored from backup have time stamps early enough to be used in the
subsequent
RECOVER
operation.
This section makes the following assumptions:
•You are performing DBPITR within the current database incarnation. If your target
time is not in the current incarnation, then see "Recovering the Database to an
Ancestor Incarnation" for more information about DBPITR to ancestor
incarnations.
•The control file is current. If you must restore a backup control file, then see
"Performing Recovery with a Backup Control File".
•Your database is using the current server parameter file. If you must restore a
backup server parameter file, then see "Restoring the Server Parameter File".
To perform DBPITR:
1. Ensure that the prerequisites described in "Prerequisites of Database Point-in-
Time Recovery" are met.
2. Determine the time, SCN, restore point, or log sequence that ends recovery.
Chapter 18
Performing Database Point-in-Time Recovery
18-27

You can use the Flashback Query features to help you identify when the logical
corruption occurred. If you have a flashback data archive enabled for a table, then
you can query data that existed far in the past.
You can also use the alert log to try to determine the time of the event from which
you must recover.
Alternatively, you can use a SQL query to determine the log sequence number
that contains the target SCN and then recover through this log. For example, run
the following query to list the logs in the current database incarnation (sample
output included):
SELECT RECID, STAMP, THREAD#, SEQUENCE#, FIRST_CHANGE#
FIRST_TIME, NEXT_CHANGE#
FROM V$ARCHIVED_LOG
WHERE RESETLOGS_CHANGE# =
( SELECT RESETLOGS_CHANGE#
FROM V$DATABASE_INCARNATION
WHERE STATUS = 'CURRENT');
RECID STAMP THREAD# SEQUENCE# FIRST_CHAN FIRST_TIM NEXT_CHANG
---------- ---------- ---------- ---------- ---------- --------- ----------
1 344890611 1 1 20037 24-SEP-13 20043
2 344890615 1 2 20043 24-SEP-13 20045
3 344890618 1 3 20045 24-SEP-13 20046
For example, if you discover that a user accidentally dropped a tablespace at 9:02
a.m., then you can recover to 9 a.m., just before the drop occurred. You lose all
changes to the database made after this time.
3. If you are using a target time expression instead of a target SCN, then ensure that
the time format environment variables are appropriate before invoking RMAN.
The following are sample Globalization Support settings:
NLS_LANG = american_america.us7ascii
NLS_DATE_FORMAT="Mon DD YYYY HH24:MI:SS"
4. Connect RMAN to the target database, as described in "Making Database
Connections with RMAN". If applicable, connect to a recovery catalog.
5. Bring the database to a mounted state using the following commands:
SHUTDOWN IMMEDIATE;
STARTUP MOUNT;
6. Perform the following operations within a
RUN
block:
a. For DBPITR, use
SET UNTIL
to specify the target time, SCN, or log sequence
number, or use
SET TO
to specify a restore point. If specifying a time, then use
the date format specified in the
NLS_LANG
and
NLS_DATE_FORMAT
environment
variables.
b. If automatic channels are not configured, then manually allocate disk and tape
channels as needed.
c. Restore and recover the database.
The following example performs DBPITR on the target database until SCN 1000:
RUN
{
SET UNTIL SCN 1000;
RESTORE DATABASE;
Chapter 18
Performing Database Point-in-Time Recovery
18-28

RECOVER DATABASE;
}
As shown in the following examples, you can also use time expressions, restore
points, or log sequence numbers to specify the
SET UNTIL
time:
SET UNTIL TIME 'Nov 15 2013 09:00:00';
SET UNTIL SEQUENCE 9923;
SET TO RESTORE POINT before_update;
If the operation completes without errors, then DBPITR has succeeded.
7. Perform either of the following mutually exclusive actions:
•Open your database for read/write, abandoning all changes after the target
SCN. In this case, you must shut down the database, mount it, and then
execute the following command:
ALTER DATABASE OPEN RESETLOGS;
The
OPEN RESETLOGS
operation fails if a data file is offline unless the data file
went offline normally or is read-only. You can bring files in read-only or offline
normal tablespaces online after the
RESETLOGS
because they do not need any
redo.
•Export one or more objects from your database with Data Pump Export. You
can then recover the database to the current point in time and reimport the
exported objects, thus returning these objects to their state before the
unwanted change without abandoning all other changes.
18.5.3 Performing Point-in-Time Recovery of CDBs and PDBs
Use the
RECOVER
command to perform point-in-time recovery (PITR) of container
databases (CDBs) and pluggable databases (PDBs). PITR of PDBs can only be
performed using RMAN.
The general information regarding PITR that is contained in this chapter applies to
CDBs with the differences described in this section and its subsections.
Note:
If you are not using a recovery catalog, it is recommended that you turn on
control file auto backups. Otherwise, PITR for PDBs may not work effectively
when RMAN needs to undo data file additions or deletions.
See Also:
•Basic Concepts of Point-in-Time Recovery for PDBs
•Performing Point-in-Time Recovery of a Whole CDB
•Performing Point-in-Time Recovery of PDBs
Chapter 18
Performing Database Point-in-Time Recovery
18-29

18.5.3.1 Performing Point-in-Time Recovery of a Whole CDB
Use the
RESTORE
and
RECOVER
commands to perform point-in-time recovery for a whole
CDB.
To perform point-in-time recovery of a whole CDB:
1. Ensure that the prerequisites described in "Prerequisites of Database Point-in-
Time Recovery" are met.
2. Determine the time, SCN, restore point, or log sequence that ends recovery.
You can use the Flashback Query features to help you identify when the logical
corruption occurred. If you have a flashback data archive enabled for a table, then
you can query data that existed far in the past.
You can also use the alert log to try to determine the time of the event from which
you must recover.
Alternatively, you can use a SQL query to determine the log sequence number
that contains the target SCN and then recover through this log. For example, run
the following query to list the logs in the current database incarnation (sample
output included):
SELECT RECID, STAMP, THREAD#, SEQUENCE#, FIRST_CHANGE#
FIRST_TIME, NEXT_CHANGE#
FROM V$ARCHIVED_LOG
WHERE RESETLOGS_CHANGE# =
( SELECT RESETLOGS_CHANGE#
FROM V$DATABASE_INCARNATION
WHERE STATUS = 'CURRENT');
RECID STAMP THREAD# SEQUENCE# FIRST_CHAN FIRST_TIM NEXT_CHANG
---------- ---------- ---------- ---------- ---------- --------- ----------
1 344890611 1 1 20037 24-SEP-13 20043
2 344890615 1 2 20043 24-SEP-13 20045
3 344890618 1 3 20045 24-SEP-13 20046
For example, if you discover that a user accidentally dropped a tablespace at 9:02
a.m., then you can recover to 9 a.m., just before the drop occurred. You lose all
changes to the database made after this time.
3. If you are using a target time expression instead of a target SCN, then ensure that
the time format environment variables are appropriate before invoking RMAN.
The following are sample Globalization Support settings:
NLS_LANG = american_america.us7ascii
NLS_DATE_FORMAT="Mon DD YYYY HH24:MI:SS"
4. Connect RMAN to the root as a common user with the
SYSBACKUP
or
SYSDBA
privilege, as described in "Connecting as Target to the Root". If applicable,
connect to a recovery catalog.
5. Bring the CDB to a mounted state.
SHUTDOWN IMMEDIATE;
STARTUP MOUNT;
6. Perform the following operations within a
RUN
block:
a. For DBPITR, use
SET
UNTIL
to specify the target time, SCN, or log sequence
number, or use
SET
TO
to specify a restore point. If specifying a time, then use
Chapter 18
Performing Database Point-in-Time Recovery
18-30

the date format specified in the
NLS_LANG
and
NLS_DATE_FORMAT
environment
variables.
b. If automatic channels are not configured, then manually allocate disk and tape
channels as needed.
c. Restore and recover the CDB.
The following example performs DBPITR on the target CDB until SCN 1000:
RUN
{
SET UNTIL SCN 1000;
RESTORE DATABASE;
RECOVER DATABASE;
}
As shown in the following examples, you can also use time expressions, restore
points, or log sequence numbers to specify the
SET
UNTIL
time:
SET UNTIL TIME 'Nov 15 2013 09:00:00';
SET UNTIL SEQUENCE 9923;
SET TO RESTORE POINT before_update;
If the operation completes without errors, then DBPITR has succeeded.
7. Perform either of the following mutually exclusive actions:
•Open your CDB for read/write, abandoning all changes after the target SCN.
In this case, you must shut down the CDB, mount it, and then execute the
following command:
ALTER DATABASE OPEN RESETLOGS;
The
OPEN RESETLOGS
operation fails if a data file is offline unless the data file
went offline normally or is read-only. You can bring files in read-only or offline
normal tablespaces online after the
RESETLOGS
because they do not need any
redo.
•Export one or more objects from your CDB with Data Pump Export. You can
then recover the CDB to the current point in time and reimport the exported
objects, thus returning these objects to their state before the unwanted change
without abandoning all other changes.
8. Open all the PDBs.
PDBs are not opened when the CDB is opened. The following command, when
connected to the root, opens all the PDBs.
ALTER PLUGGABLE DATABASE ALL OPEN;
You can open each PDB separately.
18.5.3.2 Performing Point-in-Time Recovery of PDBs
When you recover one or more PDBs to a specified point-in-time, the remaining PDBs
in the CDB are not affected and they can be open and operational.
When performing DBPITR on one or more PDBs in a CDB that uses shared undo,
backups of the root and the CDB seed (
PDB$SEED
) of the CDB that contains the PDBs
are required.
Chapter 18
Performing Database Point-in-Time Recovery
18-31

Starting with Oracle Database 12c Release 2 (12.2), if the
COMPATIBLE
initialization
parameter is set to 12.2.0 or higher, you can perform flashback database for a CDB
across a PDB flashback operation or PDB PITR.
To perform DBPITR on a PDB:
1. Ensure that the prerequisites described in "Prerequisites of Database Point-in-
Time Recovery" are met.
2. Determine the time, SCN, restore point, or log sequence that ends recovery.
Use Flashback Query or the alert log to determine when the logicla corruption
occurred. Or, use a SQL query to determine the log sequence number that
contains the target SCN and then recover through this log.
3. If you are using a target time expression instead of a target SCN, then ensure that
the time format environment variables are appropriate before invoking RMAN.
The following are sample Globalization Support settings:
NLS_LANG = american_america.us7ascii
NLS_DATE_FORMAT="Mon DD YYYY HH24:MI:SS"
4. Connect RMAN to the root as a common user with the
SYSDBA
or
SYSBACKUP
privilege, as described in "Making RMAN Connections to a CDB". If applicable,
connect to a recovery catalog.
5. Close the PDB that is being recovered. The other PDBs and the CDB can remain
open.
ALTER PLUGGABLE DATABASE pdb1 CLOSE;
6. Perform the following operations within a
RUN
block:
a. For DBPITR, use
SET
UNTIL
to specify the target time, SCN, or log sequence
number, or use
SET
TO
to specify a restore point. If specifying a time, then use
the date format specified in the
NLS_LANG
and
NLS_DATE_FORMAT
environment
variables.
b. If automatic channels are not configured, then manually allocate disk and tape
channels as needed.
c. Restore and recover the CDB.
The following example performs DBPITR on the PDB
my_pdb
until SCN 1000:
RUN
{
SET UNTIL SCN 1000;
RESTORE PLUGGABLE DATABASE my_pdb;
RECOVER PLUGGABLE DATABASE my_pdb;
}
If the operation completes without errors, then DBPITR has succeeded.
7. Open the PDB abandoning all changes after the target SCN.
The following example opens the PDB named
my_pdb
.
ALTER PLUGGABLE DATABASE my_pdb OPEN RESETLOGS;
Example 18-4 Recovering a PDB to a Specified Point-in-time
This example recovers a PDB named
PDB5
up to the SCN 1066 and then opens it for
read/write access. Connect to the root as a common user with the
SYSDBA
or
SYSBACKUP
privilege and enter the following commands:
Chapter 18
Performing Database Point-in-Time Recovery
18-32

ALTER PLUGGABLE DATABASE pdb5 CLOSE;
run
{
SET UNTIL SCN 1066;
RESTORE PLUGGABLE DATABASE pdb5;
RECOVER PLUGGABLE DATABASE pdb5;
}
ALTER PLUGGABLE DATABASE pdb5 OPEN RESETLOGS;
This example assumes that a fast recovery area is being used. If you do not use a fast
recovery area, then you must specify the temporary location of the auxiliary set files by
using the
AUXILIARY DESTINATION
clause.
Opening the PDB with
RESETLOGS
creates a new PDB incarnation. You can query the
V$PDB_INCARNATION
view for the incarnation number.
See Also:
"Basic Concepts of Point-in-Time Recovery for PDBs" for information about
the fast recovery area usage during point-in-time recovery of PDBs
18.5.4 Performing Point-in-Time Recovery of Application PDBs
Use the
RESTORE
and
RECOVER
commands to perform point-in-time recovery of an
application PDB.
The
COMPATIBLE
parameter for the CDB must be set to 12.2 or higher.
To perform point-in-time recovery of an application PDB:
1. Ensure that the prerequisites for point-in-time recovery are met.
2. Start RMAN and connect to the application root as an application common user
with the
SYSDBA
or
SYSBACKUP
privilege.
The application root has its own service name and you can connect to the
application root in the same way that you connect to a PDB.
3. Determine the time, SCN, restore point, or log sequence that ends recovery.
4. Close the application PDB that must be recovered.
The following command closes the application PDB called
hr_appcont_pdb1
.
ALTER PLUGGABLE DATABASE hr_appcont_pdb1 CLOSE;
5. Perform the following operations within a
RUN
block:
a. Use
SET UNTIL
to specify the target time, SCN, or log sequence number, or use
SET TO
to specify a restore point. If specifying a time, then use the date format
specified in the
NLS_LANG
and
NLS_DATE_FORMAT
environment variables.
b. If automatic channels are not configured, then manually allocate disk and tape
channels as needed.
c. Restore and recover the application container.
RUN
{
Chapter 18
Performing Database Point-in-Time Recovery
18-33

SET UNTIL SCN 34506;
RESTORE PLUGGABLE DATABASE hr_appcont_pdb1;
RECOVER PLUGGABLE DATABASE hr_appcont_pdb1;
}
6. Open the application PDB with
RESETLOGS
. This results in all changes after the
target SCN being abandoned.
ALTER PLUGGABLE DATABASE hr_appcont_pdb1 OPEN RESETLOGS;
See Also:
Making RMAN Connections to a CDB
18.5.5 Performing Point-in-Time Recovery of Sparse Databases
Performing point-in-time recovery of sparse databases is similar to performing point-in-
time recovery of normal databases.
Ensure that the
COMPATIBLE
initialization parameter of the database being recovered is
set to 12.2 or higher.
Note:
The base (read-only) data files in a sparse database are not encrypted.
Ensure that the base data files are stored in a protected storage and
accessed using secured communications.
To perform point-in-time recovery of a sparse database:
1. Ensure that the prerequisites described in "Prerequisites of Database Point-in-
Time Recovery" are met.
2. Determine the time, SCN, restore point, or log sequence that ends recovery.
You can use the Flashback Query features to help you identify when the logical
corruption occurred. If you have a flashback data archive enabled for a table, then
you can query data that existed far in the past.
You can also use the alert log to try to determine the time of the event from which
you must recover.
Alternatively, you can use a SQL query to determine the log sequence number
that contains the target SCN and then recover through this log. For example, run
the following query to list the logs in the current database incarnation (sample
output included):
SELECT RECID, STAMP, THREAD#, SEQUENCE#, FIRST_CHANGE#
FIRST_TIME, NEXT_CHANGE#
FROM V$ARCHIVED_LOG
WHERE RESETLOGS_CHANGE# =
( SELECT RESETLOGS_CHANGE#
FROM V$DATABASE_INCARNATION
WHERE STATUS = 'CURRENT');
Chapter 18
Performing Database Point-in-Time Recovery
18-34

RECID STAMP THREAD# SEQUENCE# FIRST_CHAN FIRST_TIM NEXT_CHANG
---------- ---------- ---------- ---------- ---------- --------- ----------
1 344890611 1 1 20037 24-SEP-13 20043
2 344890615 1 2 20043 24-SEP-13 20045
3 344890618 1 3 20045 24-SEP-13 20046
For example, if you discover that a user accidentally dropped a tablespace at 9:02
a.m., then you can recover to 9 a.m., just before the drop occurred. You lose all
changes to the database made after this time.
3. If you are using a target time expression instead of a target SCN, then ensure that
the time format environment variables are appropriate before invoking RMAN.
The following are sample Globalization Support settings:
NLS_LANG = american_america.us7ascii
NLS_DATE_FORMAT="Mon DD YYYY HH24:MI:SS"
4. Connect RMAN to the target database and, if applicable, the recovery catalog
database, as described in "Making Database Connections with RMAN".
5. Bring the database to a mounted state.
SHUTDOWN IMMEDIATE;
STARTUP MOUNT;
If the operation completes without errors, then DBPITR has succeeded.
6. Perform the following operations within a
RUN
block:
a. For DBPITR, use
SET
UNTIL
to specify the target time, SCN, or log sequence
number, or use
SET
TO
to specify a restore point. If specifying a time, then use
the date format specified in the
NLS_LANG
and
NLS_DATE_FORMAT
environment
variables.
b. If automatic channels are not configured, then manually allocate disk and tape
channels as needed.
c. Restore and recover the sparse database with the
FROM SPARSE
option.
The following example performs point-in-time recovery for a sparse database
till the SCN
2775080
:
RUN
{
SET UNTIL SCN 2775080;
RESTORE FROM SPARSE DATABASE;
RECOVER DATABASE;
}
7. Perform either of the following mutually exclusive actions:
•Open your database for read/write, abandoning all changes after the target
SCN. In this case, you must shut down the database, mount it, and then
execute the following command:
ALTER DATABASE OPEN RESETLOGS;
The
OPEN RESETLOGS
operation fails if a data file is offline unless the data file
went offline normally or is read-only. You can bring files in read-only or offline
normal tablespaces online after the
RESETLOGS
because they do not need any
redo.
Chapter 18
Performing Database Point-in-Time Recovery
18-35

•Export one or more objects from your database with Data Pump Export. You
can then recover the database to the current point in time and reimport the
exported objects, thus returning these objects to their state before the
unwanted change without abandoning all other changes.
18.6 Flashback and Database Point-in-Time Recovery
Scenarios
This section describes variations of the basic Flashback Database and DBPITR
scenarios.
This section contains the following topics:
•Rewinding an OPEN RESETLOGS Operation with Flashback Database
•Rewinding the Database to an SCN in an Abandoned Incarnation Branch
•Recovering the Database to an Ancestor Incarnation
18.6.1 Rewinding an OPEN RESETLOGS Operation with Flashback
Database
Flashback Database can be used to undo an
OPEN RESETLOGS
operation.
The procedure for using Flashback Database to reverse an unwanted
ALTER DATABASE
OPEN RESETLOGS
statement is similar to the general case described in "Performing a
Flashback Database Operation". Rather than specifying a particular SCN or point in
time for the
FLASHBACK DATABASE
command, however, you use
FLASHBACK DATABASE TO
BEFORE RESETLOGS
.
To undo an
OPEN RESETLOGS
operation:
1. Connect SQL*Plus to the target database and verify that the beginning of the
flashback window is earlier than the time of the most recent
OPEN RESETLOGS
.
Run the following queries:
SELECT RESETLOGS_CHANGE# FROM V$DATABASE;
SELECT OLDEST_FLASHBACK_SCN FROM V$FLASHBACK_DATABASE_LOG;
If
V$DATABASE.RESETLOGS_CHANGE#
is greater than
V$FLASHBACK_DATABASE_LOG.OLDEST_FLASHBACK_SCN
, then you can use Flashback
Database to reverse the
OPEN RESETLOGS
operation.
2. Shut down the database, mount it, and recheck the flashback window. If the
resetlogs SCN is still within the flashback window, then proceed to the next step.
3. Connect RMAN to the target database, as described in "Making Database
Connections with RMAN".
4. Perform a flashback to the SCN immediately before the
RESETLOGS
.
Use the following form of the
FLASHBACK DATABASE
command:
FLASHBACK DATABASE TO BEFORE RESETLOGS;
As with other uses of
FLASHBACK DATABASE
, if the target SCN is before the beginning
of the flashback database window, an error is returned and the database is not
Chapter 18
Flashback and Database Point-in-Time Recovery Scenarios
18-36

modified. If the command completes successfully, then the database is left
mounted and recovered to the most recent SCN before the
OPEN RESETLOGS
operation in the previous incarnation.
5. Open the database read-only in SQL*Plus and perform queries as needed to
ensure that the effects of the logical corruption have been reversed.
Open the database read-only as follows:
ALTER DATABASE OPEN READ ONLY;
6. To make the database available for updates again, shut down the database,
mount it, and then execute the following command:
ALTER DATABASE OPEN RESETLOGS;
18.6.1.1 About Undoing an OPEN RESETLOGS on Standby Databases with
Flashback Database
Flashback Database across
OPEN RESETLOGS
may be used to perform multiple functions
in a Data Guard environment.
This includes the following:
•Flashback to undo logical standby switchovers
In this case, the database reverts to its role (primary or standby) at the target time
for the Flashback Database operation.
•Undo of a physical standby activation
You can temporarily activate a physical standby database, use it for testing or
reporting purposes, and then use Flashback Database to return it to its role as a
physical standby.
•Ongoing use of a standby database for testing
The use of Flashback Database means that you do not require the use of storage
snapshots.
See Also:
Oracle Data Guard Concepts and Administration for details on these
advanced applications of Flashback Database with Data Guard
18.6.2 Rewinding the Database to an SCN in an Abandoned
Incarnation Branch
You can use Flashback Database to rewind a database to an abandoned database
incarnation.
The effect of Flashback Database or DBPITR followed by an
OPEN RESETLOGS
operation
is to return the database to a previous SCN, and to abandon changes after this point.
Therefore, some SCNs after that point can refer either to changes that were
abandoned or changes in the current history of the database. In this way, a target SCN
specified in
FLASHBACK DATABASE
can be ambiguous.
Chapter 18
Flashback and Database Point-in-Time Recovery Scenarios
18-37

Unlike SCNs, time expressions and restore points are not ambiguous. A time
expression is always associated with the incarnation that was current at that time. A
restore point is always associated with the current incarnation when it was created.
This is true even for times and restore points that correspond to abandoned database
incarnations. The database incarnation is automatically reset to the incarnation that
was current at the specified time or when the restore point was created.
You may want to use Flashback Database to rewind the database to an SCN in the
parent incarnation that is later than the SCN of the
OPEN RESETLOGS
operation at which
the current incarnation path branched from the old incarnation. Figure 14-1 shows how
SCNs can be generated in an incarnation branch even after an
OPEN RESETLOGS
operation creates a new incarnation. As shown in the diagram, the database could be
at SCN 3000 in incarnation 3 when you must return to the abandoned SCN 1500 in
incarnation 1.
If the SCN to which you are rewinding is in the direct ancestral path, or if you are
rewinding the database to a restore point, then an explicit
RESET DATABASE
command is
not necessary for Flashback Database. However, an explicit
RESET DATABASE TO
INCARNATION
command is required when you use
FLASHBACK DATABASE
to rewind the
database to an SCN in an abandoned database incarnation.
To rewind the database to an SCN in an abandoned incarnation branch:
1. Use SQL*Plus to connect to the target database and verify that the flashback logs
contain enough information to flash back to the SCN.
For example, execute the following query:
SELECT OLDEST_FLASHBACK_SCN FROM V$FLASHBACK_DATABASE_LOG;
2. Determine the target incarnation number for the Flashback Database operation,
that is, the incarnation key for the parent incarnation.
For example, execute the following query:
SELECT PRIOR_INCARNATION#
FROM V$DATABASE_INCARNATION
WHERE STATUS = 'CURRENT';
3. Start RMAN and connect to the target database, as described in "Making
Database Connections with RMAN".
4. Shut down the database, and then mount it as follows:
SHUTDOWN IMMEDIATE;
STARTUP MOUNT;
5. Set the database incarnation to the parent incarnation.
For example, use the following command to return to incarnation 1:
RESET DATABASE TO INCARNATION 1;
6. Run the
FLASHBACK DATABASE
command, specifying the target SCN.
For example, use the following command to rewind the database to SCN 1500:
FLASHBACK DATABASE TO SCN 1500;
7. Open the database read-only in SQL*Plus and perform queries as needed to
ensure that the effects of the logical corruption have been reversed.
Open the database read-only as follows:
ALTER DATABASE OPEN READ ONLY;
Chapter 18
Flashback and Database Point-in-Time Recovery Scenarios
18-38

8. To make the database available for updates again, shut down the database,
mount it, and then execute the following command:
ALTER DATABASE OPEN RESETLOGS;
See Also:
•"About Database Incarnations" for useful background information about
database incarnations, abandoned changes, and the effects of
ALTER
DATABASE OPEN RESETLOGS
•Oracle Database Backup and Recovery Reference for details about the
RESET DATABASE
command
18.6.3 Recovering the Database to an Ancestor Incarnation
To perform DPITR to an noncurrent database incarnation, you must explicitly execute
the
RESET DATABASE
to reset the database to the incarnation that was current at the
target SCN. You must also restore a control file from the database incarnation
containing the target SCN.
When RMAN is connected to a recovery catalog, a
RESTORE CONTROLFILE
command only
searches the current database incarnation for the closest time specified in the
UNTIL
clause. To restore a control file from a noncurrent incarnation, you must execute
LIST
INCARNATION
to identify the target database incarnation and specify this incarnation in
the
RESET DATABASE TO INCARNATION
command.
When RMAN is connected to a recovery catalog, you cannot execute the
RESET
DATABASE TO INCARNATION
command before the database is mounted. Thus, you must
execute
SET UNTIL
, restore the control file from autobackup, and then mount it.
Assume the following situation:
•RMAN is connected to a recovery catalog.
•You have a backup of target database
trgt
from October 2, 2013.
•DBPITR was performed on this database on October 10, 2013 to correct an earlier
error. The
OPEN
RESETLOGS
operation after that DBPITR started a new incarnation.
On October 25, you discover that you need crucial data that was dropped from the
database at 8:00 a.m. on October 8, 2013. This time is before the beginning of the
current incarnation.
To perform DBPITR to a noncurrent incarnation:
1. Ensure that the prerequisites described in "Prerequisites of Database Point-in-
Time Recovery" are met.
2. Start RMAN and connect to a target database and recovery catalog, if required, as
described in "Making Database Connections with RMAN".
3. Determine which database incarnation was current at the time of the backup.
Use
LIST INCARNATION
to find the primary key of the incarnation that was current at
the target time:
Chapter 18
Flashback and Database Point-in-Time Recovery Scenarios
18-39

LIST INCARNATION OF DATABASE trgt;
List of Database Incarnations
DB Key Inc Key DB Name DB ID STATUS Reset SCN Reset Time
------- ------- ------- ------ ------- ---------- ----------
1 2 TRGT 1224038686 PARENT 1 02-OCT-13
1 582 TRGT 1224038686 CURRENT 59727 10-OCT-13
Look at the
Reset SCN
and
Reset Time
columns to identify the correct incarnation,
and note the incarnation key in the
Inc
Key
column. In this example, the backup
was made 2 October 2013. In this case, the incarnation key value is 2.
4. Ensure that the database is started but not mounted.
STARTUP FORCE NOMOUNT;
5. Reset the target database to the incarnation obtained in Step 2.
In this example, specify the incarnation current at the time of the backup of 2
October. Use the value from the
Inc Key
column to identify the incarnation.
RESET DATABASE TO INCARNATION 2;
6. Restore and recover the database, performing the following actions in the
RUN
command:
•Set the end time for recovery to the time just before the loss of the data.
•Allocate any channels required that are not configured.
•Restore the control file from the October 2 backup and mount it.
•Restore the data files and recover the database. Use the
RECOVER DATABASE ...
UNTIL
command to perform DBPITR, bringing the database to the target time
of 7:55 a.m. on October 8, just before the data was lost.
The following example shows all of the steps required in this case:
RUN
{
SET UNTIL TIME 'Oct 8 2013 07:55:00';
RESTORE CONTROLFILE;
# without recovery catalog, use RESTORE CONTROLFILE FROM AUTOBACKUP
ALTER DATABASE MOUNT;
RESTORE DATABASE;
RECOVER DATABASE;
}
ALTER DATABASE OPEN RESETLOGS;
See Also:
Oracle Database Backup and Recovery Reference for details about the
RESET DATABASE
command
Chapter 18
Flashback and Database Point-in-Time Recovery Scenarios
18-40

19
Performing Block Media Recovery
This chapter explains how to restore and recover individual data blocks within a data
file. This chapter contains the following topics:
•Overview of Block Media Recovery
•Prerequisites for Block Media Recovery
•Recovering Individual Blocks
•Recovering All Blocks in V$DATABASE_BLOCK_CORRUPTION
See Also:
•Oracle Database Backup and Recovery Reference for
RECOVER
syntax
•Oracle Database Reference for details about the
V$DATABASE_BLOCK_CORRUPTION
view
19.1 Overview of Block Media Recovery
Block media recovery recovers provides lower mean time to recover (MTTR) by
recovering corrupt data blocks.
This section contains the following topics:
•Purpose of Block Media Recovery
•Basic Concepts of Block Media Recovery
19.1.1 Purpose of Block Media Recovery
Use block media recovery to recover one or more corrupt data blocks within a data file.
Block media recovery provides the following advantages over data file media recovery:
•Lowers the mean time to recover (MTTR) because only blocks needing recovery
are restored and recovered
•Enables affected data files to remain online during recovery
Without block media recovery, if even a single block is corrupt, then you must take
the data file offline and restore a backup of the data file. You must apply all redo
generated for the data file after the backup was created. The entire file is
unavailable until media recovery completes. With block media recovery, only the
blocks actually being recovered are unavailable during the recovery.
Block media recovery is most useful for physical corruption problems that involve a
small, well-known number of blocks. Block-level data loss usually results from
intermittent, random I/O errors that do not cause widespread data loss, and memory
19-1

corruptions that are written to disk. Block media recovery is not intended for cases
where the extent of data loss or corruption is unknown and the entire data file requires
recovery. In such cases, data file media recovery is the best solution.
19.1.2 Basic Concepts of Block Media Recovery
Usually, the database marks a block as media corrupt and then writes it to disk when
the corruption is first encountered. No subsequent read of the block is successful until
the block is recovered. You can perform block recovery only on blocks that are marked
corrupt or that fail a corruption check.
Typically, block corruption is reported in the following locations:
•Results of the
LIST FAILURE
,
VALIDATE
, or
BACKUP ... VALIDATE
command
•The
V$DATABASE_BLOCK_CORRUPTION
view
•Error messages in standard output
•The alert log
•User trace files
•Results of the SQL commands
ANALYZE TABLE
and
ANALYZE INDEX
•Results of the DBVERIFY utility
•Third-party media management output
For example, you may discover the following messages in a user trace file:
ORA-01578: ORACLE data block corrupted (file # 7, block # 3)
ORA-01110: data file 7: '/oracle/oradata/trgt/tools01.dbf'
ORA-01578: ORACLE data block corrupted (file # 2, block # 235)
ORA-01110: data file 2: '/oracle/oradata/trgt/undotbs01.dbf'
See Also:
Oracle Database Backup and Recovery Reference for
RECOVER ... BLOCK
syntax
19.1.2.1 About Block Recovery and Standby Databases
Block recovery behavior depends on whether the data block corruption was
discovered on the primary database or the physical standby database.
If the database on which the corruption occurs is associated with a real-time query
physical standby database, then the database automatically attempts to perform block
media recovery. The primary database searches for good copies of blocks on the
standby database and, if they are found, repairs the blocks with no impact to the query
that encountered the corrupt block. The Oracle Database physical block corruption
message (
ORA-1578
) is displayed only if the database cannot repair the corruption.
Whenever block corruption has been automatically detected, you can perform block
media recovery manually with the
RECOVER ... BLOCK
command. By default, RMAN first
searches for good blocks in the real-time query physical standby database, then
flashback logs and then blocks in full or level 0 incremental backups.
Chapter 19
Overview of Block Media Recovery
19-2

Note:
For block media recovery to work automatically, the physical standby
database must be in real-time query mode. An Oracle Active Data Guard
license is required.
If a corrupt data block is discovered on a real-time query physical standby database,
the server attempts to repair the corruption by obtaining a copy of the block from the
primary database. The repair is performed in the background, enabling subsequent
queries to succeed if the repair is successful. Automatic block repair is attempted if the
following database initialization parameters are configured on the standby database as
described:
•The
LOG_ARCHIVE_CONFIG
parameter is configured with a
DG_CONFIG
list and a
LOG_ARCHIVE_DEST_n
parameter is configured for the primary database with the
DB_UNIQUE_NAME
attribute
or
•The
FAL_SERVER
parameter is configured and its value contains an Oracle Net
service name for the primary database
Note:
If a corrupt block is detected during validation, such as by the RMAN
VALIDATE
command, then recovery is not initiated automatically.
See Also:
•Oracle Database Backup and Recovery Reference for
RECOVER ... BLOCK
syntax
•Oracle Data Guard Concepts and Administration to learn about the real-
time query option for standby databases
19.1.2.2 About Identifying Corrupt Blocks
The
V$DATABASE_BLOCK_CORRUPTION
view displays blocks marked corrupt by database
components such as RMAN,
ANALYZE
, and SQL queries.
The following types of corruption result in the addition of rows to this view:
•Physical corruption (sometimes called media corruption)
The database does not recognize the block: the checksum is invalid, the block
contains all zeros, or the block header is corrupt.
Physical corruption checking is enabled by default. You can turn off checksum
checking by specifying the
NOCHECKSUM
option of the
BACKUP
command, but other
Chapter 19
Overview of Block Media Recovery
19-3
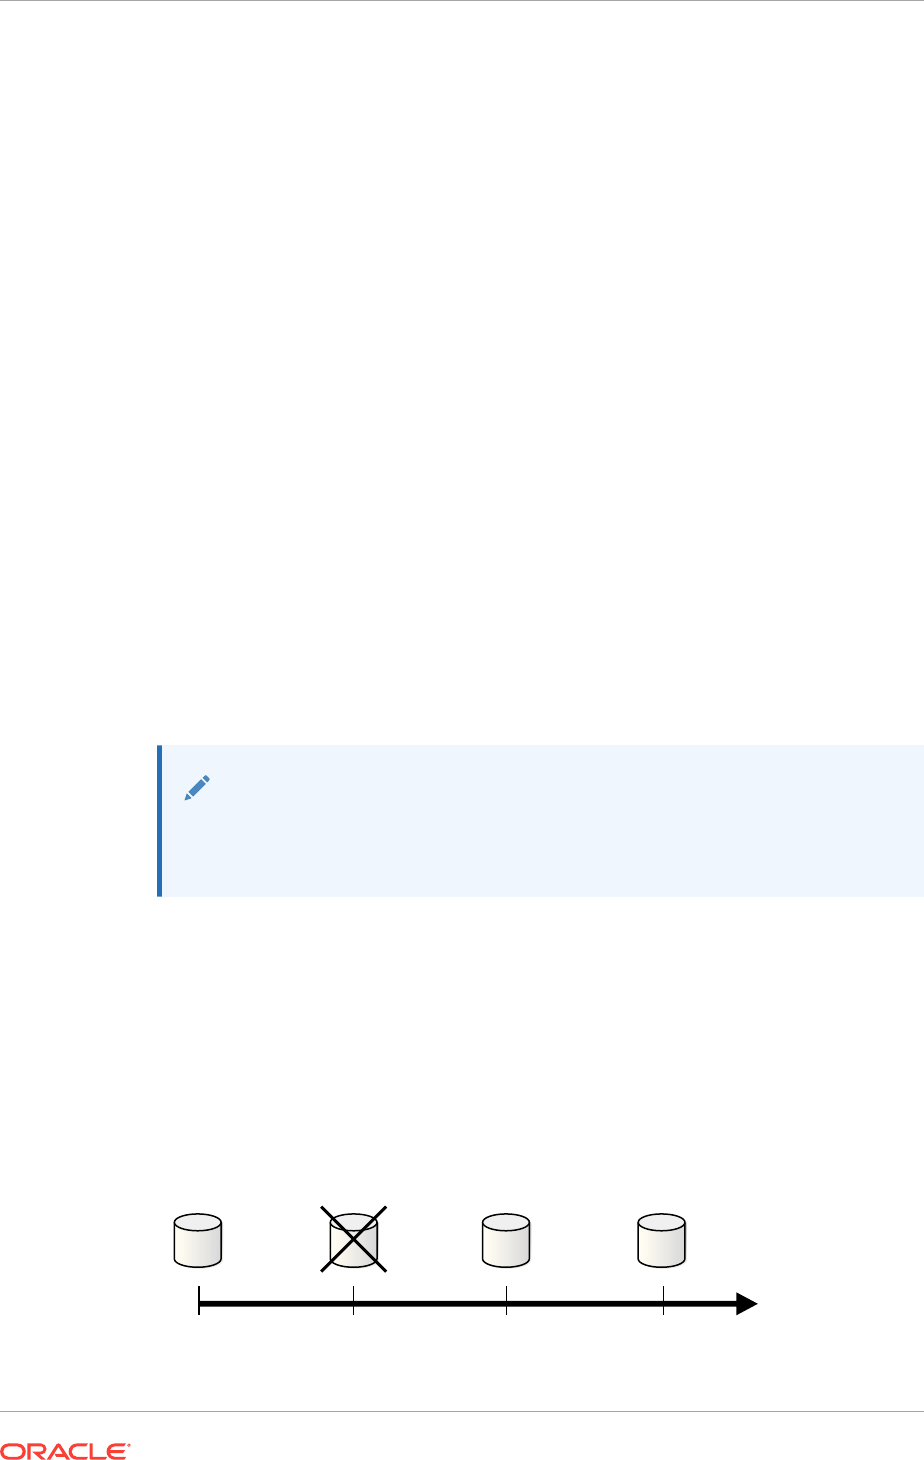
physical consistency checks, such as checks of the block headers and footers,
cannot be disabled.
•Logical corruption
The block has a valid checksum, the header and footer match, and so on, but the
contents are logically inconsistent. Block media recovery may not be able to repair
all logical block corruptions. In these cases, alternate recovery methods, such as
tablespace point-in-time recovery, or dropping and re-creating the affected objects,
may repair the corruption.
Logical corruption checking is disabled by default. You can turn it on by specifying
the
CHECK
LOGICAL
option of the
BACKUP
,
RESTORE
,
RECOVER
, and
VALIDATE
commands.
The database can detect some corruptions by validating relationships between blocks
and segments, but cannot detect them by a check of an individual block. The
V$DATABASE_BLOCK_CORRUPTION
view does not record at this level of granularity.
19.1.2.3 About Missing Redo During Block Recovery
Block media recovery only requires an unbroken set of redo changes for the blocks
being recovered. This is unlike data file recovery that requires an unbroken series of
redo changes from the beginning of recovery to the end.
Like data file media recovery, block media recovery cannot generally survive a missing
or inaccessible archived log, although it attempts restore failover when looking for
usable copies of archived redo log files. Also, block media recovery cannot survive
physical redo corruptions that result in checksum failure. However, block media
recovery can survive gaps in the redo stream if the missing or corrupt redo records do
not affect the blocks being recovered.
Note:
Each block is recovered independently during block media recovery, so
recovery may be successful for a subset of blocks.
When RMAN first detects missing or corrupt redo records during block media
recovery, it does not immediately signal an error because the block undergoing
recovery may create one later in the redo stream. When a block is re-created, all
previous redo for that block becomes irrelevant because the redo applies to an old
incarnation of the block. For example, the database creates a new a block when users
drop or truncate a table and then use the block for other data.
Assume that media recovery is performed on block 13 as depicted in Figure 19-1.
Figure 19-1 Performing RMAN Media Recovery
Block 13 is
restored in
datafile 4
Missing redo
for block 13
Block 13 is
newed
Last change
for block 13
Redo
application
Change 100 Change 120 Change 160Change 140
Chapter 19
Overview of Block Media Recovery
19-4

After block recovery begins, RMAN discovers that change 120 is missing from the
redo stream, either because the log block is corrupt or because the log cannot be
found. RMAN continues recovery if block 13 is re-created later in the redo stream.
Assume that in change 140 a user drops the table
employees
stored in block 13,
allocates a new table in this block, and inserts data into the new table. At this point, the
database formats block 13 as a new block. Recovery can now proceed with this block
even though some redo preceding the recreation operation was missing.
See Also:
About RMAN Restore Failover
19.2 Prerequisites for Block Media Recovery
Certain prerequisites must be met before you perform block media recovery by using
the
RECOVER ... BLOCK
command.
The prerequisites include the following:
•The target database must run in
ARCHIVELOG
mode and be open or mounted with a
current control file.
•If the target database is a standby database, then it must be in a consistent state,
recovery cannot be in session, and the backup must be older than the corrupted
file.
•The backups of the data files containing the corrupt blocks must be full or level 0
backups. They cannot be proxy copies or incremental backups.
If only proxy copy backups exist, then you can restore them to a nondefault
location on disk, in which case RMAN considers them data file copies and
searches them for blocks during block media recovery.
•RMAN can use only archived redo logs for the recovery.
RMAN cannot use level 1 incremental backups. Block media recovery cannot
survive a missing or inaccessible archived redo log, although it can sometimes
survive missing redo records.
•Flashback Database must be enabled on the target database for RMAN to search
the flashback logs for good copies of corrupt blocks.
If flashback logging is enabled and contains older, uncorrupted versions of the
corrupt blocks, then RMAN can use these blocks, possibly speeding up the
recovery.
•The target database must be associated with a real-time query physical standby
database for RMAN to search the database for good copies of corrupt blocks.
19.3 Recovering Individual Blocks
Use the
RECOVER...BLOCK
command to recover individual corrupt blocks in a data file.
This section contains the following topics:
•Recovering Individual Blocks Using the RECOVER...BLOCK Command
Chapter 19
Prerequisites for Block Media Recovery
19-5

•Example: Recovering Individual Blocks Using the Data Recovery Advisor
19.3.1 Recovering Individual Blocks Using the RECOVER...BLOCK
Command
You identify the blocks that require recovery and then use any available backup to
restore and recover these blocks.
To recover specific data blocks using the RECOVER...BLOCK command:
1. Obtain the data file numbers and block numbers of the corrupted blocks.
The easiest way to locate trace files and the alert log is to connect SQL*Plus to the
target database and execute the following query:
SELECT NAME, VALUE
FROM V$DIAG_INFO;
2. Start RMAN and connect to the target database, which must be mounted or open.
3. Run the
SHOW ALL
command to confirm that the appropriate channels are
preconfigured.
4. Run the
RECOVER ... BLOCK
command at the RMAN prompt, specifying the file and
block numbers for the corrupted blocks.
The following example recovers two blocks.
RECOVER
DATAFILE 8 BLOCK 13
DATAFILE 2 BLOCK 19;
You can also specify various options to control RMAN behavior. The following
example indicates that only backups with the tag
mondayam
are used when
searching for blocks. You could use the
FROM BACKUPSET
option to restrict the type of
backup that RMAN searches, or the
EXCLUDE FLASHBACK LOG
option to restrict RMAN
from searching the flashback logs.
RECOVER
DATAFILE 8 BLOCK 13
DATAFILE 2 BLOCK 199
FROM TAG mondayam;
19.3.2 Example: Recovering Individual Blocks Using the Data
Recovery Advisor
You can use the Data Recovery Advisor to diagnose and repair failures caused by
data block corruptions. In this example, corrupt data blocks were discovered when the
VALIDATE DATABASE
command.
To generate automated repair options and repair the failure using the Data
Recovery Advisor:
1. Start RMAN and connect to the target database, as described in "Making
Database Connections with RMAN".
2. List the failures recorded by the Data Recovery Advisor using the following
command:
Chapter 19
Recovering Individual Blocks
19-6

LIST FAILURE;
Database Role: PRIMARY
List of Database Failures
=========================
Failure ID Priority Status Time Detected Summary
---------- -------- --------- ------------- -------
5720 HIGH OPEN 24-APR-14 Datafile 14:
'/home1/oracle/dbs/tbs_32.f' contains one or more corrupt blocks
3. Generate repair options for the failure listed Step 2.
The following command generates repair options and creates a repair script to
perform the automated repair tasks.
ADVISE FAILURE;
Database Role: PRIMARY
List of Database Failures
=========================
Failure ID Priority Status Time Detected Summary
---------- -------- --------- ------------- -------
5720 HIGH OPEN 24-APR-14 Datafile 14:
'/home1/oracle/dbs/tbs_32.f' contains one or more corrupt blocks
analyzing automatic repair options; this may take some time
using channel ORA_DISK_1
analyzing automatic repair options complete
Mandatory Manual Actions
========================
no manual actions available
Optional Manual Actions
=======================
no manual actions available
Automated Repair Options
========================
Option Repair Description
------ ------------------
1 Perform block media recovery of block 20 in file 14
Strategy: The repair includes complete media recovery with no data loss
Repair script: /home1/oracle/log/diag/rdbms/db12/hm/reco_287949467.hm
4. Perform the automated repairs recommended by Data Recovery Advisor.
RMAN uses the repair script generated by the
ADVISE FAILURE
command to perform
the required repairs.
REPAIR FAILURE;
Strategy: The repair includes complete media recovery with no data loss
Repair script: /home1/oracle/log/diag/rdbms/db12/hm/reco_287949467.hm
contents of repair script:
# block media recovery recover datafile 14 block 20;
Do you really want to execute the above repair (enter YES or NO)?
yes
Chapter 19
Recovering Individual Blocks
19-7

executing repair script
Starting recover at 24-APR-14
using channel ORA_DISK_1
channel ORA_DISK_1: restoring block(s)channel
ORA_DISK_1: specifying block(s) to restore from backup setrestoring blocks of
datafile 00014
channel ORA_DISK_1: reading from backup piece /backups/DB121/backupset/
2014_04_24/o1_mf_nnndf_TAG20140424T213309_9omsd7vb_.bkp
channel ORA_DISK_1: piece handle=/backups/DB121/backupset/2014_04_24/
o1_mf_nnndf_TAG20140424T213309_9omsd7vb_.bkp tag=TAG20140424T213309
channel ORA_DISK_1: restored block(s) from backup piece 1
channel ORA_DISK_1: block restore complete, elapsed time: 00:00:01
starting media recovery
media recovery complete, elapsed time: 00:00:03
Finished recover at 24-APR-14repair failure complete
When the
LIST FAILURE
command displays more than one failures, you can
perform repair actions only for a particular failure. Use the option number
displayed in the Automated Repair Options section of the
ADVISE FAILURE
command output to perform specific repair actions.
The following command performs only the repair actions listed under Option 2 of
the Automated Repair Options section.
REPAIR FAILURE USING ADVISE OPTION 2;
See Also:
•Diagnosing and Repairing Failures with Data Recovery Advisor
•Checking for Block Corruptions by Validating the Database
19.4 Recovering All Blocks in
V$DATABASE_BLOCK_CORRUPTION
RMAN can automatically recover all blocks listed in the
V$DATABASE_BLOCK_CORRUPTION
view.
To recover all blocks logged in V$DATABASE_BLOCK_CORRUPTION:
1. Start SQL*Plus and connect to the target database.
2. Query
V$DATABASE_BLOCK_CORRUPTION
to determine whether corrupt blocks exist. For
example, execute the following statement:
SQL> SELECT * FROM V$DATABASE_BLOCK_CORRUPTION;
3. Start RMAN and connect to the target database, as descried in "Making Database
Connections with RMAN".
4. Recover all blocks marked corrupt in
V$DATABASE_BLOCK_CORRUPTION
.
The following command repairs all physically corrupted blocks recorded in the
view:
RMAN> RECOVER CORRUPTION LIST;
Chapter 19
Recovering All Blocks in V$DATABASE_BLOCK_CORRUPTION
19-8

After the blocks are recovered, the database removes them from
V$DATABASE_BLOCK_CORRUPTION
.
See Also:
Oracle Database Backup and Recovery Reference to learn about the
RECOVER ... BLOCK
command
Chapter 19
Recovering All Blocks in V$DATABASE_BLOCK_CORRUPTION
19-9

20
Performing RMAN Recovery: Advanced
Scenarios
The preceding chapters in Diagnosing and Responding to Failures cover the most
basic recovery scenarios and are intended to be as generic as possible. The scenarios
in this chapter are less common or are more complicated than the basic scenarios.
This chapter contains the following topics:
•Recovering a NOARCHIVELOG Database with Incremental Backups
•Restoring the Server Parameter File
•Performing Recovery with a Backup Control File
•Performing Disaster Recovery
•Restoring a Database on a New Host
•Restoring and Recovering Files Over the Network
20.1 Recovering a NOARCHIVELOG Database with
Incremental Backups
You can perform limited recovery of changes to a database running in
NOARCHIVELOG
mode by applying incremental backups. The incremental backups must be consistent,
like all backups of a database run in
NOARCHIVELOG
mode, so you cannot make backups
of the database when it is open.
Restoring a database running in
NOARCHIVELOG
mode is similar to restoring a database
in
ARCHIVELOG
mode. The main differences are:
•Only consistent backups can be used in restoring a database in
NOARCHIVELOG
mode.
•Media recovery is not possible because no archived redo logs exist.
When you are recovering a
NOARCHIVELOG
database, specify the
NOREDO
option on the
RECOVER
command to indicate that RMAN does not attempt to apply archived redo logs.
Otherwise, RMAN returns an error.
To recover a NOARCHIVELOG database with incremental backups:
1. After connecting to the target database and the recovery catalog, place the
database in a mounted state:
STARTUP FORCE MOUNT
2. Restore and recover the database.
For example, you can perform incomplete recovery with the following commands:
20-1

RESTORE DATABASE
FROM TAG "consistent_whole_backup";
RECOVER DATABASE NOREDO;
3. Open the database with the
RESETLOGS
option.
For example, enter the following command:
ALTER DATABASE OPEN RESETLOGS;
20.2 Restoring the Server Parameter File
RMAN can restore a lost server parameter file to its default location or to a location of
your choice. Unlike the loss of the control file, the loss of the server parameter file
does not cause the instance to immediately stop. The instance may continue
operating, although you must shut it down and restart it after restoring the server
parameter file.
Note the following considerations when restoring the server parameter file:
•If the instance is already started with the server parameter file, then you cannot
overwrite the existing server parameter file.
•When the instance is started with a client-side initialization parameter file, RMAN
restores the server parameter file to the default location if the
TO
clause is not used
in the restore command. The default location is platform-specific, for
example,
?/dbs/spfile.ora
on Linux.
•A recovery catalog simplifies the recovery procedure because you can avoid
recording and remembering the DBID. This procedure assumes that you are not
using a recovery catalog.
To restore the server parameter file from autobackup:
1. Start RMAN and do one of the following:
•If the database instance is started at the time of the loss of the server
parameter file, then connect to the target database.
•If the database instance is not started when the server parameter file is lost,
and if you are not using a recovery catalog, then run the
SET DBID
command to
set the DBID of the target database.
2. Shut down the database instance and restart it without mounting the database.
When the server parameter file is not available, RMAN starts the instance with a
dummy parameter file. For example, enter the following command:
STARTUP FORCE NOMOUNT;
3. Execute a
RUN
command to restore the server parameter file.
Depending on the situation, you may need to execute multiple commands in the
RUN
command. Note the following considerations:
•If restoring from tape, then use
ALLOCATE CHANNEL
to allocate an SBT channel
manually. If restoring from disk, then RMAN uses the default disk channel.
•If the autobackups were not produced with the default format (
%F
), then use the
SET CONTROLFILE AUTOBACKUP FOR DEVICE TYPE
command to specify the format in
effect when the autobackup was performed.
Chapter 20
Restoring the Server Parameter File
20-2

•If the most recent autobackup was not created today, then use
SET UNTIL
to
specify the date from which to start the search.
•If RMAN is not connected to a recovery catalog, then use
SET DBID
to set the
DBID for the target database.
•To restore the server parameter file to a nondefault location, specify the
TO
clause or
TO PFILE
clause on the
RESTORE SPFILE
command.
•If you know that RMAN never produces more than n autobackups each day,
then you can set the
RESTORE SPFILE FROM AUTOBACKUP ... MAXSEQ
parameter to
n to reduce the search time.
MAXSEQ
is set to 255 by default, and
RESTORE
counts
backward from
MAXSEQ
to find the last backup of the day. To terminate the
restore operation if you do not find the autobackup in the current day (or
specified day), set
MAXDAYS 1
on the
RESTORE
command.
The following example illustrates a
RUN
command that restores a server parameter
file from an autobackup on tape:
RUN
{
ALLOCATE CHANNEL c1 DEVICE TYPE sbt PARMS ...;
SET UNTIL TIME 'SYSDATE-7';
SET CONTROLFILE AUTOBACKUP FORMAT
FOR DEVICE TYPE sbt TO '/disk1/control_files/autobackup_%F';
SET DBID 123456789;
RESTORE SPFILE
TO '/tmp/spfileTEMP.ora'
FROM AUTOBACKUP MAXDAYS 10;
}
4. Restart the database instance with the restored file.
If you are restarting RMAN with a server parameter file in a nondefault location,
then create an initialization parameter file with the line
SPFILE=new_location
, where
new_location
is the path name of the restored server parameter file. Then, restart
the instance with the client-side initialization parameter file.
For example, create a file
/tmp/init.ora
which contains the single line:
SPFILE=/tmp/spfileTEMP.ora
You can use the following RMAN command to restart the instance with the
restored server parameter file:
STARTUP FORCE PFILE=/tmp/init.ora;
See Also:
"Determining the DBID of the Database" for details on determining the DBID
Chapter 20
Restoring the Server Parameter File
20-3

20.2.1 Restoring the Server Parameter File from a Control File
Autobackup
If you have configured control file autobackups, then the server parameter file is
backed up with the control file whenever an autobackup is taken.
To restore the server parameter file from the control file autobackup:
1. Set the DBID for your database.
2. Use the
RESTORE SPFILE FROM AUTOBACKUP
command.
If the autobackup is in a nondefault format, then first use the
SET CONTROLFILE
AUTOBACKUP FORMAT
command to specify the format.
Example 20-1 Restoring the Server Parameter File from a Control File
Autobackup
This example sets the DBID and restores the server parameter file from a control file
autobackup in a nondefault location. RMAN uses the autobackup format and DBID to
search for control file autobackups. If a control file autobackup is found, then RMAN
restores the server parameter file from that backup to its default location.
SET DBID 320066378;
RUN
{
SET CONTROLFILE AUTOBACKUP FORMAT
FOR DEVICE TYPE DISK TO 'autobackup_format';
RESTORE SPFILE FROM AUTOBACKUP;
}
See Also:
•Description of
CONFIGURE CONTROLFILE AUTOBACKUP FORMAT
in the entry for
the
CONFIGURE
command in Oracle Database Backup and Recovery
Reference to learn how to determine the correct value for
autobackup_format
•"Determining the DBID of the Database" for details on how to determine
the DBID
20.2.2 Creating an Initialization Parameter File with RMAN
You can also restore the server parameter file as a client-side initialization parameter
file with the
TO PFILE 'filename'
clause.
The file name that you specify must be on a file system accessible from the host
where the RMAN client is running. This file need not be accessible directly from the
host running the instance.
The following RMAN command creates an initialization parameter file named
/tmp/
initTEMP.ora
on the system running the RMAN client:
RESTORE SPFILE TO PFILE '/tmp/initTEMP.ora';
Chapter 20
Restoring the Server Parameter File
20-4

To restart the instance with the initialization parameter file, use the following
command, again running RMAN on the same client host:
STARTUP FORCE PFILE='/tmp/initTEMP.ora';
20.3 Performing Recovery with a Backup Control File
When all current control files are lost, you must restore a backup control file.
This section contains the following topics:
•About Recovery with a Backup Control File
•Performing Recovery with a Backup Control File and No Recovery Catalog
20.3.1 About Recovery with a Backup Control File
If all copies of the current control file are lost or damaged, then you must restore and
mount a backup control file. You must then run the
RECOVER
command, even if no data
files have been restored, and open the database with the
RESETLOGS
option.
During recovery, RMAN automatically searches for online and archived logs that are
not recorded in the RMAN repository and catalogs any that it finds. RMAN attempts to
find a valid archived redo log in any current archiving destination with the current log
format. The current format is specified in the initialization parameter file used to start
the instance (or all instances in an Oracle RAC configuration). Similarly, RMAN
attempts to find the online redo logs by using the file names listed in the control file.
If you changed the archiving destination or format during recovery, or if you added new
online log members after the backup of the control file, then RMAN may not be able to
automatically catalog a needed online or archived log. Whenever RMAN cannot find
online redo logs and you did not specify an
UNTIL
time, RMAN reports errors similar to
the following:
RMAN-00571: ===========================================================
RMAN-00569: =============== ERROR MESSAGE STACK FOLLOWS ===============
RMAN-00571: ===========================================================
RMAN-03002: failure of recover command at 08/29/2013 14:23:09
RMAN-06054: media recovery requesting unknown log: thread 1 scn 86945
In this case, you must use the
CATALOG
command to manually add the required redo
logs to the repository so that recovery can proceed.
Note:
If some copies of the current control file are usable, however, then you can
follow the procedure in "Responding to the Loss of a Subset of the Current
Control Files" and avoid the recovery and
RESETLOGS
operation.
Chapter 20
Performing Recovery with a Backup Control File
20-5

See Also:
The discussion of
RESTORE CONTROLFILE
in Oracle Database Backup and
Recovery Reference for more details about restrictions on using
RESTORE
CONTROLFILE
in different scenarios (such as when using a recovery catalog, or
restoring from a specific backup)
20.3.1.1 About Control File Locations During RMAN Restore
When restoring the control file, the default destination is all of the locations defined in
the
CONTROL_FILES
initialization parameter. If the
CONTROL_FILES
initialization parameter is
not set, then the database uses the same rules to determine the destination for the
restored control file that it uses when creating a control file if the
CONTROL_FILES
parameter is not set.
One way to restore the control file to one or more new locations is to change the
CONTROL_FILES
initialization parameter, and then use the
RESTORE CONTROLFILE
command
with no arguments to restore the control file to the default locations. For example, if
you are restoring your control file after a disk failure made some but not all
CONTROL_FILES
locations unusable, you can change
CONTROL_FILES
to replace references
to the failed disk with path names pointing to another disk, and then run
RESTORE
CONTROLFILE
with no arguments.
You can also restore the control file to any location that you choose other than the
CONTROL_FILES
locations, by using the form
RESTORE CONTROLFILE TO ' filename'
:
RESTORE CONTROLFILE TO '/tmp/my_controlfile';
You can perform this operation with the database in
NOMOUNT
,
MOUNT
, or
OPEN
states,
because you are not overwriting any of the control files currently in use. Any existing
file named
'filename'
is overwritten. After restoring the control file to a new location,
you can then update the
CONTROL_FILES
initialization parameter to include the new
location.
See Also:
•The description of the
CREATE CONTROLFILE
statement in Oracle Database
SQL Language Reference for the rules that determine the destination of
restored control files
•Oracle Database Backup and Recovery Reference for
RESTORE
CONTROLFILE
syntax
20.3.1.2 About RMAN Recovery With and Without a Recovery Catalog
The process of recovering a control file depends on whether a recovery catalog is
used.
When RMAN is connected to a recovery catalog, the recovery procedure with a
backup control file is identical to recovery with a current control file. The RMAN
metadata missing from the backup control file is available from the recovery catalog.
Chapter 20
Performing Recovery with a Backup Control File
20-6

The only exception is if the database name is not unique in the catalog, in which case
you must use
SET DBID
command before restoring the control file.
If you are not using a recovery catalog, then you must restore your control file from an
autobackup. To restore the control file from autobackup, the database must be in a
NOMOUNT
state. You must first set the DBID for your database, and then use the
RESTORE
CONTROLFILE FROM AUTOBACKUP
command.
Example 20-2 Setting the DBID and Restoring the Control File from
Autobackup
In this example, RMAN uses the autobackup format and DBID to determine where to
hunt for the control file autobackup. If one is found, RMAN restores the control file to
all control file locations listed in the
CONTROL_FILES
initialization parameter.
SET DBID 320066378;
RUN
{
SET CONTROLFILE AUTOBACKUP FORMAT
FOR DEVICE TYPE DISK TO 'autobackup_format';
RESTORE CONTROLFILE FROM AUTOBACKUP;
}
See Also:
•"Determining the DBID of the Database" to learn how to determine your
DBID
•The description of
CONFIGURE CONTROLFILE AUTOBACKUP FORMAT
in the entry
for
CONFIGURE
in Oracle Database Backup and Recovery Reference to
learn how to determine the correct value for the autobackup format
20.3.1.3 About RMAN Recovery When Using a Fast Recovery Area
The commands for restoring a control file are the same whether or not the database
uses a fast recovery area.
If the database uses a fast recovery area, then RMAN updates a control file restored
from backup by crosschecking all disk-based backups and image copies recorded in
the control file. RMAN catalogs any backups in the recovery area that are not
recorded. As a result, the restored control file has a complete and accurate record of
all backups in the recovery area and any other backups known to the control file at the
time of the backup.
RMAN does not automatically crosscheck tape backups after restoring a control file. If
you are using tape backups, then you can restore and mount the control file, and
optionally crosscheck the backups on tape, as shown in the following example:
CROSSCHECK BACKUP DEVICE TYPE sbt;
Chapter 20
Performing Recovery with a Backup Control File
20-7

20.3.2 Performing Recovery with a Backup Control File and No
Recovery Catalog
Recovering a database with a backup control file and when no recovery catalog is
used requires you to restore the control file from an autobackup.
This section assumes that you have RMAN backups of the control file, but do not use
a recovery catalog. It also assumes that you enabled the control file autobackup
feature for the target database and can restore an autobackup of the control file.
Because the autobackup uses a well-known format, RMAN can restore it even though
it does not have a repository available that lists the available backups. You can restore
the autobackup to the default or a new location. RMAN replicates the control file to all
CONTROL_FILES
locations automatically.
Note:
If you know the backup piece name that contains the control file (for
example, from the media manager or because the piece is on disk), then you
can specify the piece name using the
RESTORE CONTROLFILE FROM 'filename'
command. The database records the location of every autobackup in the
alert log.
Because you are not connected to a recovery catalog, the RMAN repository contains
only information about available backups at the time of the control file backup. If you
know the location of other usable backup sets or image copies, then add them to the
control file RMAN repository with the
CATALOG
command.
To recover the database with a control file autobackup in
NOCATALOG
mode:
1. Start RMAN and connect to a target database, as described in "Making Database
Connections with RMAN".
2. Start the target database instance without mounting the database. For example:
STARTUP NOMOUNT;
3. Set the database identifier for the target database with the
SET DBID
command.
RMAN displays the DBID whenever you connect to a target database. You can
also obtain it by inspecting saved RMAN log files, querying the catalog, or looking
at the file names of control file autobackup. For example, run:
SET DBID 676549873;
4. Write an RMAN command file to restore the autobackup control file and perform
recovery.
The command file contains the following steps:
a. Optionally, specify the most recent backup time stamp that RMAN can use
when searching for a control file autobackup to restore.
b. If you know that a different control file autobackup format was in effect when
the control file autobackup was created, then specify a nondefault format for
the restore of the control file.
Chapter 20
Performing Recovery with a Backup Control File
20-8

c. If an SBT channel created the control file autobackup, then allocate one or
more SBT channels. Because no recovery catalog is available, you cannot use
preconfigured channels.
d. Restore the autobackup of the control file, optionally setting the maximum
number of days backward that RMAN can search and the initial sequence
number that it uses in its search for the first day.
e. If you know that the control file contains information about configured channels
that is useful to you in the rest of the restore process, then you can exit RMAN
to clear manually allocated channels from Step 4.c.
If you restart the RMAN client and mount the database, then these configured
channels are available for your use. If you do not care about using configured
channels from your control file, then you can simply mount the database.
f. This step depends on whether the online redo logs are available. The option
OPEN RESETLOGS
is always required after recovery with a backup control file,
regardless of whether logs are available.
If the online redo logs are usable, then RMAN can find and apply these logs.
Perform a complete restore and recovery as described in "Performing
Complete Database Recovery".
If the online redo logs are unusable, then perform DBPITR as described in
"Performing Database Point-in-Time Recovery". An
UNTIL
clause is required to
specify a target time, SCN, or log sequence number for the recovery before
the first SCN of the online redo logs (otherwise, RMAN issues the
RMAN-6054
error).
When you perform DBPITR with a backup control file, before opening the
database with
RESETLOGS
, you can open the database read-only using
SQL*Plus and run queries as needed to verify that the effects of the logical
corruption have been reversed. If you are satisfied with the results, then you
can open the database with
RESETLOGS
.
Note:
When specifying log sequences, if the last created archived redo log
has sequence n, then specify
UNTIL SEQUENCE n+1
so that RMAN
applies n and then stops.
In the following example, the online redo log files have been lost, and the most
recent archived redo log sequence number is 13243. This example shows how to
restore the control file autobackup and recover through the latest log.
RUN
{
# Optionally, set upper limit for eligible time stamps of control file
# backups
# SET UNTIL TIME '09/10/2017 13:45:00';
# Specify a nondefault autobackup format only if required
# SET CONTROLFILE AUTOBACKUP FORMAT FOR DEVICE TYPE DISK
# TO '?/oradata/%F.bck';
ALLOCATE CHANNEL c1 DEVICE TYPE sbt PARMS '...'; # allocate manually
RESTORE CONTROLFILE FROM AUTOBACKUP
MAXSEQ 100 # start at sequence 100 and count down
MAXDAYS 180; # start at UNTIL TIME and search back 6 months
Chapter 20
Performing Recovery with a Backup Control File
20-9

ALTER DATABASE MOUNT;
}
# Now use automatic channels configured in restored control file
RESTORE DATABASE UNTIL SEQUENCE 13244;
RECOVER DATABASE UNTIL SEQUENCE 13244;
5. If recovery was successful, then open the database and reset the online logs:
ALTER DATABASE OPEN RESETLOGS;
20.4 Performing Disaster Recovery
Disaster recovery includes the restoration and recovery of the target database after
the loss of the entire target database, the recovery catalog database, all current
control files, all online redo log files, and all parameter files.
This section contains the following topics:
•Prerequisites of Disaster Recovery
•Recovering the Database After a Disaster
20.4.1 Prerequisites of Disaster Recovery
Certain prerequisites must be met before you perform disaster recovery using RMAN.
You must have the following:
•Backups of all data files
•All archived redo logs generated after the creation time of the oldest backup that
you intend to restore
•At least one control file autobackup
•A record of the DBID of the database
20.4.2 Recovering the Database After a Disaster
Assume that the Linux server on which your database was running has been damaged
beyond repair. Fortunately, you backed up the database to Oracle Secure Backup and
have the tapes available. You can recover the database by using these backups.
The procedure for disaster recovery is similar to the procedure for recovering the
database with a backup control file in
NOCATALOG
mode. If you are restoring the
database to a new host, then review the considerations described in "Restoring a
Database on a New Host".
. The scenario assumes the following:
•Oracle Database is installed on the new host.
•You are restoring the database to a new Linux host with the same directory
structure as the old host.
•You have one tape drive containing backups of all the data files and archived redo
logs through log 1124, and autobackups of the control file and server parameter
file.
•You do not use a recovery catalog with the database.
Chapter 20
Performing Disaster Recovery
20-10

To recover the database on the new host:
1. Ensure that the prerequisites described in "Prerequisites of Disaster Recovery" are
met.
2. If possible, restore or re-create all relevant network files such as
tnsnames.ora
and
listener.ora
and a password file.
3. Start RMAN and connect to the target database instance, as described in "Making
Database Connections with RMAN".
At this stage, no initialization parameter file exists. If you have set
ORACLE_SID
and
ORACLE_HOME
, then you can use operating system authentication to connect as
SYSDBA
or
SYSBACKUP
.
4. Specify the DBID for the target database with the
SET
DBID
command, as described
in "Restoring the Server Parameter File".
For example, enter the following command:
SET DBID 676549873;
5. Run the
STARTUP NOMOUNT
command.
When the server parameter file is not available, RMAN attempts to start the
instance with a dummy server parameter file.
6. Allocate a channel to the media manager and then restore the server parameter
file from autobackup.
For example, enter the following command to restore the server parameter file
from Oracle Secure Backup:
RUN
{
ALLOCATE CHANNEL c1 DEVICE TYPE sbt;
RESTORE SPFILE FROM AUTOBACKUP;
}
7. Restart the instance with the restored server parameter file.
STARTUP FORCE NOMOUNT;
8. Write a command file to perform the restore and recovery operation, and then
execute the command file. The command file must do the following:
a. Allocate a channel to the media manager.
b. Restore a control file autobackup (see "Performing Recovery with a Backup
Control File and No Recovery Catalog").
c. Mount the restored control file.
d. Catalog any backups not recorded in the repository with the
CATALOG
command.
e. Restore the data files to their original locations. If volume names have
changed, then run
SET
NEWNAME
commands before the restore operation and
perform a switch after the restore operation to update the control file with the
new locations for the data files, as shown in the following example.
f. Recover the data files. RMAN stops recovery when it reaches the log
sequence number specified.
Chapter 20
Performing Disaster Recovery
20-11

RMAN> RUN
{
# Manually allocate a channel to the media manager
ALLOCATE CHANNEL t1 DEVICE TYPE sbt;
# Restore autobackup of the control file. This example assumes that you have
# accepted the default format for the autobackup name.
RESTORE CONTROLFILE FROM AUTOBACKUP;
# The set until command is used in case the database
# structure has changed in the most recent backups, and you want to
# recover to that point in time. In this way RMAN restores the database
# to the same structure that the database had at the specified time.
ALTER DATABASE MOUNT;
SET UNTIL SEQUENCE 1124 THREAD 1;
RESTORE DATABASE;
RECOVER DATABASE;
}
The following example of the
RUN
command shows the same scenario except with
new file names for the restored data files:
RMAN> RUN
{
# If you must restore the files to new locations,
# use SET NEWNAME commands:
SET NEWNAME FOR DATAFILE 1 TO '/dev/vgd_1_0/rlvt5_500M_1';
SET NEWNAME FOR DATAFILE 2 TO '/dev/vgd_1_0/rlvt5_500M_2';
SET NEWNAME FOR DATAFILE 3 TO '/dev/vgd_1_0/rlvt5_500M_3';
ALLOCATE CHANNEL t1 DEVICE TYPE sbt;
RESTORE CONTROLFILE FROM AUTOBACKUP;
ALTER DATABASE MOUNT;
SET UNTIL SEQUENCE 124 THREAD 1;
RESTORE DATABASE;
SWITCH DATAFILE ALL; # Update control file with new location of data files.
RECOVER DATABASE;
}
9. If recovery was successful, then open the database and reset the online logs:
ALTER DATABASE OPEN RESETLOGS;
20.5 Restoring a Database on a New Host
Use the
RESTORE
and
RECOVER
commands to restore a database on a new host.
Restoring a database on a new host is useful when you want to perform a test run of
your disaster recovery procedures or to permanently move a database to a new host.
If you use the procedure in this section, then the DBID for the restored database is the
same as the DBID for the original database. Do not register a test database created in
this way in the same recovery catalog as the source database. Because the DBID of
the two databases is the same, the metadata for the test database can interfere with
RMAN's ability to restore and recover the source database.
If your goal is to create a copy of your target database for ongoing use on a new host,
then use the RMAN
DUPLICATE
command instead of this procedure. The
DUPLICATE
command assigns a new DBID to the database it creates, enabling it to be registered
in the same recovery catalog as the original database.
To restore a database on a new host:
Chapter 20
Restoring a Database on a New Host
20-12

1. Complete the steps that must be performed before you restore the database, as
described in "Preparing to Restore a Database on a New Host".
2. Transfer the target database backups to the new host and restore the backups, as
described in "Restoring Disk Backups to a New Host".
See Also:
Testing the Restore of a Database on a New Host
20.5.1 Preparing to Restore a Database on a New Host
Certain steps must be preformed to prepare for the restoration of the database on a
new host.
The steps include the following:
•Record the DBID for your source database.
•Make the source database initialization parameter file accessible on the new host.
Copy the file from the old host to a new host by using an operating system utility.
•If you perform a test restore operation only, then ensure that RMAN is not
connected to the recovery catalog. Otherwise, RMAN records metadata about the
restored data files in the recovery catalog. This metadata interferes with future
attempts to restore and recover the primary database.
If you must use a recovery catalog because the control file is not large enough to
contain the RMAN repository data on all of the backups that you must restore,
then use Oracle Data Pump to export the catalog and import it into a different
schema or database. Afterward, use the copied recovery catalog for the test
restore. Otherwise, the recovery catalog considers the restored database as the
current target database.
•Ensure that backups used for the restore operation are accessible on the restore
host. For example, if the backups were made with a media manager, then verify
that the tape device is connected to the new host. If you are using disk copies,
then use the procedure in the following section.
•If you are performing a trial restore of the production database, then perform either
of the following actions before restoring the database in the test environment:
–If the test database will use a fast recovery area that is physically different
from the recovery area used by the production database, then set
DB_RECOVERY_FILE_DEST
in the test database instance to the new location.
–If the test database will use a fast recovery area that is physically the same as
the recovery area used by the production database, then set
DB_UNIQUE_NAME
in
the test database instance to a different name from the production database.
If you do not perform either of the preceding actions, then RMAN assumes that
you are restoring the production database and deletes flashback logs from the fast
recovery area because they are considered unusable.
Chapter 20
Restoring a Database on a New Host
20-13

See Also:
"Determining the DBID of the Database" to learn how to determine the DBID
fo your database
20.5.2 Restoring Disk Backups to a New Host
To move the database to a new host by using data file copies or backup sets on disk,
you must transfer the files manually to the new host. This procedure assumes that
RMAN is using a recovery catalog.
To restore backup files to a new host:
1. Start RMAN and connect to a target database and recovery catalog, as described
in "Making Database Connections with RMAN".
2. Run a
LIST
command to see a listing of backups of the data file and control file
autobackups.
For example, enter the following command to view data file copies:
LIST COPY;
For example, enter the following command to view control file backups:
LIST BACKUP OF CONTROLFILE;
The piece name of the autobackup must use the
%F
substitution variable, so the
autobackup piece name includes the string
c-IIIIIIIIII-YYYYMMDD-QQ
, where
IIIIIIIIII
stands for the DBID,
YYYYMMDD
is a time stamp in the Gregorian calendar
of the day the backup is generated, and
QQ
is the sequence in hexadecimal.
3. Copy the backups to the new host with an operating system utility.
Enter a command such as the following to copy all data file copies to the
?/
oradata/trgt
directory on the new host:
% cp -r /disk1/*dbf /net/new_host/oracle/oradata/trgt
Enter a command such as the following to copy the autobackup backup piece to
the
/tmp
directory on the new host:
% cp -r /disk1/auto_bkp_loc/c-1618370911-20130208-00 /net/new_host/tmp
You must use the
SET CONTROLFILE AUTOBACKUP FORMAT
command when restoring an
autobackup from a nondefault location.
See Also:
"Restoring the Server Parameter File from a Control File Autobackup"
Chapter 20
Restoring a Database on a New Host
20-14

20.5.3 Testing the Restore of a Database on a New Host
It is recommended that you test whether you can restore your database to a new host.
In this scenario, you have two networked Linux hosts,
hosta
and
hostb
. A target
database named
trgta
is on
hosta
and is registered in recovery catalog
catdb
. You
want to test the restore and recovery of
trgta
on
hostb
, while keeping database
trgta
up and running on
hosta
.
Now, assume that the directory structure of
hostb
is different from
hosta
. The target
database is located in
/net/hosta/dev3/oracle/dbs
, but you want to restore the
database to
/net/hostb/oracle/oradata/test
. You have tape backups of data files,
control files, archived redo logs, and the server parameter file on a media manager
accessible by both hosts. The
ORACLE_SID
for the
TRGTA
database is
TRGTA
and does not
change for the restored database.
Caution:
If you are restoring the database for test purposes, then never connect
RMAN to the test database and the recovery catalog.
To restore the database on a new host:
1. Ensure that the backups of the target database are accessible on the new host.
To test disaster recovery, you must have a recoverable backup of the target
database. When preparing your disaster recovery strategy, ensure that the
backups of the data files, control files, and server parameter file are restorable on
hostb
. Thus, you must configure the media management software so that
hostb
is
a media manager client and can read the backup sets created on
hosta
. Consult
the media management vendor for support on this issue.
2. Configure the
ORACLE_SID
on
hostb
.
This scenario assumes that you want to start the RMAN client on
hostb
and
authenticate yourself through the operating system. However, you must be
connected to
hostb
either locally or through a net service name.
After logging in to
hostb
with administrator privileges, edit the
/etc/group
file so that
you are included in the DBA group:
dba:*:614:<your_user_name>
Set the
ORACLE_SID
environment variable on
hostb
to the same value used on
hosta
:
% setenv ORACLE_SID trgta
3. Start RMAN on
hostb
and connect to the target database without connecting to the
recovery catalog.
For example, enter the following command:
% rman NOCATALOG
RMAN> CONNECT TARGET /
4. Set the DBID and start the database instance without mounting the database.
Chapter 20
Restoring a Database on a New Host
20-15

For example, run
SET
DBID
to set the DBID, then run
STARTUP
NOMOUNT
:
SET DBID 1340752057;
STARTUP NOMOUNT
RMAN fails to find the server parameter file, which has not yet been restored, but
starts the instance with a "dummy" file. Sample output follows:
startup failed: ORA-01078: failure in processing system parameters
LRM-00109: could not open parameter file '/net/hostb/oracle/dbs/inittrgta.ora'
trying to start the Oracle instance without parameter files ...
Oracle instance started
5. Restore and edit the server parameter file.
Because you enabled the control file autobackup feature when making your
backups, the server parameter file is included in the backup. If you are restoring
an autobackup that has a nondefault format, then use the
SET CONTROLFILE
AUTOBACKUP FORMAT
command to indicate the format.
Allocate a channel to the media manager, then restore the server parameter file as
a client-side parameter file and use the
SET
command to indicate the location of the
autobackup (in this example, the autobackup is in
/tmp
):
RUN
{
ALLOCATE CHANNEL c1 DEVICE TYPE sbt PARMS '...';
SET CONTROLFILE AUTOBACKUP FORMAT FOR DEVICE TYPE DISK TO '/tmp/%F';
RESTORE SPFILE
TO PFILE '?/oradata/test/inittrgta.ora'
FROM AUTOBACKUP;
SHUTDOWN ABORT;
}
6. Edit the restored initialization parameter file.
Change any location-specific parameters, for example, those ending in
_DEST
, to
reflect the new directory structure. For example, edit the following parameters:
- IFILE
- LOG_ARCHIVE_DEST_1
- CONTROL_FILES
7. Restart the instance with the edited initialization parameter file.
For example, enter the following command:
STARTUP FORCE NOMOUNT PFILE='?/oradata/test/inittrgta.ora';
8. Restore the control file from an autobackup and then mount the database.
For example, enter the following command:
RUN
{
ALLOCATE CHANNEL c1 DEVICE TYPE sbt PARMS '...';
RESTORE CONTROLFILE FROM AUTOBACKUP;
ALTER DATABASE MOUNT;
}
RMAN restores the control file to whatever locations you specified in the
CONTROL_FILES
initialization parameter.
Chapter 20
Restoring a Database on a New Host
20-16

9. Catalog the data file copies that you copied in "Restoring Disk Backups to a New
Host", using their new file names or
CATALOG START
WITH
(if you know all the files are
in directories with a common prefix easily addressed with a
CATALOG START WITH
command). For example, run:
CATALOG START WITH '/oracle/oradata/trgt/';
If you want to specify files individually, then you can execute a
CATALOG
command
as follows:
CATALOG DATAFILECOPY
'/oracle/oradata/trgt/system01.dbf', '/oracle/oradata/trgt/undotbs01.dbf',
'/oracle/oradata/trgt/cwmlite01.dbf', '/oracle/oradata/trgt/drsys01.dbf',
'/oracle/oradata/trgt/example01.dbf', '/oracle/oradata/trgt/indx01.dbf',
'/oracle/oradata/trgt/tools01.dbf', '/oracle/oradata/trgt/users01.dbf';
10. Start a SQL*Plus session on the new database and query the database file names
recorded in the control file.
Because the control file is from the
trgta
database, the recorded file names use
the original
hosta
file names. You can query
V$
views to obtain this information.
Run the following query in SQL*Plus:
COLUMN NAME FORMAT a60
SPOOL LOG '/tmp/db_filenames.out'
SELECT FILE# AS "File/Grp#", NAME
FROM V$DATAFILE
UNION
SELECT GROUP#,MEMBER
FROM V$LOGFILE;
SPOOL OFF
EXIT
11. Write the RMAN restore and recovery script. The script must include the following
steps:
a. For each data file on the destination host that is restored to a different path
than it had on the source host, use a
SET
NEWNAME
command to specify the new
path on the destination host. If the file systems on the destination system are
set up to have the same paths as the source host, then do not use
SET NEWNAME
for those files restored to the same path as on the source host.
b. For each online redo log that is to be created at a different location than it had
on the source host, use SQL
ALTER
DATABASE
RENAME
FILE
commands to specify
the path name on the destination host. If the file systems on the destination
system are set up to have the same paths as the source host, then do not use
ALTER DATABASE RENAME FILE
for those files restored to the same path as on the
source host.
c. Perform a
SET UNTIL
operation to limit recovery to the end of the archived redo
logs. The recovery stops with an error if no
SET UNTIL
command is specified.
d. Restore and recover the database.
e. Run the
SWITCH DATAFILE ALL
command so that the control file recognizes the
new path names as the official new names of the data files.
The following code shows the RMAN script
reco_test.rman
that can perform the
restore and recovery operation.
RUN
{
# allocate a channel to the tape device
Chapter 20
Restoring a Database on a New Host
20-17

ALLOCATE CHANNEL c1 DEVICE TYPE sbt PARMS '...';
# rename the data files and online redo logs
SET NEWNAME FOR DATAFILE 1 TO '?/oradata/test/system01.dbf';
SET NEWNAME FOR DATAFILE 2 TO '?/oradata/test/undotbs01.dbf';
SET NEWNAME FOR DATAFILE 3 TO '?/oradata/test/cwmlite01.dbf';
SET NEWNAME FOR DATAFILE 4 TO '?/oradata/test/drsys01.dbf';
SET NEWNAME FOR DATAFILE 5 TO '?/oradata/test/example01.dbf';
SET NEWNAME FOR DATAFILE 6 TO '?/oradata/test/indx01.dbf';
SET NEWNAME FOR DATAFILE 7 TO '?/oradata/test/tools01.dbf';
SET NEWNAME FOR DATAFILE 8 TO '?/oradata/test/users01.dbf';
ALTER DATABASE RENAME FILE '/dev3/oracle/dbs/redo01.log'
TO '?/oradata/test/redo01.log';
ALTER DATABASE RENAME FILE '/dev3/oracle/dbs/redo02.log'
TO '?/oradata/test/redo02.log';
# Do a SET UNTIL to prevent recovery of the online logs
SET UNTIL SCN 123456;
# restore the database and switch the data file names
RESTORE DATABASE;
SWITCH DATAFILE ALL;
# recover the database
RECOVER DATABASE;
}
EXIT
12. Execute the script created in the previous step.
For example, start RMAN to connect to the target database and run the
@
command:
% rman TARGET / NOCATALOG
RMAN> @reco_test.rman
13. Open the restored database with the
RESETLOGS
option.
From the RMAN prompt, open the database with the
RESETLOGS
option:
ALTER DATABASE OPEN RESETLOGS;
Caution:
When you re-open your database in the next step, do not connect to the
recovery catalog. Otherwise, the new database incarnation created is
registered automatically in the recovery catalog, and the file names of
the production database are replaced by the new file names specified in
the script.
14. Optionally, delete the test database with all of its files.
Note:
If you used an ASM disk group, then the
DROP DATABASE
command is the
only way to safely remove the files of the test database. If you restored
to non-ASM storage then you can also use operating system commands
to remove the database.
Chapter 20
Restoring a Database on a New Host
20-18

Use the
DROP DATABASE
command to delete all files associated with the database
automatically. The following example deletes the database files:
STARTUP FORCE NOMOUNT PFILE='?/oradata/test/inittrgta.ora';
DROP DATABASE;
Because you did not perform the restore and recovery operation when connected
to the recovery catalog, the recovery catalog contains no records for any of the
restored files or the procedures performed during the test. Likewise, the control file
of the
trgta
database is completely unaffected by the test.
See Also:
"Making Database Connections with RMAN"
20.6 Restoring Backups Created Using Older Versions of
RMAN
You can restore backups that were created using older versions of RMAN, up to
Oracle Database 9i Release 2 (9.2.0.8).
There must be a supported upgrade path between the Oracle Database version on
which the backups were created and the Oracle software version on which you want to
run the restored database.
In this example, the source database is an Oracle Database 11g Release 2 database
and it is configured to use a server parameter file (spfile). The database runs in
ARCHIVELOG
mode and uses a fast recovery area. Control file autobackups are also
configured. You then create RMAN backups of the source database, including the
archived redo logs.
The destination host on which these backups are restored has Oracle Database 12c
Release 1 installed.
To restore RMAN backups that were created using an RMAN version that is
older than the current target database version:
1. Verify that there is a supported upgrade path from the database version on which
the backups were created to the Oracle server version on which you plan to
restore the database.
For example, if your RMAN backups were created on Oracle Database 11g
Release 2 (11.2.0.3) and you want to run the restored database on Oracle
Database 12c Release 1 (12.1), then you must verify that there is a supported
upgrade path from release 11.2.0.3 to release 12.1.
See Also:
Oracle Database Upgrade Guide for information about the database
upgrade paths
Chapter 20
Restoring Backups Created Using Older Versions of RMAN
20-19

2. Ensure that the source database backups are available at the destination host on
which they must be restored.
You can either use an operating system utility to copy the backups to the
destination host or store the backups in a shared location that is accessible to the
destination host.
3. Shut down the destination database.
4. On the destination host, set the
ORACLE_SID
to the same value that was used on the
source database.
% setenv ORACLE_SID db112
5. Start RMAN on the destination host and connect to the target database using
operating system authentication and without a recovery catalog.
% rman target / NOCATALOG
6. Set the DBID to the same value as the source database.
The following command sets the DBID to 699892390, which is the DBID of the
source database whose backups are being restored.
RMAN> set DBID 699892390;
7. Start the target database in nomount mode.
RMAN> startup nomount;
RMAN fails to find the server parameter file, which has not yet been restored.
However, the instance is started with a “dummy” file and the following output is
displayed:
startup failed: ORA-01078: failure in processing system parameters
LRM-00109: could not open parameter file '/oracle/dbs/inittrgta.ora'
trying to start the Oracle instance without parameter files ...
Oracle instance started
8. Restore the server parameter file from the source database autobackup.
Because controlfile autobackups were enabled in the source database, the server
parameter file is included in the backup. To restore an autobackup that has a
nondefault format, use the
SET CONTROLFILE AUTOBACKUP FORMAT
command to
indicate the format.
The following example sets the autobackup format, restores the spfile in the
source database to the pfile
/dev3/oracle/network/init_db112.ora
, and then shuts
down the target database.
run
{
set controlfile autobackup format for device type disk to '/scratch/fra/cf/
%F.bck';
restore spfile to pfile '/dev3/oracle/network/init_db112.ora' from
autobackup recovery area '/scratch /fra/cf' db_name 'DB112';
shutdown abort;
}
9. Edit the restored initialization parameter file and modify the required initialization
parameters.
This includes the
COMPATIBLE
parameter, if the compatibility requirement for the
target database is different from that set in the source database, and parameters
that are deprecated in the target database release. Also update any location-
Chapter 20
Restoring Backups Created Using Older Versions of RMAN
20-20

specific parameters such as those ending with
_DEST
to reflect the new directory
structure.
In this example, you must edit the pfile located at /dev3/oracle/network/
init_db112.ora.
10. Restart the instance with the edited initialization parameter file.
The following command starts the database instance in nomount mode using the
edited parameter file.
RMAN> startup force nomount pfile='/dev3/oracle/network/init_db112.ora';
11. Restore the control file from an autobackup and then mount the database.
The following example sets the format for the control file autobackups, restores the
control file from an autobackup, and then mounts the database.
run
{
set controlfile autobackup format for device type disk to '/scratch/fra/cf/
%F.bck';
restore controlfile from autobackup recovery area '/scratch/fra/cf' db_name
'DB112';
alter database mount;
}
The control file is restored to the location specified in the
CONTROL_FILES
initialization parameter in the edited initialization parameter file.
12. Catalog data file copies of the source database that were made available to the
destination host.
If all the files are in directories with a common prefix, then use the
CATALOG START
WITH
command. If you want to specify the file names individually, then use the
CATALOG DATAFILECOPY
command.
In the following example, all the data file copies are stored in a single folder /
scratch/fra/DB112/backupset and so we use the
CATALOG START WITH
command.
RMAN> catalog start with '/scratch/fra/DB112/backupset';
13. Restore and recover the source database.
If the data files are restored to a different path than those on the source database,
you must specify a new path on the destination host by using the
SET NEWNAME
command. If the online redo logs are to be created in a different location than
those on the source database, then use the
ALTER DATABASE RENAME FILE
command
to specify the location of each redo log file on the destination database.
In this example, the
SET NEWNAME FOR DATABASE
command is used to specify the new
location for all restored data files. The new location for each online redo log file is
specified using an
ALTER DATABASE RENAME FILE
command. Recovery is performed
until the SCN specified in the command.
run
{
set newname for database to '/ade/b/1885631999/oracle/dbs/%U.f';
alter database rename file '/dev1/oracle/dbs/redo01.log' to '/dev3/
oracle/dbs/redo1.log';
alter database rename file '/dev1/oracle/dbs/redo02.log' to '/dev3/
oracle/dbs/redo2.log';
set until scn 1092435;
Chapter 20
Restoring Backups Created Using Older Versions of RMAN
20-21

restore database;
switch datafile all;
recover database;
}
14. Open the restored database with the
RESETLOGS
and
UPGRADE
options.
RMAN> alter database open resetlogs upgrade;
Statement processed
RMAN-06900: WARNING: unable to generate V$RMAN_STATUS or V$RMAN_OUTPUT row
RMAN-06901: WARNING: disabling update of the V$RMAN_STATUS and V$RMAN_OUTPUT rows
ORACLE error from target database:
ORA-04023: Object SYS.STANDARD could not be validated or authorized
The error is caused by database packages that need to be revalidated as part of
the upgrade process.
15. Exit RMAN.
16. Upgrade the target database to the desired Oracle release by performing the steps
required to upgrade a database.
See Also:
Oracle Database Upgrade Guide for information about upgrading the
database
20.7 Restoring and Recovering Files Over the Network
RMAN enables you to restore or recover files by connecting, over the network, to a
physical standby database that contains the required files. You can restore an entire
database, data files, control files, server parameter file, or tablespaces. Restoring files
over the network is very useful in scenarios where you need to synchronize the
primary and standby databases.
Backup sets are used to restore or recover files over the network. Therefore, you can
use multisection backups, encryption, and compression to improve backup and restore
performance.
Restoring and recovering files over the network is supported starting with Oracle
Database 12c Release 1 (12.1).
This section includes:
•About Restoring Files Over the Network
•About Recovering Files Over the Network
•Scenarios for Restoring and Recovering Files Over the Network
•Restoring Data Files Over the Network
•Rolling Forward a Physical Standby Database Using the RECOVER Command
20.7.1 About Restoring Files Over the Network
RMAN restores database files, over the network, from a physical standby database by
using the
FROM SERVICE
clause of the
RESTORE
command.
Chapter 20
Restoring and Recovering Files Over the Network
20-22

The
FROM SERVICE
clause provides the service name of the physical standby database
from which the files must be restored. During the restore operation, RMAN creates
backup sets, on the physical standby database, of the files that need to be restored
and then transfers these backup sets to the target database over the network.
Use the
SECTION SIZE
clause of the
RESTORE
command to perform a multisection restore
operation. To encrypt the backup sets created on the physical standby database, use
the
SET ENCRYPTION
command before the
RESTORE
command to specify the encryption
algorithm used.
To transfer files from the physical standby database as compressed backup sets, use
the
USING COMPRESSED BACKUPSET
clause in the
RESTORE
command. By default, RMAN
compresses backup sets using the algorithm that is set in the RMAN configuration.
You can override the default and set a different algorithm by using the
SET COMPRESSION
ALGORITHM
command before the
RESTORE
statement.
20.7.2 About Recovering Files Over the Network
You can perform recovery by fetching an incremental backup, over the network, from a
primary database and then applying this incremental backup to the physical standby
database.
RMAN is connected as
TARGET
to the physical standby database. The recovery process
is optimized by restoring only the used data blocks in a data file. Use the
FROM SERVICE
clause to specify the service name of the primary database from which the incremental
backup must be fetched.
To use multisection backup sets during the recovery process, specify the
SECTION SIZE
clause in the
RECOVER
command. To transfer the required files from the primary
database as encrypted backup sets, use the
SET ENCRYPTION
command before the
RESTORE
command to specify the encryption algorithm used to create the backup sets.
To compress backup sets that are used to recover files over the network, use the
USING
COMPRESSED BACKUPSET
. RMAN compresses backup sets when it creates them on the
primary database and then transfers these backup sets to the target database.
20.7.3 Scenarios for Restoring and Recovering Files Over the Network
Recovering files by connecting, over the network, to a physical standby database is
useful in certain scenarios.
These scenarios include the following:
•You need to roll-forward a physical standby database to make it in-sync with the
primary database.
After creating an incremental backup of the latest changes on the primary
database, you can restore the physical standby database using the incremental
backup.
•You want to restore lost data files, control files, or tablespaces on a primary
database using the corresponding files on the physical standby database. You can
also restore files on a physical standby database by using the primary database.
Chapter 20
Restoring and Recovering Files Over the Network
20-23

20.7.4 Restoring Data Files Over the Network
Use the
RESTORE
command to restore lost or damaged data files by connecting over the
network to a primary database or physical standby database.
In this example, the
DB_UNIQUE_NAME
of the primary database is
MAIN
and the
DB_UNIQUE_NAME
of the physical standby database is
STANDBY
. The data file
sales.dbf
on
the primary database was lost. You want to restore this data file from the physical
standby database. The service name of the physical standby database is
standby_tns
.
The
RESTORE
command with the
FROM SERVICE
clause enables you to restore the lost
data file in the primary database by using the data file in the physical standby
database. The password file in the primary database and the physical standby
database are the same.
Use the following steps to restore the data file
sales.dbf
in the primary database by
using the data file in the physical standby database:
1. Connect to the primary database as a user with the
SYSBACKUP
privilege.
%RMAN
RMAN> CONNECT TARGET "sbu@main AS SYSBACKUP";
Enter the password for the
sbu
user when prompted.
2. Specify that the backup sets must be encrypted using the AES128 encryption
algorithm
RMAN> SET ENCRYPTION ALGORITHM 'AES128';
3. Ensure that the
tnsnames.ora
file in the physical standby database contains an
entry corresponding to the primary database. Also ensure that the password files
on the primary and physical standby database are the same.
4. Restore the data file on the primary database by using the data file on the physical
standby database. The following command creates multisection backup sets to
perform the restore operation.
RESTORE DATAFILE '/oradata/datafiles/sales.dbf'
FROM SERVICE standby_tns
SECTION SIZE 120M;
20.7.5 Rolling Forward a Physical Standby Database Using the
RECOVER Command
RMAN rolls forward a physical standby database by creating an incremental backup
that contains the changes to the primary database, transferring the incremental
backup over the network to the physical standby database, and then applying the
incremental backup to the physical standby database. All changes to data files on the
primary database, beginning with the SCN in the standby data file header, are
included in the incremental backup.
You can use the
RECOVER ... FROM SERVICE
command to synchronize the data files on
the physical standby database with those on the primary database. This command
refreshes the standby data files and rolls them forward to the same point-in-time as the
primary. However, the standby control file still contains old SCN values which are
lower than the SCN values in the standby data files. Therefore, to complete the
synchronization of the physical standby database, you must refresh the standby
Chapter 20
Restoring and Recovering Files Over the Network
20-24

control file and then update the data file names, online redo log file names, and the
standby redo log file names in the refreshed standby control file.
If network resources are a constraint, then you can use the
BACKUP INCREMENTAL
command to create incremental backups on the primary database, and then use the
incremental backups to roll forward the physical standby database.
"Steps to Refresh a Physical Standby Database with Changes Made to the Primary
Database" describes the steps to refresh a physical standby using the
FROM SERVICE
clause.
See Also:
Oracle Data Guard Concepts and Administration for information about using
the
BACKUP INCREMENTAL
command to roll forward a physical standby database
20.7.5.1 Steps to Refresh a Physical Standby Database with Changes Made to
the Primary Database
Use the
RECOVER STANDBY DATABASE
command with the
FROM SERVICE
clause to refresh a
physical standby database with changes that were made to the primary database.
This example assumes that the
DB_UNIQUE_NAME
of the primary database is
MAIN
and its
net service name is
primary_db
. The
DB_UNIQUE_NAME
of the standby database is
STANDBY
and its net service name is
standby_db
.
To refresh the physical standby database with changes made to the primary
database:
1. Ensure that the following prerequisites are met:
•Oracle Net connectivity is established between the physical standby database
and the primary database.
You can do this by adding an entry corresponding to the primary database in
the
tnsnames.ora
file of the physical standby database.
•The password files on the primary database and the physical standby
database are the same.
•The
COMPATIBLE
parameter in the initialization parameter file of the primary
database and physical standby database is set to 12.0.
2. Start RMAN and connect as target to the physical standby database. It is
recommended that you also connect to a recovery catalog.
The following commands connect as
TARGET
to the physical standby database and
as
CATALOG
to the recovery catalog. The connection to the physical standby is
established using the
sbu
user, who has been granted
SYSBACKUP
privilege. The net
service name of the physical standby database is
standby_db
and that of the
recovery catalog is
catdb
.
CONNECT TARGET "sbu@standby_db AS SYSBACKUP";
CONNECT CATALOG rman@catdb;
Chapter 20
Restoring and Recovering Files Over the Network
20-25

3. Roll forward the physical standby database using the
RECOVER STANDBY DATABASE
command with the
FROM SERVICE
clause.
The
FROM SERVICE
clause specifies the service name of the primary database using
which the physical standby must be rolled forward. The standby database is
restarted after the roll forward operation.
The following example rolls forward the physical standby database using the
primary database whose service name is
primary_db
.
RECOVER STANDBY DATABASE FROM SERVICE primary_db;
4. (For Active Data Guard only) Perform the following steps to recover redo data and
open the physical standby database in read-only mode:
ALTER DATABASE RECOVER MANAGED STANDBY DATABASE UNTIL CONSISTENT;
ALTER DATABASE OPEN READ ONLY;
5. Start the managed recovery processes on the physical standby database.
The following command starts the managed recovery process:
ALTER DATABASE RECOVER MANAGED STANDBY DATABASE DISCONNECT FROM SESSION;
When using Data Guard Broker, use the following command to start the managed
recovery process:
DGMGRL> edit database standby_db set state='APPLY-ON';
See Also:
Oracle Database Net Services Administrator's Guide for information about
establishing Oracle Net connectivity
Chapter 20
Restoring and Recovering Files Over the Network
20-26

21
Performing RMAN Tablespace Point-in-
Time Recovery (TSPITR)
This chapter explains how to perform RMAN tablespace point-in-time recovery. This
chapter contains the following sections:
•Overview of RMAN TSPITR
•TSPITR Restrictions, Special Cases, and Limitations
•Planning and Preparing for TSPITR
•Running RMAN TSPITR:
–Performing Fully Automated RMAN TSPITR
–Overriding Defaults for RMAN TSPITR with an RMAN-Managed Auxiliary
Database
–Performing RMAN TSPITR Using Your Own Auxiliary Database
•Troubleshooting RMAN TSPITR
21.1 Overview of RMAN TSPITR
To use RMAN tablespace point-in-time recovery (TSPITR) effectively, it is helpful to
understand what types of problems it can resolve, its components, what RMAN does
during TSPITR, and the various limitations and restrictions on when and how it can be
run. This section explains the basic concepts, preparatory tasks, and modes of running
RMAN TSPITR.
To perform TSPITR for CDBs and PDBs, you must connect to the root as a user with
the
SYSDBA
or
SYSBACKUP
privilege. To perform TSPITR of one more more PDBs, you
must have a backup of the root and the CDB seed of the CDB that contains the PDBs.
21.1.1 Purpose of RMAN TSPITR
Recovery Manager (RMAN) TSPITR enables quick recovery of one or more
tablespaces in a database to an earlier time without affecting the rest of the
tablespaces and objects in the database.
RMAN TSPITR is most useful for the following situations:
•To recover a logical database to a point different from the rest of the physical
database, when multiple logical databases exist in separate tablespaces of one
physical database. For example, you maintain logical databases in the
orders
and
personnel
tablespaces. An incorrect batch job or data manipulation language
(DML) statement corrupts the data in only one tablespace.
•To recover data lost after data definition language (DDL) operations that change
the structure of tables. You cannot use Flashback Table to rewind a table to before
the point of a structural change such as a truncate table operation.
21-1

•To recover a table after it has been dropped with the
PURGE
option.
•To recover from the logical corruption of a table.
•To recover dropped tablespaces. In fact, RMAN can perform TSPITR on dropped
tablespaces even when a recovery catalog is not used.
You can also use Flashback Database to rewind data, but you must rewind the entire
database rather than just a subset. Also, unlike TSPITR, the Flashback Database
feature necessitates the overhead of maintaining flashback logs. The point in time to
which you can flash back the database is more limited than the TSPITR window, which
extends back to your earliest recoverable backup.
21.1.2 Basic Concepts of RMAN TSPITR
Understand the concepts of RMAN TSPITR such as the terminology and modes used.
This section contains the following topics:
•Common Terms for RMAN TSPITR
•Modes of RMAN TSPITR
•How RMAN TSPITR Works With an RMAN-Managed Auxiliary Database
21.1.2.1 Common Terms for RMAN TSPITR
This section defines some common entities that are used by RMAN TSPITR.
Table 21-1 RMAN TSPITR Entities
Name Explanation
Target instance Contains the tablespace to be recovered to the target time
Target time Point in time or SCN of the tablespace after TSPITR completes
Auxiliary database A database used in the recovery process to perform the work of
recovery. The auxiliary database has other files associated with
it. See auxiliary set for a complete list.
Auxiliary destination An optional disk location that RMAN uses to temporarily store
the auxiliary set files. The auxiliary destination is used only with
an RMAN-managed auxiliary database. Specifying an auxiliary
destination with a user-managed auxiliary database results in an
error.
All references to auxiliary destination in this chapter assume use
of an RMAN-managed auxiliary database.
Recovery set Data files in the tablespaces that you intend to recover
Chapter 21
Overview of RMAN TSPITR
21-2

Table 21-1 (Cont.) RMAN TSPITR Entities
Name Explanation
Auxiliary set Data files required for TSPITR that are not part of the recovery
set. The auxiliary set typically includes:
•The
SYSTEM
and
SYSAUX
tablespaces.
•Data files containing rollback or undo segments from the
target database instance.
•Temporary tablespaces.
•Control file from source database.
•Archived redo logs that must be restored to recover the
auxiliary database to specified point in time.
•Online redo logs of the auxiliary database. These logs are
different from the online redo logs of the source database.
They are created when the auxiliary database is opened
with the
RESETLOGS
option.
The auxiliary set does not include the parameter file, password
file, or associated network files.
21.1.2.2 Modes of RMAN TSPITR
There are several modes of running RMAN TSPITR. The difference between the
various modes of operation corresponds to how much automation versus
customization you require in your environment.
You start RMAN TSPITR with the RMAN
RECOVER TABLESPACE
command. There are
three ways to run the utility:
•Fully Automated (the default)
In this mode, RMAN manages the entire TSPITR process including the auxiliary
database. You specify the tablespaces of the recovery set, an auxiliary
destination, the target time, and you allow RMAN to manage all other aspects of
TSPITR.
The default mode is recommended unless you specifically need more control over
the location of recovery set files after TSPITR, auxiliary set files during TSPITR,
channel settings and parameters or some other aspect of your auxiliary database.
•Automated: RMAN-Managed Auxiliary Database with User Settings
You can override some defaults of RMAN TSPITR while still using an RMAN-
managed auxiliary database and destination. This variation of the default mode
enables you to benefit from some built-in management that RMAN TSITR provides
while being able to specify:
–Location of auxiliary set or recovery set files
–Initialization parameters
•Non-Automated: TSPITR and User-Managed Auxiliary Database
This mode of RMAN TSPITR requires you to set up and manage all aspects of the
auxiliary database and some aspects of the TSPITR process. This mode may be
appropriate if, for example, you must allocate a different number of channels or
change the channel parameters for your user-managed auxiliary database.
Chapter 21
Overview of RMAN TSPITR
21-3

See Also:
•Performing Fully Automated RMAN TSPITR
•Overriding Defaults for RMAN TSPITR with an RMAN-Managed Auxiliary
Database
•Performing RMAN TSPITR Using Your Own Auxiliary Database
21.1.2.3 How RMAN TSPITR Works With an RMAN-Managed Auxiliary
Database
Select tablespaces from the recovery set, an auxiliary destination, and a target time
before you perform fully automated RMAN TSPITR (default).
The automated mode of RMAN TSPITR shares many of these high-level processing
steps. RMAN TSPITR automatically performs the following actions:
1. If the tablespaces in the recovery set have not been dropped, checks to see if they
are self-contained by executing the
DBMS_TTS.TRANSPORT_SET_CHECK
for the recovery
set tablespaces and then checking that the view
TRANSPORT_SET_VIOLATIONS
is
empty. If the query returns rows, RMAN stops TSPITR processing. You must
resolve any tablespace containment violations before TSPITR can proceed.
Example 21-1 shows you how to set up and run the query before invoking RMAN
TSPITR.
2. Checks to see if a connection to a user-managed auxiliary database was provided.
If it is, then RMAN TSPITR uses it. If not, RMAN TSPITR creates the auxiliary
database, starts it, and connects to it.
3. Takes the tablespaces to be recovered offline in the target database, if the
tablespaces in the recovery set have not been dropped.
4. Restores a backup control file from a point in time before the target time to the
auxiliary database.
5. Restores the data files from the recovery set and the auxiliary set to the auxiliary
database.
Files are restored either in the:
•Locations that you specify for each file
•Original location of the file (for recovery set data files)
•Auxiliary destination (if you used the
AUXILIARY DESTINATION
argument of
RECOVER TABLESPACE
and an RMAN-managed auxiliary database)
6. Recovers the restored data files in the auxiliary database to the specified time.
7. Opens the auxiliary database with the
RESETLOGS
option.
8. Makes the recovery set tablespaces read-only in the auxiliary database.
9. Exports the recovery set tablespaces from the auxiliary database using the Data
Pump utility to produce a transportable tablespace dump file.
10. Shuts down the auxiliary database.
11. Drops the recovery set tablespaces from the target.
Chapter 21
Overview of RMAN TSPITR
21-4

12. Data Pump utility reads the transportable tablespace dump file and plugs the
recovery set tablespaces into the target.
13. Makes the tablespaces that were put in the target database read/write and
immediately takes them offline.
14. Deletes all auxiliary set files.
At this point, RMAN TSPITR has finished. The recovery set data files are returned to
their contents at the specified point in time, and belong to the target database.
The recovery set tablespaces are left offline for you to back up and then bring back
online. These last steps follow Oracle's recommendation and best practice of backing
up recovered tablespaces as soon as TSPITR completes.
21.2 TSPITR Restrictions, Special Cases, and Limitations
Some database problems cannot be resolved with TSPITR because of certain
restrictions and limitations.
The following list explains when you cannot perform TSPITR:
•If there are no archived redo logs or if the database runs in
NOARCHIVELOG
mode.
•If TSPITR is used to recover a renamed tablespace to a point in time before it was
renamed, you must use the previous name of the tablespace to perform the
recovery operation.
In this case when TSPITR completes, the target database contains two copies of
the same tablespace, the original tablespace with the new name and the TSPITR
tablespace with the old name. If this is not your goal, then you can drop the new
tablespace with the new name.
•If constraints for the tables in tablespace
tbs1
are contained in tablespace
tbs2
,
then you cannot recover
tbs1
without also recovering
tbs2
.
•If a table and its indexes are stored in different tablespaces, then the indexes must
be dropped before performing TSPITR.
•You cannot use TSPITR to recover the current default tablespace.
•You cannot use TSPITR to recover tablespaces containing any of the following
objects:
–Objects with underlying objects (such as materialized views) or contained
objects (such as partitioned tables) unless all of the underlying or contained
objects are in the recovery set. Additionally, if the partitions of a partitioned
table are stored in different tablespaces, then you must either drop the table
before performing TSPITR or move all the partitions to the same tablespace
before performing TSPITR.
–Undo or rollback segments
–Oracle8-compatible advanced queues with multiple recipients
–Objects owned by the user
SYS
. Examples of these types of objects are: PL/
SQL, Java classes, callout programs, views, synonyms, users, privileges,
dimensions, directories, and sequences.
Chapter 21
TSPITR Restrictions, Special Cases, and Limitations
21-5

21.2.1 Limitations of TSPITR
There are some limitations to consider when performing TSPITR.
After TSPITR completes, RMAN recovers the data files in the recovery set to the
target time. Note the following special cases:
•TSPITR does not recover query optimizer statistics for recovered objects.You
must gather new statistics after TSPITR completes.
•If you run TSPITR on a tablespace and bring the tablespace online at time t, then
backups of the tablespace created before time t are no longer usable for recovery
with a current control file. You cannot use the current control file to recover the
database to any time less than or equal to t.
•If one or more data files in the recovery set have Oracle Managed File (OMF)
names and the compatibility in the target database is set to version 10.1 or earlier,
RMAN cannot reuse the data file. This restriction is true even if no SET
NEWNAME command is provided for the data file. A new OMF name is created for
the recovery set data file. This action temporarily doubles the space requirements
for the data file. This is because
DB_CREATE_FILE_DEST
has two copies of the data
file (the original data file and the one used by TSPITR) until the tablespace is
dropped in the target and the original data file is deleted.
RMAN uses the transportable tablespaces functionality to perform TSPITR. Therefore,
any limitations on transportable tablespaces are also applicable to TSPITR.
See Also:
Oracle Database Administrator’s Guide for information about limitations on
transportable tablespaces
21.2.2 About Special Considerations When Not Using a Recovery
Catalog
Be aware of certain precautions when not using a recovery catalog during TSPITR.
The precautions include the following:
•Because RMAN has no historical record of the undo in the control file, RMAN
assumes that the current set of tablespaces with rollback or undo segments were
the same set present at the time when recovery was performed. If the tablespace
set has changed since that time, then the current rollback or undo segments were
the same segments present at the time to which recovery is performed. If the undo
segments have changed since that time, then you can use
UNDO TABLESPACE
to
indicate the correct set of tablespaces with undo at the point in time where the
tablespaces are being recovered.
•TSPITR to a time that is too old may not succeed if Oracle Database has reused
the control file records for needed backups. (In planning your database, set the
CONTROL_FILE_RECORD_KEEP_TIME
initialization parameter to a value large enough to
ensure that control file records needed for TSPITR are kept.)
Chapter 21
TSPITR Restrictions, Special Cases, and Limitations
21-6

•To rerun TSPITR when you are not using a recovery catalog, you must first drop
the tablespace to be used by TSPITR from the target database.
21.3 Planning and Preparing for TSPITR
Certain steps must be completed when preparing to perform TSPITR.
To prepare for TSPITR:
1. Read and understand the considerations described in "TSPITR Restrictions,
Special Cases, and Limitations".
2. Select the target time until which the tablespace must be recovered, as described
in "Selecting the Right Target Time for TSPITR".
3. Determine the recovery set, as described in "Determining the Recovery Set".
4. Identify and preserve objects that will be lost after the TSPITR operation
completes, as described in "Identifying and Preserving Objects That Are Lost After
TSPITR".
21.3.1 Selecting the Right Target Time for TSPITR
It is extremely important that you choose the right target time or SCN for your TSPITR.
Note that after you bring a tablespace online after TSPITR, you cannot use any
backup from a time earlier than the moment you brought the tablespace online.
If you have a recovery catalog, then you can perform repeated TSPITR operations to
different target times because the catalog contains tablespace history information. If
RMAN uses only a control file, however, repeated TSPITR is only possible after
dropping the tablespace because the control file does not have the tablespace history.
In this case, RMAN only knows about the current set of tablespaces. The tablespace
on which TSPITR was performed has a creation time equal to the time it was brought
online.
To identify a target time for TSPITR, investigate past states of your data and find the
point in time when unwanted changes occurred by using one of the following
techniques:
•Flashback Query
•Oracle Transaction Query
•Flashback Version Query
See Also:
•"TSPITR Restrictions, Special Cases, and Limitations"
•Oracle Database Development Guide for more information on Flashback
Query, Flashback Transaction Query, and Flashback Version Query
Chapter 21
Planning and Preparing for TSPITR
21-7

21.3.2 Determining the Recovery Set
Initially, your recovery set includes the data files for the tablespaces that you intend to
recover. However, if objects in the tablespaces that you need have relationships (such
as constraints) to objects in other tablespaces, then you must account for these
relationships before you can perform TSPITR
You have the following choices when faced with such a relationship:
•Add the tablespace including the related objects to your recovery set
•Remove the relationship
•Suspend the relationship for the duration of TSPITR
See Also:
"Identify and Resolve Dependencies on the Primary Database " for
information about resolving relationships to other tablespaces
21.3.2.1 Identify and Resolve Dependencies on the Primary Database
RMAN TSPITR requires that the tablespace that is being recovered be self-contained
and that no
SYS
-owned objects reside in the tablespace.
To identify and resolve dependencies:
1. Use the
DBMS_TTS.TRANSPORT_SET_CHECK
procedure to locate objects outside the
tablespace and identify relationships between objects that span the recovery set
boundaries.
If the
TRANSPORT_SET_VIOLATIONS
view returns rows, you must investigate and
correct the problem according to the choices described in "Determining the
Recovery Set".
2. Record all actions performed during this step so that you can re-create any
suspended or removed relationships after completing TSPITR.
Proceed with TSPITR only when the
TRANSPORT_SET_VIOLATIONS
view is empty for
the tablespaces in the recovery set.
Note:
If one or more of the tablespaces in the recovery set have been dropped,
RMAN TSPITR cannot run the procedure
DBMS_TTS.TRANSPORT_SET_CHECK
. In
this case,
DBMS_TTS.TRANSPORT_SET_CHECK
is run when the Data Pump export of
the auxiliary database occurs. Just like RMAN TSPITR, if the export
operation encounters any tablespaces that are not self-contained, it fails.
Chapter 21
Planning and Preparing for TSPITR
21-8

Example 21-1 Querying DBMS_TTS.TRANSPORT_SET_CHECK for a Subset of
Tablespaces
This example illustrates how to use the
DBMS_TTS.TRANSPORT_SET_CHECK
procedure for an
initial recovery set consisting of tablespaces
tools
and
users
. It queries the
transportable tablespace violations table to manage any dependencies. No rows are
returned from this query when all dependencies are managed.
BEGIN
DBMS_TTS.TRANSPORT_SET_CHECK('USERS,TOOLS', TRUE,TRUE);
END;
/
SELECT * FROM TRANSPORT_SET_VIOLATIONS;
See Also:
Oracle Database PL/SQL Packages and Types Reference for more
information about the
DBMS_TTS.TRANSPORT_SET_CHECK
procedure and
corresponding view
21.3.3 Identifying and Preserving Objects That Are Lost After TSPITR
When you perform RMAN TSPITR on a tablespace, objects created after the target
recovery time are lost. You can preserve such objects after they are identified by
exporting them before TSPITR with the Data Pump Export utility and reimporting them
afterward with Data Pump Import.
To determine which objects are lost in TSPITR, query the
TS_PITR_OBJECTS_TO_BE_DROPPED
view on the primary database. Filter the view for
objects whose
CREATION_TIME
is after the target time for TSPITR. The following table
describes the contents of the view.
Table 21-2 TS_PITR_OBJECTS_TO_BE_DROPPED View
Column Name Meaning
OWNER
Owner of the object to be dropped
NAME
The name of the object that is lost by undergoing TSPITR
CREATION_TIME
Creation time stamp for the object
TABLESPACE_NAME
Name of the tablespace containing the object
Example 21-2 Querying TS_PITR_OBJECTS_TO_BE_DROPPED
This example displays the objects that need to be preserved when performing TSPITR
with a recovery set consisting of
users
and
tools
and a recovery point in time of
November 2, 2017, 7:03:11 am.
SELECT OWNER, NAME, TABLESPACE_NAME,
TO_CHAR(CREATION_TIME, 'YYYY-MM-DD:HH24:MI:SS')
FROM TS_PITR_OBJECTS_TO_BE_DROPPED
WHERE TABLESPACE_NAME IN ('USERS','TOOLS')
AND CREATION_TIME > TO_DATE('02-NOV-17:07:03:11','YY-MON-DD:HH24:MI:SS')
ORDER BY TABLESPACE_NAME, CREATION_TIME;
Chapter 21
Planning and Preparing for TSPITR
21-9

The
TO_CHAR
and
TO_DATE
functions are used to avoid issues with different national date
formats. Of course, you can use local date formats in your own work.
Example 21-3 Using SCN and TS_PITR_OBJECTS_TO_BE_DROPPED
If the SCN to recover tablespaces
USERS
and
TOOLS
is 1645870, this example
determines the objects that are dropped. Use conversion functions to determine the
time stamp associated with the SCN and the objects that are dropped.
SELECT OWNER, NAME, TABLESPACE_NAME,
TO_CHAR(CREATION_TIME,'YYYY-MM-DD:HH24:MI:SS')
FROM TS_PITR_OBJECTS_TO_BE_DROPPED
WHERE TABLESPACE_NAME IN ('USERS','TOOLS')
AND CREATION_TIME > TO_DATE(TO_CHAR(SCN_TO_TIMESTAMP(1645870),
'MM/DD/YYYY HH24:MI:SS'),
'MM/DD/YYYY HH24:MI:SS')
ORDER BY TABLESPACE_NAME, CREATION_TIME;
See Also:
Oracle Database Reference for more information about the
TS_PITR_OBJECTS_TO_BE_DROPPED
view
21.4 Performing Fully Automated RMAN TSPITR
In the default mode, RMAN bases as much of the configuration for TSPITR as
possible on the target database.
During TSPITR, the recovery set data files are written in their current locations on the
target database (For OMF files, see "Limitations of TSPITR"). The same channel
configurations for the target database are used on the auxiliary database when
restoring files from backup. Auxiliary set data files and other auxiliary database files,
however, are stored in the auxiliary destination.
Use the
AUXILIARY DESTINATION
parameter to set a location for RMAN to use for the
auxiliary set data files. The auxiliary destination must be a location on disk with
enough space to hold auxiliary set data files. Even if you use other techniques to
rename some or all of the auxiliary set data files, specifying an
AUXILIARY DESTINATION
parameter provides a default location for auxiliary set data files for which names are
not specified. TSPITR does not fail if you inadvertently do not provide names for all
auxiliary set data files.
To perform fully automated RMAN TSPITR, the user performing TSPITR must be able
to connect with the
SYSBACKUP
or
SYSDBA
privilege using operating system authentication.
To perform fully automated RMAN TSPITR:
1. Review the information in "TSPITR Restrictions, Special Cases, and Limitations".
2. Perform the tasks in "Planning and Preparing for TSPITR".
3. Start an RMAN session on the target database and, if applicable, connect to a
recovery catalog, as described in "Making Database Connections with RMAN".
Chapter 21
Performing Fully Automated RMAN TSPITR
21-10

Note:
Do not connect to an auxiliary database when starting the RMAN client
for automated TSPITR. If RMAN is connected to an auxiliary database
when you run
RECOVER TABLESPACE
, then RMAN assumes that you are
managing your own auxiliary database, as described in "Performing
RMAN TSPITR Using Your Own Auxiliary Database", and tries to use
the connected auxiliary for TSPITR.
4. Configure any channels required for TSPITR on the target instance.
The auxiliary database uses the same channel configuration as the target instance
when performing TSPITR.
5. Run the
RECOVER TABLESPACE
command, specifying both the
UNTIL
clause and the
AUXILIARY DESTINATION
parameter.
This example returns the
USERS
and
TOOLS
tablespaces to the end of log sequence
number 1299, and stores the auxiliary set files in the
/disk1/auxdest
directory.
RECOVER TABLESPACE users, tools
UNTIL LOGSEQ 1300 THREAD 1
AUXILIARY DESTINATION '/disk1/auxdest';
6. View the results of the
RECOVER
command to decide which step to take:
•If no error occurs during TSPITR, then proceed to Step 7.
The tablespaces are taken offline by RMAN, restored from backup and
recovered to the desired point in time on the auxiliary database, and then
reimported to the target database. The tablespaces are left offline. All auxiliary
set data files and other auxiliary database files are cleaned up from the
auxiliary destination.
•If an error occurs during TSPITR, then proceed to "Troubleshooting RMAN
TSPITR".
7. If TSPITR completes successfully, then back up the recovered tablespaces before
bringing them online.
For example, enter the following command:
BACKUP TABLESPACE users, tools;
After you perform TSPITR on a tablespace, you can no longer use previous
backups of that tablespace after TSPITR successfully completes. If you use the
recovered tablespaces without taking a backup, then you run your database
without a usable backup of these tablespaces.
8. Bring the tablespaces back online.
For example, enter the following command:
RMAN> ALTER TABLESPACE users, tools ONLINE;
Your recovered tablespaces are now ready for use.
Chapter 21
Performing Fully Automated RMAN TSPITR
21-11

21.5 Overriding Defaults for RMAN TSPITR with an RMAN-
Managed Auxiliary Database
You can customize some aspects of RMAN TSPITR while still mostly following the
procedure for performing fully automated RMAN TSPITR.
These include the following:
•Rename or relocate your recovery set data files so that the data files making up
the recovered tablespaces are not stored in the original locations after TSPITR.
This may be necessary if the disk that originally contained the tablespace is not
usable.
•Specify a location other than the auxiliary destination for some or all auxiliary set
data files. You might choose this option if no single location on disk has enough
space for all auxiliary set files.
•Rename files in an Oracle Managed Files format.
•Set up image copy backups of your auxiliary set data files in advance to avoid
having to restore data files during TSPITR.
•Customize initialization parameters for your RMAN-managed auxiliary database.
See Also:
•"Renaming TSPITR Recovery Set Data Files with SET NEWNAME"
•"Naming TSPITR Auxiliary Set Data Files"
•"Considerations When Renaming OMF Auxiliary Set Files in TSPITR"
•"Using Image Copies for Faster RMAN TSPITR Performance"
•"Customizing Initialization Parameters for the Automatic Auxiliary
Database in TSPITR"
21.5.1 Renaming TSPITR Recovery Set Data Files with SET
NEWNAME
You may not want the recovery set data files restored and recovered in their original
locations. The
SET NEWNAME
command enables you to specify a new destination. When
you specify a new destination for the recovery set, RMAN does not remove the original
data files of the tablespaces.
To specify new recovery set file names, create a
RUN
block and use
SET NEWNAME
commands within it. Be sure to assign names that do not conflict with each other or
with the names of your current data files.
Example 21-4 Renaming Recovery Set Files
This example specifies new names for recovery set data files. In this example, RMAN
takes the following actions:
Chapter 21
Overriding Defaults for RMAN TSPITR with an RMAN-Managed Auxiliary Database
21-12

•Restores each specified data file to the new location during TSPITR.
•Uses the image copy if one exists at the specified location and its checkpoint is
before the specified point in time. If this criteria is not met, then RMAN overwrites
the image copy.
•Plugs the newly recovered data file into the target control file.
RMAN does not detect conflicts between names set with
SET NEWNAME
and current data
file names on the target database until the actual recovery. If RMAN detects a conflict,
then TSPITR fails and RMAN reports an error. The valid data file is not overwritten.
RUN
{
.
.
.
SET NEWNAME FOR DATAFILE 'ORACLE_HOME/oradata/trgt/users01.dbf'
TO '/newfs/users01.dbf';
...other SET NEWNAME commands...
RECOVER TABLESPACE users, tools UNTIL SEQUENCE 1300 THREAD 1;
}
21.5.2 Naming TSPITR Auxiliary Set Data Files
Unlike recovery set data files, which are usually stored in their original locations,
auxiliary set data files must not overwrite the corresponding original files in the target
database. If you do not specify an auxiliary set file location that is different from its
original location, then TSPITR fails. The failure occurs when RMAN attempts to
overwrite the corresponding file in the original database and discovers the file in use.
The simplest way to provide locations for auxiliary set data files is to specify an
auxiliary destination for TSPITR. However, RMAN supports the following alternatives
for controlling the location of auxiliary set data files, which are listed in order of
precedence shown in Table 21-3.
Table 21-3 Order of Precedence for Naming Files
Order Technique Section
1
SET NEWNAME
"Using SET NEWNAME to Name Auxiliary Set
Data Files During TSPITR"
2
CONFIGURE AUXNAME
"Using SET NEWNAME and CONFIGURE
AUXNAME with Auxiliary Set Image Copies"
3
DB_FILE_NAME_CONVERT
"Using DB_FILE_NAME_CONVERT to Name
Auxiliary Set Data Files During TSPITR".
If the target database uses OMF names for
auxiliary set, then you cannot use
DB_FILE_NAME_CONVERT
. See "Considerations
When Renaming OMF Auxiliary Set Files in
TSPITR".
4
AUXILIARY DESTINATION
argument
to
RECOVER TABLESPACE
when
using an RMAN-managed
auxiliary database
Chapter 21
Overriding Defaults for RMAN TSPITR with an RMAN-Managed Auxiliary Database
21-13

Settings higher on the list override settings lower on the list in situations where both
have been applied. For example, you might run
RECOVER TABLESPACE... AUXILIARY
DESTINATION
on a target database when some auxiliary set data files have auxiliary
names configured with
CONFIGURE AUXNAME
.
Even if you intend to use either of the preceding techniques to provide locations for
specific files, Oracle recommends that you provide an
AUXILIARY DESTINATION
argument
to
RECOVER TABLESPACE
when using an RMAN-managed auxiliary database. If you
overlook renaming some auxiliary set data files, then TSPITR still succeeds. Any files
not otherwise renamed are placed in the auxiliary destination.
Note:
You can view any current
CONFIGURE AUXNAME
settings by running the
SHOW
AUXNAME
command, which is described in Oracle Database Backup and
Recovery Reference.
21.5.2.1 Considerations When Renaming OMF Auxiliary Set Files in TSPITR
Auxiliary set data files can have Oracle Managed Files (OMF) in the target and can
use Automatic Storage Management (ASM) or non-ASM storage. TSPITR performs
name conversion differently when the
DB_FILE_NAME_CONVERT
initialization parameter is
set and the OMF files are in ASM or non-ASM storage.
21.5.2.1.1 Using ASM Storage
You can use
DB_FILE_NAME_CONVERT
and
LOG_FILE_NAME_CONVERT
initialization parameters
for the auxiliary database to specify the conversion of the disk group. RMAN uses the
pattern to convert the ASM disk group name and generates a valid OMF file name in
the converted disk group.
For Oracle Managed Files (OMF) that use ASM storage, the database converts only
disk group names as in: +DISK1 to +DISK2.
The following command specifies the conversion for the log files:
LOG_FILE_NAME_CONVERT='+onlinelogs','+tmpasm'
If the
DB_FILE_NAME_CONVERT
and
LOG_FILE_NAME_CONVERT
parameters change a substring
other than the disk group name, the conversion is ignored and the resulting disk group
name is used. For example:
DB_FILE_NAME_CONVERT='+DATAFILE/prod','+DATAFILE/tspitr'
The preceding command results in an invalid ASM OMF file name and the change is
ignored. Instead, the files are created in disk group name +DATAFILE and the
following message is issued:
WARNING: DB_FILE_NAME_CONVERT resulted in invalid ASM names; names changed to disk
group only
If auxiliary set data files are stored in ASM disk groups, then you can use the
SET
NEWNAME
command to redirect individual files to a specific disk group accessible from
the auxiliary database (and allow the database to generate the file name within the
disk group).
Chapter 21
Overriding Defaults for RMAN TSPITR with an RMAN-Managed Auxiliary Database
21-14

Example 21-5 Redirecting ASM files
This example shows how to use the
SET NEWNAME
command to redirect individual files to
a specific disk group.
RUN
{
SET NEWNAME FOR DATAFILE 1 TO "+DISK2";
SET NEWNAME FOR DATAFILE 2 TO "+DISK3";
RECOVER TABLESPACE users, tools
UNTIL LOGSEQ 1300 THREAD 1
AUXILIARY DESTINATION '/disk1/auxdest';
}
21.5.2.1.2 Using Non-ASM Storage
Multiple methods are available to rename OMF (non-ASM) file names for the auxiliary
database.
The initialization parameters
DB_FILE_NAME_CONVERT
and
LOG_FILE_NAME_CONVERT
cannot
be used to rename OMF (non-ASM) file names for the auxiliary database because this
method generates invalid OMF file names. If you must control the generation of new
OMF file names that do not use ASM storage, you must rename them using one of the
following alternate techniques.
The various naming options are listed in order from most recommended to least
recommended.
1. Use an auxiliary destination, as described in "Performing Fully Automated RMAN
TSPITR".
2. Specify locations for new OMF files with one or more of the OMF initialization
parameters for the auxiliary database so that all of the necessary OMF files are
handled:
•
DB_CREATE_FILE_DEST
for the auxiliary set data files
•
DB_CREATE_ONLINE_LOG_DEST_n
with
DB_CREATE_FILE_DEST
for the online redo logs
of the auxiliary database if the online logs are not created in the
DB_CREATE_FILE_DEST
21.5.2.2 Using SET NEWNAME to Name Auxiliary Set Data Files During
TSPITR
To specify a new name for an auxiliary set data file, you can enclose
RECOVER
TABLESPACE
in a
RUN
command and use a
SET NEWNAME
command within the
RUN
block to
rename the file.
Example 21-6 Renaming Auxiliary Set Oracle Managed Files (OMF) in TSPITR
This example illustrates the basic technique of using SET NEWNAME to rename files.
The result depends on whether
/disk1/auxdest/system01.dbf
exists when
RECOVER
TABLESPACE
is executed. If
?/oradata/system01.dbf
exists at the specified location and
was created at an SCN before the
UNTIL
time for TSPITR, then the
DATAFILECOPY
is
used and the restore operation is not necessary. Otherwise, RMAN restores the
auxiliary set data file to the
NEWNAME
instead of the default location. If your intention is to
control where the auxiliary set data files are stored, then ensure that no file is stored at
the location specified by
SET NEWNAME
before performing TSPITR.
Chapter 21
Overriding Defaults for RMAN TSPITR with an RMAN-Managed Auxiliary Database
21-15

RUN
{
SET NEWNAME FOR DATAFILE '?/oradata/prod/system01.dbf'
TO '/disk1/auxdest/system01.dbf';
SET NEWNAME FOR DATAFILE '?/oradata/prod/sysaux01.dbf'
TO '/disk1/auxdest/sysaux01.dbf';
SET NEWNAME FOR DATAFILE '?/oradata/prod/undotbs01.dbf'
TO '/disk1/auxdest/undotbs01.dbf';
RECOVER TABLESPACE users, tools
UNTIL LOGSEQ 1300 THREAD 1
AUXILIARY DESTINATION '/disk1/auxdest';
}
See Also:
"Using SET NEWNAME and CONFIGURE AUXNAME with Auxiliary Set
Image Copies"
21.5.2.3 Using DB_FILE_NAME_CONVERT to Name Auxiliary Set Data Files
During TSPITR
When you do not want to use an auxiliary destination for all of your auxiliary set data
files, but you also do not want to name every file individually, you can include a
DB_FILE_NAME_CONVERT
initialization parameter in the initialization parameter file used by
the auxiliary database.
You can use this technique only when one of the following situations exists:
•You create your own initialization parameter file for an automatically managed
auxiliary database, as described in "Customizing Initialization Parameters for the
Automatic Auxiliary Database in TSPITR"
•You create your own auxiliary database, as described in "Performing RMAN
TSPITR Using Your Own Auxiliary Database"
The
DB_FILE_NAME_CONVERT
initialization parameter in the auxiliary database specifies
how to derive names for files in the auxiliary database from the original names of the
corresponding files in the target database instance. The parameter consists of a list of
pairs of strings. For any file name that contains the first string of a pair as a substring,
the name of the corresponding file in the auxiliary database is generated by
substituting the second string of the pair into the original file name.
For example, assume that the target instance contains the following files:
•
?/oradata/trgt/system01.dbf
of the
SYSTEM
tablespace
•
?/oradata/trgt/sysaux01.dbf
of the
SYSAUX
tablespace
•
?/oradata/trgt/undotbs01.dbf
of the
undotbs
tablespace
To place the corresponding files of the auxiliary database in
/bigtmp
, you add the
following line to the auxiliary database parameter file:
DB_FILE_NAME_CONVERT=('?/oradata/trgt', '/bigtmp')
New file names for the corresponding auxiliary database files are
/bigtmp/trgt/
system01.dbf
,
/bigtmp/trgt/sysaux01.dbf
, and
/bigtmp/trgt/undotbs01.dbf
.
Chapter 21
Overriding Defaults for RMAN TSPITR with an RMAN-Managed Auxiliary Database
21-16

The most important point to remember is that
DB_FILE_NAME_CONVERT
must be present in
the auxiliary database parameter file. If the auxiliary database was manually created,
then add
DB_FILE_NAME_CONVERT
to the auxiliary database parameter file.
You can still rename individual auxiliary set data files with the
SET NEWNAME
or
CONFIGURE
AUXNAME
command. Also, files that do not match the patterns provided in
DB_FILE_NAME_CONVERT
are not renamed. When using RMAN-managed auxiliary
database, you can use the
AUXILIARY DESTINATION
parameter of
RECOVER TABLESPACE
command to ensure that all auxiliary set data files are sent to some destination. If the
renaming methods do not provide a new name for a file at the auxiliary database, then
TSPITR fails.
21.5.2.3.1 Renaming Temp Files During TSPITR
Temp files are considered part of the auxiliary set for your database. When the
auxiliary database is instantiated, RMAN recreates the temporary tablespaces of the
target database and generates their names with the regular rules for the auxiliary data
file names.
To rename temp files, you can use one of the following:
•
SET NEWNAME FOR TEMPFILE
command
•
DB_FILE_NAME_CONVERT
initialization parameter of the auxiliary database. If the
temporary files have non-ASM Oracle Managed File names, you cannot use this
parameter option.
•
AUXILIARY DESTINATION
clause of the
RECOVER
command when using an RMAN-
managed auxiliary database
See Also:
Considerations When Renaming OMF Auxiliary Set Files in TSPITR
21.5.3 Using Image Copies for Faster RMAN TSPITR Performance
TSPITR performance can be enhanced by redirecting RMAN to use existing image
copies of the recovery set and auxiliary set data files. In this case, RMAN does not
need to restore the data files from backup.
In general, if a suitable image copy is available in the specified location, then RMAN
uses the image copy to perform TSPITR, and the data file copy is uncataloged from
the target control file.
You can use the following techniques to tell RMAN about the possible existence of an
image copy of a data file:
•Use the
CONFIGURE AUXNAME
command with image copies of auxiliary set data files
•Use the
SET NEWNAME
command with image copies of recovery set data files or
auxiliary set data files
Chapter 21
Overriding Defaults for RMAN TSPITR with an RMAN-Managed Auxiliary Database
21-17

See Also:
•Using SET NEWNAME and CONFIGURE AUXNAME with Auxiliary Set
Image Copies
•Using SET NEWNAME with Recovery Set Image Copies
21.5.3.1 Using SET NEWNAME with Recovery Set Image Copies
The
SET NEWNAME
command enables you to specify the location of the image copies
when performing TSPITR using image copies.
During TSPITR, RMAN looks in the specified
NEWNAME
location for the data file. RMAN
checks whether an image copy backup of the data file exists with a data file checkpoint
SCN early enough that it can be recovered to the target time. If RMAN finds a usable
image copy, then RMAN uses it in TSPITR. Otherwise, RMAN restores the data file to
the
NEWNAME
location. Any file in the location specified by the
NEWNAME
is overwritten. The
specified
NEWNAME
becomes the name of the data file in the target database after
TSPITR completes.
Example 21-7 Using SET NEWNAME
This example performs TSPITR by using image copies of recovery set files. The
SET
NEWNAME
command specifies the location of the image copies of the specified
tablespace.
RUN
{
SET NEWNAME FOR DATAFILE 'ORACLE_HOME/oradata/trgt/users01.dbf'
TO '/newfs/users1.dbf';
...other RMAN commands, if any...
RECOVER TABLESPACE users, tools UNTIL SEQUENCE 1300 THREAD 1;
}
21.5.3.2 Using SET NEWNAME and CONFIGURE AUXNAME with Auxiliary
Set Image Copies
The
CONFIGURE AUXNAME
command sets a persistent alternative location for an auxiliary
set data file image copy, whereas the
SET NEWNAME
command sets an alternative
location for the duration of a
RUN
command.
Assume that you use
SET NEWNAME
or
CONFIGURE AUXNAME
to specify a new location for an
auxiliary set data file. Also assume that there is an image copy at that location with an
SCN that can be used in TSPITR. In this case, RMAN uses the image copy. If there is
no usable image copy at that location, however, then RMAN restores a usable copy
from backup. (If an image copy is present but the SCN is after the target time for
TSPITR, then the data file is overwritten by the restored file.)
As with all auxiliary set files, the file is deleted after TSPITR. This behavior occurs
regardless of whether it was an image copy created before TSPITR or restored by
RMAN during TSPITR.
The primary use of
CONFIGURE AUXNAME
is to make TSPITR faster by eliminating restore
times. If you anticipate performing TSPITR, then you can include in your backup
routine the maintenance of a set of image copies of the auxiliary set data files, and
Chapter 21
Overriding Defaults for RMAN TSPITR with an RMAN-Managed Auxiliary Database
21-18

update these periodically to the earliest point to which you expect to perform TSPITR.
The recommended usage model is:
1. Configure the
AUXNAME
for the files once when setting up this strategy.
2. Perform
BACKUP AS COPY DATAFILE n FORMAT auxname
regularly to maintain the
updated image copy. For better performance, use an incrementally updated
backup strategy to keep the image copies up-to-date without performing full
backups of the data files.
3. When TSPITR is needed, specify a target time after the last update of the image
copy.
21.5.3.3 Performing TSPITR with CONFIGURE AUXNAME and Image Copies:
Scenario
This procedure uses
CONFIGURE AUXNAME
when performing TSPITR using image copies.
Assume that you have enough disk space to save image copies of your entire
database for use in TSPITR. In preparation for the possibility of TSPITR, you do the
following:
•Configure an
AUXNAME
for each data file in the auxiliary set by using a command of
the following form:
CONFIGURE AUXNAME FOR DATAFILE n TO auxname_n;
•Take an image copy of the auxiliary set every Sunday by using a command of the
following form:
BACKUP AS COPY DATAFILE n FORMAT auxname_n
If the image copies are all in the same location on disk, and if they are named
similarly to the original data files, then you can avoid performing backups of every
data file. Instead, you can use the
FORMAT
or
DB_FILE_NAME_CONVERT
options of the
BACKUP
command and use
BACKUP AS COPY DATABASE
. For example, if the configured
auxiliary names are a translation of the location
maindisk
to
auxdisk
, then you use
the following command:
BACKUP AS COPY
DATABASE
DB_FILE_NAME_CONVERT (maindisk, auxdisk);
Note:
Because Oracle managed file names cannot generally be translated
using a simple substitution, you cannot typically use
DB_FILE_NAME_CONVERT
to generate names for image copies stored in
OMF.
After these steps, you are prepared for TSPITR without restoring the auxiliary set from
backup. For example, if an erroneous batch job, started on November 15, 2013, at
19:00:00, incorrectly updates the tables in the tablespace
parts
, you use the following
command to perform TSPITR on tablespace
parts
:
RECOVER TABLESPACE parts UNTIL TIME 'November 15 2013, 19:00:00';
Chapter 21
Overriding Defaults for RMAN TSPITR with an RMAN-Managed Auxiliary Database
21-19

Because
AUXNAME
locations are configured and refer to data file copies from an SCN
before the TSPITR target time, the auxiliary set is not restored from backup. Instead,
the data file copies are used in recovery, which reduces the restore overhead.
You can also prevent the recovery set from being restored. You must take frequent
image copies of the tablespaces and use
SET NEWNAME
to specify the location of these
copies. This method ensures that the recovery set is not restored and the tablespace
changes location after TSPITR successfully completes.
21.5.4 Customizing Initialization Parameters for the Automatic
Auxiliary Database in TSPITR
The automatic auxiliary database uses a set of default initialization parameters. You
can add other parameters, if required.
The automatic auxiliary database looks for additional initialization parameters to
complement the default parameters in a location that is operating system-dependent.
For example, in UNIX this location is:
?/rdbms/admin/params_auxinst.ora
. RMAN always
looks for this additional parameter file for an RMAN-automatic auxiliary database when
performing TSPITR. If the file is not found, then RMAN does not generate an error.
Instead, RMAN uses the default parameters listed in the following table for the RMAN-
managed automatic auxiliary database.
Table 21-4 Default Initialization Parameters for the RMAN-Managed Auxiliary
Database
Initialization Parameter Value
DB_NAME
Same as
DB_NAME
of the source database
COMPATIBLE
Same as the
COMPATIBLE
setting of the target database
DB_UNIQUE_NAME
RMAN auto-generated unique value based on
DB_NAME
DB_BLOCK_SIZE
Same as the
DB_BLOCK_SIZE
of the target database
DB_CREATE_FILE_DEST
Auxiliary destination (only if the
AUXILIARY DESTINATION
argument is specified when using an RMAN-managed auxiliary
database). RMAN creates Oracle Managed Files for the
auxiliary set files in this location.
LOG_ARCHIVE_DEST_1
Auxiliary destination (only if the
AUXILIARY DESTINATION
clause is specified when using an RMAN-managed auxiliary
database). Archived logs needed for recovery are restored to
this location.
SGA_TARGET 280M
DB_FILES
Same as
DB_FILES
of the target database
PROCESSES 50
Usually it is not necessary to alter or add to the values of these initialization
parameters, especially if you provide an
AUXILIARY DESTINATION
clause to the
RECOVER
TABLESPACE
command when using a RMAN-managed auxiliary database. If you
override an initialization parameter in Table 21-4 with an inappropriate value, then
TSPITR may fail due to problems with the auxiliary database. Nevertheless, you can
add other parameters besides these basic parameters if needed. For example, you
can use
DB_FILE_NAME_CONVERT
to specify the names of the data files in the auxiliary and
recovery sets.
Chapter 21
Overriding Defaults for RMAN TSPITR with an RMAN-Managed Auxiliary Database
21-20

To override or specify parameters for the automatic auxiliary database, you can do
either of the following:
•Place the initialization parameters in the operating system specific default auxiliary
parameter file name. For example, in UNIX, the file name is:
?/rdbms/admin/
params_auxinst.ora
.
•Perform these steps:
1. Place the initialization parameters in a file.
2. Specify the location of this file with the
SET AUXILIARY INSTANCE PARAMETER FILE
command before executing TSPITR.
Regardless of the method that you choose, the parameters that you specify take
precedence over defaults and can override the value of an
AUXILIARY DESTINATION
clause.
This section contains the following topics:
•Specifying the Auxiliary Database Archived Logs in TSPITR
•Specifying the Auxiliary Database Control File Location in TSPITR
•Specifying the Auxiliary Database Online Log Location in TSPITR
21.5.4.1 Specifying the Auxiliary Database Control File Location in TSPITR
If you use an initialization parameter file, then you can use the
CONTROL_FILES
initialization parameter to specify your own location for the control file of your auxiliary
database
If you do not explicitly specify a control file location, and if you use the
AUXILIARY
DESTINATION
clause, then RMAN locates the control file in the auxiliary destination. If
you do not use the
AUXILIARY DESTINATION
clause, then the auxiliary database control
files are stored in an operating system-specific location.
No matter where you store your auxiliary database control file, it is removed at the end
of the TSPITR operation. Because control files are relatively small, it is rare that
RMAN encounters a problem creating an auxiliary control file. If there is not enough
space to create the control file, however, then TSPITR fails.
21.5.4.2 Specifying the Auxiliary Database Archived Logs in TSPITR
To perform recovery on the auxiliary and recovery sets after restoring them at the
auxiliary database, RMAN may need to restore archived logs. When an auxiliary
destination is being used, the archived logs are restored to that location.
In the absence of an auxiliary destination and any other initialization parameters, the
archived logs are restored to an operating system specific location. For details, consult
your operating system specific documentation. You can use the
LOG_ARCHIVE_DEST_1
initialization parameter to specify an alternative location where the archived logs are
restored.
21.5.4.3 Specifying the Auxiliary Database Online Log Location in TSPITR
If you specify the
LOG_FILE_NAME_CONVERT
initialization parameter in your auxiliary
database parameter file and the parameter successfully converts the names of the
Chapter 21
Overriding Defaults for RMAN TSPITR with an RMAN-Managed Auxiliary Database
21-21

online redo logs of the target, then this parameter determines the online redo log
location.
The same restrictions that apply to OMF data files, as described in "Considerations
When Renaming OMF Auxiliary Set Files in TSPITR", apply to OMF online redo logs.
If RMAN is managing the auxiliary database and an auxiliary destination is specified,
RMAN creates the online redo log in the auxiliary destination.
Alternatively, you can use
DB_CREATE_FILE_DEST
or
DB_CREATE_FILE_DEST
and
DB_CREATE_ONLINE_LOG_1
to specify the location where the auxiliary database redo logs
are created. If you choose the latter option, then you must use
DB_CREATE_ONLINE_LOG_1
with
DB_CREATE_FILE_DEST
.
TSPITR fails to create the online redo logs if you do not specify a location for them by
using one of the following:
•
LOG_FILE_NAME_CONVERT
•
DB_CREATE_FILE_DEST
•
DB_CREATE_FILE_DEST
and
DB_CREATE_ONLINE_LOG_1
•
AUXILIARY DESTINATION
21.6 Performing RMAN TSPITR Using Your Own Auxiliary
Database
Although Oracle recommends that you let RMAN manage all aspects of the auxiliary
database, there may be times when you must create and manage your own auxiliary
database. If you select this mode, you are responsible for setting up, starting, stopping
and cleaning up the auxiliary database used in TSPITR.
One reason that you might want to create your own instance is to exercise control of
channels used in TSPITR. The automatic auxiliary database uses the configured
channels of the target database as the basis for the channels to configure on the
auxiliary database and to use during the restore operation. You may need different
channel settings and may not want to use the
CONFIGURE
command to change the
settings on the target database. In this case, you can operate your own auxiliary
database. By connecting to the auxiliary database before invoking
RECOVER
, a run block
can provide specific channel allocations using the
ALLOCATE AUXILIARY CHANNEL
command.
This section contains the following topics:
•Preparing Your Own Auxiliary Database for RMAN TSPITR
•Preparing RMAN Commands for TSPITR with Your Own Auxiliary Database
•Executing TSPITR with Your Own Auxiliary Database
•Performing TSPITR with Your Own Auxiliary Database: Scenario
21.6.1 Preparing Your Own Auxiliary Database for RMAN TSPITR
Creating an Oracle instance suitable for use as an auxiliary database requires you to
perform a set of steps.
The steps include the following:
Chapter 21
Performing RMAN TSPITR Using Your Own Auxiliary Database
21-22

•Step 1: Create an Oracle Password File for the Auxiliary Database
•Step 2: Create an Initialization Parameter File for the Auxiliary Database
•Step 3: Check Oracle Net Connectivity to the Auxiliary Database
21.6.1.1 Step 1: Create an Oracle Password File for the Auxiliary Database
There are multiple ways to create a password file for the auxiliary database.
See Also:
Oracle Database Administrator’s Guideto learn how to create and maintain
Oracle password files
21.6.1.2 Step 2: Create an Initialization Parameter File for the Auxiliary
Database
Use a text editor to create an initialization parameter file for the auxiliary database on
the target database host.
Note:
For TSPITR, the target and auxiliary database instances must be on the
same host.
In this example, assume that your parameter file is placed at
/tmp/initAux.ora
. Set the
parameters described in the following table:
Table 21-5 Initialization Parameters in a User-Managed Auxiliary Database
Initialization Parameter Mandatory? Value
DB_NAME
YES The same name as the target database
DB_UNIQUE_NAME
YES A value different from any database in the same
Oracle home. For simplicity, specify
_dbname
.
For example, if the target database name is
trgt
, then specify
_trgt
.
REMOTE_LOGIN_PASSWORDFILE
YES Set to
EXCLUSIVE
when connecting to the
auxiliary database with a password file.
Otherwise, set to
NONE
.
COMPATIBLE
YES The same value as the parameter in the target
database
DB_BLOCK_SIZE
YES If this initialization parameter is set in the target
database, then it must be set to the same value
in the auxiliary database.
Chapter 21
Performing RMAN TSPITR Using Your Own Auxiliary Database
21-23

Table 21-5 (Cont.) Initialization Parameters in a User-Managed Auxiliary Database
Initialization Parameter Mandatory? Value
LOG_FILE_NAME_CONVERT
NO Patterns to generate file names for the online
redo logs of the auxiliary database based on the
online redo log names of the target database.
Query
V$LOGFILE.MEMBER
to obtain target
instance online redo log file names, and ensure
that the conversion pattern matches the format
of the file name shown in the view.
Note: Some platforms do not support ending
patterns in a forward or backward slash (
\
or
/
).
See Also: "Specifying the Auxiliary Database
Online Log Location in TSPITR" for restrictions
on possible values for
LOG_FILE_NAME_CONVERT
with OMF file names and "Considerations When
Renaming OMF Auxiliary Set Files in TSPITR"
DB_FILE_NAME_CONVERT
NO Patterns to convert file names for the data files
of the auxiliary database. You can use this
parameter to generate file names for those files
that you did not name with
SET
NEWNAME
or
CONFIGURE
AUXNAME
. Obtain the data file names
by querying
V$DATAFILE.NAME
, and ensure that
the conversion pattern matches the format of
the file name displayed in the view.
Note: Some platforms do not support ending
patterns in a forward or backward slash (
\
or
/
).
See Also: "Using DB_FILE_NAME_CONVERT
to Name Auxiliary Set Data Files During
TSPITR" and "Considerations When Renaming
OMF Auxiliary Set Files in TSPITR".
DB_CREATE_FILE_DEST
NO Identifies a location for all auxiliary set files.
LOG_ARCHIVE_DEST_n
NO Identifies where archived logs required for
recover are created.
DB_CREATE_ONLINE_LOG_n
NO With
DB_CREATE_FILE_DEST
identifies a different
location where online redo logs are created.
CONTROL_FILES
NO File names that do not conflict with the control
file names of the target instance (or any other
existing file).
SGA_TARGET
NO
(Recommende
d)
280M
STREAMS_POOL_SIZE
NO
YES
If
SGA_TARGET
is set
If
SGA_TARGET
is not set
Set other parameters as needed, including the parameters to specify how much
memory the auxiliary database uses.
The following example shows possible initialization parameter settings for an auxiliary
database for TSPITR:
DB_NAME=trgt
DB_UNIQUE_NAME=_trgt
Chapter 21
Performing RMAN TSPITR Using Your Own Auxiliary Database
21-24

CONTROL_FILES=/tmp/control01.ctl
DB_FILE_NAME_CONVERT=('/oracle/oradata/trgt/','/tmp/')
LOG_FILE_NAME_CONVERT=('/oracle/oradata/trgt/redo','/tmp/redo')
REMOTE_LOGIN_PASSWORDFILE=exclusive
COMPATIBLE =11.0.0
DB_BLOCK_SIZE=8192
Note:
After setting these initialization parameters, ensure that you do not overwrite
the initialization settings for the production files at the target database.
21.6.1.3 Step 3: Check Oracle Net Connectivity to the Auxiliary Database
The auxiliary database must have a valid net service name. Before proceeding, use
SQL*Plus to ensure that you can establish a
SYSBACKUP
or
SYSDBA
connection to the
auxiliary database.
See Also:
Oracle Database Administrator’s Guide for more information about Oracle
Net
21.6.2 Preparing RMAN Commands for TSPITR with Your Own
Auxiliary Database
Keep in mind certain guidelines when performing TSPITR with your own auxiliary
instance.
If you run your own auxiliary database, then it is possible for the sequence of
commands required for TSPITR to be long. This situation can occur when you allocate
a complex channel configuration for restoring from backup and you are not using
DB_CREATE_FILE_DEST
to determine file naming of auxiliary set files.
You may want to store the series of commands for TSPITR in an RMAN command file.
Review the command file carefully to catch any errors. To read the command file into
RMAN, use the
@
command (or the
CMDFILE
command-line argument when starting
RMAN).
The following example runs the command file named
/tmp/tspitr.rman
:
@/tmp/tspitr.rman;
See Also:
"Using Command Files with RMAN"
Chapter 21
Performing RMAN TSPITR Using Your Own Auxiliary Database
21-25

21.6.2.1 Planning Channels for TSPITR with Your Own Auxiliary Database
The default behavior for channels when you use your own auxiliary database for
TSPITR can be overridden.
When you run your own auxiliary database, the default behavior is to use the
automatic channel configuration of the target database. If you decide to allocate your
own channels with a different configuration (changing the number of channels or
channel parameters), you can include
ALLOCATE AUXILIARY CHANNEL
commands in a
RUN
block along with the
RECOVER TABLESPACE
command for TSPITR. Plan these commands,
if necessary, and add them to the sequence of commands you run for TSPITR.
See Also:
"Performing TSPITR with Your Own Auxiliary Database: Scenario" to learn
how to include channel allocation in your TSPITR script
21.6.2.2 Planning Data File Names with Your Own Auxiliary Database: SET
NEWNAME
You may want to use
SET NEWNAME
commands to refer to existing image copies of
auxiliary set files to improve TSPITR performance, or to assign new names to the
recovery set files for after TSPITR. Plan these commands, if necessary, and add them
to the sequence of commands that you run for TSPITR.
See Also:
Renaming TSPITR Recovery Set Data Files with SET NEWNAME
21.6.3 Executing TSPITR with Your Own Auxiliary Database
Complete the prerequisites and then follow the steps in this section to perform TSPITR
with your own auxiliary database.
Prerequisites to perform this task include:
•"Preparing Your Own Auxiliary Database for RMAN TSPITR"
•"Preparing RMAN Commands for TSPITR with Your Own Auxiliary Database"
Use the following steps to perform TSPITR with your own auxiliary instance:
•Step 1: Start the Auxiliary Database in NOMOUNT Mode
•Step 2: Connect the RMAN Client to Target and Auxiliary Databases
•Step 3: Execute the RECOVER TABLESPACE Command
Chapter 21
Performing RMAN TSPITR Using Your Own Auxiliary Database
21-26

See Also:
Performing TSPITR with Your Own Auxiliary Database: Scenario
21.6.3.1 Step 1: Start the Auxiliary Database in NOMOUNT Mode
Before beginning RMAN TSPITR, you must start the auxiliary database. Because the
auxiliary database does not yet have a control file, you can only start the instance in
NOMOUNT
mode.
Do not create a control file or try to mount or open the auxiliary database for TSPITR.
To start the auxiliary database:
1. Start SQL*Plus and connect to the auxiliary database with
SYSOPER
privileges.
2. Start the auxiliary database in
NOMOUNT
mode, specifying a parameter file if
necessary.
For example, enter the following SQL*Plus command:
SQL> STARTUP NOMOUNT PFILE='/tmp/initAux.ora'
Remember that if you specify
PFILE
, then the path for the
PFILE
is a client-side path
on the host from which you run SQL*Plus.
21.6.3.2 Step 2: Connect the RMAN Client to Target and Auxiliary Databases
Start RMAN and connect to the target database and the manually created auxiliary
database.
For example, use a command such as the following:
rman target dba AUXILIARY auxusr@aux
See Also:
"Making Database Connections with RMAN"
21.6.3.3 Step 3: Execute the RECOVER TABLESPACE Command
Use the
RECOVER TABLESPACE
command to perform TSPITR with your own auxiliary
instance.
In the simplest case, run a
RECOVER TABLESPACE... UNTIL
command such as the
following at the RMAN prompt:
RECOVER TABLESPACE ts1, ts2... UNTIL TIME 'time';
If you want to use the
ALLOCATE AUXILIARY CHANNEL
or
SET NEWNAME
commands, then
include these commands before the
RECOVER TABLESPACE
command within a
RUN
command. The following example illustrates this technique:
Chapter 21
Performing RMAN TSPITR Using Your Own Auxiliary Database
21-27

RUN
{
ALLOCATE AUXILIARY CHANNEL c1 DEVICE TYPE DISK;
ALLOCATE AUXILIARY CHANNEL c2 DEVICE TYPE sbt;
# and so on...
RECOVER TABLESPACE ts1, ts2 UNTIL TIME 'time';
}
21.6.4 Performing TSPITR with Your Own Auxiliary Database:
Scenario
This procedure uses the
RECOVER TABLESPACE... UNTIL
command to perform TSPITR.
This scenario illustrates the following features of RMAN TSPITR:
•Managing your own auxiliary database
•Configuring channels for restore of backups from disk and SBT devices
•Using recoverable image copies for some auxiliary set data files using
SET NEWNAME
•Specifying new names for recovery set data files using
SET NEWNAME
To use TSPITR with your own auxiliary database:
1. Prepare the auxiliary database, as described in "Preparing Your Own Auxiliary
Database for RMAN TSPITR". Specify a password for the auxiliary database in the
password file, and set up the auxiliary database parameter file
/bigtmp/
init_tspitr_prod.ora
with the following settings:
DB_NAME=PROD
DB_UNIQUE_NAME=tspitr_PROD
CONTROL_FILES=/bigtmp/tspitr_cntrl.dbf
DB_CREATE_FILE_DEST=/bigtmp
COMPATIBLE=11.0.0
BLOCK_SIZE=8192
REMOTE_LOGIN_PASSWORD=exclusive
2. Create service name
pitprod
for the auxiliary database, and check for connectivity.
3. Using SQL*Plus, connect to the auxiliary database with
SYSOPER
privileges. Start
the instance in
NOMOUNT
mode:
SQL> STARTUP NOMOUNT PFILE=/bigtmp/init_tspitr_prod.ora
4. Start RMAN and connect to the target and auxiliary database instances, as
described in "Making Database Connections with RMAN".
rman target / auxiliary '"sbu@pitprod AS SYSBACKUP"'
5. Enter the following commands in a
RUN
block to set up and execute TSPITR:
RUN
{
# Specify NEWNAME for recovery set data files
SET NEWNAME FOR TABLESPACE clients
TO '?/oradata/prod/rec/%b';
# Specify NEWNAMES for some auxiliary set
# data files that have a valid image copy to avoid restores:
SET NEWNAME FOR DATAFILE '?/oradata/prod/system01.dbf'
TO '/backups/prod/system01_monday_noon.dbf';
SET NEWNAME FOR DATAFILE '?/oradata/prod/system02.dbf'
Chapter 21
Performing RMAN TSPITR Using Your Own Auxiliary Database
21-28

TO '/backups/prod/system02_monday_noon.dbf';
SET NEWNAME FOR DATAFILE '?/oradata/prod/sysaux01.dbf'
TO '/backups/prod/sysaux01_monday_noon.dbf';
SET NEWNAME FOR DATAFILE '?/oradata/prod/undo01.dbf'
TO '/backups/prod/undo01_monday_noon.dbf';
# Specify the types of channels to use
ALLOCATE AUXILIARY CHANNEL c1 DEVICE TYPE DISK;
ALLOCATE AUXILIARY CHANNEL t1 DEVICE TYPE sbt;
# Recover the clients tablespace to 24 hours ago:
RECOVER TABLESPACE clients UNTIL TIME 'sysdate-1';
}
Consider storing this command sequence in a command file and executing the
command file.
If the TSPITR operation is successful, then the results are:
•The recovery set data files are registered in the target database control file under
the names specified with
SET NEWNAME
, with their contents as of the time specified
time for TSPITR.
•The auxiliary files are removed by RMAN, including the control files, online logs,
and auxiliary set data files of the auxiliary database.
•The auxiliary database is shut down.
If the TSPITR operation fails, the auxiliary set files are removed and the auxiliary
database is shut down. The recovery set files are left in the specified location and in
an unresolved state from the failed TSPITR run.
21.7 Troubleshooting RMAN TSPITR
A variety of problems can cause RMAN TSPITR to fail. The problem must be identified
and fixed.
Some of the possible areas to check and fix are as follows:
•File name conflicts
•Mismatched or incorrect TSPITR target times for sets of tablespaces and undo
segments
•Management issues with auxiliary databases not created by RMAN
See Also:
•Troubleshooting File Name Conflicts During TSPITR
•Troubleshooting the Identification of Tablespaces with Undo Segments
During TSPITR
•Troubleshooting the Restart of a Manual Auxiliary Database After
TSPITR Failure
Chapter 21
Troubleshooting RMAN TSPITR
21-29

21.7.1 Troubleshooting File Name Conflicts During TSPITR
Name conflicts can occur between files in the target database, file names assigned by
the
SET NEWNAME
or
CONFIGURE AUXNAME
commands, and file names generated by the
effect of the
DB_FILE_NAME_CONVERT
parameter.
Suppose that
SET NEWNAME
,
CONFIGURE AUXNAME
, and
DB_FILE_NAME_CONVERT
cause multiple
files in the auxiliary or recovery sets to have the same name. In this case, RMAN
reports an error during TSPITR. To correct the problem, use different values for these
parameters.
21.7.2 Troubleshooting the Identification of Tablespaces with Undo
Segments During TSPITR
During TSPITR, RMAN needs information about which tablespaces had undo
segments at the TSPITR target time. This information is usually available in the
recovery catalog, if one is used.
If there is no recovery catalog or if the information is not found in the recovery catalog,
RMAN assumes that the set of tablespaces with undo segments at the target time
equals the set of tablespaces with undo segments at the present time. If this
assumption is not correct, then TSPITR fails with an error. In this case, use the
UNDO
TABLESPACE
clause to provide a list of tablespaces with undo segments at the target
time.
21.7.3 Troubleshooting the Restart of a Manual Auxiliary Database
After TSPITR Failure
If you are managing your own auxiliary database and TSPITR fails, do not attempt to
rerun TSPITR without resolving the errors.
You must follow this approach:
1. Identify and fix the problems that prevented TSPITR from a successful run.
2. Start the auxiliary database in
NOMOUNT
.
3. Run TSPITR again.
Chapter 21
Troubleshooting RMAN TSPITR
21-30

22
Recovering Tables and Table Partitions
This chapter describes how to recover tables and table partitions to a specified point in
time. This chapter contains the following topics:
•Overview of Recovering Tables and Table Partitions from RMAN Backups
•Preparing to Recover Tables and Table Partitions
•Recovering Tables and Table Partitions
•Recovering Tables and Table Partitions in PDBs
•Examples: Recovering Tables and Table Partitions From RMAN Backups
22.1 Overview of Recovering Tables and Table Partitions
The RMAN
RECOVER
command enables you to recover tables and table partitions from
RMAN backups.
Note:
There are other methods of recovering tables to a specified point in time
such as Oracle Flashback and TSPITR. For more information about the
scenarios in which these methods are useful and how to recover tables using
these methods, see:
•Performing Flashback and Database Point-in-Time Recovery
•Performing RMAN Tablespace Point-in-Time Recovery (TSPITR)
See Also:
•Purpose of Recovering Tables and Table Partitions from RMAN Backups
•RMAN Backups Required to Recover Tables and Table Partitions
•Basic Concepts of Recovering Tables and Table Partitions from RMAN
Backups
22.1.1 Purpose of Recovering Tables and Table Partitions from RMAN
Backups
RMAN enables you to recover one or more tables or table partitions to a specified
point in time without affecting the remaining database objects. You can use previously-
22-1

created RMAN backups to recover tables and table partitions to a specified point in
time.
Recovering tables and table partitions from RMAN backups is useful in the following
scenarios:
•You need to recover a very small number of tables to a particular point in time. In
this situation, TSPITR is not the most effective solution because it moves all the
objects in the tablespace to a specified point in time.
•You need to recover tables that have been logically corrupted or have been
dropped and purged.
•Flashback Table is not possible because the desired point-in-time is older than
available undo.
•You want to recover data that is lost after a DDL operation modified the structure
of tables. Using Flashback Table is not possible because a DDL was run on the
tables between the desired point in time and the current time. Flashback Table
cannot rewind tables through structural changes such as a truncate table
operation.
22.1.2 RMAN Backups Required to Recover Tables and Table
Partitions
To recover tables or table partitions, you need a full backup of undo,
SYSTEM
,
SYSAUX
,
and the tablespace that contains the tables or table partitions.
To recover a table, all partitions that contain the dependent objects of the table must
be included in the recovery set. If the indexes or partitions for a table in tablespace
tbs1
are contained in tablespace
tbs2
, then you can recover the table only if
tablepsace
tbs2
is also included in the recovery set.
To recover tables in a PDB, you need backups of the following:
•
SYSTEM
,
SYSAUX
, and undo tablespace of the root, CDB seed, and the PDB
containing the tables
•Tablespace containing the tables or partitions
See Also:
Prerequisites for Recovering Tables and Table Partitions from RMAN
Backups
22.1.3 Basic Concepts of Recovering Tables and Table Partitions from
RMAN Backups
RMAN uses the
RECOVER
command to recover tables or table partitions to a specified
point in time.
To recover tables and table partitions from an RMAN backup, you need to provide the
following information:
Chapter 22
Overview of Recovering Tables and Table Partitions
22-2

•Names of tables or table partitions that must be recovered
•Point in time to which the tables or table partitions must be recovered
•Whether the recovered tables or table partitions must be imported into the target
database
RMAN uses this information to automate the process of recovering the specified tables
or table partitions. As part of the recovery process, RMAN creates an auxiliary
database that is used to recover tables or table partitions to the specified point in time.
If the recovered tables or table partitions need to be renamed, mapped to a new
tablespace, or mapped to a new schema, then you must specify the new names for
the tables, tablespaces, or schemas.
See Also:
•Steps Performed By RMAN to Recover Tables and Table Partitions
•About the Location of Auxiliary Database Files During RMAN Table
Recovery
•About the Data Pump Export Dump File Used During RMAN Table
Recovery
•About Renaming Recovered Tables and Table Partitions During RMAN
Recovery
•About Recovering Tables and Partitions Into a New Schema
22.1.3.1 Steps Performed By RMAN to Recover Tables and Table Partitions
RMAN performs a series of steps while automating the process of recovering tables or
table partitions from an RMAN backup.
The steps include the following:
1. Determines which backup contains the tables or table partitions that need to be
recovered, based on the point in time specified for the recovery.
2. Determines if there is sufficient space on the target host to create the auxiliary
instance that will be used during the table or partition recovery process.
If the required space is not available, then RMAN displays an error and exits the
recovery operation.
3. Creates an auxiliary database on the target host and recovers the specified tables
or table partitions, until the specified point in time, into this auxiliary database.
You can specify the location on the target host to which the recovered data files
are stored in the auxiliary database.
4. Creates a Data Pump export dump file that contains the recovered tables or table
partitions.
You can specify the name and the location of the Data Pump export dump file
used to store the metadata of the recovered tables or table partitions.
5. (Optional) Imports the Data Pump export dump file into the target instance.
Chapter 22
Overview of Recovering Tables and Table Partitions
22-3

You can choose not to import the export dump file that contains the recovered
tables or table partitions into the target database. If you do not import the export
dump file as part of the recovery process, you must manually import it later using
the Data Pump Import utility.
6. (Optional) Renames the recovered tables or table partitions in the target database.
You can also import recovered objects into a tablespace or schema that is
different from the one in which they originally existed.
See Also:
•About the Location of Auxiliary Database Files During RMAN Table
Recovery
•About the Data Pump Export Dump File Used During RMAN Table
Recovery
•About Importing Recovered Tables and Table Partitions into the Target
Database
•About Renaming Recovered Tables and Table Partitions During RMAN
Recovery
•About Recovering Tables and Partitions Into a New Schema
22.1.3.2 About the Location of Auxiliary Database Files During RMAN Table
Recovery
RMAN creates an auxiliary database that it uses during the process of recovering the
specified tables or table partitions. Multiple techniques are available to specify the
location of auxiliary database files.
On the target host that is used to store data files for the auxiliary database, use one of
the following techniques:
•
AUXILIARY DESTINATION
clause in the
RECOVER
command
•
SET NEWNAME
command
Use a
RUN
block containing the
RECOVER
command and required
SET NEWNAME
commands that rename the data files.
See Also:
•
RECOVER
command syntax in Oracle Database Backup and Recovery
Reference
•
SET
command syntax in Oracle Database Backup and Recovery
Reference
It is recommended that you provide a location for data files in the auxiliary database by
using the
AUXILIARY DESTINATION
clause. When you use the
SET NEWNAME
command, if
Chapter 22
Overview of Recovering Tables and Table Partitions
22-4

you omit the name of even one data file required for the recovery process, the tables
or table partitions cannot be recovered.
22.1.3.3 About the Data Pump Export Dump File Used During RMAN Table
Recovery
After recovering tables or table partitions to the specified point in time on the auxiliary
database, RMAN creates a Data Pump export dump file that contains the recovered
objects. You can either specify a name and location for this dump file or allow RMAN
to use a default name and location.
Use the
DATAPUMP DESTINATION
clause of the
RECOVER
command to specify the location in
which the Data Pump export dump file is created. The location is typically the path of
the operating-system directory that stores the dump file. If you omit this clause, the
dump file is stored in the location specified by the
AUXILIARY DESTINATION
parameter. If
you do not specify an auxiliary destination, the dump file is stored in a default
operating system-specific location. On Linux, this default location is
$ORACLE_HOME/dbs
.
On Windows, the default location is
%ORACLE_HOME\database
.
Use the
DUMP FILE
clause of the
RECOVER
command to specify the name of the Data
Pump export dump file. If you omit this clause, RMAN uses a default operating
system-specific name for the dump file. On Linux and Windows, the default dump file
name is
tspitr_SID-of-clone_n.dmp
, where
SID-of-clone
is the Oracle SID of the
auxiliary database created by RMAN to perform the recovery and
n
is any randomly-
generated number. If a file with the name specified by
DUMP FILE
exists in the location
in which the dump file must be created, then the recover operation fails.
22.1.3.4 About Importing Recovered Tables and Table Partitions into the
Target Database
By default, RMAN imports the recovered tables or table partitions, which are stored in
the export dump file, into the target database. However, you can choose not to import
the recovered tables or table partitions by using the
NOTABLEIMPORT
clause of the
RESTORE
command.
When
NOTABLEIMPORT
is used, RMAN recovers them to the specified point and then
creates the export dump file. However, this dump file is not imported into the target
database. You must manually import this dump file into your target database, when
required, by using the Data Pump Import utility.
If an error occurs during the import operation, RMAN does not delete the export dump
file at the end of the table recovery. This enables you to manually import the dump file.
22.1.3.5 About Renaming Recovered Tables and Table Partitions During
RMAN Recovery
Use the
REMAP TABLE
clause to rename recovered tables or table partitions in the target
database.
If a table with the same name as the one that you recovered exists in the target
database, RMAN displays an error message indicating that the
REMAP TABLE
clause
must be used to rename the recovered table.
Chapter 22
Overview of Recovering Tables and Table Partitions
22-5

When you recover table partitions, each table partition is recovered into a separate
table. Use the
REMAP TABLE
clause to specify the table names into which each
recovered partition must be imported. If you do not explicitly specify table names,
RMAN generates table names by concatenating the recovered table name and
partition name. The generated names are in the format
tablename_partitionname
. If a
table with this name exists in the target database, then RMAN appends _1 to the
name. If this name too exists, then RMAN appends _2 to the name and so on.
To import the recovered tables or table partitions into a tablespace that is different
from the one in which these objects originally existed, use the
REMAP TABLESPACE
clause
of the
RECOVER
command. Only the tables or table partitions that are being recovered
are remapped, the existing objects are not changed.
Note:
When you use the
REMAP
option, any named constraints and indexes are not
imported. This is to avoid name conflicts with existing tables.
22.1.3.6 About Recovering Tables and Partitions Into a New Schema
Recovering tables or table partitions into a different schema enables you to avoid
name conflicts that may be caused by constraint, index, or trigger names that already
existing in the source schema.
Starting with Oracle Database 12c Release 2 (12.2), you can recover tables or table
partitions into a schema that is different from the source schema (the schema in which
they originally existed). While recovering objects into a different schema, you can
either retain their original names or rename them. You can rename tables and remap
the schema in a single recovery operation. For example, you can recover the
HR.EMPLOYEES
table either into the
NEW_HR.EMPLOYEES
table, the
HR.NEW_EMPLOYEES
table, or
the
NEW_HR.NEW_EMPLOYEES
table. The
REMAP TABLE
clause enables you to rename objects
and recover them into a different schema.
During table recovery, use the
REMAP TABLE
clause of the
RECOVER TABLE
command to
map the source schema to a new schema. The new schema must exist in the target
database before you perform the recovery.
Note:
Table recovery is not supported on physical standby databases. For logical
standby databases, objects that are recovered on the primary database are
propagated to the logical standby.
Note:
Example: Recovering a Table into a New Schema
Chapter 22
Overview of Recovering Tables and Table Partitions
22-6

22.1.4 Limitations of Recovering Tables and Table Partitions from
RMAN Backups
Recovering tables and table partitions from RMAN backups by using the
RECOVER
command is subject to certain limitations.
The limitations include the following:
•Tables and table partitions belonging to
SYS
schema cannot be recovered.
•Tables and table partitions from
SYSTEM
and
SYSAUX
tablespaces cannot be
recovered.
•Tables and table partitions on standby databases cannot be recovered.
•Tables with named
NOT NULL
constraints cannot be recovered with the
REMAP
option.
22.2 Preparing to Recover Tables and Table Partitions
You must perform some preliminary tasks before you prepare to recover tables or
table partitions .
Review the limitations described in "Limitations of Recovering Tables and Table
Partitions from RMAN Backups".
The preparation for recovering tables or table partitions from RMAN backups includes
the following steps:
•Verifying that the prerequisites required to recover tables or table partitions are
met
•Determining the point in time to which the tables or table partitions must be
recovered
•Deciding if the recovered tables or table partitions must be imported into the target
database
By default, RMAN imports the recovered tables or table partitions into the target
database. However, you can specify that RMAN must not import the recovered
objects.
•Deciding if the recovered tables or table partitions must be renamed, mapped to a
new tablespace, or mapped to a new schema.
Chapter 22
Preparing to Recover Tables and Table Partitions
22-7

See Also:
•"Prerequisites for Recovering Tables and Table Partitions from RMAN
Backups"
•"About Importing Recovered Tables and Table Partitions into the Target
Database"
•"Determining the Point-in-time to Which Tables and Table Partitions
Must be Recovered"
•"About Renaming Recovered Tables and Table Partitions During RMAN
Recovery"
•"About Recovering Tables and Partitions Into a New Schema"
22.2.1 Prerequisites for Recovering Tables and Table Partitions from
RMAN Backups
Certain prerequisites must be met before you recover tables or table partitions from
RMAN backups.
They include the following:
•The target database must be in read-write mode.
•The target database must be in
ARCHIVELOG
mode.
•You must have RMAN backups of the tables or table partitions as they existed at
the point in time to which you want recover these objects.
•To recover single table partitions, the
COMPATIBLE
initialization parameter for target
database must be set to 11.1.0 or higher.
See Also:
RMAN Backups Required to Recover Tables and Table Partitions
22.2.2 Determining the Point-in-time to Which Tables and Table
Partitions Must be Recovered
It is important to determine the exact point in time to which you want to recover the
tables or table partitions. There are multiple ways to specify the point in time to which
objects must be recovered.
Use one of the following methods:
•SCN
Recovers tables or table partitions to the state that they were at the time specified
by the SCN.
•Time
Chapter 22
Preparing to Recover Tables and Table Partitions
22-8

Recovers tables or table partitions to the state they were in at the specified time.
Use the date format specified in the
NLS_LANG
and
NLS_DATE_FORMAT
environment
variables. You can also use data constants such as
SYSDATE
to specify the time, for
example
SYSDATE-30
.
•Sequence number
Recovers tables or table partitions to the state they were at the time specified by
the log sequence number and thread number.
22.3 Recovering Tables and Table Partitions
Use the
RESTORE
and
RECOVER
commands to recover tables or table partitions.
To recover tables or table partitions in a non-CDB to a specified point in time:
1. Perform the planning tasks described in "Preparing to Recover Tables and Table
Partitions".
2. Start RMAN and connect as
TARGET
to the target database. You must connect as a
user with the
SYSBACKUP
or
SYSDBA
privilege, as described in "Making Database
Connections with RMAN".
3. Recover the selected tables or table partitions to the specified point in time by
using the
RECOVER TABLE
command. You must use the
AUXILIARY DESTINATION
clause
and one of the following clauses to specify the point in time for recovery:
UNTIL
TIME
,
UNTIL SCN
, or
UNTIL SEQUENCE
.
You can use the following additional clauses in the
RECOVER
command:
•
DUMP FILE
and
DATAPUMP DESTINATION
Specifies the name of the export dump file containing recovered tables or table
partitions and the location in which it must be stored.
See "About the Data Pump Export Dump File Used During RMAN Table
Recovery" for information.
•
NOTABLEIMPORT
Indicates that the recovered tables or table partitions must not be imported into
the target database.
See "About Importing Recovered Tables and Table Partitions into the Target
Database"
•
REMAP TABLE
Renames the recovered tables or table partitions in the target database. This
clause is also used to recover tables or table partitions into a schema that is
different from the source schema.
See "About Renaming Recovered Tables and Table Partitions During RMAN
Recovery and About Recovering Tables and Partitions Into a New Schema"
•
REMAP TABLESPACE
Recovers the tables or table partitions into a tablespace that is different from
the one in which these objects originally existed.
See "About Renaming Recovered Tables and Table Partitions During RMAN
Recovery"
Chapter 22
Recovering Tables and Table Partitions
22-9

See Also:
Examples: Recovering Tables and Table Partitions From RMAN Backups
22.4 Recovering Tables and Table Partitions in PDBs
RMAN enables you to use the
RECOVER
command to recover one or more tables or
table partitions in a pluggable database (PDB) to a specified point-in-time, without
impacting other objects in the PDB.
The steps used to recover tables or table partitions in a PDB are similar to the ones
used for non-CDBs, with the differences described in this section.
To recover tables or table partitions in a PDB:
1. Perform the planning tasks described in "Preparing to Recover Tables and Table
Partitions".
2. Start RMAN and connect to the root as a user with the
SYSDBA
or
SYSBACKUP
privilege, as described in "Making RMAN Connections to a CDB".
3. Recover the tables or table partitions to the specified point in time by using the
RECOVER TABLE ... OF PLUGGABLE DATABASE
command.
You must use the
AUXILIARY DESTINATION
clause and one of the following clauses:
UNITL TIME
,
UNTIL SCN
, or
UNTIL SEQUENCE
.
Depending on your requirements, you may also need to use the one or more of
the following clauses:
DUMP FILE
,
DATAPUMP DESTINATION
,
NOTABLEIMPORT
,
REMAP TABLE
,
or
REMAP TABLESPACE
.
See Also:
•Basic Concepts of Recovering Tables and Table Partitions from
RMAN Backups
•Oracle Database Backup and Recovery Reference for information
about the
RECOVER
command
The following command recovers the table
PDB_EMP
in the PDB
HR_PDB
to the state
that it was in 4 days before the current date.
HR
is the name of the schema that
contains the table. The recovered table is renamed to
EMP_RECVR
.
RECOVER TABLE HR.PDB_EMP OF PLUGGABLE DATABASE HR_PDB
UNTIL TIME 'SYSDATE-4'
AUXILIARY DESTINATION '/tmp/backups'
REMAP TABLE 'HR'.'PDB_EMP':'EMP_RECVR';
Chapter 22
Recovering Tables and Table Partitions in PDBs
22-10

22.5 Examples: Recovering Tables and Table Partitions
From RMAN Backups
This section contains examples that cover multiple scenarios for recovering tables and
table partitions.
•Example: Recovering Tables to a Specified Point in Time
•Example: Recovering Table Partitions to a Specified Log Sequence Number
•Example: Recovering a Table into a New Schema
22.5.1 Example: Recovering Tables to a Specified Point in Time
This example recovers multiple tables to a specified point in time that is represented
using
SYSDATE
.
Assume that you want to recover two tables
EMP
and
DEPT
to the state they were in two
days ago, before some logical corruption occurred. However, you do not want RMAN
to import these tables into the target database. RMAN must only create the export
dump file, called
emp_dept_exp_dump.dat
, in the location
/tmp/recover/dumpfiles
. Using
NOTABLEIMPORT
indicates that these tables must not be imported into the target
database. You can import these tables, when required, by using the Data Pump import
utility. The auxiliary destination used during the recovery process is
/tmp/oracle/
recover
.
To recover tables
EMP
and
DEPT
without importing them into the target database:
1. Perform the planning tasks described in "Preparing to Recover Tables and Table
Partitions".
In this example, you need to recover tables to a point in time specified by an
expression that uses
SYSDATE
. However, the recovered tables must not be imported
in to the target database.
2. Start an RMAN session and connect as
TARGET
to the target database as described
in "Making Database Connections with RMAN".
3. Recover the tables
EMP
and
DEPT
using the following clauses in the
RECOVER
command:
DATAPUMP DESTINATION
,
DUMP FILE
,
REMAP TABLE
, and
NOTABLEIMPORT
.
The following
RECOVER
command recovers the
EMP
and
DEPT
tables.
RECOVER TABLE SCOTT.EMP, SCOTT.DEPT
UNTIL TIME 'SYSDATE-1'
AUXILIARY DESTINATION '/tmp/oracle/recover'
DATAPUMP DESTINATION '/tmp/recover/dumpfiles'
DUMP FILE 'emp_dept_exp_dump.dat'
NOTABLEIMPORT;
See Also:
Oracle Database Backup and Recovery Reference for additional examples
about recovering tables to a specified point in time
Chapter 22
Examples: Recovering Tables and Table Partitions From RMAN Backups
22-11

22.5.2 Example: Recovering Table Partitions to a Specified Log
Sequence Number
This example uses RMAN backups to recover multiple table partitions.
In this example, the table
sales
, in the schema
sh
, contains the following partitions:
sales_1998
,
sales_1999
,
sales_2000
, and
sales_2001
. This table is stored in the
sales_ts
tablespace. You need to recover two partitions,
sales_1998
and
sales_1999
, to a point in
time that is specified by a redo log sequence number. The recovered tables must be
automatically imported into the target database and mapped to the tablespace
SALES_PRE_2000_TS
.
To recover the partitions
sales_1998
and
sales_1999
to a specified log sequence
number:
1. Perform the planning tasks described in "Preparing to Recover Tables and Table
Partitions".
In this example, you need to recover two table partitions to a specified log
sequence number and then import these partitions into the target database.
2. Start an RMAN session and connect as
TARGET
to the target database as described
in "Making Database Connections with RMAN".
3. Recover partitions using the following
RECOVER
command with the
REMAP TABLE
and
REMAP TABLESPACE
clauses.
RECOVER TABLE SH.SALES:SALES_1998, SH.SALES:SALES_1999
UNTIL SEQUENCE 354
AUXILIARY DESTINATION '/tmp/oracle/recover'
REMAP TABLE 'SH'.'SALES':'SALES_1998':'HISTORIC_SALES_1998',
'SH'.'SALES':'SALES_1999':'HISTORIC_SALES_1999'
REMAP TABLESPACE 'SALES_TS':'SALES_PRE_2000_TS';
In this case, the specified table partitions are imported as separate tables, called
historic_sales_1998
and
historic_sales_1999
, into the
sales_pre_2000_ts
tablespace of the target database. The
REMAP TABLE
clause specifies the names
used for the imported tables. The auxiliary destination used during the recovery
process is
/tmp/oracle/recover
.
If you omit the
REMAP TABLE
clause, RMAN uses default names for the imported
tables. The name is a combination of the original table name and the partition
name.
22.5.3 Example: Recovering a Table into a New Schema
This example recovers multiple tables into a new schema that is different from the
source schema.
In this example, the
HR.DEPARTMENTS
and
SH.CHANNELS
tables need to be recovered to the
state that they were in one day ago, before a logical corruption occurred. The
recovered tables must be renamed as
NEW_DEPARTMENTS
and
NEW_CHANNELS
and imported
into the
EXAMPLE
schema. The schema
EXAMPLE
exists at the time this example is run.
Chapter 22
Examples: Recovering Tables and Table Partitions From RMAN Backups
22-12

The
REMAP TABLE
clause is used to indicate how the source schema is mapped to a new
target schema. The auxiliary destination used during the recovery process is
/tmp/
auxdest
.
1. Perform the planning tasks required to recover tables from RMAN backups. In this
example, you need to recover tables to a point in time specified by an expression
that uses
SYSDATE
.
See Preparing to Recover Tables and Table Partitions.
2. Start an RMAN session and connect to the target database as described in
"Making Database Connections with RMAN".
3. Recover the
HR.DEPARTMENTS
and
SH.CHANNELS
tables, rename them to
NEW_DEPARTMENTS
and
NEW_CHANNELS
respectively, and then import them into the
EXAMPLE
schema.
The following
RECOVER
command performs the required table recovery:
RECOVER TABLE HR.DEPARTMENTS, SH.CHANNELS
UNTIL TIME 'SYSDATE – 1'
AUXILIARY DESTINATION '/tmp/auxdest'
REMAP TABLE hr.departments:example.new_departments,
sh.channels:example.new_channels;
Chapter 22
Examples: Recovering Tables and Table Partitions From RMAN Backups
22-13


23
Tuning RMAN Performance
This chapter contains the following topics:
•Purpose of RMAN Performance Tuning
•Basic Concepts of RMAN Performance Tuning
•Using V$ Views to Diagnose RMAN Performance Problems
•Tuning RMAN Backup Performance
23.1 Purpose of RMAN Performance Tuning
The purpose of RMAN tuning is to identify the bottlenecks for a given job and use
RMAN commands, initialization parameters, or adjustments to physical media to
improve performance.
An RMAN backup or restore job can be divided into separate phases or components.
The slowest of these phases in any RMAN job is called the bottleneck.
23.2 Basic Concepts of RMAN Performance Tuning
Tuning RMAN performance requires a detailed understanding of how RMAN creates a
backup. The work of a backup is performed by one or more channels. A channel
represents a stream of bytes to a storage device.
For the purposes of illustration, you can think of the byte stream as passing from the
input buffers in memory through the CPU to the output buffers, and from there to the
storage device. To direct a backup to two tape devices, you allocate two tape channels
so that each byte stream goes to a different device.
The work of each channel, whether of type disk or System Backup Tape (SBT), is
subdivided into distinct phases. The following table describes these phases.
Table 23-1 Phases in Channel Work
Sequ
ence
Phase Description Additional Information
1 Read phase A channel reads blocks from disk
into input I/O buffers.
"Read Phase"
2 Copy phase A channel copies blocks from
input buffers to output buffers and
performs additional processing on
the blocks.
"Copy Phase"
23-1
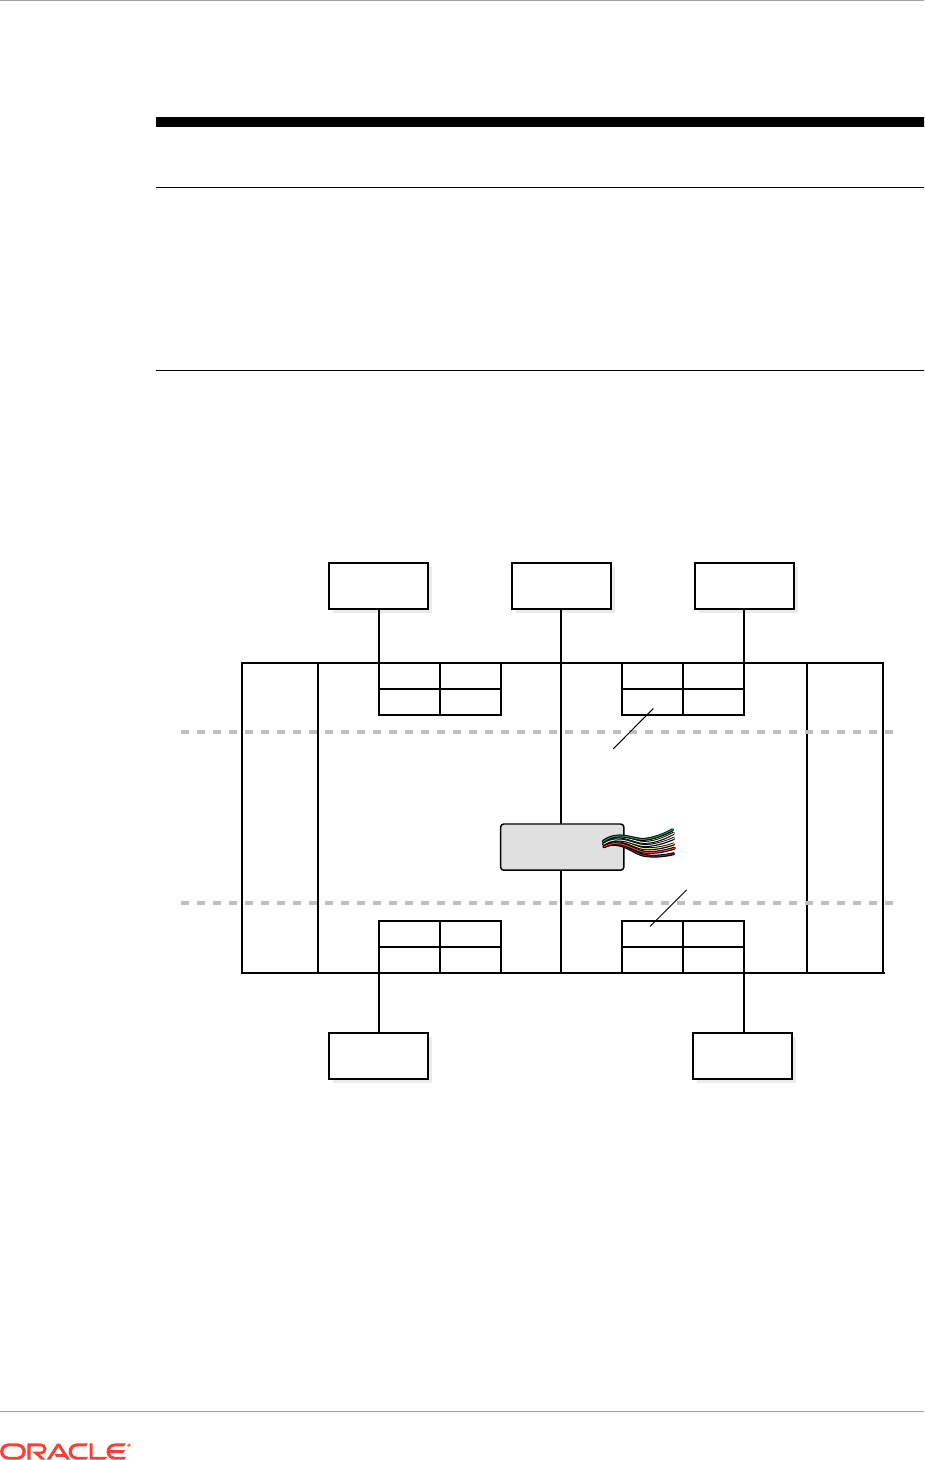
Table 23-1 (Cont.) Phases in Channel Work
Sequ
ence
Phase Description Additional Information
3 Write phase A channel writes the blocks from
output buffers to storage media.
The write phase can take either of
the following mutually exclusive
forms, depending on the type of
backup media: write phase for
System Backup Tape (SBT) or
write phase for disk.
•"Write Phase for System
Backup Tape (SBT)"
•"Write Phase for Disk"
Figure 23-1 depicts two channels backing up data stored on three disks. Each channel
reads the data into the input buffers, processes the data while copying it from the input
to the output buffers, and then writes the data from the output buffers to disk.
Figure 23-1 Phases of a Multichannel Backup to Disk
Read
Copy
Write
CPU
Channel
1
Channel
2
Output
buffers
Input
buffers
Disk
Subsystem
Disk
Subsystem
Disk
Subsystem
Disk
Subsystem
Disk
Subsystem
Figure 23-2 also depicts two channels backing up data stored on three disks, but one
disk is mounted remotely over the network. Each channel reads the data into the input
buffers, processes the data while copying it from the input buffers to the output buffers,
and then writes the data from the output buffers to tape. Channel 1 writes the data to a
locally attached tape drive, whereas channel 2 sends the data over the network to a
remote media server.
Chapter 23
Basic Concepts of RMAN Performance Tuning
23-2
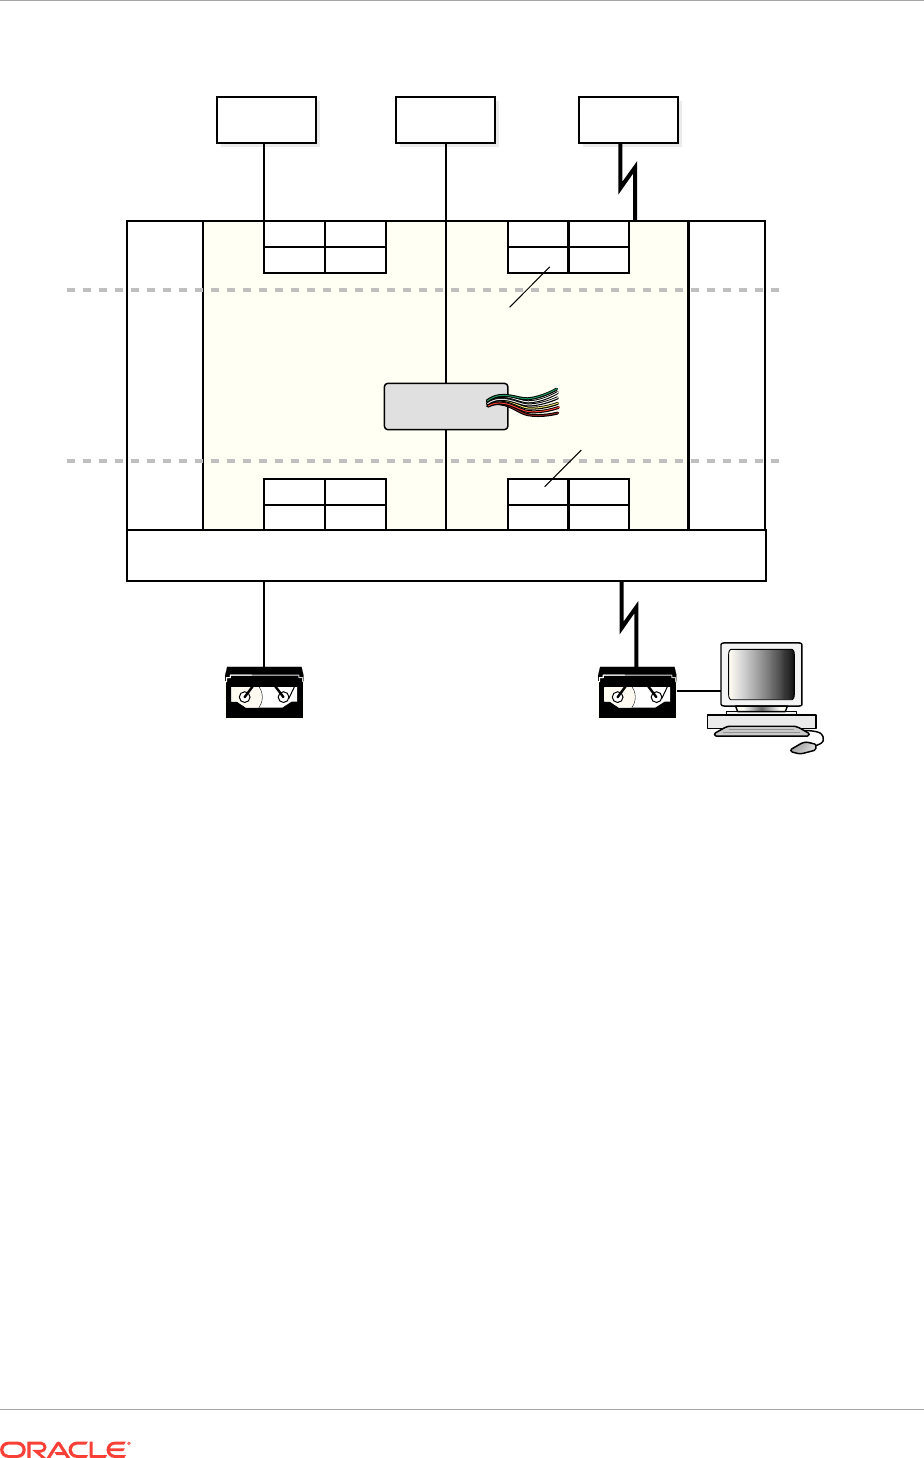
Figure 23-2 Phases of a Multichannel Backup to Tape
MML
Read
Copy
Write
Media
NFS
Local TCP/IP
Media
Server
Media
Output
buffers
Input
buffers
Channel
1
Channel
2
CPU
Disk
Subsystem
Disk
Subsystem
Disk
Subsystem
When restoring data, a channel performs these steps in reverse order and reverses
the reading and writing operations. The following sections explain RMAN tuning
concepts in terms of a backup.
The number of channels available for use with a device determines whether RMAN
can read from and write to this device in parallel. It is recommended that the number of
channels be equal to the number of storage devices used. Therefore, when RMAN
uses disk, the number of channels must be equal to the number of physical disks
accessed. When RMAN uses tape, the number of channels must be equal to the
number of tape drives accessed by RMAN.
23.2.1 Read Phase
Multiple factors can affect the performance when an RMAN channel is reading data
from disk.
This following topics in this section explains these factors:
•Allocation of Input Disk Buffers
•Synchronous and Asynchronous Disk I/O
•Disk I/O Slaves
•RATE Channel Parameter
Chapter 23
Basic Concepts of RMAN Performance Tuning
23-3

23.2.1.1 Allocation of Input Disk Buffers
During a backup, an RMAN channel reads the blocks from the input files into I/O disk
buffers. The database files on the disk subsystem can be managed by either
Automatic Storage Management (ASM) or an alternative volume manager or file
system. The considerations for backup tuning change depending on whether you
manage database files with ASM.
The allocation of the input buffers depends on how the files are multiplexed. Backup
multiplexing is RMAN's ability to read several files in a backup simultaneously from
different sources and then write them to a single backup piece. The level of
multiplexing, which is the number of input files simultaneously read and then written
into the same backup piece, is determined by the algorithm described in "About
Multiplexed RMAN Backup Sets". Review this section before proceeding.
When an RMAN channel backs up files from disk, it uses the rules described in
Table 23-2 to determine how large to make the input disk buffers.
Table 23-2 Data File Read Buffer Sizing Algorithm
Level of Multiplexing Input Disk Buffer Size
Less than or equal to 4 The RMAN channel allocates 16 buffers of size 1 megabyte
(MB) so that the total buffer size for all the input files is 16 MB.
Greater than 4 but less than or
equal to 8
The RMAN channel allocates a variable number of disk buffers
of size 512 kilobytes (KB) so that the total buffer size for all the
input files is less than 16 MB.
Greater than 8 The RMAN channel allocates 4 disk buffers of 128 KB for each
file, so that the total buffer size for each input file is 512 KB.
In the example shown in Figure 23-3, one channel is backing up four data files.
MAXOPENFILES
is set to 4 and
FILESPERSET
is set to 4. Thus, the level of multiplexing is 4.
So, the total size of the buffers for each data file is 4 MB. The combined size of all the
buffers is 16 MB.
Chapter 23
Basic Concepts of RMAN Performance Tuning
23-4
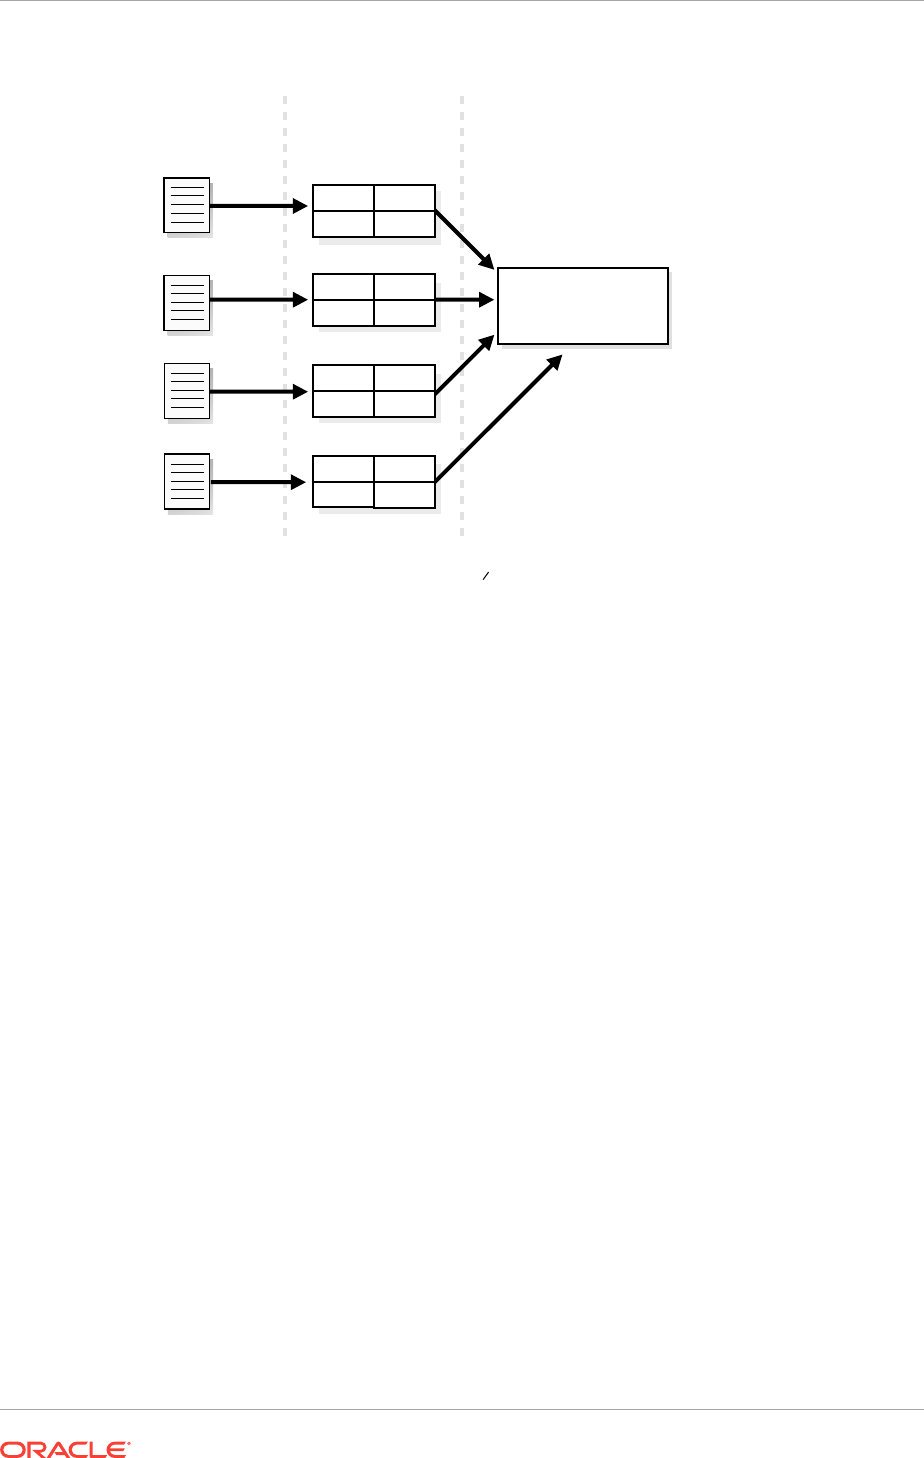
Figure 23-3 Disk Buffer Allocation
1 MB
1 MB
1 MB
1 MB
Tape driveDatafiles Input disk
buffers
SGA if BACKUP_DISK_IO_SLAVES = 0
PGA if BACKUP_DISK_IO_SLAVES = 0
or
Channel
FILESPERSET = 4
MAXOPENFILES = 4
Datafile 2
Datafile 3
Datafile 1
Datafile 4
If a channel is backing up files stored in ASM, then the number of input disk buffers
equals the number of physical disks in the ASM disk group only if the level of
multiplexing is 1. For example, if a data file is stored in an ASM disk group that
contains 16 physical disks, then the channel allocates 16 input buffers for the data file
backup.
If a channel is restoring a backup from disk, then 4 buffers are allocated. The size of
the buffers is dependent on the operating system.
23.2.1.2 Synchronous and Asynchronous Disk I/O
When a channel reads from or writes to disk, the I/O is either synchronous I/O or
asynchronous I/O.
When the disk I/O is synchronous, a server process can perform only one task at a
time. When the disk I/O is asynchronous, a server process can begin an I/O operation
and then perform other work while waiting for the I/O to complete. RMAN can also
begin multiple I/O operations before waiting for the first to complete.
When reading from an ASM disk group, use asynchronous disk I/O if possible. Also, if
a channel reads from a raw device managed with a volume manager, then
asynchronous disk I/O also works well. Some operating systems support native
asynchronous disk I/O. The database takes advantage of this feature if it is available.
23.2.1.3 Disk I/O Slaves
On operating systems that do not support native asynchronous I/O, the database can
simulate it with special I/O slave processes. These processes are dedicated to
performing I/O on behalf of another process.
Chapter 23
Basic Concepts of RMAN Performance Tuning
23-5

You can control disk I/O slaves by setting the
DBWR_IO_SLAVES
initialization parameter,
which is not dynamic. The parameter specifies the number of I/O server processes
used by the database writer process (DBWR). By default, the value is 0 and I/O server
processes are not used. If asynchronous I/O is disabled, then RMAN allocates four
backup disk I/O slaves for any nonzero value of
DBWR_IO_SLAVES
.
When attempting to get shared buffers for I/O slaves, the database does the following:
•If the
LARGE_POOL_SIZE
initialization parameter is set, and if the
DBWR_IO_SLAVES
parameter is set to a nonzero value, then the database attempts to get memory
from the large pool. If this value is not large enough, then an error is recorded in
the alert log, the database does not try to get buffers from the shared pool, and
asynchronous I/O is not used.
•If the
LARGE_POOL_SIZE
initialization parameter is not set or is set to zero, then the
database attempts to get memory from the shared pool.
•If the database cannot get enough memory, then it obtains I/O buffer memory from
the Program Global Area (PGA) and writes a message to the
alert
.
log
file
indicating that synchronous I/O is used for this backup.
The memory from the large pool is used for many features, including the shared
server, parallel query, and RMAN I/O slave buffers. Configuring the large pool
prevents RMAN from competing with other subsystems for the same memory.
Requests for contiguous memory allocations from the shared pool are usually small
(under 5 KB). However, a request for a large contiguous memory allocation can either
fail or require significant memory housekeeping to release the required amount of
contiguous memory. Although the shared pool may be unable to satisfy this memory
request, the large pool can do so. The large pool does not have a least recently used
(LRU) list; the database does not attempt to age memory out of the large pool.
23.2.1.4 RATE Channel Parameter
You can use the
RATE
parameter to set an upper limit for bytes read so that RMAN
does not consume excessive disk bandwidth and degrade online performance.
Essentially,
RATE
serves as a backup throttle.
In the
ALLOCATE
and
CONFIGURE CHANNEL
commands, the
RATE
parameter specifies the
bytes per second that are read on a channel. For example, if you set
RATE 1500K
, and if
each disk drive delivers 3 megabytes per second, then the channel leaves some disk
bandwidth available to the online system.
23.2.2 Copy Phase
In the copy phase, a channel copies blocks from the input buffers to the output buffers
and performs additional processing.
For example, if a channel reads data from disk and backs up to tape, then the channel
copies the data from the disk buffers to the output tape buffers.
The copy phase involves the following types of processing:
•Validation
•Compression
•Encryption
Chapter 23
Basic Concepts of RMAN Performance Tuning
23-6

When performing validation of the blocks, RMAN checks them for corruption. Typically,
this processing is not CPU-intensive.
When performing binary compression, RMAN applies a compression algorithm to the
data in backup sets. Binary compression can be CPU-intensive. You can choose
which compression algorithm RMAN uses for backups. The basic compression level
for RMAN has a good compression ratio for most scenarios. If you enabled the Oracle
Advanced Compression option, there are several different levels to choose from that
provide tradeoffs between compression ratios and required CPU resources.
When performing backup encryption, RMAN encrypts backup sets by using an
algorithm listed in
V$RMAN_ENCRYPTION_ALGORITHMS
. RMAN offers three modes of
encryption: transparent, password-protected, and dual-mode. Backup encryption can
be CPU-intensive.
See Also:
•Validating Database Files and Backups
•Making Compressed Backups
•Encrypting RMAN Backups
23.2.3 Write Phase for System Backup Tape (SBT)
When backing up to SBT, RMAN gives the media management software a stream of
bytes and associates a unique name with this stream. All details of how and where
that stream is stored are handled entirely by the media manager. Thus, a backup to
tape involves the interaction of both RMAN and the media manager.
Factors that affect the write phase for SBT are described in the following topics:
•RMAN Component of the Write Phase for SBT
•Media Manager Component of the Write Phase for SBT
23.2.3.1 RMAN Component of the Write Phase for SBT
The RMAN-specific factors affecting the SBT write phase are analogous to the factors
affecting disk reads. In both cases, the buffer allocation, slave processes, and
synchronous or asynchronous I/O affect performance.
23.2.3.1.1 Allocation of Tape Buffers
If you back up to or restore from an SBT device, then by default the database allocates
four buffers for each channel for the tape writers (or reads if restoring data as shown in
Figure 23-4). The size of the tape I/O buffers is platform-dependent. You can change
this value with the
PARMS
and
BLKSIZE
parameters of the
ALLOCATE CHANNEL
or
CONFIGURE
CHANNEL
command.
Chapter 23
Basic Concepts of RMAN Performance Tuning
23-7
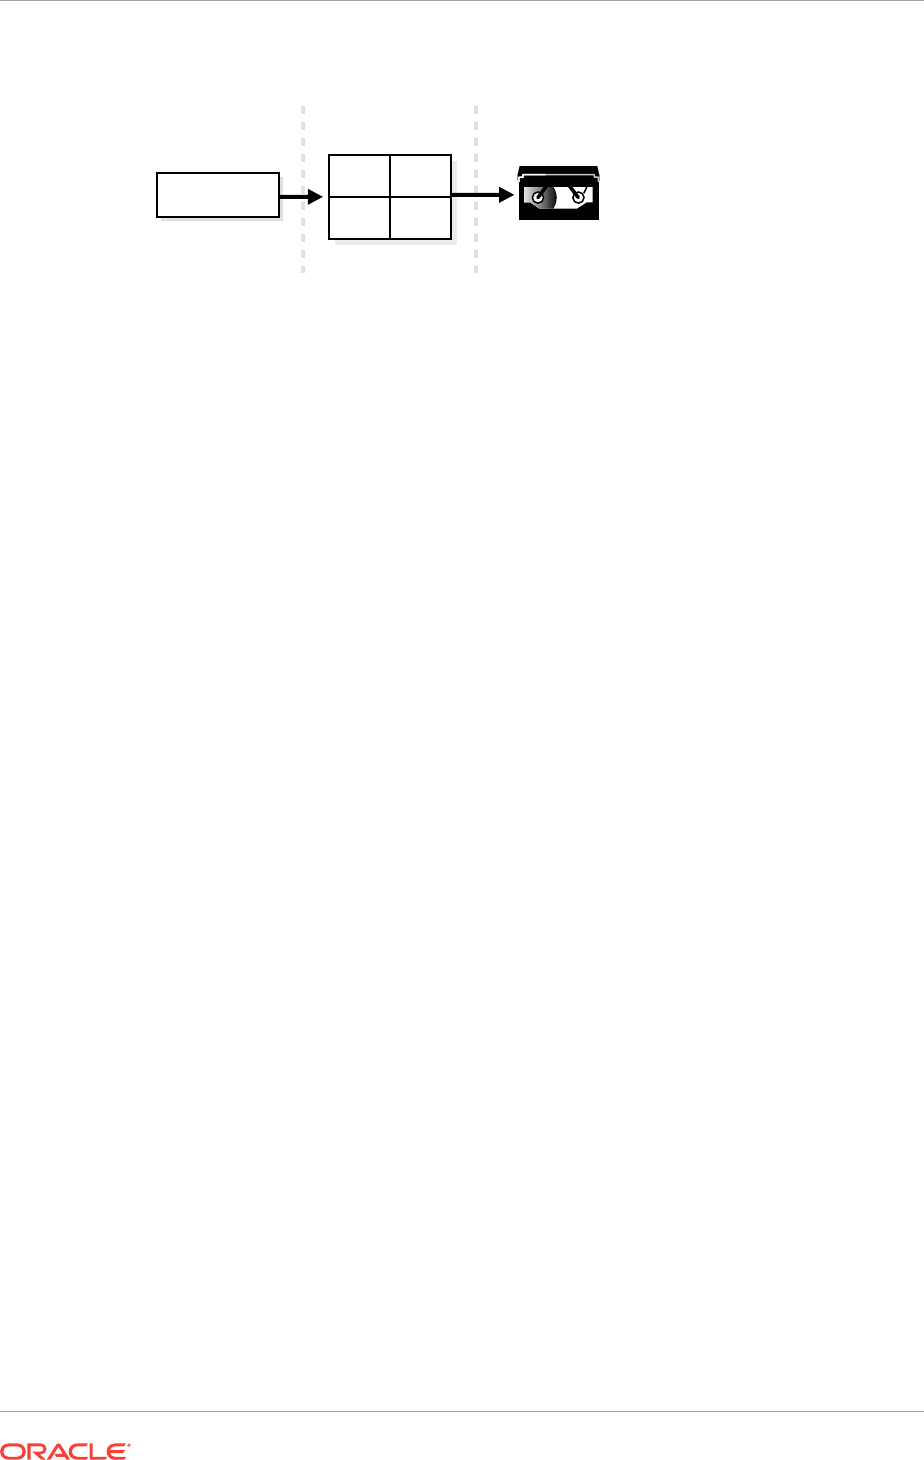
Figure 23-4 Allocation of Tape Buffers
256
256
Channel
SGA if BACKUP_TAPE_IO_SLAVES = TRUE
PGA if BACKUP_TAPE_IO_SLAVES = FALSE
or
256
256
Tape driveOutput tape
buffers
23.2.3.1.2 Tape I/O Slaves
RMAN allocates the tape buffers in the System Global Area (SGA) or the Program
Global Area (PGA), depending on whether I/O slaves are used. If you set the
initialization parameter
BACKUP_TAPE_IO_SLAVES=true
, then RMAN allocates tape buffers
from the SGA. Tape devices can only be accessed by one process at a time, so
RMAN starts as many slaves as necessary for the number of tape devices. If the
LARGE_POOL_SIZE
initialization parameter is also set, then RMAN allocates buffers from
the large pool. If you set
BACKUP_TAPE_IO_SLAVES=false
, then RMAN allocates the
buffers from the PGA.
If you use I/O slaves, then set the
LARGE_POOL_SIZE
initialization parameter to dedicate
SGA memory to holding these large memory allocations. This parameter prevents
RMAN I/O buffers from competing with the library cache for SGA memory. If I/O slaves
for tape I/O were requested but there is not enough space in the SGA for them, slaves
are not used, and a message appears in the alert log.
The parameter
BACKUP_TAPE_IO_SLAVES
specifies whether RMAN uses slave processes
rather than the number of slave processes. Tape devices can only be accessed by
one process at a time, and RMAN uses the number of slaves necessary for the
number of tape devices.
23.2.3.1.3 Synchronous and Asynchronous I/O
When an SBT channel reads or writes data to tape, the I/O is always synchronous. For
tape I/O, each channel allocated (whether manually or automatically) corresponds to a
server process, called here a channel process.
Figure 23-5 shows synchronous I/O in a backup to tape.
Chapter 23
Basic Concepts of RMAN Performance Tuning
23-8

Figure 23-5 Synchronous Tape I/O
1010101
Channel
process
12
Channel process
composes tape
buffer
3
Media Manager
code returns
after writing
Channel process runs media
manager code to internalize
buffer for writing
4Channel Process
composes next
buffer
Tape Buffers
1010101
Media
Manager
The following steps occur:
1. The channel process composes a tape buffer.
2. The channel process executes media manager code that processes the tape
buffer and internalizes it for further processing and storage by the media manager.
3. The media manager code returns a message to the server process stating that it
has completed writing.
4. The channel process can initiate a new task.
Figure 23-6 shows asynchronous I/O in a tape backup. Asynchronous I/O to tape is
simulated by using tape slaves. In this case, each allocated channel corresponds to a
server process, which in the explanation that follows is identified as a channel process.
For each channel process, one tape slave is started (or more than one, if multiple
copies exist).
Figure 23-6 Asynchronous Tape I/O
Channel
process
Tape
Slave
1010101 1010101 1010101
1
Channel process
prepares tape
buffer
3
4
2
2
3
22
Channel
process
prepares
more
tape
buffers
while
step
runs
2
Media
Manager
Tape Slave internalizes
and writes tape buffer
Tape slave returns
from media
manager, requests
next buffer
The following steps occur:
1. A channel process writes blocks to a tape buffer.
Chapter 23
Basic Concepts of RMAN Performance Tuning
23-9

2. The channel process sends a message to the tape slave process to process the
tape buffer. The tape slave process executes media manager code that processes
the tape buffer and internalizes it so that the media manager can process it.
3. While the tape slave process is writing, the channel process is free to read data
from the data files and prepare more output buffers.
4. After the tape slave channel returns from the media manager code, it requests a
new tape buffer, which usually is ready. Thus waiting time for the channel process
is reduced, and the backup is completed faster.
23.2.3.2 Media Manager Component of the Write Phase for SBT
Multiple factors affect the speed of the backup to tape.
They include the following:
•Network Throughput
•Native Transfer Rate
•Tape Compression
•Tape Streaming
•Physical Tape Block Size
23.2.3.2.1 Network Throughput
If the tape device is remote, then the media manager must transfer data over the
network.
For example, an administrative domain in Oracle Secure Backup can contain multiple
networked client hosts, media servers, and tape devices. If the database is on one
host, but the output tape drive is attached to a different host, then Oracle Secure
Backup manages the data transfer over the network. The network throughput is the
upper limit for backup performance.
23.2.3.2.2 Native Transfer Rate
The tape native transfer rate is the speed of writing to a tape without compression.
This speed represents the upper limit of the backup rate.
The upper limit of your backup performance should be the aggregate transfer rate of
all of your tape drives. If your backup is performing at that rate, and if it is not using an
excessive amount of CPU, then RMAN performance tuning does not help.
23.2.3.2.3 Tape Compression
The level of tape compression is very important for backup performance. If the tape
has good compression, then the sustained backup rate is faster.
For example, if the compression ratio is 2:1 and native transfer rate of the tape drive is
6 megabytes per second, then the resulting backup speed is 12 megabytes per
second. In this case, RMAN must be able to read disks with a throughput of more than
12 megabytes per second or the disk becomes the bottleneck for the backup.
Chapter 23
Basic Concepts of RMAN Performance Tuning
23-10

Note:
Do not use both tape compression provided by the media manager and
binary compression provided by RMAN. If the media manager compression
is efficient, then it is usually the better choice. Using RMAN-compressed
backup sets can be an effective alternative to reduce bandwidth used to
move uncompressed backup sets over a network to the media manager, if
the CPU overhead required to compress the data in RMAN is acceptable.
23.2.3.2.4 Tape Streaming
Tape streaming during write operations has a major effect on tape backup
performance.
Many tape drives are fixed-speed, streaming tape drives. Because such drives can
write data at only one speed, when they run out of data to write to tape, the tape must
slow and stop. Typically, when the drive's buffer empties, the tape is moving so quickly
that it actually overshoots; to continue writing, the drive must rewind the tape to locate
the point where it stopped writing. Multiple speed tape drives are available that
alleviate this problem.
23.2.3.2.5 Physical Tape Block Size
The physical tape block size can affect backup performance.
The block size is the amount of data written by media management software to a tape
in one write operation. In general, the larger the tape block size, the faster the backup.
The physical tape block size is not controlled by RMAN or Oracle database, but by
media management software. See your media management software's documentation
for details.
23.2.4 Write Phase for Disk
The principal factor affecting the write phase for disk is the buffer size.
When the output of the backup resides on disk, each channel allocates four output
buffers of 1 MB each. The disk channel writes the blocks to the disk subsystem. When
restoring files, the read phase is similar to the write phase when backing up files,
except the blocks move in the opposite direction.
If RMAN reads from a disk asynchronously, then it writes to the disk asynchronously.
When writing to disk, you can make use of disk I/O slaves just as when reading from
disk.
If RMAN is backing up files to a disk-based output destination striped over multiple
disks, then you can allocate multiple channels. The number of channels is limited only
to the number of disks over which the destination is striped. ASM is one example of a
destination striped over multiple disks.
Chapter 23
Basic Concepts of RMAN Performance Tuning
23-11

23.3 Using V$ Views to Diagnose RMAN Performance
Problems
Typically, you begin the tuning process by using
V$
views to determine where RMAN
backup and restore operations are encountering problems.
This section contains the following topics:
•Monitoring RMAN Job Progress with V$SESSION_LONGOPS
•Identifying Bottlenecks with V$BACKUP_SYNC_IO and V$BACKUP_ASYNC_IO
23.3.1 Monitoring RMAN Job Progress with V$SESSION_LONGOPS
You can monitor the progress of backups and restore jobs by querying the view
V$SESSION_LONGOPS
. RMAN uses two types of rows in
V$SESSION_LONGOPS
: detail rows and
aggregate rows.
Detail rows describe the files being processed by one job step, whereas aggregate
rows describe the files processed by all job steps in an RMAN command. A job step is
the creation or restoration of one backup set or data file copy. Detail rows are updated
with every buffer that is read or written during the backup step, so their granularity of
update is small. Aggregate rows are updated when each job step completes, so their
granularity of update is large.
Table 23-3 describes the columns in
V$SESSION_LONGOPS
that are most relevant for
RMAN. Typically, you view the detail rows rather than the aggregate rows to determine
the progress of each backup set.
Table 23-3 Columns of V$SESSION_LONGOPS Relevant for RMAN
Column Description for Detail Rows
SID
The server session ID corresponding to an RMAN channel
SERIAL#
The server session serial number. This value changes each time a server
session is reused.
OPNAME
A text description of the row. Examples of details rows include
RMAN:
datafile
copy
,
RMAN:
full
datafile
backup
, and
RMAN:
full
datafile
restore
.
Note:
RMAN:
aggregate
input
and
RMAN:
aggregate
output
are the only
aggregate rows.
CONTEXT
For backup output rows, this value is
2
. For all other rows except proxy
copy (which does not update this column), the value is
1
.
Chapter 23
Using V$ Views to Diagnose RMAN Performance Problems
23-12

Table 23-3 (Cont.) Columns of V$SESSION_LONGOPS Relevant for RMAN
Column Description for Detail Rows
SOFAR
The meaning of this column depends on the type of operation described by
this row:
•For image copies, the number of blocks that have been read
•For backup input rows, the number of blocks that have been read from
the files being backed up
•For backup output rows, the number of blocks that have been written to
the backup piece
•For restores, the number of blocks that have been processed to the
files that are being restored in this one job step
•For proxy copies, the number of files that have been copied
TOTALWORK
The meaning of this column depends on the type of operation described by
this row:
•For image copies, the total number of blocks in the file.
•For backup input rows, the total number of blocks to be read from all
files processed in this job step.
•For backup output rows, the value is
0
because RMAN does not know
how many blocks that it will write into any backup piece.
•For restores, the total number of blocks in all files restored in this job
step.
•For proxy copies, the total number of files to be copied in this job step.
Each server session performing a backup or restore job reports its progress compared
to the total work required for a job step. For example, if you restore the database with
two channels, and each channel has two backup sets to restore (a total of four sets),
then each server session reports its progress through a single backup set. When a set
is completely restored, RMAN begins reporting progress on the next set to restore.
To monitor RMAN job progress:
1. Before starting the RMAN job, create a script file (called, for this example,
longops
)
containing the following SQL statement:
SELECT SID, SERIAL#, CONTEXT, SOFAR, TOTALWORK,
ROUND(SOFAR/TOTALWORK*100,2) "%_COMPLETE"
FROM V$SESSION_LONGOPS
WHERE OPNAME LIKE 'RMAN%'
AND OPNAME NOT LIKE '%aggregate%'
AND TOTALWORK != 0
AND SOFAR <> TOTALWORK;
2. Start RMAN and connect to the target database and recovery catalog (if used).
3. Start an RMAN job. For example, enter:
RMAN> RESTORE DATABASE
;
4. While the RMAN job is running, start SQL*Plus and connect to the target
database, and execute the
longops
script to check the progress of the RMAN job. If
you repeat the query while the RMAN job progresses, then you see output such as
the following:
SQL> @longops
SID SERIAL# CONTEXT SOFAR TOTALWORK %_COMPLETE
---------- ---------- ---------- ---------- ---------- ----------
Chapter 23
Using V$ Views to Diagnose RMAN Performance Problems
23-13

8 19 1 10377 36617 28.34
SQL> @longops
SID SERIAL# CONTEXT SOFAR TOTALWORK % COMPLETE
---------- ---------- ---------- ---------- ---------- ----------
8 19 1 21513 36617 58.75
SQL> @longops
SID SERIAL# CONTEXT SOFAR TOTALWORK % COMPLETE
---------- ---------- ---------- ---------- ---------- ----------
8 19 1 29641 36617 80.95
SQL> @longops
SID SERIAL# CONTEXT SOFAR TOTALWORK % COMPLETE
---------- ---------- ---------- ---------- ---------- ----------
8 19 1 35849 36617 97.9
SQL> @longops
no rows selected
5. If you run the
longops
script at intervals of 2 minutes or more and the
%
_
COMPLETE
column does not increase, then RMAN is encountering a problem. See "Monitoring
RMAN Interaction with the Media Manager" to obtain more information.
If you frequently monitor the execution of long-running tasks, then you could create a
shell script or batch file under your host operating system that runs SQL*Plus to
execute this query repeatedly.
23.3.2 Identifying Bottlenecks with V$BACKUP_SYNC_IO and
V$BACKUP_ASYNC_IO
You can use the
V$BACKUP_SYNC_IO
and
V$BACKUP_ASYNC_IO
views to determine the
source of backup or restore bottlenecks and to see detailed progress of backup jobs.
V$BACKUP_SYNC_IO
contains rows when the I/O is synchronous to the process (or thread
on some platforms) performing the backup.
V$BACKUP_ASYNC_IO
contains rows when the
I/O is asynchronous. Asynchronous I/O is obtained either with I/O processes or
because it is supported by the underlying operating system.
The results of a backup or restore job remain in memory until the database instance
shuts down. Thus, you can query the views after the job completes.
To determine whether the tape is streaming when the I/O is synchronous:
1. Start SQL*Plus and connect to the target database.
2. Query the
EFFECTIVE_BYTES_PER_SECOND
column in the
V$BACKUP_SYNC_IO
or
V$BACKUP_ASYNC_IO
view.
If
EFFECTIVE_BYTES_PER_SECOND
is less than the raw capacity of the hardware, then
the tape is not streaming. If
EFFECTIVE_BYTES_PER_SECOND
is greater than the raw
capacity of the hardware, the tape may or may not be streaming. Compression
may cause the
EFFECTIVE_BYTES_PER_SECOND
to be greater than the speed of real
I/O.
Chapter 23
Using V$ Views to Diagnose RMAN Performance Problems
23-14

See Also:
Oracle Database Reference for more information about these views
23.3.2.1 Identifying Bottlenecks with Synchronous I/O
Query the
V$BACKUP_SYNC_IO
view to identify bottlenecks with synchronoous I/O.
With synchronous I/O, it is difficult to identify specific bottlenecks because all
synchronous I/O is a bottleneck to the process. The only way to tune synchronous I/O
is to compare the rate (in bytes per second) with the device's maximum throughput
rate. If the rate is lower than the rate that the device specifies, then consider tuning
this aspect of the backup and restore process.
To determine the rate of synchronous I/O:
1. Start SQL*Plus and connect to the target database.
2. Query the
DISCRETE_BYTES_PER_SECOND
column in the
V$BACKUP_SYNC_IO
view to
display the I/O rate.
If you see data in
V$BACKUP_SYNC_IO
, then the problem is that you have not enabled
asynchronous I/O or you are not using disk I/O slaves.
23.3.2.2 Identifying Bottlenecks with Asynchronous I/O
Query the
V$BACKUP_ASYNC_IO
to identify bottlenecks with asynchronous I/O.
Long waits are the number of times the backup or restore process told the operating
system to wait until an I/O was complete. Short waits are the number of times the
backup or restore process made an operating system call to poll for I/O completion in
a nonblocking mode. Ready indicates the number of times when I/O was ready for
use, so there was no need to make an operating system call to poll for I/O completion.
To determine the rate of asynchronous I/O:
1. Start SQL*Plus and connect to the target database.
2. Query the
LONG_WAITS
and
IO_COUNT
columns in the
V$BACKUP_ASYNC_IO
view to
display the I/O rate.
The simplest way to identify the bottleneck is to find the data file that has the
largest ratio for
LONG_WAITS
divided by
IO_COUNT
. For example, you can use the
following query:
SELECT LONG_WAITS/IO_COUNT, FILENAME
FROM V$BACKUP_ASYNC_IO
WHERE LONG_WAITS/IO_COUNT > 0
ORDER BY LONG_WAITS/IO_COUNT DESC;
Note:
If you have synchronous I/O but you set
BACKUP_DISK_IO_SLAVES
, then the I/O
is displayed in
V$BACKUP_ASYNC_IO
.
Chapter 23
Using V$ Views to Diagnose RMAN Performance Problems
23-15

See Also:
Oracle Database Referencefor descriptions of the
V$BACKUP_SYNC_IO
and
V$BACKUP_ASYNC_IO
views
23.4 Tuning RMAN Backup Performance
Many factors can affect backup performance. Often, finding the solution to a slow
backup is a process of trial and error.
To obtain the best performance for a backup, follow these steps:
1. Remove the
RATE
parameter for channel settings, as described in "Removing the
RATE Parameter from Channel Settings".
2. If your disk does not support asynchronous I/O, then set the
DBWR_IO_SLAVES
parameter, as described in "Setting DBWR_IO_SLAVES to Simulate
Asynchronous I/O".
3. Set the
LARGE_POOL_SIZE
parameter, as described in "Setting LARGE_POOL_SIZE
to Resolve Shared Memory Issues".
4. Remove bottlenecks that affect backup performance, as described in "Tuning the
Read, Write, and Copy Phases".
23.4.1 Removing the RATE Parameter from Channel Settings
The
RATE
parameter on a channel is intended to reduce, rather than increase, backup
throughput so that more disk bandwidth is available for other database operations. If
the backup is not streaming to tape, then confirm that the
RATE
parameter is not set.
To remove the RATE parameter:
1. Examine your backup script.
2. Do one of the following:
•If the backup is in a
RUN
command, then remove the
RATE
parameter, if it is
specified, from the
ALLOCATE
command. Skip the remaining steps.
•If the backup is not in a
RUN
command, then start RMAN, connect to the target
database, and proceed to the next step.
3. Execute the
SHOW ALL
command to show the currently configured settings.
4. Remove the
RATE
parameter, if it is set, from the
CONFIGURE CHANNEL
command.
See Also:
RATE Channel Parameter
Chapter 23
Tuning RMAN Backup Performance
23-16

23.4.2 Setting DBWR_IO_SLAVES to Simulate Asynchronous I/O
Some operating systems support native asynchronous I/O. If and only if your disk does
not support asynchronous I/O, then set
DBWR_IO_SLAVES
. Any nonzero value for
DBWR_IO_SLAVES
causes a fixed number of disk I/O slaves to be used for backup and
restore, which simulates asynchronous I/O.
To enable disk I/O slaves:
1. Start SQL*Plus and connect to the target database.
2. Shut down the database.
3. Set
DBWR_IO_SLAVES
initialization parameter to a nonzero value.
This setting enables the database writer processes to use slaves. Thus, you may
need to increase the value of the
PROCESSES
initialization parameter.
4. Restart the database.
5. Restart the RMAN backup.
See Also:
Synchronous and Asynchronous Disk I/O
23.4.3 Setting LARGE_POOL_SIZE to Resolve Shared Memory
Issues
Set the
LARGE_POOL_SIZE
initialization parameter if the database reports an error in the
alert log stating that it does not have enough memory and that it cannot start I/O
slaves.
The alert log message resembles the following:
ksfqxcre: failure to allocate shared memory means sync I/O will be used whenever
async I/O to file not supported natively
The large pool is used for RMAN and for other purposes, so its total size must
accommodate all uses. This is especially true if
DBWR_IO_SLAVES
has been set and the
DBWR process needs buffers.
To set the large pool size:
1. Start SQL*Plus and connect to the target database.
2. Optionally, query
V$SGASTAT.POOL
to determine in which pool (shared pool or large
pool) the memory for an object resides.
3. Set the
LARGE_POOL_SIZE
initialization parameter in the target database.
You can execute an
ALTER SYSTEM SET
statement to set the parameter dynamically.
The formula for setting
LARGE_POOL_SIZE
is as follows:
LARGE_POOL_SIZE =
number_of_allocated_channels
*
(16 MB + ( 4 * size_of_tape_buffer ) )
Chapter 23
Tuning RMAN Backup Performance
23-17

4. Restart the RMAN backup.
See Also:
•Oracle Database Concepts for more information about the large pool
•Oracle Database Reference for complete information about initialization
parameters
23.4.4 Tuning the Read, Write, and Copy Phases
You can perform several tasks to identify and remedy bottlenecks that affect backup
performance.
This includes the following tasks:
•Using Backup Validation To Distinguish Between Read and Write Bottlenecks
•Tuning the Read Phase
•Tuning the Copy and Write Phases
23.4.4.1 Using Backup Validation To Distinguish Between Read and Write
Bottlenecks
One reliable way to determine whether the output device or input disk I/O is the
bottleneck in a given backup job is to compare the time required to run backup tasks
with the time required to run
BACKUP VALIDATE
of the same tasks.
BACKUP VALIDATE
of a
backup performs the same disk reads as a real backup but performs no I/O to an
output device.
To compare backup and validation times:
1. Ensure your NLS environment date format variable is set to show the time. For
example, set the NLS variables as follows:
setenv NLS_LANG AMERICAN_AMERICA.WE8DEC;
setenv NLS_DATE_FORMAT "MM/DD/YYYY HH24:MI:SS"
2. Edit your backup script to use the
BACKUP VALIDATE
command instead of the
BACKUP
command.
3. Run the backup script.
4. Examine the RMAN output and calculate the difference between the times
displayed in the
Starting backup at
and
Finished backup at
messages.
5. Edit the backup script to use the
BACKUP
command instead of the
BACKUP VALIDATE
command.
6. Run the backup script.
7. Examine the RMAN output and calculate the difference between the times
displayed in the
Starting backup at
and
Finished backup at
messages.
8. Compare the backup times for the validation and real backup.
Chapter 23
Tuning RMAN Backup Performance
23-18

If the time for the
BACKUP VALIDATE
to tape is about the same as the time for a real
backup to tape, then reading from disk is the likely bottleneck.
If the time for the
BACKUP VALIDATE
to tape is significantly less than the time for a
real backup to tape, then writing to the output device is the likely bottleneck.
See Also:
•Tuning the Read Phase
•Tuning the Copy and Write Phases.
23.4.4.2 Tuning the Read Phase
Tuning the read phase can help to improve RMAN performance.
RMAN may not be able to send data blocks to the output device fast enough to keep it
occupied. For example, during an incremental backup, RMAN only backs up blocks
changed since a previous data file backup as part of the same strategy. If you do not
turn on block change tracking, then RMAN must scan whole data files for changed
blocks, and fill output buffers as it finds such blocks. If few blocks changed, and if
RMAN is making an SBT backup, then RMAN may not fill output buffers fast enough to
keep the tape drive streaming.
You can improve backup performance by adjusting the level of multiplexing, which is
number of input files simultaneously read and then written into the same RMAN
backup piece. The level of multiplexing is the minimum of the
MAXOPENFILES
setting on
the channel and the number of input files placed in each backup set. The following
table makes recommendations for adjusting the level of multiplexing.
Table 23-4 Adjusting the Level of Multiplexing
ASM Striped Disk Recommendation
No Yes Increase the level of multiplexing. Determine which is
the minimum,
MAXOPENFILES
or the number of files in
each backup set, and then increase this value.
In this way, you increase the rate at which RMAN fills
tape buffers, which makes it more likely that buffers
are sent to the media manager fast enough to
maintain streaming.
No No Increase the
MAXOPENFILES
setting on the channel.
Yes Not applicable Set the
MAXOPENFILES
parameter on the channel to
1
or
2
.
Chapter 23
Tuning RMAN Backup Performance
23-19

See Also:
•"About Multiplexed RMAN Backup Sets" to learn how the
MAXOPENFILES
and
FILESPERSET
settings affect the level of multiplexing
•"About RMAN Incremental Backups" for a conceptual overview
23.4.4.3 Tuning the Copy and Write Phases
If the read phase is performing well, then the copy or write phases are probably the
bottleneck. In particular, if RMAN is sending data blocks to the tape drive fast enough
to support streaming, but the tape is not streaming, then the SBT write phase is the
bottleneck.
Try to improve performance using one of the techniques described in the following
table.
Table 23-5 Techniques for Improving Copy and Write Performance
Technique Description Additional Informaiton
If the backup is a full backup,
then consider using
incremental backups
Incremental level 1 backups
write only the changed blocks
from data files to tape, so that
any bottleneck on writing to
tape has less impact on your
overall backup strategy. In
particular, if tape drives are
not locally attached to the
node of the database being
backed up, then incremental
backups can be faster. .
"Making and Updating RMAN
Incremental Backups"
If the backup uses the basic
compression algorithm, then
consider using the Oracle
Advanced Compression option
•"Configuring Compression
Options"
•"About Binary
Compression for RMAN
Backup Sets"
If the database host uses
multiple CPUs, and if the
backup uses binary
compression, then increase
the number of channels
If the backup is encrypted,
then change the encryption
algorithm to
AES128
The
AES128
algorithm is the
least CPU-intensive algorithm.
"Configuring the Backup
Encryption Algorithm"
(For tape backups only) Adjust
the size of the tape I/O buffers
Use the
PARMS
and
BLKSIZE
parameters of the
ALLOCATE
CHANNEL
or
CONFIGURE
CHANNEL
command to set the
size. The size of the tape I/O
buffers is platform-dependent.
The
BLKSIZE
setting overrides
the default.
Chapter 23
Tuning RMAN Backup Performance
23-20

Table 23-5 (Cont.) Techniques for Improving Copy and Write Performance
Technique Description Additional Informaiton
(For tape backups only) Adjust
settings in the media
management software
Some media manager
settings, including the tape
block size, may affect backup
performance.
If RMAN is backing up files to
ASM, then increase the
number of channels
For example, if RMAN is
backing up the database to a
single disk group with 16
physical disks, then allocate or
configure at least 4 disk
channels, up to a maximum of
16.
Chapter 23
Tuning RMAN Backup Performance
23-21

24
Troubleshooting RMAN Operations
This chapter describes how to troubleshoot Recovery Manager. This chapter contains
the following topics:
•Interpreting RMAN Message Output
•Using V$ Views for RMAN Troubleshooting
•Testing the Media Management API
•Terminating an RMAN Command
24.1 Interpreting RMAN Message Output
Recovery Manager provides detailed error messages that can aid in troubleshooting
problems.
Also, Oracle Database and the third-party media vendors generate useful debugging
output of their own. The following discussion explains how to identify and interpret the
different errors that you may encounter.
24.1.1 Identifying Types of RMAN Message Output
Output that is useful for troubleshooting failed or unresponsive RMAN jobs is located
in several different places.
The following table provides an overview of where to locate message output that can
be used to troubleshoot RMAN backup problems.
Table 24-1 Types of Message Output
Type of
Output
Produced
By
Location Description
RMAN
messages
RMAN Completed job information is in
V$RMAN_STATUS
and
RC_RMAN_STATUS
.
Current job information is in
V$RMAN_OUTPUT
.
When running RMAN from the command
line, you can direct output to the following
places:
•Standard output
•A log file specified by
LOG
on the
command line or the
SPOOL
LOG
command
•A file created by redirecting RMAN
output (for example, in UNIX, using
the'
>
' operator)
Contains actions relevant to the RMAN
job and error messages generated by
RMAN, the database server, and the
media vendor. RMAN error messages
have an
RMAN-
prefix. Normal action
descriptions do not have a prefix.
You can execute the following PL/SQL to
remove all entries from
V$RMAN_STATUS
:
update node set high_rsr_recid=0
where db_key =
our_target_database_db_key ;
The preceding function removes all job-
related entries. No rows are visible until
new backup jobs are shown in
V$RMAN_BACKUP_JOB_DETAILS
.
24-1

Table 24-1 (Cont.) Types of Message Output
Type of
Output
Produced
By
Location Description
alert_
SID
.l
og
Oracle
Database
The
alert
subdirectory of the Automatic
Diagnostic Repository (ADR) home
Contains a chronological log of errors,
initialization parameter settings, and
administration operations. Records values
for overwritten control file records.
Oracle trace
file
Oracle
Database
The
trace
subdirectory of the ADR home Contains detailed output generated by
Oracle Database processes. This file is
created when an
ORA-600
or
ORA-3113
error message occurs, whenever RMAN
cannot allocate a channel, and when the
database fails to load the media
management library.
sbtio.log
Third-party
media
management
software
The
trace
subdirectory of the ADR home Contains vendor-specific information
written by the media management
software. This log does not contain Oracle
Database or RMAN errors.
Media
manager log
file
Third-party
media
management
software
The file names for any media manager
logs other than
sbtio.log
are determined
by the media management software.
Contains information about the
functioning of the media management
device
24.1.2 Troubleshooting Long-Running RMAN Operations
RMAN message output provides information about the progress of backup and
recovery operations. Use this information to take any required actions to troubleshoot
operations that are stuck or awaiting resources.
Certain operations such as backup, restore, recovery, and duplication for large
databases typically take a long time to complete. However, it is not always clear if the
operation is progressing or waiting on some resources. Starting with Oracle Database
Release 18c, RMAN message output contains additional logging information that
indicates if a job is waiting on resources. Every 10 minutes, RMAN checks if there is a
change in the number of blocks processed. If there no change in the blocks
processed, then RMAN displays a message with the associated wait event.
The following is an example of the RMAN output for a
RESTORE
operation:
allocated channel: c1
channel c1: SID=123 device type=SBT_TAPE
channel c1: WARNING: Oracle Test Disk API
Starting restore at 18-JAN-18
channel c1: starting datafile backup set restore
channel c1: specifying datafile(s) to restore from backup set
channel c1: restoring datafile 00002 to /ade/b/2776899351/oracle/dbs/tbs_ax1.f
channel c1: reading from backup piece 01sov1t4_1_1
***** Hang Detected ***** at 2018-01-18 04:11:23 for channel c1, INSTID: 1, SID:
123, serial: 35831
No change in read blocks, thus showing wait event[Total blocks = 192000, Blocks read/
recovered = 41530]
Chapter 24
Interpreting RMAN Message Output
24-2

Seq_No Event Waiting Time(mirco secs)
602 Backup: MML read backup piece 38094371
***** Hang Detected ***** at 2018-01-18 04:11:33 for channel c1, INSTID: 1, SID:
123, serial: 35831
No change in read blocks, thus showing wait event[Total blocks = 192000, Blocks read/
recovered = 41530]
Seq_No Event Waiting Time(mirco secs)
602 Backup: MML read backup piece 48106104
channel c1: piece handle=01sov1t4_1_1 tag=TAG20180118T040804
channel c1: restored backup piece 1
channel c1: restore complete, elapsed time: 00:02:35
Finished restore at 18-JAN-18
released channel: c1
The output indicates that the restore was stuck because of a problem with a media
manager read operation. After the read operation completed, the RMAN restore was
successful.
24.1.3 Recognizing RMAN Error Message Stacks
RMAN reports errors as they occur. If an error is not retrievable, that is, if RMAN
cannot perform failover to another channel to complete a particular job step, then
RMAN also reports a summary of the errors after all job sets complete. This feature is
known as deferred error reporting.
One way to determine whether RMAN encountered an error is to examine its return
code. A second way is to search the RMAN output for the string
RMAN-00569
, which is
the message number for the error stack banner. All RMAN errors are preceded by this
error message. If you do not see an
RMAN-00569
message in the output, then there are
no errors.
Example 24-1 RMAN Syntax Error
This example shows an RMAN syntax error. The
RMAN-00569
message is followed by
other error messages that indicate the reason for the error.
RMAN-00571: ===========================================================
RMAN-00569: =============== ERROR MESSAGE STACK FOLLOWS ===============
RMAN-00571: ===========================================================
RMAN-00558: error encountered while parsing input commands
RMAN-01005: syntax error: found ")": expecting one of: "archivelog, backup,
backupset, controlfilecopy, current, database, datafile, datafilecopy, (, plus, ;,
tablespace"
RMAN-01007: at line 1 column 18 file: standard input
See Also:
Identifying RMAN Return Codes
24.1.4 Identifying RMAN Error Codes
You can use the error codes in RMAN message stacks to troubleshoot problems with
RMAN commands.
Chapter 24
Interpreting RMAN Message Output
24-3

Typically, you find the following types of error codes in RMAN message stacks:
•Errors prefixed with
RMAN-
These are RMAN errors.
•Errors prefixed with
ORA-
Media manager errors use the
ORA-
prefix.
•Errors preceded by the line
Additional information:
See Also:
•RMAN Error Message Numbers for the error ranges of RMAN errors
•ORA-19511: Media Manager Errors for the error ranges of media
manager errors
•Oracle Database Error Messages Referencefor explanations of
RMAN
and
ORA
error codes
24.1.4.1 RMAN Error Message Numbers
RMAN error messages are prefixed with RMAN-.
The following table indicates the error ranges for common RMAN error messages, all
of which are described in Oracle Database Error Messages Reference.
Table 24-2 RMAN Error Message Ranges
Error Range Cause
0550-0999 Command-line interpreter
1000-1999 Keyword analyzer
2000-2999 Syntax analyzer
3000-3999 Main layer
4000-4999 Services layer
5000-5499 Compilation of
RESTORE
or
RECOVER
command
5500-5999 Compilation of
DUPLICATE
command
6000-6999 General compilation
7000-7999 General execution
8000-8999 PL/SQL programs
9000-9999 Low-level keyword analyzer
10000-10999 Server-side execution
11000-11999 Interphase errors between PL/SQL and RMAN
12000-12999 Recovery catalog packages
Chapter 24
Interpreting RMAN Message Output
24-4

24.1.4.2 ORA-19511: Media Manager Errors
If a media manager error occurs,
ORA-19511
is signaled, and the media manager is
expected to provide RMAN a descriptive error. RMAN displays the error passed back
to it by the media manager.
For example, you might see this:
ORA-19511: Error received from media manager layer, error text:
sbtpvt_open_input: file .* does not exist or cannot be accessed, errno = 2
The message from the media manager should provide you with enough information to
let you fix the root problem. If it does not, then refer to the documentation for your
media manager or contact your media management vendor support representative for
further information.
ORA-19511
errors originate with the media manager, not with Oracle
Database. The database just passes on the message from the media manager. The
cause can be addressed only by the media management vendor.
If you are still using an SBT 1.1-compliant media management layer, you may see
some additional error message text. Output from an SBT 1.1-compliant media
management layer is similar to the following:
ORA-19507: failed to retrieve sequential file, handle="c-140148591-20031014-06",
parms=""
ORA-27007: failed to open file
Additional information: 7000
Additional information: 2
ORA-19511: Error received from media manager layer, error text:
SBT error = 7000, errno = 0, sbtopen: backup file not found
The "Additional information" provided uses error codes specific to SBT 1.1. The values
displayed correspond to the media manager message numbers and error text listed in
Table 24-3. RMAN again signals the error, as an ORA-19511
Error received from
media manager layer
error, and a general error message related to the error code
returned from the media manager and including the SBT 1.1 error number is then
displayed.
The SBT 1.1 error messages are listed here for your reference. Table 24-3 lists media
manager message numbers and their corresponding error text. In the error codes,
O/S
stands for operating system. The errors marked with an asterisk (*) are internal and
are not typically seen during normal operation.
Chapter 24
Interpreting RMAN Message Output
24-5

Table 24-3 Media Manager Error Message Ranges
Cause No. Message
sbtopen 7000
7001
7002*
7003
7004
7005
7006
7007
7008
7009
7010
7011
7012*
Backup file not found (only returned for read)
File exists (only returned for write)
Bad mode specified
Invalid block size specified
No tape device found
Device found, but busy; try again later
Tape volume not found
Tape volume is in-use
I/O Error
Can't connect with Media Manager
Permission denied
O/S error for example malloc, fork error
Invalid argument(s) to sbtopen
sbtclose 7020*
7021*
7022
7023
7024*
7025
Invalid file handle or file not open
Invalid flags to sbtclose
I/O error
O/S error
Invalid argument(s) to sbtclose
Can't connect with Media Manager
sbtwrite 7040*
7041
7042
7043
7044*
Invalid file handle or file not open
End of volume reached
I/O error
O/S error
Invalid argument(s) to sbtwrite
sbtread 7060*
7061
7062
7063
7064
7065*
Invalid file handle or file not open
EOF encountered
End of volume reached
I/O error
O/S error
Invalid argument(s) to sbtread
sbtremove 7080
7081
7082
7083
7084
7085
7086*
Backup file not found
Backup file in use
I/O Error
Can't connect with Media Manager
Permission denied
O/S error
Invalid argument(s) to sbtremove
sbtinfo 7090
7091
7092
7093
7094
7095*
Backup file not found
I/O Error
Can't connect with Media Manager
Permission denied
O/S error
Invalid argument(s) to sbtinfo
Chapter 24
Interpreting RMAN Message Output
24-6

Table 24-3 (Cont.) Media Manager Error Message Ranges
Cause No. Message
sbtinit 7110*
7111
Invalid argument(s) to sbtinit
O/S error
24.1.5 Interpreting RMAN Error Stacks
It is important to identify the relevant messages in the RMAN error stack.
Note the following tips and suggestions while interpreting RMAN messages:
•Read the messages from the bottom up, because this is the order in which RMAN
issues the messages. The last one or two errors displayed in the stack are often
the most informative.
•When you are using an SBT 1.1 media management layer and you are presented
with SBT 1.1 style error messages containing the "
Additional information:
"
numeric error codes, look for the
ORA-19511
message that follows for the text of
error messages passed back to RMAN by the media manager. These messages
identify the real failure in the media management layer.
•Look for the
RMAN-03002
or
RMAN-03009
message (
RMAN-03009
equals
RMAN-03002
but
includes the channel ID), immediately following the error banner. These messages
indicate which command failed. Syntax errors generate
RMAN-00558
.
•Identify the basic type of error according to the error range chart in Table 24-2 and
then refer to the error messages for information about the most important
messages.
See Also:
•Interpreting RMAN Errors: Example and Interpreting Server Errors:
Example for examples of RMAN error messages
•Interpreting SBT 2.0 Media Management Errors: Example and
Interpreting SBT 1.1 Media Management Errors: Example for examples
of interpreting media management errors
•Oracle Database Error Messages for information about the error
messages
24.1.5.1 Interpreting RMAN Errors: Example
Errors prefixed by RMAN- indicate errors caused by RMAN commands.
You attempt a backup of tablespace
users
and receive the following message:
Starting backup at 29-AUG-13
using channel ORA_DISK_1
RMAN-00571: ===========================================================
RMAN-00569: =============== ERROR MESSAGE STACK FOLLOWS ===============
RMAN-00571: ===========================================================
Chapter 24
Interpreting RMAN Message Output
24-7

RMAN-03002: failure of backup command at 08/29/2013 15:14:03
RMAN-20202: tablespace not found in the recovery catalog
RMAN-06019: could not translate tablespace name "USESR"
The
RMAN-03002
error indicates that the
BACKUP
command failed. You read the last two
messages in the stack first and immediately see the problem: no tablespace
users
appears in the recovery catalog because you mistyped the name as
usesr
.
24.1.5.2 Interpreting Server Errors: Example
Errors from the server are prefixed with ORA-.
Assume that you attempt to recover a tablespace and receive the following errors:
RMAN> RECOVER TABLESPACE users;
Starting recover at 29-AUG-13
using channel ORA_DISK_1
starting media recovery
media recovery failed
RMAN-00571: ===========================================================
RMAN-00569: =============== ERROR MESSAGE STACK FOLLOWS ===============
RMAN-00571: ===========================================================
RMAN-03002: failure of recover command at 08/29/2013 15:18:43
RMAN-11003: failure during parse/execution of SQL statement: alter database recover
if needed tablespace USERS
ORA-00283: recovery session canceled due to errors
ORA-01124: cannot recover data file 8 - file is in use or recovery
ORA-01110: data file 8: '/oracle/oradata/trgt/users01.dbf'
As suggested, you start reading from the bottom up. The
ORA-01110
message explains
there was a problem with the recovery of data file
users01.dbf
. The second error
indicates that the database cannot recover the data file because it is in use or being
recovered. The remaining RMAN errors indicate that the recovery session was
canceled due to the server errors. Hence, you conclude that because you were not
recovering this data file, the problem must be that the data file is online and you must
take it offline and restore a backup.
24.1.5.3 Interpreting SBT 2.0 Media Management Errors: Example
This example shows how to interpret errors caused at the media manager level.
Assume that you use a tape drive and see the following output during a backup job:
RMAN-00571: ===========================================================
RMAN-00569: =============== ERROR MESSAGE STACK FOLLOWS ===============
RMAN-00571: ===========================================================
ORA-19624: operation failed, retry possible
ORA-19507: failed to retrieve sequential file, handle="/tmp/mydir", parms=""
ORA-27029: skgfrtrv: sbtrestore returned error
ORA-19511: Error received from media manager layer, error text:
sbtpvt_open_input:file /tmp/mydir does not exist or cannot be accessed, errno=2
The error text displayed following the
ORA-19511
error is generated by the media
manager and describes the real source of the failure. See the media manager
documentation to interpret this error.
Chapter 24
Interpreting RMAN Message Output
24-8

24.1.5.4 Interpreting SBT 1.1 Media Management Errors: Example
This example shows the output of a backup job that has errors media management
errors.
Assume that you use a tape drive and see the following output during a backup job:
RMAN-00571: ===========================================================
RMAN-00569: =============== ERROR MESSAGE STACK FOLLOWS ===============
RMAN-00571: ===========================================================
RMAN-03009: failure of backup command on c1 channel at 09/04/2013 13:18:19
ORA-19506: failed to create sequential file, name="07d36ecp_1_1", parms=""
ORA-27007: failed to open file
SVR4 Error: 2: No such file or directory
Additional information: 7005
Additional information: 1
ORA-19511: Error received from media manager layer, error text:
SBT error = 7005, errno = 2, sbtopen: system error
The main information of interest returned by SBT 1.1 media managers is the error
code in the "Additional information" line:
Additional information: 7005
Referring to Table 24-3, you discover that error
7005
means that the media
management device is busy. So, the media management software is not able to write
to the device because it is in use or there is a problem with it.
Note:
The
sbtio.log
contains information written by the media management
software, not Oracle Database. Thus, you must consult your media vendor
documentation to interpret the error codes and messages. If no information is
written to the
sbtio.log
, then contact your media manager support to ask
whether they are writing error messages in some other location, or whether
there are steps you must take to have the media manager errors appear in
sbtio.log
.
24.1.6 Identifying RMAN Return Codes
One way to determine whether RMAN encountered an error is to examine its return
code or exit status. The RMAN client returns 0 to the shell from which it was invoked if
no errors occurred, and a nonzero error value otherwise.
How you access this return code depends upon the environment from which you
invoked the RMAN client. For example, if you run UNIX with the C shell, then, when
RMAN completes, the return code is placed in a shell variable called
$status
. The
method of returning exit status is a detail specific to the host operating system rather
than the RMAN client.
Chapter 24
Interpreting RMAN Message Output
24-9

24.2 Using V$ Views for RMAN Troubleshooting
When
LIST
,
REPORT
, and
SHOW
do not provide all the information that you need for RMAN
operations, some V$ views can provide useful details.
Sometimes it is useful to identify exactly what a server session performing a backup
and recovery job is doing. The views described in the following table are useful for
obtaining information about RMAN jobs.
Table 24-4 Useful V$ Views for Troubleshooting
View Description
V$PROCESS
Identifies currently active processes
V$SESSION
Identifies currently active sessions. Use this view to determine which
database server sessions correspond to which RMAN allocated
channels.
V$SESSION_WAIT
Lists the events or resources for which sessions are waiting
You can use the preceding views to perform the following tasks:
•Monitoring RMAN Interaction with the Media Manager
•Correlating Server Sessions with RMAN Channels
24.2.1 Monitoring RMAN Interaction with the Media Manager
You can use the event names in the dynamic performance event views to monitor
RMAN calls to the media management API. The event names have one-to-one
correspondence with SBT functions.
See the following example:
Backup: MML v1 open backup piece
Backup: MML v1 read backup piece
Backup: MML v1 write backup piece
Backup: MML v1 query backup piece
Backup: MML v1 delete backup piece
Backup: MML v1 close backup piece
.
.
.
To obtain the complete list of SBT events, you can use the following query:
SELECT NAME
FROM V$EVENT_NAME
WHERE NAME LIKE '%MML%';
Before making a call to any of functions in the media management API, the server
adds a row in
V$SESSION_WAIT
, with the
STATE
column including the string
WAITING
. The
V$SESSION_WAIT.SECONDS_IN_WAIT
column shows the number of seconds that the server
has been waiting for this call to return. After an SBT function is returned from the
media manager, this row disappears.
Chapter 24
Using V$ Views for RMAN Troubleshooting
24-10

A row in
V$SESSION_WAIT
corresponding to an SBT event name does not indicate a
problem, because the server updates these rows at run time. The rows appear and
disappear as calls are made and returned. However, if the
SECONDS_IN_WAIT
column is
high, then the media manager may be suspended.
To monitor the SBT events, you can run the following SQL query:
COLUMN EVENT FORMAT a17
COLUMN SECONDS_IN_WAIT FORMAT 999
COLUMN STATE FORMAT a15
COLUMN CLIENT_INFO FORMAT a30
SELECT p.SPID, s.EVENT, s.SECONDS_IN_WAIT AS SEC_WAIT,
sw.STATE, s.CLIENT_INFO
FROM V$SESSION_WAIT sw, V$SESSION s, V$PROCESS p
WHERE sw.EVENT LIKE '%MML%'
AND s.SID=sw.SID
AND s.PADDR=p.ADDR;
Examine the SQL output to determine which SBT functions are waiting. For example,
the following output indicates that RMAN has been waiting for the
sbtbackup
function to
return for 10 minutes:
SPID EVENT SEC_WAIT STATE CLIENT_INFO
---- ----------------- ---------- --------------- ------------------------------
8642 Backup: MML creat 600 WAITING rman channel=ORA_SBT_TAPE_1
Note:
The
V$SESSION_WAIT
view shows only database events, not media manager
events.
See Also:
Oracle Database Reference for descriptions of the
V$SESSION_WAIT
view.
24.2.2 Correlating Server Sessions with RMAN Channels
To identify which server sessions correspond to which RMAN channels, you can query
V$SESSION
and
V$PROCESS
.
The
SPID
column of
V$PROCESS
identifies the operating system ID number for the
process or thread. For example, on UNIX the
SPID
column shows the process ID,
whereas on Windows the
SPID
column shows the thread ID. You have two basic
methods for obtaining this information, depending on whether you have multiple
RMAN sessions active concurrently.
This section contains the following topics:
•Matching Server Sessions with Channels When One RMAN Session Is Active
•Matching Server Sessions with Channels in Multiple RMAN Sessions
Chapter 24
Using V$ Views for RMAN Troubleshooting
24-11

24.2.2.1 Matching Server Sessions with Channels When One RMAN Session
Is Active
When only one RMAN session is active, the easiest method for determining the server
session ID for an RMAN channel is to query the target database.
Run the following query on the target database while the RMAN job is executing:
COLUMN CLIENT_INFO FORMAT a30
COLUMN SID FORMAT 999
COLUMN SPID FORMAT 9999
SELECT s.SID, p.SPID, s.CLIENT_INFO
FROM V$PROCESS p, V$SESSION s
WHERE p.ADDR = s.PADDR
AND CLIENT_INFO LIKE 'rman%';
The following shows sample output:
SID SPID CLIENT_INFO
---- ------------ ------------------------------
14 8374 rman channel=ORA_SBT_TAPE_1
If you set an ID using the RMAN
SET COMMAND ID
command instead of using the
system-generated default ID, then search for that value in the
CLIENT_INFO
column
instead of
'rman%'
.
24.2.2.2 Matching Server Sessions with Channels in Multiple RMAN Sessions
If multiple RMAN sessions are active, then the
V$SESSION.CLIENT_INFO
column can yield
the same information for a channel in each session.
For example:
SID SPID CLIENT_INFO
---- ------------ ------------------------------
14 8374 rman channel=ORA_SBT_TAPE_1
9 8642 rman channel=ORA_SBT_TAPE_1
In this case, you have the following methods for determining which channel
corresponds to which
SID
value.
24.2.2.2.1 Obtaining the Channel ID from the RMAN Output
You must first obtain the
sid
values from the RMAN output and then use these values
in your SQL query.
To correlate a process with a channel during a backup:
1. In an active session, run the RMAN job as usual and examine the output to get the
SID for the channel. For example, the output may show:
Starting backup at 21-AUG-13
allocated channel: ORA_SBT_TAPE_1
channel ORA_SBT_TAPE_1: sid=14 devtype=SBT_TAPE
2. Start a SQL*Plus session and then query the joined
V$SESSION
and
V$PROCESS
views
while the RMAN job is executing. For example, enter:
Chapter 24
Using V$ Views for RMAN Troubleshooting
24-12

COLUMN CLIENT_INFO FORMAT a30
COLUMN SID FORMAT 999
COLUMN SPID FORMAT 9999
SELECT s.SID, p.SPID, s.CLIENT_INFO
FROM V$PROCESS p, V$SESSION s
WHERE p.ADDR = s.PADDR
AND CLIENT_INFO LIKE 'rman%'
/
Use the
sid
value obtained from the first step to determine which channel
corresponds to which server session:
SID SPID CLIENT_INFO
---------- ------------ ------------------------------
14 2036 rman channel=ORA_SBT_TAPE_1
12 2066 rman channel=ORA_SBT_TAPE_1
24.2.2.2.2 Correlating Server Sessions with Channels by Using SET COMMAND ID
You specify a command ID string in the RMAN backup script. You can then query
V$SESSION.CLIENT_INFO
for this string.
To correlate a process with a channel during a backup:
1. In each session, set the
COMMAND
ID
to a different value after allocating the channels
and then back up the desired object. For example, enter the following in session 1:
RUN
{
ALLOCATE CHANNEL c1 TYPE disk;
SET COMMAND ID TO 'sess1';
BACKUP DATABASE
;
}
Set the command ID to a string such as
sess2
in the job running in session 2:
RUN
{
ALLOCATE CHANNEL c1 TYPE sbt;
SET COMMAND ID TO 'sess2';
BACKUP DATABASE
;
}
2. Start a SQL*Plus session and then query the joined
V$SESSION
and
V$PROCESS
views
while the RMAN job is executing. For example, enter:
SELECT SID, SPID, CLIENT_INFO
FROM V$PROCESS p, V$SESSION s
WHERE p.ADDR = s.PADDR
AND CLIENT_INFO LIKE '%id=sess%';
If you run the
SET
COMMAND
ID
command in the RMAN job, then the
CLIENT_INFO
column displays in the following format:
id=command_id,rman channel=channel_id
For example, the following shows sample output:
SID SPID CLIENT_INFO
---- ------------ ------------------------------
11 8358 id=sess1
Chapter 24
Using V$ Views for RMAN Troubleshooting
24-13

15 8638 id=sess2
14 8374 id=sess1,rman channel=c1
9 8642 id=sess2,rman channel=c1
The rows that contain the string
rman channel
show the channel performing the
backup. The remaining rows are for the connections to the target database.
See Also:
Oracle Database Backup and Recovery Reference for
SET COMMAND ID
syntax,
andOracle Database Reference for more information about
V$SESSION
and
V$PROCESS
24.3 Testing the Media Management API
On some platforms, Oracle provides a diagnostic tool called
sbttest
. This utility
performs a simple test of the media management software by acting as the Oracle
database server and attempting to communicate with the media manager.
This section contains the following topics:
•Obtaining the sbttest Utility
•Obtaining Online Documentation for the sbttest Utility
•Using the sbttest Utility
24.3.1 Obtaining the sbttest Utility
The default location of the
sbttest
utility depends on the platform.
On UNIX, the
sbttest
utility is typically located in
$ORACLE_HOME/bin
. If for some reason
the utility is not included with your platform, then contact Oracle Support Services to
obtain the C version of the program. You can compile this version of the program on
all UNIX platforms.
On platforms such as Solaris, you do not have to relink when using
sbttest
. On other
platforms, relinking may be necessary.
24.3.2 Obtaining Online Documentation for the sbttest Utility
Use the
sbttest
command, without arguments, to list the various arguments for this
program.
For online documentation of
sbttest
, issue the following on the command line:
% sbttest
The program displays the list of possible arguments for the program:
Error: backup file name must be specified
Usage: sbttest backup_file_name # this is the only required parameter
<-dbname database_name>
<-trace trace_file_name>
<-remove_before>
Chapter 24
Testing the Media Management API
24-14

<-no_remove_after>
<-read_only>
<-no_regular_backup_restore>
<-no_proxy_backup>
<-no_proxy_restore>
<-file_type n>
<-copy_number n>
<-media_pool n>
<-os_res_size n>
<-pl_res_size n>
<-block_size block_size>
<-block_count block_count>
<-proxy_file os_file_name bk_file_name
[os_res_size pl_res_size block_size block_count]>
<-libname sbt_library_name>
The display also indicates the meaning of each argument. For example, following is
the description for two optional parameters:
Optional parameters:
-dbname specifies the database name which will be used by SBT
to identify the backup file. The default is "sbtdb"
-trace specifies the name of a file where the Media Management
software will write diagnostic messages.
24.3.3 Using the sbttest Utility
Use
sbttest
to perform a quick test of the media manager.
If
sbttest
returns 0, then the test ran without error, which means that the media
manager is correctly installed and can accept a data stream and return the same data
when requested. If
sbttest
returns a nonzero value, then either the media manager is
not installed or it is not configured correctly.
To use sbttest:
1. Confirm that the program is installed and included in the system path by typing
sbttest
at the command line:
% sbttest
If the program is operational, then you see a display of the online documentation.
2. Execute the program, specifying any of the arguments described in the online
documentation. For example, enter the following to create test file
some_file.f
and
write the output to
sbtio.log
:
% sbttest some_file.f -trace sbtio.log
You can also test a backup of an existing data file. For example, this command
tests data file
tbs_33.f
of database
prod
:
% sbttest tbs_33.f -dbname prod
3. Examine the output. If the program encounters an error, then it provides messages
describing the failure. For example, if the database cannot find the library, you
see:
libobk.so could not be loaded. Check that it is installed properly, and that
LD_LIBRARY_PATH environment variable (or its equivalent on your platform)
includes the directory where this file can be found. Here is some additional
Chapter 24
Testing the Media Management API
24-15

information on the cause of this error:
ld.so.1: sbttest: fatal: libobk.so: open failed: No such file or directory
In some cases,
sbttest
can work but an RMAN backup does not. The reasons can be
the following:
•The user who starts
sbttest
is not the owner of the Oracle Database processes.
•If the database server is not linked with the media management library or cannot
load it dynamically when needed, then RMAN backups to the media manager fail,
but
sbttest
may still work.
•The
sbttest
program passes all environment parameters from the shell but RMAN
does not.
24.4 Terminating an RMAN Command
There are several ways to terminate an RMAN command in the middle of execution.
They include the following:
•The preferred method is to press Ctrl+C (or the equivalent "attention" key
combination for your system) in the RMAN interface. This also terminates
allocated channels, unless they are suspended in the media management code,
as happens when, for example, they are waiting for a tape to be mounted.
•You can end the server session corresponding to the RMAN channel by running
the SQL
ALTER SYSTEM KILL SESSION
statement as described in Terminating the
Session with ALTER SYSTEM KILL SESSION.
•You can terminate the server session corresponding to the RMAN channel on the
operating system as described in Terminating the Session at the Operating
System Level.
24.4.1 Terminating the Session with ALTER SYSTEM KILL SESSION
To terminate an RMAN session by using the ALTER SYSTEM statement, you need
the Oracle session ID for the RMAN channel and the serial number. This information is
contained in the RMAN log for messages.
Search for messages with the format shown in the following example:
channel ch1: sid=15 devtype=SBT_TAPE
The
sid
and
devtype
are displayed for each allocated channel. The Oracle Database
sid
is different from the operating system process ID. You can end the session using a
SQL
ALTER
SYSTEM
KILL
SESSION
statement.
ALTER SYSTEM KILL SESSION
takes two arguments, the
sid
printed in the RMAN message
and a serial number, both of which can be obtained by querying
V$SESSION
.
For example, run the following statement, where
sid_in_rman_output
is the number
from the RMAN message:
SELECT SERIAL#
FROM V$SESSION
WHERE SID=
sid_in_rman_output
;
Then, run the following statement, substituting the
sid_in_rman_output
and serial
number obtained from the query:
Chapter 24
Terminating an RMAN Command
24-16

ALTER SYSTEM KILL SESSION '
sid_in_rman_output
,
serial#
';
This statement has no effect on the session if the session stopped in media manager
code.
24.4.2 Terminating the Session at the Operating System Level
Finding and terminating the processes that are associated with the server sessions is
operating system-specific. On some platforms, the server sessions are not associated
with any processes at all. See your operating system-specific documentation for more
information.
24.4.3 Terminating an RMAN Session That Is Not Responding in the
Media Manager
You may sometimes need to terminate an RMAN job that is not responding in the
media manager. The best way to terminate RMAN when the channel connections are
not responding in the media manager is to terminate the session in the media
manager.
If this action does not solve the problem, then on some platforms, such as Linux, you
may be able to terminate the Oracle Database processes of the connections.
(Terminating the Oracle processes may cause problems with the media manager. See
your media manager documentation for details.)
This section contains the following topics:
•Components of an RMAN Session
•Process Behavior During a Suspended Job
•Terminating an RMAN Session: Basic Steps
24.4.3.1 Components of an RMAN Session
The nature of an RMAN session depends on the operating system.
In UNIX, an RMAN session has the following processes associated with it:
•The RMAN client process itself
•The default channel, the initial connection to the target database
•One target connection to the target database corresponding to each allocated
channel
•The catalog connection to the recovery catalog database, if you use a recovery
catalog
•An auxiliary connection to an auxiliary instance, during
DUPLICATE
or TSPITR
operations
•A polling connection to the target database, used for monitoring RMAN command
execution on the various allocated channels. By default, RMAN makes one polling
connection. RMAN makes additional polling connections if you use different
connect strings in the
ALLOCATE CHANNEL
or
CONFIGURE CHANNEL
commands. One
polling connection exists for each distinct connect string used in the
ALLOCATE
CHANNEL
or
CONFIGURE CHANNEL
command.
Chapter 24
Terminating an RMAN Command
24-17

24.4.3.2 Process Behavior During a Suspended Job
RMAN usually stops responding because a channel connection is waiting in the media
manager code for a tape resource. The catalog connection and the default channel
appear to suspend, because they are waiting for RMAN to tell them what to do. Polling
connections seem to be in an infinite loop while polling the RPC under the control of
the RMAN process.
If you terminate the RMAN process itself, then you also terminate the catalog
connection, the auxiliary connection, the default channel, and the polling connections.
If target and auxiliary connections are suspended but not while executing media
manager code, they also terminate. If either the target connection or any of the
auxiliary connections are executing in the media management layer, then they do not
terminate until the processes are manually terminated at the operating system level.
Not all media managers can detect the termination of the Oracle Database process.
Those which cannot may keep resources busy or continue processing. Consult your
media manager documentation for details.
Terminating the catalog connection does not cause the RMAN process to terminate
because RMAN is not performing catalog operations while the backup or restore is in
progress. Removing default channel and polling connections causes the RMAN
process to detect that a channel is no longer present and then to exit. In this case, the
connections to the unresponsive channels remain active as described previously.
24.4.3.3 Terminating an RMAN Session: Basic Steps
After the unresponsive channels in the media manager code are terminated, the
RMAN process detects this termination and exits, removing all connections except
target connections that are still operative in the media management layer.
The warning about the media manager resources still applies in this case.
To terminate an Oracle Database process that is not responding in the media
manager:
1. Query
V$SESSION
and
V$SESSION_WAIT
, as described in "Using V$ Views for RMAN
Troubleshooting". For example, execute the following query:
COLUMN EVENT FORMAT a17
COLUMN SECONDS_IN_WAIT FORMAT 999
COLUMN STATE FORMAT a10
COLUMN CLIENT_INFO FORMAT a30
SELECT p.SPID, s.EVENT, s.SECONDS_IN_WAIT AS SEC_WAIT,
sw.STATE, s.CLIENT_INFO
FROM V$SESSION_WAIT sw, V$SESSION s, V$PROCESS p
WHERE sw.EVENT LIKE '%MML%'
AND s.SID=sw.SID
AND s.PADDR=p.ADDR;
Examine the SQL output to determine which SBT functions are waiting. For
example, the output may be as follows:
SPID EVENT SEC_WAIT STATE CLIENT_INFO
---- ----------------- ---------- ---------- -----------------------------
8642 Backup:MML write 600 WAITING rman channel=ORA_SBT_TAPE_1
8374 Backup:MML write 600 WAITING rman channel=ORA_SBT_TAPE_2
Chapter 24
Terminating an RMAN Command
24-18

2. Using operating system-level tools appropriate to your platform, end the
unresponsive sessions. For example, on Linux execute a
kill
-9
command:
% kill -9 8642 8374
Some platforms include a command-line utility called
orakill
that enables you to
terminate a specific thread. From a command prompt, run the following command,
where
sid
identifies the database instance to target, and the
thread_id
is the
SPID
value from the query in Step 1:
orakill sid thread_id
3. Check that the media manager also clears its processes. If any remain, the next
backup or restore operation may freeze again, due to the previous problems in the
backup or restore operation. In some media managers, the only solution is to shut
down and restart the media manager. If the documentation from the media
manager does not provide the needed information, contact technical support for
the media manager.
See Also:
Your operating system-specific documentation for the relevant
commands
Chapter 24
Terminating an RMAN Command
24-19

Part VII
Transferring Data with RMAN
The following chapters describe how to use RMAN for database and tablespace
transport and migration. This part of the book contains these chapters:
•Duplicating a Database
•Duplicating a Database: Advanced Topics
•Creating Transportable Tablespace Sets
•Transporting Data Across Platforms

25
Duplicating Databases
This chapter describes how to use the
DUPLICATE
command to create an independently
functioning database copy.
This chapter contains the following topics:
•Overview of RMAN Database Duplication
•Planning to Duplicate a Database
•Preparing the Auxiliary Instance
•Duplicating a Database
•Duplicating CDBs and PDBs
•Restarting DUPLICATE After a Failure
•Examples: Duplicating Databases
•Example: Script to Duplicate a Database Using Backup-based Duplication
25.1 Overview of RMAN Database Duplication
Database duplication is the use of the
DUPLICATE
command to copy all or a subset of
the data in a source database. The duplicate database (the copied database) functions
entirely independently from the source database (the database being copied).
This section contains the following topics:
•Purpose of Database Duplication
•Basic Concepts of Database Duplication
•Types of Database Duplication
•How RMAN Duplicates a Database
•Contents of a Duplicate Database
•About the Destination Host for Database Duplication
•About Duplicate Database File Names
•About Duplicating a Database to a Past Point-in-Time
•Prerequisites for Duplicating a Database
25.1.1 Purpose of Database Duplication
A duplicate database is useful for a variety of purposes, most of which involve testing.
You can perform the following tasks in a duplicate database:
•Test backup and recovery procedures
25-1

For example, you can duplicate the production database on
host1
to
host2
, and
then use the duplicate database on
host2
to practice restoring and recovering this
database while the production database on
host1
operates as usual.
•Test an upgrade to a new release of Oracle Database
•Test the effect of applications on database performance
•Create a standby database
You can create a physical standby database or an Oracle Data Guard far sync
instance. A standby database is a copy of the primary database that you update
continually with archived redo log files from the primary database. If the primary
database is inaccessible, then you can fail over to the standby database, which
becomes the new primary database. A database copy, however, cannot be used
in this way: it is not intended for failover scenarios and does not support the
various standby recovery and failover options.
•Generate reports
See Also:
Oracle Data Guards Concepts and Administration to learn how to create a
standby database with the
DUPLICATE
command
25.1.2 Basic Concepts of Database Duplication
You must understand some basic concepts before duplicating a database.
The source host is the computer that hosts the source database. The source
database instance is the instance that is associated with the source database.
The destination host is the computer that hosts the duplicate database. The source
host and destination host can be the same or different computers.
For the duplication process, the database instance that is associated with the duplicate
database is called the auxiliary instance.
RMAN must perform database point-in-time recovery, even when no explicit point in
time is provided for duplication. Point-in-time recovery is required because the online
redo log files in the source database are not backed up and cannot be applied to the
duplicate database. The farthest point of recovery of the duplicate database is the
most recent redo log file archived by the source database.
RMAN assigns a new DBID to the duplicate database (except when a standby
database is created, in which case the source DBID is retained). You can then register
the duplicate database in the same recovery catalog as the source database.
If you copy a database with operating system utilities rather than the
DUPLICATE
command, then the DBID of the copied database remains the same as the original
database. To register the copied database in the same recovery catalog with the
original, you must change the DBID with the DBNEWID utility.
Chapter 25
Overview of RMAN Database Duplication
25-2

See Also:
Oracle Database Utilities
25.1.2.1 Initialization Parameters for the Auxiliary Instance
Certain mandatory initialization parameters must be set for the auxiliary instance.
The following table describes a subset of the possible initialization parameters for the
auxiliary instance.
Table 25-1 Auxiliary Instance Initialization Parameters
Initialization Parameter Value Status
DB_NAME
The same name used in the
DUPLICATE
command. If you
use the
DUPLICATE
command
to create a standby database,
then the name must be the
same as the primary
database.
The
DB_NAME
initialization
parameter for the duplicate
database must be unique
among databases in its Oracle
home.
Required
CONTROL_FILES
Control file locations . Required
DB_BLOCK_SIZE
The block size for the
duplicate database. This block
size must match the block size
of the source database. If the
source database parameter
file contains a value for the
DB_BLOCK_SIZE
initialization
parameter, then you must
specify the same value for the
auxiliary instance. However, if
no
DB_BLOCK_SIZE
parameter
is specified in the source
database initialization
parameter file, then do not
specify
DB_BLOCK_SIZE
parameter in the auxiliary
instance.
Required, if this initialization
parameter is set in the source
database
Chapter 25
Overview of RMAN Database Duplication
25-3

Table 25-1 (Cont.) Auxiliary Instance Initialization Parameters
Initialization Parameter Value Status
DB_FILE_NAME_CONVERT
Pairs of strings for converting
the names of data files and
temp files. You can also
specify
DB_FILE_NAME_CONVERT
parameter on the
DUPLICATE
command itself. See "Using
the
DB_FILE_NAME_CONVERT
Parameter to Generate
Names for Non-OMF or ASM
Data Files".
Optional
LOG_FILE_NAME_CONVERT
Pairs of strings for naming
online redo log files. See
"Using the
LOG_FILE_NAME_CONVER
T Parameter to Generate
Names for Non-OMF or ASM
Log Files".
Optional
DB_CREATE_FILE_DEST
Location for Oracle managed
data files.
Optional
DB_CREATE_ONLINE_LOG_DEST_
n
Location for Oracle managed
online redo log files.
Optional
DB_RECOVERY_FILE_DEST
Location for fast recovery
area.
Optional
Oracle Real Application
Cluster (Oracle RAC)
parameters:
•
<INSTANCESIDn>.INSTANC
E_NAME
•
<INSTANCESIDn>.INSTANC
E_NUMBER
•
<INSTANCESIDn>.THREAD
•
<INSTANCESIDn>.UNDO_TA
BLESPACE
•
<INSTANCESIDn>.LOCAL_L
ISTENER
Set these parameters for each
instance of the Oracle RAC
database.
Required for Oracle RAC
configuration
See Also:
•Oracle Database Reference for more information about initialization
parameters for the auxiliary instance
•Table 26-1 to learn about options for naming duplicate files
Chapter 25
Overview of RMAN Database Duplication
25-4

25.1.2.2 About Parallelizing Backup Set Creation During Active Database
Duplication
RMAN multisection backups provide faster backup performance by backing up very
large data files in parallel. Multiple backup pieces are created, with a separate channel
writing to each backup piece. Starting with Oracle Database 12c Release 1 (12.1), you
can use multisection backup sets to transfer the source files that are required to
perform active database duplication.
Use the
SECTION SIZE
option in the
DUPLICATE
command to create multisection backup
sets. The following command creates multisection backup sets, with the size of each
backup piece being 400MB. Assume that the connection to the target database and
auxiliary instance has been made by using net service names.
DUPLICATE TARGET DATABASE TO dup_db
FROM ACTIVE DATABASE
PASSWORD FILE
SECTION SIZE 400M;
25.1.2.3 About Encrypting Backup Sets During Active Database Duplication
RMAN can use backup sets to transfer the source database files that need to be
duplicated. The backup sets are transferred over the network to the auxiliary database.
Backup sets can be encrypted for additional security. Use the
SET ENCRYPTION
ALGORITHM
command before the
DUPLICATE
command to specify the encryption
algorithm.
Before you perform active database duplication, use one of the following techniques to
ensure that the encryption is successful:
•If the source database uses transparent encryption, then you must share the
Oracle software keystore that contains the encryption key between the source
database and the auxiliary instance, as described in Making the Oracle Keystore
Available to the Destination Host.
•If the source database uses password encryption, then you must specify the
password used to encrypt backups.
The following command sets the encryption password (where
password
is a
placeholder for the actual password that you enter):
SET ENCRYPTION ON IDENTIFIED BY password;
25.1.2.4 About Compressing Backup Sets During Active Database Duplication
When backup sets are used to perform active database duplication, RMAN can use
backup compression to minimize the size of the backup sets that are used to transfer
files from the source database to the destination host. Thus, compression can
enhance the performance of the duplication process.
Compressing backup sets used for active database duplication is supported starting
with Oracle Database 12c Release 1 (12.1).
Use the
USING COMPRESSED BACKUPSET
clause of the
DUPLICATE
command to compress the
backup sets that contain data which is required to perform active database duplication.
The following command performs active database duplication by using compressed
Chapter 25
Overview of RMAN Database Duplication
25-5

backup sets. Assume that the connection to the target database and auxiliary instance
has been made using net service names.
DUPLICATE TARGET DATABASE TO dup_db
FROM ACTIVE DATABASE
PASSWORD FILE
USING COMPRESSED BACKUPSET;
25.1.3 Types of Database Duplication
RMAN enables you to perform two main types of database duplication.
They include the following:
•Backup-based duplication
The duplicate database is created by using preexisting RMAN backups or copies
of the source database. You can use different techniques to duplicate a database
by using backup-based duplication.
•Active database duplication
The duplicate database is created by copying the live source database over the
network to the auxiliary instance. The duplication can be performed by using
backup sets or image copies.
You can use any type of duplication to duplicate a database either to the local host or
to a remote host.
See Also:
•Techniques for Performing Backup-Based Duplication
•Techniques for Performing Active Database Duplication
25.1.3.1 Overview of Backup-Based Duplication
In backup-based duplication, preexisting RMAN backups of the source database are
used to create the duplicate database. A combination of full and incremental backups
can be used. RMAN determines which backups and archived redo log files must be
used based on the
UNTIL
condition.
In backup-based duplication, the primary work of duplicating the database is
performed by auxiliary channels. You can configure additional channels as described
in Configuring RMAN Channels for Use in Duplication.
Backup-based duplication can be used in the following scenarios:
•A connection to the source database is not available, but backups of the source
database are available.
•Network bandwidth between the source host and the destination host is a
constraint.
When network bandwidth between the source host and destination host is limited,
using active database duplication may result in reduced performance. For
example, the source host and the destination host are in different geographical
Chapter 25
Overview of RMAN Database Duplication
25-6
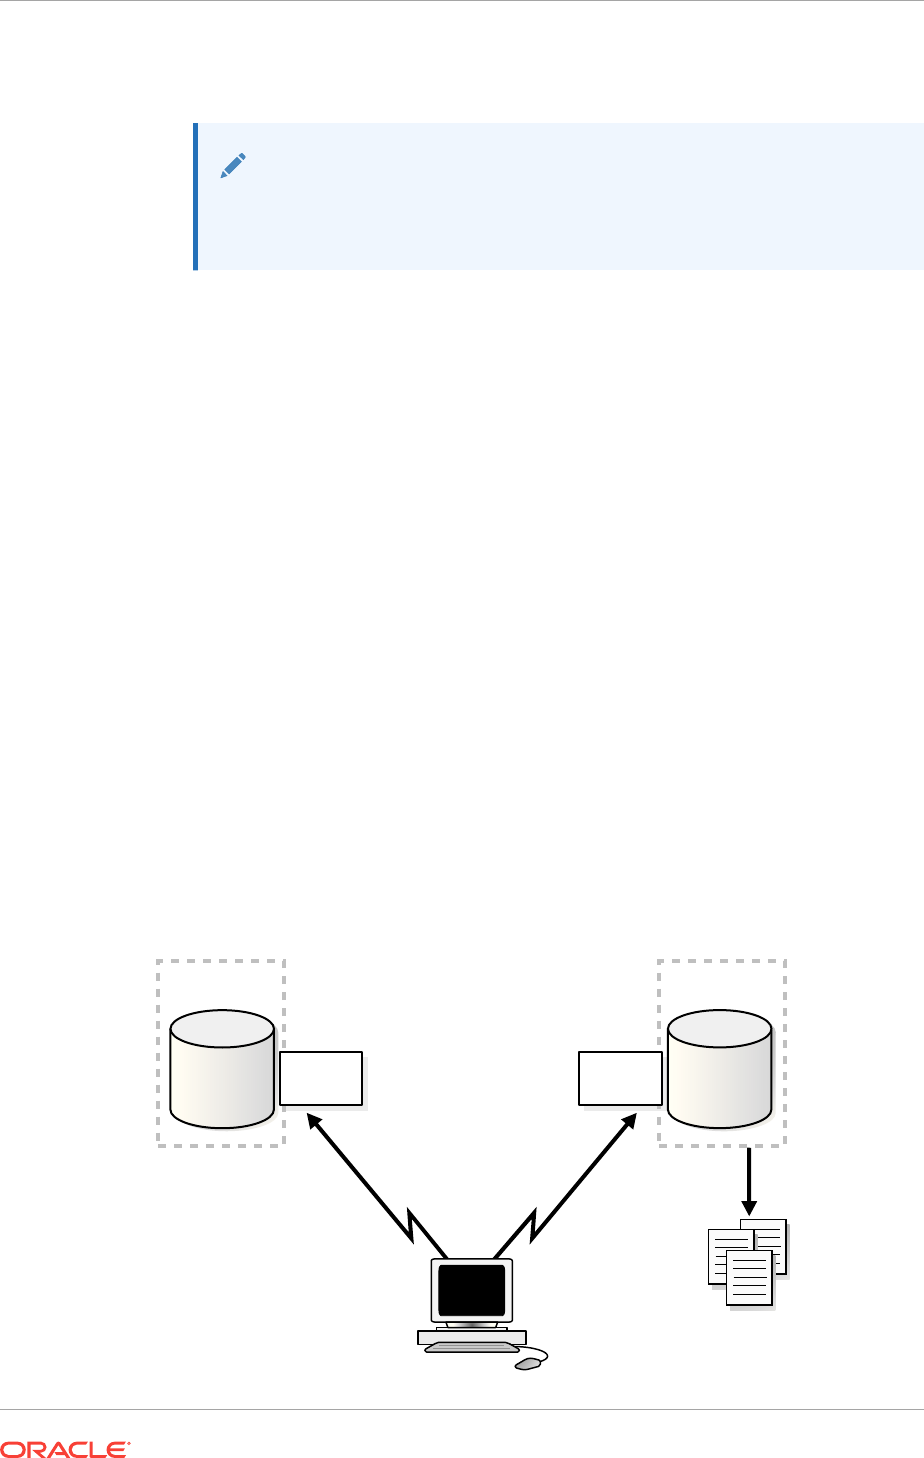
locations and are connected over a WAN. In such cases, it may be preferable to
use backup-based duplication.
See Also:
Overview of Active Database Duplication for details of scenarios in which
active database duplication is preferred.
25.1.3.2 Techniques for Performing Backup-Based Duplication
Multiple techniques are available for performing backup-based duplication.
Use one of the following mutually-exclusive techniques to perform backup-based
duplication:
•Backup-Based Duplication with a Target Connection
•Backup-Based Duplication Without a Target Connection
•Backup-Based Duplication Without a Target Database and Recovery Catalog
Connection
25.1.3.2.1 Backup-Based Duplication with a Target Connection
In this method, you must connect as
TARGET
to the source database and as
AUXILIARY
to
the auxiliary instance.
Figure 25-1 below illustrates backup-based duplication with a target connection. You
may connect to a recovery catalog but it is not mandatory (not in figure). RMAN uses
the metadata in the control file of the source database to determine which backups or
copies must be used to perform the duplication.
The destination host must have access to the RMAN backups that are required to
create the duplicate database.
Figure 25-1 Backup-Based Duplication with a Target Connection
Source
Database
Duplicate
Database
Destination
Host
Source
Host
Auxiliary
Instance
Source
Instance
RMAN
Client
Connect
Target
Connect
Auxiliary
RMAN
Backups
Chapter 25
Overview of RMAN Database Duplication
25-7
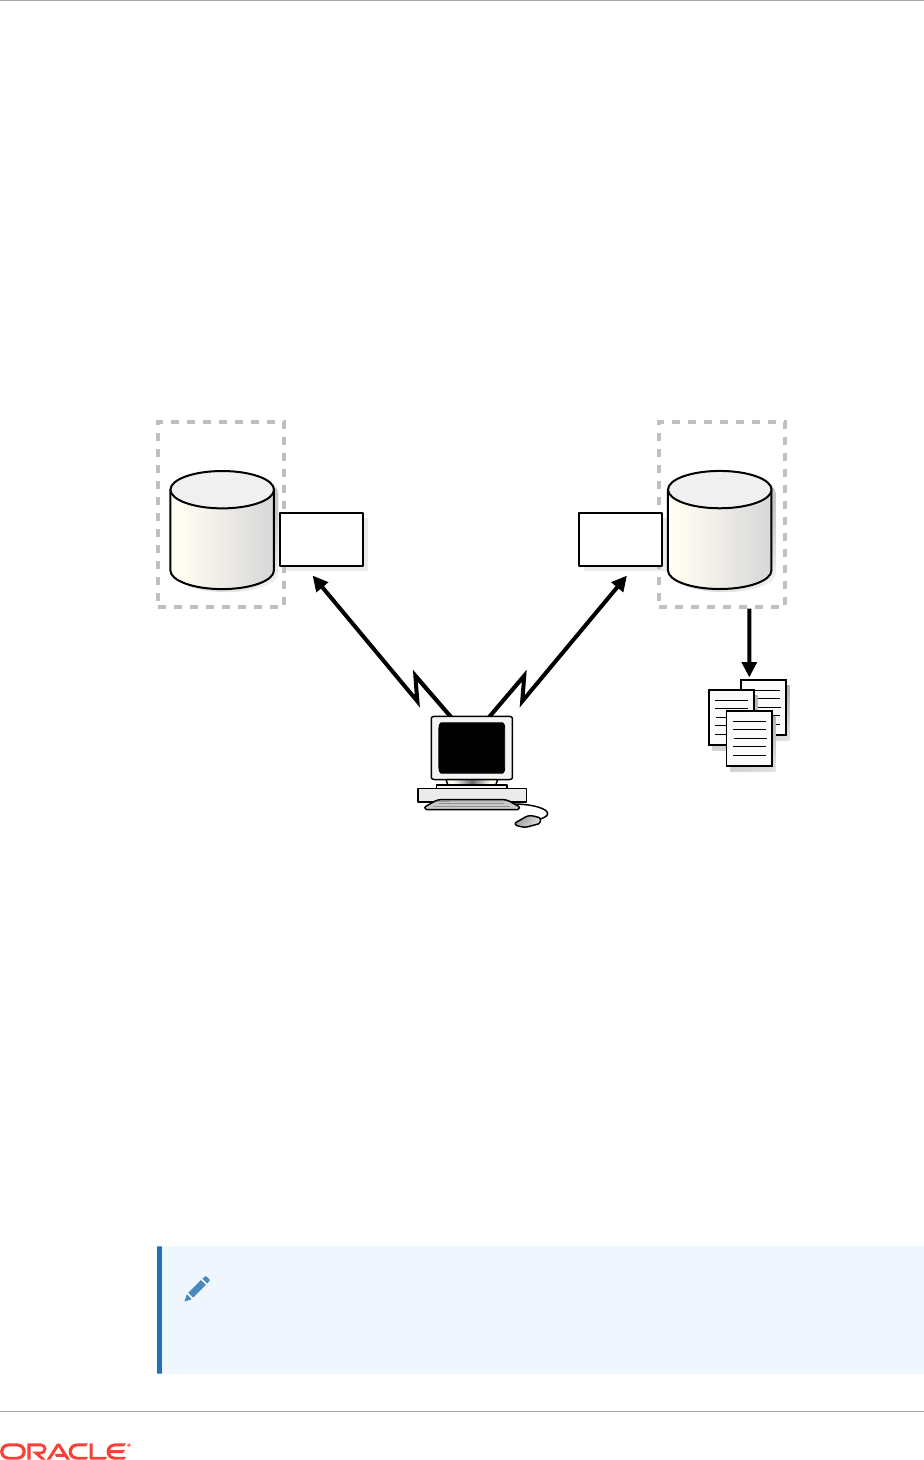
25.1.3.2.2 Backup-Based Duplication Without a Target Connection
In this method, you connect as
CATALOG
to the recovery catalog database and as
AUXILIARY
to the auxiliary instance.
Figure 25-2 illustrates backup-based duplication without a target connection. RMAN
uses the metadata in the recovery catalog to determine which backups or copies are
required to perform the duplication.
The destination host must have access to the RMAN backups required to create the
duplicate database.
Figure 25-2 Backup-Based Duplication Without a Target Connection
Recovery
Catalog
Database
Duplicate
Database
Destination
Host
Recovery
Catalog Host
Auxiliary
Instance
Catalog
Instance
RMAN
Client
Connect
Catalog
Connect
Auxiliary
RMAN
Backups
25.1.3.2.3 Backup-Based Duplication Without a Target Database and Recovery Catalog
Connection
In this method, there is no connection to either the source database or the recovery
catalog.
Figure 25-3 illustrates backup-based duplication without connections to the target or to
the recovery catalog database instance. You perform duplication by connecting to the
auxiliary instance and using backups or copies of the source database that are stored
in a disk location on the destination host. RMAN obtains metadata about where the
backups and copies reside from the
BACKUP LOCATION
clause of the
DUPLICATE
command.
A disk backup location containing all the backups or copies required for duplication
must be available to the destination host.
Note:
This method is not supported for backups that are stored on tape devices.
Chapter 25
Overview of RMAN Database Duplication
25-8
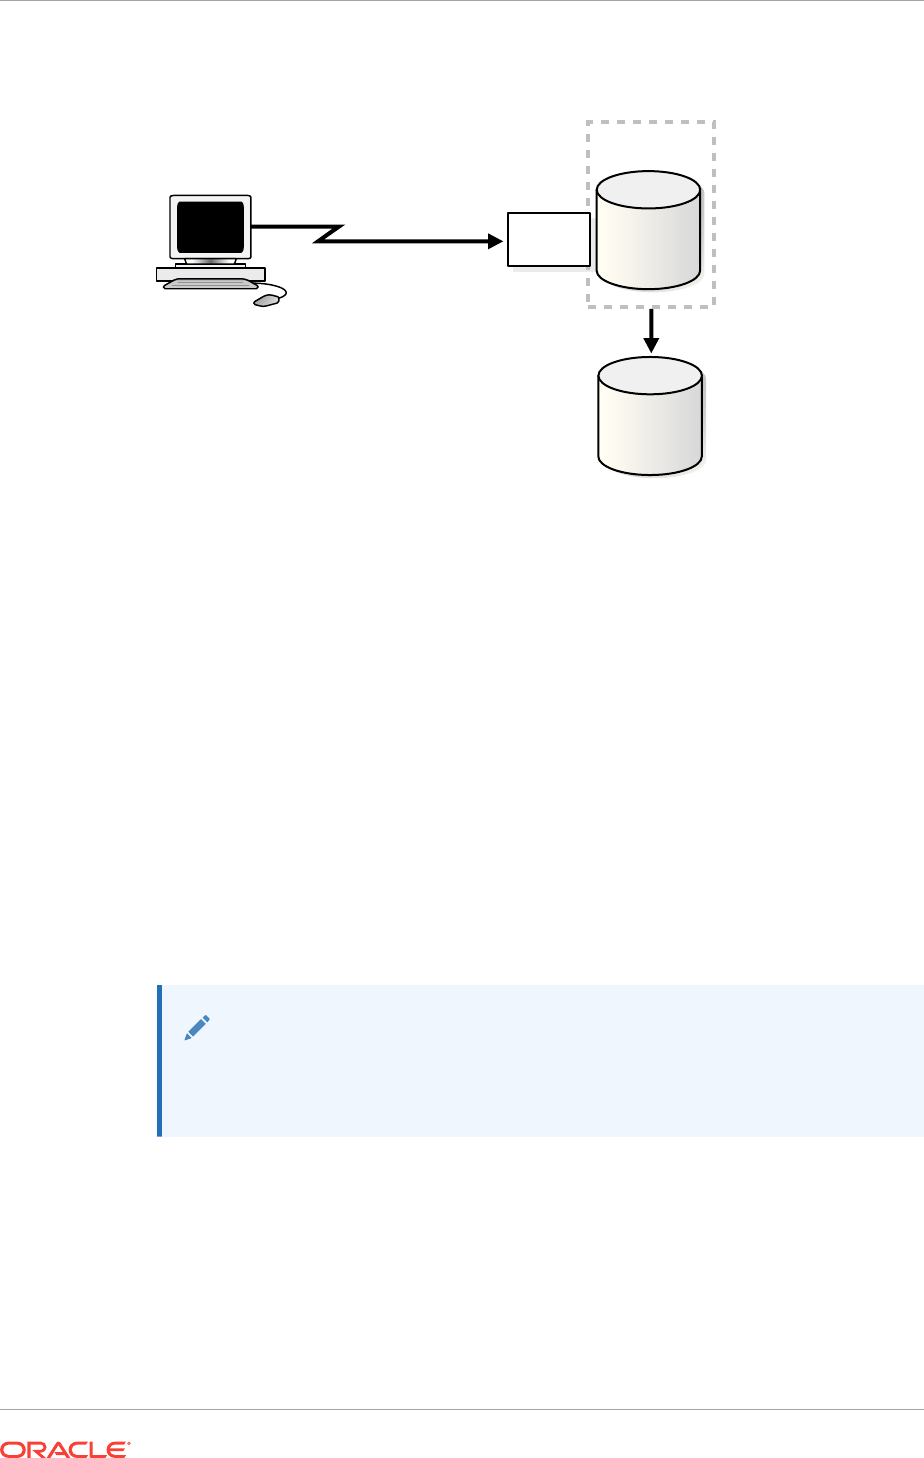
Figure 25-3 Backup-Based Duplication Without a Target Connection or
Recovery Catalog Connection
Duplicate
Database
Backup
Location
Destination
Host
Auxiliary
Instance
RMAN
Client Connect Auxiliary
25.1.3.3 Overview of Active Database Duplication
Active database duplication does not require backups of the source database. It
duplicates the live source database to the destination host by copying the database
files over the network to the auxiliary instance. RMAN can copy the required files as
image copies or backup sets.
For active database duplication, the duplication technique used determines which
channel performs the principal work. When active database duplication is performed
using backup sets, the principal work of duplication is performed by the auxiliary
channels. When image copies are used, the primary work is performed by the target
channels.
To perform active database duplication, a connection to the target database is
required. Oracle recommends that you use active database duplication in general,
unless network bandwidth between the source host and the destination host is a
constraint. Active database duplication requires minimal setup and is simpler to
perform.
Note:
For active database duplication, the source database must use a server
parameter file.
Some of the scenarios in which active database duplication using backup sets may be
preferred over using image copies are:
•You want to use multisection backups, compression, or encryption while
duplicating your database.
•The source database does not have sufficient network resources to transfer the
required database files to the duplicate database.
•You want to minimize the resources used by the duplication process.
Chapter 25
Overview of RMAN Database Duplication
25-9
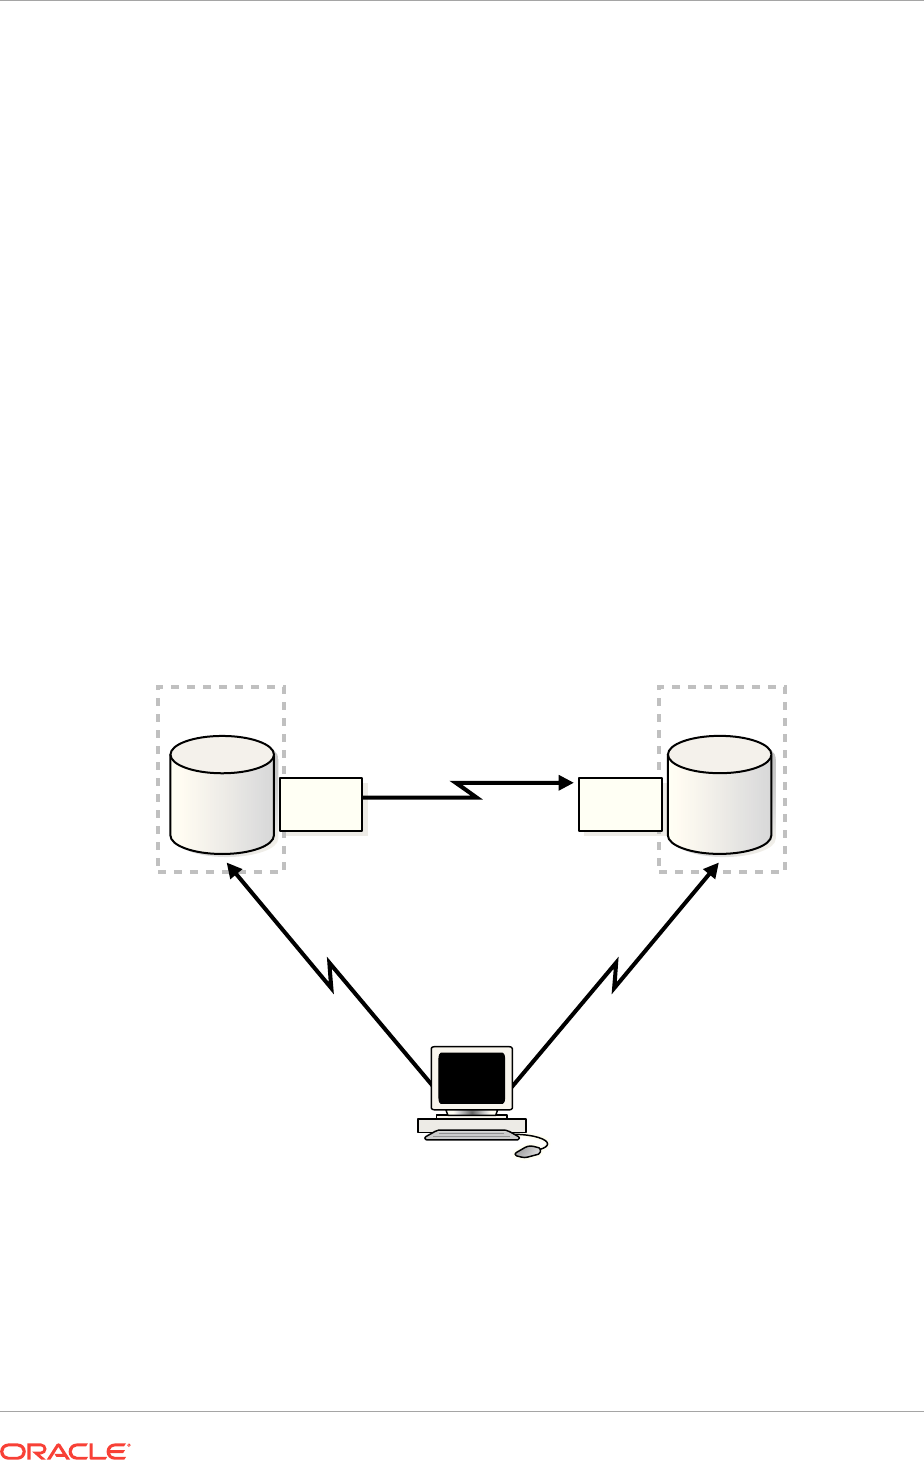
Active database duplication with backup sets uses minimal resources on the
source database.
25.1.3.4 Techniques for Performing Active Database Duplication
Multiple techniques are available for performing active database duplication.
Use one of the two mutually-exclusive methods to perform active database duplication:
•Active Database Duplication Using Image Copies
•Active Database Duplication Using Backup Sets
25.1.3.4.1 Active Database Duplication Using Image Copies
In this method, RMAN connects as
TARGET
to the source database and as
AUXILIARY
to
the auxiliary instance. The source database then transfers the required database files
over the network to the auxiliary instance. This method is referred to as the push-
based method of active database duplication.
Figure 25-4 illustrates active database duplication using image copies. Using image
copies for active database duplication may require additional resources on the source
database. You can configure additional target channels to improve the duplication
performance as described in Configuring RMAN Channels for Use in Duplication.
Figure 25-4 Active Database Duplication Using Image Copies
Source
Database
Duplicate
Database
Destination
Host
Source
Host
Auxiliary
Instance
Source
Instance
RMAN
Client
Connect
Target
Connect
Auxiliary
push-based
active duplication
25.1.3.4.2 Active Database Duplication Using Backup Sets
Using backup sets to perform active database duplication is also known as the pull-
based method of active database duplication.
In this method, RMAN connects as
TARGET
to the source database and as
AUXILIARY
to
the auxiliary instance. The auxiliary instance then connects to the source database
Chapter 25
Overview of RMAN Database Duplication
25-10
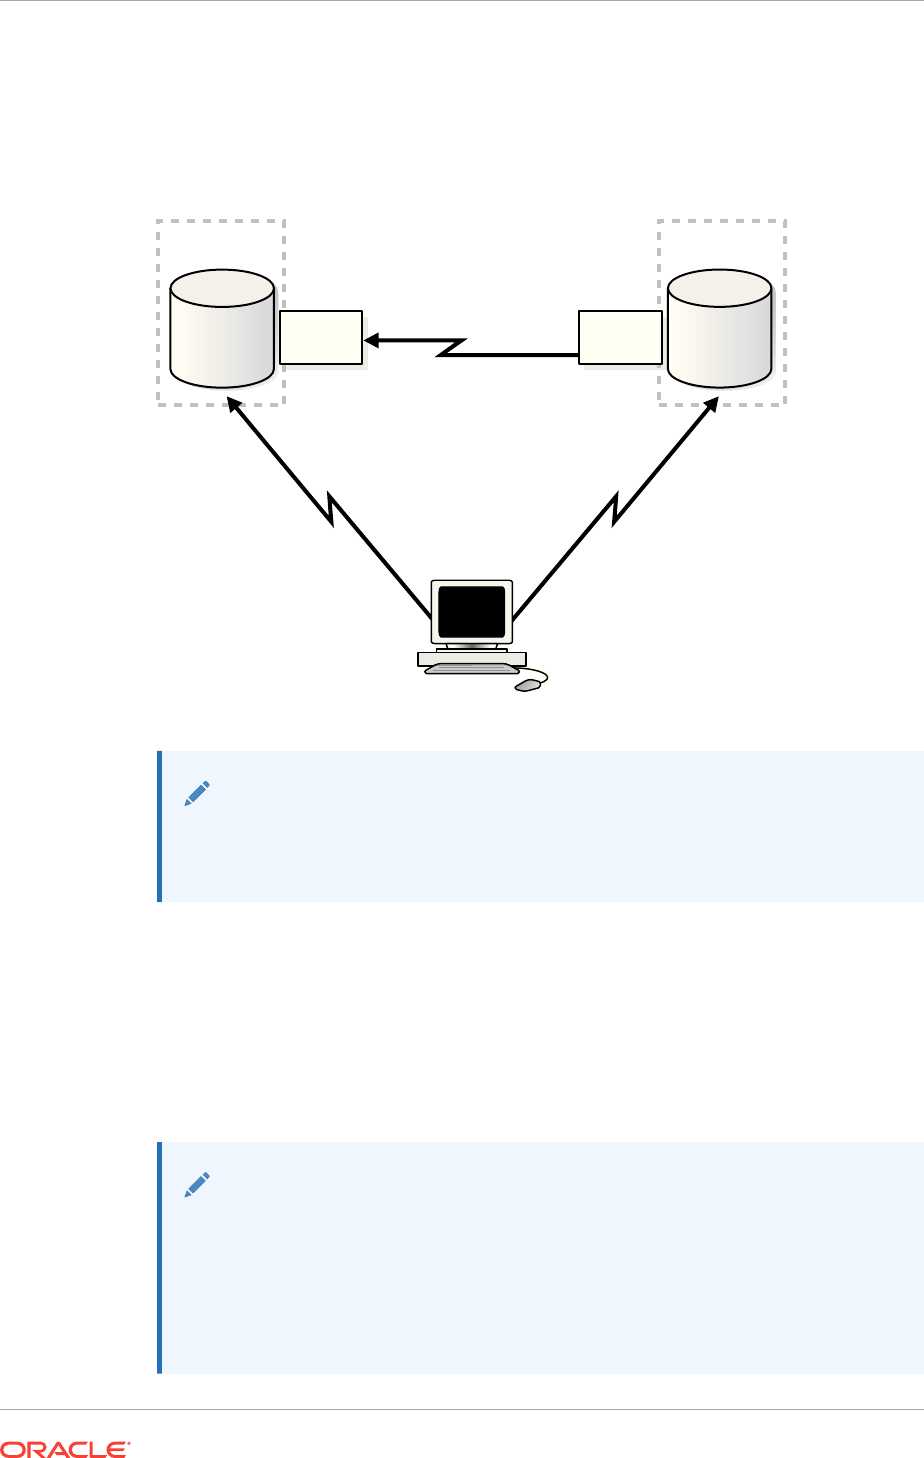
through Oracle Net Services and retrieves the required database files, over the
network, from the source database. Figure 25-5 illustrates active database duplication
using backup sets.
Figure 25-5 Active Database Duplication Using Backup Sets
Source
Database
Duplicate
Database
Destination
Host
Source
Host
Auxiliary
Instance
Source
Instance
RMAN
Client
Connect
Target
Connect
Auxiliary
pull-based
active duplication
Note:
Performing active database duplication using backup sets is available
starting Oracle Database 12c Release 1 (12.1).
Using backup sets for active database duplication provides the following advantages:
•RMAN can use unused block compression, thus reducing the size of backups that
must be transported over the network.
•Backup sets can be created in parallel, on the source database, by using
multisection backups.
•Backup sets created on the source database can be encrypted.
See Also:
•About Compressing Backup Sets During Active Database Duplication
•About Parallelizing Backup Set Creation During Active Database
Duplication
•About Encrypting Backup Sets During Active Database Duplication
Chapter 25
Overview of RMAN Database Duplication
25-11

25.1.3.5 Factors that Determine Whether Backup Sets or Image Copies Are
Used for Active Database Duplication
RMAN can use backup sets or image copies to perform active database duplication.
RMAN uses backup sets to perform active database duplication when the connection
to the target database is established using a net service name and any one of the
following conditions is satisfied:
•The
DUPLICATE ... FROM ACTIVE DATABASE
command contains either the
USING
BACKUPSET
,
USING COMPRESSED BACKUPSET
, or
SECTION SIZE
clause.
•The number of auxiliary channels allocated is equal to or greater than the number
of target channels allocated.
Otherwise, RMAN uses image copies to perform active database duplication.
Note:
Oracle recommends that you use backup sets to perform active database
duplication.
25.1.4 How RMAN Duplicates a Database
RMAN performs a set of automated steps to duplicate a database.
The steps include the following:
1. Create a default server parameter file for the auxiliary instance, if the following
conditions are true:
•Duplication does not involve a standby database
•Server parameter files are not being duplicated
•The auxiliary instance was not started with a server parameter file
2. Restors from backup or copies from the active database the latest control file that
satisfies the
UNTIL
clause requirements.
3. Mouns the auxiliary instance by using the restored control file or the backup
control file that is copied from the active database.
4. Uss metadata in the RMAN repository to select the backups that are used to
restore the data files to the auxiliary instance. This step applies to backup-based
duplication.
5. Copy the duplicate database files to the destination host and restores them to a
noncurrent point in time by using incremental backups and archived redo log files.
6. Shut down and restarts the auxiliary database instance on the destination host in
NOMOUNT
mode.
7. Create a new control file, which then creates and stores the new DBID in the data
files.
Chapter 25
Overview of RMAN Database Duplication
25-12

8. Open the duplicate database with the
RESETLOGS
option and creates the online redo
log for the new database.If you do not want to open the duplicate database, use
the
NOOPEN
clause in the
DUPLICATE
statement, as described in Deciding the State of
the Duplicate Database.
See Also:
The
DUPLICATE
entry in Oracle Database Backup and Recovery Reference for
a complete list of which files are copied to the duplicate database
25.1.5 Contents of a Duplicate Database
A duplicate database can include the same contents as the source database or only a
subset of the tablespaces in the source database.
For example, you can use the
TABLESPACE
option of the
DUPLICATE
command to duplicate
only specified tablespaces, or the
SKIP READONLY
option to exclude read-only
tablespaces from the duplicate database.
25.1.5.1 About Duplicating a Subset of the Source Database
The
DUPLICATE
command contains clauses that enable you to duplicate a subset of the
entire source database.
It is not always necessary to duplicate all tablespaces of a database. For example, you
may plan to generate reports that require only a subset of tablespaces from your
source database.
The following table explains the
DUPLICATE
command options to specify subsets of
tablespaces for the duplicate database:
Table 25-2 Options to Specify Subsets of Tablespaces for the Duplicate
Database
DUPLICATE Options Explanation
SKIP READONLY
Excludes the data files of read-only
tablespaces from the duplicate database.
SKIP TABLESPACE 'tablespace_name ', ...
Excludes the specified tablespaces from the
duplicate database. You cannot exclude the
SYSTEM
and
SYSAUX
tablespaces, tablespaces
with
SYS
objects, undo tablespaces,
tablespaces with undo segments, tablespaces
with materialized views, or tablespaces in such
a way that the duplicated tablespaces are not
self-contained.
TABLESPACE 'tablespace_name ', ...
Automatically includes the
SYSTEM
,
SYSAUX
,
and undo tablespaces. The included
tablespaces must be self-contained and the
resulting skipped tablespaces must not contain
SYS
objects or materialized views.
Chapter 25
Overview of RMAN Database Duplication
25-13

Note:
When you exclude tablespaces in backup-based duplication without a target
connection or without a target and a recovery catalog connection, RMAN has
special prerequisites. See the Prerequisites section of the
DUPLICATE
command in Oracle Database Backup and Recovery Referencefor details.
25.1.6 About the Destination Host for Database Duplication
RMAN creates the duplicate database on the specified destination host. The
destination host can be the same as the source host or different.
When the same computer is used as the source host and the destination host, the
duplication is termed as duplicating to the local host. When the source host and the
destination host are on different computers, the duplication is termed as duplicating to
a remote host.
About Duplicating a Database to the Local Host
When you duplicate a database to the local host, you must store the duplicate
database files by using a directory structure that is different from that of the source
database. For example, if the source database files are stored in the
/disk1/oracle
directory, then the duplicate database files can be stored in the
/disk2/oracle
directory. The duplicate database file names can be the same as those of the source
database or different. The techniques for specifying alternate names for duplicate
database files are described in "Methods of Generating Database File Names for the
Duplicate Database".
Caution:
Using
NOFILENAMECHECK
when duplicating to the local host overwrites the
source database files.
About Duplicating a Database to a Remote Host
When you duplicate a database to a remote host, the duplicate database files can
either use the same directory structure and file names as the source database or use
a different directory structure and file names. If you choose to name duplicate
database files differently, then you must use one the techniques described in Methods
of Generating Database File Names for the Duplicate Database to specify how
duplicate database files are named.
Note:
Duplication to a remote host requires a password file and an Oracle Net
Services connection to the auxiliary instance.
Chapter 25
Overview of RMAN Database Duplication
25-14

25.1.7 About Duplicate Database File Names
Depending on the destination host used and your duplication scenario, the duplicate
database files can either use the same names as the source database or different
names. The database files include the data file, control files, online redo log files, and
temp files.
If you choose to name duplicate database files differently, you must specify a strategy
for naming these files.
See Also:
•Choosing a Strategy for Naming Duplicate Database Files
•About the Destination Host for Database Duplication
25.1.8 About Duplicating a Database to a Past Point-in-Time
You can use clauses in the
DUPLICATE
command to duplicate a database to a past point
in time.
By default, the
DUPLICATE
command creates the duplicate database by using the most
recent backups of the target database and then performs recovery to the most recent
consistent point contained in the incremental backups and archived redo logs.
However, you can recover the duplicate database to a past point in time by using one
of the following methods:
•
DUPLICATE … UNTIL
command
•
SET UNTIL
command before the
DUPLICATE
command
See Also:
Oracle Database Backup and Recovery Reference for an example of
duplicating a database to a past point in time
25.1.9 Prerequisites for Duplicating a Database
The prerequisites depend on the type of database duplication being performed. Some
prerequisites are common to all types of duplication and others are specific to a
particular type of duplication.
See Also:
Oracle Database Backup and Recovery Reference for details about
prerequisites for each duplication technique
Chapter 25
Overview of RMAN Database Duplication
25-15

25.2 Planning to Duplicate a Database
Before duplicating a database, you must make some decisions about the duplication
process.
Planning to duplicate a database includes the following tasks:
•Choosing a Duplication Technique
•Choosing a Strategy for Naming Duplicate Database Files
•Installing the Oracle Database Software on the Destination Host
•Deciding the State of the Duplicate Database
•Making Backups Accessible to the Duplicate Instance
25.2.1 Choosing a Duplication Technique
Your business requirements and the database environment determine which
duplication technique is best for your situation.
Consider the following questions:
•Are you familiar with the prerequisites for each duplication technique?
Review the Prerequisites section of the
DUPLICATE
command description in Oracle
Database Backup and Recovery Reference for a complete list.
Some prerequisites are specific and depend on the duplication technique. For
example, active duplication requires that the source and auxiliary instances use
the same password as the source database, whereas backup-based duplication
without connections to the target database and recovery catalog requires only that
all backups and database copies reside in a single location.
•Do backups of the source database exist?
The principal advantage of active database duplication is that it does not require
source database backups. Active duplication copies mounted or online database
files over a network to the auxiliary instance. One disadvantage of this technique is
the negative performance effect on the network. Another disadvantage is that the
source database is running processes required to transfer the files to the auxiliary
host, thereby affecting the source database and production workload.
If the source database backups exist, and if the effect on the network is
unacceptable, then backup-based duplication may be a better option. You can
copy backups to temporary storage and transfer them manually to the destination
host. If duplication is made with a connection to the target or the recovery catalog,
then the backup files on the destination host must have the same file specification
as they had on the source host. Otherwise, this is not a requirement.
•Is a recovery catalog available?
If a recovery catalog exists, then you can perform backup-based duplication
without connecting RMAN as TARGET to the source database. This technique is
advantageous where network connections from the auxiliary host to the source
database are restricted or prone to intermittent disruptions. When you perform
duplication without using a target connection, the source database is unaffected by
the duplication.
Chapter 25
Planning to Duplicate a Database
25-16

•How much disk space is available on the destination host?
When you perform duplication by using disk backups, disk space on the
destination host can be an issue. For example, if the source database is 1 terabyte
(TB), and if you duplicate the database from disk backups without using shared
disk or network file system (NFS), then you must have at least 2 terabytes (TB) of
space available on the destination host. In some environments, manual transfer of
backups is necessary because NFS performance is a bottleneck.
•Are the source and destination hosts connected by a LAN or a WAN?
Performance of active database duplication is probably slower on a wide area
network (WAN) than on a local area network (LAN). If the performance
degradation on a WAN is unacceptable, then backup-based duplication may be
the only viable option.
•When do you plan to duplicate the database?
If you must duplicate the database during a period of high user activity, then the
loss of network throughput caused by active duplication may be a problem, making
backup-based duplication a better choice. Also, in active database duplication, the
RMAN channels that are required for copying files to the auxiliary host can affect
performance.
25.2.2 Choosing a Strategy for Naming Duplicate Database Files
When you duplicate a database, RMAN generates names for the database files in the
duplicate database. This includes the control files, data files, temp files, and online
redo log files.
Depending on your duplication scenario, you can name the duplicate database files by
using one of the following techniques:
•Using the Same Names for Database Files in the Source Database and Duplicate
Database
•Using Different Names for the Database Files in the Source Database and
Duplicate Database
If you do not specify a strategy to generate names for duplicate database files, then
RMAN uses the same file names and directory structure as the source database for
the duplicate database. Only when duplicating to a remote host, use the
NOFILENAMECHECK
clause to indicate that RMAN must not display an error when the
names of the database files are the same in the source and duplicate database.
Some of the methods used to specify alternate names for duplicate database files may
generate file names that are the same as the ones used by the source database. This
may happen if, for example, you used the
SET NEWNAME
or the
CONFIGURE AUXNAME
commands to specify names for the duplicate database files. Use caution when you
specify the file names for the duplicate database, else you may mistakenly overwrite
the source database files.
25.2.2.1 Using the Same Names for Database Files in the Source Database
and Duplicate Database
Certain conditions must be met to use the same names for files in the source and
duplicate database.
Chapter 25
Planning to Duplicate a Database
25-17

The simplest duplication strategy is to configure the duplicate database to use the
same directory structure and file names as the source database. You can use the
same directory structure and names only when duplicating to a remote host.
Using the same directory structure and file names means that your environment meets
the following requirements:
•If the source database uses ASM disk groups, then the duplicate database must
use ASM disk groups with the same names.
•If the source database files are Oracle Managed Files, then the auxiliary instance
must set the
DB_CREATE_FILE_DEST
parameter to the same directory location as the
source database. Although the directories are the same on the source and
destination hosts, Oracle Database chooses the relative names for the duplicate
files.
•If the names of the database files in the source database contain a path, then this
path name must be the same in the duplicate database.
•For Oracle Real Application Clusters (RAC) environments, use the same value for
the
ORACLE_SID
parameter of the source and destination databases.
When you configure your environment as suggested, no additional configuration is
required to name the duplicate files.
25.2.2.2 Using Different Names for the Database Files in the Source Database
and Duplicate Database
If the source host and the destination host use different directory structures, or if they
use the same directory structures but you want to name the database files differently,
then you must specify how RMAN should generate names for the duplicate database
files.
Note:
It is recommended that you use different names for the ASM disk groups in
the source and duplicate database.
See Also:
Methods of Generating Database File Names for the Duplicate Database
25.2.2.3 Methods of Generating Database File Names for the Duplicate
Database
Depending on the method that you choose, RMAN can either automatically generate
file names or use specific names for the duplicate database files. The database files
include the data files, control files, online redo log files, and temp files.
Use one of the following methods, listed in the order of precedence, to generate file
names for the duplicate database:
Chapter 25
Planning to Duplicate a Database
25-18

•
SET NEWNAME
command
Provides specific names for the duplicate database files. Based on your
requirement, use the
SET NEWNAME FOR DATABASE
,
SET NEWNAME FOR DATAFILE
,
SET
NEWNAME FOR TABLESPACE
, or
SET NEWNAME FOR TEMPFILE
command.
For OMF and ASM database files, you must use the
SET NEWNAME...TO NEW
comand
and not explicitly provide names for the database files.
•
CONFIGURE AUXNAME
command
Specifies non-OMF and non-ASM alternative names for duplicate database files.
•
SPFILE
clause of the
DUPLICATE
command
Sets all the necessary initialization parameters that are related to duplicate
database file names, with the exception of the
DB_FILE_NAME_CONVERT
parameter.
•(Online redo log files only)
LOGFILE
clause of the
DUPLICATE
command
Names online redo log files in the duplicate database. You cannot use this method
while creating a standby database.
Note:
When duplicating to the local host or to a remote host without the
NOFILENAMECHECK
clause, ensure that you do not use the name of an
online redo log file that is currently in use by the source database.
•
DB_FILE_NAME_CONVERT
and
LOG_FILE_NAME_CONVERT
initialization parameters
Specifies a rule for converting file names in the source database to names in the
duplicate database. You can specify multiple conversion pairs.
When you use the
DB_FILE_NAME_CONVERT
parameter for ASM file names, only disk
group name changes must be performed.
Note:
If the source database uses Oracle Managed Files, then you cannot use
this method to specify alternative names for duplicate database files.
•
DB_CREATE_FILE_DEST
and
DB_CREATE_ONLINE_LOG_DEST
_n parameters
Creates Oracle Managed Files at the location specified by these parameters. This
is the recommended method to specify alternative names for OMF and ASM.
If more than one method is used to specify alternate names for duplicate database
files, then the order of precedence decides which technique is used to name files. Any
files that are not renamed by a particular method are renamed by the method that
follows it. For example, if two data files are not included in the
SET NEWNAME
command,
then these data files are renamed by using the
DB_FILE_NAME_CONVERT
parameter.
Chapter 25
Planning to Duplicate a Database
25-19

See Also:
•Specifying Alternative Names for Duplicate Database Files
•The
DUPLICATE
command in Oracle Database Backup and Recovery
Reference for the
LOGFILE
and
SPFILE
clauses
Preventing File Name Checking During Database Duplication
It is possible for the
CONFIGURE AUXNAME
command, the
SET NEWNAME
command, or the
DB_FILE_NAME_CONVERT
parameter to generate a name that is already in use in the target
database. In this case, RMAN displays an error during duplication. When duplicating to
a remote host, use the
NOFILENAMECHECK
option to avoid this error message.
Note:
Using
NOFILENAMECHECK
when duplicating to the local host overwrites the
target database files.
Generating Names for Control Files in the Duplicate Database
By default, RMAN creates the control file in the default location in the duplicate
database. You can specify alternate files names and directory names to store the
duplicate database control files. While choosing names for the control files, ensure that
you do not mistakenly overwrite the control files of the source database.
Use one of the following techniques, listed in the order of precedence, to specify the
location of the duplicate database control files:
•Set the
CONTROL_FILES
initialization parameter in the auxiliary instance's initialization
parameter file.
•Create an OMF-based control file in a location which is determined by setting one
of the following parameters:
–
DB_CREATE_ONLINE_LOG_DEST_n
–
DB_CREATE_FILE_DEST
–
DB_RECOVERY_FILE_DEST
If more than one of these parameters is set, then the order of precedence used is
the order in which these parameters are listed.
25.2.3 Installing the Oracle Database Software on the Destination
Host
If the source and destination host are different, then you must install the Oracle
Database software on the destination host so that the auxiliary instance can be
created.
You can install the software in one of the following ways:
Chapter 25
Planning to Duplicate a Database
25-20

•Perform a normal installation with Oracle Universal Installer (OUI).
Install an Oracle Database that is the same release as the source database. Do
not create a database; install the software only. Apply any required patches.
•Clone the source Oracle home.
Use OUI to clone the source Oracle home. This ensures that all patches applied to
the source database are present in the duplicate database.
25.2.4 Deciding the State of the Duplicate Database
When you use the RMAN
DUPLICATE
command, the duplicate database is created and
opened in
RESETLOGS
mode. You can use the
NOOPEN
clause in the
DUPLICATE
command
to specify that the duplicate database must not be opened.
You may not want to open the duplicate database immediately after creation in the
following situations:
•Opening the duplicate database may cause errors.
•You need to modify the initialization parameters of the duplicate database.
For example, you need to modify flashback database settings, configure fast
incremental backups, or modify block change tracking.
•You are creating a new database as part of an upgrade procedure.
During an upgrade you cannot open the database with the
RESETLOGS
option. The
NOOPEN
clause enables you to duplicate the database and then leave it in a state
that is ready for opening in upgrade mode and for subsequent execution of
upgrade scripts.
25.2.5 Making Backups Accessible to the Duplicate Instance
Names of the backups used during duplication are stored in the RMAN repository or
control file.
Note:
If you are performing active database duplication, then this step is not
necessary.
When duplicating with a target connection and recovery catalog connection or with just
a target connection, RMAN uses metadata in the RMAN repository to locate backups
and archived redo log files that are required for duplication. If RMAN is connected to a
recovery catalog, then RMAN obtains the backup metadata from the catalog. If RMAN
is not connected to a catalog, as may be the case when you perform backup-based
duplication with a target connection, then RMAN obtains metadata from the control file.
Unless you are duplicating without a connection to the target and to the recovery
catalog, the names of the backups must be available with the same names recorded in
the RMAN repository. Ensure that auxiliary channels on the destination host can
access all data file backups and archived redo log files. This is required to restore and
recover the duplicate database to the desired point in time. If not, duplication fails. The
archived redo log files can be available either as image copies or backup sets.
Chapter 25
Planning to Duplicate a Database
25-21

Note:
The database backup need not have been generated with the
BACKUP
DATABASE
command. You can mix full and incremental backups of individual
data files, but a full backup of every data file is required.
See Also:
•Making SBT Backups Accessible to the Auxiliary Instance
•Making Disk Backups Accessible to the Auxiliary Instance
25.2.5.1 Making SBT Backups Accessible to the Auxiliary Instance
The steps to make SBT backups accessible to the auxiliary instance are specific to
your media manager configuration.
To make SBT backups accessible to the auxiliary instance:
1. If necessary, install media management software on the destination host.
2. Make the tapes with the backups accessible to the destination host. Typically, you
do one of the following:
•Physically move the tapes to a drive attached to the remote host.
•Use a network-accessible tape server.
3. If necessary, inform the remote media management software about the existence
of the tapes.
25.2.5.2 Making Disk Backups Accessible to the Auxiliary Instance
When you make disk backups accessible to the auxiliary instance, your strategy
depends on whether you duplicate the database while connected to the target or
recovery catalog. If you do not connect to the target or recovery catalog, then you
must designate a backup location for the duplication by using the
BACKUP LOCATION
clause.
When you use a backup location, the backups and copies can reside in a shared
location or can be moved to the location on the destination host. In the latter case, you
do not need to preserve the name or the original path of the backup or copy. The
location specified in the
BACKUP LOCATION
option must contain sufficient backup sets,
image copies, and archived logs to restore all of the files that are being duplicated, and
recover them to the desired point in time.
It is not required that all of the backups be from the same point in time, or that they all
be backup sets, or all image copies. Data file backups can be supplied as either image
copies or backup sets. Archived logs can be supplied either in their normal format or
as backup sets of archived logs.
Chapter 25
Planning to Duplicate a Database
25-22

When you use backups from different points in time, the backup location must contain
archived logs covering the time from the start of the oldest backup until the desired
recovery point.
If the backup location contains backup files from multiple databases, then the
DATABASE
clause must specify the name of the database that is to be duplicated. If the backup
location contains backup files from multiple databases having the same name, then
the
DATABASE
clause must specify both the name and
DBID
of the database that is to be
duplicated.
The source database's Fast Recovery Area is particularly well suited for use as a
backup location because it almost always contains all the files that are required for the
duplication. To use a Fast Recovery Area as a backup location, you can either
remotely access it from the destination system, or copy its contents to the destination
system.
When you are not using a backup location, your strategy depends on the following
mutually exclusive scenarios:
•Identical file systems for source and destination hosts
This scenario is the simplest and Oracle recommends it. For example, assume
that the backups of the source database are stored in the
/dsk1/bkp
directory. In
this case, you can make disk backups accessible to the destination host in either
of these ways:
–Manually transfer backups from the source host to an identical path in the
destination host. For example, if the backups are in the
/dsk1/bkp
directory on
the source host, then use FTP to transfer them to the
/dsk1/bkp
directory on
the destination host.
–Use NFS or shared disks and ensure that the same path is accessible in the
destination host. For example, assuming that the source host can access the
/
dsk1/bkp
directory, use NFS to mount the
/dsk1/bkp
directory on the
destination host and use
/dsk1/bkp
as the mount point name.
•Different file systems for source and destination hosts
In this case you cannot use the same directory name on the destination host as
you use on the source host. You have the following options:
–You can use shared disk to make backups available. This section explains the
shared disk technique.
–You cannot use shared disk to make backups available. Making Disk Backups
Accessible Without Shared Disk describes this technique.
Assume that you have two hosts,
srchost
and
dsthost
, and access to NFS or
shared disk. The database on
srchost
is called
srcdb
. The backups of
srcdb
reside
in the
/dsk1/bkp
directory on host
srchost
. The directory
/dsk1/bkp
is in use on the
destination host, but the directory
/dsk2/dup
is not in use on either host.
To transfer the backups from the source host to the destination host:
1. Create a backup storage directory in either the source or destination host.
For this example, create backup directory
/dsk2/dup
on the destination host.
2. Mount the directory created in the previous step on the other host, ensuring that
the directory and the mount point names are the same.
For example, if you created the
/dsk2/dup
directory on the destination host, then
use NFS to mount this directory as
/dsk2/dup
on the source host.
Chapter 25
Planning to Duplicate a Database
25-23

3. Make the backups available in the new location on the destination host. You can
use either of the following techniques:
•Connect RMAN to the source database as TARGET and use the
BACKUP
command to back up the backups. For example, use the
BACKUP COPY OF
DATABASE
command to copy the backups in the
/dsk1/bkp
directory on the
source host to the
/dsk2/dup
directory on the destination host. In this case,
RMAN automatically catalogs the backups in the new location.
If you are duplicating a PDB, then use the
PLUGGABLE DATABASE
syntax of the
BACKUP COPY OF
command to copy only the backups of the PDB.
•Use an operating system utility to transfer the backups to the new location. For
example, use FTP to transfer the backups from the
/dsk1/bkp
directory on the
source host to the
/dsk2/dup
directory on the destination host, or use the
cp
command to copy the backups from the
/dsk1/bkp
directory on the source host
to the
/dsk2/dup
directory on the destination host. Afterward, connect RMAN to
the source database as TARGET and use the
CATALOG
command to update the
RMAN repository with the location of the manually transferred backups.
25.3 Preparing the Auxiliary Instance
RMAN uses an auxiliary instance to create the duplicate database. You must prepare
the auxiliary instance before you begin the duplication.
Depending on your duplication scenario, you need to perform either some or the tasks
that are described in this section. Preparing the auxiliary instance includes the
following tasks:
•Creating Directories for the Duplicate Database
•Creating an Initialization Parameter File for the Auxiliary Instance
•Creating a Password File for the Auxiliary Instance
•Establishing Oracle Net Connectivity Between the Source Database and Auxiliary
Instance
•Starting the Auxiliary Instance
•Making the Oracle Keystore Available to the Destination Host
25.3.1 Creating Directories for the Duplicate Database
On the destination host, you must create the directories that are used to store the
duplicate database files on the destination host. This includes the directories that store
the data files, control files, online redo log files, and temp files.
25.3.2 Creating an Initialization Parameter File for the Auxiliary
Instance
Multiple methods are available to create the initialization parameter file that is required
to start the auxiliary instance.
Use one of the following methods to create the initialization parameter file:
•Create an initialization parameter file manually.
Chapter 25
Preparing the Auxiliary Instance
25-24

If the source database does not use a server parameter file, then you must set all
the necessary parameters for the auxiliary instance in a text-based initialization
parameter file.
•Direct RMAN to use the initialization parameter file of the source database for the
auxiliary instance.
This technique is applicable only if the source database uses a server parameter
file. Copying the initialization parameter file from the source database is useful
when the duplicate database must use the same parameter settings as the source.
Note:
It is recommended to use a server parameter file instead of a text-based
initialization parameter file for duplication.
The client-side parameter file for the auxiliary instance must reside on the same host
as the RMAN client that performs the duplication.
It is recommended that you create the initialization parameter file in the default location
on the auxiliary instance. On Windows, the default initialization parameter file is
ORACLE_HOME/dbs/initORACLE_SID.ora
and on Linux the file name is
ORACLE_HOME\database
\intiORACLE_SID.ora
.
See Also:
•Initialization Parameters for the Auxiliary Instance
•Steps to Create an Initialization Parameter File for the Auxiliary Instance
•Copying the Server Parameter File from the Source Database
25.3.2.1 Steps to Create an Initialization Parameter File for the Auxiliary
Instance
The initialization parameter file for the auxiliary instance must contain at least the
DB_NAME
and
DB_DOMAIN
initialization parameters. Additional parameters may be
specified, if required. Ensure that the initialization parameter file is on the same host
as the RMAN client that performs the duplication.
To create the initialization parameter file for the auxiliary instance:
1. Do one of the following:
•Copy the initialization parameter file from the source host to the destination
host, placing it in the operating system-specific default location, and then
modify the
DB_NAME
and
DB_DOMAIN
initialization parameters.
If you are duplicating a CDB, ensure that the
ENABLE_PLUGGABLE_DATABASE
parameter is present and set to
TRUE
.
See Copying the Server Parameter File from the Source Database.
•Complete these steps:
Chapter 25
Preparing the Auxiliary Instance
25-25

a. Using a text editor, create an empty file for use as a text-based
initialization parameter file, and save it in the operating system-specific
default location.
b. In the parameter file, set the
DB_NAME
and
DB_DOMAIN
initialization
parameters. These are the only required parameters.
Setting the
DB_DOMAIN
parameter enables you to connect to the default
database service when you connect with a net service name.
c. If the auxiliary instance is to be a CDB, then set the following parameter:
ENABLE_PLUGGABLE_DATABASE=TRUE
2. Set the various location parameters such as
CONTROL_FILES
and
DB_RECOVERY_FILE_DEST
.
3. If necessary, set other initialization parameters like those needed for Oracle Real
Application Clusters.
4. Set the required environment variables, such as
ORACLE_HOME
and
ORACLE_SID
.
5. (Optional) Set initialization parameters that specify the location of the duplicate
database files if one of the following conditions is satisfied:
•The source host and the destination host are the same (duplication to the local
host).
•The duplicate database uses a directory structure that is different from that of
the source host to store database files.
Depending on the technique used to specify alternate names for duplicate
database files, include one or more of the following parameters in the initialization
parameter file:
CONTROL_FILES
,
DB_FILE_NAME_CONVERT
,
LOG_FILE_NAME_CONVERT
,
DB_CREATE_FILE_DEST
,
DB_CREATE_ONLINE_FILE_DEST
_
n
, and
RECOVERY_FILE_DEST
.
Note:
It is recommended that you verify that all paths specified are accessible
to the destination host and to the server session of the auxiliary instance.
See Methods of Generating Database File Names for the Duplicate Database.
6. Start SQL*Plus and connect to the auxiliary instance as a user with
SYSDBA
or
SYSBACKUP
privileges. Start the auxiliary instance in
NOMOUNT
mode. If the file is in the
default location, no
PFILE
parameter is required on the
STARTUP
command.
SQL> STARTUP NOMOUNT;
Example 25-1 Sample Initialization Parameter File for the Auxiliary Instance
DB_NAME=dupdb
CONTROL_FILES=(/dup/oracle/oradata/prod/control01.ctl,
dup/oracle/oradata/prod/control02.ctl)
DB_FILE_NAME_CONVERT=(/oracle/oradata/prod/,/dup/oracle/oradata/prod/)
LOG_FILE_NAME_CONVERT=(/oracle/oradata/prod/redo,/dup/oracle/oradata/prod/redo)
Chapter 25
Preparing the Auxiliary Instance
25-26

25.3.2.2 Copying the Server Parameter File from the Source Database
If the source database uses a server parameter file, then including the
SPFILE
option in
the
DUPLICATE
command directs RMAN to use the server parameter file from the source
database for the auxiliary instance.
For backup-based duplication, the server parameter file is restored from backups. For
active database duplication, the server parameter file is copied from the source
database to the auxiliary instance.
When the source database uses a text-based initialization parameter file, use the
PFILE
clause in the
DUPLICATE
command to copy the source database's initialization
parameter file to the auxiliary instance.
You can modify the values that were copied or restored from the server parameter file
of the source database by using the
PARAMETER_VALUE_CONVERT
option of
SPFILE
or the
SET
clause of the
DUPLICATE
. For example, you can use the
SET
clause to change the
value of the
DB_FILE_NAME_CONVERT
parameter in the auxiliary instance's server
parameter file.
If the source database does not use a server parameter file or RMAN cannot restore a
backup of the server parameter file, then you must manually create a text-based
initialization parameter file, as described in Steps to Create an Initialization Parameter
File for the Auxiliary Instance.
25.3.3 Creating a Password File for the Auxiliary Instance
Connections to the auxiliary instance can be established by using operating system
authentication or password file authentication. For backup-based duplication, you can
either create a password file or use operating system authentication to connect to the
auxiliary instance. For active database duplication, you must use password file
authentication.
To connect to a database by using password file authentication, you must create a
password file for the database. When duplicating to a remote host, setting up a
password file is also mandatory.
Note:
When you create a standby database by using RMAN duplication, password
files are always copied. In all other cases, password files are copied only if
you specify the
PASSWORD FILE
option in the
DUPLICATE
command.
Use one of the following options to create a password file for the auxiliary instance on
the destination host:
•Use operating system-specific utilities to copy the source database password file
to the destination host and then rename it to match the auxiliary instance name.
This is applicable only if the source and destination hosts are on the same
platform.
•Create the password file manually. Ensure that the password for the
SYSDBA
and
SYSBACKUP
users are the same in the source database and auxiliary instance.
Chapter 25
Preparing the Auxiliary Instance
25-27

•Create the password file with the
orapwd
utility. The
SYSBACKUP
option creates a
SYSBACKUP
entry in the new password file.
•Specify the
PASSWORD FILE
option on the
DUPLICATE... FROM ACTIVE DATABASE
command.
RMAN copies the source database password file to the destination host and
overwrites any existing password file for the auxiliary instance. This technique is
useful if the source database password file has multiple passwords to make
available on the duplicate database.
When you use active database duplication, the password file must contain at least
two passwords, for the
SYS
user and the
SYSBACKUP
user. These passwords must
match the passwords in the source database.
Note:
If you create a standby database with the
FROM ACTIVE DATABASE
option,
then RMAN always copies the password file to the standby host.
See Also:
Oracle Database Administrator’s Guide
25.3.4 Establishing Oracle Net Connectivity Between the Source
Database and Auxiliary Instance
You must be able to establish a connection between the source database and auxiliary
instance for certain forms of duplication.
If any of the following conditions is true, the auxiliary instance must be available
through Oracle Net Services:
•The RMAN client is run from a host other than the destination host
•The duplication technique chosen is active database duplication
•The destination host is different from the source host
To perform active database duplication, you must connect to the auxiliary instance
with
SYSDBA
or
SYSBACKUP
privilege and by using a net service name. The source
database to which RMAN is connected as
TARGET
uses this net service name to
connect directly to the auxiliary database instance.
To establish Oracle Net connectivity and set up a static listener:
•Follow the instructions in Oracle Database Administrator’s Guide to configure a
client for connection to a database and add static service information for the
listener.
Chapter 25
Preparing the Auxiliary Instance
25-28

Example 25-2 Example: Establishing Oracle Net Connectivity Between the
Source Database and Auxiliary Instance
Assume that the
DB_NAME
of the source database is
src
and the source host is
src.example.com
. The
DB_NAME
of the auxiliary instance is
dup
and the auxiliary instance
is created on the host
dup.example.com
.
Use the following steps to establish Oracle Net connectivity between the source
database and the auxiliary instance:
1. In the
tnanames.ora
file of the source database, add the following entry that
corresponds to the duplicate database:
dupdb = (DESCRIPTION=(ADDRESS=(PROTOCOL=TCP)(HOST=dup.example.com)(PORT=1521))
(CONNECT_DATA=(SERVICE_NAME=dup)))
2. On the destination host, create the
tnsnames.ora
file in the
$ORACLE_HOME/admin/
network
folder. Add the following entry that corresponds to the source database.
srcdb = (DESCRIPTION=(ADDRESS=(PROTOCOL=TCP)(HOST=src.example.com)(PORT=1521))
(CONNECT_DATA=(SERVICE_NAME=src)))
25.3.5 Starting the Auxiliary Instance
The initialization parameter file that you create is used to start the auxiliary instance.
RMAN shuts down and restarts the auxiliary instance as part of the duplication. Hence,
it is a good idea to create a server-side initialization parameter file for the auxiliary
instance in the default location. If you do not have a server-side initialization parameter
file in the default location, then you must specify the client-side initialization parameter
file with the
PFILE
parameter on the
DUPLICATE
command.
Note:
Because the auxiliary instance does not yet have a control file, you can only
start the instance in
NOMOUNT
mode. Do not create a control file or try to mount
or open the auxiliary instance.
To start the auxiliary instance:
1. Start RMAN.
% rman
2. Connect to the auxiliary instance as a user with the
SYSDBA
or
SYSBACKUP
privilege.
The following example uses password file authentication to connect to the auxiliary
instance.
RMAN> CONNECT SYS@dupdb AS SYSDBA;
The following example uses operating system authentication to connect to the
auxiliary instance by using the
SYSBACKUP
privilege.
RMAN> CONNECT / AS SYSBACKUP;
3. Start the auxiliary instance in
NOMOUNT
mode.
RMAN > STARTUP FORCE NOMOUNT;
Chapter 25
Preparing the Auxiliary Instance
25-29

See Also:
Creating an Initialization Parameter File for the Auxiliary Instance
25.3.6 Making the Oracle Keystore Available to the Destination Host
If transparent encryption is configured on the source database, then you must ensure
that the Oracle software keystore from the source database is available to the auxiliary
instance. Manually copy the keystore from the source database to the destination host.
The Oracle software keystore contains the TDE master key used to:
•decrypt encrypted backups when performing backup-based duplication.
•decrypt database or tablespace data when performing active database duplication
of TDE-encrypted databases or tablespaces.
The following are the requirements for the keystore at the duplicate database:
•The keystore must be in the default location, or in the location indicated by the
sqlnet.ora
file.
•Permissions on the Oracle keystore file must be set so that the database can
access the file.
•During duplication, the auxiliary instance is restarted thereby causing the Oracle
software keystore to become unavailable. To ensure that the auxiliary instance
has access to the keystore, set the
ENCRYPTION_WALLET_LOCATION
parameter in the
sqlnet.ora
file such that it points to the keystore location.
•With Oracle Real Application Clusters (Oracle RAC), register the auxiliary instance
statically with an Oracle Grid Infrastructure listener and use the
ENVS
parameter in
the
sqlnet.ora
file of the Oracle Grid home to specify environment variables that
set the keystore location and the unique name of the database.
The following example sets the
ENVS
parameter in
sqlnet.ora
to specify the
keystore location and unique database name:
(ENVS="ORACLE_UNQNAME=cdbrptl, ENCRYPTION_WALLET_LOCATION=(SOURCE=(METHOD=FILE)
(METHOD_DATA=(DIRECTORY=/etc/ORACLE/WALLETS/cdbrpt1)))")
•If the source database uses a password-based software keystore (not an auto-
login software keystore), then you must provide the keystore password before you
begin the duplication.
Use the
SET
command with the
DECRYPTION WALLET OPEN IDENTIFIED BY
clause to
specify the password that must be used to open the keystore.
The following command specifies the password used to open the keystore (where
password
is a placeholder for the actual password that you enter):
SET DECRYPTION WALLET OPEN IDENTIFIED BY password;
Chapter 25
Preparing the Auxiliary Instance
25-30

See Also:
•Oracle Database Advanced Security Guide for information about
specifying the Oracle keystore location in
sqlnet.ora
•Oracle Database Advanced Security Guide for information about the
default Oracle keystore location
•Oracle Database Advanced Security Guide for information about
converting a standard Oracle keystore to an auto-login keystore
•Oracle Database Backup and Recovery Reference for information about
the
SET
command
•Example: Performing Backup-based Duplication by Using Encrypted
Backups
25.4 Duplicating a Database
This section describes how to perform database duplication. The steps to duplicate
CDBs and PDBs have minor variations from the steps used for non-CDBs.
Note:
Performing simultaneous duplication operations using the same source
database is not supported.
See Also:
•Duplicating the Whole Database
•Duplicating a Subset of the Source Database Tablespaces
•Duplicating an Oracle RAC Database
•Duplicating Sparse Databases
25.4.1 Duplicating the Whole Database
Use the
DUPLICATE
command to duplicate databases.
To duplicate a database:
1. Ensure that the prerequisites for the selected duplication technique are met.
See Prerequisites for Duplicating a Database.
2. Complete the required planning tasks before you begin database duplication.
See Planning to Duplicate a Database.
3. Prepare the auxiliary instance that is used when creating the duplicate database.
Chapter 25
Duplicating a Database
25-31

See Preparing the Auxiliary Instance.
4. Start RMAN and connect to required databases. Depending on your duplication
technique, you may need to connect to one or more of the following: target
database, auxiliary instance, or recovery catalog.
See Starting RMAN and Connecting to Databases.
5. Place the source database in a proper state (if necessary).
See Placing the Source Database in a Proper State.
6. (Optional) Configure RMAN channels to improve duplication performance.
Channels perform the primary task of duplicating the database. .
See Configuring RMAN Channels for Use in Duplication.
7. Use the
DUPLICATE
command to duplicate the source database.
See Using the DUPLICATE Command to Duplicate Databases.
When you perform active database duplication, you can encrypt or compress the
backup sets that are used to transfer files from the source database to the duplicate
database. Additionally, you can create backup sets on the source database in parallel
by using multisection backups.
See Also:
Basic Concepts of Database Duplication
25.4.2 Duplicating a Subset of the Source Database Tablespaces
You can duplicate specified tablespaces within a source database.
To duplicate some tablespaces in a database:
1. Ensure that the prerequisites for the selected duplication technique are met.
See Prerequisites for Duplicating a Database.
2. Complete the required planning tasks before you begin database duplication.
See Planning to Duplicate a Database.
3. Prepare the auxiliary instance that is used when creating the duplicate database.
See Preparing the Auxiliary Instance.
4. Start RMAN and connect to required databases. Depending on your duplication
technique, you may need to connect to one or more of the following: target
database, auxiliary instance, or recovery catalog.
See Starting RMAN and Connecting to Databases.
5. Place the source database in a proper state (if necessary).
See Placing the Source Database in a Proper State.
6. (Optional) Configure RMAN channels to improve duplication performance.
Channels perform the primary task of duplicating the database.
See Configuring RMAN Channels for Use in Duplication.
Chapter 25
Duplicating a Database
25-32

7. Run the
DUPLICATE
command with one or more of the options in Table 1–1.
Other factors that influence what tablespaces are copied include the
OFFLINE
NORMAL
option. When tablespaces are taken offline with the
OFFLINE NORMAL
option
before duplication, RMAN does not duplicate the associated data files, and issues
DROP TABLESPACE
statement for these tablespaces on the duplicate database.
Therefore, you do not have to specify options to exclude these tablespaces.
Note:
RMAN does duplicate tablespaces that are taken offline with any other
option besides
NORMAL
(unless they are named in a
SKIP TABLESPACE
option). Only
OFFLINE NORMAL
tablespaces are skipped automatically. As
with online tablespaces, RMAN requires a valid backup for these
tablespaces when you use backup-based duplication.
Example 25-3 Excluding Read-Only Tablespaces
This example shows how to skip read-only tablespaces during database duplication
DUPLICATE TARGET DATABASE TO dupdb
FROM ACTIVE DATABASE
SKIP READONLY;
Example 25-4 Excluding Specified Tablespaces
This example shows how to skip a tablespace named
tools
during database
duplication.
DUPLICATE TARGET DATABASE
TO dupdb
FROM ACTIVE DATABASE
SKIP TABLESPACE tools;
Example 25-5 Including Specified Tablespaces
You can use the
TABLESPACE
option to specify which tablespaces to include in the
specified database. The remaining tablespaces are skipped. The duplicated subset of
tablespaces must be self-contained. The resulting set of skipped tablespaces must not
have undo segments or materialized views.
This example includes the
users
tablespace, which is assumed to be self-contained,
and all other tablespaces are excluded, except for
SYSTEM
and
SYSAUX
tablespaces and
tablespaces with undo segments.
DUPLICATE TARGET DATABASE
TO dupdb
FROM ACTIVE DATABASE
TABLESPACE users;
Example 25-6 Including Specified Tablespaces with Undo Segments
This example performs backup-based duplication with a target connection, but without
a recovery catalog connection. You want to specify a subset of tablespaces for
duplication. If the target database is not open in this scenario, then RMAN has no way
to obtain the names of the tablespaces with undo segments. Thus, you must specify
the
UNDO TABLESPACE
option for these tablespaces. The
users
tablespace must be self-
Chapter 25
Duplicating a Database
25-33

contained. The resulting set of skipped tablespaces must not have undo segments or
materialized views.
DUPLICATE TARGET DATABASE TO dupdb
TABLESPACE users
UNDO TABLESPACE undotbs;
25.4.3 Duplicating an Oracle RAC Database
The steps to duplicate an Oracle Real Application Clusters (Oracle RAC) database
contain minor variations from the ones used to duplicate databases.
1. Ensure that the prerequisites for the selected duplication technique are met.
See Prerequisites for Duplicating a Database.
2. Complete the required planning tasks before you begin database duplication.
See Planning to Duplicate a Database.
3. Prepare the auxiliary instance that is used when creating the duplicate database.
While duplicating an Oracle Real Application Clusters (Oracle RAC) database, set
the
CLUSTER_DATABASE
initialization parameter on the auxiliary database to FALSE.
This parameter can be reset to TRUE after the duplication completes.
See Preparing the Auxiliary Instance.
4. Start RMAN and connect to required databases. Depending on your duplication
technique, you may need to connect to one or more of the following: target
database, auxiliary instance, or recovery catalog.
See Starting RMAN and Connecting to Databases.
5. Place the source database in a proper state (if necessary).
See Placing the Source Database in a Proper State.
6. (Optional) Configure RMAN channels to improve duplication performance.
Channels perform the primary task of duplicating the database.
See Configuring RMAN Channels for Use in Duplication.
7. Use the
DUPLICATE
command to duplicate the source database.
See Using the DUPLICATE Command to Duplicate Databases.
Note:
For more information about duplicating an Oracle RAC database, refer to
My Oracle Support Note 1617946.1 at
https://support.oracle.com/rs?
type=doc&id=1617946.1
25.4.4 Duplicating Sparse Databases
The duplication process for a sparse database begins with an implicit restore and then
completes duplicating the database containing sparse data files.
Ensure that the backing file of the sparse data file is available for duplication.
Chapter 25
Duplicating a Database
25-34

Note:
Active database duplication is not allowed for sparse databases.
To duplicate a sparse database:
1. Ensure that the prerequisites for the selected duplication technique are met.
See Prerequisites for Duplicating a Database.
2. Complete the required planning tasks before you begin database duplication.
See Planning to Duplicate a Database.
3. Prepare the auxiliary instance that is used when creating the duplicate database.
While duplicating an Oracle Real Application Clusters (Oracle RAC) database, set
the
CLUSTER_DATABASE
initialization parameter on the auxiliary database to FALSE.
This parameter can be reset to TRUE after the duplication completes.
See Preparing the Auxiliary Instance.
4. Start RMAN and connect to required databases. Depending on your duplication
technique, you may need to connect to one or more of the following: target
database, auxiliary instance, or recovery catalog.
See Starting RMAN and Connecting to Databases.
5. Place the source database in a proper state (if necessary).
See Placing the Source Database in a Proper State.
6. (Optional) Configure RMAN channels to improve duplication performance.
Channels perform the primary task of duplicating the database.
See Configuring RMAN Channels for Use in Duplication.
7. Run the
DUPLICATE
command for the sparse database.
The following command duplicates the sparse database
db1
:
DUPLICATE FROM SPARSE DATABASE 'DB1' TO 'DUP1';
Note:
The base (read-only) data files in a sparse database are not encrypted.
Ensure that the base data files are stored in a protected storage and
accessed using secured communications.
25.4.5 Configuring RMAN Channels for Use in Duplication
The primary job of database duplication is performed by RMAN channels. Each
channel corresponds to an Oracle Database server session that performs the
duplication tasks. Depending on the duplication technique, RMAN uses either auxiliary
channels or target channels.
Use one of the following methods to configure channels:
Chapter 25
Duplicating a Database
25-35

•Automatically allocate channels by using the
CONFIGURE
command
•Manually allocate channels by using the
ALLOCATE
command
If no automatic channels are configured, then you can manually allocate at least one
channel before you being the duplication. The
ALLOCATE
command that allocates
channels must be in the same
RUN
block as the
DUPLICATE
command.
RMAN can use the same channel configurations on the source database for
duplication on the destination host even if the source database channels do not
specify the
AUXILIARY
option.
See Also:
•Configuring Channels for Backup-based Duplication
•Configuring Channels for Active Database Duplication
25.4.5.1 Configuring Channels for Backup-based Duplication
For backup-based duplication, the principal work of the duplication is performed by the
auxiliary channels. An auxiliary channel corresponds to a server session on the
auxiliary instance on the destination host. RMAN uses the channels to restore backups
in the auxiliary instance.
Configure additional auxiliary channels to improve the performance of the duplicate
operation. If you do not explicitly configure auxiliary channels, then RMAN uses the
same channel configurations on the source database for duplication on the destination
host. RMAN can use these configurations even if the source database channels do not
specify the
AUXILIARY
option.
Note the following additional considerations:
•With disk-based backups, you can increase the speed of the duplication operation
by allocating additional channels.
With tape-based duplication, you can allocate only as many channels as the
number of tape devices that are available.
•The channel type (DISK or sbt) of the auxiliary channel must match the backup
media. In general, the more channels you allocate for disk backups, the faster the
duplication. You cannot increase the speed of duplication after the disks reach
their maximum read/write rate. For tape backups, limit the number of channels to
the number of devices that are available.
•If the auxiliary channels need special parameters (for example, to point to a
different media manager), then you can configure an automatic channel with the
AUXILIARY
option of the
CONFIGURE
command.
•When you perform duplication without a target connection and without a recovery
catalog, only disk channels can be used. If no user-allocated channels are used,
then only one channel initially restores the control file. After the control file is
mounted, the number of allocated channels depends on the configuration in the
restored control file.
•If you omit the
USING BACKUPSET
clause from the
DUPLICATE
command and the
number of allocated auxiliary channels is greater than or equal to the number of
Chapter 25
Duplicating a Database
25-36

target channels, then RMAN still uses active database duplication with backup
sets.
•If the auxiliary channels cannot access backups of the required data files and
archived redo log files, then the duplication fails.
Example 25-7 Configuring Auxiliary Channels for Disk-based Backups
The following example allocates three auxiliary channels to duplicate a database to
disk.
run
{
ALLOCATE AUXILIARY CHANNEL c1 DEVICE TYPE disk;
ALLOCATE AUXILIARY CHANNEL c2 DEVICE TYPE disk;
ALLOCATE AUXILIARY CHANNEL c3 DEVICE TYPE disk;
. . .
DUPLICATE DATABASE . . . ;
}
25.4.5.2 Configuring Channels for Active Database Duplication
With active database duplication, you need not change your source database channel
configuration or configure auxiliary channels. However, you may want to increase the
parallelism setting of the source database disk channels so that RMAN copies files
over the network in parallel.
The type of active database duplication technique used determines which channels
perform the principal work of duplication. When image copies are used to perform
active database duplication, the primary work is performed by the target channels.
Configure multiple target channels on the source database to improve the duplication
performance. When active database duplication is performed by using backup sets,
the principal work of duplication is performed by the auxiliary channels. Therefore, it is
recommended that you allocate additional auxiliary channels. The number of auxiliary
channels must be greater than or equal to the number of target channels. Using
backup sets for active duplication also enables parallelism, which can improve the
speed of the duplication process.
25.4.6 Placing the Source Database in a Proper State
If RMAN is connected to the source database as
TARGET
, then the source database
must be in a proper state for duplication.
Note:
If you are performing backup-based duplication without a target connection,
then skip to Starting RMAN and Connecting to Databases.
To ensure that the source database is in a proper state:
1. If the source database instance is not mounted or open, then mount or open it.
2. If you are performing active database duplication, then ensure that the following
additional requirements are met:
•If the source database is open, then archiving must be enabled.
Chapter 25
Duplicating a Database
25-37

•If the source database is not open, then the database does not require
instance recovery.
25.4.7 Starting RMAN and Connecting to Databases
You must start the RMAN client and connect to the database instances as required by
the chosen duplication technique. The RMAN client can be located on any host so
long as it can connect to the necessary databases over the network.
To start RMAN and connect to the target and auxiliary instances:
1. Start the RMAN client on any host that can connect to the necessary database
instances.
For example, enter the following command at the operating system prompt on the
destination host:
% rman
2. At the RMAN prompt, run
CONNECT
commands for the database instances that are
required for your duplication technique.
Note:
When you duplicate a whole CDB or one or more PDBs, connect to the
root of both instances.
•For active database duplication using image copies, you must connect to the
source database as
TARGET
and to the auxiliary instance as
AUXILIARY
. You
must supply the net service name to connect to the
AUXILIARY
instance. A
recovery catalog connection is optional. A recovery catalog connection is
optional. On both instances, the password for the user performing the
duplication must be the same. Any user with a
SYSDBA
or
SYSBACKUP
privilege
can perform duplication.
•For active database duplication using backup sets, you must connect to the
source database as
TARGET
by using a net service name. The auxiliary instance
uses this net service name to connect to the source database and retrieve the
backup sets that are required for the duplication. Connect to the auxiliary
instance as
AUXILIARY
. If you are connecting to the auxiliary instance remotely
or intend to use the
PASSWORD FILE
option of the
DUPLICATE
command, then
connect to the auxiliary instance with a net service name. On both instances,
the password for the user performing the duplication must be the same. Any
user with a
SYSDBA
or
SYSBACKUP
privilege can perform duplication. A recovery
catalog connection is optional.
•For backup-based duplication without a target connection, you must connect
to the auxiliary instance as
AUXILIARY
and the recovery catalog as
CATALOG
.
•For backup-based duplication with a target connection, you must connect to
the source database as
TARGET
and the auxiliary instance as
AUXILIARY
. A
recovery catalog is optional.
•For backup-based duplication without target and recovery catalog
connections, you must connect to the auxiliary instance as
AUXILIARY
.
Chapter 25
Duplicating a Database
25-38

Note:
You cannot connect as
TARGET
to a standby database.
Example: Connecting to the Required Databases When Performing Active
Database Duplication
In this example, a connection is established to the source database and the auxiliary
instance using net service names. The Net Service name of the source database is
srcdb
and that of the auxiliary instance is
dupdb
.
To connect to required databases from the destination host:
1. Start the RMAN client on the destination host.
% rman
2. Connect to the source database as
TARGET
.
RMAN> CONNECT TARGET sys@srcdb;
Enter the password for the
SYS
user on the source database when prompted.
3. Connect to the auxiliary instance as
AUXILIARY
.
RMAN> CONNECT AUXILIARY sys@dupdb;
Enter the password for the
SYS
user on the auxiliary instance when prompted.
25.4.8 Using the DUPLICATE Command to Duplicate Databases
RMAN provides multiple options for duplicating databases by using the
DUPLICATE
command.
Use one of the following options of the
DUPLICATE
command:
•
DUPLICATE DATABASE
or
DUPLICATE...ACTIVE DATABASE
Use these for duplicating non-CDBs and CDBs.
•
DUPLICATE DATABASE ... FOR STANDBY
Use this to create a standby database by duplicating the source database.
Use the
DUPLICATE DATABASE ... FOR FARSYNC
command to create an Oracle Data
Guard far sync instance using duplication.
•
DUPLICATE PLUGGABLE DATABASE
Use this to duplicate one or more PDBs while connected to the root.
When you use the
SET NEWNAME
command to specify alternate names for duplicate
database files, ensure that you enclose the
DUPLICATE
command and the
SET NEWNAME
commands within a
RUN
block.
Chapter 25
Duplicating a Database
25-39

See Also:
•Examples: Duplicating Databases
•The
DUPLICATE
command in Oracle Database Backup and Recovery
Reference for additional examples on duplication
25.5 Duplicating CDBs and PDBs
Use the
DUPLICATE
command to duplicate CDBs, one or more PDBs, sparse CDBs, and
sparse PDBs. The steps to duplicate CDBs and PDBs are similar to those of
duplicating non-CDBs with minor variations to the procedure for duplicating a non-
CDB. This section describes how to duplicate CDBs and PDBs.
See Also:
•Duplicating CDBs
•Duplicating Sparse CDBs
•Duplicating PDBs
•Duplicating Tablespaces Within a PDB to a New CDB
25.5.1 Duplicating CDBs
Use the
DUPLICATE
command to duplicate CDBs.
Duplicating a whole CDB or one or more PDBs requires only minimal adjustments to
the procedure for duplicating a non-CDB, as described in "Duplicating the Whole
Database".
To duplicate a CDB:
1. Complete the planning tasks described in "Planning to Duplicate a Database" with
the following change:
In "Making Backups Accessible to the Duplicate Instance" and "Making Disk
Backups Accessible Without Shared Disk", note the following adjustment:
Use the
PLUGGABLE DATABASE
syntax of the
BACKUP
command to copy only the
backups of a specific PDB.
The following command transfers the backup files for the entire CDB:
BACKUP COPY OF DATABASE;
The following command transfers only the backup files for the PDB
pdb3
:
BACKUP COPY OF PLUGGABLE DATABASE pdb3;
2. Ensure that the prerequisites for the selected duplication technique are met, as
described in "Prerequisites for Duplicating a Database".
Chapter 25
Duplicating CDBs and PDBs
25-40

3. Prepare the auxiliary instance, as described in "Preparing the Auxiliary Instance",
with the following changes:
•You must create the auxiliary instance as a CDB. To do so, start the instance
with the following declaration in the initialization parameter file:
enable_pluggable_database=TRUE
•When instructed to create an initialization parameter file for the auxiliary
instance, you must copy the file from the source database. This ensures that
the auxiliary instance is also a CDB. After you copy the file, perform the
following steps:
–Modify the
DB_NAME
parameter
–Modify the various destination or location parameters
•When instructed to connect to the necessary instances, connect to the root as
a user with
SYSDBA
or
SYSBACKUP
privilege. On both instances, the password for
the user performing the duplication must be the same.
4. Start RMAN and connect to the root as a user with the
SYSDBA
or
SYSBACKUP
privilege.
On both the auxiliary instance and the target database, the password for the user
performing the duplication must be the same.
5. Place source database in a proper state, if necessary, as described in "Placing the
Source Database in a Proper State".
6. Configure RMAN channels, if necessary, as described in "Configuring RMAN
Channels for Use in Duplication".
The primary task of duplication is performed by RMAN channels. Configuring
additional channels improves the duplication performance.
7. Use the
DUPLICATE
command to duplicate the source CDB.
See "Using the DUPLICATE Command to Duplicate Databases".
25.5.2 Duplicating Sparse CDBs
Use the
DUPLICATE
command to duplicate sparse CDBs.
To duplicate a sparse CDB:
1. Complete the planning tasks described in "Planning to Duplicate a Database" with
the following change:
In "Making Backups Accessible to the Duplicate Instance" and "Making Disk
Backups Accessible Without Shared Disk", note the following adjustment:
Use the
PLUGGABLE DATABASE
syntax of the
BACKUP
command to copy only the
backups of a specific PDB.
The following command transfers the backup files for the entire CDB:
BACKUP COPY OF DATABASE;
The following command transfers only the backup files for the PDB
pdb3
:
BACKUP COPY OF PLUGGABLE DATABASE pdb3;
Chapter 25
Duplicating CDBs and PDBs
25-41

2. Ensure that the prerequisites for the selected duplication technique are met, as
described in "Prerequisites for Duplicating a Database".
3. Prepare the auxiliary instance, as described in "Preparing the Auxiliary Instance",
with the following changes:
•You must create the auxiliary instance as a CDB. To do so, start the instance
with the following declaration in the initialization parameter file:
enable_pluggable_database=TRUE
•When instructed to create an initialization parameter file for the auxiliary
instance, you must copy the file from the source database. This ensures that
the auxiliary instance is also a CDB. After you copy the file, perform the
following steps:
–Modify the
DB_NAME
parameter
–Modify the various destination/location parameters
•When instructed to connect to the necessary instances, connect to the root as
a user with
SYSDBA
or
SYSBACKUP
privilege. On both instances, the password for
the user performing the duplication must be the same.
4. Start RMAN and connect to the root as a user with the
SYSDBA
or
SYSBACKUP
privilege.
On both the auxiliary instance and the target database, the password for the user
performing the duplication must be the same.
5. Place the source database in a proper state, if necessary, as described in "Placing
the Source Database in a Proper State".
6. Configure RMAN channels, if necessary, as described in "Configuring RMAN
Channels for Use in Duplication".
The primary task of duplication is performed by RMAN channels. Configuring
additional channels improves the duplication performance.
7. Run the
DUPLICATE
command with the
FROM SPARSE
option.
For example, the following command duplicates the CDB on to
cdb2
:
DUPICATE FROM SPARSE TO cdb2 DATABASE;
25.5.3 Duplicating PDBs
You can duplicate a PDB to a new multitenant container database (CDB) or an
existing CDB.
Topics:
•About Duplicating PDBs
•Restrictions on Duplicating a PDB to an Existing CDB
•Duplicating a PDB to a New CDB
•Duplicating a PDB to an Existing CDB
•Duplicating Sparse PDBs
Chapter 25
Duplicating CDBs and PDBs
25-42

25.5.3.1 About Duplicating PDBs
You can duplicate a single PDB, a set of PDBs, or a set of tablespaces within a PDB
by using the
DUPLICATE
command.
To duplicate PDBs, you must log in to the root of the CDB as a user with the
SYSDBA
or
SYSBACKUP
privilege. When duplicating a PDB to a new CDB, you must create the
auxiliary instance as a CDB. To do so, start the auxiliary instance with the declaration
enable_pluggable_database=TRUE
in the initialization parameter file.
When you duplicate one or more PDBs, RMAN also duplicates the root (
CDB$ROOT
) and
the CDB seed (
PDB$SEED
). The resulting duplicate database is a fully functional CDB
that contains the root, the CDB seed, and the duplicated PDBs.
Table 25-3 Techniques for Duplicating PDBs
Technique Description Additional Information
Duplicate a PDB to an existing
CDB
To duplicate a PDB into an
existing CDB, use the
DUPLICATE PLUGGABLE
DATABASE pdb_name TO
cdb_name
syntax. Here,
cdb_name
is the name of an
existing CDB.
Duplicating a PDB to an
Existing CDB
Duplicate specified PDBs to a
new CDB
Use one of the following
techniques:
•Duplicate the specified
PDBs to a new CDB by
using the following
syntax:
DUPLICATE DATABASE TO
cdb_name
PLUGGABLE
DATABASE
pdb_name;
Use a comma-delimited
list to duplicate multiple
PDBs.
•Duplicate all the PDBs,
except the PDBs
specified by pdb_name,
to a new CDB by using
the following syntax:
DUPLICATE DATABASE TO
cdb_name SKIP
PLUGGABLE DATABASE
pdb_name
Use a comma-delimited
list to specify multiple
PDBs that must be
excluded.
Duplicating a PDB to a New
CDB
Chapter 25
Duplicating CDBs and PDBs
25-43

Table 25-3 (Cont.) Techniques for Duplicating PDBs
Technique Description Additional Information
Duplicate specified
tablespaces within a PDB to a
new CDB
Use one of the following
techniques:
•Duplicate specified
tablespaces within a PDB
to a new CDB by usingthe
following syntax:
DUPLICATE DATABASE TO
cdb_name TABLESPACE
pdb_name:tablespace_na
me;
The tablespace name
must be prefixed with the
name of the PDB that
contains the tablespace. If
you omit the name of the
PDB, root is taken as the
default.
•Duplicate all tablespaces
in the CDB except the
specified tablespaces to a
new CDB by usingthe
following syntax:
DUPLICATE DATABASE TO
cdb_name SKIP
TABLESPACE
pdb_name:tablespace_na
me
Duplicating Tablespaces
Within a PDB to a New CDB
25.5.3.2 Restrictions on Duplicating a PDB to an Existing CDB
Duplicating a PDB to an existing CDB is subject to certain restrictions.
•Only active database duplication is supported.
•Only the following clauses of the
DUPLICATE
command are supported:
NORESUME
,
DB_FILE_NAME_CONVERT
,
SECTION SIZE
, and
USING COMPRESSED BACKUPSET
.
•The following clauses of the
DUPLICATE
command are not supported:
SPFILE
,
NO
STANDBY
,
FARSYNC STANDBY
, and
LOG_FILE_NAME_CONVERT
.
•Duplicating a PDB to a CDB that is a standby database is not supported.
•Only one PDB can be duplicated at a time.
•Partial PDB duplication is not supported, only complete PDB duplication is
supported. For example, you cannot include or exclude specific tablespaces while
duplicating a PDB.
•Duplicating a non-CDB as a PDB in an existing CDB is not supported.
•Duplicating PDBs that contain TDE-encrypted tablespaces is not supported.
Chapter 25
Duplicating CDBs and PDBs
25-44

25.5.3.3 Duplicating a PDB to an Existing CDB
Use the
DUPLICATE
command to duplicate a PDB to an existing CDB.
To duplicate a PDB to an existing CDB:
1. Ensure that the required prerequisites are met. This includes the following:
•Prerequisites for active database duplication
•Additional prerequisites for duplicating a PDB to an existing CDB
See Oracle Database Backup and Recovery Reference.
2. Review the limitations of duplicating a PDB to an existing CDB, as described in
"Restrictions on Duplicating a PDB to an Existing CDB".
3. Choose a strategy for naming duplicate database files, as described in "Choosing
a Strategy for Naming Duplicate Database Files".
4. Create the directories that store the duplicate database files on the destination
CDB, as described in "Creating Directories for the Duplicate Database".
5. Establish Oracle net connectivity between the source CDB and the destination
CDB, as described in "Establishing Oracle Net Connectivity Between the Source
Database and Auxiliary Instance".
6. Start RMAN and make the following connections:
•Connect
AS TARGET
to the root of the source CDB as a common user with the
SYSDBA
or
SYSBACKUP
privilege.
•Connect
AS AUXILIARY
to the root of the destination CDB as a common user
with the
SYSDBA
or
SYSBACKUP
privilege.
7. Ensure that the destination CDB is open in read-write mode.
8. Configure RMAN channels, if necessary, as described in "Configuring RMAN
Channels for Use in Duplication".
The primary task of duplication is performed by RMAN channels. Configuring
additional channels improves the duplication performance.
9. Duplicate the PDB by using the
DUPLICATE PLUGGABLE DATABASE
command.
The following command duplicates the PDB
mypdb
to an existing CDB
cdb_sales
.
DUPLICATE PLUGGABLE DATABASE mypdb TO cdb_sales
DB_FILE_NAME_CONVERT('cdb1','pdb1')
FROM ACTIVE DATABASE
SECTION SIZE 400M;
To use a different name for the PDB in the destination (duplicate) database, use
the
PLUGGABLE DATABASE mypdb AS pdb_dup TO cdb_sales
syntax.
10. Delete the foreign archived redo log files that were restored to the location
specified by the
remote_recovery_file_dest
initialization parameter as part of the
duplication.
Chapter 25
Duplicating CDBs and PDBs
25-45

Note:
Duplicating a PDB to an existing CDB is supported starting with Oracle
Database Release 18c.
See Also:
•About Duplicating PDBs
•Example: Duplicating a PDB to an Existing CDB by Using Active
Duplication
25.5.3.4 Duplicating a PDB to a New CDB
Use the
DUPLICATE
command to duplicate one or more PDBs to a new CDB.
To duplicate a PDB to a new CDB:
1. Complete the planning tasks described in "Planning to Duplicate a Database" with
the following change:
In "Making Backups Accessible to the Duplicate Instance" and "Making Disk
Backups Accessible Without Shared Disk", note the following adjustment:
Use the
PLUGGABLE DATABASE
syntax of the
BACKUP
command to copy only the
backups of a specific PDB.
For example, the following command transfers only the backups files for the PDB
pdb3
:
BACKUP COPY OF PLUGGABLE DATABASE pdb3;
2. Ensure that the prerequisites for the selected duplication technique are met, as
described in "Prerequisites for Duplicating a Database".
3. Prepare the auxiliary instance, as described in "Preparing the Auxiliary Instance",
with the following changes:
•You must create the auxiliary instance as a CDB. To do so, start the instance
with the following declaration in the initialization parameter file:
enable_pluggable_database=TRUE
•When instructed to create an initialization parameter file for the auxiliary
instance, you must copy the file from the source database. This ensures that
the auxiliary instance is also a CDB. After you copy the file, perform the
following steps:
–Modify the
DB_NAME
parameter
–Modify the various destination/location parameters
•When instructed to connect to the necessary instances, connect to the root as
a user with
SYSDBA
or
SYSBACKUP
privilege. On both instances, the password for
the user performing the duplication must be the same.
Chapter 25
Duplicating CDBs and PDBs
25-46

4. Start RMAN and connect to the root as a user with the
SYSDBA
or
SYSBACKUP
privilege.
On both the auxiliary instance and the target database, the password for the user
performing the duplication must be the same.
5. Place source database in proper state, if necessary, as described in "Placing the
Source Database in a Proper State".
6. Configure RMAN channels, if necessary, as described in "Configuring RMAN
Channels for Use in Duplication".
The primary task of duplication is performed by the RMAN channels. Configuring
additional channels improves the duplication performance.
7. Duplicate the PDB by using the
DUPLICATE … PLUGGABLE DATABASE
command.
Examples: Duplicating PDBs
•To duplicate the PDB
pdb1
to the CDB
cdb1
, use the following command:
DUPLICATE DATABASE TO cdb1 PLUGGABLE DATABASE pdb1;
•To duplicate the PDBs
pdb1
,
pdb3
, and
pdb4
to the database
cdb1
, use the following
command:
DUPLICATE DATABASE TO cdb1 PLUGGABLE DATABASE pdb1,pdb3,pdb4;
•To duplicate all the PDBs in the CDB, except the PDB
pdb3
, use the following
command:
DUPLICATE DATABASE TO cdb1 SKIP PLUGGABLE DATABASE pdb3;
See Also:
About Duplicating PDBs
25.5.3.5 Duplicating Sparse PDBs
Use the
DUPLICATE
command to duplicate sparse pluggable databases (PDBs).
To duplicate a sparse PDB:
1. Complete the planning tasks described in "Planning to Duplicate a Database" with
the following change:
In "Making Backups Accessible to the Duplicate Instance" and "Making Disk
Backups Accessible Without Shared Disk", use the
PLUGGABLE DATABASE
syntax of
the
BACKUP
command to copy only the backups of a specific PDB.
For example, the following command transfers only the backups files for the PDB
pdb3
:
BACKUP COPY OF PLUGGABLE DATABASE pdb3;
2. Ensure that the prerequisites for the selected duplication technique are met as
described in "Prerequisites for Duplicating a Database".
3. Prepare the auxiliary instance as described in "Preparing the Auxiliary Instance",
with the following changes:
Chapter 25
Duplicating CDBs and PDBs
25-47

•Create the auxiliary instance as a CDB. To do so, start the instance with the
following declaration in the initialization parameter file:
enable_pluggable_database=TRUE
•When instructed to create an initialization parameter file for the auxiliary
instance, you must copy the file from the source database. This ensures that
the auxiliary instance is also a CDB. After copying, perform the following
steps:
–Modify the
DB_NAME
parameter
–Modify the various destination/location parameters
•When instructed to connect to the necessary instances, connect to the root as
a user with
SYSDBA
or
SYSBACKUP
privilege. On both instances, the password for
the user performing the duplication must be the same.
4. Start RMAN and connect to the root as a user with the
SYSDBA
or
SYSBACKUP
privilege.
On both the auxiliary instance and the target database, the password for the user
performing the duplication must be the same.
5. Place source database in proper state (if necessary) as described in "Placing the
Source Database in a Proper State".
6. (Optional) Configure RMAN channels to improve duplication performance as
described in "Configuring RMAN Channels for Use in Duplication".
7. Run the
DUPLICATE
command with the
PLUGGABLE DATABASE
and
FROM SPARSE
options.
To duplicate PDB
pdb1
to CDB
cdb2
, run the following command:
DUPLICATE FROM SPARSE to cdb2 PLUGGABLE DATABASE pdb1;
Note:
The base (read-only) data files in a sparse database are not encrypted.
Ensure that the base data files are stored in a protected storage and
accessed using secured communications.
25.5.4 Duplicating Tablespaces Within a PDB to a New CDB
You can duplicate one or more tablespaces within a PDB to a new CDB by using the
DUPLICATE
command.
To duplicate tablespaces within a PDB:
1. Ensure that you have completed Steps 1 to 4 in Duplicating a PDB to a New CDB.
2. Run the
DUPLICATE
command with the
TABLESPACE
option described in About
Duplicating PDBs.
The following are some examples of duplicating tablespaces that are contained in
PDBs:
To duplicate the
users
tablespace that is part of PDB
pdb1
, use the following
command:
DUPLICATE DATABASE TO cdb1 TABLESPACE pdb1:users;
Chapter 25
Duplicating CDBs and PDBs
25-48

To duplicate the PDB
pdb1
and the users tablespace in PDB
pdb2
, use the following
command:
DUPLICATE DATABASE TO cdb1 PLUGGABLE DATABASE pdb1 TABLESPACE pdb2:users;
25.6 Duplicating Databases to Oracle Cloud
Use the
DUPLICATE
command to duplicate an on-premise database to Oracle Cloud.
Both backup-based and active duplication are supported.
Oracle databases on Oracle Cloud are always encrypted. Therefore, when you
duplicate a database or part of a database to Oracle Cloud, any tablespaces created
in Oracle Cloud are encrypted even if no encryption clause is specified during
duplication.
The
COMPATIBLE
parameter of the source and Oracle Cloud database must be set to
18.0.0 or higher.
1. Ensure that the prerequisites for the selected duplication technique are met. It is
recommended that you use active database duplication.
See "Prerequisites for Duplicating a Database".
2. Configure the Oracle Database Cloud Backup Module. This backup module is an
SBT interface that enables you to perform backup and recovery operations to
Oracle Cloud.
See Oracle Cloud Using Oracle Database Backup Service for information about
installing Oracle Database Cloud Backup Module
3. Complete the planning tasks, as described in "Planning to Duplicate a Database".
4. Prepare the auxiliary instance, as described in "Preparing the Auxiliary Instance",
with the following changes when duplicating CDBs:
•You must create the auxiliary instance as a CDB. To do so, start the instance
with the following declaration in the initialization parameter file:
enable_pluggable_database=TRUE
•When instructed to create an initialization parameter file for the auxiliary
instance, you must copy the file from the source database. This ensures that
the auxiliary instance is also a CDB. After you copy the file, perform the
following steps:
–Modify the
DB_NAME
parameter
–Modify the various destination/location parameters
•Start the auxiliary instance in
NOMOUNT
mode.
Note:
Because the auxiliary instance must be created on Oracle Cloud, the
Oracle Cloud administrator must perform the steps to prepare the
auxiliary instance.
5. Start RMAN and connect to the root as a common user with the
SYSDBA
or
SYSBACKUP
privilege.
Chapter 25
Duplicating Databases to Oracle Cloud
25-49

On both the auxiliary instance and the target database, the password for the user
performing the duplication must be the same.
6. If the source CDB uses encryption, then open the Oracle keystore that contains
the master key on the source CDB.
7. Configure RMAN channels, if necessary, as described in "Configuring RMAN
Channels for Use in Duplication".
The RMAN channels perform the primary task of duplication. Configuring
additional channels improves the duplication performance.
8. On the destination CDB, open the Oracle keystore from the source CDB.
If the destination CDB uses a password-based software keystore, then you must
specify the password used to open this keystore. The following command sets the
password used to open a password-based software keystore (replace password
with your keystore password):
SET DECRYPTION WALLET OPEN IDENTIFIED BY 'password';
9. Use the
DUPLICATE
command to duplicate the source CDB.
See "Using the DUPLICATE Command to Duplicate Databases".
Note:
Using duplication to create a standby database to Oracle Cloud is not
supported.
See Also:
RMAN Duplicate from an Active Database for more details about duplicating
databases to Oracle Cloud Infrastructure
25.7 Duplicating an Oracle Cloud Database as an On-
premise Database
Use the
DUPLICATE
command to duplicate an Oracle Cloud Database as an on-premise
database. Both backup-based and active duplication are supported.
Oracle Cloud databases are always encrypted. When you duplicate a database from
Oracle Cloud, the Oracle keystore that stores the master key must be copied to the
on-premise database. This key is required to decrypt the data files that are duplicated
from the Oracle Cloud database. The duplicate database may or may not use
encryption.
The
COMPATIBLE
parameter of the source and destination database must be set to
18.0.0 or higher.
Chapter 25
Duplicating an Oracle Cloud Database as an On-premise Database
25-50

1. Ensure that the prerequisites for the selected duplication technique are met, as
described in "Prerequisites for Duplicating a Database". It is recommended that
you use active database duplication.
2. Configure the Oracle Database Cloud Backup Module. This backup module is an
SBT interface that enables you to perform backup and recovery operations to
Oracle Cloud.
See Oracle Cloud Using Oracle Database Backup Service for information about
installing Oracle Database Cloud Backup Module
3. Complete the planning tasks described in "Planning to Duplicate a Database".
4. Prepare the auxiliary instance, as described in "Preparing the Auxiliary Instance",
with the following changes:
•You must create the auxiliary instance as a CDB. To do so, start the instance
with the following declaration in the initialization parameter file:
enable_pluggable_database=TRUE
•When instructed to create an initialization parameter file for the auxiliary
instance, you must copy the file from the source database. This ensures that
the auxiliary instance is also a CDB. After you copy the file, perform the
following steps:
–Modify the
DB_NAME
parameter
–Modify the various destination/location parameters
•When instructed to connect to the necessary instances, start RMAN and
connect to the root as a common user with
SYSDBA
or
SYSBACKUP
privilege. On
both instances, the password for the user performing the duplication must be
the same.
5. Copy the Oracle keystore from Oracle Cloud to the auxiliary instance.
The auxiliary instance needs to decrypt the data files from Oracle Cloud before
encrypting them again by using the Oracle keystore in the Oracle Cloud database.
6. Configure RMAN channels, if necessary, as described in "Configuring RMAN
Channels for Use in Duplication".
The primary task of duplication is performed by RMAN channels. Configuring
additional channels improves the duplication performance.
7. On the auxiliary instance, open the Oracle keystore that was copied from the
source Oracle Cloud database.
If the destination CDB uses a password-based software keystore, then you must
specify the password used to open this keystore. The following command sets the
password used to open a password-based software keystore (replace password
with your keystore password):
SET DECRYPTION WALLET OPEN IDENTIFIED BY 'password';
8. Use the
DUPLICATE
command to duplicate the source CDB.
To create a duplicate database that does not use encryption, use the
AS DECRYPTED
option in the
DUPLICATE
command. For example:
DUPLICATE DATABASE TO my_cdb
FROM ACTIVE DATABASE
AS DECRYPTED;
Chapter 25
Duplicating an Oracle Cloud Database as an On-premise Database
25-51

See "Using the DUPLICATE Command to Duplicate Databases".
Note:
Duplicating
AS STANDBY
by using
AS ENCRYPTED
or
AS DECRYPTED
is not
supported.
25.8 Restarting DUPLICATE After a Failure
RMAN automatically optimizes a
DUPLICATE
command that is a repeat of a previously
failed
DUPLICATE
command.
The repeat
DUPLICATE
command notices which data files were successfully copied
earlier and does not copy them again. This applies to all forms of duplication, whether
they are backup-based (with or without a target connection) or active database
duplication. The automatic optimization of the
DUPLICATE
command can be especially
useful when a failure occurs during the duplication of very large databases.
To restart a duplicate operation:
1. Exit RMAN.
2. Start SQL*Plus and connect to the auxiliary instance with
SYSDBA
or
SYSBACKUP
privilege. Start the auxiliary instance in
NOMOUNT
mode with the same
SPFILE
or
PFILE
specification that you used initially. If you omitted this specification initially,
then omit it again here.
This example starts the auxiliary instance by using the parameters in the file
/
home/my_pfile.ora
:
STARTUP FORCE PFILE=/home/my_pfile.ora
3. Exit SQL*Plus and start RMAN.
4. Connect to the same databases as initially.
5. Repeat the
DUPLICATE
command.
The second
DUPLICATE
operation:
•Locates the data files that were successfully duplicated by the initial
DUPLICATE
command.
•Displays a message similar to the following for each data file that it does not
need to duplicate again:
RMAN-05560: Using previous duplicated file /oradata/new/data01.f for
datafile 1 with checkpoint SCN of 1654665
•Restores only the missing or incomplete data files, thereby avoiding recopying
and restoring all the data files.
If you do not want RMAN to automatically recover from a failed
DUPLICATE
operation, specify the keyword
NORESUME
to disable the functionality. Using the
keyword
NORESUME
in the first invocation of
DUPLICATE
prevents a subsequent
DUPLICATE
command for the new database from using this automatic optimization.
Chapter 25
Restarting DUPLICATE After a Failure
25-52

25.9 Examples: Duplicating Databases
This section contains examples on duplicating databases by using different duplication
techniques.
See Also:
•Example: Duplicating a Database to a Remote ASM Host by Using
Active Database Duplication with Backup Sets
•Example: Duplicating a Database to a Remote Host by Using Active
Database Duplication with Image Copies
•Example: Duplicating a Database to a Remote Host by Using Backup-
based Duplication without a Target Connection or Recovery Catalog
•Example: Duplicating a Database to a Remote Host by Using Backup-
Based Duplication with a Recovery Catalog
•Example: Duplicating a Database to a Remote Host by Using Backup-
based Duplication with a Target Connection
•Example: Duplicating a Database to the Local Host by Using Active
Database Duplication
•Example: Duplicating PDBs to a New CDB by Using Active Database
Duplication
•Example: Duplicating a PDB to an Existing CDB by Using Active
Duplication
•Example: Performing Backup-based Duplication by Using Encrypted
Backups
25.9.1 Example: Duplicating a Database to a Remote ASM Host by
Using Active Database Duplication with Backup Sets
This example describes how to use active database duplication to duplicate a
database to a remote ASM host.
This example assumes the following scenario:
•The source host and the destination host are different.
•Both the source database and the duplicate database manage database files by
using ASM.
•The duplicate database files use a different directory structure than the source
database.
•Network bandwidth on the source host is limited.
•The duplicate database must be opened after the duplication process completes.
Use the following steps to create a duplicate database for the scenario that is
described in this example:
Chapter 25
Examples: Duplicating Databases
25-53

1. Plan the duplication, as described in "Planning to Duplicate a Database".
This includes the following tasks:
•Choose a duplication technique that suits the scenario and requirements.
Because network bandwidth on the source host is limited, active database
duplication by using backup sets is performed.
•Choose a strategy to name duplicate database files.
In this example, the
DB_CREATE_FILE_DEST
initialization parameter is used to
specify the location of the duplicate database files.
•Configure six auxiliary channels on the auxiliary instance, as described in
"Configuring RMAN Channels for Use in Duplication".
In this example, there are two target channels configured on the source
database. For RMAN to use backup sets to perform active database
duplication, the number of auxiliary channels must be equal to or greater than
the number of target channels.
2. Ensure that the prerequisites for the chosen duplication technique are met, as
described in "Prerequisites for Duplicating a Database".
3. Prepare the auxiliary instance, as described in "Preparing the Auxiliary Instance".
•Create the disk groups that will store the database files on the destination
host.
If it does not already exist, create the
+DGROUP2
disk group to store the duplicate
database files.
•Copy the password file from the source database to the destination database,
as described in "Creating a Password File for the Auxiliary Instance".
•Set up Oracle net services connectivity between the source database and the
auxiliary instance by using a static listener.
•Copy the source database software keystore to the destination host. Specify
the password that must be used to open the password-based software
keystore by using the
SET
command.
See "Making the Oracle Keystore Available to the Destination Host".
•Start the auxiliary instance in
NOMOUNT
mode, as described in "Starting the
Auxiliary Instance".
4. Start RMAN and connect to the source database as
TARGET
and to the auxiliary
instance as
AUXILIARY
.
%rman
RMAN> CONNECT TARGET sys@srcdb as SYSDBA;
RMAN> CONNECT AUXILIARY sys@dupdb AS SYSBACKUP;
See Also:
For active database duplication, connection to the auxiliary instance
must also use password file authentication.
5. Duplicate the database by using the
DUPLICATE
command.
Chapter 25
Examples: Duplicating Databases
25-54

The
SPFILE
clause directs RMAN to copy the server parameter file from the source
database to the auxiliary instance. Use the
DB_CREATE_FILE_DEST
parameter to
specify the disk group that is used to store the duplicate database files in the
duplicate database.
DUPLICATE DATABASE to dupdb
FROM ACTIVE DATABASE
PASSWORD FILE
SPFILE
SET DB_CREATE_FILE_DEST='+DGROUP2';
See Also:
Examples: Duplicating Databases
25.9.2 Example: Duplicating a Database to a Remote Host by Using
Active Database Duplication with Image Copies
This example uses active database duplication with image copies to duplicate a
database to a remote host.
This example assumes the following scenario:
•The source host and the destination host are different.
•The duplicate database files use a directory structure that is different from that of
the source database.
•The source database and the duplicate database use Oracle Managed Files
(OMF) to create database files.
•The source database must be available during the duplication process.
•The duplicate database must be opened after the duplication process completes.
Use the following steps to create a duplicate database for the scenario that is
described in this example:
1. Plan the duplication, as described in "Planning to Duplicate a Database". This
includes the following tasks:
•Choose a duplication technique that suits the scenario and requirements.
Since the bandwidth between the source and destination is limited, active
database duplication by using image copies is performed.
•Choose a strategy to name duplicate database files.
In this example, the
DB_FILE_NAME_CONVERT
and
LOG_FILE_NAME_CONVERT
initialization parameters are used to specify how the source database file
names are converted to duplicate database file names.
•When you perform active database duplication by using image copies, RMAN
uses image copies either if no auxiliary channels are configured or if the
number of auxiliary channels is lesser than the number of target channels.
Therefore, no additional channels need to be configured to perform active
database duplication by using image copies.
Chapter 25
Examples: Duplicating Databases
25-55

2. Ensure that the prerequisites for the chosen duplication technique are met, as
described in "Prerequisites for Duplicating a Database".
3. Prepare the auxiliary instance, as described in "Preparing the Auxiliary Instance".
•Create the directories that store the database files on the destination host.
In this example, create the
/app/db_home2/database
directory to store the data
files, control file, and server parameter file and the
/app/db_home2/logfiles
directory to store the online redo log files.
•On the destination host, create a minimal initialization parameter file for the
auxiliary instance. The file is called
initdup.ora
and is located in the
/app/
db_home1/database
directory. It contains the following entries:
DB_NAME=dup
DB_DOMAIN = dup.example.com
See "Creating an Initialization Parameter File for the Auxiliary Instance".
•Copy the password file from the source database to destination host, as
described in "Creating a Password File for the Auxiliary Instance"
•Set up Oracle net services connectivity between the source database and the
auxiliary instance by using a static listener, as described in "Establishing
Oracle Net Connectivity Between the Source Database and Auxiliary
Instance".
•Start the auxiliary instance in
NOMOUNT
mode, as described in "Starting the
Auxiliary Instance".
4. Start RMAN and connect to the source database as
TARGET
and to the auxiliary
instance as
AUXILIARY
.
% rman
RMAN> CONNECT TARGET sys@srcdb as SYSDBA;
RMAN> CONNECT AUXILIARY sys@dupdb AS SYSBACKUP;
See Also:
For active database duplication, connection to the auxiliary instance
must also use password file authentication.
5. Duplicate the database by using the
DUPLICATE
command. Include the
SPFILE
clause with the
DB_FILE_NAME_CONVERT
and
LOG_FILE_NAME_CONVERT
parameters to
specify that the server parameter file from the source database must be used for
the auxiliary instance.
The duplicate database files are stored in the duplicate database by using OMF-
generated names. The
PARAMETER_VALUE_CONVERT
option of the
SPFILE
clause
specifies that the path name
/app/db_home1
should be converted to
/app_db_home2
.
DUPLICATE DATABASE TO dupdb
FROM ACTIVE DATABASE
PASSWORD FILE
SPFILE PARAMETER_VALUE_CONVERT='/app/dbhome1','/app/db_home2'
SET db_file_name_convert='/app/dbhome1/dbs','/app/db_home2/database/dbs'
SET log_file_name_convert='/app/dbhome1/log','/app/db_home2/logfiles';
Chapter 25
Examples: Duplicating Databases
25-56

See Also:
Examples: Duplicating Databases
25.9.3 Example: Duplicating a Database to a Remote Host by Using
Backup-based Duplication without a Target Connection or Recovery
Catalog
This example describes how to perform duplication to a remote host by using backup-
based duplication without a target connection or recovery catalog.
This example uses the following scenario:
•A complete backup of the source database including the control files, data files,
and archived redo log files is available in the /backups/db_files directory on the
destination host.
•A connection to the target database or recovery catalog is not available.
•The source host and destination host are different.
•The duplicate database uses a directory structure that is different from that used
by the source database to store the duplicate database files. The data files and
control file of the duplicate database files are stored in the /oracle2/database
directory and the online redo logs files are stored in /oracle2/database/logs
directory.
•The
DB_NAME
of the source database is
db12
and that of the duplicate database is
dup
.
•The duplicate database must be opened after the duplication process completes.
Use the following steps to create a duplicate database for the scenario that is
described in this example:
1. Plan the duplication, as described in "Planning to Duplicate a Database". This
includes the following tasks:
•Choose a duplication technique that suits the scenario and requirements.
In this example, backup-based duplication without a target connection or
recovery catalog connection is performed. Therefore, we use the
BACKUP
LOCATION
clause to specify the location of the source database backups.
•Because the duplicate database uses a directory structure that is different
from the source database, you must choose a strategy to generate duplicate
database file names.
In this example, the
SET NEWNAME FOR DATABASE
command specifies the location
of the data files and control file. The
LOGFILE
clause of the
DUPLICATE
command
specifies the location of the online redo log files.
•Copy the required backups to the destination host by using the same directory
structure used on the source database.
In this example, the backups of the data files and archived redo log files must
be stored in
/backups/db_files
and the backups of the control files and server
parameter file in
/backups/cf
on the destination host.
Chapter 25
Examples: Duplicating Databases
25-57

2. Ensure that the prerequisites for the chosen duplication technique are met, as
described in "Prerequisites for Duplicating a Database".
3. Prepare the auxiliary instance.
•Create the directories that will store the duplicate database files on the
destination host.
In this example, you create the
/oracle2/database
directory to store the data
files, control file, and server parameter file. Create the
/oracle2/database/logs
directory to store the online redo log files.
•Create a minimal initialization parameter file for the auxiliary instance, as
described in "Creating an Initialization Parameter File for the Auxiliary
Instance".
The file is called
initdup.ora
and is located in the
/oracle2/database
directory.
In addition to any other specific settings, it must contain the following entries:
DB_NAME = dup
DB_DOMAIN = dupdb.example.com
•Create a password file for the auxiliary instance by using the
orapwd
utility. A
password file is required because the duplicate database is being created on a
remote host.
See "Creating a Password File for the Auxiliary Instance".
•Set up Oracle Net Services connectivity between the source database and the
auxiliary instance by using a static listener, as described in "Establishing
Oracle Net Connectivity Between the Source Database and Auxiliary
Instance".
This is required because this example duplicates a database to a remote host.
•Start the auxiliary instance in
NOMOUNT
mode, as described in "Starting the
Auxiliary Instance".
4. Start RMAN and connect to the source database as
TARGET
and to the auxiliary
instance as
AUXILIARY
.
%rman
RMAN> CONNECT TARGET /
RMAN> CONNECT AUXILIARY sys@dup AS SYSBACKUP;
Enter the passwords when prompted.
5. Duplicate the database by using the
DUPLICATE
command.
Include the
BACKUP LOCATION
clause to specify the location of the source database
backups. Enclose the
SET NEWNAME FOR DATABASE
and
DUPLICATE
command within a
RUN
block. The
LOGFILE
clause specifies the names and location of the online redo
log files.
run
{
set newname for database to '/oracle2/database/%b';
duplicate database 'db12' to 'dup'
logfile group 1 ('/oracle2/database/logs/r1.f','/ oracle2/database/logs/r2.f')
size 4m reuse,
group 2 ('/ oracle2/database/logs/r3.f','/oracle2/database/logs/r4.f')
size 4m reuse
backup location '/backups/db_files';
}
Chapter 25
Examples: Duplicating Databases
25-58

See Also:
Examples: Duplicating Databases
25.9.4 Example: Duplicating a Database to a Remote Host by Using
Backup-Based Duplication with a Recovery Catalog
This example describes how to perform duplication to a remote host by using backup-
based duplication with a recovery catalog.
This example assumes the following scenario:
•A complete backup of the source database is available on the source host. The
backups of the data files and archived redo log files are stored in
/bkups/db_files
.
The backups of the control files and server parameter file are stored in
/bkups/cf
.
•A connection to the source database is not available, but a connection to the
recovery catalog is available.
•The source host and destination host are different. The destination host used OMF
and has the Oracle Database software installed.
•The duplicate database stores database files in a different directory structure than
the source database. The database files of the duplicate database must be stored
in the
/app/oracle2/dbs
directory.
•The
DB_NAME
of the source database is
ora
and its Net Service name is
oradb
. The
DB_NAME
of the duplicate database is
dup
and its Net Service name is
dupdb
.
•The read-only tablespaces in the source database must be excluded from the
duplicate database.
•The duplicate database must not be opened after the duplication process
completes.
Use the following steps to create a duplicate database for the scenario that is
described in this example:
1. Plan the duplication. as described in "Planning to Duplicate a Database". This
includes the following tasks:
•Choose a duplication technique that suits the scenario and requirements.
In this example, backup-based duplication using a recovery catalog
connection is performed.
•Choose a strategy to generate duplicate database file names.
Since the duplicate database uses OMF, use the
DB_CREATE_FILE_DEST
parameter in the auxiliary instance's initialization parameter file to specify the
directory in which the duplicate database files are stored.
•Use the
NOOPEN
clause of the
DUPLICATE
command to specify that the duplicate
database must not be opened using
RESETLOGS
after the duplication completes.
•Copy the required backups to the destination host using the same directory
structure used on the source database.
Chapter 25
Examples: Duplicating Databases
25-59

In this example, the backups of the data files and archived redo log files must
be stored in
/scratch/db_files
and the backups of the control files and server
parameter file in
/scratch/cf
on the destination host.
2. Ensure that the prerequisites for the chosen duplication technique are met, as
described in "Prerequisites for Duplicating a Database".
3. Prepare the auxiliary instance, as described in "Preparing the Auxiliary Instance".
•Create the directories that will store the duplicate database files on the
destination host.
In this example, you create the
/app/oracle2/dbs
directory to store the data
files, control file, online redo log files, and server parameter file.
•Create an initialization parameter file for the auxiliary instance. The file is
called
initdup.ora
and is located in the
/app/oracle2/dbs
directory. In addition
to any other specific settings, it must contain the following entries:
DB_NAME=dup
DB_DOMAIN = dupdb.example.com
DB_CREATE_FILE_DEST= /app/oracle2/dbs
See "Creating an Initialization Parameter File for the Auxiliary Instance".
•Create a password file for the auxiliary instance by using the
orapwd
utility. A
password file is required because the duplicate database is being created on a
remote host.
See "Creating a Password File for the Auxiliary Instance".
•Set up Oracle net services connectivity between the source database and the
auxiliary instance using a static listener. This is required because this example
duplicates a database to a remote host.
See "Establishing Oracle Net Connectivity Between the Source Database and
Auxiliary Instance".
•Start the auxiliary instance in
NOMOUNT
mode, as described in "Starting the
Auxiliary Instance".
4. Start RMAN and connect to the source database as
TARGET
and to the auxiliary
instance as
AUXILIARY
.
%rman
RMAN> CONNECT TARGET sys@oradb;
RMAN> CONNECT AUXILIARY sys@dupdb;
Enter the passwords when prompted.
5. Duplicate the database by using the
DUPLICATE
command.
Include the
SKIP READONLY
clause to exclude the read-only tablespaces from the
duplicate database. Because there is no connection to a target database, you
must specify the name of the target database that is being duplicated.
DUPLICATE DATABASE db12 TO dup
SKIP READONLY;
Chapter 25
Examples: Duplicating Databases
25-60

See Also:
Examples: Duplicating Databases
25.9.5 Example: Duplicating a Database to a Remote Host by Using
Backup-based Duplication with a Target Connection
This example describes how to perform duplication to a remote host by using backup-
based duplication with a target connection.
This example uses the following scenario:
•A complete backup of the source database including the control file, data files, and
archived redo log files is available.
•A connection to the source database is available.
•The source host and destination host are different.
•The source database is configured to use transparent encryption with a password-
based software keystore.
•The duplicate database uses the same directory structure and file names as the
source database to store database files.
On the source host, the data file, control files and server parameter file are stored
in
/app/db_home1/database
and the online redo log files are stored in
/app/db_home1/
logfiles
.
•The
DB_NAME
of the source database is
src
and its Net Service name is
srcdb
. The
DB_NAME
of the duplicate database is
dup
and its Net Service name is
dupdb
.
•On the source host, backups of the data files and archived redo log files are stored
in
/bkups/oradata/db_files
. The backups of the control files and server parameter
file are stored in
/bkups/oradata/cf
.
•The tablespaces
HR
and
SH
must be excluded from the duplicate database.
The remaining tablespaces in the source database are self-contained and do not
have links to the
hr
and
sh
tablespaces.
•The duplicate database must be opened after the duplication process completes.
Use the following steps to create a duplicate database for the scenario that is
described in this example:
1. Plan the duplication, as described in "Planning to Duplicate a Database". This
includes the following tasks:
•Choose a duplication technique that is suitable for your scenario.
In this example, backup-based duplication by using a target connection is
performed.
•Because the duplicate database uses the same directory structure as source
database, you need not specify an alternative file naming strategy.
However, use the
NOFILENAMECHECK
clause in the
DUPLICATE
command to prevent
RMAN from checking if the data files and online redo logs files of the source
database use the same names as that on the duplicate database.
Chapter 25
Examples: Duplicating Databases
25-61

•Configure three additional auxiliary channels, as described in "Configuring
RMAN Channels for Use in Duplication". Using additional auxiliary channels
enhances the performance of the duplication process
•Copy the required backups to the destination host using the same directory
structure used on the source database.
In this example, the backups of the data files and archived redo log files must
be stored in the
/bkups/oradata/db_files
directory and the backups of the
control file and server parameter file in the
/bkups/oradata/cf
directory on the
destination host.
2. Ensure that the prerequisites for the chosen duplication technique are met, as
described in "Prerequisites for Duplicating a Database".
3. Prepare the auxiliary instance, as described in "Preparing the Auxiliary Instance".
•Create the directories that store the duplicate database files on the destination
host.
In this example, the source database and the duplicate database use the
same directory structure. Create the
/app/database
directory to store the data
files, control file, and server parameter file and the
/app/logfiles
directory to
store the online redo log files.
•Create a minimal initialization parameter file for the auxiliary instance. The file
is called
initdup.or
a and is located in the
/app/database
directory. It contains
the following entries:
DB_NAME=dup
DB_DOMAIN = dup.example.com
See "Creating an Initialization Parameter File for the Auxiliary Instance".
•Create a password file for the auxiliary instance by copying the password file
from the source database to the duplicate database, as described in "Creating
a Password File for the Auxiliary Instance".
•Set up Oracle Net Services connectivity between the source database and the
auxiliary instance by using a static listener, as described in "Establishing
Oracle Net Connectivity Between the Source Database and Auxiliary
Instance".
•Start the auxiliary instance in
NOMOUNT
mode, as described in "Starting the
Auxiliary Instance"
4. Start RMAN and connect to the source database as
TARGET
and to the auxiliary
instance as
AUXILIARY
. These connections are established from the destination
host and the auxiliary connection uses operating system authentication.
%rman
RMAN> CONNECT TARGET sys@dupdb AS SYSBACKUP;
RMAN> CONNECT AUXILIARY /
5. Duplicate the database by using the
DUPLICATE
command.
Include the
SKIP TABLEPACE
clause to specify the tablespaces that must be omitted
during the duplication process. Use the
SPFILE
clause to specify that the server
parameter file from the source database must be restored and copied to the
duplicate database.
DUPLICATE DATABASE TO dup
SPFILE
Chapter 25
Examples: Duplicating Databases
25-62

SKIP TABLESPACE HR, SH
NOFILENAMECHECK;
See Also:
Examples: Duplicating Databases
25.9.6 Example: Duplicating a Database to the Local Host by Using
Active Database Duplication
This example uses active database duplication to duplicate a database to the local
host.
This example assumes the following scenario:
•The source host and the destination host are the same.
•Both the source database and the duplicate database manage database files by
using Oracle Managed Files (OMF).
•The duplicate database files use a different directory structure than the source
database.
•The source database is run in
ARCHIVELOG
mode and is available during the
duplication process.
•The service name of the source database
dbsrc
and that of the duplicate database
is
dbdup
. The source database uses a server parameter file (spfile).
Use the following steps to create a duplicate database for the scenario that is
described in this example:
1. Plan the duplication, as described in "Planning to Duplicate a Database".
This includes the following tasks:
•Choose a duplication technique that suits the scenario and requirements
Because network bandwidth on the source host is limited, active database
duplication by using backup sets is performed.
•Choose a strategy to name duplicate database files
In this example, the
DB_CREATE_FILE_DEST
initialization parameter is used to
specify the location of the duplicate database files.
To ensure that the source database files are not overwritten, do not include
the
NOFILENAMECHECK
clause in the
DUPLICATE
command.
•Configure auxiliary channels on the auxiliary instance
In this example, there are three target channels configured on the source
database. For RMAN to use backup sets to perform active database
duplication, the number of auxiliary channels must be equal to or greater than
the number of target channels.
See "Configuring RMAN Channels for Use in Duplication".
2. Ensure that the prerequisites for the chosen duplication technique are met, as
described in "Prerequisites for Duplicating a Database".
Chapter 25
Examples: Duplicating Databases
25-63

3. Prepare the auxiliary instance, as described in "Preparing the Auxiliary Instance".
•Create the directories that store the database files on the destination host
In this example, create the
/app/db_home3/dbs
directory to store the data files,
control file, and server parameter file and the
/app/db_home3/logfiles
directory
to store the online redo log files.
•Copy the password file from the source database to the duplicate database, as
described in "Creating a Password File for the Auxiliary Instance".
•Create an initialization parameter file for the auxiliary instance with the
following minimum parameters:
DB_NAME
,
CONTROL_FILES
,
DB_CREATE_FILE_DEST
,
and
LOG_CREATE_FILE_DEST
.
•Set up Oracle net services connectivity between the source database and the
auxiliary instance by using a static listener.
•Start the auxiliary instance in
NOMOUNT
mode, as described in "Starting the
Auxiliary Instance".
4. Start RMAN and connect to the source database as
TARGET
and to the auxiliary
instance as
AUXILIARY
. Both connections user net service names.
%rman
RMAN> CONNECT TARGET sys@srcdb as SYSDBA;
RMAN> CONNECT AUXILIARY sys@dupdb AS SYSBACKUP;
Note: For active database duplication, the connection to the auxiliary instance
must also use password file authentication.
5. Duplicate the database by using the
DUPLICATE
command.
DUPLICATE DATABASE to dbdup
FROM ACTIVE DATABASE;
See Also:
Examples: Duplicating Databases
25.9.7 Example: Duplicating PDBs to a New CDB by Using Active
Database Duplication
This example describes how to use active database duplication to duplicate a PDB to
a new CDB.
This example assumes the following scenario:
•The source host and the destination host are different.
•Both the source database and the duplicate database manage database files by
using OMF.
•Network bandwidth on the source host is limited.
•The duplicate database files use a different directory structure than the source
database.
Use the following steps to create a duplicate database for the scenario that is
described in this example:
Chapter 25
Examples: Duplicating Databases
25-64

1. Plan the duplication, as described in "Planning to Duplicate a Database". This
includes the following tasks:
•Choose a duplication technique that suits the scenario and requirements.
Because network bandwidth on the source host is limited, active database
duplication by using backup sets is performed.
•Choose a strategy to name duplicate database files.
In this example, the
DB_FILE_NAME_CONVERT
and
LOG_FILE_NAME_CONVERT
initialization parameters are used to specify the location of the duplicate
database files.
•Configure four auxiliary channels on the auxiliary instance, as described in
"Configuring RMAN Channels for Use in Duplication".
In this example, two target channels are configured on the source database.
For RMAN to use backup sets to perform active database duplication, the
number of auxiliary channels must be equal to or greater than the number of
target channels.
2. Ensure that the prerequisites for the chosen duplication technique are met, as
described in "Prerequisites for Duplicating a Database".
3. Prepare the auxiliary instance, as described in "Preparing the Auxiliary Instance".
•Create the directories that store the database files on the destination host.
In this example, create the
/app/dbhome3/database
directory to store the data
files, control file, and server parameter file and the
/app/dbhome3/logfiles
directory to store the online redo log files.
•On the destination host, create a minimal initialization parameter file for the
auxiliary instance. The file is called
initdup.ora
and contains the following
entries:
ENABLE_PLUGGABLE_DATABASE=true
DB_NAME=dup
DB_DOMAIN = dup.example.com
•Create the password file on the destination database by using the
PASSWORD
FILE
option in the
DUPLICATE
command..
•Set up Oracle net services connectivity between the source database and the
auxiliary instance by using a static listener.
•Start the auxiliary instance in
NOMOUNT
mode, as described in "Starting the
Auxiliary Instance". Connect to the root as a common user with the
SYSDBA
or
SYSBACKUP
privilege.
4. Start RMAN and connect to the root of the source database as
TARGET
and to the
auxiliary instance as
AUXILIARY
.
%rman
RMAN> CONNECT TARGET sys@srcdb as SYSDBA;
RMAN> CONNECT AUXILIARY sys@dupdb AS SYSBACKUP;
Note: For active database duplication, connection to the auxiliary instance must
also use password file authentication.
5. Ensure that the source CDB is open or mounted.
6. Duplicate the database by using the
DUPLICATE
command.
Chapter 25
Examples: Duplicating Databases
25-65

The
SPFILE
option directs RMAN to copy the server parameter file from the source
database to the auxiliary instance. Use the
DB_CREATE_FILE_DEST
parameter to
specify the disk group that is used to store the duplicate database files in the
duplicate database.
DUPLICATE DATABASE to dupdb
FROM ACTIVE PLUGGABLE DATABASE my_pdb
PASSWORD FILE
SET DB_FILE_NAME_CONVERT='/app/dbhome/database','/app/dbhome3/database' SET
LOG_FILE_NAME_CONVERT='/app/dbhome/logfiles','/app/dbhome3/logfiles';
See Also:
Examples: Duplicating Databases
25.9.8 Example: Duplicating a PDB to an Existing CDB by Using
Active Duplication
This example describes how to use active database duplication to duplicate a PDB
into an existing CDB.
The example assumes the following scenario:
•The source CDB,
cdb_src
, and the destination CDB,
cdb_dest
, are on different
hosts.
•Both source and destination CDB use OMF to manage database files.
•The source and destination CDBs have compatible set to 18.0.0 or higher.
•The source CDB and the destination CDB use local undo.
•The PDB being duplicated,
my_pdb
, is in read-write mode.
•The source CDB and the destination CDB are open in read-write mode.
•The initialization parameter
REMOTE_RECOVERY_FILE_DEST
which determines the
location to which foreign archived redo log files are restored is set for the
destination CDB.
1. Plan the duplication, as described in "Planning to Duplicate a Database". This
includes the following tasks:
•Because the PDB is being duplicated to an existing CDB, the only duplication
technique available is active duplication.
•Choose a strategy to name duplicate database files.
In this example, the
DB_FILE_NAME_CONVERT
initialization parameter is used to
specify the location of the duplicate database files.
•Configure four auxiliary channels on the destination CDB, as described in
"Configuring RMAN Channels for Use in Duplication".
In this example, there are three target channels configured on the source
database. For RMAN to use backup sets to perform active database
duplication, the number of auxiliary channels must be equal to or greater than
the number of target channels.
Chapter 25
Examples: Duplicating Databases
25-66

2. Ensure that the prerequisites for active duplication and the additional prerequisites
for duplicating a PDB to an existing CDB are met, as described in Oracle
Database Backup and Recovery Reference.
3. Establish Oracle net connectivity between the source CDB and the destination
CDB, as described in "Establishing Oracle Net Connectivity Between the Source
Database and Auxiliary Instance".
4. Create the directories that will store the duplicate database files on the destination
host, as described in "Creating Directories for the Duplicate Database".
5. Start RMAN and connect as
TARGET
to the root of the source CDB and as
AUXILIARY
to the root of the destination CDB.
%rman
RMAN> CONNECT TARGET sys@cdbsrc as SYSDBA;
RMAN> CONNECT AUXILIARY sys@cdbdup AS SYSBACKUP;
Note: For active database duplication, connection to the destination CDB must
use password file authentication.
6. Duplicate the database by using the
DUPLICATE
command.
Use the
DB_CREATE_FILE_DEST
parameter to specify the disk group that is used to
store the duplicate database files in the duplicate database.
DUPLICATE PLUGGABLE DATABASE my_pdb AS dup_pdb TO cdb_dest
FROM ACTIVE DATABASE
DB_FILE_NAME_CONVERT='/disk1/oracle/dbs','disk2/oracle/dbs';
7. Delete the foreign archived redo log files that were restored to the location
specified by the
remote_recovery_file_dest
initialization parameter as part of the
duplication.
25.9.9 Example: Performing Backup-based Duplication by Using
Encrypted Backups
RMAN enables you to use the
DUPLICATE
command to perform backup-based
duplication by using encrypted backups.
This example uses the following scenario:
•The source host and destination host are different.
•Both source and destination database use OMF to manage database file names.
However, the duplicate database uses a directory structure that is different from
that of the source database.
•Source database backups are encrypted by using transparent-mode encryption
with the encryption key stored in a password-based software keystore. The
keystore password is set up by using the following command (where
password
is a
placeholder for the actual password that you enter):
ALTER SYSTEM SET ENCRYPTION KEY IDENTIFIED BY password;
•A complete backup of the source database including the control files, data files,
and archived redo log files is stored in the
/oracle2/rman_backups
directory.
•The
DB_NAME
of source database is
db_src
and that of the duplicate database is
dup_db
.
Chapter 25
Examples: Duplicating Databases
25-67

•The
EXAMPLE
and
TOOLS
tablespaces must be excluded from the duplicate database.
•The duplicate database must be opened after the duplication process completes.
To perform backup-based database duplication by using encrypted backups:
1. Plan the duplication, as described in "Planning to Duplicate a Database". This
includes the following tasks:
a. Choose a duplication technique that suits the scenario and requirements.
In this example, backup-based duplication without target connection or
recovery catalog connection is performed. The
BACKUP LOCATION
option is used
to specify the location of the source database backups.
b. Choose a strategy to generate duplicate database file names.
Because the duplicate database uses a directory structure that is different
from the source database, use the
DB_CREATE_FILE_DEST
parameter in the
auxiliary instance's initialization parameter file to specify the location in which
duplicate database files are stored.
c. Copy the required backups to the destination host by using the same directory
structure that was used on the source database.
2. Ensure that the prerequisites for the chosen duplication technique are met, as
described in "Prerequisites for Duplicating a Database".
3. Prepare the auxiliary instance.
a. Create the directories that store the database files on the destination host.
In this example, create the
/app/db_home2/database
directory to store the data
files, control file, and server parameter file and the
/app/db_home2/logfiles
directory to store the online redo log files.
b. Create a minimal initialization parameter file for the auxiliary instance.
The file is called
initdup.ora
and is located in the
/app/db_home2/database
directory. It contains the following entries:
DB_NAME=dup_db
DB_DOMAIN = dup.example.com
DB_CREATE_FILE_DEST = /app/db_home2/database
See "Creating an Initialization Parameter File for the Auxiliary Instance".
c. Copy the password file from the source database to destination host, as
described in "Creating a Password File for the Auxiliary Instance".
A password file is required because the duplicate database is being created
on a remote host.
d. Set up Oracle net services connectivity between the source database and the
auxiliary instance by using a static listener. This is required because this
example duplicates a database to a remote host.
See "Establishing Oracle Net Connectivity Between the Source Database and
Auxiliary Instance".
e. Start the auxiliary instance in
NOMOUNT
mode by using the parameter file
initdupdb.ora
created in Step 3b.
4. Start RMAN and connect to the source database as
TARGET
and to the auxiliary
instance as
AUXILIARY
.
Chapter 25
Examples: Duplicating Databases
25-68

%rman
RMAN> CONNECT TARGET /
RMAN> CONNECT AUXILIARY sys@dup_db AS SYSBACKUP
Enter the passwords when prompted.
5. Because the source database backups used to duplicate the database are
encrypted backups, specify the password that must be used to open the software
keystore that contains the encryption key (where
password
is a placeholder for the
actual password that you enter).
SET DECRYPTION WALLET OPEN IDENTIFIED BY password;
Note that the password specified in the
SET
command must the same as the one
that was set on the source database by using the
ALTER SYSTEM SET ENCRYPTION KEY
command.
6. Duplicate the database by using the
DUPLICATE
command.
Before you perform the duplication, you must specify the password that must be
used to decrypt the RMAN backups.
DUPLICATE TARGET DATABASE TO 'dup_db'
SKIP TABLESPACE example, tools
PFILE '/ app/db_home2/initdupdb.ora'
BACKUP LOCATION '/oracle2/rman_backups';
See Also:
Examples: Duplicating Databases
25.10 Example: Script to Duplicate a Database Using
Backup-based Duplication
This example shows how to use a script to automate the process of duplicating a
target database.
This example assumes the following:
•The backups of the target database are available to the auxiliary instance.
•The connection to the RMAN recovery catalog that contains metadata for the
target database is available (connection to the target database is not required).
•Both source and duplicate database use Oracle Managed Files (OMF).
•The operating system used is Linux or UNIX.
•The audit directory is created on the auxiliary database host.
•The prerequisites for backup-based duplication are met.
The script provided in this example performs the following tasks:
•Drops the auxiliary database.
•Backs up the target database.
•Creates a dummy auxiliary instance and opens it in
NOMOUNT
mode.
Chapter 25
Example: Script to Duplicate a Database Using Backup-based Duplication
25-69

•Duplicates the target database by using the target database backups and
metadata in the RMAN recovery catalog.
The duplicate database control file is stored as
+REDO/ORACLE_SID/CONTROLFILE/
cf3.ctl
and the data files are stored in the
+DATA
directory.
•Verifies that the required objects are created in the duplicate database.
To duplicate a target database by using backup-based duplication without a target
connection:
1. Create a parameter file (pfile) for the auxiliary instance. The pfile contains only the
DB_NAME
initialization parameter, which is set to the SID of the duplicate database.
The following pfile, called
init_dup.ora
and located in the
/home/oracle
directory,
sets the
DB_NAME
parameter. Replace
dup_db
with the SID of your duplicate
database:
*.db_name = 'dup_db'
2. Use a text editor and create a Shell script (called
dup_db.sh
in this example) with
the contents shown below and with the following modifications:
•Replace the value of the
ORACLE_HOME
variable with the Oracle home directory
of your auxiliary instance.
•Replace the value of the
logdir
variable with the directory in which you want to
store log files.
•Replace the following placeholders (shown in Italics) with values appropriate
to your duplication scenario:
dup_db
: SID and service name of the auxiliary instance
tgt_db
: SID and service name of the target database
sys_pswd
: Password for the
SYS
user of the target database
rman_cat_user
: Name of the RMAN catalog user
cat_user_pswd
: Password for the RMAN catalog user
rman_cat_user
rman_catalog_db
: SID of the RMAN catalog database
system_pswd
: Password for the
SYSTEM
user in the target database
•If you want to store the duplicate database control file using a name and
location that is different from
+REDO/ORACLE_SID/CONTROLFILE/cf3.ctl
, then
replace the value of
control_files
in the
dup_aux_db
function with a value that
is appropriate for your duplication scenario.
•If you want to store the duplicate data files in a directory that is different from
+DATA
, then replace the value of
db_create_file_dest
in the
dup_aux_db
function
with a value that is appropriate for your duplication scenario.
#!/bin/bash
export ORACLE_HOME=/u01/app/oracle/product/11.2.0.4/dbhome_2
export ORACLE_BASE=/uo1/app/oracle
export ORACLE_SID=dup_db
export PATH=$PATH:$HOME/bin:$ORACLE_HOME/bin:$ORACLE_HOME/Opatch
export LD_LIBRARY_PATH=$ORACLE_HOME/lib:$ORACLE_HOME/rdbms/lib:/lib:/usr/lib;
export LD_LIBRARY_PATH
export logdir=/home/oracle/log
export dt='date +%y%m%d%H%M%S'
export NLS_DATE_FORMAT='DD-MM-YYYY HH24:MI:SS'
Chapter 25
Example: Script to Duplicate a Database Using Backup-based Duplication
25-70

function drop_aux_db {
export ORACLE_SID=dup_db
$ORACLE_HOME/bin/sqlplus -s '/ as sysdba' <<EOF2
set pagesize 999 linesize 999 heading off feedback off
select name, open_mode from v\$database;
shutdown immediate;
startup mount exclusive restrict;
drop database;
exit;
EOF2
}
echo "Backup the target database"
function backup_source_db {
$ORACLE_HOME/bin/rman target sys/sys_pswd@tgt_db catalog
rman_cat_user/cat_user_pswd@rman_catalog_db <<EOF
RUN {
backup as backupset cumulative incremental level 1 database include current
controlfile plus archivelog not backed up delete input;}
exit;
EOF
}
sleep 120
echo "List the backup of the target database"
function check_source_db_backup {
$ORACLE_HOME/bin/rman target sys/sys_pswd@tgt_db catalog
rman_cat_user/cat_user_pswd@rman_catalog_db <<EOF
LIST BACKUP OF DATABASE COMPLETED AFTER '(SYSDATE-1/24)';
EOF
}
echo "Start the auxiliary database in FORCE NOMOUNT mode"
function nomount_aux_db {
export ORACLE_SID=dup_db
$ORACLE_HOME/bin/rman target / <<EOF2
startup force nomount pfile='/home/oracle/init_dup.ora';
exit;
EOF2
}
echo "Duplicate the target database"
function dup_aux_db {
export ORACLE_SID=dup_db
$ORACLE_HOME/bin/rman catalog rman_cat_user/cat_user_pswd@rman_catalog_db
AUXILIARY /
<<EOF
duplicate database tgt_db to dup_db spfile
set control_files '+REDO/${ORACLE_SID}/CONTROLFILE/cf3.ctl'
set db_create_file_dest '+DATA/' ;
exit;
EOF
}
echo "Check schema objects on the target"
function check_source_db {
$ORACLE_HOME/bin/sqlplus -s system/system_pswd@tgt_db <<EOF2
set pagesize 999 linesize 999 heading off feedback off
select name, open_mode from v\$database;
Chapter 25
Example: Script to Duplicate a Database Using Backup-based Duplication
25-71

select table_name, num_rows from dba_tables where owner='SOE';
exit;
EOF2
}
echo "Check schema objects on the auxiliary"
function check_aux_db {
export ORACLE_SID=dup_db
$ORACLE_HOME/bin/sqlplus -s '/ as sysdba' <<EOF2
set pagesize 999 linesize 999 heading off feedback off
select name, open_mode from v\$database;
select table_name, num_rows from dba_tables where owner='SOE';
exit;
EOF2
}
drop_aux_db
backup_source_db
check_source_db_backup
nomount_aux_db
dup_aux_db
check_source_db
check_aux_db
3. Set execute permissions for the script
dup_db.sh
by using the
chmod
command.
$ chmod +x dup_db.sh
4. On the duplicate host (that hosts the duplicate database), run the
dup_db.sh
script.
The following command runs the
dup_db.sh
script that is stored in the
/home/
my_scripts/duplication
directory:
$./home/my_scripts/duplication/dup_db.sh
Chapter 25
Example: Script to Duplicate a Database Using Backup-based Duplication
25-72

26
Duplicating Databases: Advanced Topics
This chapter explains advanced forms of database duplication.
This chapter contains the following topics:
•Specifying Alternative Names for Duplicate Database Files
•Making Disk Backups Accessible Without Shared Disk
26.1 Specifying Alternative Names for Duplicate Database
Files
If the source database and duplicate database do not use the same names for
database files, then you must choose an alternative naming strategy for the duplicate
files.
Depending on whether the source and duplicate databases use Oracle Managed Files
(OMF) or Oracle Automatic Storage Management (ASM), use one of the following
strategies:
•Specifying Non-OMF or Non-ASM Alternative Names for Duplicate Database Files
•Using the CONFIGURE AUXNAME Command to Name File System Data Files
and OMF or ASM Target Data Files
If the source data files use OMF, then you cannot rename them by using the
DB_FILE_NAME_CONVERT
initialization parameter. Using Non-ASM Storage discusses
the details and options of OMF-managed data files.
26.1.1 Specifying Non-OMF or Non-ASM Alternative Names for
Duplicate Database Files
When the source and duplicate database either use different directory structures or
use the same structure but you want to name the duplicate files differently, then you
must specify how duplicate database files must be named.
Table 26-1 summarizes the formats that are available for naming each type of file.
Table 26-1 Substitution Variables for the SET NEWNAME Command
Variable Description
%b
Specifies the file name stripped of directory paths. For example, if a
data file is named
/oradata/prod/financial.dbf
, then
%b
results in
financial.dbf
.
%f
Specifies the absolute file number of the data file for which the new
name is generated. For example, if data file 2 is duplicated, then
%f
generates the value 2.
26-1

Table 26-1 (Cont.) Substitution Variables for the SET NEWNAME Command
Variable Description
%I
Specifies the DBID.
%N
Specifies the tablespace name.
%U
Specifies the following format:
data-D-%d_id-%I_TS-%N_FNO-%f
Use one of the following techniques to provide alternate names for non-OMF or non-
ASM duplicate database files:
•Using the SET NEWNAME Command to Name File System Data Files and Temp
Files
•Using the CONFIGURE AUXNAME Command to Name File System Data Files
and OMF or ASM Target Data Files
26.1.1.1 Using the SET NEWNAME Command to Name File System Data Files
and Temp Files
Use the
SET NEWNAME
command before you execute the
DUPLICATE
command to name
duplicate data files.
RMAN supports the following commands, listed in order of precedence:
1.
SET NEWNAME FOR DATAFILE
and
SET NEWNAME FOR TEMPFILE
2.
SET NEWNAME FOR TABLESPACE
3.
SET NEWNAME FOR DATABASE
The order of precedence means that the
SET NEWNAME FOR TABLESPACE
command
specifies names for files that are not named by the
SET NEWNAME FOR DATAFILE
and
SET
NEWNAME FOR TEMPFILE
commands, whereas the
SET NEWNAME FOR DATABASE
command
specifies names for files that are not named by the
SET NEWNAME FOR TABLESPACE
,
SET
NEWNAME FOR DATAFILE
, or
SET NEWNAME FOR TEMPFILE
commands.
When yo use the
SET NEWNAME FOR DATAFILE
command, you can specify a full path as a
literal, as in
/oradata1/system01.dbf
. However, when you use the
SET
command with
the
FOR DATABASE
or
FOR TABLESPACE
options, you must use at least one of these
substitution variables, described in Table 26-1:
%b
,
%f
,
%U
(
%I
and
%N
are optional).
To use the
SET NEWNAME
command to specify new file names:
1. Ensure that the prerequisites for the selected duplication technique are met.
See "Prerequisites for Duplicating a Database".
2. Complete the required planning tasks before you begin database duplication.
See "Planning to Duplicate a Database".
3. Prepare the auxiliary instance that is used when you create the duplicate
database.
While duplicating an Oracle Real Application Clusters (Oracle RAC) database, set
the
CLUSTER_DATABASE
initialization parameter on the auxiliary database to
FALSE
.
This parameter can be reset to
TRUE
after the duplication process completes.
Chapter 26
Specifying Alternative Names for Duplicate Database Files
26-2

See "Preparing the Auxiliary Instance".
4. Start RMAN and connect to required databases. Depending on your duplication
technique, you may need to connect to one or more of the following: target
database, auxiliary instance, or recovery catalog.
See "Starting RMAN and Connecting to Databases".
5. Place the source database in a proper state, if necessary.
See "Placing the Source Database in a Proper State".
6. (Optional) Configure RMAN channels to improve duplication performance.
Channels perform the primary task of duplicating the database.
See "Configuring RMAN Channels for Use in Duplication".
7. Within a
RUN
command, issue the
SET NEWNAME
command before you issue the
DUPLICATE
command.
Example 26-1 Duplicating Databases with the SET NEWNAME FOR DATAFILE
Command
This example illustrates a script that specifies new names for data files 1 through 5
and temp file 1. The script does not set a new name for data file 6 because it is in the
TOOLS
tablespace, which is excluded from the duplicate database.
Assume the following:
•DBID is 87650928
•Database name is
PROD
Use the following command to duplicate the database:
RUN
{
SET NEWNAME FOR DATAFILE 1 TO '/oradata1/system01.dbf';
SET NEWNAME FOR DATAFILE 2 TO '/oradata2/sysaux01.dbf';
SET NEWNAME FOR DATAFILE 3 TO '/oradata3/undotbs01.dbf';
SET NEWNAME FOR DATAFILE 4 TO '/oradata4/users01.dbf';
SET NEWNAME FOR DATAFILE 5 TO '/oradata5/users02.dbf';
SET NEWNAME FOR TEMPFILE 1 TO '/oradatat/temp01.dbf';
DUPLICATE TARGET DATABASE TO dupdb
SKIP TABLESPACE tools
LOGFILE
GROUP 1 ('/duplogs/redo01a.log','/duplogs/redo01b.log') SIZE 4M REUSE,
GROUP 2 ('/duplogs/redo02a.log', '/duplogs/redo02b.log') SIZE 4M REUSE;
}
Example 26-2 Duplicating Databases with the SET NEWNAME FOR DATAFILE
and SET NEWNAME FOR TABLESPACE Commands
This example is a variation of Example 26-1 and uses a single
SET NEWNAME
command
to name all data files in the tablespace
users
. After the example completes, the file
names for tablespace
users
are set to:
/oradata4/users01.dbf
and
/oradata5/
users02.dbf
.
Use the following command to duplicate the database:
{
SET NEWNAME FOR TABLESPACE users TO '/oradata%f/%b';
SET NEWNAME FOR DATAFILE 1 TO '/oradata1/system01.dbf';
SET NEWNAME FOR DATAFILE 2 TO '/oradata2/sysaux01.dbf';
Chapter 26
Specifying Alternative Names for Duplicate Database Files
26-3

SET NEWNAME FOR DATAFILE 3 TO '/oradata3/undotbs01.dbf';
SET NEWNAME FOR TEMPFILE 1 TO '/oradatat/temp01.dbf';
DUPLICATE TARGET DATABASE TO dupdb
SKIP TABLESPACE tools
LOGFILE
GROUP 1 ('/duplogs/redo01a.log','/duplogs/redo01b.log') SIZE 4M REUSE,
GROUP 2 ('/duplogs/redo02a.log','/duplogs/redo02b.log') SIZE 4M REUSE;
}
Example 26-3 Duplicating Database with the SET NEWNAME FOR DATABASE
Command
This example is a variation of Example 26-1 and uses a single
SET
command to name
all data files in the database.
Use the following command to duplicate the database:
RUN
{
SET NEWNAME FOR DATABASE TO '/oradata/%U';
DUPLICATE TARGET DATABASE TO dupdb
SKIP TABLESPACE tools
LOGFILE
GROUP 1 ('/duplogs/redo01a.log','/duplogs/redo01b.log') SIZE 4M REUSE,
GROUP 2 ('/duplogs/redo02a.log','/duplogs/redo02b.log') SIZE 4M REUSE;
}
The following table shows the results from this example.
Table 26-2 Results for the SET NEWNAME DATABASE Command
Before SET
NEWNAME
DATABASE
Tablesp
ace
Name
Data
File
Numb
er
After SET NEWNAME DATABASE TO '/oradata/
%U';
.../system01.dbf SYSTEM
1
/oradata/data-D-PROD_id-87650928_TS-
SYSTEM_FNO-1
.../sysaux01.dbf SYSAUX
2
/oradata/data-D-PROD_id-87650928_TS-
SYSAUX_FNO-2
.../
undotbs01.dbf
UNDOTS
3
/oradata/data-D-PROD_id-87650928_TS-
UNDOTS_FNO-3
.../users01.dbf USERS
4
/oradata/data-D-PROD_id-87650928_TS-
USERS_FNO-4
.../users02.dbf USERS
5
/oradata/data-D-PROD_id-87650928_TS-
USERS_FNO-5
.../temp01.dbf TEMP
1
/oradata/data-D-PROD_id-87650928_TS-TEMP_FNO-1
See Also:
Oracle Database Backup and Recovery Reference for details on substitution
variables usable in
SET NEWNAME
Chapter 26
Specifying Alternative Names for Duplicate Database Files
26-4

26.1.1.2 Using the CONFIGURE AUXNAME Command to Name File System
Data Files and OMF or ASM Target Data Files
The
CONFIGURE AUXNAME
command is an alternative to the
SET NEWNAME
command. The
difference is that after you configure the auxiliary name the first time, additional
DUPLICATE
commands reuse the configured settings. In contrast, you must reissue the
SET NEWNAME
command every time you execute the
DUPLICATE
command.
To use the
CONFIGURE AUXNAME
command to specify names for duplicate data files:
1. Issue a
CONFIGURE AUXNAME
command for each file to name in the duplicate
database.
For example, enter the following commands at the RMAN prompt to specify names
for files data files 1 through 5:
CONFIGURE AUXNAME FOR DATAFILE 1 TO '/oradata1/system01.dbf';
CONFIGURE AUXNAME FOR DATAFILE 2 TO '/oradata2/sysaux01.dbf';
CONFIGURE AUXNAME FOR DATAFILE 3 TO '/oradata3/undotbs01.dbf';
CONFIGURE AUXNAME FOR DATAFILE 4 TO '/oradata4/users01.dbf';
CONFIGURE AUXNAME FOR DATAFILE 5 TO '/oradata5/users02.dbf';
2. Issue a
DUPLICATE
command.
For example, enter the following command at the RMAN prompt:
SET NEWNAME FOR TEMPFILE 1 TO '/oradatat/temp01.dbf';
DUPLICATE TARGET DATABASE
TO dupdb
SKIP TABLESPACE tools
LOGFILE
GROUP 1 ('/duplogs/redo01a.log','/duplogs/redo01b.log') SIZE 4M REUSE,
GROUP 2 ('/duplogs/redo02a.log','/duplogs/redo02b.log') SIZE 4M REUSE;
See Also:
Oracle Database Backup and Recovery Reference for details on using
CONFIGURE AUXNAME
26.1.2 Specifying OMF or ASM Alternative Names for Duplicate
Database Files
You must specify how to name duplicate database files when the source database and
duplicate database do not use the same names for database files.
The following sections discuss requirements and procedures for creating a duplicate
database when some or all files of the duplicate database use OMF or ASM:
•Settings and Restrictions for OMF Initialization Parameters
•Setting Initialization Parameters for ASM
•Examples: Duplicating Databases to ASM
•Using the SET NEWNAME Command to Create OMF or ASM Files
Chapter 26
Specifying Alternative Names for Duplicate Database Files
26-5

•Using the DB_FILE_NAME_CONVERT Parameter to Generate Names for Non-
OMF or ASM Data Files
•Using the LOG_FILE_NAME_CONVERT Parameter to Generate Names for Non-
OMF or ASM Log Files
See Also:
Oracle Automatic Storage Management Administrator's Guide for an
introduction to ASM and OMF
26.1.2.1 Settings and Restrictions for OMF Initialization Parameters
When you create a duplicate database that uses OMF, you must set initialization
parameters in the auxiliary instance. If you use the
SPFILE
option of the
DUPLICATE
command to name the files, then you can set initialization parameters in the
SPFILE
option.
Table 26-3 describes the relevant parameters and recommended settings.
Table 26-3 Initialization Parameters for Oracle Managed Files
Initialization Parameter Purpose Recommendation
DB_CREATE_FILE_DEST
Specifies the default
location for Oracle managed
data files. This location is
also the default location for
Oracle managed control
files and online logs if no
DB_CREATE_ONLINE_LOG_DES
T
initialization parameters
are specified.
Set this parameter to the location
for OMF. Any database files that
have no location specified are
created in the directory specified by
the
DB_CREATE_FILE_DEST
parameter. You can override the
default for specific files by using the
SET NEWNAME
command, as
described in "Using the SET
NEWNAME Command to Create
OMF or ASM Files".
DB_CREATE_ONLINE_LOG_DE
ST_n
Specifies the default
location for Oracle managed
control files and online redo
logs. If multiple parameters
are set, then one control file
and one online redo log is
created in each location.
Set these parameters (_1, _2, and
so on) only if you want to multiplex
the control files and online redo log
files in multiple locations.
DB_RECOVERY_FILE_DEST
Specifies the default
location for the fast recovery
area. The fast recovery area
contains multiplexed copies
of current control files and
online redo log files.
Set this parameter if you want a
multiplexed copy of the control file
and online redo log file in the
recovery area.
Table 26-4 lists the restrictions on setting other initialization parameters.
Chapter 26
Specifying Alternative Names for Duplicate Database Files
26-6

Table 26-4 Initialization Parameter Restrictions for Oracle Managed Files
Initialization Parameter Purpose Restriction
CONTROL_FILES
Specifies one or more names
of control files, separated by
commas.
Do not set this parameter if you
want the duplicate database control
files in an OMF format. When you
use control files in an OMF format,
Oracle recommends that you use a
server parameter file at the
duplicate database .
DB_FILE_NAME_CONVERT
Converts the file name of a
new data file on the primary
database to a file name on
the duplicate database.
Do not set this parameter. Omitting
this parameter enables the
database to generate valid Oracle
managed file names for the
duplicate data files.
LOG_FILE_NAME_CONVERT
Converts the file name of a
new log file on the primary
database to the file name of
a log file on the standby
database.
Do not set this parameter. Omitting
this parameter allows the database
to generate valid Oracle managed
online redo log file names.
To direct duplicate database online
redo log files to Oracle managed
storage, you can use the
DB_CREATE_FILE_DEST
,
DB_RECOVERY_FILE_DEST
, or
DB_CREATE_ONLINE_LOG_DEST_n
initialization parameters to identify
an Oracle managed location for the
online logs.
26.1.2.2 Setting Initialization Parameters for ASM
You must identify the initialization parameters that control the location where files are
created and set these parameters to an ASM disk group.
The procedure for creating a duplicate database to an ASM location is similar to that of
creating a duplicate database to OMF. For example, set the
DB_CREATE_FILE_DEST
,
DB_CREATE_ONLINE_DEST_n
, and
CONTROL_FILES
parameters to
+DISK1
.
See Also:
Settings and Restrictions for OMF Initialization Parameters
26.1.2.3 Examples: Duplicating Databases to ASM
This section contains examples on duplicating databases to ASM.
Example 26-4 Duplicating a Database from a File System to ASM
In this example, you use active database duplication. If the source database uses a
server parameter file (or a backup is available), then you can create a temporary
initialization parameter file on the destination host and set only the
DB_NAME
parameter.
Chapter 26
Specifying Alternative Names for Duplicate Database Files
26-7

Assume that the source database
prod
is on
host1
and stores its data files in a non-
ASM file system. The control files for
prod
are located in
/oracle/oradata/prod/
. You
want to duplicate the source database to database
dupdb
on remote host
host2
. You
want to store the duplicate database files in ASM disk group
+DISK1
.
After connecting RMAN to the target, duplicate, and recovery catalog databases, run
the following RMAN script to duplicate the database.
DUPLICATE TARGET DATABASE TO dupdb
FROM ACTIVE DATABASE
SPFILE
PARAMETER_VALUE_CONVERT '/oracle/oradata/prod/', '+DISK1'
SET DB_CREATE_FILE_DEST +DISK1;
When the
DUPLICATE
command completes, the duplicate database is created, with data
files, online redo log files, and control files in ASM disk group
+DISK1
.
Example 26-5 Duplicating a Database from ASM to ASM
In this example, you use active database duplication. If the source database uses a
server parameter file (or a backup is available), then you can create a temporary
initialization parameter file on the destination host and set only the
DB_NAME
parameter.
Assume that the source database
prod
is on
host1
and stores its data files in ASM disk
group
+DISK1
. You want to duplicate the target to database
dupdb
on remote host
host2
.
You want to store the data files for
dupdb
in ASM. Specifically, you want to store the
data files and control files in disk group
+DISK2
.
In the
DUPLICATE
command, set
PARAMETER_VALUE_CONVERT
to convert all directory
locations from
+DISK1
to
+DISK2
. The new file names in
+DISK2
are generated by ASM
and do not match the original file names in disk group
+DISK1
.
After connecting to the target, duplicate, and catalog databases, run the following
RMAN script to duplicate the database.
DUPLICATE TARGET DATABASE
TO dupdb
FROM ACTIVE DATABASE
SPFILE PARAMETER_VALUE_CONVERT '+DISK1','+DISK2'
SET DB_RECOVERY_FILE_DEST_SIZE='750G';
When the
DUPLICATE
command completes, the duplicate database is created, with data
files, online redo logs, and control files in the larger ASM disk group
+DISK2
.
26.1.2.4 Using the SET NEWNAME Command to Create OMF or ASM Files
To name Oracle managed data files, you can use the
SET NEWNAME
command with the
TO NEW
option instead of the
TO 'filename'
option. RMAN creates the specified data
files or temp files with OMF names in the location specified by the
DB_CREATE_FILE_DEST
parameter.
To use the
SET NEWNAME
command to specify names for OMF:
1. Set the
DB_CREATE_FILE_DEST
initialization parameter at the auxiliary instance to the
desired location.
2. Enclose the
DUPLICATE
command in a
RUN
block and use the
SET NEWNAME
command
with the
TO NEW
option for OMF.
Chapter 26
Specifying Alternative Names for Duplicate Database Files
26-8

Example 26-6 Duplicating Databases with the SET NEWNAME FOR DATAFILE
and SET NEWNAME FOR TABLESPACE Commands
This example illustrates a script that specifies literal names for data files 1-5. The only
Oracle Managed Files in the source database are the data files in the
users
tablespace. Therefore, the
TO NEW
option is specified in the
SET NEWNAME
command for
these files.
RUN
{
SET NEWNAME FOR TABLESPACE users TO NEW;
SET NEWNAME FOR DATAFILE 3 TO NEW;
SET NEWNAME FOR DATAFILE 1 TO '/oradata1/system01.dbf';
SET NEWNAME FOR DATAFILE 2 TO '/oradata2/sysaux01.dbf';
SET NEWNAME FOR TEMPFILE 1 TO '/oradatat/temp01';
DUPLICATE TARGET DATABASE TO dupdb
SKIP TABLESPACE tools
LOGFILE
GROUP 1 ('/duplogs/redo01a.log','/duplogs/redo01b.log') SIZE 4M REUSE,
GROUP 2 ('/duplogs/redo02a.log','/duplogs/redo02b.log') SIZE 4M REUSE;
}
Example 26-7 Using the SET NEWNAME Command to Create Files in an ASM
Disk Group
This example uses the
SET NEWNAME
command to direct individual data files, temp files,
or tablespaces to a specified ASM disk group.
RUN
{
SET NEWNAME FOR DATAFILE 1 TO "+DGROUP1";
SET NEWNAME FOR DATAFILE 2 TO "+DGROUP2";
.
.
.
DUPLICATE TARGET DATABASE
TO dupdb
FROM ACTIVE DATABASE
SPFILE SET DB_CREATE_FILE_DEST +DGROUP3;
}
See Also:
Using the SET NEWNAME Command to Name File System Data Files and
Temp Files
26.1.2.5 Using the DB_FILE_NAME_CONVERT Parameter to Generate
Names for Non-OMF or ASM Data Files
In addition to using the
SET NEWNAME
or
CONFIGURE AUXNAME
commands, you can use the
DB_FILE_NAME_CONVERT
parameter to transform target file names. You can either specify
the
DB_FILE_NAME_CONVERT
option in the
DUPLICATE
command or you can set it in the
initialization parameter file of the auxiliary instance.
For example, you can change the target file name from the
/oracle/
directory to
the
/dup/oracle/
directory. The
DB_FILE_NAME_CONVERT
parameter allows you to specify
Chapter 26
Specifying Alternative Names for Duplicate Database Files
26-9

multiple conversion file name pairs. It can also be used to produce names for data files
and temp files.
Restrictions of the DB_FILE_NAME_CONVERT Parameter
You cannot use the
DB_FILE_NAME_CONVERT
option of the
DUPLICATE
command to control
generation of new names for files at the duplicate instance that are in the OMF format
at the source database instance.
See Also:
Oracle Database Backup and Recovery Reference
26.1.2.6 Using the LOG_FILE_NAME_CONVERT Parameter to Generate
Names for Non-OMF or ASM Log Files
If the
LOG_FILE
clause has been omitted and none of the OMF initialization parameters
DB_CREATE_FILE_DEST
,
DB_CREATE_ONLINE_DEST_n
, or
DB_RECOVERY_FILE_DEST
are specified,
then the
LOG_FILE_NAME_CONVERT
parameter can transform target file names. This works
in the same way that the
DB_FILE_NAME_CONVERT
parameter does to transform target file
names from
log_*
to
duplog_*
.
You can specify multiple conversion file name pairs with this parameter. When you
specify the
LOG_FILE_NAME_CONVERT
parameter, RMAN uses the
REUSE
parameter when
creating the online redo logs. If an online redo log file exists at the named location and
is of the correct size, then it is reused for the duplication process.
Restrictions of the LOG_FILE_NAME_CONVERT Parameter
•If you set OMF initialization parameters, do not specify the
LOG_FILE_NAME_CONVERT
parameter.
•The
LOG_FILE_NAME_CONVERT
parameter cannot be specified as a clause in the
DUPLICATE
command, it can only be specified in the initialization parameter of the
auxiliary instance.
•You cannot use the
LOG_FILE_NAME_CONVERT
initialization parameter to control
generation of new names for files at the duplicate instance that are in the OMF
format at the source database instance.
26.2 Making Disk Backups Accessible Without Shared Disk
You can use the shared disk technique to make backups available to the auxiliary
instance. When NFS or shared disk is not an option, then the path that stores the
backups must exist on both the source and destination hosts, unless the
BACKUP
LOCATION
option is used for the
DUPLICATE
command without a target or recovery catalog
connection.
Assume that you maintain two hosts,
srchost
and
dsthost
. The database on
srchost
is
srcdb
. The RMAN backups of
srcdb
reside in the
/dsk1/bkp
directory on host
srchost
.
The directory
/dsk1/bkp
is in use on the destination host, so you intend to store
backups in the
/dsk2/dup
directory on the destination host.
Chapter 26
Making Disk Backups Accessible Without Shared Disk
26-10

To transfer the backups from the source host to the destination host:
1. Create a directory in the source host that has the same name as the directory on
the destination host that contains the backups.
For example, if you intend to store the RMAN backups in the
/dsk2/dup
directory
on the destination host, then create the
/dsk2/dup
directory on the source host.
2. On the source host, copy the backups to the directory created in the previous step,
and then catalog the backups. You can use either of the following approaches:
•Connect RMAN to the source database as
TARGET
and use the
BACKUP
command to back up the backups. For example, use the
BACKUP COPY OF
DATABASE
command to copy the backups in
/dsk1/bkp
on the source host to
/
dsk2/dup
on the source host. In this case, RMAN automatically catalogs the
backups in the new location. If you are duplicating a PDB, then use the
PLUGGABLE DATABASE
syntax of the
BACKUP COPY OF
command to copy only the
backups of the PDB.
•Use an operating system utility to copy the backups in the
/dsk1/bkp
directory
on the source host to the
/dsk2/dup
directory on the source host. Afterward,
connect RMAN to the source database as
TARGET
and use the
CATALOG
command to update the source control file with the location of the manually
transferred backups.
3. Manually transfer the backups in the new directory on the source host to the
identically named directory on the destination host.
For example, use FTP to transfer the backups in the
/dsk2/dup
directory on the
source host to the
/dsk2/dup
directory on the destination host.
The auxiliary channel can search for backups in the
/dsk2/dup
directory on the
destination host and restore them.
Chapter 26
Making Disk Backups Accessible Without Shared Disk
26-11

27
Creating Transportable Tablespace Sets
This chapter explains how to use RMAN to create transportable tablespace sets by
restoring backups.
This chapter contains the following sections:
•Overview of Creating Transportable Tablespace Sets
•Customizing Initialization Parameters for the Auxiliary Instance
•Creating a Transportable Tablespace Set
•Troubleshooting the Creation of Transportable Tablespace Sets
•Transportable Tablespace Set Scenarios
27.1 Overview of Creating Transportable Tablespace Sets
You can use RMAN or the transportable tablespaces feature to create transportable
tablespace sets.
This section explains the basic concepts and tasks involved in creating transportable
tablespace sets from RMAN backups. The discussion in this chapter assumes that you
are familiar with the transportable tablespace procedure described in Oracle Database
Administrator’s Guide. The procedure in this chapter is an alternative technique for
generating transportable tablespace sets.
27.1.1 Purpose of Creating Transportable Tablespace Sets
A transportable tablespace set contains data files for a set of tablespaces and an
export file containing structural metadata for the set of tablespaces. The export file is
generated by Data Pump Export.
One use of transportable tablespace sets is to create a tablespace repository. For
example, if you have a database with some tablespaces used for quarterly reporting,
you can create transportable sets for these tablespaces for storage in a tablespace
repository. Subsequently, versions of the tablespace can be requested from the
repository and attached to another database for use in generating reports.
Another use for transportable tablespaces is in an Oracle Streams environment. When
preparing to use Oracle Streams to keep a destination database synchronized with a
source database, you must perform Oracle Streams instantiation. You must bring the
destination database up to a given SCN at which the two databases were known to be
synchronized before you can use Oracle Streams to move subsequent updates from
the source database to the destination database. You can create transportable
tablespace sets from backups as part of the Oracle Streams instantiation.
A key benefit of the RMAN
TRANSPORT TABLESPACE
command is that it does not need
access to the live data files from the tablespaces to be transported. In contrast, the
transportable tablespace technique described in Oracle Database Administrator’s
Guide requires that the tablespaces to be transported are open read-only during the
27-1

transport. Thus, transporting from backups improves database availability, especially
for large tablespaces, because the tablespaces to be transported can remain open for
writes during the operation. Also, placing a tablespace in read-only mode can take a
long time, depending on current database activity.
The RMAN
TRANSPORT TABLESPACE
command also enables you to specify a target point
in time, SCN, or restore point during your recovery window and transport tablespace
data as it existed at that time. For example, if your backup retention policy guarantees
a 1 week recovery window, and if you want to create transportable tablespaces based
on the contents of the database on the last day of the month, then RMAN can perform
this task at any time during the first week of the next month.
See Also:
•Oracle Database Backup and Recovery Reference for reference
information about the
TRANSPORT
TABLESPACE
command
•Oracle Streams Replication Administrator's Guide for more details on
RMAN and Oracle Streams instantiations
27.1.2 Basic Concepts of Transportable Tablespace Sets
You create a transportable tablespace set by connecting RMAN to a source database
as
TARGET
and then executing the
TRANSPORT TABLESPACE
command. The source
database contains the tablespaces to be transported.
You must have a backup of all needed tablespaces and archived redo log files
available for use by RMAN that can be recovered to the target point in time for the
TRANSPORT TABLESPACE
operation. Figure 27-1 illustrates the basic process of
transportable tablespace creation.
Chapter 27
Overview of Creating Transportable Tablespace Sets
27-2
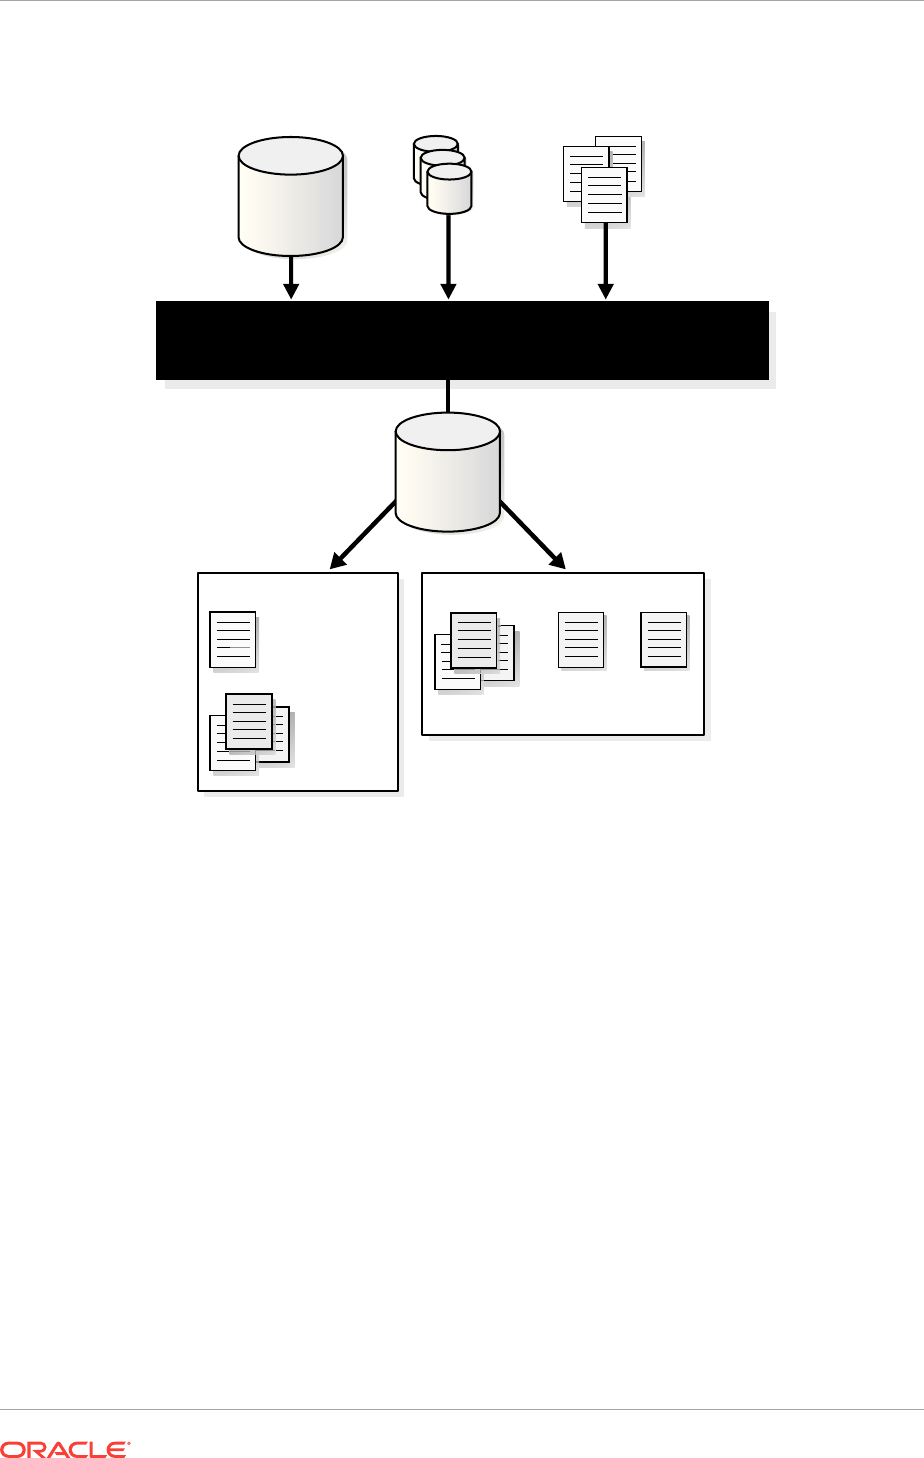
Figure 27-1 RMAN Transportable Tablespace from Backup: Architecture
Recovery Manager
Auxiliary Destination
Control
File
Auxiliary
Set Files
Tablespace Destination
Transportable
Set Datafiles
Backups of
source database
Archived
redo logs
Oracle
Recovery
Catalog
Source
database
Oracle
Recovery
Catalog
Auxiliary
instance
Sample
Import
Script
Export
Dump
File
The process shown in Figure 27-1 occurs in the following phases:
1. RMAN starts an auxiliary instance.
An auxiliary instance is created by RMAN on the same host as the source
database to perform the restore and recovery of the tablespaces. RMAN
automatically creates an initialization parameter file for the auxiliary instance and
starts it
NOMOUNT
.
2. RMAN restores a backup of the source database control file to serve as the
auxiliary instance control file and mounts this control file.
3. RMAN restores auxiliary set and transportable set data files from the backups of
the source database.
The auxiliary set includes data files and other files required for the tablespace
transport but which are not themselves part of the transportable tablespace set.
The auxiliary set typically includes the
SYSTEM
and
SYSAUX
tablespaces, temp files,
and data files containing rollback or undo segments. The auxiliary instance has
other files associated with it, such as its own control file, parameter file, and online
logs, but they are not part of the auxiliary set.
RMAN stores the auxiliary data files in the selected auxiliary destination. The
auxiliary destination is a disk location where RMAN can store auxiliary set files
Chapter 27
Overview of Creating Transportable Tablespace Sets
27-3

such as the parameter file, data files (other than those in the transportable set),
control files, and online logs of the auxiliary instance during the transport. If the
transport succeeds, then RMAN deletes these files.
RMAN stores the transportable set files in the tablespace destination. The
tablespace destination is a disk location that by default contains the data file
copies and other output files when the tablespace transport command completes.
4. RMAN performs database point-in-time recovery (DBPITR) at the auxiliary
instance.
The recovery updates auxiliary and transportable set data files to their contents as
of the target time specified for the
TRANSPORT
TABLESPACE
command. If no target time
is specified, then RMAN recovers with all available redo. RMAN restores archived
redo logs from backup as necessary at the auxiliary destination (or other location)
and deletes them after they are applied.
5. RMAN opens the auxiliary database with the
RESETLOGS
option.
The data files now reflect the tablespace contents as of the target SCN for the
tablespace transport operation.
6. RMAN places the transportable set tablespaces of the auxiliary instance into read-
only mode. RMAN also invokes Data Pump Export in transportable tablespace
mode to create the export dump file for the transportable set.
By default, the dump file is located in the tablespace destination. You can specify
an alternate location for the dump file.
RMAN also generates the sample Data Pump import script for use when plugging
in the transported tablespaces at a target database. The contents of this script are
written to a file named
impscript.sql
in the tablespace destination. The commands
for the script are also included in the RMAN command output.
7. If the preceding steps are successful, then RMAN shuts down the auxiliary
instance and deletes all files created during the
TRANSPORT
TABLESPACE
operation
except for the transportable set files, the Data Pump Export file, and the sample
import script.
See Also:
"Specifying Locations for Data Pump Files"
27.1.3 Basic Steps of Creating Transportable Tablespace Sets
To create transportable tablespace sets, you set the required parameters in the
auxiliary instance initialization parameter file and then use the
TRANSPORT TABLESPACE
command.
Before creating transportable tablespace sets you must meet several prerequisites.
The basic steps of creating transportable tablespace sets are as follows:
1. Start the RMAN client and connect to the source database and, if used, the
recovery catalog.
2. Ensure that the prerequisites for the
TRANSPORT TABLESPACE
command are met.
Chapter 27
Overview of Creating Transportable Tablespace Sets
27-4

3. If necessary, set additional parameters in the auxiliary instance parameter file.
This task is described in "Customizing Initialization Parameters for the Auxiliary
Instance".
4. Execute the
TRANSPORT TABLESPACE
command.
This basic technique is described in "Creating a Transportable Tablespace Set".
Variations on this technique are described in "Transportable Tablespace Set
Scenarios".
5. If the
TRANSPORT TABLESPACE
command fails, troubleshoot the problem and then retry
the command until it succeeds.
This technique is described in "Troubleshooting the Creation of Transportable
Tablespace Sets".
6. Return to the procedure for transporting tablespaces described in Oracle
Database Administrator’s Guide.
See Also:
Oracle Database Backup and Recovery Reference for the prerequisites of
the
TRANSPORT TABLESPACE
command
27.2 Customizing Initialization Parameters for the Auxiliary
Instance
RMAN enables you to customise initialization parameters that are used for the
auxiliary instance.
When RMAN creates the auxiliary instance, it creates an initialization parameter file.
The default values work for most
TRANSPORT TABLESPACE
cases, especially if you specify
the
AUXILIARY DESTINATION
option on the
TRANSPORT TABLESPACE
command. RMAN can
also use an auxiliary instance parameter file that contains values for additional
initialization parameters. These values override the values of parameters defined in
the default initialization parameter file.
See Also:
•Using Initialization Parameters to Name Auxiliary Files
•About Setting Initialization Parameters for the RMAN Auxiliary Instance
•Setting the Location of the Auxiliary Instance Parameter File
27.2.1 About Setting Initialization Parameters for the RMAN Auxiliary
Instance
RMAN defines certain basic initialization parameters for the automatic auxiliary
instance that is used with transportable tablespaces.
Chapter 27
Customizing Initialization Parameters for the Auxiliary Instance
27-5

You might use an auxiliary instance parameter file to include additional parameters for
the following reasons:
•To increase
STREAMS_POOL_SIZE
and
SHARED_POOL_SIZE
if needed for Data Pump
Export.
•To manage locations for auxiliary instance data files. For example, you do not
want all auxiliary instance data files stored in the same location on disk, but you do
not want to specify the location of every file individually.
•To specify names for online redo logs with
LOG_FILE_NAME_CONVERT
.
The auxiliary instance parameter file is not intended to be a complete initialization
parameter file for the auxiliary instance. Any parameters specified are added to or
override the default parameters for the auxiliary instance. It is not necessary to specify
parameters in the initialization file that you do not intend to override.
The following table describes the initialization parameters for the auxiliary instance.
Table 27-1 Default Initialization Parameters for the Auxiliary Instance
Initialization Parameter Value
DB_NAME
Same as
DB_NAME
of the source database.
COMPATIBLE
Same as the compatible setting of the source database.
DB_UNIQUE_NAME
Generated unique value based on
DB_NAME
.
DB_BLOCK_SIZE
Same as the
DB_BLOCK_SIZE
of the source database.
DB_FILES
Same value as
DB_FILES
for the source database
SGA_TARGET
280M recommended value.
DB_CREATE_FILE_DEST
Auxiliary destination (only if the
AUXILIARY DESTINATION
argument
to
TRANSPORT TABLESPACE
is set). RMAN creates Oracle managed
control files and online logs in this location.
Overriding a basic initialization parameter with an inappropriate value in the auxiliary
instance parameter file can cause
TRANSPORT TABLESPACE
to fail. If you encounter a
problem, then try returning the initialization parameter to its default value.
See Also:
"Using Initialization Parameters to Name Auxiliary Files" to learn how to use
DB_FILE_NAME_CONVERT
and
LOG_FILE_NAME_CONVERT
to name files
27.2.2 Setting the Location of the Auxiliary Instance Parameter File
By default, RMAN looks for the auxiliary initialization parameter file at an operating
system-dependent location on the host running the RMAN client. This location may not
be on the host running the auxiliary instance. For UNIX systems, this location is
?/
rdbms/admin/params_auxint.ora
, where the question mark (
?
) stands for
ORACLE_HOME
on
Chapter 27
Customizing Initialization Parameters for the Auxiliary Instance
27-6

the host running RMAN. If no file is found in the default location, then RMAN does not
generate an error.
If you use the default initialization parameters for the auxiliary instance, then check
whether an auxiliary instance parameter file exists before running
TRANSPORT
TABLESPACE
.
To specify a different location for the auxiliary instance parameter file, you can use the
RMAN
SET AUXILIARY INSTANCE PARAMETER FILE
command in a
RUN
block before the
TRANSPORT TABLESPACE
command. As with the default location of the auxiliary instance
parameter file, the path specified when using the
SET AUXILIARY INSTANCE PARAMETER
FILE
command is a client-side path.
Example 27-1 Specifying an Auxiliary Instance Parameter File
This example describes how you can use the initialization parameter file with
TRANSPORT
TABLESPACE
.
Create a file named
/tmp/auxinstparams.ora
on the host running the RMAN client. This
file contains the following initialization parameter:
SHARED_POOL_SIZE=150M;
The
SHARED_POOL_SIZE
parameter in
/tmp/auxinstparams.ora
overrides the default value
used for
SHARED_POOL_SIZE
when RMAN creates the auxiliary instance.
The following commands use an initialization parameter file when creating
transportable tablespaces.
RUN
{
SET AUXILIARY INSTANCE PARAMETER FILE TO '/tmp/auxinstparams.ora';
TRANSPORT TABLESPACE tbs_2
TABLESPACE DESTINATION '/disk1/transportdest'
AUXILIARY DESTINATION '/disk1/auxdest';
}
27.3 Creating a Transportable Tablespace Set
This procedure describes the use of
TRANSPOR TTABLESPACE
in the most basic and
automated case.
It is assumed that you have met the prerequisites required for the
TRANSPORT
TABLESPACE
command. Oracle Database Backup and Recovery Reference. It is also
assumed that you have met the following requirements described in Oracle Database
Administrator’s Guide:
•Confirmed that tablespace transport is supported between your source and
destination platforms
•Identified a self-contained set of tablespaces to include in the transportable set
To create a transportable tablespace set:
1. Start the RMAN client and connect to the source database and, if used, the
recovery catalog database.
2. Run the
TRANSPORT TABLESPACE
command in RMAN.
In the most basic case, you specify an
AUXILIARY DESTINATION
clause, which is
optional but recommended. RMAN uses default values that work for most cases. If
Chapter 27
Creating a Transportable Tablespace Set
27-7

you do not specify an auxiliary location, then ensure that locations are specified for
all auxiliary instance files. See the rules described in "Specifying Auxiliary File
Locations with Transportable Tablespaces" to learn how to name auxiliary files.
The following example creates a transportable tablespace set that includes
tablespaces
tbs_2
and
tbs_3
.
TRANSPORT TABLESPACE tbs_2, tbs_3
TABLESPACE DESTINATION '/disk1/transportdest'
AUXILIARY DESTINATION '/disk1/auxdest';
After the command completes successfully, note the following results:
•The transportable set data files are left in the location
/disk1/transportdest
with their original names. The transportable tablespace set data files are not
automatically converted to the endian format of the destination database by
TRANSPORT
TABLESPACE
. If necessary, use the RMAN
CONVERT
command to
convert the data files to the endian format of the destination database after
creating the transportable set.
•The Data Pump export dump file for the transportable set is named
dmpfile.dmp
, the export log is named
explog.log
, and the sample import script
is named
impscrpt.sql
.
All files are created in
/disk1/transportdest
. If a file under the name of the
export dump file exists in the tablespace destination, then
TRANSPORT
TABLESPACE
fails when it calls Data Pump Export. If you are repeating a
previous
TRANSPORT TABLESPACE
operation, delete the previous output files,
including the export dump file.
•The auxiliary set files are removed from
/disk1/auxdest
.
3. If necessary, edit the sample import script.
The sample import script assumes that the files used to import the tablespaces
into the destination database are stored in the same locations where they were
created by
TRANSPORT
TABLESPACE
. If files have been moved to new disk locations
before being plugged in, then you must update the sample script with the new
locations of the files before using the script to plug in the transported tablespaces.
4. Return to the process for transporting tablespaces described in Oracle Database
Administrator’s Guide.
See Also:
"Transportable Tablespace Set Scenarios" for variations on the basic case
described in this section.
Chapter 27
Creating a Transportable Tablespace Set
27-8

27.4 Troubleshooting the Creation of Transportable
Tablespace Sets
When the RMAN
TRANSPORT TABLESPACE
command fails, the failed auxiliary instance
files are left intact in the auxiliary instance destination for troubleshooting.
If your
SET NEWNAME
,
CONFIGURE AUXNAME
, and
DB_FILE_NAME_CONVERT
settings cause
multiple files in the auxiliary or transportable tablespace sets to have the same name,
then RMAN reports an error during the
TRANSPORT TABLESPACE
command. To correct the
problem, use different values for these parameters to ensure that duplicate file names
are not created. Naming techniques are described in "Specifying Auxiliary File
Locations with Transportable Tablespaces".
27.5 Transportable Tablespace Set Scenarios
This section contains the following topics:
•Creating a Transportable Tablespace Set at a Specified Time or SCN
•Specifying Locations for Data Pump Files
•Specifying Auxiliary File Locations with Transportable Tablespaces
27.5.1 Creating a Transportable Tablespace Set at a Specified Time
or SCN
You can specify a target time or SCN with the
TRANSPORT TABLESPACE
command. During
the tablespace transport operation, RMAN restores the tablespace at the auxiliary
instance with backups from before the target time and performs point-in-time recovery
on the auxiliary database to the specified target time. Backups and archived redo logs
needed for this point-in-time recovery must be available.
Example 27-2 Specifying an End SCN
This example specifies the target time with an SCN (in the current incarnation or its
ancestors).
TRANSPORT TABLESPACE tbs_2
TABLESPACE DESTINATION '/disk1/transportdest'
AUXILIARY DESTINATION '/disk1/auxdest'
UNTIL SCN 11379;
Example 27-3 Specifying an End Restore Point
This example specifies a restore point as the target time for the transportable
tablespace set creation.
TRANSPORT TABLESPACE tbs_2
TABLESPACE DESTINATION '/disk1/transportdest'
AUXILIARY DESTINATION '/disk1/auxdest'
TO RESTORE POINT 'before_upgrade';
Chapter 27
Troubleshooting the Creation of Transportable Tablespace Sets
27-9

Example 27-4 Specifying an End Time
This example specifies an end time which is used as the target time for the
transportable tablespace set creation.
TRANSPORT TABLESPACE tbs_2
TABLESPACE DESTINATION '/disk1/transportdest'
AUXILIARY DESTINATION '/disk1/auxdest'
UNTIL TIME 'SYSDATE-1';
27.5.2 Specifying Locations for Data Pump Files
You can change the names of the Data Pump export dump file for the transportable
set, the sample import script for use at the target database, the log file generated by
Data Pump Export, and the directory to which they are written.
By default, these files are stored in the tablespace destination and named as follows:
•The Data Pump export dump file is named
dmpfile.dmp
.
•The export log file is named
explog.log
.
•The sample import script is named
impscrpt.sql
.
You can place the dump file and the export log in a different directory by using the
DATAPUMP DIRECTORY
clause of the
TRANSPORT TABLESPACE
command, passing in the name
of a database directory object. The database directory object used by the
DATAPUMP
DIRECTORY
clause is not the directory path of an actual file system directory. The value
passed corresponds to the
DIRECTORY
command-line argument of Data Pump Export.
You can rename these files with the
DUMP FILE EXPORT LOG
, and
IMPORT SCRIPT
clauses
of the
TRANSPORT TABLESPACE
command. The file names cannot contain full file paths
with directory names. If the
DUMP FILE
or
EXPORT LOG
file names specify file paths, then
TRANSPORT TABLESPACE
fails when it attempts to generate the export dump files. Use the
DATAPUMP DIRECTORY
clause to specify a database directory object that identifies a
location for the outputs of Data Pump Export.
The following scenario illustrates the use of
TRANSPORT TABLESPACE
with the
DATAPUMP
DIRECTORY
,
DUMP FILE
,
EXPORT LOG
, and
IMPORT SCRIPT
file names specified. Assume that
you create a database directory object as follows for use with Data Pump Export:
CREATE OR REPLACE DIRECTORY mypumpdir as '/datapumpdest';
Example 27-5 Specifying Output File Locations
This example shows a
TRANSPORT TABLESPACE
command with optional arguments that
specify output file locations.
TRANSPORT TABLESPACE tbs_2
TABLESPACE DESTINATION '/transportdest'
AUXILIARY DESTINATION '/auxdest'
DATAPUMP DIRECTORY mypumpdir
DUMP FILE 'mydumpfile.dmp'
IMPORT SCRIPT 'myimportscript.sql'
EXPORT LOG 'myexportlog.log';
After a successful run, RMAN cleans up the auxiliary destination, creates the Data
Pump export dump file and the export log in the directory referenced by
DATAPUMP
Chapter 27
Transportable Tablespace Set Scenarios
27-10

DIRECTORY
(
/datapumpdest/mydumpfile.dmp
and
/datapumpdest/myexportlog.log
), and
stores the transportable set data files in
/transportdest
.
See Also:
Oracle Database Utilities for more details on the use of directory objects with
Data Pump Export
27.5.3 Specifying Auxiliary File Locations with Transportable
Tablespaces
Several rules are applicable to the location of auxiliary instance files created during the
transport.
If RMAN determines that any of the auxiliary files, designated by any of the methods
for specifying auxiliary file locations, contain a data file copy that is suitable to be used
for the desired point in time for this transport operation, then that data file copy is used
instead of restoring the data file. Any data file copies that are present, but not suitable
for this transport operation, because they are more recent than the requested point in
time, or are not recognized as part of the target database, are overwritten when the
data files are restored.
The simplest technique is to use the
AUXILIARY
DESTINATION
clause of the
TRANSPORT
TABLESPACE
command and let RMAN manage all file locations automatically.
The following table lists the techniques available for specifying file locations when
relocating some or all auxiliary instance files, in the order of precedence that RMAN
uses:
Table 27-2 Options for specifying auxiliary file locations
Order of
Preceden
ce
Auxiliary File Naming Technique Additional Information
1
SET NEWNAME FOR DATAFILES
SET NEWNAME FOR TABLESPACE
SET NEWNAME FOR DATABASE
"Using SET NEWNAME for Auxiliary
Data Files"
2
CONFIGURE AUXNAME
"Using CONFIGURE AUXNAME for
Auxiliary Data Files"
3
AUXILIARY DESTINATION
clause of the
TRANSPORT TABLESPACE
command
"Using AUXILIARY DESTINATION to
Specify a Location for Auxiliary Files"
4
LOG_FILE_NAME_CONVERT
and
DB_FILE_NAME_CONVERT
in the
initialization parameter file
"Using Initialization Parameters to Name
Auxiliary Files"
If you use several of these options, then the first option in the list that applies to a file
determines the file name.
Chapter 27
Transportable Tablespace Set Scenarios
27-11

27.5.3.1 Using SET NEWNAME for Auxiliary Data Files
You can use the
SET NEWNAME
command to specify a location for auxiliary data files.
Use the following
SET NEWNAME
commands in a
RUN
block to specify file names for use in
the
TRANSPORT TABLESPACE
command:
•
SET NEWNAME FOR DATAFILE
•
SET NEWNAME FOR DATABASE
•
SET NEWNAME FOR TABLESPACE
Example 27-6 Using SET NEWNAME FOR DATAFILE to Name Auxiliary Data
Files
The
SET NEWNAME FOR DATAFILE
commands in this example cause the auxiliary instance
data files to be restored to the locations named instead of to
/disk1/auxdest
.
RUN
{
SET NEWNAME FOR DATAFILE '/oracle/dbs/tbs_12.f'
TO '/bigdrive/auxdest/tbs_12.f';
SET NEWNAME FOR DATAFILE '/oracle/dbs/tbs_11.f'
TO '/bigdrive/auxdest/tbs_11.f';
TRANSPORT TABLESPACE tbs_2
TABLESPACE DESTINATION '/disk1/transportdest'
AUXILIARY DESTINATION '/disk1/auxdest';
}
The
SET NEWNAME
command is best used with one-time operations. If you expect to
create transportable tablespaces from backup regularly for a particular set of
tablespaces, then consider using the
CONFIGURE AUXNAME
command instead of the
SET
NEWNAME
command to make persistent settings for the location of the auxiliary instance
data files.
27.5.3.2 Using CONFIGURE AUXNAME for Auxiliary Data Files
You can use the
CONFIGURE AUXNAME
command to specify persistent locations for
transportable tablespace set or auxiliary set data files. RMAN restores each data file
for which a
CONFIGURE AUXNAME
command has been used to the specified location before
recovery. RMAN deletes auxiliary set data files when the operation is complete, unless
the operation failed.
An example illustrates the relationship between the
CONFIGURE AUXNAME
and
TRANSPORT ... AUXILIARY DESTINATION
commands. Suppose that you want to transport
tablespace
tbs_11
. The tablespace
tbs_12
, which contains data file
tbs_12.f
, is part of
the auxiliary set. You execute the following steps:
1. You use the
CONFIGURE AUXNAME
statement to set a persistent nondefault location for
the auxiliary set data file
/oracle/dbs/tbs_12.f
.
For example, you enter the following command:
CONFIGURE AUXNAME FOR DATAFILE '/oracle/dbs/tbs_12.f'
TO '/disk1/auxdest/tbs_12.f';
2. You execute the
TRANSPORT TABLESPACE
command with the
AUXILIARY DESTINATION
and
TABLESPACE DESTINATION
options.
Chapter 27
Transportable Tablespace Set Scenarios
27-12

For example, you enter the following command:
TRANSPORT TABLESPACE tbs_11
AUXILIARY DESTINATION '/myauxdest'
TABLESPACE DESTINATION '/disk1/transportdest';
In the preceding scenario, RMAN restores the auxiliary set copy of data file
/
oracle/dbs/tbs_12.f
to
/disk1/auxdest/tbs_12.f
instead of the location specified by the
AUXILIARY DESTINATION
option. The
CONFIGURE AUXNAME
command setting is higher in the
order of precedence than the
AUXILIARY DESTINATION
option.
Note:
You can view any current
CONFIGURE AUXNAME
settings by executing the
SHOW
AUXNAME
command, which is described in Oracle Database Backup and
Recovery Reference.
27.5.3.3 Using AUXILIARY DESTINATION to Specify a Location for Auxiliary
Files
If you use the
AUXILIARY DESTINATION
option with the
TRANSPORT TABLESPACE
command,
then any auxiliary set file that is not moved to another location using a
SET NEWNAME
or
CONFIGURE AUXNAME
command is stored in the auxiliary destination during the
TRANSPORT
TABLESPACE
operation.
If you do not use the
AUXILIARY DESTINATION
option, then you must use
LOG_FILE_NAME_CONVERT
parameter to specify the location of the online redo log files for
the auxiliary instance. Neither the
SET NEWNAME
nor
CONFIGURE AUXNAME
commands can
affect the location of the auxiliary instance online redo logs. Thus, if you do not use the
AUXILIARY DESTINATION
option or
LOG_FILE_NAME_CONVERT
parameter, then RMAN has no
information about where to create the online redo logs.
27.5.3.4 Using Initialization Parameters to Name Auxiliary Files
You can use the
LOG_FILE_NAME_CONVERT
and
DB_FILE_NAME_CONVERT
initialization
parameters in an auxiliary instance parameter file to determine the names for online
redo logs and other database files at the auxiliary instance. If no
AUXILIARY DESTINATION
clause is specified on the
TRANSPORT TABLESPACE
command, then these parameters
determine the location of any files for which no
CONFIGURE AUXNAME
or
SET NEWNAME
command was run.
You cannot use the
LOG_FILE_NAME_CONVERT
or
DB_FILE_NAME_CONVERT
parameters to
generate new Oracle Managed Files (OMF) names for files at the auxiliary instance
when the original files are OMF files. The database manages the generation of unique
file names in each OMF destination. You must use an
AUXILIARY DESTINATION
clause to
control the location of the online redo log files. You must use the
AUXILIARY
DESTINATION
clause,
SET NEWNAME
or
CONFIGURE AUXNAME
commands, or
DB_CREATE_FILE_DEST
initialization parameter to specify the location for OMF data files.
Chapter 27
Transportable Tablespace Set Scenarios
27-13

See Also:
Oracle Database Reference for more details on the
LOG_FILE_NAME_CONVERT
and
DB_FILE_NAME_CONVERT
initialization parameters
Chapter 27
Transportable Tablespace Set Scenarios
27-14

28
Transporting Data Across Platforms
You can use RMAN to transport tablespaces across platforms with different endian
formats. You can also use RMAN to transport an entire database to a different
platform so long as the two platforms have the same endian format.
This chapter contains the following topics:
•About Cross-Platform Data Transport
•Overview of Cross-Platform Data Transport Using Image Copies
•Performing Cross-Platform Tablespace Conversion with Image Copies
•Performing Cross-Platform Data File Conversion with Image Copies
•Performing Cross-Platform Database Conversion with Image Copies
•Overview of Cross-Platform Data Transport Using Backup Sets
•Performing Cross-Platform Database Transport with Backup Sets
•Performing Cross-Platform Transport of Read-Only Tablespaces Using Backup
Sets
•Overview of Cross-Platform Transport of Tablespaces Using Inconsistent Backups
•Performing Cross-Platform Transport of Tablespaces Using Inconsistent Backups
•Performing Cross-Platform Data Transport in CDBs and PDBs
28.1 About Cross-Platform Data Transport
Cross-platform transportable tablespace is a variation of ordinary transportable
tablespace. All of the restrictions that apply to transportable tablespaces apply here
also, such as the need to ensure that all of the objects being transported are
completely contained within the set of tablespaces being transported. Cross-platform
transportable tablespace can be performed between platforms that have the same, or
different, endian format.
Cross-platform transportable database is not the same thing as transportable
tablespace. In this case you are copying an entire database, including the
SYSTEM
tablespace from one platform to another. Containment checks are irrelevant, and
because the
SYSTEM
tablespace is being copied, no export/import step is required.
Cross-platform transportable database can only be performed between platforms that
have the same endian format.
28.1.1 Purpose of Cross-Platform Data Transport
You can transport tablespaces in a database that runs on one platform into a database
that runs on a different platform. Typical uses of cross-platform transportable
tablespaces include the following:
28-1

•Publishing structured data as transportable tablespaces for distribution to
customers, who can convert the tablespaces for integration into their existing
databases regardless of platform
•Moving data from a large data warehouse server to data marts on smaller
computers such as Linux-based workstations or servers
•Sharing read-only tablespaces across a heterogeneous cluster in which all hosts
share the same endian format
•Migrating tablespaces across platforms with minimal application downtime
A full discussion of transportable tablespaces, their uses, and the different techniques
for creating and using them is found in Oracle Database Administrator's Guide.
You can also use RMAN to transport an entire database from one platform to another.
For example, business requirements demand that you run your databases on less
expensive servers that use a different platform. In this case, you can use RMAN to
transport the entire database rather than re-create it and use import utilities or
transportable tablespaces to repopulate the data.
You can convert a database on the destination host or source host. Reasons for
converting on the destination host include:
•Avoiding performance overhead on the source host due to the conversion process
•Distributing a database from one source system to multiple recipients on several
different platforms
•Evaluating a migration path for a new platform
28.1.2 Methods of Transporting Data Across Platforms
RMAN enables you to transport data files, tablespaces, or an entire database from one
platform to another. When you transport an entire database to a different platform, the
destination platform must have the same endian format as the source platform.
Use one of the following methods to transport data across platforms:
•Transport data using image copies
•Transport data using backup sets
See Also:
–"Overview of Cross-Platform Data Transport Using Image Copies"
–"Overview of Cross-Platform Data Transport Using Backup Sets "
28.1.3 Platforms that Support Cross-Platform Data Transport
The Oracle Database maintains a list of internal names for each platform that supports
cross-platform data transport. These names are stored in the
V$TRANSPORTABLE_PLATFORM
view. Use this view to determine the internal name of the source platform or
destination platform. While transporting data across platforms, you may need to
specify the exact name of the source or destination platform. Any platform names
Chapter 28
About Cross-Platform Data Transport
28-2

specified as a parameter of the
CONVERT
or
BACKUP
command must be entered exactly as
shown in the
V$TRANSPORTABLE_PLATFORM
view.
Use the following query to obtain the platform name of the connected database:
SELECT PLATFORM_NAME
FROM V$TRANSPORTABLE_PLATFORM
WHERE PLATFORM_ID =
( SELECT PLATFORM_ID FROM V$DATABASE );
Use the following query to obtain the name of the Linux platform:
SELECT PLATFORM_ID, PLATFORM_NAME, ENDIAN_FORMAT
FROM V$TRANSPORTABLE_PLATFORM
WHERE UPPER(PLATFORM_NAME) LIKE '%LINUX%';
28.2 Overview of Cross-Platform Data Transport Using
Image Copies
RMAN enables you to use image copies to transport tablespaces, data files, or an
entire database. You use the RMAN
CONVERT
command to perform cross-platform
transport with image copies. Tablespace transport is sometimes performed by
individually transporting the data files that store the tablespace data. However, it is not
possible to transport a single data file that is part of a tablespace that consists of
multiple data files.
You must use the RMAN
CONVERT
command in a transportable tablespace operation
when the source platform is different from the destination platform and the endian
formats are different. If you are converting part of the database between platforms that
have the same endian format, you can use operating system methods to copy the files
from the source to the destination. If you are converting an entire, same endian
database, any data files with undo information must be converted. You cannot copy
these files directly from the source to the destination platform.
28.2.1 Overview of Tablespace and Data File Conversion Using Image
Copies
You can perform tablespace conversion with the RMAN
CONVERT
TABLESPACE
command
on the source host, but not on the destination host. The
CONVERT TABLESPACE
command
does not perform in-place conversion of data files. Rather, the command produces
output files in the correct format for use on the destination platform. The command
does not alter the contents of data files in the source database.
You can use the
CONVERT
DATAFILE
command to convert files. Typically, the
CONVERT
DATAFILE
command is used on the destination host and the
CONVERT TABLESPACE
command is used on the source host. When you use the
CONVERT DATAFILE
command
on the source host, ensure that data files are cleanly offline or the tablespaces
containing those data files are read-only. The Data Pump Export utility generates an
export dump file that, with data files manually copied to the destination host, can be
imported into the destination database. Until the Data Pump export dump file is
imported into the destination database, the data files are not associated with a
tablespace name in the database. In this case, RMAN cannot translate the tablespace
name into a list of data files. Therefore, you must use
CONVERT
DATAFILE
and identify the
data files by file name.
Chapter 28
Overview of Cross-Platform Data Transport Using Image Copies
28-3

Note:
Using
CONVERT TABLESPACE
or
CONVERT DATAFILE
is only one step in using cross-
platform transportable tablespaces. Read the discussion of transportable
tablespaces in Oracle Database Administrator's Guide in its entirety before
attempting to follow the procedures in this chapter.
See Also:
The following sections describe how to perform cross-platform transport of
tablespaces and data files using image copies:
•"Performing Cross-Platform Tablespace Conversion with Image Copies"
•"Performing Cross-Platform Data File Conversion with Image Copies"
28.2.2 Overview of Database Conversion Using Image Copies
To convert a whole database to a different platform, both platforms must use the same
endian format. The RMAN
CONVERT
DATABASE
command automates the movement of an
entire database from a source platform to a destination platform. The transported
database contains the same data as the source database and also has, with a few
exceptions, the same settings as the source database.
Files automatically transported to the destination platform include:
•Data files that belong to permanent tablespaces
Unlike transporting tablespaces across platforms, transporting entire databases
requires that certain types of blocks, such as blocks in undo segments, be
reformatted to ensure compatibility with the destination platform. Even though the
endian formats for the source and destination platforms are the same, certain
types of files must undergo a conversion process. See "Checking the Database
Before Cross-Platform Database Conversion" for details about the types of files
that need conversion.
•Initialization parameter file or server parameter file
If the database uses a text-based initialization parameter file, then RMAN
transports it. If the database uses a server parameter file, then RMAN generates
an initialization parameter file based on the server parameter file, transports it and
creates a new server parameter file at the destination based on the settings in the
initialization parameter file.
Usually, some parameters in the initialization parameter file require manual
updating for the new database. For example, you may change the
DB_NAME
and
parameters such as
CONTROL_FILES
that indicate the locations of files on the
destination host.
You can convert the format of the data files either on the source platform or on the
destination platform. The
CONVERT DATABASE ON DESTINATION PLATFORM
command does
not convert the format of data files. Rather, it generates scripts that you can run
manually to perform the conversion. The
CONVERT SCRIPT
parameter creates a convert
script that you can manually execute at the destination host to convert data file copies
Chapter 28
Overview of Cross-Platform Data Transport Using Image Copies
28-4

in batch mode. The
TRANSPORT SCRIPT
parameter generates a transport script that
contains SQL statements to create the new database on the destination platform.
See Also:
My Oracle Support Note 1079563.1, "RMAN DUPLICATE/RESTORE/
RECOVER Mixed Platform Support" for the following information:
•List of platform combinations that do not require the
CONVERT DATABASE
command
•Prerequisites for the source database and destination databases
See Also:
http://www.oracle.com/goto/maa
for best practices on using cross-platform
transportable tablespace and database procedures as part of data migration
tasks
See Also:
The following sections describe how to perform cross-platform transport of a
database using image copies:
•"Checking the Database Before Cross-Platform Database Conversion"
•"Converting Data Files on the Source Host When Transporting a
Database"
•"Converting Data Files on the Destination Host When Transporting a
Database"
28.3 Performing Cross-Platform Tablespace Conversion
with Image Copies
See the list of
CONVERT
command prerequisites described in Oracle Database Backup
and Recovery Reference. Meet all these prerequisites before doing the steps in this
section.
For purposes of illustration, assume that you must transport tablespaces
finance
and
hr
from source database
prod_source
, which runs on a Sun Solaris host. You plan to
transport them to destination database
prod_dest
running on a Linux PC. You plan to
store the converted data files in the temporary directory
/tmp/transport_linux/
on the
source host.
Chapter 28
Performing Cross-Platform Tablespace Conversion with Image Copies
28-5

See Also:
"Overview of Tablespace and Data File Conversion Using Image Copies"
To perform cross-platform tablespace conversion with image copies:
1. Start SQL*Plus and connect to the source database
prod_source
with administrator
privileges.
2. Query the name for the destination platform in the
V$TRANSPORTABLE_PLATFORM
view.
The
PLATFORM_NAME
for Linux on a PC is
Linux IA (64-bit)
.
See Also:
"Platforms that Support Cross-Platform Data Transport" for information
about determining the platform name
3. Check if the tablespaces to be transported are self-contained by executing the
DBMS_TTS.TRANSPORT_SET_CHECK
procedure. If the
TRANSPORT_SET_VIOLATIONS
view
contains rows corresponding to the specified tablespaces, then you must resolve
the dependencies before proceeding with the conversion.
See Also:
Example 21-1 for information about executing the
DBMS_TTS.TRANSPORT_SET_CHECK
procedure
4. Place the tablespaces to be transported in read-only mode. For example, enter:
ALTER TABLESPACE finance READ ONLY;
ALTER TABLESPACE hr READ ONLY;
5. Choose a method for naming the output files.
See Also:
"About Renaming Output Files During RMAN Cross-Platform Data File
Conversion"
6. Start RMAN and connect to the source database (not the destination database) as
TARGET
. For example, enter:
% rman
RMAN> CONNECT TARGET "sbu@prod_source AS SYSBACKUP";
7. Run the
CONVERT TABLESPACE
command to convert the data files into the endian
format of the destination host.
In the following example, the
FORMAT
argument controls the name and location of
the converted data files:
Chapter 28
Performing Cross-Platform Tablespace Conversion with Image Copies
28-6

RMAN> CONVERT TABLESPACE finance,hr
2> TO PLATFORM 'Linux IA (64-bit)'
3> FORMAT '/tmp/transport_linux/%U';
The result is a set of converted data files in the
/tmp/transport_linux/
directory,
with data in the correct endian format for the Linux IA (64-bit) platform.
See Also:
Oracle Database Backup and Recovery Reference for the full semantics
of the
CONVERT
command
8. Follow the rest of the general outline for transporting tablespaces:
a. Use the Oracle Data Pump Export utility to create the export dump file on the
source host.
b. Move the converted data files and the export dump file from the source host to
the desired directories on the destination host.
c. Plug the tablespace in to the new database with the DataPump Import utility.
d. If applicable, place the transported tablespaces into read/write mode.
See Also:
Oracle Database Administrator's Guide for information about using
transportable tablespaces
28.4 Performing Cross-Platform Data File Conversion with
Image Copies
See the list of
CONVERT
command prerequisites described in Oracle Database Backup
and Recovery Reference. Meet these prerequisites before performing the steps in this
section.
This section contains the following topics:
•About Renaming Output Files During RMAN Cross-Platform Data File Conversion
•Performing Tablespace Transportation on the Destination Host Using RMAN
CONVERT DATAFILE
28.4.1 About Renaming Output Files During RMAN Cross-Platform
Data File Conversion
Data file conversion necessitates that you choose a technique for naming the output
files. You must use the
FORMAT
or
DB_FILE_NAME_CONVERT
arguments to the
CONVERT
command to control the naming of output files. The rules are listed in order of
precedence:
Chapter 28
Performing Cross-Platform Data File Conversion with Image Copies
28-7

1. Any file that matches any pattern provided in the
DB_FILE_NAME_CONVERT
clause is
named based upon this pattern.
2. If you specify a
FORMAT
clause, then any file not named based on the pattern
provided in the
DB_FILE_NAME_CONVERT
clause is named based on the
FORMAT
pattern.
Note:
You cannot use the
DB_FILE_NAME_CONVERT
clause to generate output file
names for the
CONVERT
command when both the source and destination files
are Oracle Managed Files.
If the source and destination platforms differ, then you must specify the
FROM PLATFORM
parameter. View platform names by querying the
V$TRANSPORTABLE_PLATFORM
. The
FROM
PLATFORM
value must match the format of the data files to be converted to avoid an
error. If you do not specify
FROM PLATFORM
, then this parameter defaults to the value of
the destination platform.
See Also:
"Platforms that Support Cross-Platform Data Transport" for information about
determining the platform name
28.4.2 Performing Tablespace Transportation on the Destination Host
Using RMAN CONVERT DATAFILE
This section explains how to use the
CONVERT DATAFILE
command. The section
assumes that you intend to transport tablespaces
finance
(data files
fin/fin01.dbf
and
fin/fin02.dbf
) and
hr
(data files
hr/hr01.dbf
and
hr/hr02.dbf
) from a source database
named
prod_source
. The database runs on a Sun Solaris host. You plan to transport
these tablespaces into a destination database named
prod_dest
, which runs on a Linux
PC. You plan to perform conversion on the destination host.
When the data files are plugged in to the destination database, you plan to store them
in
/orahome/dbs
and preserve the current directory structure. That is, data files for the
hr
tablespace are stored in the
/orahome/dbs/hr
subdirectory, and data files for the
finance
tablespace are stored in the
/orahome/dbs/fin
directory.
See Also:
"Overview of Tablespace and Data File Conversion Using Image Copies"
To perform cross-platform data file conversion with image copies:
1. Start SQL*Plus and connect to the source database
prod_source
with administrator
privileges.
Chapter 28
Performing Cross-Platform Data File Conversion with Image Copies
28-8

2. Query the name for the source platform in
V$TRANSPORTABLE_PLATFORM
.
For this scenario, assume that the
PLATFORM_NAME
for the source host is
Solaris[tm]
OE (64-bit)
.
See Also:
"Platforms that Support Cross-Platform Data Transport" for information
about determining the platform name
3. Identify the tablespaces to be transported from the source database and place
them in read-only mode.
For example, enter the following SQL statements to place
finance
and
hr
in read-
only mode:
ALTER TABLESPACE finance READ ONLY;
ALTER TABLESPACE hr READ ONLY;
4. On the source host, use Data Pump Export to create the export dump file
In this example, the dump file is named
expdat.dmp
.
5. Make the export dump file and the data files to be transported available to the
destination host.
You can use NFS to make the dump file and current database files (not copies)
accessible. Alternatively, you can use an operating system utility to copy these
files to the destination host.
In this example, you store the files in the
/tmp/transport_solaris/
directory of the
destination host. You preserve the subdirectory structure from the original location
of the files; that is, the data files are stored as:
•
/tmp/transport_solaris/fin/fin01.dbf
•
/tmp/transport_solaris/fin/fin02.dbf
•
/tmp/transport_solaris/hr/hr01.dbf
•
/tmp/transport_solaris/hr/hr02.dbf
6. Start RMAN and connect to the destination database (not the source database) as
TARGET
. For example, the following command connects to the target database
prod_dest
using the
sbu
user who is granted the
SYSBACKUP
privilege:
% rman
RMAN> CONNECT TARGET "sbu@prod_dest AS SYSBACKUP";
7. Execute the
CONVERT DATAFILE
command to convert the data files into the endian
format of the destination host.
In this example, you use
DB_FILE_NAME_CONVERT
to control the name and location of
the converted data files. You also specify the
FROM
PLATFORM
clause.
RMAN> CONVERT DATAFILE
2> '/tmp/transport_solaris/fin/fin01.dbf',
3> '/tmp/transport_solaris/fin/fin02.dbf',
4> '/tmp/transport_solaris/hr/hr01.dbf',
5> '/tmp/transport_solaris/hr/hr02.dbf'
6> DB_FILE_NAME_CONVERT
7> '/tmp/transport_solaris/fin','/orahome/dbs/fin',
Chapter 28
Performing Cross-Platform Data File Conversion with Image Copies
28-9

8> '/tmp/transport_solaris/hr','/orahome/dbs/hr'
9> FROM PLATFORM 'Solaris[tm] OE (64-bit)';
The result is a set of converted data files in the
/orahome/dbs/
directory that are
named as follows:
•
/orahome/dbs/fin/fin01.dbf
•
/orahome/dbs/fin/fin02.dbf
•
/orahome/dbs/hr/hr01.dbf
•
/orahome/dbs/hr/hr02.dbf
8. Follow the rest of the general outline for transporting tablespaces:
a. Plug the tablespace in to the new database with the DataPump Import utility.
b. If applicable, place the transported tablespaces into read-only mode.
See Also:
•Oracle Database Backup and Recovery Reference for the syntax and
semantics of the
CONVERT
command
•Oracle Database Administrator's Guide for information about
transportable tablespaces
28.5 Performing Cross-Platform Database Conversion with
Image Copies
When you perform cross-platform database conversion with image copies, you can
convert the data files on either the source host or the destination host.
This section contains:
•Checking the Database Before Cross-Platform Database Conversion
•Converting Data Files on the Source Host When Transporting a Database
•Converting Data Files on the Destination Host When Transporting a Database
28.5.1 Checking the Database Before Cross-Platform Database
Conversion
As explained in "Overview of Cross-Platform Data Transport Using Image Copies", you
can use the RMAN
CONVERT DATABASE
command to automate the copying of an entire
database from one platform to another. You convert the database data files on either
the source or destination platforms.
Before converting the database, see the list of
CONVERT DATABASE
command
prerequisites described in Oracle Database Backup and Recovery Reference. Confirm
that you meet all these prerequisites before attempting the procedure in this section.
Chapter 28
Performing Cross-Platform Database Conversion with Image Copies
28-10

One prerequisite is that both the source and destination platform must share the same
endian format. For example, you can transport a database from Microsoft Windows to
Linux for x86 (both little-endian), or from HP-UX to AIX (both big-endian), but not from
HP-UX to Linux for x86 (big-endian to little-endian).
Note:
If you cannot use the
CONVERT DATABASE
command because the platforms do
not share endian formats, then you can create a new database on the
destination platform and then use cross-platform transportable tablespace to
copy your data.
When you transport entire databases, note that certain files require RMAN conversion
to ensure compatibility with the destination platform. Even though the endian formats
for the source and destination platform are the same, these files cannot be simply
copied from the source to the destination system. The following kinds of files require
RMAN conversion:
•Any file containing undo segments
•Any file containing automatic segment space management (ASSM) segment
headers that is being transported to or from the HP Tru64 platform
Note:
When converting to or from Tru64 UNIX platform, even if the databases use
the same endian format, you must use the
CONVERT
command to convert data
files with automatic segment space management (ASSM) headers. See My
Oracle Support Note 732053.1 for information about identifying data files that
contain undo data or ASSM headers.
The
CONVERT DATABASE
command, by default, processes all data files in the database
using RMAN conversion. The RMAN conversion copies the files from one location to
another, even when it does not make any changes to the file. If you have other
preferred means to copy those files that do not require RMAN conversion, you can use
the
SKIP UNNECESSARY DATAFILES
option of the
CONVERT DATABASE
command. If you select
this option, then the
CONVERT DATABASE
command only processes the files that require
conversion. All other files must either be made accessible to the user or copied from
the source to the destination database.
Whether the data file conversion is performed at the source or destination host, you
must copy the files while the source database is open in read-only mode.
To check the database before cross-platform conversion:
1. On the source database, start a SQL*Plus session as a user with the
SYSDBA
or
SYSBACKUP
privilege.
2. Open the database in read-only mode.
Chapter 28
Performing Cross-Platform Database Conversion with Image Copies
28-11

SHUTDOWN IMMEDIATE
STARTUP MOUNT
ALTER DATABASE OPEN READ ONLY;
3. Ensure that server output is on in SQL*Plus.
For example, enter the following SQL*Plus command:
SET SERVEROUTPUT ON
4. Execute the
DBMS_TDB.CHECK_DB
function.
This check ensures that no conditions prevent the transport of the database, such
as incorrect compatibility settings, in-doubt or active transactions, or incompatible
endian formats between the source platform and destination platform.
You can call
CHECK_DB
without arguments to see if a condition at the source
database prevents transport. You can also call this function with the arguments
shown in Table 28-1.
Table 28-1 CHECK_DB Function Parameters
Parameter Description
target_platform_name
The name of the destination platform as it appears in the
V$DB_TRANSPORTABLE_PLATFORM
view.
This parameter is optional, but is required when the
skip_option
parameter is used. If omitted, it is assumed that
the destination platform is compatible with the source
platform, and only the conditions not related to platform
compatibility are tested.
skip_option
Specifies which, if any, parts of the database to skip when
checking whether the database can be transported.
Supported values (of type
NUMBER
) are:
•
SKIP_NONE
(or
0
), which checks all tablespaces
•
SKIP_OFFLINE
(or
2
), which skips checking data files in
offline tablespaces
•
SKIP_READONLY
(or
3
), which skips checking data files in
read-only tablespaces
The following example illustrates executing
CHECK_DB
on a 32-bit Linux platform for
transporting a database to 32-bit Windows, skipping read-only tablespaces.
DECLARE
db_ready BOOLEAN;
BEGIN
db_ready :=
DBMS_TDB.CHECK_DB('Microsoft Windows IA (32-bit)',DBMS_TDB.SKIP_READONLY);
END;
/
PL/SQL procedure successfully completed.
If no warnings appear, or if
DBMS_TDB.CHECK_DB
returns
TRUE
, then you can transport
the database. Proceed to Step 6.
If warnings appear, or if
DBMS_TDB.CHECK_DB
returns
FALSE
, then you cannot currently
transport the database. Proceed to Step 5.
5. Examine the output to learn why the database cannot be transported, fix the
problem if possible, and then return to the Step 4.
Chapter 28
Performing Cross-Platform Database Conversion with Image Copies
28-12

See Also:
Oracle Database PL/SQL Packages and Types Reference for
information about
DBMS_TDB
6. Execute the
DBMS_TDB.CHECK_EXTERNAL
function to identify any external tables,
directories, or BFILEs. RMAN cannot automate the transport of these files, so you
must copy the files manually and re-create the database directories.
The following example shows how to call the
DBMS_TDB.CHECK_EXTERNAL
function.
DECLARE
external BOOLEAN;
BEGIN
/* value of external is ignored, but with SERVEROUTPUT set to ON
* dbms_tdb.check_external displays report of external objects
* on console */
external := DBMS_TDB.CHECK_EXTERNAL;
END;
/
If no external objects exist, then the procedure completes with no output. If
external objects exist, however, then the output is similar to the following:
The following external tables exist in the database:
SH.SALES_TRANSACTIONS_EXT
The following directories exist in the database:
SYS.DATA_PUMP_DIR, SYS.MEDIA_DIR, SYS.DATA_FILE_DIR, SYS.LOG_FILE_DIR
The following BFILEs exist in the database:
PM.PRINT_MEDIA
PL/SQL procedure successfully completed.
28.5.2 Converting Data Files on the Source Host When Transporting a
Database
When you transport entire databases, certain types of blocks such as blocks in undo
segments must be reformatted to ensure compatibility with the destination platform.
Even though the endian formats for the source and destination platform are the same,
certain data files must undergo a conversion process and cannot be simply copied
from one platform to another.
Data files with undo information and those from the HP Tru64 platform must be
converted. By default, all data files are converted when the
CONVERT DATABASE
command
is executed. If, however,
SKIP UNNECESSARY DATAFILES
is used in the
CONVERT DATABASE
command, then the data files with undo segments and those from the HP Tru64
platform are converted. All other data files do not require conversion and can be
copied to the new database using FTP, an operating system copy command, or some
other mechanism.
See Also:
"Overview of Database Conversion Using Image Copies"
Chapter 28
Performing Cross-Platform Database Conversion with Image Copies
28-13

This section assumes that you have met all of the
CONVERT DATABASE
prerequisites and
followed the steps in "Checking the Database Before Cross-Platform Database
Conversion". The goal of this procedure is to convert the format of data files on the
source host as part of a cross-platform database transport.
Assume that you want to convert a database running on Solaris to a database that
runs on Windows.
To convert the database on the source host:
1. Open the source database in read-only mode.
SHUTDOWN IMMEDIATE;
STARTUP MOUNT;
ALTER DATABASE OPEN READ ONLY;
2. Start RMAN and connect to the source database as
TARGET
as described in
"Making Database Connections with RMAN".
3. Run the
CONVERT
DATABASE
command.
The following example shows a
CONVERT DATABASE
command (sample output
included). The
TRANSPORT SCRIPT
parameter specifies the location of the generated
SQL script that you can use to create the new database. The
TO PLATFORM
parameter indicates the platform of the destination database. The
DB_FILE_NAME_CONVERT
parameter specifies the naming scheme for the generated
data files.
RMAN> CONVERT DATABASE
2> NEW DATABASE 'newdb'
3> TRANSPORT SCRIPT '/tmp/convertdb/transportscript.sql'
4> TO PLATFORM 'Microsoft Windows IA (32-bit)'
5> DB_FILE_NAME_CONVERT '/disk1/oracle/dbs' '/tmp/convertdb';
Starting conversion at source at 25-NOV-13
using channel ORA_DISK_1
External table SH.SALES_TRANSACTIONS_EXT found in the database
.
.
.
Directory SYS.ORACLE_HOME found in the database
Directory SYS.ORACLE_BASE found in the database
Directory SYS.LOG_FILE_DIR found in the database
.
.
.
BFILE PM.PRINT_MEDIA found in the database
User SYS with SYSDBA and SYSOPER privilege found in password file
User SBU with SYSBACKUP privilege found in password file
channel ORA_DISK_1: starting datafile conversion
input datafile fno=00001 name=/disk1/oracle/dbs/tbs_01.f
converted datafile=/tmp/convertdb/tbs_01.f
channel ORA_DISK_1: datafile conversion complete, elapsed time: 00:00:15
channel ORA_DISK_1: starting datafile conversion
input datafile fno=00002 name=/disk1/oracle/dbs/tbs_ax1.f
converted datafile=/tmp/convertdb/tbs_ax1.f
channel ORA_DISK_1: datafile conversion complete, elapsed time: 00:00:03
.
.
.
Chapter 28
Performing Cross-Platform Database Conversion with Image Copies
28-14

channel ORA_DISK_1: starting datafile conversion
input datafile fno=00016 name=/disk1/oracle/dbs/tbs_52.f
converted datafile=/tmp/convertdb/tbs_52.f
channel ORA_DISK_1: datafile conversion complete, elapsed time: 00:00:01
Edit init.ora file init_00gb3vfv_1_0.ora. This PFILE will be used to
create the database on the target platform
Run SQL script /tmp/convertdb/transportscript.sql on the target platform
to create database
To recompile all PL/SQL modules, run utlirp.sql and utlrp.sql on
the target platform
To change the internal database identifier, use DBNEWID Utility
Finished conversion at source at 25-NOV-13
4. After
CONVERT
DATABASE
completes, you can open the source database read/write
again.
5. Move the data files generated by
CONVERT DATABASE
to the desired locations on the
destination host.
In Step 3, the command creates the files in the
/tmp/convertdb/
directory on the
source host. Move these files to the directory on the destination host that will
contain the destination database files.
6. If the path to the data files is different on the destination host, then edit the
transport script to refer to the new data file locations.
7. If necessary, edit the initialization parameter file to change any settings for the
destination database.
You must edit several entries at the top of the initialization parameter file when the
database is moved to the destination platform. For example, the initialization
parameter file may look as follows:
# Please change the values of the following parameters:
control_files = "/tmp/convertdb/cf_D-NEWDBT_id-1778429277_00gb9u2s"
service_names = "NEWDBT.example.com"
db_recovery_file_dest = "/tmp/convertdb/orcva"
db_recovery_file_dest_size= 10737418240
instance_name = "NEWDBT"
db_name = "NEWDBT"
plsql_native_library_dir = "/tmp/convertdb/plsqlnld1"
8. If necessary, edit the transport script to use the new names for the converted data
files.
In the example in Step 3, the transport script is named
/tmp/convertdb/
transportscript.sql
. You run this script on the destination host to create the
database. Thus, you must edit this script with the correct names for the data files.
9. On the destination host, start SQL*Plus and connect to the destination database
instance as
SYSDBA
or
SYSBACKUP
using operating system authentication.
For example, connect as follows:
SQL> CONNECT / AS SYSBACKUP
If you choose not to use operating system authentication, you can create a
password file and then connect with a user name and password.
10. Execute the transport script in SQL*Plus to create the new database on the
destination host.
SQL> @transportscript
Chapter 28
Performing Cross-Platform Database Conversion with Image Copies
28-15

When the transport script finishes, the creation of the new database is complete.
See Also:
Oracle Database Administrator's Guide for information about operating
system authentication and password file authentication
28.5.3 Converting Data Files on the Destination Host When
Transporting a Database
This section assumes that you have met all of the
CONVERT DATABASE
command
prerequisites and followed the steps in "Checking the Database Before Cross-Platform
Database Conversion". The goal of this procedure is to convert the format of data files
on the destination host as part of a cross-platform database transport.
See Also:
"Overview of Database Conversion Using Image Copies"
Perform the data file conversion in the following phases:
1. Performing Preliminary Data File Conversion Steps on the Source Host
2. Running the Conversion Scripts on the Destination Host
28.5.3.1 Performing Preliminary Data File Conversion Steps on the Source
Host
In this procedure, you execute the
CONVERT DATABASE
command on the source host. This
command generates an initialization parameter file and scripts that you can edit for
use on the destination host. You also copy the unconverted data files from the source
host to the destination host.
To perform preliminary data file conversion steps on the source host:
1. Ensure that the database is open in read-only mode.
2. Start RMAN and connect to the source database as
TARGET
, as described in
"Making Database Connections with RMAN".
3. Run the
CONVERT
DATABASE ON DESTINATION PLATFORM
command.
The following example shows a sample
CONVERT DATABASE
command (sample
output included). The
ON DESTINATION PLATFORM
parameter specifies that any
CONVERT
commands required for data files are executed on the destination platform
rather than the source platform. The
FORMAT
parameter specifies the naming
scheme for the generated files.
RMAN> CONVERT DATABASE
2> ON DESTINATION PLATFORM
3> CONVERT SCRIPT '/tmp/convertdb/convertscript-target'
Chapter 28
Performing Cross-Platform Database Conversion with Image Copies
28-16

4> TRANSPORT SCRIPT '/tmp/convertdb/transportscript-target'
5> NEW DATABASE 'newdbt'
6> FORMAT '/tmp/convertdb/%U';
Starting conversion at source at 28-JAN-13
using target database control file instead of recovery catalog
allocated channel: ORA_DISK_1
channel ORA_DISK_1: sid=39 devtype=DISK
External table SH.SALES_TRANSACTIONS_EXT found in the database
.
.
.
Directory SYS.ORACLE_HOME found in the database
Directory SYS.ORACLE_BASE found in the database
Directory SYS.LOG_FILE_DIR found in the database
.
.
.
BFILE PM.PRINT_MEDIA found in the database
User SYS with SYSDBA and SYSOPER privilege found in password file
User SBU with SYSBACKUP privilege found in password file
channel ORA_DISK_1: starting to check datafiles
input datafile fno=00001 name=/disk1/oracle/dbs/tbs_01.f
channel ORA_DISK_1: datafile checking complete, elapsed time: 00:00:00
channel ORA_DISK_1: starting to check datafiles
input datafile fno=00002 name=/disk1/oracle/dbs/tbs_ax1.f
channel ORA_DISK_1: datafile checking complete, elapsed time: 00:00:00
channel ORA_DISK_1: starting to check datafiles
input datafile fno=00017 name=/disk1/oracle/dbs/tbs_03.f
channel ORA_DISK_1: datafile checking complete, elapsed time: 00:00:00
.
.
.
channel ORA_DISK_1: starting to check datafiles
input datafile fno=00015 name=/disk1/oracle/dbs/tbs_51.f
channel ORA_DISK_1: datafile checking complete, elapsed time: 00:00:00
channel ORA_DISK_1: starting to check datafiles
input datafile fno=00016 name=/disk1/oracle/dbs/tbs_52.f
channel ORA_DISK_1: datafile checking complete, elapsed time: 00:00:00
Edit init.ora file /tmp/convertdb/init_00gb9u2s_1_0.ora. This PFILE will be used
to create the database on the target platform
Run SQL script /tmp/convertdb/transportscript-target on the target platform to
create database
Run RMAN script /tmp/convertdb/convertscript-target on target platform to
convert datafiles
To recompile all PL/SQL modules, run utlirp.sql and utlrp.sql on the target
platform
To change the internal database identifier, use DBNEWID Utility
Finished conversion at source at 28-JAN-13
Starting Control File Autobackup at 28-JAN-13
piece handle=/disk2/oracle/backups/c-1678658224-20131202-02 comment=NONE
Finished Control File Autobackup at 28-JAN-13
The previous command creates a transport script, an initialization parameter file
for the new database, and a convert script containing RMAN
CONVERT DATAFILE
commands for each data file being converted.
Chapter 28
Performing Cross-Platform Database Conversion with Image Copies
28-17

Note:
CONVERT
DATABASE
ON
DESTINATION
PLATFORM
does not produce converted
data file copies. The command only creates scripts.
4. Use an operating system utility to copy the following files to a temporary location
on the destination host:
•The data files to be converted
•The convert script
•The transport script
•The initialization file for the destination database
5. Make the source database read/write.
28.5.3.2 Running the Conversion Scripts on the Destination Host
This section explains how to use the scripts created in the previous section to convert
the data files on the destination host and complete the transport process.
The convert script created in the previous phase uses the original data file names of
the source database files. The
FORMAT
parameter specifies the name that was
generated with the
FORMAT
or
DB_FILE_NAME_CONVERT
parameter of the
CONVERT DATABASE
command.
If the data files of the source database are accessible from the destination host with
the same path names, then so long as the source database is read-only you can run
the convert script on the destination host without any changes. For example, if the
source and destination hosts both use NFS to mount a disk containing the source data
files, and if the mount point for both hosts is
/fs1/dbs/
, then no editing is needed.
To run the conversion scripts on the destination host:
1. If necessary, edit the convert script.
In the script, one
CONVERT
DATAFILE
command exists for each data file to be
converted. The convert script must indicate the current temporary file names of the
unconverted data files and the output file names of the converted data files. A
typical convert script looks as follows:
RUN
{
CONVERT
FROM PLATFORM 'Linux IA (32-bit)'
PARALLELISM 10
DATAFILE '/disk1/oracle/dbs/tbs_01.f'
FORMAT '/tmp/convertdb/data_D-TV_I-1778429277_TS-SYSTEM_FNO-1_7qgb9u2s'
DATAFILE '/disk1/oracle/dbs/tbs_ax1.f'
FORMAT '/tmp/convertdb/data_D-TV_I-1778429277_TS-SYSAUX_FNO-2_7rgb9u2s'
DATAFILE '/disk1/oracle/dbs/tbs_03.f'
FORMAT '/tmp/convertdb/data_D-TV_I-1778429277_TS-SYSTEM_FNO-17_7sgb9u2s'
DATAFILE '/disk1/oracle/dbs/tbs_51.f'
FORMAT '/tmp/convertdb/data_D-TV_I-1778429277_TS-TBS_5_FNO-15_8egb9u2u'
Chapter 28
Performing Cross-Platform Database Conversion with Image Copies
28-18

DATAFILE '/disk1/oracle/dbs/tbs_52.f'
FORMAT '/tmp/convertdb/data_D-TV_I-1778429277_TS-TBS_5_FNO-16_8fgb9u2u';
}
Edit each
DATAFILE
command in the convert script to specify the temporary location
of each data file as input. Also, edit the
FORMAT
parameter of each command to
specify the desired final location of the data files of the transported database.
2. If necessary, edit the initialization parameter file on the destination host to change
settings for the destination database.
You must edit several entries at the top of the initialization parameter file. For
example, the initialization parameter file may look as follows:
# Please change the values of the following parameters:
control_files = "/tmp/convertdb/cf_D-NEWDBT_id-1778429277_00gb9u2s"
db_recovery_file_dest = "/tmp/convertdb/orcva"
db_recovery_file_dest_size= 10737418240
instance_name = "NEWDBT"
service_names = "NEWDBT.example.com"
plsql_native_library_dir = "/tmp/convertdb/plsqlnld1"
db_name = "NEWDBT"
3. On the destination host, use SQL*Plus to start the database instance in
NOMOUNT
mode.
Specify the initialization parameter file that you copied in the preceding step. For
example, enter the following command:
SQL> STARTUP NOMOUNT PFILE='/tmp/init_convertdb_00i2gj63_1_0.ora'
4. Start RMAN and connect to the destination database (not the source database) as
TARGET
. For example, enter the following command:
% rman
RMAN> CONNECT TARGET "sbu@prod_dest AS SYSBACKUP";
5. Run the convert script at the RMAN prompt. For example, enter the following
command:
RMAN> @/tmp/convertdb/convertscript-target
6. Shut down the database instance.
This step is necessary because the transport script that must execute includes a
STARTUP NOMOUNT
command.
7. If necessary, edit the transport script to use the new names for the converted data
files.
In the example in Step 3, the transport script is
/tmp/convertdb/
transportscript.sql
. You run this script on the destination host to create the
database. Thus, you must edit this script with the correct names for the data files.
8. Execute the transport script in SQL*Plus.
For example, create the new database on the destination host as follows:
SQL> @/tmp/convertdb/transportscript
When the transport script completes, the destination database is created.
Chapter 28
Performing Cross-Platform Database Conversion with Image Copies
28-19

28.6 Overview of Cross-Platform Data Transport Using
Backup Sets
RMAN can transport databases, data files, and tablespaces across platforms by using
backup sets. Performing cross-platform data transport with backup sets enables you to
use block compression to reduce the size of backups. This improves backup
performance and reduces the time taken to transport backups over the network.
Note:
To perform cross-platform data transport using backup sets, the version of
the destination database must be Oracle Database 12c Release 1 (12.1) or
later.
When you transport an entire database to a different platform, the source platform and
the destination platform must use the same endian format. However, user tablespaces
can be transported to a destination platform that uses a different endian format from
the source platform.
On the source database, you create a cross-platform backup of the data that needs to
be transported. A cross-platform backup is an RMAN backup that can be restored on a
destination platform that is different from the source platform. On the destination
database, you restore and then recover the cross-platform backup to obtain the data
that you wanted to transport. Cross-platform backups can be restored on any platform
that is supported in the
V$TRANSPORTABLE_PLATFORM
view.
RMAN does not catalog backup sets created for cross-platform transport in the control
file. This ensures that backup sets created for cross-platform transport are not used
during regular restore operations.
About Clauses Used to Create Cross-Platform Backups Using Backups Sets
Use the
FOR TRANSPORT
or
TO PLATFORM
clause in the
BACKUP
command to create cross-
platform backups. When you create a cross-platform backup of read-only tablespaces
using either of these clauses, RMAN can also create a Data Pump export dump file
containing the metadata required to plug these tablespaces into the destination
database.
Although the
TO PLATFORM
and
FOR TRANSPORT
clauses are not supported in Oracle
Database 10g Release 2 (10.2) or Oracle Database 11g, you can transport data from
these versions of the database to Oracle Database 12c Release 1 (12.1). On the
source database, you first create backup sets of the tablespaces to be transported and
then create the Data Pump export dump file by using the
expdp
command. To restore
these backups on the destination database, you perform a restore operation using the
RESTORE
command and then use the
impdp
command to import the Data Pump export
dump file.
Chapter 28
Overview of Cross-Platform Data Transport Using Backup Sets
28-20

Scenarios in Which RMAN Automatically Creates a Cross-Platform Backup of
the Database
When you use backup sets to back up an entire database RMAN automatically creates
a cross-platform backup of the database in addition to the specified backup if the
following conditions are met:
•Prerequisites for transporting an entire database as a backup set are satisfied.
See Also:
"Prerequisites for Cross-Platform Database Transport Using Backup
Sets"
•The
BACKUP
command does not contain any clause that is incompatible with the
FOR
TRANSPORT
or
TO PLATFORM
clause.
See Also:
Oracle Database Backup and Recovery Reference for information about
the incompatible clauses
The following
BACKUP
command creates a cross-platform backup of the database.
Although the command does not contain either the
FOR TRANSPORT
or
TO PLATFORM
clause
to indicate that it is a cross-platform backup, because the conditions described in
"Prerequisites for Cross-Platform Database Transport Using Backup Sets" are
satisfied, an implicit cross-platform backup of the database is created.
RUN
{
ALLOCATE CHANNEL c1 DEVICE TYPE DISK;
ALLOCATE CHANNEL c2 DEVICE TYPE DISK;
ALLOCATE CHANNEL c3 DEVICE TYPE DISK;
BACKUP
SKIP OFFLINE
FILESPERSET 1
FORMAT '/tmp/xplat_backups/implicit_full_db_%U'
DATABASE;}
High-Level Steps to Transport Data Across Platforms Using Backup Sets
Transporting data across platforms using backup sets consists of the following high-
level steps:
1. On the source database, use the
BACKUP
command to create a cross-platform
backup of the database, tablespaces, or data files that need to be transported to a
different platform. The backup is created as backup sets on the source host.
Chapter 28
Overview of Cross-Platform Data Transport Using Backup Sets
28-21

See Also:
•"About Backing Up Data on the Source Database for Cross-Platform
Data Transport"
•"About the Data Pump Export Dump File Used for Cross-Platform
Tablespace Transport"
2. Transfer the backup sets created on the source host to the destination host.
You can transport the backup sets using operating system utilities. For example, if
your operating system is Linux or UNIX, you can use the
cp
command to transfer
backup sets.
3. On the destination database, restore the backup sets that were transferred from
the source host. Use the
RESTORE
command to restore cross-platform backups.
When you are transporting tablespaces across platforms by using inconsistent
tablespace backups, the additional step of recovering the tablespaces is required
as described in "Performing Cross-Platform Transport of Tablespaces Using
Inconsistent Backups".
See Also:
•"About Restoring Data on the Destination Host During Cross-
Platform Data Transport"
•"About Selecting Objects to Be Restored from Cross-Platform
Backups"
•"About Names and Locations for Restored Objects on the
Destination Database"
•"About Importing the Data Pump Export Dump File Created During
Cross-Platform Tablespace Transport"
Detailed information about how to transport data across platforms using backup sets,
the prerequisites, and the RMAN syntax used are provided in the following sections:
•"Performing Cross-Platform Database Transport with Backup Sets"
•"Performing Cross-Platform Transport of Read-Only Tablespaces Using Backup
Sets"
•"Performing Cross-Platform Transport of Tablespaces Using Inconsistent
Backups"
28.6.1 Basic Terms Used in Cross-Platform Data Transport Using
Backup Sets
Before using backup sets to perform cross-platform data transport, it is useful to
understand the following terms.
Chapter 28
Overview of Cross-Platform Data Transport Using Backup Sets
28-22

Foreign Data File
Data files that do not belong to the destination database are called foreign data files.
These data files are being plugged in to the destination database as part of a data
transfer to the destination database. In the source database, this data file is identified
by its original data file number.
Foreign Tablespace
A foreign tablespace is a set of foreign data files that comprise a tablespace in the
source database. These foreign data files do not belong to the destination database,
but are being transported into the destination database and are identified by the
original tablespace name in the source database.
Foreign Data File Copy
A foreign data file copy is a data file that was restored from a cross-platform backup. It
cannot be directly plugged in to the destination database because it is inconsistent.
You must apply a cross-platform incremental backup to this data file and recover it
before you can plug it in to the destination database.
Data Pump Destination
A Data Pump destination is a location on the disk of the server host of the destination
database on which the Data Pump export dump file and the Data Pump log files are
stored.
28.6.2 About Backing Up Data on the Source Database for Cross-
Platform Data Transport
To create the backup set containing data that must be transported to the destination
database, use the
BACKUP
command on the source database. To indicate that you are
creating a cross-platform backup, the
BACKUP
command must contain either the
FOR
TRANSPORT
or
TO PLATFORM
clause.
When you use
FOR TRANSPORT
, the backup set that is created can be transported to any
destination database. If the destination database uses an endian format that is
different from that of the source database, then the required endian format conversion
is performed on the destination database. The benefit of this method is that the
processing overhead of the conversion operation is offloaded to the destination
database.
When you use
TO PLATFORM
, the endian format conversion is performed on the source
database. The target platform specified by the
TO PLATFORM
clause must be a supported
platform for cross-platform transport. The
V$TRANSPORTABLE_PLATFORM
view contains the
list of supported platforms.
You can create cross-platform backups that contain multiple backup pieces. See the
Oracle Database Backup and Recovery Reference for examples.
You cannot use certain clauses of the
BACKUP
command when you create a cross-
platform backup using either the
FOR TRANSPORT
or
TO PLATFORM
clause. See Oracle
Database Backup and Recovery Reference for information about the clauses that are
not compatible with
TO PLATFORM
and
FOR TRANSPORT
.
Chapter 28
Overview of Cross-Platform Data Transport Using Backup Sets
28-23

28.6.3 About the Data Pump Export Dump File Used for Cross-
Platform Tablespace Transport
When you create a cross-platform consistent tablespace backup, the backup set
contains the data files that contain data related to the specified tablespaces. A
consistent tablespace backup is a backup of one or more tablespaces that is created
when the tablespaces are in read-only mode. After you restore this backup in your
destination database, the tablespaces must be plugged in to the destination database.
To do this, in addition to the backup set containing the tablespace data, you need the
metadata for these tablespaces from the source database.
On the source database, use the
DATAPUMP
clause in the
BACKUP
command to create the
metadata required to plug tablespaces in to the target database. The metadata is
stored in a Data Pump export dump file as a separate backup set. Use this backup set
to plug the transported tablespaces in to the target database.
You can specify how the backup set containing the tablespace metadata is named by
using the
FORMAT
option with the
DATAPUMP
clause. If you omit the
FORMAT
option, then the
format specified in the
BACKUP
command is used to name the export dump file. When
no
FORMAT
option is specified in the
BACKUP
command, the default format is used.
Note:
When you use the
DATAPUMP
clause, the tablespaces that are being
transported must be made read-only.
28.6.4 About Restoring Data on the Destination Host During Cross-
Platform Data Transport
On the destination database, you use the
RESTORE
command to restore the database,
tablespaces, or data files contained in a cross-platform backup consisting of backup
sets. When you perform a cross-platform restore operation, you must use the
foreignFileSpec
subclause of the
RESTORE
command. See Oracle Database Backup and
Recovery Reference for more information.
When you restore cross-platform backups, you must specify the following information:
•Backup set that contains data that was backed up on the source database
Use the
BACKUPSET
option of the
foreignFileSpec
subclause to specify the name of
the cross-platform backup set from which data must be restored. If the cross-
platform backup consists of multiple backup sets, use a separate
BACKUPSET
clause
for each backup set. To restore tablespaces, you must specify the backup sets
that contain the tablespace data using the
BACKUPSET
clause and the backup set
that contains the tablespace metadata using the
DUMP FILE
option of the
foreignFileSpec
subclause.
Using multiple backup sets is not supported during recovery. You cannot apply
multiple backup sets to a set of foreign data files.
Chapter 28
Overview of Cross-Platform Data Transport Using Backup Sets
28-24

See Also:
Oracle Database Backup and Recovery Reference for information about
BACKPSET
and
DUMP FILE
•Data file numbers or names of tablespaces as they exist in the source database
If you are restoring data files or tablespaces, you can restore specific tablespaces
or data files that are contained in a cross-platform backup.
See Also:
"About Names and Locations for Restored Objects on the Destination
Database"
•Location where the restored data files must be stored
Use the
FORMAT
clause to specify the location and the names used to store the
restored data files.
If you do not provide a destination, then the
DB_FILE_CREATE_DEST
initialization
parameter must be set in the target platform. RMAN restores the data files to the
location specified by this parameter using new Oracle Managed File (OMF)
names.
See Also:
"About Names and Locations for Restored Objects on the Destination
Database"
•Name of the source platform (only when conversion is performed on the
destination database)
Use
FROM PLATFORM
to specify the name of the source platform on which the backup
sets were created. The platform name must exactly match the name specified
while creating the backup set. If there is a difference in the platform names, the
restore operation fails.
See Also:
"About Backing Up Data on the Source Database for Cross-Platform
Data Transport"
28.6.5 About Selecting Objects to Be Restored from Cross-Platform
Backups
While restoring data from a cross-platform backup, you can either restore all the data
contained in the cross-platform backup or only certain objects.
Chapter 28
Overview of Cross-Platform Data Transport Using Backup Sets
28-25

See Also:
Oracle Database Backup and Recovery Reference for more information
about the clauses described in this section
Restoring All Data Contained in the Cross-Platform Backup
To restore the entire database, use the
FOREIGN DATABASE
clause in the
RESTORE
command. This clause can only be used when restoring from a whole database
backup set and when both the source platform and destination platform use the same
endian format. You can optionally use the
FORMAT
clause to specify the pattern used to
name restored files.
To restore all the data files contained in the cross-platform backup, use the
ALL
FOREIGN DATAFILES
clause in the
RESTORE
command.
Restoring Part of the Data Contained in the Cross-Platform Backup Set
You can restore some data files or tablespaces contained in a cross-platform backup.
To restore only some data files, use the
FOREIGN DATAFILE
clause in the
RESTORE
command. Specify the absolute file number of the data file in the source database
while restoring data. To restore only some tablespaces contained in a cross-platform
backup, use the
FOREIGN TABLESPACE
clause in the
RESTORE
command. Specify the
names of the tablespaces that must be restored as part of this clause.
28.6.6 About Names and Locations for Restored Objects on the
Destination Database
When you restore a cross-platform backup, specify the data file names and the
location to which they are restored using one of the following options in the
RESTORE
command:
•Use the
TO NEW
option with the
ALL FOREIGN DATAFILES
clause to restore the data
files to the location specified by the
DB_FILE_CREATE_DEST
parameter. By default,
RMAN uses OMF names for the data files.
•Use the
FORMAT
option to specify the pattern used to name restored data files. You
can also specify the directory for these files as part of the
FORMAT
specification.
See Also:
Oracle Database Backup and Recovery Reference for more information
about the clauses described in this section
28.6.7 About Importing the Data Pump Export Dump File Created
During Cross-Platform Tablespace Transport
While restoring a cross-platform backup of read-only tablespaces on the destination
database, use the
DUMP FILE ... FROM BACKUPSET
option of the
foreignFileSpec
Chapter 28
Overview of Cross-Platform Data Transport Using Backup Sets
28-26

subclause to restore the backup set that contains the Data Pump export dump file. The
export dump file contains the metadata required to plug the tablespace in to the
destination database.
Use the
DATAPUMP
clause in the
RESTORE
command to specify the location on the
destination host to which the export dump file is restored. If you omit this clause, the
dump file is restored to a default operating system-specific location.
By default, RMAN automatically imports the export dump file after all the required
foreign data files are restored. You can choose not to import the export dump file by
specifying the
NOIMPORT
clause. If you do not import the export dump file as part of the
restore operation, then you must manually import the dump file when you want to plug
the tablespaces in to the destination database.
Note:
If the export dump file is automatically imported (that is, the
NOIMPORT
clause
is not used), then the destination database must be open in read/write mode.
28.7 Performing Cross-Platform Database Transport with
Backup Sets
You can transport an entire database from a source platform to a different destination
platform. While creating the cross-platform backup to transport a database, you can
convert the database either on the source database or the destination database. The
benefit of performing the conversion on the destination database is that the processing
overhead of the convert operation is offloaded from the source to the destination
database.
See Also:
"Overview of Cross-Platform Data Transport Using Backup Sets "
Prerequisites for Cross-Platform Database Transport Using Backup Sets
Before you create a cross-platform backup to transport a database across platforms,
the following prerequisites must be met:
•The
COMPATIBLE
parameter in the server parameter file of the source database and
the destination database must be set to 12.0.0 or higher.
•The source database must be open in read-only mode.
•The
DBMS_TDB.CHECK_DB
procedure must run successfully.
Chapter 28
Performing Cross-Platform Database Transport with Backup Sets
28-27

See Also:
"Checking the Database Before Cross-Platform Database Conversion"
for information about using the
DBMS_TDB.CHECK_DB
procedure
•The source platform and destination platform must use the same endian format.
See Also:
"Steps to Transport a Database to a Different Platform Using Backup Sets"
28.7.1 Steps to Transport a Database to a Different Platform Using
Backup Sets
Use the following steps to transport an entire database from one platform to another:
1. Ensure that the prerequisites required to perform cross-platform database
transport are met.
See Also:
"Prerequisites for Cross-Platform Database Transport Using Backup
Sets"
2. Start SQL*Plus and connect to the source database
prod_source
with administrator
privileges.
% sqlplus sys@prod_source as SYSDBA
When prompted, enter the password for the
sys
user.
3. Query the name of the destination platform in
V$TRANSPORTABLE_PLATFORM
.
To transport the entire database, the endian formats of the source platform and
the destination platform must be the same.
See Also:
"Platforms that Support Cross-Platform Data Transport" for information
about determining the platform name
4. Choose a method for naming the output files.
Use the
FORMAT
clause of the
BACKUP
command to specify the names of the output
files.
For example, the following
FORMAT
clause specifies that the output files must be
stored using unique names that begin with
transport_
in the directory
/oradata/
backups/special.
Chapter 28
Performing Cross-Platform Database Transport with Backup Sets
28-28

FORMAT '/oradata/backups/special/transport_%U'
5. Start RMAN and connect to the source database as
TARGET
.
The source database is the database that contains the data that needs to be
transported to a different platform.
In this example,
sbu
is a user who is granted the
SYSBACKUP
privilege in the source
database
prod_source
.
% RMAN
RMAN> CONNECT TARGET "sbu@prod_source AS SYSBACKUP";
Enter the password for the
sbu
user when prompted.
6. Place the database in read-only mode.
SHUTDOWN IMMEDIATE;
STARTUP MOUNT;
ALTER DATABASE OPEN READ ONLY;
7. Back up the source database using the
FOR TRANSPORT
or
TO PLATFORM
clause in the
BACKUP
command. Using either of these clauses creates a cross-platform backup
that uses backup sets.
The following example creates a cross-platform backup of the entire database.
This backup can be restored on any supported platform that uses the same endian
format as the source database. The source platform is Sun Solaris x86 64-bit.
Because the
FOR TRANSPORT
clause is used, the conversion is performed on the
destination database. The cross-platform database backup is stored in
db_trans.bck
in the
/tmp/xplat_backups
directory on the source host.
BACKUP
FOR TRANSPORT
FORMAT '/tmp/xplat_backups/db_trans.bck'
DATABASE;
8. Disconnect from the source database.
9. Move the backup sets created by the
BACKUP
command to the destination host.
Use operating system-specific utilities to transfer the created backup sets from the
source host to the destination host.
For example, if the operating system of your source and destination hosts is Linux
or UNIX, use the
cp
command to move files.
10. Connect to the destination database, to which the database must be transported,
as
TARGET
.
In this example,
sbu
is a user who is granted the
SYSBACKUP
privilege in the
destination database
prod_dest
.
% RMAN
RMAN> CONNECT TARGET "sbu@prod_dest AS SYSBACKUP";
Enter the password for the
sbu
user when prompted.
11. Ensure that the destination database is in
NOMOUNT
state.
12. Restore the backup sets that were transferred from the source by using the
RESTORE
command with the
FOREIGN DATABASE
clause.
The following example restores the cross-platform database backup created in
Step 7. The destination database uses the same endian format as the source
Chapter 28
Performing Cross-Platform Database Transport with Backup Sets
28-29

database. The
FROM PLATFORM
clause specifies the name of the platform on which
the backup was created. This clause is required to convert backups on the
destination. The backup set containing the cross-platform database backup is
stored in the
/tmp/xplat_restores
directory on the destination host. The
TO NEW
option specifies that the restored foreign data files must use new OMF-specified
names in the destination database. Ensure that the
DB_CREATE_FILE_DEST
initialization parameter is set.
RESTORE
FROM PLATFORM 'Solaris Operating System (x86-64)'
FOREIGN DATABASE TO NEW
FROM BACKUPSET '/tmp/xplat_restores/db_trans.bck';
28.8 Performing Cross-Platform Transport of Read-Only
Tablespaces Using Backup Sets
Use the
BACKUP
command with the
FOR TRANSPORT
or
TO PLATFORM
clause to create
backup sets that can be used to transport read-only tablespaces from one platform to
another. When you transport read-only tablespaces, you must also export the
metadata of these tablespaces. The metadata is required to plug the tablespaces in to
the destination database. While transporting tablespaces across platforms, the source
and destination platform can use different endian formats.
You can restore all the data files or tablespaces contained in a cross-platform backup
or only some of them. After restoring these objects, you can specify the name and
location for the restored data files.
See Also:
•"About Backing Up Data on the Source Database for Cross-Platform
Data Transport"
•"About Selecting Objects to Be Restored from Cross-Platform Backups"
•"About Names and Locations for Restored Objects on the Destination
Database"
Prerequisites for Performing Cross-Platform Tablespace Transport Using
Backup Sets
Before you create a cross-platform backup that can be used to transport tablespaces
to a different platform, the following prerequisites must be met:
•
COMPATIBLE
parameter in the server parameter file of the source database and
destination database is set to 12.0.0 or greater.
•The tablespaces to be transported are self-contained.
Execute the
DBMS_TTS.TRANSPORT_SET_CHECK
procedure to check for dependencies. If
the
TRANSPORT_SET_VIOLATIONS
view contains rows corresponding to the specified
tablespaces, then you must resolve the dependencies before creating the cross-
platform backup.
Chapter 28
Performing Cross-Platform Transport of Read-Only Tablespaces Using Backup Sets
28-30

See Also:
Example 21-1 for information about executing the
DBMS_TTS.TRANSPORT_SET_CHECK
procedure
•The tablespaces to be transported are in read-only mode, unless the
ALLOW
INCONSISTENT
clause is used in the
BACKUP
command.
See Also:
"Steps to Transport Read-Only Tablespaces to a Different Platform Using
Backup Sets" for information about using the
DBMS_TDB.CHECK_DB
procedure
28.8.1 Steps to Transport Read-Only Tablespaces to a Different
Platform Using Backup Sets
1. Ensure that the prerequisites required to transport tablespaces to another platform
are met.
See Also:
"Prerequisites for Performing Cross-Platform Tablespace Transport
Using Backup Sets"
2. Connect to the source database from which you need to transport tablespaces as
TARGET
.
In this example,
sbu
is a user who is granted the
SYSBACKUP
privilege on the source
database
prod_source
.
$ RMAN
RMAN> CONNECT TARGET "sbu@prod_source AS SYSBACKUP";
Enter the password for the s
bu
user when prompted.
Note:
To perform cross-platform transport of an encrypted tablespace, you
must connect to the PDB as a common user with the
SYSDBA
or
SYSBACKUP
privilege.
3. Query the name of the destination platform in
V$TRANSPORTABLE_PLATFORM
.
Chapter 28
Performing Cross-Platform Transport of Read-Only Tablespaces Using Backup Sets
28-31

See Also:
"Platforms that Support Cross-Platform Data Transport" for information
about determining the platform name
4. Place the tablespaces to be transported in read-only mode.
The following command places the tablespace
EXAMPLE
in read-only mode.
ALTER TABLESPACE example READ ONLY;
5. Choose a method for naming the output files.
Use the
FORMAT
clause of the
BACKUP
command to specify a pattern for naming the
output files.
See Also:
"About Names and Locations for Restored Objects on the Destination
Database"
6. If the tablespace being transported is a TDE-encrypted tablespace, then specify
the passphrase that will be used to wrap the master key before storing it in the
backupset.
The following command sets the passphrase to
encr_temp
.
RMAN> SET PASSPHRASE ON IDENTIFIED BY encr_temp;
7. Back up the tablespace on the source database using the
BACKUP
command with
the
TO PLATFORM
or
FOR TRANSPORT
clause. Use the
DATAPUMP
clause to indicate that
an export dump file for the tablespaces must be created. The export dump file is
created in its own backup piece.
The following example creates a cross-platform backup of the tablespaces
projects
and
tasks
that can be restored on the Solaris[tm] OE (64-bit) platform.
This backup is stored in the backup set
trans_ts.bck
in the
/tmp/xplat_backups
directory. The Data Pump export dump file containing metadata required to plug
the tablespaces in to the destination database is stored in
trans_ts_dmp.bck
in
the
/tmp/xplat_backups
directory.
RMAN > BACKUP
TO PLATFORM 'Solaris[tm] OE (64-bit)'
FORMAT '/tmp/xplat_backups/trans_ts.bck'
DATAPUMP FORMAT '/tmp/xplat_backups/trans_ts_dmp.bck'
TABLESPACE projects, tasks;
Because the
TO PLATFORM
clause is used, conversion to the endian format of the
destination database is performed on the source database.
Chapter 28
Performing Cross-Platform Transport of Read-Only Tablespaces Using Backup Sets
28-32

Note:
When you use the
DATAPUMP
clause, ensure that the target database is
open.
8. Disconnect from the source database.
9. Move the backup sets created by the
BACKUP
command and the Data Pump export
dump file to the destination host.
You can use operating system utilities to move the backup sets from the source
host to the destination host.
10. Connect to the destination database, into which the tablespaces must be
transported, as
TARGET
.
In this example,
sbu
is a user who is granted the
SYSBACKUP
privilege on the
destination database
prod_dest
.
% RMAN
RMAN> CONNECT TARGET "sbu@prod_dest AS SYSBACKUP";
Enter the password for the s
bu
user when prompted.
11. If the tablespace being transported is a TDE-encyrpted tablespace, then provide
the passphrase that was used on the source database to wrap the master key.
The following example sets the passphrase to encr_temp.
SET PASSPHRASE ON IDENTIFIED BY encr_temp;
12. Restore the backup sets that were transported from the source database using the
RESTORE
command. Use the
DUMP FILE
clause to import the export dump file
containing the tablespace metadata and plug the tablespaces in to the destination
database.
The following example restores the
projects
and
tasks
tablespaces from the
cross-platform backup created in Step 7. The backup set
trans_ts.bck
in the
/tmp/
xplat_restores
directory on the destination host. The Data Pump export dump file
containing the metadata that is required to plug these tablespaces in to the
destination database is stored in the
trans_ts_dump.bck
in the
/tmp/xplat_restores
directory.
RMAN> RESTORE
FOREIGN TABLESPACE projects, tasks TO NEW
FROM BACKUPSET '/tmp/xplat_restores/trans_ts.bck'
DUMP FILE FROM BACKUPSET '/tmp/xplat_restores/trans_ts_dmp.bck';
See Also:
Oracle Database Backup and Recovery Reference for additional examples
on performing cross-platform backup and restore operations
Chapter 28
Performing Cross-Platform Transport of Read-Only Tablespaces Using Backup Sets
28-33

28.9 Overview of Cross-Platform Transport of Tablespaces
Using Inconsistent Backups
RMAN enables you to transport inconsistent tablespace backups across platforms. An
inconsistent tablespace backup is a backup of one or more tablespaces that is created
when the tablespaces are in read/write mode. The term inconsistent refers to the fact
that data files in the backup contain changes that were made after the files were
checkpointed. The foreign data files produced during a cross-platform inconsistent
backup operation cannot be directly plugged in to the destination database. They must
be made consistent before they can be opened on the destination database. You
make the foreign data files consistent by applying a cross-platform incremental
backup, created when the tablespaces are placed in read-only mode, to these foreign
data files. This backup must also include the export dump file containing the metadata
required for plug the transported tablespaces in to the destination database.
Inconsistent tablespace backups enable you to reduce application downtime. When
the tablespaces are online and available to the users, you create cross-platform
inconsistent backups on the source database. The first backup must be a level 0
incremental backup. Subsequently, create smaller level 1 incremental backups that
contain the changes made to the tablespaces since the most recent level 1 backup.
These level 0 and level 1 incremental backups can be restored and applied on the
destination database even as other level 1 incremental backups are being created on
the source database. You need not wait until all the level 1 incremental backups are
created on the source database before you start applying previously-created level 1
backups on the destination database. Since the tablespaces are still online while these
incremental backups are being created, there is no application downtime at this stage.
The final level 1 incremental backup is created with the tablespaces placed in read-
only mode. The application downtime begins at this stage. This final backup must
include the metadata required to plug the tablespaces in to the destination database.
On the destination database, you first restore the level 0 incremental backup to create
a set of foreign data files. Next, apply the level 1 incremental backups that were
created when the tablespaces were in read/write mode to these restored foreign data
files. Apply these backups in the same order in which they were created. In most
cases, the destination database catches up with the last level 1 incremental backup
before the final incremental backup, taken with the tablespaces placed in read-only
mode, is created on the source database. The last step is to restore the final level 1
incremental backup, created when the tablespaces were placed in read-only mode, to
make the foreign data files consistent. This backup contains the tablespace metadata
required to plug the tablespaces in to the destination database.
See Also:
"Performing Cross-Platform Transport of Tablespaces Using Inconsistent
Backups"
Chapter 28
Overview of Cross-Platform Transport of Tablespaces Using Inconsistent Backups
28-34

28.10 Performing Cross-Platform Transport of Tablespaces
Using Inconsistent Backups
You can transport inconsistent tablespaces across platforms using backup sets or
image copies. Use the
BACKUP
command to create a cross-platform backup using
backup sets. The
CONVERT
command creates cross-platform backups using image
copies.
This section describes how to transport inconsistent tablespaces from one platform to
another. An example of transporting an inconsistent tablespace across platforms using
backup sets is included.
See Also:
For more information about using scripts to perform cross-platform transport
using backup sets, refer to the My Oracle Support Note 1389592.1 at
https://support.oracle.com/rs?type=doc&id=1389592.1
See Also:
•"Overview of Cross-Platform Transport of Tablespaces Using
Inconsistent Backups"
•Steps to Transport Inconsistent Tablespaces to a Different Platform
About Creating Inconsistent and Incremental Backups on the Source Database
Use the
ALLOW INCONSISTENT
clause in a
BACKUP
or
CONVERT
command to create a cross-
platform inconsistent backup of one or more tablespaces. The tablespaces being
transported are in read/write mode when an inconsistent backup is created. To create
incremental backups, use the
INCREMENTAL LEVEL 1
clause in the
BACKUP
command.
The first inconsistent backup is a level 0 incremental backup. Subsequently, you can
create multiple cross-platform level 1 incremental backups. The final cross-platform
incremental backup must be a consistent backup that is created when the tablespaces
are read-only. When you create this final incremental backup, use the
DUMP FILE
clause
in the
BACKUP
command to create the dump file containing the tablespace metadata.
When you use the
CONVERT
command, you must explicitly create the export dump file
that contains the metadata for the tablespaces by using the Data Pump Export utility.
Note:
The
ALLOW INCONSISTENT
clause cannot be used for cross-platform whole
database backups.
Chapter 28
Performing Cross-Platform Transport of Tablespaces Using Inconsistent Backups
28-35

See Also:
"Steps to Transport Inconsistent Tablespaces to a Different Platform " for
information about specifying the SCN
About Restoring and Recovering Inconsistent Backups on the Destination
Database
You first restore the cross-platform level 0 incremental backup, taken when the
tablespaces are placed in read/write mode, on the destination database. This
operation creates restores the backup and creates foreign data file copies. These
foreign data files are inconsistent because the tablespaces were not placed in read-
only mode when the backup was created. To make these foreign data files consistent
and achieve a consistent checkpointed SCN, apply the incremental backups in the
order in which they were created. The final incremental backup applied must be a
cross-platform incremental backup that was created when the tablespaces were in
read-only mode. Next, to plug the tablespaces in to the destination database, you
restore and import the dump file that contains the metadata of the tablespaces being
transported.
Requirements for Applying Cross-Platform Incremental Backups to the Restored
Data Files
To successfully apply a cross-platform incremental tablespace backup to a set of
restored foreign data files, the following conditions must be satisfied:
•For each data file that is included in the cross-platform incremental backup, the
start SCN must be lower than the current checkpoint SCN of the foreign data file
copy.
•The foreign data file copies created by the restore operation must not be modified.
For example, if a foreign data file copy has been plugged in to the destination
database, made read/write, and then made read-only, then RMAN considers that
this file has been modified.
28.10.1 Steps to Transport Inconsistent Tablespaces to a Different
Platform
This section describes the high-level steps to perform cross-platform transport of
inconsistent tablespaces using backup sets or image copies.
The prerequisites for transporting inconsistent tablespaces using backup sets are
described in "Prerequisites for Performing Cross-Platform Tablespace Transport Using
Backup Sets". The prerequisites for transporting inconsistent tablespaces using image
copies (
CONVERT
command) are described in Oracle Database Backup and Recovery
Reference.
Perform the following tasks to transport inconsistent tablespaces to a different
platform:
1. Create the files required to transport one more tablespaces in the source database
as described in Creating Files Required to Transport Tablespaces to a Different
Platform
Chapter 28
Performing Cross-Platform Transport of Tablespaces Using Inconsistent Backups
28-36

2. Transfer files from the source host to the destination host as described in
Transferring Files Created on the Source Host to the Destination Host.
3. Restore tablespaces and plug them into the destination database as described in
Restoring Tablespaces and Plugging them in to the Destination Database.
28.10.1.1 Creating Files Required to Transport Tablespaces to a Different
Platform
This step consists of performing the following tasks in the source database:
1. If the tablespace being transported is a TDE-encrypted tablespace, then specify
the passphrase that will be used to wrap the master key before storing it in the
backupset.
The following command sets the passphrase to
encr_temp
.
RMAN> SET PASSPHRASE ON IDENTIFIED BY encr_temp;
2. Create a cross-platform level 0 inconsistent backup of the tablespaces that must
be transported to a different platform. The tablespaces are in read/write mode.
Use the
ALLOW INCONSISTENT
and
INCREMENTAL LEVEL 0
clauses in the
BACKUP
command to indicate that the backup is an inconsistent backup of one or more
tablespaces.
3. Create a cross-platform level 1 incremental backup of the tablespaces that must
be transported to another platform. The tablespace are in read/write mode.
Subsequent to the first level 0 inconsistent backup, you can create any number of
level 1 incremental backups when the tablespaces are in read/write mode. Use the
ALLOW INCONSISTENT
and
INCREMENTAL LEVEL 1
clause to create these incremental
backups. Performing frequent incremental backups when the tablespaces are in
read/write mode is advantageous because this reduces the amount of changed
data that needs to be applied to the destination database using the final
incremental backup that is taken when the tablespace is read-only.
4. Create a cross-platform level 1 incremental backup of the tablespaces with the
tablespaces in read-only mode.
This is the final incremental backup and it must include the dump file that contains
the metadata required to plug the transported tablespaces in to the destination
database. Use the
INCREMENTAL LEVEL 1
clause in the
BACKUP
command to create a
level 1incremental backup.
When you perform cross-platform transport using the
BACKUP
command, use the
DATAPUMP
clause to create the Data Pump export dump files along with the
incremental backup. The dump file is created in a separate backup set. When you
create cross-platform incremental backups using image copies, you must explicitly
create the dump file containing tablespace metadata by using the Data Pump
Export utility.
28.10.1.2 Transferring Files Created on the Source Host to the Destination
Host
Use FTP, an operating system copy command, or some other mechanism to move the
backup sets, data files, and the dump file that were created in the source database to
the destination host.
Chapter 28
Performing Cross-Platform Transport of Tablespaces Using Inconsistent Backups
28-37

28.10.1.3 Restoring Tablespaces and Plugging them in to the Destination
Database
This step consists of performing the following tasks on the destination database:
1. If the tablespace being transported is a TDE-encyrpted tablespace, then provide
the passphrase that was used on the source database to wrap the master key.
The following example sets the passphrase to encr_temp.
SET PASSPHRASE ON IDENTIFIED BY encr_temp;
2. Restore the cross-platform level 0 inconsistent backup.
This restore operation creates a set of foreign data files on the destination
database. These foreign data files are inconsistent, and they need recovery before
they can be plugged in to the destination database.
Use the
RESTORE
command to restore the cross-platform level 0 inconsistent
backup. When you restore a cross-platform inconsistent backups that consist of
backup sets, use the
FROM BACKUPSET
clause to specify the name of the backup set
that contains the level 0 inconsistent backup.
See Also:
Oracle Database Backup and Recovery Reference for information about
using the
RESTORE
command for cross-platform restore operations
3. Apply the cross-platform level 1 incremental backup, taken when the tablespaces
were in read/write mode, to the foreign data files restored in Step 1.
If you created multiple cross-platform level 1 incremental backups, these
incremental backups must be applied in the order in which they were created. Use
the
RECOVER
command to apply the incremental backups. The
FOREIGN DATAFILECOPY
clause of the
RECOVER
command must list each data file to which the incremental
backup must be applied. Use the
FROM BACKPSET
clause to specify the name of the
backup set that contains the data to be recovered.
4. Apply the cross-platform level 1 incremental backup, taken when the tablespaces
were in read-only mode, to the foreign data files restored in Step 1.
Use the
RECOVER
command to apply the incremental backup. The
FOREIGN
DATAFILECOPY
clause of the
RECOVER
command must list each data file to which the
incremental backup needs to be applied. Use the
FROM BACKPSET
clause to specify
the name of the backup set that contains the data to be recovered.
5. Restore the backup set containing the tablespace metadata.
Use the
RESTORE
command to restore the backup set that contains the dump file
created during the cross-platform incremental backup. The tablespaces were in
read-only mode when this backup was created. You can optionally use the
DUMP
FILE
clause to specify a name for the dump file on the destination database and
the
DATAPUMP DESTINATION
clause to specify the directory in which the dump file is
restored. If these clauses are omitted, RMAN uses the configured defaults. When
transporting data using backup sets, use the
FROM BACKUPSET
clause to specify the
name of the backup set that contains the dump file.
Chapter 28
Performing Cross-Platform Transport of Tablespaces Using Inconsistent Backups
28-38

6. Import the dump file containing the tablespace metadata into the destination
database.
Plug the recovered tablespaces in to the destination database by using the Data
Pump Import utility to import the dump file created during the incremental backup.
You must run the Data Pump Import utility as a user with the
SYSDBA
privilege.
28.10.2 Example: Performing Cross-Platform Inconsistent Tablespace
Transport Using Backup Sets
This example transports the inconsistent tablespace
my_tbs
from the source database,
which is on the Sun Solaris platform, to a destination database on the Linux x86 64-bit
platform.
See Also:
"Steps to Transport Inconsistent Tablespaces to a Different Platform " for
conceptual information about each step in this example
The following steps enable you to transport the inconsistent tablespace
my_tbs
across
platforms using backup sets:
1. Connect to the source database as a user who is granted the
SYSBACKUP
privilege.
RMAN> CONNECT TARGET "sbu@prod_source AS SYSBACKUP";
2. Ensure that the prerequisites required to transport tablespaces to another platform
are met.
See Also:
"Prerequisites for Performing Cross-Platform Tablespace Transport
Using Backup Sets"
3. Create a cross-platform level 0 inconsistent backup of the tablespace
my_tbs
when
the tablespace is read/write mode. This backup is stored in a backup set named
my_tbs_incon.bck
in the directory
/tmp/xplat_backups
.
BACKUP
FOR TRANSPORT
ALLOW INCONSISTENT
INCREMENTAL LEVEL 0
TABLESPACE my_tbs FORMAT '/tmp/xplat_backups/my_tbs_incon.bck';
Because
FOR TRANSPORT
is used instead of
TO PLATFORM
, this cross-platform backup
can be restored on any platform. The conversion will be performed on the
destination database.
4. Create a cross-platform level 1 incremental backup of the tablespace
my_tbs
that
contains the changes made after backup in Step 3 was created. The tablespace is
still in read/write mode. This incremental backup is stored in
my_tbs_incon1.bck
in
the directory
/tmp/xplat_backups
.
Chapter 28
Performing Cross-Platform Transport of Tablespaces Using Inconsistent Backups
28-39

BACKUP
FOR TRANSPORT
ALLOW INCONSISTENT
INCREMENTAL LEVEL 1
TABLESPACE my_tbs FORMAT '/tmp/xplat_backups/my_tbs_incon1.bck';
To minimize application downtime, the level 0 and level 1 incremental backups
created in Steps 3 and 4 can be restored and applied on the destination database
while the source tablespace is still in read/write mode. When the destination
database catches up with last level 1 incremental backup, you can create the final
incremental backup with the tablespace placed in read-only mode.
5. Place the tablespace
my_tbs
in read-only mode.
ALTER TABLESPACE my_tbs READ ONLY;
6. Create the final cross-platform level 1 incremental backup of the tablespace
my_tbs
. This backup contains changes made to the database after the backup that
was created in Step 4. It must include the export dump file that contains the
tablespace metadata.
BACKUP
FOR TRANSPORT
INCREMENTAL LEVEL 1
TABLESPACE my_tbs
FORMAT '/tmp/xplat_backups/my_tbs_incr.bck'
DATAPUMP FORMAT '/tmp/xplat_backups/my_tbs_incr_dp.bck';
The incremental backup is stored in
my_tbs_incr.bck
. The export dump file
containing the tablespace metadata is stored in a backup set named
my_tbs_incr_dp.bck
.
The following is a formatted output of the
BACKUP
command that was run in this
step. The output is edited to display only the relevant information. Observe that the
dump file is called
backup_tts_RDBMS_13462.dmp
, which is a name assigned by the
operating system, and is stored in the directory specified by the
DESTINATION
clause.
Starting backup at 12-SEP-12
……
Performing export of metadata for specified tablespaces...
EXPDP> Starting "SYS"."TRANSPORT_EXP_RDBMS_zocc":
.........
EXPDP>
***************************************************************************
EXPDP> Dump file set for SYS.TRANSPORT_EXP_RDBMS_zocc is:
EXPDP> /ade/b/191802369/oracle/backup_tts_RDBMS_13462.dmp
EXPDP>
**************************************************************************
.......
Export completed
.......
……
channel ORA_DISK_1: specifying datafile(s) in backup set
input datafile file number=00006 name=/ade/b/191802369/oracle/dbs/tbs_11.f
input datafile file number=00007 name=/ade/b/191802369/oracle/dbs/tbs_12.f
input datafile file number=00020 name=/ade/b/191802369/oracle/dbs/tbs_14.f
input datafile file number=00010 name=/ade/b/191802369/oracle/dbs/tbs_13.f
……
……
Finished backup at 12-SEP-12
Chapter 28
Performing Cross-Platform Transport of Tablespaces Using Inconsistent Backups
28-40

7. Move the backup sets and the export dump file generated in Steps 3, 4, and 6
from the source host to the desired directories on the destination host.
In this example, all the required files are moved to the directory
/tmp/
xplat_restores
on the destination host.
8. Connect to the destination database as a user who is granted the
SYSBACKUP
privilege.
RMAN> CONNECT TARGET "sbu@prod_dest AS SYSBACKUP";
sbu
is a user who is granted the
SYSBACKUP
privilege in the destination database.
9. Restore the cross-platform level 0 inconsistent backup created in Step 3.
Use the
FOREIGN DATAFILE
clause to specify the data files that must be restored.
The
FROM PLATFORM
clause specifies the name of the platform on which the backup
was created. This clause is required to convert backups on the destination
database.
In this example, the data files with numbers 6, 7, 20, and 10 are restored to the
names specified in the
FORMAT
clause corresponding to that data file. The data file
numbers must be the numbers used on the source database. You can obtain the
data file numbers from the RMAN output of the inconsistent backup created in
Step 3.
RESTORE
FROM PLATFORM 'Solaris[tm] OE (64-bit)'
FOREIGN DATAFILE 6
FORMAT '/tmp/aux/mytbs_6.df',
7
FORMAT '/tmp/aux/mytbs_7.df',
20
FORMAT '/tmp/aux/mytbs_20.df',
10
FORMAT '/tmp/aux/mytbs_10.df'
FROM BACKUPSET '/tmp/xplat_restores/my_tbs_incon.bck';
10. Recover the foreign data files obtained in Step 9 by applying the first cross-
platform level 1 incremental backup that was created Step 4.
RECOVER
FROM PLATFORM 'Solaris[tm] OE (64-bit)'
FOREIGN DATAFILECOPY '/tmp/aux/mytbs_6.df','/tmp/aux/mytbs_7.df','/tmp/aux/
mytbs_20.df','/tmp/aux/mytbs_10.df'
FROM BACKUPSET '/tmp/xplat_restores/my_tbs_incon1.bck';
In this example, the incremental backup that is being applied to the restored
foreign data files is stored in
/tmp/xplat_restores/my_tbs_incon1.bck
.
11. Recover the foreign data files obtained in Step 9 by applying the final cross-
platform level 1 incremental backup that was created in Step 6. This backup was
created with the tablespaces in read-only mode.
RECOVER
FROM PLATFORM 'Solaris[tm] OE (64-bit)'
FOREIGN DATAFILECOPY '/tmp/aux/mytbs_6.df','/tmp/aux/mytbs_7.df','/tmp/aux/
mytbs_20.df','/tmp/aux/mytbs_10.df'
FROM BACKUPSET '/tmp/xplat_restores/my_tbs_incr.bck';
In this example, the incremental backup that is being applied to the restored
foreign data files is stored in
/tmp/xplat_restores/my_tbs_incr.bck
.
Chapter 28
Performing Cross-Platform Transport of Tablespaces Using Inconsistent Backups
28-41

12. Restore the backup set containing the export dump file. This dump file contains
the tablespace metadata required to plug the tablespaces into the destination
database.
RESTORE
FROM PLATFORM 'Solaris[tm] OE (64-bit)'
DUMP FILE 'my_tbs_restore_md.dmp'
DATAPUMP DESTINATION '/tmp/dump'
FROM BACKUPSET '/tmp/xplat_restores/my_tbs_incr_dp.bck';
In this example, the dump file is restored to a file called
my_tbs_restore_md.dmp
in
the directory
/tmp/dump
. You can omit the name of the dump file and the
DATAPUMP
DESTINATION
clause and allow RMAN to use operating-system defaults for these
parameters.
13. Plug the tablespace in to the destination database. Use the Data Pump import
utility to import the dump file containing the tablespace metadata in to the
destination database.
# impdp directory=dp_dir dumpfile=backup_tts_RDBMS_13462.dmp
transport_datafiles='/tmp/aux/mytbs_6.df','/tmp/aux/mytbs_7.df','/tmp/aux/
mytbs_20.df','/tmp/aux/mytbs_10.df' nologfile=Y
When prompted for a user name and password, enter the credentials of the
SYS
user. In this example,
dp_dir
is a directory object that was created using
CREATE
DIRECTORY
command and is mapped to the
/tmp
directory.
28.11 Performing Cross-Platform Transport of Data Files
Over the Network
RMAN enables you to perform cross-platform transport of data files over the network.
RMAN can connect to a source database, create the required data file backups in the
backupset format, transfer them to the destination, and then restore the backups on
the destination database. This task is performed by using the
FROM SERVICE
clause
along with the
RESTORE FOREIGN DATAFILE
command.
You need to establish connectivity between the source database and the target
database by adding the required entries to the
tnsnames.ora
and
listener.ora
files. The
COMPATIBLE
initialization parameter of the source and destination databases must be set
to 12.2.
1. Open RMAN and connect
AS TARGET
to the target database (on which the data file
must be restored) as a user with the
SYSDBA
or
SYSBACKUP
privilege
2. Restore the required data files by using the corresponding data files on the source
database.
The
FROM SERVICE
clause specifies the service name of the source database from
which the data files must be restored.
The following statement restores the data files 21 and 22 using data files from a
source database with service name
source_db
. The
TO NEW
clause indicates that the
data files restored for the specified tablespace must use new names that are
different from those on the source database.
Chapter 28
Performing Cross-Platform Transport of Data Files Over the Network
28-42

RESTORE
FOREIGN DATAFILE 21,22 TO NEW
FROM SERVICE 'source_db';
3. Recover the foreign data files that were restored in Step 2.
The
FROM SERVICE
clauses specifies the service name of the source database.
The following statement recovers the foreign data files specified by the
FOREIGN
DATAFILECOPY
clause using data files in the source database whose service name is
source_db
.
RECOVER
FOREIGN DATAFILECOPY '/u01/oracle/oradata/db1_tbs21.dbf','/u01/oracle/oradata/
db1_tbs22.db'
FROM SERVICE 'source_db';
28.12 Performing Cross-Platform Data Transport in CDBs
and PDBs
RMAN provides support for transporting data across platforms in a multitenant
environment. You can transport a whole multitenant container database (CDB), the
root only, or one or more pluggable databases (PDBs) across platforms. The cross-
platform transport can be performed using images copies or backup sets. The
information in this chapter is applicable to CDBs and PDBs with the differences
described in the following sections.
This section contains the following topics:
•About Cross-Platform Transport of PDBs
•Performing Cross-Platform Transport of a Whole CDB
•Performing Cross-Platform Transport of a Closed PDB
•Performing Cross-Platform Transport of a PDB Using Inconsistent Backups
•Performing Cross-Platform Transport of Tablespaces in a PDB
28.12.1 About Cross-Platform Transport of PDBs
To transport an entire PDB to a different platform, the source platform and destination
platform must use the same endian format. The
COMPATIBLE
parameter on the source
and destination CDB must be set to 12.1 or higher.
Use one of the following techniques to transport PDBs across platforms:
•Connect to the root and use the
BACKUP FOR TRANSPORT ... PLUGGABLE DATABASE
or
BACKUP TO PLATFORM ... PLUGGABLE DATABASE
command to create a cross-platform
backup of one or more PDBs.
When you are connected to the root, the following command creates a cross-
platform backup of the PDBs
hr_pdb
and
sales_pdb
. The PDBs must be read-only
mode before the cross-platform backup is created.
BACKUP FOR TRANSPORT
PLUGGABLE DATABASE hr_pdb, sales_pdb FORMAT '/tmp/backups/pdb_%U';
Chapter 28
Performing Cross-Platform Data Transport in CDBs and PDBs
28-43

•Connect to the PDB and use the
BACKUP FOR TRANSPORT
or
BACKUP TO PLATFORM
commands to create backup sets that can be used to transport the PDB data to
another platform.
Note:
Performing cross-platform data transport of one or more PDBs by using the
CONVERT
command is not supported.
See Also:
"Making RMAN Connections to a CDB"
28.12.2 Performing Cross-Platform Transport of a Whole CDB
In a CDB, the steps to transport data across platforms are similar to the ones used for
non-CDBs. The only difference is that, on both the source and destination databases,
you must connect to the root as a common user with the common
SYSBACKUP
or
SYSDBA
privilege.
See Also:
"Performing Cross-Platform Database Transport with Backup Sets"
To transport an entire CDB, the source platform and the destination platform must use
the same endian format.
The
BACKUP FOR TRANSPORT
or
BACKUP TO PLATFORM
command creates a cross-platform
backup of the whole CDB. The
CONVERT
command creates image copies of the CDB
that can be transported to a different platform.
The following command, when connected to the root, creates a cross-platform backup
of the whole CDB:
BACKUP
TO PLATFORM 'Linux x86 64-bit'
DATABASE FORMAT '/tmp/backups/cdb_%U;
While restoring the cross-platform backup on the destination database, the
RESTORE
DATABASE
command restores the whole CDB.
See Also:
"Making RMAN Connections to a CDB"
Chapter 28
Performing Cross-Platform Data Transport in CDBs and PDBs
28-44

28.12.3 Performing Cross-Platform Transport of a Closed PDB
Pluggable database (PDBs) can be transported and plugged in to a destination
multitenant container database (CDB) which is on a different platform than the source
CDB. In addition to an RMAN backup of the PDB, you need the metadata required to
plug the PDB into the destination CDB.
The
COMPATIBLE
parameter on the source CDB and destination CDB must be set to
12.2. The source CDB and the destination CDB must use the same endian format.
To perform cross-platform transport of a closed PDB into a destination CDB:
1. Perform the following steps on the source CDB:
a. Connect to the root as a common user with the
SYSDBA
or
SYSBACKUP
privilege.
b. Close the PDB that needs to be transported.
The following statement closes the PDB
hr_pdb
.
RMAN> ALTER PLUGGABLE DATABASE hr_pdb CLOSE IMMEDIATE;
c. Create a cross-platform full backup of the PDB that must be transported by
using the
BACKUP PLUGGABLE DATABASE
command.
To create a cross-platform backup, include either the
FOR TRANSPORT
or
TO
PLATFORM
clause.
The following example creates a cross-platform backup of the PDB
hr_pdb
for
the
Linux x86 64-bit
platform. The metadata required to plug this PDB into the
destination CDB is specified using the
UNPLUG INTO
clause and stored in the
XML file
metadata_hrpdb.xml
.
BACKUP TO PLATFORM= 'Linux x86 64-bit'
UNPLUG INTO '/u01/oradata/backups/metadata_hrpdb.xml'
PLUGGABLE DATABASE hr_pdb
FORMAT '/u01/oradata/backups/transport_hrpdb.bck';
2. Transport the backup sets and the XML file created in Step 1c to the destination
CDB.
3. Perform the following steps on the destination CDB:
a. Connect to the root as a common user with the
SYSDBA
or
SYSBACKUP
privilege.
b. Ensure that the CDB is open in read-write mode.
The following command displays the current mode of the CDB.
RMAN> SELECT open_mode FROM V$DATABASE;
c. Determine if the source PDB that is being transported is compatible with the
destination CDB by using the
DBMS_PDB.CHECK_PLUG_COMPATIBILITY
procedure.
The following function determines if the source PDB
hr_pdb
, whose metadata
is stored in an XML file
metadata_hrpdb.xml
, can be plugged in to the
destination CDB. The function returns
TRUE
is the source PDB is compatible
with the destination CDB.
SQL> declare
2 c boolean;
3 begin
4 c:=dbms_pdb.check_plug_compatibility('/u02/backup_restore/
Chapter 28
Performing Cross-Platform Data Transport in CDBs and PDBs
28-45

metadata_hrpdb.xml','HR_PDB');
5 if (c) then dbms_output.put_line('True');
6 else dbms_output.put_line('False');
7 end if;
8 end;
9 /
PL/SQL procedure successfully completed.
d. Restore the PDB backup that was created on the source CDB.
The
USING
clause specifies the name of the XML file that contains the
metadata required to plug the source PDB into the destination CDB. To copy
data files to a different location than described in the XML file, use the
FILE_NAME_CONVERT
clause.
The following statement restores the backup of the PDB
hr_pdb
that is stored
in the backupset
transport_hrpdb.bck
. The metadata for this PDB is stored in
metadata_hrpdb.xml
.
RESTORE
USING '/u02/backup_restore/metadata_hrpdb.xml'
FOREIGN PLUGGABLE DATABASE hr_pdb FORMAT '/u02/oracle/oradata/%U'
FROM BACKUPSET '/u02/backup_restore/transport_hrpdb.bck';
e. Open the restored PDB.
The following command opens the PDB
hr_pdb
.
RMAN> ALTER PLUGGABLE DATABASE hr_pdb OPEN;
Note:
If a PDB with the same name as the one being transported exists on
the destination database, then the restore operation fails.
Note:
Performing Cross-Platform Transport of a PDB Using Inconsistent
Backups
28.12.4 Performing Cross-Platform Transport of a PDB Using
Inconsistent Backups
You can use a combination of inconsistent and consistent backups to transport a PDB
and plug it into a CDB that is on a different platform. Inconsistent backups enable you
to reduce application downtime because the PDB can be open while the backup is
performed
When the PDB is open, you create cross-platform inconsistent backups. The first
backup is an incremental level 0 backup. Subsequent backups are incremental level 1
backups that contain changes made to the PDB since the last incremental backup.
There is no restriction on the number of inconsistent level 1 backups. Finally, close the
Chapter 28
Performing Cross-Platform Data Transport in CDBs and PDBs
28-46

PDB, create the last consistent incremental level 1 backup and the XML file containing
the metadata required to plug the source PDB into a destination CDB.
The
COMPATIBLE
parameter on the source CDB and destination CDB must be set to
12.2. The source CDB and the destination CDB must use the same endian format.
1. Perform the following steps on the source CDB:
a. Connect to the root as a common user with the
SYSDBA
or
SYSBACKUP
privilege.
b. Ensure that the PDB that must be transported is in read-write mode.
c. Note the database SCN before a level 0 backup is created.
SELECT CHECKPOINT_CHANGE# FROM V$DATABASE;
d. Create a cross-platform incremental level 0 backup of the PDB that must be
transported by using the
BACKUP ... PLUGGABLE DATABASE
command.
Use either the
FOR TRANSPORT
or
TO PLATFORM
clause to specify a cross-platform
backup. Include the
ALLOW INCONSISTENT
clause to indicate that the PDB is not
in a consistent state.
The following statement creates a cross-platform incremental level 0 backup of
the PDB
hr_pdb
.
BACKUP INCREMENTAL LEVEL 0
FOR TRANSPORT
ALLOW INCONSISTENT
PLUGGABLE DATABASE hr_pdb FORMAT '/u01/backups/hr_pdb_level0.bck';
Because the PDB is in read-write mode, an inconsistent backup is created.
e. Close the PDB being transported.
The following command closes the PDB
hr_pdb
.
RMAN> ALTER PLUGGABLE DATABASE hr_pdb CLOSE IMMEDIATE;
f. Create a consistent cross-platform incremental backup. The point-in-time for
the incremental backup must be from the SCN noted in Step 1c.
Include the
UNPLUG INTO
clause to specify the name of the XML that stores the
metadata required to plug this PDB into the destination CDB.
The following statement creates a cross-platform incremental backup of the
PDB
hr_pdb
. This is a consistent PDB backup.
BACKUP INCREMENTAL FROM SCN 36462
FOR TRANSPORT
UNPLUG INTO '/u01/backups/metadata_hr_pdb.xml'
PLUGGABLE DATABASE hr_pdb FORMAT '/u01/backups/hr_pdb_level1_con.bck';
2. Transport all the PDB backups and the XML file containing the PDB metadata to
the destination database.
Note:
Typically, you would transport the inconsistent backups as they are
created and then restore them on the destination CDB.
3. Perform the following steps on the destination CDB:
Chapter 28
Performing Cross-Platform Data Transport in CDBs and PDBs
28-47

a. Connect to the root as a common user with the
SYSDBA
or
SYSBACKUP
privilege.
b. Ensure that the destination CDB is open in read-write mode.
c. Restore the cross-platform inconsistent level 0 backup of the PDB that was
created on the source CDB.
This restore operation creates a set of foreign data files that correspond to the
source PDB in the destination CDB.
The following statement restores the cross-platform level 0 backup of the PDB
hr_pdb
that is stored in the backupset
hr_pdb_level0.bck
.
RESTORE
FOREIGN PLUGGABLE DATABASE hr_pdb FORMAT '/u02/oradata/%U'
FROM BACKUPSET '/u02/backup_restore/hr_pdb_level0.bck';
d. Apply the cross-platform level 1 incremental backup created when the source
PDB was closed to the data files restored in Step 3c. Use the XML file
containing the source PDB metadata to plug the PDB into the destination
CDB.
The following command recovers the foreign data files by using the
incremental level 1 backup
hr_pdb_level1_con.bck
. There are two restored
foreign data files specified using the
FOREIGN DATAFILECOPY
clause. The
USING
clause specifies the XML file that contains metatdata required to plug the PDB
into the destination CDB.
RECOVER
USING '/u02/backup_restore/metadata_hr_pdb.xml'
FOREIGN DATAFILECOPY '/u2/oradata/09qurbdp_1_1','/u2/oradata/03bcdqrv_2_5'
FROM BACKUPSET '/u02/backup_restore/hr_pdb_level1_con.bck';
e. Determine the name of the transported PDB in the destination CDB.
The source PDB is plugged in to the destination using a different name.
Typically, the name is the unique name of the CDB followed by a randomly-
generated number.
The following command displays the list of PDBs.
SELECT name FROM V$PDBS;
f. Open the recovered PDB.
The following statement opens the PDB
mycdb_72346
.
RMAN> ALTER PLUGGABLE DATABASE mycdb_72346 OPEN;
Note:
If a PDB with the same name as the one being transported exists on
the destination database, then the restore operation fails.
Note:
Performing Cross-Platform Transport of a Closed PDB
Chapter 28
Performing Cross-Platform Data Transport in CDBs and PDBs
28-48

28.12.5 Performing Cross-Platform Transport of Tablespaces in a PDB
RMAN enables you to transport user tablespaces contained in a PDB to a different
platform by using either the
CONVERT
or
BACKUP
command. In this case, the source
platform and the destination platform can use different endian formats.
Use one of the following techniques to transport a tablespace in a PDB:
•Connect to the PDB as
TARGET
and use the
BACKUP TABLESPACE
command to create a
cross-platform backup of the selected tablespaces.
See "Steps to Transport Read-Only Tablespaces to a Different Platform Using
Backup Sets".
•Connect to the PDB as
TARGET
and use the
CONVERT TABLESPACE
command to
transport a read-only tablespace.
The following command, when connected to the PDB, converts the read-only
tablespace
my_tbs
:
CONVERT TABLESPACE my_tbs
TO PLATFORM 'Solaris[tm] OE (64-bit)'
FORMAT '/tmp/xplat_backups/my_tbs_%U.bck';
•Connect to the PDB as
TARGET
and use the
CONVERT DATAFILE
command.
The following command, when connected to the PDB, converts the data file
sales.df
:
CONVERT
FROM PLATFORM 'Solaris[tm] OE (64-bit)'
DATAFILE '/u01/app/oracle/oradata/orcl/sales.df'
FORMAT '/tmp/xplat_backups/sales_df_solaris.dat'
However, when connected as
TARGET
to a PDB, you cannot use the
CONVERT DATAFILE
command to convert a tablespace that contains undo segments.
See Also:
Example: Transporting a Tablespace in a PDB
28.12.5.1 Example: Transporting a Tablespace in a PDB
This example used the
CONVERT
command to transport the tablespace
sales_tbs
from
the PDB
pdb5
to the destination PDB
pdb3
. The source PDB is on a Sun Solaris
platform and the destination PDB is on a Linux x86 64-bit platform.
1. Ensure that the required prerequisites are met.
Chapter 28
Performing Cross-Platform Data Transport in CDBs and PDBs
28-49

See Also:
•"Prerequisites for Performing Cross-Platform Tablespace Transport
Using Backup Sets"
•Oracle Database Backup and Recovery Reference for the
CONVERT
command prerequisites
2. Start SQL*Plus and connect to the source PDB as a user who is granted the
SYSDBA
or
SYSBACKUP
privilege.
In this example,
sbu
is a user who has been granted the
SYSBACKUP
privilege on the
source PDB
pdb5
.
% sqlplus sbu@pdb5 AS SYSBACKUP
3. Query the name for the destination platform in the
V$TRANSPORTABLE_PLATFORM
view.
In this example, the platform name for the destination platform is
Linux x86 64-bit
.
4. Verify that the tablespace that is to be transported is self-contained.
See Also:
Oracle Database Administrator's Guide for information about determining
whether tablespaces are self-contained
5. Place the tablespace to be transported in read-only mode.
SQL> ALTER TABLESPACE sales_tbs READ ONLY;
6. Create the directory object that is used to store the files generated by the
DataPump export and import utilities.
SQL> CREATE OR REPLACE DIRECTORY xtt_dir AS '/scratch/xtt';
Directory created.
7. Start RMAN and connect to the source PDB as a user with the
SYSDBA
or
SYSBACKUP
privilege.
The following example starts RMAN and connects to the source PDB
pdb5
as the
sbu
user who has been granted the
SYSBACKUP
privilege.
% rman
RMAN> CONNECT TARGET "sbu@pdb5 as sysbackup"
8. Convert the tablespace on the source database using the
CONVERT
command.
The following command converts the tablespace
sales_tbs
to the destination
platform Linux x86-64 bit. The converted data files are stored in
/tmp/
xplat_convert/sales_tbs_conv.bck
.
RMAN> CONVERT TABLESPACE 'SALES_TBS'
TO PLATFORM 'Linux x86 64-bit'
FORMAT '/tmp/xplat_convert/sales_tbs_conv.bck';
9. Exit RMAN.
Chapter 28
Performing Cross-Platform Data Transport in CDBs and PDBs
28-50

10. On the source database, use the DataPump export utility to create an export dump
file containing the metadata for tablespace
sales_tbs
. Use the credentials of the
SYS
user to perform the export.
The following command creates an export dump file called
sales_tbs_conv.dmp
in
the location specified by the directory object
xtt_dir
. The credentials used to
perform the export are that of the
SYS
user.
# expdp "'"sys@pdb5 as sysdba"'" directory=xtt_dir dumpfile=sales_tbs_conv.dmp
logfile=sales_tbs_conv.log transport_tablespaces=sales_tbs
11. Copy the converted data files created in Step 8 and the export dump file created in
Step 10 to the destination PDB. You can use operating system commands to copy
the files.
12. On the destination PDB, plug the tablespace into the PDB by using the DataPump
import utility. Use the credentials of the
SYS
user to perform the import.
The following example imports the metadata contained in the export dump file
sales_tbs_conv.dmp
and the converted data files in
/tmp/xplat_convert/
sales_tbs_conv.bck
into the PDB
pdb3
.
#impdp "'"sys@pdb3 as sysdba"'" directory=xtt_dir dumpfile=sales_tbs_conv.dmp
datafiles=/tmp/xplat_convert/sales_tbs_conv.bck
13. Start SQL*Plus and connect to the destination PDB as a user with the
SYSDBA
or
SYSBACKUP
privilege.
The following command connects to the PDB
pdb3
as the
sbu
user who has been
granted the
SYSBACKUP
privilege.
%sqlplus sbu@pdb3 as sysbackup
14. Verify the status of the converted tablespace on the destination PDB.
The following query determines the status of the tablespace
sales_tbs
.
SQL> SELECT status FROM dba_tablespaces
WHERE tablespace_name LIKE 'SALES_TBS';
STATUS
---------
READ ONLY
15. Make the tablespace
sales_tbs
in the destination PDB
pdb3
online.
SQL> ALTER TABLESPACE sales_tbs READ WRITE;
Chapter 28
Performing Cross-Platform Data Transport in CDBs and PDBs
28-51

Part VIII
Performing User-Managed Backup and
Recovery
The following chapters describe how to perform backup and recovery when using a
user-managed backup and recovery strategy, that is, one that does not depend upon
RMAN. This part of the book contains these chapters:
•Making User-Managed Database Backups
•Performing User-Managed Database Flashback and Recovery
•Performing User-Managed Recovery: Advanced Scenarios

29
Making User-Managed Database Backups
This chapter describes methods of backing up an Oracle database in a user-managed
backup and recovery strategy, that is, a strategy that does not depend on using
Recovery Manager (RMAN).
This chapter contains the following topics:
•Querying V$ Views to Obtain Backup Information
•Making User-Managed Backups of the Whole Database
•Making User-Managed Backups of CDBs and PDBs
•Making User-Managed Backups of Tablespaces and Data Files
•Making User-Managed Backups of Tablespaces in CDBs
•Making User-Managed Backups of the Control File
•Making User-Managed Backups of Archived Redo Logs
•Making User-Managed Backups in SUSPEND Mode
•Making User-Managed Backups to Raw Devices
•Making Backups with Third-Party Snapshot Technologies
•Verifying User-Managed Data File Backups
29.1 Querying V$ Views to Obtain Backup Information
Before making a backup, you must identify all the files in your database and decide
what to back up. You can use V$ views to obtain this information.
This section contains the following topics:
•Listing Database Files Before a Backup
•Determining Data File Status for Online Tablespace Backups
29.1.1 Listing Database Files Before a Backup
Use the
V$DATAFILE
and
V$CONTROLFILE
views to identify the data files and control files
for your database. This same procedure works whether you named these files
manually or allowed Oracle Managed Files to name them.
Caution:
Never back up online redo log files.
29-1

To list data files and control files:
1. Start SQL*Plus and query
V$DATAFILE
to obtain a list of data files. For example,
enter:
SELECT NAME FROM V$DATAFILE;
You can also join the
V$TABLESPACE
and
V$DATAFILE
views to obtain a listing of data
files along with their associated tablespaces:
SELECT t.NAME "Tablespace", f.NAME "Data File"
FROM V$TABLESPACE t, V$DATAFILE f
WHERE t.TS# = f.TS#
ORDER BY t.NAME;
2. Obtain the file names of the current control files by querying the
V$CONTROLFILE
view. For example, issue the following query:
SELECT NAME FROM V$CONTROLFILE;
You only need to back up one copy of a multiplexed control file.
3. If you plan to perform control file backup with the
ALTER
DATABASE
BACKUP
CONTROLFILE
TO
'filename'
statement, then save a list of all data files and online redo log files
with the control file backup. Because the current database structure may not
match the database structure at the time a given control file backup was created,
saving a list of files recorded in the backup control file can aid the recovery
procedure.
29.1.2 Determining Data File Status for Online Tablespace Backups
To check whether a data file is part of a current online tablespace backup, query the
V$BACKUP
view.
This view is useful only for user-managed online tablespace backups, because neither
RMAN backups nor offline tablespace backups require the data files of a tablespace to
be in backup mode. Some user-managed backup procedures require you to place the
tablespace in backup mode to protect against the possibility of a fractured block.
However, updates to the database create more than the usual amount of redo in
backup mode.
The
V$BACKUP
view is most useful when the database is open. It is also useful
immediately after an instance failure because it shows the backup status of the files at
the time of the failure. Use this information to determine whether you have left any
tablespaces in backup mode.
V$BACKUP
is not useful if the control file currently in use is a restored backup or a new
control file created after the media failure occurred. A restored or re-created control file
does not contain the information that the database needs to populate
V$BACKUP
accurately. Also, if you have restored a backup of a file, this file's
STATUS
in
V$BACKUP
reflects the backup status of the older version of the file, not the most current version.
Thus, this view can contain misleading data about restored files.
For example, the following query displays which data files are currently included in a
tablespace that has been placed in backup mode:
SELECT t.name AS "TB_NAME", d.file# as "DF#", d.name AS "DF_NAME", b.status
FROM V$DATAFILE d, V$TABLESPACE t, V$BACKUP b
WHERE d.TS#=t.TS#
Chapter 29
Querying V$ Views to Obtain Backup Information
29-2

AND b.FILE#=d.FILE#
AND b.STATUS='ACTIVE';
The following sample output shows that the
tools
and
users
tablespaces currently
have
ACTIVE
status:
TB_NAME DF# DF_NAME STATUS
---------------------- ---------- -------------------------------- ------
TOOLS 7 /oracle/oradata/trgt/tools01.dbf ACTIVE
USERS 8 /oracle/oradata/trgt/users01.dbf ACTIVE
In the
STATUS
column,
NOT
ACTIVE
indicates that the file is not currently in backup mode
(that is, you have not executed the
ALTER
TABLESPACE
...
BEGIN
BACKUP
or
ALTER DATABASE
BEGIN BACKUP
statement), whereas
ACTIVE
indicates that the file is currently in backup
mode.
29.2 Making User-Managed Backups of the Whole
Database
You can make a consistent whole database backup of all files in a database after the
database has been shut down with the
NORMAL
,
IMMEDIATE
, or
TRANSACTIONAL
options. A
whole database backup taken while the database is open or after an instance failure or
SHUTDOWN
ABORT
command is inconsistent. In such cases, the files are inconsistent with
the database checkpoint SCN.
You can make a whole database backup if a database is operating in either
ARCHIVELOG
or
NOARCHIVELOG
mode. If you run the database in
NOARCHIVELOG
mode, however, then
the backup must be consistent; that is, you must shut down the database cleanly
before the backup.
The set of backup files that results from a consistent whole database backup is
consistent because all files are checkpointed to the same SCN. You can restore the
consistent database backup without further recovery. After restoring the backup files,
you can perform additional recovery steps to recover the database to a more current
time if the database is operated in
ARCHIVELOG
mode. Also, you can take inconsistent
whole database backups if your database is in
ARCHIVELOG
mode.
Control files play a crucial role in database restore and recovery. For databases
running in
ARCHIVELOG
mode, Oracle recommends that you back up control files with the
ALTER
DATABASE
BACKUP
CONTROLFILE
TO
'filename'
statement.
See Also:
"Making User-Managed Backups of the Control File" for more information
about backing up control files
Making Consistent Whole Database Backups
This section describes how to back up the database with an operating system utility.
Chapter 29
Making User-Managed Backups of the Whole Database
29-3

To make a consistent whole database backup:
1. If the database is open, then use SQL*Plus to shut down the database with the
NORMAL
,
IMMEDIATE
, or
TRANSACTIONAL
options.
2. Use an operating system utility to make backups of all data files and all control
files specified by the
CONTROL_FILES
parameter of the initialization parameter file.
Also, back up the initialization parameter file and other Oracle product initialization
files. To find these files, do a search for
*.ora
starting in your Oracle home
directory and recursively search all of its subdirectories.
For example, you can back up the data files, control files, and archived logs to
/
disk2/backup
as follows:
% cp $ORACLE_HOME/oradata/trgt/*.dbf /disk2/backup
% cp $ORACLE_HOME/oradata/trgt/arch/* /disk2/backup/arch
3. Restart the database with the
STARTUP
command in SQL*Plus.
See Also:
Oracle Database Administrator's Guide for more information about
starting up and shutting down a database
29.3 Making User-Managed Backups of CDBs and PDBs
The information in this chapter applies to multitenant container databases (CDBs) and
pluggable databases (PDBs) with only slight changes, as described in the following
section.
To make a consistent whole database backup for a CDB:
1. Open SQL*Plus.
2. Connect to the root as a user with the
SYSDBA
or
SYSBACKUP
system privilege as
described in "Connecting as Target to the Root".
3. If the database is open, then use SQL*Plus to shut down the database with the
NORMAL
,
IMMEDIATE
, or
TRANSACTIONAL
options.
4. Use an operating system utility to make backups of all data files and all control
files specified by the
CONTROL_FILES
parameter of the initialization parameter file.
Also, back up the initialization parameter file and other Oracle product initialization
files. To find these files, do a search for
*.ora
starting in your Oracle home
directory and recursively search all of its subdirectories.
For example, you can back up the data files, control files, and archived logs to
/
disk3/backup
as follows:
% cp $ORACLE_HOME/oradata/cdb1/*.dbf /disk3/backup
% cp $ORACLE_HOME/oradata/cdb1/arch/* /disk3/backup/arch
5. Restart the database with the
STARTUP
command in SQL*Plus.
Chapter 29
Making User-Managed Backups of CDBs and PDBs
29-4

See Also:
•Oracle Database SQL Language Reference for more information about
using
ALTER DATABASE
command for CDBs
•Oracle Database Administrator’s Guide for more information about
starting up and shutting down a database
To make a consistent backup of a PDB:
1. Open SQL*Plus.
2. Connect to the PDB as a user with the
SYSDBA
or
SYSBACKUP
system privilege as
described in "Connecting as Target to a PDB".
3. Begin the backup with the SQL
ALTER DATABASE
command.
ALTER DATABASE BEGIN BACKUP;
4. Use an operating system utility to copy the data files belonging to the PDB to a
backup device.
5. End the backup with the SQL
ALTER DATABASE
command.
ALTER DATABASE END BACKUP;
29.4 Making User-Managed Backups of Tablespaces and
Data Files
The technique for making user-managed backups of tablespaces and data files
depends on whether the files are offline or online.
This section contains the following topics:
•Making User-Managed Backups of Offline Tablespaces and Data Files
•Making User-Managed Backups of Online Tablespaces and Data Files
29.4.1 Making User-Managed Backups of Offline Tablespaces and
Data Files
Note the following guidelines when backing up offline tablespaces:
•You cannot take offline the
SYSTEM
tablespace or a tablespace with active undo
segments. The following technique cannot be used for such tablespaces.
•Assume that a table is in tablespace
Primary
and its index is in tablespace
Index
.
Taking tablespace
Index
offline while leaving tablespace
Primary
online can cause
errors when data manipulation language (DML) is issued against the indexed
tables located in
Primary
. The problem appears only when the access method
chosen by the optimizer must access the indexes in the
Index
tablespace.
Chapter 29
Making User-Managed Backups of Tablespaces and Data Files
29-5

To back up offline tablespaces:
1. Before beginning a backup of a tablespace, identify the tablespace's data files by
querying the
DBA_DATA_FILES
view. For example, assume that you want to back up
the
users
tablespace. Enter the following statement in SQL*Plus:
SELECT TABLESPACE_NAME, FILE_NAME
FROM SYS.DBA_DATA_FILES
WHERE TABLESPACE_NAME = 'USERS';
TABLESPACE_NAME FILE_NAME
------------------------------- --------------------------------
USERS /oracle/oradata/trgt/users01.dbf
In this example,
/oracle/oradata/trgt/users01.dbf
is a fully specified file name
corresponding to the data file in the
users
tablespace.
2. Take the tablespace offline using normal priority if possible, because it guarantees
that you can subsequently bring the tablespace online without having to recover it.
For example:
SQL> ALTER TABLESPACE users OFFLINE NORMAL;
3. Back up the offline data files. For example:
% cp /oracle/oradata/trgt/users01.dbf /d2/users01_'date "+%m_%d_%y"'.dbf
4. Bring the tablespace online. For example:
ALTER TABLESPACE users ONLINE;
Note:
If you took the tablespace offline using temporary or immediate priority,
then you cannot bring the tablespace online unless you perform
tablespace recovery.
5. Archive the unarchived redo logs so that the redo required to recover the
tablespace backup is archived. For example, enter:
ALTER SYSTEM ARCHIVE LOG CURRENT;
29.4.2 Making User-Managed Backups of Online Tablespaces and
Data Files
You can back up all or only specific data files of an online tablespace while the
database is open. The procedure differs depending on whether the online tablespace
is read/write or read-only.
Note:
Do not back up temporary tablespaces.
Chapter 29
Making User-Managed Backups of Tablespaces and Data Files
29-6

This section contains the following topics:
•Making User-Managed Backups of Online Read/Write Tablespaces
•Making Multiple User-Managed Backups of Online Read/Write Tablespaces
•Ending a Backup After an Instance Failure or SHUTDOWN ABORT
•Making User-Managed Backups of Read-Only Tablespaces
29.4.2.1 Making User-Managed Backups of Online Read/Write Tablespaces
You must put a read/write tablespace in backup mode to make user-managed data file
backups when the tablespace is online and the database is open. The
ALTER
TABLESPACE
...
BEGIN
BACKUP
statement places a tablespace in backup mode. In backup
mode, the database copies whole changed data blocks into the redo stream. After you
take the tablespace out of backup mode with the
ALTER
TABLESPACE
...
END
BACKUP
or
ALTER
DATABASE
END
BACKUP
statement, the database advances the data file checkpoint
SCN to the current database checkpoint SCN.
When restoring a data file backed up in this way, the database asks for the appropriate
set of redo log files to apply if recovery is needed. The redo logs contain all changes
required to recover the data files and make them consistent.
To back up online read/write tablespaces in an open database:
1. Before beginning a backup of a tablespace, use the
DBA_DATA_FILES
data dictionary
view to identify all of the data files in the tablespace. For example, assume that
you want to back up the
users
tablespace. Enter the following:
SELECT TABLESPACE_NAME, FILE_NAME
FROM SYS.DBA_DATA_FILES
WHERE TABLESPACE_NAME = 'USERS';
TABLESPACE_NAME FILE_NAME
------------------------------- --------------------
USERS /oracle/oradata/trgt/users01.dbf
USERS /oracle/oradata/trgt/users02.dbf
2. Mark the beginning of the online tablespace backup. For example, the following
statement marks the start of an online backup for the tablespace
users
:
SQL> ALTER TABLESPACE users BEGIN BACKUP;
Caution:
If you do not use
BEGIN
BACKUP
to mark the beginning of an online
tablespace backup and wait for this statement to complete before
starting your copies of online tablespaces, then the data file copies
produced are not usable for subsequent recovery operations. Attempting
to recover such a backup is risky and can return errors that result in
inconsistent data. For example, the attempted recovery operation can
issue a fuzzy file warning, and can lead to an inconsistent database that
you cannot open.
3. Back up the online data files of the online tablespace with operating system
commands. For example, Linux and UNIX users might enter:
Chapter 29
Making User-Managed Backups of Tablespaces and Data Files
29-7

% cp /oracle/oradata/trgt/users01.dbf /d2/users01_'date "+%m_%d_%y"'.dbf
% cp /oracle/oradata/trgt/users02.dbf /d2/users02_'date "+%m_%d_%y"'.dbf
4. After backing up the data files of the online tablespace, run the SQL statement
ALTER
TABLESPACE
with the
END
BACKUP
option. For example, the following statement
ends the online backup of the tablespace
users
:
SQL> ALTER TABLESPACE users END BACKUP;
5. Archive the unarchived redo logs so that the redo required to recover the
tablespace backup is archived. For example, enter:
SQL> ALTER SYSTEM ARCHIVE LOG CURRENT;
Caution:
If you fail to take the tablespace out of backup mode, then Oracle
Database continues to write copies of data blocks in this tablespace to
the online redo logs, causing performance problems. Also, you receive
an
ORA-01149
error if you try to shut down the database with the
tablespaces still in backup mode.
29.4.2.2 Making Multiple User-Managed Backups of Online Read/Write
Tablespaces
When backing up several online tablespaces, you can back them up either serially or
in parallel. Use either of the following procedures depending on your needs:
•Backing Up Online Tablespaces in Parallel
•Backing Up Online Tablespaces Serially
29.4.2.2.1 Backing Up Online Tablespaces in Parallel
You can simultaneously create data file copies of multiple tablespaces requiring
backups in backup mode. Note, however, that by putting all tablespaces in online
mode together, you can generate large redo logs if there is heavy update activity on
the affected tablespaces, because the redo must contain a copy of each changed data
block in each changed data file. Be sure to consider the size of the likely redo before
using the procedure outlined here.
To back up online tablespaces in parallel:
1. Prepare the online tablespaces for backup by issuing all necessary
ALTER
TABLESPACE
statements together. For example, put tablespaces
users
,
tools
, and
indx
in backup mode as follows:
SQL> ALTER TABLESPACE users BEGIN BACKUP;
SQL> ALTER TABLESPACE tools BEGIN BACKUP;
SQL> ALTER TABLESPACE indx BEGIN BACKUP;
If you are backing up all tablespaces, you can use this command:
SQL> ALTER DATABASE BEGIN BACKUP;
2. Back up all files of the online tablespaces. For example, a Linux or UNIX user
might back up data files with the
*.dbf
suffix as follows:
Chapter 29
Making User-Managed Backups of Tablespaces and Data Files
29-8

% cp $ORACLE_HOME/oradata/trgt/*.dbf /disk2/backup/
3. Take the tablespaces out of backup mode as in the following example:
SQL> ALTER TABLESPACE users END BACKUP;
SQL> ALTER TABLESPACE tools END BACKUP;
SQL> ALTER TABLESPACE indx END BACKUP;
Again, if you are handling all data files together, you can use the
ALTER DATABASE
command instead of
ALTER TABLESPACE
:
SQL> ALTER DATABASE END BACKUP;
4. Archive the online redo logs so that the redo required to recover the tablespace
backups is available for later media recovery. For example, enter:
SQL> ALTER SYSTEM ARCHIVE LOG CURRENT;
29.4.2.2.2 Backing Up Online Tablespaces Serially
You can place all tablespaces requiring online backups in backup mode one at a time.
Oracle recommends the serial backup option because it minimizes the time between
ALTER
TABLESPACE
...
BEGIN/END
BACKUP
statements. During online backups, more redo
information is generated for the tablespace because whole data blocks are copied into
the redo log.
To back up online tablespaces serially:
1. Prepare a tablespace for online backup. For example, to put tablespace
users
in
backup mode enter the following:
SQL> ALTER TABLESPACE users BEGIN BACKUP;
In this case you probably do not want to use
ALTER DATABASE BEGIN BACKUP
to put all
tablespaces in backup mode simultaneously, because of the unnecessary volume
of redo log information generated for tablespaces in online mode.
2. Back up the data files in the tablespace. For example, enter:
% cp /oracle/oradata/trgt/users01.dbf /d2/users01_'date "+%m_%d_%y"'.dbf
3. Take the tablespace out of backup mode. For example, enter:
SQL> ALTER TABLESPACE users END BACKUP;
4. Repeat this procedure for each remaining tablespace.
5. Archive the unarchived redo logs so that the redo required to recover the
tablespace backups is archived. For example, enter:
SQL> ALTER SYSTEM ARCHIVE LOG CURRENT;
29.4.2.3 Ending a Backup After an Instance Failure or SHUTDOWN ABORT
The following situations can cause a tablespace backup to fail and be incomplete:
•The backup completed, but you did not run the
ALTER
TABLESPACE
...
END
BACKUP
statement.
•An instance failure or
SHUTDOWN
ABORT
interrupted the backup.
Chapter 29
Making User-Managed Backups of Tablespaces and Data Files
29-9

Whenever recovery from a failure is required, if a data file is in backup mode when an
attempt is made to open it, then the database does not open the data file until either a
recovery command is issued, or the data file is taken out of backup mode.
For example, the database may display a message such as the following at startup:
ORA-01113: file 12 needs media recovery
ORA-01110: data file 12: '/oracle/dbs/tbs_41.f'
If the database indicates that the data files for multiple tablespaces require media
recovery because you forgot to end the online backups for these tablespaces, then so
long as the database is mounted, running the
ALTER
DATABASE
END
BACKUP
statement
takes all the data files out of backup mode simultaneously.
In high availability situations, and in situations when no database administrator (DBA)
is monitoring the database, the requirement for user intervention is intolerable. Hence,
you can write a failure recovery script that does the following:
1. Mounts the database
2. Runs the
ALTER
DATABASE
END
BACKUP
statement
3. Runs
ALTER
DATABASE
OPEN
, enabling the system to start automatically
An automated crash recovery script containing
ALTER
DATABASE
END
BACKUP
is especially
useful in the following situations:
•All nodes in an Oracle Real Application Clusters (Oracle RAC) configuration fail.
•One node fails in a cold failover cluster (that is, a cluster that is not an Oracle
RAC configuration in which the secondary node must mount and recover the
database when the first node fails).
Alternatively, you can take the following manual measures after the system fails with
tablespaces in backup mode:
•Recover the database and avoid issuing
END
BACKUP
statements altogether.
•Mount the database, then run the
ALTER
TABLESPACE
...
END
BACKUP
statement for
each tablespace still in backup mode.
29.4.2.3.1 Ending Backup Mode with the ALTER DATABASE END BACKUP Statement
You can run the
ALTER
DATABASE
END
BACKUP
statement when you have multiple
tablespaces still in backup mode. The primary purpose of this command is to allow a
crash recovery script to restart a failed system without DBA intervention. You can also
perform the following procedure manually.
To take tablespaces out of backup mode simultaneously:
1. Mount but do not open the database. For example, enter:
SQL> STARTUP MOUNT
2. If you are performing this procedure manually (that is, not as part of a failure
recovery script), query the
V$BACKUP
view to list the data files of the tablespaces
that were being backed up before the database was restarted:
SQL> SELECT * FROM V$BACKUP WHERE STATUS = 'ACTIVE';
FILE# STATUS CHANGE# TIME CON_ID
---------- ------------------ ---------- --------- -------
12 ACTIVE 20863 25-NOV-02 0
Chapter 29
Making User-Managed Backups of Tablespaces and Data Files
29-10

13 ACTIVE 20863 25-NOV-02 0
20 ACTIVE 20863 25-NOV-02 0
3 rows selected.
3. Issue the
ALTER
DATABASE
END
BACKUP
statement to take all data files currently in
backup mode out of backup mode. For example, enter:
SQL> ALTER DATABASE END BACKUP;
You can use this statement only when the database is mounted but not open. If
the database is open, then use
ALTER
TABLESPACE
...
END
BACKUP
or
ALTER
DATABASE
DATAFILE
...
END
BACKUP
for each affected tablespace or data file.
Caution:
Do not use
ALTER
DATABASE
END
BACKUP
if you have restored any of the
affected files from a backup.
29.4.2.3.2 Ending Backup Mode with the SQL*Plus RECOVER Command
The
ALTER
DATABASE
END
BACKUP
statement is not the only way to respond to a failed
online backup; you can also run the SQL*Plus
RECOVER
command. This method is
useful when you are not sure whether someone has restored a backup, because if
someone has indeed restored a backup, then the
RECOVER
command brings the backup
up-to-date. Only run the
ALTER
DATABASE
END
BACKUP
or
ALTER
TABLESPACE
...
END
BACKUP
statement if you are sure that the files are current.
Note:
The
RECOVER
command method is slow because the database must scan redo
generated from the beginning of the online backup.
To take tablespaces out of backup mode with the RECOVER command:
1. Mount the database. For example, enter:
SQL> STARTUP MOUNT
2. Recover the database as usual. For example, enter:
SQL> RECOVER DATABASE
3. Use the
V$BACKUP
view to confirm that there are no active data files:
SQL> SELECT * FROM V$BACKUP WHERE STATUS = 'ACTIVE';
no rows selected.
See Also:
Performing User-Managed Database Flashback and Recovery for
information about recovering a database
Chapter 29
Making User-Managed Backups of Tablespaces and Data Files
29-11

29.4.2.4 Making User-Managed Backups of Read-Only Tablespaces
When backing up an online read-only tablespace, you can simply back up the online
data files. You do not have to place the tablespace in backup mode because the
database is not permitting changes to the data files.
If the set of read-only tablespaces is self-contained, then in addition to backing up the
tablespaces with operating system commands, you can also export the tablespace
metadata with the transportable tablespace functionality. If a media error or a user
error occurs (such as accidentally dropping a table in the read-only tablespace), you
can transport the tablespace back into the database.
See Also:
Oracle Database Administrator's Guide to learn how to transport tablespaces
To back up online read-only tablespaces in an open database:
1. Query the
DBA_TABLESPACES
view to determine which tablespaces are read-only. For
example, run this query:
SELECT TABLESPACE_NAME, STATUS
FROM DBA_TABLESPACES
WHERE STATUS = 'READ ONLY';
2. Before beginning a backup of a read-only tablespace, identify all of the
tablespace's data files by querying the
DBA_DATA_FILES
data dictionary view. For
example, assume that you want to back up the
history
tablespace:
SELECT TABLESPACE_NAME, FILE_NAME
FROM SYS.DBA_DATA_FILES
WHERE TABLESPACE_NAME = 'HISTORY';
TABLESPACE_NAME FILE_NAME
------------------------------- --------------------
HISTORY /oracle/oradata/trgt/history01.dbf
HISTORY /oracle/oradata/trgt/history02.dbf
3. Back up the online data files of the read-only tablespace with operating system
commands. You do not have to take the tablespace offline or put the tablespace in
backup mode because users are automatically prevented from making changes to
the read-only tablespace. For example:
% cp $ORACLE_HOME/oradata/trgt/history*.dbf /disk2/backup/
Note:
When restoring a backup of a read-only tablespace, take the tablespace
offline, restore the data files, then bring the tablespace online. A backup
of a read-only tablespace is still usable if the read-only tablespace is
made read/write after the backup, but the restored backup requires
recovery.
Chapter 29
Making User-Managed Backups of Tablespaces and Data Files
29-12

4. Optionally, export the metadata in the read-only tablespace. By using the
transportable tablespace feature, you can quickly restore the data files and import
the metadata in case of media failure or user error. For example, export the
metadata for tablespace
history
as follows:
% expdp DIRECTORY=dpump_dir1 DUMPFILE=hs.dmp TRANSPORT_TABLESPACES=history
LOGFILE=tts.log
See Also:
Oracle Database Reference for more information about the
DBA_DATA_FILES
and
DBA_TABLESPACES
views
29.5 Making User-Managed Backups of Tablespaces in
CDBs
The procedures in the section "Making User-Managed Backups of Tablespaces and
Data Files" are applicable to CDBs and PDBs with the modifications described in the
following sections:
•Making User-Managed Backups of Offline Tablespaces and Data Files in CDBs
•Making User-Managed Backups of Online Tablespaces in CDBs and PDBs
29.5.1 Making User-Managed Backups of Offline Tablespaces and
Data Files in CDBs
The guidelines described in "Making User-Managed Backups of Offline Tablespaces
and Data Files" are also applicable to tablespaces and data files in CDBs and PDBs.
To backup offline tablespaces in a multitenant environment:
1. Open SQL*Plus.
2. Perform one of the following operations:
•To back up offline tablespaces in the root, connect to the root as a common
user with the
SYSDBA
or
SYSBACKUP
system privilege.
•To back up offline tablespaces in a PDB, connect to the PDB as a common
user or local user with
SYSDBA
or
SYSBACKUP
system privilege.
3. Before beginning a backup of a tablespace, identify the tablespace's data files by
querying the
DBA_DATA_FILES
view. For example, assume that you want to back up
the
users
tablespace. Enter the following statement in SQL*Plus:
SELECT TABLESPACE_NAME, FILE_NAME
FROM SYS.DBA_DATA_FILES
WHERE TABLESPACE_NAME = 'USERS';
TABLESPACE_NAME FILE_NAME
------------------------------- --------------------------------
USERS /oracle/oradata/trgt/users01.dbf
Chapter 29
Making User-Managed Backups of Tablespaces in CDBs
29-13

In this example,
/oracle/oradata/trgt/users01.dbf
is a fully specified file name
corresponding to the data file in the
users
tablespace.
4. Take the tablespace offline using normal priority if possible, because it guarantees
that you can subsequently bring the tablespace online without having to recover it.
For example:
SQL> ALTER TABLESPACE users OFFLINE NORMAL;
5. Back up the offline data files. For example:
% cp /oracle/oradata/trgt/users01.dbf /d2/users01_'date "+%m_%d_%y"'.dbf
6. Bring the tablespace online. For example:
ALTER TABLESPACE users ONLINE;
Note:
If you took the tablespace offline using temporary or immediate priority,
then you cannot bring the tablespace online unless you perform
tablespace recovery.
7. Archive the unarchived redo logs so that the redo required to recover the
tablespace backup is archived. For example, enter:
ALTER SYSTEM ARCHIVE LOG CURRENT;
29.5.2 Making User-Managed Backups of Online Tablespaces in
CDBs and PDBs
The guidelines described in "Making User-Managed Backups of Online Tablespaces
and Data Files" are also applicable to tablespaces and data files in CDBs and PDBs.
To back up online tablespaces in the root container:
1. Open SQL*Plus.
2. Connect to the root as a user with the
SYSDBA
or
SYSBACKUP
system privilege.
3. Follow the instructions in "Making User-Managed Backups of Online Tablespaces
and Data Files".
To backup online tablespaces in a PDB:
1. Open SQL*Plus.
2. Connect to the PDB as a user with
SYSDBA
or
SYSBACKUP
system privilege.
3. Follow the instructions in "Making User-Managed Backups of Online Tablespaces
and Data Files".
29.6 Making User-Managed Backups of the Control File
Back up the control file of a database after making a structural modification to a
database operating in
ARCHIVELOG
mode. To back up a database's control file, you must
have the
ALTER
DATABASE
system privilege.
Chapter 29
Making User-Managed Backups of the Control File
29-14

This section contains the following topics:
•Backing Up the Control File to a Binary File
•Backing Up the Control File to a Trace File
29.6.1 Backing Up the Control File to a Binary File
The primary method for backing up the control file is to use a SQL statement to
generate a binary file. A binary backup is preferable to a trace file backup because it
contains additional information such as the archived log history, offline range for read-
only and offline tablespaces, and backup sets and copies (if you use RMAN). If
COMPATIBLE
is 10.2 or higher, binary control file backups include temp file entries.
To back up the control file after a structural change:
1. Make the desired change to the database. For example, you may create a
tablespace:
CREATE TABLESPACE tbs_1 DATAFILE 'file_1.f' SIZE 10M;
2. Back up the database's control file, specifying a file name for the output binary file.
The following example backs up a control file to
/disk1/backup/cf.bak
:
ALTER DATABASE BACKUP CONTROLFILE TO '/disk1/backup/cf.bak' REUSE;
Specify
REUSE
to make the new control file overwrite one that currently exists.
29.6.2 Backing Up the Control File to a Trace File
You can back up the control file to a text file that contains a
CREATE CONTROLFILE
statement. You can edit the trace file to create a script that creates a new control file
based on the control file that was current when you created the trace file.
If you specify neither the
RESETLOGS
nor
NORESETLOGS
option in the SQL statement, then
the resulting trace file contains versions of the control file for both
RESETLOGS
and
NORESETLOGS
options. Temp file entries are included in the output using
ALTER
TABLESPACE ... ADD TEMPFILE
statements.
To avoid recovering offline normal or read-only tablespaces, edit them out of the
CREATE
CONTROLFILE
statement. When you open the database with the re-created control
file, the database marks these omitted files as
MISSING
. You can run an
ALTER
DATABASE
RENAME
FILE
statement to rename them to their original file names.
The trace file containing the
CREATE CONTROLFILE
statement is stored in a subdirectory
determined by the
DIAGNOSTIC_DEST
initialization parameter. You can look in the
database alert log for the name and location of the trace file to which the
CREATE
CONTROLFILE
statement was written. See Oracle Database Administrator's Guide to
learn how to locate the alert log.
To back up the control file to a trace file:
1. Mount or open the database.
2. Execute the following SQL statement:
ALTER DATABASE BACKUP CONTROLFILE TO TRACE;
Chapter 29
Making User-Managed Backups of the Control File
29-15

See Also:
"Recovery of Read-Only Files with a Re-Created Control File" for special
issues relating to read-only, offline normal, and temporary files included in
CREATE
CONTROLFILE
statements
29.7 Making User-Managed Backups of Archived Redo
Logs
To save disk space in your primary archiving location, you may want to back up
archived logs to tape or to an alternative disk location. If you archive to multiple
locations, then only back up one copy of each log sequence number.
To back up archived redo logs:
1. To determine which archived redo log files the database has generated, query
V$ARCHIVED_LOG
. For example, run the following query:
SELECT THREAD#,SEQUENCE#,NAME
FROM V$ARCHIVED_LOG;
2. Back up one copy of each log sequence number by using an operating system
utility. This example backs up all logs in the primary archiving location to a disk
devoted to log backups:
% cp $ORACLE_HOME/oracle/trgt/arch/* /disk2/backup/arch
See Also:
Oracle Database Reference for more information about the data
dictionary views
29.8 Making User-Managed Backups in SUSPEND Mode
This section contains the following topics:
•About the Suspend/Resume Feature
•Making Backups in a Suspended Database
29.8.1 About the Suspend/Resume Feature
Some third-party tools allow you to mirror a set of disks or logical devices, that is,
maintain an exact duplicate of the primary data in another location, and then split the
mirror. Splitting the mirror involves separating the copies so that you can use them
independently.
With the
SUSPEND
/
RESUME
functionality, you can suspend I/O to the database, then split
the mirror and make a backup of the split mirror. By using this feature, which
complements the backup mode functionality, you can suspend database I/Os so that
Chapter 29
Making User-Managed Backups of Archived Redo Logs
29-16

no new I/O can be performed. You can then access the suspended database to make
backups without I/O interference.
Usually, you do not need to use
SUSPEND
/
RESUME
to make split mirror backups, although
it is necessary if your system requires the database cache to be free of dirty buffers
before a volume can be split. Some RAID devices benefit from suspending writes
while the split operation is occurring; your RAID vendor can advise you on whether
your system would benefit from this feature.
The
ALTER
SYSTEM
SUSPEND
statement suspends the database by halting I/Os to data file
headers, data files, and control files. When the database is suspended, all preexisting
I/O operations can complete; however, any new database I/O access attempts are
queued.
The
ALTER
SYSTEM
SUSPEND
and
ALTER
SYSTEM
RESUME
statements operate on the database
and not just the instance. If the
ALTER
SYSTEM
SUSPEND
statement is entered on one
system in an Oracle RAC configuration, then the internal locking mechanisms
propagate the halt request across instances, thereby suspending I/O operations for all
active instances in a given cluster.
29.8.2 Making Backups in a Suspended Database
After a successful database suspension, you can back up the database to disk or
break the mirrors. Because suspending a database does not guarantee immediate
termination of I/O, Oracle recommends that you precede the
ALTER
SYSTEM
SUSPEND
statement with a
BEGIN
BACKUP
statement so that the tablespaces are placed in backup
mode.
You must use conventional user-managed backup methods to back up split mirrors.
RMAN cannot make database backups or copies because these operations require
reading the data file headers. After the database backup is finished or the mirrors are
resilvered, then you can resume normal database operations using the
ALTER
SYSTEM
RESUME
statement.
Backing up a suspended database without splitting mirrors can cause an extended
database outage because the database is inaccessible during this time. If backups are
taken by splitting mirrors, however, then the outage is nominal. The outage time
depends on the size of cache to flush, the number of data files, and the time required
to break the mirror.
Note the following restrictions for the
SUSPEND/RESUME
feature:
•In an Oracle RAC configuration, do not start a new instance while the original
nodes are suspended.
•No checkpoint is initiated by the
ALTER
SYSTEM
SUSPEND
or
ALTER
SYSTEM
RESUME
statements.
•You cannot issue
SHUTDOWN
with
IMMEDIATE
,
NORMAL
, or
TRANSACTIONAL
options while
the database is suspended.
•Issuing
SHUTDOWN
ABORT
on a database that is suspended reactivates the database.
This prevents media recovery or failure recovery from getting into a unresponsive
state.
To make a split mirror backup in SUSPEND mode:
1. Place the database tablespaces in backup mode. For example, to place
tablespace
users
in backup mode, enter:
Chapter 29
Making User-Managed Backups in SUSPEND Mode
29-17

ALTER TABLESPACE users BEGIN BACKUP;
If you are backing up all of the tablespaces for your database, you can instead
use:
ALTER DATABASE BEGIN BACKUP;
Caution:
Do not use the
ALTER
SYSTEM
SUSPEND
statement as a substitute for placing
a tablespace in backup mode.
2. If your mirror system has problems with splitting a mirror while disk writes are
occurring, then suspend the database. For example, issue the following statement:
ALTER SYSTEM SUSPEND;
3. Verify that the database is suspended by querying the
V$INSTANCE
view. For
example:
SELECT DATABASE_STATUS FROM V$INSTANCE;
DATABASE_STATUS
-----------------
SUSPENDED
4. Split the mirrors at the operating system or hardware level.
5. End the database suspension. For example, issue the following statement:
ALTER SYSTEM RESUME;
6. Establish that the database is active by querying the
V$INSTANCE
view. For
example, enter:
SELECT DATABASE_STATUS FROM V$INSTANCE;
DATABASE_STATUS
-----------------
ACTIVE
7. Take the specified tablespaces out of backup mode. For example, enter the
following statement to take tablespace
users
out of backup mode:
ALTER TABLESPACE users END BACKUP;
8. Copy the control file and archive the online redo logs as usual for a backup.
See Also:
•"Making Split Mirror Backups with RMAN"
•Oracle Database Administrator's Guide for more information about
the
SUSPEND
/
RESUME
feature
•Oracle Database SQL Language Reference for the
ALTER SYSTEM
SUSPEND
syntax
Chapter 29
Making User-Managed Backups in SUSPEND Mode
29-18

29.9 Making User-Managed Backups to Raw Devices
A raw device is a disk or partition that does not have a file system. A raw device can
contain only a single file. Backing up files on raw devices poses operating system
specific issues. The following sections discuss some of these issues on UNIX, Linux,
and Windows.
This section contains the following topics:
•Backing Up to Raw Devices on Linux and UNIX
•Backing Up to Raw Devices on Windows
29.9.1 Backing Up to Raw Devices on Linux and UNIX
The
dd
command on Linux and UNIX is the most common backup utility for backing up
to or from raw devices. See your operating system-specific documentation for
complete details about this utility.
Using
dd
effectively requires that you specify the correct options, based on your
database. Table 29-1 lists details about your database that affect the options you use
for
dd
.
Table 29-1 Aspects of the Database Important for dd Usage
Data Explanation
Block size You can specify the size of the buffer that
dd
uses to copy data. For
example, you can specify that
dd
copies data in units of 8 KB or 64 KB. The
block size for
dd
need not correspond to either the Oracle block size or the
operating system block size: it is merely the size of the buffer used by
dd
when making the copy.
Raw offset On some systems, the beginning of the file on the raw device is reserved
for use by the operating system. This storage space is called the raw
offset. Oracle Database does not back up or restore these bytes.
Size of Oracle
Database block
0
At the beginning of every Oracle database file, the operating system-
specific code places an Oracle block called block 0. The generic Oracle
code does not recognize this block, but the block is included in the size of
the file on the operating system. Typically, this block is the same size as the
other Oracle blocks in the file.
The information in Table 29-1 enables you to set the
dd
options specified in
Table 29-2.
Table 29-2 Options for dd Command
This Option ... Specifies ...
if
The name of the input file, that is, the file that you are reading
of
The name of the output file, that is, the file to which you are writing
bs
The buffer size used by
dd
to copy data
Chapter 29
Making User-Managed Backups to Raw Devices
29-19

Table 29-2 (Cont.) Options for dd Command
This Option ... Specifies ...
skip
The number of
dd
buffers to skip on the input raw device if a raw offset
exists. For example, if you are backing up a file on a raw device with a 64
KB raw offset, and the
dd
buffer size is 8 KB, then you can specify
skip=8
so that the copy starts at offset 64 KB.
seek
The number of
dd
buffers to skip on the output raw device if a raw offset
exists. For example, if you are backing up a file onto a raw device with a 64
KB raw offset, and the
dd
buffer size is 8 KB, then you can specify
skip=8
so that the copy starts at offset 64 KB.
count
The number of blocks on the input raw device for
dd
to copy. It is best to
specify the exact number of blocks to copy when copying from a raw device
to a file system; otherwise extra space at the end of the raw volume that is
not used by the Oracle data file is copied to the file system.
Remember to include block
0
in the total size of the input file. For example,
if the
dd
block size is 8 KB, and you are backing up a 30720 KB data file,
then you can set
count=3841
. This value for
count
actually backs up 30728
KB: the extra 8 KB are for Oracle block
0
.
Because a raw device can be the input or output device for a backup, you have four
possible scenarios for the backup. The possible options for
dd
depend on which
scenario you choose, as illustrated in Table 29-3.
Table 29-3 Scenarios Involving dd Backups
Backing Up from ... Backing Up to ... Options Specified for dd
Command
Raw device Raw device
if,
of,
bs,
skip
,
seek
,
count
Raw device File system
if,
of,
bs,
skip
,
count
File system Raw device
if,
of,
bs,
seek
File system File system
if,
of,
bs
29.9.1.1 Backing Up with the dd Utility on Linux and UNIX: Examples
For these examples of
dd
utility usage, assume the following:
•You are backing up a 30720 KB data file.
•The beginning of the data file has a block 0 of 8 KB.
•The raw offset is 64 KB.
•You set the
dd
block size to 8 KB when a raw device is involved in the copy.
In the following example, you back up from one raw device to another raw device:
% dd if=/dev/rsd1b of=/dev/rsd2b bs=8k skip=8 seek=8 count=3841
In the following example, you back up from a raw device to a file system:
% dd if=/dev/rsd1b of=/backup/df1.dbf bs=8k skip=8 count=3841
In the following example, you back up from a file system to a raw device:
Chapter 29
Making User-Managed Backups to Raw Devices
29-20

% dd if=/backup/df1.dbf of=/dev/rsd2b bs=8k seek=8
In the following example, you back up from a file system to a file system, and set the
block size to a high value to boost I/O performance:
% dd if=/oracle/dbs/df1.dbf of=/backup/df1.dbf bs=1024k
29.9.2 Backing Up to Raw Devices on Windows
Like Linux and UNIX, Windows supports raw disk partitions in which the database can
store data files, online logs, and control files. Each raw partition is assigned either a
drive letter or physical drive number and does not contain a file system. As in Linux
and UNIX, each raw partition on Windows is mapped to a single file.
Windows differs from Linux and UNIX in the naming convention for Oracle files. On
Windows, raw data file names are formatted as follows:
\\.\drive_letter:
\\.\PHYSICALDRIVEdrive_number
For example, the following are possible raw file names:
\\.\G:
\\.\PHYSICALDRIVE3
The procedure for making user-managed backups of raw data files is basically the
same as for copying files on a Windows file system, except that you use the Oracle
OCOPY
utility rather than the Windows-supplied
copy.exe
or
ntbackup.exe
utilities.
OCOPY
supports 64-bit file I/O, physical raw drives, and raw files. The
OCOPY
utility cannot back
up directly to tape.
To display online documentation for
OCOPY
, enter
OCOPY
by itself at the Windows prompt.
Sample output follows:
Usage of OCOPY:
ocopy from_file [to_file [a | size_1 [size_n]]]
ocopy -b from_file to_drive
ocopy -r from_drive to_dir
Note the important
OCOPY
options described in Table 29-4.
Table 29-4 OCOPY Options
Option Action
b
Splits the input file into multiple output files. This option is useful for backing
up to devices that are smaller than the input file.
r
Combines multiple input files and writes to a single output file. This option is
useful for restoring backups created with the
-b
option.
29.9.2.1 Backing Up with OCOPY: Example
In this example, assume the following:
•Data file
12
is mounted on the
\\.\G:
raw partition.
•The
C:
drive mounts a file system.
•The database is open.
Chapter 29
Making User-Managed Backups to Raw Devices
29-21

To back up the data file on the raw partition \\.\
G:
to a local file system, you can run the
following command at the prompt after placing data file
12
in backup mode:
OCOPY "\\.G:" C:\backup\datafile12.bak
29.9.2.2 Specifying the -b and -r Options for OCOPY: Example
In this example, assume the following:
•
\\.\G:
is a raw partition containing data file
7
•The
E:
drive is a removable disk drive.
•The database is open.
To back up the data file onto drive
E:
, you can execute the following command at the
Windows prompt after placing data file
7
in backup mode:
# first argument is file name, second argument is drive
OCOPY -b "\\.\G:" E:\
When drive
E:
fills up, you can use another disk. In this way, you can divide the
backup of data file
7
into multiple files.
Similarly, to restore the backup, take the tablespace containing data file
7
offline and
run this command:
# first argument is drive, second argument is directory
OCOPY -r E:\ "\\.\G:"
29.10 Making Backups with Third-Party Snapshot
Technologies
You can use Storage Snapshot Optimization to take third-party snapshots of the
database, without placing the database in backup mode. The snapshots must conform
to the requirements described in this section.
Storage Snapshot Optimization provides the following benefits:
•Eliminates the complexity and overhead associated with placing the database in
backup mode.
•Performs the recovery in a single step by using the
RECOVER ... SNAPSHOT TIME
command. You can recover either to the current time or to a point in time after the
snapshot was taken.
To use Snapshot Storage Optimization, the third-party snapshot technology must
conform to the following requirements:
•The database is crash consistent during the snapshot.
•The snapshot preserves write order for each file.
•The snapshot technology stores the time at which the snapshot is completed.
If the vendor cannot guarantee compliance with these requirements, then you must
place your data files into backup mode by using the
ALTER DATABASE
or
ALTER TABLESPACE
statement with the
BEGIN BACKUP
clause. Place your data files in backup mode just
before you create the snapshot. When a tablespace is in backup mode, the database
writes the before image for an entire block to the redo stream before modifying a
Chapter 29
Making Backups with Third-Party Snapshot Technologies
29-22

block. The database also records changes to the block in the online redo log. Backup
mode also freezes the data file checkpoint until the file is removed from backup mode.
Oracle Database performs this safeguard because it cannot guarantee that a third-
party backup tool copies the file header before copying the data blocks. Immediately
after the snapshot is created, use the
ALTER DATABASE
or
ALTER TABLESPACE
command
with the
END BACKUP
clause to take the data files out of backup mode. You need not wait
until the snapshot is actually copied to the backup media to end backup mode.
Note:
RMAN does not support storage-based replication technologies when the
database being backed-up resides on Oracle Automatic Storage
Management (Oracle ASM).
See Also:
"Recovery Using Storage Snapshot Optimization"
Volume Shadow Copy Service (VSS) is a set of Windows APIs that enable
applications to create consistent snapshots called shadow copies. The Oracle VSS
writer runs as a service on Windows systems and is integrated with VSS-enabled
applications. You can use these applications to create snapshots of database files
managed by the Oracle instance. For example, you can make shadow copies of an
Oracle database while it is open read/write.
See Also:
Oracle Database Platform Guide for Microsoft Windows to learn how to back
up and recover the database with VSS-enabled applications
29.11 Verifying User-Managed Data File Backups
You must periodically verify your backups to ensure that they are usable for recovery.
This section contains the following topics:
•Testing the Restoration of Data File Backups
•Running the DBVERIFY Utility
29.11.1 Testing the Restoration of Data File Backups
The best way to test the usability of data file backups is to restore them to a separate
host and attempt to open the database, performing media recovery if necessary. This
option requires that you have a separate host available for the restore procedure.
Chapter 29
Verifying User-Managed Data File Backups
29-23

See Also:
"Performing Complete Database Recovery" to learn how to recover files with
SQL*Plus
29.11.2 Running the DBVERIFY Utility
The
DBVERIFY
program is an external command-line utility that performs a physical data
structure integrity check on an offline data file. Use
DBVERIFY
to ensure that a user-
managed backup of a data file is valid before it is restored or as a diagnostic aid when
you have encountered data corruption problems.
The name and location of
DBVERIFY
is dependent on your operating system. For
example, to perform an integrity check on data file
users01.dbf
on Linux or UNIX, run
the
dbv
command as follows:
% dbv file=users01.dbf
Sample
dbv
output follows:
DBVERIFY - Verification starting : FILE = users01.dbf
DBVERIFY - Verification complete
Total Pages Examined : 250
Total Pages Processed (Data) : 1
Total Pages Failing (Data) : 0
Total Pages Processed (Index): 0
Total Pages Failing (Index): 0
Total Pages Processed (Other): 2
Total Pages Processed (Seg) : 0
Total Pages Failing (Seg) : 0
Total Pages Empty : 247
Total Pages Marked Corrupt : 0
Total Pages Influx : 0
See Also:
Oracle Database Utilities to learn about
DBVERIFY
Chapter 29
Verifying User-Managed Data File Backups
29-24

30
Performing User-Managed Database
Flashback and Recovery
This chapter describes how to restore and recover a database and use the flashback
features of Oracle Database in a user-managed backup and recovery strategy. A user-
managed backup and recovery strategy means a method that does not depend on
RMAN.
This chapter contains the following topics:
•Performing Flashback Database with SQL*Plus
•Overview of User-Managed Media Recovery
•Performing Complete Database Recovery
•Performing Incomplete Database Recovery
•Recovering a Database in NOARCHIVELOG Mode
•Troubleshooting Media Recovery
30.1 Performing Flashback Database with SQL*Plus
You can use SQL*Plus to perform flashback database operations on non-CDBs,
multitenant container databases (CDBs), and pluggable databases (PDBs). Oracle
Flashback Database returns your entire database or an entire PDB to a previous state
without requiring you to restore files from backup.
Flashback Database requires you to create a fast recovery area for your database and
enable the collection of flashback logs. The requirements and preparations for
flashback database are the same whether you use RMAN or SQL*Plus.
See Also:
•Performing Flashback and Database Point-in-Time Recovery for details
about how the Flashback Database feature works, requirements for
using Flashback Database, and how to enable the collection of flashback
logs required for Flashback Database
•Performing Flashback Database of non-CDBs with SQL*Plus
•Performing Flashback Database of CDBs with SQL*Plus
•Performing Flashback Database of PDBs with SQL*Plus
30-1

30.1.1 Performing Flashback Database of non-CDBs with SQL*Plus
The SQL*Plus
FLASHBACK DATABASE
command performs the same function as the RMAN
FLASHBACK DATABASE
command: it returns the database to a prior state.
The prerequisites for performing a flashback database operation are described in
Prerequisites for Flashback Database and Restore Points.
To perform a flashback of a non-CDB using SQL*Plus:
1. Query the target database to determine the range of possible flashback SCNs.
The following SQL*Plus queries show you the latest and earliest SCN in the
flashback window:
SELECT CURRENT_SCN FROM V$DATABASE;
SELECT OLDEST_FLASHBACK_SCN, OLDEST_FLASHBACK_TIME
FROM V$FLASHBACK_DATABASE_LOG;
2. Use other flashback features if necessary to identify the SCN or time of the
unwanted changes to your database.
3. Ensure that the target database is mounted.
The following commands start the database in
MOUNT
mode.
SHUTDOWN IMMEDIATE;
STARTUP MOUNT;
4. Start SQL*Plus with administrator privileges.
5. Run the
FLASHBACK DATABASE
statement to return the database to a prior
TIMESTAMP
or
SCN
. For example:
FLASHBACK DATABASE TO SCN 46963;
FLASHBACK DATABASE TO TIMESTAMP '2013-11-05 14:00:00';
FLASHBACK DATABASE
TO TIMESTAMP to_timestamp('2013-11-11 16:00:00', 'YYYY-MM-DD HH24:MI:SS');
6. When the operation completes, open the database read-only and perform queries
to verify that you have recovered the data you need.
If your chosen target time was not far enough in the past, then use another
FLASHBACK DATABASE
statement. Otherwise, you can use
RECOVER DATABASE
to return
the database to the present time and then try another
FLASHBACK DATABASE
statement.
7. When satisfied with the results, open the database with the
RESETLOGS
option.
If appropriate, you can also use Data Pump Export to save lost data, use
RECOVER
DATABASE
to return the database to the present, and reimport the lost object.
Chapter 30
Performing Flashback Database with SQL*Plus
30-2

See Also:
•Oracle Database Development Guide to learn how to use related
flashback features such as Oracle Flashback Query and Oracle
Flashback Transaction Query
•Performing Flashback and Database Point-in-Time Recovery for details
about how the Flashback Database feature works, requirements for
using Flashback Database, and how to enable the collection of flashback
logs required for Flashback Database
30.1.2 Performing Flashback Database of CDBs with SQL*Plus
Use the SQL*Plus
FLASHBACK
DATABASE
command to return a whole multitenant
container database (CDB) to a prior state. The SQL*Plus
FLASHBACK DATABASE
command performs the same function as the RMAN
FLASHBACK DATABASE
command.
The prerequisites for performing a flashback database operation are described in
Prerequisites for Flashback Database and Restore Points.
To perform a flashback of the whole CDB using SQL*Plus:
1. Connect SQL*Plus to the root as a common user with the
SYSDBA
privilege.
2. Perform Steps 1 through 3 described in Performing Flashback Database of non-
CDBs with SQL*Plus.
3. Run the
FLASHBACK DATABASE
command to return the CDB to a prior timestamp,
SCN, or restore point.
The following are some examples of flashback operations of CDBs:
FLASHBACK DATABASE TO RESTORE POINT cdb_grp;
FLASHBACK DATABASE TO SCN 34468;
4. Perform Steps 5 and 6 described in Performing Flashback Database of non-CDBs
with SQL*Plus.
5. Since the pluggable databases (PDBs) are not automatically opened when the
CDB is opened, open the PDBs.
The following command, when connected to the root, opens all the PDBs:
ALTER PLUGGABLE DATABASE ALL OPEN;
If you want to open only some PDBs, then you can open each PDB separately.
The following command, when connected to the root, opens the PDB
my_pdb
.
ALTER PLUGGABLE DATABASE my_pdb OPEN;
See Also:
Performing Flashback and Database Point-in-Time Recovery for details
about how the Flashback Database feature works, requirements for using
Flashback Database, and how to enable the collection of flashback logs
required for Flashback Database
Chapter 30
Performing Flashback Database with SQL*Plus
30-3

30.1.3 Performing Flashback Database of PDBs with SQL*Plus
Use the SQL*Plus
FLASHBACK
DATABASE
command to return a specific pluggable
database (PDB) to a prior state. The remaining PDBs in the multitenant container
database (CDB) are not impacted by the flashback operation on a single PDB.
The SQL*Plus
FLASHBACK DATABASE
command performs the same function as the RMAN
FLASHBACK DATABASE
command.
The prerequistes for performing a flashback database operation are described in
Prerequisites for Flashback Database and Restore Points.
To perform a flashback of a PDB using SQL*Plus:
1. Connect SQL*PLus to the root as a common user with the
SYSDBA
privilege.
2. Ensure that the CDB is open.
The following command, when connected to the root, displays the mode in which
the CDB is open.
SELECT open_mode from V$DATABASE;
3. Determine the desired SCN, restore point, or point in time for the
FLASHBACK
DATABASE
command.
Query the
V$RESTORE_POINT
view to obtain the list of PDB restore points.
V$FLASHBACK_DATABASE_LOG
displays the oldest SCN to which a flashback operation
can be performed.
4. Ensure that the PDB for which the Flashback Database operation must be
performed is closed. Other PDBs can be open and operational.
When connected to the root, the following
ALTER PLUGGABLE DATABASE
command
closes the PDB
my_pdb
.
ALTER PLUGGABLE DATABASE my_pdb CLOSE;
5. Perform a Flashback Database operation on the specified PDB to the desired
point in time.
The following are some examples of flashback database operations on PDBs.
•For a PDB that uses local undo:
FLASHBACK PLUGGABLE DATABASE my_pdb TO SCN 24368;
FLASHBACK PLUGGABLE DATABASE my_pdb TO RESTORE POINT guar_rp;
•For a PDB that uses shared undo, you can only use SQL*Plus to perform a
flashback operation if you are flashing back the PDB to a clean PDB restore
point. For example:
FLASHBACK PLUGGABLE DATABASE my_pdb TO RESTORE POINT before_appl_changes;
6. Open the PDB with
RESETLOGS
.
The following command opens the PDB named
my_pdb
with
RESETLOGS
:
ALTER PLUGGABLE DATABASE my_pdb OPEN RESETLOGS;
Chapter 30
Performing Flashback Database with SQL*Plus
30-4

Note:
Flashback operations on a proxy PDB are not supported.
See Also:
Performing Flashback and Database Point-in-Time Recovery for details
about how the Flashback Database feature works, requirements for using
Flashback Database, and how to enable the collection of flashback logs
required for Flashback Database
30.2 Overview of User-Managed Media Recovery
This section provides an overview of recovery with SQL*Plus. This section contains
the following topics:
•About User-Managed Restore and Recovery
•Automatic Recovery with the RECOVER Command
•Recovery When Archived Logs Are in the Default Location
•Recovery When Archived Logs Are in a Nondefault Location
•Recovery Using Storage Snapshot Optimization
•Recovery Cancellation
•Parallel Media Recovery
30.2.1 About User-Managed Restore and Recovery
Typically, you restore a file when a media failure or user error has damaged or deleted
one or more data files. In a user-managed restore operation, you use an operating
system utility to restore a backup of the file.
If a media failure affects data files, then the recovery procedure depends on:
•The archiving mode of the database:
ARCHIVELOG
or
NOARCHIVELOG
•The type of media failure
•The files affected by the media failure (data files, control files, archived redo logs,
and the server parameter file are all candidates for restore operations)
If either a permanent or temporary media failure affects any data files of a database
operating in
NOARCHIVELOG
mode, then the database automatically shuts down. If the
media failure is temporary, then correct the underlying problem and restart the
database. Usually, crash recovery recovers all committed transactions from the online
redo log. If the media failure is permanent, then recover the database as described in
"Recovering a Database in NOARCHIVELOG Mode".
Table 30-1 explains the implications for media recovery when you lose files in a
database that runs in
ARCHIVELOG
mode.
Chapter 30
Overview of User-Managed Media Recovery
30-5

Table 30-1 User-Managed Restore Operations
If You Lose... Then...
Data files in the
SYSTEM
tablespace or data files with
active undo segments
The database automatically shuts down. If the hardware problem is temporary,
then fix it and restart the database. Usually, crash recovery recovers lost
transactions. If the hardware problem is permanent, then restore the data files
from backups and recover the database as described in "Performing Closed
Database Recovery".
Data files not in the
SYSTEM
tablespace or data files that do
not contain active rollback or
undo segments
Affected data files are taken offline, but the database stays open. If the
unaffected portions of the database must remain available, then do not shut down
the database. Take tablespaces containing problem data files offline using the
temporary option, then recover them as described in "Performing Open Database
Recovery".
All copies of the current control
file
You must restore a backup control file and then open the database with the
RESETLOGS
option.
If you do not have a backup, then you can attempt to re-create the control file. If
possible, use the script included in the
ALTER
DATABASE
BACKUP
CONTROLFILE
TO
TRACE
output. Additional work may be required to match the control file structure
with the current database structure.
One copy of a multiplexed
control file
Copy an intact multiplexed control file into the location of the damaged or missing
control file and open the database. If you cannot copy the control file to its
original location, then edit the initialization parameter file to reflect a new location
or remove the damaged control file. Then, open the database.
One or more archived logs
required for media recovery
You must restore backups of these archived logs for recovery to proceed. You
can restore either to the default or nondefault location. If you do not have
backups, then you must perform incomplete recovery up to an SCN before the
first missing redo log and open
RESETLOGS
.
The server parameter file
(SPFILE)
If you have a backup of the server parameter file, then restore it. Alternatively, if
you have a backup of the client-side initialization parameter file, then you can
restore a backup of this file, start the instance, and then re-create the server
parameter file.
Note:
Restore and recovery of Oracle Managed Files is no different from restore
and recovery of user-named files.
To perform media recovery, Oracle recommends that you use the
RECOVER
statement in
SQL*Plus. You can also use the SQL statement
ALTER
DATABASE
RECOVER
, but the
RECOVER
statement is often simpler. To start any type of media recovery, you must
adhere to the following restrictions:
•You must have administrator privileges.
•All recovery sessions must be compatible.
•One session cannot start complete media recovery while another performs
incomplete media recovery.
•You cannot start media recovery if you are connected to the database through a
shared server process.
Chapter 30
Overview of User-Managed Media Recovery
30-6

30.2.2 Automatic Recovery with the RECOVER Command
When using SQL*Plus to perform media recovery, the easiest strategy is to perform
automatic recovery with the SQL*Plus
RECOVER
command. Automatic recovery initiates
recovery without manually prompting SQL*Plus to apply each individual archived redo
log.
When using SQL*Plus, you have the following options for automating the application of
the default file names of archived redo logs needed during recovery:
•Issuing
SET
AUTORECOVERY
ON
before issuing the
RECOVER
command. If you perform
recovery with
SET
AUTORECOVERY
OFF
, which is the default, then you must enter file
names manually or accept the suggested file name by pressing Enter.
•Specifying the
AUTOMATIC
keyword as an option of the
RECOVER
command.
In either case, no interaction is required when you issue the
RECOVER
command if the
necessary files are in the correct locations with the correct names. When the database
successfully applies a redo log file, the following message is returned:
Log applied.
You are then prompted for the next redo log in the sequence. If the most recently
applied log is the last required log, then recovery is terminated.
The file names used for automatic recovery are derived from the concatenated values
of
LOG_ARCHIVE_FORMAT
with
LOG_ARCHIVE_DEST_n
, where
n
is the highest value among all
enabled, local destinations. For example, assume that the following initialization
parameter settings are in effect in the database instance:
LOG_ARCHIVE_DEST_1 = "LOCATION=/arc_dest/loc1/"
LOG_ARCHIVE_DEST_2 = "LOCATION=/arc_dest/loc2/"
LOG_ARCHIVE_DEST_STATE_1 = DEFER
LOG_ARCHIVE_DEST_STATE_2 = ENABLE
LOG_ARCHIVE_FORMAT = arch_%t_%s_%r.arc
In this example, SQL*Plus automatically suggests the file name
/arc_dest/loc2/arch_
%t_%s_%r.arc
(where
%t
is the thread,
%s
is the sequence and
%r
is the resetlogs ID).
See Also:
•Automatic Recovery with SET AUTORECOVERY
•Automatic Recovery with the AUTOMATIC Option of the RECOVER
Command
30.2.2.1 Automatic Recovery with SET AUTORECOVERY
After restoring data file backups, you can run the
SET
AUTORECOVERY
ON
command to
enable automatic recovery. For example, you could enter the following commands in
SQL*Plus to perform automatic recovery and open the database:
STARTUP MOUNT
SET AUTORECOVERY ON
Chapter 30
Overview of User-Managed Media Recovery
30-7

RECOVER DATABASE
ALTER DATABASE OPEN;
Note:
After issuing the SQL*Plus
RECOVER
command, you can view all files that have
been considered for recovery in the
V$RECOVERY_FILE_STATUS
view. You can
access status information for each file in the
V$RECOVERY_STATUS
view. These
views are not accessible after you terminate the recovery session.
30.2.2.2 Automatic Recovery with the AUTOMATIC Option of the RECOVER
Command
Besides using
SET
AUTORECOVERY
to turn on automatic recovery, you can also simply
specify the
AUTOMATIC
keyword in the
RECOVER
command. For example, you could enter
the following commands in SQL*Plus to perform automatic recovery and open the
database:
STARTUP MOUNT
RECOVER AUTOMATIC DATABASE
ALTER DATABASE OPEN;
If you use an Oracle Real Application Clusters configuration, and if you are performing
incomplete recovery or using a backup control file, then the database can only
compute the name of the first archived redo log file from the first redo thread. You may
have to manually apply the first log file from the other redo threads. After the first log
file in a given thread has been supplied, the database can suggest the names of the
subsequent logs in this thread.
30.2.3 Recovery When Archived Logs Are in the Default Location
No additional setup is required to perform recovery when the archived redo log files
are present in the default location.
During recovery, as a log is needed, the database suggests the file name. If you run
nonautomatic media recovery with SQL*Plus, then the output is displayed in the format
shown by this example:
ORA-00279: change 53577 generated at 11/26/02 19:20:58 needed for thread 1
ORA-00289: suggestion : /oracle/oradata/trgt/arch/arcr_1_802.arc
ORA-00280: change 53577 for thread 1 is in sequence #802
Specify log: [<RET> for suggested | AUTO | FROM logsource | CANCEL ]
Similar messages are returned when you use an
ALTER
DATABASE
...
RECOVER
statement.
However, no prompt is displayed.
The database constructs suggested archived log file names by concatenating the
current values of the initialization parameters
LOG_ARCHIVE_DEST_n
(where
n
is the
highest value among all enabled, local destinations) and
LOG_ARCHIVE_FORMAT
and using
log history data from the control file. The following are possible settings:
LOG_ARCHIVE_DEST_1 = 'LOCATION = /oracle/oradata/trgt/arch/'
LOG_ARCHIVE_FORMAT = arcr_%t_%s.arc
Chapter 30
Overview of User-Managed Media Recovery
30-8

SELECT NAME FROM V$ARCHIVED_LOG;
NAME
----------------------------------------
/oracle/oradata/trgt/arch/arcr_1_467.arc
/oracle/oradata/trgt/arch/arcr_1_468.arc
/oracle/oradata/trgt/arch/arcr_1_469.arc
Thus, if all the required archived log files are present at the
LOG_ARCHIVE_DEST_1
destination, and if the value for
LOG_ARCHIVE_FORMAT
is never altered, then the database
can suggest and apply log files to complete media recovery automatically.
30.2.4 Recovery When Archived Logs Are in a Nondefault Location
To perform media recovery when archived redo log files are stored in a nondefault
location, you must specify the location of archived redo log files.
You have the following mutually exclusive options when performing media recovery
when archived logs are not in their default location:
•Edit the
LOG_ARCHIVE_DEST_n
parameter that specifies the location of the archived
redo logs, then recover as usual.
This task is described in Resetting the Archived Log Destination.
•Use the
SET
statement in SQL*Plus to specify the nondefault log location before
recovery, or the
LOGFILE
parameter of the
RECOVER
command.
This task is described in Overriding the Archived Log Destination.
30.2.4.1 Resetting the Archived Log Destination
You can edit the initialization parameter file or issue
ALTER
SYSTEM
statements to change
the default location of the archived redo logs.
To change the default archived log location before recovery:
1. Use an operating system utility to restore the archived logs to a nondefault
location. For example, enter:
% cp /backup/arch/* /tmp/
2. Change the value for the archive log parameter to the nondefault location. You can
issue
ALTER
SYSTEM
statements while the instance is started, or edit the initialization
parameter file and then start the database instance. For example, while the
instance is shut down edit the parameter file as follows:
LOG_ARCHIVE_DEST_1 = 'LOCATION=/tmp/'
LOG_ARCHIVE_FORMAT = arcr_%t_%s.arc
3. Using SQL*Plus, start a new instance by specifying the edited initialization
parameter file, and then mount the database. For example, enter:
STARTUP MOUNT
4. Begin media recovery as usual. For example, enter:
RECOVER DATABASE
Chapter 30
Overview of User-Managed Media Recovery
30-9

30.2.4.2 Overriding the Archived Log Destination
In some cases, you may want to override the current setting for the archiving
destination parameter as a source for archived log files.
To recover archived logs in a nondefault location with SET LOGSOURCE:
1. Using an operating system utility, copy the archived redo logs to an alternative
location. For example, enter:
% cp $ORACLE_HOME/oradata/trgt/arch/* /tmp
2. Specify the alternative location within SQL*Plus for the recovery operation. Use
the
LOGSOURCE
parameter of the
SET
statement. For example, start SQL*Plus and
run:
SET LOGSOURCE "/tmp"
3. Recover the offline tablespace. For example, to recover the offline tablespace
users
do the following:
RECOVER AUTOMATIC TABLESPACE users
4. Alternatively, you can avoid running
SET
LOGSOURCE
and simply run:
RECOVER AUTOMATIC TABLESPACE users FROM "/tmp"
Note:
Overriding the redo log source does not affect the archive redo log
destination for online redo log groups being archived.
30.2.5 Recovery Using Storage Snapshot Optimization
Storage Snapshot Optimization enables you to use third-party snapshots of the
database, taken when the database is not in backup mode, to recover the database
either to the current time or to a specified point in time after the snapshot was created.
If the database was not placed in backup mode when the storage snapshot was
created, then you can perform recovery using this snapshot only if the snapshot
conforms to Oracle requirements. See "Making Backups with Third-Party Snapshot
Technologies". If these conditions are met, then you can take the same basic recovery
steps as any other backup method, using either RMAN or SQL*Plus.
If the storage snapshot does not conform to the requirements for using Storage
Snapshot Optimization, then you create a snapshot by placing the data files in backup
mode. To perform recovery using such snapshots, use the procedure described in
Performing Complete Database Recovery Using SQL*Plus or Performing Incomplete
Database Recovery.
Specifying the Time for Snapshot Recovery
If a storage snapshot was created when the database was not in backup mode, you
must specify the
SNAPSHOT TIME
option while using this snapshot to recover the
database. The
SNAPSHOT TIME
option can be used in both the RMAN or SQL*Plus
RECOVER
command. The time specified using the
SNAPSHOT TIME
option must be a time
Chapter 30
Overview of User-Managed Media Recovery
30-10

that is immediately after the snapshot is complete. If you specify an incorrect time,
then the database may be corrupt in a way that is not repairable.
Because the time clocks in the storage array, where the snapshot takes place, and the
machine hosting the Oracle Database may not be perfectly synchronized, it is
recommended that you add a few seconds to the time that you specify in the
SNAPSHOT
TIME
option. This helps you avoid any possibility of leaving the files in an inconsistent
state by recovering to a point before the snapshot was taken.
All times specified in the
RECOVER
command, including in the
SNAPSHOT TIME
clause, are
assumed to be in the time zone of the Oracle Database host. However, the time clocks
in the storage array may be in a different time zone from the Oracle Database host. If
the storage array reports its snapshot times in a different time zone, then you must
take that difference into account when specifying the time in the
SNAPSHOT TIME
option.
Note:
The recovery point, specified by the
UNTIL
option, cannot be earlier than the
specified
SNAPSHOT TIME
.
Examples: Recovery Using Storage Snapshots
The examples in this section use the
RECOVER DATABASE
command to perform recovery
using snapshots. You can use the
RECOVER DATABASE
command from RMAN or
SQL*Plus. However, the
UNTIL CANCEL
clause is valid only in SQL*Plus.
To completely recover a database:
RECOVER DATABASE;
To recover a database using a particular snapshot:
This example recovers uses a snapshot taken on August 15 at 2:00 P.M. to recover
the database. The
UNTIL TIME
clause can specify any time after the snapshot.
RECOVER DATABASE UNTIL TIME '10/15/2012 15:00:00' SNAPSHOT TIME '10/15/2012
14:00:00';
To perform a partial recovery using archived redo log files:
This example uses the log files from a snapshot taken on August 15 at 2:00 P.M.
RECOVER DATABASE UNTIL CANCEL SNAPSHOT TIME '10/15/2012 14:00:00';
30.2.6 Recovery Cancellation During User-Managed Recovery
If you start media recovery and must then interrupt it, then either enter
CANCEL
when
prompted for a redo log file, or use your operating system's interrupt signal if you must
terminate when recovering an individual data file, or when automated recovery is in
progress. After recovery is canceled, you can resume it later with the
RECOVER
command. Recovery resumes where it left off when it was canceled.
Chapter 30
Overview of User-Managed Media Recovery
30-11

30.2.7 Parallel Media Recovery
By default, Oracle Database uses parallel media recovery to improve performance of
the roll forward phase of media recovery. In parallel recovery of media, the database
uses a "division of labor" approach to allocate different processes to different data
blocks while rolling forward, thereby making the procedure more efficient. The number
of processes used is derived from the
CPU_COUNT
initialization parameter, which by
default equals the number of CPUs on the system. For example, if parallel recovery is
performed on a system where
CPU_COUNT
is
4
, and only one data file is recovered, then
four spawned processes read blocks from the archive logs and apply redo.
Typically, media recovery is limited by data block reads and writes. Parallel recovery
attempts to use all of the available I/O bandwidth of the system to improve
performance. Unless there is a system I/O bottleneck or poor asynchronous I/O
support, parallel recovery is likely to improve performance of recovery.
To override the default behavior of performing parallel recovery, use the SQL*Plus
RECOVER
command with the
NOPARALLEL
option, or
RECOVER
PARALLEL
0
. The
RECOVERY_PARALLELISM
initialization parameter controls instance or crash recovery only.
Media recovery is not affected by the value used for
RECOVERY_PARALLELISM
.
See Also:
SQL*Plus User's Guide and Reference for more information about the
SQL*Plus
RECOVER
...
PARALLEL
and
NOPARALLEL
commands
30.3 Performing Complete Database Recovery Using
SQL*Plus
Typically, you perform complete recovery of the database when a media failure has
made one or more data files inaccessible. During complete database recovery, you
use all available redo to recover the database to the current SCN.
The
V$RECOVER_FILE
view indicates which files need recovery. Depending on the
circumstances, you can either recover the whole database or recover individual
tablespaces or data files. Because you do not have to open the database with the
RESETLOGS
option after complete recovery, you have the option of recovering some data
files at one time and the remaining data files later.
The topics in this section describe the steps necessary to complete media recovery
operations.
Chapter 30
Performing Complete Database Recovery Using SQL*Plus
30-12

See Also:
•Performing Closed Database Recovery
•Performing Open Database Recovery
•Performing Crash and Instance Recovery of CDBs
30.3.1 Performing Closed Database Recovery
When performing complete recovery while the database is not open, you can recover
either all damaged data files in one operation or perform individual recovery of each
damaged data file in separate operations.
This procedure assumes the following:
•The current control file is available.
•You have backups of all needed data files.
•All necessary archived redo logs are available.
To restore and recover damaged or missing data files:
1. If the database is open, query
V$RECOVER_FILE
to determine which data files must
be recovered and why they must be recovered.
If you are planning to perform complete recovery rather than point-in-time
recovery, then you can recover only those data files that require recovery, rather
than the whole database. For point-in-time recovery, you must restore and recover
all data files, unless you perform RMAN TSPITR. You can also use Flashback
Database, but this procedure affects all data files and returns the entire database
to a past time.
You can query the
V$RECOVER_FILE
view to list data files requiring recovery by data
file number with their status and error information.
SELECT FILE#, ERROR, ONLINE_STATUS, CHANGE#, TIME
FROM V$RECOVER_FILE;
Note:
You cannot use
V$RECOVER_FILE
with a control file restored from backup
or a control file that was re-created after the time of the media failure
affecting the data files. A restored or re-created control file does not
contain the information needed to update
V$RECOVER_FILE
accurately.
You can also perform useful joins by using the data file number and the
V$DATAFILE
and
V$TABLESPACE
views to get the data file and tablespace names.
The
ERROR
column identifies the problem for each file requiring recovery.
2. Query the
V$ARCHIVED_LOG
and
V$RECOVERY_LOG
views to determine which archived
redo log files are needed.
Chapter 30
Performing Complete Database Recovery Using SQL*Plus
30-13

V$ARCHIVED_LOG
lists file names for all archived redo logs, whereas
V$RECOVERY_LOG
lists only the archived redo logs that the database needs to perform media
recovery. The latter view also includes the probable names of the files based on
the naming convention specified by using the
LOG_ARCHIVE_FORMAT
parameter.
Note:
V$RECOVERY_LOG
is only populated when media recovery is required for a
data file. Thus, this view is not useful for a planned recovery, such as
recovery from a user error.
If a data file requires recovery, but no backup of the data file exists, then
you need all redo generated starting from the time when the data file was
added to the database.
3. If all archived logs are available in the default location, then skip to the Step 4.
If some archived logs must be restored, and if sufficient space is available, then
restore the required archived redo log files to the location specified by
LOG_ARCHIVE_DEST_1
. The database locates the correct log automatically when
required during media recovery. For example, you might enter a command such
as the following on Linux or UNIX:
% cp /disk2/arch/* $ORACLE_HOME/oradata/trgt/arch
If sufficient space is not available, then restore some or all of the required archived
redo log files to an alternative location.
4. If the database is open, then shut it down. For example:
SHUTDOWN IMMEDIATE
5. Inspect the media to determine the source of the problem.
If the hardware problem that caused the media failure was temporary, and if the
data was undamaged (for example, a disk or controller power failure occurred),
then no media recovery is required: start the database and resume normal
operations.
If you cannot repair the problem, then proceed to the Step 6.
6. If the files are permanently damaged, then identify the most recent backups for the
damaged files. Restore only the data files damaged by the media failure: do not
restore undamaged data files or any online redo log files.
For example, if
ORACLE_HOME/oradata/trgt/users01.dbf
is the only damaged file,
then you may find that
/backup/users01_10_24_02.dbf
is the most recent backup of
this file. If you do not have a backup of a specific data file, then you may be able to
create an empty replacement file that can be recovered.
7. Use an operating system utility to restore the data files to their default location or
to a new location. For example, a Linux or UNIX user restoring
users01.dbf
to its
default location might enter:
% cp /backup/users01_10_24_06.dbf $ORACLE_HOME/oradata/trgt/users01.dbf
Use the following guidelines when determining where to restore data file backups:
Chapter 30
Performing Complete Database Recovery Using SQL*Plus
30-14

•If the hardware problem is repaired and you can restore the data files to their
default locations, then restore the data files to their default locations and begin
media recovery.
•If the hardware problem persists and you cannot restore data files to their
original locations, then restore the data files to an alternative storage device.
Indicate the new location of these files in the control file with the
ALTER
DATABASE RENAME FILE
statement. See Oracle Database Administrator's Guide.
•If you are restoring a data file to a raw disk or partition, then the technique is
basically the same as when you are restoring to a file on a file system. Be
aware of the naming conventions for files on raw devices (which differ
depending on the operating system), and use an operating system utility that
supports raw devices.
8. Connect to the database with administrator privileges. Then start a new instance
and mount, but do not open, the database. For example, enter:
STARTUP MOUNT
9. If you restored one or more damaged data files to alternative locations, then
update the control file of the database to reflect the new data file names. For
example, to change the file name of the data file in tablespace
users
you might
enter:
ALTER DATABASE RENAME FILE '?/oradata/trgt/users01.dbf' TO
'/disk2/users01.dbf';
10. Obtain the data file names and statuses of all data files by checking the list of data
files that normally accompanies the current control file or by querying the
V$DATAFILE
view. For example, enter:
SELECT NAME,STATUS FROM V$DATAFILE;
11. Ensure that all data files requiring recovery are online. The only exceptions are
data files in an offline tablespace that was taken offline normally or data files in a
read-only tablespace. For example, to guarantee that a data file named
/
oracle/dbs/tbs_10.f
is online, enter the following:
ALTER DATABASE DATAFILE '/oracle/dbs/tbs_10.f' ONLINE;
If a specified data file is already online, then the database ignores the statement. If
you prefer, create a script to bring all data files online simultaneously, as in the
following example:
SPOOL onlineall.sql
SELECT 'ALTER DATABASE DATAFILE '''||name||''' ONLINE;' FROM V$DATAFILE;
SPOOL OFF
SQL> @onlineall
12. If you restored archived redo logs to an alternative location, then you can specify
the location before media recovery with the
LOGSOURCE
parameter of the
SET
command in SQL*Plus. For example, if the logs are staged in
/tmp
, you can enter
the following command:
SET LOGSOURCE /tmp
Alternatively, you can skip Step 12 and use the
FROM
parameter on the
RECOVER
command as in Step 13. For example, if the logs are staged in
/tmp
, you can enter
the following command:
RECOVER AUTOMATIC FROM '/tmp' DATABASE
Chapter 30
Performing Complete Database Recovery Using SQL*Plus
30-15

Note:
Overriding the redo log source does not affect the archive redo log
destination for online redo log groups being archived.
13. Issue a statement to recover the database, tablespace, or data file. For example,
enter one of the following
RECOVER
commands:
RECOVER AUTOMATIC DATABASE # whole database
RECOVER AUTOMATIC TABLESPACE users # specific tablespace
RECOVER AUTOMATIC DATAFILE '?/oradata/trgt/users01.dbf'; # specific data file
If you choose not to automate the application of archived redo logs, then you must
accept or reject each prompted log. If you automate recovery, then the database
applies the logs automatically. Recovery continues until all required archived and
online redo logs have been applied to the restored data files. The database
notifies you when media recovery is complete:
Media recovery complete.
If no archived redo logs are required for complete media recovery, then the
database applies all necessary online redo log files and terminates recovery.
14. After recovery terminates, open the database for use:
ALTER DATABASE OPEN;
15. After archived logs are applied, and after making sure that a copy of each archived
log group still exists in offline storage, delete the restored copy of the archived
redo log file to free disk space. For example:
% rm /tmp/*.arc
See Also:
•"Recovering After the Loss of All Current Control Files" and "Re-
Creating a Control File" for information about restoring or re-creating
the control file
•"Re-Creating Data Files When Backups Are Unavailable" for
information about performing recovery when data file backups are
missing
•"Performing Incomplete Database Recovery" for information about
performing database point-in-time recovery when you are missing
redo required to completely recover the database
•"Overview of User-Managed Media Recovery" for an overview of log
application during media recovery
Chapter 30
Performing Complete Database Recovery Using SQL*Plus
30-16

30.3.2 Performing Open Database Recovery
You can perform complete recovery of non-
SYSTEM
data files in a database while the
database is open.
This procedure assumes the following:
•The current control file is available.
•You have backups of all needed data files.
•All necessary archived redo logs are available.
It is possible for a media failure to occur while the database remains open, leaving the
undamaged data files online and available for use. Damaged data files—but not the
tablespaces that contain them—are automatically taken offline if the database writer
cannot write to them. If the database writer cannot open a data file, an error is still
returned. Queries that cannot read damaged files return errors, but the data files are
not taken offline because of the failed queries. For example, you may run a SQL query
and see output such as:
ERROR at line 1:
ORA-01116: error in opening database file 3
ORA-01110: data file 11: '/oracle/oradata/trgt/cwmlite02.dbf'
ORA-27041: unable to open file
SVR4 Error: 2: No such file or directory
Additional information: 3
Note:
You cannot use the procedure in this section to perform complete media
recovery on the
SYSTEM
tablespace while the database is open. If the media
failure damages data files of the
SYSTEM
tablespace, then the database
automatically shuts down.
To restore data files in an open database:
1. Follow Step 1 through Step 3 in "Performing Closed Database Recovery".
2. If the database is open, then take all tablespaces containing damaged data files
offline. For example, if the tablespaces
USERS
and
TOOLS
contain damaged data
files, then execute the following SQL statements:
ALTER TABLESPACE users OFFLINE TEMPORARY;
ALTER TABLESPACE tools OFFLINE TEMPORARY;
If you specify
TEMPORARY
, then Oracle Database creates a checkpoint for all online
data files in the tablespace. Files that are offline when you issue this statement
may require media recovery before you bring the tablespace back online. If you
specify
IMMEDIATE
, then you must perform media recovery on the tablespace before
bringing it back online.
3. Inspect the media to determine the source of the problem.
You can use the DBVERIFY utility to run an integrity check on offline data files.
Chapter 30
Performing Complete Database Recovery Using SQL*Plus
30-17

If the hardware problem that caused the media failure was temporary, and if the
data was undamaged, then no media recovery is required. You can bring the
offline tablespaces online and resume normal operations. If you cannot repair the
problem, or if DBVERIFY reports corrupt blocks, then proceed to the Step 4.
4. If files are permanently damaged, then use operating system commands to restore
the most recent backup files of only the data files damaged by the media failure.
For example, to restore
users01.dbf
you might use the
cp
command on Linux or
UNIX as follows:
% cp /disk2/backup/users01.dbf $ORACLE_HOME/oradata/trgt/users01.dbf
If the hardware problem is fixed and the data files can be restored to their original
locations, then do so. Otherwise, restore the data files to an alternative storage
device. Do not restore undamaged data files, online redo logs, or control files.
Note:
In some circumstances, if you do not have a backup of a specific data
file, you can use the
ALTER
DATABASE
CREATE
DATAFILE
statement to create
an empty replacement file that is recoverable.
5. If you restored one or more damaged data files to alternative locations, then
update the control file of the database to reflect the new data file names. For
example, to change the file name of the data file in tablespace
users
you might
enter:
ALTER DATABASE RENAME FILE '?/oradata/trgt/users01.dbf' TO
'/disk2/users01.dbf';
6. If you restored archived redo logs to an alternative location, then you can specify
the location before media recovery with the
LOGSOURCE
parameter of the
SET
command in SQL*Plus. For example, if the logs are staged in
/tmp
, you can enter
the following command:
SET LOGSOURCE /tmp
Alternatively, you can skip Step 6 and use the
FROM
parameter on the
RECOVER
command as in Step 7. For example, if the logs are staged in
/tmp
, you can enter
the following command:
RECOVER AUTOMATIC FROM '/tmp' TABLESPACE users, tools;
Note:
Overriding the redo log source does not affect the archive redo log
destination for online redo log groups being archived.
7. Connect to the database with administrator privileges, and start offline tablespace
recovery of all damaged data files in one or more offline tablespaces using one
step. For example, recover
users
and
tools
as follows:
RECOVER AUTOMATIC TABLESPACE users, tools;
Chapter 30
Performing Complete Database Recovery Using SQL*Plus
30-18

The database begins the roll forward phase of media recovery by applying the
necessary archived and online redo logs to reconstruct the restored data files.
Unless the application of files is automated with the
RECOVER
AUTOMATIC
or
SET
AUTORECOVERY
ON
commands, the database prompts for each required redo log file.
Recovery continues until all required archived logs have been applied to the data
files. The online redo logs are then automatically applied to the restored data files
to complete media recovery. If no archived redo logs are required for complete
media recovery, then the database does not prompt for any. Instead, all necessary
online redo logs are applied, and media recovery is complete.
8. When the damaged tablespaces are recovered up to the moment that media
failure occurred, bring the offline tablespaces online. For example, to bring
tablespaces
USERS
and
TOOLS
online, issue the following statements:
ALTER TABLESPACE users ONLINE;
ALTER TABLESPACE tools ONLINE;
See Also:
•Oracle Database Administrator's Guide to learn about creating data files
and Oracle Database SQL Language Reference to learn about
ALTER
DATABASE
RENAME
FILE
•"Running the DBVERIFY Utility"
•"Recovering After the Loss of All Current Control Files" and "Re-Creating
a Control File" for information about restoring or re-creating the control
file
•"Re-Creating Data Files When Backups Are Unavailable" for information
about performing recovery when data file backups are missing
•"Performing Incomplete Database Recovery" for information about
performing database point-in-time recovery when you are missing redo
required to completely recover the database
30.3.3 Performing Crash and Instance Recovery of CDBs
Oracle Database performs crash and instance recovery for the entire multitenant
container database (CDB). You cannot recover individual pluggable databases
(PDBs).
This procedure assumes the following:
•The current control file is available.
•You have backups of all needed data files.
•All necessary archived redo logs are available.
To perform crash and instance recovery for a CDB:
1. Open a SQL client such as SQL*Plus.
2. Connect to the root as a common user with the
ALTER PLUGGABLE DATABASE
system
privilege.
Chapter 30
Performing Complete Database Recovery Using SQL*Plus
30-19

3. Follow the procedures in "Performing Closed Database Recovery".
If you do not want to recover a particular PDB, take its files offline.
See Also:
•"Recovering After the Loss of All Current Control Files" and "Re-Creating
a Control File" for information about restoring or re-creating the control
file
•"Re-Creating Data Files When Backups Are Unavailable" for information
about performing recovery when data file backups are missing
•"Performing Incomplete Database Recovery" for information about
performing database point-in-time recovery when you are missing redo
required to completely recover the database
30.4 Performing Incomplete Database Recovery
Incomplete recovery is also known as database point-in-time recovery.
Typically, you perform database point-in-time recovery (DBPITR) in the following
situations:
•You want to recover the database to an SCN before a user or administrative error.
•The database contains corrupt blocks.
•Complete database recovery failed because all necessary archived redo logs were
not available.
•You are creating a test database or a reporting database from production
database backups.
If the database is operating in
ARCHIVELOG
mode, and if the only copy of an archived
redo log file is damaged, then the damaged file does not affect the present operation
of the database. Table 30-2 describes situations that can arise depending on when the
redo log was written and when you backed up the data file.
Table 30-2 Loss of Archived Redo Logs
If You Backed Up... Then...
All data files after the filled
online redo log group (which
is now archived) was written
The archived version of the filled online redo log group is not
required for complete media recovery.
A specific data file before the
filled online redo log group
was written
If the corresponding data file is damaged by a permanent media
failure, then use the most recent backup of the damaged data
file and perform tablespace point-in-time recovery of the
damaged data file, up to the damaged archived redo log file.
Chapter 30
Performing Incomplete Database Recovery
30-20

Caution:
If you know that an archived redo log group has been damaged, then
immediately back up all data files so that you have a whole database backup
that does not require the damaged archived redo log.
The technique for DBPITR is very similar to the technique for performing closed
database recovery, except that you terminate DBPITR by specifying a particular time
or SCN or entering
CANCEL
. Cancel-based recovery prompts you with the suggested file
names of archived redo logs. Recovery stops when you specify
CANCEL
instead of a file
name or when all redo has been applied to the data files. Cancel-based recovery is the
best technique to control which archived log terminates recovery.
See Also:
•"Performing Cancel-Based Incomplete Recovery"
•"Performing Time-Based or Change-Based Incomplete Recovery"
•"Performing Closed Database Recovery"
30.4.1 Performing Cancel-Based Incomplete Recovery
In cancel-based recovery, recovery proceeds by prompting you with the suggested file
names of archived redo log files. Recovery stops when you specify
CANCEL
instead of a
file name or when all redo has been applied to the data files.
This procedure assumes the following:
•The current control file is available.
•You have backups of all needed data files.
To perform cancel-based recovery:
1. Follow Step 1 through Step 8 in "Performing Closed Database Recovery".
2. Begin cancel-based recovery by issuing the following command in SQL*Plus:
RECOVER DATABASE UNTIL CANCEL
Note:
If you fail to specify the
UNTIL
clause on the
RECOVER
command, then the
database assumes a complete recovery and does not open until all redo
is applied.
The database applies the necessary redo log files to reconstruct the restored data
files. The database supplies the name it expects to find from
LOG_ARCHIVE_DEST_1
and requests you to stop or proceed with applying the log file. If the control file is a
Chapter 30
Performing Incomplete Database Recovery
30-21

backup, then you must supply the names of the online redo logs if you want to
apply the changes in these logs.
3. Continue applying redo log files until the last log has been applied to the restored
data files, then cancel recovery by executing the following command:
CANCEL
The database indicates whether recovery is successful. If you cancel before all the
data files have been recovered to a consistent SCN and then try to open the
database, then you get an
ORA-1113
error if more recovery is necessary. You can
query
V$RECOVER_FILE
to determine whether more recovery is needed, or if a
backup of a data file was not restored before starting incomplete recovery.
4. Open the database with the
RESETLOGS
option. You must always reset the logs after
incomplete recovery or recovery with a backup control file. For example:
ALTER DATABASE OPEN RESETLOGS;
If you attempt to use
OPEN
RESETLOGS
when you should not, or if you neglect to reset
the log when you should, then the database returns an error and does not open
the database. Correct the problem and try again.
5. After opening the database with the
RESETLOGS
option, check the alert log.
Note:
The easiest way to locate trace files and the alert log is to run the
following SQL query:
SELECT NAME, VALUE FROM V$DIAG_INFO
.
When you open with the
RESETLOGS
option, the database returns different
messages depending on whether recovery was complete or incomplete. If the
recovery was complete, then the following message appears in the alert log:
RESETLOGS after complete recovery through change scn
If the recovery was incomplete, then this message is reported in the alert log,
where
scn
refers to the end point of incomplete recovery:
RESETLOGS after incomplete recovery UNTIL CHANGE scn
Also check the alert log to determine whether the database detected
inconsistencies between the data dictionary and the control file. Table 30-3
describes two possible scenarios.
Table 30-3 Inconsistencies Between Data Dictionary and Control File
Data File Listed in
Control File
Data File Listed in
the Data Dictionary
Result
Yes No References to the unlisted data file are
removed from the control file. A message in
the alert log indicates what was found.
Chapter 30
Performing Incomplete Database Recovery
30-22

Table 30-3 (Cont.) Inconsistencies Between Data Dictionary and Control
File
Data File Listed in
Control File
Data File Listed in
the Data Dictionary
Result
No Yes The database creates a placeholder entry in
the control file under
MISSINGnnnnn
(where
nnnnn
is the file number in decimal).
MISSINGnnnnn
is flagged in the control file as
offline and requiring media recovery. You
can make the data file corresponding to
MISSINGnnnnn
accessible by using
ALTER
DATABASE
RENAME
FILE
for
MISSINGnnnnn
so
that it points to the data file. If you do not
have a backup of this data file, then drop the
tablespace.
See Also:
•"About User-Managed Media Recovery Problems" for descriptions of
situations that can cause
ALTER
DATABASE
OPEN
RESETLOGS
to fail
•"Recovering After the Loss of All Current Control Files" for information
about restoring or re-creating the control file
•"Re-Creating Data Files When Backups Are Unavailable" for information
about performing recovery when data file backups are missing
30.4.2 Performing Time-Based or Change-Based Incomplete
Recovery
You can specify an SCN or time for the end point of incomplete recovery.
If your database is affected by seasonal time changes (for example, daylight savings
time), then you may experience a problem if a time appears twice in the redo log and
you want to recover to the second, or later time. To handle time changes, perform
cancel-based or change-based recovery.
This procedure assumes the following:
•The current control file is available.
•You have backups of all needed data files.
To perform change-based or time-based recovery:
1. Follows Step 1 through Step 8 in "Performing Closed Database Recovery".
2. Issue the
RECOVER
DATABASE
UNTIL
statement to begin recovery. If recovering to an
SCN, then specify as a decimal number without quotation marks. For example, to
recover through SCN 10034 issue:
RECOVER DATABASE UNTIL CHANGE 10034;
Chapter 30
Performing Incomplete Database Recovery
30-23

If recovering to a time, then the time is always specified using the following format,
delimited by single quotation marks:
'YYYY-MM-DD:HH24:MI:SS'
. The following
statement recovers the database up to a specified time:
RECOVER DATABASE UNTIL TIME '2000-12-31:12:47:30'
3. Apply the necessary redo log files to recover the restored data files. The database
automatically terminates the recovery when it reaches the correct time, and
returns a message indicating whether recovery is successful.
Note:
Unless recovery is automated, the database supplies the name from
LOG_ARCHIVE_DEST_1
and asks you to stop or proceed with after each log.
If the control file is a backup, then after the archived logs are applied you
must supply the names of the online logs.
4. Follow Steps 4 and 5 in "Performing Cancel-Based Incomplete Recovery".
See Also:
•"Recovering After the Loss of All Current Control Files" for information
about restoring or re-creating the control file
•"Re-Creating Data Files When Backups Are Unavailable" for information
about performing recovery when data file backups are missing
30.5 Recovering a Database in NOARCHIVELOG Mode
If a media failure damages data files in a
NOARCHIVELOG
database, then the only option
for recovery is usually to restore a consistent whole database backup. If you are using
logical backups created by Oracle Data Pump Export to supplement regular physical
backups, then you can also attempt to restore the database by importing an exported
backup of the database into a re-created database or a database restored from an old
backup.
To restore and recover the most recent whole database backup:
1. If the database is open, then shut down the database. For example, enter:
SHUTDOWN IMMEDIATE
2. If possible, correct the media problem so that the backup database files can be
restored to their original locations.
3. Restore the most recent whole database backup with operating system
commands. Restore all of the data files and control files of the whole database
backup, not just the damaged files. If the hardware problem has not been
corrected and some or all of the database files must be restored to alternative
locations, then restore the whole database backup to a new location. The following
example restores a whole database backup to its default location:
% cp /backup/*.dbf $ORACLE_HOME/oradata/trgt/
Chapter 30
Recovering a Database in NOARCHIVELOG Mode
30-24

4. If necessary, edit the restored initialization parameter file to indicate the new
location of the control files. For example:
CONTROL_FILES = "/new_disk/oradata/trgt/control01.dbf"
5. Start an instance using the restored and edited parameter file and mount, but do
not open, the database. For example:
STARTUP MOUNT
6. If the restored data file names are different (such as when you restore to a
different file system or directory, on the same node or a different node), then
update the control file to reflect the new data file locations. For example, to
rename data file
1
you might enter:
ALTER DATABASE RENAME FILE '?/oradata/trgt/system01.dbf' TO
'/new_disk/oradata/system01.dbf';
7. If the online redo logs were located on a damaged disk, and the hardware problem
is not corrected, then specify a new location for each affected online log. For
example, enter:
ALTER DATABASE RENAME FILE '?/oradata/trgt/redo01.log' TO
'/new_disk/oradata/redo_01.log';
ALTER DATABASE RENAME FILE '?/oradata/trgt/redo02.log' TO
'/new_disk/oradata/redo_02.log';
8. Because online redo logs are never backed up, you cannot restore them with the
data files and control files. To enable the database to reset the online redo logs,
you must first mimic incomplete recovery:
RECOVER DATABASE UNTIL CANCEL
CANCEL
9. Open the database in
RESETLOGS
mode. This command clears the online redo logs
and resets the log sequence to 1:
ALTER DATABASE OPEN RESETLOGS;
If you restore a
NOARCHIVELOG
database backup and then reset the log, the action
discards all changes to the database made from the time the backup was taken to
the time of the failure.
See Also:
Oracle Database Administrator's Guide for more information about renaming
and relocating data files, and Oracle Database SQL Language Reference to
learn about
ALTER
DATABASE
RENAME
FILE
30.6 Troubleshooting Media Recovery
This section describes how to troubleshoot user-managed media recovery, that is,
media recovery performed without using Recovery Manager (RMAN). This section
includes the following topics:
•About User-Managed Media Recovery Problems
•Investigating the Media Recovery Problem: Phase 1
Chapter 30
Troubleshooting Media Recovery
30-25

•Trying to Fix the Recovery Problem Without Corrupting Blocks: Phase 2
•Deciding Whether to Allow Recovery to Mark as Corrupt Blocks: Phase 3
•Allowing Recovery to Corrupt Blocks: Phase 4
•Performing Trial Recovery
30.6.1 About User-Managed Media Recovery Problems
Table 30-4 describes potential problems that can occur during media recovery.
Table 30-4 Media Recovery Problems
Problem Description
Missing or misnamed
archived log
Recovery stops because the database cannot find the archived log
recorded in the control file.
When you attempt to open
the database, error
ORA-1113
indicates that a
data file needs media
recovery.
This error commonly occurs because:
•You are performing incomplete recovery but failed to restore all
needed data file backups.
•Incomplete recovery stopped before data files reached a consistent
SCN.
•You are recovering data files from an online backup, but not enough
redo was applied to make the data files consistent.
•You are performing recovery with a backup control file, and did not
specify the location of a needed online redo log.
•A data file is undergoing media recovery when you attempt to open
the database.
•Data files needing recovery were not brought online before you
execute the
RECOVER
DATABASE
command, and so were not
recovered.
Redo record problems Two possible cases are as follows:
•Recovery stops because of failed consistency checks, a problem
called stuck recovery. Stuck recovery can occur when an underlying
operating system or storage system loses a write issued by the
database during normal operation.
•The database signals an internal error when applying the redo. This
problem can be caused by an Oracle Database bug. If checksum
verification is not being used, then the errors can also be caused by
corruptions to the redo or data blocks.
Corrupted archived logs Logs may be corrupted while they are stored on or copied between
storage systems. If
DB_BLOCK_CHECKSUM
is enabled, then the database
usually signals a checksum error. If checksum checking is disabled, then
log corruption may appear as a problem with redo.
Archived logs with
incompatible parallel redo
format
If you enable the parallel redo feature, then the database generates redo
logs in a new format. Prior releases of Oracle are unable to apply parallel
redo logs. However, releases before Oracle9i Database Release 2 (9.2)
can detect the parallel redo format and indicate the inconsistency with
the following error message:
External
error
00303,
00000,
"cannot
process
Parallel
Redo"
.
Chapter 30
Troubleshooting Media Recovery
30-26

Table 30-4 (Cont.) Media Recovery Problems
Problem Description
Corrupted data blocks A data file backup may have contained a corrupted data block, or the
data block may become corrupted either during recovery or when it is
copied to the backup. If
DB_BLOCK_CHECKSUM
is enabled, then the
database computes a checksum for each block during normal operations
and stores it in the block before writing it to disk. When the database
reads the block from disk later, it recomputes the checksum and
compares it to the stored value. If they do not match, then the database
signals a checksum error. If checksum checking is disabled, then the
problem may also appear as a redo corruption.
Random problems Memory corruptions and other transient problems can occur during
recovery.
The symptoms of media recovery problems are usually external or internal errors
signaled during recovery. For example, an external error indicates that a redo block or
a data block has failed checksum verification checks. Internal errors can be caused by
either bugs in the database or errors arising from the underlying operating system and
hardware.
If media recovery encounters a problem while recovering a database backup, then
whether it is a stuck recovery problem or a problem during redo application, the
database always stops and leaves the data files undergoing recovery in a consistent
state, that is, at a consistent SCN preceding the failure. You can then do one of the
following:
•Open the database read-only to investigate the problem.
•Open the database with the
RESETLOGS
option, if the requirements for opening
RESETLOGS
have been met. The
RESETLOGS
restrictions apply to opening the physical
standby database as well, because a standby database is updated by a form of
media recovery.
In general, opening the database read-only or opening with the
RESETLOGS
option
requires all online data files to be recovered to the same SCN. If this requirement is
not met, then the database may signal
ORA-1113
or other errors when you attempt to
open it. Some common causes of
ORA-1113
are described in Table 30-4.
The basic methodology for responding to media recovery problems occurs in the
following phases:
1. Try to identify the cause of the problem. Run a trial recovery if needed.
2. If the problem is related to missing redo logs or if you suspect that there is a redo
log, memory, or data block corruption, then try to resolve the problem using the
methods described in Table 30-5.
3. If you cannot resolve the problem using the methods described in Table 30-5, then
do one of the following:
•Open the database with the
RESETLOGS
option if you are recovering a whole
database backup. If you have performed serial media recovery, then the
database contains all the changes up to but not including the changes at the
SCN where the corruption occurred. No changes from this SCN onward are in
the recovered part of the database. If you have restored online backups, then
Chapter 30
Troubleshooting Media Recovery
30-27

opening
RESETLOGS
succeeds only if you have recovered through all the
ALTER
...
END
BACKUP
operations in the redo stream.
•Proceed with recovery by allowing media recovery to corrupt data blocks. After
media recovery completes, try performing block media recovery using RMAN.
•Call Oracle Support Services as a last resort.
See Also:
"Performing Disaster Recovery" to learn about block media recovery
30.6.2 Investigating the Media Recovery Problem: Phase 1
If media recovery encounters a problem, then obtain as much information as possible
after recovery halts. You do not want to waste time fixing the wrong problem, which
may make matters worse.
The goal of this initial investigation is to determine whether the problem is caused by
incorrect setup, corrupted redo logs, corrupted data blocks, memory corruption, or
other problems. If you see a checksum error on a data block, then the data block is
corrupted. If you see a checksum error on a redo log block, then the redo log is
corrupted.
Sometimes the cause of a recovery problem can be difficult to determine.
Nevertheless, the methods in this section enable you to quickly recover a database
even when you do not completely understand the cause of the problem.
To investigate media recovery problems:
1. Examine the
alert.log
to see whether the error messages give general
information about the nature of the problem. For example, does the
alert_SID.log
indicate any checksum failures? Does the
alert_SID.log
indicate that media
recovery may have to corrupt data blocks to continue?
2. Check the trace file generated by the Oracle Database during recovery. It may
contain additional error information.
30.6.3 Trying to Fix the Recovery Problem Without Corrupting Blocks:
Phase 2
Depending on the type of media recovery problem you suspect, you have different
solutions at your disposal. You can try one or a combination of the techniques
described in Table 30-5. These solutions are common repair techniques and fairly safe
for resolving most media recovery issues.
Chapter 30
Troubleshooting Media Recovery
30-28

Table 30-5 Media Recovery Solutions
If You Suspect... Then...
Missing or misnamed archived
redo logs
Determine whether you entered the correct file name. If you did, then check
whether the log is missing from the operating system. If it is missing, and if you
have a backup, then restore the backup and apply the log. If you do not have a
backup, then if possible perform incomplete recovery up to the point of the
missing log.
ORA-1113
for
ALTER DATABASE
OPEN
Review the causes of this error in Table 30-4. Ensure that all read/write data files
requiring recovery are online.
If you use a backup control file for recovery, then the control file and data files
must be at a consistent SCN for the database to be opened. If you do not have
the necessary redo, then you must re-create the control file.
Corrupt archived logs The log is corrupted if the checksum verification on the log redo block fails. If
DB_BLOCK_CHECKSUM
was not enabled either during the recovery session or when
the database generated the redo, then recovery problems may be caused by
corrupted logs. If the log is corrupt and an alternate copy of the corrupt log is
available, then try to apply it and see whether this tactic fixes the problem.
The
DB_BLOCK_CHECKSUM
initialization parameter determines whether checksums
are computed for redo log and data blocks.
Archived logs with incompatible
parallel redo format
If you run an Oracle Database release before Oracle9i Database Release 2, and
if you attempt to apply redo logs created with the parallel redo format, then you
must do the following steps:
1. Upgrade the database to a later release.
2. Perform media recovery.
3. Shut down the database consistently and back up the database.
4. Downgrade the database to the original release.
Memory corruption or transient
problems
You may be able to fix the problem by shutting down the database and restarting
recovery. The database should be left in a consistent state if the second attempt
also fails.
Corrupt data blocks Restore and recover the data file again with user-managed methods, or restore
and recover individual data blocks with the RMAN
RECOVER ... BLOCK
command.
This technique may fix the problem.
A data block is corrupted if the checksum verification on the block fails. If
DB_BLOCK_CHECKING
is disabled, then a corrupted data block problem may appear
as a redo problem. If you must proceed with media recovery, then you may want
to allow media recovery to mark the block as corrupt for now, continue recovery,
and then use RMAN to perform block media recovery later.
If you cannot fix the problem with the methods described in Table 30-5, then there may
be no easy way to fix the problem without losing data. You have these options:
•Open the database with the
RESETLOGS
option (for whole database recovery).
This solution discards all changes after the point where the redo problem
occurred, but guarantees a logically consistent database.
•Allow media recovery to corrupt one or more data blocks and then proceed.
This option only succeeds if the alert log indicates that recovery can continue if it is
allowed to corrupt a data block, which is the case for most recovery problems. This
option is best if you must bring up the database quickly and recover all changes. If
Chapter 30
Troubleshooting Media Recovery
30-29

you are considering this option, then proceed to "Deciding Whether to Allow
Recovery to Mark as Corrupt Blocks: Phase 3".
See Also:
" Performing Block Media Recovery "to learn how to perform block media
recovery with the
RECOVER ... BLOCK
command
30.6.4 Deciding Whether to Allow Recovery to Mark as Corrupt
Blocks: Phase 3
When media recovery encounters a problem, the alert log may indicate that recovery
can continue if it is allowed to mark as corrupt the data block causing the problem. The
alert log contains information about the block: its block type, block address, the
tablespace it belongs to, and so forth. For blocks containing user data, the alert log
may also report the data object number.
In this case, the database can proceed with recovery if it is allowed to mark the
problem block as corrupt. Nevertheless, this response is not always advisable. For
example, if the block is an important block in the
SYSTEM
tablespace, marking the block
as corrupt can eventually prevent you from opening the recovered database. Another
consideration is whether the recovery problem is isolated. If this problem is followed
immediately by many other problems in the redo stream, then you may want to open
the database with the
RESETLOGS
option.
For a block containing user data, you can usually query the database to discover
which object or table owns this block. If the database is not open, then you can open
the database read-only, even if you are recovering a whole database backup. The
following example cancels recovery and opens the database read-only:
CANCEL
ALTER DATABASE OPEN READ ONLY;
Assume that the data object number reported in the
alert_SID.log
is
8031
. You can
determine the owner, object name, and object type by issuing this query:
SELECT OWNER, OBJECT_NAME, SUBOBJECT_NAME, OBJECT_TYPE
FROM DBA_OBJECTS
WHERE DATA_OBJECT_ID = 8031;
To determine whether a recovery problem is isolated, you can run a diagnostic trial
recovery, which scans the redo stream for problems but does not actually make any
changes to the recovered database. If a trial recovery discovers any recovery
problems, then it reports them in the
alert_SID.log
. You can use the
RECOVER
...
TEST
statement to invoke trial recovery, as described in "Executing the RECOVER... TEST
Statement".
After you have done these investigations, you can follow the guidelines in Table 30-6
to decide whether to allow recovery to permit corrupt blocks.
Chapter 30
Troubleshooting Media Recovery
30-30

Table 30-6 Guidelines for Allowing Recovery to Permit Corrupt Blocks
If the Problem
Is...
and the Block
Is...
Then...
Not isolated You can open the database with the
RESETLOGS
option.
This response is important for stuck recovery problems,
because stuck recovery can be caused by the operating
system or a storage system losing writes. If an operating
system or storage system suddenly fails, then it can
cause stuck recovery problems on several blocks.
Isolated In the
SYSTEM
tablespace
Do not corrupt the block, because it may eventually
prevent you from opening the database. However,
sometimes data in the
SYSTEM
tablespace is
unimportant. If you must corrupt a
SYSTEM
block and
recover all changes, then contact Oracle Support
Services.
Isolated Index data Consider corrupting index blocks because the index can
be rebuilt later after the database has been recovered.
Isolated User data Decide based on the importance of the data. If you
continue with data file recovery and corrupt a block, then
you lose data in the block. However, you can use RMAN
to perform block media recovery later, after data file
recovery completes. If you open
RESETLOGS
, then the
database is consistent but loses any changes made
after the point where recovery was stopped.
Isolated Rollback or undo
data
If all of the transactions are committed, then consider
corrupting the rollback or undo block. The database is
not harmed if the transactions that generated the undo
are never rolled back. However, if those transactions are
rolled back, then corrupting the undo block can cause
problems. If you are unsure, then contact Oracle
Support Services.
See Also:
"Performing Trial Recovery" to learn how to perform trial recovery, and
"Allowing Recovery to Corrupt Blocks: Phase 4" if you decide to allow
recovery to permit corrupt blocks
30.6.5 Allowing Recovery to Corrupt Blocks: Phase 4
If you decide to allow recovery to proceed despite block corruptions, then run the
RECOVER
command with the
ALLOW
n
CORRUPTION
clause, where
n
is the number of
allowable corrupt blocks.
To allow recovery to corrupt blocks:
1. Ensure that all normal recovery preconditions are met. For example, if the
database is open, then take tablespaces offline before attempting recovery.
2. Run the
RECOVER
command as in the following example:
Chapter 30
Troubleshooting Media Recovery
30-31

RECOVER DATABASE ALLOW 5 CORRUPTION
30.6.6 Performing Trial Recovery
When problems such as stuck recovery occur, you have a difficult choice. If the block
is relatively unimportant, and if the problem is isolated, then it is better to corrupt the
block. But if the problem is not isolated, then it may be better to open the database
with the
RESETLOGS
option.
Because of this situation, Oracle Database supports trial recovery. A trial recovery
applies redo in a way similar to normal media recovery, but it never writes its changes
to disk and it always rolls back its changes. Trial recovery occurs only in memory.
This section contains the following topics:
•How Trial Recovery Works
•Executing the RECOVER... TEST Statement
See Also:
"Allowing Recovery to Corrupt Blocks: Phase 4"
30.6.6.1 How Trial Recovery Works
By default, if a trial recovery encounters a stuck recovery or similar problem, then it
always marks the data block as corrupt in memory when this action can allow recovery
to proceed. The database writes errors generated during trial recovery to alert files.
These errors are clearly marked as test run errors.
Like normal media recovery, trial recovery can prompt you for archived log file names
and ask you to apply them. Trial recovery ends when:
•The database runs out of the maximum number of buffers in memory that trial
recovery is permitted to use
•An unrecoverable error is signaled, that is, an error that cannot be resolved by
corrupting a data block
•You cancel or interrupt the recovery session
•The next redo record in the redo stream changes the control file
•All requested redo has been applied
When trial recovery ends, the database removes all effects of the test run from the
system—except the possible error messages in the alert files. If the instance fails
during trial recovery, then the database removes all effects of trial recovery from the
system, because trial recovery never writes changes to disk.
Trial recovery lets you foresee what problems might occur if you were to continue with
normal recovery. For problems caused by ongoing memory corruption, trial recovery
and normal recovery can encounter different errors.
Chapter 30
Troubleshooting Media Recovery
30-32

30.6.6.2 Executing the RECOVER... TEST Statement
You can use the
TEST
option for any
RECOVER
command. For example, you can start
SQL*Plus and then issue any of the following commands:
RECOVER DATABASE TEST
RECOVER DATABASE USING BACKUP CONTROLFILE UNTIL CANCEL TEST
RECOVER TABLESPACE users TEST
RECOVER DATABASE UNTIL CANCEL TEST
By default, trial recovery always attempts to corrupt blocks in memory if this action
allows trial recovery to proceed. Trial recovery by default can corrupt an unlimited
number of data blocks. You can specify the
ALLOW
n
CORRUPTION
clause on the
RECOVER
...
TEST
statement to limit the number of data blocks that trial recovery can
corrupt in memory.
A trial recovery command is usable in any scenario in which a normal recovery
command is usable. Nevertheless, you only need to run trial recovery when recovery
runs into problems.
See Also:
How Trial Recovery Works
Chapter 30
Troubleshooting Media Recovery
30-33

31
Performing User-Managed Recovery:
Advanced Scenarios
This chapter describes several common media failure scenarios. It shows how to
recover from each failure when using a user-managed backup and recovery strategy,
that is, a strategy that does not depend on Recovery Manager. This chapter contains
the following topics:
•Responding to the Loss of a Subset of the Current Control Files
•Recovering After the Loss of All Current Control Files
•Re-Creating a Control File
•Re-Creating Data Files When Backups Are Unavailable
•Recovering NOLOGGING Tables and Indexes
•Recovering Transportable Tablespaces
•Recovering After the Loss of Online Redo Log Files
•Recovering from a Dropped Table Without Using Flashback Features
•Dropping a Database with SQL*Plus
31.1 Responding to the Loss of a Subset of the Current
Control Files
Use the following procedures to recover a database if a permanent media failure has
damaged one or more control files of a database and at least one current control file
has not been damaged by the media failure.
This section contains the following topics:
•Copying a Multiplexed Control File to a Default Location
•Copying a Multiplexed Control File to a Nondefault Location
31.1.1 Copying a Multiplexed Control File to a Default Location
If the disk and file system containing the lost control file are intact, then you can simply
copy an intact control file to the location of the missing control file. In this case, you do
not have to edit the
CONTROL_FILES
initialization parameter.
To replace a damaged control file by copying a multiplexed control file:
1. If the instance is still running, then shut it down:
SQL> SHUTDOWN ABORT
2. Correct the hardware problem that caused the media failure. If you cannot repair
the hardware problem quickly, then proceed with database recovery by restoring
31-1

damaged control files to an alternative storage device, as described in "Copying a
Multiplexed Control File to a Nondefault Location".
3. Use an intact multiplexed copy of the database's current control file to copy over
the damaged control files. For example, to replace
bad_cf.f
with
good_cf.f
, you
might enter:
% cp /oracle/good_cf.f /oracle/dbs/bad_cf.f
4. Start a new instance and mount and open the database. For example, enter:
SQL> STARTUP
31.1.2 Copying a Multiplexed Control File to a Nondefault Location
If the disk and file system containing the lost control file are not intact, then you cannot
copy a good control file to the location of the missing control file. In this case, you must
alter the
CONTROL_FILES
initialization parameter to indicate a new location for the
missing control file.
To restore a control file to a nondefault location:
1. If the instance is still running, then shut it down:
SQL> SHUTDOWN ABORT
2. If you cannot correct the hardware problem that caused the media failure, then
copy the intact control file to alternative location.
For example, to copy a good version of
control01.dbf
to a new disk location you
might issue the following commands:
% cp /disk1/oradata/trgt/control01.dbf /new_disk/control01.dbf
3. Edit the parameter file of the database so that the
CONTROL_FILES
parameter reflects
the current locations of all control files and excludes all control files that were not
restored.
Assume that the initialization parameter file contains the following setting:
CONTROL_FILES='/disk1/oradata/trgt/control01.dbf','/bad_disk/control02.dbf'
You can edit the
CONTROL_FILES
initialization parameter as follows:
CONTROL_FILES='/disk1/oradata/trgt/control01.dbf','/new_disk/control02.dbf'
4. Start a new instance and mount and open the database. For example:
SQL> STARTUP
31.2 Recovering After the Loss of All Current Control Files
Use the following procedures to restore a backup control file if a permanent media
failure has damaged all control files of a database and you have a backup of the
control file. When a control file is inaccessible, you can start the instance, but not
mount the database. If you attempt to mount the database when the control file is
unavailable, then you receive the following error message:
ORA-00205: error in identifying control file, check alert log for more info
Chapter 31
Recovering After the Loss of All Current Control Files
31-2

Note:
The easiest way to locate trace files and the alert log is to run the following
SQL query:
SELECT NAME, VALUE FROM V$DIAG_INFO
.
You cannot mount and open the database until the control file is accessible again. If
you restore a backup control file, then you must open the database with the
RESETLOGS
option.
As indicated in Table 31-1, the procedure for restoring the control file depends on
whether the online redo logs are available.
Table 31-1 Scenarios When Control Files Are Lost
Status of Online
Logs
Status of Data Files Restore Procedure
Available Current If the online logs contain redo necessary for
recovery, then restore a backup control file
and apply the logs during recovery. You must
specify the file name of the online logs
containing the changes to open the database.
After recovery, open the database with the
RESETLOGS
option.
Note: If you re-create a control file, then it is
not necessary to use the
OPEN
RESETLOGS
option after recovery when the online redo
logs are accessible.
Unavailable Current If the online logs contain redo necessary for
recovery, then re-create the control file.
Because the online redo logs are inaccessible,
open
RESETLOGS
.
Available Backup Restore a backup control file, perform
complete recovery, and then open the
database with the
RESETLOGS
option.
Unavailable Backup Restore a backup control file, perform
incomplete recovery, and then open
RESETLOGS
.
This section contains the following topics:
•Recovering with a Backup Control File in the Default Location
•Recovering with a Backup Control File in a Nondefault Location
•Recovering Through an Added Data File with a Backup Control File
•Recovering Read-Only Tablespaces with a Backup Control File
31.2.1 Recovering with a Backup Control File in the Default Location
If possible, restore the control file to its original location. In this way, you avoid having
to specify new control file locations in the initialization parameter file.
Chapter 31
Recovering After the Loss of All Current Control Files
31-3

To restore a backup control file to its default location:
1. If the instance is still running, shut it down:
SQL> SHUTDOWN ABORT
2. Correct the hardware problem that caused the media failure.
3. Restore the backup control file to all locations specified in the
CONTROL_FILES
parameter in the server parameter file or initialization parameter file. For example,
if
/disk1/oradata/trgt/control01.dbf
and
/disk2/oradata/trgt/control02.dbf
are
the control file locations listed in the server parameter file, then use an operating
system utility to restore the backup control file to these locations:
% cp /backup/control01.dbf /disk1/oradata/trgt/control01.dbf
% cp /backup/control02.dbf /disk2/oradata/trgt/control02.dbf
4. Start a new instance and mount the database. For example, enter:
SQL> STARTUP MOUNT
5. Begin recovery by executing the
RECOVER
command with the
USING
BACKUP
CONTROLFILE
clause. Specify
UNTIL
CANCEL
if you are performing incomplete
recovery. For example, enter:
SQL> RECOVER DATABASE USING BACKUP CONTROLFILE UNTIL CANCEL
6. Apply the prompted archived logs. If you then receive another message saying
that the required archived log is missing, then it probably means that a necessary
redo record is located in the online redo logs. This situation can occur when
unarchived changes were located in the online logs when the instance failed.
For example, assume that you see the following:
ORA-00279: change 55636 generated at 11/08/2002 16:59:47 needed for thread 1
ORA-00289: suggestion : /oracle/work/arc_dest/arcr_1_111.arc
ORA-00280: change 55636 for thread 1 is in sequence #111
Specify log: {<RET>=suggested | filename | AUTO | CANCEL}
You can specify the name of an online redo log and press Enter (you may have to
try this a few times until you find the correct log):
ORACLE_HOME/oradata/redo01.dbf
Log applied.
Media recovery complete.
If the online logs are inaccessible, then you can cancel recovery without applying
them. If all data files are current, and if redo in the online logs is required for
recovery, then you cannot open the database without applying the online logs. If
the online logs are inaccessible, then you must re-create the control file, using the
procedure described in "Re-Creating a Control File".
7. Open the database with the
RESETLOGS
option after finishing recovery:
SQL> ALTER DATABASE OPEN RESETLOGS;
31.2.2 Recovering with a Backup Control File in a Nondefault Location
If you cannot restore the control file to its original place because the media damage is
too severe, then you must specify new control file locations in the server parameter
file. A valid control file must be available in all locations specified by the
CONTROL_FILES
Chapter 31
Recovering After the Loss of All Current Control Files
31-4

initialization parameter. If not, then the database prevents you from the mounting the
database.
To restore a control file to a nondefault location:
1. If the instance is still running, shut it down:
SQL> SHUTDOWN ABORT
2. Correct the hardware problem that caused the media failure.
3. Edit all locations specified in the
CONTROL_FILES
initialization parameter to reflect the
new control file locations. Assume that the control file locations listed in the server
parameter file are as follows, and both disks are inaccessible:
CONTROL_FILES='/disk1/oradata/trgt/control01.dbf',
'/disk2/oradata/trgt/control02.dbf'
You can edit the initialization parameter file and specify accessible locations, as
shown in the following example:
CONTROL_FILES='/disk3/cf/control01.dbf','/disk4/cf/control02.dbf'
4. Restore the backup control file to all locations specified in the
CONTROL_FILES
parameter in the server parameter file or initialization parameter file. For example,
if
/disk1/oradata/trgt/control01.dbf
and
/disk2/oradata/trgt/control02.dbf
are
the control file locations listed in the server parameter file, then use an operating
system utility to restore the backup control file to these locations:
% cp /backup/control01.dbf /disk1/oradata/trgt/control01.dbf
% cp /backup/control02.dbf /disk2/oradata/trgt/control02.dbf
5. Start a new instance and mount the database. For example, enter:
SQL> STARTUP MOUNT
6. Begin recovery by executing the
RECOVER
command with the
USING
BACKUP
CONTROLFILE
clause. Specify
UNTIL
CANCEL
if you are performing incomplete
recovery. For example, enter:
SQL> RECOVER DATABASE USING BACKUP CONTROLFILE UNTIL CANCEL
7. Apply the prompted archived logs. If you then receive another message saying
that the required archived log is missing, then it probably means that a necessary
redo record is located in the online redo logs. This situation can occur when
unarchived changes were located in the online logs when the instance failed.
For example, assume that you see the following:
ORA-00279: change 55636 generated at 11/08/2002 16:59:47 needed for thread 1
ORA-00289: suggestion : /oracle/work/arc_dest/arcr_1_111.arc
ORA-00280: change 55636 for thread 1 is in sequence #111
Specify log: {<RET>=suggested | filename | AUTO | CANCEL}
You can specify the name of an online redo log and press Enter (you may have to
try this a few times until you find the correct log):
ORACLE_HOME/oradata/redo01.dbf
Log applied.
Media recovery complete.
If the online logs are inaccessible, then you can cancel recovery without applying
them. If all data files are current, and if redo in the online logs is required for
recovery, then you cannot open the database without applying the online logs. If
Chapter 31
Recovering After the Loss of All Current Control Files
31-5

the online logs are inaccessible, then you must re-create the control file, using the
procedure described in "Re-Creating a Control File".
8. Open the database with the
RESETLOGS
option after finishing recovery:
SQL> ALTER DATABASE OPEN RESETLOGS;
31.2.3 Recovering Through an Added Data File with a Backup Control
File
If database recovery with a backup control file rolls forward through a
CREATE
TABLESPACE
or an
ALTER
TABLESPACE
ADD
DATAFILE
operation, then the database stops
recovery when applying the redo record for the added files and lets you confirm the file
names.
For example, suppose that the following sequence of events occurs:
1. You back up the database.
2. You create a tablespace containing the following data files:
/disk1/oradata/trgt/
test01.dbf
and
/disk1/oradata/trgt/test02.dbf
.
3. You restore a backup control file and perform media recovery through the
CREATE
TABLESPACE
operation.
You may see the following error when applying the
CREATE
TABLESPACE
redo data:
ORA-00283: recovery session canceled due to errors
ORA-01244: unnamed datafile(s) added to control file by media recovery
ORA-01110: data file 11: '/disk1/oradata/trgt/test02.dbf'
ORA-01110: data file 10: '/disk1/oradata/trgt/test01.dbf'
To recover through an ADD DATAFILE operation:
1. View the files added by querying
V$DATAFILE
., as in the following example:
SELECT FILE#,NAME
FROM V$DATAFILE;
FILE# NAME
--------------- ----------------------
1 /disk1/oradata/trgt/system01.dbf
.
.
.
10 /disk1/oradata/trgt/UNNAMED00001
11 /disk1/oradata/trgt/UNNAMED00002
2. If multiple unnamed files exist, then determine which unnamed file corresponds to
which data file by using one of these methods:
•Open the
alert_SID.log
, which contains messages about the original file
location for each unnamed file.
•Derive the original file location of each unnamed file from the error message
and
V$DATAFILE
: each unnamed file corresponds to the file in the error
message with the same file number.
3. Issue the
ALTER
DATABASE
RENAME
FILE
statement to rename the data files. For
example, enter:
Chapter 31
Recovering After the Loss of All Current Control Files
31-6

ALTER DATABASE RENAME FILE '/db/UNNAMED00001' TO
'/disk1/oradata/trgt/test01.dbf';
ALTER DATABASE RENAME FILE '/db/UNNAMED00002' TO
'/disk1/oradata/trgt/test02.dbf';
4. Continue recovery by issuing the recovery statement. For example:
RECOVER AUTOMATIC DATABASE USING BACKUP CONTROLFILE UNTIL CANCEL
31.2.4 Recovering Read-Only Tablespaces with a Backup Control File
If you have a read-only tablespace on read-only or slow media, then you may
encounter errors or poor performance when recovering with the
USING
BACKUP
CONTROLFILE
option. This situation occurs when the backup control file indicates that a
tablespace was read/write when the control file was backed up. In this case, media
recovery may attempt to write to the files. For read-only media, the database issues an
error saying that it cannot write to the files. For slow media, such as a hierarchical
storage system backed up by tapes, performance may suffer.
To avoid these problems, use current control files rather than backups to recover the
database. If you must use a backup control file, then you can also avoid this problem if
the read-only tablespace has not suffered a media failure. You have the following
alternatives for recovering read-only and slow media when using a backup control file:
•Take data files from read-only tablespaces offline before doing recovery with a
backup control file, and then bring the files online after media recovery.
•Use the correct version of the control file for the recovery. If the tablespace is
read-only when recovery completes, then the control file backup must be from a
time when the tablespace was read-only. Similarly, if the tablespace is read/write
after recovery, then the control file must be from a time when the tablespace was
read/write.
31.3 Re-Creating a Control File
If all control files have been lost in a permanent media failure, but all online redo log
members remain intact, then you can recover the database after creating a new
control file. You are not required to open the database with the
RESETLOGS
option after
the recovery.
Depending on the existence and currency of a control file backup, you have the
options listed in Table 31-2 for generating the text of the
CREATE
CONTROLFILE
statement.
The changes to the database are recorded in the alert_SID.log, so check this log when
you are deciding which option to choose.
Table 31-2 Options for Creating the Control File
If you... Then...
Executed
ALTER
DATABASE
BACKUP
CONTROLFILE
TO
TRACE
NORESETLOGS
after you made the last
structural change to the database, and if you
have saved the SQL command trace output
Use the
CREATE
CONTROLFILE
statement from
the trace output as-is.
Chapter 31
Re-Creating a Control File
31-7

Table 31-2 (Cont.) Options for Creating the Control File
If you... Then...
Performed your most recent execution of
ALTER
DATABASE
BACKUP
CONTROLFILE
TO
TRACE
before you made a structural change to the
database
Edit the output of
ALTER
DATABASE
BACKUP
CONTROLFILE
TO
TRACE
to reflect the change.
For example, if you recently added a data file
to the database, then add this data file to the
DATAFILE
clause of the
CREATE
CONTROLFILE
statement.
Backed up the control file with the
ALTER
DATABASE
BACKUP
CONTROLFILE
TO
filename
statement (not the
TO
TRACE
option)
Use the control file copy to obtain SQL output.
Create a temporary database instance, mount
the backup control file, and then run
ALTER
DATABASE
BACKUP
CONTROLFILE
TO
TRACE
NORESETLOGS
. If the control file copy predated a
recent structural change, then edit the trace
option to reflect the change.
Do not have a control file backup in either
TO
TRACE
format or
TO
filename
format
Execute the
CREATE
CONTROLFILE
statement
manually (See Oracle Database SQL
Language Reference).
Note:
If your character set is not the default US7ASCII, then you must specify the
character set as an argument to the
CREATE
CONTROLFILE
statement. The
database character set is written to the alert log at startup. The character set
information is also recorded in the
BACKUP
CONTROLFILE
TO
TRACE
output.
To create a control file and recover the database:
1. Start the database in
NOMOUNT
mode. For example, enter:
STARTUP NOMOUNT
2. Create the control file with the
CREATE
CONTROLFILE
statement, specifying the
NORESETLOGS
option (See to Table 31-2 for options). The following example
assumes that the character set is the default US7ASCII:
CREATE CONTROLFILE REUSE DATABASE SALES NORESETLOGS ARCHIVELOG
MAXLOGFILES 32
MAXLOGMEMBERS 2
MAXDATAFILES 32
MAXINSTANCES 16
MAXLOGHISTORY 1600
LOGFILE
GROUP 1 (
'/diska/prod/sales/db/log1t1.dbf',
'/diskb/prod/sales/db/log1t2.dbf'
) SIZE 100K,
GROUP 2 (
'/diska/prod/sales/db/log2t1.dbf',
'/diskb/prod/sales/db/log2t2.dbf'
) SIZE 100K
DATAFILE
Chapter 31
Re-Creating a Control File
31-8

'/diska/prod/sales/db/database1.dbf',
'/diskb/prod/sales/db/filea.dbf';
After creating the control file, the instance mounts the database.
3. Recover the database as usual (without specifying the
USING
BACKUP
CONTROLFILE
clause):
RECOVER DATABASE
4. Open the database after recovery completes (the
RESETLOGS
option is not required):
ALTER DATABASE OPEN;
5. Immediately back up the control file. The following SQL statement backs up a
database's control file to
/backup/control01.dbf
:
ALTER DATABASE BACKUP CONTROLFILE TO '/backup/control01.dbf' REUSE;
To create a control file for a multitenant container database:
1. Ensure that the multitenant container database (CDB) is not mounted in any
instance.
2. Open SQL*Plus.
3. Connect to the root as a user with the
SYSDBA
privilege.
4. Follow the previous procedure for creating a control file and recovering the
database.
See Also:
"Backing Up the Control File to a Trace File", and "Re-Creating Data Files
When Backups Are Unavailable"
31.3.1 Recovering Through a RESETLOGS with a Created Control
File
You can recover backups through an
OPEN
RESETLOGS
operation so long as:
•You have a current, backup, or created control file that detects prior incarnations
•You have all available archived redo logs
If you must re-create the control file, then the trace file generated by
ALTER
DATABASE
BACKUP
CONTROLFILE
TO
TRACE
contains the necessary commands to reconstruct the
complete incarnation history. The
V$DATABASE_INCARNATION
view displays the
RESETLOGS
history of the control file, and the
V$LOG_HISTORY
view displays the archived log history.
It is possible for the incarnation history to be incomplete in the in re-created control file.
For example, archived logs necessary for recovery may be missing. In this case, it is
possible to create incarnation records explicitly with the
ALTER
DATABASE
REGISTER
LOGFILE
statement.
In the following example, you register four logs that are necessary for recovery but are
not recorded in the re-created control file, and then recover the database:
Chapter 31
Re-Creating a Control File
31-9

ALTER DATABASE REGISTER LOGFILE '/disk1/oradata/trgt/arch/arcr_1_1_42343523.arc';
ALTER DATABASE REGISTER LOGFILE '/disk1/oradata/trgt/arch/arcr_1_1_34546466.arc';
ALTER DATABASE REGISTER LOGFILE '/disk1/oradata/trgt/arch/arcr_1_1_23435466.arc';
ALTER DATABASE REGISTER LOGFILE '/disk1/oradata/trgt/arch/arcr_1_1_12343533.arc';
RECOVER AUTOMATIC DATABASE;
31.3.2 Recovery of Read-Only Files with a Re-Created Control File
If a current or backup control file is unavailable for recovery, then you can execute a
CREATE
CONTROLFILE
statement. Do not list read-only files in the
CREATE
CONTROLFILE
statement so recovery can skip them. No recovery is required for read-only data files
unless you restored backups of these files when the data files were read/write.
After you create a control file and attempt to mount and open the database, the
database performs a data dictionary check against the files listed in the control file. For
each file that is not listed in the
CREATE
CONTROLFILE
statement but is present in the data
dictionary, an entry is created for them in the control file. These files are named as
MISSINGnnnnn
, where
nnnnn
is a 5-digit number starting with
0
.
After the database is open, rename the read-only files to their correct file names by
executing the
ALTER
DATABASE
RENAME
FILE
statement for all the files whose names are
prefixed with
MISSING
.
To prepare for a scenario in which you might have to re-create the control file:
Run the following statement when the database is mounted or open to obtain the
CREATE
CONTROLFILE
syntax:
ALTER DATABASE BACKUP CONTROLFILE TO TRACE;
The preceding SQL statement produces a trace file that you can edit and use as a
script to re-create the control file. You can specify either the
RESETLOGS
or
NORESETLOGS
(default) keywords to generate
CREATE
CONTROLFILE
...
RESETLOGS
or
CREATE
CONTROLFILE
...
NORESETLOGS
versions of the script.
All the restrictions related to read-only files in
CREATE
CONTROLFILE
statements also apply
to offline normal tablespaces, except that you must to bring the tablespace online after
the database is open. Omit temp files from the
CREATE
CONTROLFILE
statement and add
them after opening the database.
See Also:
"Backing Up the Control File to a Trace File" to learn how to make trace
backups of the control file
31.4 Re-Creating Data Files When Backups Are Unavailable
If a data file is damaged and no backup of the file is available, then you can still
recover the data file if:
•All archived log files written after the creation of the original data file are available
Chapter 31
Re-Creating Data Files When Backups Are Unavailable
31-10

•The control file contains the name of the damaged file (that is, the control file is
current, or is a backup taken after the damaged data file was added to the
database)
Note:
You cannot re-create any of the data files for the
SYSTEM
tablespace by
using the
CREATE
DATAFILE
clause of the
ALTER
DATABASE
statement
because the necessary redo is not available.
To re-create a data file for recovery:
1. Create an empty data file to replace a damaged data file that has no
corresponding backup. For example, assume that data file
/disk1/oradata/trgt/
users01.dbf
is damaged, and no backup is available. The following statement re-
creates the original data file (same size) on
disk2
:
ALTER DATABASE CREATE DATAFILE '/disk1/oradata/trgt/users01.dbf' AS
'/disk2/users01.dbf';
This statement creates an empty file that is the same size as the lost file. The
database looks at information in the control file and the data dictionary to obtain
size information. The old data file is renamed as the new data file.
2. Perform media recovery on the empty data file. For example, enter:
RECOVER DATAFILE '/disk2/users01.dbf'
3. All archived logs written after the original data file was created must be applied to
the new, empty version of the lost data file during recovery.
31.5 Recovering NOLOGGING Tables and Indexes
You can create tables and indexes with the
CREATE
TABLE
AS
SELECT
statement. You can
also specify that the database create them with the
NOLOGGING
option. When you create
a table or index as
NOLOGGING
, the database does not generate redo log records for the
operation. Thus, you cannot recover objects created with
NOLOGGING
, even if you run in
ARCHIVELOG
mode.
Note:
If you cannot afford to lose tables or indexes created with
NOLOGGING
, then
make a backup after the unrecoverable table or index is created.
Be aware that when you perform media recovery, and some tables or indexes are
created normally whereas others are created with the
NOLOGGING
option, the
NOLOGGING
objects are marked logically corrupt by the
RECOVER
operation. Any attempt to access
the unrecoverable objects returns an
ORA-01578
error message. Drop the
NOLOGGING
objects and re-create them if needed.
Because it is possible to create a table with the
NOLOGGING
option and then create an
index with the
LOGGING
option on that table, the index is not marked as logically corrupt
Chapter 31
Recovering NOLOGGING Tables and Indexes
31-11

after you perform media recovery. The table was unrecoverable (and thus marked as
corrupt after recovery), however, so the index points to corrupt blocks. The index must
be dropped, and the table and index must be re-created if necessary.
See Also:
Oracle Data Guard Concepts and Administration for information about the
effect of
NOLOGGING
on a database
31.6 Recovering Transportable Tablespaces
The transportable tablespace feature of Oracle Database enables a user to transport a
set of tablespaces from one database to another. Transporting a tablespace into a
database is like creating a tablespace with loaded data. Using this feature is often an
advantage for the following reasons:
•It is faster than using the Data Pump Export or SQL*Loader utilities because it
involves only copying data files and integrating metadata
•You can use it to move index data, hence avoiding the necessity of rebuilding
indexes
See Also:
Oracle Database Administrator's Guide for detailed information about using
the transportable tablespace feature
Like normal tablespaces, transportable tablespaces are recoverable. However, even
though you can recover normal tablespaces without a backup, you must have a
consistent version of the transported data files to recover a transported tablespace.
To recover a transportable tablespace, use the following procedure:
1. If the database is open, then take the transported tablespace offline. For example,
if you want to recover the
users
tablespace, then issue the following statement:
ALTER TABLESPACE users OFFLINE IMMEDIATE;
2. Restore a backup of the transported data files with an operating system utility. The
backup can be the initial version of the transported data files or any backup taken
after the tablespace is transported. For example, enter:
% cp /backup/users.dbf $ORACLE_HOME/oradata/trgt/users01.dbf
3. Recover the tablespace as usual. For example, enter:
RECOVER TABLESPACE users
You may see the error
ORA-01244
when recovering through a transportable tablespace
operation just as when recovering through a
CREATE
TABLESPACE
operation. In this case,
rename the unnamed files to the correct locations using the procedure in "Recovering
Through an Added Data File with a Backup Control File".
Chapter 31
Recovering Transportable Tablespaces
31-12

31.7 Recovering After the Loss of Online Redo Log Files
If a media failure has affected the online redo logs of a database, then the appropriate
recovery procedure depends on the following considerations:
•The configuration of the online redo log: mirrored or non-mirrored
•The type of media failure: temporary or permanent
•The types of online redo log files affected by the media failure: current, active,
unarchived, or inactive
The following table displays
V$LOG
status information that can be crucial in a recovery
situation involving online redo logs.
Table 31-3 STATUS Column of V$LOG
Status Description
UNUSED
The online redo log has never been written to.
CURRENT
The online redo log is active, that is, needed for instance recovery, and
it is the log to which the database is currently writing. The redo log can
be open or closed.
ACTIVE
The online redo log is active, that is, needed for instance recovery, but
is not the log to which the database is currently writing. It may be in
use for block recovery, and may or may not be archived.
CLEARING
The log is being re-created as an empty log after an
ALTER
DATABASE
CLEAR
LOGFILE
statement. After the log is cleared, then the status
changes to
UNUSED
.
CLEARING_CURRENT
The current log is being cleared of a closed thread. The log can stay in
this status if there is some failure in the switch such as an I/O error
writing the new log header.
INACTIVE
The log is no longer needed for instance recovery. It may be in use for
media recovery, and may or may not be archived.
This section contains the following topics:
•Recovering After Losing a Member of a Multiplexed Online Redo Log Group
•Recovering After Losing All Members of an Online Redo Log Group
31.7.1 Recovering After Losing a Member of a Multiplexed Online
Redo Log Group
You can recover after losing a member of a multiplexed online redo log group. The
database continues to function as usual during the following conditions:
If the online redo log of a database is multiplexed, and if at least one member of each
online redo log group is not affected by the media failure, then the database continues
functioning as usual, but error messages are written to the log writer trace file and the
alert_SID.log
of the database.
You can resolve the problem of a missing member of a multiplexed online redo log
group by taking one of the following actions:
Chapter 31
Recovering After the Loss of Online Redo Log Files
31-13

•If the hardware problem is temporary, then correct it. The log writer process
accesses the previously unavailable online redo log files as if the problem never
existed.
•If the hardware problem is permanent, then drop the damaged member and add a
new member by using the following procedure.
Note:
The newly added member provides no redundancy until the log group is
reused.
1. Locate the file name of the damaged member in
V$LOGFILE
. The status is
INVALID
if
the file is inaccessible:
SELECT GROUP#, STATUS, MEMBER
FROM V$LOGFILE
WHERE STATUS='INVALID';
GROUP# STATUS MEMBER
------- ----------- ---------------------
0002 INVALID /disk1/oradata/trgt/redo02.log
2. Drop the damaged member. For example, to drop member
redo02.log
from group
2
, issue the following statement:
ALTER DATABASE DROP LOGFILE MEMBER '/disk1/oradata/trgt/redo02.log';
3. Add a new member to the group. For example, to add
redo02.log
to group
2
, issue
the following statement:
ALTER DATABASE ADD LOGFILE MEMBER '/disk1/oradata/trgt/redo02b.log'
TO GROUP 2;
If the file to add already exists, then it must be the same size as the other group
members, and you must specify the
REUSE
option. For example:
ALTER DATABASE ADD LOGFILE MEMBER '/disk1/oradata/trgt/redo02b.log'
REUSE TO GROUP 2;
31.7.2 Recovering After Losing All Members of an Online Redo Log
Group
If a media failure damages all members of an online redo log group, then different
scenarios can occur depending on the type of online redo log group affected by the
failure and the archiving mode of the database.
If the damaged online redo log group is current and active, then it is needed for crash
recovery; otherwise, it is not. Table 31-4 outlines the various recovery scenarios.
Table 31-4 Recovering After the Loss of an Online Redo Log Group
If the Group
Is...
Then... And You Can...
Inactive It is not needed for crash
recovery
Clear the archived or unarchived group.
Chapter 31
Recovering After the Loss of Online Redo Log Files
31-14

Table 31-4 (Cont.) Recovering After the Loss of an Online Redo Log Group
If the Group
Is...
Then... And You Can...
Active It is needed for crash recovery Attempt to issue a checkpoint and clear the
log; if impossible, then you must either use
Flashback Database or restore a backup and
perform incomplete recovery up to the most
recent available redo log.
Current It is the redo log that the
database is currently writing to
Attempt to clear the log; if impossible, then you
must either use Flashback Database or
restore a backup and perform incomplete
recovery up to the most recent available redo
log.
To determine whether the damaged group is active or inactive.
1. Locate the file name of the lost redo log in
V$LOGFILE
and then look for the group
number corresponding to it. For example, enter:
SELECT GROUP#, STATUS, MEMBER FROM V$LOGFILE;
GROUP# STATUS MEMBER
------- ----------- ---------------------
0001 /oracle/dbs/log1a.f
0001 /oracle/dbs/log1b.f
0002 INVALID /oracle/dbs/log2a.f
0002 INVALID /oracle/dbs/log2b.f
0003 /oracle/dbs/log3a.f
0003 /oracle/dbs/log3b.f
2. Determine which groups are active.
For example, execute the following SQL query (sample output included):
SELECT GROUP#, MEMBERS, STATUS, ARCHIVED
FROM V$LOG;
GROUP# MEMBERS STATUS ARCHIVED
------ ------- --------- -----------
0001 2 INACTIVE YES
0002 2 ACTIVE NO
0003 2 CURRENT NO
3. Perform one of the following actions:
•If the affected group is inactive, then follow the procedure in "Losing an
Inactive Online Redo Log Group".
•If the affected group is active (as in the preceding example), then follow the
procedure in "Losing an Active Online Redo Log Group ".
31.7.2.1 Losing an Inactive Online Redo Log Group
If all members of an online redo log group with
INACTIVE
status are damaged, then the
procedure depends on whether you can fix the media problem that damaged the
inactive redo log group. If the failure is temporary, then fix the problem. The log writer
can reuse the redo log group when required. If the failure is permanent, then the
damaged inactive online redo log group eventually halts normal database operation.
Chapter 31
Recovering After the Loss of Online Redo Log Files
31-15

Reinitialize the damaged group manually by issuing the
ALTER DATABASE CLEAR LOGFILE
statement as described in this section.
31.7.2.1.1 Clearing Inactive, Archived Redo
You can clear an inactive redo log group when the database is open or closed. The
procedure depends on whether the damaged group has been archived.
To clear an inactive, online redo log group that has been archived:
1. If the database is shut down, then start a new instance and mount the database:
STARTUP MOUNT
2. Reinitialize the damaged log group. For example, to clear redo log group
2
, issue
the following statement:
ALTER DATABASE CLEAR LOGFILE GROUP 2;
31.7.2.1.2 Clearing Inactive, Unarchived Redo
Clearing a not-yet-archived redo log allows it to be reused without archiving it. This
action makes backups unusable if they were started before the last change in the log,
unless the file was taken offline before the first change in the log. Hence, if you need
the cleared log file for recovery of a backup, then you cannot recover that backup.
Clearing a not-yet-archived-redo-log, prevents complete recovery from backups due to
the missing log.
To clear an inactive, online redo log group that has not been archived:
1. If the database is shut down, then start a new instance and mount the database:
SQL> STARTUP MOUNT
2. Clear the log using the
UNARCHIVED
keyword.
For example, to clear log group
2
, issue the following SQL statement:
SQL> ALTER DATABASE CLEAR UNARCHIVED LOGFILE GROUP 2;
If there is an offline data file that requires the cleared log to bring it online, then the
keywords
UNRECOVERABLE
DATAFILE
are required. The data file must be dropped
because the redo logs necessary to bring the data file online are being cleared,
and there is no copy of it. For example, enter:
SQL> ALTER DATABASE CLEAR UNARCHIVED LOGFILE GROUP 2 UNRECOVERABLE DATAFILE;
3. Immediately back up all data files in the database with an operating system utility,
so that you have a backup you can use for complete recovery without relying on
the cleared log group. For example, enter:
% cp /disk1/oracle/dbs/*.dbf /disk2/backup
4. Back up the database's control file with the
ALTER
DATABASE
statement. For example,
enter:
SQL> ALTER DATABASE BACKUP CONTROLFILE TO '/oracle/dbs/cf_backup.f';
31.7.2.1.3 Failure of CLEAR LOGFILE Operation
The
ALTER
DATABASE
CLEAR
LOGFILE
statement can fail with an I/O error due to media
failure when it is not possible to:
Chapter 31
Recovering After the Loss of Online Redo Log Files
31-16

•Relocate the redo log file onto alternative media by re-creating it under the
currently configured redo log file name
•Reuse the currently configured log file name to re-create the redo log file because
the name itself is invalid or unusable (for example, due to media failure)
In these cases, the
ALTER
DATABASE
CLEAR
LOGFILE
statement (before receiving the I/O
error) successfully informs the control file that the log is being cleared and does not
require archiving. The I/O error occurs at the step in which the
CLEAR
LOGFILE
statement
attempts to create the new redo log file and write zeros to it. This fact is reflected in
V$LOG.CLEARING_CURRENT
.
31.7.2.2 Losing an Active Online Redo Log Group
If the database is still running and the lost active redo log is not the current log, then
issue the
ALTER
SYSTEM
CHECKPOINT
statement. If the operation is successful, then the
active redo log becomes inactive, and you can follow the procedure in "Losing an
Inactive Online Redo Log Group". If the operation is unsuccessful, or if your database
has halted, then perform one of procedures in this section, depending on the archiving
mode.
The current log is the one
LGWR
is currently writing to. If a
LGWR
I/O operation fails, then
LGWR terminates and the instance fails. In this case, you must restore a backup,
perform incomplete recovery, and open the database with the
RESETLOGS
option.
31.7.2.2.1 Recovering from the Loss of Active Logs in NOARCHIVELOG Mode
In this scenario, the database archiving mode is
NOARCHIVELOG
.
To recover from the loss of an active online log group in NOARCHIVELOG
mode:
1. If the media failure is temporary, then correct the problem so that the database
can reuse the group when required.
2. Restore the database from a consistent, whole database backup (data files and
control files). For example, enter:
% cp /disk2/backup/*.dbf $ORACLE_HOME/oradata/trgt/
3. Mount the database:
STARTUP MOUNT
4. Because online redo logs are not backed up, you cannot restore them with the
data files and control files. To allow the database to reset the online redo logs, you
must first mimic incomplete recovery:
RECOVER DATABASE UNTIL CANCEL
CANCEL
5. Open the database using the
RESETLOGS
option:
ALTER DATABASE OPEN RESETLOGS;
6. Shut down the database consistently. For example, enter:
SHUTDOWN IMMEDIATE
7. Make a whole database backup.
Chapter 31
Recovering After the Loss of Online Redo Log Files
31-17

If the media failure is temporary, then correct the problem so that the database can
reuse the group when required. If the media failure is not temporary, then use the
following procedure.
31.7.2.2.2 Recovering from Loss of Active Logs in ARCHIVELOG Mode
In this scenario, the database archiving mode is
ARCHIVELOG
.
To recover from loss of an active online redo log group in ARCHIVELOG mode:
1. Begin incomplete media recovery, recovering up through the log before the
damaged log.
2. Ensure that the current name of the lost redo log can be used for a newly created
file. If not, then rename the members of the damaged online redo log group to a
new location. For example, enter:
ALTER DATABASE RENAME FILE "/disk1/oradata/trgt/redo01.log" TO "/tmp/redo01.log";
ALTER DATABASE RENAME FILE "/disk1/oradata/trgt/redo02.log" TO "/tmp/redo02.log";
3. Open the database using the
RESETLOGS
option:
ALTER DATABASE OPEN RESETLOGS;
Note:
All updates executed from the end point of the incomplete recovery to
the present must be reexecuted.
31.7.2.3 Loss of Multiple Redo Log Groups
If you have lost multiple groups of the online redo log, then use the recovery method
for the most difficult log to recover. The order of difficulty, from most difficult to least
difficult, is as follows:
1. The current online redo log
2. An active online redo log
3. An unarchived online redo log
4. An inactive online redo log
31.8 Recovering from a Dropped Table Without Using
Flashback Features
One common error is the accidental dropping of a table from your database. In
general, the fastest and simplest solution is to use the Flashback Drop feature to
reverse the dropping of the table. If you cannot use Flashback Table (for example,
because Flashback Drop is disabled or the table was dropped with the
PURGE
option),
then you can perform the procedure in this section.
In this scenario, assume that you do not have the Flashback Database functionality
enabled, so the
FLASHBACK
DATABASE
command is not an option. However, you do have
Chapter 31
Recovering from a Dropped Table Without Using Flashback Features
31-18

physical backups of the database. If possible, keep the database that experienced the
user error online and available for use.
Note:
Grant powerful privileges only to appropriate users to minimize user errors
that require recovery.
To recover a table that has been accidentally dropped:
1. Back up all data files of the existing database in case an error is made during the
remaining steps of this procedure.
2. Restore a partial backup of the database to an alternative location. At minimum,
restore the following:
•
SYSTEM
and
SYSAUX
tablespaces
•Tablespaces containing undo or rollback segments
•Self-contained tablespaces that contain the data to be retrieved
3. Perform incomplete recovery of this backup using a restored backup control file, to
the point just before the table was dropped.
4. Export the lost data from the temporary, restored version of the database using
Data Pump Export. In this case, export the accidentally dropped table.
Note:
System audit options are exported.
5. Use the Data Pump Import utility to import the data back into the production
database.
6. Delete the files of the temporary copy of the database to conserve space.
See Also:
Oracle Database Utilities for more information about Oracle Data Pump
31.9 Dropping a Database with SQL*Plus
You may need to remove a database, that is, the database files that form the
database, from the operating system. For example, this scenario can occur when you
create a test database and then no longer have a use for it. The SQL statement
DROP
DATABASE
can perform this function.
Chapter 31
Dropping a Database with SQL*Plus
31-19

See Also:
"Dropping a Database" to learn how to use the equivalent RMAN command
DROP
DATABASE
To drop a database with SQL*Plus:
1. After connecting to the database with administrator privileges, ensure that the
database is either mounted or open in restricted mode with no users connected.
For example, enter the following command:
SQL> STARTUP RESTRICT FORCE MOUNT
2. Remove the data files and control files from the operating system.
For example, enter the following command:
SQL> DROP DATABASE; # deletes all database files, both ASM and non-ASM
If the database is on raw disk, then the command does not delete the actual raw
disk special files.
3. Use an operating system utility to delete all backups and archived logs associated
with the database.
For example, on Linux and UNIX enter the following command:
% rm /backup/* /disk1/oradata/trgt/arch/*
Chapter 31
Dropping a Database with SQL*Plus
31-20

Glossary
active database duplication
A duplicate database that is created over a network without restoring backups of the
target database. This technique is an alternative to backup-based duplication.
ancestor incarnation
The parent incarnation is the database incarnation from which the current incarnation
branched following an
OPEN RESETLOGS
operation. The parent of the parent incarnation
is an ancestor incarnation. Any parent of an ancestor incarnation is also an ancestor
incarnation.
application container
A named set of application PDBs that are plugged in to an application root.
application PDB
A PDB that is plugged in to an application container.
application root
The root container within an application container. Every application container has
exactly one application root. An application root can contain common objects and is
created with the
CREATE PLUGGABLE DATABASE
statement.
archival backup
A database backup that is exempted from the normal backup and recovery strategy.
Typically, these backups are archived onto separate storage media and retained for
long periods.
archived redo log
A copy of a filled member of an online redo log group made when the database is in
ARCHIVELOG
mode. After the LGWR process fills each online redo log with redo records,
the archiver process copies the log to one or more redo log archiving destinations.
This copy is the archived redo log. RMAN does not distinguish between an original
archived redo log and an image copy of an archived redo log; both are considered
image copies.
archived redo log deletion policy
A configurable, persistent RMAN policy that governs when archived redo logs can be
deleted. You can configure the policy with the
CONFIGURE ARCHIVELOG DELETION POLICY
command.
Glossary-1

archived redo log failover
An RMAN feature that enables RMAN to complete a backup even when some
archived log destinations are missing logs or have logs with corrupt blocks. For
example, if you back up logs in the fast recovery area that RMAN determines are
corrupt, RMAN can search for logs in other archiving locations and back them up
instead if they are intact.
ARCHIVELOG mode
The mode of the database in which Oracle Database copies filled online redo logs to
disk. Specify the mode at database creation or with the
ALTER
DATABASE
ARCHIVELOG
statement.
See Also: archived redo log, NOARCHIVELOG mode
archiving
The operation in which a filled online redo log file is copied to an offline log archiving
destination. An offline copy of an online redo logs is called an archived redo log. You
must run the database in
ARCHIVELOG
mode to archive redo logs.
asynchronous I/O
A server process can begin an I/O and then perform other work while waiting for the
I/O to complete while RMAN is either reading or writing data. RMAN can also begin
multiple I/O operations before waiting for the first I/O to complete.
automatic channel allocation
The ability of RMAN to perform backup and restore tasks without requiring the use of
the
ALLOCATE CHANNNEL
command. You can use the
CONFIGURE
command to specify disk
and tape channels. Then, you can issue commands such as
BACKUP
and
RESTORE
at the
RMAN command prompt without manually allocating channels. RMAN uses whatever
configured channels that it needs to execute the commands.
Automatic Diagnostic Repository (ADR)
A system-managed repository for storing and organizing database trace files and other
diagnostic data. ADR provides a comprehensive view of all the serious errors
encountered by the database and maintains all relevant data needed for problem
diagnostic and their eventual resolution. The repository contains data describing
incidents, traces, dumps, alert messages, data repair records, data integrity check
records, SQL trace information, core dumps, and so on.
The initialization parameter
DIAGNOSTIC_DEST
specifies the location of the ADR base,
which is the directory that contains one or more ADR homes. Each ADR home is used
by a product or a product instance to store diagnostic data in well-defined
subdirectories. For example, diagnostic data for an Oracle Database instance is stored
in its ADR home, which includes an
alert
subdirectory for alert messages, a
trace
subdirectory for trace files, and so on. The easiest way to locate trace files and the
alert log is to run the following SQL query:
SELECT NAME, VALUE FROM V$DIAG_INFO
.
Glossary
Glossary-2

Automatic Storage Management (ASM)
A vertical integration of both the file system and the volume manager built specifically
for Oracle Database files. ASM consolidates storage devices into easily managed disk
groups and provides benefits such as mirroring and striping without requiring a third-
party logical volume manager.
automatic undo management mode
A mode of the database in which undo data is stored in a dedicated undo tablespace.
The only undo management that you must perform is the creation of the undo
tablespace. All other undo management is performed automatically.
auxiliary channel
An RMAN channel that is connected to an auxiliary instance. An auxiliary channel is
specified with the
AUXILIARY
keyword of the
ALLOCATE CHANNEL
or
CONFIGURE CHANNEL
command.
auxiliary database
(1) A database created from target database backups with the RMAN
DUPLICATE
command.
(2) A temporary database that is restored to a new location and then started with a
new instance name during tablespace point-in-time recovery (TSPITR). A TSPITR
auxiliary database contains the recovery set and auxiliary set.
auxiliary destination
In a transportable tablespace operation, the location on disk where auxiliary set files
such as the parameter file, data files (other than those of the tablespaces being
transported), control files, and online redo logs of the auxiliary instance can be stored.
auxiliary instance
The Oracle instance associated with an auxiliary database, or the temporary instance
used in tablespace point-in-time recovery (TSPITR) or a transportable tablespace
operation.
auxiliary set
In TSPITR, the set of files that is not in the recovery set but which must be restored in
the auxiliary database for the TSPITR operation to be successful. In a transportable
tablespace operation, the auxiliary set includes data files and other files required for
the tablespace transport but which are not themselves part of the recovery set.
backup
(1) A backup copy of data, that is, a database, tablespace, table, data file, control file,
or archived redo log. Backups can be physical (at the database file level) or logical (at
the database object level). Physical backups can be created by using RMAN to back
up one or more data files, control files or archived redo log files. You can create logical
backups with Data Pump Export.
Glossary
Glossary-3

(2) In an RMAN context, the output of the
BACKUP
command. The output format of a
backup can be a backup set, proxy copy, or image copy. Logs archived by the
database are considered copies rather than backups.
backup and recovery
The set of concepts, procedures, and strategies involved in protecting the database
against data loss due to media failure or users errors.
backup-based duplication
A duplicate database that is created by restoring and recovering backups of the target
database. This technique is an alternative to active database duplication.
backup control file
A backup of the control file. You can back up the control file with the RMAN
backup
command or with the SQL statement
ALTER
DATABASE
BACKUP
CONTROLFILE
TO
'filename'
.
backup encryption
The encryption of backup sets by using an algorithm listed in
V$RMAN_ENCRYPTION_ALGORITHMS
. RMAN can transparently encrypt data written to backup
sets and decrypt those backup sets when they are needed in a
RESTORE
operation.
RMAN offers three modes of encryption: transparent, password protected, and dual
mode.
backup mode
The database mode (also called hot backup mode) initiated when you issue the
ALTER
TABLESPACE
...
BEGIN
BACKUP
or
ALTER
DATABASE
BEGIN
BACKUP
command before taking an
online backup. You take a tablespace out of backup mode when you issue the
ALTER
TABLESPACE
...
END
BACKUP
or
ALTER
DATABASE
END
BACKUP
command.
When making a user-managed backup of data files in an online tablespace, you must
place the tablespace in backup mode to protect against the possibility of a fractured
block. In backup mode, updates to the database create more than the usual amount of
redo. Each time a block in the buffer cache becomes dirty, the database must write an
image of the changed block to the redo log file, in addition to recording the changes to
the data. RMAN does not require you to put the database in backup mode.
See Also: corrupt block
backup optimization
A configuration enabling RMAN to automatically skip backups of files that it has
already backed up. You enable and disable backup optimization with the
CONFIGURE
command.
backup piece
The physical file format used to store an RMAN backup set. Each logical backup set
contains one or more physical backup pieces.
Glossary
Glossary-4

backup retention policy
A user-defined policy for determining how long backups and archived logs must be
retained for media recovery. You can define a retention policy in terms of backup
redundancy or a recovery window. RMAN retains the data file backups required to
satisfy the current retention policy, and any archived redo logs required for complete
recovery of those data file backups.
backup set
A backup of one or more data files, control files, server parameter files, and archived
redo log files. Each backup set consists of one or more binary files. Each binary file is
called a backup piece. Backup pieces are written in a proprietary format that can only
be created or restored by RMAN.
Backup sets are produced by the RMAN
BACKUP
command. A backup set usually
consists of only one backup piece. RMAN divides the contents of a backup set among
multiple backup pieces only if you limit the backup piece size using the
MAXPIECESIZE
option of the
ALLOCATE CHANNEL
or
CONFIGURE CHANNEL
command.
See Also: unused block compression, multiplexing, RMAN
backup undo optimization
The exclusion of undo not needed for recovery of an RMAN backup because the it
describes and contains already-committed transactions. For example, a user updates
the
salaries
table in the
USERS
tablespace. The change is written to the
USERS
tablespace, while the before image of the data is written to the
UNDO
tablespace. A
subsequent RMAN backup of the
UNDO
tablespace may not include the undo for the
salary change. Backup undo optimization is built-in RMAN behavior and cannot be
disabled.
backup window
A period of time during which a backup activity must complete.
base recovery catalog
The entirety of the recovery catalog schema. The base recovery catalog is
distinguished from a virtual private catalog, which is a subset of a recovery catalog.
binary compression
A technique whereby RMAN applies a compression algorithm to data in backup sets.
block change tracking
A database option that causes Oracle Database to track data file blocks affected by
each database update. The tracking information is stored in a block change tracking
file. When block change tracking is enabled, RMAN uses the record of changed blocks
from the change tracking file to improve incremental backup performance by only
reading those blocks known to have changed, instead of reading data files in their
entirety.
Glossary
Glossary-5

block change tracking file
A binary file used by RMAN to record changed blocks to improve incremental backup
performance. You create and rename this file with the
ALTER DATABASE
statement.
block media recovery
The recovery of specified blocks within a data file with the Recovery Manager
RECOVER ... BLOCK
command. Block media recovery leaves the affected data files
online and restores and recovers only the damaged or corrupted blocks.
breaking a mirror
The termination of a disk mirroring procedure so that a mirror image is no longer kept
up-do-date.
CDB
An Oracle Database installation that contains at least one PDB. A CDB also contains
one root and one seed. Every Oracle Database is either a CDB or a non-CDB.
CDB restore point
An alias for an SCN or a point in time in a multitenant container database (CDB). CDB
restore points are accessible to all PDBs within the CDB.
channel
An RMAN channel represents one stream of data to or from a backup device. A
channel can either be a
DISK
channel (used to perform disk I/O) or an SBT channel
(used to perform I/O through a third-party media management software). Each
allocated channel starts a new Oracle Database session. The session then performs
backup, restore, and recovery operations.
See Also: target database
channel parallelism
Allocating multiple channels for RMAN operations.
checkpoint
A data structure that defines an SCN in the redo thread of a database. Checkpoints
are recorded in the control file and each data file header, and are a crucial element of
recovery.
checksum
A number calculated by the database from all the bytes stored in a data or redo block.
If the
DB_BLOCK_CHECKSUM
initialization parameter is enabled, then the database
calculates the checksum for every data file or online redo log block and stores it in the
block header when writing to disk. The database can use the checksum value to check
consistency.
circular reuse records
Control file records containing information used by RMAN for backups and recovery
operations. These records are arranged in a logical ring. When all available record
Glossary
Glossary-6

slots are full, Oracle either expands the control file to make room for a new records or
overwrites the oldest record. The
CONTROL_FILE_RECORD_KEEP_TIME
initialization
parameter controls how many days records must be kept before they can be
overwritten. The default for
CONTROL_FILE_RECORD_KEEP_TIME
is 7 days.
See Also: noncircular reuse records
closed backup
A backup of one or more database files taken while the database is closed. Typically,
closed backups are whole database backups. If you closed the database consistently,
then all the files in the backup are consistent. Otherwise, the backups are inconsistent.
See Also: consistent shutdown, consistent backup
cold backup
See closed backup
command file
In an RMAN context, a client-side text file containing a sequence of RMAN commands.
You can run command files with the
@
or
@@
commands from within RMAN or from the
operating system prompt with the
@
or
CMDFILE
parameters.
common user
In a multitenant container database (CDB), a database user that exists with the same
identity in the root and in every existing and future PDB.
complete recovery
Recovery of one or more data files that applies all redo generated after the restored
backup. Typically, you perform complete media recovery when media failure damages
one or more data files or control files. You fully recover the damaged files using all
redo generated since the restored backup was taken.
See Also: incomplete recovery
consistent backup
A whole database backup that you can open with the
RESETLOGS
option without
performing media recovery. You do not need to apply redo to this backup to make it
consistent. Unless you apply the redo generated since the consistent backup was
created, however, you lose all transactions since the time of the consistent backup.
You can only take consistent backups after you have performed a consistent shutdown
of the database. The database must not be re-opened until the backup has completed.
See Also: fuzzy file, inconsistent backup
consistent shutdown
A database shut down with the
IMMEDIATE
,
TRASACTIONAL
, or
NORMAL
options of the
statement. A database shut down cleanly does not require recovery; it is already in a
consistent state.
Glossary
Glossary-7

control file autobackup
The automatic backup of the current control file and server parameter file that RMAN
makes after backups and, if the database is in
ARCHIVELOG
mode, after structural
changes.
The control file autobackup has a default file name that allows RMAN to restore it even
if the control file and recovery catalog are lost. You can override the default file name.
convert script
A script generated by the
CONVERT DATABASE
command that you can use to convert data
file formats on the destination host.
copy
To back up a bit-for-bit image of an Oracle file (Oracle data files, control files, and
archived redo logs) onto disk. You can copy in two ways:
•Using operating system utilities (for example, the UNIX
cp
or
dd
)
•Using the RMAN
BACKUP
AS
COPY
command
See Also: backup
corrupt block
An Oracle block that is not in a recognized Oracle format, or whose contents are not
internally consistent. Typically, corruptions are caused by faulty hardware or operating
system problems. Oracle identifies corrupt blocks as either logically corrupt (an Oracle
internal error) or media corrupt (the block format is not correct).
You can repair a media corrupt block with block media recovery, or dropping the
database object that contains the corrupt block so that its blocks are reused for
another object. If media corruption is due to faulty hardware, then neither solution
works until the hardware fault is corrected.
crash recovery
The automatic application of online redo records to a database after either a single-
instance database crashes or all instances of an Oracle Real Applications Cluster
configuration crash. Crash recovery only requires redo from the online logs; archived
redo logs are not required.
See Also: recover
cross-platform backup
A backup that is created on the source database and can be restored on the
destination database that is running on a different platform than the source platform.
Cross-platform backups are used to transport data across platforms.
Cross-platform operations can be performed either on the source database or
destination database. However, they are often performed on the destination database
because this is the usually the non-production database.
Glossary
Glossary-8

crosscheck
A check to determine whether files on disk or in the media management catalog
correspond to the data in the RMAN repository. Because the media management
software can mark tapes as expired or unusable, and because files can be deleted
from disk or otherwise become corrupted, the RMAN repository can contain outdated
information about backups. Run the
CROSSCHECK
command to perform a crosscheck.
See Also: validation
cumulative incremental backup
An incremental backup that backs up all the blocks changed since the most recent
backup at level 0. When recovering with cumulative incremental backups, only the
most recent cumulative incremental backup must be applied.
See Also: differential incremental backup, incremental backup
current incarnation
The database incarnation in which the database is currently generating redo.
current online redo log
The online redo log file in which the LGWR background process is currently logging
redo records.
See Also: redo log, redo log group
data integrity check
An invocation of a checker, which is a diagnostic procedure registered with the Health
Monitor.
data repair
The use of media recovery or Oracle Flashback Technology to recover lost or
corrupted data.
Data Recovery Advisor
An Oracle Database tool that automatically diagnoses persistent data failures,
presents repair options to the user, and executes repairs at the user's request.
database area
A location for the Oracle managed data files, control files, and online redo log files.
The database area is specified by the
DB_CREATE_FILE_DEST
initialization parameter.
database checkpoint
The thread checkpoint that has the lowest SCN. All changes in all enabled redo
threads with SCNs before the database checkpoint SCN are guaranteed to have been
written to disk.
See Also: checkpoint, data file checkpoint
Glossary
Glossary-9

database identifier
See DBID
database point-in-time recovery (DBPITR)
The recovery of an entire database to a specified past target time, SCN, or log
sequence number.
See Also: incomplete recovery, tablespace point-in-time recovery (TSPITR)
database registration
See registration
data file checkpoint
A data structure that defines an SCN in the redo thread of a database for a particular
data file. Every data file has a checkpoint SCN, which you can view in
V$DATAFILE.CHECKPOINT_CHANGE#
. All changes with an SCN lower than this SCN are
guaranteed to be in the data file.
data file media recovery
The application of redo records to a restored data file to roll it forward to a more
current time. Unless you are doing block media recovery, the data file must be offline
while being recovered.
DBID
An internal, uniquely generated number that differentiates databases. Oracle creates
this number automatically when you create the database.
destination database
The database into which data from the source database is being transported.
destination host
The computer on which a duplicate database resides.
destination platform
When transporting data across platforms, the platform on which the destination
database is running.
differential incremental backup
A type of incremental backup that backs up all blocks that have changed since the
most recent backup at level 1 or level 0. For example, in a differential level 1 backup
RMAN determines which level 1 or level 0 incremental backup is most recent and then
backs up all blocks changed since that backup. Differential backups are the default
type of incremental backup. When recovering using differential incremental backups,
RMAN must apply all differential incremental level 1 backups since the restored data
file backup.
See Also: cumulative incremental backup, incremental backup
Glossary
Glossary-10

direct ancestral path
When multiple
OPEN RESETLOGS
operations have been performed, the incarnation path
that includes the parent incarnation of the current database incarnation and each
ancestor incarnation of the current incarnation.
disaster recovery
A strategic response to the loss of all data associated with a database installation. For
example, a fire may destroy a server in a data center, forcing you to reinstall Oracle
Database on a new server and recover the lost database from backups.
disk controller
A hardware component that is responsible for controlling one or more disk drives.
disk group
A collection of disks that are managed as a unit by Automatic Storage Management
(ASM). The components of a disk group include disks, files, and allocation units.
disk quota
A user-specified limit to the size of the fast recovery area. When the disk quota is
reached, Oracle automatically deletes files that are no longer needed.
duplexed backup set
In RMAN, a duplexed backup set is an RMAN-generated identical copy of a backup
set. Each backup piece is in the original backup set is copied, with each copy getting a
unique copy number (for example,
0tcm8u2s_1_1
and
0tcm8u2s_1_2
).
duplicate database
A database created from target database backups using the RMAN duplicate
command.
See Also: auxiliary database
expired backup
A backup whose status in the RMAN repository is
EXPIRED
, which means that the
backup was not found. RMAN marks backups and copies as expired when you run a
CROSSCHECK
command and the files are absent or inaccessible.
export
The extraction of logical data (that is, not physical files) from a database into a binary
file using Data Pump Export. You can then use Data Pump Import to import the data
into a database.
See Also: logical backup
Glossary
Glossary-11

export dump file
A file created by the Data Pump Export utility. The dump file set is made up of one or
more disk files that contain table data, database object metadata, and control
information. The files are written in a proprietary, binary format.
failure
For Data Recovery Advisor, a failure is a persistent data corruption that has been
diagnosed by the database. A failure can manifest itself as observable symptoms such
as error messages and alerts, but a failure is different from a symptom because it
represents a diagnosed problem. Failures are recorded in a repository for diagnostic
data located outside of the database.
For each failure, Data Recovery Advisor generates a problem statement that
unambiguously describes it. Examples of failures include inaccessible data files and
corrupted undo segments. Data Recovery Advisor maps every failure to a repair option
or set of repair options.
failure priority
The priority of a failure diagnosed by Data Recovery Advisor. Every failure that is not
closed has
CRITICAL
,
HIGH
, or
LOW
status. You can manually change the status of
HIGH
and
LOW
failures with the
CHANGE
command.
failure status
The status of a failure diagnosed by Data Recovery Advisor. Every failure has
OPEN
or
CLOSED
status.
fast recovery area
An optional disk location that you can use to store recovery-related files such as
control file and online redo log copies, archived redo log files, flashback logs, and
RMAN backups. Oracle Database and RMAN manage the files in the fast recovery
area automatically. You can specify the disk quota, which is the maximum size of the
fast recovery area. Formerly referred to as flash recovery area.
file section
A contiguous range of blocks in a data file. A multisection backup processes a large
file in parallel by copying each section to a separate backup piece.
flashback data archive
A historical repository of transactional changes to every record in a table for the
duration of the record's lifetime. A flashback data archive enables you to use some
logical flashback features to transparently access historical data from far in the past.
flashback database window
The range of SCNs for which there is currently enough flashback log data to support
the
FLASHBACK
DATABASE
command. The flashback database window cannot extend
further back than the earliest SCN in the available flashback logs.
Glossary
Glossary-12

flashback logs
Oracle-generated logs used to perform flashback database operations. The database
can only write flashback logs to the fast recovery area. Flashback logs are written
sequentially and are not archived. They cannot be backed up to disk.
flashback retention target
A user-specified time or SCN that specifies how far into the past you want to be able to
perform a flashback of the database.
foreign archived redo log
An archived redo log received by a logical standby database for a LogMiner session.
Unlike normal archived logs, foreign archived logs have a different DBID. For this
reason, they cannot be backed up or restored on a logical standby database.
foreign data file
A data file that does not belong to the target database, but is being plugged into the
target database during a tablespace transport operation.
foreign data file copy
A data file that was created when a cross-platform backup is restored in the
destination database. It cannot be directly plugged in to the destination database
because it is inconsistent.
foreign tablespace
A set of foreign data files that comprise a tablespace in the source database. These
foreign data files do not belong to the target database, but are being transported into
the target database from the source database.
fractured block
A block in which the header and footer are not consistent at a given SCN. In a user-
managed backup, an operating system utility can back up a data file at the same time
that DBWR is updating the file. It is possible for the operating system utility to read a
block in a half-updated state, so that the block that is copied to the backup media is
updated in its first half, while the second half contains older data. In this case, the
block is fractured.
For non-RMAN backups, the
ALTER TABLESPACE ... BEGIN BACKUP
or
ALTER DATABASE
BEGIN BACKUP
command is the solution for the fractured block problem. When a
tablespace is in backup mode, and a change is made to a data block, the database
logs a copy of the entire block image before the change so that the database can
reconstruct this block if media recovery finds that this block was fractured.
full backup
A non-incremental RMAN backup. The word "full" does not refer to how much of the
database is backed up, but to the fact that the backup is not incremental.
Consequently, you can make a full backup of one data file.
Glossary
Glossary-13

full resynchronization
An RMAN operation that updates the recovery catalog with all changed metadata in
the database's control file. You can initiate a full catalog resynchronization by issuing
the RMAN command
RESYNC
CATALOG
. (It is rarely necessary to use
RESYNC
CATALOG
because RMAN automatically performs resynchronizations when needed.)
fuzzy file
A data file that contains at least one block with an SCN greater than or equal to the
checkpoint SCN in the data file header. Fuzzy files are possible because database
writer does not update the SCN in the file header with each file block write. For
example, this situation occurs when Oracle updates a data file that is in backup mode.
A fuzzy file that is restored always requires media recovery.
guaranteed restore point
A restore point for which the database is guaranteed to retain the flashback logs for an
Oracle Flashback Database operation. Unlike a normal restore point, a guaranteed
restore point does not age out of the control file and must be explicitly dropped.
Guaranteed restore points use space in the fast recovery area, which must be defined.
hot backup
See online backup
hot backup mode
See backup mode
image copy
A bit-for-bit copy of a single data file, archived redo log file, or control file that is:
•Usable as-is to perform recovery (unlike a backup set, which uses unused block
compression and is in an RMAN-specific format)
•Generated with the RMAN
BACKUP
AS
COPY
command, an operating system
command such as the UNIX
cp
, or by the Oracle archiver process
incarnation
A separate version of a database. The incarnation of the database changes when you
open it with the
RESETLOGS
option, but you can recover backups from a prior incarnation
so long as the necessary redo is available.
incomplete recovery
A synonym for database point-in-time recovery (DBPITR).
See Also: complete recovery, media recovery, recover
inconsistent backup
A backup in which some files in the backup contain changes that were made after the
files were checkpointed. This type of backup needs recovery before it can be made
consistent. Inconsistent backups are usually created by taking online database
Glossary
Glossary-14

backups. You can also make an inconsistent backup by backing up data files while a
database is closed, either:
•Immediately after the crash of an Oracle instance (or, in an Oracle RAC
configuration, all instances)
•After shutting down the database using
SHUTDOWN
ABORT
Inconsistent backups are only useful if the database is in
ARCHIVELOG
mode and all
archived redo logs created since the backup are available.
See Also: consistent backup, online backup, system change number (SCN), whole
database backup
incremental backup
An RMAN backup in which only modified blocks are backed up. Incremental backups
are classified by level. A level 0 incremental backup performs the same function as a
full backup in that they both back up all blocks that have ever been used. The
difference is that a full backup does not affect blocks backed up by subsequent
incremental backups, whereas an incremental backup affects blocks backed up by
subsequent incremental backups.
Incremental backups at level 1 back up only blocks that have changed since previous
incremental backups. Blocks that have not changed are not backed up. An incremental
backup can be either a differential incremental backup or a cumulative incremental
backup.
incremental forever
After a full backup, only incremental backups are stored. This allows for faster
recovery because the current image copy of the database is readily available.
incrementally updated backup
An RMAN data file copy that is updated by an incremental backup. An effective
backup strategy is to copy a data file, make an incremental backup, and then merge
the incremental backup into the image copy. This strategy reduces the time required
for media recovery because the image copy is updated with the latest data block
changes.
instance failure
The termination of an Oracle instance due to a hardware failure, Oracle internal error,
or
SHUTDOWN
ABORT
statement. Crash or instance recovery is always required after an
instance failure.
instance recovery
In an Oracle RAC configuration, the application of redo data to an open database by
an instance when this instance discovers that another instance has crashed.
See Also: recover
Glossary
Glossary-15

interblock corruption
A type of block corruption in which the corruption occurs between blocks rather than
within the block itself. This type of corruption can only be logical corruption.
intrablock corruption
A type of block corruption in which the corruption occurs within the block itself. This
type of corruption can be either a physical corruption or logical corruption.
level 0 incremental backup
An RMAN incremental backup that backs up all data blocks in the data files being
backed up. An incremental backup at level 0 is identical in content to a full backup, but
unlike a full backup the level 0 backup is considered a part of the incremental backup
strategy.
level of multiplexing
The number of input files simultaneously read and then written into the same RMAN
backup piece.
local user
In a multitenant container database (CDB), any user that is not a common user. A
local user exists in exactly one PDB.
LogMiner
A utility that enables log files to be read, analyzed, and interpreted by SQL statements.
See Also: archived redo log
log sequence number
A number that uniquely identifies a set of redo records in a redo log file. When Oracle
fills one online redo log file and switches to a different one, Oracle automatically
assigns the new file a log sequence number.
See Also: log switch, redo log
log switch
The point at which LGWR stops writing to the active redo log file and switches to the
next available redo log file. LGWR switches when either the active log file is filled with
redo records or you force a switch manually.
See Also: redo log
logical backup
A backup of database schema objects, such as tables. Logical backups are created
and restored with the Oracle Data Pump Export utility. You can restore objects from
logical backups using the Data Pump Import utility.
Glossary
Glossary-16

logical corruption
A type of corruption in which the block has a valid checksum, the header and footer
match, and so on, but the contents are logically inconsistent.
logical flashback features
The set of Oracle Flashback Technology features other than Oracle Flashback
Database. The logical features enable you to view or rewind individual database
objects or transactions to a past time.
long-term backup
A backup that you want to exclude from a backup retention policy, but want to record
in the recovery catalog. Typically, long-term backups are snapshots of the database
that you may want to use in the future for report generation.
lost write
A write to persistent storage that the database believes has occurred based on
information from the I/O subsystem, when in fact the write has not occurred.
mean time to recover (MTTR)
The time required to perform recovery.
media failure
Damage to the disks containing any of the files used by Oracle, such as the data files,
archived redo log files, or control file. When Oracle detects media failure, it takes the
affected files offline.
See Also: media recovery
media management catalog
A catalog of records maintained by a media management software. This catalog is
completely independent from the RMAN recovery catalog. The Oracle Secure Backup
catalog is an example of a media management catalog.
media management library
A software library that RMAN can use to back up to tertiary storage. An SBT interface
conforms to a published API and is supplied by a media management vendor. Oracle
Secure Backup includes an SBT interface for use with RMAN.
media management software
An Oracle or third-party software library that integrates with Recovery Manager so that
database backups can be written directly to SBT devices.
media manager multiplexing
Multiplexing in which the media management software rather than RMAN manages
the mixing of blocks during an RMAN backup. One type of media manager
multiplexing occurs when the media manager writes the concurrent output from
Glossary
Glossary-17

multiple RMAN channels to a single sequential device. Another type occurs when a
backup mixes database files and non-database files on the same tape.
media recovery
The application of redo or incremental backups to a restored backup data file or
individual data block.
When performing media recovery, you can recover a database, tablespace, data file,
or set of blocks within a data file. Media recovery can be either complete recovery (in
which all changes in the redo logs are applied) or incomplete recovery (in which only
changes up to a specified point in time are applied). Media recovery is only possible
when the database is in
ARCHIVELOG
mode.
See Also: block media recovery, recover
mirroring
Maintaining identical copies of data on one or more disks. Typically, mirroring is
performed on duplicate hard disks at the operating system level, so that if one disk is
unavailable, the other disk can continue to service requests without interruptions.
When mirroring files, Oracle Database writes once while the operating system writes
to multiple disks. When multiplexing files, Oracle Database writes the same data to
multiple files.
MTTR
See mean time to recover (MTTR)
multiplexed backup set
A backup set that contains blocks from multiple input files. For example, you could
multiplex 10 data files into one backup set. Only whole files, never partial files, are
included in a backup set.
multiplexing
The meaning of the term depends on which files are multiplexed.
Online redo logs: The automated maintenance of multiple identical copies of the
online redo log.
Control file: The automated maintenance of multiple identical copies of a database
control file.
Backup set: The RMAN technique of reading database files simultaneously from
the disks and then writing the blocks to the same backup piece.
Archived redo logs: The Oracle archiver process can archive multiple copies of a
redo log.
See Also: mirroring
multisection backup
An RMAN backup set in which each backup piece contains a file section, which is a
contiguous range of blocks in a data file. A multisection backup set contains multiple
backup pieces, but a backup set never contains only a part of a data file.
Glossary
Glossary-18

You create a multisection backup by specifying the
SECTION SIZE
parameter on the
BACKUP
command. An RMAN channel can process each file section independently,
either serially or in parallel. Thus, in a multisection backup, multiple channels can back
up a single file.
multitenant architecture
The architecture that enables an Oracle database to function as a multitenant
container database (CDB).
multitenant container database (CDB)
See CDB
native transfer rate
In a tape drive, the speed of writing to a tape without compression. This speed
represents the upper limit of the backup rate.
NOARCHIVELOG mode
The mode of the database in which Oracle does not require filled online redo logs to
be archived before they can be overwritten. Specify the mode at database creation or
change it with the
ALTER
DATABASE
NOARCHIVELOG
command.
If you run in
NOARCHIVELOG
mode, it severely limits the possibilities for recovery of lost or
damaged data.
See Also: archived redo log, ARCHIVELOG mode
non-CDB
An Oracle Database that is not a multitenant container database (CDB). All Oracle
Databases created using Oracle Database 11g Release 2 (11.2) or earlier versions
are non-CDBs.
noncircular reuse records
Control file records containing critical information needed by the Oracle database.
These records are never automatically overwritten. Some examples of information in
noncircular reuse records include the locations of data files and online redo logs.
See Also: circular reuse records
normal restore point
A label for an SCN or time. For commands that support an SCN or time, you can often
specify a restore point. Normal restore points exist in the circular list and can be
overwritten in the control file. However, if the restore point pertains to an archival
backup, then it is preserved in the recovery catalog.
obsolete backup
A backup that is not needed to satisfy the current backup retention policy. For
example, if your retention policy dictates that you must maintain one backup of each
Glossary
Glossary-19

data file, but you have two backups of data file
1
, then the second backup of data file
1
is considered obsolete.
offline normal
A tablespace is offline normal when taken offline with the
ALTER
TABLESPACE
...
OFFLINE
NORMAL
statement. The data files in the tablespace are checkpointed and do not require
recovery before being brought online. If a tablespace is not taken offline normal, then
its data files must be recovered before being brought online.
offsite backup
An SBT backup that requires retrieval by the media management software before
RMAN can restore it. You can list offsite backups with
RESTORE ... PREVIEW
.
online backup
A backup of one or more data files taken while a database is open and the data files
are online.
online redo log
The online redo log is a set of two or more files that record all changes made to the
database. Whenever a change is made to the database, Oracle generates a redo
record in the redo buffer. The LGWR process writes the contents of the redo buffer
into the online redo log.
The current online redo log is the one being written to by LGWR. When LGWR gets to
the end of the file, it performs a log switch and begins writing to a new log file. If you
run the database in
ARCHIVELOG
mode, then each filled online redo log file must be
copied to one or more archiving locations before LGWR can overwrite them.
See Also: archived redo log
online redo log group
The Oracle online redo log consists of two or more online redo log groups. Each group
contains one or more identical online redo log members. An online redo log member is
a physical file containing the redo records.
online redo log member
A physical online redo log file within an online redo log group. Each log group must
have one or more members. Each member of a group is identical.
operating system backup
See user-managed backup
operating system backup and recovery
See user-managed backup and recovery
Oracle Enterprise Manager Cloud Control
The primary product for managing your database is Oracle Enterprise Manager Cloud
Control (Cloud Control), a Web-based interface. After you have installed the Oracle
Glossary
Glossary-20

Database software, created or upgraded a database, and configured the network, you
can use Cloud Control to manage your database. Cloud Control also provides an
interface for performance advisors and for Oracle utilities such as SQL*Loader and
Recovery Manager (RMAN).
Oracle Flashback Database
The return of the whole database to a prior consistent SCN by the
FLASHBACK DATABASE
command in RMAN or SQL. A database flashback is different from traditional media
recovery because it does not involve the restore of physical files, instead restoring
your current data files to past states using saved images of changed data blocks. This
feature uses flashback logs and archived redo logs.
Oracle Flashback Technology
A set of Oracle Database features that provide an additional layer of data protection.
These features include Oracle Flashback Query, Oracle Flashback Version Query,
Oracle Flashback Transaction Query, Oracle Flashback Transaction, Oracle
Flashback Table, Oracle Flashback Drop, and Oracle Flashback Database.
You can use flashback features to view past states of data and rewind parts or all of
your database. In general, flashback features are more efficient and less disruptive
than media recovery in most situations in which they apply.
Oracle managed file
A database file managed by the Oracle Managed Files feature.
Oracle Managed Files (OMF)
A service that automates naming, location, creation, and deletion of database files
such as control files, redo log files, data files and others, based on a few initialization
parameters. You can use Oracle managed files on top of a traditional file system
supported by the host operating system, for example, VxFS or ODM. It can simplify
many aspects of the database administration by eliminating the need to devise your
own policies for such details.
Oracle Secure Backup
An Oracle media manager that supplies reliable data protection through file system
backup to tape. The Oracle Secure Backup SBT interface also enables you to use
RMAN to back up Oracle databases. All major tape drives and tape libraries in SAN,
Gigabit Ethernet, and SCSI environments are supported.
Oracle-suggested backup strategy
A backup strategy available through a wizard in Oracle Enterprise Manager. The
strategy involves periodically applying a level 1 incremental backup to a level 0 backup
to create an incremental forever. If run daily, this strategy provides 24 hour point-in-
time recovery from disk.
Oracle VSS writer
A service on Windows systems that acts as coordinator between an Oracle Database
instance and other Volume Shadow Copy Service (VSS) components, enabling data
Glossary
Glossary-21

providers to create a shadow copy of files managed by the Oracle instance. For
example, the Oracle VSS writer can place data files in hot backup mode to provide a
recoverable copy of these data files in a shadow copy set.
orphaned backups
Backups that were not made in the direct ancestral path of the current incarnation of
the database. Orphaned backups cannot be used in the current incarnation.
parallel recovery
A form of recovery in which several processes simultaneously apply changes from
redo log files. The
RECOVERY_PARALLELISM
initialization parameter determines the level of
parallelism for instance and crash recovery. You can use the
PARALLEL
and
NOPARALLEL
options of the
RECOVER
command to control parallelism for media recovery.Oracle
Database automatically chooses the optimum degree of recovery parallelism. Usually,
manually setting the level of parallelism for instance, crash, or media recovery is not
recommended or necessary.
parent incarnation
The database incarnation from which the current incarnation branched following an
OPEN RESETLOGS
operation.
partial resynchronization
A type of resynchronization in which RMAN transfers data about archived logs, backup
sets, and data file copies from the target control file to the recovery catalog.
password file
A file created by the
ORAPWD
command, and required if you want to connect using the
SYSDBA
or
SYSBACKUP
privilege over a network. For details on password files, see the
Oracle Database Administrator's Guide.
PDB
In a multitenant container database (CDB), a portable collection of schemas, schema
objects, and nonschema objects that appears to an Oracle Net client as a non-CDB.
PDB restore point
An alias for an SCN or a point in time in a particular pluggable database (PDB). A PDB
restore point is applicable only to the PDB in which it is defined and cannot be used to
perform operations either on other PDBs or the CDB.
physical backup
A backup of physical files. A physical backup contrasts with a logical backup such as a
table export.
physical corruption
A type of corruption in which the database does not recognize a corrupt block. The
database may not recognize the block because the checksum is invalid, the block
contains all zeros, or the header and footer of the block do not match.
Glossary
Glossary-22

physical schema
The data files, control files, and redo logs in a database at a given time. Issue the
RMAN
REPORT
SCHEMA
command to obtain a list of tablespaces and data files.
physical standby database
A copy of a production database that you can use for disaster protection.
pluggable database (PDB)
See PDB
point-in-time recovery
The incomplete recovery of database files to a noncurrent time. Point-in-time recovery
is also known as incomplete recovery.
See Also: media recovery, recover
problem
A critical error in the database that is recorded in the Automatic Diagnostic Repository
(ADR). Critical errors include internal errors and other severe errors. Each problem
has a problem key, which is a set of attributes that describe the problem. The problem
key includes the ORA error number, error parameter values, and other information.
proxy copy
A backup in which the media management software manages the transfer of data
between the media storage device and disk during RMAN backup and restore
operations.
raw device
A disk or partition without a file system. Thus, you cannot use
ls
, Windows Explorer,
and so on to view their contents. The raw partition appears to Oracle Database as a
single file.
recover
To recover a database file or a database is typically to perform media recovery, crash
recovery, or instance recovery. This term can also be used generically to refer to
reconstructing or re-creating lost data by any means.
See Also: complete recovery, incomplete recovery
recovery
When used to refer to a database file or a database, the application of redo data or
incremental backups to database files to reconstruct lost changes. The three types of
recovery are instance recovery, crash recovery, and media recovery. Oracle Database
performs the first two types of recovery automatically using online redo records; only
media recovery requires you to restore a backup and issue commands.
See Also: complete recovery, incomplete recovery
Glossary
Glossary-23

recovery catalog
A set of Oracle tables and views used by RMAN to store RMAN repository information
about one or more Oracle databases. RMAN uses this metadata to manage the
backup, restore, and recovery of Oracle databases.
Use of a recovery catalog is optional although it is highly recommended. For example,
starting with Oracle Database 11g, a single recovery catalog schema can keep track of
database file names for all databases in a Data Guard environment. This catalog
schema also keeps track of where the online redo logs, standby redo logs, temp files,
archived redo logs, backup sets, and image copies are created for all databases.
The primary storage for RMAN repository information for a database is always in the
control file of the database. A recovery catalog is periodically updated with RMAN
repository data from the control file. For the loss of a control file, the recovery catalog
can provide most or all of the lost metadata required for restore and recovery of the
database. The recovery catalog can also store records of archival backups and RMAN
stored scripts for use with target databases.
See Also: recovery catalog database
recovery catalog database
An Oracle Database that contains a recovery catalog schema.
recovery catalog schema
The recovery catalog database schema that contains the recovery catalog tables and
views.
Recovery Manager (RMAN)
The primary utility for physical backup and recovery of Oracle databases. RMAN
keeps records of Oracle databases in its own structure called an RMAN repository,
manages storage of backups, validates backups. You can use it with or without the
central information repository called a recovery catalog. If you do not use a recovery
catalog, then RMAN uses the database's control file to store information necessary for
backup and recovery operations. You can use RMAN with third-party media
management software to back up files to tertiary storage.
See Also: backup piece, backup set, copy, media management software, recovery
catalog
recovery set
One or more tablespaces that are being recovered to an earlier point in time during
tablespace point-in-time recovery (TSPITR). After TSPITR, all database objects in the
recovery set have been recovered to the same point in time.
See Also: auxiliary set
recovery window
A recovery window is one type of RMAN backup retention policy, in which the DBA
specifies a period of time and RMAN ensures retention of backups and archived redo
Glossary
Glossary-24

logs required for point-in-time recovery to any time during the recovery window. The
interval always ends with the current time and extends back in time for the number of
days specified by the user.
For example, if the retention policy is set for a recovery window of seven days, and the
current time is 11:00 AM on Tuesday, RMAN retains the backups required to allow
point-in-time recovery back to 11:00 AM on the previous Tuesday.
recycle bin
A data dictionary table containing information about dropped objects. Dropped tables
and any associated objects such as indexes, constraints, nested tables, and so on are
not removed and still occupy space. The Flashback Drop feature uses the recycle bin
to retrieve dropped objects.
redo log
A redo log can be either an online redo log or an archived redo log. The online redo
log is a set of two or more redo log groups that records all changes made to Oracle
data files and control files. An archived redo log is a copy of an online redo log that
has been written to an offline destination.
redo log group
Each online redo log member (which corresponds to an online redo log file) belongs to
a redo log group. Redo log groups contain one or more members. A redo log group
with multiple members is called a multiplexed redo log group. The contents of all
members of a redo log group are identical.
redo thread
The redo generated by an instance. If the database runs in a single instance
configuration, then the database has only one thread of redo.
redundancy
In a retention policy, the setting that determines many copies of each backed-up file to
keep. A redundancy-based retention policy is contrasted with retention policy that uses
a recovery window.
redundancy set
A set of backups enabling you to recover from the failure or loss of any Oracle
Database file.
registration
In RMAN, the execution of a
REGISTER
DATABASE
command to record the existence of a
target database in the recovery catalog. A target database is uniquely identified in the
catalog by its DBID. You can register multiple databases in the same catalog, and also
register the same database in multiple catalogs.
Glossary
Glossary-25

repair
For Data Recovery Advisor, a repair is an action or set of actions that fixes one or
more failures. Examples repairs include block media recovery, data file media
recovery, Oracle Flashback Database, and so on.
repair option
For Data Recovery Advisor, one possible technique for repairing a failure. Different
repair options are intended to fix the same problem, but represent different advantages
and disadvantages in terms of repair time and data loss.
RESETLOGS
A technique for opening a database that archives any current online redo logs (if using
ARCHIVELOG
mode), resets the log sequence number to 1, and clears the online redo
logs. An
ALTER DATABASE OPEN RESETLOGS
statement begins a new database incarnation.
The starting SCN for the new incarnation, sometimes called the
RESETLOGS
SCN, is the
incomplete recovery SCN of the media recovery preceding the
OPEN RESETLOGS
, plus
one.
An
ALTER DATABASE OPEN RESETLOGS
statement is required after incomplete recovery or
recovery with a backup control file. An
OPEN
RESETLOGS
operation does not affect the
recoverability of the database. Backups from before the
OPEN
RESETLOGS
operation
remain valid and can be used along with backups taken after the
OPEN
RESETLOGS
operation to repair any damage to the database.
resilver a split mirror
The process of making the contents of a split mirror identical with the contents of the
storage devices from which the mirror was split. The operating system or the hardware
managing the mirror refreshes a broken mirror from the half that is up-to-date and then
maintains both sides of the mirror.
restartable backup
The feature that enables RMAN to back up only those files that have not been backed
up since a specified date. The unit of restartability is last completed backup set or
image copy. You can use this feature after a backup fails to back up the parts of the
database missed by the failed backup.
restore
The replacement of a lost or damaged file with a backup. You can restore files either
with commands such as UNIX
cp
or the RMAN
RESTORE
command.
restore failover
The automatic search by RMAN for usable backups in a restore operation if a
corrupted or inaccessible backup is found.
restore optimization
The default behavior in which RMAN avoids restoring data files from backup when
possible.
Glossary
Glossary-26

restore point
A user-defined a name associated with an SCN of the database corresponding to the
time of the creation of the restore point. A restore point can be a guaranteed restore
point or a normal restore point.
resynchronization
The operation that updates the recovery catalog with current metadata from the target
database control file. You can initiate a full resynchronization of the catalog by issuing
a
RESYNC
CATALOG
command. A partial resynchronization transfers information to the
recovery catalog about archived redo log files, backup sets, and data file copies.
RMAN resynchronizes the recovery catalog automatically when needed.
retention policy
See backup retention policy
reverse resynchronization
In a Data Guard environment, the updating of a primary or standby database control
file with metadata obtained from the recovery catalog. For example, if you configure
persistent RMAN settings for a standby database that is not the connected target
database, then RMAN performs a reverse resynchronization the next time RMAN
connects as target to the standby database. In this way, the recovery catalog keeps
the metadata in the control files in a Data Guard environment up to date.
RMAN
See Recovery Manager (RMAN)
RMAN backup job
The set of
BACKUP
commands executed within a single RMAN session. For example,
assume that you start the RMAN client, execute
BACKUP DATABASE
,
BACKUP ARCHIVELOG
,
and
RECOVER COPY
, and then exit the RMAN client. The RMAN backup job consists of
the database backup and the archived redo log backup.
RMAN client
An Oracle Database executable that interprets commands, directs server sessions to
execute those commands, and records its activity in the target database control file.
The RMAN executable is automatically installed with the database and is typically
located in the same directory as the other database executables. For example, the
RMAN client on Linux is named
rman
and is located in
$ORACLE_HOME/bin
.
RMAN job
The set of RMAN commands executed in an RMAN session. For example, assume
that you start the RMAN client, execute
BACKUP DATABASE
,
BACKUP ARCHIVELOG
, and
RECOVER COPY
, and then exit the RMAN client. The RMAN job consists of the two
backups and the roll forward of the data file copy.
Glossary
Glossary-27

RMAN maintenance commands
Commands that you can use to manage RMAN metadata records and backups. The
maintenance commands are
CATALOG
,
CHANGE
,
CROSSCHECK
, and
DELETE
.
RMAN repository
The record of RMAN metadata about backup and recovery operations on the target
database. The authoritative copy of the RMAN repository is always stored in the
control file of the target database. A recovery catalog can also be used for longer-term
storage of the RMAN repository, and can serve as an alternate source of RMAN
repository data if the control file of your database is lost.
See Also: recovery catalog database, resynchronization
RMAN session
An RMAN session begins when the RMAN client is started and ends when you exit
from the client or the RMAN process is terminated. Multiple RMAN commands can be
executed in a single RMAN session.
rollback segments
Database segments that record the before-images of changes to the database.
rolling back
The use of rollback segments to undo uncommitted changes applied to the database
during the rolling forward stage of recovery.
rolling forward
The application of redo records or incremental backups to data files and control files to
recover changes to those files.
See Also: rolling back
root
In a multitenant container database (CDB), a system-supplied set of schemas, schema
objects, and non-schema objects that functions as the parent for PDBs. Every CDB
has only one root and all PDBs belong to the root.
RUN block
A series of RMAN commands that are executed sequentially.
SBT
System Backup to Tape. This term specifies a nondisk backup device type, typically a
tape library or tape drive. RMAN supports channels of type disk and SBT.
shadow copy
In the Volume Shadow Copy Service (VSS) infrastructure on Windows, a consistent
snapshot of a component or volume.
Glossary
Glossary-28

snapshot control file
A copy of a database control file created in an operating system-specific location by
Recovery Manager. RMAN creates the snapshot control file so that it has a consistent
version of a control file to use when either resynchronizing the recovery catalog or
backing up the control file.
source database
The database that you are copying when you create a duplicate database. When
transporting data to another platform, the source database is the database that
contains the data that is to be transported.
source host
The host on which a source database resides.
source platform
When transporting data, the platform on which the source database is running. The
source database contains the data to be transported to a destination database running
on a different platform.
sparse backup
An RMAN backup that backs up one or more sparse data files. For each sparse data
file, a full backup of the shadow file (not the base file) is created.
sparse database
A database that contains one or more sparse data files.
sparse data file
A logical Oracle object that is created as the shadow of a base data file. The base data
file is read-only. The sparse data file is read-write and contains the updates made to
the base data file.
split mirror backup
A backup of database files that were previously mirrored. Some third-party tools
enable you to use mirroring a set of disks or logical devices, that is, maintain an exact
duplicate of the primary data in another location. Splitting a mirror involves separating
the file copies so that you can use them independently. With the
ALTER SYSTEM SUSPEND/
RESUME
database feature, you can suspend I/O to the database, split the mirror, and
make a backup of the split mirror.
stored script
A sequence of RMAN commands stored in the recovery catalog. Stored scripts can be
global or local. Global scripts can be shared by all databases registered in the
recovery catalog.
synchronous I/O
A server process can perform only one task at a time while RMAN is either reading or
writing data.
Glossary
Glossary-29

system change number (SCN)
A stamp that defines a committed version of a database at a point in time. Oracle
assigns every committed transaction a unique SCN.
tablespace destination
In a transportable tablespace operation, the location on disk which (by default)
contains the data file copies and other output files when the tablespace transport
command completes.
tablespace point-in-time recovery (TSPITR)
The recovery of one or more non-
SYSTEM
tablespaces to a noncurrent time. You use
RMAN to perform TSPITR.
tag
Identifier for an RMAN backup. If you generate a backup set, then the tag is assigned
to each backup piece rather than to the backup set. If you do not specify a tag for a
backup, then RMAN assigns one automatically.
target database
In an RMAN environment, the database to which you are connected as
TARGET
. The
target database is the database on which you are performing RMAN operations.
target host
The computer on which a target database resides.
target instance
In an RMAN environment, the instance associated with a target database.
temp file
A file that belongs to a temporary tablespace and is created with the
TEMPFILE
option.
Temporary tablespaces cannot contain permanent database objects such as tables,
and are typically used for sorting. Because temp files cannot contain permanent
objects, RMAN does not back them up. RMAN does keep track of the locations of
temp files in the control file, however, and during recovery re-creates the temp files as
needed at those locations.
transport script
A script generated by the
CONVERT DATABASE
command. This script contains SQL
statements used to create the new database on the destination platform.
transportable tablespace
A feature that transports a set of tablespaces from one database to another, or from
one database to itself. Transporting a tablespace into a database is like creating a
tablespace with loaded data.
Glossary
Glossary-30

transportable tablespace set
Data files for the set of tablespaces in a transportable tablespace operation, and an
export file containing metadata for the set of tablespaces. You use Data Pump Export
to perform the export of metadata.
trial recovery
A simulated recovery initiated with the
RECOVER ... TEST
command in RMAN or
SQL*Plus. A trial recovery applies redo in a way similar to normal media recovery, but
it never writes its changes to disk and it always rolls back its changes. Trial recovery
occurs only in memory.
undo retention period
The minimum amount of time that Oracle Database attempts to retain old undo data in
the undo tablespace before overwriting it. Old (committed) undo data that is older than
the current undo retention period is said to be expired. Old undo data with an age that
is less than the current undo retention period is said to be unexpired.
undo tablespace
A dedicated tablespace that stores only undo information when the database is run in
automatic undo management mode.
unused block compression
A feature by which RMAN reduces the size of data file backup sets by skipping data
blocks. RMAN always skips blocks that have never been used. Under certain
conditions, which are described in the
BACKUP AS BACKUPSET
entry in Oracle Database
Backup and Recovery Reference, RMAN also skips previously used blocks that are
not currently being used.
user-managed backup
A backups made using a non-RMAN method, for example, using an operating system
utility. For example, you can make a user-managed backup by running the
cp
command on Linux or the
COPY
command on Windows. A user-managed backup is also
called an operating system backup.
user-managed backup and recovery
A backup and recovery strategy for an Oracle Database that does not use RMAN. This
term is equivalent to operating system backup and recovery. You can back up and
restore database files using operating system utilities (for example, the
cp
command in
UNIX), and recover using the SQL*Plus
RECOVER
command.
validation
In an RMAN context, a test that checks database files for block corruption or checks a
backup set to determine whether it can be restored. RMAN can check for both physical
and logical block corruption.
Glossary
Glossary-31

virtual private catalog
A subset of the metadata in a base recovery catalog to which a database user is
granted access. The owner of a base recovery catalog can grant or revoke restricted
access to the recovery catalog to other database users. Each restricted user has full
read/write access to his own virtual private catalog.
Volume Shadow Copy Service (VSS)
An infrastructure on Windows server platforms that enables requestors, writers, and
providers to participate in the creation of a consistent snapshot called a shadow copy.
The VSS service uses well-defined COM interfaces. See Oracle Database Platform
Guide for Microsoft Windows to learn how to use RMAN with VSS.
whole database backup
A backup of the control file and all data files that belong to a database.
Zero Data Loss Recovery Appliance (Recovery Appliance)
An enterprise-level, cloud-scale Engineered System, that provides a single, centralized
repository for backups of all your Oracle Databases. You can use RMAN commands to
backup your target databases to Recovery Appliance.
Glossary
Glossary-32

Index
Symbols
%d substitution variable
BACKUP FORMAT, 2-5
%p substitution variable
BACKUP FORMAT, 2-5
%s substitution variable
BACKUP FORMAT, 2-5
%t substitution variable
BACKUP FORMAT, 2-5
%U substitution variable, 9-5
BACKUP FORMAT, 2-5
A
ABORT option
SHUTDOWN statement, 30-24, 31-1, 31-2
about
backing up CDBs, 4-7
backing up PDBs, 4-7
about, flashback database for CDBs, 18-5
about, flashback database for PDBs, 18-5
active database duplication, 4-11
Advanced Security Option, 8-6
ADVISE FAILURE command, 15-5, 15-12
alert log, 12-6
ALLOCATE CHANNEL command, 5-5, 6-1, 9-5
MAXPIECESIZE option, 6-5
ALLOW ... CORRUPTION clause, RECOVER
command, 30-31
ALTER DATABASE statement
CLEAR LOGFILE clause, 31-16
END BACKUP clause, 29-10
OPEN RESETLOGS clause, 13-35
RECOVER clause, 30-10, 30-13, 30-17
RESETLOGS option, 30-25
ALTER SYSTEM statement
KILL SESSION clause, 24-16
RESUME clause, 29-18
SUSPEND clause, 29-18
ALTER TABLESPACE statement
BEGIN BACKUP clause, 29-7, 29-9
END BACKUP option, 29-9
application containers
about backing up, 9-24
application containers (continued)
backing up, 9-24, 9-25
complete recovery, 17-34
application errors, 1-3
application PDBs
backing up, 9-26
complete recovery, 17-35
point-in-time recovery, 18-33
application root
backing up, 9-25
complete recovery, 17-33
archival backups, 1-4, 9-48, 12-17
archived redo log deletion policies, 5-37, 5-38,
9-34
archived redo log files
applying during media recovery, 30-6, 30-8,
30-10
backing up, 9-33
using RMAN, 9-31
with other backups, 9-32
backing up, in CDBs, 9-35
cataloging, 12-19
changing default location, 30-9
corrupted, 30-26
delete after backups, 9-36
delete after backups, in CDBs, 9-37
deleting, 14-7, 30-13
deletion after backup, 9-31
failover, 9-31
incompatible format, 30-26
location during recovery, 30-6
loss of, 30-20
restoring using RMAN, 17-10
ARCHIVELOG mode
backups in, 2-6
AS SELECT clause
CREATE TABLE statement, 31-11
autobackups, control file, 8-17, 9-12, 9-49
configuring, 5-8
format, 5-8
automated repairs
Data Recovery Advisor, 1-9
automatic channel allocation, 6-1
automatic channels, 3-3, 3-5
configuring, 6-2
Index-1

automatic channels (continued)
naming conventions, 3-5
overriding, 6-1
Automatic Diagnostic Repository (ADR), 5-13,
8-18, 12-4, 15-2, 16-2, 16-3, 24-1
Automatic Storage Management (ASM)
backups to, 9-4
Automatic Workload Repository (AWR), 7-20
AUTORECOVERY option
SET statement, 30-7
auxiliary instance parameter file
with TRANSPORT TABLESPACE, 27-5
availability
of RMAN backups, 12-16
AVAILABLE option
of CHANGE command, 12-16
B
backing up
application containers, 9-25
application PDBs, 9-26
application root, 9-25
data files in PDBs, 9-22
database, 9-1
sparse PDBs, 9-30
tablespaces in PDBs, 9-22
with Oracle Enterprise Manager Cloud
Control, 1-11
backup
to Recovery Appliance, 3-11
backup and recovery
definition, 1-1
introduction, 1-1
solutions, 1-5
strategy, 1-2
user-managed, 1-5
BACKUP command, 2-4, 2-6, 3-5, 3-10, 5-30,
5-33, 6-1, 6-4, 6-6, 8-1, 8-3, 9-2, 9-34
ALLOW INCONSISTENT option, 28-37
ARCHIVELOG option, 9-32, 9-33
AS COMPRESSION BACKUPSET option,
9-7
AS COPY option, 2-4, 8-11
BACKUPSET option, 6-10, 8-14, 8-15, 9-52,
9-54
CHANNEL option, 5-6
COMPRESSED BACKUPSET option, 9-7
COPIES parameter, 8-14, 8-15
COPY OF option, 8-14, 8-16, 9-52, 9-55
CURRENT CONTROLFILE option, 9-12,
9-13
DATABASE option, 9-10
DATAFILE option, 9-11
BACKUP command (continued)
DATAPUMP option, 28-24, 28-32, 28-33,
28-39
DB_FILE_NAME_CONVERT parameter,
8-11
DELETE INPUT option, 9-36, 12-24
DELETE option, 9-31
DEVICE TYPE clause, 5-3, 5-33, 9-3, 9-13
DURATION parameter, 10-16
FILESPERSET parameter, 8-8
FOR RECOVER OF COPY option, 9-41
FOR TRANSPORT parameter, 28-23, 28-29
FORMAT parameter, 2-5, 5-13, 5-16, 8-6,
8-15, 9-4
INCREMENTAL LEVEL 1 parameter, 28-37,
28-39
INCREMENTAL LEVEL O parameter, 28-37,
28-39
INCREMENTAL option, 2-7, 2-8, 9-37, 9-39,
9-40
KEEP option, 9-48, 9-50, 9-51
MAXSETSIZE parameter, 10-1
NOT BACKED UP clause, 9-34
PLUS ARCHIVELOG option, 9-32
PROXY ONLY option, 8-10
PROXY option, 8-10
RECOVERY AREA option, 9-52
SECTION SIZE parameter, 8-4, 9-8, 10-3
SPFILE option, 9-15
TABLESPACE option, 9-11
TAG parameter, 2-5, 9-5
TO PLATFORM parameter, 28-23, 28-32
VALIDATE option, 2-9, 15-2, 15-10, 16-4
BACKUP CONTROLFILE clause
ALTER DATABASE statement, 29-2
BACKUP COPIES parameter
CONFIGURE command, 6-5
backup encryption, 6-10, 8-6, 14-4
decrypting backups, 17-11
default algorithm, 6-9
dual-mode, 6-12, 10-14
overview, 10-11
password, 6-12, 10-13
transparent, 6-11, 10-13
backup mode, 8-12
ending with ALTER DATABASE END
BACKUP, 29-10
for online user-managed backups, 29-7,
29-22
instance failure, 29-9
backup optimization, 9-34
configuring, 5-32, 10-4
definition, 5-33, 9-34
disabling, 5-33, 5-36
enabling, 5-33, 5-36
Index
Index-2

backup optimization (continued)
redundancy and, 5-35
retention policies and, 5-34
backup pieces, 8-4
definition, 2-4
maximum size, 6-5
names, 8-6
names on tape, 5-16
backup retention policies, 1-4, 3-8, 5-20
affect on backup optimization, 5-34
configuring, 5-30
configuring for redundancy, 5-31
definition, 8-23
disabling, 5-32
exempt backups, 9-48, 12-17
recovery window, 8-23
recovery windows, 5-31
redundancy, 8-23, 8-27
backup sets, 2-4, 8-1
backing up, 8-15, 9-52
backups
backups of, 8-15
compressed, 5-4, 6-7, 9-7
configuring as default, 5-4
configuring maximum size, 6-4
crosschecking, 12-12
duplexing, 10-8
how RMAN generates, 8-8
limiting size, 8-8
maximum size, 6-4, 10-1
multiplexed, 2-4, 6-4, 8-8, 9-6, 23-4
naming, 8-6
overview, 8-3
Recovery Manager
backups
backing up, 8-15
specifying maximum size, 8-7
specifying number, 8-8
testing restore of, 17-9
Backup Solutions Program (BSP), 3-7
backup strategy
fast recovery area, 5-20
backup tags, RMAN, 9-5
backup techniques, comparison, 1-5
backup windows, 10-16
backup-based duplication
configuring channels, 25-36
backups
archival, 1-4, 9-48
archived redo log files, in CDBs, 9-35
archived redo logs
using RMAN, 9-31
availability, 12-16
backup sets, 9-52
closed, 29-3
backups (continued)
consistent, 29-3
making using RMAN, 8-2
control file, 9-12, 29-14
control files, 29-14
binary, 29-15
correlating RMAN channels with, 24-12,
24-13
crosschecking, 12-12
cumulative incremental, 8-20
data file
using RMAN, 9-54, 9-55
DBVERIFY utility, 29-23
default type for RMAN, 5-4
determining data file status, 29-2
duplexing, 6-5, 10-8
excluding tablespaces from backups, 6-6
exempt from retention policy, 12-17
expired, deleting, 12-28
generating reports for, 11-1, 11-11
image copies, 8-11
inconsistent, 29-3
making using RMAN, 8-2
incremental, 8-19, 9-37, 10-8, 10-9
incrementally updated, 9-40
listing files needed, 29-1
logical, 1-2
long-term, 1-4
managing, 12-1
multisection, 3-5, 8-4, 16-4
NOARCHIVELOG mode, 9-15
obsolete, 8-27, 12-28
offline, 29-5
offsite, 17-8
optimizing, 5-33, 9-34
orphaned, 14-10
PDBs, using Oracle Enterprise Manager
Cloud Control, 9-22
PDBs, using RMAN, 9-19
physical, 1-2
previewing, 17-7
read-only tablespaces, 29-12
recovering pre-RESETLOGS, 18-39
recovery catalog, 13-17
Recovery Manager, 9-2
reporting objects needing backups, 11-12
restartable, 10-14
restoring user-managed, 30-5
root
using Oracle Enterprise Manager Cloud
Control, 9-19
using RMAN, 9-19
server parameter files, 9-15
skipping files during, 10-7
split mirror, 8-12
Index
3

backups (continued)
split mirror (continued)
using RMAN, 10-10
stored scripts, 13-3, 13-20
tablespace, 29-8
using RMAN, 9-11, 9-54, 9-55
testing RMAN, 16-3, 16-4, 16-6
using media manager, 5-14
user-managed, 29-1
using storage snapshots, 29-22
validating, 16-4, 16-6
verifying, 29-23
whole CDB, 9-18
whole database, 9-10, 29-3
BEGIN BACKUP clause
ALTER TABLESPACE statement, 29-7
binary compression for backups, 9-7
block change tracking, 1-2, 8-21, 9-44
disk space used for, 9-45
enabling and disabling, 9-46
moving the change tracking file, 9-47
block corruptions, 1-3
stored in
V$DATABASE_BLOCK_CORRUPTION,
16-4
block media recovery, 1-3, 16-3
automatic, 19-2
BSP, 3-7
C
cancel-based media recovery, 30-23
canceling RMAN commands, 24-16
CATALOG command, 12-19
START WITH parameter, 13-11
CDB restore point, 7-7
CDB restore points, creating, 7-13
CDB restore points, viewing, 7-16
CDB, rewinding, 18-21
CDBs
about backup and recovery of, 4-7
backing up, 9-18
complete recovery, 17-21
after switching to a copy, 17-32
using Oracle Enterprise Manager Cloud
Control, 17-25
complete restore, 17-20
connecting to, 4-7
crash recovery, 30-19
Data Recovery Advisor, 15-8
diagnose failures, 15-8
instance recovery, 30-19
performing point-in-time recovery, 18-30
repairing failures, 15-8
reporting, 11-17
CDBs (continued)
transporting across platforms, 28-44
user-managed backups, 29-4
validating, 16-9
CDBs, restore points, 7-7
CHANGE command
AVAILABLE option, 12-16
DB_UNIQUE_NAME parameter, 13-31
RESET DB_UNIQUE_NAME option, 3-10
UNCATALOG option, 12-22
CHANGE FAILURE command, 15-17
channels, RMAN, 3-3
configuring, 5-5
configuring advanced options, 6-1
definition, 3-3
generic, 5-5
naming conventions, 3-5
Oracle RAC environment, 6-2
parallel, 5-6
character sets
setting for use with RMAN, 4-13
circular reuse records, 12-4
clean PDB restore points, 7-7
CLEAR LOGFILE clause
of ALTER DATABASE, 31-16
client, RMAN, 2-1, 3-1, 3-6
cold failover cluster
definition, 29-10
command files, RMAN, 2-10
command interface
RMAN, 3-3
commands, Recovery Manager
ADVISE FAILURE, 15-5, 15-12
ALLOCATE CHANNEL, 5-5, 6-1, 6-5, 9-5
BACKUP, 2-4–2-9, 3-5, 3-10, 5-3, 5-6, 5-13,
5-16, 5-30, 5-33, 6-1, 6-4, 6-6, 6-10,
8-1, 8-3, 8-4, 8-8, 8-10, 8-11,
8-14–8-16, 9-2, 9-3, 9-5, 9-7,
9-10–9-13, 9-15, 9-31, 9-32, 9-34,
9-36, 9-37, 9-39–9-41, 9-48,
9-50–9-52, 9-54, 9-55
PROXY ONLY option, 8-10
PROXY option, 8-10
BACKUP CURRENT CONTROLFILE, 9-13
canceling, 24-16
CATALOG, 12-19
CHANGE, 3-10, 12-12
CHANGE FAILURE, 15-17
CONFIGURE, 3-9, 5-5, 5-30, 5-39, 6-1, 6-5,
6-13, 6-14
CREATE CATALOG, 13-8
CREATE SCRIPT, 13-21
CROSSCHECK, 12-12
DELETE, 12-12, 12-19, 12-23
DROP CATALOG, 13-42
Index
Index-4

commands, Recovery Manager (continued)
DROP DATABASE, 12-30
EXECUTE SCRIPT, 13-20, 13-22
EXIT, 2-2
FLASHBACK DATABASE, 13-35
how RMAN interprets, 3-3
IMPORT CATALOG, 13-39
LIST, 2-11, 11-1, 11-3, 11-4, 13-35, 15-8
INCARNATION option, 11-10, 13-35
MAXSETSIZE, 6-4
piping, 4-18
PRINT SCRIPT, 13-24
RECOVER, 14-6
REPAIR FAILURE, 15-15, 15-17
REPLACE SCRIPT, 13-22
REPORT, 2-12, 11-11, 11-12
NEED BACKUP option, 11-12
RESET DATABASE
INCARNATION option, 13-35
RESTORE, 17-4
RESYNC CATALOG, 13-19, 13-27, 13-31
FROM CONTROLFILECOPY option,
13-19
REVOKE, 13-15
SET, 6-12
SHOW, 2-4, 5-2
SPOOL, 15-15
SWITCH, 17-18
terminating, 24-16
UNREGISTER DATABASE, 13-32
UPGRADE CATALOG, 13-37
VALIDATE, 15-2, 15-10, 16-4
commands, SQL*Plus
RECOVER
UNTIL TIME option, 30-23
SET, 30-7, 30-10, 30-13, 30-17
comments in RMAN syntax, 4-15
COMPATIBLE initialization parameter, 6-10
complete recovery
application containers, 17-34
application PDBs, 17-35
application root, 17-33
overview, 17-1
procedures, 30-12
sparse databases, 17-37
using preplugin backups, 17-27
compressed backups, 5-4, 9-7
algorithms, 6-7
CONFIGURE command
AUXNAME option, 6-14
BACKUP OPTIMIZATION option, 5-36
CHANNEL option, 5-5, 6-1
CONTROLFILE AUTOBACKUP option, 8-17,
9-49
DB_UNIQUE_NAME option, 5-39
CONFIGURE command (continued)
ENCRYPTION option, 6-13
EXCLUDE option, 6-6
FOR DB_UNIQUE_NAME option, 3-9
MAXPIECESIZE option, 6-5
MAXSETSIZE option, 6-4
RETENTION POLICY clause, 8-23
RETENTION POLICY option, 5-30
configuring media managers, 5-13
installing, 5-11
prerequisites, 5-11
configuring Recovery Manager
autobackups, 5-8, 8-17
backup optimization, 5-32
backup retention policies, 5-30
backup set size, 6-4
default backup type, 5-4
default devices, 5-3
overview, 5-1
shared server, 6-16
snapshot control file location, 6-15
specific channels, 6-2
tablespace exclusion for backups, 6-6
connecting
to CDBs, 4-7
to PDBs, 4-7
consistent backups, 8-2
using RMAN, 8-2
whole database, 29-3
control file autobackups, 12-6
after structural changes to database, 8-17
configuring, 5-8, 8-17
default format, 8-18
format, 5-8
control files
backups, 29-2, 29-14
binary, 29-15
including within database backup, 9-13
manual, 9-13
recovery using, 20-5
using RMAN, 9-12
circular reuse records, 12-4
configuring location, 5-28
creating after loss of all copies, 31-7
finding file names, 29-2
multiplexed, 5-20, 5-28, 12-6, 17-3, 29-2,
30-6, 31-1
loss of, 31-1
multiplexing, 12-6
re-created, 31-7
restoring, 20-6, 31-1, 31-2
snapshot, 13-27
specifying location of, 6-15
user-managed restore after loss of all copies,
31-7
Index
5

CONTROL_FILE_RECORD_KEEP_TIME
initialization parameter, 12-4, 12-6
CONTROL_FILES initialization parameter, 20-6,
21-23, 31-2
CONVERT command
ALLOW INCONSISTENT option, 28-37
COPIES option
BACKUP command, 10-9
corrupt blocks, 14-1, 16-2, 30-27
recovering, 19-3
RMAN and, 10-14
crash recovery
of CDBs, 30-19
CREATE CATALOG command, 13-8
CREATE DATAFILE clause, ALTER DATABASE
statement, 31-11
CREATE SCRIPT command, 13-21
CREATE TABLE statement
AS SELECT clause, 31-11
CREATE TABLESPACE statement, 31-6
creating
virtual private catalogs, 13-13
creating, PDB restore points, 7-14
cross-platform data transport
data pump destination, 28-22
cross-platform transport
data files, using image copies, 28-7
databases
using backup sets, 28-27
using image copies, 28-10
inconsistent tablespaces, 28-35
about, 28-34
example, 28-39
steps, 28-36
methods, 28-2
using backup sets, 28-20
using image copies, 28-3
of CDBs, 28-44
of PDBs, 28-43
over the network, 28-42
PDB to a new CDB, 28-45, 28-46
read-only tablespaces
using backup sets, 28-30
using image copies, 28-5
tablespaces in PDBs, 28-49
tablespaces, DataPump export dump file,
28-24
cross-platform transportable tablespace, 28-1
CROSSCHECK command, 12-12
crosschecking, RMAN, 2-13, 12-3, 12-12
definition, 12-12
recovery catalog with the media manager,
12-12
cumulative incremental backups, 2-7, 2-8, 8-19,
8-20
D
data blocks, corrupted, 1-2, 1-3, 2-14, 2-20, 14-1,
15-10, 15-17, 16-4, 19-1, 30-27, 30-28
data dictionary views, 29-6, 29-7, 29-12, 29-13
data files
backing up, 9-11, 9-54, 9-55, 29-5
backing up, in PDBs, 9-22
determining status, 29-2
listing, 29-1
losing, 30-5
restoring, 14-3
transporting across platforms, 28-7
Data Guard environment
archived log deletion policies, 5-38
changing a DB_UNIQUE_NAME, 13-31
configuring RMAN, 5-39
reporting in a, 11-3
RMAN backups, 9-2
RMAN backups, accessibility of, 3-10
RMAN backups, association of, 3-10
RMAN backups, interchangeability of, 3-9,
9-12
RMAN usage, 3-8
data integrity checks, 1-9, 15-2, 15-10
data preservation, definition of, 1-4
data protection, definition, 1-2
data pump destination, 28-22
Data Recovery Advisor, 2-14, 11-4, 14-1
automated repairs, 1-9
data integrity checks, 15-2, 15-10
failure consolidation, 15-4
failure priority, 15-4
failures, 15-2, 15-3
feasibility checks, 15-5
for CDBs, 15-8
overview, 1-9
purpose, 15-1
repair options, 15-12
repairing failures, 15-15
repairs, 15-2, 15-5
user interfaces, 15-2
data repair
overview, 14-1
techniques, 14-1
data transfer, RMAN, 1-4
database connections
Recovery Manager
auxiliary database, 4-11
hiding passwords, 4-10
without a catalog, 4-2
SYSBACKUP required for RMAN, 4-2
types in RMAN, 4-2
Database Home page, accessing, 1-10
database point-in-time recovery, 18-1, 18-26
Index
Index-6

database point-in-time recovery (continued)
definition, 18-2
Flashback Database and, 7-2
prerequisites, 18-26
user-managed, 30-20
databases
duplicating, 25-31
listing for backups, 29-1
media recovery procedures, user-managed,
30-1
media recovery scenarios, 31-1
multitenant container, 9-17
recovery
after control file damage, 31-1, 31-2
registering in recovery catalog, 13-10
reporting on schemas, 11-15
suspending, 29-16
transporting across platforms
using backup sets, 28-27
using image copies, 28-10
unregistering from recovery catalog, 13-32
DB_BLOCK_CHECKSUM initialization
parameter, 16-2
DB_CREATE_FILE_DEST initialization
parameter, 9-46, 17-13
DB_FILE_NAME_CONVERT initialization
parameter, 21-23
DB_FLASHBACK_RETENTION_TARGET
initialization parameter, 5-24
DB_LOST_WRITE_PROTECT initialization
parameter, 6-17
DB_NAME initialization parameter, 21-23
DB_RECOVERY_FILE_DEST initialization
parameter, 2-1
DB_RECOVERY_FILE_DEST_SIZE initialization
parameter, 2-1
DB_UNIQUE_NAME initialization parameter, 3-8,
3-10, 5-39, 11-3
DBA_DATA_FILES view, 29-6, 29-7, 29-12,
29-13
DBID
determining, 17-6
problems registering copied database, 13-2
DBMS_PIPE package, 4-18
DBPITR, 18-26
DBVERIFY utility, 29-23
DELETE command, 12-19, 12-23, 12-26
EXPIRED option, 12-12, 12-28
OBSOLETE option, 8-27, 12-28
deleting
archived redo log files, 9-36
archived redo log files, in CDBs, 9-37
dropped PDB backups, 12-29
deleting backups, 2-13, 12-23, 12-24, 12-26
deletion policies, archived redo log, 5-37
deletion policies, archived redo log (continued)
enabling, 5-38
devices, configuring default, 5-3
diagnose failures
in CDBs, 15-8
differential incremental backups, 2-7, 8-19
direct ancestral path, 14-8, 18-17, 18-37
disabling
Flashback Database, 7-19
disaster recovery, 1-4
definition, 1-3
disconnecting
from Recovery Manager, 2-2
disk API, 5-13
disk failures, 1-3
disk usage
monitoring, 12-8
DROP DATABASE command, 12-30
dropped tables, retrieving, 18-12
dropping a database, 12-30
dropping the recovery catalog, 13-42
dual mode backup encryption, 6-12
dual-mode backup encryption, 10-14
duplexing backup sets, 6-5, 8-14, 10-8
duplicate databases
active database duplication, 4-11
duplicating
Cloud database to on-premise, 25-50
configuring channels, 25-35
databases, 25-31
PDBs, 25-64
preparing auxiliary instance, 25-24
sparse CDBs, 25-41
sparse databases, 25-34
sparse PDBs, 25-47
tablespaces, 25-32
duplicating a PDB
to existing CDBs, 25-45
duplicating databases
initialization file, 25-24
Oracle keystore, 25-30
duplicating PDBs
to new CDB, 25-46
duplicatingOracle Cloud
to, 25-49
duplication
SET NEWNAME, 26-2
using encrypted backups, 25-67
DURATION parameter, BACKUP command,
10-16
E
enabling
Flashback Database, 7-18
Index
7

enabling (continued)
lost write protection, 6-18
encrypted backups, 10-11, 14-4
backup-based duplication, 25-67
decrypting, 17-11
environment variables
NLS_DATE_FORMAT, 4-13
NLS_LANG, 4-13
error codes
media manager, 24-5
RMAN, 24-1, 24-3, 24-4
error messages, RMAN
interpreting, 24-7
error stacks, RMAN
interpreting, 24-7
example
duplicating databases, 25-69
multisection incremental backups, 9-8
recovering tables into new schema, 22-12
recovery using preplugin backups, 17-28
examples
preplugin backups, 9-23
recovering using third-party snapshots, 30-10
rolling forward a physical standby, 20-24
EXECUTE SCRIPT command, 13-22
EXIT command, 2-2
exiting RMAN, 2-2
expired backups, 8-23, 12-12
deleting, 12-28
EXPIRED option
DELETE command, 12-28
F
failover, when restoring files, 14-4
failures
definition, 1-3
media, 1-3
failures, Data Recovery Advisor, 15-2, 15-3
consolidation, 15-4
priority, 15-4
fast recovery area, 3-1, 3-8, 18-3
autobackups, 5-8
changing locations, 12-11
configuring, 5-20
definition, 2-1
disabling, 12-11
effect of retention policy, 8-28
enabling, 5-23
flashback database window, 7-3
maintaining, 12-7
monitoring disk usage, 12-8
monitoring usage, 12-8
Oracle Managed Files, 5-22
PDB point-in-time recovery, 18-29
fast recovery area (continued)
permanent and impermanent files, 5-20
RMAN files in, 5-30
setting location, 5-25
setting size, 5-24
snapshot control files, 6-15
space management, 5-22
feasibility checks, Data Recovery Advisor, 15-5
file names, listing for backup, 29-1
file sections, 8-7, 8-8, 10-3, 16-4
flashback CDB, 18-21
flashback CDB, using SQL*Plus, 30-3
flashback data archive
definition, 1-7
Flashback Database, 1-8, 2-16, 14-1, 18-1
determining the flashback database window,
18-17
disabling, 7-19
enabling, 7-18
flashback logs, 1-8, 7-9
limitations, 7-3
monitoring, 7-20
overview, 1-8
prerequisites, 18-17
purpose, 18-1
requirements, 7-11
space management, 12-9
estimating disk space requirement, 5-25
tuning performance, 7-20
FLASHBACK DATABASE command, 18-17
flashback database window, 7-3
flashback database, and PITR for PDBs, 18-6
flashback database, PDBs, 18-24
Flashback Drop, 18-4, 18-12
flashback logs, 1-8, 2-16, 7-2, 12-9, 18-3
guaranteed restore points and, 7-5
flashback PDB, local undo, 18-7
flashback PDB, shared undo, 18-7
flashback PDB, using SQL*Plus, 30-4
flashback retention target, 7-2
Flashback Table, 18-4
using, 18-8, 18-9
FLASHBACK TABLE statement, 18-8, 18-9
Flashback Technology, 18-1
logical features, 18-4
overview, 1-6
flashback undrop
restoring objects, 18-13
foreign data file, 28-22
foreign data file copy, 28-22
foreign tablespace, 28-22
formats, for RMAN backups, 9-4
fractured blocks, 8-2
detection, 8-2
full backups, 8-18
Index
Index-8

full backups (continued)
incremental backups and, 2-7
G
generic channels
definition, 5-5
groups, redo log, 31-14, 31-15
guaranteed restore points, 1-8, 5-24
alternative to storage snapshots, 7-6
compared to storage snapshots, 7-6
creating, 7-12
flashback logs and, 7-5
requirements, 7-11
space usage in fast recovery area, 7-16
H
Health Monitor, 15-3
hot backup mode
failed backups, 29-9, 29-10
for online user-managed backups, 29-8
I
I/O errors
effect on backups, 10-14
image copies, 2-4, 8-1, 8-11
definition, 8-11
testing restore of, 17-9
IMPORT CATALOG command, 13-39
INCARNATION option
LIST command, 11-10, 13-35
RESET DATABASE command, 13-35
incarnations
database, 11-10, 14-7, 18-17, 18-37
INCLUDE CURRENT CONTROLFILE option
BACKUP command, 9-13
incomplete media recovery, 30-20
incomplete recovery
defined, 18-26
in Oracle Real Application Clusters
configuration, 30-8
overview, 14-6
time-based, 30-23
with backup control file, 30-8
inconsistent backups, 8-2
using RMAN, 2-6, 8-2
inconsistent tablespaces
transporting across platforms, 28-35
incremental backups, 2-7, 9-37
block change tracking, 9-44
differential, 8-19
how RMAN applies, 14-7
incremental backups (continued)
making, 9-37
multisection incremental backups, 9-8
using RMAN, 10-8, 10-9
initialization parameter file, 14-6
initialization parameters
CONTROL_FILES, 20-6, 31-2
DB_FILE_NAME_CONVERT, 21-23
DB_NAME, 21-23
LOG_ARCHIVE_DEST_n, 30-8
LOG_ARCHIVE_FORMAT, 30-8
LOG_FILE_NAME_CONVERT, 21-23
instance failures
backup mode and, 29-9
instance recovery
of CDBs, 30-19
integrity checks, 16-1
interpreting RMAN error stacks, 24-7
interrupting media recovery, 30-11
J
jobs, RMAN
monitoring progress, 23-12
querying details about, 11-18
K
KEEP option
BACKUP command, 12-17
L
level 0 incremental backups, 2-7, 8-19, 8-21
level 1 incremental backups, 8-19, 8-20
LIST command, 2-11, 11-1, 11-3, 11-4
FAILURE option, 15-8
INCARNATION option, 13-35
listing
dropped PDB backups, 11-18
preplugin backups, 11-9
local undo, flashback PDB operations, 18-7
log sequence numbers, 30-6
LOG_ARCHIVE_DEST_n initialization
parameter, 5-29, 5-30, 17-10, 30-7, 30-8,
30-13, 30-21, 30-23
LOG_ARCHIVE_FORMAT initialization
parameter, 30-8
LOG_FILE_NAME_CONVERT initialization
parameter, 21-23
logical backups, 1-2
logical block corruption, 16-2
LOGSOURCE variable
SET statement, 30-10, 30-13, 30-17
long waits, 23-15
Index
9

loss of
inactive log group, 31-15
lost write protection
enabling, 6-18
lost writes, detecting, 6-17
M
maintenance commands, RMAN, 2-13, 3-5, 12-2
Data Guard environment, 12-2
managing RMAN metadata, 11-1, 12-1
MAXPIECESIZE parameter
SET command, 5-16
MAXSETSIZE parameter
BACKUP command, 6-4, 10-1
CONFIGURE command, 6-4
media failures, 1-3
archived redo log file loss, 30-20
complete recovery, 30-12
complete recovery, user-managed, 30-12
control file loss, 31-7
datafile loss, 30-5
definition, 1-3
NOARCHIVELOG mode, 30-24
online redo log group loss, 31-14
recovery, 30-12
recovery procedures
examples, 30-5
Media Management Layer (MML) API, 3-6, 6-5
media managers, 3-1, 3-4, 3-6, 3-7
backing up files, 3-7
backup piece names, 5-16
Backup Solutions Program, 3-7
catalog, 3-1
configuring for use with RMAN, 5-13
crosschecking, 12-12
definition, 2-1
error codes, 24-5
file restrictions, 5-16
installing, 5-11
library location, 5-11
linking
testing, 5-13
linking to software, 3-7, 5-11
multiplexing backups, 8-8
prerequisites for configuring, 5-11
sbttest program, 24-14
testing, 5-13, 5-14
testing backups, 5-14
testing the API, 24-14
third-party, 5-10
troubleshooting, 5-14
media recovery, 8-23
ADD DATAFILE operation, 31-6
after control file damage, 31-1, 31-2
media recovery (continued)
applying archived redo logs, 30-6
cancel-based, 30-20, 30-23
complete, 30-12
closed database, 30-13
complete, user-managed, 30-12
corruption
allowing to occur, 30-30
errors, 30-27
incomplete, 30-20
interrupting, 30-11
lost files
lost archived redo log files, 30-20
lost data files, 30-5
lost mirrored control files, 31-1
NOARCHIVELOG mode, 30-24
offline tablespaces in open database, 30-17
online redo log files, 31-13
parallel, 30-12
problems, 30-26–30-28
restarting, 30-11
restoring
whole database backups, 30-24
resuming after interruption, 30-11
roll forward phase, 30-6
scenarios, 31-1
time-based, 30-20
transportable tablespaces, 31-12
trial, 30-32
troubleshooting, 30-26, 30-27
user-managed, 30-1
using Recovery Manager, 14-6
metadata, RMAN, 3-5, 11-1, 12-1, 13-1
mirrored files
backups using, 10-10
splitting, 29-16
suspend/resume mode, 29-16
using RMAN, 10-10
monitoring fast recovery area usage, 12-8
monitoring RMAN, 24-10
MTTR, 15-1
multiplexed backup sets, 6-4, 8-8, 9-6, 23-4
multiplexed control files, 5-20, 5-28, 12-6, 17-3,
29-2, 30-6, 31-1
multisection backups, 3-5, 8-4, 8-7, 8-8, 10-3,
16-4
views, 9-8
multisection incremental backups, 9-8
example, 9-8
multitenant container databases, 4-7
N
naming
duplicate database files, 26-2
Index
Index-10

naming backup sets, 8-6
NLS_DATE_FORMAT environment variable,
4-13
NLS_LANG environment variable, 4-13
NOARCHIVELOG mode
backing up, 9-15
disadvantages, 30-24
recovery, 30-24
non-CDBs
preplugin backups, 9-16
O
obsolete backups, 8-23
definition, 8-23
deleting, 2-13, 8-27, 12-28
off-site backups, 17-8
online redo logs, 31-15
active group, 31-14, 31-15
applying during media recovery, 30-6
archived group, 31-14, 31-15
clearing
failure, 31-16
clearing inactive logs
archived, 31-16
unarchived, 31-16
configuring location, 5-28
current group, 31-14, 31-15
inactive group, 31-14, 31-15
loss of, 31-15
active group, 31-17, 31-18
all members, 31-14
group, 31-14
recovery, 31-13
loss of group, 31-17, 31-18
multiple group loss, 31-18
replacing damaged member, 31-13
status of members, 31-14, 31-15
OPEN RESETLOGS clause
ALTER DATABASE statement, 13-35, 14-7,
18-17, 18-36
ORA-01578 error message, 31-11
Oracle Advanced Compression option, 6-8
Oracle Backup Solutions Program (BSP), 3-7
Oracle Cloud
duplicating to, 25-49
Oracle Data Pump, 1-2, 18-17
Oracle Enterprise Manager Cloud Control
about, 1-10
accessing the Database Home page, 1-10
Oracle Flashback Database, 1-8
Oracle Flashback Drop, 1-7
Oracle Flashback Query, 1-7
Oracle Flashback Table, 1-7
Oracle Flashback Transaction, 1-7
Oracle Flashback Transaction Query, 1-7
Oracle Flashback Version Query, 1-7
Oracle keystore, 6-11
Oracle Managed Files
fast recovery, 5-22
Oracle Real Application Clusters (Oracle RAC)
RMAN channels and, 6-2
Oracle Secure Backup, 3-7, 5-10
Oracle software keystore
and backups, 6-11
Oracle VSS writer, 5-20
orphaned backups, 14-10
P
packages
DBMS_PIPE, 4-18
password backup encryption, 6-12
password-mode encryption, 10-13
passwords
connecting to RMAN, 4-10
PDB restore points, 7-7
PDB restore points, creating, 7-14
PDB restore points, namespace, 7-8
PDB restore points, viewing, 7-16
PDBs, 4-7
about backup and recovery of, 4-7
about duplicating, 25-43
backing up, using Oracle Enterprise Manager
Cloud Control, 9-22
backing up, using RMAN, 9-19
complete recovery
data files, 17-29
tablespaces, 17-29
using RMAN, 17-23
complete restore, 17-20
connecting to, 4-7
orphaned backups, 14-10
performing point-in-time recovery, 18-31
point-in-time recovery and fast recovery area,
18-29
preplugin backups, 9-20
recovering table partitions, 22-10
recovering tables, 22-10
reporting, 11-17
restrictions when connected to, 4-8
transporting across platforms, 28-43
user-managed backups, 29-4
validating, 16-9
PDBs, clean PDB restore point, 7-7
PDBs, flashback database and PITR, 18-6
PDBs, flashback database operation, 18-24
PDBs, restore points, 7-7
PDBs, rewinding, 18-24
performance tuning
Index
11

performance tuning (continued)
short waits
definition of, 23-15
performance tuning, RMAN
backup performance, 23-16
long waits, 23-15
physical backups, 1-2
physical block corruption, 16-2
pipe interface, RMAN, 4-18
PITR, for PDBs, 18-6
pluggable databases, 4-7
point of recoverability
recovery window, 8-25
point-in-time recovery, 30-20
application PDBs, 18-33
of CDBs, 18-30
of PDBs, 18-31
performing
with current control file, 18-27
tablespace, 18-1
preplugin backups
about, 8-14
example, 9-23
non-CDB, 9-16
PDBs, 9-20
PREVIEW option, RESTORE command, 11-1
previewing backups, 17-7
PRINT SCRIPT command, 13-24
proxy copies, 3-7, 8-10
PROXY option
BACKUP command, 8-10
Q
QUIT command, 2-2
quitting RMAN, 2-2
R
raw devices
backing up to, 29-19
UNIX backups, 29-19
Windows backups, 29-21
RC_ARCHIVED_LOG view, 11-22
RC_BACKUP_FILES view, 11-24
RC_BACKUP_PIECE view, 11-21
RC_BACKUP_SET view, 12-23
read-only tablespaces
backups, 29-12
transporting across platforms
using backup sets, 28-30
using image copies, 28-5
RECOVER clause
ALTER DATABASE statement, 30-10, 30-13,
30-17
RECOVER command, 14-6
COPY option, 9-40
FOREIGN DATAFILECOPY clause, 28-38,
28-39
PARALLEL and NOPARALLEL options,
30-12
TEST option, 16-8
unrecoverable objects and standby
databases, 31-11
UNTIL TIME option, 30-23
USING BACKUP CONTROLFILE clause,
31-7
recovering
table partitions in PDBs, 22-10
tables in PDBs, 22-10
recovering database file
over the network, 20-23
recovering database files
over the network, example, 20-24
using physical standby, 20-23
recovering files over the network
scenarios, 20-23
recovering table partitions
example, 22-12
limitations, 22-7
overview, 22-1
prerequisites, 22-8
steps, 22-9
recovering tables
example, 22-11
limitations, 22-7
new schema, 22-6
overview, 22-1
prerequisites, 22-8
steps, 22-9
recovery
ADD DATAFILE operation, 31-6
automatically applying archived logs, 30-7
cancel-based, 30-23
complete, 17-1, 30-12
CDBs, 17-21
CDBs using Oracle Enterprise Manager
Cloud Control, 17-25
closed database, 30-13
data files in PDBs, 17-29
offline tablespaces, 30-17
PDBs, 17-23
root, 17-22
tablespaces in PDBs, 17-29
tablespaces in PDBs using Cloud
Control, 17-31
corruption
intentionally allowing, 30-30
data files, 30-5
database
Index
Index-12

recovery (continued)
database (continued)
complete, 17-1
in NOARCHIVELOG mode, 20-1
database files
how RMAN applies changes, 14-7
overview, 14-6
database, point-in-time, 18-1, 18-26
disaster using RMAN, 20-10
dropped table, 31-18
errors, 30-27
failures requiring, 1-3
interrupting, 30-11
media, 30-1, 30-25, 31-1
multiple redo threads, 30-8
of lost or damaged recovery catalog, 13-19
online redo logs, 31-13
loss of group, 31-14
parallel, 30-12
preparing for, 17-4
problems, 30-26
fixing, 30-28
investigating, 30-28
stuck, 30-26
third-party snapshots
example, 30-10
time-based, 30-23
transportable tablespaces, 31-12
trial, 30-32
explanation, 30-32
overview, 30-32
troubleshooting, 30-26
user errors, 31-18
user-managed, 30-1, 30-25, 31-1
using backup control file, 20-5
without recovery catalog, 20-8
using logs in a nondefault location, 30-9
using logs in default location, 30-8
using logs in nondefault location, 30-10
using storage snapshots, 30-10
using third-party snapshots, 30-10
with Oracle Enterprise Manager Cloud
Control, 1-11
without a recovery catalog, 12-6
Recovery Appliance
backing up to, 3-11
recovery catalog, 3-5, 13-1
backing up, 13-17
cataloging backups, 12-19, 13-11
centralization of metadata, 13-3
creating, 13-5
crosschecking, 12-12
DBID problems, 13-2
definition, 2-1, 3-1
deleting backups, 12-23
recovery catalog (continued)
deleting records, 12-26
dropping, 13-42
log switch record, 12-19
managing size of, 13-29
operating with, 3-5
purpose of, 13-1
recovery of, 13-19
refreshing, 13-27
registering databases, 13-2, 13-9, 13-10
resynchronizing, 13-27
space requirements, 13-6
stored scripts, 13-20
creating, 13-21
synchronization, 13-27
unregistering databases, 13-32
updating
after operating system deletions, 12-23
upgrading, 13-36, 13-37
views, querying, 11-21
virtual private catalogs, 3-5
recovery catalogs
backing up, 13-17
dropping, 13-42
importing, 13-39
moving, 13-42
Recovery Manager
allocating tape buffers, 23-7
archived redo logs
backups, 9-31
backups, 9-2
archived redo logs, 9-31
backing up, 9-52
batch deletion of obsolete, 8-27
control files, 9-12
data file, 9-11, 9-54, 9-55
duplexed, 8-14
image copy, 8-11
incremental, 9-37, 10-8, 10-9
optimization, 5-33, 9-34
tablespace, 9-54, 9-55
testing, 16-3, 16-4, 16-6
validating, 16-4, 16-6
whole database, 9-10
channels, 3-3
naming conventions, 3-5
client, 2-1
connecting to databases, 2-2
corrupt data file blocks
handling I/O errors and, 10-14
crosschecking recovery catalog, 12-12
database character set, 4-13
database connections, 4-2
auxiliary database, 4-11
duplicate database, 4-11
Index
13

Recovery Manager (continued)
database connections (continued)
hiding passwords, 4-10
SYSBACKUP or SYSDBA required for
target, 4-2
without a catalog, 4-2
DBMS_PIPE package, 4-18
definition, 2-1
disconnecting from, 2-2
error codes
message numbers, 24-4
errors, 24-1, 24-3
interpreting, 24-7
file deletion, 12-24
fractured block detection in, 8-2
image copy backups, 8-11
incremental backups
cumulative, 8-20
differential, 8-19
level 0, 8-19
integrity checking, 16-1
jobs, monitoring progress, 23-12
jobs, querying details of, 11-18
lists, 11-3
maintenance commands, 2-13
media management
backing up files, 3-7
Backup Solutions Program (BSP), 3-7
crosschecking, 12-12
media manager, linking with a, 5-11
metadata, 3-5, 11-1, 12-1, 13-1
monitoring, 24-10
overview, 2-1, 3-3
performance
monitoring, 24-10
pipe interface, 4-18
proxy copy, 3-7
recovery
after total media failure, 20-10
recovery catalog, 13-1
backing up, 13-17
crosschecking, 12-12
managing the size of, 13-29
operating with, 3-5
recovering, 13-19
registration of target databases, 13-2,
13-9, 13-10
resynchronizing, 13-27
synchronization, 13-27
upgrading, 13-37
reports, 11-11
database schema, 11-15
objects needing a backup, 11-12
obsolete backups, 11-14
repository, 3-5
Recovery Manager (continued)
restoring
archived redo logs, 17-10
retention policies
configuring, 5-30
return codes, 24-9
setting time parameters, 4-13
snapshot control file location, 6-15
starting, 2-2
synchronous and asynchronous I/O, 23-5,
23-8
terminating commands, 24-16
test disk API, 5-13
types of backups, 8-11
using RMAN commands, 3-3
recovery window, 5-30
point of recoverability, 8-25
RECOVERY WINDOW parameter
CONFIGURE command, 5-31
recovery windows
configuring for retention policy, 5-31
definition, 8-25
RECOVERY_CATALOG_OWNER role, 13-13
recycle bin, 18-4, 18-12
restoring objects from, 18-13
redo logs
incompatible format, 30-26
naming, 30-8
parallel redo, 30-26
redo records
problems when applying, 30-26
REGISTER command, 13-10
REPAIR FAILURE command, 15-15, 15-17
repair failures
in CDBs, 15-8
repair options, Data Recovery Advisor, 15-12
repairs, Data Recovery Advisor, 15-2
consolidation of, 15-5
manual and automatic, 15-5
REPLACE SCRIPT command, 13-22
REPORT command, 2-12, 11-1, 11-11
NEED BACKUP option, 11-12
OBSOLETE option, 8-27
reporting
in CDBs, 11-17
in PDBs, 11-17
reports, RMAN, 2-10, 11-1, 11-11
backup jobs, 11-18
database schema, 11-15
files needing backups, 11-12
obsolete backups, 11-14
unrecoverable backups, 11-14
repository, RMAN, 3-5
RESET DATABASE command
INCARNATION option, 13-35
Index
Index-14

RESETLOGS operation
when necessary, 14-7
RESETLOGS option
of ALTER DATABASE, 30-25
restartable backups, 10-14
RESTORE command, 14-3, 17-4
ALL FOREIGN DATAFILES clause, 28-26
BACKUPSET clause, 28-24
DATAPUMP clause, 28-27
DATAPUMP DESTINATION clause, 28-38,
28-39
DUMPFILE clause, 28-24, 28-38, 28-39
FORCE option, 14-6
FOREIGN DATABASE clause, 28-26, 28-30
FOREIGN DATAFILE clause, 28-26, 28-39
FOREIGN TABLESPACE clause, 28-26,
28-33
FROM BACKUPSET clause, 28-38
FROM PLATFORM parameter, 28-25
FROM SERVICE parameter, 20-24
NOIMPORT option, 28-27
PREVIEW option, 11-1, 17-7
VALIDATE HEADER option, 11-1, 17-7
restore optimization, 14-6
restore points, 1-8, 2-16
creating, 7-12
dropping, 7-17
flashing back to, 18-37
guaranteed, 1-8, 7-5
compared to storage snapshots, 7-6
listing, 7-15
multitenant environment, 7-6
requirements, 7-11
restore points, creating in CDBs, 7-13
restore points, creating in PDBs, 7-14
restore points, in CDBs, 7-7
restore validation, 17-9
restoring
control files, 20-6
to default location, 31-1
to nondefault location, 31-2
database
to default location, 30-24
database files, 14-3, 14-6
encrypted backups, 14-4
server parameter files, 20-2
testing, 16-8, 17-9
user-managed backups, 30-5
restoring database file
over the network, 20-22
restoring database files
over the network, example, 20-24
restoring files over the network
scenarios, 20-23
restrictions
restrictions (continued)
PDBs, 4-8
RESUME clause
ALTER SYSTEM statement, 29-18
resuming recovery after interruption, 30-11
RESYNC CATALOG command, 13-27, 13-31
FROM CONTROLFILECOPY option, 13-19
resynchronizing the recovery catalog, 13-27,
13-31
SET command
DBID option, 3-9
return codes
RMAN, 24-9
REVOKE command, 13-15
rewinding
CDBs, 18-21
RMAN, 3-1
RMAN repository, 1-5, 2-1
RMAN sessions, 2-16, 3-3
root
backing up
using Oracle Enterprise Manager Cloud
Control, 9-19
using RMAN, 9-19
complete recovery, 17-22
complete restore, 17-20
S
SBT, 3-4, 3-7, 5-17
sbttest program, 24-14
scenarios, Recovery Manager
NOARCHIVELOG backups, 9-15
recovering pre-resetlogs backup, 18-39, 20-1
recovery after total media failure, 20-10
scripts, RMAN, 2-10
substitution variables in, 9-50
server parameter files
autobackups, 8-17
backups, 9-15
configuring autobackups, 5-8, 8-17
restoring, 20-2
server sessions, Recovery Manager, 3-3
session architecture, Recovery Manager, 3-3
SET command
ENCRYPTION option, 6-12
MAXCORRUPT option, 16-3
SET statement
AUTORECOVERY option, 30-7
LOGSOURCE variable, 30-10, 30-13, 30-17
shadow copies, 9-40
shared server
configuring for use with RMAN, 6-16
configuring RMAN, 6-16
shared undo, flashback PDB operations, 18-7
Index
15

short waits
definition, 23-15
SHOW command, 2-4, 5-2
SHUTDOWN statement
ABORT option, 30-24, 31-1, 31-2
size of backup sets, setting, 8-7
skipping files in RMAN backups, 10-7
snapshot control file
specifying location, 6-15
specifying location in Oracle Real Application
Clusters environment, 6-15
snapshot control files, 6-15, 13-27
snapshots
backing up using third-party technologies,
29-22
using Storage Snapshot Optimization, 29-22
sparse backups, 8-13
sparse CDBs
duplicating, 25-41
sparse data files
backing up, 9-28
sparse databases
duplicating, 25-34
sparse PDBs
backing up, 9-30
duplicating, 25-47
sparse tablespaces
backing up, 9-28
split mirrors
suspend/resume mode, 29-16
using as backups, 10-10
SPOOL command, 15-15
standby databases, 3-1
statements, SQL
ALTER DATABASE, 30-10, 30-13, 30-17
status
dropped PDB backups, 12-18
Storage Snapshot Optimization, 29-22
storage snapshots, 7-6, 29-22, 30-10
recovering, 30-10
stored scripts, 3-5, 9-50, 13-3, 13-20, 13-40
creating RMAN, 13-21
deleting, 13-26
dynamic, 13-23
executing, 13-26
listing names of, 13-25
managing, 13-20
printing, 13-24
substitution variables in, 13-23
stuck recovery, 30-26
substitution variables, FORMAT parameter, 5-16,
8-6, 8-11
substitution variables, stored scripts, 13-23
SUSPEND clause
ALTER SYSTEM statement, 29-18
suspend/resume mode, 29-16
suspending a database, 29-16
SWITCH command, 17-18
SYSBACKUP privilege, 4-4
system backup to tape, 3-7
system time
changing
effect on recovery, 30-23
T
tables, recovery of dropped, 31-18
tablespace point-in-time recovery, 18-1
performing on dropped tablespaces, 21-1
planning, 21-7
preparing the auxiliary instance, 21-22
restrictions, 21-6
why perform, 21-1
tablespaces
backups, 9-54, 9-55, 29-8
offline, 29-5
online, 29-8
backups using RMAN, 9-11
backups, in PDBs, 9-22
excluding from backups, 6-6
excluding from RMAN backups, 6-6
read-only
backing up, 29-12
read/write
backing up, 29-7
recovering accessible
when database is open, 17-16
recovering in PDBs
using Cloud Control, 17-31
recovering offline in open database, 30-17
transporting across platforms, in PDBs,
28-49
transporting with RMAN, 27-1
user-managed backups, in CDBs, 29-13
user-managed backups, in PDBs, 29-13
tape devices, 3-7
target database
connecting to, 2-2
definition, 2-1, 3-1
terminating RMAN commands, 24-16
test disk API, 5-13
testing RMAN
backups, 16-3, 16-4, 16-6
with media management API, 24-14
third-party snapshots
specifying recovery time, 30-10
time format
RECOVER DATABASE UNTIL TIME
statement, 30-23
time parameters
Index
Index-16

time parameters (continued)
setting for Recovery Manager use, 4-13
time-based recovery, 30-23
trace files, RMAN, 24-1
transparent backup encryption, 6-11
transparent-mode backup encryption, 10-13
transportable tablespaces
creating with RMAN, 27-1
and Data Pump Export, 27-10
and past points in time, 27-9
auxiliary destination, 27-2
auxiliary instance parameter file, 27-5,
27-6
file locations, 27-11
initialization parameters, 27-5
cross-platform, 28-1
recovery, 31-12
transporting tablespaces, 27-1
trial recovery, 16-8, 30-32
tuning Recovery Manager
V$ views, 24-10
U
UNAVAILABLE option
of CHANGE, 12-16
UNCATALOG option
CHANGE command, 12-22
deleting repository records, 12-22
undo optimization, backup, 5-33, 8-6
unrecoverable objects
recovery, 31-11
UNREGISTER DATABASE command, 13-32
unregistering databases, 13-32
UNTIL TIME option
RECOVER command, 30-23
upgrading
virtual private catalog, 13-16
upgrading the recovery catalog, 13-37
user errors
definition, 1-3
recovery from, 31-18
user-managed backups, 29-1, 29-3
backup mode, 29-7, 29-9
control files, 29-14
definition, 8-12
determining data file status, 29-2
hot backups, 8-2, 29-10
listing files before, 29-1
of CDBs, 29-4
of PDBs, 29-4
offline tablespaces, 29-5
read-only tablespaces, 29-12
tablespaces, 29-8
tablespaces in CDBs, 29-13
user-managed backups (continued)
tablespaces in PDBs, 29-13
verifying, 29-23
whole database, 29-3
user-managed recovery, 30-20
ADD DATAFILE operation, 31-6
complete, 30-12
incomplete, 30-20
interrupting, 30-11
scenarios, 31-1
user-managed restore operations, 30-5
V
V$ARCHIVED_LOG view, 5-25, 11-22, 18-27,
18-34
listing all archived logs, 29-16
V$BACKUP view, 29-2
V$BACKUP_ASYNC_IO view, 23-14
V$BACKUP_DATAFILE view, 9-38, 12-20
V$BACKUP_FILES view, 5-31, 12-12, 12-20
V$BACKUP_PIECE view, 11-21, 12-20
V$BACKUP_REDOLOG view, 12-20
V$BACKUP_SET view, 12-20, 12-23
V$BACKUP_SPFILE view, 12-20
V$BACKUP_SYNC_IO view, 23-14
V$BLOCK_CHANGE_TRACKING view, 9-47
V$CONTROLFILE view, 9-12
V$DATABASE view, 11-23, 18-9, 18-36
V$DATABASE_BLOCK_CORRUPTION view,
1-5, 2-20, 16-3, 16-4, 19-1–19-3, 19-8
V$DATABASE_INCARNATION view, 13-35
V$DATAFILE view, 17-5, 21-23, 29-2
listing files for backups, 29-1
V$DATAFILE_HEADER view, 11-1, 17-5
V$DIAG_INFO view, 19-6
V$EVENT_NAME view, 24-10
V$FLASHBACK_DATABASE_LOG view, 5-25,
18-17, 18-36
V$FLASHBACK_DATABASE_STAT view, 7-20
V$INSTANCE view, 17-5
V$LOG_HISTORY view
listing all archived logs, 30-13
V$LOGFILE view, 21-23, 31-14, 31-15
V$PARAMETER view, 18-9
V$PROCESS view, 11-1, 24-11
V$RECOVER_FILE view, 17-5, 30-13
V$RECOVERY_AREA_USAGE view, 12-8
V$RECOVERY_FILE_DEST, 12-8
V$RECOVERY_FILE_DEST view, 12-8
V$RECOVERY_LOG view
listing logs needed for recovery, 30-13
V$RESTORE_POINT, 7-16
V$RESTORE_POINT view, 18-9
V$RMAN_BACKUP_JOB_DETAILS view, 11-18
Index
17

V$RMAN_BACKUP_SUBJOB_DETAILS view,
11-18
V$RMAN_ENCRYPTION_ALGORITHMS view,
6-10, 6-14, 23-6
V$RMAN_OUTPUT view, 11-23
V$RMAN_STATUS view, 24-1
V$SESSION view, 6-16, 11-1, 24-11
V$SESSION_LONGOPS view, 23-12
V$SESSION_WAIT view, 24-10
V$SGASTAT view, 23-17
V$SYSSTAT view, 7-20
V$TABLESPACE view, 17-5, 29-2
VALIDATE command, 15-2, 15-10, 16-4
SECTION SIZE parameter, 16-4
VALIDATE HEADER option, RESTORE
command, 11-1
validating
CDBs, 16-9
PDBs, 16-9
validation, RMAN, 15-10
backups, 2-9, 16-4, 16-6
database files, 2-9, 16-4
restore operations, 17-9
validation, RMAN (continued)
viewing, CDB restore points, 7-16
viewing, PDB restore points, 7-16
views
for multisection backups, 9-8
views, recovery catalog, 11-1, 11-21
virtual private catalogs, 3-5
creating, 13-13
upgrading, 13-16
Volume Shadow Copy Service (VSS), 5-20, 9-40
W
whole database backups
ARCHIVELOG mode, 29-3
inconsistent, 29-3
NOARCHIVELOG mode, 29-3
preparing for, 29-3
using RMAN, 9-10
Z
Zero Data Loss Recovery Appliance, 1-11
Index
Index-18
