RPM Manual Digi Tech 1 Guitar Effects Owner’s
User Manual: DigiTech RPM-1 Guitar Effects Owner’s Manual Troubleshoot DigiTech RPM-1 Guitar Effects |
Open the PDF directly: View PDF ![]() .
.
Page Count: 7

Safety Precautions
The symbols shown above are internationally
accepted symbols that warn of potential haz-
ards with electrical products. The lightning
flash with arrow point in an equilateral trian-
gle means that there are dangerous voltages
present within the unit. The exclamation
point in an equilateral triangle indicates that it
is necessary for users to refer to the owner’s
manual.
These symbols warn that there are no user
serviceable parts inside the unit. Do not open
the unit. Do not attempt to service the unit
yourself. Refer all servicing to qualified per-
sonnel. Opening the chassis for any reason
will void the manufacturer’s warranty. Do not
get the unit wet. If liquid is spilled on the
unit, shut it off immediately and take it to a
dealer for service. Disconnect the unit during
lightning storms or wind storms to prevent
damage.
CAUTION
RISK OF ELECTRIC SHOCK
DO NOT OPEN
ATTENTION: RISQUE DU CHOC ELECTRIQUE - NE PAS OUVRIR
RPM-1
Vacuum-Tube Rotary Speaker Emulator
Contents
Power and Grounding 2
Introduction 2
Front Panel 3
Rear Panel 4
Connection Diagrams, Setting Levels 4
Performance Notes 5
Suggested Settings 5
What is a rotary speaker? 6
Specifications, Warranty 7
The information contained in this manual is subject to change at any time without notification.
Some information contained in this manual may also become inaccurate due to undocumented
changes in the product since this version of the manual was completed. This manual supercedes
all previous versions. DigiTech RPM-1 July 26/95
Manual Copyright © 1995 IVL Technologies Ltd.
Software Copyright © 1985–1995 IVL Technologies Ltd.
Patents and patent applications:
US Patents 4,688,464, 5,231,671, 5,301,259 and 5,428,708;
Patent applications: International PCT/CA93/00099
Canada: 2,090,948, Japan 1994-502785, Europe: 92914139.8
DigiTech and the DigiTech logo are registered trademarks of DOD Electronics Corporation
RPM-1 and the
ivl
logo are trademarks of IVL Technologies Ltd.

The RPM-1 is equipped with a three-prong,
grounded power cord for your protection. Do
not cut off the ground prong of the plug, and
do not use an adapter or extension cord to plug
the unit into a two prong outlet unless the
adapter or extension cord is properly grounded.
The RPM-1, like any piece of music hardware, is
sensitive to voltage drops, spikes, and surges;
interference such as lightning or power
“brownouts” can permanently damage the cir-
cuitry inside the unit. Here are some suggestions
to help protect your RPM-1 from such a fate:
• Turn it off: Make a habit of turning off all of
your gear when it is not in use. If there is
lightning or a severe windstorm, unplug all of
your equipment: A surge from a nearby light-
ning strike or downed power line can destroy
electronic equipment even if the switch is off.
Power and Grounding
Information:
• Spike/Surge Protectors: This is an inexpensive
solution to all but the severest of AC line
conditions. Surge protected power strips are
usually slightly more expensive than unpro-
tected strips, and higher quality multi-stage
surge suppressors usually start under $50,
making them a worthwhile investment for
protection of all your valuable electronic
equipment.
• AC Line Conditioners: This is the best (but
most expensive) way to protect your musical
equipment from line voltage fluctuations. Line
conditioners constantly monitor the incoming
voltage for excessive peaks and dips and
make adjustments accordingly, delivering
consistent power levels. For expensive studio
equipment, AC line conditioners are highly
recommended.
Introduction:
Thank you for purchasing the DigiTech RPM-1,
a new effect that creates a classic sound.
When electric organs were first sold, their
sound was static and needed some “animation”,
so the rotating speaker cabinet was born. The
rotating speaker sound became synonymous
with blues, jazz and rock & roll, especially
when players discovered that they could drive
the cabinets’ built-in tube amplifiers into distor-
tion and get a thick, warm sound as well as the
swirling rotary effect. (See diagram, page 6)
The DigiTech RPM-1 allows you to emulate that
classic rotating speaker sound without having to
deal with the bulky speaker cabinets that were
formerly required.
Based on extensive study of rotating speaker
cabinets, the DigiTech RPM-1 incorporates
speaker emulation circuitry which delivers an
authentic sound by recreating the individual
horn and cabinet resonances of a real rotating
speaker.
There are several features of the DigiTech
RPM–1 that make it unique:
1) Where competing products use solid-state
distortion circuitry to simulate overdriven
sounds, the DigiTech RPM-1 is unique in that it
uses a vacuum tube analog distortion pre-amp.
The 12AX7A pre-amp stage gives you the
authentic, rich, warm overdriven sounds previ-
ously attainable only with actual rotating speak-
er cabinets.
2) Only the DigiTech RPM-1 gives you the flexi-
bility to run mono, stereo, or tri-output mode to
simulate the most effective microphone arrange-
ments on stage or in the studio.
3) The DigiTech RPM-1 is a ruggedly built, 1U
full rack-mount unit, with AC power. No exter-
nal power supplies or flimsy plastic cases.
4) While other units are based on modified cho-
rus or phase-shifting circuits, only the DigiTech
RPM-1 incorporates patented Intelligent Pitch
Shifting technology together with VLSI delay
and volume modulation circuitry for maximum
realism.
2
RPM-1 Vacuum-Tube Rotary Speaker Emulator
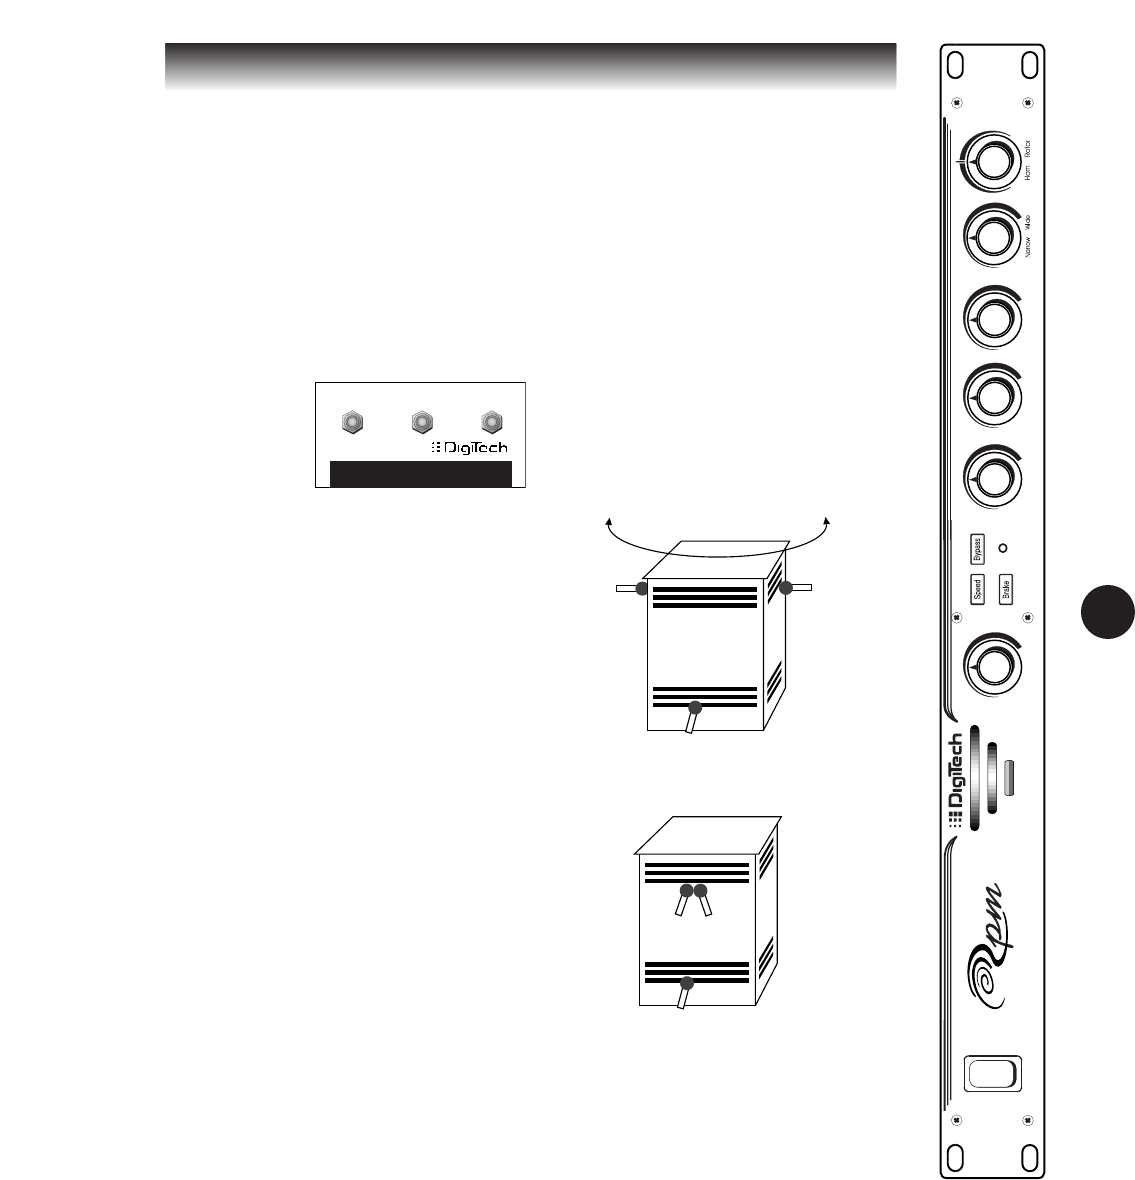
DriveInput Horn Speed Rotor
Acceleration Spread Balance
Clip
Power Switch
Turn on the RPM-1 before your mixer or ampli-
fier, or turn down volume on mixer or amp if
you are going to switch the RPM-1 on or off.
Input
Controls the input level to the RPM-1. Adjust this
while playing so that the Clip indicator only
flashes on the loudest musical peaks. Turning
up the Drive control increases the pre-amp gain,
and you may have to adjust the Input after set-
ting the Drive. (See also page 4 for balancing
Bypass)
Speed Switch
(also activated by
the left footswitch
button) Alternates
between the slow
and fast rotary
speeds. The light
will flash in time with the revolutions.
Brake
(also activated by the center footswitch
button) Stops the rotation portion of the effect,
leaving the Drive and Cabinet Emulation effects
in place. The Brake over-rides the speed con-
trol; turn off the Brake to return to the rotating
sound. When the Brake is applied, the Horn
and Rotor stop at a random position, like a real
rotating speaker. By quickly dis-engaging and
re-engaging the Brake, you can change the
stopped position, to control the harmonic con-
tent of the stationary sound.
Bypass
(also activated by the right footswitch
button) Bypasses the RPM-1 effects so that the
original “dry” signal is sent to all three outputs.
The Bypass is full Stereo - Right and Left
inputs remain separated while the RPM-1 is
Bypassed.
Drive
Controls the amount of overdrive provided by
the RPM-1’s vacuum-tube pre-amp. The tone
will change from clean in the fully counter-
clockwise position, to a lightly compressed
sound with a touch of distortion in the center, to
a compressed, full-out overdrive “crunch” in the
fully clockwise direction. You may have to
adjust the Input after setting the Drive.
Horn speed
Sets the rotation speed of the horn (high fre-
quency portion of the sound) in both the fast
and slow Speed settings.
Rotor Acceleration
Because the low-frequency rotor in a rotating
speaker cabinet is much larger than the horn, it
takes longer to speed up and slow down than
the horn does. The Rotor Acceleration control
determines how fast the Rotor sound speeds up
and slows down - clockwise makes the accelera-
tion time shorter. In the fully counter-clockwise
position, the Rotor sound does not turn at all.
Spread
Emulates the position of two microphones
around the rotary speaker cabinet. A fully wide
spread setting corresponds to a 180˚ spacing of
the mics (i.e. on either side of the cabinet),
which gives the most dramatic stereo effect. A
fully narrow setting emulates both mics being
placed together giving a monaural sound. If you
are using the RPM-1 with only the mono output,
turn the control fully clockwise.
Balance
Adjusts the volume balance between the high
frequency Horn sound and the low frequency
Rotor sound. This can be used to adjust the fre-
quency balance; counter-clockwise toward Horn
is brighter, clockwise toward Rotor is darker.
Front Panel
3
Mic
(RHorn)
Mic
(LHorn)
Mic (Rotor)
Wide Spread
180° angle between microphones
Mic
(RHorn)
Mic
(LHorn)
Mic (Rotor)
Narrow Spread
0° angle between microphones
A
FOOTSWITCH
BC
FS300
Speed Brake Bypass
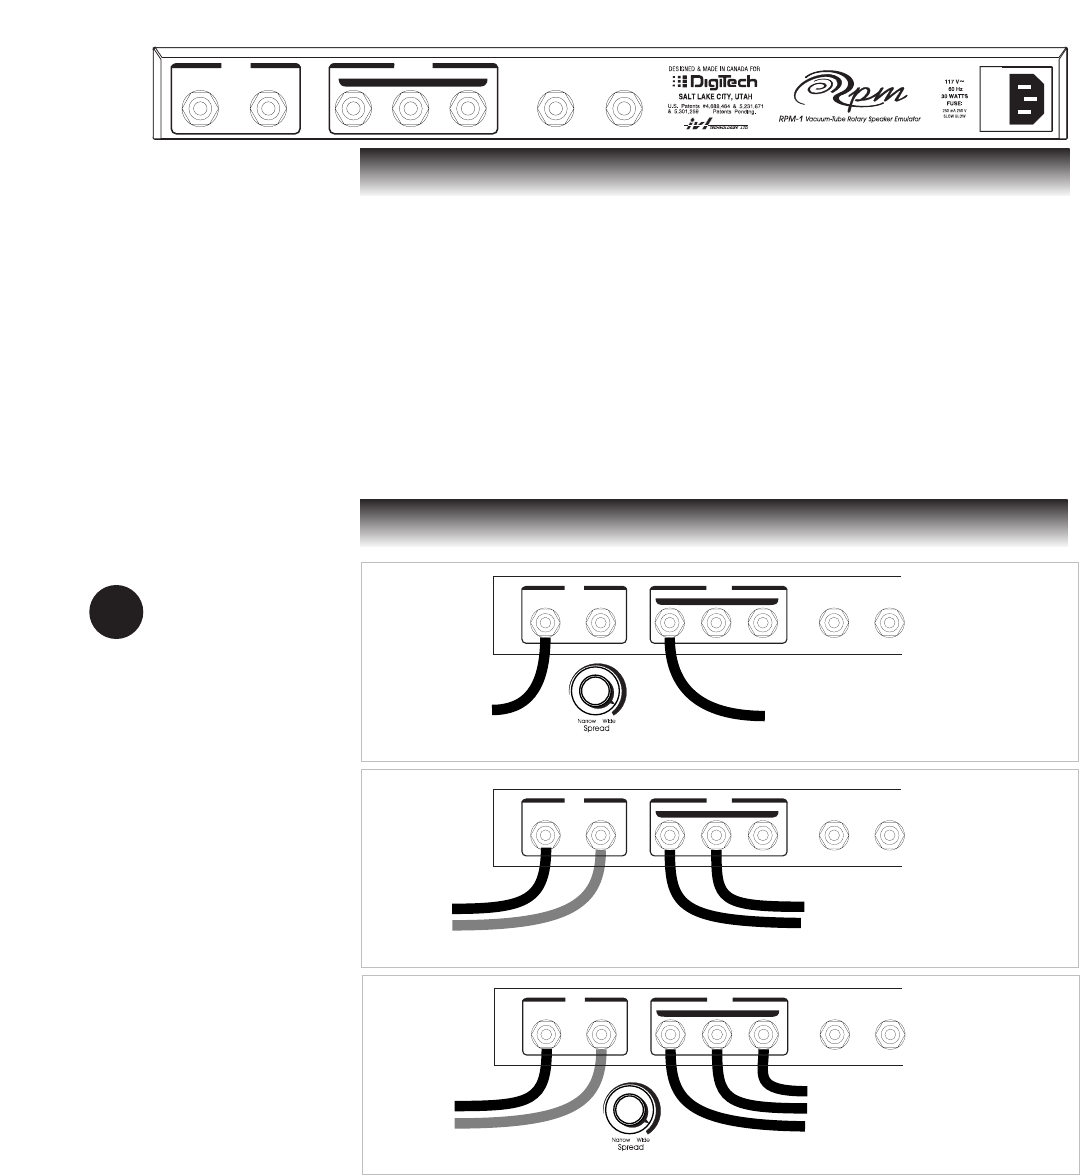
INPUT OUTPUT
RIGHTLEFT (MONO) RIGHTLEFT (MONO)
RHORNLHORN ROTOR FOOTSWITCH CONTINUOUS
CONTROLLER
Mono
Stereo
Tri-Output
Mono output
of instrument
or mixer FX send
Mono or stereo
output of
instrument, or FX send
Mono Left
Stereo Right
To Mixer:
Chan 1, pan Center
Chan 2, pan Right
Chan 3, pan Left
To Mixer:
Right FX Return or Chan 1, pan Right
Left FX Return or Chan 2, pan Left
To Mixer or amplifier
FX Return or Channel
Mono or stereo
output of
instrument, or FX send
Turn Spread to Wide
INPUT OUTPUT
RIGHTLEFT (MONO) RIGHTLEFT (MONO)
RHORNLHORN ROTOR FOOTSWITCH CONTINUOUS
CONTROLLER
INPUT OUTPUT
RIGHTLEFT (MONO) RIGHTLEFT (MONO)
RHORNLHORN ROTOR FOOTSWITCH CONTINUOUS
CONTROLLER
Mono Left
Stereo Right
Turn Spread to Wide
4
Matching Bypass and
Effect levels
When setting up your
instrument volume and
RPM-1 Input levels, use
the Bypass button or the
Bypass footswitch to
alternate between the
Bypass and Effect sounds
while you are playing,
and adjust the Input con-
trol until the two levels
are equal.
If your instrument is out-
putting a very hot signal,
the 12AX7A tube will be
compressing and adding
warmth to the signal even
at minimum Drive set-
tings. This may be desir-
able, unless you need to
balance the Bypass level;
in that case, you should
turn the RPM-1 Input
control up to maximum
and then turn your instru-
ment volume down to
balance the levels.
Tri-Output mode
To use Tri-Output mode,
leave the Horn/Rotor
Balance control in the
center position, and
adjust the Spread control
to maximum Wide posi-
tion. Route the three out-
puts to three input chan-
nels on your mixer, pan
the LHorn and RHorn
outputs left and right and
pan Rotor center.
This gives you the most
flexibility by allowing you
to EQ and balance the
Left Horn, Right Horn
and Rotor sounds inde-
pendently. Try applying
reverb to both Horn out-
puts while leaving the
Rotor output dry.
INPUT OUTPUT
RIGHTLEFT (MONO) RIGHTLEFT (MONO)
RHORNLHORN ROTOR FOOTSWITCH CONTINUOUS
CONTROLLER
Rear Panel
Stereo Inputs
Use Right and Left inputs for stereo, use
one plug only in the Left input for mono.
Outputs
Use the Left output for mono, Left and
Right for a stereo image of the rotating
effect, and LHorn, RHorn and Rotor to sim-
ulate two microphones on the horn (high
frequency) and one microphone on the
Rotor (low frequency).
Footswitch
Stereo 1/4” phone jack for the DigiTech
FS300 Footswitch (included)
Continuous Controller
For an optional volume pedal - controls the
rotor speed, overriding the Speed and Brake
buttons when a pedal is plugged in.
This input will use most passive volume pedals
or a 0–5 V control voltage pedal - plug a stan-
dard guitar cord between the pedal’s output and
the Continuous Controller jack.
Plug the pedal in before you turn on the RPM-
1, then immediately after turning on the RPM-1,
sweep the pedal from its minimum to maximum
position to calibrate the response.
Connection Diagrams
Performance Notes
Note
The RPM-1 contains a 12AX7A vac-
uum tube, which must be warm to
run properly. Note the air vents
on the front of the case. Make sure
that these are never
blocked, and ensure
that no foreign object
enters these vents.
Adjusting the Drive
The Drive control, Input control and the vol-
ume of your instrument all interact to create the
distortion sound of the RPM-1. As you turn the
Drive control from fully counter-clockwise
towards the vertical position, you will notice the
sound taking on a warmer or “furry” tone and
the overall volume will increase somewhat. This
may require an adjustment of the Input level.
The exact point at which the distortion starts
depends on the Input level and your instru-
ment’s volume. Past the 12 o’clock position, the
distortion becomes more aggressive.
When you play chords at high distortion levels,
you may hear a rhythmic beating sound which
is independent of the horn and rotor speed.
This beating is the interference distortion sound
caused by the interaction between two or more
notes being played at the same time. Try play-
ing single lines instead of chords, and you’ll
notice that the beating drops off. If you prefer
not to have this beating sound, reduce the
Drive control.
Speed control
Organists have traditionally used the speeding
up and slowing down of the rotating speakers
to add emphasis and excitement to their play-
ing. Usually, you would not leave the Fast
Speed setting on continuously, but rather you
would toggle the Fast speed on and off to
emphasize peaks in your playing. The most
interesting part of the rotary speaker sound
occurs while the rotor and horn are accelerating
and decelerating.
Brake
The Brake button will gradually bring the rotary
effect to a complete stop from either the Fast or
the Slow setting. This is useful when you don’t
want the rotating effect, but do want the distor-
tion and/or cabinet emulation to warm your
sound up. You can change the Speed setting,
but with the Brake on, there will be no rotating
effect. When you disengage the Brake, the rotor
and horn will then speed up to the current
Speed setting again, based on the Rotor
Acceleration control.
Footswitch
The RPM-1 comes with the DigiTech FS-300
footswitch, which has three switches on it.
From left to right, the footswitches correspond
to the RPM-1’s Speed, Brake and Bypass but-
tons.
Using the RPM-1 with Guitar
The RPM-1 faithfully emulates the rotor and
horn resonances of a real cabinet, which can
sound a bit bassy and dark if a guitar is con-
nected directly to the input. It is best to run a
guitar through a pre-amp or a guitar processor
(such as the DigiTech GSP series), with the
RPM-1 in the effects loop, or at the end of the
audio chain like a real rotating speaker cabinet
would be.
If you want to connect a guitar directly, you
can use the Balance control like a tone control,
more treble on the left (Horn) side, more bass
on the right (Rotor) side.
For a clean, warm sound, keep the volume
control on your guitar and the Input control up
near their maximums and the Drive control
around 10 to 12 o’clock.
5
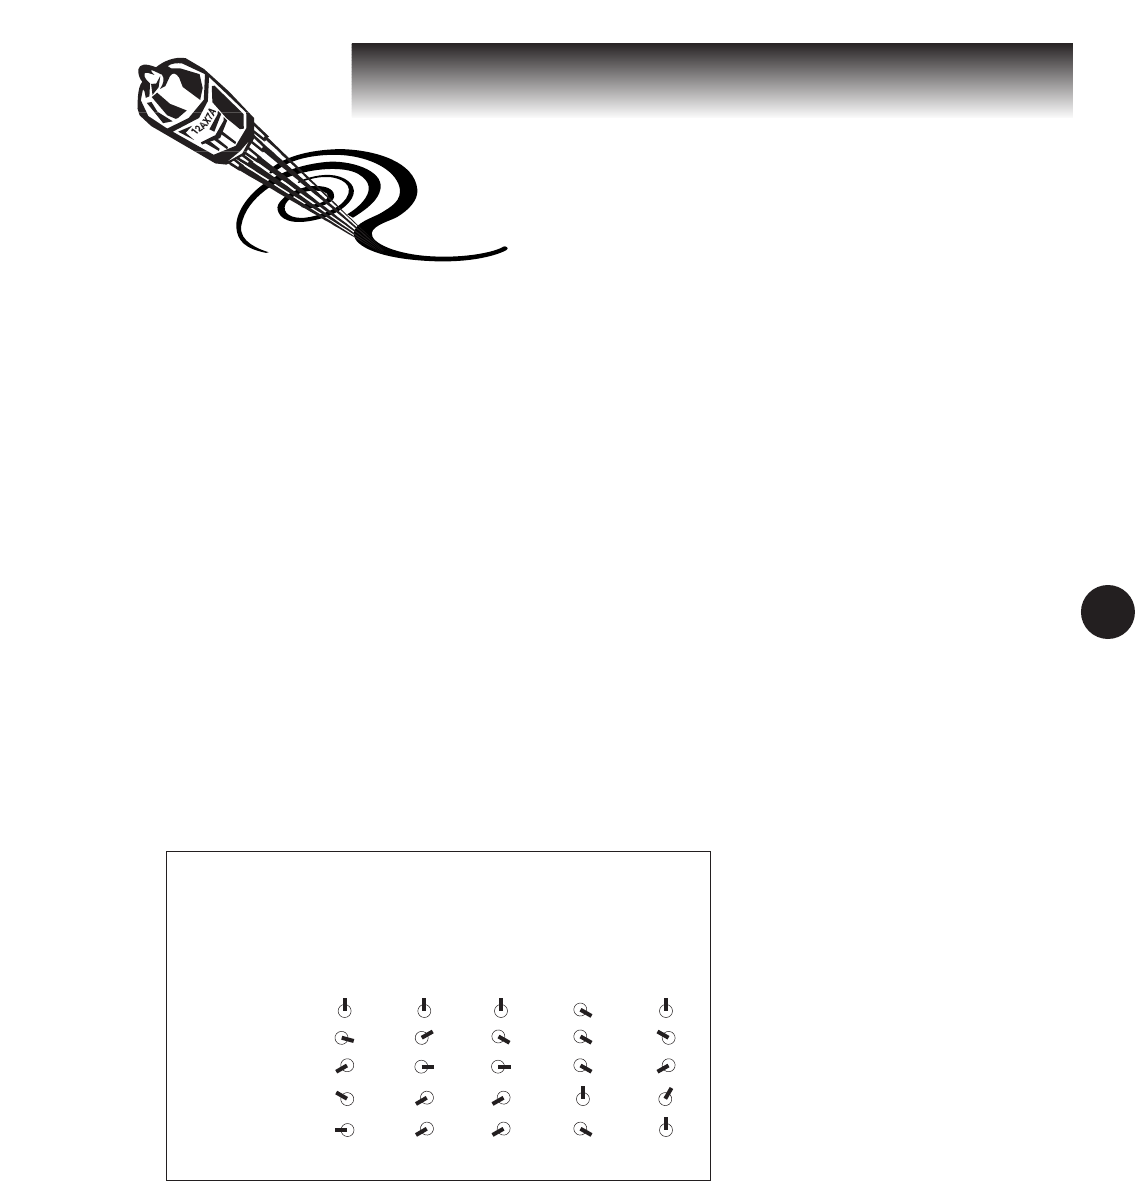
Suggested Settings:
Use the following settings as a guide to acheiving different effects.
Keep in mind that different instruments may require slightly different
settings, especially in the adjustment of the Drive control.
Drive Horn Speed Rotor Accel. Spread Balance
Standard Organ
Solo Organ
Super Stereo FX
“Tine” Electric Piano
Synthesizer

What is a rotary speaker?
A rotating speaker cabinet consists of a high frequency compression
driver and a low frequency speaker, whose sound is directed through
mechanical deflectors spun by motors. The motors can be switched
between stop, slow and fast rotation speed.
The horn and the rotor create a directional beam of sound, and as
they spin, this sound beam is swept around 360°. The sound is always
moving in relation to the listener, creating pitch (Doppler) shifts, vol-
ume variation, and constantly changing, complex reflections from the
inside of the cabinet and the surrounding objects.
For tube-amp distortion for rhythm guitar, turn
up the Drive control. This will give a warm dis-
tortion similar to classic tube amplifier / bass
speaker cabinet combinations.
Keyboard sounds
The RPM-1 sounds great on a variety of key-
board sounds, especially when used on a mixer
FX send so that you can blend the RPM-1 sound
with the direct sound. A touch of distortion will
enhance the realism of electric piano sounds,
and the cabinet emulation simulates the built in
speakers of popular electric pianos. Sampled
piano sounds through the RPM-1 with Drive at
11 o’clock, Horn Speed at 8 o’clock and Balance
at about 1 o’clock can create a convincing
“reed” electric piano. With Drive at 8 o’clock,
and Balance closer to 12:00, you can get a com-
pressed, bell-like piano sound. The cabinet
emulation will round out and warm up any
sound you put through it, so try the RPM-1 with
the Brake engaged even when you don’t want a
rotating speaker effect. The cabinet emulation
has a definite personality to its frequency
response, so “realistic” sampled sounds and
sounds with lots of high frequency content can
be altered, sometimes dramatically. You can
experiment with it; try doubling the RPM-1
sound with the straight sound, both for solo
instruments and for pad sounds. Turn off any
distortion, delay, chorusing or modulation in the
instrument to feed the RPM-1 a clean sound.
Organ
For best results, make sure that your organ
sound input is as pure as possible. Whether you
are using a combo organ, synthesizer, sound
module or tone-wheel organ, turn off any dis-
tortion, delay, chorusing or modulation in the
instrument. The best sound is achieved by let-
ting the RPM-1 add the rotating speaker emula-
tion to a clean organ sound. You can add
reverb or delay with an external effects device
placed after the RPM-1 in the audio chain, or
through an effects send on your mixer.
Organists will often change the timbre of their
sound by pushing in and pulling out the draw-
bars on their instrument while they are playing.
This emphasizes certain frequencies of their
sound over others. If you are not using an
organ with drawbars, you can twist the RPM-1
Balance control to get a variation in tone while
you are playing.
Motor
H.F. Driver
Horn
Dummy
Horn
Sound
L.F. Driver
(woofer)
Rotor
Sound
Motor
Conceptual diagram of a rotating speaker cabinet. The components
above would be housed in a large wooden cabinet.
6

Specifications
DigiTech RPM -1 Vacuum Tube Rotary Speaker Emulator
Input sensitivity -10 dBu to + 4 dBu
Input impedance 470 kOhms
Maximum output level + 8 dBu
Output impedance 1.5 kOhms (max.)
Continuous Control CV in Control Voltage 0 – 5 VDC; Passive - auto calibration
Dynamic range > 90 dB IHF-A weighted
T.H.D. + N < 0.1% IHF-A weighted, @ 1 kHz input
Dimensions 17.5” (W) x 5.5” (D) x 1.25” (H) (not including rack mount)
Weight 5 lbs
Power supply consumption 30 W
Power requirements 117 VAC 60 Hz
Tube Type 12AX7A
Over the course of time, the 12AX7A vacuum tube may wear and require replacement. Replace
only with a tube of the same number, and refer installation to a service shop or dealer. Avoid
dropping the RPM-1 or handling it roughly, as this could shorten the life of the tube.
Don’t install the RPM-1 in an unventilated rack, and don’t install directly above heat-producing
equipment such as power amplifiers.
Note: Design and specifications are subject to change without notice.
FCC Notice
This equipment generates and
uses radio frequency energy
and if not installed and used
properly, that is, in strict accor-
dance with the manufacturer’s
instructions, may cause inter-
ference to radio and television
reception. It has been type
tested and found to comply
with the limits for a Class A
computing device in accor-
dance with the specifications
in Subpart J of Part 15 of
FCC
Rules, which are designated to
provide reasonable protection
against such interference in a
residential installation.
However, there is no guaran-
tee that interference will not
occur in a particular installa-
tion. if this equipment does
cause interference to radio or
television reception, which can
be determined by turning the
equipment
OFF
and
ON
, the
user is encouraged to try to
correct the interference by one
or more of the following mea-
sures:
Reorient the receiving antenna
Relocate this equipment with
respect to the receiver
Move this equipment away
from the receiver
Plug this equipment into a dif-
ferent outlet so that this equip-
ment and the receiver are on
different branch circuits.
If necessary, the user should
consult the dealer or an expe-
rienced radio/television techni-
cian for additional suggestions.
The user may find the follow-
ing booklet prepared by the
Federal Communications
Commission helpful:
“How to Identify and Resolve
Radio/TV Interference
Problems”
The booklet is available from
the U.S. Government Printing
Office, Washington, DC 20402 ,
Stock # 004-000-00345-4
1. The warranty registration card must be mailed within ten days after purchase date to validate
this warranty.
2. DigiTech warrants this product, when used solely within the U.S., to be free from defects in
materials and workmanship under normal use and service.
3. DigiTech liability under this warranty is limited to repairing or replacing defective materials
that show evidence of defect, provided the product is returned to DigiTech WITH RETURN
AUTHORIZATION, where all parts and labor will be covered up to a period of one year. A
Return Authorization number may be obtained from DigiTech by telephone. The company
shall not be liable for any consequential damage as a result of the product’s use in any cir-
cuit or assembly.
4. Proof-of-purchase is considered to be the burden of the consumer
5. DigiTech reserves the right to make changes in design or make additions or improvements
upon this product without incurring any obligation to install the same on products previously
manufactured.
6. The foregoing is in lieu of all other warranties, express or implied, and DigiTech neither
assumes nor authorizes any person to assume for it any obligation or liability in connection
with the sale of this product. In no event shall DigiTech or its dealers be liable for special or
consequential damages or from any delay in the performance of this warranty due to causes
beyond their control.
Warranty 7
