Rails Crash Course A No Nonsense Guide To Development (2015)
User Manual:
Open the PDF directly: View PDF ![]() .
.
Page Count: 298 [warning: Documents this large are best viewed by clicking the View PDF Link!]

RAILS CRASH COURSE
RAILS CRASH COURSE. Copyright © 2015 by Anthony Lewis.
All rights reserved. No part of this work may be reproduced or transmitted in any form or by any means,
electronic or mechanical, including photocopying, recording, or by any information storage or retrieval
system, without the prior written permission of the copyright owner and the publisher.
Printed in USA
First printing
18 17 16 15 14 1 2 3 4 5 6 7 8 9
ISBN-10: 1-59327-572-2
ISBN-13: 978-1-59327-572-3
Publisher: William Pollock
Production Editor: Serena Yang
Cover Illustration: W. Sullivan
Interior Design: Octopod Studios
Developmental Editor: Jennifer Griffith-Delgado
Technical Reviewer: Xavier Noria
Copyeditor: LeeAnn Pickrell
Compositor: Susan Glinert Stevens
Proofreader: James Fraleigh
Indexer: Nancy Guenther
For information on distribution, translations, or bulk sales, please contact No Starch Press, Inc. directly:
No Starch Press, Inc.
245 8th Street, San Francisco, CA 94103
phone: 415.863.9900; info@nostarch.com
www.nostarch.com
Library of Congress Cataloging-in-Publication Data
Lewis, Anthony, 1975- author.
Rails crash course : a no-nonsense guide to Rails development / by Anthony Lewis.
pages cm
ISBN 978-1-59327-572-3 -- ISBN 1-59327-572-2
1. Ruby (Computer program language) 2. Ruby on rails (Electronic resource) I. Title.
TK5105.8885.R83L49 2015
006.7'54--dc23
2014034816
No Starch Press and the No Starch Press logo are registered trademarks of No Starch Press, Inc. Other
product and company names mentioned herein may be the trademarks of their respective owners. Rather
than use a trademark symbol with every occurrence of a trademarked name, we are using the names only
in an editorial fashion and to the benefit of the trademark owner, with no intention of infringement of the
trademark.
The information in this book is distributed on an “As Is” basis, without warranty. While every precaution
has been taken in the preparation of this work, neither the author nor No Starch Press, Inc. shall have any
liability to any person or entity with respect to any loss or damage caused or alleged to be caused directly or
indirectly by the information contained in it.
BRief CoNteNts
Foreword by Xavier Noria .............................................. xv
Acknowledgments ....................................................xvii
Introduction .........................................................xix
PART I: RUBY ON RAILS FUNDAMENTALS
Chapter 1: Ruby Fundamentals ............................................3
Chapter 2: Rails Fundamentals ...........................................19
Chapter 3: Models....................................................29
Chapter 4: Controllers .................................................43
Chapter 5: Views.....................................................57
Chapter 6: Deployment.................................................75
PART II: BUILDING A SOCIAL NETWORKING APP
Chapter 7: Advanced Ruby..............................................89
Chapter 8: Advanced Active Record ......................................105
Chapter 9: Authentication ..............................................123
Chapter 10: Testing ..................................................141
Chapter 11: Security .................................................163
Chapter 12: Performance ..............................................175
Chapter 13: Debugging ...............................................195
Chapter 14: Web APIs ................................................205
Chapter 15: Custom Deployment .........................................223
Solutions ..........................................................239
Index ............................................................259
CoNteNts iN Detail
FOREWORD by Xavier Noria xv
ACKNOWLEDGMENTS xvii
INTRODUCTION xix
Who This Book Is For . . . . . . . . . . . . . . . . . . . . . . . . . . . . . . . . . . . . . . . . . . . . . . . . xx
Overview ........................................................xx
Installation....................................................... xxi
Ruby, Rails, and Git ......................................... xxi
Multiple Ruby Versions........................................xxiii
PART I
RUBY ON RAILS FUNDAMENTALS
1
RUBY FUNDAMENTALS 3
Interactive Ruby .................................................... 4
Data Types ....................................................... 5
Numbers .................................................. 5
Strings .................................................... 6
Symbols................................................... 7
Arrays .................................................... 7
Hashes ................................................... 8
Booleans .................................................. 9
Constants ....................................................... 10
Variables ....................................................... 10
Control Flow ..................................................... 11
Conditionals............................................... 11
Iteration .................................................. 12
Methods ........................................................ 14
Classes ......................................................... 15
Class Methods ............................................. 17
Inheritance ................................................ 17
Summary ....................................................... 18
Exercises........................................................ 18
2
RAILS FUNDAMENTALS 19
Your First Rails Application ........................................... 20
Rails Principles.................................................... 21
Convention over Configuration .................................. 21
Don’t Repeat Yourself ........................................ 22
viii Contents in Detail
Rails Architecture .................................................. 22
Model . . . . . . . . . . . . . . . . . . . . . . . . . . . . . . . . . . . . . . . . . . . . . . . . . . . 22
View . . . . . . . . . . . . . . . . . . . . . . . . . . . . . . . . . . . . . . . . . . . . . . . . . . . . 22
Controller................................................. 23
Rails Application Structure............................................ 23
The app Directory ........................................... 23
The bin Directory............................................ 23
The config Directory ......................................... 23
The db Directory ............................................ 24
The lib Directory ............................................ 24
The log Directory............................................ 24
The public Directory ......................................... 24
The test Directory ........................................... 25
The tmp Directory ........................................... 25
The vendor Directory ......................................... 25
Rails Commands .................................................. 25
The gem Command.......................................... 25
The bundle Command ........................................ 26
The rake Command.......................................... 26
The rails Command .......................................... 26
Rails Scaffold..................................................... 27
Summary ....................................................... 28
Exercises........................................................ 28
3
MODELS 29
The Post Model ................................................... 29
Active Record .................................................... 30
Create, Read, Update, and Delete ...................................... 30
Create ................................................... 31
Read .................................................... 32
Update .................................................. 33
Delete ................................................... 33
More Active Record Methods.......................................... 34
Query Conditions ........................................... 34
Calculations ............................................... 35
Migrations ...................................................... 35
The Schema ............................................... 36
Adding a Column ........................................... 37
Inside the Author Migration .................................... 37
Validations ...................................................... 38
Adding a Validation ......................................... 38
Testing Data ............................................... 39
Associations ..................................................... 39
Generating the Model ........................................ 39
Adding Associations ......................................... 40
Using Associations .......................................... 40
Summary ....................................................... 42
Exercises........................................................ 42
Contents in Detail ix
4
CONTROLLERS 43
Representational State Transfer ........................................ 43
Routing ......................................................... 45
Resources................................................. 45
Custom Routes ............................................. 46
The Root Route ............................................. 47
Paths and URLs ............................................. 47
Controller Actions ................................................. 48
A Brief Detour from Actions .................................... 49
Back to Controller Actions ..................................... 52
Adding Comments ................................................. 54
Summary ....................................................... 55
Exercises........................................................ 56
5
VIEWS 57
Embedded Ruby................................................... 58
Output ................................................... 58
Control Flow............................................... 58
Comments ................................................ 59
Helpers......................................................... 59
URL Helpers ............................................... 59
Number Helpers ............................................ 60
Your Own Helpers .......................................... 61
The Posts Index Page ............................................... 61
Layouts ......................................................... 64
Asset Tag Helpers ........................................... 65
CSRF Meta Tags Helper....................................... 66
Yield .................................................... 67
Partials ......................................................... 67
Collections ................................................ 67
Showing Comments.......................................... 68
Forms .......................................................... 69
Form Helpers .............................................. 70
Form Errors ............................................... 70
Form Controls .............................................. 71
Comment Form ................................................... 72
Summary ....................................................... 74
Exercises........................................................ 74
6
DEPLOYMENT 75
Version Control ................................................... 75
Git ............................................................ 76
Setup.................................................... 76
Getting Started ............................................. 76
Basic Usage ............................................... 77
x Contents in Detail
Heroku ......................................................... 81
Getting Started ............................................. 81
Updating Your Gemfile ....................................... 81
Deploying Your Application .................................... 83
Summary ....................................................... 84
Part I Remarks .................................................... 84
Exercises........................................................ 85
PART II
BUILDING A SOCIAL NETWORKING APP
7
ADVANCED RUBY 89
Modules ........................................................ 90
Modules as Namespaces ...................................... 91
Modules as Mixins .......................................... 91
Ruby Object Model ................................................ 95
Ancestors ................................................. 95
Methods ................................................. 96
Class .................................................... 96
Introspection ..................................................... 97
Duck Typing ..................................................... 98
Metaprogramming ................................................. 99
define_method ............................................. 99
class_eval ............................................... 100
method_missing ........................................... 102
Summary ...................................................... 104
Exercises....................................................... 104
8
ADVANCED ACTIVE RECORD 105
Advanced Data Modeling ........................................... 106
Self Join Associations........................................ 106
Many-to-Many Associations ................................... 107
Single-Table Inheritance ...................................... 110
Polymorphic Associations..................................... 111
The Social Application ............................................. 112
User Model .............................................. 112
Post Models .............................................. 117
Comment Model ........................................... 120
Summary ...................................................... 120
Exercises....................................................... 121
Contents in Detail xi
9
AUTHENTICATION 123
The Authentication System........................................... 125
Post Index and Show ........................................ 125
Sign Up ................................................. 128
Log In .................................................. 132
Current User.............................................. 135
Authenticate User .......................................... 136
Use Current User........................................... 137
Summary ...................................................... 138
Exercises....................................................... 139
10
TESTING 141
Testing in Rails................................................... 142
Preparing to Test........................................... 142
Running Tests ............................................. 142
Using Fixtures ............................................. 144
Putting Assertions to Work .................................... 146
Eliminating Duplication with Callbacks............................ 147
Model Tests..................................................... 148
Controller Tests .................................................. 150
Controller Test Helpers....................................... 150
Controller Test Assertions ..................................... 150
Integration Tests .................................................. 152
Integration Helpers ......................................... 152
Testing a Flow ............................................ 152
Adding Features with Test-Driven Development ............................ 154
Show User ............................................... 154
Create Post............................................... 157
Summary ...................................................... 161
Exercises....................................................... 161
11
SECURITY 163
Authorization Attacks .............................................. 163
Injection Attacks.................................................. 165
SQL Injection ............................................. 166
Cross-Site Scripting . . . . . . . . . . . . . . . . . . . . . . . . . . . . . . . . . . . . . . . . . 167
Cross-Site Request Forgery Attacks ..................................... 170
How CSRF Works .......................................... 170
Preventing CSRF ........................................... 170
Summary ...................................................... 172
Exercises....................................................... 172
xii Contents in Detail
12
PERFORMANCE 175
Built-in Optimization Features ........................................ 176
Asset Pipeline ............................................. 176
Turbolinks ............................................... 179
Code Optimizations ............................................... 180
Reducing Database Queries ................................... 180
Pagination ............................................... 183
Caching ....................................................... 185
Cache Keys .............................................. 187
Low-Level Caching.......................................... 187
Fragment Caching.......................................... 189
Issues................................................... 191
Summary ...................................................... 192
Exercises....................................................... 193
13
DEBUGGING 195
The debug Helper ................................................ 196
The Rails Logger.................................................. 197
Log Levels................................................ 197
Logging ................................................. 198
Debugger ...................................................... 199
Entering the Debugger....................................... 200
Debugger Commands ....................................... 200
Summary ...................................................... 204
Exercises....................................................... 204
14
WEB APIS 205
The GitHub API .................................................. 206
HTTP.......................................................... 207
Status Codes ............................................. 207
Curl ................................................... 208
Authentication ................................................... 209
Your Own API ................................................... 211
API Routes ............................................... 211
API Controllers ............................................ 212
Customizing JSON Output .................................... 213
Token-Based Authentication ................................... 216
Summary ...................................................... 222
Exercises....................................................... 222
Contents in Detail xiii
15
CUSTOM DEPLOYMENT 223
Virtual Private Servers.............................................. 224
Amazon AWS Setup ........................................ 224
Ubuntu Linux Setup ......................................... 225
Capistrano ..................................................... 230
Getting Started ............................................ 231
Configuration ............................................. 232
Database Setup ........................................... 233
Secrets Setup ............................................. 234
Add to Git ............................................... 234
Deployment .............................................. 235
Adding a Virtual Host ....................................... 236
Summary ...................................................... 237
Exercises....................................................... 237
SOLUTIONS 239
INDEX 259
foRewoRD
Ruby on Rails turned web development upside down.
By abstracting the core of web programming in an
unparalleled way, this unique piece of technology
changed the game forever. With Rails, you can write
web applications quickly without compromising qual-
ity. You can be very productive, write little code, deal
with almost no configuration, and adapt to changes
in specifications with agility, all while keeping a well-
organized and elegant code base.
With Ruby on Rails, you feel empowered. Want to explore something
with a quick prototype? Delivered in no time. Need to develop a solid
production-ready website? Presto!
xvi Foreword
A decade later, the fundamental principles underlying the Rails break-
through still permeate and drive the design of the framework and the way
Rails applications are developed. You’ll learn about these fundamental
aspects of the Rails culture explicitly in the second chapter of Rails Crash
Course and implicitly by example throughout the book.
While the foundational ideas behind Ruby on Rails remain key, the
framework has evolved. Ruby on Rails has been extended here, shrunk
there, iterated, and refined. The world in which Rails applications live has
also evolved. Rails Crash Course presents the most modern and idiomatic
Ruby on Rails.
But first things first. Ruby on Rails is a web framework written in the
Ruby programming language. Think about Rails as a huge Ruby library: A
Rails application is written in Ruby and uses the classes and core support
provided by Ruby on Rails. Therefore, you definitely have to know some
Ruby in order to write Ruby on Rails applications! The first chapter of Rails
Crash Course introduces Ruby in case you are not familiar with it. Ruby is a
powerful programming language, but it is easy to learn, and with that quick
introduction, you’ll know enough to begin. Later, more advanced Ruby is
explained.
Once you know some Ruby, you’re going to learn Rails. All aspects of
the framework are covered, including how to write models that get persisted
easily in a database, how to validate data, how to handle web requests, how
to serve HTML, and so on.
Rails Crash Course covers all sides of Ruby on Rails, but then it takes you
beyond the basics. For example, you’ll learn some advanced Active Record,
authentication, and how to write an application that provides a REST API,
but you’ll also learn about testing, security, performance, debugging, and
other practical concerns of writing real-world web applications.
Further, Rails Crash Course guides you step-by-step all the way through
uploading your application to production platforms and seeing it run on
the Internet. That’s an amazing experience. You’ll learn how to deploy to
Heroku and how to deploy to a computer in the Amazon cloud. While the
servers needed to run an application for learning are small and free, they are
the real thing: You’ll upload to the exact same services big companies are
deploying their applications to. Rails Crash Course is a superb introduction
to Ruby on Rails, and by reading it, you’ll get a solid understanding of Ruby
on Rails and its ecosystem in a broad sense.
Welcome, and enjoy!
Xavier Noria
Cubelles, Spain
July 2014
aCkNowleDGmeNts
First, I’d like to thank everyone at No Starch Press for giving me the oppor-
tunity to write this book. Jennifer Griffith-Delgado guided me through the
process of writing this book. As a first-time author, I found her corrections
and suggestions invaluable. Serena Yang managed the production of the
book and kept everything moving forward even as I dragged my feet at
times.
Xavier Noria did an outstanding job as the technical reviewer. Not only
did he make sure the code samples were correct and followed best practices,
he also pointed out several places where my explanations could be better.
If there are any mistakes left in this book, I’m sure it’s only because I didn’t
correct them when he pointed them out.
I am grateful to Tim Taylor for introducing me to programming by
teaching me BASIC on a Commodore 64 in the 7th grade. We’ve come a
long way since then. I’d also like to thank a few more of my friends from
the Paris Independent School District who convinced me that I could teach
even though I’m not really a teacher: Karol Ackley, Paula Alsup, Denise
Kornegay, Dee Martin, and Frances Reed.
xviii Acknowledgments
Thanks to everyone in the amazing Austin technology community.
Special thanks to Austin on Rails and its founder Damon Clinkscales.
Thank you to everyone who attended one of my Rails classes or confer-
ence sessions. This book grew out of the curriculum I developed for
those classes. Your questions and comments helped clarify the material
in this book.
Finally, my most heartfelt thanks to my family: my wife, Paige, and
our sons, Matthew and Wyatt. The book is finally done; let’s go play!
iNtRoDuCtioN
The Ruby on Rails framework emphasizes developer
productivity, making it possible to implement sites
that would once have taken months to build in a mat-
ter of weeks—or even days! Thanks to the Ruby pro-
gramming language and principles such as convention
over configuration and don’t repeat yourself, Rails develop-
ers spend less time configuring their applications and
more time writing code.
Ruby on Rails is also a full-stack web framework, meaning it handles
everything from accessing data in a database to rendering web pages in
the browser. As a full-stack framework, Rails is made up of a seemingly end-
less list of different components, such as Active Record, the asset pipeline,
CoffeeScript, Sass, jQuery, turbolinks, and a variety of testing frameworks.
This book aims to cut through that list and explain exactly what you
need to know to develop your own Ruby on Rails applications. After you
gain some experience with the fundamentals of Rails, I’ll introduce and
explain new components of the framework as needed.
xx Introduction
By the end, you’ll know how to build your own Rails application
from scratch. You’ll add tests to ensure features work as expected, protect
your application and your users from security vulnerabilities, optimize your
application’s performance, and finally deploy your application to your own
server.
Who This Book Is For
I assume you have some experience with web development before starting
this book. You should be familiar with HTML and CSS. You should know
what an H1 element is and how to add images and links to a web page. Some
knowledge of object-oriented programming is helpful but not required.
You’ll use your computer’s terminal (or command prompt) to enter
commands, but you don’t need much prior experience with terminal com-
mands to follow the examples. In addition to the terminal, you’ll also need
a text editor for writing Ruby code. Many Rails developers use a vintage edi-
tor, such as Vim or Emacs.
If you don’t already have a preferred text editor, I recommend Sublime
Text. A free trial of Sublime Text is available online at http://www.sublimetext
.com/. The free trial version never expires, but it does occasionally prompt
you to purchase a license.
Overview
This book is divided into two parts. The first part covers the fundamentals
of the Ruby language and the Ruby on Rails framework. The second covers
advanced topics in both Ruby and Ruby on Rails. There are exercises at the
end of every chapter, and solutions for them appear at the end of the book.
Chapter 1: Ruby Fundamentals covers the basics of Ruby, including
datatypes, control flow, methods, and classes.
Chapter 2: Rails Fundamentals covers the basics of Ruby on Rails.
Topics include Rails principles, the directory structure used by Rails appli-
cations, and common Rails commands. You’ll create your first Rails applica-
tion at the end of this chapter!
Chapter 3: Models, Chapter 4: Controllers, and Chapter 5: Views
describe the three parts of the model-view-controller architecture used
by Rails.
Chapter 6: Deployment covers creating a Git repository to store your
application and deploying your application to the web using Heroku.
Once you understand the fundamentals of Ruby and Ruby on Rails,
you’re ready for more advanced topics.
Chapter 7: Advanced Ruby covers Ruby modules, the Ruby object
model, and even a bit of metaprogramming.
Chapter 8: Advanced Active Record covers more advanced Active
Record associations. You’ll also build the data model for a new application
at the end of this chapter.
Introduction xxi
Chapter 9: Authentication covers the authentication system used by your
new application. This system allows users sign up for an account, log in to
your application, and log off.
Chapter 10: Testing covers automated testing for each part of your appli-
cation using the MiniTest framework included with Ruby. This chapter also
discusses test-driven development.
Chapter 11: Security covers common web application security vulner-
abilities and explains how to make sure your application is secure.
Chapter 12: Performance covers performance optimizations for Rails
applications. Topics include the optimization features already built in to
Rails, SQL query optimizations, and caching.
Chapter 13: Debugging explains several ways to track down bugs.
Learn how to add to the log files generated by your application and how
to use the interactive debugger for really tough bugs.
Chapter 14: Web APIs explains how to use the GitHub API and then
covers the process of creating your own API for your application.
Finally, Chapter 15: Custom Deployment explains the process of set-
ting up your own server on the Amazon cloud and deploying your applica-
tion using Capistrano.
Installation
To follow the examples and complete the exercises in this book, you’ll
need the Ruby programming language, the Ruby on Rails framework,
the Git version control system, and the Heroku Toolbelt.
The Ruby language website provides installation instructions at https://
www.ruby-lang.org/en/installation/. Rails is distributed as a collection of Ruby
gems, which you’ll download and install with a single command that depends
on your operating system. (The Ruby on Rails website also provides instruc-
tions at http://rubyonrails.org/download/.) You can download Git at http://
git-scm.com/downloads/.
Once you’ve installed Ruby, Rails, and Git, install the latest version
of the Heroku Toolbelt, which you’ll use to deploy your applications to
Heroku. Download the Heroku Toolbelt installer from https://toolbelt.heroku
.com/, and then follow the instructions there to complete the installation.
Ruby, Rails, and Git
The sections below contain detailed installation instructions for Ruby, Rails,
and Git on Mac OS X, Linux, and Windows. If you’re using Mac OS X or
Linux, also see “Multiple Ruby Versions” on page xxiii for an alternative
way to install Ruby. There’s a tool called pik for managing multiple Ruby
versions on Windows, but it hasn’t been updated since 2012, so I won’t
cover it here.

xxii Introduction
Mac OS X
Check your current version of Ruby with ruby --version. If you have Mac OS X
Mavericks, you should already have Ruby version 2.0.0. Otherwise, you need
to install a newer version.
Even if you already have Ruby 2.0.0, I recommend using the Homebrew
package manager on Mac OS X. Homebrew is an easy way to install and
update common development tools on Mac OS X. Instructions for down-
loading and installing Homebrew are online at http://brew.sh/. Once you
install Homebrew, open a terminal and enter the command brew install
ruby to install the latest version of Ruby.
Next, install Ruby on Rails with the command gem install rails.
Then use Homebrew again to install Git by entering the command brew
install git.
Linux
Installation instructions for Linux differ slightly based on which Linux
distribution you are using. First, check your package manager; it may have
a recent version of Ruby. If so, just install that package as you would any
other.
If not, you’ll need to install Ruby from source. Download the current
stable version from https://www.ruby-lang.org/en/downloads/. Unpack the file
and then enter the following commands in a terminal:
$ ./configure
$ make
$ sudo make install
Once the installation is complete, install Ruby on Rails by entering the
command sudo gem install rails.
Every Linux distribution includes Git. Install Git with your package
manager if it’s not already installed on your system.
Windows
You’ll use RubyInstaller to install Ruby. Download the RubyInstaller and
the matching Development Kit from http://rubyinstaller.org/downloads/.
First, click the latest Ruby version on the RubyInstaller download page
to download the installer; at the time of writing, it’s 2.0.0-p484. Then scroll
down to the section labeled Development Kit and click the link under your
version of Ruby to download the Development Kit. As of this writing, for
Ruby 2.0, you’d choose DevKit-mingw64-32-4.7.2-20130224-1151-sfx.exe. If
you are using a 64-bit version of Windows, then download the 64-bit ver-
sion of the installer and the matching 64-bit Development Kit, currently
DevKit-mingw64-64-4.7.2-20130224-1151-sfx.exe.
Once these downloads finish, double-click the RubyInstaller file and
then follow the prompts on your screen to install Ruby. Once that is com-
plete, double-click the DevKit file and follow the prompts to install the
Development Kit.

Introduction xxiii
Once you’ve installed Ruby and the Development Kit, install Rails by
opening a command prompt and entering gem install rails. This will con-
nect to the RubyGems server. Then download and install the various pack-
ages that make up the Ruby on Rails framework.
Finally, download the latest version of Git and double-click the file to
complete the installation.
Multiple Ruby Versions
Several third-party tools exist to make it easier to install and manage mul-
tiple versions of Ruby on a single computer. This can be useful if you main-
tain several different applications or if you want to test an application on a
different version of Ruby.
The Ruby on Rails website recommends managing your Ruby instal-
lation with rbenv and the ruby-build plugin. The rbenv command switches
between Ruby versions and ruby-build provides the rbenv install command
that you use to install different versions of Ruby.
Installing rbenv
If you’re using Mac OS X, both rbenv and ruby-build can be installed using
Homebrew. Instructions for installing Homebrew are online at http://brew.sh/.
Open a Terminal, enter brew install rbenv ruby-build, and skip to
“Installing Ruby” on page xxiv.
On Linux, install rbenv and ruby-build by cloning the code from GitHub
as shown below. Complete installation instructions are available online at
https://github.com/sstephenson/rbenv/.
First, make sure you have the proper development tools installed. The
ruby-build wiki at https://github.com/sstephenson/ruby-build/wiki/ contains a
suggested build environment for most popular Linux distributions. For
example, on Ubuntu, enter the following command to install everything
you need to compile Ruby.
$ sudo apt-get install autoconf bison build-essential git \
libssl-dev libyaml-dev libreadline6 \
libreadline6-dev zlib1g zlib1g-dev
Reading package lists... Done
Building dependency tree
--snip--
Do you want to continue? [Y/n]
Type the letter y to install these packages, and press enter. Packages
needed for other Linux distributions are listed on the wiki page above.
Next, enter the following command to clone the rbenv git repository
into your home directory.
$ git clone https://github.com/sstephenson/rbenv.git ~/.rbenv
Cloning into '/home/ubuntu/.rbenv'...
--snip--
Checking connectivity... done.

xxiv Introduction
Then, add the ~/.rbenv/bin directory to your $PATH and add a line to
your .bashrc file to initialize rbenv each time you log on.
$ echo 'export PATH="$HOME/.rbenv/bin:$PATH"' >> ~/.bashrc
$ echo 'eval "$(rbenv init -)"' >> ~/.bashrc
$ source ~/.bashrc
Finally, install ruby-build by cloning its git repository into the rbenv
plugins directory with the following command.
$ git clone https://github.com/sstephenson/ruby-build.git \
~/.rbenv/plugins/ruby-build
Cloning into '/home/ubuntu/.rbenv/plugins/ruby-build'...
--snip--
Checking connectivity... done.
Once you have rbenv and ruby-build installed, you’re ready to install Ruby.
Installing Ruby
Enter the command rbenv install -l to list the currently available Ruby
versions.
$ rbenv install -l
Available versions:
1.8.6-p383
1.8.6-p420
1.8.7-p249
1.8.7-p302
--snip--
Ignore the versions with words such as jruby, rbx, and ree at the begin-
ning. For now, just focus on the version numbers. The latest version as
of this writing is 2.1.1. If there is a newer version when you install rbenv,
replace 2.1.1 with the correct version number in the command below.
$ rbenv install 2.1.1
Downloading yaml-0.1.6.tar.gz...
--snip--
Installed ruby-2.1.1 to /home/ubuntu/.rbenv/versions/2.1.1
Once this completes, enter rbenv global 2.1.1 to set your system’s global
default Ruby version. Now install Ruby on Rails by entering gem install rails.
Finally, update rbenv by entering rbenv rehash. You can learn more about how
rbenv lets you switch Ruby versions at the rbenv website https://github.com/
sstephenson/rbenv/.
PART I
RuBy oN Rails fuNDameNtals
1
RuBy fuNDameNtals
In 1993, Yukihiro “Matz” Matsumoto combined parts
of his favorite languages (Perl, Smalltalk, Eiffel, Ada,
and Lisp) to create his own ideal language, which he
called Ruby.
Ruby is a dynamic, object-oriented programming language that also
supports imperative and functional programming styles. It focuses on sim-
plicity, productivity, and developer happiness. The Ruby website refers to it
as “A Programmer’s Best Friend,” and developers with experience in other
languages usually find Ruby easy to write and natural to read.
A solid foundation in Ruby is essential to understanding Ruby on Rails,
so I’ll cover Ruby fundamentals in this chapter. As we progress through the
language features, I’ll demonstrate common idioms used by experienced
Ruby developers, so you can use them in your own programs later.
4 Chapter 1
Interactive Ruby
My favorite way to explore the Ruby language is through the Interactive Ruby
interpreter (IRB). Most of the time, I develop applications in a text editor, but
I still keep an IRB session open to test ideas quickly.
To start IRB, open a terminal (or command prompt on Windows), type
irb, and press enter. You should see a prompt similar to this:
irb(main):001:0>
If you see an error message after entering irb, then you probably don’t
have it installed. Check out the Introduction, and follow the Ruby installa-
tion instructions to get IRB set up.
IRB is a type of program called a read-eval-print loop (REPL). IRB reads
your input, evaluates it, and displays the result. It repeats this process until
you press ctrl-D or enter quit or exit.
Try out IRB by typing a few words surrounded by quotation marks:
irb(main):001:0> "Hello, Ruby"
=> "Hello, Ruby"
Ruby evaluates the expression you entered and displays the result. A
simple string evaluates to itself, but this isn’t the same as printing the string.
To output something on the screen, use the Ruby method puts, as shown here:
irb(main):002:0> puts "Hello, Ruby"
Hello, Ruby
=> nil
Now Ruby outputs the string to the screen and displays nil, which is
the result of evaluating the puts method. In Ruby, every method returns
something. The puts method doesn’t have anything useful to return, so it
returns nil.
As you work through the rest of this chapter, you’ll find more examples
that you can enter into IRB. I encourage you to try them out and explore
what you can do with IRB and Ruby.
Note If IRB stops evaluating what you’re typing, you may have “confused” it by forgetting
a closing quotation mark or some other syntax it was expecting. If this happens, press
ctrl-C to cancel the current operation and return to a working prompt.
Now, let’s take a look at the data types available in Ruby.

Ruby Fundamentals 5
Data Types
Ruby has six main data types: number, string, symbol, array, hash, and
Boolean. In this section, I’ll briefly discuss each of these data types and
how to use them.
Numbers
Ruby supports the math operations you learned in school, plus a few you
may not have seen before. Type an expression into IRB and press enter to
see the result:
irb(main):003:0> 1 + 1
=> 2
We asked Ruby to evaluate the expression 1 + 1, and it responded with
the result, which is 2. Try out a few more math operations. Everything
should work as expected, at least until you try division, as shown here:
irb(main):004:0> 7 / 3
=> 2
Ruby performs integer division by default. In other words, it drops the
remainder. You can find that remainder with the modulus operator (%). If
you’d rather get a fractional answer, however, you need to tell Ruby explic-
itly to use floating-point math by including a decimal point and zero after at
least one of the numbers. Here, you can see examples of both the modulus
operator and floating-point division in IRB:
irb(main):005:0> 7 % 3
=> 1
irb(main):006:0> 7.0 / 3
=> 2.3333333333333335
This concept is important to understand: although these appear to be
simple math operators, they are actually methods in Ruby. You can even call
methods on data types that other languages consider primitives.
irb(main):007:0> 1.odd?
=> true
Here, we ask the number 1 if it is odd and IRB responds with true.

6 Chapter 1
Strings
You can create strings by surrounding characters with single or double
quotes, as in this example:
irb(main):008:0> 'A String!'
=> "A String!"
You can also combine strings in Ruby to create larger ones. The language
understands both adding strings and multiplying a string by a number.
Let’s look at an example of each:
irb(main):009:0> "Hello" + "World"
=> "HelloWorld"
irb(main):010:0> "Hi" * 3
=> "HiHiHi"
Notice that Ruby doesn’t automatically put spaces between words when
adding or multiplying. You are responsible for that detail.
Until now, I haven’t differentiated between single- and double-quoted
strings, but double-quoted strings actually allow you to combine strings in
more complex ways. For example, they support a feature called string inter-
polation, in which Ruby evaluates an expression surrounded by #{ and },
converts the result to a string, and inserts it into the string automatically,
as shown here:
irb(main):011:0> x = 10
=> 10
irb(main):012:0> "x is #{x}"
=> "x is 10"
In this case, #{x} evaluates to 10, so Ruby converts the number 10 to a
string and returns "x is 10".
Double-quoted strings also support special characters such as newlines
and tabs. These special characters consist of a backslash followed by a letter.
Type \n to create a newline (shown next) or \t to create a tab. To add a lit-
eral backslash in a double-quoted string, type two backslashes.
irb(main):013:0> puts "Line one\nLine two"
Line one
Line two
=> nil
You’ve already seen a few string methods, but many others are handy,
including length and empty?. (Yes, methods in Ruby can end with question
marks and even exclamation marks.) Let’s look at those two methods in
action:
irb(main):014:0> "Hello".length
=> 5
Ruby Fundamentals 7
irb(main):015:0> "Hello".empty?
=> false
The length method returns the number of characters in a string,
whereas empty? tells you whether a string contains any characters.
Note A question mark at the end of method name, as in empty?, indicates that it is a predi-
cate, and it will return a true or false value. An exclamation mark (!) usually signi-
fies that the method does something dangerous such as modifying the object in place.
Symbols
Ruby has a data type not often seen in other programming languages, and
that’s the symbol. Symbols are similar to strings in that they are made of
characters, but instead of being surrounded by quotes, symbols are prefixed
with a colon, like this:
irb(main):016:0> :name
=> :name
Symbols are typically used as identifiers. They are created only once
and are unique. This means they are easy for programmers to read as a
string, but also memory efficient. You can see this for yourself by creating
a few strings and symbols and then calling the object_id method on them.
irb(main):017:0> "name".object_id
=> 70156617860420
irb(main):018:0> "name".object_id
=> 70156617844900
irb(main):019:0> :name.object_id
=> 67368
irb(main):020:0> :name.object_id
=> 67368
Notice that the two strings here have the same content, but different
object ids. These are two different objects. The two symbols have the same
content and the same object id.
When Ruby compares two strings for equality, it checks each individual
character. Comparing two symbols for equality requires only a numeric
comparison, which is much more efficient.
Arrays
An array represents a list of objects in Ruby. You create an array by sur-
rounding a list of objects with square brackets. For example, let’s make an
array of numbers:
irb(main):021:0> list = [1, 2, 3]
=> [1, 2, 3]
8 Chapter 1
Ruby arrays can contain any kind of object, even other arrays. You can
access individual elements of an array by passing a numeric index to the
array’s [] method. The first element is at index zero. Try examining the first
element in the array just created:
irb(main):022:0> list[0]
=> 1
Entering list[0] tells Ruby to fetch the first number in the array, and
the method returns 1.
Note If you try to access an element that isn’t in the array, the [] method will return nil.
You can also pass two numbers to the [] method to create an array slice,
as shown next. The first number you provide specifies the starting index,
whereas the second tells it how many elements you want in your array slice:
irb(main):023:0> list[0, 2]
=> [1, 2]
Here, the [] method starts at index zero and returns the first two num-
bers in list.
Like strings, you can also add arrays to create a new one using the
+ operator. If you just want to add elements to the end of an existing array,
you can use the << operator. You can see an example of each operation here:
irb(main):024:0> list + [4, 5, 6]
=> [1, 2, 3, 4, 5, 6]
irb(main):025:0> list << 4
=> [1, 2, 3, 4]
Though the + operator returns a new array, it doesn’t modify the exist-
ing array. The << operator does modify the existing array. You can also use
an index to reassign an existing element or add a new element to the array.
Hashes
A hash is a set of key-value pairs. In Ruby, hashes are enclosed in curly
braces. Unlike an array index, a hash key can be of any data type. For
example, symbols are frequently used as hash keys. When you need to
access a value in a hash, just pass the corresponding key to the [] method,
as shown next. Attempting to access a key that does not exist returns nil.
irb(main):026:0> some_guy = { :name => "Tony", :age => 21 }
=> {:name=>"Tony", :age=>21}
irb(main):027:0> some_guy[:name]
=> "Tony"
The combination of an equal sign and a greater-than sign (=>) between
the key and value is commonly referred to as a hash rocket. Because symbols

Ruby Fundamentals 9
are used as hash keys so often, Ruby 1.9 added a shorthand syntax specifi-
cally for them. You can take the colon from the front of the symbol, put it at
the end, and then leave out the hash rocket. Here’s an example:
irb(main):028:0> another_guy = { name: "Ben", age: 20 }
=> {:name=>"Ben", :age=>20}
Although you can create a hash with this shorthand, Ruby seems to be
sentimental as it still uses the old syntax when displaying the hash.
You can also use the keys method to get an array of all keys in a hash.
If you need an array of all the values in the hash, use the method values
instead. The code here shows an example of each method, using the same
hash just created:
irb(main):029:0> another_guy.keys
=> [:name, :age]
irb(main):030:0> another_guy.values
=> ["Ben", 20]
Hashes are frequently used to represent data structures, as in these
examples. They are also sometimes used to pass named parameters to a
method. If a hash is the last (or only) argument to a method call, you can
even leave off the curly braces.
For example, the merge method combines two hashes. The code here
merges the hash named another_guy with a new hash containing { job: "none" }.
irb(main):031:0> another_guy.merge job: "none"
=> {:name=>"Ben", :age=>20, :job=>"none"}
Because the only argument to this method call is the new hash, you
can leave off the curly braces. Rails has many other examples of this type
of method call.
Booleans
A Boolean expression is anything that evaluates to true or false. These
expressions often involve a Boolean operator, and Ruby supports familiar
operators including less than (<), greater than (>), equal (==), and not equal
(!=). Try these Boolean expressions at the IRB prompt:
irb(main):032:0> 1 < 2
=> true
irb(main):033:0> 5 == 6
=> false
Ruby also provides and (&&) and or (||) operators for combining mul-
tiple Boolean expressions, as shown next:
irb(main):034:0> 1 < 2 || 1 > 2
=> true
10 Chapter 1
irb(main):035:0> 5 != 6 && 5 == 5
=> true
Both of these operators short circuit. That is, && is only true if the expres-
sions on both sides evaluate to true. If the first expression is false, then the
second expression is not evaluated. Likewise, || is true if either expression
is true. If the first expression is true, then the second expression is not
evaluated.
The || operator is also sometimes used with assignment. You might do
this when you want to initialize a variable only if it is currently nil and keep
the current value otherwise. Ruby provides the ||= operator for this case.
This is referred to as conditional assignment, and you can see an example here:
irb(main):036:0> x = nil
=> nil
irb(main):037:0> x ||= 6
=> 6
If the variable x had not been a false value, then the conditional assign-
ment would have returned the value of x instead of setting it to 6.
Note Any expression in Ruby can be evaluated as a Boolean expression. In Ruby, only
nil and false are considered false. Every other value is considered true. This differs
from some other languages, where things like empty strings, empty collections, and the
number zero are considered false.
Constants
A constant gives a name to a value that doesn’t change. In Ruby, the name of
a constant must begin with a capital letter. Constants are typically written in
uppercase, like this one:
irb(main):038:0> PI = 3.14
=> 3.14
irb(main):039:0> 2 * PI
=> 6.28
Ruby won’t actually stop you from assigning a new value to a constant,
but it does display a warning if you do.
Variables
In Ruby, you don’t need to declare a variable in advance or specify a type.
Just assign a value to a name as shown here:
irb(main):040:0> x = 10
=> 10

Ruby Fundamentals 11
The variable x now refers to the number 10. Variable names are typically
written in snake case, that is, all lowercase with underscores between words.
irb(main):041:0> first_name = "Matthew"
=> "Matthew"
Variable names can include letters, numbers, and underscores, but they
must start with either a letter or underscore.
Control Flow
The examples we’ve looked at so far have all been linear. Real programs usu-
ally include statements that only execute when a certain condition is met
and statements that are repeated multiple times. In this section, I cover
Ruby’s conditional statements and iteration.
Conditionals
Conditional statements let your program choose between one or more branches
of code to execute based on an expression you provide. As such, making a
decision in code is also called branching. For example, the following condi-
tional prints the word Child only if the expression age < 13 evaluates to true.
irb(main):042:0> age = 21
=> 21
irb(main):043:0> if age < 13
irb(main):044:1> puts "Child"
irb(main):045:1> end
=> nil
The variable age is set to 21, so age < 13 will evaluate to false, and noth-
ing will be printed.
You can also use elsif and else to make more complicated conditionals.
Let’s look at a code example that has to check multiple conditions:
irb(main):046:0> if age < 13
irb(main):047:1> puts "Child"
irb(main):048:1> elsif age < 18
irb(main):049:1> puts "Teen"
irb(main):050:1> else
irb(main):051:1> puts "Adult"
irb(main):052:1> end
Adult
=> nil
This code can take three different branches depending on the value of
age. In our case, it should skip the code inside the if and elsif statements
and just print Adult.
12 Chapter 1
All of the previous conditional examples checked for true expressions,
but what if you want to execute a block of code when an expression is false
instead? Like other languages, Ruby has a logical not operator (either not or
!), which is useful here. The following example will print the value of name if
it is not an empty string.
irb(main):053:0> name = "Tony"
=> "Tony"
irb(main):054:0> if !name.empty?
irb(main):055:1> puts name
irb(main):056:1> end
=> nil
When name.empty? is false, the ! operator should reverse the result to
true so the code inside the if statement executes. A more natural way to
say this conditional might be “unless name is empty, print its value.” Unlike
an if statement, Ruby’s unless statement executes code when the expression
evaluates to false.
irb(main):057:0> name = "Tony"
=> ""
irb(main):058:0> unless name.empty?
irb(main):059:1> puts name
irb(main):060:1> end
=> nil
That still seems a little wordy to me. For one-line expressions such as
this, Ruby lets you put the conditional at the end of the line:
irb(main):061:0> name = "Tony"
=> ""
irb(main):062:0> puts name unless name.empty?
=> nil
This example is concise and readable. To me, this code says “print name
unless it’s empty.” This code is also a great example of Ruby’s flexibility. You
can write conditional expressions using the style that makes the most sense
to you.
Iteration
When you’re working with a collection of objects, such as an array or hash,
you’ll frequently want to perform operations on each item. In addition to
the for loops seen in other languages, Ruby collections provide the each
method.
Ruby Fundamentals 13
The each method accepts a block of code and executes it for every ele-
ment in the collection. A block in Ruby usually starts with the word do and
ends with the word end. A block can also accept one or more parameters,
which are listed inside a pair of pipe characters. The each method returns
the value of the entire collection.
This next example iterates over each element in the array list, which
we created earlier in this chapter as [1, 2, 3, 4]. It assigns the element to the
variable number and then prints the value of number.
irb(main):063:0> list.each do |number|
irb(main):064:1> puts number
irb(main):065:1> end
1
2
3
4
=> [1, 2, 3, 4]
Simple blocks like this are often written on one line in Ruby. Instead of
writing do and end to indicate a block, you can use opening and closing curly
braces, which are common in one-line blocks. Like the previous example,
this one iterates over the list and prints each element, but it does everything
in a single line of code.
irb(main):066:0> list.each { |n| puts n }
1
2
3
4
=> [1, 2, 3, 4]
You can also use the each method to iterate over a hash. Because a hash
is a collection of key-value pairs, the block will take two parameters. Let’s
try using each with one of our earlier hashes:
irb(main):067:0> some_guy.each do |key, value|
irb(main):068:1> puts "The #{key} is #{value}."
irb(main):069:1> end
The name is Tony.
The age is 21.
=> {:name=>"Tony", :age=>21}
Blocks are useful for more than just iteration. Any method can poten-
tially accept a block and use the code it contains. For example, you can pass
a block to the File.open method. Ruby should pass the file handle as a vari-
able to the block, execute the code within the block, and then close the file
automatically.
14 Chapter 1
Methods
A method is a named block of reusable code. Defining your own methods in
Ruby is simple. A method definition starts with the word def, followed by a
name, and continues until end. This method will print “Hello, World!” each
time it is called:
irb(main):070:0> def hello
irb(main):071:1> puts "Hello, World!"
irb(main):072:1> end
=> nil
As you can see in the example, a method definition should return nil.
Note If you’re using Ruby 2.1, method definitions return the name of the method as a
symbol.
Once you’ve defined a method, you can call it by entering its name at
the IRB prompt:
irb(main):073:0> hello
Hello, World!
=> nil
Ruby methods always return the value of their last statement; in this
case, the last statement was puts, which returns nil. You can use return to
return a value explicitly, or you can just add the value you wish to return
as the last line of the method.
For example, if you want the hello method to return true, you can mod-
ify it like this:
irb(main):074:0> def hello
irb(main):075:1> puts "Hello, World!"
irb(main):076:1> true
irb(main):077:1> end
=> nil
Now call the method as before:
irb(main):078:0> hello
Hello, World!
=> true
Because the last line of the method is the value true, the method returns
true when called.
In Ruby, you specify method parameters by adding them after the
method name, optionally enclosed in parentheses, as shown in the next
example. Parameters can also have default values.

Ruby Fundamentals 15
irb(main):079:0> def hello(name = "World")
irb(main):080:1> puts "Hello, #{name}!"
irb(main):081:1> end
=> nil
This example redefines the hello method to accept a parameter called
name. This parameter has a default value of "World". This method can be
called as before to display “Hello, World!”, or you can pass a value for the
name parameter to greet someone else.
irb(main):082:0> hello
Hello, World!
=> nil
irb(main):083:0> hello "Tony"
Hello, Tony!
=> nil
The parentheses around method arguments are also optional. Include
them if the intention is not clear; otherwise, feel free to omit them.
Classes
In an object-oriented programming language such as Ruby, a class repre-
sents the state and behavior of a distinct type of object. In Ruby, an object’s
state is stored in instance variables, and methods define its behavior. A
Ruby class definition starts with the word class, followed by a capitalized
name, and continues to the matching end.
Class definitions can include a special method called initialize. This
method is called when a new instance of the class is created. It is typically
used to assign values to the instance variables needed by the class. In Ruby,
instance variables start with an @, as shown in the following class definition:
irb(main):084:0> class Person
irb(main):085:1> def initialize(name)
irb(main):086:2> @name = name
irb(main):087:2> end
irb(main):088:1> def greet
irb(main):089:2> puts "Hi, I'm #{@name}."
irb(main):090:2> end
irb(main):091:1> end
=> nil
This code defines a new class called Person. The initialize method takes
one parameter and assigns the value of that parameter to the instance vari-
able @name. The greet method prints a friendly greeting. Let’s write some
code that uses this new class.

16 Chapter 1
irb(main):092:0> person = Person.new("Tony")
=> #<Person:0x007fc98418d710 @name="Tony">
irb(main):093:0> person.greet
Hi, I'm Tony.
=> nil
You can create an instance of the Person class by calling Person.new and
passing the required parameters. The previous example creates an instance
of Person with the name Tony.
The return value of Person.new is a string representation of the object. It
consists of the class name followed by a reference to the object in memory
and a list of instance variables. Calling the greet method should display the
friendly greeting we expect.
Instance variables, like @name, are not accessible outside of the class. Try
to access person.name from the IRB prompt, and you should see an error.
irb(main):094:0> person.name
NoMethodError: undefined method 'name'
If you need to access or change @name outside of the class, you need to
write a getter and a setter. These are methods that get or set the value of an
instance variable. Fortunately, Ruby classes provide the method attr_accessor,
which writes getters and setters for you.
You would normally include attr_accessor :name in your definition of the
Person class. Rather than retype the entire class definition, you can reopen
the class and add this line:
irb(main):095:0> class Person
irb(main):096:1> attr_accessor :name
irb(main):097:1> end
=> nil
This code adds the attr_accessor call to the Person class and updates all
objects of the class automatically. And this is another example of the Ruby’s
flexibility. You can reopen a class, even at runtime, and add new methods as
needed.
Now, if we want to change the name of our person, we can just set it
equal to something else, as shown here:
irb(main):098:0> person.name
=> "Tony"
irb(main):099:0> person.name = "Wyatt"
=> "Wyatt"
irb(main):100:0> person.greet
Hi, I'm Wyatt.
=> nil

Ruby Fundamentals 17
The attr_accessor method uses the symbol :name to define the getter name
and the setter name=. You can now get and set the value of the instance vari-
able as needed. If you only want a getter, include a call to attr_reader instead
of attr_accessor. Doing this lets you read the value of @name, but not change it.
Class Methods
The attr_accessor method is different from the methods I’ve discussed so
far. Note that attr_accessor is called inside the body of the class definition.
The methods you’ve seen so far, such as the greet method, are called on an
instance of a class.
In Ruby, methods called on an instance of a class are called instance
methods. Methods called on the class itself are called class methods. Another
example of a class method is new. When you typed Person.new("Tony") before,
you were calling the class method new of the class Person.
Inheritance
In Ruby, you can define a new class that builds on the state and behavior of
an existing class, and the new class will inherit variables and methods from
the existing one. Inheritance defines an is-a relationship between those two
classes. For example, a student is a person. We can define the class Student
like this:
irb(main):101:0> class Student < Person
irb(main):102:1> def study
irb(main):103:2> puts "ZzzzZzzz"
irb(main):104:2> end
irb(main):105:1> end
=> nil
The < Person on the first line indicates that the Student class inherits
from the Person class. The variables and methods defined by Person are now
available to Student:
irb(main):106:0> student = Student.new("Matt")
#<Student:0x007fd7c3ac4d90 @name="Matt">
u irb(main):107:0> student.greet
Hi, I'm Matt.
=> nil
irb(main):108:0> student.study
ZzzzzZzzzz
=> nil
Because we created greet on Person earlier in the chapter, we can have
any Student call this method u without defining it in our new class.
Ruby only supports single inheritance, which means that one class
can’t inherit from multiple classes at the same time. You can, however,
work around this limitation by using modules. A module is a collection of

18 Chapter 1
methods and constants that cannot be instantiated but can be included in
other classes to provide additional behavior. We discuss modules and other
advanced features of Ruby in Chapter 7.
Summary
You are now well on your way to becoming a great Ruby on Rails program-
mer. The Ruby knowledge you gained in this chapter will make understand-
ing the Rails framework much easier.
I recommend working with IRB as much as you need to feel comfort-
able with Ruby. When you’re ready to start exploring Rails, enter exit to
leave IRB, and continue on to Chapter 2.
Exercises
1. You can read plaintext files in Ruby with the File.read method. Create
a file containing a paragraph or two from a blog post or book, and name
it test.txt in the current directory. This next code sample reads a file
named test.txt into the variable file and displays the contents of the file:
file = File.read("test.txt")
puts file
As you can see, file contains a string. Use file.split to convert
the string into an array of words. You can now use Ruby’s built-in
array methods to operate on the contents of the file. For example, use
file.split.length to count words in the file. file.split.uniq.length tells
you how many unique words are in the file.
2. Using the array of words from Exercise 1, count how many times each
word appears in the file. One way to do this is by iterating over the
array and storing the count for each word in a hash where the key is
the word and the value is the count.
3. Create a WordCounter class to perform the operations from Exercises 1
and 2. The class should accept a filename to read when it is initial-
ized and include methods named count, uniq_count, and frequency for
performing the operations from the previous two exercises. The follow-
ing class definition should help you get started:
class WordCounter
def initialize(file_name)
@file = File.read(file_name)
end
# your code here...
end

2
Rails fuNDameNtals
Ruby on Rails is an open source web framework. Like
the Ruby language, it emphasizes programmer happi-
ness and productivity. As you’ll see, it includes sensible
defaults that allow you to spend less time dealing with
configuration and more time writing code. It also cre-
ates a directory structure for your application with a
place for every file you need.
Rails was created by David Heinemeier Hansson. He extracted the
framework from the project management application Basecamp that he
built for 37signals. It was first released as open source in July 2004.
Rails is also a full-stack web framework. This means it contains every-
thing you need to build web applications that accept user requests, query
databases, and respond with data rendered in templates.
Enter the following command in a terminal to ensure that Rails is
installed:
$ rails --version

20 Chapter 2
This should display Rails 4.0.0 or greater. If not, check the installation
instructions for Rails in “Ruby, Rails, and Git” on page xxi.
Your First Rails Application
Rails makes getting started easy, so let’s dive right in. You’re only five com-
mands away from having a running Rails web application.
Just like Jedi Knights build their own lightsabers, I think web develop-
ers should build their own personal websites, so that’s where we’ll start. I
use my website as a playground for testing new ideas. In the fast-moving
world of Ruby on Rails, keeping your own site up-to-date also helps you
learn to use new features as they are released.
Open a terminal window and create a directory for your Rails projects.
I call mine code, but you can use any name you like.
$ mkdir code
$ cd code
Now use the rails new command to create a new application. Our first
application will be a simple weblog, so let’s just call it blog.
$ rails new blog
This command creates all of the files your new application needs and
then runs the bundle install command to download and install any other
gems needed by Rails. (Gems are packaged Ruby applications or libraries.)
Depending on your connection speed, this may take a few minutes. When
the install is complete, use the cd command to move to the newly created
blog directory:
$ cd blog
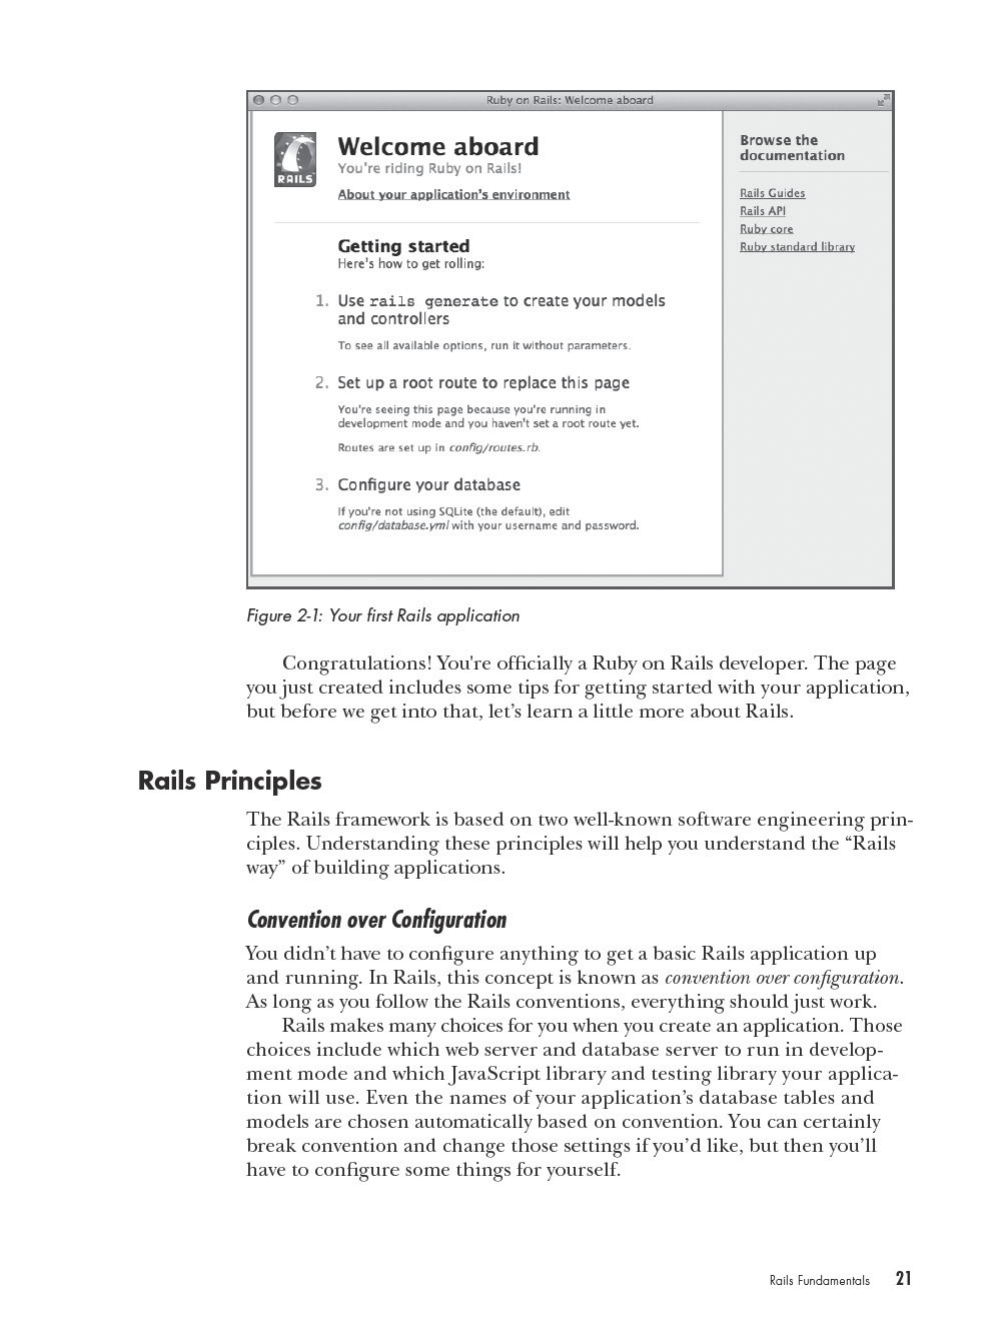
Finally, use the rails server command to launch a server so you can see
your new application. When you created this application, a directory called
bin was also created inside blog. The bin directory is where you’ll find rails
and other commands you’ll need later.
$ bin/rails server
This command starts the WEBrick server that is built in to Ruby. Once
the server has started, open your web browser and go to this address: http://
localhost:3000. If everything worked correctly, you should see a web page like
the one in Figure 2-1.

22 Chapter 2
Don’t Repeat Yourself
The other key principle in Rails is don’t repeat yourself, often abbreviated
DRY. In Rails, you avoid duplicating knowledge within your application.
Specifying the same information in more than one place can lead to errors
when you change one instance and not the other.
You’ll see several examples of the DRY principle as we work our way
through the Rails architecture and directory structure. There is a single,
specific place for each part of a Rails application. Things that can be inferred
from another source, such as the names of columns in a database table,
don’t need to be specified anywhere.
Rails Architecture
Rails applications are structured around the model-view-controller (MVC)
software engineering pattern. The MVC pattern is designed to separate
an application’s data from a user’s interaction with it. This separation of
concerns usually results in an application that is easier to understand and
maintain.
Model
The model represents your application’s data and the rules for manipulating
that data. The application’s data is sometimes referred to as the application’s
state. The rules for manipulating this data are also known as business logic. All
changes to your application’s state must pass through the model layer.
Rails models contain code for data validation and associations between
models. Most of the code you write will be inside of a Rails model, unless it
is directly involved with the user’s view of the data.
View
The view is the user interface for your application. Because we are building
web applications, the view will consist mainly of HTML. Rails uses a tem-
plate system called Embedded Ruby (ERB) by default.
Embedded Ruby allows you to include Ruby code for accessing data
within an HTML template. When the user requests a page, the Ruby code
in the template is evaluated by the server, and the resulting HTML page is
sent to the user.
The ability to embed Ruby code inside a view can sometimes lead pro-
grammers to include too much code inside a view. Doing this is problematic
because if you add another view, then that code will need to be duplicated.
Code used only by the view can be moved to a helper, which is a method
meant specifically for use in the view. In general, a view should never con-
tain code more complex than a simple conditional statement.
Note In addition to HTML pages, Rails can also generate JSON and XML. Ruby has
built-in support for generating CSV files, and gems are available for generating other
types of output, such as PDF documents and Excel spreadsheets.
Rails Fundamentals 23
Controller
The controller is like the glue that holds together the model and the view. The
controller is responsible for accepting a request from the user, gathering
the necessary data from the model, and rendering the correct view. This
sounds like a lot of work, but thanks to the conventions used in Rails appli-
cations, the process happens almost automatically.
In Rails, the controller is simply a Ruby class with methods that corre-
spond to the various actions in your application. For example, in your blog
application, you have a method named show for displaying a blog post and a
method named new for adding a new post.
Rails Application Structure
Now that you’re familiar with the principles and architecture used
by Rails, let’s see where these pieces live within the directory structure
created by the rails new command. Inside the blog directory, you should
find 10 subdirectories.
The app Directory
The app directory is where you’ll spend most of your time while building
your application. It contains subdirectories for each part of the MVC archi-
tecture discussed previously, as well as assets, helpers, and mailers.
The assets directory holds the images, JavaScript files, and CSS style-
sheets used by your application. The helpers directory contains Ruby files
with methods used by your views. The mailers directory is for Ruby classes
used to send email.
The bin Directory
The bin directory holds simple Ruby scripts for accessing the bundle, rails,
and rake command-line programs used while building your application.
These scripts ensure that the three programs run in the context of the cur-
rent Rails application. You can have multiple versions of these programs
installed at the same time, which can lead to errors if you don’t use the
scripts in bin to access them.
The config Directory
Rails makes heavy use of convention over configuration, but sometimes con-
figuration is unavoidable. In those cases, look to the config directory.
The environments subdirectory contains configuration files for the three
different environments created automatically by Rails. An environment is a
collection of settings used for a specific purpose such as development or test-
ing. These settings are stored in development.rb (used while developing your
application), test.rb (used while running automated tests), and production.rb
(used after your application is deployed and running in production).
24 Chapter 2
The file application.rb contains the settings for all environments.
Information in one of the specific environment files just mentioned will,
however, take precedence over settings here.
The file database.yml holds database configuration for each of the three
environments. Rails creates a SQLite database, by default, when you run
rails new, so the default settings in database.yml are for that SQLite database.
This database is a single file that you will use during development. You usu-
ally want to specify a different database server to use in production.
The file routes.rb maps the web address entered by the user to a specific
controller and action in your application. As you add resources and actions
to your application, you need to update this file to reflect the changes. I cover
resource-based routing during the discussion of controllers in Chapter 4.
The db Directory
The db directory initially contains only a single file called seeds.rb. Use this
file to create your application’s default data. For example, in an application
with user accounts, you may want to include a special “admin” user here.
As you build your application, you will create database migrations, Ruby
scripts that create and modify the tables in your database. A directory
named migrate is created to hold these database migration files. The file
schema.rb, which shows the current state of your application’s database, is
created as well. If you use the default SQLite database in your application,
the database itself is also placed in this folder.
The lib Directory
The lib directory is the place to put any reusable library code you write.
This directory is initially empty except for two subdirectories: assets and
tasks. Assets are images, CSS stylesheets, and JavaScript files. Task s are Ruby
scripts used to automate actions such as managing your application’s data-
base, clearing log and temporary files, and running tests. These tasks are
executed using the rake command.
The log Directory
As your application runs, data is written to a file in the log directory. When
you run your code in the development environment, this file is named
development.log. Separate files will be created for the test and production
environments.
The public Directory
Files in the public directory are sent to users as if the files were in the root
directory of your application. For example, three files in this directory are
for error messages—404.html, 422.html, and 500.html. You can see one of
these files in your browser by adding its name to your address bar. If you
visit http://localhost:3000/404.html, for example, you should see the default
“page does not exist” error page.

Rails Fundamentals 25
This directory also holds a default favicon.ico, the image that appears
in the address bar of most browsers, and a robots.txt file that controls how
search engines index your application. You can modify all of these files for
your application. You’ll probably want to customize the error pages with your
own branding and add a custom favicon for your site.
The test Directory
The test directory contains subdirectories with automated tests for each part
of your application. It also holds the script test_helper.rb, which loads the test
environment settings in config/environments/test.rb and adds helper methods
used in your tests.
Some Rails developers practice test-driven development (TDD). In TDD,
you first write an automated test describing a new feature; then you add just
enough code to make the test pass; and finally you refactor, or restructure,
the code as needed to improve readability and reduce complexity.
The tmp Directory
The tmp directory contains ephemeral files. Here, you find cached copies of
your application’s assets, process id files (pids) for running programs (such
as your web server), user sessions, and files representing sockets being used
by your application.
Note Because these files usually do not need to be saved, version control systems ignore them.
The vendor Directory
Finally, the vendor directory holds assets needed by third-party gems that
you add to your application. Its purpose is similar to the lib directory,
except it is used by libraries that you did not write yourself.
Rails Commands
You use four different command-line programs when building Rails appli-
cations. These can sometimes be confusing to new Rails developers.
The gem Command
The gem command installs Ruby gems. The Rails framework is actually
distributed as a collection of gem files.
Your newly created Rails application is made up of over 40 gems.
Main taining the correct versions of these gems and dependencies between
them can get complicated. For this reason, you rarely use the gem command
directly; instead, you usually rely on a tool called Bundler to manage gems
and keep your dependencies up to date. You interact with Bundler using
the bundle command.

26 Chapter 2
The bundle Command
The bundle command is used to install and update the gems needed by your
application. It installs gems by reading the Gemfile that was automatically
created by the rails new command in the root directory of your Rails appli-
cation. It stores the version numbers of gems you’re using and their depen-
dencies in the file Gemfile.lock.
The bundle list command displays the names and versions of all gems
currently being used by your application:
$ bin/bundle list
As mentioned earlier, we are using the copy of bundle inside the bin
directory.
The rake Command
The rake command is an automated build tool used to run tasks related to
your application. (If you are familiar with the make command, rake is the
Ruby version.) Enter this command to obtain a list of the available tasks
for your application:
$ bin/rake --tasks
This command prints a list of tasks your application can use along with
a short description of each to your terminal. Some gems add tasks to your
application, and you can also add your own tasks by writing Ruby scripts
and saving them in the lib/tasks directory.
The rails Command
You used the rails command earlier to create an application and start the
server. You can also use this command to generate new code and launch the
console. Enter the rails command by itself to list the available options:
$ bin/rails
In addition to the new command that you used to build your application
and the server command that starts a web server, Rails also provides several
other helpful commands. These include the generate command (generates
new code), the console command (starts an interactive Ruby console with
your Rails application preloaded), and the dbconsole command (starts a
command-line interface for the currently configured database).
Now that you’ve seen some Rails command-line tools, let’s use a few of
them to add some functionality to the blog application we created.

Rails Fundamentals 27
Rails Scaffold
We’re going to use a Rails feature known as scaffolding. Rails scaffolding
is a sometimes-controversial feature that generates application code for
you. This single command creates a model, a set of views, and a controller
automatically.
Many developers believe that you should write all of your own code. I
agree with them, but Rails scaffolding is helpful for bootstrapping an appli-
cation, especially for developers new to Ruby on Rails. We will explore the
generated code over the next few chapters. By the end, you will understand
each file and be able to write those files by hand.
Open a new terminal window (or a new tab in your current one).
Change to your code/blog directory if necessary. Then, use the rails generate
command to add posts to the blog:
$ bin/rails generate scaffold Post utitle:string vbody:text
Here, we’ve asked Rails to generate a scaffold for a blog Post. We speci-
fied that a Post should have a title u and a body v.
The title will be a string, and the body will be a text field in the database.
As this command runs, you should see a flurry of activity in your terminal
as files are generated and placed in the correct folders.
The previous command should have generated a database migration.
Use the rake command to run that migration:
$ bin/rake db:migrate
This command should create a table named posts with fields named
id, title, body, created_at, and updated_at. The title and body fields will store
data entered by the user. Rails adds the id, created_at, and updated_at fields
automatically. The id field is a unique, auto-incrementing integer that rep-
resents each row in the database. The created_at and updated_at fields are
timestamps representing when the row was created and when it was last
updated. Rails keeps track of these values automatically.
To see the results, go to http://localhost:3000/posts in your web browser.
You should see a page like the one in Figure 2-2.
Figure 2-2: The Rails Post scaffolding
28 Chapter 2
This page certainly won’t win any awards for design, but it is functional.
Click the New Post link to see a form for adding a new blog post. After you
add a post, click the Back link to return to the home page.
By default, Rails shows your data in a table with links for Show, Edit, and
Destroy. Feel free to try these links and verify that the application is working.
As you play with the application, be sure to look at the output in the
terminal window where the server is running. This is a copy of the develop-
ment log generated by your application. You’ll find a wealth of information
here, such as the URL requested, the Ruby method being run, and the SQL
commands being executed.
Summary
This chapter covered the basic principles, architecture, directory structure,
and commands used to build Rails applications. In the next chapter, we’ll
dig in to the Rails code we just generated, starting with models, and you’ll
learn to write your own code.
Exercises
1. Explore the functionality of your new blog. Create, edit, and destroy
posts. View the list of posts and individual posts. Note how the URL
in the address bar changes as you move around the application.
2. Get used to moving around the various files in the blog application in
your editor of choice. If you’re using Sublime Text 2, you can open the
blog directory itself and then use the sidebar to open individual files.
3
moDels
In Rails, models represent the data in your applica-
tion and the rules to manipulate that data. Models
manage interactions between your application and a
corresponding database table. The bulk of your appli-
cation’s business logic should also be in the models.
This chapter covers Active Record, the Rails component that provides
model persistence (that is, storing data in the database), as well as data vali-
dations, database migrations, and model associations. Validations are rules
to ensure that only valid data is stored in the database. You create database
migrations to change the schema of the database, and associations are rela-
tionships between multiple models in your application.
The Post Model
In the previous chapter, we used the Rails scaffold generator to build a
simple blog with models, views, and controllers for blog posts. Look at the
post model created by the scaffold generator by opening the file app/models/
post.rb in your favorite text editor.

30 Chapter 3
class Post < ActiveRecord::Base
end
There’s not much to see here. Right now, the file just tells us that the
class Post inherits from ActiveRecord::Base. Before I talk about what you can
actually do with Post, let’s begin our discussion with Active Record.
Active Record
Active Record is an implementation of the object-relational mapping (ORM)
pattern described, using the same name, by Martin Fowler in Patterns of
Enterprise Application Architecture (Addison-Wesley Professional, 2002). It’s
an automated mapping between classes and tables as well as attributes and
columns.
Each table in your database is represented by a class in your applica-
tion. Each row of that table is represented by an instance (or object) of the
associated class, and each column of that row is represented by an attribute
of that object. The example in Table 3-1 demonstrates this structure. If you
could look inside your database, this is what you would see.
Table 3-1: The Posts Table
id title body created_at updated_at
1Hello, World Welcome to my blog... ... ...
2My Cat The cutest kitty in the... ... ...
3Too Busy Sorry I haven’t posted... ... ...
Table 3-1 holds three example blog posts. This table is represented by
the Post class. The post with an id of 1 can be represented by a Post object.
Let’s call our object post.
You can access the data associated with a single column by calling an
attribute method on the object. For example, to see the post’s title, call
post.title. The ability to access and change database values by calling attri-
bute methods on an object is known as direct manipulation.
Create, Read, Update, and Delete
Let’s explore Active Record further by entering a few commands in the Rails
console. The Rails console is the IRB that you used in Chapter 1 with your
Rails application’s environment preloaded.
To start the Rails console, go to your blog directory and enter bin/rails
console. You might notice that the console takes a little longer to start than
the IRB. During that slight pause, your application’s environment is being
loaded.
As with the IRB, you can enter exit to quit the console when you’re done.

Models 31
The four major functions of database applications are create, read,
update, and delete, usually abbreviated as CRUD. Once you know how to per-
form these four actions, you can build any type of application you need.
Rails makes these actions easy for you. In most cases, you can accom-
plish each with a single line of code. Let’s use them now to work with posts
on our blog.
Create
We’ll start by adding a few records to the database. Enter these commands in
the Rails console as you work through this section. The remaining examples
in this chapter use these records.
The easiest way to create a record in Rails is with the appropriately
named create method, as shown here:
2.1.0 :001 > Post.create title: "First Post"
u (0.1ms) begin transaction
SQL (0.4ms) INSERT INTO "posts" ("created_at"...
(1.9ms) commit transaction
=> #<Post id: 1, title: "First Post", ...>
The Rails console displays the SQL being sent to the database as com-
mands are run u. In the interest of brevity, I’m going to omit these SQL
statements in the rest of the samples.
The create method accepts a hash of attribute-value pairs and inserts
a record into the database with the appropriate values. In this case, it’s
setting the title attribute to the value "First Post". When you run this
example, the values for id, created_at, and updated_at are set for you auto-
matically. The id column is an auto-incrementing value in the database,
whereas created_at and updated_at are timestamps set for you by Rails. The
body column is set to NULL since no value was passed for it.
The create method is a shortcut for instantiating a new Post object,
assigning values, and saving it to the database. If you don’t want to take the
shortcut, you could also write a separate line of code for each action:
2.1.0 :002 > post = Post.new
=> #<Post id: nil, title: nil, ...>
2.1.0 :003 > post.title = "Second Post"
=> "Second Post"
2.1.0 :004 > post.save
=> true
We had to use multiple commands this time, but just like before, we’ve
created a brand new Post object. Two posts are now stored in the database.
In both examples, we only assigned values to the post’s title attribute, but
you would assign values to the post body in exactly the same way. Rails
assigns values to id, created_at, and updated_at automatically. You shouldn’t
change these.

32 Chapter 3
Read
Once you have a few posts in your database, you’ll probably want to read
them back out for display. First, let’s look at all of the posts in the database
with the all method:
2.1.0 :005 > posts = Post.all
=> #<ActiveRecord::Relation [#<Post id: 1, ...>, #<Post id: 2, ...>]>
This returns an Active Record relation, which contains an array of all
posts in your database, and stores it in posts. You can chain additional meth-
ods onto this relation, and Active Record combines them into a single query.
Active Record also implements the first and last methods, which return
the first and last entries in an array. The Active Record version of these
methods returns only the first or last record in the database table. This is
much more efficient than fetching all of the records in the table and then
calling first or last on the array. Let’s try fetching a couple of posts from
our database:
2.1.0 :006 > Post.first
=> #<Post id: 1, title: "First Post", ...>
2.1.0 :007 > Post.last
=> #<Post id: 2, title: "Second Post", ...>
This example returns the first and last posts, as ordered by id. You’ll
learn how to order records by a different field in the next section. Sometimes,
however, you’ll know exactly which record you want, and it might not be the
first or last one. In that case, you can use the find method to retrieve a record
by id.
2.1.0 :008 > post = Post.find 2
=> #<Post id: 2, title: "Second Post", ...>
Just don’t ask find to fetch a record that doesn’t exist. If a record
with the specified id isn’t in your database, Active Record will raise an
ActiveRecord::RecordNotFound exception. When you know a specific record
exists but you don’t know its id, you can use the where method to specify an
attribute that you do know:
2.1.0 :009 > post = Post.where(title: "First Post").first
=> #<Post id: 1, title: "First Post", ...>
The where method also returns a relation. If more than one record
matches, you can chain the all method after where and tell Rails to retrieve
all matching records on demand when they are needed.

Models 33
If you know the database has only one matching record, you can chain
the first method after where to retrieve that specific record as in the previ-
ous example. This pattern is so common that Active Record also provides
the find_by method as a shortcut:
2.1.0 :010 > post = Post.find_by title: "First Post"
=> #<Post id: 1, title: "First Post", ...>
This method takes a hash of attribute-value pairs and returns the first
matching record.
Update
Updating a record is as easy as reading it into a variable, changing values
via direct manipulation, and then saving it back to the database:
2.1.0 :011 > post = Post.find 2
=> #<Post id: 2, title: "Second Post", ...>
2.1.0 :012 > post.title = "2nd Post"
=> "2nd Post"
2.1.0 :013 > post.save
=> true
Rails also provides the update method, which takes a hash of attribute-
value pairs, updates the record, and saves to the database all on one line:
2.1.0 :014 > post = Post.find 2
=> #<Post id: 2, title: "2nd Post", ...>
2.1.0 :015 > post.update title: "Second Post"
=> true
The update method, like the save method, returns true when successful
or false if it has a problem saving the record.
Delete
Once you have read a record from the database, you can delete it with the
destroy method. But this time don’t type in these commands. You don’t want
to delete the posts you created earlier!
2.1.0 :016 > post = Post.find 2
=> #<Post id: 2, title: "Second Post", ...>
2.1.0 :017 > post.destroy
=> #<Post id: 2, title: "Second Post", ...>
The destroy method can also be called on the class to delete a record by
id, which has the same effect as reading the record into a variable first:
2.1.0 :018 > Post.destroy 2
=> #<Post id: 2, title: "Second Post", ...>

34 Chapter 3
You can also delete records based on a relation:
2.1.0 :019 > Post.where(title: "First Post").destroy_all
=> [#<Post id: 1, title: "First Post", ...>]
This example deletes all records with a title of "First Post". Be careful
with the destroy_all method, however. If you call it without a where clause,
you’ll delete all records of the specified class!
More Active Record Methods
If you’re familiar with SQL or other methods of accessing records in a data-
base, you know there’s much more to working with a database than simple
CRUD. Active Record provides methods for more database operations, such
as ordering, limiting, counting, and other calculations.
Query Conditions
In addition to the simple where conditions you’ve seen so far, Active Record
also has several methods to help refine your queries. The order method
specifies the order of returned records; limit specifies how many records
to return; and offset specifies the first record to return from a list.
The limit and offset methods are often used together for pagination.
For example, if you want to show 10 blog posts per page, you can read the
posts for the first page like this:
2.1.0 :020 > posts = Post.limit(10)
=> #<ActiveRecord::Relation [#<Post id: 1, ...>, #<Post id: 2, ...>]>
To read the posts for the second page of your site, you’ll need to skip
the first 10 posts:
2.1.0 :021 > posts = Post.limit(10).offset(10)
=> #<ActiveRecord::Relation []>
Entering this returns an empty set since we only have two posts in
our database. When you combine offset with limit in this way, you can
pass offset multiples of what you passed limit to view different pages of
your blog.
You can also change how the entries in a relation are ordered. When
using limit, the order of records returned is undefined, so you need to
specify an order. With the order method, you can specify a different order
for the set of records returned:
2.1.0 :022 > posts = Post.limit(10).order "created_at DESC"
=> #<ActiveRecord::Relation [#<Post id: 2, ...>, #<Post id: 1, ...>]>
Using DESC tells order to return the posts from newest to oldest. You
could also use ASC to order them the opposite way. If you would rather see

Models 35
posts alphabetized by title, try replacing "created_at DESC" with "title ASC".
The order method defaults to ascending order if you don’t specify ASC or
DESC, but I always give an order so my intention is clear.
Calculations
Databases also provide methods for performing calculations on records.
We could read the records and perform these operations in Ruby, but the
methods built in to the database are usually optimized to be faster and use
less memory.
The count method returns the number of records matching a given
condition:
2.1.0 :023 > count = Post.count
=> 2
If you don’t specify a condition, count counts all records by default, as in
this example.
The sum, average, minimum, and maximum methods perform the requested
function on a field. For example, this line of code finds and returns the
date on the newest blog post:
2.1.0 :024 > date = Post.maximum :created_at
=> 2014-03-12 04:10:08 UTC
The maximum created_at date you see should match the date for your
newest blog post, not necessarily the date you see in the example.
Migrations
Database migrations are used any time you need to change your database’s
structure. When we used the scaffold generator to create blog posts, it gen-
erated a migration for us, but you can also create migrations yourself. As
you build your application, your database migrations contain a complete
record of the changes made to your database.
Migration files are stored in the db/migrate directory and start with a
timestamp that indicates when they were created. For example, you can
see the migration created by the scaffold generator by editing the file
db/migrate/*_create_posts.rb. (Because the timestamps on your files will
surely be different from mine, I’ll use an asterisk from now on to refer to
the date part of the filename.) Let’s look at that file now:
class CreatePosts < ActiveRecord::Migration
u def change
create_table :posts do |t|
t.string :title
t.text :body
t.timestamps

36 Chapter 3
end
end
end
Database migrations are actually Ruby classes. The change method is
called u when the migration is run. In this case, the method creates a table
named posts with fields for title, body, and timestamps. The timestamps field
refers to both the created_at and updated_at fields. Rails also automatically
adds the id column.
You can run migrations as tasks with the rake command. For example,
you enter bin/rake db:migrate to run all pending migrations and bring your
database up-to-date.
Rails keeps track of which migrations have been run by storing the
timestamps in a database table called schema_migrations.
If you make a mistake in a database migration, use the db:rollback task
to undo it. After you correct the migration, use db:migrate to run it again.
The Schema
In addition to the individual migration files, Rails also stores your data-
base’s current state. You can see this by opening the file db/schema.rb.
Ignoring the comment block at the top of the file, it should look like this:
--snip--
ActiveRecord::Schema.define(version: 20130523013959) do
create_table "posts", force: true do |t|
t.string "title"
t.text "body"
t.datetime "created_at"
t.datetime "updated_at"
end
end
This file is updated whenever you run a database migration. You should
not edit it manually. If you are moving your application to a new computer
and would like to create a new, empty database all at once instead of by
running the individual migrations, you can do that with the db:schema:load
rake task:
$ bin/rake db:schema:load
Running this command resets the database structure and removes all
of your data in the process.
Models 37
Adding a Column
Now that you know more about migrations, let’s create one and run it.
When we created our blog post model, we forgot that posts need authors.
Add a string column to the posts table by generating a new migration:
$ bin/rails g migration add_author_to_posts author:string
The Rails generator (g is short for generate) looks at the name of your
migration, in this case, add_author_to_posts, and tries to figure out what
you want to do. This is another example of convention over configuration:
name your migration in the format add_ColumnName_to_TableName, and Rails
will parse that to add what you need. Based on the name, we clearly want to
add a column named author to the posts table. We also specified that author
is a string, so Rails has all the information it needs to create the migration.
Note You can name a migration anything you want, but you should follow the convention
so you don’t have to edit the migration manually.
Enter bin/rake db:migrate to run the migration and add the author col-
umn to your database. If you still have a Rails console open, you’ll need to
exit and restart with bin/rails console for your changes to take effect. You
can also look at the db/schema.rb file to see the new column in the posts table.
Inside the Author Migration
The code you just generated for adding a column is simple. Edit the file
db/migrate/*_add_author_to_posts.rb to see how it works.
class AddAuthorToPosts < ActiveRecord::Migration
def change
add_column :posts, :author, :string
end
end
Like *_create_posts.rb, this migration is a class containing a change method.
The add_column method is called with the table name, column name, and col-
umn type. If you want to add multiple columns, you could create separate
migrations for each, or you could call this method multiple times.
Active Record migrations also provide the rename_column method for
changing a column’s name, the remove_column method for removing a col-
umn from a table, and the change_column method for changing a column’s
type or other options, such as default value.
38 Chapter 3
Validations
Remember that models have rules for manipulating application data. Active
Record validations are sets of rules created to protect your data. Add valida-
tion rules to ensure that only good data makes it into your database.
Adding a Validation
Let’s look at an example. Because we’re making a blog, we should ensure
that all posts have a title so readers don’t get confused, and we can do that
with a validation rule.
Validations are implemented as class methods in Rails. Open the post
model (app/models/post.rb) in your editor and add this line:
class Post < ActiveRecord::Base
validates :title, :presence => true
end
This validates the presence of text in the title field. Attempting to
create a blog post with a blank title should now result in an error.
otheR CommoN ValiDatioNs
Rails provides a variety of other validations in addition to the :presence valida-
tion. For example, you can use the :uniqueness validation to ensure that no two
posts have the same title.
The :length validation accepts a hash of options to confirm that the value
is the correct length. Adding this line to your post model confirms that all titles
are at least five characters:
validates :title, :length => { :minimum => 5 }
You can also specify a :maximum value instead of a :minimum, or you can
use :is to set an exact value.
The :exclusion validation ensures the value does not belong to a given set
of values. For example, adding this validation prohibits blog posts with the title
Title:
validates :title, :exclusion => { :in => [ "Title" ] }
You can think of :exclusion as a blacklist for values you don’t want to allow.
Rails also provides an :inclusion validation for specifying a whitelist of accepted
values.

Models 39
Testing Data
Validations are automatically run before data is saved to the database.
Attempt to store invalid data, and save returns false. You can also test a
model manually with the valid? method:
2.1.0 :025 > post = Post.new
=> #<Post id: nil, title: nil, ...>
2.1.0 :026 > post.valid?
=> false
2.1.0 :027 > post.errors.full_messages
=> ["Title can't be blank"]
In this example, the valid? method should return false because you
didn’t set a value for the title. Failing validations add messages to an array
called errors, and calling full_messages on the errors array should return a
list of error messages generated by Active Record based on your validations.
Use validations freely to keep bad data out of your database, but also
consider your users when you create those validations. Make it clear which
values are valid, and display error messages if invalid data is given so the
user can correct the mistake.
Associations
Only the simplest of applications contain a single model. As your applica-
tion grows, you’ll need additional models, and as you add more, you’ll
need to describe the relationships between them. Active Record associations
describe the relationships between models. For example, let’s add comments
to our blog posts.
Posts and comments are associated. Each post has many comments, and
each comment belongs to a post. This one-to-many relationship is one of the
most commonly used associations, and we’ll explore it here.
Generating the Model
A blog comment should have an author, a body, and a reference to a post.
You can easily generate a model using that information:
$ bin/rails g model Comment author:string body:text post:references
Note Remember to run database migrations after generating this new model!
The post:references option tells the Rails generator to add a foreign key
to the comments database table. In this case, the foreign key is named post_id
because it refers to a post. The post_id field contains the id of this comment’s
post. The migration created the column we need in the database, so now we
need to edit our models to finish setting up the association.
40 Chapter 3
Adding Associations
First, open app/model/post.rb again to add the comments association. Earlier
I said that each post has many comments, and that’s the association we
need here:
class Post < ActiveRecord::Base
validates :title, :presence => true
has_many :comments
end
Rails uses a class method called has_many to create this association in
a readable way. Now, edit app/model/comment.rb, and you’ll see that the
Rails generator already added the matching belongs_to statement for you
automatically:
class Comment < ActiveRecord::Base
belongs_to :post
end
The post to comments association should now work as intended. If your
Rails console was still running while you made these changes, you’ll need to
restart it to see the effects.
Using Associations
When you create an association in a model, Rails automatically defines
several methods for that model. Use these methods, and you won’t have to
worry about keeping the post_id updated. They maintain this relationship
for you automatically.
The has_many Methods
The has_many :comments statement you saw inside Post defines several methods:
comments Returns an Active Record relation representing the array of
comments for this post
comments< Adds an existing comment to this post
comments= Replaces the existing array of comments for this post with
a given array
comment_ids Returns an array of the comment ids associated with
this post
comment_ids= Replaces the existing array of comments for this post
with the comments corresponding to the given array of ids
Because the comments method returns a relation, it is commonly used
with other methods. For example, you can create new comments associ-
ated with a post with post.comments.build, which builds a new comment
belonging to this post, or post.comments.create, which creates a new com-
ment belonging to this post and saves it to the database. Each of these

Models 41
methods automatically assigns the post_id of the newly created comment.
This example creates a new comment associated with your first post. You
should see the new comment in the output from post.comments:
2.1.0 :028 > post = Post.first
=> #<Post id: 1, title: "First Post", ...>
2.1.0 :029 > post.comments.create :author => "Tony", :body => "Test comment"
=> #<Comment id: 1, author: "Tony", ...>
2.1.0 :030 > post.comments
=> #<ActiveRecord::Relation [#<Comment id: 1, author: "Tony", ...>]>
If you want to check if any comments are associated with a post, use
comments.empty?, which returns true if there are none. You might also find it
helpful to know how many comments are associated with a particular post;
in that case, you use comments.size:
2.1.0 :031 > post.comments.empty?
=> false
2.1.0 :032 > post.comments.size
=> 1
When you know a post has comments associated with it, you can look
for a particular comment by passing post.comments.find a comment id. This
method raises an ActiveRecord::RecordNotFound exception if a matching
comment cannot be found belonging to this post. Use post.comments.where
instead if you would rather not raise an exception. This method just returns
an empty relation if a matching comment is not found.
The belongs_to Methods
The belongs_to :post statement inside the Comment model defines five methods.
Because belongs_to is a singular association (a comment can only belong to
one post), all of these methods have singular names:
post Returns an instance of the post that this comment belongs to
post= Assigns this comment to a different post
build_post Builds a new post for this comment
create_post Creates a new post for this comment and saves it to the
database
create_post! Creates a new post for this comment but raises
ActiveRecord::RecordInvalid if the post is not valid
These methods are the inverse of the methods defined in the Post model.
Use them when you have a comment and you would like to manipulate its
post. For example, let’s fetch the post associated with our first comment:
2.1.0 :033 > comment = Comment.first
=> #<Comment id: 1, author: "Tony", ...>
2.1.0 :034 > comment.post
=> #<Post id: 1, title: "First Post", ...>

42 Chapter 3
Calling post on the first comment, which is also our only comment so
far, should return our first post. This confirms the association works both
ways. Assuming you still have more than one post in your database, you can
also assign this comment to a different post:
2.1.0 :035 > comment.post = Post.last
=> #<Post id: 2, title: "Second Post", ...>
2.1.0 :036 > comment.save
=> true
Assigning a comment to another post updates the comment’s post_id,
but does not write that to the database. Don’t forget to call save after updat-
ing the post_id! If you make this common mistake, the comment’s post_id
won’t actually change.
Summary
This chapter has been a whirlwind tour of Active Record, so play around
in the console until you’re comfortable with these ideas. Add more posts,
update the existing posts with body text, and create comments associated
with these posts. Focus on the CRUD operations and association methods
in particular. These methods are commonly used in all Rails applications.
The next chapter covers Rails controllers. There, you’ll see all of these
methods in use as you work your way through the various controller actions.
Exercises
1. It might be nice to contact the people leaving comments on our blog.
Generate a new migration to add a string column to the comments
table to store an email address. Run this migration, and use the Rails
console to verify that you can add an email address to comments now.
2. We need to ensure that users actually enter some text when they create
a comment. Add validations to the comments model for the author and
body fields.
3. Write a query to determine the number of comments belonging to each
post. You can’t do this with a single query, but you should be able to find
the answer by iterating over a collection of posts as if it were an array.
4
CoNtRolleRs
Rails controllers connect your application’s models and
views. Any web requests that your application receives
are routed to the appropriate controller. The control-
ler gets data from the model and then renders the
appropriate view or redirects to a different location.
In this chapter, we continue working on our blog. Along the way, you’ll
learn about controllers in detail. I’ll cover resource representation with
REST, routing resources, and the types of actions a controller can take.
Representational State Transfer
Representational State Transfer, or REST, is a client-server software archi-
tecture introduced in 2000 by Dr. Roy Fielding, one of the authors of the
HTTP specification. REST deals with the representation of resources,
and in Rails, resources correspond to models. In RESTful architectures,
clients initiate requests to servers. Servers process those requests and return
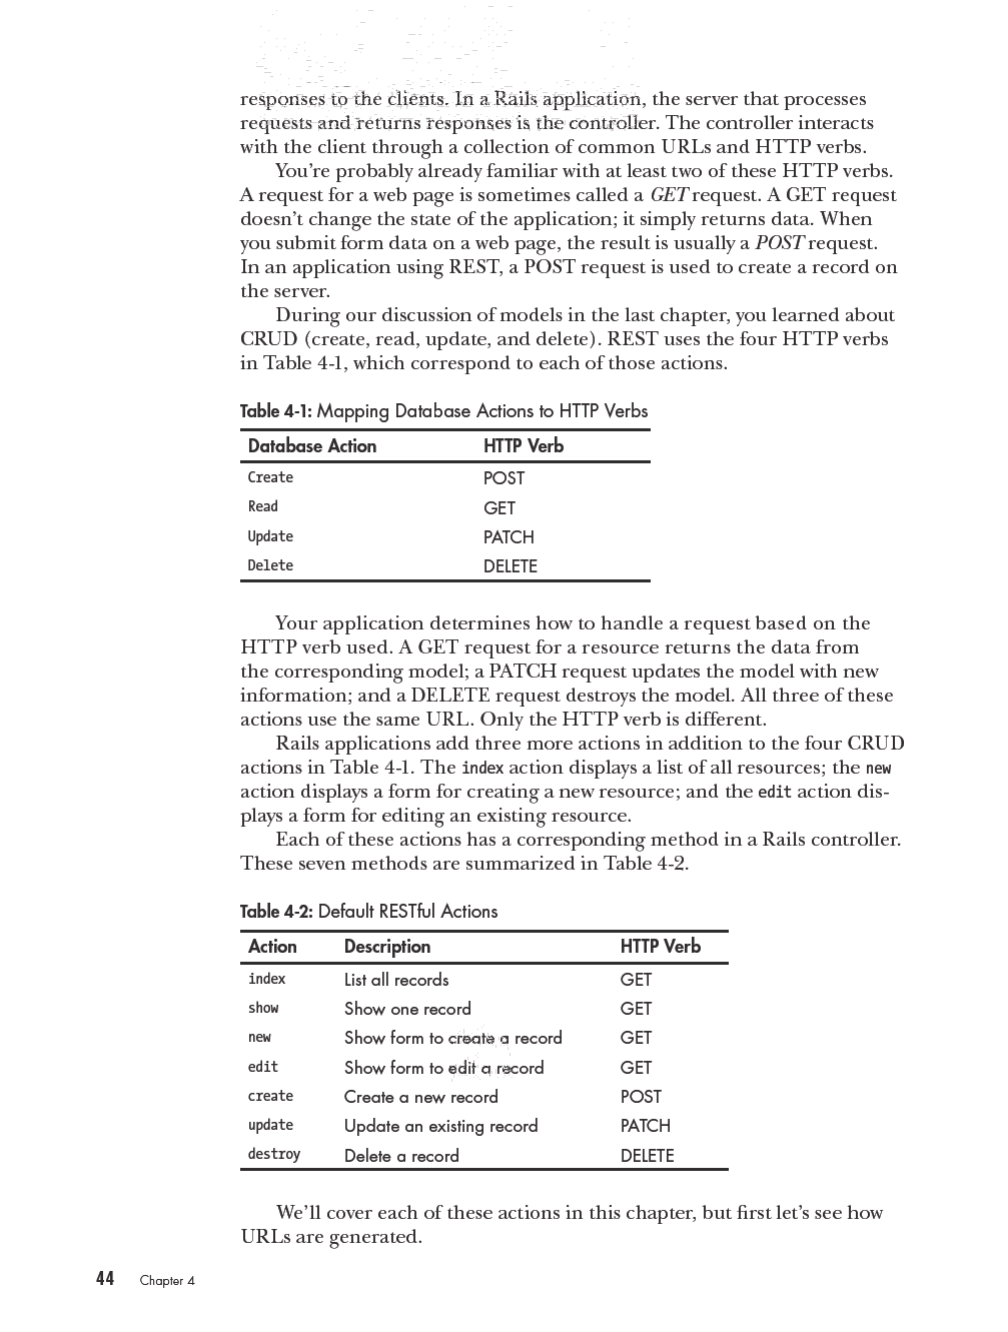

Controllers 45
Routing
Setting up all of these URLs and mapping actions to verbs might sound
pretty complicated, but luckily, Rails routing handles all of this for you.
Routes connect URLs to the code that comprises an application. First, let’s
look at the most common type of route, the resource route.
Resources
Your application’s routes are stored in the file config/routes.rb. Open that file
in your text editor.
Ignore all of the comments. Your file should only have three lines
right now:
Rails.application.routes.draw do
resources :posts
end
Rails applications use REST by default. The blog application currently
has only one resource (blog posts), and the single line resources :posts
builds a set of routes for your application. Use the rake command to display
your application’s routes:
$ bin/rake routes
Prefix Verb URI Pattern Controller#Action
posts GET /posts(.:format) posts#index
POST /posts(.:format) posts#create
--snip--
This command outputs the route helper prefix, HTTP verb, URL pat-
tern, and controller action for each of the seven default RESTful actions.
For example, a GET request to /posts calls the PostsController#index
method. As you make changes to the routes file, run this command again
to see how your application’s routes also change.
Nested Resources
When one resource belongs to another resource, you can add it as a nested
resource. In the blog, comments belong to posts. Here’s how you represent
that in config/routes.rb:
resources :posts do
resources :comments
end
Add a block after resources :posts with a do, end pair. Then add
resources :comments inside that block. This tells Rails that comments are
only available inside of posts.

46 Chapter 4
Restricted Resources
Adding resources :comments as you just saw creates routes for each of the
seven default RESTful actions for comments. For now, let’s only worry about
creating new comments. You can restrict the set of routes generated for a
resource by adding an only clause to that resource in config/routes.rb:
resources :posts do
resources :comments, only: :create
end
Now, only the comment create action is mapped to a URL. You should
only provide routes to actions that you plan to implement.
Custom Routes
Some actions in your application may not correspond to any of the seven
default actions. For example, your application may include a search action
that returns a list of posts containing a specific term. In cases such as this,
Rails lets you manually configure custom routes.
Custom routes are also useful for mapping old URLs to a new Rails
application or simplifying URLs for complex actions. For example, imagine
your application allows users to log in by creating a new session and log out
by destroying their session. Adding resources :user_session creates paths like
user_session/new. If you would rather use different paths, you can create cus-
tom routes for login and logout.
Rails.application.routes.draw do
resources :posts do
resources :comments, :only => :create
end
get 'login' => 'user_sessions#new'
post 'login' => 'user_session#create'
delete 'logout' => 'user_sessions#destroy'
end
Now your application’s login page should be at the path /login. When
a user visits the login page, his or her browser sends a GET request for
this path. The controller displays the login form in response to that GET
request. When the user submits the form, the browser sends a POST request
to the same path with the contents of the form. The controller then creates
a new session for the user in response to the POST request. When the user
clicks the log out button, a DELETE request to the path /logout destroys the
user’s session.
We aren’t adding authentication to the blog application, but you can
still add these routes to config/routes.rb if you want to see the routes created.
Remove them before moving on because accessing a path that doesn’t cor-
respond to a controller action results in an error.
Controllers 47
The Root Route
Finally, let’s create a root route so we don’t have to add /posts to the browser’s
address bar every time. The root route sets the home page for your applica-
tion. Add root 'posts#index' near the end of config/routes.rb:
Rails.application.routes.draw do
resources :posts do
resources :comments, :only => :create
end
root 'posts#index'
end
Now, accessing your server without a path should display the posts
index page. You should always include a root route for your application.
Paths and URLs
Adding a route also automatically creates helpers for your controllers and
views. You can use these helpers, shown in Table 4-3, instead of manually
typing URLs in your application. That way, if you decide to change your
application’s URLs in the future, you won’t have to search for and update
all of the old URLs in your code.
Table 4-3: Rails Path and URL Helpers
Path Helpers URL Helpers
posts_path posts_url
new_post_path new_post_url
edit_post_path(id) edit_post_url(id)
post_path(id) post_url(id)
The path helpers include only the path, whereas the URL helpers also
include the protocol, server, and port (if not standard). Rails applications
generally use path helpers. The URL helpers are useful for situations in which
the full URL is needed, such as to generate URLs for inclusion in emails.
The first part of each method name matches the prefix displayed by the
bin/rake routes command.
You can test these helpers in the Rails console like this:
2.1.0 :001 > app.posts_path
=> "/posts"
2.1.0 :002 > app.post_path(1)
=> "/posts/1"
2.1.0 :003 > app.new_post_path
=> "/posts/new"
2.1.0 :004 > app.root_path
=> "/"

48 Chapter 4
Testing these helpers is a useful sanity check when working with Rails
routes. If you forget which helper to use to create a path, you can type it in
the console to see the result.
Controller Actions
The convention in Rails is to have a controller corresponding to each
resource. That controller includes methods for each action. (Remember the
principle from Chapter 2: convention over configuration.) The Rails scaf-
fold generator created a controller for posts. Open the file app/ controllers/
posts_controller.rb to see the Ruby code behind these methods. I recommend
running the Rails server as you work your way through the rest of this
chapter:
$ bin/rails server
Now, let’s look at each controller method in turn, starting with index
and working our way down to destroy.
The index action retrieves all posts from the database:
def index
@posts = Post.all
end
You see the familiar @post = Post.all in that method. You may be sur-
prised that this is the only line of code in the index method. By default, Rails
renders a view file matching the action name, in this case app/views/posts/
index.html.erb. (We’ll discuss views in the next chapter.)
Go to http://localhost:3000/posts in your browser to see the results of the
index action.
The show action retrieves a single post from the database, but the show
method contains no code at all:
def show
end
This method relies on a Rails before_action, which you should see on
line two of the controller:
before_action :set_post, only: [:show, :edit, :update, :destroy]
The before_action is a class method that automatically calls the set_post
method, shown next, before the methods show, edit, update, and destroy. This
eliminates duplicate code in these methods. (Remember DRY: Don’t repeat
yourself.)
def set_post
@post = Post.find(params[:id])
end

Controllers 49
The set_post method is defined near the bottom of the controller under
the keyword private. It calls the Post.find method to retrieve the post with
an id corresponding to a parameter passed to the controller. Parameters
are covered in more detail in the next section, so for now, let’s continue
examining these controller methods.
The new action displays a form for adding a new post:
def new
@post = Post.new
end
The form uses data from a newly created post. Click the New Post link at
the bottom of the post index page to see this form.
The edit action displays a form for editing an existing post. Like the
show method, this method contains no code:
def edit
end
This form uses data retrieved by the set_post method discussed previously.
A Brief Detour from Actions
Before discussing create, update, and destroy, let’s talk about a few key Rails
topics that you need to know to understand those methods. In this section,
we’ll explore parameters, render/redirect, response formats, and the flash.
Parameters
Parameters generally represent part of the URL used to request a page or
values from a form, and they’re accessible in the controller as a hash named
params. For example, the set_post method you saw earlier retrieved the id of
the requested post from the params hash, like this:
@post = Post.find(params[:id])
You can see the parameters passed with each request in the output
from the rails server command in your terminal. For example, go to
http://localhost:3000/posts/1 and then look at the Rails server output in
your terminal:
Started GET "/posts/1" for 127.0.0.1 at 2014-03-31 20:30:03 -0500
Processing by PostsController#show as HTML
u Parameters: {"id"=>"1"}
Post Load (0.3ms) SELECT "posts".* FROM "posts"
WHERE "posts"."id" = ? LIMIT 1 [["id", "1"]]
Rendered posts/show.html.erb within layouts/application (233.9ms)
Completed 200 OK in 274ms (Views: 245.5ms | ActiveRecord: 26.2ms)

50 Chapter 4
In this case, the 1 in the URL represents the id of the requested post u.
Because we requested a single post, the show method is called, and this id is
used to find the post in set_post.
Form data is represented by a nested hash with values. For example,
editing this post results in a params hash more like this:
{
"utf8"=>"",
"authenticity_token"=>"...",
u "post"=>{"title"=>"First Post", "body"=>""},
"commit"=>"Update Post",
v "id"=>"1"
}
You still access params[:id] v to find the correct post, and you can also
access params[:post] u to see the new values submitted by the user. Because
these are user-submitted values, you should ensure that your application
only accepts data for the appropriate attributes. Malicious users could send
requests with invalid parameters in an attempt to attack your application.
For blog posts, you only want users to be able to edit the title and body
attributes. Rails includes a feature called Strong Parameters, which makes
specifying which attributes your application accepts easy. You can see the
feature in action in the post_params method:
def post_params
params.require(:post).permit(:title, :body)
end
This method first requires the params hash to contain a nested hash with
the key :post. It then returns only the permitted values (:title and :body)
from this nested hash. Using the earlier example params hash, post_params
returns a hash like this:
{"title" => "First Post", "body" => ""}
Other values in the params[:post] hash are silently ignored. Remember,
always use the post_params method when accessing the parameters for a
newly created or updated post.
Render or Redirect
Every action must either render a view or redirect to another action. By
default, an action renders a file matching the action name. For example,
the show method in the posts controller looks for a file named app/views/
posts/show.html.erb and uses that file to build the HTML response that is
sent back to the user.
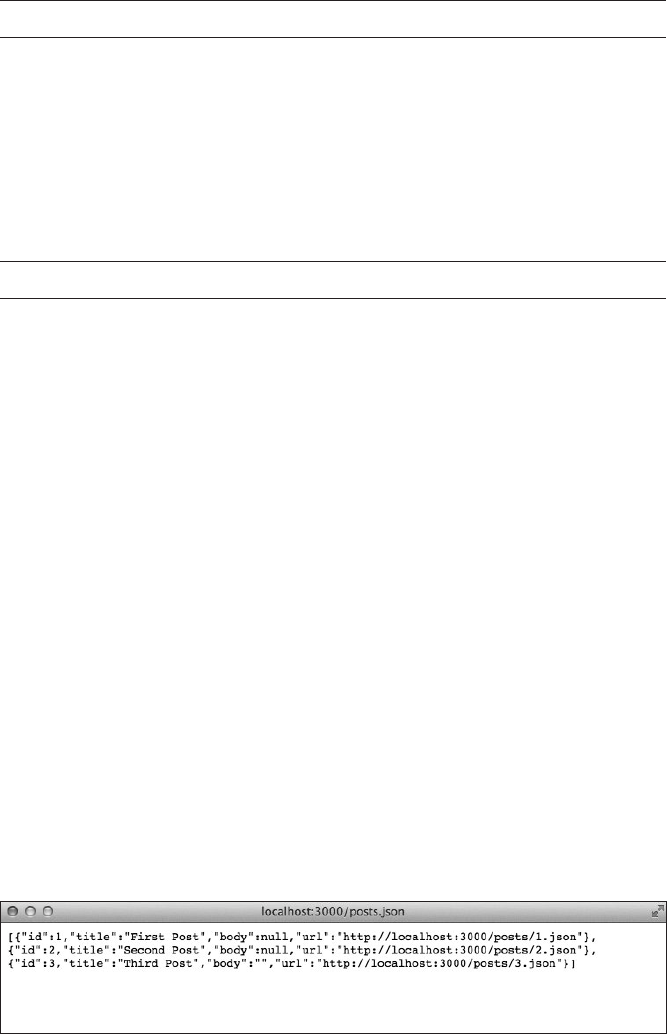
Controllers 51
You can tell Rails to render the response for a different action with the
render method like this:
render action: "edit"
The ability to specify actions is helpful if you need to render a different
view based on user input. This example is from the update method. If the
post could not be updated with the data provided by the user, this method
renders the edit view again, giving the user a chance to correct the data.
Sometimes you need to send the user to a page other than the one
he or she requested. Use the redirect_to method to take care of this. For
example, if the user enters valid data while creating or updating a post, the
controller action redirects the user to that post:
redirect_to @post
When you call redirect_to, the address in the user’s browser changes
to reflect the new page, and another request is made. You can see this by
watching the address bar as you submit form data and by looking at the out-
put from rails server in your terminal.
To see this in action, first go to http://localhost:3000/posts/new in your
browser. This is the new post form. Enter a title for the new post, and then
click the Create Post button. Watch the address bar closely after clicking the
button.
The form makes a POST request to http://localhost:3000/posts. This
request is routed to the create method. After creating the post, you are
redirected to http://localhost:3000/posts/3, assuming that your new post has
an id of 3. The address is changed automatically by the redirect_to method.
Response Formats
Rails can generate responses in several formats, though all I’ve discussed
so far is HTML. Scaffold-generated controllers can also include JavaScript
Object Notation (JSON) responses, which are useful for creating application
programming interfaces (APIs). Other formats include XML and even PDF.
You can try another response type in your web browser by visiting
this URL: http://localhost:3000/posts.json. This URL is the same as the
posts index URL used earlier, except it has .json added to the end. Rails
recognizes this as a JSON request and renders the collection of posts as
JSON, as in Figure 4-1.
Figure 4-1: Posts in JSON format
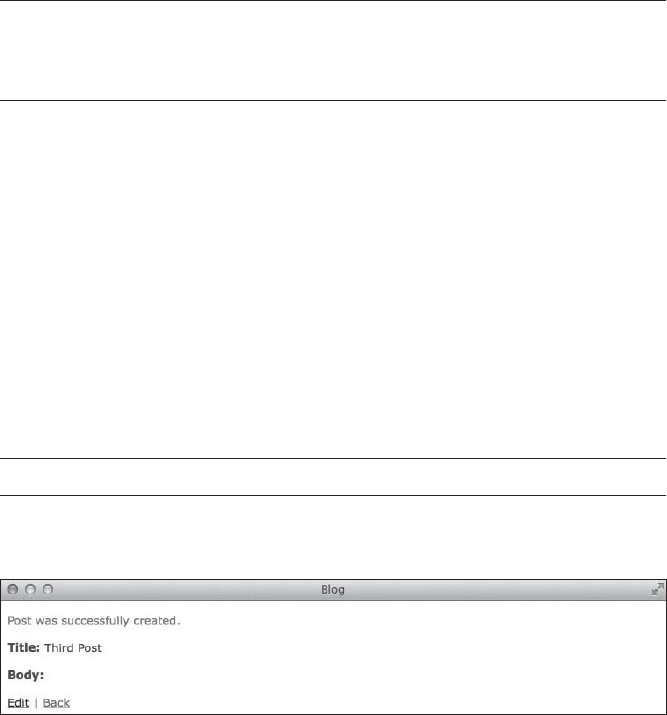
52 Chapter 4
You specify the formats an action accepts and the responses to each for-
mat with a call to the respond_to method. This method accepts a block with
a single parameter representing the requested format. Here is an example
from the destroy method:
respond_to do |format|
format.html { redirect_to posts_url }
format.json { head :no_content }
end
This method is called right after a post is destroyed. If the client
requests HTML data, this block redirects to posts_url, the index page. If
the client requests JSON data, by adding .json to the end of the URL, this
block responds with an empty header to indicate the post no longer exists.
The Flash
Flash messages are alerts to the user that are only valid for a single request.
Flash messages are stored in the user’s session, typically in a cookie. They
are usually styled differently to stand out. For example, the stylesheet
included with Rails scaffolding uses green text for flash messages.
Flash messages are helpful for sending error messages or other notifica-
tions to the user. They are generally set on a redirect. Here’s an example
from the create method in the posts controller:
redirect_to @post, notice: 'Post was successfully created.'
When a post is successfully created, the user is redirected to the new
post and a flash message like the one in Figure 4-2 is shown.
Figure 4-2: A flash message
The create flash message is the green text, and it matches the message
added earlier.
Back to Controller Actions
Now you should know everything you need to understand the create, update,
and destroy actions. The methods written by the scaffold generator respond
to requests for both HTML and JSON data with messages indicating success
or errors, but let’s focus on the HTML responses for now. I’ll cover JSON
responses in depth when I talk about building your own APIs.

Controllers 53
Note The formatting in each method has been adjusted slightly to better fit this page.
The create method is responsible for creating a post using the params
from the new post form:
def create
@post = Post.new(post_params)
respond_to do |format|
if @post.save
format.html { redirect_to @post,
notice: 'Post was successfully created.' }
format.json { render action: 'show',
status: :created, location: @post }
else
format.html { render action: 'new' }
format.json { render json: @post.errors,
status: :unprocessable_entity }
end
end
end
The first line of the method @post = Post.new(post_params) uses Strong
Parameters to ensure only the accepted parameters are allowed into the call
to new. Inside the respond_to block, the return value of @post.save is checked.
If it’s true, then the user is redirected to the newly created post. If it is false,
then the new action is rendered again so the user can correct any errors.
The update method is similar to the create method. The main difference
is that the code checks the return value of @post.update instead of @post.save.
def update
respond_to do |format|
if @post.update(post_params)
format.html { redirect_to @post,
notice: 'Post was successfully updated.' }
format.json { render action: 'show',
status: :ok, location: @post }
else
format.html { render action: 'edit' }
format.json { render json: @post.errors,
status: :unprocessable_entity }
end
end
end
If @post.update returns true, the code redirects the user to the updated
post; otherwise, it renders the edit form so the user can correct the errors.
The destroy method is simpler than the create and update methods
because it doesn’t check the return value of @post.destroy.
54 Chapter 4
def destroy
@post.destroy
respond_to do |format|
format.html { redirect_to posts_url }
format.json { head :no_content }
end
end
After the post is destroyed, the code redirects the user back to the
index page, posts_url.
Adding Comments
You added a route to the create comment action earlier, so now let’s add a
simple controller for that action. You’ll add the form for entering new com-
ments in the next chapter.
Generate a new controller for comments using the Rails generator:
$ bin/rails generate controller comments
u create app/controllers/comments_controller.rb
invoke erb
v create app/views/comments
invoke test_unit
create test/controllers/comments_controller_test.rb
invoke helper
create app/helpers/comments_helper.rb
invoke test_unit
create test/helpers/comments_helper_test.rb
invoke assets
invoke coffee
create app/assets/javascripts/comments.js.coffee
invoke scss
create app/assets/stylesheets/comments.css.scss
Note that I specified only a controller, not scaffolding. This code gener-
ates an empty controller u and an empty views directory v, as well as files
for helpers, tests, and assets. We’ll have to fill in the details ourselves. Start
by opening the file app/controllers/comments_controller.rb in your editor:
class CommentsController < ApplicationController
end
Because you’re implementing the create action, the first thing you need
is a create method. You can model it after the create method in the posts
controller. Assume that users won’t be adding comments via an API, so it
isn’t necessary to generate JSON responses.

Controllers 55
class CommentsController < ApplicationController
def create
u @post = Post.find(params[:post_id])
v if @post.comments.create(comment_params)
w redirect_to @post,
notice: 'Comment was successfully created.'
else
redirect_to @post,
alert: 'Error creating comment.'
end
end
end
This code first finds the correct post u using the post_id in the params
hash. It then uses the comments association to create a new comment v and
redirects back to the post w. Each call to redirect_to sets a flash message to
indicate success or failure.
Because you’re using Strong Parameters in your application, you also
need to add the comment_params method to specify the parameters you want
to accept.
class CommentsController < ApplicationController
--snip--
private
def comment_params
params.require(:comment).permit(:author, :body)
end
end
In the case of comments, you only accept an author and a body. Any
other parameters are ignored. In the next chapter, you’ll update the post
show view to display existing comments and include a form for creating new
comments.
Summary
This chapter introduced many important Rails concepts—REST, routing,
and controllers. I also discussed parameters, render versus redirect, response
formats, and the flash.
We started at the database in the last chapter and worked our way for-
ward in this chapter. In the next chapter, we’ll get all the way to the user
and cover the last piece of the MVC puzzle: views.
56 Chapter 4
Exercises
1. Good error messages are important for any application. If something
goes wrong, your users need to know what the problem is and how to
correct it. Currently, if a comment can’t be created, users see the mes-
sage “Error creating comment.” Update the CommentsController create
method to also show a list of error messages in the alert.
2. In Exercise 1 at the end of Chapter 3, you added an email field to the
Comment model. Update the comment_params method in CommentsController
to also accept this field.
5
Views
A view is the user interface to your application.
Typically, views include web pages for displaying
database records and forms for creating and updat-
ing those records. Views also sometimes take the
form of responses to API requests.
This chapter covers the most common Rails view template type, called
Embedded Ruby, as well as view-specific helpers and layouts. You’ll also learn
how to avoid duplication in your HTML code with partials and how to gen-
erate forms to accept user input.
Enter bin/rails server to start the Rails server now. And keep it running
in a terminal window as you work through the examples in this chapter, so
you can see the changes you make to the application in your web browser
and watch the server output.

58 Chapter 5
Embedded Ruby
Embedded Ruby (ERB), the default template type in Rails, is used to build
view templates. An Embedded Ruby template contains a mixture of Ruby
code and HTML that is similar to ASP, JSP, or PHP.
Templates are stored in a subdirectory of app/views named after the
controller. For example, you’ll find the templates for the posts controller in
app/views/posts. The Rails convention is to name templates after the action
they represent, with the file extension .html.erb. The default template for the
index action is index.html.erb.
Embedded Ruby contains three special tags for executing Ruby code.
These tags are used for output, control flow, and comments. Let’s take a
look at each of these.
Output
The <%= %> tag (also called the output tag) executes the code it contains and
prints the return value on the page. Open the file app/views/posts/show.html.erb
in your editor to see several examples of this tag.
For instance, this tag prints the title of the current post:
<%= @post.title %>
Note that any HTML in the title is escaped by default. That is, any
reserved characters are converted to character references and displayed
on the page instead of being interpreted as HTML. This safeguard pre-
vents malicious users from entering HTML code on your page that could
cause a page to break or even a cross-site scripting attack. Cross-site script-
ing attacks and other security concerns are covered in Chapter 11.
Control Flow
The <% %> tag executes the code it contains without printing anything on
the page. This tag is useful for control flow statements such as loops or con-
ditionals. Open the file app/views/posts/index.html.erb to see this tag in action.
This example uses the each method to loop over an array of posts:
<% @posts.each do |post| %>
<tr>
<td><%= post.title %></td>
<td><%= post.body %></td>
<td><%= link_to 'Show', post %></td>
<td><%= link_to 'Edit', edit_post_path(post) %></td>
<td><%= link_to 'Destroy', post, method: :delete,
data: { confirm: 'Are you sure?' } %></td>
</tr>
<% end %>

Views 59
Output tags are used inside the loop to print the values of post.title
and post.body. This example also shows three instances of the link_to helper.
These helpers create links to the show, edit, and destroy actions for each post.
We’ll discuss helpers in the next section.
Comments
Finally, the <%# %> tag is used to enter comments. Comments are usually notes
to yourself or other programmers describing what your code does. Unlike
HTML comments (which start with <!-- and end with -->), ERB comments
will not appear in the HTML source. Use ERB comments for notes that you
don’t want to be visible in the HTML generated by the view template.
The ERB templates you’ve looked at so far were generated by the Rails
scaffold when we first created our blog. They’re uncommented, but you can
easily add your own comments. Here’s one:
<%# This code is crazy %>
In addition to notes to the programmer, you can also use ERB com-
ments to remove code temporarily from the page. Add a hash sign (#) after
the first percent sign (%) in any other ERB tag, and the code inside that tag
will not be executed.
Helpers
Helpers are Ruby methods that simplify the code inside your views, making it
easier to read. Rails includes helpers for creating links to resources, format-
ting numbers, and other common tasks. You can also easily write your own
helper methods.
By using helpers, you can avoid placing too much logic in your view.
If it takes more than a single line of code to display a value, then that code
should probably be in a helper method.
URL Helpers
Create links with the link_to helper method:
link_to 'Show', post
This example generates an HTML link like this: <a href="/posts/1">
Show</a>, assuming post has an id of 1.
You can also use the URL and path helpers you saw in the last chapter
to create links:
link_to 'Edit', edit_post_path(post)
This example generates a link like this: <a href="/posts/1/edit">Edit</a>.
60 Chapter 5
You can also include the HTTP verb to use for the link as well as addi-
tional data attributes. Use this for links that change state on the server,
such as a link to destroy a resource. Remember that GET requests should
not be used to change state.
link_to 'Destroy', post, method: :delete,
data: { confirm: 'Are you sure?'}
This example generates a link with data-method="delete" and
data-confirm="Are you sure?". Rails includes the jQuery unobtrusive Java-
Script library (jquery_ujs.js) by default. This library uses the method and
confirm attributes to build a hidden form at run-time that creates a confir-
mation window and then submits the destroy link using a proper DELETE
request. Aren’t you glad you don’t have to do that yourself?
Note Web browsers are only able to issue GET and POST requests. Rails fakes the DELETE
request by passing a parameter named _method with the value delete. When you update
a record, the PATCH request is handled the same way.
Number Helpers
Rails includes several handy methods for displaying numbers:
number_to_currency
number_to_human
number_to_human_size
number_to_percentage
number_with_delimiter
number_with_precision
Each method accepts a number and returns a string representing that
number with some formatting applied. That formatting is related to the
word at the end of the method.
The number_to_currency method, shown next, rounds the given number
to two decimal places and prepends a dollar sign:
number_to_currency 100
So this example returns "$100.00".
The methods number_to_human and number_to_human_size convert numbers
into easy-to-read string representations.
number_to_human 1000000
number_to_human_size 1024
So these examples return "1 million" and "1 KB", respectively.

Views 61
Format percentages with number_to_percentage. This method rounds the
number to three decimal places, by default, and appends a percent sign.
You can specify a precision as an option.
number_to_percentage 12.345
number_to_percentage 12.345, precision: 1
These examples return "12.345%" and "12.3%", respectively.
In addition to URL and number helpers, Rails also has built-in helpers
for working with dates and assets such as images, CSS files, and JavaScript
files. Later in this chapter, I cover helpers for creating forms and form fields.
I can’t cover all of the helpers in Rails here, so for now, let’s see how to
add your own helper methods.
Your Own Helpers
You can easily create your own helpers by adding methods to the appropri-
ate file in the app/helpers directory. The Rails scaffold generator has created
a couple of mostly empty files in that directory for you automatically.
Add helpers that are only needed in a single controller to the helper file
for that controller. For example, helpers that are only used in posts views
should be added to the PostsHelper module in app/helpers/posts_helper.rb.
Add helpers used throughout the application to the ApplicationHelper
module in app/helpers/application_helper.rb. Open this file and let’s see how
it works:
module ApplicationHelper
def friendly_date(d)
d.strftime("%B %e, %Y")
end
end
This code defines a new helper method called friendly_date. You can
use this method in any view in your application to format a date for display.
friendly_date Time.new(2014, 12, 25)
This example returns "December 25, 2014". If you later decide to display
dates in a different format throughout your application, you only have to
change this method instead of changing all of your views.
The Posts Index Page
Now that you know more about how views work in Rails, let’s update the
index view to look more like a blog. Go to http://localhost:3000/posts in your
browser to see the index page, shown in Figure 5-1.
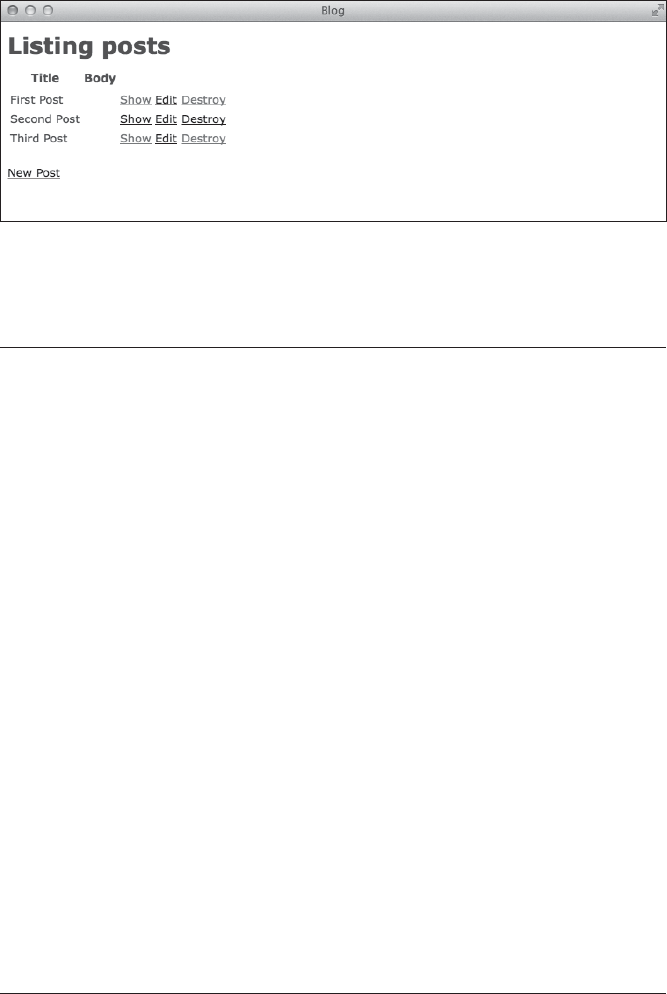
62 Chapter 5
Figure 5-1: The posts index page
Your blog posts are currently displayed in a table. Open the file app/
views/posts/index.html.erb in your editor:
<h1>Listing posts</h1>
u <table>
<thead>
<tr>
<th>Title</th>
<th>Body</th>
<th></th>
<th></th>
<th></th>
</tr>
</thead>
<tbody>
v <% @posts.each do |post| %>
<tr>
<td><%= post.title %></td>
<td><%= post.body %></td>
<td><%= link_to 'Show', post %></td>
<td><%= link_to 'Edit', edit_post_path(post) %></td>
<td><%= link_to 'Destroy', post, method: :delete,
data: { confirm: 'Are you sure?' } %></td>
</tr>
<% end %>
</tbody>
</table>
<br>
<%= link_to 'New Post', new_post_path %>
This template first creates an HTML table u and adds a table header to
the page. It then loops over each post v and displays that post’s attributes
in a table row.
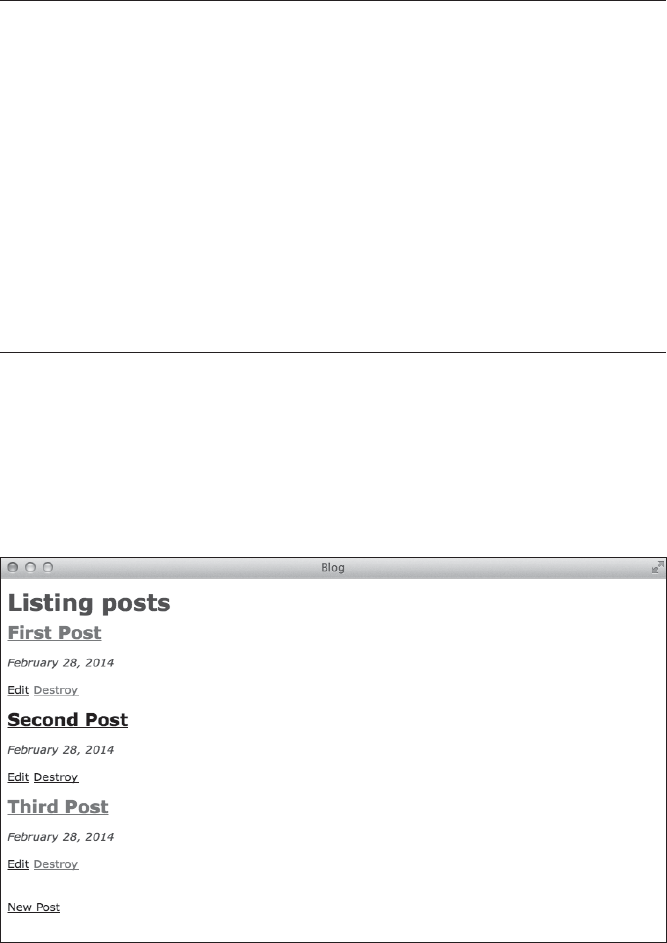
Views 63
A proper blog would display each post title as a heading followed by the
post body in a paragraph. Update the index view to look like this:
<h1>Listing posts</h1>
u <% @posts.each do |post| %>
v <h2><%= link_to post.title, post %></h2>
w <p><i><%= friendly_date post.created_at %></i></p>
<p><%= post.body %></p>
<p>
<%= link_to 'Edit', edit_post_path(post) %>
<%= link_to 'Destroy', post, method: :delete,
data: { confirm: 'Are you sure?' } %>
</p>
<% end %>
<br>
<%= link_to 'New Post', new_post_path %>
The template still loops over each post u as before. Instead of display-
ing the post attributes in table cells, however, it now shows the title v in
a second-level heading and uses the friendly_date helper w you added in
the previous section to format the created_at date. The links to edit and
destroy the post are now at the bottom, and the link to show the post is now
around the post title. Refresh the page in your browser to see the changes,
shown in Figure 5-2.
Figure 5-2: The updated posts index page
Our blog still won’t win any design awards, but it’s looking better!

64 Chapter 5
Layouts
You may have noticed that the views you’ve seen so far only include the con-
tents of the web page without the other required elements such as html, head,
and body. These elements are the basic structure of all web pages.
Check the server output in your terminal to see what’s happening when
you load the index page:
--snip--
u Started GET "/posts" for 127.0.0.1 at 2014-03-09 18:34:40 -0500
v Processing by PostsController#index as HTML
Post Load (0.2ms) SELECT "posts".* FROM "posts"
w Rendered posts/index.html.erb within layouts/application (62.5ms)
Completed 200 OK in 92ms (Views: 91.2ms | ActiveRecord: 0.2ms)
--snip--
Here, we have a GET request u for the path /posts. It is processed by
the index method v in PostsController. Finally, the server renders posts/
index.html.erb within layouts/application w.
In Rails, a layout is a file containing the basic HTML required for
every page on your site. Rather than repeat the same HTML in every view,
you only write it once inside the layout file. This is another way that Rails
removes needless duplication.
Let’s jump right in and dissect the layout for your blog. The server out-
put calls it layouts/application, so open app/views/layouts/application.html.erb
to see the layout for your application:
u <!DOCTYPE html>
<html>
<head>
<title>Blog</title>
<%= stylesheet_link_tag 'application', media: 'all',
v 'data-turbolinks-track' => true %>
<%= javascript_include_tag 'application',
w 'data-turbolinks-track' => true %>
<%= csrf_meta_tags %>
</head>
<body>
<%= yield %>
</body>
</html>
This file contains the basic HTML for every page on your site: the
HTML5 doctype u followed by the head section and body section.
The head section sets the title of the page. It then includes Rails helpers
for linking to your site’s CSS v and JavaScript w files. It also includes a
helper that protects your application from cross-site request forgery (CSRF)
attacks, which I’ll cover in Chapter 11. The body section includes the yield
statement .

Views 65
The rest of this section covers these helper methods and the yield
statement.
Asset Tag Helpers
In a Rails application, files such as CSS, JavaScript, and images are called
assets. Assets are external files needed by the web browser accessing your
application. These files are stored in subdirectories of the app/assets
directory.
As your application grows, you may need several CSS and JavaScript
files to control your site’s appearance and client-side functionality. The
Rails server output also lists the CSS and JavaScript files your application
is already using:
--snip--
u Started GET "/assets/scaffolds.css?body=1" for 127.0.0.1 at ...
u Started GET "/assets/application.css?body=1" for 127.0.0.1 at ...
v Started GET "/assets/turbolinks.js?body=1" for 127.0.0.1 at ...
v Started GET "/assets/jquery.js?body=1" for 127.0.0.1 at ...
v Started GET "/assets/posts.js?body=1" for 127.0.0.1 at ...
v Started GET "/assets/jquery_ujs.js?body=1" for 127.0.0.1 at ...
v Started GET "/assets/application.js?body=1" for 127.0.0.1 at ...
u Started GET "/assets/posts.css?body=1" for 127.0.0.1 at ...
As you can see, our simple blog is already using three different CSS
files u and five JavaScript files v. Rather than list each of these files sepa-
rately in the layout, Rails uses CSS and JavaScript files called manifests to
require individual CSS and JavaScript files. A manifest file is simply a list
of other files needed by your application.
A Rails feature known as the asset pipeline combines these CSS and
JavaScript files together into two files and compresses them when your
application is running in the production environment. These files are
named application.css and application.js. By combining these files, your
application receives fewer requests from users, which should improve its
performance.
The head section of the layout contains ERB tags for adding the CSS
and JavaScript manifest files that your application needs.
stylesheet_link_tag
The stylesheet_link_tag method adds an HTML link tag for the default CSS
manifest, application.css, and each of the CSS files referenced in the mani-
fest. Open the file app/assets/stylesheets/application.css to see how it works.
66 Chapter 5
/*
--snip--
*
u *= require_tree .
v *= require_self
*/
This file starts with a block of comments explaining its purpose as
well as the lines starting with require_tree u and require_self v. The
require_tree . statement includes all other CSS files in the app/assets/
stylesheets directory and subdirectories. The require_self statement means
the contents of this CSS file are included at the bottom.
javascript_include_tag
The javascript_include_tag method adds a script tag for the default JavaScript
manifest, application.js, and each of the JavaScript files listed in the mani-
fest. Now open the JavaScript manifest app/assets/javascript/application.js.
--snip--
//
//= require jquery
//= require jquery_ujs
//= require turbolinks
//= require_tree .
This file is similar to the CSS manifest. It starts with a block of com-
ments explaining its purpose and then includes the JavaScript libraries,
jquery, jquery_ujs, and turbolinks by default, as well as any other JavaScript
files in the app/assets/javascript directory and subdirectories.
Note The asset pipeline, turbolinks, and other performance issues are discussed in more
detail in Chapter 12.
CSRF Meta Tags Helper
The csrf_meta_tags method adds two meta tags to the head of each web page.
These tags are designed to protect your application from CSRF attacks.
If you view the source on any page of your application, you should see
a meta tag named csrf-token that contains a long string of random hexa-
decimal digits. This token is unique to your current session and is passed to
your application any time a form is submitted.
<meta content="authenticity_token" name="csrf-param" />
<meta content="..." name="csrf-token" />

Views 67
In a CSRF attack, a trusted user of your application visits a malicious
site. The malicious site then attempts to submit requests to your application
as that trusted user. Because the malicious site has no way of knowing this
secret token, these requests fail. CSRF and other security concerns are cov-
ered in Chapter 11.
Yield
In a layout, the yield statement identifies where content from the view
should be inserted. In this case, the HTML generated by app/views/posts/
index.html is inserted between the body tags to form the complete web page
that is sent to the user.
The yield statement is not required to be the only statement in the body
element. You can add other elements to the body as needed. For example,
you might add a common header or footer here that appears on each page
of your application.
Partials
Like helpers, partials are used to extract code into meaningful units and to
avoid duplicating code that is common to multiple views. The difference
is that whereas helpers contain shared Ruby code, partials contain shared
HTML code.
Partials are stored in view templates with filenames that begin with an
underscore. For example, app/views/posts/_form.html.erb is a partial that ren-
ders a post form.
Code that is repeated across multiple pages is commonly separated out
into partials to make the template code easier to follow. If you look at the
new post and edit post templates, app/views/posts/new.html.erb and app/views/
posts/edit.html.erb, respectively, you’ll see they both render the same form
partial with this line of code:
<%= render 'form' %>
Here, the partial is named _form.html.erb but is referred to simply as form
when rendered.
If you find yourself repeating the same HTML code on more than one
page, or in more than one place on a single page, you should copy that code
into a partial and replace it with a render statement.
Collections
Partials can also be used to eliminate loops in view templates. When you
use the :collection option, a corresponding partial is inserted into the tem-
plate for each member of the collection. Using :collection doesn’t necessar-
ily remove code duplication entirely, but it can simplify the template.

68 Chapter 5
For example, you could move the code inside the <% @posts.each ... %>
block in index.html.erb into a new file named app/views/posts/_post.html.erb.
You could then replace the block with a single line of code like this one:
<%= render :partial => 'post', :collection => @posts %>
In this example, Rails understands that @posts is an array of post objects,
so it looks for a partial named app/views/posts/_post.html.erb and renders it
on the page once for each object in the array. Because this action is so com-
mon, you can simplify even further to this:
<%= render @posts %>
Let’s get some hands-on experience with partials by adding comments
to the post show page.
Showing Comments
You added a model for comments in Chapter 3 and a controller in Chapter 4,
but you still can’t see them on the page. Nearly every post should have com-
ments, and you don’t want to repeat that code in every single page, so this is
a perfect opportunity to put partials to work.
To get started, open app/views/posts/show.html.erb in your editor:
<p id='notice'><%= notice %></p>
<p>
<strong>Title:</strong>
<%= @post.title %>
</p>
<p>
<strong>Body:</strong>
<%= @post.body %>
</p>
<%= link_to 'Edit', edit_post_path(@post) %> |
<%= link_to 'Back', posts_path %>
Let’s first clean up this page a bit like we did the posts index page by wrap-
ping the title in a heading tag and the body in a paragraph, as shown here:
<p id='notice'><%= notice %></p>
<h2><%= @post.title %></h2>
<p><%= @post.body %></p>
<%= link_to 'Edit', edit_post_path(@post) %> |
<%= link_to 'Back', posts_path %>
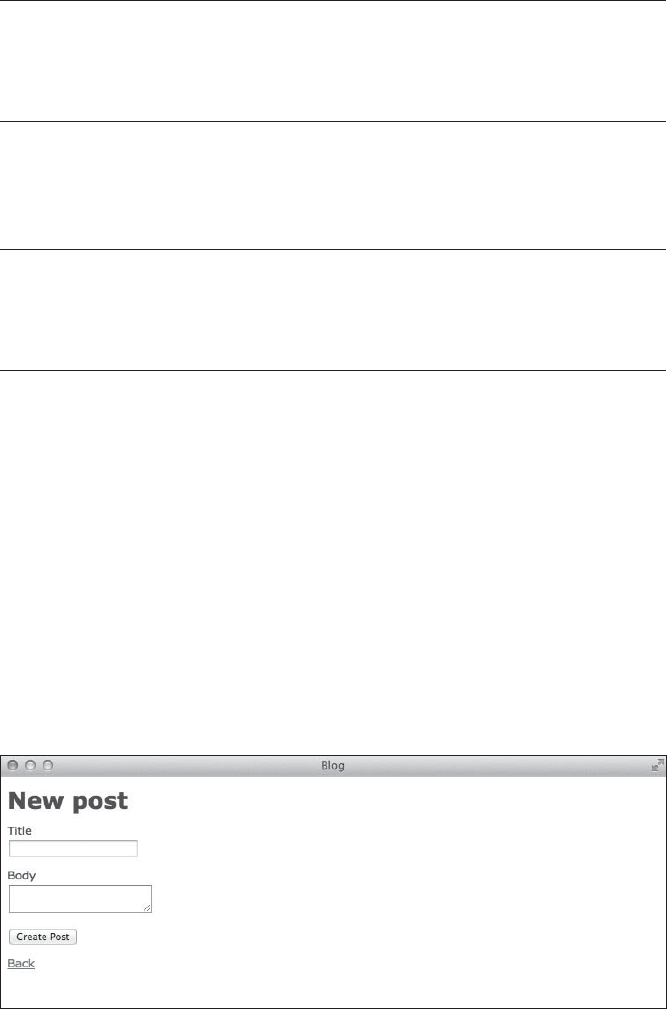
Views 69
Now add a heading and a render statement for the comments at the
bottom of the page:
--snip--
<h3>Comments</h3>
<%= render @post.comments %>
This code shows the comments under the heading by rendering the
@post.comments collection with a partial. For this to work, you’ll also need to
create a partial for rendering a single comment. Create a new file named
app/views/comments/_comment.html.erb containing this:
<p><%= comment.author %> said:</p>
<blockquote>
<%= comment.body %>
</blockquote>
If you added any comments earlier using the Rails console, you should
now see them at the bottom of the page. Of course, you can’t ask your users
to add comments using the console; they expect a comment form. Let’s see
how forms are created in a Rails application.
Forms
Accepting input from users can be one of the more difficult parts of build-
ing a web application. Rails includes an elegant system for generating forms.
Rails provides helper methods for the various form controls. When
bound to a model, these helper methods generate the correct HTML
markup for passing values back to the controller automatically.
Go to http://localhost:3000/posts/new in your browser to see the New Post
form created by the Rails scaffold generator, as shown in Figure 5-3.
Figure 5-3: The New Post form

70 Chapter 5
This simple form consists of a text box for the post title, a text area for
the post body, and a button labeled Create Post to submit the form.
Form Helpers
You can use helpers to generate a form and all of the necessary fields and
labels. Open the file app/views/posts/_form.html.erb to see an example of a
Rails form:
u <%= form_for(@post) do |f| %>
v <% if @post.errors.any? %>
w <div id="error_explanation">
<h2><%= pluralize(@post.errors.count, 'error') %>
prohibited this post from being saved:</h2>
<ul>
<% @post.errors.full_messages.each do |msg| %>
<li><%= msg %></li>
<% end %>
</ul>
</div>
<% end %>
<div class='field'>
<%= f.label :title %><br>
<%= f.text_field :title %>
</div>
<div class='field'>
<%= f.label :body %><br>
<%= f.text_area :body %>
</div>
<div class='actions'>
<%= f.submit %>
</div>
<% end %>
This partial is used when creating a new post and editing an existing
post. The form begins with a call to the form_for method u with a block that
contains the rest of the form. Next an if statement v checks to see if the
post contains any errors. If the form has errors, the error_explanation div w
appears before the rest of the form. Otherwise, nothing is shown here.
Finally, you’ll see the form controls .
Form Errors
Let’s first look at the code for displaying errors like the one shown in
Figure 5-4. Remember from our discussion of controllers that if a create
or update action fails, the form will be rendered again. Try creating a new
post with a blank title to see the error.
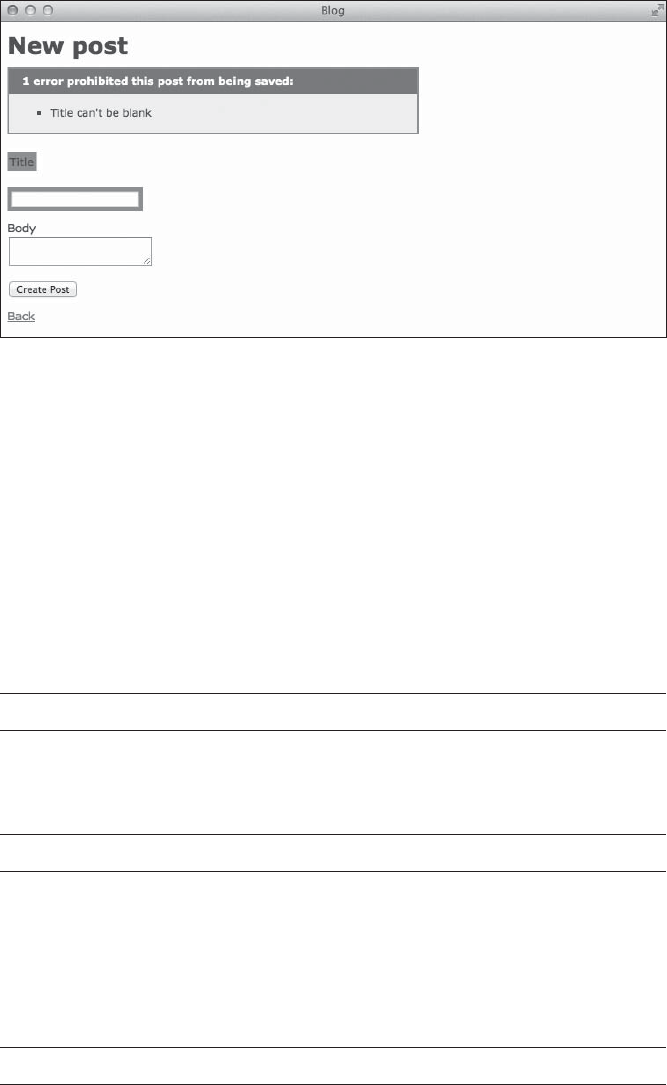
Views 71
Figure 5-4: Post creation error
Figure 5-4 shows the error_explanation div with the number of errors
in a heading followed by a bulleted list of the actual errors. Also, the label
for the title field now has a red background and the text box for the title
is outlined in red. Rails does this by wrapping these elements in a div with
class field_with_errors.
Now that you know how to display errors, let’s look at the form_for
method and other helper methods for creating form controls.
Form Controls
Use the form_for block to create a form bound to a model. For example, this
particular form is bound to the model stored in @post:
<%= form_for(@post) do |f| %>
Within this block, you have access to helper methods to add controls
such as labels, text fields, and buttons to the form. Use the form builder object
(in this case f) to call these methods.
<%= f.label :title %>
The label helper is used to create a label tag for the specified field.
The previous statement will generate this HTML: <label for="post_title">
Title</label>. Rails converts the field name to a string and capitalizes the
first letter. Your users can click this label to focus the cursor in the text field
for the title. Of course, you still have to create that text field, and Rails has a
helper for that, too.
<%= f.text_field :title %>

72 Chapter 5
The text_field helper generates the following HTML: <input id=
"post_title" name="post[title]" type="text" />. Note that the id of this input
(post_title) matches the for value of the label tag in the previous para-
graph. Also notice the name of this field. Rails sets names on form fields
to indicate both the model (post) and the attribute to modify (title).
The next few lines of code add a label for the post body followed by a
text_area for entering the body text. These controls work the same as the
title fields. The text_area helper generates this HTML: <textarea id=
"post_body" name="post[body]"></textarea>.
Besides controls for entering the title and body text, you need a button
to submit the form:
<%= f.submit %>
The submit helper generates a submit button. The button’s label is based
on the class name of the current model and whether the model has been
saved to the database. In the case of a new post, the value will be "Create
Post" and the HTML looks like this: <input name="commit" type="submit"
value="Create Post" />. If the post has already been saved to the database,
the value is "Update Post".
Rails includes form helpers for every field you need, and you can always
add your own helpers to create custom fields. Built-in examples include
check_box, hidden_field, password_field, radio_button, and text_area.
Helper methods for HTML5 field types, such as email_field, phone_field,
and url_field, are also included. These fields look like regular text fields,
but on mobile devices, you’ll see an alternate keyboard. Use these field
types to ensure that your application is mobile-friendly.
Comment Form
Now let’s put your new form knowledge to work and add the comment form.
First, add another heading to the end of the post show page at app/views/
posts/show.html.erb:
<h4>New Comment</h4>
Add the form for creating a comment underneath that new heading, as
shown next. The array being passed to the form_for method contains both
@post and @post.comments.build. Because every comment belongs to a post,
you must pass the post and comment to the method. In this case, you’re
using the current post and a new comment created by @post.comments.build.
<%= form_for [@post, @post.comments.build] do |f| %>
<div class='field'>
<%= f.label :author %><br>
<%= f.text_field :author %>
</div>
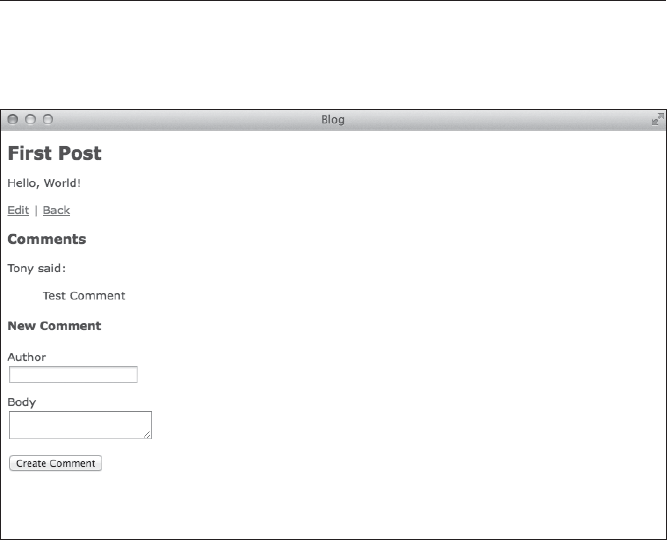
Views 73
<div class='field'>
<%= f.label :body %><br>
<%= f.text_area :body %>
</div>
<div class='actions'>
<%= f.submit %>
</div>
<% end %>
The rest of the comment form should look similar to the post form;
even the field names are the same. Refresh the page in your browser and
make sure the form renders like the one shown in Figure 5-5.
Figure 5-5: The New Comment form
Now enter an author name and comment body and click the Create
Comment button. Submitting the form should display your new comment
and add a flash message to the top of the page that says “Comment was suc-
cessfully created.”
Check the output of the rails server command in your terminal to see
exactly what happened. Assuming your post has an id of 1, you should first see
a POST to the path /posts/1/comments. This calls the CommentsController#create
method.
You added this controller and method in the last chapter; recall that
the create method builds and saves a new comment and then redirects the
user back to the post. You should see this redirect as a GET request for
/posts/1 in the output. This happens when the user is redirected back to the
post show page.

74 Chapter 5
Summary
Spend some time working on your application’s views. We cleaned up the
index page a little, but I recommend you improve it further. The other
pages could also use some work. The following exercises should give you
some ideas.
In the next chapter, you’ll set up Git for version control and deploy your
application to the web for everyone to see.
Exercises
1. Our blog’s heading only appears on the index page. Move the h1 ele-
ment from the posts index page to the application layout. While you’re
at it, come up with something a little more interesting to call it than
“Listing posts.” Also, change the h1 headings on the New Post and Edit
Post pages to h2 headings.
2. In Chapter 3, you added an author field to the posts table. Add a text
field for author to the post form and update the post_params method in
PostsController to permit author as a parameter.
3. Users can create comments now, but you have no way to remove them.
You need to be able to remove the inevitable spam posts! First, update
the comment resource in config/routes.rb to add a route for the destroy
action. The :only option should be :only => [:create, :destroy]. Next,
add the destroy action in the CommentsController, similar to the destroy
action for posts. Finally, add a link to this action at the bottom of app/
views/comments/_comment.html.erb:
<%= link_to 'Destroy', [comment.post, comment],
method: :delete, data: { confirm: 'Are you sure?' } %>
6
DeploymeNt
Now that you’ve built an application, let’s put it on
the Web for everyone to see. Rails applications can be
deployed in many ways. Rails runs on everything from
simple shared hosting to dedicated servers to virtual
servers in the cloud.
The cloud application platform known as Heroku is one of the easiest
ways to deploy your application, and I cover it in this chapter. Heroku uses
the Git version control system to deploy applications, so we need to talk
about version control systems first.
Version Control
A version control system (VCS) records changes to files over time so you can
easily go back to a specific version later. The repository is the data structure,
usually stored on a server, that holds a copy of the files in the VCS and a his-
torical list of changes to those files. With a VCS, you can make changes to your
source code knowing that you can always go back to the last working version.

76 Chapter 6
Originally, version control systems were centralized. That is, the source
code repository was stored on a single server. Developers could connect to
that server and check out files to make changes to the code. But central-
ized systems also have a single point of failure. Examples of centralized
version control systems include the Concurrent Version System (CVS) and
Subversion.
The most popular type of version control system today is distributed.
With a distributed version control system, each client stores a complete copy
of the source code repository. That way, if a single client fails, everyone else
can continue to work with no loss of data.
In a distributed system, a central server is still commonly used. Developers
push their changes to this server and pull changes made by other develop-
ers. Popular distributed version control systems include Git and Mercurial.
Because Heroku uses Git to deploy applications, I’ll focus on Git.
Git
Git was originally developed by Linus Torvalds in 2005 for use with the
Linux kernel. The word git is British slang for a despicable person. Torvalds
once joked that he names all of his projects after himself.
Git quickly spread beyond the Linux community, and most Ruby projects
now use Git, including Ruby on Rails. If you don’t already have Git, installa-
tion instructions can be found in “Ruby, Rails, and Git” on page xxi.
Setup
Before you start using Git, set your name and email address. Open a termi-
nal window and enter the following command to set your name:
$ git config --global user.name "Your Name"
The --global flag tells Git to apply this change to your global configura-
tion. Without this flag, the change would only apply to the current repository.
Also, set your email address:
$ git config --global user.email "you@example.com"
Now every time you commit a change, your name and email address
is included, making it easy to see who made which changes when working
with a team.
Getting Started
Now you’re ready to create a repository for the blog. Move to your code/blog
directory and enter this command:
$ git init
Initialized empty Git repository in /Users/tony/code/blog/.git/

Deployment 77
This initializes an empty Git repository in the hidden .git subdirectory.
Next, let’s add all of the application’s files to the repository:
$ git add .
The add command accepts a filename or directory path and adds it to
Git’s staging area. Files in the staging area are ready to be committed to the
repository. The dot in the command represents the current directory. So after
you run this command, all files in the current directory and any subdirecto-
ries are ready to be committed. When you commit, Git takes a snapshot of
the current state of your project and stores it in the repository.
Now commit all staged files to the repository:
u $ git commit -m "Initial commit"
[master (root-commit) e393590] Initial commit
85 files changed, 1289 insertions(+)
create mode 100644 .gitignore
create mode 100644 Gemfile
--snip--
create mode 100644 test/test_helper.rb
create mode 100644 vendor/assets/javascripts/.keep
create mode 100644 vendor/assets/stylesheets/.keep
Note that I specified the commit message “Initial commit" with the
-m flag u. If you leave off this flag, Git will open your default editor so you
can type a commit message. If you do not type a commit message, the
commit fails.
If you want to view the current repository’s commit history, enter the
git log command. The list shows previous commits in order from newest to
oldest. Each entry includes who made the commit and when, along with the
commit message.
$ git log
u commit e3935901a2562bf8c04c480b3c5681c102985a4e
Author: Your Name <you@example.com>
Date: Wed Apr 2 16:41:24 2014 -0500
Initial commit
Each commit is represented by a unique 40-character hexadecimal
hash u. These hashes can be abbreviated to the first seven characters—in
this case, e393590—if you need to refer to this particular commit again.
Basic Usage
As you work on a project using Git, follow this basic workflow:
1. Edit local files as needed.
2. Stage files to be committed with the git add command.
3. Commit the changes to the repository with the git commit command.

78 Chapter 6
You can commit changes to Git as often as you like, but I find it helpful
to commit changes related to a single simple feature or bug fix together.
That way, all of the changes are tied to one commit, making it easier to
revert and remove a feature if necessary. It’s also a good idea to commit any
outstanding changes at the end of a working session.
Other Useful Commands
Git contains many additional commands; enter git --help to see a list of
those you’ll use most often. You’ve already seen the init, add, commit, and log
commands, but here are a few more that you’ll find particularly useful as
you navigate Git.
The git status command displays a list of changed and new files:
$ git status
On branch master
nothing to commit, working directory clean
In this case, nothing has changed. Edit a file in your project, README
.rdoc, for example, and then enter the git status command again:
$ git status
On branch master
Changes not staged for commit:
(use "git add <file>..." to update what will be committed)
(use "git checkout -- <file>..." to discard changes...)
u modified: README.rdoc
no changes added to commit (use "git add" and/or "git commit -a")
The git status command shows the current state of your working direc-
tory and staging area. Here, it lists all files that have been staged for commit
and files with changes that have not been staged for commit u.
The git diff command shows detailed changes to files:
$ git diff
diff --git a/README.rdoc b/README.rdoc
index dd4e97e..c7fabfa 100644
--- a/README.rdoc
+++ b/README.rdoc
@@ -1,4 +1,4 @@
u -== README
+== Blog
This README would normally document whatever steps are necessary to get the
application up and running.

Deployment 79
Here, I changed the word README to Blog u on the first line of the
file. Use this command before git add to see exactly what changes will be
staged for commit. You can also pass a filename to this command if you
only care about changes to a single file.
The git checkout command can undo changes to a file:
u $ git checkout -- README.rdoc
$ git status
On branch master
nothing to commit, working directory clean
Here, I’ve discarded the changes to the file README.rdoc by using git
checkout followed by two dashes and the filename u. This command does
not produce any output. Then I used git status to confirm that the change
had been discarded.
The git clone command makes a local copy of a remote repository:
$ git clone url
The remote repository is represented by <url>. Git is a great tool for col-
laboration and is used by many open-source projects. This command makes
that possible. Before you start working on an existing project, you clone a
copy of the repository to your computer.
Branches
You may have noticed that the git status command includes the phrase,
“On branch master.” In Git, a branch is a named set of changes. The default
branch is called master. It represents the main line of development. The
changes I’ve made so far have all been committed to the master branch.
If you’re working on a large feature that may take some time to com-
plete, you can create a separate branch to store changes you’re working on
without affecting the master branch. This way, you can work on your own
branch without impacting the rest of your team. Once the new feature is
complete, you’ll merge your new branch back into the master branch.
Use the git branch command followed by a branch name of your choice
to create a new branch. In this example, I’ll call my branch testing :
$ git branch testing
Enter the git branch command without specifying a name to see a list of
the branches that currently exist in the repository:
$ git branch
* master
testing

80 Chapter 6
The star shows the currently selected branch. I created a new branch,
but I’m still looking at the master branch. To switch to a different branch,
use the git checkout command:
$ git checkout testing
Switched to branch 'testing'
Now I’m on the testing branch. Changes committed here will not affect
the master branch. Once you are finished making changes, checkout the
master branch and merge your changes into it:
$ git checkout master
Switched to branch 'master'
$ git merge testing
Already up-to-date.
All of the changes from the testing branch are now also in the master
branch. You can confirm this with the git log command. Now that you’re
finished with the testing branch, add the -d flag to the git branch command
to delete it:
$ git branch -d testing
Deleted branch testing (was e393590).
You don’t have to delete branches after they have been merged, but
doing so keeps the list of branches clean.
Remotes
So far, all of our changes have been stored locally, but you should store an
additional copy of your repository on another server as a backup and to
make it easier for others to clone your repository. To do this, you need to
set up a remote. A remote is simply a nickname for another repository at a
specific URL. Use the git remote add command to associate a nickname with
a URL:
git remote add name url
Once you have added a remote, use the git push command to send
changes to the URL and the git pull command to retrieve changes made
remotely. You’ll see a real-world example of this in the next section.

Deployment 81
Heroku
Heroku is a cloud application platform for deploying web applications. This
type of platform is sometimes referred to as a Platform as a Service (PaaS),
meaning Heroku takes care of server configuration and management so
you can focus on application development. The service also includes an
extensive collection of add-ons. Getting started is free, but large applica-
tions requiring more processor resources and memory can get expensive.
After some initial setup, you can use a git push command to deploy
your application and access it on the Web.
Getting Started
First, sign up for a free account at http://www.heroku.com. Remember the
password you select; you’ll need it again to log in.
Next, install the Heroku Toolbelt if you haven’t already (see http://toolbelt
.heroku.com/ for instructions). The Toolbelt is Heroku’s set of tools for deploy-
ing your application to its platform.
Now, open a terminal window, navigate to your blog directory, and log
in to Heroku:
$ heroku login
Enter your Heroku credentials.
Email: you@example.com
Password (typing will be hidden):
Authentication successful.
This command prompts you for your email address and the password you
created earlier, and then it checks your computer for an existing secure shell
(SSH) public key. Your public key is one half of the public/private key pair
used to authenticate over SSH. When you attempt to log on, your private
key is used to make a cryptographic digital signature. Heroku then uses
your public key to verify this digital signature and confirm your identity.
If you don’t already have a public key, press Y to create one when
prompted. Your public key is automatically uploaded to Heroku after it is
created. Heroku uses your public key for authentication so you don’t have
to type your password every time you deploy your application.
Now that you’ve logged in to Heroku, you need to prepare your applica-
tion for deployment.
Updating Your Gemfile
No matter what kind of application you’re building, you need to install
certain gems to interface with Heroku and deploy your application. In this
section, we’ll look at the two gems you need to add to your application’s
Gemfile.

82 Chapter 6
Heroku’s servers use the PostgreSQL database server. Rather than
install PostgreSQL locally, we used SQLite for development. You’ll need to
ensure that the PostgreSQL gem, called simply pg, is installed in the pro-
duction environment.
Heroku also requires the rails_12factor gem, which ensures that your
application’s assets can be served by Heroku’s servers and that your applica-
tion’s log files are sent to the correct place.
Open the file Gemfile in the root of your Rails application and locate the
line gem 'sqlite3'. You’ll use the PostgreSQL gem in production, but you
still need the SQLite gem for development and testing, so update this line
by adding group: [:development, :test] as shown here:
gem 'sqlite3', group: [:development, :test]
This instructs the bundle command to install this gem only in the devel-
opment and test environments.
Now you need to install the pg and rails_12factor gems just mentioned.
You only need these gems in the production environment, so add these
next lines below the line you just updated:
# gems required by Heroku
gem 'pg', group: :production
gem 'rails_12factor', group: :production
Once you’ve made these changes, save and close the Gemfile. Because
you’ve changed your application’s Gemfile, run the bundle command again
to update dependencies.
$ bin/bundle install --without production
Because you’re running this command locally, where you develop and
test your application, you don’t need to install production environment
gems, so add the --without production flag. Bundler remembers flags passed
to bundle install, so --without production is assumed every time you run the
command from now on.
Finally, you need to add and commit these changes to your Git reposi-
tory. Enter these commands to update Git with your changes:
$ git add .
$ git commit -m "Update Gemfile for Heroku"
[master 0338fc6] Update Gemfile for Heroku
2 files changed, 13 insertions(+), 1 deletion(-)
You could enter any message in place of Update Gemfile for Heroku, but
commit messages are more helpful when they describe what you’ve changed.

Deployment 83
Now, your account is set up, and your application is nearly ready to
deploy. The last step is to create an application on Heroku:
$ heroku create
u Creating glacial-journey-3029... done, stack is cedar
http://glacial-journey-3029.herokuapp.com/ | git@he...
v Git remote heroku added
This command u creates a new application on Heroku’s servers with a
randomly generated name. You could have specified a name after the create
command, but the name must be unique. You can always change the name
later if you want. The create command also v sets up a Git remote named
heroku for you automatically.
Deploying Your Application
Everything is ready now, so you can finally deploy your application. Use
the git push command to push the current state of your master branch to
Heroku:
$ git push heroku master
Initializing repository, done.
Counting objects: 102, done.
Delta compression using up to 8 threads.
--snip--
-----> Launching... done, v6
http://glacial-journey-3029.herokuapp.com/ deployed to Heroku
To git@heroku.com:glacial-journey-3029.git
* [new branch] master -> master
Heroku recognizes this git push command and automatically detects
that a Ruby on Rails application is being deployed, installs the production
gems specified in your Gemfile, updates your application’s database configu-
ration, precompiles your application’s assets, and launches your application.
When you deploy any application for the first time, you also need to run
database migrations to create the database tables needed by your applica-
tion in Heroku’s database server. Use the heroku run command to execute
the rake db:migrate command on Heroku’s server:
$ heroku run rake db:migrate
Running `rake db:migrate` attached to terminal... up, run.1833
Migrating to CreatePosts (20140315004352)
--snip--
If you make more database changes to your application, remember to
commit the changes to the master branch in Git, push the master branch to
Heroku, and run this command again.
84 Chapter 6
Now you can open your web browser to the URL Heroku created for you
earlier, or you can let Heroku handle that for you by entering this command:
$ heroku open
Your default web browser should open and load your blog application
automatically.
Now that your application is set up on Heroku, you can deploy any time
you want by committing changes to your Git repository and pushing the
changes to Heroku.
Summary
Your blog is now safely stored in the Git distributed version control system.
Changes to your source code are being tracked and can be easily undone.
You blog is also available to the world via Heroku. Now you can deploy new
features with a git push command.
Part I Remarks
This chapter marks the end of the first part of this book. We’ve covered the
fundamentals of Ruby and Rails. Models represent your application’s data;
views are the user interface for your application; and controllers are the
glue that holds them together. You’ll use these concepts to build any appli-
cation you want.
Looking at the application you built in Part I, you’ll find plenty of areas
to improve. For example, anyone can edit or even delete posts on your blog.
Also, what happens if you write thousands of posts? The index page will
probably time out before it can display them all! You may not quite have the
tools to fix those problems right now, but once you dive into Part II, that
will change.
GithuB
Any discussion of Git in a Rails book is incomplete without at least a mention
of GitHub. GitHub is the number one source code host in the world. GitHub
provides project management features such as wikis, issue tracking, and code
review via pull requests.
The Rails community has embraced GitHub as the best place for collabo-
rating on open-source software. Rails itself is hosted on GitHub at https://github
.com/rails/rails/. Sign up for a free account, if you don’t already have one, and
join the community!
Deployment 85
In the next part of this book, we’ll build a new social network application
and cover advanced topics such as more complex data modeling, authentica-
tion, testing, security, performance optimizations, and debugging.
After learning these concepts, you’ll be able to solve these problems
with the blog and build a variety of other applications.
Exercises
1. Practice making changes to your application, adding and commit-
ting those changes to your local Git repository, and then pushing the
changes to Heroku. Many Rails developers deploy multiple times per
day, so familiarize yourself with this process.
2. Create an account on GitHub, learn how create a new repository on
its servers, and push your application. GitHub has an online help area
that walks you through the process if you have any trouble. Also, use
GetHub’s Explore feature to see the repositories of popular projects on
its servers.
3. Finally, see if you can “scratch your own itch.” Create a simple Rails
application based on one of your interests. Create a catalog of your
favorite books, or maybe an application to track your vinyl collection.
PART II
BuilDiNG a
soCial NetwoRkiNG app
7
aDVaNCeD RuBy
You learned the fundamentals of Ruby back in
Chapter 1. This chapter covers some of the lan-
guage’s advanced features, including modules,
the Ruby object model, introspection, and a bit of
metaprogramming.
Modules are used frequently in Rails applications to group similar func-
tionality and share behavior between classes. The Ruby object model deter-
mines how methods are found and called in a hierarchy of inherited classes
and shared code from modules. Introspection supports polymorphism by
allowing you to look inside a class to see which methods it understands.
Metaprogramming lets your classes respond to methods that don’t exist by
defining methods at runtime.
Open a terminal window and launch IRB to get started. Several of the
examples in this chapter are longer than normal. You may find it easier to
type the example into your editor, save it as a file with the extension rb, and
then run the example in your terminal by entering ruby filename.rb. Or you
can simply copy and paste the code from your editor into IRB.

90 Chapter 7
Modules
As you saw in Chapter 1, a module is a collection of methods and constants
that cannot be instantiated. You define modules in basically the same way
you define classes. Module definitions begin with the word module, followed
by an uppercase name, and continue to the word end.
To demonstrate using modules, we first need a class definition. Let’s
define a simple Person class:
class Person
u attr_accessor :name
v def initialize(name)
@name = name
end
end
This class uses attr_accessor u to define getters and setters for the instance
variable @name, and sets the value of @name when created v.
Class names are usually nouns because they represent objects. Module
names are usually adjectives because they represent behavior. Many Ruby
modules take this convention a step further and use adjective names ending
with able, such as Comparable and Forwardable.
Here’s a silly example, just to show how it’s done:
module Distractable
def distract
puts "Ooh, kittens!"
end
end
Enter this module in IRB, include it in the Person class you created ear-
lier in this chapter, and see if you can distract someone:
irb(main):001:0> class Person
irb(main):002:1> include Distractable
irb(main):003:1> end
=> Person
irb(main):004:0> p = Person.new("Tony")
=> #<Person:0x007fceb1163de8 @name="Tony">
irb(main):005:0> p.distract
Ooh, kittens!
=> nil
In Chapter 5, you also defined a module method while working with
Rails helpers. ApplicationHelper is a module that is automatically mixed into
all controllers by Rails.

Advanced Ruby 91
Modules serve two purposes in Ruby:
• Modules are used to group related methods and prevent name
conflicts.
• Modules define methods that can be mixed in to classes to provide
additional behavior.
Organizing your code becomes more important as your application
grows. By providing namespaces and making it easy to share code between
classes, modules help you break your code into manageable pieces. Let’s
look at both of these purposes.
Modules as Namespaces
A Ruby module can be used as a namespace, a container for code such as
constants or methods with related functionality.
The Math module is an example of a built-in Ruby module used as a
namespace. It defines the constants E and PI as well as many common trigo-
nometric and transcendental methods. The double-colon operator (::) is
used to access constants in Ruby. The following example accesses the con-
stant PI in the Math module:
irb(main):006:0> Math::PI
=> 3.141592653589793
Methods defined in a module are accessed with a dot (.), just like
methods in a class:
irb(main):007:0> Math.sin(0)
=> 0.0
Modules as Mixins
A Ruby module can also be used as a mixin to provide additional functional-
ity to a class. Ruby only supports single inheritance; that is, a class can only
inherit from a single parent class. Modules allow you to implement some-
thing similar to multiple inheritance: a class can include several modules,
adding each module’s methods to its own.
You can add a module’s methods to a class in three ways, using include,
prepend, or extend. I discuss the effect of each of these keywords next.
include
The include statement adds the methods from a module to a class as instance
methods and is the most common way of mixing a module into a class.

92 Chapter 7
The Comparable module, included in Ruby, is commonly used as a mixin.
It adds comparison operators and the between? method to classes when
included. The class only needs to implement the <=> operator. This opera-
tor compares two objects and returns –1, 0, or 1, depending on whether the
receiver is less than, equal to, or greater than the other object.
To use this module as a mixin, add it Person class you created previously:
class Person
u include Comparable
v def <=>(other)
name <=> other.name
end
end
This class now includes the Comparable module u and defines the
<=> operator v to compare the name of this object with the name of
another object.
After entering this in IRB, create a few people and see if they can be
compared:
irb(main):008:0> p1 = Person.new("Tony")
=> #<Person:0x007f91b40140a8 @name="Tony">
irb(main):009:0> p2 = Person.new("Matt")
=> #<Person:0x007f91b285fea8 @name="Matt">
irb(main):010:0> p3 = Person.new("Wyatt")
=> #<Person:0x007f91b401fb88 @name="Wyatt">
irb(main):011:0> p1 > p2
=> true
Here p1 is greater then p2 because T is greater than M alphabetically.
The between? method tells you whether an object falls between two others:
irb(main):012:0> p1.between? p2, p3
=> true
In this case, between? returns true since T is between M and W alphabeti-
cally, which means it works as expected.
prepend
The prepend statement also adds a module’s methods to a class, but prepend
inserts the module’s methods before the class’s methods. This means if the
module defines a method with the same name as the class, the module’s
method will be executed instead of the class’s method. Using prepend, you
can override a method in the class by writing a method in the module with
the same name.
One practical use for prepend is memoization. Memoization is an optimi-
zation technique in which a program stores the result of a calculation to
avoid repeating the same calculation multiple times.

Advanced Ruby 93
For example, imagine you wanted to implement the Fibonacci sequence
in Ruby. The first two numbers in the Fibonacci sequence are zero and one.
Each subsequent number is the sum of the previous two. Here is a method
to calculate the nth value of the Fibonacci sequence in Ruby:
class Fibonacci
def calc(n)
return n if n < 2
u return calc(n - 1) + calc(n - 2)
end
end
Notice that the calc method is recursive. Every call to calc with a value
of n greater than 1 results in two more calls to itself u. Try creating an
instance of this class and calculating some small values of n:
irb(main):013:0> f = Fibonacci.new
=> #<Fibonacci:0x007fd8d3269518>
irb(main):014:0> f.calc 10
=> 55
irb(main):015:0> f.calc 30
=> 832040
As you call the method with larger values of n, the method takes notice-
ably longer to run. For values of n around 40, the method takes several sec-
onds to return an answer.
The Fibonacci calc method is slow because it repeats the same calcula-
tions many times. But if you define a module to implement memoization,
the calculations should take significantly less time. Let’s do that now:
module Memoize
def calc(n)
u @@memo ||= {}
v @@memo[n] ||= super
end
end
The Memoize module also defines a calc method. This method has a cou-
ple of interesting features. First, it initializes a class variable named @@memo u
with an empty hash if it is not already initialized. This hash stores the result
of the calc method for each value of n. Next, it assigns the return value of
super to @@memo at key n v if that value is not already assigned. Because we
are using prepend to add this module into Fibonacci, super calls the original
calc method defined by the class.
Each time the calc method is called, @@memo stores the Fibonacci num-
ber for the value n. For example, after calling calc(3), the @@memo hash holds
these keys and values:
{
0 => 0,
1 => 1,

94 Chapter 7
2 => 1,
3 => 2
}
On each line, the key (the first number) is the value of n and the
value (the second number) is the corresponding Fibonacci number. The
Fibonacci number for 0 is 0, 1 is 1, 2 is 1, and 3 is 2. By storing these inter-
mediate values, the calc method never needs to perform the same calcula-
tion more than once. Use prepend Memoize to add the Memoize module to the
Fibonacci class and try it for yourself:
irb(main):016:0> class Fibonacci
irb(main):017:1> prepend Memoize
irb(main):018:1> end
=> Fibonacci
irb(main):019:0> f.calc 40
=> 102334155
Now that the values of calc are being memoized, you should be able
to call calc for greater values of n and get an answer almost instantly. Try
it with n = 100 or even n = 1000. Note that you didn’t have to restart IRB or
instantiate a new Fibonacci object. Method lookup in Ruby is dynamic.
extend
When you use include or prepend to add a module to a class, the module’s
methods are added to the class as instance methods. In Chapter 1, you
learned that there are also class methods that are called on the class itself
instead of on an instance of the class. The extend statement adds the meth-
ods from a module as class methods. Use extend to add behavior to the class
itself instead of instances of the class.
The Ruby standard library includes a module named Forwardable, which
you can use to extend a class. The Forwardable module contains methods
useful for delegation. Delegation means relying on another object to handle
a set of method calls. Delegation is a way to reuse code by assigning the
responsibility of certain method calls to another class.
For example, imagine a class named Library that manages a collection
of books. We store the books in an array named @books:
class Library
def initialize(books)
@books = books
end
end
We can store our books, but we can’t do anything with them yet. We
could use attr_accessor to make the @books array available outside of the
class, but that would make all of the array’s methods available to users of
our class. A user could then call methods such as clear or reject to remove
all of the books from our library.

Advanced Ruby 95
Instead, let’s delegate a few methods to the @books array to provide the
functionality we need—a way to get the size of the library and add a book.
u require 'forwardable'
class Library
v extend Forwardable
w def_delegators :@books, :size, :push
def initialize(books)
@books = books
end
end
The Forwardable module is in the Ruby Standard Library, not the
Ruby core, so we first need to require it u. Next, we use extend to add the
Forwardable methods to our class as class methods v. Finally, we can call
the def_delegators method w. The first argument to this method is a symbol
representing the instance variable to which we’re delegating methods.
In this case, the instance variable is @books. The rest of the arguments
are symbols representing the methods we want to delegate. The size method
returns the number of elements in the array. The push method appends a
new element to the end of an array.
In the following example, lib.size initially prints 2 because we have two
books in our library. After adding a book, the size updates to 3.
irb(main):020:0> lib = Library.new ["Neuromancer", "Snow Crash"]
=> #<Library:0x007fe6c91854e0 @books=["Neuromancer", "Snow Crash"]>
irb(main):021:0> lib.size
=> 2
irb(main):022:0> lib.push "The Hobbit"
=> ["Neuromancer", "Snow Crash", "The Hobbit"]
irb(main):023:0> lib.size
=> 3
Ruby Object Model
The Ruby object model explains how Ruby locates a method when it is called.
With inheritance and modules, you may find yourself wondering exactly
where a particular method is defined or, in the case of multiple methods
with the same name, which one is actually invoked by a particular call.
Ancestors
Continuing with the simple Person class defined previously, we can find out
a lot about this class in IRB. First, let’s see which classes and modules define
methods for the Person class:
irb(main):024:0> Person.ancestors
=> [Person, Distractable, Comparable, Object, Kernel, BasicObject]

96 Chapter 7
The class method ancestors returns a list of classes that Person inher-
its from and the modules it includes. In this example, Person, Object, and
BasicObject are classes, whereas Distractable, Comparable, and Kernel are mod-
ules. You can find out which of these are classes and which are modules by
calling the class method as explained in the Class section below.
Object is the default root of all Ruby objects. Object inherits from
BasicObject and mixes in the Kernel module. BasicObject is the parent class
of all classes in Ruby. You can think of it as a blank class that all other
classes build on. Kernel defines many of the Ruby methods that are called
without a receiver, such as puts and exit. Every time you call puts, you’re
actually calling the instance method puts in the Kernel module.
The order of this list indicates the order in which Ruby searches for a
called method. Ruby first looks for a method definition in the class Person
and then continues looking through the list until the method is found. If
Ruby doesn’t find the method, it raises a NoMethodError exception.
Methods
You can see a list of the class methods and instance methods defined by a
class by calling methods and instance_methods, respectively. These lists include
methods defined by all parent classes by default. Pass the parameter false to
leave out only these:
irb(main):025:0> Person.methods
=> [:allocate, :new, :superclass, :freeze, :===, :==, ... ]
irb(main):026:0> Person.methods(false)
=> []
irb(main):027:0> Person.instance_methods(false)
=> [:name, :name=, :<=>]
The Person class contains almost 100 different class methods from its
ancestors, but it defines none of its own, so the call to methods(false) returns
an empty array. The call to instance_methods returns the name and name= meth-
ods defined by attr_accessor and the <=> method that we defined in the
body of the class.
Class
The last piece of the object model concerns the Person class itself. Everything
in Ruby is an object, that is, an instance of a class. Therefore, the Person
class must be an instance of some class.
irb(main):028:0> Person.class
=> Class
All Ruby classes are instances of the class Class. Defining a class, such
as Person, creates an instance of the class Class and assigns it to a global con-
stant, in this case Person. The most important method in Class is new, which is
responsible for allocating memory for a new object and calling the initialize
method.

Advanced Ruby 97
Class has its own set of ancestors:
irb(main):029:0> Class.ancestors
=> [Class, Module, Object, Kernel, BasicObject]
Class inherits from the class Module, which inherits from Object as before.
The Module class contains definitions of several of the methods used in this
section such as ancestors and instance_methods.
Introspection
Introspection, also known as reflection, is the ability to examine an object’s
type and other properties as a program is running. You’ve already seen how
to determine an object’s type by calling class and how to get a list of meth-
ods defined by an object by calling methods and instance_methods, but Ruby’s
Object class defines several more methods just for introspecting objects. For
example, given an object, you may want to determine if it belongs to a par-
ticular class:
irb(main):030:0> p = Person.new("Tony")
=> #<Person:0x007fc0ca1a6278 @name="Tony">
irb(main):031:0> p.is_a? Person
=> true
The is_a? method returns true if the given class is the class of the receiv-
ing object. In this case, it returns true because the object p is a Person.
irb(main):032:0> p.is_a? Object
=> true
It also returns true if the given class or module is an ancestor of the
receiving object. In this case, Object is an ancestor of Person, so is_a?
returns true.
Use the instance_of? method if you need to determine exactly which
class was used to create an object:
irb(main):033:0> p.instance_of? Person
=> true
irb(main):034:0> p.instance_of? Object
=> false
The instance_of? method returns true only if the receiving object is an
instance of the given class. This method returns false for ancestors and
classes inheriting from the given class. This type of introspection is help-
ful in some situations, but generally you don’t need to know the exact class
used to create an object—just the object’s capabilities.

98 Chapter 7
Duck Typing
In duck typing, you only need to know whether an object accepts the meth-
ods you need to call. If the object responds to the needed methods, you
don’t have to worry about class names or inheritance. The name duck typ-
ing comes from the phrase, “If it walks like a duck and quacks like a duck,
call it a duck.”
In Ruby, you can use the respond_to? method to see if an object responds
to a particular method. If respond_to? returns false, then calling the method
raises a NoMethodError exception as explained earlier.
For example, imagine a simple method to print some information to a
file with a timestamp:
def write_with_time(file, info)
file.puts "#{Time.now} - #{info}"
end
You can try this method in IRB.
u irb(main):001:0> f = File.open("temp.txt", "w")
=> #<File:temp.txt>
v irb(main):002:0> write_with_time(f, "Hello, World!")
=> nil
w irb(main):003:0> f.close
=> nil
First, open a File named temp.txt in the current directory and store
the File instance in the variable f u. Then pass f and the message "Hello,
World!" to the write_with_time method v. Finally, close the File with f.close w.
The file temp.txt in the current directory now contains a single line simi-
lar to the one here:
2014-05-21 16:52:07 -0500 - Hello, World!
This method works great until someone accidentally passes a value to it
that isn’t a file, such as nil. Here’s a possible fix for that bug:
def write_with_time(file, info)
u if file.instance_of? File
file.puts "#{Time.now} - #{info}"
else
raise ArgumentError
end
end
This fix solves the problem by checking to see if file is an instance of
the File class u, but it also limits the usefulness of this method. Now it only
works with files. What if you want to write over the network using a Socket or
write to the console using STDOUT?

Advanced Ruby 99
Instead of testing the type of file, let’s test its capabilities:
def write_with_time(file, info)
u if file.respond_to?(:puts)
file.puts "#{Time.now} - #{info}"
else
raise ArgumentError
end
end
You know that the write_with_time method calls the method puts, so
check to see if file responds to the puts method u. Now, write_with_time
works with any data type that responds to the puts method.
Using duck typing leads to code that can be easily reused. Look for
more opportunities to apply duck typing as you build applications.
Metaprogramming
Metaprogramming is the practice of writing code that works with code instead
of data. With Ruby, you can write code that defines new behavior at runtime.
The techniques in this section can save you time and remove duplication
from your code by allowing Ruby to generate methods when your program
is loaded or as it runs.
This section covers two different ways of dynamically defining methods:
define_method and class_eval. It also covers method_missing, so you can respond
to methods that haven’t been defined.
define_method
Let’s say we have an application with a list of features that can be enabled
for users. The User class stores these features in a hash named @features. If
a user has access to a feature, the corresponding hash value will be true.
We want to add methods of the form can_ feature! and can_ feature? to
enable a feature and check if a feature is enabled, respectively. Rather than
write several mostly identical methods, we can iterate over the list of avail-
able features and use define_method, as shown here, to define the individual
methods:
class User
u FEATURES = ['create', 'update', 'delete']
FEATURES.each do |f|
v define_method "can_#{f}!" do
@features[f] = true
end
w define_method "can_#{f}?" do
!!@features[f]
end
end
100 Chapter 7
def initialize
@features = {}
end
end
The User class first creates a constant array u of available features named
FEATURES. It then iterates over FEATURES using each and calls define_method to
create a method of the form can_ feature! v to allow a user access to a fea-
ture. Still inside the each block, the class also defines a method of the form
can_ feature? w that determines whether a user has access to the feature. This
method converts the value @features[f] to either true or false by using two
NOT operators .
Note Using two NOT operators isn’t strictly necessary because the @features hash returns
nil for keys without values and Ruby treats nil as false, but this technique is com-
monly used.
Now let’s create a new User and try the dynamically defined methods:
irb(main):001:0> user = User.new
=> #<User:0x007fc01b95abe0 @features={}>
irb(main):002:0> user.can_create!
=> true
irb(main):003:0> user.can_create?
=> true
irb(main):004:0> user.can_update?
=> false
irb(main):005:0> user.can_delete?
=> false
If you want more practice with define_method, see if you can add meth-
ods of the form cannot_feature!, which disables a feature for the user. More
details are provided in Exercise 3 at the end of this chapter.
class_eval
The class_eval method evaluates a string of code as if it were typed directly
into the class definition. Using class_eval is an easy way to add instance
methods to a class at runtime.
When I discussed attr_accessor in Chapter 1, you learned that it defines
getter and setter methods for instance variables in a class, but I didn’t dis-
cuss exactly how those methods were defined. The attr_accessor method
is built in to Ruby. You don’t need to define it yourself, but you can learn
about class_eval by implementing your own version of attr_accessor.
u class Accessor
v def self.accessor(attr)
class_eval "
w def #{attr}
@#{attr}

Advanced Ruby 101
end
def #{attr}=(val)
@#{attr} = val
end
"
end
end
Here, you define a class named Accessor u with a single class method
named accessor v. This method works like the built-in attr_accessor. It
accepts a single parameter representing the attribute for which you’re cre-
ating getter and setter methods. Pass the string to class_eval, which uses
string interpolation to insert the value of attr as needed to define two meth-
ods. The first method has the same name as the attribute and returns the
value of the attribute w. The second method is the attribute name followed
by an equal sign. It sets the attribute to a specified value val .
For example, if attr is :name, then accessor defines the methods name and
name= by replacing attr with name in the specified places. This is a little hard
to follow without an example. The following code uses the accessor method
in a class:
u class Element < Accessor
v accessor :name
def initialize(name)
@name = name
end
end
First, you have the Element class inherit from the Accessor class u so
the accessor method is available. Then, you pass the name of the instance
variable to accessor v. Here, you pass the symbol :name. When the program
runs, the call to class_eval automatically generates this code inside the
Element class:
u def name
@name
end
v def name=(val)
@name = val
end
The name method returns the current value of the instance variable
@name u. The name= method accepts a value and assigns it to @name v. Test
this by creating an instance of the Element class and trying to get and set
the value of name:
u irb(main):001:0> e = Element.new "lead"
=> #<Element:0x007fc01b840110 @name="lead">

102 Chapter 7
v irb(main):002:0> e.name = "gold"
=> "gold"
w irb(main):003:0> puts e.name
gold
=> nil
First, create a new Element and initialize its name with "lead" u. Next,
use the name= method to assign the new name "gold" v. Finally, use the name
method to display the value of @name w. There you have it. With a bit of
metaprogramming magic, you turned lead into gold.
method_missing
Whenever Ruby can’t find a method, it calls method_missing on the receiver.
This method receives the original method name as a symbol, an array of
arguments, and any block passed to the method call.
By default, method_missing calls super, which passes the method up the
ancestor chain until it finds an ancestor class containing the method. If the
method reaches the BasicObject class, it raises a NoMethodError exception. You
can override method_missing by defining your own implementation in a class
to intercept these method calls and add your own behavior.
Let’s start with a simple example so you can see how it works. This class
echoes any unknown method calls back to you three times:
class Echo
def method_missing(name, *args, &block)
word = name
puts "#{word}, #{word}, #{word}"
end
end
Now that method_missing is overridden, if you try to call a nonexistent
method on an instance of this class, you’ll just see that method’s “echo” in
the terminal:
irb(main):001:0> echo = Echo.new
=> #<Echo:0x007fa8131c9590>
irb(main):002:0> echo.hello
=> hello, hello, hello
A real-world use for method_missing is the Rails dynamic finder.
Using dynamic finders, you can write Active Record queries like
Post.find_by_title("First Post") instead of Post.where(title: "First
Post").first.
Dynamic finders can be implemented using method_missing. Let’s
define our own version of dynamic finders. Instead of method names
like find_by_attribute, we’ll use query_by_attribute so we can avoid con-
flicts with the built-in methods.
Advanced Ruby 103
Open the Post model at app/models/post.rb in your blog directory to
follow along with this example:
class Post < ActiveRecord::Base
validates :title, :presence => true
has_many :comments
u def self.method_missing(name, *args, &block)
v if name =~ /\Aquery_by_(.+)\z/
w where($1 => args[0]).first
else
super
end
end
end
First, define the method_missing class method u because our query
_by_attribute method will be called on the Post class. Next, test the name
against a regular expression v.
Finally, call the built-in where method w using the string captured by
the regular expression and the first argument passed to the method. Be
sure to call super if the string doesn’t match; this ensures that unknown
methods will be sent to the parent class.
Note The regular expression /\Aquery_by_(.+)\z/ matches strings that start with
“query_by_” and then captures the rest of the string using parenthesis. A full
discussion of regular expressions is beyond the scope of this book. The website
h t t p : //r u b u l a r. c o m / is a great way to edit and test regular expressions online.
The real dynamic finders also check to make sure the captured string
matches an attribute of the model. If you try to call our query_by_attribute
method with nonexistent column, it raises a SQLException.
irb(main):001:0> Post.query_by_title "First Post"
=> #<Post id: 1, ...>
Our implementation of query_by_attribute has one more problem:
irb(main):002:0> Post.respond_to? :query_by_title
=> false
Because we’re overriding method_missing to call this method, Ruby doesn’t
know that the Post class can respond to it. To fix this, we need to also over-
ride the respond_to_missing? method in the Post model at app/models/post.rb.
class Post < ActiveRecord::Base
--snip--
def self.respond_to_missing?(name, include_all=false)
u name.to_s.start_with?("query_by_") || super

104 Chapter 7
end
end
Instead of the regular expression used in method_missing, we just check if
the method name starts with "query_by_" u. If it does, this method returns
true. Otherwise, super is called. Now restart the Rails console and try again:
irb(main):001:0> Post.respond_to? :query_by_title
=> true
With this change in place, respond_to? returns true as expected. Remem-
ber to always override respond_to_missing? when using method_missing. Other-
wise, users of your class have no way of knowing which methods it accepts,
and the duck typing techniques covered earlier will fail.
Summary
If you write enough Ruby, then you will eventually see all of the techniques
covered in this chapter used in real-world programs. When that time comes,
you can be confident that you’ll understand what the code does, instead of
just assuming that metaprogramming is some kind of magic.
In the next chapter, you’ll start building a new Rails application from
scratch. Along the way I’ll cover some advanced data-modeling techniques
and you’ll learn even more about Active Record.
For now, try these exercises.
Exercises
1. The Rails framework makes extensive use of modules both as namespaces
and to add behavior to classes. Open a Rails console inside your blog
directory and look at the ancestors of Post. How many ancestors does it
have? Based on their names, can you tell what some of them do?
2. Update the define_method sample by adding a cannot_ feature! method.
This method should set the value corresponding to the correct key in
the @features hash to false.
3. Verify that class_eval created the instance methods you expected inside
the Element class by calling Element.instance_methods(false). Then reopen the
Element class and call accessor :symbol to add two more methods for an
instance variable named @symbol.
8
aDVaNCeD aCtiVe ReCoRD
When building a new application, work out the data
model first. A data model is a description of the models
in your program, along with their attributes and asso-
ciations. First, identify the models needed and the
relationships between them, and then create tables
for these models and test them in the Rails console.
Once the data models are working properly, building
the rest of the application is much easier.
Some people think of diagrams with boxes and arrows when they hear
the words data model. These diagrams are unnecessary if you understand
how the models relate without them. This chapter does include some basic
diagrams, however, to illustrate different associations. In each diagram, the
arrows point from the foreign key in a child model to the primary key in
the parent model.
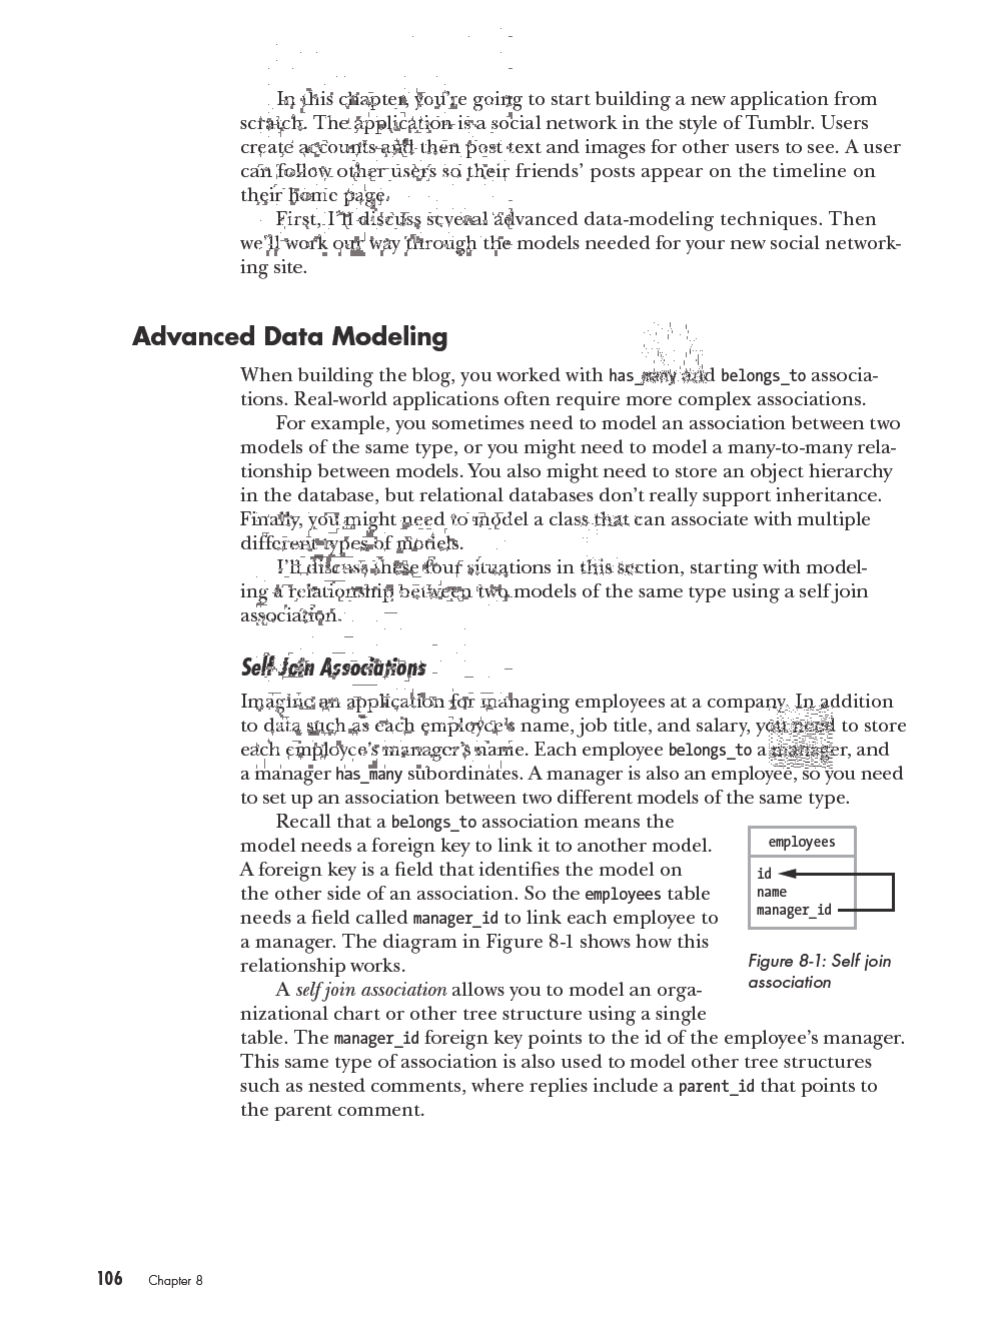
Advanced Active Record 107
Once the manager_id field has been added to the employees table, you can
define the associations in the Employee model:
class Employee < ActiveRecord::Base
u has_many :subordinates, class_name: 'Employee',
v foreign_key: 'manager_id'
w belongs_to :manager, class_name: 'Employee'
end
First, you add a has_many association for subordinates. Because this asso-
ciation refers to the Employee model, and not a model named Subordinate, you
must specify class_name: 'Employee' u. You must also specify the foreign key
name, in this case, manager_id v. Finally, add the belongs_to association for
the manager. Again, you must explicitly state the model’s class name because
Rails can’t figure it out based on the association name w.
With these associations in place, you can call the subordinates method to
get a list of a manager’s subordinates. You can also use the methods manager
and manager= to get and set an employee’s manager. Almost every employee
should have a manager_id, as shown in Table 8-1. If your manager_id is nil, then
you must be the boss!
Table 8-1: The employees Table
id name manager_id
1Alice NULL
2Bob 1
Notice that the manager_id for Bob is 1. That means Alice is Bob’s man-
ager. Alice’s manager_id is NULL, which is nil in Ruby. She’s the CEO of this
two-person company.
Many-to-Many Associations
Whereas a one-to-many association only involves two tables, a many-to-
many association always involves a third table known as a join table. The join
table stores foreign keys for each side of the association. It belongs_to each
of the models in the association.
Rails provides two different ways to set up a many-to-many association.
has_and_belongs_to_many
If you’re using a join table strictly for the association and need no addi-
tional data, then use a has_and_belongs_to_many association. You still need to
create the join table, but you don’t need to define a model for it. The join
table must be named after the two models it joins.
108 Chapter 8
For example, authors write many books, and some books have multiple
authors. All of the data you need is stored in either the author or book
model, so you can create a has_and_belongs_to_many association between
authors and books, as in Figure 8-2.
id
name
authors
id
name
books
author_id
book_id
authors_books
Figure 8-2: has_and_belongs_to_many association
Figure 8-2 shows the Author and Book models with the join table between
them. Define the association between these models as shown here:
class Author < ActiveRecord::Base
has_and_belongs_to_many :books
end
An author might write many books, but a book can also have many
authors:
class Book < ActiveRecord::Base
has_and_belongs_to_many :authors
end
For this association to work, the join table between authors and books
must be named authors_books and must contain fields author_id and book_id.
Use the rails generate command to create an empty migration file:
$ bin/rails g migration CreateAuthorsBooks
invoke active_record
create db/migrate/..._create_authors_books.rb
Then edit the migration file to remove the primary key and create the
two foreign keys:
class CreateAuthorsBooks < ActiveRecord::Migration
def change
create_table :authors_books, id: false do |t|
u t.references :author, null: false, index: true
t.references :book, null: false, index: true
end
end
end
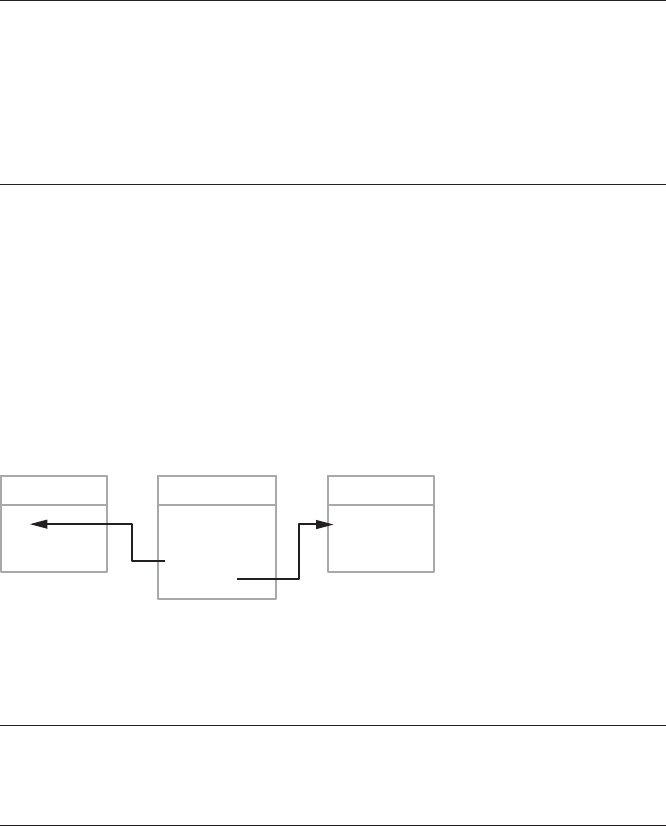
Advanced Active Record 109
The t.references :author statement u indicates this field is a foreign
key that references an Author model. The field is named author_id. The
null: false option adds a constraint so NULL values are not allowed, and
the index: true option creates a database index to speed up queries on this
field. The next line creates the book_id field, also with a NULL constraint
and database index.
You can also use the create_join_table method inside the migration to
create the join table. This method takes the names of the associations and
creates the correct table with no primary key and a foreign key for each
association with a NULL constraint. This method does not automatically
create indices for the foreign keys. You can add indices as shown here:
class CreateAuthorsBooks < ActiveRecord::Migration
def change
create_join_table :authors, :books do |t|
t.index :author_id
t.index :book_id
end
end
end
After creating the join table, you don’t need to do anything to make the
association work. There is no model associated with the join table. With a
has_and_belongs_to_many association, Rails manages the join table for you.
has_many :through
If you would like to store additional information in the join table besides
the foreign keys of the associated models, use a has_many :through associa-
tion. For example, you could model the association between bands and venues
using a join table named performances. Figure 8-3 shows the relationship
among bands, performances, and venues.
id
name
bands
id
showtime
band_id
venue_id
performances
id
name
venues
Figure 8-3: has_many :through association
Each performance belongs to a band and a venue. It also has a show-
time. The models look like this:
class Band < ActiveRecord::Base
has_many :performances
has_many :venues, through: :performances
end

110 Chapter 8
A band performs many times, and so the band is associated with many
different venues through its performances:
class Venue < ActiveRecord::Base
has_many :performances
has_many :bands, through: :performances
end
A venue hosts many performances. The venue is associated with many
different bands through the performances it hosts:
class Performance < ActiveRecord::Base
belongs_to :band
belongs_to :venue
end
Performances associate a band with a venue. A venue can also store addi-
tional data, such as the showtime of the performance, in the performances
table.
Single-Table Inheritance
Sometimes you need to store a hierarchy of classes in the database. Most
relational databases don’t support inheritance, but you can use single-table
inheritance to create these models and store the inheritance structure in the
database.
For example, imagine you are writing an application to manage a pet
store. You need a way to model different types of pets such as dogs and fish.
Pet dogs and pet fish share many of the same attributes and methods, so it
makes sense for both of them to inherit from a parent class named Pet.
In Rails, you can create a single table for pets and then store records
for the two child classes Dog and Fish in the same table. Rails uses a column
named type to keep track of the type of object stored in each row. In addi-
tion to the columns needed by the parent model, you also need to add all
columns needed by the child models to the table. You need this because all
models are stored in the same table.
The parent model Pet is a normal Active Record model. The Pet model
inherits from ActiveRecord::Base:
class Pet < ActiveRecord::Base
end
The Dog model inherits from Pet:
class Dog < Pet
end
Advanced Active Record 111
The Fish model also inherits from Pet:
class Fish < Pet
end
With these models in place, you can store records of all three types in a
single table named pets, shown in Table 8-2.
Table 8-2: The pets Table
id type name cost
1Dog Collie 200
2Fish Gold Fish 5
3Dog Cocker Spaniel 100
These three rows from the pets table hold data for the Dog and Fish
models. You can now make calls like Pet.count to count the pets in the table.
Calling Dog.count returns 2 and Fish.count returns 1. Because Rails knows
teach record type, pet = Pet.find(2) returns an object of type Fish.
You’ll look at another example of single-table inheritance in the next
section, when you create the post models for your new application.
Polymorphic Associations
With polymorphic associations, a model can belong to more than one other
model using a single association. The classic example of a polymorphic asso-
ciation is allowing comments on multiple types of objects. For example, you
might want to let people comment on both posts and images. Here is what
your comment model might look like using a polymorphic association:
class Comment < ActiveRecord::Base
belongs_to :commentable, polymorphic: true
end
Instead of using belongs_to :post or belongs_to :image, you specify that
a comment belongs_to something called :commentable. This name can be
anything you like, but the convention is to make it an adjective form of the
model name.
The comments table will need two fields for this association to work, an
integer field named commentable_id and a string field named commentable_type.
The commentable_type field holds the class name of the object that owns this
comment. This setup is similar to the type column in the single-table inheri-
tance example you saw in the previous section. The commentable_id is a foreign
key referring to the id of the object that owns this comment.

112 Chapter 8
Include as: :commentable on the has_many :comments associations in models
that can have comments:
class Post < ActiveRecord::Base
has_many :comments, as: :commentable
end
class Image < ActiveRecord::Base
has_many :comments, as: :commentable
end
The has_many association works the same as always. A method call like
@post.comments returns a list of comments associated with the post. It works
by looking for comments that match both the id of the @post object and the
class name Post.
If your application grows and you need comments on other models, you
can add the same has_many association to the new model without changing
anything in the Comment model.
That’s enough theory for now. Let’s put some of this knowledge to work.
The Social Application
In this section, you’ll build the data model for a social networking service
similar to Tumblr. You need models for users and posts. You also need to
represent a user following another user as well as several different types of
posts, and users should be able to comment on posts.
Start by creating a new, empty Rails application in your code directory:
$ cd code
$ rails new social
$ cd social
I’m calling my application social, but call yours whatever you like. Who
knows, you may launch this app and sell it for a billion dollars someday!
Now let’s work through the models needed for this application.
User Model
If this is to be a social site, the first thing you need is a model for users and
the relationships between them. Tumblr, like Twitter, doesn’t use the idea of
friendship between users. Instead, you subscribe to another user’s updates
by “following” that user.
Start by creating a new resource named User. For now, add string
fields for name and email. You can always add more fields later by creating
another database migration. The following command creates a controller,
model, database migration, and other files for users:
$ bin/rails generate resource User name email

Advanced Active Record 113
Create the users table by running this new database migration:
$ bin/rake db:migrate
Next, you need to create a model to represent the idea of subscriptions.
A subscription is a type of self join, but it is a many-to-many association,
so you need a join table. What should this model contain? You subscribe
to another user’s posts by following them. You can call the user you are
following a leader. So you need to store a leader_id and a follower_id in the
subscriptions table.
When one user follows another user, the following user’s id is stored in
the follower_id field and the other user’s id is stored in the leader_id field.
This setup allows you to find a list of a user’s followers and leaders easily.
$ bin/rails g model Subscription leader:references follower:references
invoke active_record
create db/migrate/..._create_subscriptions.rb
create app/models/subscription.rb
invoke test_unit
create test/models/subscription_test.rb
create test/fixtures/subscriptions.yml
Because this is a join table, use the model generator to create a data-
base migration and model for subscriptions. Don’t forget to update your
database:
$ bin/rake db:migrate
Now that you’ve created the tables, you need to update the model files
to define the associations. First, open the file app/models/subscription.rb in
your editor:
class Subscription < ActiveRecord::Base
belongs_to :leader, class_name: 'User'
belongs_to :follower, class_name: 'User'
end
You used leader:references and follower:references when creating the
model, so the Rails model generator added two belongs_to associations to
the Subscription model for you. Both :leader and :follower actually refer to
a User, so you need to add the class name User. By default, Rails looks for
model names that match association names. If you don’t specify a class
name, Rails looks for models named Leader and Follower. Figure 8-4 shows
the tables for users and subscriptions.
Note In reality, these tables also include created_at and updated_at timestamps, but I left
these out of the diagrams in this chapter for brevity.

114 Chapter 8
subscriptions
id
leader_id
follower_id
id
name
email
users
Figure 8-4: Subscription associations
In the subscriptions table, both leader_id and follower_id are foreign keys
referring to a user. Now that the Subscription associations are done, let’s add
the User associations. Open the file app/models/user.rb in your editor:
class User < ActiveRecord::Base
u has_many :subscriptions, foreign_key: :follower_id,
v dependent: :destroy
w has_many :leaders, through: :subscriptions
end
Start with the fact that a user has many subscriptions. In this case, you
need to specify the foreign key to use. Normally, you would call this user_id,
but you’re modeling leaders and followers, so call it follower_id instead u.
Also specify what happens if this user is deleted with dependent: :destroy v.
This tells Rails to destroy any associated subscriptions if this user is ever
destroyed. Finally, add the has_many:through association to leaders w.
Next, add a few methods to the model to make working with the asso-
ciations easier. You can also use these methods to test the associations in
the Rails console:
class User < ActiveRecord::Base
has_many :subscriptions, foreign_key: :follower_id,
dependent: :destroy
has_many :leaders, through: :subscriptions
u def following?(leader)
leaders.include? leader
end
v def follow!(leader)
w if leader != self && !following?(leader)
leaders << leader
end
end
end
First, add a predicate method, a method returning a true or false value,
called following? u to see if the current user is following another user. This
method checks to see if the current user’s leaders collection includes the
leader passed as an argument to the method.

Advanced Active Record 115
Then, add the follow! method v to indicate that the current user is
following another user. This method ensures the current user isn’t trying
to follow himself or herself and isn’t already following the other user w. If
neither case is true, the leader passed to this method is inserted into the
current user’s leaders collection with <<, the insertion operator.
With these methods in place, you can now launch a Rails console and
test your associations:
$ bin/rails console
Start by creating two users:
irb(main):001:0> alice = User.create name: "Alice"
(0.1ms) begin transaction
SQL (0.6ms) INSERT INTO "users" ...
(0.8ms) commit transaction
=> #<User id: 1, name: "Alice", ...>
irb(main):002:0> bob = User.create name: "Bob"
(0.1ms) begin transaction
SQL (0.6ms) INSERT INTO "users" ...
(0.8ms) commit transaction
=> #<User id: 2, name: "Bob", ...>
Now, call the follow! method on alice and pass in bob. Then call the fol-
lowing? method on alice to confirm that follow worked correctly. Finally, call
following? again to see if bob is following alice:
irb(main):003:0> alice.follow! bob
User Exists (0.2ms) SELECT ...
(0.1ms) begin transaction
SQL (16.1ms) INSERT INTO ...
(20.4ms) commit transaction
User Load (0.3ms) SELECT ...
=> #<ActiveRecord::Associations::CollectionProxy ...>
irb(main):004:0> alice.following? bob
=> true
irb(main):005:0> bob.following? alice
User Exists (0.2ms) SELECT ...
=> false
The call to alice.follow! bob adds bob to collection of leaders for alice.
Next, the call to alice.following? bob checks to see if the alice.leaders collec-
tion includes bob. It does, so the method returns true. Of course, it doesn’t
actually look for bob, but the id of the User referred to as bob. The call to
bob.following? alice returns false. The bob.leaders collection is empty, so
bob is not following alice. Tables 8-3 and 8-4 show the users and subscriptions
tables after Alice follows Bob, again with the timestamp fields omitted.
116 Chapter 8
Table 8-3: The users Table
id name email
1Alice NULL
2Bob NULL
The users table holds records for alice and bob.
Table 8-4: The subscriptions Table
id leader_id follower_id
1 2 1
The subscriptions table holds a single record representing the asso-
ciation between alice and bob. The leader_id is 2, the id of bob; and the
follower_id is 1, the id of alice. This means alice is following bob.
At this point, you can get a list of every user that alice is following by
calling the leaders method. Having this list is helpful, but it’s only half of
what you need. You also want to be able to list a user’s followers. To do
this, use the subscriptions table again, only this time going in the opposite
direction.
You need another has_many association on the Subscription model that is
the reverse of the existing association. You can then use that association to
find followers.
class User < ActiveRecord::Base
has_many :subscriptions, foreign_key: :follower_id,
dependent: :destroy
has_many :leaders, through: :subscriptions
u has_many :reverse_subscriptions, foreign_key: :leader_id,
v class_name: 'Subscription',
dependent: :destroy
w has_many :followers, through: :reverse_subscriptions
def following?(leader)
leaders.include? leader
end
def follow!(leader)
if leader != self && !following?(leader)
leaders << leader
end
end
end
This association is the reverse of the existing :subscriptions association.
There’s no clever word for the reverse of a subscription, so name the asso-
ciation :reverse_subscriptions. This association uses the leader_id field as the
foreign key u. Because the association name doesn’t match the name of

Advanced Active Record 117
the model, you also need to specify a class name v. As with the subscrip-
tion association, also specify dependent: :destroy so you aren’t left with
orphan records in the subscriptions table if a user is destroyed. After add-
ing the :reverse_subscriptions association, you can use it to add another
has_many :through association for :followers w.
Restart the Rails console for these changes to take effect, and then try
the new association:
u irb(main):001:0> alice = User.find(1)
User Load (0.3ms) SELECT ...
=> #<User id: 1, name: "Alice", ...>
irb(main):002:0> bob = User.find(2)
User Load (0.3ms) SELECT ...
=> #<User id: 2, name: "Bob", ...>
v irb(main):003:0> alice.followers
User Load (0.2ms) SELECT ...
=> #<ActiveRecord::Associations::CollectionProxy []>
w irb(main):004:0> alice.followers.to_a
=> []
irb(main):005:0> bob.followers.to_a
User Load (0.2ms) SELECT ...
=> [#<User id: 1, name: "Alice", ...>]
Because you restarted the console, you first need to find your
users in the database u. Call the followers method on alice to see if
she has any followers v. This method returns a type of relation called
an ActiveRecord::Associations::CollectionProxy. I made the output a little
easier to read by chaining to_a after followers, which converts the output
to an array w.
The output shows that alice has no followers and bob has a single fol-
lower—alice. The User associations and methods are working correctly so
far. Now that users can follow each other, let’s move on to posts.
Post Models
People don’t just want to share plain text on a social network—they also
want to share images, links, and videos. We should allow our users to cre-
ate a different kind of post for each type of content, though the post types
will share some common functionality. This sounds like a perfect use for
inheritance.
First, create a base model called Post, and then inherit from that class
to create models for TextPost, ImagePost, and so on. You can use single-
table inheritance to create these models and store the inheritance struc-
ture in the database. Because the posts table holds records for all types
of posts, you must add columns needed by the other models to the posts
table. In addition to the usual title and body fields, add a url field to store
the address of an image for image posts and a type field for single-table
inheritance.

118 Chapter 8
With those requirements in mind, generate the post resource and
update your application’s database:
$ bin/rails g resource Post title body:text url type user:references
$ bin/rake db:migrate
The user:references option adds a user_id field so you can associate posts
with users. Don’t forget to update your application’s database.
Now you’re ready to create resources for the different types of posts.
$ bin/rails g resource TextPost --parent=Post --migration=false
$ bin/rails g resource ImagePost --parent=Post --migration=false
Here, I’ve passed two options to the resource generator. The
--parent=Post option indicates that these models inherit from Post and
the --migration=false option tells the generator to not create a database
migration for this resource. A database migration is not needed because
these resources are stored in the posts table you created earlier.
First, let’s update the newly created Post model in app/models/post.rb
to make sure all posts have an associated user and type:
class Post < ActiveRecord::Base
belongs_to :user
u validates :user_id, presence: true
v validates :type, presence: true
end
All posts in our social application belong to an individual user. This
validation ensures that a Post can’t be created without an associated user_id u.
The type validation v validates that all records are identified as either a
TextPost or an ImagePost.
Now add validations to the TextPost and ImagePost models. First, edit
app/models/image_post.rb and add a URL validation to the ImagePost model:
class ImagePost < Post
validates :url, presence: true
end
The url field holds the address of the image for an ImagePost. Users can
copy a URL from an image sharing site such as Flickr or Imgur. The appli-
cation shouldn’t allow an ImagePost to be saved without an image url.
Then update the TextPost model in app/models/text_post.rb to check for a
post body:
class TextPost < Post
validates :body, presence: true
end

Advanced Active Record 119
The application also shouldn’t allow a TextPost to be saved without
body text.
While you’re editing models, also add the associations for the new
post models under the rest of the has_many associations to the User model
at app/models/user.rb:
class User < ActiveRecord::Base
has_many :subscriptions, foreign_key: :follower_id,
dependent: :destroy
has_many :leaders, :through => :subscriptions
has_many :reverse_subscriptions, foreign_key: :leader_id,
class_name: 'Subscription',
dependent: :destroy
has_many :followers, through: :reverse_subscriptions
has_many :posts, dependent: :destroy
has_many :text_posts, dependent: :destroy
has_many :image_posts, dependent: :destroy
--snip--
Now you can restart the Rails console and use these new models:
u irb(main):001:0> alice = User.find(1)
User Load (42.0ms) SELECT ...
=> #<User id: 1, ...>
irb(main):002:0> post1 = alice.text_posts.create(body: "First Post")
(0.1ms) begin transaction
SQL (0.7ms) INSERT INTO ...
(1.9ms) commit transaction
=> #<TextPost id: 1, ...>
irb(main):003:0> post2 = alice.image_posts.create(
url: "http://i.imgur.com/Y7syDEa.jpg")
(0.1ms) begin transaction
SQL (0.7ms) INSERT INTO ...
(1.9ms) commit transaction
=> #<ImagePost id: 2, ...>
v irb(main):004:0> alice.posts.to_a
Post Load (32.3ms) SELECT ...
=> [#<TextPost id: 1, ...>, #<ImagePost id: 2, ...>]
w irb(main):005:0> alice.text_posts.to_a
TextPost Load (0.4ms) SELECT ...
=> [#<TextPost id: 1, ...>]
Because you restarted the console, first find the User representing
alice u. Then create a TextPost and an ImagePost belonging to alice. The
posts method on the User model returns all posts associated with that user
regardless of type v. Note that the TextPost and ImagePost you just created
are both returned in the same collection. The text_posts method returns
only TextPost objects w.
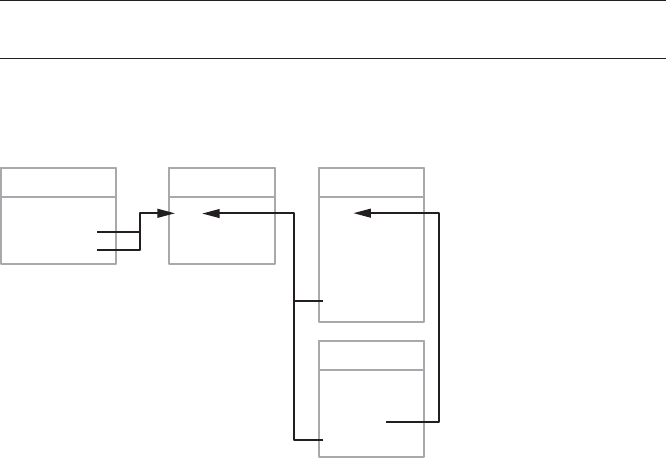
120 Chapter 8
Comment Model
Now that the models for users and posts are in place, create the comments
model for the application. Add a text field to hold the body of the comment,
a post_id to reference the post that owns this comment, and a user_id to ref-
erence the user who left the comment.
Note that I am not using a polymorphic association with these comments.
Because my different post types all inherit from the base class Post, I can
simply associate Comment with Post, allowing comments on any type of post.
$ bin/rails g resource Comment body:text post:references user:references
$ bin/rake db:migrate
Also add has_many :comments to the User and Post model to complete the
associations among users, posts, and comments. Figure 8-5 shows the tables
you created in this chapter and their associations.
id
leader_id
follower_id
id
name
email
users
id
title
body
url
type
user_id
posts
id
body
post_id
user_id
subscriptions
comments
Figure 8-5: The social application data model, with timestamps omitted
With this, you have all of your models and are well on your way to build-
ing your new social network.
Summary
I covered some pretty advanced database modeling techniques in this chap-
ter. The User model has several complex associations. The different types
of posts demonstrate single-table inheritance. Luckily, the Comment model
didn’t contain any surprises.
In the next chapter, I’ll talk about authentication, and you’ll start add-
ing controller actions and views so users can sign up and log in to your
social network.
Advanced Active Record 121
Exercises
1. You specified dependent: :destroy on all has_many associations in this
chapter to ensure that dependent models would be removed. For
example, because the Post model has a dependent: :destroy association
with the User model, if a User is destroyed, then all of the user’s posts
are also destroyed. What do you think would happen if you specified
dependent: :destroy on a belongs_to association?
2. Add validations to the Comment model to ensure that every comment
belongs to a User and a Post. Your application shouldn’t allow a Comment
to be created without a user_id and post_id. You should also ensure that
all comments have text in the body field.
3. Use the Rails console to create a new User. Create a TextPost or ImagePost
belonging to this User and at least one Comment. Now destroy the User, and
make sure the associated Post and Comment are also destroyed.
9
autheNtiCatioN
Identity is a core concept in any social network, and
authentication is the act of identifying yourself to a
system. You want users to be able to sign up for new
accounts and log into your application. Although
gems like devise and authlogic provide complete
authentication systems for Rails applications, in this
chapter, you’ll get your hands dirty by building your
own system instead.
In addition to the signup, login, and logout actions, you’ll also add
methods for getting the current logged-in user’s identity and redirecting
anonymous users to the login page. This authentication system will require
controllers and views, so before starting, let’s take a moment to add a little
style to your site with the Bootstrap framework.
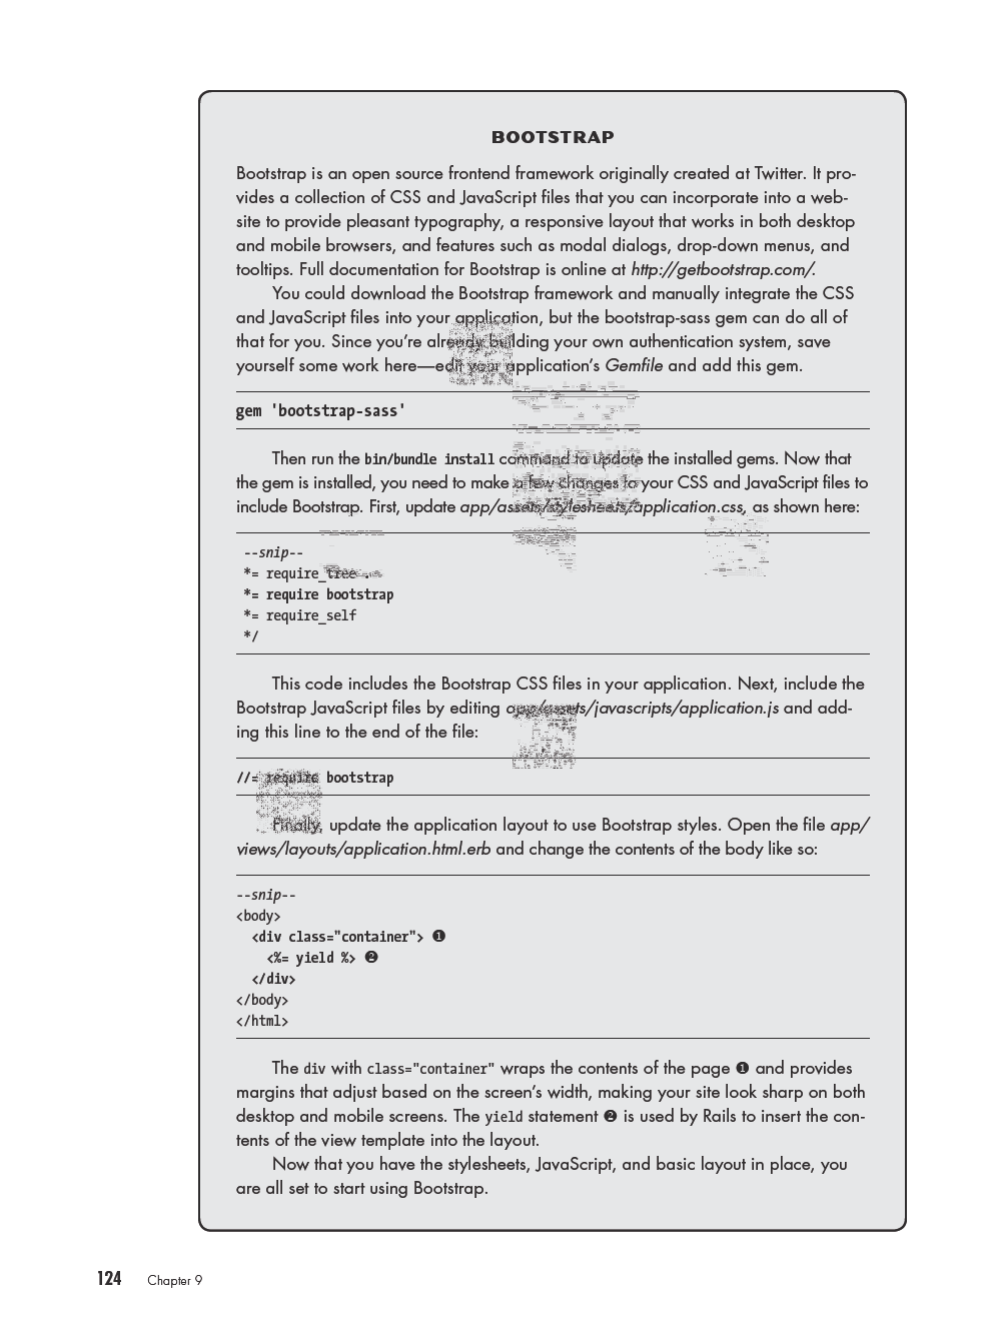

Authentication 125
The Authentication System
The purpose of the authentication system is to identify the current user
and only display pages the user wants to see or is authorized to see. You’ll
use a combination of an email address and password to identify users.
Email addresses are a good choice because they are globally unique. No
two people have the same email address.
In your application, anonymous users are only allowed to see pages
for logging in or signing up for a new account. Every other page should be
restricted.
Post Index and Show
Before you start building the authentication system, you need data to pro-
tect from anonymous users. Let’s add the index and show pages for the Post
models created in the last chapter. First, you need to add controller actions.
Open the file app/controllers/posts_controller.rb in your editor and add these
index and show methods:
class PostsController < ApplicationController
u def index
@posts = Post.all
end
v def show
@post = Post.find(params[:id])
end
end
These two actions are similar to the index and show actions in the blog
from Chapter 4. The index action u retrieves all posts from the database
and assigns them to the @posts variable. It then renders the view at app/
views/posts/index.html.erb. The show action v finds the requested post using
the id from the params hash, assigns it to @post, and renders the view at app/
views/posts/show.html.erb.
Now you need to create corresponding view templates for these actions.
Create a new file named app/views/posts/index.html.erb and add the following
code:
u <div class="page-header">
<h1>Home</h1>
</div>
v <%= render @posts %>
The index view adds a header u using the Bootstrap page-header class
and renders the collection @posts v using partials.
Because you’re using partials to render the posts, add those next; you’ll
need a partial for each post type—of which there are two—so you need two
partial files.

126 Chapter 9
First, create the file app/views/text_posts/_text_post.html.erb and open it
for editing:
u <div class="panel panel-default">
v <div class="panel-heading">
<h3 class="panel-title">
w <%= text_post.title %>
</h3>
</div>
<div class="panel-body">
<p><em>By <%= text_post.user.name %></em></p>
<%= text_post.body %>
</div>
</div>
This partial uses Bootstrap’s panel component to display a TextPost. The
panel class u adds a gray border around the content. The panel-heading class
v adds a light gray background. The title is then rendered inside an h3 ele-
ment with <%= text_post.title %> w. The panel-body class adds padding to
match the heading. The post author and body are rendered in this section.
Then create the file app/views/image_posts/_image_post.html.erb with
the following content. The ImagePost partial is just a slight variation on the
TextPost partial:
<div class="panel panel-default">
<div class="panel-heading">
<h3 class="panel-title">
<%= image_post.title %>
</h3>
</div>
<div class="panel-body">
<p><em>By <%= image_post.user.name %></em></p>
u <%= image_tag image_post.url, class: "img-responsive" %>
<%= image_post.body %>
</div>
</div>
This partial uses the ERB image_tag helper to add an image tag with the
source set to image_post.url u, the location of the image. This line also adds
Bootstrap’s img-responsive class to the image, which causes it to scale auto-
matically based on the browser width.
With these views in place, start the Rails server and look at the
application:
$ bin/rails server
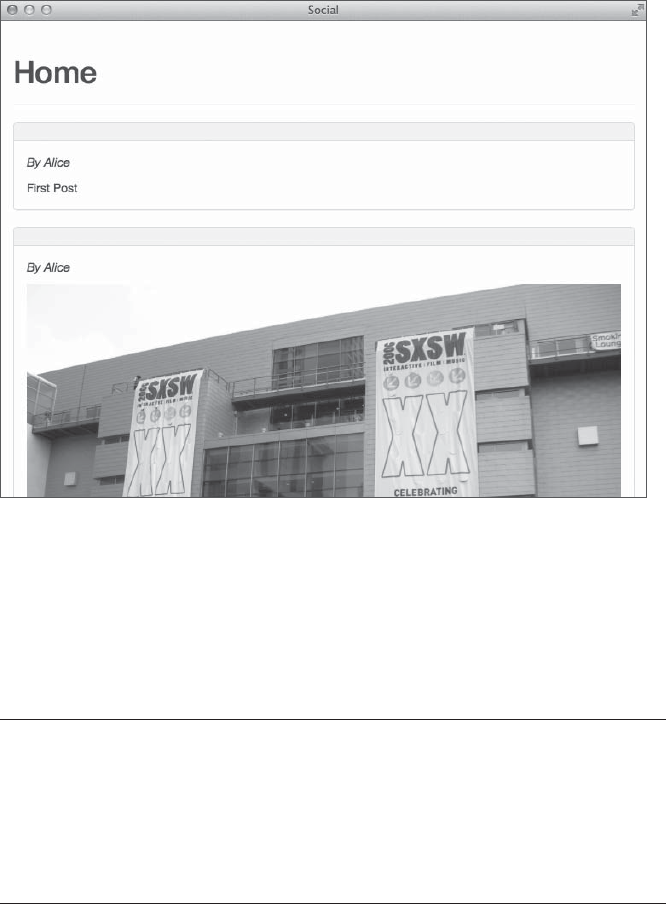
Authentication 127
Now go to http://localhost:3000/posts in your web browser. The Post index
view should look similar to Figure 9-1, depending on how many posts you
created in the Rails console.
Figure 9-1: The Post index view
You created two posts in the previous chapter, and your application’s
Post index view currently shows those two posts. You didn’t add titles in the
last chapter, so the headings are blank.
Now that the Post partials have been created, the Post show view can also
use those partials. Create the new file app/views/posts/show.html.erb with the
following content:
<div class="page-header">
<h1>Post</h1>
</div>
u <%= render @post %>
<%= link_to "Home", posts_path,
v class: "btn btn-default" %>
The show view is similar to the index view with two exceptions. It renders
a single post u instead of a collection of posts, and it includes a button v
that links back to the posts index page.
Go to http://localhost:3000/posts/1 to see it in action, as in Figure 9-2.
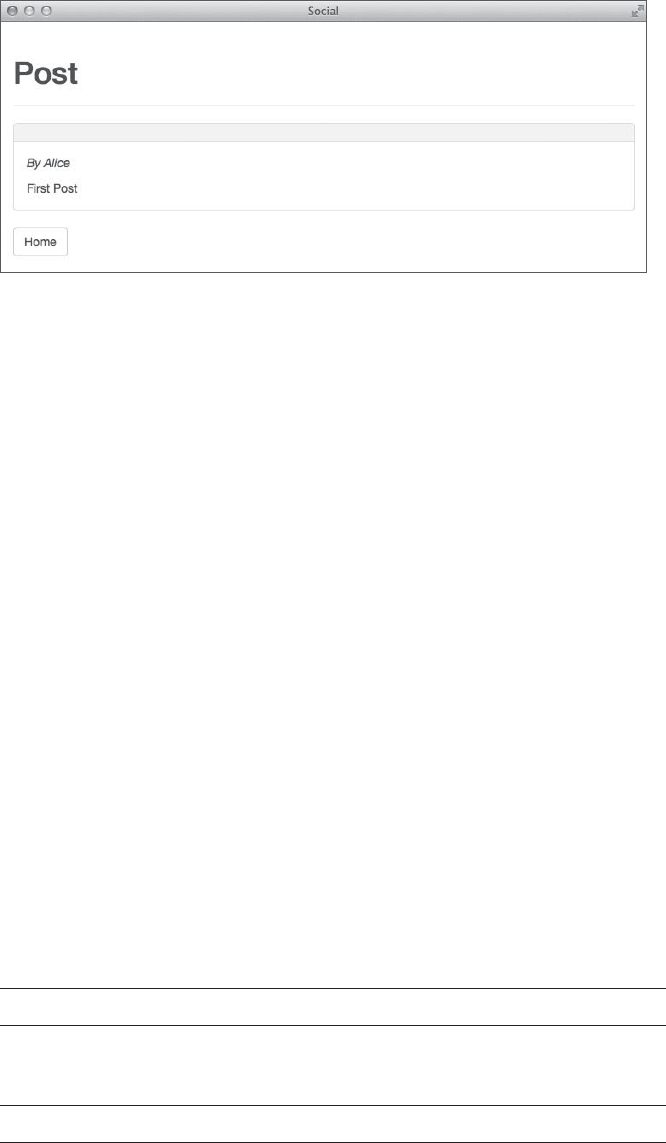
128 Chapter 9
Figure 9-2: The Post show view
Now that the application has actions and views for displaying posts, let’s
move on to adding authentication to protect these actions from anonymous
users.
Sign Up
Here, you’ll implement a user sign-up process that asks for an email address,
password, and password confirmation. If the user enters an email address
that isn’t already in the database and provides passwords that match, the
system will create a new User and thank the user for signing up.
You can already store the new user’s email address because you have a
string field named email in the users table. You need to be more careful, how-
ever, with passwords. Never store a user’s password in plain text. Instead, store
a hashed version of the password, known as a password digest. The secure pass-
word feature in Rails provides built-in support for password hashing, using a
hashing algorithm called bcrypt. Bcrypt is a secure one-way hash.
You can enable the secure password feature by calling the method
has_secure_password in a Rails model. This method adds the password and
password_confirmation attributes to the model and expects the model to
have a string field named password_digest. It adds validations that require
matching password and password_confirmation attributes on creation. If these
attributes match, it automatically hashes the password and stores it in the
password_digest field.
First, edit your application’s Gemfile and add the bcrypt gem. Because
many applications include an authentication system, a commented-out line
is already available for this gem. Remove the hash mark at the beginning of
that line and save the file.
gem 'bcrypt', '~> 3.1.7'
Anytime you change the Gemfile, you also need to run the bin/bundle
install command to update the gems installed on your system:
$ bin/bundle install

Authentication 129
The next step is to add the password_digest field to the users table and
run the database migration with bin/rake db:migrate so you can store the
user’s hashed password:
$ bin/rails g migration AddPasswordDigistToUsers password_digest
Now you need to turn on the secure password feature for the User
model. Open app/models/user.rb and add the line has_secure_password below
the has_many associations you added in the last chapter. While you’re editing
that file, also add presence and uniqueness validations for the email field:
class User < ActiveRecord::Base
--snip--
has_secure_password
validates :email, presence: true, uniqueness: true
--snip--
end
The default route for creating a new user is http://localhost:3001/users/
new. That works, but a custom route such as http://localhost:3001/signup
might be easier to remember.
Edit config/routes.rb and add a route for the sign-up page. After a user
signs up for an account or logs in to your application, you want to redirect
the user to the home page. So set the root route to the posts index page
while you’re editing this file.
Rails.application.routes.draw do
resources :comments
resources :image_posts
resources :text_posts
resources :posts
resources :users
get 'signup', to: 'users#new', as: 'signup'
root 'posts#index'
end
Open app/controllers/users_controller.rb and add the necessary actions to
UsersController for creating new Users:
class UsersController < ApplicationController
u def new
@user = User.new
end
v def create
@user = User.new(user_params)
if @user.save

130 Chapter 9
redirect_to root_url,
notice: "Welcome to the site!"
else
render "new"
end
end
private
def user_params
params.require(:user).permit(:name, :email, :password,
:password_confirmation)
end
end
The new method u instantiates an empty new User object and renders
the sign-up form. The create method v instantiates a User object using the
parameters passed from the form. Then, if the user can be saved, it redirects
the user to the root of the site and displays a welcome message. Otherwise,
it renders the new user form again.
Now that the controller actions are in place, add the sign-up form in
app/views/users/new.html.erb:
<div class="page-header">
<h1>Sign Up</h1>
</div>
<%= form_for(@user) do |f| %>
u <% if @user.errors.any? %>
<div class="alert alert-danger">
<strong>
<%= pluralize(@user.errors.count, "error") %>
prevented you from signing up:
</strong>
<ul>
<% @user.errors.full_messages.each do |msg| %>
<li><%= msg %></li>
<% end %>
</ul>
</div>
<% end %>
v <div class="form-group">
<%= f.label :email %>
w <%= f.email_field :email, class: "form-control" %>
</div>
<div class="form-group">
<%= f.label :password %>
<%= f.password_field :password, class: "form-control" %>
</div>
<div class="form-group">
<%= f.label :password_confirmation %>
<%= f.password_field :password_confirmation,
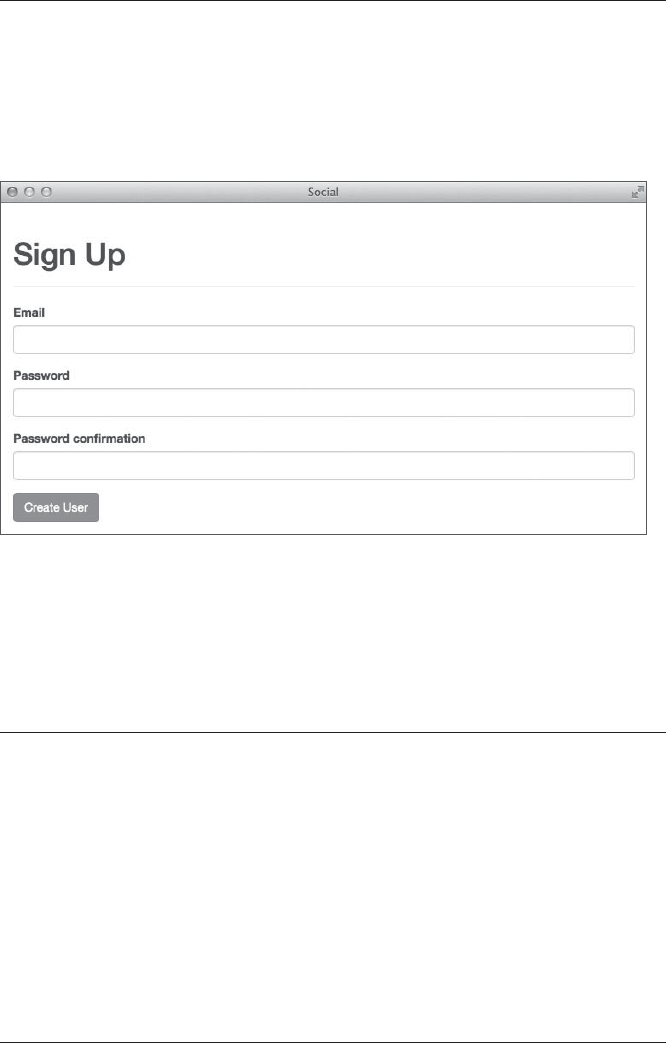
Authentication 131
class: "form-control" %>
</div>
<%= f.submit class: "btn btn-primary" %>
<% end %>
The first half of this form displays error messages u, if any. The form
uses a div with the Bootstrap class form-group to group labels and inputs v,
and adds the class form-control to input controls w. Bootstrap uses these
classes to apply styles to the form.
Go to http://localhost:3000/signup in your web browser to see the sign-up
form, as in Figure 9-3.
Figure 9-3: The sign-up form
In the create action, you added a flash message to welcome new users, but
your views don’t have a place for displaying flash messages yet. Bootstrap
includes an alert class that’s perfect for displaying flash messages. Open the
application layout at app/views/layouts/application.html.erb and add a section
for flash messages, as shown here:
--snip--
<body>
<div class="container">
u <% if notice %>
<div class="alert alert-success"><%= notice %></div>
<% end %>
v <% if alert %>
<div class="alert alert-danger"><%= alert %></div>
<% end %>
<%= yield %>
</div>
</body>
</html>

132 Chapter 9
This application uses two different kinds of flash messages: A notice
message u indicates success. A notice is shown in green using Bootstrap’s
alert-success class. An alert message v indicates an error. An alert is shown
in red using the Bootstrap alert-danger class.
In the last chapter, you didn’t add email addresses or passwords to the
users you created. If you want to log in using alice or bob, you can update
their accounts in the Rails console.
u irb(main):001:0> alice = User.find(1)
User Load ...
=> #<User id: 1, name: "Alice", ...>
v irb(main):002:0> alice.email = "alice@example.com"
=> "alice@example.com"
irb(main):003:0> alice.password = "password"
=> "password"
irb(main):004:0> alice.password_confirmation = "password"
=> "password"
w irb(main):005:0> alice.save
--snip--
=> true
After starting the Rails console with bin/rails console, find the User by
id u. Then assign values for the email, password, and password_confirmation v.
Finally, save the User with alice.save w. Repeat these steps for the other User.
Make sure the email for each user is unique.
Now that you’ve seen how to create a form for users to sign up for an
account, let’s explore how to let them log in.
Log In
A user signing up for an account fills out a form like the one in Figure 9-3
and creates a new user record in the database. On the other hand, there is
no model that represents a login, and a login doesn’t create a record in the
database. Instead, the user’s identity is stored in the session, a small amount
of data used to identify requests from a particular browser to the web
server.
Sessions
In general, web servers are stateless. That is, they don’t remember the iden-
tity of a user from one request to the next. You must add this functionality,
which you do by storing the currently logged-in user’s user_id in the session.
Rails stores session information in a cookie by default. Session cookies
are signed and encrypted to prevent tampering. Users can’t see the data
stored in their session cookie.

Authentication 133
Session values in Rails are stored using key-value pairs, and they’re
accessed like a hash:
session[:user_id] = @user.id
This command stores @user.id in a cookie on the current user’s com-
puter. That cookie is automatically sent to the server with every request to
your application.
When a user successfully logs in to your site, you need to store the user_id
in the session. Then you look for a user_id in the session on every request. If
a user_id is found and a User record matches that id, then you know that user is
authenticated. Otherwise, you should redirect the user to the login page.
Implementation
Now let’s implement the login process. First, use the Rails generator to
create a sessions controller:
$ bin/rails g controller Sessions
Next, open config/routes.rb. Add a new resource called :sessions and add
routes for login and logout:
Rails.application.routes.draw do
resources :comments
resources :image_posts
resources :text_posts
resources :posts
resources :users
resources :sessions
get 'signup', to: 'users#new', as: 'signup'
get 'login', to: 'sessions#new', as: 'login'
get 'logout', to: 'sessions#destroy', as: 'logout'
root 'posts#index'
end
Now, create a new file named app/views/sessions/new.html.erb and add the
login form:
<div class="page-header">
<h1>Log In</h1>
</div>

134 Chapter 9
u <%= form_tag sessions_path do %>
<div class="form-group">
<%= label_tag :email %>
<%= email_field_tag :email, params[:email],
class: "form-control" %>
</div>
<div class="form-group">
<%= label_tag :password %>
<%= password_field_tag :password, nil,
class: "form-control" %>
</div>
<%= submit_tag "Log In", class: "btn btn-primary" %>
<% end %>
Notice that I’m using form_tag u here instead of form_for. The sign-up
process used form_for because that form was associated with the User model.
Use form_tag now because the login form is not associated with a model.
The sessions controller handles login and logout. Edit app/controllers/
sessions_controller.rb to add these actions:
class SessionsController < ApplicationController
u def new
end
v def create
user = User.find_by(email: params[:email])
if user && user.authenticate(params[:password])
session[:user_id] = user.id
redirect_to root_url, notice: "Log in successful!"
else
flash.now.alert = "Invalid email or password"
render "new"
end
end
w def destroy
session[:user_id] = nil
redirect_to root_url, notice: "Log out successful!"
end
end
The new method u renders the login form. The controller action
doesn’t need to do anything. Remember that actions render a view file
matching their name by default. In this case, the new method renders the
view at /app/views/sessions/new.html.erb. The create method v looks for a
user record by email address. If it finds a matching user and that user can
be authenticated with the provided password, it stores the user_id in the ses-
sion and redirects to the home page. Otherwise, it adds an error message
to the flash and redisplays the login form. The destroy method w clears the
user_id stored in the session and redirects to the home page.
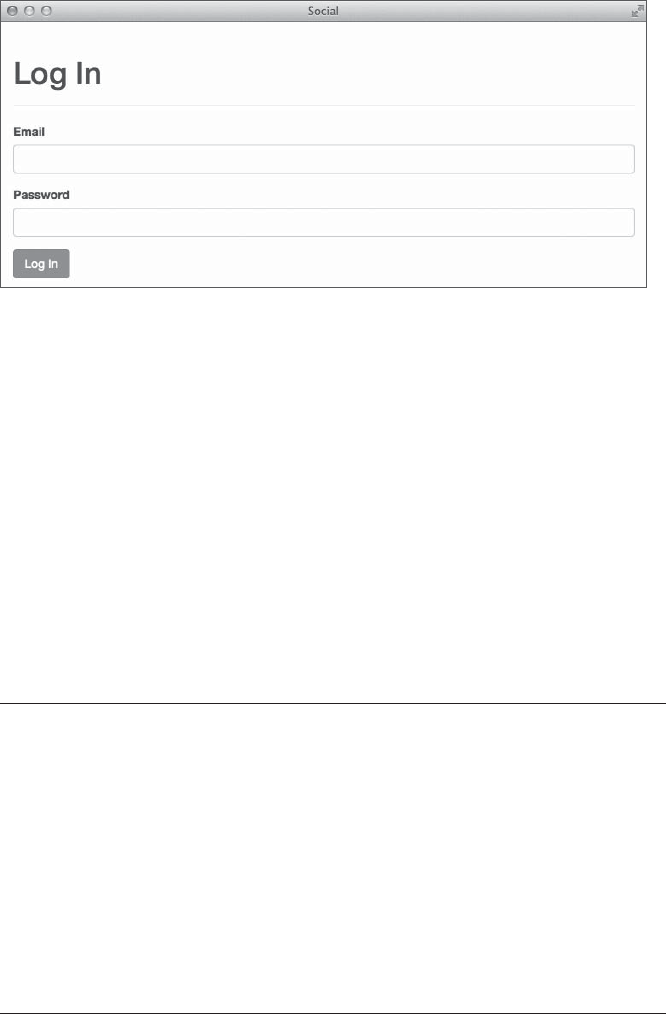
Authentication 135
Go to http://localhost:3000/login to see the login form shown in Figure 9-4.
Figure 9-4: The login form
Users can log in and log out now, but the rest of the application has no
way to know anything about the current user. As you add features to the
application, the identity of the current user will be used frequently. For
example, the application uses the current user to decide which posts to dis-
play and to assign ownership to any new posts or comments created. Now
let’s add the methods needed to make the authentication system available
to the rest of the application.
Current User
First, you need to be able to identify the currently logged-in user. Add
the current_user method to ApplicationController in app/controllers/application
_controller.rb and make it a helper method. That way, it will be available in all
controllers and views, laying the groundwork for other parts of the app to
access the currently logged-in user:
class ApplicationController < ActionController::Base
# Prevent CSRF attacks by raising an exception.
# For APIs, you may want to use :null_session instead.
protect_from_forgery with: :exception
private
def current_user
if session[:user_id]
@current_user ||= User.find(session[:user_id])
end
end
helper_method :current_user
end

136 Chapter 9
The current_user method returns a User object representing the cur-
rently logged-in user. This method returns nil when no one is logged in,
so you can also use it in conditional statements that should have different
results when no user is logged in.
For example, use the current_user method to add a logout link when a
user is logged in or show links to log in and sign up when no one is logged
in. Open app/views/layouts/application.html.erb and add this code just above
the yield statement:
--snip--
<div class="pull-right">
<% if current_user %>
<%= link_to 'Log Out', logout_path %>
<% else %>
<%= link_to 'Log In', login_path %> or
<%= link_to 'Sign Up', signup_path %>
<% end %>
</div>
<%= yield %>
</div>
</body>
</html>
Now logged-in users should see a link to log out, and anonymous users
should see links to either log in or sign up.
Authenticate User
In any social app, certain pages should not be available to anonymous users.
The last thing you need is a way to restrict pages so only authenticated users
can view them. You can do this with the Rails before_action method.
A before_action is a method that runs automatically before any other
action in the controller. These methods are sometimes used to remove dupli-
cation by loading data needed by several different actions. A before_action
can also halt the current request by rendering or redirecting to another
location.
Create a method named authenticate_user! that redirects to the login
page if there is no current user. Add this method to the ApplicationController
in app/controllers/application_controller.rb so it is available in all controllers:
class ApplicationController < ActionController::Base
# Prevent CSRF attacks by raising an exception.
# For APIs, you may want to use :null_session instead.
protect_from_forgery with: :exception
private
def current_user
if session[:user_id]

Authentication 137
@current_user ||= User.find(session[:user_id])
end
end
helper_method :current_user
def authenticate_user!
redirect_to login_path unless current_user
end
end
Because you set the posts index page as the home page of your
application, let’s try this method in the posts controller. Open the file
app/controllers/posts_controller.rb and add a before_action:
class PostsController < ApplicationController
before_action :authenticate_user!
--snip--
end
Now if an anonymous user tries to access the home page, he or she
should be redirected to the login page automatically. Be sure you don’t add
this before_action to the sessions page. If you do, anonymous users won’t be
able to access the login page!
Use Current User
Now that your application knows who’s logged in, you can change the home
page to display only posts authored by the current user or anyone the current
user is following. This type of home page is usually arranged in chronologi-
cal order and called a timeline.
The first thing you need to do is add a method to the User model to
return a user_id list that you can use to query posts. Let’s call this method
timeline_user_ids. Open the file app/models/user.rb and add this method near
the end:
--snip--
def timeline_user_ids
u leader_ids + [id]
end
end
The has_many :leaders association added in Chapter 8 automatically
adds a method called leader_ids that returns an array of the id values of
this user’s leaders—or the people whose posts the user is following. The
timeline_user_ids method adds the current user’s id to the array returned
by leader_ids and returns the new array u, which should contain every user
you want to display on the timeline.
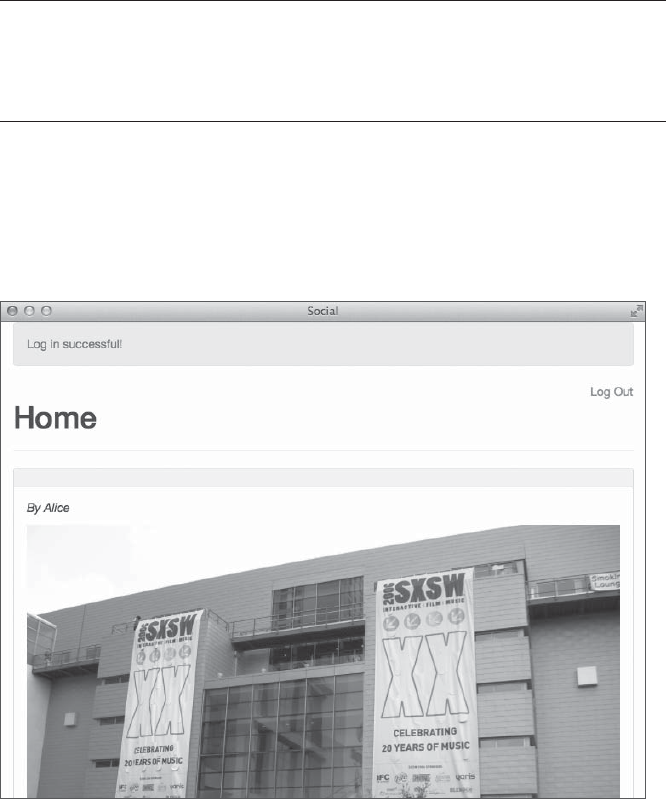
138 Chapter 9
Now open app/controllers/posts_controller.rb and update the index action
to use this method:
def index
user_ids = current_user.timeline_user_ids
@posts = Post.where(user_id: user_ids)
.order("created_at DESC")
end
Instead of just fetching every post with Post.all, the index action first
obtains the list of user_ids returned by current_user.timeline_user_ids. It
then initializes @posts to include every post that should be in the timeline
based on those ids. Also add an order clause because timelines are shown in
reverse chronological order.
Log in to see the Post index page in Figure 9-5.
Figure 9-5: The Post index view after login
Click the Log Out link and confirm that you’re redirected to the Log
In page.
Summary
Your application is really starting to take shape now. You have some pretty
good-looking styles in place thanks to Bootstrap. Users can now sign up,
log in, and log out. You can also restrict access to pages based on whether
a user is authenticated.
Authentication 139
You’ve written a lot of code, but so far you’ve only tested it by clicking
around in the browser. This isn’t too bad when you only have a few actions
to test. As the number of actions in your application grows, however, this
sort of testing gets tedious.
In the next chapter, you’ll learn about automated testing of models and
controllers. We’ll look at the default test framework already included by
Rails, write tests for various parts of the application, and learn a little about
test-driven development.
Exercises
1. You added a post show action and view, but currently you can’t get to the
page for an individual post without typing in the URL. Use the Rails
time_ago_in_words helper to create a link to the post in the TextPost and
ImagePost partials based on the created_at field.
2. Add comments to posts. The process is similar to adding comments to
the blog at the end of Chapter 5. First, update the post show page at
app/views/posts/show.html.erb to render a collection of comments and a
form for adding a new comment at the bottom as shown here:
--snip--
<h3>Comments<h3>
<%= render @post.comments %>
<h4>New Comment</h4>
<%= form_for @post.comments.build do |f| %>
<div class="form-group">
<%= f.label :body %><br>
<%= f.text_area :body, class: "form-control" %>
</div>
u <%= f.hidden_field :post_id %>
<%= f.submit class: "btn btn-primary" %>
<% end %>
The form includes the post_id of the current post in a hidden field
u. Next, add the create action to CommentsController at app/controllers/
comments_controller.rb:
def create
@comment = current_user.comments.build(comment_params)
if @comment.save
redirect_to post_path(@comment.post_id),
notice: 'Comment was successfully created.'
else
redirect_to post_path(@comment.post_id),
alert: 'Error creating comment.'
end
end

140 Chapter 9
Also add the private comment_params method to CommentsController. In
addition to the comment body, also permit the post_id passed in params:
def comment_params
params.require(:comment).permit(:body, :post_id)
end
Make sure only authenticated users can access this controller. Finally,
create the comment partial app/views/comments/_comment.html.erb. This
partial needs to show the name of the user who added the comment
and the comment’s body.
3. How secure is the authentication system? Look at the password_digest
field for a User. Also, examine the cookie placed on your computer after
you log in to the application. Can you figure out the data contained in
either of these?
10
testiNG
So far, you’ve tested your code by typing in the Rails
console and clicking links in the web browser. As
you add more features to your application, however,
this won’t scale. And even with more effective test
methods, you’ll still have to remember to retest every-
thing in the application after you add each feature.
Otherwise you might miss a regression.
Rather than manually testing your application, you can write auto-
mated tests in Ruby to ensure your code is correct and meets all of your
requirements. Once you have a set of automated tests in place, you can run
an entire suite of tests to catch regressions, helping you to refactor your
code with confidence.
Several different test frameworks are available for Ruby. In this chapter,
we focus on the default test framework used by Rails: MiniTest.

142 Chapter 10
Testing in Rails
Basic test skeletons are automatically created in the test directory when you
generate Rails models and controllers. These are just starting points: They
don’t really test anything, but having the framework in place makes adding
your own tests much easier.
In this chapter, I’ll discuss testing models and controllers. You’ll learn
how to test individual components and the interactions between compo-
nents. But first, let’s prepare your environment for testing.
Preparing to Test
So far you’ve been working in the Rails development environment while
building the application. The Rails test environment is preconfigured for
testing, but you still must do a few things before running your tests.
The test environment uses a separate database just for running tests.
First, make sure your application’s db/schema.rb is up to date by running
database migrations:
$ bin/rake db:migrate
The test database is automatically re-created before each test run to
ensure that tests don’t depend on data already in the database.
Running Tests
Now that the test database is set up, you’re ready to run your tests. Rails pro-
vides several different rake tasks for running the various types of tests you’ll
create.
The bin/rake test command runs all tests by default. If you include the
name of a test file on the command line, it only runs the tests in that file.
While working on a particular model or controller, running the tests associ-
ated with that class is faster.
This command runs all of the tests in the file test/models/user_test.rb:
$ bin/rake test test/models/user_test.rb
After a short pause, you should see output like this:
Run options: --seed 46676
# Running:
Finished in 0.001716s, 0.0000 runs/s, 0.0000 assertions/s.
0 runs, 0 assertions, 0 failures, 0 errors, 0 skips
As the last line indicates, no tests have been defined yet. Open test/
models/user_test.rb in your editor and let’s add some tests.

Testing 143
u require 'test_helper'
v class UserTest < ActiveSupport::TestCase
w # test "the truth" do
# assert true
# end
end
This test file first requires the file test/test_helper.rb u, which holds the
configuration for all tests. The test helper also loads all fixtures, or sample
data, and can include helper methods for tests. Next, the test file defines a
test case named UserTest by inheriting from ActiveSupport::TestCase v. A test
case is a set of tests related to a class. Inside the test case, a simple example
test w is provided in the comments.
The commented-out test doesn’t really test anything even if you uncom-
ment it, so you could remove it. But these lines do show the basic structure
of all tests, so let’s examine them before moving forward:
u test "the truth" do
v assert true
end
The test method u accepts a test name and a block of code to execute.
This block contains one or more assertions v. An assertion tests a line of
code for an expected result. The assert method shown here expects its
argument to evaluate to a true value. If the assertion is true, the test passes
and a single dot is printed. Otherwise, the test fails and an F is printed
along with a message identifying the failing test.
Now let’s follow this basic test structure to add a real test to this file.
I find it helpful to open the model I’m testing, in this case, app/models/
user.rb, and the test file at the same time. I usually add tests for any custom
methods I’ve added to a model and verify that the model’s validations are
working as expected. Looking at the user model, you see several has_many
associations, followed by the Rails has_secure_password method, a validation,
and the methods you’ve written.
First, let’s make sure you can create a valid user. Remember, the
has_secure_password method adds validations for attributes named password
and password_confirmation. Users are also required to have a unique email
address, so to create a valid user, you must provide email, password, and
password_confirmation.
test "saves with valid attributes" do
u user = User.new(
email: "user@example.com",
password: "password",
password_confirmation: "password"
)
v assert user.save
end

144 Chapter 10
Here, you instantiate a new User object with valid attributes u and
assert that it saves v.
Run the tests in this file again:
$ bin/rake test test/models/user_test.rb
Run options: --seed 40521
# Running:
u .
Finished in 0.067091s, 14.9051 tests/s, 14.9051 assertions/s.
v 1 runs, 1 assertions, 0 failures, 0 errors, 0 skips
The single dot u represents the single test. The last line of output v
tells you that you ran one test with one assertion and had zero failures.
You could continue adding tests at this point, but manually creating
users for all of your tests will get tedious. Luckily, Rails includes the fixtures
I mentioned earlier, which can automatically create as many model objects
with sample data as you need.
Using Fixtures
Fixtures provide sample data for tests, and they are written in a format called
YAML. YAML originally stood for Yet Another Markup Language, but is now a
recursive acronym for YAML Ain’t Markup Language. Fixtures are automati-
cally loaded into the test database by the file tests/test_helper.rb and are
available to all test cases.
User Fixtures
Open the file test/fixtures/users.yml, remove its contents, and create two
sample users:
u user1:
v email: user1@example.com
w password_digest: <%= BCrypt::Password.create "password" %>
user2:
email: user2@example.com
password_digest: <%= BCrypt::Password.create "password" %>
This code adds sample data for two users. The YAML file begins with
the name of the first fixture followed by a colon u. In this case, the fixture
is named user1. The indented lines under the name specify attributes. The
first user has an email address of user1@example.com v.
You can even use ERB to help add data to fixtures. Rather than precom-
pute the values for the password_digest field, use the BCrypt::Password.create
method to create the password_digest w dynamically . This method is part
of the bcrypt gem you installed in Chapter 9.

Testing 145
Refer to one of these users in your tests by calling the users method and
passing the name of the user you want. For example, users(:user1) returns
the first user just defined.
Go back to the user tests in test/models/user_test.rb and let’s try the new
fixtures:
test "validates email presence" do
u @user1 = users(:user1)
v @user1.email = nil
w assert_not @user1.valid?
end
This test uses a fixture to initialize a user u, sets the user’s email to
nil v, and ensures the user is not valid with the assert_not method w. The
assert_not method only passes if its condition is a false value.
This test proves that an email is required; now you’ll add a test for
email uniqueness.
test "validates email uniqueness" do
u @user1 = users(:user1)
@user2 = users(:user2)
v @user1.email = @user2.email
w assert_not @user1.valid?
end
This test uses fixtures to initialize two users u, sets the first user’s email
equal to the second user’s email v, and asserts w that the first user is no lon-
ger valid. The second user is still valid because the first user can’t be saved
with invalid data. You can look at the test log in log/test.log to see the queries
being run for each test.
Fixtures have id values based on a hash of the fixture name, and those
values are always the same. For example, the id for @user1 is 206669143. This
value never changes. Associations between fixtures are created by name
because the id of each fixture is based on its name. The Post fixtures dis-
cussed next include associations with the User fixtures you created earlier.
Post Fixtures
Rails automatically created fixture files for the TextPost and ImagePost types.
You’ll include both types of fixtures in the Post file. The fixture files for the
other types will cause an error, so delete the files test/fixtures/text_posts.yml
and test/fixtures/image_posts.yml before moving on.
Now open the file test/fixtures/posts.yml and create some sample posts:
post1:
title: Title One
body: Body One

146 Chapter 10
type: TextPost
user: user1
post2:
title: Title Two
url: http://i.imgur.com/Y7syDEa.jpg
type: ImagePost
user: user1
post3:
title: Title Three
body: Body Three
type: TextPost
user: user2
Here, you have three posts. The first two belong to the User named user1
and the third belongs to user2. You’ll put these to good use a little later
when you add tests for the Post model.
Putting Assertions to Work
Assertions are the building blocks of tests. You’ve already seen a few asser-
tions, such as assert and assert_not, in the tests you’ve written so far. The
MiniTest library contains more, and Rails adds a few of its own. Here are
some of the most commonly used assertions:
assert test
Passes if the test expression evaluates to true
assert_empty obj
Passes if obj.empty? is true
assert_equal expected, actual
Passes if the expected value equals the actual value
assert_includes collection, obj
Passes if collection.includes?(obj) returns true
assert_instance_of class, obj
Passes if obj.instance_of?(class) is true
assert_match regexp, string
Passes if the given string matches the regular expression regexp
assert_nil obj
Passes if obj.nil? is true
Each of these assertions also comes in a “not” form. For example,
assert_not passes if the expression being tested is false and assert_not_equal
passes if the expected value is not equal to the actual value. Assertions also
accept an optional message parameter, which is a string that prints if the
assertion fails.

Testing 147
Let’s put our knowledge of assertions to work and add a few more tests
to the user model. Here’s the first one:
test "should follow leader" do
u @user1 = users(:user1)
@user2 = users(:user2)
v @user1.follow!(@user2)
w assert_equal 1, @user1.leaders.count
assert_equal 1, @user2.followers.count
end
This test creates two users using fixtures u and then calls the follow!
method on @user1 with @user2 as an argument v. It then ensures that @user1
has one leader and @user2 has one follower w.
This next test verifies the following? method works correctly:
test "following? should be true" do
@user1 = users(:user1)
@user2 = users(:user2)
@user1.follow!(@user2)
assert @user1.following?(@user2)
end
It again uses fixtures to create two users and then calls the follow!
method on @user1 with @user2 as an argument and finally ensures that
@user1.following?(@user2) is true.
Eliminating Duplication with Callbacks
The tests you’ve made should all work correctly, but I’ve introduced some
duplication in the code. Almost every test uses fixtures to create users.
Remember, don’t repeat yourself. Luckily, test cases include two callbacks
that can help eliminate this duplication. Callbacks are methods that are
called automatically before and after each test.
The setup method is called before each test, and the teardown method
is called after each test. These methods are commonly used to initialize
objects that are employed in multiple tests. You can use the setup method
to initialize the values of @user1 and @user2 automatically.
class UserTest < ActiveSupport::TestCase
u def setup
@user1 = users(:user1)
@user2 = users(:user2)
end
--snip--

148 Chapter 10
v test "following? should be true" do
@user1.follow!(@user2)
assert @user1.following?(@user2)
end
end
Now that @user1 and @user2 are being initialized u in the setup method,
you can remove the duplication from each of the tests, as shown in the
rewritten test for following? v.
Model Tests
The tests you’ve seen so far are model tests. Model tests verify the behavior
of your application’s models. These types of tests were previously called
unit tests. I typically add tests for validations and for any custom methods
I’ve written.
I’ve covered both of these for the User model, so now let’s add tests for
the Post model. You may also want to refer to the Post model in app/models/
post.rb as you write tests.
class Post < ActiveRecord::Base
belongs_to :user
has_many :comments, dependent: :destroy
validates :user_id, presence: true
validates :type, presence: true
end
The Post model is still pretty simple. A post belongs to a user and can
have many comments. It also validates the presence of a user_id and a type.
Let’s add a test to verify that a Post has a user_id. Open the file test/models/
post_test.rb in your editor:
require 'test_helper'
class PostTest < ActiveSupport::TestCase
u def setup
@post1 = posts(:post1)
@post2 = posts(:post2)
end
v test "validates user_id presence" do
@post1.user_id = nil
assert_not @post1.valid?
end
end

Testing 149
The setup method u initializes two posts that you can refer to in your
tests. The first test v verifies that a Post without a user_id is not valid.
Since you have model tests for the users and posts now, you can use the
bin/rake test:models command to run all model tests:
$ bin/rake test:models
Run options: --seed 47072
# Running:
......
Finished in 0.234202s, 25.6189 runs/s, 29.8887 assertions/s.
6 runs, 7 assertions, 0 failures, 0 errors, 0 skips
If this command results in an error, delete the unused fixture files for
the TextPost and ImagePost models as mentioned earlier. Delete test/fixtures/
text_posts.yml and test/fixtures/image_posts.yml.
The other post types have validations of their own. For example, the
TextPost validates the presence of a body, and the ImagePost validates the pres-
ence of a url. Since we already have TextPost and ImagePost fixtures, let’s add
tests for both of those validations:
test "TextPost requires body" do
u assert_instance_of TextPost, @post1
v @post1.body = nil
w assert_not @post1.valid?
end
test "ImagePost requires url" do
assert_instance_of ImagePost, @post2
@post2.url = nil
assert_not @post2.valid?
end
Both of these tests follow the same pattern. First, verify that @post1 is
an instance of TextPost u. Next, set the body of @post1 to nil v. Finally, verify
that @post1 is no longer valid w. The ImagePost assertions do the same, but
for @post2.
150 Chapter 10
Controller Tests
Controller tests verify the actions of a single controller by simulating requests
to your application and validating the responses. Controller tests ensure
that a controller action responds successfully to valid requests, and that it
renders the correct view or redirects to the correct location. These types of
tests were previously called functional tests.
Controller Test Helpers
Rails includes several helper methods and variables that make controller
tests easier to write.
The methods get, post, put, patch, head, and delete simulate a request to a
controller action. These methods can take two optional hashes: one repre-
senting request parameters and another representing the current session.
After a request has been made with one of those six methods, the fol-
lowing four hashes become available:
assigns Contains the instance variables assigned in the controller
action
cookies Contains any cookie values set in the action
flash Holds the flash values set in the action
session Contains any session values set by the action
Your tests also have access to three instance variables: @controller con-
tains the controller processing the request; @request is the request being
processed; and @response is the controller’s response to the request.
Controller Test Assertions
Rails adds several assertions specifically for controller tests in addition
to those you’ve already seen. Controller actions always either render a
response or redirect to a different URL.
assert_response type
Passes if the HTTP response matches a specific status code. Use a status
code or one of the symbols :success, :redirect, :missing, or :error for type.
assert_redirected_to options
Passes if the request causes a redirect to the path given in options.
assert_template expected
Passes if the request renders the expected template.
These assertions verify that a controller action correctly responds to
a request. For a simple GET request, assert_response :success might be the
only test needed. If the controller action assigns an instance variable, you
should also verify that assignment.

Testing 151
Let’s add controller tests for the new and create actions in UsersController.
First, test that the new action successfully renders the sign-up form with a
newly created instance of the User model. Open the file test/controllers/
users_controller_test.rb to add the following test:
test "should get new with new user" do
u get :new
v user = assigns(:user)
w assert user.new_record?
assert_response :success
end
This test issues a GET request for the new user page u, gets a copy of
the value assigned to the instance variable @user v in the controller, and
verifies that user is a new record w and the response was successful.
The next test checks the ability to create new users given valid data:
test "should create user" do
u params = {
user: {
email: "user@example.com",
password: "password",
password_confirmation: "password"
}
}
v post :create, params
w assert_redirected_to root_url
end
This test is a bit more complex because the create action expects a hash
of values for the new user u. This test issues a POST request to the create
action using the params hash v and then verifies that the action redirects to
the root_url w.
The previous test checks what happens when a User is successfully saved.
You should test the other path through the controller action, that is, when
the User can’t be saved. You could add a test that attempts to create a user
with invalid attributes and verifies the new user template is rendered again.
Run the new controller tests with the bin/rake test:controllers
command:
$ bin/rake test:controllers
The UsersController tests should pass successfully, so let’s move on to the
PostsController. Verify that the before_action method authenticate_user! is work-
ing correctly so your application won’t show posts to unauthenticated users.

152 Chapter 10
Open the file test/controllers/posts_controller_test.rb in your editor and add
the following tests:
test "redirects anonymous users to login" do
u get :index
v assert_redirected_to login_url
end
test "get index for authenticated users" do
w user1 = users(:user1)
get :index, {}, { user_id: user1.id }
assert_response :success
end
The first test attempts to GET the post index page u and verifies the
action redirects to the login page v. The second test initializes a user using
a fixture w then issues the GET request for the index page with a user_id in
the session . Simulating a logged-in user by including a valid user_id in the
session should result in a successful response.
Integration Tests
Integration tests verify the interaction between several different controllers.
These are commonly used to test the flow between several pages of your
application. An example of a flow would be logging in to the application,
viewing a page, and then performing some other action. Each of these
actions could be covered by controller tests. An integration test ensures
that they all work together.
Integration Helpers
Because integration tests generally involve moving between pages in the
application, your tests need not only to make requests to actions but also
to follow any redirects. The helper methods redirect? and follow_redirect!
check to see if the last request resulted in a redirect and follow a redirect
response, respectively.
If you know that a request results in a redirect, more specific methods
are available. You can use get_via_redirect, post_via_redirect, put_via_redirect,
patch_via_redirect, or delete_via_redirect to make the appropriate request
and also follow the redirect.
Testing a Flow
Rails doesn’t create integration tests automatically like model and control-
ler tests because Rails has no way of knowing which flows you want to test.
Although they are not created automatically, Rails does include a generator
you can use to create integration tests.

Testing 153
Let’s add an integration test to verify that a user can log in to the appli-
cation, see the home page, and then log out. First, use the bin/rails generate
command to create a new integration test:
$ bin/rails g integration_test user_flow
This command creates a new file named test/integration/user_flow_test.rb.
Open that file in your editor and let’s add a test:
require 'test_helper'
class UserFlowTest < ActionDispatch::IntegrationTest
test "user login, browse, and logout" do
user = users(:user1)
u get "/login"
assert_response :success
v post_via_redirect "/sessions",
email: user.email,
password: "password"
assert_equal "/", path
w get_via_redirect "/logout"
assert_equal "/login", path
end
end
This test looks like an extended controller test. The test requests a page
with get u and then verifies a successful response. You know that a user logs
in to the application with a POST request to the sessions path and is then
redirected to the home page, so you use the post_via_redirect method to
submit the user’s email address and password and then follow the redirect
automatically v. Finally, the test issues a GET request for the logout page w
and is redirected back to the login page.
Enter the following command to run the integration test:
$ bin/rake test test/integration/user_flow_test.rb
Run options: --seed 51886
# Running:
.
Finished in 1.049118s, 0.9532 runs/s, 2.8595 assertions/s.
1 runs, 3 assertions, 0 failures, 0 errors, 0 skips

154 Chapter 10
This test confirms that a user can log in to the application, view the
home page, and then log out successfully.
This path is basically the only one a user can take through the applica-
tion at this time. As you add more actions to the application, you can create
integration tests to verify that other flows work correctly.
Adding Features with Test-Driven Development
The tests written so far have all verified existing functionality, but some
Rails developers use tests to define features before implementing them, a
practice called test-driven development (TDD). In TDD, you write a test first
and then add code to make the test pass. Once the test passes, you can
refactor the code if necessary. If you follow TDD, you won’t have to worry
about parsing your code later to figure out what functionality to verify.
TDD is usually a three-step process known as red-green-refactor:
1. Write a failing test (red).
2. Write code to make the test pass (green).
3. Refactor as needed (refactor).
By following this process, you can be confident that new functionality
meets the requirements specified in the test and that it did not introduce
any regressions.
Let’s use TDD to add features to our social application. Although many
features are still missing, let’s focus on these:
• Add a user show page showing a user’s posts and a Follow button.
• Give users the ability to create new posts.
For each of these features, you’ll first write a failing test and then write
code to make the test pass.
Show User
The user show page displays the user’s name and posts. It should also include
a button to allow other users to follow this user. To add the user show page,
you need to add a show method to the user controller and create a corre-
sponding view. You know the controller should assign an instance variable
named @user for the view to use and respond with success, so let’s add a test
for that.
Open the file test/controllers/users_controller_test.rb and add this test:
test "should show user" do
user = users(:user1)
get :show, id: user.id

Testing 155
assert assigns(:user)
assert_response :success
end
Now, run the test and make sure it fails:
$ bin/rake test test/controllers/users_controller_test.rb
Running this test should result in an error. The action show could not be
found for UsersController because you haven’t created it yet. So let’s add the
show action to app/controllers/users_controller.rb:
class UsersController < ApplicationController
def show
@user = User.find(params[:id])
@posts = @user.posts.order("created_at DESC")
end
--snip--
Save the file and run the tests again. This time you should see a differ-
ent error. The template is missing. Create a new file named app/views/users/
show.html.erb, and add that template now:
<div class="page-header">
<h1>User</h1>
</div>
<p class="lead"><%= @user.name %></p>
<h2>Posts</h2>
<%= render @posts %>
<%= link_to "Home", root_path,
class: "btn btn-default" %>
Save this file and run the tests again. All tests should now pass, but you
still have one problem. This page shows the user’s email address and the
user’s posts, but no one can follow the user!
Following a user creates a record in the subscriptions table in the data-
base. Because this has to happen on the server, adding the Follow button
requires a controller action and a new route to that action.
Add another controller test to test/controllers/users_controller_test.rb to
describe this action:
test "should follow user" do
u user1 = users(:user1)
user2 = users(:user2)
v get :follow, { id: user2.id }, { user_id: user1.id }
156 Chapter 10
w assert user1.following? user2
assert_redirected_to user_url(user2)
end
This test first creates two users using fixtures u. Next, it issues a GET
request for the follow action with the second user’s id as a parameter and
the first user’s id in the session v. This simulates user1 following user2.
Finally, it verifies that user1 is now following user2 and that the request redi-
rects back to the show page for user2 w.
Now open the file app/controllers/users_controller.rb, and add the follow
action after the other actions, but before the private methods:
class UsersController < ApplicationController
--snip--
def follow
u @user = User.find(params[:id])
v if current_user.follow!(@user)
w redirect_to @user, notice: "Follow successful!"
else
redirect_to @user, alert: "Error following."
end
end
private
--snip--
This method finds the correct user using the id parameter u, calls the
follow! method on current_user v, and then redirects to @user w.
Now open config/routes.rb and add a route to the new follow action:
Rails.application.routes.draw do
--snip--
get 'signup', to: 'users#new', as: 'signup'
get 'follow/:id', to: 'users#follow', as: 'follow_user'
--snip--
end
I added this under the signup route because these actions are both in the
user controller. Now, back in app/views/users/show.html.erb, you can add the
Follow button:
--snip--
<p class="lead"><%= @user.name %></p>
<%= link_to "Follow", follow_user_path(@user),
class: "btn btn-default" %>
<h2>Posts</h2>
--snip--
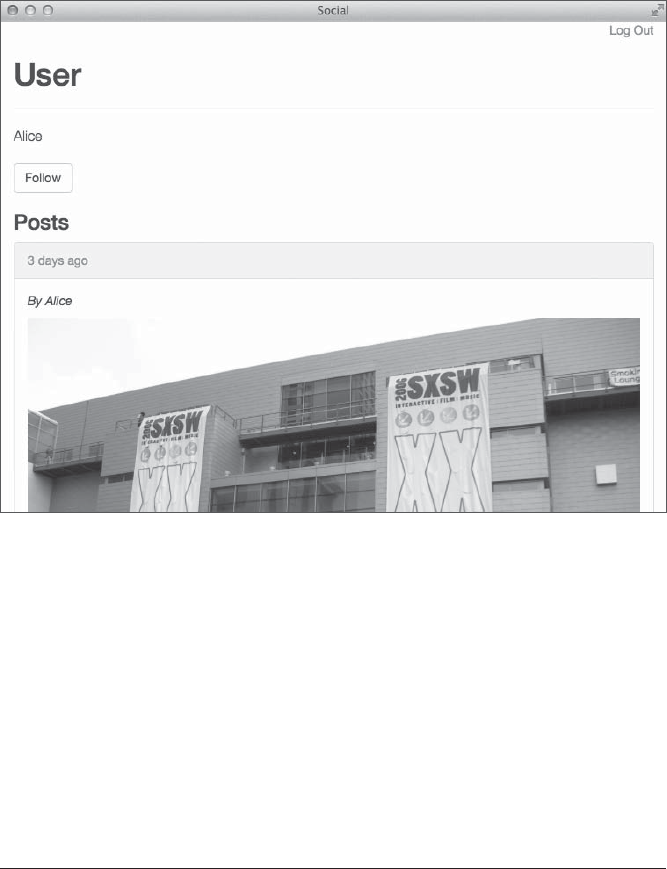
Testing 157
The Follow button is similar to the Home button; it’s actually a link with
Bootstrap’s btn and btn-default styles applied to make it look like a button.
You can now run the controller tests again and verify that they all pass.
You can also start the Rails server if it isn’t already running and go to
http://localhost:3000/users/1 in your web browser to see the show page for the
first user, as shown in Figure 10-1.
Figure 10-1: The user show page
Figure 10-1 is the show page with the user’s name, a button for following
this user, and the user’s posts.
Create Post
Now let’s give users the ability to add posts. Adding posts requires two control-
ler actions: new and create. The new action also requires a matching view. The
create action should redirect to the newly created post, so a view isn’t needed.
Your application has two different types of posts. Start by adding the
ability to create posts of type TextPost. The new action in TextPostsController
should instantiate a new TextPost object and render a form for that object. Add
a failing test to test/controllers/text_posts_controller_test.rb and then get to work:
test "get new with new post" do
u user1 = users(:user1)
v get :new, {}, { user_id: user1.id }

158 Chapter 10
text_post = assigns(:text_post)
assert text_post.new_record?
assert_response :success
end
The test first creates a new user using a fixture u and then issues a GET
request for the new action with user_id set in the session v. This step is nec-
essary because the TextPostsController requires an authenticated user. The
test then gets the text_post instance variable, verifies it’s a new record, and
verifies a successful response. Run the tests and watch this one fail:
$ bin/rake test test/controllers/text_posts_controller_test.rb
The error message should indicate that the new action is missing from
TextPostsController. Open app/controllers/text_posts_controller.rb, and add the
new action:
class TextPostsController < ApplicationController
def new
@text_post = TextPost.new
end
end
You almost have enough to get the test to pass. The last step is to add
the corresponding view. Create the file app/views/text_posts/new.html.erb, and
add the following content:
<div class="page-header">
<h1>New Text Post</h1>
</div>
<%= render 'form' %>
This view is a page header followed by a render command for the form
partial. Let’s add the partial now. First, create the file app/views/text_posts/
_form.html.erb, and add this form:
<%= form_for @text_post do |f| %> u
<div class="form-group">
<%= f.label :title %>
<%= f.text_field :title, class: "form-control" %> v
</div>
<div class="form-group">
<%= f.label :body %>
<%= f.text_area :body, class: "form-control" %> w
</div>
<%= f.submit class: "btn btn-primary" %>
<%= link_to 'Cancel', :back, class: "btn btn-default" %>
<% end %>

Testing 159
This partial creates a form for the new TextPost assigned to @text_post u.
The form includes a text field for the post title v, a text area for the post
body w, and buttons to submit the form or cancel and go back .
While you’re editing views, add a button for creating a new text post on
the home page. Open app/views/posts/index.html.erb, and then add this link
under the page header:
<p>
<%= link_to "New Text Post", new_text_post_path,
class: "btn btn-default" %>
</p>
You should now be able to run the TextPostController tests successfully.
Now add another controller test to describe creating a TextPost to test/
controllers/text_posts_controller_test.rb:
test "should create post" do
u user = users(:user1)
v params = {
text_post: {
title: "Test Title",
body: "Test Body"
}
}
w post :create, params, { user_id: user.id }
text_post = assigns(:text_post)
assert text_post.persisted?
assert_redirected_to post_url(text_post)
end
As with the previous controller test for the TextPostsController, this test
first initializes a new user u from a fixture. Next, it sets up the necessary
parameters v for a new TextPost, and then issues a POST request w to the
create action with the params hash and the user.id in the session. Finally,
it ensures the new text post was persisted to the database and that the
request redirects to the new post’s URL.
The first step to making this test pass is to add a create action to the
TextPostsController. Open the file app/controllers/text_posts_controller.rb, and
add the following method:
class TextPostsController < ApplicationController
--snip--
def create
@text_post =
u current_user.text_posts.build(text_post_params)
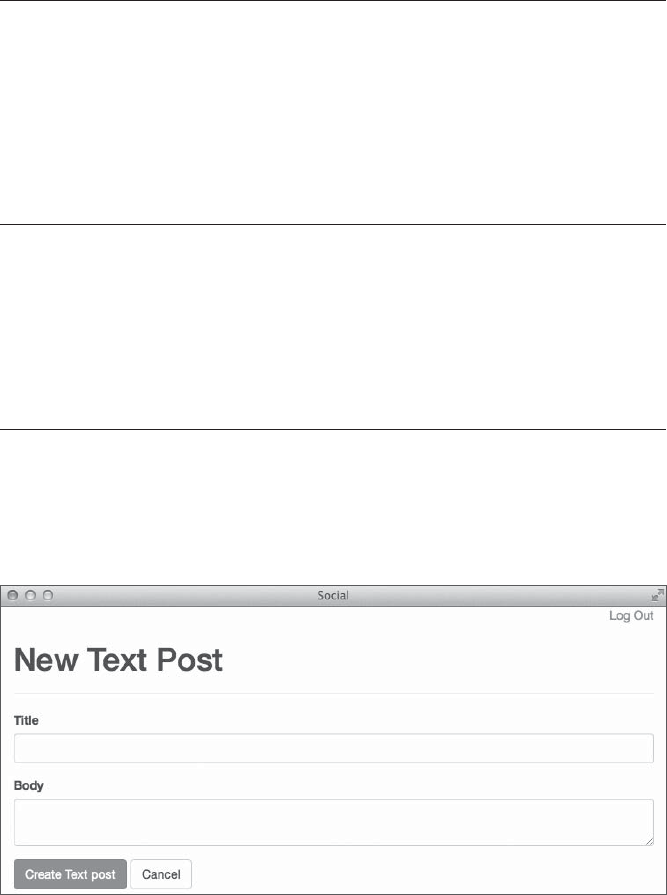
160 Chapter 10
if @text_post.save
v redirect_to post_path(@text_post),
notice: "Post created!"
else
w render :new, alert: "Error creating post."
end
end
end
The create method builds a new text post u for the current user using
the params from the form. If it is able to save this new post, it redirects the
user v to the newly created post. Otherwise, it renders the new text post
form w again with an error message.
Finally, add the text_post_params method for Rails strong params. This
method is called in the create action to get the permitted parameters
for the new TextPost. Add this private method near the bottom of the
TextPostsController class:
class TextPostsController < ApplicationController
--snip--
private
def text_post_params
u params.require(:text_post).permit(:title, :body)
end
end
This method ensures u that the params hash contains the :text_post key
and permits key-value pairs for :title and :body under the :text_post key.
With this change, all of your tests should pass again. Click the New Text
Post button on the home page, as shown in Figure 10-2, to see the form for
creating a TextPost.
Figure 10-2: The New Text Post form

Testing 161
The process for creating a new ImagePost is similar. Exercise 3 at the end
of this chapter walks through the necessary steps.
These new features bring our application much closer to being a fully
functioning social network.
Summary
We covered a lot of ground in this chapter. You learned about the MiniTest
framework. You wrote model, controller, and integration tests. We discussed
test-driven development and then you used it to add features to your social
network.
You can write the tests either before or after the code, and you can use
any test framework—what matters is that you write tests. The ability to type
a single command and verify your application is working correctly is worth
the small investment of your time. Over the life of an application, the bene-
fits of a comprehensive set of tests for your application are immeasurable.
Exercises
1. You currently cannot get to the user show page without typing in the
URL. Update the TextPost and ImagePost partials so the user’s name is a
link to the user’s show page. Also, add a link called Profile that links to
the current user’s show page next to the Log Out link near the top of the
application layout.
2. The follow action should not be available to anonymous users. Add a
call in UsersController to before_action :authenticate_user! with the only
option to require authentication before the follow action. The following
test should pass after you update UsersController:
test "follow should require login" do
user = users(:user1)
get :follow, { id: user.id }
assert_redirected_to login_url
end
Also, the Follow button on the user show page should not appear
for anonymous users or if the current user is already following the user
being displayed. Update the show view to fix this.
3. Add new and create actions for image posts and the private image_post
_params method used by the create action in app/controllers/image_posts_
controller.rb. Then create a view for the new action at app/views/image_
posts/new.html.erb and a partial for the ImagePost form at app/views/
image_posts/_form.html.erb.

162 Chapter 10
Add the following controller tests to test/controllers/image_posts_
controller_test.rb. Both tests should pass after you add the actions to
ImagePostsController and create the associated views.
test "get new with new post" do
user1 = users(:user1)
get :new, {}, { user_id: user1.id }
image_post = assigns(:image_post)
assert image_post.new_record?
assert_response :success
end
test "should create post" do
user = users(:user1)
params = {
image_post: {
title: "Test Title",
url: "http://i.imgur.com/Y7syDEa.jpg"
}
}
post :create, params, { user_id: user.id }
image_post = assigns(:image_post)
assert image_post.persisted?
assert_redirected_to post_url(image_post)
end
Your implementation of these actions and views should be similar
to the TextPost new and create actions and views. If you would like to
practice TDD, feel free to add these tests and confirm they fail before
you start implementing the actions.
11
seCuRity
When users sign up for an account on your web-
site, they trust that you will keep their data safe and
secure. Unfortunately, as the popularity of your appli-
cation increases, so does the likelihood of attack. Even
if your application is not popular yet, it can still fall
victim to automated systems that scan the web looking
for vulnerable sites.
In this chapter, you’ll learn about four of the most common security
vulnerabilities and how to protect your site from them. We’ll discuss autho-
rization, injection, cross-site scripting, and cross-site request forgery attacks.
Authorization Attacks
You created an authentication system in Chapter 9, but authentication is not
the same thing as authorization. Authentication identifies a user. Authorization
specifies what a logged-in user can access within your application. Your

164 Chapter 11
authentication system uses an email address and a password to identify a
user. Authorization systems usually deal with roles or privileges.
At this point, you aren’t defining roles for the users in your applica-
tion, but some privileges should be in place. For example, a user should be
able to view and edit his or her own posts but only view posts belonging to
another user. A user should also be able to moderate comments on his or
her own posts, even if another user added the comment.
An authorization attack occurs when a user manages to bypass privileges
and access a resource that is owned by another user. The most common
type of authorization attack is known as an insecure direct object reference, which
means the user can manipulate the URL to access a restricted resource in
your application.
Let’s look at an example from your social app. This code sample creates
a method to allow users to edit previously created text posts, but it includes a
resource lookup that allows an insecure direct object reference:
def edit
@text_post = TextPost.find(params[:id])
end
This method finds the TextPost to edit using the id parameter passed
in as part of the URL, regardless of who originally created it. Because this
code doesn’t check which user is trying to access the post, any authenticated
user could edit any post in the application. All the user has to do is open
one of his or her posts to edit, work out which part of the URL represents
the post id, and change that value to another post’s id.
You only want users to be able to edit their own posts. This next listing
shows a better way to handle this lookup:
def edit
@text_post = current_user.text_posts.find(params[:id])
end
By using current_user.text_posts, the find method is restricted to only
posts belonging to the current user. Now if a user changes the id in the
URL in an attempt to modify another user’s post, the find will fail and the
user should see the 404 error page. If a resource is owned by a user, always
reference that user when finding the resource in the database.
Now that you know the correct way to find a post to be edited, add the pre-
vious method to the text post controller at app/controllers/text_posts_controller.rb.
When the user submits the edit text post form, the changes are sent to the
update action. Use the same authorization idea to add an update method for
text posts:
def update
u @text_post = current_user.text_posts.find(params[:id])
v if @text_post.update(text_post_params)
redirect_to post_path(@text_post), notice: "Post updated!"
Security 165
else
render :edit, alert: "Error updating post."
end
end
This method finds the correct text post u belonging to the current
user and calls the update method v using the params from the text post form.
If the call to update is successful, the text post is updated in the database
and the user is redirected to the updated post. Otherwise, the edit view is
rendered again with an error message.
Next, create the file app/views/text_posts/edit.html.erb and add the edit
view for text posts:
<div class="page-header">
<h1>Edit Text Post</h1>
</div>
<%= render 'form' %>
This view is the same as the new view for text posts except for the head-
ing. This view reuses the form partial you created in the last chapter.
Finally, add a link to the edit action in the TextPost partial at app/views/
text_posts/_text_post.html.erb.
<%= text_post.body %>
u <% if text_post.user == current_user %>
<p>
<%= link_to 'Edit', edit_text_post_path(text_post),
class: "btn btn-default" %>
</p>
<% end %>
</div>
</div>
This link should only appear if the text post belongs to the current user u.
Editing image posts follows the same pattern. Add the edit and update
methods, complete with authorization, to app/controllers/image_posts_controller
.rb, create an edit view for image posts at app/views/image_posts/edit.html.erb,
and add a link to the edit action in the ImagePost partial at app/views/image
_posts/_image_post.html.erb. These steps are covered in Exercise 1 at the end
of this chapter.
Injection Attacks
An injection attack occurs when input from a user is executed as part of the
application. Injection attacks are extremely common, especially in older
applications.
166 Chapter 11
The first rule of avoiding injection attacks is never trust input from the
user. If an application does not ensure that all data entered by a user is safe,
then it is vulnerable to injection attacks. Keep this in mind as we look at two
types of injection attacks in this section: SQL injection and cross-site scripting.
SQL Injection
In a SQL injection attack, user input is added directly to an SQL statement. If
a malicious user provides actual SQL code as input, he or she could bypass
your application’s authorization system, query your application’s database,
and obtain or delete restricted information.
For example, consider an application where the Rails built-in secure
password feature is not used. Instead, the developer stores usernames
and passwords in the database and has written his or her own authenticate
method to verify a user’s credentials. This custom User.authenticate method
shows what not to do, as it’s vulnerable to SQL injection:
class User < ActiveRecord::Base
u def self.authenticate(username, password)
v where("username = '#{username}' " +
"AND password = '#{password}'").first
end
end
This method accepts arguments for username and password u. These
values are entered by the user and passed to the controller as parameters.
These variables are then added to a where call using string interpolation v.
This method returns the correct user object for valid username and
password combinations. For example, assuming a User with username tony
and password secret, this method returns the User:
User.authenticate("tony", "secret")
=> #<User id: 1, username: ...>
The method call then generates the following SQL code:
SELECT * FROM "users"
WHERE (username = 'tony' AND password = 'secret')
ORDER BY "users"."id" ASC
LIMIT 1
This method also works correctly when passed invalid username and
password combinations:
User.authenticate("tony", "wrong")
=> nil
In this case, the password is not valid so the method returns nil. So far,
so good!

Security 167
Bypassing an Authentication System
Unfortunately, savvy attackers know a handy SQL string that allows
them to bypass completely this authenticate method: ' OR '1'='1. In SQL,
the statement '1'='1' evaluates to TRUE, so if it is added to any other condi-
tional statement with OR, the entire conditional evaluates to TRUE.
Let’s see what happens when this string is passed to the authenticate
method for username and password:
User.authenticate("' OR '1'='1", "' OR '1'='1")
=> #<User id: 1, username: ...>
I didn’t pass the method any valid data, so how did the authenticate method
succeed? The SQL code generated by the method call shows the trick:
SELECT * FROM "users"
WHERE (username = '' OR '1'='1' AND password = '' OR '1'='1')
ORDER BY "users"."id" ASC
LIMIT 1
Even though there is no user with an empty string for username and
password, the addition of OR '1'='1' causes the WHERE clause to evaluate to TRUE
and the method returns the first user in the database. The attacker is now
logged in as the first user. This attack is made worse by the fact that the first
user in the database usually belongs to the application’s creator, who might
also have special privileges.
Preventing SQL Injection
Thankfully, you can usually find SQL injection errors just by looking at
your code carefully. If you see string interpolation inside a where method,
assume it is dangerous and needs to be corrected.
If you must build your own query string, switch to hash conditions:
def self.authenticate
username = params[:username]
password = params[:password]
where(username: username,
password: password).first
end
Here, the string is completely removed from the call to the where method.
Cross-Site Scripting
Cross-site scripting (XSS) is another common injection attack. In a cross-site
scripting attack, an attacker is allowed to enter malicious JavaScript code
into your application. Any text field can potentially be used in a cross-site
scripting attack. When another user views a page with malicious JavaScript,
the user’s browser executes the code as if it were part of your application.
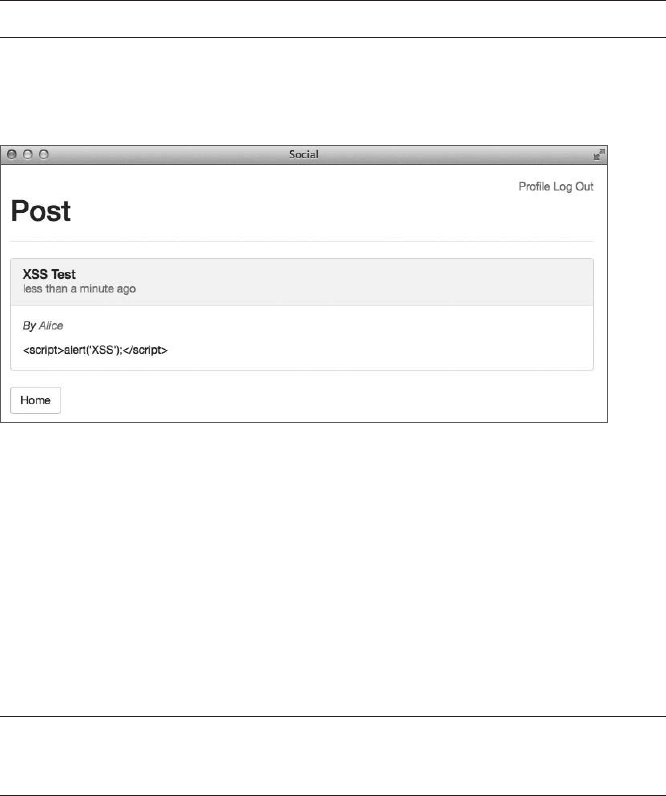
168 Chapter 11
Cross-site scripting vulnerabilities can be exploited to deface your web-
site or even display fake log-in forms in an attempt to steal user credentials.
The possibilities are almost endless if an attacker is able to inject code into
your site.
Built-in Protection
Rails includes protection from cross-site scripting by default. Your applica-
tion is safe from XSS attacks unless you explicitly bypass this protection. As
a quick check, try entering the following JavaScript code in the body of a
new text post:
<script>alert('XSS');</script>
After saving this post, you should see that before displaying text on the
page, as shown in Figure 11-1, Rails first escapes all HTML tags by replacing
special characters with their corresponding character entities.
Figure 11-1: Text post with escaped HTML
For example, less-than signs are replaced with < and greater-than
signs with >. Instead of being executed, the code is displayed on the page
like any other text. So if you never plan to allow users to enter HTML into
your site, your application is safe from cross-site scripting.
Unfortunately, users might like to enter HTML tags to format their
posts in your application. In this case, your site will need to accept at least
a few HTML tags. You can turn off the automatic escaping of HTML tags
by using the raw helper method in your view. Open app/views/text_posts/
_text_post.html.erb and add raw before text_post.body:
--snip--
<%= raw text_post.body %>
--snip--
Now when you refresh the page in your browser, the script tag will not
be escaped, and you should see a pop-up window with the text “XSS,” as
shown in Figure 11-2.
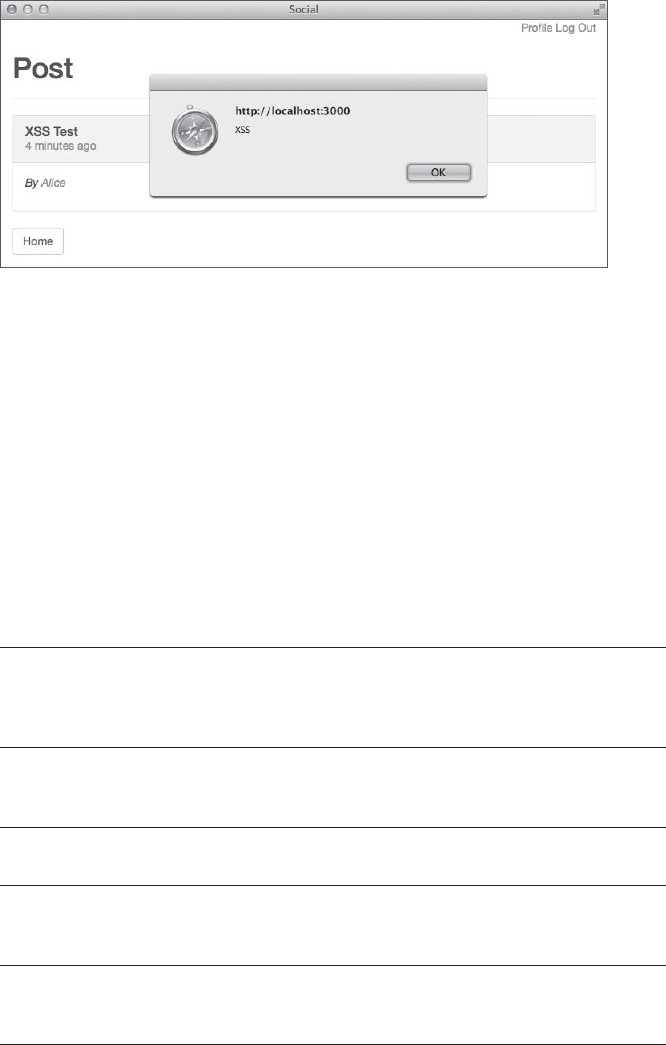
Security 169
Figure 11-2: Text post with XSS vulnerability
The trick is to let your application only accept safe tags, such as <strong>
for bold, <em> for italics, and <p> for marking paragraphs, while rejecting
dangerous tags such as <script>. You might be tempted to write your own
helper method to deal with these dangerous tags, but thankfully, Rails pro-
vides the sanitize helper method to take care of this for you.
The sanitize method
The sanitize helper method removes all HTML tags that are not explic-
itly allowed by its whitelist. You can see the list of allowed tags by entering
ActionView::Base.sanitized_allowed_tags in a Rails console.
Try a few examples of the sanitize method in the Rails console to famil-
iarize yourself with how it works:
irb(main):001:0> helper.sanitize("<p>Hello</p>")
=> "<p>Hello</p>"
irb(main):002:0> helper.sanitize("<script>alert('XSS')</script>")
=> ""
You can specify your own array of allowed tags by including a value for
the tags key in the options hash:
irb(main):003:0> helper.sanitize("<p>Hello</p>", tags: ["em", "strong"])
=> "Hello"
Now that you’ve seen the sanitize method in action, replace the raw
method call with sanitize in the TextPost partial you edited earlier.
--snip--
<%= sanitize text_post.body %>
--snip--
Refresh the page again and you should no longer see the alert.

170 Chapter 11
Cross-Site Request Forgery Attacks
A cross-site request forgery (CSRF) attack occurs when one of your application’s
users visits another site that has been modified by an attacker to target your
site specifically. The malicious site attempts to use your application’s trust in
this user to submit requests to your application.
To exploit a CSRF vulnerability, the attacker must first find the vulner-
ability in your application. Next, he or she must create a page with a link
to the vulnerability. Finally, the attacker must trick your application’s users
into visiting the malicious page and activating the link.
How CSRF Works
Imagine you are building an online payment application. Your application
includes a transfer action that accepts amount and to parameters that specify
how much money to transfer to another user.
An attacker could study the requests generated by your site and attempt
to replicate those requests on his or her own site using something as simple
as an HTML image tag:
<img src="http://yoursite.com/transfer?amount=100&to=attacker">
Every time someone visits this page, the user’s browser issues a GET
request to your site when it tries to load this image. If the visitor is logged in
to your site and your site is vulnerable to CSRF attacks, $100 is transferred
from the visitor’s account to the attacker’s account.
You aren’t building a payment site, but your site is vulnerable to a CSRF
attack. In Chapter 10, you added a method for one user to follow another user
on the site. In doing that, you added the following line to config/routes.rb:
get 'follow/:id', to: 'users#follow', as: 'follow_user'
By looking at the request created when I click the Follow button, I can
create a malicious link to exploit this vulnerability. Assuming my account’s
id is 10, the link would look like this:
<img src="http://yoursite.com/follow/10">
Now all I need to do is convince other users to visit a page containing
this image tag and they will follow me automatically.
Preventing CSRF
You can prevent CSRF attacks in two steps. First, include a user-specific
token with all requests that change state in your application, and ignore any
request that does not include this token. Second, never use a GET request
to change state. If a request could create or change data in the database or
the session, it should use POST.

Security 171
Rails takes care of including a secret token and denying requests by
default. Open the application layout at app/views/layouts/application.html.erb
to see the code for including the token:
<%= csrf_meta_tags %>
Load your site in a web browser and then view source to see the meta
tags generated by this method in the page’s head.
<meta content="authenticity_token" name="csrf-param" />
<meta content="KA1Q/JoVfI+aV6/L4..." name="csrf-token" />
You can also see the authenticity_token in a hidden field included
with every form in your application. Every time you submit a form, the
value from this hidden field is included with the other parameters. The
authenticity_token is also automatically included with all POST requests.
Now open app/controllers/application_controller.rb to see the code that
actually denies invalid requests:
protect_from_forgery with: :exception
Here, Rails goes one step further and raises an exception for requests
that don’t include the CSRF token. This exception is logged and can be
used to track down attackers.
You must handle the second step yourself. Any time you add a con-
troller action, make sure you do not use a GET request if the action could
change data. The follow action added in Chapter 10 creates a record in the
database, so it should be a POST request. The POST request automatically
includes the authenticity_token, and Rails verifies the token thanks to the
protect_from_forgery method in ApplicationController.
To correct this vulnerability in your application, open config/routes.rb
and change the follow action to use POST instead of GET:
--snip--
post 'follow/:id', to: 'users#follow', as: 'follow_user'
--snip--
Now update the link in app/views/users/show.html.erb to use the POST
method instead of the default GET:
<%= link_to "Follow", follow_user_path(@user),
method: :post, class: "btn btn-default" %>
With these two changes, the follow action should now be safe from
CSRF attacks.

172 Chapter 11
Summary
Malicious users and sites are unavoidable on the Web today. As your appli-
cation gains popularity, the risk of attack rises. Thankfully, Rails provides
the tools you need to protect your application and your users from attacks.
The security vulnerabilities covered in this chapter were taken from
the Top 10 list published by The Open Web Application Security Project
(OWASP). Visit http://www.owasp.org/ to find your local OWASP chapter and
discuss application security at free meetings in your area.
Now that your application is functional and secure, we’ll look at perfor-
mance in the next chapter. No one likes a slow web application! Here again,
Rails provides several tools for improving your application’s performance,
but you have to put them to use.
Exercises
1. Users should also be able to edit their image posts. Add the edit and
update methods to the ImagePostsController at app/controllers/image_posts
_controller.rb. Also add the ImagePost edit view at app/views/image_posts/
edit.html.erb. Finally, add a link to the edit action in the ImagePost partial
at app/views/image_posts/_image_post.html.erb. The methods and views
should be similar to those you added for text posts.
2. Users should be able to moderate comments on their own posts.
First, add a @can_moderate instance variable inside the show action in
PostsController, as shown here:
--snip--
def show
@post = Post.find(params[:id])
@can_moderate = (current_user == @post.user)
end
end
This variable is true if the current_user is the author of the
post being displayed. Now update the comment partial at app/views/
comments/_comment.html.erb to include a link to the destroy action if
the value of @can_moderate is true. Finally, add the destroy action to the
CommentsController at app/controllers/comments_controller.rb. This action
should find the correct comment using the id from the params hash,
call the destroy method on the comment, and then redirect to the
post_path with a message indicating success or failure.

Security 173
3. You need to correct one more CSRF vulnerability in your application.
Open the routes file at config/routes.rb and look at the logout route:
--snip--
get 'login', to: 'sessions#new', as: 'login'
u get 'logout', to: 'sessions#destroy', as: 'logout'
root 'posts#index'
end
This route leads to the destroy action in the SessionsController and
you’re using a GET request u to access it. Change this route from get
to delete so a DELETE request is required. Also, add method: :delete to
the Log Out link in the application layout at app/views/layouts/application
.html.erb.
12
peRfoRmaNCe
The relative performance of Ruby on Rails compared
to other languages and web frameworks is still a topic
of debate. A quick Google search reveals that many
people feel Ruby on Rails is slow.
Newer versions of the Ruby interpreter have made great strides where
performance is concerned. Ruby 2.0 included garbage collection optimiza-
tions and other improvements that made it much faster than older versions.
Ruby 2.1 introduced a generational garbage collector that was even faster still.
As the Ruby language has improved, so has Ruby on Rails. The Rails
framework now includes several features designed specifically to improve
application performance. This chapter starts with discussions of two of
those built-in features and then moves on to cover some things you can do
to improve performance. Finally, I’ll talk about the caching techniques sup-
ported by Rails.

176 Chapter 12
Built-in Optimization Features
The asset pipeline and turbolinks are two built-in Rails performance opti-
mizations you’ve been using since creating your original blog. Both of these
features are enabled by default on new Rails applications, and we’ll explore
how they work here.
Asset Pipeline
The asset pipeline is a Rails feature that combines all of the individual
JavaScript and CSS files used by your application into one JavaScript and
one CSS file, reducing the number of requests a browser makes to render
a web page because your application uses more than one file of each type.
Web browsers are limited in the number of requests they can make in paral-
lel, so fewer requests should result in faster loading pages.
The asset pipeline also minifies, or compresses, JavaScript and CSS
files by removing whitespace and comments. Smaller files load faster, so
your web pages load faster.
Finally, the asset pipeline preprocessor also enables you to use higher-
level languages such as CoffeeScript instead of JavaScript and Sass instead
of plain CSS. Files in these higher-level languages are precompiled to plain
JavaScript and CSS using their respective compilers before being served so
web browsers can understand them.
Manifests
As you generate controllers for your application, Rails also generates a cor-
responding JavaScript and CSS file in the app/assets/javascripts and app/assets/
stylesheets directories. Rather than link to each of these files separately in
your application, Rails uses a manifest file. As mentioned in Chapter 5,
a manifest file is a list of other files needed by your application.
Manifest files use directives, instructions specifying other files to include,
in order to build a single file for use in the production environment. The
require directive includes a single file in the manifest. The require_tree
directive includes all files in a directory. The require_self directive includes
the contents of the manifest file.
To see an example, open the default CSS manifest at app/assets/stylesheets/
application.css:
/*
* This is a manifest file that'll be compiled into application.css,
* which will include all the files listed below.
*
--snip--
*
u *= require_tree .
v *= require bootstrap
w *= require_self
*/

Performance 177
This file first uses the require_tree . directive u to include all CSS files
in the current directory. It then includes the Bootstrap stylesheets using the
require bootstrap directive v you added in Chapter 9. Finally, the require_self
directive w includes the contents of this file below the comment block. Cur-
rently, nothing appears below the comment block.
The asset pipeline searches for assets in three different locations by
default. You know about one of them already: The app/assets directory is
used for CSS, JavaScript, and image files owned by your application.
The lib/assets directory is for assets needed by libraries you have writ-
ten. Because you haven’t written any libraries yet, this directory is currently
empty. The vendor/assets directory is for assets created by third parties, such
as code for JavaScript plug-ins and CSS frameworks.
Ruby gems can add their own directories to the list of locations that the
asset pipeline searches. You can see this in the JavaScript manifest at app/
assets/javascripts/application.js:
// This is a manifest file that'll be compiled into application.js,
// which will include all the files listed below.
//
--snip--
//
u //= require jquery
//= require jquery_ujs
//= require turbolinks
v //= require_tree .
w //= require bootstrap
This file uses the require directive u to include the jQuery, jQuery UJS,
and Turbolinks libraries that are part of the jquery-rails and turbolinks
gems included in your application’s Gemfile.
It then uses require_tree v to include all JavaScript files in the current
directory. Finally, it requires the JavaScript files w needed by the Bootstrap
CSS framework.
You won’t find jquery, jquery_ujs, turbolinks, or bootstrap in the vendor/
assets/javascripts directory. Instead, the gems that provide these files have
updated the asset pipeline search path to include their own directories.
You can see the complete list of asset pipeline search paths by enter-
ing Rails.application.config.assets.paths in the Rails console. This state-
ment returns an array of paths. In this list, you should find paths such as
jquery-rails-3.1.0/vendor/assets/javascript, turbolinks-2.2.2/lib/assets/javascripts,
and bootstrap-sass-3.1.1.0/vendor/assets/javascripts.
Debug Mode
As you’ve seen, CSS and JavaScript files are served as separate, uncom-
pressed files in the development environment. Your social media applica-
tion is serving 31 separate CSS and JavaScript files according to the server
output. An asset pipeline configuration called debug mode controls how
assets are handled in each environment.

178 Chapter 12
In the development environment, debug mode is turned on. That means
the files referred to in the CSS and JavaScript files are served separately,
which is useful if you need to debug an issue with a file using your browser’s
development tools.
If you want to force assets to be combined and preprocessed so you can
see how they are served in the production environment, you can turn off
debug mode. Just change the value of config.assets.debug near the bottom
of the development environment configuration file config/environments/
development.rb:
config.assets.debug = false
When debug mode is off, Rails concatenates and runs preprocessors,
such as the CoffeeScript or Sass compiler, on all files before serving them.
Restart the Rails server after modifying this file, and then check the server
output in your terminal to see the difference:
Started GET "/login" for 127.0.0.1 at 2014-03-16 20:38:43 -0500
Processing by SessionsController#new as HTML
Rendered sessions/new.html.erb within layouts/application (1.5ms)
Completed 200 OK in 5ms (Views: 4.5ms | ActiveRecord: 0.0ms)
u Started GET "/assets/application.css" for 127.0.0.1 at ...
v Started GET "/assets/application.js" for 127.0.0.1 at ...
Only two files (u and v) are served now—the CSS and JavaScript man-
ifest files. This setting can actually slow down page loads in development
because the files are combined for every request, so change config.assets
.debug back to true before continuing.
Asset Precompilation
In the production environment, you should precompile your application’s
assets and serve them as static files by your web server. You can precom-
pile assets in several ways. When you deployed your blog to Heroku in
Chapter 6, you precompiled assets during deployment. Rails also includes
a rake task to precompile assets.
The rake task compiles all files from your CSS and JavaScript manifests
and writes them to the public/assets directory. You can precompile assets for
the production environment with the following command:
$ RAILS_ENV=production bin/rake assets:precompile
During precompilation, an MD5 hash is generated from the contents
of the compiled files and inserted into the filenames as the files are saved.
Because the filename is based on the contents of the file, you can be sure
the correct version of the file is served if you update a file.

Performance 179
For example, after precompilation, the file app/assets/stylesheets/application
.css might be named public/assets/application-d5ac076c28e38393c3059d7167501
838.css. Rails view helpers use the correct name automatically in produc-
tion. You don’t need the compiled assets for development, so when you’re
finished looking at them, remove them using the assets:clobber rake task:
$ RAILS_ENV=production bin/rake assets:clobber
This command deletes the public/assets directory and all of its contents.
In Chapter 15, you’ll learn how to deploy your application to your own
server using a program called Capistrano. You can configure Capistrano
to precompile assets automatically during deployment just as you did when
you deployed the blog to Heroku.
Turbolinks
The asset pipeline reduces the number of requests the web browser makes
for assets, but the browser still needs to parse and recompile the CSS and
JavaScript for every page. Depending on the amount of CSS and JavaScript
your application includes, this could take a significant amount of time.
Turbolinks is a Rails feature that speeds up the process of following links
in your application by replacing the contents of the current page’s body and
the title with the data for the new page instead of loading an entirely new
page. With turbolinks, CSS and JavaScript files are not even downloaded
when a link is clicked.
Turbolinks in Action
Turbolinks is on by default in new Rails applications. You’ve been using it
without even knowing since you built your first application in Chapter 2.
You can see it working by watching the output from the Rails server. Go to
http://localhost:3000/ in your browser and check the output in your terminal:
Started GET "/" for 127.0.0.1 at ...
Processing by PostsController#index as HTML
--snip--
Started GET "/assets/bootstrap.js?body=1" for 127.0.0.1 at ...
Started GET "/assets/application.js?body=1" for 127.0.0.1 at ...
After the GET request for the posts index page, the browser fetches all
of the CSS and JavaScript files needed by your application. Now click a link
such as New Text Post on the index page and check the output again:
Started GET "/text_posts/new" for 127.0.0.1 at ...
Processing by TextPostsController#new as HTML
User Load (0.2ms) SELECT "users".* FROM "users"
WHERE "users"."id" = ? LIMIT 1 [["id", 7]]

180 Chapter 12
Rendered text_posts/_form.html.erb (2.4ms)
Rendered text_posts/new.html.erb within layouts/application (3.3ms)
Completed 200 OK in 38ms (Views: 36.5ms | ActiveRecord: 0.2ms)
The browser only makes a GET request for the New Text Post page. It
does not fetch the CSS and JavaScript files because they are already loaded
in memory. Finally, click the Back button in your browser.
This time there is no output in the terminal window. The index page was
cached in the browser and no requests were sent to the server. Turbolinks
caches ten pages by default.
JavaScript Events
If your application includes JavaScript code that uses jQuery’s ready func-
tion to attach event handlers or trigger other code, the JavaScript needs to
be modified to work with turbolinks. Because turbolinks doesn’t reload the
entire page when a link is clicked, the ready function is not called.
Instead, the page:load event is fired at the end of the loading process.
You can see this in action by adding the following CoffeeScript code to
app/assets/javascripts/posts.js.coffee:
--snip--
$(document).ready ->
u console.log 'Document Ready'
$(document).on 'page:load', ->
v console.log 'Page Load'
Unfortunately, CoffeeScript is beyond the scope of this book, but you
might recognize what this code snippet does if you’re already familiar with
JavaScript. It prints “Document Ready” u in your browser’s JavaScript con-
sole when the page first loads, and “Page Load” v when you click a link
that uses turbolinks.
Because you aren’t currently using $(document).ready() to trigger any
JavaScript code, you don’t need to worry about this right now. But you
should revisit this section if you ever start using the ready function.
Code Optimizations
Now that you’ve seen a few of the built-in optimizations provided by Rails,
let’s look at extra things you can do to improve performance. I’ll cover some
techniques you can use to reduce the number of database queries your appli-
cation makes and improve the performance of slow queries.
Reducing Database Queries
Rails models make accessing data so easy that you might forget you’re actu-
ally querying a database. Luckily, the Rails server shows SQL statements in
the terminal. Look at this output as you navigate your application to spot
possible inefficiencies.
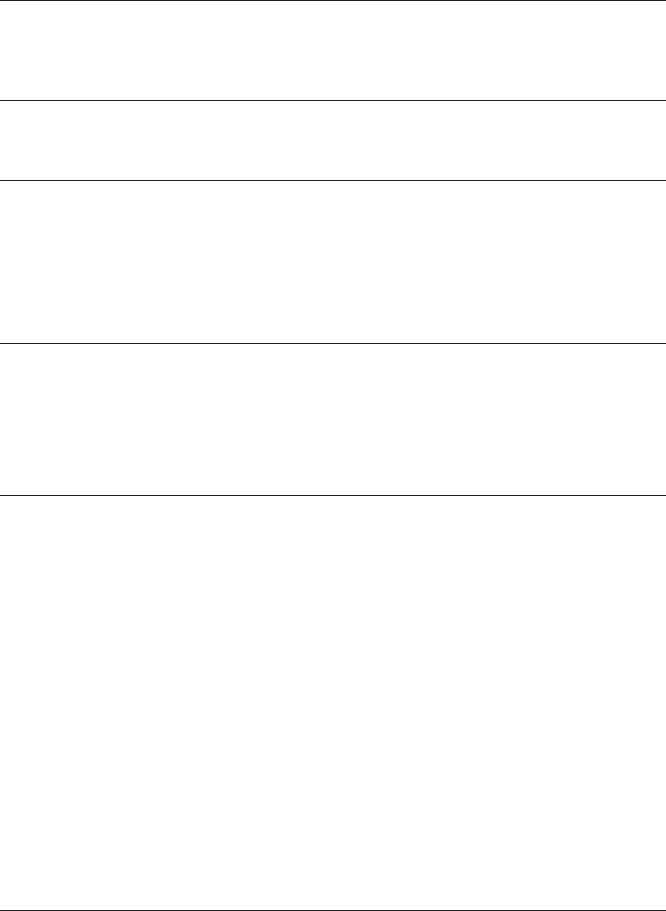
Performance 181
Examining SQL Output
Make sure your server is running, and keep an eye on your terminal output
as I walk you through a few examples. Be sure you are logged out of the
application before you start. First, browse to the login page at http://
localhost:3000/login and check the server output:
Started GET "/login" for 127.0.0.1 at 2014-03-18 18:58:39 -0500
Processing by SessionsController#new as HTML
Rendered sessions/new.html.erb within layouts/application (2.0ms)
Completed 200 OK in 12ms (Views: 11.8ms | ActiveRecord: 0.0ms)
This page doesn’t produce any SQL queries.
Now log in to the application:
Started POST "/sessions" for 127.0.0.1 at 2014-03-18 18:59:01 -0500
Processing by SessionsController#create as HTML
Parameters: ...
u User Load (0.2ms) SELECT "users".* FROM "users"
WHERE "users"."email" = 'alice@example.com' LIMIT 1
Redirected to http://localhost:3000/
Completed 302 Found in 70ms (ActiveRecord: 0.2ms)
This page produces one SQL query u as Rails loads the user matching
the email address you entered on the previous page. The create method in
SessionsController uses this record to authenticate the password you entered.
After you log in to the application, you should be redirected to the posts
index page. Your server output for that page should look something like this:
Started GET "/" for 127.0.0.1 at 2014-03-18 18:59:02 -0500
Processing by PostsController#index as HTML
u User Load (0.1ms) SELECT "users".* FROM "users"
WHERE "users"."id" = ? LIMIT 1 [["id", 1]]
v (0.1ms) SELECT "users".id FROM "users" INNER JOIN
"subscriptions" ON "users"."id" = "subscriptions"."leader_id"
WHERE "subscriptions"."follower_id" = ? [["follower_id", 1]]
w Post Load (0.2ms) SELECT "posts".* FROM "posts"
WHERE "posts"."user_id" IN (2, 1)
ORDER BY created_at DESC
User Load (0.1ms) SELECT "users".* FROM "users"
WHERE "users"."id" = ? LIMIT 1 [["id", 2]]
User Load (0.1ms) SELECT "users".* FROM "users"
WHERE "users"."id" = ? LIMIT 1 [["id", 1]]
CACHE (0.0ms) SELECT "users".* FROM "users"
WHERE "users"."id" = ? LIMIT 1 [["id", 1]]
Rendered collection (2.7ms)
Rendered posts/index.html.erb within layouts/application (3.8ms)
Completed 200 OK in 13ms (Views: 11.0ms | ActiveRecord: 0.6ms)

182 Chapter 12
This page produces six queries. It first finds the user with id 1 u;
this query looks up the current_user inside the authenticate_user! call in
PostController. Next, the page finds the ids v of the users the current user
is following in the call to current_user.timeline_user_ids. It then finds posts w
where the user_id matches the id of the current_user or one of his or her
followers.
Finally, the page queries for a user matching an id with SELECT
"users".* FROM "users" three times in a row. That looks a little strange to
me. My index page has three posts, but there are three extra queries. Let’s
look at the index action in app/controllers/posts_controller.rb and see what’s
happening:
class PostsController < ApplicationController
u before_action :authenticate_user!
def index
v user_ids = current_user.timeline_user_ids
w @posts = Post.where(user_id: user_ids)
.order("created_at DESC")
end
--snip--
This code calls authenticate_user! u before each action. The index action
finds the user_ids v that current_user wants to see and then finds the posts
w matching those users. You’ve already accounted for those queries in the
previous server output. Since the index action isn’t creating the three user
queries, they must be coming from the view.
The index view renders the collection of posts. That means the source
of these queries must be in the TextPost partial in app/views/text_posts/
_text_post.html.erb:
--snip--
<div class="panel-body">
u <p><em>By <%= text_post.user.name %></em></p>
--snip--
Here’s the problem. The name u of the user who created each post is
displayed by calling text_post.user.name. If you check the ImagePost partial,
you can verify it does the same thing. For every post displayed, an extra
query is generated, which explains the three extra queries you saw in the
SQL output.
N + 1 Queries
Code that creates an extra database query for each record in a collection
falls into a category of problems called N + 1 Queries. These problems are
common in Rails applications, and they occur when associations on a col-
lection are referenced without first loading the associated models.

Performance 183
In this case, I loaded a collection of posts into @posts. I then referenced
the name for the user who created each post. Because I didn’t load all of
those users in advance, Rails fetches them one at a time from the database
as the page is rendered. These extra queries meant the three posts on the
index page resulted in four queries. The number of queries is always one
more than the number of items in the collection.
Luckily, this problem is easy to fix. In Rails, you can specify in advance
all associations that are going to be needed with the includes method. This
technique is called eager loading.
Let’s update the index action in PostsController to use eager loading now:
--snip--
def index
user_ids = current_user.timeline_user_ids
u @posts = Post.includes(:user).where(user_id: user_ids)
.order("created_at DESC")
end
--snip--
Here, I chain the includes(:user) method u to the query that sets @posts.
The symbol passed to includes must match the name of an association on
the model. In this case, post belongs_to :user.
With the includes method, Rails ensures that the specified associations
are loaded using the minimum number of queries. After you save this file,
refresh the index page in your browser and check the SQL output in your
terminal:
--snip--
Post Load (0.3ms) SELECT "posts".* FROM "posts"
WHERE "posts"."user_id" IN (2, 1) ORDER BY created_at DESC
u User Load (0.3ms) SELECT "users".* FROM "users"
WHERE "users"."id" IN (2, 1)
--snip--
The three queries to find each user have been replaced with u a single
query that finds all users at once.
Watch out for extra queries as you build applications. Look for calls like
text_post.user.name in the view. Notice the two dots in that call. The two dots
mean you’re accessing data in an associated model, which can introduce an
N + 1 Queries problem, so you should preload the association before the
view is rendered.
Pagination
You’ve reduced the number of database queries needed to load posts for
the index page, but think about what happens when you have thousands of
posts. The index page tries to show them all, increasing your application’s
load time by a lot. You can use pagination, the process of splitting a collec-
tion of records into multiple pages, to alleviate this problem.

184 Chapter 12
The will_paginate gem can do all the pagination for you. First, add
will_paginate to your application’s Gemfile:
--snip--
gem 'bootstrap-sass'
gem 'will_paginate'
--snip--
Remember to always update installed gems after changing the Gemfile:
$ bin/bundle install
Next, update the index action in app/controllers/posts_controller.rb to add a
call to the paginate method:
--snip--
def index
user_ids = current_user.timeline_user_ids
@posts = Post.includes(:user).where(user_id: user_ids)
u .paginate(page: params[:page], per_page: 5)
.order("created_at DESC")
end
--snip--
The paginate method is chained with the other methods that set the
instance variable @posts u. The will_paginate gem adds params[:page] auto-
matically. I specified per_page: 5 so you can see the pagination working with
only 6 posts in your database. The default is 30 records per page.
The paginate method adds the correct limit and offset calls to the data-
base query automatically so the minimum number of records are selected.
Finally, open the index view at app/views/posts/index.html.erb and add a
call to will_paginate at the end of the page:
--snip--
u <%= will_paginate @posts %>
The will_paginate view helper u accepts a collection of records, in this
case @posts, and renders the correct links to navigate through the pages of
this collection.
To see this working, you need to restart your Rails server since you added
a new gem. Then create new posts until you have at least six, and browse
to a user page. If you click through to the second page, as in Figure 12-1,
you should see the new links.
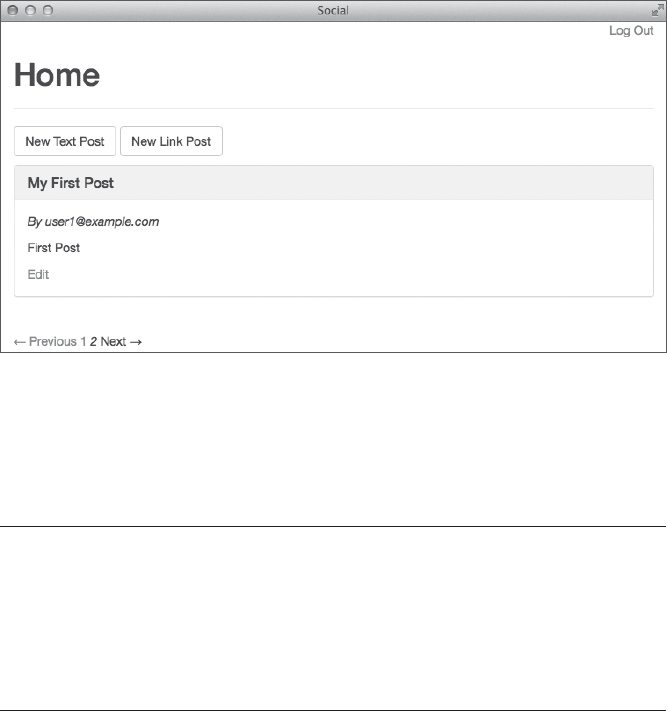
Performance 185
Figure 12-1: Pagination links
The will_paginate view helper added links to Previous and 1, which you
can click to go back to the first page from the second.
Check the server output again to see the query used to retrieve posts
from the database:
Started GET "/posts?page=2" for 127.0.0.1 at 2014-03-26 11:52:27 -0500
Processing by PostsController#index as HTML
Parameters: {"page"=>"2"}
--snip--
u Post Load (0.4ms) SELECT "posts".* FROM "posts"
WHERE "posts"."user_id" IN (2, 1)
ORDER BY created_at DESC LIMIT 5 OFFSET 5
--snip--
The query for page two u now includes LIMIT 5 OFFSET 5 as expected.
This query only fetches posts that are needed to render the page.
Caching
In programming, caching is the process of storing frequently used data so
additional requests for the same data will be faster. Rails calls the place
where data is stored a cache store. Rails applications commonly use two types
of caching.
Low-level caching stores the result of time-consuming calculations in
the cache—useful for values that are frequently read, but rarely change.
Fragment caching stores parts of a view in the cache to speed up page ren-
dering. Rendering a large collection of models can be time consuming. If
the data rarely changes, fragment caching can increase your application’s
page load speed.

186 Chapter 12
Caching is disabled, by default, in the development environment, so
before you can start learning about it, you need to enable it. Leaving the
cache disabled in development is a good idea because you always want to
work with the latest version of data while in development. For example, if
you store a value in the cache, then change the code that calculates that
value, your application could return the cached value instead of the value
calculated by the new code.
You’ll enable caching in development for this chapter, so you can see
how it works and learn about the types of caching used in Rails applica-
tions. Open config/environments/development.rb and change the value of
config.action_controller.perform_caching to true:
Social::Application.configure do
--snip--
# Show full error reports and disable caching.
config.consider_all_requests_local = true
config.action_controller.perform_caching = true
--snip--
end
Once you’re finished with this chapter, change this value back to false
to disable caching in the development environment.
Rails supports several different cache stores. The default, ActiveSupport::
Cache::FileStore, stores cached data on the filesystem. A popular choice
for production applications is ActiveSupport::Cache::MemCacheStore, which
uses the memcached server to store data. The memcached server is a high-
performance cache store that supports distributed caching across several
computers.
Now that you’ve enabled caching, let’s specify a cache store for your
application to use. Rather than install memcached on your computer, you
can use the ActiveSupport::Cache::MemoryStore to demonstrate caching. This
option also stores cached objects in your computer’s memory, but doesn’t
require the installation of additional software. Add this line to config/
environments/development.rb under the line you just changed:
Social::Application.configure do
--snip--
# Show full error reports and disable caching.
config.consider_all_requests_local = true
config.action_controller.perform_caching = true
config.cache_store = :memory_store
--snip--
end
Storing the cache in memory is faster than storing it on disk. The
memory store allocates 32MB of memory, by default. When the amount

Performance 187
of cached data exceeds this amount, the memory store runs a cleanup pro-
cess that removes the least recently used objects, so you never need to worry
about manually removing objects from the cache.
Restart the Rails server for these changes to take effect.
Cache Keys
Everything in the cache is referenced by cache key. A cache key is a unique
string that identifies a particular object or other piece of data.
Active Record models include the cache_key method for generating a key
automatically. You can try it in the Rails console by calling cache_key on an
instance of a model:
2.1.0 :001 > post = Post.first
Post Load (0.2ms) SELECT "posts".* ...
=> #<TextPost id: 1, title: ...>
2.1.0 :002 > post.cache_key
u => "text_posts/1-20140317221533035072000"
The cache key for this post is the pluralized version of the class name,
followed by a slash, then the post id, a dash, and finally the updated_at date
as a string u.
Using the updated_at date as part of the key solves the cache invalida-
tion problem. When the post is modified, the updated_at date changes, so its
cache_key also changes. This way you don’t have to worry about getting out
of date data from the cache.
Low-Level Caching
Low-level caching is useful when you need to perform a time-consuming
calculation or database operation. It is frequently used with API requests
that might take a while to return. Low-level caching in Rails uses the
Rails.cache.fetch method.
The fetch method takes a cache key and attempts to read a matching
value from the cache. The fetch method also takes a block. When given
a block of Ruby code, if the value is not already in the cache, the method
evaluates the block, writes the result to the cache, and returns the result.
To demonstrate low-level caching, let’s show the number of comments
for each post on the index page. To do this, first edit app/views/text_posts/
_text_post.html.erb and add the comment count below the text_post.body:
--snip--
<p><%= sanitize text_post.body %></p>
<p><%= pluralize text_post.comments.count, "Comment" %></p>
--snip--

188 Chapter 12
This new line of code uses the pluralize helper method to pluralize
the word “Comment” correctly based on the number of comments. For
example, if the post has no comments, it prints “0 Comments”. Make a simi-
lar change to app/views/image_posts/_image_post.html.erb, replacing text_post
with image_post.
Now refresh the posts index page in your browser and look at the server
output:
Started GET "/posts" for 127.0.0.1 at 2014-03-26 15:15:05 -0500
Processing by PostsController#index as HTML
--snip--
u (0.1ms) SELECT COUNT(*) FROM "comments"
WHERE "comments"."post_id" = ? [["post_id", 6]]
(0.1ms) SELECT COUNT(*) FROM "comments"
WHERE "comments"."post_id" = ? [["post_id", 5]]
(0.1ms) SELECT COUNT(*) FROM "comments"
WHERE "comments"."post_id" = ? [["post_id", 4]]
(0.1ms) SELECT COUNT(*) FROM "comments"
WHERE "comments"."post_id" = ? [["post_id", 3]]
(0.1ms) SELECT COUNT(*) FROM "comments"
WHERE "comments"."post_id" = ? [["post_id", 2]]
Rendered collection (5.4ms)
Rendered posts/index.html.erb within layouts/application (10.1ms)
Completed 200 OK in 22ms (Views: 16.8ms | ActiveRecord: 1.5ms)
This change adds five new queries u to count the number of comments
for each post. Those extra queries take up valuable loading time, but you
can improve performance by getting rid of them. One way to remove such
queries is by caching the values you need (in this case, the number of com-
ments per post) using Rails.cache.fetch.
You can perform the caching by adding a method to the Post model. Edit
app/models/post.rb and add the cached_comment_count method, as shown here:
class Post < ActiveRecord::Base
--snip--
def cached_comment_count
u Rails.cache.fetch [self, "comment_count"] do
comments.size
end
end
end
This method passes the array [self, "comment_count"] u to the
Rails.cache.fetch method. Here, self represents the current post. The
fetch method combines these values into a single cache key. The block
still calls comments.size as before.

Performance 189
Now update the TextPost and ImagePost views to use this new method:
--snip--
<p><%= pluralize text_post.cached_comment_count, "Comment" %></p>
--snip--
When you refresh the index page in your browser, the six comment
count queries are executed one more time and the values are cached.
Refresh the page again, watch the server output, and note the queries
are no longer executed.
This caching solution has one small problem. The Rails cache_key
method uses the post id and updated_at date to create the cache key, but
adding a comment to a post does not change the post updated_at date.
What you need is a way to update the post when a comment is added.
Rails provides the touch option to associations just for this purpose.
When you specify touch: true on an association, Rails automatically sets the
updated_at value of the parent model to the current time when any part of
the association changes. This happens when a model is added or removed
from the association or when one of the associated models is changed.
Open app/models/comment.rb and add touch: true to the belongs_to asso-
ciation, as shown here:
class Comment < ActiveRecord::Base
belongs_to :post, touch: true
belongs_to :user
validates :user_id, presence: true
end
Now the updated_at value on the post changes whenever one of its com-
ments is updated or deleted or when a new comment is created for it. If you
add a comment to a post, then reload the index page, the comment count
query is executed for this post again and the new count is cached.
Note You can also solve this problem using a Rails counter cache. With a counter cache,
Rails keeps track of the number of comments associated with each post automatically.
Enable this feature by adding a column named comments_count to the Post model and
adding counter_cache: true to the belongs_to :post declaration inside the Comment
model.
Fragment Caching
Besides low-level caching of values, you can also use a Rails feature called
fragment caching to cache parts of a view. Caching the view decreases your
application’s page load time by storing the rendered view data in the cache.
Fragment caching is usually done inside a partial.

190 Chapter 12
To demonstrate fragment caching effectively, I need a slow page. Using
a slow page makes the impact of fragment caching obvious. Let’s use the
Ruby sleep method to render posts more slowly. Obviously, you would never
do this in a real application—this is only for demonstration.
Open the app/views/text_posts/_text_post.html.erb partial and add the call
to sleep on the first line as shown here:
u <% sleep 1 %>
<div class="panel panel-default">
--snip--
</div>
This call to sleep u tells Ruby to pause for 1 second. Make the same
change to the ImagePost partial at app/views/image_posts/_image_post.html.erb.
Now when you refresh the index page, it should take much longer to
display. Check the server output for the exact time:
Started GET "/posts" for 127.0.0.1 at 2014-03-26 16:03:32 -0500
Processing by PostsController#index as HTML
--snip--
u Rendered collection (5136.5ms)
Rendered posts/index.html.erb within layouts/application (5191.6ms)
Completed 200 OK in 5362ms (Views: 5263.1ms | ActiveRecord: 11.8ms)
Rendering those five posts took more than five seconds u, which makes
sense with those five sleep calls.
Now let’s add fragment caching to the partials. Edit app/views/text_
posts/_text_post.html.erb again and add the cache method call and block, as
shown here:
u <% cache text_post do %>
<% sleep 1 %>
<div class="panel panel-default">
--snip--
</div>
<% end %>
The cache method u calls cache_key on the text_post automatically. I
also indented all of the code inside the block. Make the same change to
the ImagePost partial.
Now when you refresh the page in your browser, you should see some
new output from the Rails server:
Started GET "/posts" for 127.0.0.1 at 2014-03-26 16:18:08 -0500
Processing by PostsController#index as HTML
--snip--
u Cache digest for text_posts/_text_post.html: 3e...
v Read fragment views/text_posts/5-2014... (0.0ms)
w Write fragment views/text_posts/5-2014... (0.1ms)
--snip--

Performance 191
Rendered collection (5021.2ms)
Rendered posts/index.html.erb within layouts/application (5026.5ms)
Completed 200 OK in 5041ms (Views: 5035.8ms | ActiveRecord: 1.1ms)
Rendering the index page now generates several lines of output about
the cache. First, a digest is generated u for the partial. This digest is the
same every time this partial is rendered. Next, Rails reads the cache v to
see if this partial is already there. Finally, since the partial was not found in
the cache, it is rendered and then written to the cache w.
Refreshing the page again should read all of the partials from the
cache, rendering the page much more quickly. Check the server output
to be sure:
Started GET "/posts" for 127.0.0.1 at 2014-03-26 16:29:13 -0500
Processing by PostsController#index as HTML
--snip--
Cache digest for text_posts/_text_post.html: 3e...
u Read fragment views/text_posts/22-2014... (0.1ms)
--snip--
v Rendered collection (25.9ms)
Rendered posts/index.html.erb within layouts/application (31.5ms)
Completed 200 OK in 77ms (Views: 73.1ms | ActiveRecord: 1.0ms)
You only see cache reads u now, and the collection renders very
quickly v, in a fraction of the time it took after you added the sleep calls.
Caching can obviously result in dramatic performance improvements.
You should remove the calls to sleep from the TextPost and ImagePost
partials now, but leave the caching in place in the views.
Issues
Caching is a great way to make your application faster, but it can also cause
some issues. Unless the cache key for a code block or view fragment includes
a user id, then the same cached data is sent to every user.
For example, the TextPost and ImagePost partials both contain code that
checks to see if the post belongs to the current user. If so, it displays a but-
ton linked to the edit action.
<% cache text_post do %>
<div class="panel panel-default">
--snip--
u <% if text_post.user == current_user %>
<p><%= link_to 'Edit', edit_text_post_path(text_post),
class: "btn btn-default" %></p>
<% end %>
</div>
</div>
<% end %>
The conditional statement in the TextPost partial at app/views/test_posts/_
text_post.html.erb shows the Edit button if the post belongs to current_user u.

192 Chapter 12
The owner of a post is probably going to be the first user to view the post.
After the owner views the post, the view fragment is cached with the Edit
button. When another user views the same post, the fragment is read from
the cache and the other user also sees the Edit button.
You can correct this issue in a couple of ways. You could include the
user id in the cache key, but that would create a separate copy of the post in
the cache for each user and remove the benefit of caching for many users. A
simpler solution is to move the button outside the fragment being cached,
as shown here:
<% cache text_post do %>
<div class="panel panel-default">
--snip--
</div>
<% end %>
<% if text_post.user == current_user %>
<p><%= link_to 'Edit', edit_text_post_path(text_post),
class: "btn btn-default" %></p>
<% end %>
Once the Edit button is moved outside the cache block, the conditional
is evaluated for every user viewing the post and the Edit button is shown
only if the current user is the owner of the post. Make the same change
to the ImagePost partial at app/views/image_posts/_image_post.html.erb.
Remember to edit config/environments/development.rb, as shown at the
beginning of this section, and disable caching in the development environ-
ment after you complete the exercises at the end of this chapter.
Summary
No one likes slow web applications! This chapter covered techniques for
speeding up your application, from Rails built-in features like the asset
pipeline and turbolinks to database query optimization, pagination, and
caching. Now try the following exercises, and make your application even
faster.
When you’ve completed the exercises, change config.action_controller
.perform_caching back to false in config/environments/development.rb. Leave
caching turned off during development. Otherwise you’ll need to remem-
ber to clear the cache any time you make a change to a cached view partial.
The next chapter covers debugging strategies you can use to track
elusive problems with your application. You’ll look through server output
and logs for clues and finally dive into a running application to see exactly
what’s happening.
Performance 193
Exercises
1. So far your performance optimizations have focused on the post
index page. Open the show page for an individual post, such as
http:// localhost:3000/posts/1. Make sure the post has several com-
ments and then examine the server output. Use eager loading in
the PostsController at app/controllers/posts_controller.rb to reduce the
number of queries this page makes.
2. The post show page renders a collection of comments. Add fragment
caching to the comment partial at app/views/comments/_comment.html.erb.
You only want the Destroy button to appear if @can_moderate is true. In
this case, include the value of @can_moderate in the cache key by passing
the array [comment, @can_moderate] to the cache method.
3. You can cache the entire comments collection by wrapping the
render @post.comments call in the show page in a cache block. Open the
show page at app/views/posts/show.html.erb and add the cache block. Pass
the array [@post, 'comments', @can_moderate] to the cache method, ensur-
ing the Destroy button is only shown to users who can moderate com-
ments as mentioned in Exercise 2. The technique of wrapping a cached
collection inside another cache block is sometimes called Russian-Doll
caching because multiple cached fragments are nested inside each
other. When an object is added to the collection, only the outer cache
needs to be re-created. The cached data for the other objects can be
reused and only the new object needs to be rendered.
13
DeBuGGiNG
I’ve been told that not all developers are perfect like
you and me. We never make mistakes in our code,
but sometimes other developers make mistakes that we
have to clean up. When that happens, the debugging
features built into Rails come in handy. This chap-
ter covers those built-in debugging features, starting
with the debug helper method, which makes it easier to
see the values of variables in your application’s views.
We spent some time looking at the Rails log in previous chapters.
In this chapter, you’ll also see how to add your own messages to that log.
Finally, using the debugger gem, you can step inside your application as
it’s running to track down really tough bugs.
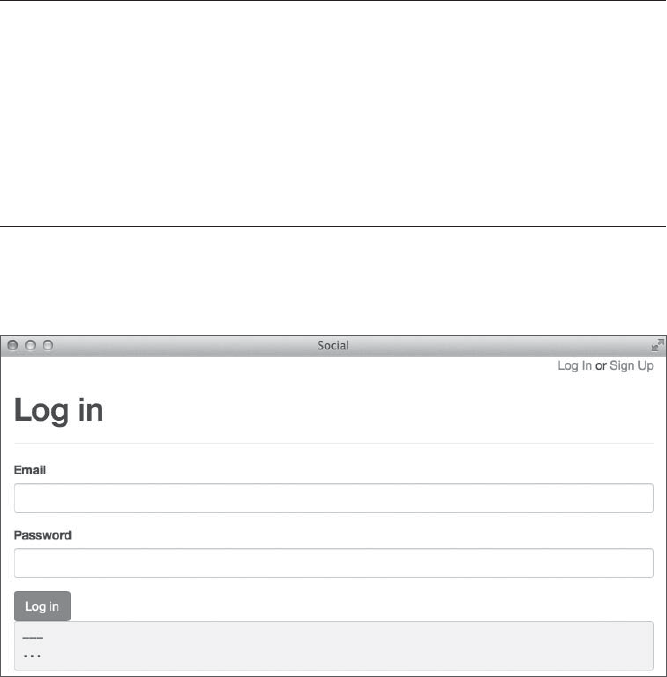
196 Chapter 13
The debug Helper
Rails includes a view helper method called debug that you can use to display
the value of an instance variable or method call available inside a Rails
view. This helper wraps its output in <pre> tags so it’s easier to read.
For example, let’s see how the output of the current_user method
changes as you move through the application. First edit app/views/layouts/
application.html.erb and add a call to the debug helper just below the yield
method, as shown here:
<!DOCTYPE html>
<html>
--snip--
<%= yield %>
<%= debug current_user %>
</div>
</body>
</html>
Now start the Rails server, if it’s not already running, and go to http://
localhost:3000/login in your browser. You should see the output from the
debug helper just below the Log In button, as shown in Figure 13-1.
Figure 13-1: Debugging current_user
At this point, the output is simply three dashes on one line followed by
three dots on the next line. The debug helper is using YAML to format its
output. YAML is a data serialization language used frequently in Rails proj-
ects. For example, the Rails database configuration file (config/database.yml)
is in YAML format. You also used YAML in Chapter 10 to define fixtures
that provide default data for tests.

Debugging 197
In YAML, the three dashes signify the beginning of a document.
Three dots indicate the end of a YAML document. In other words, this is
an empty YAML document. On the Log In page current_user is nil, and
the empty YAML document reflects that.
Now log in to your application and scroll to the bottom of the posts
index page to see how the output from current_user changed.
u --- !ruby/object:User
v attributes:
id: 1
name: Alice
email: alice@example.com
created_at: 2014-02-26 ...
updated_at: 2014-02-26 ...
password_digest: "$2a$10$7..."
Now the YAML output is a little more fleshed out. The first line starts
with three dashes followed by !ruby/object:User u, which represents the type
of object being shown. In this case, the object is a Ruby object of class User.
The word attributes v represents the start of the object’s attributes and
their values. Below that, you see the User model attributes: id, name, email,
created_at, updated_at, and password_digest.
Displaying this information is a great way to monitor the state of your
application as it runs. Unfortunately, using the debug helper limits you to
seeing values only for your current session, and if your application renders
nothing in the browser window, you won’t be able to see any values at all. In
those cases, you can rely on the Rails log to track down bugs.
The Rails Logger
Throughout this book, I’ve talked about Rails server output. As the Rails
server runs, it shows a copy of the development log. You can open the file
log/development.log in your editor to examine that log even when the server
is not running.
This file may be quite large depending on how much you’ve been using
the application the log belongs to. You can use the bin/rake log:clear com-
mand to clear your application’s log files.
Log Levels
The Rails logger uses levels named :debug, :info, :warn, :error, :fatal, and
:unknown. These levels indicate the severity of the message being logged.
The level is assigned by the developer when a message is logged.
If the level is equal to or higher than the log level configured for the
current environment, the message is added to the corresponding log file.
The default log level in the development and test environments is :debug
and above, and the default log level in the production environment is
:info and above.
198 Chapter 13
Because the default log level in production does not display the :debug
level, you can leave these debug messages in your code without worrying
about cluttering up the logs when your application is deployed and running.
Logging
Each of the log levels has a corresponding method used to print messages.
For example, you can call logger.debug "Message" to add a message with the
level :debug to the log.
You’ve already seen how to use the debug helper to show values in views.
Rails logger messages are typically used in models and controllers.
Let’s add the value of current_user to the log and compare it to what is
shown in the browser. Open the file app/controllers/posts_controller.rb in your
editor and add the logger statement shown here to the PostsController:
class PostsController < ApplicationController
before_action :authenticate_user!
def index
u logger.debug current_user
user_ids = current_user.timeline_user_ids
--snip--
This line u adds the output of current_user to the development log
every time the posts index action is called. Refresh the page in your browser
and examine the log output in your terminal:
Started GET "/" for 127.0.0.1 at 2014-04-05 19:34:03 -0500
Processing by PostsController#index as HTML
User Load (0.1ms) SELECT "users".* FROM "users"
WHERE "users"."id" = ? LIMIT 1 [["id", 1]]
u #<User:0x007fd3c94d4e10>
(0.1ms) SELECT "users".id FROM "users" ...
--snip--
Rendered posts/index.html.erb within layouts/application (27.1ms)
Completed 200 OK in 61ms (Views: 35.9ms | ActiveRecord: 1.7ms)
The logger.debug converts the value of the current_user method to a
string and adds it to the log as #<User:0x007fd3c94d4e10> u. Unfortunately,
when a Ruby object like current_user is converted to a string, the default
representation is the object’s class followed by its object_id.
What you want to do is inspect the object. The inspect method displays
attributes and values when called on a Rails model. Change the call to
current_user that you just added to the PostsController to current_user.inspect
and refresh the page in your browser again.
Started GET "/" for 127.0.0.1 at 2014-04-05 19:34:27 -0500
Processing by PostsController#index as HTML
User Load (0.1ms) SELECT "users".* FROM "users"
WHERE "users"."id" = ? LIMIT 1 [["id", 1]]
Debugging 199
u #<User id: 1, name: "User One", ...>
(0.1ms) SELECT "users".id FROM "users" ...
--snip--
Rendered posts/index.html.erb within layouts/application (27.1ms)
Completed 200 OK in 63ms (Views: 40.9ms | ActiveRecord: 1.7ms)
This output is much better. The value of current_user is shown u with
all attributes, just as it appears in the Rails console. The Rails logger dis-
plays any string you send to it. I sometimes label the data that I’m logging
and add characters like stars to make the data stand out more:
class PostsController < ApplicationController
before_action :authenticate_user!
def index
logger.debug "** current_user = "
logger.debug current_user.inspect
user_ids = current_user.timeline_user_ids
--snip--
You may have had some trouble locating the value of current_user in out-
put before, but with human-readable labels, it is easier to spot.
Debugger
Sometimes simply seeing the values of variables after the fact is not enough
to debug an issue. The Ruby debugger lets you step into your application as
it runs. Inside the debugger, you can see code as it is executed, examine the
values of variables, and even change values.
First, edit your application’s Gemfile to add the debugger gem. For Ruby
version 2.0 or greater, you should use the byebug gem. Older versions of Ruby
should use the debugger gem.
--snip--
# Use debugger
gem 'byebug', group: [:development, :test]
The correct gem for your Ruby version is commented out at the bottom
of the Gemfile. Remove the # from the beginning of the line and save the
file. The debugger isn’t needed in the production environment, so this line
only adds it to the development and test groups.
Because you changed the Gemfile, remember to update installed gems
with the bin/bundle install command. You also need to restart the Rails
server:
$ bin/rails server
Now that you’ve installed the debugger, let’s see what it can do.

200 Chapter 13
Entering the Debugger
If you call the debugger method in your code, your application stops execut-
ing when it reaches that call, and Rails launches the debugger. For example,
remove the logger statements you added to the posts index action earlier in
app/controllers/posts_controller.rb and instead use the debugger:
class PostsController < ApplicationController
before_action :authenticate_user!
def index
user_ids = current_user.timeline_user_ids
debugger
@posts = Post.includes(:user).where(user_id: user_ids)
.paginate(page: params[:page], per_page: 5)
.order("created_at DESC")
end
--snip--
When the index action is called, execution pauses at the debugger state-
ment, and the debugger is started. Refresh the posts index page in your
browser. The page shouldn’t finish loading. Check the server output in your
terminal, and you should see the debugger prompt:
u .../social/app/controllers/posts_controller.rb:9
@posts = Post.includes(:user).where(user_id: user_ids)
[4, 13] in .../social/app/controllers/posts_controller.rb
v 4 def index
5 user_ids = current_user.timeline_user_ids
6
7 debugger
8
=> 9 @posts = Post.includes(:user).where(user_id: user_ids)
10 .paginate(page: params[:page], per_page: 5)
11 .order("created_at DESC")
12 end
13
w (rdb:2)
In the normal server output, you should see a line indicating the current
position u in the source code. In this case, execution is paused at line 9 inside
app/controllers/posts_controller.rb. Next, the output v shows your place in the
code. You should see 10 lines of code with line 9 in the center. Finally, the
debugger prompt w is waiting for your input.
Debugger Commands
The debugger accepts a variety of commands for working with your appli-
cation’s code. This section covers the most common commands. Unless

Debugging 201
otherwise noted, each of these commands can be abbreviated using the
first letter of its name.
Start by entering the help command:
(rdb:2) help
ruby-debug help v1.6.6
Type 'help <command-name>' for help on a specific command
Available commands:
backtrace break catch condition
continue delete disable display
down edit enable eval
exit finish frame help
info irb jump kill
list method next p
pp ps putl quit
reload restart save set
show skip source start
step thread tmate trace
undisplay up var where
(rdb:2)
The help command shows a list of all available debugger commands.
You can also follow help with the name of another command for informa-
tion on a specific command.
When you entered the debugger, you were shown 10 lines of code around
your current position. The list command displays the next 10 lines of code
inside the debugger.
(rdb:2) list
[14, 18] in /Users/tony/code/social/app/controllers/posts_controller.rb
14 def show
15 @post = Post.find(params[:id])
16 @can_moderate = (current_user == @post.user)
17 end
18 end
(rdb:2)
Each time you enter the list command another 10 lines of code are
displayed. In this case, the current file has only five more lines of code, so
those five lines are shown. Enter list- to see the previous 10 lines of code,
and enter list= to show the code around your current position:
(rdb:2) list=
[4, 13] in /Users/tony/code/social/app/controllers/posts_controller.rb
4 def index
5 user_ids = current_user.timeline_user_ids
6
7 debugger
8
=> 9 @posts = Post.includes(:user).where(user_id: user_ids)
202 Chapter 13
10 .paginate(page: params[:page], per_page: 5)
11 .order("created_at DESC")
12 end
13
(rdb:2)
Now that you know where you are in the code, you might want to
examine the values of some variables. The var command displays currently
defined variables and their contents. To see local variables, enter the var
local command:
(rdb:2) var local
self = #<PostsController:0x007ffbfeb21018>
user_ids = [2, 1]
(rdb:2)
Here, only two local variables are defined. The variable self indicates
that you are inside the PostsController. The variable user_ids received its
contents on line 5 in the previous code.
List instance variables and their values with the var instance command:
(rdb:2) var instance
@_action_has_layout = true
@_action_name = "index"
@_config = {}
@_env = {"GATEWAY_INTERFACE"=>"CGI/1.1", "P...
@_headers = {"Content-Type"=>"text/html"}
@_lookup_context = #<ActionView::LookupCont...
@_prefixes = ["posts", "application"]
@_request = #<ActionDispatch::Request:0x007...
@_response = #<ActionDispatch::Response:0x0...
@_response_body = nil
@_routes = nil
@_status = 200
@current_user = #<User id: 1, name: "User O...
@marked_for_same_origin_verification = true
(rdb:2)
Quite a few instance variables are already defined at this point. The
only instance variable set by this code is @current_user. This instance variable
is defined in the current_user method in ApplicationController. The other
variables are defined by Rails. Note that @posts is not defined yet. Your cur-
rent position is line 9, which defines @posts, but that line has not yet been
executed.
The display command adds a variable to the display list inside the debug-
ger. If you are especially interested in the value of user_ids, for example, enter
the display user_ids command to add it to the display list, as shown here:
(rdb:2) display user_ids
1: user_ids = [2, 1]
(rdb:2)
Debugging 203
You can also show the contents of the display list and their values with
the display command, abbreviated disp:
(rdb:2) disp
1: user_ids = [2, 1]
(rdb:2)
To remove a variable from the display list, use the undisplay command
followed by the number corresponding to a variable in the list. For example,
undisplay 1 removes user_ids from the display list.
Use the eval command to evaluate any Ruby code you like and print
its value. This command is abbreviated p, as in print. For example, you
might want to print the length of the user_ids array or the output from the
current_user method.
(rdb:2) eval user_ids.length
2
(rdb:2) p current_user
#<User id: 1, name: "User One", email: "user...
(rdb:2)
The debugger is a Ruby shell, so you can also evaluate Ruby commands
by simply entering them at the prompt. The eval command is not even nec-
essary. For example, set the value of user_ids to an empty array by entering
this statement at the debugger prompt:
(rdb:2) user_ids = []
[]
(rdb:2)
This prints the return value of the expression user_ids = [] just as if you
had typed it in the Rails console.
Several commands are available for executing your application’s code
inside the debugger. The most commonly used command is next, which
executes the next line of code. The next command executes methods on the
next line of code without moving inside the method.
The step command is similar, but it also shows you each line that exe-
cutes inside method calls. The step command moves through your applica-
tion and its dependencies literally one line of code at a time. You can use it
to find bugs in the Rails framework or other gems used by your application.
When you are finished moving around in your code, use the continue
command to resume execution and finish the current request. If you’ve been
following along throughout this section, you may remember you set the value
of user_ids to an empty array. When you continue execution and the posts
index page finally renders, no posts are displayed. Because you set user_ids
to an empty array, the @posts instance variable is also empty, and the render
@posts statement inside the index view renders nothing.
204 Chapter 13
The Ruby debugger probably isn’t something you’ll use every day, and
some developers never use it. But if you ever encounter a really hard-to-find
bug, the debugger is invaluable.
Summary
This chapter described several debugging techniques. Displaying values
in your application’s views with the debug helper method or adding data to
the log file with logger statements will help you track down most bugs. The
interactive debugger provides complete control over your application, allow-
ing you to step through your code and pinpoint bugs that are particularly
hard to find.
The next chapter covers web application programming interfaces, or
APIs. We’ll discuss using other application’s APIs and creating your own.
Exercises
1. Using the debug helper method, display the contents of each post as it is
rendered on the posts index page. Add a debug call inside the partial for
each type of post.
2. Add the id and type of each post in the @posts instance variable to the
log using a call to logger.debug in the index action of app/controllers/
posts_controller.rb.
3. Practice using the debugger to explore your application’s code. Use the
next command in the debugger to see what happens when a user logs in
to the application.
14
weB apis
Eventually, you might want to expand your applica-
tion beyond your website. Popular web applications
usually also have a native mobile client and sometimes
even a desktop client. You may also want to integrate
data from your application with other websites and
applications.
A web application programming interface (or API) makes all of these things
possible. Think of an API as a language that applications use to communi-
cate with each other. On the Web, the API is usually a REST protocol using
JavaScript Object Notation (JSON) messages.
In this chapter, we’ll explore the GitHub API to see how to access detailed
information about users and repositories. After discussing GitHub’s API,
you’ll build your own. In the process, I’ll cover details such as JSON, the
Hypertext Transfer Protocol (HTTP), and token-based authentication.

206 Chapter 14
The GitHub API
The GitHub code-hosting service has an extensive API. Many of its features
are even available without authentication. If you want to continue exploring
the GitHub API after working through the examples in this chapter, com-
plete details are available online at https://developer.github.com/.
The GitHub API provides easy access to data about users, organizations,
repositories, and other site features. For example, go to https://api.github.com/
orgs/rails/ in your web browser to see the Rails organization on GitHub:
{
"login": "rails",
u "id": 4223,
v "url": "https://api.github.com/orgs/rails",
"repos_url": "https://api.github.com/orgs/rails/repos",
"events_url": "https://api.github.com/orgs/rails/events",
"members_url": "https://api.github.com/orgs/rails/me...",
"public_members_url": "https://api.github.com/orgs/r...",
"avatar_url": "https://avatars.githubusercontent.com...",
"name": "Ruby on Rails",
"company": null,
"blog": "http://weblog.rubyonrails.org/",
"location": null,
"email": null,
"public_repos": 73,
"public_gists": 3,
"followers": 2,
"following": 0,
"html_url": "https://github.com/rails",
w "created_at": "2008-04-02T01:59:25Z",
"updated_at": "2014-04-13T20:24:49Z",
"type": "Organization"
}
The data returned should be at least partially familiar to anyone who’s
worked with Rails models. You’ll see fields for id u, created_at w, and
updated_at , as seen in all of the models you’ve created so far. The GitHub
API also includes several url fields v that you can use to access more data
about the organization.
For example, go to the repos_url (https://api.github.com/orgs/rails/repos/)
to see a list of source code repositories belonging to the Rails organization.
From there, you can access the details of an individual repository by going
to its url, such as https://api.github.com/repos/rails/rails/.
Go to https://api.github.com/users/username/ to access information about
an individual user. To see my GitHub account, visit https://api.github.com/
users/anthonylewis/ in your browser.

Web APIs 207
Note The data returned by these requests is in JavaScript Object Notation (JSON) for-
mat, which is based on a subset of the JavaScript programming language. In JSON
format, data between curly braces is a single JavaScript object with various named
properties. Each property consists of a name, followed by a colon, and the property
value. This format is quite similar to a hash in Ruby.
In addition to the simple requests for data you’ve made so far, the
GitHub API also supports creating and updating objects using the appro-
priate requests. These actions require authentication, of course. But before
I can cover API authentication, I need to tell you a little more about HTTP.
HTTP
HTTP is the language of the Web. Web servers and browsers use this pro-
tocol to communicate. I’ve discussed some aspects of HTTP already, such
as the HTTP verbs (GET, POST, PATCH, and DELETE), while covering the
REST architecture in Chapter 4.
In addition to the data you’ve seen so far, an HTTP response also con-
tains a header with more detailed information. You’re probably familiar with
part of the data in an HTTP response header. Anyone who’s spent any time
on the Web has probably seen a 404 or 500 response from a web server.
Status codes such as these are included in every response from a web server.
Status Codes
The first line of every response includes an HTTP status code. This three-
digit numeric code tells the client the type of response to expect.
Status codes are broken up into five categories based on their first digit:
• 1xx Informational
• 2xx Success
• 3xx Redirection
• 4xx Client Error
• 5xx Server Error
You shouldn’t encounter any status codes in the 1xx range while work-
ing with APIs. The original HTTP 1.0 specification did not define any codes
in this range, and in my experience, they are rarely used.
Status codes in the 2xx range indicate a successful request. Hopefully,
you’ll encounter many of these. Common codes include 200 OK, which indi-
cates a successful response, typically to a GET request; 201 Created, which
is returned when an object is created on the server in response to a POST
request; and 204 No Content, which indicates that a request was successful,
but there is no additional data in the response.

208 Chapter 14
The 3xx range of status codes indicates a redirect to a different address.
Rails issues a 302 Found response any time you use redirect_to in your appli-
cation. To see this in action, log in to your application and watch the log for
the redirect.
Status codes in the 4xx range indicate some kind of client error. In
other words, the user made a mistake. 401 Unauthorized is returned in
response to a request for a URL that requires authentication. The 403
Forbidden status code is similar to 401, except the server will not complete
the request even if the client successfully authenticates. The 404 Not Found
is sent when a client attempts to access a URL that does not exist. As you
work with APIs, you may encounter the 406 Not Acceptable status code for an
invalid request or the 422 Unprocessable Entity status code, which means the
request is valid, but the included data could not be processed.
The 5xx range of status codes indicates an error on the server. The 500
Internal Server Error code is the most commonly used. It is a general message
that does not provide any additional data. The 503 Service Unavailable status
code indicates a temporary problem with the server.
To see these codes, you need to examine the HTTP header sent with a
response. These are not normally displayed by web browsers. Luckily, tools
exist that make examining HTTP headers easy. One of the most popular is
the command-line program known as Curl.
Curl
Curl is a free command-line tool for network communication. Curl is
included with Mac OS X and Linux, and Windows users can download the
tool from http://curl.haxx.se/. Curl uses URL syntax, making it an ideal tool
for testing web APIs.
Open a terminal window and try a few curl commands. Let’s start with
the GitHub API you just looked at.
$ curl https://api.github.com/users/anthonylewis
{
"login": "anthonylewis",
"id": 301,
--snip--
}
This example shows how to retrieve information about a particular user
account from GitHub. Curl only shows the response data by default; enter
curl -i to include the HTTP headers with the response:
$ curl -i https://api.github.com/users/anthonylewis
u HTTP/1.1 200 OK
Server: GitHub.com
Date: Thu, 17 Apr 2014 00:36:29 GMT
Content-Type: application/json; charset=utf-8
Status: 200 OK

Web APIs 209
v X-RateLimit-Limit: 60
X-RateLimit-Remaining: 58
w X-RateLimit-Reset: 1397696651
--snip--
{
"login": "anthonylewis",
"id": 301,
--snip--
}
The response headers start with the status code of 200 OK u. Also note
that GitHub API requests are rate limited. The X-RateLimit-Limit: 60 line v
indicates that you are limited to 60 requests over a certain period of time.
The next line says you have 58 requests remaining. Your rate limit resets
automatically at the time given by the X-RateLimit-Reset: 1397696651 line w.
Note The number 1397696651 is a Unix timestamp. You can convert it to a normal time by
entering Time.at 1397696651 in an IRB session or Rails console.
Authentication
So far, you’ve only read public data from the GitHub API. You can also use
the GitHub API to read private data about users and repositories and to cre-
ate or update information, but these actions require authentication.
I covered user authentication in Chapter 9. Users expect to log in to
an application once and then browse a site for some time. You maintain a
user’s log in state in the session, which is stored in a cookie that the browser
automatically includes with every request.
API requests don’t maintain a session. Applications accessing an API
need to provide authentication credentials with each request. A popular
choice for API requests is token-based authentication. In token-based authenti-
cation, users include a unique API token with each request.
You can use the curl command to test token-based authentication on
GitHub. First, you need to generate a personal access token on GitHub’s
Application Settings page. Log in to GitHub, if necessary, and go to https://
github.com/settings/applications/. On that page, click the Generate New Token
button. Next, you provide a description for this token; something like API
Testing should be fine. Finally, confirm that the checkboxes beside “repo”
and “user” are checked, and click the Generate Token Button.
GitHub should take you back to the Application Settings page and pres-
ent you with a new 40-digit hexadecimal token. Copy your new token and
paste it into a text file so you can keep up with it. As the on-screen message
says, you won’t be able to see it again!

210 Chapter 14
To verify your token is working, enter the following curl command in
your terminal. Replace the word token with your actual token in all of these
requests:
$ curl -H "Authorization: Token token" https://api.github.com/user
{
"login": "anthonylewis",
"id": 301,
--snip--
Here, I’ve used the -H parameter to curl to pass custom header data to
the server, and, in this case, that data is the Authorization: Token header fol-
lowed by my token.
You should see information about your own account, even though
you didn’t specify a username. GitHub uses your personal access token to
authenticate the request.
You can now use the token to access private information, such as the list
of Git repositories associated with your account.
$ curl -H "Authorization: Token token" https://api.github.com/user/repos
[
{
"id": 6289476,
"name": "blog",
"full_name": "anthonylewis/blog",
"owner": {
"login": "anthonylewis",
"id": 301,
--snip--
GitHub should return an array of repositories created with your account.
Depending on how many repositories you’ve created, this could be a lot of data.
Now that you have a token, you can also add another repository to your
account using a POST request. As you learned in Chapter 4, POST means
create in R EST.
u $ curl -i -d '{"name":"API Test"}' \
-H "Authorization: Token token" \
https://api.github.com/user/repos
v HTTP/1.1 201 Created
Server: GitHub.com
Date: Mon, 21 Apr 2014 23:47:59 GMT
Content-Type: application/json; charset=utf-8
Status: 201 Created
--snip---
w {
"id": 18862420,
"name": "API-Test",
"full_name": "anthonylewis/API-Test",
"owner": {
"login": "anthonylewis",

Web APIs 211
"id": 301,
--snip--
The -d option to curl specifies data to be included with the request. Here,
you send a JSON string with the name "API Test" for the new repository u.
Because you’re sending data, curl automatically uses a POST request. GitHub
responds to the request with headers indicating HTTP status 201 Created v,
followed by information about the newly created repository w.
Now that you have some experience with an existing API, let’s create
our own API for our social application.
Your Own API
You may remember from Chapter 4 that the Rails scaffold generator used
the respond_to method inside the PostsController to return different data
based on the type of request. This approach is fine for some applications,
but the addition of user authentication and sessions in your application
leads to problems.
The existing controllers authenticate users by calling the authenticate_user!
method before every action. Your API will use a different method to sup-
port token-based authentication. The existing controllers also display data,
such as posts, based on the value of current_user. Your API will display all
posts when requested.
Rather than use the same controllers for the application and the API,
you can build separate controllers for each. Because your application is
mainly about posts, you’ll start there when building your API.
API Routes
Start by adding routes for API requests. The GitHub API used a subdomain
for API requests. Because you haven’t set up your own domain, you’ll use
a separate path for API requests. Open the file config/routes.rb and add the
following block near the end:
Social::Application.routes.draw do
--snip--
u namespace :api do
resources :posts
end
end
The namespace :api block u indicates that all routes created for the
resources it contains start with the path api/. Additionally, the controller
files for those resources should be inside a directory named api, and the
controller classes should be inside a module named Api.
You can enter the bin/rake routes command in a terminal to see the
newly created routes.

212 Chapter 14
API Controllers
Now that you’ve defined the routes, you need to create a controller to handle
these actions. First, create a directory for the API controllers by entering
the following command:
$ mkdir app/controllers/api
Then create a new file named app/controllers/api/posts_controller.rb and
add the code for the API PostsController, as shown here:
module Api
class PostsController < ApplicationController
u respond_to :json
v def index
@posts = Post.all
w respond_with @posts
end
end
end
The file starts with module Api to indicate this class belongs to the API
namespace. Inside the PostsController class is a call to the respond_to class
method. Calling respond_to :json, indicates that the actions in this control-
ler return JSON data u.
The class then defines the index action v. The index action retrieves all
posts and then uses the respond_with method to send them to the client w.
The respond_with method automatically formats the data based on the for-
mat and HTTP verb used in the request. In this case, it should return JSON
data in response to a GET request for the index action.
After you save this file, start the Rails server if it isn’t already started.
Then you can use curl to test your API by entering this command:
$ curl http://localhost:3000/api/posts
[{"id":1,"title":"First Post","body":"Hello, World!"...
The API returns an array of posts in response to the posts index action.
The data is compact and on a single line, which can be hard to read,
but several free tools can pretty-print JSON data for you. For example, jq is
a JSON processor that pretty-prints JSON data and adds syntax highlight-
ing. Download jq from http://stedolan.github.io/jq/. Once installed, you can
pipe the output through jq’s basic filter by adding | jq '.' to the end of the
command:
$ curl http://localhost:3000/api/posts | jq '.'
[
{
"id": 1,
"title": "First Post",

Web APIs 213
"body": "Hello, World!",
"url":null,
"user_id":1,
--snip--
The remaining examples in this chapter are pretty-printed. I leave off
the | jq '.' for brevity, but you should include it if you want your output to
look like what you see in the book. You can also see JSON output in your
web browser. Entering http://localhost:3000/api/posts in your web browser
causes an ActionController::UnknownFormat error. If you check the server
output in your terminal, you’ll see this is a 406 Not Acceptable error, as dis-
cussed earlier in this chapter. This error occurs because the controller only
responds to JSON requests, but your web browser asks for HTML by default.
Specify a different content type by adding an extension to the URL
in the address bar. Browsing to http://localhost:3000/api/posts.json returns a
JSON array of posts as expected.
Customizing JSON Output
So far your API returns all of the data associated with each post. You may
want to include additional data with each record, and, in some cases, you
may want to exclude data from some fields. For example, including data
about the author of each post is helpful, but you don’t want to include the
user’s password_digest or api_token.
You can customize the output from your API built in to Rails in a couple
of ways. Which method you use depends on how much customization you
need and your personal preference.
as_json
Because this API returns JSON data, you can easily customize the output
by changing the way Rails converts a model to JSON. Rails first calls the
as_json method on a model to convert it to a hash, which is then converted
to a JSON string.
You can override the as_json method in the Post model to customize the
data returned for each post. Open the file app/models/post.rb and add the
as_json method, shown here, to force the method to show only each post’s
id and title:
class Post < ActiveRecord::Base
--snip--
u def as_json(options={})
v super(only: [:id, :title])
end
--snip--
end

214 Chapter 14
Be sure to include the options parameter with a default value of {} u
because the original as_json includes it. You aren’t using the options param-
eter, but because you’re overriding an existing method, your definition
must match the original. Your as_json method calls super, which invokes
the original as_json method defined by Active Record, with the parameter
only: [:id, :title] v.
With this method in place, your API should only return the id and title
of each post. Use the curl command to verify the change:
$ curl http://localhost:3000/api/posts
[
{"id": 1, "title": "First Post"},
{"id": 2, "title": "Google Search"}
]
The as_json method supports several additional options. Instead of
specifying fields to include with :only, you could exclude fields with the
:except option. You can also include associated models with the :include
option. For example, update the as_json method, as shown here, to exclude
the user_id field and include the post’s associated user model:
def as_json(options={})
super(except: [:user_id], include: :user)
end
The :methods option calls a list of methods and includes their return
values in the output. For example, you can use this option to call the
cached_comment_count method you added in Chapter 12:
def as_json(options={})
super(except: [:user_id], include: :user,
methods: :cached_comment_count)
end
This option will include the cached number of comments associated
with this post in the output.
Overriding as_json certainly works, but depending on the level of cus-
tomization required, this can get a bit messy. Fortunately, Rails provides
a way to customize fully the JSON data returned by your API. Remove the
as_json method from the Post model and let’s cover jbuilder.
Jbuilder
Jbuilder is a domain-specific language for generating JSON output. The
jbuilder gem is included by default in the Gemfile generated by the rails new
command. Using jbuilder, you can create views for each of your API actions,
just as you used ERB to create views for web actions.

Web APIs 215
As with your other views, you need to create a directory for your
jbuilder views. The view directory must match the controller name. Enter
the following commands to create a directory for API views and a sub-
directory for the PostsController views:
$ mkdir app/views/api
$ mkdir app/views/api/posts
With these directories in place, you can create your first jbuilder view.
Create a new file named app/views/api/posts/index.json.jbuilder and open it in
your editor. Add this single line of code and save the file:
json.array! @posts
The json.array! method tells jbuilder to render the value of @posts as a
JSON array. Use Curl to check the output of the index action:
$ curl http://localhost:3000/api/posts
[
{
"id": 1,
"title": "First Post",
"body": "Hello, World!",
"url":null,
"user_id":1,
--snip--
The output is the same as when you started. Now let’s see about custom-
izing this output.
The json.array! method also accepts a block. Inside the block, you can
access each individual record in the array. You can then use the json.extract!
method to include only certain fields from the post:
json.array! @posts do |post|
json.extract! post, :id, :title, :body, :url
end
This example renders the id, title, body, and url fields from each post
as JSON.
All of the usual view helpers are also available in jbuilder views. For
example, you can include a URL for each post using the api_post_url helper
method:
json.array! @posts do |post|
json.extract! post, :id, :title, :body, :url
u json.post_url api_post_url(post)
end

216 Chapter 14
The output of method calls, such as api_post_url(post) u, are automati-
cally converted to JSON format. The next example adds some data about
the author of each post:
json.array! @posts do |post|
json.extract! post, :id, :title, :body, :url
json.post_url api_post_url(post)
json.user do
json.extract! post.user, :id, :name, :email
end
end
Here, I’ve used the json.extract! method again to include only specific
fields for each user. You don’t want to make the password_digest for users
available through your public API.
Token-Based Authentication
Now let’s add authentication so you can also create posts through your API.
You’ll add token-based authentication, like you used earlier when accessing
the GitHub API.
Generating Tokens
First, add a field for the api_token string to the User model by generating a
database migration:
$ bin/rails g migration add_api_token_to_users api_token:string
Remember to enter the bin/rake db:migrate command after generating
this migration to update your database.
Now update the User model by opening app/models/user.rb in your editor
and adding a validation for the api_token field and a before_validation call-
back to generate the API token:
class User < ActiveRecord::Base
--snip--
u validates :api_token, presence: true, uniqueness: true
v before_validation :generate_api_token
--snip--
First, you need to validate that the api_token is present and unique u.
Because you’re using this value to authenticate, no two users can have the
same api_token.

Web APIs 217
Next, you use a before_validation callback to call a method to generate
the api_token if it doesn’t already exist v. Add the generate_api_token method
at the bottom of the User model as shown here:
class User < ActiveRecord::Base
--snip--
def generate_api_token
u return if api_token.present?
loop do
v self.api_token = SecureRandom.hex
w break unless User.exists? api_token: api_token
end
end
end
The generate_api_token method returns immediately if the api_token
already has a value u. If a value is not present for the api_token, the method
calls SecureRandom.hex inside an endless loop to generate a value v. The
SecureRandom class uses the most secure random-number generator avail-
able on your computer to generate values. On Unix computers, it uses the
/dev/urandom device; on Windows, it uses the Win32 Cryptographic API.
The SecureRandom class also includes several methods for formatting random
values. The hex method returns a random 32-character hexadecimal value.
Finally, if a user with this api_token doesn’t exist, break out of the loop w.
Now open a Rails console and update the existing users:
u irb(main):001:0> user = User.first
User Load (0.2ms) SELECT "users".* ...
=> #<User id: 1, ... api_token: nil>
v irb(main):002:0> user.save
(0.1ms) begin transaction
User Exists (0.2ms) SELECT 1 AS one FROM ...
User Exists (0.1ms) SELECT 1 AS one FROM ...
User Exists (0.1ms) SELECT 1 AS one FROM ...
SQL (1.3ms) UPDATE "users" SET "api_token" ...
(1.7ms) commit transaction
=> true
Because the generate_api_token method is called automatically using a
before_validation callback, you simply need to load the user into a variable u
and then save it to the database v to update it. Do this for each of your
users. If any user doesn’t have a value for api_token, it will be created.

218 Chapter 14
Now update the user show view to display the api_token when a user views
his or her own account. Update app/views/users/show.html.erb as shown here:
<div class="page-header">
<h1>User</h1>
</div>
<p class="lead"><%= @user.email %></p>
u <% if @user == current_user %>
<p class="lead">API Token: <%= @user.api_token %></p>
<% end %>
--snip--
Because API tokens are essentially passwords, you want to protect
them by only showing them when the user being displayed is equal to the
current_user u.
Authenticating Requests
Now that all users have an API token, let’s put those tokens to use. The pro-
cess of authenticating with a token is similar to the username and password
authentication you already created. Because you may have more than one
controller for your API, you should include the authentication method in
ApplicationController, which is the parent class of all other controllers.
First, you need a method to authenticate using an api_token. Luckily,
Rails has a built-in method called authenticate_or_request_with_http_token
to handle the details for you. Open the file app/controllers/application_
controller.rb and add the following method to see how this works:
class ApplicationController < ActionController::Base
# Prevent CSRF attacks by raising an exception.
# For APIs, you may want to use :null_session instead.
protect_from_forgery with: :exception
private
def authenticate_token!
authenticate_or_request_with_http_token do |token, options|
u @api_user = User.find_by(api_token: token)
end
end
--snip--
This method is named authenticate_token! to match the authenticate_user!
method you added in Chapter 9. The authenticate_or_request_with_http_token
retrieves the token included in the request’s Authorization header and
passes it to a block. Inside the block, you try to find a user in the database

Web APIs 219
using the given token u. The find_by method returns a User object if a
matching user is found, or nil otherwise. This value is assigned to the
@api_user instance variable and returned from the block. If the block returns
a false value, such as nil, the method knows that authentication failed and
sends a 401 Unauthorized response to the client.
You wrote a helper method called current_user for accessing the authenti-
cated user in Chapter 9. For API requests, the authenticated user is already
assigned to the @api_user instance variable, so you can use this variable.
Your token-based authentication solution is ready to go now. Let’s try it
out by adding the ability to create text posts through your API.
Using Token-Based Authentication
First, you need to add routes for text posts, so open config/routes.rb and add
the text_posts resources inside the :api namespace:
Social::Application.routes.draw do
--snip--
namespace :api do u
resources :posts
resources :text_posts
end
end
Now you need a controller for text posts. Remember, it needs to be
inside the api/ directory because the routes are in the :api namespace.
Create a file named app/controllers/api/text_posts_controller.rb and add the
following code:
module Api
class TextPostsController < ApplicationController
respond_to :json
u before_action :authenticate_token!
end
end
This controller starts the same as the API posts controller. The
TextPostsController class must be inside a module called Api. It also
includes respond_to :json. The first change is the addition of before_action
:authenticate_token! u. The controller calls the authenticate_token! method
before each action.
You want to create text posts, so add the create method:
module Api
class TextPostsController < ApplicationController
respond_to :json
before_action :authenticate_token!

220 Chapter 14
u def create
@text_post = @api_user.text_posts.create(text_post_params)
respond_with @text_post
end
end
end
The create method uses the @api_user instance variable set inside
authenticate_token! to create a new text post u. You then use respond_with
to send the new text post back to the client. Note that you don’t check to
see whether the text post was actually created. The respond_with method
automatically sends the appropriate error response if @text_post contains
errors.
Because you also want to specify permitted parameter values, your final
addition is a text_post_params method:
module Api
class TextPostsController < ApplicationController
before_action :authenticate_token!
respond_to :json
def create
@text_post = @api_user.text_posts.build(text_post_params)
respond_with @text_post
end
private
u def text_post_params
params.require(:text_post).permit(:title, :body)
end
end
end
The text_post_params method permits data for a :title and :body in a
nested hash with the key :text_post u. This is the same as the text_post_params
method in the controller for web requests.
Enter the curl command to try out the new API. Make sure to set the
Content-Type header to application/json when you run the command, so Rails
automatically parses the JSON data included with your request. Replace the
word token with the actual api_token from one of your application’s users.
$ curl -i \
-d '{"text_post":{"title":"Test","body":"Hello"}}' \
-H "Content-Type: application/json" \
-H "Authorization: Token token" \
http://localhost:3000/api/text_posts
u HTTP/1.1 422 Unprocessable Entity
--snip--

Web APIs 221
Something went wrong: The status code 422 Unprocessable Entity u
means the data the client passed to the server is not valid. Check the server
output in your terminal for more information.
Started POST "/api/text_posts" for 127.0.0.1 at 2014-04-23 19:39:09 -0500
Processing by Api::TextPostsController#create as */*
Parameters: {"text_post"=>{"title"=>"Test", "body"=>"Hello"}}
u Can't verify CSRF token authenticity
Completed 422 Unprocessable Entity in 1ms
--snip--
The data passed to the server is valid but didn’t include a CSRF token u.
Remember, this token is not the same as the API token. The CSRF token is
another unique token that is sent automatically when you submit form data
in your application. Because you aren’t submitting a form, you have no way
of knowing the correct CSRF token.
When you were updating the ApplicationController earlier, you may have
noticed a helpful comment at the top of the class. Rails normally prevents
CSRF attacks by raising an exception. This is great for a web application,
but it won’t work for an API. Instead of raising an exception, you can pre-
vent CSRF attacks by clearing out the user’s session data. Now any time the
application receives data from a user that does not include the CSRF token,
it clears the user’s session, effectively logging the user out of the application
and preventing the attack.
Fortunately, rather than store authentication data in the session, API cli-
ents include the correct API token with each request. So API requests should
work fine with a null session. Open app/controllers/application_controller.rb in
your editor and make the following update:
class ApplicationController < ActionController::Base
# Prevent CSRF attacks by raising an exception.
# For APIs, you may want to use :null_session instead.
u protect_from_forgery with: :null_session
--snip--
In the protect_from_forgery method call u, change the value of the :with
option to :null_session, and then try the same request again using curl:
$ curl -i \
-d '{"text_post":{"title":"Test","body":"Hello"}}' \
-H "Content-Type: application/json" \
-H "Authorization: Token token" \
http://localhost:3000/api/text_posts
u HTTP/1.1 201 Created
--snip--

222 Chapter 14
v {
"id":5,
"title":"Test",
"body":"Hello",
"url":null,
"user_id":1,
"created_at":"2014-04-24T00:33:35.874Z",
"updated_at":"2014-04-24T00:33:35.874Z"
}
The status code is now 201 Created, which means success u. The HTTP
headers are followed by a JSON representation of the new text post v.
Because you didn’t create a jbuilder view for this action, the default JSON
representation is used.
You can also open the posts index page in your browser, or issue an API
request for all posts with the command curl http://localhost:3000/api/posts,
to verify the text post was created successfully.
Summary
A Web API can open up your application to collaborations from both your
customers and third-party applications. With an effective API, you can also
build native mobile or desktop clients for your application. You could even
use another application’s API to integrate its data into yours.
In this chapter, we discussed the GitHub API and used it to access
detailed data about users and repositories. After covering the Hypertext
Transfer Protocol and token-based authentication, you built your own API
for your social network application.
In the next chapter, you’ll learn how to set up your own server to host
Rails applications and use the Capistrano remote server automation tool to
deploy and maintain your applications.
Exercises
1. Verify that your token-based authentication is really working by issuing
a POST request with a fake token. Use the curl command to send the
request, and be sure to check both the status code in the headers and
the response body.
2. Try to create a text post with invalid data and see what happens. You
can check the validation for text posts in app/models/text_post.rb. Again,
use the curl command to send the request and be sure to check the sta-
tus code in both the headers and the response body.
3. Extend the API by adding a show action to the posts controller. This
action should find the correct post using params[:id] and then use the
respond_with method to send the post back to the client. Because this is
a GET request, you can check it with curl or in your web browser.
15
Custom DeploymeNt
Moving your finished application into production
and making it available to users requires you to make
many choices. You can choose from a variety of web
hosting providers, Rails application servers, databases,
and automated deployment systems. In Chapter 6, you
learned about Heroku, a hosting service that uses Git
for deployment.
Most large companies have an operations team to configure servers and
deploy applications. But as a beginning Rails programmer, you may not
have the luxury of a dedicated operations team to deploy your application.
In this chapter, you’ll set up a server to host your application, config-
ure your application’s production environment, push your application to
GitHub, and finally deploy to your server using Capistrano.

224 Chapter 15
Virtual Private Servers
A virtual private server (VPS) is a type of virtual machine sold by web hosting
providers. A single physical server can run many virtual private servers. An
individual VPS is often referred to as an instance.
When you buy a VPS, you get part of the processing power, memory,
and disk space of a larger physical server. You get you full access to your
part of the server, including the ability to choose your operating system. So
you are free to install the software you need and configure the server how-
ever you like. Unfortunately, you are also responsible for any installation
and configuration errors on the server.
Many different hosting providers offer VPS services. A quick Google
search leads to hundreds of competing providers. A popular choice among
both startups and established companies is Amazon Web Services (AWS).
Note The rest of this chapter uses AWS to set up a server and deploy your application, but
the instructions are not AWS specific. If you would rather use a different service, cre-
ate an instance running Ubuntu Linux 14.04 LTS, and you should be able to follow
along with no problem. Ubuntu Linux 14.04 LTS is a long-term support release with
guaranteed support until April 2019.
Amazon AWS Setup
In addition to being a popular choice, Amazon also provides an AWS free
usage tier for new users. You can read more about the free usage tier at
http://aws.amazon.com/free/ to see if you qualify. Even if you don’t qualify
for the free usage tier, you can still get an AWS Micro instance for a few
cents an hour.
Amazon calls their VPS service Amazon Elastic Compute Cloud (Amazon
EC2). Rather than cover the details of setting up your Amazon account here,
please refer to the Amazon EC2 documentation at http://aws.amazon.com/
documentation/ec2/.
Click the User Guide link, and follow the instructions, starting with
Setting Up. This section walks you through the process of signing up for
AWS, creating a user account in the AWS Identity and Access Management
(IAM) system, creating a key pair, and creating a security group. Be sure
you store your IAM credentials and private key—you’ll need them for this
chapter.
Then move on to Getting Started. In this section, you should launch an
EC2 instance, connect to your instance, add a storage volume, and finally
clean up your instance and volume. The EC2 user guide uses an Amazon
Linux machine image that we won’t be using again, so be sure to follow the
clean-up instructions in the User Guide when you’re done with this section.
Once you’re up to speed on Amazon EC2, you can set up your produc-
tion server as described in this section. I recommend Ubuntu Linux, so the
instructions that follow are Ubuntu specific. From the EC2 Management
Console, click the Launch Instance button to create a new server instance,
and choose the Ubuntu Server 14.04 LTS (PV) Amazon Machine Image

Custom Deployment 225
in the Quick Start section. Because this is a web server, you need to config-
ure the security group to allow HTTP traffic. Click the Next button in the
Launch Instance wizard until you reach Step 6: Configure Security Group.
Now click the Add Rule button, select HTTP from the Type drop-down
menu, and click the Review and Launch button. Finally, click the Launch
button.
Once the instance is running, make note of the public DNS name dis-
played in the EC2 Management Console, and then connect to the instance
with SSH in a terminal window. Using the following command, replace
your_key_file with the full path to the private key file you created in the
Setting Up section of the EC2 User Guide and your_instance_name with the
public DNS name of your instance:
$ ssh -i your_key_file ubuntu@your_instance_name
Welcome to Ubuntu 14.04 LTS...
--snip--
The default user account on the Ubuntu AMI is named ubuntu. So this
command connects to the user named ubuntu at your instance.
Ubuntu Linux Setup
Once you’re connected, you can configure the instance for hosting Ruby
on Rails applications. Enter all of the commands in this section on your
instance over the SSH connection.
Ubuntu uses a system called apt-get for installing software from
online repositories. The first thing you need is Ruby. Unfortunately, the
default repositories often contain an older version of Ruby, but you have
a way around that.
Installing Ruby
The developers at a hosting company called Brightbox have set up their
own Ubuntu repository with the latest version of Ruby and made it available
to the public. This repository is known as a Personal Package Archive (PPA).
You can add this repository to your instance and get the latest version of
Ruby using these commands:
$ sudo apt-get install python-software-properties
Reading package lists... Done
--snip--
Setting up python-software-properties (0.92.36) ...
$ sudo apt-add-repository ppa:brightbox/ruby-ng
Next generation Ubuntu packages for Ruby ...
--snip--
http://brightbox.com
More info: https://launchpad.net/~brightbox/+archive/ruby-ng
Press [ENTER] to continue or ctrl-c to cancel adding it
226 Chapter 15
Press enter when prompted, and then wait for the word OK to appear.
After you add the Brightbox repository, update the apt-get package lists so
it can find the newer versions of the Ruby packages.
$ sudo apt-get update
Ign http://us-east-1.ec2.archive.ubuntu.com trusty ...
--snip--
Fetched 13.7 MB in 9s (1,471 kB/s)
Reading package lists... Done
Now install Ruby version 2.1. The following command installs both the
Ruby interpreter and the development headers needed to compile addi-
tional gems:
$ sudo apt-get install ruby2.1 ruby2.1-dev
Reading package lists... Done
--snip--
Do you want to continue? [Y/n]
Press enter to continue. Once the installation completes, check the
Ruby version.
$ ruby -v
ruby 2.1.1p76 (2014-02-24 revision 45161) [x86_64-linux-gnu]
Since Ruby is frequently updated, you’ll probably see a newer version
number than the one shown here. Now that Ruby’s installed, you need a
web server for Ruby on Rails applications.
Installing Apache and Passenger
A variety of web servers are available today. The most popular web server is
Apache, and that’s what we’ll use. Install the Apache HTTP Server version 2
with this command:
$ sudo apt-get install apache2
Reading package lists... Done
--snip--
Do you want to continue? [Y/n]
Press enter to continue.
Once you’ve completed this, open your web browser and go to the pub-
lic DNS name of your instance to see the default Ubuntu website. Although
you can’t see your application yet, you’re making progress.
Apache is great for serving web pages, but you need an application
server to run your Ruby on Rails application. A popular application server
that integrates with Apache is Phusion Passenger.
Phusion provides the Passenger application server through its own
apt-get repository. It’s not a PPA like the Brightbox repository you used
earlier, however, so the setup has a few more steps.

Custom Deployment 227
First, enter the apt-key command to import Phusion’s RSA key for the
Ubuntu key server:
$ sudo apt-key adv --keyserver keyserver.ubuntu.com \
--recv-keys 561F9B9CAC40B2F7
Executing: gpg --ignore-time-conflict ...
--snip--
gpg: imported: 1 (RSA: 1)
The apt-get program uses this key to ensure that packages you install
are really coming from Phusion. Phusion’s repository uses an encrypted
HTTP connection (HTTPS) to communicate with your instance.
First, you need to add the Phusion Passenger repository to your instance.
Enter the following command to open a new file in the nano editor on your
instance. (Or, if you’re more comfortable with another command-line edi-
tor, use that instead.)
$ sudo nano /etc/apt/sources.list.d/passenger.list
Enter deb https://oss-binaries.phusionpassenger.com/apt/passenger trusty
main on the first line to add the address of the Phusion Passenger reposi-
tory to your instance. Then, if you’re using nano, press ctrl-O followed by
enter to save the file and ctrl-X to exit the editor.
Now update the apt-get package lists again:
$ sudo apt-get update
Ign http://us-east-1.ec2.archive.ubuntu.com trusty InRelease
--snip--
Reading package lists... Done
Then install the Apache 2 Phusion Passenger module:
$ sudo apt-get install libapache2-mod-passenger
Reading package lists... Done
--snip--
Do you want to continue? [Y/n]
Press enter to continue. Once the installation completes, your
instance should be set up to serve both standard web pages and Ruby
on Rails applications.
With your web server installed, create a directory for your applica-
tion. The default directory for regular HTML web pages is /var/www/html.
Because you’re deploying a Ruby on Rails application, create a separate
directory with these commands.
$ sudo mkdir /var/www/social
$ sudo chown ubuntu /var/www/social
$ sudo chgrp ubuntu /var/www/social

228 Chapter 15
The first command creates a directory named /var/www/social. The
next two commands assign ownership of that directory to your ubuntu user
and group, allowing you to write files to that directory as needed.
Now you need to install and set up a database for your application.
Installing PostgreSQL
This chapter uses the PostgreSQL database, but which database software
you choose is mostly up to you. MySQL is another popular, open source
option you might consider.
Install PostgreSQL with this command:
$ sudo apt-get install postgresql postgresql-contrib
Reading package lists... Done
--snip--
Do you want to continue? [Y/n]
Press enter to continue. Now that the database software is installed,
let’s add a user account and create a few databases. The default user account
for PostgreSQL is named postgres, so you need to issue the createuser com-
mand as the postgres user with the sudo -u postgres command:
$ sudo -u postgres createuser --superuser ubuntu
This command creates a new user named ubuntu with superuser
access to the database. This user has full access to all database commands.
PostgreSQL is configured with an authentication system known as ident
sameuser, by default, in Ubuntu. This means if your Ubuntu username
matches your PostgreSQL username, you can connect without a password.
Now that you’ve created a PostgreSQL account for yourself, add a data-
base and then see if you can connect to it:
$ createdb ubuntu
$ psql
psql (9.3.4)
Type "help" for help.
ubuntu=# help
You are using psql, the command-line interface to PostgreSQL.
Type: \copyright for distribution terms
\h for help with SQL commands
\? for help with psql commands
\g or terminate with semicolon to execute query
\q to quit
ubuntu=#

Custom Deployment 229
Your account can now log in to PostgreSQL and run commands. Enter
\q to quit. Now add a production database for your social application by
entering this command:
$ createdb social_production
You won’t need to enter any other PostgreSQL commands on your
instance. Now that you’ve created the production database, the migrations
in your application create the tables needed by your application. You’ll
configure the application to use this database before you deploy to your
instance.
Installing Build Tools
Your instance is almost ready to go! Before you can deploy your application,
however, you need to install a few more tools. Some of the gems your appli-
cation uses need to be compiled, and to do so, you need build tools such as
a C compiler. You also need Git for retrieving code from repositories and
header files for PostgreSQL to compile the PostgreSQL database gem.
Fortunately, this single command should install all of the build tools
you need:
$ sudo apt-get install build-essential git libpq-dev
Reading package lists... Done
--snip--
Do you want to continue? [Y/n]
The build-essential package is a collection of common build tools
needed to compile many different types of software. You’re already famil-
iar with Git from Chapter 6. The libpq-dev package is needed to compile
PostgreSQL client applications such as the pg gem.
Installing Gems
The last setup step is to install the gems your application needs. As you’ll
learn in the next section, the bundle command runs automatically when you
deploy, but installing gems while you’re connected to the server helps to
verify everything is working.
Gems normally generate documentation during installation. On the
server, this documentation just takes up space and slows down the installa-
tion. You can tell the gem command to not generate documentation by add-
ing gem: --no-document to your .gemrc file:
$ echo "gem: --no-document" >> ~/.gemrc

230 Chapter 15
Now that you’ve turned off gem documentation, install Rails:
$ sudo gem install rails
Fetching: thread_safe-0.3.3.gem (100%)
Successfully installed thread_safe-0.3.3
Fetching: minitest-5.3.3.gem (100%)
Successfully installed minitest-5.3.3
--snip--
Because you’re using the PostgreSQL database, also install the pg gem.
Parts of this gem are written in C, and they’ll be compiled automatically
during the installation.
$ sudo gem install pg
Building native extensions. This could take a while...
Successfully installed pg-0.17.1
1 gem installed
Finally, you need a gem called therubyracer. This gem embeds Google’s
V8 JavaScript interpreter into Ruby. Rails uses this gem to compile assets on
the server. Parts of this gem must also be compiled.
$ sudo gem install therubyracer
Building native extensions. This could take a while...
Successfully installed therubyracer-0.12.1
1 gem installed
With these gems in place, your instance is ready to run Rails applica-
tions. Now that the VPS setup is complete, let’s learn about Capistrano and
the changes you need to make to your application to deploy and run it in
production.
Capistrano
Capistrano is an open source tool for automating the process of running
scripts and deploying applications on remote servers over an SSH connec-
tion. Capistrano extends the rake tool that you’ve used already. Just like rake,
Capistrano uses a simple DSL to define tasks, which are applied to different
servers based on their role.
Tasks include things such as pulling code from a Git repository, running
bundle install, or running database migrations with rake. Roles are different
types of servers such as web, application, or database. Currently, these are
all on the same server, but when your application gets too big for a single
server, Capistrano makes splitting the work among multiple servers easy.
Capistrano also supports deploying an application to different stages.
Capistrano stages are sets of servers, such as staging servers and production
servers. Both of these servers run your Rails application in the produc-
tion environment, but the staging server is probably used only for testing,
whereas the production server is accessible by your users.

Custom Deployment 231
Getting Started
Exit the SSH session on your VPS or open another terminal window on
your local computer to set up Capistrano. Because Capistrano is a gem, you
first need to update your application’s Gemfile. Capistrano is already in the
file, but it’s commented out. Remove the pound sign from the beginning
of the line for the capistrano-rails gem to install both Capistrano and the
Rails-specific tasks you need.
While you’re editing the Gemfile, also make the changes needed for run-
ning in production:
--snip--
# Use sqlite3 as the database for Active Record
u gem 'sqlite3', group: [:development, :test]
--snip--
# See https://github.com/sstephenson/execjs#readme...
v gem 'therubyracer', platforms: :ruby, group: :production
--snip--
# Use Capistrano for deployment
w gem 'capistrano-rails', group: :development
# Use PostgreSQL in production
gem 'pg', group: :production
# Use debugger
gem 'byebug', group: [:development, :test]
These changes first specify that the SQLite gem is only needed in the
development and test environments u. Next, therubyracer gem is needed
to compile assets in production v as mentioned in the last section. The
capistrano-rails gem is only needed in development w. Finally, you also need
the PostgreSQL gem in production .
Now update the installed gems on your computer:
$ bin/bundle install --binstubs --without production
Fetching gem metadata from https://rubygems.org/........
Fetching additional metadata from https://rubygems.org/..
Resolving dependencies...
--snip--
The --binstubs option tells bundler to also install the executable files
in the bin/ directory. For example, Capistrano includes the cap command
that you’ll use to deploy your application, and you’ll run that from bin/. The
--without production option tells bundler to install only gems for the development
and test environments.

232 Chapter 15
Next, you need to install Capistrano in your application:
$ bin/cap install
mkdir -p config/deploy
create config/deploy.rb
create config/deploy/staging.rb
create config/deploy/production.rb
mkdir -p lib/capistrano/tasks
Capified
This process generates the files you need to configure Capistrano to
deploy your application. Let’s dig into those next.
Configuration
Now that your application has been Capified, you may notice some new
files. The first of these is named Capfile and is located in the root of the
application. You need to make one small change to that file:
# Load DSL and Setup Up Stages
require 'capistrano/setup'
# Includes default deployment tasks
require 'capistrano/deploy'
u # Include all Rails tasks
require 'capistrano/rails'
--snip--
As the comment says, the new require line includes Capistrano’s Rails-
specific tasks in your application u. After you save this file, you can see a list
of Capistrano tasks by entering the bin/cap -T command in your terminal.
Next, you need to edit the file config/deploy.rb. This file contains con-
figuration that is shared by all deployment stages, such as the name of your
application and the address of your Git repository.
# config valid only for Capistrano 3.1
lock '3.2.1'
u set :application, 'social'
set :repo_url, 'https://github.com/yourname/social.git'
# Default branch is :master
# ask :branch, proc { `git rev-parse --abbrev-ref HEAD`.chomp }.call
# Default deploy_to directory is /var/www/my_app
v set :deploy_to, '/var/www/social'
--snip--
namespace :deploy do

Custom Deployment 233
desc 'Restart application'
task :restart do
on roles(:app), in: :sequence, wait: 5 do
# Your restart mechanism here, for example:
w execute :touch, release_path.join('tmp/restart.txt')
end
end
after :publishing, :restart
--snip--
end
First, set the name of your application to social and specify the URL of
your Git repository u. Replace yourname with your GitHub username. Next,
set the deploy directory to the /var/www/social directory that you created on
your instance v. Finally, uncomment the execute line w in the restart task.
This line executes the touch tmp/restart.txt command. This command is
needed to restart the Passenger application server after deployment.
Now that the shared settings are updated, edit the config/deploy/
production.rb file. This file contains settings specific to the Capistrano
production stage. Replace the existing code in this file with the following code:
server 'your_instance_name',
u user: 'ubuntu', roles: %w{web app db}
v set :ssh_options, {
keys: 'your_key_file'
}
First, Capistrano needs the address of your servers, along with the
username and roles of each server u. Your instance is fulfilling all three
roles, and the username is ubuntu. Replace your_instance_name with your
server’s public DNS name. Next, specify the SSH options needed to con-
nect to your instance v. Capistrano needs the path to your private key to
connect. Replace your_key_file with the full path to your private key file.
Database Setup
Next, configure your application to use the PostgreSQL database you cre-
ated earlier. Database configuration is in the file config/database.yml. Update
the production section, as shown here:
--snip--
production:
adapter: postgresql
encoding: unicode
u database: social_production
pool: 5

234 Chapter 15
v username: ubuntu
w password:
This code tells Rails to use the PostgreSQL database named
social_production u in the production environment. Rails will connect
to the database with the username ubuntu v and no password w, thanks to
the Ubuntu’s ident sameuser authentication setup mentioned earlier.
Secrets Setup
The last thing you need to set up is the secret key used to sign your applica-
tion’s cookies. This value is stored in the file config/secrets.yml. This file can
also be used to store other secret information such as passwords or API keys
needed by your application.
--snip--
development:
secret_key_base: 242ba1d...
test:
secret_key_base: 92d581d...
u # Do not keep production secrets in the repository,
# instead read values from the environment.
production:
v secret_key_base: <%= ENV["SECRET_KEY_BASE"] %>
As mentioned in the comment, you shouldn’t keep production secrets
in this file u. If the code for your application is stored in a public Git reposi-
tory, these secrets would then be publicly available. Instead, this file uses an
ERB tag to read the value of the SECRET_KEY_BASE environment variable v.
Before you can set this environment variable on your server, generate a
value using the following command:
$ bin/rake secret
a3467dbd655679241a41d44b8245...
Copy the value output by this command and save it in a safe place.
You’ll need it again when you set up the virtual host for your application
later in this chapter.
Add to Git
With Capistrano configured and the database configured, you’re ready to
create a Git repository for your application and push your code to GitHub.
Capistrano runs git commands on your instance to pull changes to your
application from GitHub during deployment.
First create a Git repository on your local computer with the following
commands. (Refer back to Chapter 6 if you need a refresher on Git.)
Custom Deployment 235
$ git init
Initialized empty Git repository in ...
$ git add .
$ git commit -m "Initial commit"
[master (root-commit) 1928798] Initial commit
123 files changed, 1826 insertions(+)
--snip--
Now log in to your GitHub account and create a new public repository
named social. Once the repository is created, add a remote to the local
repository you just created and push the code up to GitHub.
$ git remote add origin https://github.com/yourname/social.git
$ git push -u origin master
Counting objects: 141, done.
--snip--
Branch master set up to track remote branch master from origin.
Once Capistrano is configured and your application is on GitHub,
you’re ready to deploy.
Deployment
First, test the connection to your instance and check if the instance is ready
to receive a deployment from Capistrano. The deploy:check task ensures
everything on the instance is set up correctly:
$ bin/cap production deploy:check
INFO [722a06ac] Running /usr/bin/env ...
--snip--
INFO [5d3c6d3e] Finished ... exit status 0 (successful).
Note that I specified the production stage in the command. You must
include the stage with every Capistrano command.
If the deploy:check task finishes successfully, you’re ready to deploy your
application for the first time:
$ bin/cap production deploy
INFO [e6d54911] Running /usr/bin/env ...
--snip--
INFO [3cb59e26] Finished ... exit status 0 (successful).
The deploy task not only checks out the latest code from GitHub but
also runs bundle install to update installed gems, compiles your applica-
tion’s assets, and migrates the database. Even once your application is
installed on your instance and running, however, you still need to make
one more configuration change to see your application on the Internet.

236 Chapter 15
Adding a Virtual Host
A Virtual Host is a way to host multiple sites on the same server or instance.
The Apache web server allows you to set up many different sites on the same
physical server. It then uses the DNS name of each site to serve the correct
site for each incoming request. You currently have only a single site running
on your instance, but you still need to set it up as a Virtual Host.
You perform this step one time. You won’t need to do this again unless
you decide to add another site to the same server. You needed to wait until
after your application was deployed since the directory names you’re going
to specify didn’t exist before.
First, connect to your instance with SSH, and then create a configura-
tion file for the social application in the /etc/apache2/sites-available directory:
$ sudo nano /etc/apache2/sites-available/social.conf
The previous command opens the new file in the nano editor. Enter the
following Apache configuration code in the new file:
u <VirtualHost *:80>
v ServerName your_instance_name
w DocumentRoot /var/www/social/current/public
SetEnv SECRET_KEY_BASE a3467dbd65...
<Directory /var/www/social/current/public>
Allow from all
Options -MultiViews
</Directory>
</VirtualHost>
The first line means this Virtual Host responds to all requests (indi-
cated by the star) on port 80 u. Next, specify the server name of this
Virtual Host v. Replace your_instance_name with the public DNS name of
your instance.
Then set the document root for this Virtual Host w. The document
root is normally the location of the site’s HTML files, but here, you set it
to your application’s public directory. This configuration is specific to the
Passenger application server.
The next line sets the SECRET_KEY_BASE environment variable . Replace
the partial key shown here with the complete 128-digit key generated by the
bin/rake secret command you entered earlier.
Finally, set options for the document root directory . The Allow from
all line means that all hosts and IP addresses are allowed access to the files
in this directory. The Options -MultiViews line turns off the MultiViews fea-
ture in Apache. This feature uses automatic content negotiation, which can
cause Apache to serve files to a client even if the file extension is not speci-
fied, which you don’t want.
Press ctrl-O followed by enter to save the file, and then press ctrl-X
to exit the editor.

Custom Deployment 237
Now that the new site is configured in Apache, you need to disable the
default site that comes with Apache and enable the social site:
$ sudo a2dissite 000-default
Site 000-default disabled.
To activate the new configuration, you need to run:
service apache2 reload
$ sudo a2ensite social
Enabling site social.
To activate the new configuration, you need to run:
service apache2 reload
Once this is done, reload Apache to activate the changes:
$ sudo service apache2 reload
* Reloading web server apache2
*
Now open your web browser and go to the public DNS name of your
instance. Your application should be available to the world, running in pro-
duction on your own virtual private server.
Summary
In this chapter, you learned how to set up a Linux server for hosting Rails
applications. You installed and configured the Apache web server, the
Phusion Passenger application server, and the PostgreSQL database server.
You also learned how to integrate the remote server automation tool
Capistrano in your Rails application. You configured your Rails application
for production and used Capistrano to deploy it to your instance.
With this done, you are well on your way to becoming a professional
Rails developer!
Exercises
1. Make a small change to your application, such as updating the title of
each page. Commit the change to your local Git repository, push the
changes to GitHub, and then deploy the change to your instance.
2. Learn about other gems you can use to add features to your Rails appli-
cations easily. For example, you might want to allow users to upload
images to your site instead of using a third-party image-hosting service.
Hundreds of open source projects are available for adding this and
other features to your application. Find one you like and try it out. If
you find a bug, fix it and send the developer a pull request on GitHub.
3. Get to know the Ruby on Rails community and get involved. Follow
Rails development on GitHub. Check out the official Ruby on Rails
website and blog. Find out about Ruby and Rails conferences and try to
attend; make yourself known at your local Ruby or Rails User Group.

solutioNs
Chapter 1
1. Exercise 1 is about learning to read a file and exploring the array
methods using the contents of the file. I’d expect to see something
like this in the console after completing the exercise:
irb(main):001:0> file = File.read("test.txt")
=> "Call me Ishmael..."
irb(main):002:0> puts file.split
Call
me
Ishmael
--snip--
=> nil
irb(main):003:0> puts file.split.length
=> 198
irb(main):004:0> puts file.split.uniq.length
=> 140
The output depends on the text you used.
240 Solutions
2. The second exercise requires writing a little code. The following sample
solves the problem using only methods covered so far:
file = File.read("test.txt")
counts = {}
file.split.each do |word|
if counts[word]
counts[word] = counts[word] + 1
else
counts[word] = 1
end
end
puts counts
This solution should print something like this:
=> {"Call"=>1, "me"=>3, "Ishmael."=>1, ...
The word “Call” appears once in the paragraph; the word “me”
appears three times; and so on.
3. Using the sample code provided in Exercise 3, the complete solution
looks like this:
class WordCounter
def initialize(file_name)
@file = File.read(file_name)
end
def count
@file.split.length
end
def uniq_count
@file.split.uniq.length
end
def frequency
counts = {}
@file.split.each do |w|
if counts[w]
counts[w] = counts[w] + 1
else
counts[w] = 1
end
end
end
end
This combines the solutions to the first two exercises, wrapping
them in a Ruby class.

Solutions 241
Chapter 2
1. The first exercise is about familiarizing yourself with a simple Rails
application and the functionality provided by default. The address of
the home page is http://localhost:3000/posts. As you move around the
application, that address changes. The new post form is at /posts/new;
the first post is at /posts/1; and the form for editing the first post is at
/posts/1/edit. These paths and their meaning are covered in Chapter 4.
2. If you’ve never worked on a large application before, the number of
files in a typical Rails application can seem daunting. Most editors
contain some type of project list for opening files, as well as keyboard
shortcuts for quickly searching for files by name. These features are
invaluable when working on larger projects.
Chapter 3
1. The following commands generate and run the migration to add an
email address to comments:
$ bin/rails g migration add_email_to_comments email:string
invoke active_record
create db/migrate/20140404225418_add_email_to_comments.rb
$ bin/rake db:migrate
== 20140404225418 AddEmailToComments: migrating...
--snip--
You can then launch a Rails console with bin/rails console and cre-
ate a new comment with an email address.
2. Open app/models/comment.rb and add the validation as shown here:
class Comment < ActiveRecord::Base
belongs_to :post
validates :author, :body, presence: true
end
Note that I added the validation for both fields on a single line.
You could do this, however, with two separate calls to the validates
method.
3. You can’t write a single query to determine the number of comments
for each post, but you can iterate over all posts and count the comments.
Enter something like this in the Rails console:
2.1.0 :001 > Post.all.each do |post|
2.1.0 :002 * puts post.comments.count
2.1.0 :003 > end
This code first finds all of the posts and then makes a count query
on the comments table for each one.

242 Solutions
Chapter 4
1. Open the file app/controllers/comments_controller.rb, and find the create
method.
class CommentsController < ApplicationController
def create
@post = Post.find(params[:post_id])
if @post.comments.create(comment_params) u
redirect_to @post,
notice: 'Comment was successfully created.'
else
redirect_to @post,
alert: 'Error creating comment.'
end
end
--snip--
Note that it currently uses @post.comments.create(comment_params) u
to initialize and save the new comment as part of the if statement.
You need to store the new comment in a variable so you can use the
errors method to get a list of errors when the save fails. Update the
create method as shown here:
class CommentsController < ApplicationController
def create
@post = Post.find(params[:post_id])
@comment = @post.comments.build(comment_params)
if @comment.save
redirect_to @post,
notice: 'Comment was successfully created.'
else
redirect_to @post,
alert: 'Error creating comment. ' +
@comment.errors.full_messages.to_sentence u
end
end
--snip--
This code adds the errors to the existing alert. Notice I used the
to_sentence method u to convert the array of error messages to a
sentence like this: “Author can’t be blank and Body can’t be blank.”
2. Edit app/controllers/comments_controller.rb, and find the comment_params
method. Add :email to the call to the permit method:
class CommentsController < ApplicationController
--snip--
private

Solutions 243
def comment_params
params.require(:comment).permit(:author, :body, :email)
end
end
Now if a user enters an email address when adding a new comment,
the address should be stored in the database. Without this change, the
email field is simply ignored.
Chapter 5
1. Remove the h1 element from app/views/posts/index.html.erb and update
app/views/layouts/application.html.erb, as shown here:
--snip--
<body>
<h1>Listing posts</h1>
<%= yield %>
</body>
</html>
Also change the headings in app/views/posts/new.html.erb and app/
views/posts/edit.html.erb to h2 headings:
<h2>New post</h2>
<%= render 'form' %>
<%= link_to 'Back', posts_path %>
2. First, add a label and text field for :author to the app/views/posts/
_form.html.erb partial:
--snip--
<div class="field">
<%= f.label :title %><br>
<%= f.text_field :title %>
</div>
<div class="field">
<%= f.label :author %><br>
<%= f.text_field :author %>
</div>
<div class="field">
<%= f.label :body %><br>
<%= f.text_area :body %>
</div>
--snip--

244 Solutions
Then add :author to the list of permitted parameters in the post_
params method at the bottom of app/controllers/posts_controller.rb:
--snip--
def post_params
params.require(:post).permit(:title, :author, :body)
end
end
3. Make the changes to config/routes.rb and app/views/comments/_comment
.html.erb as described in the question. Here is how I would write the
destroy action in app/controllers/comments_controller.rb:
--snip--
def destroy
@post = Post.find(params[:post_id])
@comment = @post.comments.find(params[:id])
@comment.destroy
respond_to do |format|
format.html { redirect_to @post }
format.json { head :no_content }
end
end
--snip--
Chapter 6
1. After editing files in your application, stage your changes in Git with git
add ., then commit these changes with git commit -m "Commit Message",
and finally push the changes to Heroku with git push heroku master.
2. If you don’t already have a GitHub account, go to https://github.com/ and
complete the sign-up form. Next you’ll need to choose a plan. The free
plan includes unlimited public repositories. Once you finish the sign-
up process, you should see the GitHub Bootcamp screen. Follow the
instructions there to create a repository and upload your application.
3. Create your new application in the code directory you created in
Chapter 2, not inside the blog directory. Use the rails new command
followed by the name of your new application. For example, to create
an application to track your record collection, type this command:
$ rails new vinyl

Solutions 245
Next think about the models your application needs. In this case,
you probably need a Record or Album model. The model needs fields such
as title, artist, and release_date. Move to the vinyl directory, and use
the rails scaffold command to generate some code to get started:
$ cd vinyl
$ bin/rails generate scaffold Album title artist release_date:datetime
Now start the Rails server and work with your new application.
Chapter 7
1. In my version of Rails, the Post class has 58 ancestors.
irb(main):001:0> Post.ancestors.count
=> 58
Using the Ruby pretty-print method (pp), you can list each ancestor
on a separate line:
irb(main):012:0> pp Post.ancestors
[Post(id: integer, title: string, body: text, created_at: datetime,
updated_at: datetime, author: string),
Post::GeneratedFeatureMethods,
#<Module:0x007fabc21bafd8>,
ActiveRecord::Base,
--snip--
ActiveRecord::Validations,
--snip--
Kernel,
BasicObject]
As you scroll through the list of ancestors, you should see
some names you recognize, such as ActiveRecord::Associations
and ActiveRecord::Validations. Also, notice that Post inherits from
BasicObject, just like every other class in Ruby.
2. The cannot_feature! method should be the same as the can_feature!
method except it assigns false to the @features[f] instead of true.
class User
FEATURES = ['create', 'update', 'delete']
FEATURES.each do |f|
define_method "can_#{f}!" do
@features[f] = true
end

246 Solutions
define_method "cannot_#{f}!" do
@features[f] = false
end
define_method "can_#{f}?" do
!!@features[f]
end
end
def initialize
@features = {}
end
end
After adding this method, create another instance of the User class
and make sure the new method works as expected:
irb(main):001:0> user = User.new
=> #<User:0x007fc01b95abe0 @features={}>
irb(main):002:0> user.can_create!
=> true
irb(main):003:0> user.can_create?
=> true
irb(main):004:0> user.cannot_create!
=> false
irb(main):005:0> user.can_create?
=> false
3. First, look at the instance methods defined by the Element class:
irb(main):001:0> Element.instance_methods(false)
=> [:name, :name=]
The methods name and name= are defined as expected. Now reopen
the Element class and add a call to accessor :symbol:
irb(main):002:0> class Element
irb(main):003:1> accessor :symbol
irb(main):004:1> end
=> :symbol=
This should create two new methods named symbol and symbol=.
You can verify that the methods were created by calling instance_methods
again:
irb(main):005:0> Element.instance_methods(false)
=> [:name, :name=, :symbol, :symbol=]
You can verify that the methods work as expected by creating an
instance of the Element class and assigning a symbol with e.symbol = "Au".

Solutions 247
Chapter 8
1. Specifying dependent: :destroy on the belongs_to side of the associa-
tion causes the parent model to be destroyed when any child model is
destroyed. In this example, destroying any Post also destroys the associ-
ated User. This mistake is fairly common.
2. The completed Comment model should look like this:
class Comment < ActiveRecord::Base
belongs_to :post
belongs_to :user
validates :post_id, presence: true
validates :user_id, presence: true
end
The Rails generator adds belongs_to associations automatically, but
it does not add validations.
3. Launch the Rails console with bin/rails console. Create a new User,
TextPost, and Comment. Verify that all of the models were created. Then
call destroy on the new User and verify that the associated TextPost and
Comment records are also destroyed.
irb(main):001:0> carol = User.create name: "Carol"
=> #<User id: 3, name: "Carol", ...>
irb(main):002:0> post = TextPost.create user: carol, body: "Testing"
=> #<TextPost id: 3, body: "Testing", ...>
irb(main):003:0> comment = Comment.create post: post, user: carol, \
body: "Hello"
=> #<Comment id: 1, body: "Hello", ...>
irb(main):004:0> carol.posts.count
=> 1
irb(main):005:0> carol.comments.count
=> 1
irb(main):006:0> carol.destroy u
--snip--
=> #<User id: 3, name: "Carol", ...>
irb(main):007:0> carol.posts.count
=> 0
irb(main):008:0> carol.comments.count
=> 0
irb(main):009:0> carol.reload v
ActiveRecord::RecordNotFound: Couldn't find User with id=3
--snip--
Note that calling destroy on the model does not remove it from
memory u. The variable carol still refers to the model even though it
has been deleted from the database. Attempting to reload the model
from the database raises an ActiveRecord::RecordNotFound exception
because the record for carol has been deleted v.

248 Solutions
Chapter 9
1. First, edit the text post partial at app/views/text_posts/_text_post.html.erb,
as shown here:
<div class="panel panel-default">
<div class="panel-heading">
<h3 class="panel-title">
<%= text_post.title %>
</h3>
<%= link_to(
"#{time_ago_in_words text_post.created_at} ago",
post_path(text_post)) %>
</div>
--snip--
This creates a link to the text_post with the time in words such
as “5 days ago.” Edit the image post partial at app/views/image_posts/
_image_post.html.erb with a similar change.
--snip--
</h3>
<%= link_to "#{time_ago_in_words image_post.created_at} ago",
post_path(image_post) %>
</div>
--snip--
The only difference here is the word text_post is replaced with
image_post. Now load the posts index page and make sure the links work
correctly.
2. The most important part of this exercise is restricting access to the con-
troller to authenticated users. Add before_action :authenticate_user! in
app/controllers/comments_controller.rb, as shown here:
class CommentsController < ApplicationController
before_action :authenticate_user!
--snip--
end
The comment partial at app/views/comments/_comment.html.erb
shows the name of the user that created the comment and the body of
the comment.
<p><em><%= comment.user.name %> said:</em></p>
<p><%= comment.body %></p>
This partial is rendered once for each comment by render @post
.comments in the post show view.

Solutions 249
3. First, start a Rails console with bin/rails console to see the password_digest
for a user.
irb(main):001:0> alice = User.find 1
User Load ...
=> #<User id: 1, name: "Alice", ...>
irb(main):002:0> alice.password_digest
=> "$2a$10$NBjrpHtfLJN14c6kVjG7sety1N4ifyuto7GD5qX7xHdVmbtweL1Ny"
The value of alice.password_digest that you see will be different.
Bcrypt automatically adds a salt to the password before generating the
hash digest. I can’t tell the password for alice by looking at that value.
Bcrypt seems pretty secure!
You can see the cookies for a site by looking at resources in your
browser’s Developer Tools or Page Info. According to the Chrome
developer tools, my current _social_session cookie is 465 bytes of alpha-
numeric digits like this "M2xkVmNTaGpVaFd...". Again, I’m not able to deci-
pher that information.
Chapter 10
1. Open the TextPost partial at app/views/text_posts/_text_post.html.erb. It
already displays the user’s name. Add a call to the link_to helper method
before the text_post.user.name and also pass the text_post.user to the
helper:
--snip--
<div class="panel-body">
<p><em>By <%= link_to text_post.user.name, text_post.user %></em></p>
<%= text_post.body %>
</div>
--snip--
Then update the ImagePost partial at app/views/image_posts/_image
_post.html.erb:
--snip--
<div class="panel-body">
<p><em>By <%= link_to image_post.user.name, image_post.user %></em></p>
<%= image_tag image_post.url, class: "img-responsive" %>
<%= image_post.body %>
</div>
--snip--

250 Solutions
Finally, update the application layout at app/views/layouts/application
.html.erb:
--snip--
<div class="pull-right">
<% if current_user %>
<%= link_to 'Profile', current_user %>
<%= link_to 'Log Out', logout_path %>
<% else %>
--snip--
The application layout already has a check for current_user. Add the
Profile link inside this conditional.
2. Open UsersController at app/controllers/users_controller.rb. Requiring
authentication before the follow action is a one-line change using the
authenticate_user! method you wrote in Chapter 9.
class UsersController < ApplicationController
before_action :authenticate_user!, only: :follow
--snip--
The only: :follow option means anonymous users can still access
the show, new, and create actions. Now update the user show view at app/
views/users/show.html.erb. I used two if statements to first verify that
current_user is not nil, and then to verify that current_user is not equal
to or already following the user being displayed.
--snip--
<p class="lead"><%= @user.name %></p>
<% if current_user %>
<% if current_user != @user && !current_user.following?(@user) %>
<%= link_to "Follow", follow_user_path(@user),
class: "btn btn-default" %>
<% end %>
<% end %>
<h3>Posts</h3>
--snip--
You could have also done this with a single if combining all three
of the conditional statements.
3. First, open app/controllers/image_posts_controller.rb, and add methods for
the new and create actions and the private image_post_params method.
These are similar to the corresponding methods in TextPostsController.
class ImagePostsController < ApplicationController
def new
@image_post = ImagePost.new
end

Solutions 251
def create
@image_post = current_user.image_posts.build(image_post_params)
if @image_post.save
redirect_to post_path(@image_post),
notice: "Post created!"
else
render :new, alert: "Error creating post."
end
end
private
def image_post_params
params.require(:image_post).permit(:title, :url, :body)
end
end
Next, add the new view at app/views/image_posts/new.html.erb:
<div class="page-header">
<h1>New Image Post</h1>
</div>
<%= render 'form' %>
Then add the form partial at app/views/image_posts/_form.html.erb:
<%= form_for @image_post do |f| %>
<div class="form-group">
<%= f.label :title %>
<%= f.text_field :title, class: "form-control" %>
</div>
<div class="form-group">
<%= f.label :url %>
<%= f.text_field :url, class: "form-control" %>
</div>
<div class="form-group">
<%= f.label :body %>
<%= f.text_area :body, class: "form-control" %>
</div>
<%= f.submit class: "btn btn-primary" %>
<%= link_to 'Cancel', :back, class: "btn btn-default" %>
<% end %>
Finally, add a button to the home page at app/views/posts/index.html.
erb that links to the New Image Post form:
--snip--
<p>
<%= link_to "New Text Post", new_text_post_path,
class: "btn btn-default" %>

252 Solutions
<%= link_to "New Image Post", new_image_post_path,
class: "btn btn-default" %>
</p>
--snip--
Refer back to “Create Post” on page 153 if you have any questions
about these actions or views.
Chapter 11
1. First, add methods for the edit and update actions to the
ImagePostsController at app/controllers/image_posts_controller.rb,
as shown here:
--snip--
def edit
@image_post = current_user.image_posts.find(params[:id])
end
def update
@image_post = current_user.image_posts.find(params[:id])
if @image_post.update(image_post_params)
redirect_to post_path(@image_post), notice: "Post updated!"
else
render :edit, alert: "Error updating post."
end
end
private
def image_post_params
params.require(:image_post).permit(:title, :body, :url)
end
end
Next, create the edit view at app/views/image_posts/edit.html.erb:
<div class="page-header">
<h1>Edit Image Post</h1>
</div>
<%= render 'form' %>
This view uses the form partial you created in Chapter 10. Finally,
add a link to the edit action in the ImagePost partial at app/views/image
_posts/_image_post.html.erb:
--snip--
<%= image_post.body %>
Solutions 253
<% if image_post.user == current_user %>
<p>
<%= link_to 'Edit', edit_image_post_path(image_post),
class: "btn btn-default" %>
</p>
<% end %>
</div>
</div>
This link is wrapped in a conditional so it only appears if this image
post was created by the current user.
2. Update the PostsController at app/controllers/posts_controller.rb, as shown
in the question.
--snip--
def show
@post = Post.find(params[:id])
@can_moderate = (current_user == @post.user)
end
end
Now edit the comment partial at app/views/comments/_comment
.html.erb and add a link to destroy the comment when the @can_moderate
instance variable is true:
<p><em><%= comment.user.name %> said:</em></p>
<p><%= comment.body %></p>
<% if @can_moderate %>
<p>
<%= link_to 'Destroy', comment_path(comment),
method: :delete, class: "btn btn-default" %>
</p>
<% end %>
Be sure to add method: :delete to the link so the destroy action is
called. Finally, add the destroy action to the CommentsController at app/
controllers/comments_controller.rb:
--snip--
def destroy
@comment = Comment.find(params[:id])
if @comment.destroy
redirect_to post_path(@comment.post_id),
notice: 'Comment successfully destroyed.'
else
redirect_to post_path(@comment.post_id),
alert: 'Error destroying comment.'
end
end

254 Solutions
private
def comment_params
params.require(:comment).permit(:body, :post_id)
end
end
This method finds the comment, calls destroy, and redirects back to
the post with a message indicating success or failure.
3. Open the routes file at config/routes.rb and edit at the logout route:
--snip--
get 'login', to: 'sessions#new', as: 'login'
delete 'logout', to: 'sessions#destroy', as: 'logout'
root 'posts#index'
end
Edit the application layout at app/views/layouts/application.html.erb
and add method: :delete to the Log Out link.
--snip--
<div class="pull-right">
<% if current_user %>
<%= link_to 'Profile', current_user %>
<%= link_to 'Log Out', logout_path, method: :delete %>
<% else %>
--snip--
Now the link issues a DELETE request to log out of the application.
Chapter 12
1. The show page loads the collection of comments to render and then
loads the owner of each comment individually as the comments are
rendered. You can eager load the comments and the owners for a
post by adding includes(comments: [:user]) in the show method in the
PostsController at app/controllers/posts_controller.rb:
--snip--
def show
@post = Post.includes(comments: [:user]).find(params[:id]) u
@can_moderate = (current_user == @post.user)
end
end
Adding includes(comments: [:user]) tells Rails to eager load the com-
ments for this post and all users associated with those comments.

Solutions 255
2. Open the Comment partial at app/views/comments/_comment.html.erb and
add the cache block:
<% cache [comment, @can_moderate] do %> u
<p><em><%= comment.user.name %> said:</em></p>
<p><%= comment.body %></p>
<% if @can_moderate %>
<p>
<%= link_to 'Destroy', comment_path(comment),
method: :delete, class: "btn btn-default" %>
</p>
<% end %>
<% end %>
Passing an array to the cache method creates a cache key that com-
bines the elements in the array u. In this case, the cache key contains
the values of the comment’s id and updated_at fields and the value of
@can_moderate, either true or false.
3. Open the show page at app/views/posts/show.html.erb and add the cache
block.
--snip--
<h3>Comments</h3>
<% cache [@post, 'comments', @can_moderate] do %> u
<%= render @post.comments %>
<% end %>
--snip--
This creates a cache key that is a combination of the cache key for
@post, the word “comments,” and the value of @can_moderate u. Now the
comments collection is displayed after a single read from the cache.
Chapter 13
1. You need to update the view partials for both types of posts for this
exercise. First, edit the file app/views/text_posts/_text_post.html.erb and
add a debug call near the bottom, as shown here:
<div class="panel panel-default">
--snip--
<%= debug text_post %>
</div>
</div>

256 Solutions
Then edit app/views/link_posts/_link_post.html.erb and add a debug
call near the bottom:
<div class="panel panel-default">
--snip--
<%= debug link_post %>
</div>
</div>
2. The easiest way to add the id and type of each post to the log is by iterat-
ing over the contents of the @posts instance variable. Edit app/controllers/
posts_controller.rb and update the index action.
class PostsController < ApplicationController
before_action :authenticate_user!
def index
user_ids = current_user.timeline_user_ids
@posts = Post.includes(:user).where(user_id: user_ids)
.paginate(page: params[:page], per_page: 5)
.order("created_at DESC")
@posts.each do |post|
logger.debug "Post #{post.id} is a #{post.type}"
end
end
--snip--
Now when you refresh the posts index page, you should see five
lines similar to “Post 5 is a TextPost” in the log.
3. To debug what happens when a user logs in to the application, you
need to add a debugger call to the create action in app/controllers/
sessions_controller.rb:
class SessionsController < ApplicationController
--snip--
def create
debugger
user = User.find_by(email: params[:email])
if user && user.authenticate(params[:password])
session[:user_id] = user.id
redirect_to root_url, :notice => "Logged in!"
else
flash.now.alert = "Invalid email or password"
render "new"
end
end
--snip--

Solutions 257
With this line in place, you can examine the params sent to this
action, the current contents of the session, and the value of user as you
move through this action.
Chapter 14
1. This curl command is the same one you used earlier to create a new
post, except I replaced the token with the word fake.
$ curl -i \
-d '{"text_post":{"title":"Test","body":"Hello"}}' \
-H "Content-Type: application/json" \
-H "Authorization: Token fake" \
http://localhost:3000/api/text_posts
HTTP/1.1 401 Unauthorized
--snip--
HTTP Token: Access denied.
Note that the status code is 401 Unauthorized and the body contains
the text "HTTP Token: Access denied."
2. Text posts validate the presence of a body, so use curl to attempt to
create a text post without specifying a body.
$ curl -i \
-d '{"text_post":{"title":"Test"}}' \
-H "Content-Type: application/json" \
-H "Authorization: Token token" \
http://localhost:3000/api/text_posts
HTTP/1.1 422 Unprocessable Entity
--snip--
{"errors":{"body":["can't be blank"]}}
Note that the status code is 422 Unprocessable Entity and the body
contains a JSON representation of the errors.
3. Add the show method to app/controllers/api/posts_controller.rb:
module Api
class PostsController < ApplicationController
respond_to :json
--snip--
def show
@post = Post.find(params[:id])
respond_with @post
end
end
end

258 Solutions
This method finds the requested post and assigns it to the @post
instance variable and then responds with that post. The following
curl command verifies that this action is working:
$ curl http://localhost:3000/api/posts/1
{
"id":1,
"title":"First Post",
"body":"Hello, World!",
"url":null,
"user_id":1,
"created_at":"2014-04-22T00:56:48.188Z",
"updated_at":"2014-04-22T00:56:48.188Z"
}
Because you didn’t create a jbuilder view for this action, the default
JSON representation for posts is returned.
Chapter 15
1. Edit the file app/views/layouts/application.html.erb to change the title of
each page:
<!DOCTYPE html>
<html>
<head>
<title>My Awesome Site</title>
--snip--
After you save this change, add it to your local Git repositories
staging area, and then commit the change with an appropriate commit
message.
$ git add .
$ git commit -m "Update title"
Now deploy your change by entering bin/cap production deploy in
your terminal.
2. The Ruby Toolbox at https://www.ruby-toolbox.com/ lists hundreds of
gems you can use to add features to your application. For example,
you can let users upload files to your application. Check the Rails File
Uploads category to find several choices, including Paperclip and
CarrierWave. From there, you can visit the website, read the documen-
tation, and see the source code for each project.
3. Go to https://github.com/rails/rails/ to join the discussion on open issues
and pull requests, and see previous commits. Ruby on Rails has a page at
http://rubyonrails.org/community/ for those looking to get involved online.
You can learn about upcoming Ruby and Rails conferences at http://
rubyconf.org/ and http://railsconf.com,/ respectively. I hope to see you
there!
Numbers and Symbols
404.html file, 24
422.html file, 24
500.html file, 24
&& (and) operator, 9–10
@, for instance variables, 15
\ (backslash), for special characters, 6
: (colon), for symbols, 7
{ } (curly braces)
for blocks, 13
for hashes, 8
:: (double-colon) operator, 91
" (double-quotes), for strings, 6
== (equal) operator, 9
! (exclamation mark), at end of
method name, 7
=> (hash rocket), 8–9
> (greater than) operator, 9
< (less than) operator, 9
and inheritance, 17
<< operator, 8
<=> operator, 92
<%= %> tag, 58
<% %> tag, 58–59
<%# %> tag, for comments, 59
% (modulus) operator, 5
!= (not equal) operator, 9
|| (or) operator, 9–10
||= (conditional assignment) operator, 10
+ operator, to add arrays, 8
? (question mark), at end of
method name, 7
[ ] (square brackets), for array, 7–8
_ (underscore), in partial names, 67
| (vertical pipe), 13
A
Accessor class, defining, 101
Active Record, 30, 106–121
cache_key method, 187
calculations, 35
query conditions, 34–35
relation, 32
ActiveRecord::Base, inheriting from, 110
ActiveRecord::RecordNotFound exception,
32, 41
ActiveSupport::Cache::FileStore cache
store, 186
ActiveSupport::Cache::MemoryStore cache
store, 186
ActiveSupport::TestCase module, 143
Ada, 3
add command (Git), 77
alert class, 131
alert-danger class, 132
alert message, 132
alert-success class, 132
all method, 32
Amazon Elastic Compute Cloud
(Amazon EC2), 224
Amazon Web Services (AWS), 224–225
ancestors class method, 95–96
and (&&) operator, 9–10
anonymous users, restricting page access,
125, 136
Apache
disabling default site, 237
installing, 226–228
API controllers, 212–213
api module, 219
API requests
adding route for, 211
authentication credentials for, 209
APIs (application programming
interfaces), 51
creating, 211–222
token-based authentication, 216–222
api_token string, 216
app/assets directory, 65, 177
application.css file, 65, 124, 176–177
application.js file, 66, 124
javascripts directory, 176
stylesheets directory, 176
app/controllers directory
api/posts_controller.rb file, 212, 257
api/text_posts_controller.rb file, 219
application_controller.rb file, 135,
171, 218
iNDex
260 Index
app/controllers directory (continued)
comments_controller.rb file, 248,
253–254
destroy action in, 244
image_post_controller.rb file, 165,
250–251
ImagePostsController methods, 252
posts_controller.rb file, 48, 125, 256
index action, 184
logger statement, 198
PostsController, 253
sessions_controller.rb file, 256
text_posts_controller.rb file, 158, 159,
164–165
users_controller.rb file, 129, 156, 250
app/helpers directory, 61
application_helper.rb file, 61
posts_helper.rb module, 61
application, view for, 22
ApplicationController class, 136–137
authentication method in, 218
ApplicationHelper module, 61, 90
application programming interface.
See API (application
programming interface)
application.rb file, 24
application server, for Ruby on Rails,
226–227
app/models directory
comment.rb file, 189
adding validation, 241
ext_post.rb file, checking for body text,
118–119
image_post.rb file, 118
post.rb file, 29
subscription.rb file, 113
user.rb file, 114, 129, 143
has_many association, 119
app/views directory, 58
comments/_comment.html.erb file, 248,
253, 255
image_posts/edit.html.erb file, 165
image_posts/_form.html.erb file, 251
image_posts/_image_post.html.erb file,
126, 188, 192, 248
ImagePost partial, 249
image_posts/new.html.erb file, 251
layouts/application.html.erb file, 64,
136, 171, 196, 250, 258
updating, 243
link_posts/_link_post.html.erb file, 256
posts/index.html.erb file, 58, 62, 125, 159
will_paginate call, 184
posts/show.html.erb file, 58, 68, 127
sessions/new.html.erb file, for login
form, 133–134
text_posts/edit.html.erb file, 165
text_posts/_form.html.erb file, 158
text_posts/_text_post.html.erb file, 126,
165, 248, 255
comment count in, 187–188
TextPost partial, 249
users/new.html.erb file, 130–131
users/show.html.erb file, 155, 156
apt-get system, for software install,
225–226
arrays, 7–8
for all keys in hash, 9
returning first and last entries in, 32
ASC order, for retrieving posts, 34
as_json method, 213–214
assertions, 146 –147
controller test, 150–152
in testing, 143
asset pipeline, 65, 176–179
asset precompilation, 178–179
debug mode, 177–178
manifests, 176–177
viewing search path list, 177
assets, in Rails application, 65
assets:clobber rake ta sk, 178
assets directory, 23, 24
assigns hash, 150
associations, 39–42
adding, 40
belongs_to methods, 41–42
defining, 113
generating model, 39
has_many methods, 40–41
has_many :through, 109–110
many-to-many, 107–110
polymorphic, 111–112
self join, 106–107
specifying in advance, 183
testing, 115 –116
touch option, 189
attr_accessor method, 16, 90, 100–101
attributes of object, displaying, 198
authenticated user, for
TextPostsController, 158
authenticate_or_request_with_http_token
method, 218
authenticate_user! method, 136, 250
authenticating over SSH (secure shell), 81
authentication, 123–140
vs. authorization, 163–164
of current user, 125
with GitHub API, 209–211
Index 261
log in, 132–135
of requests, 218–219
token-based, 216–222
of user, 136–137
authenticity_token token, 171
authorization attacks, 163–165
author migration, 37
average method, 35
AWS (Amazon Web Services), 224–225
B
backslash (\), for special characters, 6
BasicObject class, 96
bcrypt gem, 128, 249
BCrypt::Password.create method, 144
before_action :authenticate_token!
method, 219
before_action :authenticate_user!
method, 248
before_action method (Rails), 48, 136
belongs_to association, 106, 107, 111–112,
113, 247
belongs_to methods, 41–42
belongs_to statement, 40
between? method, 92
bin directory, 20, 23
bundle install command, 124, 128, 199
cap production deploy command, 258
rails console command, 247, 249
rails generate command, 153
rails server command, 57
rake db:migrate command, 129, 216
rake log:clear command, 197
rake routes command, 211
rake test command, 142
rake test:models command, 149
--binstubs option, for bundler, 231
block of code, 13
blog posts, adding comments, 39
body element (HTML), 64
Booleans, 9–10
Bootstrap, 124
form-group class, 131
panel component, 126
styles for links, 157
bootstrap_sass gem, 124
branch command (Git), 79
branching, 11
BrightBox, 225
build-essential package, 229
build tools, installing, 229
bundle command, 25–26, 82, 229
bundle install command, 20, 235
Bundler tool, 25
flags in, 82
business logic, 22
byebug gem, 199
C
cached_comment_count method, 188
cache_key method, 187, 189, 190
cache keys, 187, 255
cache store, 185
Rails support of, 186
caching, 185–192
enabling, 186
fragment, 189–191
issues, 191–192
low-level, 187–189
calc method, 93
callbacks, eliminating, 147–148
canceling current operation, 4
cannot_feature! method, 245
Capfile, 232
Capistrano, 178, 230–237
configuration, 232–233
database setup, 233–234
deployment, 235
secrets setup, 234
setup, 231–232
virtual host, 236–237
capistrano-rails gem, 231
Cascading Style Sheets (CSS)
asset pipeline and, 176
including in application, 124
lists of application use, 65
case
for constants, 10
for variables, 11
cd command, 20
centralized version control systems, 76
change_column method, 37
change method, 36
changes, pushing or pulling, 76
checkout command (Git), 79, 80
child model, 106
classes, 15–18
adding new methods, 16
ancestors, 95–96
assigning method calls to another, 94
creating instance of, 16
as instance of other class, 96–97
methods, 96
class_eval method, 100–102
class methods, 17
class statement, 15
262 Index
client error, 4xx status codes for, 208
cloud application platform. See Heroku
cloud application platform
code
block, 13
executing inside debugger, 203
optimization, 180–185
CoffeeScript, 176, 180
:collection option, 67–68
collections, 67–68
colon (:), for symbols, 7
columns in database, adding, 37
combining strings, 6
comment model, 120, 247
comment_params method, 55, 242
comments
adding, 54–55
adding to blog posts, 39
belongs_to methods, 41–42
form, 72–73
has_many methods, 40–41
show page for, 254
showing, 68–69
CommentsController#create method, 72
commit command (Git), 77–78
commit message, 77
Comparable module, 92
Concurrent Version System (CVS), 76
conditional assignment (||= ) operator, 10
conditional statements, 11–12
for Edit button, 191–192
config.action_controller.perform_caching
setting, 186
config.assets.debug setting, 178
config directory, 23
deploy/production.rb file, 233
deploy.rb file, 232–233
environments/development.rb file, 178,
186, 192
routes.rb file, 45, 46, 156, 171
logout route, 254
secrets.yml file, 234
console command, 26
constants, 10
continue command (debugger), 203
control flow, 11–13, 58–59
controllers, 23, 43–56
actions, 48–54
API, 212–213
helpers for, 47–48
parameters, 49–50
response formats, 51–52
testing, 150–152
controls on forms, helper methods for,
69–70
convention over configuration, 21
cookies, 52
secret key for, 234
cookies hash, 150
count method, 35
create action, 44
controller test for, 151
POST request for, 151
create command, in Heroku, 83
create comment action, controller for, 54
created_at field, 28
create_join_table method, 109
create method, 31, 53
for login form, 134
in SessionsController, 181–182
createuser command, for PostgreSQL, 228
cross-site request forgery (CSRF), 64,
170 –171
token, 221
cross-site scripting (XSS), 167–169
CRUD functions, 31, 44
CSRF (cross-site request forgery), 64,
170 –171
token, 221
csrf_meta_tags method, 66–67
csrf-token meta tag, 66
CSS. See Cascading Style Sheets (CSS)
Curl, 208–209, 220–221, 257
to check index action output, 215
testing API, 212
for testing token-based
authentication, 209
curly braces ({ })
for blocks, 13
for hashes, 8
current user
authentication, 125
identifying, 135–136
using, 137–139
current_user method, 135–136, 219
output of, 196
custom routes, 46
CVS (Concurrent Version System), 76
D
data, testing, 39
database
adding columns, 37
adding records, 31
CRUD functions, 31, 44
current state, 36
HTTP verbs for actions, 44
retrieving posts from, 48
Index 263
database migrations, 24, 28, 35–37
and application deployment, 83
for creating table, 113
preventing creation of, 118
updating db/schema.rb with, 142
database queries, reducing, 180–183
database.yml file, 24
data model, 106
advanced, 106–112
for social networking service, 112
data types, 5–11
arrays, 7–8
Booleans, 9–10
hashes, 8–9
numbers, 5
strings, 6–7
symbols, 7
dbconsole command, 26
db directory, 24
migrate directory, 35
schema.rb file, 36
db:rollback statement, 36
debugger method, 200, 256
debugging, 195–204
commands, 200–204
Rails logger for, 197–199
debug helper, 196–197
:debug log level, 197
debug mode, 177–178
def_delegators method, 95
define_method method, 99–100
def statement, 14
delegation, 94
delete method, 150
DELETE request, 44, 46, 60
delete_via_redirect method, 152
deleting records, 33–34
dependent: :destroy option, 117
deploy:check task, 235
deployment, 75–85, 223–237
Capistrano, 230–237
virtual private servers, 224–230
DESC order, for retrieving posts, 34
destroy action, 44, 253
destroy method, 33–34, 53–54, 247
for user_id, 134
development environment,
debug mode, 178
development.log file, 24
development.rb file, 23
diff command (Git), 78–79
digital signature, 81
directives, in manifest files, 176
direct manipulation, 30
directory
creating for Ruby on Rails, 227–228
for Rails project, 20
display command (debugger), 202–203
distributed version control system, 76
div element, class="container", 124
division, math operation, 5
doctype (HTML5), 64
documentation
for Bootstrap, 124
from gems, 229
document root, for Virtual Host, 236
do, end pair, for adding block, 45
Don’t Repeat Yourself (DRY), 22
do statement, 13
double-colon (::) operator, 91
double-quotes ("), for strings, 6
DRY (Don’t Repeat Yourself), 22
duck typing, 98–99
duplication, eliminating, 147–148
E
each method, 12–13, 58
eager loading, 183
edit action, 44, 49
Edit button, conditional statement for,
191–192
Eiffel, 3
Element class, instance methods of, 246
elements
adding to array end, 8
of web pages, 64
else statement, 11
elsif statement, 11
email address
of current user, 125
storing, 128
Embedded Ruby (ERB), 22, 57, 58–59
comments, 59
Employee model, defining
associations in, 107
empty? method, 6–7
end statement, 13, 14, 90
environments directory, 23
equal (==) operator, 9
ERB (Embedded Ruby), 22, 57, 58–59
comments, 59
error_explanation div element, 70–71
error messages
code for displaying, 70–71
files for, 24
errors array, 39
errors method, 242
264 Index
/etc/apache2/sites-available directory,
236–237
eval command (debugger), 203
exclamation mark (!), at end of
method name, 7
:exclusion validation, 38
exit command, 4, 30
extend statement, 94
F
favcon.ico file, 25
features, enabling and checking for,
99–100
fetch method, 187
Fibonacci sequence, 93–94
Fielding, Roy, 43
field_with_errors class, 71
file.open method, passing block to, 13
file.read method, 18
file.split method, 18
find_by method, 219
find method, 32, 164
first method, 32
fixtures, 144 –146, 156
flags, in Bundler, 82
flash hash, 150
flash messages, 52
displaying, 131–132
floating-point math, 5
flow between pages, testing, 152
follow action, safety from
CSRF attacks, 171
following? method, 114
following! method, 115
follow_redirect! method, 152
foreign key, 106
in migration file, 108
for loop, 12–13
form builder object, 71
form_for method, 71, 72
forms, 69–72
for comments, 72–73
form_tag, 134
Forwardable module, 94–95
Fowler, Martin, Patterns of Enterprise
Application Architecture, 30
fragment caching, 185, 189–191
friendly_date helper method, 61
full-stack web framework, 19
functional tests, 150
G
garbage collection, optimization, 175
gem command, 25, 229
Gemfile
adding debugger gem, 199
updating for Heroku, 81–83
gems, 20, 258
bcrypt, 128
bootstrap_sass, 124
byebug, 199
capistrano-rails, 231
directories in asset pipeline
searches, 177
documentation from, 229
installing, 229–230
jbuilder, 214–216
updating installed, 124, 128, 199
will_paginate, 184
generate_api_token method, 217
generate command, 26
get method, 150
GET request, 44, 46, 60
and state change, 170
test issuing, 151
getter methods, 16
get_via_redirect method, 152
git add command, 77
git branch command, 79
git checkout command, 79, 80
git commit command, 77–78
git diff command, 78–79
git --help command, 78
GitHub, 84
account, 244
pushing code to, 234–235
GitHub API, 205, 206–207
authentication with, 209–211
token generation, 209–210
git log command, 77
git pull command, 80
git push command, 80, 83
git remote add command, 80
git status command, 78, 79
Git version control system, 75
basic usage, 77–80
branches, 79–80
getting started, 76–77
remotes, 80
repository, creating, 234–235
setup, 76
staging area of, 77
greater than (>) operator, 9
greet method, 15–16
Index 265
H
Hansson, David Heinemeier, 19
hashed version of password, 128
hashes, 8–9
for commit, 77
iteration over, 13
hash rocket (=>), 8–9
has_many association, 106, 107, 112, 116, 143
has_many :leaders association, 137
has_many method, 40
has_many :through association, 109–110, 117
has_secure_password method, 128, 143
head element (HTML), 64
head method, 150
help command, for debugger, 201
--help command (Git), 78
helpers, 22, 59–61
adding methods, 61
for controllers, 47–48
controller test, 150
integration, 152
methods for form controls, 69–70
helpers directory, 23
Heroku cloud application platform, 75,
81–84
deploying application, 83–84
Gemfile update for, 81–83
heroku run command, 83
Heroku Toolbelt, installing, xxi, 81
hex method, 217
home page
root route setting for application, 47
timeline for, 137
HTML, partials for shared code, 67–69
HTML5 field types, helper
methods for, 72
HTML page
Rails layout for, 64
Ruby code and, 22
HTTP, 207–209
status codes, 207–208
HTTP verbs, 60
for database actions, 44
I
identifiers, symbols as, 7
id field, 28
retrieving record by, 32
if statement, 11, 250
ImagePost
editing, 165
fixture files for, 145–146
validation test, 149
image_post_params method, 250–251
image_tag helper, 126
img-responsive class (Bootstrap), 126
include statement, for methods, 91–92
:inclusion validation, 38
index action, 44, 48, 125, 212
index for array, 8
index page
for post model, 125
for posts, 61–63
indices, creating for foreign keys, 109
inheritance, 17–18
in Ruby, 91
single-table, 110 –111
initialize statement, 15
injection attacks, 165–169
insecure direct object reference, 164
inspect method, 198
installing
Apache, 226–228
build tools, 229
gems, 229–230
Heroku Toolbelt, xxi, 81
PostgreSQL, 228–229
Rails, xxi–xxiii, 230
Ruby, xxi–xxiv, 225–226
instance, 224
of class, creating, 16
instance methods, 17
instance_methods method, 96
instance_of? method, 97
instance variables
accessing, 16
assigning value to, 15
instantiating objects, 31
integer division, 5
integration tests, 152–154
Interactive Ruby interpreter (IRB), 4
Internal Server Error code, 208
introspection, 97
IRB (Interactive Ruby interpreter), 4
irb command, 4
is_a? method, 97
is-a relationship, 17
:is validation, 38
iteration, 12–13
J
JavaScript
asset pipeline and, 176
events, 180
including in application, 124
list of files in use, 65
javascript_include_tag method, 66
266 Index
JavaScript Object Notation (JSON), 22,
51, 207
customizing output, 213–216
messages, 205
jbuilder gem, 214–216
join table, 113
creating, 109
for many_to_many association, 107–109
jq (JSON processor), 212–213
JSON (JavaScript Object Notation), 22,
51, 207
customizing output, 213–216
messages, 205
json.array! method, 215
json.extract! method, 215
K
Kernel class, 96
keys method, 9
key-value pairs, 8
L
label helper, 71
last method, 32
layouts for views, 64–67
leader_ids method, 137
leaders method, 116
length method, 6
:length validation, 38
less than (<) operator, 9
lib/assets directory, 177
lib directory, 24
libpq-dev package, 229
limit method, 34
link_to helper, 59
Lisp, 3
list command (debugger), 201–202
local variables, 202
log directory, 24
development.log file, 197
test.log file, 145
logger (Rails), 197–199
log in, 132–135
custom routes for, 46
implementing, 133–135
logout, custom routes for, 46
low-level caching, 185, 187–189
M
mailers directory, 23
manifests, 65, 176–177
many-to-many associations, 107–110
margins, for page, 124
master branch, 79
Math module, 91
math operations, in IRB, 5
Matsumoto, Yukihiro, 3
maximum method, 35
:maximum validation, 38
memcached server, 186
memoization, 92
Memoize module, calc method, 93
Mercurial, 76
merge method, 9
metaprogramming, 89, 99–104
method_missing method, 102–104
methods, 14–15, 96
include statement for, 91–92
passing named parameters to, 9
migration files, rails generate command
to create empty, 108
migrations, 35–37. See also database
migrations
minimum method, 35
:minimum validation, 38
MiniTest framework, 141, 146
mistakes. See debugging
mixins, modules as, 91–95
mkdir command, 20
models, 29–42
adding validations to, 118
relationship between two of same
type, 106
testing, 148–149
model-view-controller (MVC), 22
module Api statement, 212
module keyword, 90
modules, 17–18, 89, 90–95
as mixins, 91–95
as namespaces, 91
modulus (%) operator, 5
MVC (model-view-controller), 22
MySQL, 228
N
N + 1 Queries, 182–183
named parameters, passing to method, 9
names
for modules, 90
for partials, 67
for templates, 58
namespaces, modules as, 91
namespace :api block, 211
nano editor, 236
nested resources, 45
Index 267
network communications, Curl for,
208–209
new action, 44, 49
controller test for, 151
New Image Post form, button linking to,
251–252
newlines, in strings, 6
new method, 17
for login form, 134
new post form, 51
params from, 53
from Rails scaffold generator, 69–70
next command (debugger), 203
nil, 4
from [] method, 8
from accessing nonexistent key, 8
for method definition, 14
NoMethodError exception, 96, 98, 102
not equal (!=) operator, 9
“not” form, of assertions, 146
notice message, 132
not operator, 12
NOT operator, 100
number helpers, 60–61
numbers, 5
number_to_currency method, 60
number_to_human method, 60
number_to_human_size method, 60
number_to_percentage method, 61
O
Object class, 96
object_id method, 7
objects
instantiating, 31
state of, 15
odd numbers, 5
offset method, 34
one-to-many relationships, 39
one-way hash, 128
open-source software,
collaborating on, 84
Open Web Application Security Project
(OWA SP), 172
operation, canceling current, 4
optimization
asset pipeline, 176 –179
built-in features, 176–180
of code, 180–185
garbage collection, 175
or (||) operator, 9–10
order clause, for timelines, 138
order method, 34
output tag (<%= %>), 58
output to screen, 4
OWASP (Open Web Application Security
Project), 172
P
Paas (Platform as a Service), 81
page rendering, speed of, 185
paginate method, 184
pagination, and optimization, 183–185
parameters, 49–50
for methods, 14–15
passing named, to method, 9
params, from new post form, 53
params hash, 49–50
:text_post key in, 160
parent model, 106
partials, 67–69
password attribute, checking for, 143
password_confirmation attribute,
checking for, 143
password digest, 128
passwords
authentication, 181–182
hashed version, 128
patch method, 150
PATCH request, 44, 60
patch_via_redirect method, 152
path helpers, 47
Patterns of Enterprise Application Architecture
(Fowler), 30
PDF format, 51
percentages, 61
performance. See also optimization
caching and, 185–192
of Ruby on Rails, 175–192
Perl, 3
Personal Package Archive (PPA), 225
pg (PostgreSQL gem), 82
installing, 230
Phusion Passenger, 226–227
pipe character (|), 13
plaintext files, reading in Ruby, 18
Platform as a Service (PaaS), 81
pluralize helper method, 188
polymorphic associations, 111–112
@post, 72
@post.comments.build, 72
post.comments.find method, 41
PostController, logger statement, 198
post f ixtures, 145–146
PostgreSQL, installing, 228–229
PostgreSQL database server, 82
PostgreSQL gem (pg), 82
post_id field, 39
268 Index
Post index view, 127
post method, 150
post model, 29–30, 117–119
index and show pages for, 125
post_params method, 50
post:references option, 39
POST request, 44, 46, 51
adding repository with, 210–211
posts
authorization to edit, 164
index page, 61–63
updating when comment is added, 189
user’s ability to add, 157–161
PostsController, respond_to method, 211
PostsHelper module, 61
posts table, 30
adding string column to, 37
posts_url, 52
post_via_redirect method, 152, 153
PPA (Personal Package Archive), 225
predicate method, 114
prepend statement, 92–94
:presence validation, 38
presence validation, for email field, 129
<pre> tags, for debug helper output, 196
pretty-printing
JSON data, 212–213
in Ruby, 245
printing Ruby code, 203
print messages, by log levels, 198
privileges, of users, 164
production environment
asset precompilation, 178–179
default log level, 197–198
production.rb file, 23
programmer, ERB comments for notes, 59
prompt, 4
return to working, 4
protect_from_forgery method, 171, 221–222
public/assets directory, 178
public directory, 24
public key, 81
pull command (Git), 80
pulling changes to server, 76
push command (Git), 80, 83
pushing changes to server, 76
push method, 95
put method, 150
puts method, 4
put_via_redirect method, 152
Q
Queries, N + 1, 182–183
query_by_attribute method, 102–103
question mark (?), at end of
method name, 7
quit command (IRB), 4
quotation marks, for strings, 6
R
Rails, 19
architecture, 22–23
commands, 25–26
confirming install, 19
installing, xxi–xxiii, 230
principles, 21–22
scaffolding, 27–28
testing in, 142–148
rails_12factor gem, for Heroku, 82
Rails application
assets in, 65
first, 20–21
modules in, 89
structure, 23–25
Rails.application.config.assets.paths
setting, 177
Rails.cache.fetch method, 187, 188
rails command, 26
Rails console
launching, 247
starting, 30
Rails counter cache, 189
Rails development environment,
preparing, 142
rails generate command, 28
Rails generator, 37
for controller for comments, 54
new post form from, 69–70
Rails logger, 197–199
levels, 197–198
rails new command, 26, 244
directory structure created by, 23
rails scaffold command, 245
rails server command, 20, 72
rake command, 24, 27, 36
to precompile assets, 178
rake db:migrate command, 83
random-number generator, 217
read-eval-print loop (REPL), 4
read operation, 32–33
ready function (jQuery), 180
records
adding to database, 31
counting, 35
deleting, 33–34
updating, 33
red-green-refactor, 154
redirect? helper method, 152
Index 269
redirection, vs. rendering view, 50–51
redirect_to method, 51
refactoring code, 25
reflection, 97
regular expressions, 103
remainder, 5
remote add command (Git), 80
remote repository, making local copy, 79
remove_column method, 37
rename_column method, 37
render action method, 51
render command
for form partial, 158
partials and, 67
rendering view, vs. redirection, 50–51
repetition, avoiding, 22
REPL (read-eval-print loop), 4
repository, 75
Representational State Transfer (REST),
43–44
require directive, 176
require_self directive, 66, 176
require_tree directive, 176, 177
require_tree . statement, 66
resource route, 45
resources :user sessions statement, 46
respond_to :json method, 219
respond_to method, 53, 211
respond_to? method, 98
respond_to_missing? method, 103–104
respond_with method, 212
REST (Representational State Transfer),
43–44
restricted resources, 46
return statement, 14
reverse of subscription, 116–117
robots.txt file, 25
root route, 47
route for sign-up page, 129
routes.rb file, 24
routing, 45–48
custom routes, 46
root route, 47
Ruby, 3
installing, xxi–xxiv, 225–226
interactive, 4
Ruby object model, 89, 95–97
Ruby on Rails, 19
application server for, 226–227
creating directory for, 227–228
performance, 175–192
resources on, 258
Ruby Toolbox, 258
S
Sass, 176
schema, 36
schema_migrations database table, 36
schema.rb file, 24
screen, output to, 4
secret key, for cookies, 234
SECRET_KEY_BASE environment variable, 236
SecureRandom class, 217
secure shell (SSH), authenticating
over, 81
securit y, 163 –173
authorization attacks, 163–165
cross-site request forgery (CSRF),
170 –171
cross-site scripting (XSS), 167–169
injection attacks, 165–169
seeds.rb file, 24
self join associations, 106–107
server. See also virtual private servers
error status codes, 208
launching, 20
session hash, 150
sessions, 132–133
set_post method, 48–49
setter methods, 16
setup method, 147, 149
short circuit operators, 10
show action, 44, 48, 125
show method, 23
show page
for comments, 254
for post model, 125
for users, 154
sign-up form, adding, 130–131
sign-up page, adding route for, 129
sign-up process, for users, 128–132
single inheritance, 17
single-table inheritance, 110 –111
size method, 95
sleep method, 190
slice, in array, 8
Smalltalk, 3
snake case, 11
snapshot, by Git, 77
social networking application, 112–120
comment model, 120
data model for, 112
post models, 117–119
user model, 112–117
software install, a pt-get system for,
225–226
270 Index
spaces between words, 6
special characters, in strings, 6
SQL
commands, 31
examining output, 181–182
injection attack, 166–167
program optimization and, 180–183
SQLite database, 24
square brackets ([ ]), for array, 7
SSH (secure shell), authenticating
over, 81
stages in Capistrano, for application
deployment, 230
staging area, of Git, 77
state of application, 22
status codes, HTTP, 207–208
status command (Git), 78, 79
step command (debugger), 203
stepping into application, 199
strings, 6–7
Strong Parameters, 50, 53, 55
stylesheet_link_tag method, 65–66
submit helper, 72
subscription, model to represent, 113
subscriptions t able, 114
Subversion, 76
sum method, 35
symbols, 7
T
tabs, in strings, 6
tasks directory, 24
TDD (test-driven development), 25
adding features with, 154–161
teardown method, 147
templates, in ERB, 58
test case, 143
test directory, 25
controllers/posts_controller_test.rb
file, 152
controllers/text_posts_controller_test.rb
file, 157–158, 159
controllers/users_controller_test.rb file,
151, 154–155
fixtures/posts.yml file, 145 –146
fixtures/users.yml file, 144
integration/user_flow_test.rb file, 153
models/user_test.rb file, 142–143, 145
test_helper.rb script, 25
test-driven development (TDD), 25
adding features with, 154–161
testing, 141–162
API with Curl, 212
associations, 115–116
controllers, 150–152
data, 39
helpers, 47
integration, 152–154
models, 148–149
in Rails, 142–148
using f ixtures, 144 –146
test log, 145
test.rb file, 23
text field, helper for creating, 71–72
text post
button for creating new, 159
edit view for, 165
update method for, 164–165
TextPost
creating posts of, 157–161
fixture files for, 145–146
validation test, 149
TextPost partial
conditional statement for Edit button,
191–192
link to edit section, 165
text post partial, editing, 248
text_post_params method, 159, 220
therubyracer gem, 230
timeline, for home page, 137
timeline_user_ids method, 137
tmp directory, 25
token-based authentication, 209, 216–222
tokens
for current session, 66
generating, 216–218
for request authentication, 218–219
Torvalds, Linus, 76
touch option, for associations, 189
touch tmp/restart.txt command, 233
t.references :author statement, 108–109
Tumblr, 112
turbolinks, 179 –180
U
Ubuntu Linux 14.04 LTS, 224
Ubuntu Linux setup, 225–230
underscore (_), in partial names, 67
undisplay command (debugger), 203
:uniqueness validation, 38
uniqueness validation, for email field, 129
unique words, 18
unit tests, 148
unless statement, 12
update action, 44
update method, 33, 51, 53
for text posts, 164–165
Index 271
updated_at field, 28
updating records, 33
URL helpers, 47, 59–60
URLs
and mapping actions to verbs, 45
validation, 118
User associations, 114
User.authenticate method, vulnerability to
SQL injection, 166
User class, creating instance of, 246
user fixtures, 144–145
user_id in session, storing, 132–133
user interface. See views
user model
api_token string, 216
for social networking application,
112–117
user:references option, 118
users
action for creating new, 129–130
authentication of, 136–137
privileges of, 164
sign-up process, 128–132
V
validation, 38–39
adding to app/models/comment.rb
file, 241
adding to model, 118
valid? method, 39
valid user, 143
values method, 9
values of object, displaying, 198
var command (debugger), 202
variables, 10–11
examining values, 202
initiating only if nil, 10
var instance command, 202
VCS (version control system), 75
vendor/assets directory, 177
vendor directory, 25
version control system (VCS), 75
vertical pipe (|), 13
views, 22, 57–74
caching parts of, 189
layouts, 64–67
view templates, creating, 125
virtual host, 236–237
virtual private servers, 224–230
Amazon AWS setup, 224–225
Ubuntu Linux setup, 225–230
W
web APIs, 205–222
web browser, JSON output on, 213
weblog, creating, 20
web pages
elements, 64
title of, 258
WEBrick server, 20
web servers, 226–228
where method, 32–33, 103
will_paginate gem, 184
--without production option, for
bundler, 231
words, counting in file, 18
write_with_time method, 99
X
XML, 22, 51
X-RateLimit-Limit, for GitHub API
requests, 209
XSS (cross-site scripting), 167–169
Y
YAML, 144, 196
dashes and dots for start and end, 197
yield statement, 67, 124
Z
zero index, for array, 8