Red Hat OpenShift Application Runtimes 1 Spring Boot Runtime Guide Open Shift En US
User Manual:
Open the PDF directly: View PDF ![]() .
.
Page Count: 112 [warning: Documents this large are best viewed by clicking the View PDF Link!]
- Table of Contents
- PREFACE
- CHAPTER 1. WHAT IS SPRING BOOT
- CHAPTER 2. MISSIONS AND CLOUD-NATIVE DEVELOPMENT ON OPENSHIFT
- CHAPTER 3. AVAILABLE MISSIONS AND BOOSTERS FOR SPRING BOOT
- 3.1. REST API LEVEL 0 MISSION - SPRING BOOT BOOSTER
- 3.1.1. Viewing the booster source code and README
- 3.1.2. REST API Level 0 design tradeoffs
- 3.1.3. Deploying the REST API Level 0 booster to OpenShift Online
- 3.1.4. Deploying the REST API Level 0 booster to Single-node OpenShift Cluster
- 3.1.5. Deploying the REST API Level 0 booster to OpenShift Container Platform
- 3.1.6. Interacting with the unmodified REST API Level 0 booster for Spring Boot
- 3.1.7. Running the REST API Level 0 booster integration tests
- 3.1.8. REST resources
- 3.2. EXTERNALIZED CONFIGURATION MISSION - SPRING BOOT BOOSTER
- 3.2.1. The externalized configuration design pattern
- 3.2.2. Externalized Configuration design tradeoffs
- 3.2.3. Viewing the booster source code and README
- 3.2.4. Deploying the Externalized Configuration booster to OpenShift Online
- 3.2.5. Deploying the Externalized Configuration booster to Single-node OpenShift Cluster
- 3.2.6. Deploying the Externalized Configuration booster to OpenShift Container Platform
- 3.2.7. Interacting with the unmodified Externalized Configuration booster for Spring Boot
- 3.2.8. Running the Externalized Configuration booster integration tests
- 3.2.9. Externalized Configuration resources
- 3.3. RELATIONAL DATABASE BACKEND MISSION - SPRING BOOT BOOSTER
- 3.3.1. Relational Database Backend design tradeoffs
- 3.3.2. Viewing the booster source code and README
- 3.3.3. Deploying the Relational Database Backend booster to OpenShift Online
- 3.3.4. Deploying the Relational Database Backend booster to Single-node OpenShift Cluster
- 3.3.5. Deploying the Relational Database Backend booster to OpenShift Container Platform
- 3.3.6. Interacting with the Relational Database Backend API
- 3.3.7. Running the Relational Database Backend booster integration tests
- 3.3.8. Relational database resources
- 3.4. HEALTH CHECK MISSION - SPRING BOOT BOOSTER
- 3.4.1. Health check concepts
- 3.4.2. Viewing the booster source code and README
- 3.4.3. Deploying the Health Check booster to OpenShift Online
- 3.4.4. Deploying the Health Check booster to Single-node OpenShift Cluster
- 3.4.5. Deploying the Health Check booster to OpenShift Container Platform
- 3.4.6. Interacting with the unmodified Health Check booster
- 3.4.7. Running the Health Check booster integration tests
- 3.4.8. Health check resources
- 3.5. CIRCUIT BREAKER MISSION - SPRING BOOT BOOSTER
- 3.5.1. The circuit breaker design pattern
- 3.5.2. Circuit Breaker design tradeoffs
- 3.5.3. Viewing the booster source code and README
- 3.5.4. Deploying the Circuit Breaker booster to OpenShift Online
- 3.5.5. Deploying the Circuit Breaker booster to Single-node OpenShift Cluster
- 3.5.6. Deploying the Circuit Breaker booster to OpenShift Container Platform
- 3.5.7. Interacting with the unmodified Spring Boot Circuit Breaker booster
- 3.5.8. Running the Circuit Breaker booster integration tests
- 3.5.9. Using Hystrix Dashboard to monitor the circuit breaker
- 3.5.10. Circuit breaker resources
- 3.6. SECURED MISSION - SPRING BOOT BOOSTER
- 3.6.1. The Secured project structure
- 3.6.2. Viewing the booster source code and README
- 3.6.3. Red Hat SSO deployment configuration
- 3.6.4. Red Hat SSO realm model
- 3.6.5. Spring Boot SSO adapter configuration
- 3.6.6. Deploying the Secured booster to Single-node OpenShift Cluster
- 3.6.7. Deploying the Secured booster to OpenShift Container Platform
- 3.6.8. Authenticating to the Secured booster API endpoint
- 3.6.9. Running the Spring Boot Secured booster integration tests
- 3.6.10. Secured SSO resources
- 3.7. CACHE MISSION - SPRING BOOT BOOSTER
- 3.7.1. How caching works and when you need it
- 3.7.2. Viewing the booster source code and README
- 3.7.3. Deploying the Cache booster to OpenShift Online
- 3.7.4. Deploying the Cache booster to Single-node OpenShift Cluster
- 3.7.5. Deploying the Cache booster to OpenShift Container Platform
- 3.7.6. Interacting with the unmodified Cache booster
- 3.7.7. Running the Cache booster integration tests
- 3.7.8. Caching resources
- 3.1. REST API LEVEL 0 MISSION - SPRING BOOT BOOSTER
- CHAPTER 4. DEVELOPING AN APPLICATION FOR THE SPRING BOOT RUNTIME
- CHAPTER 5. DEBUGGING
- CHAPTER 6. MONITORING
- APPENDIX A. THE SOURCE-TO-IMAGE (S2I) BUILD PROCESS
- APPENDIX B. UPDATING THE DEPLOYMENT CONFIGURATION OF A BOOSTER
- APPENDIX C. CONFIGURING A JENKINS FREESTYLE PROJECT TO DEPLOY YOUR APPLICATION WITH THE FABRIC8 MAVEN PLUGIN
- APPENDIX D. DEPLOYING A SPRING BOOT APPLICATION USING WAR FILES
- APPENDIX E. ADDITIONAL SPRING BOOT RESOURCES
- APPENDIX F. APPLICATION DEVELOPMENT RESOURCES
- APPENDIX G. PROFICIENCY LEVELS
- APPENDIX H. GLOSSARY

Red Hat OpenShift Application
Runtimes 1
Spring Boot Runtime Guide
For Use with Red Hat OpenShift Application Runtimes
Last Updated: 2018-11-08


Red Hat OpenShift Application Runtimes 1 Spring Boot Runtime Guide
For Use with Red Hat OpenShift Application Runtimes

Legal Notice
Copyright © 2018 Red Hat, Inc.
The text of and illustrations in this document are licensed by Red Hat under a Creative Commons
Attribution–Share Alike 3.0 Unported license ("CC-BY-SA"). An explanation of CC-BY-SA is
available at
http://creativecommons.org/licenses/by-sa/3.0/
. In accordance with CC-BY-SA, if you distribute this document or an adaptation of it, you must
provide the URL for the original version.
Red Hat, as the licensor of this document, waives the right to enforce, and agrees not to assert,
Section 4d of CC-BY-SA to the fullest extent permitted by applicable law.
Red Hat, Red Hat Enterprise Linux, the Shadowman logo, JBoss, OpenShift, Fedora, the Infinity
logo, and RHCE are trademarks of Red Hat, Inc., registered in the United States and other
countries.
Linux ® is the registered trademark of Linus Torvalds in the United States and other countries.
Java ® is a registered trademark of Oracle and/or its affiliates.
XFS ® is a trademark of Silicon Graphics International Corp. or its subsidiaries in the United States
and/or other countries.
MySQL ® is a registered trademark of MySQL AB in the United States, the European Union and
other countries.
Node.js ® is an official trademark of Joyent. Red Hat Software Collections is not formally related to
or endorsed by the official Joyent Node.js open source or commercial project.
The OpenStack ® Word Mark and OpenStack logo are either registered trademarks/service marks
or trademarks/service marks of the OpenStack Foundation, in the United States and other countries
and are used with the OpenStack Foundation's permission. We are not affiliated with, endorsed or
sponsored by the OpenStack Foundation, or the OpenStack community.
All other trademarks are the property of their respective owners.
Abstract
This guide provides details on using the Spring Boot runtime with Red Hat OpenShift Application
Runtimes.

. . . . . . . . . . . . . . . . . . . . . . . . . . . . . . . . . . . . . . . . . . . . . . . . . . . . . . . . . . . . . . . . . . . . . . . . . . . . . . . . . . . . . . . . . . . . . . . . . . . . . . . . . . . . . . . . . . . . . . . . . . . . . . . . . . . . . . . . . . . . . . . . . . . . . . . . . . . . . . . . . . . . . . . . . . . . . . . . . . . . . . . . . . . . . . . . . . . . . . . . . . . . . . . . . . . . . . . . . . . . . . . . . . . . . . . . . . . . . . . . . . . . . . . . . . . . . . . . . . . . . . . . . . . . . . . . . . . . . . . .
. . . . . . . . . . . . . . . . . . . . . . . . . . . . . . . . . . . . . . . . . . . . . . . . . . . . . . . . . . . . . . . . . . . . . . . . . . . . . . . . . . . . . . . . . . . . . . . . . . . . . . . . . . . . . . . . . . . . . . . . . . . . . . . . . . . . . . . . . . . . . . . . . . . . . . . . . . . . . . . . . . . . . . . . . . . . . . . . . . . . . . . . . . . . . . . . . . . . . . . . . . . . . . . . . . . . . . . . . . . . . . . . . . . . . . . . . . . . . . . . . . . . . . . . . . . . . . . . . . . . . . . . . . . . . . . . . . . . . . . .
. . . . . . . . . . . . . . . . . . . . . . . . . . . . . . . . . . . . . . . . . . . . . . . . . . . . . . . . . . . . . . . . . . . . . . . . . . . . . . . . . . . . . . . . . . . . . . . . . . . . . . . . . . . . . . . . . . . . . . . . . . . . . . . . . . . . . . . . . . . . . . . . . . . . . . . . . . . . . . . . . . . . . . . . . . . . . . . . . . . . . . . . . . . . . . . . . . . . . . . . . . . . . . . . . . . . . . . . . . . . . . . . . . . . . . . . . . . . . . . . . . . . . . . . . . . . . . . . . . . . . . . . . . . . . . . . . . . . . . . .
. . . . . . . . . . . . . . . . . . . . . . . . . . . . . . . . . . . . . . . . . . . . . . . . . . . . . . . . . . . . . . . . . . . . . . . . . . . . . . . . . . . . . . . . . . . . . . . . . . . . . . . . . . . . . . . . . . . . . . . . . . . . . . . . . . . . . . . . . . . . . . . . . . . . . . . . . . . . . . . . . . . . . . . . . . . . . . . . . . . . . . . . . . . . . . . . . . . . . . . . . . . . . . . . . . . . . . . . . . . . . . . . . . . . . . . . . . . . . . . . . . . . . . . . . . . . . . . . . . . . . . . . . . . . . . . . . . . . . . . .
Table of Contents
PREFACE
CHAPTER 1. WHAT IS SPRING BOOT
1.1. SPRING BOOT TESTED AND VERIFIED VERSION
1.2. SPRING BOOT FEATURES AND FRAMEWORKS SUMMARY
CHAPTER 2. MISSIONS AND CLOUD-NATIVE DEVELOPMENT ON OPENSHIFT
Missions
Boosters
CHAPTER 3. AVAILABLE MISSIONS AND BOOSTERS FOR SPRING BOOT
3.1. REST API LEVEL 0 MISSION - SPRING BOOT BOOSTER
3.1.1. Viewing the booster source code and README
3.1.2. REST API Level 0 design tradeoffs
3.1.3. Deploying the REST API Level 0 booster to OpenShift Online
3.1.3.1. Deploying the booster using developers.redhat.com/launch
3.1.3.2. Authenticating the oc CLI client
3.1.3.3. Deploying the REST API Level 0 booster using the oc CLI client
3.1.4. Deploying the REST API Level 0 booster to Single-node OpenShift Cluster
3.1.4.1. Getting the Fabric8 Launcher tool URL and credentials
3.1.4.2. Deploying the booster using the Fabric8 Launcher tool
3.1.4.3. Authenticating the oc CLI client
3.1.4.4. Deploying the REST API Level 0 booster using the oc CLI client
3.1.5. Deploying the REST API Level 0 booster to OpenShift Container Platform
3.1.6. Interacting with the unmodified REST API Level 0 booster for Spring Boot
3.1.7. Running the REST API Level 0 booster integration tests
3.1.8. REST resources
3.2. EXTERNALIZED CONFIGURATION MISSION - SPRING BOOT BOOSTER
3.2.1. The externalized configuration design pattern
3.2.2. Externalized Configuration design tradeoffs
3.2.3. Viewing the booster source code and README
3.2.4. Deploying the Externalized Configuration booster to OpenShift Online
3.2.4.1. Deploying the booster using developers.redhat.com/launch
3.2.4.2. Authenticating the oc CLI client
3.2.4.3. Deploying the Externalized Configuration booster using the oc CLI client
3.2.5. Deploying the Externalized Configuration booster to Single-node OpenShift Cluster
3.2.5.1. Getting the Fabric8 Launcher tool URL and credentials
3.2.5.2. Deploying the booster using the Fabric8 Launcher tool
3.2.5.3. Authenticating the oc CLI client
3.2.5.4. Deploying the Externalized Configuration booster using the oc CLI client
3.2.6. Deploying the Externalized Configuration booster to OpenShift Container Platform
3.2.7. Interacting with the unmodified Externalized Configuration booster for Spring Boot
3.2.8. Running the Externalized Configuration booster integration tests
3.2.9. Externalized Configuration resources
3.3. RELATIONAL DATABASE BACKEND MISSION - SPRING BOOT BOOSTER
3.3.1. Relational Database Backend design tradeoffs
3.3.2. Viewing the booster source code and README
3.3.3. Deploying the Relational Database Backend booster to OpenShift Online
3.3.3.1. Deploying the booster using developers.redhat.com/launch
3.3.3.2. Authenticating the oc CLI client
3.3.3.3. Deploying the Relational Database Backend booster using the oc CLI client
3.3.4. Deploying the Relational Database Backend booster to Single-node OpenShift Cluster
6
7
7
7
9
9
9
10
10
10
10
11
11
11
12
13
13
14
14
15
16
16
17
17
18
18
18
19
19
19
20
20
22
22
22
23
23
25
25
26
27
27
28
28
29
29
29
30
31
Table of Contents
1

3.3.4.1. Getting the Fabric8 Launcher tool URL and credentials
3.3.4.2. Deploying the booster using the Fabric8 Launcher tool
3.3.4.3. Authenticating the oc CLI client
3.3.4.4. Deploying the Relational Database Backend booster using the oc CLI client
3.3.5. Deploying the Relational Database Backend booster to OpenShift Container Platform
3.3.6. Interacting with the Relational Database Backend API
Troubleshooting
3.3.7. Running the Relational Database Backend booster integration tests
3.3.8. Relational database resources
3.4. HEALTH CHECK MISSION - SPRING BOOT BOOSTER
3.4.1. Health check concepts
3.4.2. Viewing the booster source code and README
3.4.3. Deploying the Health Check booster to OpenShift Online
3.4.3.1. Deploying the booster using developers.redhat.com/launch
3.4.3.2. Authenticating the oc CLI client
3.4.3.3. Deploying the Health Check booster using the oc CLI client
3.4.4. Deploying the Health Check booster to Single-node OpenShift Cluster
3.4.4.1. Getting the Fabric8 Launcher tool URL and credentials
3.4.4.2. Deploying the booster using the Fabric8 Launcher tool
3.4.4.3. Authenticating the oc CLI client
3.4.4.4. Deploying the Health Check booster using the oc CLI client
3.4.5. Deploying the Health Check booster to OpenShift Container Platform
3.4.6. Interacting with the unmodified Health Check booster
3.4.7. Running the Health Check booster integration tests
3.4.8. Health check resources
3.5. CIRCUIT BREAKER MISSION - SPRING BOOT BOOSTER
3.5.1. The circuit breaker design pattern
Circuit breaker implementation
3.5.2. Circuit Breaker design tradeoffs
3.5.3. Viewing the booster source code and README
3.5.4. Deploying the Circuit Breaker booster to OpenShift Online
3.5.4.1. Deploying the booster using developers.redhat.com/launch
3.5.4.2. Authenticating the oc CLI client
3.5.4.3. Deploying the Circuit Breaker booster using the oc CLI client
3.5.5. Deploying the Circuit Breaker booster to Single-node OpenShift Cluster
3.5.5.1. Getting the Fabric8 Launcher tool URL and credentials
3.5.5.2. Deploying the booster using the Fabric8 Launcher tool
3.5.5.3. Authenticating the oc CLI client
3.5.5.4. Deploying the Circuit Breaker booster using the oc CLI client
3.5.6. Deploying the Circuit Breaker booster to OpenShift Container Platform
3.5.7. Interacting with the unmodified Spring Boot Circuit Breaker booster
3.5.8. Running the Circuit Breaker booster integration tests
3.5.9. Using Hystrix Dashboard to monitor the circuit breaker
3.5.10. Circuit breaker resources
3.6. SECURED MISSION - SPRING BOOT BOOSTER
3.6.1. The Secured project structure
3.6.2. Viewing the booster source code and README
3.6.3. Red Hat SSO deployment configuration
3.6.4. Red Hat SSO realm model
3.6.4.1. Red Hat SSO users
3.6.4.2. The application clients
3.6.5. Spring Boot SSO adapter configuration
3.6.6. Deploying the Secured booster to Single-node OpenShift Cluster
32
32
32
33
34
35
36
36
37
37
38
38
39
39
39
40
41
41
42
42
43
44
44
46
47
47
48
48
48
49
49
49
50
50
51
52
52
53
53
54
55
57
57
58
59
59
59
60
61
61
62
63
63
Red Hat OpenShift Application Runtimes 1 Spring Boot Runtime Guide
2

. . . . . . . . . . . . . . . . . . . . . . . . . . . . . . . . . . . . . . . . . . . . . . . . . . . . . . . . . . . . . . . . . . . . . . . . . . . . . . . . . . . . . . . . . . . . . . . . . . . . . . . . . . . . . . . . . . . . . . . . . . . . . . . . . . . . . . . . . . . . . . . . . . . . . . . . . . . . . . . . . . . . . . . . . . . . . . . . . . . . . . . . . . . . . . . . . . . . . . . . . . . . . . . . . . . . . . . . . . . . . . . . . . . . . . . . . . . . . . . . . . . . . . . . . . . . . . . . . . . . . . . . . . . . . . . . . . . . . . . .
. . . . . . . . . . . . . . . . . . . . . . . . . . . . . . . . . . . . . . . . . . . . . . . . . . . . . . . . . . . . . . . . . . . . . . . . . . . . . . . . . . . . . . . . . . . . . . . . . . . . . . . . . . . . . . . . . . . . . . . . . . . . . . . . . . . . . . . . . . . . . . . . . . . . . . . . . . . . . . . . . . . . . . . . . . . . . . . . . . . . . . . . . . . . . . . . . . . . . . . . . . . . . . . . . . . . . . . . . . . . . . . . . . . . . . . . . . . . . . . . . . . . . . . . . . . . . . . . . . . . . . . . . . . . . . . . . . . . . . . .
. . . . . . . . . . . . . . . . . . . . . . . . . . . . . . . . . . . . . . . . . . . . . . . . . . . . . . . . . . . . . . . . . . . . . . . . . . . . . . . . . . . . . . . . . . . . . . . . . . . . . . . . . . . . . . . . . . . . . . . . . . . . . . . . . . . . . . . . . . . . . . . . . . . . . . . . . . . . . . . . . . . . . . . . . . . . . . . . . . . . . . . . . . . . . . . . . . . . . . . . . . . . . . . . . . . . . . . . . . . . . . . . . . . . . . . . . . . . . . . . . . . . . . . . . . . . . . . . . . . . . . . . . . . . . . . . . . . . . . . .
. . . . . . . . . . . . . . . . . . . . . . . . . . . . . . . . . . . . . . . . . . . . . . . . . . . . . . . . . . . . . . . . . . . . . . . . . . . . . . . . . . . . . . . . . . . . . . . . . . . . . . . . . . . . . . . . . . . . . . . . . . . . . . . . . . . . . . . . . . . . . . . . . . . . . . . . . . . . . . . . . . . . . . . . . . . . . . . . . . . . . . . . . . . . . . . . . . . . . . . . . . . . . . . . . . . . . . . . . . . . . . . . . . . . . . . . . . . . . . . . . . . . . . . . . . . . . . . . . . . . . . . . . . . . . . . . . . . . . . . .
. . . . . . . . . . . . . . . . . . . . . . . . . . . . . . . . . . . . . . . . . . . . . . . . . . . . . . . . . . . . . . . . . . . . . . . . . . . . . . . . . . . . . . . . . . . . . . . . . . . . . . . . . . . . . . . . . . . . . . . . . . . . . . . . . . . . . . . . . . . . . . . . . . . . . . . . . . . . . . . . . . . . . . . . . . . . . . . . . . . . . . . . . . . . . . . . . . . . . . . . . . . . . . . . . . . . . . . . . . . . . . . . . . . . . . . . . . . . . . . . . . . . . . . . . . . . . . . . . . . . . . . . . . . . . . . . . . . . . . . .
3.6.6.1. Getting the Fabric8 Launcher tool URL and credentials
3.6.6.2. Creating the Secured booster using Fabric8 Launcher
3.6.6.3. Authenticating the oc CLI client
3.6.6.4. Deploying the Secured booster using the oc CLI client
3.6.7. Deploying the Secured booster to OpenShift Container Platform
3.6.7.1. Authenticating the oc CLI client
3.6.7.2. Deploying the Secured booster using the oc CLI client
3.6.8. Authenticating to the Secured booster API endpoint
3.6.8.1. Getting the Secured booster API endpoint
3.6.8.2. Authenticating HTTP requests using the command line
3.6.8.3. Authenticating HTTP requests using the web interface
3.6.9. Running the Spring Boot Secured booster integration tests
3.6.10. Secured SSO resources
3.7. CACHE MISSION - SPRING BOOT BOOSTER
3.7.1. How caching works and when you need it
3.7.2. Viewing the booster source code and README
3.7.3. Deploying the Cache booster to OpenShift Online
3.7.3.1. Deploying the booster using developers.redhat.com/launch
3.7.3.2. Authenticating the oc CLI client
3.7.3.3. Deploying the Cache booster using the oc CLI client
3.7.4. Deploying the Cache booster to Single-node OpenShift Cluster
3.7.4.1. Getting the Fabric8 Launcher tool URL and credentials
3.7.4.2. Deploying the booster using the Fabric8 Launcher tool
3.7.4.3. Authenticating the oc CLI client
3.7.4.4. Deploying the Cache booster using the oc CLI client
3.7.5. Deploying the Cache booster to OpenShift Container Platform
3.7.6. Interacting with the unmodified Cache booster
3.7.7. Running the Cache booster integration tests
3.7.8. Caching resources
CHAPTER 4. DEVELOPING AN APPLICATION FOR THE SPRING BOOT RUNTIME
4.1. CREATING A BASIC SPRING BOOT APPLICATION
4.1.1. Creating an application
4.1.2. Deploying an application to OpenShift
4.2. DEPLOYING AN EXISTING SPRING BOOT APPLICATION TO OPENSHIFT
CHAPTER 5. DEBUGGING
5.1. REMOTE DEBUGGING
5.1.1. Starting your Spring Boot application locally in debugging mode
5.1.2. Starting an uberjar in debugging mode
5.1.3. Starting your application on OpenShift in debugging mode
5.1.4. Attaching a remote debugger to the application
5.2. DEBUG LOGGING
5.2.1. Add Spring Boot debug logging
5.2.2. Accessing Spring Boot debug logs on localhost
5.2.3. Accessing debug logs on OpenShift
CHAPTER 6. MONITORING
6.1. ACCESSING JVM METRICS FOR YOUR APPLICATION ON OPENSHIFT
6.1.1. Accessing JVM metrics using Jolokia on OpenShift
APPENDIX A. THE SOURCE-TO-IMAGE (S2I) BUILD PROCESS
APPENDIX B. UPDATING THE DEPLOYMENT CONFIGURATION OF A BOOSTER
63
64
64
65
66
66
66
67
67
68
70
73
74
74
74
75
76
76
76
77
78
78
79
79
80
81
81
82
82
83
83
83
86
87
89
89
89
89
90
91
92
92
93
93
95
95
95
97
98
Table of Contents
3

. . . . . . . . . . . . . . . . . . . . . . . . . . . . . . . . . . . . . . . . . . . . . . . . . . . . . . . . . . . . . . . . . . . . . . . . . . . . . . . . . . . . . . . . . . . . . . . . . . . . . . . . . . . . . . . . . . . . . . . . . . . . . . . . . . . . . . . . . . . . . . . . . . . . . . . . . . . . . . . . . . . . . . . . . . . . . . . . . . . . . . . . . . . . . . . . . . . . . . . . . . . . . . . . . . . . . . . . . . . . . . . . . . . . . . . . . . . . . . . . . . . . . . . . . . . . . . . . . . . . . . . . . . . . . . . . . . . . . . . .
. . . . . . . . . . . . . . . . . . . . . . . . . . . . . . . . . . . . . . . . . . . . . . . . . . . . . . . . . . . . . . . . . . . . . . . . . . . . . . . . . . . . . . . . . . . . . . . . . . . . . . . . . . . . . . . . . . . . . . . . . . . . . . . . . . . . . . . . . . . . . . . . . . . . . . . . . . . . . . . . . . . . . . . . . . . . . . . . . . . . . . . . . . . . . . . . . . . . . . . . . . . . . . . . . . . . . . . . . . . . . . . . . . . . . . . . . . . . . . . . . . . . . . . . . . . . . . . . . . . . . . . . . . . . . . . . . . . . . . . .
. . . . . . . . . . . . . . . . . . . . . . . . . . . . . . . . . . . . . . . . . . . . . . . . . . . . . . . . . . . . . . . . . . . . . . . . . . . . . . . . . . . . . . . . . . . . . . . . . . . . . . . . . . . . . . . . . . . . . . . . . . . . . . . . . . . . . . . . . . . . . . . . . . . . . . . . . . . . . . . . . . . . . . . . . . . . . . . . . . . . . . . . . . . . . . . . . . . . . . . . . . . . . . . . . . . . . . . . . . . . . . . . . . . . . . . . . . . . . . . . . . . . . . . . . . . . . . . . . . . . . . . . . . . . . . . . . . . . . . . .
. . . . . . . . . . . . . . . . . . . . . . . . . . . . . . . . . . . . . . . . . . . . . . . . . . . . . . . . . . . . . . . . . . . . . . . . . . . . . . . . . . . . . . . . . . . . . . . . . . . . . . . . . . . . . . . . . . . . . . . . . . . . . . . . . . . . . . . . . . . . . . . . . . . . . . . . . . . . . . . . . . . . . . . . . . . . . . . . . . . . . . . . . . . . . . . . . . . . . . . . . . . . . . . . . . . . . . . . . . . . . . . . . . . . . . . . . . . . . . . . . . . . . . . . . . . . . . . . . . . . . . . . . . . . . . . . . . . . . . . .
. . . . . . . . . . . . . . . . . . . . . . . . . . . . . . . . . . . . . . . . . . . . . . . . . . . . . . . . . . . . . . . . . . . . . . . . . . . . . . . . . . . . . . . . . . . . . . . . . . . . . . . . . . . . . . . . . . . . . . . . . . . . . . . . . . . . . . . . . . . . . . . . . . . . . . . . . . . . . . . . . . . . . . . . . . . . . . . . . . . . . . . . . . . . . . . . . . . . . . . . . . . . . . . . . . . . . . . . . . . . . . . . . . . . . . . . . . . . . . . . . . . . . . . . . . . . . . . . . . . . . . . . . . . . . . . . . . . . . . . .
. . . . . . . . . . . . . . . . . . . . . . . . . . . . . . . . . . . . . . . . . . . . . . . . . . . . . . . . . . . . . . . . . . . . . . . . . . . . . . . . . . . . . . . . . . . . . . . . . . . . . . . . . . . . . . . . . . . . . . . . . . . . . . . . . . . . . . . . . . . . . . . . . . . . . . . . . . . . . . . . . . . . . . . . . . . . . . . . . . . . . . . . . . . . . . . . . . . . . . . . . . . . . . . . . . . . . . . . . . . . . . . . . . . . . . . . . . . . . . . . . . . . . . . . . . . . . . . . . . . . . . . . . . . . . . . . . . . . . . . .
APPENDIX C. CONFIGURING A JENKINS FREESTYLE PROJECT TO DEPLOY YOUR APPLICATION WITH
THE FABRIC8 MAVEN PLUGIN
Next steps
APPENDIX D. DEPLOYING A SPRING BOOT APPLICATION USING WAR FILES
APPENDIX E. ADDITIONAL SPRING BOOT RESOURCES
APPENDIX F. APPLICATION DEVELOPMENT RESOURCES
APPENDIX G. PROFICIENCY LEVELS
Foundational
Advanced
Expert
APPENDIX H. GLOSSARY
H.1. PRODUCT AND PROJECT NAMES
H.2. TERMS SPECIFIC TO FABRIC8 LAUNCHER
100
101
102
105
106
107
107
107
107
108
108
108
Red Hat OpenShift Application Runtimes 1 Spring Boot Runtime Guide
4

Table of Contents
5

PREFACE
This guide covers concepts as well as practical details needed by developers to use the Spring Boot
runtime. It provides information governing the design of a Spring Boot application deployed as a Linux
container on OpenShift.
Red Hat OpenShift Application Runtimes 1 Spring Boot Runtime Guide
6

CHAPTER 1. WHAT IS SPRING BOOT
Spring Boot lets you create stand-alone Spring-based applications. See Additional Resources for a list of
documents about Spring Boot.
The Spring Boot runtime gives you the advantages and convenience of the OpenShift platform:
rolling updates
service discovery
canary deployments
ways to implement common microservice patterns: externalized configuration, health check,
circuit breaker, and failover
1.1. SPRING BOOT TESTED AND VERIFIED VERSION
The Spring Boot runtime version 1.5.16.RELEASE is tested and verified to run with the Embedded
Apache Tomcat Container on OpenShift. When used with Spring Boot, this embedded container, as well
as other components such as the Java container image, are part of a Red Hat subscription.
For a complete list of Spring Boot components provided as part of this release, see the Release Notes.
1.2. SPRING BOOT FEATURES AND FRAMEWORKS SUMMARY
This guide covers the design of modern applications using Spring Boot. These concepts support
developing Web or Websocket applications using either a HTTP connector or non-blocking HTTP
connector. The applications can be packaged and deployed without modification or updated to use cloud
native features on OpenShift.
The features in the table below are available as a collection of missions which run on OpenShift. Some
features are native to Kubernetes, others are available from Spring Cloud Kubernetes. Features such as
Actuator are available directly in Spring Boot.
Table 1.1. Features and Frameworks Summary
Feature Problem Addressed Cloud Native Framework
Circuit Breaker Switches between
services and continues
to process incoming
requests without
interruption in case of
service failure.
Yes Spring Cloud Netflix -
Hystrix
Health Check Checks readiness and
liveness of the service.
Service restarts
automatically if probing
fails.
Yes Spring Boot Actuator
CHAPTER 1. WHAT IS SPRING BOOT
7

Service Discovery Discovers
Service/Endpoint
deployed on OpenShift
and exposed behind a
service or route using
the service name
matching a DNS entry.
Yes - using Kubernetes
API
Spring Cloud
Kubernetes -
DiscoveryClient
Server Side Load
Balancing
Handles load increases
by deploying multiple
service instances, and
by transparently
distributing the load
across them.
Yes - Using internal
Kubernetes Load
Balancer
-
Client Side Load
Balancing
Transparently handle
load balancing on the
client for better control
and load distribution
across multiple service
instances.
No Spring Cloud
Kubernetes - Ribbon
Externalize Parameters Makes the application
independent of the
environment where it
runs.
Yes - Kubernetes
ConfigMap or Secret
Spring Cloud
Kubernetes - ConfigMap
Feature Problem Addressed Cloud Native Framework
Red Hat OpenShift Application Runtimes 1 Spring Boot Runtime Guide
8

CHAPTER 2. MISSIONS AND CLOUD-NATIVE DEVELOPMENT
ON OPENSHIFT
When developing applications on OpenShift, you can use missions and boosters to kickstart your
development.
Missions
Missions are working applications that showcase different fundamental pieces of building cloud native
applications and services.
A mission implements a Microservice pattern such as:
Creating REST APIs
Interoperating with a database
Implementing the Health Check pattern
You can use missions for a variety of purposes:
A proof of technology demonstration
A teaching tool, or a sandbox for understanding how to develop applications for your project
They can also be updated or extended for your own use case
Boosters
A booster is the implementation of a mission in a specific runtime. Boosters are preconfigured,
functioning applications that demonstrate core principles of modern application development and run in
an environment similar to production.
Each mission is implemented in one or more runtimes. Both the specific implementation and the actual
project that contains your code are called a booster.
For example, the REST API Level 0 mission is implemented for these runtimes:
Node.js booster
Spring Boot booster
Eclipse Vert.x booster
Thorntail booster
CHAPTER 2. MISSIONS AND CLOUD-NATIVE DEVELOPMENT ON OPENSHIFT
9

CHAPTER 3. AVAILABLE MISSIONS AND BOOSTERS FOR
SPRING BOOT
The following boosters are available for Spring Boot.
3.1. REST API LEVEL 0 MISSION - SPRING BOOT BOOSTER
Mission proficiency level: Foundational.
What the REST API Level 0 Mission Does
The REST API Level 0 mission shows how to map business operations to a remote procedure call
endpoint over HTTP using a REST framework. This corresponds to Level 0 in the Richardson Maturity
Model. Creating an HTTP endpoint using REST and its underlying principles to define your API lets you
quickly prototype and design the API flexibly.
This booster introduces the mechanics of interacting with a remote service using the HTTP protocol. It
allows you to:
Execute an HTTP GET request on the api/greeting endpoint.
Receive a response in JSON format with a payload consisting of the Hello, World! String.
Execute an HTTP GET request on the api/greeting endpoint while passing in a String
argument. This uses the name request parameter in the query string.
Receive a response in JSON format with a payload of Hello, $name! with $name replaced by
the value of the name parameter passed into the request.
3.1.1. Viewing the booster source code and README
Prerequisites
One of the following:
Access to developers.redhat.com/launch
Fabric8 Launcher installed on a Single-node OpenShift Cluster
Procedure
1. Use the Fabric8 Launcher tool to generate your own version of the booster.
2. View the generated GitHub repository or download and extract the ZIP file that contains the
booster source code.
Additional resources
Using developers.redhat.com/launch
Using the Fabric8 Launcher tool on a Single-node OpenShift Cluster
3.1.2. REST API Level 0 design tradeoffs
Red Hat OpenShift Application Runtimes 1 Spring Boot Runtime Guide
10

Table 3.1. Design Tradeoffs
Pros Cons
The booster enables fast prototyping.
The API Design is flexible.
HTTP endpoints allow clients to be
language-neutral.
As an application or service matures, the
REST API Level 0 approach might not scale
well. It might not support a clean API design
or use cases with database interactions.
Any operations involving shared,
mutable state must be integrated with
an appropriate backing datastore.
All requests handled by this API design
are scoped only to the container
servicing the request. Subsequent
requests might not be served by the
same container.
3.1.3. Deploying the REST API Level 0 booster to OpenShift Online
Use one of the following options to execute the REST API Level 0 booster on OpenShift Online.
Use developers.redhat.com/launch
Use the oc CLI client
Although each method uses the same oc commands to deploy your application, using
developers.redhat.com/launch provides an automated booster deployment workflow that executes the
oc commands for you.
3.1.3.1. Deploying the booster using developers.redhat.com/launch
Prerequisites
An account at OpenShift Online.
Procedure
1. Navigate to the developers.redhat.com/launch URL in a browser and log in.
2. Follow on-screen instructions to create and launch your booster in Spring Boot.
3.1.3.2. Authenticating the oc CLI client
To work with boosters on OpenShift Online using the oc command-line client, you need to authenticate
the client using the token provided by the OpenShift Online web interface.
Prerequisites
An account at OpenShift Online.
Procedure
CHAPTER 3. AVAILABLE MISSIONS AND BOOSTERS FOR SPRING BOOT
11

1. Navigate to the OpenShift Online URL in a browser.
2. Click on the question mark icon in the top right-hand corner of the Web console, next to your
user name.
3. Select Command Line Tools in the drop-down menu.
4. Find the text box that contains the oc login … command with the hidden token, and click the
button next to it to copy its content to your clipboard.
5. Paste the command into a terminal application. The command uses your authentication token to
authenticate your oc CLI client with your OpenShift Online account.
3.1.3.3. Deploying the REST API Level 0 booster using the oc CLI client
Prerequisites
The booster application created using developers.redhat.com/launch. For more information, see
Section 3.1.3.1, “Deploying the booster using developers.redhat.com/launch”.
The oc client authenticated. For more information, see Section 3.1.3.2, “Authenticating the oc
CLI client”.
Procedure
1. Clone your project from GitHub.
Alternatively, if you downloaded a ZIP file of your project, extract it.
2. Create a new project in OpenShift.
3. Navigate to the root directory of your booster.
4. Use Maven to start the deployment to OpenShift.
This command uses the Fabric8 Maven Plugin to launch the S2I process on OpenShift and to
start the pod.
5. Check the status of your booster and ensure your pod is running.
$ oc login OPENSHIFT_URL --token=MYTOKEN
$ git clone git@github.com:USERNAME/MY_PROJECT_NAME.git
$ unzip MY_PROJECT_NAME.zip
$ oc new-project MY_PROJECT_NAME
$ mvn clean fabric8:deploy -Popenshift
$ oc get pods -w
NAME READY STATUS RESTARTS
AGE
Red Hat OpenShift Application Runtimes 1 Spring Boot Runtime Guide
12

The MY_APP_NAME-1-aaaaa pod should have a status of Running once it is fully deployed
and started. Your specific pod name will vary. The number in the middle will increase with each
new build. The letters at the end are generated when the pod is created.
6. Once your booster is deployed and started, determine its route.
Example Route Information
The route information of a pod gives you the base URL which you use to access it. In the
example above, you would use http://MY_APP_NAME-
MY_PROJECT_NAME.OPENSHIFT_HOSTNAME as the base URL to access the application.
3.1.4. Deploying the REST API Level 0 booster to Single-node OpenShift Cluster
Use one of the following options to execute the REST API Level 0 booster locally on Single-node
OpenShift Cluster:
Using Fabric8 Launcher
Using the oc CLI client
Although each method uses the same oc commands to deploy your application, using Fabric8 Launcher
provides an automated booster deployment workflow that executes the oc commands for you.
3.1.4.1. Getting the Fabric8 Launcher tool URL and credentials
You need the Fabric8 Launcher tool URL and user credentials to create and deploy boosters on Single-
node OpenShift Cluster. This information is provided when the Single-node OpenShift Cluster is started.
Prerequisites
The Fabric8 Launcher tool installed, configured, and running. For more information, see the
Install and Configure the Fabric8 Launcher Tool guide.
Procedure
1. Navigate to the console where you started Single-node OpenShift Cluster.
2. Check the console output for the URL and user credentials you can use to access the running
Fabric8 Launcher:
Example Console Output from a Single-node OpenShift Cluster Startup
MY_APP_NAME-1-aaaaa 1/1 Running 0
58s
MY_APP_NAME-s2i-1-build 0/1 Completed 0
2m
$ oc get routes
NAME HOST/PORT
PATH SERVICES PORT TERMINATION
MY_APP_NAME MY_APP_NAME-MY_PROJECT_NAME.OPENSHIFT_HOSTNAME
MY_APP_NAME 8080
CHAPTER 3. AVAILABLE MISSIONS AND BOOSTERS FOR SPRING BOOT
13

3.1.4.2. Deploying the booster using the Fabric8 Launcher tool
Prerequisites
The URL of your running Fabric8 Launcher instance and the user credentials of your Single-node
OpenShift Cluster. For more information, see Section 3.1.4.1, “Getting the Fabric8 Launcher tool
URL and credentials”.
Procedure
1. Navigate to the Fabric8 Launcher URL in a browser.
2. Follow on-screen instructions to create and launch your booster in Spring Boot.
3.1.4.3. Authenticating the oc CLI client
To work with boosters on Single-node OpenShift Cluster using the oc command-line client, you need to
authenticate the client using the token provided by the Single-node OpenShift Cluster web interface.
Prerequisites
The URL of your running Fabric8 Launcher instance and the user credentials of your Single-node
OpenShift Cluster. For more information, see Section 3.1.4.1, “Getting the Fabric8 Launcher tool
URL and credentials”.
Procedure
1. Navigate to the Single-node OpenShift Cluster URL in a browser.
2. Click on the question mark icon in the top right-hand corner of the Web console, next to your
user name.
3. Select Command Line Tools in the drop-down menu.
4. Find the text box that contains the oc login … command with the hidden token, and click the
button next to it to copy its content to your clipboard.
5. Paste the command into a terminal application. The command uses your authentication token to
authenticate your oc CLI client with your Single-node OpenShift Cluster account.
...
-- Removing temporary directory ... OK
-- Server Information ...
OpenShift server started.
The server is accessible via web console at:
https://192.168.42.152:8443
You are logged in as:
User: developer
Password: developer
To login as administrator:
oc login -u system:admin
Red Hat OpenShift Application Runtimes 1 Spring Boot Runtime Guide
14

3.1.4.4. Deploying the REST API Level 0 booster using the oc CLI client
Prerequisites
The booster application created using Fabric8 Launcher tool on a Single-node OpenShift
Cluster. For more information, see Section 3.1.4.2, “Deploying the booster using the Fabric8
Launcher tool”.
Your Fabric8 Launcher tool URL.
The oc client authenticated. For more information, see Section 3.1.4.3, “Authenticating the oc
CLI client”.
Procedure
1. Clone your project from GitHub.
Alternatively, if you downloaded a ZIP file of your project, extract it.
2. Create a new project in OpenShift.
3. Navigate to the root directory of your booster.
4. Use Maven to start the deployment to OpenShift.
This command uses the Fabric8 Maven Plugin to launch the S2I process on OpenShift and to
start the pod.
5. Check the status of your booster and ensure your pod is running.
The MY_APP_NAME-1-aaaaa pod should have a status of Running once it is fully deployed
and started. Your specific pod name will vary. The number in the middle will increase with each
new build. The letters at the end are generated when the pod is created.
6. Once your booster is deployed and started, determine its route.
$ oc login OPENSHIFT_URL --token=MYTOKEN
$ git clone git@github.com:USERNAME/MY_PROJECT_NAME.git
$ unzip MY_PROJECT_NAME.zip
$ oc new-project MY_PROJECT_NAME
$ mvn clean fabric8:deploy -Popenshift
$ oc get pods -w
NAME READY STATUS RESTARTS
AGE
MY_APP_NAME-1-aaaaa 1/1 Running 0
58s
MY_APP_NAME-s2i-1-build 0/1 Completed 0
2m
CHAPTER 3. AVAILABLE MISSIONS AND BOOSTERS FOR SPRING BOOT
15

Example Route Information
The route information of a pod gives you the base URL which you use to access it. In the
example above, you would use http://MY_APP_NAME-
MY_PROJECT_NAME.OPENSHIFT_HOSTNAME as the base URL to access the application.
3.1.5. Deploying the REST API Level 0 booster to OpenShift Container Platform
The process of creating and deploying boosters to OpenShift Container Platform is similar to OpenShift
Online:
Prerequisites
The booster created using developers.redhat.com/launch or the Fabric8 Launcher tool.
Procedure
Follow the instructions in Section 3.1.3, “Deploying the REST API Level 0 booster to OpenShift
Online”, only use the URL and user credentials from the OpenShift Container Platform Web
Console.
3.1.6. Interacting with the unmodified REST API Level 0 booster for Spring Boot
The booster provides a default HTTP endpoint that accepts GET requests.
Prerequisites
Your application running
The curl binary or a web browser
Procedure
1. Use curl to execute a GET request against the booster. You can also use a browser to do this.
2. Use curl to execute a GET request with the name URL parameter against the booster. You can
also use a browser to do this.
$ oc get routes
NAME HOST/PORT
PATH SERVICES PORT TERMINATION
MY_APP_NAME MY_APP_NAME-MY_PROJECT_NAME.OPENSHIFT_HOSTNAME
MY_APP_NAME 8080
$ curl http://MY_APP_NAME-
MY_PROJECT_NAME.OPENSHIFT_HOSTNAME/api/greeting
{"content":"Hello, World!"}
$ curl http://MY_APP_NAME-
MY_PROJECT_NAME.OPENSHIFT_HOSTNAME/api/greeting?name=Sarah
{"content":"Hello, Sarah!"}
Red Hat OpenShift Application Runtimes 1 Spring Boot Runtime Guide
16
NOTE
From a browser, you can also use a form provided by the booster to perform these same
interactions. The form is located at the root of the project http://MY_APP_NAME-
MY_PROJECT_NAME.OPENSHIFT_HOSTNAME.
3.1.7. Running the REST API Level 0 booster integration tests
This booster includes a self-contained set of integration tests. When run inside an OpenShift project, the
tests:
Deploy a test instance of the application to the project.
Execute the individual tests on that instance.
Remove all instances of the application from the project when the testing is done.
WARNING
Executing integration tests removes all existing instances of the booster application
from the target OpenShift project. To avoid accidentally removing your booster
application, ensure that you create and select a separate OpenShift project to
execute the tests.
Prerequisites
The oc client authenticated
An empty OpenShift project
Procedure
Execute the following command to run the integration tests:
3.1.8. REST resources
More background and related information on REST can be found here:
Architectural Styles and the Design of Network-based Software Architectures - Representational
State Transfer (REST)
Richardson Maturity Model
JSR 311: JAX-RS: The JavaTM API for RESTful Web Services
Building a RESTful Service with Spring
REST API Level 0 Mission - Eclipse Vert.x Booster
$ mvn clean verify -Popenshift,openshift-it
CHAPTER 3. AVAILABLE MISSIONS AND BOOSTERS FOR SPRING BOOT
17

REST API Level 0 Mission - Thorntail Booster
REST API Level 0 Mission - Node.js Booster
3.2. EXTERNALIZED CONFIGURATION MISSION - SPRING BOOT
BOOSTER
Mission proficiency level: Foundational.
The Externalized Configuration mission provides a basic example of using a ConfigMap to externalize
configuration. ConfigMap is an object used by OpenShift to inject configuration data as simple key and
value pairs into one or more Linux containers while keeping the containers independent of OpenShift.
This mission shows you how to:
Set up and configure a ConfigMap.
Use the configuration provided by the ConfigMap within an application.
Deploy changes to the ConfigMap configuration of running applications.
3.2.1. The externalized configuration design pattern
Whenever possible, externalize the application configuration and separate it from the application code.
This allows the application configuration to change as it moves through different environments, but
leaves the code unchanged. Externalizing the configuration also keeps sensitive or internal information
out of your code base and version control. Many languages and application servers provide environment
variables to support externalizing an application’s configuration.
Microservices architectures and multi-language (polyglot) environments add a layer of complexity to
managing an application’s configuration. Applications consist of independent, distributed services, and
each can have its own configuration. Keeping all configuration data synchronized and accessible creates
a maintenance challenge.
ConfigMaps enable the application configuration to be externalized and used in individual Linux
containers and pods on OpenShift. You can create a ConfigMap object in a variety of ways, including
using a YAML file, and inject it into the Linux container. ConfigMaps also allow you to group and scale
sets of configuration data. This lets you configure a large number of environments beyond the basic
Development, Stage, and Production. You can find more information about ConfigMaps in the OpenShift
documentation.
3.2.2. Externalized Configuration design tradeoffs
Table 3.2. Design Tradeoffs
Pros Cons
Red Hat OpenShift Application Runtimes 1 Spring Boot Runtime Guide
18

Configuration is separate from deployments
Can be updated independently
Can be shared across services
Adding configuration to environment
requires additional step
Has to be maintained separately
Requires coordination beyond the scope of
a service
Pros Cons
3.2.3. Viewing the booster source code and README
Prerequisites
One of the following:
Access to developers.redhat.com/launch
Fabric8 Launcher installed on a Single-node OpenShift Cluster
Procedure
1. Use the Fabric8 Launcher tool to generate your own version of the booster.
2. View the generated GitHub repository or download and extract the ZIP file that contains the
booster source code.
Additional resources
Using developers.redhat.com/launch
Using the Fabric8 Launcher tool on a Single-node OpenShift Cluster
3.2.4. Deploying the Externalized Configuration booster to OpenShift Online
Use one of the following options to execute the Externalized Configuration booster on OpenShift Online.
Use developers.redhat.com/launch
Use the oc CLI client
Although each method uses the same oc commands to deploy your application, using
developers.redhat.com/launch provides an automated booster deployment workflow that executes the
oc commands for you.
3.2.4.1. Deploying the booster using developers.redhat.com/launch
Prerequisites
An account at OpenShift Online.
Procedure
CHAPTER 3. AVAILABLE MISSIONS AND BOOSTERS FOR SPRING BOOT
19

1. Navigate to the developers.redhat.com/launch URL in a browser and log in.
2. Follow on-screen instructions to create and launch your booster in Spring Boot.
3.2.4.2. Authenticating the oc CLI client
To work with boosters on OpenShift Online using the oc command-line client, you need to authenticate
the client using the token provided by the OpenShift Online web interface.
Prerequisites
An account at OpenShift Online.
Procedure
1. Navigate to the OpenShift Online URL in a browser.
2. Click on the question mark icon in the top right-hand corner of the Web console, next to your
user name.
3. Select Command Line Tools in the drop-down menu.
4. Find the text box that contains the oc login … command with the hidden token, and click the
button next to it to copy its content to your clipboard.
5. Paste the command into a terminal application. The command uses your authentication token to
authenticate your oc CLI client with your OpenShift Online account.
3.2.4.3. Deploying the Externalized Configuration booster using the oc CLI client
Prerequisites
The booster application created using developers.redhat.com/launch. For more information, see
Section 3.2.4.1, “Deploying the booster using developers.redhat.com/launch”.
The oc client authenticated. For more information, see Section 3.2.4.2, “Authenticating the oc
CLI client”.
Procedure
1. Clone your project from GitHub.
Alternatively, if you downloaded a ZIP file of your project, extract it.
2. Create a new OpenShift project.
$ oc login OPENSHIFT_URL --token=MYTOKEN
$ git clone git@github.com:USERNAME/MY_PROJECT_NAME.git
$ unzip MY_PROJECT_NAME.zip
$ oc new-project MY_PROJECT_NAME
Red Hat OpenShift Application Runtimes 1 Spring Boot Runtime Guide
20

3. Assign view access rights to the service account before deploying your booster, so that the
booster can access the OpenShift API in order to read the contents of the ConfigMap.
4. Navigate to the root directory of your booster.
5. Deploy your ConfigMap configuration to OpenShift using application.yml.
6. Verify your ConfigMap configuration has been deployed.
7. Use Maven to start the deployment to OpenShift.
This command uses the Fabric8 Maven Plugin to launch the S2I process on OpenShift and to
start the pod.
8. Check the status of your booster and ensure your pod is running.
The MY_APP_NAME-1-aaaaa pod should have a status of Running once its fully deployed and
started. Your specific pod name will vary. The number in the middle will increase with each new
build. The letters at the end are generated when the pod is created.
9. Once your booster is deployed and started, determine its route.
Example Route Information
$ oc policy add-role-to-user view -n $(oc project -q) -z default
$ oc create configmap app-config --from-file=application.yml
$ oc get configmap app-config -o yaml
apiVersion: v1
data:
application.yml: |
# This properties file should be used to initialise a ConfigMap
greeting:
message: "Hello %s from a ConfigMap!"
...
$ mvn clean fabric8:deploy -Popenshift
$ oc get pods -w
NAME READY STATUS
RESTARTS AGE
MY_APP_NAME-1-aaaaa 1/1 Running 0
58s
MY_APP_NAME-s2i-1-build 0/1 Completed 0
2m
$ oc get routes
NAME HOST/PORT
PATH SERVICES PORT TERMINATION
MY_APP_NAME MY_APP_NAME-MY_PROJECT_NAME.OPENSHIFT_HOSTNAME
MY_APP_NAME 8080
CHAPTER 3. AVAILABLE MISSIONS AND BOOSTERS FOR SPRING BOOT
21

The route information of a pod gives you the base URL which you use to access it. In the
example above, you would use http://MY_APP_NAME-
MY_PROJECT_NAME.OPENSHIFT_HOSTNAME as the base URL to access the application.
3.2.5. Deploying the Externalized Configuration booster to Single-node OpenShift
Cluster
Use one of the following options to execute the Externalized Configuration booster locally on Single-node
OpenShift Cluster:
Using Fabric8 Launcher
Using the oc CLI client
Although each method uses the same oc commands to deploy your application, using Fabric8 Launcher
provides an automated booster deployment workflow that executes the oc commands for you.
3.2.5.1. Getting the Fabric8 Launcher tool URL and credentials
You need the Fabric8 Launcher tool URL and user credentials to create and deploy boosters on Single-
node OpenShift Cluster. This information is provided when the Single-node OpenShift Cluster is started.
Prerequisites
The Fabric8 Launcher tool installed, configured, and running. For more information, see the
Install and Configure the Fabric8 Launcher Tool guide.
Procedure
1. Navigate to the console where you started Single-node OpenShift Cluster.
2. Check the console output for the URL and user credentials you can use to access the running
Fabric8 Launcher:
Example Console Output from a Single-node OpenShift Cluster Startup
3.2.5.2. Deploying the booster using the Fabric8 Launcher tool
Prerequisites
...
-- Removing temporary directory ... OK
-- Server Information ...
OpenShift server started.
The server is accessible via web console at:
https://192.168.42.152:8443
You are logged in as:
User: developer
Password: developer
To login as administrator:
oc login -u system:admin
Red Hat OpenShift Application Runtimes 1 Spring Boot Runtime Guide
22

The URL of your running Fabric8 Launcher instance and the user credentials of your Single-node
OpenShift Cluster. For more information, see Section 3.2.5.1, “Getting the Fabric8 Launcher tool
URL and credentials”.
Procedure
1. Navigate to the Fabric8 Launcher URL in a browser.
2. Follow on-screen instructions to create and launch your booster in Spring Boot.
3.2.5.3. Authenticating the oc CLI client
To work with boosters on Single-node OpenShift Cluster using the oc command-line client, you need to
authenticate the client using the token provided by the Single-node OpenShift Cluster web interface.
Prerequisites
The URL of your running Fabric8 Launcher instance and the user credentials of your Single-node
OpenShift Cluster. For more information, see Section 3.2.5.1, “Getting the Fabric8 Launcher tool
URL and credentials”.
Procedure
1. Navigate to the Single-node OpenShift Cluster URL in a browser.
2. Click on the question mark icon in the top right-hand corner of the Web console, next to your
user name.
3. Select Command Line Tools in the drop-down menu.
4. Find the text box that contains the oc login … command with the hidden token, and click the
button next to it to copy its content to your clipboard.
5. Paste the command into a terminal application. The command uses your authentication token to
authenticate your oc CLI client with your Single-node OpenShift Cluster account.
3.2.5.4. Deploying the Externalized Configuration booster using the oc CLI client
Prerequisites
The booster application created using Fabric8 Launcher tool on a Single-node OpenShift
Cluster. For more information, see Section 3.2.5.2, “Deploying the booster using the Fabric8
Launcher tool”.
Your Fabric8 Launcher tool URL.
The oc client authenticated. For more information, see Section 3.2.5.3, “Authenticating the oc
CLI client”.
Procedure
1. Clone your project from GitHub.
$ oc login OPENSHIFT_URL --token=MYTOKEN
CHAPTER 3. AVAILABLE MISSIONS AND BOOSTERS FOR SPRING BOOT
23

Alternatively, if you downloaded a ZIP file of your project, extract it.
2. Create a new OpenShift project.
3. Assign view access rights to the service account before deploying your booster, so that the
booster can access the OpenShift API in order to read the contents of the ConfigMap.
4. Navigate to the root directory of your booster.
5. Deploy your ConfigMap configuration to OpenShift using application.yml.
6. Verify your ConfigMap configuration has been deployed.
7. Use Maven to start the deployment to OpenShift.
This command uses the Fabric8 Maven Plugin to launch the S2I process on OpenShift and to
start the pod.
8. Check the status of your booster and ensure your pod is running.
The MY_APP_NAME-1-aaaaa pod should have a status of Running once its fully deployed and
started. Your specific pod name will vary. The number in the middle will increase with each new
build. The letters at the end are generated when the pod is created.
$ git clone git@github.com:USERNAME/MY_PROJECT_NAME.git
$ unzip MY_PROJECT_NAME.zip
$ oc new-project MY_PROJECT_NAME
$ oc policy add-role-to-user view -n $(oc project -q) -z default
$ oc create configmap app-config --from-file=application.yml
$ oc get configmap app-config -o yaml
apiVersion: v1
data:
application.yml: |
# This properties file should be used to initialise a ConfigMap
greeting:
message: "Hello %s from a ConfigMap!"
...
$ mvn clean fabric8:deploy -Popenshift
$ oc get pods -w
NAME READY STATUS
RESTARTS AGE
MY_APP_NAME-1-aaaaa 1/1 Running 0
58s
MY_APP_NAME-s2i-1-build 0/1 Completed 0
2m
Red Hat OpenShift Application Runtimes 1 Spring Boot Runtime Guide
24

9. Once your booster is deployed and started, determine its route.
Example Route Information
The route information of a pod gives you the base URL which you use to access it. In the
example above, you would use http://MY_APP_NAME-
MY_PROJECT_NAME.OPENSHIFT_HOSTNAME as the base URL to access the application.
3.2.6. Deploying the Externalized Configuration booster to OpenShift Container
Platform
The process of creating and deploying boosters to OpenShift Container Platform is similar to OpenShift
Online:
Prerequisites
The booster created using developers.redhat.com/launch or the Fabric8 Launcher tool.
Procedure
Follow the instructions in Section 3.2.4, “Deploying the Externalized Configuration booster to
OpenShift Online”, only use the URL and user credentials from the OpenShift Container Platform
Web Console.
3.2.7. Interacting with the unmodified Externalized Configuration booster for
Spring Boot
The booster provides a default HTTP endpoint that accepts GET requests.
Prerequisites
Your application running
The curl binary or a web browser
Procedure
1. Use curl to execute a GET request against the booster. You can also use a browser to do this.
2. Update the deployed ConfigMap configuration.
$ oc get routes
NAME HOST/PORT
PATH SERVICES PORT TERMINATION
MY_APP_NAME MY_APP_NAME-MY_PROJECT_NAME.OPENSHIFT_HOSTNAME
MY_APP_NAME 8080
$ curl http://MY_APP_NAME-
MY_PROJECT_NAME.OPENSHIFT_HOSTNAME/api/greeting
{"content":"Hello World from a ConfigMap!"}
$ oc edit configmap app-config
CHAPTER 3. AVAILABLE MISSIONS AND BOOSTERS FOR SPRING BOOT
25

Change the value for the greeting.message key to Bonjour! and save the file. After you
save this, the changes will be propagated to your OpenShift instance.
3. Deploy the new version of your application so the ConfigMap configuration changes are picked
up.
4. Check the status of your booster and ensure your new pod is running.
The MY_APP_NAME-1-aaaaa pod should have a status of Running once it’s fully deployed and
started. Your specific pod name will vary. The number in the middle will increase with each new
build. The letters at the end are generated when the pod is created.
5. Execute a GET request using curl against the booster with the updated ConfigMap
configuration to see your updated greeting. You can also do this from your browser using the
web form provided by the application.
3.2.8. Running the Externalized Configuration booster integration tests
This booster includes a self-contained set of integration tests. When run inside an OpenShift project, the
tests:
Deploy a test instance of the application to the project.
Execute the individual tests on that instance.
Remove all instances of the application from the project when the testing is done.
WARNING
Executing integration tests removes all existing instances of the booster application
from the target OpenShift project. To avoid accidentally removing your booster
application, ensure that you create and select a separate OpenShift project to
execute the tests.
Prerequisites
The oc client authenticated
$ oc rollout latest dc/MY_APP_NAME
$ oc get pods -w
NAME READY STATUS RESTARTS
AGE
MY_APP_NAME-1-aaaaa 1/1 Running 0 58s
MY_APP_NAME-s2i-1-build 0/1 Completed 0 2m
$ curl http://MY_APP_NAME-
MY_PROJECT_NAME.OPENSHIFT_HOSTNAME/api/greeting
{"content":"Bonjour!"}
Red Hat OpenShift Application Runtimes 1 Spring Boot Runtime Guide
26

An empty OpenShift project
View access permission assigned to the service account of your booster application. This allows
your application to read the configuration from the ConfigMap:
Procedure
Execute the following command to run the integration tests:
3.2.9. Externalized Configuration resources
More background and related information on Externalized Configuration and ConfigMap can be found
here:
OpenShift ConfigMap Documentation
Blog Post about ConfigMap in OpenShift
Externalized Configuration with Spring Boot
Externalized Configuration - Eclipse Vert.x Booster
Externalized Configuration - Thorntail Booster
Externalized Configuration - Node.js Booster
3.3. RELATIONAL DATABASE BACKEND MISSION - SPRING BOOT
BOOSTER
Limitation: Run this booster on a Single-node OpenShift Cluster. You can also use a manual workflow
to deploy this booster to OpenShift Online Pro and OpenShift Container Platform. This booster is not
currently available on OpenShift Online Starter.
Mission proficiency level: Foundational.
What the Relational Database Backend Booster Does
The Relational Database Backend booster expands on the REST API Level 0 booster to provide a basic
example of performing create, read, update and delete (CRUD) operations on a PostgreSQL database
using a simple HTTP API. CRUD operations are the four basic functions of persistent storage, widely
used when developing an HTTP API dealing with a database.
The booster also demonstrates the ability of the HTTP application to locate and connect to a database in
OpenShift. Each runtime shows how to implement the connectivity solution best suited in the given case.
The runtime can choose between options such as using JDBC, JPA, or accessing ORM APIs directly.
The booster application exposes an HTTP API, which provides endpoints that allow you to manipulate
data by performing CRUD operations over HTTP. The CRUD operations are mapped to HTTP Verbs.
The API uses JSON formatting to receive requests and return responses to the user. The user can also
use an UI provided by the booster to use the application. Specifically, this booster provides an
application that allows you to:
$ oc policy add-role-to-user view -n $(oc project -q) -z default
$ mvn clean verify -Popenshift,openshift-it
CHAPTER 3. AVAILABLE MISSIONS AND BOOSTERS FOR SPRING BOOT
27

Navigate to the application web interface in your browser. This exposes a simple website
allowing you to perform CRUD operations on the data in the my_data database.
Execute an HTTP GET request on the api/fruits endpoint.
Receive a response formatted as a JSON array containing the list of all fruits in the database.
Execute an HTTP GET request on the api/fruits/* endpoint while passing in a valid item ID
as an argument.
Receive a response in JSON format containing the name of the fruit with the given ID. If no item
matches the specified ID, the call results in an HTTP error 404.
Execute an HTTP POST request on the api/fruits endpoint passing in a valid name value to
create a new entry in the database.
Execute an HTTP PUT request on the api/fruits/* endpoint passing in a valid ID and a
name as an argument. This updates the name of the item with the given ID to match the name
specified in your request.
Execute an HTTP DELETE request on the api/fruits/* endpoint, passing in a valid ID as an
argument. This removes the item with the specified ID from the database and returns an HTTP
code 204 (No Content) as a response. If you pass in an invalid ID, the call results in an HTTP
error 404.
This booster also contains a set of automated integration tests that can be used to verify that the
application is fully integrated with the database.
This booster does not showcase a fully matured RESTful model (level 3), but it does use compatible
HTTP verbs and status, following the recommended HTTP API practices.
3.3.1. Relational Database Backend design tradeoffs
Table 3.3. Design Tradeoffs
Pros Cons
Each runtime determines how to implement
the database interactions. One can use a
low-level connectivity API such as JDBC,
some other can use JPA, and yet another
can access ORM APIs directly. Each
runtime decides what would be the best
way.
Each runtime determines how the schema is
created.
The PostgreSQL database example
provided with this mission is not backed up
with persistent storage. Changes to the
database are lost if you stop or redeploy the
database pod. To use an external database
with your mission’s pod in order to preserve
changes, see the Integrating External
Services chapter of the OpenShift
Documentation. It is also possible to set up
persistent storage with database containers
on OpenShift. (For more details about using
persistent storage with OpenShift and
containers, see the Persistent Storage,
Managing Volumes and Persistent Volumes
chapters of the OpenShift Documentation).
3.3.2. Viewing the booster source code and README
Red Hat OpenShift Application Runtimes 1 Spring Boot Runtime Guide
28

Prerequisites
One of the following:
Access to developers.redhat.com/launch
Fabric8 Launcher installed on a Single-node OpenShift Cluster
Procedure
1. Use the Fabric8 Launcher tool to generate your own version of the booster.
2. View the generated GitHub repository or download and extract the ZIP file that contains the
booster source code.
Additional resources
Using developers.redhat.com/launch
Using the Fabric8 Launcher tool on a Single-node OpenShift Cluster
3.3.3. Deploying the Relational Database Backend booster to OpenShift Online
Use one of the following options to execute the Relational Database Backend booster on OpenShift
Online.
Use developers.redhat.com/launch
Use the oc CLI client
Although each method uses the same oc commands to deploy your application, using
developers.redhat.com/launch provides an automated booster deployment workflow that executes the
oc commands for you.
3.3.3.1. Deploying the booster using developers.redhat.com/launch
Prerequisites
An account at OpenShift Online.
Procedure
1. Navigate to the developers.redhat.com/launch URL in a browser and log in.
2. Follow on-screen instructions to create and launch your booster in Spring Boot.
3.3.3.2. Authenticating the oc CLI client
To work with boosters on OpenShift Online using the oc command-line client, you need to authenticate
the client using the token provided by the OpenShift Online web interface.
Prerequisites
An account at OpenShift Online.
CHAPTER 3. AVAILABLE MISSIONS AND BOOSTERS FOR SPRING BOOT
29

Procedure
1. Navigate to the OpenShift Online URL in a browser.
2. Click on the question mark icon in the top right-hand corner of the Web console, next to your
user name.
3. Select Command Line Tools in the drop-down menu.
4. Find the text box that contains the oc login … command with the hidden token, and click the
button next to it to copy its content to your clipboard.
5. Paste the command into a terminal application. The command uses your authentication token to
authenticate your oc CLI client with your OpenShift Online account.
3.3.3.3. Deploying the Relational Database Backend booster using the oc CLI client
Prerequisites
The booster application created using developers.redhat.com/launch. For more information, see
Section 3.3.3.1, “Deploying the booster using developers.redhat.com/launch”.
The oc client authenticated. For more information, see Section 3.3.3.2, “Authenticating the oc
CLI client”.
Procedure
1. Clone your project from GitHub.
Alternatively, if you downloaded a ZIP file of your project, extract it.
2. Create a new OpenShift project.
3. Navigate to the root directory of your booster.
4. Deploy the PostgreSQL database to OpenShift. Ensure that you use the following values for
user name, password, and database name when creating your database application. The
booster application is pre-configured to use these values. Using different values prevents your
booster application from integrating with the database.
5. Check the status of your database and ensure the pod is running.
$ oc login OPENSHIFT_URL --token=MYTOKEN
$ git clone git@github.com:USERNAME/MY_PROJECT_NAME.git
$ unzip MY_PROJECT_NAME.zip
$ oc new-project MY_PROJECT_NAME
$ oc new-app -e POSTGRESQL_USER=luke -ePOSTGRESQL_PASSWORD=secret -
ePOSTGRESQL_DATABASE=my_data openshift/postgresql-92-centos7 --
name=my-database
Red Hat OpenShift Application Runtimes 1 Spring Boot Runtime Guide
30

The my-database-1-aaaaa pod should have a status of Running and should be indicated as
ready once it is fully deployed and started. Your specific pod name will vary. The number in the
middle will increase with each new build. The letters at the end are generated when the pod is
created.
6. Use maven to start the deployment to OpenShift.
This command uses the Fabric8 Maven Plugin to launch the S2I process on OpenShift and to
start the pod.
7. Check the status of your booster and ensure your pod is running.
Your MY_APP_NAME-1-aaaaa pod should have a status of Running and should be indicated as
ready once it is fully deployed and started.
8. Once your booster is deployed and started, determine its route.
Example Route Information
The route information of a pod gives you the base URL which you use to access it. In the
example above, you would use http://MY_APP_NAME-
MY_PROJECT_NAME.OPENSHIFT_HOSTNAME as the base URL to access the application.
3.3.4. Deploying the Relational Database Backend booster to Single-node
OpenShift Cluster
Use one of the following options to execute the Relational Database Backend booster locally on Single-
node OpenShift Cluster:
Using Fabric8 Launcher
Using the oc CLI client
Although each method uses the same oc commands to deploy your application, using Fabric8 Launcher
provides an automated booster deployment workflow that executes the oc commands for you.
$ oc get pods -w
my-database-1-aaaaa 1/1 Running 0 45s
my-database-1-deploy 0/1 Completed 0 53s
$ mvn clean fabric8:deploy -Popenshift
$ oc get pods -w
NAME READY STATUS RESTARTS
AGE
MY_APP_NAME-1-aaaaa 1/1 Running 0 58s
MY_APP_NAME-s2i-1-build 0/1 Completed 0 2m
$ oc get routes
NAME HOST/PORT
PATH SERVICES PORT TERMINATION
MY_APP_NAME MY_APP_NAME-MY_PROJECT_NAME.OPENSHIFT_HOSTNAME
MY_APP_NAME 8080
CHAPTER 3. AVAILABLE MISSIONS AND BOOSTERS FOR SPRING BOOT
31

3.3.4.1. Getting the Fabric8 Launcher tool URL and credentials
You need the Fabric8 Launcher tool URL and user credentials to create and deploy boosters on Single-
node OpenShift Cluster. This information is provided when the Single-node OpenShift Cluster is started.
Prerequisites
The Fabric8 Launcher tool installed, configured, and running. For more information, see the
Install and Configure the Fabric8 Launcher Tool guide.
Procedure
1. Navigate to the console where you started Single-node OpenShift Cluster.
2. Check the console output for the URL and user credentials you can use to access the running
Fabric8 Launcher:
Example Console Output from a Single-node OpenShift Cluster Startup
3.3.4.2. Deploying the booster using the Fabric8 Launcher tool
Prerequisites
The URL of your running Fabric8 Launcher instance and the user credentials of your Single-node
OpenShift Cluster. For more information, see Section 3.3.4.1, “Getting the Fabric8 Launcher tool
URL and credentials”.
Procedure
1. Navigate to the Fabric8 Launcher URL in a browser.
2. Follow on-screen instructions to create and launch your booster in Spring Boot.
3.3.4.3. Authenticating the oc CLI client
To work with boosters on Single-node OpenShift Cluster using the oc command-line client, you need to
authenticate the client using the token provided by the Single-node OpenShift Cluster web interface.
Prerequisites
...
-- Removing temporary directory ... OK
-- Server Information ...
OpenShift server started.
The server is accessible via web console at:
https://192.168.42.152:8443
You are logged in as:
User: developer
Password: developer
To login as administrator:
oc login -u system:admin
Red Hat OpenShift Application Runtimes 1 Spring Boot Runtime Guide
32

The URL of your running Fabric8 Launcher instance and the user credentials of your Single-node
OpenShift Cluster. For more information, see Section 3.3.4.1, “Getting the Fabric8 Launcher tool
URL and credentials”.
Procedure
1. Navigate to the Single-node OpenShift Cluster URL in a browser.
2. Click on the question mark icon in the top right-hand corner of the Web console, next to your
user name.
3. Select Command Line Tools in the drop-down menu.
4. Find the text box that contains the oc login … command with the hidden token, and click the
button next to it to copy its content to your clipboard.
5. Paste the command into a terminal application. The command uses your authentication token to
authenticate your oc CLI client with your Single-node OpenShift Cluster account.
3.3.4.4. Deploying the Relational Database Backend booster using the oc CLI client
Prerequisites
The booster application created using Fabric8 Launcher tool on a Single-node OpenShift
Cluster. For more information, see Section 3.3.4.2, “Deploying the booster using the Fabric8
Launcher tool”.
Your Fabric8 Launcher tool URL.
The oc client authenticated. For more information, see Section 3.3.4.3, “Authenticating the oc
CLI client”.
Procedure
1. Clone your project from GitHub.
Alternatively, if you downloaded a ZIP file of your project, extract it.
2. Create a new OpenShift project.
3. Navigate to the root directory of your booster.
4. Deploy the PostgreSQL database to OpenShift. Ensure that you use the following values for
user name, password, and database name when creating your database application. The
booster application is pre-configured to use these values. Using different values prevents your
$ oc login OPENSHIFT_URL --token=MYTOKEN
$ git clone git@github.com:USERNAME/MY_PROJECT_NAME.git
$ unzip MY_PROJECT_NAME.zip
$ oc new-project MY_PROJECT_NAME
CHAPTER 3. AVAILABLE MISSIONS AND BOOSTERS FOR SPRING BOOT
33

booster application from integrating with the database.
5. Check the status of your database and ensure the pod is running.
The my-database-1-aaaaa pod should have a status of Running and should be indicated as
ready once it is fully deployed and started. Your specific pod name will vary. The number in the
middle will increase with each new build. The letters at the end are generated when the pod is
created.
6. Use maven to start the deployment to OpenShift.
This command uses the Fabric8 Maven Plugin to launch the S2I process on OpenShift and to
start the pod.
7. Check the status of your booster and ensure your pod is running.
Your MY_APP_NAME-1-aaaaa pod should have a status of Running and should be indicated as
ready once it is fully deployed and started.
8. Once your booster is deployed and started, determine its route.
Example Route Information
The route information of a pod gives you the base URL which you use to access it. In the
example above, you would use http://MY_APP_NAME-
MY_PROJECT_NAME.OPENSHIFT_HOSTNAME as the base URL to access the application.
3.3.5. Deploying the Relational Database Backend booster to OpenShift Container
Platform
The process of creating and deploying boosters to OpenShift Container Platform is similar to OpenShift
Online:
$ oc new-app -e POSTGRESQL_USER=luke -ePOSTGRESQL_PASSWORD=secret -
ePOSTGRESQL_DATABASE=my_data openshift/postgresql-92-centos7 --
name=my-database
$ oc get pods -w
my-database-1-aaaaa 1/1 Running 0 45s
my-database-1-deploy 0/1 Completed 0 53s
$ mvn clean fabric8:deploy -Popenshift
$ oc get pods -w
NAME READY STATUS RESTARTS
AGE
MY_APP_NAME-1-aaaaa 1/1 Running 0 58s
MY_APP_NAME-s2i-1-build 0/1 Completed 0 2m
$ oc get routes
NAME HOST/PORT
PATH SERVICES PORT TERMINATION
MY_APP_NAME MY_APP_NAME-MY_PROJECT_NAME.OPENSHIFT_HOSTNAME
MY_APP_NAME 8080
Red Hat OpenShift Application Runtimes 1 Spring Boot Runtime Guide
34

Prerequisites
The booster created using developers.redhat.com/launch or the Fabric8 Launcher tool.
Procedure
Follow the instructions in Section 3.3.3, “Deploying the Relational Database Backend booster to
OpenShift Online”, only use the URL and user credentials from the OpenShift Container Platform
Web Console.
3.3.6. Interacting with the Relational Database Backend API
When you have finished creating your application booster, you can interact with it the following way:
Prerequisites
Your application running
The curl binary or a web browser
Procedure
1. Obtain the URL of your application by executing the following command:
NAME HOST/PORT
PATH SERVICES PORT TERMINATION
MY_APP_NAME MY_APP_NAME-MY_PROJECT_NAME.OPENSHIFT_HOSTNAME
MY_APP_NAME 8080
2. To access the web interface of the database application, navigate to the application URL in your
browser:
Alternatively, you can make requests directly on the api/fruits/* endpoint using curl:
List all entries in the database:
$ oc get route MY_APP_NAME
http://MY_APP_NAME-MY_PROJECT_NAME.OPENSHIFT_HOSTNAME
$ curl http://MY_APP_NAME-
MY_PROJECT_NAME.OPENSHIFT_HOSTNAME/api/fruits
[ {
"id" : 1,
"name" : "Cherry",
}, {
"id" : 2,
"name" : "Apple",
}, {
"id" : 3,
"name" : "Banana",
} ]
CHAPTER 3. AVAILABLE MISSIONS AND BOOSTERS FOR SPRING BOOT
35

Retrieve an entry with a specific ID
Create a new entry:
Update an Entry
Delete an Entry:
Troubleshooting
If you receive an HTTP Error code 503 as a response after executing these commands, it
means that the application is not ready yet.
3.3.7. Running the Relational Database Backend booster integration tests
This booster includes a self-contained set of integration tests. When run inside an OpenShift project, the
tests:
Deploy a test instance of the application to the project.
Execute the individual tests on that instance.
Remove all instances of the application from the project when the testing is done.
$ curl http://MY_APP_NAME-
MY_PROJECT_NAME.OPENSHIFT_HOSTNAME/api/fruits/3
{
"id" : 3,
"name" : "Banana",
}
$ curl -H "Content-Type: application/json" -X POST -d
'{"name":"pear"}' http://MY_APP_NAME-
MY_PROJECT_NAME.OPENSHIFT_HOSTNAME/api/fruits
{
"id" : 4,
"name" : "pear",
}
$ curl -H "Content-Type: application/json" -X PUT -d
'{"name":"pineapple"}' http://MY_APP_NAME-
MY_PROJECT_NAME.OPENSHIFT_HOSTNAME/api/fruits/1
{
"id" : 1,
"name" : "pineapple",
}
$ curl -X DELETE http://MY_APP_NAME-
MY_PROJECT_NAME.OPENSHIFT_HOSTNAME/api/fruits/1
Red Hat OpenShift Application Runtimes 1 Spring Boot Runtime Guide
36

WARNING
Executing integration tests removes all existing instances of the booster application
from the target OpenShift project. To avoid accidentally removing your booster
application, ensure that you create and select a separate OpenShift project to
execute the tests.
Prerequisites
The oc client authenticated
An empty OpenShift project
Procedure
Execute the following command to run the integration tests:
3.3.8. Relational database resources
More background and related information on running relational databases in OpenShift, CRUD, HTTP
API and REST can be found here:
HTTP Verbs
Architectural Styles and the Design of Network-based Software Architectures - Representational
State Transfer (REST)
The never ending REST API design debase
REST APIs must be Hypertext driven
Richardson Maturity Model
JSR 311: JAX-RS: The JavaTM API for RESTful Web Services
Building a RESTful Service with Spring
Relational Database Backend Mission - Eclipse Vert.x Booster
Relational Database Backend Mission - Thorntail Booster
Relational Database Backend Mission - Node.js Booster
3.4. HEALTH CHECK MISSION - SPRING BOOT BOOSTER
Mission proficiency level: Foundational.
$ mvn clean verify -Popenshift,openshift-it
CHAPTER 3. AVAILABLE MISSIONS AND BOOSTERS FOR SPRING BOOT
37

When you deploy an application, its important to know if it is available and if it can start handling
incoming requests. Implementing the health check pattern allows you to monitor the health of an
application, which includes if an application is available and whether it is able to service requests.
NOTE
If you are not familiar with the health check terminology, see the Section 3.4.1, “Health
check concepts” section first.
The purpose of this use case is to demonstrate the health check pattern through the use of probing.
Probing is used to report the liveness and readiness of an application. In this use case, you configure an
application which exposes an HTTP health endpoint to issue HTTP requests. If the container is alive,
according to the liveness probe on the health HTTP endpoint, the management platform receives 200
as return code and no further action is required. If the health HTTP endpoint does not return a
response, for example if the thread is blocked, then the application is not considered alive according to
the liveness probe. In that case, the platform kills the pod corresponding to that application and recreates
a new pod to restart the application.
This use case also allows you to demonstrate and use a readiness probe. In cases where the application
is running but is unable to handle requests, such as when the application returns an HTTP 503 response
code during restart, this application is not considered ready according to the readiness probe. If the
application is not considered ready by the readiness probe, requests are not routed to that application
until it is considered ready according to the readiness probe.
3.4.1. Health check concepts
In order to understand the health check pattern, you need to first understand the following concepts:
Liveness
Liveness defines whether an application is running or not. Sometimes a running application moves
into an unresponsive or stopped state and needs to be restarted. Checking for liveness helps
determine whether or not an application needs to be restarted.
Readiness
Readiness defines whether a running application can service requests. Sometimes a running
application moves into an error or broken state where it can no longer service requests. Checking
readiness helps determine whether or not requests should continue to be routed to that application.
Fail-over
Fail-over enables failures in servicing requests to be handled gracefully. If an application fails to
service a request, that request and future requests can then fail-over or be routed to another
application, which is usually a redundant copy of that same application.
Resilience and Stability
Resilience and Stability enable failures in servicing requests to be handled gracefully. If an application
fails to service a request due to connection loss, in a resilient system that request can be retried after
the connection is re-established.
Probe
A probe is a Kubernetes action that periodically performs diagnostics on a running container.
3.4.2. Viewing the booster source code and README
Prerequisites
One of the following:
Red Hat OpenShift Application Runtimes 1 Spring Boot Runtime Guide
38

Access to developers.redhat.com/launch
Fabric8 Launcher installed on a Single-node OpenShift Cluster
Procedure
1. Use the Fabric8 Launcher tool to generate your own version of the booster.
2. View the generated GitHub repository or download and extract the ZIP file that contains the
booster source code.
Additional resources
Using developers.redhat.com/launch
Using the Fabric8 Launcher tool on a Single-node OpenShift Cluster
3.4.3. Deploying the Health Check booster to OpenShift Online
Use one of the following options to execute the Health Check booster on OpenShift Online.
Use developers.redhat.com/launch
Use the oc CLI client
Although each method uses the same oc commands to deploy your application, using
developers.redhat.com/launch provides an automated booster deployment workflow that executes the
oc commands for you.
3.4.3.1. Deploying the booster using developers.redhat.com/launch
Prerequisites
An account at OpenShift Online.
Procedure
1. Navigate to the developers.redhat.com/launch URL in a browser and log in.
2. Follow on-screen instructions to create and launch your booster in Spring Boot.
3.4.3.2. Authenticating the oc CLI client
To work with boosters on OpenShift Online using the oc command-line client, you need to authenticate
the client using the token provided by the OpenShift Online web interface.
Prerequisites
An account at OpenShift Online.
Procedure
1. Navigate to the OpenShift Online URL in a browser.
CHAPTER 3. AVAILABLE MISSIONS AND BOOSTERS FOR SPRING BOOT
39

2. Click on the question mark icon in the top right-hand corner of the Web console, next to your
user name.
3. Select Command Line Tools in the drop-down menu.
4. Find the text box that contains the oc login … command with the hidden token, and click the
button next to it to copy its content to your clipboard.
5. Paste the command into a terminal application. The command uses your authentication token to
authenticate your oc CLI client with your OpenShift Online account.
3.4.3.3. Deploying the Health Check booster using the oc CLI client
Prerequisites
The booster application created using developers.redhat.com/launch. For more information, see
Section 3.4.3.1, “Deploying the booster using developers.redhat.com/launch”.
The oc client authenticated. For more information, see Section 3.4.3.2, “Authenticating the oc
CLI client”.
Procedure
1. Clone your project from GitHub.
Alternatively, if you downloaded a ZIP file of your project, extract it.
2. Create a new OpenShift project.
3. Navigate to the root directory of your booster.
4. Use Maven to start the deployment to OpenShift.
This command uses the Fabric8 Maven Plugin to launch the S2I process on OpenShift and to
start the pod.
5. Check the status of your booster and ensure your pod is running.
$ oc login OPENSHIFT_URL --token=MYTOKEN
$ git clone git@github.com:USERNAME/MY_PROJECT_NAME.git
$ unzip MY_PROJECT_NAME.zip
$ oc new-project MY_PROJECT_NAME
$ mvn clean fabric8:deploy -Popenshift
$ oc get pods -w
NAME READY STATUS RESTARTS
AGE
MY_APP_NAME-1-aaaaa 1/1 Running 0
Red Hat OpenShift Application Runtimes 1 Spring Boot Runtime Guide
40

The MY_APP_NAME-1-aaaaa pod should have a status of Running once its fully deployed and
started. You should also wait for your pod to be ready before proceeding, which is shown in the
READY column. For example, MY_APP_NAME-1-aaaaa is ready when the READY column is
1/1. Your specific pod name will vary. The number in the middle will increase with each new
build. The letters at the end are generated when the pod is created.
6. Once your booster is deployed and started, determine its route.
Example Route Information
The route information of a pod gives you the base URL which you use to access it. In the
example above, you would use http://MY_APP_NAME-
MY_PROJECT_NAME.OPENSHIFT_HOSTNAME as the base URL to access the application.
3.4.4. Deploying the Health Check booster to Single-node OpenShift Cluster
Use one of the following options to execute the Health Check booster locally on Single-node OpenShift
Cluster:
Using Fabric8 Launcher
Using the oc CLI client
Although each method uses the same oc commands to deploy your application, using Fabric8 Launcher
provides an automated booster deployment workflow that executes the oc commands for you.
3.4.4.1. Getting the Fabric8 Launcher tool URL and credentials
You need the Fabric8 Launcher tool URL and user credentials to create and deploy boosters on Single-
node OpenShift Cluster. This information is provided when the Single-node OpenShift Cluster is started.
Prerequisites
The Fabric8 Launcher tool installed, configured, and running. For more information, see the
Install and Configure the Fabric8 Launcher Tool guide.
Procedure
1. Navigate to the console where you started Single-node OpenShift Cluster.
2. Check the console output for the URL and user credentials you can use to access the running
Fabric8 Launcher:
Example Console Output from a Single-node OpenShift Cluster Startup
58s
MY_APP_NAME-s2i-1-build 0/1 Completed 0
2m
$ oc get routes
NAME HOST/PORT
PATH SERVICES PORT TERMINATION
MY_APP_NAME MY_APP_NAME-MY_PROJECT_NAME.OPENSHIFT_HOSTNAME
MY_APP_NAME 8080
CHAPTER 3. AVAILABLE MISSIONS AND BOOSTERS FOR SPRING BOOT
41

3.4.4.2. Deploying the booster using the Fabric8 Launcher tool
Prerequisites
The URL of your running Fabric8 Launcher instance and the user credentials of your Single-node
OpenShift Cluster. For more information, see Section 3.4.4.1, “Getting the Fabric8 Launcher tool
URL and credentials”.
Procedure
1. Navigate to the Fabric8 Launcher URL in a browser.
2. Follow on-screen instructions to create and launch your booster in Spring Boot.
3.4.4.3. Authenticating the oc CLI client
To work with boosters on Single-node OpenShift Cluster using the oc command-line client, you need to
authenticate the client using the token provided by the Single-node OpenShift Cluster web interface.
Prerequisites
The URL of your running Fabric8 Launcher instance and the user credentials of your Single-node
OpenShift Cluster. For more information, see Section 3.4.4.1, “Getting the Fabric8 Launcher tool
URL and credentials”.
Procedure
1. Navigate to the Single-node OpenShift Cluster URL in a browser.
2. Click on the question mark icon in the top right-hand corner of the Web console, next to your
user name.
3. Select Command Line Tools in the drop-down menu.
4. Find the text box that contains the oc login … command with the hidden token, and click the
button next to it to copy its content to your clipboard.
5. Paste the command into a terminal application. The command uses your authentication token to
authenticate your oc CLI client with your Single-node OpenShift Cluster account.
...
-- Removing temporary directory ... OK
-- Server Information ...
OpenShift server started.
The server is accessible via web console at:
https://192.168.42.152:8443
You are logged in as:
User: developer
Password: developer
To login as administrator:
oc login -u system:admin
Red Hat OpenShift Application Runtimes 1 Spring Boot Runtime Guide
42

3.4.4.4. Deploying the Health Check booster using the oc CLI client
Prerequisites
The booster application created using Fabric8 Launcher tool on a Single-node OpenShift
Cluster. For more information, see Section 3.4.4.2, “Deploying the booster using the Fabric8
Launcher tool”.
Your Fabric8 Launcher tool URL.
The oc client authenticated. For more information, see Section 3.4.4.3, “Authenticating the oc
CLI client”.
Procedure
1. Clone your project from GitHub.
Alternatively, if you downloaded a ZIP file of your project, extract it.
2. Create a new OpenShift project.
3. Navigate to the root directory of your booster.
4. Use Maven to start the deployment to OpenShift.
This command uses the Fabric8 Maven Plugin to launch the S2I process on OpenShift and to
start the pod.
5. Check the status of your booster and ensure your pod is running.
The MY_APP_NAME-1-aaaaa pod should have a status of Running once its fully deployed and
started. You should also wait for your pod to be ready before proceeding, which is shown in the
READY column. For example, MY_APP_NAME-1-aaaaa is ready when the READY column is
1/1. Your specific pod name will vary. The number in the middle will increase with each new
build. The letters at the end are generated when the pod is created.
$ oc login OPENSHIFT_URL --token=MYTOKEN
$ git clone git@github.com:USERNAME/MY_PROJECT_NAME.git
$ unzip MY_PROJECT_NAME.zip
$ oc new-project MY_PROJECT_NAME
$ mvn clean fabric8:deploy -Popenshift
$ oc get pods -w
NAME READY STATUS RESTARTS
AGE
MY_APP_NAME-1-aaaaa 1/1 Running 0
58s
MY_APP_NAME-s2i-1-build 0/1 Completed 0
2m
CHAPTER 3. AVAILABLE MISSIONS AND BOOSTERS FOR SPRING BOOT
43

6. Once your booster is deployed and started, determine its route.
Example Route Information
The route information of a pod gives you the base URL which you use to access it. In the
example above, you would use http://MY_APP_NAME-
MY_PROJECT_NAME.OPENSHIFT_HOSTNAME as the base URL to access the application.
3.4.5. Deploying the Health Check booster to OpenShift Container Platform
The process of creating and deploying boosters to OpenShift Container Platform is similar to OpenShift
Online:
Prerequisites
The booster created using developers.redhat.com/launch or the Fabric8 Launcher tool.
Procedure
Follow the instructions in Section 3.4.3, “Deploying the Health Check booster to OpenShift
Online”, only use the URL and user credentials from the OpenShift Container Platform Web
Console.
3.4.6. Interacting with the unmodified Health Check booster
Once you have the booster deployed, you will have a service called MY_APP_NAME running that exposes
the following REST endpoints:
/api/greeting
Returns a name as a String.
/api/stop
Forces the service to become unresponsive as means to simulate a failure.
The following steps demonstrate how to verify the service availability and simulate a failure. This failure
of an available service causes the OpenShift self-healing capabilities to be trigger on the service.
Alternatively, you can use the web interface to perform these steps.
1. Use curl to execute a GET request against the MY_APP_NAME service. You can also use a
browser to do this.
{"content":"Hello, World!"}
$ oc get routes
NAME HOST/PORT
PATH SERVICES PORT TERMINATION
MY_APP_NAME MY_APP_NAME-MY_PROJECT_NAME.OPENSHIFT_HOSTNAME
MY_APP_NAME 8080
$ curl http://MY_APP_NAME-
MY_PROJECT_NAME.OPENSHIFT_HOSTNAME/api/greeting
Red Hat OpenShift Application Runtimes 1 Spring Boot Runtime Guide
44

2. Invoke the /api/stop endpoint and verify the availability of the /api/greeting endpoint
shortly after that.
Invoking the /api/stop endpoint simulates an internal service failure and triggers the
OpenShift self-healing capabilities. When invoking /api/greeting after simulating the failure,
the service should return an Application is not available page.
(followed by)
<html>
<head>
...
</head>
<body>
<div>
<h1>Application is not available</h1>
...
</div>
</body>
</html>
NOTE
Depending on when OpenShift removes the pod after you invoke the /api/stop
endpoint, you might initially see a 404 error code. If continue to invoke the
/api/greeting endpoint, you will see the Application is not
available page after OpenShift removes the pod.
3. Use oc get pods -w to continuously watch the self-healing capabilities in action.
While invoking the service failure, you can watch the self-healing capabilities in action on
OpenShift console, or with the oc client tools. You should see the number of pods in the READY
state move to zero (0/1) and after a short period (less than one minute) move back up to one
(1/1). In addition to that, the RESTARTS count increases every time you you invoke the service
failure.
4. Optional: Use the web interface to invoke the service.
Alternatively to the interaction using the terminal window, you can use the web interface
provided by the service to invoke the different methods and watch the service move through the
life cycle phases.
http://MY_APP_NAME-MY_PROJECT_NAME.OPENSHIFT_HOSTNAME
$ curl http://MY_APP_NAME-
MY_PROJECT_NAME.OPENSHIFT_HOSTNAME/api/stop
$ curl http://MY_APP_NAME-
MY_PROJECT_NAME.OPENSHIFT_HOSTNAME/api/greeting
$ oc get pods -w
NAME READY STATUS RESTARTS AGE
MY_APP_NAME-1-26iy7 0/1 Running 5 18m
MY_APP_NAME-1-26iy7 1/1 Running 5 19m
CHAPTER 3. AVAILABLE MISSIONS AND BOOSTERS FOR SPRING BOOT
45

5. Optional: Use the web console to view the log output generated by the application at each stage
of the self-healing process.
1. Navigate to your project.
2. On the sidebar, click on Monitoring.
3. In the upper right-hand corner of the screen, click on Events to display the log messages.
4. Optional: Click View Details to display a detailed view of the Event log.
The health check application generates the following messages:
Message Status
Unhealthy Readiness probe failed. This message is
expected and indicates that the simulated failure
of the /api/greeting endpoint has been
detected and the self-healing process starts.
Killing The unavailable Docker container running the
service is being killed before being re-created.
Pulling Downloading the latest version of docker image
to re-create the container.
Pulled Docker image downloaded successfully.
Created Docker container has been successfully created
Started Docker container is ready to handle requests
3.4.7. Running the Health Check booster integration tests
This booster includes a self-contained set of integration tests. When run inside an OpenShift project, the
tests:
Deploy a test instance of the application to the project.
Execute the individual tests on that instance.
Remove all instances of the application from the project when the testing is done.
Red Hat OpenShift Application Runtimes 1 Spring Boot Runtime Guide
46

WARNING
Executing integration tests removes all existing instances of the booster application
from the target OpenShift project. To avoid accidentally removing your booster
application, ensure that you create and select a separate OpenShift project to
execute the tests.
Prerequisites
The oc client authenticated
An empty OpenShift project
Procedure
Execute the following command to run the integration tests:
3.4.8. Health check resources
More background and related information on health checking can be found here:
Overview of Application Health in OpenShift
Health Checking in Kubernetes
Kubernetes Liveness and Readiness Probes
Kubernetes Probes
Health Check - Eclipse Vert.x Booster
Health Check - Thorntail Booster
Health Check - Node.js Booster
3.5. CIRCUIT BREAKER MISSION - SPRING BOOT BOOSTER
Limitation: Run this booster on a Single-node OpenShift Cluster. You can also use a manual workflow
to deploy this booster to OpenShift Online Pro and OpenShift Container Platform. This booster is not
currently available on OpenShift Online Starter.
Mission proficiency level: Foundational.
The Circuit Breaker mission demonstrates a generic pattern for reporting the failure of a service and then
limiting access to the failed service until it becomes available to handle requests. This helps prevent
cascading failure in other services that depend on the failed services for functionality.
This mission shows you how to implement a Circuit Breaker and Fallback pattern in your services.
$ mvn clean verify -Popenshift,openshift-it
CHAPTER 3. AVAILABLE MISSIONS AND BOOSTERS FOR SPRING BOOT
47

3.5.1. The circuit breaker design pattern
The Circuit Breaker is a pattern intended to:
Reduce the impact of network failure and high latency on service architectures where services
synchronously invoke other services.
If one of the services:
becomes unavailable due to network failure, or
incurs unusually high latency values due to overwhelming traffic,
other services attempting to call its endpoint may end up exhausting critical resources in an
attempt to reach it, rendering themselves unusable.
Prevent the condition also known as cascading failure, which can render the entire microservice
architecture unusable.
Act as a proxy between a protected function and a remote function, which monitors for failures.
Trip once the failures reach a certain threshold, and all further calls to the circuit breaker return
an error or a predefined fallback response, without the protected call being made at all.
The Circuit Breaker usually also contain an error reporting mechanism that notifies you when the Circuit
Breaker trips.
Circuit breaker implementation
With the Circuit Breaker pattern implemented, a service client invokes a remote service endpoint
via a proxy at regular intervals.
If the calls to the remote service endpoint fail repeatedly and consistently, the Circuit Breaker
trips, making all calls to the service fail immediately over a set timeout period and returns a
predefined fallback response.
When the timeout period expires, a limited number of test calls are allowed to pass through to
the remote service to determine whether it has healed, or remains unavailable.
If the test calls fail, the Circuit Breaker keeps the service unavailable and keeps returning the
fallback responses to incoming calls.
If the test calls succeed, the Circuit Breaker closes, fully enabling traffic to reach the remote
service again.
3.5.2. Circuit Breaker design tradeoffs
Table 3.4. Design Tradeoffs
Pros Cons
Red Hat OpenShift Application Runtimes 1 Spring Boot Runtime Guide
48

Enables a service to handle the failure of
other services it invokes.
Optimizing the timeout values can be
challenging
Larger-than-necessary timeout values
may generate excessive latency.
Smaller-than-necessary timeout values
may introduce false positives.
Pros Cons
3.5.3. Viewing the booster source code and README
Prerequisites
One of the following:
Access to developers.redhat.com/launch
Fabric8 Launcher installed on a Single-node OpenShift Cluster
Procedure
1. Use the Fabric8 Launcher tool to generate your own version of the booster.
2. View the generated GitHub repository or download and extract the ZIP file that contains the
booster source code.
Additional resources
Using developers.redhat.com/launch
Using the Fabric8 Launcher tool on a Single-node OpenShift Cluster
3.5.4. Deploying the Circuit Breaker booster to OpenShift Online
Use one of the following options to execute the Circuit Breaker booster on OpenShift Online.
Use developers.redhat.com/launch
Use the oc CLI client
Although each method uses the same oc commands to deploy your application, using
developers.redhat.com/launch provides an automated booster deployment workflow that executes the
oc commands for you.
3.5.4.1. Deploying the booster using developers.redhat.com/launch
Prerequisites
An account at OpenShift Online.
CHAPTER 3. AVAILABLE MISSIONS AND BOOSTERS FOR SPRING BOOT
49

Procedure
1. Navigate to the developers.redhat.com/launch URL in a browser and log in.
2. Follow on-screen instructions to create and launch your booster in Spring Boot.
3.5.4.2. Authenticating the oc CLI client
To work with boosters on OpenShift Online using the oc command-line client, you need to authenticate
the client using the token provided by the OpenShift Online web interface.
Prerequisites
An account at OpenShift Online.
Procedure
1. Navigate to the OpenShift Online URL in a browser.
2. Click on the question mark icon in the top right-hand corner of the Web console, next to your
user name.
3. Select Command Line Tools in the drop-down menu.
4. Find the text box that contains the oc login … command with the hidden token, and click the
button next to it to copy its content to your clipboard.
5. Paste the command into a terminal application. The command uses your authentication token to
authenticate your oc CLI client with your OpenShift Online account.
3.5.4.3. Deploying the Circuit Breaker booster using the oc CLI client
Prerequisites
The booster application created using developers.redhat.com/launch. For more information, see
Section 3.5.4.1, “Deploying the booster using developers.redhat.com/launch”.
The oc client authenticated. For more information, see Section 3.5.4.2, “Authenticating the oc
CLI client”.
Procedure
1. Clone your project from GitHub.
Alternatively, if you downloaded a ZIP file of your project, extract it.
2. Create a new OpenShift project.
$ oc login OPENSHIFT_URL --token=MYTOKEN
$ git clone git@github.com:USERNAME/MY_PROJECT_NAME.git
$ unzip MY_PROJECT_NAME.zip
Red Hat OpenShift Application Runtimes 1 Spring Boot Runtime Guide
50

3. Navigate to the root directory of your booster.
4. Use Maven to start the deployment to OpenShift.
This command uses the Fabric8 Maven Plugin to launch the S2I process on OpenShift and to
start the pod.
5. Check the status of your booster and ensure your pod is running.
Both the MY_APP_NAME-greeting-1-aaaaa and MY_APP_NAME-name-1-aaaaa pods
should have a status of Running once they are fully deployed and started. You should also wait
for your pods to be ready before proceeding, which is shown in the READY column. For example,
MY_APP_NAME-greeting-1-aaaaa is ready when the READY column is 1/1. Your specific
pod names will vary. The number in the middle will increase with each new build. The letters at
the end are generated when the pod is created.
6. Once your booster is deployed and started, determine its route.
Example Route Information
The route information of a pod gives you the base URL which you use to access it. In the
example above, you would use http://MY_APP_NAME-greeting-
MY_PROJECT_NAME.OPENSHIFT_HOSTNAME as the base URL to access the application.
3.5.5. Deploying the Circuit Breaker booster to Single-node OpenShift Cluster
Use one of the following options to execute the Circuit Breaker booster locally on Single-node OpenShift
Cluster:
$ oc new-project MY_PROJECT_NAME
$ mvn clean fabric8:deploy -Popenshift
$ oc get pods -w
NAME READY STATUS RESTARTS
AGE
MY_APP_NAME-greeting-1-aaaaa 1/1 Running 0
17s
MY_APP_NAME-greeting-1-deploy 0/1 Completed 0
22s
MY_APP_NAME-name-1-aaaaa 1/1 Running 0
14s
MY_APP_NAME-name-1-deploy 0/1 Completed 0
28s
$ oc get routes
NAME HOST/PORT
PATH SERVICES PORT TERMINATION
MY_APP_NAME-greeting MY_APP_NAME-greeting-
MY_PROJECT_NAME.OPENSHIFT_HOSTNAME MY_APP_NAME-greeting
8080 None
MY_APP_NAME-name MY_APP_NAME-name-
MY_PROJECT_NAME.OPENSHIFT_HOSTNAME MY_APP_NAME-name
8080 None
CHAPTER 3. AVAILABLE MISSIONS AND BOOSTERS FOR SPRING BOOT
51

Using Fabric8 Launcher
Using the oc CLI client
Although each method uses the same oc commands to deploy your application, using Fabric8 Launcher
provides an automated booster deployment workflow that executes the oc commands for you.
3.5.5.1. Getting the Fabric8 Launcher tool URL and credentials
You need the Fabric8 Launcher tool URL and user credentials to create and deploy boosters on Single-
node OpenShift Cluster. This information is provided when the Single-node OpenShift Cluster is started.
Prerequisites
The Fabric8 Launcher tool installed, configured, and running. For more information, see the
Install and Configure the Fabric8 Launcher Tool guide.
Procedure
1. Navigate to the console where you started Single-node OpenShift Cluster.
2. Check the console output for the URL and user credentials you can use to access the running
Fabric8 Launcher:
Example Console Output from a Single-node OpenShift Cluster Startup
3.5.5.2. Deploying the booster using the Fabric8 Launcher tool
Prerequisites
The URL of your running Fabric8 Launcher instance and the user credentials of your Single-node
OpenShift Cluster. For more information, see Section 3.5.5.1, “Getting the Fabric8 Launcher tool
URL and credentials”.
Procedure
1. Navigate to the Fabric8 Launcher URL in a browser.
2. Follow on-screen instructions to create and launch your booster in Spring Boot.
...
-- Removing temporary directory ... OK
-- Server Information ...
OpenShift server started.
The server is accessible via web console at:
https://192.168.42.152:8443
You are logged in as:
User: developer
Password: developer
To login as administrator:
oc login -u system:admin
Red Hat OpenShift Application Runtimes 1 Spring Boot Runtime Guide
52

3.5.5.3. Authenticating the oc CLI client
To work with boosters on Single-node OpenShift Cluster using the oc command-line client, you need to
authenticate the client using the token provided by the Single-node OpenShift Cluster web interface.
Prerequisites
The URL of your running Fabric8 Launcher instance and the user credentials of your Single-node
OpenShift Cluster. For more information, see Section 3.5.5.1, “Getting the Fabric8 Launcher tool
URL and credentials”.
Procedure
1. Navigate to the Single-node OpenShift Cluster URL in a browser.
2. Click on the question mark icon in the top right-hand corner of the Web console, next to your
user name.
3. Select Command Line Tools in the drop-down menu.
4. Find the text box that contains the oc login … command with the hidden token, and click the
button next to it to copy its content to your clipboard.
5. Paste the command into a terminal application. The command uses your authentication token to
authenticate your oc CLI client with your Single-node OpenShift Cluster account.
3.5.5.4. Deploying the Circuit Breaker booster using the oc CLI client
Prerequisites
The booster application created using Fabric8 Launcher tool on a Single-node OpenShift
Cluster. For more information, see Section 3.5.5.2, “Deploying the booster using the Fabric8
Launcher tool”.
Your Fabric8 Launcher tool URL.
The oc client authenticated. For more information, see Section 3.5.5.3, “Authenticating the oc
CLI client”.
Procedure
1. Clone your project from GitHub.
Alternatively, if you downloaded a ZIP file of your project, extract it.
2. Create a new OpenShift project.
$ oc login OPENSHIFT_URL --token=MYTOKEN
$ git clone git@github.com:USERNAME/MY_PROJECT_NAME.git
$ unzip MY_PROJECT_NAME.zip
CHAPTER 3. AVAILABLE MISSIONS AND BOOSTERS FOR SPRING BOOT
53

3. Navigate to the root directory of your booster.
4. Use Maven to start the deployment to OpenShift.
This command uses the Fabric8 Maven Plugin to launch the S2I process on OpenShift and to
start the pod.
5. Check the status of your booster and ensure your pod is running.
Both the MY_APP_NAME-greeting-1-aaaaa and MY_APP_NAME-name-1-aaaaa pods
should have a status of Running once they are fully deployed and started. You should also wait
for your pods to be ready before proceeding, which is shown in the READY column. For example,
MY_APP_NAME-greeting-1-aaaaa is ready when the READY column is 1/1. Your specific
pod names will vary. The number in the middle will increase with each new build. The letters at
the end are generated when the pod is created.
6. Once your booster is deployed and started, determine its route.
Example Route Information
The route information of a pod gives you the base URL which you use to access it. In the
example above, you would use http://MY_APP_NAME-greeting-
MY_PROJECT_NAME.OPENSHIFT_HOSTNAME as the base URL to access the application.
3.5.6. Deploying the Circuit Breaker booster to OpenShift Container Platform
The process of creating and deploying boosters to OpenShift Container Platform is similar to OpenShift
Online:
$ oc new-project MY_PROJECT_NAME
$ mvn clean fabric8:deploy -Popenshift
$ oc get pods -w
NAME READY STATUS RESTARTS
AGE
MY_APP_NAME-greeting-1-aaaaa 1/1 Running 0
17s
MY_APP_NAME-greeting-1-deploy 0/1 Completed 0
22s
MY_APP_NAME-name-1-aaaaa 1/1 Running 0
14s
MY_APP_NAME-name-1-deploy 0/1 Completed 0
28s
$ oc get routes
NAME HOST/PORT
PATH SERVICES PORT TERMINATION
MY_APP_NAME-greeting MY_APP_NAME-greeting-
MY_PROJECT_NAME.OPENSHIFT_HOSTNAME MY_APP_NAME-greeting
8080 None
MY_APP_NAME-name MY_APP_NAME-name-
MY_PROJECT_NAME.OPENSHIFT_HOSTNAME MY_APP_NAME-name
8080 None
Red Hat OpenShift Application Runtimes 1 Spring Boot Runtime Guide
54

Prerequisites
The booster created using developers.redhat.com/launch or the Fabric8 Launcher tool.
Procedure
Follow the instructions in Section 3.5.4, “Deploying the Circuit Breaker booster to OpenShift
Online”, only use the URL and user credentials from the OpenShift Container Platform Web
Console.
3.5.7. Interacting with the unmodified Spring Boot Circuit Breaker booster
Once you have the Spring Boot booster deployed, you have the following services running:
MY_APP_NAME-name
Exposes the following endpoints:
the /api/name endpoint, which returns a name when this service is working, and an error
when this service is set up to demonstrate failure.
the /api/state endpoint, which controls the behavior of the /api/name endpoint and
determines whether the service works correctly or demonstrates failure.
MY_APP_NAME-greeting
Exposes the following endpoints:
the /api/greeting endpoint that you can call to get a personalized greeting response.
When you call the /api/greeting endpoint, it issues a call against the /api/name
endpoint of the MY_APP_NAME-name service as part of processing your request. The call
made against the /api/name endpoint is protected by the Circuit Breaker.
If the remote endpoint is available, the name service responds with an HTTP code 200 (OK)
and you receive the following greeting from the /api/greeting endpoint:
{"content":"Hello, World!"}
If the remote endpoint is unavailable, the name service responds with an HTTP code 500
(Internal server error) and you receive a predefined fallback response from the
/api/greeting endpoint:
{"content":"Hello, Fallback!"}
the /api/cb-state endpoint, which returns the state of the Circuit Breaker. The state can
be:
open : the circuit breaker is preventing requests from reaching the failed service,
closed: the circuit breaker is allowing requests to reach the service.
The following steps demonstrate how to verify the availability of the service, simulate a failure and
receive a fallback response.
CHAPTER 3. AVAILABLE MISSIONS AND BOOSTERS FOR SPRING BOOT
55

1. Use curl to execute a GET request against the MY_APP_NAME-greeting service. You can
also use the Invoke button in the web interface to do this.
2. To simulate the failure of the MY_APP_NAME-name service you can:
use the Toggle button in the web interface.
scale the number of replicas of the pod running the MY_APP_NAME-name service down to 0.
execute an HTTP PUT request against the /api/state endpoint of the MY_APP_NAME-
name service to set its state to fail.
3. Invoke the /api/greeting endpoint. When several requests on the /api/name endpoint fail:
a. the Circuit Breaker opens,
b. the state indicator in the web interface changes from CLOSED to OPEN,
c. the Circuit Breaker issues a fallback response when you invoke the /api/greeting
endpoint:
4. Restore the name MY_APP_NAME-name service to availability. To do this you can:
use the Toggle button in the web interface.
scale the number of replicas of the pod running the MY_APP_NAME-name service back up to
1.
execute an HTTP PUT request against the /api/state endpoint of the MY_APP_NAME-
name service to set its state back to ok.
5. Invoke the /api/greeting endpoint again. When several requests on the /api/name
endpoint succeed:
a. the Circuit Breaker closes,
b. the state indicator in the web interface changes from OPEN to CLOSED,
$ curl http://MY_APP_NAME-greeting-
MY_PROJECT_NAME.LOCAL_OPENSHIFT_HOSTNAME/api/greeting
{"content":"Hello, World!"}
$ curl -X PUT -H "Content-Type: application/json" -d '{"state":
"fail"}' http://MY_APP_NAME-name-
MY_PROJECT_NAME.LOCAL_OPENSHIFT_HOSTNAME/api/state
$ curl http://MY_APP_NAME-greeting-
MY_PROJECT_NAME.LOCAL_OPENSHIFT_HOSTNAME/api/greeting
{"content":"Hello, Fallback!"}
$ curl -X PUT -H "Content-Type: application/json" -d '{"state":
"ok"}' http://MY_APP_NAME-name-
MY_PROJECT_NAME.LOCAL_OPENSHIFT_HOSTNAME/api/state
Red Hat OpenShift Application Runtimes 1 Spring Boot Runtime Guide
56

c. the Circuit Breaker issues a returns the Hello World! greeting when you invoke the
/api/greeting endpoint:
3.5.8. Running the Circuit Breaker booster integration tests
This booster includes a self-contained set of integration tests. When run inside an OpenShift project, the
tests:
Deploy a test instance of the application to the project.
Execute the individual tests on that instance.
Remove all instances of the application from the project when the testing is done.
WARNING
Executing integration tests removes all existing instances of the booster application
from the target OpenShift project. To avoid accidentally removing your booster
application, ensure that you create and select a separate OpenShift project to
execute the tests.
Prerequisites
The oc client authenticated
An empty OpenShift project
Procedure
Execute the following command to run the integration tests:
3.5.9. Using Hystrix Dashboard to monitor the circuit breaker
Hystrix Dashboard lets you easily monitor the health of your services in real time by aggregating Hystrix
metrics data from an event stream and displaying them on one screen.
Prerequisites
The application deployed
Procedure
1. Log in to your Single-node OpenShift Cluster cluster.
$ curl http://MY_APP_NAME-greeting-
MY_PROJECT_NAME.LOCAL_OPENSHIFT_HOSTNAME/api/greeting
{"content":"Hello, World!"}
$ mvn clean verify -Popenshift,openshift-it
CHAPTER 3. AVAILABLE MISSIONS AND BOOSTERS FOR SPRING BOOT
57

2. To access the Web console, use your browser to navigate to your Single-node OpenShift Cluster
URL.
3. Navigate to the project that contains your Circuit Breaker application.
4. Import the YAML template for the Hystrix Dashboard application. You can do this by clicking
Add to Project, then selecting the Import YAML / JSON tab, and copying the contents of the
YAML file into the text box. Alternatively, you can execute the following command:
5. Click the Create button to create the Hystrix Dashboard application based on the template.
Alternatively, you can execute the following command.
6. Wait for the pod containing Hystrix Dashboard to deploy.
7. Obtain the route of your Hystrix Dashboard application.
8. To access the Dashboard, open the Dashboard application route URL in your browser.
Alternatively, you can navigate to the Overview screen in the Web console and click the route
URL in the header above the pod containing your Hystrix Dashboard application.
9. To use the Dashboard to monitor the MY_APP_NAME-greeting service, replace the default
event stream address with the following address and click the Monitor Stream button.
http://MY_APP_NAME-greeting-
MY_PROJECT_NAME.LOCAL_OPENSHIFT_HOSTNAME/hystrix.stream
Additional resources
The Hystrix Dashboard wiki page
3.5.10. Circuit breaker resources
Follow the links below for more background information on the design principles behind the Circuit
Breaker pattern
microservices.io: Microservice Patterns: Circuit Breaker
$ oc login OPENSHIFT_URL --token=MYTOKEN
$ oc project MY_PROJECT_NAME
$ oc create -f https://raw.githubusercontent.com/snowdrop/openshift-
templates/master/hystrix-dashboard/hystrix-dashboard.yml
$ oc new-app --template=hystrix-dashboard
$ oc get route hystrix-dashboard
NAME HOST/PORT
PATH SERVICES PORT TERMINATION WILDCARD
hystrix-dashboard hystrix-dashboard-
MY_PROJECT_NAME.LOCAL_OPENSHIFT_HOSTNAME hystrix-
dashboard <all> None
Red Hat OpenShift Application Runtimes 1 Spring Boot Runtime Guide
58
Martin Fowler: CircuitBreaker
Circuit Breaker Mission - Eclipse Vert.x Booster
Circuit Breaker Mission - Thorntail Booster
Circuit Breaker Mission - Node.js Booster
3.6. SECURED MISSION - SPRING BOOT BOOSTER
Limitation: Run this booster on a Single-node OpenShift Cluster. You can also use a manual workflow
to deploy this booster to OpenShift Online Pro and OpenShift Container Platform. This booster is not
currently available on OpenShift Online Starter.
Mission proficiency level: Advanced.
The Secured booster secures a REST endpoint using Red Hat SSO. (This booster expands on the REST
API Level 0 booster).
Red Hat SSO:
Implements the Open ID Connect protocol which is an extension of the OAuth 2.0 specification.
Issues access tokens to provide clients with various access rights to secured resources.
Securing an application with SSO enables you to add security to your applications while centralizing the
security configuration.
IMPORTANT
This mission comes with Red Hat SSO pre-configured for demonstration purposes, it
does not explain its principles, usage, or configuration. Before using this mission, ensure
that you are familiar with the basic concepts related to Red Hat SSO.
3.6.1. The Secured project structure
The SSO booster project contains:
the sources for the Greeting service, which is the one which we are going to to secure
a template file (service.sso.yaml) to deploy the SSO server
the Keycloak adapter configuration to secure the service
3.6.2. Viewing the booster source code and README
Prerequisites
One of the following:
Access to developers.redhat.com/launch
Fabric8 Launcher installed on a Single-node OpenShift Cluster
Procedure
CHAPTER 3. AVAILABLE MISSIONS AND BOOSTERS FOR SPRING BOOT
59

1. Use the Fabric8 Launcher tool to generate your own version of the booster.
2. View the generated GitHub repository or download and extract the ZIP file that contains the
booster source code.
Additional resources
Using developers.redhat.com/launch
Using the Fabric8 Launcher tool on a Single-node OpenShift Cluster
3.6.3. Red Hat SSO deployment configuration
The service.sso.yaml file in this booster contains all OpenShift configuration items to deploy a pre-
configured Red Hat SSO server. The SSO server configuration has been simplified for the sake of this
exercise and does provide an out-of-the-box configuration, with pre-configured users and security
settings. The service.sso.yaml file also contains very long lines, and some text editors, such as
gedit, may have issues reading this file.
WARNING
It is not recommended to use this SSO configuration in production. Specifically, the
simplifications made to the booster security configuration impact the ability to use it
in a production environment.
Table 3.5. SSO Booster Simplifications
Change Reason Recommendation
The default configuration includes
both public and private keys in
the yaml configuration files.
We did this because the end user
can deploy Red Hat SSO module
and have it in a usable state
without needing to know the
internals or how to configure Red
Hat SSO.
In production, do not store private
keys under source control. They
should be added by the server
administrator.
The configured clients accept
any callback url.
To avoid having a custom
configuration for each runtime, we
avoid the callback verification that
is required by the OAuth2
specification.
An application-specific callback
URL should be provided with a
valid domain name.
Clients do not require SSL/TLS
and the secured applications
are not exposed over HTTPS.
The boosters are simplified by not
requiring certificates generated for
each runtime.
In production a secure application
should use HTTPS rather than
plain HTTP.
Red Hat OpenShift Application Runtimes 1 Spring Boot Runtime Guide
60

The token timeout has been
increased to 10 minutes from
the default of 1 minute.
Provides a better user experience
when working with the command
line examples
From a security perspective, the
window an attacker would have to
guess the access token is
extended. It is recommended to
keep this window short as it
makes it much harder for a
potential attacker to guess the
current token.
Change Reason Recommendation
3.6.4. Red Hat SSO realm model
The master realm is used to secure this booster. There are two pre-configured application client
definitions that provide a model for command line clients and the secured REST endpoint.
There are also two pre-configured users in the Red Hat SSO master realm that can be used to validate
various authentication and authorization outcomes: admin and alice.
3.6.4.1. Red Hat SSO users
The realm model for the secured boosters includes two users:
admin
The admin user has a password of admin and is the realm administrator. This user has full access to
the Red Hat SSO administration console, but none of the role mappings that are required to access
the secured endpoints. You can use this user to illustrate the behavior of an authenticated, but
unauthorized user.
alice
The alice user has a password of password and is the canonical application user. This user will
demonstrate successful authenticated and authorized access to the secured endpoints. An example
representation of the role mappings is provided in this decoded JWT bearer token:
{
"jti": "0073cfaa-7ed6-4326-ac07-c108d34b4f82",
"exp": 1510162193,
"nbf": 0,
"iat": 1510161593,
"iss": "https://secure-sso-
sso.LOCAL_OPENSHIFT_HOSTNAME/auth/realms/master", 1
"aud": "demoapp",
"sub": "c0175ccb-0892-4b31-829f-dda873815fe8",
"typ": "Bearer",
"azp": "demoapp",
"nonce": "90ff5d1a-ba44-45ae-a413-50b08bf4a242",
"auth_time": 1510161591,
"session_state": "98efb95a-b355-43d1-996b-0abcb1304352",
"acr": "1",
"client_session": "5962112c-2b19-461e-8aac-84ab512d2a01",
"allowed-origins": [
"*"
],
CHAPTER 3. AVAILABLE MISSIONS AND BOOSTERS FOR SPRING BOOT
61

1
2
3
4
5
The iss field corresponds to the Red Hat SSO realm instance URL that issues the token. This
must be configured in the secured endpoint deployments in order for the token to be verified.
The roles object provides the roles that have been granted to the user at the global realm level.
In this case alice has been granted the booster-admin role. We will see that the secured
endpoint will look to the realm level for authorized roles.
The resource_access object contains resource specific role grants. Under this object you will
find an object for each of the secured endpoints.
The resource_access.secured-booster-endpoint.roles object contains the roles
granted to alice for the secured-booster-endpoint resource.
The preferred_username field provides the username that was used to generate the access
token.
3.6.4.2. The application clients
The OAuth 2.0 specification allows you to define a role for application clients that access secured
resources on behalf of resource owners. The master realm has the following application clients defined:
demoapp
This is a confidential type client with a client secret that is used to obtain an access token that
contains grants for the alice user which enable alice to access the Thorntail, Eclipse Vert.x,
Node.js and Spring Boot based REST booster deployments.
secured-booster-endpoint
"realm_access": {
"roles": [ 2
"booster-admin"
]
},
"resource_access": { 3
"secured-booster-endpoint": {
"roles": [
"booster-admin" 4
]
},
"account": {
"roles": [
"manage-account",
"view-profile"
]
}
},
"name": "Alice InChains",
"preferred_username": "alice", 5
"given_name": "Alice",
"family_name": "InChains",
"email": "alice@keycloak.org"
}
Red Hat OpenShift Application Runtimes 1 Spring Boot Runtime Guide
62

1
2
3
4
5
6
7
8
9
The secured-booster-endpoint is a bearer-only type of client that requires a booster-admin
role for accessing the associated resources, specifically the Greeting service.
3.6.5. Spring Boot SSO adapter configuration
The SSO adapter is the client side, or client to the SSO server, component that enforces security on the
web resources. In this specific case, it is the Greeting service.
Both the SSO adapter and endpoint security are configured in
src/main/resources/application.properties.
Example application.properties file
The security realm to be used.
The address of the Red Hat SSO server (Interpolation at build time).
The actual keycloak client configuration.
Secret to access authentication server.
Check the token for application level role mappings for the user.
If enabled the adapter will not attempt to authenticate users, but only verify bearer tokens.
A simple name for the security constraint.
A roles needed to access a secured endpoint.
A secured endpoints path pattern.
3.6.6. Deploying the Secured booster to Single-node OpenShift Cluster
3.6.6.1. Getting the Fabric8 Launcher tool URL and credentials
You need the Fabric8 Launcher tool URL and user credentials to create and deploy boosters on Single-
node OpenShift Cluster. This information is provided when the Single-node OpenShift Cluster is started.
$ # Adapter configuration
keycloak.realm=${realm:master} 1
keycloak.realm-key=...
keycloak.auth-server-url=${sso.auth.server.url} 2
keycloak.resource=${client.id:secured-booster-endpoint} 3
keycloak.credentials.secret=${secret:1daa57a2-b60e-468b-a3ac-25bd2dc2eadc}
4
keycloak.use-resource-role-mappings=true 5
keycloak.bearer-only=true 6
# Endpoint security configuration
keycloak.securityConstraints[0].securityCollections[0].name=admin stuff 7
keycloak.securityConstraints[0].securityCollections[0].authRoles[0]=booste
r-admin 8
keycloak.securityConstraints[0].securityCollections[0].patterns[0]=/api/gr
eeting 9
CHAPTER 3. AVAILABLE MISSIONS AND BOOSTERS FOR SPRING BOOT
63

Prerequisites
The Fabric8 Launcher tool installed, configured, and running. For more information, see the
Install and Configure the Fabric8 Launcher Tool guide.
Procedure
1. Navigate to the console where you started Single-node OpenShift Cluster.
2. Check the console output for the URL and user credentials you can use to access the running
Fabric8 Launcher:
Example Console Output from a Single-node OpenShift Cluster Startup
3.6.6.2. Creating the Secured booster using Fabric8 Launcher
Prerequisites
The URL and user credentials of your running Fabric8 Launcher instance. For more information,
see Section 3.6.6.1, “Getting the Fabric8 Launcher tool URL and credentials”.
Procedure
Navigate to the Fabric8 Launcher URL in a browser and log in.
Follow the on-screen instructions to create your booster in Spring Boot. When asked about
which deployment type, select I will build and run locally.
Follow on-screen instructions.
When done, click the Download as ZIP file button and store the file on your hard drive.
3.6.6.3. Authenticating the oc CLI client
To work with boosters on Single-node OpenShift Cluster using the oc command-line client, you need to
authenticate the client using the token provided by the Single-node OpenShift Cluster web interface.
Prerequisites
...
-- Removing temporary directory ... OK
-- Server Information ...
OpenShift server started.
The server is accessible via web console at:
https://192.168.42.152:8443
You are logged in as:
User: developer
Password: developer
To login as administrator:
oc login -u system:admin
Red Hat OpenShift Application Runtimes 1 Spring Boot Runtime Guide
64

The URL of your running Fabric8 Launcher instance and the user credentials of your Single-node
OpenShift Cluster. For more information, see Section 3.6.6.1, “Getting the Fabric8 Launcher tool
URL and credentials”.
Procedure
1. Navigate to the Single-node OpenShift Cluster URL in a browser.
2. Click on the question mark icon in the top right-hand corner of the Web console, next to your
user name.
3. Select Command Line Tools in the drop-down menu.
4. Find the text box that contains the oc login … command with the hidden token, and click the
button next to it to copy its content to your clipboard.
5. Paste the command into a terminal application. The command uses your authentication token to
authenticate your oc CLI client with your Single-node OpenShift Cluster account.
3.6.6.4. Deploying the Secured booster using the oc CLI client
Prerequisites
The booster application created using the Fabric8 Launcher tool on a Single-node OpenShift
Cluster. For more information, see Section 3.6.6.2, “Creating the Secured booster using Fabric8
Launcher”.
Your Fabric8 Launcher URL.
The oc client authenticated. For more information, see Section 3.6.6.3, “Authenticating the oc
CLI client”.
Procedure
1. Clone your project from GitHub.
Alternatively, if you downloaded a ZIP file of your project, extract it.
2. Create a new OpenShift project.
3. Navigate to the root directory of your booster.
4. Deploy the Red Hat SSO server using the service.sso.yaml file from your booster ZIP file:
$ oc login OPENSHIFT_URL --token=MYTOKEN
$ git clone git@github.com:USERNAME/MY_PROJECT_NAME.git
$ unzip MY_PROJECT_NAME.zip
$ oc new-project MY_PROJECT_NAME
$ oc create -f service.sso.yaml
CHAPTER 3. AVAILABLE MISSIONS AND BOOSTERS FOR SPRING BOOT
65

5. Use Maven to start the deployment to Single-node OpenShift Cluster.
This command uses the Fabric8 Maven Plugin to launch the S2I process on Single-node
OpenShift Cluster and to start the pod.
This process generates the uberjar file as well as the OpenShift resources and deploys them to the
current project on your Single-node OpenShift Cluster server.
3.6.7. Deploying the Secured booster to OpenShift Container Platform
In addition to the Single-node OpenShift Cluster, you can create and deploy the booster on OpenShift
Container Platform with only minor differences. The most important difference is that you need to create
the booster application on Single-node OpenShift Cluster before you can deploy it with OpenShift
Container Platform.
Prerequisites
The booster created using Single-node OpenShift Cluster.
3.6.7.1. Authenticating the oc CLI client
To work with boosters on OpenShift Container Platform using the oc command-line client, you need to
authenticate the client using the token provided by the OpenShift Container Platform web interface.
Prerequisites
An account at OpenShift Container Platform.
Procedure
1. Navigate to the OpenShift Container Platform URL in a browser.
2. Click on the question mark icon in the top right-hand corner of the Web console, next to your
user name.
3. Select Command Line Tools in the drop-down menu.
4. Find the text box that contains the oc login … command with the hidden token, and click the
button next to it to copy its content to your clipboard.
5. Paste the command into a terminal application. The command uses your authentication token to
authenticate your oc CLI client with your OpenShift Container Platform account.
3.6.7.2. Deploying the Secured booster using the oc CLI client
Prerequisites
$ mvn clean fabric8:deploy -Popenshift -DskipTests \
-DSSO_AUTH_SERVER_URL=$(oc get route secure-sso -o
jsonpath='{"https://"}{.spec.host}{"/auth\n"}')
$ oc login OPENSHIFT_URL --token=MYTOKEN
Red Hat OpenShift Application Runtimes 1 Spring Boot Runtime Guide
66

The booster application created using the Fabric8 Launcher tool on a Single-node OpenShift
Cluster.
The oc client authenticated. For more information, see Section 3.6.7.1, “Authenticating the oc
CLI client”.
Procedure
1. Clone your project from GitHub.
Alternatively, if you downloaded a ZIP file of your project, extract it.
2. Create a new OpenShift project.
3. Navigate to the root directory of your booster.
4. Deploy the Red Hat SSO server using the service.sso.yaml file from your booster ZIP file:
5. Use Maven to start the deployment to OpenShift Container Platform.
This command uses the Fabric8 Maven Plugin to launch the S2I process on OpenShift Container
Platform and to start the pod.
This process generates the uberjar file as well as the OpenShift resources and deploys them to the
current project on your OpenShift Container Platform server.
3.6.8. Authenticating to the Secured booster API endpoint
The Secured booster provides a default HTTP endpoint that accepts GET requests if the caller is
authenticated and authorized. The client first authenticates against the Red Hat SSO server and then
performs a GET request against the Secured booster using the access token returned by the
authentication step.
3.6.8.1. Getting the Secured booster API endpoint
When using a client to interact with the booster, you must specify the Secured booster endpoint, which is
the PROJECT_ID service.
Prerequisites
The Secured booster deployed and running.
$ git clone git@github.com:USERNAME/MY_PROJECT_NAME.git
$ unzip MY_PROJECT_NAME.zip
$ oc new-project MY_PROJECT_NAME
$ oc create -f service.sso.yaml
$ mvn clean fabric8:deploy -Popenshift -DskipTests \
-DSSO_AUTH_SERVER_URL=$(oc get route secure-sso -o
jsonpath='{"https://"}{.spec.host}{"/auth\n"}')
CHAPTER 3. AVAILABLE MISSIONS AND BOOSTERS FOR SPRING BOOT
67

The oc client authenticated.
Procedure
1. In a terminal application, execute the oc get routes command.
A sample output is shown in the following table:
Example 3.1. List of Secured endpoints
Name Host/Port Path Services Port Termination
secure-sso secure-sso-
myproject.LO
CAL_OPEN
SHIFT_HOS
TNAME
secure-sso <all> passthrough
PROJECT_I
D
PROJECT_I
D-
myproject.LO
CAL_OPEN
SHIFT_HOS
TNAME
PROJECT_I
D
<all>
sso sso-
myproject.LO
CAL_OPEN
SHIFT_HOS
TNAME
sso <all>
In the above example, the booster endpoint would be http://PROJECT_ID-
myproject.LOCAL_OPENSHIFT_HOSTNAME. PROJECT_ID is based on the name you entered
when generating your booster using developers.redhat.com/launch or the Fabric8 Launcher tool.
3.6.8.2. Authenticating HTTP requests using the command line
Request a token by sending a HTTP POST request to the Red Hat SSO server. In the following
example, the jq CLI tool is used to extract the token value from the JSON response.
Prerequisites
The secured booster endpoint URL. For more information, see Section 3.6.8.1, “Getting the
Secured booster API endpoint”.
The jq command-line tool (optional). To download the tool and for more information, see
https://stedolan.github.io/jq/.
Procedure
1. Request an access token with curl, the credentials, and <SSO_AUTH_SERVER_URL> and
extract the token from the response with the jq command:
Red Hat OpenShift Application Runtimes 1 Spring Boot Runtime Guide
68

<SSO_AUTH_SERVER_URL> is the url of the secure-sso service.
The attributes, such as username, password, and client_secret are usually kept secret,
but the above command uses the default provided credentials with this booster for
demonstration purpose.
If you do not want to use jq to extract the token, you can run just the curl command and
manually extract the access token.
NOTE
The -sk option tells curl to ignore failures resulting from self-signed certificates.
Do not use this option in a production environment. On macOS, you must have
curl version 7.56.1 or greater installed. It must also be built with OpenSSL.
1. Invoke the Secured service. Attach the access (bearer) token to the HTTP headers:
curl -sk -X POST
https://<SSO_AUTH_SERVER_URL>/auth/realms/master/protocol/openid-
connect/token \
-d grant_type=password \
-d username=alice\
-d password=password \
-d client_id=demoapp \
-d client_secret=1daa57a2-b60e-468b-a3ac-25bd2dc2eadc \
| jq -r '.access_token'
eyJhbGciOiJSUzI1NiIsInR5cCIgOiAiSldUIiwia2lkIiA6ICJRek1nbXhZMUhrQnpx
TnR0SnkwMm5jNTNtMGNiWDQxV1hNSTU1MFo4MGVBIn0.eyJqdGkiOiI0NDA3YTliNC04
YWRhLTRlMTctODQ2ZS03YjI5MjMyN2RmYTIiLCJleHAiOjE1MDc3OTM3ODcsIm5iZiI6
MCwiaWF0IjoxNTA3NzkzNzI3LCJpc3MiOiJodHRwczovL3NlY3VyZS1zc28tc3NvLWRl
bW8uYXBwcy5jYWZlLWJhYmUub3JnL2F1dGgvcmVhbG1zL21hc3RlciIsImF1ZCI6ImRl
bW9hcHAiLCJzdWIiOiJjMDE3NWNjYi0wODkyLTRiMzEtODI5Zi1kZGE4NzM4MTVmZTgi
LCJ0eXAiOiJCZWFyZXIiLCJhenAiOiJkZW1vYXBwIiwiYXV0aF90aW1lIjowLCJzZXNz
aW9uX3N0YXRlIjoiMDFjOTkzNGQtNmZmOS00NWYzLWJkNWUtMTU4NDI5ZDZjNDczIiwi
YWNyIjoiMSIsImNsaWVudF9zZXNzaW9uIjoiMzM3Yzk0MTYtYTdlZS00ZWUzLThjZWQt
ODhlODI0MGJjNTAyIiwiYWxsb3dlZC1vcmlnaW5zIjpbIioiXSwicmVhbG1fYWNjZXNz
Ijp7InJvbGVzIjpbImJvb3N0ZXItYWRtaW4iXX0sInJlc291cmNlX2FjY2VzcyI6eyJz
ZWN1cmVkLWJvb3N0ZXItZW5kcG9pbnQiOnsicm9sZXMiOlsiYm9vc3Rlci1hZG1pbiJd
fSwiYWNjb3VudCI6eyJyb2xlcyI6WyJtYW5hZ2UtYWNjb3VudCIsInZpZXctcHJvZmls
ZSJdfX0sIm5hbWUiOiJBbGljZSBJbkNoYWlucyIsInByZWZlcnJlZF91c2VybmFtZSI6
ImFsaWNlIiwiZ2l2ZW5fbmFtZSI6IkFsaWNlIiwiZmFtaWx5X25hbWUiOiJJbkNoYWlu
cyIsImVtYWlsIjoiYWxpY2VAa2V5Y2xvYWsub3JnIn0.mjmZe37enHpigJv0BGuIitOj
-
kfMLPNwYzNd3n0Ax4Nga7KpnfytGyuPSvR4KAG8rzkfBNN9klPYdy7pJEeYlfmnFUkM4
EDrZYgn4qZAznP1Wzy1RfVRdUFi0-
GqFTMPb37o5HRldZZ09QljX_j3GHnoMGXRtYW9RZN4eKkYkcz9hRwgfJoTy2CuwFqeJw
ZYUyXifrfA-JoTr0UmSUed-0NMksGrtJjjPggUGS-
qOn6OgKcmN2vaVAQlxW32y53JqUXctfLQ6DhJzIMYTmOflIPy0sgG1mG7sovQhw1xTg0
vTjdx8zQ-EJcexkj7IivRevRZsslKgqRFWs67jQAFQA
$ curl -v -H "Authorization: Bearer <TOKEN>"
http://<SERVICE_HOST>/api/greeting
{
CHAPTER 3. AVAILABLE MISSIONS AND BOOSTERS FOR SPRING BOOT
69

Example 3.2. A sample GET Request Headers with an Access (Bearer) Token
<SERVICE_HOST> is the URL of the secured booster endpoint. For more information, see
Section 3.6.8.1, “Getting the Secured booster API endpoint”.
2. Verify the signature of the access token.
The access token is a JSON Web Token, so you can decode it using the JWT Debugger:
a. In a web browser, navigate to the JWT Debugger website.
b. Select RS256 from the Algorithm drop down menu.
NOTE
Make sure the web form has been updated after you made the selection, so it
displays the correct RSASHA256(…) information in the Signature section. If it
has not, try switching to HS256 and then back to RS256.
c. Paste the following content in the topmost text box into the VERIFY SIGNATURE section:
NOTE
This is the master realm public key from the Red Hat SSO server deployment
of the Secured booster.
d. Paste the token output from the client output into the Encoded box.
The Signature Verified sign is displayed on the debugger page.
3.6.8.3. Authenticating HTTP requests using the web interface
In addition to the HTTP API, the secured endpoint also contains a web interface to interact with.
"content": "Hello, World!",
"id": 2
}
> GET /api/greeting HTTP/1.1
> Host: <SERVICE_HOST>
> User-Agent: curl/7.51.0
> Accept: */*
> Authorization: Bearer <TOKEN>
-----BEGIN PUBLIC KEY-----
MIIBIjANBgkqhkiG9w0BAQEFAAOCAQ8AMIIBCgKCAQEAoETnPmN55xBJjRzN/cs30
OzJ9olkteLVNRjzdTxFOyRtS2ovDfzdhhO9XzUcTMbIsCOAZtSt8K+6yvBXypOSYv
I75EUdypmkcK1KoptqY5KEBQ1KwhWuP7IWQ0fshUwD6jI1QWDfGxfM/h34FvEn/0t
J71xN2P8TI2YanwuDZgosdobx/PAvlGREBGuk4BgmexTOkAdnFxIUQcCkiEZ2C41u
CrxiS4CEe5OX91aK9HKZV4ZJX6vnqMHmdDnsMdO+UFtxOBYZio+a1jP4W3d7J5fGe
iOaXjQCOpivKnP2yU2DPdWmDMyVb67l8DRA+jh0OJFKZ5H2fNgE3II59vdsRwIDAQ
AB
-----END PUBLIC KEY-----
Red Hat OpenShift Application Runtimes 1 Spring Boot Runtime Guide
70
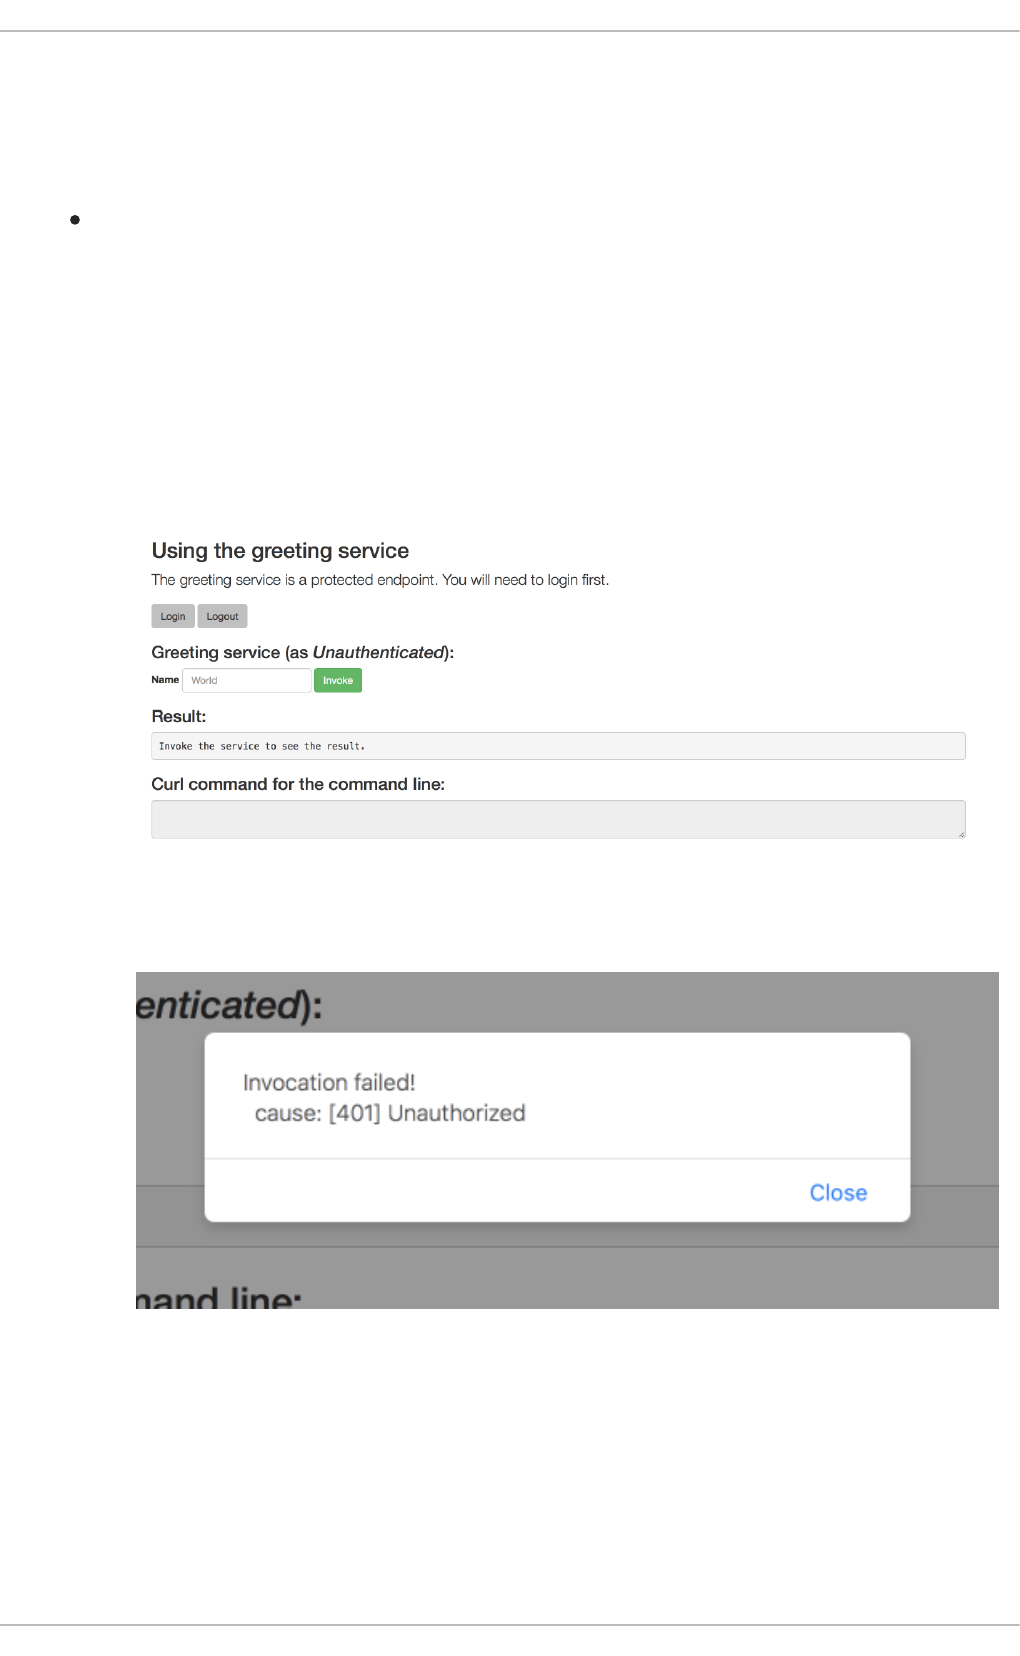
The following procedure is an exercise for you to see how security is enforced, how you authenticate,
and how you work with the authentication token.
Prerequisites
The secured endpoint URL. For more information, see Section 3.6.8.1, “Getting the Secured
booster API endpoint”.
Procedure
1. In a web browser, navigate to the endpoint URL.
2. Perform an unauthenticated request:
a. Click the Invoke button.
Figure 3.1. Unauthenticated Secured Booster Web Interface
The services responds with an HTTP 401 Unauthorized status code.
Figure 3.2. Unauthenticated Error Message
3. Perform an authenticated request as a user:
a. Click the Login button to authenticate against Red Hat SSO. You will be redirected to the
SSO server.
b. Log in as the Alice user. You will be redirected back to the web interface.
CHAPTER 3. AVAILABLE MISSIONS AND BOOSTERS FOR SPRING BOOT
71
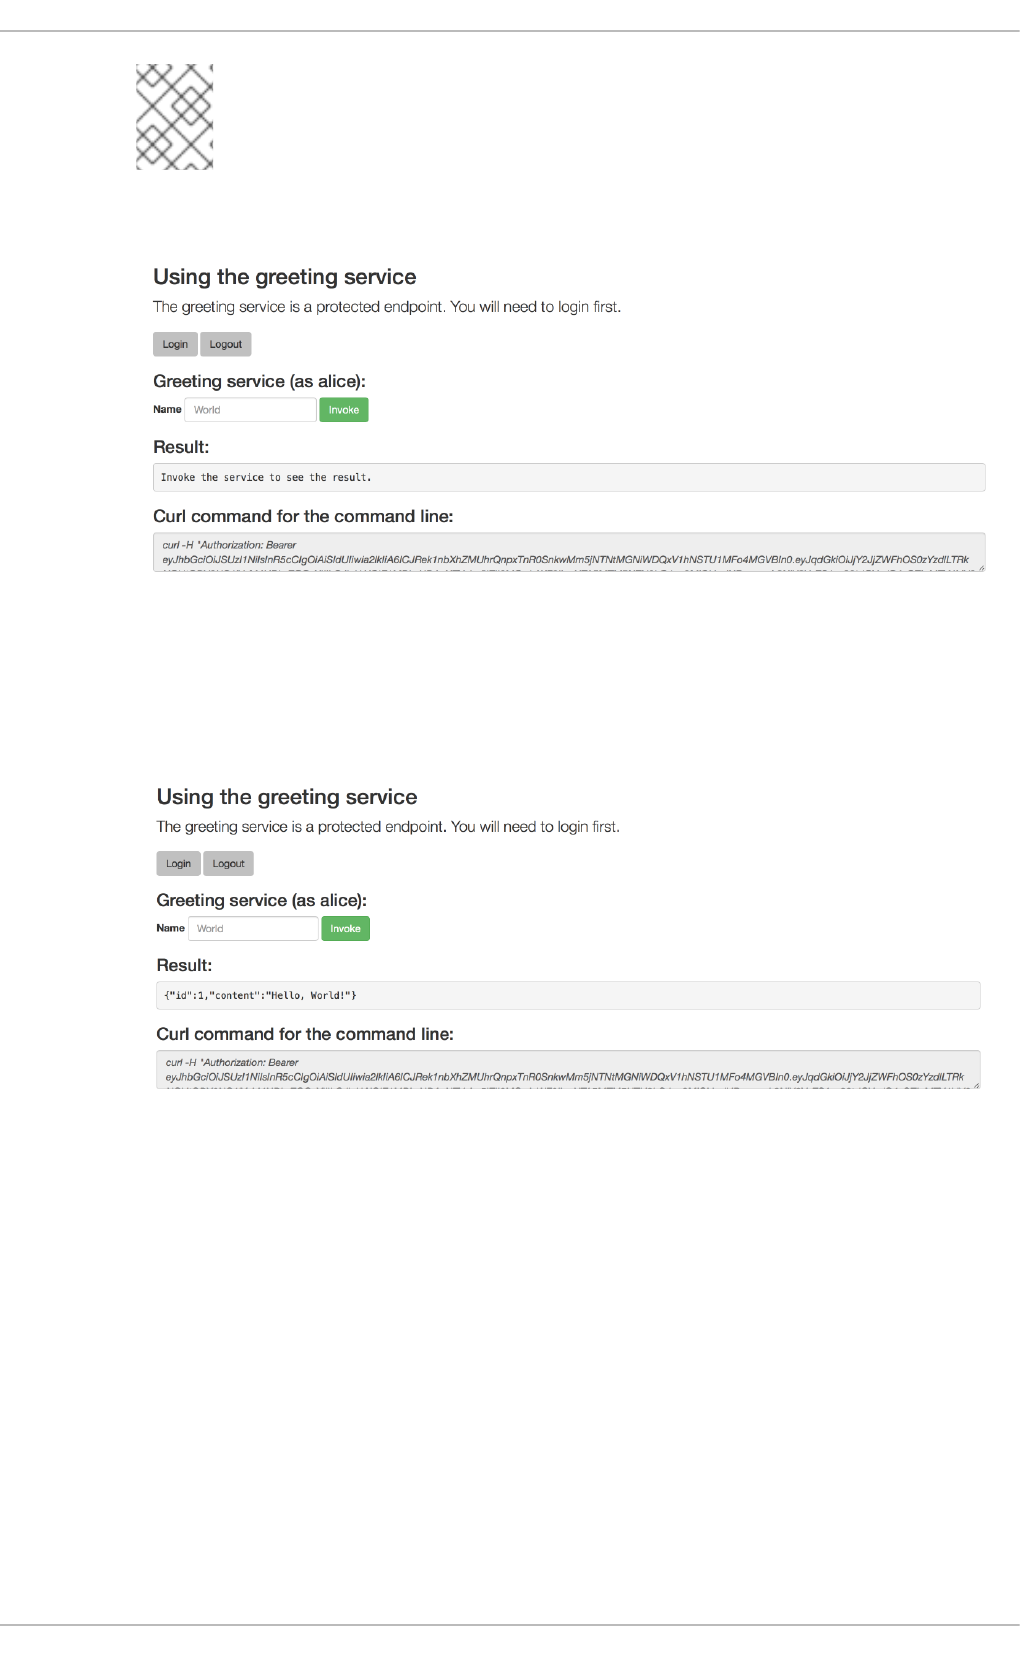
NOTE
You can see the access (bearer) token in the command line output at the
bottom of the page.
Figure 3.3. Authenticated Secured Booster Web Interface (as Alice)
c. Click Invoke again to access the Greeting service.
Confirm that there is no exception and the JSON response payload is displayed. This means
the service accepted your access (bearer) token and you are authorized access to the
Greeting service.
Figure 3.4. The Result of an Authenticated Greeting Request (as Alice)
d. Log out.
4. Perform an authenticated request as an admininstrator:
a. Click the Invoke button.
Confirm that this sends an unauthenticated request to the Greeting service.
b. Click the Login button and log in as the admin user.
Red Hat OpenShift Application Runtimes 1 Spring Boot Runtime Guide
72
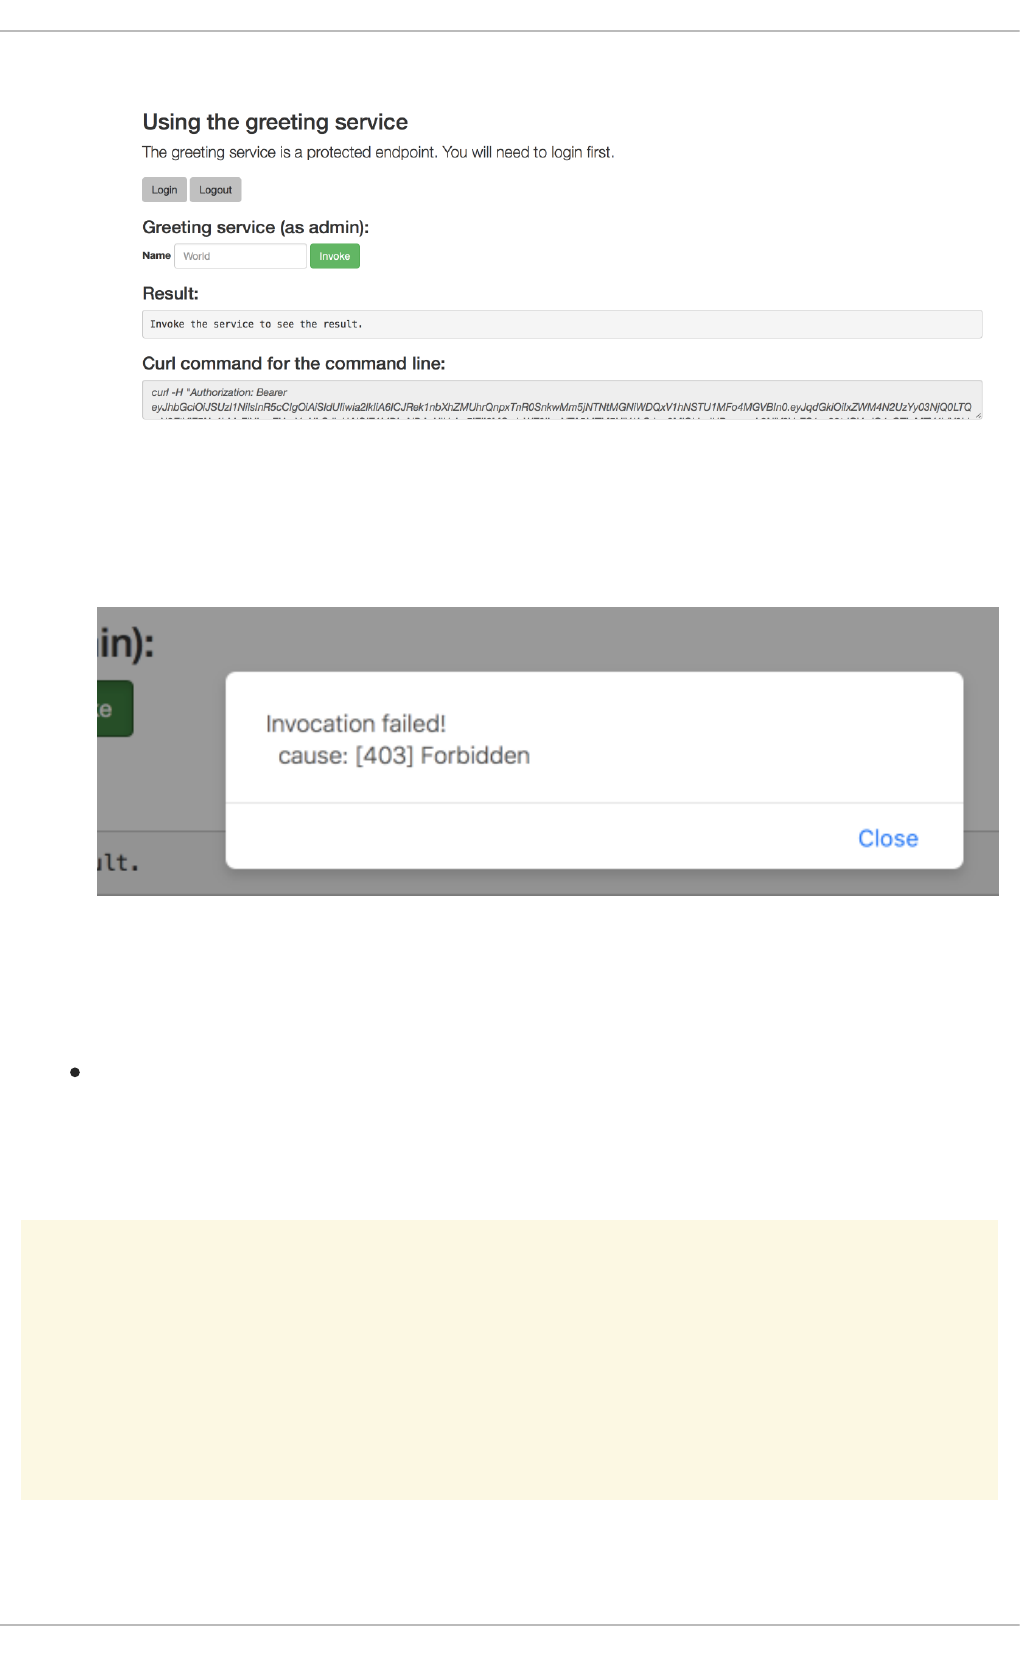
Figure 3.5. Authenticated Secured Booster Web Interface (as admin)
5. Click the Invoke button.
The service responds with an HTTP 403 Forbidden status code because the admin user is
not authorized to access the Greeting service.
Figure 3.6. Unauthorized Error Message
3.6.9. Running the Spring Boot Secured booster integration tests
Prerequisites
The oc client authenticated.
Procedure
WARNING
Executing integration tests removes all existing instances of the booster application
from the target OpenShift project. To avoid accidentally removing your booster
application, ensure that you create and select a separate OpenShift project to
execute the tests.
1. In a terminal application, navigate to the directory with your project.
CHAPTER 3. AVAILABLE MISSIONS AND BOOSTERS FOR SPRING BOOT
73

2. Create the Red Hat SSO server application:
3. Wait until the Red Hat SSO server is ready. Go to the Web console or view the output of oc
get pods to check if the pod running the Red Hat SSO server is ready.
4. Execute the integration tests:
3.6.10. Secured SSO resources
Follow the links below for additional information on the principles behind the OAuth2 specification and on
securing your applications using Red Hat SSO and Keycloak:
Aaron Parecki: OAuth2 Simplified
Red Hat SSO 7.1 Documentation
Keycloak 3.2 Documentation
Secured Mission - Eclipse Vert.x Booster
Secured Mission - Thorntail Booster
Secured Mission - Node.js Booster
3.7. CACHE MISSION - SPRING BOOT BOOSTER
Limitation: Run this booster on a Single-node OpenShift Cluster. You can also use a manual workflow
to deploy this booster to OpenShift Online Pro and OpenShift Container Platform. This booster is not
currently available on OpenShift Online Starter.
Mission proficiency level: Advanced.
The Cache mission demonstrates how to use a cache to increase the response time of applications.
This mission shows you how to:
Deploy a cache to OpenShift.
Use a cache within an application.
3.7.1. How caching works and when you need it
Caches allows you to store information and access it for a given period of time. You can access
information in a cache faster or more reliably than repeatedly calling the original service. A disadvantage
of using a cache is that the cached information is not up to date. However, that problem can be reduced
by setting an expiration or TTL (time to live) on each value stored in the cache.
Example 3.3. Caching example
oc create -f service.sso.yaml
mvn clean verify -Popenshift,openshift-it -DSSO_AUTH_SERVER_URL=$(oc
get route secure-sso -o jsonpath='{"https://"}{.spec.host}
{"/auth\n"}')
Red Hat OpenShift Application Runtimes 1 Spring Boot Runtime Guide
74

Assume you have two applications: service1 and service2:
Service1 depends on a value from service2.
If the value from service2 infrequently changes, service1 could cache the value from
service2 for a period of time.
Using cached values can also reduce the number of times service2 is called.
If it takes service1 500 ms to retrieve the value directly from service2, but 100 ms to retrieve
the cached value, service1 would save 400 ms by using the cached value for each cached
call.
If service1 would make uncached calls to service2 5 times per second, over 10 seconds, that
would be 50 calls.
If service1 started using a cached value with a TTL of 1 second instead, that would be
reduced to 10 calls over 10 seconds.
How the Cache mission works
1. The cache, cute name, and greeting services are deployed and exposed.
2. User accesses the web frontend of the greeting service.
3. User invokes the greeting HTTP API using a button on the web frontend.
4. The greeting service depends on a value from the cute name service.
The greeting service first checks if that value is stored in the cache service. If it is, then the
cached value is returned.
If the value is not cached, the greeting service calls the cute name service, returns the value,
and stores the value in the cache service with a TTL of 5 seconds.
5. The web front end displays the response from the greeting service as well as the total time of the
operation.
6. User invokes the service multiple times to see the difference between cached and uncached
operations.
Cached operations are significantly faster than uncached operations.
User can force the cache to be cleared before the TTL expires.
3.7.2. Viewing the booster source code and README
Prerequisites
One of the following:
Access to developers.redhat.com/launch
Fabric8 Launcher installed on a Single-node OpenShift Cluster
Procedure
CHAPTER 3. AVAILABLE MISSIONS AND BOOSTERS FOR SPRING BOOT
75

1. Use the Fabric8 Launcher tool to generate your own version of the booster.
2. View the generated GitHub repository or download and extract the ZIP file that contains the
booster source code.
Additional resources
Using developers.redhat.com/launch
Using the Fabric8 Launcher tool on a Single-node OpenShift Cluster
3.7.3. Deploying the Cache booster to OpenShift Online
Use one of the following options to execute the Cache booster on OpenShift Online.
Use developers.redhat.com/launch
Use the oc CLI client
Although each method uses the same oc commands to deploy your application, using
developers.redhat.com/launch provides an automated booster deployment workflow that executes the
oc commands for you.
3.7.3.1. Deploying the booster using developers.redhat.com/launch
Prerequisites
An account at OpenShift Online.
Procedure
1. Navigate to the developers.redhat.com/launch URL in a browser and log in.
2. Follow on-screen instructions to create and launch your booster in Spring Boot.
3.7.3.2. Authenticating the oc CLI client
To work with boosters on OpenShift Online using the oc command-line client, you need to authenticate
the client using the token provided by the OpenShift Online web interface.
Prerequisites
An account at OpenShift Online.
Procedure
1. Navigate to the OpenShift Online URL in a browser.
2. Click on the question mark icon in the top right-hand corner of the Web console, next to your
user name.
3. Select Command Line Tools in the drop-down menu.
Red Hat OpenShift Application Runtimes 1 Spring Boot Runtime Guide
76

4. Find the text box that contains the oc login … command with the hidden token, and click the
button next to it to copy its content to your clipboard.
5. Paste the command into a terminal application. The command uses your authentication token to
authenticate your oc CLI client with your OpenShift Online account.
3.7.3.3. Deploying the Cache booster using the oc CLI client
Prerequisites
The booster application created using developers.redhat.com/launch. For more information, see
Section 3.7.3.1, “Deploying the booster using developers.redhat.com/launch”.
The oc client authenticated. For more information, see Section 3.7.3.2, “Authenticating the oc
CLI client”.
Procedure
1. Clone your project from GitHub.
Alternatively, if you downloaded a ZIP file of your project, extract it.
2. Create a new project.
3. Navigate to the root directory of your booster.
4. Deploy the cache service.
5. Use Maven to start the deployment to OpenShift.
6. Check the status of your booster and ensure your pod is running.
$ oc login OPENSHIFT_URL --token=MYTOKEN
$ git clone git@github.com:USERNAME/MY_PROJECT_NAME.git
$ unzip MY_PROJECT_NAME.zip
$ oc new-project MY_PROJECT_NAME
$ oc apply -f service.cache.yml
$ mvn clean fabric8:deploy -Popenshift
$ oc get pods -w
NAME READY STATUS RESTARTS
AGE
cache-server-123456789-aaaaa 1/1 Running 0
8m
MY_APP_NAME-cutename-1-bbbbb 1/1 Running 0
4m
MY_APP_NAME-cutename-s2i-1-build 0/1 Completed 0
CHAPTER 3. AVAILABLE MISSIONS AND BOOSTERS FOR SPRING BOOT
77

Your 3 pods should have a status of Running once they are fully deployed and started.
7. Once your booster is deployed and started, determine its route.
Example Route Information
The route information of a pod gives you the base URL which you use to access it. In the
example above, you would use http://MY_APP_NAME-greeting-
MY_PROJECT_NAME.OPENSHIFT_HOSTNAME as the base URL to access the greeting service.
3.7.4. Deploying the Cache booster to Single-node OpenShift Cluster
Use one of the following options to execute the Cache booster locally on Single-node OpenShift Cluster:
Using Fabric8 Launcher
Using the oc CLI client
Although each method uses the same oc commands to deploy your application, using Fabric8 Launcher
provides an automated booster deployment workflow that executes the oc commands for you.
3.7.4.1. Getting the Fabric8 Launcher tool URL and credentials
You need the Fabric8 Launcher tool URL and user credentials to create and deploy boosters on Single-
node OpenShift Cluster. This information is provided when the Single-node OpenShift Cluster is started.
Prerequisites
The Fabric8 Launcher tool installed, configured, and running. For more information, see the
Install and Configure the Fabric8 Launcher Tool guide.
Procedure
1. Navigate to the console where you started Single-node OpenShift Cluster.
2. Check the console output for the URL and user credentials you can use to access the running
Fabric8 Launcher:
7m
MY_APP_NAME-greeting-1-ccccc 1/1 Running 0
3m
MY_APP_NAME-greeting-s2i-1-build 0/1 Completed 0
3m
$ oc get routes
NAME HOST/PORT
PATH SERVICES PORT TERMINATION
MY_APP_NAME-cutename MY_APP_NAME-cutename-
MY_PROJECT_NAME.OPENSHIFT_HOSTNAME MY_APP_NAME-cutename
8080 None
MY_APP_NAME-greeting MY_APP_NAME-greeting-
MY_PROJECT_NAME.OPENSHIFT_HOSTNAME MY_APP_NAME-greeting
8080 None
Red Hat OpenShift Application Runtimes 1 Spring Boot Runtime Guide
78

Example Console Output from a Single-node OpenShift Cluster Startup
3.7.4.2. Deploying the booster using the Fabric8 Launcher tool
Prerequisites
The URL of your running Fabric8 Launcher instance and the user credentials of your Single-node
OpenShift Cluster. For more information, see Section 3.7.4.1, “Getting the Fabric8 Launcher tool
URL and credentials”.
Procedure
1. Navigate to the Fabric8 Launcher URL in a browser.
2. Follow on-screen instructions to create and launch your booster in Spring Boot.
3.7.4.3. Authenticating the oc CLI client
To work with boosters on Single-node OpenShift Cluster using the oc command-line client, you need to
authenticate the client using the token provided by the Single-node OpenShift Cluster web interface.
Prerequisites
The URL of your running Fabric8 Launcher instance and the user credentials of your Single-node
OpenShift Cluster. For more information, see Section 3.7.4.1, “Getting the Fabric8 Launcher tool
URL and credentials”.
Procedure
1. Navigate to the Single-node OpenShift Cluster URL in a browser.
2. Click on the question mark icon in the top right-hand corner of the Web console, next to your
user name.
3. Select Command Line Tools in the drop-down menu.
4. Find the text box that contains the oc login … command with the hidden token, and click the
button next to it to copy its content to your clipboard.
...
-- Removing temporary directory ... OK
-- Server Information ...
OpenShift server started.
The server is accessible via web console at:
https://192.168.42.152:8443
You are logged in as:
User: developer
Password: developer
To login as administrator:
oc login -u system:admin
CHAPTER 3. AVAILABLE MISSIONS AND BOOSTERS FOR SPRING BOOT
79

5. Paste the command into a terminal application. The command uses your authentication token to
authenticate your oc CLI client with your Single-node OpenShift Cluster account.
3.7.4.4. Deploying the Cache booster using the oc CLI client
Prerequisites
The booster application created using Fabric8 Launcher tool on a Single-node OpenShift
Cluster. For more information, see Section 3.7.4.2, “Deploying the booster using the Fabric8
Launcher tool”.
Your Fabric8 Launcher tool URL.
The oc client authenticated. For more information, see Section 3.7.4.3, “Authenticating the oc
CLI client”.
Procedure
1. Clone your project from GitHub.
Alternatively, if you downloaded a ZIP file of your project, extract it.
2. Create a new project.
3. Navigate to the root directory of your booster.
4. Deploy the cache service.
5. Use Maven to start the deployment to OpenShift.
6. Check the status of your booster and ensure your pod is running.
$ oc login OPENSHIFT_URL --token=MYTOKEN
$ git clone git@github.com:USERNAME/MY_PROJECT_NAME.git
$ unzip MY_PROJECT_NAME.zip
$ oc new-project MY_PROJECT_NAME
$ oc apply -f service.cache.yml
$ mvn clean fabric8:deploy -Popenshift
$ oc get pods -w
NAME READY STATUS RESTARTS
AGE
cache-server-123456789-aaaaa 1/1 Running 0
8m
MY_APP_NAME-cutename-1-bbbbb 1/1 Running 0
4m
MY_APP_NAME-cutename-s2i-1-build 0/1 Completed 0
7m
Red Hat OpenShift Application Runtimes 1 Spring Boot Runtime Guide
80

Your 3 pods should have a status of Running once they are fully deployed and started.
7. Once your booster is deployed and started, determine its route.
Example Route Information
The route information of a pod gives you the base URL which you use to access it. In the
example above, you would use http://MY_APP_NAME-greeting-
MY_PROJECT_NAME.OPENSHIFT_HOSTNAME as the base URL to access the greeting service.
3.7.5. Deploying the Cache booster to OpenShift Container Platform
The process of creating and deploying boosters to OpenShift Container Platform is similar to OpenShift
Online:
Prerequisites
The booster created using developers.redhat.com/launch or the Fabric8 Launcher tool.
Procedure
Follow the instructions in Section 3.7.3, “Deploying the Cache booster to OpenShift Online”, only
use the URL and user credentials from the OpenShift Container Platform Web Console.
3.7.6. Interacting with the unmodified Cache booster
Prerequisites
Your application deployed
Procedure
1. Navigate to the greeting service using your browser.
2. Click Invoke the service once.
Notice the duration value is above 2000. Also notice the cache state has changed form No
cached value to A value is cached.
MY_APP_NAME-greeting-1-ccccc 1/1 Running 0
3m
MY_APP_NAME-greeting-s2i-1-build 0/1 Completed 0
3m
$ oc get routes
NAME HOST/PORT
PATH SERVICES PORT TERMINATION
MY_APP_NAME-cutename MY_APP_NAME-cutename-
MY_PROJECT_NAME.OPENSHIFT_HOSTNAME MY_APP_NAME-cutename
8080 None
MY_APP_NAME-greeting MY_APP_NAME-greeting-
MY_PROJECT_NAME.OPENSHIFT_HOSTNAME MY_APP_NAME-greeting
8080 None
CHAPTER 3. AVAILABLE MISSIONS AND BOOSTERS FOR SPRING BOOT
81
3. Wait 5 seconds and notice cache state has changed back to No cached value.
The TTL for the cached value is set to 5 seconds. When the TTL expires, the value is no longer
cached.
4. Click Invoke the service once more to cache the value.
5. Click Invoke the service a few more times over the course of a few seconds while cache state is
A value is cached.
Notice a significantly lower duration value since it is using a cached value. If you click Clear
the cache, the cache is emptied.
3.7.7. Running the Cache booster integration tests
This booster includes a self-contained set of integration tests. When run inside an OpenShift project, the
tests:
Deploy a test instance of the application to the project.
Execute the individual tests on that instance.
Remove all instances of the application from the project when the testing is done.
WARNING
Executing integration tests removes all existing instances of the booster application
from the target OpenShift project. To avoid accidentally removing your booster
application, ensure that you create and select a separate OpenShift project to
execute the tests.
Prerequisites
The oc client authenticated
An empty OpenShift project
Procedure
Execute the following command to run the integration tests:
3.7.8. Caching resources
More background and related information on caching can be found here:
Cache Mission - Eclipse Vert.x Booster
Cache Mission - Thorntail Booster
Cache Mission - Node.js Booster
$ mvn clean verify -Popenshift,openshift-it
Red Hat OpenShift Application Runtimes 1 Spring Boot Runtime Guide
82

CHAPTER 4. DEVELOPING AN APPLICATION FOR THE
SPRING BOOT RUNTIME
The recommended approach for specifying and using supported and tested Maven artifacts in a Spring
Boot application is to use the OpenShift Application Runtimes Spring Boot BOM.
4.1. CREATING A BASIC SPRING BOOT APPLICATION
In addition to using a booster, you can create new Spring Boot applications from scratch and deploy
them to OpenShift.
4.1.1. Creating an application
Create a simple Greeting application to run on OpenShift using Spring Boot. The following procedure
shows you how to:
Write some simple application code that makes use of functionalities provided by Spring Boot.
Declare dependencies and configure the application build using a pom.xml file.
Start your application on localhost and verify that it works.
Prerequisites
Maven installed.
JDK 8 or later installed.
Procedure
1. Create the application directory and navigate to it.
2. Create a pom.xml file.
$ mkdir myApp
$ cd myApp
<?xml version="1.0" encoding="UTF-8"?>
<project xmlns="http://maven.apache.org/POM/4.0.0"
xmlns:xsi="http://www.w3.org/2001/XMLSchema-instance"
xsi:schemaLocation="http://maven.apache.org/POM/4.0.0
http://maven.apache.org/xsd/maven-4.0.0.xsd">
<modelVersion>4.0.0</modelVersion>
<groupId>com.example</groupId>
<artifactId>my-app</artifactId>
<version>1.0.0-SNAPSHOT</version>
<name>MyApp</name>
<description>My Application</description>
<properties>
<fabric8.generator.from>registry.access.redhat.com/redhat-
openjdk-18/openjdk18-openshift:1.2</fabric8.generator.from>
CHAPTER 4. DEVELOPING AN APPLICATION FOR THE SPRING BOOT RUNTIME
83

</properties>
<dependencyManagement>
<dependencies>
<dependency>
<groupId>me.snowdrop</groupId>
<artifactId>spring-boot-bom</artifactId>
<version>1.5.16.Final-redhat-00001</version>
<type>pom</type>
<scope>import</scope>
</dependency>
</dependencies>
</dependencyManagement>
<dependencies>
<dependency>
<groupId>org.springframework.boot</groupId>
<artifactId>spring-boot-starter-tomcat</artifactId>
</dependency>
<dependency>
<groupId>org.springframework.boot</groupId>
<artifactId>spring-boot-starter-actuator</artifactId>
</dependency>
<dependency>
<groupId>org.apache.cxf</groupId>
<artifactId>cxf-spring-boot-starter-jaxrs</artifactId>
</dependency>
<dependency>
<groupId>com.fasterxml.jackson.jaxrs</groupId>
<artifactId>jackson-jaxrs-json-provider</artifactId>
</dependency>
</dependencies>
<build>
<plugins>
<plugin>
<groupId>org.springframework.boot</groupId>
<artifactId>spring-boot-maven-plugin</artifactId>
<version>1.5.16.RELEASE</version>
</plugin>
</plugins>
</build>
<!-- Specify the repositories containing RHOAR artifacts -->
<repositories>
<repository>
<id>redhat-ga</id>
<name>Red Hat GA Repository</name>
<url>https://maven.repository.redhat.com/ga/</url>
</repository>
</repositories>
<pluginRepositories>
<pluginRepository>
<id>redhat-ga</id>
<name>Red Hat GA Repository</name>
Red Hat OpenShift Application Runtimes 1 Spring Boot Runtime Guide
84

3. Create a new class in src/main/java/com/example/.
As a recommended practice, ensure that the location of your class within the directory structure
of your project reflects the value that you set for groupId in your pom.xml file. For example, for
<groupId>my.awesome.project</groupId>, the location of the class should be
src/main/java/my/awesome/project/.
<url>https://maven.repository.redhat.com/ga/</url>
</pluginRepository>
</pluginRepositories>
<profiles>
<profile>
<id>openshift</id>
<build>
<plugins>
<plugin>
<groupId>io.fabric8</groupId>
<artifactId>fabric8-maven-plugin</artifactId>
<version>3.5.40</version>
<executions>
<execution>
<goals>
<goal>resource</goal>
<goal>build</goal>
</goals>
</execution>
</executions>
</plugin>
</plugins>
</build>
</profile>
</profiles>
</project>
package com.example;
import org.springframework.boot.SpringApplication;
import org.springframework.boot.autoconfigure.SpringBootApplication;
import org.springframework.web.bind.annotation.RequestMapping;
import org.springframework.web.bind.annotation.ResponseBody;
import org.springframework.web.bind.annotation.RestController;
@SpringBootApplication
@RestController
public class MyApp {
public static void main(String[] args) {
SpringApplication.run(MyApp.class, args);
}
@RequestMapping("/")
@ResponseBody
public Message displayMessage() {
return new Message();
}
CHAPTER 4. DEVELOPING AN APPLICATION FOR THE SPRING BOOT RUNTIME
85

4. Start your application. Execute the following command in the directory containing you
application.
5. Using curl or your browser, verify your application is running at http://localhost:8080.
Additional information
As a recommended practice, you can configure liveness and readiness probes to enable health
monitoring for your application when running on OpenShift. To learn how application health
monitoring on OpenShift works, try the Health Check booster.
4.1.2. Deploying an application to OpenShift
This procedure shows you how to:
Build your application and deploy it to OpenShift using the Fabric8 Maven Plugin.
Use the command line to interact with your application running on OpenShift.
Prerequisites
The oc CLI client installed.
Maven installed.
A Maven-based application.
Procedure
1. Log in to your OpenShift instance with the oc client.
2. Create a new project.
static class Message {
private String content = "Greetings!";
public String getContent() {
return content;
}
public void setContent(String content) {
this.content = content;
}
}
}
$ mvn spring-boot:run
$ curl http://localhost:8080
{"content":"Greetings!"}
$ oc login ...
Red Hat OpenShift Application Runtimes 1 Spring Boot Runtime Guide
86

3. In a terminal application, navigate to the directory containing your application:
4. Use Maven to start the deployment to OpenShift.
This command uses the Fabric8 Maven Plugin to launch the S2I process on OpenShift and to
start the pod.
5. Check the status of your booster and ensure your pod is running.
The MY_APP_NAME-1-aaaaa pod should have a status of Running once it is fully deployed
and started. Your specific pod name will vary. The number in the middle will increase with each
new build. The letters at the end are generated when the pod is created.
6. Once your booster is deployed and started, determine its route.
Example Route Information
The route information of a pod gives you the base URL which you use to access it. In the
example above, you would use http://MY_APP_NAME-
MY_PROJECT_NAME.OPENSHIFT_HOSTNAME as the base URL to access the application.
7. Using curl or your browser, verify your application is running in OpenShift.
4.2. DEPLOYING AN EXISTING SPRING BOOT APPLICATION TO
OPENSHIFT
You can easily deploy your existing application to OpenShift using the Fabric8 Maven plugin.
Prerequisites
$ oc new-project MY_PROJECT_NAME
$ cd myApp
$ mvn clean fabric8:deploy -Popenshift
$ oc get pods -w
NAME READY STATUS RESTARTS
AGE
MY_APP_NAME-1-aaaaa 1/1 Running 0
58s
MY_APP_NAME-s2i-1-build 0/1 Completed 0
2m
$ oc get routes
NAME HOST/PORT
PATH SERVICES PORT TERMINATION
MY_APP_NAME MY_APP_NAME-MY_PROJECT_NAME.OPENSHIFT_HOSTNAME
MY_APP_NAME 8080
$ curl http://MY_APP_NAME-MY_PROJECT_NAME.OPENSHIFT_HOSTNAME
{"content":"Greetings!"}
CHAPTER 4. DEVELOPING AN APPLICATION FOR THE SPRING BOOT RUNTIME
87

A Spring Boot–based application
Procedure
1. Add the following profile to the pom.xml file in the root directory of your application:
In this profile, the Fabric8 Maven plugin is invoked for building and deploying the application to
OpenShift.
2. Deploy the application to OpenShift according to instructions in Section 4.1.2, “Deploying an
application to OpenShift”.
<profiles>
<profile>
<id>openshift</id>
<build>
<plugins>
<plugin>
<groupId>io.fabric8</groupId>
<artifactId>fabric8-maven-plugin</artifactId>
<version>3.5.40</version>
<executions>
<execution>
<goals>
<goal>resource</goal>
<goal>build</goal>
</goals>
</execution>
</executions>
</plugin>
</plugins>
</build>
</profile>
</profiles>
Red Hat OpenShift Application Runtimes 1 Spring Boot Runtime Guide
88

CHAPTER 5. DEBUGGING
This sections contains information about debugging your Spring Boot–based application both in local
and remote deployments.
5.1. REMOTE DEBUGGING
To remotely debug an application, you must first configure it to start in a debugging mode, and then
attach a debugger to it.
5.1.1. Starting your Spring Boot application locally in debugging mode
One of the ways of debugging a Maven-based project is manually launching the application while
specifying a debugging port, and subsequently connecting a remote debugger to that port. This method
is applicable at least when launching the application manually using the mvn spring-boot:run goal.
Prerequisites
A Maven-based application
Procedure
1. In a console, navigate to the directory with your application.
2. Launch your application and specify the necessary JVM arguments and the debug port using the
following syntax:
$PORT_NUMBER is an unused port number of your choice. Remember this number for the remote
debugger configuration.
If you want the JVM to pause and wait for remote debugger connection before it starts the
application, change suspend to y.
5.1.2. Starting an uberjar in debugging mode
If you chose to package your application as a Spring Boot uberjar, debug it by executing it with the
following parameters.
Prerequisites
An uberjar with your application
Procedure
1. In a console, navigate to the directory with the uberjar.
2. Execute the uberjar with the following parameters. Ensure that all the parameters are specified
before the name of the uberjar on the line.
$ mvn spring-boot:run -Drun.jvmArguments="-Xdebug -
Xrunjdwp:transport=dt_socket,server=y,suspend=n,address=$PORT_NUMBER
"
CHAPTER 5. DEBUGGING
89

$PORT_NUMBER is an unused port number of your choice. Remember this number for the remote
debugger configuration.
If you want the JVM to pause and wait for remote debugger connection before it starts the
application, change suspend to y.
5.1.3. Starting your application on OpenShift in debugging mode
To debug your Spring Boot-based application on OpenShift remotely, you must set the JAVA_DEBUG
environment variable inside the container to true and configure port forwarding so that you can connect
to your application from a remote debugger.
Prerequisites
Your application running on OpenShift.
The oc binary installed on your machine.
The ability to execute the oc port-forward command in your target OpenShift environment.
Procedure
1. Using the oc command, list the available deployment configurations:
2. Set the JAVA_DEBUG environment variable in the deployment configuration of your application to
true, which configures the JVM to open the port number 5005 for debugging. For example:
3. Redeploy the application if it is not set to redeploy automatically on configuration change. For
example:
4. Configure port forwarding from your local machine to the application pod:
a. List the currently running pods and find one containing your application:
b. Configure port forwarding:
$ java -
agentlib:jdwp=transport=dt_socket,server=y,suspend=n,address=$PORT_N
UMBER -jar $UBERJAR_FILENAME
$ oc get dc
$ oc set env dc/MY_APP_NAME JAVA_DEBUG=true
$ oc rollout latest dc/MY_APP_NAME
$ oc get pod
NAME READY STATUS RESTARTS
AGE
MY_APP_NAME-3-1xrsp 0/1 Running 0 6s
...
$ oc port-forward MY_APP_NAME-3-1xrsp $LOCAL_PORT_NUMBER:5005
Red Hat OpenShift Application Runtimes 1 Spring Boot Runtime Guide
90
Here, $LOCAL_PORT_NUMBER is an unused port number of your choice on your local
machine. Remember this number for the remote debugger configuration.
5. When you are done debugging, unset the JAVA_DEBUG environment variable in your application
pod. For example:
Additional resources
You can also set the JAVA_DEBUG_PORT environment variable if you want to change the debug port
from the default, which is 5005.
5.1.4. Attaching a remote debugger to the application
When your application is configured for debugging, attach a remote debugger of your choice to it. In this
guide, Red Hat JBoss Developer Studio is covered, but the procedure is similar when using other
programs.
Prerequisites
The application running either locally or on OpenShift, and configured for debugging.
The port number that your application is listening on for debugging.
Red Hat JBoss Developer Studio installed on your machine. You can download it from the Red
Hat JBoss Developer Studio download page.
Procedure
1. Start Red Hat JBoss Developer Studio.
2. Create a new debug configuration for your application:
a. Click Run→Debug Configurations.
b. In the list of configurations, double-click Remote Java application. This creates a new
remote debugging configuration.
c. Enter a suitable name for the configuration in the Name field.
d. Enter the path to the directory with your application into the Project field. You can use the
Browse… button for convenience.
e. Set the Connection Type field to Standard (Socket Attach) if it is not already.
f. Set the Port field to the port number that your application is listening on for debugging.
g. Click Apply.
3. Start debugging by clicking the Debug button in the Debug Configurations window.
To quickly launch your debug configuration after the first time, click Run→Debug History and
select the configuration from the list.
Additional resources
$ oc set env dc/MY_APP_NAME JAVA_DEBUG-
CHAPTER 5. DEBUGGING
91

Debug an OpenShift Java Application with JBoss Developer Studio on Red Hat Knowledgebase.
A Debugging Java Applications On OpenShift and Kubernetes article on OpenShift Blog.
5.2. DEBUG LOGGING
5.2.1. Add Spring Boot debug logging
Add debug logging to your application.
Prerequisites
An application you want to debug. For example, the REST API Level 0 booster.
Procedure
1. Declare a org.apache.commons.logging.Log object using the
org.apache.commons.logging.LogFactory for the class you want to add logging.
For example, if you wanted to add logging to the GreetingEndpoint class in the REST API
Level 0 booster, you would use GreetingEndpoint.class.
2. Add debugging statements using logger.debug("my logging message").
Example logging statement
3. Add a logging.level.fully.qualified.name.of.TheClass=DEBUG in
src/main/resources/application.properties.
For example, if you added a logging statement to
io.openshift.booster.service.GreetingEndpoint you would use:
This enables log messages at the DEBUG level and above to be shown in the logs for your class.
import org.apache.commons.logging.Log;
import org.apache.commons.logging.LogFactory;
...
private static Log logger = LogFactory.getLog(TheClass.class);
@GET
@Path("/greeting")
@Produces("application/json")
public Greeting greeting(@QueryParam("name") @DefaultValue("World")
String name) {
String message = String.format(properties.getMessage(), name);
logger.debug("Message: " + message);
return new Greeting(message);
}
logging.level.io.openshift.booster.service.GreetingEndpoint=DEBUG
Red Hat OpenShift Application Runtimes 1 Spring Boot Runtime Guide
92

5.2.2. Accessing Spring Boot debug logs on localhost
Start your application and interact with it to see the debugging statements.
Prerequisites
An application with debug logging enabled.
Procedure
1. Start your application.
2. Test your application to invoke debug logging.
For example, to test the REST API Level 0 booster, you can invoke the /api/greeting
method:
3. View your application logs to see your debug messages.
To disable debug logging, remove
logging.level.fully.qualified.name.of.TheClass=DEBUG from
src/main/resources/application.properties and restart your application.
5.2.3. Accessing debug logs on OpenShift
Start your application and interact with it to see the debugging statements in OpenShift.
Prerequisites
A Maven-based application with debug logging enabled.
The oc CLI client installed and authenticated.
Procedure
1. Deploy your application to OpenShift:
2. View the logs:
1. Get the name of the pod with your application:
2. Start watching the log output:
$ mvn spring-boot:run
$ curl http://localhost:8080/api/greeting?name=Sarah
i.o.booster.service.GreetingEndpoint : Message: Hello, Sarah!
$ mvn clean fabric8:deploy -Popenshift
$ oc get pods
$ oc logs -f pod/MY_APP_NAME-2-aaaaa
CHAPTER 5. DEBUGGING
93

Keep the terminal window displaying the log output open so that you can watch the log
output.
3. Interact with your application:
For example, if you had debug logging in the REST API Level 0 booster to log the message
variable in the /api/greeting method:
1. Get the route of your application:
2. Make an HTTP request on the /api/greeting endpoint of your application:
4. Return to the window with your pod logs and inspect debug logging messages in the logs.
i.o.booster.service.GreetingEndpoint : Message: Hello, Sarah!
5. To disable debug logging, remove
logging.level.fully.qualified.name.of.TheClass=DEBUG from
src/main/resources/application.properties and redeploy your application.
$ oc get routes
$ curl $APPLICATION_ROUTE/api/greeting?name=Sarah
Red Hat OpenShift Application Runtimes 1 Spring Boot Runtime Guide
94

CHAPTER 6. MONITORING
This section contains information about monitoring your Spring Boot–based application running on
OpenShift.
6.1. ACCESSING JVM METRICS FOR YOUR APPLICATION ON
OPENSHIFT
6.1.1. Accessing JVM metrics using Jolokia on OpenShift
Jolokia is a built-in lightweight solution for accessing JMX (Java Management Extension) metrics over
HTTP on OpenShift. Jolokia allows you to access CPU, storage, and memory usage data collected by
JMX over an HTTP bridge. Jolokia uses a REST interface and JSON-formatted message payloads. It is
suitable for monitoring cloud applications thanks to its comparably high speed and low resource
requirements.
For Java-based applications, the OpenShift Web console provides the integrated hawt.io console that
collects and displays all relevant metrics output by the JVM running your application.
Prerequistes
the oc client authenticated
a Java-based application container running in a project on OpenShift
latest JDK 1.8.0 image
Procedure
1. List the deployment configurations of the pods inside your project and select the one that
corresponds to your application.
NAME REVISION DESIRED CURRENT TRIGGERED BY
MY_APP_NAME 2 1 1 config,image(my-app:6)
...
2. Open the YAML deployment template of the pod running your application for editing.
3. Add the following entry to the ports section of the template and save your changes:
oc get dc
oc edit dc/MY_APP_NAME
...
spec:
...
ports:
- containerPort: 8778
name: jolokia
protocol: TCP
...
...
CHAPTER 6. MONITORING
95

4. Redeploy the pod running your application.
The pod is redeployed with the updated deployment configuration and exposes the port 8778.
5. Log into the OpenShift Web console.
6. In the sidebar, navigate to Applications > Pods, and click on the name of the pod running your
application.
7. In the pod details screen, click Open Java Console to access the hawt.io console.
Additional resources
hawt.io documentation
oc rollout latest dc/MY_APP_NAME
Red Hat OpenShift Application Runtimes 1 Spring Boot Runtime Guide
96

APPENDIX A. THE SOURCE-TO-IMAGE (S2I) BUILD PROCESS
Source-to-Image (S2I) is a build tool for generating reproducible Docker-formatted container images from
online SCM repositories with application sources. With S2I builds, you can easily deliver the latest
version of your application into production with shorter build times, decreased resource and network
usage, improved security, and a number of other advantages. OpenShift supports multiple build
strategies and input sources.
For more information, see the Source-to-Image (S2I) Build chapter of the OpenShift Container Platform
documentation.
You must provide three elements to the S2I process to assemble the final container image:
The application sources hosted in an online SCM repository, such as GitHub.
The S2I Builder image, which serves as the foundation for the assembled image and provides
the ecosystem in which your application is running.
Optionally, you can also provide environment variables and parameters that are used by S2I
scripts.
The process injects your application source and dependencies into the Builder image according to
instructions specified in the S2I script, and generates a Docker-formatted container image that runs the
assembled application. For more information, check the S2I build requirements, build options and how
builds work sections of the OpenShift Container Platform documentation.
APPENDIX A. THE SOURCE-TO-IMAGE (S2I) BUILD PROCESS
97

APPENDIX B. UPDATING THE DEPLOYMENT
CONFIGURATION OF A BOOSTER
The deployment configuration for a booster contains information related to deploying and running the
booster in OpenShift, such as route information or readiness probe location. The deployment
configuration of a booster is stored in a set of YAML files. For boosters that use the Fabric8 Maven
Plugin, the YAML files are located in the src/main/fabric8/ directory. For boosters using Nodeshift,
the YAML files are located in the .nodeshift directory.
IMPORTANT
The deployment configuration files used by the Fabric8 Maven Plugin and Nodeshift do
not have to be full OpenShift resource definitions. Both Fabric8 Maven Plugin and
Nodeshift can take the deployment configuration files and add some missing information
to create a full OpenShift resource definition. The resource definitions generated by the
Fabric8 Maven Plugin are available in the target/classes/META-INF/fabric8/
directory. The resource definitions generated by Nodeshift are available in the
tmp/nodeshift/resource/ directory.
Prerequisites
An existing booster project.
The oc CLI client installed.
Procedure
1. Edit an existing YAML file or create an additional YAML file with your configuration update.
For example, if your booster already has a YAML file with a readinessProbe configured,
you could change the path value to a different available path to check for readiness:
If a readinessProbe is not configured in an existing YAML file, you can also create a new
YAML file in the same directory with the readinessProbe configuration.
2. Deploy the updated version of your booster using Maven or npm.
3. Verify that your configuration updates show in the deployed version of your booster.
spec:
template:
spec:
containers:
readinessProbe:
httpGet:
path: /path/to/probe
port: 8080
scheme: HTTP
...
$ oc export all --as-template='my-template'
apiVersion: v1
kind: Template
Red Hat OpenShift Application Runtimes 1 Spring Boot Runtime Guide
98

Additional resources
If you updated the configuration of your application directly using the web-based console or the oc CLI
client, export and add these changes to your YAML file. Use the oc export all command to show the
configuration of your deployed application.
metadata:
creationTimestamp: null
name: my-template
objects:
- apiVersion: v1
kind: DeploymentConfig
...
spec:
...
template:
...
spec:
containers:
...
livenessProbe:
failureThreshold: 3
httpGet:
path: /path/to/different/probe
port: 8080
scheme: HTTP
initialDelaySeconds: 60
periodSeconds: 30
successThreshold: 1
timeoutSeconds: 1
...
APPENDIX B. UPDATING THE DEPLOYMENT CONFIGURATION OF A BOOSTER
99

APPENDIX C. CONFIGURING A JENKINS FREESTYLE
PROJECT TO DEPLOY YOUR APPLICATION WITH THE
FABRIC8 MAVEN PLUGIN
Similar to using Maven and the Fabric8 Maven Plugin from your local host to deploy an application, you
can configure Jenkins to use Maven and the Fabric8 Maven Plugin to deploy an application.
Prerequisites
Access to an OpenShift cluster.
The Jenkins container image running on same OpenShift cluster.
A JDK and Maven installed and configured on your Jenkins server.
An application configured to use Maven, the Fabric8 Maven Plugin, and the Red Hat base image
in the pom.xml.
Example pom.xml
The source of the application available in GitHub.
Procedure
1. Create a new OpenShift project for your application:
a. Open the OpenShift Web console and log in.
b. Click Create Project to create a new OpenShift project.
c. Enter the project information and click Create.
2. Ensure Jenkins has access to that project.
For example, if you configured a service account for Jenkins, ensure that account has edit
access to the project of your application.
3. Create a new freestyle Jenkins project on your Jenkins server:
a. Click New Item.
b. Enter a name, choose Freestyle project, and click OK.
c. Under Source Code Management, choose Git and add the GitHub url of your application.
d. Under Build, choose Add build step and select Invoke top-level Maven targets.
e. Add the following to Goals:
<properties>
...
<fabric8.generator.from>registry.access.redhat.com/redhat-openjdk-
18/openjdk18-openshift</fabric8.generator.from>
</properties>
Red Hat OpenShift Application Runtimes 1 Spring Boot Runtime Guide
100

Substitute MY_PROJECT with the name of the OpenShift project for your application.
f. Click Save.
4. Click Build Now from the main page of the Jenkins project to verify your application builds and
deploys to the OpenShift project for your application.
You can also verify that your application is deployed by opening the route in the OpenShift
project of the application.
Next steps
Consider adding GITSCM polling or using the Poll SCM build trigger. These options enable
builds to run every time a new commit is pushed to the GitHub repository.
Consider adding a build step that executes tests before deploying.
clean fabric8:deploy -Popenshift -Dfabric8.namespace=MY_PROJECT
APPENDIX C. CONFIGURING A JENKINS FREESTYLE PROJECT TO DEPLOY YOUR APPLICATION WITH THE FABRIC8 MAVEN PLUGIN
101

APPENDIX D. DEPLOYING A SPRING BOOT APPLICATION
USING WAR FILES
IMPORTANT
Red Hat does not support packaging and deploying Spring Boot applications using WAR
files in this release of RHOAR.
As an alternative to the supported application packaging and deployment workflow using fat JAR files,
you can package and deploy a Spring Boot application as a WAR (Web Application Archive) file. You
must configure your build and deployment settings to ensure that your application builds and deploys
correctly on OpenShift.
Prerequisites
A Spring Boot application, such as a booster.
Fabric8 Maven Plugin used to deploy your application to OpenShift.
Spring Boot Maven Plugin used to package your application.
Procedure
1. Add war packaging to the pom.xml file of your project.
Example pom.xml
2. Ensure the the repackage Maven goal for the Spring Boot Maven plugin is defined in the
pom.xml file.
Example pom.xml
<project ...>
...
<packaging>war</packaging>
...
...
<build>
...
<plugins>
...
<plugin>
<groupId>org.springframework.boot</groupId>
<artifactId>spring-boot-maven-plugin</artifactId>
<executions>
<execution>
<goals>
<goal>repackage</goal>
</goals>
</execution>
</executions>
</plugin>
Red Hat OpenShift Application Runtimes 1 Spring Boot Runtime Guide
102

This ensures that the Spring Boot classes used to launch the application are included in the
WAR file, and that the corresponding properties for these classes are defined in the
MANIFEST.mf file of the WAR file:
Main-Class: org.springframework.boot.loader.WarLauncher
Spring-Boot-Classes: WEB-INF/classes/
Spring-Boot-Lib: WEB-INF/lib/
Spring-Boot-Version: 1.5.16.RELEASE
3. Add the ARTIFACT_COPY_ARGS environment variable to the pom.xml file.
The Fabric8 Maven Plugin consumes this variable during the build process and ensures that the
Build and Deploy tool uses the WAR file (rather than the default fat JAR file) to create the
application container image:
Example pom.xml
</plugins>
</build>
...
...
<profile>
<id>openshift</id>
<build>
<plugins>
<plugin>
<groupId>io.fabric8</groupId>
<artifactId>fabric8-maven-plugin</artifactId>
<executions>
...
</executions>
<configuration>
<images>
<image>
<name>${project.artifactId}:%t</name>
<alias>${project.artifactId}</alias>
<build>
<from>registry.access.redhat.com/redhat-openjdk-18/openjdk18-
openshift:${openjdk18-openshift.version}</from>
<assembly>
<basedir>/deployments</basedir>
<descriptorRef>artifact</descriptorRef>
</assembly>
<env>
<ARTIFACT_COPY_ARGS>*.war</ARTIFACT_COPY_ARGS>
<JAVA_APP_DIR>/deployments</JAVA_APP_DIR>
</env>
<ports>
<port>8080</port>
APPENDIX D. DEPLOYING A SPRING BOOT APPLICATION USING WAR FILES
103

4. Add the JAVA_APP_JAR environment variable to the src/main/fabric8/deployment.yml
file.
This variable instructs the Fabric8 Maven Plugin to launch your application using the WAR file
included with the container. If src/main/fabric8/deployment.yml does not exist, you can
create it.
Example deployment.yml
5. Build and deploy your application:
</ports>
</build>
</image>
</images>
</configuration>
</plugin>
</plugins>
</build>
</profile>
...
spec:
template:
spec:
containers:
...
env:
- name: JAVA_APP_JAR
value: ${project.artifactId}-${project.version}.war
mvn clean fabric8:deploy -Popenshift
Red Hat OpenShift Application Runtimes 1 Spring Boot Runtime Guide
104

APPENDIX E. ADDITIONAL SPRING BOOT RESOURCES
OpenShift Architecture Overview
Spring Boot Microservices On Red Hat OpenShift Container Platform 3
Spring Cloud Kubernetes
Spring Boot Project
Spring Framework Project
OpenShift Spring Boot Lab Microservices
Creating Spring Boot Applications using Fabric8
Fabric8 Maven Plugin
APPENDIX E. ADDITIONAL SPRING BOOT RESOURCES
105


APPENDIX G. PROFICIENCY LEVELS
Each available mission teaches concepts that require certain minimum knowledge. This requirement
varies by mission. The minimum requirements and concepts are organized in several levels of
proficiency. In addition to the levels described here, you might need additional information specific to
each mission.
Foundational
The missions rated at Foundational proficiency generally require no prior knowledge of the subject
matter; they provide general awareness and demonstration of key elements, concepts, and terminology.
There are no special requirements except those directly mentioned in the description of the mission.
Advanced
When using Advanced missions, the assumption is that you are familiar with the common concepts and
terminology of the subject area of the mission in addition to Kubernetes and OpenShift. You must also be
able to perform basic tasks on your own, for example configure services and applications, or administer
networks. If a service is needed by the mission, but configuring it is not in the scope of the mission, the
assumption is that you have the knowledge to to properly configure it, and only the resulting state of the
service is described in the documentation.
Expert
Expert missions require the highest level of knowledge of the subject matter. You are expected to
perform many tasks based on feature-based documentation and manuals, and the documentation is
aimed at most complex scenarios.
APPENDIX G. PROFICIENCY LEVELS
107

APPENDIX H. GLOSSARY
H.1. PRODUCT AND PROJECT NAMES
developers.redhat.com/launch
developers.redhat.com/launch is a standalone getting started experience offered by Red Hat for
jumpstarting cloud-native application development on OpenShift. It provides a hassle-free way of
creating functional example applications, called missions, as well as an easy way to build and deploy
those missions to OpenShift.
Fabric8 Launcher
The Fabric8 Launcher is the upstream project on which developers.redhat.com/launch is based.
Single-node OpenShift Cluster
An OpenShift cluster running on your machine using Minishift.
H.2. TERMS SPECIFIC TO FABRIC8 LAUNCHER
Booster
A language-specific implementation of a particular mission on a particular runtime. Boosters are listed
in a booster catalog.
For example, a booster is a web service with a REST API implemented using the Thorntail runtime.
Booster Catalog
A Git repository that contains information about boosters.
Mission
An application specification, for example a web service with a REST API.
Missions generally do not specify which language or platform they should run on; the description only
contains the intended functionality.
Runtime
A platform that executes boosters. For example, Thorntail or Eclipse Vert.x.
Red Hat OpenShift Application Runtimes 1 Spring Boot Runtime Guide
108
