What Is The Computer Vision API? Reference Guide
User Manual:
Open the PDF directly: View PDF ![]() .
.
Page Count: 270 [warning: Documents this large are best viewed by clicking the View PDF Link!]

ContentsContents
Computer Vision API Documentation
Overview
What is Computer Vision?
Quickstarts
Using the REST API
Analyze a remote image
cURL
Go
Java
JavaScript
Node.js
PHP
Python
Ruby
Analyze a local image
C#
Python
Generate a thumbnail
C#
cURL
Go
Java
JavaScript
Node.js
PHP
Python
Ruby
Extract printed text
C#
cURL
Go
Java
JavaScript
Node.js
PHP
Python
Ruby
Extract handwritten text
C#
Java
JavaScript
Python
Use a domain model
PHP
Python
Using the .NET SDK
Analyze an image
Generate a thumbnail
Extract text
Using the Python SDK
Tutorials
Generate metadata for images
Concepts
Tagging images
Detecting objects
Detecting brands
Categorizing images
Describing images
Detecting faces
Detecting image types
Detecting domain-specific content
Detecting color schemes
Generating thumbnails
Recognize printed and handwritten text
Detecting adult and racy content
How-to guides
Use Computer Vision
Java
JavaScript
Python
Call the Computer Vision API
Use containers
Install and run containers
Configure containers
Use the Computer Vision Connected Service
Analyze videos in real time
Reference
Azure CLI
Azure PowerShell
Computer Vision API v2.0
Computer Vision API v1.0
SDKs
.NET
Node.js
Python
Go
Android (Java)
Swift
Resources
Samples
Explore an image processing app
Other Computer Vision samples
FAQ

What is Computer Vision?
5/29/2019 • 5 minutes to read • Edit Online
Analyze images for insight
ACTION DESCRIPTION
Tag visual features Identify and tag visual features in an image, from a set of
thousands of recognizable objects, living things, scenery, and
actions. When the tags are ambiguous or not common
knowledge, the API response provides 'hints' to clarify the
meaning of the tag in the context of a known setting. Tagging
isn't limited to the main subject, such as a person in the
foreground, but also includes the setting (indoor or outdoor),
furniture, tools, plants, animals, accessories, gadgets, and so
on.
Detect objects Object detection is similar to tagging, but the API returns the
bounding box coordinates for each tag applied. For example, if
an image contains a dog, cat and person, the Detect operation
will list those objects together with their coordinates in the
image. You can use this functionality to process further
relationships between the objects in an image. It also lets you
know when there are multiple instances of the same tag in an
image.
Detect brands Identify commercial brands in images or videos from a
database of thousands of global logos. You can use this
feature, for example, to discover which brands are most
popular on social media or most prevalent in media product
placement.
Categorize an image Identify and categorize an entire image, using a category
taxonomy with parent/child hereditary hierarchies. Categories
can be used alone, or with our new tagging models.
Currently, English is the only supported language for tagging
and categorizing images.
Azure's Computer Vision service provides developers with access to advanced algorithms that process images and
return information. To analyze an image, you can either upload an image or specify an image URL. The images
processing algorithms can analyze content in several different ways, depending on the visual features you're
interested in. For example, Computer Vision can determine if an image contains adult or racy content, or it can find
all of the human faces in an image.
You can use Computer Vision in your application by using either a native SDK or invoking the REST API directly.
This page broadly covers what you can do with Computer Vision.
You can analyze images to detect and provide insights about their visual features and characteristics. All of the
features in the table below are provided by the Analyze Image API.

Describe an image Generate a description of an entire image in human-readable
language, using complete sentences. Computer Vision's
algorithms generate various descriptions based on the objects
identified in the image. The descriptions are each evaluated
and a confidence score generated. A list is then returned
ordered from highest confidence score to lowest.
Detect faces Detect faces in an image and provide information about each
detected face. Computer Vision returns the coordinates,
rectangle, gender, and age for each detected face.
Computer Vision provides a subset of the functionality that
can be found in Face, and you can use the Face service for
more detailed analysis, such as facial identification and pose
detection.
Detect image types Detect characteristics about an image, such as whether an
image is a line drawing or the likelihood of whether an image
is clip art.
Detect domain-specific content Use domain models to detect and identify domain-specific
content in an image, such as celebrities and landmarks. For
example, if an image contains people, Computer Vision can use
a domain model for celebrities included with the service to
determine if the people detected in the image match known
celebrities.
Detect the color scheme Analyze color usage within an image. Computer Vision can
determine whether an image is black & white or color and, for
color images, identify the dominant and accent colors.
Generate a thumbnail Analyze the contents of an image to generate an appropriate
thumbnail for that image. Computer Vision first generates a
high-quality thumbnail and then analyzes the objects within
the image to determine the area of interest. Computer Vision
then crops the image to fit the requirements of the area of
interest. The generated thumbnail can be presented using an
aspect ratio that is different from the aspect ratio of the
original image, depending on your needs.
Get the area of interest Analyze the contents of an image to return the coordinates of
the area of interest. This is the same function that is used to
generate a thumbnail, but instead of cropping the image,
Computer Vision returns the bounding box coordinates of the
region, so the calling application can modify the original image
as desired.
ACTION DESCRIPTION
Extract text from images
You can use Computer Vision to extract text from an image into a machine-readable character stream using optical
character recognition (OCR). If needed, OCR corrects the rotation of the recognized text and provides the frame
coordinates of each word. OCR supports 25 languages and automatically detects the language of the recognized
text.
You can also use the Read API to extract both printed and handwritten text from images and text-heavy documents.
The Read API uses updated models and works for a variety objects with different surfaces and backgrounds, such
as receipts, posters, business cards, letters, and whiteboards. Currently, English is the only supported language.
Moderate content in images
Use containers
Image requirements
Data privacy and security
Next steps
You can use Computer Vision to detect adult and racy content in an image and return a confidence score for both.
The filter for adult and racy content detection can be set on a sliding scale to accommodate your preferences.
Use Computer Vision containers to recognize printed and handwritten text locally by installing a standardized
Docker container closer to your data.
Computer Vision can analyze images that meet the following requirements:
The image must be presented in JPEG, PNG, GIF, or BMP format
The file size of the image must be less than 4 megabytes (MB)
The dimensions of the image must be greater than 50 x 50 pixels
For OCR, the dimensions of the image must be between 50 x 50 and 4200 x 4200 pixels
As with all of the Cognitive Services, developers using the Computer Vision service should be aware of Microsoft's
policies on customer data. See the Cognitive Services page on the Microsoft Trust Center to learn more.
Get started with Computer Vision by following a quickstart guide:
Quickstart: Analyze an image
Quickstart: Extract handwritten text
Quickstart: Generate a thumbnail

Quickstart: Analyze a remote image using the REST
API and cURL in Computer Vision
4/18/2019 • 2 minutes to read • Edit Online
Prerequisites
Create and run the sample command
curl -H "Ocp-Apim-Subscription-Key: <subscriptionKey>" -H "Content-Type: application/json"
"https://westcentralus.api.cognitive.microsoft.com/vision/v2.0/analyze?
visualFeatures=Categories,Description&details=Landmarks&language=en" -d "
{\"url\":\"http://upload.wikimedia.org/wikipedia/commons/3/3c/Shaki_waterfall.jpg\"}"
Examine the response
In this quickstart, you analyze a remotely stored image to extract visual features using Computer Vision's REST
API. With the Analyze Image method, you can extract visual features based on image content.
If you don't have an Azure subscription, create a free account before you begin.
You must have cURL.
You must have a subscription key for Computer Vision. You can get a free trial key from Try Cognitive Services.
Or, follow the instructions in Create a Cognitive Services account to subscribe to Computer Vision and get your
key.
To create and run the sample, do the following steps:
1. Copy the following command into a text editor.
2. Make the following changes in the command where needed:
3. Open a command prompt window.
4. Paste the command from the text editor into the command prompt window, and then run the command.
a. Replace the value of <subscriptionKey> with your subscription key.
b. Replace the request URL (https://westcentralus.api.cognitive.microsoft.com/vision/v2.0/analyze ) with
the endpoint URL for the Analyze Image method from the Azure region where you obtained your
subscription keys, if necessary.
c. Optionally, change the language parameter of the request URL (language=en ) to use a different
supported language.
d. Optionally, change the image URL in the request body (
http://upload.wikimedia.org/wikipedia/commons/3/3c/Shaki_waterfall.jpg\ ) to the URL of a different
image to be analyzed.
A successful response is returned in JSON. The sample application parses and displays a successful response in the
command prompt window, similar to the following example:

{
"categories": [
{
"name": "outdoor_water",
"score": 0.9921875,
"detail": {
"landmarks": []
}
}
],
"description": {
"tags": [
"nature",
"water",
"waterfall",
"outdoor",
"rock",
"mountain",
"rocky",
"grass",
"hill",
"covered",
"hillside",
"standing",
"side",
"group",
"walking",
"white",
"man",
"large",
"snow",
"grazing",
"forest",
"slope",
"herd",
"river",
"giraffe",
"field"
],
"captions": [
{
"text": "a large waterfall over a rocky cliff",
"confidence": 0.916458423253597
}
]
},
"requestId": "b6e33879-abb2-43a0-a96e-02cb5ae0b795",
"metadata": {
"height": 959,
"width": 1280,
"format": "Jpeg"
}
}
Next steps
Explore the Computer Vision API used to analyze an image, detect celebrities and landmarks, create a thumbnail,
and extract printed and handwritten text. To rapidly experiment with the Computer Vision API, try the Open API
testing console.
Explore the Computer Vision API

Quickstart: Analyze a remote image using the REST
API and Go in Computer Vision
4/18/2019 • 3 minutes to read • Edit Online
Prerequisites
Create and run the sample
package main
import (
"encoding/json"
"fmt"
"io/ioutil"
"net/http"
"strings"
"time"
)
func main() {
// Replace <Subscription Key> with your valid subscription key.
const subscriptionKey = "<Subscription Key>"
// You must use the same Azure region in your REST API method as you used to
// get your subscription keys. For example, if you got your subscription keys
// from the West US region, replace "westcentralus" in the URL
// below with "westus".
//
// Free trial subscription keys are generated in the "westus" region.
In this quickstart, you analyze a remotely stored image to extract visual features by using Computer Vision's REST
API. With the Analyze Image method, you can extract visual features based on image content.
If you don't have an Azure subscription, create a free account before you begin.
You must have Go installed.
You must have a subscription key for Computer Vision. You can get a free trial key from Try Cognitive Services.
Or, follow the instructions in Create a Cognitive Services account to subscribe to Computer Vision and get your
key.
To create and run the sample, do the following steps:
1. Copy the below code into a text editor.
2. Make the following changes in code where needed:
3. Save the code as a file with a .go extension. For example, analyze-image.go .
4. Open a command prompt window.
5. At the prompt, run the go build command to compile the package from the file. For example,
go build analyze-image.go .
6. At the prompt, run the compiled package. For example, analyze-image .
a. Replace the value of subscriptionKey with your subscription key.
b. Replace the value of uriBase with the endpoint URL for the Analyze Image method from the Azure
region where you obtained your subscription keys, if necessary.
c. Optionally, replace the value of imageUrl with the URL of a different image that you want to analyze.

// Free trial subscription keys are generated in the "westus" region.
// If you use a free trial subscription key, you shouldn't need to change
// this region.
const uriBase =
"https://westcentralus.api.cognitive.microsoft.com/vision/v2.0/analyze"
const imageUrl =
"https://upload.wikimedia.org/wikipedia/commons/3/3c/Shaki_waterfall.jpg"
const params = "?visualFeatures=Description&details=Landmarks&language=en"
const uri = uriBase + params
const imageUrlEnc = "{\"url\":\"" + imageUrl + "\"}"
reader := strings.NewReader(imageUrlEnc)
// Create the HTTP client
client := &http.Client{
Timeout: time.Second * 2,
}
// Create the POST request, passing the image URL in the request body
req, err := http.NewRequest("POST", uri, reader)
if err != nil {
panic(err)
}
// Add request headers
req.Header.Add("Content-Type", "application/json")
req.Header.Add("Ocp-Apim-Subscription-Key", subscriptionKey)
// Send the request and retrieve the response
resp, err := client.Do(req)
if err != nil {
panic(err)
}
defer resp.Body.Close()
// Read the response body
// Note, data is a byte array
data, err := ioutil.ReadAll(resp.Body)
if err != nil {
panic(err)
}
// Parse the JSON data from the byte array
var f interface{}
json.Unmarshal(data, &f)
// Format and display the JSON result
jsonFormatted, _ := json.MarshalIndent(f, "", " ")
fmt.Println(string(jsonFormatted))
}
Examine the response
A successful response is returned in JSON. The sample application parses and displays a successful response in the
command prompt window, similar to the following example:
{
"categories": [
{
"detail": {
"landmarks": []
},
"name": "outdoor_water",
"score": 0.9921875
}
],
"description": {
"captions": [
{
"confidence": 0.916458423253597,
"text": "a large waterfall over a rocky cliff"
}
],
"tags": [
"nature",
"water",
"waterfall",
"outdoor",
"rock",
"mountain",
"rocky",
"grass",
"hill",
"covered",
"hillside",
"standing",
"side",
"group",
"walking",
"white",
"man",
"large",
"snow",
"grazing",
"forest",
"slope",
"herd",
"river",
"giraffe",
"field"
]
},
"metadata": {
"format": "Jpeg",
"height": 959,
"width": 1280
},
"requestId": "a92f89ab-51f8-4735-a58d-507da2213fc2"
}
Next steps
Explore the Computer Vision API used to analyze an image, detect celebrities and landmarks, create a thumbnail,
and extract printed and handwritten text. To rapidly experiment with the Computer Vision API, try the Open API
testing console.
Explore the Computer Vision API
Quickstart: Analyze a remote image using the
Computer Vision REST API and Java
4/18/2019 • 4 minutes to read • Edit Online
Prerequisites
Create and run the sample application
In this quickstart, you analyze a remotely stored image to extract visual features by using Computer Vision's REST
API. With the Analyze Image method, you can extract visual features based on image content.
If you don't have an Azure subscription, create a free account before you begin.
You must have Java™ Platform, Standard Edition Development Kit 7 or 8 (JDK 7 or 8) installed.
You must have a subscription key for Computer Vision. You can get a free trial key from Try Cognitive Services.
Or, follow the instructions in Create a Cognitive Services account to subscribe to Computer Vision and get your
key.
To create and run the sample, do the following steps:
import java.net.URI;
import org.apache.http.HttpEntity;
import org.apache.http.HttpResponse;
import org.apache.http.client.methods.HttpPost;
import org.apache.http.entity.StringEntity;
import org.apache.http.client.utils.URIBuilder;
import org.apache.http.impl.client.CloseableHttpClient;
import org.apache.http.impl.client.HttpClientBuilder;
import org.apache.http.util.EntityUtils;
import org.json.JSONObject;
1. Create a new Java project in your favorite IDE or editor. If the option is available, create the Java project from
a command line application template.
2. Import the following libraries into your Java project. If you're using Maven, the Maven coordinates are
provided for each library.
Apache HTTP client (org.apache.httpcomponents:httpclient:4.5.5)
Apache HTTP core (org.apache.httpcomponents:httpcore:4.4.9)
JSON library (org.json:json:20180130)
3. Add the following import statements to the file that contains the Main public class for your project.
4. Replace the Main public class with the following code, then make the following changes in code where
needed:
a. Replace the value of subscriptionKey with your subscription key.
b. Replace the value of uriBase with the endpoint URL for the Analyze Image method from the Azure
region where you obtained your subscription keys, if necessary.
c. Optionally, replace the value of imageToAnalyze with the URL of a different image that you want to
analyze.

public class Main {
// **********************************************
// *** Update or verify the following values. ***
// **********************************************
// Replace <Subscription Key> with your valid subscription key.
private static final String subscriptionKey = "<Subscription Key>";
// You must use the same Azure region in your REST API method as you used to
// get your subscription keys. For example, if you got your subscription keys
// from the West US region, replace "westcentralus" in the URL
// below with "westus".
//
// Free trial subscription keys are generated in the "westus" region.
// If you use a free trial subscription key, you shouldn't need to change
// this region.
private static final String uriBase =
"https://westcentralus.api.cognitive.microsoft.com/vision/v2.0/analyze";
private static final String imageToAnalyze =
"https://upload.wikimedia.org/wikipedia/commons/" +
"1/12/Broadway_and_Times_Square_by_night.jpg";
public static void main(String[] args) {
CloseableHttpClient httpClient = HttpClientBuilder.create().build();
try {
URIBuilder builder = new URIBuilder(uriBase);
// Request parameters. All of them are optional.
builder.setParameter("visualFeatures", "Categories,Description,Color");
builder.setParameter("language", "en");
// Prepare the URI for the REST API method.
URI uri = builder.build();
HttpPost request = new HttpPost(uri);
// Request headers.
request.setHeader("Content-Type", "application/json");
request.setHeader("Ocp-Apim-Subscription-Key", subscriptionKey);
// Request body.
StringEntity requestEntity =
new StringEntity("{\"url\":\"" + imageToAnalyze + "\"}");
request.setEntity(requestEntity);
// Call the REST API method and get the response entity.
HttpResponse response = httpClient.execute(request);
HttpEntity entity = response.getEntity();
if (entity != null) {
// Format and display the JSON response.
String jsonString = EntityUtils.toString(entity);
JSONObject json = new JSONObject(jsonString);
System.out.println("REST Response:\n");
System.out.println(json.toString(2));
}
} catch (Exception e) {
// Display error message.
System.out.println(e.getMessage());
}
}
}
Compile and run the program

Examine the response
1. Save, then build the Java project.
2. If you're using an IDE, run Main .
Alternately, if you're running the program from a command line window, run the following commands. These
commands presume your libraries are in a folder named libs that is in the same folder as Main.java ; if not, you
will need to replace libs with the path to your libraries.
javac -cp ".;libs/*" Main.java
java -cp ".;libs/*" Main
1. Compile the file Main.java .
2. Run the program. It will send the request to the QnA Maker API to create the KB, then it will poll for the
results every 30 seconds. Each response is printed to the command line window.
A successful response is returned in JSON. The sample application parses and displays a successful response in the
console window, similar to the following example:
REST Response:
{
"metadata": {
"width": 1826,
"format": "Jpeg",
"height": 2436
},
"color": {
"dominantColorForeground": "Brown",
"isBWImg": false,
"accentColor": "B74314",
"dominantColorBackground": "Brown",
"dominantColors": ["Brown"]
},
"requestId": "bbffe1a1-4fa3-4a6b-a4d5-a4964c58a811",
"description": {
"captions": [{
"confidence": 0.8241405091548035,
"text": "a group of people on a city street filled with traffic at night"
}],
"tags": [
"outdoor",
"building",
"street",
"city",
"busy",
"people",
"filled",
"traffic",
"many",
"table",
"car",
"group",
"walking",
"bunch",
"crowded",
"large",
"night",
"light",
"standing",
"man",
"tall",
"umbrella",
"riding",
"sign",
"crowd"
]
},
"categories": [{
"score": 0.625,
"name": "outdoor_street"
}]
}
Clean up resources
Next steps
When no longer needed, delete the Java project, including the compiled class and imported libraries.
Explore a Java Swing application that uses Computer Vision to perform optical character recognition (OCR); create
smart-cropped thumbnails; plus detect, categorize, tag, and describe visual features, including faces, in an image. To
rapidly experiment with the Computer Vision API, try the Open API testing console.


Quickstart: Analyze a remote image using the REST
API and JavaScript in Computer Vision
4/19/2019 • 3 minutes to read • Edit Online
Prerequisites
Create and run the sample
<!DOCTYPE html>
<html>
<head>
<title>Analyze Sample</title>
<script src="https://ajax.googleapis.com/ajax/libs/jquery/1.9.0/jquery.min.js"></script>
</head>
<body>
<script type="text/javascript">
function processImage() {
// **********************************************
// *** Update or verify the following values. ***
// **********************************************
// Replace <Subscription Key> with your valid subscription key.
var subscriptionKey = "<Subscription Key>";
// You must use the same Azure region in your REST API method as you used to
// get your subscription keys. For example, if you got your subscription keys
// from the West US region, replace "westcentralus" in the URL
// below with "westus".
//
// Free trial subscription keys are generated in the "westus" region.
// If you use a free trial subscription key, you shouldn't need to change
In this quickstart, you analyze a remotely stored image to extract visual features by using Computer Vision's REST
API. With the Analyze Image method, you can extract visual features based on image content.
If you don't have an Azure subscription, create a free account before you begin.
You must have a subscription key for Computer Vision. You can get a free trial key from Try Cognitive Services. Or,
follow the instructions in Create a Cognitive Services account to subscribe to Computer Vision and get your key.
To create and run the sample, do the following steps:
1. Copy the following code into a text editor.
2. Make the following changes in code where needed:
3. Save the code as a file with an .html extension. For example, analyze-image.html .
4. Open a browser window.
5. In the browser, drag and drop the file into the browser window.
6. When the webpage is displayed in the browser, choose the Analyze Image button.
a. Replace the value of subscriptionKey with your subscription key.
b. Replace the value of uriBase with the endpoint URL for the Analyze Image method from the Azure
region where you obtained your subscription keys, if necessary.
c. Optionally, replace the value of the value attribute for the inputImage control with the URL of a
different image that you want to analyze.

// If you use a free trial subscription key, you shouldn't need to change
// this region.
var uriBase =
"https://westcentralus.api.cognitive.microsoft.com/vision/v2.0/analyze";
// Request parameters.
var params = {
"visualFeatures": "Categories,Description,Color",
"details": "",
"language": "en",
};
// Display the image.
var sourceImageUrl = document.getElementById("inputImage").value;
document.querySelector("#sourceImage").src = sourceImageUrl;
// Make the REST API call.
$.ajax({
url: uriBase + "?" + $.param(params),
// Request headers.
beforeSend: function(xhrObj){
xhrObj.setRequestHeader("Content-Type","application/json");
xhrObj.setRequestHeader(
"Ocp-Apim-Subscription-Key", subscriptionKey);
},
type: "POST",
// Request body.
data: '{"url": ' + '"' + sourceImageUrl + '"}',
})
.done(function(data) {
// Show formatted JSON on webpage.
$("#responseTextArea").val(JSON.stringify(data, null, 2));
})
.fail(function(jqXHR, textStatus, errorThrown) {
// Display error message.
var errorString = (errorThrown === "") ? "Error. " :
errorThrown + " (" + jqXHR.status + "): ";
errorString += (jqXHR.responseText === "") ? "" :
jQuery.parseJSON(jqXHR.responseText).message;
alert(errorString);
});
};
</script>
<h1>Analyze image:</h1>
Enter the URL to an image, then click the <strong>Analyze image</strong> button.
<br><br>
Image to analyze:
<input type="text" name="inputImage" id="inputImage"
value="https://upload.wikimedia.org/wikipedia/commons/3/3c/Shaki_waterfall.jpg" />
<button onclick="processImage()">Analyze image</button>
<br><br>
<div id="wrapper" style="width:1020px; display:table;">
<div id="jsonOutput" style="width:600px; display:table-cell;">
Response:
<br><br>
<textarea id="responseTextArea" class="UIInput"
style="width:580px; height:400px;"></textarea>
</div>
<div id="imageDiv" style="width:420px; display:table-cell;">
Source image:
<br><br>
<img id="sourceImage" width="400" />
</div>
</div>

</div>
</body>
</html>
Examine the response
A successful response is returned in JSON. The sample webpage parses and displays a successful response in the
browser window, similar to the following example:

{
"categories": [
{
"name": "outdoor_water",
"score": 0.9921875,
"detail": {
"landmarks": []
}
}
],
"description": {
"tags": [
"nature",
"water",
"waterfall",
"outdoor",
"rock",
"mountain",
"rocky",
"grass",
"hill",
"covered",
"hillside",
"standing",
"side",
"group",
"walking",
"white",
"man",
"large",
"snow",
"grazing",
"forest",
"slope",
"herd",
"river",
"giraffe",
"field"
],
"captions": [
{
"text": "a large waterfall over a rocky cliff",
"confidence": 0.916458423253597
}
]
},
"color": {
"dominantColorForeground": "Grey",
"dominantColorBackground": "Green",
"dominantColors": [
"Grey",
"Green"
],
"accentColor": "4D5E2F",
"isBwImg": false
},
"requestId": "73ef10ce-a4ea-43c6-aee7-70325777e4b3",
"metadata": {
"height": 959,
"width": 1280,
"format": "Jpeg"
}
}
Next steps

Explore a JavaScript application that uses Computer Vision to perform optical character recognition (OCR); create
smart-cropped thumbnails; plus detect, categorize, tag, and describe visual features, including faces, in an image. To
rapidly experiment with the Computer Vision API, try the Open API testing console.
Computer Vision API JavaScript Tutorial
Quickstart: Analyze a remote image using the REST
API with Node.js in Computer Vision
4/18/2019 • 2 minutes to read • Edit Online
Prerequisites
Create and run the sample
In this quickstart, you analyze a remotely stored image to extract visual features by using Computer Vision's REST
API. With the Analyze Image method, you can extract visual features based on image content.
If you don't have an Azure subscription, create a free account before you begin.
You must have Node.js 4.x or later installed.
You must have npm installed.
You must have a subscription key for Computer Vision. You can get a free trial key from Try Cognitive Services.
Or, follow the instructions in Create a Cognitive Services account to subscribe to Computer Vision and get your
key.
To create and run the sample, do the following steps:
1. Install the npm request package.
npm install request
a. Open a command prompt window as an administrator.
b. Run the following command:
c. After the package is successfully installed, close the command prompt window.
2. Copy the following code into a text editor.
3. Make the following changes in code where needed:
a. Replace the value of subscriptionKey with your subscription key.
b. Replace the value of uriBase with the endpoint URL for the Analyze Image method from the Azure
region where you obtained your subscription keys, if necessary.
c. Optionally, replace the value of imageUrl with the URL of a different image that you want to analyze.
d. Optionally, replace the value of the language request parameter with a different language.
4. Save the code as a file with a .js extension. For example, analyze-image.js .
5. Open a command prompt window.
6. At the prompt, use the node command to run the file. For example, node analyze-image.js .

'use strict';
const request = require('request');
// Replace <Subscription Key> with your valid subscription key.
const subscriptionKey = '<Subscription Key>';
// You must use the same location in your REST call as you used to get your
// subscription keys. For example, if you got your subscription keys from
// westus, replace "westcentralus" in the URL below with "westus".
const uriBase =
'https://westcentralus.api.cognitive.microsoft.com/vision/v2.0/analyze';
const imageUrl =
'https://upload.wikimedia.org/wikipedia/commons/3/3c/Shaki_waterfall.jpg';
// Request parameters.
const params = {
'visualFeatures': 'Categories,Description,Color',
'details': '',
'language': 'en'
};
const options = {
uri: uriBase,
qs: params,
body: '{"url": ' + '"' + imageUrl + '"}',
headers: {
'Content-Type': 'application/json',
'Ocp-Apim-Subscription-Key' : subscriptionKey
}
};
request.post(options, (error, response, body) => {
if (error) {
console.log('Error: ', error);
return;
}
let jsonResponse = JSON.stringify(JSON.parse(body), null, ' ');
console.log('JSON Response\n');
console.log(jsonResponse);
});
Examine the response
A successful response is returned in JSON. The sample parses and displays a successful response in the command
prompt window, similar to the following example:

{
"categories": [
{
"name": "outdoor_water",
"score": 0.9921875,
"detail": {
"landmarks": []
}
}
],
"description": {
"tags": [
"nature",
"water",
"waterfall",
"outdoor",
"rock",
"mountain",
"rocky",
"grass",
"hill",
"covered",
"hillside",
"standing",
"side",
"group",
"walking",
"white",
"man",
"large",
"snow",
"grazing",
"forest",
"slope",
"herd",
"river",
"giraffe",
"field"
],
"captions": [
{
"text": "a large waterfall over a rocky cliff",
"confidence": 0.916458423253597
}
]
},
"color": {
"dominantColorForeground": "Grey",
"dominantColorBackground": "Green",
"dominantColors": [
"Grey",
"Green"
],
"accentColor": "4D5E2F",
"isBwImg": false
},
"requestId": "81b4e400-e3c1-41f1-9020-e6871ad9f0ed",
"metadata": {
"height": 959,
"width": 1280,
"format": "Jpeg"
}
}
Clean up resources

Next steps
When no longer needed, delete the file, and then uninstall the npm request package. To uninstall the package, do
the following steps:
npm uninstall request
1. Open a command prompt window as an administrator.
2. Run the following command:
3. After the package is successfully uninstalled, close the command prompt window.
Explore the Computer Vision APIs used to analyze an image, detect celebrities and landmarks, create a thumbnail,
and extract printed and handwritten text. To rapidly experiment with the Computer Vision API, try the Open API
testing console.
Explore the Computer Vision API
Quickstart: Analyze a remote image using the REST
API and PHP in Computer Vision
4/18/2019 • 2 minutes to read • Edit Online
Prerequisites
Create and run the sample
In this quickstart, you analyze a remotely stored image to extract visual features by using Computer Vision's REST
API. With the Analyze Image method, you can extract visual features based on image content.
If you don't have an Azure subscription, create a free account before you begin.
You must have PHP installed.
You must have Pear installed.
You must have a subscription key for Computer Vision. You can get a free trial key from Try Cognitive Services.
Or, follow the instructions in Create a Cognitive Services account to subscribe to Computer Vision and get your
key.
To create and run the sample, do the following steps:
1. Install the PHP5 HTTP_Request2 package.
pear install HTTP_Request2
a. Open a command prompt window as an administrator.
b. Run the following command:
c. After the package is successfully installed, close the command prompt window.
2. Copy the following code into a text editor.
3. Make the following changes in code where needed:
a. Replace the value of subscriptionKey with your subscription key.
b. Replace the value of uriBase with the endpoint URL for the Analyze Image method from the Azure
region where you obtained your subscription keys, if necessary.
c. Optionally, replace the value of imageUrl with the URL of a different image that you want to analyze.
d. Optionally, replace the value of the language request parameter with a different language.
4. Save the code as a file with a .php extension. For example, analyze-image.php .
5. Open a browser window with PHP support.
6. Drag and drop the file into the browser window.
<html>
<head>
<title>Analyze Image Sample</title>
</head>
<body>
<?php
// Replace <Subscription Key> with a valid subscription key.
$ocpApimSubscriptionKey = '<Subscription Key>';
// You must use the same location in your REST call as you used to obtain
// your subscription keys. For example, if you obtained your subscription keys
// from westus, replace "westcentralus" in the URL below with "westus".
$uriBase = 'https://westcentralus.api.cognitive.microsoft.com/vision/v2.0/';
$imageUrl = 'https://upload.wikimedia.org/wikipedia/commons/3/3c/Shaki_waterfall.jpg';
require_once 'HTTP/Request2.php';
$request = new Http_Request2($uriBase . '/analyze');
$url = $request->getUrl();
$headers = array(
// Request headers
'Content-Type' => 'application/json',
'Ocp-Apim-Subscription-Key' => $ocpApimSubscriptionKey
);
$request->setHeader($headers);
$parameters = array(
// Request parameters
'visualFeatures' => 'Categories,Description',
'details' => '',
'language' => 'en'
);
$url->setQueryVariables($parameters);
$request->setMethod(HTTP_Request2::METHOD_POST);
// Request body parameters
$body = json_encode(array('url' => $imageUrl));
// Request body
$request->setBody($body);
try
{
$response = $request->send();
echo "<pre>" .
json_encode(json_decode($response->getBody()), JSON_PRETTY_PRINT) . "</pre>";
}
catch (HttpException $ex)
{
echo "<pre>" . $ex . "</pre>";
}
?>
</body>
</html>
Examine the response
A successful response is returned in JSON. The sample website parses and displays a successful response in the
browser window, similar to the following example:
{
"categories": [
{
"name": "outdoor_water",
"score": 0.9921875,
"detail": {
"landmarks": []
}
}
],
"description": {
"tags": [
"nature",
"water",
"waterfall",
"outdoor",
"rock",
"mountain",
"rocky",
"grass",
"hill",
"covered",
"hillside",
"standing",
"side",
"group",
"walking",
"white",
"man",
"large",
"snow",
"grazing",
"forest",
"slope",
"herd",
"river",
"giraffe",
"field"
],
"captions": [
{
"text": "a large waterfall over a rocky cliff",
"confidence": 0.916458423253597
}
]
},
"requestId": "ebf5a1bc-3ba2-4c56-99b4-bbd20ba28705",
"metadata": {
"height": 959,
"width": 1280,
"format": "Jpeg"
}
}
Clean up resources
When no longer needed, delete the file, and then uninstall the PHP5 HTTP_Request2 package. To uninstall the
package, do the following steps:
1. Open a command prompt window as an administrator.
2. Run the following command:

Next steps
pear uninstall HTTP_Request2
3. After the package is successfully uninstalled, close the command prompt window.
Explore the Computer Vision API used to analyze an image, detect celebrities and landmarks, create a thumbnail,
and extract printed and handwritten text. To rapidly experiment with the Computer Vision API, try the Open API
testing console.
Explore the Computer Vision API
Quickstart: Analyze a remote image using the REST
API and Python in Computer Vision
4/19/2019 • 3 minutes to read • Edit Online
Prerequisites
Create and run the sample
In this quickstart, you analyze a remotely stored image to extract visual features by using Computer Vision's REST
API. With the Analyze Image method, you can extract visual features based on image content.
You can run this quickstart in a step-by step fashion using a Jupyter notebook on MyBinder. To launch Binder,
select the following button:
launch
launch binder
binder
If you don't have an Azure subscription, create a free account before you begin.
You must have Python installed if you want to run the sample locally.
You must have a subscription key for Computer Vision. You can get a free trial key from Try Cognitive Services.
Or, follow the instructions in Create a Cognitive Services account to subscribe to Computer Vision and get your
key.
You must have the following Python packages installed. You can use pip to install Python packages.
requests
matplotlib
pillow
To create and run the sample, do the following steps:
1. Copy the following code into a text editor.
2. Make the following changes in code where needed:
3. Save the code as a file with an .py extension. For example, analyze-image.py .
4. Open a command prompt window.
5. At the prompt, use the python command to run the sample. For example, python analyze-image.py .
a. Replace the value of subscription_key with your subscription key.
b. Replace the value of vision_base_url with the endpoint URL for the Computer Vision resource in the
Azure region where you obtained your subscription keys, if necessary.
c. Optionally, replace the value of image_url with the URL of a different image that you want to analyze.
import requests
# If you are using a Jupyter notebook, uncomment the following line.
#%matplotlib inline
import matplotlib.pyplot as plt
import json
from PIL import Image
from io import BytesIO
# Replace <Subscription Key> with your valid subscription key.
subscription_key = "<Subscription Key>"
assert subscription_key
# You must use the same region in your REST call as you used to get your
# subscription keys. For example, if you got your subscription keys from
# westus, replace "westcentralus" in the URI below with "westus".
#
# Free trial subscription keys are generated in the "westus" region.
# If you use a free trial subscription key, you shouldn't need to change
# this region.
vision_base_url = "https://westcentralus.api.cognitive.microsoft.com/vision/v2.0/"
analyze_url = vision_base_url + "analyze"
# Set image_url to the URL of an image that you want to analyze.
image_url = "https://upload.wikimedia.org/wikipedia/commons/thumb/1/12/" + \
"Broadway_and_Times_Square_by_night.jpg/450px-Broadway_and_Times_Square_by_night.jpg"
headers = {'Ocp-Apim-Subscription-Key': subscription_key }
params = {'visualFeatures': 'Categories,Description,Color'}
data = {'url': image_url}
response = requests.post(analyze_url, headers=headers, params=params, json=data)
response.raise_for_status()
# The 'analysis' object contains various fields that describe the image. The most
# relevant caption for the image is obtained from the 'description' property.
analysis = response.json()
print(json.dumps(response.json()))
image_caption = analysis["description"]["captions"][0]["text"].capitalize()
# Display the image and overlay it with the caption.
image = Image.open(BytesIO(requests.get(image_url).content))
plt.imshow(image)
plt.axis("off")
_ = plt.title(image_caption, size="x-large", y=-0.1)
plt.show()
Examine the response
{
"categories": [
{
"name": "outdoor_",
"score": 0.00390625,
"detail": {
"landmarks": []
}
},
{
"name": "outdoor_street",
"score": 0.33984375,
"detail": {
"landmarks": []
A successful response is returned in JSON. The sample webpage parses and displays a successful response in the
command prompt window, similar to the following example:

"landmarks": []
}
}
],
"description": {
"tags": [
"building",
"outdoor",
"street",
"city",
"people",
"busy",
"table",
"walking",
"traffic",
"filled",
"large",
"many",
"group",
"night",
"light",
"crowded",
"bunch",
"standing",
"man",
"sign",
"crowd",
"umbrella",
"riding",
"tall",
"woman",
"bus"
],
"captions": [
{
"text": "a group of people on a city street at night",
"confidence": 0.9122243847383961
}
]
},
"color": {
"dominantColorForeground": "Brown",
"dominantColorBackground": "Brown",
"dominantColors": [
"Brown"
],
"accentColor": "B54316",
"isBwImg": false
},
"requestId": "c11894eb-de3e-451b-9257-7c8b168073d1",
"metadata": {
"height": 600,
"width": 450,
"format": "Jpeg"
}
}
Next steps
Explore a Python application that uses Computer Vision to perform optical character recognition (OCR); create
smart-cropped thumbnails; plus detect, categorize, tag, and describe visual features, including faces, in an image. To
rapidly experiment with the Computer Vision API, try the Open API testing console.
Computer Vision API Python Tutorial

Quickstart: Analyze a remote image using the REST
API and Ruby in Computer Vision
4/18/2019 • 2 minutes to read • Edit Online
Prerequisites
Create and run the sample
In this quickstart, you analyze a remotely stored image to extract visual features by using Computer Vision's REST
API. With the Analyze Image method, you can extract visual features based on image content.
If you don't have an Azure subscription, create a free account before you begin.
You must have Ruby 2.4.x or later installed.
You must have a subscription key for Computer Vision. You can get a free trial key from Try Cognitive Services.
Or, follow the instructions in Create a Cognitive Services account to subscribe to Computer Vision and get your
key.
To create and run the sample, do the following steps:
1. Copy the following code into a text editor.
2. Make the following changes in code where needed:
3. Save the code as a file with an .rb extension. For example, analyze-image.rb .
4. Open a command prompt window.
5. At the prompt, use the ruby command to run the sample. For example, ruby analyze-image.rb .
a. Replace <Subscription Key> with your subscription key.
b. Replace https://westcentralus.api.cognitive.microsoft.com/vision/v2.0/analyze with the endpoint URL
for the Analyze Image method in the Azure region where you obtained your subscription keys, if
necessary.
c. Optionally, replace the value of the language request parameter with a different language.
d. Optionally, replace http://upload.wikimedia.org/wikipedia/commons/3/3c/Shaki_waterfall.jpg\ with the
URL of a different image that you want to analyze.
require 'net/http'
# You must use the same location in your REST call as you used to get your
# subscription keys. For example, if you got your subscription keys from westus,
# replace "westcentralus" in the URL below with "westus".
uri = URI('https://westcentralus.api.cognitive.microsoft.com/vision/v2.0/analyze')
uri.query = URI.encode_www_form({
# Request parameters
'visualFeatures' => 'Categories, Description',
'details' => 'Landmarks',
'language' => 'en'
})
request = Net::HTTP::Post.new(uri.request_uri)
# Request headers
# Replace <Subscription Key> with your valid subscription key.
request['Ocp-Apim-Subscription-Key'] = '<Subscription Key>'
request['Content-Type'] = 'application/json'
request.body =
"{\"url\": \"http://upload.wikimedia.org/wikipedia/commons/3/3c/Shaki_waterfall.jpg\"}"
response = Net::HTTP.start(uri.host, uri.port, :use_ssl => uri.scheme == 'https') do |http|
http.request(request)
end
puts response.body
Examine the response
{
"categories": [
{
"name": "abstract_",
"score": 0.00390625
},
{
"name": "people_",
"score": 0.83984375,
"detail": {
"celebrities": [
{
"name": "Satya Nadella",
"faceRectangle": {
"left": 597,
"top": 162,
"width": 248,
"height": 248
},
"confidence": 0.999028444
}
]
}
}
],
"adult": {
"isAdultContent": false,
"isRacyContent": false,
"adultScore": 0.0934349000453949,
"racyScore": 0.068613491952419281
},
A successful response is returned in JSON. The sample parses and displays a successful response in the command
prompt window, similar to the following example:

},
"tags": [
{
"name": "person",
"confidence": 0.98979085683822632
},
{
"name": "man",
"confidence": 0.94493889808654785
},
{
"name": "outdoor",
"confidence": 0.938492476940155
},
{
"name": "window",
"confidence": 0.89513939619064331
}
],
"description": {
"tags": [
"person",
"man",
"outdoor",
"window",
"glasses"
],
"captions": [
{
"text": "Satya Nadella sitting on a bench",
"confidence": 0.48293603002174407
}
]
},
"requestId": "0dbec5ad-a3d3-4f7e-96b4-dfd57efe967d",
"metadata": {
"width": 1500,
"height": 1000,
"format": "Jpeg"
},
"faces": [
{
"age": 44,
"gender": "Male",
"faceRectangle": {
"left": 593,
"top": 160,
"width": 250,
"height": 250
}
}
],
"color": {
"dominantColorForeground": "Brown",
"dominantColorBackground": "Brown",
"dominantColors": [
"Brown",
"Black"
],
"accentColor": "873B59",
"isBWImg": false
},
"imageType": {
"clipArtType": 0,
"lineDrawingType": 0
}
}

Quickstart: Analyze a local image using the REST API
and C# in Computer Vision
4/18/2019 • 4 minutes to read • Edit Online
Prerequisites
Create and run the sample application
using Newtonsoft.Json.Linq;
using System;
using System.IO;
using System.Net.Http;
using System.Net.Http.Headers;
using System.Threading.Tasks;
namespace CSHttpClientSample
{
static class Program
{
// Replace <Subscription Key> with your valid subscription key.
const string subscriptionKey = "<Subscription Key>";
// You must use the same Azure region in your REST API method as you used to
// get your subscription keys. For example, if you got your subscription keys
// from the West US region, replace "westcentralus" in the URL
In this quickstart, you will analyze a locally stored image to extract visual features by using Computer Vision's
REST API. With the Analyze Image method, you can extract visual feature information based on image content.
If you don't have an Azure subscription, create a free account before you begin.
You must have Visual Studio 2015 or later.
You must have a subscription key for Computer Vision. You can get a free trial key from Try Cognitive Services.
Or, follow the instructions in Create a Cognitive Services account to subscribe to Computer Vision and get your
key.
To create the sample in Visual Studio, do the following steps:
1. Create a new Visual Studio solution in Visual Studio, using the Visual C# Console App (.NET Framework)
template.
2. Install the Newtonsoft.Json NuGet package.
3. Replace the code in Program.cs with the following code, and then make the following changes in code where
needed:
4. Run the program.
5. At the prompt, enter the path to a local image.
a. On the menu, click Tools, select NuGet Package Manager, then Manage NuGet Packages for
Solution.
b. Click the Browse tab, and in the Search box type "Newtonsoft.Json".
c. Select Newtonsoft.Json when it displays, then click the checkbox next to your project name, and Install.
a. Replace the value of subscriptionKey with your subscription key.
b. Replace the value of uriBase with the endpoint URL for the Analyze Image method from the Azure
region where you obtained your subscription keys, if necessary.

// from the West US region, replace "westcentralus" in the URL
// below with "westus".
//
// Free trial subscription keys are generated in the "westus" region.
// If you use a free trial subscription key, you shouldn't need to change
// this region.
const string uriBase =
"https://westcentralus.api.cognitive.microsoft.com/vision/v2.0/analyze";
static void Main()
{
// Get the path and filename to process from the user.
Console.WriteLine("Analyze an image:");
Console.Write(
"Enter the path to the image you wish to analyze: ");
string imageFilePath = Console.ReadLine();
if (File.Exists(imageFilePath))
{
// Call the REST API method.
Console.WriteLine("\nWait a moment for the results to appear.\n");
MakeAnalysisRequest(imageFilePath).Wait();
}
else
{
Console.WriteLine("\nInvalid file path");
}
Console.WriteLine("\nPress Enter to exit...");
Console.ReadLine();
}
/// <summary>
/// Gets the analysis of the specified image file by using
/// the Computer Vision REST API.
/// </summary>
/// <param name="imageFilePath">The image file to analyze.</param>
static async Task MakeAnalysisRequest(string imageFilePath)
{
try
{
HttpClient client = new HttpClient();
// Request headers.
client.DefaultRequestHeaders.Add(
"Ocp-Apim-Subscription-Key", subscriptionKey);
// Request parameters. A third optional parameter is "details".
// The Analyze Image method returns information about the following
// visual features:
// Categories: categorizes image content according to a
// taxonomy defined in documentation.
// Description: describes the image content with a complete
// sentence in supported languages.
// Color: determines the accent color, dominant color,
// and whether an image is black & white.
string requestParameters =
"visualFeatures=Categories,Description,Color";
// Assemble the URI for the REST API method.
string uri = uriBase + "?" + requestParameters;
HttpResponseMessage response;
// Read the contents of the specified local image
// into a byte array.
byte[] byteData = GetImageAsByteArray(imageFilePath);
// Add the byte array as an octet stream to the request body.
using (ByteArrayContent content = new ByteArrayContent(byteData))
{
{
// This example uses the "application/octet-stream" content type.
// The other content types you can use are "application/json"
// and "multipart/form-data".
content.Headers.ContentType =
new MediaTypeHeaderValue("application/octet-stream");
// Asynchronously call the REST API method.
response = await client.PostAsync(uri, content);
}
// Asynchronously get the JSON response.
string contentString = await response.Content.ReadAsStringAsync();
// Display the JSON response.
Console.WriteLine("\nResponse:\n\n{0}\n",
JToken.Parse(contentString).ToString());
}
catch (Exception e)
{
Console.WriteLine("\n" + e.Message);
}
}
/// <summary>
/// Returns the contents of the specified file as a byte array.
/// </summary>
/// <param name="imageFilePath">The image file to read.</param>
/// <returns>The byte array of the image data.</returns>
static byte[] GetImageAsByteArray(string imageFilePath)
{
// Open a read-only file stream for the specified file.
using (FileStream fileStream =
new FileStream(imageFilePath, FileMode.Open, FileAccess.Read))
{
// Read the file's contents into a byte array.
BinaryReader binaryReader = new BinaryReader(fileStream);
return binaryReader.ReadBytes((int)fileStream.Length);
}
}
}
}
Examine the response
A successful response is returned in JSON. The sample application parses and displays a successful response in the
console window, similar to the following example:

{
"categories": [
{
"name": "abstract_",
"score": 0.00390625
},
{
"name": "others_",
"score": 0.0234375
},
{
"name": "outdoor_",
"score": 0.00390625
}
],
"description": {
"tags": [
"road",
"building",
"outdoor",
"street",
"night",
"black",
"city",
"white",
"light",
"sitting",
"riding",
"man",
"side",
"empty",
"rain",
"corner",
"traffic",
"lit",
"hydrant",
"stop",
"board",
"parked",
"bus",
"tall"
],
"captions": [
{
"text": "a close up of an empty city street at night",
"confidence": 0.7965622853462756
}
]
},
"requestId": "dddf1ac9-7e66-4c47-bdef-222f3fe5aa23",
"metadata": {
"width": 3733,
"height": 1986,
"format": "Jpeg"
},
"color": {
"dominantColorForeground": "Black",
"dominantColorBackground": "Black",
"dominantColors": [
"Black",
"Grey"
],
"accentColor": "666666",
"isBWImg": true
}
}

Clean up resources
Next steps
When no longer needed, delete the Visual Studio solution. To do so, open File Explorer, navigate to the folder in
which you created the Visual Studio solution, and delete the folder.
Explore a basic Windows application that uses Computer Vision to perform optical character recognition (OCR);
create smart-cropped thumbnails; plus detect, categorize, tag, and describe visual features, including faces, in an
image.
Computer Vision API C# Tutorial
Quickstart: Analyze a local image using the REST API
and Python in Computer Vision
4/19/2019 • 3 minutes to read • Edit Online
Prerequisites
Create and run the sample
In this quickstart, you analyze a locally stored image to extract visual features by using Computer Vision's REST
API. With the Analyze Image method, you can extract visual features based on image content.
You can run this quickstart in a step-by step fashion using a Jupyter notebook on MyBinder. To launch Binder,
select the following button:
launch
launch binder
binder
If you don't have an Azure subscription, create a free account before you begin.
You must have Python installed if you want to run the sample locally.
You must have a subscription key for Computer Vision. You can get a free trial key from Try Cognitive Services.
Or, follow the instructions in Create a Cognitive Services account to subscribe to Computer Vision and get your
key.
You must have the following Python packages installed. You can use pip to install Python packages.
requests
matplotlib
pillow
To create and run the sample, do the following steps:
1. Copy the following code into a text editor.
2. Make the following changes in code where needed:
3. Save the code as a file with an .py extension. For example, analyze-local-image.py .
4. Open a command prompt window.
5. At the prompt, use the python command to run the sample. For example, python analyze-local-image.py .
a. Replace the value of subscription_key with your subscription key.
b. Replace the value of vision_base_url with the endpoint URL for the Computer Vision resource in the
Azure region where you obtained your subscription keys, if necessary.
c. Optionally, replace the value of image_path with the path and file name of a different image that you
want to analyze.

import requests
# If you are using a Jupyter notebook, uncomment the following line.
#%matplotlib inline
import matplotlib.pyplot as plt
from PIL import Image
from io import BytesIO
# Replace <Subscription Key> with your valid subscription key.
subscription_key = "<Subscription Key>"
assert subscription_key
# You must use the same region in your REST call as you used to get your
# subscription keys. For example, if you got your subscription keys from
# westus, replace "westcentralus" in the URI below with "westus".
#
# Free trial subscription keys are generated in the "westus" region.
# If you use a free trial subscription key, you shouldn't need to change
# this region.
vision_base_url = "https://westcentralus.api.cognitive.microsoft.com/vision/v2.0/"
analyze_url = vision_base_url + "analyze"
# Set image_path to the local path of an image that you want to analyze.
image_path = "C:/Documents/ImageToAnalyze.jpg"
# Read the image into a byte array
image_data = open(image_path, "rb").read()
headers = {'Ocp-Apim-Subscription-Key': subscription_key,
'Content-Type': 'application/octet-stream'}
params = {'visualFeatures': 'Categories,Description,Color'}
response = requests.post(
analyze_url, headers=headers, params=params, data=image_data)
response.raise_for_status()
# The 'analysis' object contains various fields that describe the image. The most
# relevant caption for the image is obtained from the 'description' property.
analysis = response.json()
print(analysis)
image_caption = analysis["description"]["captions"][0]["text"].capitalize()
# Display the image and overlay it with the caption.
image = Image.open(BytesIO(image_data))
plt.imshow(image)
plt.axis("off")
_ = plt.title(image_caption, size="x-large", y=-0.1)
Examine the response
{
"categories": [
{
"name": "outdoor_",
"score": 0.00390625,
"detail": {
"landmarks": []
}
},
{
"name": "outdoor_street",
"score": 0.33984375,
"detail": {
"landmarks": []
A successful response is returned in JSON. The sample webpage parses and displays a successful response in the
command prompt window, similar to the following example:
"landmarks": []
}
}
],
"description": {
"tags": [
"building",
"outdoor",
"street",
"city",
"people",
"busy",
"table",
"walking",
"traffic",
"filled",
"large",
"many",
"group",
"night",
"light",
"crowded",
"bunch",
"standing",
"man",
"sign",
"crowd",
"umbrella",
"riding",
"tall",
"woman",
"bus"
],
"captions": [
{
"text": "a group of people on a city street at night",
"confidence": 0.9122243847383961
}
]
},
"color": {
"dominantColorForeground": "Brown",
"dominantColorBackground": "Brown",
"dominantColors": [
"Brown"
],
"accentColor": "B54316",
"isBwImg": false
},
"requestId": "c11894eb-de3e-451b-9257-7c8b168073d1",
"metadata": {
"height": 600,
"width": 450,
"format": "Jpeg"
}
}
Clean up resources
Next steps
When no longer needed, delete the file.
Explore a Python application that uses Computer Vision to perform optical character recognition (OCR); create
smart-cropped thumbnails; plus detect, categorize, tag, and describe visual features, including faces, in an image. To

Quickstart: Generate a thumbnail using the REST API
and C# in Computer Vision
4/18/2019 • 5 minutes to read • Edit Online
Prerequisites
Create and run the sample application
using Newtonsoft.Json.Linq;
using System;
using System.IO;
using System.Net.Http;
using System.Net.Http.Headers;
using System.Threading.Tasks;
namespace CSHttpClientSample
{
static class Program
{
// Replace <Subscription Key> with your valid subscription key.
const string subscriptionKey = "<Subscription Key>";
// You must use the same Azure region in your REST API method as you used to
// get your subscription keys. For example, if you got your subscription keys
In this quickstart, you generate a thumbnail from an image by using Computer Vision's REST API. With the Get
Thumbnail method, you can generate a thumbnail of an image. You specify the height and width, which can differ
from the aspect ratio of the input image. Computer Vision uses smart cropping to intelligently identify the area of
interest and generate cropping coordinates based on that region.
If you don't have an Azure subscription, create a free account before you begin.
You must have Visual Studio 2015 or later.
You must have a subscription key for Computer Vision. You can get a free trial key from Try Cognitive Services.
Or, follow the instructions in Create a Cognitive Services account to subscribe to Computer Vision and get your
key.
To create the sample in Visual Studio, do the following steps:
1. Create a new Visual Studio solution in Visual Studio, using the Visual C# Console App template.
2. Install the Newtonsoft.Json NuGet package.
3. Replace the code in Program.cs with the following code, and then make the following changes in code where
needed:
4. Run the program.
5. At the prompt, enter the path to a local image.
a. On the menu, click Tools, select NuGet Package Manager, then Manage NuGet Packages for
Solution.
b. Click the Browse tab, and in the Search box type "Newtonsoft.Json".
c. Select Newtonsoft.Json when it displays, then click the checkbox next to your project name, and Install.
a. Replace the value of subscriptionKey with your subscription key.
b. Replace the value of uriBase with the endpoint URL for the Get Thumbnail method from the Azure
region where you obtained your subscription keys, if necessary.

// get your subscription keys. For example, if you got your subscription keys
// from the West US region, replace "westcentralus" in the URL
// below with "westus".
//
// Free trial subscription keys are generated in the "westus" region.
// If you use a free trial subscription key, you shouldn't need to change
// this region.
const string uriBase =
"https://westcentralus.api.cognitive.microsoft.com/vision/v2.0/generateThumbnail";
static void Main()
{
// Get the path and filename to process from the user.
Console.WriteLine("Thumbnail:");
Console.Write(
"Enter the path to the image you wish to use to create a thumbnail image: ");
string imageFilePath = Console.ReadLine();
if (File.Exists(imageFilePath))
{
// Call the REST API method.
Console.WriteLine("\nWait a moment for the results to appear.\n");
MakeThumbNailRequest(imageFilePath).Wait();
}
else
{
Console.WriteLine("\nInvalid file path");
}
Console.WriteLine("\nPress Enter to exit...");
Console.ReadLine();
}
/// <summary>
/// Gets a thumbnail image from the specified image file by using
/// the Computer Vision REST API.
/// </summary>
/// <param name="imageFilePath">The image file to use to create the thumbnail image.</param>
static async Task MakeThumbNailRequest(string imageFilePath)
{
try
{
HttpClient client = new HttpClient();
// Request headers.
client.DefaultRequestHeaders.Add(
"Ocp-Apim-Subscription-Key", subscriptionKey);
// Request parameters.
// The width and height parameters specify a thumbnail that's
// 200 pixels wide and 150 pixels high.
// The smartCropping parameter is set to true, to enable smart cropping.
string requestParameters = "width=200&height=150&smartCropping=true";
// Assemble the URI for the REST API method.
string uri = uriBase + "?" + requestParameters;
HttpResponseMessage response;
// Read the contents of the specified local image
// into a byte array.
byte[] byteData = GetImageAsByteArray(imageFilePath);
// Add the byte array as an octet stream to the request body.
using (ByteArrayContent content = new ByteArrayContent(byteData))
{
// This example uses the "application/octet-stream" content type.
// The other content types you can use are "application/json"
// and "multipart/form-data".
content.Headers.ContentType =

new MediaTypeHeaderValue("application/octet-stream");
// Asynchronously call the REST API method.
response = await client.PostAsync(uri, content);
}
// Check the HTTP status code of the response. If successful, display
// display the response and save the thumbnail.
if (response.IsSuccessStatusCode)
{
// Display the response data.
Console.WriteLine("\nResponse:\n{0}", response);
// Get the image data for the thumbnail from the response.
byte[] thumbnailImageData =
await response.Content.ReadAsByteArrayAsync();
// Save the thumbnail to the same folder as the original image,
// using the original name with the suffix "_thumb".
// Note: This will overwrite an existing file of the same name.
string thumbnailFilePath =
imageFilePath.Insert(imageFilePath.Length - 4, "_thumb");
File.WriteAllBytes(thumbnailFilePath, thumbnailImageData);
Console.WriteLine("\nThumbnail written to: {0}", thumbnailFilePath);
}
else
{
// Display the JSON error data.
string errorString = await response.Content.ReadAsStringAsync();
Console.WriteLine("\n\nResponse:\n{0}\n",
JToken.Parse(errorString).ToString());
}
}
catch (Exception e)
{
Console.WriteLine("\n" + e.Message);
}
}
/// <summary>
/// Returns the contents of the specified file as a byte array.
/// </summary>
/// <param name="imageFilePath">The image file to read.</param>
/// <returns>The byte array of the image data.</returns>
static byte[] GetImageAsByteArray(string imageFilePath)
{
// Open a read-only file stream for the specified file.
using (FileStream fileStream =
new FileStream(imageFilePath, FileMode.Open, FileAccess.Read))
{
// Read the file's contents into a byte array.
BinaryReader binaryReader = new BinaryReader(fileStream);
return binaryReader.ReadBytes((int)fileStream.Length);
}
}
}
}
Examine the response
A successful response is returned as binary data, which represents the image data for the thumbnail. If the request
succeeds, the thumbnail is saved to the same folder as the local image, using the original name with the suffix
"_thumb". If the request fails, the response contains an error code and a message to help determine what went
wrong.

Response:
StatusCode: 200, ReasonPhrase: 'OK', Version: 1.1, Content: System.Net.Http.StreamContent, Headers:
{
Pragma: no-cache
apim-request-id: 131eb5b4-5807-466d-9656-4c1ef0a64c9b
Strict-Transport-Security: max-age=31536000; includeSubDomains; preload
x-content-type-options: nosniff
Cache-Control: no-cache
Date: Tue, 06 Jun 2017 20:54:07 GMT
X-AspNet-Version: 4.0.30319
X-Powered-By: ASP.NET
Content-Length: 5800
Content-Type: image/jpeg
Expires: -1
}
Clean up resources
Next steps
The sample application displays a successful response in the console window, similar to the following example:
When no longer needed, delete the Visual Studio solution. To do so, open File Explorer, navigate to the folder in
which you created the Visual Studio solution, and delete the folder.
Explore a basic Windows application that uses Computer Vision to perform optical character recognition (OCR);
create smart-cropped thumbnails; plus detect, categorize, tag, and describe visual features, including faces, in an
image. To rapidly experiment with the Computer Vision APIs, try the Open API testing console.
Computer Vision API C# Tutorial
Quickstart: Generate a thumbnail using the REST API
and cURL in Computer Vision
4/18/2019 • 2 minutes to read • Edit Online
Prerequisites
Get Thumbnail request
NOTENOTE
Create and run the sample command
In this quickstart, you generate a thumbnail from an image using Computer Vision's REST API. You specify the
desired height and width, which can differ in aspect ration from the input image. Computer Vision uses smart
cropping to intelligently identify the area of interest and generate cropping coordinates around that region.
If you don't have an Azure subscription, create a free account before you begin.
You must have cURL.
You must have a subscription key for Computer Vision. You can get a free trial key from Try Cognitive Services.
Or, follow the instructions in Create a Cognitive Services account to subscribe to Computer Vision and get your
key.
With the Get Thumbnail method, you can generate a thumbnail of an image.
To run the sample, do the following steps:
1. Copy the following code into an editor.
2. Replace <Subscription Key> with your valid subscription key.
3. Replace <File> with the path and filename to save the thumbnail.
4. Change the Request URL (https://westcentralus.api.cognitive.microsoft.com/vision/v2.0 ) to use the location
where you obtained your subscription keys, if necessary.
5. Optionally, change the image ({\"url\":\"... ) to analyze.
6. Open a command window on a computer with cURL installed.
7. Paste the code in the window and run the command.
You must use the same location in your REST call as you used to obtain your subscription keys. For example, if you obtained
your subscription keys from westus, replace "westcentralus" in the URL below with "westus".
To create and run the sample, do the following steps:
1. Copy the following command into a text editor.
2. Make the following changes in the command where needed:
a. Replace the value of <subscriptionKey> with your subscription key.
b. Replace the value of <thumbnailFile> with the path and name of the file in which to save the thumbnail.
c. Replace the request URL (
https://westcentralus.api.cognitive.microsoft.com/vision/v2.0/generateThumbnail ) with the endpoint

Examine the response
Next steps
curl -H "Ocp-Apim-Subscription-Key: <subscriptionKey>" -o <thumbnailFile> -H "Content-Type:
application/json" "https://westcentralus.api.cognitive.microsoft.com/vision/v2.0/generateThumbnail?
width=100&height=100&smartCropping=true" -d "
{\"url\":\"https://upload.wikimedia.org/wikipedia/commons/thumb/5/56/Shorkie_Poo_Puppy.jpg/1280px-
Shorkie_Poo_Puppy.jpg\"}"
URL for the Get Thumbnail method from the Azure region where you obtained your subscription keys, if
necessary.
d. Optionally, change the image URL in the request body (
https://upload.wikimedia.org/wikipedia/commons/thumb/5/56/Shorkie_Poo_Puppy.jpg/1280px-
Shorkie_Poo_Puppy.jpg\
) to the URL of a different image from which to generate a thumbnail.
3. Open a command prompt window.
4. Paste the command from the text editor into the command prompt window, and then run the command.
A successful response writes the thumbnail image to the file specified in <thumbnailFile> . If the request fails, the
response contains an error code and a message to help determine what went wrong. If the request seems to
succeed but the created thumbnail is not a valid image file, it might be that your subscription key is not valid.
Explore the Computer Vision API to how to analyze an image, detect celebrities and landmarks, create a thumbnail,
and extract printed and handwritten text. To rapidly experiment with the Computer Vision API, try the Open API
testing console.
Explore the Computer Vision API

Quickstart: Generate a thumbnail using the REST API
and Go in Computer Vision
4/18/2019 • 2 minutes to read • Edit Online
Prerequisites
Create and run the sample
package main
import (
"encoding/json"
"fmt"
"io/ioutil"
"net/http"
"strings"
"time"
)
func main() {
// Replace <Subscription Key> with your valid subscription key.
const subscriptionKey = "<Subscription Key>"
// You must use the same Azure region in your REST API method as you used to
// get your subscription keys. For example, if you got your subscription keys
// from the West US region, replace "westcentralus" in the URL
In this quickstart, you generate a thumbnail from an image using Computer Vision's REST API. You specify the
height and width, which can differ in aspect ratio from the input image. Computer Vision uses smart cropping to
intelligently identify the area of interest and generate cropping coordinates based on that region.
If you don't have an Azure subscription, create a free account before you begin.
You must have Go installed.
You must have a subscription key for Computer Vision. You can get a free trial key from Try Cognitive Services.
Or, follow the instructions in Create a Cognitive Services account to subscribe to Computer Vision and get your
key.
To create and run the sample, do the following steps:
1. Copy the following code into a text editor.
2. Make the following changes in code where needed:
3. Save the code as a file with a .go extension. For example, get-thumbnail.go .
4. Open a command prompt window.
5. At the prompt, run the go build command to compile the package from the file. For example,
go build get-thumbnail.go .
6. At the prompt, run the compiled package. For example, get-thumbnail .
a. Replace the value of subscriptionKey with your subscription key.
b. Replace the value of uriBase with the endpoint URL for the Get Thumbnail method from the Azure
region where you obtained your subscription keys, if necessary.
c. Optionally, replace the value of imageUrl with the URL of a different image from which you want to
generate a thumbnail.
// from the West US region, replace "westcentralus" in the URL
// below with "westus".
//
// Free trial subscription keys are generated in the "westus" region.
// If you use a free trial subscription key, you shouldn't need to change
// this region.
const uriBase =
"https://westcentralus.api.cognitive.microsoft.com/vision/v2.0/generateThumbnail"
const imageUrl =
"https://upload.wikimedia.org/wikipedia/commons/9/94/Bloodhound_Puppy.jpg"
const params = "?width=100&height=100&smartCropping=true"
const uri = uriBase + params
const imageUrlEnc = "{\"url\":\"" + imageUrl + "\"}"
reader := strings.NewReader(imageUrlEnc)
// Create the HTTP client
client := &http.Client{
Timeout: time.Second * 2,
}
// Create the POST request, passing the image URL in the request body
req, err := http.NewRequest("POST", uri, reader)
if err != nil {
panic(err)
}
// Add headers
req.Header.Add("Content-Type", "application/json")
req.Header.Add("Ocp-Apim-Subscription-Key", subscriptionKey)
// Send the request and retrieve the response
resp, err := client.Do(req)
if err != nil {
panic(err)
}
defer resp.Body.Close()
// Read the response body.
// Note, data is a byte array
data, err := ioutil.ReadAll(resp.Body)
if err != nil {
panic(err)
}
// Parse the JSON data
var f interface{}
json.Unmarshal(data, &f)
// Format and display the JSON result
jsonFormatted, _ := json.MarshalIndent(f, "", " ")
fmt.Println(string(jsonFormatted))
}
Examine the response
Next steps
A successful response contains the thumbnail image binary data. If the request fails, the response contains an error
code and a message to help determine what went wrong.
Explore the Computer Vision API to analyze an image, detect celebrities and landmarks, create a thumbnail, and
extract printed and handwritten text. To rapidly experiment with the Computer Vision API, try the Open API testing

Quickstart: Generate a thumbnail using the REST API
and Java in Computer Vision
4/18/2019 • 4 minutes to read • Edit Online
Prerequisites
Create and run the sample application
In this quickstart, you generate a thumbnail from an image by using Computer Vision's REST API. You specify the
height and width, which can differ from the aspect ratio of the input image. Computer Vision uses smart cropping
to intelligently identify the area of interest and generate cropping coordinates based on that region.
If you don't have an Azure subscription, create a free account before you begin.
You must have Java™ Platform, Standard Edition Development Kit 7 or 8 (JDK 7 or 8) installed.
You must have a subscription key for Computer Vision. You can get a free trial key from Try Cognitive Services.
Or, follow the instructions in Create a Cognitive Services account to subscribe to Computer Vision and get your
key.
To create and run the sample, do the following steps:
import java.awt.*;
import javax.swing.*;
import java.net.URI;
import java.io.InputStream;
import javax.imageio.ImageIO;
import java.awt.image.BufferedImage;
import org.apache.http.HttpEntity;
import org.apache.http.HttpResponse;
import org.apache.http.client.methods.HttpPost;
import org.apache.http.entity.StringEntity;
import org.apache.http.client.utils.URIBuilder;
import org.apache.http.impl.client.CloseableHttpClient;
import org.apache.http.impl.client.HttpClientBuilder;
import org.apache.http.util.EntityUtils;
import org.json.JSONObject;
1. Create a new Java project in your favorite IDE or editor. If the option is available, create the Java project from
a command line application template.
2. Import the following libraries into your Java project. If you're using Maven, the Maven coordinates are
provided for each library.
Apache HTTP client (org.apache.httpcomponents:httpclient:4.5.5)
Apache HTTP core (org.apache.httpcomponents:httpcore:4.4.9)
JSON library (org.json:json:20180130)
3. Add the following import statements to the file that contains the Main public class for your project.
4. Replace the Main public class with the following code, then make the following changes in code where
needed:
a. Replace the value of subscriptionKey with your subscription key.

// This sample uses the following libraries:
// - Apache HTTP client (org.apache.httpcomponents:httpclient:4.5.5)
// - Apache HTTP core (org.apache.httpcomponents:httpccore:4.4.9)
// - JSON library (org.json:json:20180130).
public class Main {
// **********************************************
// *** Update or verify the following values. ***
// **********************************************
// Replace <Subscription Key> with your valid subscription key.
private static final String subscriptionKey = "<Subscription Key>";
// You must use the same Azure region in your REST API method as you used to
// get your subscription keys. For example, if you got your subscription keys
// from the West US region, replace "westcentralus" in the URL
// below with "westus".
//
// Free trial subscription keys are generated in the "westus" region.
// If you use a free trial subscription key, you shouldn't need to change
// this region.
private static final String uriBase =
"https://westcentralus.api.cognitive.microsoft.com/vision/v2.0/generateThumbnail";
private static final String imageToAnalyze =
"https://upload.wikimedia.org/wikipedia/commons/9/94/Bloodhound_Puppy.jpg";
public static void main(String[] args) {
CloseableHttpClient httpClient = HttpClientBuilder.create().build();
try {
URIBuilder uriBuilder = new URIBuilder(uriBase);
// Request parameters.
uriBuilder.setParameter("width", "100");
uriBuilder.setParameter("height", "150");
uriBuilder.setParameter("smartCropping", "true");
// Prepare the URI for the REST API method.
URI uri = uriBuilder.build();
HttpPost request = new HttpPost(uri);
// Request headers.
request.setHeader("Content-Type", "application/json");
request.setHeader("Ocp-Apim-Subscription-Key", subscriptionKey);
// Request body.
StringEntity requestEntity =
new StringEntity("{\"url\":\"" + imageToAnalyze + "\"}");
request.setEntity(requestEntity);
// Call the REST API method and get the response entity.
HttpResponse response = httpClient.execute(request);
HttpEntity entity = response.getEntity();
// Check for success.
b. Replace the value of uriBase with the endpoint URL for the Get Thumbnail method from the Azure
region where you obtained your subscription keys, if necessary.
c. Optionally, replace the value of imageToAnalyze with the URL of a different image for which you want to
generate a thumbnail.
5. Save, then build the Java project.
6. If you're using an IDE, run Main . Otherwise, open a command prompt window and then use the java
command to run the compiled class. For example, java Main .
// Check for success.
if (response.getStatusLine().getStatusCode() == 200) {
// Display the thumbnail.
System.out.println("\nDisplaying thumbnail.\n");
displayImage(entity.getContent());
} else {
// Format and display the JSON error message.
String jsonString = EntityUtils.toString(entity);
JSONObject json = new JSONObject(jsonString);
System.out.println("Error:\n");
System.out.println(json.toString(2));
}
} catch (Exception e) {
System.out.println(e.getMessage());
}
}
// Displays the given input stream as an image.
private static void displayImage(InputStream inputStream) {
try {
BufferedImage bufferedImage = ImageIO.read(inputStream);
ImageIcon imageIcon = new ImageIcon(bufferedImage);
JLabel jLabel = new JLabel();
jLabel.setIcon(imageIcon);
JFrame jFrame = new JFrame();
jFrame.setLayout(new FlowLayout());
jFrame.setSize(100, 150);
jFrame.add(jLabel);
jFrame.setVisible(true);
jFrame.setDefaultCloseOperation(JFrame.EXIT_ON_CLOSE);
} catch (Exception e) {
System.out.println(e.getMessage());
}
}
}
Examine the response
Next steps
A successful response is returned as binary data, which represents the image data for the thumbnail. If the request
succeeds, the thumbnail is generated from the binary data in the response and displayed in a separate window
created by the sample application. If the request fails, the response is displayed in the console window. The
response for the failed request contains an error code and a message to help determine what went wrong.
Explore a Java Swing application that uses Computer Vision to perform optical character recognition (OCR); create
smart-cropped thumbnails; plus detect, categorize, tag, and describe visual features, including faces, in an image. To
rapidly experiment with the Computer Vision API, try the Open API testing console.
Computer Vision API Java Tutorial

Quickstart: Generate a thumbnail using the REST API
and JavaScript in Computer Vision
4/18/2019 • 3 minutes to read • Edit Online
Prerequisites
Create and run the sample
<!DOCTYPE html>
<html>
<head>
<title>Thumbnail Sample</title>
</head>
<body>
<script type="text/javascript">
function processImage() {
// **********************************************
// *** Update or verify the following values. ***
// **********************************************
// Replace <Subscription Key> with your valid subscription key.
var subscriptionKey = "<Subscription Key>";
// You must use the same Azure region in your REST API method as you used to
// get your subscription keys. For example, if you got your subscription keys
// from the West US region, replace "westcentralus" in the URL
// below with "westus".
//
// Free trial subscription keys are generated in the "westus" region.
In this quickstart, you generate a thumbnail from an image by using Computer Vision's REST API. You specify the
height and width, which can differ in aspect ratio from the input image. Computer Vision uses smart cropping to
intelligently identify the area of interest and generate cropping coordinates based on that region.
If you don't have an Azure subscription, create a free account before you begin.
You must have a subscription key for Computer Vision. You can get a free trial key from Try Cognitive Services. Or,
follow the instructions in Create a Cognitive Services account to subscribe to Computer Vision and get your key.
To create and run the sample, do the following steps:
1. Copy the following code into a text editor.
2. Make the following changes in code where needed:
3. Save the code as a file with an .html extension. For example, get-thumbnail.html .
4. Open a browser window.
5. In the browser, drag and drop the file into the browser window.
6. When the webpage is displayed in the browser, choose the Generate thumbnail button.
a. Replace the value of subscriptionKey with your subscription key.
b. Replace the value of uriBase with the endpoint URL for the Get Thumbnail method from the Azure
region where you obtained your subscription keys, if necessary.
c. Optionally, replace the value of the value attribute for the inputImage control with the URL of a
different image that you want to analyze.

// If you use a free trial subscription key, you shouldn't need to change
// this region.
var uriBase =
"https://westcentralus.api.cognitive.microsoft.com/vision/v2.0/generateThumbnail";
// Request parameters.
var params = "?width=100&height=150&smartCropping=true";
// Display the source image.
var sourceImageUrl = document.getElementById("inputImage").value;
document.querySelector("#sourceImage").src = sourceImageUrl;
// Prepare the REST API call:
// Create the HTTP Request object.
var xhr = new XMLHttpRequest();
// Identify the request as a POST, with the URL and parameters.
xhr.open("POST", uriBase + params);
// Add the request headers.
xhr.setRequestHeader("Content-Type","application/json");
xhr.setRequestHeader("Ocp-Apim-Subscription-Key", subscriptionKey);
// Set the response type to "blob" for the thumbnail image data.
xhr.responseType = "blob";
// Process the result of the REST API call.
xhr.onreadystatechange = function(e) {
if(xhr.readyState === XMLHttpRequest.DONE) {
// Thumbnail successfully created.
if (xhr.status === 200) {
// Show response headers.
var s = JSON.stringify(xhr.getAllResponseHeaders(), null, 2);
document.getElementById("responseTextArea").value =
JSON.stringify(xhr.getAllResponseHeaders(), null, 2);
// Show thumbnail image.
var urlCreator = window.URL || window.webkitURL;
var imageUrl = urlCreator.createObjectURL(this.response);
document.querySelector("#thumbnailImage").src = imageUrl;
} else {
// Display the error message. The error message is the response
// body as a JSON string. The code in this code block extracts
// the JSON string from the blob response.
var reader = new FileReader();
// This event fires after the blob has been read.
reader.addEventListener('loadend', (e) => {
document.getElementById("responseTextArea").value =
JSON.stringify(JSON.parse(e.srcElement.result), null, 2);
});
// Start reading the blob as text.
reader.readAsText(xhr.response);
}
}
}
// Make the REST API call.
xhr.send('{"url": ' + '"' + sourceImageUrl + '"}');
};
</script>
<h1>Generate thumbnail image:</h1>
Enter the URL to an image to use in creating a thumbnail image,
then click the <strong>Generate thumbnail</strong> button.
<br><br>
<br><br>
Image for thumbnail:
<input type="text" name="inputImage" id="inputImage"
value="https://upload.wikimedia.org/wikipedia/commons/thumb/5/56/Shorkie_Poo_Puppy.jpg/1280px-
Shorkie_Poo_Puppy.jpg" />
<button onclick="processImage()">Generate thumbnail</button>
<br><br>
<div id="wrapper" style="width:1160px; display:table;">
<div id="jsonOutput" style="width:600px; display:table-cell;">
Response:
<br><br>
<textarea id="responseTextArea" class="UIInput"
style="width:580px; height:400px;"></textarea>
</div>
<div id="imageDiv" style="width:420px; display:table-cell;">
Source image:
<br><br>
<img id="sourceImage" width="400" />
</div>
<div id="thumbnailDiv" style="width:140px; display:table-cell;">
Thumbnail:
<br><br>
<img id="thumbnailImage" />
</div>
</div>
</body>
</html>
Examine the response
Next steps
A successful response is returned as binary data, which represents the image data for the thumbnail. If the request
succeeds, the thumbnail is generated from the binary data in the response and displayed in the browser window. If
the request fails, the response is displayed in the console window. The response for the failed request contains an
error code and a message to help determine what went wrong.
Explore a JavaScript application that uses Computer Vision to perform optical character recognition (OCR); create
smart-cropped thumbnails; plus detect, categorize, tag, and describe visual features, including faces, in an image. To
rapidly experiment with the Computer Vision API, try the Open API testing console.
Computer Vision API JavaScript Tutorial

Quickstart: Generate a thumbnail using the REST API
and Node.js in Computer Vision
4/18/2019 • 2 minutes to read • Edit Online
Prerequisites
Create and run the sample
In this quickstart, you generate a thumbnail from an image by using Computer Vision's REST API. With the Get
Thumbnail method, you can generate a thumbnail of an image. You specify the height and width, which can differ
from the aspect ratio of the input image. Computer Vision uses smart cropping to intelligently identify the area of
interest and generate cropping coordinates based on that region.
If you don't have an Azure subscription, create a free account before you begin.
You must have Node.js 4.x or later installed.
You must have npm installed.
You must have a subscription key for Computer Vision. You can get a free trial key from Try Cognitive Services.
Or, follow the instructions in Create a Cognitive Services account to subscribe to Computer Vision and get your
key.
To create and run the sample, do the following steps:
1. Install the npm request package.
npm install request
a. Open a command prompt window as an administrator.
b. Run the following command:
c. After the package is successfully installed, close the command prompt window.
2. Copy the following code into a text editor.
3. Make the following changes in code where needed:
a. Replace the value of subscriptionKey with your subscription key.
b. Replace the value of uriBase with the endpoint URL for the Get Thumbnail method from the Azure
region where you obtained your subscription keys, if necessary.
c. Optionally, replace the value of imageUrl with the URL of a different image that you want to analyze.
4. Save the code as a file with a .js extension. For example, get-thumbnail.js .
5. Open a command prompt window.
6. At the prompt, use the node command to run the file. For example, node get-thumbnail.js .
'use strict';
const request = require('request');
// Replace <Subscription Key> with your valid subscription key.
const subscriptionKey = '<Subscription Key>';
// You must use the same location in your REST call as you used to get your
// subscription keys. For example, if you got your subscription keys from
// westus, replace "westcentralus" in the URL below with "westus".
const uriBase =
'https://westcentralus.api.cognitive.microsoft.com/vision/v2.0/generateThumbnail';
const imageUrl =
'https://upload.wikimedia.org/wikipedia/commons/9/94/Bloodhound_Puppy.jpg';
// Request parameters.
const params = {
'width': '100',
'height': '100',
'smartCropping': 'true'
};
const options = {
uri: uriBase,
qs: params,
body: '{"url": ' + '"' + imageUrl + '"}',
headers: {
'Content-Type': 'application/json',
'Ocp-Apim-Subscription-Key' : subscriptionKey
}
};
request.post(options, (error, response, body) => {
if (error) {
console.log('Error: ', error);
return;
}
});
Examine the response
Next steps
A successful response is returned as binary data, which represents the image data for the thumbnail. If the request
fails, the response is displayed in the console window. The response for the failed request contains an error code
and a message to help determine what went wrong.
Explore the Computer Vision API used to analyze an image, detect celebrities and landmarks, create a thumbnail,
and extract printed and handwritten text. To rapidly experiment with the Computer Vision API, try the Open API
testing console.
Explore the Computer Vision API
Quickstart: Generate a thumbnail using the REST API
and PHP in Computer Vision
4/18/2019 • 2 minutes to read • Edit Online
Prerequisites
Create and run the sample
In this quickstart, you generate a thumbnail from an image by using Computer Vision's REST API. With the Get
Thumbnail method, you can generate a thumbnail of an image. You specify the height and width, which can differ
from the aspect ratio of the input image. Computer Vision uses smart cropping to intelligently identify the area of
interest and generate cropping coordinates based on that region.
If you don't have an Azure subscription, create a free account before you begin.
You must have PHP installed.
You must have Pear installed.
You must have a subscription key for Computer Vision. You can get a free trial key from Try Cognitive Services.
Or, follow the instructions in Create a Cognitive Services account to subscribe to Computer Vision and get your
key.
To create and run the sample, do the following steps:
1. Install the PHP5 HTTP_Request2 package.
pear install HTTP_Request2
a. Open a command prompt window as an administrator.
b. Run the following command:
c. After the package is successfully installed, close the command prompt window.
2. Copy the following code into a text editor.
3. Make the following changes in code where needed:
a. Replace the value of subscriptionKey with your subscription key.
b. Replace the value of uriBase with the endpoint URL for the Get Thumbnail method from the Azure
region where you obtained your subscription keys, if necessary.
c. Optionally, replace the value of imageUrl with the URL of a different image for which you want to
generate a thumbnail.
4. Save the code as a file with a .php extension. For example, get-thumbnail.php .
5. Open a browser window with PHP support.
6. Drag and drop the file into the browser window.

<html>
<head>
<title>Get Thumbnail Sample</title>
</head>
<body>
<?php
// Replace <Subscription Key> with a valid subscription key.
$ocpApimSubscriptionKey = '<Subscription Key>';
// You must use the same location in your REST call as you used to obtain
// your subscription keys. For example, if you obtained your subscription keys
// from westus, replace "westcentralus" in the URL below with "westus".
$uriBase = 'https://westcentralus.api.cognitive.microsoft.com/vision/v2.0/';
$imageUrl =
'https://upload.wikimedia.org/wikipedia/commons/9/94/Bloodhound_Puppy.jpg';
require_once 'HTTP/Request2.php';
$request = new Http_Request2($uriBase . 'generateThumbnail');
$url = $request->getUrl();
$headers = array(
// Request headers
'Content-Type' => 'application/json',
'Ocp-Apim-Subscription-Key' => $ocpApimSubscriptionKey
);
$request->setHeader($headers);
$parameters = array(
// Request parameters
'width' => '100', // Width of the thumbnail.
'height' => '100', // Height of the thumbnail.
'smartCropping' => 'true',
);
$url->setQueryVariables($parameters);
$request->setMethod(HTTP_Request2::METHOD_POST);
// Request body parameters
$body = json_encode(array('url' => $imageUrl));
// Request body
$request->setBody($body);
try
{
$response = $request->send();
echo "<pre>" .
json_encode(json_decode($response->getBody()), JSON_PRETTY_PRINT) . "</pre>";
}
catch (HttpException $ex)
{
echo "<pre>" . $ex . "</pre>";
}
?>
</body>
</html>
Examine the response
A successful response is returned as binary data, which represents the image data for the thumbnail. If the request
fails, the response is displayed in the browser window. The response for the failed request contains an error code
and a message to help determine what went wrong.

Clean up resources
Next steps
When no longer needed, delete the file, and then uninstall the PHP5 HTTP_Request2 package. To uninstall the
package, do the following steps:
pear uninstall HTTP_Request2
1. Open a command prompt window as an administrator.
2. Run the following command:
3. After the package is successfully uninstalled, close the command prompt window.
Explore the Computer Vision API to analyze an image, detect celebrities and landmarks, create a thumbnail, and
extract printed and handwritten text. To rapidly experiment with the Computer Vision API, try the Open API testing
console.
Explore the Computer Vision API
Quickstart: Generate a thumbnail using the REST API
and Python in Computer Vision
4/18/2019 • 2 minutes to read • Edit Online
Prerequisites
Create and run the sample
In this quickstart, you will generate a thumbnail from an image using Computer Vision's REST API. With the Get
Thumbnail method, you can specify the desired height and width, and Computer Vision uses smart cropping to
intelligently identify the area of interest and generate cropping coordinates based on that region.
If you don't have an Azure subscription, create a free account before you begin.
You must have a subscription key for Computer Vision. You can get a free trial key from Try Cognitive Services.
Or, follow the instructions in Create a Cognitive Services account to subscribe to Computer Vision and get your
key.
A code editor such as Visual Studio Code
To create and run the sample, copy the following code into the code editor.
import requests
# If you are using a Jupyter notebook, uncomment the following line.
#%matplotlib inline
import matplotlib.pyplot as plt
from PIL import Image
from io import BytesIO
# Replace <Subscription Key> with your valid subscription key.
subscription_key = "<Subscription Key>"
assert subscription_key
# You must use the same region in your REST call as you used to get your
# subscription keys. For example, if you got your subscription keys from
# westus, replace "westcentralus" in the URI below with "westus".
#
# Free trial subscription keys are generated in the "westus" region.
# If you use a free trial subscription key, you shouldn't need to change
# this region.
vision_base_url = "https://westcentralus.api.cognitive.microsoft.com/vision/v2.0/"
thumbnail_url = vision_base_url + "generateThumbnail"
# Set image_url to the URL of an image that you want to analyze.
image_url = "https://upload.wikimedia.org/wikipedia/commons/9/94/Bloodhound_Puppy.jpg"
headers = {'Ocp-Apim-Subscription-Key': subscription_key}
params = {'width': '50', 'height': '50', 'smartCropping': 'true'}
data = {'url': image_url}
response = requests.post(thumbnail_url, headers=headers, params=params, json=data)
response.raise_for_status()
thumbnail = Image.open(BytesIO(response.content))
# Display the thumbnail.
plt.imshow(thumbnail)
plt.axis("off")
# Verify the thumbnail size.
print("Thumbnail is {0}-by-{1}".format(*thumbnail.size))
Examine the response
Run in Jupyter (optional)
Next, do the following:
1. Replace the value of subscription_key with your subscription key.
2. Replace the value of vision_base_url with the endpoint URL for the Computer Vision resource in the Azure
region where you obtained your subscription keys, if necessary.
3. Optionally, replace the value of image_url with the URL of a different image for which you want to generate a
thumbnail.
4. Save the code as a file with an .py extension. For example, get-thumbnail.py .
5. Open a command prompt window.
6. At the prompt, use the python command to run the sample. For example, python get-thumbnail.py .
A successful response is returned as binary data which represents the image data for the thumbnail. The sample
should display this image. If the request fails, the response is displayed in the command prompt window and
should contain an error code.
You can optionally run this quickstart in a step-by step fashion using a Jupyter notebook on MyBinder. To launch

Quickstart: Generate a thumbnail using the REST API
and Ruby in Computer Vision
4/18/2019 • 2 minutes to read • Edit Online
Prerequisites
Create and run the sample
In this quickstart, you generate a thumbnail from an image by using Computer Vision's REST API. With the Get
Thumbnail method, you can generate a thumbnail of an image. You specify the height and width, which can differ
from the aspect ratio of the input image. Computer Vision uses smart cropping to intelligently identify the area of
interest and generate cropping coordinates based on that region.
If you don't have an Azure subscription, create a free account before you begin.
You must have Ruby 2.4.x or later installed.
You must have a subscription key for Computer Vision. You can get a free trial key from Try Cognitive Services.
Or, follow the instructions in Create a Cognitive Services account to subscribe to Computer Vision and get your
key.
To create and run the sample, do the following steps:
1. Copy the following code into a text editor.
2. Make the following changes in code where needed:
3. Save the code as a file with an .rb extension. For example, get-thumbnail.rb .
4. Open a command prompt window.
5. At the prompt, use the ruby command to run the sample. For example, ruby get-thumbnail.rb .
a. Replace <Subscription Key> with your subscription key.
b. Replace https://westcentralus.api.cognitive.microsoft.com/vision/v2.0/analyze with the endpoint URL
for the Get Thumbnail method in the Azure region where you obtained your subscription keys, if
necessary.
c. Optionally, replace
https://upload.wikimedia.org/wikipedia/commons/thumb/5/56/Shorkie_Poo_Puppy.jpg/1280px-
Shorkie_Poo_Puppy.jpg\
with the URL of a different image for which you want to generate a thumbnail.
require 'net/http'
# You must use the same location in your REST call as you used to get your
# subscription keys. For example, if you got your subscription keys from westus,
# replace "westcentralus" in the URL below with "westus".
uri = URI('https://westcentralus.api.cognitive.microsoft.com/vision/v2.0/generateThumbnail')
uri.query = URI.encode_www_form({
# Request parameters
'width' => '100',
'height' => '100',
'smartCropping' => 'true'
})
request = Net::HTTP::Post.new(uri.request_uri)
# Request headers
# Replace <Subscription Key> with your valid subscription key.
request['Ocp-Apim-Subscription-Key'] = '<Subscription Key>'
request['Content-Type'] = 'application/json'
request.body =
"{\"url\": \"https://upload.wikimedia.org/wikipedia/commons/thumb/5/56/" +
"Shorkie_Poo_Puppy.jpg/1280px-Shorkie_Poo_Puppy.jpg\"}"
response = Net::HTTP.start(uri.host, uri.port, :use_ssl => uri.scheme == 'https') do |http|
http.request(request)
end
#puts response.body
Examine the response
Next steps
A successful response is returned as binary data, which represents the image data for the thumbnail. If the request
fails, the response is displayed in the console window. The response for the failed request contains an error code
and a message to help determine what went wrong.
Explore the Computer Vision API used to analyze an image, detect celebrities and landmarks, create a thumbnail,
and extract printed and handwritten text. To rapidly experiment with the Computer Vision API, try the Open API
testing console.
Explore the Computer Vision API

Quickstart: Extract printed text (OCR) using the REST
API and C# in Computer Vision
4/18/2019 • 4 minutes to read • Edit Online
Prerequisites
Create and run the sample application
using Newtonsoft.Json.Linq;
using System;
using System.IO;
using System.Net.Http;
using System.Net.Http.Headers;
using System.Threading.Tasks;
namespace CSHttpClientSample
{
static class Program
{
// Replace <Subscription Key> with your valid subscription key.
const string subscriptionKey = "<Subscription Key>";
// You must use the same Azure region in your REST API method as you used to
// get your subscription keys. For example, if you got your subscription keys
// from the West US region, replace "westcentralus" in the URL
In this quickstart, you will extract printed text with optical character recognition (OCR) from an image by using
Computer Vision's REST API. With the OCR feature, you can detect printed text in an image and extract recognized
characters into a machine-usable character stream.
If you don't have an Azure subscription, create a free account before you begin.
You must have Visual Studio 2015 or later.
You must have a subscription key for Computer Vision. You can get a free trial key from Try Cognitive Services.
Or, follow the instructions in Create a Cognitive Services account to subscribe to Computer Vision and get your
key.
To create the sample in Visual Studio, do the following steps:
1. Create a new Visual Studio solution in Visual Studio, using the Visual C# Console App template.
2. Install the Newtonsoft.Json NuGet package.
3. Replace the code in Program.cs with the following code, and then make the following changes in code where
needed:
4. Run the program.
5. At the prompt, enter the path to a local image.
a. On the menu, click Tools, select NuGet Package Manager, then Manage NuGet Packages for
Solution.
b. Click the Browse tab, and in the Search box type "Newtonsoft.Json".
c. Select Newtonsoft.Json when it displays, then click the checkbox next to your project name, and Install.
a. Replace the value of subscriptionKey with your subscription key.
b. Replace the value of uriBase with the endpoint URL for the OCR method from the Azure region where
you obtained your subscription keys, if necessary.

// from the West US region, replace "westcentralus" in the URL
// below with "westus".
//
// Free trial subscription keys are generated in the "westus" region.
// If you use a free trial subscription key, you shouldn't need to change
// this region.
const string uriBase =
"https://westcentralus.api.cognitive.microsoft.com/vision/v2.0/ocr";
static void Main()
{
// Get the path and filename to process from the user.
Console.WriteLine("Optical Character Recognition:");
Console.Write("Enter the path to an image with text you wish to read: ");
string imageFilePath = Console.ReadLine();
if (File.Exists(imageFilePath))
{
// Call the REST API method.
Console.WriteLine("\nWait a moment for the results to appear.\n");
MakeOCRRequest(imageFilePath).Wait();
}
else
{
Console.WriteLine("\nInvalid file path");
}
Console.WriteLine("\nPress Enter to exit...");
Console.ReadLine();
}
/// <summary>
/// Gets the text visible in the specified image file by using
/// the Computer Vision REST API.
/// </summary>
/// <param name="imageFilePath">The image file with printed text.</param>
static async Task MakeOCRRequest(string imageFilePath)
{
try
{
HttpClient client = new HttpClient();
// Request headers.
client.DefaultRequestHeaders.Add(
"Ocp-Apim-Subscription-Key", subscriptionKey);
// Request parameters.
// The language parameter doesn't specify a language, so the
// method detects it automatically.
// The detectOrientation parameter is set to true, so the method detects and
// and corrects text orientation before detecting text.
string requestParameters = "language=unk&detectOrientation=true";
// Assemble the URI for the REST API method.
string uri = uriBase + "?" + requestParameters;
HttpResponseMessage response;
// Read the contents of the specified local image
// into a byte array.
byte[] byteData = GetImageAsByteArray(imageFilePath);
// Add the byte array as an octet stream to the request body.
using (ByteArrayContent content = new ByteArrayContent(byteData))
{
// This example uses the "application/octet-stream" content type.
// The other content types you can use are "application/json"
// and "multipart/form-data".
content.Headers.ContentType =
new MediaTypeHeaderValue("application/octet-stream");

// Asynchronously call the REST API method.
response = await client.PostAsync(uri, content);
}
// Asynchronously get the JSON response.
string contentString = await response.Content.ReadAsStringAsync();
// Display the JSON response.
Console.WriteLine("\nResponse:\n\n{0}\n",
JToken.Parse(contentString).ToString());
}
catch (Exception e)
{
Console.WriteLine("\n" + e.Message);
}
}
/// <summary>
/// Returns the contents of the specified file as a byte array.
/// </summary>
/// <param name="imageFilePath">The image file to read.</param>
/// <returns>The byte array of the image data.</returns>
static byte[] GetImageAsByteArray(string imageFilePath)
{
// Open a read-only file stream for the specified file.
using (FileStream fileStream =
new FileStream(imageFilePath, FileMode.Open, FileAccess.Read))
{
// Read the file's contents into a byte array.
BinaryReader binaryReader = new BinaryReader(fileStream);
return binaryReader.ReadBytes((int)fileStream.Length);
}
}
}
}
Examine the response
{
"language": "en",
"textAngle": -1.5000000000000335,
"orientation": "Up",
"regions": [
{
"boundingBox": "154,49,351,575",
"lines": [
{
"boundingBox": "165,49,340,117",
"words": [
{
"boundingBox": "165,49,63,109",
"text": "A"
},
{
"boundingBox": "261,50,244,116",
"text": "GOAL"
}
]
},
{
"boundingBox": "165,169,339,93",
"words": [
A successful response is returned in JSON. The sample application parses and displays a successful response in the
console window, similar to the following example:
{
"boundingBox": "165,169,339,93",
"text": "WITHOUT"
}
]
},
{
"boundingBox": "159,264,342,117",
"words": [
{
"boundingBox": "159,264,64,110",
"text": "A"
},
{
"boundingBox": "255,266,246,115",
"text": "PLAN"
}
]
},
{
"boundingBox": "161,384,338,119",
"words": [
{
"boundingBox": "161,384,86,113",
"text": "IS"
},
{
"boundingBox": "274,387,225,116",
"text": "JUST"
}
]
},
{
"boundingBox": "154,506,341,118",
"words": [
{
"boundingBox": "154,506,62,111",
"text": "A"
},
{
"boundingBox": "248,508,247,116",
"text": "WISH"
}
]
}
]
}
]
}
Clean up resources
Next steps
When no longer needed, delete the Visual Studio solution. To do so, open File Explorer, navigate to the folder in
which you created the Visual Studio solution, and delete the folder.
Explore a basic Windows application that uses Computer Vision to perform optical character recognition (OCR);
create smart-cropped thumbnails; plus detect, categorize, tag, and describe visual features, including faces, in an
image.
Computer Vision API C# Tutorial
Quickstart: Extract printed text (OCR) using the REST
API and cURL in Computer Vision
4/18/2019 • 2 minutes to read • Edit Online
Prerequisites
Create and run the sample command
curl -H "Ocp-Apim-Subscription-Key: <subscriptionKey>" -H "Content-Type: application/json"
"https://westcentralus.api.cognitive.microsoft.com/vision/v2.0/ocr?language=unk&detectOrientation=true" -d "
{\"url\":\"https://upload.wikimedia.org/wikipedia/commons/thumb/a/af/Atomist_quote_from_Democritus.png/338px-
Atomist_quote_from_Democritus.png\"}"
Examine the response
{
"language": "en",
"orientation": "Up",
"textAngle": 0,
"regions": [
{
In this quickstart, you extract printed text with optical character recognition (OCR) from an image by using
Computer Vision's REST API. With the OCR method, you can detect printed text in an image and extract
recognized characters into a machine-usable character stream.
If you don't have an Azure subscription, create a free account before you begin.
You must have cURL.
You must have a subscription key for Computer Vision. You can get a free trial key from Try Cognitive Services.
Or, follow the instructions in Create a Cognitive Services account to subscribe to Computer Vision and get your
key.
To create and run the sample, do the following steps:
1. Copy the following command into a text editor.
2. Make the following changes in the command where needed:
3. Open a command prompt window.
4. Paste the command from the text editor into the command prompt window, and then run the command.
a. Replace the value of <subscriptionKey> with your subscription key.
b. Replace the request URL (https://westcentralus.api.cognitive.microsoft.com/vision/v2.0/ocr ) with the
endpoint URL for the OCR method from the Azure region where you obtained your subscription keys, if
necessary.
c. Optionally, change the image URL in the request body (
https://upload.wikimedia.org/wikipedia/commons/thumb/a/af/Atomist_quote_from_Democritus.png/338px-
Atomist_quote_from_Democritus.png\
) to the URL of a different image to be analyzed.
A successful response is returned in JSON. The sample application parses and displays a successful response in the
command prompt window, similar to the following example:

{
"boundingBox": "21,16,304,451",
"lines": [
{
"boundingBox": "28,16,288,41",
"words": [
{
"boundingBox": "28,16,288,41",
"text": "NOTHING"
}
]
},
{
"boundingBox": "27,66,283,52",
"words": [
{
"boundingBox": "27,66,283,52",
"text": "EXISTS"
}
]
},
{
"boundingBox": "27,128,292,49",
"words": [
{
"boundingBox": "27,128,292,49",
"text": "EXCEPT"
}
]
},
{
"boundingBox": "24,188,292,54",
"words": [
{
"boundingBox": "24,188,292,54",
"text": "ATOMS"
}
]
},
{
"boundingBox": "22,253,297,32",
"words": [
{
"boundingBox": "22,253,105,32",
"text": "AND"
},
{
"boundingBox": "144,253,175,32",
"text": "EMPTY"
}
]
},
{
"boundingBox": "21,298,304,60",
"words": [
{
"boundingBox": "21,298,304,60",
"text": "SPACE."
}
]
},
{
"boundingBox": "26,387,294,37",
"words": [
{
"boundingBox": "26,387,210,37",
"text": "Everything"
},
{
"boundingBox": "249,389,71,27",
"boundingBox": "249,389,71,27",
"text": "else"
}
]
},
{
"boundingBox": "127,431,198,36",
"words": [
{
"boundingBox": "127,431,31,29",
"text": "is"
},
{
"boundingBox": "172,431,153,36",
"text": "opinion."
}
]
}
]
}
]
}
Next steps
Explore the Computer Vision API used to analyze an image, detect celebrities and landmarks, create a thumbnail,
and extract printed and handwritten text. To rapidly experiment with the Computer Vision API, try the Open API
testing console.
Explore the Computer Vision API
Quickstart: Extract printed text (OCR) using the REST
API and Go in Computer Vision
4/18/2019 • 3 minutes to read • Edit Online
Prerequisites
Create and run the sample
package main
import (
"encoding/json"
"fmt"
"io/ioutil"
"net/http"
"strings"
"time"
)
func main() {
// Replace <Subscription Key> with your valid subscription key.
const subscriptionKey = "<Subscription Key>"
// You must use the same Azure region in your REST API method as you used to
// get your subscription keys. For example, if you got your subscription keys
// from the West US region, replace "westcentralus" in the URL
// below with "westus".
In this quickstart, you extract printed text with optical character recognition (OCR) from an image by using
Computer Vision's REST API. With the OCR method, you can detect printed text in an image and extract
recognized characters into a machine-usable character stream.
If you don't have an Azure subscription, create a free account before you begin.
You must have Go installed.
You must have a subscription key for Computer Vision. You can get a free trial key from Try Cognitive Services.
Or, follow the instructions in Create a Cognitive Services account to subscribe to Computer Vision and get your
key.
To create and run the sample, do the following steps:
1. Copy the following code into a text editor.
2. Make the following changes in code where needed:
3. Save the code as a file with a .go extension. For example, get-printed-text.go .
4. Open a command prompt window.
5. At the prompt, run the go build command to compile the package from the file. For example,
go build get-printed-text.go .
6. At the prompt, run the compiled package. For example, get-printed-text .
a. Replace the value of subscriptionKey with your subscription key.
b. Replace the value of uriBase with the endpoint URL for the OCR method from the Azure region where
you obtained your subscription keys, if necessary.
c. Optionally, replace the value of imageUrl with the URL of a different image that you want to analyze.
//
// Free trial subscription keys are generated in the "westus" region.
// If you use a free trial subscription key, you shouldn't need to change
// this region.
const uriBase =
"https://westcentralus.api.cognitive.microsoft.com/vision/v2.0/ocr"
const imageUrl = "https://upload.wikimedia.org/wikipedia/commons/thumb/a/af/" +
"Atomist_quote_from_Democritus.png/338px-Atomist_quote_from_Democritus.png"
const params = "?language=unk&detectOrientation=true"
const uri = uriBase + params
const imageUrlEnc = "{\"url\":\"" + imageUrl + "\"}"
reader := strings.NewReader(imageUrlEnc)
// Create the Http client
client := &http.Client{
Timeout: time.Second * 2,
}
// Create the Post request, passing the image URL in the request body
req, err := http.NewRequest("POST", uri, reader)
if err != nil {
panic(err)
}
// Add headers
req.Header.Add("Content-Type", "application/json")
req.Header.Add("Ocp-Apim-Subscription-Key", subscriptionKey)
// Send the request and retrieve the response
resp, err := client.Do(req)
if err != nil {
panic(err)
}
defer resp.Body.Close()
// Read the response body.
// Note, data is a byte array
data, err := ioutil.ReadAll(resp.Body)
if err != nil {
panic(err)
}
// Parse the Json data
var f interface{}
json.Unmarshal(data, &f)
// Format and display the Json result
jsonFormatted, _ := json.MarshalIndent(f, "", " ")
fmt.Println(string(jsonFormatted))
}
Examine the response
{
"language": "en",
"orientation": "Up",
"regions": [
{
"boundingBox": "21,16,304,451",
"lines": [
A successful response is returned in JSON. The sample application parses and displays a successful response in the
command prompt window, similar to the following example:

"lines": [
{
"boundingBox": "28,16,288,41",
"words": [
{
"boundingBox": "28,16,288,41",
"text": "NOTHING"
}
]
},
{
"boundingBox": "27,66,283,52",
"words": [
{
"boundingBox": "27,66,283,52",
"text": "EXISTS"
}
]
},
{
"boundingBox": "27,128,292,49",
"words": [
{
"boundingBox": "27,128,292,49",
"text": "EXCEPT"
}
]
},
{
"boundingBox": "24,188,292,54",
"words": [
{
"boundingBox": "24,188,292,54",
"text": "ATOMS"
}
]
},
{
"boundingBox": "22,253,297,32",
"words": [
{
"boundingBox": "22,253,105,32",
"text": "AND"
},
{
"boundingBox": "144,253,175,32",
"text": "EMPTY"
}
]
},
{
"boundingBox": "21,298,304,60",
"words": [
{
"boundingBox": "21,298,304,60",
"text": "SPACE."
}
]
},
{
"boundingBox": "26,387,294,37",
"words": [
{
"boundingBox": "26,387,210,37",
"text": "Everything"
},
{
"boundingBox": "249,389,71,27",
"text": "else"
}

}
]
},
{
"boundingBox": "127,431,198,36",
"words": [
{
"boundingBox": "127,431,31,29",
"text": "is"
},
{
"boundingBox": "172,431,153,36",
"text": "opinion."
}
]
}
]
}
],
"textAngle": 0
}
Next steps
Explore the Computer Vision API used to analyze an image, detect celebrities and landmarks, create a thumbnail,
and extract printed and handwritten text. To rapidly experiment with the Computer Vision API, try the Open API
testing console.
Explore the Computer Vision API
Quickstart: Extract printed text (OCR) using the REST
API and Java in Computer Vision
4/18/2019 • 3 minutes to read • Edit Online
Prerequisites
Create and run the sample application
In this quickstart, you extract printed text with optical character recognition (OCR) from an image by using
Computer Vision's REST API. With the OCR method, you can detect printed text in an image and extract
recognized characters into a machine-usable character stream.
If you don't have an Azure subscription, create a free account before you begin.
You must have Java™ Platform, Standard Edition Development Kit 7 or 8 (JDK 7 or 8) installed.
You must have a subscription key for Computer Vision. You can get a free trial key from Try Cognitive Services.
Or, follow the instructions in Create a Cognitive Services account to subscribe to Computer Vision and get your
key.
To create and run the sample, do the following steps:
import java.net.URI;
import org.apache.http.HttpEntity;
import org.apache.http.HttpResponse;
import org.apache.http.client.methods.HttpPost;
import org.apache.http.entity.StringEntity;
import org.apache.http.client.utils.URIBuilder;
import org.apache.http.impl.client.CloseableHttpClient;
import org.apache.http.impl.client.HttpClientBuilder;
import org.apache.http.util.EntityUtils;
import org.json.JSONObject;
1. Create a new Java project in your favorite IDE or editor. If the option is available, create the Java project from
a command line application template.
2. Import the following libraries into your Java project. If you're using Maven, the Maven coordinates are
provided for each library.
Apache HTTP client (org.apache.httpcomponents:httpclient:4.5.5)
Apache HTTP core (org.apache.httpcomponents:httpcore:4.4.9)
JSON library (org.json:json:20180130)
3. Add the following import statements to the file that contains the Main public class for your project.
4. Replace the Main public class with the following code, then make the following changes in code where
needed:
a. Replace the value of subscriptionKey with your subscription key.
b. Replace the value of uriBase with the endpoint URL for the OCR method from the Azure region where
you obtained your subscription keys, if necessary.
c. Optionally, replace the value of imageToAnalyze with the URL of a different image from which you want
to extract printed text.

5. Save, then build the Java project.
6. If you're using an IDE, run Main . Otherwise, open a command prompt window and then use the java
command to run the compiled class. For example, java Main .

public class Main {
// **********************************************
// *** Update or verify the following values. ***
// **********************************************
// Replace <Subscription Key> with your valid subscription key.
private static final String subscriptionKey = "<Subscription Key>";
// You must use the same Azure region in your REST API method as you used to
// get your subscription keys. For example, if you got your subscription keys
// from the West US region, replace "westcentralus" in the URL
// below with "westus".
//
// Free trial subscription keys are generated in the "westus" region.
// If you use a free trial subscription key, you shouldn't need to change
// this region.
private static final String uriBase =
"https://westcentralus.api.cognitive.microsoft.com/vision/v2.0/ocr";
private static final String imageToAnalyze =
"https://upload.wikimedia.org/wikipedia/commons/thumb/a/af/" +
"Atomist_quote_from_Democritus.png/338px-Atomist_quote_from_Democritus.png";
public static void main(String[] args) {
CloseableHttpClient httpClient = HttpClientBuilder.create().build();
try {
URIBuilder uriBuilder = new URIBuilder(uriBase);
uriBuilder.setParameter("language", "unk");
uriBuilder.setParameter("detectOrientation", "true");
// Request parameters.
URI uri = uriBuilder.build();
HttpPost request = new HttpPost(uri);
// Request headers.
request.setHeader("Content-Type", "application/json");
request.setHeader("Ocp-Apim-Subscription-Key", subscriptionKey);
// Request body.
StringEntity requestEntity =
new StringEntity("{\"url\":\"" + imageToAnalyze + "\"}");
request.setEntity(requestEntity);
// Call the REST API method and get the response entity.
HttpResponse response = httpClient.execute(request);
HttpEntity entity = response.getEntity();
if (entity != null) {
// Format and display the JSON response.
String jsonString = EntityUtils.toString(entity);
JSONObject json = new JSONObject(jsonString);
System.out.println("REST Response:\n");
System.out.println(json.toString(2));
}
} catch (Exception e) {
// Display error message.
System.out.println(e.getMessage());
}
}
}
Examine the response
REST Response:
{
"orientation": "Up",
"regions": [{
"boundingBox": "21,16,304,451",
"lines": [
{
"boundingBox": "28,16,288,41",
"words": [{
"boundingBox": "28,16,288,41",
"text": "NOTHING"
}]
},
{
"boundingBox": "27,66,283,52",
"words": [{
"boundingBox": "27,66,283,52",
"text": "EXISTS"
}]
},
{
"boundingBox": "27,128,292,49",
"words": [{
"boundingBox": "27,128,292,49",
"text": "EXCEPT"
}]
},
{
"boundingBox": "24,188,292,54",
"words": [{
"boundingBox": "24,188,292,54",
"text": "ATOMS"
}]
},
{
"boundingBox": "22,253,297,32",
"words": [
{
"boundingBox": "22,253,105,32",
"text": "AND"
},
{
"boundingBox": "144,253,175,32",
"text": "EMPTY"
}
]
},
{
"boundingBox": "21,298,304,60",
"words": [{
"boundingBox": "21,298,304,60",
"text": "SPACE."
}]
},
{
"boundingBox": "26,387,294,37",
"words": [
{
"boundingBox": "26,387,210,37",
"text": "Everything"
},
{
"boundingBox": "249,389,71,27",
"text": "else"
A successful response is returned in JSON. The sample application parses and displays a successful response in the
console window, similar to the following example:
"text": "else"
}
]
},
{
"boundingBox": "127,431,198,36",
"words": [
{
"boundingBox": "127,431,31,29",
"text": "is"
},
{
"boundingBox": "172,431,153,36",
"text": "opinion."
}
]
}
]
}],
"textAngle": 0,
"language": "en"
}
Clean up resources
Next steps
When no longer needed, delete the Java project, including the compiled class and imported libraries.
Explore a Java Swing application that uses Computer Vision to perform optical character recognition (OCR); create
smart-cropped thumbnails; plus detect, categorize, tag, and describe visual features, including faces, in an image. To
rapidly experiment with the Computer Vision API, try the Open API testing console.
Computer Vision API Java Tutorial

Quickstart: Extract printed text (OCR) using the REST
API and JavaScript in Computer Vision
4/18/2019 • 3 minutes to read • Edit Online
Prerequisites
Create and run the sample
<!DOCTYPE html>
<html>
<head>
<title>OCR Sample</title>
<script src="https://ajax.googleapis.com/ajax/libs/jquery/1.9.0/jquery.min.js"></script>
</head>
<body>
<script type="text/javascript">
function processImage() {
// **********************************************
// *** Update or verify the following values. ***
// **********************************************
// Replace <Subscription Key> with your valid subscription key.
var subscriptionKey = "<Subscription Key>";
// You must use the same Azure region in your REST API method as you used to
// get your subscription keys. For example, if you got your subscription keys
// from the West US region, replace "westcentralus" in the URL
// below with "westus".
//
In this quickstart, you extract printed text with optical character recognition (OCR) from an image by using
Computer Vision's REST API. With the OCR method, you can detect printed text in an image and extract
recognized characters into a machine-usable character stream.
If you don't have an Azure subscription, create a free account before you begin.
You must have a subscription key for Computer Vision. You can get a free trial key from Try Cognitive Services. Or,
follow the instructions in Create a Cognitive Services account to subscribe to Computer Vision and get your key.
To create and run the sample, do the following steps:
1. Copy the following code into a text editor.
2. Make the following changes in code where needed:
3. Save the code as a file with an .html extension. For example, get-printed-text.html .
4. Open a browser window.
5. In the browser, drag and drop the file into the browser window.
6. When the webpage is displayed in the browser, choose the Read image button.
a. Replace the value of subscriptionKey with your subscription key.
b. Replace the value of uriBase with the endpoint URL for the OCR method from the Azure region where
you obtained your subscription keys, if necessary.
c. Optionally, replace the value of the value attribute for the inputImage control with the URL of a
different image that you want to analyze.

// Free trial subscription keys are generated in the "westus" region.
// If you use a free trial subscription key, you shouldn't need to change
// this region.
var uriBase =
"https://westcentralus.api.cognitive.microsoft.com/vision/v2.0/ocr";
// Request parameters.
var params = {
"language": "unk",
"detectOrientation": "true",
};
// Display the image.
var sourceImageUrl = document.getElementById("inputImage").value;
document.querySelector("#sourceImage").src = sourceImageUrl;
// Perform the REST API call.
$.ajax({
url: uriBase + "?" + $.param(params),
// Request headers.
beforeSend: function(jqXHR){
jqXHR.setRequestHeader("Content-Type","application/json");
jqXHR.setRequestHeader("Ocp-Apim-Subscription-Key", subscriptionKey);
},
type: "POST",
// Request body.
data: '{"url": ' + '"' + sourceImageUrl + '"}',
})
.done(function(data) {
// Show formatted JSON on webpage.
$("#responseTextArea").val(JSON.stringify(data, null, 2));
})
.fail(function(jqXHR, textStatus, errorThrown) {
// Display error message.
var errorString = (errorThrown === "") ?
"Error. " : errorThrown + " (" + jqXHR.status + "): ";
errorString += (jqXHR.responseText === "") ? "" :
(jQuery.parseJSON(jqXHR.responseText).message) ?
jQuery.parseJSON(jqXHR.responseText).message :
jQuery.parseJSON(jqXHR.responseText).error.message;
alert(errorString);
});
};
</script>
<h1>Optical Character Recognition (OCR):</h1>
Enter the URL to an image of printed text, then
click the <strong>Read image</strong> button.
<br><br>
Image to read:
<input type="text" name="inputImage" id="inputImage"
value="https://upload.wikimedia.org/wikipedia/commons/thumb/a/af/Atomist_quote_from_Democritus.png/338px-
Atomist_quote_from_Democritus.png" />
<button onclick="processImage()">Read image</button>
<br><br>
<div id="wrapper" style="width:1020px; display:table;">
<div id="jsonOutput" style="width:600px; display:table-cell;">
Response:
<br><br>
<textarea id="responseTextArea" class="UIInput"
style="width:580px; height:400px;"></textarea>
</div>
<div id="imageDiv" style="width:420px; display:table-cell;">
Source image:
Source image:
<br><br>
<img id="sourceImage" width="400" />
</div>
</div>
</body>
</html>
Examine the response
{
"language": "en",
"orientation": "Up",
"textAngle": 0,
"regions": [
{
"boundingBox": "21,16,304,451",
"lines": [
{
"boundingBox": "28,16,288,41",
"words": [
{
"boundingBox": "28,16,288,41",
"text": "NOTHING"
}
]
},
{
"boundingBox": "27,66,283,52",
"words": [
{
"boundingBox": "27,66,283,52",
"text": "EXISTS"
}
]
},
{
"boundingBox": "27,128,292,49",
"words": [
{
"boundingBox": "27,128,292,49",
"text": "EXCEPT"
}
]
},
{
"boundingBox": "24,188,292,54",
"words": [
{
"boundingBox": "24,188,292,54",
"text": "ATOMS"
}
]
},
{
"boundingBox": "22,253,297,32",
"words": [
{
"boundingBox": "22,253,105,32",
"text": "AND"
},
{
"boundingBox": "144,253,175,32",
"text": "EMPTY"
A successful response is returned in JSON. The sample webpage parses and displays a successful response in the
browser window, similar to the following example:
"text": "EMPTY"
}
]
},
{
"boundingBox": "21,298,304,60",
"words": [
{
"boundingBox": "21,298,304,60",
"text": "SPACE."
}
]
},
{
"boundingBox": "26,387,294,37",
"words": [
{
"boundingBox": "26,387,210,37",
"text": "Everything"
},
{
"boundingBox": "249,389,71,27",
"text": "else"
}
]
},
{
"boundingBox": "127,431,198,36",
"words": [
{
"boundingBox": "127,431,31,29",
"text": "is"
},
{
"boundingBox": "172,431,153,36",
"text": "opinion."
}
]
}
]
}
]
}
Next steps
Explore a JavaScript application that uses Computer Vision to perform optical character recognition (OCR); create
smart-cropped thumbnails; plus detect, categorize, tag, and describe visual features, including faces, in an image. To
rapidly experiment with the Computer Vision API, try the Open API testing console.
Computer Vision API JavaScript Tutorial
Quickstart: Extract printed text (OCR) using the REST
API and Node.js in Computer Vision
4/18/2019 • 3 minutes to read • Edit Online
Prerequisites
Create and run the sample
In this quickstart, you extract printed text with optical character recognition (OCR) from an image by using
Computer Vision's REST API. With the OCR method, you can detect printed text in an image and extract
recognized characters into a machine-usable character stream.
If you don't have an Azure subscription, create a free account before you begin.
You must have Node.js 4.x or later installed.
You must have npm installed.
You must have a subscription key for Computer Vision. You can get a free trial key from Try Cognitive Services.
Or, follow the instructions in Create a Cognitive Services account to subscribe to Computer Vision and get your
key.
To create and run the sample, do the following steps:
1. Install the npm request package.
npm install request
a. Open a command prompt window as an administrator.
b. Run the following command:
c. After the package is successfully installed, close the command prompt window.
2. Copy the following code into a text editor.
3. Make the following changes in code where needed:
a. Replace the value of subscriptionKey with your subscription key.
b. Replace the value of uriBase with the endpoint URL for the OCR method from the Azure region where
you obtained your subscription keys, if necessary.
c. Optionally, replace the value of imageUrl with the URL of a different image from which you want to
extract printed text.
4. Save the code as a file with a .js extension. For example, get-printed-text.js .
5. Open a command prompt window.
6. At the prompt, use the node command to run the file. For example, node get-printed-text.js .
'use strict';
const request = require('request');
// Replace <Subscription Key> with your valid subscription key.
const subscriptionKey = '<Subscription Key>';
// You must use the same location in your REST call as you used to get your
// subscription keys. For example, if you got your subscription keys from
// westus, replace "westcentralus" in the URL below with "westus".
const uriBase =
'https://westcentralus.api.cognitive.microsoft.com/vision/v2.0/ocr';
const imageUrl = 'https://upload.wikimedia.org/wikipedia/commons/thumb/a/af/' +
'Atomist_quote_from_Democritus.png/338px-Atomist_quote_from_Democritus.png';
// Request parameters.
const params = {
'language': 'unk',
'detectOrientation': 'true',
};
const options = {
uri: uriBase,
qs: params,
body: '{"url": ' + '"' + imageUrl + '"}',
headers: {
'Content-Type': 'application/json',
'Ocp-Apim-Subscription-Key' : subscriptionKey
}
};
request.post(options, (error, response, body) => {
if (error) {
console.log('Error: ', error);
return;
}
let jsonResponse = JSON.stringify(JSON.parse(body), null, ' ');
console.log('JSON Response\n');
console.log(jsonResponse);
});
Examine the response
{
"language": "en",
"orientation": "Up",
"textAngle": 0,
"regions": [
{
"boundingBox": "21,16,304,451",
"lines": [
{
"boundingBox": "28,16,288,41",
"words": [
{
"boundingBox": "28,16,288,41",
"text": "NOTHING"
}
]
},
{
A successful response is returned in JSON. The sample parses and displays a successful response in the command
prompt window, similar to the following example:

{
"boundingBox": "27,66,283,52",
"words": [
{
"boundingBox": "27,66,283,52",
"text": "EXISTS"
}
]
},
{
"boundingBox": "27,128,292,49",
"words": [
{
"boundingBox": "27,128,292,49",
"text": "EXCEPT"
}
]
},
{
"boundingBox": "24,188,292,54",
"words": [
{
"boundingBox": "24,188,292,54",
"text": "ATOMS"
}
]
},
{
"boundingBox": "22,253,297,32",
"words": [
{
"boundingBox": "22,253,105,32",
"text": "AND"
},
{
"boundingBox": "144,253,175,32",
"text": "EMPTY"
}
]
},
{
"boundingBox": "21,298,304,60",
"words": [
{
"boundingBox": "21,298,304,60",
"text": "SPACE."
}
]
},
{
"boundingBox": "26,387,294,37",
"words": [
{
"boundingBox": "26,387,210,37",
"text": "Everything"
},
{
"boundingBox": "249,389,71,27",
"text": "else"
}
]
},
{
"boundingBox": "127,431,198,36",
"words": [
{
"boundingBox": "127,431,31,29",
"text": "is"
},
{
{
"boundingBox": "172,431,153,36",
"text": "opinion."
}
]
}
]
}
]
}
Clean up resources
Next steps
When no longer needed, delete the file, and then uninstall the npm request package. To uninstall the package, do
the following steps:
npm uninstall request
1. Open a command prompt window as an administrator.
2. Run the following command:
3. After the package is successfully uninstalled, close the command prompt window.
Explore the Computer Vision API used to analyze an image, detect celebrities and landmarks, create a thumbnail,
and extract printed and handwritten text. To rapidly experiment with the Computer Vision API, try the Open API
testing console.
Explore the Computer Vision API
Quickstart: Extract printed text (OCR) using the REST
API and PHP in Computer Vision
4/18/2019 • 3 minutes to read • Edit Online
Prerequisites
Create and run the sample
In this quickstart, you extract printed text with optical character recognition (OCR) from an image by using
Computer Vision's REST API. With the OCR method, you can detect printed text in an image and extract
recognized characters into a machine-usable character stream.
If you don't have an Azure subscription, create a free account before you begin.
You must have PHP installed.
You must have Pear installed.
You must have a subscription key for Computer Vision. You can get a free trial key from Try Cognitive Services.
Or, follow the instructions in Create a Cognitive Services account to subscribe to Computer Vision and get your
key.
To create and run the sample, do the following steps:
1. Install the PHP5 HTTP_Request2 package.
pear install HTTP_Request2
a. Open a command prompt window as an administrator.
b. Run the following command:
c. After the package is successfully installed, close the command prompt window.
2. Copy the following code into a text editor.
3. Make the following changes in code where needed:
a. Replace the value of subscriptionKey with your subscription key.
b. Replace the value of uriBase with the endpoint URL for the OCR method from the Azure region where
you obtained your subscription keys, if necessary.
c. Optionally, replace the value of imageUrl with the URL of a different image from which you want to
extract printed text.
4. Save the code as a file with a .php extension. For example, get-printed-text.php .
5. Open a browser window with PHP support.
6. Drag and drop the file into the browser window.
<?php
<html>
<head>
<title>OCR Sample</title>
</head>
<body>
<?php
// Replace <Subscription Key> with a valid subscription key.
$ocpApimSubscriptionKey = '<Subscription Key>';
// You must use the same location in your REST call as you used to obtain
// your subscription keys. For example, if you obtained your subscription keys
// from westus, replace "westcentralus" in the URL below with "westus".
$uriBase = 'https://westcentralus.api.cognitive.microsoft.com/vision/v2.0/';
$imageUrl = 'https://upload.wikimedia.org/wikipedia/commons/thumb/a/af/' .
'Atomist_quote_from_Democritus.png/338px-Atomist_quote_from_Democritus.png';
require_once 'HTTP/Request2.php';
$request = new Http_Request2($uriBase . 'ocr');
$url = $request->getUrl();
$headers = array(
// Request headers
'Content-Type' => 'application/json',
'Ocp-Apim-Subscription-Key' => $ocpApimSubscriptionKey
);
$request->setHeader($headers);
$parameters = array(
// Request parameters
'language' => 'unk',
'detectOrientation' => 'true'
);
$url->setQueryVariables($parameters);
$request->setMethod(HTTP_Request2::METHOD_POST);
// Request body parameters
$body = json_encode(array('url' => $imageUrl));
// Request body
$request->setBody($body);
try
{
$response = $request->send();
echo "<pre>" .
json_encode(json_decode($response->getBody()), JSON_PRETTY_PRINT) . "</pre>";
}
catch (HttpException $ex)
{
echo "<pre>" . $ex . "</pre>";
}
?>
</body>
</html>
Examine the response
{
A successful response is returned in JSON. The sample website parses and displays a successful response in the
browser window, similar to the following example:

{
"language": "en",
"orientation": "Up",
"textAngle": 0,
"regions": [
{
"boundingBox": "21,16,304,451",
"lines": [
{
"boundingBox": "28,16,288,41",
"words": [
{
"boundingBox": "28,16,288,41",
"text": "NOTHING"
}
]
},
{
"boundingBox": "27,66,283,52",
"words": [
{
"boundingBox": "27,66,283,52",
"text": "EXISTS"
}
]
},
{
"boundingBox": "27,128,292,49",
"words": [
{
"boundingBox": "27,128,292,49",
"text": "EXCEPT"
}
]
},
{
"boundingBox": "24,188,292,54",
"words": [
{
"boundingBox": "24,188,292,54",
"text": "ATOMS"
}
]
},
{
"boundingBox": "22,253,297,32",
"words": [
{
"boundingBox": "22,253,105,32",
"text": "AND"
},
{
"boundingBox": "144,253,175,32",
"text": "EMPTY"
}
]
},
{
"boundingBox": "21,298,304,60",
"words": [
{
"boundingBox": "21,298,304,60",
"text": "SPACE."
}
]
},
{
"boundingBox": "26,387,294,37",
"words": [
{
{
"boundingBox": "26,387,210,37",
"text": "Everything"
},
{
"boundingBox": "249,389,71,27",
"text": "else"
}
]
},
{
"boundingBox": "127,431,198,36",
"words": [
{
"boundingBox": "127,431,31,29",
"text": "is"
},
{
"boundingBox": "172,431,153,36",
"text": "opinion."
}
]
}
]
}
]
}
Clean up resources
Next steps
When no longer needed, delete the file, and then uninstall the PHP5 HTTP_Request2 package. To uninstall the
package, do the following steps:
pear uninstall HTTP_Request2
1. Open a command prompt window as an administrator.
2. Run the following command:
3. After the package is successfully uninstalled, close the command prompt window.
Explore the Computer Vision API to analyze an image, detect celebrities and landmarks, create a thumbnail, and
extract printed and handwritten text. To rapidly experiment with the Computer Vision API, try the Open API testing
console.
Explore the Computer Vision API
Quickstart: Extract printed text (OCR) using the REST
API and Python in Computer Vision
4/18/2019 • 3 minutes to read • Edit Online
Prerequisites
Create and run the sample
In this quickstart, you extract printed text with optical character recognition (OCR) from an image by using
Computer Vision's REST API. With the OCR method, you can detect printed text in an image and extract
recognized characters into a machine-usable character stream.
You can run this quickstart in a step-by step fashion using a Jupyter notebook on MyBinder. To launch Binder,
select the following button:
launch
launch binder
binder
If you don't have an Azure subscription, create a free account before you begin.
You must have Python installed if you want to run the sample locally.
You must have a subscription key for Computer Vision. You can get a free trial key from Try Cognitive Services.
Or, follow the instructions in Create a Cognitive Services account to subscribe to Computer Vision and get your
key.
To create and run the sample, do the following steps:
1. Copy the following code into a text editor.
2. Make the following changes in code where needed:
3. Save the code as a file with an .py extension. For example, get-printed-text.py .
4. Open a command prompt window.
5. At the prompt, use the python command to run the sample. For example, python get-printed-text.py .
a. Replace the value of subscription_key with your subscription key.
b. Replace the value of vision_base_url with the endpoint URL for the Computer Vision resource in the
Azure region where you obtained your subscription keys, if necessary.
c. Optionally, replace the value of image_url with the URL of a different image from which you want to
extract printed text.

import requests
# If you are using a Jupyter notebook, uncomment the following line.
#%matplotlib inline
import matplotlib.pyplot as plt
from matplotlib.patches import Rectangle
from PIL import Image
from io import BytesIO
# Replace <Subscription Key> with your valid subscription key.
subscription_key = "<Subscription Key>"
assert subscription_key
# You must use the same region in your REST call as you used to get your
# subscription keys. For example, if you got your subscription keys from
# westus, replace "westcentralus" in the URI below with "westus".
#
# Free trial subscription keys are generated in the "westus" region.
# If you use a free trial subscription key, you shouldn't need to change
# this region.
vision_base_url = "https://westcentralus.api.cognitive.microsoft.com/vision/v2.0/"
ocr_url = vision_base_url + "ocr"
# Set image_url to the URL of an image that you want to analyze.
image_url = "https://upload.wikimedia.org/wikipedia/commons/thumb/a/af/" + \
"Atomist_quote_from_Democritus.png/338px-Atomist_quote_from_Democritus.png"
headers = {'Ocp-Apim-Subscription-Key': subscription_key}
params = {'language': 'unk', 'detectOrientation': 'true'}
data = {'url': image_url}
response = requests.post(ocr_url, headers=headers, params=params, json=data)
response.raise_for_status()
analysis = response.json()
# Extract the word bounding boxes and text.
line_infos = [region["lines"] for region in analysis["regions"]]
word_infos = []
for line in line_infos:
for word_metadata in line:
for word_info in word_metadata["words"]:
word_infos.append(word_info)
word_infos
# Display the image and overlay it with the extracted text.
plt.figure(figsize=(5, 5))
image = Image.open(BytesIO(requests.get(image_url).content))
ax = plt.imshow(image, alpha=0.5)
for word in word_infos:
bbox = [int(num) for num in word["boundingBox"].split(",")]
text = word["text"]
origin = (bbox[0], bbox[1])
patch = Rectangle(origin, bbox[2], bbox[3], fill=False, linewidth=2, color='y')
ax.axes.add_patch(patch)
plt.text(origin[0], origin[1], text, fontsize=20, weight="bold", va="top")
plt.axis("off")
Examine the response
{
"language": "en",
"orientation": "Up",
A successful response is returned in JSON. The sample webpage parses and displays a successful response in the
command prompt window, similar to the following example:

"orientation": "Up",
"textAngle": 0,
"regions": [
{
"boundingBox": "21,16,304,451",
"lines": [
{
"boundingBox": "28,16,288,41",
"words": [
{
"boundingBox": "28,16,288,41",
"text": "NOTHING"
}
]
},
{
"boundingBox": "27,66,283,52",
"words": [
{
"boundingBox": "27,66,283,52",
"text": "EXISTS"
}
]
},
{
"boundingBox": "27,128,292,49",
"words": [
{
"boundingBox": "27,128,292,49",
"text": "EXCEPT"
}
]
},
{
"boundingBox": "24,188,292,54",
"words": [
{
"boundingBox": "24,188,292,54",
"text": "ATOMS"
}
]
},
{
"boundingBox": "22,253,297,32",
"words": [
{
"boundingBox": "22,253,105,32",
"text": "AND"
},
{
"boundingBox": "144,253,175,32",
"text": "EMPTY"
}
]
},
{
"boundingBox": "21,298,304,60",
"words": [
{
"boundingBox": "21,298,304,60",
"text": "SPACE."
}
]
},
{
"boundingBox": "26,387,294,37",
"words": [
{
"boundingBox": "26,387,210,37",
"text": "Everything"

"text": "Everything"
},
{
"boundingBox": "249,389,71,27",
"text": "else"
}
]
},
{
"boundingBox": "127,431,198,36",
"words": [
{
"boundingBox": "127,431,31,29",
"text": "is"
},
{
"boundingBox": "172,431,153,36",
"text": "opinion."
}
]
}
]
}
]
}
Next steps
Explore a Python application that uses Computer Vision to perform optical character recognition (OCR); create
smart-cropped thumbnails; plus detect, categorize, tag, and describe visual features, including faces, in an image. To
rapidly experiment with the Computer Vision API, try the Open API testing console.
Computer Vision API Python Tutorial
Quickstart: Extract printed text (OCR) using the REST
API and Ruby in Computer Vision
4/18/2019 • 2 minutes to read • Edit Online
Prerequisites
Create and run the sample
In this quickstart, you extract printed text with optical character recognition (OCR) from an image by using
Computer Vision's REST API. With the OCR method, you can detect printed text in an image and extract
recognized characters into a machine-usable character stream.
If you don't have an Azure subscription, create a free account before you begin.
You must have Ruby 2.4.x or later installed.
You must have a subscription key for Computer Vision. You can get a free trial key from Try Cognitive Services.
Or, follow the instructions in Create a Cognitive Services account to subscribe to Computer Vision and get your
key.
To create and run the sample, do the following steps:
1. Copy the following code into a text editor.
2. Make the following changes in code where needed:
3. Save the code as a file with an .rb extension. For example, get-printed-text.rb .
4. Open a command prompt window.
5. At the prompt, use the ruby command to run the sample. For example, ruby get-printed-text.rb .
a. Replace <Subscription Key> with your subscription key.
b. Replace https://westcentralus.api.cognitive.microsoft.com/vision/v2.0/ocr with the endpoint URL for
the OCR method in the Azure region where you obtained your subscription keys, if necessary.
c. Optionally, replace
https://upload.wikimedia.org/wikipedia/commons/thumb/a/af/Atomist_quote_from_Democritus.png/338px-
Atomist_quote_from_Democritus.png\
with the URL of a different image from which you want to extract printed text.

require 'net/http'
# You must use the same location in your REST call as you used to get your
# subscription keys. For example, if you got your subscription keys from westus,
# replace "westcentralus" in the URL below with "westus".
uri = URI('https://westcentralus.api.cognitive.microsoft.com/vision/v2.0/ocr')
uri.query = URI.encode_www_form({
# Request parameters
'language' => 'unk',
'detectOrientation' => 'true'
})
request = Net::HTTP::Post.new(uri.request_uri)
# Request headers
# Replace <Subscription Key> with your valid subscription key.
request['Ocp-Apim-Subscription-Key'] = '<Subscription Key>'
request['Content-Type'] = 'application/json'
request.body =
"{\"url\": \"https://upload.wikimedia.org/wikipedia/commons/thumb/a/af/" +
"Atomist_quote_from_Democritus.png/338px-Atomist_quote_from_Democritus.png\"}"
response = Net::HTTP.start(uri.host, uri.port, :use_ssl => uri.scheme == 'https') do |http|
http.request(request)
end
puts response.body
Examine the response
A successful response is returned in JSON. The sample parses and displays a successful response in the command
prompt window, similar to the following example:

{
"language": "en",
"textAngle": -2.0000000000000338,
"orientation": "Up",
"regions": [
{
"boundingBox": "462,379,497,258",
"lines": [
{
"boundingBox": "462,379,497,74",
"words": [
{
"boundingBox": "462,379,41,73",
"text": "A"
},
{
"boundingBox": "523,379,153,73",
"text": "GOAL"
},
{
"boundingBox": "694,379,265,74",
"text": "WITHOUT"
}
]
},
{
"boundingBox": "565,471,289,74",
"words": [
{
"boundingBox": "565,471,41,73",
"text": "A"
},
{
"boundingBox": "626,471,150,73",
"text": "PLAN"
},
{
"boundingBox": "801,472,53,73",
"text": "IS"
}
]
},
{
"boundingBox": "519,563,375,74",
"words": [
{
"boundingBox": "519,563,149,74",
"text": "JUST"
},
{
"boundingBox": "683,564,41,72",
"text": "A"
},
{
"boundingBox": "741,564,153,73",
"text": "WISH"
}
]
}
]
}
]
}
Next steps

Quickstart: Extract handwritten text using the REST
API and C# in Computer Vision
5/29/2019 • 6 minutes to read • Edit Online
IMPORTANTIMPORTANT
Prerequisites
Create and run the sample application
using Newtonsoft.Json.Linq;
using System;
using System.IO;
using System.Linq;
using System.Net.Http;
using System.Net.Http.Headers;
using System.Threading.Tasks;
In this quickstart, you will extract handwritten text from an image by using Computer Vision's REST API. With the
Batch Read API and the Read Operation Result API, you can detect handwritten text in an image and extract
recognized characters into a machine-readable character stream.
Unlike the OCR method, the Batch Read method runs asynchronously. This method does not return any information in the
body of a successful response. Instead, the Read method returns a URI in the Operation-Location response header field.
You can then call this URI, which represents the Read Operation Result method, in order to check the status and return the
results of the Batch Read method call.
If you don't have an Azure subscription, create a free account before you begin.
You must have Visual Studio 2015 or later.
You must have a subscription key for Computer Vision. You can get a free trial key from Try Cognitive Services.
Or, follow the instructions in Create a Cognitive Services account to subscribe to Computer Vision and get your
key.
To create the sample in Visual Studio, do the following steps:
1. Create a new Visual Studio solution in Visual Studio, using the Visual C# Console App template.
2. Install the Newtonsoft.Json NuGet package.
3. Replace the code in Program.cs with the following code, and then make the following changes in code where
needed:
4. Run the program.
5. At the prompt, enter the path to a local image.
a. On the menu, click Tools, select NuGet Package Manager, then Manage NuGet Packages for
Solution.
b. Click the Browse tab, and in the Search box type "Newtonsoft.Json".
c. Select Newtonsoft.Json when it displays, then click the checkbox next to your project name, and Install.
a. Replace the value of subscriptionKey with your subscription key.
b. Replace the value of uriBase with the endpoint URL for the Batch Read method from the Azure region
where you obtained your subscription keys, if necessary.
using System.Threading.Tasks;
namespace CSHttpClientSample
{
static class Program
{
// Replace <Subscription Key> with your valid subscription key.
const string subscriptionKey = "<Subscription Key>";
// You must use the same Azure region in your REST API method as you used to
// get your subscription keys. For example, if you got your subscription keys
// from the West US region, replace "westcentralus" in the URL
// below with "westus".
//
// Free trial subscription keys are generated in the "westus" region.
// If you use a free trial subscription key, you shouldn't need to change
// this region.
const string uriBase =
"https://westus.api.cognitive.microsoft.com/vision/v2.0/read/core/asyncBatchAnalyze";
static void Main()
{
// Get the path and filename to process from the user.
Console.WriteLine("Handwriting Recognition:");
Console.Write(
"Enter the path to an image with handwritten text you wish to read: ");
string imageFilePath = Console.ReadLine();
if (File.Exists(imageFilePath))
{
// Call the REST API method.
Console.WriteLine("\nWait a moment for the results to appear.\n");
ReadHandwrittenText(imageFilePath).Wait();
}
else
{
Console.WriteLine("\nInvalid file path");
}
Console.WriteLine("\nPress Enter to exit...");
Console.ReadLine();
}
/// <summary>
/// Gets the handwritten text from the specified image file by using
/// the Computer Vision REST API.
/// </summary>
/// <param name="imageFilePath">The image file with handwritten text.</param>
static async Task ReadHandwrittenText(string imageFilePath)
{
try
{
HttpClient client = new HttpClient();
// Request headers.
client.DefaultRequestHeaders.Add(
"Ocp-Apim-Subscription-Key", subscriptionKey);
// Assemble the URI for the REST API method.
string uri = uriBase;
HttpResponseMessage response;
// Two REST API methods are required to extract handwritten text.
// One method to submit the image for processing, the other method
// to retrieve the text found in the image.
// operationLocation stores the URI of the second REST API method,
// returned by the first REST API method.
string operationLocation;

// Reads the contents of the specified local image
// into a byte array.
byte[] byteData = GetImageAsByteArray(imageFilePath);
// Adds the byte array as an octet stream to the request body.
using (ByteArrayContent content = new ByteArrayContent(byteData))
{
// This example uses the "application/octet-stream" content type.
// The other content types you can use are "application/json"
// and "multipart/form-data".
content.Headers.ContentType =
new MediaTypeHeaderValue("application/octet-stream");
// The first REST API method, Batch Read, starts
// the async process to analyze the written text in the image.
response = await client.PostAsync(uri, content);
}
// The response header for the Batch Read method contains the URI
// of the second method, Read Operation Result, which
// returns the results of the process in the response body.
// The Batch Read operation does not return anything in the response body.
if (response.IsSuccessStatusCode)
operationLocation =
response.Headers.GetValues("Operation-Location").FirstOrDefault();
else
{
// Display the JSON error data.
string errorString = await response.Content.ReadAsStringAsync();
Console.WriteLine("\n\nResponse:\n{0}\n",
JToken.Parse(errorString).ToString());
return;
}
// If the first REST API method completes successfully, the second
// REST API method retrieves the text written in the image.
//
// Note: The response may not be immediately available. Handwriting
// recognition is an asynchronous operation that can take a variable
// amount of time depending on the length of the handwritten text.
// You may need to wait or retry this operation.
//
// This example checks once per second for ten seconds.
string contentString;
int i = 0;
do
{
System.Threading.Thread.Sleep(1000);
response = await client.GetAsync(operationLocation);
contentString = await response.Content.ReadAsStringAsync();
++i;
}
while (i < 10 && contentString.IndexOf("\"status\":\"Succeeded\"") == -1);
if (i == 10 && contentString.IndexOf("\"status\":\"Succeeded\"") == -1)
{
Console.WriteLine("\nTimeout error.\n");
return;
}
// Display the JSON response.
Console.WriteLine("\nResponse:\n\n{0}\n",
JToken.Parse(contentString).ToString());
}
catch (Exception e)
{
Console.WriteLine("\n" + e.Message);
}
}
}
/// <summary>
/// Returns the contents of the specified file as a byte array.
/// </summary>
/// <param name="imageFilePath">The image file to read.</param>
/// <returns>The byte array of the image data.</returns>
static byte[] GetImageAsByteArray(string imageFilePath)
{
// Open a read-only file stream for the specified file.
using (FileStream fileStream =
new FileStream(imageFilePath, FileMode.Open, FileAccess.Read))
{
// Read the file's contents into a byte array.
BinaryReader binaryReader = new BinaryReader(fileStream);
return binaryReader.ReadBytes((int)fileStream.Length);
}
}
}
}
Examine the response
{
"status": "Succeeded",
"recognitionResults": [
{
"page": 1,
"clockwiseOrientation": 349.59,
"width": 3200,
"height": 3200,
"unit": "pixel",
"lines": [
{
"boundingBox": [202,618,2047,643,2046,840,200,813],
"text": "Our greatest glory is not",
"words": [
{
"boundingBox": [204,627,481,628,481,830,204,829],
"text": "Our"
},
{
"boundingBox": [519,628,1057,630,1057,832,518,830],
"text": "greatest"
},
{
"boundingBox": [1114,630,1549,631,1548,833,1114,832],
"text": "glory"
},
{
"boundingBox": [1586,631,1785,632,1784,834,1586,833],
"text": "is"
},
{
"boundingBox": [1822,632,2115,633,2115,835,1822,834],
"text": "not"
}
]
},
{
"boundingBox": [420,1273,2954,1250,2958,1488,422,1511],
"text": "but in rising every time we fall",
"words": [
A successful response is returned in JSON. The sample application parses and displays a successful response in the
console window, similar to the following example:
{
"boundingBox": [423,1269,634,1268,635,1507,424,1508],
"text": "but"
},
{
"boundingBox": [667,1268,808,1268,809,1506,668,1507],
"text": "in"
},
{
"boundingBox": [874,1267,1289,1265,1290,1504,875,1506],
"text": "rising"
},
{
"boundingBox": [1331,1265,1771,1263,1772,1502,1332,1504],
"text": "every"
},
{
"boundingBox": [1812, 1263, 2178, 1261, 2179, 1500, 1813, 1502],
"text": "time"
},
{
"boundingBox": [2219, 1261, 2510, 1260, 2511, 1498, 2220, 1500],
"text": "we"
},
{
"boundingBox": [2551, 1260, 3016, 1258, 3017, 1496, 2552, 1498],
"text": "fall"
}
]
},
{
"boundingBox": [1612, 903, 2744, 935, 2738, 1139, 1607, 1107],
"text": "in never failing ,",
"words": [
{
"boundingBox": [1611, 934, 1707, 933, 1708, 1147, 1613, 1147],
"text": "in"
},
{
"boundingBox": [1753, 933, 2132, 930, 2133, 1144, 1754, 1146],
"text": "never"
},
{
"boundingBox": [2162, 930, 2673, 927, 2674, 1140, 2164, 1144],
"text": "failing"
},
{
"boundingBox": [2703, 926, 2788, 926, 2790, 1139, 2705, 1140],
"text": ",",
"confidence": "Low"
}
]
}
]
}
]
}
Clean up resources
Next steps
When no longer needed, delete the Visual Studio solution. To do so, open File Explorer, navigate to the folder in
which you created the Visual Studio solution, and delete the folder.

Quickstart: Extract handwritten text using the REST
API and Java in Computer Vision
5/29/2019 • 6 minutes to read • Edit Online
IMPORTANTIMPORTANT
Prerequisites
Create and run the sample application
In this quickstart, you extract handwritten text from an image by using Computer Vision's REST API. With the
Batch Read API and the Read Operation Result API, you can detect handwritten text in an image, then extract
recognized characters into a machine-usable character stream.
Unlike the OCR method, the Batch Read method runs asynchronously. This method does not return any information in the
body of a successful response. Instead, the Batch Read method returns a URI in the value of the Operation-Content
response header field. You can then call this URI, which represents the Read Operation Result method, in order to check the
status and return the results of the Batch Read method call.
If you don't have an Azure subscription, create a free account before you begin.
You must have Java™ Platform, Standard Edition Development Kit 7 or 8 (JDK 7 or 8) installed.
You must have a subscription key for Computer Vision. You can get a free trial key from Try Cognitive Services.
Or, follow the instructions in Create a Cognitive Services account to subscribe to Computer Vision and get your
key.
To create and run the sample, do the following steps:
1. Create a new Java project in your favorite IDE or editor. If the option is available, create the Java project from
a command line application template.
2. Import the following libraries into your Java project. If you're using Maven, the Maven coordinates are
provided for each library.
Apache HTTP client (org.apache.httpcomponents:httpclient:4.5.5)
Apache HTTP core (org.apache.httpcomponents:httpcore:4.4.9)
JSON library (org.json:json:20180130)
3. Add the following import statements to the file that contains the Main public class for your project.

public class Main {
// **********************************************
// *** Update or verify the following values. ***
// **********************************************
// Replace <Subscription Key> with your valid subscription key.
private static final String subscriptionKey = "<Subscription Key>";
// You must use the same Azure region in your REST API method as you used to
// get your subscription keys. For example, if you got your subscription keys
// from the West US region, replace "westcentralus" in the URL
// below with "westus".
//
// Free trial subscription keys are generated in the "westus" region.
// If you use a free trial subscription key, you shouldn't need to change
// this region.
private static final String uriBase =
"https://westus.api.cognitive.microsoft.com/vision/v2.0/read/core/asyncBatchAnalyze";
private static final String imageToAnalyze =
"https://upload.wikimedia.org/wikipedia/commons/thumb/d/dd/" +
"Cursive_Writing_on_Notebook_paper.jpg/800px-Cursive_Writing_on_Notebook_paper.jpg";
public static void main(String[] args) {
CloseableHttpClient httpTextClient = HttpClientBuilder.create().build();
CloseableHttpClient httpResultClient = HttpClientBuilder.create().build();;
try {
// This operation requires two REST API calls. One to submit the image
// for processing, the other to retrieve the text found in the image.
URIBuilder builder = new URIBuilder(uriBase);
// Prepare the URI for the REST API method.
URI uri = builder.build();
HttpPost request = new HttpPost(uri);
import java.net.URI;
import org.apache.http.HttpEntity;
import org.apache.http.HttpResponse;
import org.apache.http.client.methods.HttpGet;
import org.apache.http.client.methods.HttpPost;
import org.apache.http.client.utils.URIBuilder;
import org.apache.http.entity.StringEntity;
import org.apache.http.impl.client.CloseableHttpClient;
import org.apache.http.impl.client.HttpClientBuilder;
import org.apache.http.util.EntityUtils;
import org.apache.http.Header;
import org.json.JSONObject;
4. Replace the Main public class with the following code, then make the following changes in code where
needed:
a. Replace the value of subscriptionKey with your subscription key.
b. Replace the value of uriBase with the endpoint URL for the Batch Read method from the Azure region
where you obtained your subscription keys, if necessary.
c. Optionally, replace the value of imageToAnalyze with the URL of a different image from which you want
to extract handwritten text.
5. Save, then build the Java project.
6. If you're using an IDE, run Main . Otherwise, open a command prompt window and then use the java
command to run the compiled class. For example, java Main .

// Request headers.
request.setHeader("Content-Type", "application/json");
request.setHeader("Ocp-Apim-Subscription-Key", subscriptionKey);
// Request body.
StringEntity requestEntity =
new StringEntity("{\"url\":\"" + imageToAnalyze + "\"}");
request.setEntity(requestEntity);
// Two REST API methods are required to extract handwritten text.
// One method to submit the image for processing, the other method
// to retrieve the text found in the image.
// Call the first REST API method to detect the text.
HttpResponse response = httpTextClient.execute(request);
// Check for success.
if (response.getStatusLine().getStatusCode() != 202) {
// Format and display the JSON error message.
HttpEntity entity = response.getEntity();
String jsonString = EntityUtils.toString(entity);
JSONObject json = new JSONObject(jsonString);
System.out.println("Error:\n");
System.out.println(json.toString(2));
return;
}
// Store the URI of the second REST API method.
// This URI is where you can get the results of the first REST API method.
String operationLocation = null;
// The 'Operation-Location' response header value contains the URI for
// the second REST API method.
Header[] responseHeaders = response.getAllHeaders();
for (Header header : responseHeaders) {
if (header.getName().equals("Operation-Location")) {
operationLocation = header.getValue();
break;
}
}
if (operationLocation == null) {
System.out.println("\nError retrieving Operation-Location.\nExiting.");
System.exit(1);
}
// If the first REST API method completes successfully, the second
// REST API method retrieves the text written in the image.
//
// Note: The response may not be immediately available. Handwriting
// recognition is an asynchronous operation that can take a variable
// amount of time depending on the length of the handwritten text.
// You may need to wait or retry this operation.
System.out.println("\nHandwritten text submitted.\n" +
"Waiting 10 seconds to retrieve the recognized text.\n");
Thread.sleep(10000);
// Call the second REST API method and get the response.
HttpGet resultRequest = new HttpGet(operationLocation);
resultRequest.setHeader("Ocp-Apim-Subscription-Key", subscriptionKey);
HttpResponse resultResponse = httpResultClient.execute(resultRequest);
HttpEntity responseEntity = resultResponse.getEntity();
if (responseEntity != null) {
// Format and display the JSON response.
String jsonString = EntityUtils.toString(responseEntity);
JSONObject json = new JSONObject(jsonString);

JSONObject json = new JSONObject(jsonString);
System.out.println("Text recognition result response: \n");
System.out.println(json.toString(2));
}
} catch (Exception e) {
System.out.println(e.getMessage());
}
}
}
Examine the response
Handwritten text submitted. Waiting 10 seconds to retrieve the recognized text.
Text recognition result response:
{
"status": "Succeeded",
"recognitionResults": [
{
"page": 1,
"clockwiseOrientation": 349.59,
"width": 3200,
"height": 3200,
"unit": "pixel",
"lines": [
{
"boundingBox": [202,618,2047,643,2046,840,200,813],
"text": "Our greatest glory is not",
"words": [
{
"boundingBox": [204,627,481,628,481,830,204,829],
"text": "Our"
},
{
"boundingBox": [519,628,1057,630,1057,832,518,830],
"text": "greatest"
},
{
"boundingBox": [1114,630,1549,631,1548,833,1114,832],
"text": "glory"
},
{
"boundingBox": [1586,631,1785,632,1784,834,1586,833],
"text": "is"
},
{
"boundingBox": [1822,632,2115,633,2115,835,1822,834],
"text": "not"
}
]
},
{
"boundingBox": [420,1273,2954,1250,2958,1488,422,1511],
"text": "but in rising every time we fall",
"words": [
{
"boundingBox": [423,1269,634,1268,635,1507,424,1508],
"text": "but"
},
{
"boundingBox": [667,1268,808,1268,809,1506,668,1507],
"text": "in"
},
A successful response is returned in JSON. The sample application parses and displays a successful response in the
console window, similar to the following example:
},
{
"boundingBox": [874,1267,1289,1265,1290,1504,875,1506],
"text": "rising"
},
{
"boundingBox": [1331,1265,1771,1263,1772,1502,1332,1504],
"text": "every"
},
{
"boundingBox": [1812, 1263, 2178, 1261, 2179, 1500, 1813, 1502],
"text": "time"
},
{
"boundingBox": [2219, 1261, 2510, 1260, 2511, 1498, 2220, 1500],
"text": "we"
},
{
"boundingBox": [2551, 1260, 3016, 1258, 3017, 1496, 2552, 1498],
"text": "fall"
}
]
},
{
"boundingBox": [1612, 903, 2744, 935, 2738, 1139, 1607, 1107],
"text": "in never failing ,",
"words": [
{
"boundingBox": [1611, 934, 1707, 933, 1708, 1147, 1613, 1147],
"text": "in"
},
{
"boundingBox": [1753, 933, 2132, 930, 2133, 1144, 1754, 1146],
"text": "never"
},
{
"boundingBox": [2162, 930, 2673, 927, 2674, 1140, 2164, 1144],
"text": "failing"
},
{
"boundingBox": [2703, 926, 2788, 926, 2790, 1139, 2705, 1140],
"text": ",",
"confidence": "Low"
}
]
}
]
}
]
}
Clean up resources
Next steps
When no longer needed, delete the Java project, including the compiled class and imported libraries.
Explore a Java Swing application that uses Computer Vision to perform optical character recognition (OCR); create
smart-cropped thumbnails; plus detect, categorize, tag, and describe visual features, including faces, in an image. To
rapidly experiment with the Computer Vision API, try the Open API testing console.
Computer Vision API Java Tutorial
Quickstart: Extract handwritten text using the REST
API and JavaScript in Computer Vision
5/29/2019 • 5 minutes to read • Edit Online
IMPORTANTIMPORTANT
Prerequisites
Create and run the sample
<!DOCTYPE html>
<html>
<head>
<title>Handwriting Sample</title>
<script src="https://ajax.googleapis.com/ajax/libs/jquery/1.9.0/jquery.min.js"></script>
</head>
<body>
<script type="text/javascript">
function processImage() {
// **********************************************
// *** Update or verify the following values. ***
// **********************************************
In this quickstart, you extract handwritten text from an image by using Computer Vision's REST API. With the
Batch Read API and the Read Operation Result API, you can detect handwritten text in an image, then extract
recognized characters into a machine-usable character stream.
Unlike the OCR method, the Batch Read method runs asynchronously. This method does not return any information in the
body of a successful response. Instead, the Batch Read method returns a URI in the value of the Operation-Content
response header field. You can then call this URI, which represents the Read Operation Result method, to both check the
status and return the results of the Batch Read method call.
If you don't have an Azure subscription, create a free account before you begin.
You must have a subscription key for Computer Vision. You can get a free trial key from Try Cognitive Services. Or,
follow the instructions in Create a Cognitive Services account to subscribe to Computer Vision and get your key.
To create and run the sample, do the following steps:
1. Copy the following code into a text editor.
2. Make the following changes in code where needed:
3. Save the code as a file with an .html extension. For example, get-handwriting.html .
4. Open a browser window.
5. In the browser, drag and drop the file into the browser window.
6. When the webpage is displayed in the browser, choose the Read image button.
a. Replace the value of subscriptionKey with your subscription key.
b. Replace the value of uriBase with the endpoint URL for the Batch Read method from the Azure region
where you obtained your subscription keys, if necessary.
c. Optionally, replace the value of the value attribute for the inputImage control with the URL of a
different image from which you want to extract handwritten text.

// **********************************************
// Replace <Subscription Key> with your valid subscription key.
var subscriptionKey = "<Subscription Key>";
// You must use the same Azure region in your REST API method as you used to
// get your subscription keys. For example, if you got your subscription keys
// from the West US region, replace "westcentralus" in the URL
// below with "westus".
//
// Free trial subscription keys are generated in the "westus" region.
// If you use a free trial subscription key, you shouldn't need to change
// this region.
var uriBase =
"https://westus.api.cognitive.microsoft.com/vision/v2.0/read/core/asyncBatchAnalyze";
// Display the image.
var sourceImageUrl = document.getElementById("inputImage").value;
document.querySelector("#sourceImage").src = sourceImageUrl;
// This operation requires two REST API calls. One to submit the image
// for processing, the other to retrieve the text found in the image.
//
// Make the first REST API call to submit the image for processing.
$.ajax({
url: uriBase,
// Request headers.
beforeSend: function(jqXHR){
jqXHR.setRequestHeader("Content-Type","application/json");
jqXHR.setRequestHeader("Ocp-Apim-Subscription-Key", subscriptionKey);
},
type: "POST",
// Request body.
data: '{"url": ' + '"' + sourceImageUrl + '"}',
})
.done(function(data, textStatus, jqXHR) {
// Show progress.
$("#responseTextArea").val("Handwritten text submitted. " +
"Waiting 10 seconds to retrieve the recognized text.");
// Note: The response may not be immediately available. Handwriting
// recognition is an asynchronous operation that can take a variable
// amount of time depending on the length of the text you want to
// recognize. You may need to wait or retry the GET operation.
//
// Wait ten seconds before making the second REST API call.
setTimeout(function () {
// "Operation-Location" in the response contains the URI
// to retrieve the recognized text.
var operationLocation = jqXHR.getResponseHeader("Operation-Location");
// Make the second REST API call and get the response.
$.ajax({
url: operationLocation,
// Request headers.
beforeSend: function(jqXHR){
jqXHR.setRequestHeader("Content-Type","application/json");
jqXHR.setRequestHeader(
"Ocp-Apim-Subscription-Key", subscriptionKey);
},
type: "GET",
})
.done(function(data) {
// Show formatted JSON on webpage.
$("#responseTextArea").val(JSON.stringify(data, null, 2));
})
.fail(function(jqXHR, textStatus, errorThrown) {
// Display error message.
var errorString = (errorThrown === "") ? "Error. " :
errorThrown + " (" + jqXHR.status + "): ";
errorString += (jqXHR.responseText === "") ? "" :
(jQuery.parseJSON(jqXHR.responseText).message) ?
jQuery.parseJSON(jqXHR.responseText).message :
jQuery.parseJSON(jqXHR.responseText).error.message;
alert(errorString);
});
}, 10000);
})
.fail(function(jqXHR, textStatus, errorThrown) {
// Put the JSON description into the text area.
$("#responseTextArea").val(JSON.stringify(jqXHR, null, 2));
// Display error message.
var errorString = (errorThrown === "") ? "Error. " :
errorThrown + " (" + jqXHR.status + "): ";
errorString += (jqXHR.responseText === "") ? "" :
(jQuery.parseJSON(jqXHR.responseText).message) ?
jQuery.parseJSON(jqXHR.responseText).message :
jQuery.parseJSON(jqXHR.responseText).error.message;
alert(errorString);
});
};
</script>
<h1>Read handwritten image:</h1>
Enter the URL to an image of handwritten text, then click
the <strong>Read image</strong> button.
<br><br>
Image to read:
<input type="text" name="inputImage" id="inputImage"
value="https://upload.wikimedia.org/wikipedia/commons/thumb/d/dd/Cursive_Writing_on_Notebook_paper.jpg/800px-
Cursive_Writing_on_Notebook_paper.jpg" />
<button onclick="processImage()">Read image</button>
<br><br>
<div id="wrapper" style="width:1020px; display:table;">
<div id="jsonOutput" style="width:600px; display:table-cell;">
Response:
<br><br>
<textarea id="responseTextArea" class="UIInput"
style="width:580px; height:400px;"></textarea>
</div>
<div id="imageDiv" style="width:420px; display:table-cell;">
Source image:
<br><br>
<img id="sourceImage" width="400" />
</div>
</div>
</body>
</html>
Examine the response
{
A successful response is returned in JSON. The sample webpage parses and displays a successful response in the
browser window, similar to the following example:

{
"status": "Succeeded",
"recognitionResults": [
{
"page": 1,
"clockwiseOrientation": 349.59,
"width": 3200,
"height": 3200,
"unit": "pixel",
"lines": [
{
"boundingBox": [202,618,2047,643,2046,840,200,813],
"text": "Our greatest glory is not",
"words": [
{
"boundingBox": [204,627,481,628,481,830,204,829],
"text": "Our"
},
{
"boundingBox": [519,628,1057,630,1057,832,518,830],
"text": "greatest"
},
{
"boundingBox": [1114,630,1549,631,1548,833,1114,832],
"text": "glory"
},
{
"boundingBox": [1586,631,1785,632,1784,834,1586,833],
"text": "is"
},
{
"boundingBox": [1822,632,2115,633,2115,835,1822,834],
"text": "not"
}
]
},
{
"boundingBox": [420,1273,2954,1250,2958,1488,422,1511],
"text": "but in rising every time we fall",
"words": [
{
"boundingBox": [423,1269,634,1268,635,1507,424,1508],
"text": "but"
},
{
"boundingBox": [667,1268,808,1268,809,1506,668,1507],
"text": "in"
},
{
"boundingBox": [874,1267,1289,1265,1290,1504,875,1506],
"text": "rising"
},
{
"boundingBox": [1331,1265,1771,1263,1772,1502,1332,1504],
"text": "every"
},
{
"boundingBox": [1812, 1263, 2178, 1261, 2179, 1500, 1813, 1502],
"text": "time"
},
{
"boundingBox": [2219, 1261, 2510, 1260, 2511, 1498, 2220, 1500],
"text": "we"
},
{
"boundingBox": [2551, 1260, 3016, 1258, 3017, 1496, 2552, 1498],
"text": "fall"
}
]
},
},
{
"boundingBox": [1612, 903, 2744, 935, 2738, 1139, 1607, 1107],
"text": "in never failing ,",
"words": [
{
"boundingBox": [1611, 934, 1707, 933, 1708, 1147, 1613, 1147],
"text": "in"
},
{
"boundingBox": [1753, 933, 2132, 930, 2133, 1144, 1754, 1146],
"text": "never"
},
{
"boundingBox": [2162, 930, 2673, 927, 2674, 1140, 2164, 1144],
"text": "failing"
},
{
"boundingBox": [2703, 926, 2788, 926, 2790, 1139, 2705, 1140],
"text": ",",
"confidence": "Low"
}
]
}
]
}
]
}
Clean up resources
Next steps
When no longer needed, delete the file.
Explore a JavaScript application that uses Computer Vision to perform optical character recognition (OCR); create
smart-cropped thumbnails; plus detect, categorize, tag, and describe visual features, including faces, in an image. To
rapidly experiment with the Computer Vision API, try the Open API testing console.
Computer Vision API JavaScript Tutorial

Quickstart: Extract handwritten text using the REST
API and Python in Computer Vision
5/29/2019 • 5 minutes to read • Edit Online
IMPORTANTIMPORTANT
Prerequisites
Create and run the sample
import requests
import time
# If you are using a Jupyter notebook, uncomment the following line.
#%matplotlib inline
import matplotlib.pyplot as plt
from matplotlib.patches import Polygon
In this quickstart, you extract handwritten text from an image by using Computer Vision's REST API. With the
Batch Read API and the Read Operation Result API, you can detect handwritten text in an image, then extract
recognized characters into a machine-usable character stream.
Unlike the OCR method, the Batch Read method runs asynchronously. This method does not return any information in the
body of a successful response. Instead, the Batch Read method returns a URI in the value of the Operation-Content
response header field. You can then call this URI, which represents the Read Operation Result API, to both check the status
and return the results of the Batch Read method call.
You can run this quickstart in a step-by step fashion using a Jupyter notebook on MyBinder. To launch Binder,
select the following button:
launch
launch binder
binder
If you don't have an Azure subscription, create a free account before you begin.
You must have Python installed if you want to run the sample locally.
You must have a subscription key for Computer Vision. You can get a free trial key from Try Cognitive Services.
Or, follow the instructions in Create a Cognitive Services account to subscribe to Computer Vision and get your
key.
To create and run the sample, do the following steps:
1. Copy the following code into a text editor.
2. Make the following changes in code where needed:
3. Save the code as a file with an .py extension. For example, get-handwritten-text.py .
4. Open a command prompt window.
5. At the prompt, use the python command to run the sample. For example, python get-handwritten-text.py .
a. Replace the value of subscription_key with your subscription key.
b. Replace the value of vision_base_url with the endpoint URL for the Computer Vision resource in the
Azure region where you obtained your subscription keys, if necessary.
c. Optionally, replace the value of image_url with the URL of a different image from which you want to
extract handwritten text.

from matplotlib.patches import Polygon
from PIL import Image
from io import BytesIO
# Replace <Subscription Key> with your valid subscription key.
subscription_key = "<Subscription Key>"
assert subscription_key
# You must use the same region in your REST call as you used to get your
# subscription keys. For example, if you got your subscription keys from
# westus, replace "westcentralus" in the URI below with "westus".
#
# Free trial subscription keys are generated in the "westus" region.
# If you use a free trial subscription key, you shouldn't need to change
# this region.
vision_base_url = "https://westcentralus.api.cognitive.microsoft.com/vision/v2.0/"
text_recognition_url = vision_base_url + "read/core/asyncBatchAnalyze"
# Set image_url to the URL of an image that you want to analyze.
image_url = "https://upload.wikimedia.org/wikipedia/commons/d/dd/Cursive_Writing_on_Notebook_paper.jpg"
headers = {'Ocp-Apim-Subscription-Key': subscription_key}
data = {'url': image_url}
response = requests.post(
text_recognition_url, headers=headers, json=data)
response.raise_for_status()
# Extracting handwritten text requires two API calls: One call to submit the
# image for processing, the other to retrieve the text found in the image.
# Holds the URI used to retrieve the recognized text.
operation_url = response.headers["Operation-Location"]
# The recognized text isn't immediately available, so poll to wait for completion.
analysis = {}
poll = True
while (poll):
response_final = requests.get(
response.headers["Operation-Location"], headers=headers)
analysis = response_final.json()
print(analysis)
time.sleep(1)
if ("recognitionResults" in analysis):
poll= False
if ("status" in analysis and analysis['status'] == 'Failed'):
poll= False
polygons=[]
if ("recognitionResults" in analysis):
# Extract the recognized text, with bounding boxes.
polygons = [(line["boundingBox"], line["text"])
for line in analysis["recognitionResults"][0]["lines"]]
# Display the image and overlay it with the extracted text.
plt.figure(figsize=(15, 15))
image = Image.open(BytesIO(requests.get(image_url).content))
ax = plt.imshow(image)
for polygon in polygons:
vertices = [(polygon[0][i], polygon[0][i+1])
for i in range(0, len(polygon[0]), 2)]
text = polygon[1]
patch = Polygon(vertices, closed=True, fill=False, linewidth=2, color='y')
ax.axes.add_patch(patch)
plt.text(vertices[0][0], vertices[0][1], text, fontsize=20, va="top")
Examine the response

{
"status": "Succeeded",
"recognitionResult": {
"lines": [
{
"boundingBox": [
2,
52,
65,
46,
69,
89,
7,
95
],
"text": "dog",
"words": [
{
"boundingBox": [
0,
59,
63,
43,
77,
86,
3,
102
],
"text": "dog"
}
]
},
{
"boundingBox": [
6,
2,
771,
13,
770,
75,
5,
64
],
"text": "The quick brown fox jumps over the lazy",
"words": [
{
"boundingBox": [
0,
4,
92,
5,
77,
71,
0,
71
],
"text": "The"
},
{
"boundingBox": [
74,
4,
189,
5,
174,
A successful response is returned in JSON. The sample webpage parses and displays a successful response in the
command prompt window, similar to the following example:

174,
72,
60,
71
],
"text": "quick"
},
{
"boundingBox": [
176,
5,
321,
6,
306,
73,
161,
72
],
"text": "brown"
},
{
"boundingBox": [
308,
6,
387,
6,
372,
73,
293,
73
],
"text": "fox"
},
{
"boundingBox": [
382,
6,
506,
7,
491,
74,
368,
73
],
"text": "jumps"
},
{
"boundingBox": [
492,
7,
607,
8,
592,
75,
478,
74
],
"text": "over"
},
{
"boundingBox": [
589,
8,
673,
8,
658,
75,
575,
75
],

],
"text": "the"
},
{
"boundingBox": [
660,
8,
783,
9,
768,
76,
645,
75
],
"text": "lazy"
}
]
},
{
"boundingBox": [
2,
84,
783,
96,
782,
154,
1,
148
],
"text": "Pack my box with five dozen liquor jugs",
"words": [
{
"boundingBox": [
0,
86,
94,
87,
72,
151,
0,
149
],
"text": "Pack"
},
{
"boundingBox": [
76,
87,
164,
88,
142,
152,
54,
150
],
"text": "my"
},
{
"boundingBox": [
155,
88,
243,
89,
222,
152,
134,
151
],
"text": "box"

},
{
"boundingBox": [
226,
89,
344,
90,
323,
154,
204,
152
],
"text": "with"
},
{
"boundingBox": [
336,
90,
432,
91,
411,
154,
314,
154
],
"text": "five"
},
{
"boundingBox": [
419,
91,
538,
92,
516,
154,
398,
154
],
"text": "dozen"
},
{
"boundingBox": [
547,
92,
701,
94,
679,
154,
525,
154
],
"text": "liquor"
},
{
"boundingBox": [
696,
94,
800,
95,
780,
154,
675,
154
],
"text": "jugs"
}
]
}
]

}
}
Next steps
Explore a Python application that uses Computer Vision to perform optical character recognition (OCR); create
smart-cropped thumbnails; plus detect, categorize, tag, and describe visual features, including faces, in an image. To
rapidly experiment with the Computer Vision API, try the Open API testing console.
Computer Vision API Python Tutorial
Quickstart: Recognize domain-specific content using
the REST API and PHP with Computer Vision
4/19/2019 • 2 minutes to read • Edit Online
Prerequisites
Create and run the sample
In this quickstart, you use a domain model to identify landmarks or, optionally, celebrities in a remotely stored
image by using Computer Vision's REST API. With the Recognize Domain Specific Content method, you can apply
a domain-specific model to recognize content within an image.
If you don't have an Azure subscription, create a free account before you begin.
You must have PHP installed.
You must have Pear installed.
You must have a subscription key for Computer Vision. You can get a free trial key from Try Cognitive Services.
Or, follow the instructions in Create a Cognitive Services account to subscribe to Computer Vision and get your
key.
To create and run the sample, do the following steps:
1. Install the PHP5 HTTP_Request2 package.
pear install HTTP_Request2
a. Open a command prompt window as an administrator.
b. Run the following command:
c. After the package is successfully installed, close the command prompt window.
2. Copy the following code into a text editor.
3. Make the following changes in code where needed:
a. Replace the value of subscriptionKey with your subscription key.
b. Replace the value of uriBase with the endpoint URL for the Recognize Domain Specific Content method
from the Azure region where you obtained your subscription keys, if necessary.
c. Optionally, replace the value of imageUrl with the URL of a different image that you want to analyze.
d. Optionally, replace the value of the domain request parameter with celebrites if you want to use the
celebrities domain model instead of the landmarks domain model.
4. Save the code as a file with a .php extension. For example, use-domain-model.php .
5. Open a browser window with PHP support.
6. Drag and drop the file into the browser window.

<html>
<head>
<title>Analyze Domain Model Sample</title>
</head>
<body>
<?php
// Replace <Subscription Key> with a valid subscription key.
$ocpApimSubscriptionKey = '<Subscription Key>';
// You must use the same location in your REST call as you used to obtain
// your subscription keys. For example, if you obtained your subscription keys
// from westus, replace "westcentralus" in the URL below with "westus".
$uriBase = 'https://westcentralus.api.cognitive.microsoft.com/vision/v2.0/';
// Change 'landmarks' to 'celebrities' to use the Celebrities model.
$domain = 'landmarks';
$imageUrl =
'https://upload.wikimedia.org/wikipedia/commons/2/23/Space_Needle_2011-07-04.jpg';
require_once 'HTTP/Request2.php';
$request = new Http_Request2($uriBase . 'models/' . $domain . '/analyze');
$url = $request->getUrl();
$headers = array(
// Request headers
'Content-Type' => 'application/json',
'Ocp-Apim-Subscription-Key' => $ocpApimSubscriptionKey
);
$request->setHeader($headers);
$parameters = array(
// Request parameters
'model' => $domain
);
$url->setQueryVariables($parameters);
$request->setMethod(HTTP_Request2::METHOD_POST);
// Request body parameters
$body = json_encode(array('url' => $imageUrl));
// Request body
$request->setBody($body);
try
{
$response = $request->send();
echo "<pre>" .
json_encode(json_decode($response->getBody()), JSON_PRETTY_PRINT) . "</pre>";
}
catch (HttpException $ex)
{
echo "<pre>" . $ex . "</pre>";
}
?>
</body>
</html>
Examine the response
A successful response is returned in JSON. The sample website parses and displays a successful response in the
browser window, similar to the following example:
{
"result": {
"landmarks": [
{
"name": "Space Needle",
"confidence": 0.9998177886009216
}
]
},
"requestId": "4d26587b-b2b9-408d-a70c-1f8121d84b0d",
"metadata": {
"height": 4132,
"width": 2096,
"format": "Jpeg"
}
}
Clean up resources
Next steps
When no longer needed, delete the file, and then uninstall the PHP5 HTTP_Request2 package. To uninstall the
package, do the following steps:
pear uninstall HTTP_Request2
1. Open a command prompt window as an administrator.
2. Run the following command:
3. After the package is successfully uninstalled, close the command prompt window.
Explore the Computer Vision API used to analyze an image, detect celebrities and landmarks, create a thumbnail,
and extract printed and handwritten text. To rapidly experiment with the Computer Vision API, try the Open API
testing console.
Explore the Computer Vision API

Quickstart: Use a domain model using the REST API
and Python in Computer Vision
4/19/2019 • 4 minutes to read • Edit Online
Prerequisites
Create and run the landmarks sample
In this quickstart, you use a domain model to identify landmarks or, optionally, celebrities in a remotely stored
image by using Computer Vision's REST API. With the Recognize Domain Specific Content method, you can apply
a domain-specific model to recognize content within an image.
You can run this quickstart in a step-by step fashion using a Jupyter notebook on MyBinder. To launch Binder,
select the following button:
launch
launch binder
binder
If you don't have an Azure subscription, create a free account before you begin.
You must have Python installed if you want to run the sample locally.
You must have a subscription key for Computer Vision. You can get a free trial key from Try Cognitive Services.
Or, follow the instructions in Create a Cognitive Services account to subscribe to Computer Vision and get your
key.
To create and run the landmark sample, do the following steps:
1. Copy the following code into a text editor.
2. Make the following changes in code where needed:
3. Save the code as a file with an .py extension. For example, get-landmarks.py .
4. Open a command prompt window.
5. At the prompt, use the python command to run the sample. For example, python get-landmarks.py .
a. Replace the value of subscription_key with your subscription key.
b. Replace the value of vision_base_url with the endpoint URL for the Computer Vision resource in the
Azure region where you obtained your subscription keys, if necessary.
c. Optionally, replace the value of image_url with the URL of a different image in which you want to detect
landmarks.
import requests
# If you are using a Jupyter notebook, uncomment the following line.
#%matplotlib inline
import matplotlib.pyplot as plt
from PIL import Image
from io import BytesIO
# Replace <Subscription Key> with your valid subscription key.
subscription_key = "<Subscription Key>"
assert subscription_key
# You must use the same region in your REST call as you used to get your
# subscription keys. For example, if you got your subscription keys from
# westus, replace "westcentralus" in the URI below with "westus".
#
# Free trial subscription keys are generated in the "westus" region.
# If you use a free trial subscription key, you shouldn't need to change
# this region.
vision_base_url = "https://westcentralus.api.cognitive.microsoft.com/vision/v2.0/"
landmark_analyze_url = vision_base_url + "models/landmarks/analyze"
# Set image_url to the URL of an image that you want to analyze.
image_url = "https://upload.wikimedia.org/wikipedia/commons/f/f6/" + \
"Bunker_Hill_Monument_2005.jpg"
headers = {'Ocp-Apim-Subscription-Key': subscription_key}
params = {'model': 'landmarks'}
data = {'url': image_url}
response = requests.post(
landmark_analyze_url, headers=headers, params=params, json=data)
response.raise_for_status()
# The 'analysis' object contains various fields that describe the image. The
# most relevant landmark for the image is obtained from the 'result' property.
analysis = response.json()
assert analysis["result"]["landmarks"] is not []
print(analysis)
landmark_name = analysis["result"]["landmarks"][0]["name"].capitalize()
# Display the image and overlay it with the landmark name.
image = Image.open(BytesIO(requests.get(image_url).content))
plt.imshow(image)
plt.axis("off")
_ = plt.title(landmark_name, size="x-large", y=-0.1)
Examine the response for the landmarks sample
A successful response is returned in JSON. The sample webpage parses and displays a successful response in the
command prompt window, similar to the following example:

{
"result": {
"landmarks": [
{
"name": "Bunker Hill Monument",
"confidence": 0.9768505096435547
}
]
},
"requestId": "659a10cd-44bb-44db-9147-a295b853b2b8",
"metadata": {
"height": 1600,
"width": 1200,
"format": "Jpeg"
}
}
Create and run the celebrities sample
To create and run the landmark sample, do the following steps:
1. Copy the following code into a text editor.
2. Make the following changes in code where needed:
3. Save the code as a file with an .py extension. For example, get-celebrities.py .
4. Open a command prompt window.
5. At the prompt, use the python command to run the sample. For example, python get-celebrities.py .
a. Replace the value of subscription_key with your subscription key.
b. Replace the value of vision_base_url with the endpoint URL for the Computer Vision resource in the
Azure region where you obtained your subscription keys, if necessary.
c. Optionally, replace the value of image_url with the URL of a different image in which you want to detect
celebrities.

import requests
# If you are using a Jupyter notebook, uncomment the following line.
#%matplotlib inline
import matplotlib.pyplot as plt
from PIL import Image
from io import BytesIO
# Replace <Subscription Key> with your valid subscription key.
subscription_key = "<Subscription Key>"
assert subscription_key
vision_base_url = "https://westcentralus.api.cognitive.microsoft.com/vision/v2.0/"
celebrity_analyze_url = vision_base_url + "models/celebrities/analyze"
# Set image_url to the URL of an image that you want to analyze.
image_url = "https://upload.wikimedia.org/wikipedia/commons/d/d9/" + \
"Bill_gates_portrait.jpg"
headers = {'Ocp-Apim-Subscription-Key': subscription_key}
params = {'model': 'celebrities'}
data = {'url': image_url}
response = requests.post(
celebrity_analyze_url, headers=headers, params=params, json=data)
response.raise_for_status()
# The 'analysis' object contains various fields that describe the image. The
# most relevant celebrity for the image is obtained from the 'result' property.
analysis = response.json()
assert analysis["result"]["celebrities"] is not []
print(analysis)
celebrity_name = analysis["result"]["celebrities"][0]["name"].capitalize()
# Display the image and overlay it with the celebrity name.
image = Image.open(BytesIO(requests.get(image_url).content))
plt.imshow(image)
plt.axis("off")
_ = plt.title(celebrity_name, size="x-large", y=-0.1)
Examine the response for the celebrities sample
A successful response is returned in JSON. The sample webpage parses and displays a successful response in the
command prompt window, similar to the following example:
{
"result": {
"celebrities": [
{
"faceRectangle": {
"top": 123,
"left": 156,
"width": 187,
"height": 187
},
"name": "Bill Gates",
"confidence": 0.9993845224380493
}
]
},
"requestId": "f14ec1d0-62d4-4296-9ceb-6b5776dc2020",
"metadata": {
"height": 521,
"width": 550,
"format": "Jpeg"
}
}
Clean up resources
Next steps
When no longer needed, delete the files for both samples.
Explore a Python application that uses Computer Vision to perform optical character recognition (OCR); create
smart-cropped thumbnails; plus detect, categorize, tag, and describe visual features, including faces, in an image. To
rapidly experiment with the Computer Vision API, try the Open API testing console.
Computer Vision API Python Tutorial
Quickstart: Analyze an image using the Computer
Vision SDK and C#
4/18/2019 • 3 minutes to read • Edit Online
Prerequisites
Create and run the sample application
In this quickstart, you will analyze both a local and a remote image to extract visual features using the Computer
Vision client library for C#. If you wish, you can download the code in this guide as a complete sample app from
the Cognitive Services Csharp Vision repo on GitHub.
A Computer Vision subscription key. You can get a free trial subscription key from Try Cognitive Services. Or,
follow the instructions in Create a Cognitive Services account to subscribe to Computer Vision and get your
key.
Any edition of Visual Studio 2015 or 2017.
The Microsoft.Azure.CognitiveServices.Vision.ComputerVision client library NuGet package. It isn't necessary
to download the package. Installation instructions are provided below.
To run the sample, do the following steps:
using Microsoft.Azure.CognitiveServices.Vision.ComputerVision;
using Microsoft.Azure.CognitiveServices.Vision.ComputerVision.Models;
using System;
using System.Collections.Generic;
using System.IO;
using System.Threading.Tasks;
namespace ImageAnalyze
{
class Program
{
// subscriptionKey = "0123456789abcdef0123456789ABCDEF"
private const string subscriptionKey = "<SubscriptionKey>";
// localImagePath = @"C:\Documents\LocalImage.jpg"
private const string localImagePath = @"<LocalImage>";
1. Create a new Visual C# Console App in Visual Studio.
2. Install the Computer Vision client library NuGet package.
a. On the menu, click Tools, select NuGet Package Manager, then Manage NuGet Packages for
Solution.
b. Click the Browse tab, and in the Search box type
"Microsoft.Azure.CognitiveServices.Vision.ComputerVision".
c. Select Microsoft.Azure.CognitiveServices.Vision.ComputerVision when it displays, then click the
checkbox next to your project name, and Install.
3. Replace the contents of Program.cs with the following code. The AnalyzeImageAsync and
AnalyzeImageInStreamAsync methods wrap the Analyze Image REST API for remote and local images,
respectively.
private const string remoteImageUrl =
"https://upload.wikimedia.org/wikipedia/commons/3/3c/Shaki_waterfall.jpg";
// Specify the features to return
private static readonly List<VisualFeatureTypes> features =
new List<VisualFeatureTypes>()
{
VisualFeatureTypes.Categories, VisualFeatureTypes.Description,
VisualFeatureTypes.Faces, VisualFeatureTypes.ImageType,
VisualFeatureTypes.Tags
};
static void Main(string[] args)
{
ComputerVisionClient computerVision = new ComputerVisionClient(
new ApiKeyServiceClientCredentials(subscriptionKey),
new System.Net.Http.DelegatingHandler[] { });
// You must use the same region as you used to get your subscription
// keys. For example, if you got your subscription keys from westus,
// replace "westcentralus" with "westus".
//
// Free trial subscription keys are generated in the "westus"
// region. If you use a free trial subscription key, you shouldn't
// need to change the region.
// Specify the Azure region
computerVision.Endpoint = "https://westcentralus.api.cognitive.microsoft.com";
Console.WriteLine("Images being analyzed ...");
var t1 = AnalyzeRemoteAsync(computerVision, remoteImageUrl);
var t2 = AnalyzeLocalAsync(computerVision, localImagePath);
Task.WhenAll(t1, t2).Wait(5000);
Console.WriteLine("Press ENTER to exit");
Console.ReadLine();
}
// Analyze a remote image
private static async Task AnalyzeRemoteAsync(
ComputerVisionClient computerVision, string imageUrl)
{
if (!Uri.IsWellFormedUriString(imageUrl, UriKind.Absolute))
{
Console.WriteLine(
"\nInvalid remoteImageUrl:\n{0} \n", imageUrl);
return;
}
ImageAnalysis analysis =
await computerVision.AnalyzeImageAsync(imageUrl, features);
DisplayResults(analysis, imageUrl);
}
// Analyze a local image
private static async Task AnalyzeLocalAsync(
ComputerVisionClient computerVision, string imagePath)
{
if (!File.Exists(imagePath))
{
Console.WriteLine(
"\nUnable to open or read localImagePath:\n{0} \n", imagePath);
return;
}
using (Stream imageStream = File.OpenRead(imagePath))
{
ImageAnalysis analysis = await computerVision.AnalyzeImageInStreamAsync(
imageStream, features);
Examine the response
https://upload.wikimedia.org/wikipedia/commons/3/3c/Shaki_waterfall.jpg
a large waterfall over a rocky cliff
Next steps
imageStream, features);
DisplayResults(analysis, imagePath);
}
}
// Display the most relevant caption for the image
private static void DisplayResults(ImageAnalysis analysis, string imageUri)
{
Console.WriteLine(imageUri);
if (analysis.Description.Captions.Count != 0)
{
Console.WriteLine(analysis.Description.Captions[0].Text + "\n");
}
else
{
Console.WriteLine("No description generated.");
}
}
}
}
4. Replace <Subscription Key> with your valid subscription key.
5. Change computerVision.Endpoint to the Azure region associated with your subscription keys, if necessary.
6. Replace <LocalImage> with the path and file name of a local image.
7. Optionally, set remoteImageUrl to a different image URL.
8. Run the program.
A successful response displays the most relevant caption for each image. You can change the DisplayResults
method to output different image data. See the AnalyzeLocalAsync method to learn more.
See API Quickstarts: Analyze a local image with C# for an example of a raw JSON output.
Explore the Computer Vision APIs used to analyze an image, detect celebrities and landmarks, create a thumbnail,
and extract printed and handwritten text.
Explore Computer Vision APIs
Quickstart: Generate a thumbnail using the Computer
Vision SDK and C#
4/18/2019 • 3 minutes to read • Edit Online
Prerequisites
GenerateThumbnailAsync method
In this quickstart, you will generate a smart-cropped thumbnail from an image using the Computer Vision SDK for
C#. If you wish, you can download the code in this guide as a complete sample app from the Cognitive Services
Csharp Vision repo on GitHub.
A Computer Vision subscription key. You can get a free trial key from Try Cognitive Services. Or, follow the
instructions in Create a Cognitive Services account to subscribe to Computer Vision and get your key.
Any edition of Visual Studio 2015 or 2017.
The Microsoft.Azure.CognitiveServices.Vision.ComputerVision client library NuGet package. It isn't necessary
to download the package. Installation instructions are provided below.
You can use these methods to generate a thumbnail of an image. You specify the height and width, which can differ
from the aspect ratio of the input image. Computer Vision uses smart cropping to intelligently identify the area of
interest and generate cropping coordinates based on that region.
To run the sample, do the following steps:
using Microsoft.Azure.CognitiveServices.Vision.ComputerVision;
using System;
using System.IO;
using System.Threading.Tasks;
namespace ImageThumbnail
{
class Program
{
private const bool writeThumbnailToDisk = false;
// subscriptionKey = "0123456789abcdef0123456789ABCDEF"
private const string subscriptionKey = "<SubscriptionKey>";
1. Create a new Visual C# Console App in Visual Studio.
2. Install the Computer Vision client library NuGet package.
a. On the menu, click Tools, select NuGet Package Manager, then Manage NuGet Packages for
Solution.
b. Click the Browse tab, and in the Search box type
"Microsoft.Azure.CognitiveServices.Vision.ComputerVision".
c. Select Microsoft.Azure.CognitiveServices.Vision.ComputerVision when it displays, then click the
checkbox next to your project name, and Install.
3. Replace Program.cs with the following code. The GenerateThumbnailAsync and
GenerateThumbnailInStreamAsync methods wrap the Get Thumbnail API for remote and local images,
respectively.

// localImagePath = @"C:\Documents\LocalImage.jpg"
private const string localImagePath = @"<LocalImage>";
private const string remoteImageUrl =
"https://upload.wikimedia.org/wikipedia/commons/9/94/Bloodhound_Puppy.jpg";
private const int thumbnailWidth = 100;
private const int thumbnailHeight = 100;
static void Main(string[] args)
{
ComputerVisionClient computerVision = new ComputerVisionClient(
new ApiKeyServiceClientCredentials(subscriptionKey),
new System.Net.Http.DelegatingHandler[] { });
// You must use the same region as you used to get your subscription
// keys. For example, if you got your subscription keys from westus,
// replace "westcentralus" with "westus".
//
// Free trial subscription keys are generated in the "westus"
// region. If you use a free trial subscription key, you shouldn't
// need to change the region.
// Specify the Azure region
computerVision.Endpoint = "https://westcentralus.api.cognitive.microsoft.com";
Console.WriteLine("Images being analyzed ...\n");
var t1 = GetRemoteThumbnailAsync(computerVision, remoteImageUrl);
var t2 = GetLocalThumbnailAsnc(computerVision, localImagePath);
Task.WhenAll(t1, t2).Wait(5000);
Console.WriteLine("Press ENTER to exit");
Console.ReadLine();
}
// Create a thumbnail from a remote image
private static async Task GetRemoteThumbnailAsync(
ComputerVisionClient computerVision, string imageUrl)
{
if (!Uri.IsWellFormedUriString(imageUrl, UriKind.Absolute))
{
Console.WriteLine(
"\nInvalid remoteImageUrl:\n{0} \n", imageUrl);
return;
}
Stream thumbnail = await computerVision.GenerateThumbnailAsync(
thumbnailWidth, thumbnailHeight, imageUrl, true);
string path = Environment.CurrentDirectory;
string imageName = imageUrl.Substring(imageUrl.LastIndexOf('/') + 1);
string thumbnailFilePath =
path + "\\" + imageName.Insert(imageName.Length - 4, "_thumb");
// Save the thumbnail to the current working directory,
// using the original name with the suffix "_thumb".
SaveThumbnail(thumbnail, thumbnailFilePath);
}
// Create a thumbnail from a local image
private static async Task GetLocalThumbnailAsnc(
ComputerVisionClient computerVision, string imagePath)
{
if (!File.Exists(imagePath))
{
Console.WriteLine(
"\nUnable to open or read localImagePath:\n{0} \n", imagePath);
return;
}
Examine the response
Thumbnail written to: C:\Documents\LocalImage_thumb.jpg
Thumbnail written to: ...\bin\Debug\Bloodhound_Puppy_thumb.jpg
Next steps
}
using (Stream imageStream = File.OpenRead(imagePath))
{
Stream thumbnail = await computerVision.GenerateThumbnailInStreamAsync(
thumbnailWidth, thumbnailHeight, imageStream, true);
string thumbnailFilePath =
localImagePath.Insert(localImagePath.Length - 4, "_thumb");
// Save the thumbnail to the same folder as the original image,
// using the original name with the suffix "_thumb".
SaveThumbnail(thumbnail, thumbnailFilePath);
}
}
// Save the thumbnail locally.
// NOTE: This will overwrite an existing file of the same name.
private static void SaveThumbnail(Stream thumbnail, string thumbnailFilePath)
{
if (writeThumbnailToDisk)
{
using (Stream file = File.Create(thumbnailFilePath))
{
thumbnail.CopyTo(file);
}
}
Console.WriteLine("Thumbnail {0} written to: {1}\n",
writeThumbnailToDisk ? "" : "NOT", thumbnailFilePath);
}
}
}
4. Replace <Subscription Key> with your valid subscription key.
5. Change computerVision.Endpoint to the Azure region associated with your subscription keys, if necessary.
6. Optionally, replace <LocalImage> with the path and file name of a local image (will be ignored if not set).
7. Optionally, set remoteImageUrl to a different image.
8. Optionally, set writeThumbnailToDisk to true to save the thumbnail to disk.
9. Run the program.
A successful response saves the thumbnail for each image locally and displays the thumbnail's location, for
example:
Explore the Computer Vision APIs used to analyze an image, detect celebrities and landmarks, create a thumbnail,
and extract printed and handwritten text.
Explore Computer Vision APIs
Quickstart: Extract handwritten text using the
Computer Vision C# SDK
5/29/2019 • 3 minutes to read • Edit Online
Prerequisites
Create and run the sample app
In this quickstart, you will extract handwritten or printed text from an image using the Computer Vision SDK for
C#. If you wish, you can download the code in this guide as a complete sample app from the Cognitive Services
Csharp Vision repo on GitHub.
A Computer Vision subscription key. You can get a free trial key from Try Cognitive Services. Or, follow the
instructions in Create a Cognitive Services account to subscribe to Computer Vision and get your key.
Any edition of Visual Studio 2015 or 2017.
The Microsoft.Azure.CognitiveServices.Vision.ComputerVision client library NuGet package. It isn't necessary
to download the package. Installation instructions are provided below.
To run the sample, do the following steps:
using Microsoft.Azure.CognitiveServices.Vision.ComputerVision;
using Microsoft.Azure.CognitiveServices.Vision.ComputerVision.Models;
using System;
using System.IO;
using System.Threading.Tasks;
namespace ExtractText
{
class Program
{
// subscriptionKey = "0123456789abcdef0123456789ABCDEF"
private const string subscriptionKey = "<Subscription key>";
// localImagePath = @"C:\Documents\LocalImage.jpg"
private const string localImagePath = @"<LocalImage>";
private const string remoteImageUrl =
"https://upload.wikimedia.org/wikipedia/commons/thumb/d/dd/Cursive_Writing_on_Notebook_paper.jpg/800px-
1. Create a new Visual C# Console App in Visual Studio.
2. Install the Computer Vision client library NuGet package.
a. On the menu, click Tools, select NuGet Package Manager, then Manage NuGet Packages for
Solution.
b. Click the Browse tab, and in the Search box type
"Microsoft.Azure.CognitiveServices.Vision.ComputerVision".
c. Select Microsoft.Azure.CognitiveServices.Vision.ComputerVision when it displays, then click the
checkbox next to your project name, and Install.
3. Replace Program.cs with the following code. The BatchReadFileAsync and BatchReadFileInStreamAsync
methods wrap the Batch Read API for remote and local images, respectively. The
GetReadOperationResultAsync method wraps the Get Read Operation Result API.

"https://upload.wikimedia.org/wikipedia/commons/thumb/d/dd/Cursive_Writing_on_Notebook_paper.jpg/800px-
Cursive_Writing_on_Notebook_paper.jpg";
private const int numberOfCharsInOperationId = 36;
static void Main(string[] args)
{
ComputerVisionClient computerVision = new ComputerVisionClient(
new ApiKeyServiceClientCredentials(subscriptionKey),
new System.Net.Http.DelegatingHandler[] { });
// You must use the same region as you used to get your subscription
// keys. For example, if you got your subscription keys from westus,
// replace "westcentralus" with "westus".
//
// Free trial subscription keys are generated in the westcentralus
// region. If you use a free trial subscription key, you shouldn't
// need to change the region.
// Specify the Azure region
computerVision.Endpoint = "https://westus.api.cognitive.microsoft.com";
Console.WriteLine("Images being analyzed ...");
var t1 = ExtractRemoteTextAsync(computerVision, remoteImageUrl);
var t2 = ExtractLocalTextAsync(computerVision, localImagePath);
Task.WhenAll(t1, t2).Wait(5000);
Console.WriteLine("Press ENTER to exit");
Console.ReadLine();
}
// Read text from a remote image
private static async Task ExtractRemoteTextAsync(
ComputerVisionClient computerVision, string imageUrl)
{
if (!Uri.IsWellFormedUriString(imageUrl, UriKind.Absolute))
{
Console.WriteLine(
"\nInvalid remoteImageUrl:\n{0} \n", imageUrl);
return;
}
// Start the async process to read the text
BatchReadFileHeaders textHeaders =
await computerVision.BatchReadFileAsync(
imageUrl);
await GetTextAsync(computerVision, textHeaders.OperationLocation);
}
// Recognize text from a local image
private static async Task ExtractLocalTextAsync(
ComputerVisionClient computerVision, string imagePath)
{
if (!File.Exists(imagePath))
{
Console.WriteLine(
"\nUnable to open or read localImagePath:\n{0} \n", imagePath);
return;
}
using (Stream imageStream = File.OpenRead(imagePath))
{
// Start the async process to recognize the text
BatchReadFileInStreamHeaders textHeaders =
await computerVision.BatchReadFileInStreamAsync(
imageStream);
await GetTextAsync(computerVision, textHeaders.OperationLocation);

Examine the response
}
}
// Retrieve the recognized text
private static async Task GetTextAsync(
ComputerVisionClient computerVision, string operationLocation)
{
// Retrieve the URI where the recognized text will be
// stored from the Operation-Location header
string operationId = operationLocation.Substring(
operationLocation.Length - numberOfCharsInOperationId);
Console.WriteLine("\nCalling GetHandwritingRecognitionOperationResultAsync()");
ReadOperationResult result =
await computerVision.GetReadOperationResultAsync(operationId);
// Wait for the operation to complete
int i = 0;
int maxRetries = 10;
while ((result.Status == TextOperationStatusCodes.Running ||
result.Status == TextOperationStatusCodes.NotStarted) && i++ < maxRetries)
{
Console.WriteLine(
"Server status: {0}, waiting {1} seconds...", result.Status, i);
await Task.Delay(1000);
result = await computerVision.GetReadOperationResultAsync(operationId);
}
// Display the results
Console.WriteLine();
var recResults = result.RecognitionResults;
foreach (TextRecognitionResult recResult in recResults)
{
foreach (Line line in recResult.Lines)
{
Console.WriteLine(line.Text);
}
}
Console.WriteLine();
}
}
}
4. Replace <Subscription Key> with your valid subscription key.
5. Change computerVision.Endpoint to the Azure region associated with your subscription keys, if necessary.
6. Replace <LocalImage> with the path and file name of a local image.
7. Optionally, set remoteImageUrl to a different image.
8. Run the program.
A successful response prints the lines of recognized text for each image.

Calling GetHandwritingRecognitionOperationResultAsync()
Calling GetHandwritingRecognitionOperationResultAsync()
Server status: Running, waiting 1 seconds...
Server status: Running, waiting 1 seconds...
dog
The quick brown fox jumps over the lazy
Pack my box with five dozen liquor jugs
Next steps
See Quickstart: Extract handwritten text - REST, C# for an example of the raw JSON output from the API call.
Explore the Computer Vision APIs used to analyze an image, detect celebrities and landmarks, create a thumbnail,
and extract printed and handwritten text.
Explore Computer Vision APIs
Azure Cognitive Services Computer Vision SDK for
Python
5/29/2019 • 6 minutes to read • Edit Online
Prerequisites
If you don't have an Azure SubscriptionIf you don't have an Azure Subscription
If you have an Azure SubscriptionIf you have an Azure Subscription
The Computer Vision service provides developers with access to advanced algorithms for processing images and
returning information. Computer Vision algorithms analyze the content of an image in different ways, depending
on the visual features you're interested in.
Analyze an image
Get subject domain list
Analyze an image by domain
Get text description of an image
Get handwritten text from image
Generate thumbnail
For more information about this service, see What is Computer Vision?.
Looking for more documentation?
SDK reference documentation
Cognitive Services Computer Vision documentation
Python 3.6+
Free Computer Vision key and associated endpoint. You need these values when you create the instance of the
ComputerVisionClient client object. Use one of the following methods to get these values.
Create a free key valid for 7 days with the Try It experience for the Computer Vision service. When the key is
created, copy the key and endpoint name. You will need this to create the client.
Keep the following after the key is created:
Key value: a 32 character string with the format of xxxxxxxxxxxxxxxxxxxxxxxxxxxxxxxx
Key endpoint: the base endpoint URL, https://westcentralus.api.cognitive.microsoft.com
The easiest method to create a resource in your subscription is to use the following Azure CLI command. This
creates a Cognitive Service key that can be used across many cognitive services. You need to choose the existing
resource group name, for example, "my-cogserv-group" and the new computer vision resource name, such as "my-
computer-vision-resource".
RES_REGION=westeurope
RES_GROUP=<resourcegroup-name>
ACCT_NAME=<computervision-account-name>
az cognitiveservices account create \
--resource-group $RES_GROUP \
--name $ACCT_NAME \
--location $RES_REGION \
--kind CognitiveServices \
--sku S0 \
--yes
Install the SDKInstall the SDK
pip install azure-cognitiveservices-vision-computervision
Authentication
ACCOUNT_ENDPOINT=<resourcegroup-name>
ACCT_NAME=<computervision-account-name>
For Azure subscription users, get credentials for key and endpointFor Azure subscription users, get credentials for key and endpoint
RES_GROUP=<resourcegroup-name>
ACCT_NAME=<computervision-account-name>
export ACCOUNT_ENDPOINT=$(az cognitiveservices account show \
--resource-group $RES_GROUP \
--name $ACCT_NAME \
--query endpoint \
--output tsv)
export ACCOUNT_KEY=$(az cognitiveservices account keys list \
--resource-group $RES_GROUP \
--name $ACCT_NAME \
--query key1 \
--output tsv)
Create clientCreate client
Install the Azure Cognitive Services Computer Vision SDK for Python package with pip:
Once you create your Computer Vision resource, you need its endpoint, and one of its account keys to
instantiate the client object.
Use these values when you create the instance of the ComputerVisionClient client object.
For example, use the Bash terminal to set the environment variables:
If you do not remember your endpoint and key, you can use the following method to find them. If you need to
create a key and endpoint, you can use the method for Azure subscription holders or for users without an Azure
subscription.
Use the Azure CLI snippet below to populate two environment variables with the Computer Vision account
endpoint and one of its keys (you can also find these values in the Azure portal). The snippet is formatted for the
Bash shell.
Get the endpoint and key from environment variables then create the ComputerVisionClient client object.

from azure.cognitiveservices.vision.computervision import ComputerVisionClient
from azure.cognitiveservices.vision.computervision.models import VisualFeatureTypes
from msrest.authentication import CognitiveServicesCredentials
# Get endpoint and key from environment variables
import os
endpoint = os.environ['ACCOUNT_ENDPOINT']
key = os.environ['ACCOUNT_KEY']
# Set credentials
credentials = CognitiveServicesCredentials(key)
# Create client
client = ComputerVisionClient(endpoint, credentials)
Examples
Analyze an imageAnalyze an image
url = "https://upload.wikimedia.org/wikipedia/commons/thumb/1/12/Broadway_and_Times_Square_by_night.jpg/450px-
Broadway_and_Times_Square_by_night.jpg"
image_analysis = client.analyze_image(url,visual_features=[VisualFeatureTypes.tags])
for tag in image_analysis.tags:
print(tag)
Get subject domain listGet subject domain list
models = client.list_models()
for x in models.models_property:
print(x)
Analyze an image by domainAnalyze an image by domain
You need a ComputerVisionClient client object before using any of the following tasks.
You can analyze an image for certain features with analyze_image . Use the visual_features property to set the
types of analysis to perform on the image. Common values are VisualFeatureTypes.tags and
VisualFeatureTypes.description .
Review the subject domains used to analyze your image with list_models . These domain names are used when
analyzing an image by domain. An example of a domain is landmarks .
You can analyze an image by subject domain with analyze_image_by_domain . Get the list of supported subject
domains in order to use the correct domain name.

# type of prediction
domain = "landmarks"
# Public domain image of Eiffel tower
url = "https://images.pexels.com/photos/338515/pexels-photo-338515.jpeg"
# English language response
language = "en"
analysis = client.analyze_image_by_domain(domain, url, language)
for landmark in analysis.result["landmarks"]:
print(landmark["name"])
print(landmark["confidence"])
Get text description of an imageGet text description of an image
domain = "landmarks"
url = "http://www.public-domain-photos.com/free-stock-photos-4/travel/san-francisco/golden-gate-bridge-in-san-
francisco.jpg"
language = "en"
max_descriptions = 3
analysis = client.describe_image(url, max_descriptions, language)
for caption in analysis.captions:
print(caption.text)
print(caption.confidence)
Get text from imageGet text from image
You can get a language-based text description of an image with describe_image . Request several descriptions with
the max_description property if you are doing text analysis for keywords associated with the image. Examples of a
text description for the following image include a train crossing a bridge over a body of water ,
a large bridge over a body of water , and a train crossing a bridge over a large body of water .
You can get any handwritten or printed text from an image. This requires two calls to the SDK: batch_read_file
and get_read_operation_result . The call to batch_read_file is asynchronous. In the results of the
get_read_operation_result call, you need to check if the first call completed with TextOperationStatusCodes before
extracting the text data. The results include the text as well as the bounding box coordinates for the text.

# import models
from azure.cognitiveservices.vision.computervision.models import TextOperationStatusCodes
import time
url = "https://azurecomcdn.azureedge.net/cvt-
1979217d3d0d31c5c87cbd991bccfee2d184b55eeb4081200012bdaf6a65601a/images/shared/cognitive-services-demos/read-
text/read-1-thumbnail.png"
raw = True
custom_headers = None
numberOfCharsInOperationId = 36
# Async SDK call
rawHttpResponse = client.batch_read_file(url, custom_headers, raw)
# Get ID from returned headers
operationLocation = rawHttpResponse.headers["Operation-Location"]
idLocation = len(operationLocation) - numberOfCharsInOperationId
operationId = operationLocation[idLocation:]
# SDK call
while True:
result = client.get_read_operation_result(operationId)
if result.status not in ['NotStarted', 'Running']:
break
time.sleep(1)
# Get data
if result.status == TextOperationStatusCodes.succeeded:
for textResult in result.recognition_results:
for line in textResult.lines:
print(line.text)
print(line.bounding_box)
Generate thumbnailGenerate thumbnail
pip install Pillow
# Pillow package
from PIL import Image
# IO package to create local image
import io
width = 50
height = 50
url = "http://www.public-domain-photos.com/free-stock-photos-4/travel/san-francisco/golden-gate-bridge-in-san-
francisco.jpg"
thumbnail = client.generate_thumbnail(width, height, url)
for x in thumbnail:
image = Image.open(io.BytesIO(x))
image.save('thumbnail.jpg')
You can generate a thumbnail (JPG) of an image with generate_thumbnail . The thumbnail does not need to be in
the same proportions as the original image.
Install Pillow to use this example:
Once Pillow is installed, use the package in the following code example to generate the thumbnail image.
Troubleshooting
GeneralGeneral
domain = "landmarks"
url = "http://www.public-domain-photos.com/free-stock-photos-4/travel/san-francisco/golden-gate-bridge-in-san-
francisco.jpg"
language = "en"
max_descriptions = 3
try:
analysis = client.describe_image(url, max_descriptions, language)
for caption in analysis.captions:
print(caption.text)
print(caption.confidence)
except HTTPFailure as e:
if e.status_code == 401:
print("Error unauthorized. Make sure your key and endpoint are correct.")
else:
raise
Handle transient errors with retriesHandle transient errors with retries
Next steps
When you interact with the ComputerVisionClient client object using the Python SDK, the
ComputerVisionErrorException class is used to return errors. Errors returned by the service correspond to the same
HTTP status codes returned for REST API requests.
For example, if you try to analyze an image with an invalid key, a 401 error is returned. In the following snippet,
the error is handled gracefully by catching the exception and displaying additional information about the error.
While working with the ComputerVisionClient client, you might encounter transient failures caused by rate limits
enforced by the service, or other transient problems like network outages. For information about handling these
types of failures, see Retry pattern in the Cloud Design Patterns guide, and the related Circuit Breaker pattern.
Applying content tags to images
Tutorial: Use Computer Vision to generate image
metadata in Azure Storage
5/10/2019 • 5 minutes to read • Edit Online
Prerequisites
Create a Computer Vision resource
In this tutorial, you will learn how to integrate the Azure Computer Vision service into a web app to generate
metadata for uploaded images. A full app guide can be found in the Azure Storage and Cognitive Services Lab on
GitHub, and this tutorial essentially covers Exercise 5 of the lab. You may wish to create the end-to-end application
by following every step, but if you'd just like to see how Computer Vision can be integrated into an existing web
app, read along here.
This tutorial shows you how to:
Create a Computer Vision resource in Azure
Perform image analysis on Azure Storage images
Attach metadata to Azure Storage images
Check image metadata using Azure Storage Explorer
If you don't have an Azure subscription, create a free account before you begin.
Visual Studio 2017 Community edition or higher, with the "ASP.NET and web development" and "Azure
development" workloads installed.
An Azure Storage account with a blob container allocated for images (follow Exercises 1 of the Azure Storage
Lab if you need help with this step).
The Azure Storage Explorer tool (follow Exercise 2 of the Azure Storage Lab if you need help with this step).
An ASP.NET web application with access to Azure Storage (follow Exercise 3 of the Azure Storage Lab to create
such an app quickly).
You will need to create a Computer Vision resource for your Azure account; this resource manages your access to
Azure's Computer Vision service.
1. Follow the instructions in Create an Azure Cognitive Services resource to create a Computer Vision
resource.
2. Then go to the menu for your resource group and click the Computer Vision API subscription that you just
created. Copy the URL under Endpoint to somewhere you can easily retrieve it in a moment. Then click
Show access keys.
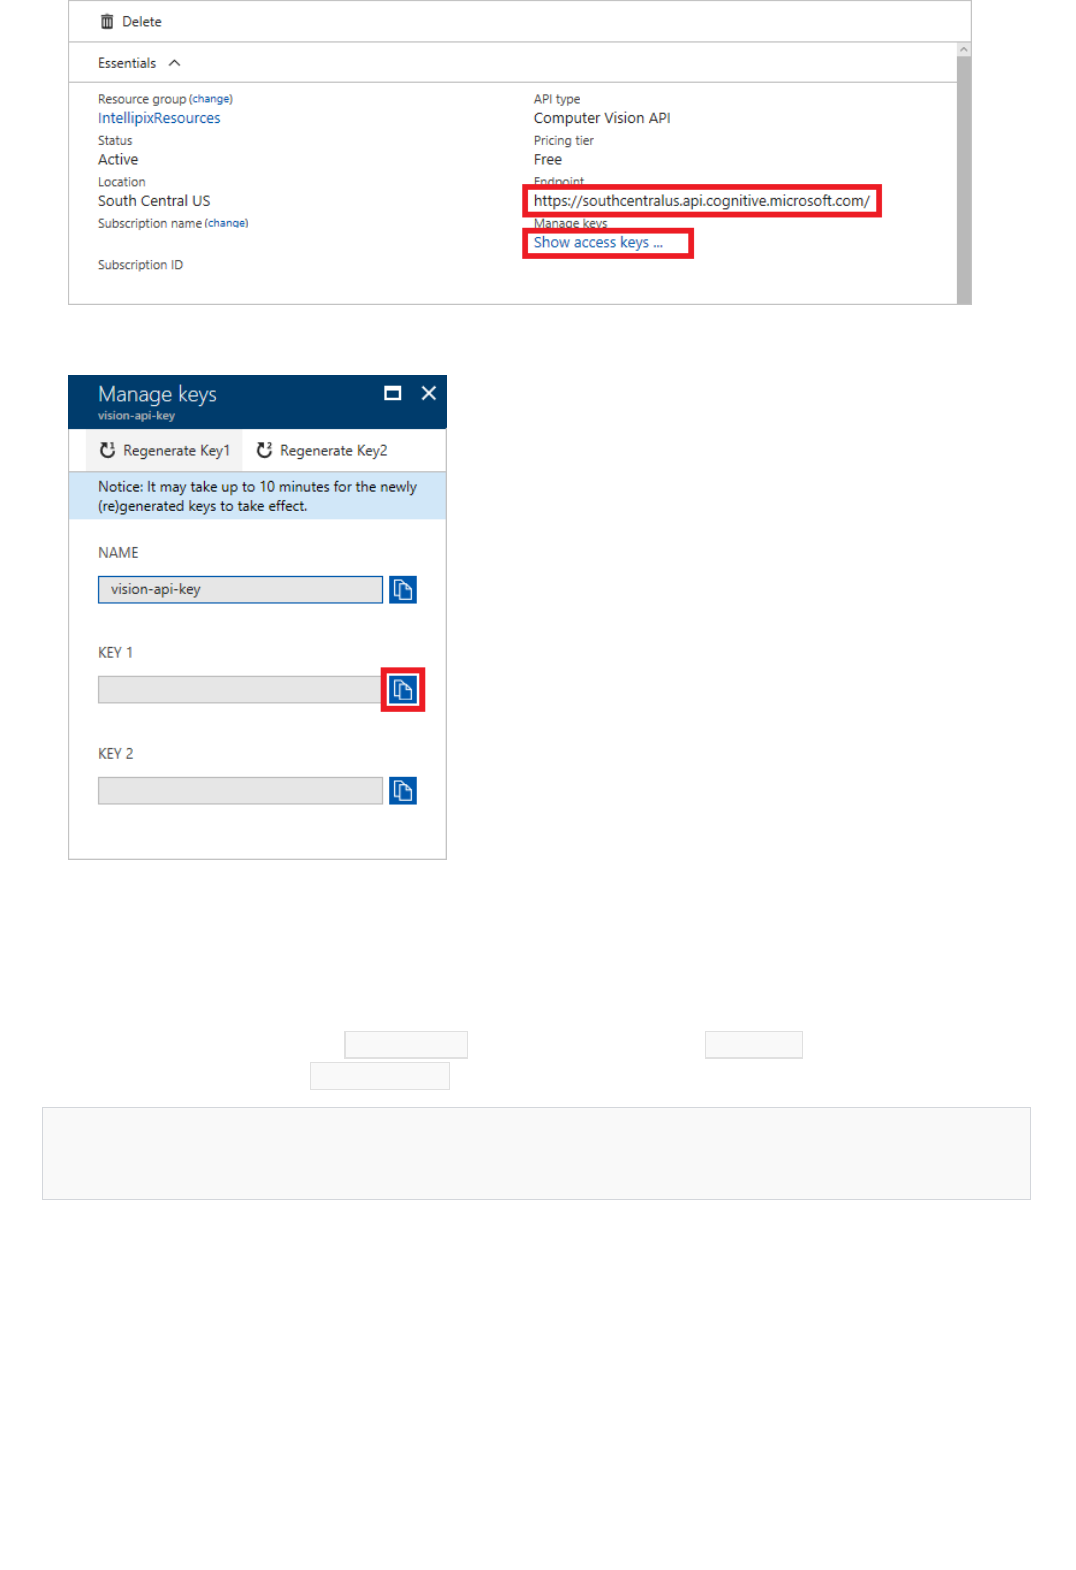
Add Computer Vision credentials
<add key="SubscriptionKey" value="VISION_KEY" />
<add key="VisionEndpoint" value="VISION_ENDPOINT" />
Add metadata generation code
3. In the next window, copy the value of KEY 1 to the clipboard.
Next, you will add required credentials to your app so that it can access Computer Vision resources
Open your ASP.NET web application in Visual Studio and navigate to the Web.config file at the root of the project.
Add the following statements to the <appSettings> section of the file, replacing VISION_KEY with the key you
copied in the previous step, and VISION_ENDPOINT with the URL you saved in the step before that.
Then in the Solution Explorer, right-click the project and use the Manage NuGet Packages command to install
the package Microsoft.Azure.CognitiveServices.Vision.ComputerVision. This package contains the types
needed to call the Computer Vision API.
Next, you will add the code that actually leverages the Computer Vision service to create metadata for images.
These steps will apply to the ASP.NET app in the lab, but you can adapt them to your own app. What's important is
that at this point you have an ASP.NET web application that can upload images to an Azure Storage container, read
images from it, and display them in the view. If you're unsure about this, it's best to follow Exercise 3 of the Azure
Storage Lab.
Test the app
using Microsoft.Azure.CognitiveServices.Vision.ComputerVision;
using Microsoft.Azure.CognitiveServices.Vision.ComputerVision.Models;
// Submit the image to Azure's Computer Vision API
ComputerVisionClient vision = new ComputerVisionClient(
new ApiKeyServiceClientCredentials(ConfigurationManager.AppSettings["SubscriptionKey"]),
new System.Net.Http.DelegatingHandler[] { });
vision.Endpoint = ConfigurationManager.AppSettings["VisionEndpoint"];
VisualFeatureTypes[] features = new VisualFeatureTypes[] { VisualFeatureTypes.Description };
var result = await vision.AnalyzeImageAsync(photo.Uri.ToString(), features);
// Record the image description and tags in blob metadata
photo.Metadata.Add("Caption", result.Description.Captions[0].Text);
for (int i = 0; i < result.Description.Tags.Count; i++)
{
string key = String.Format("Tag{0}", i);
photo.Metadata.Add(key, result.Description.Tags[i]);
}
await photo.SetMetadataAsync();
foreach (IListBlobItem item in container.ListBlobs())
{
var blob = item as CloudBlockBlob;
if (blob != null)
{
blob.FetchAttributes(); // Get blob metadata
var caption = blob.Metadata.ContainsKey("Caption") ? blob.Metadata["Caption"] : blob.Name;
blobs.Add(new BlobInfo()
{
ImageUri = blob.Uri.ToString(),
ThumbnailUri = blob.Uri.ToString().Replace("/photos/", "/thumbnails/"),
Caption = caption
});
}
}
1. Open the HomeController.cs file in the project's Controllers folder and add the following using statements
at the top of the file:
2. Then, go to the Upload method; this method converts and uploads images to blob storage. Add the
following code immediately after the block that begins with // Generate a thumbnail (or at the end of your
image-blob-creation process). This code takes the blob containing the image (photo ), and uses Computer
Vision to generate a description for that image. The Computer Vision API also generates a list of keywords
that apply to the image. The generated description and keywords are stored in the blob's metadata so that
they can be retrieved later on.
3. Next, go to the Index method in the same file; this method enumerates the stored image blobs in the
targeted blob container (as IListBlobItem instances) and passes them to the application view. Replace the
foreach block in this method with the following code. This code calls CloudBlockBlob.FetchAttributes to
get each blob's attached metadata. It extracts the computer-generated description (caption ) from the
metadata and adds it to the BlobInfo object, which gets passed to the view.
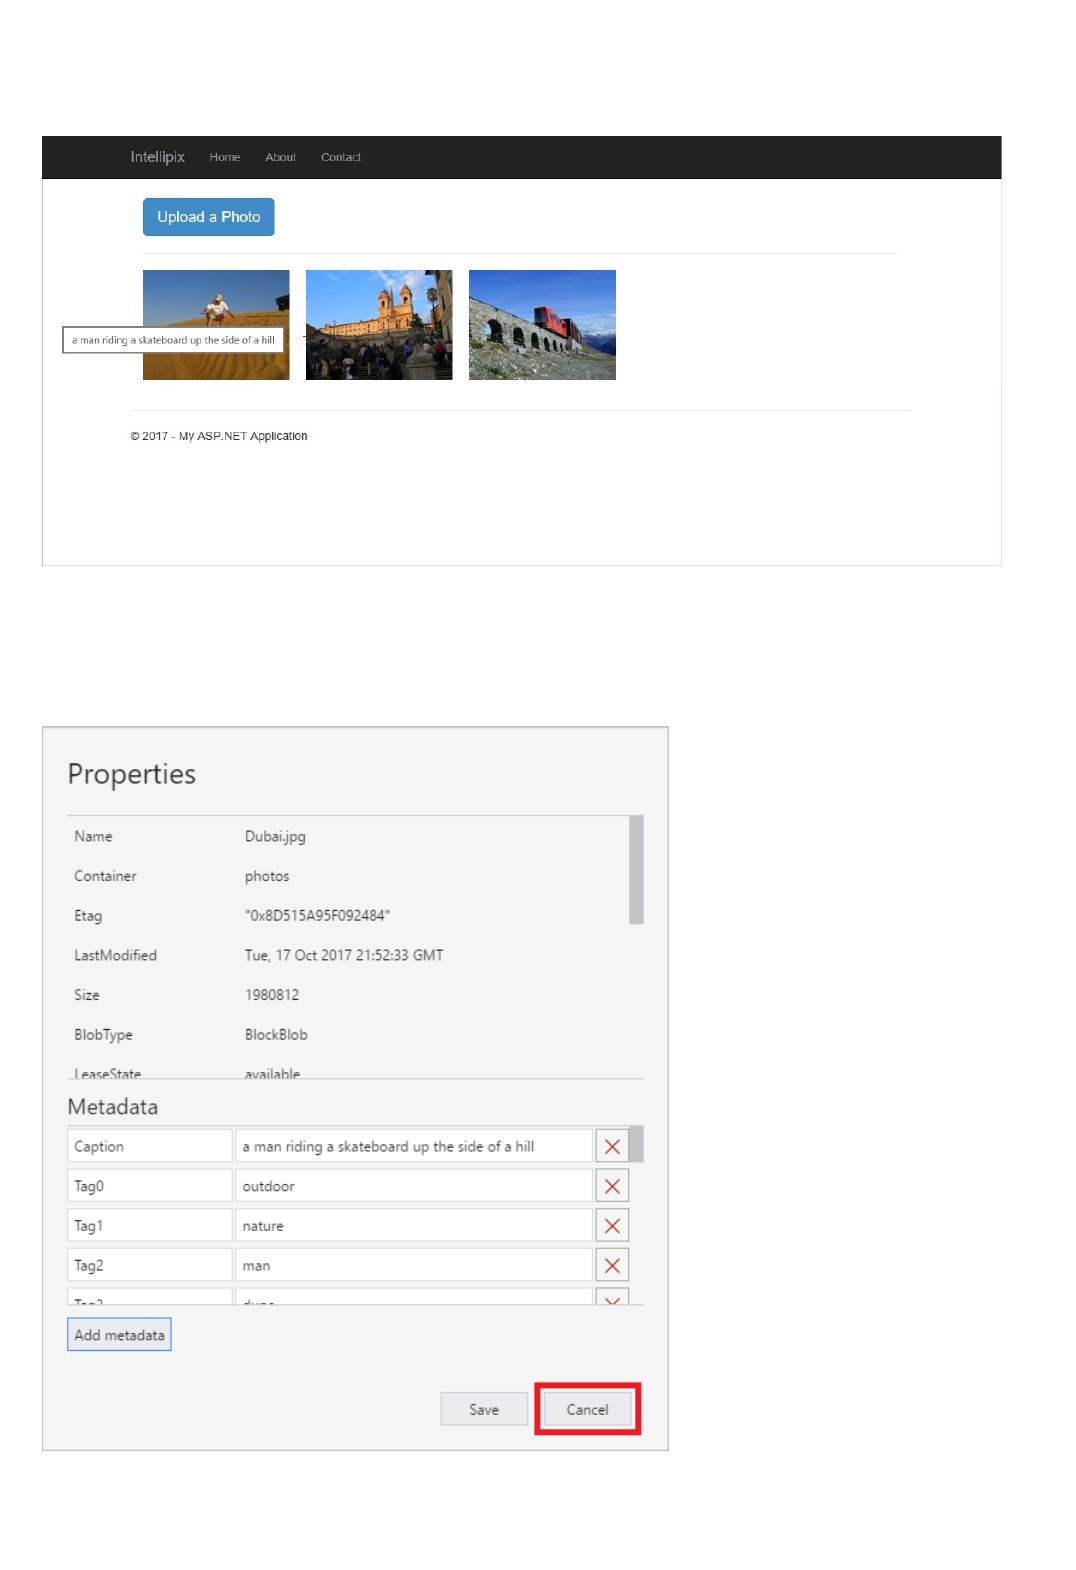
Clean up resources
Save your changes in Visual Studio and press Ctrl+F5 to launch the application in your browser. Use the app to
upload a few images, either from the "photos" folder in the lab's resources or from your own folder. When you
hover the cursor over one of the images in the view, a tooltip window should appear and display the computer-
generated caption for the image.
To view all of the attached metadata, use the Azure Storage Explorer to view the storage container you're using for
images. Right-click any of the blobs in the container and select Properties. In the dialog, you'll see a list of key-
value pairs. The computer-generated image description is stored in the item "Caption," and the search keywords
are stored in "Tag0," "Tag1," and so on. When you're finished, click Cancel to close the dialog.
If you'd like to keep working on your web app, see the Next steps section. If you don't plan to continue using this

Next steps
application, you should delete all app-specific resources. To do this, you can simply delete the resource group that
contains your Azure Storage subscription and Computer Vision resource. This will remove the storage account, the
blobs uploaded to it, and the App Service resource needed to connect with the ASP.NET web app.
To delete the resource group, open the Resource groups blade in the portal, navigate to the resource group you
used for this project, and click Delete resource group at the top of the view. You will be asked to type the resource
group's name to confirm that you want to delete it, because once deleted, a resource group can't be recovered.
In this tutorial, you integrated Azure's Computer Vision service into an existing web app to automatically generate
captions and keywords for blob images as they're uploaded. Next, refer to the Azure Storage Lab, Exercise 6, to
learn how to add search functionality to your web app. This takes advantage of the search keywords that the
Computer Vision service generates.
Add search to your app
Applying content tags to images
2/15/2019 • 2 minutes to read • Edit Online
Image tagging example
Computer Vision returns tags based on thousands of recognizable objects, living beings, scenery, and actions.
When tags are ambiguous or not common knowledge, the API response provides 'hints' to clarify the meaning of
the tag in context of a known setting. Tags are not organized as a taxonomy and no inheritance hierarchies exist. A
collection of content tags forms the foundation for an image 'description' displayed as human readable language
formatted in complete sentences. Note, that at this point English is the only supported language for image
description.
After uploading an image or specifying an image URL, Computer Vision algorithms output tags based on the
objects, living beings, and actions identified in the image. Tagging is not limited to the main subject, such as a
person in the foreground, but also includes the setting (indoor or outdoor), furniture, tools, plants, animals,
accessories, gadgets etc.
The following JSON response illustrates what Computer Vision returns when tagging visual features detected in
the example image.
.
{
"tags": [
{
"name": "grass",
"confidence": 0.9999995231628418
},
{
"name": "outdoor",
"confidence": 0.99992108345031738
},
{
"name": "house",
"confidence": 0.99685388803482056
},
{
"name": "sky",
"confidence": 0.99532157182693481
},
{
"name": "building",
"confidence": 0.99436837434768677
},
{
"name": "tree",
"confidence": 0.98880356550216675
},
{
"name": "lawn",
"confidence": 0.788884699344635
},
{
"name": "green",
"confidence": 0.71250593662261963
},
{
"name": "residential",
"confidence": 0.70859086513519287
},
{
"name": "grassy",
"confidence": 0.46624681353569031
}
],
"requestId": "06f39352-e445-42dc-96fb-0a1288ad9cf1",
"metadata": {
"height": 200,
"width": 300,
"format": "Jpeg"
}
}
Next steps
Learn concepts about categorizing images and describing images.

Detect common objects in images
4/19/2019 • 2 minutes to read • Edit Online
Object detection example
Object detection is similar to tagging, but the API returns the bounding box coordinates (in pixels) for each object
found. For example, if an image contains a dog, cat and person, the Detect operation will list those objects together
with their coordinates in the image. You can use this functionality to process the relationships between the objects
in an image. It also lets you determine whether there are multiple instances of the same tag in an image.
The Detect API applies tags based on the objects or living things identified in the image. There is currently no
formal relationship between the tagging taxonomy and the object detection taxonomy. At a conceptual level, the
Detect API only finds objects and living things, while the Tag API can also include contextual terms like "indoor",
which can't be localized with bounding boxes.
The following JSON response illustrates what Computer Vision returns when detecting objects in the example
image.

{
"objects":[
{
"rectangle":{
"x":730,
"y":66,
"w":135,
"h":85
},
"object":"kitchen appliance",
"confidence":0.501
},
{
"rectangle":{
"x":523,
"y":377,
"w":185,
"h":46
},
"object":"computer keyboard",
"confidence":0.51
},
{
"rectangle":{
"x":471,
"y":218,
"w":289,
"h":226
},
"object":"Laptop",
"confidence":0.85,
"parent":{
"object":"computer",
"confidence":0.851
}
},
{
"rectangle":{
"x":654,
"y":0,
"w":584,
"h":473
},
"object":"person",
"confidence":0.855
}
],
"requestId":"a7fde8fd-cc18-4f5f-99d3-897dcd07b308",
"metadata":{
"width":1260,
"height":473,
"format":"Jpeg"
}
}
Limitations
It's important to note the limitations of object detection so you can avoid or mitigate the effects of false negatives
(missed objects) and limited detail.
Objects are generally not detected if they're small (less than 5% of the image).
Objects are generally not detected if they're arranged closely together (a stack of plates, for example).
Objects are not differentiated by brand or product names (different types of sodas on a store shelf, for
example). However, you can get brand information from an image by using the Brand detection feature.
Use the API
The object detection feature is part of the Analyze Image API. You can call this API through a native SDK or
through REST calls. Include Objects in the visualFeatures query parameter. Then, when you get the full JSON
response, simply parse the string for the contents of the "objects" section.
Quickstart: Analyze an image (.NET SDK)
Quickstart: Analyze an image (REST API)
Detect popular brands in images
4/19/2019 • 2 minutes to read • Edit Online
Brand detection example
{
"brands":[
{
"name":"Microsoft",
"confidence":0.706,
"rectangle":{
"x":470,
"y":862,
"w":338,
"h":327
}
}
],
"requestId":"5fda6b40-3f60-4584-bf23-911a0042aa13",
"metadata":{
"width":2286,
"height":1715,
"format":"Jpeg"
}
}
Brand detection is a specialized mode of object detection that uses a database of thousands of global logos to
identify commercial brands in images or video. You can use this feature, for example, to discover which brands are
most popular on social media or most prevalent in media product placement.
The Computer Vision service detects whether there are brand logos in a given image; if so, it returns the brand
name, a confidence score, and the coordinates of a bounding box around the logo.
The built-in logo database covers popular brands in consumer electronics, clothing, and more. If you find that the
brand you're looking for is not detected by the Computer Vision service, you may be better served creating and
training your own logo detector using the Custom Vision service.
The following JSON responses illustrate what Computer Vision returns when detecting brands in the example
images.
In some cases, the brand detector will pick up both the logo image and the stylized brand name as two separate
logos.
{
"brands":[
{
"name":"Microsoft",
"confidence":0.657,
"rectangle":{
"x":436,
"y":473,
"w":568,
"h":267
}
},
{
"name":"Microsoft",
"confidence":0.85,
"rectangle":{
"x":101,
"y":561,
"w":273,
"h":263
}
}
],
"requestId":"10dcd2d6-0cf6-4a5e-9733-dc2e4b08ac8d",
"metadata":{
"width":1286,
"height":1715,
"format":"Jpeg"
}
}
Use the API
The brand detection feature is part of the Analyze Image API. You can call this API through a native SDK or
through REST calls. Include Brands in the visualFeatures query parameter. Then, when you get the full JSON
response, simply parse the string for the contents of the "brands" section.
Quickstart: Analyze an image (.NET SDK)
Quickstart: Analyze an image (REST API)
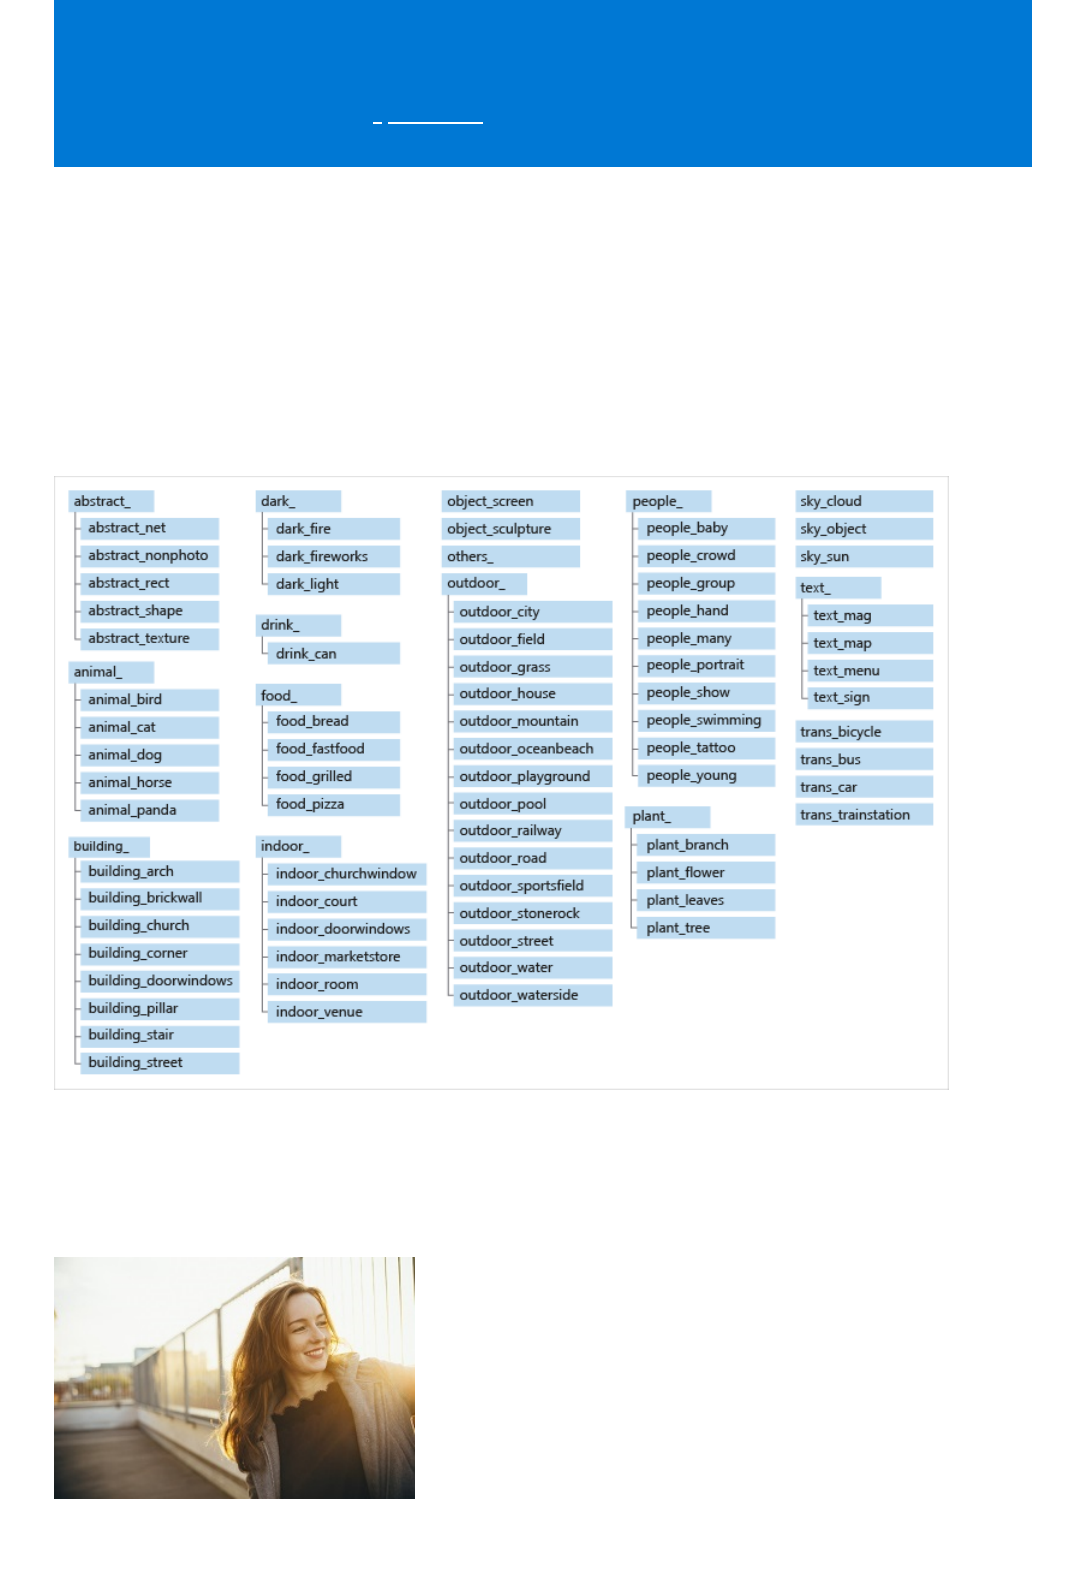
Categorize images by subject matter
4/19/2019 • 2 minutes to read • Edit Online
The 86-category concept
Image categorization examples
In addition to tags and a description, Computer Vision returns the taxonomy-based categories detected in an
image. Unlike tags, categories are organized in a parent/child hereditary hierarchy, and there are fewer of them
(86, as opposed to thousands of tags). All category names are in English. Categorization can be done by itself or
alongside the newer tags model.
Computer vision can categorize an image broadly or specifically, using the list of 86 categories in the following
diagram. For the full taxonomy in text format, see Category Taxonomy.
The following JSON response illustrates what Computer Vision returns when categorizing the example image
based on its visual features.
{
"categories": [
{
"name": "people_",
"score": 0.81640625
}
],
"requestId": "bae7f76a-1cc7-4479-8d29-48a694974705",
"metadata": {
"height": 200,
"width": 300,
"format": "Jpeg"
}
}
IMAGE CATEGORY
people_group
animal_dog
outdoor_mountain
The following table illustrates a typical image set and the category returned by Computer Vision for each image.

Describe images with human-readable language
2/15/2019 • 2 minutes to read • Edit Online
Image description example
{
"description": {
"tags": ["outdoor", "building", "photo", "city", "white", "black", "large", "sitting", "old", "water",
"skyscraper", "many", "boat", "river", "group", "street", "people", "field", "tall", "bird", "standing"],
"captions": [
{
"text": "a black and white photo of a city",
"confidence": 0.95301952483304808
},
{
"text": "a black and white photo of a large city",
"confidence": 0.94085190563213816
},
{
"text": "a large white building in a city",
"confidence": 0.93108362931954824
}
]
},
"requestId": "b20bfc83-fb25-4b8d-a3f8-b2a1f084b159",
"metadata": {
"height": 300,
"width": 239,
"format": "Jpeg"
}
}
Next steps
Computer Vision can analyze an image and generate a human-readable sentence that describes its contents. The
algorithm actually retruns several descriptions based on different visual features, and each description is given a
confidence score. The final output is a list of descriptions ordered from highest to lowest confidence.
The following JSON response illustrates what Computer Vision returns when describing the example image
based on its visual features.

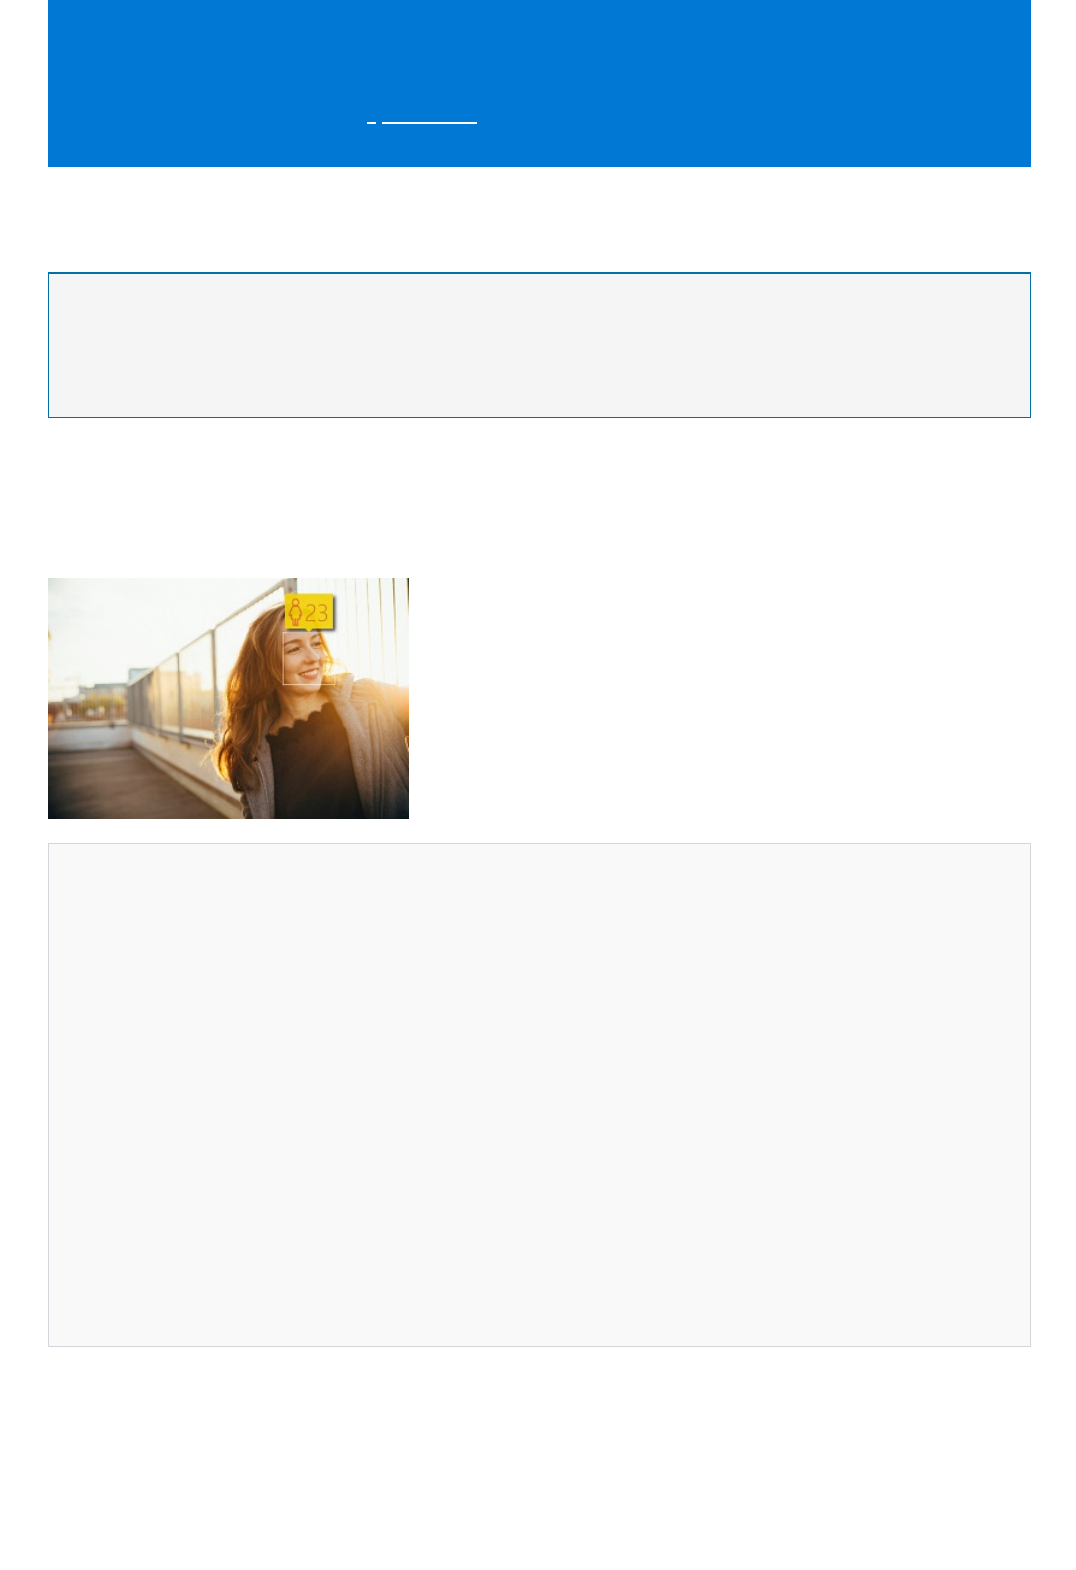
Face detection with Computer Vision
4/19/2019 • 2 minutes to read • Edit Online
NOTENOTE
Face detection examples
{
"faces": [
{
"age": 23,
"gender": "Female",
"faceRectangle": {
"top": 45,
"left": 194,
"width": 44,
"height": 44
}
}
],
"requestId": "8439ba87-de65-441b-a0f1-c85913157ecd",
"metadata": {
"height": 200,
"width": 300,
"format": "Png"
}
}
Computer Vision can detect human faces within an image and generate the age, gender, and rectangle for each
detected face.
This feature is also offered by the Azure Face service. See this alternative for more detailed face analysis, including face
identification and pose detection.
The following example demonstrates the JSON response returned by Computer Vision for an image containing a
single human face.
The next example demonstrates the JSON response returned for an image containing multiple human faces.

{
"faces": [
{
"age": 11,
"gender": "Male",
"faceRectangle": {
"top": 62,
"left": 22,
"width": 45,
"height": 45
}
},
{
"age": 11,
"gender": "Female",
"faceRectangle": {
"top": 127,
"left": 240,
"width": 42,
"height": 42
}
},
{
"age": 37,
"gender": "Female",
"faceRectangle": {
"top": 55,
"left": 200,
"width": 41,
"height": 41
}
},
{
"age": 41,
"gender": "Male",
"faceRectangle": {
"top": 45,
"left": 103,
"width": 39,
"height": 39
}
}
],
"requestId": "3a383cbe-1a05-4104-9ce7-1b5cf352b239",
"metadata": {
"height": 230,
"width": 300,
"format": "Png"
}
}
Next steps

Detecting image types with Computer Vision
3/12/2019 • 2 minutes to read • Edit Online
Detecting clip art
VALUE MEANING
0 Non-clip-art
1 Ambiguous
2 Normal-clip-art
3 Good-clip-art
Clip art detection examplesClip art detection examples
{
"imageType": {
"clipArtType": 3,
"lineDrawingType": 0
},
"requestId": "88c48d8c-80f3-449f-878f-6947f3b35a27",
"metadata": {
"height": 225,
"width": 300,
"format": "Jpeg"
}
}
With the Analyze Image API, Computer Vision can analyze the content type of images, indicating whether an
image is clip art or a line drawing.
Computer Vision analyzes an image and rates the likelihood of the image being clip art on a scale of 0 to 3, as
described in the following table.
The following JSON responses illustrates what Computer Vision returns when rating the likelihood of the example
images being clip art.
{
"imageType": {
"clipArtType": 0,
"lineDrawingType": 0
},
"requestId": "a9c8490a-2740-4e04-923b-e8f4830d0e47",
"metadata": {
"height": 200,
"width": 300,
"format": "Jpeg"
}
}
Detecting line drawings
Line drawing detection examplesLine drawing detection examples
{
"imageType": {
"clipArtType": 2,
"lineDrawingType": 1
},
"requestId": "6442dc22-476a-41c4-aa3d-9ceb15172f01",
"metadata": {
"height": 268,
"width": 300,
"format": "Jpeg"
}
}
Computer Vision analyzes an image and returns a boolean value indicating whether the image is a line drawing.
The following JSON responses illustrates what Computer Vision returns when indicating whether the example
images are line drawings.

Detect domain-specific content
4/19/2019 • 2 minutes to read • Edit Online
Scoped analysisScoped analysis
In addition to tagging and high-level categorization, Computer Vision also supports further domain-specific
analysis using models that have been trained on specialized data.
There are two ways to use the domain-specific models: by themselves (scoped analysis) or as an enhancement to
the categorization feature.
You can analyze an image using only the chosen domain-specific model by calling the Models/<model>/Analyze
API.
The following is a sample JSON response returned by the models/celebrities/analyze API for the given image:
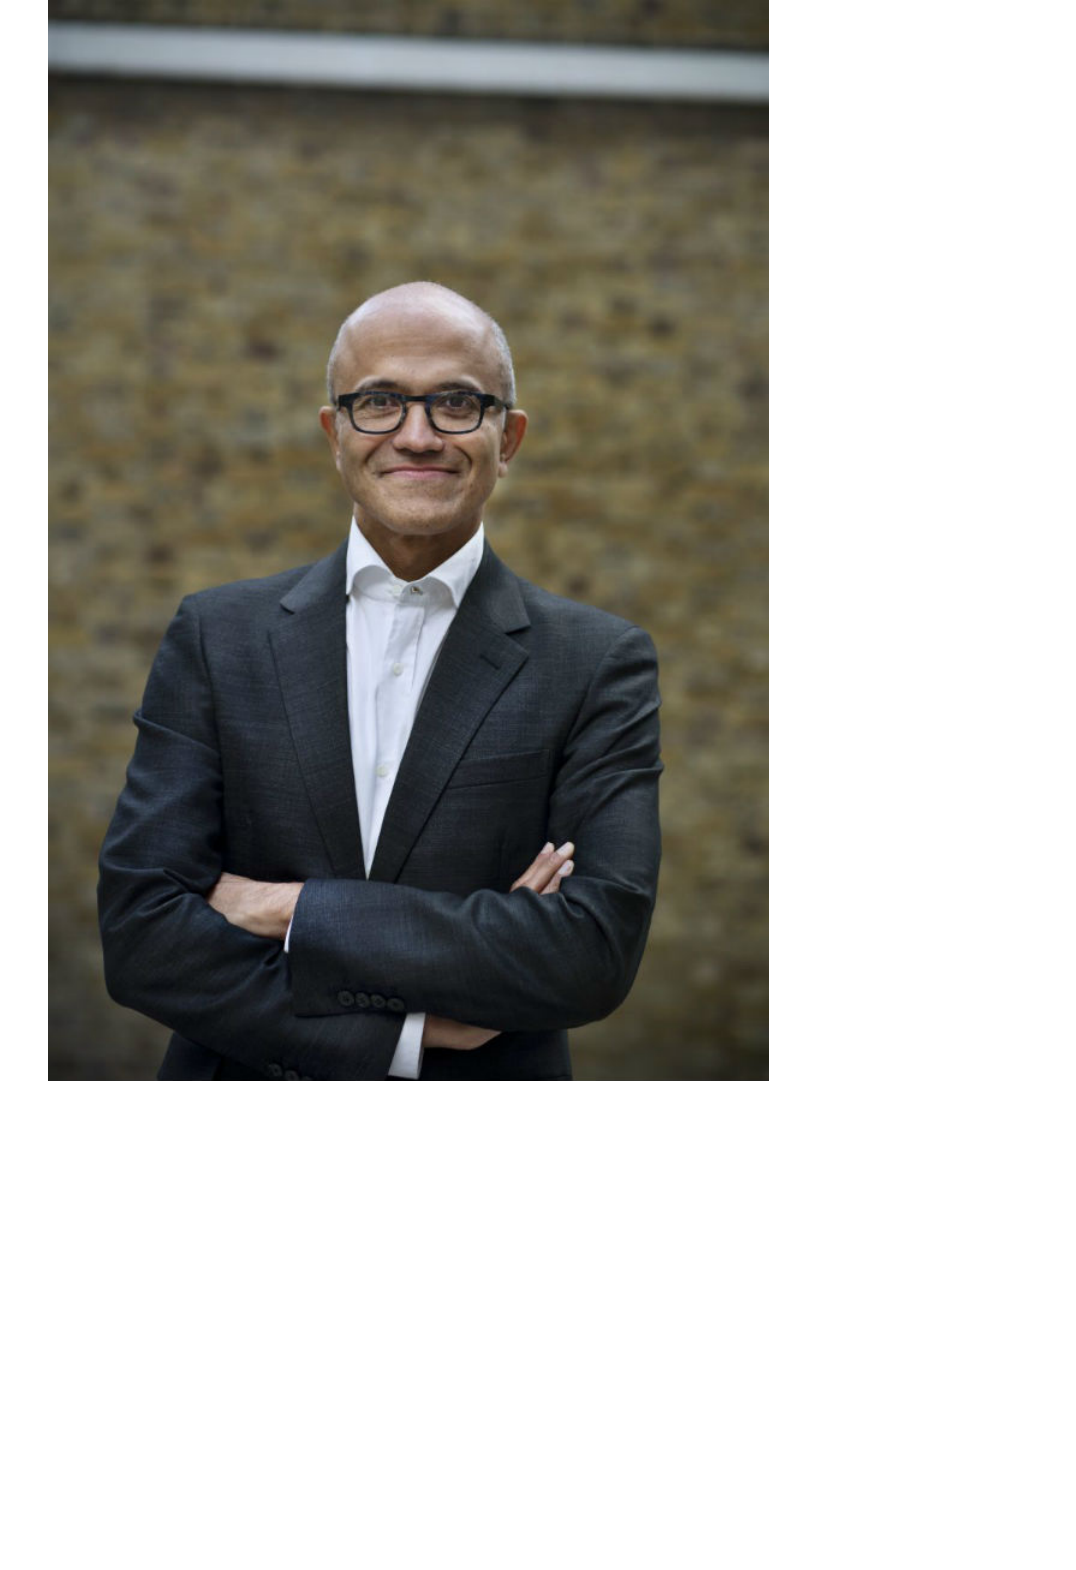
{
"result": {
"celebrities": [{
"faceRectangle": {
"top": 391,
"left": 318,
"width": 184,
"height": 184
},
"name": "Satya Nadella",
"confidence": 0.99999856948852539
}]
},
"requestId": "8217262a-1a90-4498-a242-68376a4b956b",
"metadata": {
"width": 800,
"height": 1200,
"format": "Jpeg"
}
}
Enhanced categorization analysisEnhanced categorization analysis
"categories":[
{
"name":"abstract_",
"score":0.00390625
},
{
"name":"people_",
"score":0.83984375,
"detail":{
"celebrities":[
{
"name":"Satya Nadella",
"faceRectangle":{
"left":597,
"top":162,
"width":248,
"height":248
},
"confidence":0.999028444
}
],
"landmarks":[
{
"name":"Forbidden City",
"confidence":0.9978346
}
]
}
}
]
You can also use domain-specific models to supplement general image analysis. You do this as part of high-level
categorization by specifying domain-specific models in the details parameter of the Analyze API call.
In this case, the 86-category taxonomy classifier is called first. If any of the detected categories have a matching
domain-specific model, the image is passed through that model as well and the results are added.
The following JSON response shows how domain-specific analysis can be included as the detail node in a
broader categorization analysis.
List the domain-specific models
NAME DESCRIPTION
celebrities Celebrity recognition, supported for images classified in the
people_ category
landmarks Landmark recognition, supported for images classified in the
outdoor_ or building_ categories
{
"models":[
{
"name":"celebrities",
"categories":[
"people_",
"人_",
"pessoas_",
"gente_"
]
},
{
"name":"landmarks",
"categories":[
"outdoor_",
"户外_",
"屋外_",
"aoarlivre_",
"alairelibre_",
"building_",
"建筑_",
"建物_",
"edifício_"
]
}
]
}
Next steps
Currently, Computer Vision supports the following domain-specific models:
Calling the Models API will return this information along with the categories to which each model can apply:
Learn concepts about categorizing images.
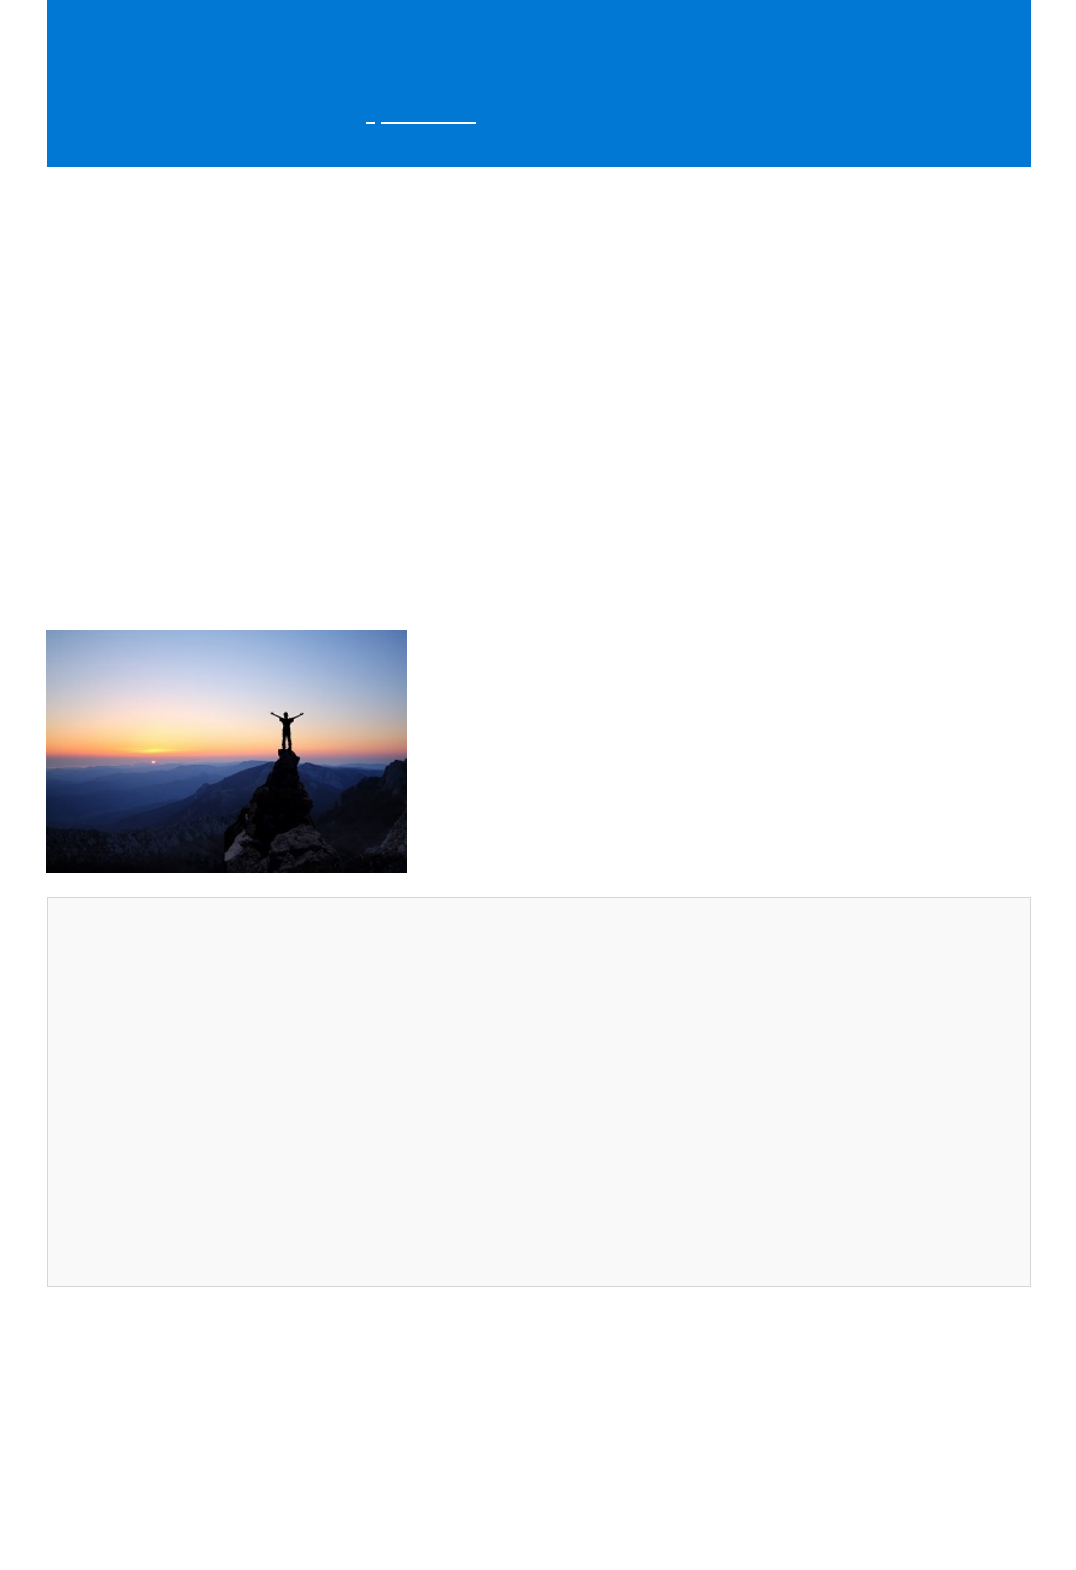
Detect color schemes in images
4/19/2019 • 2 minutes to read • Edit Online
Color scheme detection examples
{
"color": {
"dominantColorForeground": "Black",
"dominantColorBackground": "Black",
"dominantColors": ["Black", "White"],
"accentColor": "BB6D10",
"isBwImg": false
},
"requestId": "0dc394bf-db50-4871-bdcc-13707d9405ea",
"metadata": {
"height": 202,
"width": 300,
"format": "Jpeg"
}
}
Dominant color examplesDominant color examples
Computer Vision analyzes the colors in an image to provide three different attributes: the dominant foreground
color, the dominant background color, and the set of dominant colors for the image as a whole. Returned colors
belong to the set: black, blue, brown, gray, green, orange, pink, purple, red, teal, white, and yellow.
Computer Vision also extracts an accent color, which represents the most vibrant color in the image, based on a
combination of dominant colors and saturation. The accent color is returned as a hexadecimal HTML color code.
Computer Vision also returns a boolean value indicating whether an image is in black and white.
The following example illustrates the JSON response returned by Computer Vision when detecting the color
scheme of the example image. In this case, the example image is not a black and white image, but the dominant
foreground and background colors are black, and the dominant colors for the image as a whole are black and
white.
The following table shows the returned foreground, background, and image colors for each sample image.
IMAGE DOMINANT COLORS
Foreground: Black
Background: White
Colors: Black, White, Green
Foreground: Black
Background: Black
Colors: Black
Accent color examplesAccent color examples
IMAGE ACCENT COLOR
#BB6D10
#C6A205
The following table shows the returned accent color, as a hexadecimal HTML color value, for each example image.
Generating smart-cropped thumbnails with
Computer Vision
4/19/2019 • 2 minutes to read • Edit Online
Area of interest
Examples
A thumbnail is a reduced-size representation of an image. Thumbnails are used to represent images and other
data in a more economical, layout-friendly way. The Computer Vision API uses smart cropping, together with
resizing the image, to create intuitive thumbnails for a given image.
The Computer Vision thumbnail generation algorithm works as follows:
1. Remove distracting elements from the image and identify the area of interest—the area of the image in which
the main object(s) appears.
2. Crop the image based on the identified area of interest.
3. Change the aspect ratio to fit the target thumbnail dimensions.
When you upload an image, the Computer Vision API analyzes it to determine the area of interest. It can then use
this region to determine how to crop the image. The cropping operation, however, will always match the desired
aspect ratio if one is specified.
You can also get the raw bounding box coordinates of this same area of interest by calling the areaOfInterest API
instead. You can then use this information to modify the original image however you wish.
The generated thumbnail can vary widely depending on what you specify for height, width, and smart cropping, as
shown in the following image.
The following table illustrates typical thumbnails generated by Computer Vision for the example images. The
thumbnails were generated for a specified target height and width of 50 pixels, with smart cropping enabled.
Recognize printed and handwritten text
5/29/2019 • 3 minutes to read • Edit Online
Read API
NOTENOTE
Image requirementsImage requirements
LimitationsLimitations
OCR (optical character recognition) API
Computer Vision provides a number of services that detect and extract printed or handwritten text that appears in
images. This is useful in a variety of scenarios such as note taking, medical records, security, and banking. The
following three sections detail three different text recognition APIs, each optimized for different use cases.
The Read API detects text content in an image using our latest recognition models and converts the identified text
into a machine-readable character stream. It's optimized for text-heavy images (such as documents that have been
digitally scanned) and for images with a lot of visual noise. It will determine which recognition model to use for
each line of text, supporting images with both printed and handwritten text. The Read API executes asynchronously
because larger documents can take several minutes to return a result.
The Read operation maintains the original line groupings of recognized words in its output. Each line comes with
bounding box coordinates, and each word within the line also has its own coordinates. If a word was recognized
with low confidence, that information is conveyed as well. See the Read API reference docs to learn more.
This feature is only available for English text.
The Read API works with images that meet the following requirements:
The image must be presented in JPEG, PNG, BMP, PDF, or TIFF format.
The dimensions of the image must be between 50 x 50 and 4200 x 4200 pixels. PDF pages must be 17 x 17
inches or smaller.
The file size of the image must be less than 20 megabytes (MB).
If you are using a free-tier subscription, the Read API will only process the first two pages of a PDF or TIFF
document. With a paid subscription, it will process up to 200 pages. Also note that the API will detect a maximum
of 300 lines per page.
Computer Vision's optical character recognition (OCR) API is similar to the Read API, but it executes
synchronously and is not optimized for large documents. It uses an earlier recognition model but works with more
languages; see Language support for a full list of the supported languages.
If necessary, OCR corrects the rotation of the recognized text by returning the rotational offset in degrees about
the horizontal image axis. OCR also provides the frame coordinates of each word, as seen in the following
illustration.
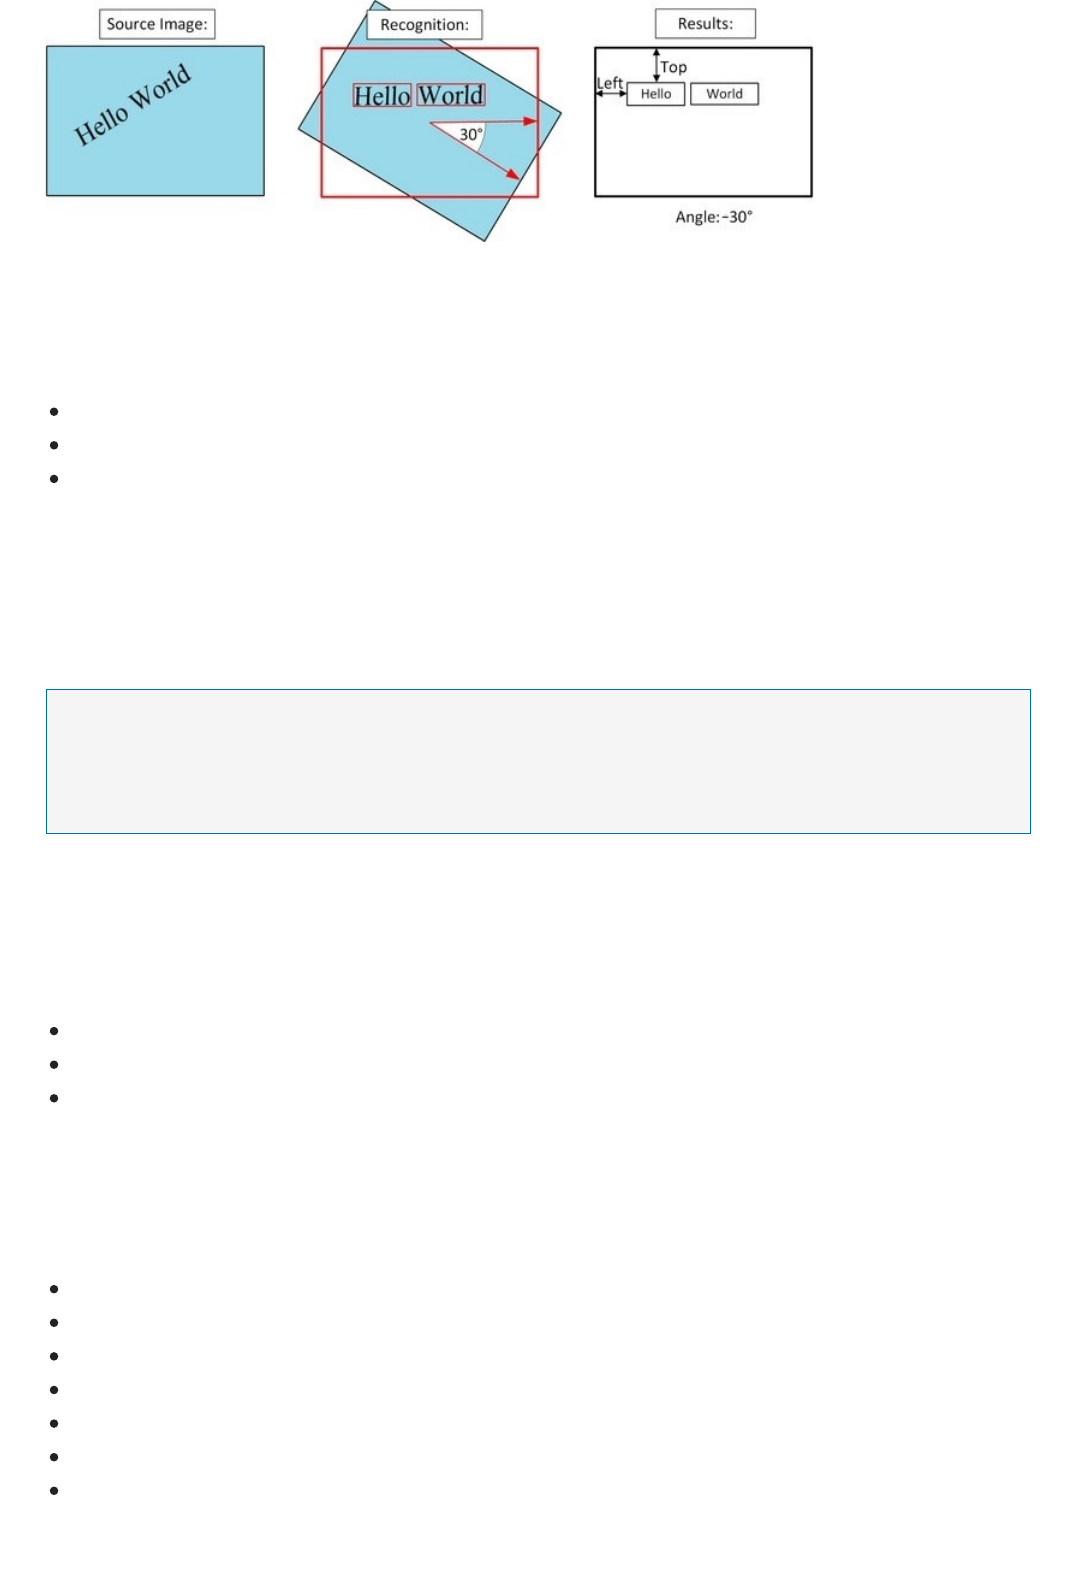
Image requirementsImage requirements
LimitationsLimitations
Recognize Text API
NOTENOTE
Image requirementsImage requirements
Limitations
See the OCR reference docs to learn more.
The OCR API works on images that meet the following requirements:
The image must be presented in JPEG, PNG, GIF, or BMP format.
The size of the input image must be between 50 x 50 and 4200 x 4200 pixels.
The text in the image can be rotated by any multiple of 90 degrees plus a small angle of up to 40 degrees.
On photographs where text is dominant, false positives may come from partially recognized words. On some
photographs, especially photos without any text, precision can vary depending on the type of image.
The Recognize Text API is being deprecated in favor of the Read API. The Read API has similar capabilities and is updated to
handle PDF, TIFF, and multi-page files.
The Recognize Text API is similar to OCR, but it executes asynchronously and uses updated recognition models.
See the Recognize Text API reference docs to learn more.
The Recognize Text API works with images that meet the following requirements:
The image must be presented in JPEG, PNG, or BMP format.
The dimensions of the image must be between 50 x 50 and 4200 x 4200 pixels.
The file size of the image must be less than 4 megabytes (MB).
The accuracy of text recognition operations depends on the quality of the images. The following factors may cause
an inaccurate reading:
Blurry images.
Handwritten or cursive text.
Artistic font styles.
Small text size.
Complex backgrounds, shadows, or glare over text or perspective distortion.
Oversized or missing capital letters at the beginnings of words.
Subscript, superscript, or strikethrough text.


Detect adult and racy content
2/15/2019 • 2 minutes to read • Edit Online
NOTENOTE
Content flag definitions
Identify adult and racy content
Next steps
Computer Vision can detect adult material in images so that developers can restrict the display of such images in
their software. Content flags are applied with a score between zero and one so that developers can interpret the
results according to their own preferences.
This feature is also offered by the Azure Content Moderator service. See this alternative for solutions to more rigorous
content moderation scenarios, such as text moderation and human review workflows.
Adult images are defined as those which are pornographic in nature and often depict nudity and sexual acts.
Racy images are defined as images that are sexually suggestive in nature and often contain less sexually explicit
content than images tagged as Adult.
The Analyze API.
The Analyze Image method returns two boolean properties, isAdultContent and isRacyContent , in the JSON
response of the method to indicate adult and racy content respectively. The method also returns two properties,
adultScore and racyScore , which represent the confidence scores for identifying adult and racy content
respectively.
Learn concepts about detecting domain-specific content and detecting faces.
Use Computer Vision features with the REST API and
Java
5/7/2019 • 22 minutes to read • Edit Online
Prerequisites
Platform requirementsPlatform requirements
Subscribe to Computer Vision API and get a subscription keySubscribe to Computer Vision API and get a subscription key
Acquire incomplete tutorial project
Download the projectDownload the project
Import the tutorial projectImport the tutorial project
This tutorial shows the features of the Azure Cognitive Services Computer Vision REST API.
Explore a Java Swing application that uses the Computer Vision REST API to perform optical character recognition
(OCR), create smart-cropped thumbnails, plus detect, categorize, tag, and describe visual features, including faces,
in an image. This example lets you submit an image URL for analysis or processing. You can use this open source
example as a template for building your own app in Java to use the Computer Vision REST API.
This tutorial will cover how to use Computer Vision to:
Analyze an image
Identify a natural or artificial landmark in an image
Identify a celebrity in an image
Create a quality thumbnail from an image
Read printed text in an image
Read handwritten text in an image
The Java Swing form application has already been written but has no functionality. In this tutorial, you add the code
specific to the Computer Vision REST API to complete the application's functionality.
This tutorial has been developed using the NetBeans IDE. Specifically, the Java SE version of NetBeans, which you
can download here.
Before creating the example, you must subscribe to Computer Vision API which is part of Azure Cognitive Services.
For subscription and key management details, see Subscriptions. Both the primary and secondary keys are valid to
use in this tutorial.
1. Go to the Cognitive Services Java Computer Vision Tutorial repository.
2. Click the Clone or download button.
3. Click Download ZIP to download a .zip file of the tutorial project.
There is no need to extract the contents of the .zip file because NetBeans imports the project from the .zip file.
Import the cognitive-services-java-computer-vision-tutorial-master.zip file into NetBeans.
1. In NetBeans, click File > Import Project > From ZIP.... The Import Project(s) from ZIP dialog box appears.
2. In the ZIP File: field, click the Browse button to locate the cognitive-services-java-computer-vision-
tutorial-master.zip file, then click Open.

Build and run the tutorial projectBuild and run the tutorial project
Add tutorial code to the project
Analyze an imageAnalyze an image
Add the event handler code for the analyze buttonAdd the event handler code for the analyze button
NOTENOTE
3. Click Import from the Import Project(s) from ZIP dialog box.
4. In the Projects panel, expand ComputerVision > Source Packages > <default package>. Some versions of
NetBeans use src instead of Source Packages > <default package>. In that case, expand src.
5. Double-click MainFrame.java to load the file into the NetBeans editor. The Design tab of the
MainFrame.java file appears.
6. Click the Source tab to view the Java source code.
1. Press F6 to build and run the tutorial application.
In the tutorial application, click a tab to bring up the pane for that feature. The buttons have empty methods,
so they do nothing.
At the bottom of the window are the fields Subscription Key and Subscription Region. These fields must
be filled with a valid subscription key and the correct region for that subscription key. To obtain a
subscription key, see Subscriptions. If you obtained your subscription key from the free trial at that link, then
the default region westcentralus is the correct region for your subscription keys.
2. Exit the tutorial application.
The Java Swing application is set up with six tabs. Each tab demonstrates a different function of Computer Vision
(analyze, OCR, and so on). The six tutorial sections do not have interdependencies, so you can add one section, all
six sections, or any subset. You can add the sections in any order.
The Analyze feature of Computer Vision scans an image for more than 2,000 recognizable objects, living things,
scenery, and actions. Once the analysis is complete, Analyze returns a JSON object that describes the image with
descriptive tags, color analysis, captions, and more.
To complete the Analyze feature of the tutorial application, perform the following steps:
The analyzeImageButtonActionPerformed event handler method clears the form, displays the image specified
in the URL, then calls the AnalyzeImage method to analyze the image. When AnalyzeImage returns, the method
displays the formatted JSON response in the Response text area, extracts the first caption from the JSONObject,
and displays the caption and the confidence level that the caption is correct.
Copy and paste the following code into the analyzeImageButtonActionPerformed method.
NetBeans won't let you paste to the method definition line (private void ) or to the closing curly brace of that method. To
copy the code, copy the lines between the method definition and the closing curly brace, and paste them over the contents of
the method.

private void analyzeImageButtonActionPerformed(java.awt.event.ActionEvent evt) {
URL analyzeImageUrl;
// Clear out the previous image, response, and caption, if any.
analyzeImage.setIcon(new ImageIcon());
analyzeCaptionLabel.setText("");
analyzeResponseTextArea.setText("");
// Display the image specified in the text box.
try {
analyzeImageUrl = new URL(analyzeImageUriTextBox.getText());
BufferedImage bImage = ImageIO.read(analyzeImageUrl);
scaleAndShowImage(bImage, analyzeImage);
} catch(IOException e) {
analyzeResponseTextArea.setText("Error loading Analyze image: " + e.getMessage());
return;
}
// Analyze the image.
JSONObject jsonObj = AnalyzeImage(analyzeImageUrl.toString());
// A return of null indicates failure.
if (jsonObj == null) {
return;
}
// Format and display the JSON response.
analyzeResponseTextArea.setText(jsonObj.toString(2));
// Extract the text and confidence from the first caption in the description object.
if (jsonObj.has("description") && jsonObj.getJSONObject("description").has("captions")) {
JSONObject jsonCaption =
jsonObj.getJSONObject("description").getJSONArray("captions").getJSONObject(0);
if (jsonCaption.has("text") && jsonCaption.has("confidence")) {
analyzeCaptionLabel.setText("Caption: " + jsonCaption.getString("text") +
" (confidence: " + jsonCaption.getDouble("confidence") + ").");
}
}
}
Add the wrapper for the REST API callAdd the wrapper for the REST API call
The AnalyzeImage method wraps the REST API call to analyze an image. The method returns a JSONObject
describing the image, or null if there was an error.
Copy and paste the AnalyzeImage method to just underneath the analyzeImageButtonActionPerformed
method.
/**
* Encapsulates the Microsoft Cognitive Services REST API call to analyze an image.
* @param imageUrl: The string URL of the image to analyze.
* @return: A JSONObject describing the image, or null if a runtime error occurs.
*/
private JSONObject AnalyzeImage(String imageUrl) {
try (CloseableHttpClient httpclient = HttpClientBuilder.create().build())
{
// Create the URI to access the REST API call for Analyze Image.
String uriString = uriBasePreRegion +
String.valueOf(subscriptionRegionComboBox.getSelectedItem()) +
uriBasePostRegion + uriBaseAnalyze;
URIBuilder builder = new URIBuilder(uriString);
// Request parameters. All of them are optional.
builder.setParameter("visualFeatures", "Categories,Description,Color,Adult");
builder.setParameter("language", "en");
// Prepare the URI for the REST API call.
URI uri = builder.build();
HttpPost request = new HttpPost(uri);
// Request headers.
request.setHeader("Content-Type", "application/json");
request.setHeader("Ocp-Apim-Subscription-Key", subscriptionKeyTextField.getText());
// Request body.
StringEntity reqEntity = new StringEntity("{\"url\":\"" + imageUrl + "\"}");
request.setEntity(reqEntity);
// Execute the REST API call and get the response entity.
HttpResponse response = httpclient.execute(request);
HttpEntity entity = response.getEntity();
// If we got a response, parse it and display it.
if (entity != null)
{
// Return the JSONObject.
String jsonString = EntityUtils.toString(entity);
return new JSONObject(jsonString);
} else {
// No response. Return null.
return null;
}
}
catch (Exception e)
{
// Display error message.
System.out.println(e.getMessage());
return null;
}
}
Run the Analyze functionRun the Analyze function
Recognize a landmarkRecognize a landmark
Press F6 to run the application. Put your subscription key into the Subscription Key field and verify that you are
using the correct region in Subscription Region. Enter a URL to an image to analyze, then click the Analyze
Image button to analyze an image and see the result.
The Landmark feature of Computer Vision analyzes an image for natural and artificial landmarks, such as
mountains or famous buildings. Once the analysis is complete, Landmark returns a JSON object that identifies the
landmarks found in the image.
To complete the Landmark feature of the tutorial application, perform the following steps:
Add the event handler code for the form buttonAdd the event handler code for the form button
NOTENOTE
private void landmarkImageButtonActionPerformed(java.awt.event.ActionEvent evt) {
URL landmarkImageUrl;
// Clear out the previous image, response, and caption, if any.
landmarkImage.setIcon(new ImageIcon());
landmarkCaptionLabel.setText("");
landmarkResponseTextArea.setText("");
// Display the image specified in the text box.
try {
landmarkImageUrl = new URL(landmarkImageUriTextBox.getText());
BufferedImage bImage = ImageIO.read(landmarkImageUrl);
scaleAndShowImage(bImage, landmarkImage);
} catch(IOException e) {
landmarkResponseTextArea.setText("Error loading Landmark image: " + e.getMessage());
return;
}
// Identify the landmark in the image.
JSONObject jsonObj = LandmarkImage(landmarkImageUrl.toString());
// A return of null indicates failure.
if (jsonObj == null) {
return;
}
// Format and display the JSON response.
landmarkResponseTextArea.setText(jsonObj.toString(2));
// Extract the text and confidence from the first caption in the description object.
if (jsonObj.has("result") && jsonObj.getJSONObject("result").has("landmarks")) {
JSONObject jsonCaption =
jsonObj.getJSONObject("result").getJSONArray("landmarks").getJSONObject(0);
if (jsonCaption.has("name") && jsonCaption.has("confidence")) {
landmarkCaptionLabel.setText("Caption: " + jsonCaption.getString("name") +
" (confidence: " + jsonCaption.getDouble("confidence") + ").");
}
}
}
Add the wrapper for the REST API callAdd the wrapper for the REST API call
The landmarkImageButtonActionPerformed event handler method clears the form, displays the image
specified in the URL, then calls the LandmarkImage method to analyze the image. When LandmarkImage
returns, the method displays the formatted JSON response in the Response text area, then extracts the first
landmark name from the JSONObject and displays it on the window along with the confidence level that the
landmark was identified correctly.
Copy and paste the following code into the landmarkImageButtonActionPerformed method.
NetBeans won't let you paste to the method definition line (private void ) or to the closing curly brace of that method. To
copy the code, copy the lines between the method definition and the closing curly brace, and paste them over the contents of
the method.
The LandmarkImage method wraps the REST API call to analyze an image. The method returns a JSONObject
describing the landmarks found in the image, or null if there was an error.

/**
* Encapsulates the Microsoft Cognitive Services REST API call to identify a landmark in an image.
* @param imageUrl: The string URL of the image to process.
* @return: A JSONObject describing the image, or null if a runtime error occurs.
*/
private JSONObject LandmarkImage(String imageUrl) {
try (CloseableHttpClient httpclient = HttpClientBuilder.create().build())
{
// Create the URI to access the REST API call to identify a Landmark in an image.
String uriString = uriBasePreRegion +
String.valueOf(subscriptionRegionComboBox.getSelectedItem()) +
uriBasePostRegion + uriBaseLandmark;
URIBuilder builder = new URIBuilder(uriString);
// Request parameters. All of them are optional.
builder.setParameter("visualFeatures", "Categories,Description,Color");
builder.setParameter("language", "en");
// Prepare the URI for the REST API call.
URI uri = builder.build();
HttpPost request = new HttpPost(uri);
// Request headers.
request.setHeader("Content-Type", "application/json");
request.setHeader("Ocp-Apim-Subscription-Key", subscriptionKeyTextField.getText());
// Request body.
StringEntity reqEntity = new StringEntity("{\"url\":\"" + imageUrl + "\"}");
request.setEntity(reqEntity);
// Execute the REST API call and get the response entity.
HttpResponse response = httpclient.execute(request);
HttpEntity entity = response.getEntity();
// If we got a response, parse it and display it.
if (entity != null)
{
// Return the JSONObject.
String jsonString = EntityUtils.toString(entity);
return new JSONObject(jsonString);
} else {
// No response. Return null.
return null;
}
}
catch (Exception e)
{
// Display error message.
System.out.println(e.getMessage());
return null;
}
}
Run the landmark functionRun the landmark function
Recognize celebritiesRecognize celebrities
Copy and paste the LandmarkImage method to just underneath the landmarkImageButtonActionPerformed
method.
Press F6 to run the application. Put your subscription key into the Subscription Key field and verify that you are
using the correct region in Subscription Region. Click the Landmark tab, enter a URL to an image of a landmark,
then click the Analyze Image button to analyze an image and see the result.
The Celebrities feature of Computer Vision analyzes an image for famous people. Once the analysis is complete,
Celebrities returns a JSON object that identifies the Celebrities found in the image.
Add the event handler code for the celebrities buttonAdd the event handler code for the celebrities button
NOTENOTE
private void celebritiesImageButtonActionPerformed(java.awt.event.ActionEvent evt) {
URL celebritiesImageUrl;
// Clear out the previous image, response, and caption, if any.
celebritiesImage.setIcon(new ImageIcon());
celebritiesCaptionLabel.setText("");
celebritiesResponseTextArea.setText("");
// Display the image specified in the text box.
try {
celebritiesImageUrl = new URL(celebritiesImageUriTextBox.getText());
BufferedImage bImage = ImageIO.read(celebritiesImageUrl);
scaleAndShowImage(bImage, celebritiesImage);
} catch(IOException e) {
celebritiesResponseTextArea.setText("Error loading Celebrity image: " + e.getMessage());
return;
}
// Identify the celebrities in the image.
JSONObject jsonObj = CelebritiesImage(celebritiesImageUrl.toString());
// A return of null indicates failure.
if (jsonObj == null) {
return;
}
// Format and display the JSON response.
celebritiesResponseTextArea.setText(jsonObj.toString(2));
// Extract the text and confidence from the first caption in the description object.
if (jsonObj.has("result") && jsonObj.getJSONObject("result").has("celebrities")) {
JSONObject jsonCaption =
jsonObj.getJSONObject("result").getJSONArray("celebrities").getJSONObject(0);
if (jsonCaption.has("name") && jsonCaption.has("confidence")) {
celebritiesCaptionLabel.setText("Caption: " + jsonCaption.getString("name") +
" (confidence: " + jsonCaption.getDouble("confidence") + ").");
}
}
}
Add the wrapper for the REST API callAdd the wrapper for the REST API call
To complete the Celebrities feature of the tutorial application, perform the following steps:
The celebritiesImageButtonActionPerformed event handler method clears the form, displays the image
specified in the URL, then calls the CelebritiesImage method to analyze the image. When CelebritiesImage
returns, the method displays the formatted JSON response in the Response text area, then extracts the first
celebrity name from the JSONObject and displays the name on the window along with the confidence level that
the celebrity was identified correctly.
Copy and paste the following code into the celebritiesImageButtonActionPerformed method.
NetBeans won't let you paste to the method definition line (private void ) or to the closing curly brace of that method. To
copy the code, copy the lines between the method definition and the closing curly brace, and paste them over the contents of
the method.
The CelebritiesImage method wraps the REST API call to analyze an image. The method returns a JSONObject
/**
* Encapsulates the Microsoft Cognitive Services REST API call to identify celebrities in an image.
* @param imageUrl: The string URL of the image to process.
* @return: A JSONObject describing the image, or null if a runtime error occurs.
*/
private JSONObject CelebritiesImage(String imageUrl) {
try (CloseableHttpClient httpclient = HttpClientBuilder.create().build())
{
// Create the URI to access the REST API call to identify celebrities in an image.
String uriString = uriBasePreRegion +
String.valueOf(subscriptionRegionComboBox.getSelectedItem()) +
uriBasePostRegion + uriBaseCelebrities;
URIBuilder builder = new URIBuilder(uriString);
// Request parameters. All of them are optional.
builder.setParameter("visualFeatures", "Categories,Description,Color");
builder.setParameter("language", "en");
// Prepare the URI for the REST API call.
URI uri = builder.build();
HttpPost request = new HttpPost(uri);
// Request headers.
request.setHeader("Content-Type", "application/json");
request.setHeader("Ocp-Apim-Subscription-Key", subscriptionKeyTextField.getText());
// Request body.
StringEntity reqEntity = new StringEntity("{\"url\":\"" + imageUrl + "\"}");
request.setEntity(reqEntity);
// Execute the REST API call and get the response entity.
HttpResponse response = httpclient.execute(request);
HttpEntity entity = response.getEntity();
// If we got a response, parse it and display it.
if (entity != null)
{
// Return the JSONObject.
String jsonString = EntityUtils.toString(entity);
return new JSONObject(jsonString);
} else {
// No response. Return null.
return null;
}
}
catch (Exception e)
{
// Display error message.
System.out.println(e.getMessage());
return null;
}
}
Run the celebrities functionRun the celebrities function
Intelligently generate a thumbnailIntelligently generate a thumbnail
describing the celebrities found in the image, or null if there was an error.
Copy and paste the CelebritiesImage method to just underneath the
celebritiesImageButtonActionPerformed method.
Press F6 to run the application. Put your subscription key into the Subscription Key field and verify that you are
using the correct region in Subscription Region. Click the Celebrities tab, enter a URL to an image of a celebrity,
then click the Analyze Image button to analyze an image and see the result.
The Thumbnail feature of Computer Vision generates a thumbnail from an image. By using the Smart Crop
Add the event handler code for the thumbnail buttonAdd the event handler code for the thumbnail button
NOTENOTE
private void thumbnailImageButtonActionPerformed(java.awt.event.ActionEvent evt) {
URL thumbnailImageUrl;
JSONObject jsonError[] = new JSONObject[1];
// Clear out the previous image, response, and thumbnail, if any.
thumbnailSourceImage.setIcon(new ImageIcon());
thumbnailResponseTextArea.setText("");
thumbnailImage.setIcon(new ImageIcon());
// Display the image specified in the text box.
try {
thumbnailImageUrl = new URL(thumbnailImageUriTextBox.getText());
BufferedImage bImage = ImageIO.read(thumbnailImageUrl);
scaleAndShowImage(bImage, thumbnailSourceImage);
} catch(IOException e) {
thumbnailResponseTextArea.setText("Error loading image to thumbnail: " + e.getMessage());
return;
}
// Get the thumbnail for the image.
BufferedImage thumbnail = getThumbnailImage(thumbnailImageUrl.toString(), jsonError);
// A non-null value indicates error.
if (jsonError[0] != null) {
// Format and display the JSON error.
thumbnailResponseTextArea.setText(jsonError[0].toString(2));
return;
}
// Display the thumbnail.
if (thumbnail != null) {
scaleAndShowImage(thumbnail, thumbnailImage);
}
}
Add the wrapper for the REST API callAdd the wrapper for the REST API call
feature, the Thumbnail feature will identify the area of interest in an image and center the thumbnail on this area, to
generate more aesthetically pleasing thumbnail images.
To complete the Thumbnail feature of the tutorial application, perform the following steps:
The thumbnailImageButtonActionPerformed event handler method clears the form, displays the image
specified in the URL, then calls the getThumbnailImage method to create the thumbnail. When
getThumbnailImage returns, the method displays the generated thumbnail.
Copy and paste the following code into the thumbnailImageButtonActionPerformed method.
NetBeans won't let you paste to the method definition line (private void ) or to the closing curly brace of that method. To
copy the code, copy the lines between the method definition and the closing curly brace, and paste them over the contents of
the method.
The getThumbnailImage method wraps the REST API call to analyze an image. The method returns a
BufferedImage that contains the thumbnail, or null if there was an error. The error message will be returned in
the first element of the jsonError string array.
Copy and paste the following getThumbnailImage method to just underneath the
thumbnailImageButtonActionPerformed method.

/**
* Encapsulates the Microsoft Cognitive Services REST API call to create a thumbnail for an image.
* @param imageUrl: The string URL of the image to process.
* @return: A BufferedImage containing the thumbnail, or null if a runtime error occurs. In the case
* of an error, the error message will be returned in the first element of the jsonError string array.
*/
private BufferedImage getThumbnailImage(String imageUrl, JSONObject[] jsonError) {
try (CloseableHttpClient httpclient = HttpClientBuilder.create().build())
{
// Create the URI to access the REST API call to identify celebrities in an image.
String uriString = uriBasePreRegion +
String.valueOf(subscriptionRegionComboBox.getSelectedItem()) +
uriBasePostRegion + uriBaseThumbnail;
URIBuilder uriBuilder = new URIBuilder(uriString);
// Request parameters.
uriBuilder.setParameter("width", "100");
uriBuilder.setParameter("height", "150");
uriBuilder.setParameter("smartCropping", "true");
// Prepare the URI for the REST API call.
URI uri = uriBuilder.build();
HttpPost request = new HttpPost(uri);
// Request headers.
request.setHeader("Content-Type", "application/json");
request.setHeader("Ocp-Apim-Subscription-Key", subscriptionKeyTextField.getText());
// Request body.
StringEntity requestEntity = new StringEntity("{\"url\":\"" + imageUrl + "\"}");
request.setEntity(requestEntity);
// Execute the REST API call and get the response entity.
HttpResponse response = httpclient.execute(request);
HttpEntity entity = response.getEntity();
// Check for success.
if (response.getStatusLine().getStatusCode() == 200)
{
// Return the thumbnail.
return ImageIO.read(entity.getContent());
}
else
{
// Format and display the JSON error message.
String jsonString = EntityUtils.toString(entity);
jsonError[0] = new JSONObject(jsonString);
return null;
}
}
catch (Exception e)
{
String errorMessage = e.getMessage();
System.out.println(errorMessage);
jsonError[0] = new JSONObject(errorMessage);
return null;
}
}
Run the thumbnail functionRun the thumbnail function
Read printed text (OCR)
Read printed text (OCR)
Press F6 to run the application. Put your subscription key into the Subscription Key field and verify that you are
using the correct region in Subscription Region. Click the Thumbnail tab, enter a URL to an image, then click the
Generate Thumbnail button to analyze an image and see the result.

Add the event handler code for the OCR buttonAdd the event handler code for the OCR button
NOTENOTE
private void ocrImageButtonActionPerformed(java.awt.event.ActionEvent evt) {
URL ocrImageUrl;
// Clear out the previous image, response, and caption, if any.
ocrImage.setIcon(new ImageIcon());
ocrResponseTextArea.setText("");
// Display the image specified in the text box.
try {
ocrImageUrl = new URL(ocrImageUriTextBox.getText());
BufferedImage bImage = ImageIO.read(ocrImageUrl);
scaleAndShowImage(bImage, ocrImage);
} catch(IOException e) {
ocrResponseTextArea.setText("Error loading OCR image: " + e.getMessage());
return;
}
// Read the text in the image.
JSONObject jsonObj = OcrImage(ocrImageUrl.toString());
// A return of null indicates failure.
if (jsonObj == null) {
return;
}
// Format and display the JSON response.
ocrResponseTextArea.setText(jsonObj.toString(2));
}
Add the wrapper for the REST API callAdd the wrapper for the REST API call
The Optical Character Recognition (OCR) feature of Computer Vision analyzes an image of printed text. After the
analysis is complete, OCR returns a JSON object that contains the text and the location of the text in the image.
To complete the OCR feature of the tutorial application, perform the following steps:
The ocrImageButtonActionPerformed event handler method clears the form, displays the image specified in the
URL, then calls the OcrImage method to analyze the image. When OcrImage returns, the method displays the
detected text as formatted JSON in the Response text area.
Copy and paste the following code into the ocrImageButtonActionPerformed method.
NetBeans won't let you paste to the method definition line (private void ) or to the closing curly brace of that method. To
copy the code, copy the lines between the method definition and the closing curly brace, and paste them over the contents of
the method.
The OcrImage method wraps the REST API call to analyze an image. The method returns a JSONObject of the
JSON data returned from the call, or null if there was an error.
Copy and paste the following OcrImage method to just underneath the ocrImageButtonActionPerformed
method.

/**
* Encapsulates the Microsoft Cognitive Services REST API call to read text in an image.
* @param imageUrl: The string URL of the image to process.
* @return: A JSONObject describing the image, or null if a runtime error occurs.
*/
private JSONObject OcrImage(String imageUrl) {
try (CloseableHttpClient httpclient = HttpClientBuilder.create().build())
{
// Create the URI to access the REST API call to read text in an image.
String uriString = uriBasePreRegion +
String.valueOf(subscriptionRegionComboBox.getSelectedItem()) +
uriBasePostRegion + uriBaseOcr;
URIBuilder uriBuilder = new URIBuilder(uriString);
// Request parameters.
uriBuilder.setParameter("language", "unk");
uriBuilder.setParameter("detectOrientation ", "true");
// Prepare the URI for the REST API call.
URI uri = uriBuilder.build();
HttpPost request = new HttpPost(uri);
// Request headers.
request.setHeader("Content-Type", "application/json");
request.setHeader("Ocp-Apim-Subscription-Key", subscriptionKeyTextField.getText());
// Request body.
StringEntity reqEntity = new StringEntity("{\"url\":\"" + imageUrl + "\"}");
request.setEntity(reqEntity);
// Execute the REST API call and get the response entity.
HttpResponse response = httpclient.execute(request);
HttpEntity entity = response.getEntity();
// If we got a response, parse it and display it.
if (entity != null)
{
// Return the JSONObject.
String jsonString = EntityUtils.toString(entity);
return new JSONObject(jsonString);
} else {
// No response. Return null.
return null;
}
}
catch (Exception e)
{
// Display error message.
System.out.println(e.getMessage());
return null;
}
}
Run the OCR functionRun the OCR function
Read handwritten text (handwriting recognition)
Read handwritten text (handwriting recognition)
Press F6 to run the application. Put your subscription key into the Subscription Key field and verify that you are
using the correct region in Subscription Region. Click the OCR tab, enter a URL to an image of printed text, then
click the Read Image button to analyze an image and see the result.
The Handwriting Recognition feature of Computer Vision analyzes an image of handwritten text. After the analysis
is complete, Handwriting Recognition returns a JSON object that contains the text and the location of the text in the
image.
To complete the Handwriting Recognition feature of the tutorial application, perform the following steps:
Add the event handler code for the handwriting buttonAdd the event handler code for the handwriting button
NOTENOTE
private void handwritingImageButtonActionPerformed(java.awt.event.ActionEvent evt) {
URL handwritingImageUrl;
// Clear out the previous image, response, and caption, if any.
handwritingImage.setIcon(new ImageIcon());
handwritingResponseTextArea.setText("");
// Display the image specified in the text box.
try {
handwritingImageUrl = new URL(handwritingImageUriTextBox.getText());
BufferedImage bImage = ImageIO.read(handwritingImageUrl);
scaleAndShowImage(bImage, handwritingImage);
} catch(IOException e) {
handwritingResponseTextArea.setText("Error loading Handwriting image: " + e.getMessage());
return;
}
// Read the text in the image.
JSONObject jsonObj = HandwritingImage(handwritingImageUrl.toString());
// A return of null indicates failure.
if (jsonObj == null) {
return;
}
// Format and display the JSON response.
handwritingResponseTextArea.setText(jsonObj.toString(2));
}
Add the wrapper for the REST API callAdd the wrapper for the REST API call
/**
* Encapsulates the Microsoft Cognitive Services REST API call to read handwritten text in an image.
* @param imageUrl: The string URL of the image to process.
* @return: A JSONObject describing the image, or null if a runtime error occurs.
*/
private JSONObject HandwritingImage(String imageUrl) {
try (CloseableHttpClient textClient = HttpClientBuilder.create().build();
CloseableHttpClient resultClient = HttpClientBuilder.create().build())
The handwritingImageButtonActionPerformed event handler method clears the form, displays the image
specified in the URL, then calls the HandwritingImage method to analyze the image. When HandwritingImage
returns, the method displays the detected text as formatted JSON in the Response text area.
Copy and paste the following code into the handwritingImageButtonActionPerformed method.
NetBeans won't let you paste to the method definition line (private void ) or to the closing curly brace of that method. To
copy the code, copy the lines between the method definition and the closing curly brace, and paste them over the contents of
the method.
The HandwritingImage method wraps the two REST API calls needed to analyze an image. Because handwriting
recognition is a time consuming process, a two step process is used. The first call submits the image for processing;
the second call retrieves the detected text when the processing is complete.
After the text is retrieved, the HandwritingImage method returns a JSONObject describing the text and the
locations of the text, or null if there was an error.
Copy and paste the following HandwritingImage method to just underneath the
handwritingImageButtonActionPerformed method.

{
// Create the URI to access the REST API call to read text in an image.
String uriString = uriBasePreRegion +
String.valueOf(subscriptionRegionComboBox.getSelectedItem()) +
uriBasePostRegion + uriBaseHandwriting;
URIBuilder uriBuilder = new URIBuilder(uriString);
// Request parameters.
uriBuilder.setParameter("handwriting", "true");
// Prepare the URI for the REST API call.
URI uri = uriBuilder.build();
HttpPost request = new HttpPost(uri);
// Request headers.
request.setHeader("Content-Type", "application/json");
request.setHeader("Ocp-Apim-Subscription-Key", subscriptionKeyTextField.getText());
// Request body.
StringEntity reqEntity = new StringEntity("{\"url\":\"" + imageUrl + "\"}");
request.setEntity(reqEntity);
// Execute the REST API call and get the response.
HttpResponse textResponse = textClient.execute(request);
// Check for success.
if (textResponse.getStatusLine().getStatusCode() != 202) {
// An error occurred. Return the JSON error message.
HttpEntity entity = textResponse.getEntity();
String jsonString = EntityUtils.toString(entity);
return new JSONObject(jsonString);
}
String operationLocation = null;
// The 'Operation-Location' in the response contains the URI to retrieve the recognized text.
Header[] responseHeaders = textResponse.getAllHeaders();
for(Header header : responseHeaders) {
if(header.getName().equals("Operation-Location"))
{
// This string is the URI where you can get the text recognition operation result.
operationLocation = header.getValue();
break;
}
}
// NOTE: The response may not be immediately available. Handwriting recognition is an
// async operation that can take a variable amount of time depending on the length
// of the text you want to recognize. You may need to wait or retry this operation.
//
// This example checks once per second for ten seconds.
JSONObject responseObj = null;
int i = 0;
do {
// Wait one second.
Thread.sleep(1000);
// Check to see if the operation completed.
HttpGet resultRequest = new HttpGet(operationLocation);
resultRequest.setHeader("Ocp-Apim-Subscription-Key", subscriptionKeyTextField.getText());
HttpResponse resultResponse = resultClient.execute(resultRequest);
HttpEntity responseEntity = resultResponse.getEntity();
if (responseEntity != null)
{
// Get the JSON response.
String jsonString = EntityUtils.toString(responseEntity);
responseObj = new JSONObject(jsonString);
}
}
while (i < 10 && responseObj != null &&
!responseObj.getString("status").equalsIgnoreCase("Succeeded"));
// If the operation completed, return the JSON object.
if (responseObj != null) {
return responseObj;
} else {
// Return null for timeout error.
System.out.println("Timeout error.");
return null;
}
}
catch (Exception e)
{
// Display error message.
System.out.println(e.getMessage());
return null;
}
}
Run the handwriting functionRun the handwriting function
Next steps
To run the application, press F6. Put your subscription key into the Subscription Key field and verify that you are
using the correct region in Subscription Region. Click the Read Handwritten Text tab, enter a URL to an image
of handwritten text, then click the Read Image button to analyze an image and see the result.
In this guide, you used the Computer Vision REST API with Java to test many of the available image analysis
features. Next, see the reference documentation to learn more about the APIs involved.
Computer Vision REST API

Use Computer Vision features with the REST API and
JavaScript
5/7/2019 • 18 minutes to read • Edit Online
Prerequisites
Platform requirementsPlatform requirements
Subscribe to Computer Vision API and get a subscription keySubscribe to Computer Vision API and get a subscription key
Acquire incomplete tutorial project
Download the projectDownload the project
Add tutorial code to the project
Analyze an imageAnalyze an image
Add the event handler code for the analyze buttonAdd the event handler code for the analyze button
This guide shows the features of the Azure Cognitive Services Computer Vision REST API.
Explore a JavaScript application that uses the Computer Vision REST API to perform optical character recognition
(OCR), create smart-cropped thumbnails, plus detect, categorize, tag, and describe visual features, including faces,
in an image. This example lets you submit an image URL for analysis or processing. You can use this open source
example as a template for building your own JavaScript app to use the Computer Vision REST API.
The JavaScript form application has already been written, but has no Computer Vision functionality. In this guide,
you add the code specific to the Computer Vision REST API to complete the application's functionality.
You can follow the steps in this guide using a simple text editor.
Before creating the example, you must subscribe to Computer Vision API which is part of the Azure Cognitive
Services. For subscription and key management details, see Subscriptions. Both the primary and secondary keys
are valid to use in this guide.
Clone the Cognitive Services JavaScript Computer Vision Tutorial, or download the .zip file and extract it to an
empty directory.
If you would prefer to use the finished project with all tutorial code added, you can use the files in the Completed
folder.
The JavaScript application is set up with six .html files, one for each feature. Each file demonstrates a different
function of Computer Vision (analyze, OCR, etc.). The six sections do not have interdependencies, so you can add
the tutorial code to one file, all six files, or only a couple of files. And you can add the tutorial code to the files in any
order.
The Analyze feature of Computer Vision scans an image for thousands of recognizable objects, living things,
scenery, and actions. Once the analysis is complete, Analyze returns a JSON object that describes the image with
descriptive tags, color analysis, captions, and more.
To complete the Analyze feature of the application, perform the following steps:
Open the analyze.html file in a text editor and locate the analyzeButtonClick function near the bottom of the
file.

function analyzeButtonClick() {
// Clear the display fields.
$("#sourceImage").attr("src", "#");
$("#responseTextArea").val("");
$("#captionSpan").text("");
// Display the image.
var sourceImageUrl = $("#inputImage").val();
$("#sourceImage").attr("src", sourceImageUrl);
AnalyzeImage(sourceImageUrl, $("#responseTextArea"), $("#captionSpan"));
}
Add the wrapper for the REST API callAdd the wrapper for the REST API call
The analyzeButtonClick event handler function clears the form, displays the image specified in the URL, then
calls the AnalyzeImage function to analyze the image. Copy and paste the following code into the
analyzeButtonClick function.
The AnalyzeImage function wraps the REST API call to analyze an image. Upon a successful return, the formatted
JSON analysis will be displayed in the specified textarea, and the caption will be displayed in the specified span.
Copy and paste the AnalyzeImage function code to just underneath the analyzeButtonClick function.
/* Analyze the image at the specified URL by using Microsoft Cognitive Services Analyze Image API.
* @param {string} sourceImageUrl - The URL to the image to analyze.
* @param {<textarea> element} responseTextArea - The text area to display the JSON string returned
* from the REST API call, or to display the error message if there was
* an error.
* @param {<span> element} captionSpan - The span to display the image caption.
*/
function AnalyzeImage(sourceImageUrl, responseTextArea, captionSpan) {
// Request parameters.
var params = {
"visualFeatures": "Categories,Description,Color",
"details": "",
"language": "en",
};
// Perform the REST API call.
$.ajax({
url: common.uriBasePreRegion +
$("#subscriptionRegionSelect").val() +
common.uriBasePostRegion +
common.uriBaseAnalyze +
"?" +
$.param(params),
// Request headers.
beforeSend: function(jqXHR){
jqXHR.setRequestHeader("Content-Type","application/json");
jqXHR.setRequestHeader("Ocp-Apim-Subscription-Key",
encodeURIComponent($("#subscriptionKeyInput").val()));
},
type: "POST",
// Request body.
data: '{"url": ' + '"' + sourceImageUrl + '"}',
})
.done(function(data) {
// Show formatted JSON on webpage.
responseTextArea.val(JSON.stringify(data, null, 2));
// Extract and display the caption and confidence from the first caption in the description object.
if (data.description && data.description.captions) {
var caption = data.description.captions[0];
if (caption.text && caption.confidence) {
captionSpan.text("Caption: " + caption.text +
" (confidence: " + caption.confidence + ").");
}
}
})
.fail(function(jqXHR, textStatus, errorThrown) {
// Prepare the error string.
var errorString = (errorThrown === "") ? "Error. " : errorThrown + " (" + jqXHR.status + "): ";
errorString += (jqXHR.responseText === "") ? "" : (jQuery.parseJSON(jqXHR.responseText).message) ?
jQuery.parseJSON(jqXHR.responseText).message : jQuery.parseJSON(jqXHR.responseText).error.message;
// Put the error JSON in the response textarea.
responseTextArea.val(JSON.stringify(jqXHR, null, 2));
// Show the error message.
alert(errorString);
});
}
Run the Analyze functionRun the Analyze function
Recognize a landmarkRecognize a landmark
Add the event handler code for the landmark buttonAdd the event handler code for the landmark button
function landmarkButtonClick() {
// Clear the display fields.
$("#sourceImage").attr("src", "#");
$("#responseTextArea").val("");
$("#captionSpan").text("");
// Display the image.
var sourceImageUrl = $("#inputImage").val();
$("#sourceImage").attr("src", sourceImageUrl);
IdentifyLandmarks(sourceImageUrl, $("#responseTextArea"), $("#captionSpan"));
}
Add the wrapper for the REST API callAdd the wrapper for the REST API call
Save the analyze.html file and open it in a Web browser. Put your subscription key into the Subscription Key
field and verify that you are using the correct region in Subscription Region. Enter a URL to an image to analyze,
then click the Analyze Image button to analyze an image and see the result.
The Landmark feature of Computer Vision analyzes an image for natural and artificial landmarks, such as
mountains or famous buildings. Once the analysis is complete, Landmark returns a JSON object that identifies the
landmarks found in the image.
To complete the Landmark feature of the application, perform the following steps:
Open the landmark.html file in a text editor and locate the landmarkButtonClick function near the bottom of
the file.
The landmarkButtonClick event handler function clears the form, displays the image specified in the URL, then
calls the IdentifyLandmarks function to analyze the image. Copy and paste the following code into the
landmarkButtonClick function.
The IdentifyLandmarks function wraps the REST API call to analyze an image. Upon a successful return, the
formatted JSON analysis will be displayed in the specified textarea, and the caption will be displayed in the
specified span.
Copy and paste the IdentifyLandmarks function code to just underneath the landmarkButtonClick function.
/* Identify landmarks in the image at the specified URL by using Microsoft Cognitive Services
* Landmarks API.
* @param {string} sourceImageUrl - The URL to the image to analyze for landmarks.
* @param {<textarea> element} responseTextArea - The text area to display the JSON string returned
* from the REST API call, or to display the error message if there was
* an error.
* @param {<span> element} captionSpan - The span to display the image caption.
*/
function IdentifyLandmarks(sourceImageUrl, responseTextArea, captionSpan) {
// Request parameters.
var params = {
"model": "landmarks"
};
// Perform the REST API call.
$.ajax({
url: common.uriBasePreRegion +
$("#subscriptionRegionSelect").val() +
common.uriBasePostRegion +
common.uriBaseLandmark +
"?" +
$.param(params),
// Request headers.
beforeSend: function(jqXHR){
jqXHR.setRequestHeader("Content-Type","application/json");
jqXHR.setRequestHeader("Ocp-Apim-Subscription-Key",
encodeURIComponent($("#subscriptionKeyInput").val()));
},
type: "POST",
// Request body.
data: '{"url": ' + '"' + sourceImageUrl + '"}',
})
.done(function(data) {
// Show formatted JSON on webpage.
responseTextArea.val(JSON.stringify(data, null, 2));
// Extract and display the caption and confidence from the first caption in the description object.
if (data.result && data.result.landmarks) {
var landmark = data.result.landmarks[0];
if (landmark.name && landmark.confidence) {
captionSpan.text("Landmark: " + landmark.name +
" (confidence: " + landmark.confidence + ").");
}
}
})
.fail(function(jqXHR, textStatus, errorThrown) {
// Prepare the error string.
var errorString = (errorThrown === "") ? "Error. " : errorThrown + " (" + jqXHR.status + "): ";
errorString += (jqXHR.responseText === "") ? "" : (jQuery.parseJSON(jqXHR.responseText).message) ?
jQuery.parseJSON(jqXHR.responseText).message : jQuery.parseJSON(jqXHR.responseText).error.message;
// Put the error JSON in the response textarea.
responseTextArea.val(JSON.stringify(jqXHR, null, 2));
// Show the error message.
alert(errorString);
});
}
Run the landmark functionRun the landmark function
Recognize celebritiesRecognize celebrities
Add the event handler code for the celebrities buttonAdd the event handler code for the celebrities button
function celebritiesButtonClick() {
// Clear the display fields.
$("#sourceImage").attr("src", "#");
$("#responseTextArea").val("");
$("#captionSpan").text("");
// Display the image.
var sourceImageUrl = $("#inputImage").val();
$("#sourceImage").attr("src", sourceImageUrl);
IdentifyCelebrities(sourceImageUrl, $("#responseTextArea"), $("#captionSpan"));
}
Add the wrapper for the REST API callAdd the wrapper for the REST API call
Save the landmark.html file and open it in a Web browser. Put your subscription key into the Subscription Key
field and verify that you are using the correct region in Subscription Region. Enter a URL to an image to analyze,
then click the Analyze Image button to analyze an image and see the result.
The Celebrities feature of Computer Vision analyzes an image for famous people. Once the analysis is complete,
Celebrities returns a JSON object that identifies the Celebrities found in the image.
To complete the Celebrities feature of the application, perform the following steps:
Open the celebrities.html file in a text editor and locate the celebritiesButtonClick function near the bottom of
the file.
The celebritiesButtonClick event handler function clears the form, displays the image specified in the URL, then
calls the IdentifyCelebrities function to analyze the image. Copy and paste the following code into the
celebritiesButtonClick function.

/* Identify celebrities in the image at the specified URL by using Microsoft Cognitive Services
* Celebrities API.
* @param {string} sourceImageUrl - The URL to the image to analyze for celebrities.
* @param {<textarea> element} responseTextArea - The text area to display the JSON string returned
* from the REST API call, or to display the error message if there was
* an error.
* @param {<span> element} captionSpan - The span to display the image caption.
*/
function IdentifyCelebrities(sourceImageUrl, responseTextArea, captionSpan) {
// Request parameters.
var params = {
"model": "celebrities"
};
// Perform the REST API call.
$.ajax({
url: common.uriBasePreRegion +
$("#subscriptionRegionSelect").val() +
common.uriBasePostRegion +
common.uriBaseCelebrities +
"?" +
$.param(params),
// Request headers.
beforeSend: function(jqXHR){
jqXHR.setRequestHeader("Content-Type","application/json");
jqXHR.setRequestHeader("Ocp-Apim-Subscription-Key",
encodeURIComponent($("#subscriptionKeyInput").val()));
},
type: "POST",
// Request body.
data: '{"url": ' + '"' + sourceImageUrl + '"}',
})
.done(function(data) {
// Show formatted JSON on webpage.
responseTextArea.val(JSON.stringify(data, null, 2));
// Extract and display the caption and confidence from the first caption in the description object.
if (data.result && data.result.celebrities) {
var celebrity = data.result.celebrities[0];
if (celebrity.name && celebrity.confidence) {
captionSpan.text("Celebrity name: " + celebrity.name +
" (confidence: " + celebrity.confidence + ").");
}
}
})
.fail(function(jqXHR, textStatus, errorThrown) {
// Prepare the error string.
var errorString = (errorThrown === "") ? "Error. " : errorThrown + " (" + jqXHR.status + "): ";
errorString += (jqXHR.responseText === "") ? "" : (jQuery.parseJSON(jqXHR.responseText).message) ?
jQuery.parseJSON(jqXHR.responseText).message : jQuery.parseJSON(jqXHR.responseText).error.message;
// Put the error JSON in the response textarea.
responseTextArea.val(JSON.stringify(jqXHR, null, 2));
// Show the error message.
alert(errorString);
});
}
Run the celebrities functionRun the celebrities function
Intelligently generate a thumbnailIntelligently generate a thumbnail
Add the event handler code for the thumbnail buttonAdd the event handler code for the thumbnail button
function thumbnailButtonClick() {
// Clear the display fields.
document.getElementById("sourceImage").src = "#";
document.getElementById("thumbnailImageSmartCrop").src = "#";
document.getElementById("thumbnailImageNonSmartCrop").src = "#";
document.getElementById("responseTextArea").value = "";
document.getElementById("captionSpan").text = "";
// Display the image.
var sourceImageUrl = document.getElementById("inputImage").value;
document.getElementById("sourceImage").src = sourceImageUrl;
// Get a smart cropped thumbnail.
getThumbnail (sourceImageUrl, true, document.getElementById("thumbnailImageSmartCrop"),
document.getElementById("responseTextArea"));
// Get a non-smart-cropped thumbnail.
getThumbnail (sourceImageUrl, false, document.getElementById("thumbnailImageNonSmartCrop"),
document.getElementById("responseTextArea"));
}
Add the wrapper for the REST API callAdd the wrapper for the REST API call
/* Get a thumbnail of the image at the specified URL by using Microsoft Cognitive Services
* Thumbnail API.
* @param {string} sourceImageUrl URL to image.
* @param {boolean} smartCropping Set to true to use the smart cropping feature which crops to the
* more interesting area of an image; false to crop for the center
* of the image.
* @param {<img> element} imageElement The img element in the DOM which will display the thumbnail image.
* @param {<textarea> element} responseTextArea - The text area to display the Response Headers returned
* from the REST API call, or to display the error message if there was
* an error.
*/
function getThumbnail (sourceImageUrl, smartCropping, imageElement, responseTextArea) {
// Create the HTTP Request object.
var xhr = new XMLHttpRequest();
// Request parameters.
Save the celebrities.html file and open it in a Web browser. Put your subscription key into the Subscription Key
field and verify that you are using the correct region in Subscription Region. Enter a URL to an image to analyze,
then click the Analyze Image button to analyze an image and see the result.
The Thumbnail feature of Computer Vision generates a thumbnail from an image. By using the Smart Crop
feature, the Thumbnail feature will identify the area of interest in an image and center the thumbnail on this area, to
generate more aesthetically pleasing thumbnail images.
To complete the Thumbnail feature of the application, perform the following steps:
Open the thumbnail.html file in a text editor and locate the thumbnailButtonClick function near the bottom of
the file.
The thumbnailButtonClick event handler function clears the form, displays the image specified in the URL, then
calls the getThumbnail function twice to create two thumbnails, one smart cropped and one without smart crop.
Copy and paste the following code into the thumbnailButtonClick function.
The getThumbnail function wraps the REST API call to analyze an image. Upon a successful return, the thumbnail
will be displayed in the specified img element.
Copy and paste the following getThumbnail function to just underneath the thumbnailButtonClick function.

// Request parameters.
var params = "width=100&height=150&smartCropping=" + smartCropping.toString();
// Build the full URI.
var fullUri = common.uriBasePreRegion +
document.getElementById("subscriptionRegionSelect").value +
common.uriBasePostRegion +
common.uriBaseThumbnail +
"?" +
params;
// Identify the request as a POST, with the URI and parameters.
xhr.open("POST", fullUri);
// Add the request headers.
xhr.setRequestHeader("Content-Type","application/json");
xhr.setRequestHeader("Ocp-Apim-Subscription-Key",
encodeURIComponent(document.getElementById("subscriptionKeyInput").value));
// Set the response type to "blob" for the thumbnail image data.
xhr.responseType = "blob";
// Process the result of the REST API call.
xhr.onreadystatechange = function(e) {
if(xhr.readyState === XMLHttpRequest.DONE) {
// Thumbnail successfully created.
if (xhr.status === 200) {
// Show response headers.
var s = JSON.stringify(xhr.getAllResponseHeaders(), null, 2);
responseTextArea.value = JSON.stringify(xhr.getAllResponseHeaders(), null, 2);
// Show thumbnail image.
var urlCreator = window.URL || window.webkitURL;
var imageUrl = urlCreator.createObjectURL(this.response);
imageElement.src = imageUrl;
} else {
// Display the error message. The error message is the response body as a JSON string.
// The code in this code block extracts the JSON string from the blob response.
var reader = new FileReader();
// This event fires after the blob has been read.
reader.addEventListener('loadend', (e) => {
responseTextArea.value = JSON.stringify(JSON.parse(e.srcElement.result), null, 2);
});
// Start reading the blob as text.
reader.readAsText(xhr.response);
}
}
}
// Execute the REST API call.
xhr.send('{"url": ' + '"' + sourceImageUrl + '"}');
}
Run the thumbnail functionRun the thumbnail function
Read printed text (OCR)
Read printed text (OCR)
Save the thumbnail.html file and open it in a Web browser. Put your subscription key into the Subscription Key
field and verify that you are using the correct region in Subscription Region. Enter a URL to an image to analyze,
then click the Generate Thumbnails button to analyze an image and see the result.
The Optical Character Recognition (OCR) feature of Computer Vision analyzes an image of printed text. After the
analysis is complete, OCR returns a JSON object that contains the text and the location of the text in the image.
To complete the OCR feature of the application, perform the following steps:
Add the event handler code for the OCR buttonAdd the event handler code for the OCR button
function ocrButtonClick() {
// Clear the display fields.
$("#sourceImage").attr("src", "#");
$("#responseTextArea").val("");
$("#captionSpan").text("");
// Display the image.
var sourceImageUrl = $("#inputImage").val();
$("#sourceImage").attr("src", sourceImageUrl);
ReadOcrImage(sourceImageUrl, $("#responseTextArea"));
}
Add the wrapper for the REST API callAdd the wrapper for the REST API call
Open the ocr.html file in a text editor and locate the ocrButtonClick function near the bottom of the file.
The ocrButtonClick event handler function clears the form, displays the image specified in the URL, then calls the
ReadOcrImage function to analyze the image. Copy and paste the following code into the ocrButtonClick
function.
The ReadOcrImage function wraps the REST API call to analyze an image. Upon a successful return, the
formatted JSON describing the text and the location of the text will be displayed in the specified textarea.
Copy and paste the following ReadOcrImage function to just underneath the ocrButtonClick function.

/* Recognize and read printed text in an image at the specified URL by using Microsoft Cognitive
* Services OCR API.
* @param {string} sourceImageUrl - The URL to the image to analyze for printed text.
* @param {<textarea> element} responseTextArea - The text area to display the JSON string returned
* from the REST API call, or to display the error message if there was
* an error.
*/
function ReadOcrImage(sourceImageUrl, responseTextArea) {
// Request parameters.
var params = {
"language": "unk",
"detectOrientation ": "true",
};
// Perform the REST API call.
$.ajax({
url: common.uriBasePreRegion +
$("#subscriptionRegionSelect").val() +
common.uriBasePostRegion +
common.uriBaseOcr +
"?" +
$.param(params),
// Request headers.
beforeSend: function(jqXHR){
jqXHR.setRequestHeader("Content-Type","application/json");
jqXHR.setRequestHeader("Ocp-Apim-Subscription-Key",
encodeURIComponent($("#subscriptionKeyInput").val()));
},
type: "POST",
// Request body.
data: '{"url": ' + '"' + sourceImageUrl + '"}',
})
.done(function(data) {
// Show formatted JSON on webpage.
responseTextArea.val(JSON.stringify(data, null, 2));
})
.fail(function(jqXHR, textStatus, errorThrown) {
// Put the JSON description into the text area.
responseTextArea.val(JSON.stringify(jqXHR, null, 2));
// Display error message.
var errorString = (errorThrown === "") ? "Error. " : errorThrown + " (" + jqXHR.status + "): ";
errorString += (jqXHR.responseText === "") ? "" : (jQuery.parseJSON(jqXHR.responseText).message) ?
jQuery.parseJSON(jqXHR.responseText).message : jQuery.parseJSON(jqXHR.responseText).error.message;
alert(errorString);
});
}
Run the OCR functionRun the OCR function
Read handwritten text (handwriting recognition)
Read handwritten text (handwriting recognition)
Save the ocr.html file and open it in a Web browser. Put your subscription key into the Subscription Key field and
verify that you are using the correct region in Subscription Region. Enter a URL to an image of text to read, then
click the Read Image button to analyze an image and see the result.
The Handwriting Recognition feature of Computer Vision analyzes an image of handwritten text. After the analysis
is complete, Handwriting Recognition returns a JSON object that contains the text and the location of the text in the
image.
To complete the Handwriting Recognition feature of the application, perform the following steps:
Add the event handler code for the handwriting buttonAdd the event handler code for the handwriting button
function handwritingButtonClick() {
// Clear the display fields.
$("#sourceImage").attr("src", "#");
$("#responseTextArea").val("");
// Display the image.
var sourceImageUrl = $("#inputImage").val();
$("#sourceImage").attr("src", sourceImageUrl);
ReadHandwrittenImage(sourceImageUrl, $("#responseTextArea"));
}
Add the wrapper for the REST API callAdd the wrapper for the REST API call
/* Recognize and read text from an image of handwriting at the specified URL by using Microsoft
* Cognitive Services Recognize Handwritten Text API.
* @param {string} sourceImageUrl - The URL to the image to analyze for handwriting.
* @param {<textarea> element} responseTextArea - The text area to display the JSON string returned
* from the REST API call, or to display the error message if there was
* an error.
*/
function ReadHandwrittenImage(sourceImageUrl, responseTextArea) {
// Request parameters.
var params = {
"handwriting": "true",
};
// This operation requires two REST API calls. One to submit the image for processing,
// the other to retrieve the text found in the image.
//
// Perform the first REST API call to submit the image for processing.
$.ajax({
url: common.uriBasePreRegion +
$("#subscriptionRegionSelect").val() +
common.uriBasePostRegion +
common.uriBaseHandwriting +
"?" +
$.param(params),
// Request headers.
beforeSend: function(jqXHR){
jqXHR.setRequestHeader("Content-Type","application/json");
jqXHR.setRequestHeader("Ocp-Apim-Subscription-Key",
encodeURIComponent($("#subscriptionKeyInput").val()));
},
Open the handwriting.html file in a text editor and locate the handwritingButtonClick function near the bottom
of the file.
The handwritingButtonClick event handler function clears the form, displays the image specified in the URL,
then calls the HandwritingImage function to analyze the image.
Copy and paste the following code into the handwritingButtonClick function.
The ReadHandwrittenImage function wraps the two REST API calls needed to analyze an image. Because
Handwriting Recognition is a time consuming process, a two step process is used. The first call submits the image
for processing; the second call retrieves the detected text when the processing is complete.
After the text is retrieved, the formatted JSON describing the text and the location of the text will be displayed in
the specified textarea.
Copy and paste the following ReadHandwrittenImage function to just underneath the handwritingButtonClick
function.

},
type: "POST",
// Request body.
data: '{"url": ' + '"' + sourceImageUrl + '"}',
})
.done(function(data, textStatus, jqXHR) {
// Show progress.
responseTextArea.val("Handwritten image submitted.");
// Note: The response may not be immediately available. Handwriting Recognition is an
// async operation that can take a variable amount of time depending on the length
// of the text you want to recognize. You may need to wait or retry this GET operation.
//
// Try once per second for up to ten seconds to receive the result.
var tries = 10;
var waitTime = 100;
var taskCompleted = false;
var timeoutID = setInterval(function () {
// Limit the number of calls.
if (--tries <= 0) {
window.clearTimeout(timeoutID);
responseTextArea.val("The response was not available in the time allowed.");
return;
}
// The "Operation-Location" in the response contains the URI to retrieve the recognized text.
var operationLocation = jqXHR.getResponseHeader("Operation-Location");
// Perform the second REST API call and get the response.
$.ajax({
url: operationLocation,
// Request headers.
beforeSend: function(jqXHR){
jqXHR.setRequestHeader("Content-Type","application/json");
jqXHR.setRequestHeader("Ocp-Apim-Subscription-Key",
encodeURIComponent($("#subscriptionKeyInput").val()));
},
type: "GET",
})
.done(function(data) {
// If the result is not yet available, return.
if (data.status && (data.status === "NotStarted" || data.status === "Running")) {
return;
}
// Show formatted JSON on webpage.
responseTextArea.val(JSON.stringify(data, null, 2));
// Indicate the task is complete and clear the timer.
taskCompleted = true;
window.clearTimeout(timeoutID);
})
.fail(function(jqXHR, textStatus, errorThrown) {
// Indicate the task is complete and clear the timer.
taskCompleted = true;
window.clearTimeout(timeoutID);
// Display error message.
var errorString = (errorThrown === "") ? "Error. " : errorThrown + " (" + jqXHR.status + "): ";
errorString += (jqXHR.responseText === "") ? "" :
(jQuery.parseJSON(jqXHR.responseText).message) ?
jQuery.parseJSON(jqXHR.responseText).message :
jQuery.parseJSON(jqXHR.responseText).message :
jQuery.parseJSON(jqXHR.responseText).error.message;
alert(errorString);
});
}, waitTime);
})
.fail(function(jqXHR, textStatus, errorThrown) {
// Put the JSON description into the text area.
responseTextArea.val(JSON.stringify(jqXHR, null, 2));
// Display error message.
var errorString = (errorThrown === "") ? "Error. " : errorThrown + " (" + jqXHR.status + "): ";
errorString += (jqXHR.responseText === "") ? "" : (jQuery.parseJSON(jqXHR.responseText).message) ?
jQuery.parseJSON(jqXHR.responseText).message : jQuery.parseJSON(jqXHR.responseText).error.message;
alert(errorString);
});
}
Run the handwriting functionRun the handwriting function
Next steps
Save the handwriting.html file and open it in a Web browser. Put your subscription key into the Subscription
Key field and verify that you are using the correct region in Subscription Region. Enter a URL to an image of text
to read, then click the Read Image button to analyze an image and see the result.
In this guide, you used the Computer Vision REST API with JavaScript to test many of the available image analysis
features. Next, see the reference documentation to learn more about the APIs involved.
Computer Vision REST API

Tutorial: Computer Vision API Python
2/15/2019 • 2 minutes to read • Edit Online
Prerequisites
Open the Tutorial Notebook in Jupyter
Run the Tutorial
# Variables
_region = 'westcentralus' #Here you enter the region of your subscription
_url = 'https://{}.api.cognitive.microsoft.com/vision/v2.0/analyze'.format(_region)
_key = None #Here you have to paste your primary key
_maxNumRetries = 10
This tutorial shows you how to use the Computer Vision API in Python and how to visualize your results using
popular libraries. You will use Jupyter to run the tutorial. To learn how to get started with interactive Jupyter
notebooks, refer to the Jupyter Documentation.
Python 2.7+ or 3.5+
pip tool
Jupyter Notebook installed
1. Go to the Cognitive Vision Python GitHub repo.
2. Click on the green button to clone or download the repo.
3. Open a command prompt and navigate to the folder Cognitive-Vision-Python\Jupyter Notebook.
4. Ensure you have all the required libraries by running the command
pip install requests opencv-python numpy matplotlib from the command prompt.
5. Start Jupyter by running the command jupyter notebook from the command prompt.
6. In the Jupyter window, click on Computer Vision API Example.ipynb to open the tutorial notebook.
To use this notebook, you will need a subscription key for the Computer Vision API. Visit the Subscription page to
sign up. On the Sign in page, use your Microsoft account to sign in and you will be able to subscribe and get free
keys. After completing the sign-up process, paste your key into the Variables section of the notebook (reproduced
below). Either the primary or the secondary key will work. Be sure to enclose the key in quotes to make it a string.
You will also need to make sure the _region field matches the region that corresponds to your subscription.
When you run the tutorial, you will be able to add images to analyze, both from a URL and from local storage. The
script will display the images and analysis information in the notebook.
Example: How to call the Computer Vision API
4/18/2019 • 5 minutes to read • Edit Online
Prerequisites
Authorize the API call
Upload an image to the Computer Vision API service and get back tags,
descriptions and celebrities
This guide demonstrates how to call Computer Vision API using REST. The samples are written both in C# using
the Computer Vision API client library, and as HTTP POST/GET calls. We will focus on:
How to get "Tags", "Description" and "Categories".
How to get "Domain-specific" information (celebrities).
Image URL or path to locally stored image.
Supported input methods: Raw image binary in the form of an application/octet stream or image URL
Supported image formats: JPEG, PNG, GIF, BMP
Image file size: Less than 4MB
Image dimension: Greater than 50 x 50 pixels
In the examples below, the following features are demonstrated:
1. Analyzing an image and getting an array of tags and a description returned.
2. Analyzing an image with a domain-specific model (specifically, "celebrities" model) and getting the
corresponding result in JSON retune.
Features are broken down on:
Option One: Scoped Analysis - Analyze only a given model
Option Two: Enhanced Analysis - Analyze to provide additional details with 86-categories taxonomy
Every call to the Computer Vision API requires a subscription key. This key needs to be either passed through a
query string parameter or specified in the request header.
To obtain a free trial key, see Try Cognitive Services. Or, follow the instructions in Create a Cognitive Services
account to subscribe to Computer Vision and get your key.
1. Passing the subscription key through a query string, see below as a Computer Vision API example:
https://westus.api.cognitive.microsoft.com/vision/v2.0/analyze?visualFeatures=Description,Tags&subscription-key=
<Your subscription key>
1. Passing the subscription key can also be specified in the HTTP request header:
ocp-apim-subscription-key: <Your subscription key>
1. When using the client library, the subscription key is passed in through the constructor of VisionServiceClient:
var visionClient = new VisionServiceClient("Your subscriptionKey");
The basic way to perform the Computer Vision API call is by uploading an image directly. This is done by sending a
POST https://westus.api.cognitive.microsoft.com/vision/v2.0/analyze?
visualFeatures=Description,Tags&subscription-key=<Your subscription key>
using Microsoft.ProjectOxford.Vision;
using Microsoft.ProjectOxford.Vision.Contract;
using System.IO;
AnalysisResult analysisResult;
var features = new VisualFeature[] { VisualFeature.Tags, VisualFeature.Description };
using (var fs = new FileStream(@"C:\Vision\Sample.jpg", FileMode.Open))
{
analysisResult = await visionClient.AnalyzeImageAsync(fs, features);
}
Ta g s o n l y:Ta g s o n l y:
POST https://westus.api.cognitive.microsoft.com/vision/v2.0/tag&subscription-key=<Your subscription key>
var analysisResult = await visionClient.GetTagsAsync("http://contoso.com/example.jpg");
De s c ri p ti o n o n l y :De s c ri p ti o n o n l y :
POST https://westus.api.cognitive.microsoft.com/vision/v2.0/describe&subscription-key=<Your subscription key>
using (var fs = new FileStream(@"C:\Vision\Sample.jpg", FileMode.Open))
{
analysisResult = await visionClient.DescribeAsync(fs);
}
Get domain-specific analysis (celebrities)
Get domain-specific analysis (celebrities)
POST https://westus.api.cognitive.microsoft.com/vision/v2.0/models/celebrities/analyze
var celebritiesResult = await visionClient.AnalyzeImageInDomainAsync(url, "celebrities");
GET https://westus.api.cognitive.microsoft.com/vision/v2.0/models
var models = await visionClient.ListModelsAsync();
"POST" request with application/octet-stream content type together with the data read from the image. For "Tags"
and "Description", this upload method will be the same for all the Computer Vision API calls. The only difference
will be the query parameters the user specifies.
Here’s how to get "Tags" and "Description" for a given image:
Option One: Get list of "Tags" and one "Description"
Option Two Get list of "Tags" only, or list of "Description" only:
Option One: Scoped Analysis - Analyze only a given model
For this option, all other query parameters {visualFeatures, details} are not valid. If you want to see all supported
models, use:
Option Two: Enhanced Analysis - Analyze to provide additional details with 86-categories taxonomy
For applications where you want to get generic image analysis in addition to details from one or more domain-
specific models, we extend the v1 API with the models query parameter.

POST https://westus.api.cognitive.microsoft.com/vision/v2.0/analyze?details=celebrities
Retrieve and understand the JSON output for analysis
{
"tags":[
{
"name":"outdoor",
"score":0.976
},
{
"name":"bird",
"score":0.95
}
],
"description":{
"tags":[
"outdoor",
"bird"
],
"captions":[
{
"text":"partridge in a pear tree",
"confidence":0.96
}
]
}
}
FIELD T YPE CONTENT
Tags object Top-level object for array of tags
tags[].Name string Keyword from tags classifier
tags[].Score number Confidence score, between 0 and 1.
description object Top-level object for a description.
description.tags[] string List of tags. If there insufficient
confidence in the ability to produce a
caption, the tags maybe the only
information available to the caller.
description.captions[].text string A phrase describing the image.
When this method is invoked, we will call the 86-category classifier first. If any of the categories match that of a
known/matching model, a second pass of classifier invocations will occur. For example, if "details=all", or "details"
include ‘celebrities’, we will call the celebrities model after the 86-category classifier is called and the result includes
the category person. This will increase latency for users interested in celebrities, compared to Option One.
All v1 query parameters will behave the same in this case. If visualFeatures=categories is not specified, it will be
implicitly enabled.
Here's an example:
description.captions[].confidence number Confidence for the phrase.
FIELD T YPE CONTENT
Retrieve and understand the JSON output of domain-specific models
{
"result":[
{
"name":"golden retriever",
"score":0.98
},
{
"name":"Labrador retriever",
"score":0.78
}
]
}
{
"requestId":"87e44580-925a-49c8-b661-d1c54d1b83b5",
"metadata":{
"width":640,
"height":430,
"format":"Jpeg"
},
"result":{
"celebrities":[
{
"name":"Richard Nixon",
"faceRectangle":{
"left":107,
"top":98,
"width":165,
"height":165
},
"confidence":0.9999827
}
]
}
}
FIELD T YPE CONTENT
categories object Top-level object
Option One: Scoped Analysis - Analyze only a given model
The output will be an array of tags, an example will be like this example:
Option Two: Enhanced Analysis - Analyze to provide additional details with 86-categories taxonomy
For domain-specific models using Option Two (Enhanced Analysis), the categories return type is extended. An
example follows:
The categories field is a list of one or more of the 86-categories in the original taxonomy. Note also that categories
ending in an underscore will match that category and its children (for example, people_ as well as people_group, for
celebrities model).
categories[].name string Name from 86-category taxonomy
categories[].score number Confidence score, between 0 and 1
categories[].detail object? Optional detail object
FIELD T YPE CONTENT
Errors Responses
Next steps
Note that if multiple categories match (for example, 86-category classifier returns a score for both people_ and
people_young when model=celebrities), the details are attached to the most general level match (people_ in that
example.)
These are identical to vision.analyze, with the additional error of NotSupportedModel error (HTTP 400), which may
be returned in both Option One and Option Two scenarios. For Option Two (Enhanced Analysis), if any of the
models specified in details are not recognized, the API will return a NotSupportedModel, even if one or more of
them are valid. Users can call listModels to find out what models are supported.
To use the REST API, go to Computer Vision API Reference.

Install and run Recognize Text containers
6/11/2019 • 9 minutes to read • Edit Online
IMPORTANTIMPORTANT
Prerequisites
REQUIRED PURPOSE
Docker Engine You need the Docker Engine installed on a host computer.
Docker provides packages that configure the Docker
environment on macOS, Windows, and Linux. For a primer on
Docker and container basics, see the Docker overview.
Docker must be configured to allow the containers to connect
with and send billing data to Azure.
On Windows, Docker must also be configured to support
Linux containers.
Familiarity with Docker You should have a basic understanding of Docker concepts,
like registries, repositories, containers, and container images,
as well as knowledge of basic docker commands.
Azure Cognitive Services resource In order to use the container, you must have:
A Cognitive Services Azure resource and the associated billing
key the billing endpoint URI. Both values are available on the
Overview and Keys pages for the resource and are required to
start the container. You need to add the vision/v2.0
routing to the endpoint URI as shown in the following
BILLING_ENDPOINT_URI example.
{BILLING_KEY}: resource key
{BILLING_ENDPOINT_URI}: endpoint URI example is:
https://westus.api.cognitive.microsoft.com/vision/v2.0
Request access to the private container registry
The Recognize Text portion of Computer Vision is also available as a Docker container. It allows you to detect and
extract printed text from images of various objects with different surfaces and backgrounds, such as receipts,
posters, and business cards.
The Recognize Text container currently works only with English.
If you don't have an Azure subscription, create a free account before you begin.
You must meet the following prerequisites before using Recognize Text containers:
Fill out and submit the Cognitive Services Vision Containers Request form to request access to the container. The
form requests information about you, your company, and the user scenario for which you'll use the container. After
IMPORTANTIMPORTANT
Log in to the private container registry
docker login containerpreview.azurecr.io -u <username> -p <password>
cat <passwordFile> | docker login containerpreview.azurecr.io -u <username> --password-stdin
The host computerThe host computer
Container requirements and recommendationsContainer requirements and recommendations
CONTAINER MINIMUM RECOMMENDED
TPS
(MINIMUM, MAXIMUM)
Recognize Text 1 core, 8 GB memory, 0.5
TPS
2 cores, 8 GB memory, 1 TPS 0.5, 1
you submit the form, the Azure Cognitive Services team reviews it to make sure that you meet the criteria for
access to the private container registry.
You must use an email address associated with either a Microsoft Account (MSA) or an Azure Active Directory (Azure AD)
account in the form.
If your request is approved, you receive an email with instructions that describe how to obtain your credentials and
access the private container registry.
There are several ways to authenticate with the private container registry for Cognitive Services containers. We
recommend that you use the command-line method by using the Docker CLI.
Use the docker login command, as shown in the following example, to log in to containerpreview.azurecr.io ,
which is the private container registry for Cognitive Services containers. Replace <username> with the user name
and <password> with the password provided in the credentials you received from the Azure Cognitive Services
team.
If you secured your credentials in a text file, you can concatenate the contents of that text file to the docker login
command. Use the cat command, as shown in the following example. Replace <passwordFile> with the path and
name of the text file that contains the password. Replace <username> with the user name provided in your
credentials.
The host is a x64-based computer that runs the Docker container. It can be a computer on your premises or a
Docker hosting service in Azure, such as:
Azure Kubernetes Service.
Azure Container Instances.
A Kubernetes cluster deployed to Azure Stack. For more information, see Deploy Kubernetes to Azure Stack.
The following table describes the minimum and recommended CPU cores and memory to allocate for each
Recognize Text container.
Each core must be at least 2.6 gigahertz (GHz) or faster.
TPS - transactions per second
Core and memory correspond to the --cpus and --memory settings, which are used as part of the docker run
command.
Get the container image with docker pull
CONTAINER REPOSITORY
Recognize Text containerpreview.azurecr.io/microsoft/cognitive-
services-recognize-text:latest
Docker pull for the Recognize Text containerDocker pull for the Recognize Text container
docker pull containerpreview.azurecr.io/microsoft/cognitive-services-recognize-text:latest
TIPTIP
docker images --format "table {{.ID}}\t{{.Repository}}\t{{.Tag}}"
IMAGE ID REPOSITORY TAG
ebbee78a6baa <container-name> latest
How to use the container
Run the container with docker run
PLACEHOLDER VALUE
{BILLING_KEY}This key is used to start the container, and is available on the
Azure Cognitive Services Keys page.
{BILLING_ENDPOINT_URI}The billing endpoint URI value. Example is:
https://westus.api.cognitive.microsoft.com/vision/v2.0
Container images for Recognize Text are available.
Use the docker pull command to download a container image.
You can use the docker images command to list your downloaded container images. For example, the following command
lists the ID, repository, and tag of each downloaded container image, formatted as a table:
Once the container is on the host computer, use the following process to work with the container.
1. Run the container, with the required billing settings. More examples of the docker run command are available.
2. Query the container's prediction endpoint.
Use the docker run command to run the container. The command uses the following parameters:
You need to add the vision/v2.0 routing to the endpoint URI as shown in the following
BILLING_ENDPOINT_URI example.
Replace these parameters with your own values in the following example docker run command.
docker run --rm -it -p 5000:5000 --memory 4g --cpus 1 \
containerpreview.azurecr.io/microsoft/cognitive-services-recognize-text \
Eula=accept \
Billing={BILLING_ENDPOINT_URI} \
ApiKey={BILLING_KEY}
IMPORTANTIMPORTANT
Run multiple containers on the same hostRun multiple containers on the same host
Query the container's prediction endpoint
Asynchronous text recognitionAsynchronous text recognition
Synchronous text recognitionSynchronous text recognition
Validate that a container is running
REQUEST PURPOSE
http://localhost:5000/ The container provides a home page.
This command:
Runs a recognize container from the container image
Allocates one CPU core and 4 gigabytes (GB) of memory
Exposes TCP port 5000 and allocates a pseudo-TTY for the container
Automatically removes the container after it exits. The container image is still available on the host computer.
More examples of the docker run command are available.
The Eula , Billing , and ApiKey options must be specified to run the container; otherwise, the container won't start. For
more information, see Billing.
If you intend to run multiple containers with exposed ports, make sure to run each container with a different
exposed port. For example, run the first container on port 5000 and the second container on port 5001.
You can have this container and a different Azure Cognitive Services container running on the HOST together. You
also can have multiple containers of the same Cognitive Services container running.
The container provides REST-based query prediction endpoint APIs.
Use the host, https://localhost:5000 , for container APIs.
You can use the POST /vision/v2.0/recognizeText and GET /vision/v2.0/textOperations/*{id}* operations in
concert to asynchronously recognize printed text in an image, similar to how the Computer Vision service uses
those corresponding REST operations. The Recognize Text container only recognizes printed text, not handwritten
text, at this time, so the mode parameter normally specified for the Computer Vision service operation is ignored
by the Recognize Text container.
You can use the POST /vision/v2.0/recognizeTextDirect operation to synchronously recognize printed text in an
image. Because this operation is synchronous, the request body for this operation is the same as that for the
POST /vision/v2.0/recognizeText operation, but the response body for this operation is the same as that returned
by the GET /vision/v2.0/textOperations/*{id}* operation.
There are several ways to validate that the container is running.
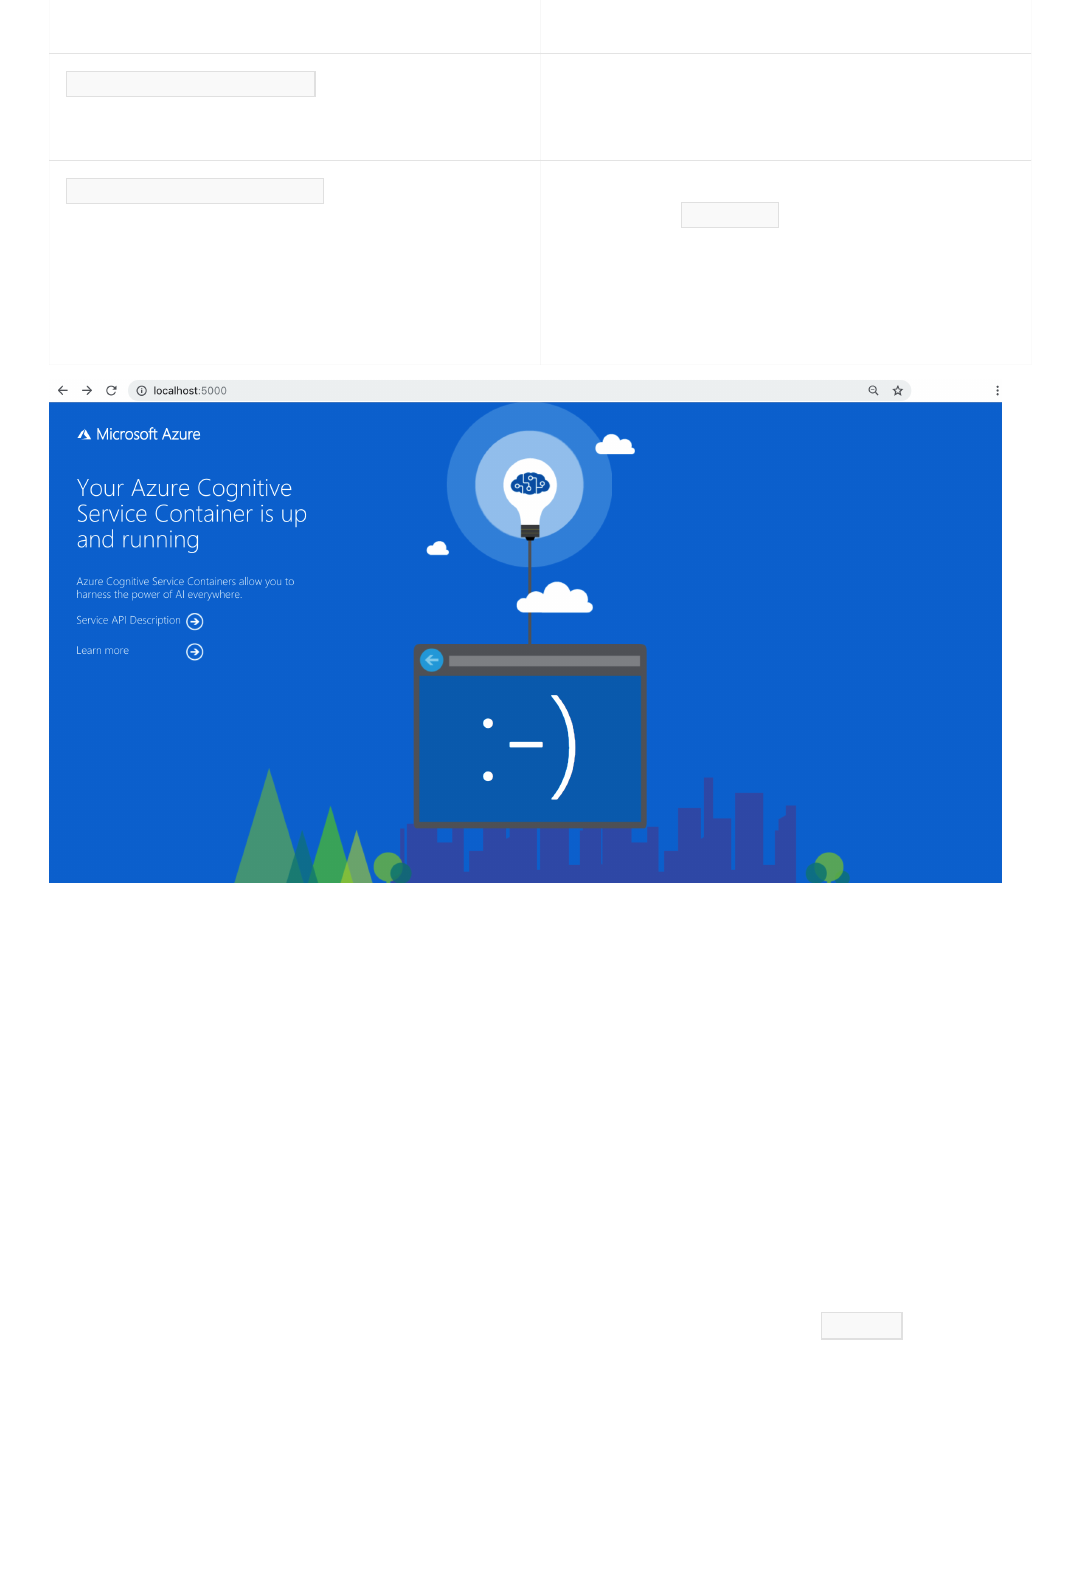
http://localhost:5000/status Requested with GET, to validate that the container is running
without causing an endpoint query. This request can be used
for Kubernetes liveness and readiness probes.
http://localhost:5000/swagger The container provides a full set of documentation for the
endpoints and a Try it now feature. With this feature, you
can enter your settings into a web-based HTML form and
make the query without having to write any code. After the
query returns, an example CURL command is provided to
demonstrate the HTTP headers and body format that's
required.
REQUEST PURPOSE
Stop the container
Troubleshooting
Billing
Connect to AzureConnect to Azure
To shut down the container, in the command-line environment where the container is running, select Ctrl+C.
If you run the container with an output mount and logging enabled, the container generates log files that are
helpful to troubleshoot issues that happen while starting or running the container.
The Recognize Text containers send billing information to Azure, using a Recognize Text resource on your Azure
account.
Queries to the container are billed at the pricing tier of the Azure resource that's used for the <ApiKey> .
Azure Cognitive Services containers aren't licensed to run without being connected to the billing endpoint for
metering. You must enable the containers to communicate billing information with the billing endpoint at all times.
Cognitive Services containers don't send customer data, such as the image or text that's being analyzed, to
Microsoft.
The container needs the billing argument values to run. These values allow the container to connect to the billing
Billing argumentsBilling arguments
OPTION DESCRIPTION
ApiKey The API key of the Cognitive Services resource that's used to
track billing information.
The value of this option must be set to an API key for the
provisioned resource that's specified in Billing .
Billing The endpoint of the Cognitive Services resource that's used to
track billing information.
The value of this option must be set to the endpoint URI of a
provisioned Azure resource.
Eula Indicates that you accepted the license for the container.
The value of this option must be set to accept.
Blog posts
Developer samples
View webinar
Summary
endpoint. The container reports usage about every 10 to 15 minutes. If the container doesn't connect to Azure
within the allowed time window, the container continues to run but doesn't serve queries until the billing endpoint
is restored. The connection is attempted 10 times at the same time interval of 10 to 15 minutes. If it can't connect
to the billing endpoint within the 10 tries, the container stops running.
For the docker run command to start the container, all three of the following options must be specified with valid
values:
For more information about these options, see Configure containers.
Running Cognitive Services Containers
Getting started with Cognitive Services Language Understanding container
Developer samples are available at our GitHub repository.
Join the webinar to learn about:
How to deploy Cognitive Services to any machine using Docker
How to deploy Cognitive Services to AKS
In this article, you learned concepts and workflow for downloading, installing, and running Recognize Text
containers. In summary:
Recognize Text provides a Linux container for Docker, encapsulating recognize text.
Container images are downloaded from the Microsoft Container Registry (MCR) in Azure.
Container images run in Docker.
You can use either the REST API or SDK to call operations in Recognize Text containers by specifying the host
URI of the container.
You must specify billing information when instantiating a container.
IMPORTANTIMPORTANT
Next steps
Cognitive Services containers are not licensed to run without being connected to Azure for metering. Customers need to
enable the containers to communicate billing information with the metering service at all times. Cognitive Services containers
do not send customer data (for example, the image or text that is being analyzed) to Microsoft.
Review Configure containers for configuration settings
Review Computer Vision overview to learn more about recognizing printed and handwritten text
Refer to the Computer Vision API for details about the methods supported by the container.
Refer to Frequently asked questions (FAQ) to resolve issues related to Computer Vision functionality.
Use more Cognitive Services Containers
Configure Recognize Text Docker containers
6/11/2019 • 7 minutes to read • Edit Online
Configuration settings
REQUIRED SETTING PURPOSE
Yes ApiKey Tracks billing information.
No ApplicationInsights Enables adding Azure Application Insights telemetry
support to your container.
Yes Billing Specifies the endpoint URI of the service resource on
Azure.
Yes Eula Indicates that you've accepted the license for the
container.
No Fluentd Writes log and, optionally, metric data to a Fluentd
server.
No Http Proxy Configures an HTTP proxy for making outbound
requests.
No Logging Provides ASP.NET Core logging support for your
container.
No Mounts Reads and writes data from the host computer to the
container and from the container back to the host
computer.
IMPORTANTIMPORTANT
ApiKey configuration setting
ApplicationInsights setting
REQUIRED NAME DATA TYPE DESCRIPTION
No InstrumentationKey String The instrumentation key of the
Application Insights instance to which
telemetry data for the container is
sent. For more information, see
Application Insights for ASP.NET Core.
Example:
InstrumentationKey=123456789
The Recognize Text container runtime environment is configured using the docker run command arguments. This container has several required
settings, along with a few optional settings. Several examples of the command are available. The container-specific settings are the billing settings.
The container has the following configuration settings:
The ApiKey , Billing , and Eula settings are used together, and you must provide valid values for all three of them; otherwise your container won't start. For
more information about using these configuration settings to instantiate a container, see Billing.
The ApiKey setting specifies the Azure Cognitive Services resource key used to track billing information for the container. You must specify a value
for the ApiKey and the value must be a valid key for the Cognitive Services resource specified for the Billing configuration setting.
This setting can be found in the following place:
Azure portal: Cognitive Services Resource Management, under Keys
The ApplicationInsights setting allows you to add Azure Application Insights telemetry support to your container. Application Insights provides in-
depth monitoring of your container. You can easily monitor your container for availability, performance, and usage. You can also quickly identify and
diagnose errors in your container.
The following table describes the configuration settings supported under the ApplicationInsights section.
Billing configuration setting
REQUIRED NAME DATA TYPE DESCRIPTION
Yes Billing String Billing endpoint URI
Example:
Billing=https://westcentralus.api.cognitive.microsoft.com/vision/v1.0
Eula setting
REQUIRED NAME DATA TYPE DESCRIPTION
Yes Eula String License acceptance
Example:
Eula=accept
Fluentd settings
NAME DATA TYPE DESCRIPTION
Host String The IP address or DNS host name of the Fluentd
server.
Port Integer The port of the Fluentd server.
The default value is 24224.
HeartbeatMs Integer The heartbeat interval, in milliseconds. If no event
traffic has been sent before this interval expires, a
heartbeat is sent to the Fluentd server. The default
value is 60000 milliseconds (1 minute).
SendBufferSize Integer The network buffer space, in bytes, allocated for send
operations. The default value is 32768 bytes (32
kilobytes).
TlsConnectionEstablishmentTimeoutMs Integer The timeout, in milliseconds, to establish a SSL/TLS
connection with the Fluentd server. The default value
is 10000 milliseconds (10 seconds).
If UseTLS is set to false, this value is ignored.
UseTLS Boolean Indicates whether the container should use SSL/TLS
for communicating with the Fluentd server. The
default value is false.
Http proxy credentials settings
The Billing setting specifies the endpoint URI of the Cognitive Services resource on Azure used to meter billing information for the container. You
must specify a value for this configuration setting, and the value must be a valid endpoint URI for a Cognitive Services resource on Azure. The
container reports usage about every 10 to 15 minutes.
This setting can be found in the following place:
Azure portal: Cognitive Services Overview, labeled Endpoint
Remember to add the vision/v1.0 routing to the endpoint URI as shown in the following table.
The Eula setting indicates that you've accepted the license for the container. You must specify a value for this configuration setting, and the value
must be set to accept .
Cognitive Services containers are licensed under your agreement governing your use of Azure. If you do not have an existing agreement governing
your use of Azure, you agree that your agreement governing use of Azure is the Microsoft Online Subscription Agreement, which incorporates the
Online Services Terms. For previews, you also agree to the Supplemental Terms of Use for Microsoft Azure Previews. By using the container you
agree to these terms.
Fluentd is an open-source data collector for unified logging. The Fluentd settings manage the container's connection to a Fluentd server. The
container includes a Fluentd logging provider, which allows your container to write logs and, optionally, metric data to a Fluentd server.
The following table describes the configuration settings supported under the Fluentd section.
If you need to configure an HTTP proxy for making outbound requests, use these two arguments:
NAME DATA TYPE DESCRIPTION
HTTP_PROXY string The proxy to use, for example, http://proxy:8888
HTTP_PROXY_CREDS string Any credentials needed to authenticate against the
proxy, for example, username:password.
<proxy-user> string The user for the proxy.
proxy-password string The password associated with <proxy-user> for the
proxy.
docker run --rm -it -p 5000:5000 \
--memory 2g --cpus 1 \
--mount type=bind,src=/home/azureuser/output,target=/output \
<registry-location>/<image-name> \
Eula=accept \
Billing=<billing-endpoint> \
ApiKey=<api-key> \
HTTP_PROXY=<proxy-url> \
HTTP_PROXY_CREDS=<proxy-user>:<proxy-password> \
Logging settings
PROVIDER PURPOSE
Console The ASP.NET Core Console logging provider. All of the ASP.NET Core
configuration settings and default values for this logging provider are supported.
Debug The ASP.NET Core Debug logging provider. All of the ASP.NET Core configuration
settings and default values for this logging provider are supported.
Disk The JSON logging provider. This logging provider writes log data to the output
mount.
docker run --rm -it -p 5000:5000 \
--memory 2g --cpus 1 \
--mount type=bind,src=/home/azureuser/output,target=/output \
<registry-location>/<image-name> \
Eula=accept \
Billing=<billing-endpoint> \
ApiKey=<api-key> \
Logging:Disk:Format=json
docker run --rm -it -p 5000:5000 \
--memory 2g --cpus 1 \
<registry-location>/<image-name> \
Eula=accept \
Billing=<billing-endpoint> \
ApiKey=<api-key> \
Logging:Console:LogLevel:Default=Debug
Disk loggingDisk logging
NAME DATA TYPE DESCRIPTION
Format String The output format for log files.
Note: This value must be set to json to enable the
logging provider. If this value is specified without also
specifying an output mount while instantiating a
container, an error occurs.
The Logging settings manage ASP.NET Core logging support for your container. You can use the same configuration settings and values for your
container that you use for an ASP.NET Core application.
The following logging providers are supported by the container:
This container command stores logging information in the JSON format to the output mount:
This container command shows debugging information, prefixed with dbug , while the container is running:
The Disk logging provider supports the following configuration settings:
MaxFileSize Integer The maximum size, in megabytes (MB), of a log file.
When the size of the current log file meets or exceeds
this value, a new log file is started by the logging
provider. If -1 is specified, the size of the log file is
limited only by the maximum file size, if any, for the
output mount. The default value is 1.
NAME DATA TYPE DESCRIPTION
Mount settings
OPTIONAL NAME DATA TYPE DESCRIPTION
Not allowed Input String Computer Vision containers do not
use this.
Optional Output String The target of the output mount. The
default value is /output . This is the
location of the logs. This includes
container logs.
Example:
--mount
type=bind,src=c:\output,target=/output
Example docker run commands
PLACEHOLDER VALUE FORMAT OR EXAMPLE
{BILLING_KEY}The endpoint key of the Cognitive Services resource. xxxxxxxxxxxxxxxxxxxxxxxxxxxxxxxx
{BILLING_ENDPOINT_URI}The billing endpoint value including region. https://westcentralus.api.cognitive.microsoft.com/vision/v1.0
IMPORTANTIMPORTANT
Recognize text container Docker examples
Basic exampleBasic example
docker run --rm -it -p 5000:5000 --memory 4g --cpus 1 \
containerpreview.azurecr.io/microsoft/cognitive-services-recognize-text \
Eula=accept \
Billing={BILLING_ENDPOINT_URI} \
ApiKey={BILLING_KEY}
Logging exampleLogging example
For more information about configuring ASP.NET Core logging support, see Settings file configuration.
Use bind mounts to read and write data to and from the container. You can specify an input mount or output mount by specifying the --mount option
in the docker run command.
The Computer Vision containers don't use input or output mounts to store training or service data.
The exact syntax of the host mount location varies depending on the host operating system. Additionally, the host computer's mount location may not
be accessible due to a conflict between permissions used by the Docker service account and the host mount location permissions.
The following examples use the configuration settings to illustrate how to write and use docker run commands. Once running, the container
continues to run until you stop it.
Line-continuation character: The Docker commands in the following sections use the back slash, \, as a line continuation character. Replace or
remove this based on your host operating system's requirements.
Argument order: Do not change the order of the arguments unless you are very familiar with Docker containers.
Remember to add the vision/v1.0 routing to the endpoint URI as shown in the following table.
Replace {argument_name} with your own values:
The Eula , Billing , and ApiKey options must be specified to run the container; otherwise, the container won't start. For more information, see Billing. The
ApiKey value is the Key from the Azure Cognitive Services Resource keys page.
The following Docker examples are for the recognize text container.
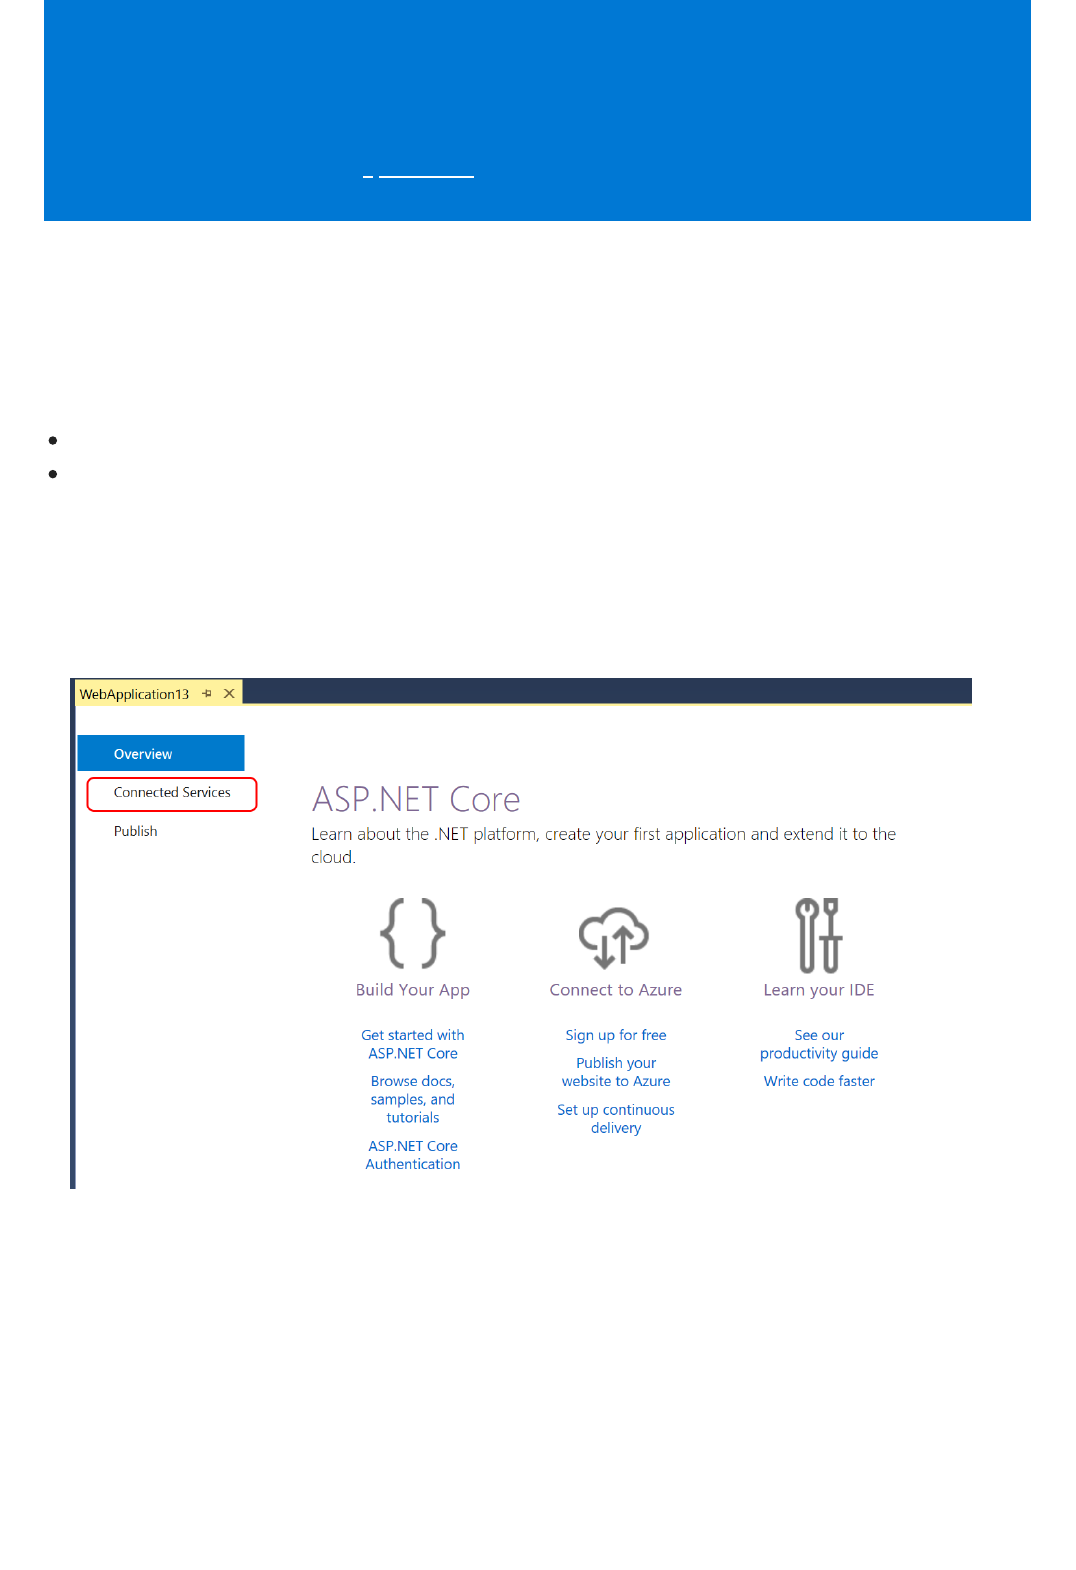
Use Connected Services in Visual Studio to connect
to the Computer Vision API
5/16/2019 • 5 minutes to read • Edit Online
Prerequisites
Install the Cognitive Services VSIX Extension
This article and its companion articles provide details for using the Visual Studio Connected Service feature for
Cognitive Services Computer Vision API. The capability is available in both Visual Studio 2017 15.7 or later, with
the Cognitive Services extension installed.
An Azure subscription. If you do not have one, you can sign up for a free account.
Visual Studio 2017 version 15.7 or later with the Web Development workload installed. Download it now.
1. With your web project open in Visual Studio, choose the Connected Services tab. The tab is available on
the welcome page that appears when you open a new project. If you don't see the tab, select Connected
Services in your project in Solution Explorer.
2. Scroll down to the bottom of the list of services, and select Find more services.
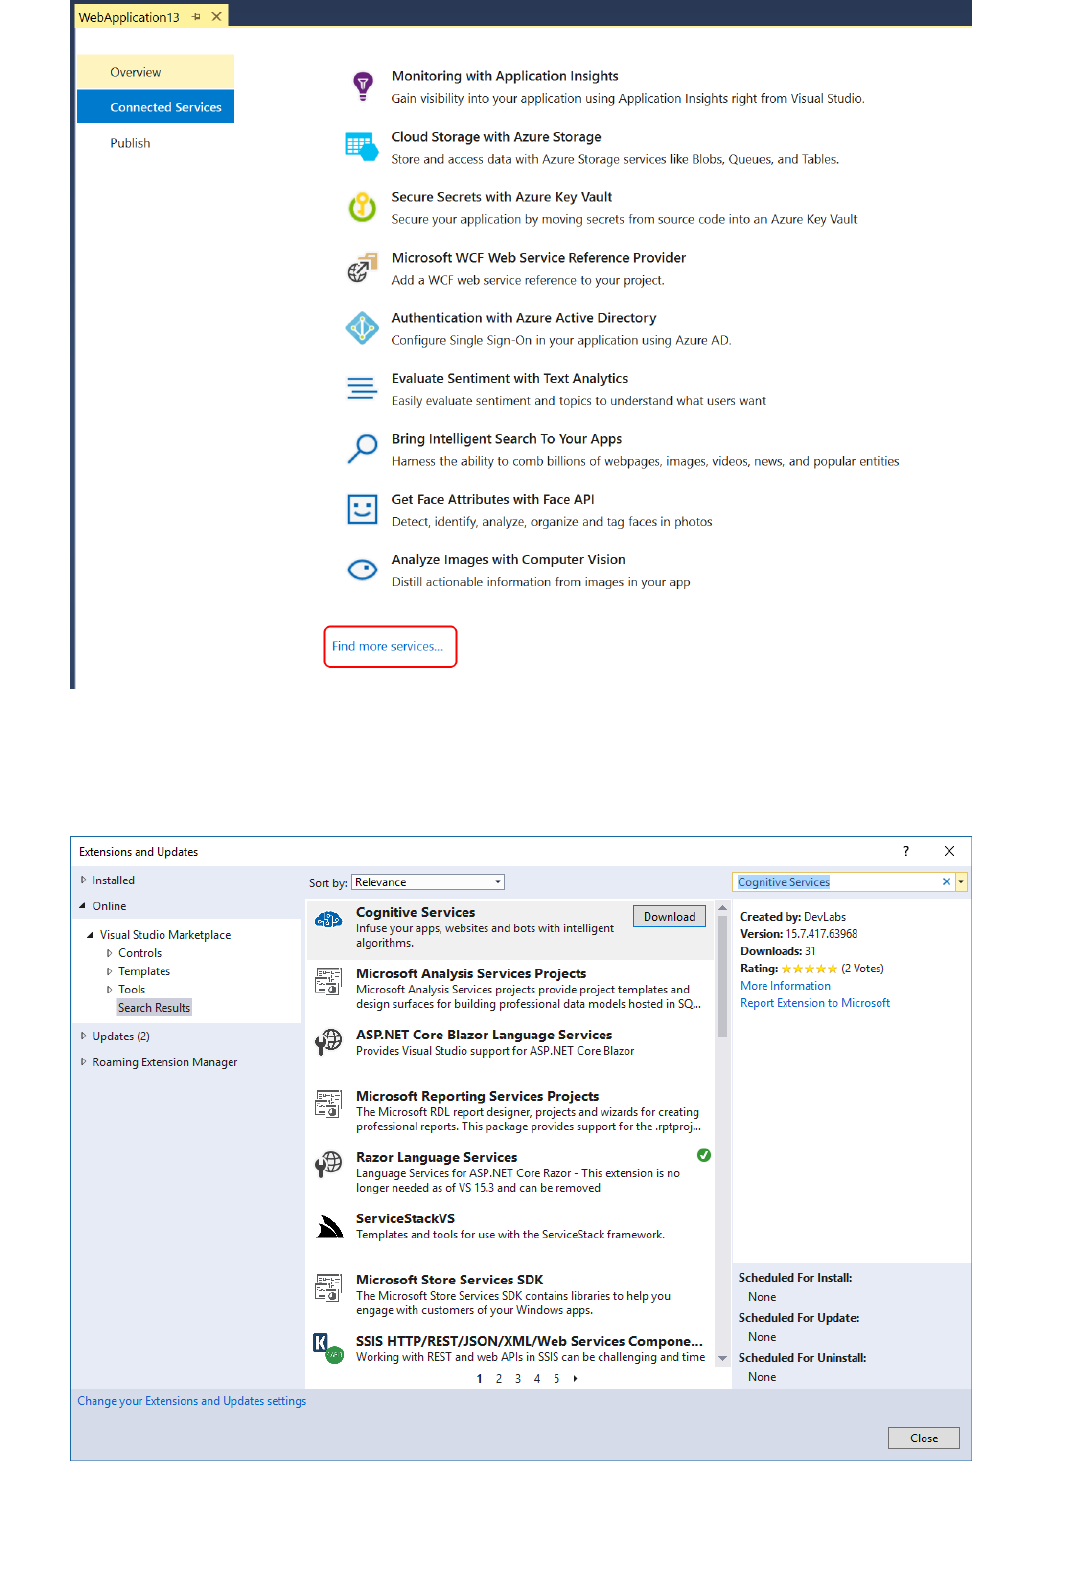
The Extensions and Updates dialog box appears.
3. In the Extensions and Updates dialog box, search for Cognitive Services, and then download and install
the Cognitive Services VSIX package.
Installing an extension requires a restart of the integrated development environment (IDE).
4. Restart Visual Studio. The extension installs when you close Visual Studio, and is available next time you
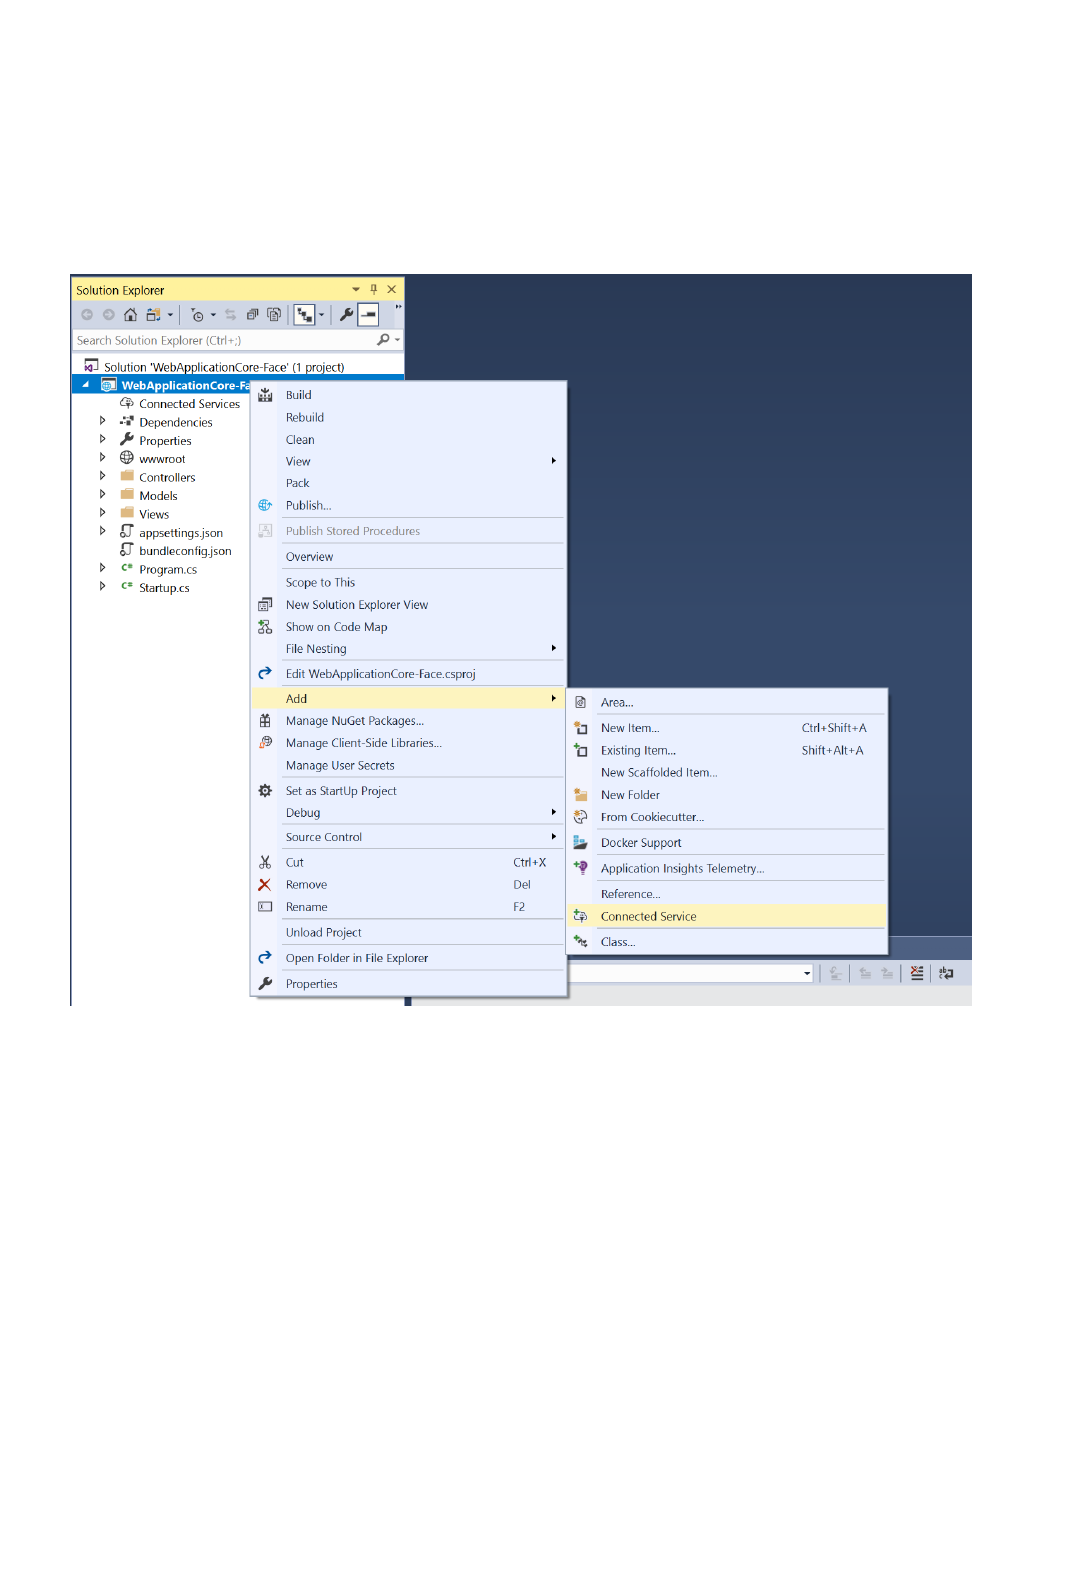
Add support to your project for Cognitive Services Computer Vision
API
launch the IDE.
1. Create a new ASP.NET Core web project. Use the Empty project template.
2. In Solution Explorer, choose Add > Connected Service. The Connected Service page appears with
services you can add to your project.
3. In the menu of available services, choose Cognitive Services Computer Vision API.
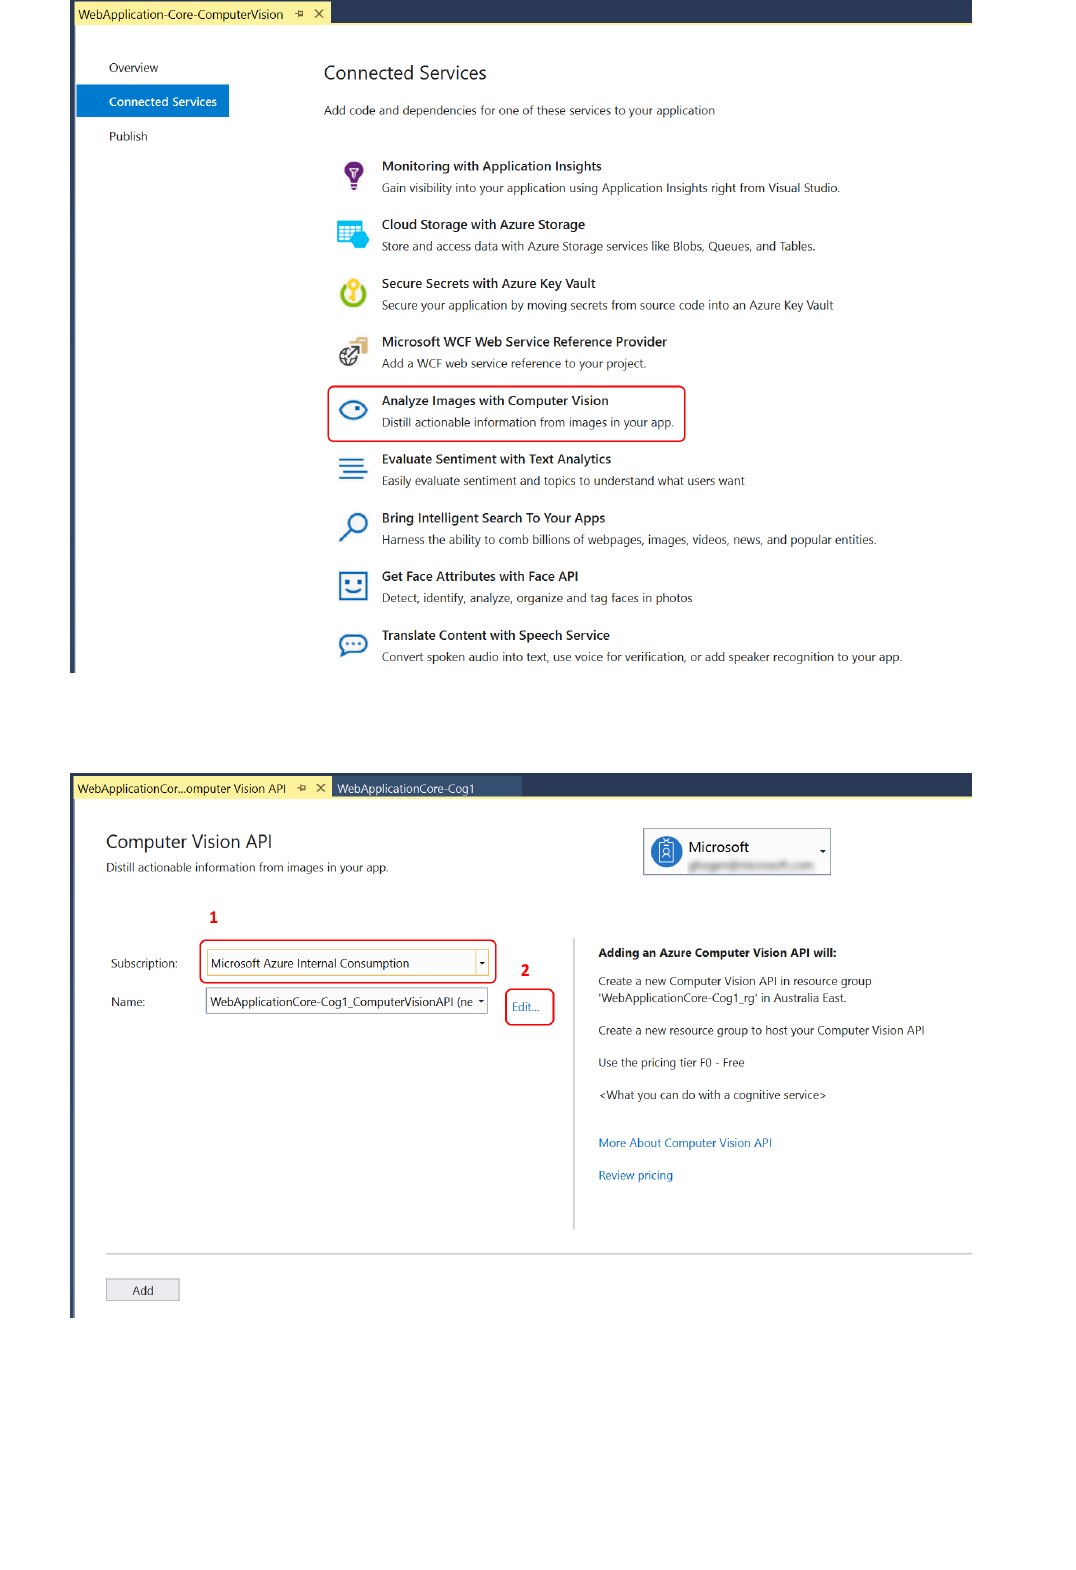
If you've signed into Visual Studio, and have an Azure subscription associated with your account, a page
appears with a dropdown list with your subscriptions.
4. Select the subscription you want to use, and then choose a name for the Computer Vision API, or choose
the Edit link to modify the automatically generated name, choose the resource group, and the Pricing Tier.
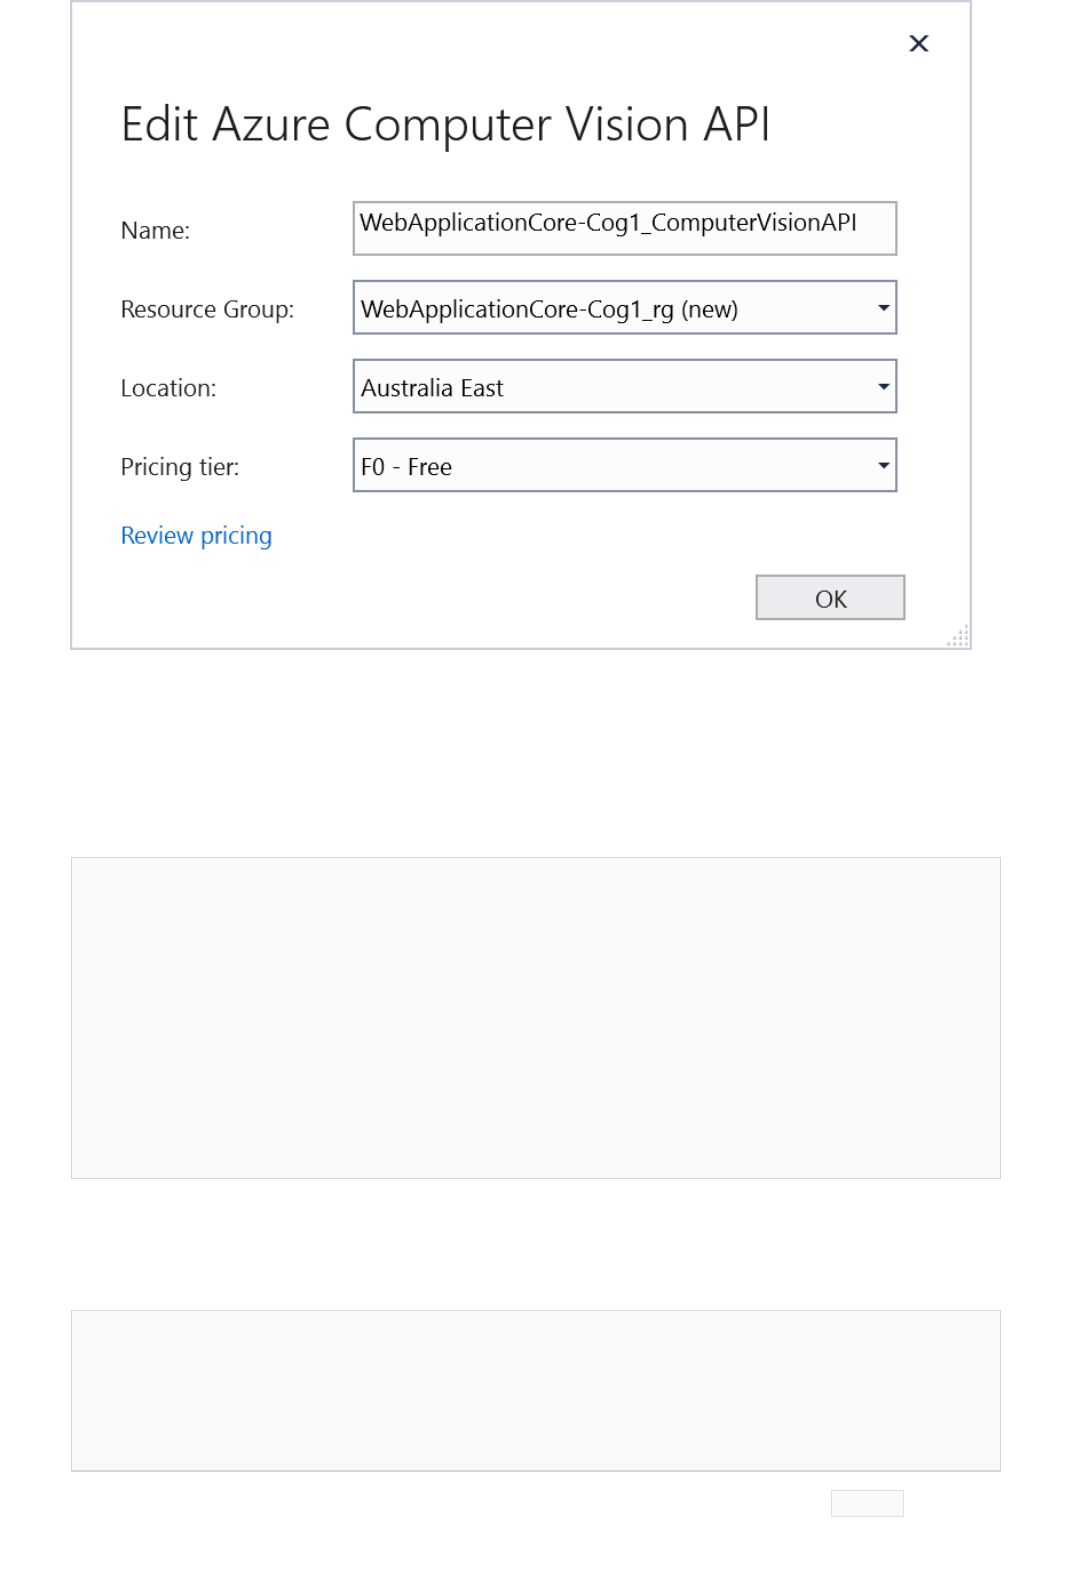
Use the Computer Vision API to detect attributes of an image
[4/26/2018 5:15:31.664 PM] Adding Computer Vision API to the project.
[4/26/2018 5:15:32.084 PM] Creating new ComputerVision...
[4/26/2018 5:15:32.153 PM] Creating new Resource Group...
[4/26/2018 5:15:40.286 PM] Installing NuGet package
'Microsoft.Azure.CognitiveServices.Vision.ComputerVision' version 2.1.0.
[4/26/2018 5:15:44.117 PM] Retrieving keys...
[4/26/2018 5:15:45.602 PM] Changing appsettings.json setting: ComputerVisionAPI_ServiceKey=<service key>
[4/26/2018 5:15:45.606 PM] Changing appsettings.json setting:
ComputerVisionAPI_ServiceEndPoint=https://australiaeast.api.cognitive.microsoft.com/vision/v2.0
[4/26/2018 5:15:45.609 PM] Changing appsettings.json setting: ComputerVisionAPI_Name=WebApplication-
Core-ComputerVision_ComputerVisionAPI
[4/26/2018 5:15:46.747 PM] Successfully added Computer Vision API to the project.
Follow the link for details on the pricing tiers.
5. Choose Add to add supported for the Connected Service. Visual Studio modifies your project to add the
NuGet packages, configuration file entries, and other changes to support a connection the Computer Vision
API. The Output Window shows the log of what is happening to your project. You should see something like
the following:
using System.IO;
using System.Text;
using Microsoft.Extensions.Configuration;
using System.Net.Http;
using System.Net.Http.Headers;
1. Add the following using statements in Startup.cs.
2. Add a configuration field, and add a constructor that initializes the configuration field in the Startup class to
enable configuration in your program.
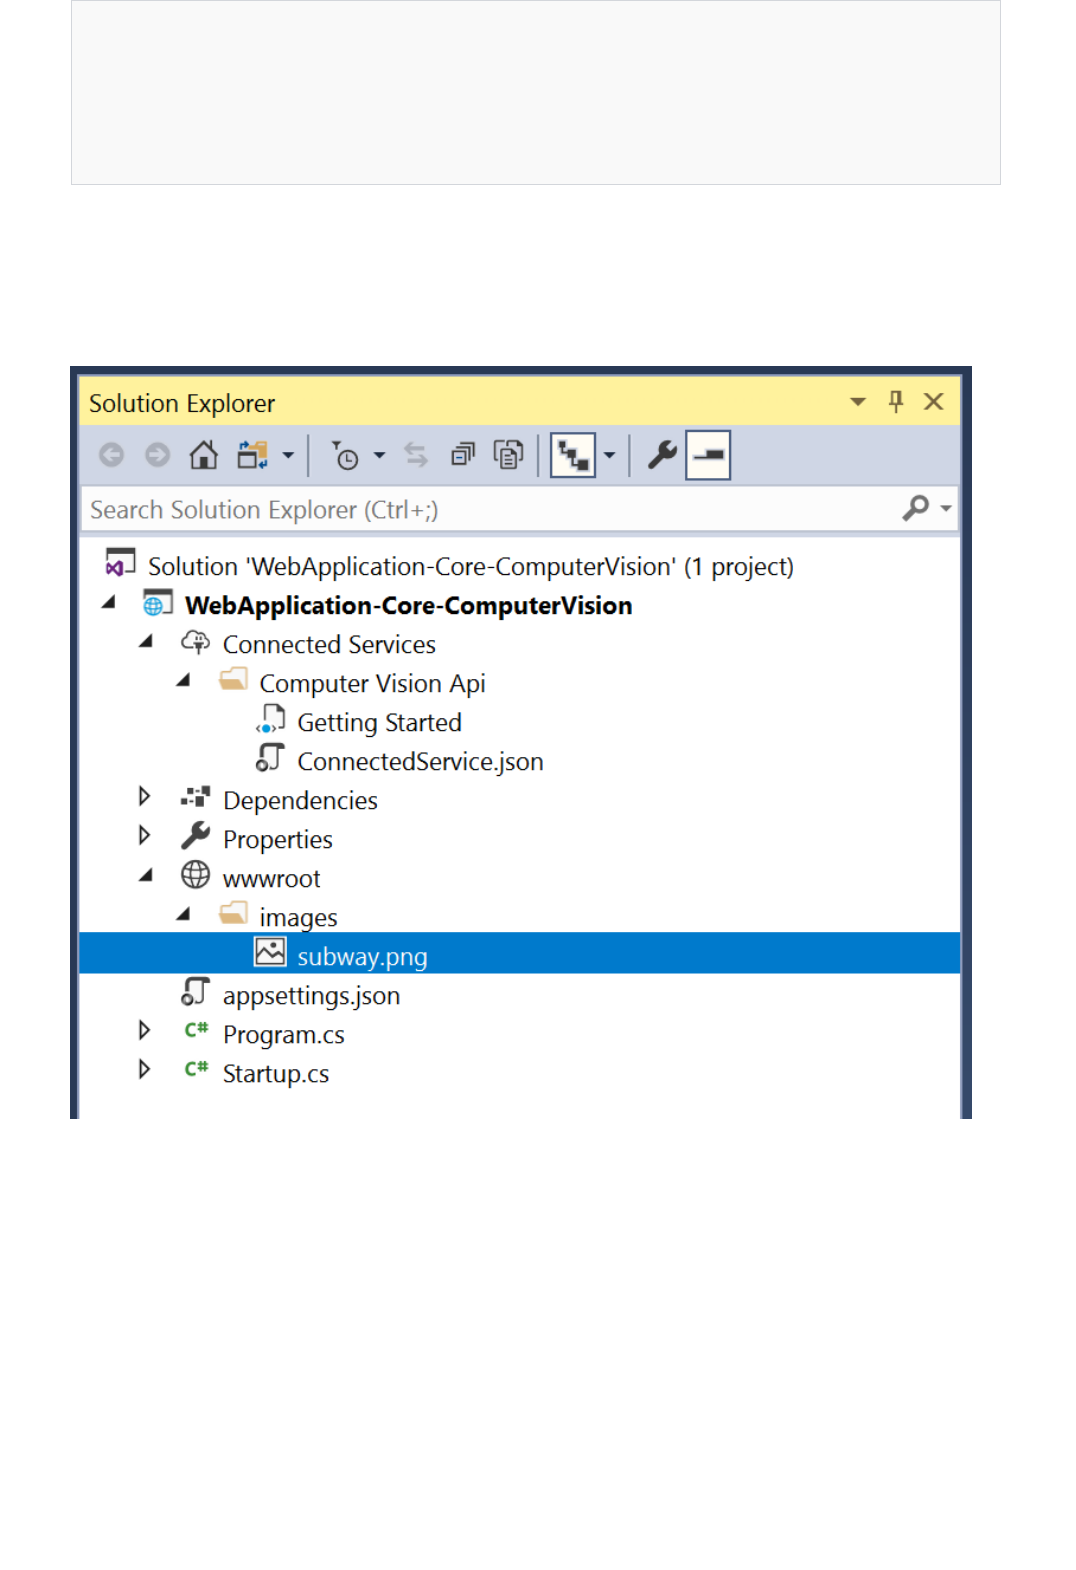
private IConfiguration configuration;
public Startup(IConfiguration configuration)
{
this.configuration = configuration;
}
3. In the wwwroot folder in your project, add an images folder, and add an image file to your wwwroot folder.
As an example, you can use one of the images on this Computer Vision API page. Right-click on one of the
images, save to your local hard drive, then in Solution Explorer, right-click on the images folder, and choose
Add > Existing Item to add it to your project. Your project should look something like this in Solution
Explorer:
4. Right-click on the image file, choose Properties, and then choose Copy if newer.
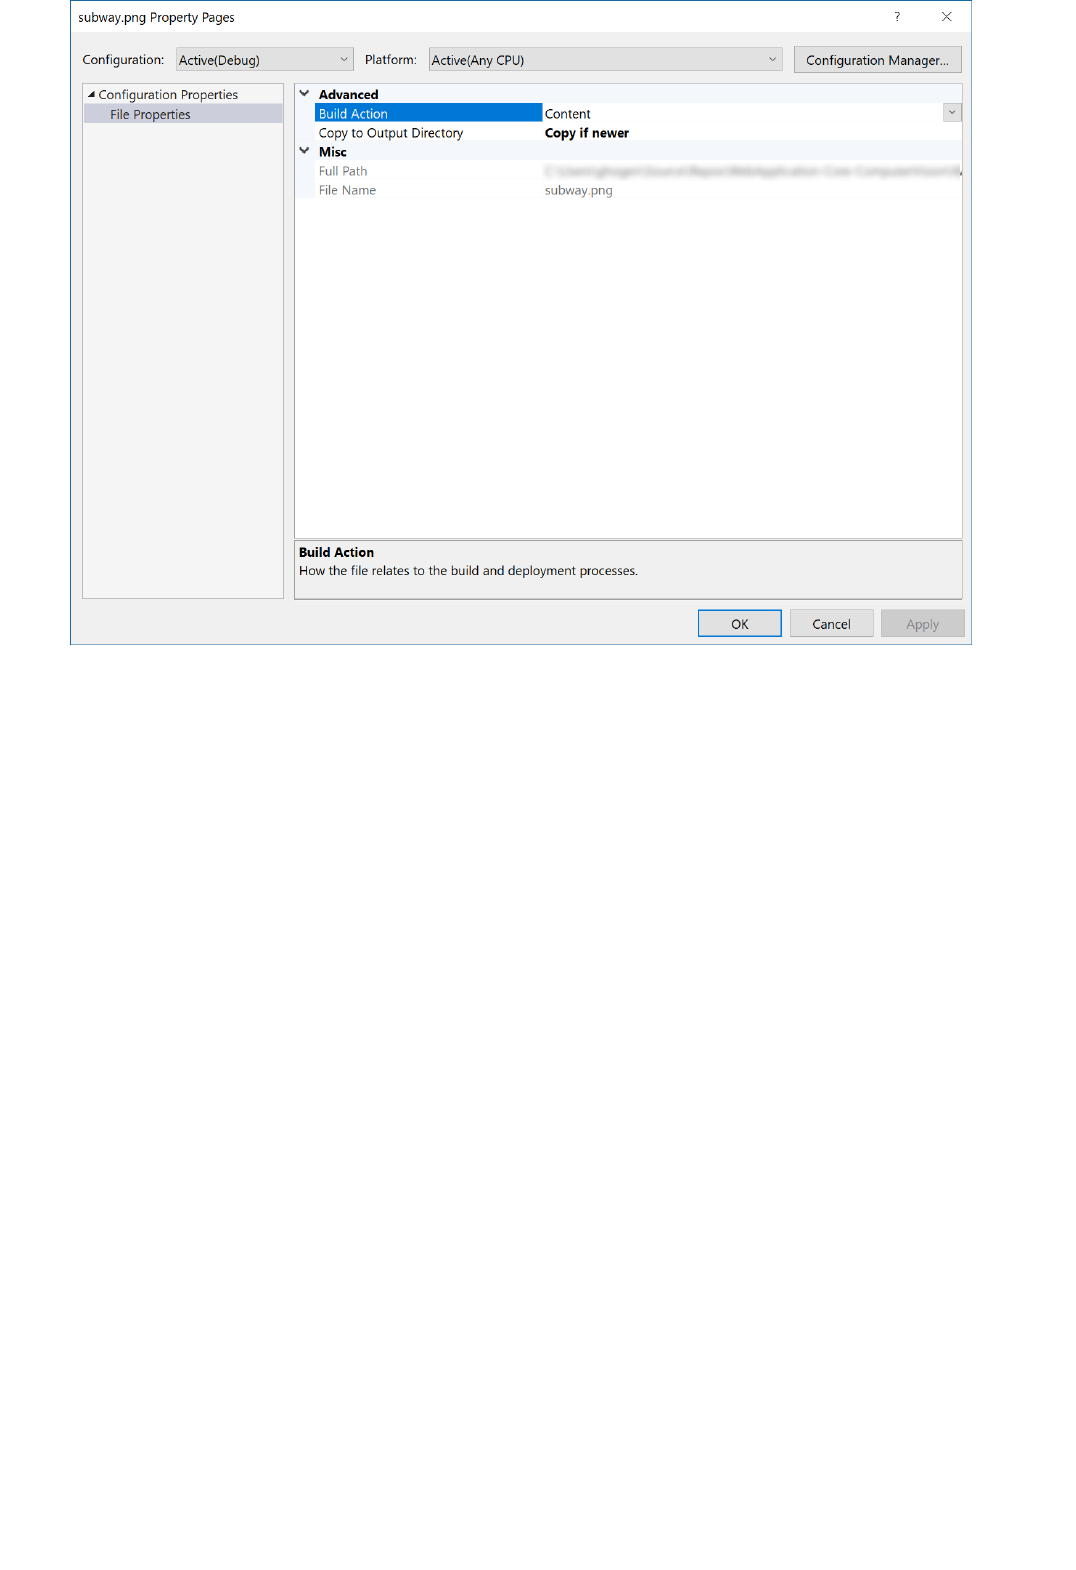
5. Replace the Configure method with the following code to access the Computer Vision API and test an
image.
// This method gets called by the runtime. Use this method to configure the HTTP request pipeline.
public void Configure(IApplicationBuilder app, IHostingEnvironment env)
{
// TODO: Change this to your image's path on your site.
string imagePath = @"images/subway.png";
// Enable static files such as image files.
app.UseStaticFiles();
string visionApiKey = this.configuration["ComputerVisionAPI_ServiceKey"];
string visionApiEndPoint = this.configuration["ComputerVisionAPI_ServiceEndPoint"];
HttpClient client = new HttpClient();
// Request headers.
client.DefaultRequestHeaders.Add("Ocp-Apim-Subscription-Key", visionApiKey);
// Request parameters. A third optional parameter is "details".
string requestParameters = "visualFeatures=Categories,Description,Color&language=en";
// Assemble the URI for the REST API Call.
string uri = visionApiEndPoint + "/analyze" + "?" + requestParameters;
HttpResponseMessage response;
// Request body. Posts an image you've added to your site's images folder.
var fileInfo = env.WebRootFileProvider.GetFileInfo(imagePath);
byte[] byteData = GetImageAsByteArray(fileInfo.PhysicalPath);
string contentString = string.Empty;
using (ByteArrayContent content = new ByteArrayContent(byteData))
{
// This example uses content type "application/octet-stream".
// The other content types you can use are "application/json" and "multipart/form-data".
content.Headers.ContentType = new MediaTypeHeaderValue("application/octet-stream");
// Execute the REST API call.
response = client.PostAsync(uri, content).Result;
// Get the JSON response.
contentString = response.Content.ReadAsStringAsync().Result;
}
if (env.IsDevelopment())
{
app.UseDeveloperExceptionPage();
}
app.Run(async (context) =>
{
await context.Response.WriteAsync("<h1>Cognitive Services Demo</h1>");
await context.Response.WriteAsync($"<p><b>Test Image:</b></p>");
await context.Response.WriteAsync($"<div><img src=\"" + imagePath + "\" /></div>");
await context.Response.WriteAsync($"<p><b>Computer Vision API results:</b></p>");
await context.Response.WriteAsync("<p>");
await context.Response.WriteAsync(JsonPrettyPrint(contentString));
await context.Response.WriteAsync("<p>");
});
}
/// <summary>
The code here constructs a HTTP request with the URI and the image as binary content for a call to the
Computer Vision REST API.
6. Add the helper functions GetImageAsByteArray and JsonPrettyPrint.

/// <summary>
/// Returns the contents of the specified file as a byte array.
/// </summary>
/// <param name="imageFilePath">The image file to read.</param>
/// <returns>The byte array of the image data.</returns>
static byte[] GetImageAsByteArray(string imageFilePath)
{
FileStream fileStream = new FileStream(imageFilePath, FileMode.Open, FileAccess.Read);
BinaryReader binaryReader = new BinaryReader(fileStream);
return binaryReader.ReadBytes((int)fileStream.Length);
}
/// <summary>
/// Formats the given JSON string by adding line breaks and indents.
/// </summary>
/// <param name="json">The raw JSON string to format.</param>
/// <returns>The formatted JSON string.</returns>
static string JsonPrettyPrint(string json)
{
if (string.IsNullOrEmpty(json))
return string.Empty;
json = json.Replace(Environment.NewLine, "").Replace("\t", "");
string INDENT_STRING = " ";
var indent = 0;
var quoted = false;
var sb = new StringBuilder();
for (var i = 0; i < json.Length; i++)
{
var ch = json[i];
switch (ch)
{
case '{':
case '[':
sb.Append(ch);
if (!quoted)
{
sb.AppendLine();
}
break;
case '}':
case ']':
if (!quoted)
{
sb.AppendLine();
}
sb.Append(ch);
break;
case '"':
sb.Append(ch);
bool escaped = false;
var index = i;
while (index > 0 && json[--index] == '\\')
escaped = !escaped;
if (!escaped)
quoted = !quoted;
break;
case ',':
sb.Append(ch);
if (!quoted)
{
sb.AppendLine();
}
break;
case ':':
sb.Append(ch);
if (!quoted)
sb.Append(" ");
break;
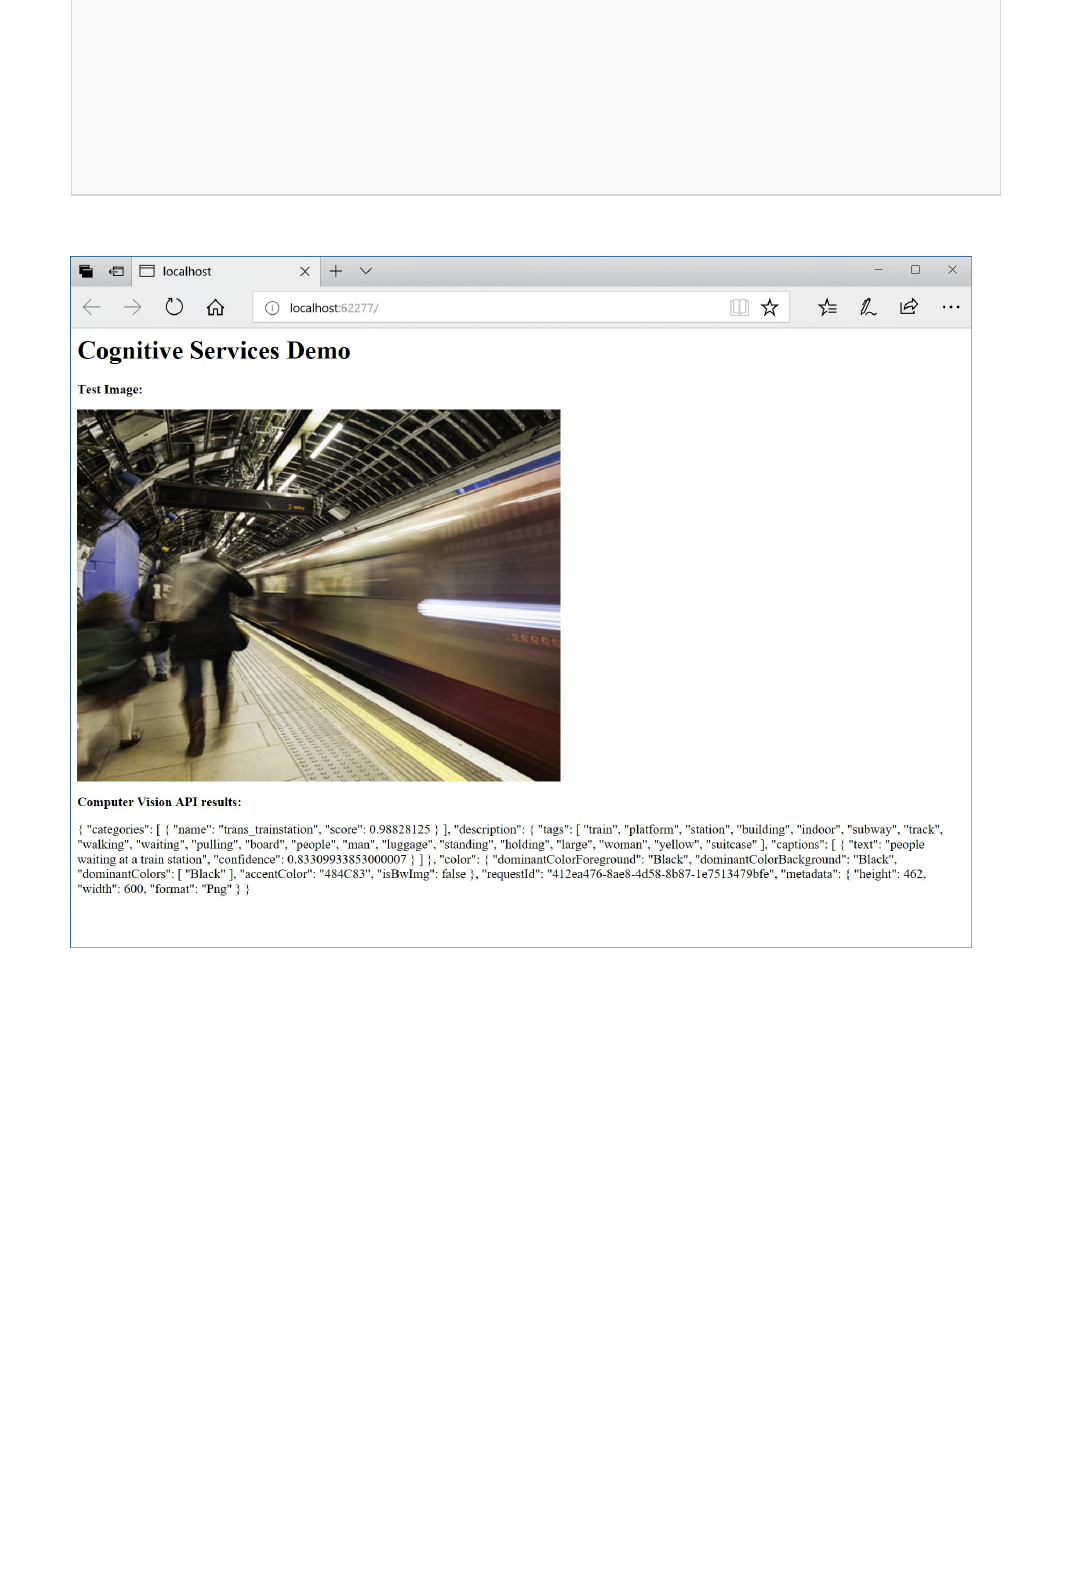
Clean up resources
Next steps
break;
default:
sb.Append(ch);
break;
}
}
return sb.ToString();
}
7. Run the web application and see what Computer Vision API found in your image.
When no longer needed, delete the resource group. This deletes the cognitive service and related resources. To
delete the resource group through the portal:
1. Enter the name of your resource group in the Search box at the top of the portal. When you see the resource
group used in this quickstart in the search results, select it.
2. Select Delete resource group.
3. In the TYPE THE RESOURCE GROUP NAME: box type in the name of the resource group and select Delete.
Learn more about the Computer Vision API by reading the Computer Vision API documentation.
How to analyze videos in real time
4/19/2019 • 6 minutes to read • Edit Online
The Approach
A Simple ApproachA Simple Approach
while (true)
{
Frame f = GrabFrame();
if (ShouldAnalyze(f))
{
AnalysisResult r = await Analyze(f);
ConsumeResult(r);
}
}
Parallelizing API CallsParallelizing API Calls
This guide will demonstrate how to perform near-real-time analysis on frames taken from a live video stream. The
basic components in such a system are:
Acquire frames from a video source
Select which frames to analyze
Submit these frames to the API
Consume each analysis result that is returned from the API call
These samples are written in C# and the code can be found on GitHub here:
https://github.com/Microsoft/Cognitive-Samples-VideoFrameAnalysis.
There are multiple ways to solve the problem of running near-real-time analysis on video streams. We will start by
outlining three approaches in increasing levels of sophistication.
The simplest design for a near-real-time analysis system is an infinite loop, where in each iteration we grab a frame,
analyze it, and then consume the result:
If our analysis consisted of a lightweight client-side algorithm, this approach would be suitable. However, when our
analysis is happening in the cloud, the latency involved means that an API call might take several seconds, during
which time we are not capturing images, and our thread is essentially doing nothing. Our maximum frame-rate is
limited by the latency of the API calls.
While a simple single-threaded loop makes sense for a lightweight client-side algorithm, it doesn't fit well with the
latency involved in cloud API calls. The solution to this problem is to allow the long-running API calls to execute in
parallel with the frame-grabbing. In C#, we could achieve this using Task-based parallelism, for example:
while (true)
{
Frame f = GrabFrame();
if (ShouldAnalyze(f))
{
var t = Task.Run(async () =>
{
AnalysisResult r = await Analyze(f);
ConsumeResult(r);
}
}
}
A Producer-Consumer DesignA Producer-Consumer Design
// Queue that will contain the API call tasks.
var taskQueue = new BlockingCollection<Task<ResultWrapper>>();
// Producer thread.
while (true)
{
// Grab a frame.
Frame f = GrabFrame();
// Decide whether to analyze the frame.
if (ShouldAnalyze(f))
{
// Start a task that will run in parallel with this thread.
var analysisTask = Task.Run(async () =>
{
// Put the frame, and the result/exception into a wrapper object.
var output = new ResultWrapper(f);
try
{
output.Analysis = await Analyze(f);
}
catch (Exception e)
{
output.Exception = e;
}
return output;
}
// Push the task onto the queue.
taskQueue.Add(analysisTask);
}
}
This approach launches each analysis in a separate Task, which can run in the background while we continue
grabbing new frames. It avoids blocking the main thread while waiting for an API call to return, however we have
lost some of the guarantees that the simple version provided -- multiple API calls might occur in parallel, and the
results might get returned in the wrong order. This approach could also cause multiple threads to enter
the ConsumeResult() function simultaneously, which could be dangerous, if the function is not thread-safe. Finally,
this simple code does not keep track of the Tasks that get created, so exceptions will silently disappear. Thus, the
final ingredient for us to add is a "consumer" thread that will track the analysis tasks, raise exceptions, kill long-
running tasks, and ensure the results get consumed in the correct order, one at a time.
In our final "producer-consumer" system, we have a producer thread that looks similar to our previous infinite loop.
However, instead of consuming analysis results as soon as they are available, the producer simply puts the tasks
into a queue to keep track of them.
We also have a consumer thread, that is taking tasks off the queue, waiting for them to finish, and either displaying
// Consumer thread.
while (true)
{
// Get the oldest task.
Task<ResultWrapper> analysisTask = taskQueue.Take();
// Await until the task is completed.
var output = await analysisTask;
// Consume the exception or result.
if (output.Exception != null)
{
throw output.Exception;
}
else
{
ConsumeResult(output.Analysis);
}
}
Implementing the Solution
Getting StartedGetting Started
the result or raising the exception that was thrown. By using the queue, we can guarantee that results get consumed
one at a time, in the correct order, without limiting the maximum frame-rate of the system.
To get your app up and running as quickly as possible, we have implemented the system described above,
intending it to be flexible enough to implement many scenarios, while being easy to use. To access the code, go to
https://github.com/Microsoft/Cognitive-Samples-VideoFrameAnalysis.
The library contains the class FrameGrabber, which implements the producer-consumer system discussed above to
process video frames from a webcam. The user can specify the exact form of the API call, and the class uses events
to let the calling code know when a new frame is acquired, or a new analysis result is available.
To illustrate some of the possibilities, there are two sample apps that use the library. The first is a simple console
app, and a simplified version of this is reproduced below. It grabs frames from the default webcam, and submits
them to the Face API for face detection.
using System;
using VideoFrameAnalyzer;
using Microsoft.ProjectOxford.Face;
using Microsoft.ProjectOxford.Face.Contract;
namespace VideoFrameConsoleApplication
{
class Program
{
static void Main(string[] args)
{
// Create grabber, with analysis type Face[].
FrameGrabber<Face[]> grabber = new FrameGrabber<Face[]>();
// Create Face API Client. Insert your Face API key here.
FaceServiceClient faceClient = new FaceServiceClient("<subscription key>");
// Set up our Face API call.
grabber.AnalysisFunction = async frame => return await
faceClient.DetectAsync(frame.Image.ToMemoryStream(".jpg"));
// Set up a listener for when we receive a new result from an API call.
grabber.NewResultAvailable += (s, e) =>
{
if (e.Analysis != null)
Console.WriteLine("New result received for frame acquired at {0}. {1} faces detected",
e.Frame.Metadata.Timestamp, e.Analysis.Length);
};
// Tell grabber to call the Face API every 3 seconds.
grabber.TriggerAnalysisOnInterval(TimeSpan.FromMilliseconds(3000));
// Start running.
grabber.StartProcessingCameraAsync().Wait();
// Wait for keypress to stop
Console.WriteLine("Press any key to stop...");
Console.ReadKey();
// Stop, blocking until done.
grabber.StopProcessingAsync().Wait();
}
}
}
The second sample app is a bit more interesting, and allows you to choose which API to call on the video frames.
On the left-hand side, the app shows a preview of the live video, on the right-hand side it shows the most recent
API result overlaid on the corresponding frame.
In most modes, there will be a visible delay between the live video on the left, and the visualized analysis on the
right. This delay is the time taken to make the API call. The exception to this is in the
"EmotionsWithClientFaceDetect" mode, which performs face detection locally on the client computer
using OpenCV, before submitting any images to Cognitive Services. By doing this, we can visualize the detected
face immediately, and then update the emotions later once the API call returns. This demonstrates the possibility of
a "hybrid" approach, where some simple processing can be performed on the client, and then Cognitive Services
APIs can be used to augment this with more advanced analysis when necessary.
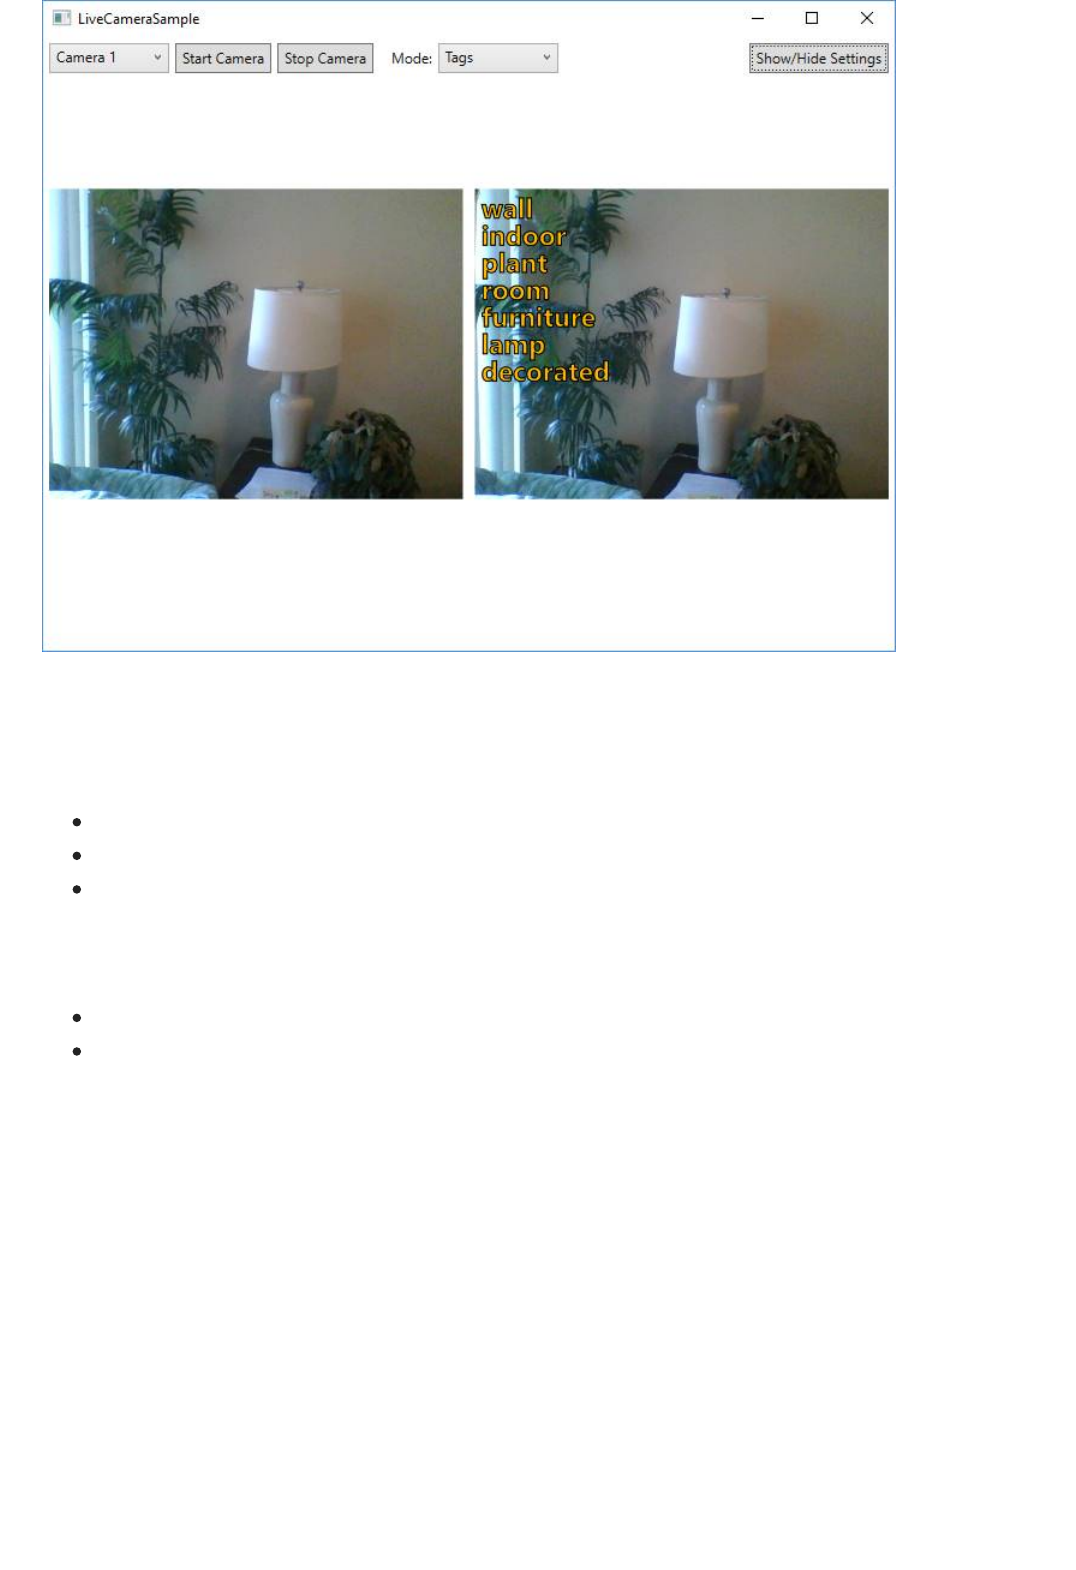
Integrating into your codebaseIntegrating into your codebase
Summary
To get started with this sample, follow these steps:
1. Get API keys for the Vision APIs from Subscriptions. For video frame analysis, the applicable APIs are:
Computer Vision API
Emotion API
Face API
2. Clone the Cognitive-Samples-VideoFrameAnalysis GitHub repo
3. Open the sample in Visual Studio 2015, build and run the sample applications:
For BasicConsoleSample, the Face API key is hard-coded directly in BasicConsoleSample/Program.cs.
For LiveCameraSample, the keys should be entered into the Settings pane of the app. They will be
persisted across sessions as user data.
When you're ready to integrate, simply reference the VideoFrameAnalyzer library from your own projects.
The image, voice, video or text understanding capabilities of VideoFrameAnalyzer uses Azure Cognitive Services.
Microsoft will receive the images, audio, video, and other data that you upload (via this app) and may use them for
service improvement purposes. We ask for your help in protecting the people whose data your app sends to Azure
Cognitive Services.
In this guide, you learned how to run near-real-time analysis on live video streams using the Face, Computer
Vision, and Emotion APIs, and how you can use our sample code to get started. You can get started building your
app with free API keys at the Azure Cognitive Services sign-up page.
Please feel free to provide feedback and suggestions in the GitHub repository, or for more broad API feedback, on
our UserVoice site.
Sample: Explore an image processing app with C#
4/19/2019 • 18 minutes to read • Edit Online
Prerequisites
Get the sample app
git clone --recurse-submodules https://github.com/Microsoft/Cognitive-Vision-Windows.git
IMPORTANTIMPORTANT
Get optional sample imagesGet optional sample images
Explore a basic Windows application that uses Computer Vision to perform optical character recognition (OCR),
create smart-cropped thumbnails, plus detect, categorize, tag and describe visual features, including faces, in an
image. The below example lets you submit an image URL or a locally stored file. You can use this open source
example as a template for building your own app for Windows using the Computer Vision API and Windows
Presentation Foundation (WPF), a part of .NET Framework.
Get the sample app from GitHub
Open and build the sample app in Visual Studio
Run the sample app and interact with it to perform various scenarios
Explore the various scenarios included with the sample app
Before exploring the sample app, ensure that you've met the following prerequisites:
You must have Visual Studio 2015 or later.
You must have a subscription key for Computer Vision. You can get a free trial key from Try Cognitive Services.
Or, follow the instructions in Create a Cognitive Services account to subscribe to Computer Vision and get your
key.
The Computer Vision sample app is available on GitHub from the Microsoft/Cognitive-Vision-Windows repository.
This repository also includes the Microsoft/Cognitive-Common-Windows repository as a Git submodule. You can
recursively clone this repository, including the submodule, either by using the git clone --recurse-submodules
command from the command line, or by using GitHub Desktop.
For example, to recursively clone the repository for the Computer Vision sample app from a command prompt, run
the following command:
Do not download this repository as a ZIP. Git doesn't include submodules when downloading a repository as a ZIP.
You can optionally use the sample images included with the Face sample app, available on GitHub from the
Microsoft/Cognitive-Face-Windows repository. That sample app includes a folder, /Data , which contains multiple
images of people. You can recursively clone this repository, as well, by the methods described for the Computer
Vision sample app.
For example, to recursively clone the repository for the Face sample app from a command prompt, run the
following command:
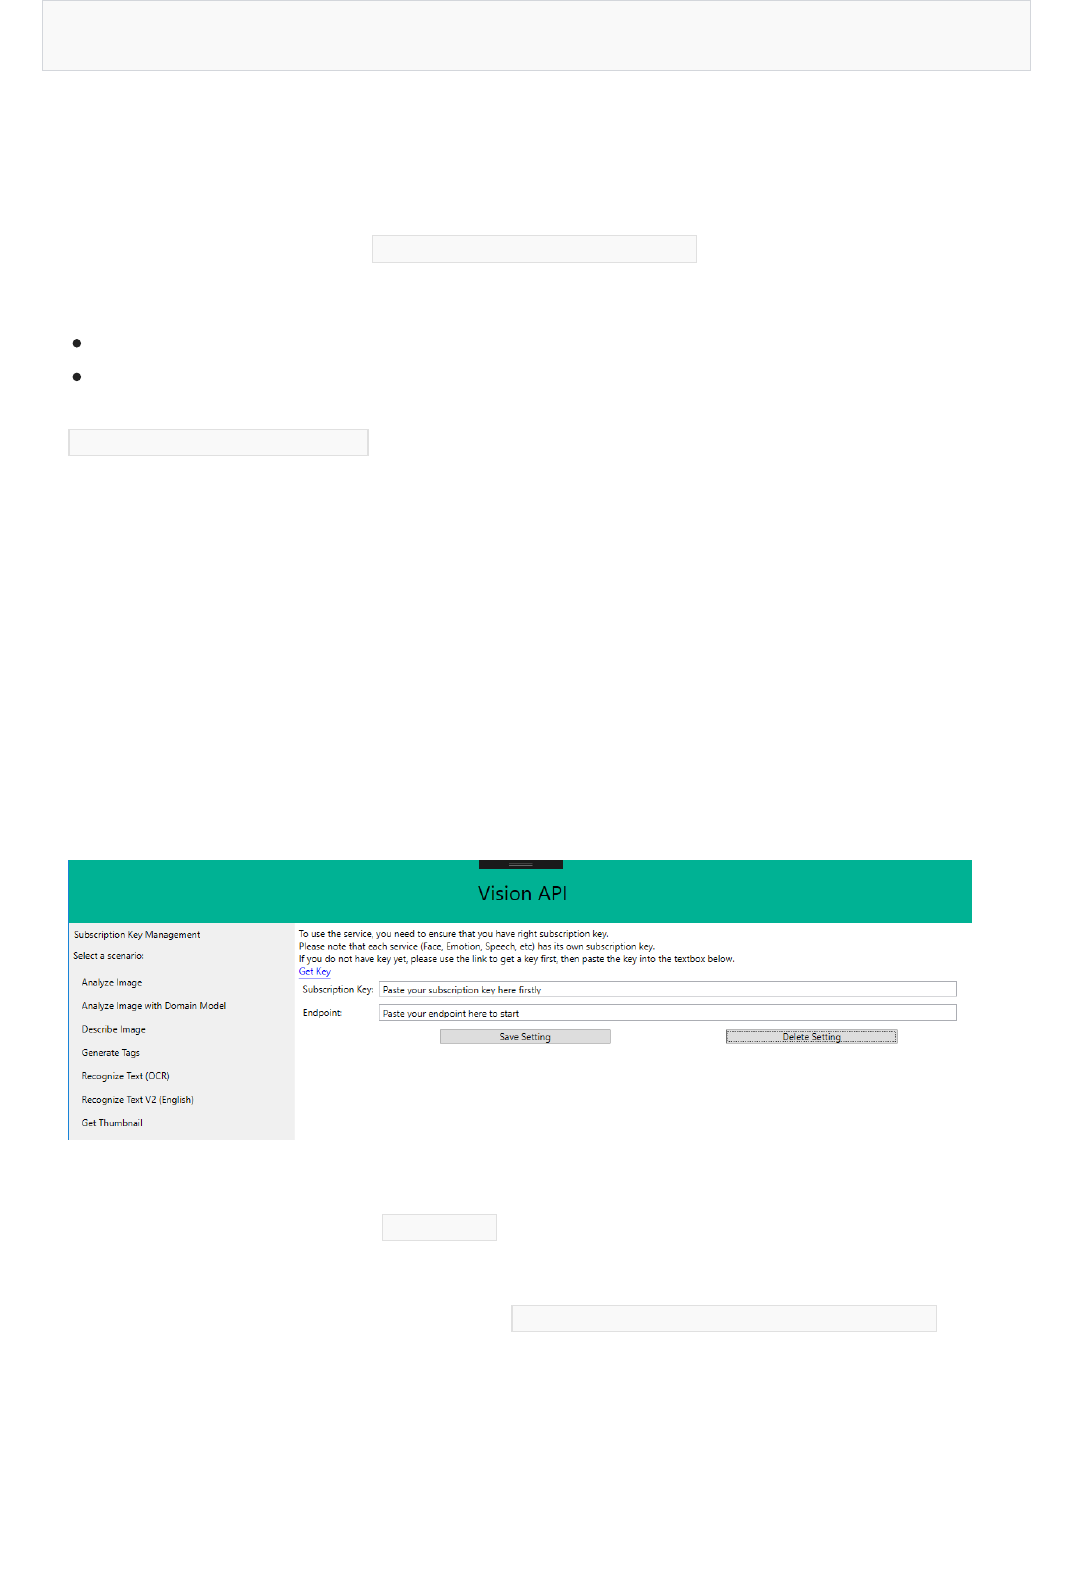
git clone --recurse-submodules https://github.com/Microsoft/Cognitive-Face-Windows.git
Open and build the sample app in Visual Studio
Run and interact with the sample app
You must build the sample app first, so that Visual Studio can resolve dependencies, before you can run or explore
the sample app. To open and build the sample app, do the following steps:
1. Open the Visual Studio solution file, /Sample-WPF/VisionAPI-WPF-Samples.sln , in Visual Studio.
2. Ensure that the Visual Studio solution contains two projects:
SampleUserControlLibrary
VisionAPI-WPF-Samples
If the SampleUserControlLibrary project is unavailable, confirm that you've recursively cloned the
Microsoft/Cognitive-Vision-Windows repository.
3. In Visual Studio, either press Ctrl+Shift+B or choose Build from the ribbon menu and then choose Build
Solution to build the solution.
You can run the sample app, to see how it interacts with you and with the Computer Vision client library when
performing various tasks, such as generating thumbnails or tagging images. To run and interact with the sample
app, do the following steps:
1. After the build is complete, either press F5 or choose Debug from the ribbon menu and then choose Start
debugging to run the sample app.
2. When the sample app is displayed, choose Subscription Key Management from the navigation pane to
display the Subscription Key Management page.
3. Enter your subscription key in Subscription Key.
4. Enter the endpoint URL, omitting the /vision/v1.0 , of the Computer Vision resource for your subscription
key in Endpoint.
For example, if you're using the subscription key from the Computer Vision free trial, enter the following
endpoint URL for the West Central US Azure region: https://westcentralus.api.cognitive.microsoft.com
5. If you don't want to enter your subscription key and endpoint URL the next time you run the sample app,
choose Save Setting to save the subscription key and endpoint URL to your computer. If you want to delete
your previously-saved subscription key and endpoint URL, choose Delete Setting.
NOTENOTE
SCENARIO DESCRIPTION
Analyze Image Uses the Analyze Image operation to analyze a local or
remote image. You can choose the visual features and
language for the analysis, and see both the image and the
results.
Analyze Image with Domain Model Uses the List Domain Specific Models operation to list the
domain models from which you can select, and the
Recognize Domain Specific Content operation to analyze a
local or remote image using the selected domain model.
You can also choose the language for the analysis.
Describe Image Uses the Describe Image operation to create a human-
readable description of a local or remote image. You can
also choose the language for the description.
Generate Tags Uses the Tag Image operation to tag the visual features of
a local or remote image. You can also choose the language
used for the tags.
Recognize Text (OCR)Uses the OCR operation to recognize and extract printed
text from an image. You can either choose the language to
use, or let Computer Vision auto-detect the language.
Recognize Text V2 (English)Uses the Recognize Text and Get Recognize Text Operation
Result operations to asynchronously recognize and extract
printed or handwritten text from an image.
Get Thumbnail Uses the Get Thumbnail operation to generate a
thumbnail for a local or remote image.
The sample app uses isolated storage, and System.IO.IsolatedStorage , to store your subscription key and
endpoint URL.
6. Under Select a scenario in the navigation pane, select one of the scenarios currently included with the
sample app:
The following screenshot illustrates the page provided for the Analyze Image scenario, after analyzing a
sample image.
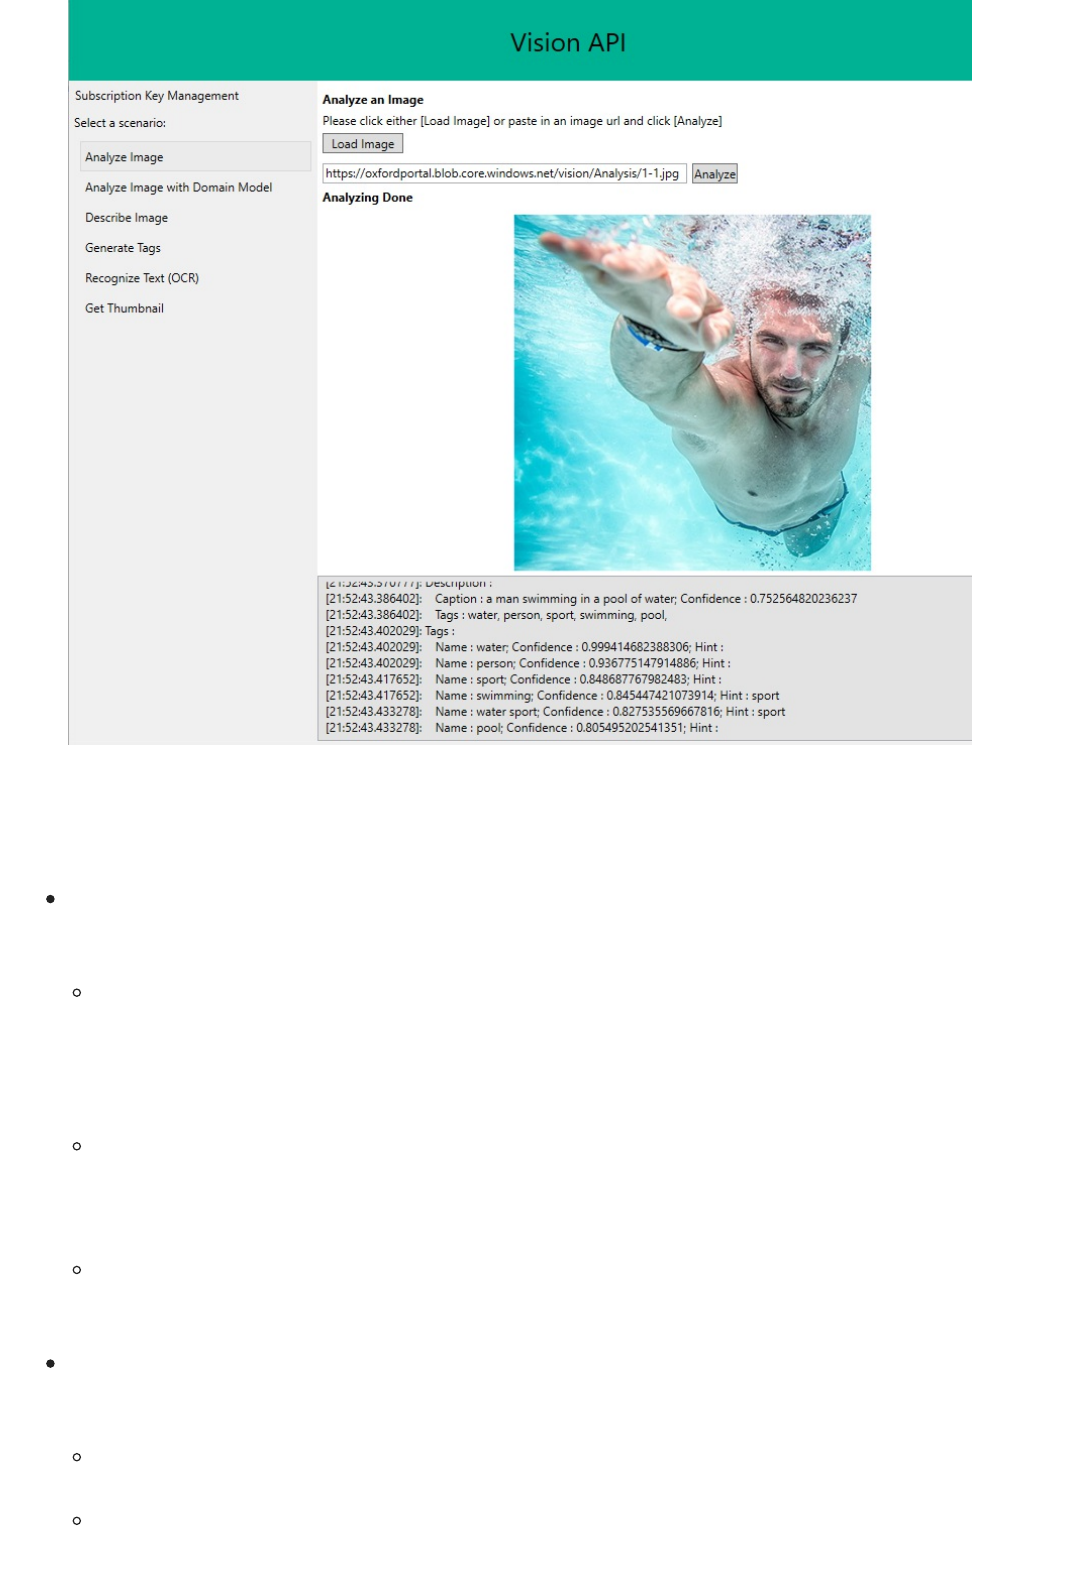
Explore the sample app
The Visual Studio solution for the Computer Vision sample app contains two projects:
SampleUserControlLibrary
The SampleUserControlLibrary project provides functionality shared by multiple Cognitive Services samples.
The project contains the following:
VisionAPI-WPF-Samples
The main project for the Computer Vision sample app, this project contains all of the interesting functionality for
Computer Vision. The project contains the following:
SampleScenarios
A UserControl that provides a standardized presentation, such as the title bar, navigation pane, and
content pane, for samples. The Computer Vision sample app uses this control in the MainWindow.xaml
window to display scenario pages and access information shared across scenarios, such as the
subscription key and endpoint URL.
SubscriptionKeyPage
A Page that provides a standardized layout for entering a subscription key and endpoint URL for the
sample app. The Computer Vision sample app uses this page to manage the subscription key and
endpoint URL used by the scenario pages.
VideoResultControl
A UserControl that provides a standardized presentation for video information. The Computer Vision
sample app doesn't use this control.
AnalyzeInDomainPage.xaml
The scenario page for the Analyze Image with Domain Model scenario.
AnalyzeImage.xaml
The scenario page for the Analyze Image scenario.
Explore the sample codeExplore the sample code
DescribePage.xaml
The scenario page for the Describe Image scenario.
ImageScenarioPage.cs
The ImageScenarioPage class, from which all of the scenario pages in the sample app are derived. This
class manages functionality, such as providing credentials and formatting output, shared by all of the
scenario pages.
MainWindow.xaml
The main window for the sample app, it uses the SampleScenarios control to present the
SubscriptionKeyPage and scenario pages.
OCRPage.xaml
The scenario page for the Recognize Text (OCR) scenario.
RecognizeLanguage.cs
The RecognizeLanguage class, which provides information about the languages supported by the various
methods in the sample app.
TagsPage.xaml
The scenario page for the Generate Tags scenario.
TextRecognitionPage.xaml
The scenario page for the Recognize Text V2 (English) scenario.
ThumbnailPage.xaml
The scenario page for the Get Thumbnail scenario.
Key portions of sample code are framed with comment blocks that start with KEY SAMPLE CODE STARTS HERE and end
with KEY SAMPLE CODE ENDS HERE , to make it easier for you to explore the sample app. These key portions of sample
code contain the code most relevant to learning how to use the Computer Vision API client library to do various
tasks. You can search for KEY SAMPLE CODE STARTS HERE in Visual Studio to move between the most relevant sections
of code in the Computer Vision sample app.
For example, the UploadAndAnalyzeImageAsync method, shown following and included in AnalyzePage.xaml,
demonstrates how to use the client library to analyze a local image by invoking the
ComputerVisionClient.AnalyzeImageInStreamAsync method.
private async Task<ImageAnalysis> UploadAndAnalyzeImageAsync(string imageFilePath)
{
// -----------------------------------------------------------------------
// KEY SAMPLE CODE STARTS HERE
// -----------------------------------------------------------------------
//
// Create Cognitive Services Vision API Service client.
//
using (var client = new ComputerVisionClient(Credentials) { Endpoint = Endpoint })
{
Log("ComputerVisionClient is created");
using (Stream imageFileStream = File.OpenRead(imageFilePath))
{
//
// Analyze the image for all visual features.
//
Log("Calling ComputerVisionClient.AnalyzeImageInStreamAsync()...");
VisualFeatureTypes[] visualFeatures = GetSelectedVisualFeatures();
string language = (_language.SelectedItem as RecognizeLanguage).ShortCode;
ImageAnalysis analysisResult = await client.AnalyzeImageInStreamAsync(imageFileStream,
visualFeatures, null, language);
return analysisResult;
}
}
// -----------------------------------------------------------------------
// KEY SAMPLE CODE ENDS HERE
// -----------------------------------------------------------------------
}
Explore the client libraryExplore the client library
// -----------------------------------------------------------------------
// KEY SAMPLE CODE STARTS HERE
// Use the following namespace for ComputerVisionClient.
// -----------------------------------------------------------------------
using Microsoft.Azure.CognitiveServices.Vision.ComputerVision;
using Microsoft.Azure.CognitiveServices.Vision.ComputerVision.Models;
// -----------------------------------------------------------------------
// KEY SAMPLE CODE ENDS HERE
// -----------------------------------------------------------------------
Explore the Analyze Image scenario
This sample app uses the Computer Vision API client library, a thin C# client wrapper for the Computer Vision API
in Azure Cognitive Services. The client library is available from NuGet in the
Microsoft.Azure.CognitiveServices.Vision.ComputerVision package. When you built the Visual Studio application,
you retrieved the client library from its corresponding NuGet package. You can also view the source code for the
client library in the /ClientLibrary folder of the Microsoft/Cognitive-Vision-Windows repository.
The client library's functionality centers around the ComputerVisionClient class, in the
Microsoft.Azure.CognitiveServices.Vision.ComputerVision namespace, while the models used by the
ComputerVisionClient class when interacting with Computer Vision are found in the
Microsoft.Azure.CognitiveServices.Vision.ComputerVision.Models namespace. In the various XAML scenario pages
included with the sample app, you'll find the following using directives for those namespaces:
You'll learn more about the various methods included with the ComputerVisionClient class as you explore the
scenarios included with the Computer Vision sample app.
Explore the Analyze Image with Domain Model scenario
This scenario is managed by the AnalyzePage.xaml page. You can choose the visual features and language for the
analysis, and see both the image and the results. The scenario page does this by using one of the following
methods, depending on the source of the image:
UploadAndAnalyzeImageAsync
This method is used for local images, in which the image must be encoded as a Stream and sent to Computer
Vision by calling the ComputerVisionClient.AnalyzeImageInStreamAsync method.
AnalyzeUrlAsync
This method is used for remote images, in which the URL for the image is sent to Computer Vision by calling
the ComputerVisionClient.AnalyzeImageAsync method.
The UploadAndAnalyzeImageAsync method creates a new ComputerVisionClient instance, using the specified
subscription key and endpoint URL. Because the sample app is analyzing a local image, it has to send the contents
of that image to Computer Vision. It opens the local file specified in imageFilePath for reading as a Stream , then
gets the visual features and language selected in the scenario page. It calls the
ComputerVisionClient.AnalyzeImageInStreamAsync method, passing the Stream for the file, the visual features, and
the language, then returns the result as an ImageAnalysis instance. The methods inherited from the
ImageScenarioPage class present the returned results in the scenario page.
The AnalyzeUrlAsync method creates a new ComputerVisionClient instance, using the specified subscription key
and endpoint URL. It gets the visual features and language selected in the scenario page. It calls the
ComputerVisionClient.AnalyzeImageInStreamAsync method, passing the image URL, the visual features, and the
language, then returns the result as an ImageAnalysis instance. The methods inherited from the ImageScenarioPage
class present the returned results in the scenario page.
This scenario is managed by the AnalyzeInDomainPage.xaml page. You can choose a domain model, such as
celebrities or landmarks , and language to perform a domain-specific analysis of the image, and see both the
image and the results. The scenario page uses the following methods, depending on the source of the image:
GetAvailableDomainModelsAsync
This method gets the list of available domain models from Computer Vision and populates the
_domainModelComboBox ComboBox control on the page, using the ComputerVisionClient.ListModelsAsync method.
UploadAndAnalyzeInDomainImageAsync
This method is used for local images, in which the image must be encoded as a Stream and sent to Computer
Vision by calling the ComputerVisionClient.AnalyzeImageByDomainInStreamAsync method.
AnalyzeInDomainUrlAsync
This method is used for remote images, in which the URL for the image is sent to Computer Vision by calling
the ComputerVisionClient.AnalyzeImageByDomainAsync method.
The UploadAndAnalyzeInDomainImageAsync method creates a new ComputerVisionClient instance, using the specified
subscription key and endpoint URL. Because the sample app is analyzing a local image, it has to send the contents
of that image to Computer Vision. It opens the local file specified in imageFilePath for reading as a Stream , then
gets the language selected in the scenario page. It calls the ComputerVisionClient.AnalyzeImageByDomainInStreamAsync
method, passing the Stream for the file, the name of the domain model, and the language, then returns the result
as an DomainModelResults instance. The methods inherited from the ImageScenarioPage class present the returned
results in the scenario page.
The AnalyzeInDomainUrlAsync method creates a new ComputerVisionClient instance, using the specified
subscription key and endpoint URL. It gets the language selected in the scenario page. It calls the
ComputerVisionClient.AnalyzeImageByDomainAsync method, passing the image URL, the visual features, and the
language, then returns the result as an DomainModelResults instance. The methods inherited from the
Explore the Describe Image scenario
Explore the Generate Tags scenario
ImageScenarioPage class present the returned results in the scenario page.
This scenario is managed by the DescribePage.xaml page. You can choose a language to create a human-readable
description of the image, and see both the image and the results. The scenario page uses the following methods,
depending on the source of the image:
UploadAndDescribeImageAsync
This method is used for local images, in which the image must be encoded as a Stream and sent to Computer
Vision by calling the ComputerVisionClient.DescribeImageInStreamAsync method.
DescribeUrlAsync
This method is used for remote images, in which the URL for the image is sent to Computer Vision by calling
the ComputerVisionClient.DescribeImageAsync method.
The UploadAndDescribeImageAsync method creates a new ComputerVisionClient instance, using the specified
subscription key and endpoint URL. Because the sample app is analyzing a local image, it has to send the contents
of that image to Computer Vision. It opens the local file specified in imageFilePath for reading as a Stream , then
gets the language selected in the scenario page. It calls the ComputerVisionClient.DescribeImageInStreamAsync
method, passing the Stream for the file, the maximum number of candidates (in this case, 3), and the language,
then returns the result as an ImageDescription instance. The methods inherited from the ImageScenarioPage class
present the returned results in the scenario page.
The DescribeUrlAsync method creates a new ComputerVisionClient instance, using the specified subscription key
and endpoint URL. It gets the language selected in the scenario page. It calls the
ComputerVisionClient.DescribeImageAsync method, passing the image URL, the maximum number of candidates (in
this case, 3), and the language, then returns the result as an ImageDescription instance. The methods inherited from
the ImageScenarioPage class present the returned results in the scenario page.
This scenario is managed by the TagsPage.xaml page. You can choose a language to tag the visual features of an
image, and see both the image and the results. The scenario page uses the following methods, depending on the
source of the image:
UploadAndGetTagsForImageAsync
This method is used for local images, in which the image must be encoded as a Stream and sent to Computer
Vision by calling the ComputerVisionClient.TagImageInStreamAsync method.
GenerateTagsForUrlAsync
This method is used for remote images, in which the URL for the image is sent to Computer Vision by calling
the ComputerVisionClient.TagImageAsync method.
The UploadAndGetTagsForImageAsync method creates a new ComputerVisionClient instance, using the specified
subscription key and endpoint URL. Because the sample app is analyzing a local image, it has to send the contents
of that image to Computer Vision. It opens the local file specified in imageFilePath for reading as a Stream , then
gets the language selected in the scenario page. It calls the ComputerVisionClient.TagImageInStreamAsync method,
passing the Stream for the file and the language, then returns the result as a TagResult instance. The methods
inherited from the ImageScenarioPage class present the returned results in the scenario page.
The GenerateTagsForUrlAsync method creates a new ComputerVisionClient instance, using the specified
subscription key and endpoint URL. It gets the language selected in the scenario page. It calls the
ComputerVisionClient.TagImageAsync method, passing the image URL and the language, then returns the result as a
TagResult instance. The methods inherited from the ImageScenarioPage class present the returned results in the
scenario page.
Explore the Recognize Text (OCR) scenario
Explore the Recognize Text V2 (English) scenario
This scenario is managed by the OCRPage.xaml page. You can choose a language to recognize and extract printed
text from an image, and see both the image and the results. The scenario page uses the following methods,
depending on the source of the image:
UploadAndRecognizeImageAsync
This method is used for local images, in which the image must be encoded as a Stream and sent to Computer
Vision by calling the ComputerVisionClient.RecognizePrintedTextInStreamAsync method.
RecognizeUrlAsync
This method is used for remote images, in which the URL for the image is sent to Computer Vision by calling
the ComputerVisionClient.RecognizePrintedTextAsync method.
The UploadAndRecognizeImageAsync method creates a new ComputerVisionClient instance, using the specified
subscription key and endpoint URL. Because the sample app is analyzing a local image, it has to send the contents
of that image to Computer Vision. It opens the local file specified in imageFilePath for reading as a Stream , then
gets the language selected in the scenario page. It calls the ComputerVisionClient.RecognizePrintedTextInStreamAsync
method, indicating that orientation is not detected and passing the Stream for the file and the language, then
returns the result as an OcrResult instance. The methods inherited from the ImageScenarioPage class present the
returned results in the scenario page.
The RecognizeUrlAsync method creates a new ComputerVisionClient instance, using the specified subscription key
and endpoint URL. It gets the language selected in the scenario page. It calls the
ComputerVisionClient.RecognizePrintedTextAsync method, indicating that orientation is not detected and passing the
image URL and the language, then returns the result as an OcrResult instance. The methods inherited from the
ImageScenarioPage class present the returned results in the scenario page.
This scenario is managed by the TextRecognitionPage.xaml page. You can choose the recognition mode and a
language to asynchronously recognize and extract either printed or handwritten text from an image, and see both
the image and the results. The scenario page uses the following methods, depending on the source of the image:
UploadAndRecognizeImageAsync
This method is used for local images, in which the image must be encoded as a Stream and sent to Computer
Vision by calling the RecognizeAsync method and passing a parameterized delegate for the
ComputerVisionClient.RecognizeTextInStreamAsync method.
RecognizeUrlAsync
This method is used for remote images, in which the URL for the image is sent to Computer Vision by calling
the RecognizeAsync method and passing a parameterized delegate for the
ComputerVisionClient.RecognizeTextAsync method.
RecognizeAsync This method handles the asynchronous calling for both the UploadAndRecognizeImageAsync and
RecognizeUrlAsync methods, as well as polling for results by calling the
ComputerVisionClient.GetTextOperationResultAsync method.
Unlike the other scenarios included in the Computer Vision sample app, this scenario is asynchronous, in that one
method is called to start the process, but a different method is called to check on the status and return the results of
that process. The logical flow in this scenario is somewhat different from that in the other scenarios.
The UploadAndRecognizeImageAsync method opens the local file specified in imageFilePath for reading as a Stream ,
then calls the RecognizeAsync method, passing:
A lambda expression for a parameterized asynchronous delegate of the
ComputerVisionClient.RecognizeTextInStreamAsync method, with the Stream for the file and the recognition
Explore the Get Thumbnail scenario
mode as parameters, in GetHeadersAsyncFunc .
A lambda expression for a delegate to get the Operation-Location response header value, in
GetOperationUrlFunc .
The RecognizeUrlAsync method calls the RecognizeAsync method, passing:
A lambda expression for a parameterized asynchronous delegate of the
ComputerVisionClient.RecognizeTextAsync method, with the URL of the remote image and the recognition mode
as parameters, in GetHeadersAsyncFunc .
A lambda expression for a delegate to get the Operation-Location response header value, in
GetOperationUrlFunc .
When the RecognizeAsync method is completed, both UploadAndRecognizeImageAsync and RecognizeUrlAsync
methods return the result as a TextOperationResult instance. The methods inherited from the ImageScenarioPage
class present the returned results in the scenario page.
The RecognizeAsync method calls the parameterized delegate for either the
ComputerVisionClient.RecognizeTextInStreamAsync or ComputerVisionClient.RecognizeTextAsync method passed in
GetHeadersAsyncFunc and waits for the response. The method then calls the delegate passed in GetOperationUrlFunc
to get the Operation-Location response header value from the response. This value is the URL used to retrieve the
results of the method passed in GetHeadersAsyncFunc from Computer Vision.
The RecognizeAsync method then calls the ComputerVisionClient.GetTextOperationResultAsync method, passing the
URL retrieved from the Operation-Location response header, to get the status and result of the method passed in
GetHeadersAsyncFunc . If the status doesn't indicate that the method completed, successfully or unsuccessfully, the
RecognizeAsync method calls ComputerVisionClient.GetTextOperationResultAsync 3 more times, waiting 3 seconds
between calls. The RecognizeAsync method returns the results to the method that called it.
This scenario is managed by the ThumbnailPage.xaml page. You can indicate whether to use smart cropping, and
specify desired height and width, to generate a thumbnail from an image, and see both the image and the results.
The scenario page uses the following methods, depending on the source of the image:
UploadAndThumbnailImageAsync
This method is used for local images, in which the image must be encoded as a Stream and sent to Computer
Vision by calling the ComputerVisionClient.GenerateThumbnailInStreamAsync method.
ThumbnailUrlAsync
This method is used for remote images, in which the URL for the image is sent to Computer Vision by calling
the ComputerVisionClient.GenerateThumbnailAsync method.
The UploadAndThumbnailImageAsync method creates a new ComputerVisionClient instance, using the specified
subscription key and endpoint URL. Because the sample app is analyzing a local image, it has to send the contents
of that image to Computer Vision. It opens the local file specified in imageFilePath for reading as a Stream . It calls
the ComputerVisionClient.GenerateThumbnailInStreamAsync method, passing the width, height, the Stream for the file,
and whether to use smart cropping, then returns the result as a Stream . The methods inherited from the
ImageScenarioPage class present the returned results in the scenario page.
The RecognizeUrlAsync method creates a new ComputerVisionClient instance, using the specified subscription key
and endpoint URL. It calls the ComputerVisionClient.GenerateThumbnailAsync method, passing the width, height, the
URL for the image, and whether to use smart cropping, then returns the result as a Stream . The methods inherited
from the ImageScenarioPage class present the returned results in the scenario page.

Computer Vision API Frequently Asked Questions
4/18/2019 • 2 minutes to read • Edit Online
TIPTIP
If you can't find answers to your questions in this FAQ, try asking the Computer Vision API community on StackOverflow or
contact Help and Support on UserVoice
Question: Can I train Computer Vision API to use custom tags? For example, I would like to feed in pictures of cat
breeds to 'train' the AI, then receive the breed value on an AI request.
Answer: This function is currently not available. However, our engineers are working to bring this functionality to
Computer Vision.
Question: Can Computer Vision be used locally without an internet connection?
Answer: We currently do not offer an on-premises or local solution.
Question: Can Computer Vision be used to read license plates?
Answer: The Vision API offers good text-detection with OCR, but it is not currently optimized for license plates. We
are constantly trying to improve our services and have added OCR for auto license plate recognition to our list of
feature requests.
Question: What types of writing surfaces are supported for handwriting recognition?
Answer: The technology works with different kinds of surfaces, including whiteboards, white paper, and yellow
sticky notes.
Question: How long does the handwriting recognition operation take?
Answer: The amount of time that it takes depends on the length of the text. For longer texts, it can take up to
several seconds. Therefore, after the Recognize Handwritten Text operation completes, you may need to wait before
you can retrieve the results using the Get Handwritten Text Operation Result operation.
Question: How does the handwriting recognition technology handle text that was inserted using a caret in the
middle of a line?
Answer: Such text is returned as a separate line by the handwriting recognition operation.
Question: How does the handwriting recognition technology handle crossed-out words or lines?
Answer: If the words are crossed out with multiple lines to render them unrecognizable, the handwriting
recognition operation doesn't pick them up. However, if the words are crossed out using a single line, that crossing
is treated as noise, and the words still get picked up by the handwriting recognition operation.
Question: What text orientations are supported for the handwriting recognition technology?
Answer: Text oriented at angles of up to around 30 degrees to 40 degrees may get picked up by the handwriting
recognition operation.

Computer Vision 86-category taxonomy
4/19/2019 • 2 minutes to read • Edit Online
abstract_
abstract_net
abstract_nonphoto
abstract_rect
abstract_shape
abstract_texture
animal_
animal_bird
animal_cat
animal_dog
animal_horse
animal_panda
building_
building_arch
building_brickwall
building_church
building_corner
building_doorwindows
building_pillar
building_stair
building_street
dark_
drink_
drink_can
dark_fire
dark_fireworks
sky_object
food_
food_bread

food_fastfood
food_grilled
food_pizza
indoor_
indoor_churchwindow
indoor_court
indoor_doorwindows
indoor_marketstore
indoor_room
indoor_venue
dark_light
others_
outdoor_
outdoor_city
outdoor_field
outdoor_grass
outdoor_house
outdoor_mountain
outdoor_oceanbeach
outdoor_playground
outdoor_railway
outdoor_road
outdoor_sportsfield
outdoor_stonerock
outdoor_street
outdoor_water
outdoor_waterside
people_
people_baby
people_crowd
people_group
people_hand
people_many

people_portrait
people_show
people_tattoo
people_young
plant_
plant_branch
plant_flower
plant_leaves
plant_tree
object_screen
object_sculpture
sky_cloud
sky_sun
people_swimming
outdoor_pool
text_
text_mag
text_map
text_menu
text_sign
trans_bicycle
trans_bus
trans_car
trans_trainstation
Language support for Computer Vision
4/19/2019 • 2 minutes to read • Edit Online
Text recognition
LANGUAGE LANGUAGE CODE OCR API
Arabic ar ✔
Chinese (Simplified)zh-Hans ✔
Chinese (Traditional)zh-Hant ✔
Czech cs ✔
Danish da ✔
Dutch nl ✔
English en ✔
Finnish fi ✔
French fr ✔
German de ✔
Greek el ✔
Hungarian hu ✔
Italian it ✔
Japanese ja ✔
Korean ko ✔
Norwegian nb ✔
Some features of Computer Vision support multiple languages; any features not mentioned here only support
English.
Computer Vision can recognize text in many languages. Specifically, the OCR API supports a variety of languages,
whereas the Read API and Recognize Text API only support English. See Recognize printed and handwritten text
for more information on this functionality and the advantages of each API.
OCR automatically detects the language of the input material, so there is no need to specify a language code in the
API call. However, language codes are always returned as the value of the "language" node in the JSON response.
Polish pl ✔
Portuguese pt ✔
Romanian ro ✔
Russian ru ✔
Serbian (Cyrillic)sr-Cyrl ✔
Serbian (Latin)sr-Latn ✔
Slovak sk ✔
Spanish es ✔
Swedish sw ✔
Turkish tr ✔
LANGUAGE LANGUAGE CODE OCR API
Image analysis
LANG
UAGE
LANG
UAGE
CODE
CATE
GORI
ES TAGS
DESC
RIPTI
ON
ADUL
T
BRAN
DS
COLO
R FACES
IMAG
ETYPE
OBJEC
TS
CELEB
RITIES
LAND
MARK
S
Chine
se
zh ✔✔✔-----✔ ✔
Englis
h
en ✔✔✔✔✔✔✔✔✔✔✔
Japan
ese
ja ✔✔✔-----✔ ✔
Portu
gues
e
pt ✔✔✔-----✔ ✔
Spani
sh
es ✔✔✔-----✔ ✔
Next steps
Some actions of the Analyze - Image API can return results in other languages, specified with the language query
parameter. Other actions return results in English regardless of what language is specified, and others throw an
exception for unsupported languages. Actions are specified with the visualFeatures and details query
parameters; see the Overview for a list of all the actions you can do with image analysis.
Get started using the Computer Vision features mentioned in this guide.