Retail POS Manual (EDITTED)x
User Manual:
Open the PDF directly: View PDF ![]() .
.
Page Count: 35

VERSION
2.0
USER MANUAL
Retail
POS
Point Of Sale, Inventory Control, and Invoicing

JDEV
Retail POS User Manual Page 2 of 35
Version 2.0
Table of contents
Introduction ……………………………………………………………………………………………………….4
Features of Retail POS ……………………………………………………………………………….4
Target Audience ………………………………………………………………………………..........4
Start Retail POS …………………………………………………………………………………………..........5
Login ………………………………………………………………………………………………….........5
Parts of the Retail POS Screen …………………………………………………………………………….6
Product Details …………………………………………………………………………………………6
Scan PLU/Barcode ……………………………………………………………………………………..7
Total Pane ………………………………………………………………………………………………….7
Company Image …………………………………………………………………………………………7
Functions Button ……………………………………………………………………………………….8
Functions Button Main Parts ………………………………………………………………………………8
F1 – Focus Grid ………………………………………………………………………………………….8
F2 – Scan Barcode ……………………………………………………………………………………..8
F3 – Browse Item ……………………………………………………………………………………….8
F4 – Void ………………………………………………………………………………………………….12
F5 – Journal ……………………………………………………………………………………………..13
F6 – Payment …………………………………………………………………………………………..15
JDEV
Retail POS User Manual Page 3 of 35
Version 2.0
Payment Window Main Parts ……………………………………………………………………………16
Amount Due …………………………………………………………………………………………….16
Tendered …………………………………………………………………………………………………16
Change …………………………………………………………………………………………………….16
Type of Payment ……………………………………………………………………………………………….17
F1 – Card ………………………………………………………………………………………………….17
F2 – Check ……………………………………………………………………………………………….17
F3 – GC …………………………………………………………………………………………………….20
F4 – Charge ……………………………………………………………………………………………..22
F5 – Cash ………………..……………………………………………………………………………….25
Continuation of Functions Button Main Parts ………………….………………………………25
F7 – Open Cash Drawer ……………………………………………………………………………25
F8 – Cancel ………………………………………………………………………………………………25
F9 – Hold Transaction ………………………………………………………………………………26
F10 – Discount …………………………………………………………………………………………28
F11 – Quantity …………………………………………………………………………………………31
F12 – X Reading ……………………………………………………………………………………….33

JDEV
Retail POS User Manual Page 4 of 35
Version 2.0
Introduction
Features of Retail POS
The goal of Retail Software is to help you focus on your sales and your customers.
Retail POS is a tool that serves this goal. It is designed for retailers who wish to
streamline customer checkouts, tracking sales, making purchase orders, counting
stock or preparing invoices. Retail POS is an organizer, an analyzer, and a time
saver. Some of its most useful features include:
✓ Easy to learn and use.
✓ Sales tracking by product.
✓ Complete sales and inventory data for every time.
✓ Full – featured POS system with slip printer, barcode and cash drawer
support.
✓ History of daily sales and POS totals.
✓ Staff Hours and Commissions.
✓ On screen review and editing of purchase orders.
Target Audience
This manual supposed for those user who don’t have the basic knowledge of
using retail point of sale.
JDEV
Retail POS User Manual Page 5 of 35
Version 2.0
Start Retail POS
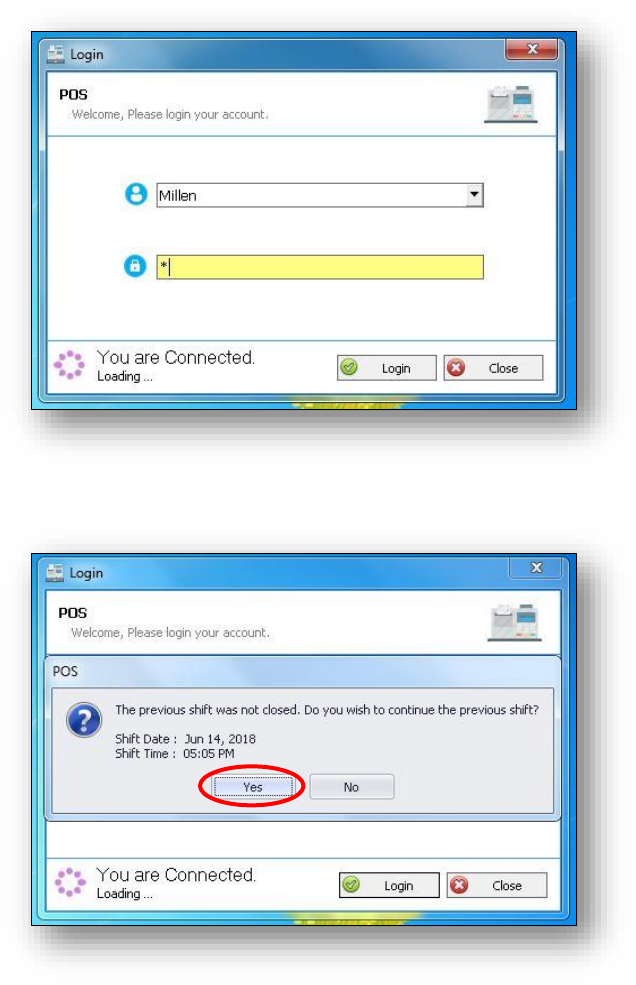
Login
• When you open Retail POS, it displays the login screen. Login using
your Username and Password.
• After you login your account you will be prompted if you want to
continue in previous shift. Then click “Yes”.
JDEV
Retail POS User Manual Page 6 of 35
Version 2.0
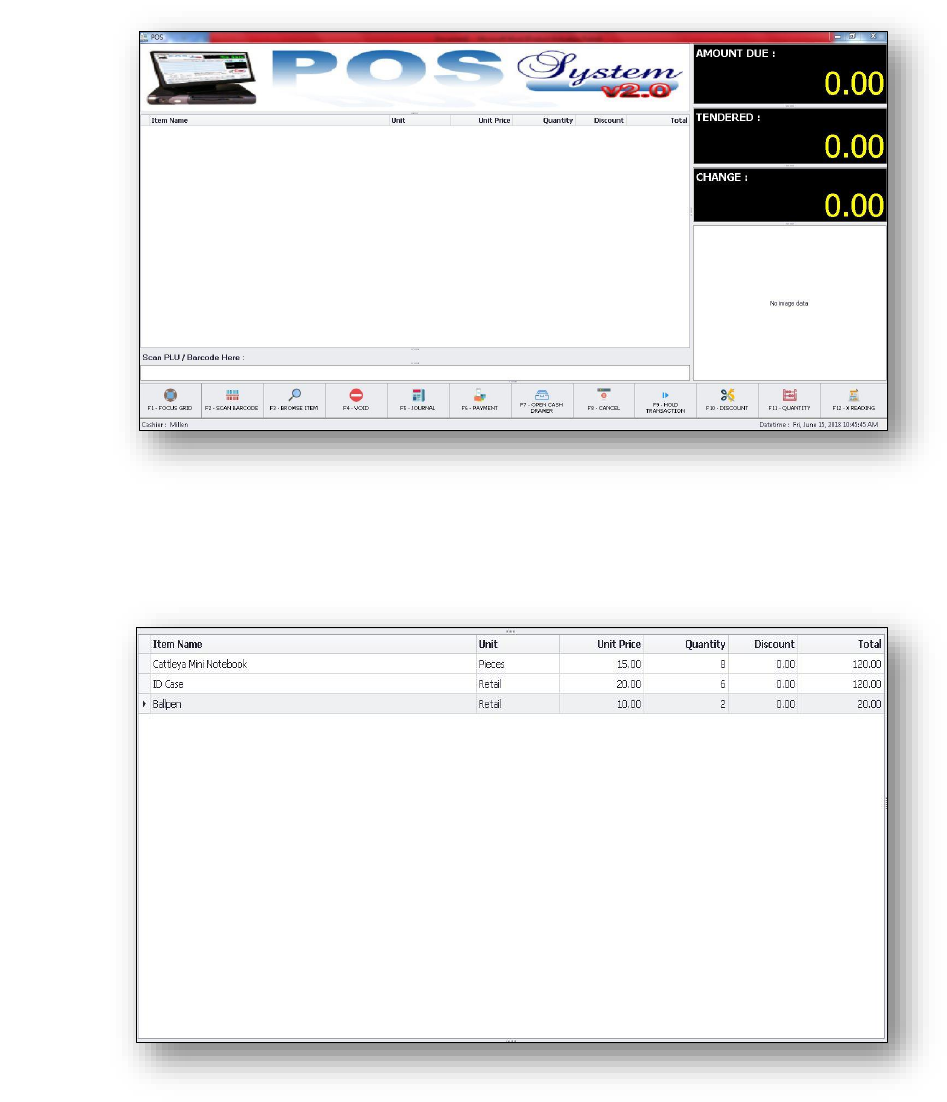
Parts of the Retail POS Screen
The main screen of Retail POS has the following main parts.
1. Product Details – you can see here the bought products.
JDEV
Retail POS User Manual Page 7 of 35
Version 2.0
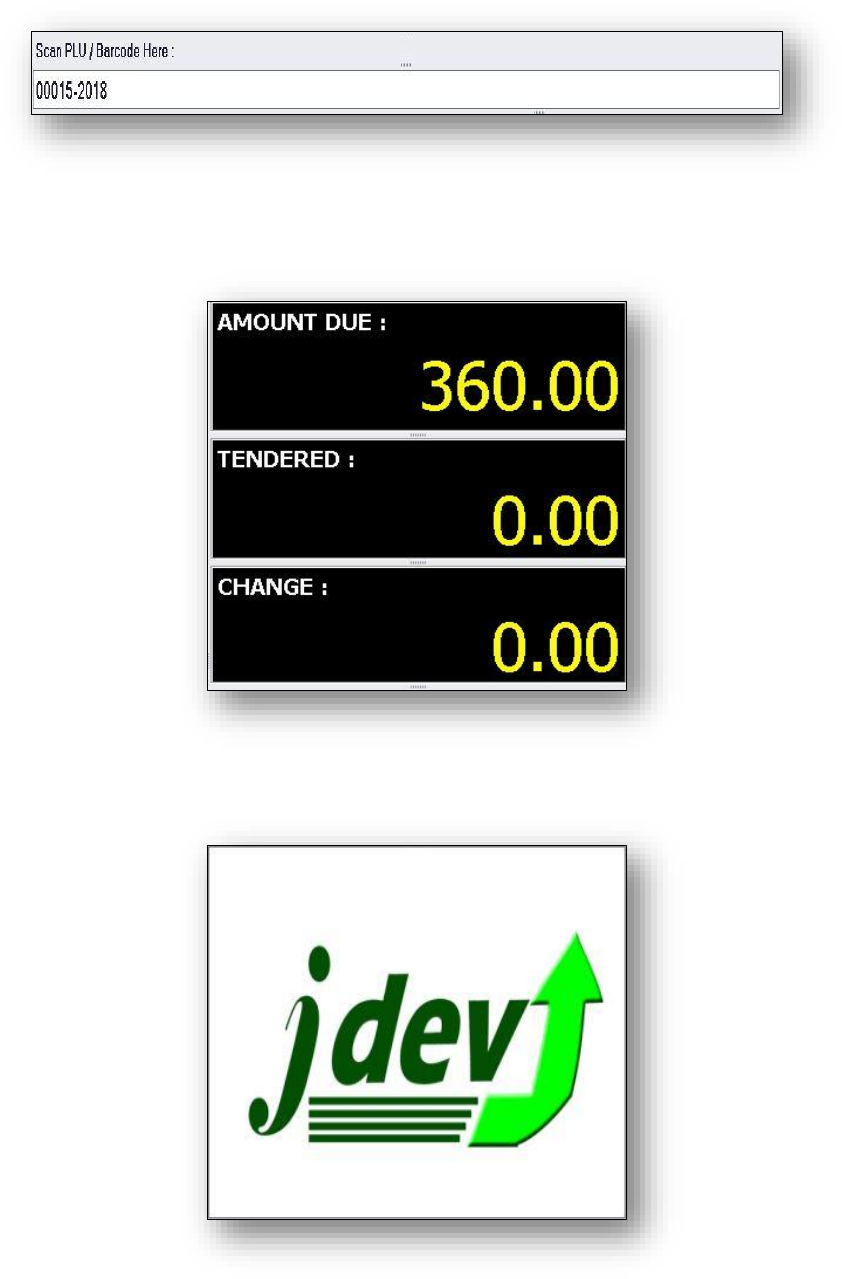
2. Scan PLU/Barcode – You can see here the barcode of the product.
3. Total Pane – The Amount Due, Tendered, and Change.
4. Company Image – Logo of the company.
JDEV
Retail POS User Manual Page 8 of 35
Version 2.0
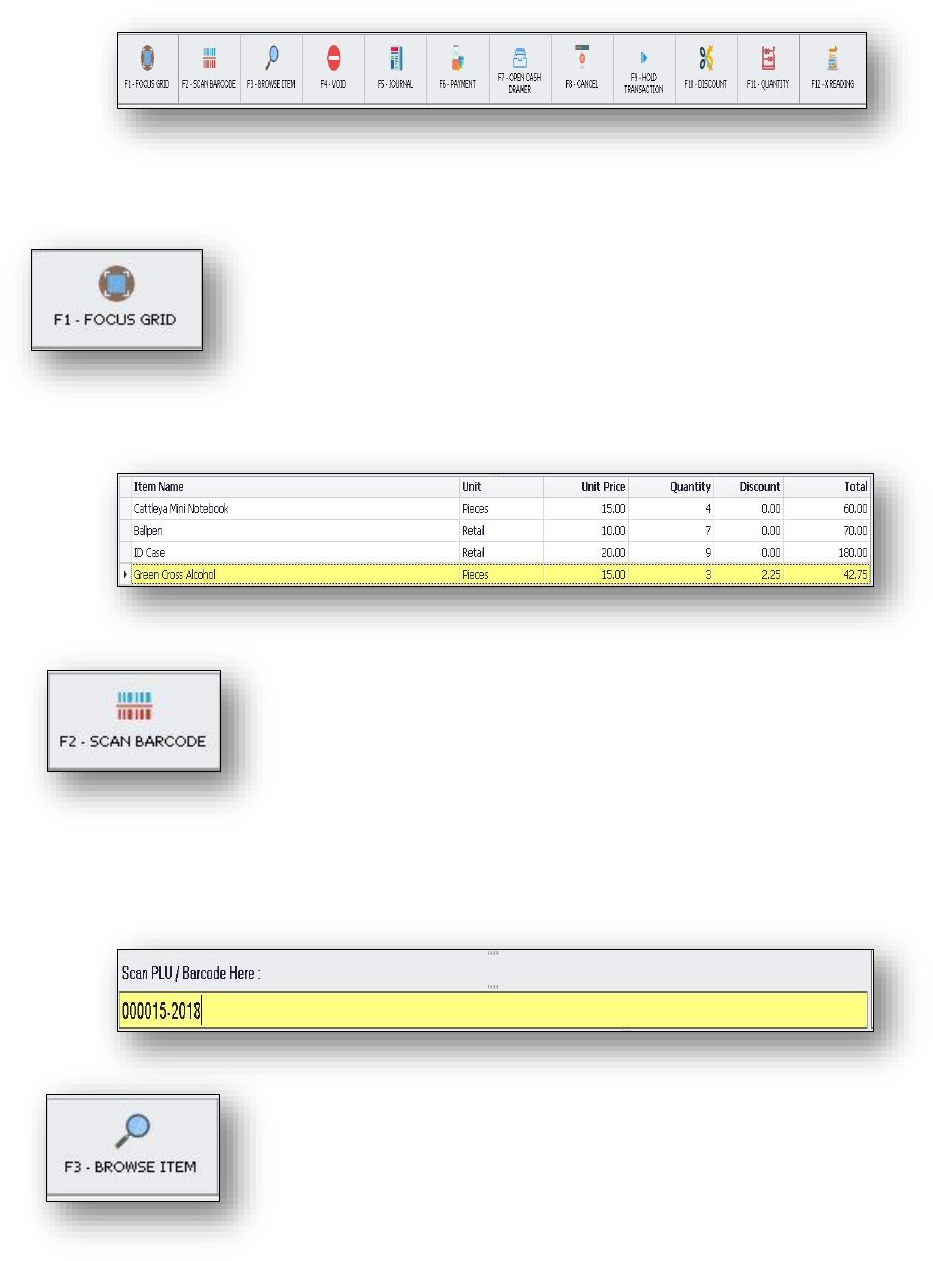
5. Functions Button – used to perform specific tasks.
Functions Button has the following main parts.
F1 - Focus Grid – It’s selected the specific product.
➢ When you click the Focus Grid (F1) it highlights the main
product.
F2 - Scan Barcode – Scan the barcode of a product.
➢ When you click the Scan Barcode (F2) it focuses in a text
box where you can input/scan the barcode of a product
and it’s automatically appear inside the text box.
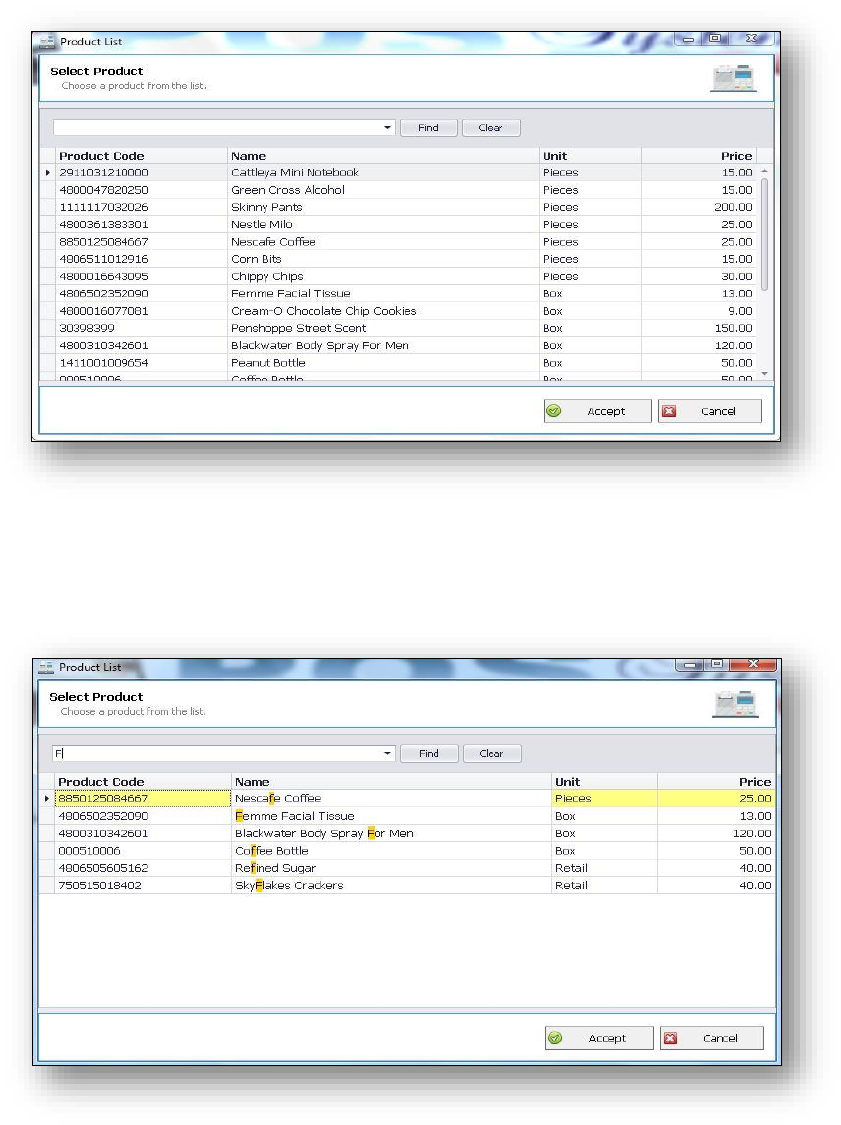
F3 - Browse Item – You can choose product from the list
JDEV
Retail POS User Manual Page 9 of 35
Version 2.0
➢ When you open the Browse Item (F3) you can see all the
list of the products and also there equivalent Product
Code, Unit, and Price.
➢ For example when you click the Find Button then you
input letter “F” inside the text box then it’s
automatically search all the products with letter F.
JDEV
Retail POS User Manual Page 10 of 35
Version 2.0
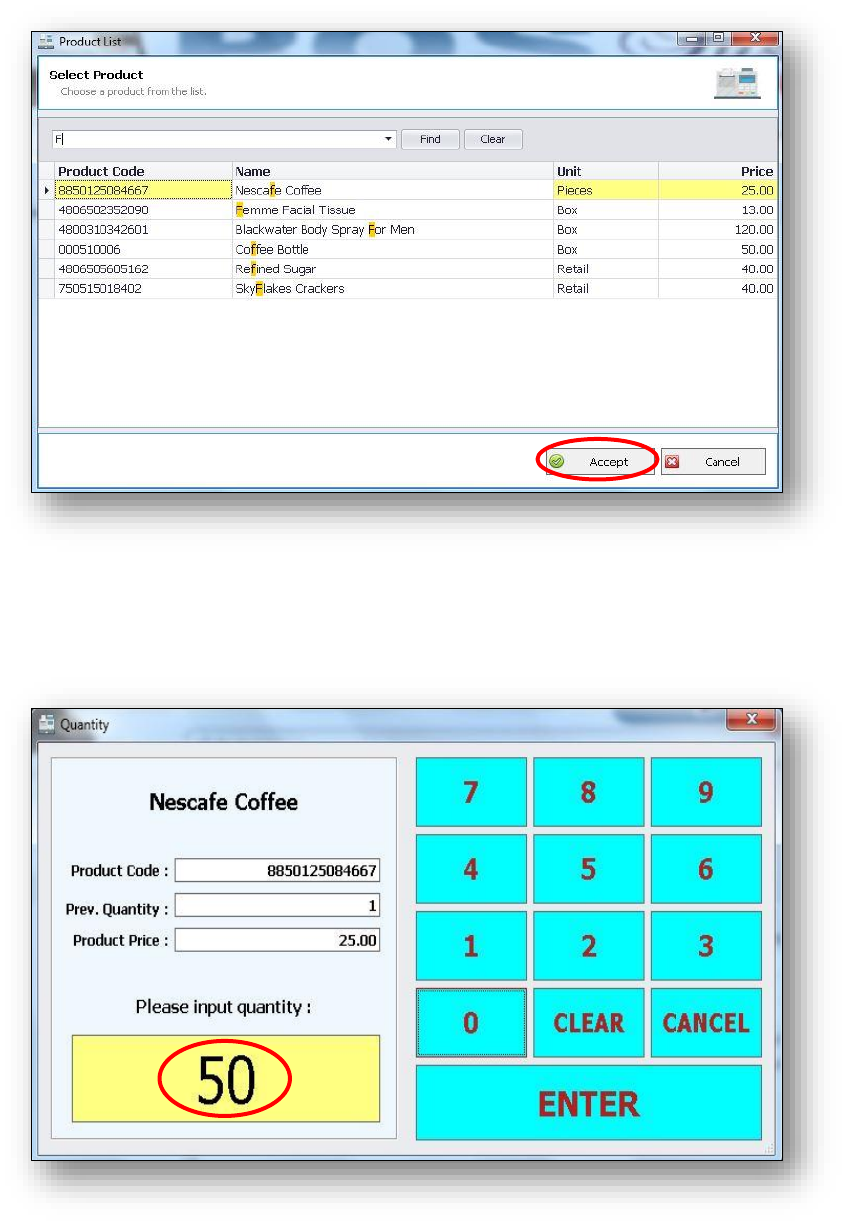
➢ Then, click the Accept Button.
➢ When you click the accept Button you can see this pop
up window then you must required to input the
quantity or amount of the product.
JDEV
Retail POS User Manual Page 11 of 35
Version 2.0
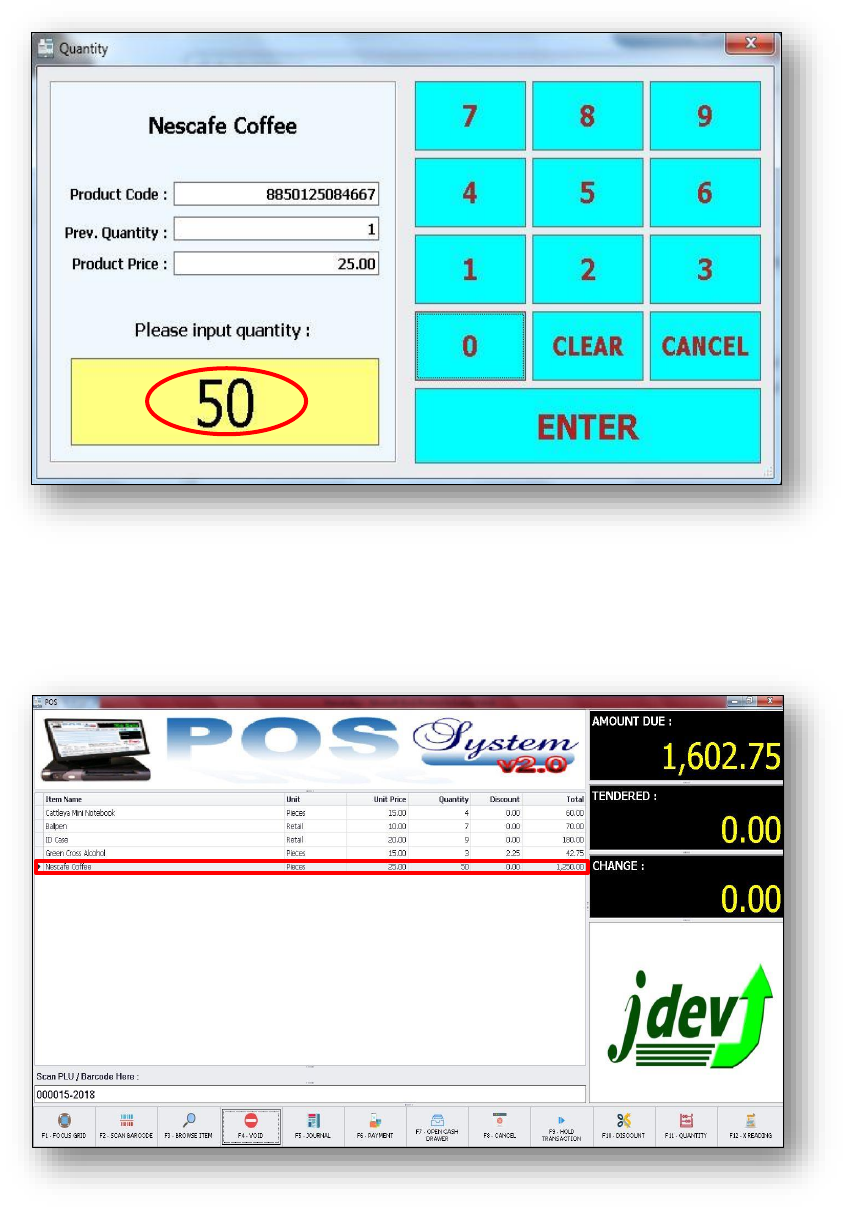
➢ Then, click the Enter Button.
➢ After you click the Enter Button it will back and appear
on the main screen of the POS then look in the product
details you see your inputted product and quantity.
JDEV
Retail POS User Manual Page 12 of 35
Version 2.0
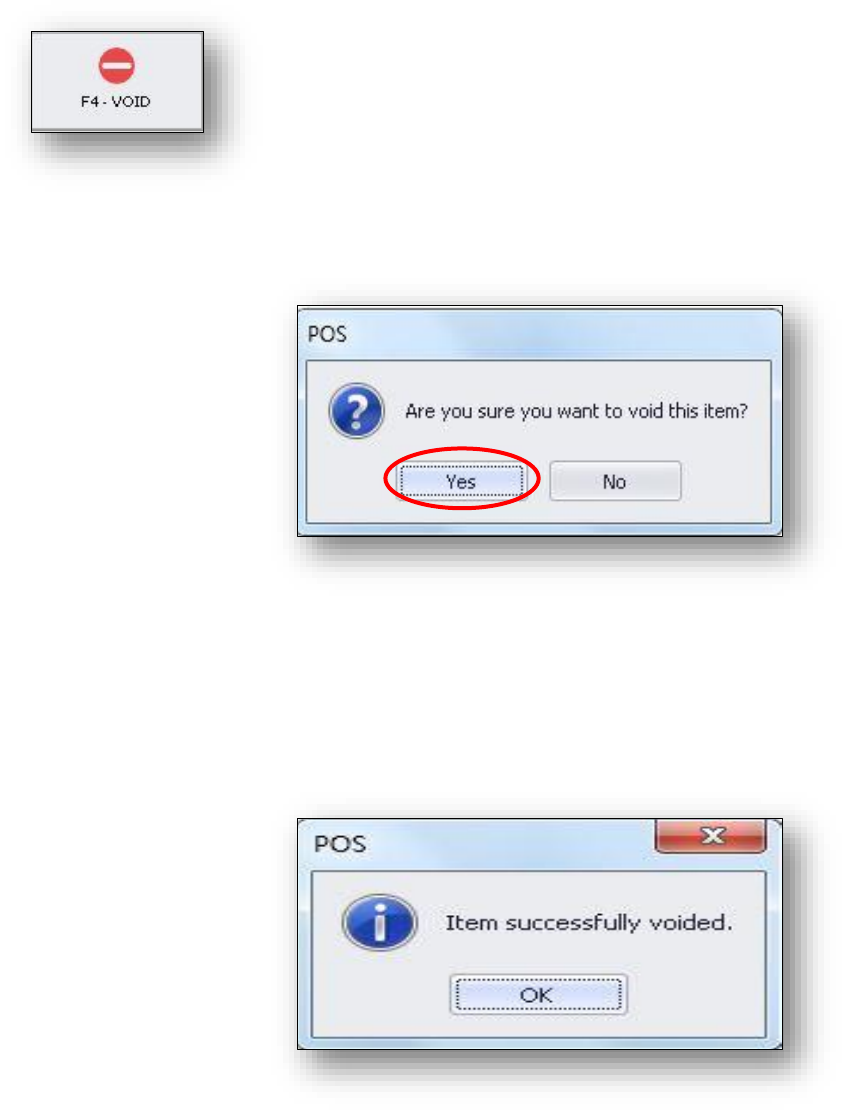
F4 - Void – Delete one product.
➢ If you click the Void (F4) there’s a question “Are you
sure you want to void this item?”, then click “Yes”.
➢ After you click “yes”. Look at the main screen of POS
where you can see the product details with highlight
was deleted.
JDEV
Retail POS User Manual Page 13 of 35
Version 2.0
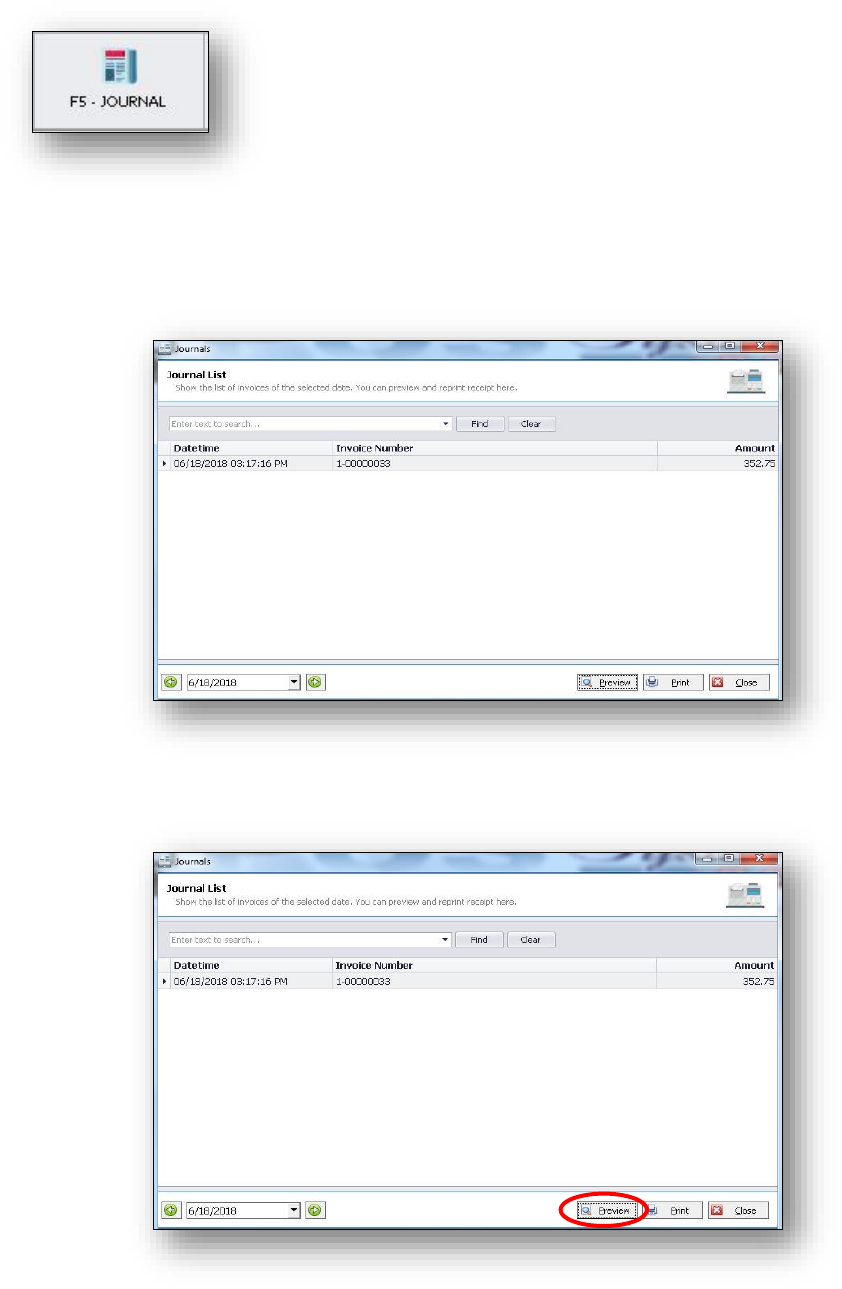
F5 - Journal – Show the list of invoices of the selected date.
You can preview and reprint receipt here.
➢ When you open the Journal (F5) you can see here the
paid item with their Date Tame, Invoice Number, and
Amount.
➢ Click Preview.
JDEV
Retail POS User Manual Page 14 of 35
Version 2.0
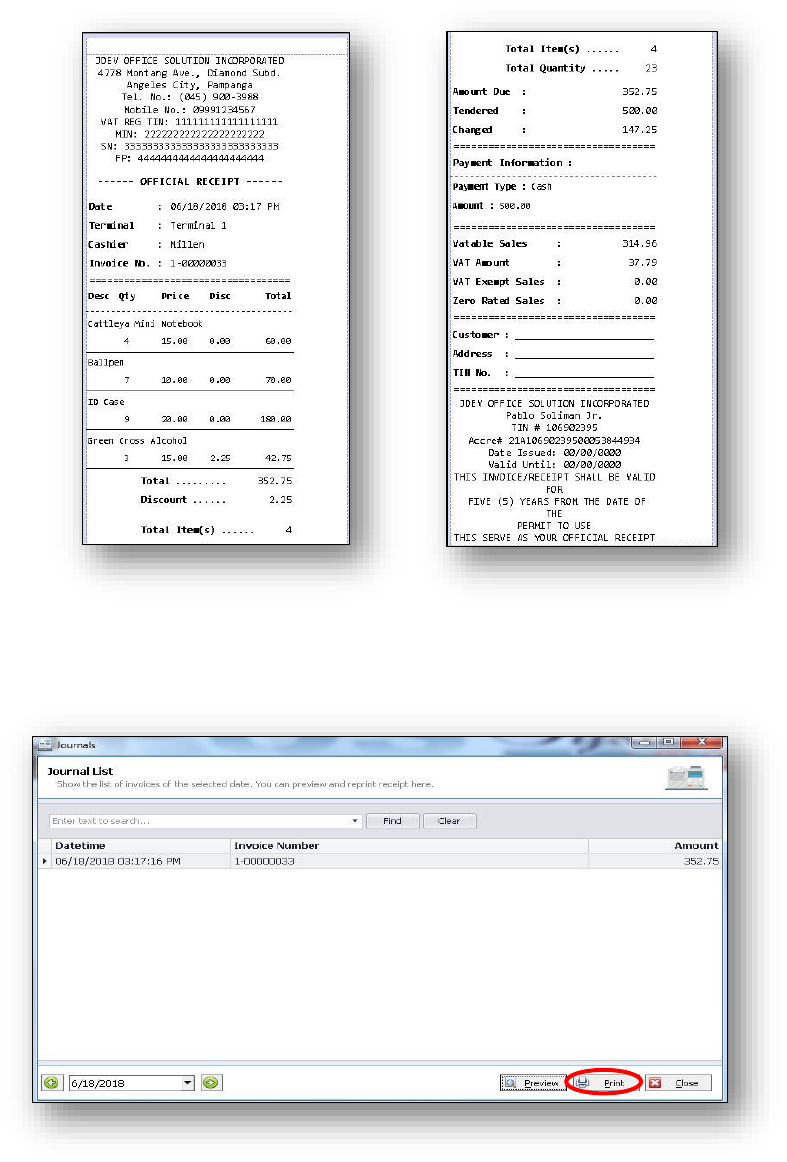
➢ After clicking preview you will see the Official Receipt.
➢ You can also print it, just click the Print Button.
JDEV
Retail POS User Manual Page 15 of 35
Version 2.0
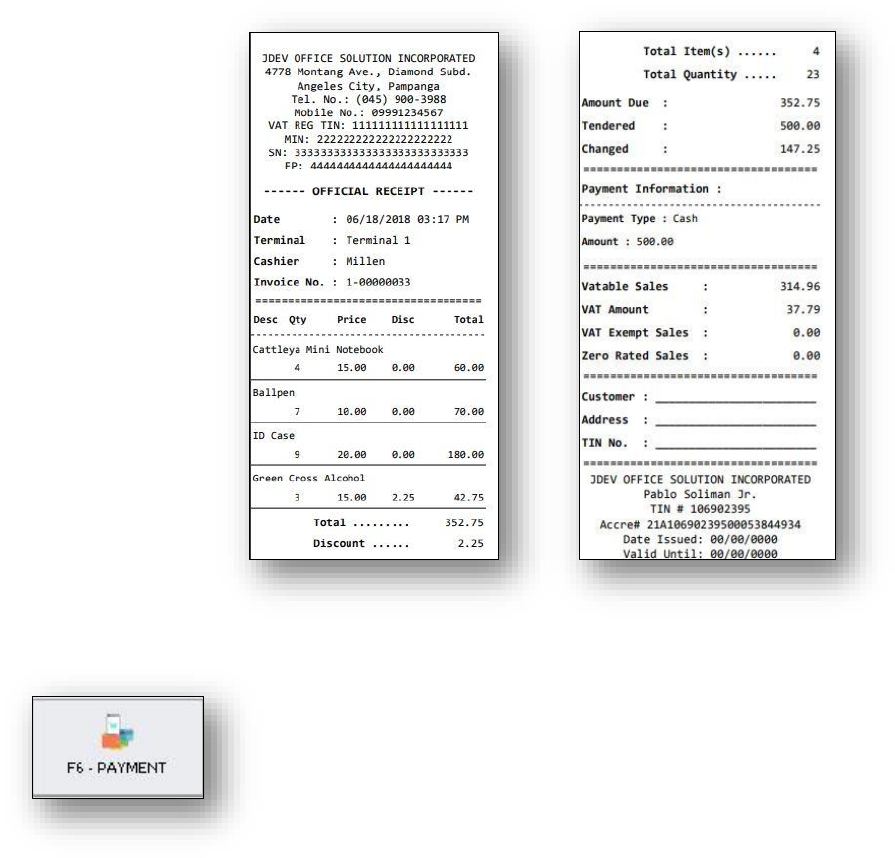
➢ After clicking the Print Button you can see this Official
Receipt. Same as the result in Preview Button.
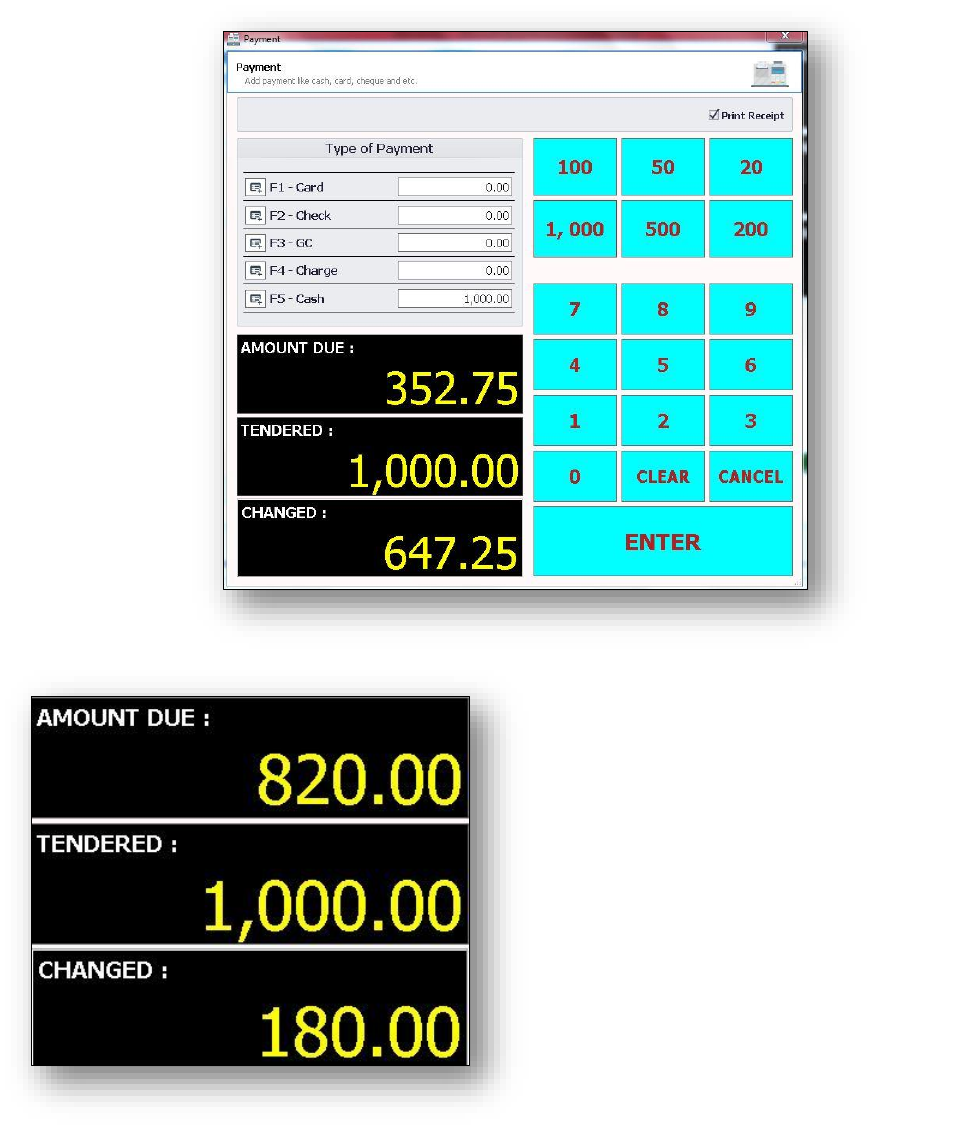
F6 - Payment – Add payment like cash, card, cheque and etc.
➢ When you open Payment (F6) you can see here the
Different Type of Payment, Amount Due, Tendered, and
Changed.
JDEV
Retail POS User Manual Page 16 of 35
Version 2.0
The Payment Window has the following main parts.
➢ Amount Due – The total amount of
bought items.
➢ Tendered – How much the money of
the customer.
➢ Change – The money returned to the
customer after paying for something
with more money than it costs.
JDEV
Retail POS User Manual Page 17 of 35
Version 2.0
Type of Payment
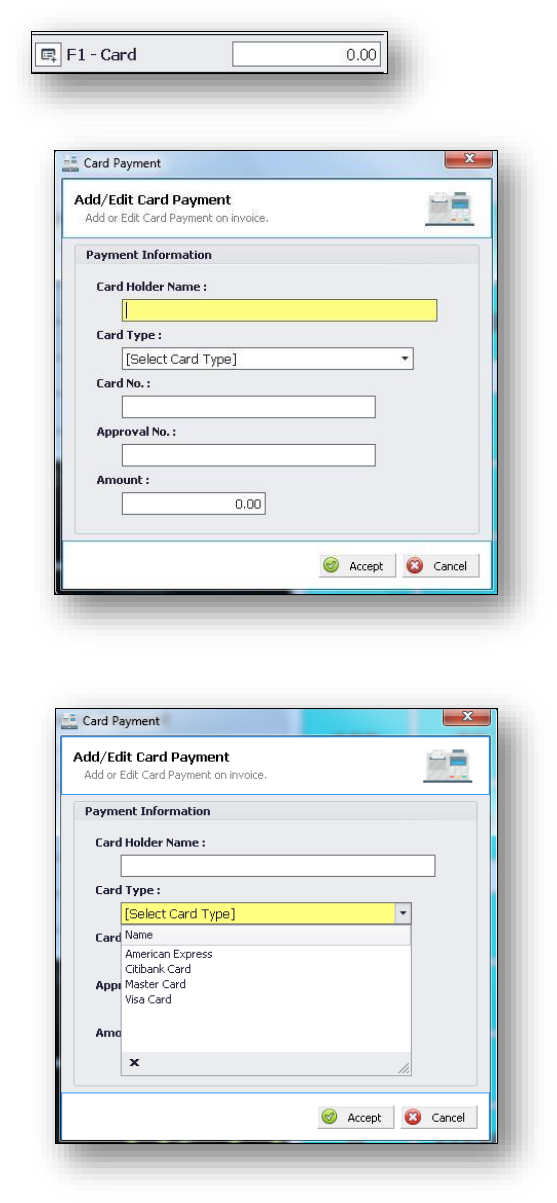
F1 - Card – Add or Edit Card Payment on Invoice.
➢ Press F1 and fill up the Payment
Information.
➢ You can select your Card Type ,
drop down the arrow inside the
text box.
JDEV
Retail POS User Manual Page 18 of 35
Version 2.0
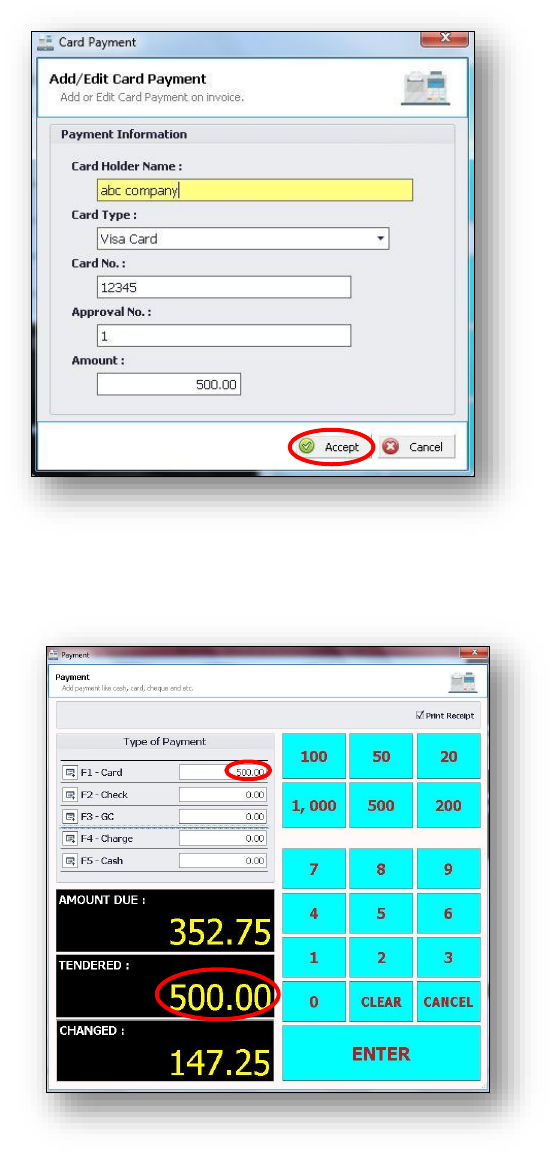
➢ After fill upping all the payment
information, just click “Accept”.
➢ After clicking Accept Button you
can see the amount “500” you
input in the Payment Information
at the right side of the F1 - Card
same value in the Tendered.
JDEV
Retail POS User Manual Page 19 of 35
Version 2.0
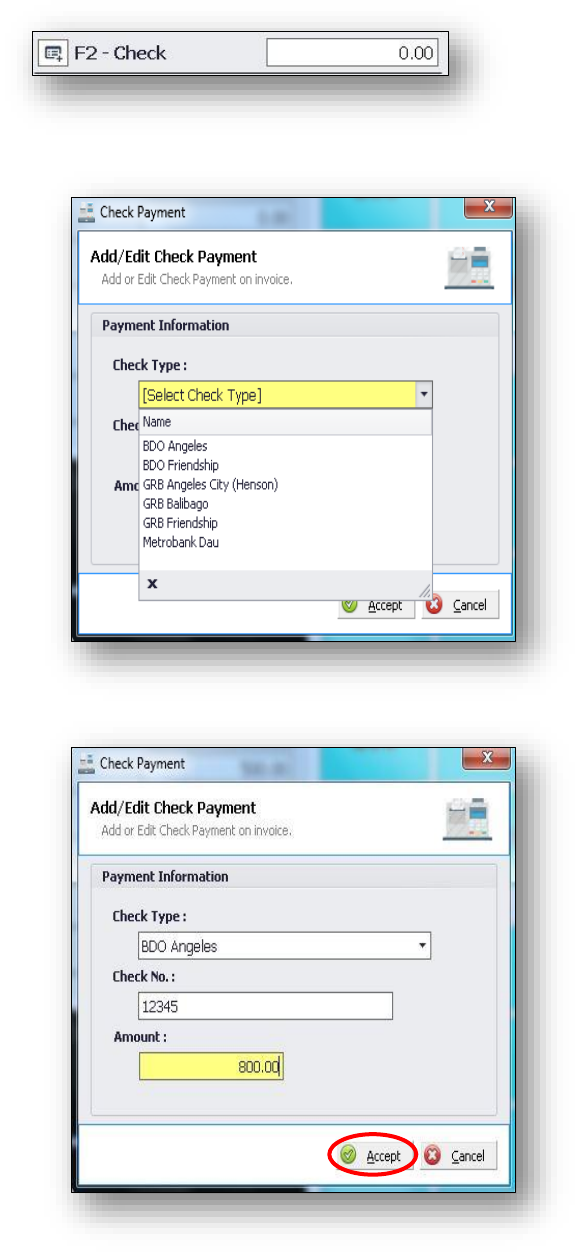
F2 - Check – Add or Edit Check Payment
on Invoice.
➢ Press F2 and fill up the Payment
Information.
➢ Select your Check Type.
➢ If all the Information’s are
completed, click “Accept”.
JDEV
Retail POS User Manual Page 20 of 35
Version 2.0
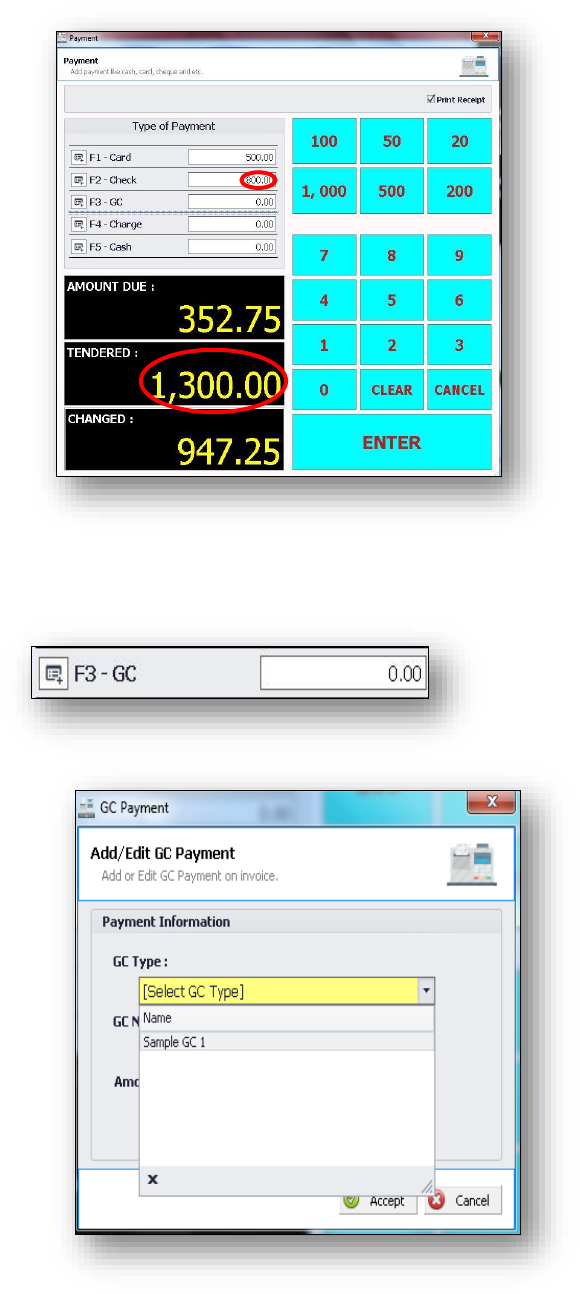
➢ You can see the “800” amount you
input in the payment formation at
the right side of F2 - Check inside
the text box.
➢ F1 - Card plus F2 - Check is equal
to the value of Tendered.
F3 - GC – Add or Edit GC Payment on
Invoice.
➢ Press F3 and fill up the Payment
Information.
➢ Choose your GC Type.

JDEV
Retail POS User Manual Page 21 of 35
Version 2.0
➢ After you fill up all the Payment
Information, click the Accept
Button.
a
➢ The “400” amount you input in
the payment information you can
see it at the right side of F3 - GC.
➢ All the sum of F1 - Card, F2 -
Check, F3 - GC is equal to the
value of Tendered.
JDEV
Retail POS User Manual Page 22 of 35
Version 2.0
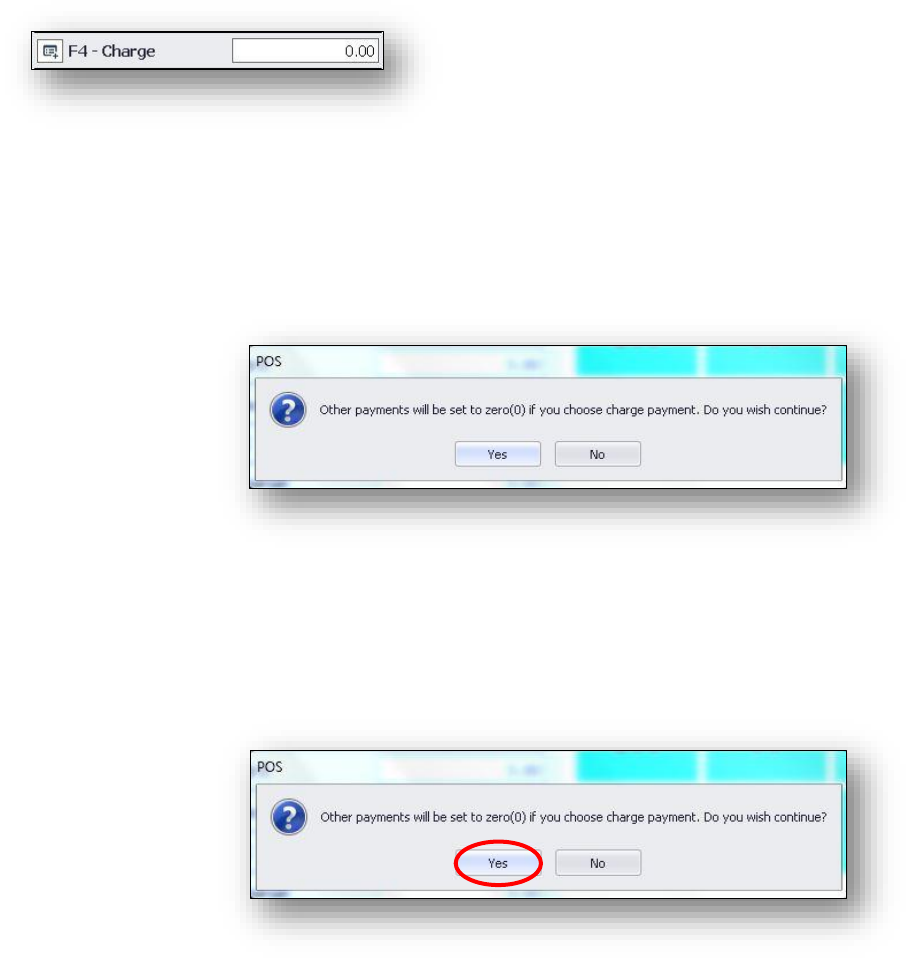
F4 - Charge – Add or Edit Charge Payment on Invoice.
➢ Press F4 and you see this prompted POS
Window.
➢ Click Yes.
JDEV
Retail POS User Manual Page 23 of 35
Version 2.0
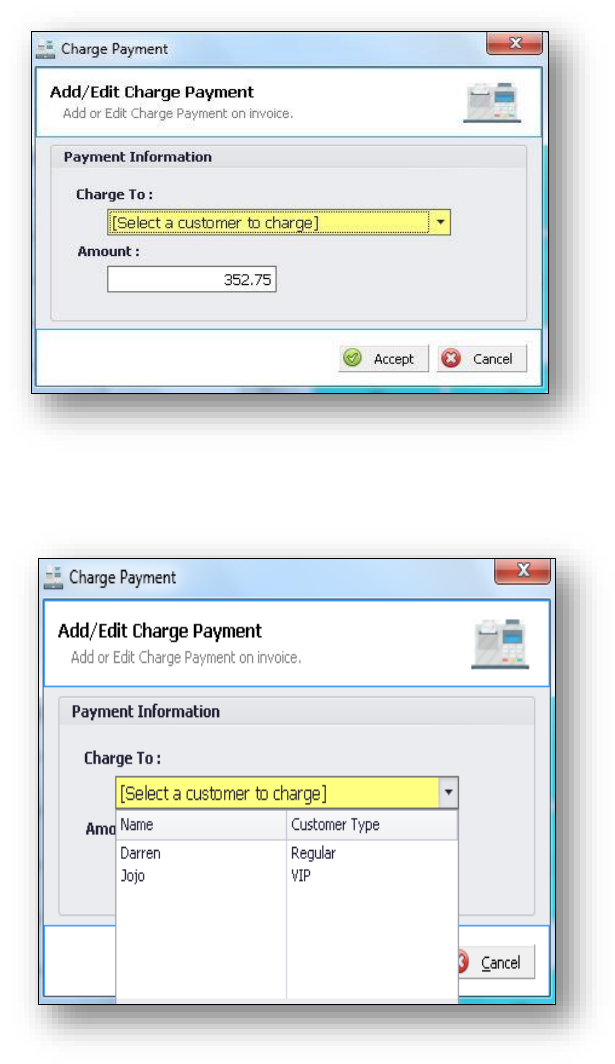
➢ After you click the yes
button, you see this Charge
Payment Window with the
content of charge to, then
the value of amount is
automatically inputted.
➢ Select a customer to charge.
JDEV
Retail POS User Manual Page 24 of 35
Version 2.0
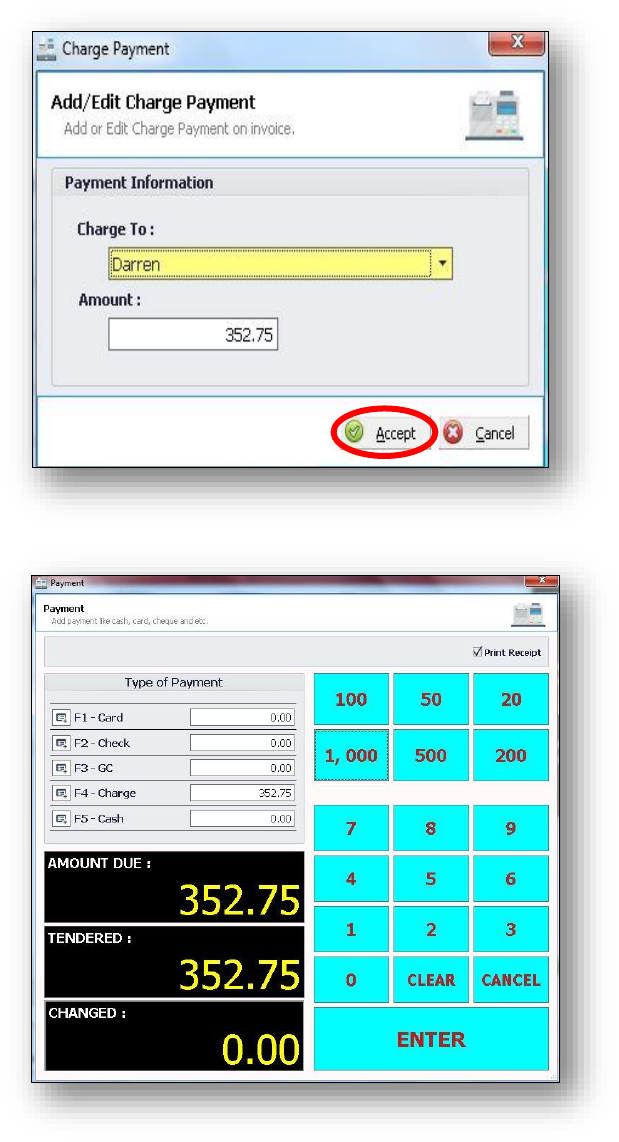
➢ After you complete the
Payment Information, click
Accept.
➢ When you click the accept
button all the value on F1 -
Card, F2 - Check, F3 - GC,
are deleted.
➢ Except the F4 - Charge it is
same on the value of
Amount Due.
JDEV
Retail POS User Manual Page 25 of 35
Version 2.0
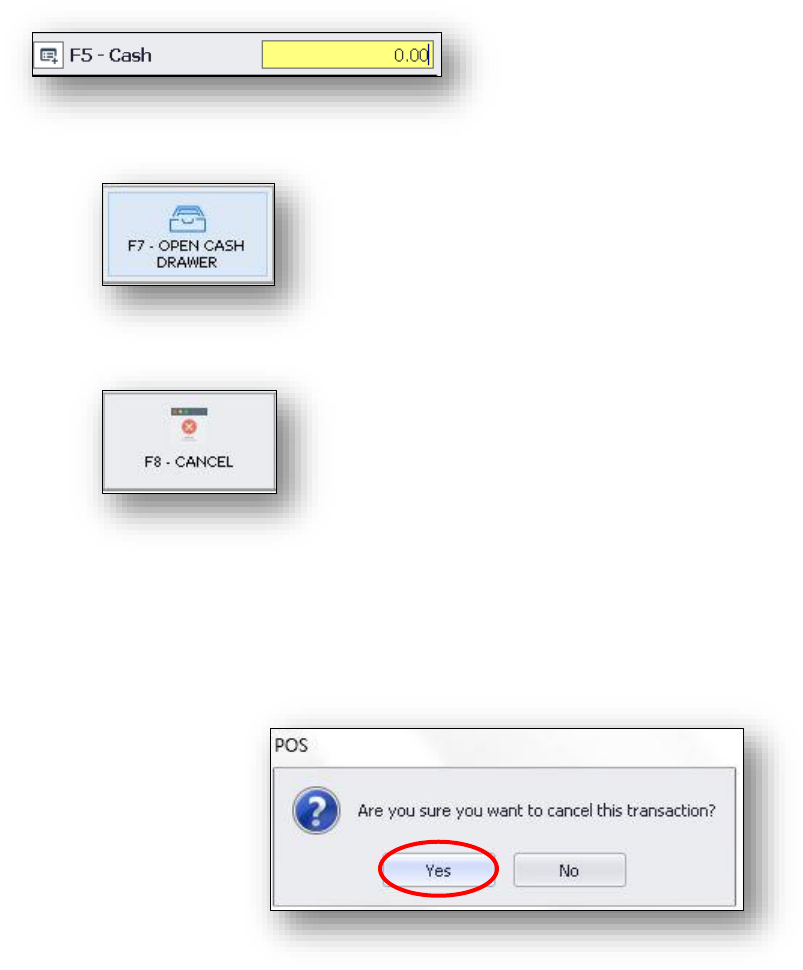
F5 - Cash – Input inside the text box how much
your money
F7- Open Cash Drawer – Press F7 to open the Cash Drawer.
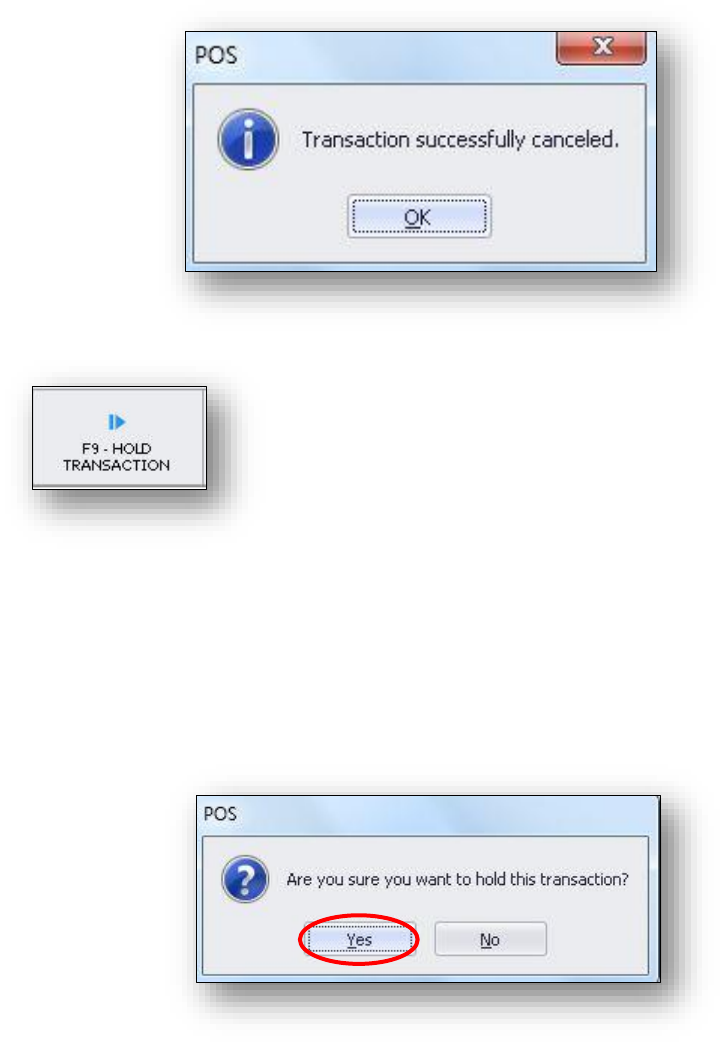
F8 - Cancel – Remove all products.
➢ When you open the Cancel (F8) you see
this prompted window. Then, click yes.
JDEV
Retail POS User Manual Page 26 of 35
Version 2.0
➢ After you click the yes button all the
Transaction successfully canceled. Unlike
the void button deleted the item one at
a time.
F9 - Hold Transaction – Hold the transaction.
➢ Press Hold Transaction (F9) to hold the
purchase item and you will see this
question.
➢ Click Yes.
JDEV
Retail POS User Manual Page 27 of 35
Version 2.0
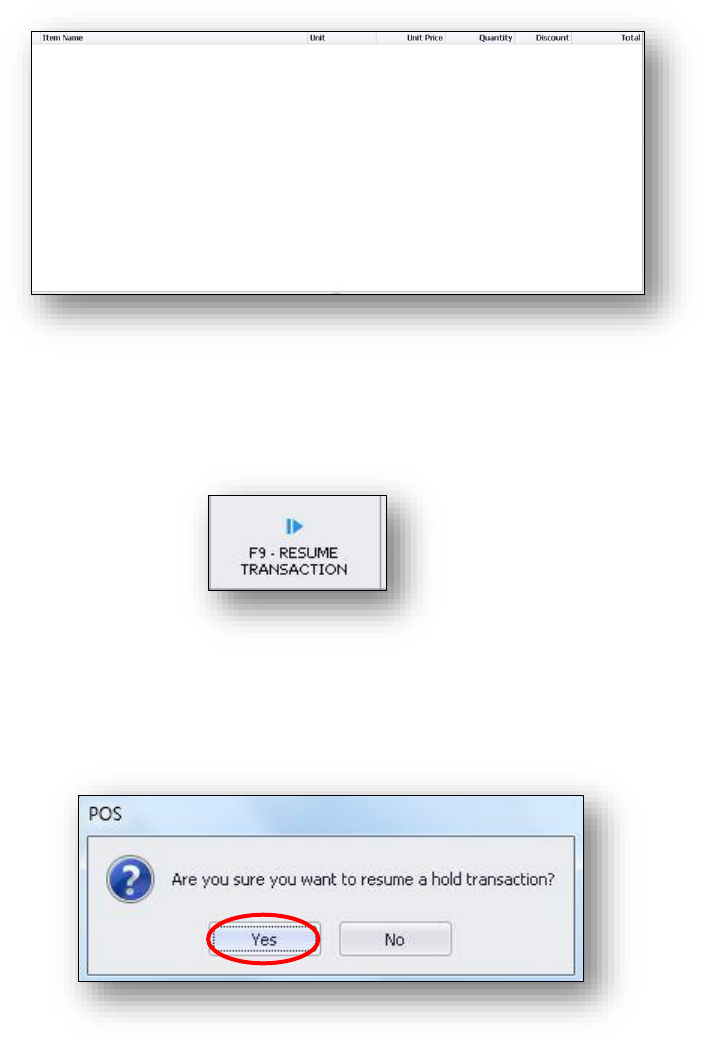
➢ After clicking yes all the all purchase
item are all hidden.
➢ If you want to resume the transaction
again just click F9.
➢ You will see this question, click yes.
JDEV
Retail POS User Manual Page 28 of 35
Version 2.0
➢ After you press the yes button you will
see again the purchase item.
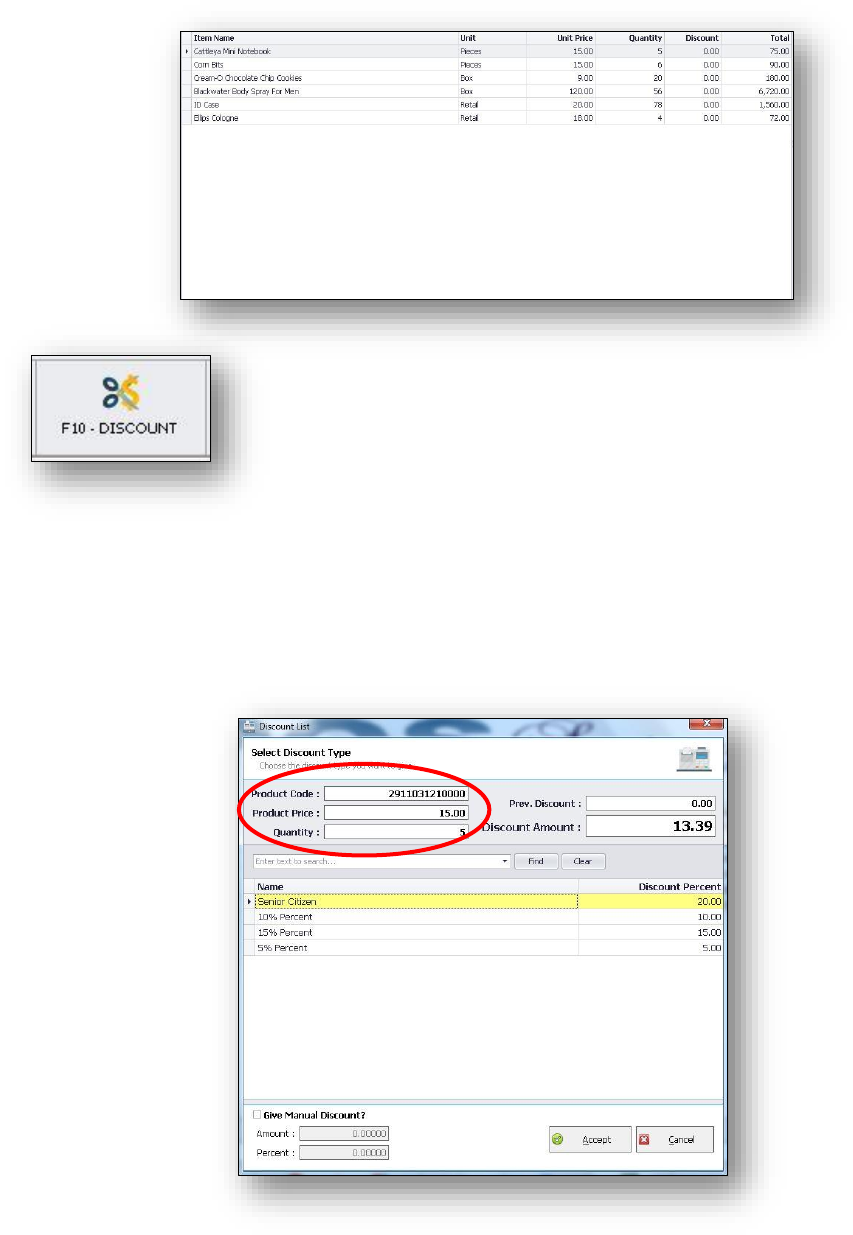
F10 - Discount – Choose the discount type you want to give.
➢ When you open the Discount (F10) you
can see here the different amount of
discount.
➢ Just choose a product you want to give a
discount.

JDEV
Retail POS User Manual Page 29 of 35
Version 2.0
➢ Select Discount Percent you want to
give.
➢ If you want to give manual discount just
check the box at the left side of Give
Manual Discount and then type the
Amount and Percent you want to give.
JDEV
Retail POS User Manual Page 30 of 35
Version 2.0
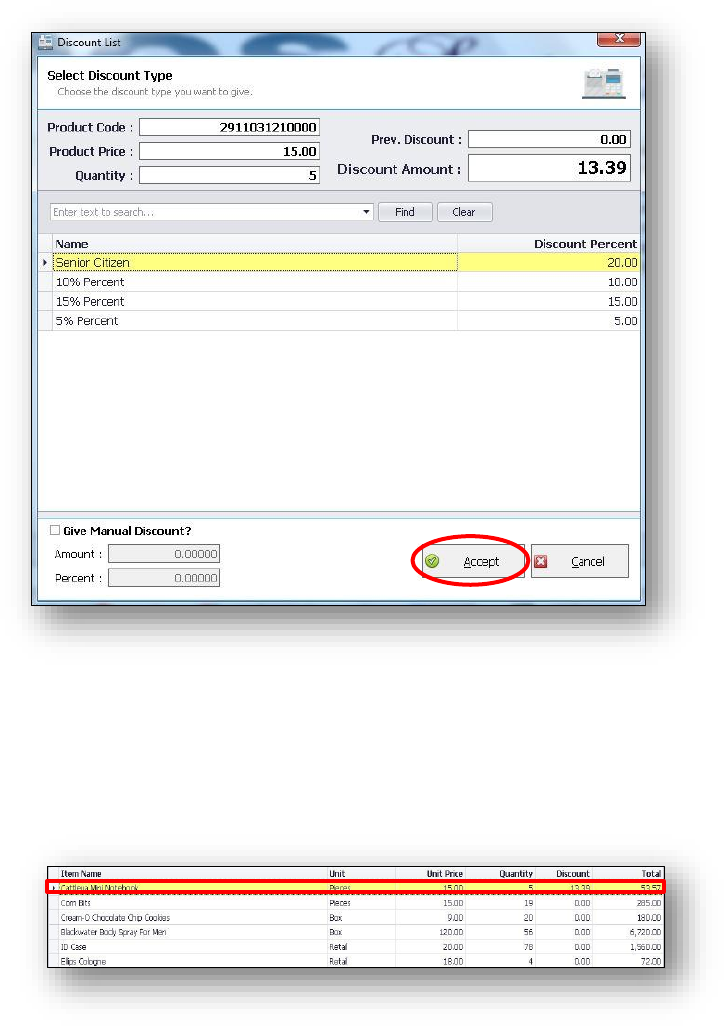
➢ Then, click Accept.
➢ And you will see at the Product Details
the “13.39” Discount you give.
JDEV
Retail POS User Manual Page 31 of 35
Version 2.0
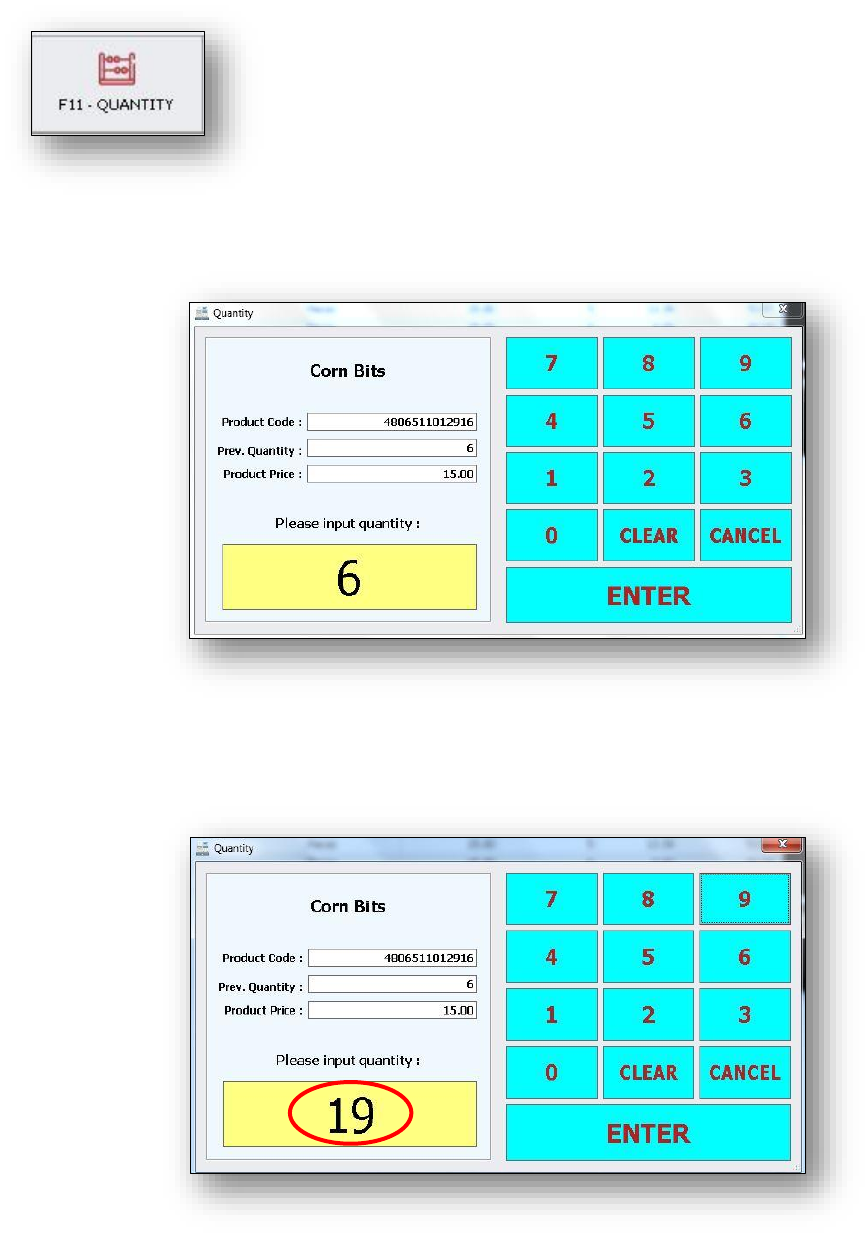
F11 - Quantity – The amount or number of product.
➢ Open Quantity (F11).
➢ Input Quantity.
JDEV
Retail POS User Manual Page 32 of 35
Version 2.0
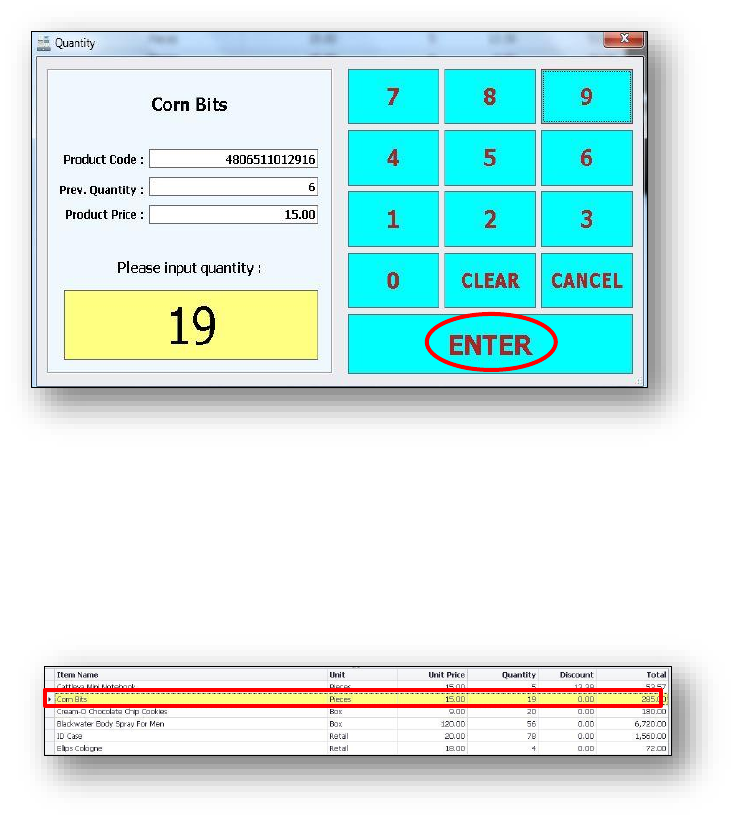
➢ Click Enter.
➢ Look at the Product Details you see the
quantity you inputted.
JDEV
Retail POS User Manual Page 33 of 35
Version 2.0
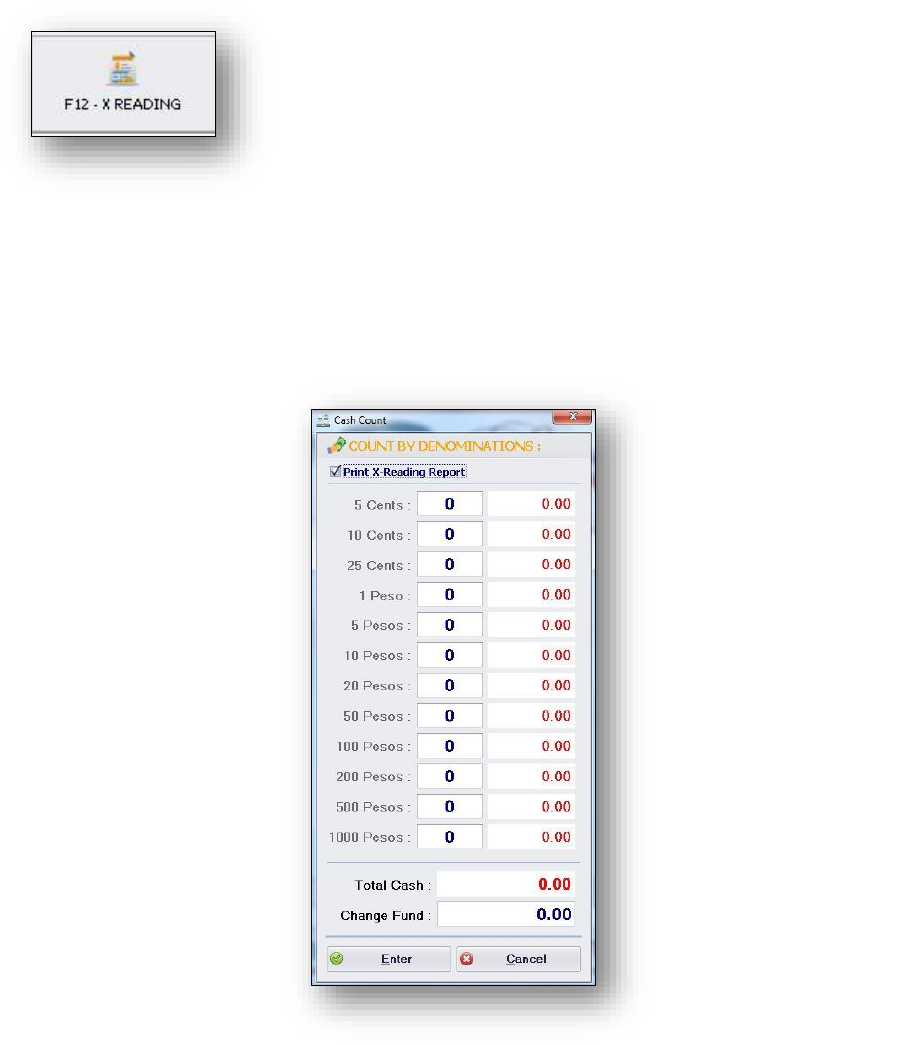
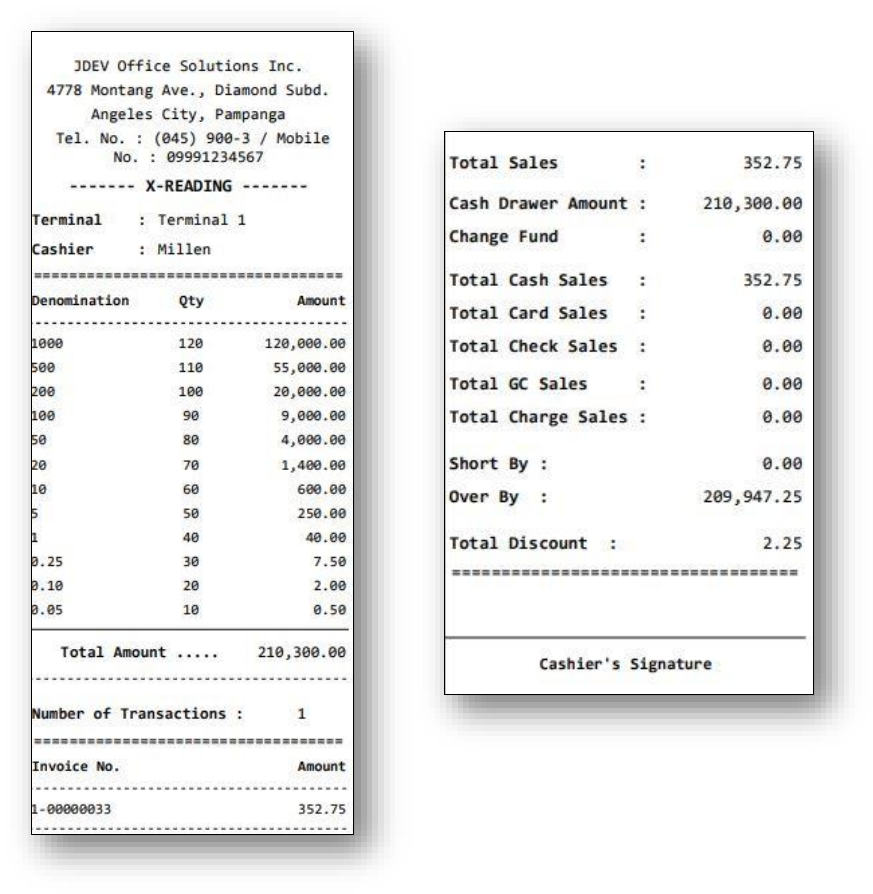
F12 - X Reading – X reading tells you denominations of
sales on that POS by that user.
➢ Open X Reading (F12).
JDEV
Retail POS User Manual Page 34 of 35
Version 2.0
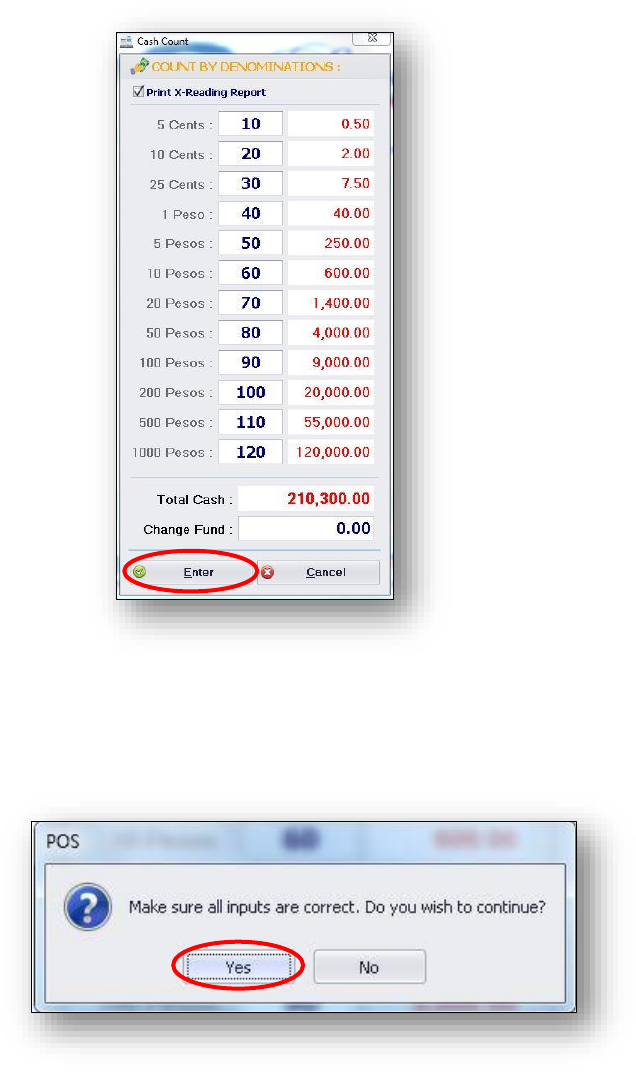
➢ Input the number of cash, and then
press Enter.
➢ After you click the enter button you will
see again prompted window. Always
click the Yes Button.
JDEV
Retail POS User Manual Page 35 of 35
Version 2.0
➢ This is the result after you press the yes
button, the result is print of receipt x
reading.
