Robo Ware Studio Manual 1.2.0 EN
User Manual:
Open the PDF directly: View PDF ![]() .
.
Page Count: 55

RoboWare Studio Manual(www.roboware.me)
Jinan Tonyrobotics Co. Ltd.(www.tonyrobotics.com)
RoboWare Studio Manual
Version:1.2.0
Date:2018-06-20

RoboWare Studio Manual(www.roboware.me)
Jinan Tonyrobotics Co. Ltd.(www.tonyrobotics.com)
CONTENTS
1 INTRODUCTION ........................................................................................................................................... 1
1.1 PURPOSE ....................................................................................................................................................1
1.2 FEATURES ...................................................................................................................................................1
1.3 UPDATES ....................................................................................................................................................2
2 INSTALLATION .............................................................................................................................................. 4
2.1 PREPARATION ............................................................................................................................................4
2.2 INSTALLATION ............................................................................................................................................4
2.3 UPGRADE ...................................................................................................................................................4
2.4 UNINSTALLATION ......................................................................................................................................4
2.5 LANUCH .....................................................................................................................................................5
3 TUTORIAL ........................................................................................................................................................ 6
3.1 LOCAL DEVELOPMENT MODE ...................................................................................................................6
3.1.1 CREATE A WORKSPACE......................................................................................................................6
3.1.2 OPEN/CLOSE A WORKSPACE ............................................................................................................6
3.1.3 CREATE A ROS PACKAGE .................................................................................................................7
3.1.4 ADD A NEW LIBRARY OR EXECUTABLE(NODE) ................................................................................8
3.1.5 ADD C++ SOURCE CODE TO LIBRARY OR EXECUTABLE(NODE) ...................................................9
3.1.6 EDIT ROS PACKAGE DEPENDENCIES ............................................................................................. 11
3.1.7 ADD MESSAGE/SERVICE/ACTION .................................................................................................. 12
3.1.8 BUILD WORKSPACE ......................................................................................................................... 13
3.1.9 BUILD MULTIPLE PACKAGES ........................................................................................................... 14
3.1.10 CLEAN BUILD OUTPUTS................................................................................................................ 17
3.1.11 INTEGRATED TERMINAL................................................................................................................ 17
3.1.12 DEBUG C++ SOURCE CODE ....................................................................................................... 18
3.1.13 DEBUG PYTHON SOURCE CODE .................................................................................................. 21
3.1.14 ADD LAUNCH FILE ........................................................................................................................ 22
3.1.15 EDIT ~/.BASHRC........................................................................................................................... 24
3.2 REMOTE DEVELOPMENT ........................................................................................................................ 24
3.2.1 CONFIGURATION OF SSH LOGIN .................................................................................................. 24
3.2.2 EDIT “/ETC/PROFILE” ON REMOTE COMPUTER ....................................................................... 25
3.2.3 REMOTE CONFIGURATION ............................................................................................................. 26
3.2.4 REMOTE DEPLOYMENT ................................................................................................................... 28
3.2.5 REMOTE BUILD ................................................................................................................................ 29
3.2.6 REMOTE CLEAN............................................................................................................................... 31
3.2.7 REMOTE DEBUG .............................................................................................................................. 31
3.2.8 REMOTE DEPLOY MULTIPLE PACKAGES ......................................................................................... 33
3.2.9 LAUNCH REMOTE FILE .................................................................................................................... 33
3.3 WIZARD FOR CREATING C++/PYTHON NODE OR CLASS .................................................................. 34
3.4 PREFERENCES .......................................................................................................................................... 37
3.5 ROS GRAPHICAL TOOLS ........................................................................................................................ 38
3.5.1 RUN ROSCORE, RVIZ, RQT, RQT-RECONFIGURE, RQT-GRAPH ................................................... 38
3.5.2 DISPLAY ACTIVE TOPICS/NODES/SERVICES AND INSTALLED PACKAGES/MESSAGES/SERVICES 39

RoboWare Studio Manual(www.roboware.me)
Jinan Tonyrobotics Co. Ltd.(www.tonyrobotics.com)
3.5.3 RECORD TO OR PLAY ROSBAG ....................................................................................................... 40
3.6 ROS PACKAGES MANAGER .................................................................................................................. 42
3.7 SNIPPETS ................................................................................................................................................. 45
3.8 VIM MODE............................................................................................................................................... 48
4 FAQ ................................................................................................................................................................ 51
4.1 HOW TO IMPORT AN EXISTING ROS WORKSPACE? ............................................................................ 51
4.2 HOW TO UPGRADE ROBOWARE STUDIO? ........................................................................................... 51
4.3 HOW TO CHANGE THE INTERFACE LANGUAGE? .................................................................................. 51
4.4 “PATH IS NOT ROS WORKSPACE” WARNING WHILE CREATING NEW WORKSPACE. .................. 51
4.5 “LINTER PYLINT IS NOT INSTALLED” WARNING. .............................................................................. 51
4.6 “GIT VERSION IS TOO LOW” WARNING. .......................................................................................... 52
4.7 ROS NODE NAMED “TEST” CANNOT BE BUILT. .............................................................................. 52
4.8 STUCK WHILE BUIDING WORKSPACE. .................................................................................................... 52
4.9 EXPLORER CANNOT BE REFRESHED AUTOMATICALLY WHILE ADDING OR DELETING FILES ............... 52
4.10 CANNOT EDIT/SELECT/COPY. ............................................................................................................. 52
4.11 HOW TO JUMP BACK/FORWARD WHILE EDITING? HOW TO SET KEYBOARD SHORTCUTS? ........... 52
4.12 CANNOT POSITION CMAKELISTS.TXT ERROR WHEN COMPILING. ................................................... 52
4.13 CANNOT EDIT DEPENDENCIES OR CREATE NEW NODE OF META PACKAGE. ................................... 52

RoboWare Studio Manual(www.roboware.me)
1
Jinan Tonyrobotics Co. Ltd.(www.tonyrobotics.com)
1 Introduction
1.1 Purpose
The purpose of this manual is to fully describe the function of RoboWare Studio and its operating
environment. It helps users understand the scope of RoboWare Studio and how to use it, and
provides the necessary information for the maintenance and updating of RoboWare Studio software.
1.2 Features
RoboWare is an IDE environment for ROS development. It makes the ROS development visual,
simple and manageable. It provides ROS workspace management, code editing, building and
debugging. It is an IDE, but it will not be an IDE only!
The main features of RoboWare Studio are:
(1) Easy installation and configuration
With a double-click installation, RoboWare Studio can automatically detect and load ROS
environment without any additional configuration. This “out-of-the-box” feature helps developers
pick it up and figure it out quickly.
(2) ROS-specific assistance, compatible with ROS indigo/jade/kinetic
RoboWare Studio is specially designed for ROS (indigo/jade/kinetic), it provides an intuitive
graphical interface for developers to create ROS workspaces/packages, add source files, create
messages/services/actions, list generated packages/nodes, etc. It can update CMakelists.txt and
package.xml automatically.
(3) Perfect source-coding experience
RoboWare Studio provides important features of a modern IDE, such as syntax highlighting,
code completion, go to definition, peek definition, diagnostic display, etc. It supports integrated
terminal, you can open multiple terminals simultaneously. It also supports Vim mode.
(4) C++ and Python debugger
RoboWare Studio support “Release”, “Debug” and “Isolated” build options. It debugs C++ and
Python codes right from the editor, with break points, call stacks and an interactive console. It
displays ROS packages and nodes in the interface.
(5) Remote deploy and debug
RoboWare Studio can deploy local codes to remote computers, which can be X86 or ARM
architecture, which makes users connect to remote computes, build and debug remote codes.
(6) Git built-in
RoboWare Studio working with Git has never been easier. It reviews diffs, stage files, and make
commits right from the editor, and push and pull from any hosted Git service.
(7) Follow ROS conventions
RoboWare Studio provides an assistant guide to standardized operation for ROS developers,
from creating nodes, defining messages, to putting files in a specific path, etc. RoboWare Studio
can help to develop high quality, well organized ROS packages.

RoboWare Studio Manual(www.roboware.me)
2
Jinan Tonyrobotics Co. Ltd.(www.tonyrobotics.com)
1.3 Updates
Version 1.2.0
1.Remove RoboWare Designer module from Studio;
Version 1.1.0
1.Add catkin_tools build option;
2.To ensure the normal use of catkin_tools, for the previous version of the ROS workspace,
you must first remove the tasks.json file in .vscode folder of workspace root, then close and reopen
the workspace;
3.Fixed some bugs;
Version 1.0.2
1.In order to guarantee a compile error positioning function, for the previous version of the
ROS workspace, you must first remove the tasks.json file in .vscode folder of workspace root, then
close and reopen the workspace;
2.Optimize remote deploy speed;
3.Add cmakelists.txt error positioning function;
4.Fix package depends automatic modification problem in package.xml;
Version 1.0.1
1.Add dependencies when creating package;
2.Fix catkin package editing problem;
Version 1.0.0
1.Integrate with RoboWare Designer;
2.Add code format function using clang-format;
3.Add catkin dependencies edit function for packages;
Version 0.7.2
1.Add rosbag loop play function;
2.Fix remote debugging abnormal exit problem;
3.Fix compile error problem under Kinetic;
Version 0.7.1
1.Use non-Vim edit mode by default;
2.Add remote .bashrc editing function;
3.Add rqt command to the menu;
4.Update Python syntax plugin;
5.Update debug plugin;
6.Automatically switch debug mode based on build options;
Version 0.7.0
1.Adopt a brand new scheme for C++ code completion;
2.Add remote roscore command to the menu;
3.Fixed some bugs;
Version 0.6.0
1.Add rosbag tool: record and play function;
2.Using VS Code v1.12.2;
3.Improved C++ code completion experience;
4.Fixed some bugs;

RoboWare Studio Manual(www.roboware.me)
3
Jinan Tonyrobotics Co. Ltd.(www.tonyrobotics.com)
Version 0.5.1
1.Provides Vim edit mode;
2.Add ROS node and C++ class wizard;
3.Synchronization of remote and local build directory;
4.Clean up build results remotely;
5.Fixed some bugs;
Version 0.5.0
1.optimize structure, decrease the size of installation package;
2.Using VS Code v1.10.1;
3.Move ROS package tools to left Activity Bar;
4.Can mark un-active ROS package in Explorer;
5.Add C++ and Python snippets;
6.Fixed some bugs;
Version 0.4.2
1.Automatically update CMakeLists.txt when add/remove source files;
2.Specify one or more packages to build;
3.Specify one or more packages to remote deploy, build;
4.Start .launch file remotely;
5.Add .bashrc menu, support one-key openning of .bashrc file ;
6.Clean up build results;
7.Fixed some bugs;
Version 0.4.1
1.Add 32-bit version of RoboWare Studio;
2.Add package installation function in ROS package manager;
3.Add code completion function with Clang;
4.Using VS Code v1.8.1;
5.Fixed some bugs;
Version 0.4.0
1.add ROS commands viewer;
2.add ROS package manager;
3.add language settings menu;
4.Fixed some bugs;
Version 0.3.1
1.Using VS Code v1.7.2;
2.Add build options list in the Explorer;
3.Add "isolated" build mode;
4.Achieve remote deployment, build and debug;
5.Increased CMakeLists.txt syntax support;
6.Run ROS commands in the integrated terminal;
7.Add rqt_reconfigure and rqt_graph commands to the menu;
8.Graphical user configuration interface;
9.Fixed some bugs;
RoboWare Studio Manual(www.roboware.me)
4
Jinan Tonyrobotics Co. Ltd.(www.tonyrobotics.com)
2 Installation
2.1 Preparation
Prior to installing, take note of the details of your platform and make sure that:
1. Your operating system is Ubuntu.
2. ROS is configured appropriately (Please refer to ROS official instructions
here[http://wiki.ros.org/kinetic/Installation/Ubuntu]).
3. You can build ROS packages using catkin_make. (You may need to run
$ sudo apt-get install build-essential
to install build tools.)
4. Install “pylint” to support Python debugging.
$ sudo apt-get install python-pip
$ sudo python -m pip install pylint
5. Install clang-format-3.8 or higher version to support code format function.
$ sudo apt-get install clang-format-3.8
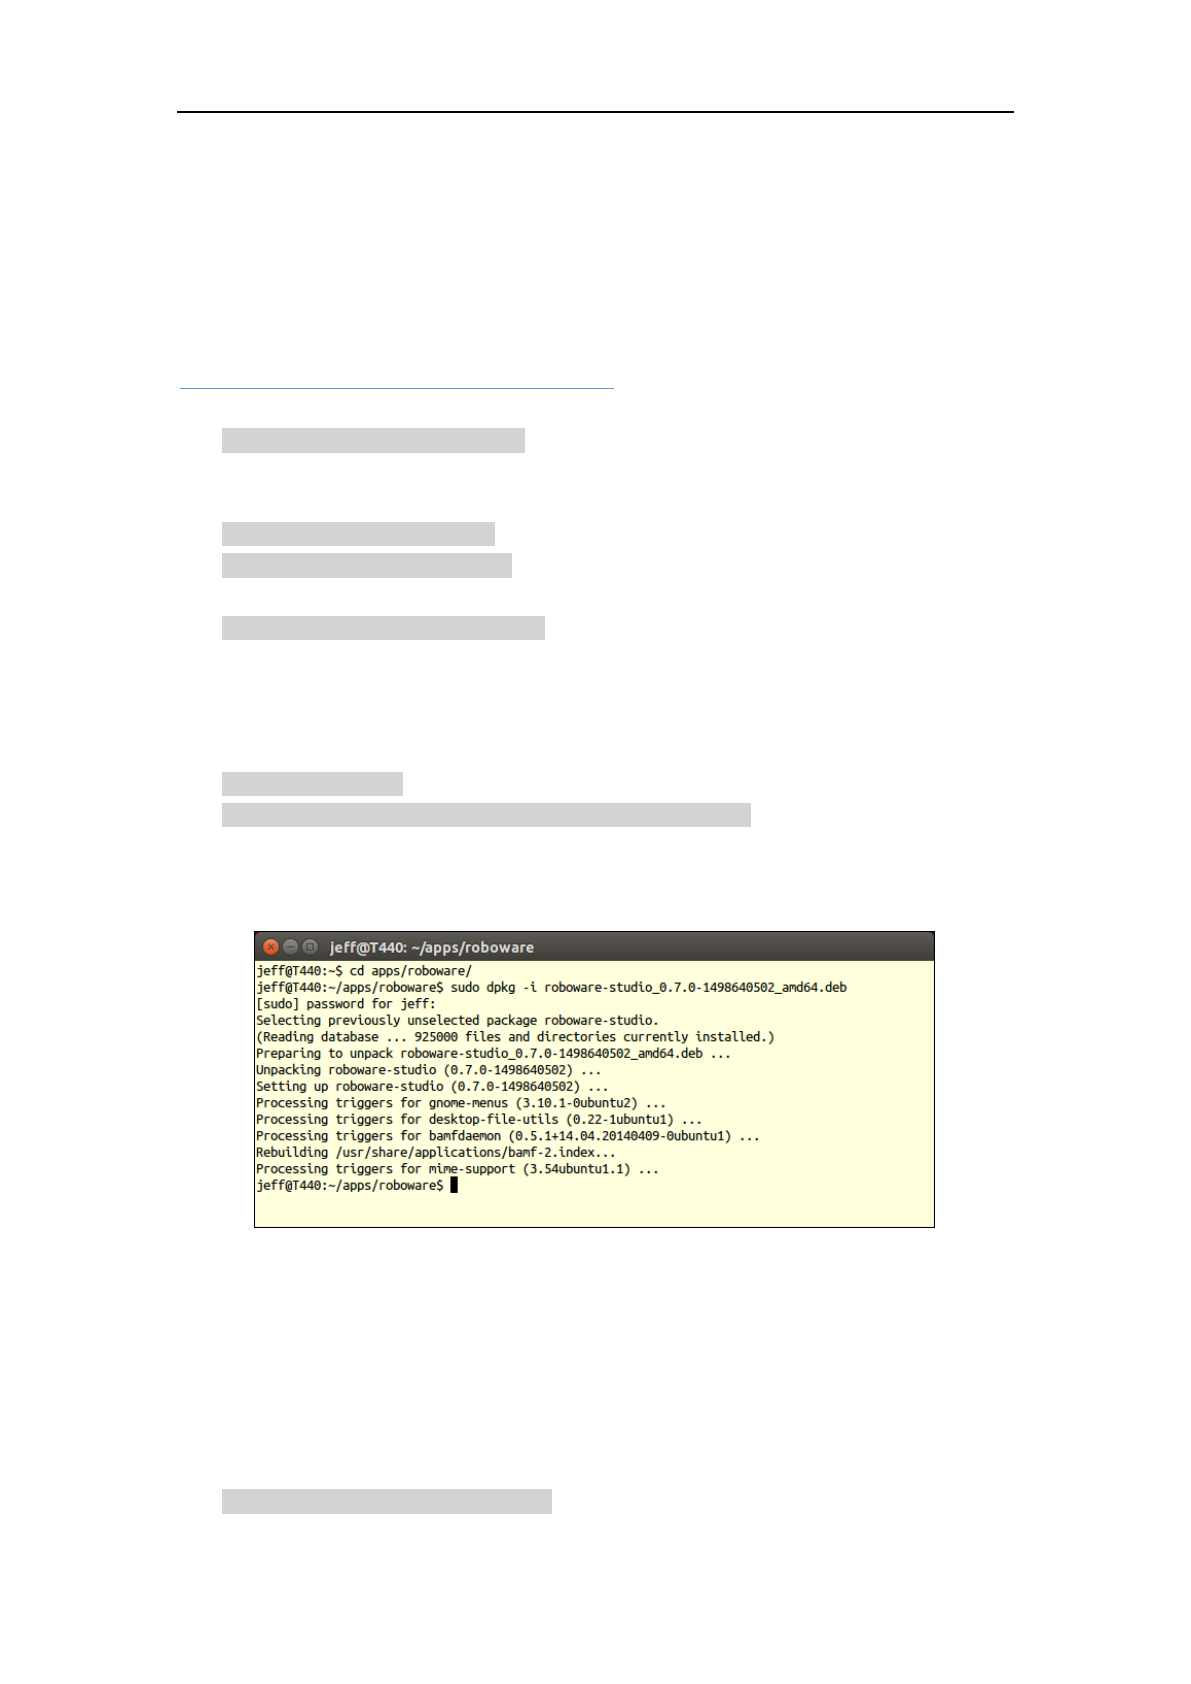
2.2 Installation
Download the latest version of RoboWare Studio and install it easily by double click the deb file or
by the following commands in a terminal:
$ cd /path/to/deb/file/
$ sudo dpkg -i roboware-studio_<version>_<architecture>.deb
Replace <version> and <architecture> with the file information (Tips: after typing “sudo dpkg
-i ”, press Tab to automatically complete the file name). After installation, RoboWare Studio
automatically detects and loads ROS environment without additional configuration.
Figure 2-1 Installation in terminal
2.3 Upgrade
Download the latest version of RoboWare Studio installation file and install, the previous version
will be replaced automatically.
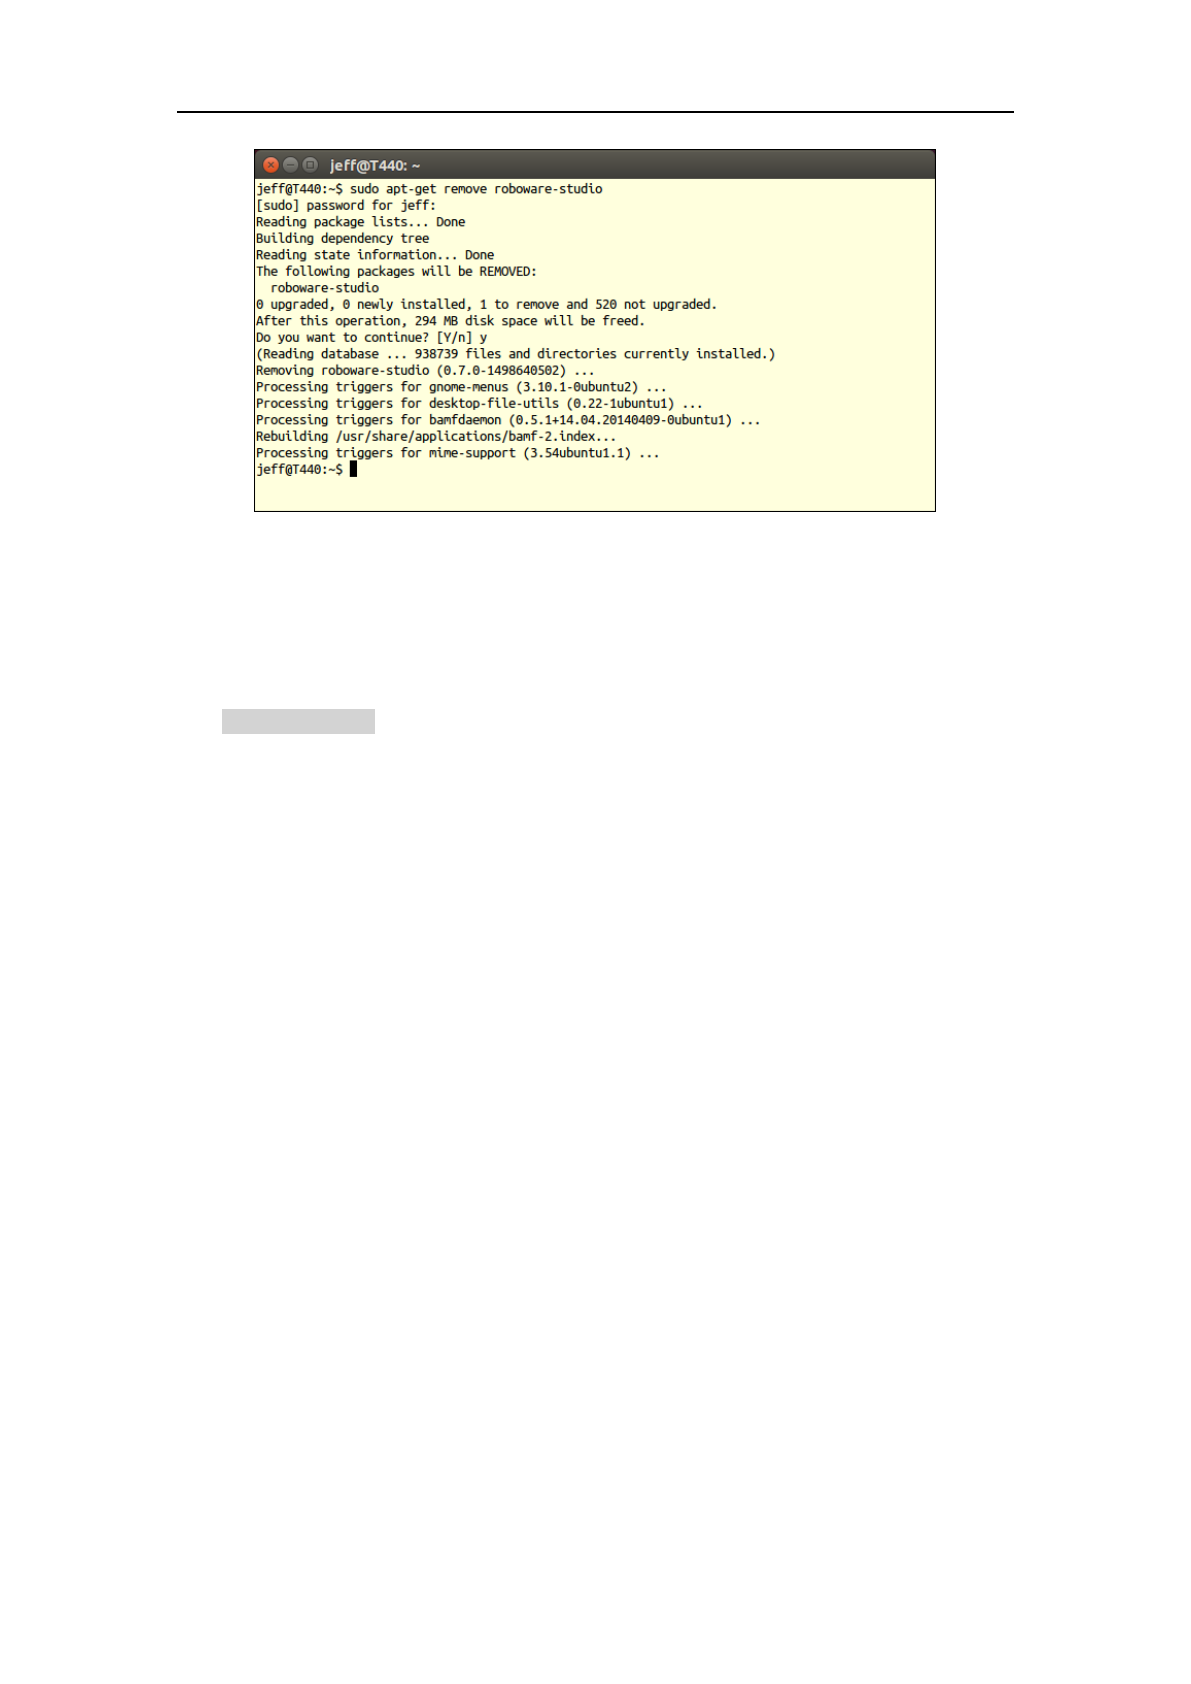
2.4 Uninstallation
Use the following commands to uninstall RoboWare Studio:
$ sudo apt-get remove roboware-studio
RoboWare Studio Manual(www.roboware.me)
5
Jinan Tonyrobotics Co. Ltd.(www.tonyrobotics.com)
Figure 2-2 Uninstallation
2.5 Lanuch
Way #1 (recommended): Click the Ubuntu logo in the upper-left corner of the screen to activate
Dash, search for “roboware studio”, click and launch.
Way #2: Start the application from terminal by executing:
$ roboware-studio

RoboWare Studio Manual(www.roboware.me)
6
Jinan Tonyrobotics Co. Ltd.(www.tonyrobotics.com)
3 Tutorial
3.1 Local development mode
3.1.1 Create a workspace
In welcome panel, click “New Workspace” button (or select “File” - “New Workspace”), select a
directory and type workspace name, for example “catkin_ws”, a catkin workspace named
“catkin_ws” will be created and displayed in the explorer window.
Figure 3-1 RoboWare Studio welcome panel
Figure 3-2 catkin_ws workspace
3.1.2 Open/close a workspace
In welcome panel, click the “Open Workspace” button (or select “File” - “Open Workspace”),
choose the workspace directory and it will be opened and displayed in the explorer window.
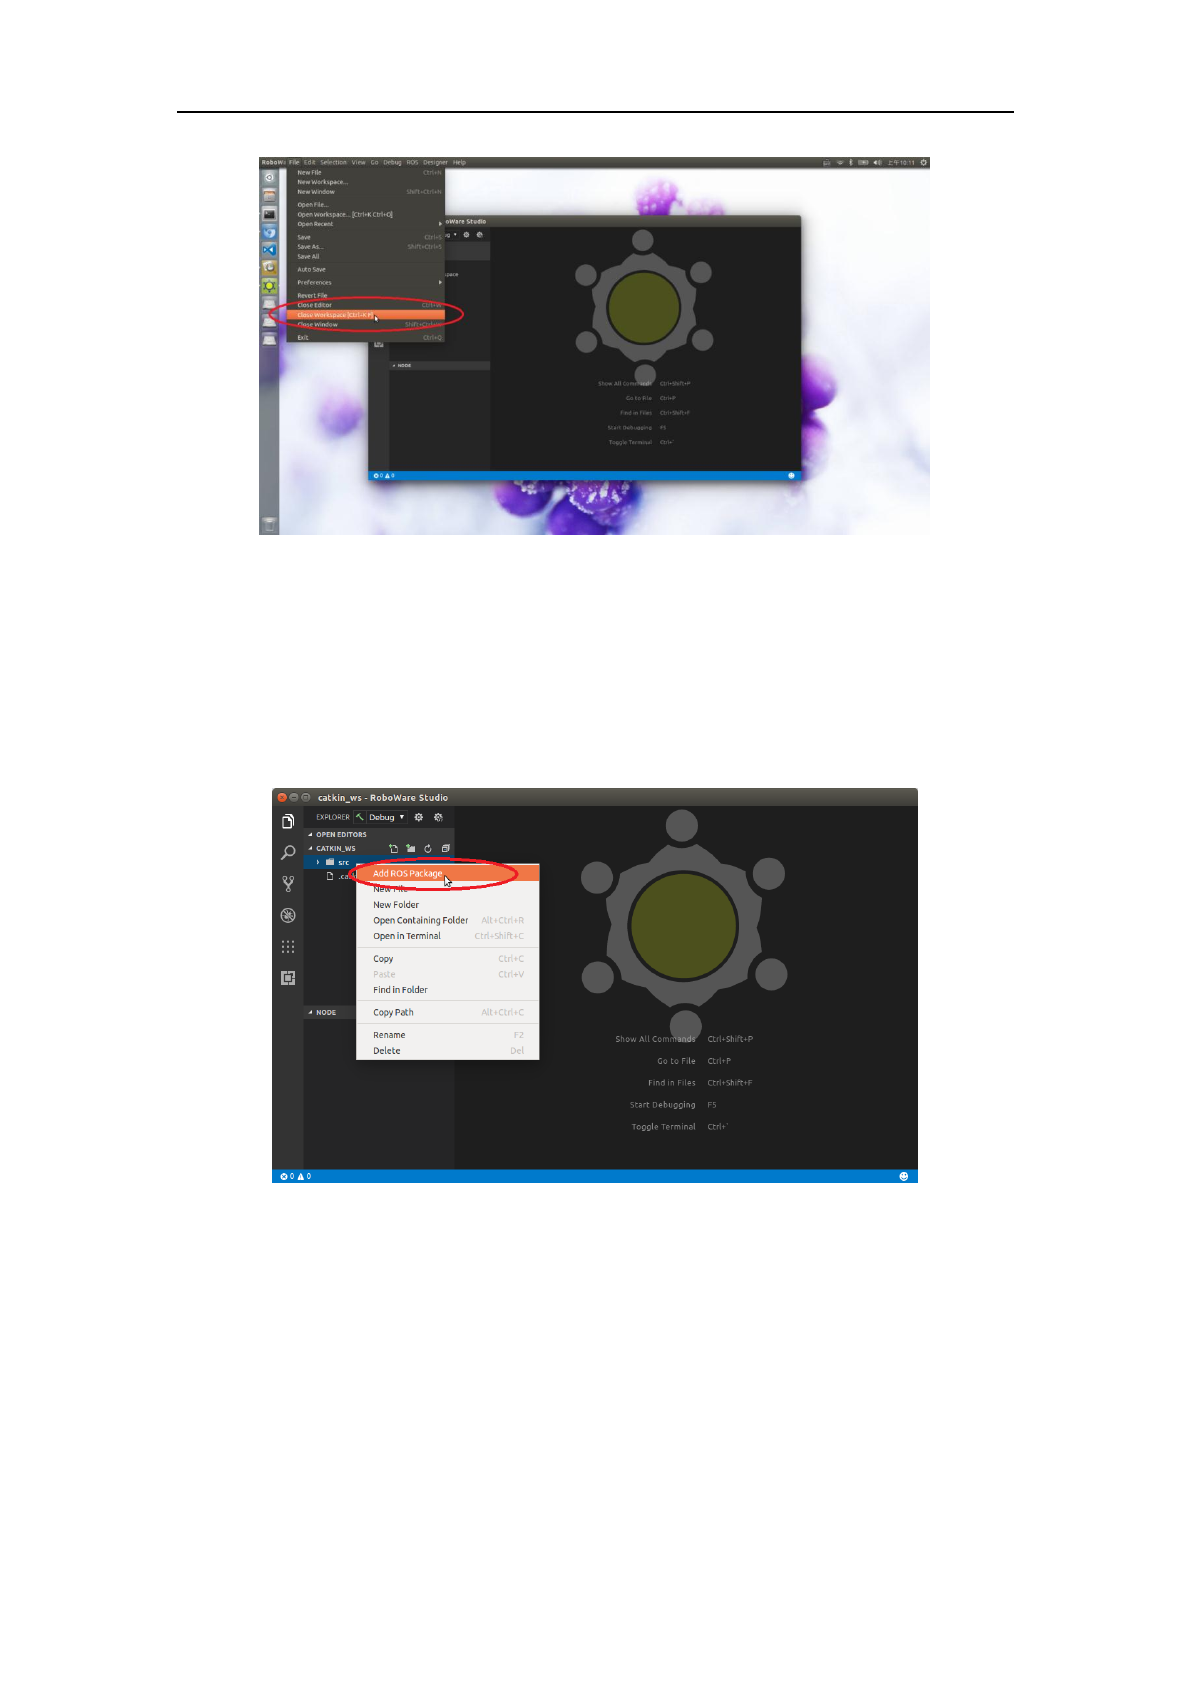
Select “File” - “Close Workspace”, RoboWare Studio will close the current workspace and
return back to welcome panel.
RoboWare Studio Manual(www.roboware.me)
7
Jinan Tonyrobotics Co. Ltd.(www.tonyrobotics.com)
Figure 3-3 Close workspace
3.1.3 Create a ROS package
Right click on “src” folder of ROS workspace.
Select “Add ROS Package”, type package name, for example:
“my_package”
A ROS package named “my_package” will be created.
RoboWare Studio Manual(www.roboware.me)
8
Jinan Tonyrobotics Co. Ltd.(www.tonyrobotics.com)
Figure 3-4 Create a package named “my_package” with dependencies “roscpp” and “std_msgs”
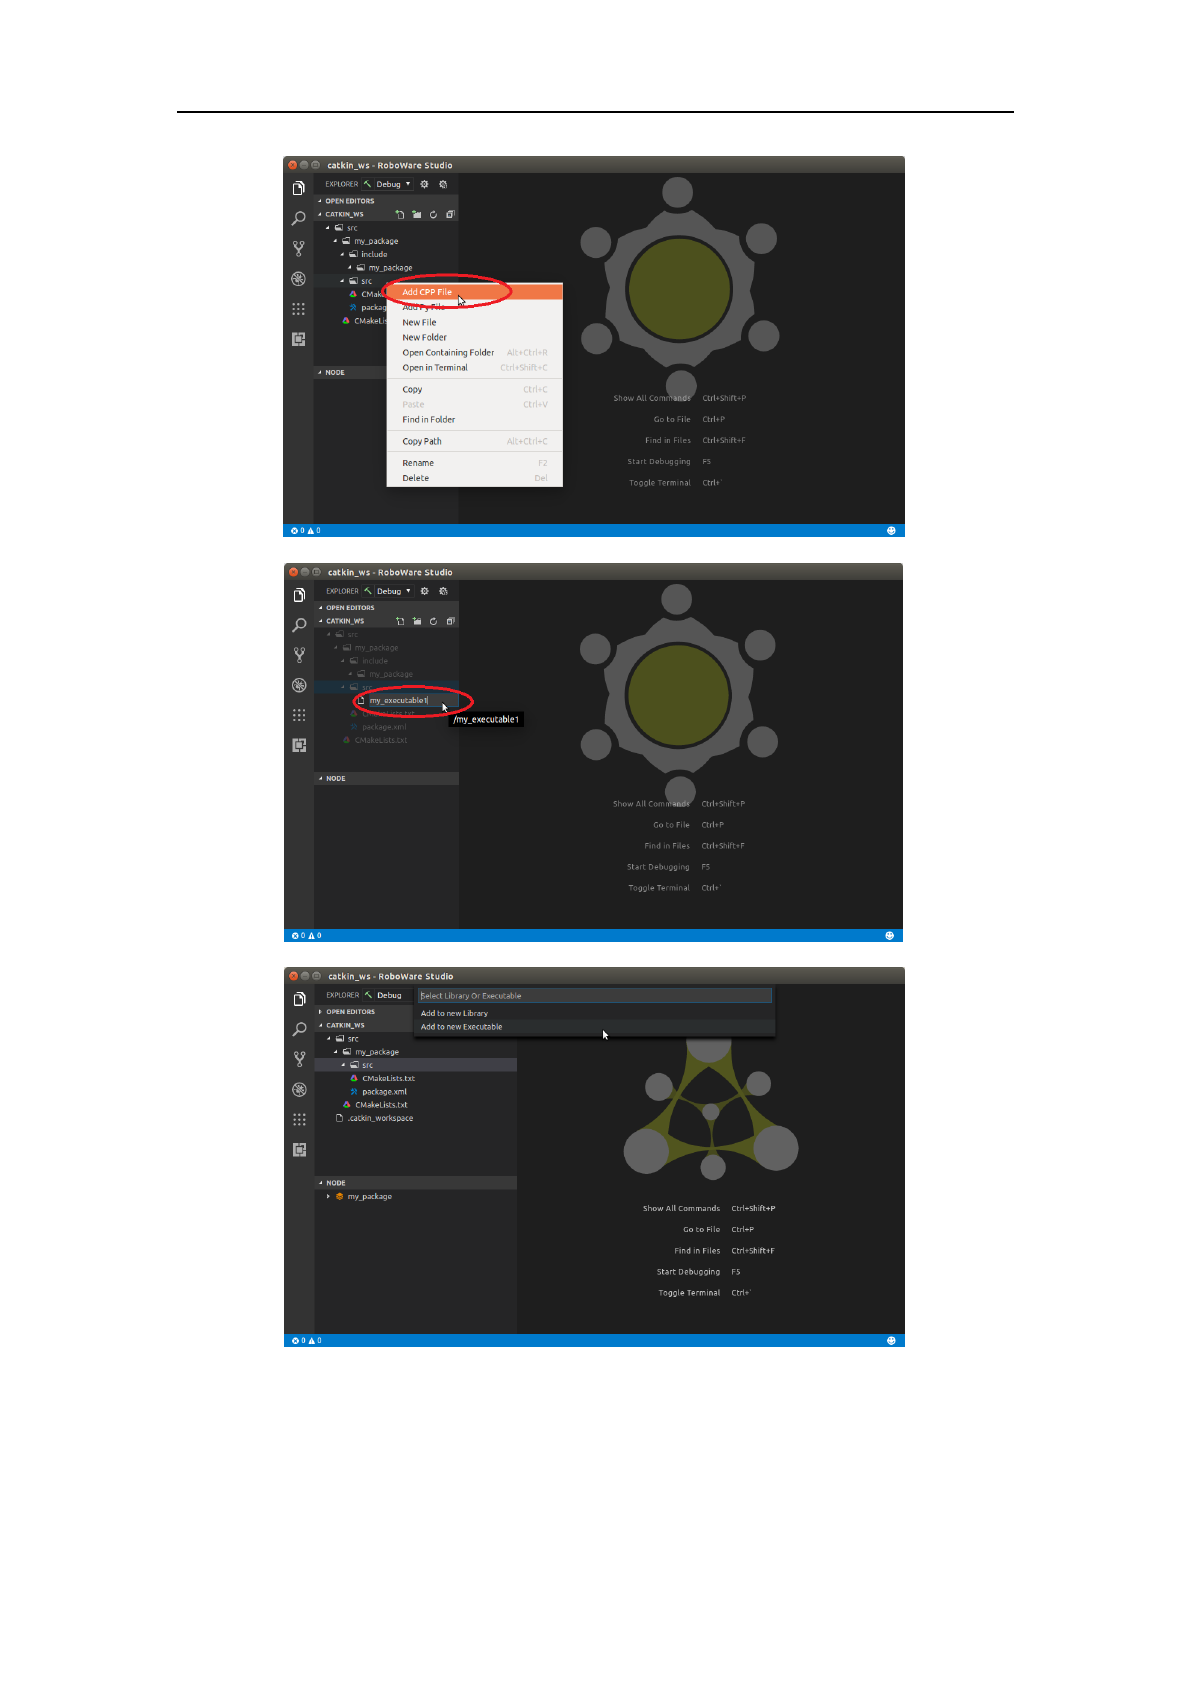
3.1.4 Add a new library or executable(Node)
Right click on package name (“my_package” here), choose “Add Src Folder” to create an
empty “src” directory.
Right click on “src” to add a cpp file, or right click on “include/my_package/” to add a header
file. After typing the file name, select an item from the list as follows:
• Add to New Library
• Add to New Executable
A library or an executable with the same name of the source file will be created.
RoboWare Studio Manual(www.roboware.me)
9
Jinan Tonyrobotics Co. Ltd.(www.tonyrobotics.com)
Figure 3-5 Create new CPP source file and add it to an executable(Node)
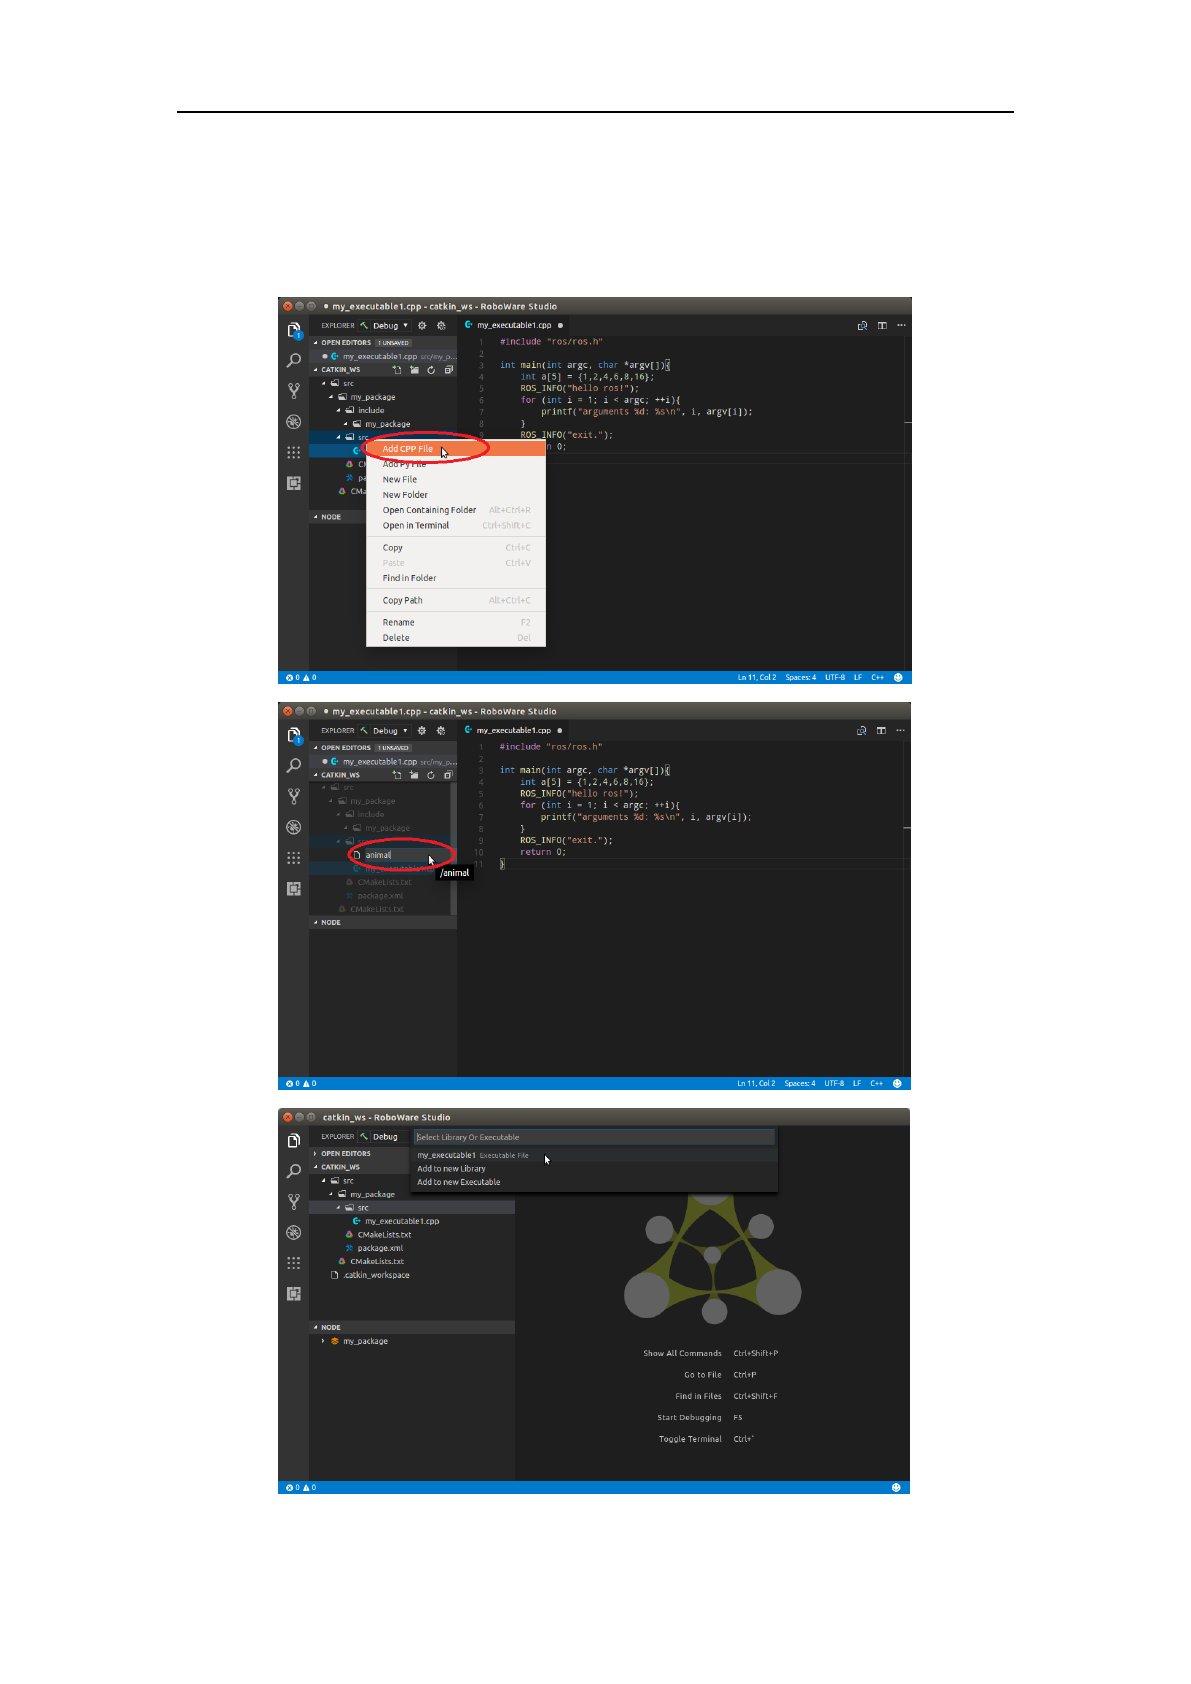
3.1.5 Add C++ source code to library or executable(Node)
Right click on “src” or “include/my_package/”. After typing the file name, select an item from
the list as follows:
• your_library_name1
RoboWare Studio Manual(www.roboware.me)
10
Jinan Tonyrobotics Co. Ltd.(www.tonyrobotics.com)
• your_library_name2
• your_executable_name1
• Add to New Library
• Add to New Executable
The source code will be added to corresponding library or executable. CMakeLists.txt will be
updated automatically.
Figure 3-6 Create a CPP file and add it to “my_executable1”

RoboWare Studio Manual(www.roboware.me)
11
Jinan Tonyrobotics Co. Ltd.(www.tonyrobotics.com)
Figure 3-7 CMakeLists.txt is updated automatically
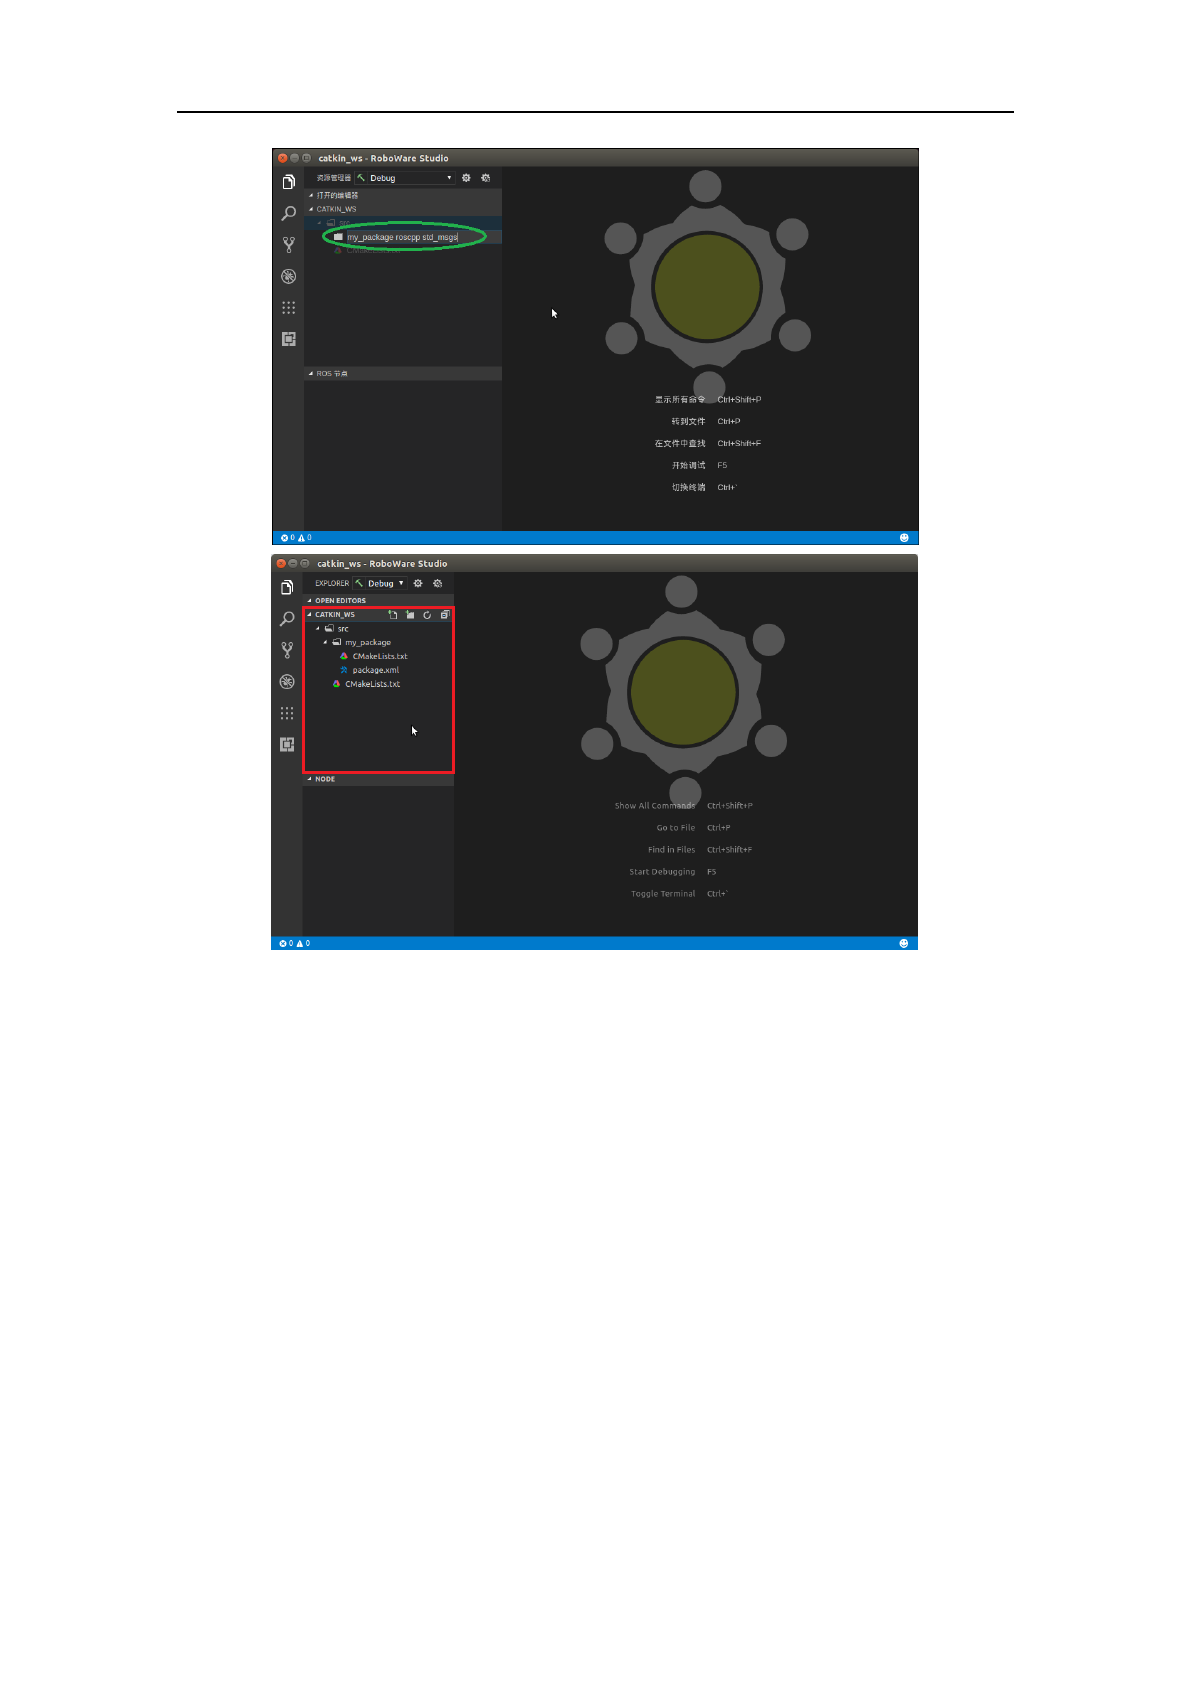
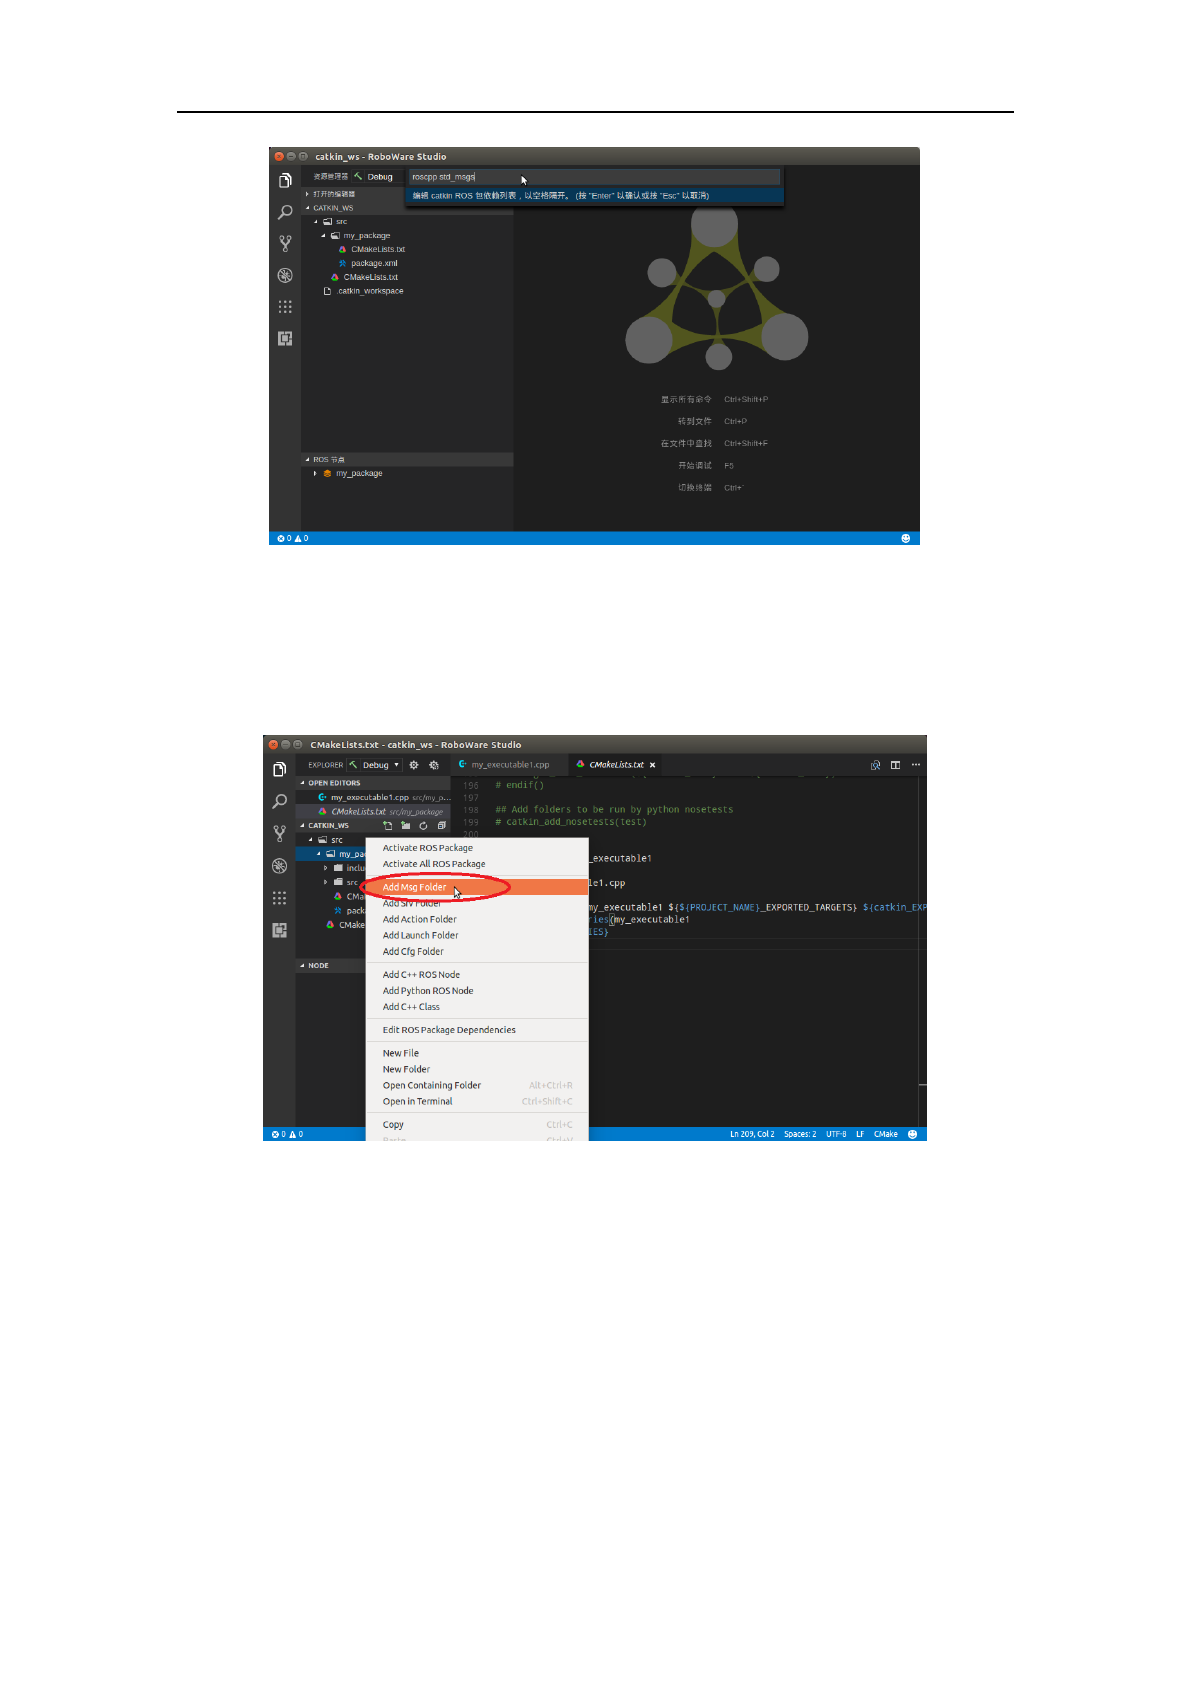
3.1.6 Edit ROS package dependencies
Right click on package name (“my_package” here), choose “Edit ROS Package Dependencies”,
and type the dependencies of this package, for example:
“roscpp std_msgs”
Press “Enter”, then “roscpp” and “std_msgs” will be added as dependencies of “my_package”. For
more dependencies, just use space to separate them.
RoboWare Studio Manual(www.roboware.me)
12
Jinan Tonyrobotics Co. Ltd.(www.tonyrobotics.com)
Figure 3-8 Edit ROS package dependencies
3.1.7 Add message/service/action
Right click on “my_package” to create msg/srv/action folder.
Right click on corresponding folder and add message/service/action file respectively.
CMakeLists.txt and package.xml file will be updated automatically.
Figure 3-9 Create “msg” folder
RoboWare Studio Manual(www.roboware.me)
13
Jinan Tonyrobotics Co. Ltd.(www.tonyrobotics.com)
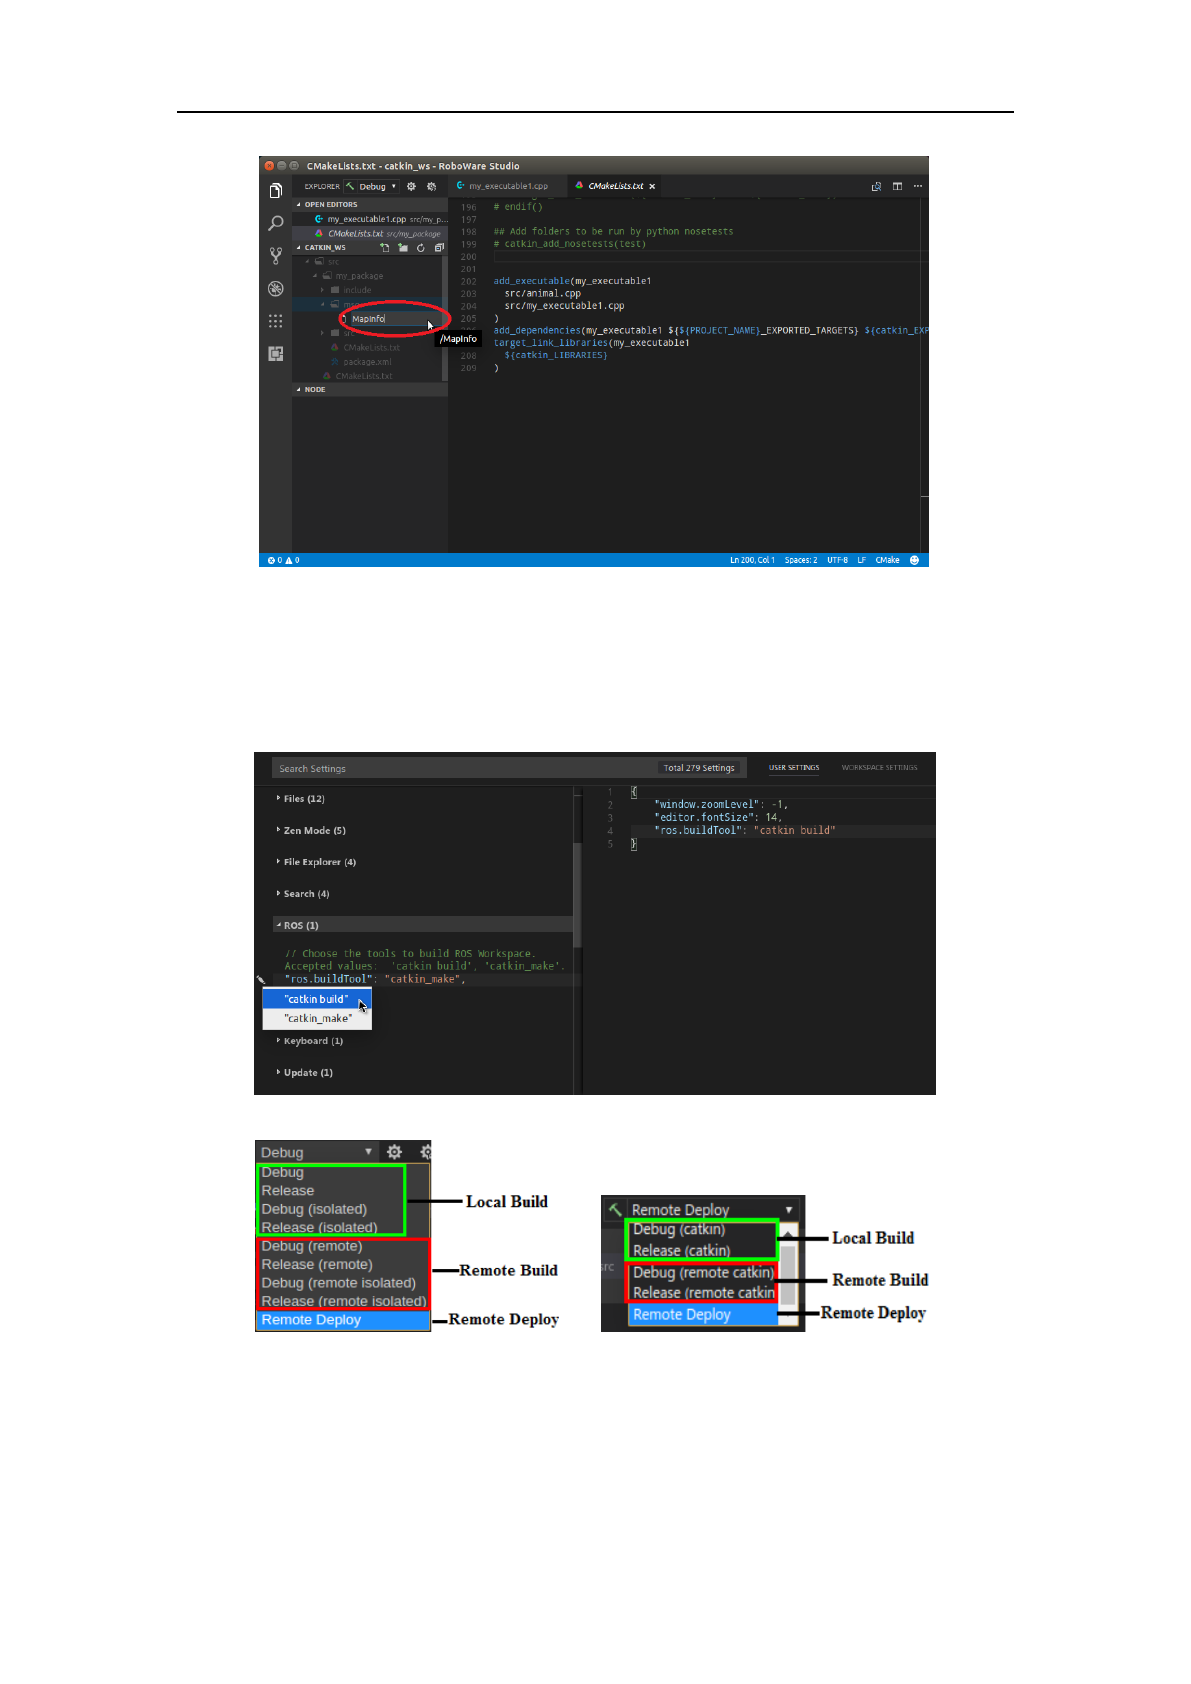
Figure 3-10 Create a message file named “MapInfo”
3.1.8 Build workspace
RoboWare Studio support “catkin_make” and “catkin_tools” build mode.
Select “File – Preferences - Settings” to open configuration page, click the icon on the left of
“ROS - ros.buildTool” item and choose build mode.
“catkin make” and “catkin_tools” build mode
catkin make catkin_tools
Figure 3-11 Build options
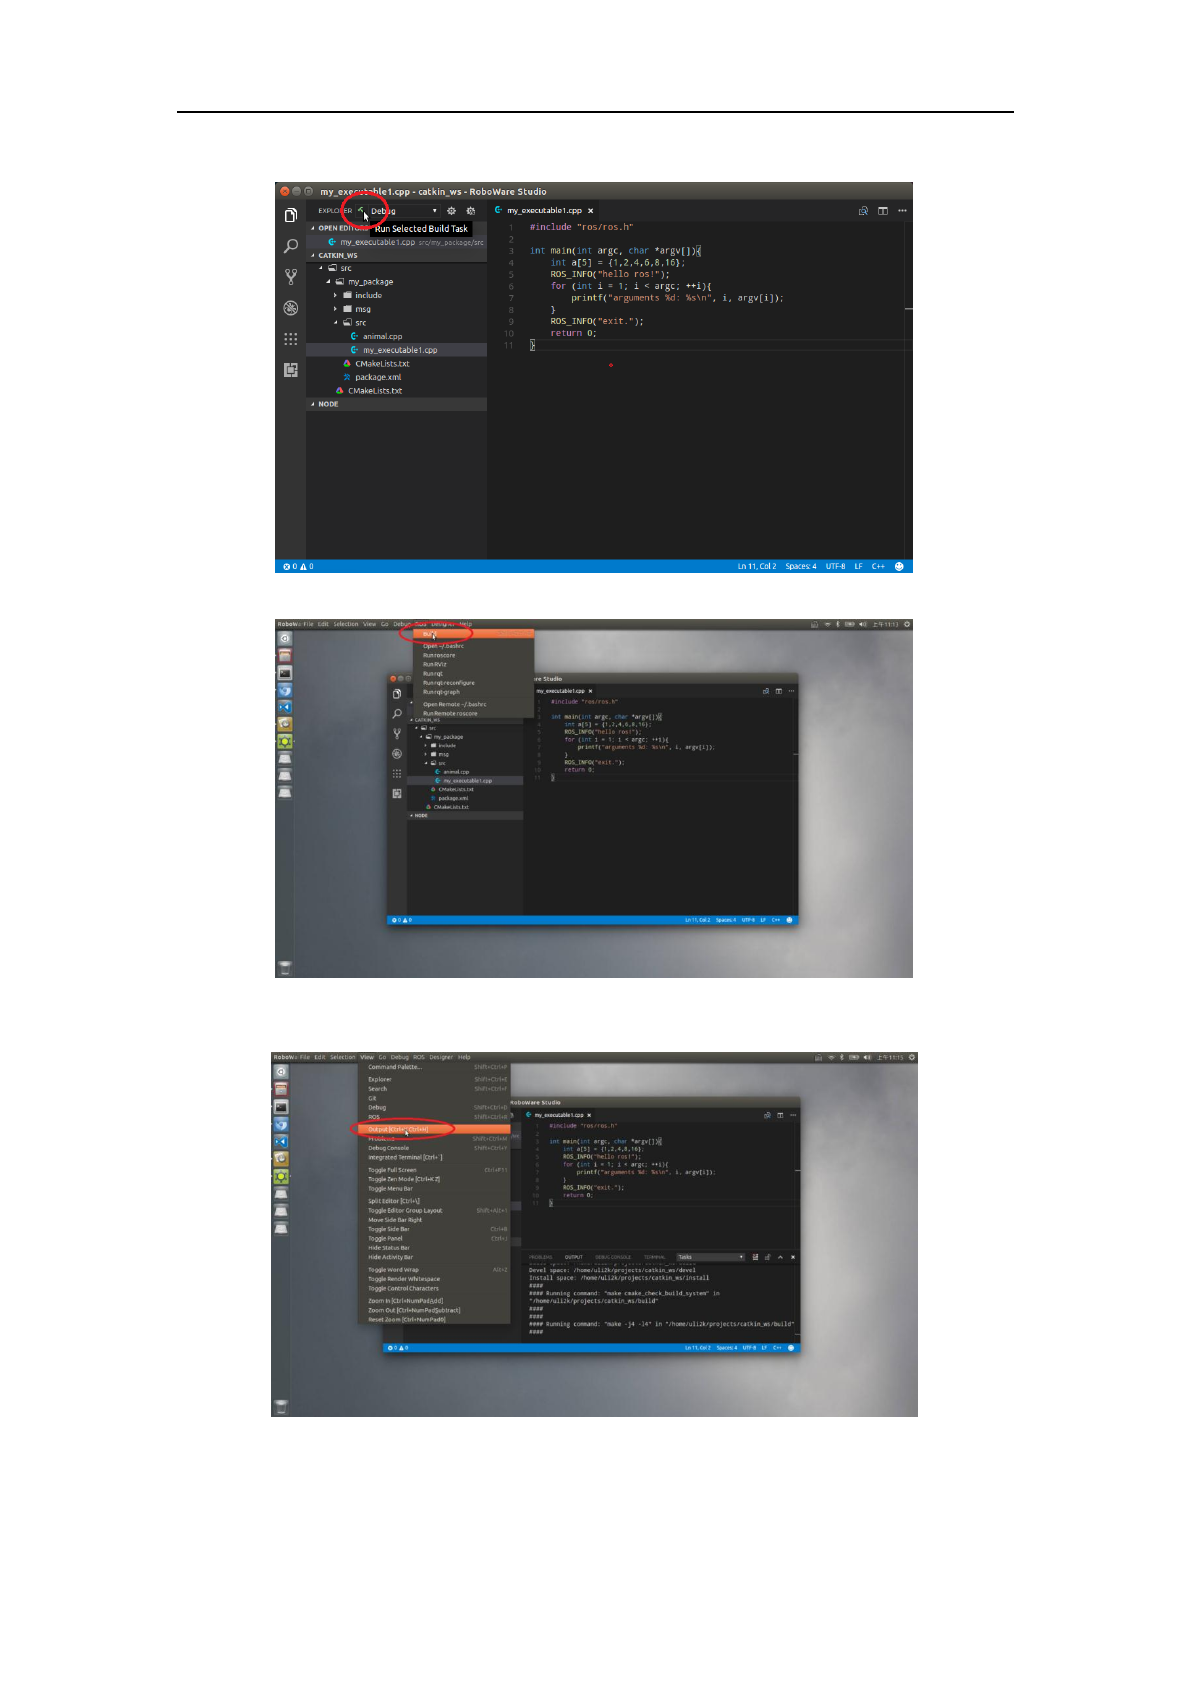
Click the “Run” icon in the left (or select “ROS” - “Build” in the menu) to build the workspace.
Select “View” - “Output” to see build outputs. In output window, “ctrl + click” to track source code
errors.
Once the workspace is built, the “Node” section at the lower part of Explorer window will
RoboWare Studio Manual(www.roboware.me)
14
Jinan Tonyrobotics Co. Ltd.(www.tonyrobotics.com)
display all packages/nodes in the current workspace.
Way #1: Click “Run” icon
Way #2: Select “ROS” - “Build” in the menu
Figure 3-12 Build ROS package
Figure 3-13 View build outputs
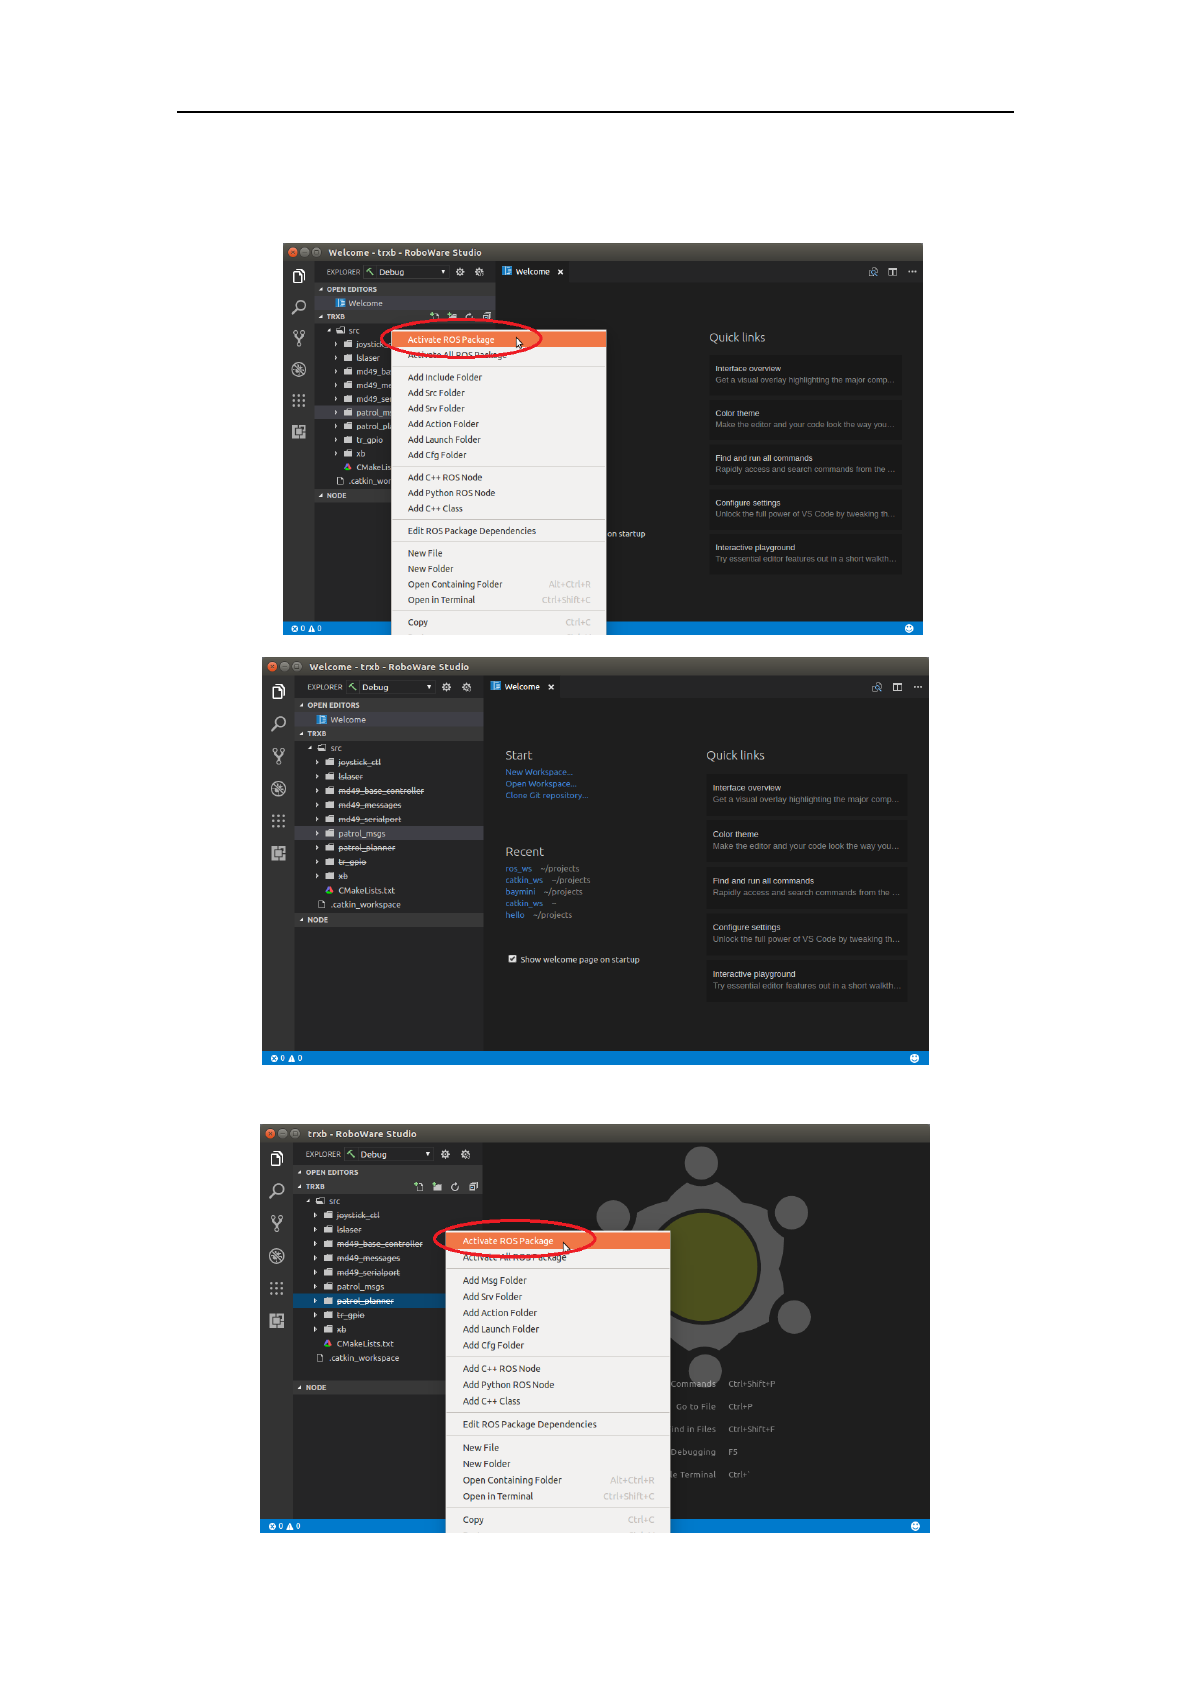
3.1.9 Build multiple packages
By default, clicking “Build” button will build all packages in current workspace. If we want to
RoboWare Studio Manual(www.roboware.me)
15
Jinan Tonyrobotics Co. Ltd.(www.tonyrobotics.com)
build multiple packages, we can right-click package name, select “Activate ROS Package” to set it
to activate it. One or more packages can be activated in this way. Now, the inactive packages will
be shown as strikethrough, they will not be built when wen click “Build” button.
Activate “patrol_msgs” package
RoboWare Studio Manual(www.roboware.me)
16
Jinan Tonyrobotics Co. Ltd.(www.tonyrobotics.com)
Activate “patrol_planner” package
Figure 3-14 Activate ROS packages
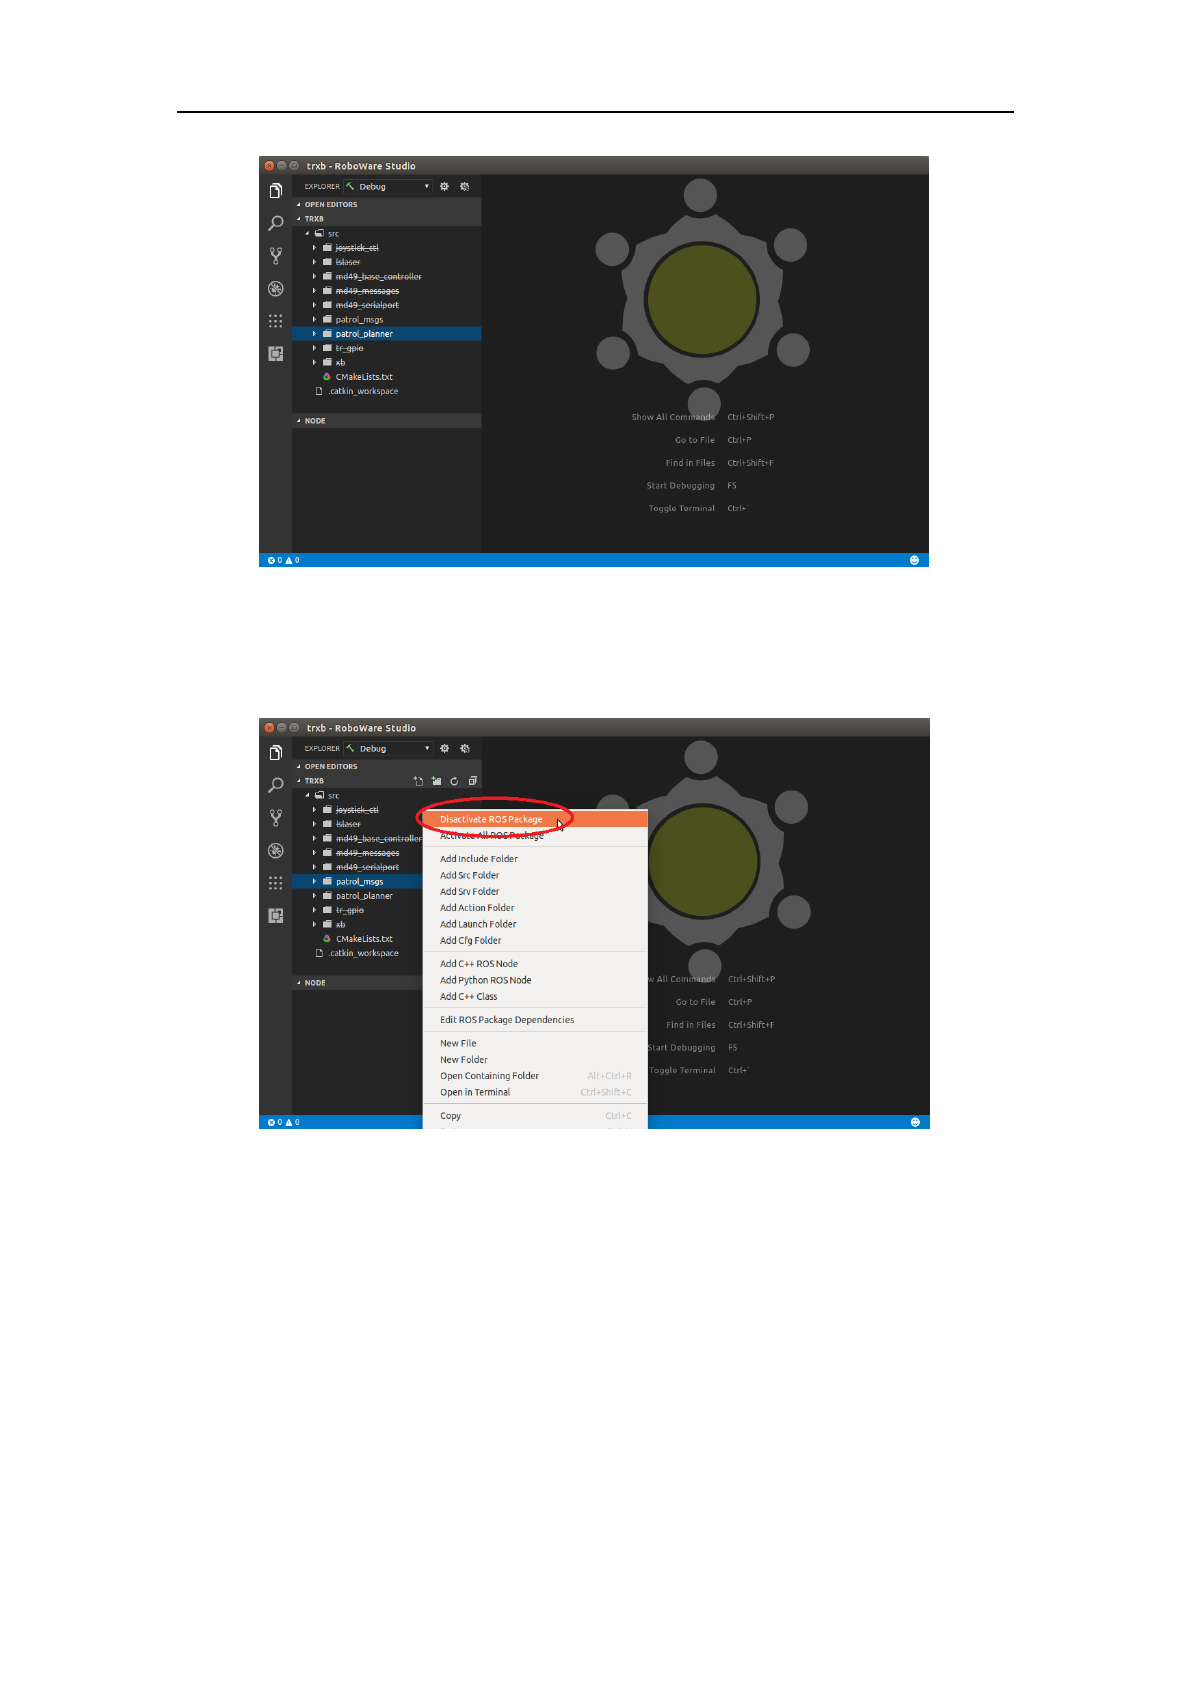
After activating “patrol_msgs” and “patrol_planner”, click “Build” button to build these two
packages.
Figure 3-15 Deactivate “patrol_msgs” package
After deactivating “patrol_msgs” package, then click “Build” button, only “patrol_planner”
will be built this time.
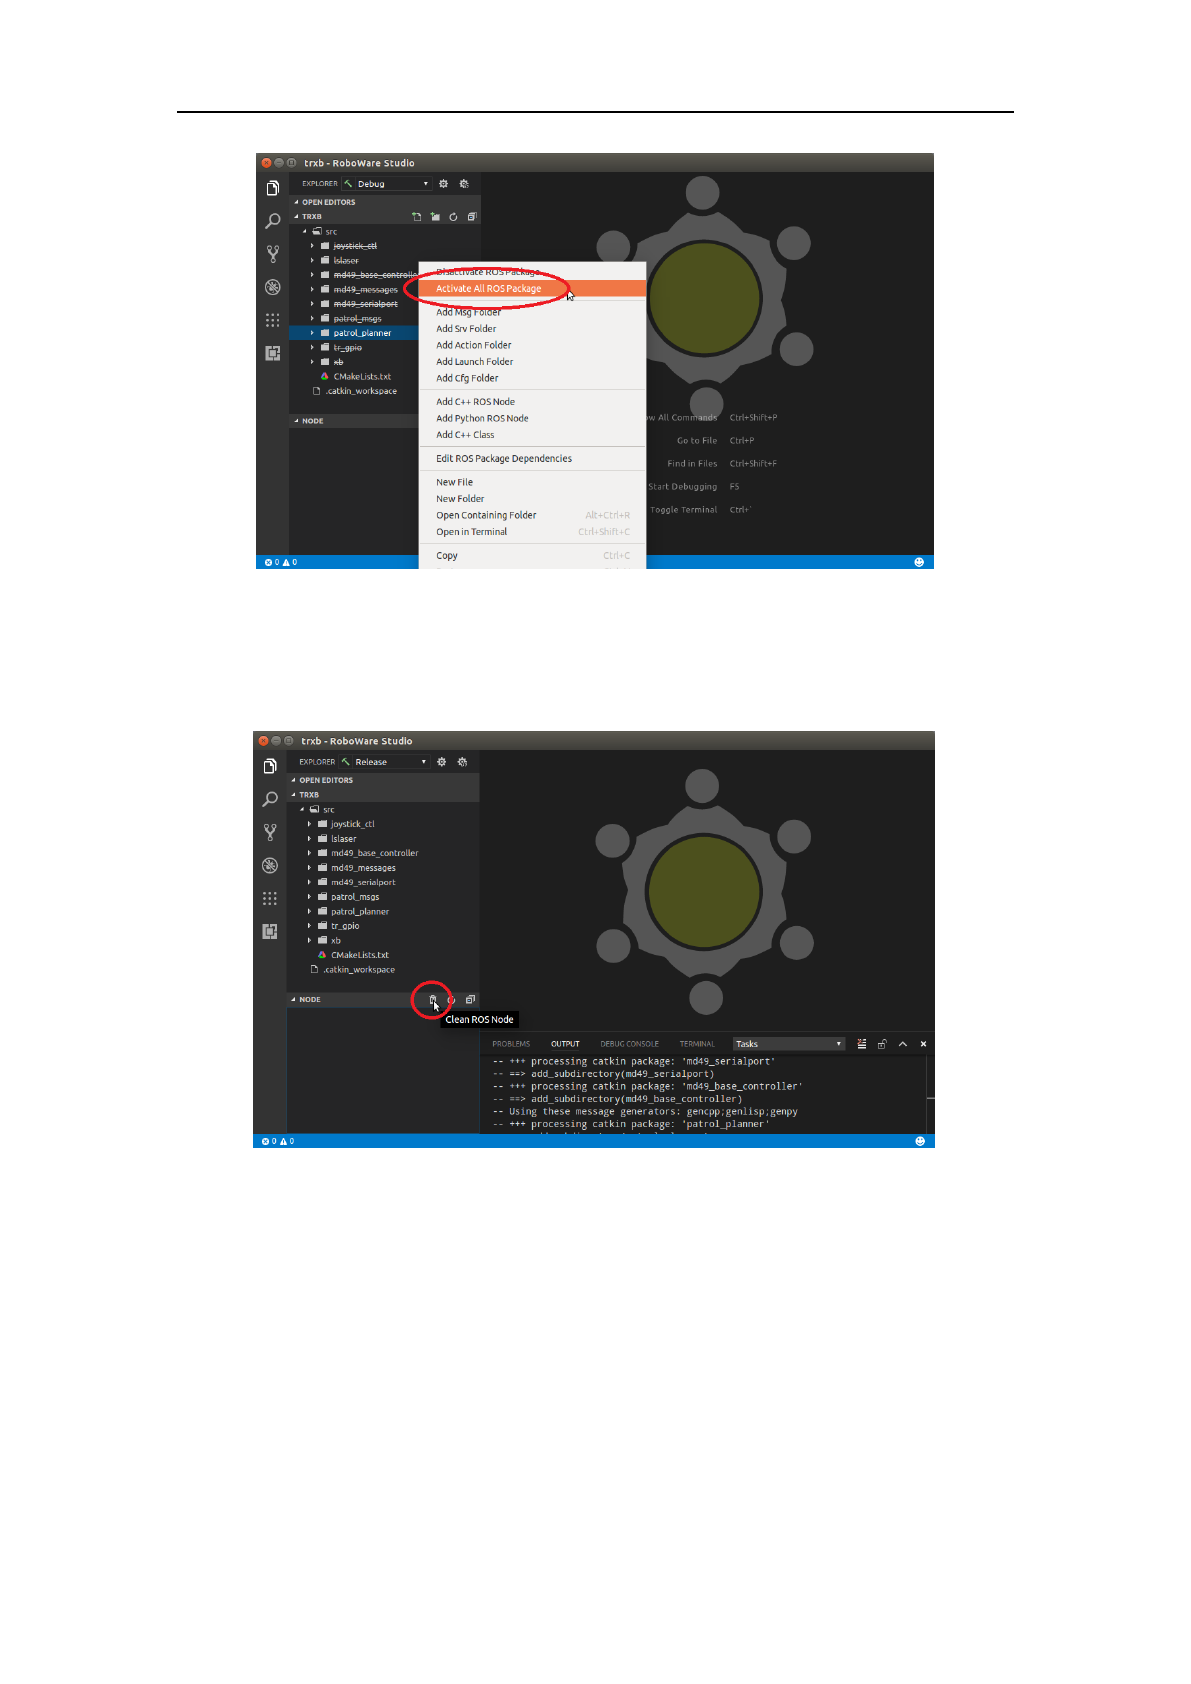
Right-click any package name, select “Activate All ROS Package”, then all packages will be
activated, click “Build” button to build all packages in current workspace.
RoboWare Studio Manual(www.roboware.me)
17
Jinan Tonyrobotics Co. Ltd.(www.tonyrobotics.com)
Figure 3-16 Activate all packages
3.1.10 Clean build outputs
The “Node” section at the lower part of Explorer window will display all nodes, click “Clean
ROS Node” icon to clean them.
Figure 3-17 Clean ROS nodes
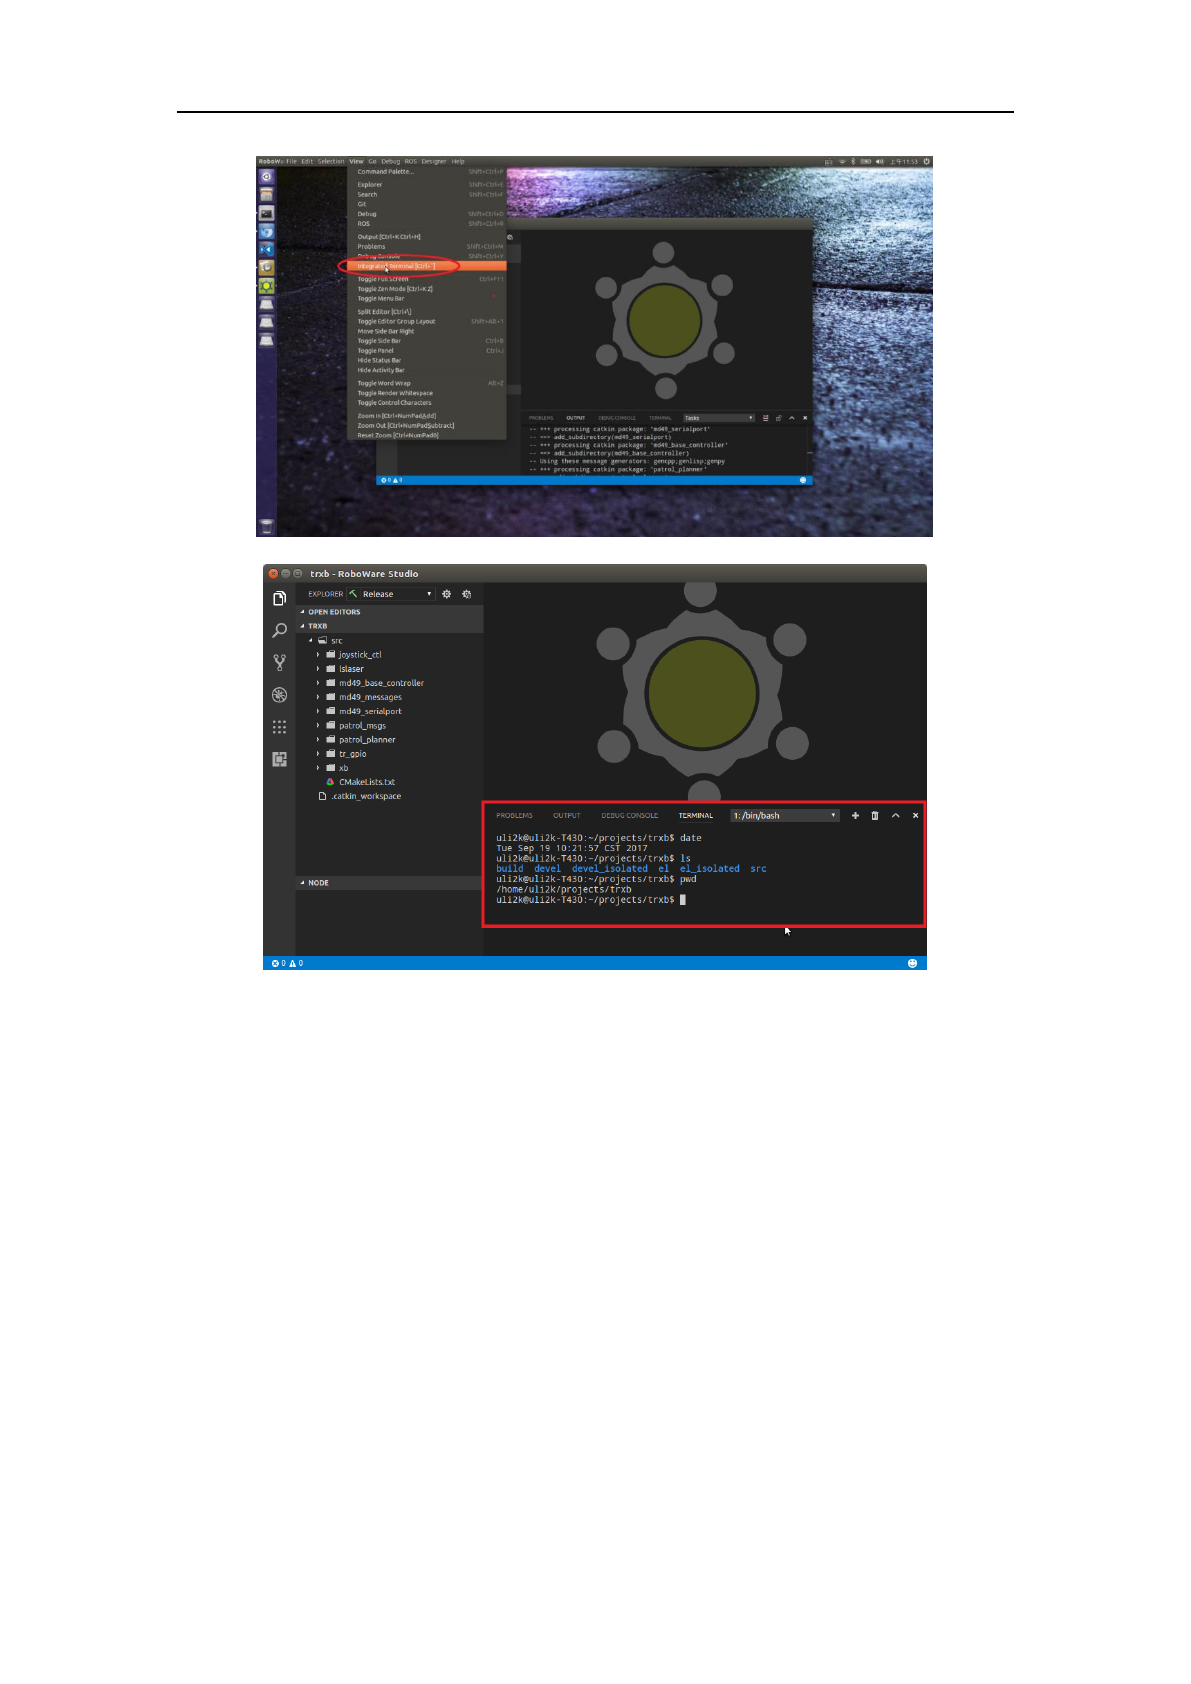
3.1.11 Integrated terminal
Select “View – Integrated Terminal” to open it and run your command in it. You can click “+”
icon to open new terminal, and choose terminal from the drop-down menu.
RoboWare Studio Manual(www.roboware.me)
18
Jinan Tonyrobotics Co. Ltd.(www.tonyrobotics.com)
Figure 3-18 Integrated terminal
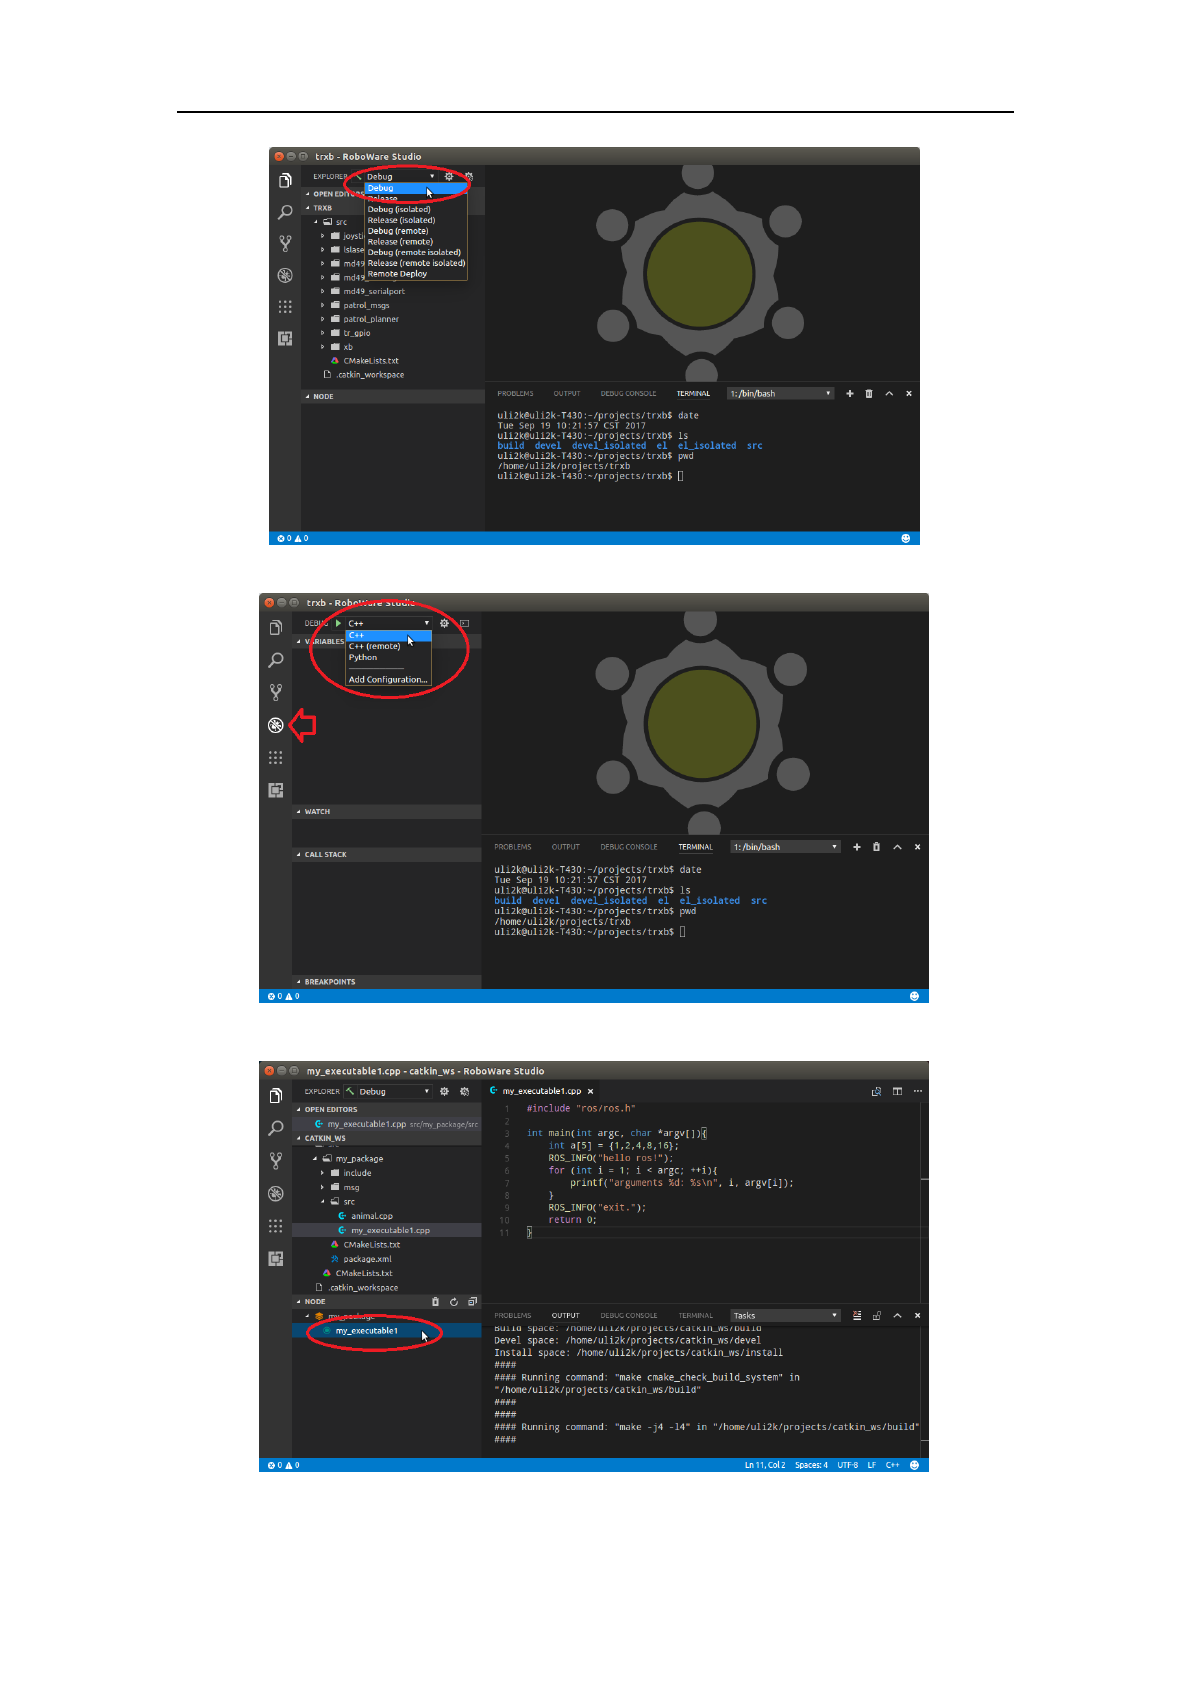
3.1.12 Debug C++ source code
In “Explorer” view, choose “Debug” option, click “Build” button to build. (or select “ROS -
Build” in the menu.)
Then, in “Debug” view, the debugger is set to “C++” automatically.
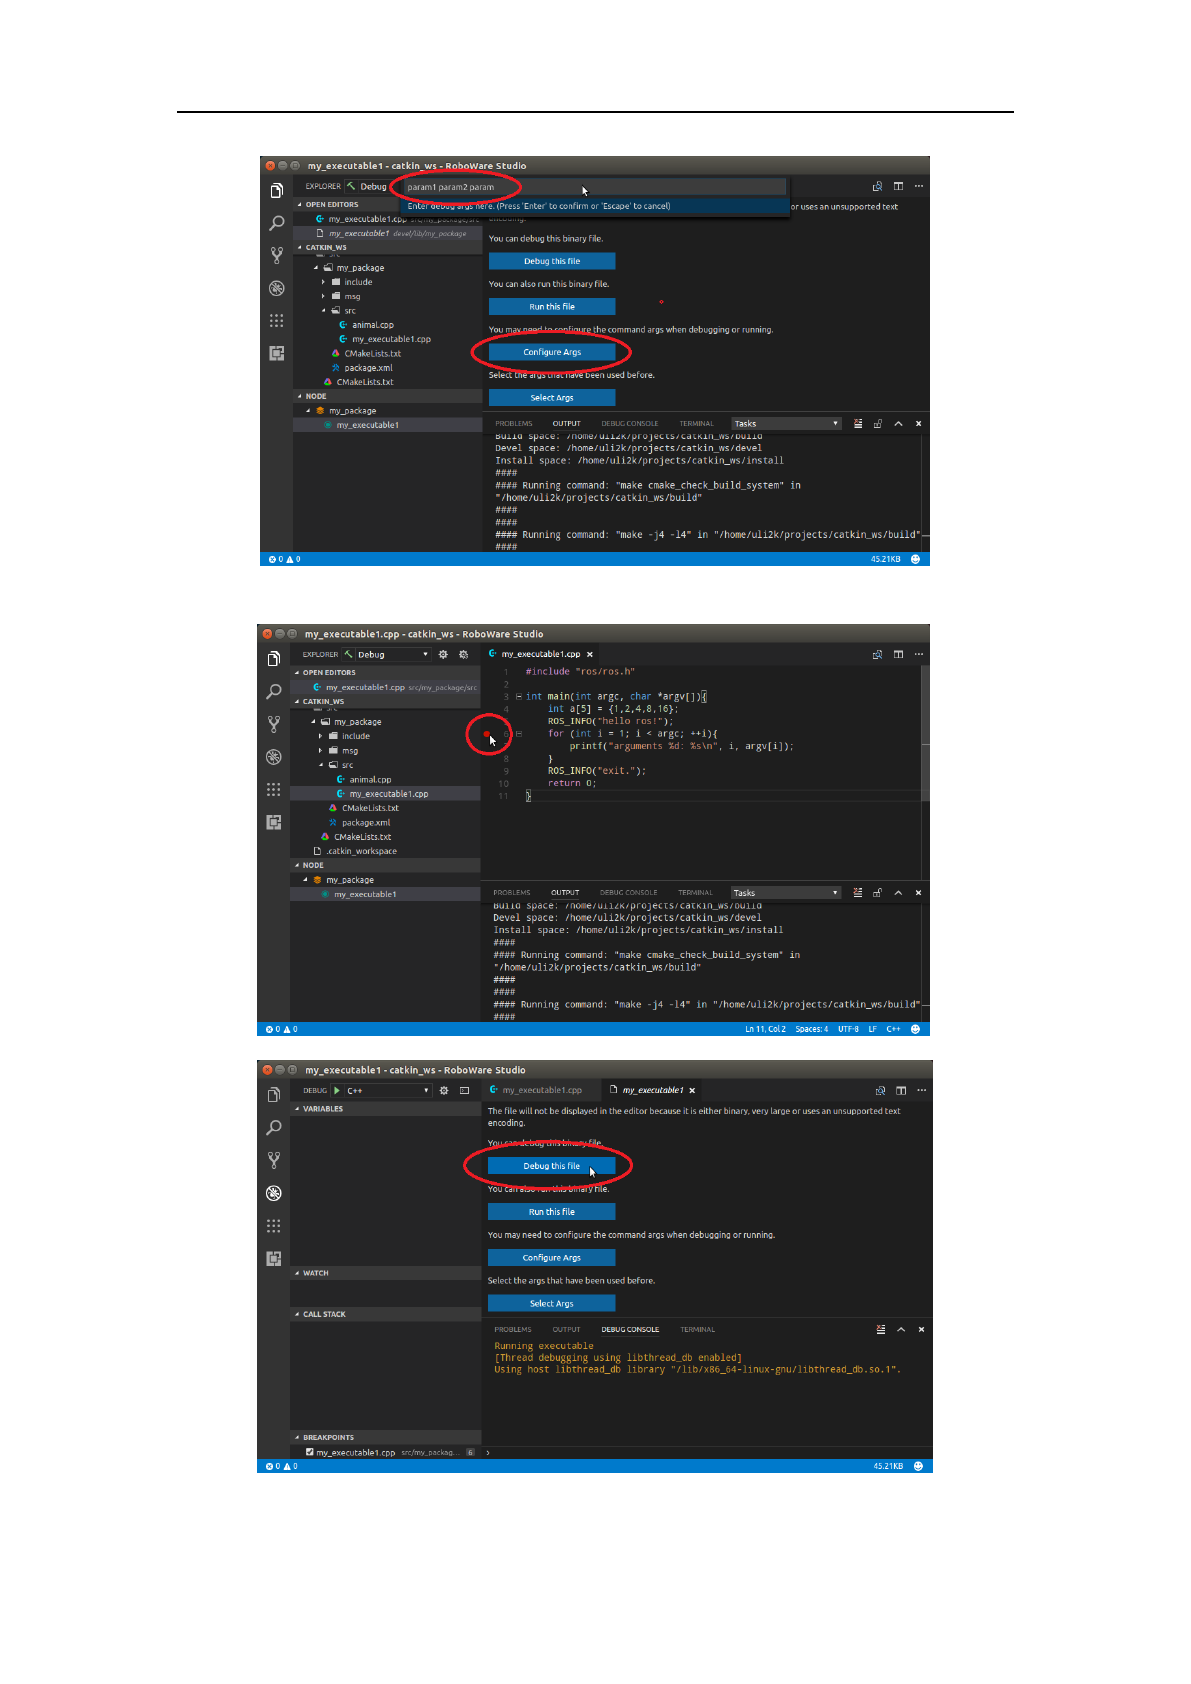
In “Explorer” view, choose a node in “Node” section, a debug panel will be displayed in the
right. After setting breakpoint in the source code, select “Debug this file” to debug.
You can also configure input arguments by clicking “Configure Args”, and select history
arguments by clicking “Select Args”.
RoboWare Studio Manual(www.roboware.me)
19
Jinan Tonyrobotics Co. Ltd.(www.tonyrobotics.com)
Figure 3-19 Choose “debug” option and build
Figure 3-20 Debugger is set to “C++” automatically
Figure 3-21 Choose a node
RoboWare Studio Manual(www.roboware.me)
20
Jinan Tonyrobotics Co. Ltd.(www.tonyrobotics.com)
Figure 3-22 Configure input arguments
RoboWare Studio Manual(www.roboware.me)
21
Jinan Tonyrobotics Co. Ltd.(www.tonyrobotics.com)
Figure 3-23 Set breakpoint and debug
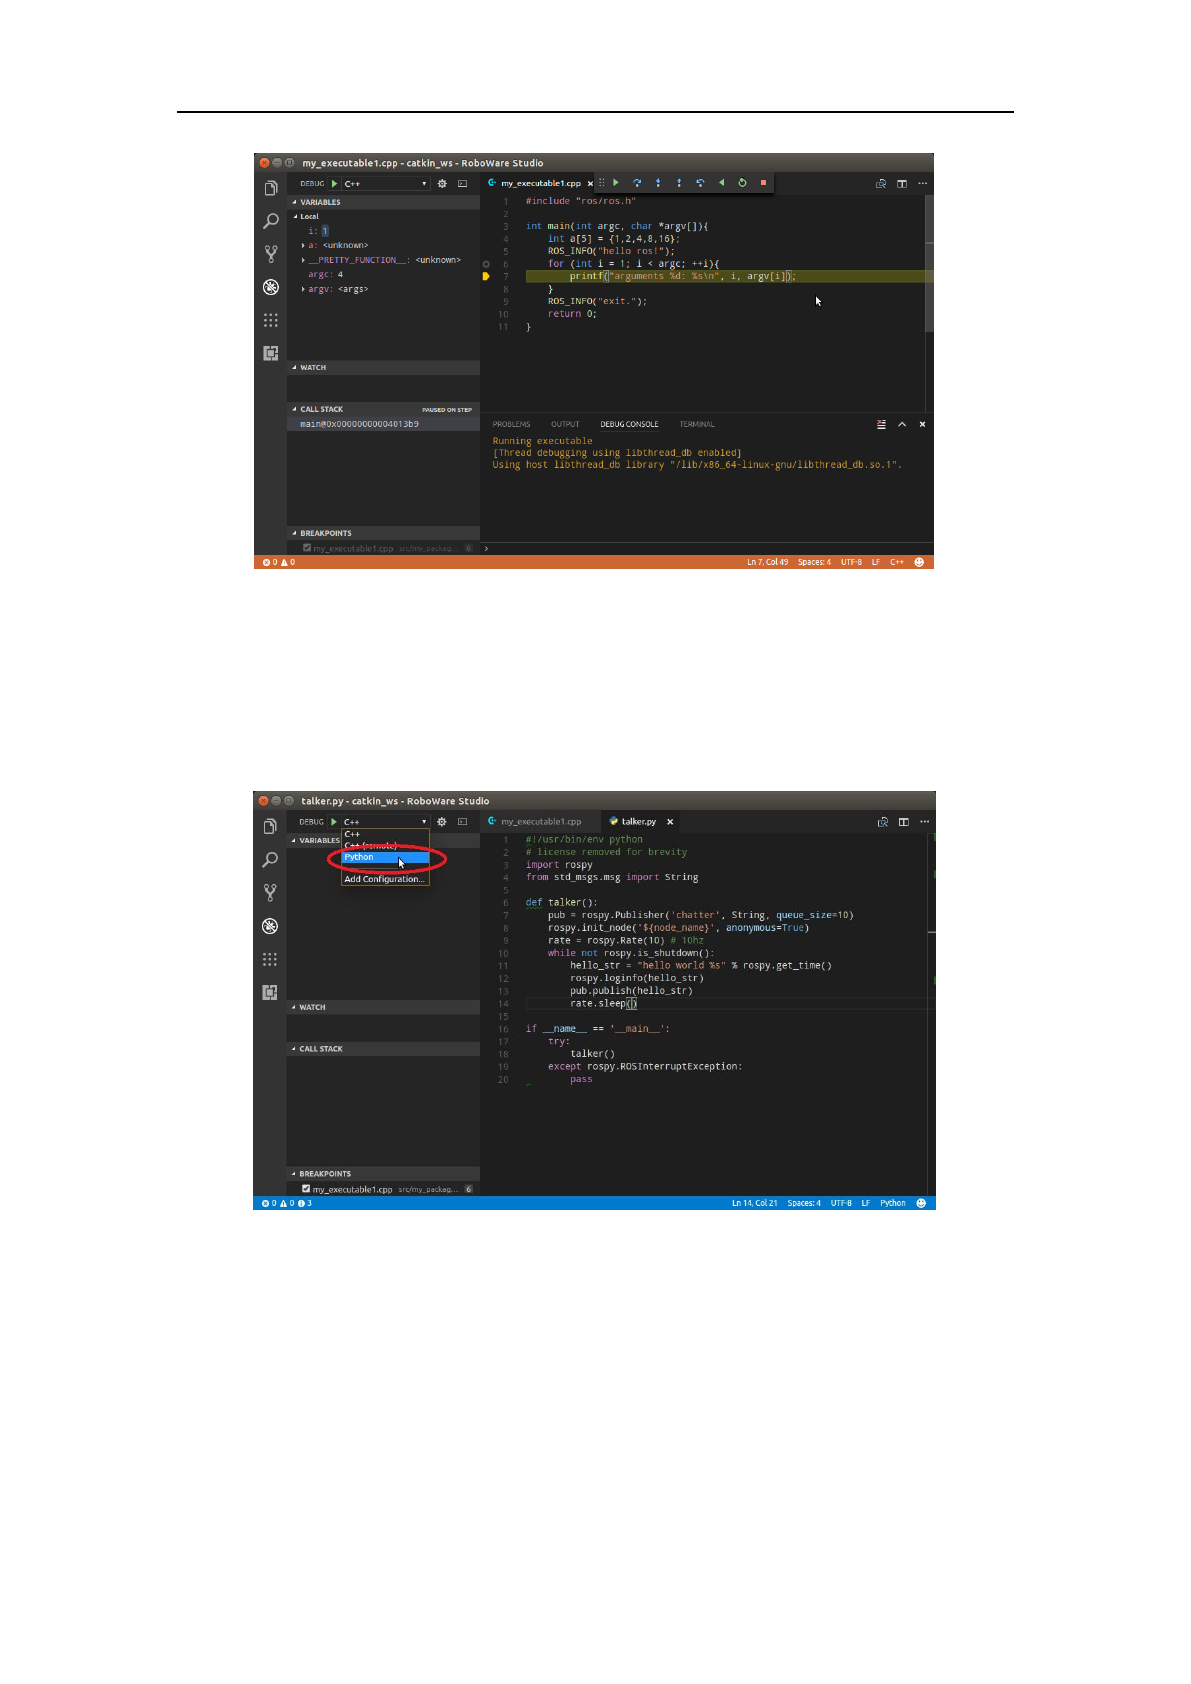
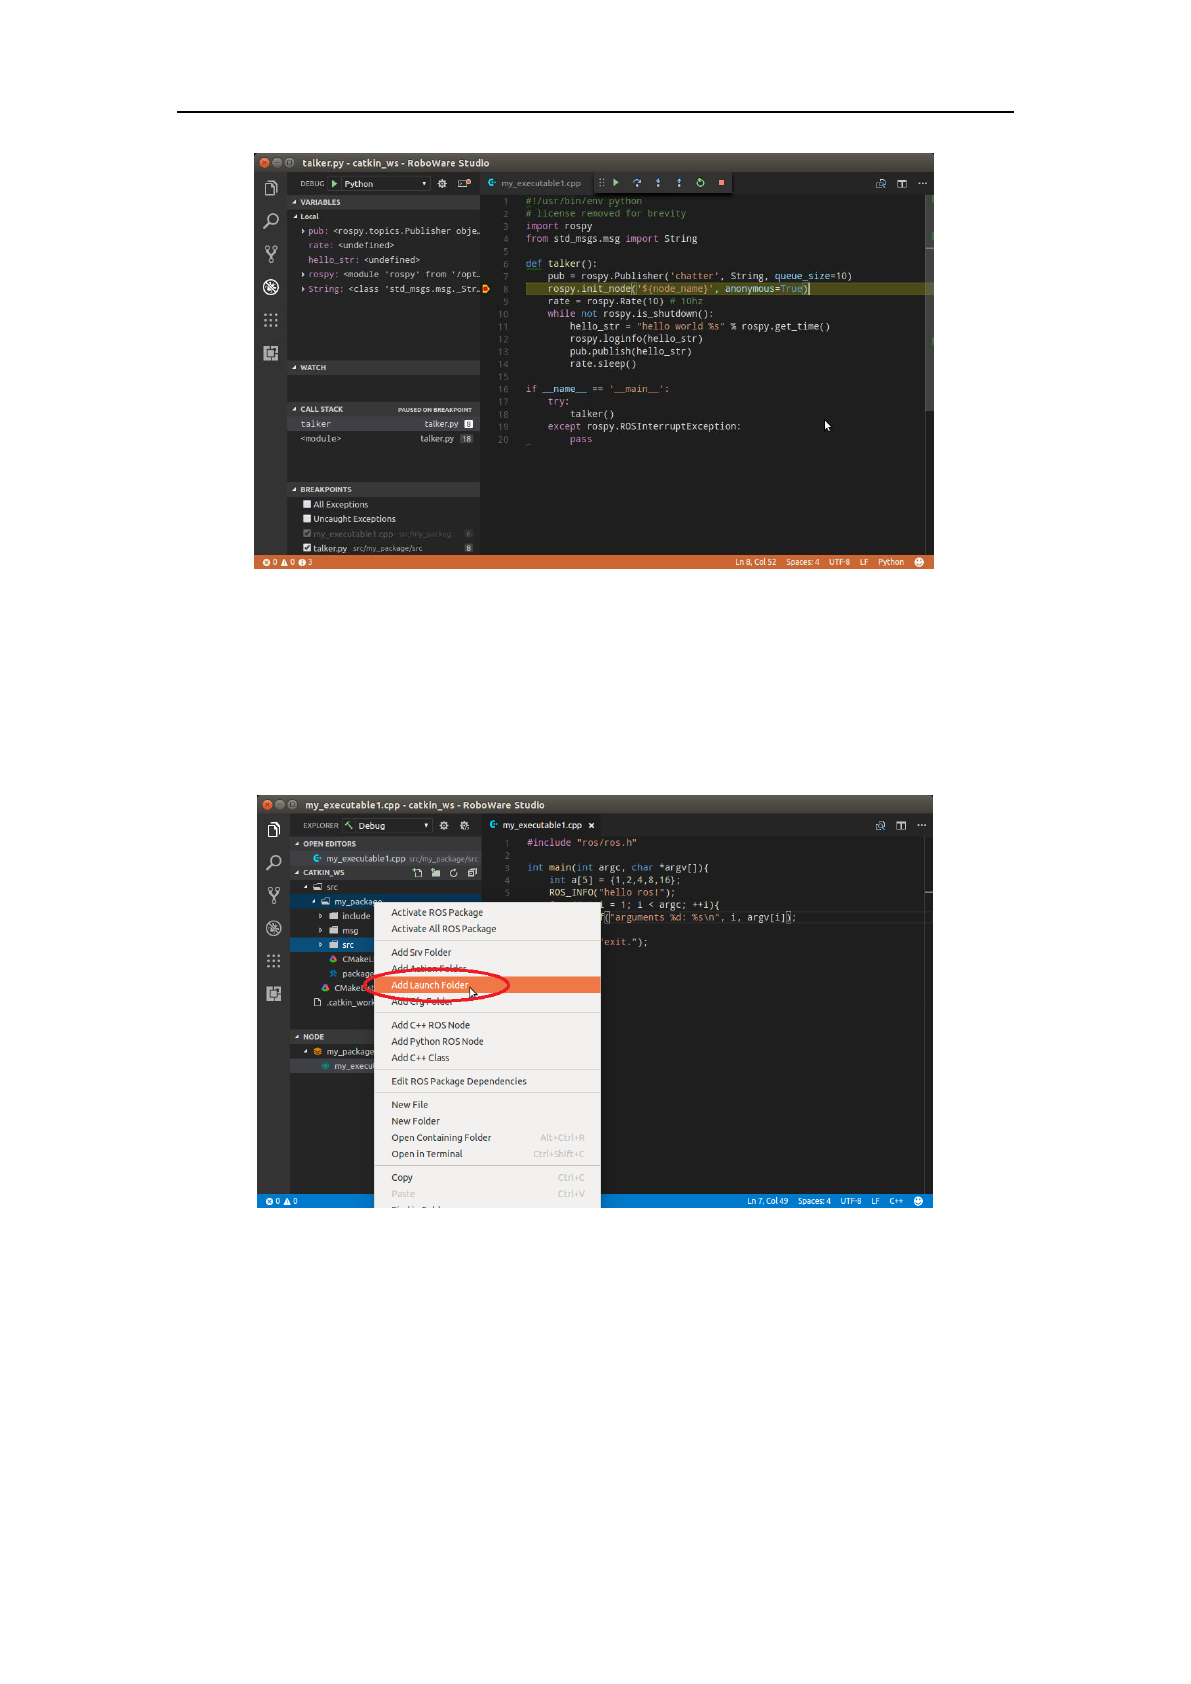
3.1.13 Debug Python source code
Go into “Debug” view by clicking “Debug” icon in the left sidebar, select “Python” debugger.
Go into “Explorer” view by clicking “Explorer” icon in the left sidebar, open python source
code, set a breakpoint.
In “Debug” view, click “Start Debugging” icon or press F5 to debug the source code.
Figure 3-24 In debug view, select “Python” debugger
RoboWare Studio Manual(www.roboware.me)
22
Jinan Tonyrobotics Co. Ltd.(www.tonyrobotics.com)
Figure 3-25 Set breakpoint and debug
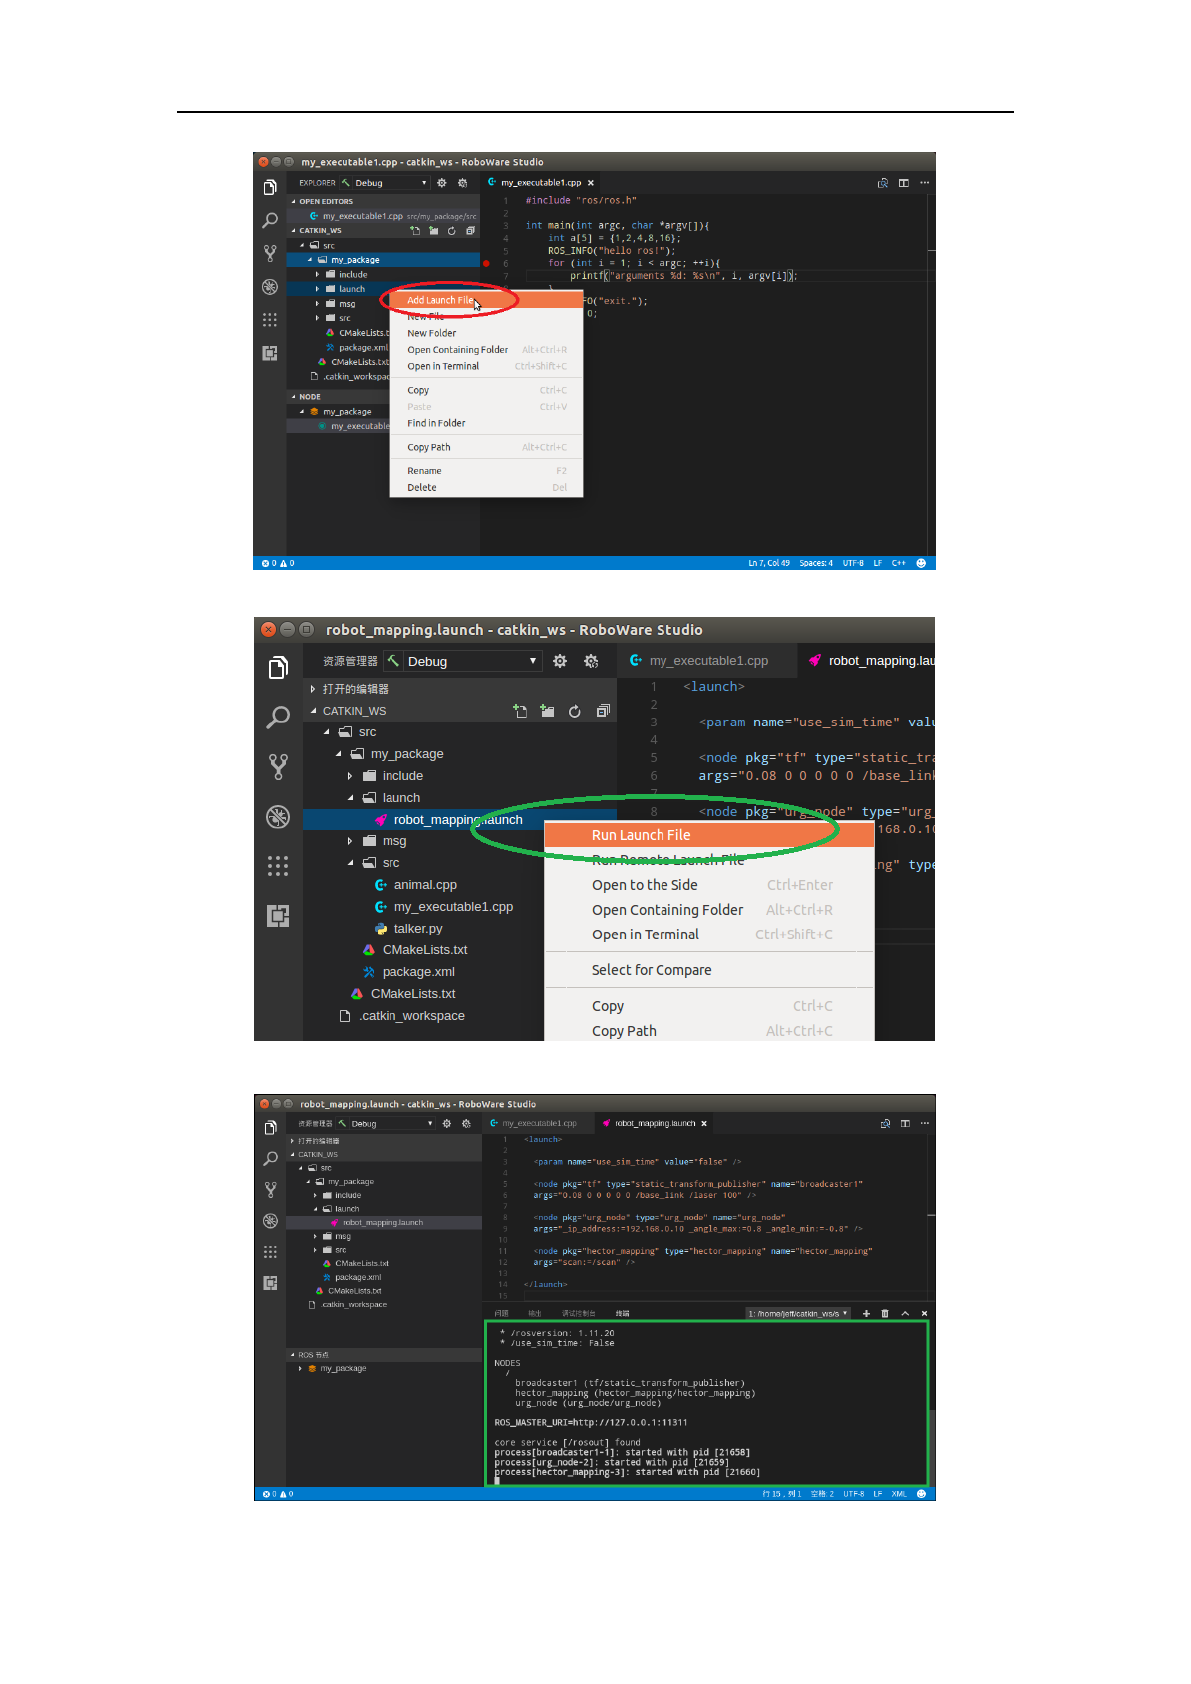
3.1.14 Add launch file
Right click on package name, select “Add Launch Folder” to create a folder named “launch”.
Then right click on “launch” folder, select “Add Launch File” to add a new file.
Right click on launch file name, select “Run Launch File”, RoboWare Studio will launch it in
an integrated terminal. Use “Ctrl+C” to abort.
Figure 3-26 Add launch folder
RoboWare Studio Manual(www.roboware.me)
23
Jinan Tonyrobotics Co. Ltd.(www.tonyrobotics.com)
Figure 3-27 Add launch file
Figure 3-28 Launch the file
RoboWare Studio Manual(www.roboware.me)
24
Jinan Tonyrobotics Co. Ltd.(www.tonyrobotics.com)
Figure 3-29 Launch file is running in an integrated terminal
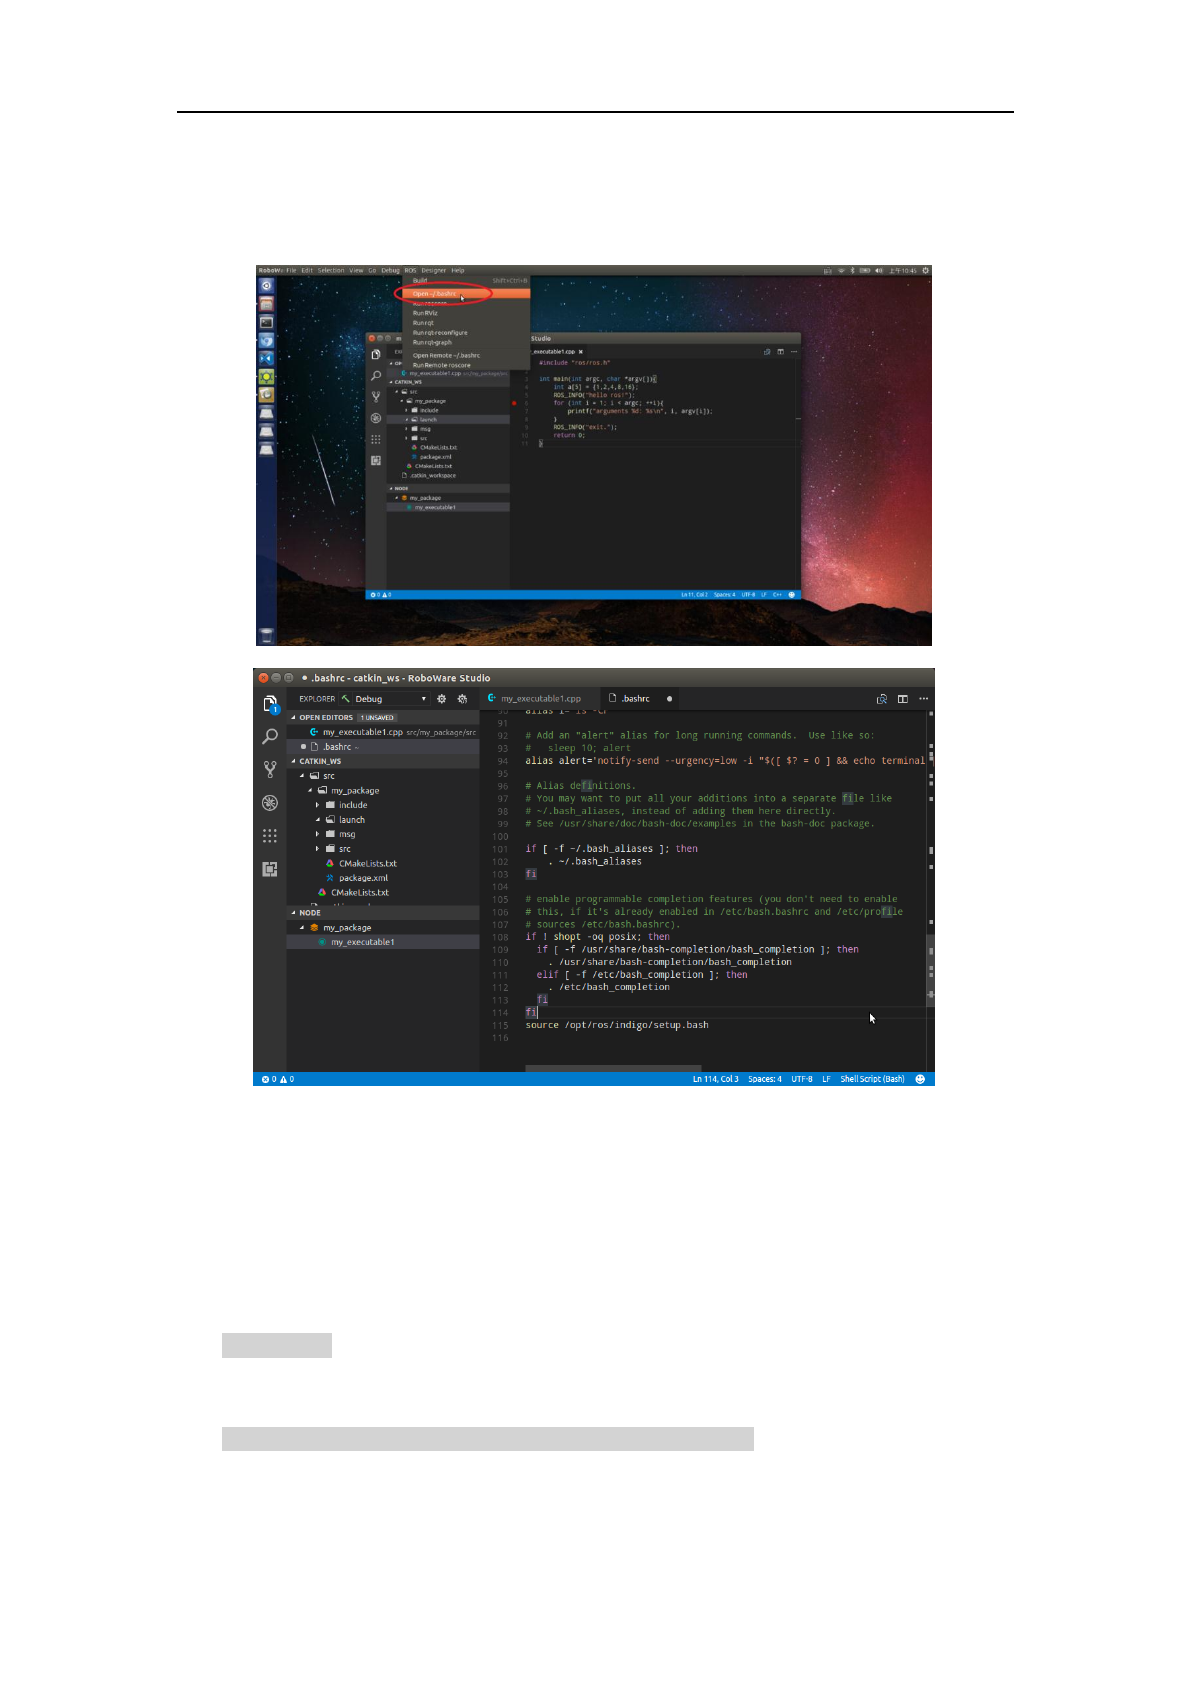
3.1.15 Edit ~/.bashrc
Select “ROS – Open ~/.bashrc” to open and edit the ~/.bashrc file.
Figure 3-30 Open and edit ~/.bashrc
There is also a “ROS – Open Remote ~/.bashrc” option to edit the .bashrc file on remote
computer, use “Ctrl+S” or select “File – Save” to save it remotely.
3.2 Remote Development
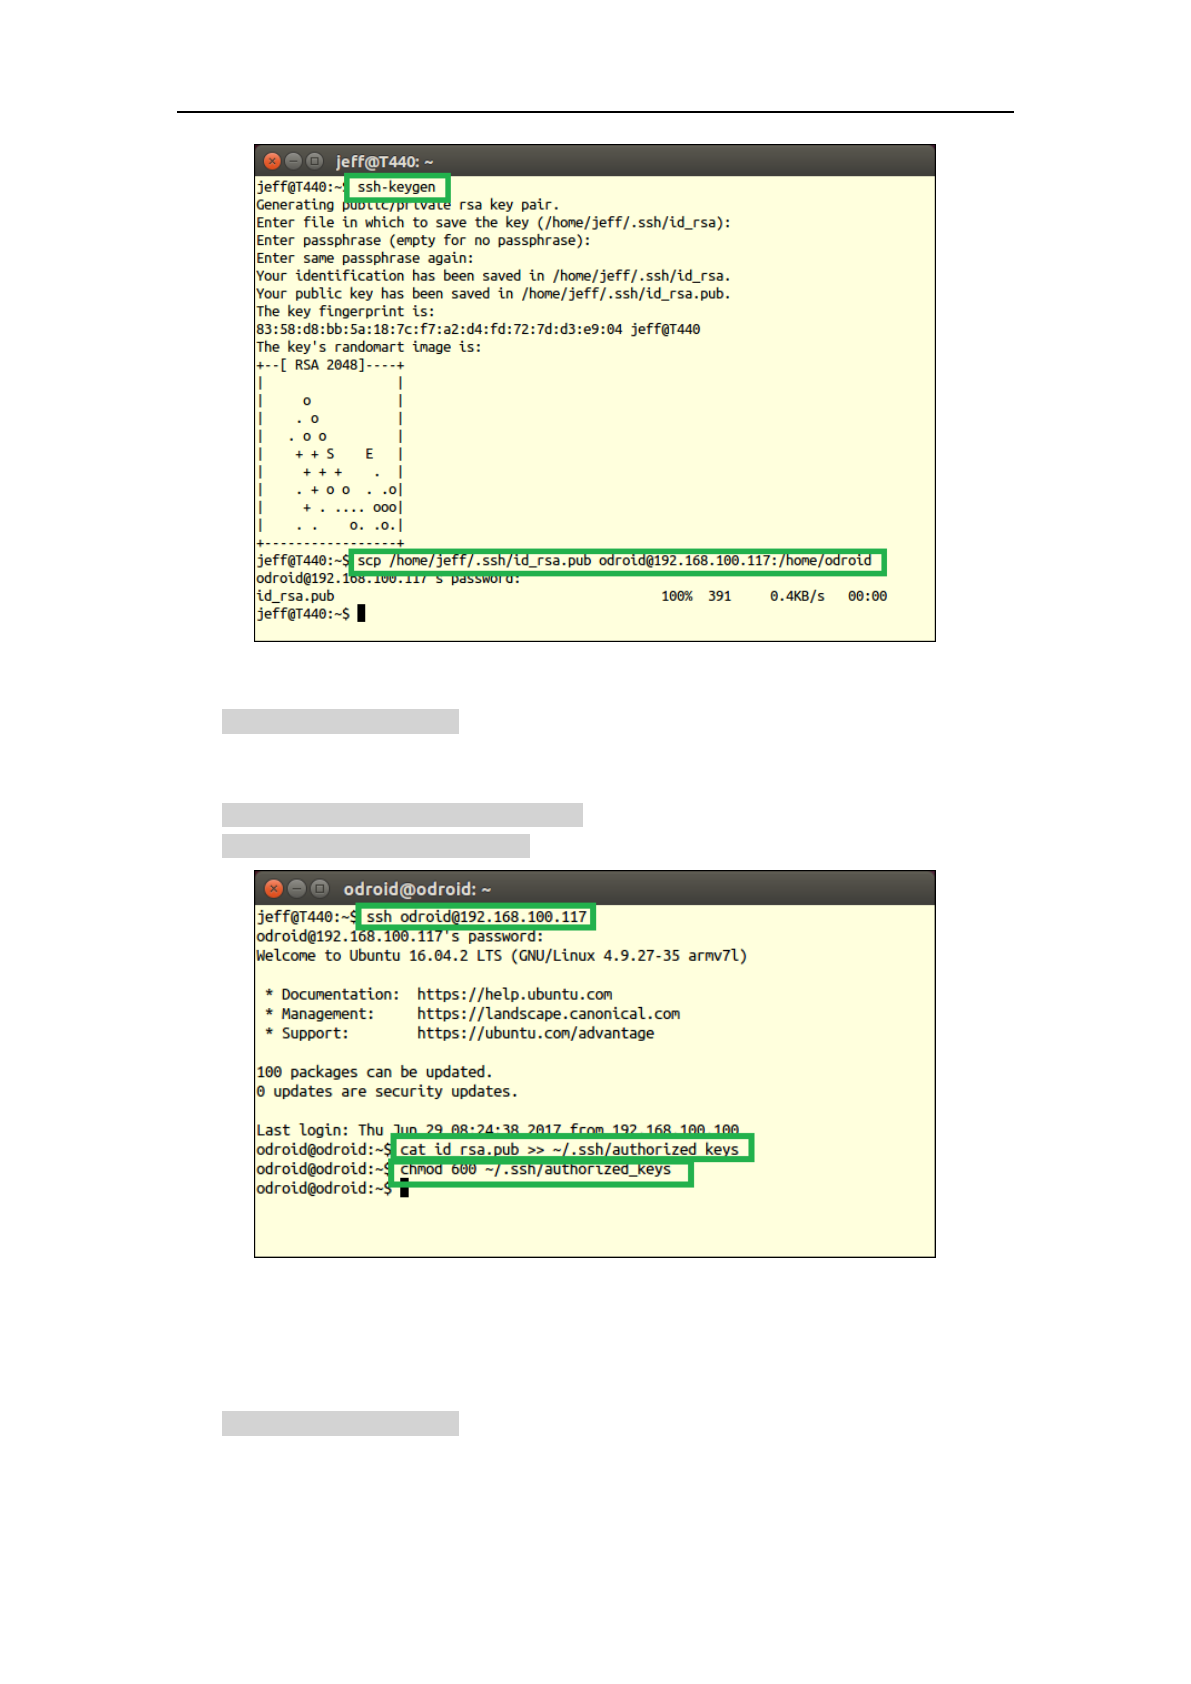
3.2.1 Configuration of SSH login
First, generate public key and private key on local PC. Open a terminal and execute:
$ ssh-keygen
Press “Enter” to accept the default parameters, “id_rsa.pub” and “id_rsa” will be generated in
“~/.ssh” folder. Then copy “id_rsa.pub” to remote computer:
$ scp ~/.ssh/id_rsa.pub username@ip_address:/home/username
Where “username” is the user name of remote computer, “ip_addreee” is the IP address of remote
computer. An example is as follows:
RoboWare Studio Manual(www.roboware.me)
25
Jinan Tonyrobotics Co. Ltd.(www.tonyrobotics.com)
Figure 3-31 Generate public/private keys, and copy public key to remote computer
After copy “id_rsa.pub” to remote computer, login on remote computer via SSH:
$ ssh username@ip_address
After login ,append the content of “id_rsa.pub” to “~/.ssh/authorized_keys” on remote
computer,and change the permission of “authorized_keys” file:
$ cat id_rsa.pub >> ~/.ssh/authorized_keys
$ chmod 600 ~/.ssh/authorized_keys
Figure 3-32 SSH login on remote computer, add authorized keys and change file permission
After configuration, you can login on remote computer without a password.
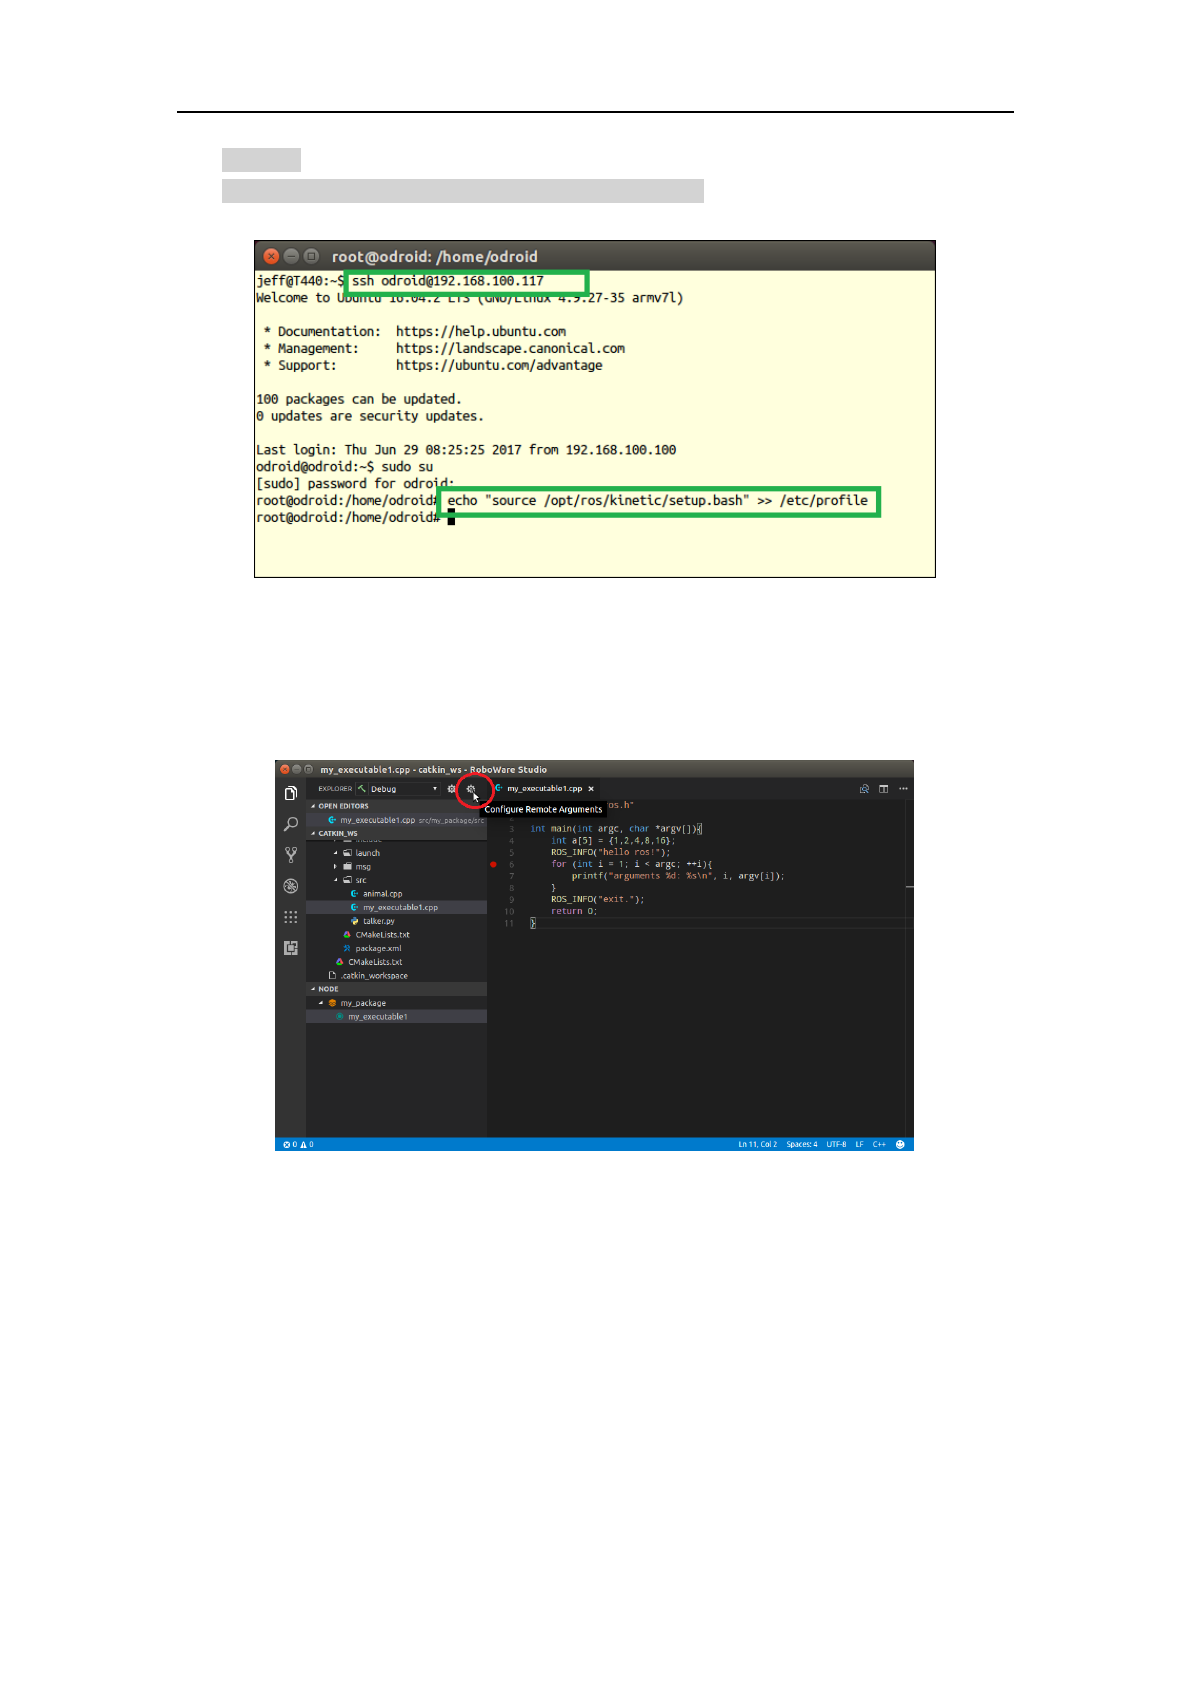
3.2.2 Edit “/etc/profile” on remote computer
Login on remote computer:
$ ssh username@ip_address
Where “username” is the user name of remote computer, “ip_addreee” is the IP address of
remote computer.
After login, switch to the root user, append ROS configuration scripts to “/etc/profile”.
RoboWare Studio Manual(www.roboware.me)
26
Jinan Tonyrobotics Co. Ltd.(www.tonyrobotics.com)
$ sudo su
$ echo "source /opt/ros/indigo/setup.bash" >> /etc/profile
Note: the ROS version here is “indigo”, you should replace that according to your ROS version.
Figure 3-33 Login on remote computer and configure
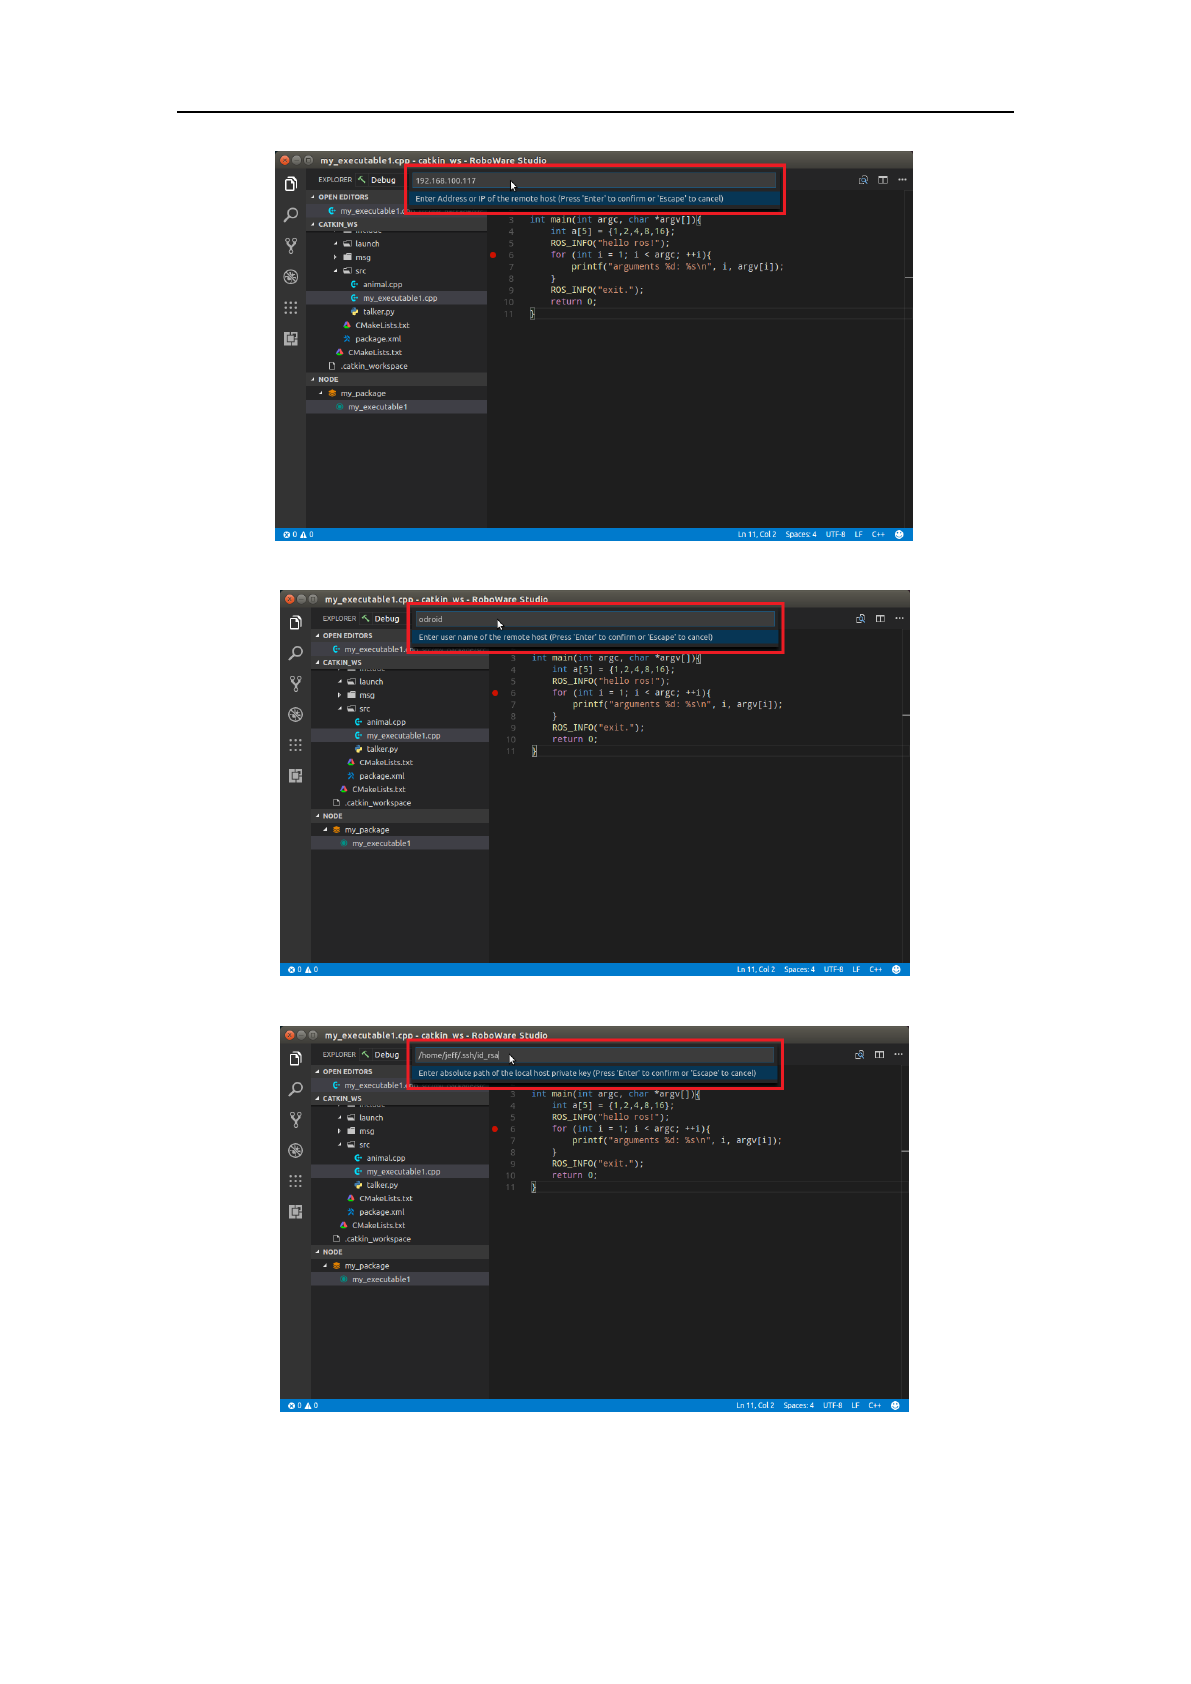
3.2.3 Remote configuration
Launch RoboWare Studio, in “Explorer” view, click “Configure Remote Arguments” icon, then
type remote IP address, remote user name, local private key file name, remote deploy directory step
by step:
Click “Configure Remote Arguments”
RoboWare Studio Manual(www.roboware.me)
27
Jinan Tonyrobotics Co. Ltd.(www.tonyrobotics.com)
Type remote IP address
Type remote user name
Type local private key file name
RoboWare Studio Manual(www.roboware.me)
28
Jinan Tonyrobotics Co. Ltd.(www.tonyrobotics.com)
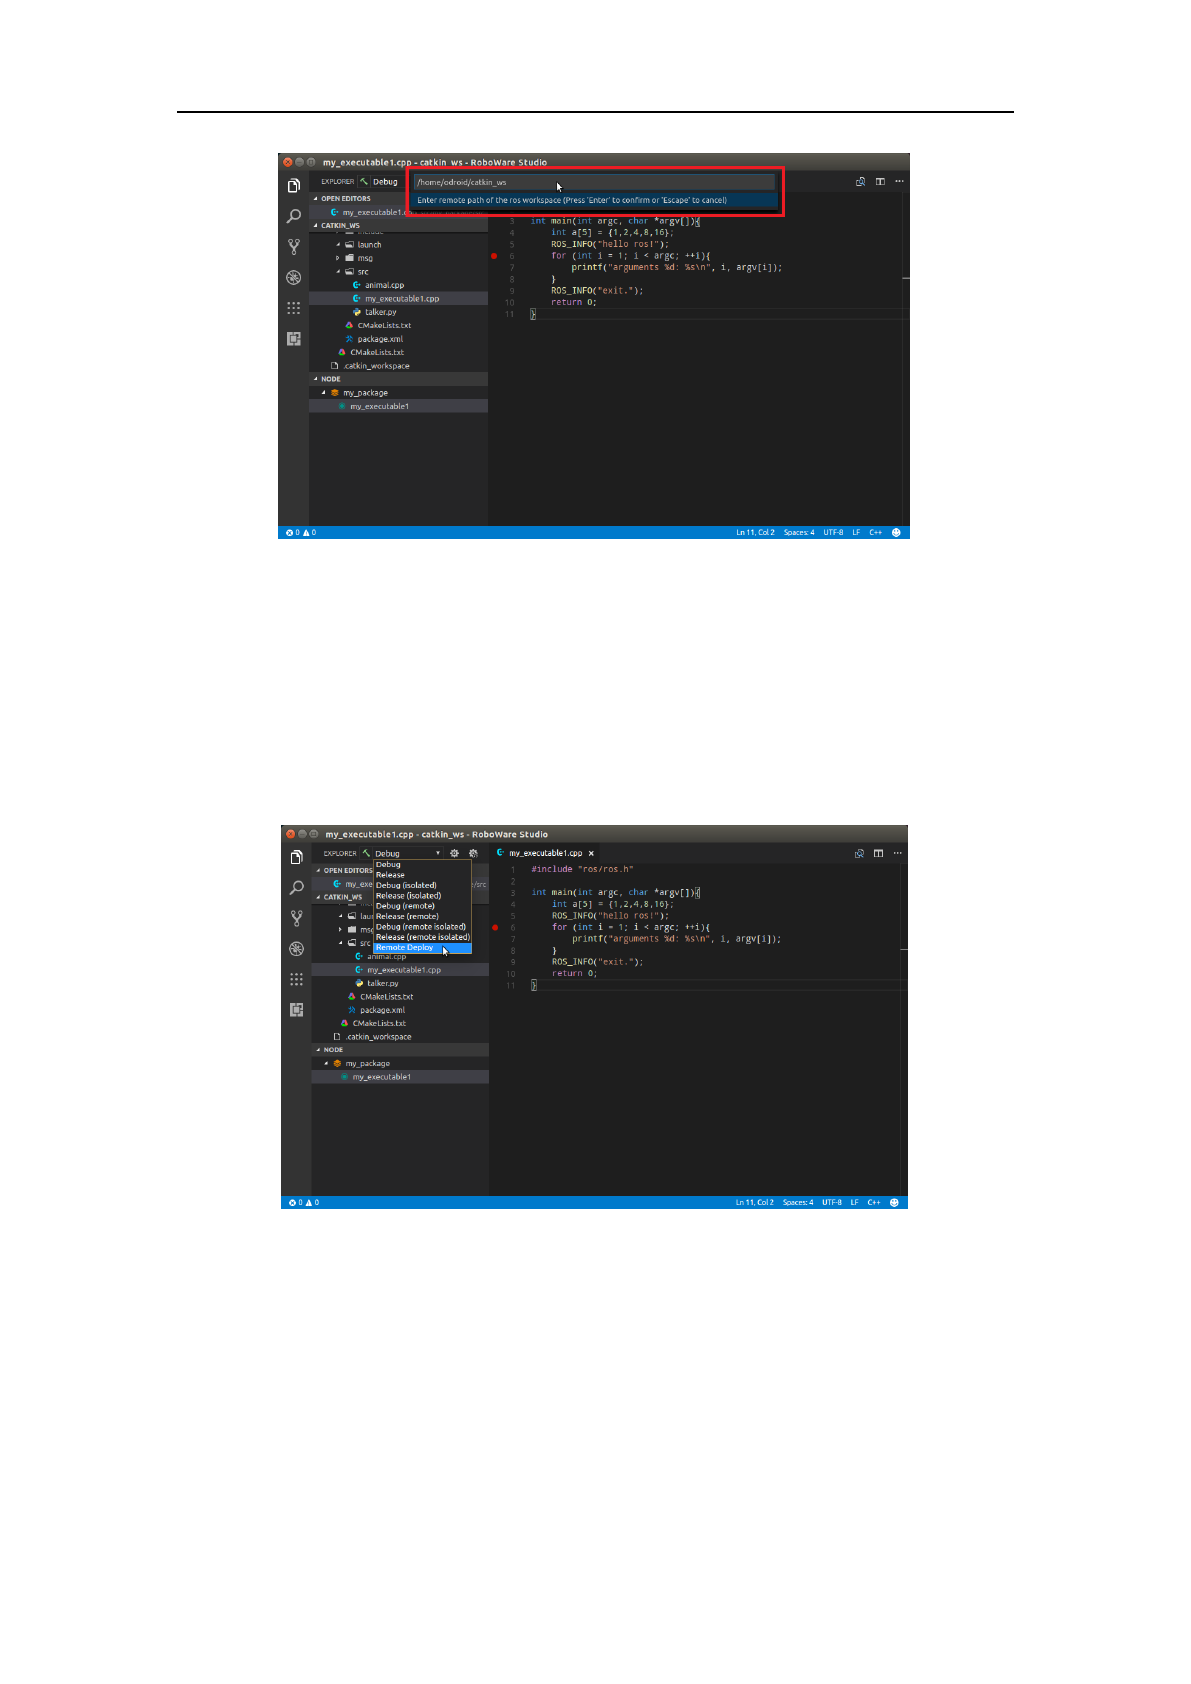
Type remote deploy path
Figure 3-34 Remote configuration
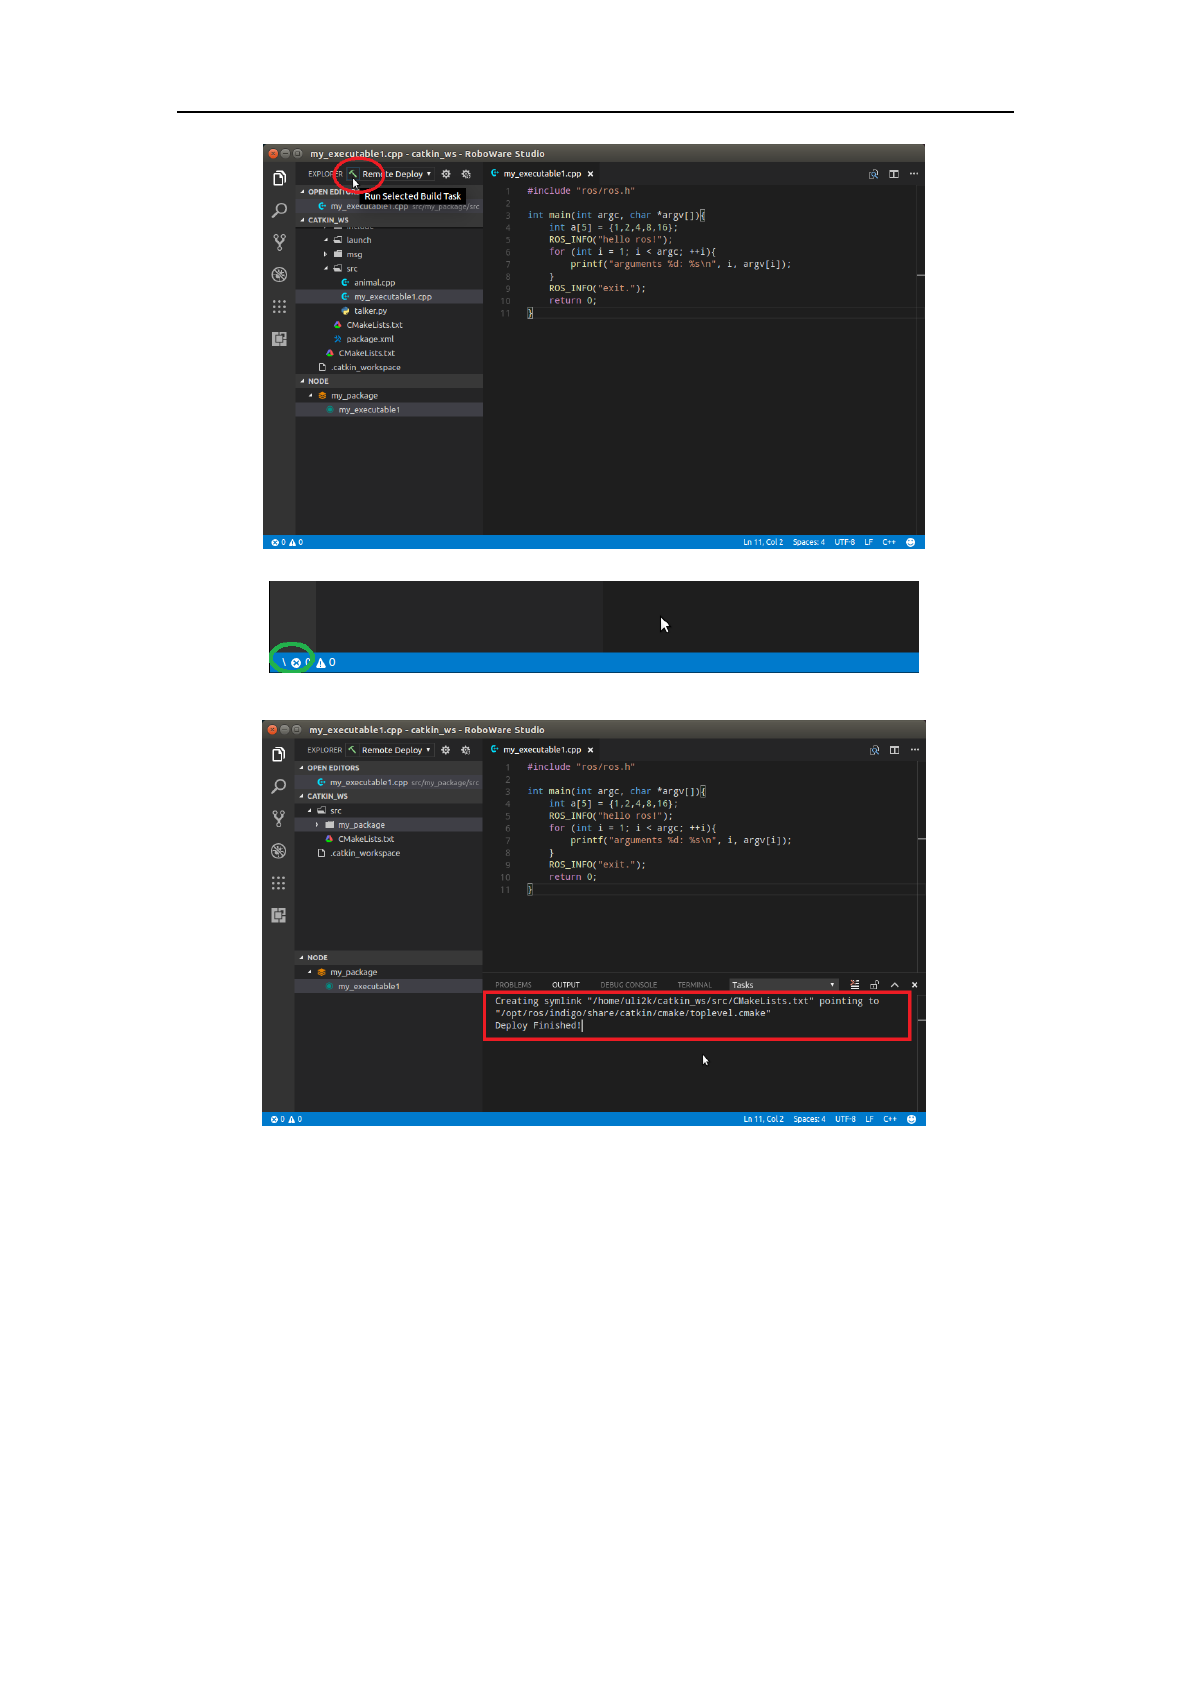
3.2.4 Remote deployment
After remote configuration, you can deploy your project to remote computer.
In “Explorer” view, select “Remote Deploy” option, press “Run” icon to deploy local codes to
the specified directory on remote computer (set in the previous section).
During remote deployment, the flag in the lower left corner of the status bar would be spinning.
Once deployed, the output window would print successful information (Deploy Finished!).
Select “Remote Deploy” option
RoboWare Studio Manual(www.roboware.me)
29
Jinan Tonyrobotics Co. Ltd.(www.tonyrobotics.com)
Run deployment
Deploying
Deploy finished
Figure 3-35 Remote deployment
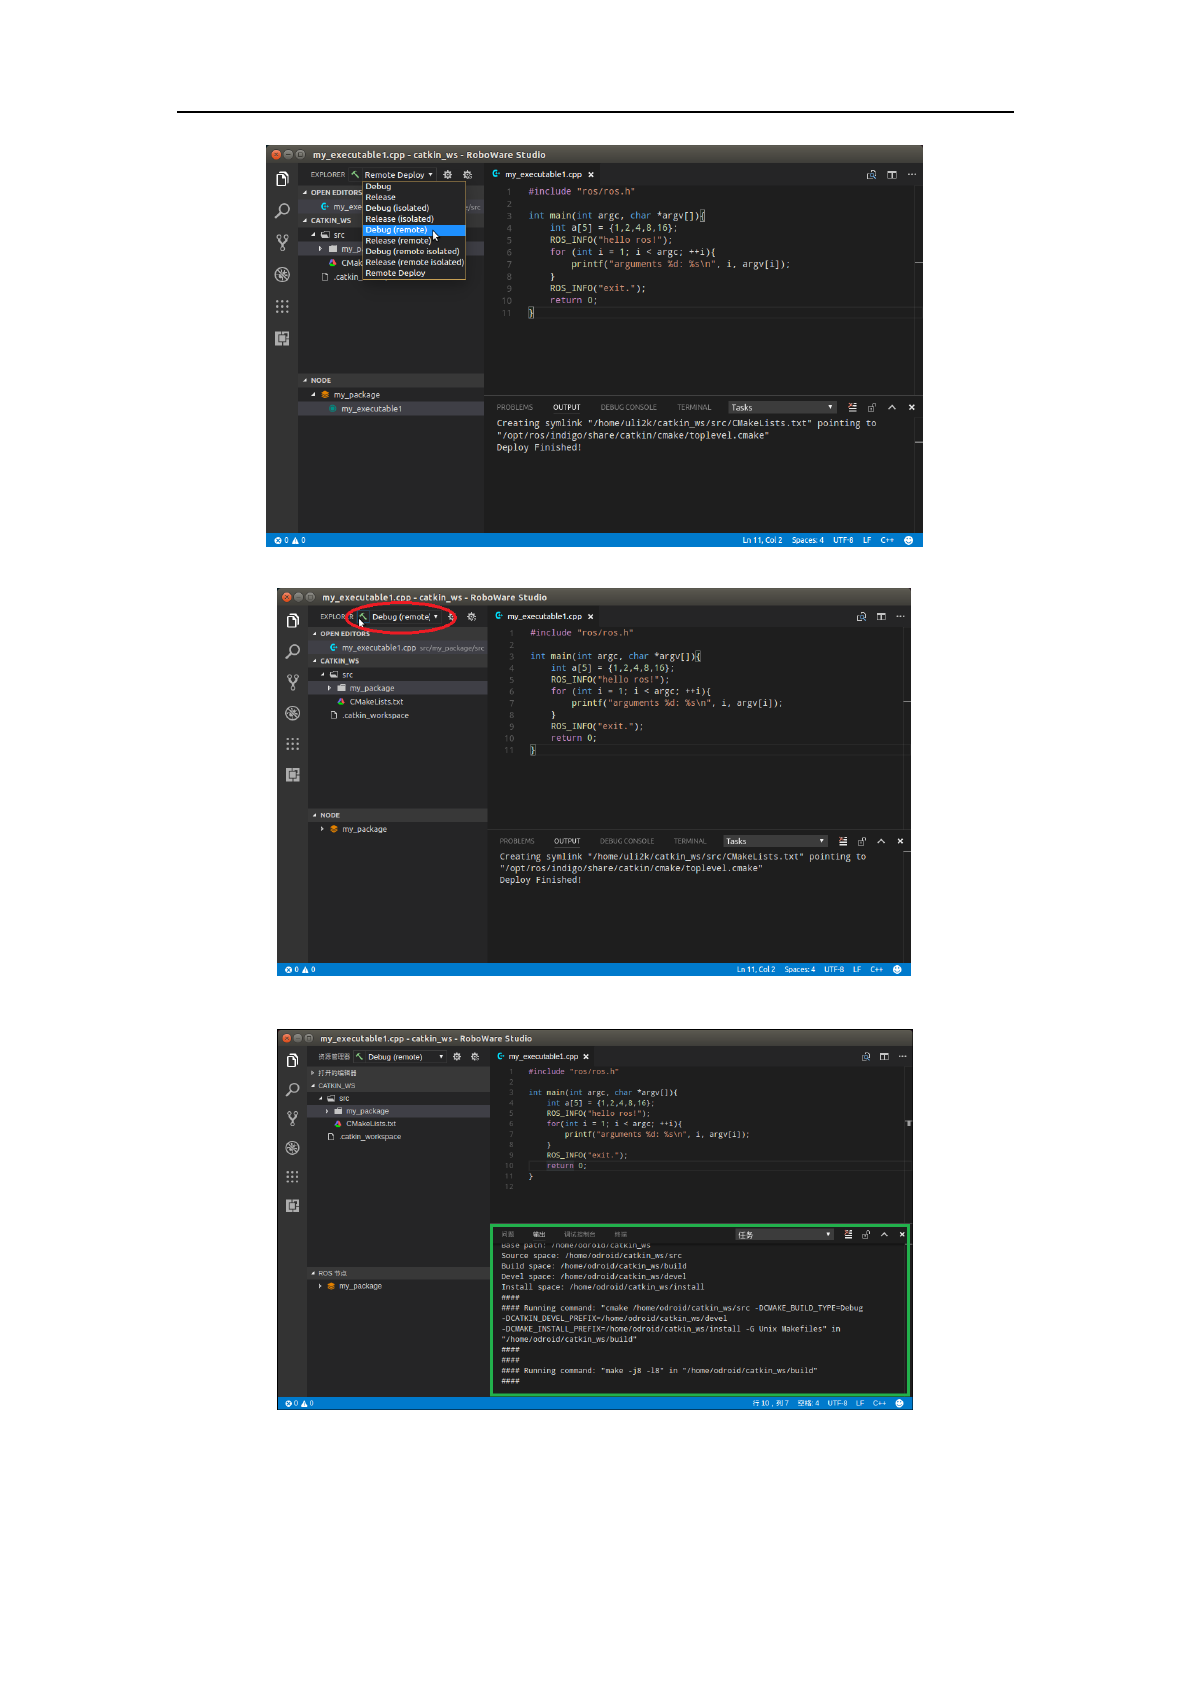
3.2.5 Remote build
After deployment, you can build remote projects. As the local build, you can choose
“catkin_make” or “catkin_tools” mode. You must install catkin_tools on remote machine previously
if you select catkin_tools. Here we only take catkin_make mode for example.
In “Explorer” view, choose “Debug (remote)” option and click “Build” button. RoboWare
Studio will send build command to remote computer, and display build information in output
window.
RoboWare Studio Manual(www.roboware.me)
30
Jinan Tonyrobotics Co. Ltd.(www.tonyrobotics.com)
Choose “Debug(remote)” option
Remote build
Remote build information
Figure 3-36 Remote build
RoboWare Studio Manual(www.roboware.me)
31
Jinan Tonyrobotics Co. Ltd.(www.tonyrobotics.com)
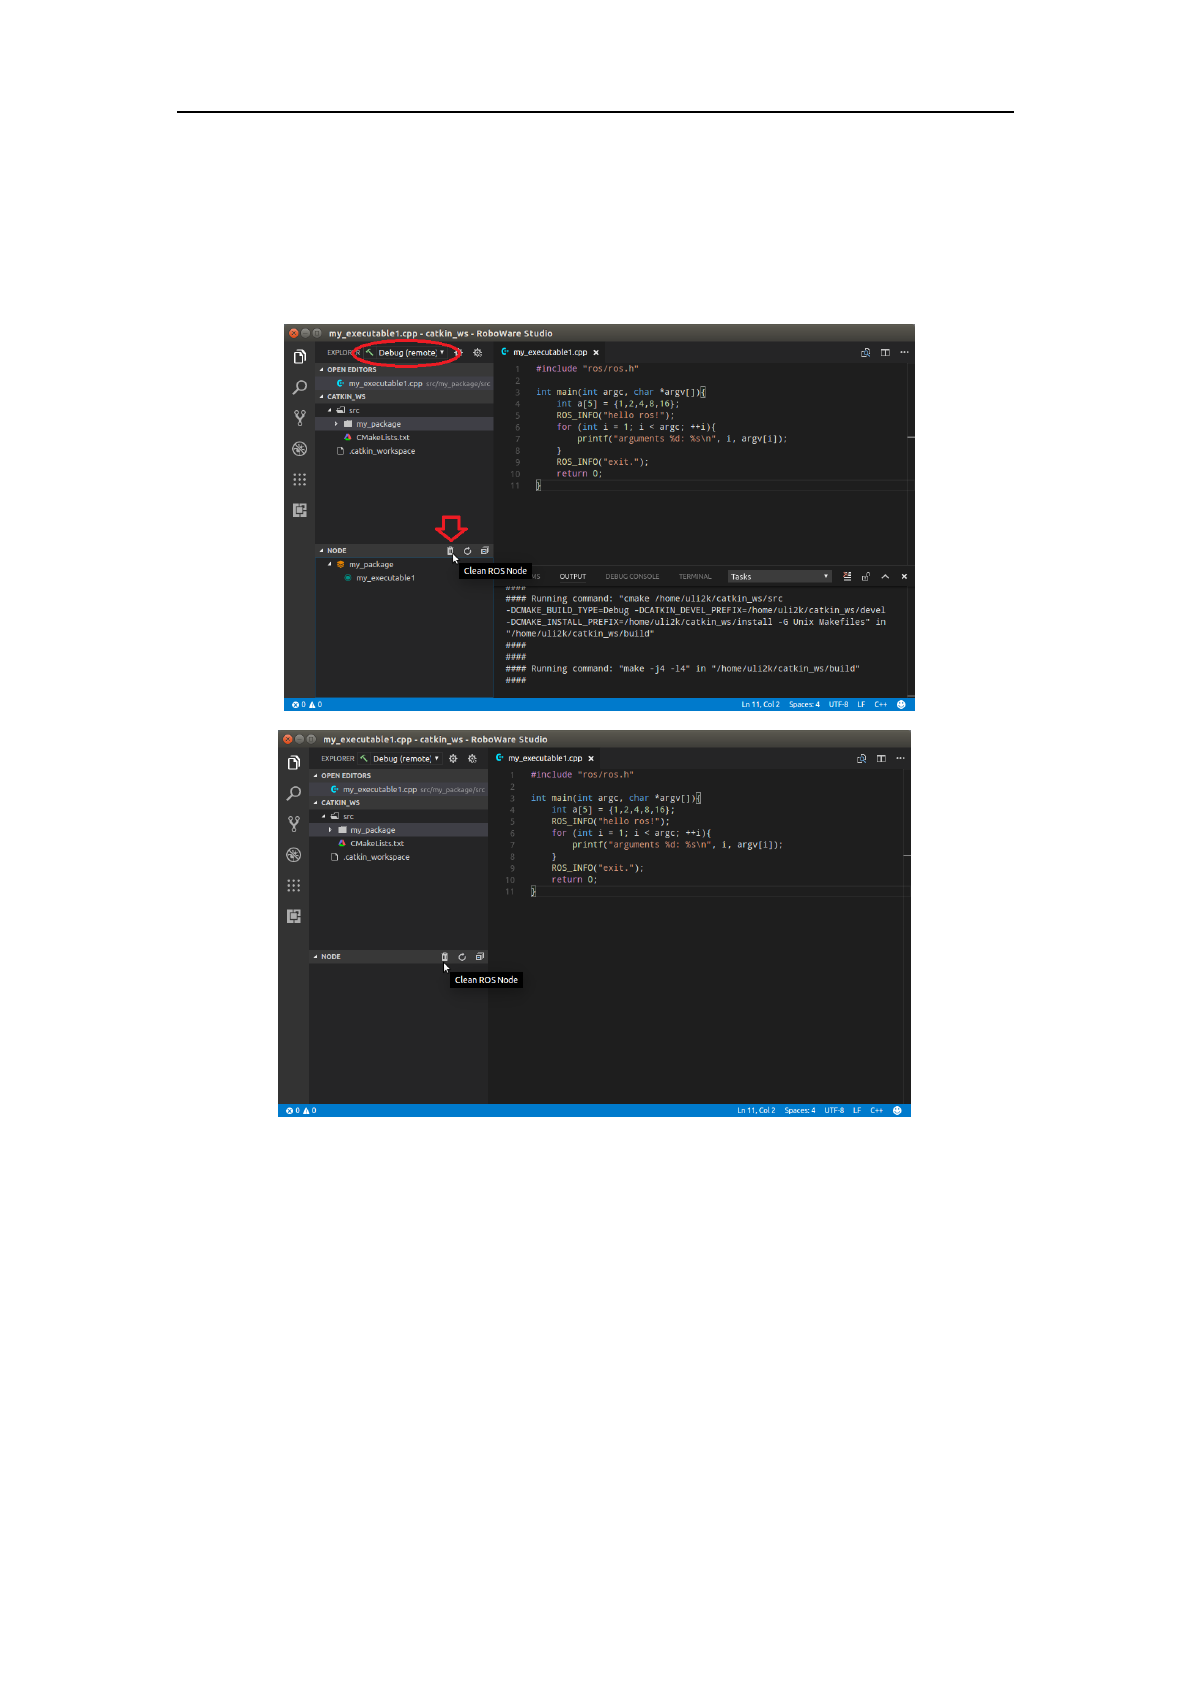
3.2.6 Remote clean
The “Node” section at the lower part of Explorer window will display all nodes, click “Clean
ROS Node” icon to clean them.
Note: Remote build outputs will be cleaned only if “remote” options are selected, otherwise,
local build outputs will be cleaned.
Figure 3-37 Clean remote build outputs
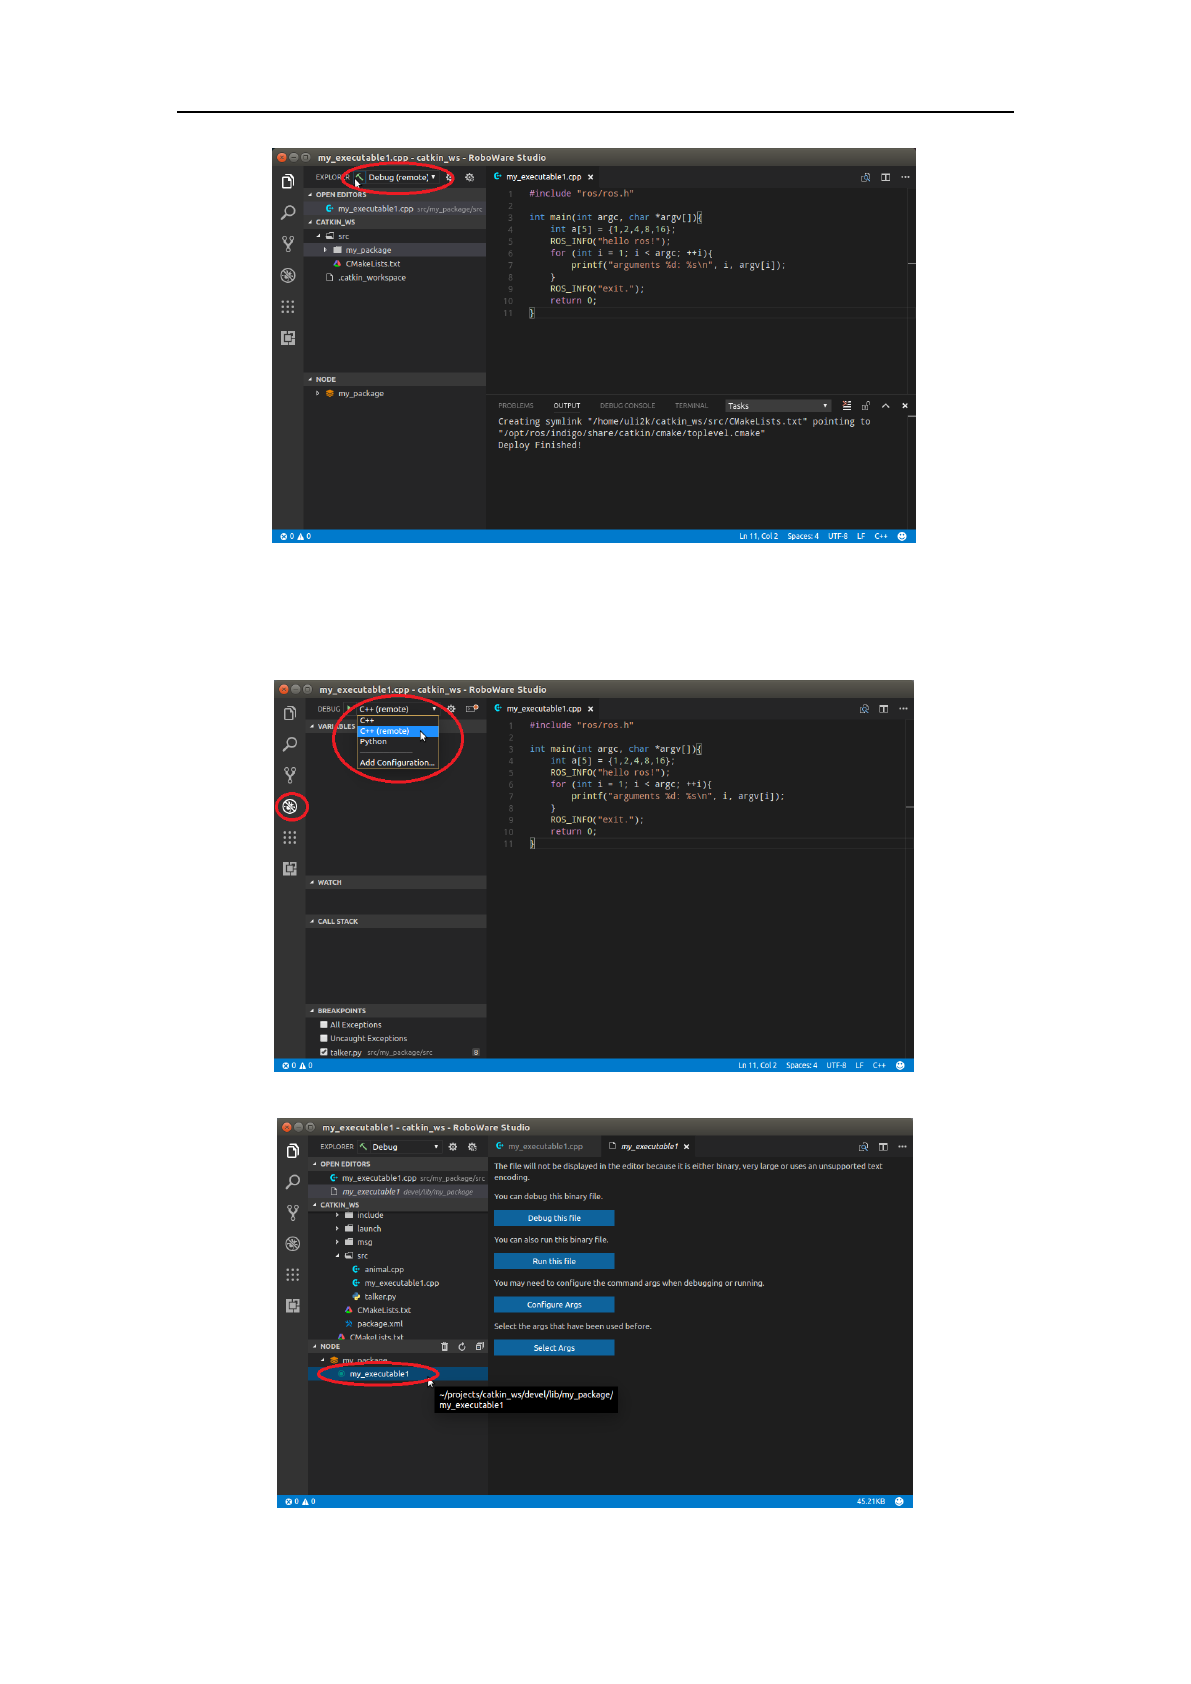
3.2.7 Remote debug
Before remote debug, make sure that remote workspace has been built with “Debug(remote)”
mode and packages and nodes are displayed in “Node” section.
RoboWare Studio Manual(www.roboware.me)
32
Jinan Tonyrobotics Co. Ltd.(www.tonyrobotics.com)
Figure 3-38 Nodes built with “Debug (remote)” option
In “Debug” view, the debugger is changed to “C++ (remote)” automatically.
Select a node in “Node” section, then you can follow the local debug instructions to debug the
remote node.
Figure 3-39 The debugger is changed to “C++ (remote)” automatically
RoboWare Studio Manual(www.roboware.me)
33
Jinan Tonyrobotics Co. Ltd.(www.tonyrobotics.com)
Figure 3-40 Remote debug
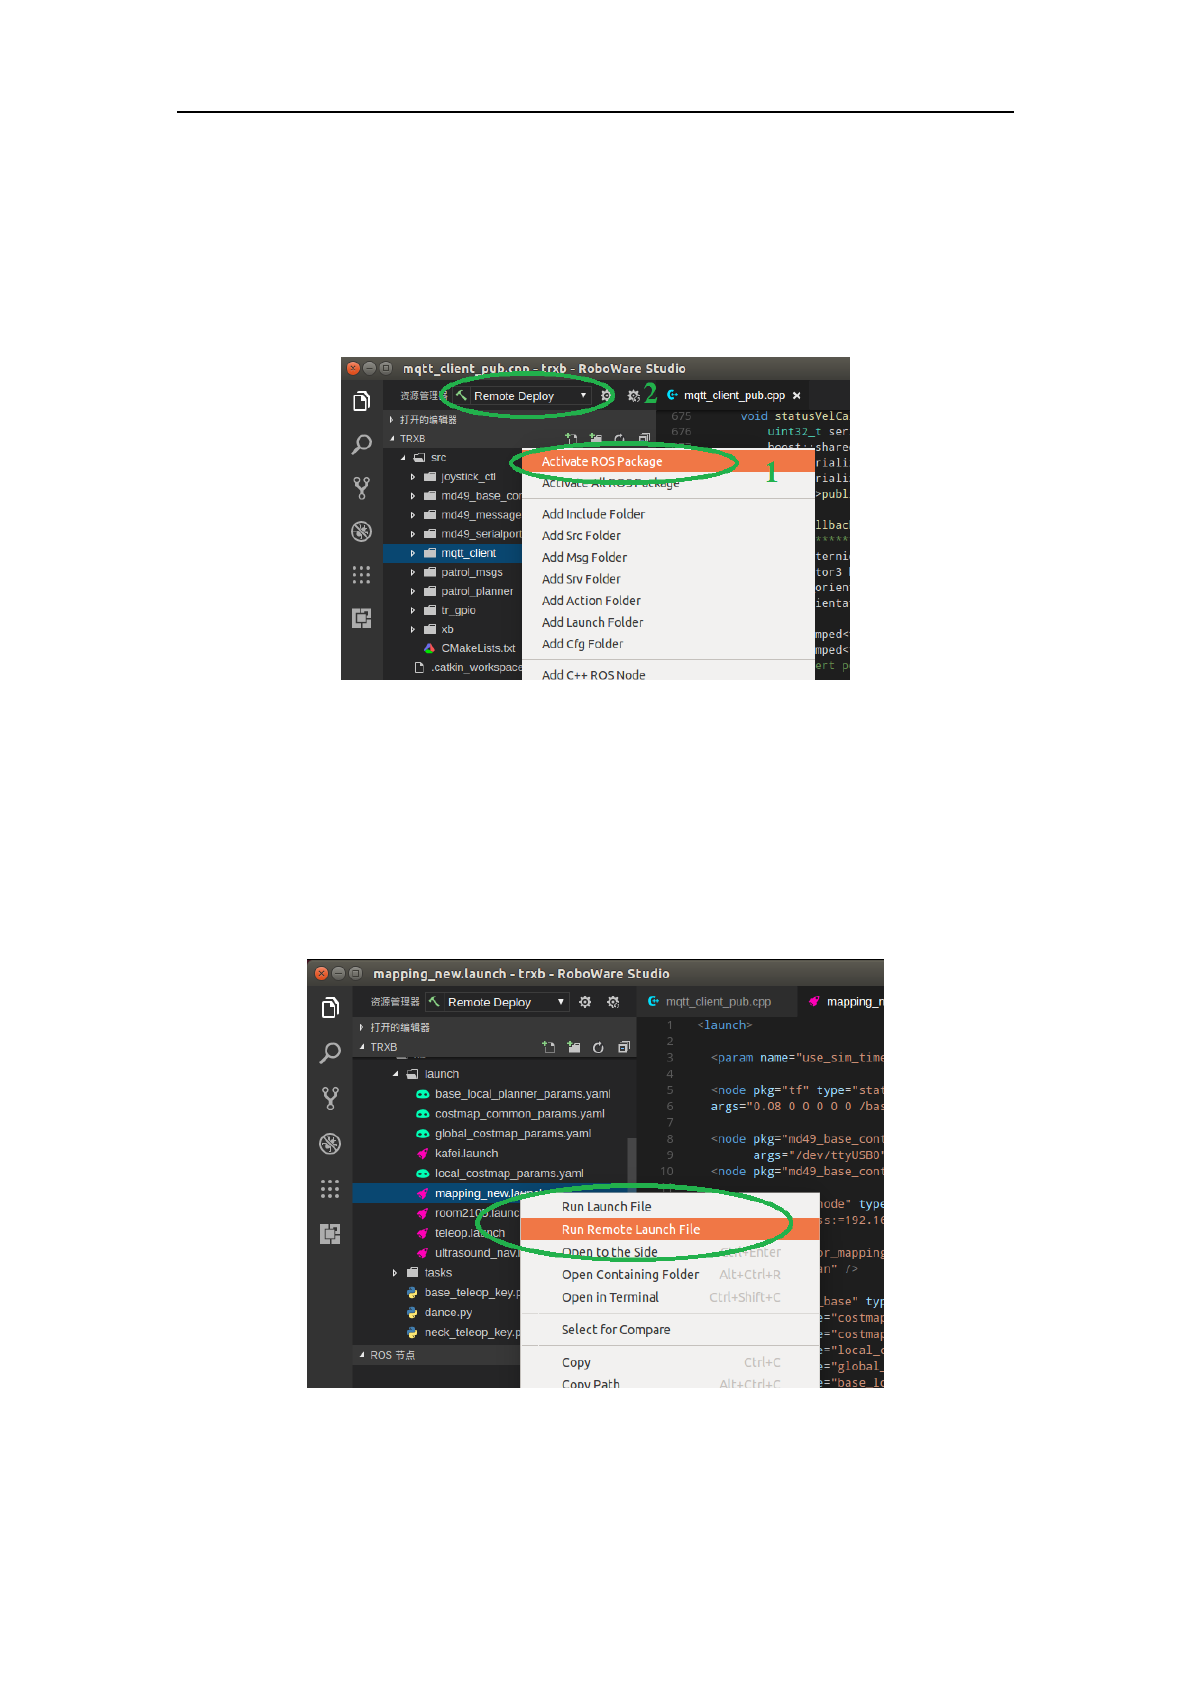
3.2.8 Remote deploy multiple packages
By default, RoboWare Studio would deploy all packages in current workspace. If you want to
deploy one or more of these packages to remote computer, you could right click on the package
name and select “Activate ROS Package”. Only active packages would be deployed to remote
computers when we click deploy button.
Figure 3-41 Deploy one or more packages
Just like local build, by default, clicking “Build” button will build all packages. If we want to
build multiple packages, we can right-click package name, select “Activate ROS Package” to set it
to activate it. One or more packages can be activated in this way. Now, the inactive packages will
be shown as strikethrough, they will not be built when wen click “Build” button.
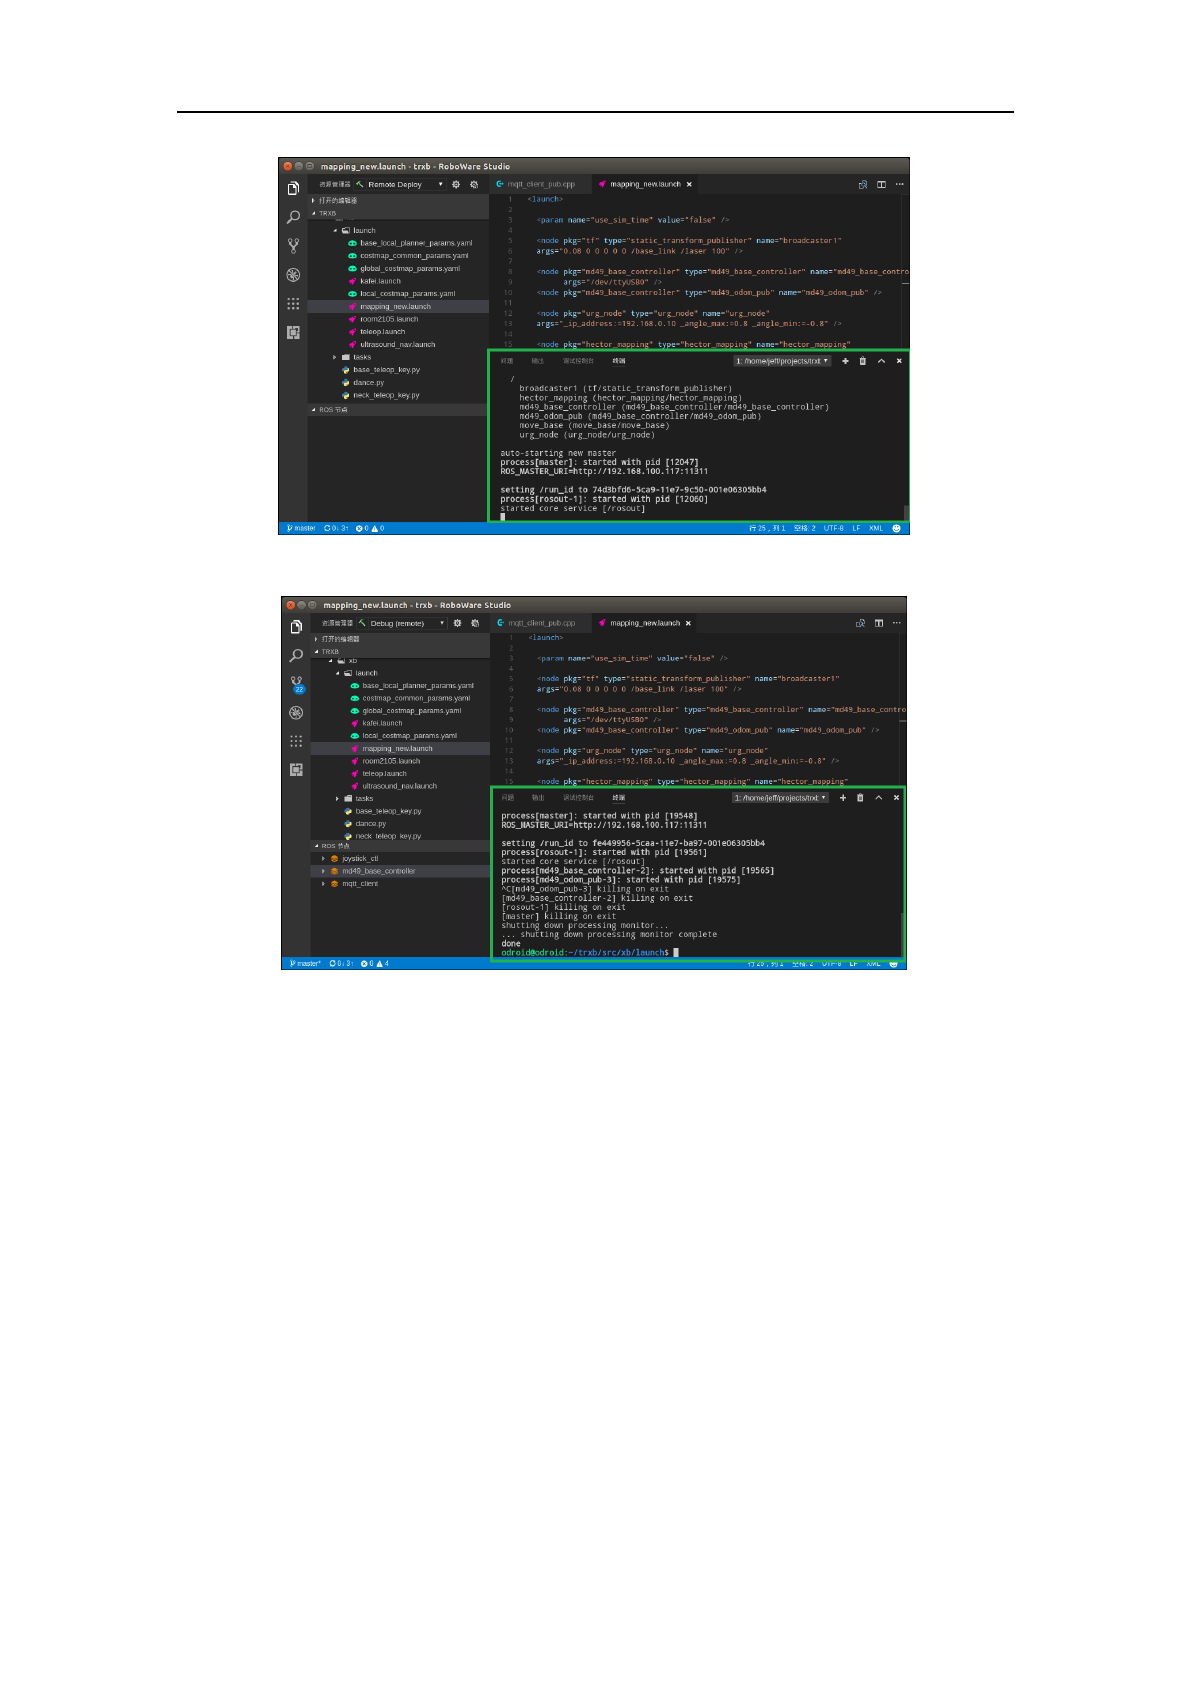
3.2.9 Launch remote file
Right click on launch file name, select “Run Remote Launch File”, RoboWare Studio will
launch remote file in an integrated terminal. Use “Ctrl+C” to abort.
Figure 3-42 Launch remote file
RoboWare Studio Manual(www.roboware.me)
34
Jinan Tonyrobotics Co. Ltd.(www.tonyrobotics.com)
Figure 3-43 Launch file is running
Figure 3-44 Use “Ctrl+C” to abort
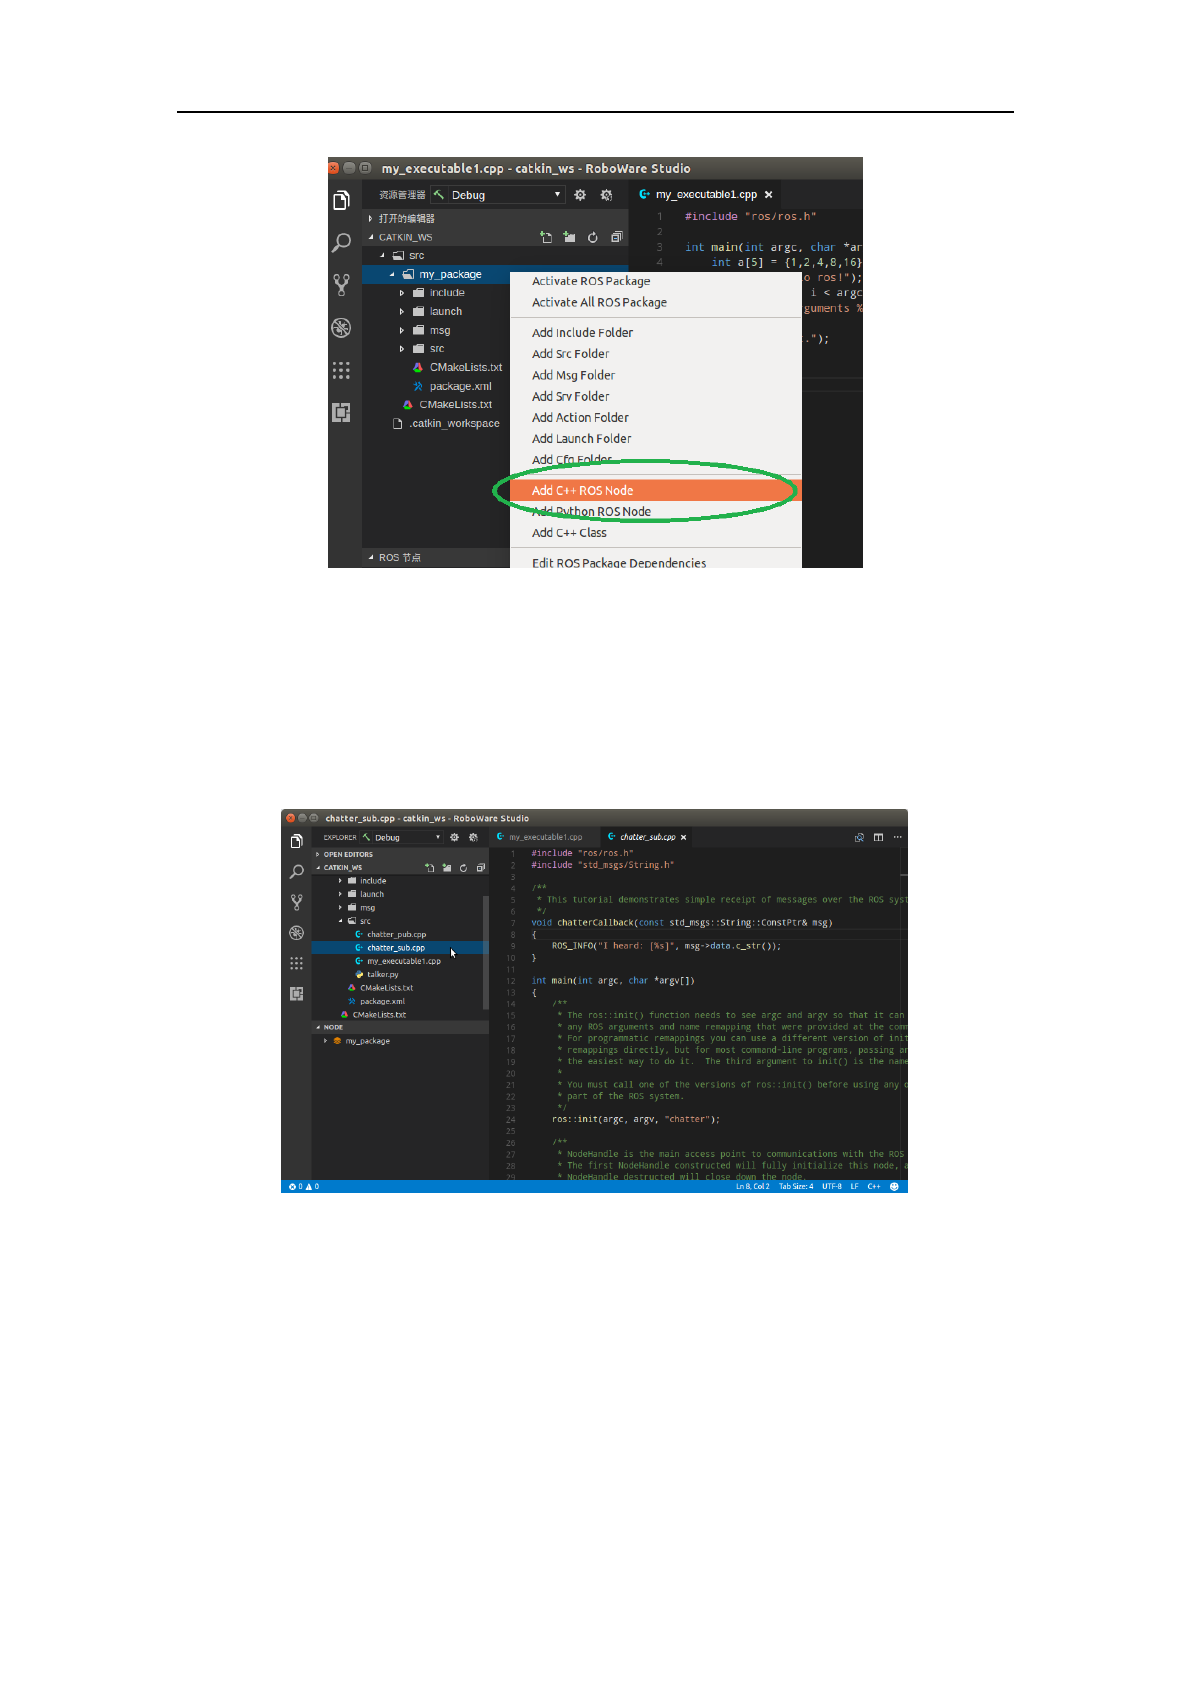
3.3 Wizard for creating C++/Python node or class
RoboWare Studio provide a wizard for creating C++/Python node or class. You can create C++
or Python node by right clicking on package name, select “Add C++ ROS Node” or “Add Python
ROS Node”, respectively. You can also create a C++ class by selecting “Add C++ Class”.
RoboWare Studio Manual(www.roboware.me)
35
Jinan Tonyrobotics Co. Ltd.(www.tonyrobotics.com)
Figure 3-45 Wizard for creating node or class
By default, two files(a publisher and a subscriber) will be created at the same time. For example,
if you want to create a C++ subscriber named “chatter”, you can right click on package name and
select “Add C++ ROS Node”, then type “chatter” in the text editor and press “Enter”, there will be
two files named “chatter_pub.cpp” and “chatter_sub.cpp” to be created. Right click on
“chatter_pub.cpp” and select “Delete”, “chatter_pub.cpp” will be deleted and “chatter_sub.cpp” will
be kept. The CMakeLists.txt file will be updated automatically.
Figure 3-46 Create C++ node
Similarly, when creating Python node, there will be a “*_sub.py” and a “*_pub.py” too, delete
the unwanted one.
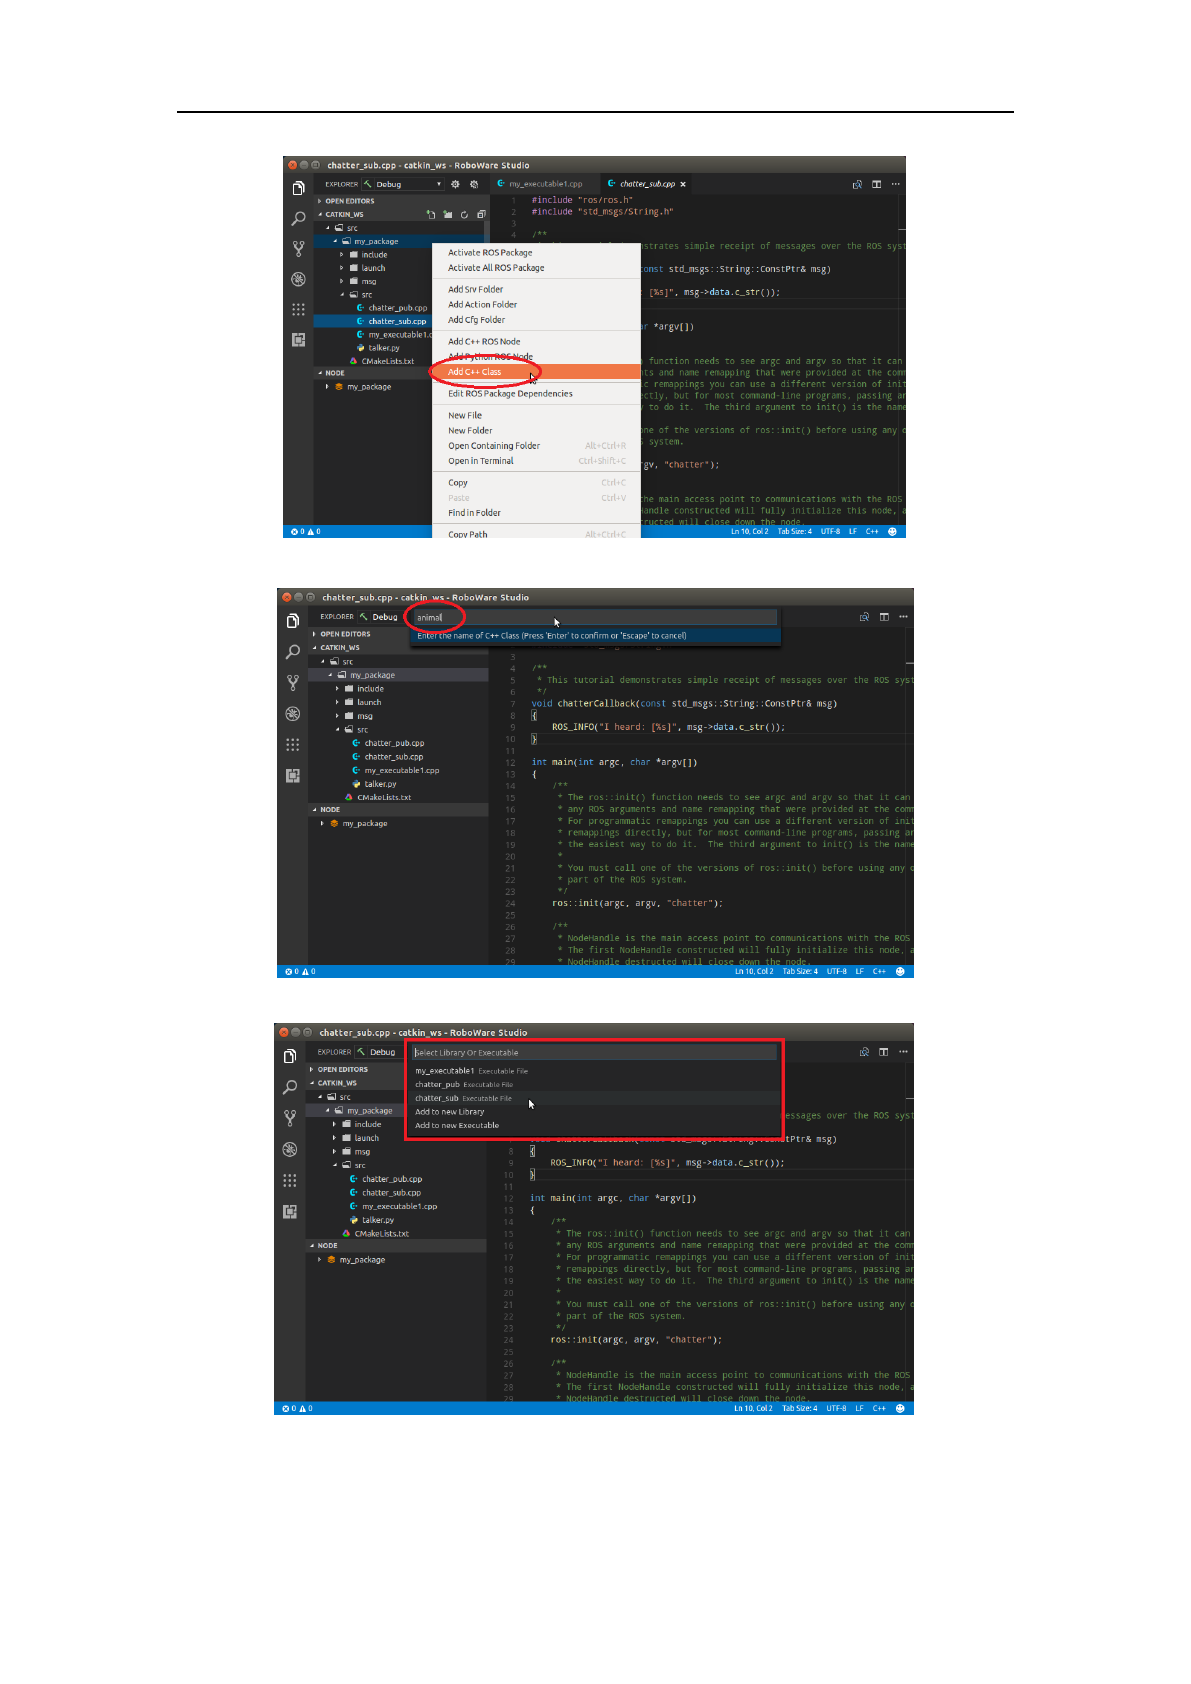
Creating C++ class is similar to creating node. Here, for example, we will create a C++ class
named “animal”.
First, right click on package name, choose “Add C++ Class”, type the name “animal” and add
it to a library or an executable, then press “Enter”, a header file named “animal.h” in
“include/<package_name>” directory and a cpp file named “animal.cpp” in “src” directory will be
created. The CMakeLists.txt file will be updated automatically.
RoboWare Studio Manual(www.roboware.me)
36
Jinan Tonyrobotics Co. Ltd.(www.tonyrobotics.com)
Choose “Add C++ Class”
Type class name “animal”
Select target libraries or executables
RoboWare Studio Manual(www.roboware.me)
37
Jinan Tonyrobotics Co. Ltd.(www.tonyrobotics.com)
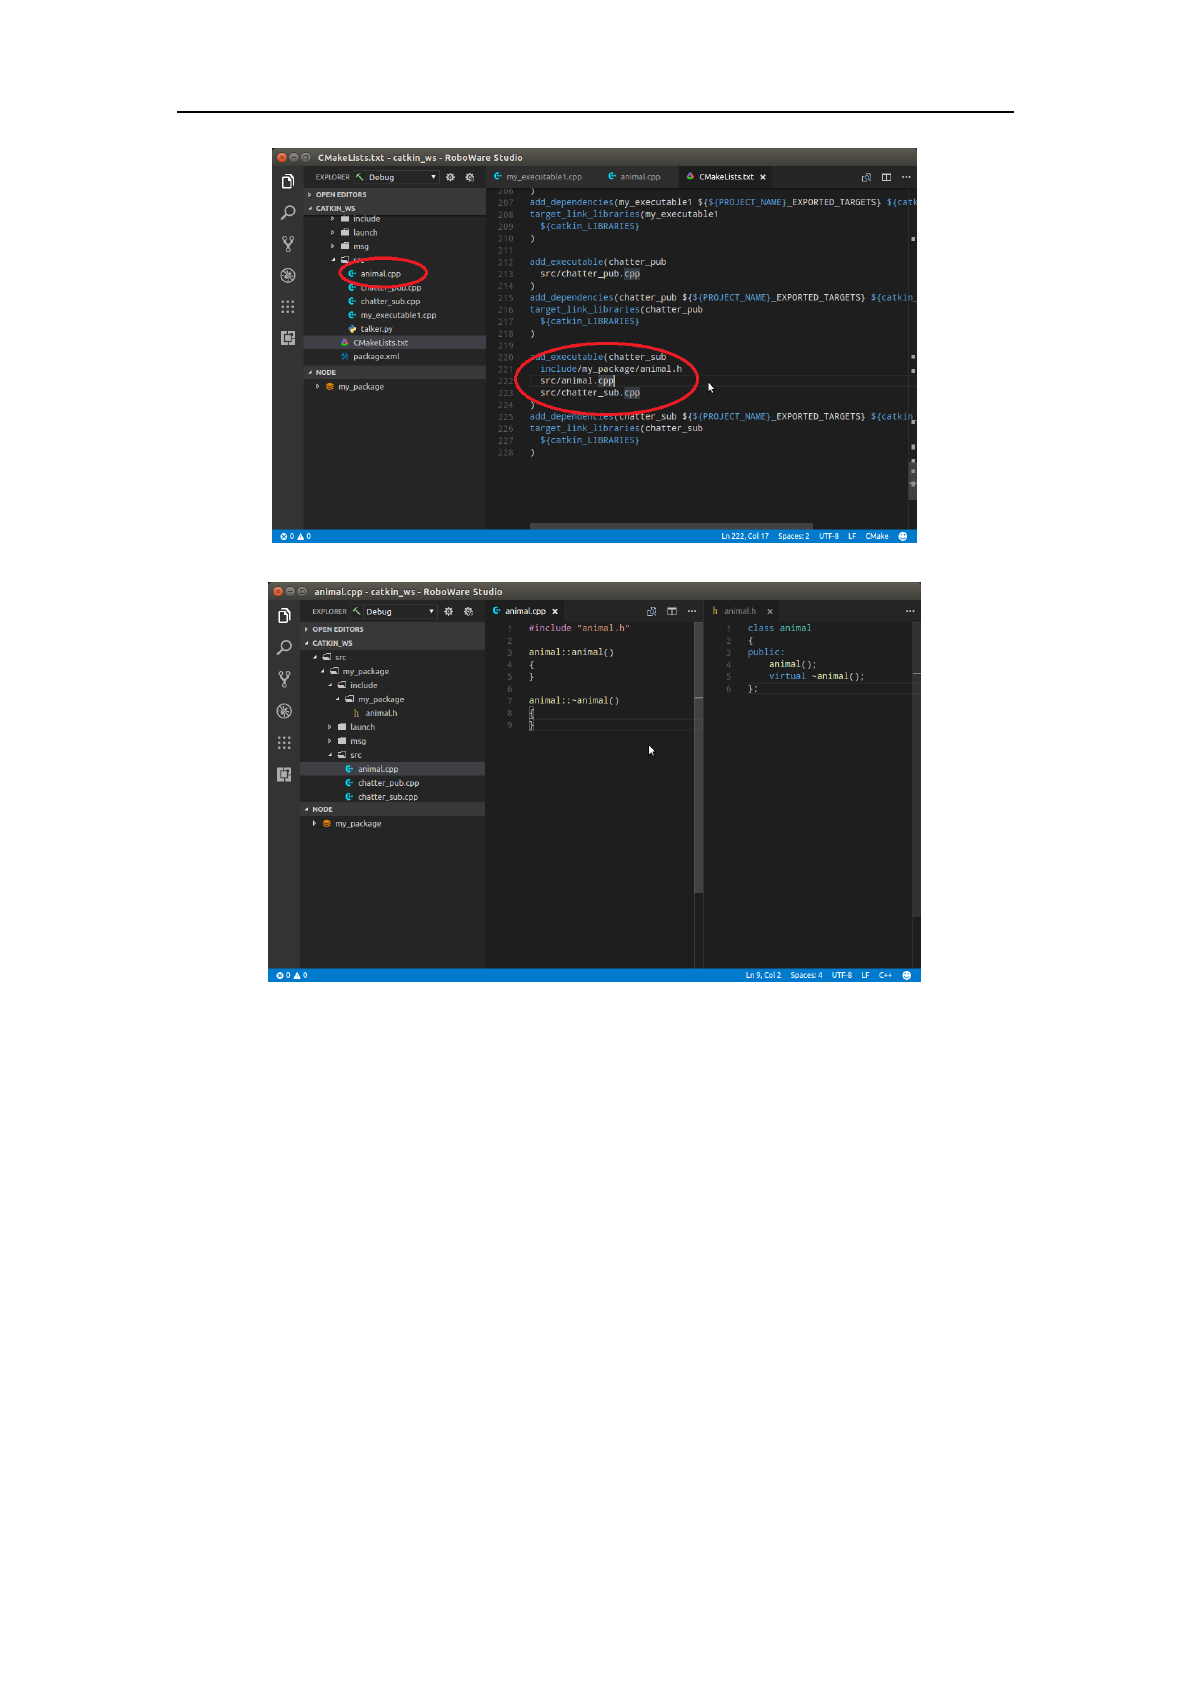
Creating “animal”class
Contents of “animal” class
Figure 3-47 Create a class named “animal”
3.4 Preferences
By selecting “File – Preferences”, RoboWare Studio provides a graphical user interface as
follows to configure language settings, workspace setting, color themes, etc.
RoboWare Studio Manual(www.roboware.me)
38
Jinan Tonyrobotics Co. Ltd.(www.tonyrobotics.com)
Figure 3-48 RoboWare Studio preferences
3.5 ROS graphical tools
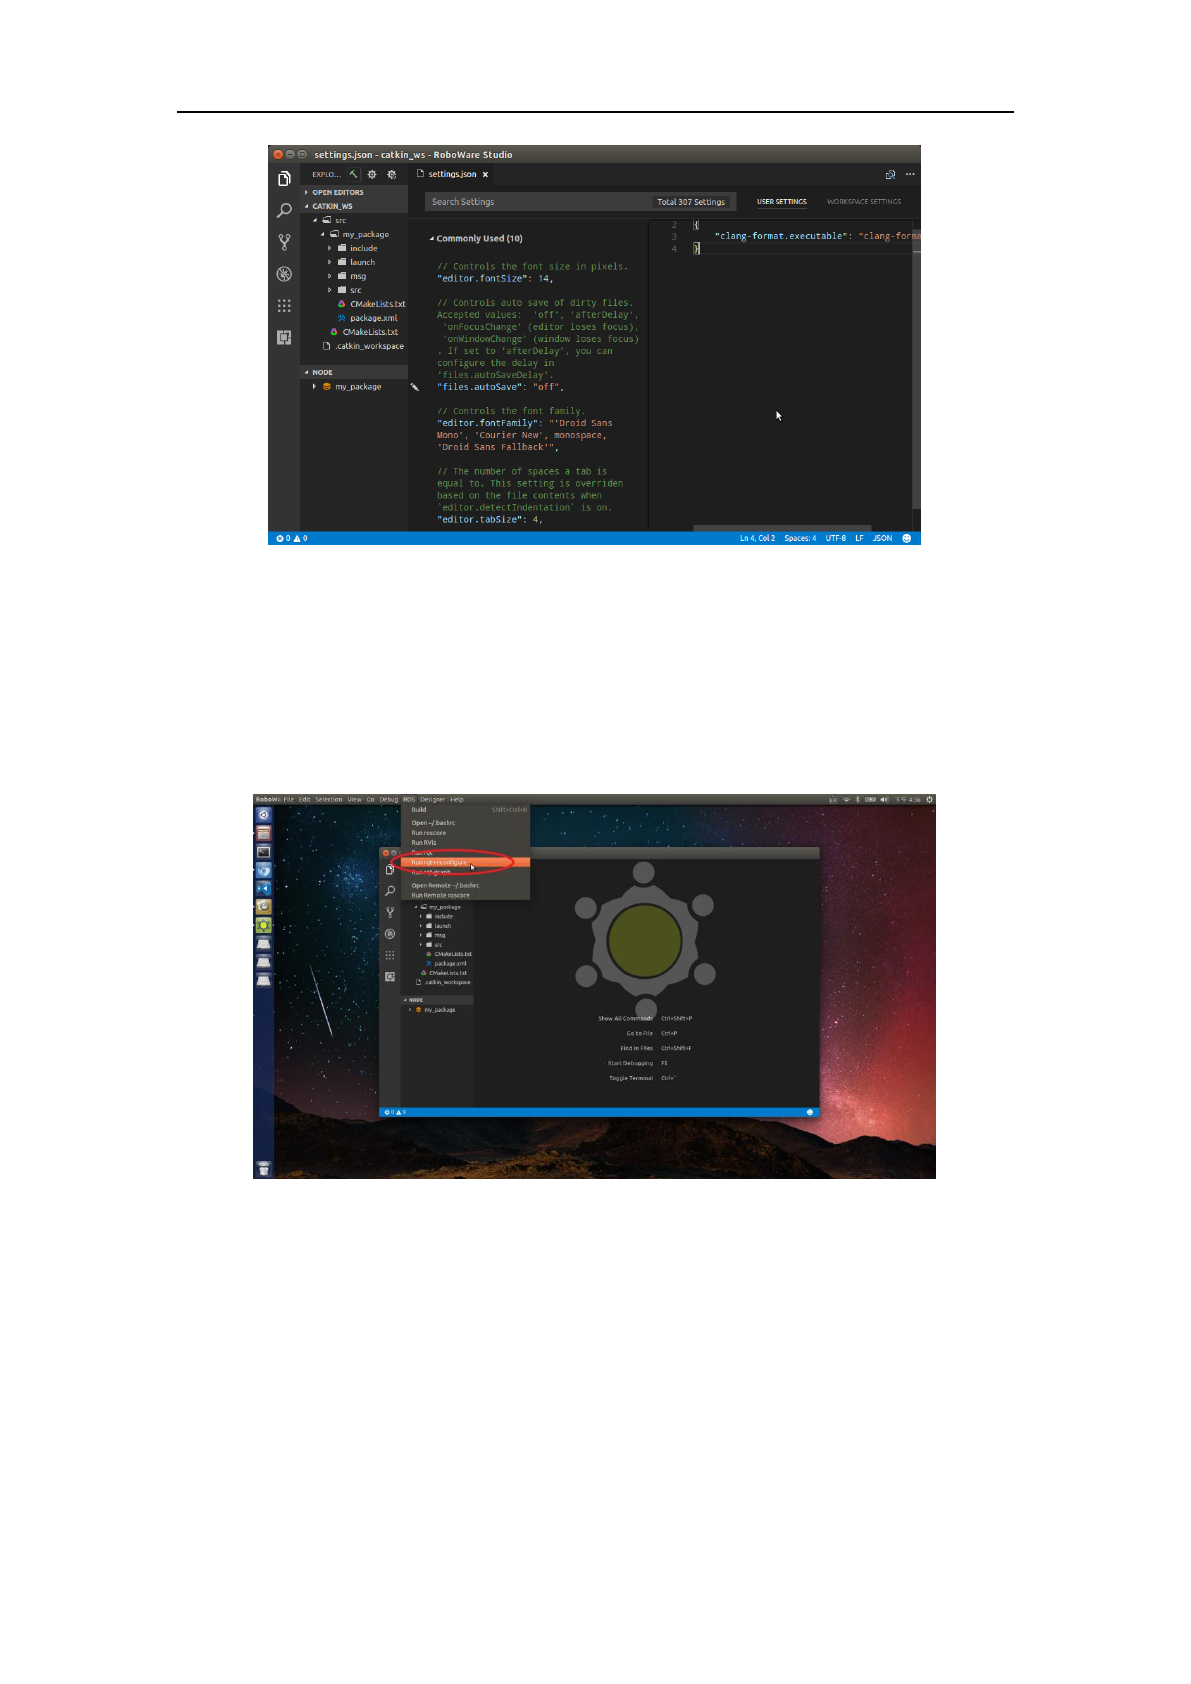
3.5.1 Run roscore, RViz, rqt, rqt-reconfigure, rqt-graph
In the menu bar, you could run commonly used ROS tools by selecting “ROS - Run roscore”,
“ROS - Run RViz”, “ROS – Run rqt”, “ROS – Run rqt-reconfigure” and “ROS run rqt-graph”.
Moreover, you could run remote roscore by selecting “ROS – Run Remote roscore”.
RoboWare Studio Manual(www.roboware.me)
39
Jinan Tonyrobotics Co. Ltd.(www.tonyrobotics.com)
Figure 3-49 Run rqt-reconfigure
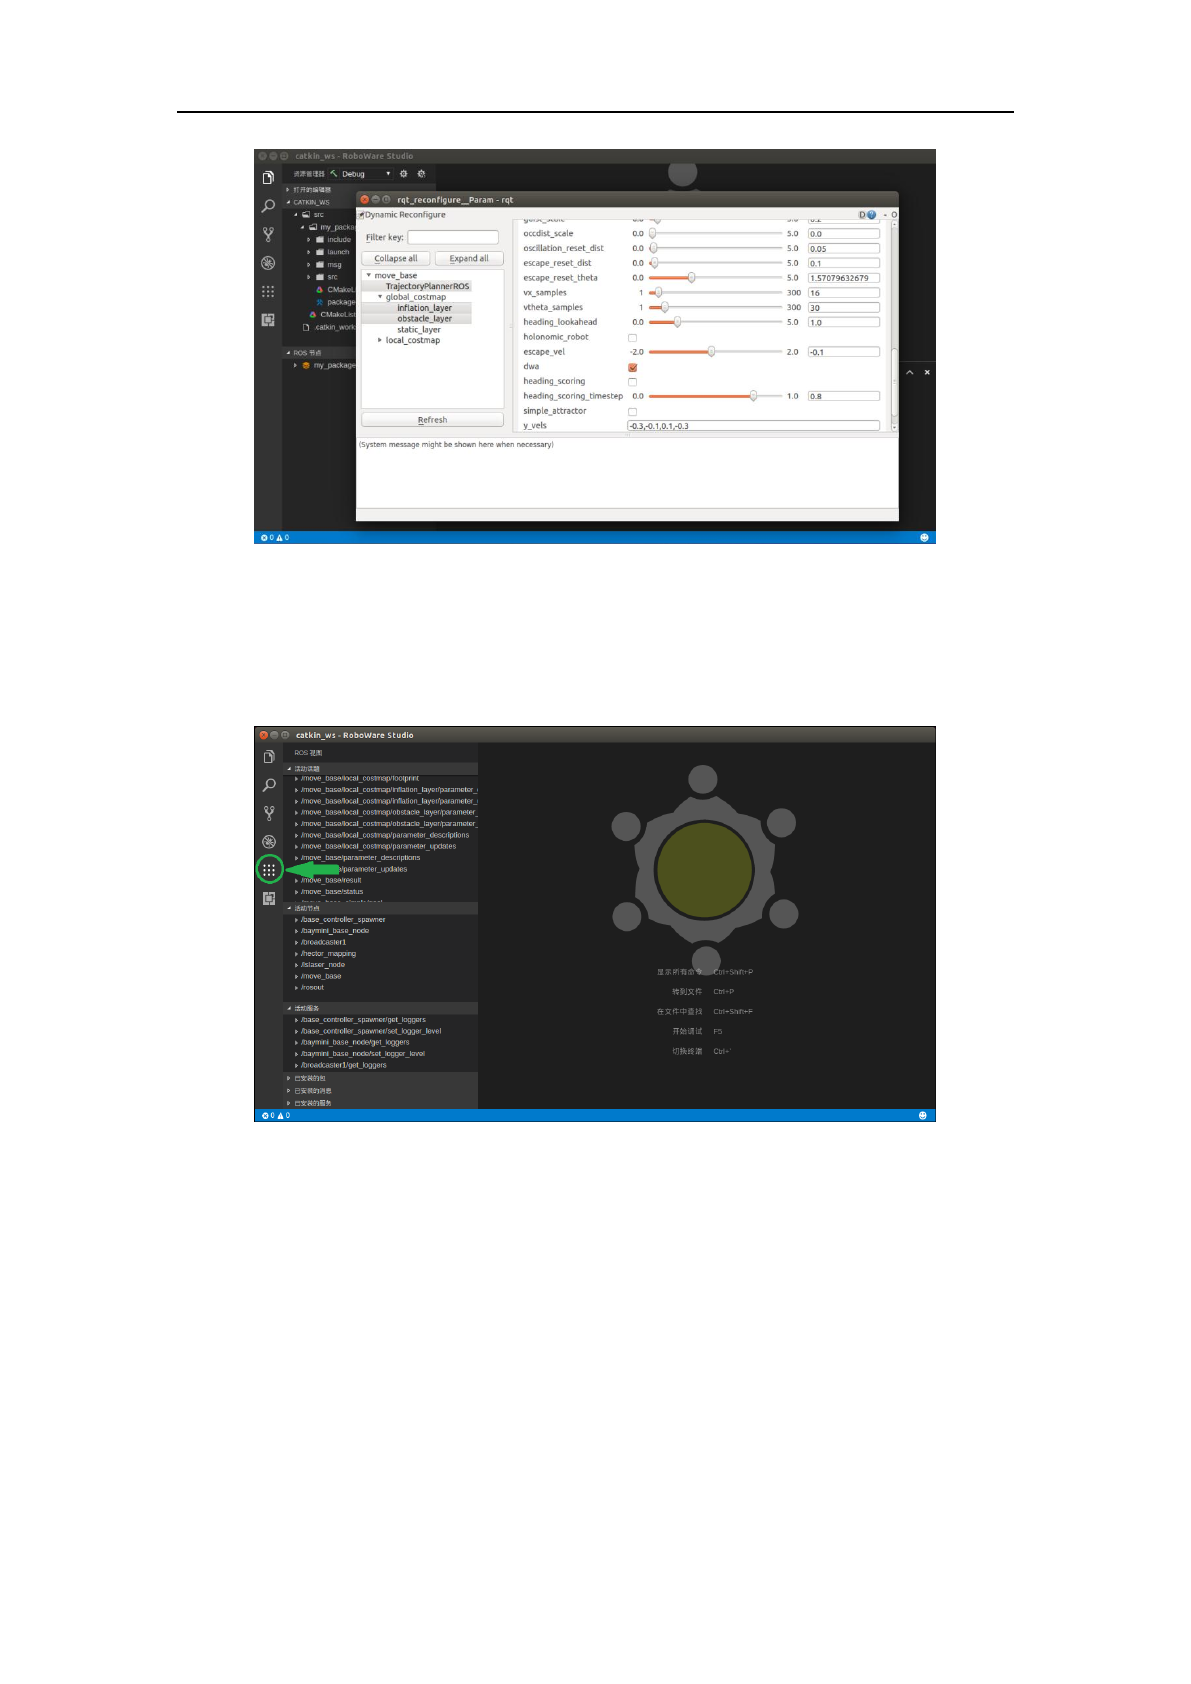
3.5.2 Display active topics/nodes/services and installed packages/messages/services
Go into “ROS” view by clicking ROS icon on left sidebar, the active topics/nodes/services and
installed packages/messages/services will be displayed. You can expand and collapse each section
to view the contents.
Figure 3-50 Go into ROS view
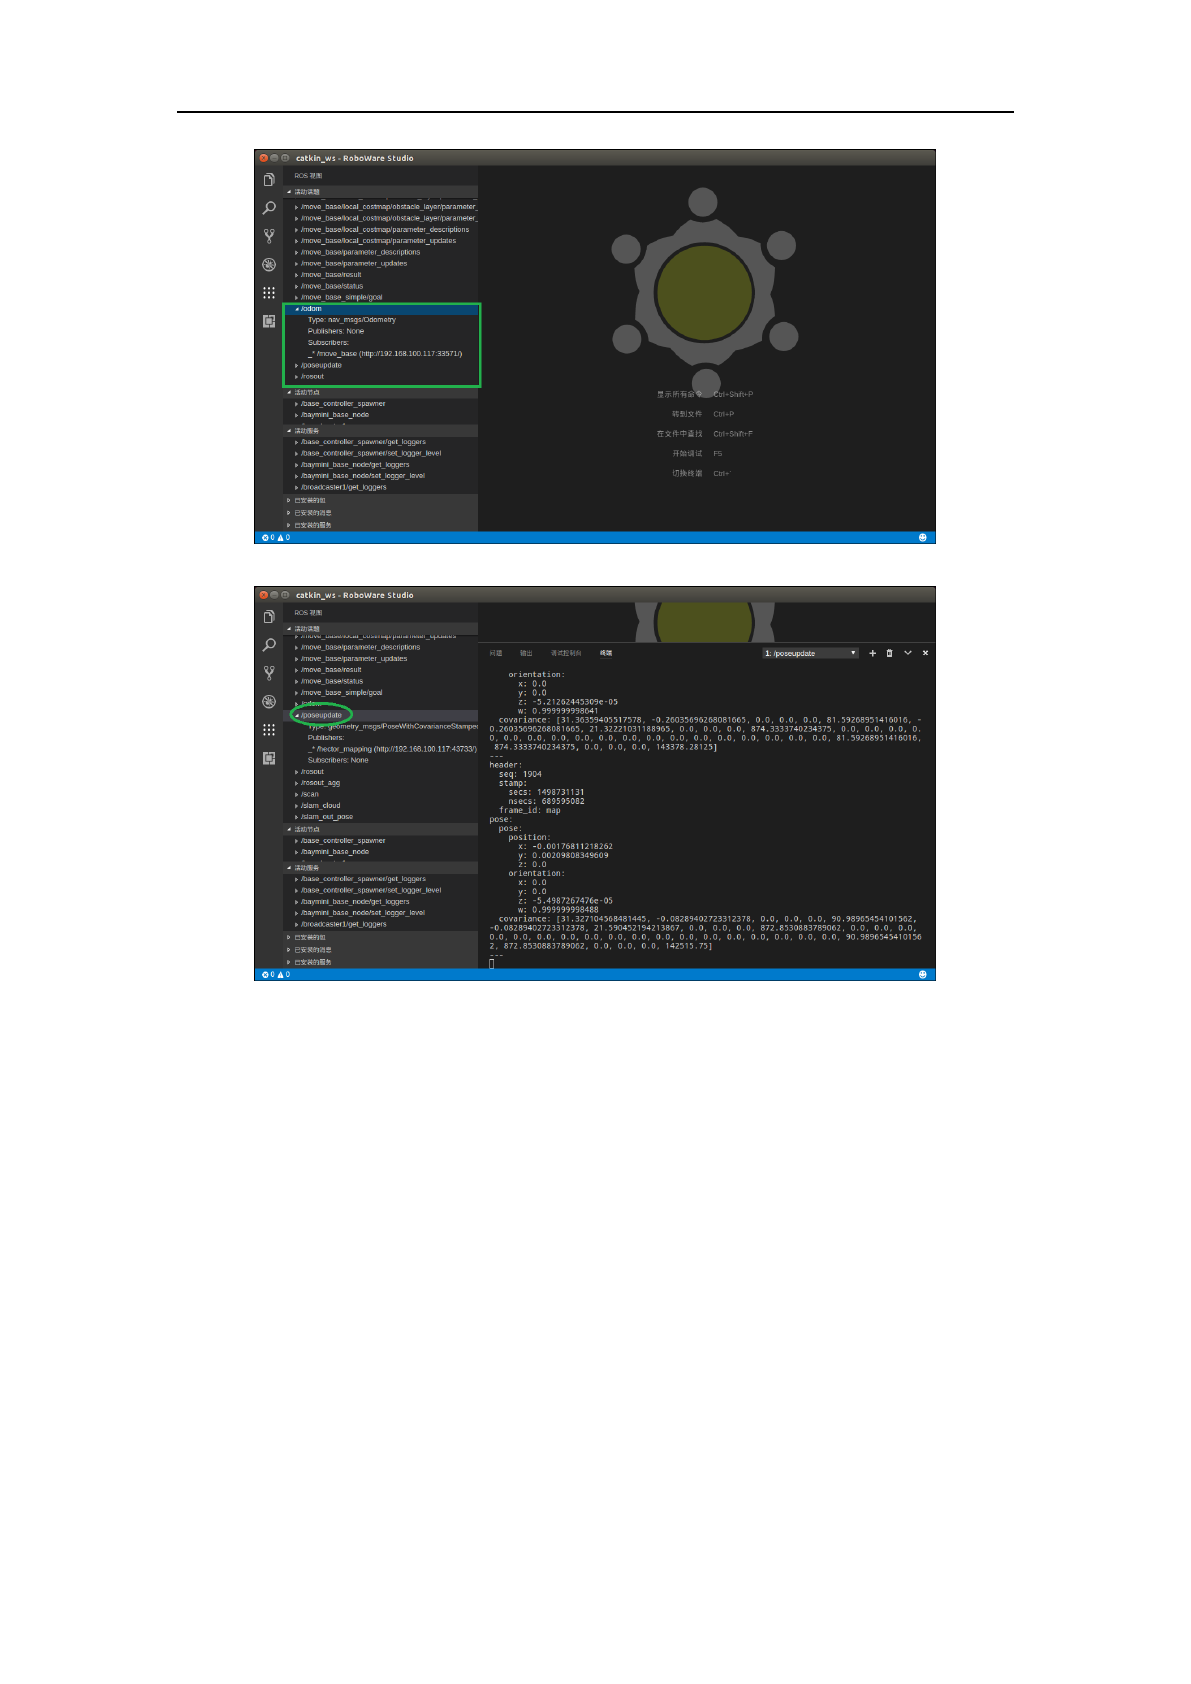
You can click the names of topics/nodes/services to check their descriptions, or double click
their names to view the real-time data streams.
RoboWare Studio Manual(www.roboware.me)
40
Jinan Tonyrobotics Co. Ltd.(www.tonyrobotics.com)
Figure 3-51 check topic descriptions
Figure 3-52 View real-time data streams of a topic
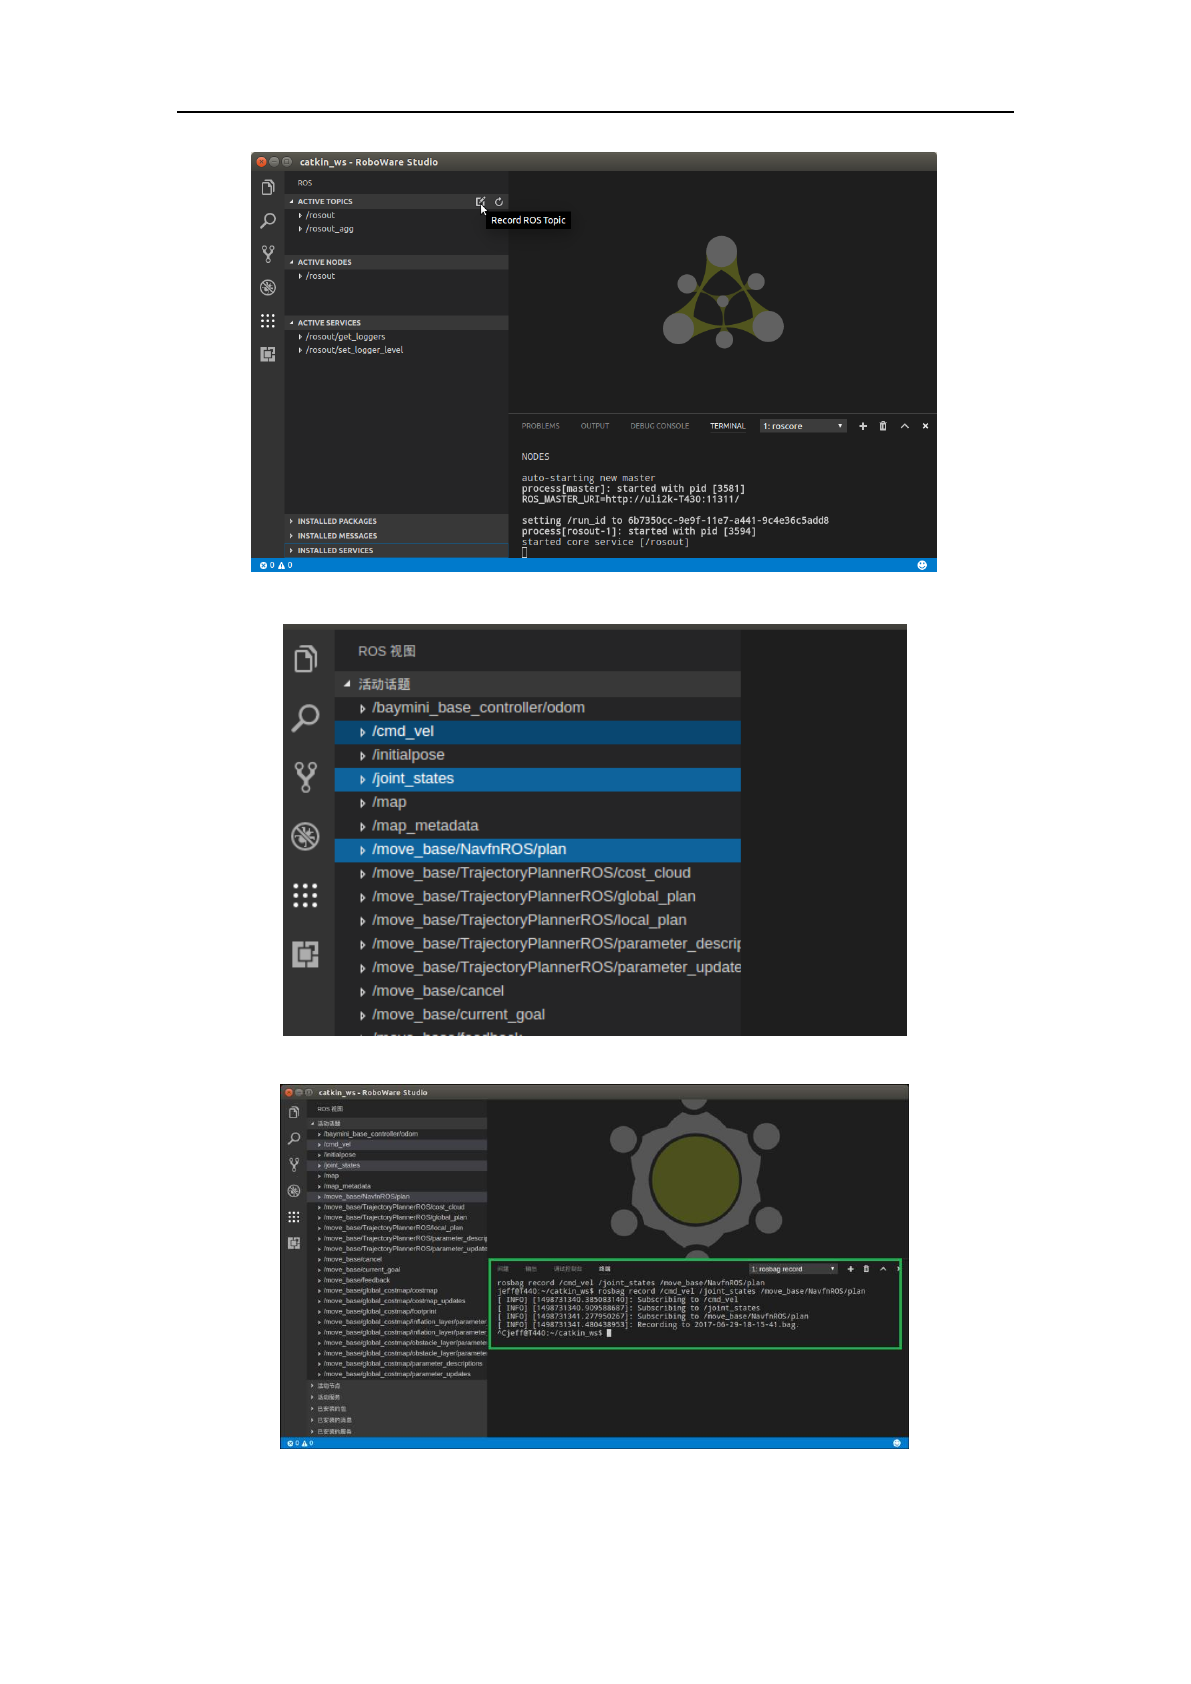
3.5.3 Record to or play rosbag
I.Record
As shown in previous section, in the “ROS” view, all active topics are listed. You can use
“rosbag” tools to record them by clicking “Record ROS Topic” icon, all active topics will be
recorded by default. If you want to record one or more topics, you can press “Ctrl” key, and choose
topic names you want to record by clicking them, then click “Record ROS Topic” icon to record
them.
The recorded bag file will be saved in root directory of current workspace, its name is in a
format of “yyyy-MM-dd-HH-mm-ss.bag”. You can stop recording by “Ctrl+C” in the integrated
terminal.
RoboWare Studio Manual(www.roboware.me)
41
Jinan Tonyrobotics Co. Ltd.(www.tonyrobotics.com)
Figure 3-53 Record all active topics
Choose one or more topics
“Ctrl+C” to stop recording
Figure 3-54 Record ROS topics
RoboWare Studio Manual(www.roboware.me)
42
Jinan Tonyrobotics Co. Ltd.(www.tonyrobotics.com)
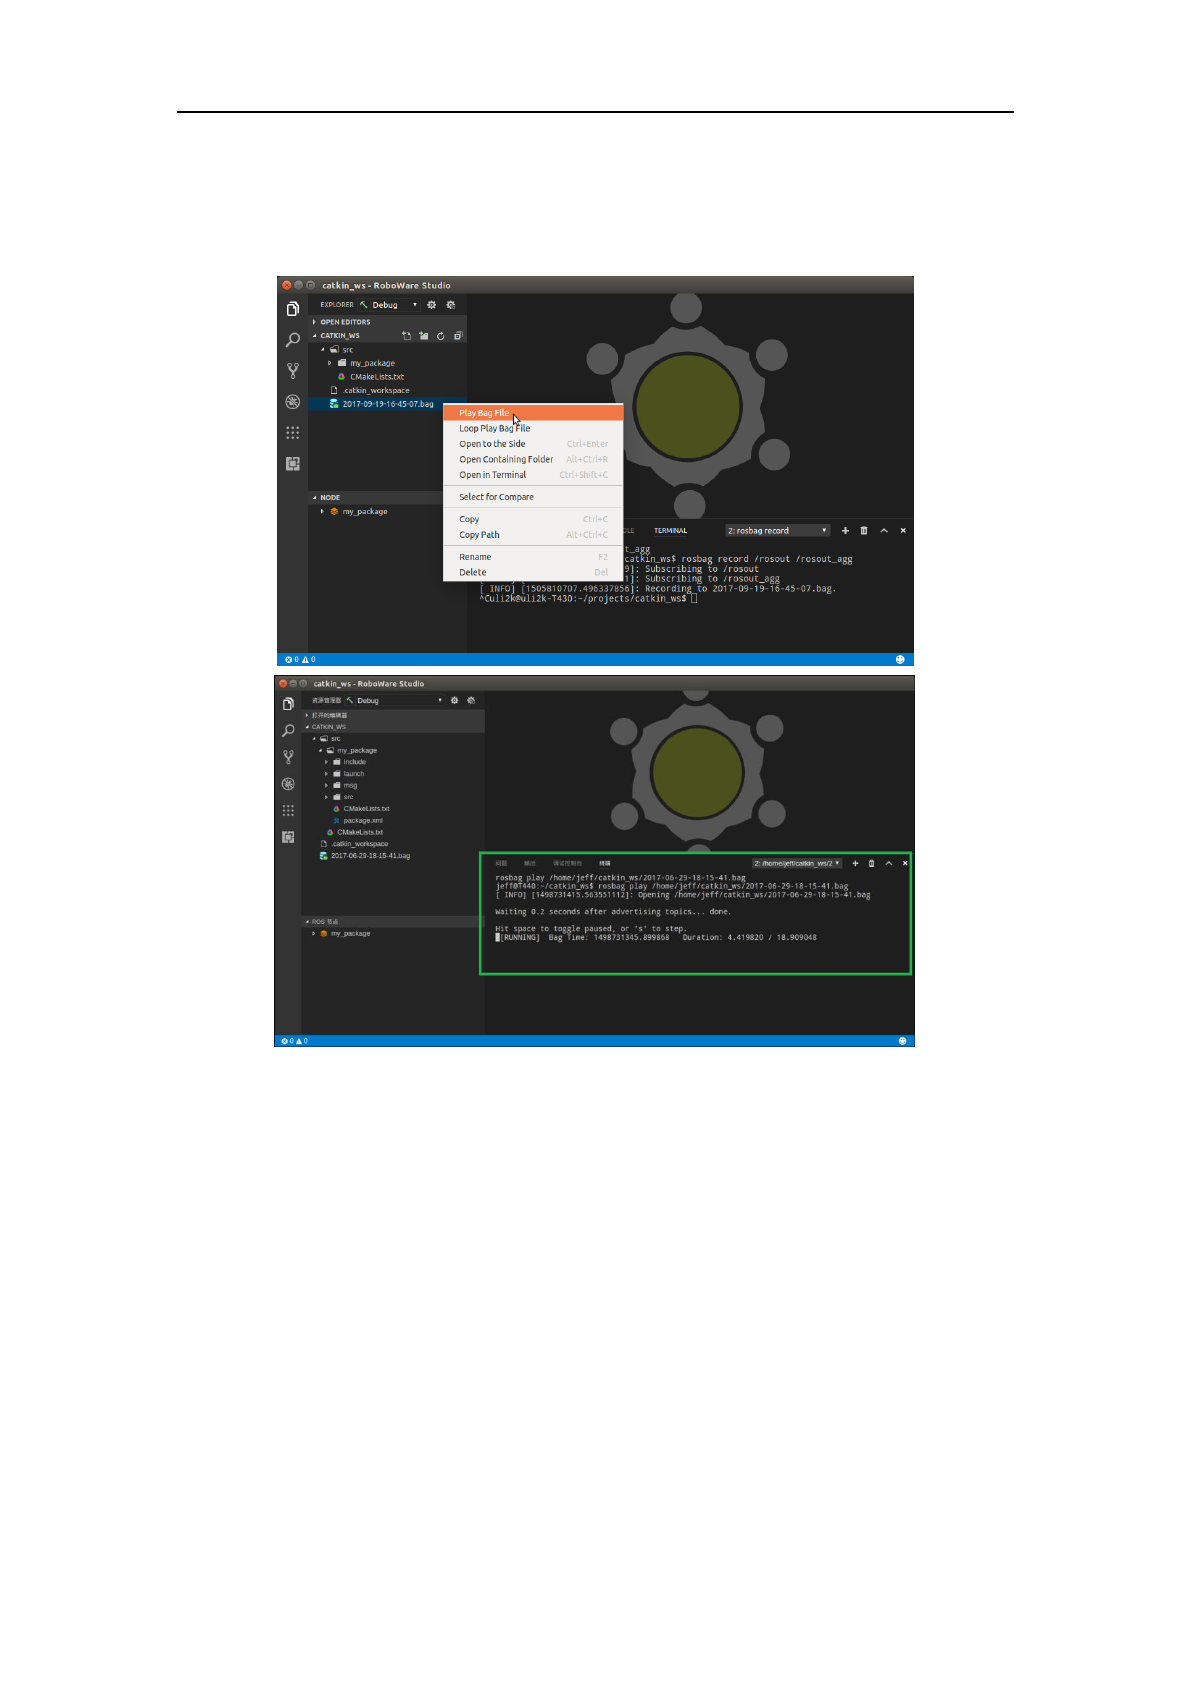
II.Play
In “Explorer” view, you can play bag file by right clicking on the bag file name and selecting
“Play Bag File”. You can also select “Loop Play Bag File” to play it in a loop. Since this task is
executed in integrated terminal, you can type “Ctrl+C” in the integrated terminal to stop playing.
Figure 3-55 Play bag file
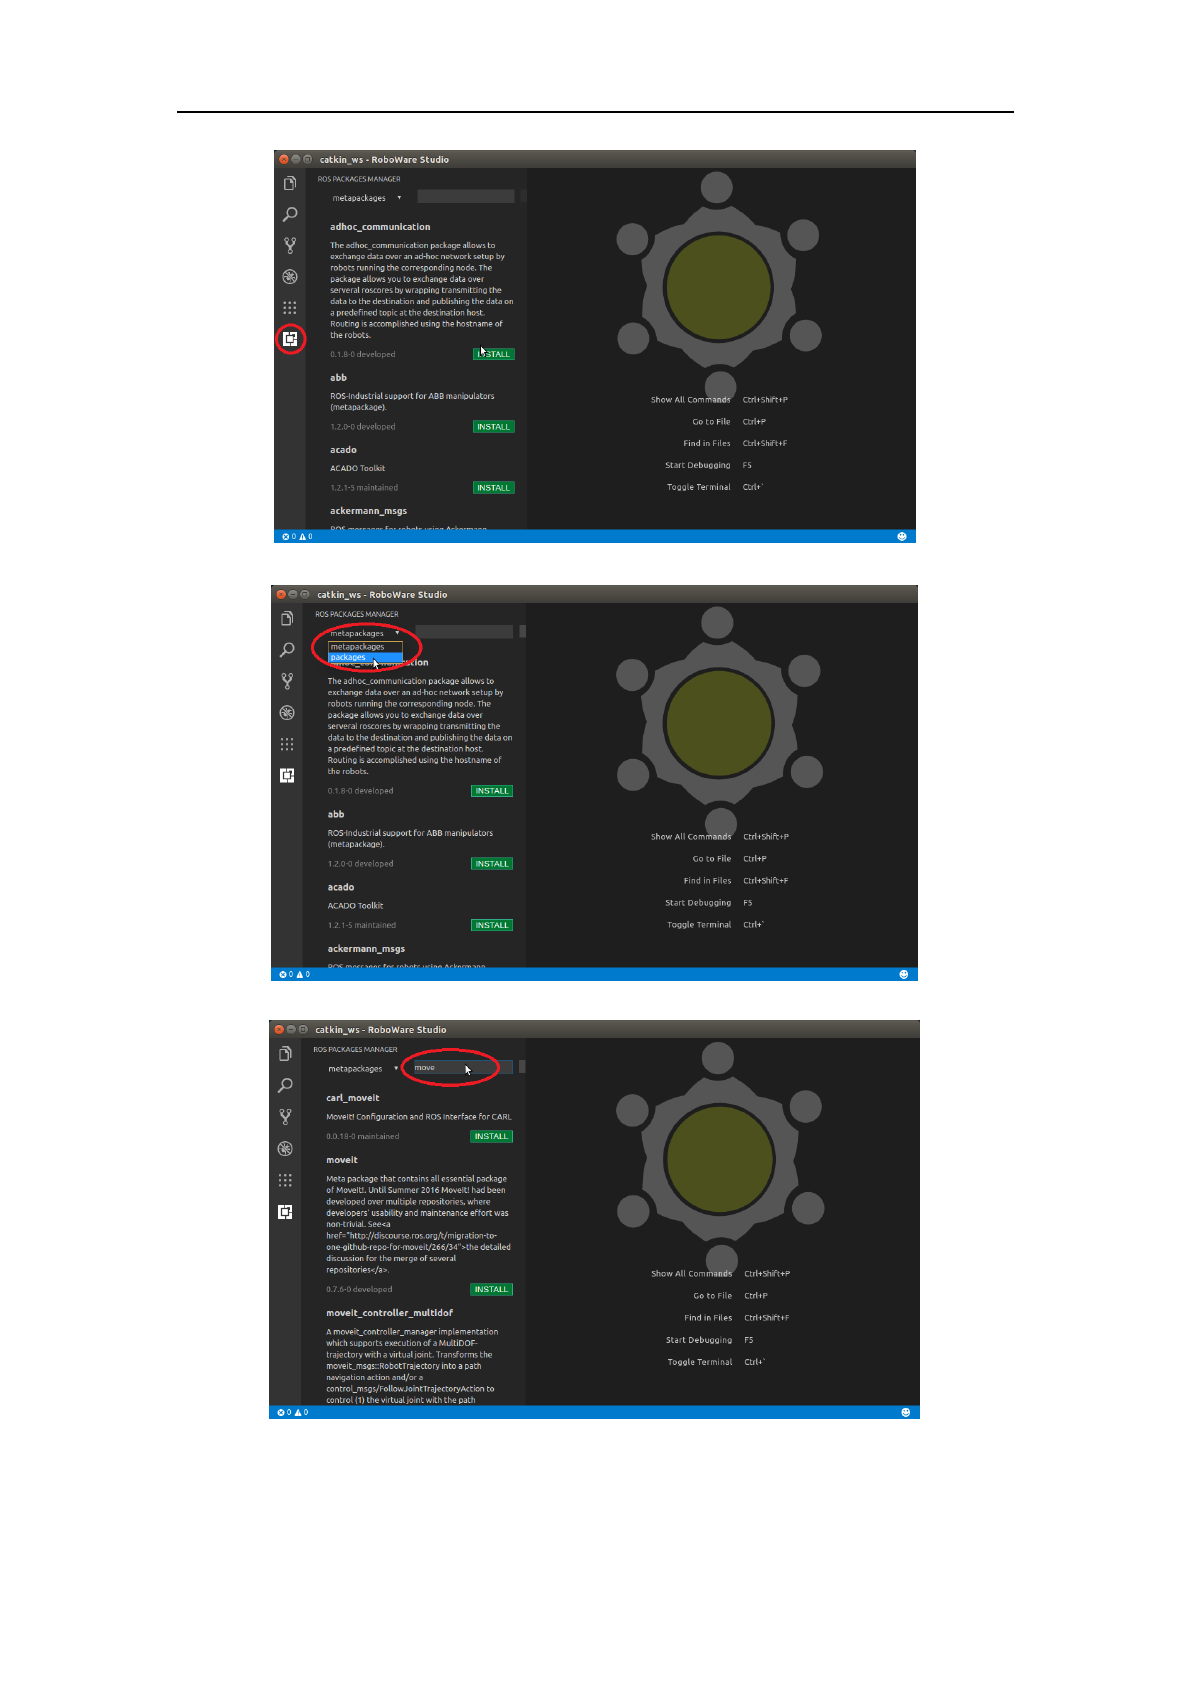
3.6 ROS Packages Manager
Go into “ROS Packages Manager” view by clicking “ROS Packages Manager” icon in the left
sidebar. RoboWare Studio will detect ROS distro automatically and list all packages of this distro
(including installed and uninstalled packages). You can choose “metapackages” and “packages” to
view theirs lists. Searching of packages is also supported.
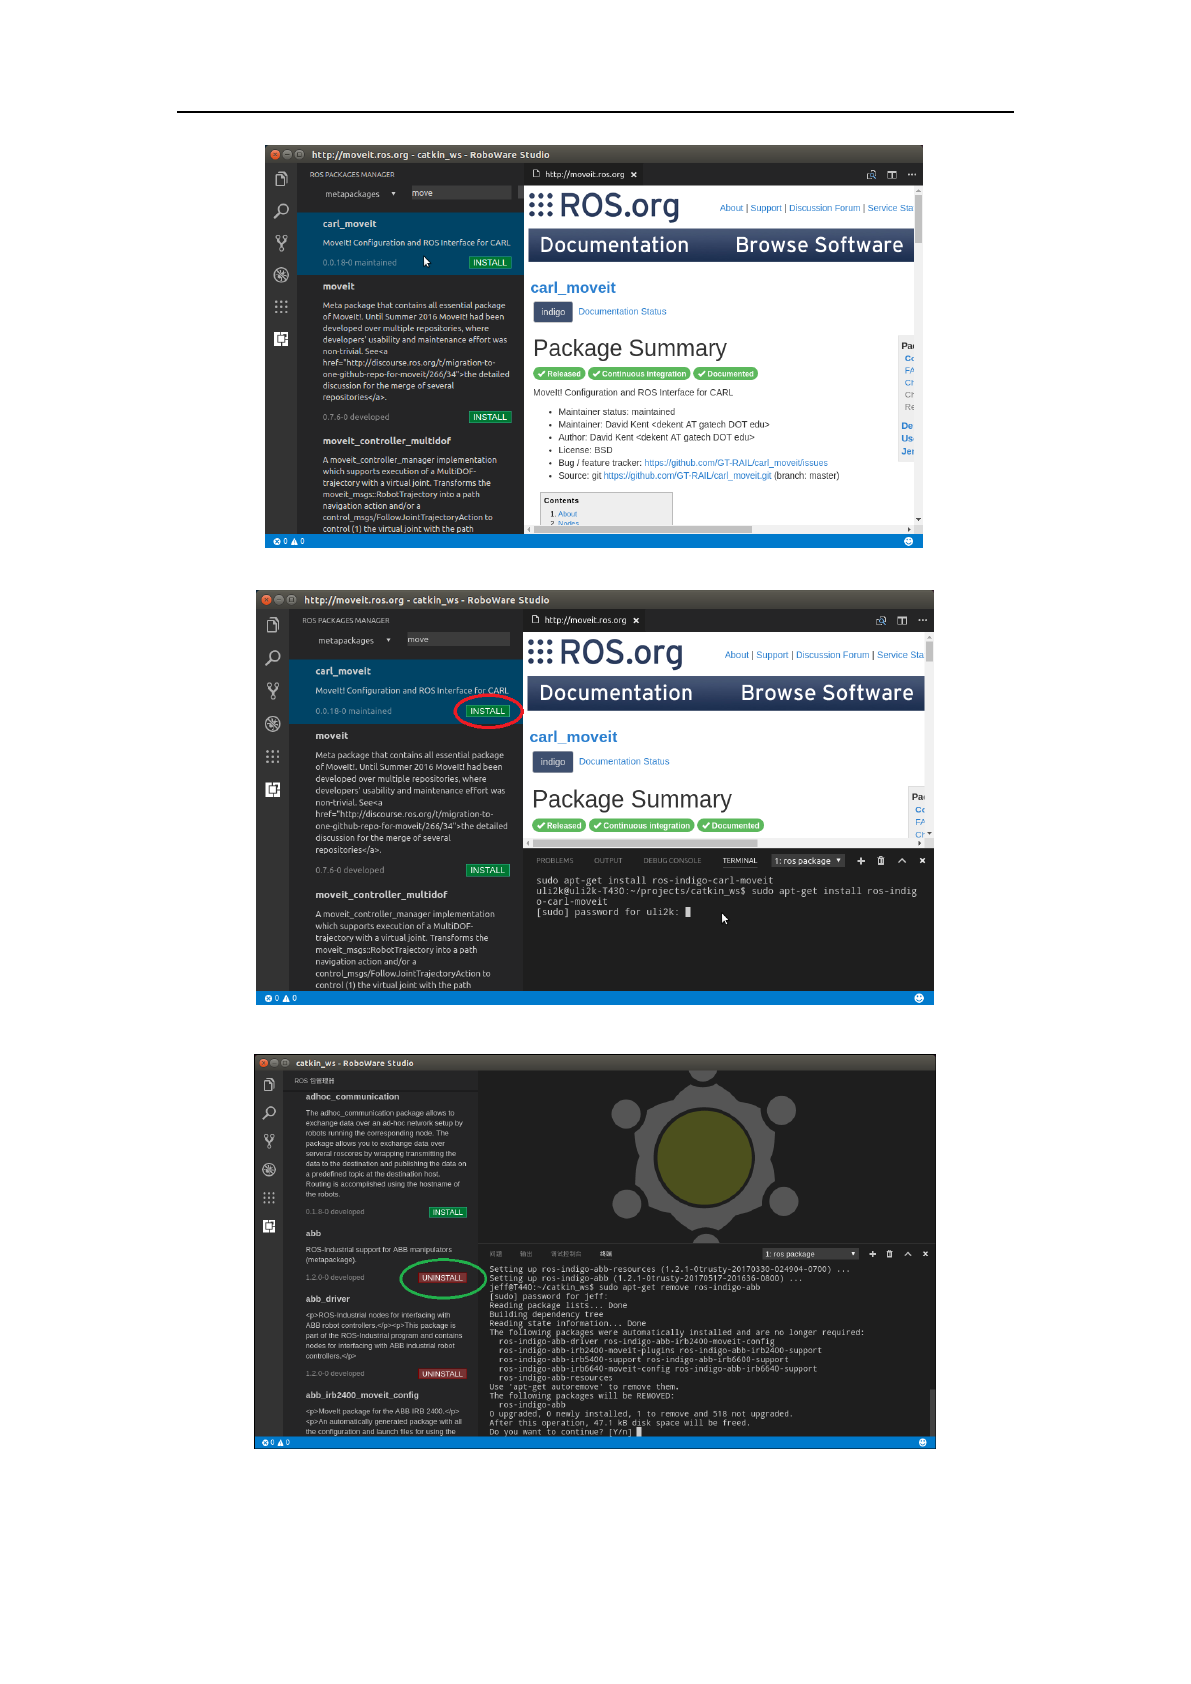
You can click the package name to view its wiki page just in RoboWare Studio. All packages
can be (un)installed by clicking the (un)install button.
RoboWare Studio Manual(www.roboware.me)
43
Jinan Tonyrobotics Co. Ltd.(www.tonyrobotics.com)
Open ROS Packages Manager
Choose ROS packages or meta packages option
Type package name to search
RoboWare Studio Manual(www.roboware.me)
44
Jinan Tonyrobotics Co. Ltd.(www.tonyrobotics.com)
View wiki page of a package
Package installation
Package uninstallation
Figure 3-56 ROS Packages Manager
RoboWare Studio Manual(www.roboware.me)
45
Jinan Tonyrobotics Co. Ltd.(www.tonyrobotics.com)
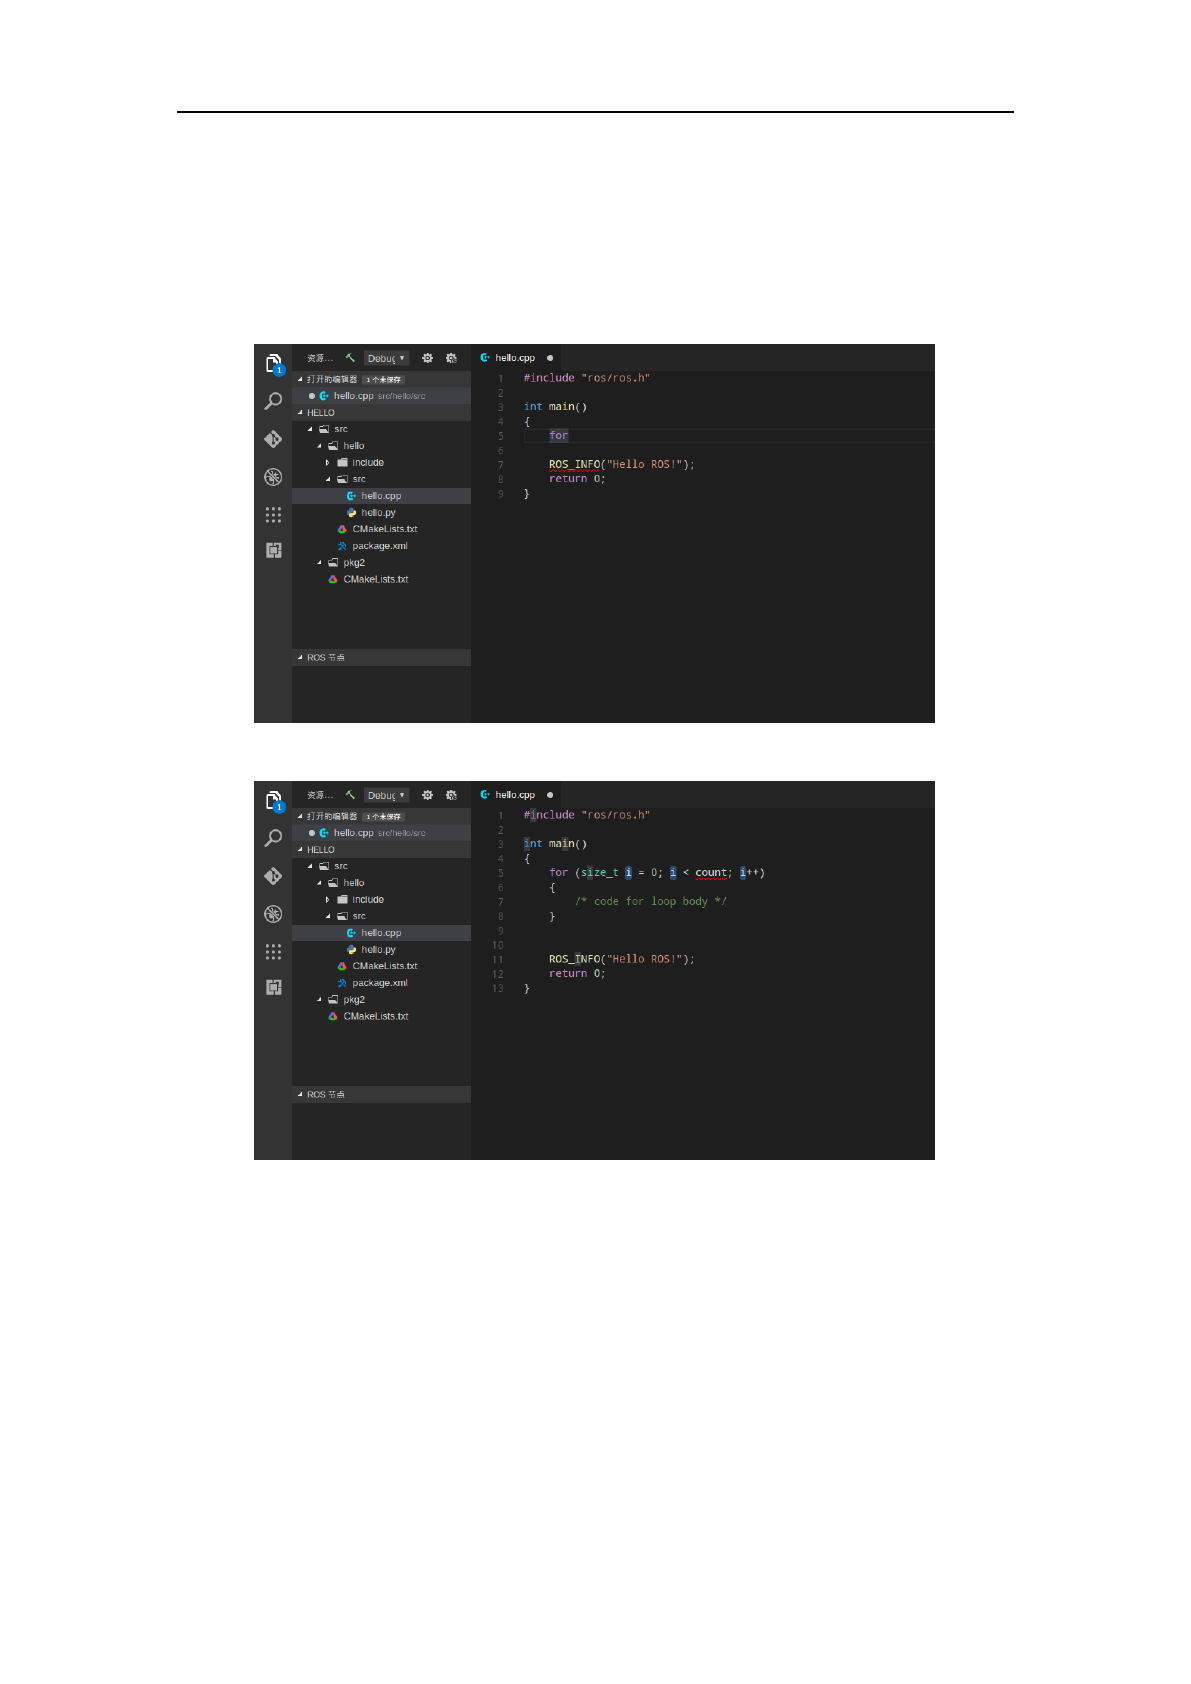
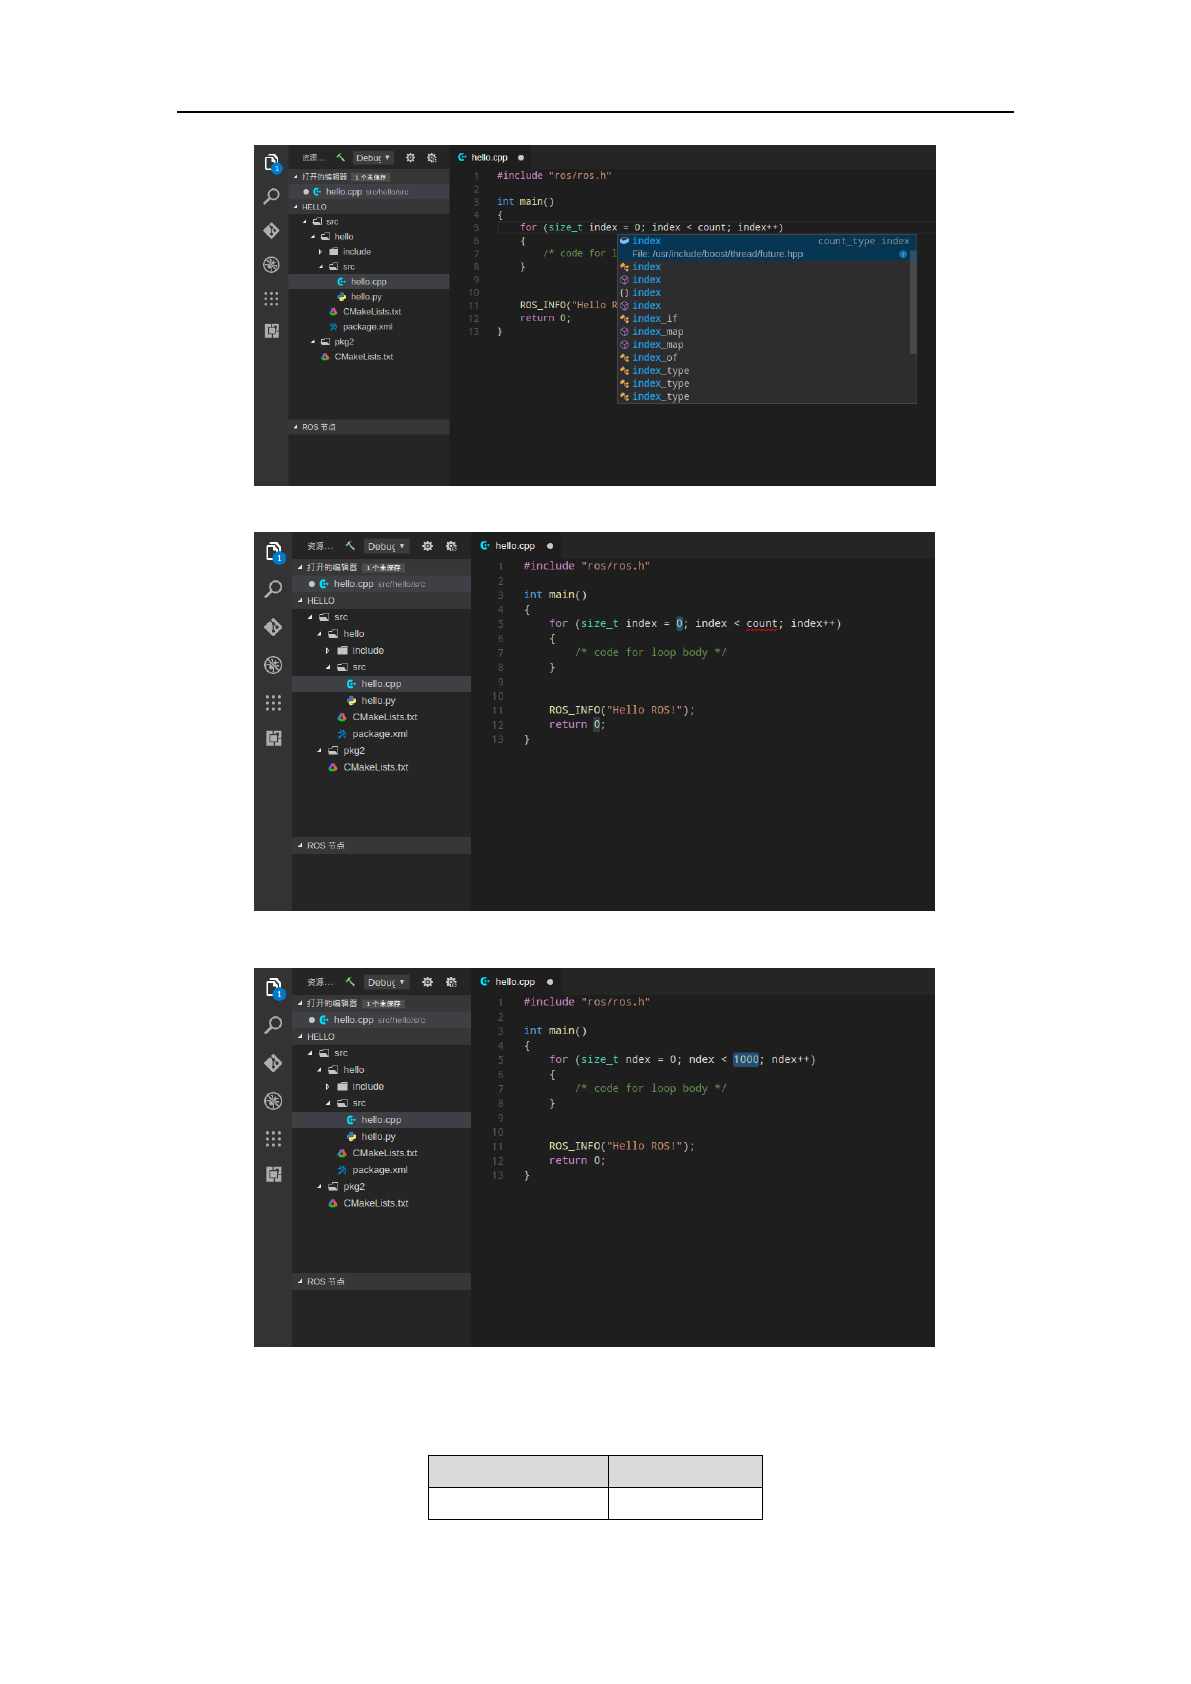
3.7 Snippets
Snippet is a small region of re-usable source code, which is formally defined by RoboWare
Studio. When you are coding, type the prefix and press the “Tab” key to automatically compete the
code. Even better, RoboWare Studio supports variable modification of snippets, for example, the
“for loop” snippet in C++:
Type “for” prefix
Press the “Tab” key to automatically compete the “for loop” code
RoboWare Studio Manual(www.roboware.me)
46
Jinan Tonyrobotics Co. Ltd.(www.tonyrobotics.com)
Variable modification in the “for loop” snippet
Press the “Tab” key to jump between variables
Change value of a variable after press the “Tab” key
Figure 3-57 Snippets
All the snippets and their prefixes available in C++ and Python are listed below:
C++ Structure
Prefix
#if
#i
RoboWare Studio Manual(www.roboware.me)
47
Jinan Tonyrobotics Co. Ltd.(www.tonyrobotics.com)
#ifdef
#ifd
#ifndef
#ifn
#else
#e
#define
#def
#undef
#und
inc
inc
Inc
Inc
typedef
type
enum
enum
union
uni
struct
stru
class
class
namespace
name
main
main
if
if
else
el
else if
ei
for
for
do
do
while
while
switch
swi
case
case
try
try
map
map
string
str
vector
vect
template
temp
ros::init
ros::init
ros::Publisher
ros::pub
ros::Subscriber
ros::sub
ros while
roswhile
Python Structure
Prefix
py
py
py3
py3
ase
ase
asne
asne
asr
asr
as
as
fail
fail
prop
prop
ifmain
ifmain
.
.
RoboWare Studio Manual(www.roboware.me)
48
Jinan Tonyrobotics Co. Ltd.(www.tonyrobotics.com)
if
if
if/else
if/else
elif
elif
else
else
while
while
while/else
while/else
for
for
for/else
for/else
try/except
try/except
try/finally
try/finally
try/except/else
try/except/else
try/except/finally
try/except/finally
try/except/else/finally
try/except/else/finally
with
with
def
def
def(class method)
def(class method)
def(static class method)
def(static class method)
def(abstract class method)
def(abstract class method)
class
class
lambda
lambda
if(main)
if(main)
async/def
async/def
async/for
async/for
async/for/else
async/for/else
async/with
async/with
pdb
pdb
rospy.init_node
ros.init
rospy.Publisher
ros.pub
rospy.Subscriber
ros.sub
ros while
roswhile
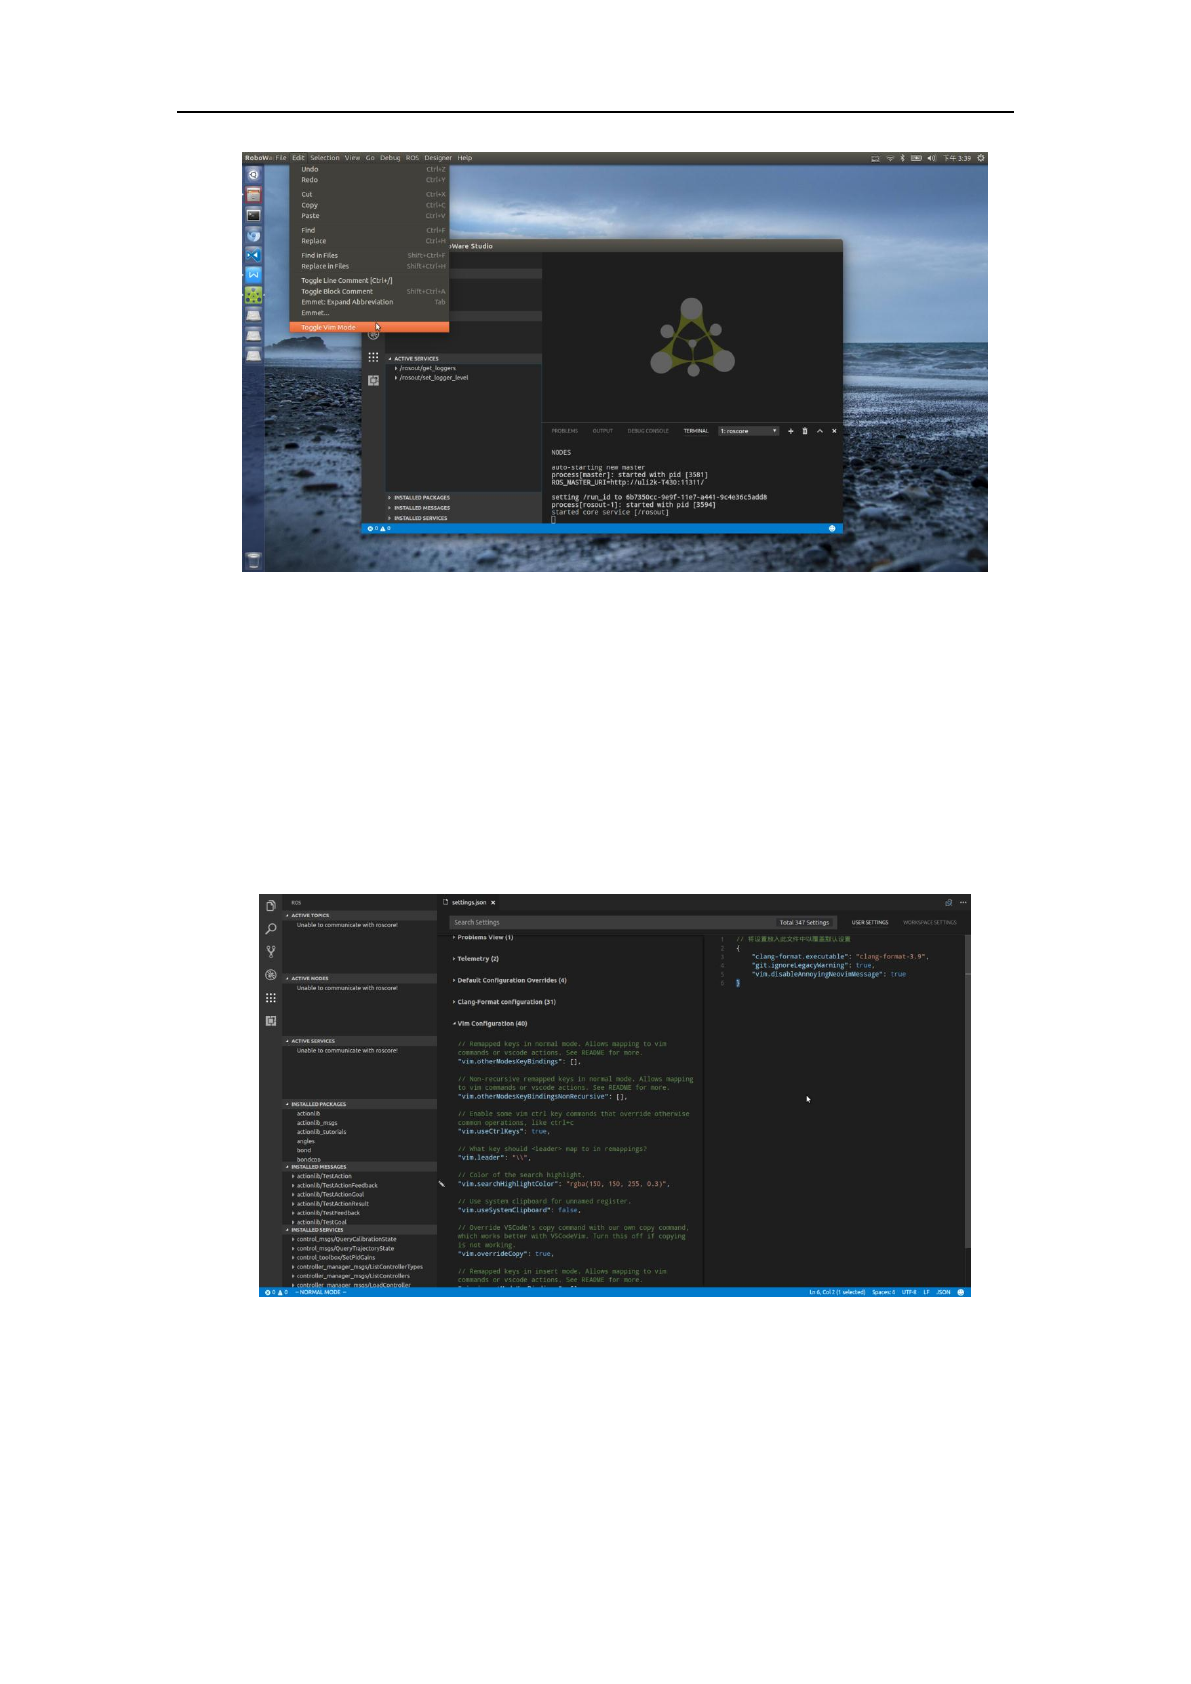
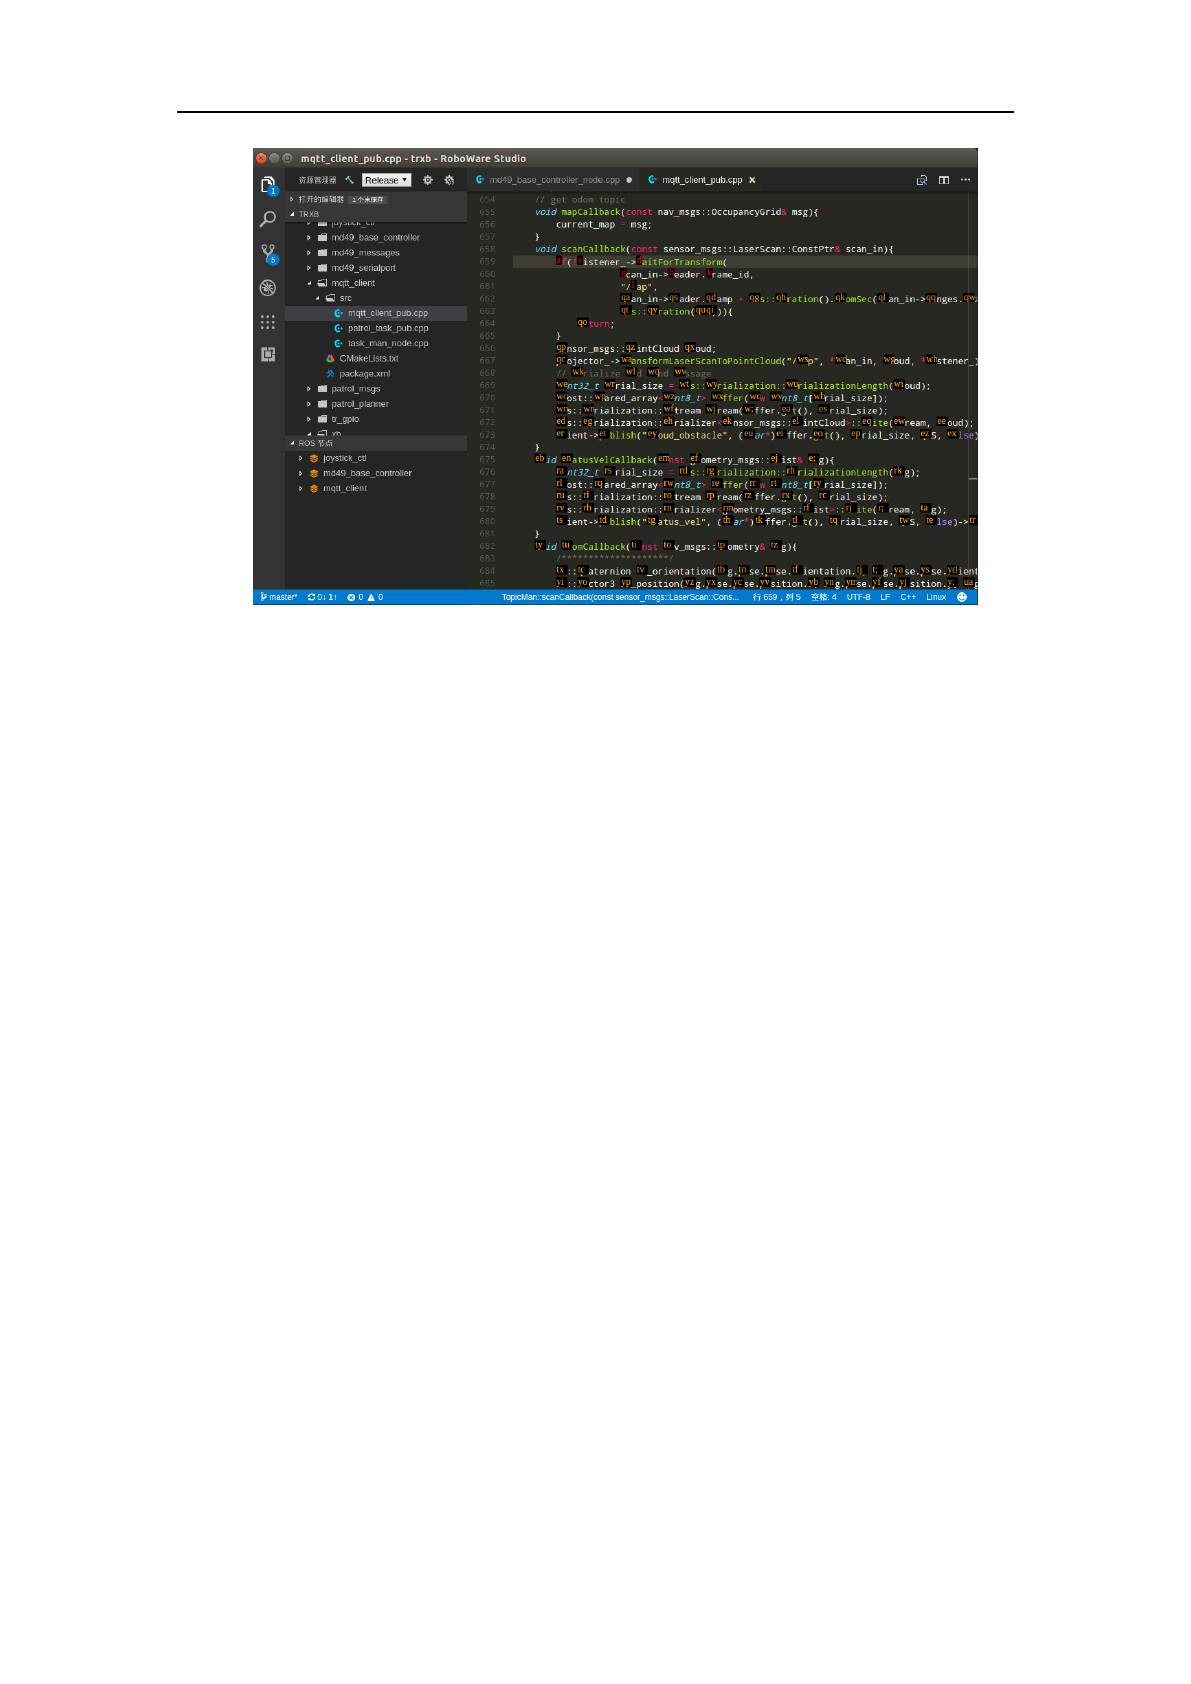
3.8 Vim mode
Select “Edit” - “Toggle Vim Mode” in the menu to switch between normal edit mode and Vim
edit mode.
RoboWare Studio Manual(www.roboware.me)
49
Jinan Tonyrobotics Co. Ltd.(www.tonyrobotics.com)
Figure 3-58 Toggle Vim Mode
Features of Vim extension:
(1) Modes: normal, insert, command-line, visual, visual line, visual block
(2) Command combinations (c3w, daw, 2dd, etc)
(3) Highly versatile command remapping (jj to <Esc>, : to command panel, etc.)
(4) Incremental search with / and ?
(5) Popular vim plugin features built-in (easymotion, surround, commentary)
(6) Vim settings similar to those found in .vimrc
Select “File” - “Preferences” - “Settings”, choose “Vim Configuration” to configure custom
settings.
Figure 3-59 Vim configuration
For example, you can set “vim.easymotion” to “true” to enable easymotion function. (<leader>
is configurable and is \ by default)
RoboWare Studio Manual(www.roboware.me)
50
Jinan Tonyrobotics Co. Ltd.(www.tonyrobotics.com)
Figure 3-60 Easymotion in Vim
RoboWare Studio Manual(www.roboware.me)
51
Jinan Tonyrobotics Co. Ltd.(www.tonyrobotics.com)
4 FAQ
4.1 How to import an existing ROS workspace?
There are TWO situations:
(1) For normal ROS workspaces which is created with command-line “catkin_init_workspace”
command, you can directly import it by clicking “Open Workspace” button in “Explorer” view, or
by selecting “File” – “Open Workspac” in the menu.
(2) For ROS workspace which is created by previous version of RoboWare Studio, you need
to delete the “.vscode” hidden folder first, then import it.
4.2 How to upgrade RoboWare Studio?
Download the latest version of RoboWare Studio installation file and install, the previous
version will be replaced automatically.
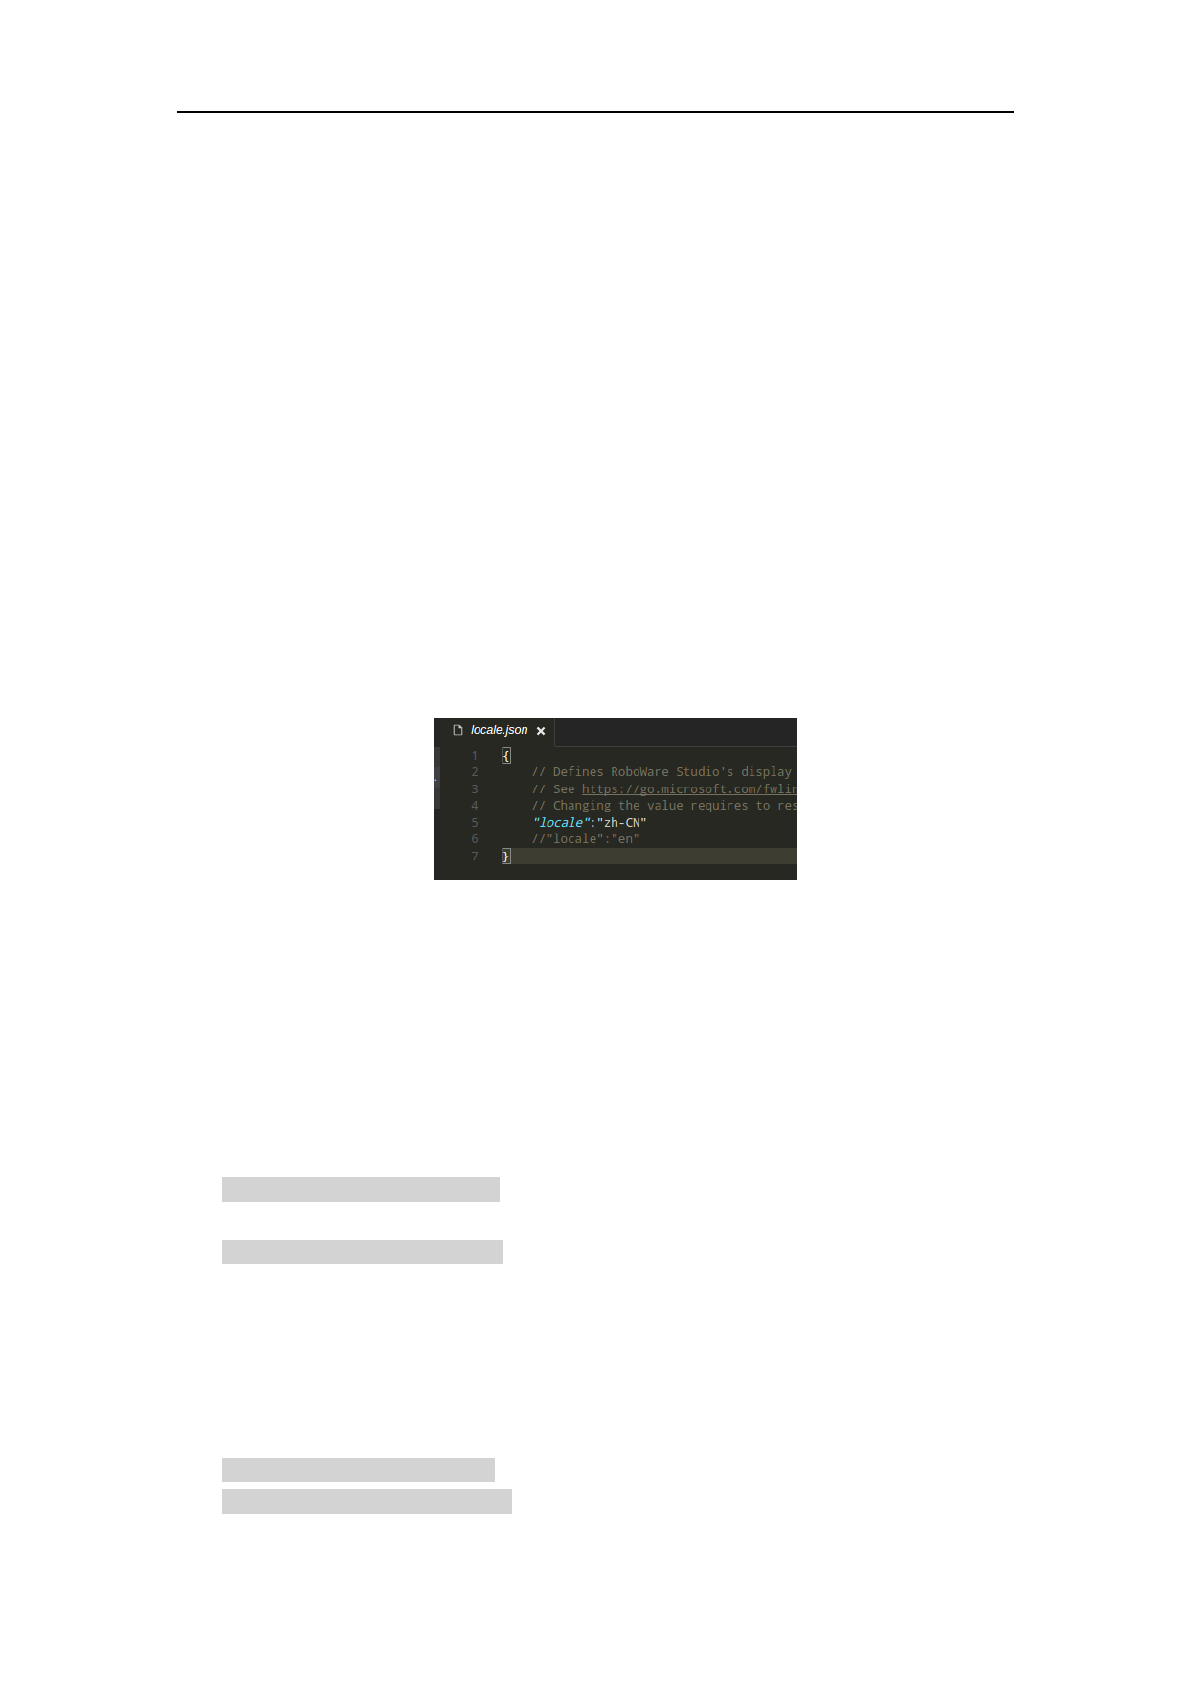
4.3 How to change the interface language?
In the menu, select “File” – “Preferences” - “Language Settings” to open the configuration file.
Figure 4-1 Language configuration file
"locale":"zh-CN" indicates Chinese language,
"locale":"en" indicates English language.
Use “//” to comment(disable) them.
After modification, close and restart RoboWare Studio for the changes to take effect.
4.4 “Path is not ROS Workspace” warning while creating new workspace.
One possibility is that ROS environment is not imported correctly, After installation of ROS,
you need to add the following scripts in the “~/.bashrc” file:
source /opt/ros/indigo/setup.bash (for indigo distro)
OR
source /opt/ros/kinetic/setup.bash (for kinetic distro)
Official tutorials of ROS installation can be found here:
http://wiki.ros.org/indigo/Installation/Ubuntu (for indigo distro)
http://wiki.ros.org/kinetic/Installation/Ubuntu (for kinetic distro)
4.5 “Linter pylint is not installed” warning.
You need to install “pylint” by executing the following commands in a terminal:
$ sudo apt-get install python-pip
$ sudo python -m pip install pylint

RoboWare Studio Manual(www.roboware.me)
52
Jinan Tonyrobotics Co. Ltd.(www.tonyrobotics.com)
4.6 “Git version is too low” warning.
You need to upgrade git, open a terminal and execute:
$ sudo apt-add-repository ppa:git-core/ppa
$ sudo apt-get update
$ sudo apt-get install git
4.7 ROS node named “test” cannot be built.
Don’t name a ROS node “test”, otherwise it will not be built successfully.
4.8 Stuck while buiding workspace.
Memory could be too small and there are too many packages in current workspace. Now, you
can choose one or several of them to build with RoboWare Studio.
4.9 Explorer cannot be refreshed automatically while adding or deleting files
RoboWare Studio uses “inotify” tool to monitor directories for changes. By default the inotify
limit is set to 8192, when this limit is not enough to monitor all files inside a directory, the limit
must be increased for RoboWare Studio to work properly.
You can set a new limit by editing “/etc/sysctl.conf” file:
$ sudo vi /etc/sysctl.conf
Find “fs.inotify.max_user_watches” option and set its value to a proper number, like: 100000.
Then reboot your system to take effect.
4.10 Cannot edit/select/copy.
Probably because it’s in Vim mode, just switch to normal mode by select “Edit” – “Toggle Vim
Mode” in the menu.
4.11 How to jump back/forward while editing? How to set keyboard shortcuts?
You can press “Ctrl+Shift+-” to jump forward, and “Ctrl+Alt+-” to jump back. Select “File” –
“Preferences” - “Keyboard Shortcuts” to set keyboard shotcuts.
4.12 Cannot position CMakelists.txt error when compiling.
First, remove the tasks.json file in .vscode folder of workspace root, then close and reopen the
workspace.
4.13 Cannot edit dependencies or create new node of meta package.
Editing dependencies or creating new node are not supported for meta package currently. You
could copy all packages under the meta package to the “src” directory to solve this problem.
