SAAS User And Quick Reference Guide
User Manual:
Open the PDF directly: View PDF ![]() .
.
Page Count: 96
- Overview
- General usage
- Payroll
- Scheduling a payroll run
- Changing the display in the All Runs table
- Modifying a scheduled payroll run
- Deleting a scheduled payroll run
- Running a payroll
- Verifying a payroll
- Recalculating a payroll run
- Aborting a payroll run
- Finalizing a payroll
- Generating the EFT report
- Generating the Bank Cash Requirements report
- Generating payroll reports on demand
- Banking
- Printing checks
- Handling checks
- Searching for specific checks or ranges of checks
- Getting check information
- Printing the Check Register
- Submitting a stop check request
- Approving or rejecting a stop check request
- Returning a check
- Submitting a reissue check request
- Approving or rejecting a reissue check request
- Requesting a manual check
- Approving or rejecting a manual check request
- Generating check reports on demand
- Getting information about a student
- Correcting an enrollment in error
- Entering a data correction
- General ledger reports
- Taxes

Last Modified: 7/26/2017
US DEPARTMENT OF LABOR
Office of Job Corps
SAAS User Guide
Student Allowance
and
Allotment System
Job Corps Data Center i
Table of ContentsTable of Contents
Overview ................................................................................................................................... 4
General usage .......................................................................................................................... 4
Adjust your Internet Explorer browser settings ............................................................................................. 4
Searching efficiently ......................................................................................................................................... 5
Getting through tables ...................................................................................................................................... 7
Don't forget to scroll ...................................................................................................................................... 8
Use the acordions ......................................................................................................................................... 8
Entering dates .................................................................................................................................................... 9
Mandatory fields ................................................................................................................................................ 9
What did I type? ................................................................................................................................................. 9
Is it working? .................................................................................................................................................... 10
The button doesn't do anything ..................................................................................................................... 10
Payroll ..................................................................................................................................... 11
Scheduling a payroll run ................................................................................................................................. 11
Changing the display in the All Runs table .................................................................................................. 13
Modifying a scheduled payroll run ................................................................................................................ 14
Deleting a scheduled payroll run ................................................................................................................... 15
Running a payroll ............................................................................................................................................ 16
Verifying a payroll ........................................................................................................................................... 18
Exceptions tab ............................................................................................................................................. 19
Student Payroll Verification tab ................................................................................................................... 19
Earnings tab ................................................................................................................................................ 21
Deductions tab ............................................................................................................................................ 22
Payroll Tax tab ............................................................................................................................................ 22
Bank Cash Reqs tab ................................................................................................................................... 24
Payroll Verification tab ................................................................................................................................ 25
Recalculating a payroll run ............................................................................................................................. 27
Aborting a payroll run ..................................................................................................................................... 28
Finalizing a payroll .......................................................................................................................................... 29
Generating the EFT report .............................................................................................................................. 31
Job Corps Data Center ii
Generating the Bank Cash Requirements report ......................................................................................... 33
Generating payroll reports on demand ......................................................................................................... 34
Banking ................................................................................................................................... 36
Mapping a bank file ......................................................................................................................................... 36
Importing a bank file ....................................................................................................................................... 37
Reconciling missing exceptions .................................................................................................................... 40
Reconciling duplicate exceptions.................................................................................................................. 41
Reconciling dollar/amount exceptions ......................................................................................................... 43
Reconciling date exceptions .......................................................................................................................... 44
Generating the Check Reconciliation Exceptions report ............................................................................ 45
Printing checks ...................................................................................................................... 46
Printing check batches ................................................................................................................................... 46
Printing reissued checks ................................................................................................................................ 48
Removing reissued checks from the print queue ........................................................................................ 48
Searching the Reissues tab ........................................................................................................................ 49
Reprinting a single check ............................................................................................................................... 51
Reprinting multiple checks ............................................................................................................................. 52
Handling checks ..................................................................................................................... 54
Searching for specific checks or ranges of checks..................................................................................... 54
Getting check information .............................................................................................................................. 56
Printing the Check Register ........................................................................................................................... 58
Submitting a stop check request ................................................................................................................... 59
Approving or rejecting a stop check request ............................................................................................... 60
Returning a check............................................................................................................................................ 61
Submitting a reissue check request .............................................................................................................. 62
Approving or rejecting a reissue check request .......................................................................................... 64
Requesting a manual check ........................................................................................................................... 65
Approving or rejecting a manual check request .......................................................................................... 67
Generating check reports on demand ........................................................................................................... 68
Getting information about a student .................................................................................... 71
Info page ........................................................................................................................................................... 72
Job Corps Data Center iii
Allotments page ............................................................................................................................................... 72
Financial page .................................................................................................................................................. 73
Pay History page.............................................................................................................................................. 74
Daily Status page ............................................................................................................................................. 74
Placements page ............................................................................................................................................. 74
Separations page ............................................................................................................................................. 75
Change History page ....................................................................................................................................... 75
Correcting an enrollment in error ......................................................................................... 81
Approving or rejecting an enrollment in error .............................................................................................. 83
Entering a data correction ..................................................................................................... 85
Submitting a correction to an advance ......................................................................................................... 85
Active student .............................................................................................................................................. 85
Separated student ....................................................................................................................................... 87
Approving or rejecting a correction to an advance ..................................................................................... 90
General ledger reports ........................................................................................................... 91
Taxes ....................................................................................................................................... 93
Updating tax settings ...................................................................................................................................... 93
Generating W-2 data ........................................................................................................................................ 95

Job Corps Data Center 4
Overview Overview
The Student Allotment and Allowance System (SAAS) is the primary system used by Job Corps to manage
student payroll, deductions, allotments, allowances, and other payroll-related tasks. As part of the Career
Development Services Systems suite of applications (CDSS), it shares centralized data in real time. This
document explains the features and functions of SAAS and the tasks that the JCDC Student Payroll and
Finance/Accounting departments can perform with the software.
This document's audience is SAAS users.
General usageGeneral usage
Adjust your Internet Explorer browser settings Adjust your Internet Explorer browser settings
SAAS runs on Internet Explorer 11. Take advantage of this browser's features to adjust the size of text and the
zoom level to suit your personal preferences.
A quick way to zoom in and out is to click CTRL – and CTRL + (hold the Control key and click the minus sign
or plus sign on your keyboard).
Use the tools in the upper right corner of the window to change the window size.
Job Corps Data Center 5
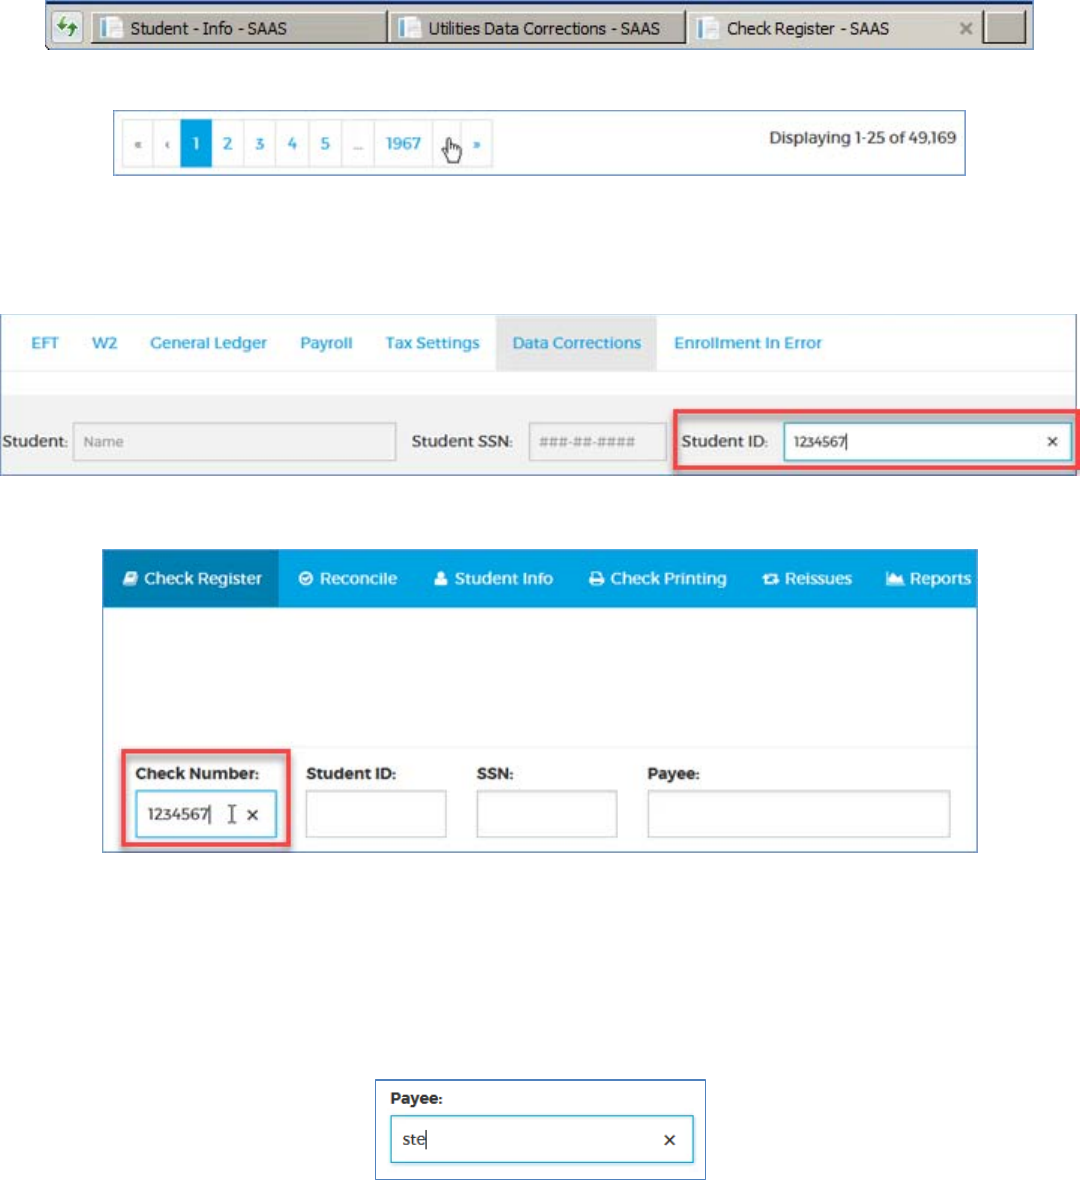
open another browser tab
Open multiple tabs to use different SAAS modules at the same time. This can be especially helpful if you want
to preserve a filtered view in one module while doing related work in another. For instance, you can view
information on a specific Student ID in the Student Info module while performing a Data Correction on the same
Student ID in the Utilities module.
Searching efficiently Searching efficiently
When you're searching or filtering for specific records on students, payments, checks, or other data, try these tips
to optimize your results.
Enter a unique identifier if possible. For instance, if you're searching for a student, enter the Student ID
if you have it.
If you're filtering for a check in the Check Register, enter the Check Number if you have it.
If you don't have a unique identifier, enter as much information as possible.
You can enter as much or as little information as you like, but the more you enter, the more precise your
results will be.
In the Check Register for instance, you can enter any part of the Payee's name. The entry shown below
will fetch every payee whose first or last name contains "ste." This would include such names as Stella
Jones, Esteban Garcia, Anne Stevens, Jane Austen, and Jesus Beneste.
Job Corps Data Center 6
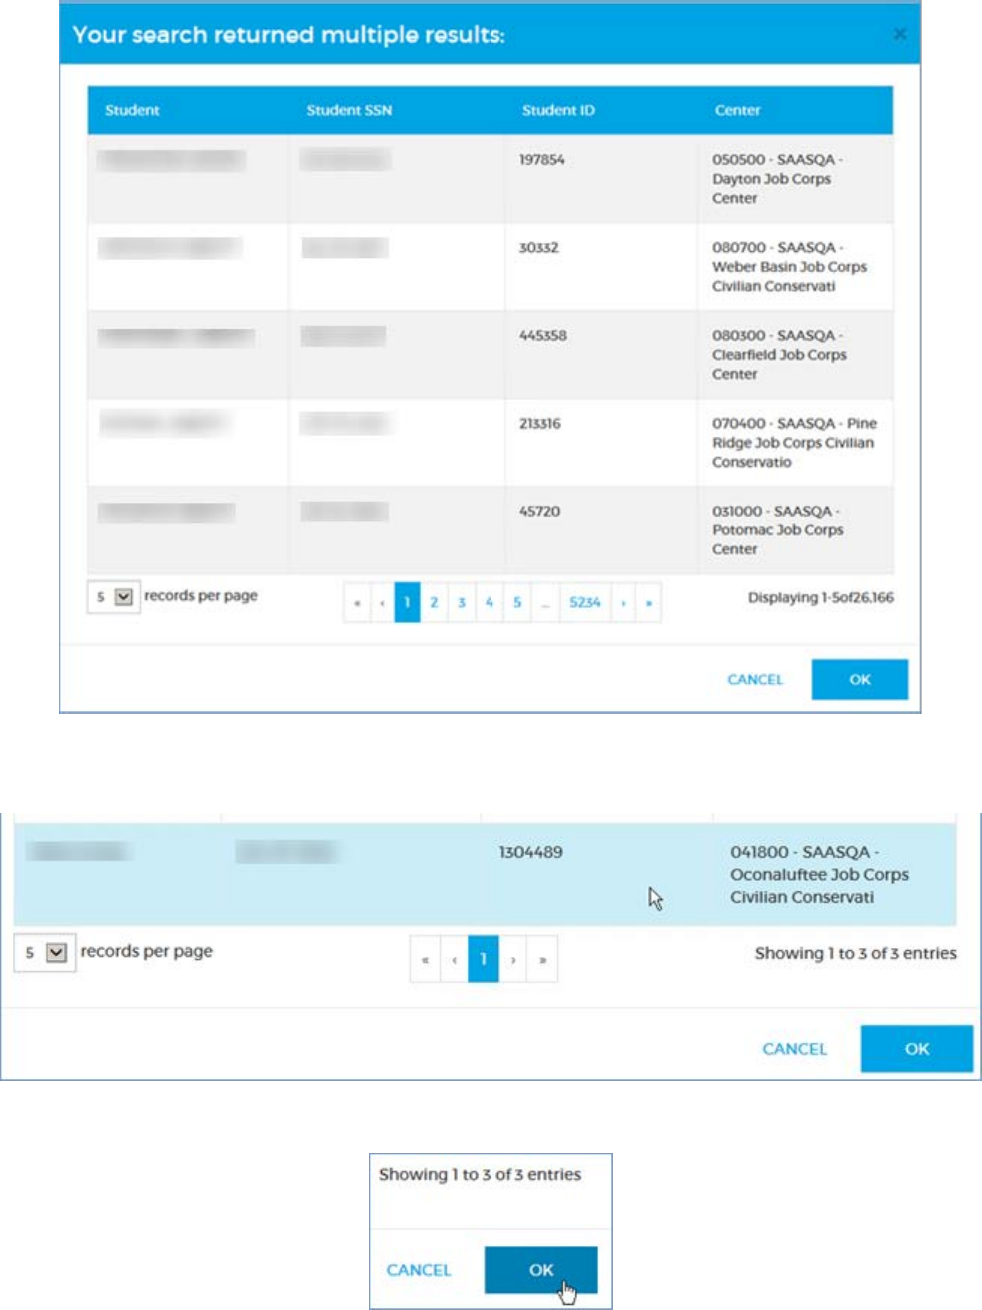
This could fetch tens of thousands of records, in which case you'll get a pop-up table like the one shown
below.
If the table contains what you consider a manageable number of results, you can select the record you
want . . .
. . . and click OK to fetch it.
Job Corps Data Center 7
If you get an unwieldy number of results, you can CANCEL and try your search again.
For some fields, such as the Payee field described above, you can enter partial information. For other
fields, such as Student SSN, you must enter the complete value.
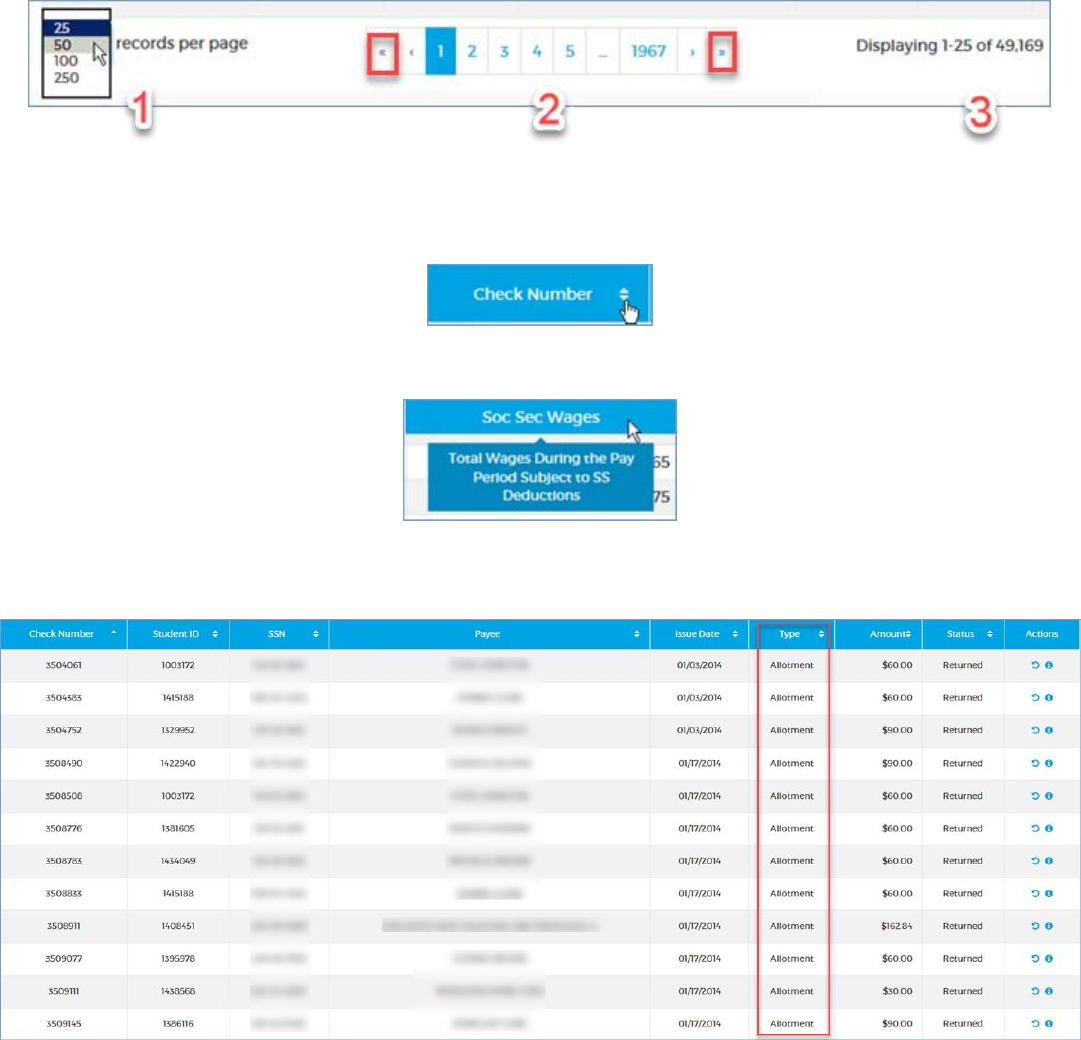
Getting through tables Getting through tables
SAAS tables generally behave the same way, whether they display one row or thousands of rows.
1 A drop-down at the bottom-left lets you set the number of rows per page.
2 A navigator in the center lets you click through the pages. You can get to the first and last pages by
clicking the « and » buttons.
3 A counter at the bottom-right tells you how many rows are in the table and which rows you're looking at.
Most tables can be sorted. Click the arrow at the right of the column heading you want to sort on. Click it again to
sort in the opposite order. If you don't see the arrow, the column can't be sorted.
Hovering your cursor over a column label shows a detailed description.
Filters: If a table looks strangely empty or incomplete, you might have filtered it to show fewer results. In the
screenshot below, you've filtered the Check Register for "Allotment" checks.
Job Corps Data Center 8
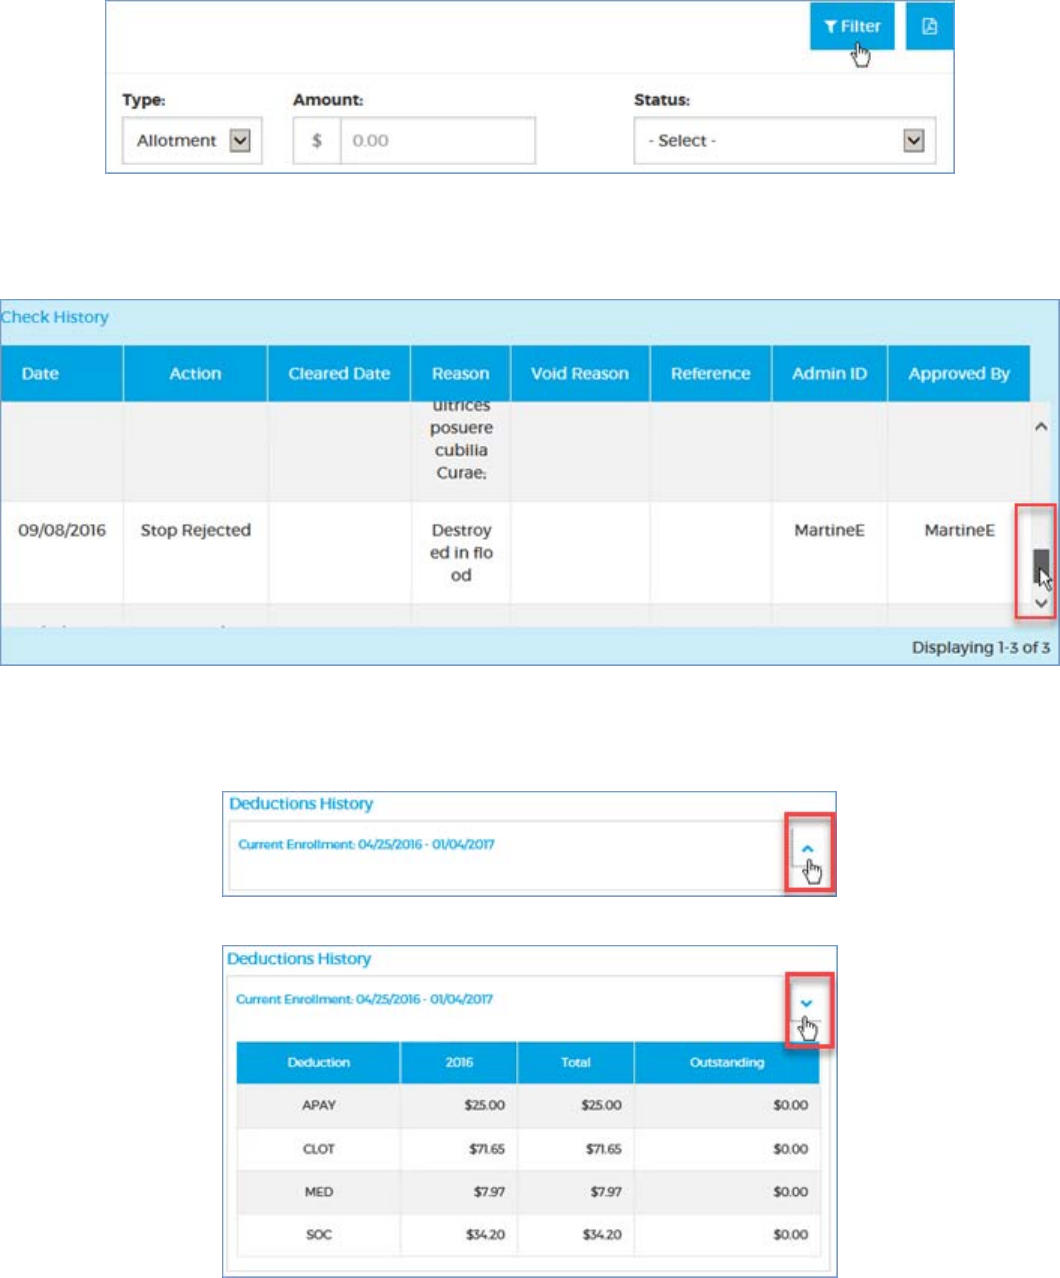
Click the Filter button again to see and adjust the filters. You can also clear filters by simply clicking to another
module in the application.
Don't forget to scroll Don't forget to scroll
Some tables have more information in them than you can see when they first load. Use the scrollbar at the side of
the table to see all the rows.
Use the accordions Use the acordions
Some tables can be collapsed and expanded so you can view as much or as little information at a time as you like.
Use the arrow at the side of the table to see all the rows.

Job Corps Data Center 9
Entering and deleting dates Entering dates
You can't use the keyboard to type or delete dates. tbd
1. Click the datepicker at the right of any date field.
2. Click on the date you want when the calendar opens. If necessary, use the arrows at the top to browse to
the month you want.
The date will be entered in the field.
To delete a date, put the cursor in the date field and click the × that appears at the right.
*Mandatory fields*Mandatory fields
Required fields are marked with an asterisk. You won't be able to execute a task (SAVE or SUBMIT, for
instance) if you haven't filled in all the mandatory fields on a form.
To clear a date or anything you have typed in, you can use your keyboard's Backspace or Delete keys, or click the
× at the far right of the field.
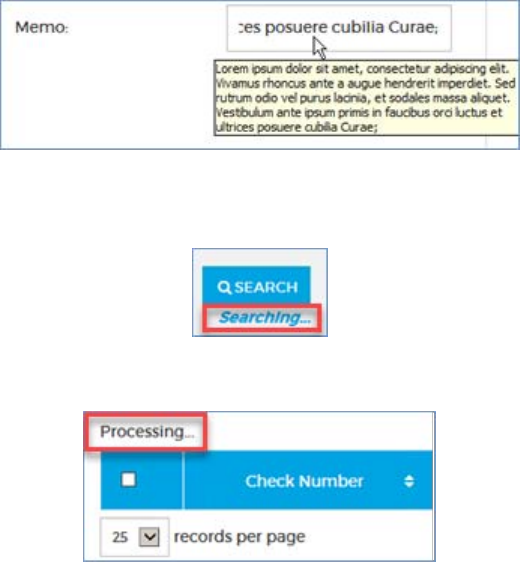
What did I type? What did I type?
Some fields let you enter up to 255 characters, but the text is entered on one line and you might wonder what you
typed at the beginning. You can hover the cursor over the field to see all the text in a pop-up. To keep track of
what you're entering, you can also type the text in another application like Notepad and copy/paste it in.
Job Corps Data Center 10
Is it working? Is it working?
Searching for a student may take a few seconds. If you see "Searching…" below the Search button, be patient.
Loading big tables, such as the Check Register, the Reissues tab, or the payroll verification tables, may also take
a few seconds. If you see "Processing…" at the top-left of a table, be patient.
The button doesn't do anything The button doesn't do anything
If some of the dates in a datepicker or a button such as SAVE, OK, or RECONCILE looks grey or "won't
click," you may not have completed all the information properly or you may be trying to enter invalid data. Be
sure you've followed all the requirements as described. You have to enter a complete Student ID or SSN, or a date
that falls within a specific range.
Job Corps Data Center 11
Payroll
Scheduling a payroll run Scheduling a payroll run
Use these steps to schedule a payroll run.
1. Go to Utilities Payroll.
2. Complete the Schedule Payroll Run form.
Pay Period Beginning
The first date of the payroll cycle.
Pay Period Ending
The last date of the payroll cycle.
Payroll Run Date
The date the payroll run should occur, almost always a Friday.
Note: You can run a payroll on a date other than the Payroll Run
Date you enter.
Payroll Type
The type of payroll to run: Regular, Allotment, Termination,
or Bonus.
Job Corps Data Center 12
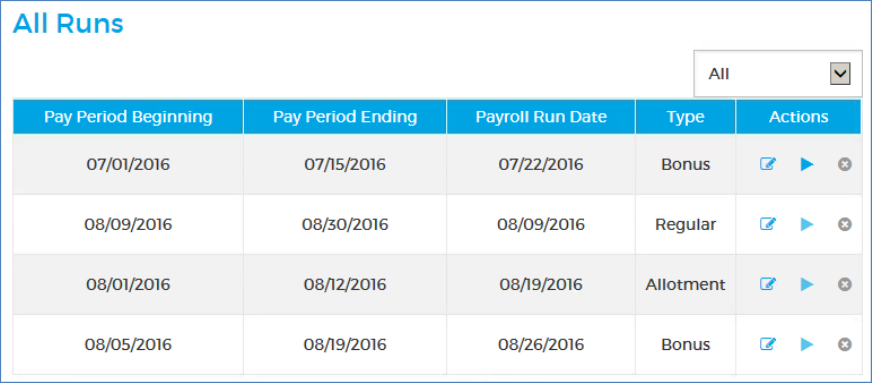
3. Click SCHEDULE to enter the payroll run in the All Runs table and clear the form.
The All Runs table displays the current and future payroll runs in ascending order by Payroll Run Date. After a
payroll is run and finalized, it no longer shows in the table.
Job Corps Data Center 13
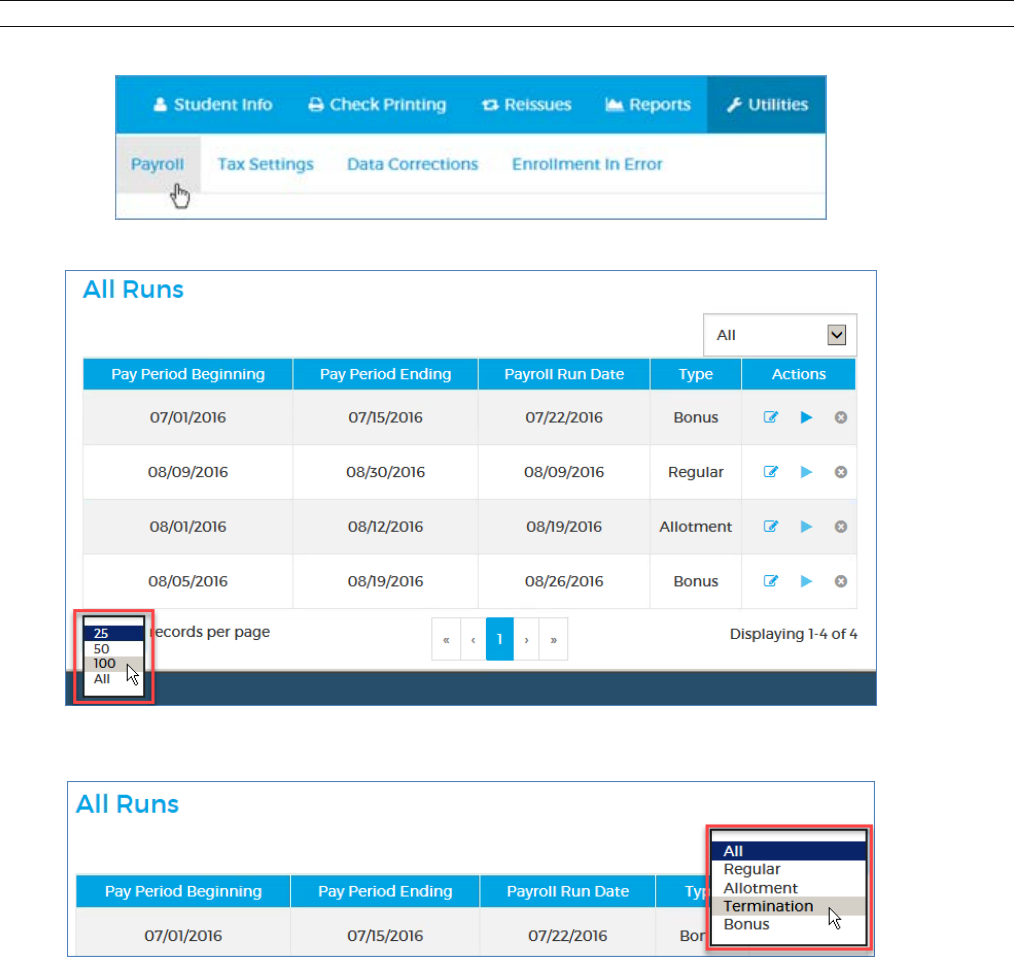
Changing the display in the All Runs table Changing the display in the All Runs table
You may want to view more or fewer rows in the All Runs table, or view only one type of payroll. Use these steps
to change the display.
Note: The scheduled payrolls display in ascending order by Payroll Run Date. You cannot change the order.
Go to Utilities Payroll.
To see more or fewer rows, use the drop-down at the bottom-left of the table.
To see the runs for only one type of payroll, select it from the drop-down filter at the top-right of the
table.
Job Corps Data Center 14
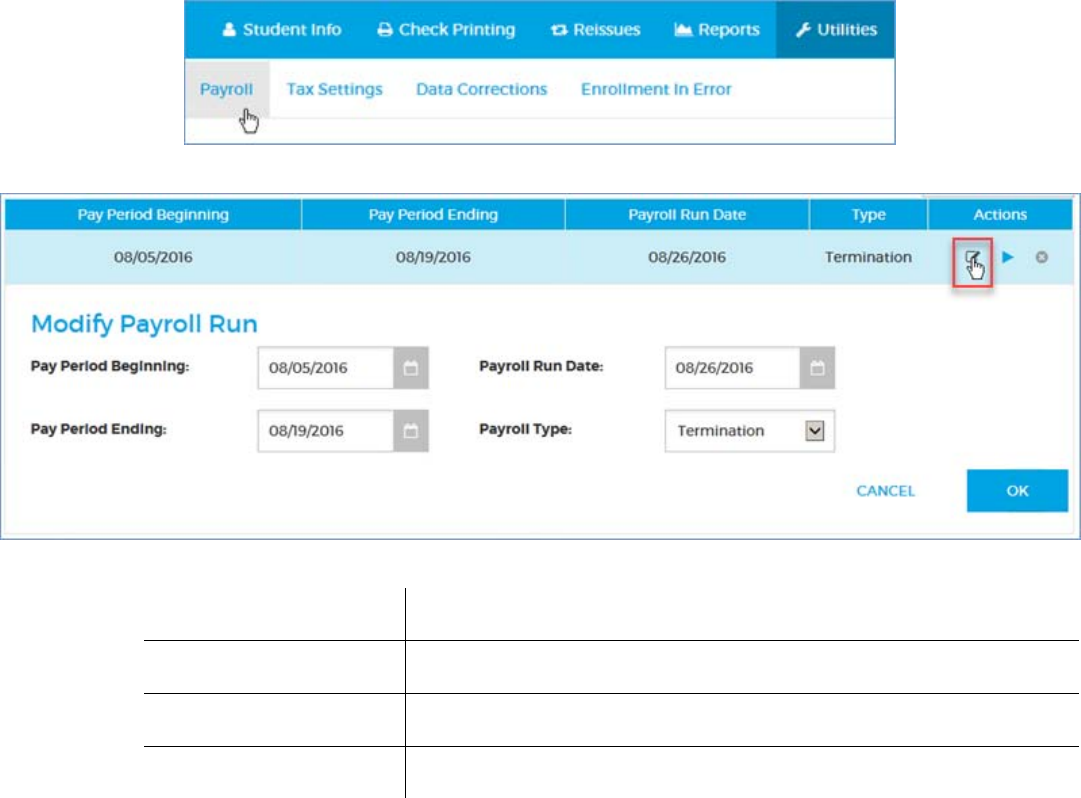
Modifying a scheduled payroll run Modifying a scheduled payroll run
Use these steps to change the Date or Type settings for a payroll run that's already in the All Runs table.
1. Go to Utilities Payroll.
2. In the All Runs table, click the pencil button in the row with the payroll run you want to change.
3. In the Modify Payroll Run form, change the settings you want.
Pay Period Beginning
The first date of the payroll cycle.
Pay Period Ending
The last date of the payroll cycle; must be after the Pay Period Beginning.
Payroll Run Date
The date the payroll run should occur, almost always a Friday.
Payroll Type
The type of payroll to run: Regular, Allotment, Termination, or Bonus.
4. Click OK to update the payroll run in the All Runs table and close the form. CANCEL closes the form
and leaves the All Runs table unchanged.
Job Corps Data Center 15
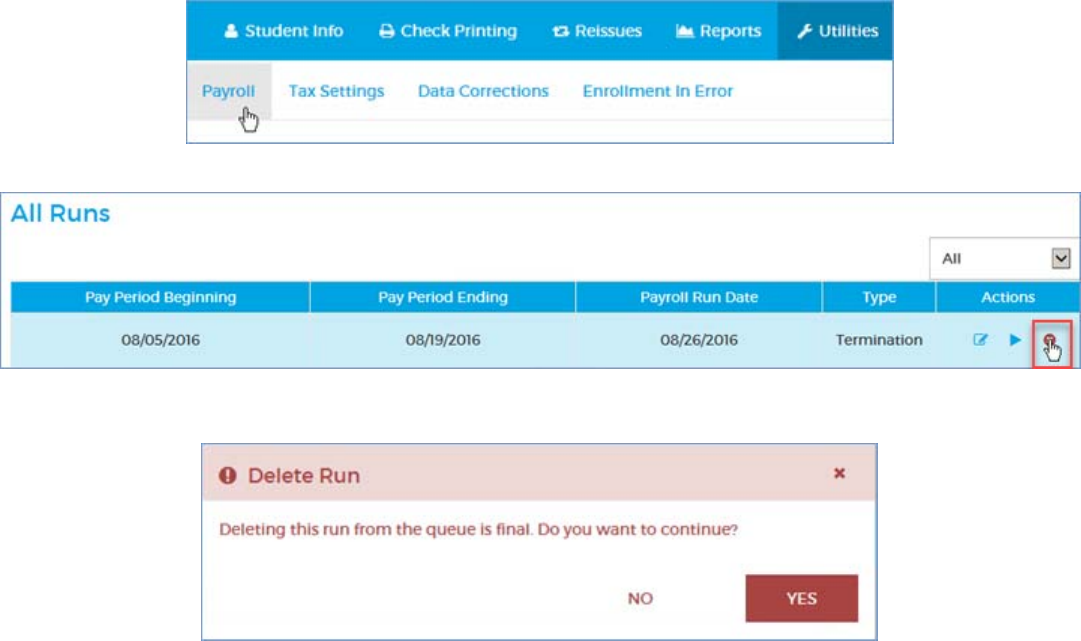
Deleting a scheduled payroll run Deleting a scheduled payroll run
Use these steps to delete a payroll that was scheduled erroneously.
1. Go to Utilities Payroll.
2. In the All Runs table, click the remove button in the row with the payroll run you want to delete.
3. When the warning appears, click YES to delete the payroll from the All Runs table. NO cancels the
deletion and leaves the All Runs table unchanged.
Job Corps Data Center 16
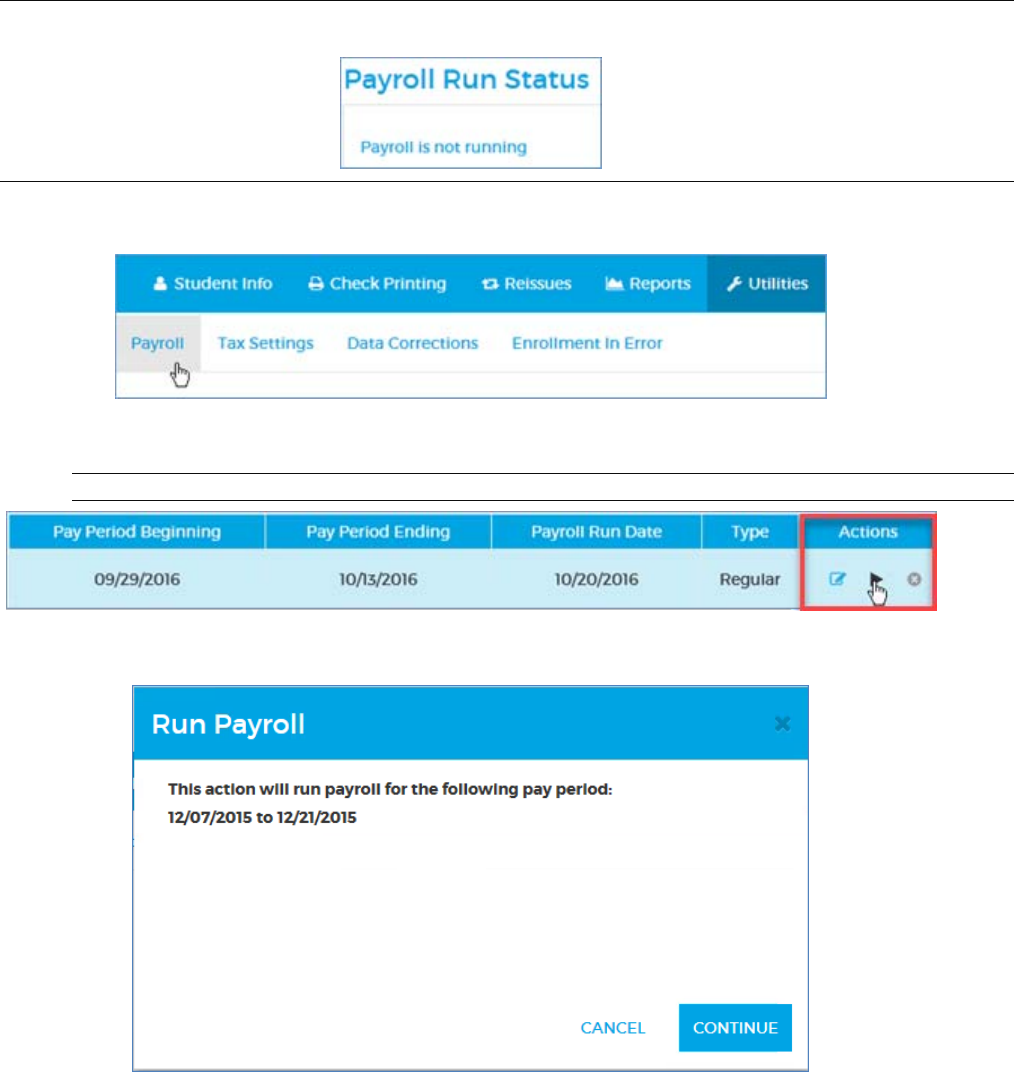
Running a payroll
Use these steps to run a payroll.
You must have a SAAS user role of Super User or Submitter to perform this task.
Note: You cannot run a payroll until the previous run is finalized. The Payroll Run Status panel at the right of the page
must show "Payroll is not running."
1. Go to Utilities Payroll.
2. Click the run button in the top row. The run button is active only in the top row, which displays the
earliest scheduled payroll run.
Note: You can run a payroll on a date other than the scheduled Payroll Run Date.
3. In the Run Payroll confirmation dialog, click CONTINUE. CANCEL cancels the payroll run and leaves
the All Runs table unchanged.
Job Corps Data Center 17
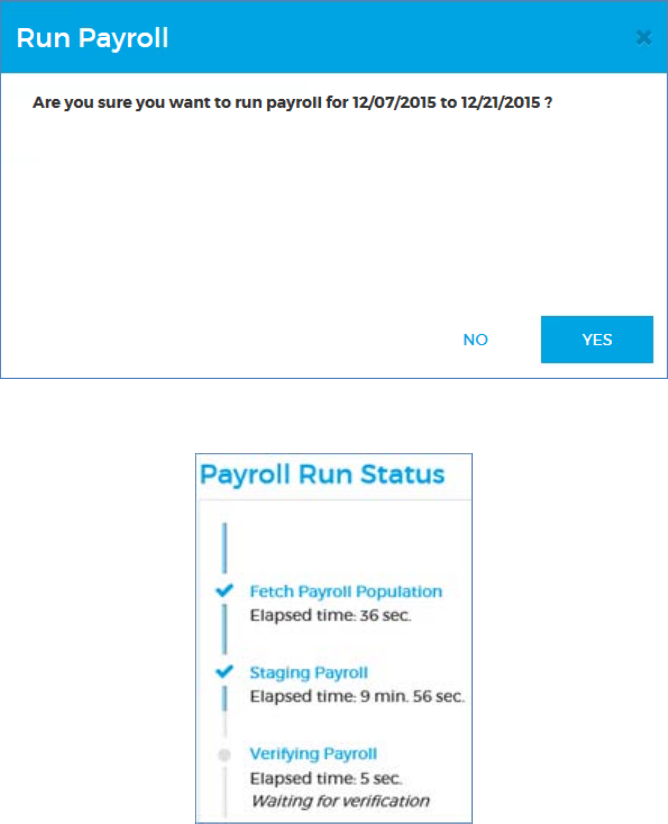
4. If you are running a payroll on a date other than the scheduled Payroll Run Date, a second Run Payroll
confirmation dialog appears. Click YES to run the payroll. NO cancels the payroll run and leaves the All
Runs table unchanged.
Each step displays in the Payroll Run Status panel. You can leave the Payroll page and return later to
verify it; it will remain in a waiting state until you or another admin takes further action.
Job Corps Data Center 18
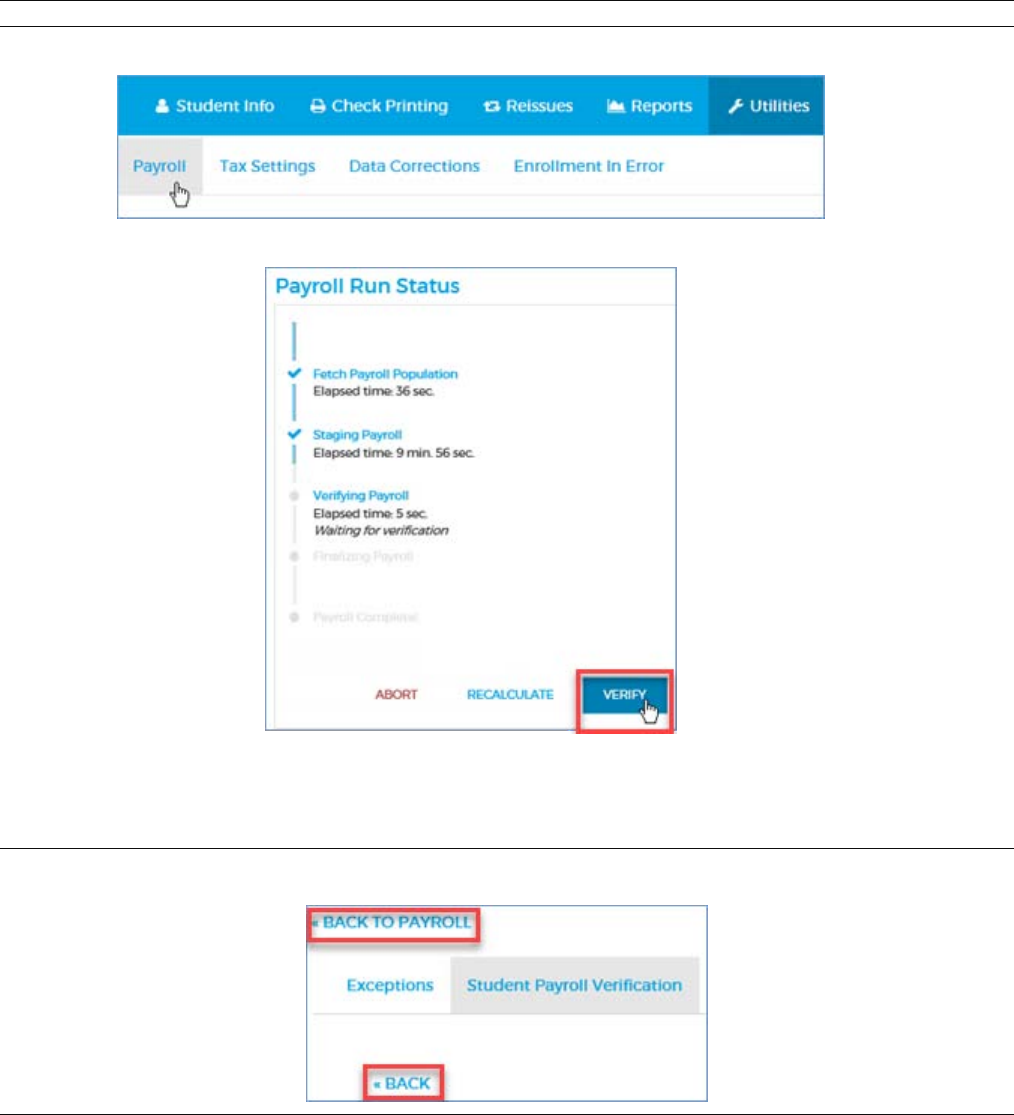
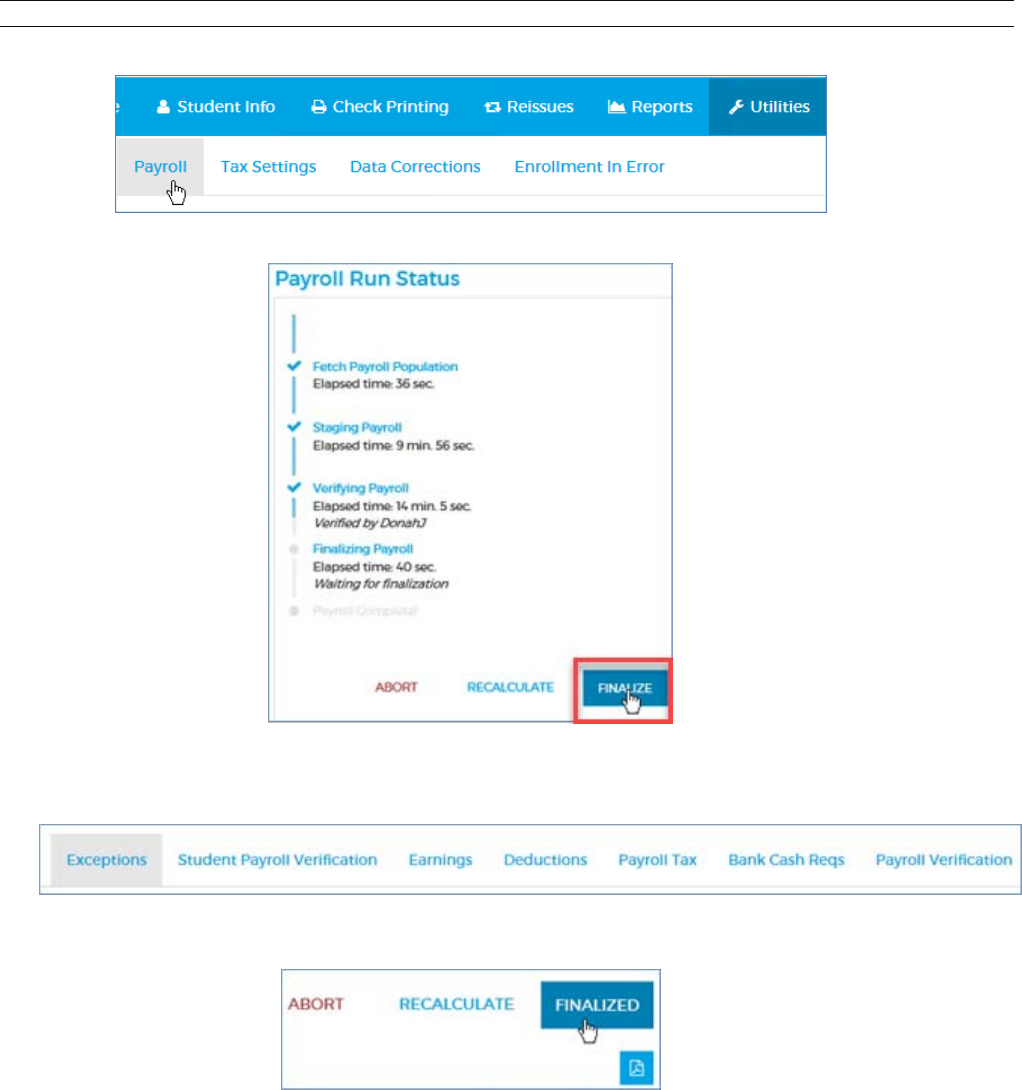
Verifying a payroll
Use these steps to verify a payroll.
You must have a SAAS user role of Super User or Submitter to perform this task.
Note: The payroll run status must be "Waiting for verification."
1. Go to Utilities Payroll.
2. Click the VERIFY button in the Payroll Run Status panel.
A verification page opens with seven tabs that are described below. Go through them in order, from left to right,
to verify the payroll.
You can also navigate back and forth by clicking the tabs or the BACK and NEXT buttons at the top of each tab.
Note: The BACK button is different from the BACK TO PAYROLL link, which returns to the Schedule Payroll page.
From the Schedule Payroll page, you can restart or resume verification by clicking VERIFY again.
Job Corps Data Center 19
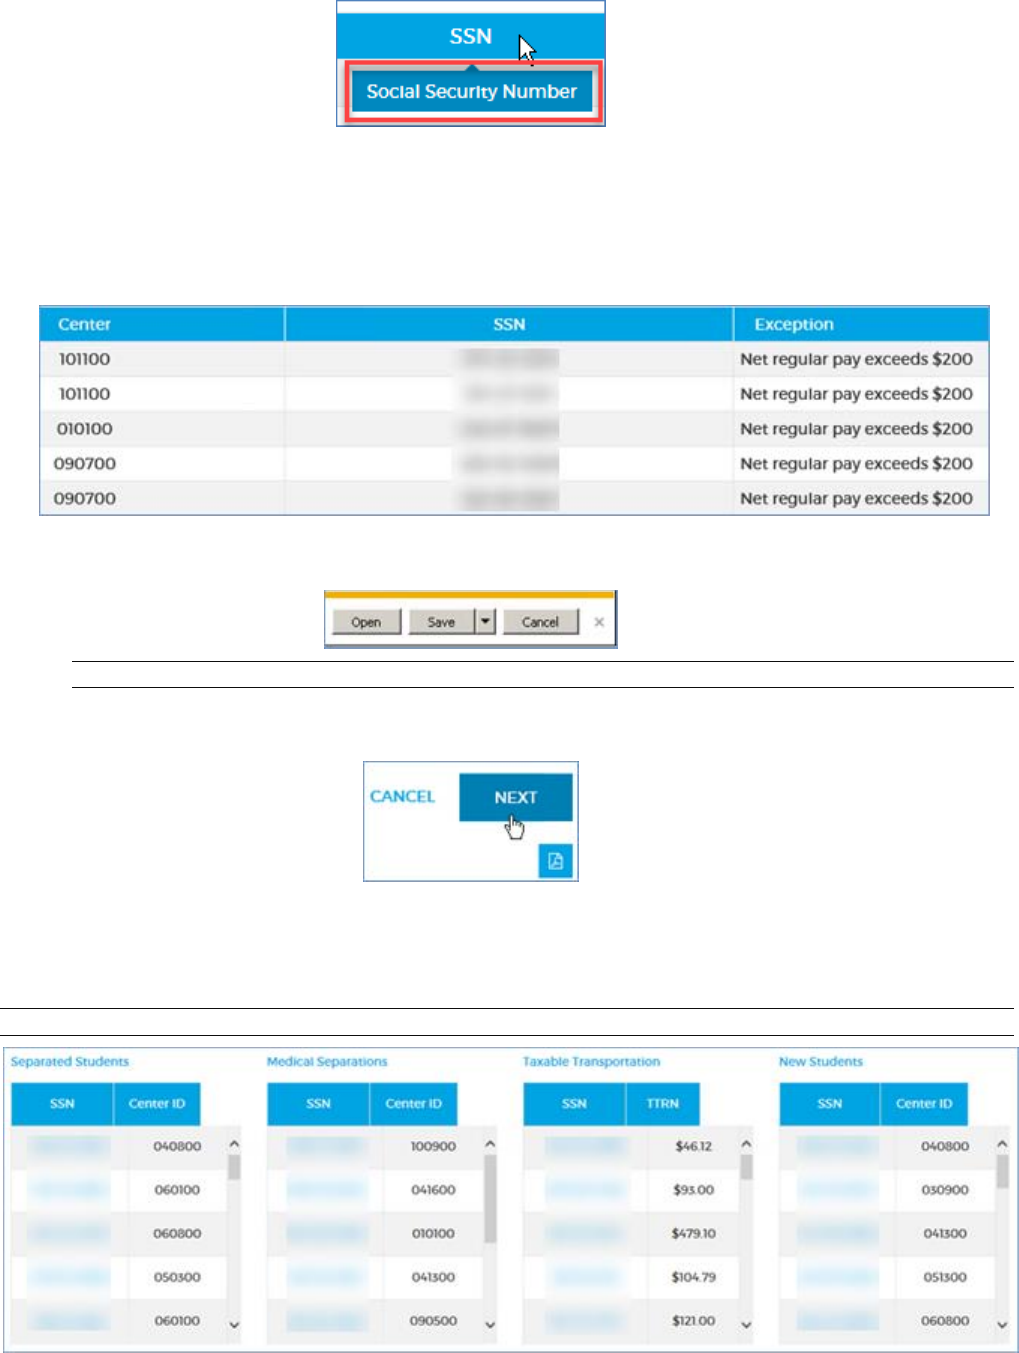
In each tab, you'll find a table with information about the payroll. You can get full descriptions by
hovering your cursor over the column headings.
Exceptions tab
The Exceptions tab displays Regular or Termination payments flagged for either of the following:
Net regular pay exceeds $200
Net separation pay exceeds $1200
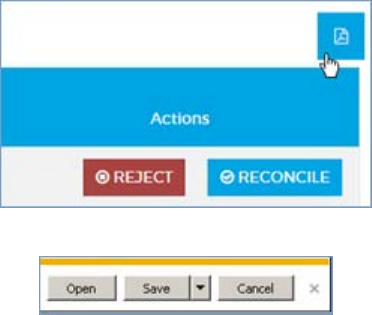
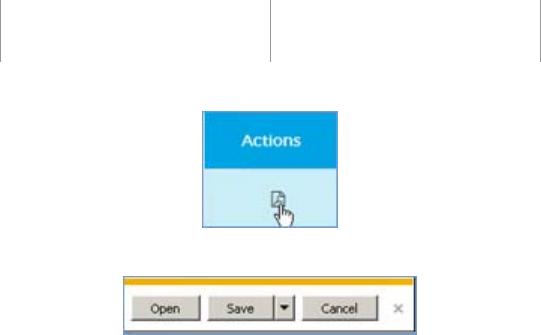
1. Review the Exceptions. Generate the Payroll Exceptions report if you like by clicking the PDF button.
When the report is ready, open, save, or cancel it using the buttons at the bottom-right of your browser.
Note: This report is not available from the Reports tab. You need to print it here if you want it.
2. Click NEXT to advance to the Student Payroll Verification tab. CANCEL cancels verification and
returns to the Schedule Payroll page.
Student Payroll Verification tab
For Regular and Termination payrolls, the Student Payroll Verification tab shows a minimum of 30 randomly
selected payment records so you can spot-check the payroll. There are four categories of payments.
Note: Some categories may be empty, but a minimum of 30 records overall is provided.
Job Corps Data Center 20
Separated Students – separation pay for students who were separated other than MSWR during this pay
period.
Medical Separations – separation pay for students who received an MSWR separation during this pay
period.
Taxable Transportation – payments that include a Taxable Transportation deduction.
New Students – payments to new enrollees receiving their first pay from Job Corps.
All these categories have the same format: a two-column display with the student's SSN and the center code.
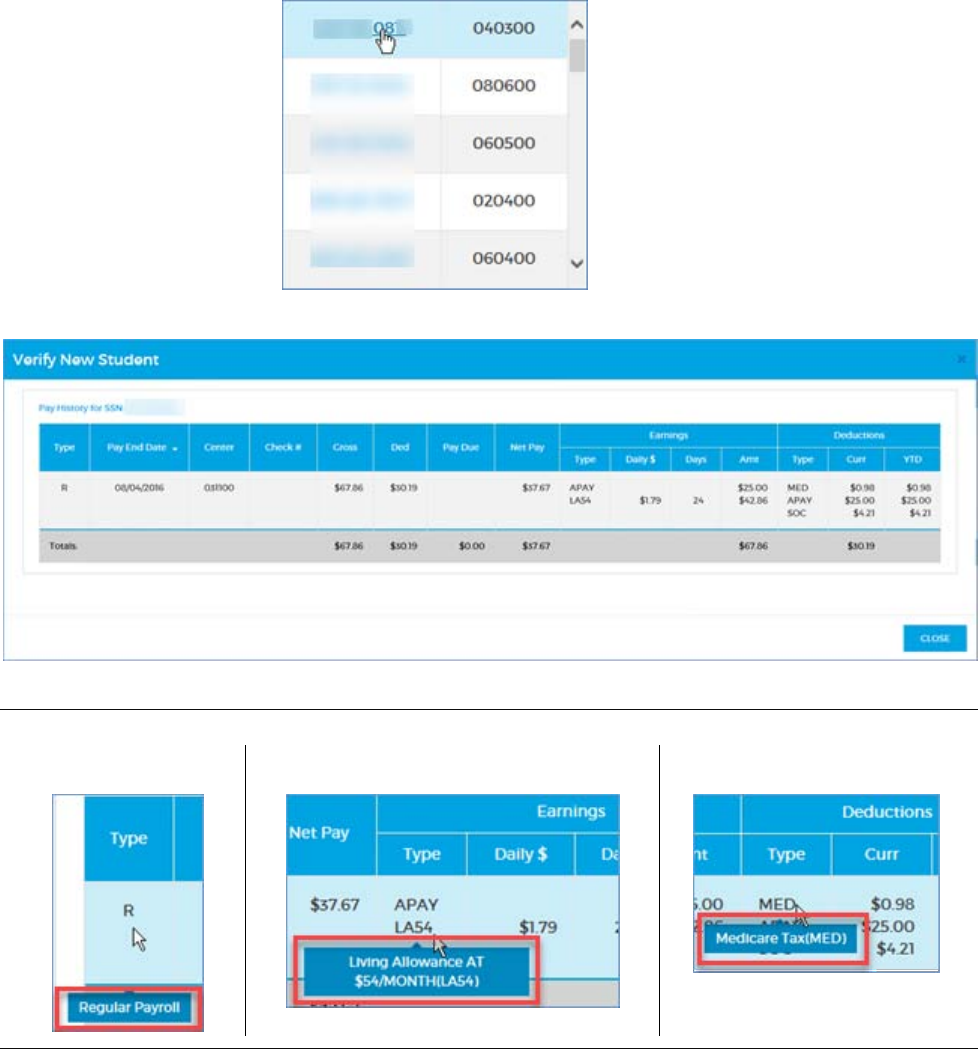
1. Click an SSN link to open the student's pay history in a separate window for your inspection.
Tip: You can hover the cursor to see full descriptions of data in the following columns:
(Pay) Type
Earnings Type
Deductions Type
Job Corps Data Center 21
2. To close the pay history window, click the CLOSE button at the bottom-right. You may have to scroll
down to see the button.
Generate the Student Payroll Verification report if you like by clicking the PDF button. When the report
is ready, open, save, or cancel it using the buttons at the bottom-right of your browser.
Note: This report is not available from the Reports tab. You need to print it here if you want it.
3. When you've finished reviewing the Student Payroll Verification tab, click NEXT to advance to the
Earnings tab. CANCEL cancels verification and returns you to the Schedule Payroll page.
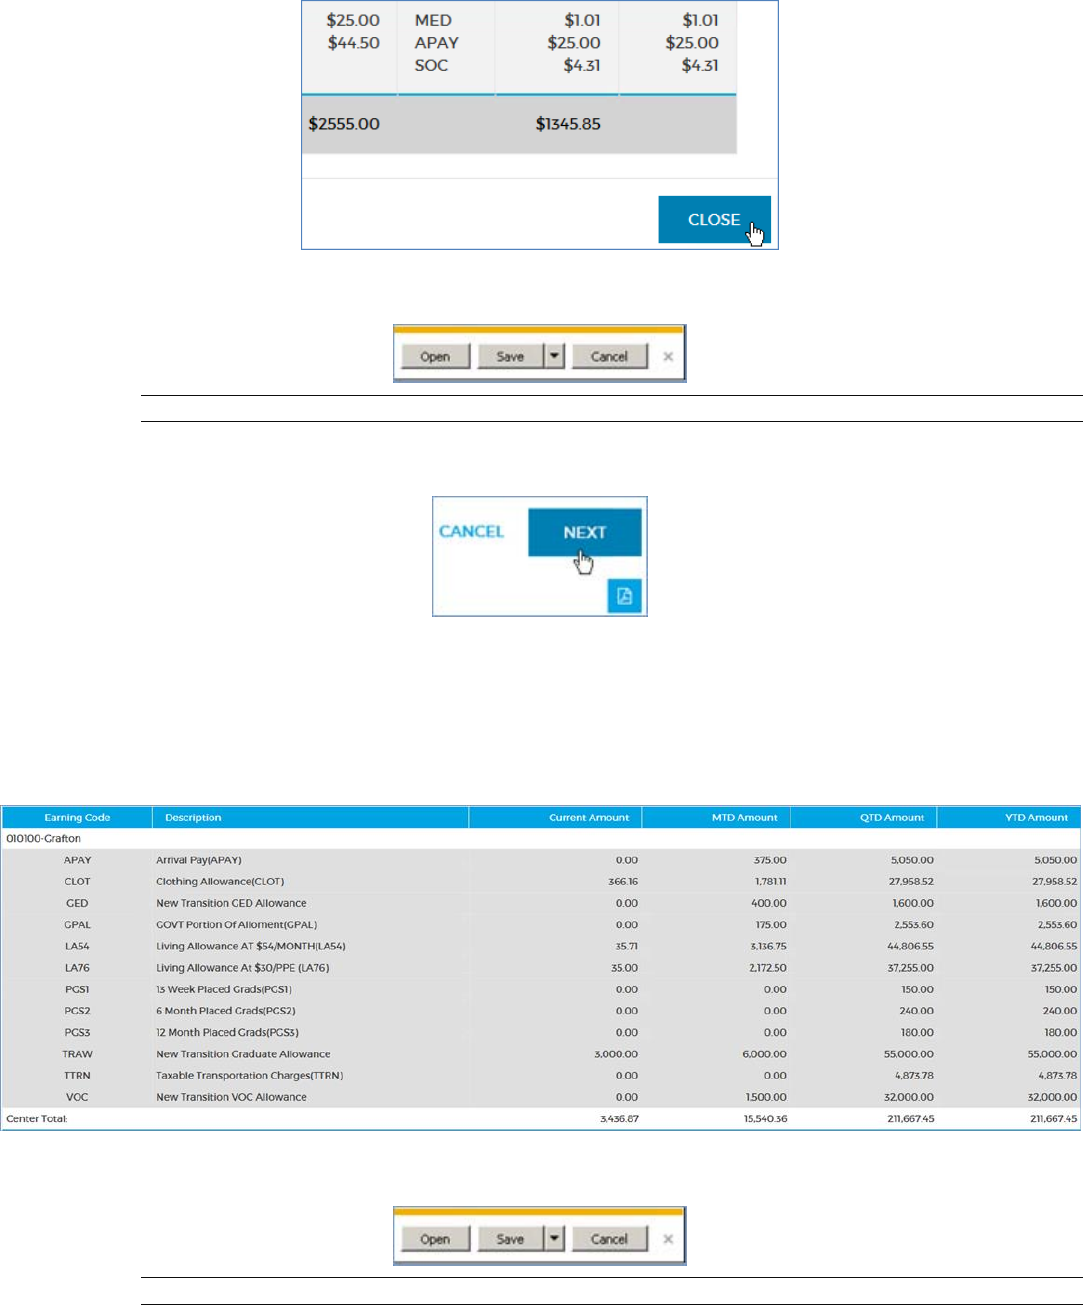
Earnings tab
The Earnings tab displays a breakdown of earnings for each center. Any earning type that a center has received
during the calendar year is listed.
Centers are listed in ascending order by center code alongside their names. You must scroll to see all the rows in
the table; you can't sort it.
1. Review the Earnings. Generate the Payroll Earnings report if you like by clicking the PDF button. When
the report is ready, open, save, or cancel it using the buttons at the bottom-right of your browser.
Tip: This report is also available at Reports
Payroll.
Job Corps Data Center 22
2. Click NEXT to advance to the Deductions tab. CANCEL cancels verification and returns to the Schedule
Payroll page.
Deductions tab
The Deductions tab displays a breakdown of deductions for each center. Any deduction type that a center has
during the calendar year is listed.
Centers are listed in ascending order by center code alongside their names. You must scroll to see all the rows in
the table; you can't sort it.
1. Review the Deductions. Generate the Payroll Deductions report if you like by clicking the PDF button.
When the report is ready, open, save, or cancel it using the buttons at the bottom-right of your browser.
Tip: This report is also available at Reports
Payroll.
2. Click NEXT to advance to the Payroll Tax tab. CANCEL cancels verification and returns to the
Schedule Payroll page.
Payroll Tax tab
The Payroll Tax tab displays totals for employee and employer portions of each type of tax processed in the
payroll run, with subtotals for each center.
Job Corps Data Center 23
Centers are listed in ascending order by center code alongside their names. You must scroll to see all the rows in
the table; you can't sort it.
1. Review the Payroll Tax information. Generate the Payroll Tax report if you like by clicking the PDF
button. When the report is ready, open, save, or cancel it using the buttons at the bottom-right of your
browser.
Tip: This report is also available at Reports
Payroll.
2. Click NEXT to advance to the Bank Cash Reqs tab. CANCEL cancels verification and returns to the
Schedule Payroll page.
Job Corps Data Center 24
Bank Cash Reqs tab
For Regular payrolls, the Bank Cash Reqs tab displays the cash requirements for each center.
Centers are listed in ascending order by center code. You must scroll to see all the rows in the table; you can't sort
it.
1. Review the Bank Cash Requirements Generate the Bank Cash Requirements report if you like by clicking
the PDF button. When the report is ready, open, save, or cancel it using the buttons at the bottom-right of
your browser.
Note: If you print the report from this tab, every row in the "Reimb Amount" column will be 0.00, since this
amount is calculated after payroll is finalized. To see the center reimbursement amounts, generate the
report from Reports
Payroll or from Utilities
EFT.
2. .Click NEXT to advance to the Payroll Verification tab. CANCEL cancels verification and returns to the
Schedule Payroll page.

Job Corps Data Center 25
Payroll Verification tab
The Payroll Verification tab displays center totals for the payroll run.
Centers are listed in ascending order by center code. You must scroll to see all the rows in the table; you can't sort
it.
1. Review the Payroll Verification information. Generate the Payroll Verification report if you like by
clicking the PDF button. When the report is ready, open, save, or cancel it using the buttons at the
bottom-right of your browser.
Tip: This report is also available at Reports
Payroll.
2. Click VERIFIED at the upper-right of the table to verify the payroll and return to the Schedule Payroll
page.

Job Corps Data Center 26
Your Admin ID will appear as the verifier in the Payroll Run Status panel. The payroll is ready for
finalization by an admin with the SAAS Approver role.
Job Corps Data Center 27
Recalculating a payroll run Recalculating a payroll run
An admin with the SAAS user role of Super User can recalculate a payroll run. The staged student population is
preserved, but the living allowances, earnings, deductions, paydues, and net are recalculated.
You can recalculate the payroll run at these points:
Payroll stage
Button location
After staging (while awaiting verification)
Payroll Run Status panel
After verification (while awaiting finalization)
Payroll Run Status panel
After reverification (instead of finalization)
Payroll Run Verification tab
Note: There is no confirmation dialog. The RECALCULATE button executes the function immediately.
Job Corps Data Center 28
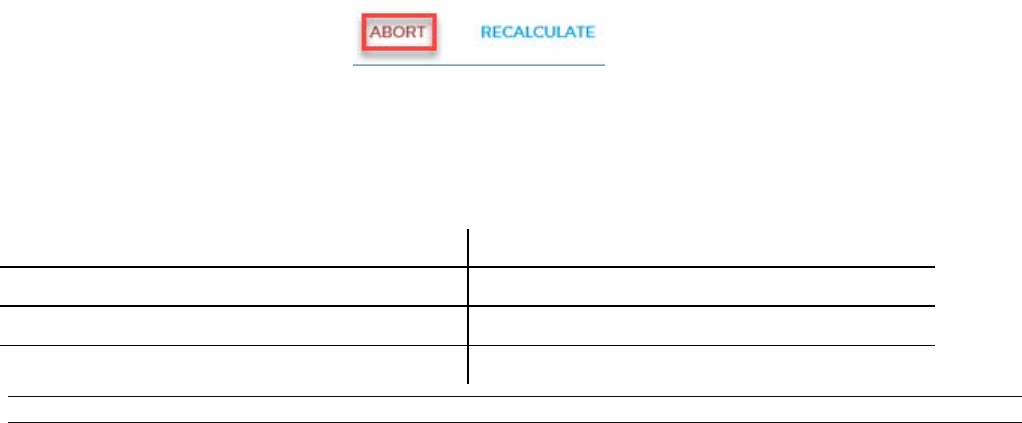
Aborting a payroll run Aborting a payroll run
An admin with the SAAS user role of Approver can abort a payroll run if an unforeseen failure occurs or the
payroll was scheduled or run erroneously (wrong dates, wrong type, etc.). Aborting a payroll run discards the
staged student population. The payroll can be re-run from the All Runs table after any necessary modifications are
made.
You can abort the payroll run at these points:
Payroll stage
Button location
After staging (while awaiting verification)
Payroll Run Status panel
After verification (while awaiting finalization)
Payroll Run Status panel
After reverification (instead of finalization)
Payroll Run Verification tab
Note: There is no confirmation dialog. The ABORT button executes the function immediately.
Job Corps Data Center 29
Finalizing a payroll
Use these steps to finalize a payroll that has been run and verified by another admin.
You must have a SAAS user role of Super User or Approver to perform this task.
Notes: The payroll run status must be "Verified."
1. Go to Utilities Payroll.
2. In the Payroll Run Status panel, click the FINALIZE button.
3. Go through the verification tabs to spot-check randomly pulled pay records and to view exceptions,
earnings, deductions, payroll taxes, bank cash requirements, and payroll verification. Generate the reports
if you like. This process is described in Verifying a payroll (page 18).
4. When you reach the final tab (Payroll Verification), click FINALIZED to finalize the payroll and return
to the Schedule Payroll page.

Job Corps Data Center 30
The run is removed from the All Runs table and the Payroll Run Status panel shows the payroll run as
complete.
Job Corps Data Center 31
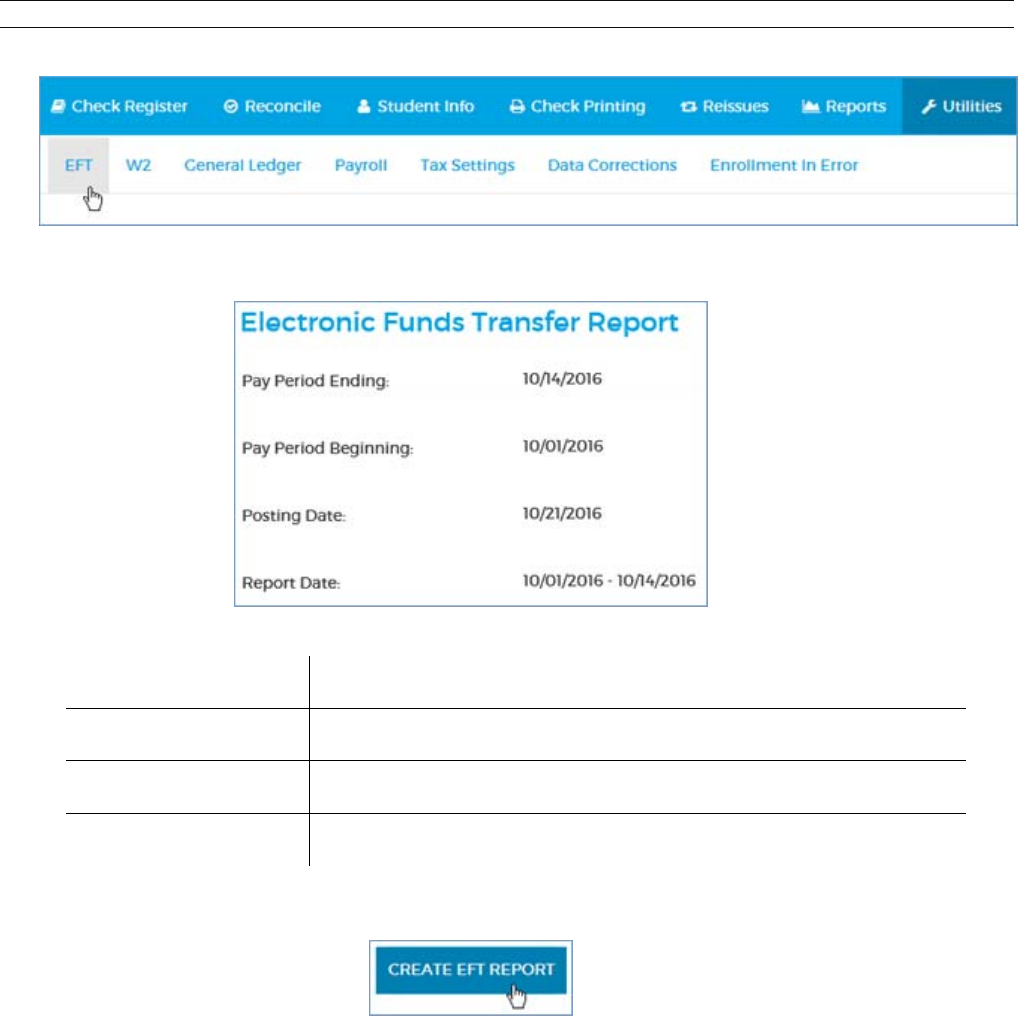
Generating the EFT report
Use these steps to generate the Electronic Funds Transfer List report for the latest Regular payroll run.
Tip: This report is also available at Reports
Payroll.
1. Go to Utilities EFT.
2. Review the Electronic Funds Transfer Report fields. These are information-only fields and cannot be
changed.
Pay Period Ending
The pay period end date for the latest Regular payroll
Pay Period Beginning
The pay period beginning date for the latest Regular payroll
Posting Date
The Bank Effective Date (7 days after the Pay Period Ending date)
Report Date
The reporting period
3. Click the Create EFT Report button.
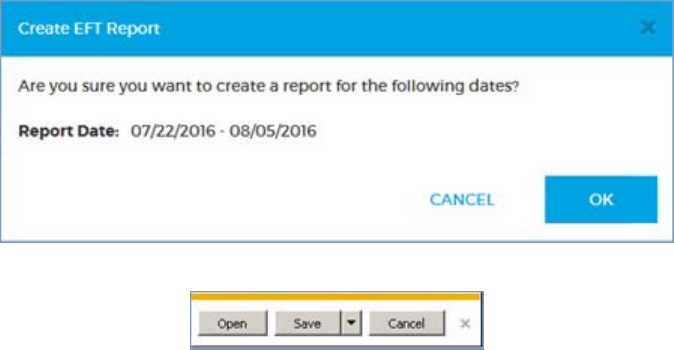
Job Corps Data Center 32
4. In the confirmation dialog, click OK to generate the report. CANCEL cancels the report generation and
leaves the Electronic Funds Transfer Report form unchanged.
5. When the report is ready, open, save, or cancel it using the buttons at the bottom-right of your browser.
The EFT report file name is ALTH1ACH.mmddyy where mmddyy is the report's run date. You can open it with
Notepad.

Job Corps Data Center 33
Generating the Bank Cash Requirements report
Use these steps to generate the Bank Cash Requirements report.
Tip: This report is also available at Reports
Payroll.
1. Go to Utilities EFT.
2. Review the Electronic Funds Transfer Report fields. These are information-only fields and cannot be
changed.
Pay Period Ending
The pay period end date for the latest Regular payroll
Pay Period Beginning
The pay period beginning date for the latest Regular payroll
Posting Date
The Friday 7 days after the Pay Period Ending date
Report Date
The reporting period
3. Click the Create BCR Report button.
4. In the confirmation dialog, click OK to generate the report. CANCEL cancels the report generation and
leaves the Electronic Funds Transfer Report form unchanged.
5. When the report is ready, open, save, or cancel it using the buttons at the bottom-right of your browser.
Job Corps Data Center 34
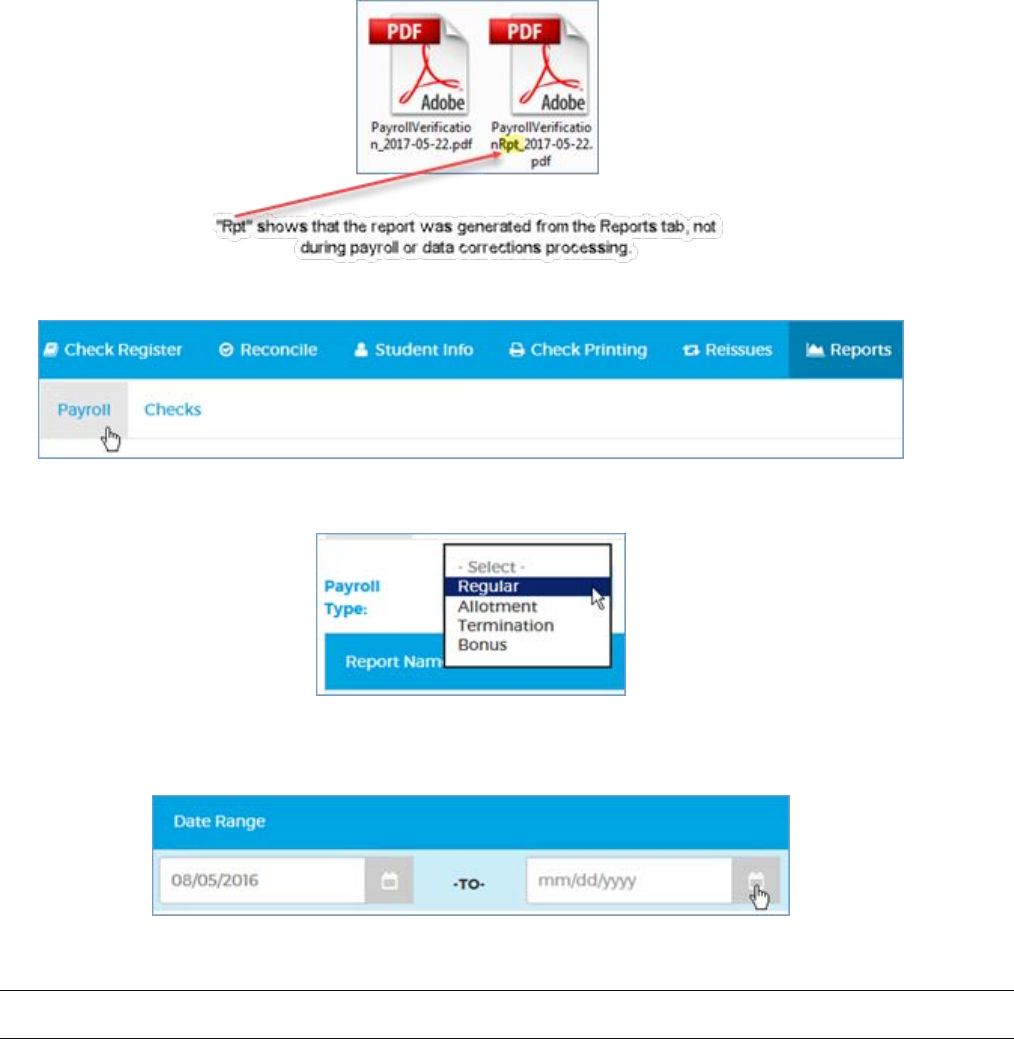
Generating payroll reports on demand
Use these steps to generate payroll reports for any date range at any time.
These are the same reports that you can generate during payroll or data corrections processing. The naming
conventions differ slightly.
1. Go to Reports Payroll.
2. For any report other than Preview Backout of Pay Cycle or Backout of Pay Cycle, make a selection from
the Payroll Type dropdown (Regular, Allotment, Termination, or Bonus).
3. Depending on the output you want, leave the date blank or use the datepickers to enter a date range. If
you leave the datepicker blank, you'll get the report for the most recent payroll. See the table below for
details.
You can run the following reports, some of which are also available from other tabs. The output depends on the
date range you select, if any.
Tip: In most cases, you will probably want to leave the datepickers blank in order to generate a report for the latest
pay period.
Job Corps Data Center 35
Report
Filename
Note: The date in the filename is the
run date of the report.
Also available at
Report period for
NO date range selection
Report period for
date range selection
Payroll Earnings
PayrollEarnings_yyyy-mm-dd
Payroll Verification
(Earnings tab)
The latest pay period of
the selected payroll type
Pay period for the most
recent PPE of the selected
payroll type within the
date range
Note: It doesn't matter how
wide this range is; even if
you enter dates that
encompass a one-year
period, only the latest pay
period of the selected
payroll type within the date
range will be used.
However, an overly narrow
date range could generate
an empty report if it does
not encompass a PPE.
Payroll Verification
PayrollVerification_ yyyy-mm-dd
Payroll Verification
(Payroll Verification tab)
Bank Cash Requirements
BankCashReqs_ yyyy-mm-dd
Payroll Verification
(Bank Cash Reqs tab)
Utilities EFT
Payroll Deductions
PayrollDeductions_ yyyy-mm-dd
Payroll Verification
(Deductions tab)
Payroll Tax
PayrollCtrTax_ yyyy-mm-dd
Payroll Verification
(Payroll Tax tab)
Electronic Funds Transfer List
BankCashReqs_ yyyy-mm-dd
Utilities EFT
this report
Preview Backout of Pay Cycle
Report
StudentPreviewPayBackout_ yyyy-mm-
dd
Utilities Data
Corrections Review
Corrections
All pending payroll
backouts; disregards any
Payroll Type selection.
The reporting period will
display as "1/1/1753 –
12/31/9999."
Pending payroll backouts
within the date range;
disregards any Payroll
Type selection
Backout of Pay Cycle Report
Backout of Pay Cycle Report
StudentPayBackoutRpt_yyyy-mm-dd
n/a
All approved payroll
backouts; disregards any
Payroll Type selection.
The reporting period will
display as "1/1/1753 –
12/31/9999."
Approved payroll
backouts within the date
range; disregards any
Payroll Type selection
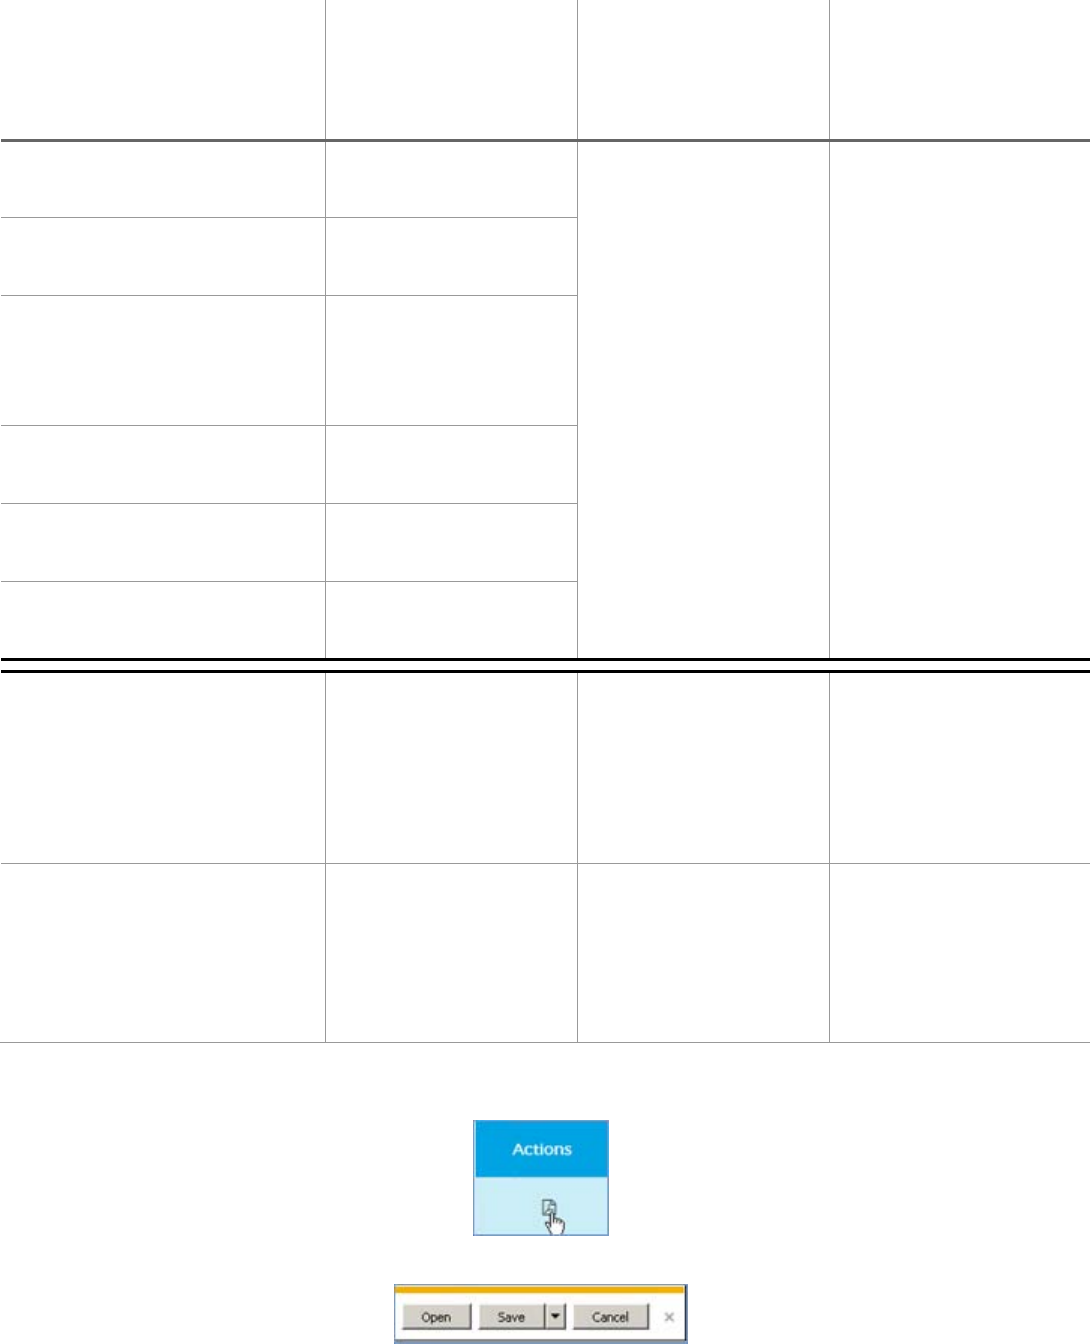
4. Click the PDF button
5. Open, save, or cancel the report using the buttons at the bottom-right of your browser.
Job Corps Data Center 36
Banking
Mapping a bank file Mapping a bank file
Use these steps to map the bank file to Excel spreadsheet columns for SAAS. This should be a one-time task. You
won't need to do it again unless the bank changes its format or JCDC changes banks.
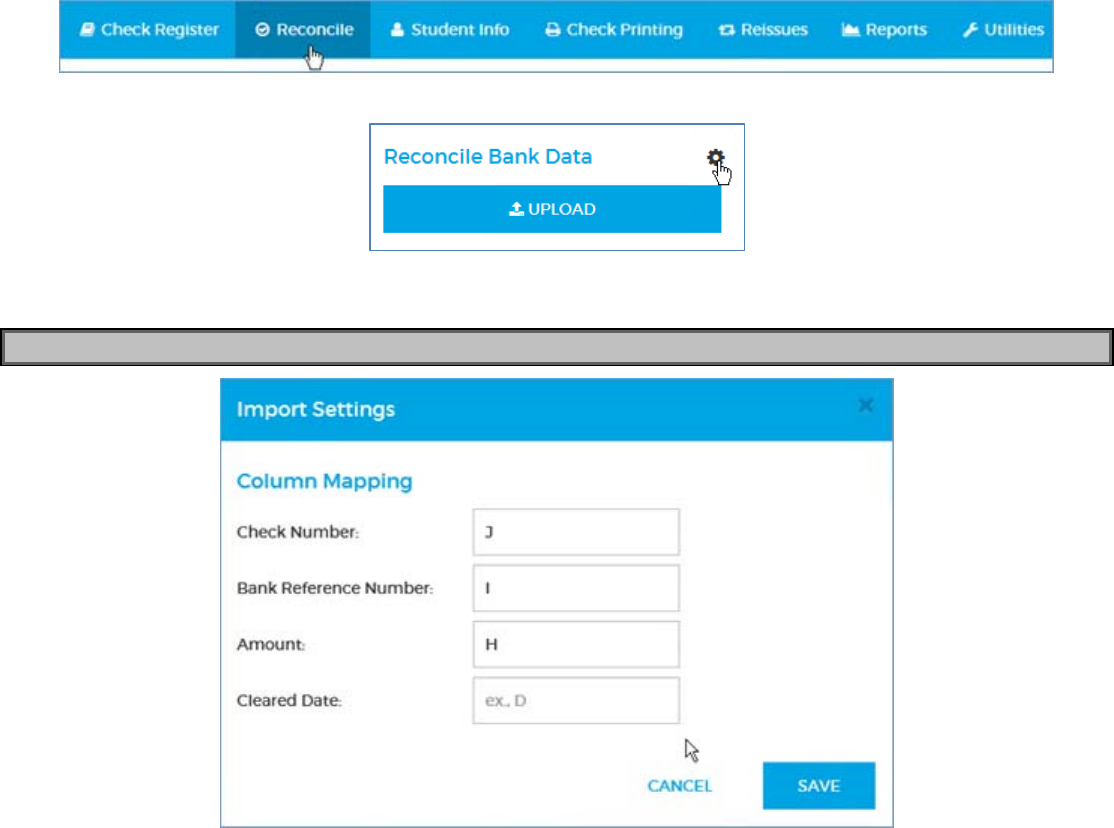
1. Click Reconcile on the main menu.
2. Click the gear button.
3. In the Import Settings dialog, click in each field and enter the UPPERCASE column letter the bank uses
for the corresponding bank data.
Warning: If you use lowercase letters, the columns will not map properly.
4. Click SAVE to import the settings. CANCEL closes the dialog without importing the settings.

Job Corps Data Center 37
Importing a bank file
Use these steps to upload, reconcile, and verify a bank file.
1. Click Reconcile on the main menu.
2. Dismiss any notifications from the previous reconcilation by clicking the × at the far right of each
message.
Note: You can dismiss these notifications even if there are existing exceptions in the Exceptions table. All
exceptions remain in the table until you reconcile or reject them.
When the messages are removed, the UPLOAD button replaces the RECONCILE button.
3. Click the UPLOAD button.
4. Browse to the bank file you want to upload.
5. When the file is loaded into the Reconcile Bank Data form, click the RECONCILE button.
Job Corps Data Center 38
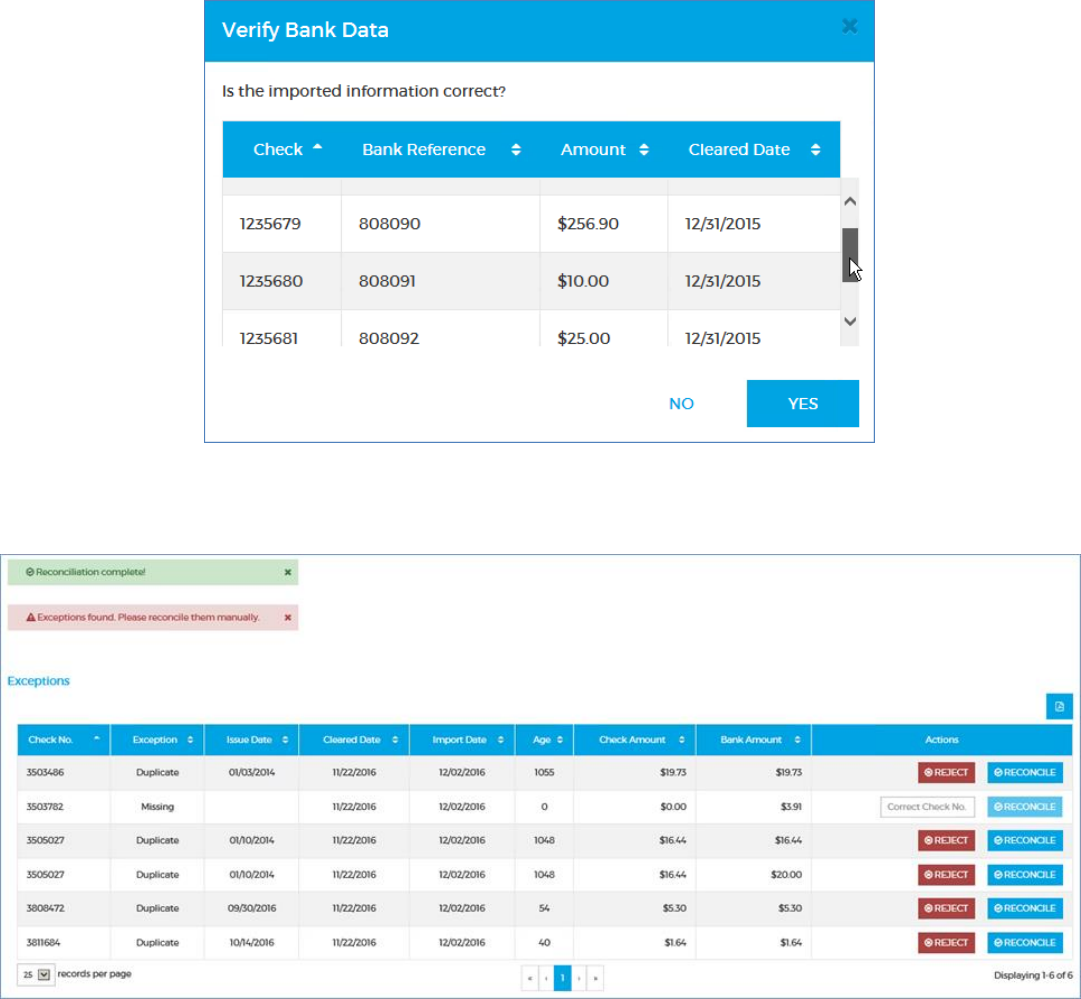
6. When the Verify Bank Data dialog opens, scroll through the sample rows (up to 25 display) to ensure that
the imported data is mapped to the columns correctly. Specifically, check numbers should appear under
the Check column, bank reference numbers in the Bank Reference column, amounts in the Amount
column, and dates in the Cleared Date column. If the columns don't match, remap them (page 36) and
click RECONCILE again.
7. Click YES to verify the mapping and reconcile the bank file. NO cancels the reconciliation.
One or two notifications display, indicating that 1) reconciliation is complete, and possibly 2) exceptions
have been found. Any exceptions display in the Exceptions table.
Job Corps Data Center 39
Optional: To generate a report of the unreconciled exceptions, click the PDF button at the upper-right of
the Exceptions table.
When the report is ready, open, save, or cancel it using the buttons at the bottom-right of your browser.
Job Corps Data Center 40
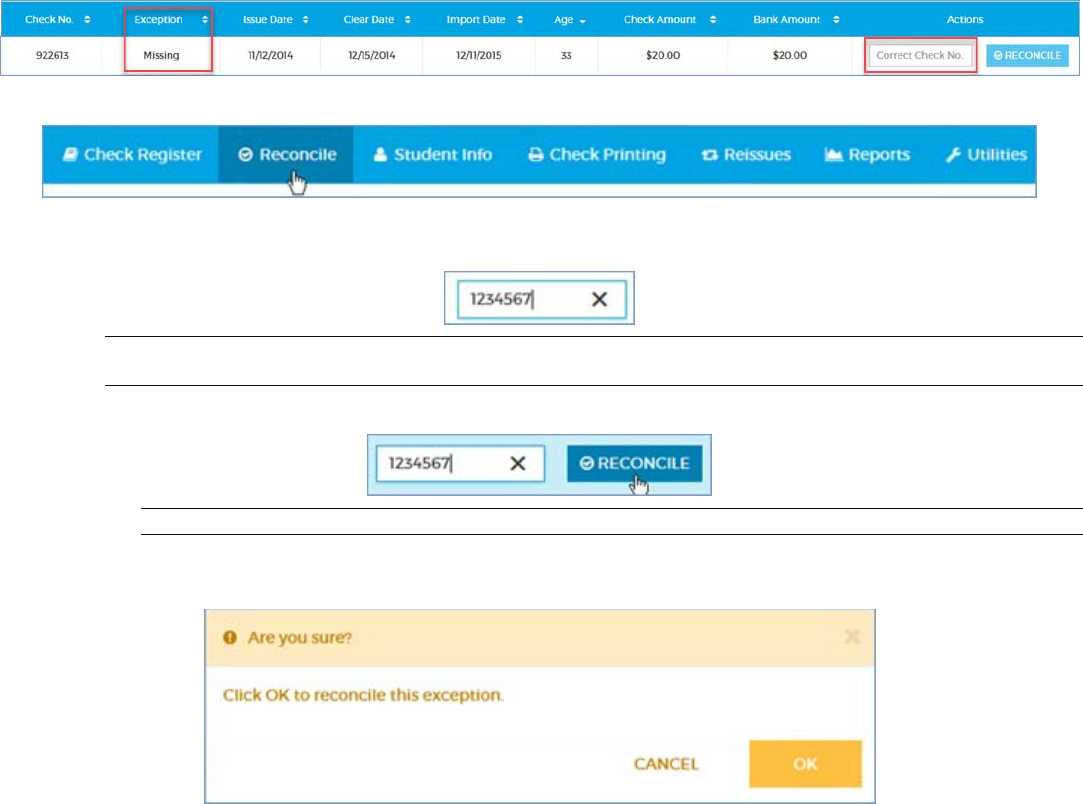
Reconciling missing exceptions
Reconcile
A Missing exception occurs when the Check No. in the Exceptions table is not in the Check Register, where it
should have a status of "Open Not Cashed." Use these steps to reconcile a "Missing" exception.
8. Click Reconcile on the main menu.
9. In the Exceptions table, enter the correct seven-digit check number in the Correct Check No field for the
Missing exception you want to reconcile.
Note: If the Correct Check No. you enter already exists in the Check Register, another exception will immediately
appear in the Exceptions table.
10. Click the RECONCILE button in the same row.
Note: You must enter a seven-digit number in the Correct Check No. field before you can click RECONCILE.
11. When the confirmation dialog opens, click OK to reconcile the check under the Correct Check No. and
remove it from the Exceptions table. CANCEL cancels the reconciliation and leaves the table unchanged.
Job Corps Data Center 41
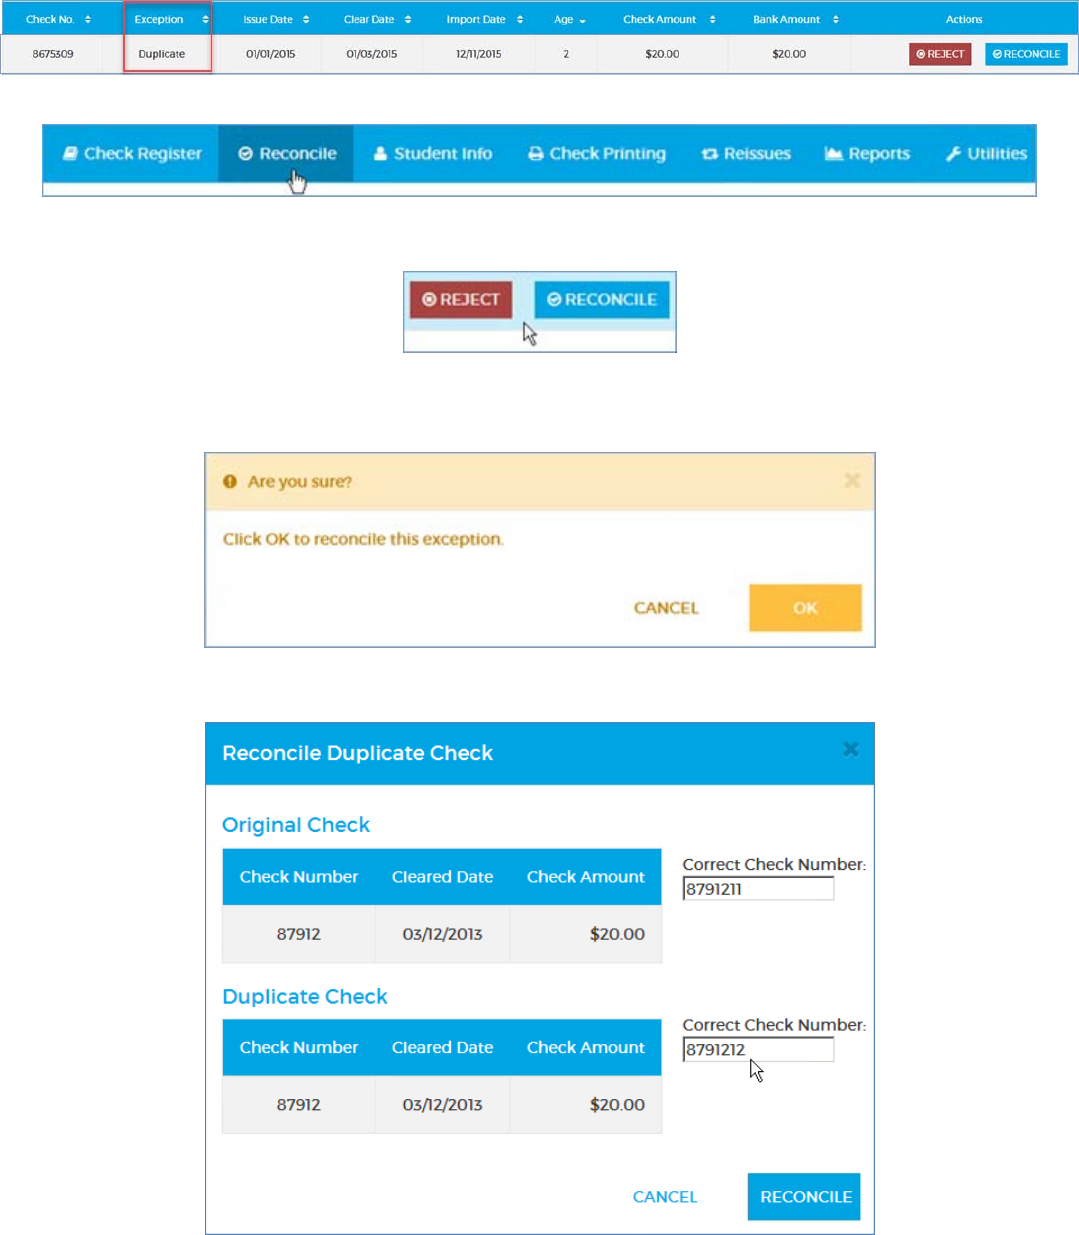
Reconciling duplicate exceptions
A Duplicate exception occurs when the check number in the bank file matches a check with a status of
"Reconciled" in the Check Register. Use these steps to reconcile a "Duplicate" exception.
1. Click Reconcile on the main menu.
2. In the Exceptions table, select an action, RECONCILE or REJECT, for the Duplicate you want to
resolve.
o Select REJECT to reject the check as a true duplicate. REJECT opens a warning dialog. Click OK
to reject the check from the bank file and remove it from the Exceptions table. CANCEL cancels the
reconciliation and leaves the table unchanged.
o Select RECONCILE to reconcile the checks under their correct check numbers .RECONCILE
opens the Reconcile Duplicate Check form.
a. Enter a seven-digit Correct Check Number for each check: the original and the duplicate.
Job Corps Data Center 42
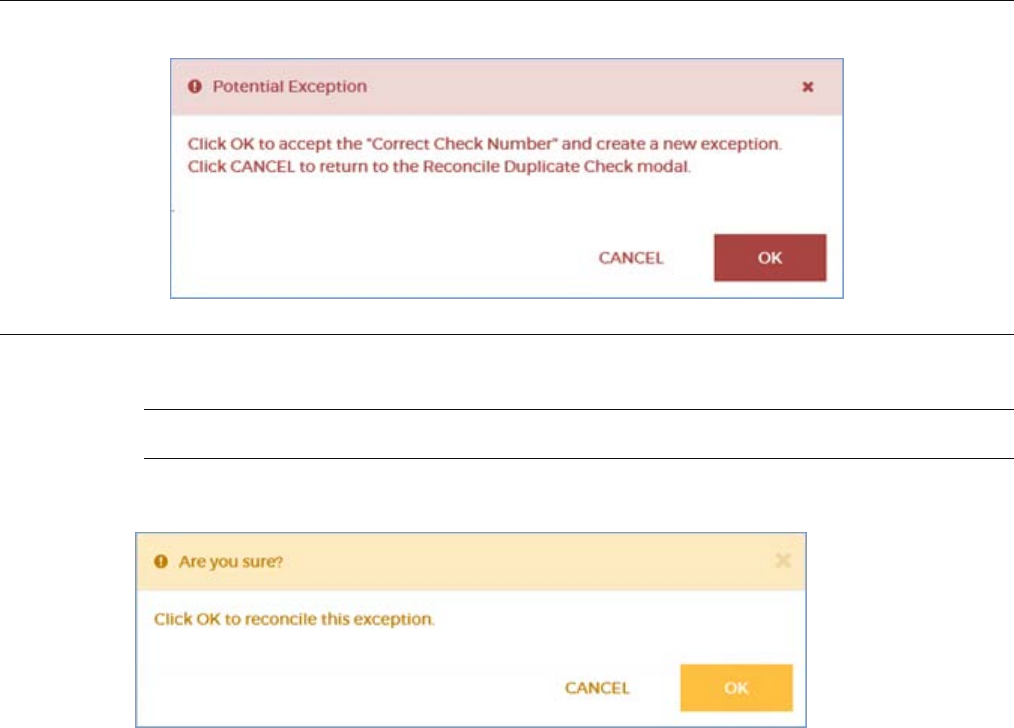
Note: When you enter the Correct Check Number, you could create another exception. Depending on the type, this
will either 1) create another row in the Exceptions table, or 2) trigger an error message.
If you receive an error message, click CANCEL or OK to dismiss it, then re-enter the Correct Check Number.
b. Click RECONCILE to reconcile the duplicate check, close the form, and remove the check from
the Exceptions table. CANCEL cancels the reconciliation and closes the form.
Note: You must enter two different seven-digit numbers in the Correct Check Number fields before
you can click RECONCILE.
c. When the confirmation dialog opens, click OK to confirm the reconciliation. CANCEL returns
you to the Reconcile Duplicate Check form with no changes.
Job Corps Data Center 43
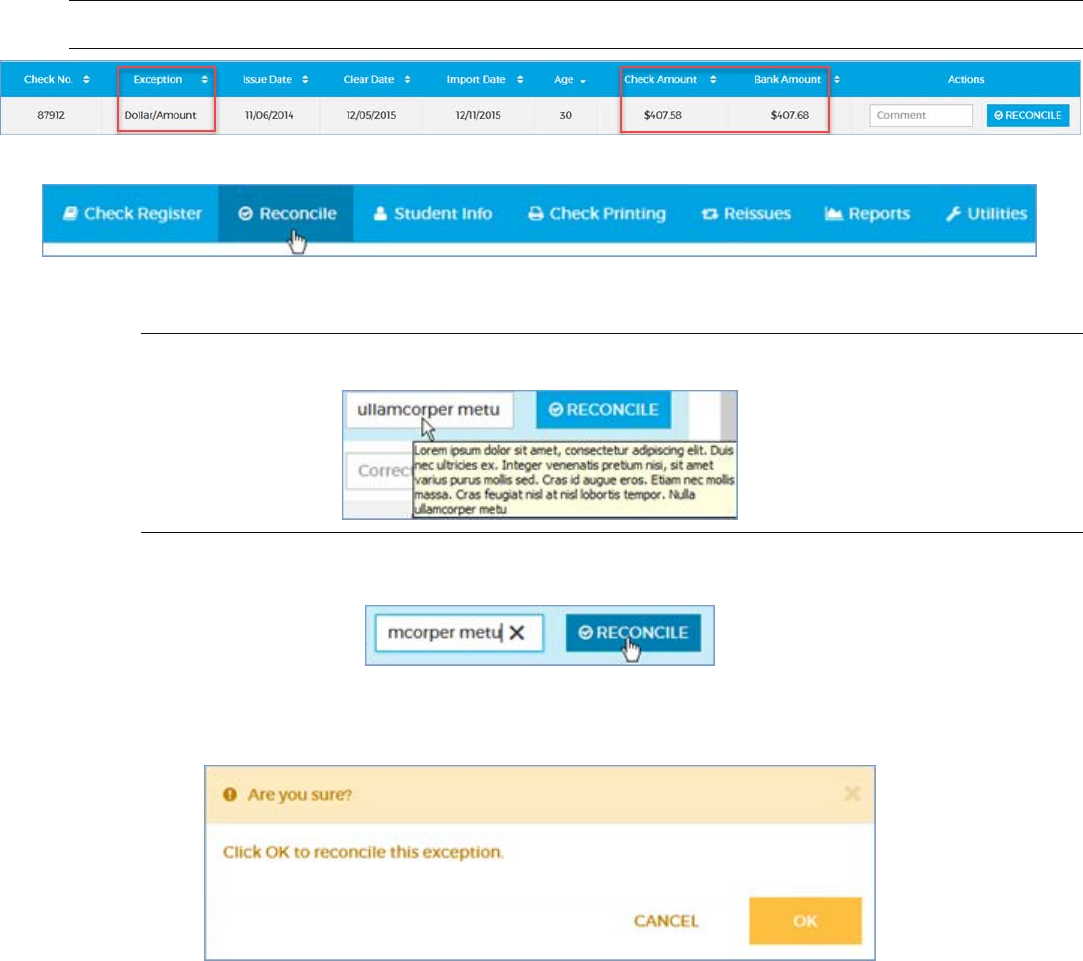
Reconciling dollar/amount exceptions
A Dollar/Amount exception occurs when the Check Amount from the Check Register and the Bank Amount are
different. Use these steps to reconcile a "Dollar/Amount" exception.
Note: If a check creates both a dollar/amount and a date exception, there will be two rows in the Exceptions table, one
for each exception type.
1. Click Reconcile on the main menu.
Optional: In the Exceptions table, enter an explanatory Comment (255 characters max) for the
Dollar/Amount exception you want to reconcile.
Tip: Text you enter here scrolls horizontally. Hover your cursor over the field to see all the text you've
entered.
2. Click the RECONCILE button for the Dollar/Amount exception you want to reconcile.
3. When the confirmation dialog opens, click OK to reconcile the check as the Check Amount, save any
comment you entered in the database, and remove the exception from the table. CANCEL cancels the
reconciliation and leaves the table unchanged.
Job Corps Data Center 44
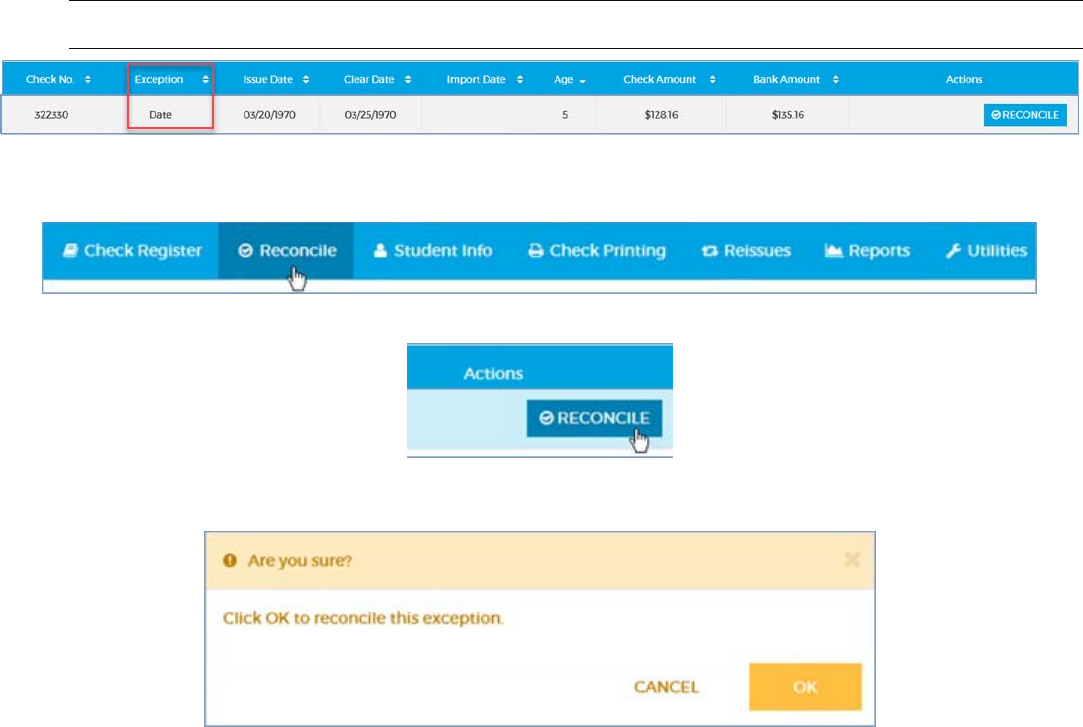
Reconciling date exceptions
A Date exception occurs when the check has the status of "Expired" in the Check Register. Use these steps to
reconcile a "Date" exception.
Note: If a check creates both a dollar/amount and a date exception, there will be two rows in the Exceptions table, one
for each exception type.
This exception serves as an FYI; reconciliation constitutes acknowledgment.
1. Click Reconcile on the main menu.
2. In the Exceptions table, click the RECONCILE button for the Date exception you want to reconcile.
3. When the warning dialog displays, click OK to remove the check from the Exceptions table. CANCEL
cancels the reconciliation and leaves the table unchanged.
Job Corps Data Center 45
Generating the Check Reconciliation Exceptions report
You can generate a report of the unreconciled exceptions from the Reconcile tab (page 40) or the Reports tab
(page 68).
If you generate the report from the Reconcile tab, all unreconciled exceptions are included in the report.
If you generate the report from the Reports tab, you have the option of limiting the exceptions to a specific bank
file import date or dates.

Job Corps Data Center 46
Printing checks
Printing check batches
Use these steps to queue check batches of all types for physical printing in EZPaySuite. You won't need paper or
check stock for these steps.
1. Go to Check Printing Define Check Batch.
2. Complete the Define Check Batch form.
Check Type
The type of checks to print.
Pay Period
The pay period for the Check Type you selected; you cannot change this.
Check Date
Default date is the current date for Manual checks and 7 days after the end
of the Pay Period for all other checks; see the restrictions below.
For Manual checks, you cannot set a Check Date earlier than the current
date or more than 7 days later than the current date.
For all other checks, you cannot set a Check Date earlier than the Pay
Period End date or more than 7 days later than the Pay Period End date.
Starting Check Number
The check number to start the print batch.
Warning: Do not change this number unless it's absolutely necessary.
3. Click PRINT.
What happens next:
One of the following print batch summary reports is generated as a PDF file that you may open, save, or
cancel using the buttons at the bottom-right of your browser:
o Termination Payroll Summary – opens if the check type is "Termination"

Job Corps Data Center 47
o Allotment Check Register – opens if the check type is "Allotment"
o Check Register – opens if the check type is "Manual," "Bonus," or "Regular." tbd: If you are printing
a batch of Manual checks, this report includes any previous Manual check print batches for the
current date.
The checks appear in the Check Register with a status of "Open Not Cashed."
Manual checks are removed from the Manual Checks table.
The batch is saved to an EZPaySuite "Checkbook" with a status of "Pending." To continue processing the
batch, log onto EZPaySuite.
Follow the instructions in the EZPaySuite User Guide, which is located on the JCDC Share drive at
S:\ACOM\Documentation\ EZPaySuite_UserGuide_v860.pdf.
Note: If you have specified a check batch for which there is no data (for example, it has already been printed
or payroll has not been finalized yet), an error message will display stating that there is nothing in the
queue.
Job Corps Data Center 48
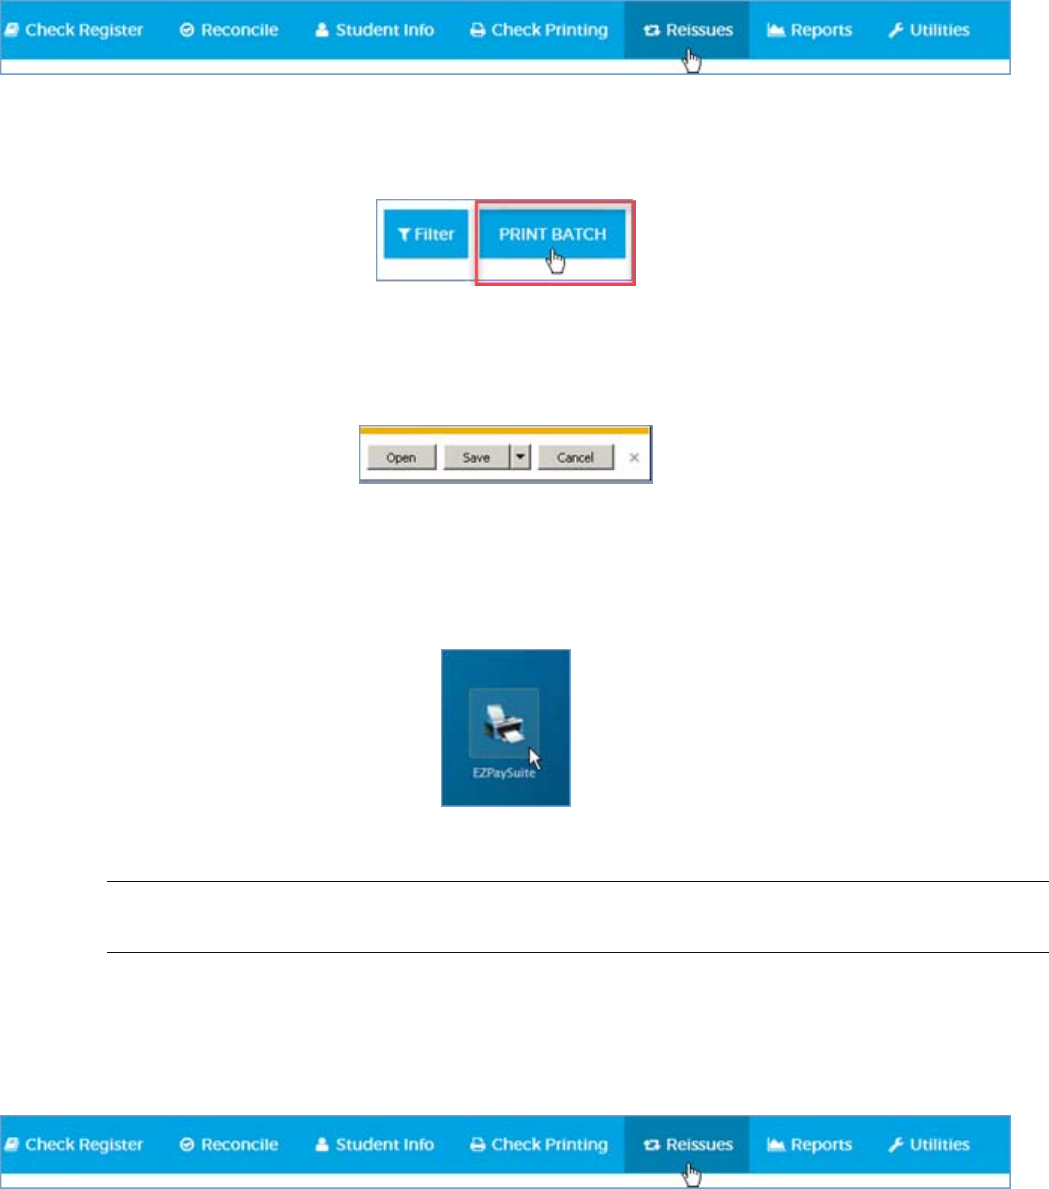
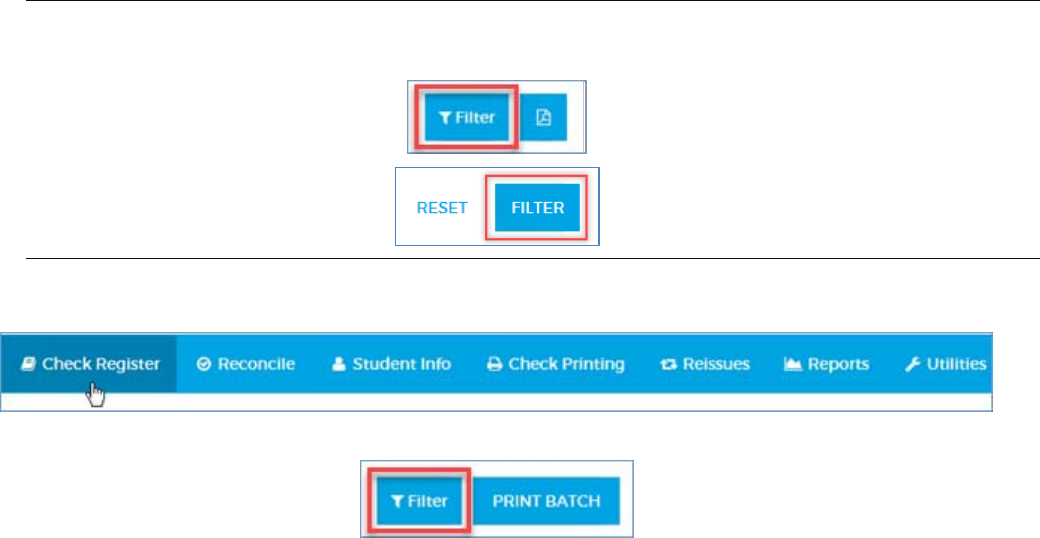
Printing reissued checks
Use these steps to print checks that have been approved for reissue.
1. Click Reissues on the main menu.
Optional:
o To fetch a specific check or range of checks, filter the results (page 49).
2. Click PRINT BATCH at the upper-right of the table.
What happens next:
The Reissued Checks Print List report is generated as a PDF file that you may open, save, or cancel using
the buttons at the bottom-right of your browser. This report includes any previous Reissued check print
batches for the current date.
The checks are removed from the Reissues tab and appear in the Check Register with new check numbers
and a status of "Open Not Cashed." The original checks remain in the Check Register with a status of
"Reissued."
The batch is saved to an EZPaySuite "Checkbook" with a status of "Pending." To continue processing the
batch, log onto EZPaySuite.
Follow the instructions in the EZPaySuite User Guide, which is located on the JCDC Share drive at
S:\ACOM\Documentation\ EZPaySuite_UserGuide_v860.pdf.
Note: If you have specified a check batch for which there is no data (for example, it has already been printed
or payroll has not been finalized yet), an error message will display stating that there is nothing in the
queue.
Removing reissued checks from the print queue
Use these steps to remove Reissued checks from the print queue. remove it
You must have a SAAS user role of Super User or Approver to perform this task.
1. Click Reissues on the main menu.
Optional: To fetch a specific check or range of checks, see Searching the Reissues tab, below.
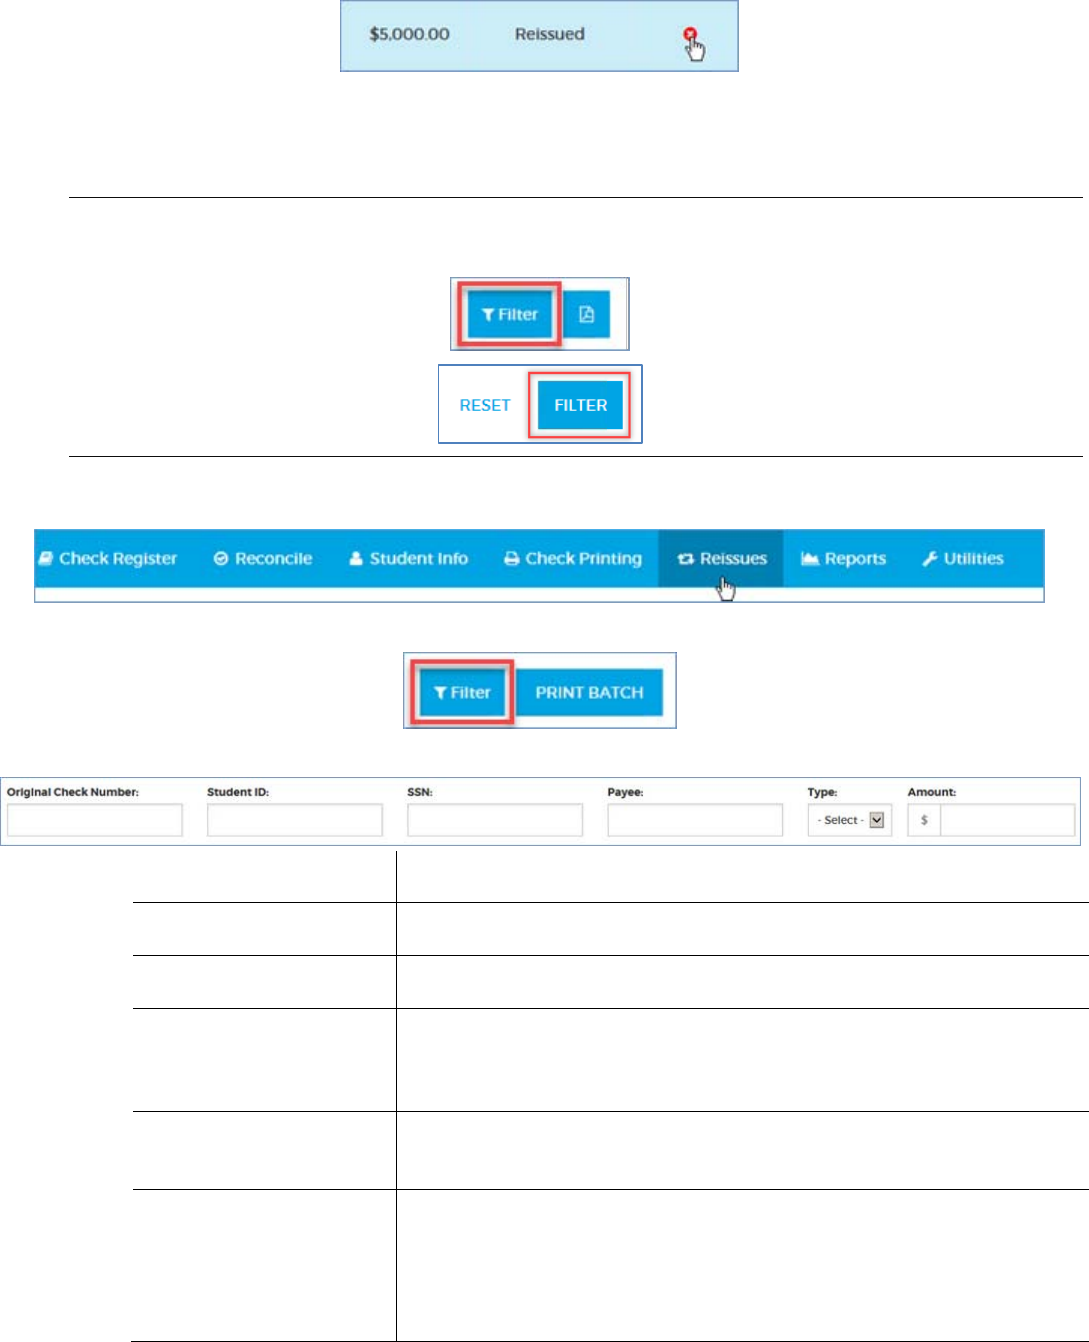
Job Corps Data Center 49
2. Click the remove button in the far-right column for each check you want to remove. This reverts the
check to its previous status, i.e. "Stopped" or "Returned."
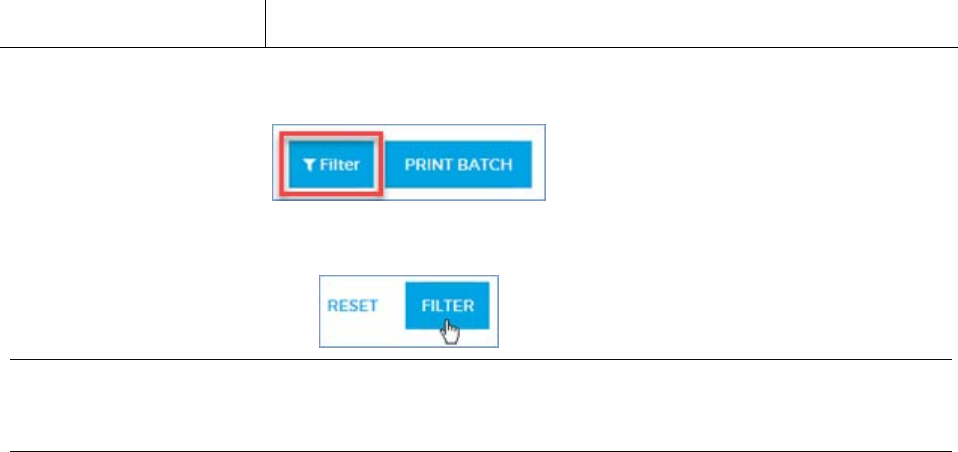
Searching the Reissues tab
Use these steps to filter or search the Reissues tab for specific checks or ranges of checks. See Searching efficiently (page
5) to optimize your results. filter the results
Note: There are two filter buttons. One is Filter and the other is FILTER (uppercase). The Filter button toggles (closes
and reopens) the filter display without changing any of your filter settings, while the FILTER button reloads the
Reissues tab with your filters applied.
1. Click Reissues on the main menu.
2. Click Filter at the far right of the page.
3. Enter criteria in any of the search fields.
Original Check Number
Enter a seven-digit number for the check.
Student ID
Enter a seven-digit number.
SSN
Enter a student's complete SSN.
Payee
Enter any part of the payee's name. For instance, if you enter "ste," you will
fetch such names as Stella Jones, Esteban Garcia, Anne Stevens, Jane
Austen, and Jesus Beneste.
Type
Select a check type from the drop-down: Allotment, Bonus, Manual,
Regular, or Termination.
Amount
Type the decimal point if you want to include the cents amount. Examples:
100 = one hundred dollars
100.00 = one hundred dollars
100.34 = one hundred dollars and thirty-four cents
Job Corps Data Center 50
.34 = thirty-four cents
Clicking the Filter button at any time toggles (closes or reopens) the filter display, leaving all your
selections.
4. Click FILTER to reload the Reissues page with the filtered results. RESET clears all the filters and
leaves the Reissues display unchanged.
Notes: 1 – If all the filters are empty and you click the FILTER button, the entire Reissues tab will display.
2 – If you click off the Reissues tab to another tab, all your filters will be cleared, and the entire
Reissues tab will display when you return.
Job Corps Data Center 51
Reprinting a single check
A check's Status must be "Open Not Cashed" to be reprinted. Use these steps to reprint a check.
1. Click Check Register on the main menu.
Optional: To fetch a specific check or range of checks, filter the results (page 54).
2. Click the Reprint Check button in the Actions column for the check you want to reprint.
3. Review the information in the Reprint Check form. The Admin ID is your ID.
4. Click PRINT. CANCEL closes the form and takes no action.
The check file is saved to EZPaySuite with a status of "Pending." To continue processing the check, log
onto EZPaySuite.
Follow the instructions in the EZPaySuite User Guide, which is located on the JCDC Share drive at
S:\ACOM\Documentation\ EZPaySuite_UserGuide_v860.pdf.

Job Corps Data Center 52
Reprinting multiple checks
A check's Status must be "Open Not Cashed" to be reprinted. Use these steps to reprint multiple checks.
1. Click Check Register on the main menu.
Optional: To fetch a specific check or range of checks, filter the results (page 54).
2. Click the checkboxes at the far left of the Check Register to select the checks you want to reprint.
Tip: To select all the checks on the page, click the box at the top of the Check Register.
Click the box again to deselect all the checks.
3. Click the Reprint Check button in the Actions column for any selected check.
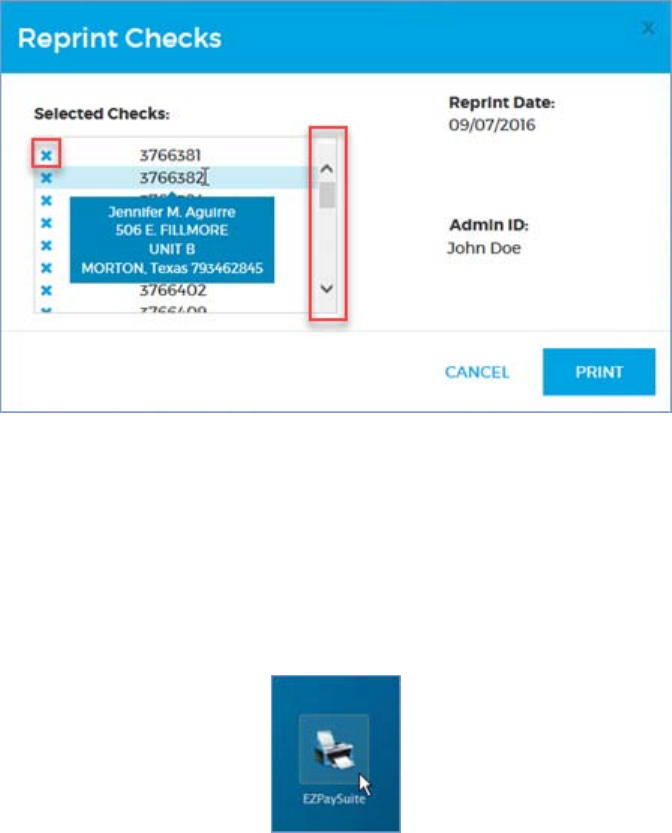
Job Corps Data Center 53
4. Review the information in the Reprint Check dialog.
o The Admin ID is your ID.
o Use the scrollbar if necessary to see all the Selected Checks.
o Hover over a check number to see the payee and the address the check will be mailed to.
Optional: click the remove button next to any check to remove it from the queue.
5. Click PRINT. CANCEL closes the form and takes no action.
The batch is saved to an EZPaySuite "Checkbook" with a status of "Pending." To continue processing the
batch, log onto EZPaySuite.
Follow the instructions in the EZPaySuite User Guide, which is located on the JCDC Share drive at
S:\ACOM\Documentation\ EZPaySuite_UserGuide_v860.pdf.
Job Corps Data Center 54
Handling checks
Searching for specific checks or ranges of checks
Use these steps to search for specific checks or ranges of checks. See Searching efficiently (page 5) to optimize
your results. filter the results
Note: There are two filter buttons. One is Filter and the other is FILTER (uppercase). The Filter button toggles (closes
and reopens) the filter display without changing any of your filter settings, while the FILTER button reloads the
Check Register with your filters applied.
1. Click Check Register on the main menu.
2. Click Filter at the far right of the page.
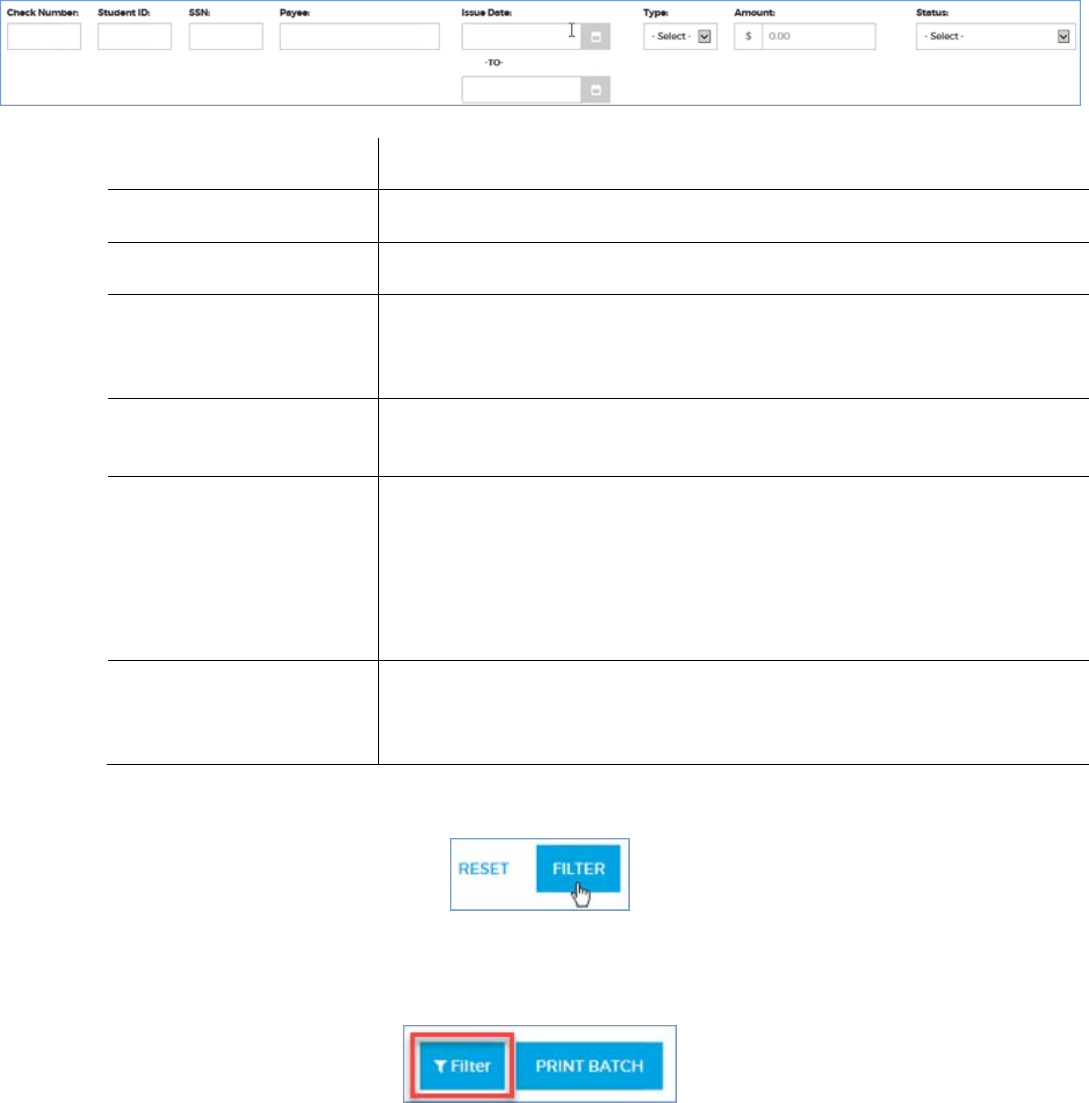
Job Corps Data Center 55
3. Enter criteria in any of the search fields.
Original Check Number
Enter a seven-digit number for the original check.
Student ID
Enter a seven-digit number.
SSN
Enter a student's complete SSN.
Payee
Enter any part of the payee's name. For instance, if you enter "ste," you will
fetch such names as Stella Jones, Esteban Garcia, Anne Stevens, Jane Austen,
and Jesus Beneste.
Type
Select a check type from the drop-down: Allotment, Bonus, Manual, Regular,
or Termination.
Amount
Type the decimal point if you want to include the cents amount. Examples:
100 = one hundred dollars
100.00 = one hundred dollars
100.34 = one hundred dollars and thirty-four cents
.34 = thirty-four cents
Status
Select a check status from the drop-down: Expired, Open Not Cashed, Open
Student Received, Printing, Reconciled, Reissue Pending, Reissued, Returned,
Stop Pending, or Stopped
4. Click FILTER to reload the Check Register with the filtered results. RESET clears all the filters and
leaves the Check Register's display unchanged.
If all the filters are empty and you click the FILTER button, the entire Check Register will display.
Clicking the Filter button at any time toggles (closes or reopens) the filter display, leaving all your
selections.
If you click off the Check Register module to another tab, all your filters will be cleared, and the entire
Check Register will display when you return. If you want to preserve a filtered view while you do related
work in another module, such as Student Info or Data Corrections, open another browser tab for the
second module.
Job Corps Data Center 56
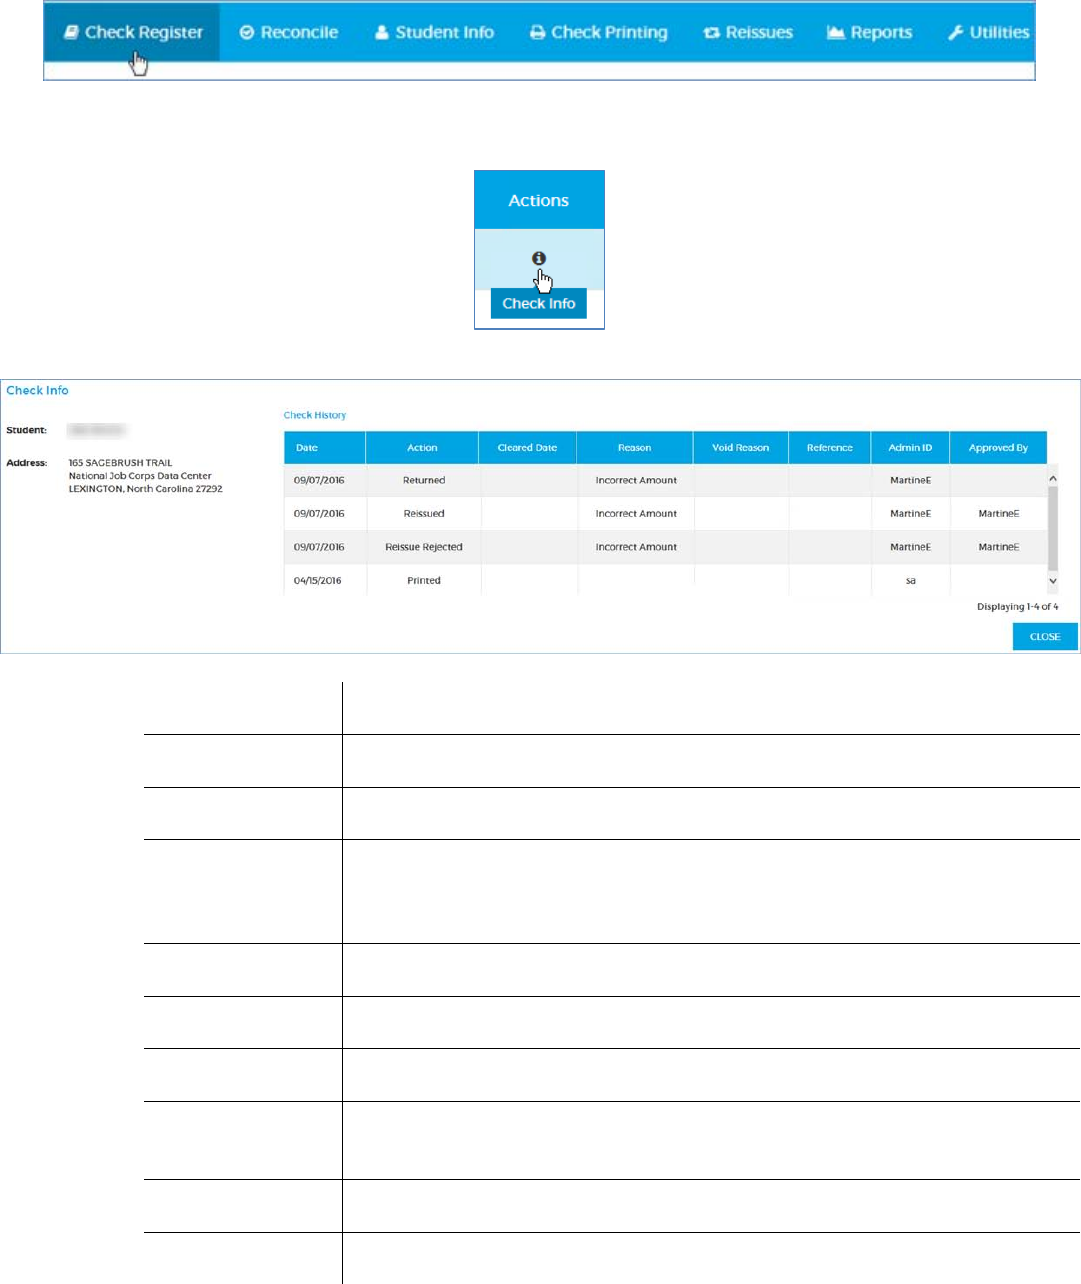
Getting check information
Use these steps to view the name of the student, the mailing address, and the history of a check.
1. Click Check Register on the main menu.
Optional: To fetch a specific check or range of checks, filter the results (page 54).
2. Click the Check Info button in the Actions column for the check you want to get information about.
The Check Info table opens, displaying Check Info and Check History information as described below.
Student
The student's full name.
Address
The student's current address.
Date
The date any action was taken on the check.
Action
Any action that has been taken on the check, by the system (suchas "Expired") or
by a user (such as "Returned"); there is a row in the table for each action that has
been taken.
Cleared Date
The date the check cleared, if any.
Reason
The reason for any action taken on the check.
Void Reason
always empty
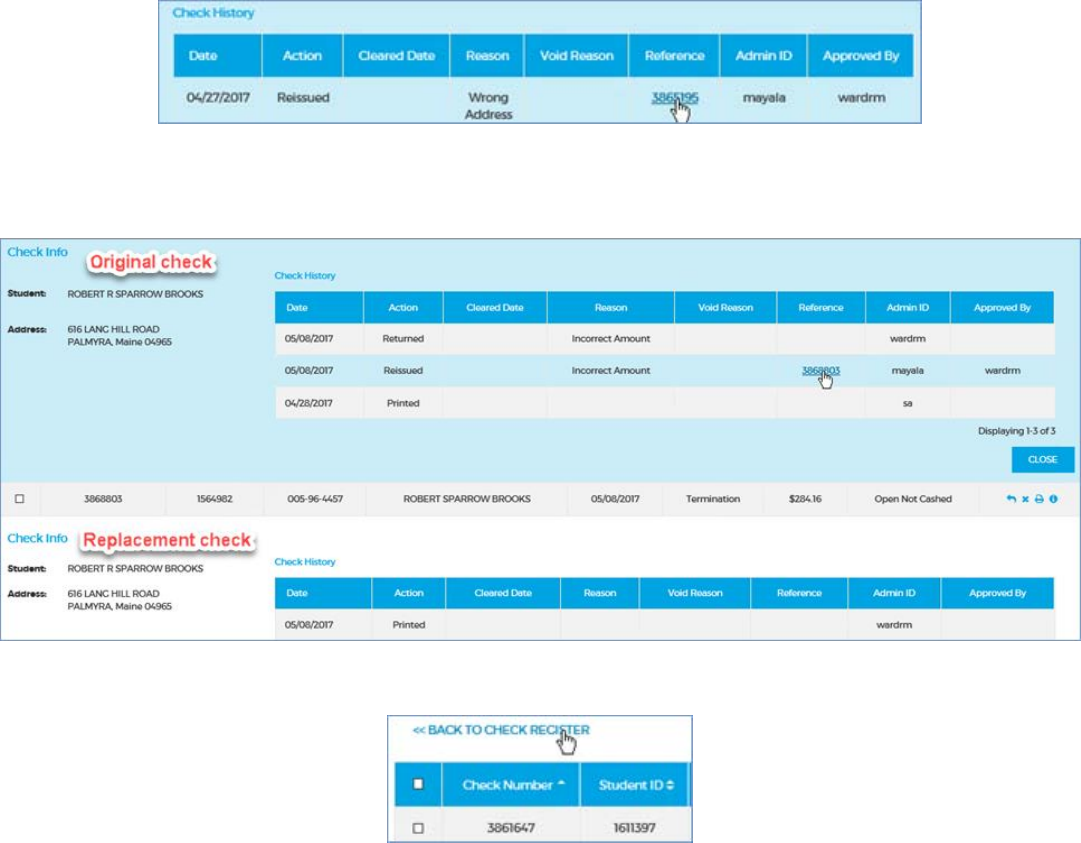
Reference
If the check Status is "Reissued," this is the Check Number of the check that
replaced it. See the Optional step below for more information.
Admin ID
The admin who submitted an action.
Approved By
The admin who approved an action.
Job Corps Data Center 57
Optional: To see more information about a check with status "Reissued," click the Reference number.
A second Check Info row opens, showing Check Info and Check History for the replacement check.
Example: Check 000001 was reissued as Check 000002. If you are currently viewing Check 000001,
clicking Reference will display information for Check 000002.
When you are finished viewing information for a reissued check click the BACK TO CHECK
REGISTER link at the upper-left to view other checks.
3. To close the Check Info window, click CLOSE at the bottom-right of the window.

Job Corps Data Center 58
Printing the Check Register
Use these steps to print the Check Register.
Note: This is not the same as the Check Register report, which provides the Check number, Student SSN, Student
Name, Amount, Date, and Status for a specific pay period.
1. Click Check Register on the main menu.
Optional: To fetch a specific check or range of checks, filter the results (page 54).
Warning: If you don't apply any filters, the entire Check Register will be printed.
2. Click the PDF button at the far right of the Check Register to print it (as filtered).
3. Open, save, or cancel the output using the buttons at the bottom-right of your browser.
Job Corps Data Center 59
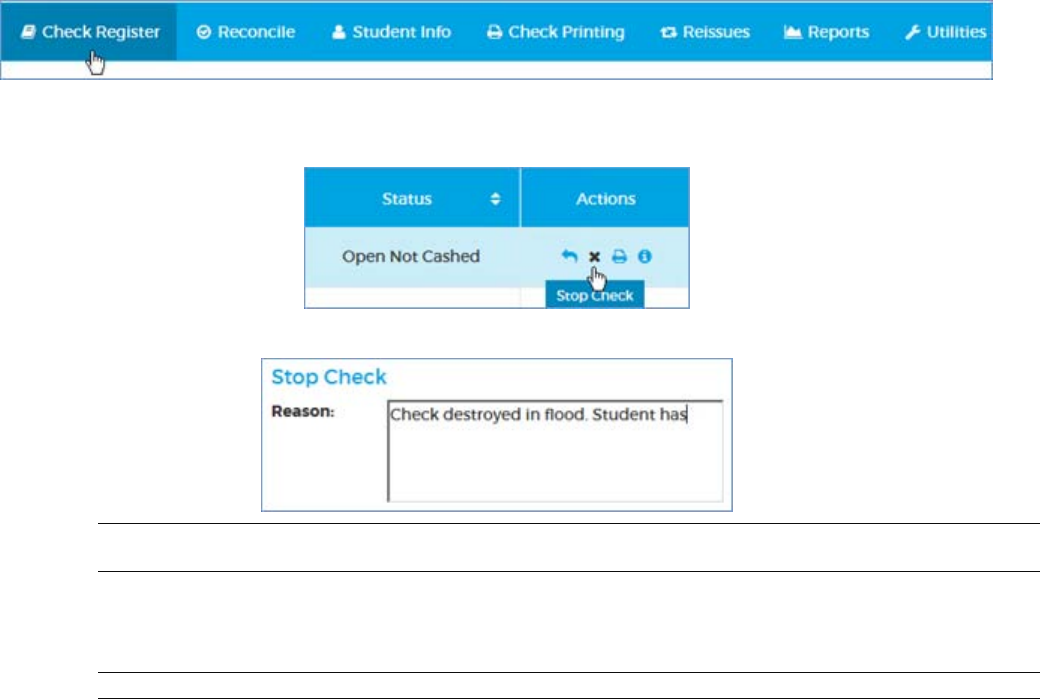
Submitting a stop check request
A check's Status must be "Expired," "Open Not Cashed," or "Open Student Received" to be submitted for a stop.
Use these steps to submit a stop check request.
You must have a SAAS user role of Super User or Submitter to perform this task.
1. Click Check Register on the main menu.
Optional: To fetch a specific check or range of checks, filter the results (page 54).
2. Click the stop check button in the Actions column for the check you want to stop.
3. In the Stop Check form, enter a Reason for stopping the check (255 characters max).
Tip: Text you enter here scrolls horizontally. Hover your cursor over the field to see all the text you've
entered.
4. Click OK to submit the stop request for approval by an admin with the SAAS Approver role, change the
check's Status to "Stop Pending" in the Check Register, and close the form. CANCEL closes the form
and takes no action.
Note: You must enter a Reason before you can click OK.
Job Corps Data Center 60
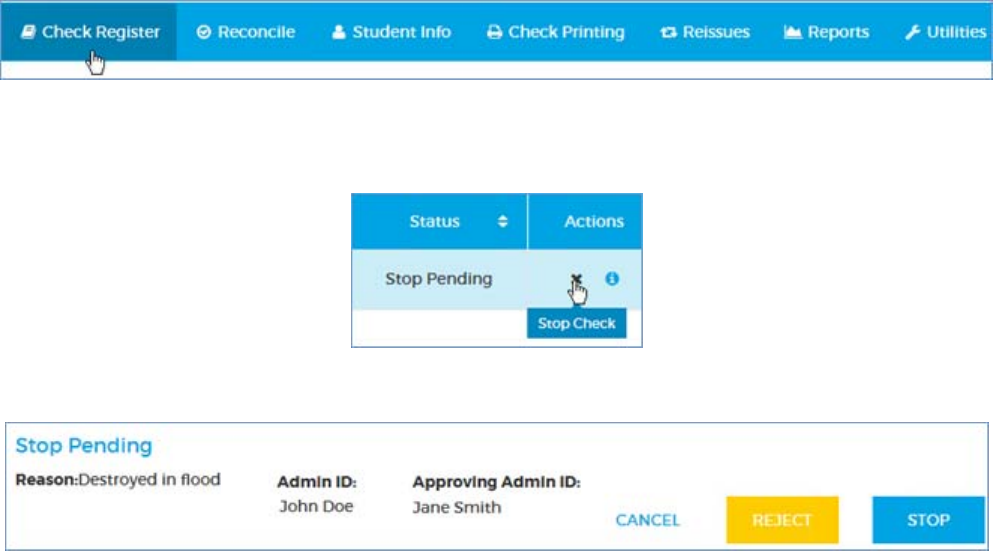
Approving or rejecting a stop check request
A check's Status must be "Stop Pending" for you to approve or reject a stop. Use these steps to approve or reject a
stop check request submitted by another admin.
You must have a SAAS user role of Approver or Super User to perform this task.
1. Click Check Register on the main menu.
Optional: To fetch a specific check or range of checks, filter the results (page 54).
2. Click the stop check button in the Actions column for the pending stop check request you want to
approve or reject.
3. Review the information in the Stop Check form. The Admin ID is the submitting admin. The Approving
Admin ID is your ID.
4. Select an action: STOP or REJECT. To take no action and close the form, click CANCEL.
o STOP closes the form, changes the check status to "Stopped," and stops the check.
o REJECT closes the form. The check's status remains "Stop Pending."
Your action, whether Stop or Reject, will display in the check's history in the Check Register Check
Info window with the date and your Admin ID.
Job Corps Data Center 61
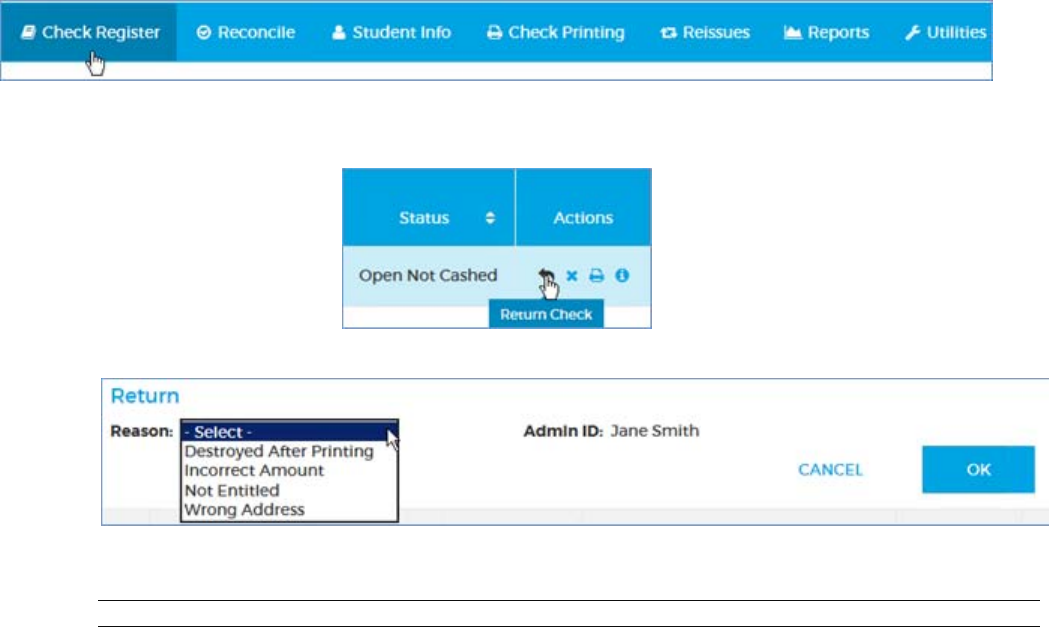
Returning a check
A check's Status must be "Expired," "Open Not Cashed," or "Open Student Received" to be returned. Use these
steps to return a check.
1. Click Check Register on the main menu.
Optional: To fetch a specific check or range of checks, filter the results (page 54).
2. Click the return button in the Actions column for the check you want to stop.
3. In the Return Check form, select a Reason for returning the check. The Admin ID is your ID.
4. Click OK to return the check, change its Status to "Returned" in the Check Register, and close the form.
CANCEL closes the form and takes no action.
Note: You must select a Reason before you can click OK.
The check will display on the Returned Checks Edit List report.
Job Corps Data Center 62
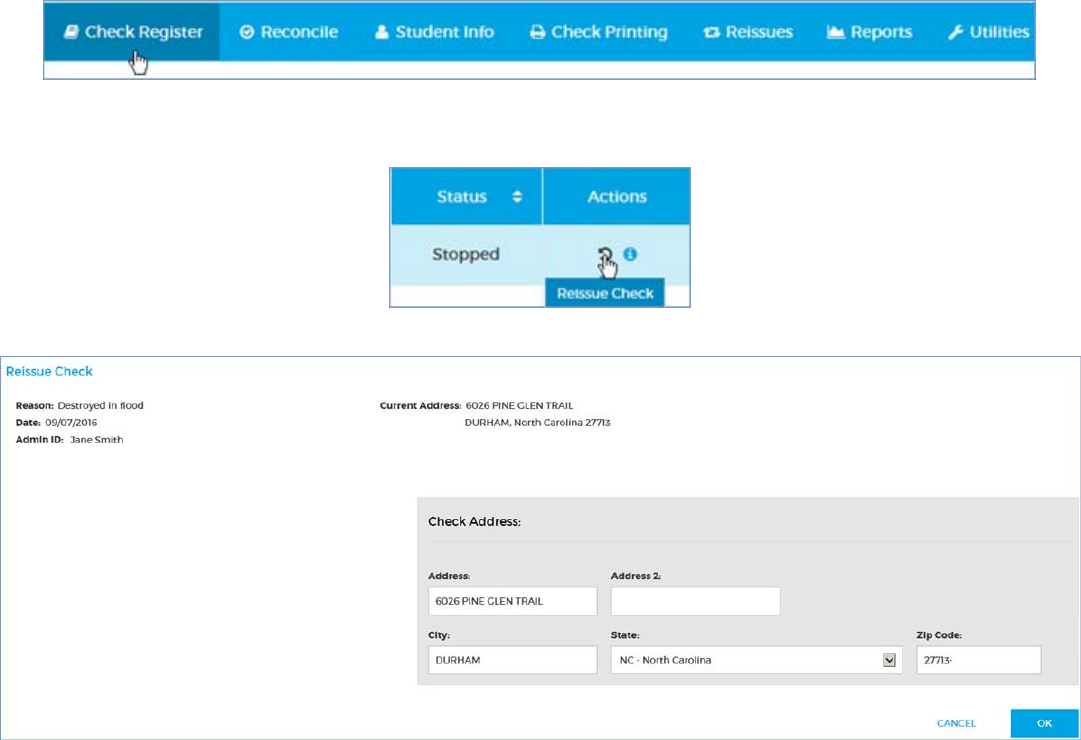
Submitting a reissue check request
A check's Status must be "Stopped" or "Returned" to be submitted for reissue. Use these steps to submit a reissue
check request.
You must have a SAAS user role of Super User or Submitter to perform this task.
1. Click Check Register on the main menu.
Optional: To fetch a specific check or range of checks, filter the results (page 54).
2. Click the reissue check button in the Actions column for the check you want to reissue.
3. Review the information in the read-only fields in the Reissue Check form. The Admin ID is your ID.

Job Corps Data Center 63
Optional: If the reissued check must be sent to an address other than the Current Address, use the Check
Address fields to change it.
4. Click OK to submit the reissue request for approval by an admin with the SAAS user role of Approver or
Super User, change the check's Status to "Reissue Pending" in the Check Register, and close the form.
CANCEL closes the form and takes no action.
Note: Whether you have changed the address or not, all the fields except Address 2 in the Check Address form
must be filled in before you can click OK.
Job Corps Data Center 64
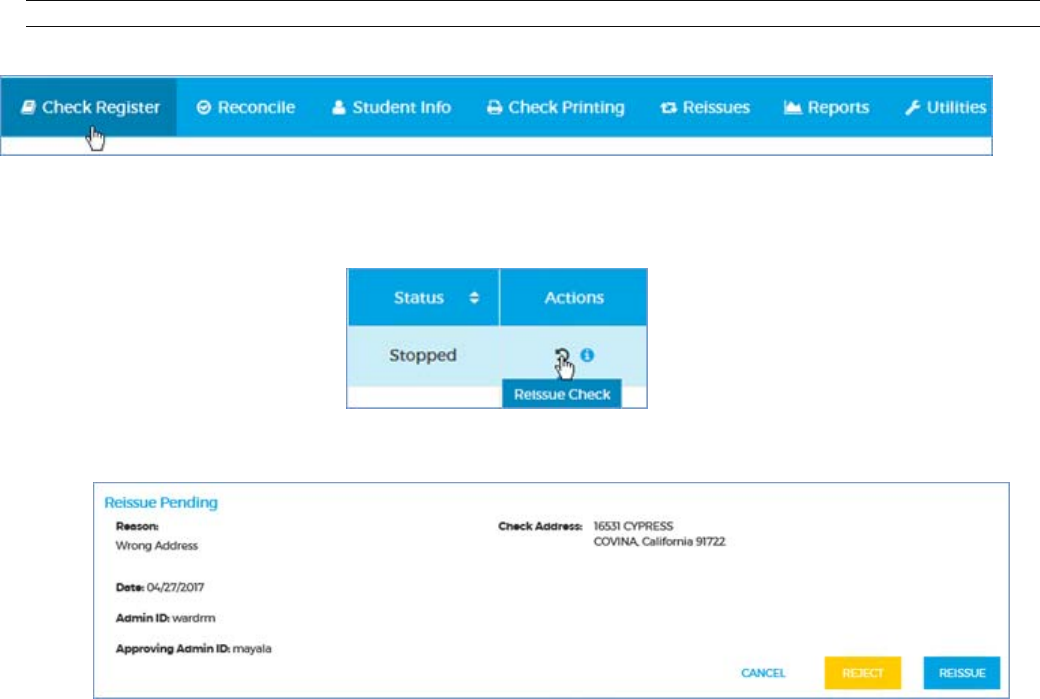
Approving or rejecting a reissue check request
Use these steps to approve or reject a check reissue request submitted by another admin.. reject it
You must have a SAAS user role of Approver or Super User to perform this task.
Note: A check's Status must be "Reissue Pending" to be approved or rejected for reissue.
1. Click Check Register on the main menu.
Optional: To fetch a specific check or range of checks, filter the results (page 54).
2. Click the reissue check button in the Actions column for the reissue check request you want to approve
or reject.
3. Review the information in the Reissue Pending form. The Admin ID is the submitting admin. The
Approving Admin ID is your ID.
4. Select an action: REISSUE or REJECT. To take no action and close the form, click CANCEL.
o REISSUE closes the form, changes the check status to "Reissued" in the Check Register, and queues
the check for printing on the Reissues tab.
o REJECT closes the form. The check's status reverts to its previous state, "Returned" or "Stopped."
Your action, whether Reissue or Reject, will display in the check's history in the Check Register
Check Info window with the date and your Admin ID.
Job Corps Data Center 65
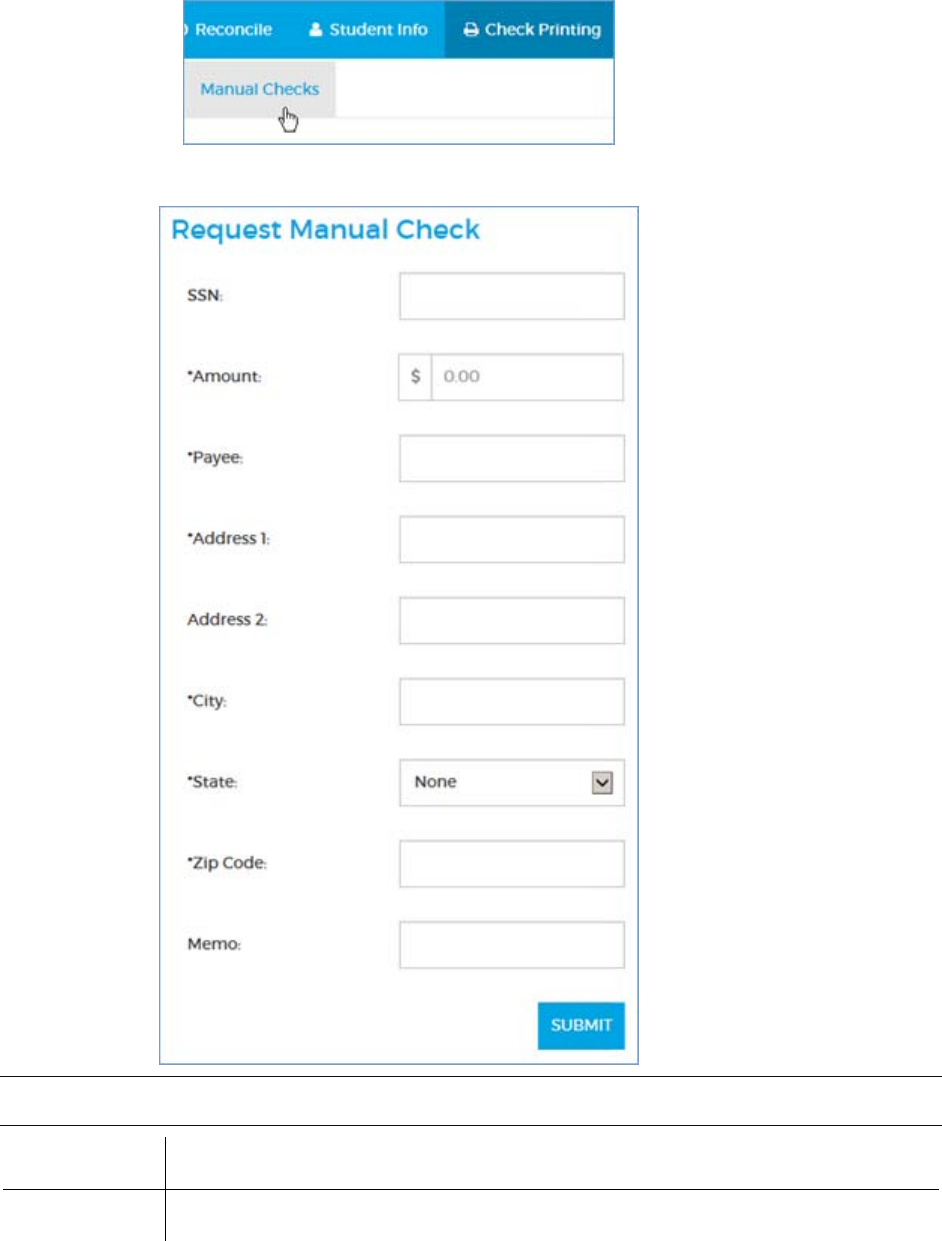
Requesting a manual check
Use these steps to submit a manual check request.
You must have a SAAS user role of Super User or Submitter to perform this task.
1. Go to Check Printing Manual Checks.
2. Complete the Request Manual Check form on the right side of the page.
Note: If you enter a valid student SSN, the remaining fields will populate with the information on record. You
can type over this with new information if you want.
SSN
Optional: enter a valid student SSN.
Amount
Enter the check amount.
Job Corps Data Center 66
Payee
Enter the complete name of the payee.
Address 1
Enter the first line of the check's mailing address.
Address 2
Optional: enter the second line of the check's mailing address.
City
Enter the city of the check's mailing address.
State
Enter the state of the check's mailing address.
Zip code
Enter the zip code of the check's mailing address.
Memo
Optional: enter a memo (255 characters max) to be printed on the check.
Tip: Text you enter here scrolls horizontally. Hover your cursor over the field to see all
the text you've entered.
Warning: If you receive an error message about an invalid SSN and then enter the correct one, the fields will automatically
repopulate with the information on record if you click or tab in them. Double-check any fields you have typed or
retyped.
3. Click SUBMIT to submit the check request for approval by an admin with the SAAS user role of
Approver or Super User, add this check to the Manual Checks table on the left side of the page with a
Status of "Pending," and clear the form.
Job Corps Data Center 67
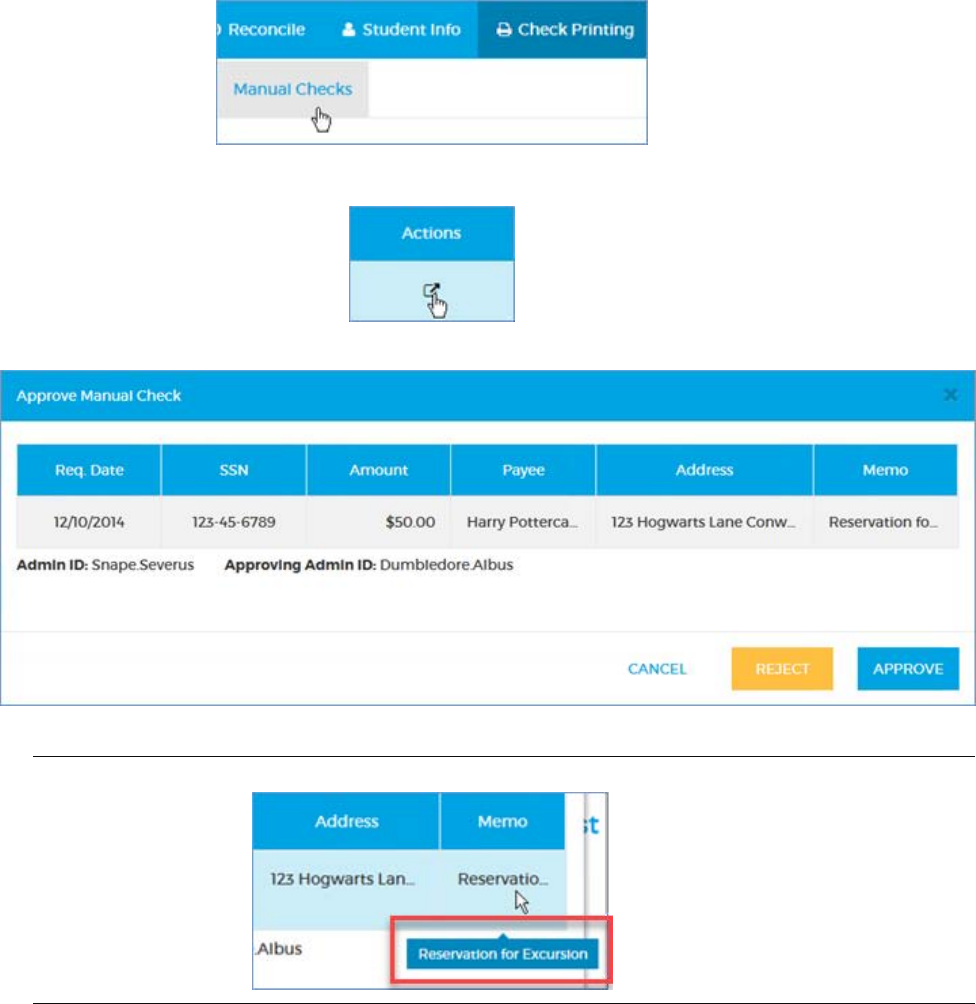
Approving or rejecting a manual check request
Use these steps to approve or reject a manual check request.
You must have a SAAS user role of Approver or Super User to perform this task.
1. Go to Check Printing Manual Checks.
2. Click the launch button at the far-right of the Manual Checks table.
3. Review the information in the Approve Manual Check form.
The Admin ID is the submitting admin. The Approving Admin ID is your ID.
Tip: To see the complete values for each field, hover your cursor over it.
4. Select an action: APPROVE or REJECT. To take no action and close the form, click CANCEL.
o APPROVE closes the form and changes the check status to "Approved." It can be printed from the
Define Check Batch tab.
o REJECT removes the check request from the Manual Checks table.
Job Corps Data Center 68
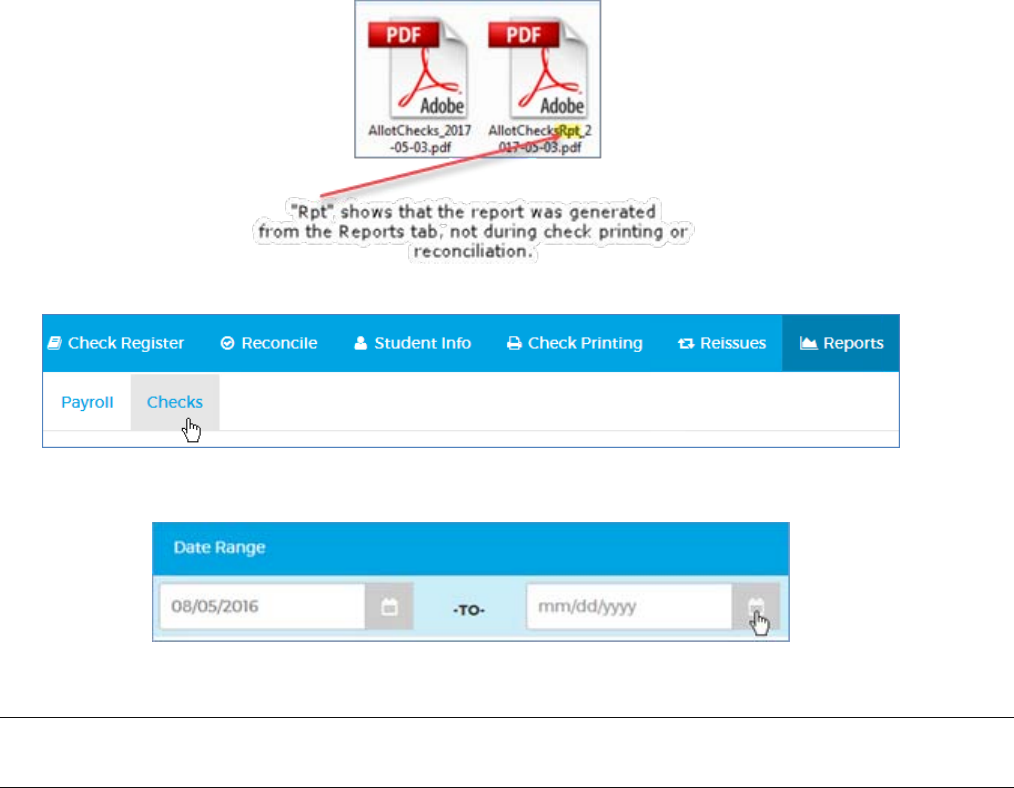
Generating check reports on demand
Use these steps to generate check reports.Reports
These are the same reports you generate during check printing or reconciliation. The naming conventions differ
slightly.
1. Go to Reports Checks.
2. Depending on the output you want, leave the date blank or use the datepickers to enter a date range (see
the table below).
You can run the following reports, some of which are also available from other tabs. The reporting period
depends on the date range you select, if any.
Note: The Manual Check Register report, which is automatically generated when manual checks are printed, is not
available from this tab. To generate an equivalent report on demand, filter the Check Register for Type: Manual,
and whatever Date and Status filters you want.

Job Corps Data Center 69
Report Filename
Note: The date in the
filename is the run date of
the report.
Also available at
Report period for
NO selected date range
Report period for
selected date range
Allotment Checks Report
AllotChecksRpt_yyyy-mm-dd
Check Printing tab
Returns the checks in the
current Allotment print
batch
Most recent pay period for
Allotment checks
If checks for the most
recent pay period have not
been printed, the report will
be empty
Pay period for the most
recent Allotment Bank
Effective Date that falls
within the date range
If checks for the selected
pay period have not been
printed, the report will be
empty
Approved Checks Edit List
ApprovedChecksRpt_ yyyy-
mm-dd
n/a
All approved manual and
reissue checks (not yet
printed)
Approved manual and
reissued checks (not yet
printed) for all the approval
dates within the date range
Check Reconciliation
Exceptions
ReconcileRpt_ yyyy-mm-dd
Reconcile tab
All checks that are
unreconciled exceptions
Unreconciled exceptions
based on bank file import
dates within the date range
Check Register
PrintChecksSummaryRpt_
yyyy-mm-dd
Check Printing tab
Returns the Bonus or
Regular checks in the
current print batch
Most recent pay period for
Bonus or Regular checks
If checks for the most
recent pay period have not
been printed, the report will
be empty
Pay period for the most
recent Bonus or Regular
Bank Effective Date within
the date range
If checks for the selected
pay period have not been
printed, the report will be
empty
Reissued Checks Report
ReissuedChecksRpt_ yyyy-mm-
dd
Reissues tab
Returns the Reissued
checks in all the Reissued
check print batches for the
current day
All reissued checks that
have been printed
All reissued checks with an
issue (print) date within the
date range tbd
Returned Checks Edit List
tbd tbd tbd
n/a
All checks with a status of
Returned
All checks with a return
date within the date range
tbd tbd
Termination Payroll
Summary
TermChecksRpt_ yyyy-mm-dd
Check Printing tab
Returns the checks in the
current Termination print
batch
Most recent pay period for
Termination checks
If checks for the most
recent pay period have not
been printed, the report will
be empty
Pay period for the most
recent Termination Bank
Effective Date within the
date range
If checks for the selected
pay period have not been
Job Corps Data Center 70
printed, the report will be
empty
3. Click the PDF button.
4. Open, save, or cancel the report using the buttons at the bottom-right of your browser.
Job Corps Data Center 71
Getting information about a student
The Student Info tab has eight pages where you can get information on a student. All the fields are read-only.
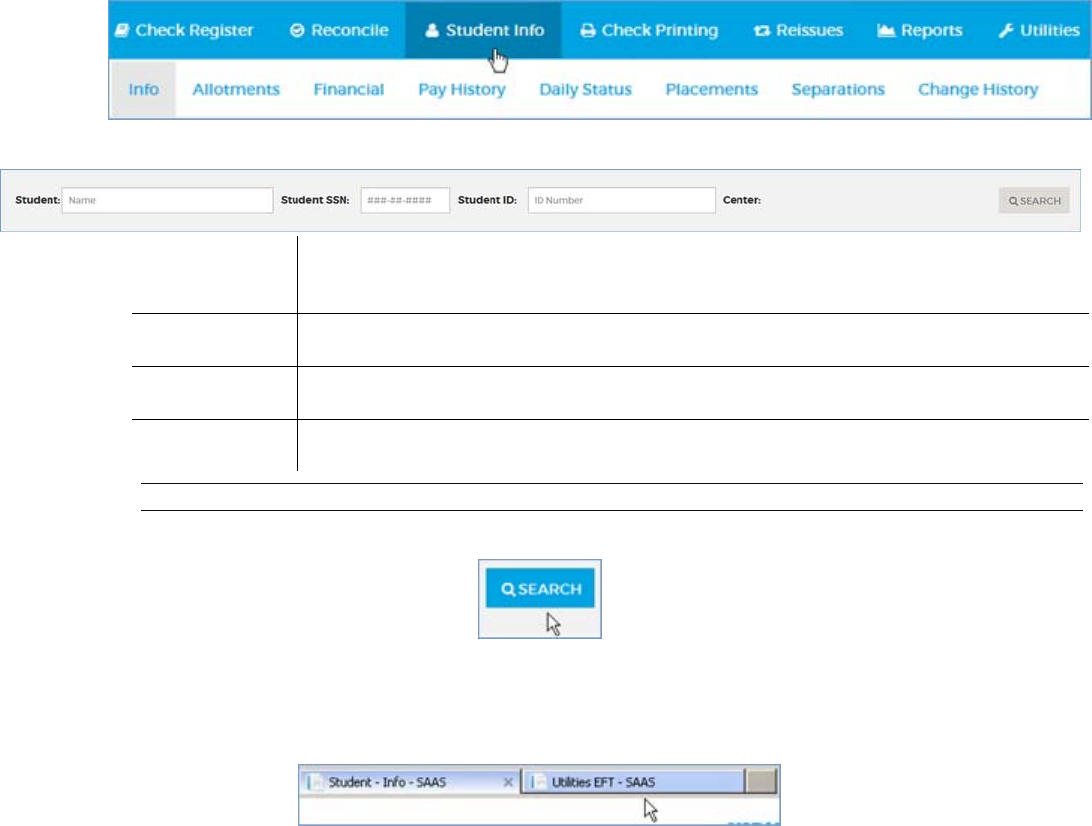
1. Click Student Info on the main menu.
2. Enter criteria in any of the search fields (Student ID should suffice). student search form
Student
Any part of a student's name. For instance, if you enter "ste," you will fetch such names
as Stella Jones, Esteban Garcia, Anne Stevens, Jane Austen, and Jesus Beneste.
Student SSN
A student's complete SSN.
Student ID
A seven-digit number.
Center
Automatically populated by your other entries.
Tip: If you get too many results, try the techniques in Searching efficiently (page 5).
3. Click SEARCH.
Your search results will stay selected as you work in the Student Info module (Info page, Allotments page,
Financials page, etc.). However, if you click to another module, such as the Check Register or Utilities, the
Student Info search fields are cleared. If you want to preserve your search results while you do related work in
another module, open another browser tab for the second module.
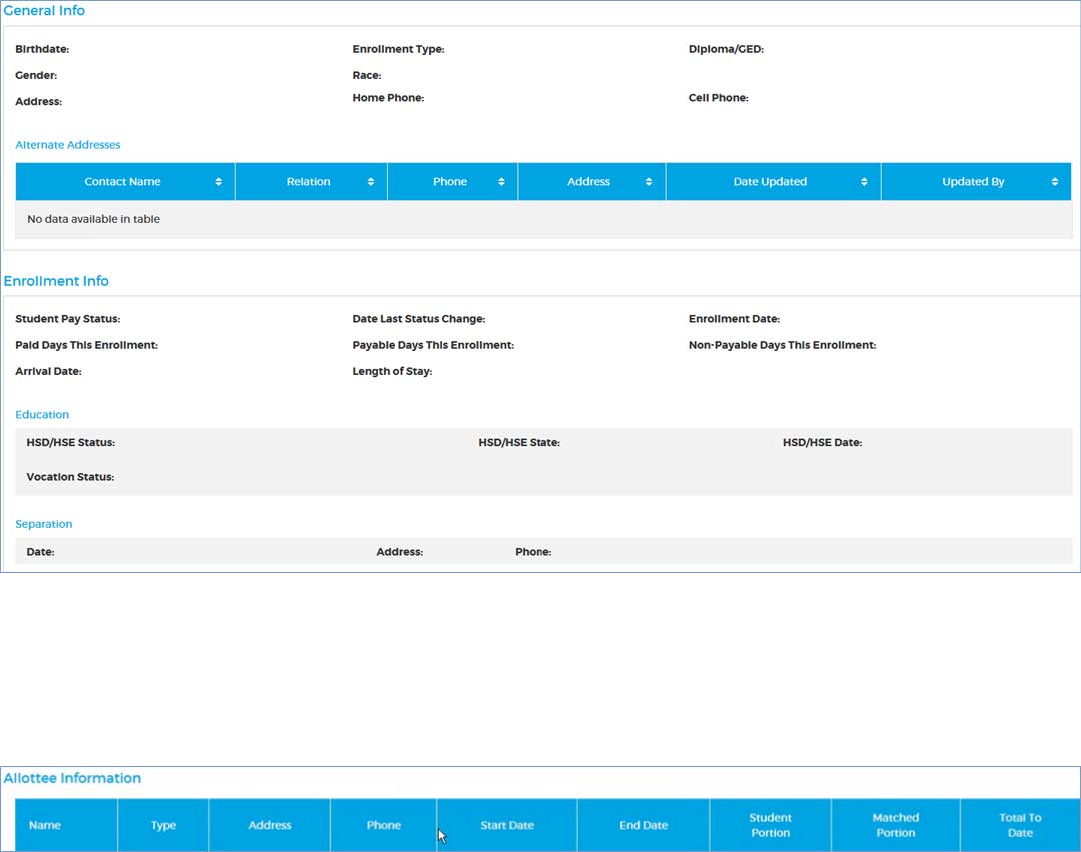
The Student Info module includes the following pages:
Info (General Info, Alternate Addresses, Enrollment Info, and Education for the current enrollment; and
information on the latest Separation in the case of a student with multiple enrollments)
Allotments (allotment information for all enrollments)
Financial (Earnings, Deductions, Reimbursements, and Accruals for all enrollments)
Pay History (Payroll History for all enrollments)
Daily Status (Daily status for all enrollments)
Placements
Separations
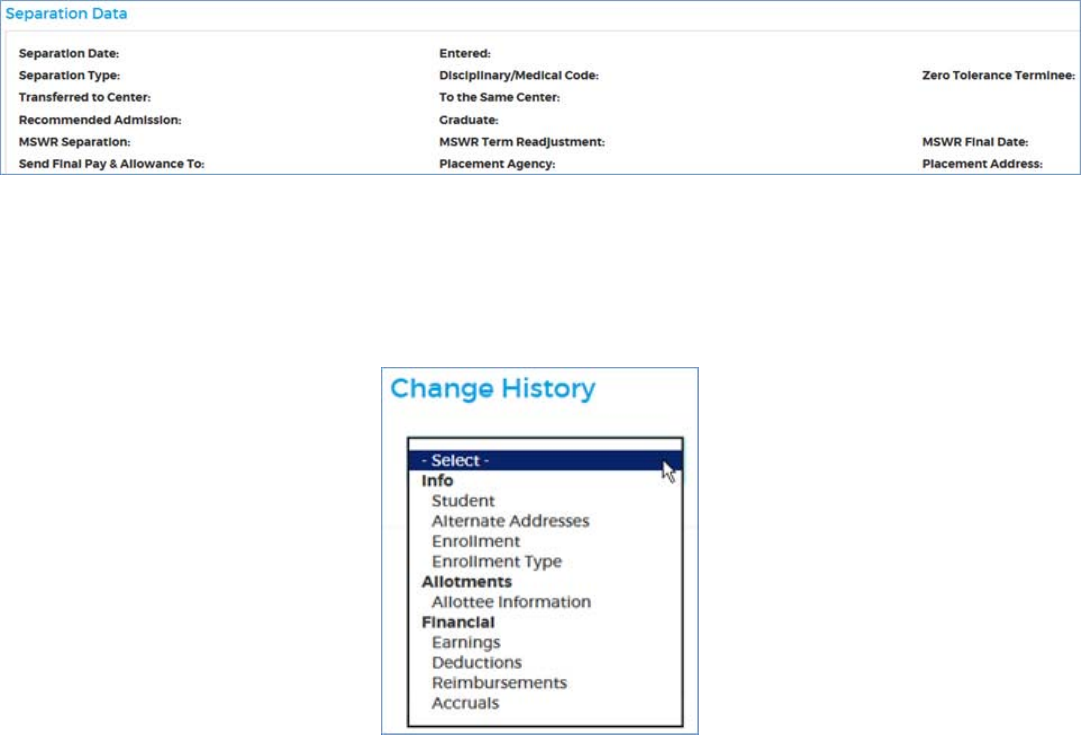
Change History (Date and Admin ID of changes to General Info, Allotments, and Financial for all
enrollments)
Job Corps Data Center 72
Info page Info page
This page provides General Info, Alternate Addresses, Enrollment Info, and Education for the current enrollment;
and information on the latest Separation in the case of a student with multiple enrollments.
Allotments page Allotments page
This page provides allotment information for all the student's enrollments, including the Type of allottee ("I" for
individual or "B" for business), the start and end dates the student chose to pay allotments, the student's
contribution ("Student Portion"), the government contribution ("Matched Portion"), and the combined totals of
both to date ("Total to Date"). There is one row for each allottee.

Job Corps Data Center 73
Financial page Financial page
This page provides information on the student's earnings, deductions, reimbursements, and accruals for all
enrollments.
Earnings and deductions are summarized per type and year; the year is determined by the earning's or deduction's
Bank Effective Date.
Tip: You can hover the cursor to see full descriptions of data in the following columns:
Earning (type)
Deductions (type)
Reimbursements
The Reimbursements table lists each reimbursement paid to the center for the student by the date the
reimbursement was requested by the center ("Transaction Date"), the reimbursement code entered by the center,
the amount, and the end date of the pay period during which the center received the reimbursement. You can also
filter the table by selecting a pay period end date from the dropdown at the upper-left of the table.
The Accruals table lists each accrual for the student, including the total amount accrued, the total amount used,
and the difference ("Amount").

Job Corps Data Center 74
Pay History page Pay History page
This table has a row for each of the student's pay records, with the most recent first.
Daily Status page Daily Status page
This table has a row for each change in the student's daily status, starting with the most recent.
Placements page Placements page
This page provides placement information for all the student's enrollments.
Job Corps Data Center 75
Separations page Separations page
This page provides separation information for all the student's enrollments.
Change History page Change History page
This page displays the Date and Admin ID of changes to General Info, Allotments, and Financial information for
all the student's enrollments.The display on this page depends on which information you select from the drop-
down. The fields available for each selection are listed below.

Job Corps Data Center 76
Change History Information
Info Student
Student Name
SSN
Birth Date
Gender
Race
Address
Home Phone
Cell Phone
Info Alternate Addresses
Contact Name
Relation
Phone
Address
Info Enrollment
Enrollment Date
Info Enrollment Type
Enrollment Type
Center Name
Arrival Date
Allotments Allottee
Information
Allottee Name
Allottee Type
Address
Phone
Start Date
End Date
Student Portion
Matched Portion
Total To Date
Financial Earnings
Earning Code
Earning Amount
Paid to Date
Outstanding Amount
Closed
Reversed
Financial Deductions
Deduction Code
Deduction Amount
Paid to Date
Outstanding Amount
Closed
Reversed
Financial Reimbursements
Transaction Date
Reimbursement Code
Center Name
Reimbursement Amount
Paid
Reversed
Pay Period Ending
Financial Accruals
Accrual Code
Accrual Amount
Accrual Used
Outstanding Accrual
Closed
Reversed

Job Corps Data Center 77
Complete index of Student Info fields Complete index of Student Info fields
This field is on
this page
in this table
Accrual
Financial
Accruals
Accrual Amount
Change History
Accruals
Accrual Code
Change History
Accruals
Accrual Used
Change History
Accruals
Accrued
Financial
Accruals
Address
Allotments
Change History
Change History
Alternate Addresses
Change History
Student Info
Student Info
Alternate Addresses
Student Info
General Info
Student Info
Separation
Agency ID
Placements
Allottee Name
Change History
Allottee Type
Change History
Student Info
Amount
Financial
Accruals
Financial
Reimbursements
Approved Date
Placements
Arrival Date
Student Info
Enrollment Info
Arrival Date
Change History
Enrollment Type
Backout Date
Pay History
Bad Days
Daily Status
Birth Date
Change History
Student Info
Birthdate
Student Info
General Info
Cell Phone
Change History
Student Info
Student Info
General Info
Center
Pay History
Center Name
Change History
Enrollment Type
Change History
Reimbursements
Check
Pay History
Closed
Change History
Accruals
Change History
Deductions
Change History
Earnings
Code
Financial
Reimbursements
Daily Status
Contact Name
Change History
Alternate Addresses
Student Info
Alternate Addresses
CT Specialist
Placements
Date
Student Info
Separation

Job Corps Data Center 78
This field is on
this page
in this table
Date Last Status Change
Student Info
Enrollment Info
Date Updated
Student Info
Alternate Addresses
Deduction
Financial
Deductions History
Deduction Amount
Change History
Deductions
Deduction Code
Change History
Deductions
Deductions Curr
Pay History
Deductions Type
Pay History
Deductions YTD
Pay History
Diploma/GED
Student Info
General Info
Disciplinary/Medical Code
Separations
Earning
Financial
Earnings History
Earning Amount
Change History
Earnings
Earning Code
Change History
Earnings
Earnings Amount
Pay History
Earnings Daily
Pay History
Earnings Days
Pay History
Earnings Type
Pay History
End Date
Allotments
Change History
Daily Status
Enrollment Date
Change History
Student Info
Enrollment Info
Enrollment Type
Change History
Student Info
General Info
Entered
Separations
Gender
Change History
Student Info
Student Info
General Info
Good Days
Daily Status
Graduate
Separations
Home Phone
Change History
Student Info
Student Info
General Info
Hourly Wage
Placements
Hours
Placements
HSD/HSE Date
Student Info
Education
HSD/HSE State
Student Info
Education
HSD/HSE Status
Student Info
Education
Job Title
Placements
Leave
Daily Status
Length of Stay
Daily Status
Student Info
Enrollment Info
Matched Portion
Allotments
Change History

Job Corps Data Center 79
This field is on
this page
in this table
MSWR Final Date
Separations
MSWR Separation
Separations
MSWR Term Readjustment
Separations
Name
Allotments
Net Pay
Pay History
Non-Payable Days This
Enrollment
Student Info
Enrollment Info
Outstanding
Financial
Deductions History
Financial
Earnings History
Outstanding Accrual
Change History
Accruals
Outstanding Amount
Change History
Deductions
Change History
Earnings
Paid
Change History
Reimbursements
Paid Days This Enrollment
Student Info
Enrollment Info
Paid to Date
Change History
Deductions
Change History
Earnings
Pay Due
Pay History
Pay Period Ending
Change History
Reimbursements
Financial
Reimbursements
Pay History
Payable Days This Enrollment
Student Info
Enrollment Info
Phone
Allotments
Change History
Change History
Alternate Addresses
Student Info
Alternate Addresses
Student Info
Separation
Placed Date
Placements
Placement Address
Separations
Placement Agency
Separations
Race
Change History
Student Info
Student Info
General Info
Recommended Admission
Separations
Reimbursement Amount
Change History
Reimbursements
Reimbursement Code
Change History
Reimbursements
Relation
Change History
Alternate Addresses
Student Info
Alternate Addresses
Report Date
Placements
Reversed
Change History
Accruals
Change History
Deductions
Change History
Earnings
Change History
Reimbursements
Send Final Pay & Allowance To
Separations
Separation Date
Separations

Job Corps Data Center 80
This field is on
this page
in this table
Separation Type
Separations
SSN
Change History
Student Info
Start Date
Allotments
Change History
Daily Status
Status
Placements
Daily Status
Student Name
Change History
Student Info
Student Pay Status
Student Info
Enrollment Info
Student Portion
Allotments
Change History
To the Same Center
Separations
Total
Financial
Deductions History
Financial
Earnings History
Total Deductions
Pay History
Total Earnings
Pay History
Total To Date
Allotments
Change History
Transaction Date
Change History
Reimbursements
Financial
Reimbursements
Transferred to Center
Separations
Type
Allotments
Placements
Pay History
Updated By
Student Info
Alternate Addresses
Used
Financial
Accruals
Verified Date
Placements
Vocation Status
Student Info
Education
Zero Tolerance Terminee
Separations
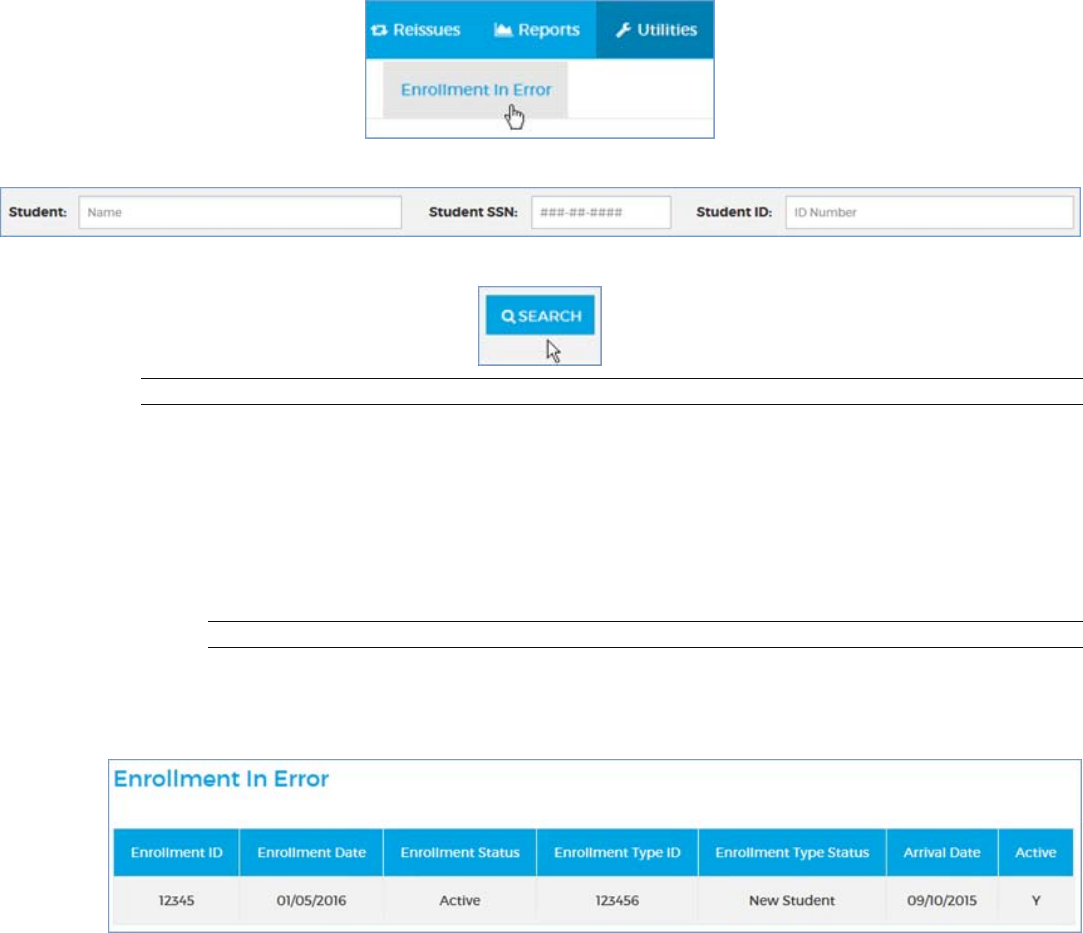
Job Corps Data Center 81
Correcting an enrollment in error
JCDC Payroll receives Remedy tickets to resolve regionally approved enrollment-in-error corrections. SAAS will
delete the SSN records and back out any uncollected pay.
Submit enrollments in error in a timely manner so that an approving admin can take action before the next regular
payroll run. Otherwise, an additional payment will be erroneously issued to the student.
Use these steps to submit an enrollment in error correction for approval by another admin.
You must have a SAAS user role of Super User or Submitter to perform this task.
1. Go to Utilities Enrollment in Error.
2. Enter criteria in any of the search fields of the student search form (Student ID should suffice).
3. Click SEARCH.
.Tip: If you get too many results, try the techniques in Searching efficiently (page 5).
o Depending on the student's enrollment status, a message may display advising you that no action is
possible because of one of the following:
The student has not arrived on center.
The student can't have been enrolled in error (Enrollment type is other than "New Student.
The student has received a payment and you must contact the center to proceed (Enrollment Type
is "New Student" and student's Paydue does not equal his/her pay).
Tip: If you get one of these messages, you may have mistyped the search info. Try again.
If you entered a valid Enrollment in Error (the student's Enrollment Type is "New Student " and his/her
Paydue matches his/her total pay to date), the Enrollment in Error table appears below the search results.
4. Review the information in the Enrollment in Error table.
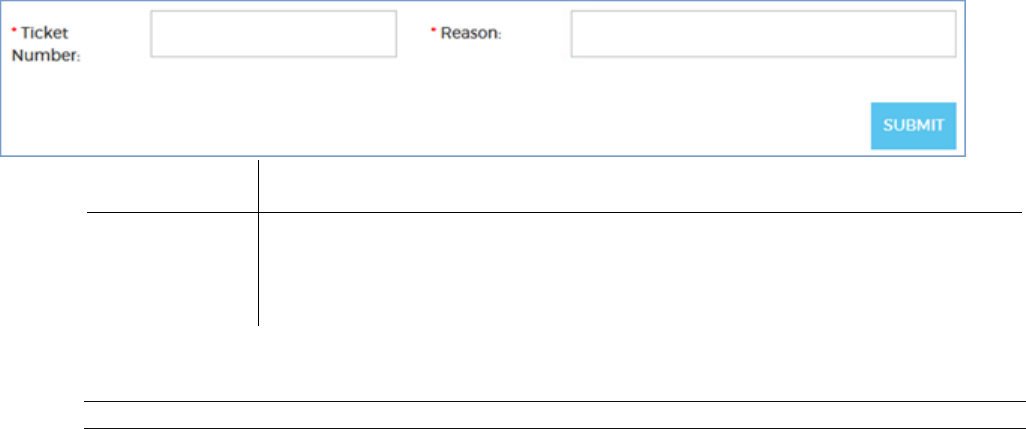
Job Corps Data Center 82
5. Complete the Enrollment in Error form below the table.
Ticket Number
The Remedy ticket number used to report the enrollment in error.
Reason
Explanatory text (255 characters max).
Tip: Text you enter here scrolls horizontally. Hover your cursor over the field to see all
the text you've entered.
6. Click SUBMIT to submit the data correction for approval by an admin with a SAAS user role of
Approver or Super User on the Review Data Corrections screen.
Note: Both fields must be completed before you can click SUBMIT.
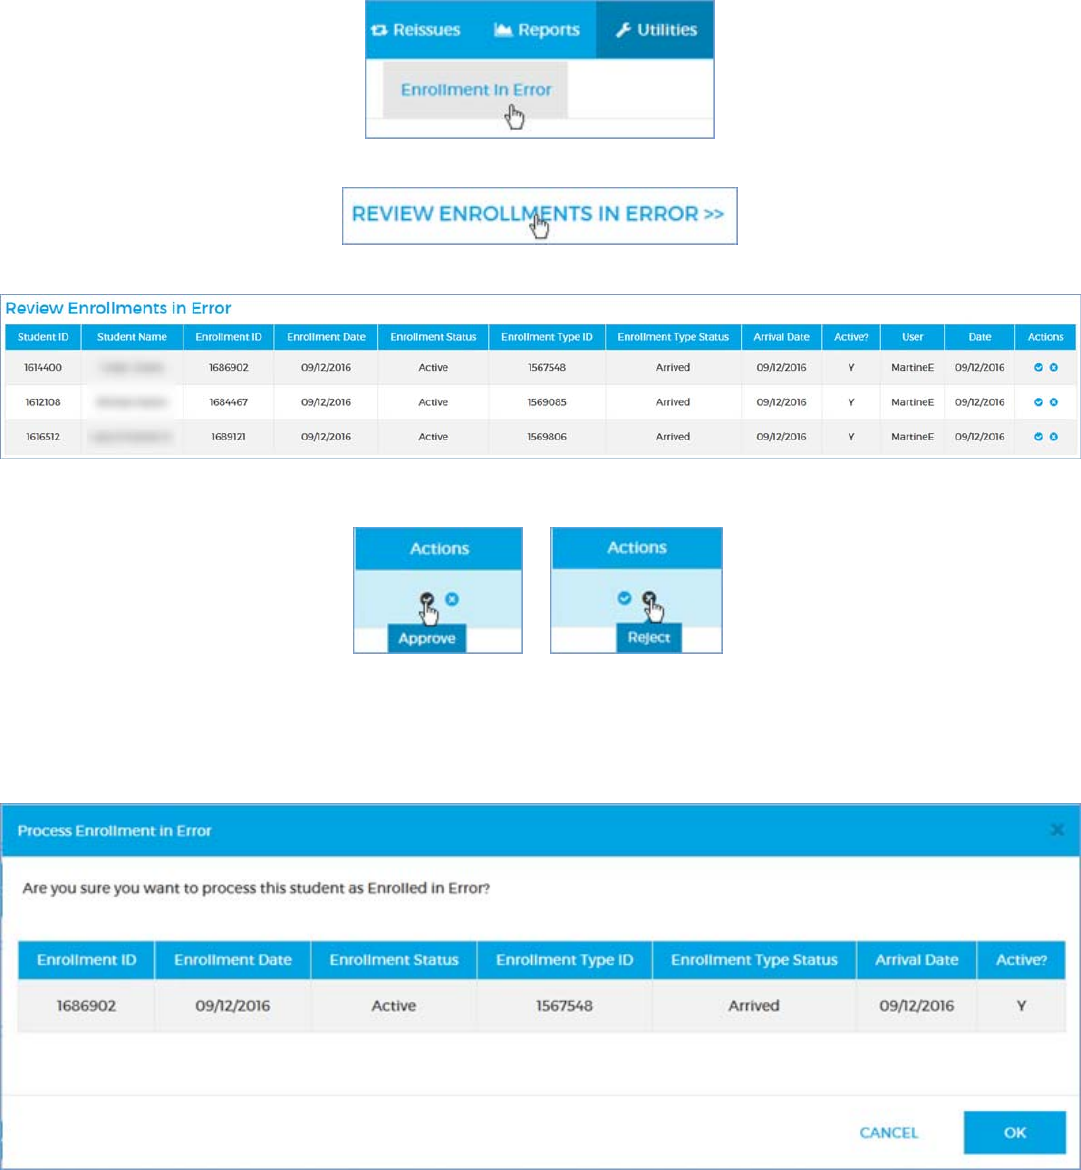
Job Corps Data Center 83
Approving or rejecting an enrollment in error
It is important to approve enrollments in error in a timely manner. If you wait until after the next regular payroll
run, an additional payment will be erroneously issued to the student.
Use these steps to approve or reject an enrollment-in-error correction submitted by another admin.
You must have a SAAS user role of Approver or Super User to perform this task.
1. Go to Utilities Enrollment in Error.
2. Click the REVIEW ENROLLMENTS IN ERROR link at the right of the page.
3. Review the information in the Review Enrollments in Error table.
4. Select an action: approve () or reject (×).
o Approve– click the approve button in the Actions column.
In the Process Enrollment in Error confirmation dialog, click OK to execute the unenrollment,
remove the row from the Review Enrollments in Error table, and close the form. CANCEL cancels
the action and closes the dialog.

Job Corps Data Center 84
o Reject– click the reject button in the Actions column to reject the correction and remove the row
from the Review Enrollments in Error table. The date of the rejection and your user ID are recorded
in the database.
Click the BACK TO ENROLLMENTS IN ERROR link at the upper-left at any time to return to the
Enrollment in Error page.
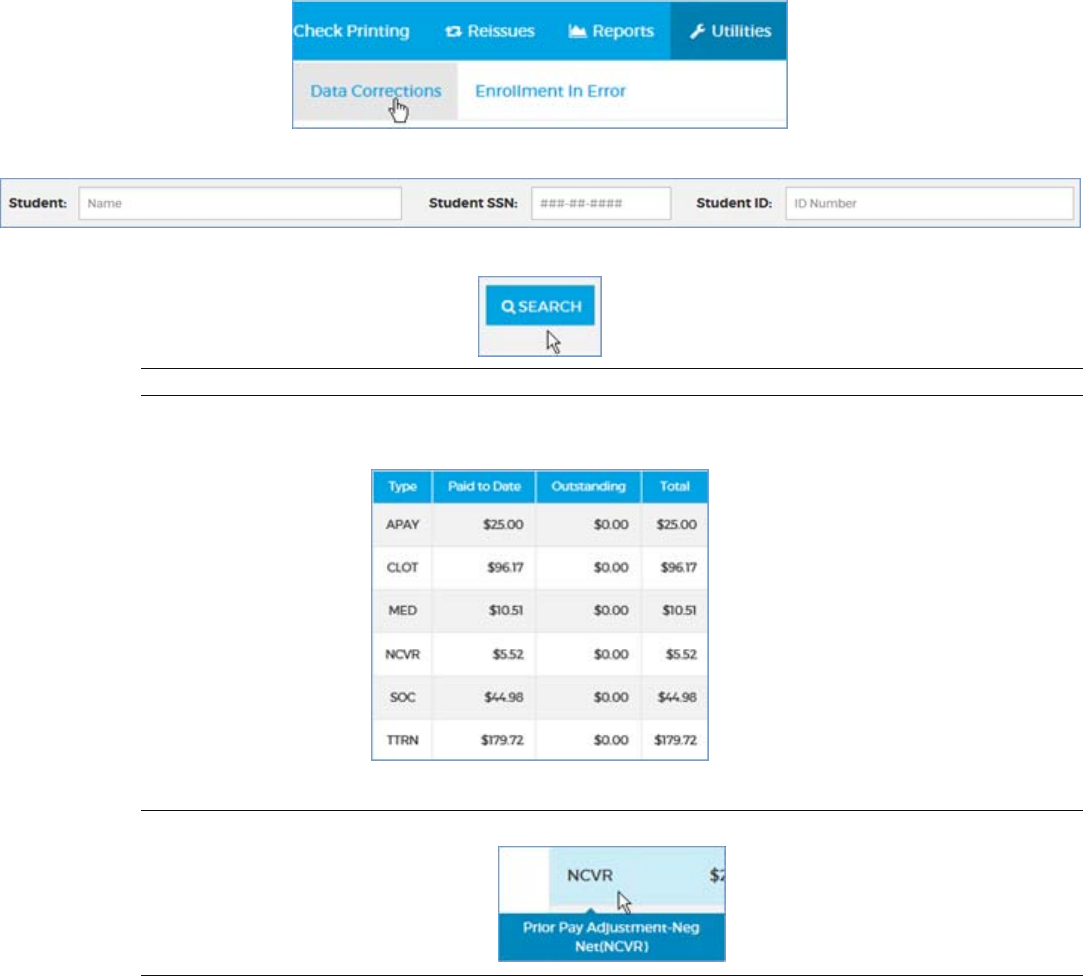
Job Corps Data Center 85
Entering a data correction
JCDC Payroll corrects erroneous pay records in some cases where the center is unable to.
Submitting a correction to an advance
Active student
Use these steps to do any of the following:
Provide an advance for Emergency Clothing
Create an advance/deduction if a center has omitted to report an advance/deduction for a transfer student
Correct the amount and/or type of an advance/deduction for a transfer student
You must have a SAAS user role of Super User or Submitter to perform this task.
1. Go to Utilities Data Corrections.
2. Enter criteria in any of the search fields of the student search form (Student ID should suffice).
3. Click SEARCH.
Tip: If you get too many results, try the techniques in Searching efficiently (page 5).
4. Review the information in the Data Corrections table, which lists all the student's deductions in his/her
current enrollment.
o Type - the type of advance or deduction.
Tip: Hover your cursor over the deduction Types to view full descriptions.
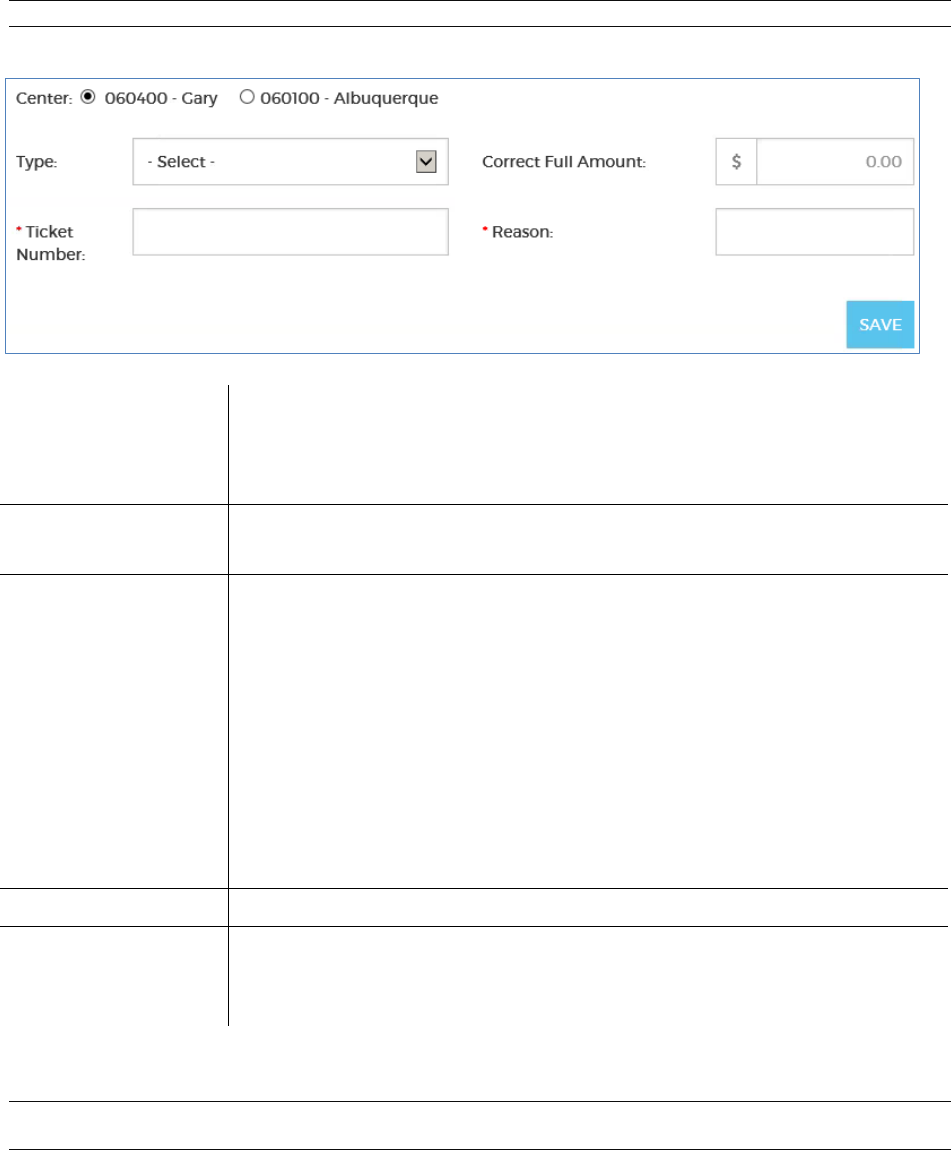
Job Corps Data Center 86
o Paid to Date - the total amount for the advance/deduction type that the student has received during
his/her current enrollment.
o Outstanding -any uncollected amount of the advance/deduction. This can be a negative amount.
o Total - the sum of the Paid to Date amount and the Outstanding amount.
Note: If the student has no pay records, a message will display that there is no data available.
5. Complete the Data Corrections form below the table.
Center
For a transferred student, select the Center that should be reimbursed.
If there is only one enrollment type, only one Center displays and it is
automatically selected. (The only data correction for this situation is providing
Emergency Clothing).
Type
The type of earning or deduction to correct.
Always select Clothing Allowance (CLOT) if there is only one Center showing.
Correct Full Amount
Amount the center disbursed plus any Total for the Type shown in the Data
Corrections table. If there is no row for this Type, enter the amount the center
disbursed.
Example 1: The center disbursed a $50 Bail Bond advance to the student in
the table shown in step 4. Enter $50 as the Correct Full Amount, since there is
no existing Total for BAIL.
Example 2: The center disbursed a $20 TTRN advance to the student in the
table shown in step 4. Enter $199.72 as the Correct Full Amount, to include the
existing $179.72 TTRN Total.
Note: If this amount is less than $1.00, type the 0 in front of the decimal point.
Otherwise, you will not be able to SAVE the correction.
Ticket Number
The Remedy ticket number used to report the enrollment in error.
Reason
Explanatory text (255 characters max).
Tip: Text you enter here scrolls horizontally. Hover your cursor over the field to
see all the text you've entered.
6. Click SAVE to submit the correction for approval by an admin with the SAAS user role of Approver or
Super User.
Note: All the fields must be completed before you can click SAVE. Any amounts less than $1.00 must have a
0 before the decimal point.
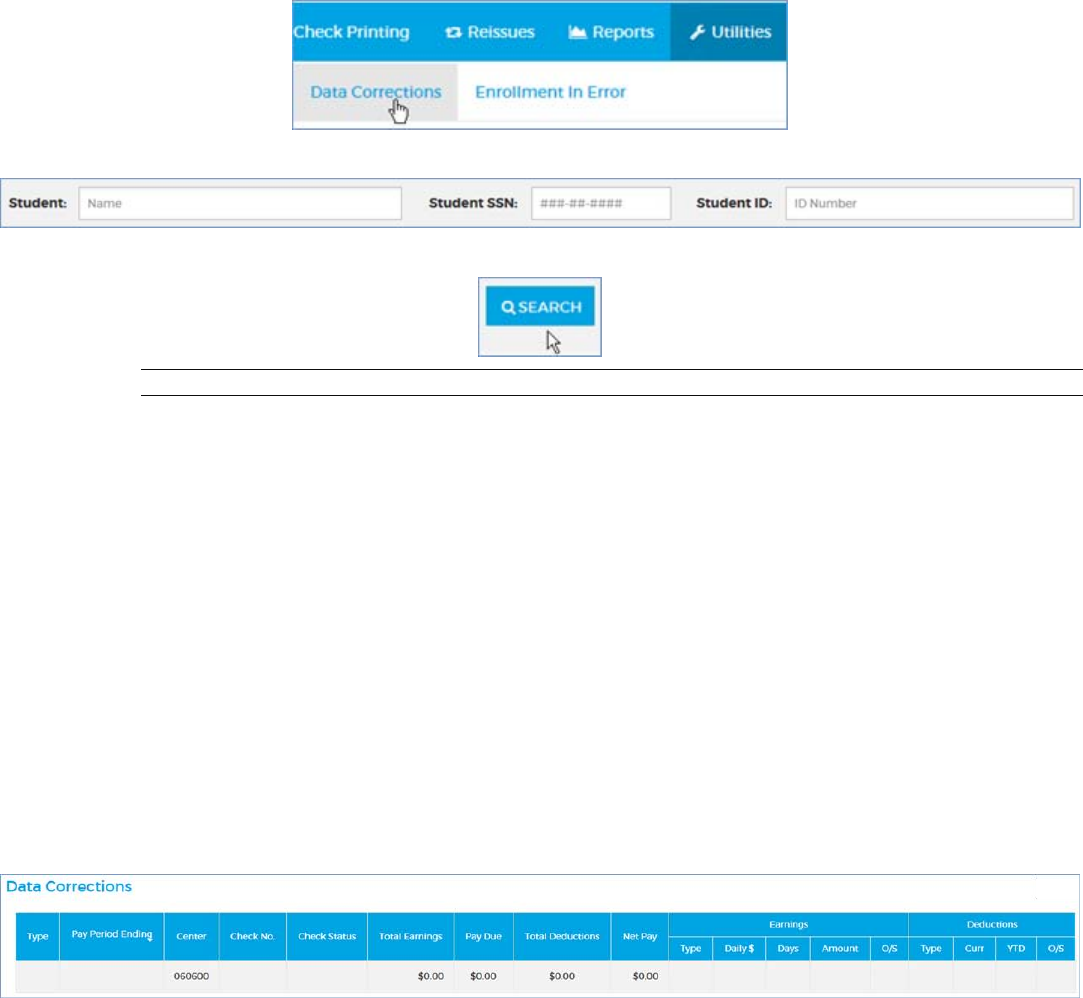
Job Corps Data Center 87
Separated student
Use these steps when a center has miscategorized a separation advance. A typical scenario is that a center
accidentally records a separation advance as taxable transportation, and a JCDC Payroll admin has returned the
check. These steps reimburse the center and back out the student's separation pay, which will be adjusted on the
next Termination payroll run.
You must have a SAAS user role of Super User or Submitter to perform this task.
1. Go to Utilities Data Corrections.
2. Enter criteria in any of the search fields of the student search form (Student ID should suffice).
3. Click SEARCH.
.Tip: If you get too many results, try the techniques in Searching efficiently (page 5).
If there's a problem with the check's status, you'll get a message. Proceed accordingly.
o If the student has already cashed the separation check, use standard procedures to close the
Remedy ticket or return it to TAC.
o If the separation check has been mailed out but the student hasn't cashed it yet, contact the
agency and ask them to return the check to JCDC Payroll. If you get it back, return it or stop it. Then
come back to Data Corrections and start over.
o If the separation check's status is "Reissued" and it is in the print queue on the Reissues tab, go to
the Reissues tab and remove it (page 48). Then come back to Data Corrections and start over.
o If the separation check's status is "Reissue pending," go to the Check Register and reject it (page
64). Then come back to Data Corrections and start over.
o If the separation check's status is "Expired," contact the agency and ask them to return the check
to JCDC Payroll. If you get it back, return it or stop it. Then come back to Data Corrections and start
over.
If the check been has stopped or returned, you'll see a Data Corrections table with the latest separation
pay information. Proceed with the steps below.
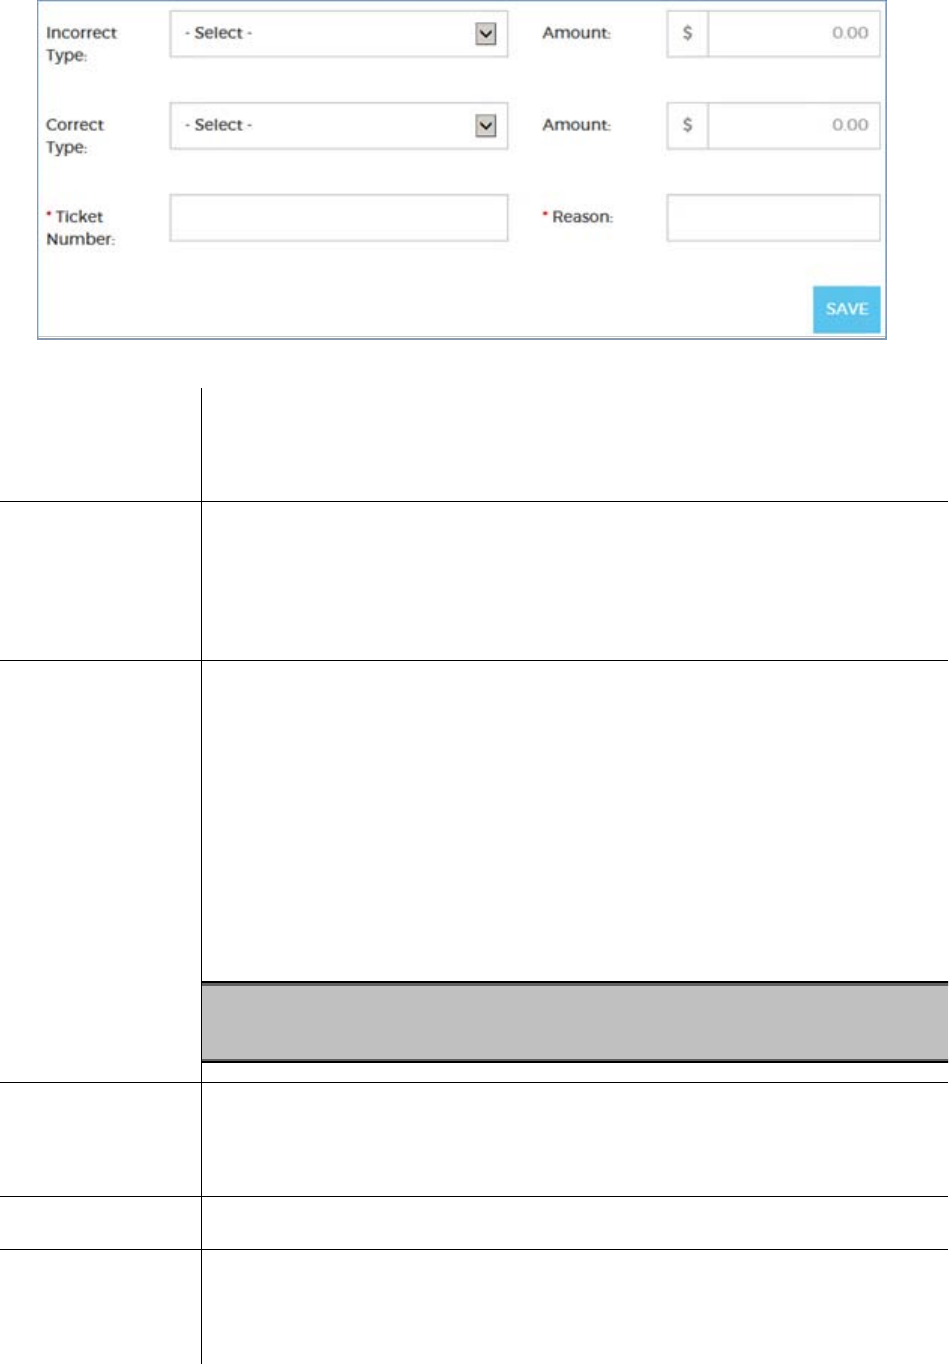
Job Corps Data Center 88
4. Complete the Data Corrections form below the table.
Incorrect Type
The type of advance the center mistakenly entered.
Note: The advance types available are those in the Earning and Deduction types in
the student's separation pay record.
Correct Type
The type of advance the center should have entered.
Notes: 1 – Earnings that are calculated by number of days paid, such as Living
Allowance, cannot be modified.
2 – Use Payroll Advance (PADV) for a separation advance.
Amount
(Incorrect Type)
The correct full amount of the selected (incorrect) advance type for the pay period.
If the student was carrying a debt for this type of deduction, this could be a
negative amount.
Example: The student was paid $400 cash in TTRN during the final pay period as
well as a $100 (cash) separation advance. The center correctly recorded the $400
TTRN, but it accidentally also recorded the $100 separation advance as TTRN.
Select "Taxable Transportation" as the Incorrect Type and enter $400 as the
Amount, as $400 is the correct full amount of TTRN for the student's final pay
period.
Note: If this amount is less than $1.00, type the 0 in front of the decimal point.
Otherwise, you will not be able to SAVE the correction.
Warning: Do not enter the amount incorrectly entered by the center. Enter the full
amount the student should receive for the Incorrect Type selection you
made.
Amount
(Correct Type)
The amount the center meant to give the student as another type of advance.
Note: If this amount is less than $1.00, type the 0 in front of the decimal point.
Otherwise, you will not be able to SAVE the correction.
Ticket Number
The Remedy ticket number.
Reason
A brief (255 characters max) explanation for the data correction.
Tip: Text you enter here scrolls horizontally. Hover your cursor over the field to see
all the text you've entered.
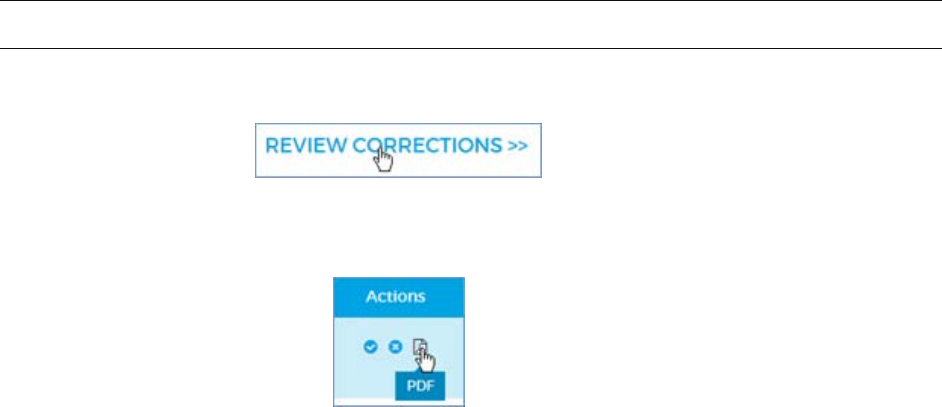
Job Corps Data Center 89
5. Click SAVE to submit the data correction for approval by another admin.
Note: All the fields must be completed before you can click SAVE. Any amounts less than $1.00 must have a
0 before the decimal point.
Once you have submitted the data correction, you can view it on the Review Data Corrections tab. Click the
REVIEW CORRECTIONS link at the right of the page.
From the Review Data Corrections table, you can also generate the Preview Backout of Pay Cycle report. This
report will contain only the data correction on the row. To generate a report with a range of data corrections, use
the Reports tab.
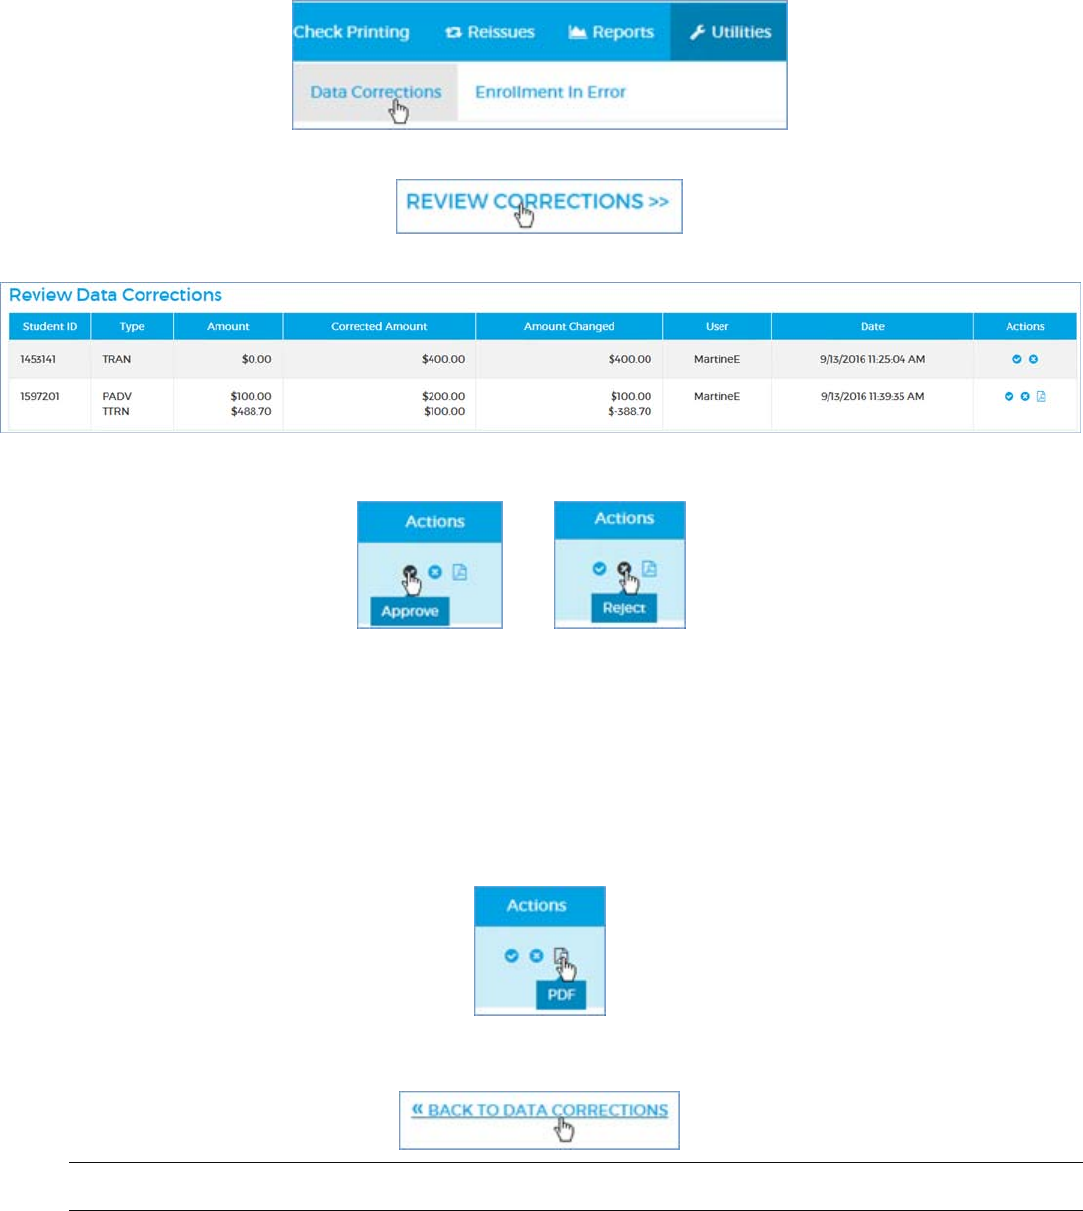
Job Corps Data Center 90
Approving or rejecting a correction to an advance
Use these steps to approve or reject a data correction submitted by another admin.
You must have a SAAS user role of Approver or Super User to perform this task.
1. Go to Utilities Data Corrections.
2. Click the REVIEW CORRECTIONS link at the right of the page.
3. Review the information in the Review Data Corrections table.
4. Select an action: approve () or reject (×).
o Approve executes the data correction and removes the row from the Review Corrections table. The
date of execution and your user ID are recorded in the database.
o Reject rejects the data correction and removes the row from the Review Corrections table. The date
of your rejection and your user ID are recorded in the database.
generate
Optional: For a data correction to a separated student, the row includes a PDF button in the Actions
column. Click it to generate the Preview Backout Pay Cycle report, which you may open, save, or cancel
using the buttons at the bottom-right of your browser. You may also run this report rom the Reports tab.
Click the BACK TO DATA CORRECTIONS link at the upper-left at any time to return to the Data
Corrections page.
Tip: After approving a data correction, you can confirm the backout by 1) running the Backout of Pay Cycle Report
and 2) viewing the backout in the student's Pay History page.
Job Corps Data Center 91
General ledger reports
Use these steps to generate general ledger reports. The following reports are available:
Weekly
Monthly
Other
allotmmddyy
bonusmmddyy
regmmddyy
reimb_mmddyy
termmmddyy
act_debt_mmddyy
allot_debt_actmmddyy
bckmmddyybck
center_trawmmddyy
check_backoutmmddyy
check_clearmmddyy
check_issdmmddyy
check_reissdmmddyy
check_stalemmddyy
gpalmmddyy
manual_chkmmddyy
paydue_mmddyy
population_mmddyy
term_debtmmddyy
traw_backoutmmddyy
mas200_mmddyy
1. Go to Utilities General Ledger.
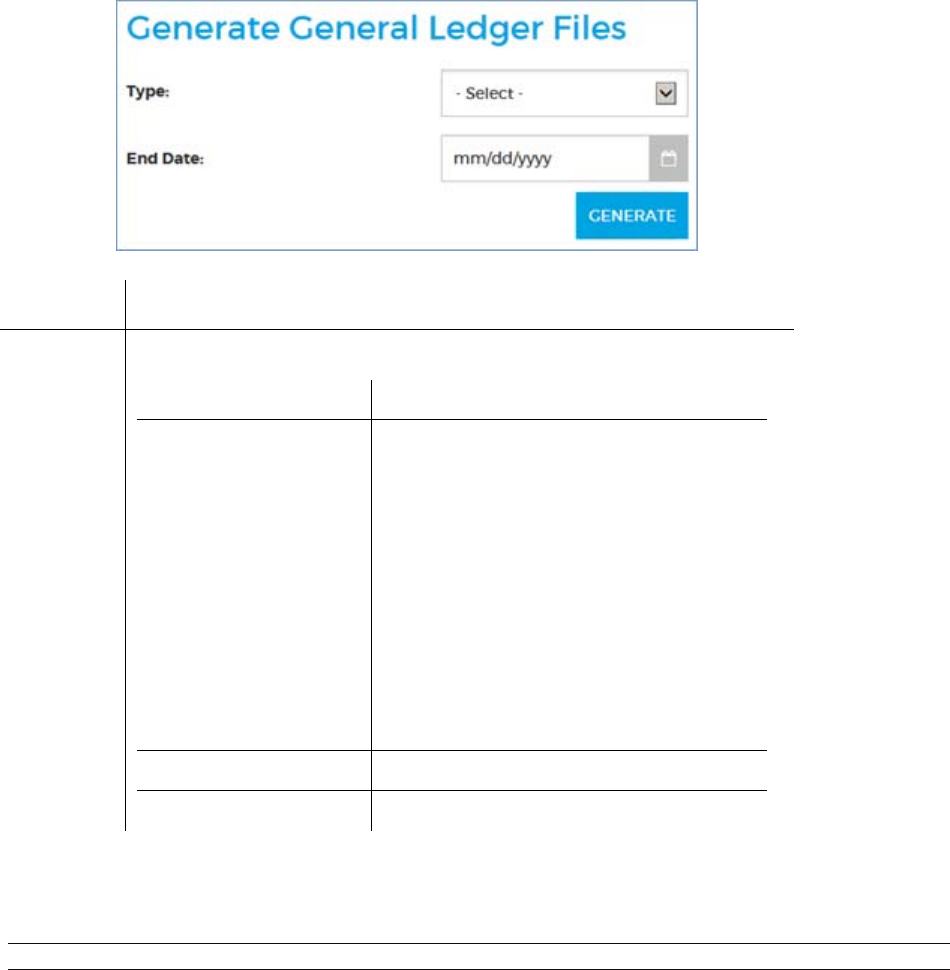
Job Corps Data Center 92
3. Complete the Generate General Ledger Files form.
Type
Type of report to generate (Weekly, Monthly, or mas200)
End Date
Use the default or change it with the datepicker.
Report Type
Default End Date
Weekly
PPE date for the most recent finalized
payroll
Notes: If you set a Weekly End Date that is
not the end date of any pay period,
these reports will be empty.
If the most recent finalized payroll is
an Allotment payroll, this date will be
two weeks later than the PPE for the
other payroll types. Change it if you
want reports for the most recent
Regular, Term, or Bonus payroll or
Reimbursement amounts.
Monthly
Last calendar day of the current month
mas200
Current date
4. Click GENERATE.
All the reports for the Type and End Date that you selected are saved to a folder in the JCDC file system
in csv format. From there, you can open them and use them as you wish.
Note: Generating the reports could take several minutes.
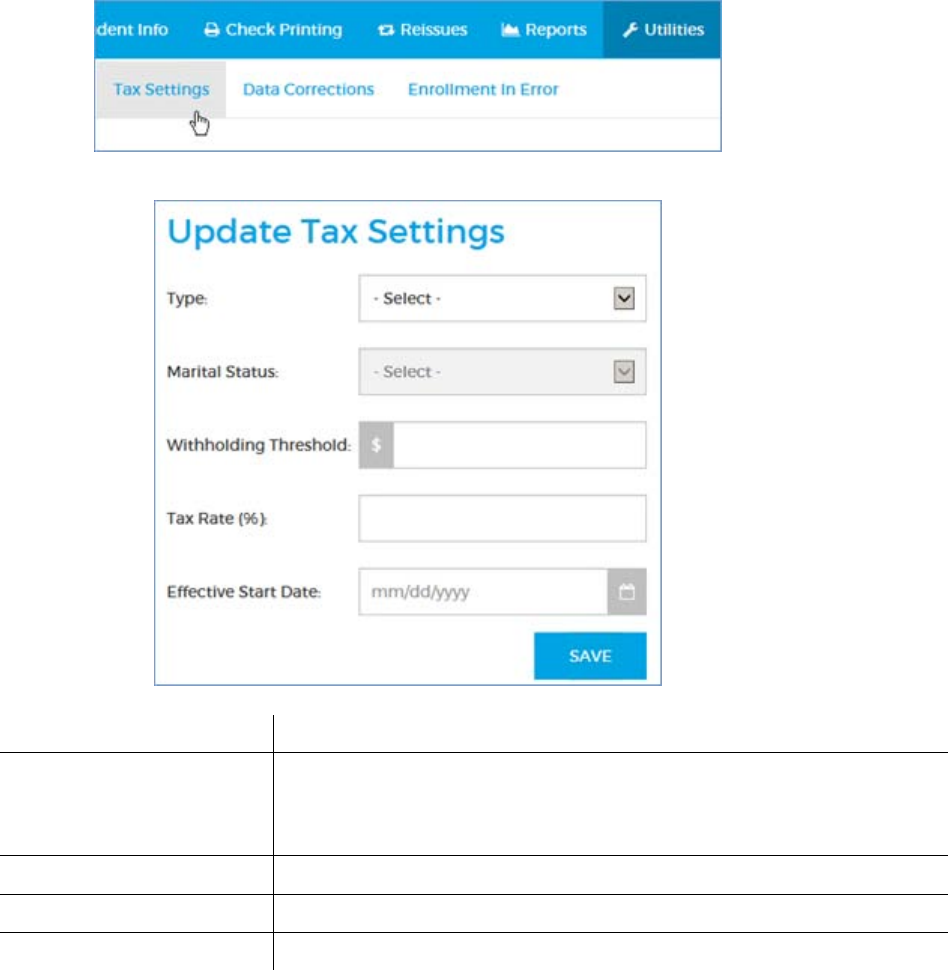
Job Corps Data Center 93
Taxes Taxes
Updating tax settings Updating tax settings
Use these steps to adjust the tax rates and withholding thresholds for payroll.
1. Go to Utilities Tax Settings.
2. Complete the Update Tax Settings form.
Type
The types of tax withholding to be adjusted.
Marital Status
Marital status that the Withholding Threshold and Tax Rate will be
applied to.
Note: This field appears only if the Type is Federal Income Tax.
Withholding Threshold
Dollar amount threshold that determines when tax should be withheld.
Tax Rate
Percentage of the tax withheld after the threshold has been met.
Effective Start Date
Date the tax settings should take effect.
3. Click SAVE to enter the tax settings in the Tax Settings table; they will be applied to all payrolls until
you set them again. If you accidentally entered the wrong tax settings, you can overwrite them by entering
the proper values in the Update Tax Settings form again.
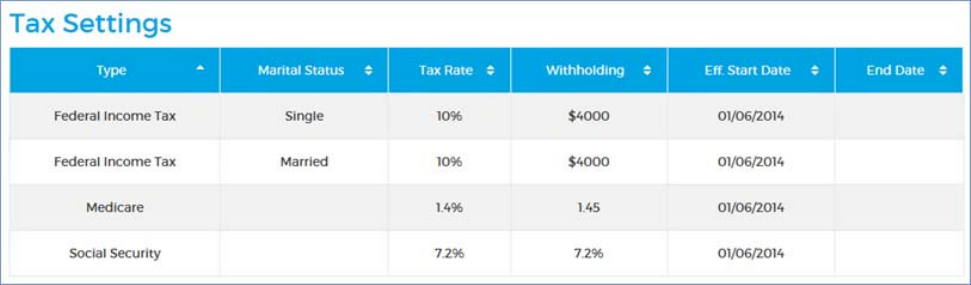
Job Corps Data Center 94
The Tax Settings table shows all your settings for the current and previous year. When you enter new tax settings,
an "End Date" is automatically entered for the previous year.
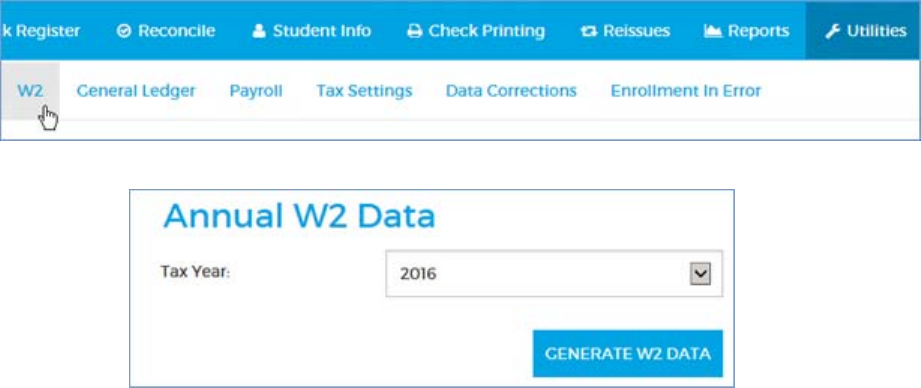
Job Corps Data Center 95
Generating W-2 data Generating W-2 data
Use these steps to generate W-2 data for a specific tax year.
1. Go to Utilities W2.
2. Select the Tax Year for which you want to generate data.
3. Click GENERATE W2 DATA.
4. When the mmf file has been generated, save it to the location of your choice.
