SAP HANA Database – Administration Guide
User Manual:
Open the PDF directly: View PDF ![]() .
.
Page Count: 74
- Introduction
- Managing Multiple SAP HANA Systems
- Starting and Stopping Systems
- Managing Licenses
- Managing Users
- Monitoring
- Configuration
- Periodic Administration Tasks
- Troubleshooting
- Appendix A
- SAP HANA HDBSQL
- Logging On to a Database
- Executing Commands
- Multiple Line Mode
- Command Buffer
- Editing Commands in an External File
- Batch File
- Redirecting Results to a File
- Executing SQL Statements
- Requesting Information About the Database Catalog
- Exiting HDBSQL
- Overview of All HDBSQL Call Options
- Overview of All HDBSQL Commands
- SAP HANA HDBSQL

SAP HANA Database – Administration Guide
SAP HANA Appliance Software SPS04
Target Audience
Consultants
Administrators
SAP Hardware Partners
Others
Public
Document version 1.1 – May, 2012

SAP HANA Database – Administration Guide 2
Copyright
© 2012
SAP
AG. All rig
hts reserved.SAP,
R/3
,
SAP NetWeaver
,
Duet
, PartnerEdge, ByDesign,
SAP
BusinessObjects Explorer, StreamWork, SAP HANA and other SAP products and services mentioned
herein as well as their respective logos are trademarks or registered trademarks of SAP AG in
Germany and other countries.Business Objects and the Business Objects logo, BusinessObjects,
Crystal Reports, Crystal Decisions, Web Intelligence, Xcelsius, and other Business Objects products
and services mentioned herein as well as their respective logos are trademarks or registered
trademarks of Business Objects Software Ltd. Business Objects is an SAP company.Sybase and
Adaptive Server, iAnywhere, Sybase 365, SQL Anywhere, and other Sybase products and services
mentioned herein as well as their respective logos are trademarks or registered trademarks of Sybase,
Inc. Sybase is an SAP company. Crossgate, m@gic EDDY, B2B 360°, B2B 360° Services are
registered trademarks of Crossgate AG in Germany and other countries. Crossgate is an SAP
company. All other product and service names mentioned are the trademarks of their respective
companies. Data contained in this document serves informational purposes only. National product
specifications may vary.These materials are subject to change without notice. These materials are
provided by SAP AG and its affiliated companies ("SAP Group") for informational purposes only,
without representation or warranty of any kind, and SAP Group shall not be liable for errors or
omissions with respect to the materials. The only warranties for SAP Group products and services
are those that are set forth in the express warranty statements accompanying such products and
services, if any. Nothing herein should be construed as constituting an additional warranty.
2012-04-02

SAP HANA Database – Administration Guide 3
Contents
Introduction........................................................................................................................................5
SAP HANA and SAP HANA Database Guides ....................................................................................5
What is the SAP HANA Database? ...................................................................................................5
About the SAP HANA Studio ............................................................................................................7
Updating the SAP HANA Studio .......................................................................................................7
SAP HANA Studio Screen Areas .......................................................................................................7
Starting the Administration Console of the SAP HANA Studio ........................................................ 10
Managing Multiple SAP HANA Systems ............................................................................................. 10
Adding Systems ............................................................................................................................. 10
Creating Folder Structures ............................................................................................................ 11
Exporting Systems ......................................................................................................................... 11
Importing Systems ........................................................................................................................ 12
Finding Systems ............................................................................................................................ 12
Monitoring SAP HANA Systems with the System Monitor .............................................................. 12
Starting and Stopping Systems .......................................................................................................... 14
Starting a System .......................................................................................................................... 14
Stopping a System ......................................................................................................................... 14
Monitoring During System Startup and Stop ................................................................................. 15
Managing Licenses ............................................................................................................................ 15
Temporary License Keys ................................................................................................................ 15
Permanent License Keys ................................................................................................................ 15
Checking the Current License Key .................................................................................................. 16
Installing Permanent Licenses ....................................................................................................... 17
Deleting Existing Permanent License Keys ..................................................................................... 17
License Auditing ............................................................................................................................ 18
Managing Users ................................................................................................................................ 19
Database Users ............................................................................................................................. 19
Operating System User ................................................................................................................. 19
Authentication .............................................................................................................................. 19
Authorization ................................................................................................................................ 20
Privileges for Adminstration Tasks ................................................................................................. 20
Provisioning Users ......................................................................................................................... 21

SAP HANA Database – Administration Guide 4
Disabling Default User Filtering of Schemas ................................................................................... 23
Monitoring ....................................................................................................................................... 25
Monitoring Overall System State ................................................................................................... 25
Monitoring System Components ................................................................................................... 26
Monitoring Alerts .......................................................................................................................... 28
Monitoring Disk Space .................................................................................................................. 29
Monitoring Performance ............................................................................................................... 31
Monitoring Memory Usage ........................................................................................................... 32
Configuration .................................................................................................................................... 37
Changing Parameter Values .......................................................................................................... 37
Resetting Parameter Values .......................................................................................................... 37
Setting the Global Allocation Limit Parameter ............................................................................... 37
Changing the Default SLD Data Supplier Configuration .................................................................. 38
Configuring Alerts ......................................................................................................................... 40
Failover Concept ........................................................................................................................... 41
Customizing the Administration Console ....................................................................................... 43
Periodic Administration Tasks ........................................................................................................... 46
Backing Up Systems ...................................................................................................................... 46
Managing Tables ........................................................................................................................... 46
Troubleshooting ............................................................................................................................... 51
The SQL Editor .............................................................................................................................. 51
Resolving a Disk Full Event ............................................................................................................ 54
Diagnosis Files ............................................................................................................................... 55
Configuring Traces ........................................................................................................................ 55
Opening a Support Connection ..................................................................................................... 58
Collecting System Information for Support .................................................................................... 59
Displaying System Information ...................................................................................................... 62
Appendix A ....................................................................................................................................... 63
SAP HANA HDBSQL ....................................................................................................................... 63
SAP HANA Database – Administration Guide 5
Introduction
This document describes the administration of the SAP HANA® database using the Administration
Console of the SAP HANA® studio.
SAPHANAandSAPHANADatabaseGuides
For more information about SAP HANA and the SAP HANA database landscape, installation and
administration, see the resources listed in the following table:
Topic Guide/Tool Quick Link
SAP HANA
l
andscape,
deployment and
installation
SAP HANA
Knowledge Center on
SAP Service
Marketplace
https://service.sa
p.com/hana
SAP HANA Master Guide
SAP HANA Installation Guides
SAP HANA
administration and
security
SAP HANA
Knowledge Center on
SAP Help Portal
http://help.sap.com/hana_appliance
SAP HANA Technical Operations Manual
SAP HANA Database – Security Guide
WhatistheSAPHANADatabase?
The SAP HANA database is a relational database that has been optimized to leverage state-of-the-art
hardware. It provides all of the SQL features of a standard relational database along with a feature-
rich set of analytical capabilities and an SAP-specific programming language for stored procedures
called SQLScript. With these facilities, the SAP HANA database is capable of embedding application
logic within the database itself. This allows complex queries to be executed directly inside the
database, thus reducing the requirement of data transfer to and from the database. This enables SAP
HANA-based applications to process vast amounts of data whilst operating in a responsive, real-time
manner.
From the administrator’s perspective, the SAP HANA database is conceptually about leveraging
modern hardware system landscapes to increase database performance and reliability. Traditionally,
databases have been designed to operate in a situation where there are limited memory and CPU
resources. Currently however, servers can provide in excess of 1TB of memory and up to 80 CPU
cores on a single system.
To better understand how the SAP HANA database improves on traditional database concepts, in the
next section we compare the two approaches to database systems.
ImpactofModernHardwareonDatabaseSystemArchitecture
Historically, database systems were designed to perform well on computer systems with limited
RAM. This had the effect that slow disk I/O was the main bottleneck in data throughput.
Consequently, the architecture of these systems was designed with a focus on optimizing disk access,
for example, by minimizing the number of disk blocks (or pages) to be read into main memory when
processing a query.
Computer architecture has changed in recent years. Now, multi-core CPUs (multiple CPUs on one
chip or in one package) are standard, with fast communication between processor cores enabling
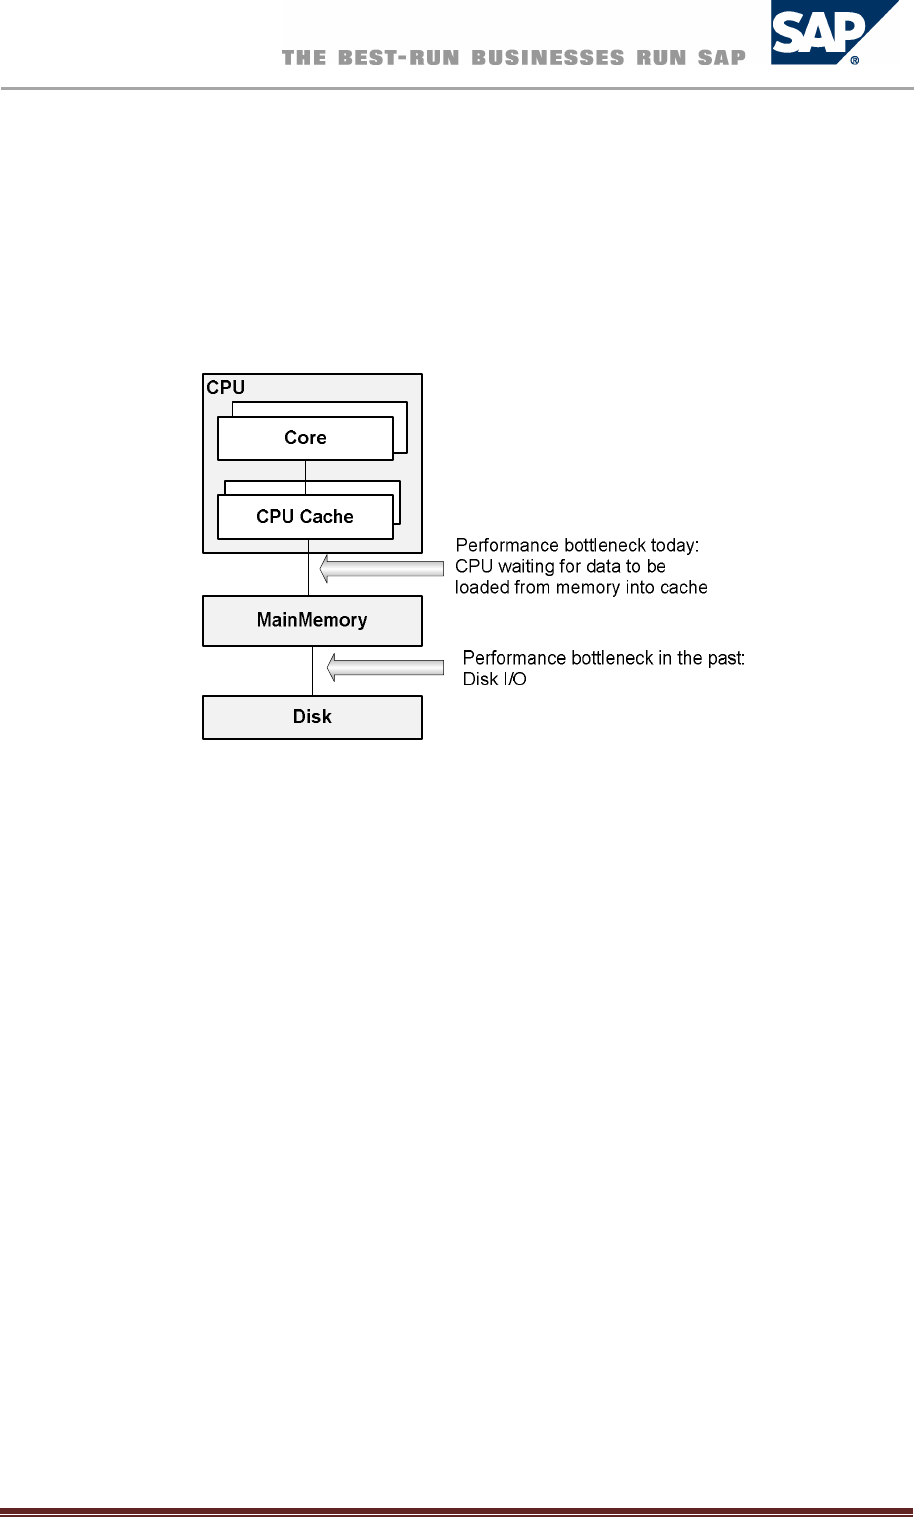
SAP HANA Database – Administration Guide 6
parallel processing. Main memory is no longer a limited resource. Modern servers can have 1 TB of
system memory and this allows complete databases to be held in RAM. Currently, server processors
have up to 80 cores, and 128 cores will soon be available. With the increasing number of cores, CPUs
are able to process increased data per time interval. This shifts the performance bottleneck from disk
I/O to the data transfer between CPU cache and main memory.
Hardware Architecture: Current and Past Performance Bottlenecks
ModernDatabaseforModernHardware
It is therefore apparent that traditional databases do not always make the most efficient use of
current hardware. So, what are the ideal characteristics of a database system running on modern
hardware?
In-memory database
All relevant data should be available in main memory, which avoids the performance penalty of disk
I/O. To use the advantages of in-memory computation, a cache-conscious implementation of data
structures and algorithms is necessary.
Support for parallel execution
Higher CPU execution speeds are currently achieved by adding more cores to a CPU package.
Multiple CPUs call for new parallel algorithms to be used in databases in order to fully utilize the
computing resources available. SAP HANA addresses these requirements by storing all of its data in
RAM and also enabling queries to be split and optimized across multiple CPU cores and multiple SAP
HANA servers.
Disk storage
Disk storage is still required to ensure the ability to restart in case of power failure and for
permanent persistency. However, this is not a performance issue as the required disk write
operations can be performed asynchronously as a background task. SAP HANA database tries to
optimize the performance from the different storage types, like main memory, solid state disks (SSD),
and traditional mechanical hard drives (HDD).

SAP HANA Database – Administration Guide 7
AbouttheSAPHANAStudio
The SAP HANA studio is a collection of tools that allows database administrators and developers to
manage data and monitor the SAP HANA database. The SAP HANA studio runs on the Eclipse
platform, which presents these tools in the form of “perspectives”.
This guide focuses on the Administration Console perspective, which targets the SAP HANA database
administrator. Additional perspectives are the Modeler and Lifecycle Management perspectives,
which are covered in other documents.
For more information about the installation of the SAP HANA studio, see SAP HANA Database -
Studio Installation Guide on SAP Help Portal at http://help.sap.com/hana_appliance.
For more information about the Eclipse platform, see http://www.eclipse.org.
UpdatingtheSAPHANAStudio
Prerequisites
You have specified the site from which the SAP HANA studio is to download updates.
For more information about how to configure the source for updates, see SAP HANA Database -
Studio Installation Guide on SAP Help Portal at http://help.sap.com/hana_appliance.
Procedure
1. From the main menu, choose Window Preferences Install/Update Available
Software Sites.
2. Choose Add... and specify the update server settings:
Name: Optional entry, name of the location of the update repository
Location: Update repository location (for example
http://<host_name>:<port_number>/tools/hdb.studio.update
or file:////update_server/hdbstudio/repository/)
UpdatingtheSAPHANAStudioManually
1. From the main menu, choose Help Check for Updates.
The system checks if there is an update available.
2. If an update is available, follow the onscreen instructions.
ConfiguringAutomaticUpdatesoftheSAPHANAStudio
1. From the main menu, choose Window Preferences Install/Update Automatic
Updates.
2. Specify your update settings.
You are automatically notified if an update is available in line with your settings.
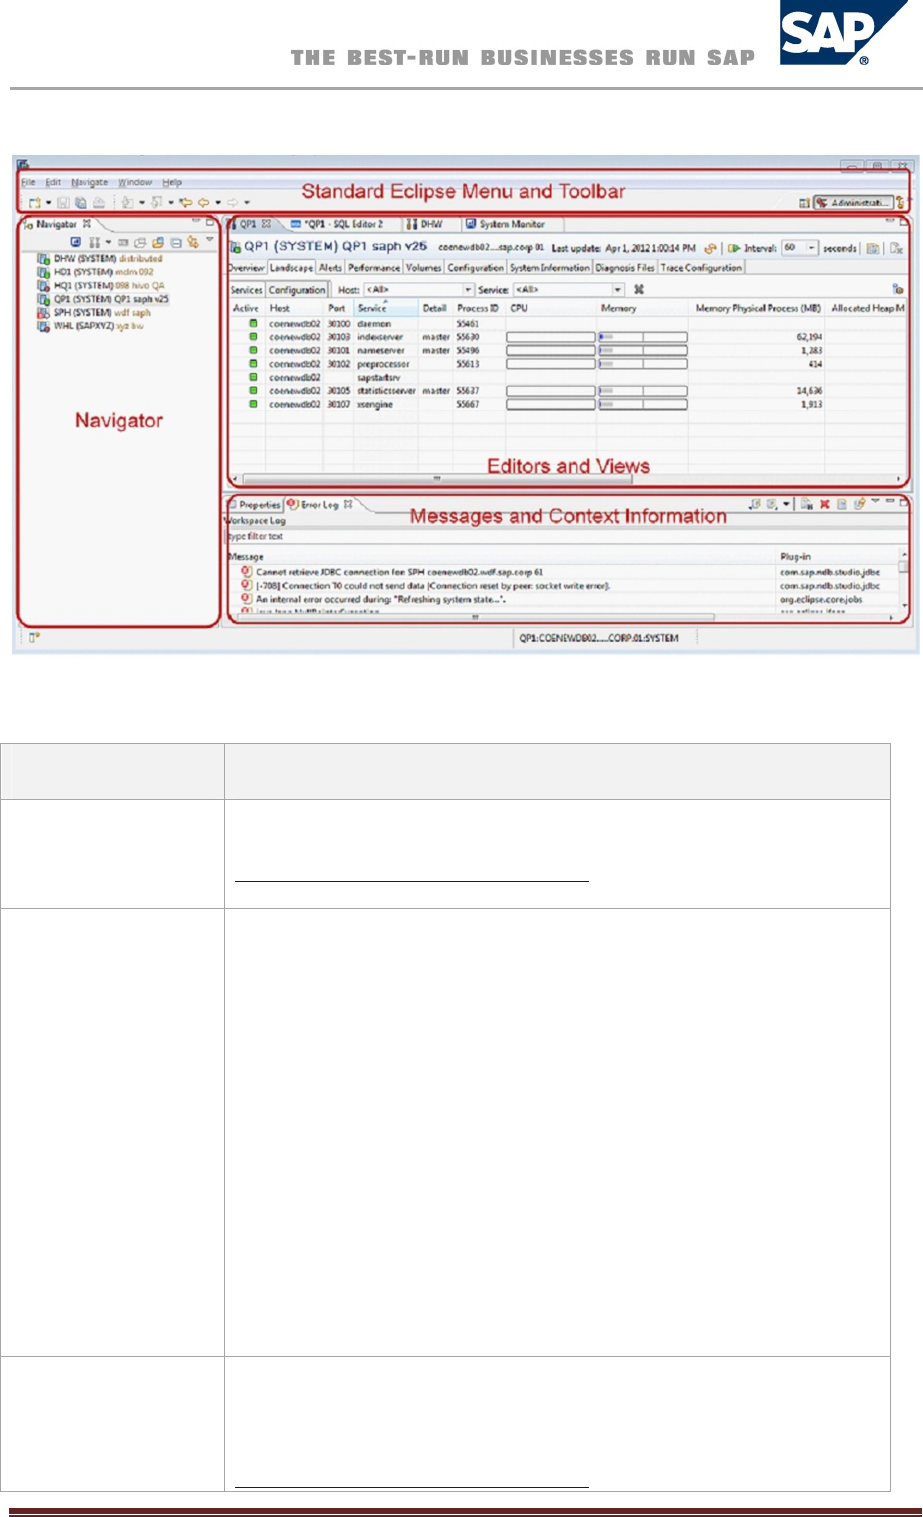
SAPHANAStudioScreenAreas
The SAP HANA studio consists of several screen areas, views and editors, which you can show and
hide as necessary. The following figure shows the screen areas of the SAP HANA studio with the
Administration Console perspective open.
SAP HANA Studio Screen Areas
SAP HANA Database – Administration Guide 8
The following is a brief overview of the various screen areas:
Screen Area Description
Eclipse standard
menu and toolbar
Standard
Eclipse functions
More information: Eclipse Workbench User Guide at
http://help.eclipse.org/indigo/index.jsp
Navigator
The navigator provides you with a
list of all
SAP HANA
systems
managed in the SAP HANA studio and allows you to drill down easily
into each system.
The navigator toolbar contains icons that provide you with quick access
to several views and editors, including:
The System Monitor
More information: Monitoring SAP HANA Systems with the
System Monitor
The Administration Console
More information: Monitoring
The SQL Editor
More information:
Troubleshooting
You can also filter the entries in several of the nodes in the navigator by
right-clicking the node and choosing Filter...
Editors and views
Each perspective has its own editors and views for editing and browsing
resources. The Administration Editor and SQL Editor are available in the
Adminstration Console perspective, for example.
More information: Eclipse Workbench User Guide at
http://help.eclipse.org/indigo/index.jsp


SAP HANA Database – Administration Guide 10
StartingtheAdministrationConsoleoftheSAPHANAStudio
1. From your file explorer, start hdbstudio[.exe].
2. On the Welcome page, choose Open Administration Console.
Once you have closed the Welcome page, you can always change from another perspective to the
Administration Console perspective by choosing Window Open Perspective Administration
Console or by selecting the perspective in the upper-right corner of the screen.
ManagingMultipleSAPHANASystems
You can manage multiple SAP HANA database systems in the SAP HANA studio.
Systems are displayed in the navigator, where they are labeled with their system ID (SID) and
description (if one was specified). When you expand a system node in the navigator, you see the
default catalog, which contains public synonyms, schemas with column views (info cubes), functions,
indexes, procedures, sequences, (private) synonyms, tables, and views.
AddingSystems
Before you can carry out administrative tasks on an SAP HANA database, you must add it to the
navigator. Note that the hostname of the server that hosts the database must be accessible from the
client where the SAP HANA studio runs, even if the system is added by means of its IP address.
Prerequisites
All the relevant ports in your firewall are open.
More information: SAP HANA Database - Security Guide on SAP Help Portal at
http://help.sap.com/hana_appliance
Procedure
1. In context menu of the navigator, choose Add System.
Note
You can also import existing systems. More information: Importing Systems
2. Enter the following data:
Hostname
Name of the host where the system is installed
Instance Number
Instance number of the system
Note
To add a distributed system, you specify the host of one of its index servers (that is,
instances). Every index server in a system has information about all the other index
servers within the same system.
Description
You can enter a description for the system, which is displayed next to the system
name in the navigation structure.
Folder

SAP HANA Database – Administration Guide 11
If you have already created a system landscape in the navigator, choose the folder to
which you want to add the system.
Locale
Your location
3. Choose Next.
4. If required, choose your authentication type and enter your user information.
More information: Managing Users
5. If you want to use a secure connection, choose Connect using SSL.
6. To enter advanced connection properties, choose Next. The following options are available:
Connection URL: Defines the properties of the connection to the database.
Auto-Reconnect: If you select this option, the SAP HANA studio automatically
reconnects after the connection to the system has broken.
7. Choose Validate SSL Certificate to ensure that the SSL connection is secure.
To override the system hostname in the certificate, enter a hostname with a defined
certificate.
8. Choose Use user key store as trust store to validate the server certificate’s validity (whether
signed by a known certificate issuer) using the user key store.
The trust store property configures the trust store for SSL connect, which is used to validate
that the SSL certificate of the server is issued by a trusted entity. Each user can to import
certificates into his or her own user key store in Java using the “keytool” option (part of JRE).
The set of root certificates delivered with the JRE from well-known issuers (for example,
Verisign, Thawte, Deutsche Telekom) is used when this option is not selected.
9. Choose Finish.
Result
The system is added in the navigator.
Note
Systems that you added using a secure connection are shown with a padlock icon.
CreatingFolderStructures
If you add several systems in the navigator, you can organize them by defining a folder structure and
assigning the systems to individual folders.
Once folders have been created, you can assign a system to a specified folder when adding it to the
navigator.
Procedure
1. From the main menu, choose New Folder.
2. Enter a folder name.
3. In the navigator, move your system to the new folder using drag and drop.
4. Repeat this procedure until you have added all your systems.
ExportingSystems
You can export a list of SAP HANA system from the SAP HANA studio to files and then use these to
import the data into another instance of the SAP HANA studio.
SAP HANA Database – Administration Guide 12
Procedure
1. From the main menu, choose File Export...
2. Expand the SAP HANA Studio folder and then choose Landscape.
3. Choose Next.
4. Select the systems to be exported and enter a target file location.
5. Choose Finish.
ImportingSystems
You can import a list of systems that you previously exported from another instance of the SAP HANA
studio.
Procedure
1. From the main menu, choose File Import...
2. Expand the SAP HANA Studio folder and then choose Landscape.
3. Choose Next.
4. Choose Browse... and select the file containing the list of systems that you want to import.
5. Select the folder into which you want to import the file.
6. Choose Finish.
FindingSystems
1. From the navigator toolbar, choose (Find System).
2. Enter a search string.
Matching systems are displayed immediately. You can also use * or ? as wildcards.
3. Select the system you were searching for.
You can select several systems in the search results using the CTRL key. You can use this, for
example, to mark duplicate systems.
4. Choose whether you want to open the system in the Administration Editor and/or the SQL
editor.
Note:
If you do not select either checkbox, the selected system will only be marked in the
navigator.
MonitoringSAPHANASystemswiththeSystemMonitor
The System Monitor provides you with an overview of all your SAP HANA systems at a glance. You
can drill down into the details of an individual system in the Administration Editor (see Monitoring).
To start the System Monitor, in the navigator toolbar choose the (System Monitor) button.
The System Monitor view displays the following information:
Column Description
System ID
ID assigned to system when added
Operational
State Indication of whether all database services have started, some have not started, or

SAP HANA Database – Administration Guide 13
some are still in the process of starting
Alerts
The statistics server generates aler
ts for
the system when resource usage and
statistical thresholds are violated. These alerts are displayed as low, medium, or
high priority. The number of alerts and their status is shown here.
Data Disk (GB)
The size of the database data volume on the
d
isk(s) holding data files
Log Disk (GB)
The size of
the database log volume on the
disk(s) holding log files
Trace Disk (GB)
The size
of database trace files on the
disk(s) holding trace files
Used Memory
(GB)
The amount of
physical memory used by the
SAP
HANA database
CPU (%)
Percent
age of CPU used by the SAP HANA
database
Hostname
The name of the server hosting the
SAP HANA database
.
Instance
Number
The instance number is the administrative unit that comprises the server
software
components.
Syste
m Data
Disk (GB)
Total disk space occupied on the disk(
s)
containing
data
files
System Log Disk
(GB)
Total dis
k space occupied on the disk(s)
containing
log
files
System Trace
Disk (GB)
Total dis
k space occupied on the disk(s)
containing trace files
Sy
stem Physical
Memory (GB)
Total amount of physical memory used
Virtual Memory
(GB)
The total combined p
hysical and virtual memory used
System CPU (%)
Overall CPU usage
Distributed
Indicates
whether
the system
is running
on a single
host
or
it
is a dist
ributed
system running on more than one host
Start Time First
Time
that the first service started
This is updated when system is restarted for any reason.
Start Time
Latest
Time tha
t the last service was started, i
f, for example, one of the services was
re
-
started individually
Version
SAP
HANA
studio
software
version
number
Platform
Operating system on which the
SAP HANA studio
is running
More information: Monitoring
SAP HANA Database – Administration Guide 14
StartingandStoppingSystems
StartingSystem
Prerequisites
You have the credentials of the operating system administrator (user <sid>adm).
More information: Managing Users
Procedure
1. In the navigator, right-click the system to be started and choose Start...
2. Optional: Specify a start timeout.
The start timeout defines how long to wait for an instance to start. If the end of the
timeout period is reached, the remaining instances are not started.
3. Enter the user name and password of the operating system administrator that was defined
when the system was installed (that is, <sid>adm).
Result
The system is started. A green icon appears in the system icon in the navigator.
Note:
You can stop and start a system in one step by right-clicking the system and choosing
Restart…
StoppingSystem
Prerequisites
You have the credentials of the operating system administrator (user <sid>adm).
More information: Managing Users
Procedure
1. In the navigator, right click the system to be stopped and choose Stop...
2. Select how you want to stop the system:
Hard
Forces all components to stop immediately.
Caution
This may lead to data loss.
Soft
Waits for all components to stop. You can specify a timeout after which a hard
shutdown is to be triggered.
Stop wait timeout (sec)
If the timeout expires, the operation continues stopping the remaining instances.
3. Enter user name and password of the system administrator.
SAP HANA Database – Administration Guide 15
Result
The system is stopped. A red icon appears in the system icon in the navigator.
MonitoringDuringSystemStartupandStop
The SAP HANA studio normally collects information about the system using SQL statements.
However, when the system has not yet started, no SQL connection is available. Therefore, while the
system is starting up or is stopped, the SAP HANA studio collects information about the database
using the sapstartsrv connection. You can view this information in the Adminstartion Editor
“diagnosis mode”. In this way, you analyze any problems that may occur during startup or while the
system is stopped. You can also read diagnosis files even when the system is stopped.
When you open the Administration Editor for a non-running system, it opens automaically in
diagnosis mode. The Administration Editor also opens automatically in diagnosis mode when you
initiate the start or stop of a system.
You can manually open diagnosis mode for a system by choosing Open Diagnosis Mode from the
drop-down menu of the (Administration) button.
Note
To be able to open the Administration Editor of a system in diagnosis mode, you must be
able to log on using the credentials of the operating system user (user <sid>adm).
ManagingLicenses
License keys are required to use SAP HANA databases.
The SAP HANA database supports two kinds of license keys: temporary license keys and permanent
license keys. While temporary license keys are automatically installed in an SAP HANA database,
permanent license keys have to be requested on the SAP Service Marketplace and applied to the
individual SAP HANA database.
TemporaryLicenseKeys
A temporary license key, which is valid for 90 days, is automatically installed with a new SAP HANA
database. During this period, you should request and apply a permanent license key.
PermanentLicenseKeys
You can request a permanent license key on the SAP Service Marketplace at
https://service.sap.com/support under Keys & Requests. Permanent license keys are valid until the
predefined expiration date. Furthermore, they specify the amount of memory licensed to the target
SAP HANA database. Before a permanent license key expires, you should request and apply a new
permanent license key. If a permanent license key expires, a temporary license key valid for 28 days
is automatically installed. During this time, you can request and install a new permanent license key.
There are two types of permanent license key available for the SAP HANA database: unenforced and
enforced. If an unenforced license key is installed, the operation of the SAP HANA database is not

SAP HANA Database – Administration Guide 16
affected if its memory consumption exceeds the licensed amount of memory. However, if an
enforced license is installed, the system is locked down when the current memory consumption of
the SAP HANA database exceeds the licensed amount of memory plus some tolerance. If this
happens, either the SAP HANA database needs to be restarted, or a new license key that covers the
amount of memory in use needs to be installed.
The two types of permanent license key differ from each other in the following line in the license key
file:
Unenforced license key: SWPRODUCTNAME=SAP-HANA
Enforced license key: SWPRODUCTNAME=SAP-HANA-ENF
Note:
Although enforced license keys currently only apply to SAP Business One, it is technically
possible to install such a license in an SAP HANA instance with a regular, unenforced
permanent license. In this case, the unenforced license key has priority. That is, if a valid
unenforced license key is found, no memory consumption check is enforced. However, if one
license key expires and becomes invalid, the other one, if valid, becomes the valid license key
of the instance. If the latter is an enforced license key, then the memory consumption check
is enforced.
In the following situations, the system goes into lockdown mode:
The temporary license key has expired.
You were using a temporary license key and the hardware key has changed.
The permanent license key has expired and you did not renew it within 28 days.
The installed license key is an enforced license key and the current memory consumption
exceeds the licensed amount plus the tolerance.
You deleted all license keys installed in your database.
The system ID and/or hardware key of your database have changed, for example, after
system copy or renaming.
In lockdown mode, no queries are possible. Only a user with the system privilege LICENSE ADMIN can
connect to the database and execute license-related queries, such as, obtain previous license data,
install a new license key, and delete installed license keys. Note that the database cannot be backed
up if it is lockdown mode.
CheckingtheCurrentLicenseKey
Prerequisites
You have the system privilege LICENSE ADMIN.
Procedure
1. In the navigator, right-click the system and choose Properties.
2. Choose License.
In the Current License Key screen area, the following information is displayed:
License type
Start date of the license key
Expiration date of the license key

SAP HANA Database – Administration Guide 17
InstallingPermanentLicenses
Prerequisites
You have the system privilege LICENSE ADMIN.
Procedure
1. To request the first permanent license key for a newly installed SAP HANA database, you
need to provide the hardware key and the system ID. To request a subsequent permanent
license key, you have to enter the installation number and system number of your SAP HANA
database. You can get the required information from the SAP HANA studio as follows:
a. In the navigator, right-click the system and choose Properties.
b. Choose License.
If the database is currently running on a temporary license key, the Request License Key
screen area displays the hardware key and the system ID. If the database already has a valid
permanent license key, the installation number and system number are displayed.
Alternatively, you can use SQL to access the required information from the M_LICENSE
system view.
2. In the license key request on SAP Service Marketplace, enter all necessary information. If you
have the installation number and system number, then enter them first so that the other
input fields are auto-completed. When you have finished, choose Submit.
Permanent licenses are sent by e-mail attachment.
3. To install the license key, you have the following options:
a. In the Request License Key screen area in the SAP HANA studio, choose Install License
Key and select the file that you received by e-mail.
b. Execute the following SQL command: SET SYSTEM LICENSE ‘<license file content>’.
Note:
A subsequent permanent license key must have the same system-identification data as the
permanent license key previously installed in the database. In particular, the system ID,
hardware key, installation number, and system number must be the same. If any difference
is detected in this data, the installation of the license key fails and no change is made to the
license key in the database.
DeletingExistingPermanentLicenseKeys
It is possible to delete all existing license keys in an SAP HANA database. This can be helpful if
permanent license keys with an incorrect installation number or incorrect system number were
installed on the database. Deleting existing license keys results in a lockdown of the database. The
installation of a new, valid permanent license key is required to unlock the database.
Prerequisites
You have the system privilege LICENSE ADMIN.
Procedure
1. In the navigator, right-click the system and choose Properties.

SAP HANA Database – Administration Guide 18
2. Choose License.
3. Choose Delete License Key.
Alternatively, you can use SQL to delete all installed license keys by executing the following
SQL command: UNSET SYSTEM LICENSE ALL
LicenseAuditing
More information: SAP Note 1704499 – License Memory Audit

SAP HANA Database – Administration Guide 19
ManagingUsers
The right to access resources and to perform operations in SAP HANA is determined exclusively by
the privileges of the database user who attempts to perform these operations. SAP HANA supports
the concept of a role, which is fundamentally a set of privileges. Roles are granted to database users,
and users thereby gain the respective privileges.
DatabaseUsers
When you install the SAP HANA database, a database user, called SYSTEM, is created by default. The
database user SYSTEM has irrevocable system privileges, such as the ability to create other database
users, access system tables, and so on.
Note:
For security reasons, it is highly recommended that you do not use user SYSTEM for day-to-
day activities. Use SYSTEM to create administration users with the minimum privilege set
required for their duties, and use those users for day-to-day administrative activities.
Several "internal database users" are also created, such as SYS and _SYS_STATISTICS. These users
cannot log on to the SAP HANA database.
OperatingSystemUser
In addition to the SAP HANA database user SYSTEM, the installation process also creates an external
operating system user (SIDadm, for example, sp1adm or xyzadm). This operating system user,
referred to here as the operating system administrator, simply exists to provide an operating system
context. From the operating system perspective, the operating system administrator is the user that
owns all SAP HANA files and all related operating system processes. Within the SAP HANA studio, the
operating system administrator’s credentials are required, for example, to start or stop database
processes or to execute a recovery. The operating system administrator is not an SAP HANA database
user.
Authentication
To be able to use the SAP HANA database, the identity of the database users first need to be verified
in a process called authentication. Several types of authentication are possible.
InternalAuthentication
Users are created in SAP HANA database only. Authentication is handled by the SAP HANA database
by means of a username-password combination.
UsingExternalUserRepositoriesforAuthentication
The SAP HANA database supports the mapping of users created in the SAP HANA database to
external users through the integration of the MIT Kerberos network authentication protocol or
through the Security Assertion Markup Language (SAML).
Kerberos
If you want to use Kerberos, you must install the relevant Kerberos client software from your
operating system software package and configure the SAP HANA database accordingly.
SAP HANA Database – Administration Guide 20
The users stored in the MIT Kerberos Key Distribution Center can then be mapped to database users
in SAP HANA database. For this purpose, specify the User Principal Name (UPN) as the external ID
when creating or changing the database user.
The following is an example of how to check whether or not Kerberos client software is installed:
Example (for Linux SLES 11, without SP1):
bash> rpm -qa | grep krb
krb5-32bit-1.6.3-133.10
krb5-1.6.3-133.10
SAML
To be able to use SAML authentication, at least one SAML identity provider must have been created.
More information: SAP HANA Database – Security Guide on SAP Help Portal at http://help.sap.com
Authorization
Once their identity has been verified, database users can perform database operations. The
confirmation that the database user is entitled to perform the operation is called authorization. The
user must have both the privilege to perform the operation and access rights to the resources (such
as schemas and tables) to which the operation applies.
Database users can have the following types of privilege:
Privileges that were directly granted to them (“direct privileges”)
Privileges that were granted to roles that they were assigned to (“inherited privileges”)
More information: SAP HANA Database – Security Guide on SAP Help Portal at
http://help.sap.com/hana_appliance
PrivilegesforAdminstrationTasks
The following is an overview of the privileges that database users require to perform particular
database operations in the Administration Editor:
Action Privilege Needed
Open the
Administration
Editor
with read-only access to the
system, monitoring views, and
statistics services
System privilege CATALOG READ or DATA ADMIN
SQL privilege SELECT for SQL schema _SYS_STATISTICS
Note
A read-only role, MONITORING, is shipped with the SAP
HANA database installation. It includes the
abovementioned privileges and can be assigned to users
to give them read-only access.
Stop and start
database
services
on the Landscape tab
System privilege SERVICE ADMIN
Change check settings on the
Alerts tab
System privilege INIFILE ADMIN
View alert information on the
Overview and Alerts tabs
SQL privilege SELECT
for the
SQL
schema
_SYS_STATISTICS

SAP HANA Database – Administration Guide 21
Mark disk full events a
s handled
System privilege MONITOR ADMIN
Cancel operations on the
Threads
sub-tab of the Performance tab
System privilege SERVICE ADMIN
Change the settings on the
Configuration tab.
System privilege INIFILE ADMIN
View diagnosis files of systems
without an SQL connection
To be able to
view the diagnosis files of a
system
without and
SAL connection, you must be logged on as system administrator.
To do so, proceed as follows:
1. In the navigator, right-click the system and choose
Properties.
2. Choose SAP System Logon.
3. Enter the <sid>adm user name and password.
Choose Apply and OK.
Note:
If an SQL connection cannot be established, the
Diagnosis Files tab is automatically displayed when you
open the Administration Editor, regardless of user
privileges. However, the file list is only displayed if you
are logged on as system administrator.
Configure
database
traces on the
Trace Configuration tab.
System privilege INIFILE ADMIN
Configure the SQL trace on the
Trace Configuration tab.
System privilege INIFILE ADMIN
Delete trace files on the
Diagnosis Files tab.
System privilege TRACE ADMIN
Start and stop the performance
trace on the Trace Configuration
tab.
System privilege TRACE ADMIN
M
ove tables
and table
partitions
to another host in a distributed
system
System prililege DATA ADMIN, or
System privilege CATALOG READ and SQL privilege
ALTER for the table being moved
Note:
If a user with system privilege CATALOG READ is also the
owner of the table, they can also move the table
without SQL privilege ALTER.
Import an
d export tables
System privileges IMPORT and EXPORT
SQL privilege INSERT for import and SELECT for export
More information: SAP HANA Database – Security Guide on SAP Help Portal at
http://help.sap.com/hana_appliance
ProvisioningUsers
As a database user with privileges for user management, you can set up other users to work with the
SAP HANA database. To do this, you can define roles with different privileges and then assign
database users to these roles.
Note:
If you are using an Identity Management (IDM) system for user provisioning, it is highly
recommended that you create a dedicated technical user for that system that has the USER
SAP HANA Database – Administration Guide 22
ADMIN and ROLE ADMIN privileges. This database user account should then be used
exclusively by the IDM system for its user provisioning tasks.
CreatingRoles
Prerequisites
To create a role, you must have the privilege ROLE ADMIN.
To grant a privilege to a role, you must have the privilege yourself and be authorized to grant
it to other users and roles.
Procedure
1. In the navigator, expand the system, then the Catalog folder and the Authorization folder.
2. Right-click the Roles folder and choose New Role.
3. Create the role by specifying a unique role name and assigning the required privileges (SQL
privileges, analytical privileges, system privileges).
4. Choose Deploy to create the role.
Note
You can delete a role by right-clicking it in the navigator and choosing Delete.
CreatingUsers
Prerequisites
To create a user, you must have the privilege USER ADMIN.
To grant a privilege to a user, you must have the privilege yourself and be authorized to grant
it to other users and roles.
Procedure
1. In the navigator, expand the system, followed by the Catalog folder, and the Authorization
folder.
2. Right-click the Users folder and choose New User.
3. Specify the following information:
A unique user name
Authentication details
You can set up one or more of the following types of user authentication:
Internal authentication by specifying a user name and password
Kerberos authentication (external) by specifying the external ID known by
the external identity provider
SAML authentication (external) by specifying the identity provider and the
user ID known by the SAML identity provider
To use identity provider based user mapping, select the checkbox in the Any
column.
Roles and privileges
You can grant roles and/or privileges (SQL privileges, analytical privileges, and system
privileges) to the user.

SAP HANA Database – Administration Guide 23
To allow the user to pass on his or her privileges to other users, select Grantable to
other users and roles.
4. Choose Deploy to create the user.
ChangingUsers
1. In the navigator, expand the system, followed by the Catalog folder and the Authorization folder.
2. Double-click the user and make the required changes. You can change the following:
Password for internal authentication
External ID for Kerberos authentication
Identity provider and external user ID for SAML authentication
Granted roles and privileges (SQL privileges, analytical privileges, system privileges)
Whether or not the user is allowed to pass on his or her privileges to other users
(Grantable to other users and roles option)
3. Choose Deploy to save the changes.
Note
You can delete a role by right-clicking it in the navigator and choosing Delete.
DeactivatingandReactivatingUsers
Users can be automatically deactivated for security reasons, for example, if they violate password
policy rules. However, as a database administrator, you may need to explicitly deactivate a user, for
example, if an employee temporarily leaves the company or if a security violation is detected.
Prerequisites
You have system privilege USER ADMIN.
Procedure
1. In the navigator, select Catalog Authorization Users <username>.
2. From the toolbar of the User Editor, choose Deactivate User...
The database user is now deactivated and remains so until you reactivate. The user still exists
in the database, but cannot connect to the database any more. The reason (explicit
deactivation) and the time of deactivation are displayed in the user’s details.
3. To reactivate the user, from the toolbar of the User Editor, choose Activate User...
You are prompted to enter a new password for the user. The user is now reactivated.
DisablingDefaultUserFilteringofSchemas
Schemas are filtered according to user by default. This is because in large SAP HANA systems hosting
multiple applications with hundreds, thousands, maybe even hundreds of thousands of users, it
would be impossible for individual users to identify the schemas with which they are permitted to
work if all schemas were visible.
Therefore, the connected user sees only those schemas for which at least one of the following
criteria applies:
The user is the schema owner
The user has at least one privilege on the schema

SAP HANA Database – Administration Guide 24
The user has at least one privilege on at least one object in the schema
The user owns at least one object in the schema
Note:
For all privilege checks, not only privileges directly granted to the user but also privileges
granted to one of his or her roles (or to roles in these roles) are considered.
As a result, users with DATA ADMIN or CATALOG READ privilege, in particular user SYSTEM, do
not see all available schemas. If, as a database administrator, you need to see all available
schemas, you must disable the default schema filter.
Procedure
1. In the navigator, right-click Catalog and choose Filters…
The Filter for Schema dialog box opens.
2. Select Display all schemas.
3. Optional: Specify a filter pattern to reduce the number of schemas displayed.
This is useful if the total number of schemas exceeds the number of displayable items in
the tree (configured under Preferences Catalog). If this is the case, then you will not
see all schemas at once and will have to browse.
4. Choose OK.

SAP HANA Database – Administration Guide 25
Monitoring
To identify problems with the database early and avoid disruptions, you need to monitor your
systems continuously. While the System Monitor provides you with an overview of all your systems,
you use the Administration Editor to monitor each individual system in detail.
To open the Administration Editor for a particular system, select the system in the navigator and
then from the toolbar choose the (Administration) button. The header of Administration Editor
contains general information about the system (name, host, instance number, time of last refresh),
as well a toolbar with the following functions:
The (Refresh current page) button allows you to manually refresh the tab you are
viewing.
The (Stop/Start automatic refresh) button allows you to activate and deactivate
automatic refresh. You can specify the interval between automatic refresh (in seconds) in the
corresponding field.
The (Copy to clipboard) button allows you to copy the details of the tab you are viewing
to the clipboard and then to paste this to another program, for example Notepad.
The (Clear messages in the header) button allows you to clear any messages displayed in
the header.
MonitoringOverallResourceUsage
When you open the Administration editor for a particular SAP HANA database system, the Overview
tab provides you with a summary of the overall status of the system as well as an overview of
resource usage. Resource indicators are presented at the level of the SAP HANA database system and
at the level of the host(s) on which the database system resides. In this way, you can more clearly
identify where resource issues lie.
The following information is available:
SAP HANA Database
o General information about the SAP HANA database system, such as operational
state, whether or not the system is distributed, the number of hosts (if distributed),
and database version
o Priority-rated alerts and messages reported by the statistics server
o The maximum amount of memory that can be reserved by SAP HANA from the
operating system (allocation limit) and the amount of memory that is currently used
o Number of CPUs available and percentage used by the SAP HANA database system
o Disk space occupied by data, log, and trace files belonging only to the SAP HANA
database system
Host(s)
o The amount of physical memory available on the host machine(s) and the amount of
physical memory used overall (that is, including that used by the activities of Linux
and all other programs on the host)
SAP HANA Database – Administration Guide 26
o The amount of virtual memory available on the host machine(s) and the amount of
virtual memory used
Note:
The physical memory bar and the virtual memory bar are related. Physical memory is
the actual physical RAM on the host machine. Virtual memory includes swap-space
on disk. SAP HANA should always execute out of physical memory; a virtual memory
size that is much larger than physical memory size is an indication of system
performance degradation, possibly requiring the addition of memory.
o Total disk space occupied on disks containing data, log, and trace files
o Number of CPUs available and overall usage
Note:
The resource indicator bars (memory, CPU, and disk) change color (red, yellow, and green)
based on configurable thresholds. In the "SAP HANA Database" area, these bars reflect
values measured for the SAP HANA database system, while in the "Host(s)" area they reflect
values measured on the machine(s) as a whole. For this reason, the color of bars may differ.
If the database system is distributed, then resource usage values displayed are aggregated
across all hosts. An additional bar shows the host with the highest (most critical) resource
usage.
MonitoringSystemComponents
The Landscape tab enables you to check that your system is running and the status of its hosts and
processes. The Landscape tab has two subtabs, Services and Configuration.
Services
The Services subtab contains information about the status of the OS processes of your SAP HANA
system. Information about resource usage and possible bottlenecks is also displayed.
The following table lists the information displayed by default:
Column Description
Active
This column displays a green, yellow
,
or red symbol to indicate
the following
:
Green: Service is started
Yellow: Service is starting or stopping
Red: Service is stopped
Note:
The daemon is shown as yellow while the host or any if its child services are
starting or stopping.
Host
The name of the
host
on
which the service is
running
Distributed systems show more than one host.
Port
Port
that
the system uses for internal communic
ation
between services
Service
Service name
Detail
T
he ro
le of the
host
on
which
the service is running (
maste
r
or stanby)
This is relevant only for distributed systems installed on more than one host.
SAP HANA Database – Administration Guide 27
Process ID
The process ID
at operating system level
CPU
Bar view showing the CPU usage
of the
service
Me
m
ory
B
ar
view show
ing
the memory
usage
of
the
service in relation to total memory
available and the effective allocation limit of the service
Used Memory
(MB)
The amount of memory used by the service
Effective
Allocation
Limit (MB)
The e
ffective maximum
memory pool size considering
the current memory
p
ool
sizes of other processes
Physcial
Memory on
Host (MB)
Total memory available on the host
Start Time
Start time of the
service
Two of these times in this column should match the Start time of first started service
and Start time of latest started service times shown on Overview tab.
For more information, see Monitoring Memory Usage.
You can display the following addtional columns by configuring the table ( button):
Allocated memory (heap and shared)
Memory used (heap and shared)
Size of caches
Shrinkable size of caches
All process memory on host (MB)
Virtual memory on host (MB)
Size of shared libraries
Size of thread stacks
The following filters are available and are primarily for use with a distributed system:
Host
This filter enables you to view one or more selected hosts.
Service
This filter shows the same service on each server. For example, you can choose to view all
the nameservers in a distributed system only.
You can restart services by choosing the corresponding entry in the context menu. If you choose to
stop or kill a service, it is stopped or killed and then automatically started again.
Configuration
The Configuration sub-tab of the Landscape tab lists the hosts in the SAP HANA system with
additional information on status and role. This is only relevant for distributed systems and in
particular, if failover is configured.
Column Description
Host
Displays the
h
ost
name
Active
Indicates whether or not the host
is active

SAP HANA Database – Administration Guide 28
Host
Status
Indicates whether or not
the host is running correctly
Failover
Status
Displays the failover status so you can see which servers are active and which
are on standby
Nameserver
R
ole
(Configured)
Displays the role of the
nameserver
as it has been configured:
master1,
master2, master3, or slave nameserver
Nameserver R
ole
(Actual)
Displays the role of the
nameserver
as it is currently running: master or slave
nameserver
Indexserver
Role
(Configured)
Displays the role of the
indexserv
er
as it has been configured:
worker
indexserver or standby
Indexserver
R
ole
(Actual)
Displays the role of the
indexserver
as it is currently running: master
indexserver, worker indexserver, or standby indexserver
Failover Group
In case of failover
,
the
server
tries to fail over to a host within the same group
Storage Partition
Displays the number of the mnt000... subdirectory used below DATA and LOG
directory
To change the configured role of the host, choose the Configure Hosts for Failover Situation button in
the toolbar.
More information: Failover Concept
MonitoringAlerts
The statistics server is one of the services of the SAP HANA database system. In addition to collecting
historical performance and resource data, the statistics server issues system resource alerts to warn
you of potential problems.
Note
You can access the historical performance and resource data collected by the statistics server
by viewing the content of the tables in the _SYS_STATISTICS schema.
More information: Displaying the Content of Tables
Some critical information that you want to have as early as possible is:
A hard disk is becoming full
CPU usage is critical
A server has crashed
By default, when the system is started, the statistics server is started automatically on the host of the
master nameserver. The statistics server internally uses SQL statements to collect information from
all index servers. Important alerts from the collected information on the system state are
summarized on the Overview tab of the Administration Editor, and displayed in detail on the Alerts
tab. To always see the latest information, the display must be regularly refreshed.
You can also receive e-mail alerts. More information: Configuring Alerts
NavigatingAlerts
At the top of the Alerts tab is a field displaying the time of the last check. You can view either All
alerts or Current alerts in the main area of the window.

SAP HANA Database – Administration Guide 29
If you choose All alerts, the alerts are broken down according to time period:
Last 15 minutes, Last 30 minutes, Last hour, Last 2 hours, and Today all show the alerts
shown in those periods. For example, if an alert was generated 10 minutes ago, it would be
shown under all these headings.
Yesterday displays alerts that were generated yesterday only.
Last week displays alerts generated during the previous week (Sunday to Saturday).
Two weeks ago displays the alerts generated during that week, and so on.
Note:
These alerts are not "rolled over" into the following weeks. This enables you to compare the
performance of the system over selected periods as well as view the alerts.
If you choose Current alerts, only those alerts that are current and have not been resolved are
displayed.
FilteringAlerts
In the Filter field, you can enter a filter parameter to view only alerts that contain the text in your
filter.
You can also choose Select Alert Filters to set filters according to priority, host, and timeframe.
DisplayingDetailedAlertInformation
Double-click an alert to see detailed information, including:
A full description of the alert
The time stamp for this instance of the alert
Information about how to resolve the alert
A history of when this alert was generated in the past
The Copy function allows you to copy the hint in the alert to the clipboard.
MonitoringDiskSpace
Data files contain all the data in the database. Data is copied to the disk at regular intervals in case of
data loss as a result of a power failure. You must always ensure that there is enough space on the
disk for these files to be saved. Data within a system is contained in volumes. Currently there is one
volume per instance/index server.
You can monitor disk space on the Volumes tab of the Administration Editor.
You can view volume information according to the following filters:
The Show filter enables you to view the volumes information either by service or storage ID.
The Host filter enables you to view volumes information either on all hosts or on selected
hosts.
Volume information displayed when the Show filter is set to Service is:
Column Description
Service/Volume
List of services storing data in the
database
. These are the nameserver,
indexserver and statisticsserver. Other services do not store any data in the

SAP HANA Database – Administration Guide 30
database
and are
therefore
not displayed. This column shows the host and
the internal communications port on which the server is running. You can
view individual Log and Data information by clicking on the arrow to the left
of the host name.
Service Name
These are the na
meserver,
indexserver
and
statistic
s
server
. In a distributed
system, there are multiple instances of each of the services.
Total Size
Total size in MB of the data and log of this service.
Data Size
Size in MB of the service data stored on the host.
L
og Size
Size in MB of the service log stored on the host.
Full Path
Full path of the service log and data files. This can be viewed by clicking the
arrow next to the host name.
Storage Device ID
Identifies the storage device. This can be useful for ch
ecking if the log and
data files are stored on the same device.
Total Storage Size
Total storage size in MB of the hard disk of the host.
Used Storage Size
Used storage in MB on the hard disk of the host.
Free Storage Size
Free storage space in MB on t
he hard disk of the host.
Volume Subpath
The directory where each service is stored on the disk.
Storage ID
Storage identifier.
Volume ID
Volume identifier.
Volume information displayed when the Show filter is set to Storage is similar to that shown above,
but is displayed in a different format and includes trace files.
Storage/Service shows the storage type, Data, Log and Trace. If you click the arrow to the left of each
storage type, you are shown the individual service information.
The Details for Volume of Service area shows further details on the selected indexserver and statistics
server. Currently the system does not show these extra details for the nameserver.
This information is useful for detailed performance analysis.
Column Description
Fil
es
Displays the name and type of file. It also shows the size of the file and how much
of the file is currently in use (in MB and also in %). If the data in the file reaches
the total size of the file, the system will automatically expand the file size. The file
path is also shown.
Volume I/O
Statistics
Shows general file I/O statistics for specific paths (storage/volume/service).
Aggregated I/O statistics are also displayed for example number of read/ write
requests, data volume (throughput), total I/O time and speed (MB/s).
Volume I/O
Performance
Statistics
Displays specific file I/O statistics for specific paths (storage/volume/service). I/O
statistics are broken down according to the I/O buffer size, for example number of
read/write requests, durations, waiting situations, and so on. These figures can be
useful when analyzing database problems.
Data Volume
Superblock
Statistics
Displays general data volume block statistics (data storage/data volume/service).
Aggregated block statistics are displayed. The data volume is partitioned into
superblocks, which are partitioned into smaller blocks (pages) of a specific size.
Only blocks of the same size are stored in the same superblock
SAP HANA Database – Administration Guide 31
Data Volume
Page Statistics
Shows specific data volume block statistics (
data storage/data volume/service).
The block statistics are broken down according to the “page size class”. You can
analyze how many superblocks are used for the specific size class and also how
many pages/blocks are used.
MonitoringPerformance
In addition to the general information about the overall system performance that you can see in the
System Monitor and on the Overview tab of the Administration Editor, you can monitor more
detailed aspects of system performance on the Performance tab, for example, to detect and resolve
optimization issues.
Note:
We recommend that you use the available filters and column configuration options of the
views below to restrict the amount of information displayed.
Tab
More Information
Threads
By default, the
T
hreads
tab
shows you a list of all
currently active
threads in your
landscape. It may be useful to see, for example, how long a thread is running, if a
thread is blocked for inexplicable length of time, and so on.
A blocked thread is indicated by a warning icon in the Status column, and you can
see detailed information about the blocking situation by hovering the cursor over
this icon.
The following features are also available on the Threads tab:
You can end the operation of a specific thread. Right-clicking the thread
and choose Cancel Operation.
You can view the call stack for a specific thread. Select the Create Call
Stacks checkbox, refresh the page, and then select the thread in
question.
SQL cache plan
The SQL plan cache is useful for observing overall SQL
performance as it provides
statistics on compiled queries. Here, you can get insight into frequently executed
queries and slow queries with a view to finding potential candidates for
optimization.
The following information may be useful:
Dominant statements (TOTAL_EXECUTION_TIME)
Long-running statements (AVG_EXECUTION_TIME)
Frequently-executed plans (EXECUTION_COUNT)
Statements with high lock contention (TOTAL_LOCK_WAIT_COUNT)
Note:
The collection of SQL plan cache statistics is enabled by default, but you
can disable it on the SQL Plan Cache tab by choosing Configure.
Expensive
statements
Expensive statements are individual SQL queries whose execution time was
above a configured threshold. Expensive statements may reduce the
performance of the database.
Note:
The expensive statements trace is deactivated by default. You can
activate it either on the Expensive Statements Trace tab or on the Trace
Configuration tab. You can also configure the threshold value here. The
default threshold value is 1000000 microseconds, that is, 1 second.
Job progress of
Certain operations typically run for a long time and may consume a considerable
SAP HANA Database – Administration Guide 32
long
-
running
operations
amount of resources, for example,
delta merges, compression, delta log replays
.
By monitoring the progress of these long-running transactions, you can
determine whether or not they are responsible for current high load, see how far
along they are and when they will finish.
System load
history
The load display gives you a graphical display of general performan
ce KPIs (such
as CPU usage, memory consumption, and table unloads) over time. You can
compare the performance of different hosts.
Troubleshoot issues detected by analyzing individual queries further or contacting support.
More Information: Troubleshooting
MonitoringMemoryUsage
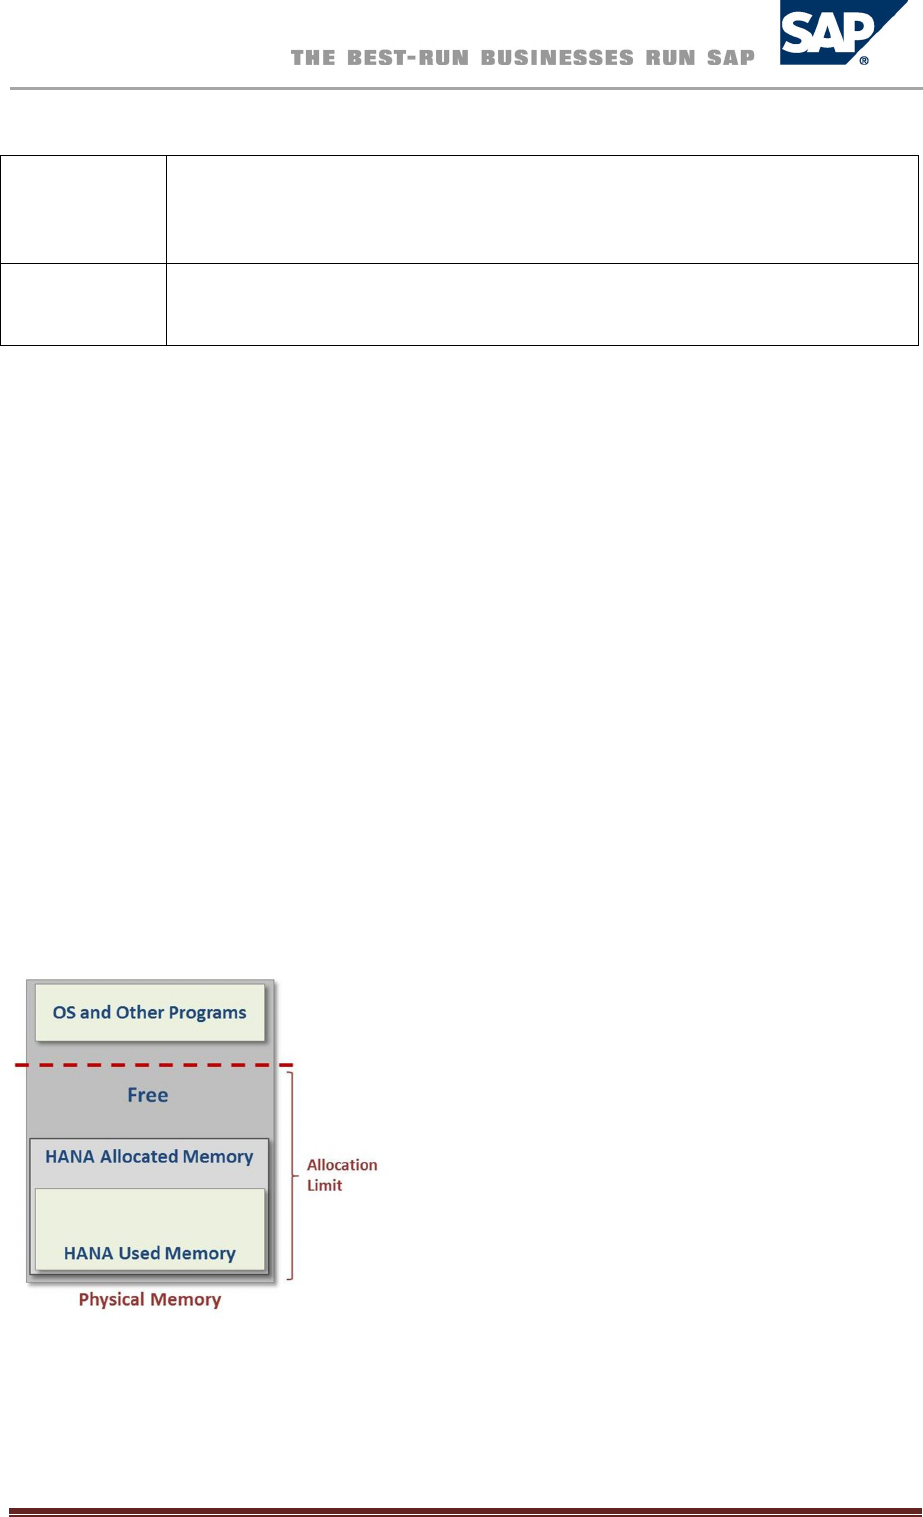
MemoryConcepts
As an in-memory database, it is critical for SAP HANA to handle and track its consumption of memory
carefully and efficiently. For this purpose, the SAP HANA database pre-allocates and manages its own
memory pool and provides a variety of memory usage indicators to allow monitoring.
SAP HANA tracks memory from the perspective of the host. The most important concepts are:
Physical memory
The amount of (system) physical memory available on the host
Allocated memory
The memory pool reserved by SAP HANA from the operating system
Used memory
The amount of memory from this pool that is actually used by the SAP HANA database
The following figure illustrates the above concepts.
Memory Concepts
DeterminingPhysicalMemorySize
Physical memory (DRAM) is the basis for all memory discussions. On most SAP HANA hosts, it ranges
from 256 gigabytes to 2 terabytes. It is used to run the Linux operating system, SAP HANA, and all
SAP HANA Database – Administration Guide 33
other programs that run on the host. There are several ways to determine the amount of physical
memory:
Physical Memory How to Determine
Available physical
memory
Execute the SQL query
select round((USED_PHYSICAL_MEMORY +
FREE_PHYSICAL_MEMORY) /1024/1024/1024, 2) as
"Physical Memory GB" from
PUBLIC.M_HOST_RESOURCE_UTILIZATION;
Read the value for Physical Memory Available on the Overview tab of
the Administration Editor
Execute Linux command cat /proc/meminfo | grep MemTotal
Free physical
memory
Execute the SQL query:
select round(FREE_PHYSICAL_MEMORY/1024/1024/1024, 2)
as "Free Physical GB" from
PUBLIC.M_HOST_RESOURCE_UTILIZATION;
Subtract the value for Memory Used from the value for Memory
Available available on the Overview tab of the Administration Editor
Execute Linux command awk 'BEGIN {sum = 0};
/^(MemFree|Buffers|Cached):/ {sum = sum + $2}; END {print
sum}' /proc/meminfo
AllocatedMemoryPool
The SAP HANA database (across its different processes) reserves a pool of memory before actual use.
This pool of allocated memory is pre-allocated from the operating system over time, up to a
predefined global allocation limit, and is then efficiently used as needed by the SAP HANA database
code. More memory is allocated to the pool as used memory grows. If used memory nears the global
allocation limit, the SAP HANA database may run out of memory if it cannot free memory.
The default allocation limit is 90% of available physical memory, but this value is configurable (see
Memory Consumption Configuration).
You can see what the global allocation limit of the database is in the Adminstration editor on the
Overview tab.
Note
The preallocation of pool memory is the reason why Linux memory indicators (such as top
and meminfo) do not accurately reflect the actual SAP HANA used memory size.
In addition to the global allocation limit, each process running on the host has an allocation limit, the
process allocation limit. Given that collectively, all process cannot consume more memory than the
global allocation limit, each process also has what is called an effective allocation limit. The effective
allocation limit of a process specifies how much physical memory a process can in reality consume
given the current memory consumption of other processes.
You can see what the current effective allocation limit of a process is in the Administration editor on
the Landscape Services tab.
Example

SAP HANA Database – Administration Guide 34
A single-host system has 100 GB physical memory. Both the global allocation limit and the
individual process allocation limits are 90% (default values).
This means the following:
• Collectively, all processes of the HANA database can use a maximum of 90 GB.
• Individually, each process can use a maximum of 90 GB.
Therefore, if 2 processes are running and the current memory pool of process 1 is 50 GB,
then the effective allocation limit of process 2 is 40 GB. This is because process 1 is already
using 50 GB and together they cannot exceed the global allocation limit of 90 GB.
DeterminingUsedMemorySize
Used memory serves several purposes:
Program code and stack
Working space and data tables (heap and shared memory)
The program code area contains the SAP HANA database itself while it is running. Different parts of
SAP HANA can share the same program code. The stack is needed to do actual computations. The
most important part of used memory is the heap and shared area. It is used for working space,
temporary data and for storing all data tables, as illustrated in the following figure:
Used Memory
You can use the M_SERVICE_MEMORY view to explore the amount of SAP HANA Used Memory as
follows:
Category SQL Query to Execute
Total memory
used
SELECT
round(sum(TOTAL_MEMORY_USED_SIZE/1024/1024)) AS
"Total Used MB" FROM SYS.M_SERVICE_MEMORY;
Code and stack size
SELECT
round
(
sum
(CODE_SIZE+STACK_SIZE)/1024/1024)
AS "Code+stack MB" FROM SYS.M_SERVICE_MEMORY;
SAP HANA Database – Administration Guide 35
Total memory consumption
of all columnar tables SELECT round(sum(MEMORY_SIZE_IN_TOTAL)/1024/1024)
AS "Column Tables MB" FROM M_CS_TABLES;
Total memory consumption
of all row tables
SEL
ECT
round
(
sum
(USED_FIXED_PART_SIZE +
USED_VARIABLE_PART_SIZE)/1024/1024) AS "Row
Tables MB" FROM M_RS_TABLES;
Total memory consumption
of all columnar tables by
schema
SELECT
SCHEMA_NAME
AS
"Schema",
round(sum(MEMORY_SIZE_IN_TOTAL) /1024/1024) AS
"MB" FROM M_CS_TABLES GROUP BY SCHEMA_NAME ORDER
BY "MB" DESC;
MemoryConsumptionofColumnarTables
The SAP HANA database loads columnar tables into memory column by column only upon use. This is
sometimes called “lazy loading”. This means that columns that are never used are not loaded, which
avoids memory waste. When the SAP HANA database runs out of allocatable memory, it may also
unload rarely used columns to free up some memory.
Therefore, if it is important to precisely measure the total, or “worst case”, amount of memory used
for a particular table, it is best to ensure that the table is fully loaded first by executing the following
SQL statement: LOAD table_name ALL.
To examine the memory consumption of columnar tables, you can use the M_CS_TABLES and
M_CS_COLUMNS views.
The following examples show how these views can be used to examine the amount of memory
consumed by a specific table. You can also see which of its columns are loaded and the compression
ratio that was accomplished.
Columnar Table How to Calculate
List all columnar tables
of schema 'SYSTEM'
SELECT
TABLE_NAME
AS
"Table",
round(MEMORY_SIZE_IN_TOTAL/1024/1024, 2) as "MB" FROM
M_CS_TABLES WHERE SCHEMA_NAME = 'SYSTEM' ORDER BY "MB"
DESC;
Show column details
of table "LineItem" in
schema "SYSTEM"
SELECT
COLUMN_NAME
AS
"Column", LOADED
AS
"Is Loaded",
round(UNCOMPRESSED_SIZE/1024/1024) AS "Uncompressed
MB", round(MEMORY_SIZE_IN_MAIN/1024/1024) AS "Main
MB", round(MEMORY_SIZE_IN_DELTA/1024/1024) AS "Delta
MB", round(MEMORY_SIZE_IN_TOTAL/1024/1024) AS "Total
Used MB", round(COMPRESSION_RATIO_IN_PERCENTAGE/100,
2) AS "Compr. Ratio" FROM M_CS_Columns WHERE
TABLE_NAME = 'LINEITEM';
Note that the M_CS_TABLES and M_CS_COLUMNS views contain a lot of additional information (such
as cardinality, main-storage versus delta storage and more). For instance, to explore further try the
following query:
SELECT * FROM M_CS_COLUMNS WHERE TABLE_NAME = '…' and COLUMN_NAME = '…'
MemoryConsumptionofRow-OrderedTables
Several system tables are in fact row-ordered tables.

SAP HANA Database – Administration Guide 36
You can use the M_RS_TABLES view to examine the memory consumption of row-ordered tables.
For instance, you can execute the following SQL query, which lists all row tables of schema ‘SYS’ by
descending size:
SELECT SCHEMA_NAME, TABLE_NAME, round((USED_FIXED_PART_SIZE +
USED_VARIABLE_PART_SIZE)/1024/1024, 2) AS "MB Used" FROM M_RS_TABLES WHERE
schema_name = 'SYS' ORDER BY "MB Used" DESC, TABLE_NAME
MemoryConsumptionandSAPHANALicenses
For more information about memory consumption with regards to SAP HANA licenses, see SAP Note
1704499 – License Memory Audit.
MemoryConsumptionConfiguration
By default, SAP HANA can pre-allocate up to 90% of the available physical memory on the host. There
is normally no reason to change the value of this variable, except in the case where a license was
purchased for less than the total of the physical memory. In such a case, you should change the
global allocation limit to remain in compliance with the license.
Example 1
You have a server with 512GB, but purchased an SAP HANA license for only 384 GB.
You therefore set the global_allocation_limit to 393216 (384 * 1024 MB).
Example 2
You have a distributed HANA system on four hosts with 512GB each, but purchased an SAP HANA
license for only 768 GB.
Set the global_allocation_limit to 196608 (192 * 1024 MB on each host).
More information: Setting the Global Allocation Limit Parameter
SAP HANA Database – Administration Guide 37
Configuration
ChangingParameterValues
The properties of a system are defined in the parameters of the configuration files.
A number of configuration files can be displayed and changed in the Administration Editor.
Procedure
1. In the Administration Editor, choose the Configuration tab.
The configuration files that contain the configuration information for the system are displayed.
2. Expand the relevant configuration file.
3. Choose Change... in the context menu of the relevant row and enter the new value for the
configuration parameter.
Result
After you have changed a parameter, a green circle is displayed next to it and the section in which
the parameter was changed is labeled with a gray rhomb.
Note:
To apply your change, you do not have to restart the system. If necessary, the system
automatically restarts the relevant components.
For some parameters, you can override the default values per host. Parameters for which you cannot
override the system-wide default values contain a minus sign in those columns in which no override
is possible.
ResettingParameterValues
You can reset a parameter value to the system-wide default value.
Procedure
1. In the Administration Editor, choose the Configuration tab.
The configuration files that contain the configuration information for the system are displayed.
2. Expand the relevant configuration file.
3. In the context menu of the parameter, choose Delete...
4. Select the level(s) on which you want to reset the parameter.
SettingtheGlobalAllocationLimitParameter
The global_allocation_limit is used to limit the amount of memory that can be used by the database.
The value is the maximum allocation limit in MB. A missing entry or a value of 0 results in the system
using the default settings (that is, 90% of the physical memory or physical memory minus 1GB in case
of small physical memory). This limit is only displayed on the Configuration tab.
Procedure
1. In the Administration Editor, choose the Configuration tab.

SAP HANA Database – Administration Guide 38
The configuration files that contain the configuration information for the system are
displayed.
2. Expand the global.ini configuration file and expand the memorymanager section.
3. In the context menu, choose Change for global_allocation_limit.
Change Configuration Value dialog box for global_allocation_limit is displayed.
There are two parts to the dialog box that enable you to set this parameter for the entire
SYSTEM and for an individual HOST. If it is set for SYSTEM, the value is used for each host. For
example, if you have 5 hosts and set the limit to 5 GB, the database can use up to 5 GB on
each host (25 GB in total). You can additionally set the value for a specific HOST. For that host
the specific value is used and the SYSTEM-value is used for all other hosts.
4. Enter the values in the New Value fields (for the SYSTEM and HOST, if required) and choose
Save.
Result
The database memory usage is limited to the amount of memory specified.
ChangingtheDefaultSLDDataSupplierConfiguration
The System Landscape Directory (SLD) is the central directory of system landscape information
relevant for the management of your software lifecycle. Data suppliers collect and send system data
to SLD on a regular basis.
For SAP HANA systems, the is the SLD data supplier. It is configured by default to automatically
transfer data to the SLD in XML format using the sldreg executable on a regular basis. However, if
it is necessary to change the default settings, you can do so in the SAP HANA studio by modifying the
nameserver.ini file. For example, it may not be necessary to send data to the SLD frequently if your
landscape is stable, or you may need to change the default save locations of the configuration and
log files.
Prerequisites
You have performed the necessary configuration for the SLD. For more information, see the
following:
SAP Note 1018839 (Registering in the System Landscape Directory Using SLGREG)
SAP HANA Installation Guide with SAP HANA Unified Installer on SAP Help Portal at
http://help.sap.com/hana_appliance SAP HANA Installation Guide with SAP HANA Unified
Installer Configuring an SAP HANA System to Connect to System Landscape Directory (SLD)
Procedure
1. In the Administration Editor, choose the Configuration tab.
2. Right-click the nameserver.ini file and choose Add Section.
3. Create the section sld.
4. Add those parameters whose default value you want to change.
The following table lists the possible parameters and their default values.
Note:

SAP HANA Database – Administration Guide 39
Under normal circumstances, you will not need to change the default values. It should only
be necessary, for example, for testing purposes or if requested as part of a support inquiry.
Key Meaning Default Value Note
enable
Activates
or deactivates the SLD data
supplier.
true
Allowed vales are t
rue
,
false
I
nterval
Specifies the frequency (in seconds)
with which the CIM.xml file is
generated. If a newly-generated
document is the same as the previous
one, it is not sent to the SLD.
300
It does not make sense
to enter small positive
values or negative
values.
If you enter 0 or a
negative value, data is
transferred to the SLD
only once.
Enter a value without a
“1000 separator” (for
example, 1899, not
1,899 or 1.899),
otherwise it will be
interpreted as 0.
force_interval
Specifies how often (in seconds) the
CIM.xml file must be sent to the SLD,
even if the file has not changed.
43200
As above
config_path
Specifies the location of the folder that
contains the configuration file
slddest.cfg.
This file is a parameter for the call to
sldreg.
/usr/sap/<sid>
/SYS/global
Example:
/usr/sap/MPW/SYS/glo
bal
X
mlpath
Specifies where the file sldreg.xml is
generated and where the smlreg.log
log file is written. smlreg.log is the
log file of sldreg, and both files are
parameters for the call to sldreg.
/usr/sap/<sid>
/HDB<id>/<cur
renthost>
Example:
/usr/sap/LRH/HDB42/v
elberlcm1
More information:
SAP Library for SAP NetWeaver on SAP Help Portal at http://help.sap.com under SAP Netweaver
SAP NetWeaver Platform SAP NetWeaver 7.3 Application Help SAP NetWeaver Library:
Function-Oriented View Solution Lifecycle Management Configuring, Working with and
Administering System Landscape Directory
Setup Guide Landscape Management Database on SAP Help Portal at http://help.sap.com under
Application Lifecycle Management SAP Solution Manager SAP Solution Manager 7.1
Configuration and Deployment Information Configuration Guide 6 Additional Guides
Note:
If errors occur in the transfer of data to the SLD, you can check the log file smlreg.log and the
nameserver trace (trace topics SLDCollect and SLDSend). The SLD data supplier is traced in
the nameserver’s regular trace file as part of database tracing.
More information: Diagnosis Files
SAP HANA Database – Administration Guide 40
ConfiguringAlerts
ConfiguringE-MailNotifications
You can configure the statistics server so that the system notifies you by e-mail about important
system alerts.
Procedure
1. In the Administration Editor, choose the Alerts tab.
2. Choose Configure Check Settings.
The Configure Check Settings dialog box is displayed. The default tab is Configure E-mail
Functions.
3. Complete the following information:
Information Description
Sender E
-
mail Address
This must be a valid e
-
mail address.
SMTP Server
This must be a valid SMTP server.
SMTP Port
Default is port 25.
4. Optional: Choose Modify Recipients and add the e-mail addresses of those users who you want
to receive an e-mail notification when all checks produce alerts.
Note that you can omit this step and only configure e-mail notification for specific checks.
5. Choose Recipients Configuration for Specific Checks.
This opens a new part of the dialog box in which you can add e-mail recipients for specific
checks. There is a list of checks for which you can add recipients. These recipients will only
receive an e-mail notification when the specified checks produce alerts.
6. Select the checks for which you want to configure e-mail notification and then choose Add
Recipients to add the e-mail addresses of the users to be notified.
7. Choose OK to save the configuration.
Result
Notifications about system alerts are sent to the specified recipients from now on. An e-mail is sent
when the rating of an alert changes.
ConfiguringCheckThresholds
You can configure the thresholds at which the statistics server generates alerts. Each check has a
Low, Medium and High priority threshold. For example, for the Check disk space option, you could
enter 90, 95 and 100 as the thresholds. This threshold is shown as a percentage of disk space
available.
Procedure
1. In the Administration Editor, choose the Alerts tab.
2. Choose Configure Check Settings.
The Configure Check Settings dialog box is displayed. The default tab is Configure E-mail
Functions.
3. Choose the Configure Check Thresholds tab.

SAP HANA Database – Administration Guide 41
4. Choose the field you want to change and enter the threshold.
5. Choose OK when you have finished configuring the check thresholds.
Result
Alerts are generated in line with the configured thresholds. The color of the bar views on the
Overview tab may change when the thresholds are changed, for example, you change the disk space
threshold from 90, 95 and 100, to 85, 90 and 95. If the disk is on 95% usage, then the bar view would
change from yellow to red.
ConfiguringStartTimesonCheckIntervals
You can configure the start times for system checks that are performed every 6 hours and every 24
hours. The intervals between checks are pre-configured.
Procedure
1. In the Administration Editor, choose the Alerts tab.
2. Choose Configure Check Settings.
The Configure Check Settings dialog box is displayed. The default tab is Configure E-mail
Functions.
3. Choose the Configure Start Time on Check Intervals tab.
There are two sections. One for setting the start time for checks with 6 hour intervals and one
for setting the start time for checks with 24 hour intervals. In each section there is a list of the
checks that this setting will affect.
4. Set the start time using the buttons on the right of the time field, or type the desired time
directly into the time field.
5. Choose OK.
Result
The start time for the checks is changed.
FailoverConcept
During installation of distributed landscapes, some hosts can be added to the landscape as standby
hosts. These are cold standby, which means that all new database processes (nameserver,
indexserver, and so on) are running, but they are idle and do not allow SQL connections. In case of
failover, they have to open the volume previously assigned to a failed host. This is not called hot
standby because failover detection and loading takes some time (1 to xx minutes).
LandscapeStartup
Up to three hosts can be configured as master nameservers. During landscape start-up, one is
elected as the active master. Other hosts will wait until a master is available.
The master nameserver assigns a volume to each starting indexserver or no volume if it is standby.
The master indexserver (providing metadata for other indexservers) and statisticsserver are assigned
on the same host as the master nameserver.

SAP HANA Database – Administration Guide 42
NameserverFailover
If the master host fails, one of the remaining master candidates becomes the active master. When
the failed host is available again, the master does not failback.
IndexserverFailover
The nameserver processes (which are running on each host in a distributed landscape) are
responsible for detecting a failure and executing the failover.
An active indexserver is assigned to one volume. A volume is a collection of directories where data
and log area are stored. A standby indexserver is started without a volume and it does not open an
SQL port.
In case of failover, the master nameserver assigns a volume to a standby indexserver. If the host with
the master nameserver failed, a new master nameserver is elected and the new master nameserver
executes additional indexserver failover.
When the failed host is available again, the volume does not fail back. Before failover the nameserver
waits some time (1-3 minutes) to allow restart of the old server. This prevents unnecessary failover.
StatisticsServerFailover
By default the statistics server runs on the same host as the master nameserver. Therefore, a failover
of the statistics server only happens at the same time as a failover of the master nameserver.
On the standby host, no statistics server is configured. In case of failover, first the new master
nameserver is started. Then the new master nameserver takes care of additional indexserver and
statistics server failovers. In order to do this, the new master nameserver configures and starts the
statistics server on the new master host. On the failed host, the statistics server configuration is
removed.
Failback
There is no automatic failback because this causes downtime while a volume is unassigned.
FailoverGroup
A failover group can be defined for each host. In case of failover, the nameserver tries to fail over to
a host within the same group. This can be used in the following situations:
Blades and storage are located within different racks
In case of failover, it should stay in the same rack to get better network performance.
Hosts have different CPU/memory configuration
In case of failover, a host with similar configuration should be used.
ConfiguringClientsforFailoverSupport
To support failover with our client libraries, you have to specify a list of hostnames separated by a
semicolon, instead of a single hostname. The client chooses one of these hosts for connecting. If the
selected host is not available, the next host from the list is used. Only if all hosts are not available will
a connection error be displayed. We recommend that you specify all hosts that are configured as
master nameserver because at least one of these hosts will be active.

SAP HANA Database – Administration Guide 43
If a connection gets lost when a host is no longer available, the client reconnects to one of the hosts
specified in the host list. For example:
Client Example
JDBC
Connect
URL
:
jdbc
:sap://host1:30015;host2:30015;host3:30015/
SQLDBC
SQLDBC_Connection *conn = env.
createConnection
();
SQLDBC_Retcode rc = conn->connect("host1:30015;host2:30015;host3:30015", "", "user",
"password");
ODBC
Connect
URL
:
"DRIVER=HDBODBC32;UID=user;PWD=password;SERVERNODE=host1:30015;host2:30015;
host3:30015;DATABASE=xxx"
CustomizingtheAdministrationConsole
There are many options available for customizing the Administration Console of the SAP HANA
studio.
1. From the main menu, choose Window Preferences Administration Console.
2. Make the required settings.
Preferences: Catalog
Option Description
Show only own database
catalog objects
If this option is selected, only the
database
objects that
belong to the database user who is currently logged on are
displayed.
Fetch all
database
catalog
objects
By default
t
he
SAP HANA studio
fetches a limited number of
catalog objects when folders such as Tables and Views are
opened. When there are a large number of catalog objects in
the database a Continue button is displayed.
If this option is selected, all catalog objects are loaded in the
corresponding folder and no Continue button is displayed.
This may affect system performance as it may take some
time to fetch all database catalog objects.
Number of
database
catalog
objects to display
You can
specify
the number of
catalog
objects to be fetched.
The default number is 1000.
Preferences: Common
Option Description
Confirm saving editors
If this option is selected, the system displays a confirmation
dialog box when an editor is closed with content that was
not saved.
Autosaving of SQL Content
Save content when
HANA Studio is closed
Save content every …
minutes
If this option is selected, the content of edited SQL editors is
saved automatically when the SAP HANA studio is closed. No
dialog requesting the user to save is displayed.
Additionally, it is possible to have the content saved at a
specified interval. If The SAP HANA studio is closed
unexpectedly, the last version can be recovered.
SAP HANA Database – Administration Guide 44
Copy options
Separate data with:
Tab separated
Align copied values with
space
Copy cell in editor by
using [CTRL] C
Copy editor content with
column header
Format for copying content from the table editor.
Representation of null value
Character used to display NULL values.
Database
identifier upper
case
Names of
database
objects can only be entered in upper
case (all caps).
Default action for
database
tables
Action that is carried out when
double
-
clicking
a
database
table.
Table Distribution Editor
Max. Number of Tables
Displayed
Indicates the maximum number of tables that are displayed
when you open view table distribution.
Preferences: Global Settings
Option Description
Update state of databases
on startup The state of all registered databases is determined when the
SAP HANA studio starts.
Confirm opening of Merged
Diagnosis Files dialog
These options
control
the appearance of information
dialogs
on the Diagnosis Files tab.
Opening information dialog
after deleting files
Open information dialog
after trace files
Preferences: Result
Option Description
Limit for LOB columns (Bytes)
Maximum number of bytes that are loaded from the
database for one LOB column.
Limit for Zoom (Bytes)
Maximum number of bytes that the Studio should display
when you zoom in the LOB column of a results table.
Append exported data to file
When you export a result table to a file, the system attaches
the content of this result table to the existing file content.
Display char byte value as
hex
Data
of the data type CHAR BYTE
is
displayed as hexadecimal
digits. If you do not choose this option, this data is displayed
in binary format.
Format values
Specifies whe
ther country
-
specific formatting is applied
(example: numeric values or dates).
Display the duration of
fetching a row
You can see in the SQL how long it took to fetch one row of a
result set.
Max displayed rows in result
Maximum number of rows fetched f
rom the
database
and
SAP HANA Database – Administration Guide 45
displayed in the result editor.
Enable zoom of LOB columns
This option must be enabled if you want to fetch a large
amount of (zoom) LOB values in the result editor.
Preferences: SQL
Option Description
Stop batch SQL statement
execution on error
When you execute a list of SQL statements that is separated
by comment characters, the system stops the execution of
the SQL statements when an error occurs.
Clear SQL editor log before
SQL statement execution
The log from the last SQL state
ment is deleted before the
next SQL statement is executed.
Close results before SQL
statement execution
When you execute an SQL statement in an SQL editor, all old
results windows in that SQL editor are closed.
Display time of statement
execution start
Y
ou can see in the SQL editor when a statement was
executed.
Display the duration of failed
statements
You can see in the SQL edito
r how long a statement took in
the SAP HANA studio even when the statement failed.
Connection parameters for
SQL window:
- Autocommit mode
- Isolation level
Connection parameters that the system uses to execute SQL
statements from the SQL editor:
Auto-commit mode:
ON: The system performs all COMMIT actions
automatically.
OFF: You have to enter COMMIT statements explicitly.
Isolation level:
The isolation level determines how the database system
implicitly controls locking and versioning of database
objects.
Confirm change of connection:
In the SQL editor, you can change the SQL connection
you are working on. When changing a connection,
cursors might get closed or transactions might get roll
backed. This option gives you the opportunity to confirm
this before proceeding.
Command separator
Separator for SQL statements in the SQL editor.
Number of tables for table
name completion
Numbe
r of tables that are displayed in the list when using
name completion in the SQL editor.
Preferences: Table Viewer
Option Description
Show gridlines These options enable you to format the tables when using
the SAP HANA studio.
Alternating colored rows
Preferences: Templates
Option Description
The settings always refer to the edito
r type that is currently open.
SAP HANA Database – Administration Guide 46
SQL Editor
Name
Word to be completed when you press the key combination
CTRL + Space.
You can create more than one template with the same
name. If more than one template exists for one word, the
system displays a list.
Context
Editor in which you can use the template.
Description -
Auto Insert
If ON, the
code
assist
automatically inserts the template if it
is the only proposal available at the cursor position.
PeriodicAdministrationTasks
BackingUpSystems
More information: SAP HANA Database – Backup and Recovery Guide on SAP Help Portal at
http://help.sap.com/hana_appliance.
ManagingTables
ViewingandModifyingTableDistribution
To support the analysis and monitoring of performance issues in a distributed system, a Table
Distribution Editor is available in which you can see how tables are distributed across the hosts. In
the case of partitioned tables, you can also see how the individual partitions and sub-partitions are
distributed, as well as detailed information about the physical distribution, for example, part ID,
partition size, and so on. You can move tables and table partitions between the available hosts, for
load balancing, for example.
1. Open the Table Distribution Editor by right-clicking any of the following entries in the
navigator and then choosing Show Table Distribution:
Catalog
Schema
Table
Note:
For performance reasons, not all tables of the selected schema are displayed, but only the
first 1000 tables. You can change this setting in Preferences. If more tables exist in the
selected schema, a message is displayed.
2. If necessary, use the filtering options to refine the list of tables displayed. For example, you
can restrict the display to tables on specific hosts only.
3. To view the distribution information of a partitioned table, select the table in the overview
list.
The Table Partition Details area is then shown underneath.
Note:
You can only see table partition information for tables of type COLUMN as this is the only
table type that can be partitioned.

SAP HANA Database – Administration Guide 47
4. To move a table to another host, proceed as follows:
a. Right-click the table in the overview list and choose Move Table...
b. Specify the host to which you want to move the table.
5. To move a table partition or sub-partition to another host, proceed as follows:
a. Right-click the partition or sub-partition in the Table Partition Details area and
choose Move Partitions…
Note that you can select multiple partitions.
b. Specify the host to which you want to move the partition(s).
More information: SAP Note 1650394 -SAP HANA DB: Partitioning and Distribution of Large Tables
DisplayingtheContentofTables
1. In the navigator, right-click the table and choose Content.
The contents of the table are displayed. Note that by default, only the first 1000 rows are
displayed. You can change this setting in Preferences.
2. To view the full content of a table cell, for example a LOB value, choose Export Cell to...
Zoom... in the context menu of the cell.
ExportingTableData
You can export table data to a file system and then import it back into your existing or another
database. This may be necessary, for example, if you want to move data from a test system to a
productive system, if you want to clone your system, or if you want to provide the data to support so
they can replicate a certain scenario.
Column store tables can be exported in binary or CSV format, while row store tables can be exported
only in CSV format. Exports in binary format are faster and more compact. However, CVS format is
better if you need to use the data in a non-HANA system. It also has the advantage of being human
readable.
Procedure
1. In the navigator, right-click the table to be exported in the navigator and choose Export.
You can also select multiple tables.
The Export wizard is displayed. The tables to be exported are displayed on the right of the
window. You can search for additional tables to be exported by typing in the Type name to
find table box.
2. Choose Add to add any tables to the list of tables to be exported.
3. Choose Next.
4. Select the file format you want to export the tables into, binary or CSV.
5. Specify whether you want to export the table definition and table data (Catalog + Data) or
only the table definition (Catalog Only). For example, you may want to copy only the table
definition in order to create a new table with the same structure.
6. Specify the location to which the file is to be exported.
7. Enter the number of parallel threads to be used for the export.
The more threads you use, the faster the export will be. This does, however, impact the
speed of the database as more threads uses more resources.
8. Choose Finish.
SAP HANA Database – Administration Guide 48
Result
The tables are exported to the specified file location.
ImportingTableData
1. In the navigator, right-click Catalog and choose Import.
2. Specify the location from which to import tables from and choose Next.
3. Enter the tables to be imported.
If importing from a remote host, you must specify the tables to be imported. If importing
from a local host, you can select the tables to be imported.
4. In the Format column of the Selected Tables list, choose the format of the files to be
imported and choose Next.
5. Choose what information to import (for binary files only).
If you are importing CSV files, this option is not available.
6. Enter the number of parallel threads to be used for the import.
The more threads you use, the faster the import will be. This does, however, impact the
speed of the database as more threads uses more resources.
7. Choose Finish.
Result
The specified tables are imported to your SAP HANA database.
FindingTables
1. Choose (Find Table) in the navigator toolbar.
2. Enter a search string (at least two characters). Matching tables are displayed immediately.
3. Select the table you were searching for.
4. Choose whether you want to display the table content and/or the table definition.
CreatingTables
1. In the navigator, open the catalog where you want to create the new table.
2. Choose Create... in the context menu of the schema to which you want to assign the table.
5. Enter the following information:
o Table name
o Table type (column or row store)
6. Define the columns of your table as follows:
a. Enter the name and properties of the first column.
b. To add further columns, choose Add Column in the context menu of the tab.
7. If necessary, add indexes.
On the Indexes tab, choose Add Index in the context menu and enter the definition of your
index.
8. To apply all your changes, choose Create Table in the context menu of the tab.
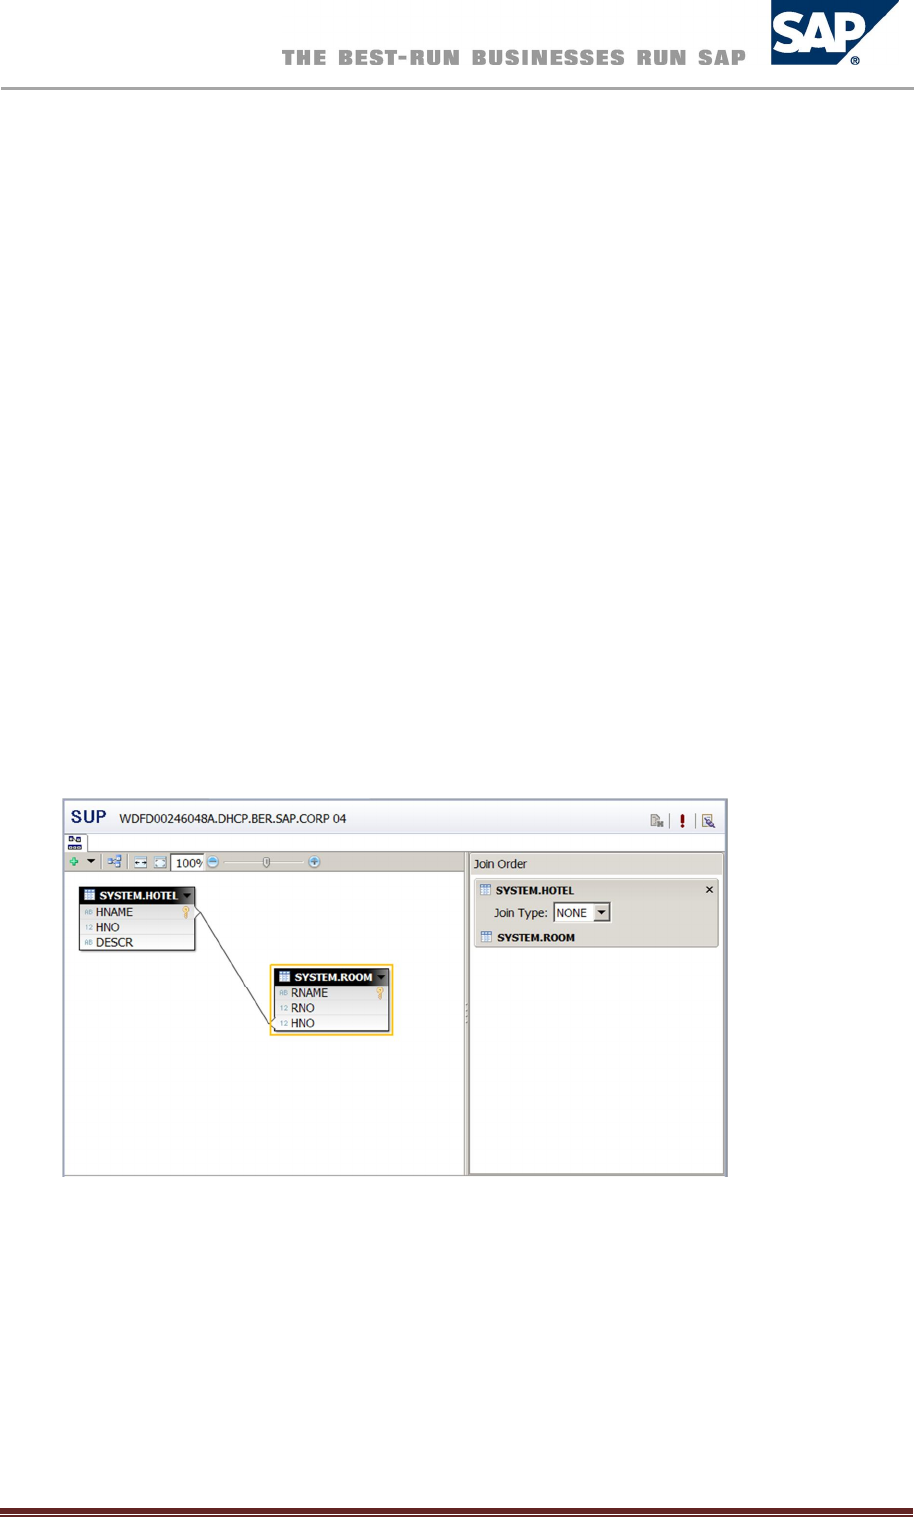
SAP HANA Database – Administration Guide 49
CreatingViews
1. Select a table in the navigator.
2. In the context menu of the table, choose New View.
3. Enter a view name.
4. Drag all relevant tables into the editor area.
More information: Defining Joins and Views using Visual SQL Builder
5. To create the view, choose Execute in the context menu of the editor.
DefiningJoinsandViewsusingVisualSQLBuilder
As an alternative to the SQL editor, you can use the Visual SQL builder to create joins and views using
a graphical user interface.
Procedure
1. Select a table in the navigator.
2. In the context menu of the table, select New View or Generate Visual SQL.
Note that if you choose to creat a new view, you must specify a view name and the schema.
3. Drag and drop tables from the navigator to the editor area.
4. To create a join, drag a column from one table to the column of another table.
Visual SQL Builder: Drag&Drop
5. Choose the join type in the Join Order box.
If you have defined more than one join, you can define the order in which the joins are
executed using drag and drop.
6. Drag and drop the columns to be contained in the result set into the Columns area.
You can specify additional constraints or create synonyms for column names after dragging the
relevant columns there.
Visual SQL Builder, Columns
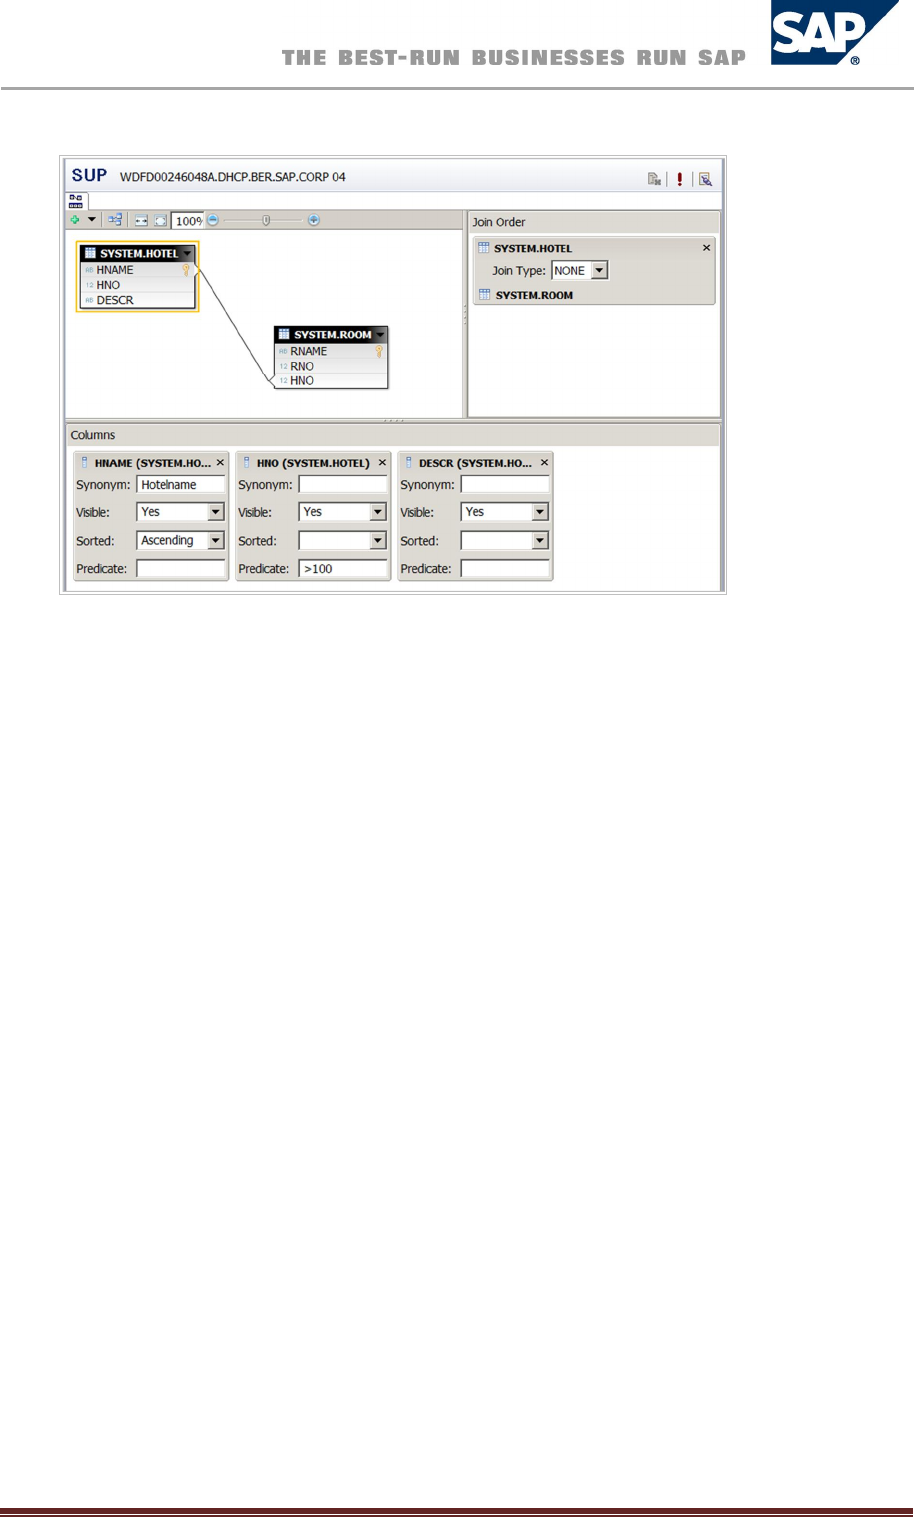
SAP HANA Database – Administration Guide 50
To preview the data in the join, choose Data Preview in the context menu of the
editor.
To show the equivalent SQL statement, choose Export SQL in the context menu of the
editor.
7. To execute the join, choose Execute in the context menu of the editor.
Loading,Unloading,andMergingTableData
The Load, Unload, and Merge functions can be used on column tables only.
The Load function loads the complete table, including the delta, into the memory. Depending on the
size of the table, this may take some time.
The Unload function removes the table, including the delta, from the memory. The next access to
this table will be slower as the data has to be reloaded into the memory. Depending on the size of
the table, this may take some time.
The Merge function merges the committed entries from the delta into the table.
Procedure
1. Select the column table in the navigator to be loaded, unloaded, or merged.
2. In the context menu of the table, choose Load, Unload or Merge as required.
3. Choose OK.

SAP HANA Database – Administration Guide 51
Troubleshooting
TheSQLEditor
Many operations in the system require you to use SQL statements. You can enter and execute SQL
statements in the SQL editor.
ExecutingSQLStatements
1. In the navigator, select the system that you want to connect to using SQL and then choose
(Open SQL Editor for Current Selection) in the navigator toolbar.
2. Enter the SQL statement. The following rules apply:
You can write SQL syntax elements in either upper or lower case.
You can add any number of spaces and line breaks.
To force the system to distinguish between upper/lower-case letters in database
object names (such as table names), enter the name between double quotation marks:
“<database_object_name>”
To comment out a line, use - - (double hyphens) at the start of the line
To use name completion, press the key combination CTRL + Space. This opens a list
from which you can choose: Schema and table names, SQL keywords, user-defined
templates.
Enter multiple SQL statements, separated by the configured separator character
(semicolon “;” by default).
3. To execute the SQL statement, choose Execute SQL in the context menu of the SQL editor.
AnalyzingSQLPerformance
During performance monitoring, you may discover SQL statements that are particularly costly for the
database, for example, statements identified by the expensive statements trace. You can analyze
such statements further in the SQL Editor using the following features.
ExplainPlan
You can evaluate the execution plan that the SAP HANA database follows to execute an SQL
statement by entering the statement and then choosing Explain Plan in the context menu. You can
enter multiple statements, separated by the configured separator character (usually a semicolon), to
generate several plan explanations at once. It is also possible to run the same statement on different
systems/users by changing the SQL connection. That is, assuming that the tables and views exist in
the other systems and you have authorization to access them.
VisualizePlan
To help you understand and analyze the execution plan of an SQL statement, you can generate a
graphical view of the plan.
Procedure
1. Enter a query into the SQL editor and choose Visualize Plan in the context menu.
A graphical representation of the query, with estimated performance, is displayed:
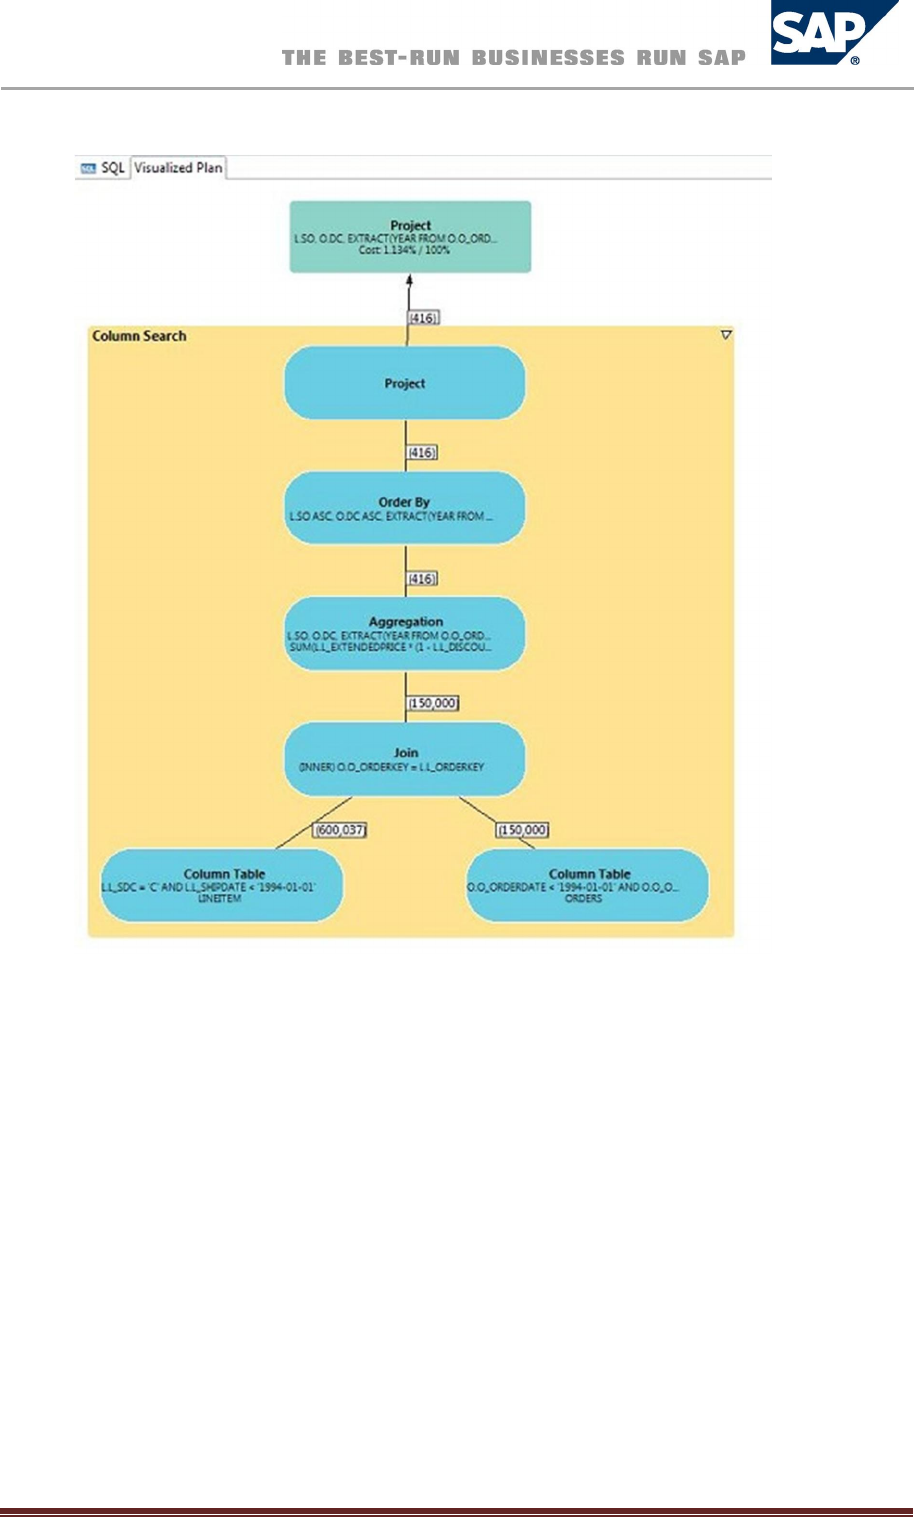
SAP HANA Database – Administration Guide 52
2. Validate the estimated performance by choosing Execute in the context menu.
A similar high-level graphic is generated with execution time information for each of the
parts:
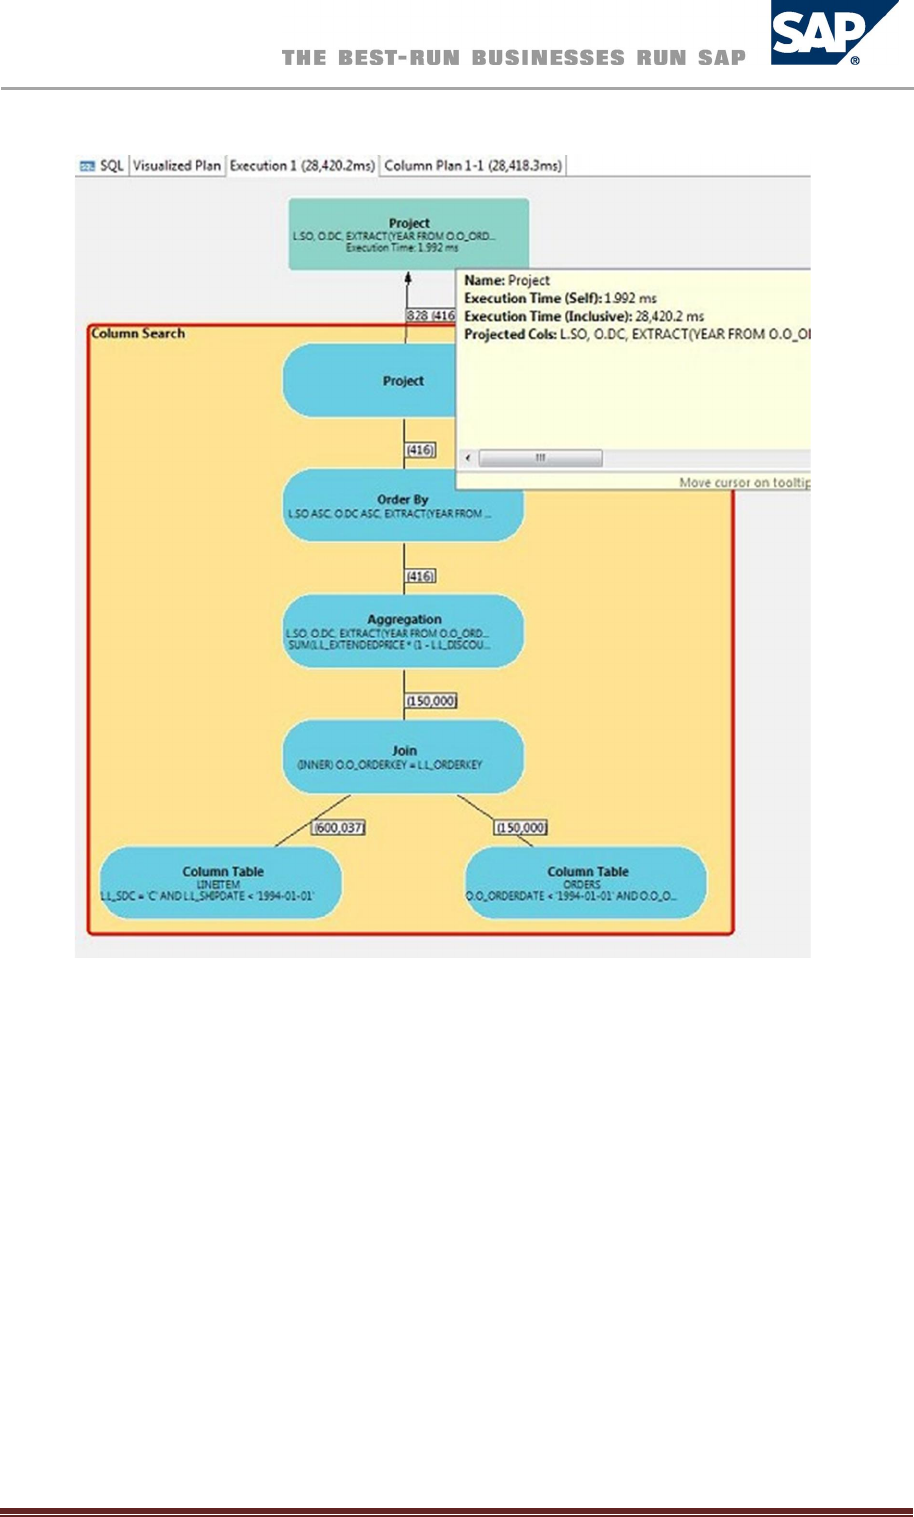
SAP HANA Database – Administration Guide 53
Note that execution time is given as a pair of values: "self" (the execution time of the node),
and "Inclusive" (the execution time including the descendent nodes.
3. If the query used the SAP HANA Column Engine, you can view the details of the various
database operations by choosing Visualize Column Plan in the context menu.
A detailed graphic is displayed:

SAP HANA Database – Administration Guide 54
This graphic is a very powerful tool for studying performance of queries on SAP HANA databases. You
can explore the graphic further, for example, you can expand, collapse, or rearrange nodes on the
screen. You can also save the graphic as an image or XML file, for example, so you can submit it as
part of a support query.
ResolvingDiskFullEvent
When the disks/storage system on which the database volumes are located run full, the database is
suspended, an internal event is triggered, and an alert is generated. In addition to the size and usage
information contained on the Overview tab of the Administration Editor, a Disk Full Event field is
displayed. A disk full event must be resolved before the database can resume.
Note:
You can also view the alert information on the Alerts tab.
Procedure
1. Check on the Volumes tab (Show: Storage) to see whether the database is using all the space
or whether additional files are using the space. The storage size and volume size can be
compared here.
More information: Monitoring Disk Space
2. Remove files that are not needed (in case additional files are stored on the SAP HANA
storage system) or add additional storage space.
3. On the Overview tab, choose the Disk Full Events link.
4. Mark the event as handled.

SAP HANA Database – Administration Guide 55
Result
The database resumes.
DiagnosisFiles
Diagnosis files hold a mixture of diagnosis, error, and information messages.
In the event of problems with SAP HANA database, you can check these diagnosis for errors. You can
see an overview of all files on the Diagnosis Files tab of the Administration Editor. We recommend
that you monitor disk space that is used for diagnosis files and delete files that are no longer needed.
DisplayingDiagnosisFiles
To display a file in the list, right-click it and choose Open, or double-click the file.
The Show Start of File and Show End of File buttons help you to navigate particularly large files more
easily. You can specify how many lines you want to see when you filter the file in this way.
MergingDiagnosisFiles
You can merge the diagnosis files listed on the Diagnosis Files tab by choosing Choose Merge Files….
This feature is helpful during troubleshooting as it allows you to review multiple diagnosis files of
different file types at the same time. The merged file is created from the most recent diagnosis files.
Once the file has been created, you can use the filtering options and timeframe slider to drill down
and analyze further.
Note:
Merging diagnosis files can take a long time depending on the size and number of files to be
merged.
DeletingDiagnosisFiles
You can delete one or more files from the list by selecting the file(s) in question and choosing Delete
in the context menu.
In the case of trace files (files ending in*.trc), it is also possible to delete several files at once, for
example all files from specific services. To delete multiple trace files, choose Delete Trace Files…
Note:
If the deletion of selected trace files fails, the content of the files is still deleted.
DownloadingDiagnosisFiles
To download a diagnosis file for offline analysis, right-click and choose Download. You can select
multiple files to download.
ConfiguringTraces
You can activate and configure several traces on the Trace Configuration tab of the Administration
Editor. Trace data is saved to trace files that can be viewed on the Diagnosis Files tab.
The following traces can be configured:
Performance trace
SQL trace
Global database trace
SAP HANA Database – Administration Guide 56
Database trace
User-specific trace
End-to-end trace
Expensive statements trace
Procedure
1. In the Administration Editor, open the Trace Configuration tab.
2. Choose the Edit Configuration icon for the trace.
The Trace Configuration dialog appears.
3. Make the required settings.
The configuration options available in the Trace Configuration dialog depend on the trace
type.
Note:
To be able to configure all traces, except the performance trace, you need the system
privilege INIFILE ADMIN. For the performance trace, you need the privilege TRACE ADMIN.
DefaultTraceStatus/Configuration
Trace Default Status/Configuration
Performance trace
Inactive
SQL trace
Inactive
Global
database
trace
Ac
tive with default configuration
Database
trace
Active with default configuration
User
-
specific trace
No
t
specified
End
-
to
-
end trace
Active with default configuration
Expens
ive
statements
trace
Inactive
Note
To restore the default status or configuration of a trace, in the Trace Configuration dialog
choose Restore Defaults.
ConfigurationOptionsforPerformanceTrace
The following configuration options are available for the performance trace:
You can configure the trace for a single specific database user and a single specific
application user.
You can trace execution plans in addition to the default trace data by choosing the
corresponding checkbox.
You can specify the file name to which the trace data is automatically saved after the
performance trace is stopped.
You can specify the trace duration.
If a certain scenario is to be traced, ensure that you enter a value greater than the time it
takes the scenario to run. If there is no specific scenario to trace but instead general system
performance, then enter a reasonable value. After the specified duration, the trace stops
automatically.
SAP HANA Database – Administration Guide 57
ConfigurationOptionsforSQLTrace
The following configuration options are available for the SQL trace:
You can activate and deactivate the SQL trace by selecting the corresponding checkbox. The
SQL is inactive by default.
If you have activated the SQL trace, you can choose from the following trace levels:
Trace Level Note
ERROR Indicates an error situation that can be recovered.
ERROR is the default trace level.
ERROR situations are always written to the log.
ERROR_ROLLBACK
Indicates statements that returned errors or that were rolled back
ALL
All statements
ALL_WITH_RESULTS
All statemen
ts with results
You can configure the trace for specific database users and application users.
You can limit the trace to specific tables and views.
You can limit the trace to certain statement types.
You can adapt the flush interval if required.
During tracing, the messages of a connection are buffered. As soon as the flush interval
number of messages is buffered (or if the connection is closed), those messages are written
to the trace file.
The trace data is stored in python files starting with sqltrace_<servername>.
More information: SAP HANA Database – SQL Script Guide on SAP Help Portal at
http://help.sap.com/hana_appliance.
OtherAvailableTraces
The global database, database, and user-specific traces are written for several services of the system
(for example, indexserver and nameserver) to files <servicename>.trc. Some of these traces are
always activated by default.
You can activate or deactivate these traces and change what is to be traced in the Trace
Configuration dialog.
Note:
Not all trace components are visible by default in Trace Configuration. To view all additional
components, select check Show All Components.
The following trace levels are available:
Trace Level Note
NONE
Trace is off.
FATAL and ERROR situations will still be recorded.
FATAL
Indicates an extreme error situation that
cannot
be recovered and that would

SAP HANA Database – Administration Guide 58
lead to a failure or an exit.
FATAL errors are always written to the log.
ERROR
Indicates an error situation that can be
recovered.
Error is the default trace level.
ERROR situations are always written to the log.
WARNING
Indicates that you should investigate the situation.
INFO
Information only
DEBUG
Verbose trace information.
Trace level DEBUG is intended for debugging.
The expensive statements trace collects SQL statements whose execution time was above a
threshold (1000000 microseconds by default). Expensive statements may reduce the performance of
the database. You can also monitor expensive statements on the Performance tab. The expensive
statements trace is Inactive by default.
The end-to-end traces are triggered by applications outside of the SAP HANA database. The default
trace levels for SAP HANA database components are normally sufficient and do not need to be
changed.
For more information about end-to-end analysis in your landscape, see SAP Library for Solution
Manager on SAP Help Portal at http://help.sap.com under Application Lifecycle Management SAP
Solution Manager SAP Solution Manager 7.1 Application Help SAP Library Technical
Operations Root Cause Analysis.
OpeningSupportConnection
Support users can log into the system with read-only access in case of troubleshooting situations.
To enable them to do so, you must have completed the following:
Install the SAPRouter
More information: SAP Support Portal at http://service.sap.com/saprouter
Set up a support connection
More information: SAP Note 1634848 - Set up a support connection
Configure Telnet connection
More information: SAP Note 37001 - Telnet link to customer systems
Configure SAP HANA database connection
More information: SAP Note 1592925 - SAP HANA database service connections
Configure TREX/BIA/HANA service connection
More information: SAP Note 1058533 - TREX/BIA/HANA service connection to customer
systems
CreateDatabaseUserandgrantMONITORINGrole
The MONITORING role allows read-only access using the Administration Editor. However, this role
does not provide any privileges for accessing application data, only for monitoring the system status,
statistics server, trace files, and so on. With the MONITORING role, it is also not possible to change
the configuration or start and stop a system. You can grant the MONITORING role to a support
engineer if SAP support needs to connect to the system. Depending on the issue to be analyzed,

SAP HANA Database – Administration Guide 59
further privileges may be needed to allow sufficient analysis (for example, to access application data
or data models).
CollectingSystemInformationforSupport
There is a Python script that allows you to collect information from your systems even when no
access to the system via SQL is possible. This information can be added to the support message.
LocationandUsage
The name of the Python script is fullSystemInfoDump.py and is part of a server installation. It runs
from a command line and is located in the directory $DIR_INSTANCE/exe/python_support
(Linux).
To execute the script <sid>adm rights are required.
To start the script out of its location directory, enter:
python fullSystemInfoDump.py
By default the script creates a zip file with all of the collected support information to the directory
DIR_TEMP/system_dump where DIR_TEMP is the content of the variable with the same name in
sapprofile.ini. This output directory is shown as console output when the script is running, but
it can be looked up by entering:
hdbsrvutil -z | grep DIR_TEMP=
To change the default directory, an explicit absolute path can be given to the script, for example:
python fullSystemInfoDump.py <output_dir>
Usage information can be displayed by entering:
python fullSystemInfoDump.py -h
To collect support information you need an SQL user with rights to select the system tables and
views listed in System Tables/Views. For security reasons the user name and password for this SQL
user cannot be given as command line parameters to the script. Instead you are prompted for this
information:
ts1adm@luvm252058a:/usr/sap/TS1/HDB01/exe/python_support> python
fullSystemInfoDump.py
User name: SYSTEM
Password:
The password is not displayed on the command line.
If the system can be reached via SQL and the user name and password information is valid, the script
starts collecting support information. If user name and/or password are invalid, the script aborts.

SAP HANA Database – Administration Guide 60
If the system cannot be reached via SQL the script only collects information that can be read without
SQL access.
The resulting zip file name has the following structure:
fullsysteminfodump_<SAPLOCALHOSTFULL>_<SAPSYSTEMNAME>_<YYYY>_<MM>_<DD>_<HH>
_<MM>_<SS>.zip
SAPLOCALHOSTFULL and SAPSYSTEMNAME are again taken from sapprofile.ini.
Informationcollectedinanycase(SQLavailableandnotavailable)
Protocolfile
All information about what has been collected is shown as console output and is written to a file
named protocol.txt that is stored in the zip file.
TraceFiles
From every trace file listed below, the most recent 300 lines are collected and each of them is stored
in a file with the same name as the trace file.
$DIR_INSTANCE/<SAPLOCALHOST>/trace/daemon_<SAPLOCALHOST>.<...>.trc
$DIR_INSTANCE/<SAPLOCALHOST>/trace/indexserver_alert_<SAPLOCALHOST>.trc
$DIR_INSTANCE/<SAPLOCALHOST>/trace/indexserver_<SAPLOCALHOST>.<...>.trc
$DIR_INSTANCE/<SAPLOCALHOST>/trace/nameserver_alert_<SAPLOCALHOST>.trc
$DIR_INSTANCE/<SAPLOCALHOST>/trace/nameserver_history.trc
$DIR_INSTANCE/<SAPLOCALHOST>/trace/nameserver_<SAPLOCALHOST>.<...>.trc
$DIR_INSTANCE/<SAPLOCALHOST>/trace/preprocessor_alert_<SAPLOCALHOST>.trc
$DIR_INSTANCE/<SAPLOCALHOST>/trace/preprocessor_<SAPLOCALHOST>.<...>.trc
$DIR_INSTANCE/<SAPLOCALHOST>/trace/statisticsserver_alert_<SAPLOCALHOST>.trc
$DIR_INSTANCE/<SAPLOCALHOST>/trace/statisticsserver_<SAPLOCALHOST>.<...>.trc
ConfigurationFiles
All of the following configuration files (ini files) are collected:
$DIR_INSTANCE/<SAPLOCALHOST>/exe/config/attributes.ini
$DIR_INSTANCE/<SAPLOCALHOST>/exe/config/daemon.ini
$DIR_INSTANCE/<SAPLOCALHOST>/exe/config/executor.ini
$DIR_INSTANCE/<SAPLOCALHOST>/exe/config/extensions.ini
$DIR_INSTANCE/<SAPLOCALHOST>/exe/config/filter.ini
$DIR_INSTANCE/<SAPLOCALHOST>/exe/config/global.ini
$DIR_INSTANCE/<SAPLOCALHOST>/exe/config/indexserver.ini
$DIR_INSTANCE/<SAPLOCALHOST>/exe/config/inifiles.ini
$DIR_INSTANCE/<SAPLOCALHOST>/exe/config/localclient.ini
$DIR_INSTANCE/<SAPLOCALHOST>/exe/config/mimetypemapping.ini
$DIR_INSTANCE/<SAPLOCALHOST>/exe/config/nameserver.ini
$DIR_INSTANCE/<SAPLOCALHOST>/exe/config/preprocessor.ini
$DIR_INSTANCE/<SAPLOCALHOST>/exe/config/scriptserver.ini
$DIR_INSTANCE/<SAPLOCALHOST>/exe/config/statisticsserver.ini
$DIR_INSTANCE/<SAPLOCALHOST>/exe/config/validmimetypes.ini

SAP HANA Database – Administration Guide 61
AdditionalInformationCollectedifSQLisAvailable
SystemTables/Views
All rows of the following system tables/views are exported into a csv file with the name of the table:
SYS.M_INIFILE_CONTENTS
SYS.M_LANDSCAPE_HOST_CONFIGURATION
SYS.M_SERVICE_STATISTICS
SYS.M_SYSTEM_OVERVIEW
SYS.M_TABLE_LOCATIONS
_SYS_STATISTICS.STATISTICS_ALERT_INFORMATION
_SYS_STATISTICS.STATISTICS_INTERVAL_INFORMATION
_SYS_STATISTICS.STATISTICS_LASTVALUES
_SYS_STATISTICS.STATISTICS_STATE
_SYS_STATISTICS.STATISTICS_VERSION{}
Only the most recent 3000 rows from the following system tables/views are exported into a csv file
with the name of the table:
_SYS_STATISTICS.GLOBAL_COLUMN_TABLES_SIZE
_SYS_STATISTICS.GLOBAL_CPU_STATISTICS
_SYS_STATISTICS.GLOBAL_INTERNAL_EVENTS
_SYS_STATISTICS.GLOBAL_MEMORY_STATISTICS
_SYS_STATISTICS.GLOBAL_PERSISTENCE_STATISTICS
_SYS_STATISTICS.GLOBAL_TABLES_SIZE
_SYS_STATISTICS.HOST_COLUMN_TABLES_PART_SIZE
_SYS_STATISTICS.HOST_DATA_VOLUME_PAGE_STATISTICS
_SYS_STATISTICS.HOST_MEMORY_STATISTICS
_SYS_STATISTICS.HOST_ONE_DAY_FILE_COUNT
_SYS_STATISTICS.HOST_RESOURCE_UTILIZATION_STATISTICS
_SYS_STATISTICS.HOST_VOLUME_FILES
_SYS_STATISTICS.INDEX_SERVER_HEAP_MEMORY_STATISTICS
_SYS_STATISTICS.STATISTICS_ALERTS
_SYS_STATISTICS.STATISTICS_ALERT_LAST_CHECK_INFORMATION
AdditionalinformationcollectedincaseSQLisnotavailable
Topologyinformation
All available topology information is exported into a file named topology.txt. It contains
information about the host topology in a tree-like structure. The keys are grouped using brackets
while the corresponding values are referenced by this symbol ==>. For example:
[]
['host']
['host', 'ld8521']
['host', 'ld8521', 'role']
==> worker
['host', 'ld8521', 'group']
==> default
['host', 'ld8521', 'nameserver']
['host', 'ld8521', 'nameserver', '30501']
['host', 'ld8521', 'nameserver', '30501', 'activated_at']
==> 2011-08-09 16:44:02.684
['host', 'ld8521', 'nameserver', '30501', 'active']
==> no
['host', 'ld8521', 'nameserver', '30501', 'info']

SAP HANA Database – Administration Guide 62
['host', 'ld8521', 'nameserver', '30501', 'info', 'cpu_manufacturer']
==> GenuineIntel
['host', 'ld8521', 'nameserver', '30501', 'info', 'topology_mem_type']
==> shared
['host', 'ld8521', 'nameserver', '30501', 'info', 'sap_retrieval_path_devid']
==> 29
['host', 'ld8521', 'nameserver', '30501', 'info', 'build_time']
==> 2011-07-26 17:15:05
['host', 'ld8521', 'nameserver', '30501', 'info', 'net_realhostname']
==> -
['host', 'ld8521', 'nameserver', '30501', 'info', 'build_branch']
==> orange_COR
['host', 'ld8521', 'nameserver', '30501', 'info', 'mem_swap']
==> 34359730176
['host', 'ld8521', 'nameserver', '30501', 'info', 'mem_phys']
DisplayingSystemInformation
The System Information tab contains the following tables, which are useful for system monitoring:
Transactions
Table Locks
Size of Tables on Disk
Session Context
SQL Plan Cache
Record Locks
Query Cache
Overall Workload
Open Transactions
Merge Statistics
Memory of All Row Tables
Lock Waiting History
Loaded Memory of Column Tables
Index Server Memory Usage
Database Information
Connections
Connection Attempts and Status
Connection Statistics
Component Memory Usage
Caches
Blocked Transactions
Backup Catalog
For more information about these system tables, see System Tables and Monitoring Views on SAP
Help Portal at http://help.sap.com/hana_appliance under Application Help References.

SAP HANA Database – Administration Guide 63
Appendix
SAPHANAHDBSQL
SAP HANA HDBSQL is a command line tool for entering and executing SQL statements, executing
database procedures, and querying information about SAP HANA databases. You can use HDBSQL
interactively or import commands from a file and execute them in the background. You can access
databases on your local computer and on remote computers.
Note:
The SAP HANA studio has similar functions to HDBSQL, but provides a graphical user
interface.
HDBSQL can be used on all operating systems supported by the database system. It is a
component of the SAP HANA software.
Features
Executing SQL Statements
Executing Database Procedures
Requesting Information About the Database Catalog
Executing Shell Commands
Executing Commands (command syntax and options)
Overview of All HDBSQL Call Options
Overview of All HDBSQL Commands
LoggingOntoDatabase
To use the HDBSQL interactively (in session mode), you log on to the database as a database user.
This opens a database session.
Prerequisites
The specified user is a database user.
OneStepLogon
Procedure
Enter the following command:
hdbsql [<options>] -n <database_host> -i <instance_id> -u <database_user> -
p <database_user_password>
Property
Description
<options>
Call options for HDBSQL
.
More information: Overview of All HDBSQL Call Options
<database_host>
Name or IP
a
ddress
of the
database
host
.
<database_user>
Name of the
database
user
.
<database_user_password>
Password of the
database
user
.
Example

SAP HANA Database – Administration Guide 64
One step logon to the database on the PARMA computer with instance ID 01 as database user MONA
with the password RED.
hdbsql -n PARMA -i 1 -u MONA –p RED
To log on using a <user_key>, enter the following command:
hdbsql [<options>] -U <user_key>
Two-StepLogon
Procedure
1. Start HDBSQL:
hdbsql [<options>]
2. Log on to the database:
\c [<options>] -n <database_host> -i <instance_id> -u
<database_user>,<database_user_password>
More information:
Executing Commands
Overview of All HDBSQL Commands
ExecutingCommands
You can use HDBSQL to execute SQL statements, database procedures, and special HDBSQL
commands.
Prerequisites
Some commands require you to be logged on to the database.
More information: Logging On to a Database
ExecutinganIndividualCommandinInteractiveMode(SessionMode)
Procedure
1. Call HDBSQL:
hdbsql [<options>]
More information: Overview of All HDBSQL Call Options
2. Enter the command.
<command>
Note
You can also enter commands in multiple line mode or edit commands in an external file.
More information:
Multiple Line Mode
Editing Commands in an External File

SAP HANA Database – Administration Guide 65
Example
You start HDBSQL and log on to the HANA database as user MONA with the password RED:
hdbsql –n localhost –i 1 -u MONA –p RED
You display general information about the database:
\s
host : wdfd00245293a:30015
database : ORG
user : SYSTEM
kernel version: 1.50.00.000000
SQLDBC version: libSQLDBCHDB 1.50.00 Build 0000000-0120
autocommit : ON
ExecutinganIndividualCommandinCommandMode
Procedure
1. Call HDBSQL and enter the command directly.
hdbsql [<options>] <command>
Example
hdbsql -n localhost -i 1 -u MONA,RED \s
2. If you want to enter an SQL statement or a database procedure as a command, place the SQL
statement or database procedure in quotation marks.
Example
hdbsql -n localhost -i 1 -u MONA,RED "select table_name, table_type
from tables"
3. HDBSQL executes the command and then exits.
ExecutingSeveralCommandsfromBatchFile
If you are in interactive mode, enter the path and name of the batch <file> from which
HDBSQL is to import the command as follows:
\I <file>
If you are working in command mode, enter the path and name of the batch <file> when you
log on to the database as follows:
hdbsql [<options>] -I <file>
More information:
Redirecting Results to a File
Overview of All HDBSQL Commands

SAP HANA Database – Administration Guide 66
MultipleLineMode
This mode enables you to enter long commands on several lines. HDBSQL stores multiple line
commands in an internal command buffer.
More information: Command Buffer
Prerequisites
You run HDBSQL in multiple line mode. You have the following options for activating multiple line
mode:
Call option: hdbsql [<options>] -m
HDBSQL command: \mu ON
Activities
To start a new line in multiple line mode, press Enter.
To execute the command, either close the last line by entering a semicolon and pressing Enter or
enter the command \g.
Example
1. Log on to the SAP HANA database in multiple line mode as user MONA with the password
RED:
hdbsql -n localhost -i 1 -u MONA,RED
2. Enter a multiple line SQL statement:
select table_name, table_type
from tables
3. Execute the SQL statement.
\g
More information:
Editing Commands in an External File
Executing Commands
CommandBuffer
If you call HDBSQL in multiple line mode, HDBSQL stores all commands in an internal command
buffer.
More information: Multiple Line Mode
Activities
Displaying the contents of the command buffer: \p
Deleting the contents of the command buffer: \r
Editing Commands in an External File
Executing the command buffer: \g

SAP HANA Database – Administration Guide 67
EditingCommandsinanExternalFile
If you have entered a long command in HDBSQL, you can make changes to this command at a later
stage by editing the command buffer in an external file.
More information: Command Buffer
Prerequisites
You have already executed a command.
More information: Executing Commands.
Procedure
1. To export the contents of the command buffer to an external file, enter the following
command:
\o [<file>]
Enter the complete file path and <file> name.
If you do not specify a file, HDBSQL generates a temporary file.
The system opens the file in an editor. To determine which editor is used, HDBSQL evaluates
the environment variables HDBSQL_EDITOR, EDITOR, and VISUAL in succession. If you have
not set any of these environment variables, vi is used on Linux and Unix. For information on
setting environment variables, see your operating system documentation.
2. Make the desired changes to the file.
3. Save the file in the editor then close file and editor.
Result
You have changed the contents of the command buffer and can now execute the changed command
with the command \g.
More information:
Multiple Line Mode
Batch File
BatchFile
HDBSQL can import commands from a batch file and process them in the background.
AUTOCOMMIT mode is activated as default. If you deactivate it, the batch file must contain an
explicit COMMIT statement to ensure that HDBSQL executes the SQL statements immediately
afterthe batch file has been imported.
Structure
The individual commands are in individual lines and separated by a semicolon.

SAP HANA Database – Administration Guide 68
You can specify the separator used in the batch file between two commands using the -c
<separator> call option. The default value is ;.
More information: Overview of All HDBSQL Call Options
Example
CREATE TABLE city
(zip NCHAR (5) PRIMARY KEY,
name NCHAR(20) ,
state NCHAR(2) );
CREATE TABLE customer
(cno INTEGER PRIMARY KEY,
title NCHAR (7),
firstname NCHAR (10) ,
name NCHAR (10),
zip NCHAR (5),
address NCHAR (25));
\dt customer;
COMMIT
In this example, AUTOCOMMIT mode is deactivated.
RedirectingResultstoFile
You redirect the result of one or more HDBSQL commands to a <file>.
Prerequisites
You are logged on to a database.
More information: Logging On to a Database
Procedure
1. Enter the following command:
\o <file>
Note
Enter the full path of the file.
2. Enter the command whose result is to be redirected to the <file>.
<command>
To enter multiple commands in succession, press Enter after each command.
3. To stop redirection to a file, enter \o.
Example

SAP HANA Database – Administration Guide 69
1. Log on to the SAP HANA database as user MONA with the password RED:
hdbsql -n localhost -i 1 -u MONA,RED
2. Create the file c:\tmp\redirected.txt to which HDBSQL is to redirect the result:
\o c:\tmp\redirected.txt
3. Enter the following command:
\ds
4. Enter another command (SQL statement).
select * from HOTEL.CUSTOMER
5. Stop redirection to the file.
\o
The redirected.txt file now has the following content:
| Schema | Owner name |
| ------ | --------------- |
| MDX_TE | SYSTEM |
| SECURI | SECURITY1 |
| SOP_PL | SYSTEM |
| SYS | SYS |
| SYSTEM | SYSTEM |
| _SYS_B | _SYS_REPO |
| _SYS_B | _SYS_REPO |
| _SYS_R | _SYS_REPO |
| _SYS_S | _SYS_STATISTICS |
| CNO | TITLE | FIRSTNAME | NAME | ZIP | ADDRESS|
| ------ | ------- | ---------- | ---------- | ----- | -------|
| 3200 | Company | ? | Datasoft | 90018 | 486 Maple Str.|
| 3400 | Mrs | Mary | Griffith | 20005 | 3401 Elder Lane|
| 3500 | Mr | Martin | Randolph | 60615 | 340 MAIN STREET, #7|
| 3600 | Mrs | Sally | Smith | 75243 | 250 Curtis Street|
| 3700 | Mr | Mike | Jackson | 45211 | 133 BROADWAY APT. 1|
| 3900 | Mr | George | Howe | 75243 | 111 B Parkway, #23|
| 4000 | Mr | Frank | Miller | 95054 | 27 5th Str., 76|
| 4400 | Mr | Antony | Jenkins | 20903 | 55 A Parkway, #15|
...
More information: Executing Commands

SAP HANA Database – Administration Guide 70
ExecutingSQLStatements
You execute an SQL statement in HDBSQL in interactive mode (session mode).
Note
For information about the other options for executing SQL statements in HDBSQL, see
Executing Commands.
Prerequisites
You are logged on to the database.
More information: Logging On to a Database
Procedure
Enter the SQL statement.
<sql_statement>
Example
1. Log on to the SAP HANA database as user MONA with the password RED and choose SQL
mode INTERNAL:
hdbsql -n localhost -i 1 -u MONA,RED
2. Display the columns CNO, TITLE, FIRSTNAME, NAME, and ZIP of table HOTEL.CUSTOMER:
select CNO,TITLE,FIRSTNAME,NAME,ZIP from HOTEL.CUSTOMER
CNO | TITLE | FIRSTNAME | NAME | ZIP
----+-------+-----------+------+------
3000 | Mrs | Jenny | Porter | 10580
3100 | Mr | Peter | Brown | 48226
3200 | Company | ? | Datasoft | 90018
3300 | Mrs | Rose | Brian | 75243
3400 | Mrs | Mary | Griffith | 20005
3500 | Mr | Martin | Randolph | 60615
3600 | Mrs | Sally | Smith | 75243
3700 | Mr | Mike | Jackson | 45211
3800 | Mrs | Rita | Doe | 97213
3900 | Mr | George | Howe | 75243
4000 | Mr | Frank | Miller | 95054
4100 | Mrs | Susan | Baker | 90018
4200 | Mr | Joseph | Peters | 92714
4300 | Company | ? | TOOLware | 20019
4400 | Mr | Antony | Jenkins | 20903
(15 rows selected) * Ok

SAP HANA Database – Administration Guide 71
RequestingInformationAbouttheDatabaseCatalog
You use an HDBSQL command to request information about the database catalog of a database in
interactive mode.
Note
For information about the other options for executing HDBSQL commands, see Executing
Commands.
Prerequisites
You are logged on to the database.
More information: Logging On to a Database
Procedure
Enter one of the HDBSQL commands listed below.
HDBSQL returns information about the database objects that correspond to the specified
[PATTERN] or [NAME] and to which you have access. If you do not specify a pattern, the system
displays information about all the database objects to which you have access.
HDBSQL Commands: Requesting Information About the
Database
Catalog
Database
Object
HDBSQL Command
Result
Column
\dc [PATTERN]
Column name
Data Type
Column length
Null value permitted or not
Position of column in primary key of table (if
applicable)
Index
\de [PATTERN]
Index name
Columns contained in index
Position of column in index
Specifies whether index is UNIQUE
Sort sequence
Database
Procedure \dp [PATTERN]
Schema Name
Name of the database procedure
Package to which database procedure is assigned
Schema
\ds [NAME]
Schema Name
Owner
Table
\dt [PATTERN]
Schema Name
Table Name
Table type
Database
users
\du [NAME]
Name of the database user
User properties
View
\dv [PATTERN]
Schema Name
View name
View types

SAP HANA Database – Administration Guide 72
The following syntax applies to the [PATTERN]:
Property
Description
PATTERN [SCHEMA.][OBJECT_NAME]
SCHEMA
Schema of the
database
objects about which you want to request
information
OBJECT_NAME
Name of the
database
object
You can use the following placeholders:
For one character: _
For any number of characters: %
Example
Requesting information on the columns in the HOTEL.CUSTOMER table:
\dc HOTEL.CUSTOMER
Table "HOTEL.CUSTOMER"
Column Name | Type | Length | Nullable | KEYPOS
------------+------+--------+----------+-------
ADDRESS | CHAR ASCII | 25 | NO |
CNO | FIXED | 4 | NO | 1
FIRSTNAME | CHAR ASCII | 10 | YES |
NAME | CHAR ASCII | 10 | NO |
TITLE | CHAR ASCII | 7 | YES |
ZIP | CHAR ASCII | 5 | YES |
(6 rows selected)
ExitingHDBSQL
To exit the interactive operating mode of HDBSQL, use the following command.
exit | quit | \q
OverviewofAllHDBSQLCallOptions
You can call the HDBSQL program with the following options:
hdbsql [<options>]
Call Options:
Database
Session
Option
Description
-i <instance_id>
Instance
ID
of the
database
-e
Encrypted data transmission
-n
<database_computer>[:<port>]
Name of the computer on which the
database
is installed
and port number
-r
Enforces execution of SQL statements as statements
rather than as prepared statements
-u <database_user >
User
name for logging on to the
database
-p <database_user_password>
Password for logging on to the
database
-U <user_store_key>
Use creden
tials from
user
store

SAP HANA Database – Administration Guide 73
-S <sql mode>
SQL mode, one of
"
INTERNAL
"
or
"
SAPR3
"
.
-z
Switches AUTOCOMMIT mode off
-r
suppress usage of prepared statements
Call Options: Input and
Output
Option
Description
-c
<separator> When importing commands from a file, HDBSQL uses the <separator> to
separate the individual commands.
The default value is ;.
-I <file> Imports commands from the batch file <file>
-m
Activates
multiple line mode for entering HDBSQL commands
-o <file> Writes the results to the <file>
-x
Suppresses additional
output
such as the number of selected rows in a result set
Call Options: Formatting the
Output
Option
Description
-A
Returns the result set in an aligned format.
-a
Suppresses the
output
of the column names in the result set.
-C
Suppresses escape
output
format.
-b
<maximum_length>
Defines the maximum number of characters for
output
of LOB values.
Default value: 10 characters
-f
HDBSQL returns all SQL statements before sending them to the
database
instance.
-F <separator>
Speci
fies which string HDBSQL uses as a separator between the individual
columns of the result set Default value: |
-g <null_value> Specifies the character for null values in the result set Default value: ?
-p <prefix>
Specifies which string is to be
output
b
efore each row of the result set
Default value: |
-P <suffix>
Specifies which string is to be
output
after each row of the result set
Default value: |
-Q
Outputs
each column of the result set in a new row
-j
Switches the page by page scroll
output
off.
Call Options: Other
Option
Description
-h
Displays the help
-t
Outputs
debug information
-T <file>
Activates
the
SQLDBC
trace
SQLDBC writes the trace data to the <file>
-v
Displays version information about the HDBSQL
program
Call Options: SSL Options
Option
Description
-sslprovider
SSL provider [sapcrypto|mscrypto]
-sslkeystore
SSL key store name

SAP HANA Database – Administration Guide 74
-ssltruststore
SSL trust store name
-ssltrustcert
Skip certificate validation
-sslhostnameincert
Hostname used for certificate validation
-sslcreatecert
Create self signed certificate
OverviewofAllHDBSQLCommands
The following table shows all HDBSQL commands that you can enter in interactive operation.
Note
Instead of an HDBSQL command, you can also enter an SQL statement or a database
procedure.
Overview of all HDBSQL Commands
Command
Description
\?
\h[elp]
Displays all HDBSQL commands
\a[utocommit] [ON|OFF]
Switches AUTOCOMMIT mode on or off
\al[ign] [ON|OFF]
Switches formatted
output
of the results of SQL statements on or
off
\es[cape] [ON|OFF]
Switches the escape
output
format on or off.
\c[onnect]
Logs a
user
onto the
database
.
\dc [PATTERN]
Lists all table columns that correspond to the PATTERN.
HDBSQL lists only those tables to which the current user has
access.
\de [PATTERN]
Lis
ts all the indexes of
database
objects that correspond to the
PATTERN
\di[sconnect]
Logs the
user
off from the
database
\dp [PATTERN]
Lists all database procedures that correspond to the PATTERN
\ds [NAME]
Lists all schemas that correspond to the NAME pattern
\dt [PATTERN]
Lists all tables that correspond to the PATTERN
\du [NAME]
Lists all database users that correspond to the NAME pattern
\dv [PATTERN]
Lists all views that correspond to the PATTERN
\e[dit][<file>]
Writes the command buffer to the <file> where you can edit it
with an editor
\f[ieldsep] <separator>
Uses the <separator> character to separate the individual
fields of the result
\g
Executes the commands in the command buffer and returns the
results
\i[nput] <file>
Imports commands from the batch file <file>
\m[ode] <INTERNAL|SAPR3>
Changes the SQL mode
\mu[ltiline] ON | OFF
Switches multiple line mode on | off
\o[utput] <file>
Redirects the result to a file
\pa[ger]
Displays results consecutively (not page by page)
\p[rint]
Displa
ys the current command buffer
\q[uit]
Exits HDBSQL
\r[eset]
Deletes the current command buffer
\ro[wsep] <separator>
Uses the <separator> character to separate the individual
rows of the result
\s[tatus]
Displays general information about the
database
