Streetlight Management System User Guide SLMSUser Ver2
User Manual:
Open the PDF directly: View PDF ![]() .
.
Page Count: 25

PB93001_01
Streetlight Management System User Guide
© GridComm Pte. Ltd. Page 1 of 25
STREETLIGHT MANAGEMENT
SYSTEM USER GUIDE

PB93001_01
Streetlight Management System User Guide
© GridComm Pte. Ltd. Page 2 of 25
1. Introduction and Hardware setup considerations ............................................................................................ 3
2. SLMS Installation ............................................................................................................................................. 4
3. Login ................................................................................................................................................................ 5
4. Common actions on various pages................................................................................................................... 7
5. User and User Profile management ................................................................................................................. 8
6. Districts and Zones .......................................................................................................................................... 9
7. Adding DPSs ................................................................................................................................................... 10
7.1 Automatically adding new DPS ................................................................................................................. 10
7.2 Manually adding a new DPS ..................................................................................................................... 11
7.3 Relocating an existing DPS ........................................................................................................................ 12
8. Placing an MLC and Sunrise and Sunset Times ............................................................................................... 13
9. Manual Control and Status of Individual DPS ................................................................................................. 14
9.1 Manual Control of Individual DPS ............................................................................................................. 14
9.2 Status of DPS ............................................................................................................................................. 15
10. Manual Control of Zones ............................................................................................................................... 16
11. Schedule Control of Zones ............................................................................................................................. 17
11.1 Adding a Dimming Profile ......................................................................................................................... 17
11.2 Dimming Point proirity .............................................................................................................................. 18
11.3 Adding a Schedule ..................................................................................................................................... 19
11.4 Commisioning a Schedule to a Zone .......................................................................................................... 21
12. Adding Alarms ............................................................................................................................................... 23
13. Viewing Reports ............................................................................................................................................ 24
13.1 Energy Report ........................................................................................................................................... 24
13.2 Failure Analysis ......................................................................................................................................... 24
13.3 Failure Report ........................................................................................................................................... 24
14. Viewing Device Lifetime ................................................................................................................................ 25
15. Contact Information ...................................................................................................................................... 25
16. Revision ......................................................................................................................................................... 25
PB93001_01
Streetlight Management System User Guide
© GridComm Pte. Ltd. Page 3 of 25
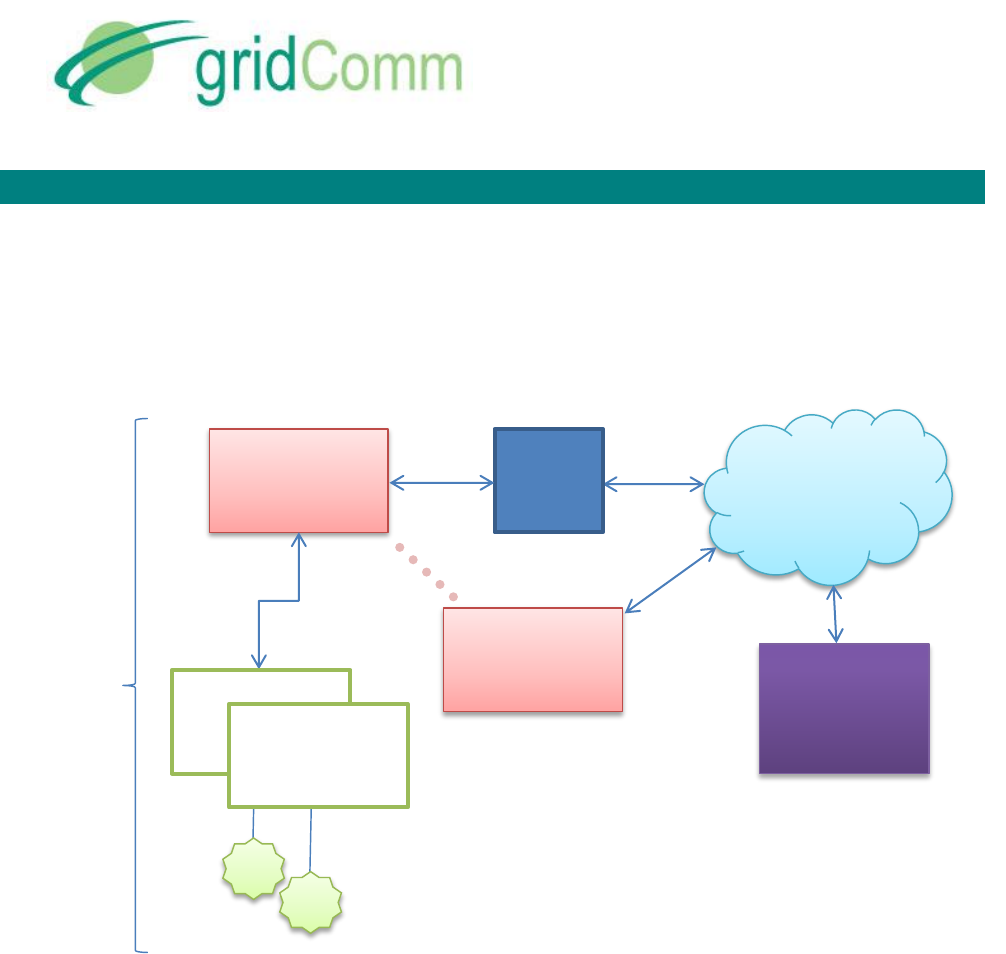
1. Introduction and Hardware setup considerations
The Streetlight Management System performs management, monitoring, real-time scheduling,
and real-time control of street lights. The Streetlight Management Server (SLMS) acts as a web
gateway and back-end server to front-end web clients. Control and monitoring is distributed
among multiple Master Light Controllers (MLCs)
The Master Light Controller (MLC) has an RS-485 output that needs to be connected to an
RS-485 to ethernet converter, or for example, a GPRS modem.
The setup of the MLC and DPS are detailed in “UG293001_01_gridComm Street Light Hardware
Installation_Guide” and “PB93001_01_GC9300_PLC Networking_Users_Guide”.
The default baud rate of the RS-485 connection is 115 Kbps, though this may be changed.
The SLMS listens on port 502 for incoming connections from the MLC.
Multiple MLCs
Master Light
Controller
(MLC)
Modbus/TCP
GPRS
modem
Modbus
/RS485
Streetlight
Management
Server
(SLMS)
Modbus/TCP
GC-
Net
Up to 247 DPS per MLC
Street Lights
Digital Power
Supply
(DPS)

PB93001_01
Streetlight Management System User Guide
© GridComm Pte. Ltd. Page 4 of 25
2. SLMS Installation
We recommend the following minimum system specifications to install and operate SLMS for
optimal performance:
CPU: 1.7MHz Duo Core CPU
OS: Win7
RAM: 2GB
HDD Space Required: 5GB
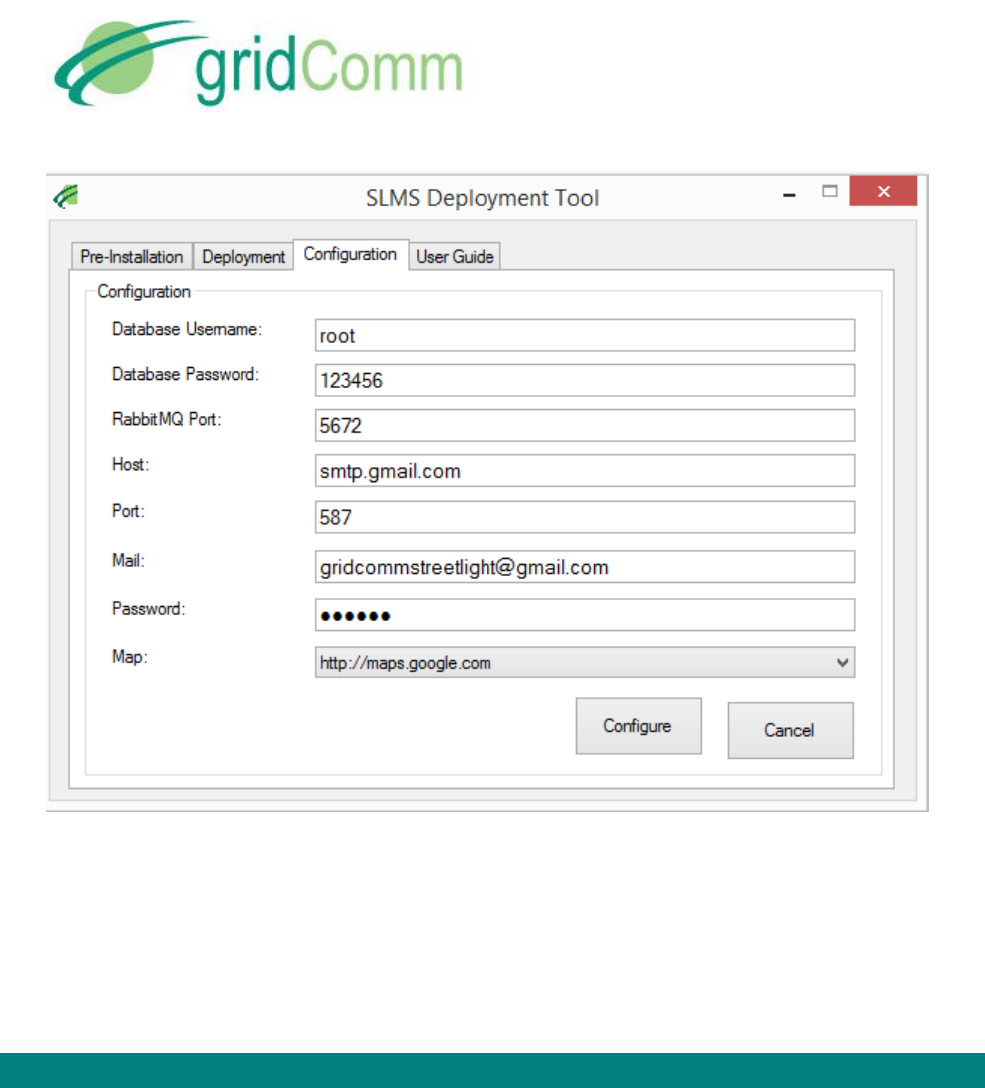
Unzip the SLMS installation package onto the intended server that will run the SLMS.
Run Installer.exe in the SLMSDeploymentTool folder from the Installer directory.
Follow the steps as detailed in the User Guide tab to install the components and configure the
SLMS.
PB93001_01
Streetlight Management System User Guide
© GridComm Pte. Ltd. Page 5 of 25
In order to use the “Email Alert feature” for Alarm in the SLMS, the entries in the Host, Port ,
Mail and Password field in the Configuration tab will need to be entered correctly.
If the server needs to be started again, execute startup.bat from the Apache Tomcat server bin
directory and then execute ObserverRun.bat (and the AlarmServerRun.bat if required for email
alert) from the directory that the deployment package was unzipped to.
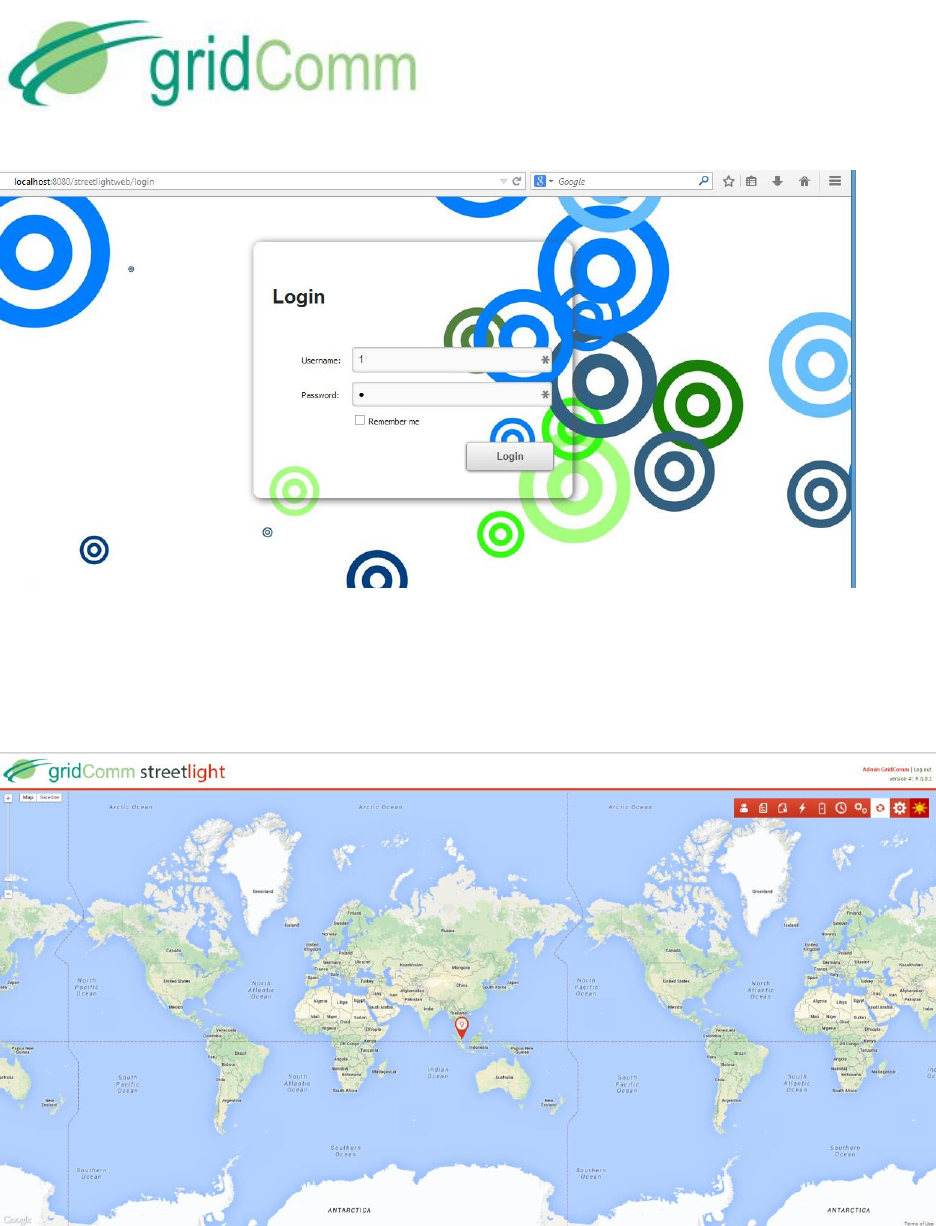
3. Login
Use a browser to connect to the server. The default port is 8080.
When connected, it goes directly to the login screen.
PB93001_01
Streetlight Management System User Guide
© GridComm Pte. Ltd. Page 6 of 25
The default Username is ‘admin’ and default Password is ‘admin’.
The homepage shows a dashboard which shows a world map with icons of any DPS that have
been placed:
On the top right are navigation icons for the common control pages available to the user:
PB93001_01
Streetlight Management System User Guide
© GridComm Pte. Ltd. Page 7 of 25
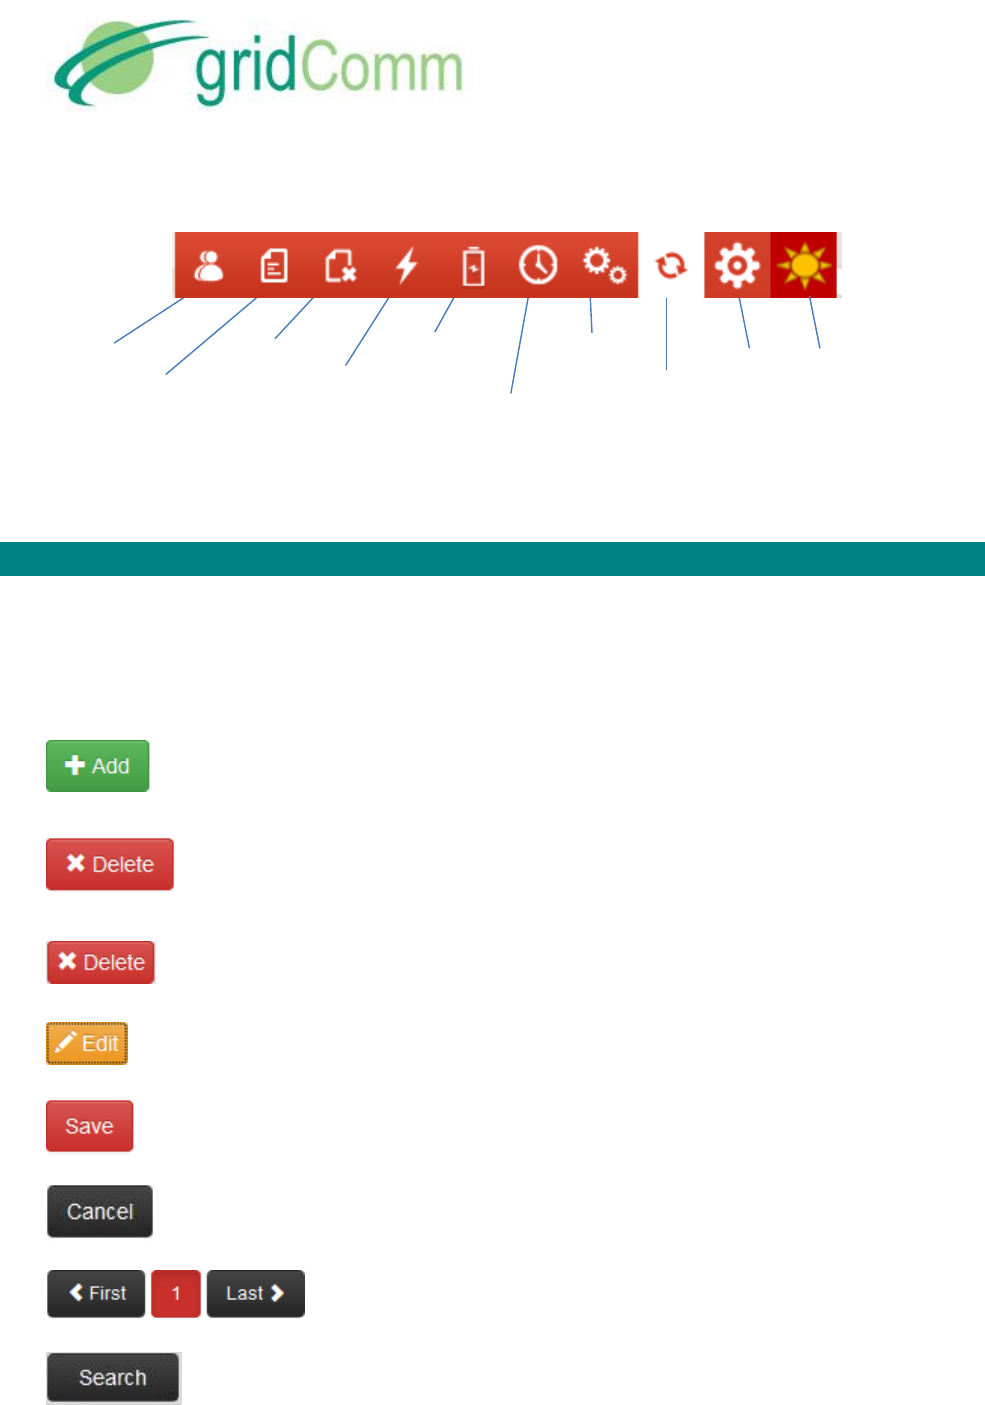
4. Common actions on various pages
Many of the pages provide a list of objects that may be managed on that page or the details of
an object being managed.
On many of these pages, these common action icons are available:
creates a new object of the type being managed, like Users, DPSs, and Zones.
at the top of the list deletes the object or objects that have been selected by
checking the checkbox next to the objects to be deleted.
at the right side of each object deletes that object.
at the right side of each object allows the user to modify the details of the object.
saves changes to the object when creating or editing an object.
discards changes while editing an object, or aborts the addition of a new object.
navigates through a list of objects over multiple pages.
lists the objects with names that contain the specified string.
Users
Failure
Report
Failure
Analysis
Energy
Report
Device
Lifetime
Alarm
Manual
Control
MLC
Refresh
Page
DPS
PB93001_01
Streetlight Management System User Guide
© GridComm Pte. Ltd. Page 8 of 25
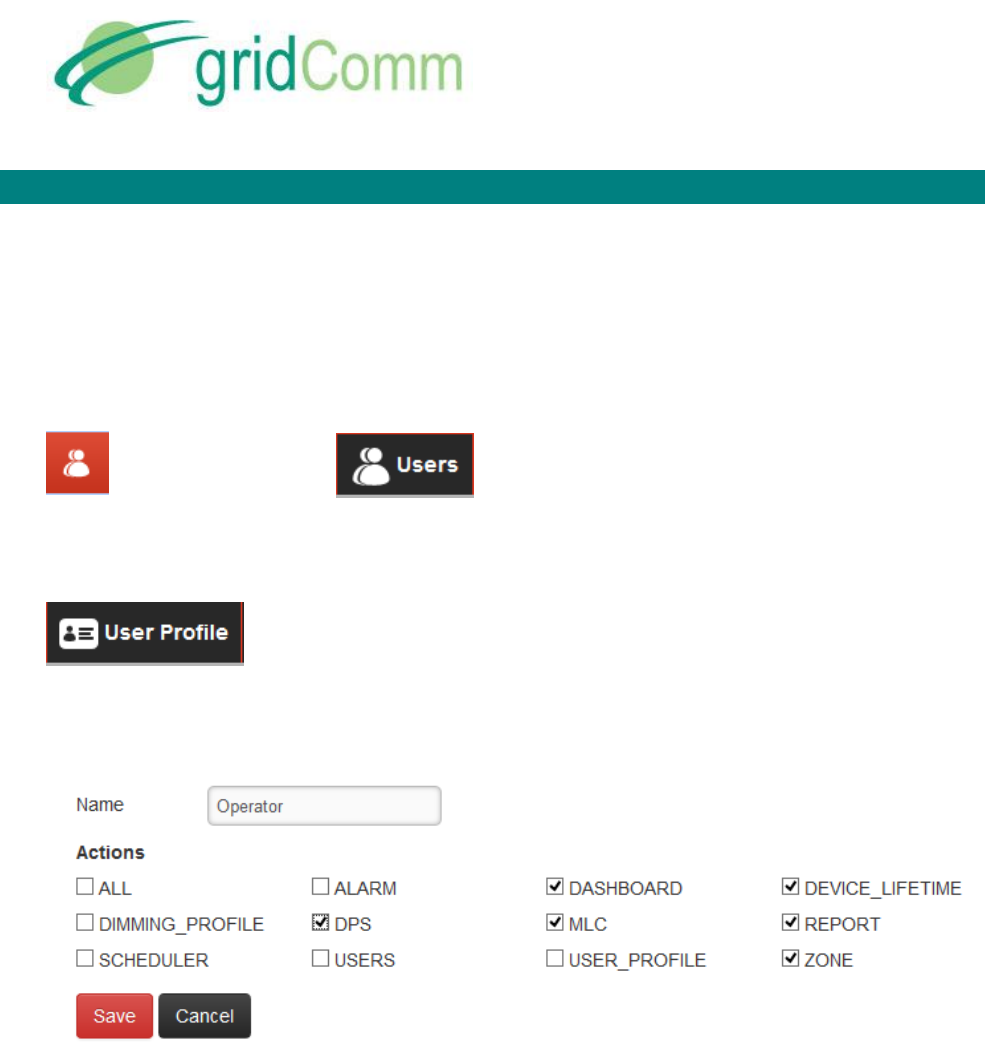
5. User and User Profile management
In general, a user should be created for each person that is to use the Streetlight Management
System from the web interface.
Each user’s allowable actions is controlled by a user profile of which each user is a member.
On installation, there is a default admin user with a user profile named DEFAULT. This DEFAULT
profile allows ALL possible actions but this may be changed.
on the dashoard or from other pages navigates to User management.
The password for any user and other user details may be modified by editing the user.
navigates to User Profile management.
The creation of a new user profile or the editing of an existing user profile allows the selection
of the allowable actions for that user profile as shown:

PB93001_01
Streetlight Management System User Guide
© GridComm Pte. Ltd. Page 9 of 25
6. Districts and Zones
Each DPS has a District and a Zone. Districts and Zones are independent constructs.
A Zone is a control grouping of DPSs. Automatic scheduling may only be applied to Zones.
A District is simply a means of categorizing DPSs. When displaying failures, power consumption,
and other information, the information may be grouped by District.
In order to add a new DPS manually, the Zone and the District of the intended DPS must first be
created.
navigates to Zones.
A Zone contains a Name and a Code. The purpose of the Zone Code is simply for ease of
searching within the Zone list. The Zone Name is used as an identifier of the Zone when using it
in other contexts, like Scheduling.
District is a sub-menu under Zone.

PB93001_01
Streetlight Management System User Guide
© GridComm Pte. Ltd. Page 10 of 25
7. Adding DPSs
Each DPS object represents a light fixture.
Navigates to the DPS list page.
The DPS list page lists all DPS that are known to the SLMS, whether or not the DPS is currently
online.
A DPS may be added into the system either manually or when an MLC registers with the SLMS.
7.1 Automatically adding new DPS
When a DPS is turned on, it connects to one of a number of MLCs which are in range. The MLCs
that it may connect to is set using the PLCM utility connected through the RS-485 port of the
DPS.
When an MLC registers with the SLMS, DPSs that are connected to that MLC are then registered
with the SLMS. If a DPS, which is identified by its DPS ID, was not previously known to the SLMS,
it is automatically added into the system.
These automatic DPS additions have default names which is a decimal number representing the
DPS ID. The DPS ID is a unique 32-bit number often represented in dotted decimal format.
For example, a DPS with a DPS ID of 1.0.0.2 has a default name of 16777218.
The details of a DPS that has been automatically added may be edited: for example, its Name,
Location, Zone and District. These DPSs have no Zone or District defined.
PB93001_01
Streetlight Management System User Guide
© GridComm Pte. Ltd. Page 11 of 25
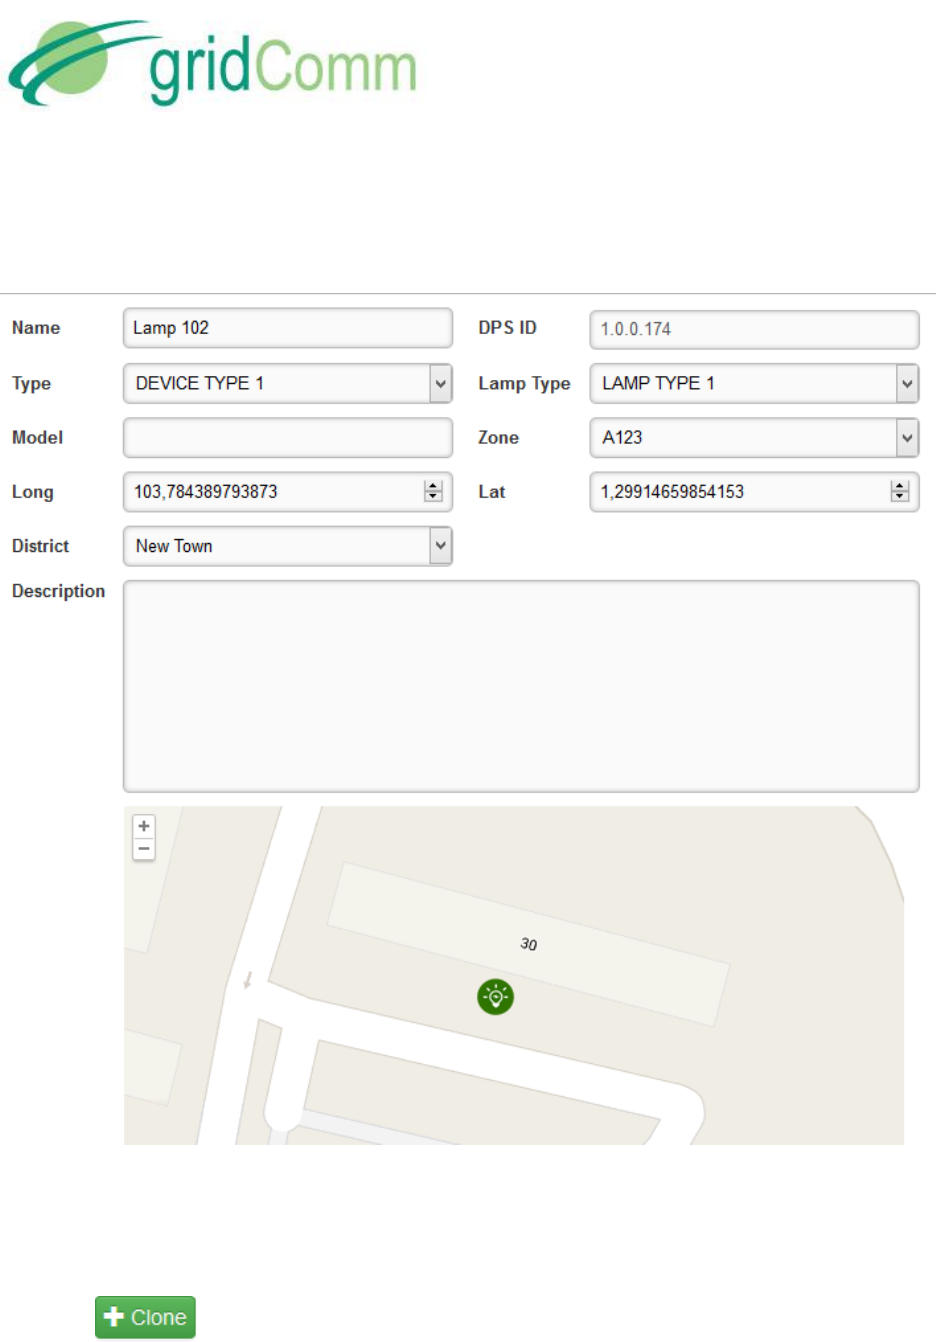
7.2 Manually adding a new DPS
A DPS may be manually added in two ways: from the DPS list page, or from the Dashboard map.
Adding a DPS from the DPS list page presents an Add DPS page as shown:
The dialog presents a small map which, when clicked the first time, will automatically fill in the
Longitude and Latitude of the new DPS according to the location selected on the map. The bulb
icon represents the location of the new DPS. This icon may be dragged within this dialog to
adjust the Longitude and Latitude accordingly.
Clicking in the DPS list page behaves like adding a new DPS but with the added
convenience of pre-filling the fields of the new DPS from the existing one.
PB93001_01
Streetlight Management System User Guide
© GridComm Pte. Ltd. Page 12 of 25
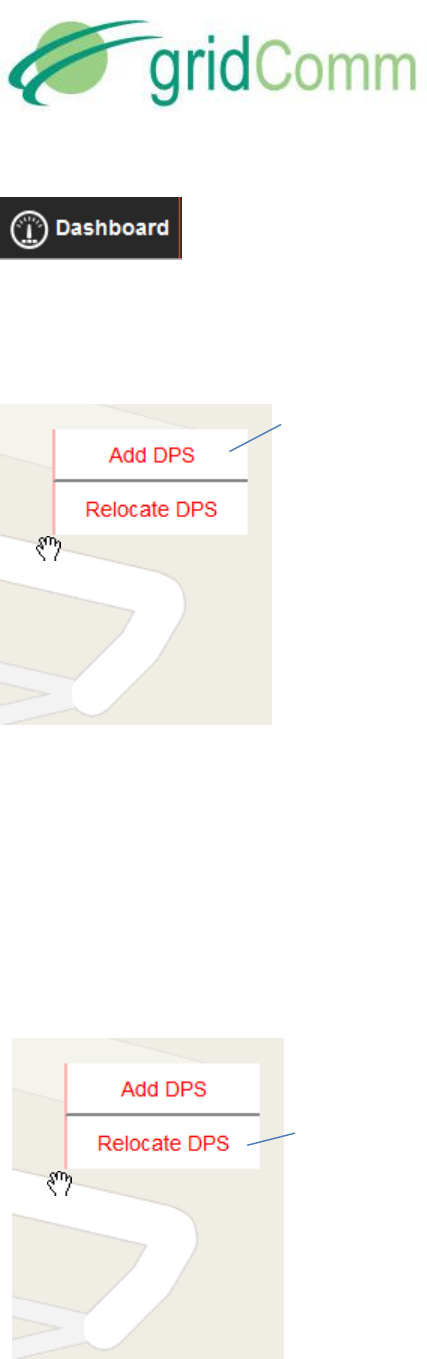
navigates to the Dashboard map.
To add a DPS to the Dashboard map, right click on the location of the map where the DPS is to
be placed and choose “Add DPS” to add a new DPS.
Add DPS will manually add a new DPS to the system. This DPS
must not have the same DPS ID as one that already exists.
7.3 Relocating an existing DPS
An existing DPS may be relocated (if it has a location), or placed (if it does not yet have a
location). To do this:
1. Edit the DPS from the DPS List. Shift the DPS location by dragging the icon in the small
map, or
2. Right-click the place in the Dashboard where the DPS in question is to be located and
choose “Relocate DPS”. Choose the DPS from the list that is to be relocated or placed
there.
Relocate DPS places a known DPS at the chosen location. This is
useful to place a DPS that has been previously added
automatically due to MLC registration. This DPS would not yet
have location data.
PB93001_01
Streetlight Management System User Guide
© GridComm Pte. Ltd. Page 13 of 25
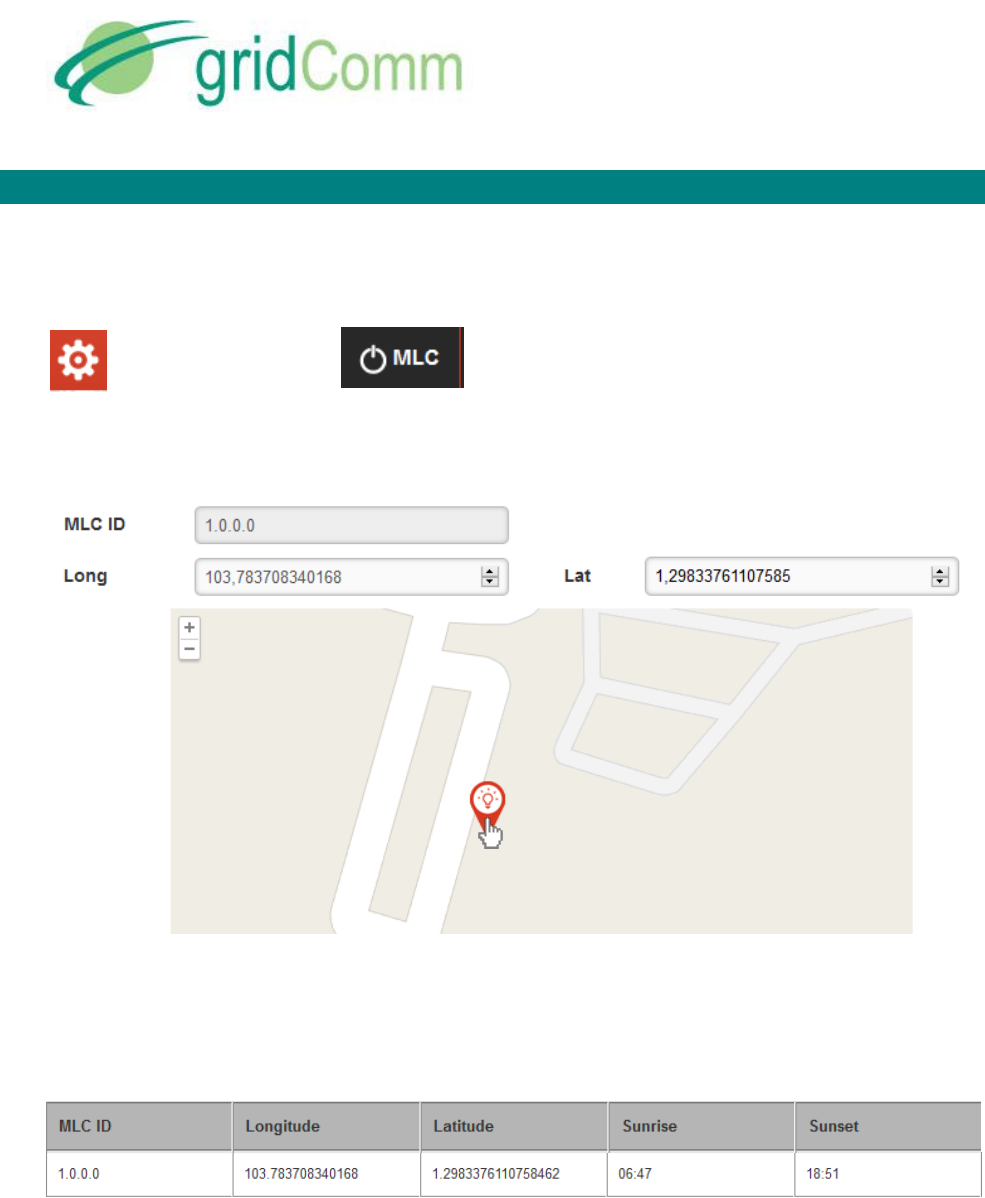
8. Placing an MLC and Sunrise and Sunset Times
When an MLC is first registered into the system, it does not have location data. In order for
Sunrise and Sunset Times to be calculated correctly, the MLC needs to be placed at a location.
on the dashboard or from other pages navigates to the MLC list page.
Editing an MLC will bring up the Update MLC page as shown:
Shift the MLC by dragging the icon around the map. Once the editing is saved, the Sunrise and
Sunset times will be calculated. The calculation is based on the Longitude, Latitude, Date, and
Timezone. Date and Timezone are taken from the operating system of the SLMS.
PB93001_01
Streetlight Management System User Guide
© GridComm Pte. Ltd. Page 14 of 25
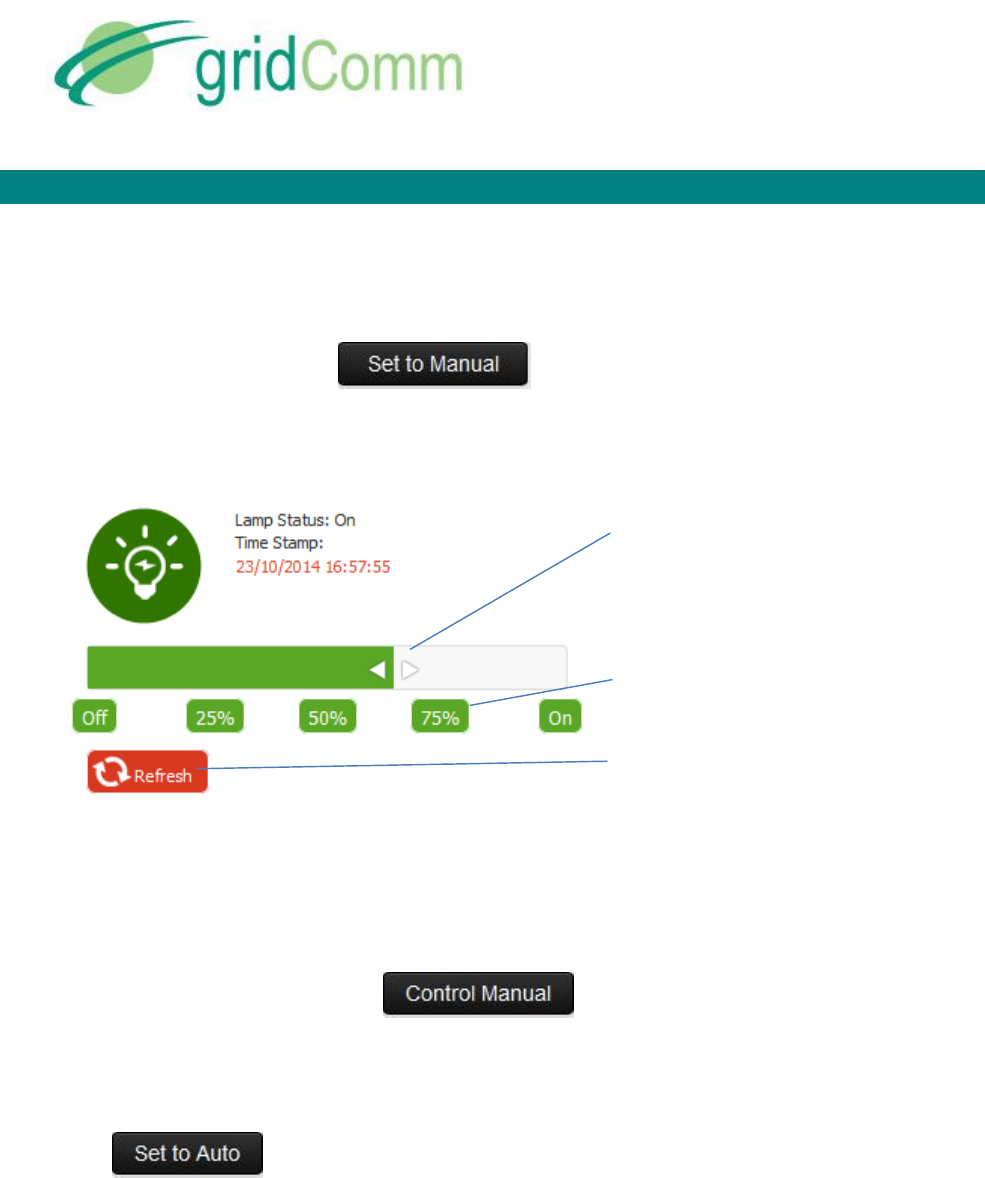
9. Manual Control and Status of Individual DPS
9.1 Manual Control of Individual DPS
A DPS may be controlled in real-time from either the DPS list page or the Dashboard map.
In the DPS list page, click on in the Status column of the DPS that is to be
controlled.
A dialogue will appear as shown:
Shift the slider to apply the
dimming level immediately.
Click preset dimming levels instead
of using the slider.
Click “Refresh” to refresh the status
information of the DPS.
Once the individual DPS been controlled this way, it remains in Manual control and does not
obey any control applied to the Zone that it belongs to: that is, it does not obey any Zone
Schedule control or Zone Manual control.
A DPS in Manual mode will show in the Status column in the DPS list.
Click on “Control Manual” to re-adjust the dimming level.
Click to remove the DPS from Manual Control. A DPS in “Auto” mode obeys
controls applied to the Zone that it belongs to.

PB93001_01
Streetlight Management System User Guide
© GridComm Pte. Ltd. Page 15 of 25
9.2 Status of DPS
The electrical data available in the status dialogue are:
Temperature (˚C)
Output Current (mA)
Input Current (mA)
Active Power (W)
Dimming Level (%)
Output Voltage (V)
Input Voltage (V)
Power Factor (%)
Power Consumed (Wh)
Error or Warning Status: Over Temperature, Under Temperature, Start-up failure, Short
Circuit, Open Loop, Over Power, Over Voltage, Under Voltage
Each DPS on the Dashboard is represented by an icon indicating its status.
The following are the icons and the what it means:
Auto mode, 100 %
Auto mode, 1 – 99 % dimming level
Auto mode, OFF
Manual mode
Error: either Open loop, Short circuit, or Start-up failure
Warning:
Over Temperature, Under Temperature, Over Power, Over Voltage or Under Voltage
Unknown state: The DPS is online but the state is not yet known
Offline
PB93001_01
Streetlight Management System User Guide
© GridComm Pte. Ltd. Page 16 of 25
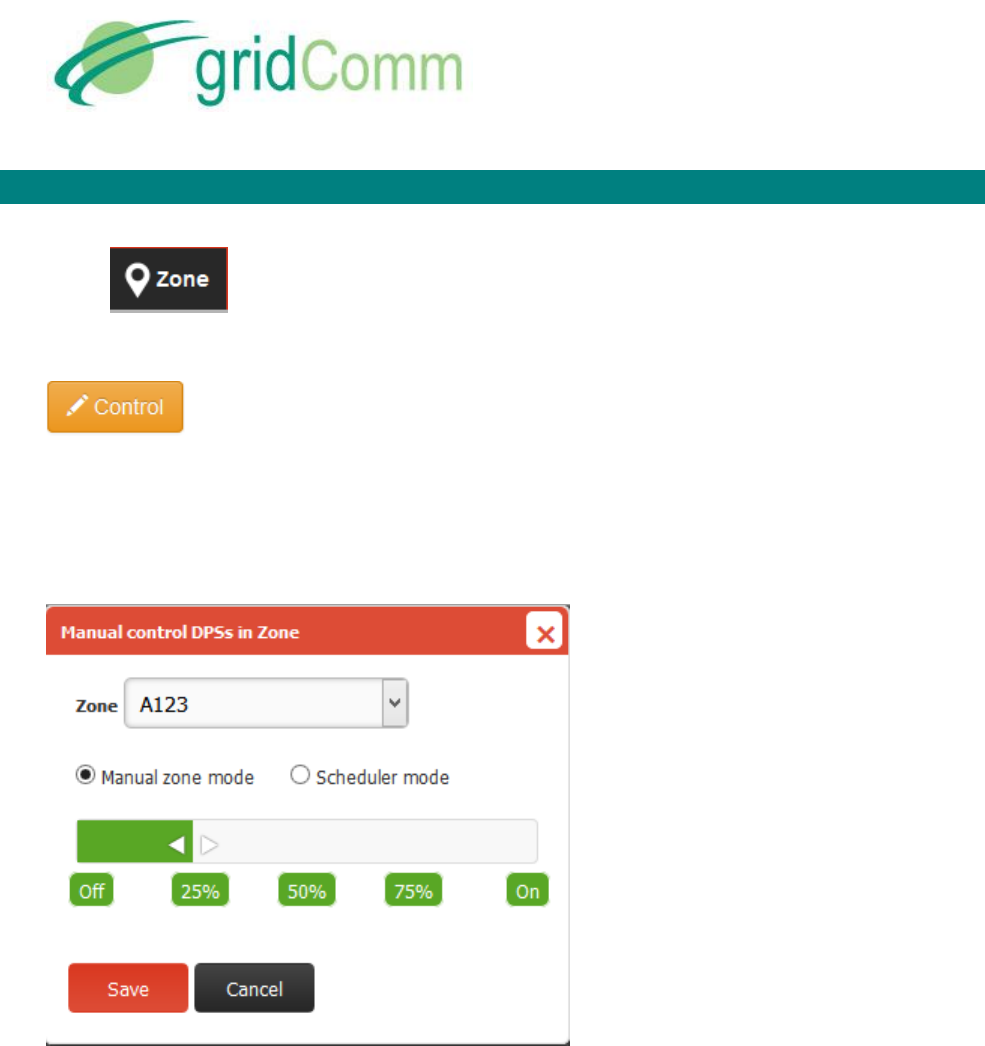
10. Manual Control of Zones
Use to navigate to Zones.
brings up a dialogue box to allow Manual Control of Zones.
In the dialogue box as shown below, to manually control the Zone dimming level, choose the
Zone from the dropdown list, check Manual zone mode, choose the desired dimming level and
click “Save”.
To release the Zone from Manual
Control, control the Zone and check
“Scheduler mode” and click “Save”.
For any particular DPS, the priority of control is:
1. Individual Manual DPS control (highest priority)
2. Manual Zone control
3. Scheduled Zone control (lowest priority)
PB93001_01
Streetlight Management System User Guide
© GridComm Pte. Ltd. Page 17 of 25
11. Schedule Control of Zones
All the DPS under a Zone may be automatically controlled according to a schedule.
To define this automatic control, a Dimming Profile and a Schedule needs to be defined for that
Zone.
A Dimming Profile defines the dimming levels that are to be applied to all the DPS in the Zone
that obeys the Dimming Profile.
A Schedule specifies a repeating pattern of dates and associates this pattern to a Dimming
Profile and a Zone. When the current date is one of the dates in this pattern, then the specified
Dimming Profile is applied to the specified Zone.
Note: a Dimming profile is applied from 12:00 pm of the specified date until 11:59 am of
the next date. For example, at 11:00 am, 1 January 2015, the Dimming profile specified for
31 December 2014 will be applied.
The Dimming Profile needs to be created first before the Schedule that uses it.
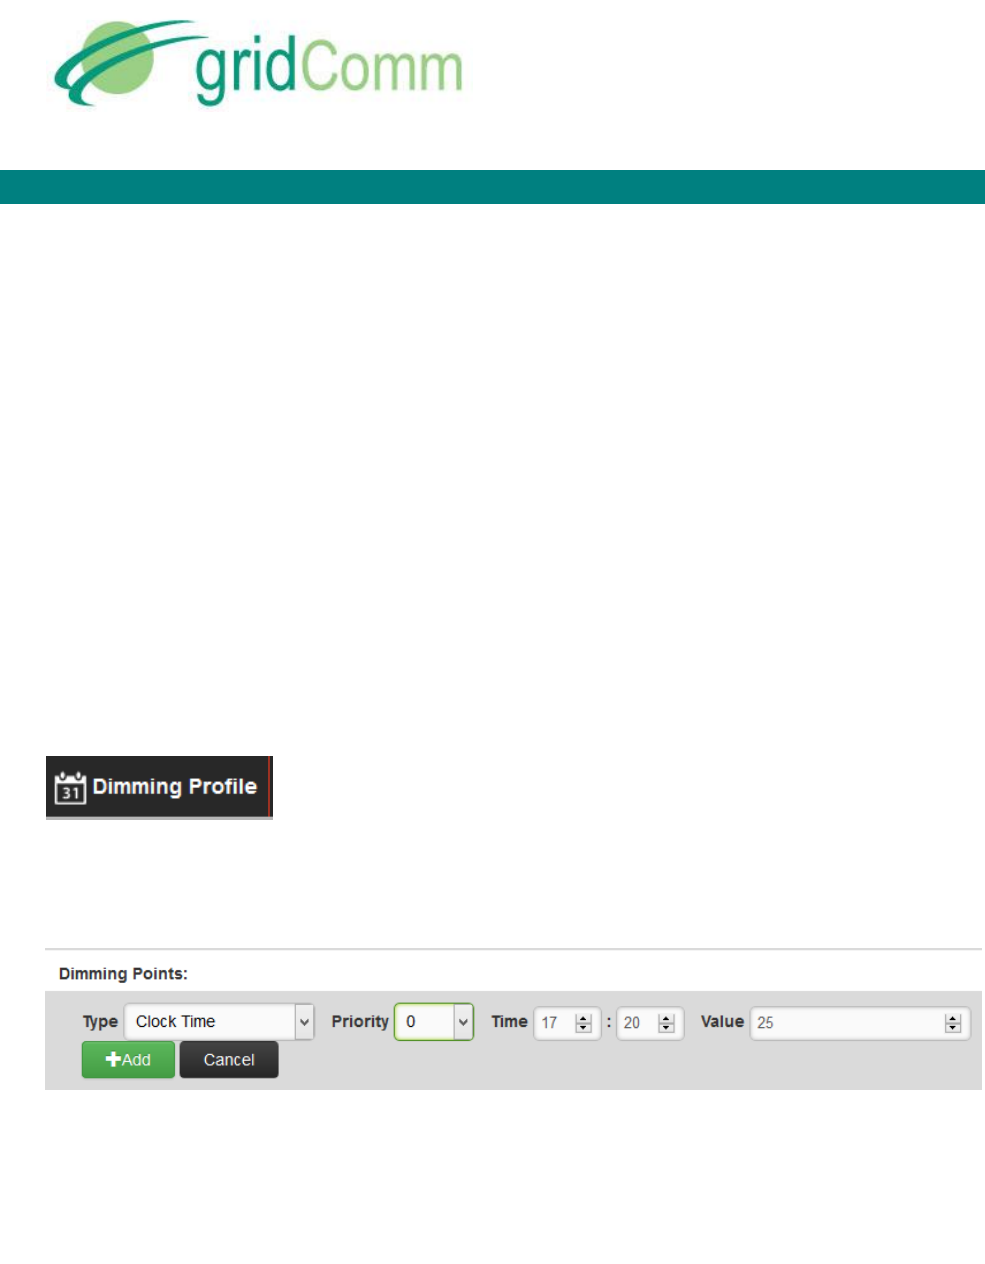
11.1 Adding a Dimming Profile
navigates to the Dimming Profile list page.
Adding a dimming profile presents an Add Dimming Profile page that allows the addition of
Dimming Points to the profile.
Each Dimming point specifies a dimming level that is to be applied to the Zone of DPS at the
specified time. The time specified may be the Local Clock Time (with no Daylight Savings
adjustments) or a relative time with respect to Sunrise and Sunset.
Note: Since a Dimming profile is applied from 12:00 pm to 11:59 am the next day, the
Dimming points are ordered according to this timing.
The Priority of a Dimming profile may be left at the same level (say 0) all the time if all the
Dimming Points are Clock Time or all of the Dimming Points are with respect to Sunrise or
Sunset. However, if there is a mixture of both types of Dimming Points in a Dimming Profile,
then the Priority may come into play.
!
!
PB93001_01
Streetlight Management System User Guide
© GridComm Pte. Ltd. Page 18 of 25
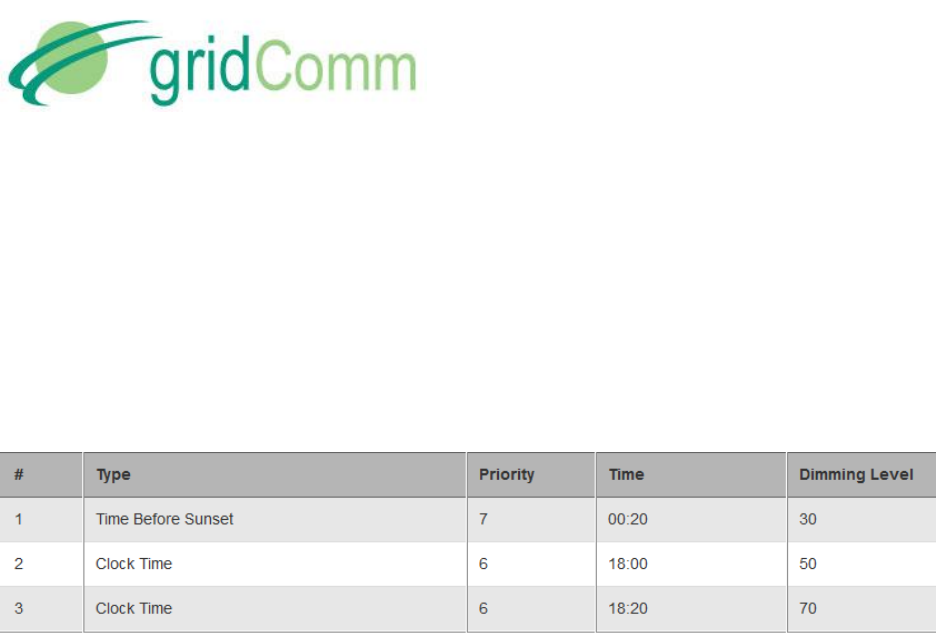
11.2 Dimming Point proirity
Dimming point priority allows either Clock Time Dimming Points or Sunrise/Sunset-relative
Dimming points to have precedence over the other. A lower priority number has a higher
precedence.
If a Dimming Point of a higher or equal priority (that is, lower or equal value) then the current
priority is reached, the Dimming Point is applied, and the current priority changes to this higher
priority, otherwise the Dimming Point is ignored.
For example, given this set of Dimming points:
If Sunset is at 18:00 h,
- then Dimming Point #1 is at 1740 h,
- at 1740h, the Zone is set to 30% Dimming level and the priority becomes 7
- at 1800h, the Zone is set to 50% Dimming level as this point is higher priority (6) then
the current priority (7) and the priority becomes 6
If Sunset is at 18:30 h,
- then Dimming Point #1 is at 1810 h,
- at 1800h, the Zone is set to 50% Dimming level and the priority becomes 6
- at 1810h, the Zone is remains at 50% Dimming level as the current priority (6) is higher
than the priority of Dimming Point #1 (which is 7) and the priority remains at 6
In both cases, Dimming Point #3 will be applied as its priority is equal to the current priority.
PB93001_01
Streetlight Management System User Guide
© GridComm Pte. Ltd. Page 19 of 25
11.3 Adding a Schedule
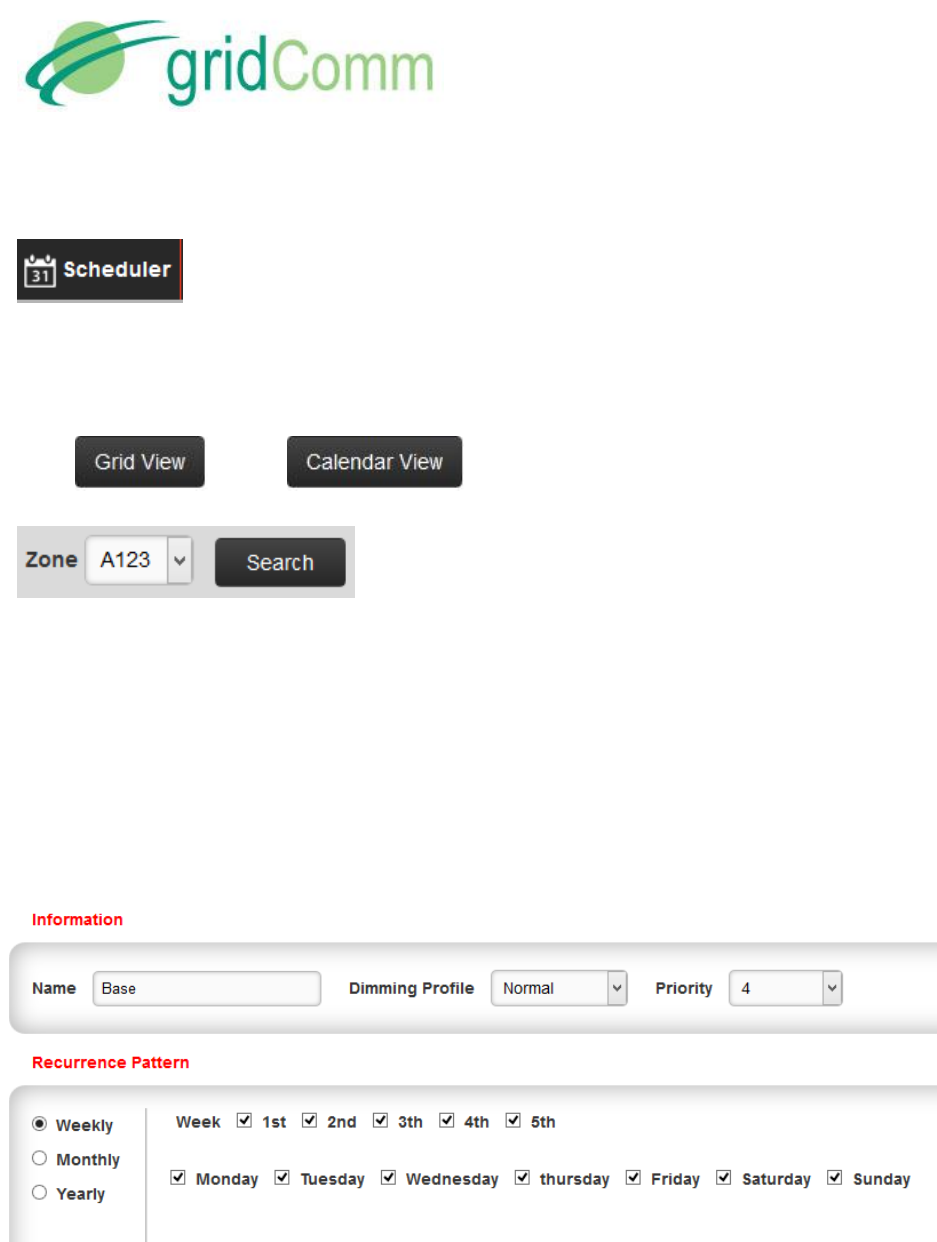
navigates to the Scheduler calendar page.
The Scheduler calendar shows at a glance what schedules have been commissioned in the
system for given Zones. This information can also be presented as a Grid.
Use and to change between the wo views.
restricts the view to only show the Schedules that have
been commissioned to the selected Zone.
Adding a Schedule presents an Add Scheduler page that allows the choosing of the date
recurrence pattern. The pattern may be one of weekly, monthly or yearly.
For a weekly pattern, choose the weeks of the month and the days of the week that this
Schedule applies to.
For example, the following Schedule applies to any day:
PB93001_01
Streetlight Management System User Guide
© GridComm Pte. Ltd. Page 20 of 25
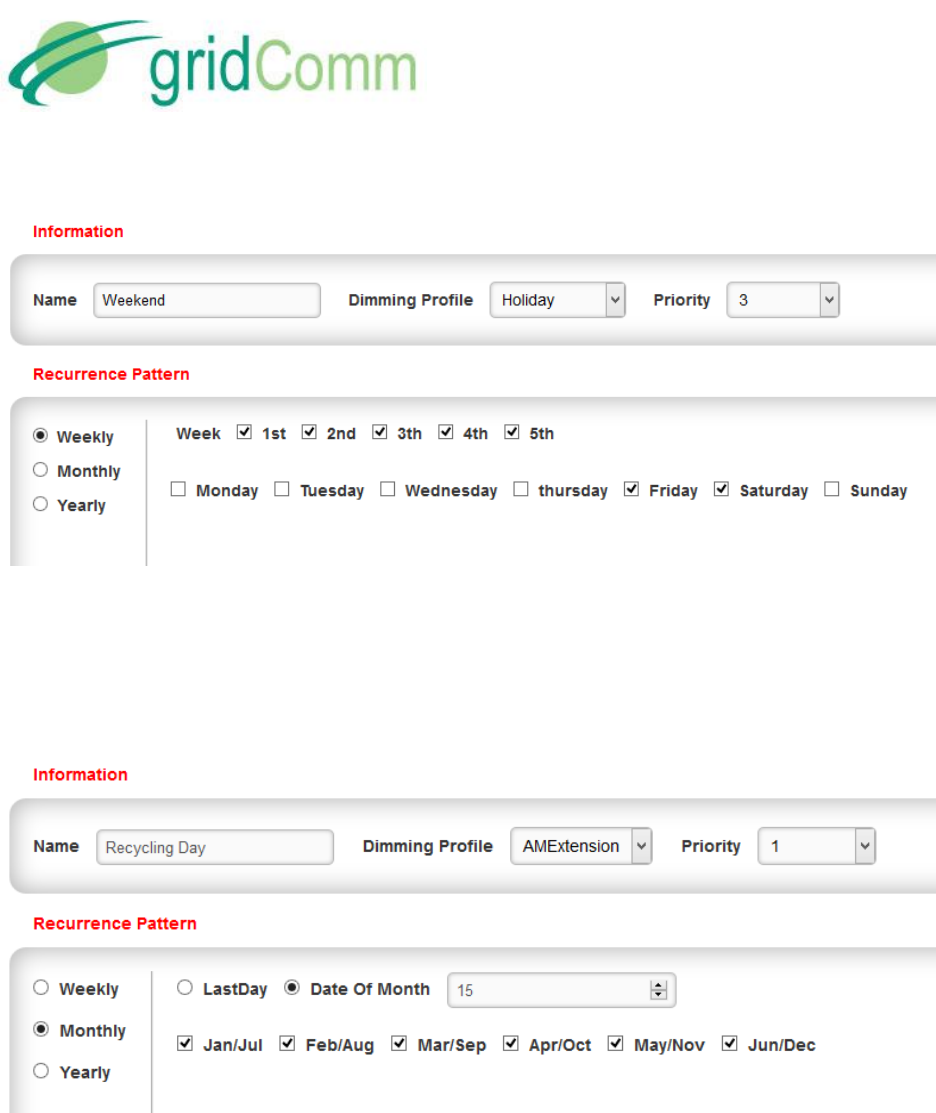
The following chooses the Fridays and Saturdays of every week:
For a monthly pattern, choose the day of the month and the month pairs that the Schedule
applies to.
For example, the following chooses the 15th day of every month:
PB93001_01
Streetlight Management System User Guide
© GridComm Pte. Ltd. Page 21 of 25
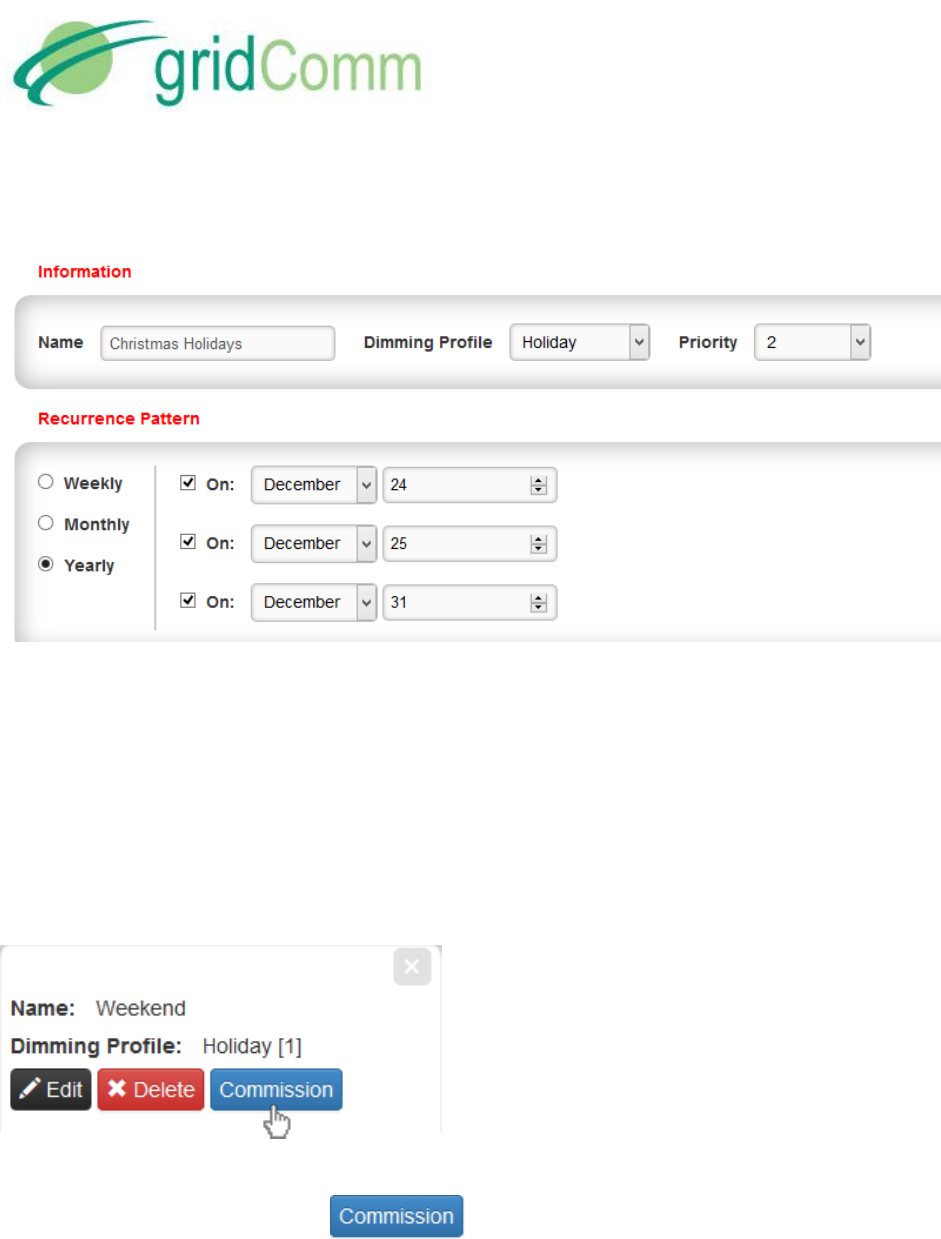
For a yearly pattern, choose the dates of the year that the Schedule applies to.
For example, the following chooses December 24, 25, and 31 of every year:
The prioirity of a Schedule resolves between multiple Schedules that are valid at the same time.
11.4 Commisioning a Schedule to a Zone
In order for a Schedule to be activated, it needs to be commissioned to a Zone.
To do this:
From Calendar view, click the Schedule and click Commission on the pop-up as shown:
Alternatively, in Grid view, click to the right of the Schedule.
The Commission Scheduler page is then presented.

PB93001_01
Streetlight Management System User Guide
© GridComm Pte. Ltd. Page 22 of 25
From this page, select the Zones that will be commissioned with the selected Schedule, and
click the right arrow to move them to Assigned Zones, then click “Save”:
To remove a Zone from an associated Schedule, click Commission to go to the Commission
Scheduler page, select the Zones to be removed from the Assigned Zones and click the left
arrow, then click “Save”:
PB93001_01
Streetlight Management System User Guide
© GridComm Pte. Ltd. Page 23 of 25
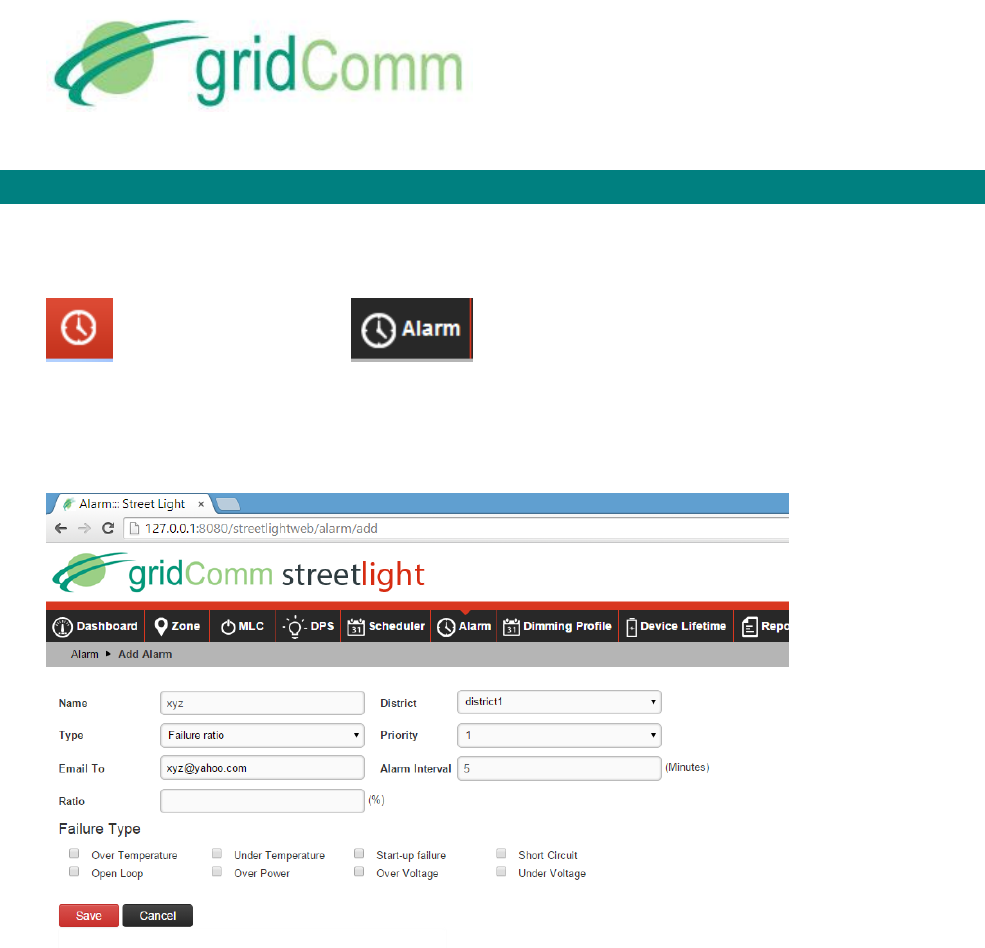
12. Adding Alarms
An Alarm is an exceptional condition that should be reported.
on the dashboard or from other pages navigates to the Alarm Page.
Adding an Alarm requires input to the following field: Name, District, Type, Email To and Alarm
Interval. Optional fields are the Priority and the Ratio (Alarm notification will be sent if number
of failures in a district exceeds the percentage specified)
The types of Alarms that may be configured:
Failure Ratio:
This Alarm will trigger if the percentage of DPS within the chosen District that has any of the
chosen Warning or Error conditions equals or exceeds the given percentage.
Failure from chosen DPS:
This Alarm will trigger if the any of the chosen DPS has any of the chosen Warning or Error
conditions.
Number of failures:
This Alarm will trigger if the number of DPS in the chosen District that has any of the chosen
Warning or Error conditions equals or exceeds the given number.
Digital Input:
PB93001_01
Streetlight Management System User Guide
© GridComm Pte. Ltd. Page 24 of 25
This Alarm will trigger if the chosen Digital Input (which is a terminal contact on the given MLC)
on any of the chosen MLCs have the chosen state (ON or OFF).
MLC offline:
This Alarm will trigger if any of the chosen MLCs have been offline for longer than the chosen
duration.
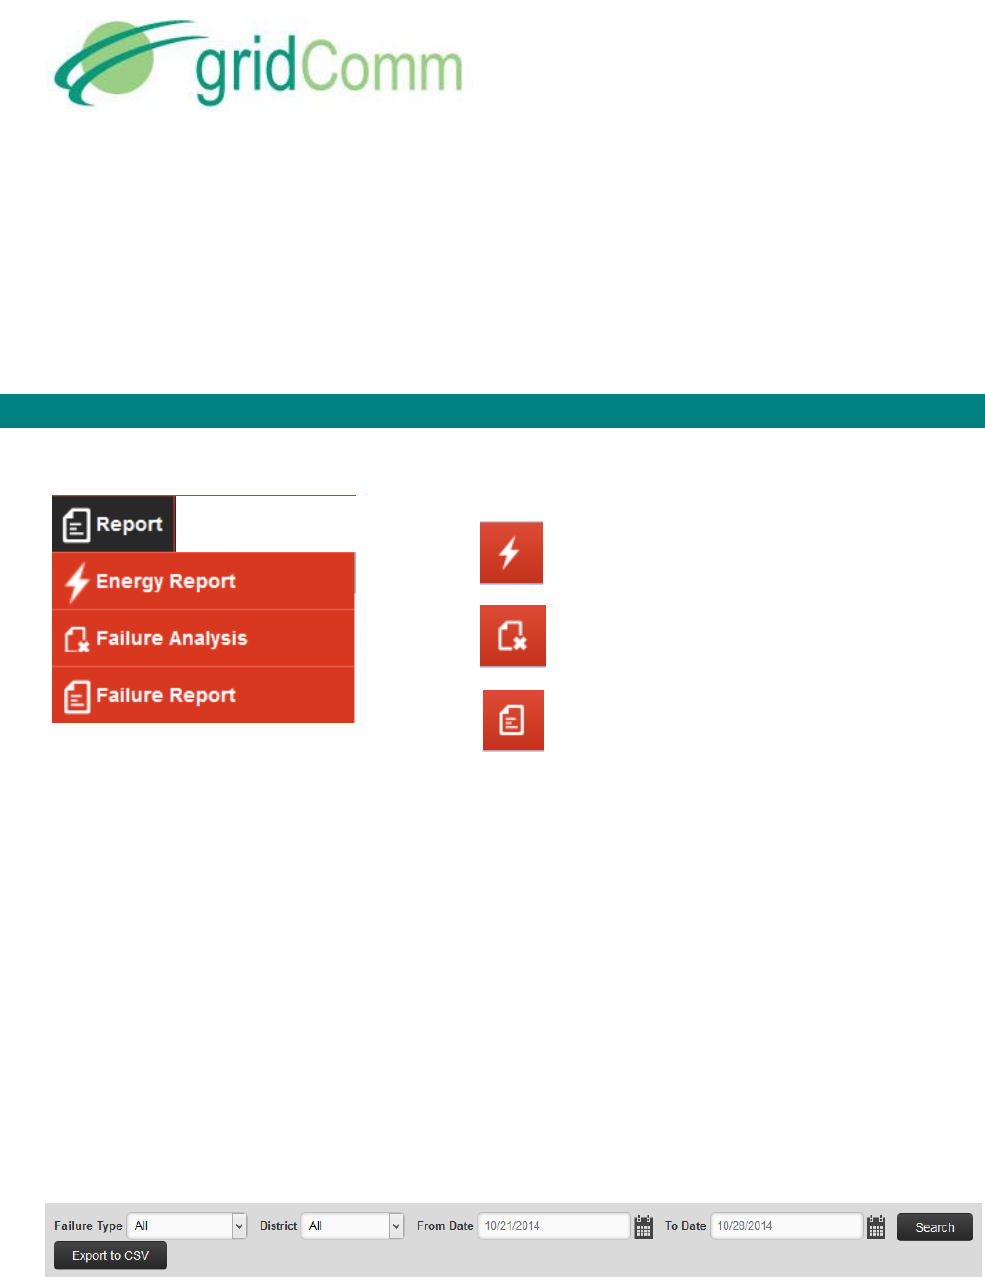
13. Viewing Reports
Energy Report, Failure Analysis and Failure Report are submenus of Report as shown:
or using from the Dashboard
13.1 Energy Report
This shows the energy consumption of each DPS by week, month or year.
13.2 Failure Analysis
Failure Analysis shows the number and the percentage of DPS within each district for which an
error or a warning has been detected.
13.3 Failure Report
Failure Report lists the failures arranged by Date.
The list can be filtered by choosing the Failure Type, District and Date, and clicking “Search”.
The list may be exported to a CSV file using “Export to CSV”.
PB93001_01
Streetlight Management System User Guide
© GridComm Pte. Ltd. Page 25 of 25
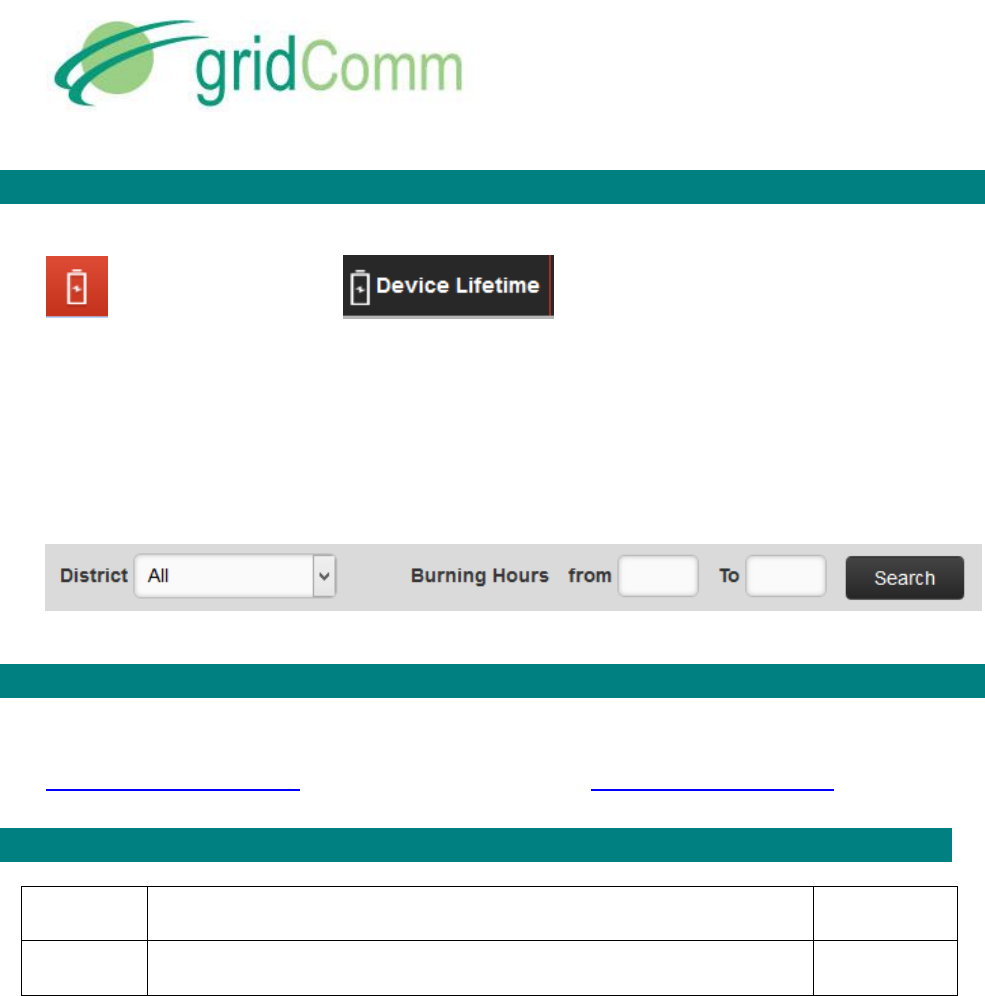
14. Viewing Device Lifetime
on the Dashboard or from other pages navigate to
Device Lifetime.
This page lists the estimated number of hours that each DPS has been running since it became
known to the SLMS.
This information can be used to estimate the remaining lifetime of each DPS.
The list may be filtered by District and/or range of Burning Hours as shown:
15. Contact Information
For more information regarding the SLMS, please contact:
sales@gridComm-plc.com GridComm Pte Ltd www.gridComm-plc.com
16. Revision
Version
Description
Date
1.0
Initial release
28/10/2014
