V SPERM IIITM SQA GOLD 2.60 USER GUIDE WHO 5th 1 JUNE 17
User Manual:
Open the PDF directly: View PDF ![]() .
.
Page Count: 53

User Guide Version 2.60 I-Button
Revision 1_JUNE_2017 1
U S E R G U I D E
V e r s i o n 2.60 I - B u t t o n
W H O 5 t h
Catalog # V-A-00734-00
June 1, 2017

User Guide Version 2.60 I-button WHO 5th
Revision 1_JUNE_2017 2
Table of
Contents
SECTION 1: System Specifications and Requirements
Sperm Quality Analyzer SQA-V Version 2.60 4
SECTION 2: System Overview
Front Panel 7
Key Pad Navigation 7
Rear Panel 7
Measurement Capillary 8
Slide Adaptor 8
Semen Parameters 9
Reportable Range 9
SECTION 3: Technology
Concentration Measurement 10
Motility Measurement 10
SECTION 4: Getting Started / Set-Up
Power-On 11
Auto-Calibration and Self-Test 11
Set-Up System Defaults: Time, Date, Printing, WHO, Chamber Standard 12
Set-Up Controls 12 and 21
SECTION 5: Testing Semen Samples
Patient Information 13
Sample Information 13
Sample Type: Fresh, Washed, Frozen, Postvasectomy 14
Sample Volume: Low Volume, Diluted, Normal Volume 14-16
Testing 16
Test Results: Normal, Low Quality 17
Printing, Saving and Transferring Results to V-Sperm Gold 18
Postvasectomy Test 19
SECTION 6: Controls and QC
Control Set-Up and Testing 21
Set-Up: Assayed Control 21
Set-Up: Non Assayed Control 22
Running CONTROLS on the Automated System 22
Electronic Self-Test and Auto-Calibration 23
SECTION 7: Archive Functions
Transferring the SQA-V Archive to V-Sperm 25
Importing Single Test Results On-line 25
Importing Patient and Control Archives to V-Sperm 25
SECTION 8: Service Menu
Service Data 26
Service Personnel 26
Printing SQA-V Default Settings 26
Add I-Button Tests 26
SECTION 9: Operating the Visualization System (Video Display)
Introduction 27
Operating Instructions 27
Standard Slide Preparation 27
Testing Capillary Preparation 27
Testing Process 27
Counting Cells Using the Visualization Screen 28

User Guide Version 2.60 I-button WHO 5th
Revision 1_JUNE_2017 3
SECTION 10: Error Messages and Warning Messages
Stabilization Failed 29
Self-Test Failed 29
Electronic Noise 30
Concentration Out of Range 30
APPENDIX 1: Filling the SQA-V Capillary with a Normal Volume Sample 31
APPENDIX 2: Filling the SQA-V Capillary with a Low Volume Sample 33
APPENDIX 3: Using Standard Slides in the Visualization System 34
APPENDIX 4: Counting Cells Using the SQA-V Visualization System 35
APPENDIX 5: Cleaning the Capillary/Slide Compartment 36
APPENDIX 6: Reference Values of Semen Variables 37
APPENDIX 7: Measuring WBC's in Semen using QwikCheck Test Strips 38
APPENDIX 8: Dilution Media: QwikCheckDilution 39
APPENDIX 9: Treating Viscous Samples: QwikCheck™ Liquefaction 40
APPENDIX 10: Assayed Control – QwikCheck-beads™ 41
APPENDIX 11: Concentration Standard: Counting Chambers 42
APPENDIX 12: Postvasectomy Protocol 43
APPENDIX 13: Globozoospermic Samples 44
APPENDIX 14: Service Report 45
APPENDIX 15: SQA-V Test Report Printouts 47
APPENDIX 16: Printer Ribbon/Paper Installation 48
APPENDIX 17: Warranty 49
APPENDIX 18: Product Performance Data 50

User Guide Version 2.60 I-button WHO 5th
Revision 1_JUNE_2017 4
Specifications
Version 2.60
SECTION 1: System Specifications and Requirements
Dimensions: 32 X 30 X 24 cm
Weight: 7 Kg
AC power supply: 100-240 VAC, 50-60 Hz, 20 VA
Archive Capacity
500 test records / 750 QC records
Display(s)
Operational backlight LCD (16 lines x 40 characters)
Video backlight LCD (8 x 10 cm)
Factory Default Settings
SYSTEM:
Date format: DD/MM/YY
Time/Date: Manufacturer's local time/date
Morphology: WHO 5th
Chamber standard: 2
Printing Options: Automatic
CONTROLS:
Control Media: Latex Beads, Stabilized Sperm CAP or MES (Lot #, Target Values, +/- Ranges set up by user)
Front Panel
Displays: LCD video display and controls, LCD operational display.
Testing: Measurement compartment, Visualization compartment.
Other: Multi-button keypad, I-Button port, Focus knob, Built-in printer.
Keypad
Operational keys: ON/OFF, TEST, PRINT, SERVICE, ARCHIVE (now disabled),
DELETE, ENTER, four cursor buttons, ESC, ten numeric buttons (0-9).
Video control keys: ZOOM IN/OUT, ILLUMINATION HIGH/LOW, and
MONITOR ON/OFF.
Measurement Compartment
Sources of radiant energy - two LEDs for motility and spectrophotometry
channels.
Detector system - two photo detectors - Motility and Optical Density.
Operating System
Analysis Time: Normal Test–75 seconds; Low Quality–2 additional minutes;
Postvasectomy – 5 minutes.
Software: Resides on flash memory and drives all man-machine interface
functions, runs algorithms for test measurements, and operates visual and
automated screens. System can be upgraded from a PC CD-ROM.
Motility channel input signal: Analog, up to 5V.
Spectrophotometer channel input signal: Modulated(kHz)analog,up to 5V.
Printer
Built-in, Dot Matrix with ribbon cassette (Citizen).
Non-thermostatic narrow paper with 20 characters per line (Citizen).
Rear Panel
Power connector w/fuse-holder (fuse 250V,1A), Video connector,RS232 outlet.

User Guide Version 2.60 I-button WHO 5th
Revision 1_JUNE_2017 5
Requirements
Visualization Compartment
White LED illumination system
CCD, 330 TV lines
Objective: Standard, x20
Signal Output: PAL standard
Zoom system for smooth magnification transition between x300 and x500
Focus regulator
Maintenance Schedule
Daily: Clean measurement compartment daily when running samples and
after every 10-15 tests and/or for ANY spillage. Follow manufacturer’s cleaning
instructions using manufacturer cleaning kit. (Refer to the appendix section
“Cleaning the Capillary/Slide Compartments” in this User Guide). ONLY use
the Manufacturers cleaning kit and cleaning brush or damage will
occur to the SQA-V film and the system will not operate!
Manufacturer Recommendations
Operate the SQA-V away from devices that may cause electronic noise (cell
phones) or other devices causing vibrations such as centrifuges.
Turn system OFF at the rear-panel when not in use for extended period of
time.
When running Postvasectomy tests do not interrupt test cycle nor interfere
with system or testing capillary in any way – this test is highly sensitive to any
motion and requires complete stability of the system during the 5 minute
testing cycle.
Variations in ambient temperature can affect semen samples. It is essential
that semen samples are not heated for testing. The SQA-V is calibrated to
conduct tests at room temperature: 20-25ºC (68-77ºF).
Semen is considered a biologically hazardous material and is subject to
individual laboratory protocols for handling such materials and at a minimum:
Laboratory coat, mask and gloves for operating personnel protection.
Samples handling and waste disposal in specially marked hazardous waste
containers.
Only personnel trained to work with biologically hazardous materials such as semen
should be testing and handling semen.
Operating Temperature
Maximum operational humidity is 80% for temperatures of up to 31ºC with
decreasing linearly to 50% at 38ºC.
Operates in a wide range of ambient temperatures (15-38ºC) however the
system is calibrated to measure semen samples at room temperature:
20-25ºC (68-77ºF). Note: Extreme ambient temperature may impact the
accuracy of motility test results because of the known effect of temperature on
human semen.
Operational Environmental conditions:
System is intended for indoor use at a maximum altitude of 2000m, mains
supply fluctuations ±10%, Overvoltage Category II, Pollution Degree II.

User Guide Version 2.60 I-button WHO 5th
Revision 1_JUNE_2017 6
PC / Hardware Requirements
Minimum requirements for V-Sperm software:
PC: Intel Core 15 M520 2.4GHz or equivalent
RAM: 4GB
Video card: 3D to support high resolutions 16:10 – 1440X900
Video color: At least 16 bit (65,535)
CD ROM drive
300GB free hard disk space for image capturing (approx. 3000 clips)
Monitor Screen: Color, Wide screen – should support resolution 16:10 or
16:9 (1440X900)
Operating system compatibility: Windows XP and 7; Excel/Word
(required for V-Sperm GOLD)
Communication Ports: Two FREE native RS232 ports (one for data transfer
and one for LIS); two USB ports
EXCEL and WORD required for export function and printing test
reports
Quality Control
Internal: Electronic Self-Test and Auto-Calibration. Runs automatically upon
start-up. Reference values are verified prior to each test.
External: Run daily prior to testing or per laboratory protocol. Runs assayed
latex bead control: "QwikCheck™-beads" (product of Medical Electronic
Systems) for concentration and negative control for motility/concentration OR
non-assayed: Latex beads or stabilized sperm CAP or MES for concentration.
Sample Testing
Sample Testing Temperature: Calibrated for room temperature only.
Motility results will be impacted by heating the specimen.
System calibrated to test Human semen and specified Control samples
only. Not for use with animal semen.
SQA-V measurement capillary: Disposable, plastic, testing capillary.
Requires 500 µl of sample for normal volume testing, 20 µl for low volume
testing, 300 µl for diluted mode. Use only manufacturers’ certified testing
capillaries in the automated and visualization system.
Slide adaptor: Supplied with the SQA-V. Must be used with a standard
laboratory slide and 22 x 22 mm cover-slip for accurate test results.
Software Required
V-Sperm Gold 3.60 (included with system): Required for setting SQA-V
system defaults, archive management/data transfer, capture and storage of
video images from the SQA-V and for displaying and printing self test data.
Excel/Word (required for V-Sperm GOLD)
User Guide Version 2.60 I-Button
Revision 1_JUNE_2017 7
SECTION 2: System Overview
The SQA-V is a high performance analytical medical device that combines technology in
electro-optics, computer algorithms and video microscopy. The system performs a 75-
second semen analysis and has the ability to print test results and archive up to 500
patient records. The system is self-testing and self-calibrating and runs latex beads or
stabilized sperm quality controls. Two systems: Automated and visualization allow
the user the flexibility to analyze all types of semen samples.
NOTE: The TEST
button of the SQA-V
keypad is only active in
the CALIBRATION
mode.
The ARCHIVE button
on the keypad is
inactive because the
SQA-V archive is
managed through
V-Sperm GOLD.
Keypad Navigation
Use NUMERIC keys to enter data; ARROW keys to move to the next field.
Press ENTER to select menu options, confirm data entries and to move to the
next screen or field.
Use the ESC button to return to the previous screen or field.
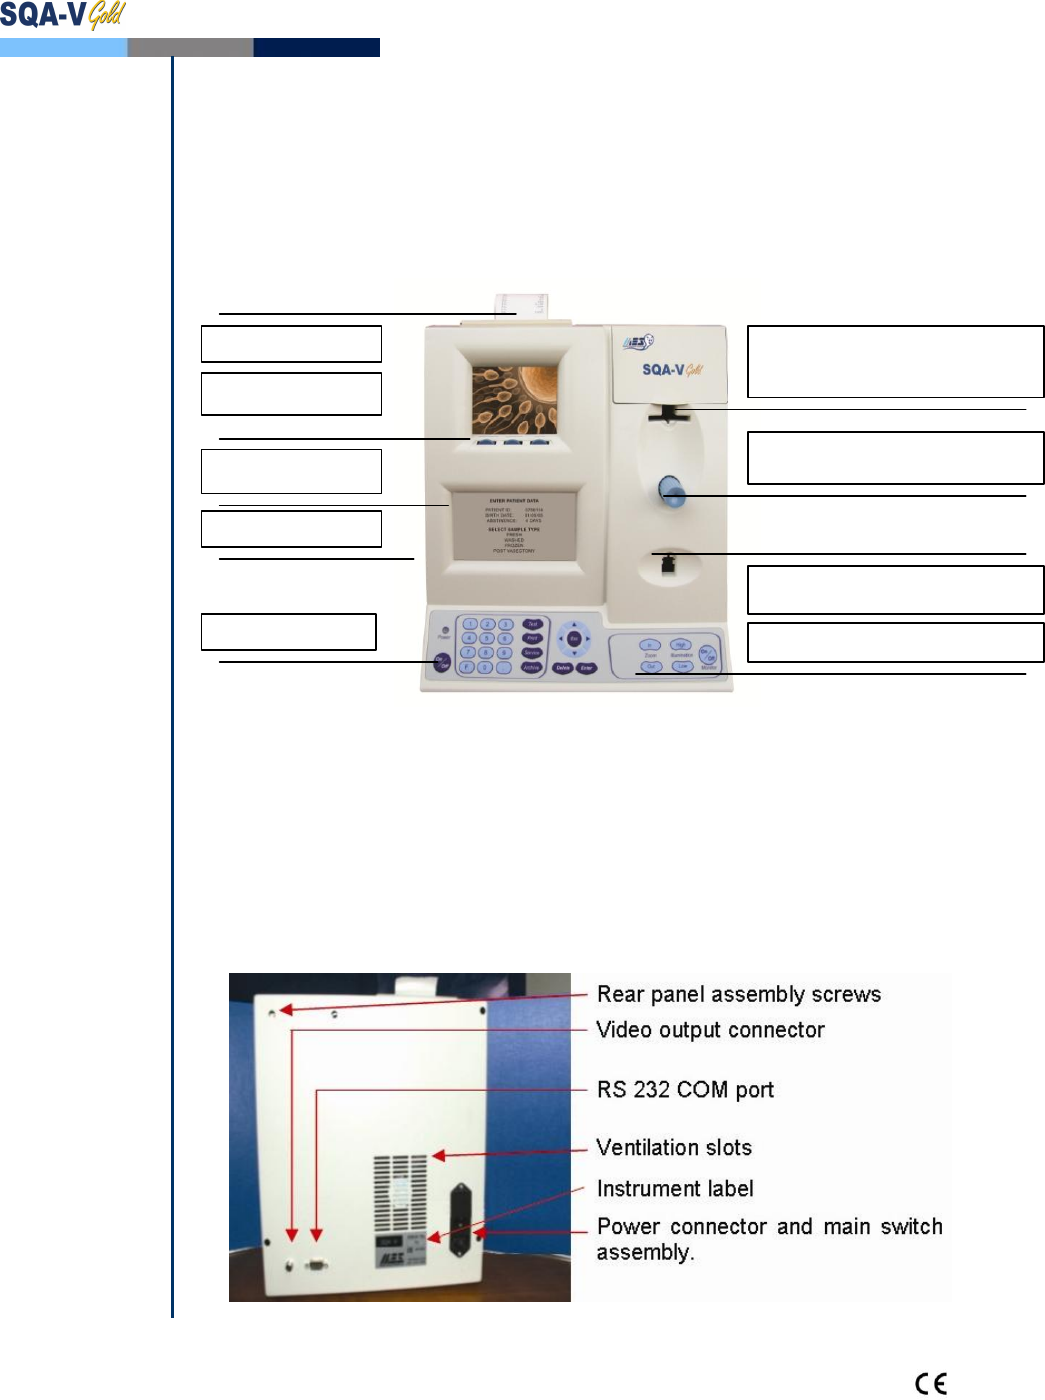
Rear Panel
Printer and paper
Prpaper
Video display
and video controls
Operational
display
I-Button
Keypad
Focus knob:
Magnification X300 to x500
Automated Measurement
compartment
Zoom magnification X300 – X500
Visualization compartment:
Accommodates both a slide and
the SQA-V testing capillary
User Guide Version 2.60 I-Button
Revision 1_JUNE_2017 8
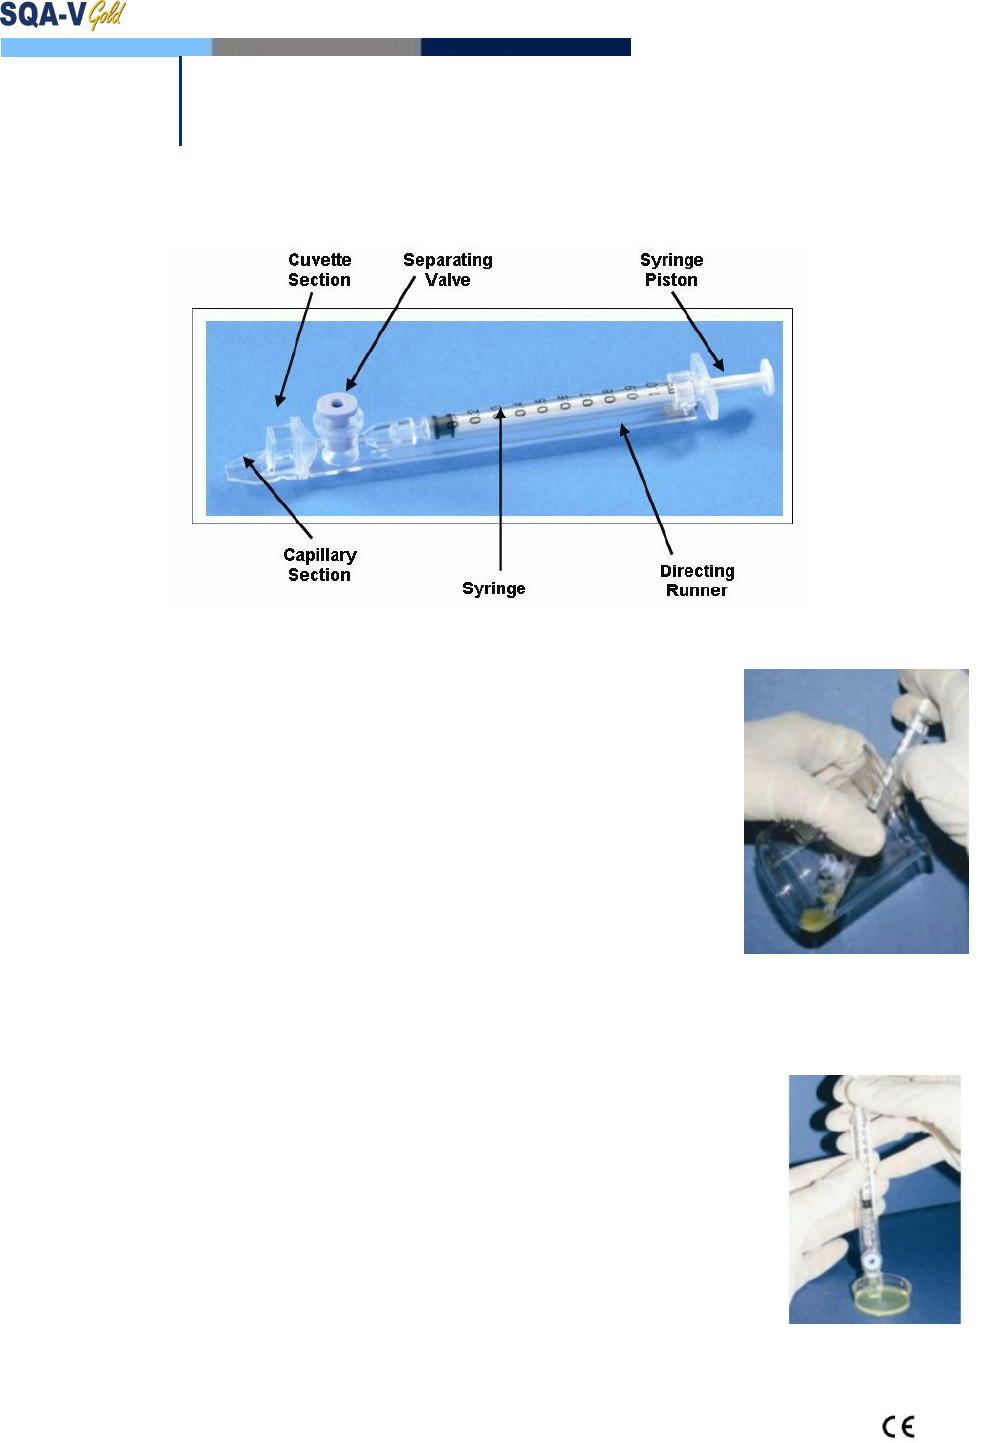
SQA-V
Components
Measurement Capillary
Disposable, designed to collect and test samples in a biologically safe manner.
Motility is measured in the 0.3 mm (thin) "Capillary Section." This section
requires 20 micro liters of semen.
Concentration is measured in the 10 mm (tall) "Cuvette Section." This section
requires 450 microliters of semen.
Both the measurement and visualization chambers of the SQA-V will
accommodate the testing capillary. Refer to: "Filling the SQA-V Capillary with
Normal and Low Volume Samples" in the Appendix section of this guide for
instructions on how to use the SQA-V testing capillary.
NOTE:
In order to accurately
visualize the sample it
must be centered
approximately 12mm
from the end of the
glass slide.
Slide Adaptor
Use with a standard laboratory slide 76 x 25.6 mm and 22 x 22 mm cover-slip
with a 10 µl sample placed approximately 12 mm from the end of the slide for
accurate results.
For use in the visualization compartment of the SQA-V.
Sample
location
Motility
Section
Cuvette
Section
Separating
Valve
Syringe
Directing
Runner
Leur Adaptor
User Guide Version 2.60 I-Button
Revision 1_JUNE_2017 9
Semen Parameters Reported by the SQA-V
Automated
Test Results
Reportable
Range
Semen Parameters with SQA-V Abbreviation in Brackets
Sperm Concentration
(SPERM CONC.)
M/ml
Velocity
(VELOCITY)
mic
/sec
Total Motility
(TOTAL MOTILITY <PR+NP>)
%
Sperm Motility Index
(SMI)
#
Progressive Motility
(PROG. MOTILITY <PR>)
%
Total Sperm Number / ejaculate
(SPERM #)
M
Non-progressive Motility
(NONPROG. MOTILITY <NP>)
%
Total Motile Sperm / ejaculate
(MOT. SPERM)
M
Immotility
(IMMOTILTIY <IM>)
%
Total Progressively Motile Sperm /
ejaculate (PROG. SPERM)
M
Sperm Morphology (normal forms, %)
(MORPH. NORM. FORMS, WHO 5th)
%
Total Functional Sperm / ejaculate
(FUNC. SPERM)
M
Motile Sperm Concentration
(MSC)
M/ml
Total Morphologically Normal Sperm /
ejaculate (MORPH. NORM. SPERM)
M
Progressively Motile Sperm
Concentration (PMSC)
M/ml
Postvasectomy: Motile, Immotile and
Total Sperm/Scan
(#SPERM/SCAN: MOTILE, IMMOTILE
and TOTAL)
#
Functional Sperm Concentration:
Progressively Motile Sperm with Normal
Morphology (FSC)
M/ml
Postvasectomy: Motile, Immotile and
Total Sperm/sample volume
(#SPERM/SAMPLE VOLUME: MOTILE,
IMMOTILE AND TOTAL)
M
Table of the Reportable Range of the SQA-V
REPORTABLE RANGE OF THE SQA-V Gold
SAMPLE
SPERM CONC in M/ml
MSC in M/ml
Motility %
FRESH
2-400 or < 2 M/ml
0.2-400 or <0.2 M/ml
0-100%
WASHED
2-200 or < 2 M/ml
0.2-200 or <0.2 M/ml
0-100%
FROZEN
Not reported
0.2-200 or <0.2 M/ml
Not reported
POSTVASECTOMY
Manual Input
0-30 Sperm/Scan
Not reported
User Guide Version 2.60 I-Button
Revision 1_JUNE_2017 10
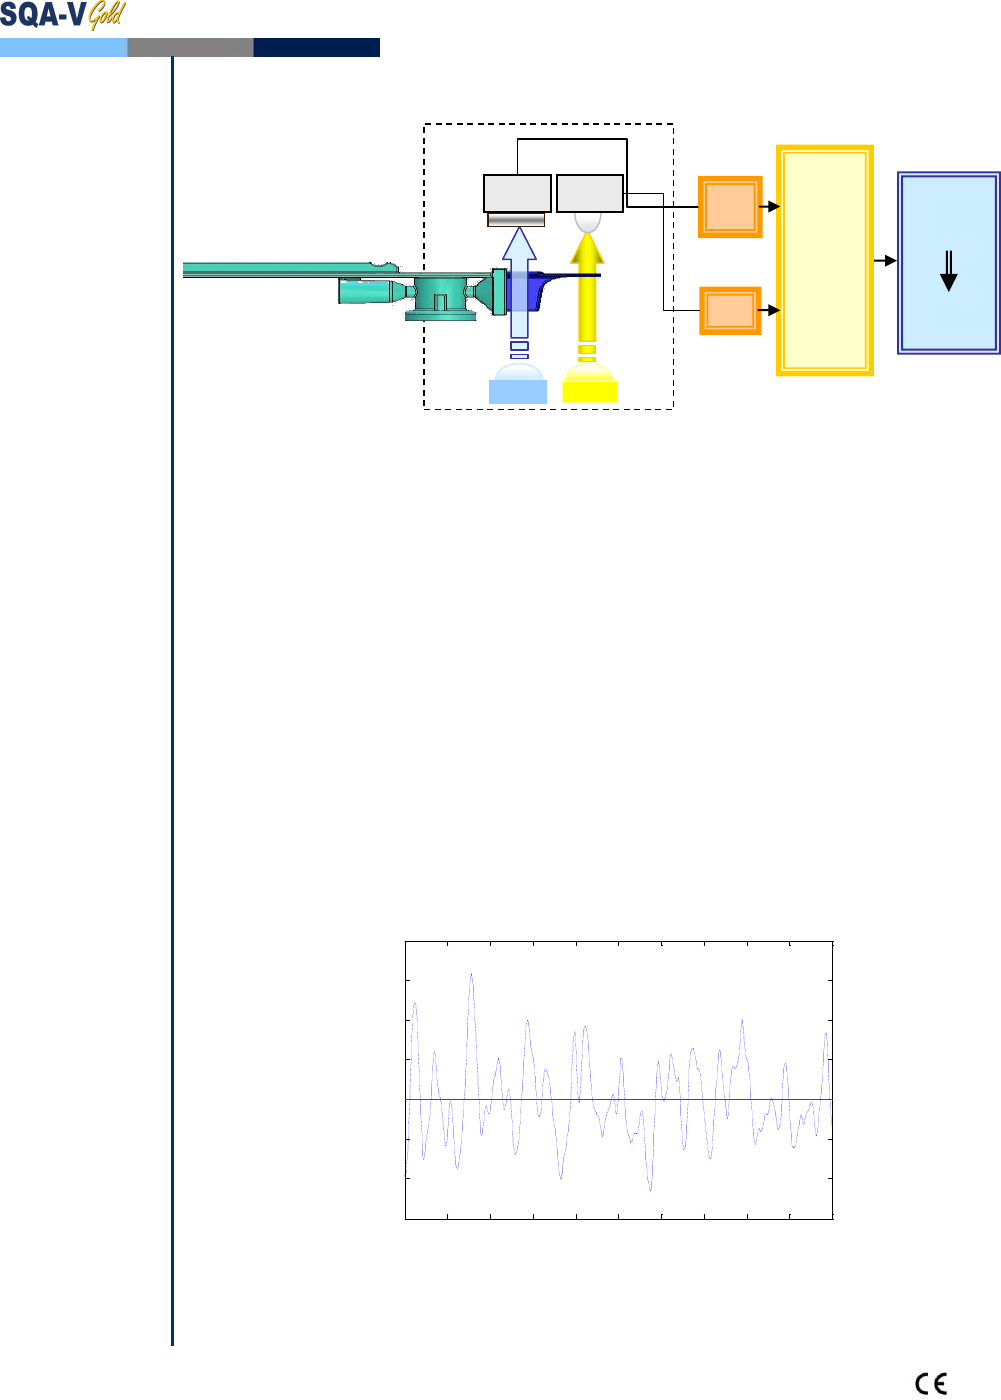
Technology
SECTION 3: Technology
Step 1: The capillary is inserted into the measurement compartment.
Step 2: Concentration:
Millions of sperm cells are analyzed: A very specific wavelength of light
is absorbed by the sperm cells in the concentration chamber of the
SQA-V testing capillary.
An optical density detector measures the amount of light absorbed by
the cells and converts it to optical density (OD).
The “OD” reading is translated into sperm concentration by a
microprocessor based on proprietary MES algorithms.
Step 3: Motility:
Tens of thousands of sperm cells are analyzed in the thin section of the
SQA-V capillary as they move through a light beam in the SQA-V: The
movement of motile sperm cells causes light disturbances.
These light disturbances are converted into electronic signals with
“peaks and valleys.”
The electronic signal peaks are analyzed by microprocessor software
based on a proprietary MES algorithm and translated into motility
parameters.
0 0.2 0.4 0.6 0.8 1 1.2 1.4 1.6 1.8 2
-0.6
-0.4
-0.2
0
0.2
0.4
0.6
0.8
Voltage [volts]
Time [sec]
Electronic Signal of Motile Sperm
SQA-V Optical Block
LED
Conv
OD
Conv
Micro
Processor
M.E.S.
Proprietary
Algorithms
Semen
Parameters
LED
Density
Detector
Motility
Detector
Step 1
Step 2
Step 3

User Guide Version 2.60 I-Button
Revision 1_JUNE_2017 11
Getting
Started
SECTION 4: Getting Started / Set-Up
Power-On
Attach factory supplied electrical cable to the outlet on the rear panel.
Plug cable into a grounded electrical source.
Turn on SQA-V by pressing the main switch located on the rear panel. The
Power indicator will illuminate and the following screen will be displayed.
Auto-Calibration and Self-Test
NOTE:
Do not insert a
capillary/slide into the
device during the
stabilization process.
Do not use any of the
keyboard functions
during stabilization.
Press ON/OFF key on the keypad and system stabilization and auto-calibration
will begin.
This process takes 5-7 minutes.
When the system stabilization and auto-calibration processes are complete, a
series of tests will be run.
Do not insert a capillary/slide into the device or use any of the keyboard
functions until instructed to do so by the system.
The MAIN menu will appear when the self-test process is complete. The
SQA-V is now ready for use.
SQA-V VERSION 2.60
STANDBY POSITION
PRESS ON/OFF KEY
TO ACTIVATE THE UNIT
SQA-V VERSION 2.60
PLEASE WAIT
SYSTEM STABILIZATION AND
AUTOCALIBRATION
MAIN MENU
TEST NEW PATIENT
RUN CONTROLS
SERVICE

User Guide Version 2.60 I-button WHO 5th
Revision 1_JUNE_2017 12
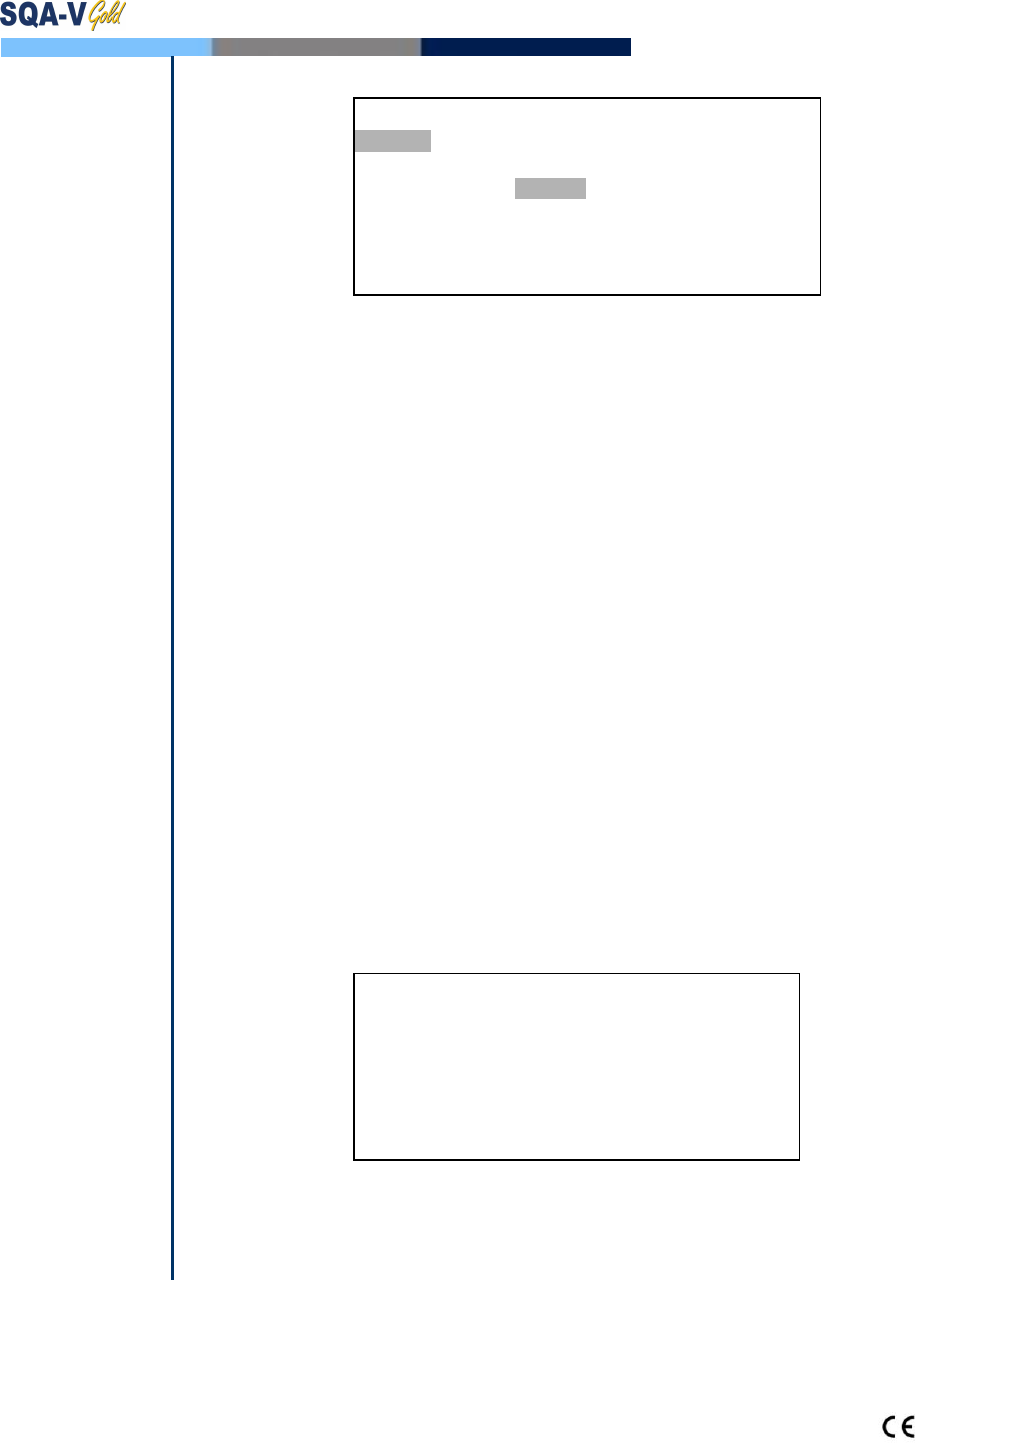
SQA-V set-up
screen from
V-Sperm GOLD
CONTROL set-up
screen from
V-Sperm GOLD
Set-up System Defaults
SQA-V system defaults are set-up through V-Sperm GOLD software. Therefore a
connection needs to be established between the SQA-V and the PC.
From the MAIN MENU, select SERVICE > SERVICE DATA.
The RS232 communication cable must be connected to the SQA-V and the PC.
Turn-on the PC and activate the V-Sperm GOLD version 3.60 software.
From the V-Sperm GOLD main navigation screen select SET-UP > SQA-V >
SQA-V Defaults. Then press the CONTINUE button.
V-Sperm GOLD will display the SQA-V system set-up screen:
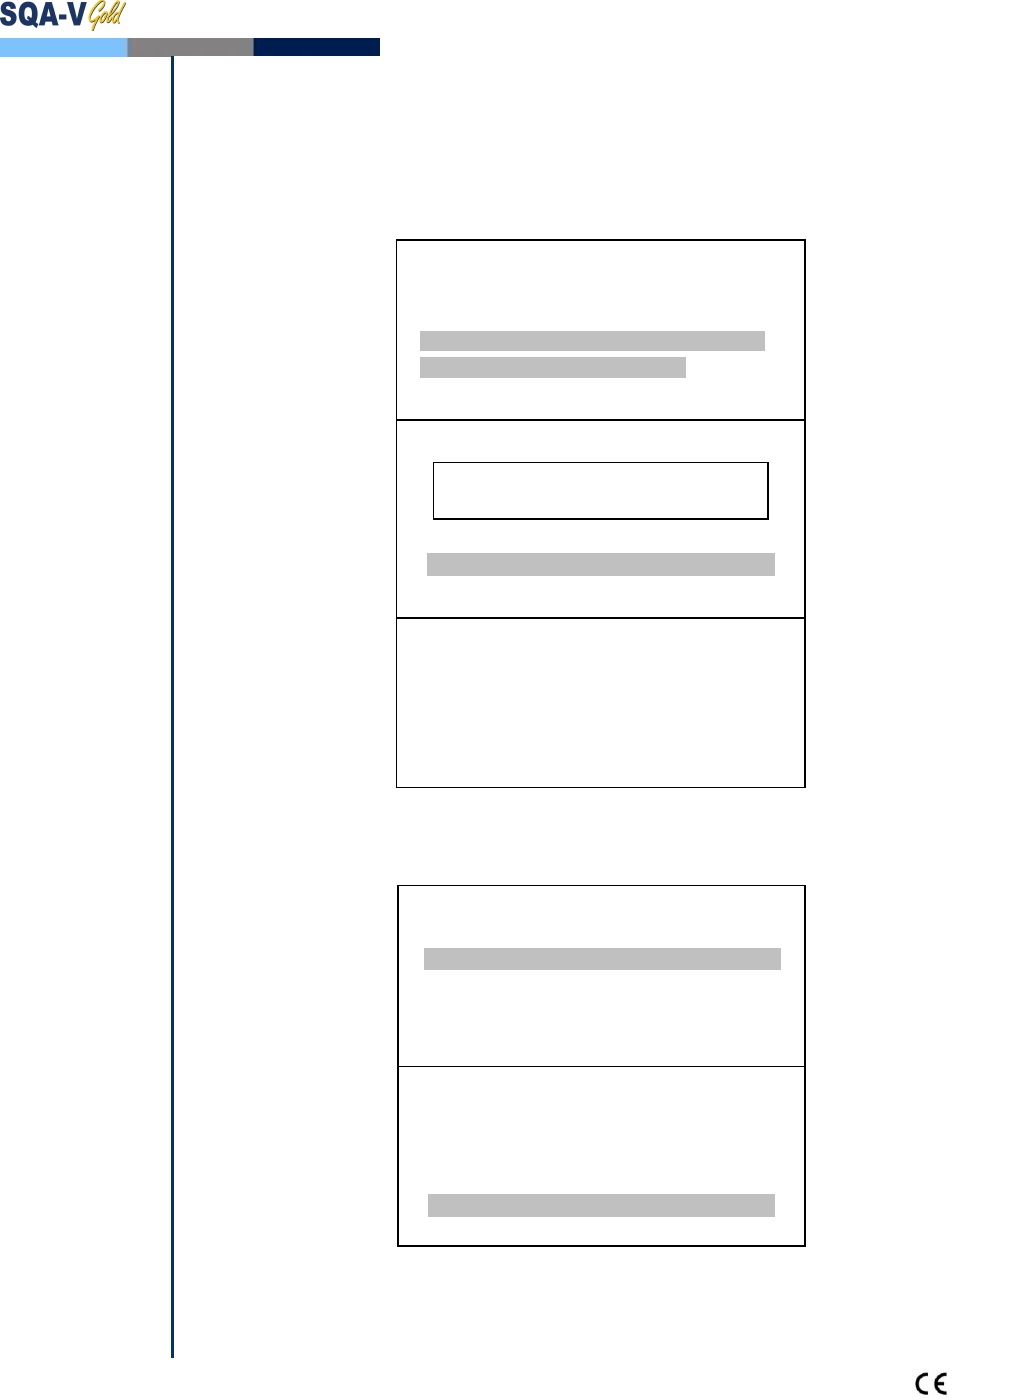
SERVICE DATA
1. 18 8. 112 15. 1.3
2. 5 9. 10 16. 110
3. 150 10. 6 17. 2
4. 28 11. 89 18. 1000
5. 77.65 12. 31 19. 1
6. 512 13. 100
7. 0.000 14. 100
SERVICE MENU
SERVICE DATA
SERVICE PERSONNEL
PRINT SELF-TEST DATA
ADD I-BUTTON TESTS
User Guide Version 2.60 I-Button
Revision 1_JUNE_2017 13
NOTE: All Set-up fields
must have data in
order to transfer
information to the
SQA-V. If CONTROL
settings are not known,
enter “0” LOT #/
Target Value/+/-
Range. Enter current
date for the date field.
NOTE: The Set-up
data transfer may take
several minutes!
Please wait…..
NOTE: Factory default
settings are listed in
RED.
SQA-V System Default settings:
Date Format (DD/MM/YY) or (MM/DD/YY)
Local date setting
Conc./Chamber Standard 1 or 2 (See appendix section for more information).
LES setting: Check with your distributor for set-up
Printing options: automatically print test results/self test report on start-up.
Control Set-up (from the manufacturer’s labeling):
Select type of control: Latex beads or Stabilized Sperm CAP.
Enter Lot Number for each control level (enter “0” if not known).
Enter +/- Range for each control level (enter “0” if not known).
Enter EXPIRATION date (use current date if the EXP date is unknown).
Press the Report button to view and print the selected default settings.
Press Apply to accept the default settings and transfer them to the SQA-V.
Testing
Samples
SECTION 5: Testing Semen Samples
Information about the patient and sample is entered prior to the testing process. In
order to accurately "classify" the semen sample by type and volume and understand
the options for testing, refer to the information below.
Patient
Information
Entering Patient and Sample Information
From the MAIN MENU select TEST NEW PATIENT and the ENTER PATIENT/
SAMPLE DATA screen is displayed.
Enter the requested sample/patient information using the SQA-V keypad:
PATIENT ID – Unique number identifying the patient (Maximum of 20
numbers can be entered).
BIRTH DATE – Birth date of the patient.
ABSTINENCE - Number of days since the patient's last ejaculation.
SAMPLE/ACCESSION # - Up to 20 numbers identifying the sample.
COLLECTED – Date and time the sample was collected.
RECEIVED – Date and time the sample was received.
PLEASE NOTE:
The SQA-V is calibrated
to run semen
specimens at room
temperature. It is not
necessary nor will the
user get accurate
motility results if the
sample is heated to
37ºC.
ENTER PATIENT / SAMPLE DATA
PATIENT ID: 5788114
BIRTH DATE: 01/01/85
ABSTINENCE: 4 DAYS
SAMPLE PROCESSING
SAMPLE / ACCESSION # 88
COLLECTED: DD/MM/YY HH:MM
RECEIVED: DD/MM/YY HH:MM
User Guide Version 2.60 I-button WHO 5th
Revision 1_JUNE_2017 14
Sample
Information
PLEASE NOTE:
1:2 dilution means 1
part semen volume
plus 1 part diluent
volume, which results
in a 1:2 dilution. MES
has included (1+1) to
further define this
dilution in order to
prevent confusion.
PLEASE NOTE:
Refer to the appendix
section of this user
guide for information
on how to measure
semen WBC’s and pH
and how to handle
viscous samples.
Press ENTER to view the next screen:
Sample Data
Select: SAMPLE TYPE (required entry) based on the following options:
FRESH – Sample not enriched, diluted or treated and is within 1 hour of
collection. Exception: Low volume samples diluted 1:2 (1+1) with
QwikCheck dilution media can be used according to User Guide instructions.
WASHED – Sample enriched or prepared for artificial insemination using a
commercial media to replace seminal plasma. Frozen samples containing egg
yolk buffer are excluded.
FROZEN – Samples that have been frozen. Only motility parameters will be
reported (MSC, PMSC, SMI and VELOCITY) in order to quantify the impact of
freezing and thawing on the motility parameters of the specimen.
POSTVASECTOMY – Fresh samples designated as postvasectomy and
tested within an hour of collection.
Enter the remaining sample information using the SQA-V keypad:
VOLUME – Volume of the whole ejaculate in milliliters.
WBC CONC. – select < 1 M/ml (normal) OR >= 1 M/ml (abnormal)
leukocytes (required entry). (QwickCheck Test Strips recommended).
PH – pH of the semen sample (QwickCheck Test Strips recommended).
APPEARANCE – NORM/ABNORM visual assessment of the specimen.
VISCOSITY/LIQUEFACTION – NORM/ABNORM (WHO 5th guidelines for
NORM liquefaction is within 60 minutes of collection @ room temperature).
If POSTVASECTOMY SAMPLE TYPE was selected, please refer to the section
"Postvasectomy Test” in this user guide.
Sample Volume
After entering the patient and sample data, the screen above will be displayed.
Using the left and right arrow keys and then ENTER, select:
YES for NORMAL VOLUME samples ≥0.5 ml.
NO for LOW VOLUME samples < 0.5 ml.
SAMPLE TYPE
SELECT FRESH / WASHED / FROZEN / POSTVASECTOMY
VOLUME 2.5 ml
WBC CONC. SELECT < 1 M/ml OR >= 1 M/ml
PH 7.0
APPEARANCE NORM./ABNORM.
VISCOSITY NORM/ABNORM
LIQUEFACTION NORM./ABNORM.
IS SAMPLE VOLUME SUFFICIENT FOR
COMPLETE TESTING >= .5 ml?
YES/NO
User Guide Version 2.60 I-Button
Revision 1_JUNE_2017 15
Low Volume
Samples
Please note:
Prior to each running a
test, the system will
perform autocalibration
(do not insert a
capillary until
instructed to do so on
the screen.)
If the sample is < 0.5 ml two options are available: Run as a low volume sample
and obtain just motility parameters or dilute the sample 1:2 (1+1) with
QwikCheck Dilution media and obtain a report of all parameters.
To run a low volume sample: Aspirate only 20 µl of sample into the motility
section of the capillary following the instructions in the Appendix section of this
User Guide: “Filling the SQA-V Capillary with a Low Volume Samples”.
Diluted
Samples
Please note:
See the appendix
section of this guide for
information about
dilution media.
Or the low volume sample can be diluted 1:2(1+1) with QwikCheck-Dilution
media:
Follow the instructions in the appendix section of this User Guide: Filling the
SQA-V Capillary with a Normal Volume Sample.
The testing cycle and test results will be the same as a normal volume specimen
(see screens below).
LOW VOLUME SPECIMEN
PLEASE SELECT SAMPLE TESTING OPTION:
DILUTE SEMEN 1:2 (1+1) WITH MEDIA
LOW VOLUME – 20 MICROLITERS ONLY
MOTILITY PARAMETERS ONLY
SID TE4a: low volume sample
SID TE4a: Low volume sample query
LOW VOLUME SPECIMEN
1. DILUTE SEMEN 1:2 (1+1) WITH MEDIA
2. MIX SAMPLE THOROUGHLY
3. FILL, CLEAN AND WIPE CAPILLARY
INSERT CAPILLARY INTO CHAMBER
TEST RESULTS
MOTILITY PARAMETERS ONLY
MSC 18.5 M/ml VELOCITY 5 mic/sec
PMSC 8.3 M/ml SMI 26
TOTALS PER VOLUME
MOT SPERM 18.5M PROG SPERM 8.3M
LOW VOLUME SAMPLE
FILL CAPILLARY – 20 MICROLITERS
CLEAN AND WIPE CAPILLARY
INSERT CAPILLARY INTO CHAMBER
LOW VOLUME SPECIMEN
PLEASE SELECT SAMPLE TESTING OPTION:
DILUTE SEMEN 1:2 (1+1) WITH MEDIA
LOW VOLUME – 20 MICROLITERS ONLY
MOTILITY PARAMETERS ONLY
SID TE4a: low volume sample
SID TE4a: Low volume sample query
User Guide Version 2.60 I-button WHO 5th
Revision 1_JUNE_2017 16
The SQA-V algorithm compensates for the sample dilution as long as the sample
has been diluted accurately (If the total sample volume is 0.4 ml then 0.4 ml of a
clear media such as Earle’s buffer must be added).
Recommendation: If the LOW VOLUME sample is viscous, first treat with the
QwikCheck-Liquefaction kit and then dilute the sample for greater accuracy.
Normal
Volume
Samples
If the sample was > 0.5 ml. the screens below will be seen.
The system will first perform an auto-calibration and check for electronic noise.
Do not insert a testing capillary, slide, nor use ANY of the SQA-V keypad or
visualization functions at this time.
PLEASE NOTE:
The SQA-V will begin
testing when a capillary
is placed into the
testing chamber.
Testing
If the sample was ≥0.5 ml the screen above will provide instructions for preparing
a testing capillary.
Fill the SQA-V testing capillary according to the instructions in the Appendix
section of this user guide: “Filling the SQA-V Capillary with a Normal Volume
Sample”.
The screen above will be displayed when it is time to insert the filled testing
capillary in the measurement compartment, testing will begin automatically.
A sample is tested in approximately 75 seconds. If the sample is low quality, the system
will perform an additional 2 minute test:
DO NOT MOVE CAPILLARY OR
OPERATE DEVICE DURING TESTING
TESTING
LOW QUALITY SAMPLE
TESTING WILL TAKE 2 MORE MINUTES
TESTING
FRESH
NORMAL VOLUME SPECIMEN
1. MIX SAMPLE THOROUGHLY
2. FILL, CLEAN AND WIPE CAPILLARY
3. WAIT FOR AUTOCALIBRATION
AUTOCALIBRATION – DO NOT TOUCH UNIT
FRESH
NORMAL VOLUME SPECIMEN
1. MIX SAMPLE THOROUGHLY
2. FILL, CLEAN AND WIPE CAPILLARY
3. WAIT FOR AUTOCALIBRATION
INSERT CAPILLARY INTO CHAMBER
User Guide Version 2.60 I-button WHO 5th
Revision 1_JUNE_2017 17
Test Results
Low Quality
Test Results
Low quality test results may be reported as < or > when one or more of the
parameters falls below the SQA-V dynamic range. Only the following will be
reported: Sperm Concentration, Motility, SMI and Motile Sperm Concentration due
to the limited number of cells, very low motility and/or poor morphology.
Examples of test results reported in this manner are seen in the screens below:
The test results will be saved/printed automatically or an option to save and print
will be displayed depending on how the SQA-V was set-up.
TEST RESULTS
SPERM CONC. 2.7 M/ml
TOTAL MOTILITY <PR+NP> < 5 %
PROG. MOTILITY <PR> %
NONPROG. MOTILITY <NP> %
IMMOTILITY <IM> %
MORPH. NORM. FORMS, WHO 5th %
TEST RESULTS
SPERM CONC. 32.6 M/ml
TOTAL MOTILITY <PR+NP> 28 %
PROG. MOTILITY <PR> 19 %
NONPROG. MOTILITY <NP> 9 %
IMMOTILITY <IM> 72 %
MORPH. NORM. FORMS, WHO 5th 21 %
TEST RESULTS
MSC 9.1 M/ml FSC 2.5 M/ml
PMSC 6.3 M/ml VELOCITY 9 mic/sec
SMI 34
TOTALS PER VOLUME
SPERM # 81.5 M MOT. SPERM 22.8 M
PROG. SPERM 15.8 M FUNC. SPERM 6.3 M
MORPH. NORM. SPERM 6.8 M
TEST RESULTS
MSC < 0.2 M/ml FSC M/ml
PMSC M/ml VELOCITY mic/sec
SMI 0
TOTALS PER VOLUME
SPERM # N.A. MOT. SPERM N.A.
PROG. SPERM N.A. FUNC SPERM N.A.
MORPH. NORM. SPERM N.A.
User Guide Version 2.60 I-Button
Revision 1_JUNE_2017 18
Printing
Saving and
Transferring
Test Results
to V-Sperm
PLEASE NOTE:
The SQA-V archive is
viewed from V-Sperm
only. The archive must
be transferred to the V-
Sperm PC in order to
view, delete and edit
records.
If the SQA-V default was set to automatically print/save test results, the screen
below will now be activated.
Immediately after saving/printing test results, an option to transfer the results of
the test just completed to V-Sperm is displayed on the SQA-V.
V-Sperm Gold must be activated and the PC must be connected via the RS232
cable to the SQA-V.
Following the screen directions, simply press the “Import Test” main menu
navigation button in V-Sperm and the test will automatically be transferred into
the V-Sperm data base.
The archive of the SQA-V can accommodate 500 Patient Test records. A warning
will appear when the archive is almost full. Data MUST be transferred to the PC
or it will be lost, overwritten or the SQA-V will no longer permit testing.
Warning QC Tests are not saved in the SQA-V (there is no QC Archive). Transfer
QC Tests to V-Sperm after performing each QC test by following the screen
instructions (above screen) after the test is run.
When the screen below is displayed, Patient Records must be transferred from
the SQA-V archive to the PC:
From the SQA-V, go to MAIN MENU > SERVICE > SERVICE DATA.
Make sure the RS232 communication cable is connected between the SQA-V
and the PC.
Turn-on the PC and activate the V-Sperm GOLD version 3.60 software.
From the V-Sperm main navigation screen select IMPORT/EXPORT >
IMPORT DATA > select IMPORT ARCHIVE (PATIENT RECORDS). Press
CONTINUE and the records will automatically be transferred.
After the records have been successfully transferred to V-Sperm, select YES
on the next screen to delete the SQA-V (Patient) archive from the SQA-V.
TO TRANSFER TEST RESULTS TO V-SPERM:
PRESS: “IMPORT TEST” BUTTON
IN V-SPERM
DATA SAVED AND
NOW PRINTING
ARCHIVE ALMOST FULL
TO AVOID POSSIBLE LOSS OF DATA
DOWNLOAD THE ARCHIVE TO THE PC
PRESS ENTER TO CONTINUE
User Guide Version 2.60 I-button WHO 5th
Revision 1_JUNE_2017 19
Post
Vasectomy
Testing
Postvasectomy Test
The SQA-V runs a five minute POSTVASECTOMY test that can detect the presence of a
very small number of motile cells. Once the automated test has been performed, the
user is given the option to follow the POSTVASECTOMY protocol outlined below and
"scan" the testing capillary in the SQA-V visualization system (A POSTVACECTOMY
Protocol can also be found in the appendix section of this guide).
By scanning through the depth of the testing capillary, immotile and motile sperm cells
can be readily identified, easily counted and entered in the operational screen for visual
confirmation of the automated test results. Clinical studies positively demonstrated that
by incorporating both the SQA-V automated AND visualization system in the testing
protocol, a very high level of accuracy is obtained for identifying motile and non-motile
sperm cells in POSTVASECTOMY samples.
In order to obtain similar levels of accuracy it is imperative that the user strictly follow
the manufacturer's protocol outlined below. Additionally, once the testing cycle is
completed, test results can be documented by capturing and archiving a video clip of the
postvasectomy specimen using V-Sperm™ software.
Select POSTVASECTOMY as the SAMPLE TYPE from the ENTER PATIENT / SAMPLE
DATA screen.
Fill the SQA-V testing capillary following instructions in the appendix section of
this guide: "Filling the SQA-V Capillary with a Normal Volume Sample."
Please note:
The POSTVASECTOMY
test takes
approximately 5
minutes to run and is
highly sensitive to
motion. Please do not
disturb the SQA-V or
the testing capillary
during the testing cycle
or the results may be
impacted.
Insert the testing capillary into the SQA-
V lower chamber when instructed.
Testing will begin automatically.
Testing takes approximately 5 minutes.
Test results for motile sperm are
reported.
Select YES to when asked: “ENTER
VISUAL DATA PER USER GUIDE?” to
manually enter the number of
MOTILE/IMMOTILE sperm seen on the
visualization system.
Press ENTER to continue.
Take the same testing capillary and
insert it into the visualization (upper)
compartment.
Set the magnification to x300 (Full zoom
out) and press ENTER to continue.
"Scan" the depth of the capillary by
slightly turning the visualization focus
knob (10 fields can be visualized) and
enter the total # MOTILE/IMMOTILE
SPERM cells visualized in all 10 fields.
The SQA-V will automatically report the
GREATER # of cells found by the
Automated or Visualization system.
Press ENTER and the test results screen
will be displayed.
DO NOT MOVE CAPILLARY OR
OPERATE DEVICE DURING TESTING
THIS TEST TAKES APPROX. 5 MINUTES
TESTING
POSTVASECTOMY
# SPERM/SCAN: # SPERM/SAMPLE VOL.:
MOTILE 3 MOTILE 0.2 M
ENTER VISUAL DATA PER USER GUIDE?
YES/NO
PLEASE INSERT CAPILLARY
INTO VISUALIZATION SLOT
ADJUST MAGNIFICATION TO x300
PRESS ENTER
TURN FOCUS KNOB AND SCAN THROUGH
ENTIRE CAPILLARY DEPTH TO COUNT
MOTILE AND IMMOTILE SPERM
PLEASE ENTER:
# MOTILE SPERM 3
# IMMOTILE SPERM 8
User Guide Version 2.60 I-button WHO 5th
Revision 1_JUNE_2017 20
Leave the testing capillary in the
visualization chamber and transfer the
test results to V-Sperm to capture and
attach a video clip of the sample in the
patient’s record.
If the SQA-V reports > 30 motile
spermatozoa, a screen will indicate that a
NORMAL TEST should be run instead of a
POSTVASECTOMY test.
> 30 motile spermatozoa is equivalent to
MSC > 2M/ml.
POSTVASECTOMY
# SPERM/SCAN: # SPERM/SAMPLE VOL:
MOTILE 3 MOTILE 0.2 M
IMMOTILE 8 IMMOTILE 0.5 M
TOTAL 11 TOTAL 0.7 M
POSTVASECTOMY
# SPERM/SCAN:
MOTILE > 30
PLEASE RE-RUN AS A NORMAL TEST

User Guide Version 2.60 I-Button
Revision 1_JUNE_2017 21
Controls
Set-Up and
Testing
Please note:
When a new control lot
is used, the control
default settings must
be changed prior to
initiating a test.
Refer to section(s):
Set-up: Assayed
Control and
Set-up: Non Assayed
material
Please note:
Level 1, 2, and
NEGATIVE control set-
up screen from
V-Sperm GOLD.
The NEGATIVE control
may also be labeled
Level 3 control on the
SQA-V.
For the SQA-V to work
properly the CONTROLS
must have set-up data
inserted. If control
material is not available
or non-assayed enter
current date in the EXP
Date field and zeros in
all other fields.
SECTION 6: Controls
External quality control samples (CONTROLS) are run on the RUN CONTROLS mode
from the MAIN MENU of the SQA-V. Commercially available latex beads or stabilized
sperm CAP can be run as non-assayed controls. QwikCheck™ beads produced by
Medical Electronic Systems are assayed for the SQA-V. It is recommended that
controls be run daily or based upon laboratory protocols.
The control media is aspirated into the testing capillary and run in the same manner
as a normal volume specimen in the testing compartment of the SQA-V.
For each new lot of controls, SQA-V system defaults need to be set-up/updated
through V-Sperm GOLD prior to running a test. To run an assayed control use the
information for Target Value and +/- Range provided on the product labeling. To run a
non-assayed control, the Target Value and +/- range must be established by the
laboratory or set 0 (zero) if not established. Follow instructions below to set-up an
assayed or non-assayed material. The testing process is the same.
Set-Up: Assayed Control
Each time a new lot of an assayed control is to be run, the user must set-up/update
the CONTROL settings through V-Sperm GOLD as described below. Previous settings
(defaults) will remain in place until updated.
Step 1: From the SQA-V MAIN MENU select SERVICE > SERVICE DATA.
Step 2: Make sure the SQA-V is connected to the PC via the RS232
communication cable.
Step 3: Activate the V-Sperm on the PC and select: SET-UP > SQA-V and
press CONTINUE.
Step 4: The set-up screen below will be activated in V-Sperm GOLD on the PC:
Step 5: Select the type of control (Latex Beads or Stabilized Sperm)
Step 6: Enter the following information from the box labeling:
LOT# - number identifying the control media lot.
EXP. DATE – control expiration date (MM = month, YY = year).
TARGET VALUE and +/- Range –manufacturer's "Target Value
and +/- Range” for the SQA-V Automated System.
NEGATIVE control target values and +/- ranges are pre-set to 0.0.
Step 7: To save settings: Press APPLY. The set-up may take two minutes.
User Guide Version 2.60 I-button WHO 5th
Revision 1_JUNE_2017 22
Please note:
To run 10 replicates:
After each completed
test, remove the
capillary and initiate
the CONTROL test
again using the same
capillary.
Set-Up: Non-Assayed Material to Establish the target value and +/- range
This is also the set-up procedure for sperm concentration proficiency
challenge
Follow the same Steps 1-5 for “Set-up: Assayed Control” above.
Step 6: Enter the following information from the product labeling
LOT# - number identifying the control media lot.
EXP. DATE – control media expiration date (MM=month, YY=year).
Step 7: Enter the TARGET VALUE and +/- Range for Level 1 and Level 2:
Enter 00 for the target value.
Enter 0.0 for the +/- range.
NEGATIVE control target value and +/- range is pre-set to 0.0
Step 8: Save settings: Press APPLY. The set-up takes about two minutes.
Step 9: Establish the target value and +/- range for each level:
Fill a testing capillary and run 10 replicates following the instructions
below “Control Testing.”
Calculate the mean target value. Based on laboratory protocols
determine the +/- range (Example: 2SD).
Follow steps 1-7 of “Set-Up: Assayed Control” to update the target
value and +/- range for the control.
Running
Controls in
the SQA-V
CONTROL Testing
Select RUN CONTROLS from the
MAIN MENU of the SQA-V.
The Control defaults have already
been set-up in V-Sperm.
Select the CONTROL LEVEL: #1, #2
or NEGATIVE (LEVEL #3) that is being
tested.
Press ENTER to continue.
Controls are run in exactly the same
manner as a normal semen sample.
Using control media, follow the same
procedure for filling an SQA-V testing
capillary with a NORMAL volume
sample.
Testing will begin automatically.
Control test results will be displayed
on the SQA-V screen.
LOW, HIGH or NORM. will be displayed
based on the testing outcomes vs.
target value and +/- range (Disregard
this for non-assayed controls target
range set at “0”).
Test results will automatically be saved
and printed.
CONTROL LATEX BEADS
SELECT:
CONTROL LEVEL:
LEVEL #1/LEVEL #2/NEGATIVE CONTROL
PRESS ENTER TO CONTINUE
CONTROL: LATEX BEADS, LEVEL #1
FILL, CLEAN AND WIPE CAPILLARY
INSERT IN CHAMBER
TESTING WILL BEGIN
AUTOMATICALLY
CONTROL TEST RESULTS
DATE 01/12/06 DD/MM/YY TIME 15:09:08
LEVEL #1 LOT# 11223344556677889900
EXP. DATE 04/09 MM/YY
TYPE: LATEX BEADS
TARGET VALUE: 45.0 +/- 6.3 M/ml
CONC. RESULTS: 45.4 M/ml NORM.
ACCEPTABLE RANGE: 38.7 – 51.3 M/ml
MAIN MENU
TEST NEW PATIENT
RUN CONTOLS
SERVICE

User Guide Version 2.60 I-button WHO 5th
Revision 1_JUNE_2017 23
Electronic Self-Test and Auto Calibration
The SQA-V automatically runs a series of tests to check calibration settings
and the internal operating system. Tests are run when the system is turned
on and prior to testing a sample.
Start-up:
Stabilization and auto calibration: Checks system stability and reference
ranges. The system sensors are analyzed for several minutes to insure that
the values are within a very narrow acceptable range. Once the system is
stable for 30 seconds it will pass stabilization and auto calibration. The system
will fail if it is not stable for at least 30 seconds and a warning message will be
displayed.
System noise: Measures the electronic noise level of the system to insure
effective measurement of electronic signals.
Self-test: The system produces electronic signals that simulate motility and
concentration measurements in order to check the performance of the system
and verify that the calibration settings are consistent with the factory
specifications. The SQA-V will report failures (see section on error and warning
messages) and "freeze" the system if the system is not within the established
self-test ranges.
Prior to testing a sample:
Auto calibration verification: Reference values are read again. The
electronic parameters of the concentration and motility channels are measured
(without a testing capillary).
System noise: Measures the electronic noise level of the system to insure
effective measurement of electronic signals. Prior to running a test, the SQA-V
will automatically adjust the noise level thresholds to insure accurate readings.
Electronic spikes: Checks for any measurement points that are out of range
electronically. More than three such points will fault the system and a warning
message will be displayed.
Instructions for printing the SQA-V system parameters to prepare for
technical support:
How to print a copy of the system parameters FROM THE SQA-V:
Remove the testing capillary from the system.
When a FAILED SELF TEST message appears select: MAIN MENU >
SERVICE>PRINT SELF-TEST DATA.
Press ENTER to generate a report.
How to view/print a copy of the system parameters FROM V-SPERM GOLD:
Verify that the SQA-V is connected to the PC and V-Sperm is activated.
From the SQA-V activate: MAIN MENU > SERVICE > SERVICE DATA.
Select the V-Sperm navigation buttons: UTILITIES>SELF-TEST DATA and
click CONTINUE.
Click on the PRINT button to view a Service Data Report.
Click PRINT in the upper left hand corner of the screen to print a report.
User Guide Version 2.60 I-button WHO 5th
Revision 1_JUNE_2017 24
Refer to the table below. Enter numbers in the "SQA-V Value" column
that corresponds to the SQA-V system parameters printout. Compare
the values. If the value from the SQA-V is within range mark the
"Pass" column. If not, mark the "Fail" column.
#
Parameter
S/W Ver. 2.60
SQA-V Value
Pass
Fail
1.
Ref 1
150 – 400 mV
2.
LED Cur 1
5 – 25 mA
3.
Amplitude
50 – 100 mV
4.
Zero Level
500 - 525
5.
Ref 2
2500 – 3500 mV
6.
LED Cur 2
10 – 32 mA
7.
CONC. 1
0 – 1 M/ml
8.
CONC. 2
50-150 M/ml
9.
CONC. 3
300-600 M/ml
10.
Count (Service
Data, Item #12)
26 - 36
User Guide Version 2.60 I-button WHO 5th
Revision 1_JUNE_2017 25
Archive
SECTION 7: Transferring the SQA-V Archive to V-Sperm
The SQA-V automatically prints PATIENT and CONTROL test results when a test is
completed. Only PATIENT TEST results (not CONTROL test results) are saved in the
SQA-V archive when the testing cycle is complete. To view, navigate, edit and
delete records, the test results have to be transferred to V-Sperm immediately
after running a test (on-line transfer) or imported to V-Sperm as a group (Patient
tests only). The SQA-V can store 500 patient records but does not store the control
records.
The screen below will be displayed when the PATIENT archive of the SQA-V is almost
full:
The following screen will appear after every CONTROL TEST is performed:
To transfer data to V-Sperm, first connect the SQA-V to the PC and activate the
V-Sperm software. There are two options for transferring test results to V-Sperm:
IMPORT TEST RESULTS ON-LINE:
Immediately after saving/printing test results, an option to transfer the results
of the test just completed is displayed on the SQA-V.
Following the screen directions, simply select the “Import Test” main menu
navigation button in V-Sperm and the test will automatically be transferred
into the V-Sperm data base.
IMPORT PATIENT RECORDS FROM THE SQA-V TO V-SPERM:
Select the V-Sperm navigation button: IMPORT/EXPORT.
Select: IMPORT DATA > IMPORT ARCHIVE and press CONTINUE and the
tests will automatically be transferred.
Select: YES on the next screen to delete records from the SQA-V archive.
ARCHIVE ALMOST FULL
TO AVOID POSSIBLE LOSS OF DATA
DOWNLOAD ARCHIVE TO PC
PRESS ENTER TO CONTINUE
TO TRANSFER TEST RESULTS TO V-SPERM:
PRESS: “IMPORT TEST” BUTTON
IN V-SPERM
ATTENTION!
TO AVOID LOSS OF DATA
TRANSFER CONTROL RESULTS TO V-SPERM
PRESS: “IMPORT TEST” BUTTON
IN V-SPERM

User Guide Version 2.60 I-button WHO 5th
Revision 1_JUNE_2017 26
Service
Menus
SECTION 8: Service Menu
System set-up, maintenance and calibration can be performed from the SERVICE MENU.
To activate this screen, press SERVICE in the MAIN MENU.
Service Data
Communication between the SQA-V and a PC via the RS232
interface is established through the SERVICE DATA screen.
System set-up and upgrades are also performed through
this screen.
The SQA-V archive can be transferred to a PC only when this
screen is activated.
Service
Personnel
A code is required to access SERVICE PERSONNEL. This option
allows a qualified service technician to access calibration and
maintenance settings.
Print SQA-V
SELF-TEST DATA
The system SELF-TEST DATA can be printed from this option.
Please note:
Go to the SQA-V to
load I-button tests
directly to the device.
Add I-Button
Tests
From the SQA-V MAIN MENU SELECT: SERVICE > ADD I-
BUTTON TESTS and follow the on screen instructions seen below:
The I-Button loading screen below will appear:
The screen below will be displayed after successfully loading tests:
SERVICE MENU
SERVICE DATA
SERVICE PERSONNEL
PRINT SELF-TEST DATA
ADD I-BUTTON TESTS
TO LOAD I-BUTTON TESTS:
1. SLIDE I-BUTTON UNDER THE CLIP
2. PRESS DOWN FIRMLY
3. BUTTON MUST CONTACT PORT EDGES
PRESS ENTER
CONTINUE TO HOLD BUTTON
PLEASE WAIT
I-BUTTON LOADING
# OF TESTS ADDED: 100
# OF TESTS NOW REMAINING: 110
PRESS ESC TO EXIT

User Guide Version 2.60 I-button WHO 5th
Revision 1_JUNE_2017 27
Visualization
System
SECTION 9: Operating the Visualization System (Video Display)
The SQA-V Visualization System with video display (upper screen) is used to view and
count sperm cells. The visualization system is a critical "link" to V-Sperm GOLD where
enhanced, real time video can be displayed on a PC monitor. The visualization system:
Accommodates both an SQA-V testing capillary to "scan" through a depth of
300 microns or a standard slide to view samples (20 micron depth).
Operates via control knobs to set focus, brightness, contrast and color, and via
the keypad zoom, illumination, and monitor on/off functions.
Magnification range: x300 to x500.
Operating
Instructions
Standard Slide Preparation:
Use 10 µl of semen.
Standard slide, 22 mm x 22 mm cover-slip (to insure 20 micron depth).
Load the prepared, standard slide into the SQA-V slide adaptor.
Testing Capillary Preparation:
Fill the SQA-V testing capillary for either a normal or low volume specimen
(see Appendix).
Visualization Process:
The video display will automatically illuminate when the SQA-V is turned on.
Use monitor ON/OFF key on the keypad to independently operate the video
display.
Wait for the self-test to complete (system is disabled at this time).
To ensure that the visualization system is working properly prior to use:
Press the HIGH ILLUMINATION key multiple times to ensure a
maximum level setting.
To view cells: Press ZOOM IN to maximum magnification (x500).
To count cells: Press ZOOM OUT to minimum magnification (x300).
Insert semen sample (either capillary or slide) into the visualization chamber.
Adjust CONTRAST, COLOR, BRIGHTNESS, FOCUS and object
ILLUMINATION controls for optimal image quality.
Use ZOOM OUT (x300) / ZOOM IN (x500) to regulate magnification.
Counting Cells Using the Visualization Screen:
1. Follow the WHO Manual instructions for semen sample collection and
preparation. Thoroughly mix the sample before step #2.
2. Pipette 10uL of the semen sample onto a standard slide and cover with a
22x22 mm coverslip. Prepare a new slide if air bubbles or liquid spillage
occurs.
3. Load the slide into the slide adaptor and then insert the slide adaptor into the
SQA-V visualization chamber. (Refer to the SQA-V User Guide APPENDIX 3:
Using Standard Slides in the Visualization System for details).
4. Press the ZOOM-OUT button on the SQA-V keypad all the way to set the
magnification to x300.
User Guide Version 2.60 I-button WHO 5th
Revision 1_JUNE_2017 28
Please note:
The visualization
screen grid of the
SQA-V is calibrated
to a CONC
STANDARD default
of “1” or
Makler/non-
dilutional chambers.
Please see the
Appendix Section
“Concentration
Standard –
Counting
Chamber” for
details.
5. Set the: BRIGHTNESS, CONTRAST & COLOR knobs of the video display:
a. COLOR knob: Turn clockwise to the end (maximum color),
b. CONTRAST: Turn counterclockwise to the end (maximum contrast),
c. BRIGHTNESS knob: Turn clockwise from the darkest setting until the
background is light (not maximum!).
6. Adjust the focus knob to maximize the image: Turn clockwise all the way.
Then turn counterclockwise until a clear image appears on the screen.
7. Go to V-Sperm and click on the Real Time Video button. FREEZE the image.
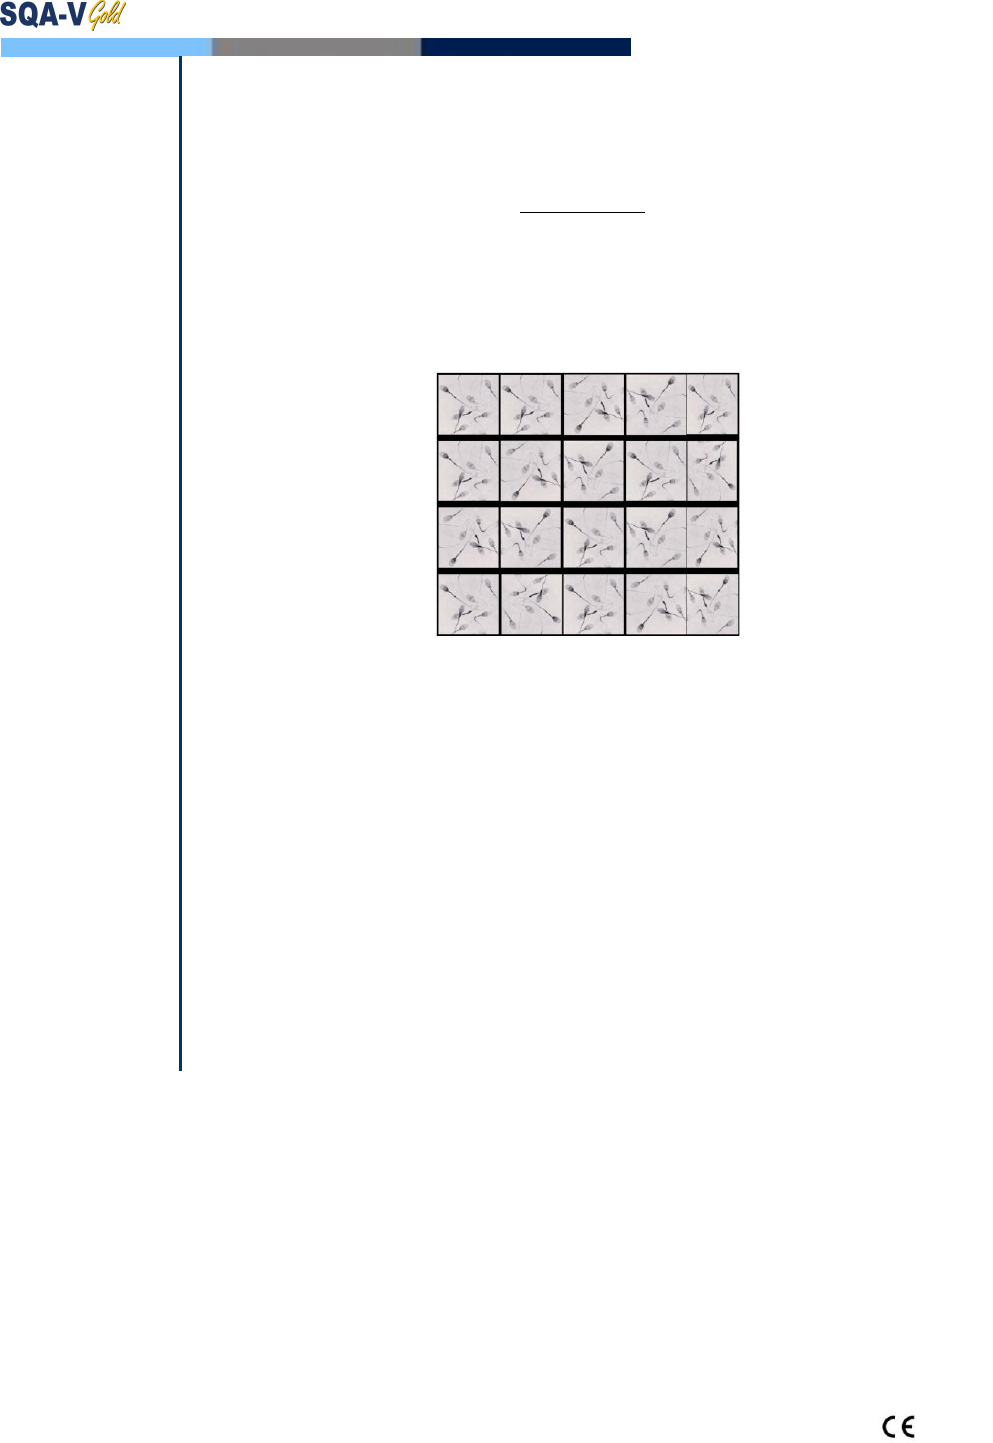
8. The screen of both the SQA-V and the V-Sperm is divided into a grid
containing 20-distinct squares (see below).
9. Each spermatozoon seen on the ENTIRE 20-square grid is 1 Million/ml of
sperm concentration. FOR EXAMPLE: In the grid above, there are 7
spermatozoa in each cell of the grid. 7 (spermatozoa) X 20 (cells) = 140 M/ml
sperm concentration for this sample.
10. To count a minimum of 200 cells (per WHO), turn the silver knob of the slide
adaptor and a new field of view will be displayed in the grid.
11. When viewing multiple fields, divide the final count by the number of screens
(fields of view) counted. For example, if two of the screens above are counted
there would be a total number of 280 sperm cells so the sperm concentration
will be: 280 ÷ 2 = 140 M/ml.
12. Refer to table 2.2 of the WHO Manual 5th Edition to determine if the duplicate
counts are acceptable.
User Guide Version 2.60 I-button WHO 5th
Revision 1_JUNE_2017 29
Error and
Warning
Messages
SECTION 10: Error Messages, Warning Messages and General
Warning
General Warning:
The SQA-V equipment’s built-in protection for the operator and the
environment is ONLY operational if the SQA-V is operated properly following
the manufacturer’s specifications.
CAUTION: There is a risk of explosion or shorting if the SQA-V battery is
replaced by an incorrect type. Replacement batteries MUST be the same type
and manufacturer. Dispose of used batteries in accordance with the
manufacturer instructions.
Environmental condition for storage and transport: Recommended to store the
SQA-V at temperatures between 20°C -30°C.
Following the manufacturer’s recommended use, the expected life span of the
SQA-V is a minimum of 5 years. The life span can be extended when utilizing
the manufacturer’s annual preventative maintenance plan.
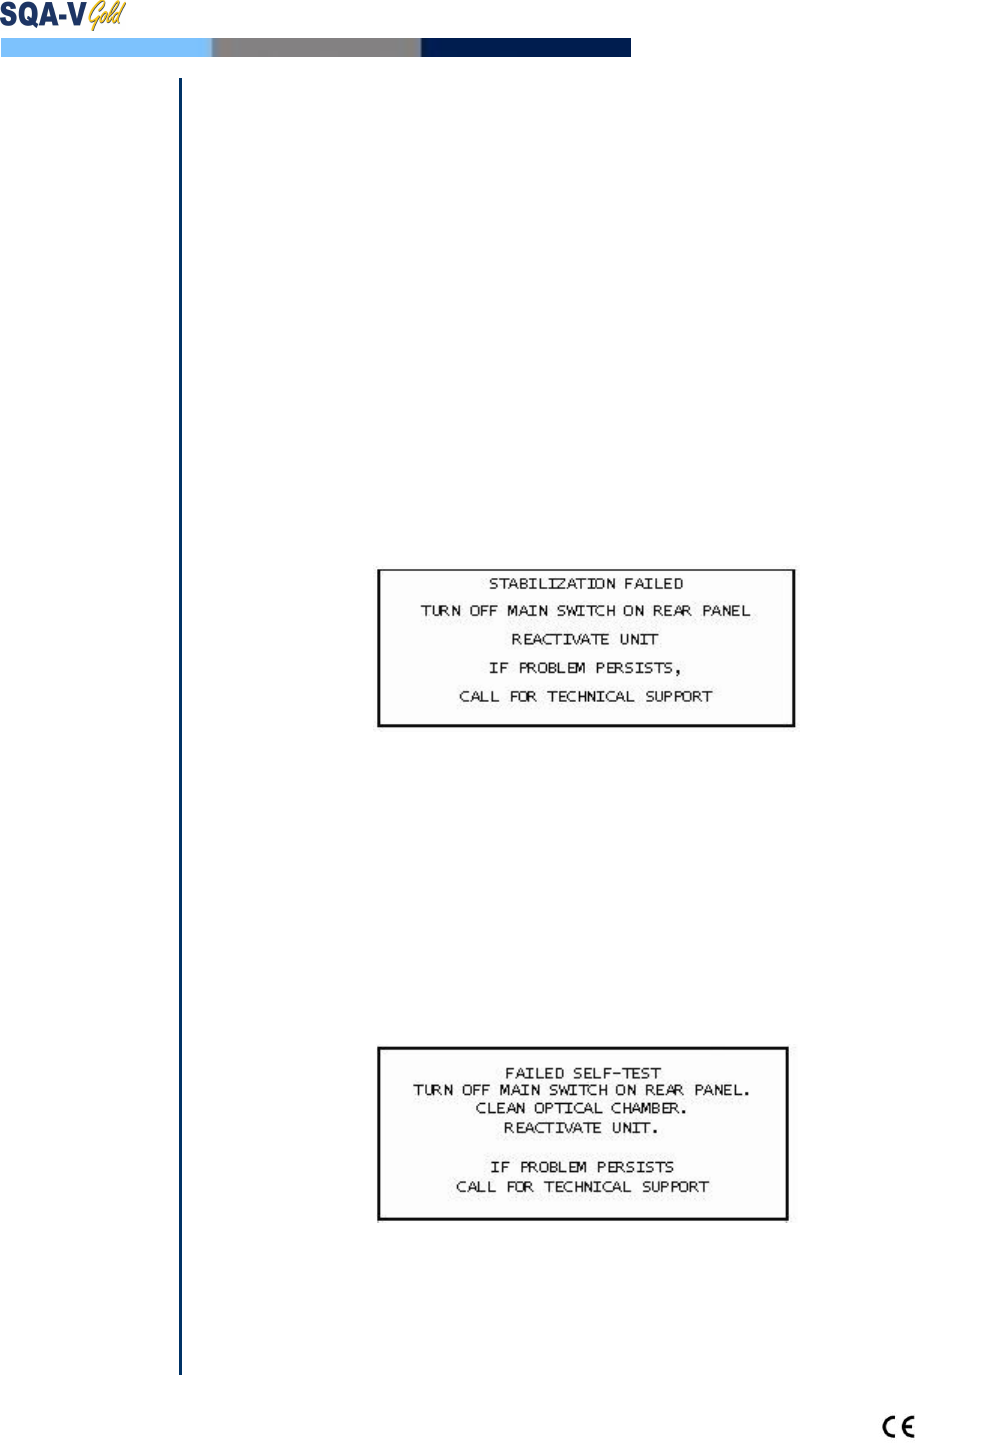
Stabilization Failed:
Ensure there is no testing capillary in the measurement compartment.
Remove the SQA-V from sources of electronic noise and vibrations.
Clean measurement compartment (refer to Appendix).
Reboot the SQA-V without a testing capillary in the chamber:
Turn system OFF then back ON at the main switch on the rear panel.
Press the front panel ON/OFF key to begin Auto-Calibration/Stabilization.
Call technical support if failure recurs.
Self-test Failed:
Ensure there is no testing capillary in the measurement compartment.
Remove the SQA-V from sources of electronic noise and vibrations.
Clean measurement compartment (refer to Appendix).
Reboot the SQA-V without a testing capillary in the chamber:
User Guide Version 2.60 I-button WHO 5th
Revision 1_JUNE_2017 30
Turn the system OFF then back ON at the main switch on the rear panel.
Press the front panel ON/OFF key to begin Auto-Calibration/Stabilization.
Call technical support if this message is displayed again. Prepare for technical
support by printing a copy of the SQA-V SERVICE DATA:
Press the SERVICE key on the SQA-V keypad to activate the SERVICE
MENU screen.
Select: PRINT SELF TEST DATA.
Press ENTER.
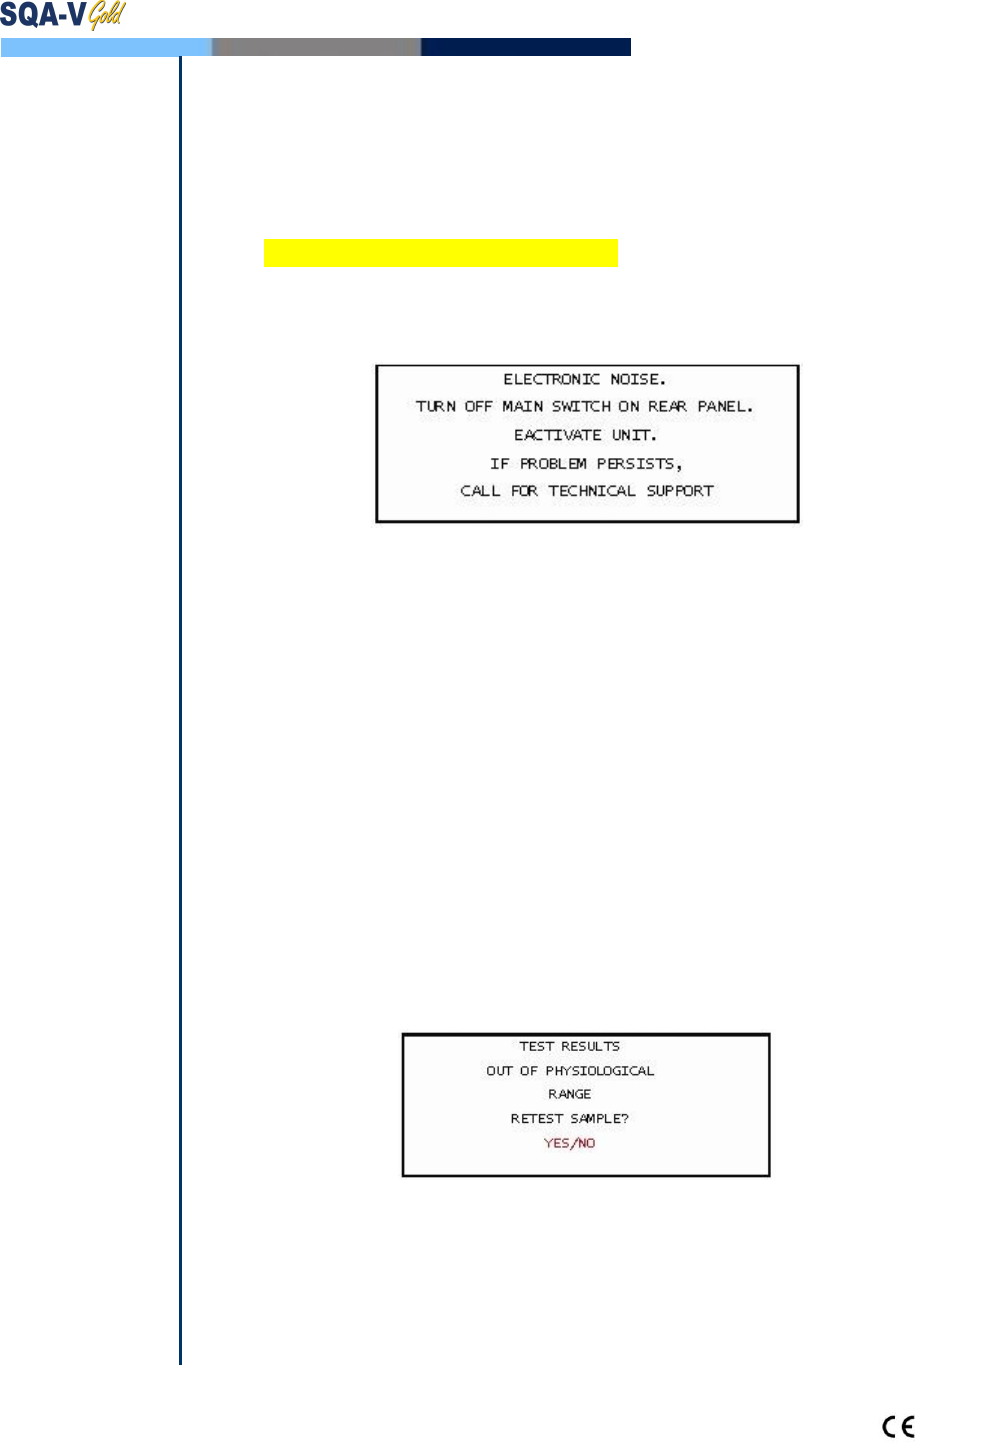
Electronic Noise:
Ensure there is no testing capillary in the measurement compartment.
Remove SQA-V from sources of electronic noise and vibrations (centrifuge).
Clean measurement compartment (refer to Appendix) and after cleaning:
Turn the system OFF then back ON at the main switch on the rear panel.
Press the front panel ON/OFF key to begin Auto-Calibration/Stabilization.
From the main menu: Select TEST NEW PATIENT and rerun the test.
Call technical support if this message is displayed again. Prepare for technical
support by printing a copy of the SQA-V SERVICE DATA:
Press the SERVICE key on the SQA-V keypad to activate the SERVICE
MENU screen.
Select: PRINT SELF TEST DATA.
Press: ENTER.
Concentration Out of Range
Testing Semen Sample:
A message will appear indicating that the tests results for Sperm Conc and/or
MSC are beyond the upper limits of the dynamic range established by the
manufacturer for testing. This message will appear if the SQA-V reads:
SPERM CONC > 500 M/ml or MSC > 450 M/ml
Review sample handling technique (Appendix "Filling the SQA-V Capillary").
Re-test the sample in a new SQA-V capillary. If the message appears again,
User Guide Version 2.60 I-button WHO 5th
Revision 1_JUNE_2017 31
reboot the system.
Call for technical assistance if problem persists.
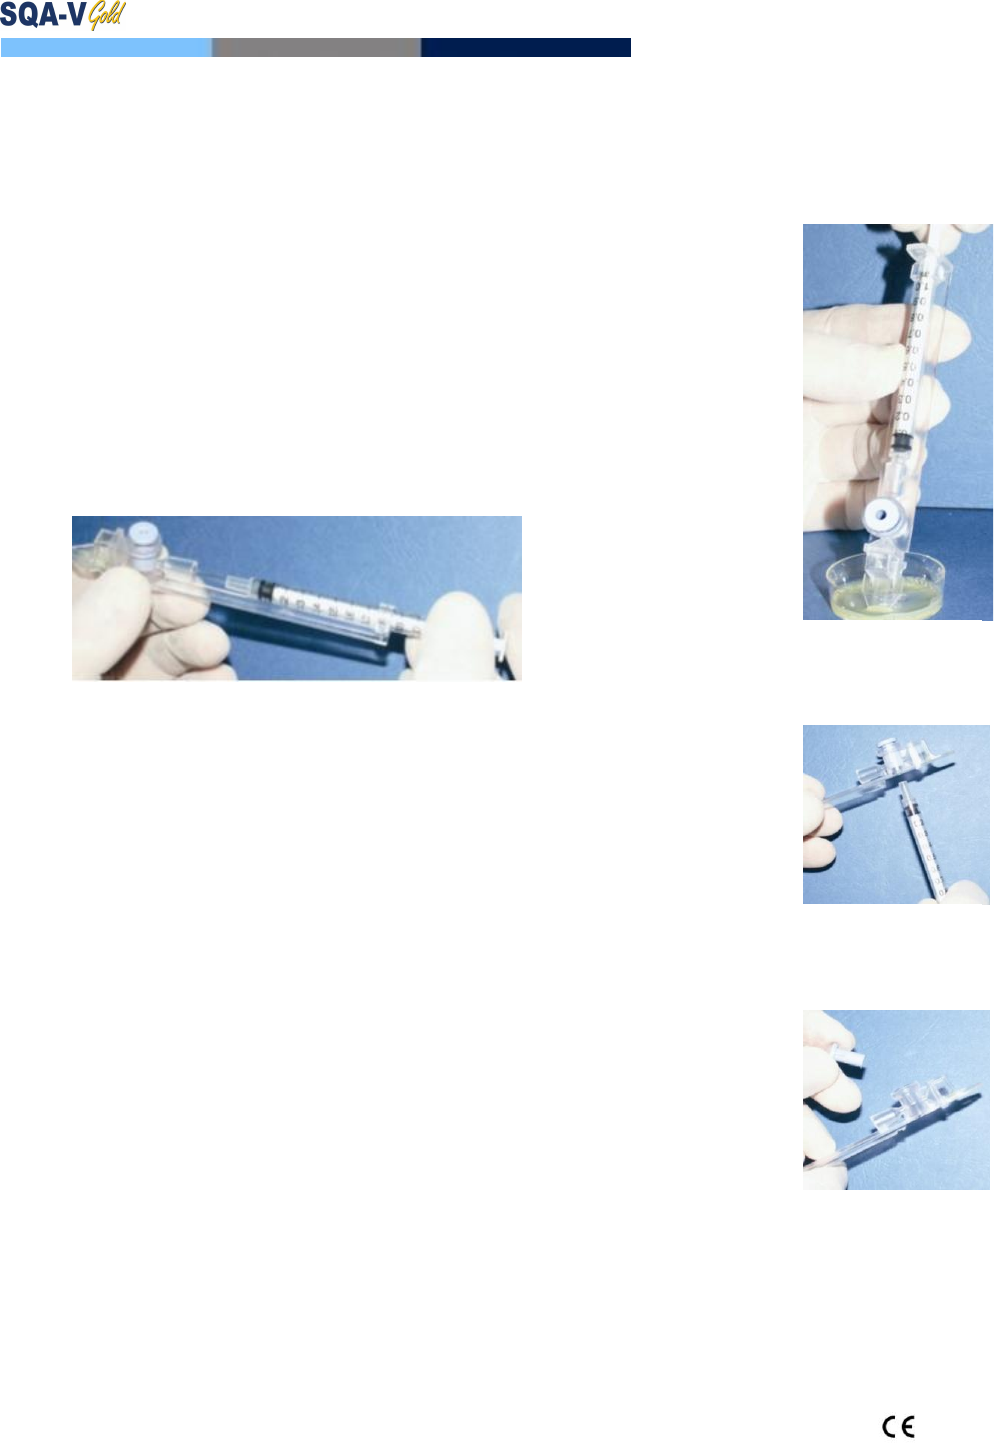
APPENDIX 1: Filling the SQA-V Capillary with a Normal Volume Sample
Sample size, collection container and preparation:
1. Sample volume should be at least .5 ml If sample volume is less
than .5 ml see Appendix 2.
2. Sample container should be wide-necked and deep enough to
facilitate inserting the capillary into the sample at the bottom of the
container.
3. The semen sample must be completely liquefied and well mixed
prior to aspiration. Gently rotate container to fully mix liquefied
specimen.
WARNING: Do not shake nor use a pipette to aspirate and dispense
specimen in order to mix, otherwise air bubbles will form.
Figure 1
4. Carefully check that liquefied, fully mixed specimen is free of air bubbles (or that there is
an adequate amount of sample below the air bubbles) before immersing the capillary into the
specimen, thus ensuring that no air bubbles will be aspirated into the capillary.
Filling the capillary:
1. Push the syringe piston in fully. Place only thin part of the capillary
into the bottom of the sample while angling the sample container at
about 45 degrees (Figure 1).
2. Placing two fingers below the piston head pull the piston back slowly
while keeping the tip of the capillary well below the sample level
and below any surface bubbles (Figure 1). Continue to aspirate the
sample until it appears in the Luer adaptor.
Figure 2
User Guide Version 2.60 I-button WHO 5th
Revision 1_JUNE_2017 32
NOTE: Transferring the sample to a standard "tissue culture dish" (3 cm in diameter/1 cm deep)
will allow better visual control when filling the capillary as an intermediate step (see Figure 2).
3. Holding the capillary in a vertical position (Figure 3), visually confirm
that the sample has completely filled the thin section (without a
meniscus) and the cuvette section and appears in the Luer adaptor. Tap
on the syringe to make sure there are no air bubbles in the sample.
If, after tapping, some air bubbles appear below the Luer adaptor, dip the
capillary into the semen sample again and aspirate a small quantity of
semen to draw the air bubbles into the syringe.
4. Quickly (to avoid wicking) and thoroughly wipe the outer surface of
the capillary - both top and bottom (Figure 4) with a delicate wipe
(Kimwipes, etc.). It is important to remove all semen from the exterior of
the capillary in order to prevent the SQA-V optical chamber from
becoming clogged. Visually confirm that the capillary chambers are still
full following the cleaning process. If some of the sample has been
depleted (meniscus formed in the thin part of the capillary) fill the
capillary part from the cuvette section by slightly pushing in the piston.
Figure 4
Figure 3
5. Slowly and carefully push-in the separating valve until it is level with
the plastic (Figure 5). The capillary is now ready to be inserted into one
of the SQA-V compartments for testing or viewing.
Figure 5
6. For automated testing push the
testing capillary into the lower
measurement compartment
with the blue stopper down.
Push it in as far as it will go to
ensure that the capillary is properly
seated in the compartment.
7. To visualize the specimen,
insert the capillary into the
visualization compartment with
the blue stopper up.
User Guide Version 2.60 I-button WHO 5th
Revision 1_JUNE_2017 33
APPENDIX 2: Filling the SQA-V Capillary with a Low Volume Sample
Sample size, collection container and preparation:
1. A sample as small as 20 micro liters can be tested for motility parameters by filling ONLY the thin
section of the testing capillary (Figure 1).
2. The semen sample must be completely liquefied and well mixed prior to
aspiration. Gently rotate the container to fully mix the liquefied specimen.
WARNING: Do not shake nor use a pipette to aspirate and dispense
specimen in order to mix, otherwise air bubbles will form.
3. Carefully check that the liquefied, fully mixed specimen is free of air
bubbles (or that there is an adequate amount of sample below the air
bubbles) before immersing the capillary into the specimen, thus ensuring that
no air bubbles will be aspirated into the capillary.
4. It is recommended that the sample be withdrawn from a standard
"tissue culture dish" (3 cm in diameter/1 cm deep) to allow for better
visual control when filling the capillary.
Figure 2
Figure 1
Filling the capillary:
1. Push the syringe piston in fully. Place only the thin part of the capillary
into the bottom of the sample (Figure 1).
2. Pull the piston back slowly without withdrawing the capillary from the
sample. Fill only the (thin) capillary chamber with 20 micro liters of
semen (Figure 1). The exact quantity aspirated can be determined by the
gradations on the 1 ml syringe. Aspirate the sample until it just appears in
the cuvette part while keeping the tip of the capillary well below the sample
level and well below the level of any bubbles covering the liquid. Withdraw
the capillary tip from the semen sample and visually inspect the capillary to
ensure that the sample has completely filled the thin section (no meniscus).
3. Quickly (to avoid wicking) and thoroughly wipe the outer surface of the
capillary - both top and bottom with a delicate wipe (Kimwipes, etc.). It is
important to remove all semen from the exterior of the capillary in order to
prevent the SQA-V optical chamber from becoming clogged. Visually confirm
that the thin chamber of the capillary is still full of semen after completing
the cleaning process. If some of the sample has been depleted push-in the
piston slightly until the first drop appears on the capillary tip and then fill the
capillary again from the sample container.
Figure 3
Figure 4
4. The separating valve must now be removed. Detach the entire syringe from the hub (Figure 2) and
use the syringe tip to firmly push-out the separating valve from the underside of the capillary
(Figure 3). Completely detach the separating valve (Figure 4). The capillary is now ready to be
inserted into the SQA-V.
5. PLEASE NOTE: Test Low Volume samples as soon as the sample is aspirated into the
capillary.
User Guide Version 2.60 I-button WHO 5th
Revision 1_JUNE_2017 34
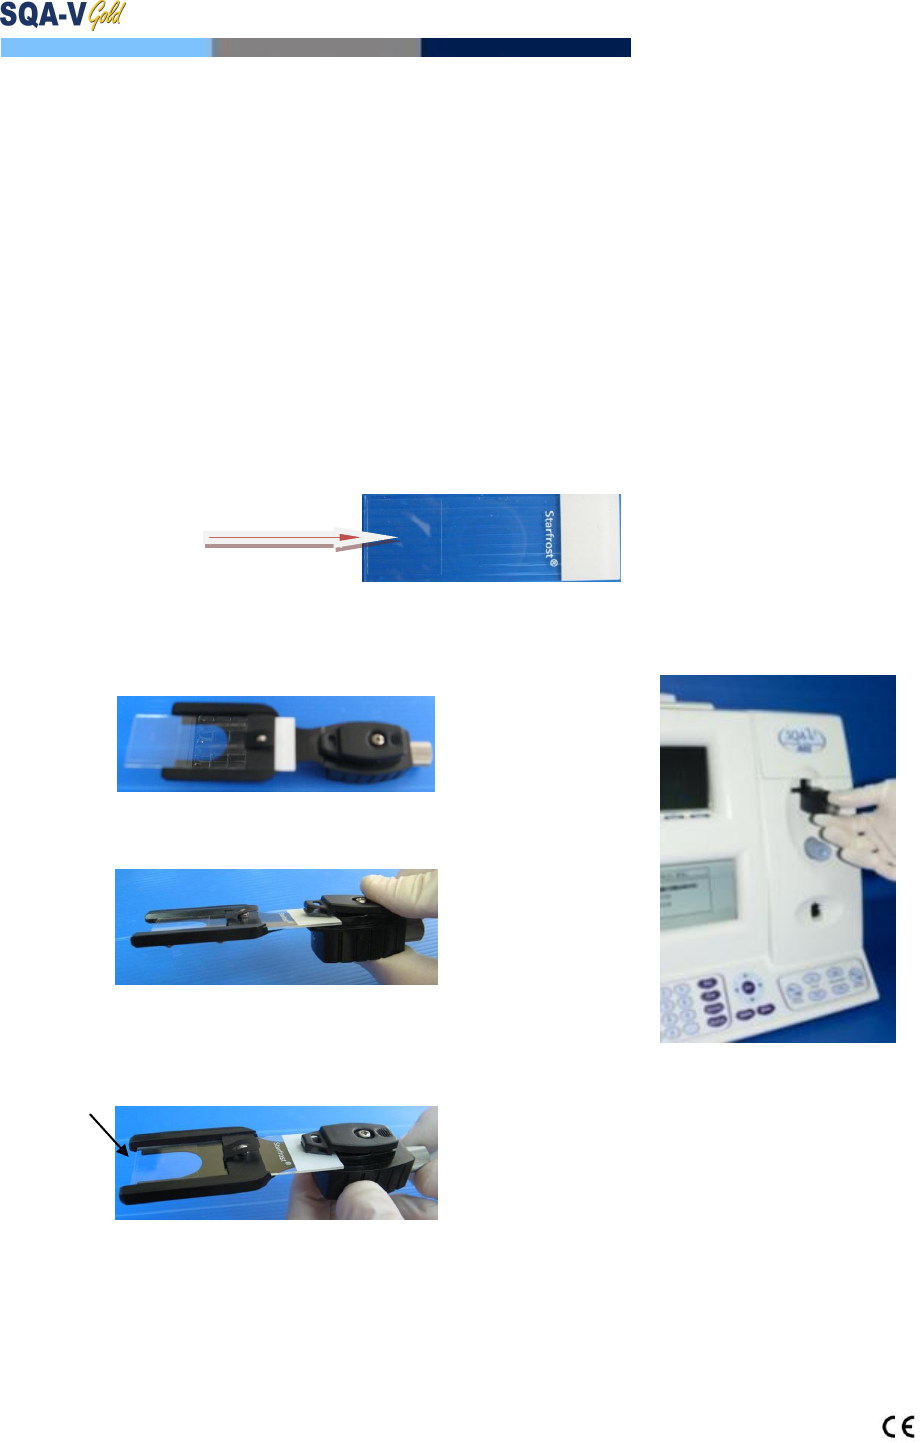
APPENDIX 3: Using Standard Slides in the Visualization System
Introduction
The SQA-V has a specially designed slide adaptor that enables the user to use standard slides to view
semen samples in the SQA-V visualization compartment. A slide is "seated" in a stable and secure manner
as described below and the slide adaptor is inserted into the SQA-V for testing.
User Instructions:
1. The slide adapter is designed for standard laboratory slides that are 76 mm long and 25.6 mm
wide. Thickness may vary from 1 mm to 2 mm. The viewing section of the slide must be completely
transparent.
2. Center a 10 micro-liter drop of semen at a distance of approximately 12 mm from the edge of the
slide and cover with a standard (22 mm x 22 mm) cover-slip. The droplet of semen should be
evenly spread across the entire surface area of the cover-slip automatically, without any additional
pressure applied to the cover-slip:
Sample location
3. Carefully place the prepared slide into the
slide adapter (with the non-loaded side
towards the slide holder):
4. Open the spring loaded slide holder by
pressing on its outer edge. Slip the slide into
the holder and release the spring:
5. Align the edge of the slide with the distal
edge of the slide adapter by turning the
silver slide position adjuster as seen below.
The slide will now be firmly in place in the
slide adapter:
6. Insert the fully loaded slide adapter into the
visualization chamber of the SQA-V:
7. Optimize the video image in the usual
manner (please see the SECTION 9:
Operating the Visualization System) and
move to additional fields of view by turning
the silver knob of the slide adapter.
User Guide Version 2.60 I-button WHO 5th
Revision 1_JUNE_2017 35
APPENDIX 4: Counting Cells using the SQA-V Visualization System
1. Follow the WHO Manual instructions for semen sample collection and preparation. Thoroughly mix the
sample before step #2.
2. Pipette 10uL of the semen sample onto a standard slide and cover with a 22x22 mm cover slip. Prepare a
new slide if air bubbles or liquid spillage occurs.
3. Load the slide into the slide adaptor and then insert the slide adaptor into the SQA-V visualization
chamber. (Refer to the SQA-V User Guide APPENDIX 3: Using Standard Slides in the Visualization System
for details).
4. Press the ZOOM-OUT button on the SQA-V keypad all the way to set the magnification to x300.
5. Set the: BRIGHTNESS, CONTRAST & COLOR knobs of the video display:
a. COLOR knob: Turn clockwise to the end (maximum color),
b. CONTRAST: Turn counterclockwise to the end (maximum contrast),
c. BRIGHTNESS knob: Turn clockwise from the darkest setting until the background is light (not
maximum!).
6. Adjust the focus knob to maximize the image: Turn clockwise all the way. Then turn counterclockwise
until a clear image appears on the screen.
7. Go to V-Sperm and click on the Real Time Video button. FREEZE the image.
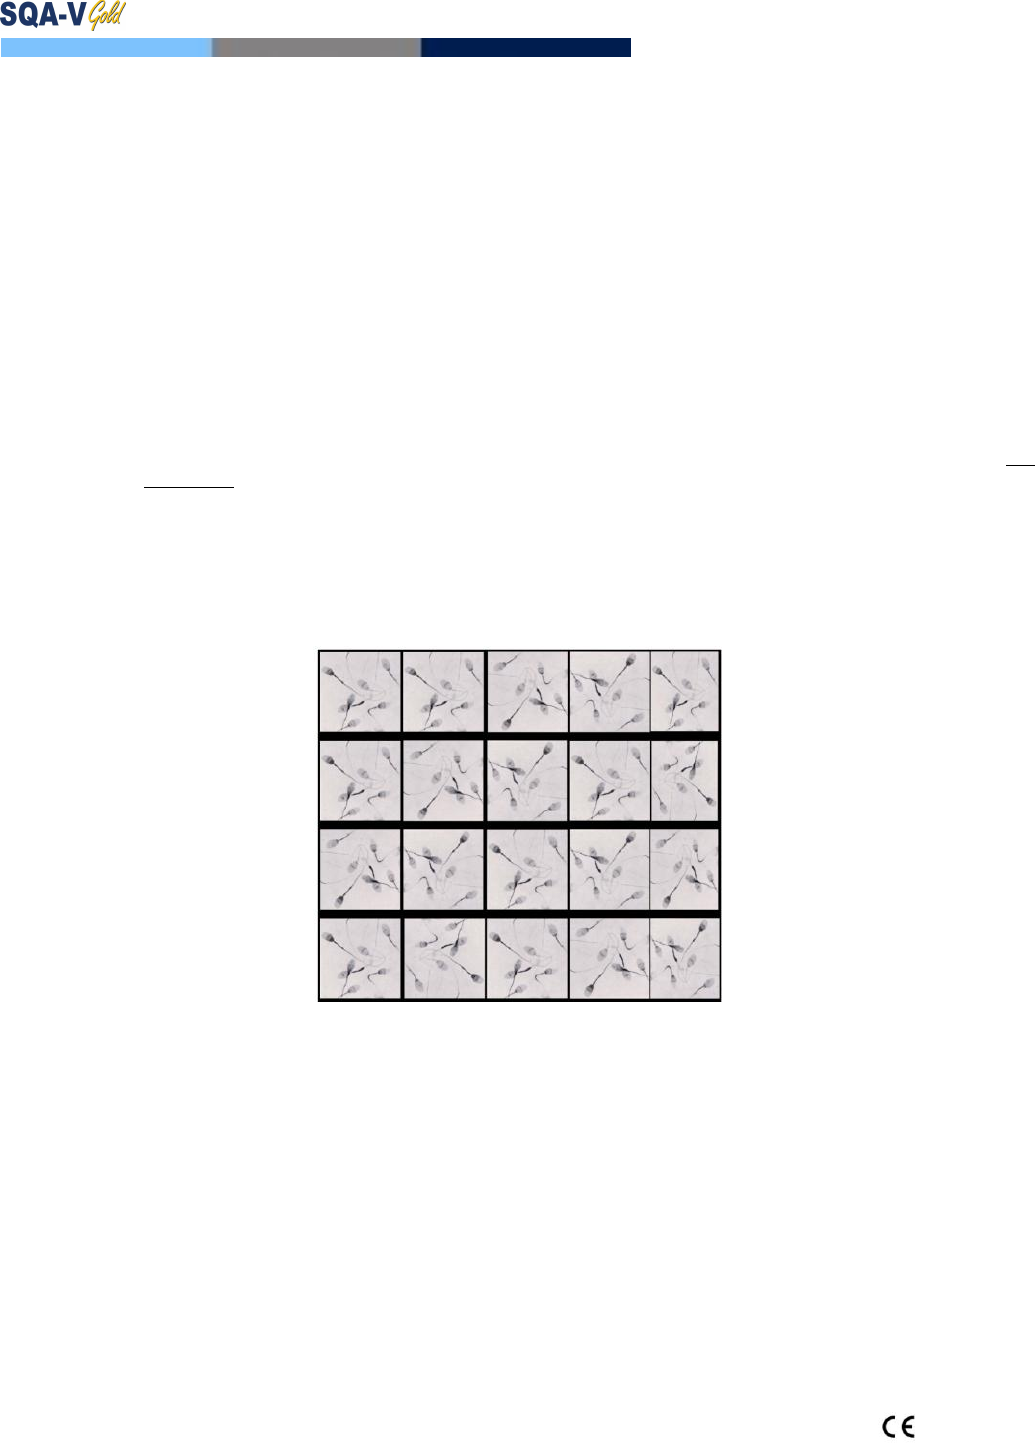
8. The screen of both the SQA-V and the V-Sperm is divided into a grid containing 20-distinct squares (see
below).
9. Each spermatozoon seen on the ENTIRE 20-square grid is 1 Million/ml of sperm concentration. FOR
EXAMPLE: In the grid above, there are 7 spermatozoa in each cell of the grid. 7 (spermatozoa) X 20
(cells) = 140 M/ml sperm concentration for this sample.
10. To count a minimum of 200 cells (per WHO), turn the silver knob of the slide adaptor and a new field of
view will be displayed in the grid.
11. When viewing multiple fields, divide the final count by the number of screens (fields of view) counted. For
example, if two of the screens above are counted there would be a total number of 280 sperm cells so
the sperm concentration will be: 280 ÷ 2 = 140 M/ml.
12. Refer to table 2.2 of the WHO Manual 5th Edition to determine if the duplicate counts are acceptable.
User Guide Version 2.60 I-button WHO 5th
Revision 1_JUNE_2017 36
APPENDIX 5: Cleaning the Capillary Compartment
When to clean: DAILY (step 1), WEEKLY (step 2)
Or if SELF-TEST or any other failure occurs
Or if System becomes contaminated with semen
Cleaning kit components:
Long cleaning brush
Fibrous material cleaning paddles (single use)
Sponge-tipped drying paddles (single use)
Cleaning fluid (single drop dispenser)
PLEASE NOTE: Cleaning and drying Paddles are for
ONE TIME use only!
CLEANING: STEP 1 (DAILY)
Insert the long brush (bristle side down) into the
upper portion of the lower chamber of the SQA in
the same manner as a testing capillary (Fig 1 and 2).
Pull the brush out, applying downward pressure to
sweep or „dust off‟ the optics (you will feel a „shelf‟ in
the back/top section of the chamber) – (Fig 2 and 3)
Monitor the system’s “REF. 2” parameter. It
should be between 2800 and 3200 mV if possible.
CLEANING: STEP 2 (WEEKLY)
1. Use a Fibrous material cleaning paddle (fig 4)
Moisten with only ONE drop of cleaning fluid.
Shake off excess fluid.
Insert into the measurement compartment fibrous
material facing DOWN ONLY (fig 5)
Move the cleaning capillary in and out three times.
2. Use a sponge-tipped drying paddle into the testing
chamber and leave it for 10 – 15 seconds (fig 6).
NOTE: Do not move this drying paddle in and out.
Fig. 1: Long cleaning brush
Fig. 2: Cleaning lower chamber
Fig. 3: “Dusting off”
Fig. 6: Insertion of drying Paddle
Fig. 5: Insertion-Fibrous material facing DOWN
Fig. 4: FIBROUS cleaning paddle

User Guide Version 2.60 I-button WHO 5th
Revision 1_JUNE_2017 37
APPENDIX 6: Reference Values of Semen Variables
The ranges established above are based on WHO 5th reference values or MES (for proprietary semen parameters).
SEMEN PARAMETER
SQA-V
TEST NAME
REFERENCE
RANGE*
SOURCE
Sperm Concentration (Count)
SPERM CONC.
≥15 M/ml
WHO 5th manual*
Total Motility (PR+NP)
TOTAL MOTILITY
<PR+NP>
≥40 %
WHO 5th manual*
Progressive Motility (PR)
PROG. MOTILITY
<PR>
≥32 %
WHO 5th manual*
Non-progressive Motility (NP)
NONPROG. MOTILITY
<NP>
-
-
Immotility (IM)
IMMOTILITY <IM>
-
-
Sperm Morphology (normal forms, %)
MORPH. NORM
FORMS, WHO 5th
≥4%
WHO 5th manual*
Motile Sperm Concentration
MSC
≥6 M/ml
MES*
Progressively Motile Sperm
Concentration
PMSC
≥5 M/ml
MES*
Functional Sperm Concentration
FSC
-
-
Velocity (Average path velocity – VAP)
VELOCITY
≥5 mic./sec.
MES*
Sperm Motility Index
SMI
≥80
MES*
Total Sperm Number
SPERM #
≥39 M
WHO 5th manual*
Total Motile Sperm
MOT. SPERM
≥16 M
MES*
Total Progressively Motile Sperm
PROG. SPERM
≥12 M
MES*
Total Functional Sperm
FUNC. SPERM
-
-
Total Morphologically Normal Sperm
MORPH. NORM.
SPERM
≥2 M
MES*
User Guide Version 2.60 I-button WHO 5th
Revision 1_JUNE_2017 38
APPENDIX 7: Measuring WBC's in Semen
SQA-V Visualization System
Follow directions for preparing a standard slide with 10 µl of semen and refer to the "Using the Visualization
System" section of this guide. View up to 10 fields by turning the silver slide adaptor knob. Search for
leukocytes. If >1 M/ml are seen on the visualization system, select ABNORMAL (ABNORM) in the SAMPLE
DATA screen.
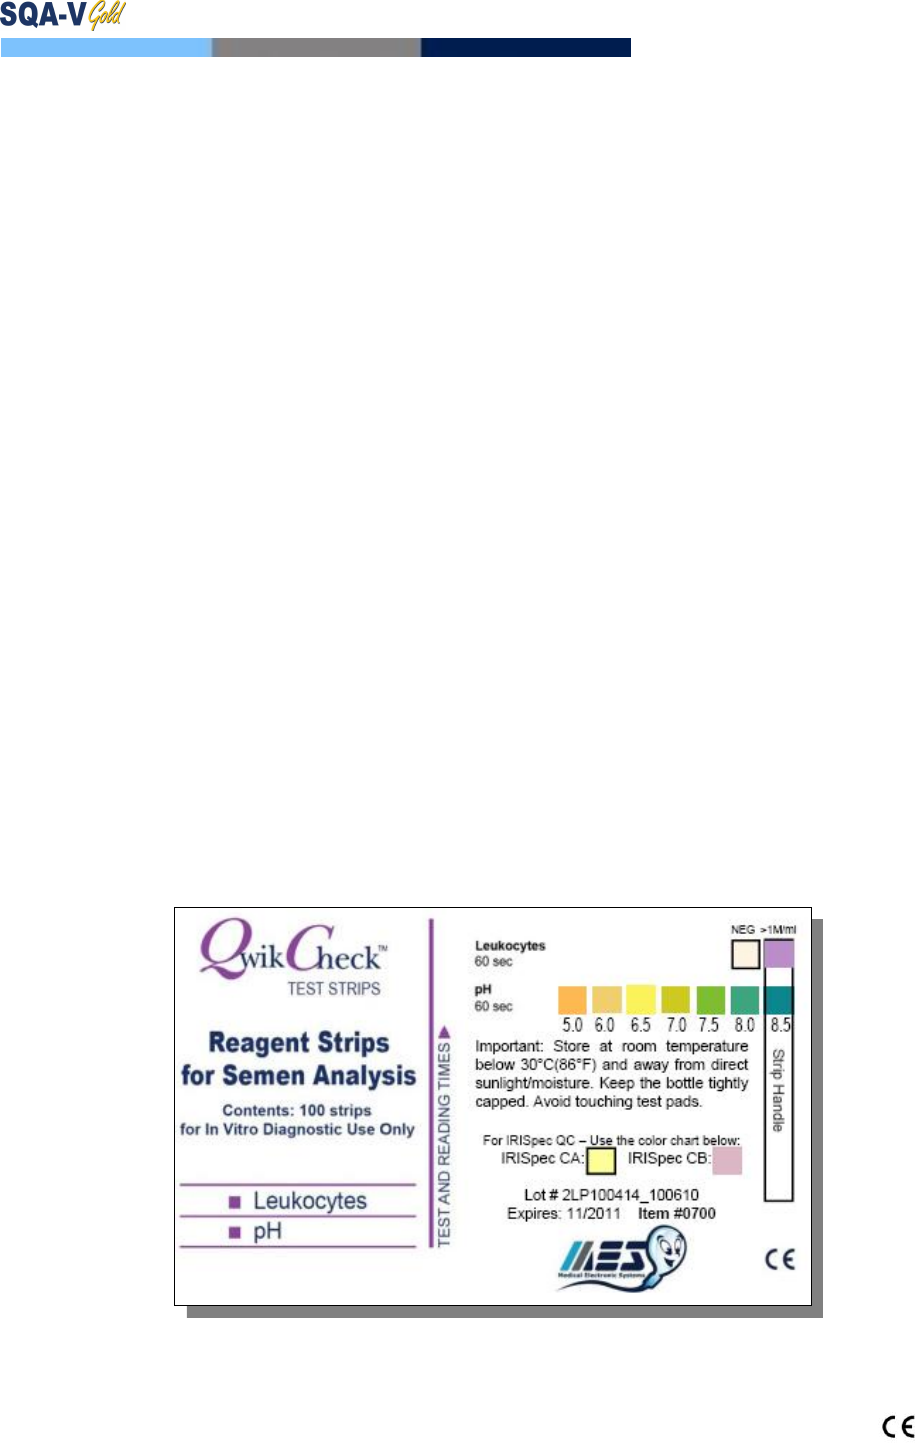
QwikCheckTest Strips for Semen
Place one drop of semen on the test patch for WBC's (leukocytes) and follow the instructions on the TEST
STRIP label/insert. Compare the patch to the color scale for WBC on the container. If the patch exceeds the
darkest lavender color on the scale it indicates that WBC concentration in the sample is abnormal or >1
Million/ml.
NOTE: Test strips are also supported for pH testing of semen.
Clinical Trial
The WBC patch of the test strip changes color due to a chemical reaction caused by the presence of esterase
in granulocytes. Esterases cleave to indoxyl ester, liberating the indoxyl which then reacts to diasonium salt to
produce a violet dye. This chemical reaction is not affected by bacteria, trichomonads or erythrocytes present
in the specimen.
QwikCheck test strips were evaluated by Medical Electronic Systems Ltd. (MES) for use as a qualitative
indicator (WBC's >1M/ml) of WBC's in human semen. To test this application WBC's were isolated from blood
and re-suspended in seminal plasma. Varying concentrations of WBC's in seminal plasma were tested using
the test strips. Test results were analyzed visually and by spectrophotometer readings.
Results and Conclusion
When the WBC concentration in semen is >1 Million/ml the WBC patch of the QwikCheck test strips exceeds
the darkest lavender color on the color chart after the testing time. (This reading corresponds to WBC
concentration > 1 Million/ml that is considered abnormal according to WHO 2010 5th edition, Pg. 107). A NEG
includes both the NEG color on the label AND any color of lavender LIGHTER than the >1M patch on the label.
References
WHO 2010 5TH edition laboratory manual for the examination of human semen, Pg. 16 (pH) and 107
(Leukocytes), Cambridge University Press.
User Guide Version 2.60 I-button WHO 5th
Revision 1_JUNE_2017 39
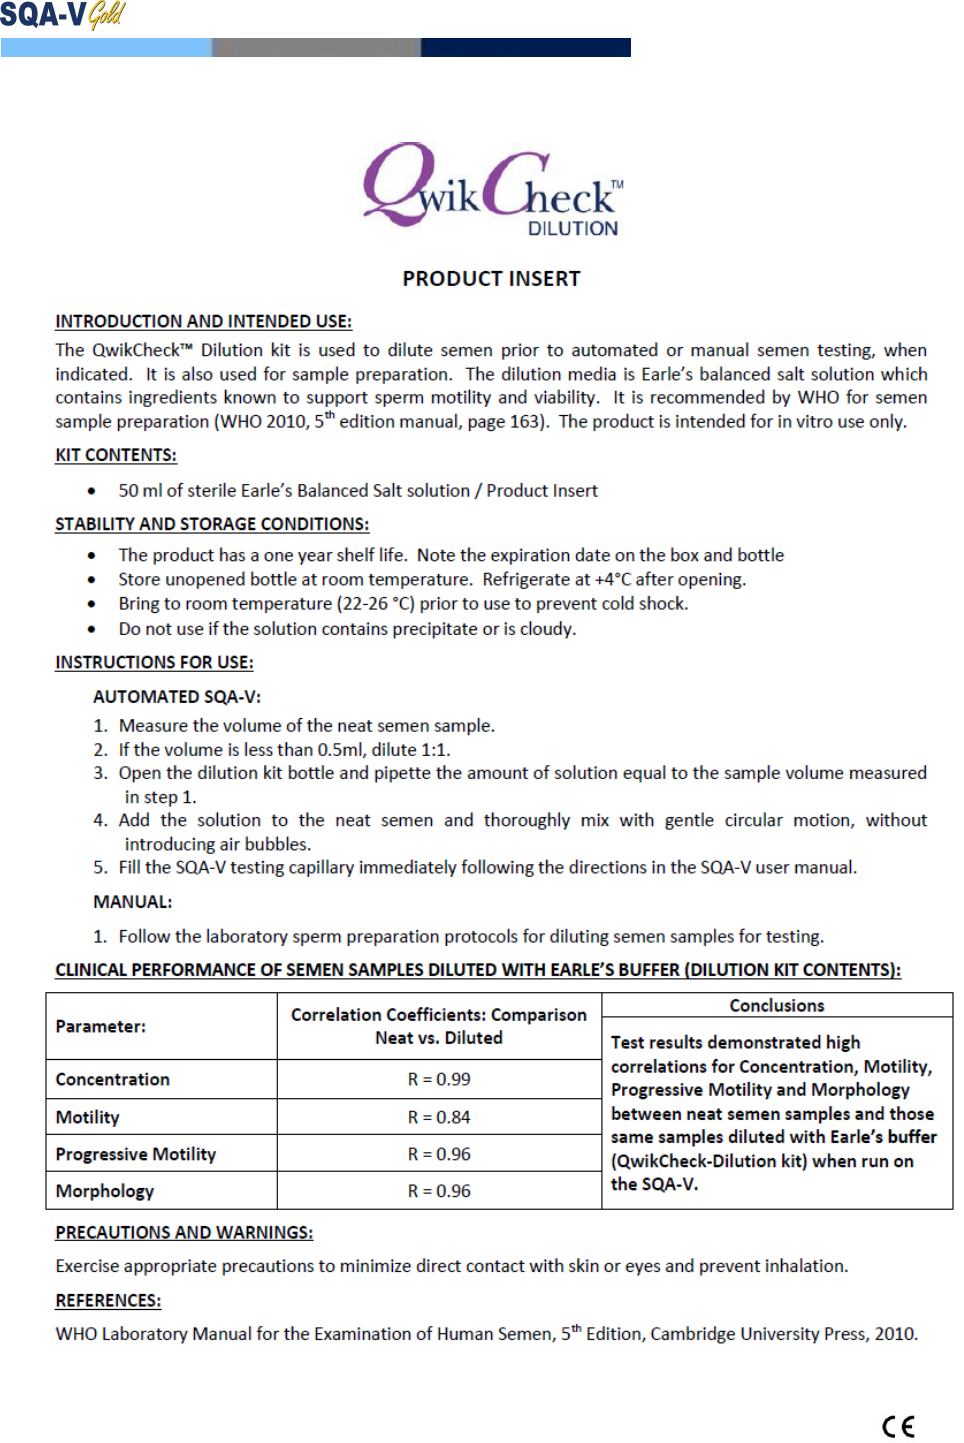
APPENDIX 8: Dilution Media
User Guide Version 2.60 I-button WHO 5th
Revision 1_JUNE_2017 40
APPENDIX 9: Treating Viscous Samples
PRODUCT INSERT
INTRODUCTION AND INTENDED USE
The QwikCheckTM Liquefaction Kit can be used to accelerate the liquefaction of viscous semen
samples that remain viscous thirty minutes after collection. High viscosity can impact the accurate
measurement of motility and concentration. Use QwikCheckTM Liquefaction to prepare viscous
semen samples for automated or manual semen analysis. For in-vitro use only.
KIT CONTENTS
20 single dose, 5 mg vials of lyophilized α-Chymotrypsin and a product insert.
STABILITY AND STORAGE CONDITIONS
The product has a one year shelf life. Note the expiration date on the box and vials.
Vials can be stored at room temperature.
INSTRUCTIONS FOR USE
1. Select one vial of α-Chymotrypsin.
2. Tap the vial to move the contents to the bottom of the vial prior to opening.
3. Add the entire contents of one vial to a viscous semen sample.
4. Gently mix the sample to dissolve the powder.
5. Once the sample has liquefied (5-10 minutes), immediately perform automated testing or
neutralize the enzymatic activity (optional) by adding of Human Serum Albumin (HSA) (not
provided in this kit).
CLINICAL PERFORMANCE: Semen Samples Treated with QwikCheck Liquefaction:
Parameter:
Correlation Coefficients:
Semen samples Treated with
Chymotrypsin vs. Non-
treated semen samples
Conclusions:
Test results demonstrated high
correlations for Concentration, Total
Motility, Progressive Motility and
Morphology between the treated
with chymotrypsin (QwikCheck
Liquefaction Kit) and non-treated
semen samples when run on the
SQA-V.
No detrimental effect is seen when
treating semen samples with
QwikCheck™ Liquefaction kit
containing 5 mg chymotrypsin.
Concentration
R = 0.98
Total Motility
R = 0.99
Progressive
Motility
R = 0.99
Morphology
R = 0.95
PRECAUTIONS AND WARNINGS
Each vial contains α-Chymotrypsin, a protease. This protease can cause irritation to eyes,
respiratory system or skin. In case of contact with eyes, rinse immediately with water and seek
medical attention. Observe the following preautions when handling the product:
Wear suitable protective clothing: Mask, gloves and laboratory coat.
Avoid dispersing material over the working area.
REFERENCES: WHO Laboratory Manual for the Examination of Human Semen and Sperm-
Cervical Mucus Interaction, 5th Edition, Cambridge University Press, 2012.
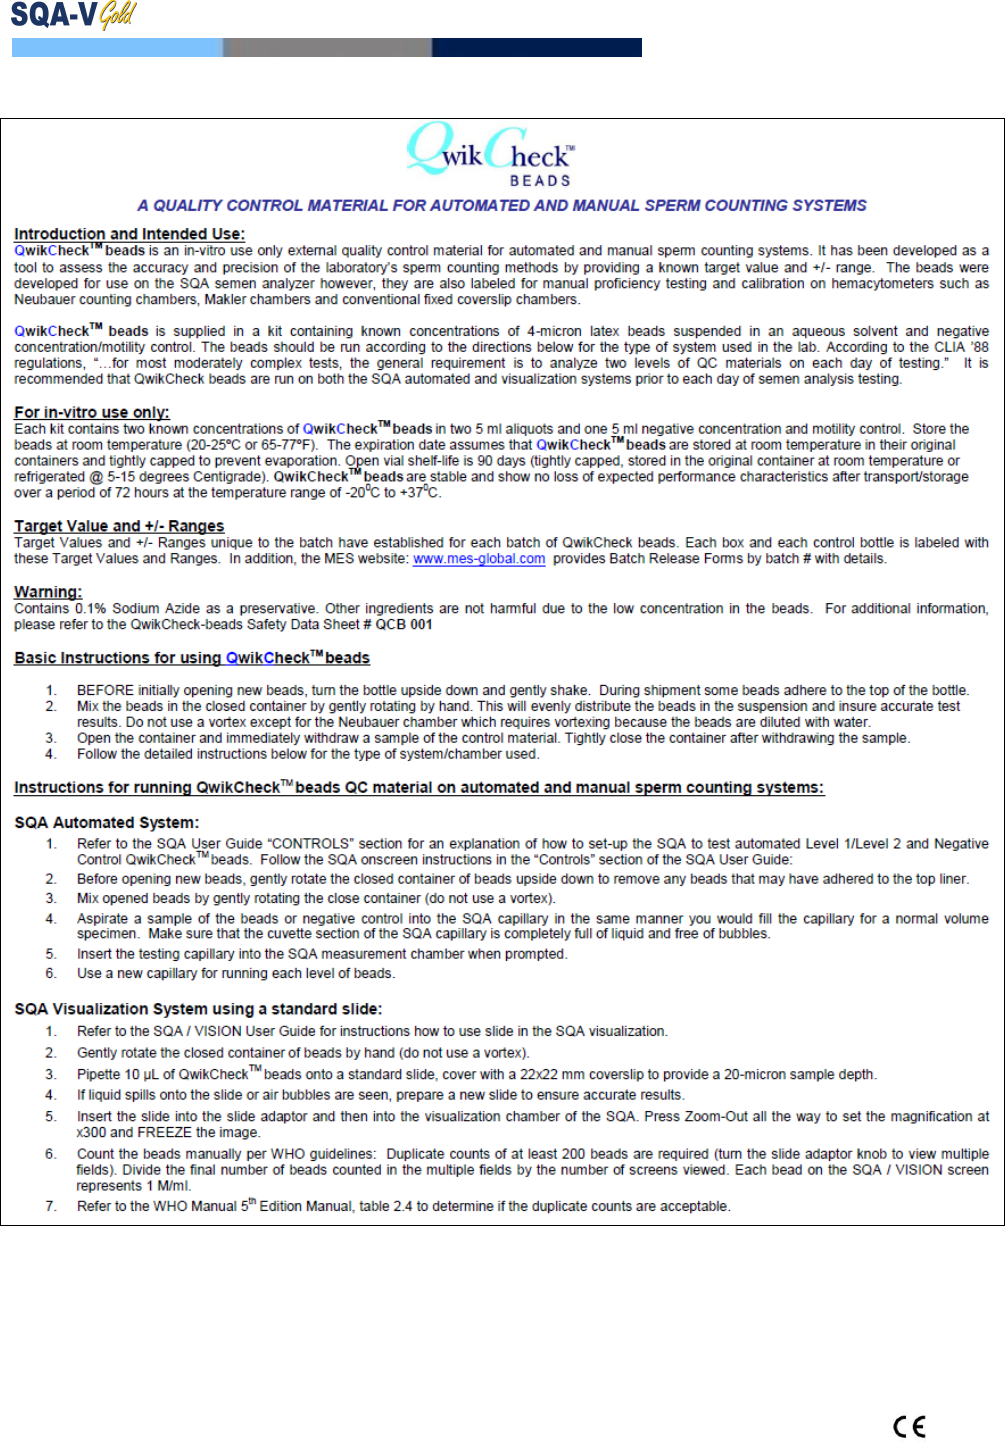
User Guide Version 2.60 I-button WHO 5th
Revision 1_JUNE_2017 41
APPENDIX 10: Assayed Control: QwikCheck™ Beads

User Guide Version 2.60 I-button WHO 5th
Revision 1_JUNE_2017 42
Appendix 11: Concentration Standard: Counting Chambers
A number of commercially available counting chambers are used in laboratories for manually counting sperm
cells. These chambers vary by depth and one type requires a diluted sample. It has been clinically established
that counts vary by approximately 30% depending on the chamber used.
The SQA-V permits the user to select the type of chamber the laboratory has implemented as a standard for
manual semen analysis. Once the concentration standard (CONC. STANDARD) has been selected the SQA-V will
automatically run semen samples based on that standard.
SQA-V Set-Up:
Select SERVICE > SERVICE DATA.
Log into V-Sperm and go to SET-UP > SQA-V > CONTINUE
Select a CONC. (concentration) STANDARD based on aligning the system with the options shown in
the table below:
CONC. STANDARD #1
CONC. STANDARD #2
Commercially available counting chambers are divided into two unique groups:
Standard #1: 10-20 micron depth and do not require sample dilution.
Standard #2: 100 micron depth (haemocytometers) that require sample dilution.
The table below classifies some commercially available chambers:
CHAMBER STANDARD #1
CHAMBER STANDARD #2
Makler
Beurker-Tuek
Micro-Cell
Buerker
Fixed Cover slip disposable chambers
Fuchs-Rosenthal
Fuchs-Rosenthal (modified)
Improved Neubauer
Neubauer
Malassez
Thoma
Thoma Modified

User Guide Version 2.60 I-button WHO 5th
Revision 1_JUNE_2017 43
Appendix 12: Post-vasectomy Protocol
The SQA-V runs a five minute POSTVASECTOMY test that can detect the presence of a very small number
of motile cells. Once the automated test has been performed the user is given the option to follow the
POSTVASECTOMY protocol outlined below (also refer to the Appendix section of this guide) and "scan" the
testing capillary in the SQA-V visualization system.
By scanning through the depth of the testing capillary the user is able to identify and readily count immotile
cells and visually confirm automated test results. Clinical studies positively demonstrated that by
incorporating both the SQA-V automated AND the visualization system in the testing protocol, a very high
level of accuracy is obtained for identifying motile and non-motile cells in POSTVASECTOMY samples.
In order to obtain similar levels of accuracy it is imperative that the user strictly follow the manufacturer’s
protocol outlined below. Additionally, once the testing cycle is complete, the user has an opportunity to
document test results by capturing and archiving a video clip of the postvasectomy specimen using
V-Sperm™ software.
This test is highly sensitive to any movement. The SQA-V and the testing capillary should not be disturbed
in any way during the 5 minute testing cycle.
Fill BOTH sections of the SQA-V testing capillary (for stability during the 5-minute test).
If the specimen volume is not adequate to fill both sections, dilute it with Earle's Buffer and
multiply results by the dilution factor.
Follow the user guide for instructions on running a POSTVASECTOMY sample.
Run the automated 5-minute test for motility parameters.
Remove the capillary and insert it into the visualization system and "scan" ten fields of the SQA-V
capillary following the user guide instructions.
Enter the number of motile and immotile sperm cells visualized.
The final test results will report the greater number of cells found in the automated or visualization
test.
Leave the testing capillary in the visualization system.
Save the test to the SQA-V archive and import it to the V-Sperm GOLD software.
Following the V-Sperm user guide instructions, import the test into the V-Sperm data base and
attach a live VIDEO clip to the patient’s test record for documentation purposes.
NOTE: If the SQA-V is reporting > 30 motile spermatozoa, a screen will indicate that a NORMAL
TEST should be run instead of POSTVASECTOMY > 30 motile spermatozoa is equivalent to
MSC > 2M/ml.
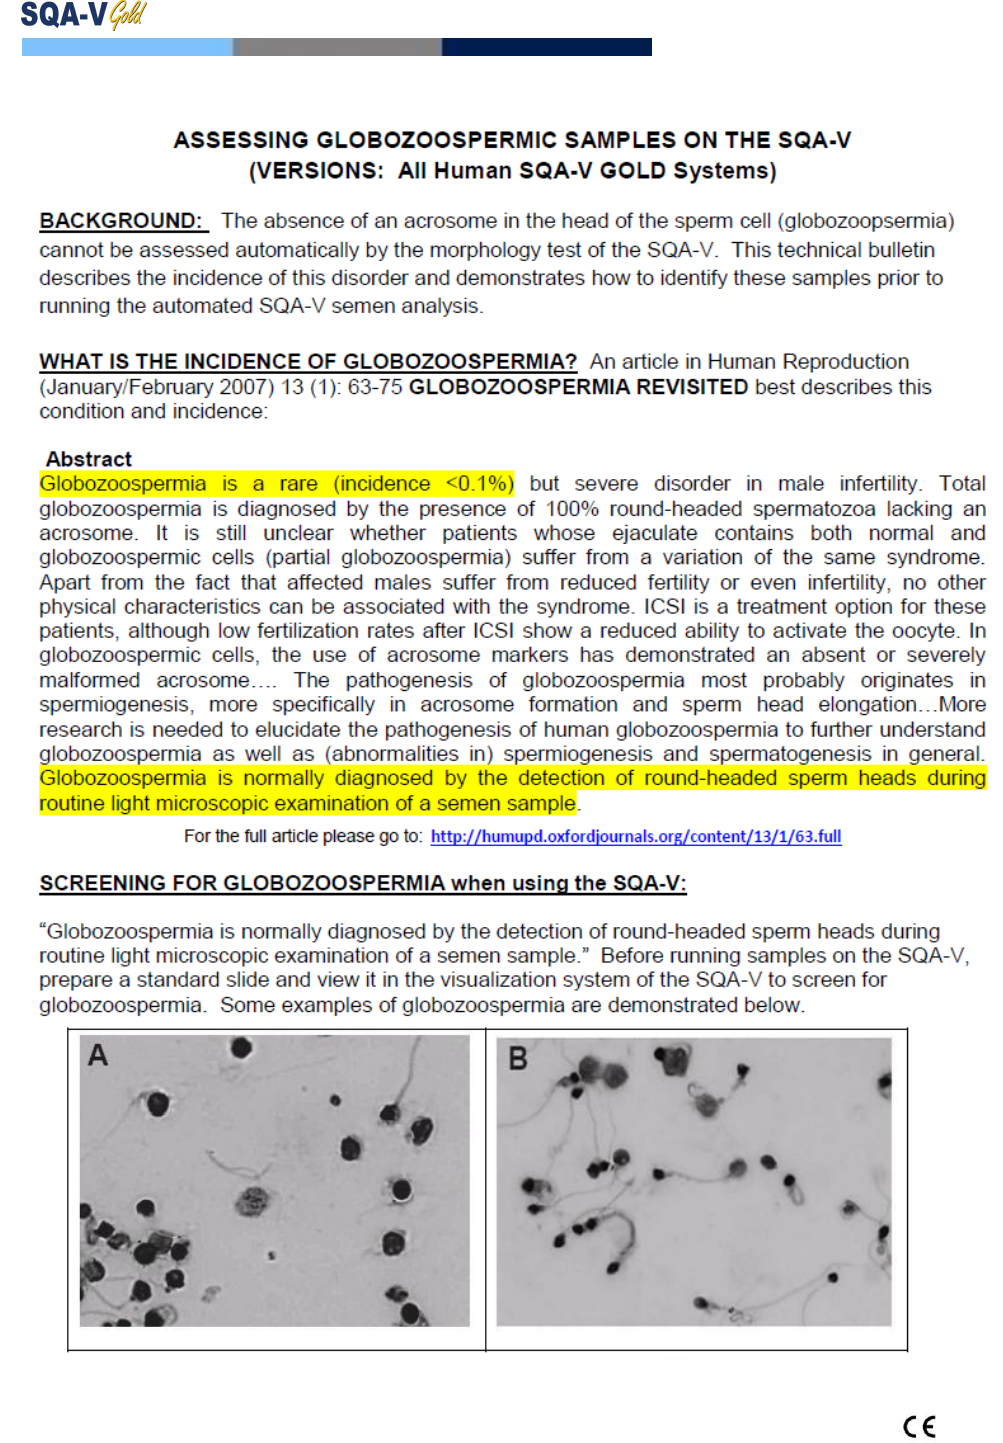
User Guide Version 2.60 I-button WHO 5th
Revision 1_JUNE_2017 44
APPENDIX 13: GLOBOZOOSPERMIC SAMPLES
User Guide Version 2.60 I-button WHO 5th
Revision 1_JUNE_2017 45
APPENDIX 14: SQA-V SERVICE SUPPORT REPORT
SQA-V SERVICE SUPPORT
Parameter Report
Device number: _______ SQA-V Software Version: ___________ Date: __________
Instruct the user to run a SERVICE report. For version 2.60 from the MAIN MENU select: SERVICE > PRINT
SELF TEST DATA.
Calibration parameters:
Fill-in the USER REPORT column with the calibration parameters found in the INTERNAL DATA SECTION of the
SERVICE DATA REPORT run on the “defective” SQA-V. Contact MES for the initial calibration parameters. These
parameters should not have changed.
Parameter
Service
Report
Item #
User Report
MES
Report
Comments
CONTR.REF1
#1
OD AMPLIF.
#13
MSC AMPLIF
#8
OD VALUE
#15
OD CORR
#16
LB OD AMP
#18
CONTR. Z.L*
#11
*CONTR. Z.L. can be adjusted in the field by a MES trained service technician.
Algorithm parameters:
Fill-in the User Report values for the following algorithm parameters found in the SERVICE DATA REPORT.
The SQA-V algorithm settings are defined and should not have changed.
Parameter
Service
Report
Item #
User
Report
MES
Settings
Comments
MIN.SP.HEIGHT
#2
5
MIN.SP.WIDTH
#9
10
MAX.SP.WIDTH
#3
150
NOISE THRESH
#10
6
SMI THRESH
#4
28
User Guide Version 2.60 I-button WHO 5th
Revision 1_JUNE_2017 46
Self Test Parameters:
Fill-in the SQA-V SELF TEST PARAMETERS from the SELF TEST printout in V-Sperm:
The SQA-V must be connected to the PC and V-Sperm activated.
From the SERVICE>SERVICE DATA screen of the SQA-V:
Go to the V-Sperm navigation buttons: UTILITIES>SELF TEST DATA
Select PRINT
Verify that the parameters listed below fall within the established range
Highlight the discrepancies and report to MES
Parameter
S/W Ver. 2.60
Criteria
SQA-V Self-Test
Parameters
Ref. 1
150 – 400 mV
LED Current 1
5 – 25 mA
Original
value
Amplitude
50 – 100 mV
Count (#12)
26 – 36
Zero Level
500 – 525
Ref. 2
2500 – 3500
LED Current 2
10 – 32 mA
Original
value
TSC 1 or CONC 1
0 – 1 M/ml
TSC 2 or CONC 2
50 – 150 M/ml
TSC 3 or CONC 3
300 – 600 M/ml
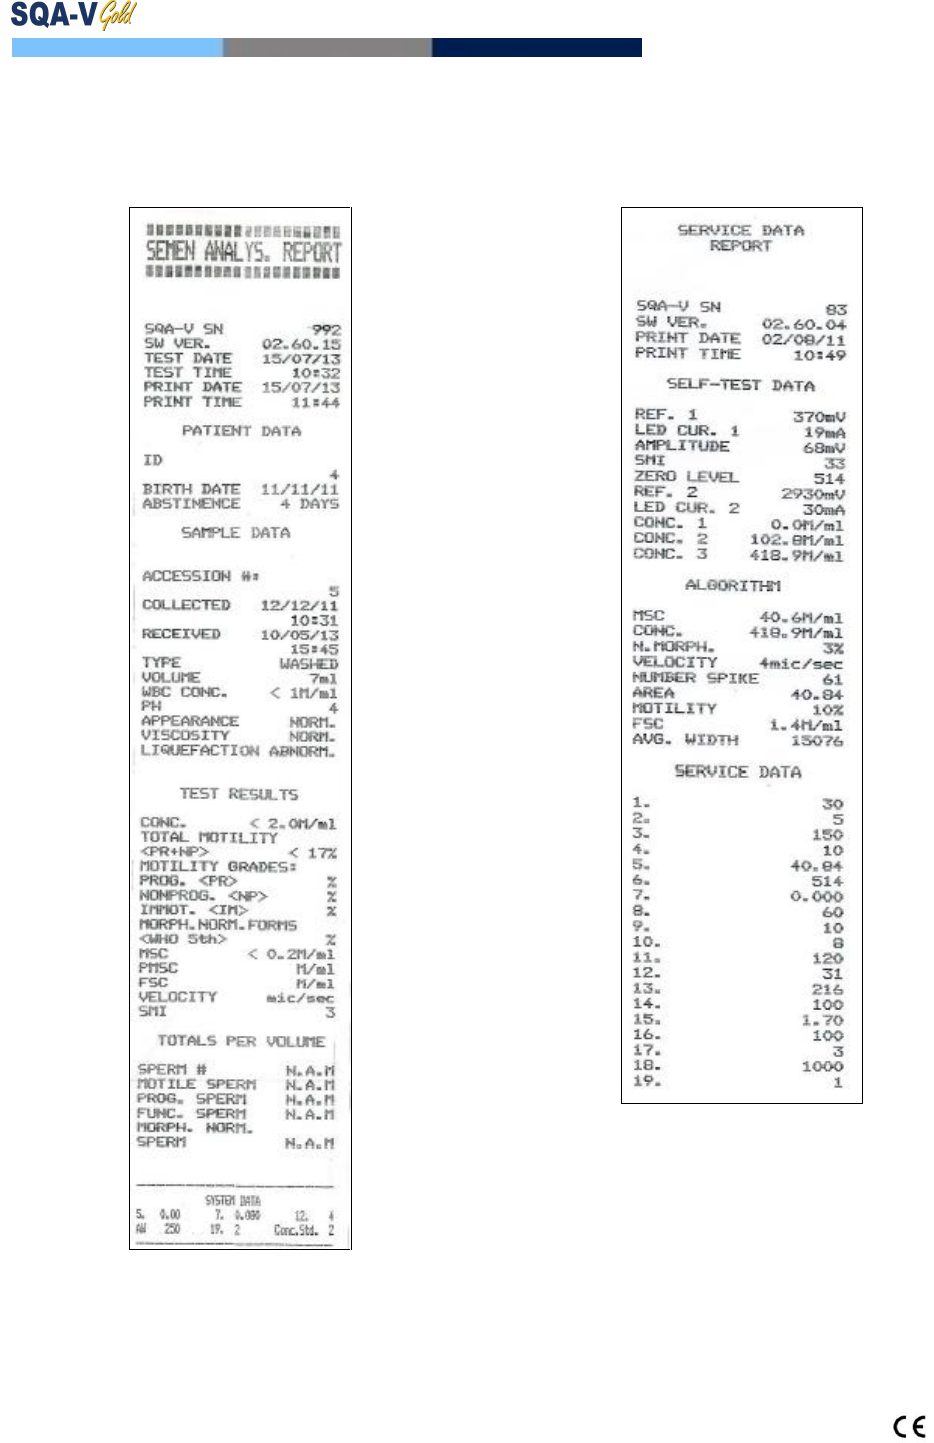
User Guide Version 2.60 I-button WHO 5th
Revision 1_JUNE_2017 47
APPENDIX 15: SQA-V Reports
Semen Analysis Report Service Data Report
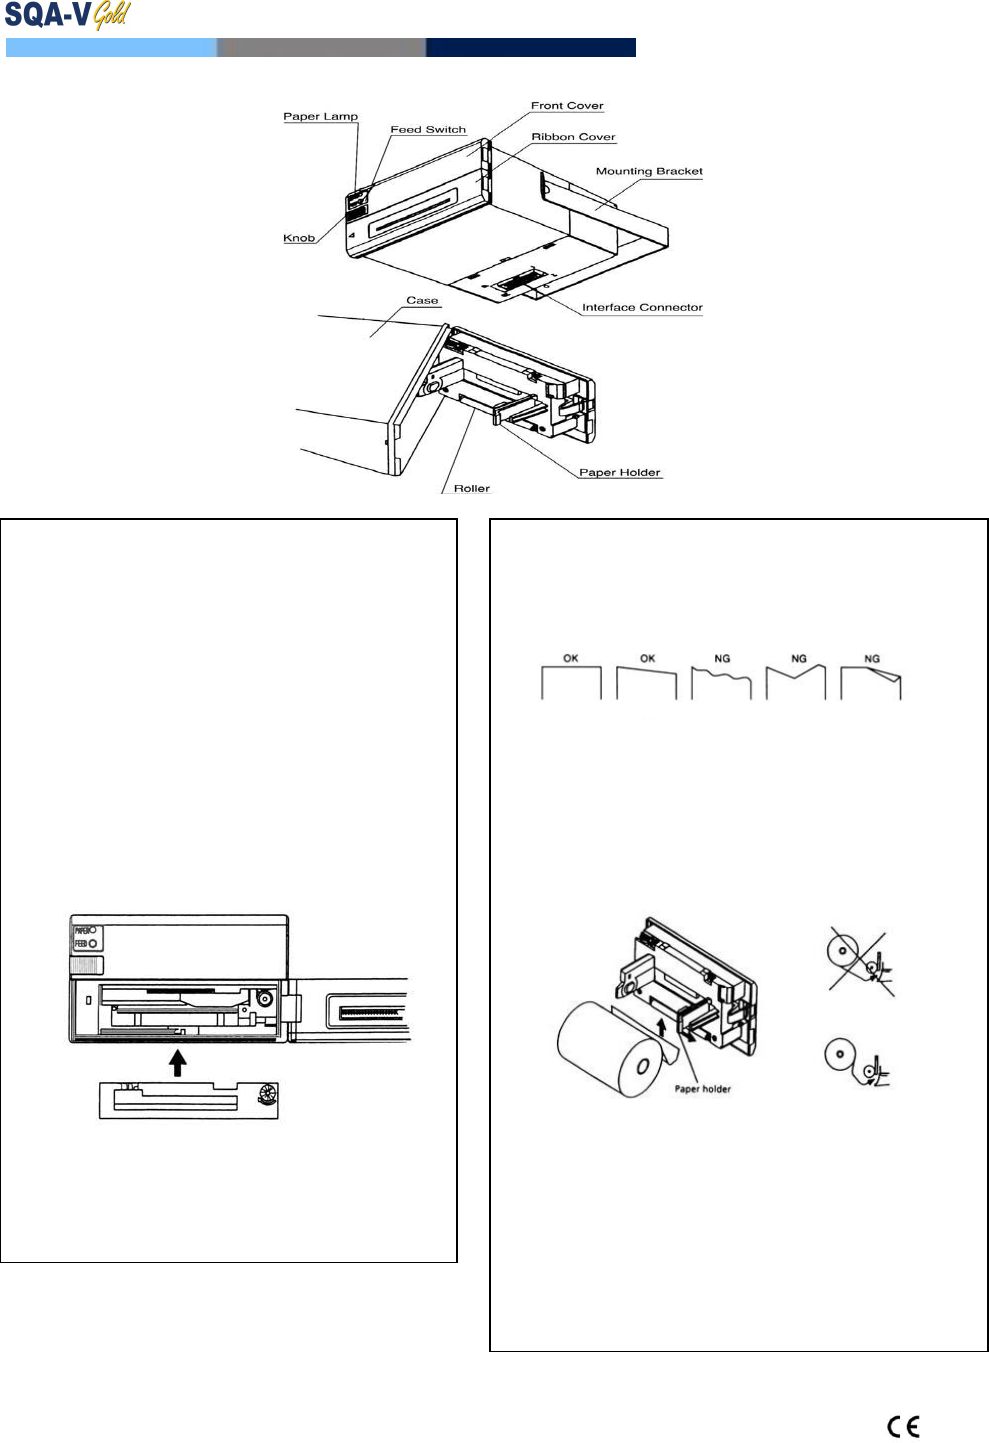
User Guide Version 2.60 I-button WHO 5th
Revision 1_JUNE_2017 48
APPENDIX 16: Printer Ribbon/Paper Installation
APPENDIX 17: Warranty
Installing the Printer Ribbon:
1. Turn off the power and open the Ribbon Cover –
remove old ribbon cassette
2. Cut away any paper that is obstructing the ribbon
installation area
3. Confirm that the new ribbon cassette is placed in the
correct way (see below)
4. Insert the new ribbon between the printing head and
the platen – press the cassette down from the knob
side
5. Remove the ribbon slack by turning the ribbon in the
correct direction to tighten it
PLEASE NOTE:
Use only M.E.S. supplied ribbons
Do not print if there is no ribbon in the holder
Ribbons will dry out if sitting for a long time in the
printer
Replace ribbons when the print starts to become
lighter
Installing Printer Paper:
1. Open the front cover to expose the paper holder and roller
2. Cut the edge of the paper as shown below
3. Insert the paper into the printer mechanism as shown
below. The paper will automatically advance OR press the
FEED SWITCH to advance the paper (advance one line at a
time by pressing once; press and hold to feed continuously)
4. Load the paper roll into the brackets – make sure the paper
roll is feeding paper in the correct direction – see example
below.
PLEASE NOTE:
Load the paper in the direction shown above
Use only M.E.S. supplied paper – standard rolls are too
large for this printer and will damage it
Do not print when there is no paper or during loading
Do not pull on the paper in the reverse direction
Paper will jam if fed diagonally or incorrectly, in this case
turn the printer OFF and gently pull the paper in the right
direction

User Guide Version 2.60 I-button WHO 5th
Revision 1_JUNE_2017 49
Sperm Quality Analyzer
SQA, QwikCheck™ GOLD
Warranty
Medical Electronic Systems ("MES") warrants that the Sperm Quality Analyzer will be free from defects in
workmanship and materials for a period of twelve (12) months from date of purchase. During the warranty
period, if the device is shown to MES's reasonable satisfaction to be defective, MES shall, at its option, repair
such a device without charge for parts or labor. The foregoing remedy shall be purchaser's sole and exclusive
remedy under this warranty. In the event (i) purchaser makes any modifications or alterations to the SQA
/QwikCheck GOLD or (ii) the SQA/QwikCheck GOLD is used, operated, opened or serviced other than as
directed by MES or is damaged as a result of use, careless transportation (not in its original box, or within
the allowed temperature range, operation or servicing other than as directed by MES, the foregoing
warranties shall be void and of no further force or effect. EXCEPT FOR THE FOREGOING WARRANTIES, THE
PRODUCTS ARE SOLD AS-IS AND WITHOUT ANY OTHER WARRANTY OF ANY NATURE WHATSOEVER. MES
HAS NOT MADE AND DOES NOT MAKE ANY OTHER REPRESENTATION, WARRANTY, GUARANTY, OR
COVENANT, EXPRESS OR IMPLIED, WITH RESPECT TO THE DESIGN, CONDITION, DURABILITY,
SUITABILITY, FITNESS FOR USE, FITNESS FOR A PARTICULAR PURPOSE, OR MERCHANTABILITY OF THE
SQA IN ANY RESPECT. UNDER NO CIRCUMSTANCES AND IN NO EVENT, WHETHER AS A RESULT OF BREACH
OF CONTRACT OR WARRANTY, TORT (INCLUDING NEGLIGENCE AND STRICT LIABILITY) OR OTHERWISE,
INCLUDING BUT NOT LIMITED TO INACCURATE RESULTS OR OPERATOR ERROR, SHALL MES BE LIABLE FOR
ANY SPECIAL, INCIDENTAL OR CONSEQUENTIAL DAMAGES. IN NO EVENT SHALL MES'S LIABILITY WITH
RESPECT TO THE PRODUCT EXCEED THE PURCHASE PRICE FOR SUCH PRODUCT.
Extended service contracts are available for purchase.
Please contact the dealer or supplier for information.
Serial Number:_____________________ Date Purchased:___________________
Dealer:___________________________ Dealer Phone#: ___________________
Purchaser:_________________________ Purchaser Phone #:________________
User Guide Version 2.60 I-button WHO 5th
Revision 1_JUNE_2017 50
APPENDIX 18: Product Performance Data
Abbreviations:
TSC: Sperm Concentration (Count) MSC: Motile Sperm Concentration
PMSC: Progressive Motile Sperm Concentration Morph Norm Forms: Morphologically Normal Forms
OD: Optical Density MV: Millivolt
Performance Data Summary
The performance the SQA-V is summarized in the text, tables and graphs below. All values concerning sperm
concentration measurements are expressed as x106 sperm cells per milliliter (M/ml). Motility and Morphology values
are expressed as a percent (%). All testing was performed using human patient and donor semen samples.
Calibration:
Each SQA-V is biologically calibrated against two reference systems at Medical Electronic System's laboratory.
Dynamic Range:
Precision and Accuracy Established Against a Known Target
(Latex beads)
Background: The precision and accuracy of the SQA-V was
compared to a known target value using latex beads (Accu-
beads®).
Latex beads are used as a quality control product to validate
the accuracy of sperm counting methods for two known levels
of concentration. In accordance with CLIA regulations such a
control is used to demonstrate operator proficiency using the
microscope and for validation of automated sperm counting
methods. The latex beads were run in the SQA-V in the same
manner semen samples are run on the system.
Limitations of method:
Latex beads cannot:
Measure sperm motility or morphology
Correct for inaccurate chamber depths or technician
errors
Method comparison:
A total of 320 latex bead samples were tested on ten SQA-V
systems (32 samples/SQA-V). SQA-V concentration readings
were compared to established target values +/- acceptable
range.
Latex beads established target values +/- ranges
(Hemacytometer):
Vial #1: 47 +/- 7.0 M/ml
Vial #2: 24 +/- 3.4 M/ml
Precision
SQA-V
Accu-beads®
CV, %
Intra-
device
Variability
High 47± 7.0 M/ml
≤
0.01
Low 24 ± 3.4 M/ml
≤
0.01
Inter-
device
Variability
High 47± 7.0 M/ml
≤
2.00
Low 24 ± 3.4 M/ml
≤
2.50
Accuracy: High Level Control
SQA-V QUALITY CONTROL TEST
(High level of Accu-beads, target range: 40-54 M/ml)
36
40
44
48
52
56
0 1 2 3 4 5 6 7 8 9 10
Number of SQA-V tested
Accu beads concentration in
millions per ml
Accuracy: Low Level Control
SQA-V QUALITY CONTROL TEST
( Low level of Accu-beads, target range: 20.6-27.4 M/ml)
18
20
22
24
26
28
30
0 1 2 3 4 5 6 7 8 9 10
Number of SQA-V tested
Accu beads concentration in
millions per ml
Sample
Type
Test
Mode
Sperm
Conc.
M/ml
Motility
%
Morph
%
MSC
M/ml
PMSC
M/ml
#Sperm
Cells/field
Fresh
Normal
<2-400
0-100
2-30
<.2-400
0-400
-
Washed
Normal
<2-200+
0-100
2-30
<.2-200+
0-200+
-
Frozen
Normal
-
-
-
<.2-200+
0-200+
-
Post-Vasectomy
-
-
-
0-2
-
0-30
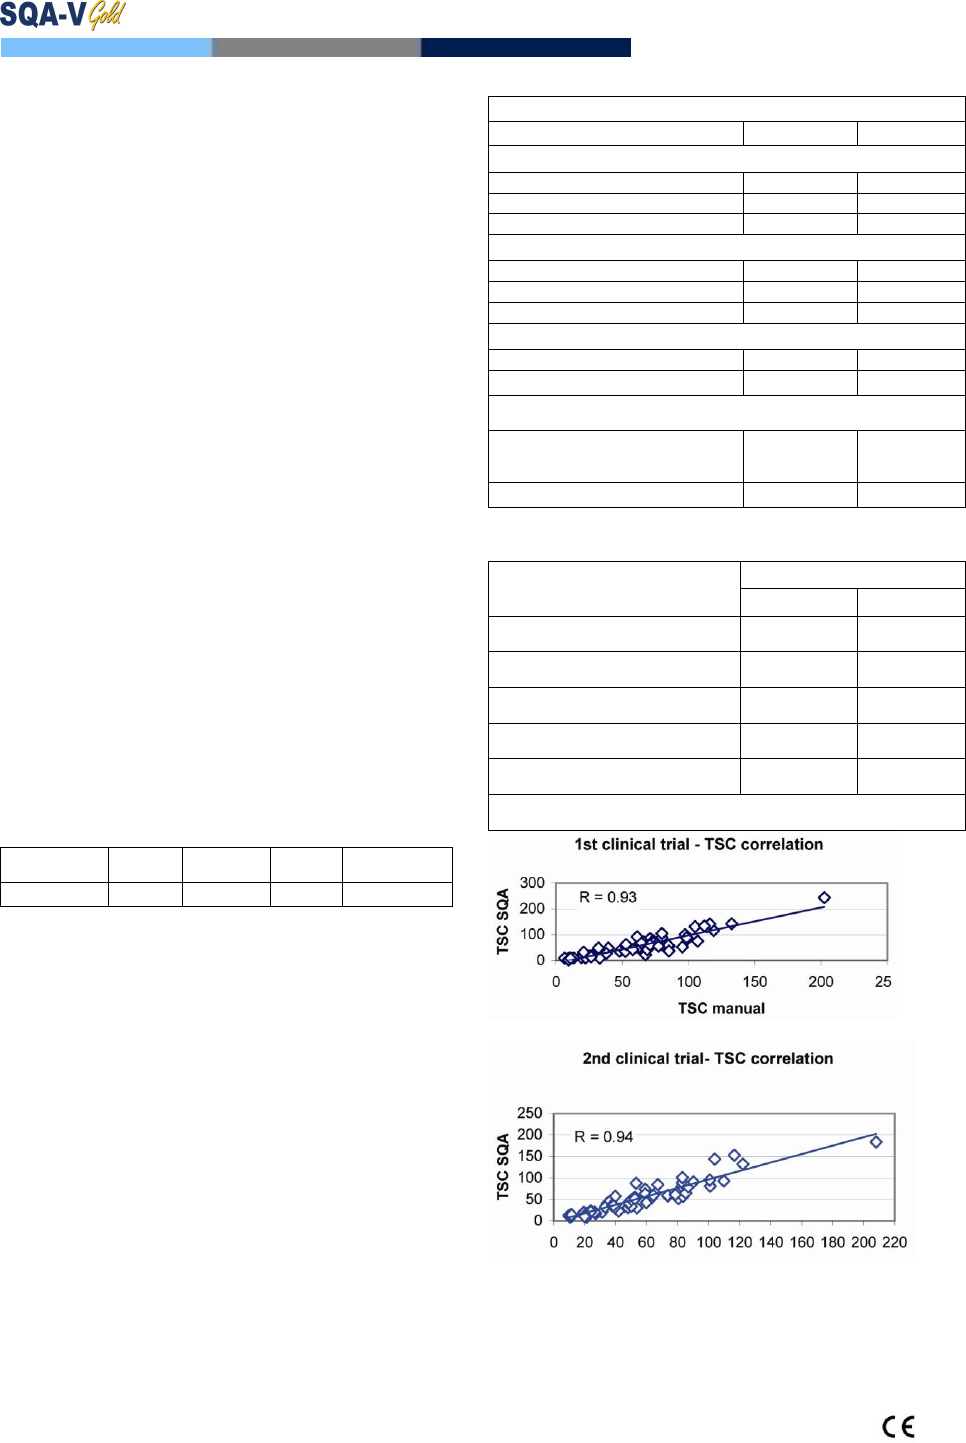
User Guide Version 2.60 I-button WHO 5th
Revision 1_JUNE_2017 51
Precision and accuracy established in clinical trials
using human semen samples
Clinical claims:
Specificity
Concentration: 85%
Motility: 80%
Morph. Norm Forms (WHO 3rd): 65%
Morph. Norm Forms (WHO 4th): 60%
Morph. Norm Forms (WHO 5th): 90%
Postvasectomy: 90% of motile cells detected
Sensitivity
Concentration: 90%
Motility: 85%
Morph. Norm Forms (WHO 3rd): 85%
Morph. Norm Forms (WHO 4th): 65%
Correlation to Manual Method
Concentration: 0.9
Motility: 0.85
Morph. Norm Forms (WHO 3rd): 0.65
Morph. Norm Forms (WHO 4th): 0.45
Morph. Norm Forms (WHO 5th): 0.45
Linearity
Linear Sperm Concentration throughout the SQA-V dynamic
range of 2M/ml to 400M/ml
Squared regression coefficient of Dilution Curve R2 ≥0.9.
Averaged coefficient of variation CV of measured vs. expected
sperm concentration ≤ 20%.
Note: Claims are less than actual correlations noted (see tables 1
and 2).
Background: The SQA-V concentration, motility and morphology
readings were compared to standard microscopic results based
on WHO 3rd, 4th and 5th standards and MES protocols. Four
independent clinical trials were conducted at MES lab, Tel
Hashomer andrology dept and Ramat Marpe lab (Israel) and ART
laboratory, University Hospital of Nantes (France). A total of
>750 human semen samples were analyzed as described below
with approximately 350 samples of low quality and tested in the
Postvasectomy mode. Among them, 246 semen samples were
tested at University Hospital of Nantes.
Analytical Specificity:
To achieve analytical specificity a specific wave length of light
which is maximally absorbed by sperm cells and minimally
absorbed by other cells and seminal plasma is used.
Low noise and high electronic resolution hardware
components and compensation circuits ensure that analytical
specificity is optimized.
Limitations of clinical specificity:
Highly viscous samples can only be read accurately with
liquefaction (QwikCheck™ Liquefaction Kit used).
Sample size must be >0.7ml for fully automated tests.
% Normal Morphology is a parameter derived from the
electronic signals of the system by a proprietary algorithm.
This is not a direct assessment of the stained smears.
Results obtained from the use of the SQA-V visualization
system may be affected by the subjectivity of the operator.
Dynamic range limitation as stated above.
#Samples
Fresh
Washed
Frozen
High
Sensitivity
>750
>300
42
30
>350
Table 1: Sensitivity/Specificity
SQA-V vs. Microscope
Sensitivity
Specificity
Trial #1:
Concentration
100%
95%
Motility
97%
85%
Morph Norm Forms (WHO 3rd )
94%
75%
Trial #2:
Concentration
94%
90%
Motility
87%
90%
Morph Norm Forms (WHO 4th )
69%
70%
Trial #3: High Sensitivity (Postvasectomy - see table #5)
Motile Sperm Cells
95%
95%
Immotile Sperm Cells
99%
100%
Trial #4 (ART laboratory, University Hospital
of Nantes, France):
SQA-V vs. Microscope
Negative
Predictive
Value
Specificity
Morph Norm Forms (WHO 5th )
92.5
97.9
Table #2: Correlation to Manual Method
Parameters
Correlation Coefficients
Trial #1
Trial #2
Sperm Concentration
0.93
0.94
Motility
0.86
0.87
Morphology WHO 3rd
0.66
-
Morphology WHO 4th / 5th
-
0.49*
MSC
-
0.79
* Correlation is low due to narrow dynamic range of this
parameter per strict criteria and manual analysis subjectivity.
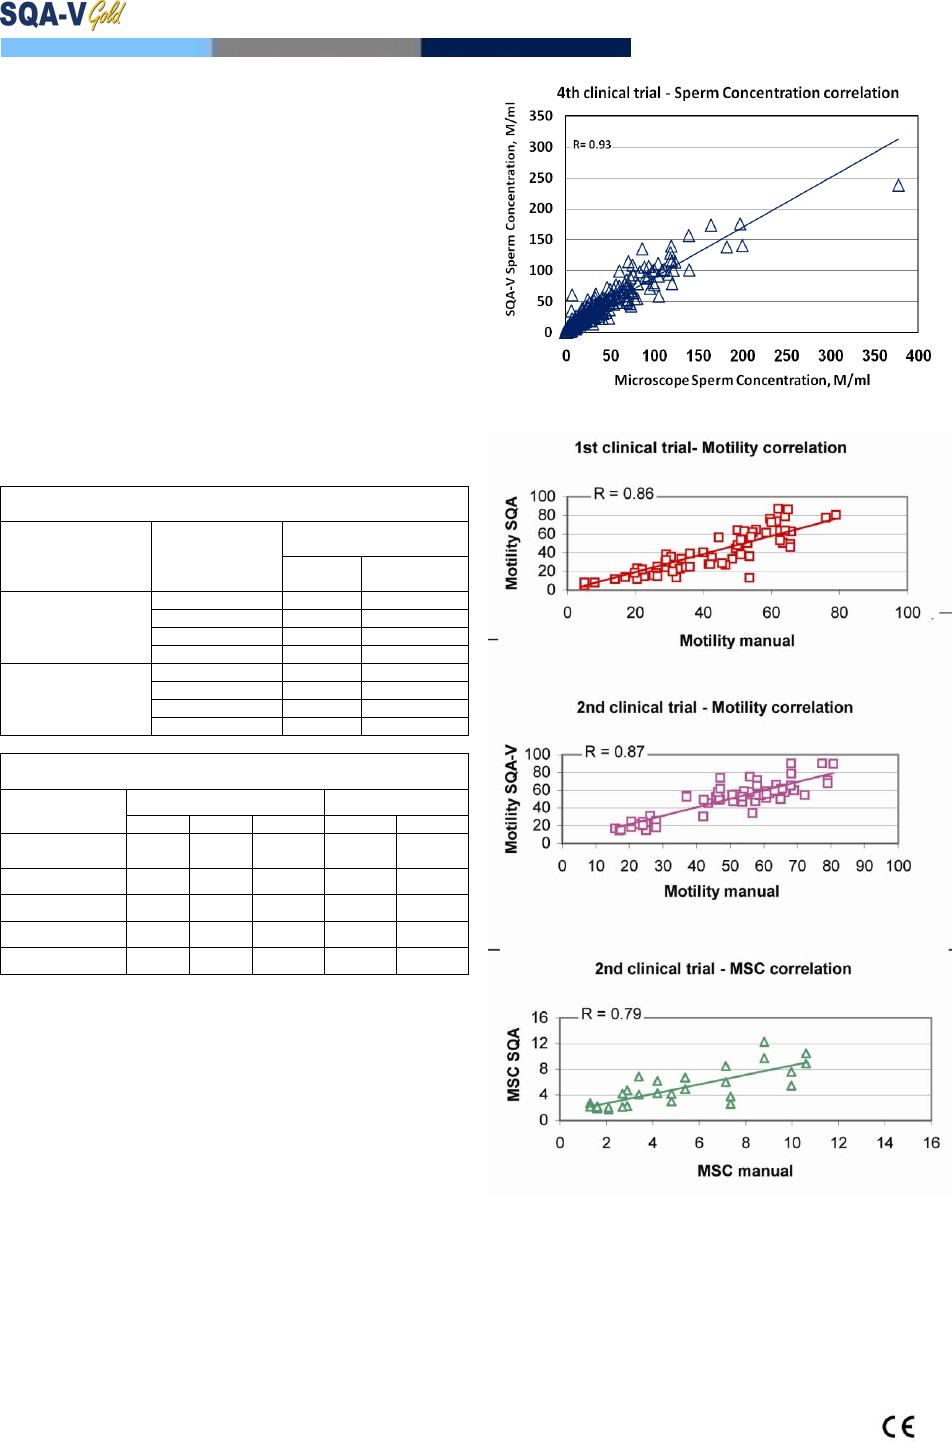
User Guide Version 2.60 I-button WHO 5th
Revision 1_JUNE_2017 52
Method comparison:
SQA-V was compared to the microscope based on WHO 3rd
(Trial #1), 4th (Trial #2) and WHO 5th (Trial #4) guidelines.
Sensitivity and Specificity were calculated using ROC
curves with the cutoffs based on the reference values of WHO
3rd, 4th and 5th guidelines (see Table #1).
Correlation coefficients of the SQA-V results to the manual
method are presented in the Table #2.
Precision: Inter-device (Tables #3) and intra-device (Table
#4) variations were compared to inter- and intra-operator
variability using Coefficients of Variation (CV, %). Duplicate
samples were assessed by two methods. The CVs
characterizing precision were calculated for multiple semen
parameters.
The POSTVASECTOMY test (Trial #3) compared three
assessment methods:
o Microscope (standard slide: X400; 10 fields of view)
o SQA-V (SQA-V + SQA-V visualization)
o SQA-V visualization system (see table #2).
Immotile cells were analyzed by use of the SQA-V
visualization system.
218 semen specimens contained motile cells and were used
as the basis for the Post Vas visualization method comparison
(Table #5).
Table #4: Mean Values and Precision: Trial #4 (n=246)
Semen
Parameter
Mean
CV, %
Op1
Op2
SQA-V
Manual
SQA-V
Sperm
Concentration
41.0
40.2
41.4
11.5
3.4
Total Motility
54.7
56.9
54.9
10.7
5.0
PR Motility
37.9
39.0
36.6
13.3
7.5
NP Motility
16.8
17.9
18.4
27.3
6.8
Morphology
7.6
7.6
11.5
27.4
6.5
Note: Op1 - operator 1; Op2 - operator 2
Table #3: Precision: Trial #1 and #2 (n=154)
Parameter
Range
Method
SQA-V
CV%
Microscope
CV%
Sperm
Concentration
Entire Range
3.1
6.1
5-40
5.2
5.9
41-80
2.1
5.5
>80
2.5
3.2
Motility
Entire Range
5.1
7.2
10-50
7.6
10.3
51-55
1.5
3.4
>55
6.0
4.1
Limitations of method:
Samples were assessed by different operators using a microscope
and the SQA-V. Inter-operator subjectivity may have affected the
results of the study.
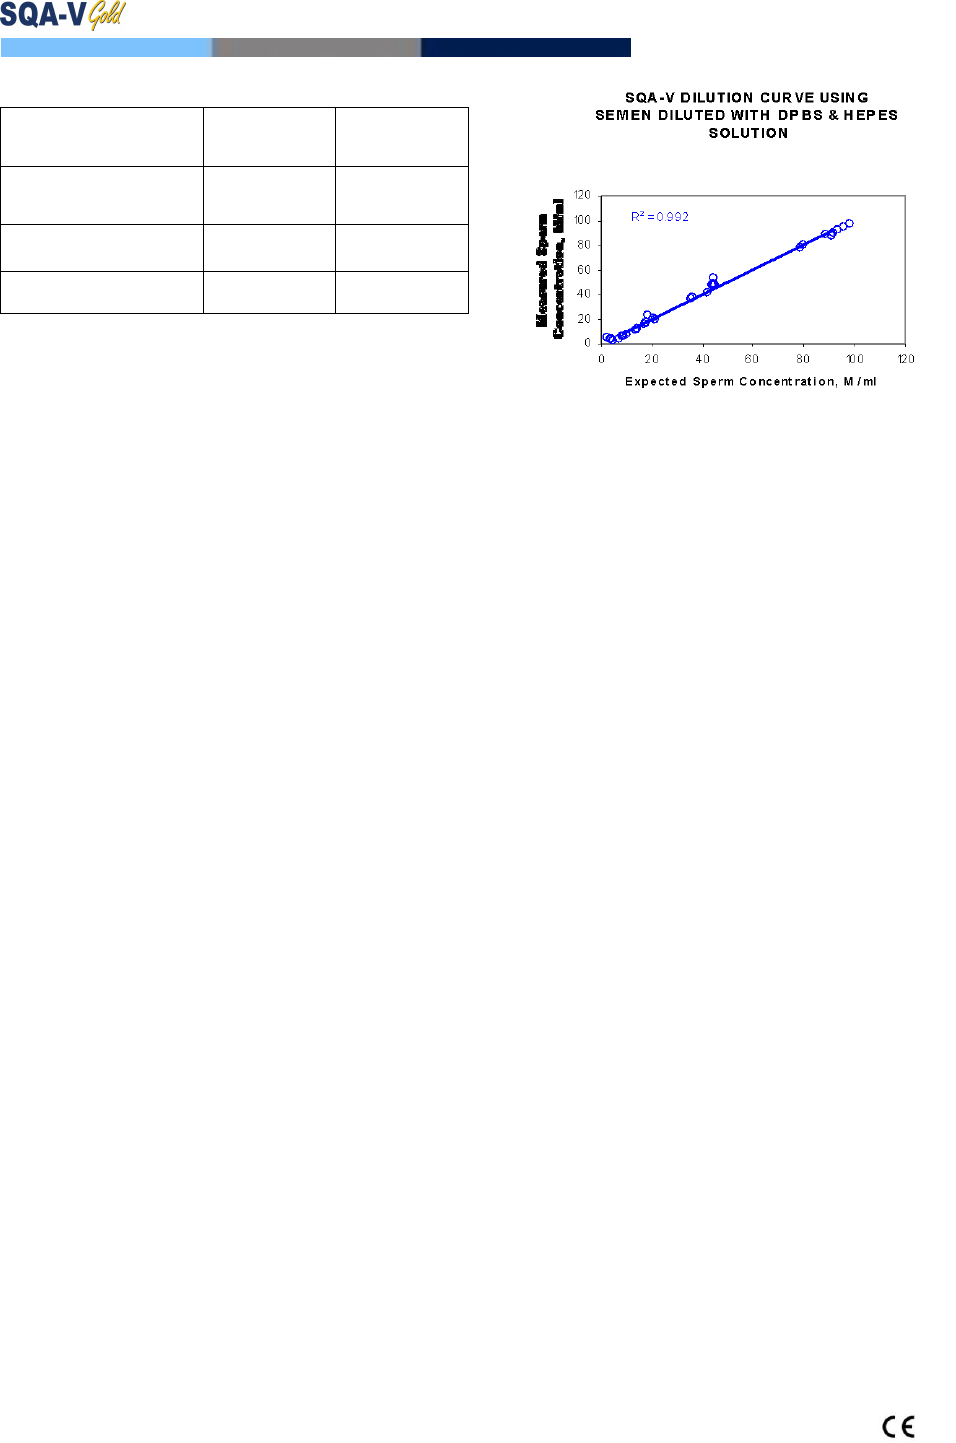
User Guide Version 2.60 I-button WHO 5th
Revision 1_JUNE_2017 53
SQA-V Linearity
Clinical claims:
Linear Sperm Concentration throughout the SQA-V dynamic
range of 2M/ml to 400M/ml:
Squared regression coefficient of Dilution Curve R2 ≥0.9.
Averaged coefficient of variation CV of measured vs.
expected sperm concentration ≤ 20%.
Goal: To demonstrate the ability of the SQA-V to accurately
report sperm concentration along the dynamic range of the
system using sequentially diluted human semen samples.
Methodology: 4 fresh human semen samples were pooled,
divided into two aliquots and centrifuged at 600g for 15 minutes.
The seminal plasma was decanted and the pellets were re-
suspended in washing media: DPBS & HepesHTF. Sequential
dilutions were run in 4 SQA-V systems.
Limitations of method:
Dilution errors contribute to the accuracy of the linearity
test results.
Sample handling errors such as the introduction of bubbles
into the testing capillary can cause inaccurate readings.
Table #5: Percentage Motile Cells Detected: Trial #3
Postvasectomy mode
Method Comparison of
218 Samples with Motile
Cells
# Samples
Motile Sperm
Detected
% Samples
Motile Sperm
Detected
SQA-V Automated
System and Visualization
System
207
95%
Visualization System only
193
89%
Microscope only
161
74%
Results:
1. Squared regression coefficient R2 of Dilution Curve (trend line)
was found to be 0.992 (note: graph displaying results of four
SQA-V’s and DPBS and Hepes dilution media).
2. Averaged coefficient of variation CV of measured vs. expected
sperm concentration was 10%.
