SIM_User_Guide SSIM_User_Guide SSIM User Guide
User Manual: SSIM_User_Guide user guide pdf - FTP File Search (13/20)
Open the PDF directly: View PDF ![]() .
.
Page Count: 122 [warning: Documents this large are best viewed by clicking the View PDF Link!]
- Contents
- Preface
- 1 Navigation
- 2 Performing Inventory Tasks
- 2.1 Searching for Inventory
- 2.2 Performing Inventory Adjustments
- 2.3 Recording Inventory Movement
- 2.4 Viewing Inventory Audits
- 2.5 Managing Store Locations
- 2.6 Performing Cycle Count
- 2.7 Performing Physical Counts
- 3 Performing Receiving Tasks
- 4 Managing Users
- 5 Performing Outbound Tasks
- 6 Managing Alerts
- 7 Prints
- Notices
- Index

Sterling Store Inventory
Management: User Guide
Fix Pack 9.1.0.1

ii User Guide
Copyright
This edition applies to the 9.1 Version of IBM® Sterling Store Inventory Management and
to all subsequent releases and modifications until otherwise indicated in new editions.
Before using this information and the product it supports, read the information in “Notices”
on page 99.
Licensed Materials - Property of IBM
IBM® Sterling Store Inventory Management
© Copyright IBM Corp. 2006 - 2011. All Rights Reserved.
US Government Users Restricted Rights - Use, duplication or disclosure restricted by GSA
ADP Schedule Contract with IBM Corp.

iii
Contents
Preface
Intended Audience ........................................................................................ix
Structure .....................................................................................................ix
Documentation............................................................................................. x
Conventions............................................................................................... xiii
1 Navigation
1.1 IBM Sterling Store Inventory Management User Interface Layout............... 1
1.1.1 Menu Bar ...................................................................................... 2
1.1.2 Title Bar........................................................................................ 3
1.1.3 Instructions to the User .................................................................. 3
1.1.4 Status/Error Messages.................................................................... 3
1.1.5 Menu Tasks................................................................................... 3
1.1.6 Dialog Buttons............................................................................... 3
1.1.7 View or Work Area ......................................................................... 4
1.2 Utilizing the Keyboard.......................................................................... 4
1.3 Supported Resolution........................................................................... 4
1.4 Logging Out of the IBM Sterling Store Inventory Management................... 5
2 Performing Inventory Tasks
2.1 Searching for Inventory ....................................................................... 7
2.1.1 Viewing the Item Details ................................................................. 8
2.1.1.1 Viewing More Details of a Selected Item....................................... 9
2.2 Performing Inventory Adjustments .......................................................10

iv User Guide
2.2.1 Searching for a Location................................................................ 11
2.3 Recording Inventory Movement........................................................... 11
2.4 Viewing Inventory Audits.................................................................... 12
2.5 Managing Store Locations................................................................... 14
2.6 Performing Cycle Count...................................................................... 14
2.6.1 Printing Count Sheets ................................................................... 14
2.6.1.1 Printing a Count Sheet............................................................. 14
2.6.1.1.1 Viewing the Count Request List ............................................ 15
2.6.1.2 Reprinting a Count Sheet.......................................................... 15
2.6.1.2.1 Viewing the Count Sheet List ............................................... 16
2.6.2 Generating Ad Hoc Count Requests................................................. 16
2.6.3 Recording Count Results................................................................ 16
2.6.4 Cancelling Pending Counts............................................................. 18
2.6.5 Viewing Count Archive Details for Multiple Count Sheets.................... 19
2.6.6 Viewing Details for a Count Sheet................................................... 19
2.6.7 Viewing Count Summary ............................................................... 20
2.6.7.1 Viewing Variances ................................................................... 20
2.7 Performing Physical Counts................................................................. 21
2.7.1 Starting a Physical Count Process ................................................... 21
2.7.2 Ending the Physical Count Process.................................................. 21
2.7.3 Recording Physical Count Details .................................................... 22
2.7.4 Viewing Physical Count Status........................................................ 23
2.7.4.1 Viewing Variances ................................................................... 23
2.7.4.1.1 Viewing Location Level Variances.......................................... 24
2.7.4.1.2 Viewing Variance Details for an Item..................................... 24
2.7.4.2 Searching for a Count Sheet ..................................................... 25
2.7.4.2.1 Rectifying Count Sheet........................................................ 25
2.7.5 Cancelling Physical Count.............................................................. 27
2.7.6 Accepting Variance....................................................................... 27
2.7.7 Audit Inquiry ............................................................................... 27
3 Performing Receiving Tasks
3.1 Printing Receiving Worksheets for a Shipment....................................... 29
3.1.1 Searching for Shipments Using the Bill of Lading Number .................. 30
3.1.1.1 Searching for a Vendor............................................................. 31

v
3.1.2 Selecting Shipment for Bill Of Lading ...............................................31
3.2 Printing Receiving Worksheets for an Order ...........................................32
3.2.1 Selecting Shipment for an Order .....................................................32
3.2.2 Searching for an Order...................................................................33
3.2.2.1 Selecting an Order ...................................................................34
3.3 Recording Receiving Worksheet Details for a Shipment............................34
3.3.1 Recording Receipt Details for a Bill Of Lading ....................................35
3.4 Recording Receiving Worksheet Details for an Order ...............................37
3.4.1 Recording Receipt Details for an Order.............................................38
3.5 Receiving Blind Receipts......................................................................40
3.6 Searching for Inbound Shipments.........................................................41
3.6.1 Viewing Shipment Details...............................................................42
4 Managing Users
4.1 Changing the Password.......................................................................43
4.2 Managing Users .................................................................................44
4.2.1 Searching for Users.......................................................................44
4.2.2 Modifying User Credentials .............................................................45
4.2.3 Transferring Users to a Store..........................................................45
4.2.3.1 Searching for a Store................................................................45
5 Performing Outbound Tasks
5.1 Printing a Pick Ticket ..........................................................................47
5.1.1 Searching for an Order...................................................................48
5.2 Searching for Shipments.....................................................................48
5.2.1 Viewing Shipment Details...............................................................50
5.2.2 Reversing a Back Room Pick ...........................................................51
5.2.3 Removing Shipments From a Manifest..............................................51
5.2.4 Modifying the Container Information................................................51
5.2.5 Viewing Shipment Audit .................................................................52
5.3 Recording a Back Room Pick................................................................53
5.3.1 Recording Back Room Pick for a Shipment........................................53
5.3.2 Resolving Shortages for a Back Room Pick........................................55
5.4 Searching for a Customer Order...........................................................55
5.4.1 Verifying Customer Details .............................................................56

vi User Guide
5.4.2 Selecting Items............................................................................ 57
5.4.3 Resolving Shortages for Customer Picks .......................................... 58
5.4.4 Viewing Order Summary ............................................................... 58
5.5 Creating a Bill of Lading ..................................................................... 59
5.5.1 Selecting a Shipment.................................................................... 59
5.5.2 Consolidating Shipments ............................................................... 60
5.5.3 Creating a Load............................................................................ 61
5.5.4 Confirming a Load ........................................................................ 61
5.5.4.1 Removing Shipment Lines from a Load....................................... 62
5.6 Opening a Manifest............................................................................ 63
5.6.1 Selecting a Shipment for a Manifest................................................ 63
5.6.2 Viewing the Manifest Details .......................................................... 64
5.7 Closing a Manifest ............................................................................. 64
6 Managing Alerts
6.1 Viewing Informational Alerts............................................................... 65
6.1.1 Viewing Alert Details..................................................................... 66
6.1.1.1 Viewing Alert Details for the Delayed Customer Pick Alert Type...... 66
6.1.1.2 Viewing Inventory Adjustment Variance Value Above the Threshold
Value..................................................................................... 66
6.1.1.3 Viewing Inventory Shortage...................................................... 66
6.1.2 Creating Alerts............................................................................. 67
6.1.2.1 Finding a User......................................................................... 67
6.1.3 Viewing the Alert Information ........................................................ 68
6.1.3.1 Viewing a List of Alerts............................................................. 68
6.1.4 Searching for Alerts...................................................................... 68
6.1.5 Viewing Alert Details..................................................................... 69
6.1.6 Closing an Alert............................................................................ 70
6.1.7 Assigning Alerts to a User.............................................................. 70
6.1.8 Assigning Alerts to a Queue........................................................... 71
7 Prints
7.1 Inbound Prints.................................................................................. 73
7.1.1 Receiving Worksheet for Bill Of Lading ............................................ 73

vii
7.1.2 Customer Label.............................................................................75
7.1.3 Receiving Worksheet for an Order ...................................................76
7.1.4 Receiving Discrepancy Report .........................................................78
7.2 Inventory Prints.................................................................................80
7.2.1 Cycle Count Worksheet..................................................................80
7.2.2 Cycle Count Variance.....................................................................82
7.2.3 Variance Details by Count Sheet......................................................83
7.2.4 Physical Count Variance Report.......................................................85
7.2.5 Item Variance Details By Count Sheet..............................................87
7.3 Outbound Prints.................................................................................89
7.3.1 Pick Ticket....................................................................................89
7.3.2 Bill Of Lading................................................................................91
Notices
Trademarks...............................................................................................102
Index

viii User Guide

ix
Preface
Intended Audience
This manual is intended to provide assistance to store associates who are
using the IBM® Sterling Store Inventory Management to perform
inventory tasks in a store.
Structure
This manual contains the following sections:
Chapter 1, "Navigation"
This chapter describes the layout of the Sterling Store Inventory
Management user interface.
Chapter 2, "Performing Inventory Tasks"
This chapter describes the tasks that a store associate is required to
perform to efficiently manage inventory in a store.
Chapter 3, "Performing Receiving Tasks"
This chapter describes the tasks that a store associate is required to
perform to efficiently receive inventory in a store.
Chapter 4, "Managing Users"
This chapter describes how a store associate can manage users in a
store.

x User Guide
Chapter 5, "Performing Outbound Tasks"
This chapter describes the outbound tasks that a store associate may be
required to perform frequently.
Chapter 6, "Managing Alerts"
This chapter describes the alert management tasks that a store associate
can perform using the Sterling Store Inventory Management.
Chapter 7, "Prints"
This chapter describes the various documents that are printed daily in a
store.
Documentation
For more information about the Sterling Store Inventory Management
components, see the following manuals:
QSterling Store Inventory Management: Release Notes
QSterling Selling and Fulfillment Suite: Applications Installation Guide
QSterling Store Inventory Management: Deployment Guide
QSterling Selling and Fulfillment Suite: Applications Reference
Implementation Guide
QSterling Store Inventory Management: Concepts
QSterling Store Inventory Management: Implementation Guide
QSterling Store Inventory Management: User Guide
QSterling Store Inventory Management: Localization Guide
QSterling Store Inventory Management: Javadocs
For more information about the IBM® Sterling Selling and Fulfillment
Foundation components, see the following manuals:
QSterling Selling and Fulfillment Foundation: Release Notes
QSterling Selling and Fulfillment Foundation: Installation Guide
QSterling Selling and Fulfillment Foundation: Upgrade Guide
QSterling Selling and Fulfillment Foundation: Configuration Deployment
Tool Guide

xi
QSterling Selling and Fulfillment Foundation: Performance Management
Guide
QSterling Selling and Fulfillment Foundation: High Availability Guide
QSterling Selling and Fulfillment Foundation: System Management
Guide
QSterling Selling and Fulfillment Foundation: Localization Guide
QSterling Selling and Fulfillment Foundation: Customization Basics
Guide
QSterling Selling and Fulfillment Foundation: Customizing APIs Guide
QSterling Selling and Fulfillment Foundation: Customizing Console JSP
Interface for End User Guide
QSterling Selling and Fulfillment Foundation: Customizing the RCP
Interface Guide
QSterling Selling and Fulfillment Foundation: Customizing User
Interfaces for Mobile Devices Guide
QSterling Selling and Fulfillment Foundation: Customizing Web UI
Framework Guide
QSterling Selling and Fulfillment Foundation: Customizing Swing
Interface Guide
QSterling Selling and Fulfillment Foundation: Extending the Condition
Builder Guide
QSterling Selling and Fulfillment Foundation: Extending the Database
Guide
QSterling Selling and Fulfillment Foundation: Extending Transactions
Guide
QSterling Selling and Fulfillment Foundation: Using Sterling RCP
Extensibility Tool Guide
QSterling Selling and Fulfillment Foundation: Integration Guide
QSterling Selling and Fulfillment Foundation: Product Concepts Guide
QSterling Warehouse Management System: Concepts Guide
QSterling Selling and Fulfillment Foundation: Application Platform
Configuration Guide

xii User Guide
QSterling Distributed Order Management: Configuration Guide
QSterling Supply Collaboration: Configuration Guide
QSterling Global Inventory Visibility: Configuration Guide
QCatalog Management: Configuration Guide
QSterling Logistics Management: Configuration Guide
QSterling Reverse Logistics: Configuration Guide
QSterling Warehouse Management System: Configuration Guide
QSterling Selling and Fulfillment Foundation: Application Platform User
Guide
QSterling Distributed Order Management: User Guide
QSterling Supply Collaboration: User Guide
QSterling Global Inventory Visibility: User Guide
QSterling Logistics Management: User Guide
QSterling Reverse Logistics: User Guide
QSterling Warehouse Management System: User Guide
QSterling Selling and Fulfillment Foundation: Mobile Application User
Guide
QSterling Selling and Fulfillment Foundation: Business Intelligence
Operational Reports Guide
QSterling Selling and Fulfillment Foundation: Javadocs
QSterling Selling and Fulfillment Suite: Glossary
QParcel Carrier: Adapter Guide
QSterling Selling and Fulfillment Foundation: Multitenant Enterprise
Guide
QSterling Selling and Fulfillment Foundation: Password Policy
Management Guide
QSterling Selling and Fulfillment Foundation: Properties Guide
QCatalog Management: Concepts Guide
QSterling Selling and Fulfillment Foundation: Pricing Concepts Guide

xiii
QSterling Selling and Fulfillment Foundation: Setting Up Quotes in
Distributed Order Management
QSterling Sensitive Data Capture Server, Release 1.0: Configuration
Guide
QSterling Sensitive Data Capture Server, Release 1.0: PA-DSS
Implementation Guide
QSterling Selling and Fulfillment Foundation: Secure Deployment Guide
QSterling Business Center: Item Administration Guide
QSterling Business Center: Pricing Administration Guide
QSterling Business Center: Customization Guide
QSterling Business Center: Localization Guide
QSterling Field Sales: Deployment Guide
QSterling Field Sales: Implementation Guide
QSterling Field Sales: Localization Guide
QSterling Field Sales: User Guide
QSterling Field Sales: Customization Guide
QVisual Modeler: Administration Guide
QVisual Modeler: Best Practices Guide
QVisual Modeler: Implementation Guide
QVisual Modeler: Installation Guide
QVisual Modeler: Tutorial Guide
For a description of the various documents in the Sterling Store
Inventory Management documentation set, see the Sterling Store
Inventory Management documentation home page at:
<YFS_HOME>/documentation/SOP_doc_home.html
where <YFS_HOME> is the /Runtime directory under the folder where this
application and Sterling Selling and Fulfillment Foundation are installed.
Conventions
The following conventions may be used in this manual:
xiv User Guide
Convention Meaning
. . . An ellipsis represents information that has been omitted.
< > Angle brackets indicate user-supplied input.
mono-spaced text Mono-spaced text indicates a file name, directory path,
attribute name, or an inline code example or command.
/ or \ Slashes and backslashes are file separators for Windows,
UNIX and LINUX operating systems. The file separator
for the Windows operating system is "\" and the file
separator for Unix and Linux systems is "/". The Unix
convention is used unless otherwise mentioned.
<INSTALL_DIR> User-supplied location of the Sterling Multi-Channel Ful-
fillment Solution installation directory and Sterling Store
Inventory Management installation directory. This is only
applicable for Release 9.1

Navigation 1
1
Navigation
In order to get maximum benefit from the Sterling Store Inventory
Management, it is important to understand the structure of the Sterling
Store Inventory Management, and how it can best work to meet your
business requirements.
This chapter discusses the structure of the Sterling Store Inventory
Management user interface and the various tasks that you can perform
using the application.
1.1 IBM Sterling Store Inventory Management
User Interface Layout
The Sterling Store Inventory Management provides a graphical user
interface for navigation.
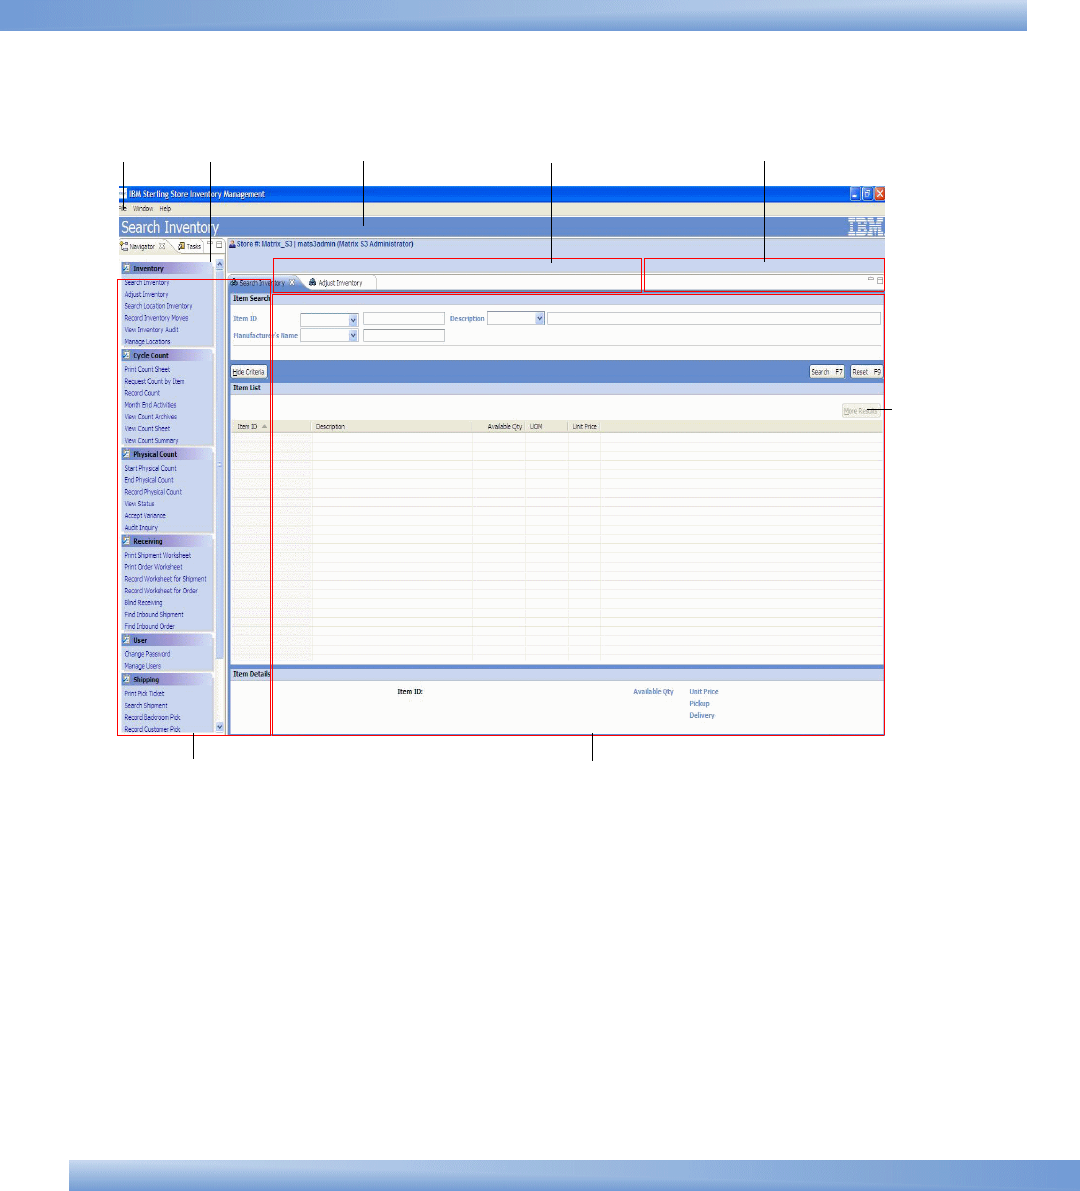
Figure 1–1 illustrates the layout of the Sterling Store Inventory
Management user interface.
2 User Guide
IBM Sterling Store Inventory Management User Interface Layout
Figure 1–1 Sterling Store Inventory Management Layout
1.1.1 Menu Bar
This bar contains the following menu options provided in the application:
QFile — This provides the following options:
–Home: Enables you to navigate to the application home page.
–Logout: Click this to log out of the Sterling Store Inventory
Management application.
Menu Bar Tasks Title Bar Instructions to the User Status/Error Messages
Dialog
Buttons
View or Work Area
Menu Tasks

IBM Sterling Store Inventory Management User Interface Layout
Navigation 3
–Exit: Click this to exit and close the Sterling Store Inventory
Management application.
QWindow — This provides the following options:
–Navigator: Click this to navigate to the menu tasks of the Sterling
Store Inventory Management application.
–Tasks: Click this to navigate to the tasks related to the active task
in the Sterling Store Inventory Management application.
QHelp — Enables you to access the online help and get more
information about the Sterling Store Inventory Management
application.
1.1.2 Title Bar
This bar displays the currently active task.
1.1.3 Instructions to the User
This area displays the name of the user who has logged in to the
application. It also displays appropriate instructions to assist the user in
handling the store operations smoothly.
1.1.4 Status/Error Messages
This area displays the current status of the task that you are performing.
It also displays error messages, if any. For example, when you add a
shipment to the load, the message "Shipment is added to load" displays.
1.1.5 Menu Tasks
The Menu Tasks enable you to access all tasks easily. The menu items
are arranged vertically in the left panel of the application.
1.1.6 Dialog Buttons
Table 1–1 describes the commonly used dialog buttons in the Sterling
Store Inventory Management.
4 User Guide
Supported Resolution
1.1.7 View or Work Area
You can perform tasks or view details related to the task in the work or
view area.
1.2 Utilizing the Keyboard
The Sterling Store Inventory Management provides keyboard shortcuts
and hot keys to help you work efficiently. Some of these keys are
available only during certain processes or operations. To view a list of hot
keys and keyboard shortcuts that the Sterling Store Inventory
Management supports, press Ctrl+Shift+L in any screen.
1.3 Supported Resolution
The Sterling Store Inventory Management supports resolution of 1024 X
768 pixels.
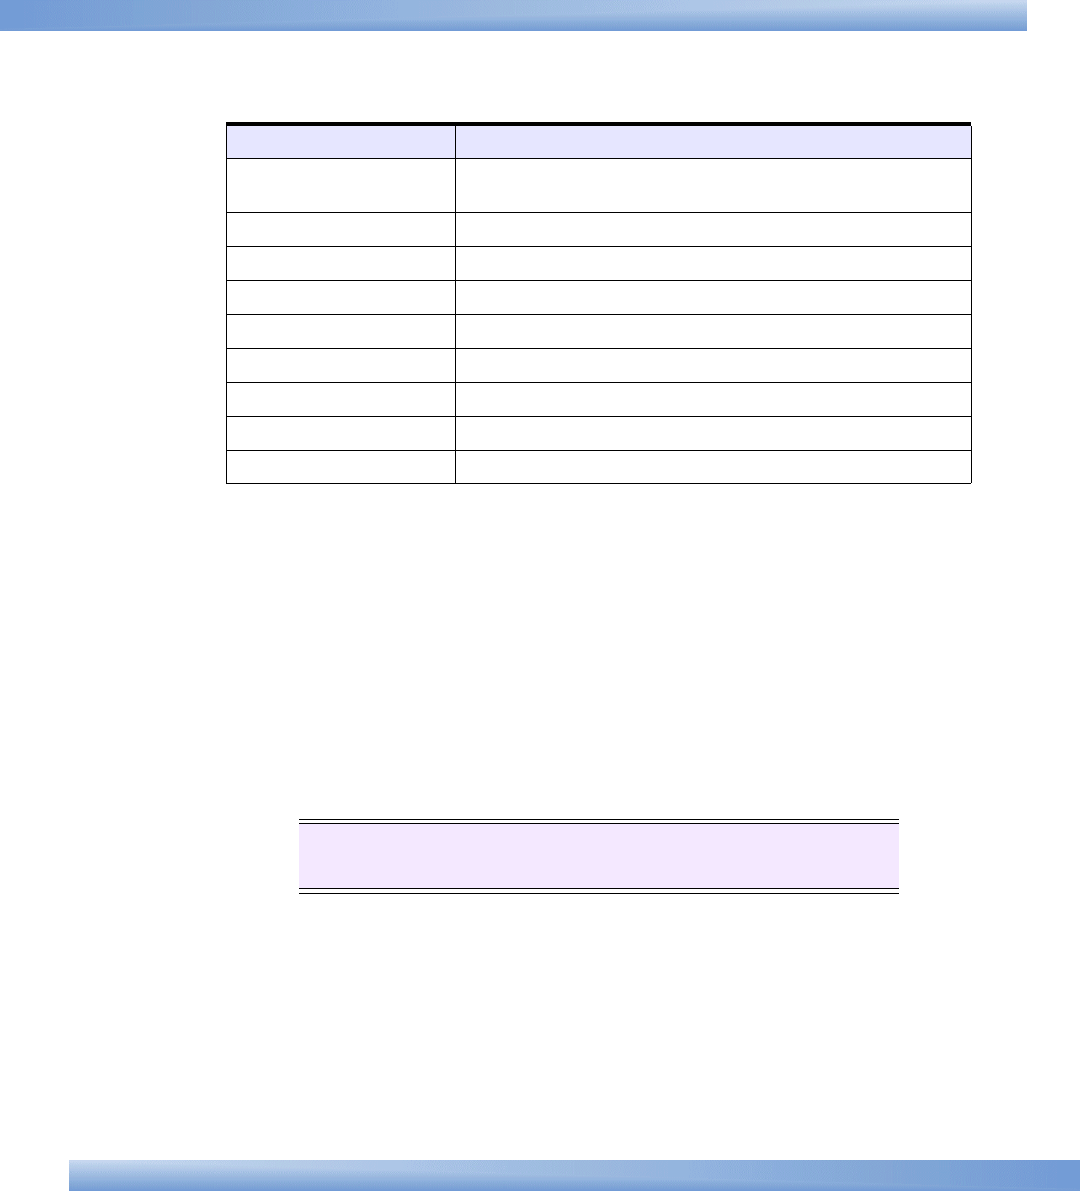
Table 1–1 Dialog Buttons
Button Function
Search Initiates a search for items, count sheets, orders, and
so forth, based on the criteria you enter.
Back to search Displays the Search screen.
Next Displays the next screen.
View Details Displays the details of the selected item or shipment.
Previous Displays the previously viewed screen.
Proceed Displays the next screen.
Confirm Confirms and saves the changes on the screen.
Hide Criteria Hides the search criteria.
Reset Clears information on the screen.
Note: If you want to traverse out of a text box in any
screen, press CTRL+TAB.

Logging Out of the IBM Sterling Store Inventory Management
Navigation 5
1.4 Logging Out of the IBM Sterling Store
Inventory Management
To log out of the Sterling Store Inventory Management, perform either of
the following actions:
QIn the Menu Bar, select File > Log Out. The Login pop-up window
displays, which enables you to log back into the application if
necessary or close the window to exit and close the application.
QIn the Menu Bar, select File > Exit to exit the application.

6 User Guide
Logging Out of the IBM Sterling Store Inventory Management

Performing Inventory Tasks 7
2
Performing Inventory Tasks
The Sterling Store Inventory Management enables a store associate to
efficiently manage the inventory execution process in a store.
Operations in a store are broken into different tasks such as receiving,
picking, and shipping of inventory. The Sterling Store Inventory
Management provides comprehensive functionality to track, monitor, and
maintain inventory in a store.
The Sterling Store Inventory Management provides:
QComprehensive visibility to inventory in any location
QAbility to adjust inventory at any location
This chapter explains the various inventory tasks, and how you can
perform them.
2.1 Searching for Inventory
This section explains how to search for items and view item details based
on the entered search criteria.
To search for an item:
1. From Menu Tasks, select Inventory > Search Inventory. The
Inventory Search screen displays.
2. In the Item
3. ID field, you can either enter the complete identifier of the item or a
part of the item.
4. In the Description field, you can either enter the complete description
or part of the item description.

8 User Guide
Searching for Inventory
5. In the Manufacturer’s Name field, enter the complete name of the
manufacturer.
6. In the Type field, select the item type from the drop-down list.
Additional search criteria displays depending on the selected item
type.
7. Click Search.
In the Item List panel, you can view details about the item such as
the identifier for the item, description, available quantity, unit of
measure, and unit price of the item.
In the Preview panel, you can view details for the selected item such
as a image of the item, identifier for an item, description, available
quantity, unit price, and also whether or not pickup and delivery is
allowed for the item.
Click on the Item ID hyperlink to view more details of the item. For
more information about viewing the item details, see Section 2.1.1,
"Viewing the Item Details".
8. Do any of the following:
QClick Show Criteria. The Item Search panel displays. If you want
to modify the search criteria, repeat Step 2 through Step 7.
QClick View Details to view more information about the selected
item. For more information about viewing the item details, see
Section 2.1.1, "Viewing the Item Details".
QClick More Results to view more records. You can view a
maximum of 200 records. By default, the system displays only 30
records.
2.1.1 Viewing the Item Details
You can view more details for the selected item and the image of the
item.
QIn the Item Details panel, you can view the identifier for an item,
organization code, unit of measure, description, and unit price.
QIn the Important Attributes panel, you can view the key attributes of
the item.

Searching for Inventory
Performing Inventory Tasks 9
QIn the Location Inventory panel, you can view the location where the
item is located, on-hand quantity, and unit of measure.
QIn the Promotions panel, you can view the short and long descriptions
of the item.
QIn the Available To Promise panel:
–You can view the currently available quantity of the item, and the
item unit of measure.
–In Availability Horizon Lead Days field, enter the number of days
for which you want to view the availability. Click Go.
–You can view the date range within which the inventory is
available in the store, the quantity you can supply, the demand
quantity, the available quantity, and shortage, if any.
QDo any of the following:
–Click More details. The More Details Of Selected Item pop-up
window displays. For more information about viewing the
accessories of an item, kit details, and so forth, see
Section 2.1.1.1, "Viewing More Details of a Selected Item".
–Click Back to Search. The Item List panel of the Inventory Search
screen displays. For more information about searching for
inventory, see Section 2.1, "Searching for Inventory".
2.1.1.1 Viewing More Details of a Selected Item
You can view more details of an item such as the accessories of an item,
kit components, specifications, items for upsell, and items for
substitution.
QTo view the accessories of an item, click the Accessories tab. You can
view the identifier for the item, description, associated quantity, and
the unit price of all accessories associated with that item.
QTo view the kit details, click the Kit Details tab. You can view the
identifier for an item, description, and the kit quantity.
QTo view the specifications of an item, click the Specifications tab.
QTo view the items for upsell, click the Up Sells tab. You can view the
identifier for an item, description, available quantity, and the unit
price of all items available for upsell.

10 User Guide
Performing Inventory Adjustments
QTo view the items for substitution, click the Substitutions tab. You can
view the identifier for the item, description, available quantity, and
the unit price of all items available for substitution.
2.2 Performing Inventory Adjustments
It may be necessary to adjust inventory from time-to-time. For example,
adjustments are made when the system quantity does not match the
actual physical quantity.
To adjust inventory:
1. From Menu Tasks, select Inventory > Adjust Inventory. The Adjust
Inventory screen displays.
2. In the Reason Notes panel, enter appropriate notes for performing
adjustments, if applicable.
3. In the Item ID field, enter the identifier of the item that you want to
adjust. Click to search for an item. The description of the item
automatically displays.
For more information about searching inventory, see Section 2.1,
"Searching for Inventory".
4. In the Location field, enter the location where you want to perform
the adjustment. Click to search for a location. For more information
about searching locations, see Section 2.2.1, "Searching for a
Location".
The item quantity that is currently available in the location and the
UOM of the item, automatically displays.
5. In the Reason field, select the appropriate adjustment reason from
the drop-down list.
6. In the Operation field, select the adjustment operation. The valid
values are Increase and Decrease.
Note: If the store has only one location, the Sterling
Store Inventory Management displays the location in the
Location field.
Recording Inventory Movement
Performing Inventory Tasks 11
7. In the Adjust Qty field, enter the number of units of the item you
want to adjust.
8. In the UOM field, select the unit of measure of the item from the
drop-down list.
The system calculates and automatically displays the final quantity
and UOM.
9. To adjust additional items, repeat Step 3 through Step 8.
10. Click Confirm.
2.2.1 Searching for a Location
To search for a location:
1. In the Location ID field, enter the complete identifier of the location
or a part of the location.
2. Click Search. The search results display in the Search Result panel.
3. From the list, select the appropriate identifier of the location.
4. Click Proceed.
2.3 Recording Inventory Movement
You can move inventory from one location to another in a store, and
record the inventory movement.
To move inventory from a location:
1. From Menu Tasks, select Inventory > Record Inventory Moves. The
Record Inventory Moves screen displays.
2. In the Item ID field, enter the identifier of the item that you want to
move. The description of the item automatically displays.
Note: The adjustment operation that displays depends on
the adjustment reason you select. For example, if you
select the reason as Found-New only the increase
operation displays in the drop-down list.
12 User Guide
Viewing Inventory Audits
Click to search for an item. For more information about searching
inventory, see Section 2.1, "Searching for Inventory".
3. In the From Location field, enter the source location from where you
want to move the item. The item quantity that is currently available
in the location, and the UOM automatically display.
Click to search for a location. For more information about searching
locations, see Section 2.2.1, "Searching for a Location".
4. In the Move Qty field, enter the quantity of item you want to move.
5. In the UOM field, select the unit of measure of the item.
6. In the To Location field, enter the target location where you want to
move the item.
Click to search for a location. For more information about searching
locations, see Section 2.2.1, "Searching for a Location".
7. Repeat Step 2 through Step 6 to move additional items from the
source location to the target location.
8. Click Confirm.
2.4 Viewing Inventory Audits
Whenever you make inventory modifications, the system creates an
inventory audit record for all inventory changes that occur in a store.
To view inventory audits:
1. From Menu Tasks, select Inventory > View Inventory Audit. The
Inventory Audit screen displays.
2. In the Find Audit Information panel:
a. In the From field, enter the start date from when you want to
view the audit information.
Click to select the date from the calendar.
b. In the To field, enter the end date up to when you want to view
the audit information.
Click to select the date from the calendar.

Viewing Inventory Audits
Performing Inventory Tasks 13
c. In the Item ID field, enter the identifier of the item for which you
want to view the audit information. The description of the item
automatically displays.
Click to search for an item. For more information about
searching for inventory, see Section 2.1, "Searching for
Inventory".
d. In the Location field, enter the location where the item is located.
Click to search for a location. For more information about
searching locations, see Section 2.2.1, "Searching for a Location".
e. In the Modification Type field, select the appropriate modification
type from the drop-down list.
f. In the Reason field, select the appropriate modification reason
from the drop-down list.
g. In the Performed By field, enter the identifier of the user who
performed modifications.
Click to search for a user. For more information about searching
for users, see Section 4.2, "Managing Users".
h. Click Search. The audit information for the selected date range
displays.
Click More Results to view more records. You can view a
maximum of 200 records. By default, the system displays only 30
records.
–In the Audit List panel, you can view the date on which the
item was modified, identifier of the item, location where the
item was modified, modification type, modification reason,
quantity adjusted, unit of measure of the item, and the user
who performed modifications.
–In the Audit Details panel, based on the item selected and the
modification type associated with the item, appropriate audit
information displays. For example, if you have received
inventory in a store, the receipt details such as the BOL
number, shipment number, and so forth displays.
–Click Show Criteria. The Find Audit Information panel displays.
If you want modify the search criteria, repeat Step a through
Step h.
14 User Guide
Performing Cycle Count
2.5 Managing Store Locations
A store manager can use Manage Locations to search for a particular
location in a store. All the locations created are regular locations. The
Sterling Store Inventory Management also allows the store manager to
add or delete a store.
From Menu Tasks, select Inventory > Manage Locations. The Manage
Locations screen displays.
In the Manage Locations screen, select the location and click to delete
location. You can add another location, once you leave the current
location.
2.6 Performing Cycle Count
You can perform count on regular or ad hoc basis to validate the
accuracy of the item inventory. You can count an item or item categories.
2.6.1 Printing Count Sheets
You can either print or reprint a count sheet to view items that are
pending count.
2.6.1.1 Printing a Count Sheet
To print a count sheet:
1. From Menu Tasks, select Cycle Count > Print Count Sheet. The Print
Count Sheet screen displays.
2. In the Count Sheet Print Options panel, under, You have... item(s) for
which count sheet is not yet printed, choose any of the following
options:
QChoose Print One count sheet with all items to print a count sheet
that lists all items that are pending count.
QChoose Print one count sheet with any... items, and specify the
actual number of items that you want to put on count. The printed
count sheet lists the specified number of items that are pending
Note: Before deleting a location, ensure that the location
is empty.

Performing Cycle Count
Performing Inventory Tasks 15
count. For example, if there are 5 items that are pending count,
and you want to count only 3 items, the first three items are put
on count.
QChoose specific items, and click Next. The Count Request List
screen displays. For more information about selecting items, see
Section 2.6.1.1.1, "Viewing the Count Request List".
3. Click Print.
2.6.1.1.1 Viewing the Count Request List
You can view details such as the identifier of the item, description,
number of orders, number of locations, and due date.
To print a count sheet:
1. Do any of the following:
QCheck the Select All box to put all items on count.
QCheck the boxes of the required items to put only the selected
items on count.
2. Click Print.
2.6.1.2 Reprinting a Count Sheet
You may want to reprint a count sheet to perform count.
To reprint a count sheet:
1. From Menu Tasks, select Cycle Count > Print Count Sheet. The Print
Count Sheet screen displays.
2. In the Count Sheet Print Options panel, under, You have... count
sheets pending count entry, choose any of the following options:
QChoose Reprint Count Sheet #, and enter the count sheet number
that you want to reprint.
QChoose specific count sheets to reprint, and click Next. The Count
Sheet List screen displays. For more information about reprinting
count sheets, see Section 2.6.1.2.1, "Viewing the Count Sheet
List".
3. Click Print.

16 User Guide
Performing Cycle Count
2.6.1.2.1 Viewing the Count Sheet List
You can view details such as the count sheet number, count sheet
creation date, and the user who created the count sheet. From the list,
select the count sheet number that you want to reprint.
2.6.2 Generating Ad Hoc Count Requests
You can generate ad hoc count requests for an item.
To generate ad hoc count request:
1. From Menu Tasks, select Cycle Count > Request Count By Item. The
Request Count By Item screen displays.
2. In the Item ID field, enter the identifier of the item.
A brief description of the item and the date on which the item was
last counted automatically displays.
Click to search for an item. For more information about searching
inventory, see Section 2.1, "Searching for Inventory".
3. Click Save to save the list of items added to the count sheet.
4. Click Print. The count sheet is printed.
2.6.3 Recording Count Results
After counting all items, you can record the count result for each item in
the count worksheet.
To record count results:
1. From Menu Tasks, select Cycle Count > Record Count. The Record
Count screen displays.
2. In the Count Sheet # field, enter the count sheet number and click
Search.
In the Enter Count Results panel, the identifier for the item,
description of the item, location where the item is located, on hand
item quantity, and mismatch found, if any, automatically displays.
Note: If the item you entered is already put on count, the
error message "Item already put on count" displays.
Performing Cycle Count
Performing Inventory Tasks 17
The mismatch quantity is computed as the difference between the
quantity from the time of printing the count sheet to the time of
recording count results. When a mismatch is found for an item, the
system raises an alert. To determine why the mismatch occurred, see
the inventory audit for the item. For more information about
inventory audits, see Section 2.4, "Viewing Inventory Audits".
3. In the Count Qty field, enter the item quantity that you counted.
4. In the UOM field, the UOM of the item automatically displays. Select
the UOM from the drop-down list, if applicable.
If variances are found, the system computes the difference between
the count quantity and onhand quantity, and displays the variance
quantity.
5. In the Count Qty field, enter the alternate item quantity that you
counted.
6. In the UOM field, the alternate UOM of the item automatically
displays. Select the alternate UOM of the item from the drop-down
list, if applicable.
7. In the Exclude field, check the box to exclude items from count. For
example, if you have a count sheet with 10 items, and if you can
count only 8 items, you can exclude the remaining 2 items from
count.
You can exclude items from count only at the item level and not at a
location level.
8. If you find any item in a new location:
a. In the Item ID field, enter the identifier of the item.
b. In the Location field, enter the location where the item is present.
Note: In the Sterling Store Inventory Management, the
blank field indicates that you need to enter the quantity
based on the alternate UOM displayed.
Note: You can enter only two alternate UOMs.

18 User Guide
Performing Cycle Count
The on-hand item quantity automatically displays.
c. In the Count Qty field, enter the item quantity that you counted.
d. In the UOM field, the UOM of the item automatically displays.
Select the UOM of the item from the drop-down list, if applicable.
If variances are found, the system computes the difference
between the count quantity and on hand quantity and displays the
variance quantity.
e. In the Count Qty field, enter the alternate item quantity that you
counted.
f. In the UOM field, the alternate UOM of the item automatically
displays. Select the alternate UOM of the item from the
drop-down list, if applicable.
g. In the Inventory Audit field, click the Inventory Audit hyperlink.
You can view the audit details for the item. For more information
about the audit details, see Section 2.4, "Viewing Inventory
Audits".
9. Click Confirm.
2.6.4 Cancelling Pending Counts
At the end of every month, you can cancel all counts that are pending.
To cancel pending counts:
1. From Menu Tasks, select Cycle Count > Month End Activities. The
Month End Activities screen displays.
2. Click Cancel All Pending Counts. All counts that are pending for that
particular month are cancelled.
Note: In the Sterling Store Inventory Management, the
blank field indicates that you need to enter the quantity
based on the alternate UOM displayed.

Performing Cycle Count
Performing Inventory Tasks 19
2.6.5 Viewing Count Archive Details for Multiple Count
Sheets You can view count archive information present in one or more count
sheets that are closed or cancelled.
To view count archive details:
1. From Menu Tasks, select Cycle Count > View Count Archives. The
View Count Archives screen displays.
2. In the Search Counts panel:
a. In the Created Between field, enter the start date.
Click to select the date from the calendar.
b. In the And field, enter the end date.
Click to select the date from the calendar.
c. In the Containing Item ID field, enter the identifier of the item, if
applicable.
d. If you want to view count archives for count sheets that are
closed, choose Closed.
By default, this option is always selected.
e. If you want to view count archives for count sheets that are
cancelled, choose Cancelled.
f. If you want to view count archives for both cancelled and closed
count sheets, Choose Both.
g. Click Search.
In the Count List panel you can view the identifier of the item,
count sheet number, date on which the count was created, current
status of the count, date on which the count was closed or
cancelled, and the user who closed or cancelled the count sheet.
If variances are found for the selected item, in the Variance Details
panel, you can view the description of the item, variance quantity,
and the cost applied to the variance.
2.6.6 Viewing Details for a Count Sheet
You can view count sheet information for a particular count sheet.

20 User Guide
Performing Cycle Count
To view count sheet details:
1. From Menu Tasks, select Cycle Count > View Count Sheet. The View
Count Sheet screen displays.
2. In the Count Sheet # field, enter the count sheet number and click
Search.
In the Count Sheet Details panel, you can view the user who reported
the count, total variance cost, and the absolute variance cost.
The total variance cost is computed as the VARIANCE_QUANTITY *
UNIT_COST, where the variance quantity is for the inventory UOM.
You can also view the identifier of the item, item description, location
where the count was performed, item quantity, UOM, variance
quantity, variance item UOM, and the variance cost.
2.6.7 Viewing Count Summary
You can view a summary of all count tasks performed on the current day.
To view the count summary:
1. From Menu Tasks, select Cycle Count > View Count Summary. The
View Count Summary screen displays.
In the Count Summary panel, you can view counts that were
manually assigned, system generated counts, counts that are
pending, total counts that are pending count, counts that are
completed, counts that are cancelled, overall counts that are pending,
net variance, absolute variance, and the total number of items with a
variance.
2. If you want to print a variance report, click Print Variance Report.
3. If you want to view variances that are found, click View Variance. The
View Count Variance screen displays. For more information about
viewing variances, see Section 2.6.7.1, "Viewing Variances".
2.6.7.1 Viewing Variances
You can view count variances found on the current day. You can also
request for a recount, if necessary.
In the Today’s Count Variance panel, you can view the total variance cost
and absolute variance cost. You can also view the identifier of the item,

Performing Physical Counts
Performing Inventory Tasks 21
description, location where the item is located, variance quantity, UOM,
variance cost, and user name who reported the variance.
If you want to recount items, check the boxes for the items that you
want to recount and click Recount.
2.7 Performing Physical Counts
Physical counts are done to synchronize the physical and system
inventory pictures and are required as part of the corporate policy or
client requirements. During Physical Count process, the store is closed
and no other activity is performed. All inventory in the store is physically
counted.
2.7.1 Starting a Physical Count Process
Before starting the physical count process in a store, you need to initiate
the physical count process in the system.
To start the physical count process:
1. From Menu Tasks, select Physical Count > Start Physical Count. The
Start Physical Count screen displays.
2. In the Start Count Sheet # field, enter the first count sheet number
that you want to use during counting.
3. In the End Count Sheet # field, enter the last count sheet number
where you want to end count.
4. Click Start Physical Count. A confirmation pop-up window displays.
5. Click OK. For the entered count sheet number range, the physical
count process starts.
2.7.2 Ending the Physical Count Process
Once all variances have been accepted, you can end a physical count.
To end a physical count process, from Menu Tasks, select Physical Count
> End Physical Count. The End Physical Count screen displays.
Click End Physical Count to complete the physical count. A confirmation
pop-up window displays. Click OK to end the physical count process.
22 User Guide
Performing Physical Counts
2.7.3 Recording Physical Count Details
After counting all items, you can record the details of the physical count
process.
To record the physical count details:
1. From Menu Tasks, select Physical Count > Record Physical Count. The
Record Physical Count screen displays.
2. In the Count Sheet # field, enter the count sheet number of the
physical count for which you want to record the count details.
3. In the Sequence # field, the sequence number displays.
4. In the Location ID field, enter the location identifier of the location
where the count is performed.
5. In the Item ID field, enter the item identifier of the item.
In the Description field, the item description displays.
6. In the Count Qty field, enter the quantity of item that you physically
counted.
7. The UOM field automatically populates.
8. In the Count Qty field, enter the quantity of the alternate item that
you physically counted.
9. The alternate UOM field automatically populates.
10. In the Total field, the total count quantity displays.
11. Click Confirm to create the count sheet.
12. If you want to clear all the data in the count sheet, click Clear Sheet
Data.
Note: In the Sterling Store Inventory Management, the
blank field indicates that you need to enter the quantity
based on the alternate UOM displayed.
Note: To delete a single record, click the Delete icon
present at the beginning of each record.
Performing Physical Counts
Performing Inventory Tasks 23
2.7.4 Viewing Physical Count Status
You can view the status of the ongoing physical count.
From Menu Tasks, select Physical Count > View Status. The Physical
Count Status screen displays.
You can view the range of count sheet numbers that are entered and also
the count sheet numbers that have not been entered.
If you want to view variances for all items counted as part of the physical
count process, click View Variance. For more information about viewing
variances, see Section 2.7.4.1, "Viewing Variances".
If you want to rectify the count entry for items counted as part of the
physical count process, click Rectify Count. For more information about
rectifying the count sheet, see Section 2.7.4.2.1, "Rectifying Count
Sheet".
2.7.4.1 Viewing Variances
You can view variances for all items counted as part of the physical count
process either when accepting a variance or during an audit inquiry.
To view variances found during the physical count process:
QTo view all new items that were found during the physical count,
choose "Show all newly found items". Click Search. In the Newly
found items panel, you can view the item identifier, item description,
count quantity, unit of measure for the item, and cost of the variance.
QTo view all items with variance, choose "Show items with variance"
and enter the following parameters:
Note: In Release 7.1 HF13 and higher, the Sterling Store
Inventory Management application provides the ability for
a user to add items in any order when recording physical
count activities.:
Note: If records do not exist for more than five
consecutive count sheets, then the range of count sheet
numbers is displayed.

24 User Guide
Performing Physical Counts
–In the Item ID Containing field, enter the identifier of the item.
You can also enter just a part of the identifier of the item. For
example, if you are searching for a keyboard, you can just type
"key". A list of items starting with letters "key" displays.
–Select net variance or absolute variance from the drop-down list.
–Select the variance from the drop-down list. The valid values are
Cost and Percentage.
You can also view variances for a given range. For example, if you
select the variance value as "Percentage", enter the range
between 10% and 20%, and click Search, you can view a list of
items for which variances are found for the specified range.
–Click Search.
In the Items with Variance panel, you can view a list of items with
variances such as the identifier of the item, description, on hand
quantity, count quantity, unit of measure for the item, variance
quantity, net variance, absolute variance, absolute variance
percentage, and net variance percentage.
If you want to view variances found for an item at the location
level, click View Location level variance. For more information
about viewing variances found for an item at the location level,
see Section 2.7.4.1.1, "Viewing Location Level Variances".
If you want to rectify the count entry for a count sheet, click
Rectify Count. For more information about rectifying a count
sheet, see Section 2.7.4.1.2, "Viewing Variance Details for an
Item".
2.7.4.1.1 Viewing Location Level Variances
You can view the identifier of the item, description, location of the item,
on hand quantity, count quantity, unit of measure for the item, variance
quantity, net variance, and net variance percentage.
If you want to rectify the count entry for items in a particular location,
click Rectify Count. For more information about rectifying the count
sheet, see Section 2.7.4.1.2, "Viewing Variance Details for an Item".
2.7.4.1.2 Viewing Variance Details for an Item

Performing Physical Counts
Performing Inventory Tasks 25
You can view the item identifier, item description, system quantity,
quantity after physical count, variance quantity, and variance value for a
particular item.
In the Variance at each Location panel, you can view the identifier for the
location, system quantity, count quantity, variance quantity, and variance
value.
You can also view a table comprising of count sheet number, count sheet
line number, the quantity of items counted, unit of measure for the item,
and the user name of the person who performed the count for the
locations where the count quantity has been recorded. Select the line
number for which you want to rectify the count and click Rectify Count
sheet. For more information about rectifying count sheet, see
Section 2.7.4.2.1, "Rectifying Count Sheet".
Click Print to print the variance details.
2.7.4.2 Searching for a Count Sheet
You can search for a particular count sheet or for all count sheets that
are part of the physical count.
To search for a count sheet:
1. In the Count Sheet # field, enter the count sheet number and click
Search.
If you do not enter the count sheet number and click Search, all the
count sheets for that physical count are displayed.
In the View count sheets panel, you can view the count sheet
number, user identifier of the user who recorded the count, and
recorded date of count sheet.
2. Select the count sheet number of the count sheet you want to rectify
and click Proceed. The Rectify Physical Count screen displays. For
more information about rectifying physical count, see
Section 2.7.4.2.1, "Rectifying Count Sheet".
2.7.4.2.1 Rectifying Count Sheet
To rectify the physical count entry for a count sheet:
1. In the Count Sheet # field, the count sheet number displays.
26 User Guide
Performing Physical Counts
In the Modify count quantity panel, the sequence number, location
identifier, the identifier of the item, and description of the item
displays.
2. In the Count Qty field, enter the new item quantity, if applicable.
3. In the Count Qty field, enter the alternate item quantity that you
counted.
4. In the Add New Items to Count Sheet panel,
a. In the Sequence # field, the sequence number of the item
displays.
b. In the Location ID field, the location identifier displays.
c. In the Item ID field, the item identifier displays.
d. In the Description field, the item description displays.
e. In the Count Qty field, enter the new item quantity, if applicable.
f. In the Count Qty field, enter the alternate item quantity that you
counted.
5. Click Confirm to record the rectified count quantity.
6. If you want to cancel the count sheet, click Void Count Sheet..
7. If you want to clear all the data in the count sheet, click Clear Sheet
Data.
Note: In the Sterling Store Inventory Management, the
blank field indicates that you need to enter the quantity
based on the alternate UOM displayed.
Note: In the Sterling Store Inventory Management, the
blank field indicates that you need to enter the quantity
based on the alternate UOM displayed.
Note: To delete a single record, click the Delete icon
present at the beginning of each record.

Performing Physical Counts
Performing Inventory Tasks 27
2.7.5 Cancelling Physical Count
To cancel physical count, from Physical Count Tasks, select Cancel
Physical Count. The Cancel Physical Count screen displays.
Select the appropriate cancellation reason code from the drop-down list
and click Cancel Physical Count.
2.7.6 Accepting Variance
Once all the count sheets are recorded, you can accept the variances for
the complete physical count.
From Menu Tasks, select Physical Count > Accept Variance. The Accept
Variance screen displays.
You can view the total variance cost and the count sheet range assigned
for the physical count. The total variance cost is a hyperlink. Click this to
view the variance research screen. If you want to view all the items
missing during count, choose Show all missing items. This option is
available only when you navigate to this screen from Accept Variance.
Click Search.
In the Missing items panel, you can view the item identifier, item
description, on hand quantity, unit of measure for the item, and cost of
the variance.
For more information about viewing variances, see Section 2.7.4.1,
"Viewing Variances".
2.7.7 Audit Inquiry
You can view the audit details for the physical count performed.
Note: In Release 7.1 HF13 and higher, when rectifying a
count sheet, the Sterling Store Inventory Management
provides the ability for a user to modify values in the Item
ID or Location ID fields of a count line without the need to
delete and recreate the count line. Additionally, the
Sterling Store Inventory Management provides the ability
for a user to add items in any order when rectifying
physical count activities.

28 User Guide
Performing Physical Counts
Navigate to Physical Count > Audit Inquiry. The Audit Inquiry screen
displays.
You can view the start and end date of the count, total number of count
sheets, total cost variance, and the total percentage of accuracy.
The percentage of accuracy = (Total no of items that are 98% or more
accurate / Total no of items) * 100
Click the Total number of count sheets hyperlink to view count sheet
details. For more information about viewing count sheet details, see
Section 2.7.4.2, "Searching for a Count Sheet".
Click the Total Variance hyperlink to view variance details. For more
information about viewing variance details, see Section 2.7.4.1, "Viewing
Variances".
From Audit Physical Count, select View Variance to view variances for the
items counted as part of the physical count. For more information about
viewing count sheet details, see Section 2.7.4.2, "Searching for a Count
Sheet".
From Audit Physical Count, select View Count Sheets to view count sheet
details. For more information about viewing count sheet details, see
Section 2.7.4.2, "Searching for a Count Sheet".

Performing Receiving Tasks 29
3
Performing Receiving Tasks
The Sterling Store Inventory Management provides visibility to detailed
information about inbound shipments for a store. The receiving process
in the Sterling Store Inventory Management involves inventory received
from other stores, distribution centers (DC), or vendors. Recording
receipts in the Sterling Store Inventory Management is an offline
process.
A receipt in the Sterling Store Inventory Management is usually made for
an inbound order or shipment. The Sterling Store Inventory Management
provides the ability to print a receiving worksheet for each shipment or
for the order, if order does not have a shipment. If you do not have order
or shipment information, the Sterling Store Inventory Management
enables you to record receipt of the shipment as blind receipt.
3.1 Printing Receiving Worksheets for a
Shipment
You can print the receiving worksheet for a shipment for a specific Bill Of
Lading (BOL) number.
To print the receiving worksheet for a shipment:
1. From Menu Tasks, select Receiving > Print Shipment Worksheet. The
Print Shipment Worksheet screen displays.
2. In the BOL # field, enter the BOL number for the expected shipment.
If you want to search for the expected shipments using the BOL
number, click Search. The Search Shipment screen displays. For more
information about searching for a shipment using BOL number as
search criteria, see Section 3.1.1, "Searching for Shipments Using the
Bill of Lading Number".
30 User Guide
Printing Receiving Worksheets for a Shipment
3. Click Print.
QIf the BOL contains a single shipment, the receiving worksheet is
directly printed.
QIf the BOL contains multiple shipments, the Select Shipment
screen displays. For more information about selecting a shipment
from a BOL, see Section 3.1.2, "Selecting Shipment for Bill Of
Lading".
QIf the BOL contains no shipments, an error message displays.
3.1.1 Searching for Shipments Using the Bill of Lading
Number You can search for a shipment by using the BOL number as search
criteria.
To search for a shipment using the BOL, in the Search Shipment panel:
1. Under Search for:
QChoose All Shipments to search for all shipments that are yet to
be received.
By default, this option is always selected.
QChoose Transfer from Store, if inventory is received from another
store. Click to select the store name. For more information
about searching for a store, see Section 4.2.3.1, "Searching for a
Store".
QChoose Ship from Vendor, if inventory is received from a vendor.
Click to select the vendor. For more information about
searching for a store vendor, see Section 3.1.1.1, "Searching for a
Vendor".
QChoose Transfer from DC, if inventory is received from a
distribution center. Enter or select the DC from the drop-down list.
2. Under Expected Delivery Date:
QChoose Till Date to view shipments that are expected to be
received until this day. Click to select the date.
QChoose Between and enter the from and to date to view a list of
shipments for the selected date range. Click to select the date.

Printing Receiving Worksheets for a Shipment
Performing Receiving Tasks 31
3. Under Containing Item ID enter the item identifier. Click to search
for an item. For more information about searching for inventory
items, see Section 2.1, "Searching for Inventory".
4. Click Search. The Search Results panel displays with a list of the
receiving shipments.
5. From the list, select the appropriate shipment.
6. Click Print to print the list of receiving shipments.
3.1.1.1 Searching for a Vendor
To search for a vendor:
1. In the Vendor ID field, enter the identifier of the vendor.
2. In the Seller Name field, enter the complete seller name or a part of
the seller name, if applicable. This field is case-sensitive.
3. In the City field, enter the complete city name or a part of the city
name, if applicable. This field is case-sensitive.
4. In the State field, enter the complete state name or a part of the
state name, if applicable. This field is case-sensitive.
For example, if you enter the state as California, all stores available in
California are listed in the Search Results panel.
5. In the Max Records field, enter the maximum number of records to
be listed as a result of your search.
By default, the value of this field is 30.
6. Click Search. The search results display in the Search Results panel.
From the list, select the appropriate identifier of the vendor and click
Proceed.
3.1.2 Selecting Shipment for Bill Of Lading
In the Select Shipment screen you can view the shipment details for a
specific BOL number.
You can also view the shipment number, current status of the shipment,
the expected date of delivery to the store, the origin of the shipment,
and the carrier service used for shipping the shipment.

32 User Guide
Printing Receiving Worksheets for an Order
From the list, select the shipment for which you want to print the
receiving worksheet and click Print.
3.2 Printing Receiving Worksheets for an Order
You can print the receiving worksheet for an order based on the specified
order number.
To print the receiving worksheet for an order:
1. From Menu Tasks, select Receiving > Print Order Worksheet. The
Print Order Worksheet screen displays.
2. In the Order # field, enter the order number for the expected
shipment.
If you want to search for an order number, click Search. The Search
Order screen displays. For more information about searching for an
order number, see Section 3.2.2, "Searching for an Order".
3. Click Print.
QIf the order contains a single shipment, the receiving worksheet is
directly printed.
QIf the order contains multiple shipments, the Select Shipment
screen displays. From the list, select the shipment for which you
want to print the receiving worksheet and click Print. For more
information about selecting a shipment, see Section 3.2.1,
"Selecting Shipment for an Order".
QIf the order does not contain a shipment, the receiving worksheet
is printed for the order.
QIf more than one order exists for the same order number, the
Select Order screen displays. From the list, select the order for
which you want to print the receiving worksheet and repeat Step
3.
3.2.1 Selecting Shipment for an Order
In the Select Shipment screen you can view the shipment details for the
order number. You can also view the shipment number, current status of
the shipment, the expected date of delivery to the store, origin of the
shipment, and the carrier service used for shipping the shipment.

Printing Receiving Worksheets for an Order
Performing Receiving Tasks 33
3.2.2 Searching for an Order
You can search for an order and its associated shipments.
To search for order, in the Search Order panel:
1. Under Search for:
QChoose All Orders if you want to search for orders that are yet to
be received.
By default, this option is always selected.
QChoose Transfer from Store if inventory is received from another
store. Click to select the store name. For more information
about searching for a vendor, see Section 4.2.3.1, "Searching for
a Store".
QChoose Ship from Vendor if inventory is received from a vendor.
Click to select the vendor. For more information about
searching for a store, see Section 3.1.1.1, "Searching for a
Vendor".
QChoose Transfer from DC if inventory is received from a DC. Enter
or select the DC from the drop-down list.
2. Under Requested Delivery Date:
QChoose Till Date to view shipments that are expected to be
received until this day.
QChoose Between and enter the from and to dates to view a list of
shipments for the specified date range. Click to select date
from the calendar.
3. Under Containing Item ID enter the identifier of the item. Click to
search for an item. For more information about searching for
inventory, see Section 2.1, "Searching for Inventory".
4. Click Search. The Search Result table displays a list of inbound
orders.
5. Select the order for which you want to print the worksheet.
6. Click Print.
QIf the order contains a single shipment, the receiving worksheet is
directly printed.

34 User Guide
Recording Receiving Worksheet Details for a Shipment
QIf the order contains multiple shipments, the Select Shipment
screen displays. From the list, select the shipment for which you
want to print the receiving worksheet and click Print. For more
information about selecting a shipment, see Section 3.2.1,
"Selecting Shipment for an Order".
QIf the order does not contain a shipment, the receiving worksheet
is printed for the order.
QIf more than one order exists with the same order number, the
Select Order screen displays. For more information about
selecting a shipment, see Section 3.2.2.1, "Selecting an Order".
From the list, select the order for which you want to print the
receiving worksheet and repeat Step 3.
3.2.2.1 Selecting an Order
In the Select Order panel, you can view the name of the seller, order
date, requested date of delivery, and the carrier used for the shipment.
3.3 Recording Receiving Worksheet Details for a
Shipment
You can record the receiving worksheet details for a shipment for the
specified receipt BOL number.
To record the receiving worksheet details:
1. From Menu Tasks, select Receiving > Record Worksheet for Shipment.
The Record Receipt screen for a shipment displays.
2. In the Record BOL # field, enter the BOL number of the shipment.
3. Click Proceed.
QIf the BOL contains a single shipment, the Record Receipt screen
displays where you can record the receipt details. For more
information about recording the shipment details, see
Section 3.3.1, "Recording Receipt Details for a Bill Of Lading".
QIf the BOL contains multiple shipments, the Select Shipment
screen displays. From the list, select the shipment and click
Proceed. For more information about recording the shipment
details, see Section 3.3.1, "Recording Receipt Details for a Bill Of
Lading".

Recording Receiving Worksheet Details for a Shipment
Performing Receiving Tasks 35
3.3.1 Recording Receipt Details for a Bill Of Lading
To record the receipt details:
In the Receipt Details panel, you can view the address from where the
shipment is shipped, order date, BOL number, shipping date, shipment
number, ETA, and carrier used for the shipment.
In the Pre-Assigned Orders panel, you can view the sales order number,
identifier of the item, description of the item, and ordered quantity of the
item.
1. In the Received Qty field, enter the quantity of items received.
In the UOM field, the unit of measure for the item displays.
2. In the Received field, enter the alternate quantity of items received, if
applicable.
3. In the UOM field, select the alternate UOM of the item from the
drop-down list.
4. In the Received field, enter the alternate quantity of items received.
5. In the UOM field, select the alternate UOM of the item from the
drop-down list.
6. In the Damaged field, enter the item quantity that is damaged, if
applicable. For example, if you receive 10 units and if 2 units are
damaged, enter 8 units of received quantity and 2 units of damaged
quantity.
By default, the damaged quantity displays.
7. In the UOM field, select the UOM from the drop-down list, if
applicable.
8. In the Damaged field, enter the alternate quantity of items damaged.
9. In the UOM field, select the alternate UOM for the item from the
drop-down list.
Note: You can enter only two alternate UOMs.
36 User Guide
Recording Receiving Worksheet Details for a Shipment
10. In the Stock Replenishment Orders panel, you can view the sales
order number, item identifier, description of the item, and ordered
quantity of the item.
a. In the Received field, enter the quantity of items received.
b. In the UOM field, select the UOM of the item from the drop-down
list, if applicable.
c. In the Received field, enter the alternate quantity of items
received.
d. In the UOM field, select the alternate UOM of the item from the
drop-down list.
e. In the Damaged field, enter the item quantity that was damaged
quantity, if applicable.
By default, the damaged quantity displays.
f. In the UOM field, select the UOM of the item from the drop-down
list, if applicable.
g. In the Damaged field, enter the alternate quantity of items
damaged.
h. In the UOM field, select the alternate UOM of the item from the
drop-down list.
11. You can enter additional items that are listed in the order and that
are present in some other shipment of the same BOL.
Note: If you check the Receive with no discrepancies box,
the ordered quantities automatically display in the
Pre-Assigned Orders panel.
Note: You can enter only two alternate UOMs.
Note: If you check the Receive with no discrepancies box,
the ordered quantities automatically display in the Stock
Replenishment Orders panel.

Recording Receiving Worksheet Details for an Order
Performing Receiving Tasks 37
In the Additional Items panel:
a. In the Order # field, enter the order number.
b. In the Item ID field, enter the identifier of the item.
A brief description of the item displays.
c. In the Received field, enter the quantity of items received.
d. In the UOM field, select the UOM of the item from the drop-down
list, if applicable.
e. In the Received field, enter the alternate quantity of items
received.
f. In the UOM field, select the alternate UOM of the item from the
drop-down list.
g. In the Damaged field, enter the quantity of the item that was
damaged, if applicable.
By default, the damaged quantity displays.
12. Click Record.
3.4 Recording Receiving Worksheet Details for an
Order You can record the receiving worksheet details for a shipment based on
the order number.
To record the receiving worksheet details:
1. From Menu Tasks, select Receiving > Record Worksheet for Order.
The Record Receipt screen for an order displays.
2. In the Record Order # field, enter the order number of the shipment.
3. Click Proceed.
QIf the order contains a single shipment, the Record Receipt for an
Order screen displays. For more information about recording
receipt details, see Section 3.4.1, "Recording Receipt Details for
an Order".
QIf the order contains multiple shipments, the Select Shipment
screen displays. From the list select the shipment for which you

38 User Guide
Recording Receiving Worksheet Details for an Order
want to record the receipt details and click Proceed. For more
information about selecting a shipment, see Section 3.2.1,
"Selecting Shipment for an Order".
QIf the order does not contain any shipment, the Record Receipt for
an Order screen displays. For more information about recording
receipt details, see Section 3.4.1, "Recording Receipt Details for
an Order".
QIf more than one order exists with the same order number, the
Select Order screen displays. For more information about
selecting an order, see Section 3.2.2.1, "Selecting an Order".
From the list select the order for which you want to record the
receipt details and repeat Step 3.
3.4.1 Recording Receipt Details for an Order
To record the receipt details:
1. In the Receipt Details panel, you can view the address from where
the shipment is shipped, order number, carrier used for the shipment,
order date, and requested delivery date.
In the BOL # field, enter the BOL number. You can view this field only
if the order does not contain any shipment.
Check the Receipt Complete box if you want to record discrepancies.
You cannot receive an order, once a discrepancy is recorded for the
order.
2. In the pre-assigned Orders panel, you can view the item identifier,
description, the quantity of items shipped, the quantity of items
received, the base unit of measure for the item, and the quantity of
items received.
a. In the Damaged field, enter the damaged quantity, if applicable.
By default, the damaged quantity displays.
b. In the UOM field, select the UOM from the drop-down list, if
applicable.
c. In the Damaged field, enter the alternate quantity of items
damaged.

Recording Receiving Worksheet Details for an Order
Performing Receiving Tasks 39
d. In the UOM field, select the alternate UOM for the item from the
drop-down list.
e. Click Record.
3. In the Stock Replenishment Orders panel, you can view the following
information:
a. In the Item ID field, the item identifier displays.
In the Description field the item description displays.
b. In the Shipment Qty field, the quantity of items shipped displays.
c. In the Receivable Qty field, you can view the sales order number,
identifier of the item, description of the item, and ordered
quantity of the item.
d. In the UOM field, the base unit of measure for the item displays.
e. In the Received field, enter the quantity of items received.
f. In the UOM field, select the UOM for the item from the drop-down
list.
g. In the Received field, enter the alternate quantity of items
received, if applicable.
h. In the UOM field, select the alternate UOM for the item from the
drop-down list.
i. In the Damaged field, enter the damaged quantity, if applicable.
By default, the damaged quantity displays.
j. In the UOM field, select the UOM from the drop-down list, if
applicable.
Note: If you check the Receive with no discrepancies box,
the ordered quantities automatically display in the Stock
Replenishment Orders panel.
Note: You can enter only two alternate UOMs.

40 User Guide
Receiving Blind Receipts
k. In the Damaged field, enter the alternate quantity of items
damaged.
l. In the UOM field, select the alternate UOM for the item from the
drop-down list.
m. Click Record.
3.5 Receiving Blind Receipts
Blind receiving is the process of receiving items in a store for which an
order or BOL does not exist in the system.
To record a blind receipt:
1. From Menu Tasks, select Receiving > Blind Receiving. The Record
Blind Receiving screen displays.
2. Under the Source panel:
QChoose Transfer from Store, if inventory is transferred from
another store. Click to select the store name. For more
information about searching for a store, see Section 4.2.3.1,
"Searching for a Store".
By default, this option is always selected.
QChoose Ship from Vendor, if inventory is received from a vendor.
Click to select the vendor. For more information about
searching for a vendor, see Section 3.1.1.1, "Searching for a
Vendor".
QChoose Transfer from DC, if inventory is received from a DC.
Enter or select the DC from the drop-down list.
3. Under the Receipt Info panel:
a. In the BOL # field, enter the BOL number of the item.
b. In the Trailer # field, enter the trailer number of the shipment.
Note: If you check the Receive with no discrepancies box,
the ordered quantities automatically display in the Stock
Replenishment Orders panel.

Searching for Inbound Shipments
Performing Receiving Tasks 41
4. In the Item ID field, enter the item identifier you want to record. For
more information about searching for inventory, see Section 2.1,
"Searching for Inventory".
In the Description field, a brief description of the item displays.
5. In the Received Qty field, enter the received quantity.
6. In the UOM field, select the UOM of the item from the drop-down list,
if applicable.
7. In the Received Qty field, enter the alternate quantity of items
received.
8. In the UOM field, select the alternate UOM of the item from the
drop-down list.
9. Click Confirm.
3.6 Searching for Inbound Shipments
You can search and view all inbound shipments.
To search an inbound shipment:
1. From Menu Tasks, select Receiving > Find Inbound Shipment. The
Shipment Console screen displays.
2. In the Search Shipment panel, under Search for:
QChoose All Shipments to search for all shipments that are yet to
be received.
By default, this option is always selected.
QChoose Transfer from Store, if inventory is transferred from
another store. Click to select the store name. For more
information about selecting a store, see Section 4.2.3.1,
"Searching for a Store".
QChoose Ship from Vendor, if inventory is received from another
vendor. Click to select the vendor. For more information about
searching for a vendor, see Section 3.1.1.1, "Searching for a
Vendor".
Note: You can enter only two alternate UOMs.
42 User Guide
Searching for Inbound Shipments
QChoose Transfer from DC, if inventory is received from a DC.
Enter or select the DC from the drop-down list.
3. Under Expected:
QChoose Till Date, to view shipments that are expected to be
received up until this day.
QChoose Between, and enter the from and to date to view a list of
shipments for the selected date range. Click to select a date
from the calendar.
4. Under Containing, enter the identifier of the item. Click to search
for an item. For more information about searching for inventory, see
Section 2.1, "Searching for Inventory".
5. Click Search. The Search Result panel displays, which lists all
shipments.
6. Select the shipment and click View Shipment Details to view the
shipment details. For more information about viewing shipment
details, see Section 3.6.1, "Viewing Shipment Details".
3.6.1 Viewing Shipment Details
You can view the inbound shipment details for the selected shipment.
QIn the Shipment Details panel, you can view the BOL number, the
address from which the shipment is shipped, the status of the
shipment, the shipment number, the shipment type, the date on
which the shipment is expected, and the code assigned to the
carrier.
QIn the Shipment Item List panel, you can view the order number
associated with the shipment, the item identifier, the received
quantity for the item in the shipment and the UOM of the item.

Managing Users 43
4
Managing Users
User groups are a collection of users who perform a similar task. For
example, a group of store users might be put in a Store user group.
Users can belong to multiple user groups, to which permissions are
assigned. A user who belongs to multiple user groups retains the least
restrictive set of permissions defined by the groups they belong to. For
example, if a user belongs to a user group that permits them to use the
Application Consoles and they also belong to a user group that only
permits them to use the Application Consoles and Configurator, the user
will have access to both applications.
This chapter describes how to establish and manage users. You can also
transfer a user from one store to another.
4.1 Changing the Password
The Change Password screen provides you the ability to change your
password.
To change the password:
1. From Menu Tasks, select User > Change Password. The Change
Password screen displays.
2. In the Old Password field, enter your case-sensitive old password.
3. In the New Password field, enter your case-sensitive new password.
4. In the Confirm Password field, enter the new password to confirm it.
5. Click Confirm.

44 User Guide
Managing Users
4.2 Managing Users
You can search for users, change user credentials, or transfer users to
another store. The Sterling Store Inventory Management does not allow
users to modify their own credentials.
This section explains how to modify credentials of the selected user and
assign user groups.
4.2.1 Searching for Users
You can search a user and modify the user’s credentials.
To search for a user:
1. From Menu Tasks, select User > Manage Users. The Manage Users
screen displays.
2. In the Search Users panel:
a. In the Store field, the store name displays.
b. In the User ID field, enter the identifier of the user. You can either
enter the complete identifier or a part of the identifier.
c. In the User Name field, enter the name of the user whose status
or group needs to be changed
d. In the Status field:
–Choose Active, if the user is currently an active user.
–Choose Inactive, if the user is currently an inactive user.
3. Click Search.
QIf there exists only one user for the entered search criteria, the
modifying user details screen displays. For more information
about modifying user credentials, see Section 4.2.2, "Modifying
User Credentials".
QIf multiple users exist for the search criteria, the search results
display in the Search Result panel. You can view the user
identifier, user name, and store’s information.
Note: Both User ID and User Name are case-sensitive.

Managing Users
Managing Users 45
Select the User ID whose credentials you want to modify and click
Proceed.
4.2.2 Modifying User Credentials
You can modify credentials for the selected user and also assign user
groups.
In the User Detail panel, you can view the identifier of the user, user
name, store information, and the current status of the user.
1. In the Change User Credentials panel:
QChoose Activate to activate the user.
QClick the Deactivate to deactivate the user.
2. In the Assign User Groups panel:
QTo subscribe the user to a user group, select the user group and
click .
QTo unsubscribe the user from a user group, select the user group
and click .
3. Click Confirm.
4.2.3 Transferring Users to a Store
You can transfer the selected user to another store.
To transfer a user to another store:
1. From Transfer Store, select Transfer Store. The Transfer Store screen
displays.
2. In the Transfer ..... to Store field, enter the store name.
If you want to search for a store, click . For more information about
searching a store, see Section 4.2.3.1, "Searching for a Store".
3. Click Confirm.
4.2.3.1 Searching for a Store
To search for a store:
1. In the Store # field, enter the store number, if applicable.

46 User Guide
Managing Users
2. In the Store Name field, enter the complete store name or a part of
the store name, if applicable. This field is case-sensitive.
3. In the City field, enter the complete city name or a part of the city
name, if applicable. This field is case-sensitive.
4. In the State field, enter the complete state name or a part of the
state name, if applicable. This field is case-sensitive.
For example, if you enter the state as California, all stores available in
California are listed in the Search Results panel.
5. In the Max Records field, enter the maximum number of records to
be listed as a result of your search.
By default, the value entered is 30.
6. Click Search. The search results display in the Search Result panel.
7. From the Store List panel, select the store where you want to transfer
the user.
8. Click Proceed.

Performing Outbound Tasks 47
5
Performing Outbound Tasks
This chapter explains the various outbound tasks that you can perform
using the Sterling Store Inventory Management.
5.1 Printing a Pick Ticket
In a store, pick tickets are generated and items are picked based on the
pick tickets.
To print a pick ticket:
1. From Menu Tasks, select Shipping > Print Pick Ticket. The Print Pick
Ticket screen displays.
2. If you want to print pick tickets for all shipments that are awaiting
back room pick, choose Print pick tickets for all... orders pending
shipping.
By default, this option is always selected.
3. If you want to print a pick ticket for an order, choose Print pick tickets
for order #, and enter the order number in the box.
QIf an order has a single shipment that is awaiting back room pick,
the pick ticket is directly printed.
QIf an order has multiple shipments, the Advanced Search screen
displays. From the list, select the shipment for which you want to
print the pick ticket and click Print.
4. If you want to search for all the shipments in an order, choose Lookup
an order to print pick tickets and click Search. The Find orders to
print pick ticket screen displays. For more information about
searching for an order, see Section 5.1.1, "Searching for an Order".

48 User Guide
Searching for Shipments
5.1.1 Searching for an Order
You can search for an order and print pick ticket for shipments in the
order.
To find a shipment:
In the Find Order to print pick ticket panel:
1. In the Credit Card # field, enter the credit card number given by the
customer.
2. In the Order # field, enter the order number, if applicable.
3. In the Phone # field, enter the phone number of the customer, if
applicable.
4. In the Last Name field, enter the last name of the customer, if
applicable.
5. In the First Name field, enter the first name of the customer, if
applicable.
6. In the Orders not picked up for... days field, enter the number of days
the shipment has been ready for customer pick up, if applicable.
7. Click Search.
In the Search Results panel, you can view the customer name,
shipment number, status of the shipment, order number, and the date
on which the store was notified of the shipment creation. Select a
shipment for which you want to print pick ticket.
Click to print the pick ticket. indicates that the pick ticket has
already been printed for the shipment number.
5.2 Searching for Shipments
You can search for the shipments that are ready for customer pick up or
delivery.
To find a shipment:
Note: All these fields are case-sensitive.

Searching for Shipments
Performing Outbound Tasks 49
1. From Menu Tasks, select Shipping > Search Shipment. The Shipment
Search screen displays.
2. In the Basic Search Parameters panel:
a. In the Shipment # field, enter the shipment number.
b. In the Order # field, enter the order number.
c. In the BOL # field, enter the BOL number of the shipment.
d. In the Manifest # field, enter the manifest number.
e. In the Tracking # field, enter the tracking number of the manifest
shipment.
f. In the Last Name field, enter the last name of the customer.
g. In the First Name field, enter the first name of the customer.
h. In the Phone # field, enter the customer’s phone number.
i. In the Zip Code field, enter the zip code of the customer.
3. In the Advanced Search Parameters panel:
a. In the Item ID field, enter the item identifier. Click to search for
an item. For more information about searching for inventory, see
Section 2.1, "Searching for Inventory".
b. In the Shipment Status field, select the status of the shipment
from the drop-down list.
c. In the Req Ship Date field, enter the date to view a list of
shipments for the selected date range.
Click to select the date from the calendar.
d. In the Delivery Method field, choose any of the following options:
–To view all the shipments ready for customer pick up, choose
Pick Up.
–To view all the shipments ready to be shipped to the customer,
choose Ship Out.
–To view all the shipments that are ready for customer pick up
or delivery, choose Both.
e. In the Document Type field, choose any of the following options:

50 User Guide
Searching for Shipments
–To view all the outbound shipments against sales order, choose
Sales Order.
–To view all the outbound shipments against transfer order,
choose Transfer Order.
–To view all the outbound shipments, choose Both.
f. Click Search.
In the Search Results panel, you can view the shipment number,
order number, customer name and address, the requested date of
shipment, and current status of the shipment.
4. Do any of the following:
QClick Show Criteria. The Shipment Search panel displays. If you
want to modify the search criteria, repeat Step 2 through Step 3.
QClick View Details to view more information about the selected
shipment. For more information about viewing the shipment
details, see Section 5.2.1, "Viewing Shipment Details".
QClick More Results to view more records. You can view a
maximum of 200 records. By default, the system displays only 30
records.
5.2.1 Viewing Shipment Details
You can view the shipment information for the selected shipment.
In the Shipment Details panel, you can view the shipment number, order
number, shipment status, requested ship date, and the carrier of the
shipment.
In the Bill To Address panel, you can view the customer name and
address.
In the Shipment Lines panel, you can view the item identifier, item
description, quantity of the item, unit of measure for the item, unit price
of the item, and line price. Line price is calculated as Quantity * Unit
Price.
You can also view the total price, total charges, if any, and the total tax
incurred.

Searching for Shipments
Performing Outbound Tasks 51
5.2.2 Reversing a Back Room Pick
After a store associate performs the back room pick, you can undo the
back room pick.
To Undo a back room pick for a shipment:
1. In the Search Results panel, select the shipment for which you want
to reverse the back room pick.
2. From Exception Tasks, select Undo Backroom Pick. A confirmation
window displays.
3. Click OK. The shipment status changes to Ready For Backroom Pick.
5.2.3 Removing Shipments From a Manifest
You can remove shipments that are added to a manifest.
To remove shipments from a manifest:
1. In the Search Results panel, select the shipment that you want to
remove from manifest.
2. From Exception Tasks, select Remove from manifest. A confirmation
window displays.
3. Click OK to remove the shipment from the manifest.
5.2.4 Modifying the Container Information
You can add or delete containers in the shipment from a manifest.
To modify containers:
1. In the Search Results panel, select the shipment for which you want
to modify the container details.
2. From Exception Tasks, select Modify container information.
In the Shipment Details panel, you can view the shipment number,
order number, shipment status, requested ship date, and the carrier
of the shipment.
Note: Once you undo the back room pick, the store
associate must manually move the inventory to the back
room and record the inventory movement.

52 User Guide
Searching for Shipments
In the Customer Address panel, you can view the customer name,
address, phone number, and zip code.
In the Modify Containers panel, you can view the container details in
a shipment such as tracking number, container weight, and unit of
measure for the weight of the container.
3. Modify the tracking number and weight of the container, if applicable.
If you want to delete a container from the shipment, select a tracking
number and click .
If you want to add another container, leave the current row and click
the next row.
4. Click Save.
5.2.5 Viewing Shipment Audit
You can view the audit trail for shipment modification.
From General Tasks, select View Shipment Audit.
QIn the Shipment Details panel, you can view the shipment number,
order number, shipment status, customer name, the billing address,
the address where the shipment needs to be shipped, and the date
on which the store is notified.
QIn the Shipment Audit panel, you can view the date the shipment was
modified, the person who performed the modification, the
modifications against the shipment, the attribute that was modified
for the shipment, the attribute value before making the modification,
the value after the shipment was modified, reason for modification,
and additional information as to why the modification was made.
QIn the Shipment Line Audit panel, you can view the date the
shipment line was modified, the person who performed the
modification, the modifications against the shipment line, the
attribute that was modified for the shipment line, the attribute value
before making the modification, the value after shipment line was
modified, reason for modification, and additional information as to
why the modification was made.

Recording a Back Room Pick
Performing Outbound Tasks 53
5.3 Recording a Back Room Pick
After picking all items, you can record the back room pick for each item
on the pick ticket.
To record a back room pick:
1. From Menu Tasks, select Shipping > Record Backroom Pick. The
Record Receipt screen displays.
2. In the Shipment # field, enter the shipment number for which you
want to record the back room pick.
3. Click Search.
QIf a single shipment exists for the entered shipment number, the
Record Backroom Pick screen displays. For more information
about recording back room pick, see Section 5.3.1, "Recording
Back Room Pick for a Shipment".
QIf multiple shipments exist for the entered shipment number, the
Search Results panel displays. In the Search Results panel, you
can view the identifier of the user who performed the back room
pick, address to which the shipment is shipped, order number of
the shipment, shipment number, date on which the store is
notified, and status of the shipment. Select the appropriate
shipment.
Click Next. The Record Backroom Pick screen displays. For more
information about recording back room pick, see Section 5.3.1,
"Recording Back Room Pick for a Shipment".
5.3.1 Recording Back Room Pick for a Shipment
You can record the quantity of items picked from the back room for the
entered shipment.
To record the picked quantity:
QIf the store is in select mode, the Shipment Details panel displays.
You can view the shipment number, order number, date on which the
store is notified, and the customer name.
QIf the store is in scan mode, you can view the shipment number.
–In the Item ID field, enter the item identifier of the item scanned.
This is applicable for scanned items.
54 User Guide
Recording a Back Room Pick
–In the last scanned item field, enter the identifier of the last
scanned item.
–In the Last Scanned Quantity field, enter the quantity of items last
scanned.
When an item is scanned, the item identifier displays. Once you
press the tab key, the last scanned quantity displays for that item.
QIn the Items available for picking panel, you can view the order
number, the item identifier, the item description, quantity of item
ordered by the customer, and the unit of measure for the item.
a. In the Pick Qty field, enter the quantity of items picked. This is
applicable if the store is in select mode.
b. In the UOM field, select the UOM of the item from the drop-down
list.
c. In the Pick Qty field, enter the alternate item quantity that you
picked.
d. In the UOM field, the alternate UOM of the item automatically
displays. Select the alternate UOM of the item from the
drop-down list, if applicable.
The quantity of items that are picked and the unit of measure for
the item automatically displays.
e. Click Next. The Shortage Resolution screen displays. For more
information about resolving shortage, see Section 5.3.2,
"Resolving Shortages for a Back Room Pick".
Note: In the Sterling Store Inventory Management, the
blank field indicates that you need to enter the quantity
based on the alternate UOM displayed.
Note: If there is excess inventory in the customer
location, you need to move inventory from the customer
location to the backroom location.

Searching for a Customer Order
Performing Outbound Tasks 55
5.3.2 Resolving Shortages for a Back Room Pick
You can record shortages, if any, when performing a back room pick.
To resolve shortages:
1. In the Shortage Resolution panel:
QIf the shortage is due to inadequate inventory, choose Inventory
Shortage. The shortage quantity is backordered.
QIf you want to pick only some items now and want to pick the
remaining items later, choose Will pick later.
QIf shortage is due to both inadequate inventory and partial pick,
choose Shortage resolution varies by line.
In the Shortage Resolution on each item panel, you can view the
order number, identifier of the item, item description, ordered
quantity, shortage quantity, and unit of measure for the item.
2. Click Confirm.
5.4 Searching for a Customer Order
When a customer walks into the store with the proof of purchase and
picks up an order, it is called as customer pick. You can verify the
customer details based on the credit card number or other details
provided by the customer.
To search for a customer order:
1. From Menu Tasks, select Shipping > Record Customer Pick. The
Pickup Order screen displays.
2. In the Enter Search Criteria panel:
a. In the Credit Card # field, enter the credit card number given by
the customer, if applicable.
b. In the Order # field, enter the order number, if applicable.
Note: The Picked Location on each Item panel appears
only when you choose Shortage resolution varies by line.

56 User Guide
Searching for a Customer Order
c. In the Phone # field, enter the customer’s phone number, if
applicable.
d. In the Last Name field, enter the last name of the customer, if
applicable.
e. In the First Name field, enter the first name of the customer, if
applicable.
f. In the Orders not picked up for... days field, enter the number of
days the shipment has been ready for customer pick up, if
applicable.
g. Click Search.
In the Search Results panel, you can view the customer name, the billing
address of the shipment, order number, the date on which the store is
notified of the shipment creation, and the status of the shipment. Select
the shipment from the list and click Next.
If the customer cannot provide the credit card number, you may need to
verify other details.
5.4.1 Verifying Customer Details
In the Order Summary panel, you can view the name of the customer
picking up the purchase, the name of the customer to whom the
purchase is billed, order number, the date on which store is notified of
the purchase, and the status of the purchase.
In the Customer Address panel, the address of the customer displays.
In the Bill To Address panel, the billing address displays.
To verify a customer details:
1. In the Enter Verification Details panel, enter the last four digits of the
credit card.
If the customer cannot provide the credit card number, click Show
Manual Verification.
2. In Manual Verification panel:
Note: All these fields are case-sensitive.

Searching for a Customer Order
Performing Outbound Tasks 57
QIf you are verifying customer address, choose Address Verified.
QIf you are verifying customer license, choose License Verified.
QIf you are verifying the passport, choose Passport Verified.
QIf you are using other verification methods, choose Other
Verification.
3. Click Next.
5.4.2 Selecting Items
You can select items from an order picked by the customer.
In the Order Summary panel, you can view the name of the customer
picking up the purchase, the name of the customer to whom the
purchase is billed, order number, the date on which the store is notified
of the purchase, and the status of the purchase.
In the Scan Item panel, you can view the item identifier, the last scanned
item, and the quantity of items last scanned.
When you scan an item, the identifier of the item displays in the item ID
field. Once you press the Tab key, the last scanned quantity displays for
that item.
In the Select Items to Pick panel, you can view the item identifier, item
description, the quantity picked from back room, the unit of measure for
the item, the item unit price, the current unit price, and the extended
price of the item. Click Next.
QIf there is a shortage in the picked quantity, the Resolving Shortage
screen displays. For more information about resolving shortage, see
Section 5.4.3, "Resolving Shortages for Customer Picks".
QIf no shortage exists, the Order Summary screen displays. For more
information about the order summary, see Section 5.4.4, "Viewing
Order Summary".
Note: You can view the Scan Item panel only if the scan
mode is enabled.

58 User Guide
Searching for a Customer Order
5.4.3 Resolving Shortages for Customer Picks
You can record shortages, if any, during a customer pick as well as the
reason for shortage.
To resolve shortages for customer picks:
QChoose Customer to pick up remaining later due to, if you want to
record partial customer pick. To record the reason for a partial
customer pick:
–Choose Inventory Shortage, if there is inadequate inventory for
customer pick.
–Choose Customer Preference, if the customer wants to collect the
remaining inventory later.
QChoose Cancel remaining due to, if customer wants to cancel a part
of the order and select the reason for cancellation from the
drop-down list. You can also enter the reason.
QChoose Shortage resolution varies by line, if item shortage is due to
inadequate inventory or due to customer preference.
Click Next. The Order Summary screen displays. For more
information about verifying order details, see Section 5.4.4, "Viewing
Order Summary".
5.4.4 Viewing Order Summary
You can view the order summary and verify the details of the order.
To view order details:
QIn the Order Summary panel, you can view the name of the customer
picking up the purchase, the name of the customer to whom the
purchase is billed, order number, the date on which store is notified of
the purchase, and the status of the purchase.
QIn the Items Picked panel, you can view the item identifier, item
description, the ordered quantity, the unit of measure for the item,
the quantity picked from back room, the order unit price, the current
unit price, and the extended price of the item. It also displays total
number of picked items and the total amount.
QIn the Items not picked panel, you can view the item identifier, item
description, the ordered quantity, the unit of measure for the item,

Creating a Bill of Lading
Performing Outbound Tasks 59
the quantity of items not picked from the back room, the item unit
price, the current unit price, and the extended price of the item. It
also displays the total number of items not picked and the total
amount.
QIn the Items Cancelled panel, you can view the item identifier, item
description, the ordered quantity, the unit of measure for the item,
the cancelled quantity, the item unit price, the current unit price, and
the extended price of the item. It also displays the total number of
items cancelled and the total amount.
QClick Confirm to save the details.
5.5 Creating a Bill of Lading
You can create a Bill of Lading (BOL) for a load.
To create a BOL:
1. From Menu Tasks, select Shipping > Create BOL. The Create BOL
screen displays.
2. In the Create BOL for a shipment panel:
QIn the Shipment # field, enter the shipment number.
QIn the Order # field, enter the order number of the shipment.
3. Click Create. The Shipment Consolidation screen displays. For more
information about consolidating shipments for a load, see
Section 5.5.2, "Consolidating Shipments".
If the order has multiple shipments, the Select Shipment screen
displays. For more information about selecting a shipment, see
Section 5.5.1, "Selecting a Shipment".
If shipments do not exist for the order, the Create Load screen
displays. For more information about creating a load, see
Section 5.5.3, "Creating a Load".
5.5.1 Selecting a Shipment
You can view shipments related to an order and select a shipment.
QIn the Shipment List panel, you can view the shipment number, order
number for the shipment, customer name, total weight of the

60 User Guide
Creating a Bill of Lading
shipment, unit of measure of the shipment, total volume, status of
the shipment, and the date on which the shipment needs to be
shipped to the customer.
To select a shipment:
1. Select the shipment from the list.
2. Click Next.
Based on the shipment you selected, the system verifies if there are
more shipments that are shipped to the same customer or
destination. If shipments are found, the Shipment Consolidation
screen displays.
5.5.2 Consolidating Shipments
You can view details of the selected shipment. You can also view other
shipments that are to be shipped to the same customer or destination.
QIn the Shipment Details panel, you can view the shipment number,
order number, name of the customer, weight of the shipment, volume
of the shipment, and the date on which the shipment needs to be
shipped to the customer.
QIn the Shipment Address panel, you can view the customer name and
address for the previously selected shipment.
QIn the Shipments Going To The Same Destination panel, you can view
the shipments being shipped to the common customer and
destination.
To consolidate shipments:
1. Check the boxes of the applicable shipments you want to consolidate.
The Consolidated Weight and Consolidated Volume for the selected
shipments displays.
2. Click the View Details hyperlink to view the details of the shipment.
For more information about viewing shipment details, see
Section 5.2.1, "Viewing Shipment Details".
3. Click Next to confirm shipment consolidation. The Create Load screen
displays. For more information about creating a load, see
Section 5.5.3, "Creating a Load".

Creating a Bill of Lading
Performing Outbound Tasks 61
5.5.3 Creating a Load
You can create a new load or include the consolidated shipments in an
existing load.
To create load:
1. If you want to create a new load for the shipments, choose Create a
new load.
2. If you want to include the shipments in a load being shipped to the
common customer and destination, choose Include in an existing
load. In the Existing loads panel, a list of all loads being shipped to
the same customer displays.
QIn the Existing Loads panel, you can view the load number,
customer address to where the shipment is shipped, the carrier
code, total weight of the load, and total volume of the load. Select
the load to which you want to include the consolidated shipment.
3. Click Next. The Load Confirmation screen displays. For more
information about confirming a load, see Section 5.5.4, "Confirming a
Load".
5.5.4 Confirming a Load
You can use this screen to confirm or modify a load that has already
been created.
To confirm a load:
1. Navigate to the Load Summary panel.
2. In the SCAC and Service field, select the scac service from the
drop-down list.
3. In the PRO # field, enter the PRO number of the load.
4. In the Trailer # field, enter the trailer number of the trailer.
5. In the Freight Terms field, select the freight terms from the
drop-down list.
In the Load Weight/Volume panel, you can view the total weight of
the load and total volume of the load. If you want to remove
shipment lines from a load, click the Has Truck Limit Exceeded
hyperlink. The Load Summary screen displays. For more information

62 User Guide
Creating a Bill of Lading
about removing shipment lines, see Section 5.5.4.1, "Removing
Shipment Lines from a Load".
In the Destination Address panel, you can view the name and address
of the destination where the shipment is shipped.
6. In the BOL Instructions panel, enter the instructions for a BOL, if
applicable.
In the Shipments in the load panel, you can view the shipment
number, order number, total weight of the load, unit of measure for
the weight, total volume of the load, and the number of pallets and
cartons in the shipment. You can enter the number of pallets and
cartons. Click Save, if you want to save the load and keep it open.
You can click Confirm to confirm the load.
5.5.4.1 Removing Shipment Lines from a Load
You can remove any shipment lines or reduce the quantity of a shipment
in a load.
In the Load Summary panel, you can view the load number, the SCAC
service, PRO number, trailer number, and freight terms.
In Load Weight/Volume panel, you can view the total weight and total
volume of the load.
In the Destination Address panel, you can view the name and address to
where the shipment is shipped.
In the Shipment Lines panel, you can view the shipment number, the
order number of the shipment, the item identifier, item description, and
the item quantity in the shipment.
To remove the shipment lines:
1. In the Remove Quantity field, enter the quantity of items you want to
remove from the shipment line.
Based on the quantity entered, the total weight and total volume of
the shipment line displays. You can also view the UOM of the item.
2. Click Save.

Opening a Manifest
Performing Outbound Tasks 63
5.6 Opening a Manifest
You can open a manifest for a shipment or add a shipment to an existing
manifest.
To open a manifest for a shipment:
1. From Menu Tasks, select Shipping > Add Shipment To Manifest. The
Add To Manifest screen displays.
2. In the Identify Shipment panel:
QIn the Shipment # field, enter the shipment number of the
shipment you want to associate with a manifest.
QIn the Order # field, enter the order number of the shipment you
want to associate with a manifest.
3. Click Create. The Manifest Details screen displays. For more
information about viewing the details of a manifest, see
Section 5.6.2, "Viewing the Manifest Details".
If the order has multiple shipments, the Select shipment screen
displays. For more information about selecting a shipment, see
Section 5.6.1, "Selecting a Shipment for a Manifest".
5.6.1 Selecting a Shipment for a Manifest
You can view shipments related to an order and select a shipment.
QIn the Shipment List panel, you can view the shipment number, order
number for the shipment, customer name, total weight of the
shipment, unit of measure of the shipment, total volume, status of
the shipment, and the date on which the shipment needs to be
shipped to the customer.
To select a shipment:
1. Select the shipment from the list.
2. Click Next. The Manifest Details screen displays. For more information
about viewing a manifest, see Section 5.6.2, "Viewing the Manifest
Details"

64 User Guide
Closing a Manifest
5.6.2 Viewing the Manifest Details
You can view the manifest details and select the carrier associated with
the shipment.
To view the manifest details:
In the Shipment Identifier panel, you can view the shipment number and
order number of the shipment.
1. In the Shipment Details panel:
a. In the SCAC and Services field, select the SCAC associated with
the shipment from the drop-down list.
b. In the Freight Terms field, select the freight term from the
drop-down list.
You can view the customer name, the date by which the shipment is
shipped to the customer, the weight of the shipment and the volume
of the shipment.
In the Shipment Address panel, you can view the name and address
of the customer to whom the shipment is shipped.
2. In the Add Containers panel:
a. In the Tracking # field, enter the container tracking number.
b. In the Container Weight field, enter the weight of the container.
The unit of measure for the weight of the container automatically
displays.
3. In the Manifest Details panel, you can view the manifest information
based on the selected carrier.
QIf you want to add a shipment and keep the manifest for the
selected SCAC open, choose Keep the manifest open.
QIf you want to add a shipment to the manifest and close the
manifest, choose Close the manifest.
QIf a manifest does not exist for the selected carrier, you can open
a new manifest by entering a new manifest number. This option
displays only if the carrier has no open manifests.
4. Click Save.

Managing Alerts 65
6
Managing Alerts
An alert is a message directed to a queue about a transaction that may
need manual intervention or review. Alerts are raised by the system
when specific events occur.
Alerts may be picked up and resolved by users who have permissions to
access the alert. Irrespective of the user who has picked up the alert, all
users who have permission to access the alert can view the alert
information.
Alerts are raised using either monitoring rules or event handlers that get
invoked when calling an API.
This chapter explains how to manage alerts.
6.1 Viewing Informational Alerts
You can view alerts raised by the system and the total number of times it
was raised.
To view the alert information:
1. From Menu Tasks, select Alerts > View Alerts. The Informational
Alerts screen displays.
You can view the alert type and the total number of times it was
raised.
2. Click the View Details hyperlink to view the alert details. For more
information about viewing alert details, see Section 6.1.1, "Viewing
Alert Details".

66 User Guide
Viewing Informational Alerts
6.1.1 Viewing Alert Details
The alert details displayed are based on the alert type. In the
Information Alert List panel, you can view alert details for the following
alert types:
QDelayed Customer Pick
QInventory Adjustment Variance value above threshold value
QInventory Shortage
6.1.1.1 Viewing Alert Details for the Delayed Customer Pick Alert
Type
You can view the shipment number, date on which the customer needs to
pick up the shipment, and the customer address. The customer details
are provided if the store associate wants to inform the customer of the
shipment.
Click Mark All As Reviewed if you have examined all alerts. This button is
permission controlled.
6.1.1.2 Viewing Inventory Adjustment Variance Value Above the
Threshold Value
You can view the identifier of the item, item description, quantity
adjusted, item’s unit of measure, cost of adjustment, and reason code
for performing the adjustment.
Click Mark All As Reviewed if you have examined all alerts. This button is
permission controlled.
6.1.1.3 Viewing Inventory Shortage
You can view the identifier of the item, shortage quantity, on hand
quantity, unit of measure of the item, and the horizon end date.
Click Mark All As Reviewed if you have examined all alerts. This button is
permission controlled.

Viewing Informational Alerts
Managing Alerts 67
6.1.2 Creating Alerts
You can create new alerts and log notes for future reference.
To create an alert:
1. From Alerts Tasks, select Create Alert. The Create Alert screen
displays.
2. In the Alert Type field, select the appropriate alert type from the
drop-down list.
3. In the User field, enter the name of the user to whom the alert is
assigned.
If you do not know the user’s identifier, click the Find User hyperlink.
The Find User pop-up window displays. For more information about
searching for a user, see Section 6.1.2.1, "Finding a User".
4. In the Follow-up Date field, enter the date on which the user needs to
follow up on the alert. Click to select the date.
5. In the Priority field, the priority of the chosen alert type displays. You
can also enter the priority of the alert.
6. In the Queue field, the assigned queue for the chosen alert type
displays. You can change the queue by selecting a different queue
from the drop-down list.
7. In the Details panel, you can enter the details of the alert.
8. Click Create to create an alert.
6.1.2.1 Finding a User
You can use the Find User pop-up to find a user.
To find a user:
1. In the User ID Contains field, enter the identifier of the user. You can
also search by entering a partial user identifier.
2. In the User Name Contains field, enter the name of the user to whom
the alert needs to be assigned. You can search by entering a partial
user name.
Note: The User ID Contains and User Name Contains
fields are case-sensitive.

68 User Guide
Viewing Informational Alerts
3. Click Find User. A list of users matching the search criteria displays.
4. Double-click the appropriate user’s identifier.
6.1.3 Viewing the Alert Information
You can view your alert information that displays in the form of a tree
structure.
To view the alert information:
1. From Alert Tasks, select View My Alerts And Queues. A tree structure
that provides a list of various alerts and queues displays, which
contains:
QMy Alerts Due For Follow-up — This displays the total number of
alerts open or due for follow-up on the current or the next day.
QMy Alerts — This displays the total number of alerts assigned to
the user.
QMy Queues — This displays all queues to which the user is
subscribed.
2. Double-click an alert or queue to view the list of alerts. For more
information about viewing the list of alerts, see Section 6.1.3.1,
"Viewing a List of Alerts".
6.1.3.1 Viewing a List of Alerts
You can view a list of alerts assigned to the user.
QIn the Alert List panel, you can view the alert identifier, priority of the
alert, alert type, date on which the alert was created, number of
times the alert was raised, and the queue to which the alert belongs.
QDouble-click an alert or queue for which you want to view details. For
more information about viewing alert details, see Section 6.1.5,
"Viewing Alert Details".
6.1.4 Searching for Alerts
You can search for alerts that are created.
To search for an alert:

Viewing Informational Alerts
Managing Alerts 69
1. From Alert Tasks, select Alert Search. The Alert Search screen
displays.
2. In the Alert Search Criteria panel, in the Alert Type field, select the
alert type from the drop-down list, if applicable.
3. In the Queue field, select the queue from the drop-down list, if
applicable. You can view all queues assigned to you.
4. In the Assigned To User field, enter the identifier of the user by
selecting the appropriate condition from the drop-down list. You can
also perform a search by entering a part of the user’s identifier.
5. In the Created On From field, enter the date range to search for
alerts that are created within the specified date range.
6. In the Alert Status field:
QSelect Open to search for alerts that are open.
QSelect WIP to search for alerts that are still work in progress.
QSelect Closed to search for alerts that are closed.
7. In the Follow-up Date From field, enter the date range to search for
alerts.
8. In the Raised Count field, enter the number of times the alert was
raised by selecting the appropriate condition from the drop-down list.
9. In the Priority field, enter the priority of the alert by selecting the
appropriate condition from the drop-down list.
10. Click Search.
In the Alert List panel, you can view the alert identifier, alert priority,
alert type, date on which the alert was created, number of times the
alert was raised, and queue to which the alert belongs.
Double-click on an alert for which you want to view the details. The
Alert Details screen displays. For more information about viewing
alert details, see Section 6.1.5, "Viewing Alert Details".
6.1.5 Viewing Alert Details
You can view the details of an alert that matches your search criteria.
QIf you want to change the status of an alert, select the appropriate
alert status from the Alert Status drop-down list and click Save.

70 User Guide
Viewing Informational Alerts
QIf you want to modify the follow-up date for an alert, enter the
appropriate date in the Follow-up Date field and click Save.
In the Notes panel, you can view any additional information about the
alert.
QIf you want to enter notes for an alert, click the Add Note hyperlink.
The Add Notes for the Alert pop-up window displays. Enter
information or specific instructions for the alert and click Add Note.
The note displays in the Notes panel.
6.1.6 Closing an Alert
You may need to close an alert, if it is no longer valid.
To close an alert:
1. From Alert Tasks, select Close Alert. The Close Alert screen displays.
You can view the identifier of the user who wants to close the alert.
2. In the Notes panel, add appropriate notes to explain why you are
closing the alert.
3. Click Close.
6.1.7 Assigning Alerts to a User
An alert can be assigned to a particular user so that it can be addressed
by that user.
To assign alerts to a user:
1. From Alert Tasks, select Assign To User. The Assign Alert to User
screen displays.
2. In the Currently Assigned To User ID field, the user identifier of the
user who has currently been assigned the alert displays.
3. In the Assign To User ID field, enter the identifier of the user to
whom you want to assign the alert.
To search for the user ID of the user to whom you want to assign the
alert, enter the user details in the Find User panel.
4. In the Find User panel:

Viewing Informational Alerts
Managing Alerts 71
a. In the User ID Contains field, enter the user identifier of the user.
You can search by entering a partial user identifier.
b. In the User Name Contains field, enter the user name of the user
to whom the alert needs to be assigned. You can search by
entering a partial user name.
c. Click Find User. The list of users matching the search criteria
displays.
5. In the Notes panel, enter the appropriate additional information.
6. Click Assign.
6.1.8 Assigning Alerts to a Queue
You can move an alert to a different queue.
To move an alert to a different queue:
1. From Alert Tasks, select Assign To Queue. The Assign Alert To Queue
screen displays.
2. In the Currently Assigned To Queue ID field, the identifier of the
queue displays.
3. In the Assign To Queue ID field, enter the identifier of the queue to
which you want to assign the alert.
To search for the Queue ID of the queue to which you want to assign
the alert, enter the queue details in the Find Queue panel.
4. In the Find Queue panel:
a. In the Queue ID Contains field, enter the identifier of the queue.
You can search by entering a partial queue identifier.
b. In the Queue Name Contains field, enter the name of the queue
to which the alert needs to be assigned. You can search by
entering a partial queue name.
c. Click Find Queue. The list of queues matching the search criteria
displays.
5. In the Notes panel, enter the appropriate additional information.
6. Click Assign.

72 User Guide
Viewing Informational Alerts

Prints 73
7
Prints
This chapter explains the various documents that are printed daily in a
store as and when requested or when initiated by the occurrence of
specific events.
The Sterling Store Inventory Management provides the following prints:
QInbound Prints
QInventory Prints
QOutbound Prints
7.1 Inbound Prints
The following inbound prints can be generated using the Sterling Store
Inventory Management:
QReceiving Worksheet for Bill Of Lading
QCustomer Label
QReceiving Worksheet for an Order
QReceiving Discrepancy Report
7.1.1 Receiving Worksheet for Bill Of Lading
You can print the receiving worksheet for a shipment based on the BOL
number. If the shipment is a part of the sales order, the customer label is
printed along with the receiving worksheet. For more information about
the customer label, see Section 7.1.2, "Customer Label".
The following is the default Receiving Worksheet for BOL that the Sterling
Store Inventory Management prints:
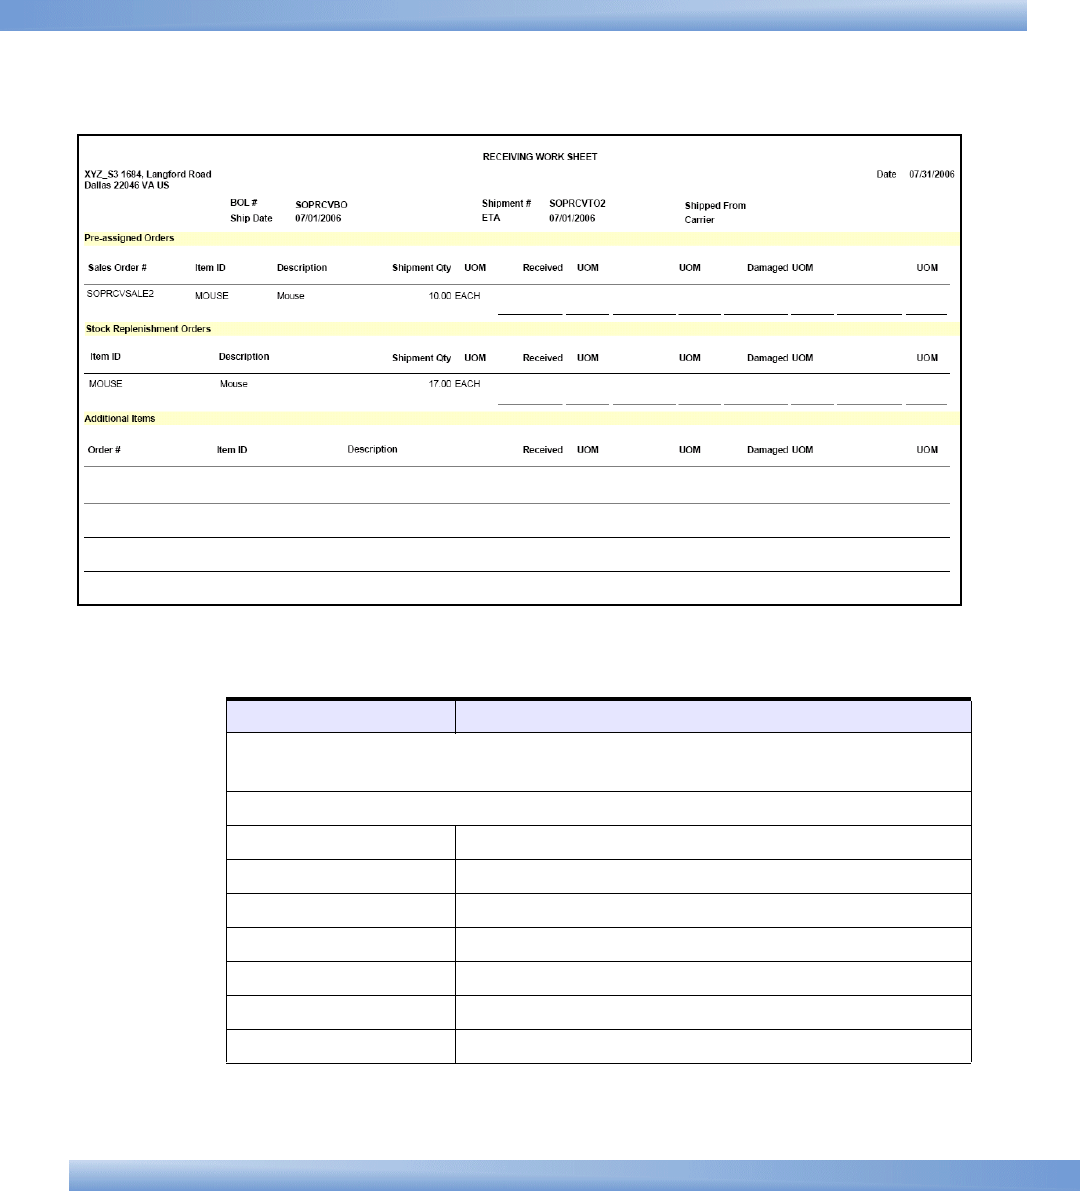
74 User Guide
Inbound Prints
Table 7–1 Receiving Worksheet for BOL
Field Description
This worksheet includes the store address, BOL number, shipping date,
shipment number, ETA, and carrier used for the shipment.
Pre-Assigned Orders
Sales Order # The sales order number of the shipment received.
Item ID The identifier of the item.
Description The item description.
Shipment Qty The quantity of the shipment being shipped.
UOM The unit of measure of the item.
Received The received quantity of the item.
Damaged The quantity of damaged items.

Inbound Prints
Prints 75
7.1.2 Customer Label
The Customer Label provides information on the customer to whom the
shipment is shipped. This label is printed only for a sales order.
The following is the default Customer Label that the Sterling Store
Inventory Management prints:
Stock Replenishment Orders
Item ID The identifier of the item.
Description The item description.
Shipment Qty The quantity of items being shipped.
UOM The unit of measure of the item.
Received The received quantity of the item.
Damaged The quantity of damaged items.
Additional Items
Order # The order number of the shipment received.
Item ID The identifier of the item.
Description The item description.
Received The received quantity of the item.
UOM The unit of measure of the item.
Damaged The quantity of damaged items.
Table 7–1 Receiving Worksheet for BOL
Field Description
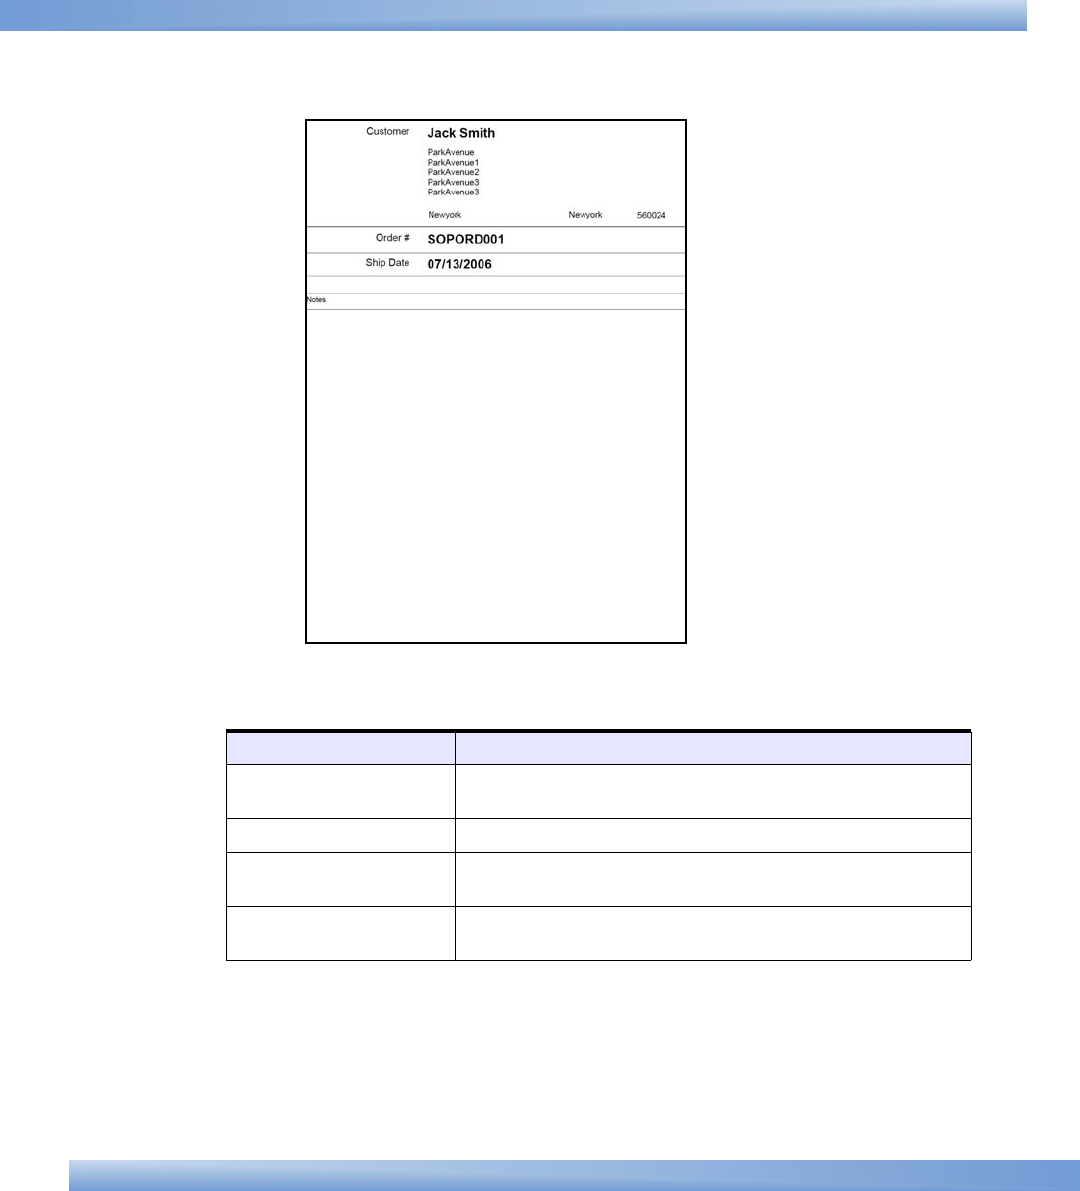
76 User Guide
Inbound Prints
7.1.3 Receiving Worksheet for an Order
You can print the receiving worksheet for a shipment based on the order
number. If the shipment is a part of the sales order, the customer label is
Table 7–2 Customer Label
Field Description
Customer The name and address of the customer to whom the
shipment needs to be shipped.
Order # The order number of the sales order.
Ship Date The date on which the shipment is shipped to the
customer.
Notes Enter additional information about the customer, if
applicable.

Inbound Prints
Prints 77
printed along with the Receiving Worksheet. For more information about
the customer label, see the Section 7.1.2, "Customer Label".
The following is the default Receiving Worksheet that the Sterling Store
Inventory Management prints:
Table 7–3 Receiving Worksheet for an Order
Field Description
This worksheet includes the store address, order date, and order
number.
Pre-Assigned Orders
Sales Order # The sales order number of the shipment received.
Item ID The identifier of the item.
Description The item description.
Shipment Qty The quantity of items being shipped.
UOM The unit of measure of the item.
Received The received quantity of the item.
Damaged The quantity of damaged items.
Stock Replenishment Orders
Store Address

78 User Guide
Inbound Prints
7.1.4 Receiving Discrepancy Report
The Receiving Discrepancy Report provides the discrepancy details
between the expected quantities and received quantities.
The following is the default Receiving Discrepancy Report that the
Sterling Store Inventory Management prints:
Item ID The identifier of the item.
Description The item description.
Shipment Qty The quantity of items being shipped.
UOM The unit of measure of the item.
Received The received quantity of the item.
Damaged The damaged quantity of the item.
Table 7–3 Receiving Worksheet for an Order
Field Description
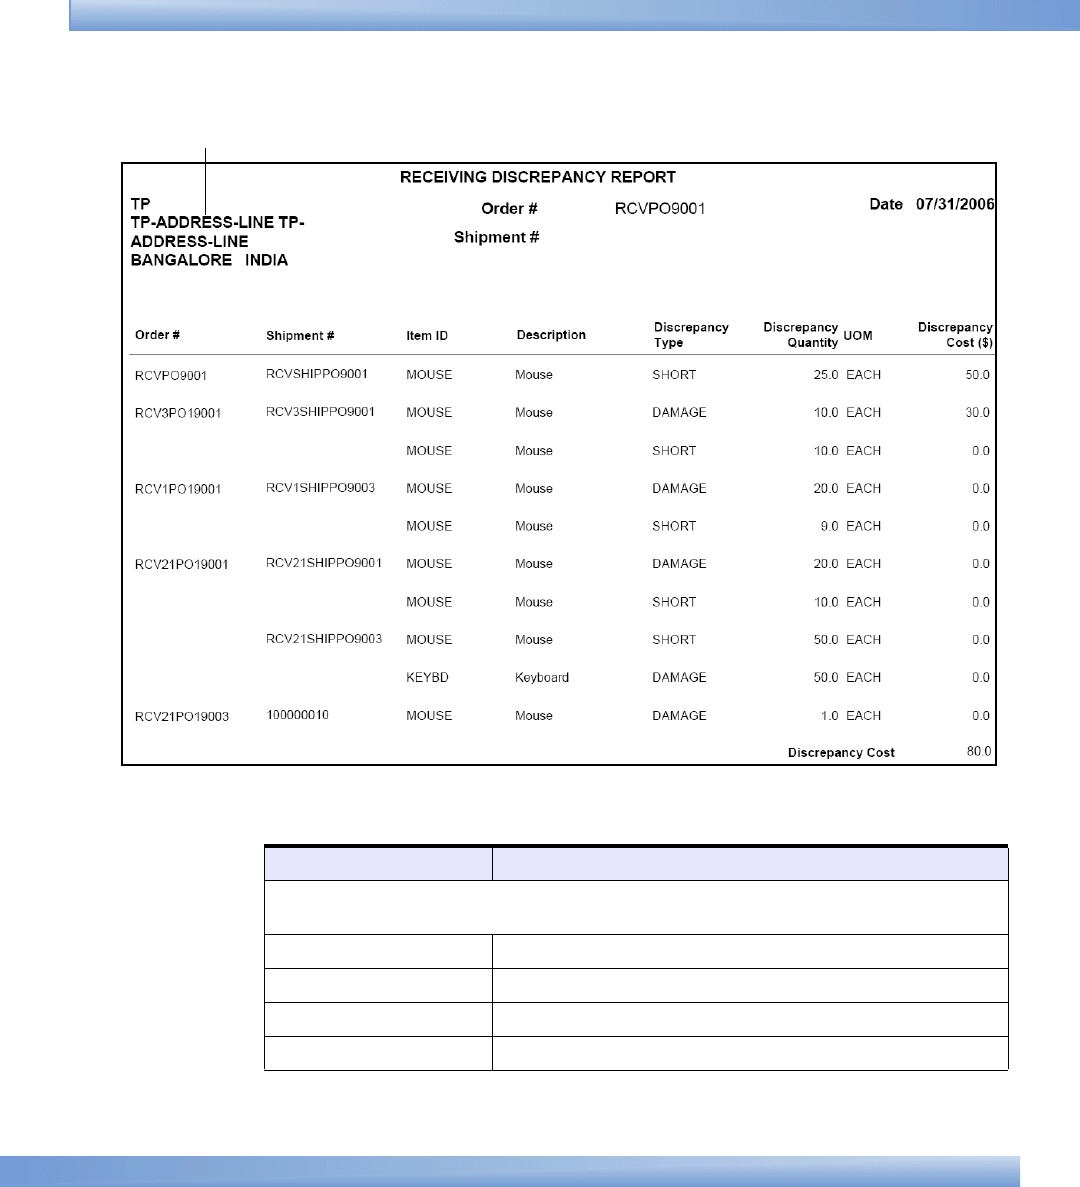
Inbound Prints
Prints 79
Table 7–4 Receiving Discrepancy Report
Field Description
The report includes the address of the store, order number, shipment number,
and the date on which the report is generated.
Order # The order number of the shipment.
Shipment # The shipment number of the shipment.
Item ID The identifier of the item.
Description The description of the item.
Store Address
80 User Guide
Inventory Prints
7.2 Inventory Prints
The following inventory prints can be generated using the Sterling Store
Inventory Management:
QCycle Count Worksheet
QCycle Count Variance
QVariance Details by Count Sheet
QPhysical Count Variance Report
QItem Variance Details By Count Sheet
7.2.1 Cycle Count Worksheet
The Cycle Count Worksheet lists all items that are pending count.
The default layout of the Cycle Count Worksheet is:
Discrepancy Type The type of discrepancy in the receipt.
Discrepancy Quantity The difference between the expected quantity and
received quantity.
UOM The unit of measure of the item.
Discrepancy Cost ($) The product of the unit cost of the item and the
discrepancy quantity.
Table 7–4 Receiving Discrepancy Report
Field Description
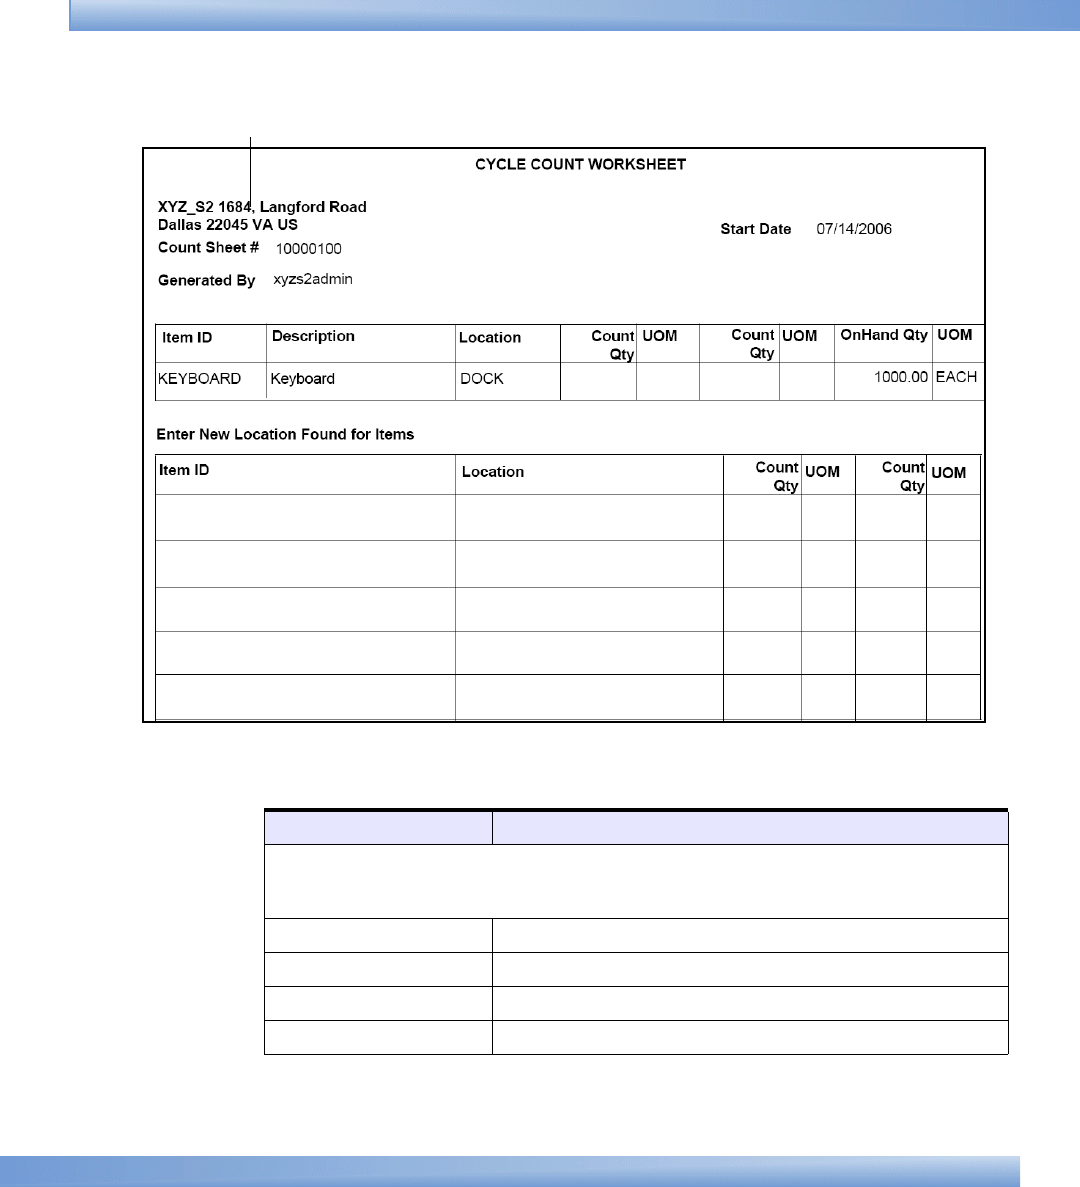
Inventory Prints
Prints 81
Table 7–5 Cycle Count Worksheet
Field Description
This worksheet includes the store address, date on which the count sheet is
printed, and the identifier of the user who generated the worksheet. In the
count sheet number field, enter the count sheet number.
Item ID The identifier of the item.
Description The description of the item.
Location The location of the item.
Count Qty The item quantity that you physically counted.
Store Address
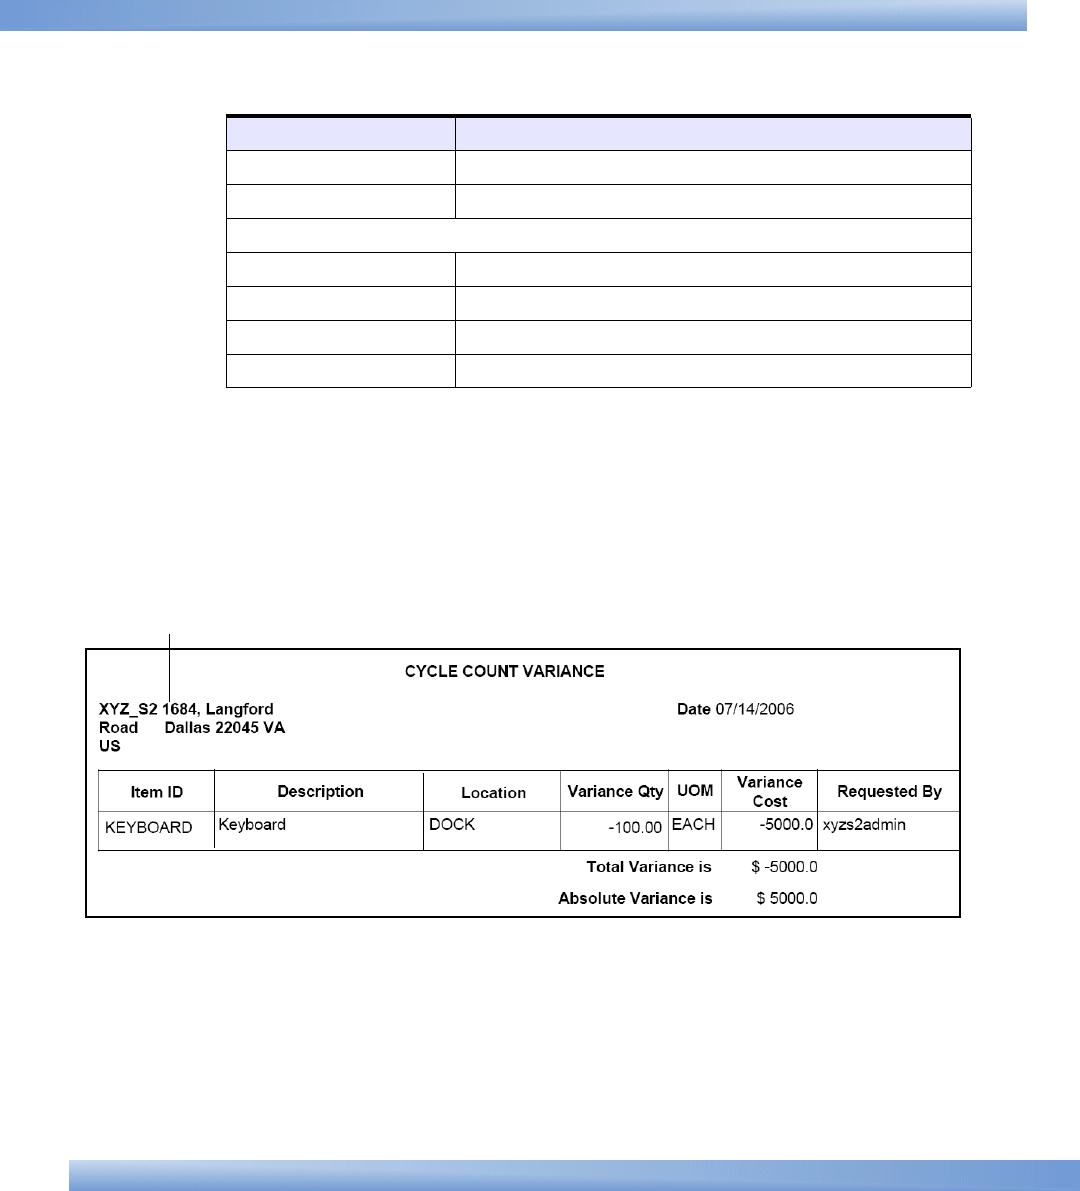
82 User Guide
Inventory Prints
7.2.2 Cycle Count Variance
The Cycle Count Variance report provides cycle count variance
information for a particular day.
The default format of the Cycle Count Variance report is:
UOM The unit of measure of the item.
Onhand Qty The onhand quantity of the item.
Enter New Location Found for Items
Item ID The identifier of the item.
Location The location of the item.
Count Qty The item quantity that you physically counted.
UOM The unit of measure of the item.
Table 7–5 Cycle Count Worksheet
Field Description
Store Address
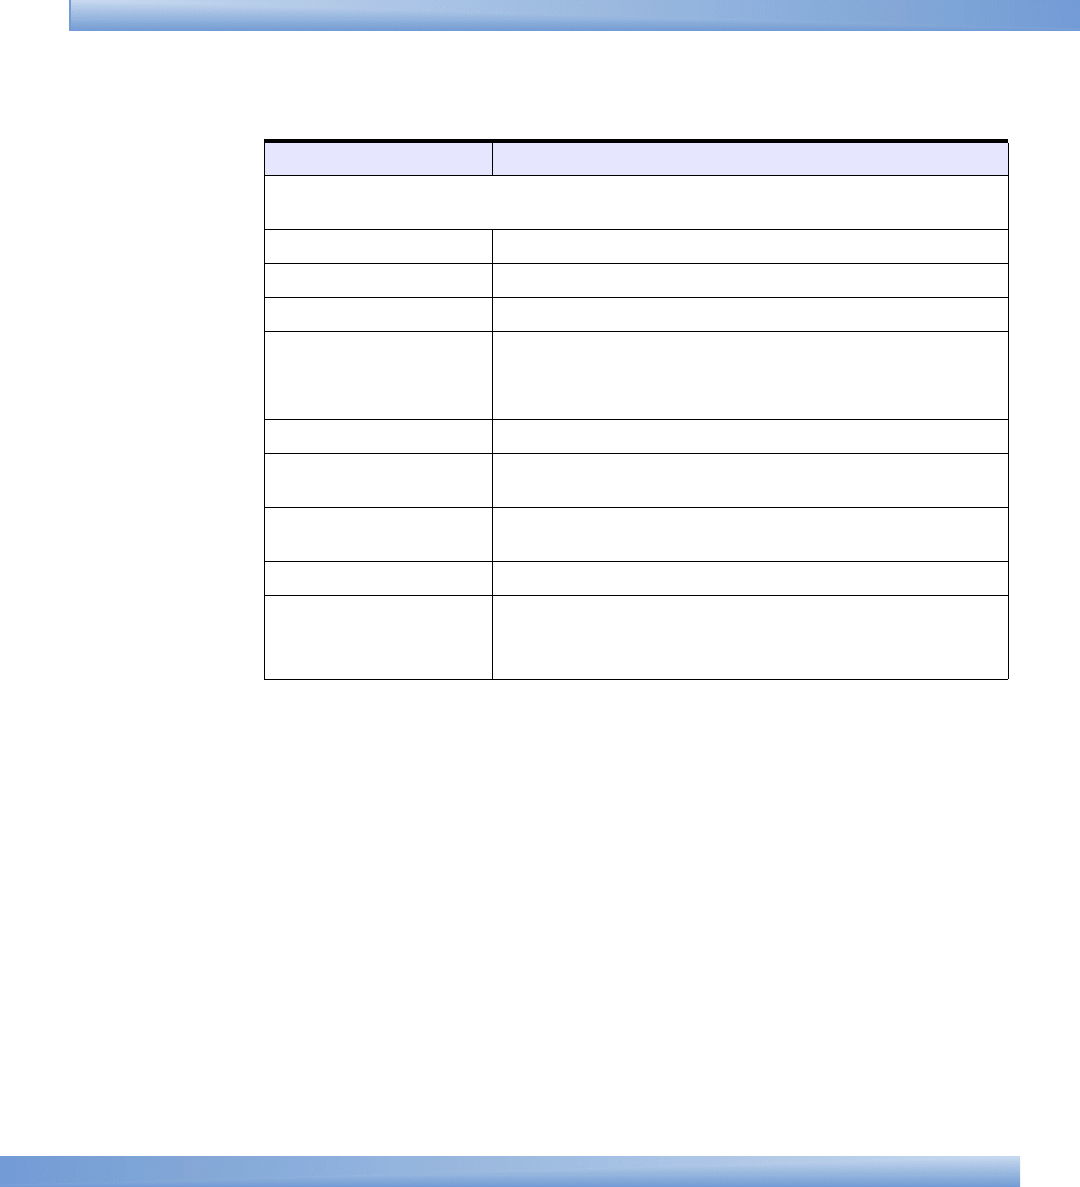
Inventory Prints
Prints 83
7.2.3 Variance Details by Count Sheet
The Variance Details by Count Sheet report provides variance information
for a cycle count based on a particular item and location.
The default format of the Cycle Count Variance Report is:
Table 7–6 Cycle Count Variance Report
Field Description
This report includes the address of the store and the date on which the report is
printed.
Item ID The identifier of the item.
Description The description of the item.
Location The location where the item is placed.
Variance Qty Displays the variance quantity.
Variance quantity is computed as the difference
between on hand quantity and count quantity.
UOM Unit of measure of the item.
Variance Cost The product of the unit cost of the item and the
absolute variance quantity.
Requested By The identifier of the user who requested the variance
report.
Total Variance is The total variance cost.
Absolute Variance is The absolute variance cost.
Even if the variance cost is negative, the absolute
variance cost is considered to be positive.
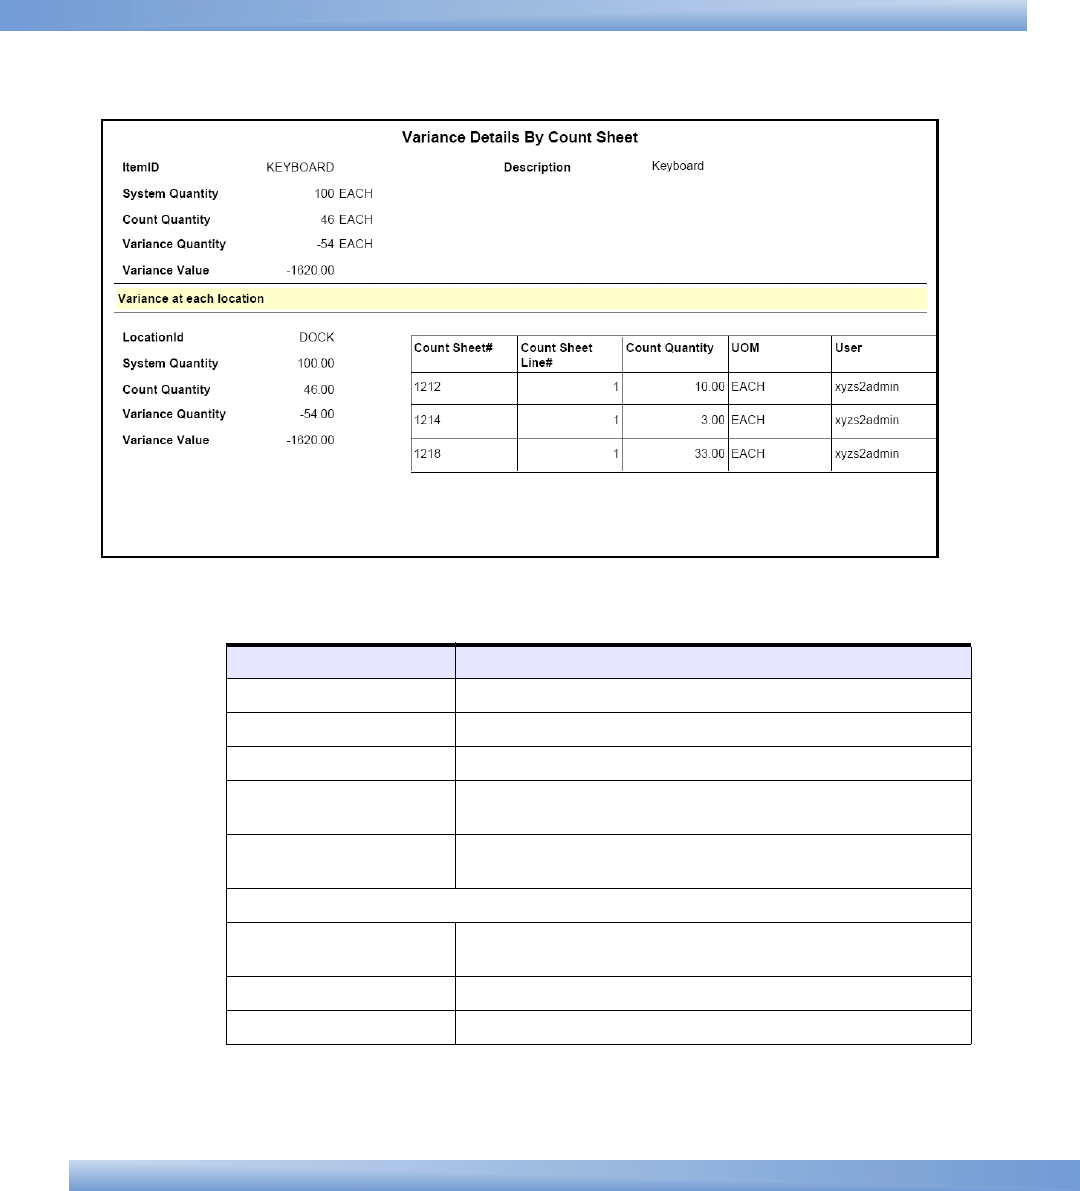
84 User Guide
Inventory Prints
Table 7–7 Variance Details by Count Sheet Report
Field Description
Item ID The identifier of the item.
System Quantity The quantity of item recorded in the system.
Count Quantity The actual quantity counted by the user.
Variance Quantity The difference between the System Quantity and the
Count Quantity.
Variance Value The product of the unit cost of the item and the
absolute variance cost.
Variance at each location
Location ID The identifier of the location where the items are
stored.
System Quantity The quantity of the item as recorded in the system.
Count Quantity The actual quantity counted by the user.
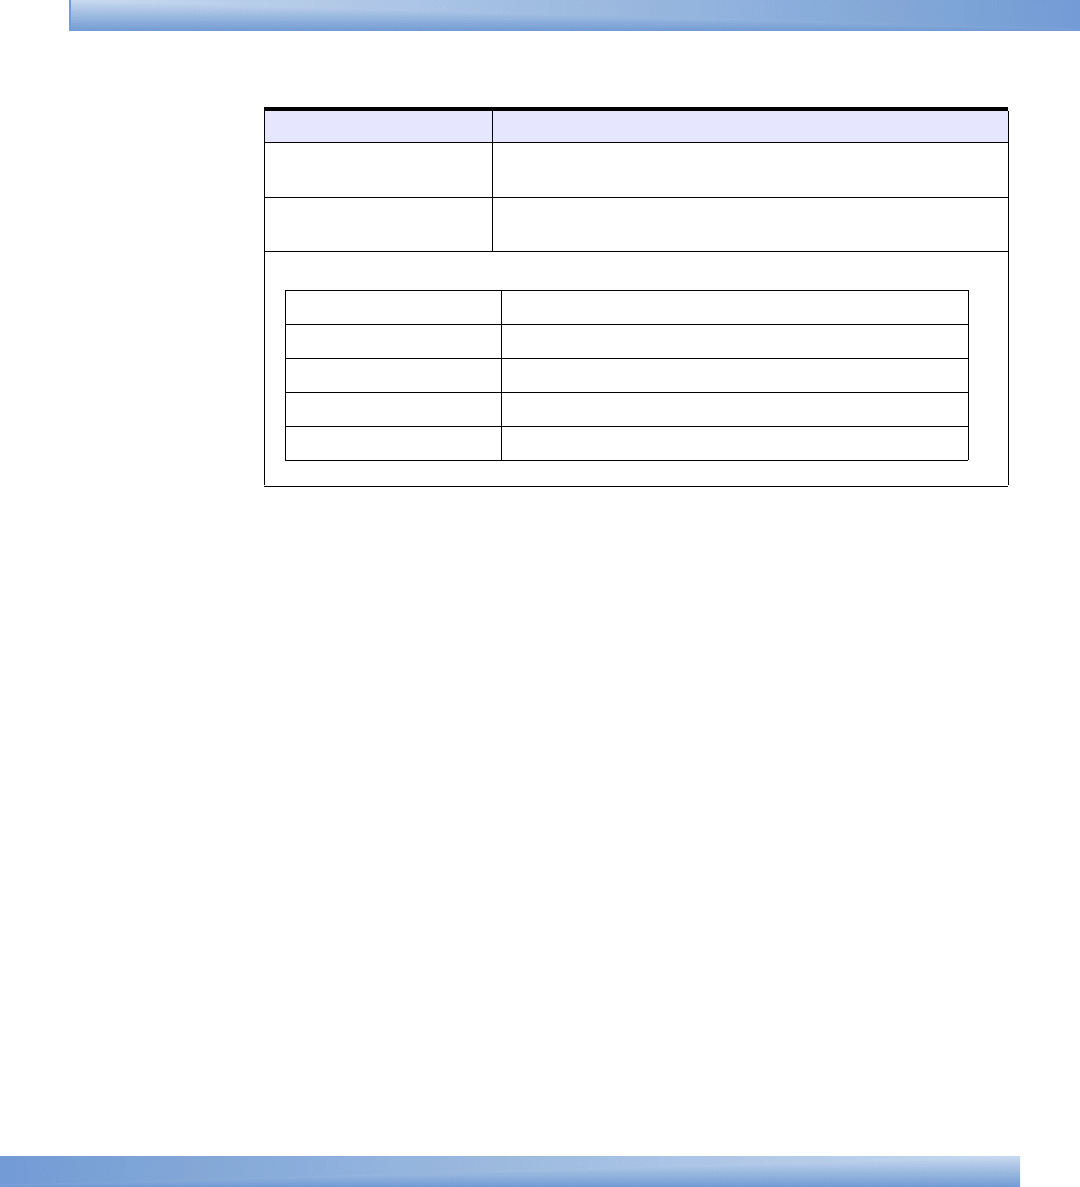
Inventory Prints
Prints 85
7.2.4 Physical Count Variance Report
The Physical Count Variance report provides the physical count variance
information.
The default format of the Physical Count Variance Report is:
Variance Quantity The difference between the System Quantity and the
Count Quantity.
Variance Value The product of the unit cost of the item and the
absolute variance quantity.
Table 7–7 Variance Details by Count Sheet Report
Field Description
Count Sheet# The count sheet number.
Count Sheet Line# The line number in the count sheet.
Count Quantity The actual quantity counted by the user.
UOM The unit of measure of the item.
User The identifier of the user.
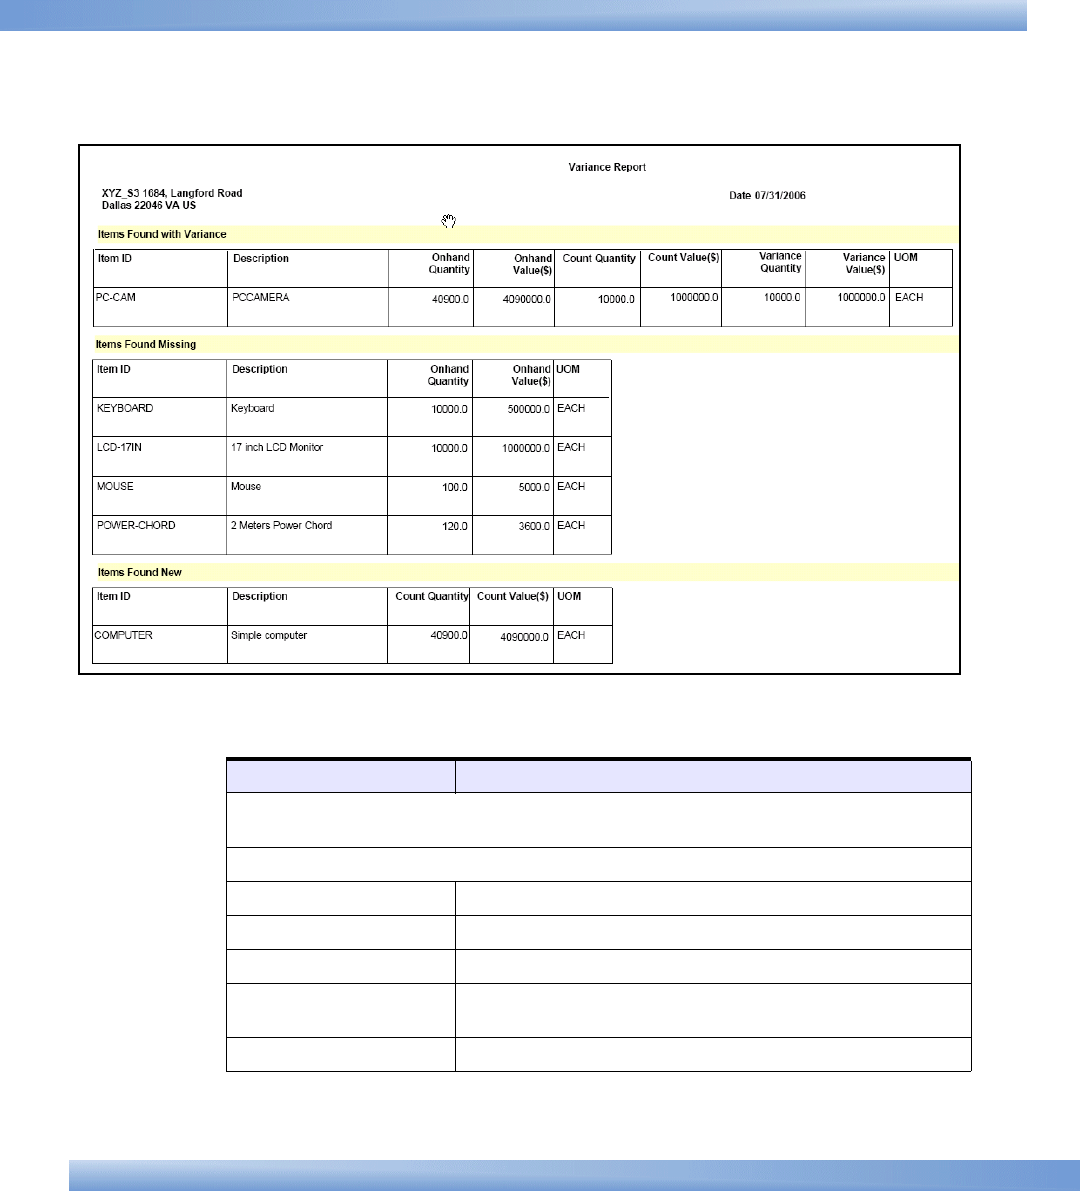
86 User Guide
Inventory Prints
Table 7–8 Variance Report
Field Description
This report includes the address of the store and the date on which the report is
generated.
Items Found With Variance
Item ID The identifier of the item.
Description The description of the item.
Onhand Quantity The on hand quantity of the item.
Onhand Value The product of the unit cost of the item and the
onhand quantity.
Count Quantity The actual quantity counted by the user.

Inventory Prints
Prints 87
7.2.5 Item Variance Details By Count Sheet
The Item Variance Details Report gives you a detailed picture of the
variance at location level.
The default format of the Item Variance Details Report is:
Count Value The product of the unit cost of the item and the count
quantity.
Variance Quantity Variance quantity is computed as the difference
between on hand quantity and count quantity.
Variance Value The product of the unit cost of the item and the
absolute variance quantity.
UOM The unit of measure of the item.
Items Found Missing
Item ID The identifier of the item.
Description The description of the item.
Onhand Quantity The onhand quantity of the item.
Onhand Value The product of the unit cost of the item and the
onhand quantity.
UOM The unit of measure of the item.
Items Found New
Item ID The identifier of the item.
Description The description of the item.
Count Quantity The actual quantity counted by the user.
Count Value The product of the unit cost of the item and the count
quantity.
UOM The unit of measure of the item.
Table 7–8 Variance Report
Field Description
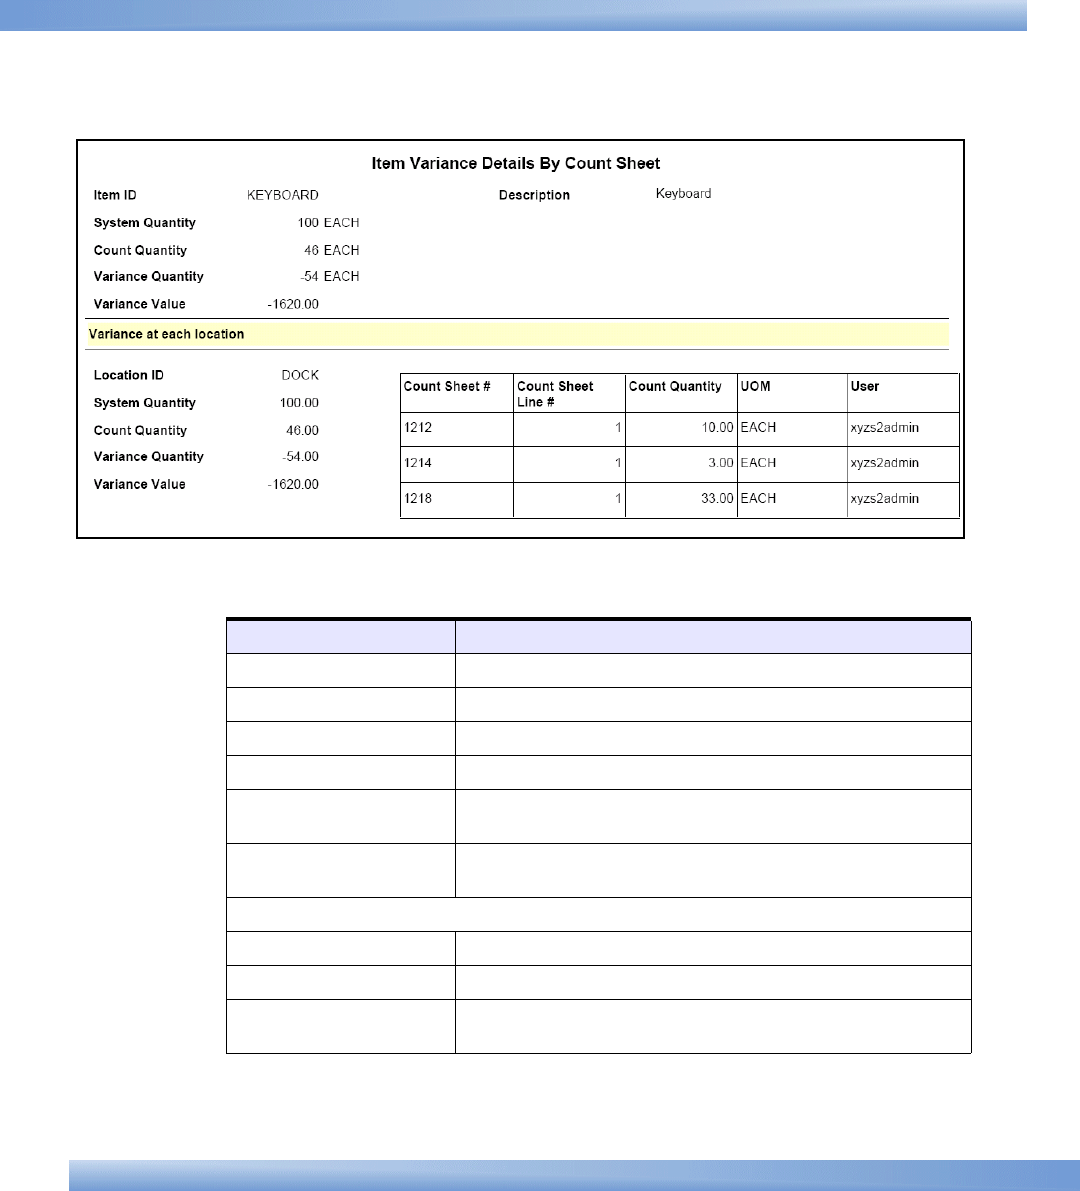
88 User Guide
Inventory Prints
Table 7–9 Item Variance Details By Count Sheet
Field Description
Item ID The identifier of the item.
Description The description of the item.
System Quantity The on hand quantity of the item.
Count Quantity The actual quantity counted by the user.
Variance Quantity Variance quantity is computed as the difference
between on hand quantity and count quantity.
Variance Value The product of the unit cost of the item and the
absolute variance quantity.
Variance at each location
Location ID The identifier of the location.
System Quantity The system quantity of the item in the location.
Count Quantity The actual quantity counted by the user in the
location.
Outbound Prints
Prints 89
7.3 Outbound Prints
The following inventory prints can be generated using the Sterling Store
Inventory Management:
QPick Ticket
QBill Of Lading
7.3.1 Pick Ticket
You can print the pick ticket for a back room pick.
The default pick ticket that the Sterling Store Inventory Management
prints is:
Variance Quantity Displays the variance quantity.
Variance quantity is computed as the difference
between on hand quantity and count quantity.
Variance Value The product of the unit cost of the item and the
absolute variance quantity.
Table 7–9 Item Variance Details By Count Sheet
Field Description
Count Sheet # The count sheet number.
Count Sheet Line # The count sheet line number.
Count Quantity The actual quantity counted by the user in the
location.
UOM The unit of measure of the item.
User The identifier of the user who performed the count.

90 User Guide
Outbound Prints
Table 7–10 Pick Ticket
Field Description
This report includes the date on which the pick ticket is printed.
Order # The order number of the shipment.
Store Notified On The date on which the store is notified of the
shipment.
Customer Name The name of the customer to whom the shipment is to
be shipped.
Special Instruction Enter appropriate information, if applicable.
Shipment # The shipment number of the shipment.
Line No. The line number.
Item The identifier of the item.
Description The item description.
Quantity The quantity of the items in the location.
UOM The unit of measure of the item.
Location The location where the item is placed.

Outbound Prints
Prints 91
7.3.2 Bill Of Lading
The Bill of Lading (BOL) is a document that provides inventory processing
information through the supply chain to a carrier, customer, and shipper.
The default Bill of Lading generated using the Sterling Store Inventory
Management is:
Picked Quantity Enter the picked quantity of items.
UOM The unit of measure of the item.
Table 7–10 Pick Ticket
Field Description
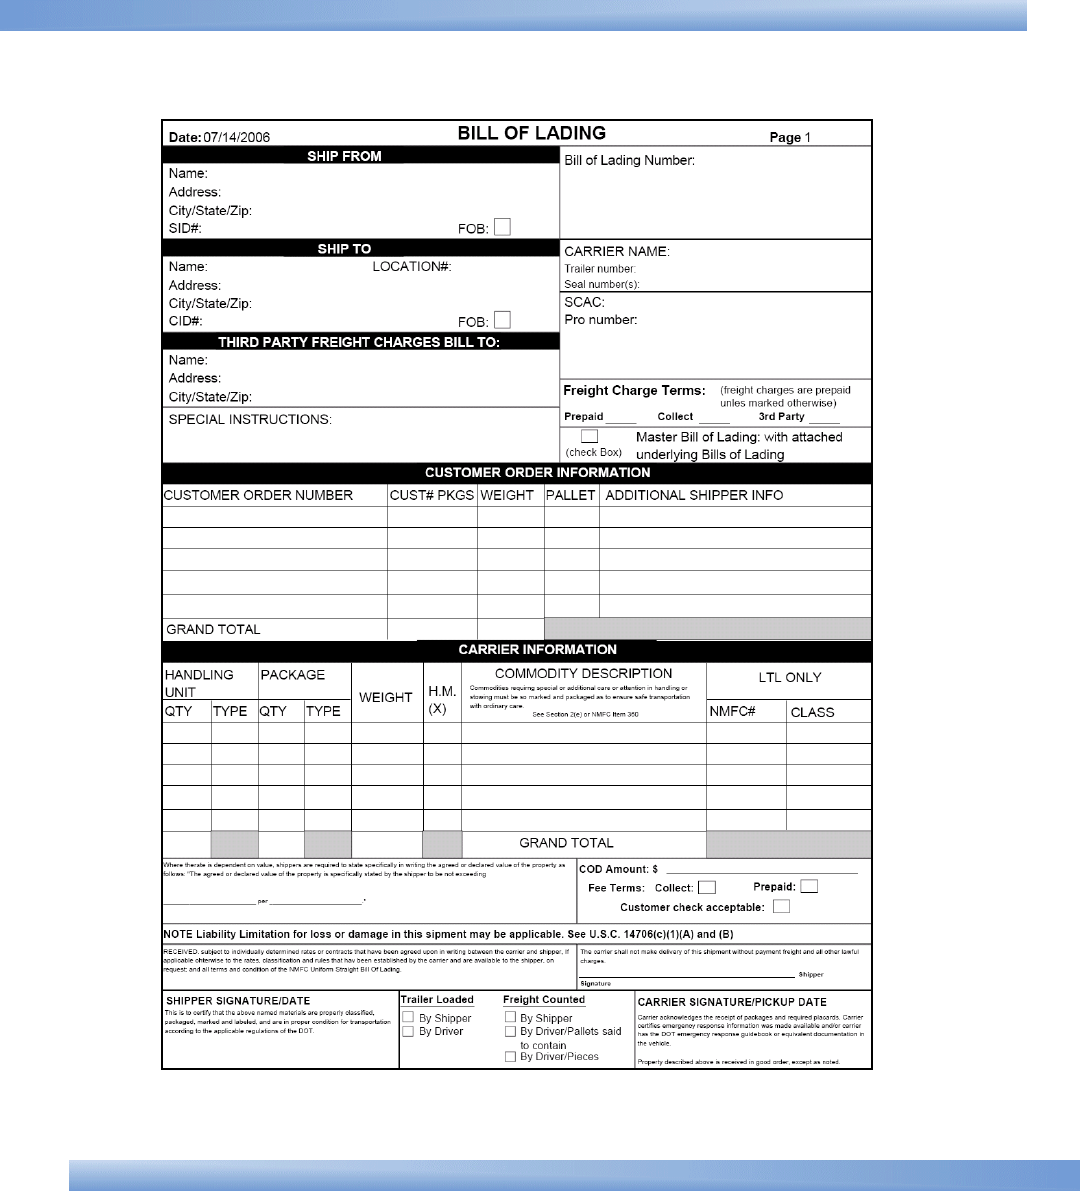
92 User Guide
Outbound Prints
Outbound Prints
Prints 93
Table 7–11 Bill Of Lading for Shipment, SHIP FROM
Fields
Name The company that is shipping the product.
Address The street address of the shipper.
City/State/ZIP The city, state, and zip code of the shipper.
SID# The shipment ID number applied by the shipper
to this shipment.
FOB Indicates the FOB freight term used for the
shipment.
Bill of Lading
Number The bill of lading number created by the shipper
to identify the shipment.
Table 7–12 Bill Of Lading for Shipment, SHIP TO
Fields
Location # The location number assigned to the ship to
address of the consignee.
Name The company where the product has to shipped.
Address The address of the company.
City/State/ZIP The city, state, and zip code of the company.
CID# The consignee ID number applied by the
consignee to this shipment.
FOB Indicates the FOB freight term used for the
shipment.
CARRIER NAME The carrier picking up the shipment.
Trailer number The trailer number of the shipment.
The trailer number is used if the truckload carrier
hauls the shipment.

94 User Guide
Outbound Prints
Seal numbers The seal number of the shipment.
The seal number is used if the shipment is full
truckload from the origin to destination.
SCAC The Standard Carrier Alpha Code (SCAC)
assigned to identify the carrier.
Pro number The Pro number assigned by the carrier to track
the shipment.
The pro number is used if an LTL carrier hauls
the shipment.
Table 7–13 Bill Of Lading for Shipment, THIRD PARTY FREIGHT
CHARGES BILL TO
Fields
Name The third party to whom the charges are billed, if
applicable.
Address The address of the third party.
City/State/ZIP The city, state, and zip code of the third party.
SPECIAL
INSTRUCTIONS Special instructions associated with the carrier.
For example, appointment number, date and
delivery instructions.
Note: Only 4 underlying BOL numbers are
printed.
Freight Charge
Terms Indicates which third party is invoiced and is
responsible for payment of the freight invoice.
Prepaid The prepaid charges for the freight paid by the
shipper from origin to the consignee's dock.
Collect The charges collected for the freight from the
consignee from origin to the dock of the
consignee.
Table 7–12 Bill Of Lading for Shipment, SHIP TO
Fields
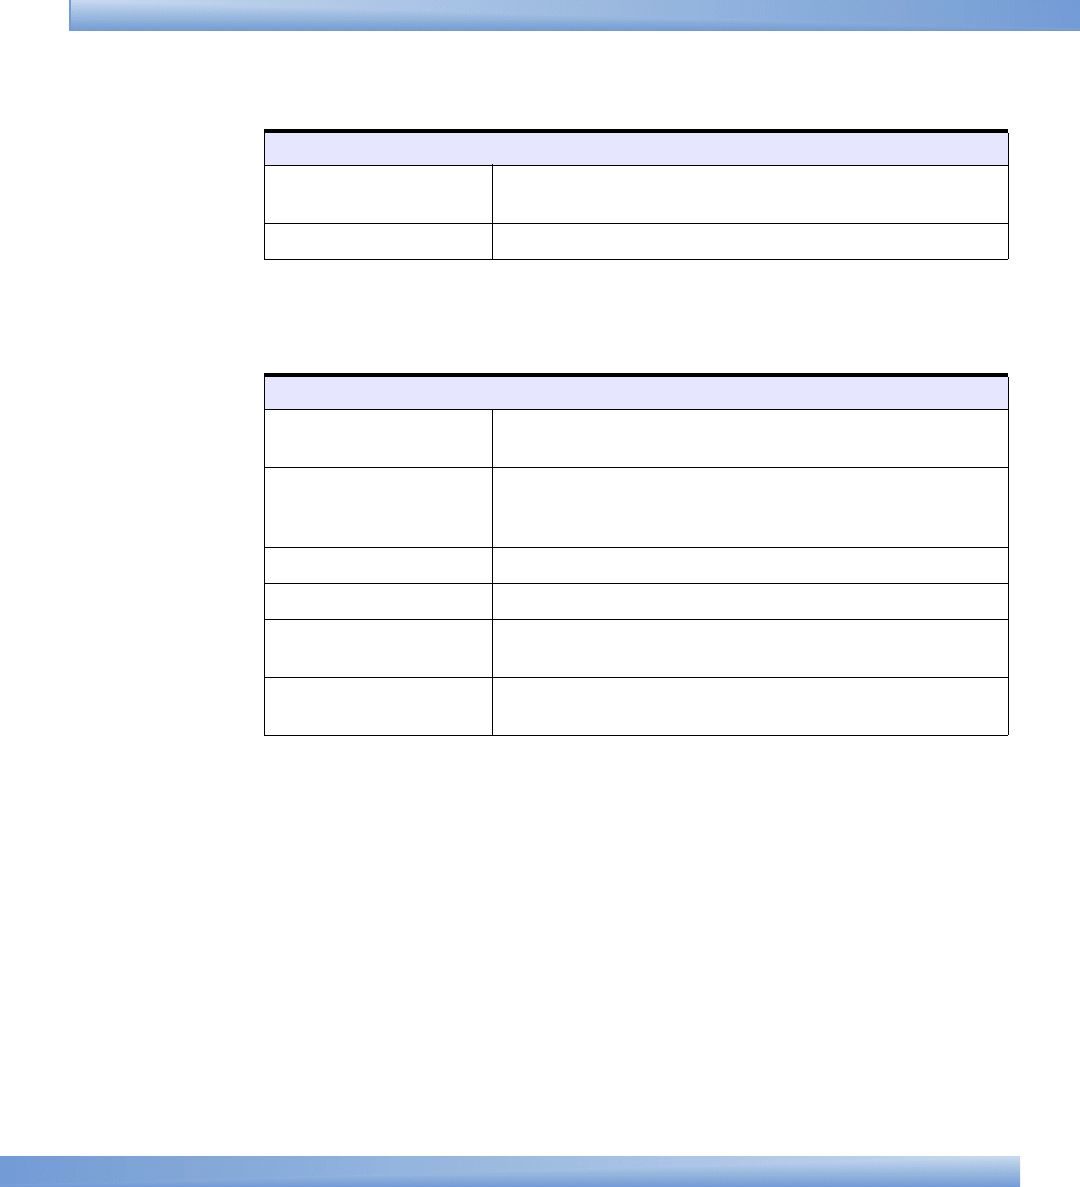
Outbound Prints
Prints 95
3rd Party The freight charges paid by the third party from
the origin to the dock of the consignee.
Master Bill of Lading Indicates whether a BOL is attached.
Table 7–14 Bill Of Lading for Shipment, CUSTOMER ORDER
INFORMATION
Fields
CUSTOMER ORDER
NUMBER The number generated by the customer to
identify the order.
CUST# PKGS The number of individual packages or cartons on
the shipment that has quantity associated with
the customer order.
WEIGHT The weight associated with the CUST# PKGS.
PALLET Indicates if the product is shipped as pallets.
ADDITIONAL
SHIPPER INFO Any additional information about the customer
order, if any.
GRAND TOTAL The grand total and weight across all customer
orders.
Table 7–13 Bill Of Lading for Shipment, THIRD PARTY FREIGHT
CHARGES BILL TO
Fields
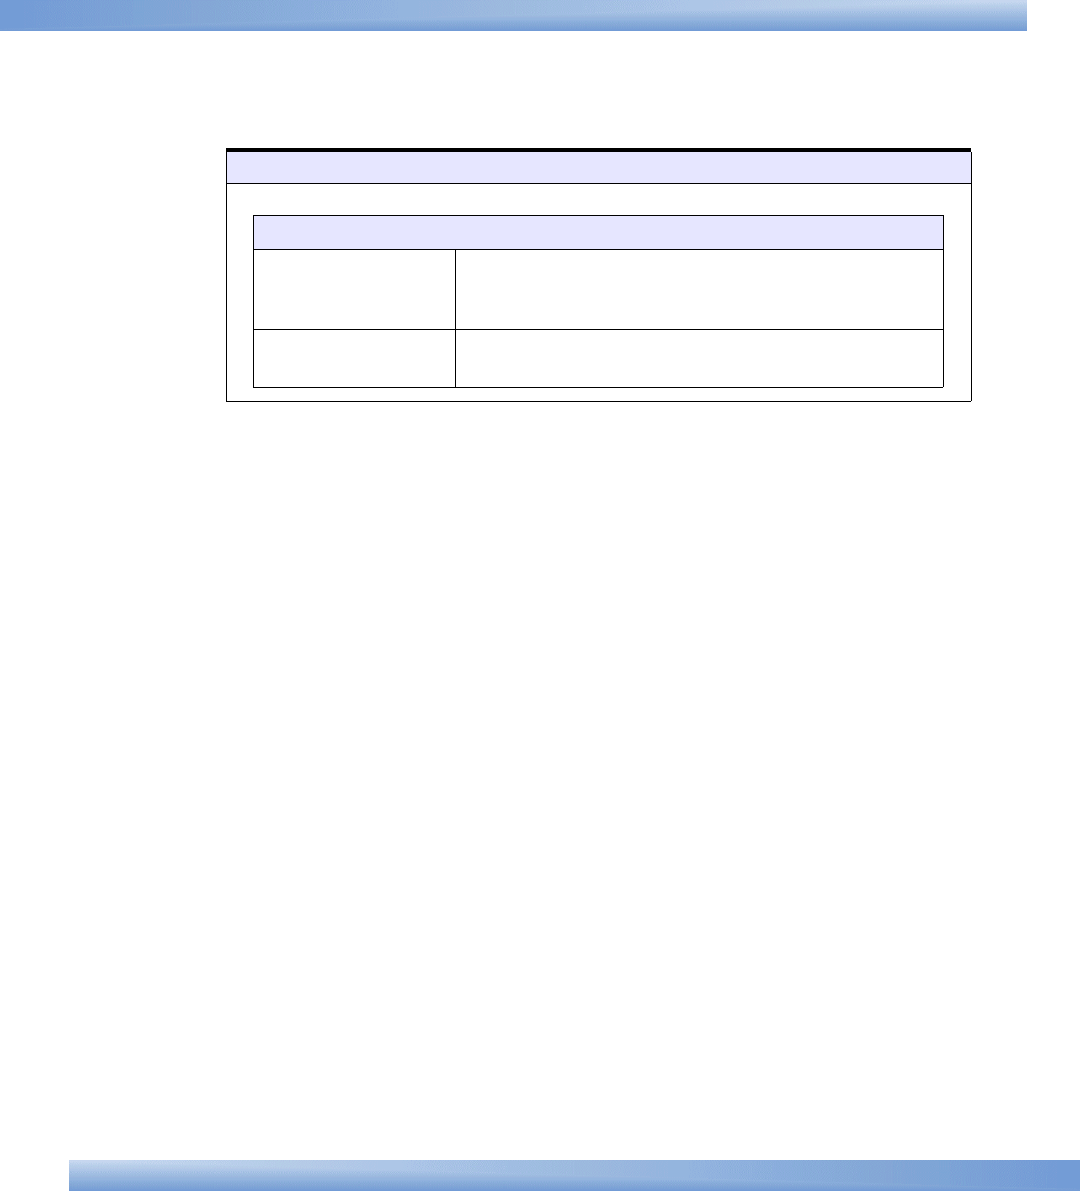
96 User Guide
Outbound Prints
Table 7–15 Bill Of Lading for Shipment, CARRIER INFORMATION
Fields
HANDLING UNIT
QTY The quantity associated with the type of
package being handled. This refers to the
pallet or carton being shipped.
TYPE The type of handling unit. For example, pallets
or cartons.
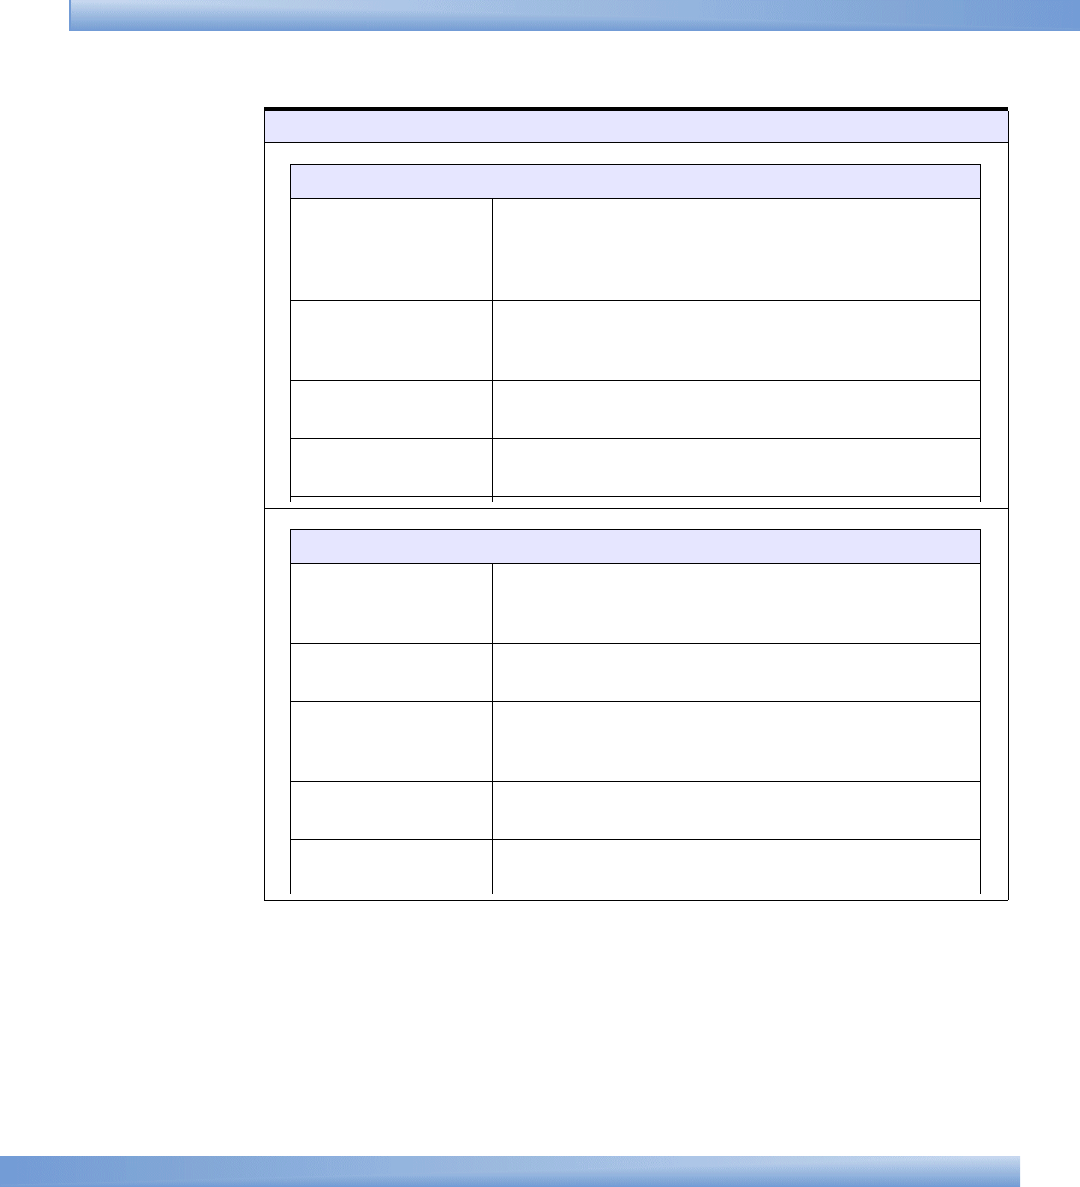
Outbound Prints
Prints 97
Table 7–15 Bill Of Lading for Shipment, CARRIER INFORMATION
Fields
PACKAGE
QTY The number of packages in the handling unit.
This refers to number of cartons in a pallet
(handling unit) or number of units in a carton
(handling unit).
TYPE The unit type associated with the package. For
example, cartons in a pallet or units (EACH) in
a carton.
WEIGHT The weight associated with the package
quantity.
H.M (X) Indicates if there is any hazardous material
(HM) in the package.
LTL ONLY
NMFC # The National Motor Freight Classification
(NMFC) number associated with the
commodity classification.
CLASS The freight class associated with the
commodity classification.
COD Amount The amount to be collected when shipment is
delivered, referred to as COD - Collect (Cash)
on Delivery.
Fee Terms The fee terms associated with the shipment.
For example, collect or prepaid.
Customer check
acceptable Indicates if checks are accepted for collect or
COD shipments.

98 User Guide
Outbound Prints

99
Notices
This information was developed for products and services offered in the
U.S.A.
IBM may not offer the products, services, or features discussed in this
document in other countries. Consult your local IBM representative for
information on the products and services currently available in your area.
Any reference to an IBM product, program, or service is not intended to
state or imply that only that IBM product, program, or service may be
used. Any functionally equivalent product, program, or service that does
not infringe any IBM intellectual property right may be used instead.
However, it is the user's responsibility to evaluate and verify the
operation of any non-IBM product, program, or service.
IBM may have patents or pending patent applications covering subject
matter described in this document. The furnishing of this document does
not grant you any license to these patents. You can send license
inquiries, in writing, to:
IBM Director of Licensing
IBM Corporation
North Castle Drive
Armonk, NY 10504-1785
U.S.A.
For license inquiries regarding double-byte character set (DBCS)
information, contact the IBM Intellectual
Property Department in your country or send inquiries, in writing, to:
Intellectual Property Licensing

100 User Guide
Legal and Intellectual Property Law
IBM Japan Ltd.
1623-14, Shimotsuruma, Yamato-shi
Kanagawa 242-8502 Japan
The following paragraph does not apply to the United Kingdom or
any other country where such provisions are inconsistent with
local law: INTERNATIONAL BUSINESS MACHINES CORPORATION
PROVIDES THIS PUBLICATION "AS IS" WITHOUT WARRANTY OF ANY
KIND, EITHER EXPRESS OR IMPLIED, INCLUDING, BUT NOT LIMITED TO,
THE IMPLIED WARRANTIES OF NON-INFRINGEMENT, MERCHANTABILITY
OR FITNESS FOR A PARTICULAR PURPOSE. Some states do
not allow disclaimer of express or implied warranties in certain
transactions, therefore, this statement may not apply to you.
This information could include technical inaccuracies or typographical
errors. Changes are periodically made to the information herein; these
changes will be incorporated in new editions of the publication. IBM may
make improvements and/or changes in the product(s) and/or the
program(s) described in this publication at any time without notice.
Any references in this information to non-IBM Web sites are provided for
convenience only and do not in any manner serve as an endorsement of
those Web sites. The materials at those Web sites are not part of the
materials for this IBM product and use of those Web sites is at your own
risk.
IBM may use or distribute any of the information you supply in any way
it believes appropriate without incurring any obligation to you.
Licensees of this program who wish to have information about it for the
purpose of enabling: (i) the exchange of information between
independently created programs and other programs (including this one)
and (ii) the mutual use of the information which has been exchanged,
should contact:
IBM Corporation
J46A/G4
555 Bailey Avenue
San Jose, CA__95141-1003

101
U.S.A.
Such information may be available, subject to appropriate terms and
conditions, including in some cases, payment of a fee.
The licensed program described in this document and all licensed
material available for it are provided by IBM under terms of the IBM
Customer Agreement, IBM International Program License Agreement or
any equivalent agreement between us.
Any performance data contained herein was determined in a controlled
environment. Therefore, the results obtained in other operating
environments may vary significantly. Some measurements may have
been made on development-level systems and there is no guarantee that
these measurements will be the same on generally available systems.
Furthermore, some measurements may have been estimated through
extrapolation. Actual results may vary. Users of this document should
verify the applicable data for their specific environment.
Information concerning non-IBM products was obtained from the
suppliers of those products, their published announcements or other
publicly available sources. IBM has not tested those products and cannot
confirm the accuracy of performance, compatibility or any other claims
related to non-IBM products. Questions on the capabilities of non-IBM
products should be addressed to the suppliers of those products.
All statements regarding IBM's future direction or intent are subject to
change or withdrawal without notice, and represent goals and objectives
only.
This information is for planning purposes only. The information herein is
subject to change before the products described become available. This
information contains examples of data and reports used in daily business
operations. To illustrate them as completely as possible, the examples
include the names of individuals, companies, brands, and products. All of
these names are ficticious and any similarity to the names and addresses
used by an actual business enterprise is entirely coincidental.
COPYRIGHT LICENSE:
This information contains sample application programs in source
language, which illustrate programming techniques on various operating
platforms. You may copy, modify, and distribute these sample programs
in any form without payment to IBM, for the purposes of developing,
using, marketing or distributing application programs conforming to the

102 User Guide
application programming interface for the operating platform for which
the sample programs are written. These examples have not been
thoroughly tested under all conditions. IBM, therefore, cannot guarantee
or imply reliability, serviceability, or function of these programs. The
sample programs are provided "AS IS", without warranty of any kind.
IBM shall not be liable for any damages arising out of your use of the
sample programs.
Each copy or any portion of these sample programs or any derivative
work, must include a copyright notice as follows:
© IBM 2011. Portions of this code are derived from IBM Corp. Sample
Programs.
© Copyright IBM Corp. 2011.
If you are viewing this information softcopy, the photographs and color
illustrations may not appear.
Trademarks
IBM, the IBM logo, and ibm.com are trademarks or registered
trademarks of International Business Machines Corp., registered in many
jurisdictions worldwide. Other product and service names might be
trademarks of IBM or other companies. A current list of IBM trademarks
is available on the Web at “Copyright and trademark information” at
www.ibm.com/legal/copytrade.shtml.
Adobe, the Adobe logo, PostScript, and the PostScript logo are either
registered trademarks or trademarks of Adobe Systems Incorporated in
the United States, and/or other countries.
IT Infrastructure Library is a registered trademark of the Central
Computer and Telecommunications Agency which is now part of the
Office of Government Commerce.
Intel, Intel logo, Intel Inside, Intel Inside logo, Intel Centrino, Intel
Centrino logo, Celeron, Intel Xeon, Intel SpeedStep, Itanium, and
Pentium are trademarks or registered trademarks of Intel Corporation or
its subsidiaries in the United States and other countries.
Linux is a registered trademark of Linus Torvalds in the United States,
other countries, or both.
Microsoft, Windows, Windows NT, and the Windows logo are trademarks
of Microsoft Corporation in the United States, other countries, or both.

103
ITIL is a registered trademark, and a registered community trademark of
the Office of Government Commerce, and is registered in the U.S. Patent
and Trademark Office.
UNIX is a registered trademark of The Open Group in the United States
and other countries.
Java and all Java-based trademarks and logos are trademarks or
registered trademarks of Oracle and/or its affiliates.
Cell Broadband Engine is a trademark of Sony Computer Entertainment,
Inc. in the United States, other countries, or both and is used under
license therefrom.
Linear Tape-Open, LTO, the LTO Logo, Ultrium and the Ultrium Logo are
trademarks of HP, IBM Corp. and Quantum in the U.S. and other
countries.
Connect Control Center®, Connect:Direct®, Connect:Enterprise,
Gentran®, Gentran:Basic®, Gentran:Control®, Gentran:Director®,
Gentran:Plus®, Gentran:Realtime®, Gentran:Server®,
Gentran:Viewpoint®, Sterling Commerce™, Sterling Information
Broker®, and Sterling Integrator® are trademarks or registered
trademarks of Sterling Commerce, Inc., an IBM Company.
Other company, product, and service names may be trademarks or
service marks of others.

104 User Guide
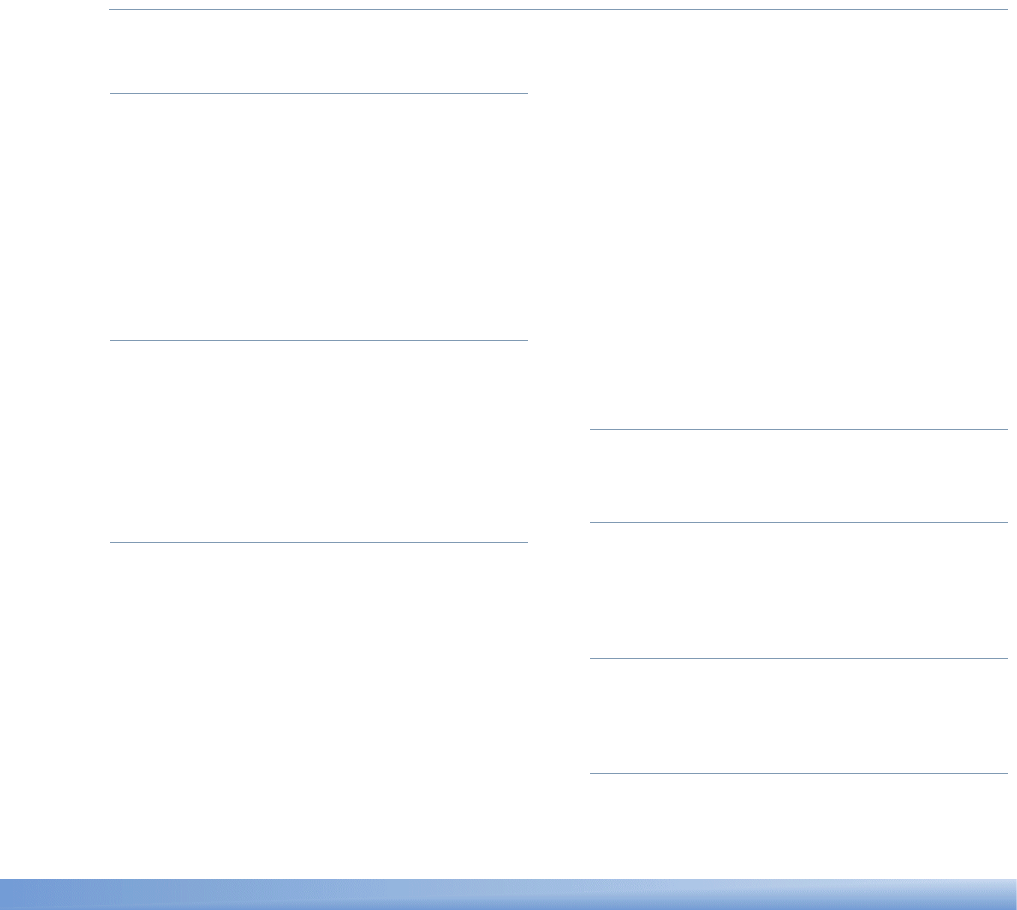
105
Index
A
Ad hoc Count Requests
generating,16
Add Notes For The Alert window,70
alert details
viewing,66
alerts
creating,67
searching,68
B
backroom pick
recording,53
blind receipt
recording,40
BOL
searching,30
C
cancelling pending counts,18
change password screen,43
changing password,43
CID# field,93
COD Amount field,97
Collect field,94
Count Results
Recording,16
count sheet details
viewing,19
Count Sheet List
viewing,16
count sheets
printing,14
count status
viewing,23
Count Summary
Viewing,20
Create Alert screen,67
Customer check acceptable field,97
customer details
verifying,56
customer order
searching,55
CUST# PKGS field,95
D
documentation home page,xiii
F
Find User screen,67
FOB field,93
Freight Charge Terms field,94
H
HANDLING UNIT fields,96
H.M (X) field,97
I
inbound shipments

106 User Guide
searching,41
informational alerts
viewing,65
Informational Alerts screen,65
Inventory
Adjusting,10
inventory
searching,7
inventory audit
inquiring,27
inventory audits
viewing,12
Inventory Search screen,7
item details
viewing,8
M
Manage Locations screen,14
manage users screen,44
ManagingUsersSIMUG,44
manifest
closing,64
viewing,64
Master Bill of Lading field,95
moving inventory
recording,11
N
NMFC # field,97
O
order
searching,33
P
physical count
cancelling,27
ending,21
recording,22
starting,21
pick ticket
printing,47
Prepaid field,94
Pro number field,94
R
receipt details for an order
recording,38
receipt details for BOL
recording,35
receiving worksheet details for a shipment
recording,34
receiving worksheet for a shipment
printing,29
receiving worksheet for an order
printing,32
recording,37
S
SCAC (Standard Carrier Alpha Code),94
Select Order,34
Select Shipment screen, 31, 32
shipment audit
viewing,52
shipment details
viewing,50
shipments
searching,48
shortage for backroom pick
resolving,55
SID# field,93
Standard Carrier Alpha Code. See SCAC
store locations
managing,14
T
the,70
U
users


108 User Guide
