STEP MXO2 V2 软件手册 Software Manual 1.0
User Manual:
Open the PDF directly: View PDF ![]() .
.
Page Count: 28

STEP-MXO2
Software Manual
STEP FPGA
STEP
2017/2/14

STEP-MXO2 Software Manual
2 / 28
STEP-MXO2 Software Manual
Contents
1.Introduction................................................................................................................................ 3
2.Installing Diamond 3.8 for Windows ........................................................................................ 3
2.1 Download Lattice Diamond Software.................................................................................. 3
2.2 Installation Procedure ......................................................................................................... 4
2.3 Licensing for Diamond ......................................................................................................... 9
3.Creating a New Project ............................................................................................................ 12
3.1 Creating a New Project ...................................................................................................... 12
3.2 Add the design files ........................................................................................................... 15
3.3 Assign Pins ......................................................................................................................... 17
3.4 Generate the compiling files and download ..................................................................... 18
4.Active-HDL quick start ............................................................................................................... 21
5.Version ..................................................................................................................................... 28

STEP-MXO2 Software Manual
3 / 28
1.Introduction
1. Introduction
Lattice Diamond® design software offers leading-edge design and implementation tools
optimized for cost-sensitive, low-power Lattice FPGA architectures. Diamond is the next
generation replacement for ispLEVER® featuring design exploration, ease of use, improved
design flow, and numerous other enhancements. This combination of new and enhanced
features allows users to complete designs faster, easier and with better results than before.
Diamond software is available as a download from the Lattice website for both Windows and
Linux. Once downloaded and installed, it can be used with either a free license or a
subscription license.
Key Features and Benefits Design Exploration
• Explore design alternatives with Implementations & Strategies
• Run Manager for accelerating exploration and utilizing multicore processors
• Lattice Synthesis Engine (LSE) for additional synthesis exploration options.
Ease-of-Use Features
• Advanced next generation user interface
• Report view with message filtering features
• Extensive cross-probing support
• File list View for managing multiple constraint, preference, debug, timing analyzer, and
power calculator files
• ECO Editor for specific physical netlist-level changes
• Platform Designer tool for mixed signal device applications
• Programmer for improved programming support
Improved Design Flow
• New Timing Analyzer view allows updated timing analysis, including clock jitter analysis,
without re-implementing the design
• Simulation Wizard to easily export designs to multiple simulators
Additional Software Included with Diamond
• LatticeMico™ system integration for embedded microprocessor applications
• EPIC full-featured physical netlist-level editor
2.Installing Diamond 3.8 for Windows
2.1 Download Lattice Diamond Software
The Lattice Diamond software is available for download from the Lattice Diamond Downloads
& Licensing web page located at
http://www.latticesemi.com/latticediamond.
Click the Downloads tab. Some documents and downloads are not visible to anonymous
STEP-MXO2 Software Manual
4 / 28
visitors. To view all items, please log in to your Lattice account. Follow the product download
instructions and uncompress the software.
2.2 Installation Procedure
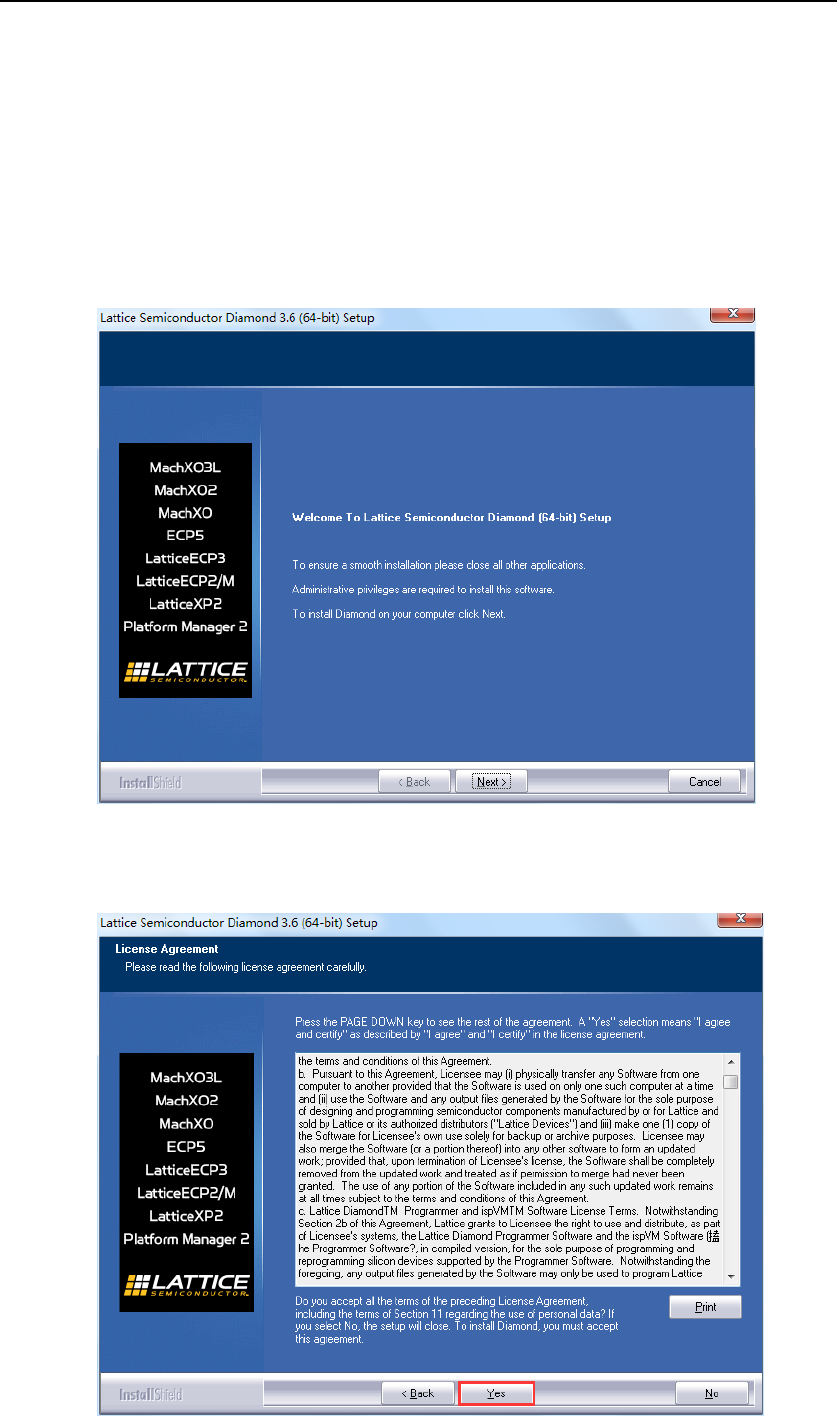
1. Close all applications before starting Diamond installation
2. Double-click on the Diamond installer you downloaded to launch the installation process.
3. The Welcome to Lattice Semiconductor Diamond Setup dialog box opens.
4. Click Next to open the License Agreement dialog box.
5. Read the license agreement. If you agree, click Yes to open the Choose Destination Location
dialog box.
STEP-MXO2 Software Manual
5 / 28
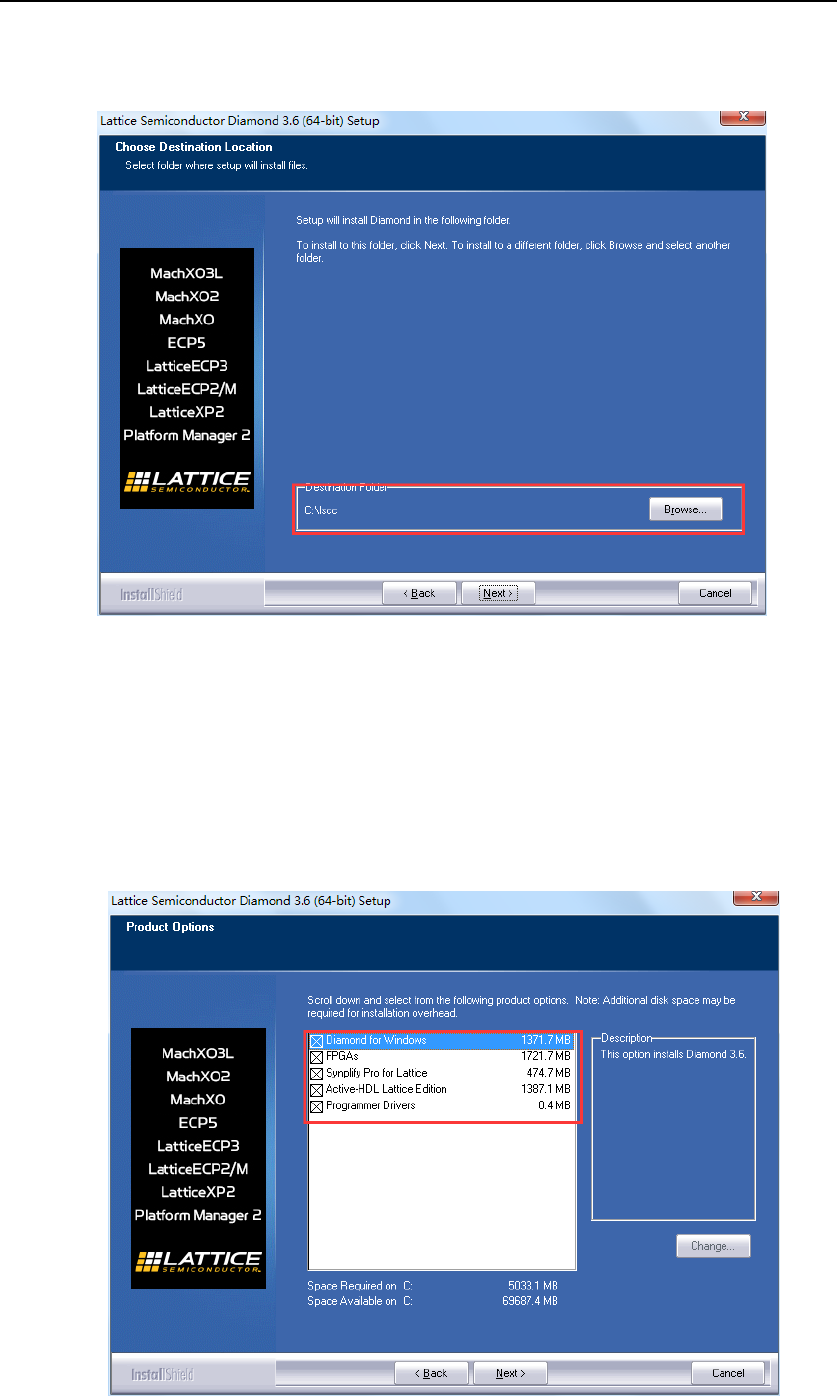
6. The default destination folder is C:\lscc. Click Browse to change the drive or destination
folder.
7. Click Next to open the Product Options dialog box.
8. Select the Diamond components that you want to install by selecting or clearing each of the
listed options. If you have purchased third-party synthesis and simulation tools directly from
the third-party vendors, you can clear the Synplify Pro for Lattice and Active-HDL Lattice
Edition product options. The FPGAs product option has additional options for selecting the
Lattice FPGA devices that you want to install. To set the additional options, select FPGAs and
click Change. In the pop-up Select Subfeatures dialog box, you can select or deselect the
features from the list. Click Continue to come back to the Product Options dialog box.
STEP-MXO2 Software Manual
6 / 28
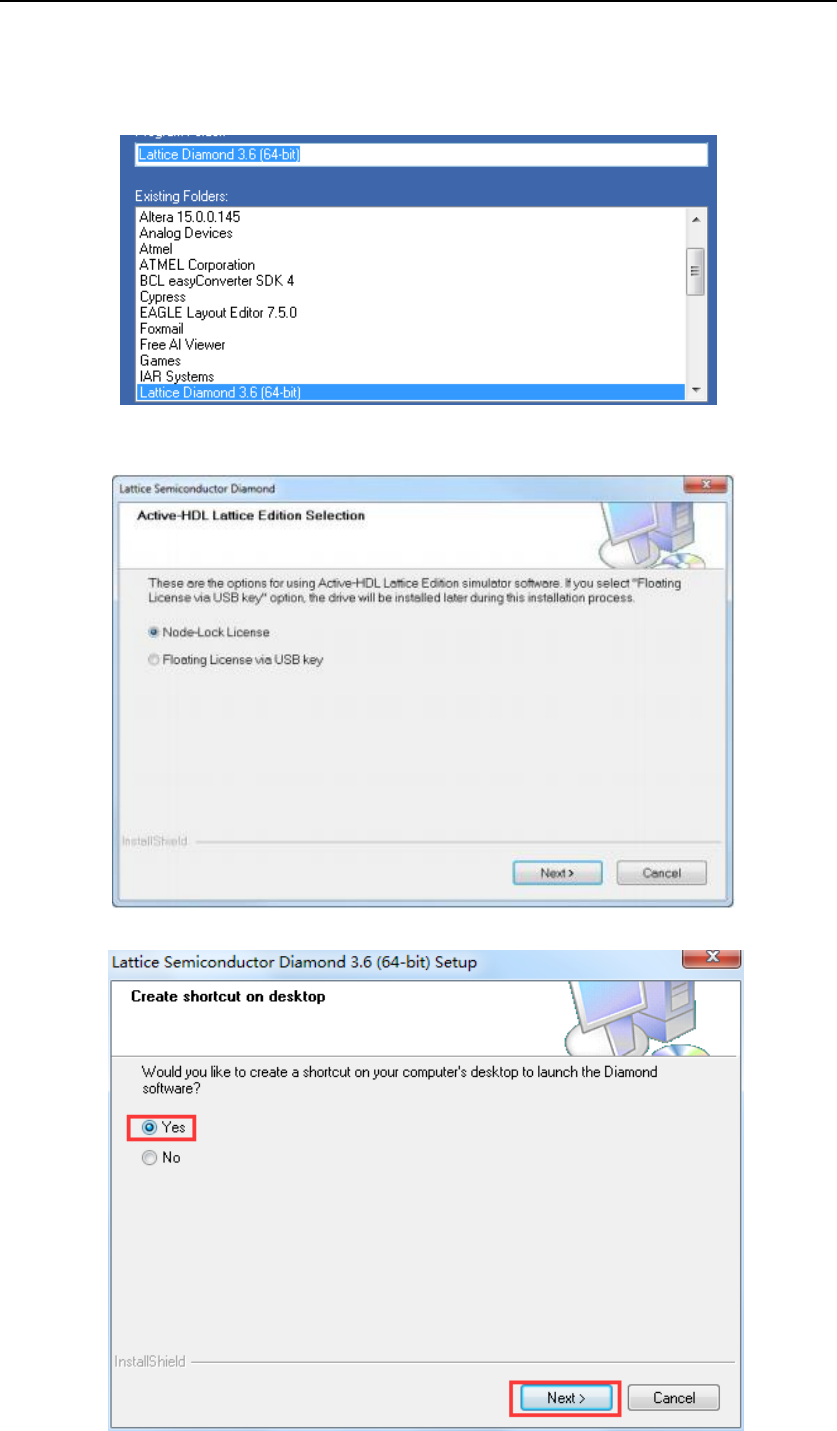
9. Click Next to open the Select Program Folder dialog box. The default name of the program
group is Lattice Diamond 3.8 (or Lattice Diamond 3.8 (64-bit) if you installed the 64-bit
version). If you want to change the name, change it in the Program Folder text box.
10. If you have selected the Active-HDL Lattice Edition option, you will be prompted to select
a license opti3zxcdon as shown below.
12. In the Create Shortcut on Desktop dialog box, select desired option and click Next.
STEP-MXO2 Software Manual
7 / 28
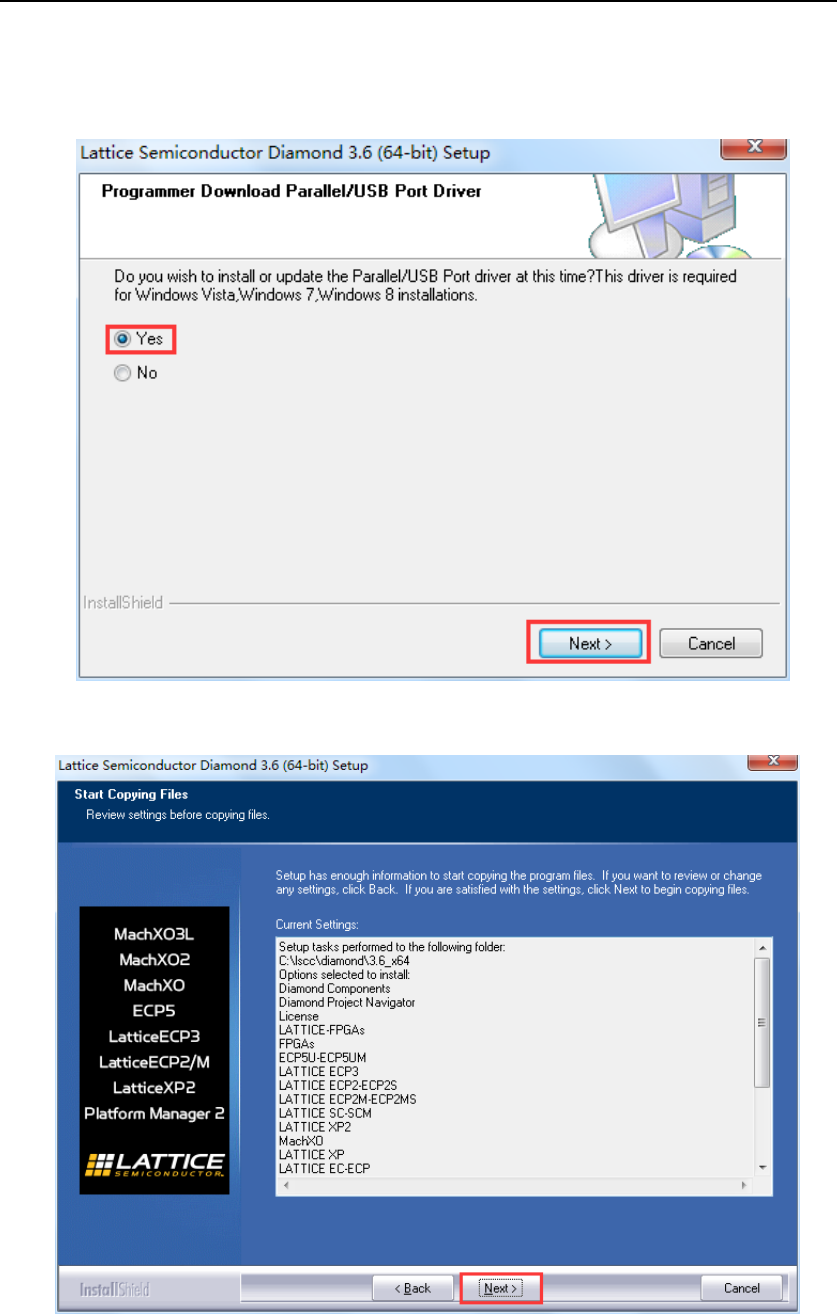
13. In the Programmer Download Parallel/USB Port Driver dialog box, select the desired
license option and click Next.
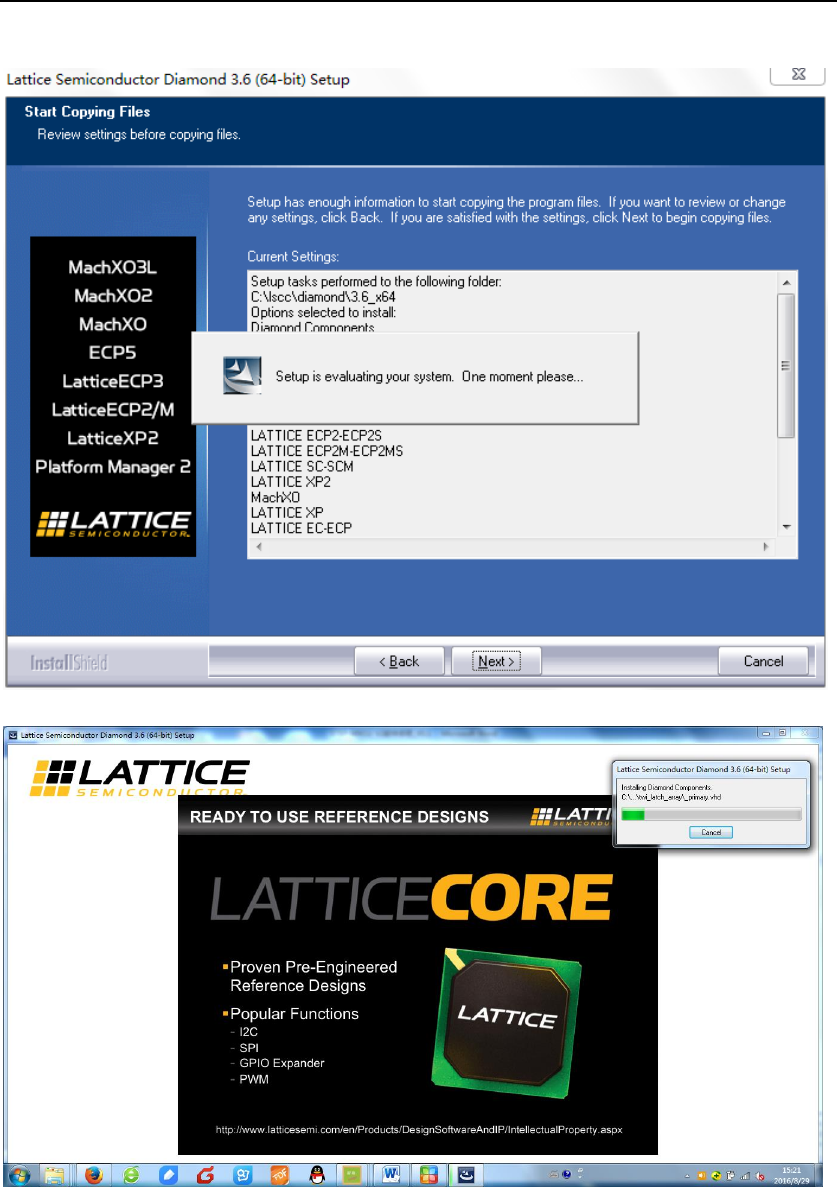
14. In the Start Copying Files dialog box, verify Diamond environment settings and click Next.
STEP-MXO2 Software Manual
8 / 28
15.Setup need to evaluate your system, just wait a moment;

STEP-MXO2 Software Manual
9 / 28
16.In the InstallShield Wizard Complete dialog box, read the note and click Finish.
2.3 Licensing for Diamond
At the end of the installation, you will use the Lattice website-based licensing capability to
license your Diamond and stand-alone Power Estimator software.
To use the software, you must receive a Lattice Semiconductor softwarelicense based on the
identification of your network interface card (NIC). The NIC ID or equivalent is the
12-character hexadecimal physical address.
License your software early to avoid any down time.
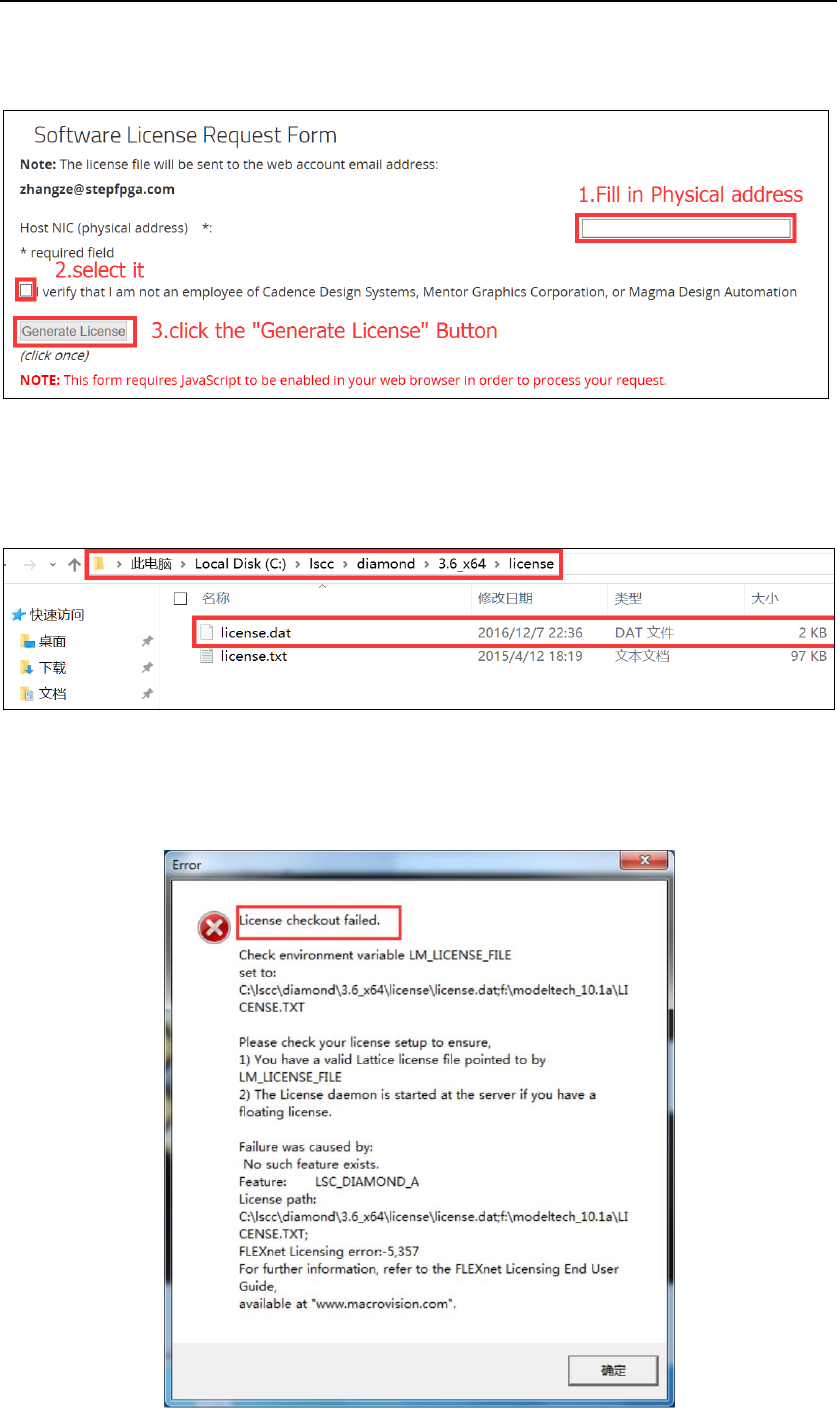
To obtain a license file for your Diamond software:
1. Go to Lattice Semiconductor Software Licensing page:
www.latticesemi.com/licensing
2. Select Lattice Diamond.
You will get the Lattice Diamond Software Licensing page.
STEP-MXO2 Software Manual
10 / 28
Fill in your MAC address(12-digit hexadecimal value), Verify it, and click the “Generate
License”.
Then the license file (License.dat) will be send to your e-mail.
In the process of installing Diamond Software, the environment variables will be added to
your system, so you just need to copy the license file(License.dat) to the Folder named
“License”, For example:
Open Diamond and use it.
Notice:
If it reports error when you open the diamond, it means that the environment variable set up
error, check your environment.
STEP-MXO2 Software Manual
11 / 28
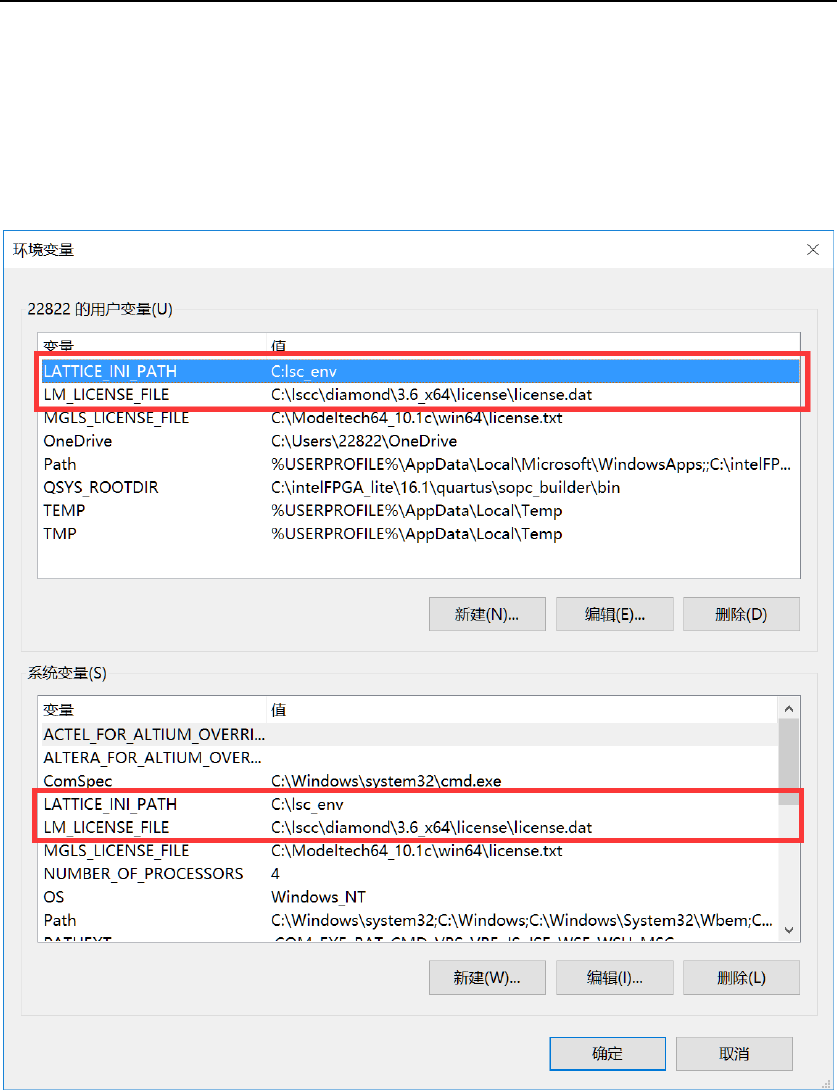
First, Right Click “This PC”, select“Properties”, click“Advanced system settings”.
Then, click “Environment Variables..”,
Check out “user variable for PC”, if there are some environment variables conflicts with
system environment variables “LM_LICENSE_FILE”, find and delete it(them); if there are no
environment variables called “LM_LICENSE_FILE”, just create it as same as the system
environment variables “LM_LICENSE_FILE”. For example:

STEP-MXO2 Software Manual
12 / 28
3.Creating a New Project
3.1 Creating a New Project
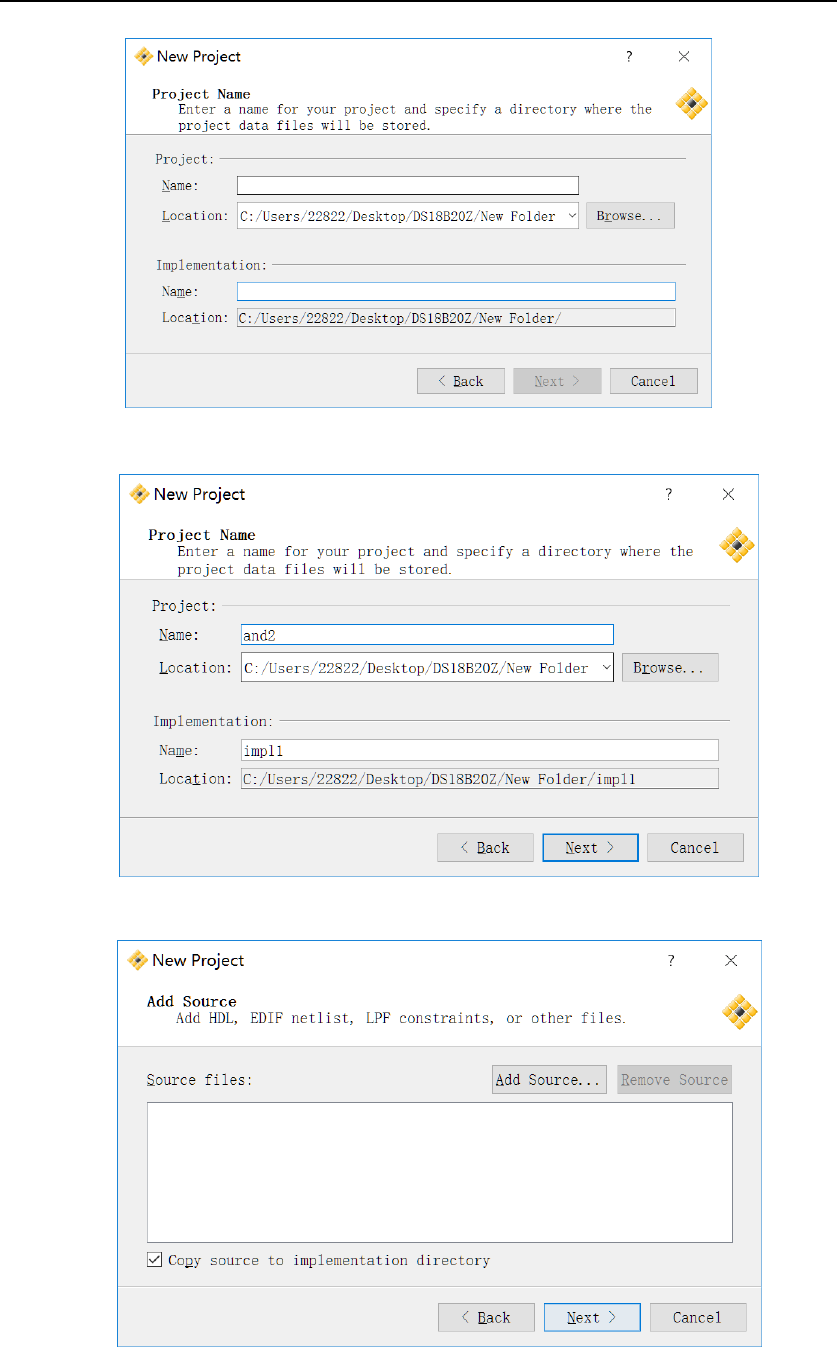
The New Project wizard steps you through the process of creating a new project, allowing
you to name the project and its implementation, add source files, and select a target device.
You can open the New Project Wizard using one of the following methods:
On the Start Page, select New in the Project pane.
From the File menu, choose New > Project
Several example project design files are included in Lattice Diamond. The following example
procedure shows how to create a new project using the“and2” example.
On the Start Page, select Project > New.
Click Next to open the Project Name dialog box.
Click Browse to open the Browse for Folder dialog box. Navigate to the Lattice Diamond
examples directory and select the and2 folder, as shown:
STEP-MXO2 Software Manual
13 / 28
Enter a Project Name: and2.
Enter an Implementation Name: impl1.
Click Next to open the Add Source dialog box.
From this dialog box, you can add Verilog or VHDL source files, EDIF netlist files, LPF
constraint files, schematic, debug and analysis files or any other project files. Diamond takes

STEP-MXO2 Software Manual
14 / 28
the source files and places them into the correct folders for the new project.
Click Next to select the device(Family: MachXO2, Device: LCMXO2-4000HC, Performance
grade: 4, Package type: CSBGA132, Part Names: LCMXO2-4000HC-4MG132C).
Click Next to open the Select Synthesis Tool dialog box. Select the synthesis tool that you want
to use.If you are designing for MachXO, MachXO2, MachXO3L, or Platform Manager, you have
the option of using Lattice Synthesis Engine (LSE) as your synthesis tool instead of Synplify
Pro for Lattice or another third-party synthesis tool. LSE is a synthesis tool custom-built for
Lattice products and fully integrated with Diamond.
Click Next to open the Project Information summary.
STEP-MXO2 Software Manual
15 / 28
At this step or any other step in the process, you can click the Back button to review or
change your selections. Click Finish. The newly created project, shown in, is now created and
open.
3.2 Add the design files
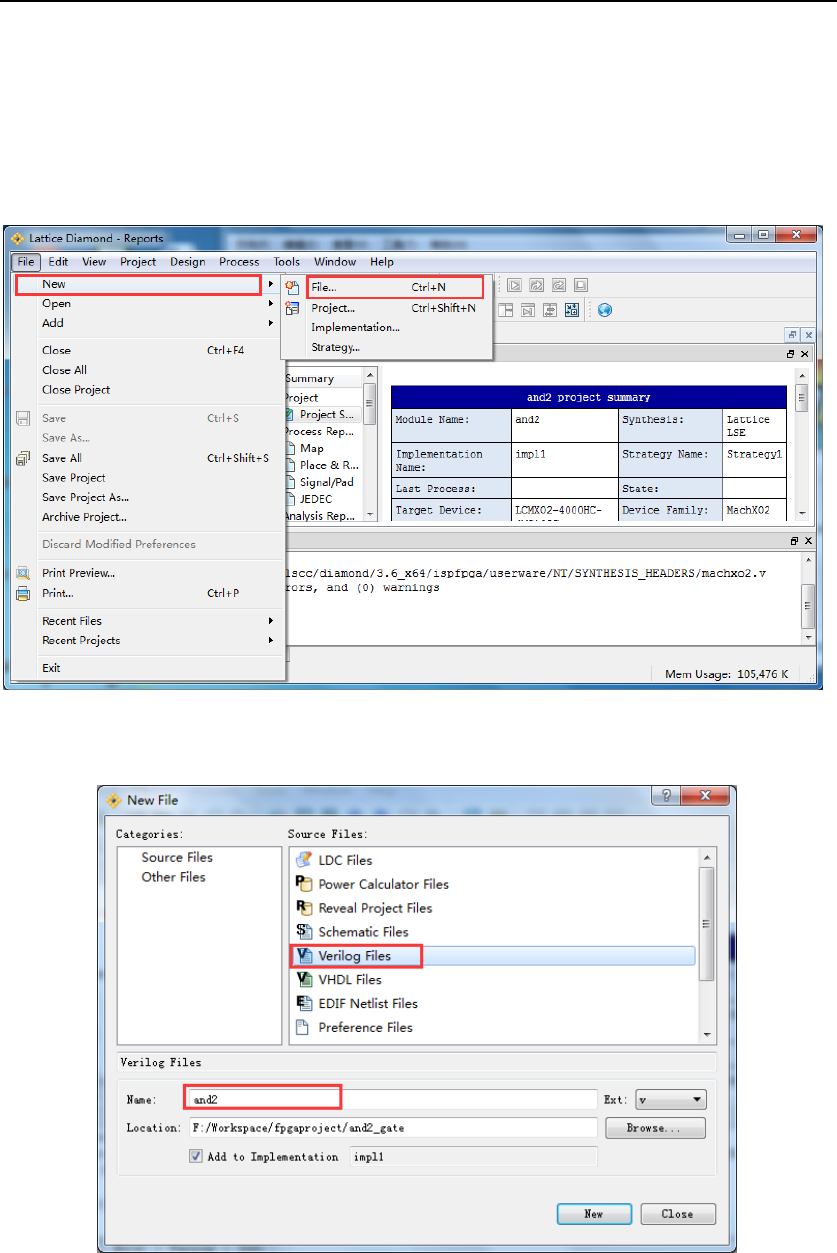
(1)Select File→New→File, create the new files.
(2)Select the file type, add Verilog Files, input the name of Verilog file, then click ‘Yes’, the
Verilog File will be created in your project.
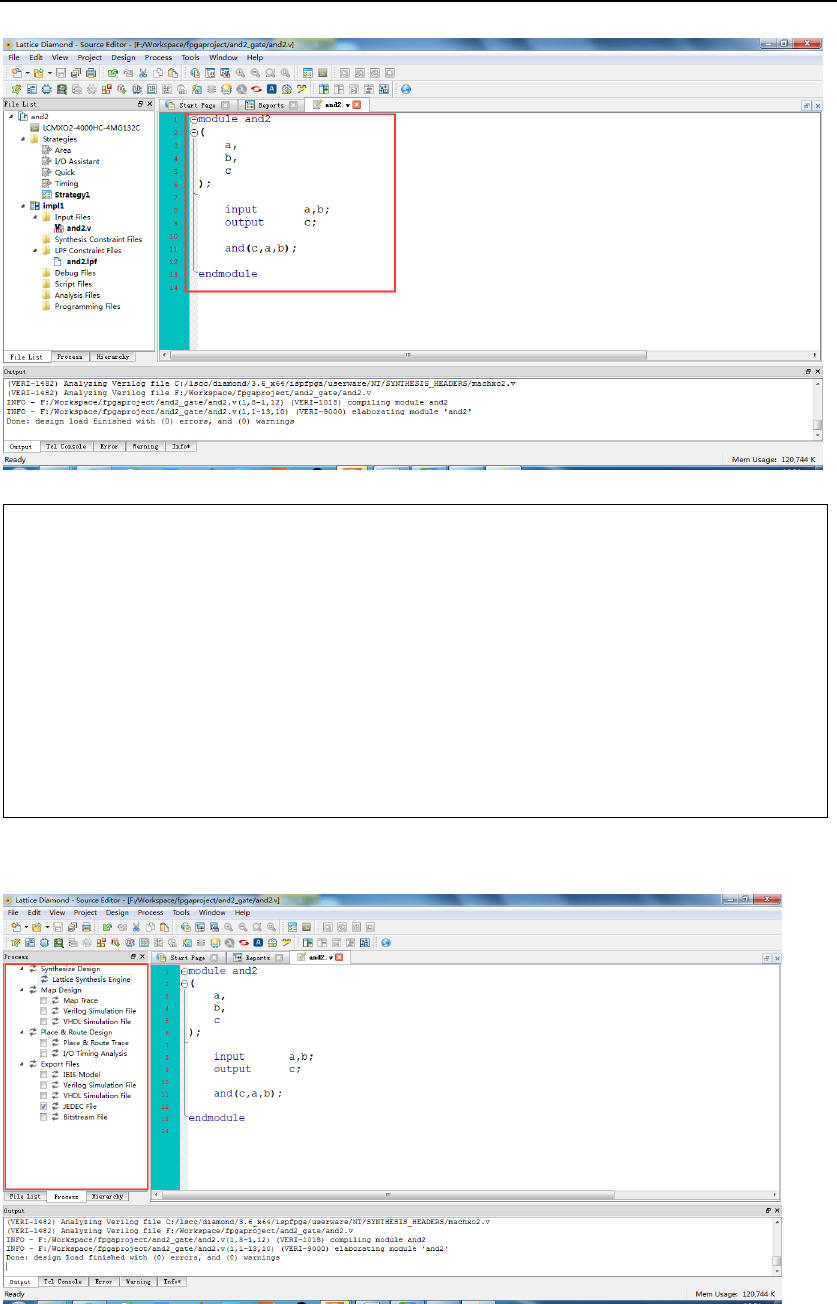
(3)Write Verilog code in this file, press Ctrl+S to save your files. The IDE will save the file to the
File List. Enter the code shown below.
STEP-MXO2 Software Manual
16 / 28
module and2
(
a,
b,
c
);
input a,b;
output c;
and(c,a,b);
endmodule
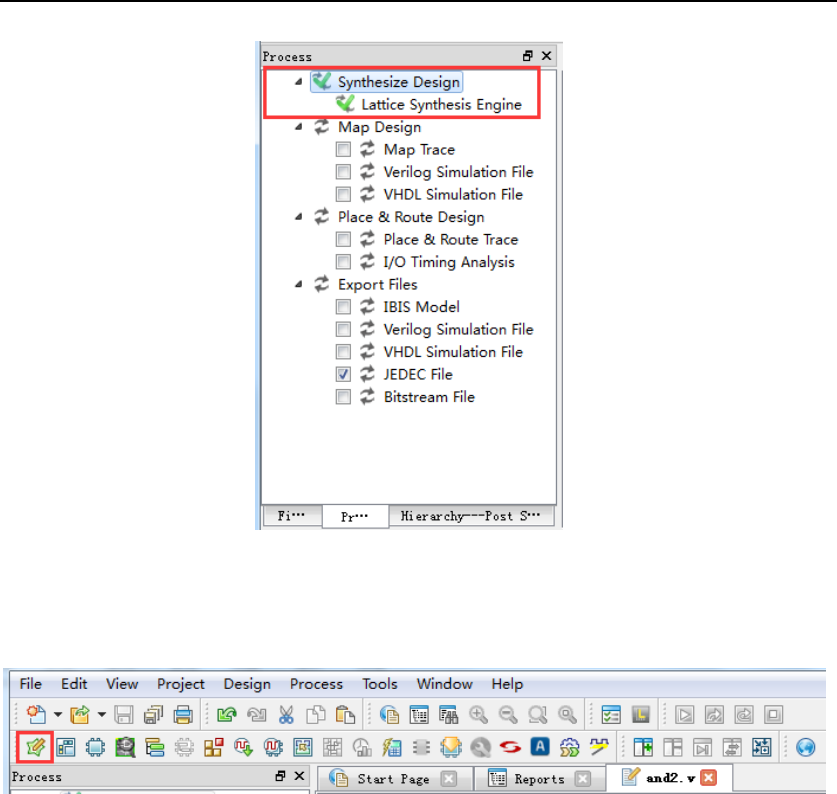
(4)Select ‘Process’(on the left side of screen), double click ‘Synthesis Design’, Synthesis
your design.
(5)If synthesis successfully, it will display a green tick on the left side of ‘Synthesis’; if
synthesis fault, it will display a red cross. Check out the error and modify your code until
successful synthesis.
STEP-MXO2 Software Manual
17 / 28
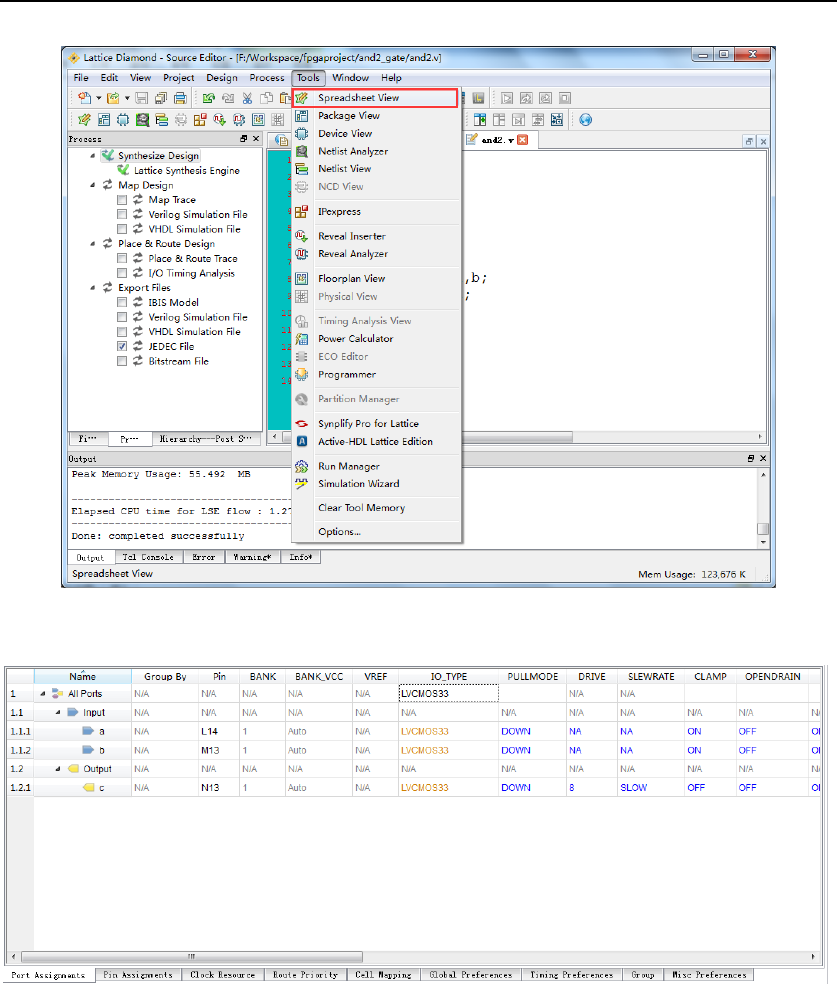
3.3 Assign Pins
(1)Select Tools→Spreadsheet View.
Or Tools->Spreadsheet View
STEP-MXO2 Software Manual
18 / 28
(2)Assign the a to Pin(L14), B to Pin(M13), C to Pin(N13), press Ctrl+S to save it.
3.4 Generate the compiling files and download
(1)The design is simple, we don’t tell you some of the things about Simulation, Layout, route.
And we create the compiling the files directly.
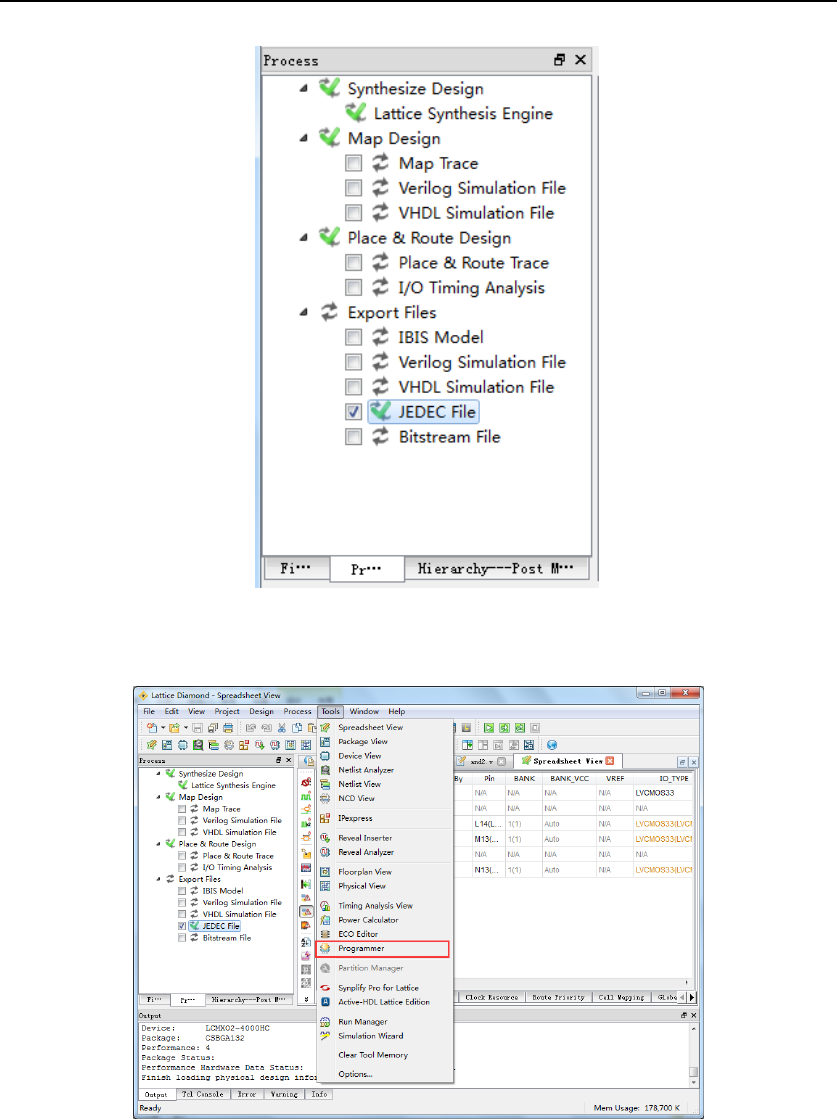
(2)Select the ‘JEDEC File’ and double-click the ‘Export File’.
STEP-MXO2 Software Manual
19 / 28
(3)Open the Programmer, Click Tools→Programmer(Don’t forget connect the STEP-MXO2 to
PC).
(4)Before programming, the IDE will create as new project from a JTAG scan, you can click
‘Detect Cable’ to detect it, if your device driver install successfully, then click ‘OK’.

STEP-MXO2 Software Manual
20 / 28
(5)Click the program button, and when program complete, it will display ‘PASS’.
Let’s see the running results by STEP-FPGA MXO2. This example is a simple, two inputs logic
gates ‘AND’, the control of a development board with the bright lights out. When the single of
LED on the STEP-FPGA is low, the led will be brighten, and initial state of button is high, when

STEP-MXO2 Software Manual
21 / 28
you push it, the single of button is low.
So, when the FPGA is running, the led will be brighten if you push any button.
4.Active-HDL quick start
Diamond provides you with an interface to create a new simulation project file that you can
import into a standalone simulator. Diamond supports Active-HDL and ModelSim simulation file
for file exports.Now let’s see how to quick start to use the integrated tool Active-HDL in the
Diamond for functional simulation.
1、 First of all you can create a testbench file as Verilog source files.
2、an2_tb.v :
`timescale 1ns/100ps
module and2_tb;
reg a,b;
wire c;
initial
begin
a=0;

STEP-MXO2 Software Manual
22 / 28
b=0;
#50
a=1;
b=0;
#50
a=1;
b=1;
#50;
a=0;
b=1;
end
and2 and2_u1(
.a (a),
.b (b),
.c (c)
);
endmodule
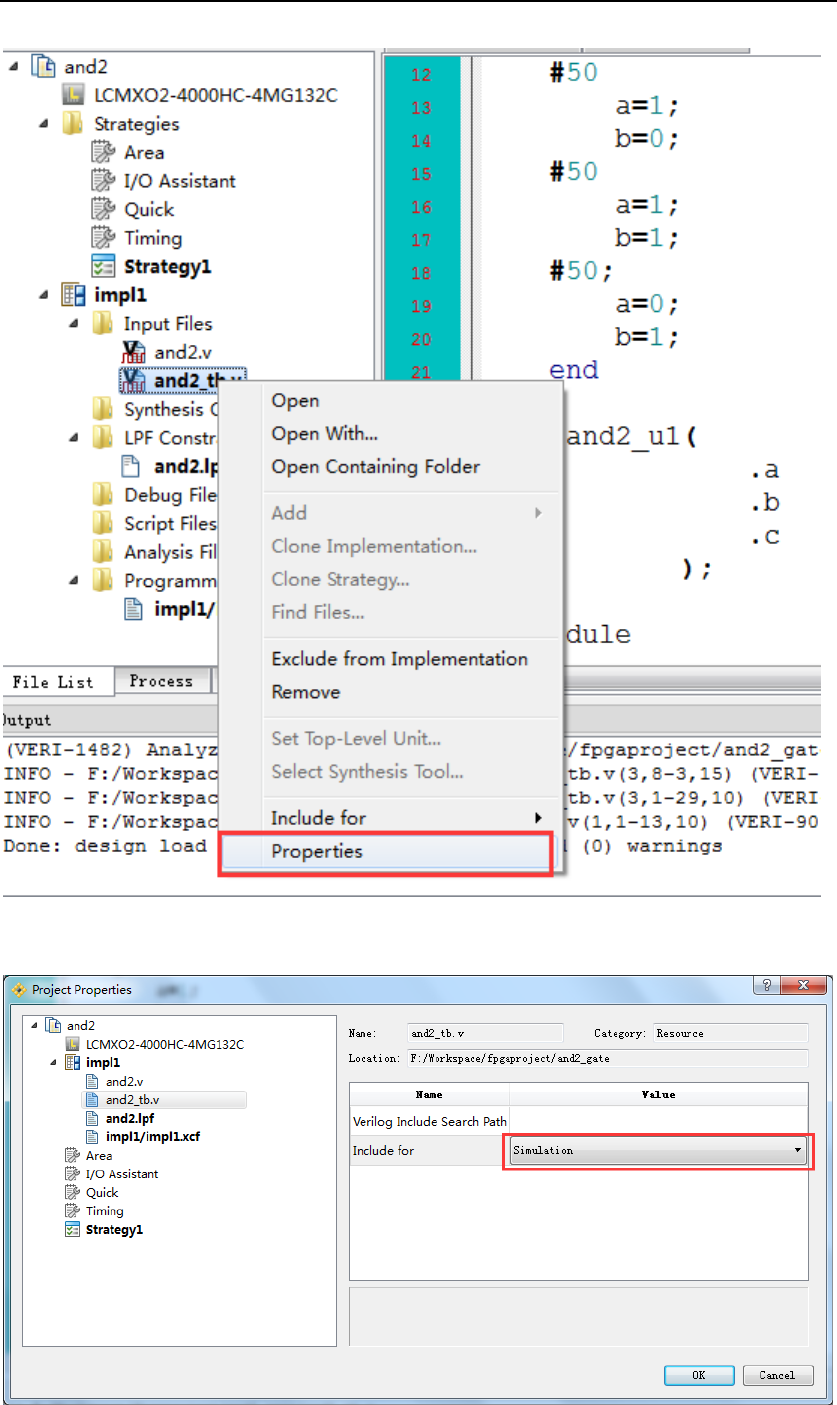
3、To note here is that the testbench files are only used for the simulation, a lot of statements are
not comprehensive. You must change set up the testbench file attributes to simulation
only.Right-click on and2_tb file in project directory
STEP-MXO2 Software Manual
23 / 28
Pop up a properties window, change the file attribute value to simulation.
STEP-MXO2 Software Manual
24 / 28
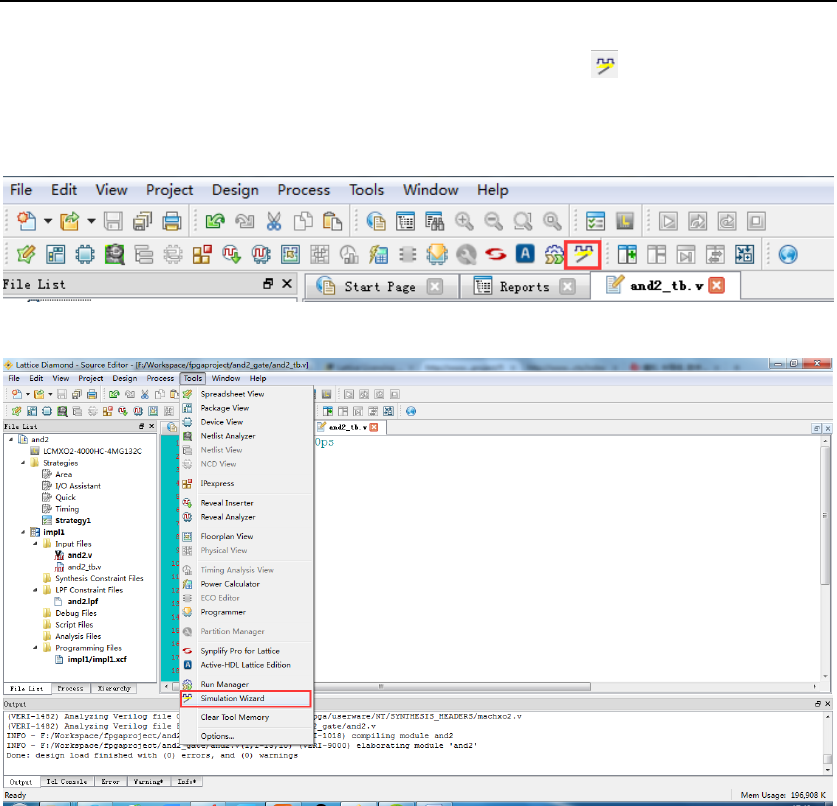
4、Choose the menu Tool -> Simulation Wizard or click the button in the toolbar, start the
simulation wizard.
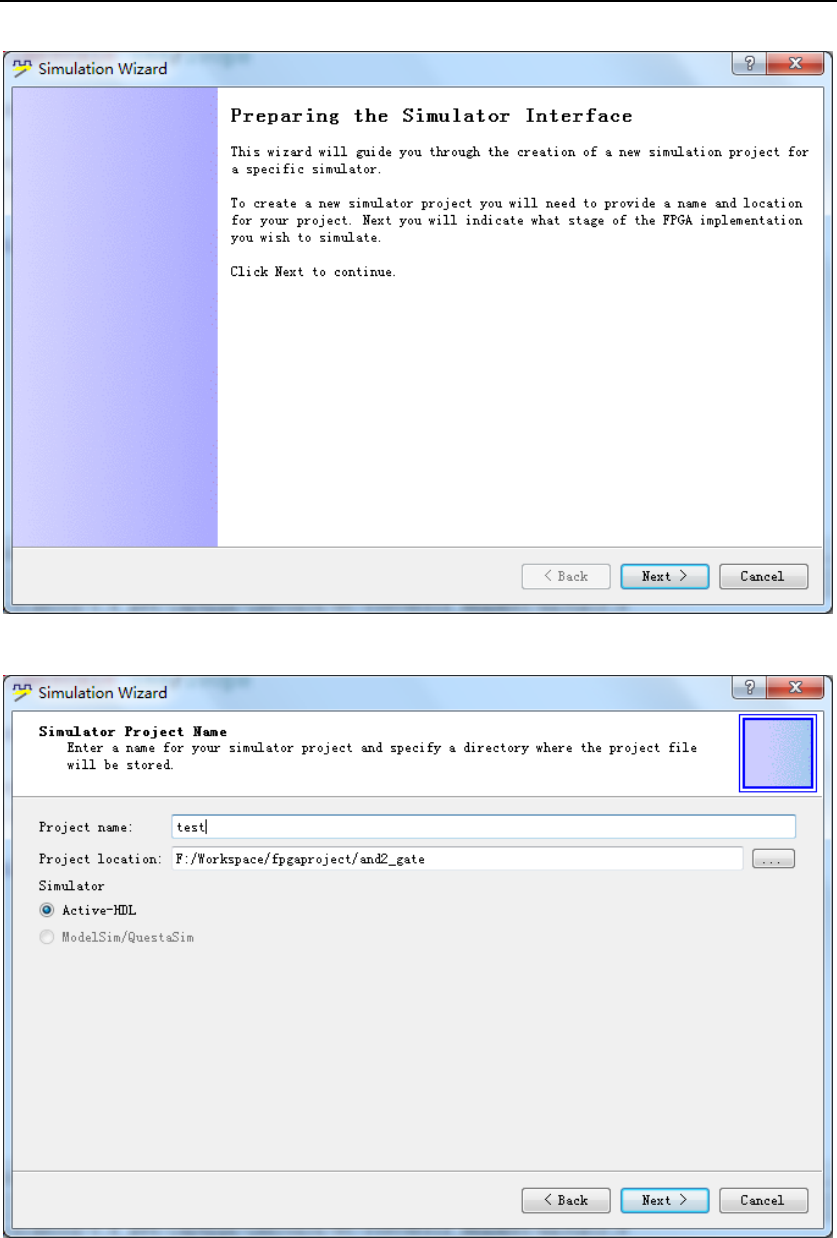
5、Pop up a simulation wizard window.
STEP-MXO2 Software Manual
25 / 28
6、Set a name for the simulation project.
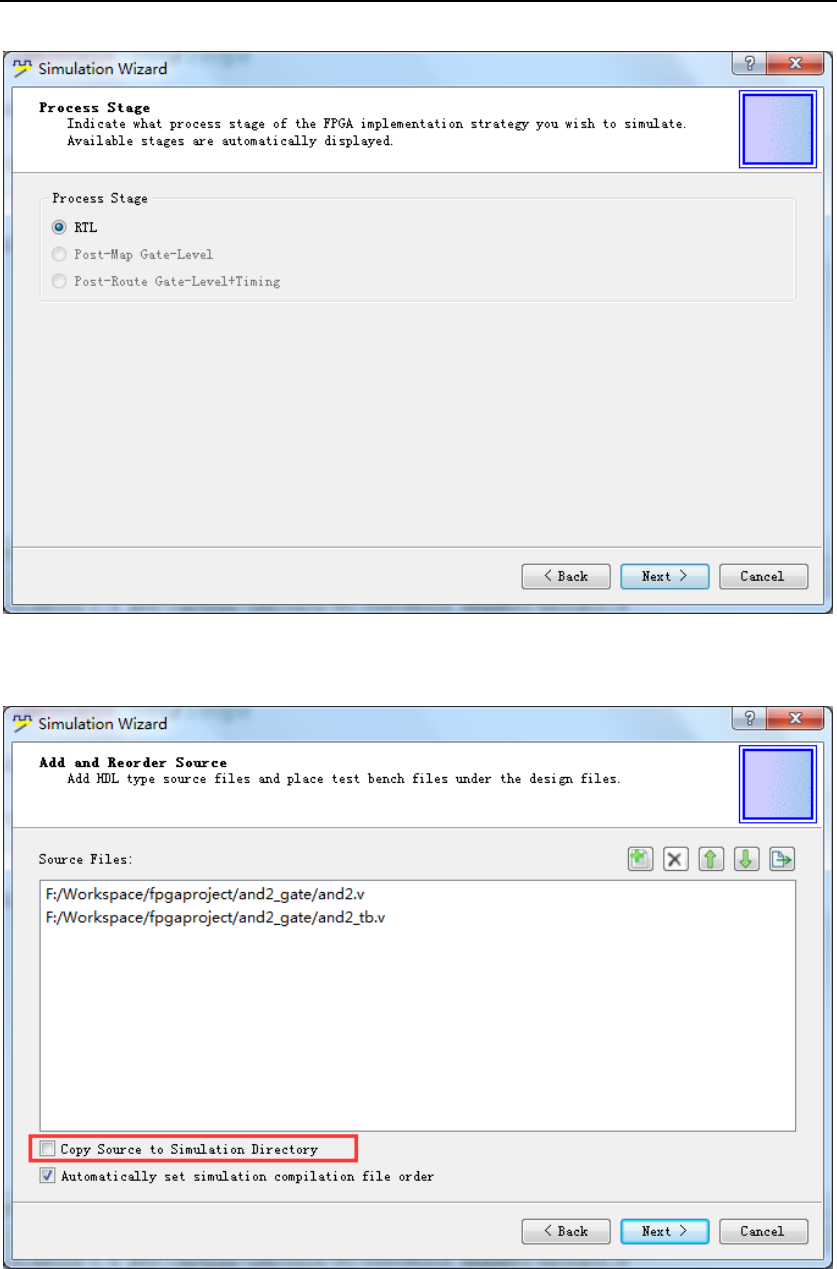
7、Choose the Process stage, now in the functional simulation you can only select RTL.
STEP-MXO2 Software Manual
26 / 28
8、Select add or remove to the Simulation of the Source files and test, if select the Copy Source to
Simulation the Directory option, will copy the source file to the directory of simulation project.
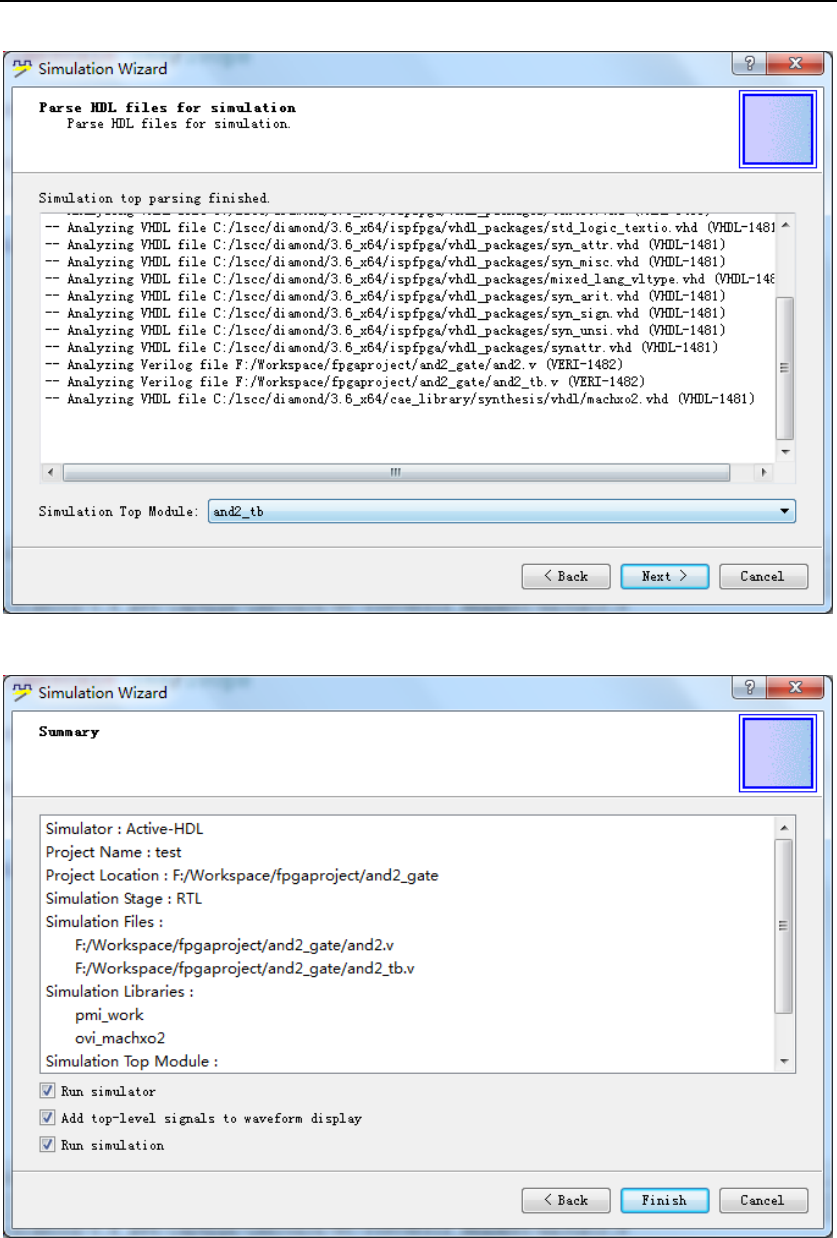
9、You can select the simulation top module.
STEP-MXO2 Software Manual
27 / 28
10、Now the simulation project has been created.
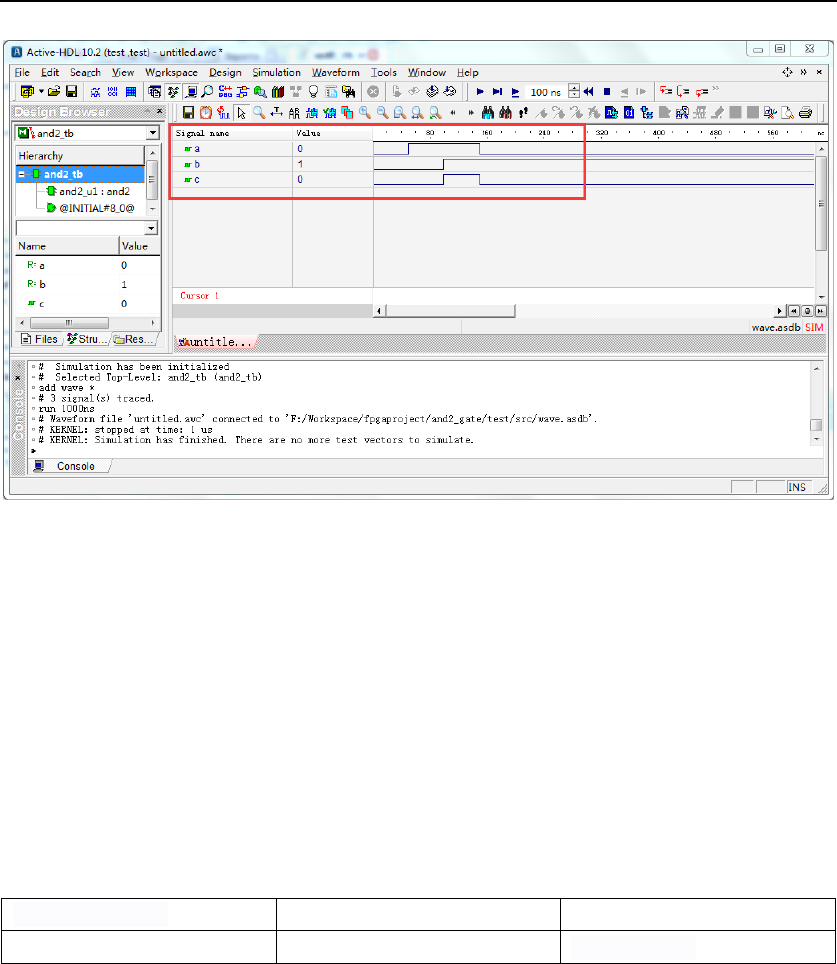
11、Finish the simulation wizard ,you can see the Wave after the simulation.
STEP-MXO2 Software Manual
28 / 28
5.Version
Version number
Date
Comments
1.0
2017.2.14
Initial Version
