Salesforce Mobile Push Notifications Implementation Guide
User Manual:
Open the PDF directly: View PDF ![]() .
.
Page Count: 31
- Mobile Push Notifications Overview
- Steps for Implementing Mobile Push Notifications
- Using the Chatter REST API Push Notification Resource (Optional)
- Reference
- Index

© Copyright 2000–2017 salesforce.com, inc. All rights reserved. Salesforce is a registered trademark of salesforce.com, inc.,
as are other names and marks. Other marks appearing herein may be trademarks of their respective owners.

CONTENTS
MOBILE PUSH NOTIFICATIONS OVERVIEW ...........................1
Push Notification Registration and Flow .......................................1
STEPS FOR IMPLEMENTING MOBILE PUSH NOTIFICATIONS ............4
Step 1. Developer Registration with Mobile OS Vendors ............................4
Step 2. Creating a Connected App ..........................................5
Create a Connected App for Android .....................................6
Create a Connected App for Apple iOS ....................................7
Testing Your Connected App Push Configuration .............................8
Step 3. Configure Your Mobile SDK App ......................................10
Enable Push Notifications in a Salesforce Mobile SDK Android App ................10
Enable Push Notifications in a Salesforce Mobile SDK iOS App ....................11
Enable Push Notifications in a Salesforce Mobile SDK Hybrid App .................13
Step 4. Using Apex Triggers to Send Push Notifications ............................13
Step 5. Packaging Components for Customer Organizations ........................15
USING THE CHATTER REST API PUSH NOTIFICATION RESOURCE
(OPTIONAL) ......................................................16
REFERENCE .......................................................17
PushNotification Class ..................................................17
PushNotification Constructors .........................................18
PushNotification Methods ............................................19
PushNotificationPayload Class ............................................20
PushNotificationPayload Methods ......................................20
Apex Limits Functions for Push Notifications ...................................23
Push Notifications Resource ..............................................23
Push Notification Limits .................................................24
Error Messages for Push Notifications .......................................25
Debug Log Events ....................................................26
INDEX ...........................................................27

MOBILE PUSH NOTIFICATIONS OVERVIEW
Mobile push notifications allow Force.com mobile application developers to easily push notifications to their users’ mobile devices when
business events occur in the customers’ organizations.
Salesforce push notifications use the connected app framework. They support customer apps built in-house and partner or ISV apps
installed via managed packages.
Business events in the customer’s organization are trapped using Apex triggers that specify the notification message payload and recipient
users. The push feature hands off notifications to services operated by device OS vendors, such as Apple or Google, for subsequent
delivery to customers’ mobile devices.
To handle events that Apex triggers can’t catch, the push notifications resource of the Chatter REST API provides an alternative mechanism.
Note: These instructions do not apply to Marketing Cloud apps. To implement Marketing Cloud MobilePush notifications, see
developer.salesforce.com/docs/atlas.en-us.mc-sdks.meta/mc-sdks/mobile-push-sdk.htm.
IN THIS SECTION:
Push Notification Registration and Flow
To enable push notifications, you register with several different entities and configure the required settings.
Push Notification Registration and Flow
To enable push notifications, you register with several different entities and configure the required settings.
Entities involved when sending a push notification include:
•The OS vendor that delivers the notification to devices
•The Salesforce organization that sends the notification
•The mobile devices that receive and display the notification
This is an outline of the registration process for developers.
1. Register with the mobile OS vendor, such as Apple or Google, for push service.
2. Create a connected app in Salesforce to upload the push credentials, such as the iOS .p12 certificate or the Android token.
3. Enable the mobile client app to handle push notifications using the Salesforce Mobile SDK.
4. Write Apex triggers to send push notifications when certain events occur on Salesforce records.
5. (For partners only) For partners who are developing the push notification triggers for other customer organizations, this additional
step should be performed.
Create a managed package containing the connected app and Apex triggers. Distribute this package to customer organizations.
The following figure illustrates the complete push notification flow for customers who develop their own mobile apps and Apex triggers.
The flow consists of the following sequence of events:
1. Developer registration with the OS vendor (Apple in this figure)
2. Connected app setup in Salesforce
3. Sending the push notification via the trigger from the Salesforce organization
1
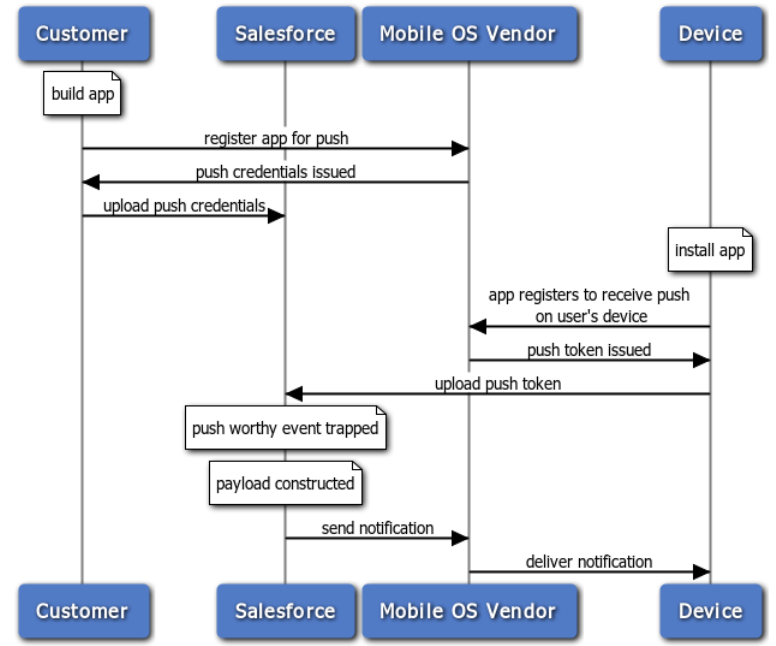
4. Delivery of the push notification to mobile devices by the OS vendor
Push Notification Flow for Customers
Salesforce sends the message to the users specified in the send call of the Apex Messaging.PushNotification class.
This next figure illustrates the complete push notification flow for partners and customers. In addition to the flow represented in the
previous diagram, this flow includes steps for customers who have installed the partner’s package. It includes purchase of the partner
app, and installation of the partner’s package to get the connected app and the Apex triggers. The last few steps of sending and delivering
the push notification are similar to the previous flow.
2
Push Notification Registration and FlowMobile Push Notifications Overview
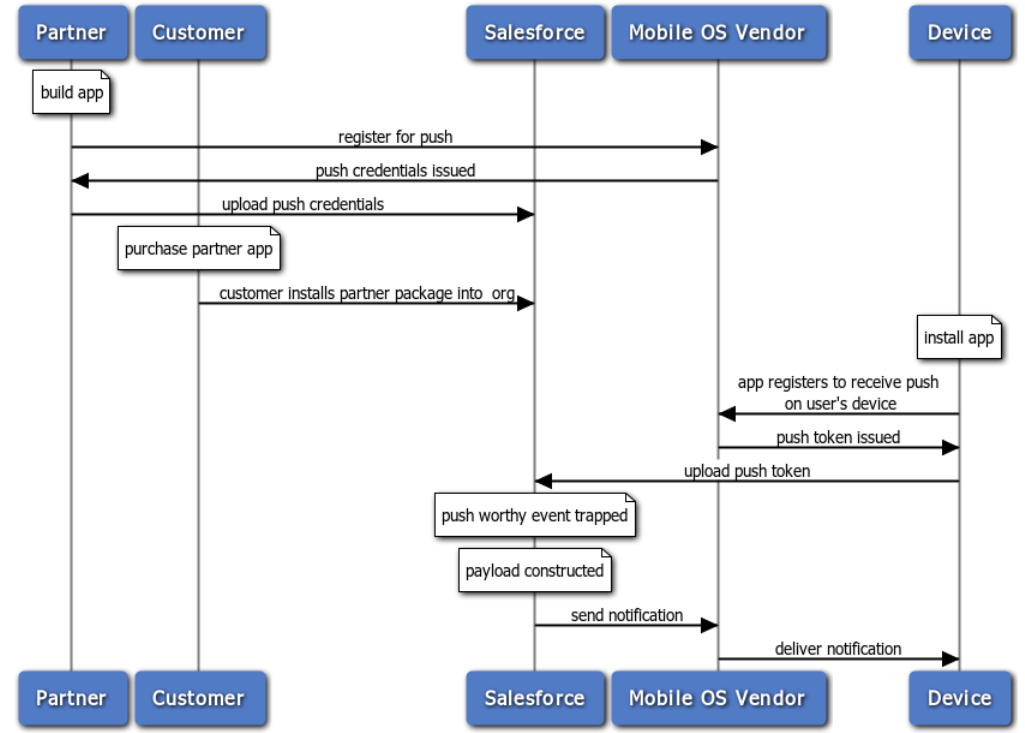
Push Notification Flow for Partners and Customers
3
Push Notification Registration and FlowMobile Push Notifications Overview
STEPS FOR IMPLEMENTING MOBILE PUSH NOTIFICATIONS
To implement mobile push notifications, you configure each of the participating technologies.
IN THIS SECTION:
Step 1. Developer Registration with Mobile OS Vendors
This step asks the OS vendor to be prepared to handle Salesforce push notifications sent to your app. Developer registration also
provides some information you’ll need to finish configuring your Salesforce connected app.
Step 2. Creating a Connected App
Once you’ve registered your mobile app with the OS vendor’s push service, the next step is to create a connected app in Salesforce.
Step 3. Configure Your Mobile SDK App
In your Mobile SDK app, implement push notification protocols required by Salesforce and the device OS provider.
Step 4. Using Apex Triggers to Send Push Notifications
After registering with the mobile OS vendor for push notification service and creating a connected app, you can send push notifications
to a mobile client app using Apex triggers.
Step 5. Packaging Components for Customer Organizations
To distribute the Apex triggers and the connected app to customers, partners can create a managed package.
Step 1. Developer Registration with Mobile OS Vendors
This step asks the OS vendor to be prepared to handle Salesforce push notifications sent to your app. Developer registration also provides
some information you’ll need to finish configuring your Salesforce connected app.
To register your mobile client app, follow the process for your target mobile OS.
Android Registration
When developing an Android app that supports push notifications, remember these key points:
•You must be a member of the Android Developer Program.
•You can test GCM push services only on an Android device with either the Android Market app or Google Play Services installed.
Push notifications don’t work on an Android emulator.
Salesforce sends push notifications to Android apps through the Google Cloud Messaging for Android (GCM) framework. See
http://developer.android.com/google/gcm/index.html for an overview of this framework.
To begin, create a Google API project for your app. Your project must have the GCM for Android feature enabled. See
http://developer.android.com/google/gcm/gs.html for instructions on setting up your project.
The setup process for your Google API project creates a key for your app. Once you’ve finished the project configuration, you’ll need to
add the Key for Server Applications (API Key) from GCM to your connected app settings.
Note: Push notification registration occurs at the end of the OAuth login flow. Therefore, an app does not receive push notifications
unless and until the user logs into a Salesforce org.
4
iOS Registration
When developing an iOS app that supports push notifications, remember these key points:
•You must be a member of the iOS Developer Program.
•You can test Apple push services only on an iOS physical device. Push notifications don’t work in the iOS simulator.
•There are no guarantees that all push notifications will reach the target device, even if the notification is accepted by Apple.
•Apple Push Notification Services setup requires the use of the OpenSSL command line utility provided in Mac OS X.
Before you can complete registration on the Salesforce side, you need to register with Apple Push Notification Services (APNS).
Registration with APNS requires the following items.
Certificate Signing Request (CSR) File
Generate this request using the Keychain Access feature in Mac OS X. You’ll also use OpenSSL to export the CSR private key to a file
for later use.
App ID from iOS Developer Program
In the iOS Developer Member Center, create an ID for your app, then use the CSR file to generate a certificate. Next, use OpenSSL to
combine this certificate with the private key file to create an appkey.p12 file. You’ll need this file later to configure your connected
app.
iOS Provisioning Profile
From the iOS Developer Member Center, create a new provisioning profile using your iOS app ID and developer certificate. You then
select the devices to include in the profile and download to create the provisioning profile. You can then add the profile to Xcode.
Install the profile on your test device using Xcode's Organizer.
When you’ve completed the configuration, sign and build your app in Xcode. Check the build logs to verify that the app is using the
correct provisioning profile. To view the content of your provisioning profile, run the following command at the Terminal window:
security cms -D -i <your profile>.mobileprovision
For detailed instructions see:
•Local and Push Notification Programming Guide at https://developer.apple.com/library/mac
•http://www.raywenderlich.com/32960/
Step 2. Creating a Connected App
EDITIONS
Available in: both Salesforce
Classic and Lightning
Experience
Connected Apps can be
created in: Group,
Professional, Enterprise,
Performance, Unlimited,
and Developer Editions
Connected Apps can be
installed in: All Editions
USER PERMISSIONS
“Customize Application” AND either
“Modify All Data” OR “Manage Connected
Apps”
To read, create, update, or delete connected
apps:
“Customize Application” AND either
“Modify All Data” OR “Manage Connected
Apps”
To update all fields except Profiles,
Permission Sets, and Service Provider SAML
Attributes:
“Customize Application” AND “Modify All
Data”
To update Profiles, Permission Sets, and
Service Provider SAML Attributes:
5
Step 2. Creating a Connected AppSteps for Implementing Mobile Push Notifications
“Customize Application” AND either
“Modify All Data” OR “Manage Connected Apps”
To install and uninstall connected apps:
“Customize Application” AND either
“Modify All Data” OR “Manage Connected Apps”
To install and uninstall packaged connected apps:
AND “Download AppExchange Packages”
Once you’ve registered your mobile app with the OS vendor’s push service, the next step is to create a connected app in Salesforce.
The Salesforce connected app enables you to provide the registration certificate or token of your mobile client app so that Salesforce
can send push notifications. Also, the connected app provides the unique API name that identifies the mobile app to send notifications
to.
IN THIS SECTION:
Create a Connected App for Android
Create a Connected App for Apple iOS
Testing Your Connected App Push Configuration
To run a quick test of your push notification setup, use the Send Test Notification page. The Send Test Notification page lets you
troubleshoot round-trip push notifications in a synchronous mechanism without having to configure Apex or REST calls. It can also
provide insights into what’s going on behind the scenes in the asynchronous environment of real-world push notifications.
Create a Connected App for Android
To create a connected app, log in to your Salesforce Developer Edition org and perform these steps.
1. From Setup, enter Apps in the Quick Find box, then select Apps.
2. In the Connected Apps section, click either Edit next to an existing connected app, or New to create a new connected app.
3. If you’re creating a new connected app:
a. Enter a unique name for your connected app. The API name field is auto-filled.
b. Optionally, fill in other fields, such as a description for your connected app.
c. Enter a contact email address.
d. In the OAuth Settings section, select Enable OAuth Settings.
e. Enter a callback URL.
f. Select OAuth scopes. At a minimum, select Access and manage your data (api) and Perform requests on your behalf at
any time (refresh_token).
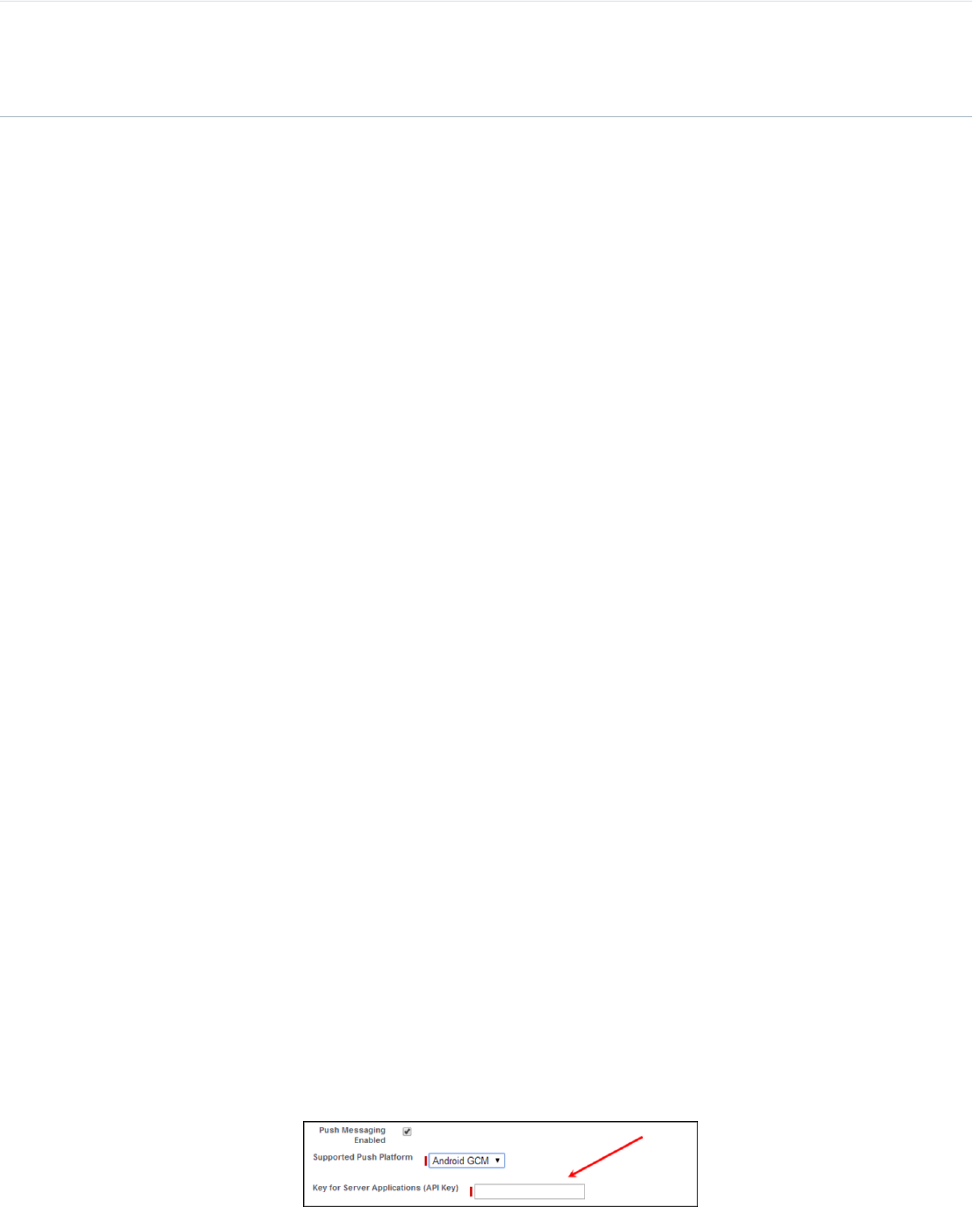
4. Under Mobile App Settings, select Push Messaging Enabled.
5. For Supported Push Platform, select Android GCM.
6. For Key for Server Applications (API Key), enter the key you obtained during the developer registration with Google.
6
Create a Connected App for AndroidSteps for Implementing Mobile Push Notifications
7. Click Save.
After saving a new connected app, you’ll get a consumer key. Mobile apps use this key as their connection token.
Create a Connected App for Apple iOS
To create a connected app, log in to your Salesforce Developer Edition org and perform these steps.
1. From Setup, enter Apps in the Quick Find box, then select Apps.
2. In the Connected Apps section, click either Edit next to an existing connected app, or New to create a new connected app.
3. If you’re creating a new connected app:
a. Enter a unique name for your connected app. The API name field is auto-filled.
b. Optionally, fill in other fields, such as a description for your connected app.
c. Enter a contact email address.
d. In the OAuth Settings section, select Enable OAuth Settings.
e. Enter a callback URL.
f. Select OAuth scopes. At a minimum, select Access and manage your data (api) and Perform requests on your behalf at
any time (refresh_token).
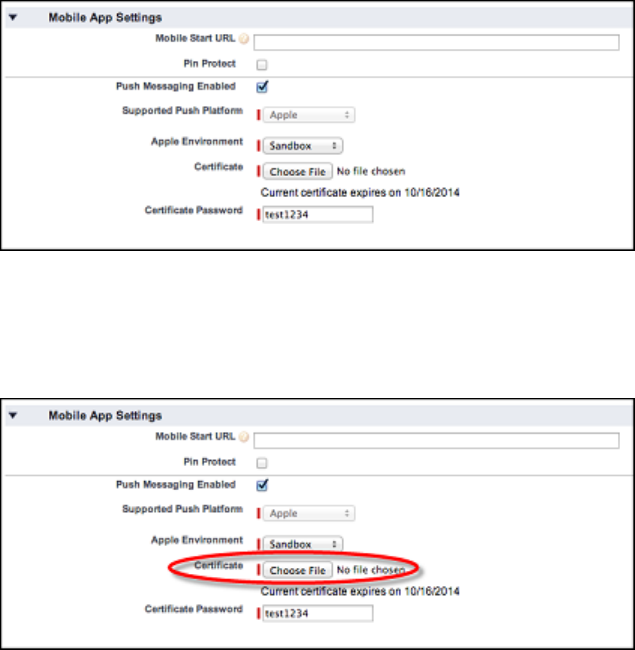
4. Under Mobile App Settings, select Push Messaging Enabled.
5. For Supported Push Platform, select Apple.
When you select the Supported Push Platform option, the dialog expands to show more settings.
6. Select the Apple environment that is valid for your APNS push notifications certificate.
7. For Certificate, select the .p12 certificate file that you received from APNS when you registered your app for push notifications (for
example, appkey.p12).
7
Create a Connected App for Apple iOSSteps for Implementing Mobile Push Notifications
8. Enter the password for your .p12 certificate file.
Testing Your Connected App Push Configuration
EDITIONS
Available in: both Salesforce
Classic and Lightning
Experience
Connected Apps can be
created in: Group,
Professional, Enterprise,
Performance, Unlimited,
and Developer Editions
Connected Apps can be
installed in: All Editions
USER PERMISSIONS
To send a push notification
from the Test Push
Notifications page:
•“Author Apex”
AND
“Manage Connected
Apps”
To run a quick test of your push notification setup, use the Send Test Notification page. The Send
Test Notification page lets you troubleshoot round-trip push notifications in a synchronous
mechanism without having to configure Apex or REST calls. It can also provide insights into what’s
going on behind the scenes in the asynchronous environment of real-world push notifications.
About the Send Test Notification Page
The Send Test Notification page uses information from your Apple Push Notification Service (APNS)
or Google Cloud Messaging for Android (GCM) setup to configure a synchronous push mechanism.
You select a device to receive the push notification by entering a connection token string. If you
don’t know the token string, you can use the Search tool to select from the list of devices that are
registered for your connected app. The Search tool automatically displays the five most recently
registered devices. You can also enter a user’s name to search for devices that are registered to that
user.
For Android GCM push notifications, you can select the Dry Run option to test your GCM setup.
This option sends the notification to the GCM server but does not forward it to a device.
Each push attempt returns a status message that indicates success or failure. See Error Messages
for Push Notifications for explanations of messages. For additional information, see:
•developer.apple.com for information on Apple APNS push notifications.
•developer.android.com for information on GCM for Android push notifications.
To reach the test page:
1. In Setup, enter Apps in the Quick Find box, then select Apps.
2. Click the name of your connected app.
3. Click Send test notification next to Supported Push Platform. This link appears only if you’ve configured your connected app to
support mobile push notifications.
Important: Successful test push notifications apply against the push notification daily limits for your organization.
IN THIS SECTION:
Send Test Push Notifications to APNS
To run a quick test of your push notification setup for Apple Push Notification Service (APNS), use the Send Test Notification page.
Send Test Push Notifications to GCM for Android
To run a quick test of your push notification setup for Google Cloud Messaging for Android (GCM), use the Test Push Notifications
page.
8
Testing Your Connected App Push ConfigurationSteps for Implementing Mobile Push Notifications

Check a User's Mobile Push Registrations
From a User page in your organization, an administrator can easily check which of the user’s devices are currently registered for push
notifications. Checking the registrations may help you troubleshoot push notification failures.
SEE ALSO:
Error Messages for Push Notifications
Push Notification Limits
Send Test Push Notifications to APNS
To run a quick test of your push notification setup for Apple Push Notification Service (APNS), use the Send Test Notification page.
1. Enter a connection token string in the Recipient field, OR search for a recipient by clicking Search , and then select one of the
search results. By default, the Search results list displays the five devices most recently registered for your connected app.
a. To find other devices, enter a user name in the Search text box.
b. Click Go to generate a list of all devices currently registered under that user name.
2. Optionally, for Alert, enter an alert message or dictionary per Apple’s specifications.
3. For Badge, enter a badge number or 0 for no badge.
4. For Sound, enter the name of a sound file in the application bundle, or enter default to use the system default alert sound.
5. Optionally, to use a custom payload, enter your payload’s JSON value in the Custom Payload field.
6. Click Send to send the test push notification, or click Clear to reset the form.
Send Test Push Notifications to GCM for Android
To run a quick test of your push notification setup for Google Cloud Messaging for Android (GCM), use the Test Push Notifications page.
1. Enter a connection token string in the Recipient field, OR search for a recipient by clicking Search , and then select one of the
search results. By default, the Search results list displays the five devices most recently registered for your connected app.
a. To find other devices, enter a user name in the Search text box.
b. Click Go to generate a list of all devices currently registered under that user name.
2. For Payload, enter a JSON value that contains your message.
3. To send the push notification to the GCM server only, select Dry Run.
4. Click Send to send the test push notification, or click Clear to reset the form.
Check a User's Mobile Push Registrations
From a User page in your organization, an administrator can easily check which of the user’s devices are currently registered for push
notifications. Checking the registrations may help you troubleshoot push notification failures.
1. In Setup, enter Users in the Quick Find box, then select Users.
2. Select a user’s name from the Full Name column.
3. Under User Detail, click View next to Mobile Push Registrations.
9
Testing Your Connected App Push ConfigurationSteps for Implementing Mobile Push Notifications
Note: If a device you expected doesn’t appear in the list, it doesn’t necessarily mean that the device isn’t properly configured.
Mobile push registrations are volatile and depend on the device state as well as the mobile app state.
Step 3. Configure Your Mobile SDK App
In your Mobile SDK app, implement push notification protocols required by Salesforce and the device OS provider.
Follow the instructions for your target mobile platform (Android, iOS, or hybrid).
IN THIS SECTION:
Enable Push Notifications in a Salesforce Mobile SDK Android App
Enable Push Notifications in a Salesforce Mobile SDK iOS App
Enable Push Notifications in a Salesforce Mobile SDK Hybrid App
Enable Push Notifications in a Salesforce Mobile SDK Android App
1. Add an entry for androidPushNotificationClientId.
a. In res/values/bootconfig.xml (for native apps):
<string name="androidPushNotificationClientId">1234567890</string>
b. In assets/www/bootconfig.json (for hybrid apps):
"androidPushNotificationClientId": "1234567890"
This example value represents the project number of the Google project that is authorized to send push notifications to Android
devices.
Note: Behind the scenes, Mobile SDK automatically reads this value and uses it to register the device against the Salesforce
connected app. Each time the user re-opens the app, Mobile SDK automatically renews the registration. This validation allows
Salesforce to send notifications to the connected app.
A device becomes unregistered if:
•The app goes unused for an extended period of time
OR
•The user logs out of the app
2. Create a class in your app that implements PushNotificationInterface. PushNotificationInterface is a
Mobile SDK Android interface for handling push notifications. PushNotificationInterface has a single method,
onPushMessageReceived(Bundle message).
public interface PushNotificationInterface {
public void onPushMessageReceived(Bundle message);
}
In this method you implement your custom functionality for displaying, or otherwise disposing of, push notifications.
3. In the onCreate() method of your Application subclass, call the
SalesforceSDKManager.setPushNotificationReceiver() method, passing in your implementation of
10
Step 3. Configure Your Mobile SDK AppSteps for Implementing Mobile Push Notifications

PushNotificationInterface. Call this method immediately after the SalesforceSDKManager.initNative()
call.
@Override
public void onCreate() {
super.onCreate();
SalesforceSDKManager.initNative(getApplicationContext(),
new KeyImpl(), MainActivity.class);
SalesforceSDKManager.getInstance().
setPushNotificationReceiver(myPushNotificationInterface);
}
Enable Push Notifications in a Salesforce Mobile SDK iOS App
Salesforce Mobile SDK for iOS provides the SFPushNotificationManager class to handle push registration. To use it, import
<SalesforceSDKCore/SFPushNotificationManager>. The SFPushNotificationManager class is available
as a runtime singleton:
[SFPushNotificationManager sharedInstance]
This class implements four registration methods:
- (void)registerForRemoteNotifications;
- (void)didRegisterForRemoteNotificationsWithDeviceToken:
(NSData*)deviceTokenData;
- (BOOL)registerForSalesforceNotifications; // for internal use
- (BOOL)unregisterSalesforceNotifications; // for internal use
Mobile SDK calls registerForSalesforceNotifications after login and unregisterSalesforceNotifications
at logout. You call the other two methods from your AppDelegate class.
1. Register with Apple for push notifications by calling registerForRemoteNotifications. Place the call in the
application:didFinishLaunchingWithOptions: method.
- (BOOL)application:(UIApplication *)application
didFinishLaunchingWithOptions:(NSDictionary *)launchOptions
{
self.window = [[UIWindow alloc]
initWithFrame:[UIScreen mainScreen].bounds];
[self initializeAppViewState];
//
// Register with APNS for push notifications. Note that,
// to receive push notifications from Salesforce, you
// also need to register for Salesforce notifications in the
// application:
// didRegisterForRemoteNotificationsWithDeviceToken:
// method (as demonstrated below.)
//
[[SFPushNotificationManager sharedInstance]
registerForRemoteNotifications];
[[SFAuthenticationManager sharedManager]
loginWithCompletion:self.initialLoginSuccessBlock
11
Enable Push Notifications in a Salesforce Mobile SDK iOS AppSteps for Implementing Mobile Push Notifications

failure:self.initialLoginFailureBlock];
return YES;
}
If registration succeeds, Apple passes a device token to the
application:didRegisterForRemoteNotificationsWithDeviceToken: method of your AppDelegate
class.
2. Forward the device token from Apple to SFPushNotificationManager by calling
didRegisterForRemoteNotificationsWithDeviceToken on the SFPushNotificationManager shared
instance.
- (void)application:(UIApplication*)application
didRegisterForRemoteNotificationsWithDeviceToken:
(NSData*)deviceToken
{
//
// Register your device token with
// the push notification manager
//
[[SFPushNotificationManager sharedInstance]
didRegisterForRemoteNotificationsWithDeviceToken:deviceToken];
}}
3. Register to receive Salesforce notifications through the connected app by calling registerForSalesforceNotifications.
Make this call only if the access token for the current session is valid.
- (void)application:(UIApplication*)application
didRegisterForRemoteNotificationsWithDeviceToken:
(NSData*)deviceToken
{
//
// Register your device token with the
// push notification manager
[[SFPushNotificationManager sharedInstance]
didRegisterForRemoteNotificationsWithDeviceToken:deviceToken];
if ([SFAccountManager sharedInstance].credentials.accessToken
!= nil){
[[SFPushNotificationManager sharedInstance]
registerForSalesforceNotifications];
}}
Note: Behind the scenes, Mobile SDK automatically reads this value and uses it to register the device against the Salesforce
connected app. Each time the user re-opens the app, Mobile SDK automatically renews the registration. This validation allows
Salesforce to send notifications to the connected app.
A device becomes unregistered if:
•The app goes unused for an extended period of time
OR
•The user logs out of the app
12
Enable Push Notifications in a Salesforce Mobile SDK iOS AppSteps for Implementing Mobile Push Notifications
4. Add the following method to log an error if registration with Apple fails.
- (void)application:(UIApplication*)application
didFailToRegisterForRemoteNotificationsWithError:
(NSError*)error
{
NSLog(@"Failed to get token, error: %@", error);
}
Enable Push Notifications in a Salesforce Mobile SDK Hybrid App
1. (Android only) If your target platform is Android:
a. Add an entry for androidPushNotificationClientId. In assets/www/bootconfig.json:
"androidPushNotificationClientId": "33333344444"
This value is the project number of the Google project that is authorized to send push notifications to an Android device.
2. In your callback for cordova.require("com.salesforce.plugin.oauth").getAuthCredentials(), add
the following code:
cordova.require("com.salesforce.util.push").registerPushNotificationHandler(
function(message) {
// add code to handle notifications
},
function(error) {
// add code to handle errors
}
);
Example: This code demonstrates how you might handle messages. The server delivers the payload in message["payload"].
function(message) {
var payload = message["payload"];
if (message["foreground"]) {
// Notification is received while the app is in
// the foreground
// Do something appropriate with payload
}
if (!message["foreground"]) {
// Notification was received while the app was in
// the background, and the notification was clicked,
// bringing the app to the foreground
// Do something appropriate with payload
}
}
Step 4. Using Apex Triggers to Send Push Notifications
After registering with the mobile OS vendor for push notification service and creating a connected app, you can send push notifications
to a mobile client app using Apex triggers.
13
Enable Push Notifications in a Salesforce Mobile SDK Hybrid
App
Steps for Implementing Mobile Push Notifications

Push notification triggers use methods in the Apex Messaging.PushNotification and
Messaging.PushNotificationPayload classes. The connected app in the Salesforce organization represents the mobile
client app that will receive the notifications.
Important: To send push notifications to a connected app, either of the following conditions must be met:
•Apex triggers are added in the same organization in which the connected app is created.
•Apex triggers are installed as part of a partner-provided managed package, along with the connected app.
Sample Apex Trigger
This sample Apex trigger sends push notifications to the connected app named Test_App, which corresponds to a mobile app on
iOS mobile clients. The trigger fires after cases have been updated and sends the push notification to two users: the case owner and the
user who last modified the case.
trigger caseAlert on Case (after update) {
for(Case cs : Trigger.New)
{
// Instantiating a notification
Messaging.PushNotification msg =
new Messaging.PushNotification();
// Assembling the necessary payload parameters for Apple.
// Apple params are:
// (<alert text>,<alert sound>,<badge count>,
// <free-form data>)
// This example doesn't use badge count or free-form data.
// The number of notifications that haven't been acted
// upon by the intended recipient is best calculated
// at the time of the push. This timing helps
// ensure accuracy across multiple target devices.
Map<String, Object> payload =
Messaging.PushNotificationPayload.apple(
'Case ' + cs.CaseNumber + ' status changed to: '
+ cs.Status, '', null, null);
// Adding the assembled payload to the notification
msg.setPayload(payload);
// Getting recipient users
String userId1 = cs.OwnerId;
String userId2 = cs.LastModifiedById;
// Adding recipient users to list
Set<String> users = new Set<String>();
users.add(userId1);
users.add(userId2);
// Sending the notification to the specified app and users.
// Here we specify the API name of the connected app.
msg.send('Test_App', users);
14
Step 4. Using Apex Triggers to Send Push NotificationsSteps for Implementing Mobile Push Notifications

}
}
Sample Android Payload
The trigger sample uses Messaging.PushNotificationPayload to create a payload for an iOS notification. Unlike iOS,
Android doesn’t have special attributes or requirements for the payload; it just needs to be in JSON format. In Apex, you create the
Android payload as a MAP<String,ANY> object. The Messaging.PushNotification class handles conversion to JSON. Here
is a sample Android payload.
Map<String, Object> androidPayload = new Map<String, Object>();
androidPayload.put('number', 1);
androidPayload.put('name', 'test');
Step 5. Packaging Components for Customer Organizations
To distribute the Apex triggers and the connected app to customers, partners can create a managed package.
When customers install your managed package, they will be able to send push notifications to the connected app from their organizations
when certain events occur on Salesforce records, such as updating records.
Note: Customers who install a managed package containing a connected app provided by a partner can’t write their own Apex
triggers to send push notifications to the connected app. This is to safeguard the partner’s registration with the mobile OS vendor
from abuse.
15
Step 5. Packaging Components for Customer OrganizationsSteps for Implementing Mobile Push Notifications

USING THE CHATTER REST API PUSH NOTIFICATION
RESOURCE (OPTIONAL)
If you prefer to send push notifications without looping through the Apex engine—in other words, if you just want to push a simple
message from a connected app on one mobile device to another—use the Chatter REST API push notification resource. This resource
is useful for sending notifications of events that occur outside of Salesforce and can be handled entirely within the mobile connected
app. You can use this resource in any type of custom app: a native Mobile SDK app, a hybrid Mobile SDK app, or an HTML5 app.
The Chatter REST API resource establishes an HTTP session to send POST requests from the sending device to one or more receiving
devices. This means that:
•The sending app and the receiving apps must either be developed in the same organization or be installed from the same package.
•Only the receiving apps are required to be registered for push notifications with Apple or Google.
•Only the receiving apps are required to implement the Salesforce Mobile SDK push notification protocols.
•Each app requires a connected app, but only the receiving connected apps must be configured for push notifications.
SEE ALSO:
Push Notifications Resource
16
REFERENCE
PushNotification Class
PushNotification is used to configure push notifications and send them from an Apex trigger.
Namespace
Messaging
Example
This sample Apex trigger sends push notifications to the connected app named Test_App, which corresponds to a mobile app on
iOS mobile clients. The trigger fires after cases have been updated and sends the push notification to two users: the case owner and the
user who last modified the case.
trigger caseAlert on Case (after update) {
for(Case cs : Trigger.New)
{
// Instantiating a notification
Messaging.PushNotification msg =
new Messaging.PushNotification();
// Assembling the necessary payload parameters for Apple.
// Apple params are:
// (<alert text>,<alert sound>,<badge count>,
// <free-form data>)
// This example doesn't use badge count or free-form data.
// The number of notifications that haven't been acted
// upon by the intended recipient is best calculated
// at the time of the push. This timing helps
// ensure accuracy across multiple target devices.
Map<String, Object> payload =
Messaging.PushNotificationPayload.apple(
'Case ' + cs.CaseNumber + ' status changed to: '
+ cs.Status, '', null, null);
// Adding the assembled payload to the notification
msg.setPayload(payload);
// Getting recipient users
String userId1 = cs.OwnerId;
String userId2 = cs.LastModifiedById;
// Adding recipient users to list
Set<String> users = new Set<String>();
users.add(userId1);
17

users.add(userId2);
// Sending the notification to the specified app and users.
// Here we specify the API name of the connected app.
msg.send('Test_App', users);
}
}
IN THIS SECTION:
PushNotification Constructors
PushNotification Methods
PushNotification Constructors
The following are the constructors for PushNotification.
IN THIS SECTION:
PushNotification()
Creates a new instance of the Messaging.PushNotification class.
PushNotification(payload)
Creates a new instance of the Messaging.PushNotification class using the specified payload parameters as key-value
pairs. When you use this constructor, you don’t need to call setPayload to set the payload.
PushNotification()
Creates a new instance of the Messaging.PushNotification class.
Signature
public PushNotification()
PushNotification(payload)
Creates a new instance of the Messaging.PushNotification class using the specified payload parameters as key-value pairs.
When you use this constructor, you don’t need to call setPayload to set the payload.
Signature
public PushNotification(Map<String,Object> payload)
Parameters
payload
Type:Map<String, Object>
The payload, expressed as a map of key-value pairs.
18
PushNotification ConstructorsReference
PushNotification Methods
The following are the methods for PushNotification. All are global methods.
IN THIS SECTION:
send(application, users)
Sends a push notification message to the specified users.
setPayload(payload)
Sets the payload of the push notification message.
setTtl(ttl)
Reserved for future use.
send(application, users)
Sends a push notification message to the specified users.
Signature
public void send(String application, Set<String> users)
Parameters
application
Type: String
The connected app API name. This corresponds to the mobile client app the notification should be sent to.
users
Type: Set
A set of user IDs that correspond to the users the notification should be sent to.
Example
See the Push Notification Example.
setPayload(payload)
Sets the payload of the push notification message.
Signature
public void setPayload(Map<String,Object> payload)
Parameters
payload
Type: Map<String, Object>
The payload, expressed as a map of key-value pairs.
19
PushNotification MethodsReference

Payload parameters can be different for each mobile OS vendor. For more information on Apple’s payload parameters, search for
“Apple Push Notification Service” at https://developer.apple.com/library/mac/documentation/.
To create the payload for an Apple device, see the PushNotificationPayload Class.
Example
See the Push Notification Example.
setTtl(ttl)
Reserved for future use.
Signature
public void setTtl(Integer ttl)
Parameters
ttl
Type: Integer
Reserved for future use.
PushNotificationPayload Class
Contains methods to create the notification message payload for an Apple device.
Namespace
Messaging
Usage
Apple has specific requirements for the notification payload. and this class has helper methods to create the payload. For more information
on Apple’s payload parameters, search for “Apple Push Notification Service” at https://developer.apple.com/library/mac/documentation/.
Example
See the Push Notification Example.
IN THIS SECTION:
PushNotificationPayload Methods
PushNotificationPayload Methods
The following are the methods for PushNotificationPayload. All are global static methods.
20
PushNotificationPayload ClassReference
IN THIS SECTION:
apple(alert, sound, badgeCount, userData)
Helper method that creates a valid Apple payload from the specified arguments.
apple(alertBody, actionLocKey, locKey, locArgs, launchImage, sound, badgeCount, userData)
Helper method that creates a valid Apple payload from the specified arguments.
apple(alert, sound, badgeCount, userData)
Helper method that creates a valid Apple payload from the specified arguments.
Signature
public static Map<String,Object> apple(String alert, String sound, Integer badgeCount,
Map<String,Object> userData)
Parameters
alert
Type: String
Notification message to be sent to the mobile client.
sound
Type: String
Name of a sound file to be played as an alert. This sound file should be in the mobile application bundle.
badgeCount
Type: Integer
Number to display as the badge of the application icon.
userData
Type: Map<String, Object>
Map of key-value pairs that contains any additional data used to provide context for the notification. For example, it can contain IDs
of the records that caused the notification to be sent. The mobile client app can use these IDs to display these records.
Return Value
Type:Map<String, Object>
Returns a formatted payload that includes all of the specified arguments.
Usage
To generate a valid payload, you must provide a value for at least one of the following parameters: alert, sound, badgeCount.
Example
See the Push Notification Example.
21
PushNotificationPayload MethodsReference
apple(alertBody, actionLocKey, locKey, locArgs, launchImage, sound,
badgeCount, userData)
Helper method that creates a valid Apple payload from the specified arguments.
Signature
public static Map<String,Object> apple(String alertBody, String actionLocKey, String
locKey, String[] locArgs, String launchImage, String sound, Integer badgeCount,
Map<String,Object> userData)
Parameters
alertBody
Type: String
Text of the alert message.
actionLocKey
Type: String
If a value is specified for the actionLocKey argument, an alert with two buttons is displayed. The value is a key to get a localized
string in a Localizable.strings file to use for the right button’s title.
locKey
Type: String
Key to an alert-message string in a Localizable.strings file for the current localization.
locArgs
Type: List<String>
Variable string values to appear in place of the format specifiers in locKey.
launchImage
Type: String
File name of an image file in the application bundle.
sound
Type: String
Name of a sound file to be played as an alert. This sound file should be in the mobile application bundle.
badgeCount
Type: Integer
Number to display as the badge of the application icon.
userData
Type: Map<String, Object>
Map of key-value pairs that contains any additional data used to provide context for the notification. For example, it can contain IDs
of the records that caused the notification to be sent. The mobile client app can use these IDs to display these records.
Return Value
Type: Map<String, Object>
Returns a formatted payload that includes all of the specified arguments.
22
PushNotificationPayload MethodsReference
Usage
To generate a valid payload, you must provide a value for at least one of the following parameters: alert, sound, badgeCount.
Apex Limits Functions for Push Notifications
Use the Apex limits functions for push notifications to get usage information.
System.Limits class:
getLimitMobilePushApexCalls()
Returns the total number of Apex calls that are allowed per transaction for mobile push notifications.
getMobilePushApexCalls()
Returns the number of Apex calls that have been used by mobile push notifications during the current metering interval.
Push Notifications Resource
Send a mobile push notification to connected apps on users’ devices. This resource is only accessible when the session is established
with a connected app that is developed in the same organization or installed in the same package as the recipient’s connected app.
Resource
/connect/notifications/push
Available version
31.0
Requires Chatter
No
HTTP methods
POST
Request body for POST
Root XML tag
<pushNotification>
JSON example
{ "appName" : "TestApp",
"namespace" : "abc",
"userIds" : ["005x00000013dPK", "005x00000013dPL"],
"payload" : "{'aps':{'alert':'test', 'badge':0, 'sound':'default'}}"
}
Properties
Available
Version
Required or
Optional
DescriptionTypeName
31.0RequiredThe API name of the connected app that
the push notification is sent to.
StringappName
31.0Required if the
namespace is set
The namespace of the connected app
that the push notification is sent to.
Stringnamespace
23
Apex Limits Functions for Push NotificationsReference
Available
Version
Required or
Optional
DescriptionTypeName
31.0RequiredThe push notification payload in JSON
format.
Stringpayload
31.0RequiredThe push notification recipient user ids.String[]userIds
Request parameters for POST
Available
Version
Required or
Optional
DescriptionTypeParameter
Name
31.0RequiredThe API name of the connected app that
the push notification is sent to.
StringappName
31.0Required if the
namespace is set
The namespace of the connected app that
the push notification is sent to.
Stringnamespace
31.0RequiredThe push notification payload in JSON
format.
Stringpayload
31.0RequiredThe push notification recipient user ids.String[]userIds
Push Notification Limits
Push notification limits apply to test push notifications as well as to production notifications.
Note: The limits described here are for core Salesforce push notifications. They do not apply to Marketing Cloud MobilePush
notifications. For further information on Marketing Cloud usage, see
developer.salesforce.com/docs/atlas.en-us.mc-sdks.meta/mc-sdks/mobile-push-sdk.htm.
The maximum push notifications allowed for each mobile app associated with your Salesforce org depends on the type of app.
Maximum notifications per app per dayMobile application type
50,000Provided by Salesforce (for example, Salesforce1)
35,000Developed by your company for internal employee use
5,000Installed from the AppExchange
Only deliverable notifications count toward this limit. For example, consider the scenario where a notification is sent to 1,000 employees
in your company, but 100 employees haven’t installed the mobile application yet. Only the notifications sent to the 900 employees who
have installed the mobile application count toward this limit.
Each test push notification that is generated through the Test Push Notification page is limited to a single recipient. Test push notifications
count toward an application’s daily push notification limit.
24
Push Notification LimitsReference

Error Messages for Push Notifications
If you get an error message while sending a push notification from the Send Test Notification page, check the following table for
suggestions on how to fix the error.
Suggested ResolutionMessage
Because the daily limit is nonnegotiable, no resolution is available.Daily push rate limit has been exceeded for this connected
application
Replace the certificate with a valid type.Certificate is not accepted by Apple Push Notification service
Supply valid certificate.Certificate is revoked
Renew certificate.Certificate expired
Retry later.Certificate not valid yet
Replace the certificate with a valid type.Invalid certificate or password
Check your input for errors.Invalid recipient or payload
Reduce size of payload.Payload exceeds maximum size
Confirm that settings are present on connected app.Unable to load push notifications settings
Provide valid device token.Recipient field contains invalid device token
Token was entered incorrectly or is corrupt. Re-enter token.Invalid device token length
Confirm that correct certificate is being used (for example, sandbox
versus production).
Error while sending notification. Confirm certificate is for the correct
Apple environment.
Retry later.Apple Push Notification service is unavailable.
Retry later.Unable to connect to Apple Push Notification service
Retry later.Unable to connect to Salesforce proxy. Contact Salesforce support
if issue persists.
Retry later.Request blocked by Salesforce proxy. Contact Salesforce support
if issue persists.
Contact Apple or retry later.Apple Push Notification service returned unknown error
Re-enter the badge value as an integer.Badge must be a number
Format payload correctly.Payload must be in a valid JSON format
Enter a valid value for one of the fields.You must enter a value for at least one of the following fields: Alert,
Badge, Sound, or Custom Payload
Provide device token.Recipient is required
Consult the GCM documentation at developer.android.com.
Possible causes:
Google Cloud Messaging authentication error
•Authorization header is missing or contains invalid syntax.
25
Error Messages for Push NotificationsReference
Suggested ResolutionMessage
•Invalid project number was sent as key.
•Key is valid, but GCM service is disabled.
•Request originated from a server that is not white-listed in the
server key IP addresses.
Retry later.Internal error in the Google Cloud Messaging server, or the server
is temporarily unavailable
Verify that mobile app is providing valid registration ID, or manually
enter valid registration ID.
Registration ID in the Recipient field is formatted incorrectly
Reduce size of payload.Payload exceeds maximum size
Provide correct server key for the app.Recipient field contains registration ID that is not valid for the
connected application’s API server key
Select recipient or provide registration ID.Recipient is required
Update recipient’s device registration ID.Recipient field contains invalid registration ID
Contact salesforce.com.GCM server returned an unexpected error. Please contact the SFDC
support team.
Contact salesforce.com.An unexpected error occurred. Please contact the SFDC support
team.
Debug Log Events
The mobile push notification service logs events that are useful to understand when you are monitoring an Apex debug log.
Events
The following events are supported:
•PUSH_NOTIFICATION_INVALID_APP
•PUSH_NOTIFICATION_INVALID_CERTIFICATE
•PUSH_NOTIFICATION_INVALID_NOTIFICATION
•PUSH_NOTIFICATION_NO_DEVICES
•PUSH_NOTIFICATION_NOT_ENABLED
•PUSH_NOTIFICATION_SENT
For more information on these events, log levels and categories, and how to use the Developer Console or monitor a debug log, see
the Force.com Apex Code Developer's Guide.
26
Debug Log EventsReference
INDEX
A
Apex
debug logs 26
C
Chatter REST API push resource 16
classes
PushNotification 17
Classes
PushNotificationPayload 20
Connected App
Android GCM push notifications, testing 9
APNS push notifications, testing 9
push notification error messages 25
testing push notifications 8
D
Debug logs 26
E
Error Message
push notifications 25
L
limits
Apex functions 23
M
Mobile Push Notification Service
check user device registrations 9
configuring a Mobile SDK app 10
Mobile Push Notification Service (continued)
Connected App Creation 5
Connected App Creation for Android 6
Connected App Creation for Apple iOS 7
developer registration with OS vendors 4
enabling a Mobile SDK Android client app 10
enabling a Mobile SDK hybrid client app 13
enabling a Mobile SDK iOS client app 11
packaging and Distribution 15
registration and Flow 1
steps for implementing 4
using Apex Triggers 13
mobile push notifications
PushNotification class 17
P
push notifications
error messages 25
limits 23–24
overview 1
PushNotification class 17
testing 8–9
Push Notifications Resource 23
PushNotification
classes 17
PushNotificationPayload
classes 20
R
Resources
push notifications 23
27
