XCAT2_Instructions Segars XCAT2 Instructions
User Manual:
Open the PDF directly: View PDF ![]() .
.
Page Count: 3
Description of XCAT Version 2
The XCAT phantom program (dxcat2) is a command line application written in the C programming language.
In the following instructions, dxcat2 refers to the program executable which may be named differently in the
LINUX and Windows versions. In LINUX, you may need to make the dxcat2 program executable in order to
run it. You would do this using this command:
chmod +x dxcat2
In LINUX, depending on how your PATHS are setup, you may also need a dot slash in front of the executable
name in order to run the program like this:
./dxcat2
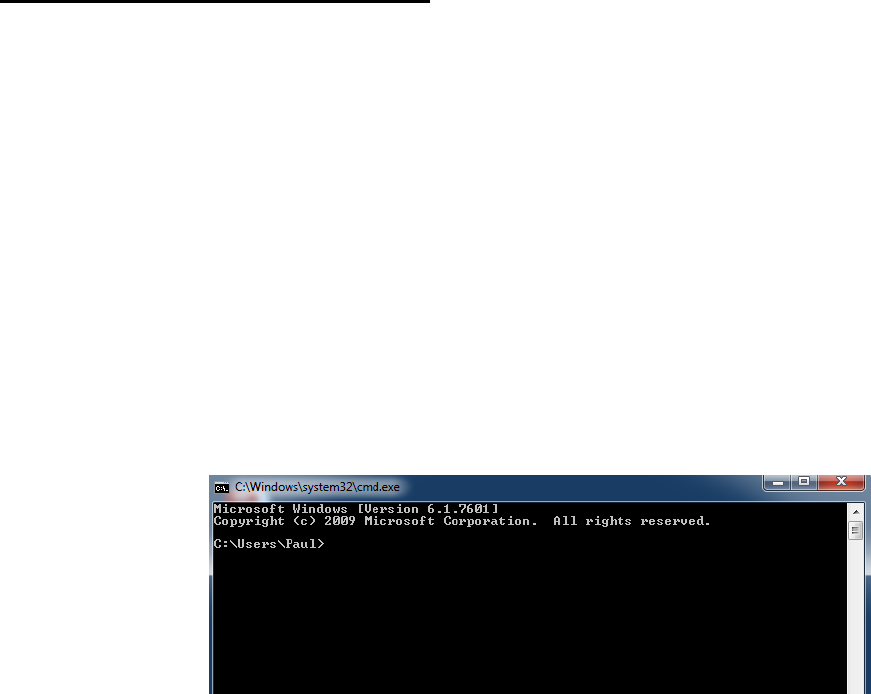
In Windows, you will need to open up a command prompt in which to run the program. You do this by left
clicking on the start menu icon then typing cmd in the search input and hitting ENTER. This will open up a
command window like the following:
Once the command window is open, you will need to change directory to the one in which the dxcat2 program
is located. You can then run the program as described below.
The program is run like this:
dxcat2 general_parfile [optional_parameter_definitions] output_name
The general_parfile contains numerous parameters to define the phantoms produced by the program. This
includes parameters to define voxel size, patient motion, variations in anatomy, radionuclide uptake ratios for
the activity phantoms, photon energy to define attenuation coefficients, etc. A sample parameter text file is
included with the phantom software (general.samp.par). See this file for more information on the types of
parameters that are available. The parameters in the parfile do not have to be in any particular order; also, all
parameters do not have to be present. Default values will be used for any absent parameters. The parameters
within the general_parfile can also be set in the command line. They can be specified after the parfile name by
using two dashes followed by the parameter name and the desired value. For example if one wanted to set the
parameter motion_option to 2 using the command line, it would be done like this:
dxcat2 general_parfile --motion_option 2 output_name
The parameter motion_option will then take on the value of 2, overwriting whatever was in the general_parfile.
Multiple parameters can be set in this manner. In the example below, both out_period and motion_option are
specified:
dxcat2 general_parfile --out_period 5 --motion_option 2 output_name
Given the parameters, as set in the general_parfile or by using the command line options, the XCAT program
can be run under 5 different modes producing different outputs. The modes are described in detail below:
Mode 0: standard phantom generation mode that will generate voxelized phantoms of the body.
For the purpose of imaging simulation, the phantom is capable
of simulating two physical models: a 3D distribution of
attenuation coefficients for a given photon energy (attenuation
phantoms) and a 3D distribution of emission radionuclide
activity for the various organs (activity phantoms). Each of
these models is stored as a voxelized phantom of a user-defined
resolution. Since the phantom is mathematically defined, there
are no errors associated with generating the phantom at
different resolutions. The phantoms are saved as raw 32 bit
floating point binary files (little endian) with no header. The
phantoms are output with the given basename output_name.
Phantom files with the extension _act are activity phantoms
while those with the extension _atn are attenuation coefficient
phantoms. The activities for the different organs in the activity phantoms are specified in the general_parfile.
The organs take on the exact values that are specified for them. The attenuation coefficients for the organs in the
attenuation phantoms are determined based on the elemental composition of the tissues and the photon energy
specified in the general_parfile. The voxelized representations produced of the phantom can be used in
combination with analytical or Monte Carlo based models of the imaging process to simulate transmission (x-
ray, x-ray CT) and emission (SPECT, PET) imaging data. To simulate other modalities, activity phantoms can
be produced with the activities set to a specific imaging property such as T1,T2, and spin density values for
MRI or acoustical properties for ultrasound.
Mode 1: heart lesion generator that will create phantoms of only the user defined
heart lesion.
This program will produce voxelized activity phantoms (saved using the
output_name) of a user defined LV perfusion defect. Perfusion defects in the
XCAT phantom are modeled as pie-shaped wedges in the LV myocardium. The
general_parfile contains parameters to define the size, location, and uptake ratio
of the lesion. In addition, the motion of the defect can be scaled. In order to
place a perfusion defect in the heart, you first need to use the dxcat2 program
(mode = 0) to generate the original heart phantoms. You will then run dxcat2
(mode = 1) to generate the phantoms for the LV perfusion defect. Subtract these
phantoms from those of mode 0 to place the defect in the body.
Mode 2: spherical lesion generator that will create phantoms of only the user defined lesion.
This program will produce voxelized activity or attenuation phantoms of just the lesion
(saved using the output_name). Lesions in the body are modeled as simple spheres. The
general_parfile contains parameters to define the size, location, and uptake ratio of the lesion.
In order to place a lesion in the body, you first need to use the dxcat2 program (mode = 0) to
generate the original phantoms (at end-expiration). Look through the image slices of the
phantom generated to find the desired pixel location for the lesion. Setup the lesion
parameters in the general_parfile to generate the lesion at the pixel location determined above.
You will then use the dxcat2 program (mode = 2) to generate the phantoms for the
lesion. Add these phantoms to those of mode 0 to place the lesions in the body.
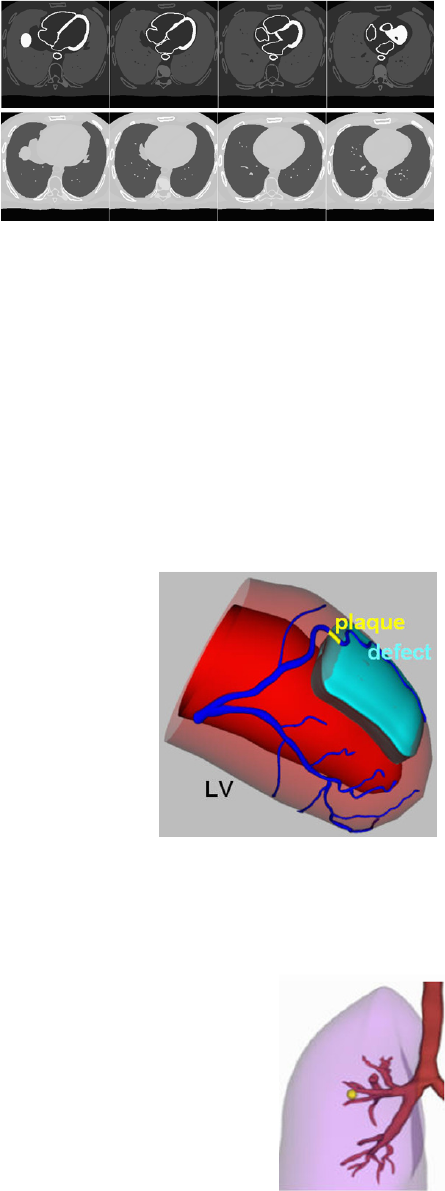
Transaxial slices of an (Top) activity phantom
(organ values specified in the parfile) and an
(Bottom) attenuation phantom (attenuation
coefficients calculated based on photon energy).
XCAT left ventricle with a
plaque and perfusion defect
modeled.
XCAT lung with
spherical lesion
modeled.
Mode 3: cardiac plaque generator that will create phantoms of only the user defined plaque.
This program will produce voxelized activity or attenuation phantoms of just the cardiac plaque. Plaques are
modeled as NURBS surfaces inside the selected vessel. The general_parfile contains parameters to define the
size, location, and uptake ratio of the plaque. In order to place a plaque in the heart, you first need to use the
dxcat2 program (mode = 0) to generate the original heart phantoms. You will then use the dxcat2 program
(mode = 3) to generate the phantoms for the plaque. To place the plaque in the phantoms, add the corresponding
plaque images to those from mode 0.
Mode 4: vector generator that will output motion vectors as determined from the phantom surfaces. The vectors
will be output as text files.
Vectors are output for each voxel of frame 1 to each additional frame. The vectors show the motion from the 1st
frame to frame N. The vectors are output as text files with the format of output_name_vec_frame1_frameN.txt.
The output vectors are a combination of known sampled points from the phantom objects and vectors
interpolated from these sampled points. The known vectors are designated as such in the vector output. You
can increase the number of known points (and accuracy of the vector output) up to a certain point by increasing
the parameter vec_factor. In using the vectors to transform one image into another, it is best to ignore the
interpolated vectors. The interpolated vectors are simply defined by averaging neighboring vectors.
Mode 5: anatomy generator will save the phantom produced from the user-defined anatomy parameters.
The phantom is saved as an organ file and two heart files. The organ file (saved as output_name.nrb) will
contain the altered anatomy of the phantom while the heart files (saved as output_name_heart.nrb and
output_name_heart_curve.txt) will contain the altered cardiac motion files (including any motion defects
modeled or any alterations in the cardiac cycle). The names of these files can then be specified in the general
parfile for later runs with the program not having to take the time to generate the anatomy again. In using a
saved anatomy with dxcat2, be sure to set all altered parameters back to their defaults; otherwise, the anatomy
will be scaled or altered again.
Viewing the Phantom Images
The voxelized phantoms are saved as raw binary images with no header (32 bit
float (or REAL), little endian). Most people use their own applications to view the
phantoms. ImageJ and Amide are two freely available applications for viewing
the phantoms as 2D slices or as a 3D volumes. They are available from
http://rsbweb.nih.gov/ij/ and http://amide.sourceforge.net/ respectively. Many
other applications capable of reading a raw image format can also be used to view
the phantom images.
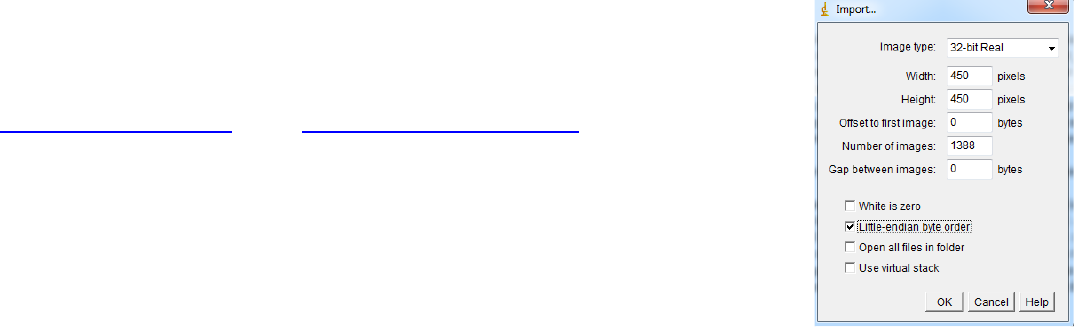
In ImageJ, to open a phantom image for example, you would use File->Import-
>Raw. Then select the phantom image. For Image type, you would specify 32-bit
Real. You would then specify the image dimensions in the width (X), height (Y),
and number of images (Z) fields. The offset and gap fields would need to be set
to 0. You would then check the box next to Little-endian byte order. Then click
OK, and the image should load.
ImageJ image import popup.
