Service Manual HL46XSL2
User Manual: Service Manual HL46XSL2
Open the PDF directly: View PDF ![]() .
.
Page Count: 86
Order No.
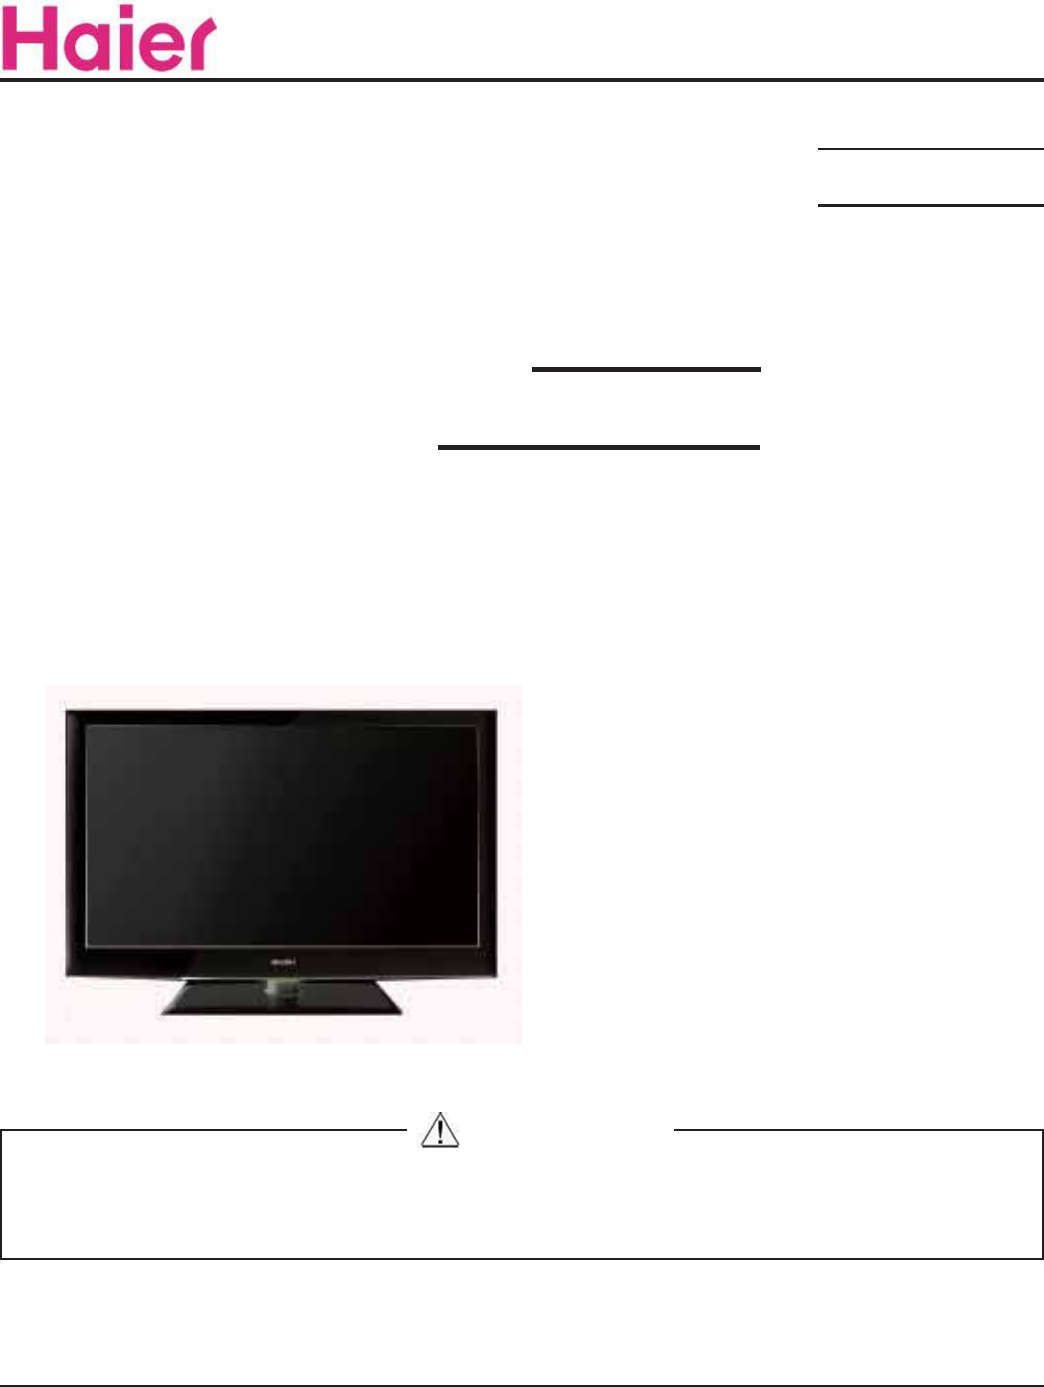
LED LCD TV
Model
Chassis
This service information is designed for experienced repair technicians only and is not designed for use by the general public.
It does not contain warnings or cautions to advise non-technical individuals of potential dangers in attempting to service a product.
Products powered by electricity should be serviced or repaired only by experienced professional technicians. Any attempt to service or repair
the product or products dealt with in this service information by anyone else could result in serious injury or death.
Haier Group
©2010 Qingdao Haier Electronics Co., Ltd.
All rights reserved. Unauthorized copying and distribution is a violation of law.
SERVICE MANUAL
WARNING
Service model.
TV1001
MTK5305
HL46XSL2/HL46XSLW2
HL46XSL2a/HL46XSLW2a

Service Manual
EA46T3
1
CONTENTS
Chapter 1.General Information
1-1. Document Information ....................................................................... 3
1-2. General Guidelines .............................................................................. 3
1-3. Important Notice ................................................................................... 3
1-3-1. Follow the regulations and warnings ..................................................... 3
1-3-2. Be careful to the electrical shock ........................................................... 3
1-3-3. Electro static discharge (ESD) ............................................................... 3
1-3-4. About lead free solder (PbF) .................................................................. 4
1-3-5. Use the genewing parts (specifi ed parts) .............................................. 4
1-3-6. Safety check after repairment ................................................................ 4
1-3-7. Ordering Spare Parts ............................................................................. 6
1-3-8. Photo used in this manual ..................................................................... 6
1-4. How to Read this Service Manual .................................................. 7
1-4-1. Using icons: ........................................................................................... 7
Chapter 2. Specifi cation
2-1. Specifi cation list ................................................................................... 8
2-2. External pictures (four faces) .......................................................... 9
Chapter 3. Disassemble and Assemble
3-1. Remove the Stand ............................................................................. 10
3-2. Remove the Power Cord ................................................................ 11
3-3. Remove the Back Cover .................................................................. 11
3-4. Remove the Mainboard ................................................................... 11
3-5. Remove the speaker ........................................................................ 11
3-6. Remove the Keypad ......................................................................... 12
3-7. Remove the Remote Control Board ........................................... 12
3-8. Remove the Stand backstop ......................................................... 12
3-9. Remove the indicator light ............................................................ 12
Chapter 4. Location of Controls and Components
4-1. Board Location ................................................................................... 13
4-2. Main Board .......................................................................................... 13
4-2-1. Function Description: ........................................................................... 14
4-2-2. Connector defi nition ............................................................................. 14
4-3. Power Supply Board ......................................................................... 14

Service Manual
2
4-3-1. Function description:............................................................................ 14
4-3-2. Connector defi nition: ............................................................................ 14
4-4. LCD Panel ............................................................................................. 15
4-4-1. Function Description: Display the signal. ............................................. 16
4-4-2. Connector defi nition: ............................................................................ 16
Chapter 5. Installation Instructions
5-1. External Equipment Connections ................................................ 20
5-2. HDMI Connections ............................................................................. 24
Chapter 6. Operation Instructions
6-1. Get to know your TV ......................................................................... 27
6-2. Get to know your remote control ................................................. 28
Chapter 7. Electrical Parts
7-1. Block Diagram ..................................................................................... 29
7-2. Circuit Diagram ................................................................................... 31
7-3. Wiring Connection Diagram ........................................................... 45
Chapter 8. Measurements and Adjustments
8-1. Service Mode ...................................................................................... 46
8-1-1.How to enter into Service Mode............................................................ 46
8-1-2.How to exit ............................................................................................ 46
8-2. Measurements and Adjustments .................................................. 46
8-2-1. The Main Menu .................................................................................... 46
8-2-2. Video.................................................................................................... 47
8-2-3. Audio .................................................................................................... 48
8-2-4. Software UpDate ................................................................................. 48
Chapter 9. Trouble shooting
9-1. Simple check ....................................................................................... 49
9-2. Power Supply Board Failure Check. ........................................... 50
9-3. Mainboard Failure Check ............................................................... 51
9-4. Pannel Failure ..................................................................................... 52
4
-
4
4
4
C
h
5-
1
5-
2
C
h
6-
1
6-
2
C
h
7-
1
7-
2
7-
3
C
h
8-
1
8
8
8
-
2
8
8
8
8
C
h
9-
1
9-
2
9
-
3
9
-
4

Service Manual
46T3
3
Chapter 1.General Information
1-1. Document Information
Document format: Adobe PDF
Author:
Compiler:
1-2. General Guidelines
When servicing, observe the original lead dress. If a short circuit is found, replace all parts which
have been overheated or damaged by the short circuit.
After servicing, see to it that all the protective devices such as insulation barriers, insulation papers
shields are properly installed.
After servicing, make the following leakage current checks to prevent the customer from being
exposed to shock hazards.
1) Leakage Current Cold Check
2) Leakage Current Hot Check
3) Prevention of Electro Static Discharge (ESD) to Electrostatically Sensitive
1-3. Important Notice
1-3-1. Follow the regulations and warnings
Most important thing is to list up the potential hazard or risk for the service personnel to open
the units and disassemble the units. For example, we need to describe properly how to avoid the
possibility to get electrical shock from the live power supply or charged electrical parts (even the
power is off).
This symbol indicates that high voltage is present inside.It is dangerous to make any
kind of contact with any inside part of this product.
This symbol indicates that there are important operating and maintenance instructions
in the literture accompanying the appliance.
1-3-2. Be careful to the electrical shock
To prevent damage which might result in electric shock or fire, do not expose this TV set to
rain or excessive moisture. This TV must not be exposed to dripping or splashing water, and
objects fi lled with liquid, such as vases, must not be placed on top of or above the TV.
1-3-3. Electro static discharge (ESD)
Some semiconductor (solid state) devices can be damaged easily by static electricity.
Such components commonly are called Electrostatically Sensitive (ES) Devices. The following

Service Manual
46T3
4
techniques should be used to help reduce the incidence of component damage caused by
electros static discharge (ESD).
Electrostatically Sensitive (ES) Devices
Some semiconductor (solid-state) devices can be damaged easily by static electricity. Such
components commonly are called Electrostatically Sensitive (ES) Devices. Examples of typical
ES devices are integrated circuits and some field-effect transistors and semiconductor "chip"
components. The following techniques should be used to help reduce the ncidence of component
damage caused by static by static electricity.
1. Immediately before handling any semiconductor component or semiconductor-equipped
assembly, drain off any electrostatic charge on your body by touching a known earth ground.
Alternatively, obtain and wear a commercially available discharging wrist strap device, which
should be removed to prevent potential shock reasons prior to applying power to the unit under
test.
2. After removing an electrical assembly equipped with ES devices, place the assembly on a
conductive surface such as aluminum foil, to prevent electrostatic charge buildup or exposure of
the assembly.
1-3-4. About lead free solder (PbF)
This product is manufactured using lead-free solder as a part of a movement within the
consumer products industry at large to be environmentally responsible. Lead-free solder must be
used in the servicing and repairing of this product.
1-3-5. Use the genewing parts (specifi ed parts)
Special parts which have purposes of fi re retardant (resistors), high-quality sound (capacitors),
low noise (resistors), etc. are used.
When replacing any of components, be sure to use only manufacture's specifi ed parts shown in
the parts list.
Safety Component
Ɣ Components identifi ed by mark have special characteristics important for safety.
1-3-6. Safety check after repairment
Confi rm that the screws, parts and wiring which were removed in order to service are put in the
original positions, or whether there are the positions which are deteriorated around the serviced
places serviced or not. Check the insulation between the antenna terminal or external metal and
the AC cord plug blades. And be sure the safety of that.
General Servicing Precautions
1. Always unplug the receiver AC power cord from the AC power source before:

Service Manual
A46T3
5
a. Removing or reinstalling any component, circuit board module or any other receiver
assembly.
b. Disconnecting or reconnecting any receiver electrical plug or other electrical connection.
c. Connecting a test substitute in parallel with an electrolytic capacitor in the receiver.
CAUTION: A wrong part substitution or incorrect polarity installation of electrolytic capacitors
may result in an explosion hazard.
2. Test high voltage only by measuring it with an appropriate high voltage meter or other voltage
measuring device (DVM, FETVOM, etc) equipped with a suitable high voltage probe.
Do not test high voltage by "drawing an arc".
3. Do not spray chemicals on or near this receiver or any of its assemblies.
4. Unless specified otherwise in this service manual, clean electrical contacts only by applying
the following mixture to the contacts with a pipe cleaner, cotton-tipped stick or comparable non-
abrasive applicator; 10% (by volume) Acetone and 90% (by volume) isopropyl alcohol (90%-99%
strength).
CAUTION: This is a fl ammable mixture.
Unless specifi ed otherwise in this service manual, lubrication of contacts is not required.
Capacitors may result in an explosion hazard.
5. Do not defeat any plug/socket B+ voltage interlocks with which receivers covered by this
service manual might be equipped.
6. Do not apply AC power to this instrument and/or any of its electrical assemblies unless all
solid-state device heat sinks are correctly installed.
7. Always connect the test receiver ground lead to the receiver chassis ground before connecting
the test receiver positive lead.
Always remove the test receiver ground lead last. Capacitors may result in an explosion
hazard.
8. Use with this receiver only the test fi xtures specifi ed in this service manual.
CAUTION: Do not connect the test fi xture ground strap to any heat sink in this receiver.
9. Remove the antenna terminal on TV and turn on the TV.
10. Insulation resistance between the cord plug terminals and the eternal exposure metal should
be more than Mohm by using the 500V insulation resistance meter.
11. If the insulation resistance is less than M ohm, the inspection repair should be required.
If you have not the 500V insulation resistance meter, use a Tester. External exposure metal:
Antenna terminal Headphone jack.
12. Use only a grounded-tip soldering iron to solder or unsolder ES devices.

Service Manual
6
13. Use only an anti-static type solder removal device. Some solder removal devices not
classifi ed as "anti-static" can generate electrical charges suffi cient to damage ES devices.
14. Do not use freon-propelled chemicals. These can generate electrical charges sufficient to
damage ES devices.
15. Do not remove a replacement ES device from its protective package until immediately
before you are ready to install it.
(Most replacement ES devices are packaged with leads electrically shorted together by
conductive foam, aluminum foil or comparable conductive material).
16. Immediately before removing the protective material from the leads of a replacement ES
device, touch the protective material to the chassis or circuit assembly into which the device will
be installed.
CAUTION: Be sure no power is applied to the chassis or circuit, and observe all other safety
precautions.
17. Minimize bodily motions when handling unpackaged replacement ES devices. (Otherwise
harmless motion such as the brushing together of your clothes fabric or the lifting of your foot
from a carpeted fl oor can generate static electricity suffi cient to damage an ES device.)
1-3-7. Ordering Spare Parts
Please include the following informations when you order parts. (Particularly the Version letter)
1. Model number, serial number and software version
The model number and serial number can be found on the back cover of each product. Software
version can be found in the Spare Parts List.
2. Spare part No. and description
Spare part No. and description can be found in the Spare Parts List.
1-3-8. Photo used in this manual
The illustration and photos used in this Service Manual may not base on the final design of
products, which may differ from your products in some way.

Service Manual
LEA46T3
7
1-4. How to Read this Service Manual
1-4-1. Using icons:
Icons are used to attract the attention of the reader to specific information. The
meaning of each icon is described in the table below:
Note:
A “note” provides information that is not indispensable, but may nevertheless be
valuable to the reader, such as tips and tricks.
Caution:
A “caution” is used when there is danger that the reader, through incorrect
manipulation, may damage equipment, loose data, get an unexpected result or has to
restart(part of) a procedure.
Warning:
A “warning” is used when there is danger of personal injury.
Reference:
A “reference” guides the reader to other places in this binder or in this manual,
where he/she will fi nd additional information on a specifi c topic.

Service Manual
8
Chapter 2. Specifi cation
2-1. Specifi cation list
Model LEA46T3
Screen size 46 inch
Aspect ratio 16:9
Resolution 1920*1080
Response Time(ms) 6 ms
Angel of view 178
Contrast 5000:1
Brightness 450cd/m2
OSD language English etc.
Color system ATSC/NTSC
Audio system BG\DK\I\L
Audio output power(Built-in)(W) 9W*2
Audio output power(outer)(W) No
Total power input(W) 160W
Voltage range(V) 90-240V
Power frequency(Hz) 50/60HZ
Net weight(KG) 18.4
Gross weight(KG) 26
Net dimension(MM) 1122*31*706
Packaged dimension(MM) 1255*245*830
Service Manual
9
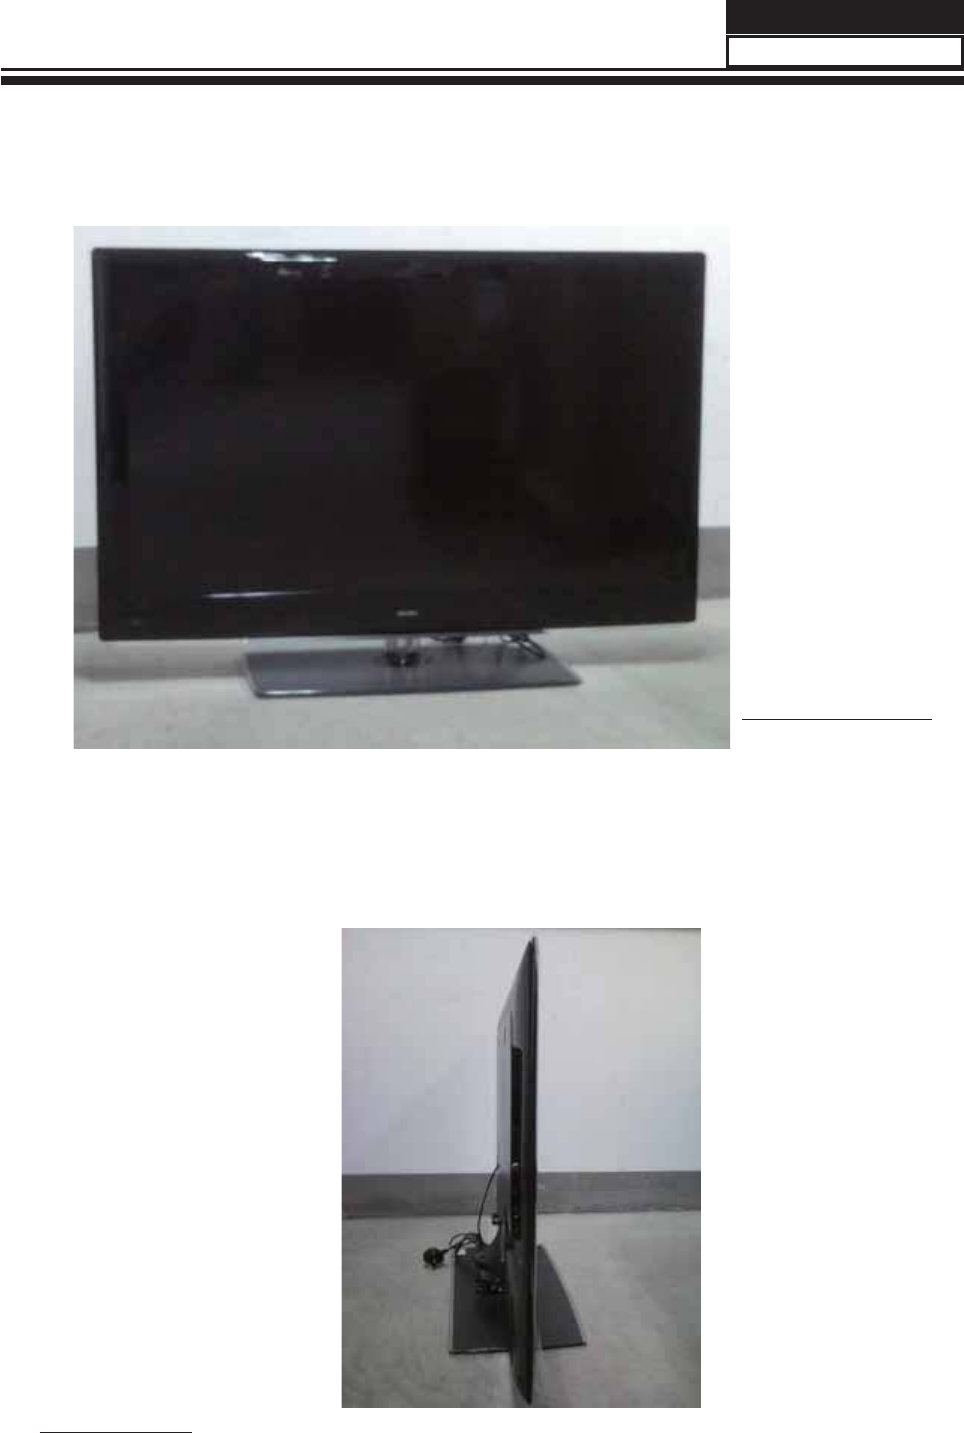
2-2. External pictures (four faces)
Front Side
Left Side
Chapter 3. Disassemble and Assemble
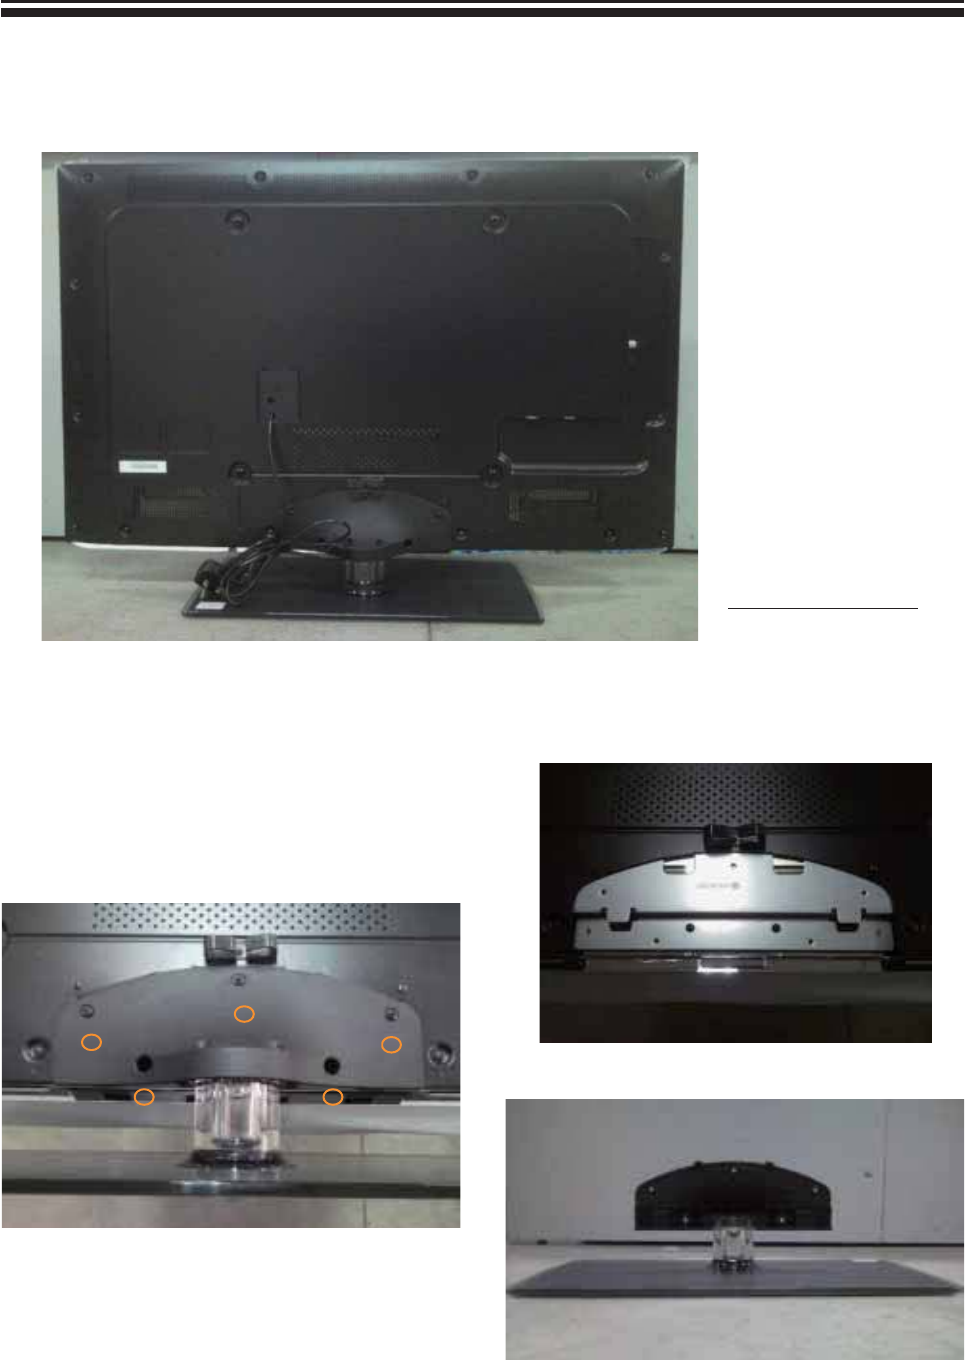
3-1. Remove the Stand
1. Lay down the unit so that back cover faces
upward
2. Remove the Five screws from the back
cover which are indicated with the circles in the
picture above.
3. Remove the stand
Service Manual
10
Back Side
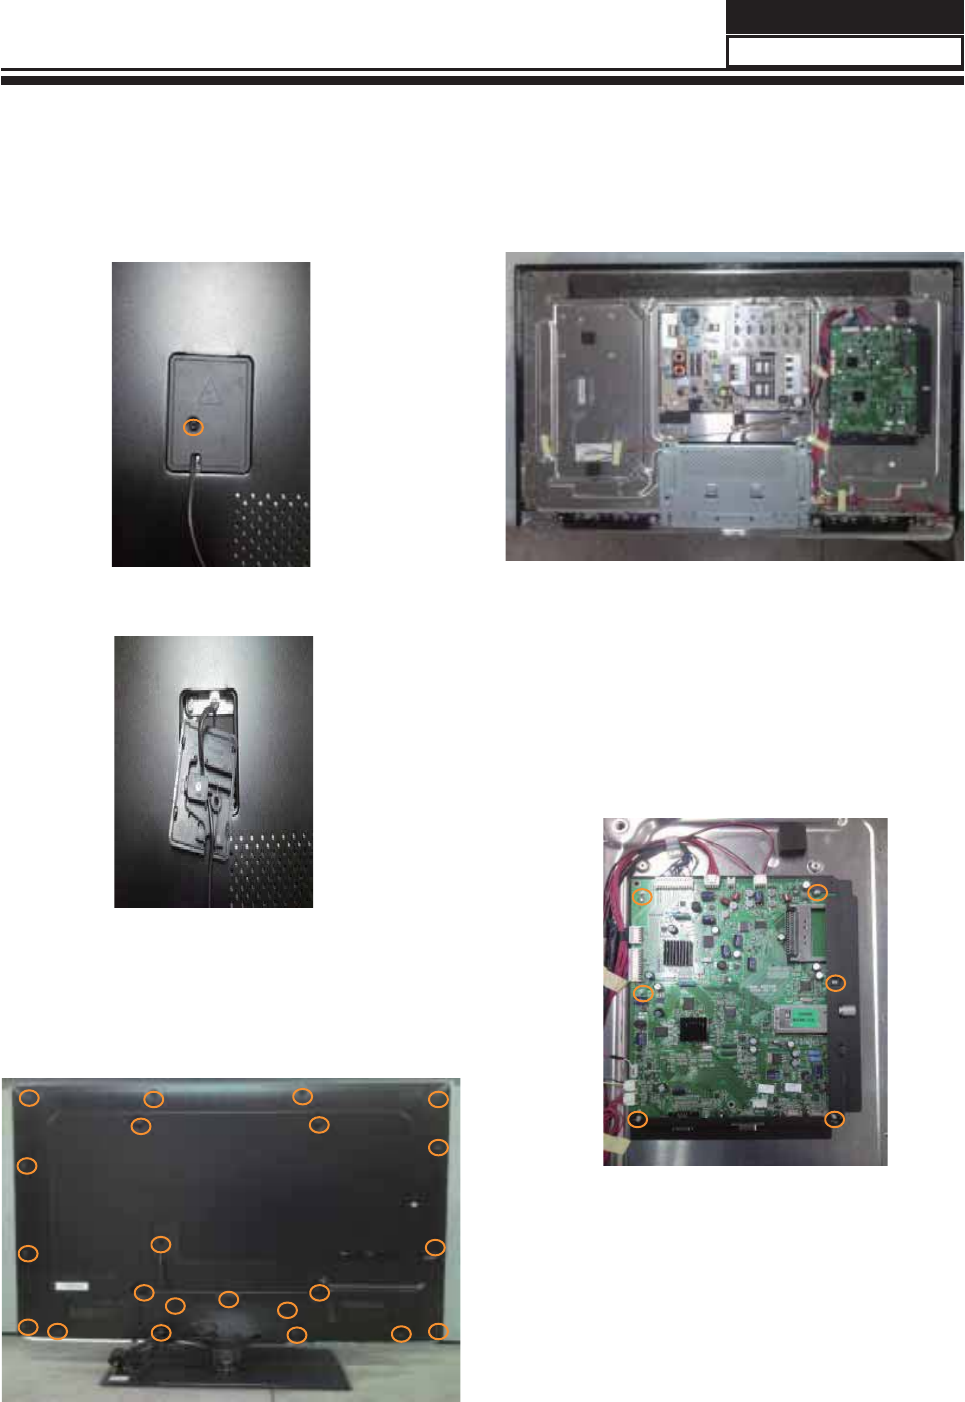
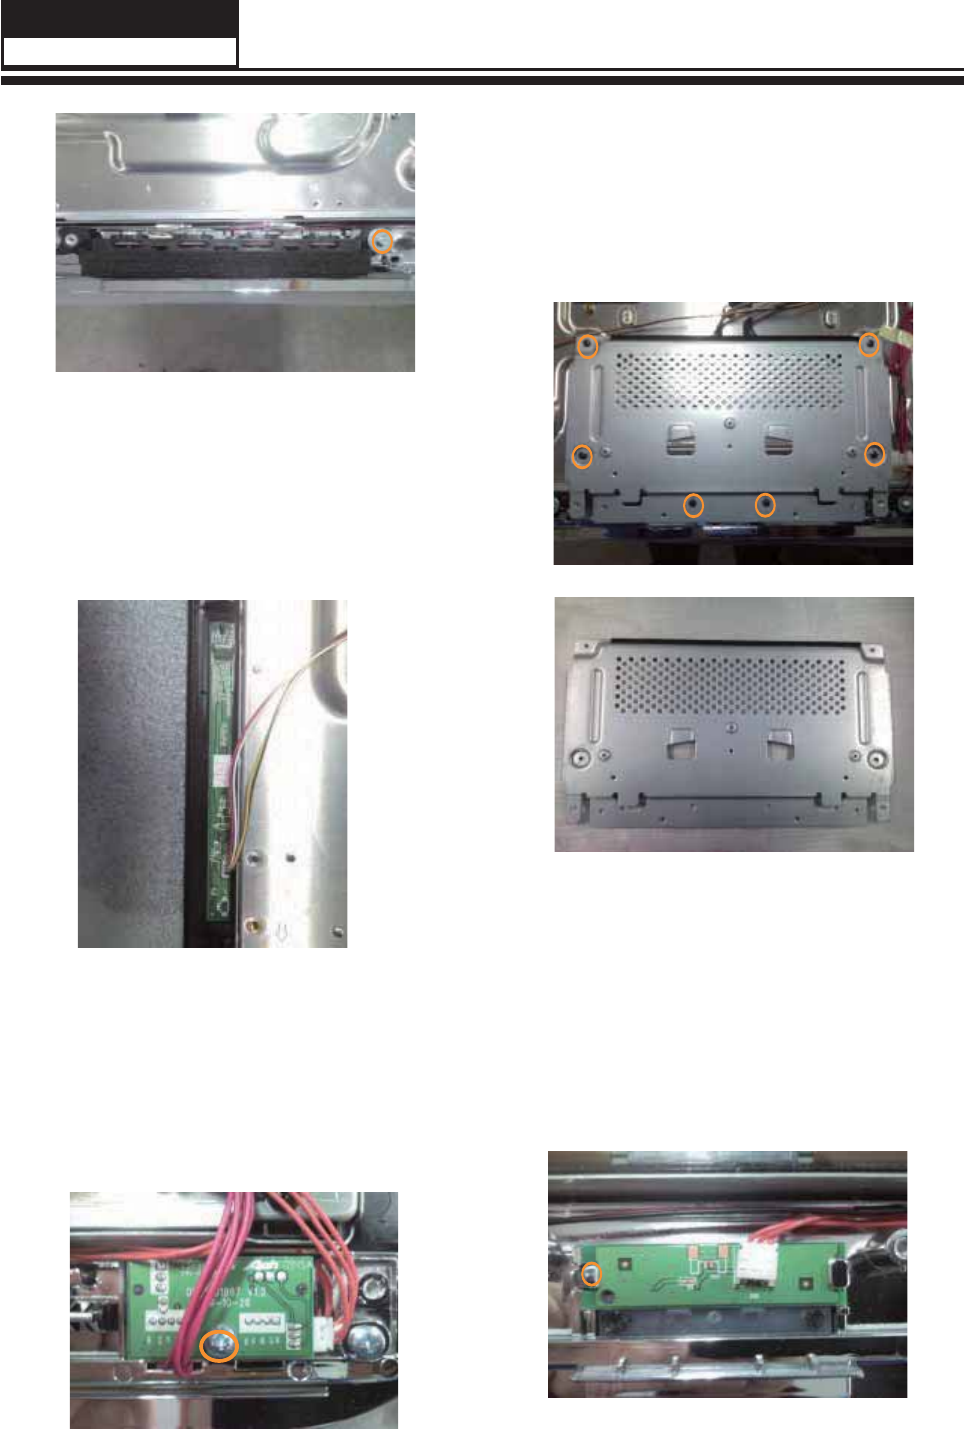
3-3. Remove the Back Cover
1. Remove the twenty-two screws indicated
by the red circles in below picture.
2. Then remove the back cover from the
unit.
3-2. Remove the Power Cord
Then remove the power cord.
Remove the screw indicated by the red
circles in below picture.
Then remove the mainboard.
3-4. Remove the Mainboard
Remove the five screws indicated by the red
circles in below picture.
3-5. Remove the speaker
Remove the screw indicated by the red
circles in below picture.
Then remove the speaker.
Service Manual
11
Remove the screw indicated by the red
circles in below picture.
3-6. Remove the Keypad
The Keypad is conglutinated with front frame
, just uncover the keypad gently.
Then remove the keypad.
Take out the remote control board.
3-7. Remove the Remote Control
Board
3-9. Remove the indicator light
The indicator light is buckled into the front
frame,remove the clasp indicated by the red
circles in below picture.
Take out the indicator light.
3-8. Remove the Stand backstop
Remove the six screws indicated by the red
circles in below picture.
Take out the stand backstop.
Service Manual
12
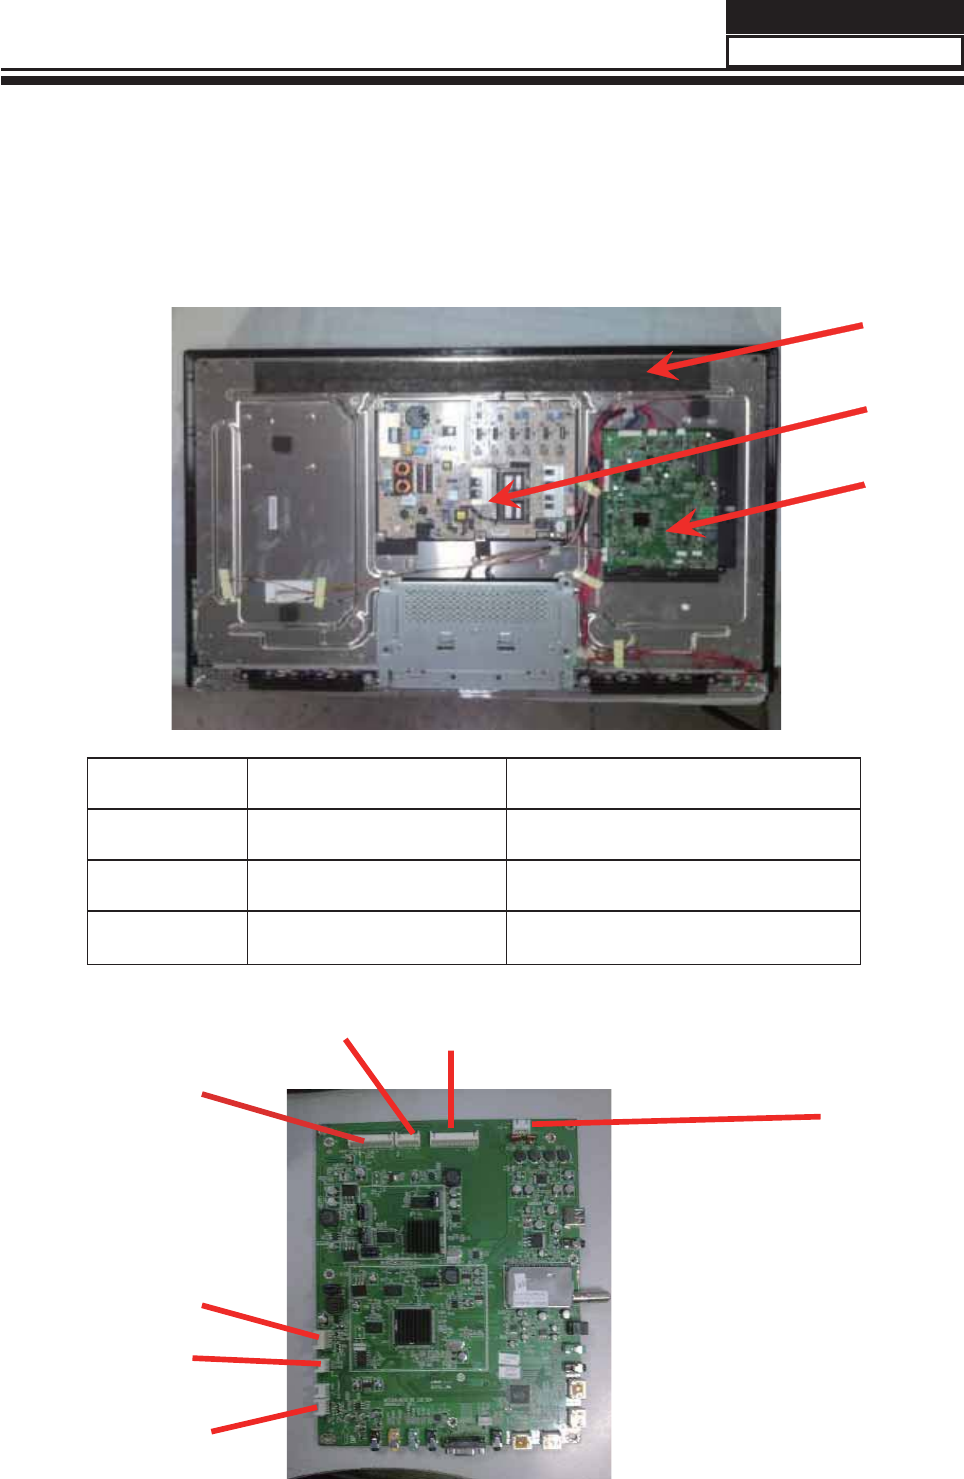
Chapter 4. Location of Controls and Components
4-1. Board Location
No. Parts number Description
A Board 0094001116AB PANEL
B Board //// Power Board
C Board DC1AK0E0100M Mainboard (0090724287)
4-2. Main Board
Service Manual
13
A
B
C
CND4
CND3
CON2
CNE2
CNA1
CND5
CNE1
4-2-1. Function Description:
Main Board
Process signal which incept from exterior equipment then translate into signal that panel can display.
4-2-2. Connector defi nition
Main board connector
Speaker connector (CON2)
Pin number Signal name
1 LOUT+
2 LOUT-
3 ROUT-
4 ROUT+
12V/5V Connector (CNA1)
Keypad Connector (CNE2)
Pin number Signal name
1 +12V
2 +12V
3 GND
4 +12V
5 GND
6 GND
7 5VSTB
8/
9 GND
10 PW-ON/OFF
11 PB-ADJUS
12 PB-ON/OFF
Pin number Signal name
1 GND
2 KEY1
3 KEY0
4 3.3VS
Rom connector (CNE1)
Pin number Signal name
1 5VS
2IR
3 LED-R
4 LED-G
5 GND
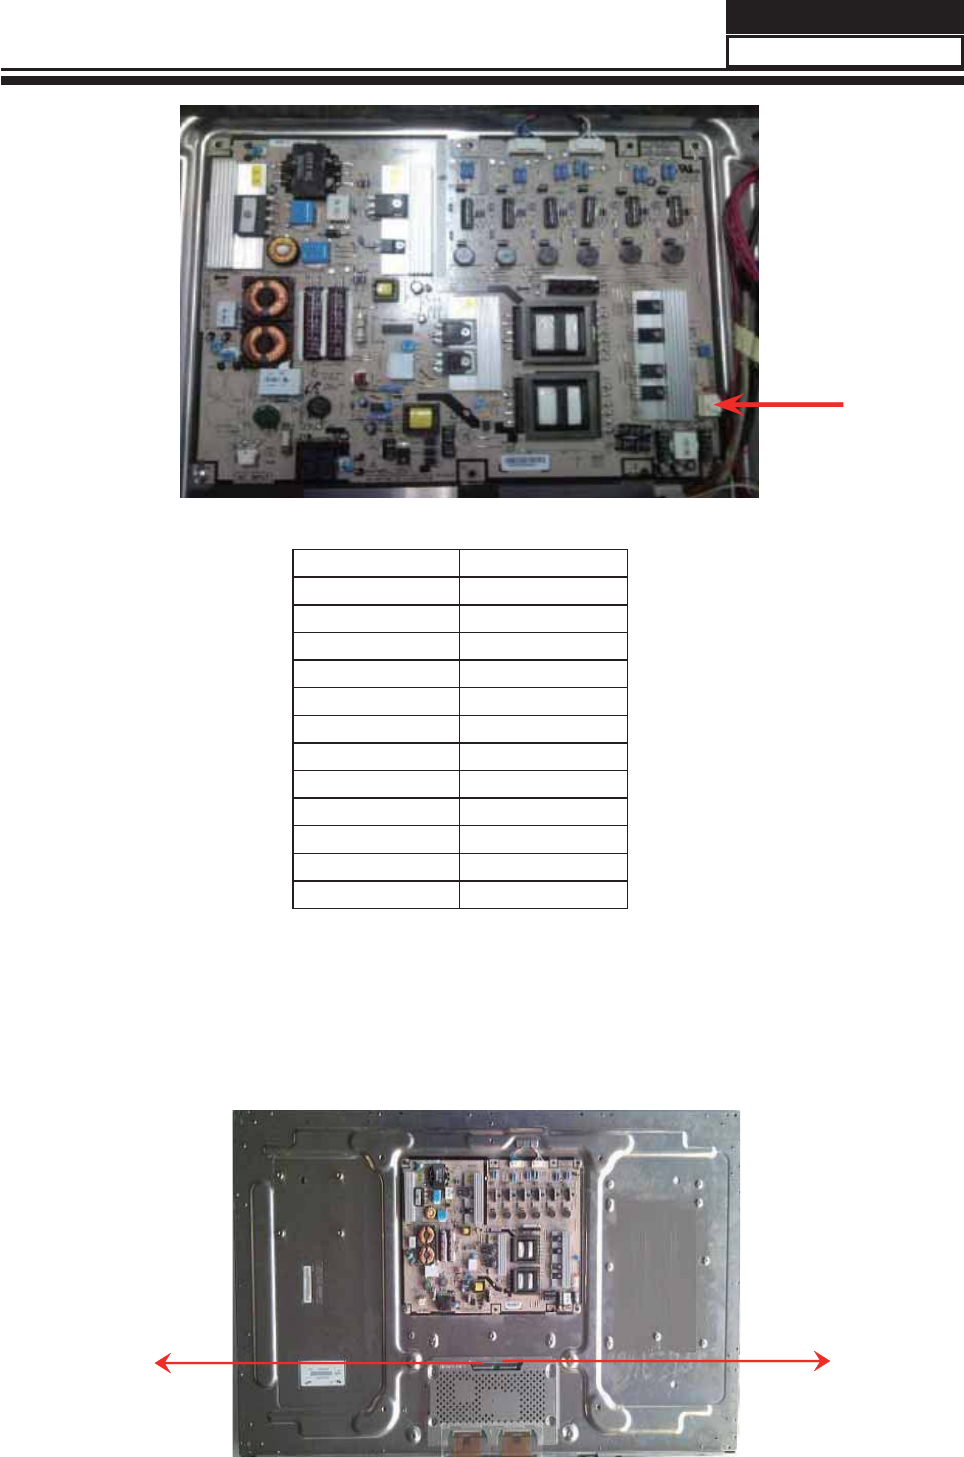
4-3. Power Supply Board
4-3-1. Function description:
To supply power for Mainboard, Panel.
4-3-2. Connector defi nition:
INPUT CONNECTOR (CN10)
Service Manual
14
4-4. LCD Panel
Pin number Signal name
1 +12V
2 +12V
3 GND
4 +12V
5 GND
6 GND
7 +5VSB
8 EXT_DIM
9 GND
10 PS-ON
11 INT_DIM
12 BL_ON
Service Manual
15
CNM801
CN2 CN1

4-4-1. Function Description: Display the signal.
4-4-2. Connector defi nition:
Pin number Symbol Description
1 12V DC Power Supply
2 12V DC Power Supply
3 12V DC Power Supply
4 12V DC Power Supply
5 12V DC Power Supply
6NC NC
7 GND Ground
8 GND Ground
9 GND Ground
10 Rx1[0]N 1st ,5th LVDS Signal -
11 Rx1[0]P 1st ,5th LVDS Signal +
12 Rx1[1]N 1st ,5th LVDS Signal -
13 Rx1[1]P 1st ,5th LVDS Signal +
14 Rx1[2]N 1st ,5th LVDS Signal -
15 Rx1[2]P 1st ,5th LVDS Signal +
16 GND Ground
17 Rx1CLK- 1st ,5th LVDS Clock -
18 Rx1CLK+ 1st ,5th LVDS Clock +
19 GND Ground
20 Rx1[3]N 1st ,5th LVDS Signal -
21 Rx1[3]P 1st ,5th LVDS Signal +
22 Rx1[4]N 1st ,5th LVDS Signal -
23 Rx1[4]P 1st ,5th LVDS Signal +
24 GND Ground
CND5 Connector
Service Manual
16

Pin number Symbol Description
25 Rx3[0]N 3rd,7th LVDS Signal -
26 Rx3[0]P 3rd,7th LVDS Signal +
27 Rx3[1]N 3rd,7th LVDS Signal -
28 Rx3[1]P 3rd,7th LVDS Signal +
29 Rx3[2]N 3rd,7th LVDS Signal -
30 Rx3[2]P 3rd,7th LVDS Signal +
31 GND Ground
32 Rx3CLK- 3rd,7th LVDS Clock -
33 Rx3CLK+ 3rd,7th LVDS Clock +
34 GND Ground
35 Rx3[3]N 3rd,7th LVDS Signal -
36 Rx3[3]P 3rd,7th LVDS Signal +
37 Rx3[4]N 3rd,7th LVDS Signal -
38 Rx3[4]P 3rd,7th LVDS Signal +
39 GND Ground
40 NC NC
41 NC NC
Service Manual
17

Pin number Symbol Description
1 12V DC Power Supply
2 12V DC Power Supply
3 12V DC Power Supply
4 12V DC Power Supply
5 12V DC Power Supply
6NC NC
7 GND Ground
8 GND Ground
9 GND Ground
10 Rx2[0]N 2nd ,6th LVDS Signal -
11 Rx2[0]P 2nd ,6th LVDS Signal +
12 Rx2[1]N 2nd ,6th LVDS Signal -
13 Rx2[1]P 2nd ,6thLVDS Signal +
14 Rx2[2]N 2nd ,6th LVDS Signal -
15 Rx2[2]P 2nd ,6th LVDS Signal +
16 GND Ground
17 Rx2CLK- 2nd ,6th LVDS Clock -
18 Rx2CLK+ 2nd ,6th LVDS Clock +
19 GND Ground
20 Rx2[3]N 2nd ,6thLVDS Signal -
21 Rx2[3]P 2nd ,6th LVDS Signal +
22 Rx2[4]N 2nd ,6th LVDS Signal -
23 Rx2[4]P 2nd ,6th LVDS Signal +
24 GND Ground
25 Rx4[0]N 4th,8th LVDS Signal -
26 Rx4[0]P 4th,8th LVDS Signal +
27 Rx4[1]N 4th,8th LVDS Signal -
CND3 Connector
Service Manual
18

Pin number Symbol Description
28 Rx4[1]P 4th,8thLVDS Signal +
29 Rx4[2]N 4th,8th LVDS Signal -
30 Rx4[2]P 4th,8th LVDS Signal +
31 GND Ground
32 Rx4CLK- 4th,8th LVDS Clock -
33 Rx4CLK+ 4th,8th LVDS Clock +
34 GND Ground
35 Rx4[3]N 4th,8th LVDS Signal -
36 Rx4[3]P 4th,8th LVDS Signal +
37 Rx4[4]N 4th,8th LVDS Signal -
38 Rx4[4]P 4th,8th LVDS Signal +
39 GND Ground
40 NC NC
41 NC NC
42 NC NC
43 NC NC
44 NC NC
45 LVDS_SEL HIGH (3.3V) Normal LVDS Format
LOW (GND) JEIDA LVDS Format
46 NC NC
47 NC NC
48 NC NC
49 NC NC
50 NC NC
51 NC NC
Service Manual
19
Warning
EN-1 Haier LED HDTV
CAUTION
!
CAUTION: TO REDUCE THE RISK OF ELECTRIC SHOCK,
DO NOT REMOVE COVER (OR BACK).
NO USER SERVICEABLE PARTS INSIDE.
REFER SERVICING TO QUALIFIED SERVICE
PERSONNEL.
RISK ELECTRIC SHOCK
DO NOT OPEN
!
The lightning flash with arrowhead
symbol, within an equilateral triangle is
intended to alert the user to the presence
of uninsulated dangerous voltage within
the product’s enclosure that may be of
sufficient magnitude to constitute a risk of
electric shock.
The exclamation point within an equilateral
triangle is intended to alert the user to
the presence of important operating and
maintenance (servicing) instructions in the
literature accompanying the appliance.
WARNING: TO PREVENT FIRE OR SHOCK HAZARD, DO NOT EXPOSE THIS APPLIANCE TO RAIN OR
MOISTURE.
CAUTION: TO PREVENT ELECTRIC SHOCK DO NOT USE THIS POLARIZED PLUG WITH AN EXTENSION
CORD, RECEPTACLE OR OTHER OUTLET UNLESS THE BLADES CAN BE FULLY INSERTED TO
PREVENT BLADE EXPOSURE.
!
Caution:
These servicing instructions are for use by qualified service personnel only. To reduce the risk of electric shock, do q
not perform any servicing other than that contained in the operating instructions unless you are qualified to do so.
Important Safety Instructions
Read t1. hese instructions.
Keep these instructions.2.
Heed all warnings.3.
Follow all instructions.4.
Do not use this apparatus near water.5.
Clean only with dry cloth.6.
Do not block any ventilation openings. Install in accordance with the manufacturer’s instructions.7.
Do not install near any heat sources such as radiators, heat registers, stoves, or other apparatus (including 8.
amplifiers) that produce heat.
Do not defeat the safety purpose of the polarized or grounding-type plug. A polarized plug has two blades with one 9.
wider than the other. A grounding type plug has two blades and a third grounding prong. The wide blade or the
third prong are provided for your safety. If the provided plug does not fit into your outlet, consult an electrician for
replacement of the obsolete outlet.
Protect the power cord from being walked on or pinched particularly at plugs, convenience receptacles, and the 10.
point where they exit from the apparatus.
Only use attachments/accessories specified by the manufacturer.11.
Use only with the cart, stand, tripod, bracket, or table specified by the manufacturer, or sold with 12.
the apparatus. When a cart is used, use caution when moving the cart/ Apparatus combination to
avoid injury from tip-over.
Unplug this apparatus during lightning storms or when unused for long periods of time.13.
Refer all servicing to qualified service personnel. Servicing is required when the apparatus has 14.
been damaged in any way, such as power-supply cord or plug is damaged, liquid has been spilled or objects have
fallen into the apparatus, the apparatus has been exposed to rain or moisture, does not operate normally, or has
been dropped.
The apparatus shall not be exposed to dripping or splashing and that no objects filled with liquids, such as vases, 15.
shall be placed on the apparatus.
The mains plug or appliance inlet is used as the disconnect device, remain it readily operable during the apparatus 16.
normal use.
Warning

Safety Instructions
Haier LED HDTV EN-2
FCC STATEMENT
This equipment has been tested and found to comply with the limits for a Class B digital device, pursuant
to Part 15 of the FCC Rule. These limits are designed to provide reasonable protection against harmful
interference in a residential installation. This equipment generates, use and can radiate radio frequency energy
and, if not installed and used in accordance with the instructions, may cause harmful interference to radio
communications. However there is no guarantee that interference will not occur in particular installation. If
this equipment does cause harmful interference to radio or television reception, which can be determined by
turning the equipment off and on, the user is encourage to try to correct the interference by one or more of the
following measures:
*Reorient or relocate the receiving antenna.
*Increase the separation between the equipment and receiver.
*Connect the equipment into an outlet on a circuit different from that to which the receiver is connected.
*Consult the dealer or an experienced radio/TV technician for help.
This device compiles with Part 15 of the FCC Rules. Operation is subject to the following two conditions:
(1) This device may be not cause harmful interference.
(2) This device must accept any interference received, including interference that may cause undesired
operation.
FCC CAUTION:
To assure continued compliance and possible undesirable interference, the provided ferrite cores must be used
when connecting this LCD display to video equipment; and maintain at least 40cm spacing to other peripheral
device.
CANADIAN NOTICE:
This Class B digital apparatus compiles with Canadian ICES-003.
Energy Star compliant
By being Energy Star compliant you are assured that your Haier model is helping the environment by using less
energy while saving you money. ENERGY STAR is a joint program of the U.S. Environmental Protection Agency and
the U.S. Department of Energy promoting energy efficiency.

Safety Instructions
EN-3 Haier LED HDTV
SAVE THESE INSTRUCTIONS
Thank you for purchasing the Haier product. This easy-to-use manual will guide you in getting the best use of your
product. Remember to record the model and serial number. They are on label in back of the unit.
Model number
serial number
Date of purchase
Staple your receipt to your manual. You will need it to obtain warranty service.

Contents
Haier LED HDTV EN-4
Contents
How to Customize your own audio status................ 17
SAP Broadcasts Setup....................................................... 18
Function menu...................................................18
Menu Language.................................................................. 18
OSD Timeout........................................................................ 18
OSD Transparency.............................................................. 18
DPMS ...................................................................................... 19
Blue Screen........................................................................... 19
DCR.......................................................................................... 19
Time Setup............................................................................ 19
Close Caption....................................................................... 19
Lock Menu..........................................................20
Parental Control rating and categories ...................... 20
Lock setup............................................................................. 21
Other Functions.................................................23
Brief Info ................................................................................ 23
Using the Guide.................................................................. 23
Quick program view.......................................................... 24
CC (Closed Caption Display)........................................... 24
USB Input ...........................................................25
To play pictures................................................................... 25
To play music ....................................................................... 26
To play video........................................................................ 26
Universal Remote Control 27
Setting Up Your Remote Control ......................27
Remote Control Codes ......................................29
Maintenance 35
Specification 35
Troubleshooting 35
Warranty 36
Warning 1
Safety Instructions 3
Introduction 5
Controls ................................................................5
Connection Options ............................................6
Universal Remote control ...................................7
Installation 8
External Equipment Connections ...................... 8
Accessories ..............................................................................8
Antenna Connection............................................................8
Choose Your Connection....................................................9
Connecting a VCR..................................................................9
External AV Source Setup...................................................9
Component Setup ................................................................9
Connecting a DTV (digital TV) ....................................... 10
Connecting a digital audio output .............................. 10
Connecting a computer................................................... 10
HDMI and DVI input .......................................................... 11
Connecting Headphones ................................................ 12
Power source........................................................................ 12
Removing the table stand and installing a wall
mount bracket .....................................................................12
Operation 13
Switching On/Off the TV set........................................... 13
Choose the Menu Language.......................................... 13
Choose the Input source ................................................. 13
Channel menu....................................................13
Channel Scan....................................................................... 13
Channel Skip ........................................................................ 14
Channel Labels.................................................................... 14
Time Shifting Mode........................................................... 14
Select the desired program............................................ 15
Select the desired sound................................................. 15
Mute........................................................................................ 15
Video menu ........................................................15
How to select picture mode........................................... 15
How to customize your own picture status.............. 16
PC Set...................................................................................... 17
Audio menu........................................................17
How to select audio mode.............................................. 17
Introduction
EN-5 Haier LED HDTV
Introduction
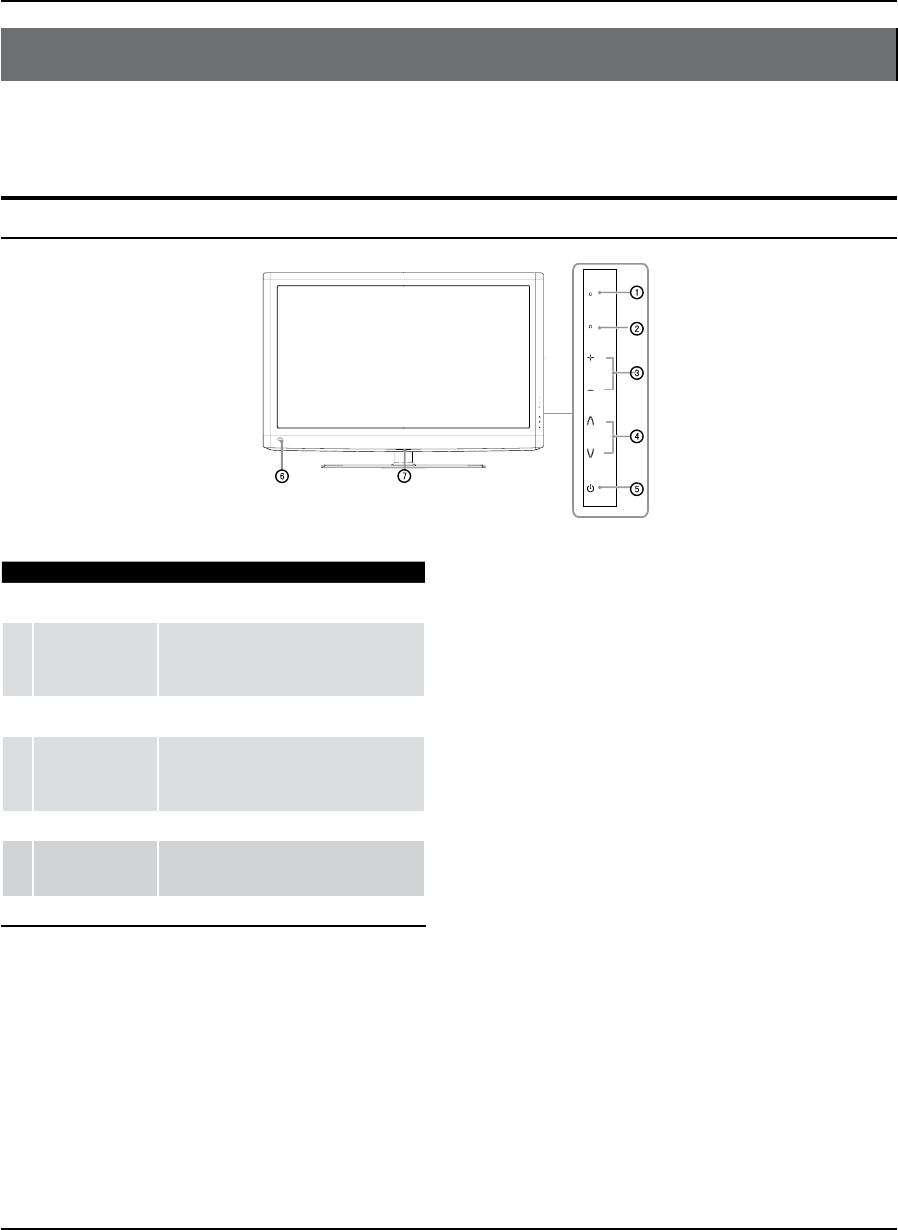
Controls
This is a simplified representation of the TV front panel, side panel control buttons and side inputs.
TV Side panel controls and connections
MENU
INPUT
VOL
CH
1MENU Menu display. Press to access the on-screen
menu display.
2INPUT
Press to access the input source mode. Press
repeatedly to change the source to the one
you want to watch. In the MENU screen, the
INPUT button serves as the ENTER button.
3VOL +/-
Press to adjust the volume. In the MENU screen,
these buttons serve as left/right buttons.
4CH +/-
Press to scan through channels. To scan quickly
through channels, press and hold down either
+/- . In the MENU screen, these buttons serve
as up/down buttons.
5POWER Press to turn on and off the TV.
6Remote Sensor
Receivers IR signals from the remote control.
Do not put anything near the sensor, which
may block the remote control signal.
7Power indicator
Introduction
Haier LED HDTV EN-6
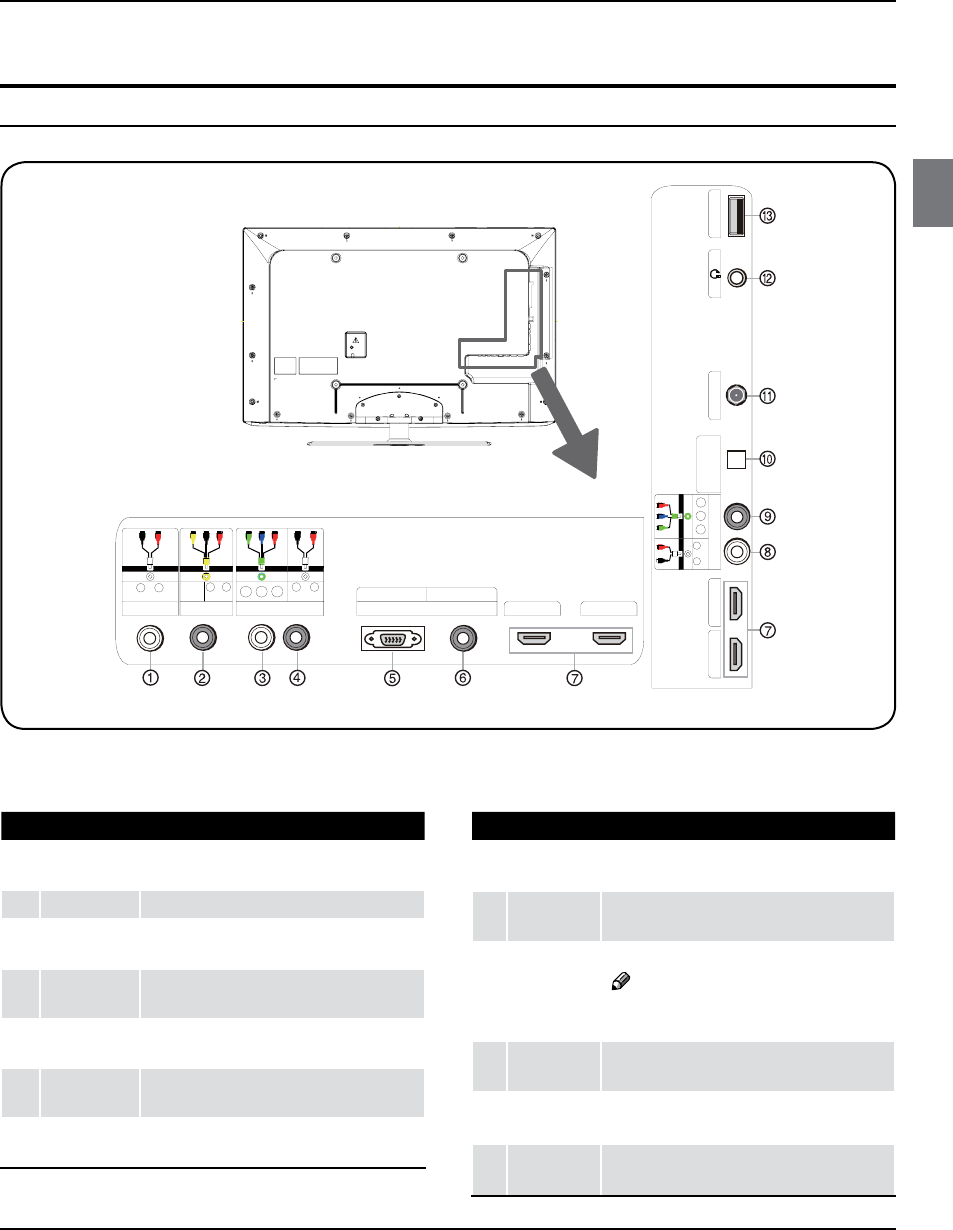
Connection Options
Back panel connections
HDMI 3 IN
HDMI 2 IN
AV IN COMPONENT 2 IN
PC PC/DVI AUDIO
Y P
b
P
r
L
AUDIO
RL
VIDEO AUDIO
R
PC IN HDMI 4 IN
AUDIO OUT
LR
YP
b
P
r
LR
HDMI 1 IN COMPONENT 1 IN
DIGITAL AUDIO OUT
(OPTICAL)
ANT IN USB
AUDIO
1AUDIO Out
Connect the audio L/R cables to your audio
equipment.
2VIDEO In Connects the video signal from a video device.
3Component
Video In
Connect a component video device to these
jacks.
4COMPONENT
AUDIO In
Connect the audio L/R cables from the
component video signal source to these jacks.
5PC Video In Connect a video cable from a computer to this
jack.
6PC Audio In Connect the audio L/R cables from a computer
to this jack.
7HDMI In Connect a HDMI device to receive digital audio
and uncompressed digital video.
8COMPONENT
AUDIO In
Connect the audio L/R cables from the component
video signal source to these jacks.
9Component
Video In Connect a component video device to these jacks.
0
Digital
Audio
Output
Connect various types of digital audio equipment.
Note
In standby mode, these ports will not R
work.
AAntenna
Input
Connect cable or antenna signals to the TV, either
directly or through your cable box.
BHeadphone
jack Headphone audio output terminal.
CUSB input
Connect a USB ash drive to view MPEG2 videos,
JPEG images or listen to MP3 songs.
Introduction
EN-7 Haier LED HDTV
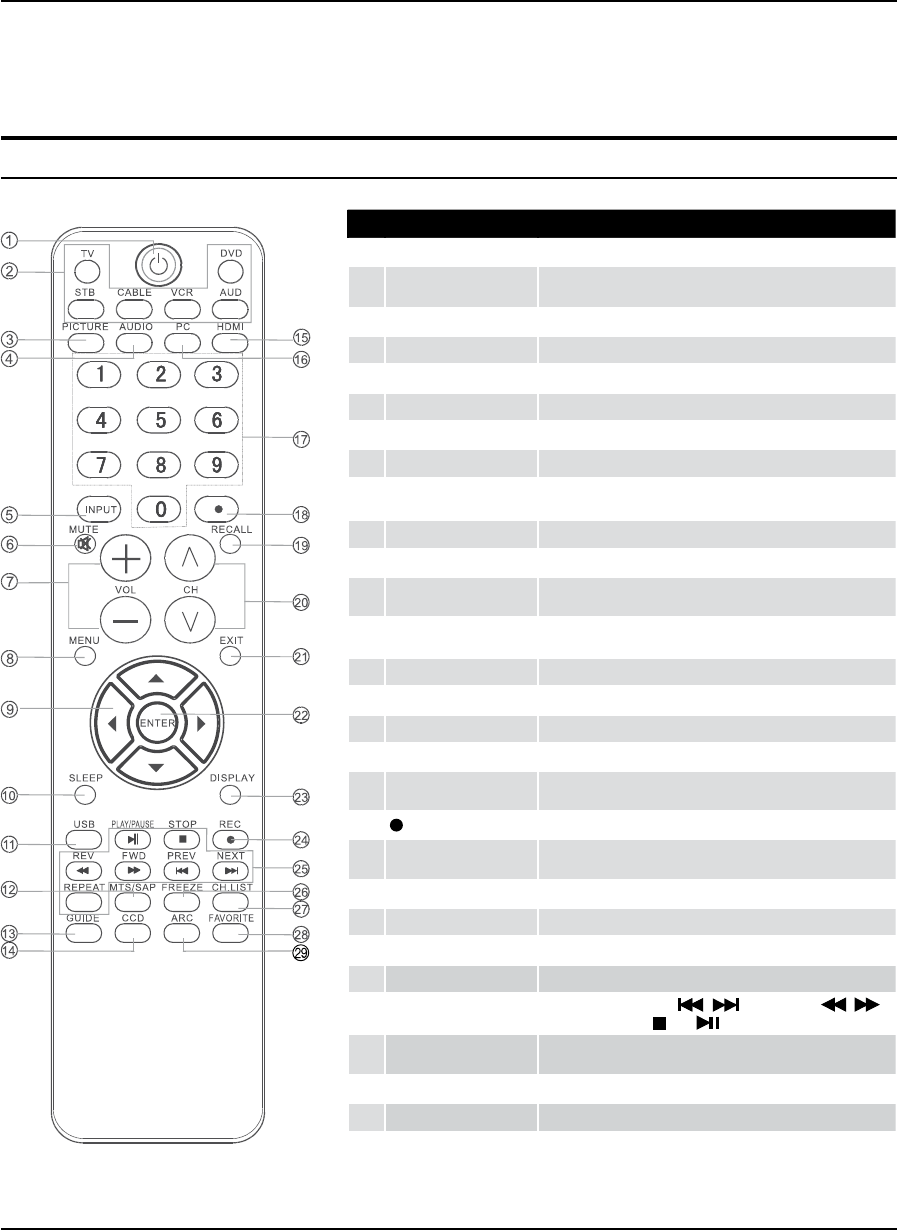
Universal Remote control
The remote control cannot be operated unless the batteries are properly loaded.
When using the remote control, aim it at the remote sensor on the TV.
1POWER Press to turn on and off the TV.
2TV DVD SETBOX CABLE
VCR AUD
To select one of the system modes in which the remote control
can be used.
3PICTURE Press repeatedly to cycle through the available picture modes.
4AUDIO Press to cycle through different sound settings.
5INPUT Show the input source.
6MUTE Switches the video sound on or off.
7VOLUME UP/DOWN Press to adjust the volume.
8MENU Press to open the on-screen menu.
9THUMBSTICK (Up/
Down/Left/Right)
Allows you to navigate the on-screen menus and adjust the
system settings to your preference.
0SLEEP button Press to display the sleep timer option.
AUSB Press to switch input source to USB in.
BMTS/SAP Selects MTS sound: Mono, Stereo, and SAP in Analog mode.
Change the audio language in DTV mode.
CGUIDE Press to display the guide when you are watching analog or
digital channels.
DCCD(closed caption) Select a closed caption.
EHDMI Press to select a device connected to the HDMI input
FPC Press to select the computer connected to the VGA input
GNumber buttons Press to change a channel.
HtCVUUPO Press to select digital channels. For example, to enter “54-3” ,
QSFTTiwitwBOEiw
I RECALL Press to jump back and forth between two channels.
JCHANNEL UP/DOWN Press to scan through channels. To scan quickly between the
last two channels, press and hold down either +/-.
KEXIT
Clears all on-screen displays and returns to TV viewing from any menu.
LENTER Accesses the highlighted item in the on-screen menu.
MDISPLAY
Press to display the TV status information on the top of the TV screen.
N REC Press to start the recording process
OUSB Functions Control the USB System. / Rewind / Fast /
Backward /Forward Stop Play/Pause REPEAT
PFREEZE Press once to display a frozen image of the current program,
but audio continues. Press again to return to the program.
QCH.LIST Open the channel list in TV.
RFAV.LIST Press to open the favorite channel list in TV.
S
ARC(Aspect Ratio Control)
Press to change the aspect ratio.
Function introduction
Installation
Haier LED HDTV EN-8
Installation
External Equipment Connections
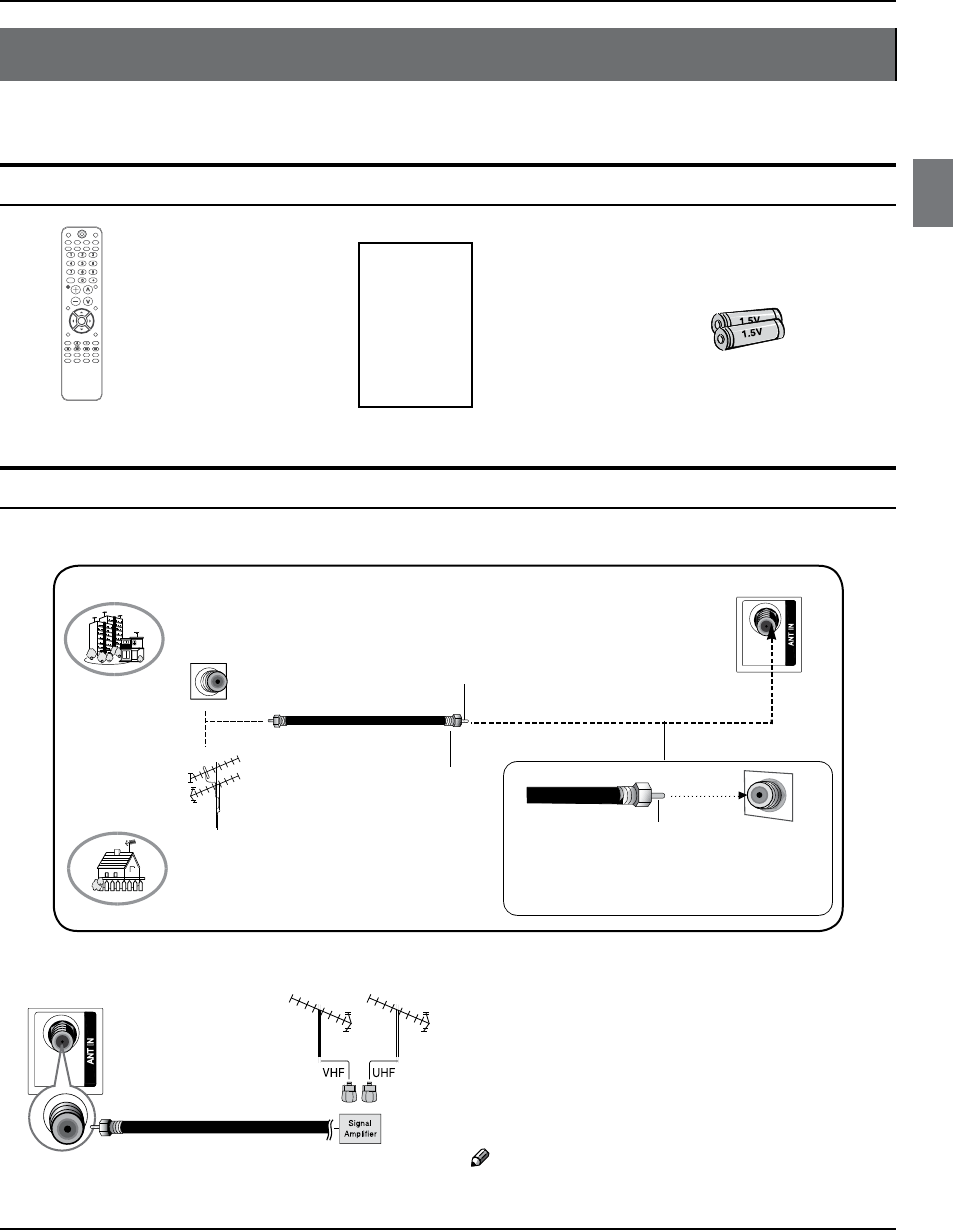
Accessories
Remote control Owner’s manual Alkaline battery (AAA) x2
Antenna Connection
Over-the-air TV reception quality will depend on your antenna type, antenna location and antenna positioning.
ANT IN
VHF Antenna
UHF Antenna
Turn clockwise to tighten
Bronze Wire
Be careful not to bend the bronze wire
when connecting the antenna.
Bronze Wire
Multi-family Dwellings/Apartments
(Connect to wall antenna socket)
Wall Antenna
Socket
RF Coaxial Wire (75 ohm)
Single-family Dwellings /Houses
(Connect to wall jack for outdoor antenna)
Outdoor Antenna
To improve the picture quality in a poor signal
area, please purchase a signal amplifier and install
properly.
If the antenna needs to be split for two TV’s, install a
“2-Way Signal Splitter” in the connections.
To install the antenna properly please contact a
professional in your area.
Note
All cables shown are not included with the TV.R
3/$<3$86(
5(9
5(3($7
*8,'(
0766$3
&&' $5&
)5((=(
(17(5
6723 &(5%68
35(9 1(;7
&+/,67
)$925,7(
79
67%
,1387
087(
92/ &+
0(18
<$/36,'3((/6
(;,7
5(&$//
3,&785( $8',2 3& +'0,
&$%/( 9&5 $8'
'9'
ANT IN

Installation
EN-9 Haier LED HDTV
Choose Your Connection
There are several ways to connect your television,
depending on the components you want to connect
and the quality of the signal you want to achieve. The
following are examples of some different ways to
connect your TV with different input sources.
Connecting a VCR
To avoid picture noise (interference), leave an adequate
distance between the VCR and TV.
How to connect
Connect the audio and video cables from the q
external equipment’s output jacks to the TV input
jacks, as shown in the figure.
When connecting the TV to external equipment, q
match the jack colors (Video = yellow, Audio Left =
white, and Audio Right = red).
AV IN
L
VIDEO AUDIO
R
AUDIO OUT
LR
Camcorder or video
game set
Video= yellow
Audio left= white
Audio right= red
Back of TV
How to use
Select the input source with using the AINPUT button
on the remote control.
Press
B
/
button to select the desired source.
Press
CENTER button to confirm.
Operate the corresponding external equipment.
D
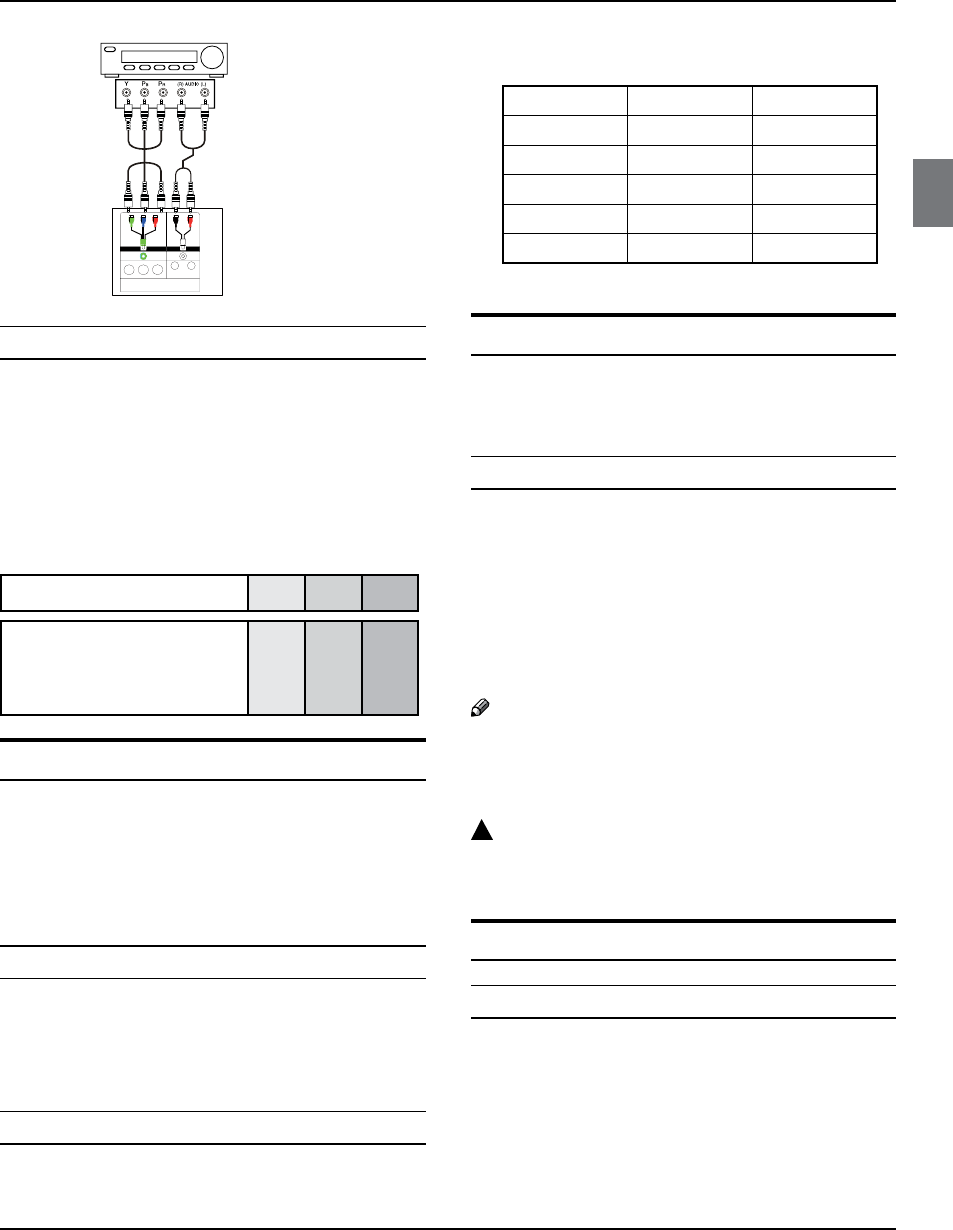
Component Setup
How to connect
Connect the DVD video outputs (COMPONENT) to the
Y Pb Pr jacks on the TV and connect the DVD audio
outputs to the YPbPr Audio IN jacks on the TV, as shown
in the figure.
AV IN
L
VIDEO AUDIO
R
AUDIO OUT
LR
Back of VCR
Back of TV
Video= yellow
Audio left= white
Audio right= red
Connection Option 1
Set VCR output switch to channel 3 or 4 and then turn
the TV to the same channel number.
Connection Option 2
Connect the audio and video cables from the VCR’s A
output jacks to the TV input jacks, as shown in the
figure. When connecting the TV to VCR, match the
jack colors (Video = yellow, Audio Left = white, and
Audio Right = red). If you connect a S-VIDEO output
from VCR to the S-VIDEO input, the picture quality is
improved; compared to connecting a regular VCR to
the Video input.
Insert a video tape into the VCR and press
BPLAY on
the VCR. (Refer to the VCR owner’s manual.)
Select the input source with using the
C INPUT button
on the remote control, and then press
/
button
to select the source, press ENTER button to confirm.
External A V Source Setup
Installation
Haier LED HDTV EN-10
Component video device
Component video cable:
Green=Y
Blue=CB/PB
Red=CR/PR
Audio cable:
White=Left audio
Red=Right audio
COMPONENT 2 IN
Y P
b
P
r
L
AUDIO
R
Back of TV
How to use
Turn on the DVD player, insert a DVD disc.A
Use BINPUT button on the remote control to select
component mode.
Component Input portsQ
To get better picture quality, connect a DVD player to
the component input ports as shown below.
Component ports on the TV Y Pb Pr
Video output ports on DVD
player
Y
Y
Y
Y
Pb
B-Y
Cb
PB
Pr
R-Y
Cr
PR
Connecting a DTV (digital TV)
This TV can receive Digital Over-the-air/Cable signals
without an external digital set-top box. However, if you do
receive Digital signals from a digital set-top box or other
digital external device, refer to the figure as shown below.
This TV supports HDCP (High-bandwidth Digital Contents
Protection) protocol for Digital Contents (480 p,720 p,1080 i).
How to connect
Use the TV’s COMPONENT, VGA or HDMI jack for q
video connections, depending on your set-top box
connector. Then, make the corresponding audio
connections.
How to use
Turn on the digital set-top box. (Refer to the owner’s A
manual for the digital set-top box.)
Use INPUT on the remote control to select B
COMPONENT, VGA or HDMI source.
Signal COMPONENT HDMI
480 i Yes Yes
480 p Yes Yes
720 p Yes Yes
1080 i Yes Yes
1080 p Yes Yes
Connecting a digital audio output
Send the TV’s audio to external audio equipment (stereo
system) via the Digital Audio Output (Optical) port.
How to connect
Connect one end of an optical cable to the TV Digital A
Audio (Optical) Output port.
Connect the other end of the optical cable to the
B
digital audio (optical) input on the audio equipment.
See the external audio equipment instruction
manual for operation.
Note
When connecting with external audio equipments, R
such as amplifers or speakers, please turn the TV
speakers off.
!
Caution:
Do not look into the optical output port. Looking q
at the laser beam may damage your vision.
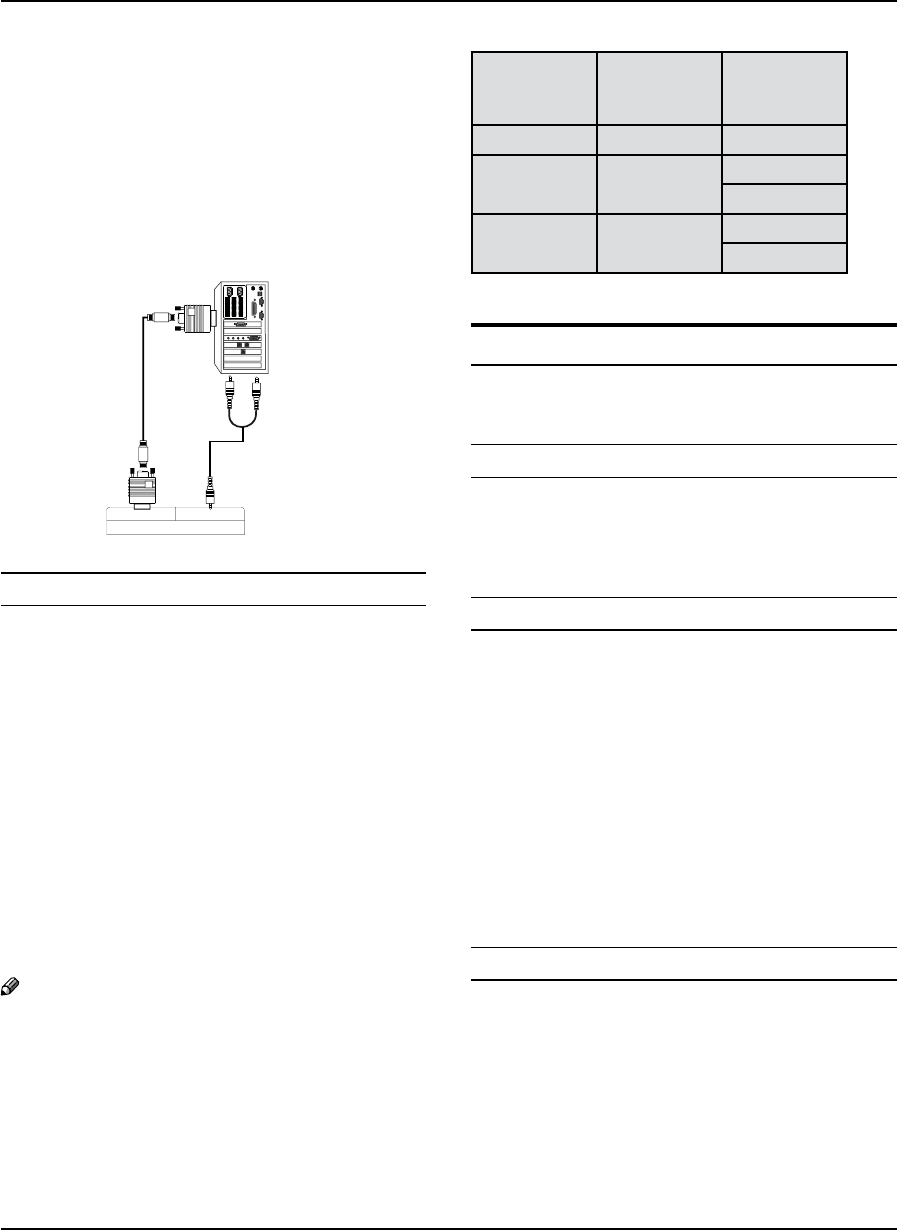
Connecting a computer
How to connect
To get the best picture quality, adjust the VGA A
graphics card to 1024s768.
Use the TV’s VGA or DVI (Digital Visual Interface) B
Audio IN port for audio connections, depending on
your computer connector.
If the graphic card on the computer does not q
Installation
EN-11 Haier LED HDTV
output analog and digital RGB simultaneously,
connect only one of either VGA IN or HDMI IN to
display the VGA on the TV.
If the graphic card on the computer does output q
analog and digital RGB simultaneously, set the TV
to either VGA or HDMI; (the other mode is set to
Plug and Play automatically by the TV.)
Then, make the corresponding audio connection.
C
If using a sound card, adjust the VGA sound as
required.
PC PC/DVI AUDIO
PC IN
Back of TV
How to use
Turn on the computer and the TV.A
Use INPUT on the remote control to select VGA or B
HDMI source.
Check the image on your TV. There may be noise
C
associated with the resolution, vertical pattern,
contrast or brightness in VGA mode. If noise
is present, change the VGA mode to another
resolution, change the refresh rate to another rate
or adjust the brightness and contrast on the menu
until the picture is clear. If the refresh rate of the VGA
graphic card can not be changed, change the VGA
graphic card or consult the manufacturer of the VGA
graphic card.
Note
Use a DVI cable.R
Avoid keeping a fixed image on the TV’s screen R
for a long period of time. The fixed image may
become permanently imprinted on the screen.
The synchronization input form for Horizontal and R
Vertical frequencies is separate.
ResolutionY
Mode Resolution
Frame
frequency
(Hz)
VGA 640s480 60 Hz
SVGA 800s600 60 Hz
75 Hz
XGA 1024s768 60 Hz
75 Hz
HDMI and DVI input
When the source device (DVD player or Set Top Box)
supports HDMI
How To Connect
Connect the source device to HDMI port of this TV A
with an HDMI cable (not supplied with this product).
No separated audio connection is necessary.
B
How To Use
If the source device supports Auto HDMI function, q
the output resolution of the source device will be
automatically set to 1280s720 p.
If the source device does not support Auto HDMI, q
you need to set the output resolution appropriately.
To get the best picture quality, adjust the output
resolution of the source device to 1280s720 p.
Select HDMI input source in input source option of q
Select Main source menu.
When the source device (DVD player or Set Top Box)
supports DVI
How To Connect
Connect the source device to HDMI port of this TV A
with a HDMI-to-DVI cable (not supplied with this
product).
A separated audio connection is necessary.
B
C
If the source device has an analog audio output
connector, connect the source device audio output to
DVI Audio In port located on the left side of HDMI port.

Installation
Haier LED HDTV EN-12
How To Use
If the source device supports Auto DVI function, q
the output resolution of the source device will be
automatically set to 1280s720 p.
If the source device does not support Auto DVI, you q
need to set the output resolution appropriately.
To get the best picture quality, adjust the output
resolution of the source device to 1280s720 p.
Press the qINPUT button to select HDMI input source
in input source option of Select Main source menu.
Connecting Headphones
You can connect a set of headphones to your set
if you wish to watch a TV programme without
disturbing the other people in the room.
USB
Back of TV
Plug a set of headphones into the 3.5 mm mini-jack
socket on the side panel of the set.
Note
Prolonged use of headphones at a high volume R
may damage your hearing.
You will not receive sound from the speakers when R
you connect headphones to the system.
Power source
TO USE AC POWER SOURCE
Use the AC polarized line cord provided for q
operation on AC. Insert the AC cord plug into a
standard polarized AC outlet.
Note
Never connect the AC line cord plug to other than R
the specified voltage. Use the attached power cord
only.
If the polarized AC cord does not fit into a non- R
polarized AC outlet, do not attempt to file or cut
the blade. It is the user’s responsibility to have an
electrician replace the obsolete outlet.
If you cause a static discharge when touching the R
unit and the unit fails to function, simply unplug
the unit from the AC outlet and plug it back in. The
unit should return to normal operation.
Removing the table stand and
installing a wall mount bracket
Remove 5 s M4 screws
securing the stand to
the TV, then remove
the stand.
Use 4 s M8 screws
to secure the wall
bracket (not supplied)
to the back of your TV.

Operation
EN-13 Haier LED HDTV
Operation
In the manual, the OSD (on screen display) may be
different from your TV’s, because it is just an example to
help you with the TV operation.
There are several options you might need to set up in
order for your TV to work properly. Read the instructions
that follow.
Initial Setup: Set according to the screen display.
Switching On/Off the TV set
First, connect power cord correctly.A
Select the viewing source by using BINPUT button on
the remote control.
When finished using the TV, press
CPOWER button on
the remote control. The TV reverts to standby mode.
If you intend to be away on vacation, disconnect the
D
power plug from the wall power outlet.
Note
If the TV in power on , the screen show information R
according the type of input signal, the information
will disappear. If there is no signal, “No Signal” will
display on the screen.
Choose the Menu Language
When you start using your set for the first time, you
must select the language which will be used for
displaying menus and indications.
Choose
ATV Input and then press MENU button.
Press
B
/
button to select Function menu.
PressC
/
ENTER button and then use
/
button
to select Language.
PressD
/
button to select language.
( English, Spanish or French)
Function
Language English
OSD Timeout Short
OSD Transparency Middle
DCR On
Blue Screen On
Time Setup
Closed Caption
Default
Select Back
EXIT
Video
Audio
Channel
Lock
Function
DPMS On
/
Choose the Input source
Change the picture source so you can watch your
TV, VCR, DVD, Cable , or any other devices that are
connected to your TV.
Press AINPUT button to enter the Select Source menu
and then use
/
button to select the desired
items (TV, Video , Component 1, Component 2, PC,
HDMI 1, HDMI 2, HDMI 3, HDMI 4).
Press BENTER button to confirm .
Channel menu
This TV set has two methods to set channels, which
are respectively Channel Scan, Channel Skip.
In this section, how to use the remote control to set
channel is explained. You can also use buttons on the
TV to set channel.
Note
The Channel menu will be only operated in normal R
TV mode.
Channel Scan
Press AMENU button and then use
/
button to
select Channel menu.
Press
B
/ ENTER button to select Tuner.
Press
C
/
button to select Cable or Antenna
mode.
Press
D
/
button to select Channel Scan.
Operation
Haier LED HDTV EN-14
Channel Skip
2 Analog
3 Analog
4 Analog
5 Analog
5-1 Digital
6 Analog
7 Analog
8 Analog
9 Analog
10 Analog
Select Back
EXIT
Set
Video
Audio
Channel
Lock
Function
ENTER /
Channel Labels
Allows you to name the channel that is selected.
Press
/ENTER button to enter the submenu.
Then press
/
to select Channel Index and Channel
Labels and
/
to select the position of the item that
you want to change, afterward press INPUT to input the
numbers and symbols and ENTER button to confirm.
Channel Label Set
Channel Index
Channel Label
Select Back
EXIT
Video
Audio
Channel
Lock
Function
1
/
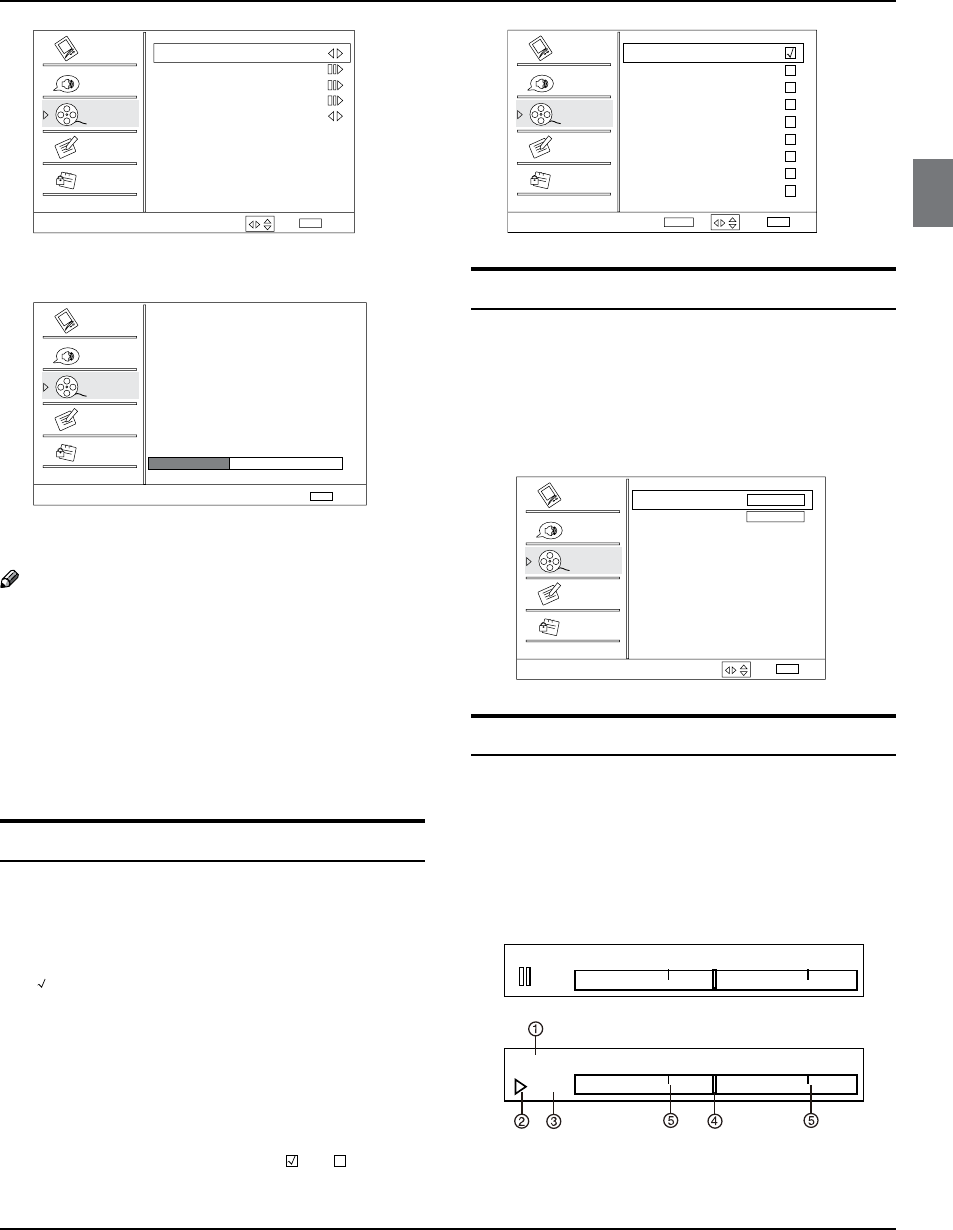
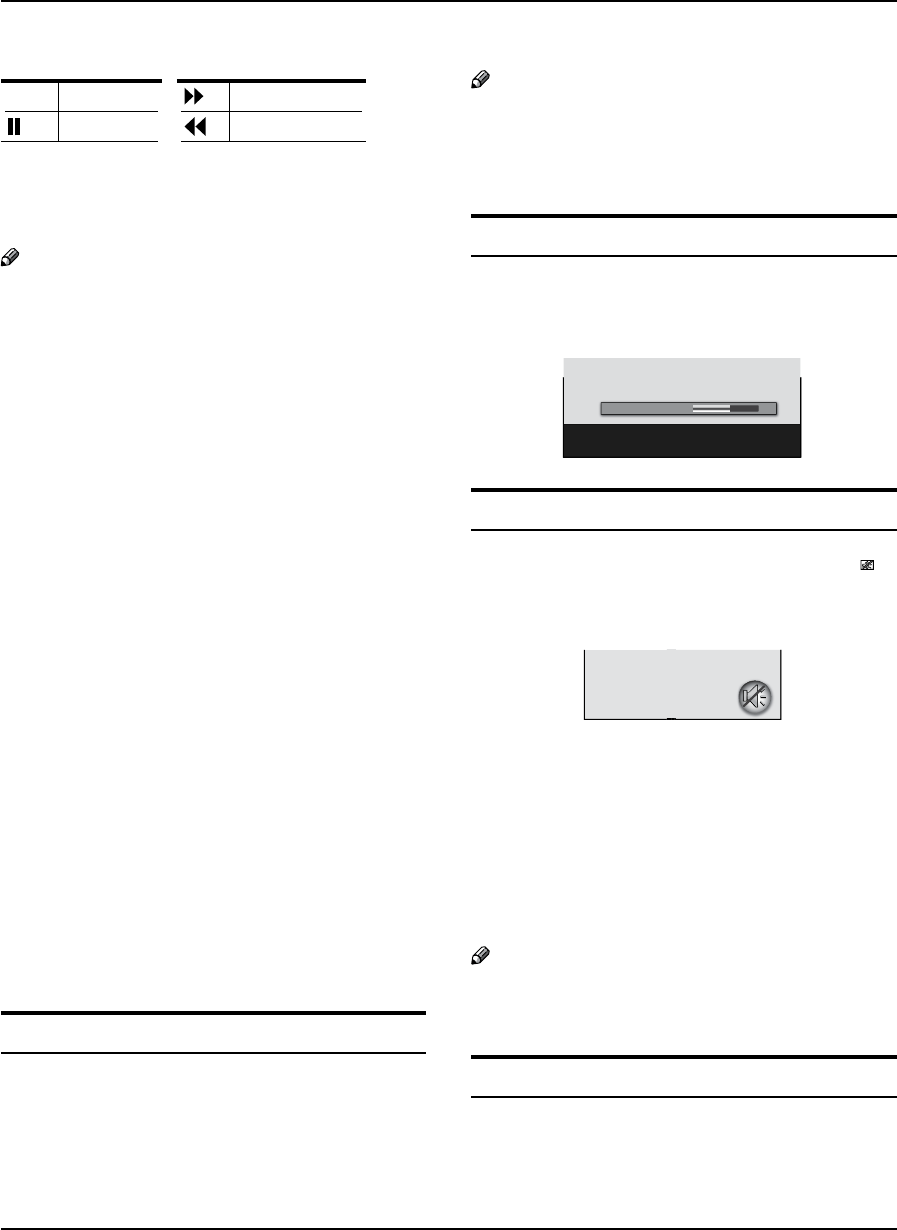
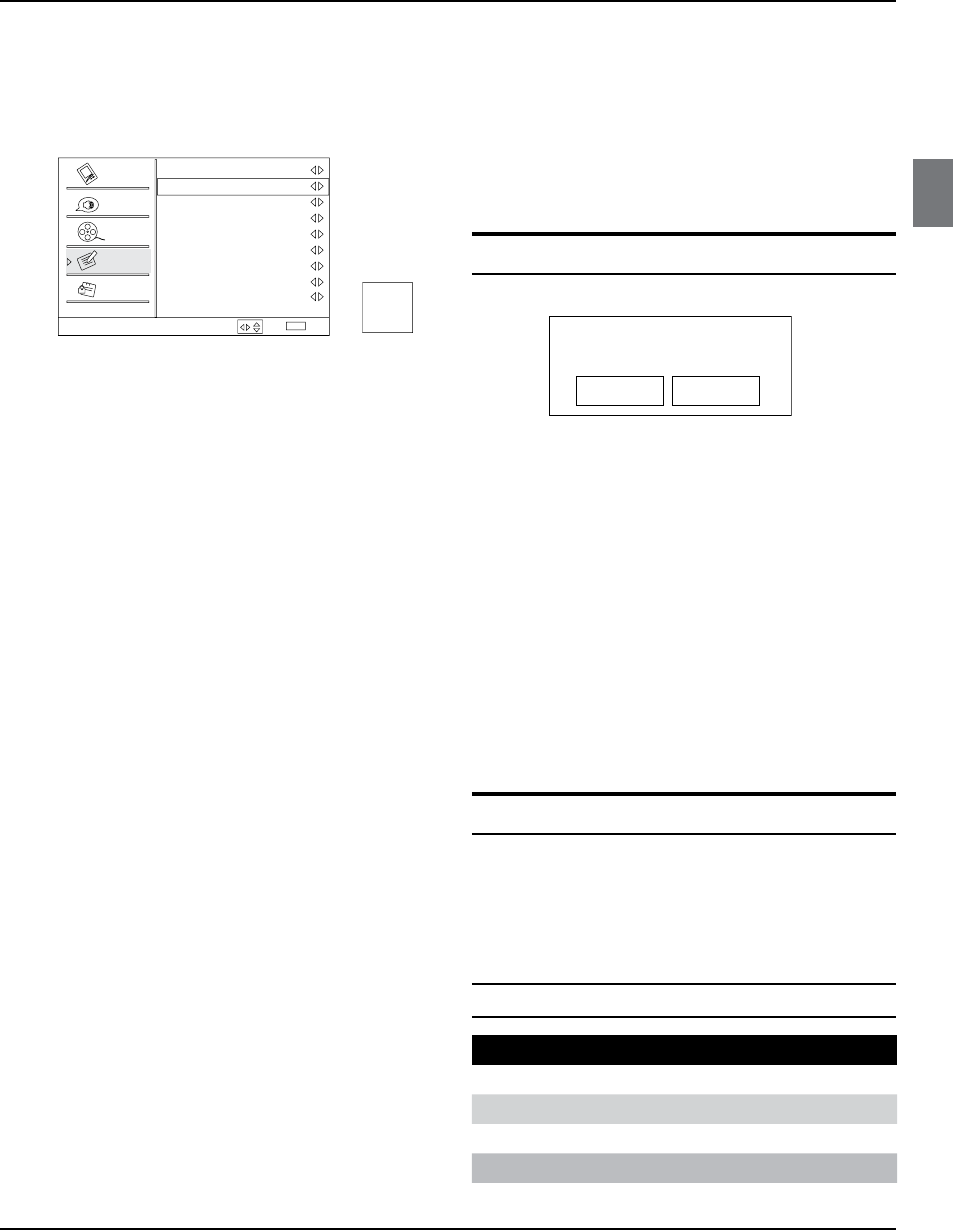
Time Shifting Mode
To turn the Time Shifting Mode on or o.
Set the
ATime Shifting On, then insert the USB drive
in the USB input.
Press
BPLAY/PAUSE to play or pause the program. If
you want to stop time shift function, press the STOP
button.
-00:00:01
1x
7:00 7:30
-00:00:01 7:00 7:30
1.Time shift time. The time delay to the current program
time.
Channel
Video
Audio
Channel
Lock
Function
Select Back
EXIT
Tuner Mode Antenna
Channel Scan
Channel Skip
Channel Labels
Time Shifting Mode On
/
PressE
/ ENTER button to start searching.
Channel Scan
Status: Scanning... Antenna
Analog Channels: 4
Digital Channels: 3
Cancel
EXIT
40%
Video
Audio
Channel
Lock
Function
To cancel searching, press FEXIT button.
Note
When RAntenna is selected, the TV will detect
antenna signals and will search for antenna TV
(NTSC and ATSC) channels available in your local
area.
WhenR Cable is selected, the TV will detect cable
company supplied signals and will search for cable
TV (NTSC, QAM modulated) channels available in
your Area.
Channel Skip
A skip channel is skipped when using
/
button to
browse the channels. A skip channel can be watch by
key-in the channel number or select by list. Default un-
scanned analog channels are skip. Channel with a check
icon is a skipped channel.
Press
AMENU button and then use
/
button to
select Channel menu.
Press
B
/ ENTER button and then use
/
button
to select Channel Skip.
Press
C
/
button to select a channel, then press
ENTER button to toggle between and .
Operation
EN-15 Haier LED HDTV
2.Playback status: It shows the playback status (Play,
Pause, Fast Forward, Rewind).
Play Fast forward
Pause Fast reverse
3.Playback speed: playback speed can be changed -
1x,2x,4x,8x,16x,32x.
4.Playback position: The playback position is always at
the center of the time bar.
5.Time scale:shows the time in half hour increments.
Note
Time Shift function is only available in DTVR
mode.
The maximum recording duration is determined R
by the memory size of the USB drive and the signal
resolution. Please use a high-speed USB 2.0 drive
with a minimum of 1GB capacity.
Time shift only supports FAT32 le-system.R
Time shift supports more than 4GB recording by R
using multi-le storage.
When the maximum recording duration is reached, R
the oldest program would be deleted and the
latest program is recorded.
When changing channel or changing input source, R
the timeshift would stop automatically.
Time shift record will store the fact of no signal.R
Time shift will store the video, audio and data R
service. we only support:
Video streams: Max 1 stream
Audio streams: Max 8 streams
CC stream: No limited.
In recording, the data is not guaranteed to be R
stored in the disk. If the timeshift playback plays
a corrupted data block, it would show “Data lost”
message to indicate that the current data is not
stored correctly.
Please connect the TV antenna or Cable TV coaxial R
cable to the Antenna input on the TV. Then please
complete the channel scan. The Time Shift feature
is available when using your ATSC tuner and QAM
cable tuner.
Select the desired program
Using ACH+/- buttons.
Press CH+ button to select a channel number in
number increasing direction.
Press CH- button to select a channel number in
number decreasing direction.
Note
If skip is ON on one channel, press RCH+/- button,
the channel will not appear.
Also can enter channel number directly, eg:2-0.
B
Select the desired sound
Press VOL-/+ buttons on the remote or the front of the
TV set to adjust the volume level. The range is 0~100.
When the volume buttons are pressed the volume level
is displayed automatically on the TV screen.
Volume 57
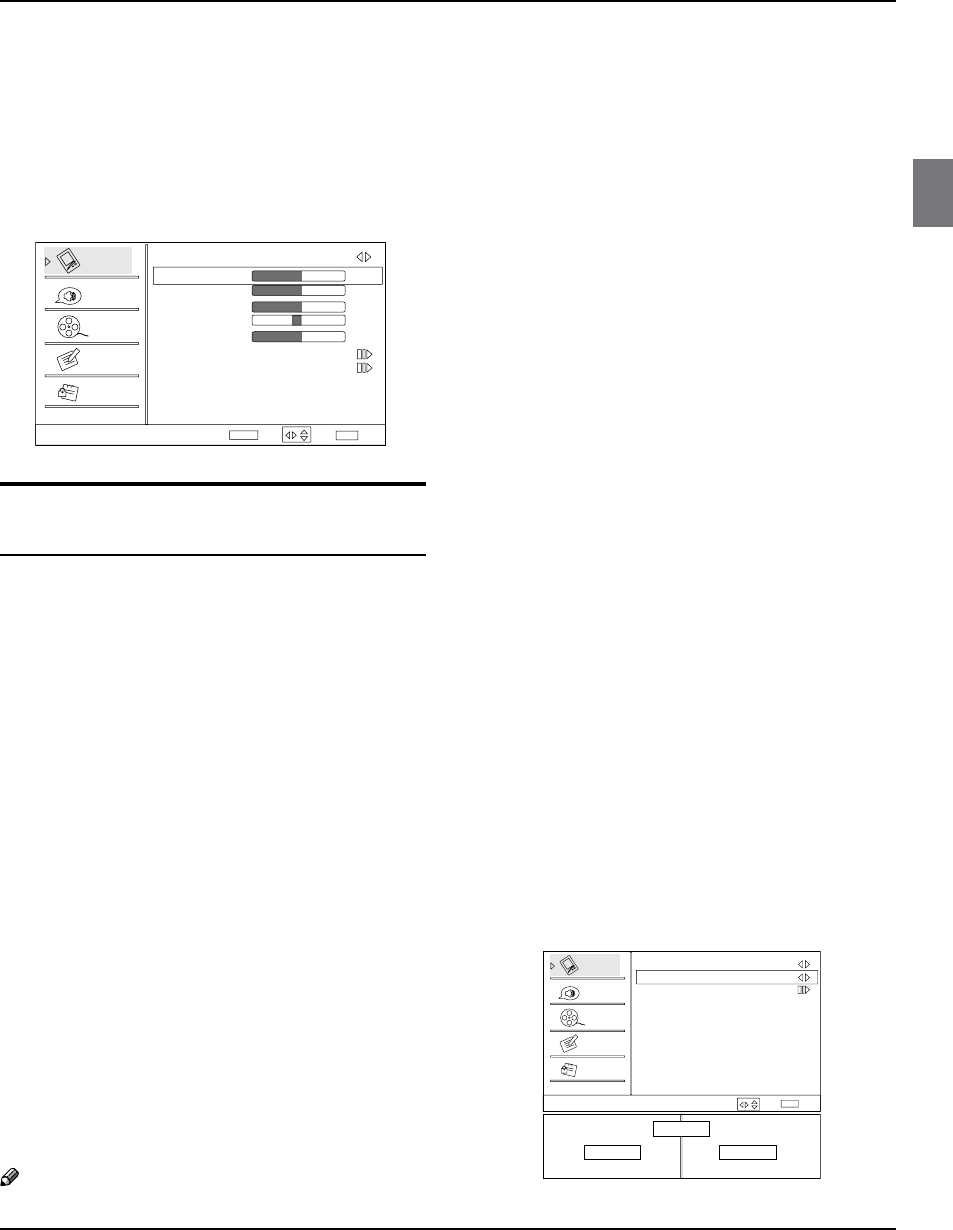
Mute
Press AMUTE button on the remote control and “ “
type face will display on the screen. At this time, the
sound of the TV set is turned off.
If you want to recover the sound, press BMUTE
button again or directly press VOL+ button.
Video menu
The TV menu gives you an overview of the menus you
can select.
Note
Depending on the input signal, one or more menu R
items may not be selectable.
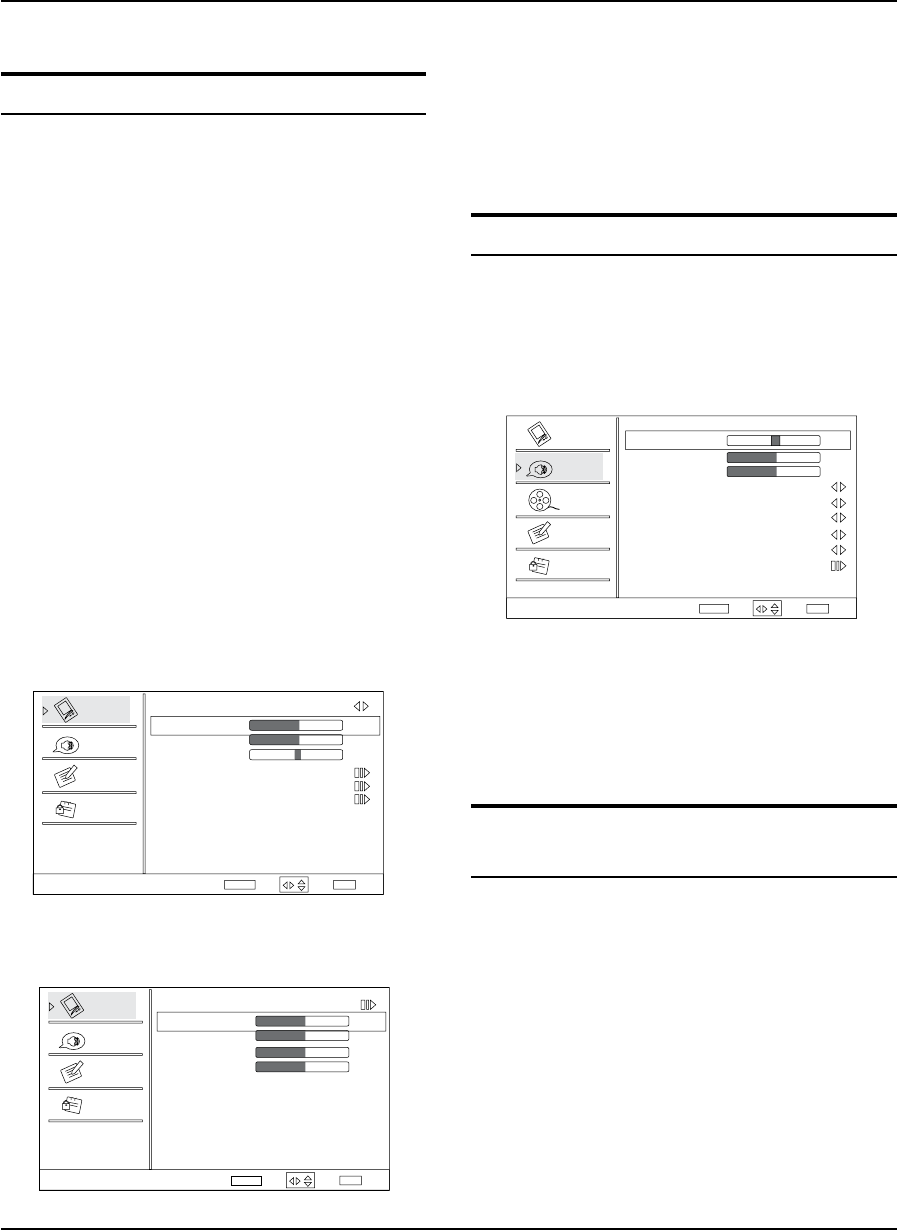
How to select picture mode
The picture mode provides the pre-defined images
settings: Standard, Vivid, Custom and Mild .
Press
AMENU button and then use
/
button to
Operation
Haier LED HDTV EN-16
select Video menu.
PressB
/ENTER button and then use
/
button to select Mode.
Press
C
/
button to select the option Standard,
Vivid, Custom and Mild.
You can also press PICTURE button on the remote control
to select the option Standard, Vivid, Custom and Mild.
Video
Audio
Channel
Lock
Function
Video
Mode Custom
Brightness
Contrast
Color
Tint
Sharpness
Color Temperature
Advanced Video
50
50
50
0
50
Select BackAdjust EXIT
ENTER /
How to customize your own picture
status
Press AMENU button and then use
/
button to
select Video menu.
Press
B
/ENTER button and then use
/
button to select the desired items.
Press
C
/ENTER button and then use
/
button
to adjust the setting.
ModeY
Select the mode of picture (Standard/ Vivid/ Custom/
Mild).
BrightnessY
This will adjust the light output of the complete
picture, which will mainly affect the darker areas of
the picture.
ContrastY
This will adjust the intensity of bright parts in the
picture but keep the dark parts unchanged.
ColorY
This will adjust the saturation level of the colors to suit
your personal preference.
TintY
Allows you to select the color mix (Tint) of the picture.
SharpnessY
This will adjust the sharpness of fine details in the
picture.
Note
Only when the item of mode is custom, the R
Brightness, Contrast, Color, Tint, Sharpness and
Color Temperature can be set by user. In other
mode the value of them are preset.
Color temperatureY
This will increase or decrease Warm (red) and Cool
(blue) colors to suit personal preferences.
Select Cool to give the white colors a blue tint,
Standard to give the white colors a neutral tint, Warm
to give the white colors a red tint.
Advanced VideoY
To adjust the picture in advanced: DNR, Black Level
Extender, White Peak Limiter, CTI, Flech Tone,
Adaptive Luma Control.
DNR:qDigital Noise Reduction, to adjust to reduce
the appearance of digitizing errror caused by the
compressin: Medium/Strong/Auto/o/Low.
MPEG NR:q To adjust the MEPG Noise Reduction:
Medium, Strong, O and Low.
Adaptive Luma Control: qTo adjust changes in the
luminance of the picture On or O.
Flesh Tone: qTo adjust the esh colors: High, O,
Low or Medium.
Blue Stretch: qTo set Blue Stretch: On and O.
Game Mode: qTo set Game Mode: On and O.
MJC:qMotion judder cancellation (MJC), capable of
solving lm judder and motion blur.
Eect:To set the MJC level: O, Low ,Middle, High.
Demo Partition:To set the eective area of MJC: Left, All,
Right.
Press
AMENU button and then use
/
button to
select Video menu.
Press
B
/ENTER button and then use
/
button to select Advanced Video.
Press
C
/ENTER button and then use
/
button to select MJC.
PressD
/ENTER button and then use
/
button to select the desired items.
Video
Audio
Channel
Lock
Function
MJC
Effect Low
Demo Partition Left
Demo
Select Back
EXIT
/
MJC Demo
On Off
Operation
EN-17 Haier LED HDTV
PC Set
When you select the PC input, this function is used.
Adjustment for screen Position, Clock, Phase, Setting
Display adjust menu by pressing INPUT button then use
/
button to select the source of PC item.
Auto sync: Y
Automatically adjust display of the picture (Only
available in PC source).
H Position: YPress
/
button and then press
/
button to adjust the horizontal position of the
picture.
VYPosition:Press
/
button and then press
/
button to adjust the vertical position of the
picture.
Phase : Y
Adjust the phase of Pixel clock.
Clock : Y
Adjust the clock of input signal.
Press
AMENU button and then use
/
button to
select Video menu.
Video
Audio
Lock
Function
Video
Mode Custom
Brightness
Contrast
Tint
Color Temperature
Advanced Video
PC
50
50
0
Select BackAdjust EXITENTER /
PressB
/ENTER button and then use
/
button
to select PC.
ENTER
Video
Audio
Lock
Function
PC
Auto Sync
H Position
V Position
Phase
Clock
50
50
Select BackAdjust EXIT
50
50
/
PressC
/ENTER button and then use
/
button
to adjust the setting.
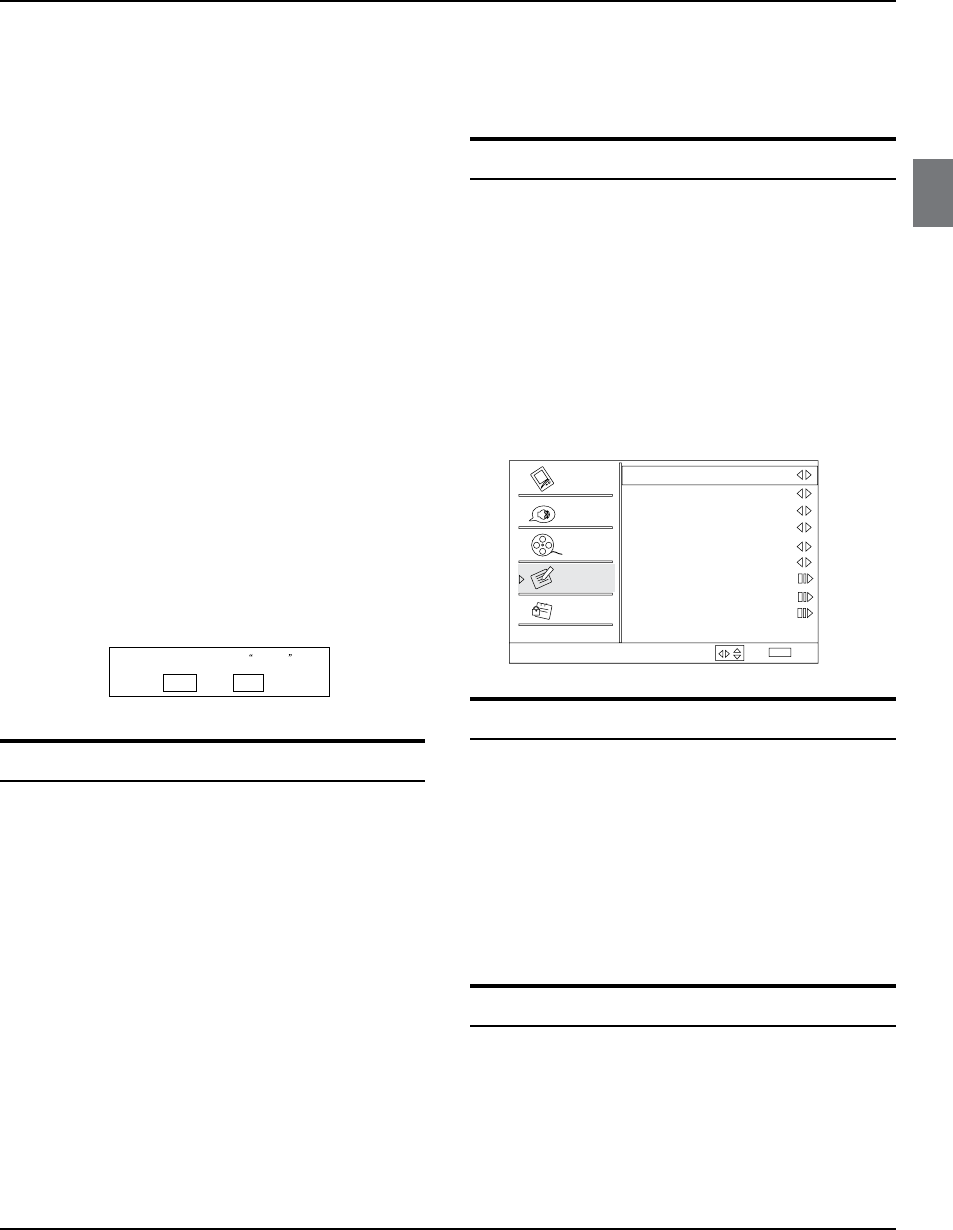
Audio menu
How to select audio mode
Press AMENU button and then use
/
button to
select Audio menu.
PressB
/ENTER button and then use
/
button
to select Mode.
Audio
Balance
Bass
Treble
SRS TS XT On
Equalizer Off
Speaker Off
AVL Off
Audio Only
0
50
50
Video
Audio
Channel
Lock
Function
Select BackAdjust EXIT
ENTER
SPDIF Type Off
/
PressC
/ENTER button to select the option Off,
Concert, Living Room, Hall, Bathroom, Cave, Arena
and Church.
You can also press qAUDIO button on the remote
control to select the Audio Mode Off, Concert, Living
Room, Hall, Bathroom, Cave, Arena and Church.
How to Customize your own audio
status
Press AMENU button and then use
/
button to
select Audio menu.
Press
B
/ENTER button and then use
/
button
to select desired items.
Press
C
/ENTER button and then use
/
button
to adjust the setting.
BalanceY
Adjust to emphasize left or right speaker balance.
BassY
Operation
Haier LED HDTV EN-18
Adjust to increase or decrease lower-pitched sounds.
TrebleY
Adjust to increase or decrease higher-pitched sounds.
SRS TS XTY
To turn the simulated surround sound on and off.
EqualizerY
To adjust the equalizer: Off, Rock, Pop, Live, Dance,
Techno, Classic and Soft.
SpeakerY: To adjust the speaker on or o.
SPDIF TypeY
To adjust the SPDIF output: Off, Dolby Digital and
PCM.
AVL (Automatic Volume Control)Y
This will reduces the differences in volume level
among broadcasters.
Audio Only Y
Press
/ENTER button to confirm, the following
display will appear on the screen.
Press
to select OK, then press OK to confirm. The TV screen
will be black and no picture , but the sound is still normal.
You can press POWER button to reveal the picture on the screen.
If enter Audio Only mode, press POWER to exit!
OK Cancel
SAP Broadcasts Setup
This TV can receive MTS stereo programs and SAP
(Secondary Audio Program) that accompanies the stereo
program; if the station transmits an additional sound
signal as well as the original one.
When having selected SAP button on the remote
control, this TV can only receive the signal when the TV
station transmits the proper signals.
Mono sound is automatically received if the broadcast is
only in Mono; even though Stereo or SAP has been selected.
Select Mono if you want to listen to mono sound during
stereo/ SAP broadcasting. Stereo or SAP can be received
in a Analog channel.
Use
ASAP button to select your desired MTS mode in
a analog signal.
Each time you press qSAP button, Mono, Stereo or
SAP appear. If other languages are available on the
digital signal, select them with the SAP button.
Press BEXIT button to save and return to TV viewing.
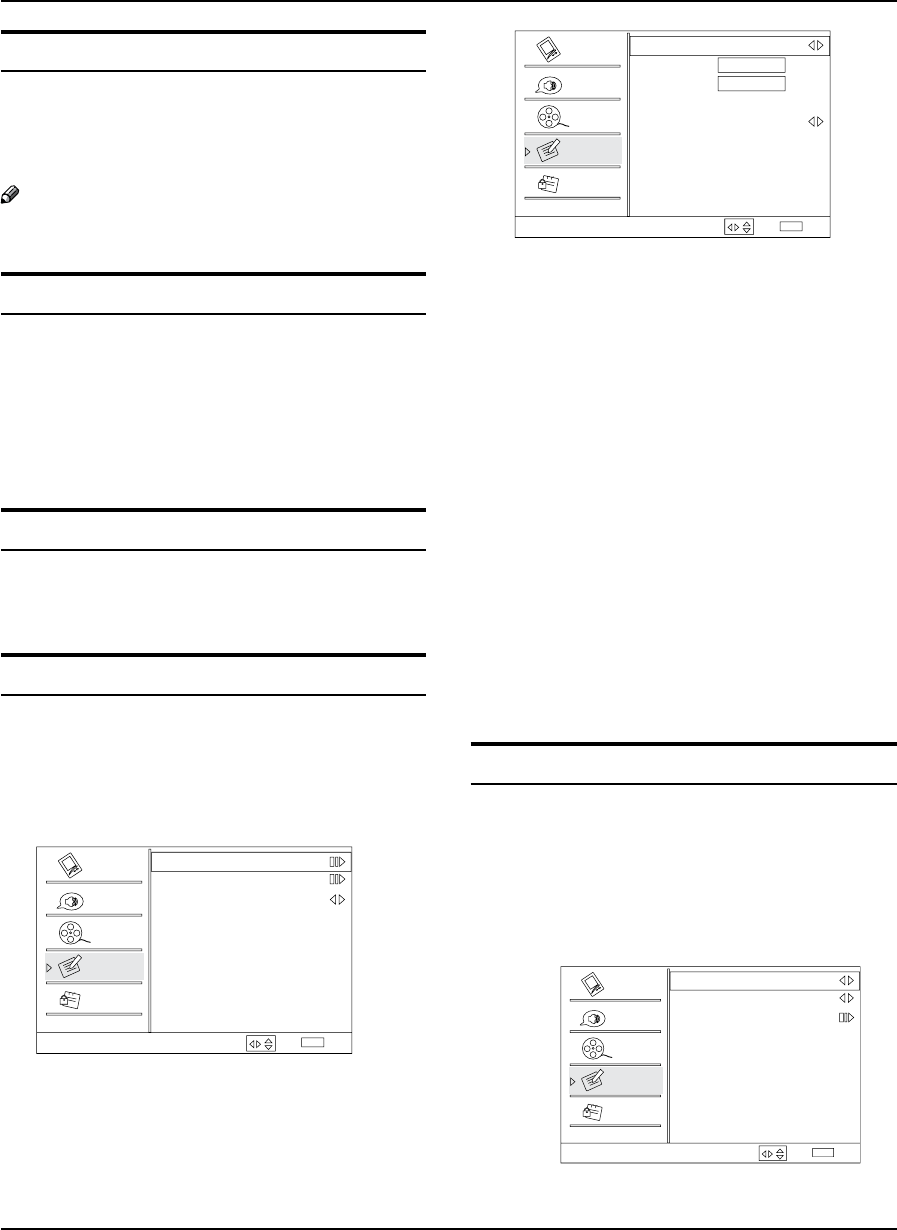
Function menu
Menu Language
When you start using your set for the first time, you must
select the language which will be used for displaying
menus and indications.
Press
AMENU button and then use
/
button to
select Function menu.
Press
B
/ENTER button and then use
/
button to select Language.
Press
C
/
button to select language.
(English,Spanish or French )
Function
Language English
OSD Timeout Short
OSD Transparency Middle
DCR On
Blue Screen On
Time Setup
Closed Caption
Default
Select Back
EXIT
Video
Audio
Channel
Lock
Function
DPMS On
/
OSD Timeout
Press AMENU button and then use
/
button to
select Function menu.
Press
B
/ENTER button and then use
/
button to select OSD Timeout.
Press
C
/
button to select Short,Middle or Long.
(Short is for 5 seconds; Middle is for 10 seconds;
Long is for 15 seconds)
OSD Transparency
Press AMENU button and then use
/
button to
select the Function menu.
Press
B
/ENTER button and then use
/
button to select OSD transparency.
Press
C
/
button to select Low,Middle or High.
Operation
EN-19 Haier LED HDTV
DPMS
PC Power Management. When set On, the set will be
put in standby mode automatically if there is no signal
received for 2 minutes.
Note
DPMS is useful only in VGA source.R
Blue Screen
Press AMENU button and then use
/
button to
select Function menu.
Press
B
/ENTER button and then use
/
button
to select Blue Screen.
Press
C
/
button to select On or Off.
DCR
Dynamic Contrast Ratio. Press VOL+/- button to select
On or O.
Time Setup
This function allows you to select your local time zone.
Broadcasted time information will correct the clock
display for your local time.
Time Zone: YPress VOL+/- button to select the
appropriate time zone.
Time Setup
Time Zone
Date/Time
Sleep Timer Off
Select Back
EXIT
Video
Audio
Channel
Lock
Function
/
Date/Time: YPress VOL+/ENTER button to enter the
submenu.
Date/Time
Auto On
Date 2009/01/01
Time 11:54 AM
Timer Off
On Time 11:54 AM
Off Time 12:00 AM
Select Back
EXIT
Video
Audio
Channel
Lock
Function
/
Auto: Press
VOL+/- button to select On or O . When
Auto mode on , the time can not be adjusted. Select
O , you can operate to set the time manually.
Date: Press
VOL+/- button to select the position and
digits button to set the date.
Time:Press VOL+/- button to select the position and
digits button to set the time.
Timer: Press VOL+/- button to select On or O . To
select O, the time can not be adjusted.
On Time/O Time:Press VOL+/- button to select the
position and digits button to set the time. Press ENTER
button to switch on AM and PM.
Sleep Timer: YPress VOL+/- button to select the
number of minutes: To select O, 5Min, 10Min,15Min,30
Min,45Min,60Min,90Min,120Min,180Min or 240Min.
You can also press qSLEEP button to select quickly
the sleep timer.
Close Caption
This allows you to modify how digital captions are
displayed on your TV. Select from the following options
to change the visual characteristics of your TV’s digital
captioning. Customize the DTV/CADTV captions that
appear on your screen.
Press VOL+/ENTER button to enter the submenu.
Closed Caption
Analog Caption Off
Digital Closed Caption Off
Digital Caption Style
Select Back
EXIT
Video
Audio
Channel
Lock
Function
/
Analog Caption YPress VOL+/- button to select
Operation
Haier LED HDTV EN-20
the Closed Caption options. It helps the hearing
impaired with the broadcast program, as well
as helping children learn how to read. A built
in decoder displays the audio portion of a
program as text on the screen when this option
is selected.
DTV Caption Style
Caption Style
Font Size
Font Style
Font Color
Background Color
Background Opacity
Font Opacity
Window Color
Window Opacity
Select Back
EXIT
Video
Audio
Channel
Lock
Function
Custom
Large
Style 1
White
Solid
Black
Solid
Black
Solid ABC
/
CC1: When CC1is displayed on TV means CC
mode is turned on.
CC2 to CC4: For other modes of video related
broadcast information.
Text1: For program guide and other information
displayed by broadcasters. (This blocks a large
portion of the picture on your screen).
Text2 to Text4 :For other modes of information
displayed by broadcasters. (This blocks a large
portion of the picture on your screen).
IMPORTANT:Closed captioning availability
entirely depends on broadcasters supplying the
signal. Therefore, closed captioning might not
always be available and language availability
will dier by broadcast.
Select CC1 for full translation of the primary
language such as English in your area. Select
CC2 for secondary language translation such
as French or any other language that may be
broadcast in your area.
DYigital Closed Caption:Press VOL+/- button
to select Service1/Service2/Service3/Service4/
Service5/Service6/O.
DYigital Caption Style: Press VOL+/ENTER button
to enter the submenu.
Caption Style: To display the digital closed caption
automatically or by Custom mode.
Font Size :To adjust the font size: Large, Small or
Medium.
Font Style :To adjust the font style: Style1, Style2,
Style3,Style4, Style5, Style6 and Style7.
Font Color: To adjust the font color: White, Green,
Blue, Red, Cyan, Yellow, Magenta and Black.
Font Opacity: To adjust the font opacity: Solid,
Translucent and Transparent.
Background Color: To adjust the background color:
Black, White, Green, Blue, Red, Cyan, Yellow and
Magenta.
Background Opacity: To adjust the background
opacity: Solid, Translucent and Transparent.
Window Color:To adjust the window color: Black,
White, Green, Blue, Red, Cyan, Yellow and Magenta.
Window Opacity: To adjust the window opacity:
Translucent, Transparent or Solid.
Default
Press VOL+/ ENTER button to enter the submenu.
Are you sure?
OK Cancel
Press VOL+/- button to select OK or Cancel, then press
OK to conrm. If OK the parameter will return to the
factory set.
Lock Menu
Parental Control can be used to block specific channels,
ratings and other viewing sources.
The parental control function is used to block program
viewing based on the ratings sent by the broadcasting
station. The default setting is to allow all programs to be
viewed. Viewing can be blocked by choosing the type of
the program and the categories.
Parental Control rating and categories
Rating guidelines are provided by broadcasting stations.
Most television programs and television movies can be
blocked by TV Rating or Individual Categories. Movies
that have been shown at the theaters or direct-to-video
movies use the Movie Rating System (MPAA) only.
Ratings for Television programs:
Parental Guide:
TV-Y (All children)
TV-Y7 (Children 7 years older)
TV-G (General audience)
TV-PG (Parental guidance suggested)
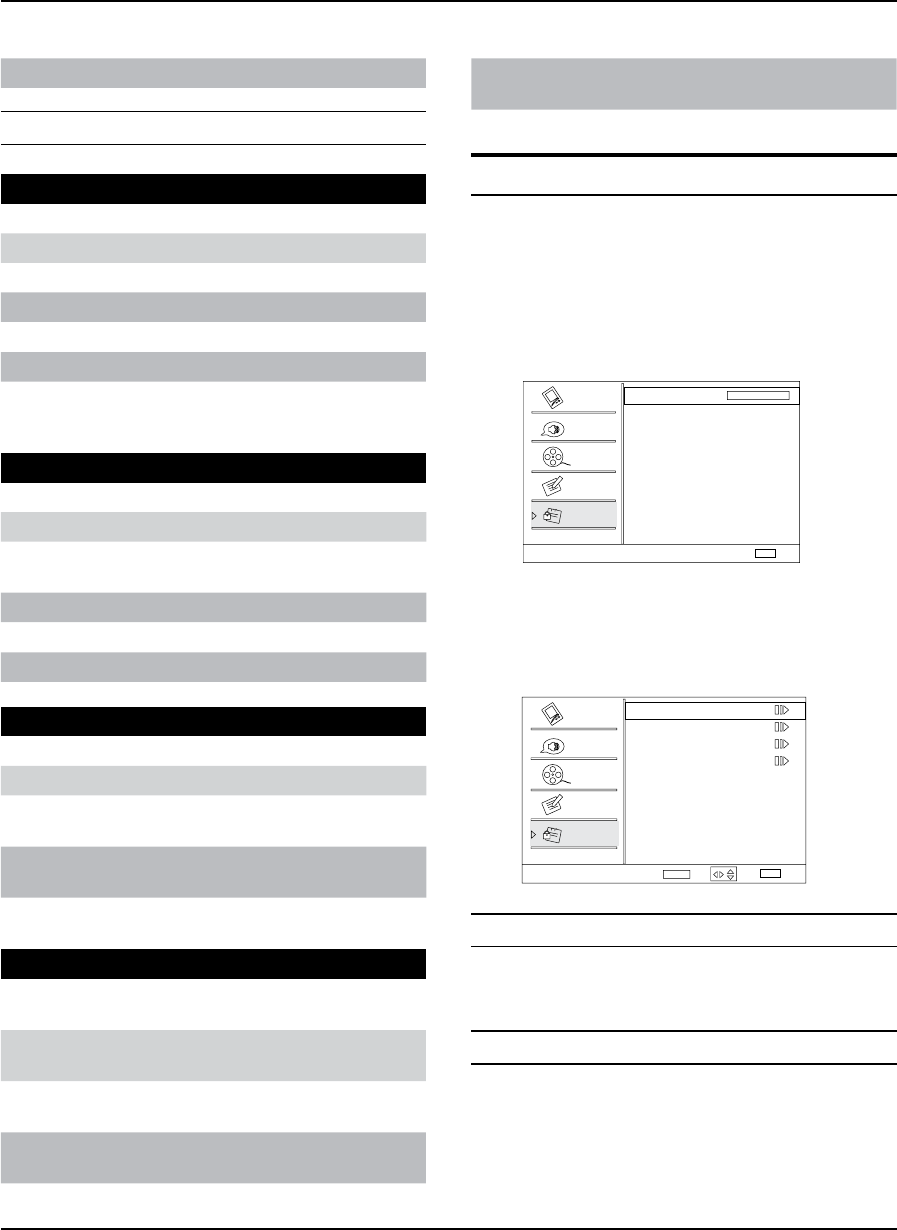
Operation
EN-21 Haier LED HDTV
TV-14 (Parents strongly cautioned)
TV-MA (Mature audience only)
Ratings for Movies previously shown in theaters:
MPAA Rating:
G (General audience)
PG (Parental guidance suggested)
PG-13 (Parents strongly cautioned)
R (Restricted)
NC-17 (No one 17 and under admitted)
X (Adult only)
If you set PG-13 : G and PG movies will be available,
PG-13, R, NC-17 and X will be blocked.
CA Eng Rating:
C Children
C8+ Children eight years and older
GGeneral Programming, suitable for all
audiences
PG Parental Guidance
14+ Viewers 14 years and older
18+ Adult Programming
CA Fren Rating:
G General
8 ans+ Not recommended for young children
13 ans+ Programming may not be suitable for
children under the age of 13
16 ans+ Programming is not suitable for
children under the age of 16
18 ans+ Programming restricted to adults
TV Rating:
A (Age) (applies to TV-Y, TV-Y7, TV-G, TV-PG,
TV-14, TV-MA)
D (Dialogue -
sexual dialogue) (applies to TV-PG, TV-14)
L (Language -
adult language) (applies to TV-PG, TV-14, TV-MA)
S (Sex - sexual
situations) (applies to TV-PG, TV-14, TV-MA)
V (Violence) (applies to TV-PG, TV-14, TV-MA)
FV (Fantasy
Violence) (applies to TV-Y7)
Lock setup
Set up blocking schemes to block specific channels,
ratings, and external viewing sources.
A password is required to gain access to this menu.
Press
AMENU button and then use
/
button to
select Lock menu. Then, press
button.
The TV is set up with the initial password “0-0-0-0” q
and security default password is 9-4-4-3.
Lock
Enter Password
Back
EXIT
Video
Audio
Channel
Lock
Function
Use B
/
button to select the desired items, and
press
or ENTER button to enter the next menu.
Once the option is selected, change the settings to
your preference.
Lock
Channel Block
Program Block
Change Password
Clean All
Select Back
EXIT
Video
Audio
Channel
Lock
Function
Enter
ENTER /
Password
Change the password by inputting a new password q
twice.
Channel Block
Press AMENU button and then use
/
button to
select Lock menu.
Press
B
/ENTER button and then use
/
button
to select Channel Block.
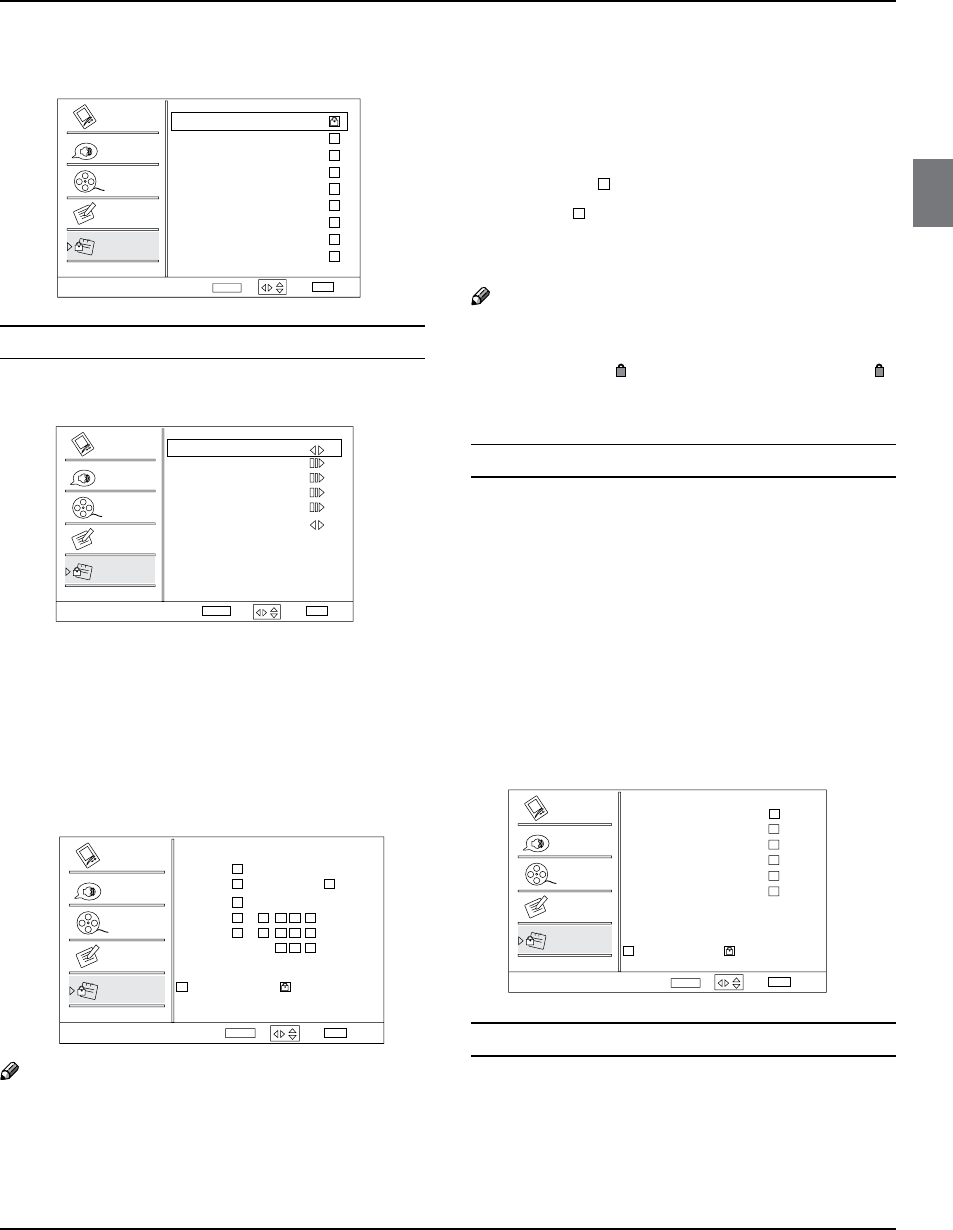
Operation
Haier LED HDTV EN-22
Press C
/
button to select the item, press OK
button to set.
Channel Block
10-1 Digital
11 Analog
11-1 Digital
12 Analog
13 Analog
14 Analog
14-1 Digital
14-2 Digital
14-3 Digital
15 Analog
Select Back
EXIT
Set
Video
Audio
Channel
Lock
Function
WCAU-DT
MBC DTV
ATSC-1
ATSC-2
ATSC-3
ENTER /
Program Block
Press VOL+/ENTER button to enter the submenu as
follows.
Program Block
Parental Lock
Parental Guide
MPAA Rating
CA Eng Rating
CA Fren Rating
Block Unrated
SelectENTER Enter Back
EXIT
Video
Audio
Channel
Lock
Function
On
On
/
Parental LockY: Press VOL+/- button to select On or
O. Used to lock all the system following. To set O,
the system following can not be available.
PYarental Guide: Press VOL+/ ENTER button
to enter the submenu as follows. To clearly
understand TV program rating codes, read the
following information:
TV-Y
TV-Y7
TV-G
TV-PG
TV-14
TV-MA
A D LSVFV
Allowed Rating Blocked Rating
Parental Guide Select Back
EXIT
Video
Audio
Channel
Lock
Function
Set
ENTER /
Note
The Parental control will automatically block certain R
categories that are “more restrictive” . For example,
if you block “TV-Y” category, then all the categories
in the “young adult” group will be blocked (TV-Y,
TV-Y7, TV-G, TV-PG, TV-14 and TV-MA).
The sub-ratings (A, D, L, S, V, FV) work together R
similarly.
How to set the A, D, L, S, V and FV sub-ratingsY
First, press q
/
button select one of these
Ratings: TV-Y, TV-Y7, TV-G, TV-PG, TV-14, or TV-MA,
and press
/
button.
A symbol “ q ” will be displayed for each sub-rating.
While “ q ” is selected, press ENTER button to go
to a sub rating. To select a different Rating, press
/
buttons and then repeat the process.
Note
The V-chip will automatically block certain R
categories that are “More restrictive” . For example,
if you block “ ” sub-rating in TV-PG, then the “ ”
sub-ratings in TV-14 and TV-MA will automatically
be blocked.
MPAA Rating
Blocks movies according to the movie ratings limits q
specified, so children cannot view certain movies.
You can set the ratings limit by blocking out all the
movies with the ratings above a specified level. Keep
in mind that the movie ratings limit only applies to
movies shown on TV, not TV programs, such as soap
operas.
Press
A
/
button to select MPAA Rating item.
Press
B
/ENTER button and then use
/
button to select the rating.
Press
CENTER button to set block or unblock.
Allowed Rating Blocked Rating
MPAA Rating Select Back
EXIT
Video
Audio
Channel
Lock
Function
Set
G
PG
PG-13
R
NC-17
X
ENTER /
CA Eng Rating
Canadian English Language RatingY
Press A
/
button to select CA Eng Rating item.
Press
B
/ENTER button and then use
/
button to select the rating.
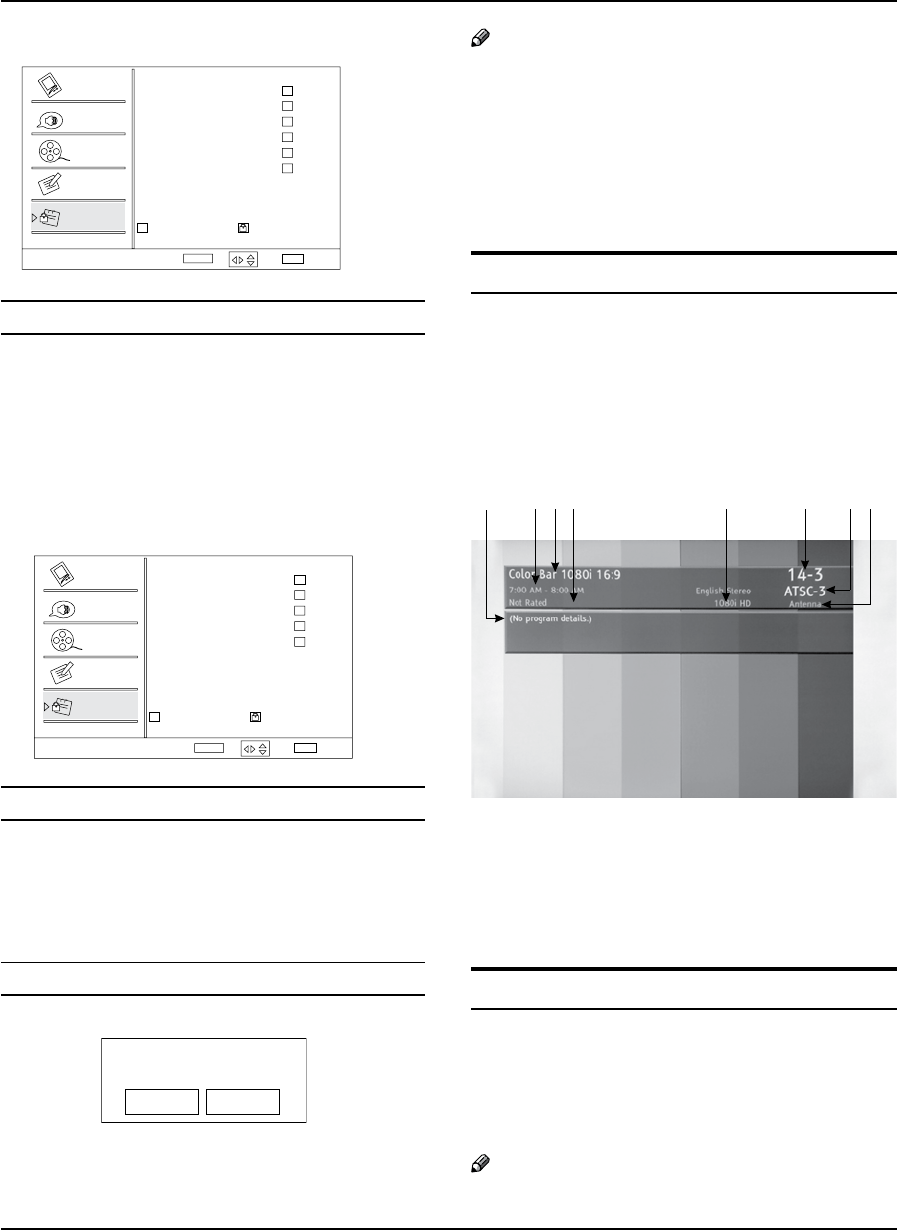
Operation
EN-23 Haier LED HDTV
PressC ENTER button to confirm.
Allowed Rating Blocked Rating
CA Eng Rating Select Back
EXIT
Video
Audio
Channel
Lock
Function
Set
C
C8+
G
PG
14+
18+
ENTER /
CA Fren Rating
Canadian French Language RatingY
PressA
/
button to select CA Fren Rating
item.
Press
B
/ENTER button and then use
/
button to select the rating.
Press
CENTER button to confirm.
Allowed Rating Blocked Rating
CA Fren Rating Select Back
EXIT
Video
Audio
Channel
Lock
Function
Set
G
8 ans+
13
16
18
ans+
ans+
ans+
ENTER /
Change Password
Press VOL+/ENTER button to enter the submenu,
press digits button to input the number of 0-9 twice
in the New Password and Conrm Password. Then you
can change the password when you input the same
number twice.
Clean All
Press VOL+/ENTER button to enter the submenu:
Are you sure?
OK Cancel
Press VOL+/- button to select OK or Cancel then OK to
conrm. If OK, the parameter will return to the factory
set.
Note
If there is any lock mark on the top of the set such as R
channel lock, parental lock and so on, you can press OK
to resume it .( Press OK to display password menu and
input your password.)
Other Functions
Brief Info
Brief Info shows the present screen information.
Press qDISPLAY button to show the Brief Info on the
screen.
Press qDISPLAY button or EXIT button to exit.
Function
Show the present screen information.
Press DISPLAY button or EXIT button to exit.
A
C
BDEFGH
A: Video resolution E: Program title
B: Program name F: Channel label
C: Program rating categories G: Tuner mode
D: Program show time H: Program details
Using the Guide
The guide allows you to select the channels from a
channel list.
The guide allows provides information about the current
program being shown on each channel (if information is
available from the station).
Note
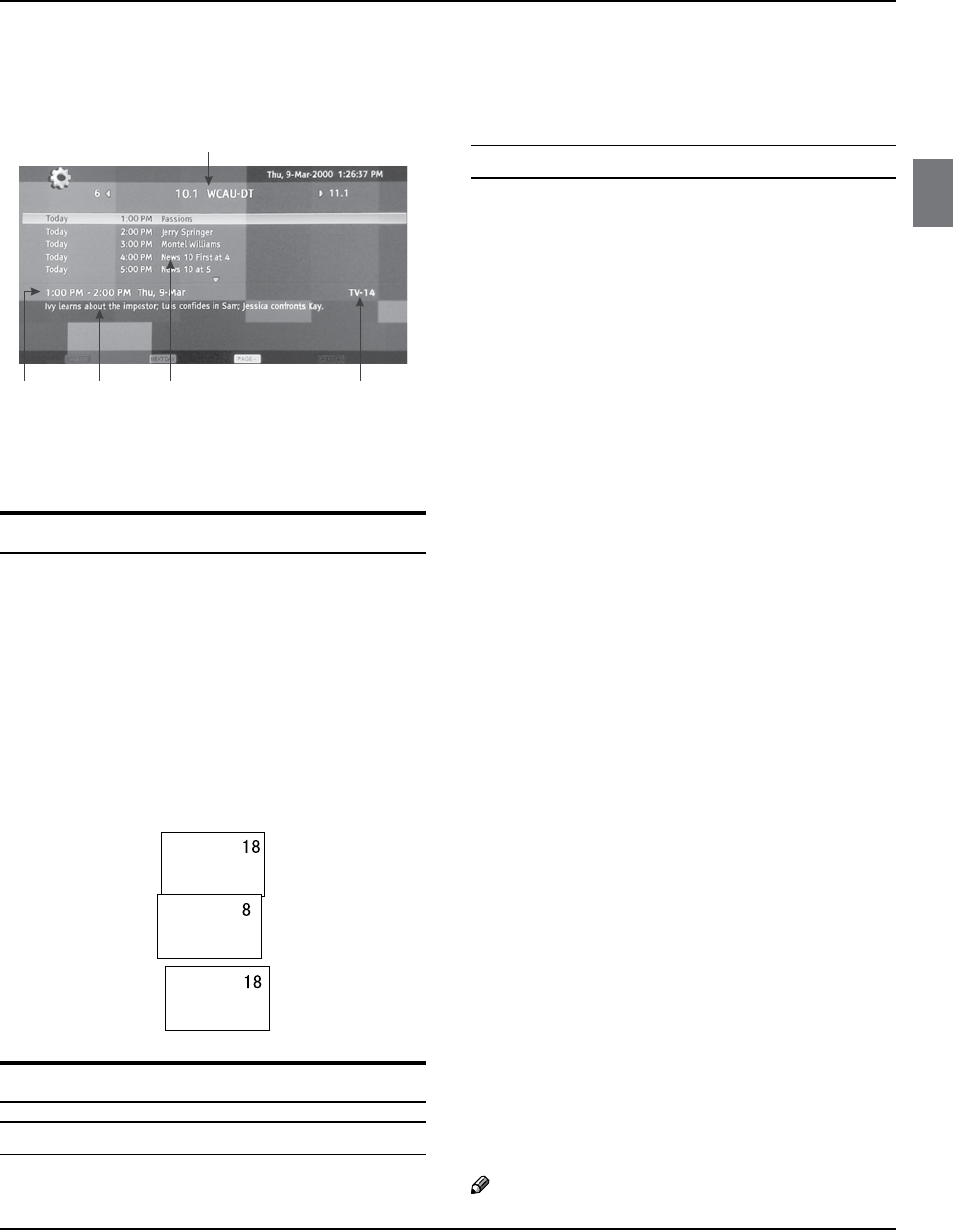
Operation
Haier LED HDTV EN-24
Program information in the guide is provided by R
the broadcasters. As a result, it may sometimes
include only the channel number, without a
program title or description.
A
BC DE
A: Program title D: Program details
B: Program options E: Program rating categories
C: Program show time
Quick program view
Press to jump back and forth between two channels. The
TV alternates between the current channel and the last
channel that was selected.
Suppose the channel number you used just now is
A
8 and the channel number you are using is 18 (as
shown in the figure).
If you want to return to the last watched program
B
channel 8, you can simply press RECALL button.
C
If you want to return to channel 18, press the button again.
CC (Closed Caption Display)
Closed Captions
Closed captioning is a process which converts the q
audio portion of a television program into written
words which then appear as subtitles on the television
screen. Closed captions allow viewers to read the
dialogue and narration of television programs.
Using Closed Captions
Captions are the subtitles of the dialogue and q
narration of television programs. For prerecorded
programs, program dialogue can be arranged
into captions in advance. Its possible to caption a
live program by using a process called real-time
captioning, which creates captions instantly.
Real-time captioning is normally done by professional q
reporters using a machine shorthand system and
computer for translation into English. Captioning is
an effective system for the hearing-impaired, and it
can also aid in teaching language skills.
In ATV mode CCD function allows you to configure q
the way you choose to view the digital captioning
(Off, CC 1, CC 2, CC 3, CC 4, Text 1, Text 2, Text 3 or
Text 4).
CAPTIONY
The term for the words that scroll across the bottom
of the TV screen; usually the audio portion of the
program provided for the hearing impaired.
TEXTY
The term for the words that appear in a large black
frame and almost cover the entire screen; usually
messages provided by the broadcaster.
In DTV mode allows you to configure the way you q
choose to view the digital captioning (Off, service 1,
service 2, service 3, service 4, service 5 or service 6).
Select one of the digital service channels made q
available by the caption provider.
There are 6 standard services. Service 1 is designated q
as the Primary Caption Service. This service contains
the verbatim, or near-verbatim captions for the
primary language being spoken in the accompanying
program audio. Service 2 is designated as the
Secondary Language Service. This service contains
captions in a secondary language which are
translations of the captions in the primary Caption
Service. The other service subchannels are not pre-
assigned. It is up to the discretion of the individual
caption provider to utilize the remaining service
channels.
Note

Operation
EN-25 Haier LED HDTV
The captions do not always use correct spelling R
and grammar. Not all TV programs and product
commercials are made for broadcast with Closed
Caption information included. Refer to your area’s
TV program listings for the TV channels and times
of Closed Caption shows. The captioned programs
are usually noted in the TV listings with service
marks such as “CC” .
USB Input
Supporting media and file format: Digital pictures A
(.JPG/.JPEG/.BMP(Baseline & Progressive)/.PNG),
digital music (.MP3(8~320kbps)) and Video(.avi/.
mpg/.mpeg/.vro/.vob/.ts coded with MPEG-1 or
MPEG-2 standard) files.
Due to dierences in the file code and file mode, It q
is possible that some files cannot be read.
Before starting operation, verify USB storage
B
device is of FAT32 file system format. At present,
this television does not support NTFS and the file
systems of other format.
Supports USB/Memory Card Plug & Play (don't need
C
to reset TV system),USB Hard-drive support - only
support the class of USB HD that follows USB power
consumption spec.
The television operation may be halted due to
D
excessive rate of information code errors. In such
case, restart the system. Please note - there are many
nonstandard USB mobile devices in the market. If a
nonstandard device is used then an identification
problem may occur.
USB Media Menu operation
Plug-in an external storage device into USB port.A
Press BUSB button on the remote to display
multimedia.
Press
CENTER button on the remote to display the
sub page.
Press DEXIT button on the remote to return to the
previous menu.
To play pictures
Press AUSB button on the remote to enter USB media
system.The system start up takes about 3 seconds.
Then insert the USB drive in the USB input.q
Press BMENU button, and the press
/
to select
Media Type , Press ENTER and press
/
to select
Photo.
PressC
/
/
/
button to select
folder or le
, and
then press ENTER button to enter the play interface.
1. Play mode:
None/Dissolve/Wipe right/
Wipe left/Wipe up/Wipe
down/Box in/Box out/
Random
3. File name
4. Pause
5. Duration
2. Play time:
Short/Medium/Long
6. Eect
7. Information
Press
DMENU button to display the option list.

Operation
Haier LED HDTV EN-26
1. Play/Pause 4. Duration
2. Repeat 5. Eect
3. Shue 6. Information
Press the button on the remote control to select the
E
adjusted item, press ENTER button to confirm.
PLAY/PAUSE
REV
REPEAT
STOPUSB REC
PREV NEXT
12
1. Play previous picture
2. Play next picture
Press
FEXIT button to return to the previous menu.
Press USB button to exit the USB mode.
Note
You may play the pictures among selected.R
To play music
Press AUSB button on the remote to enter stream
media system.
Press BMENU button, and the press
/
to select
Media Type , Press ENTER and press
/
to select
Music.
PressC
/
/
/
button to select
folder or le
, and
then press ENTER button to enter the play interface.
1. Play Time 4. Shue On or O
2. File Name 5. Audio Only
3. Repeat 6. Information
Press
DMENU button to display the option list
.
1. Play/Pause 4. Show Info
2. Repeat 5. Show Spectrum
3. Shue On or O 6. Audio Only
Press the button on the remote control to select the
E
adjusted item, press ENTER button to confirm.
PLAY/PAUSE
REV
REPEAT
STOPUSB REC
PREV NEXT
67
35
4
121. Play or pause
2 Stop
3. Fast reverse
4. Repeat
5. Fast forward
6. Play previous music
7. Play next music
Press
F EXIT button to return to the previous menu.
Press USB button to exit the USB mode.
Note
You may play the music among selected.R
To play video
Press AUSB button on the remote to enter stream
media system.
Press BMENU button, and the press
/
to select
Media Type , Press ENTER and press
/
to select
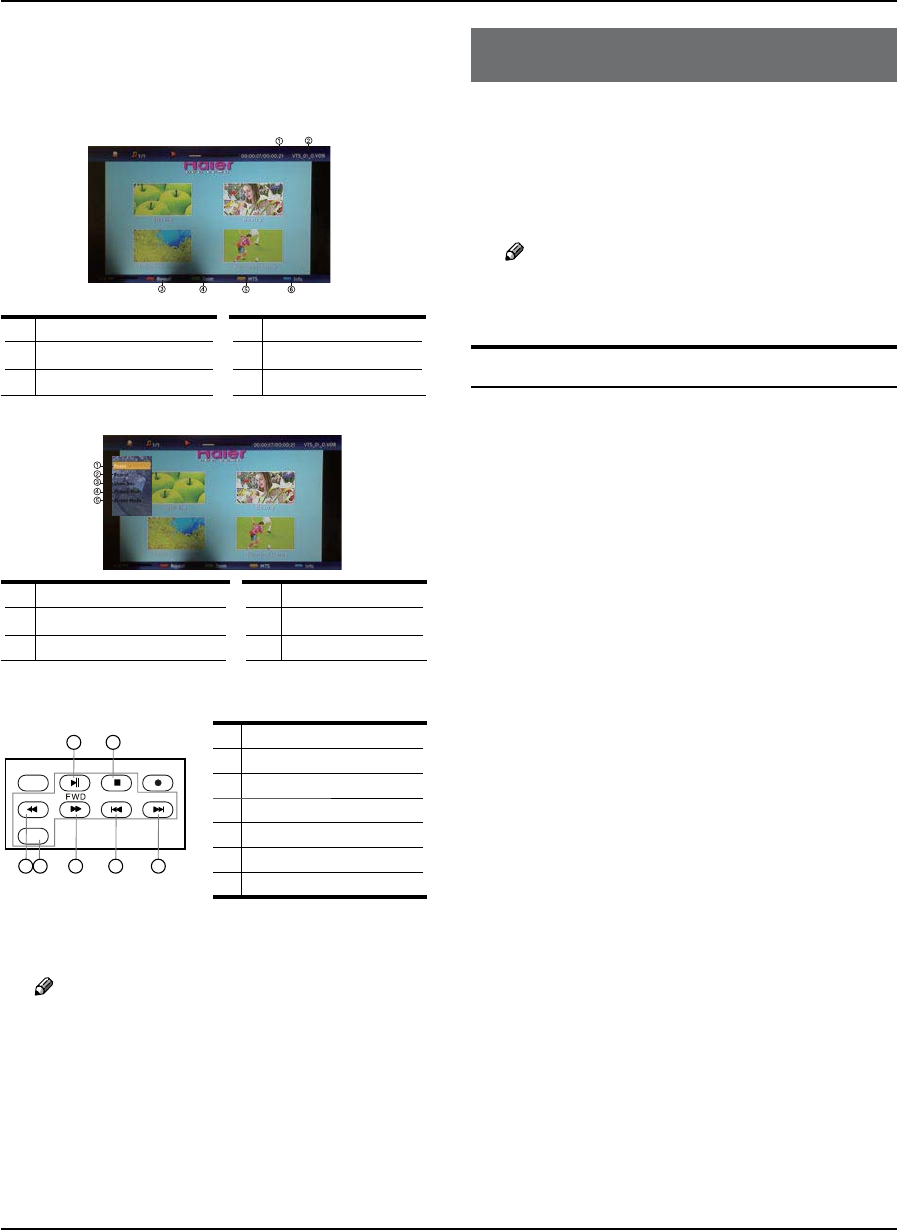
Universal Remote Control
EN-27 Haier LED HDTV
Video.
Press
C
/
/
/
button to select desired video
folder, and then press ENTER button to enter the
play interface.
1. Play Time 4. Shue On or O
2. File Name 5. Audio Only
3. Repeat 6. Information
Press
DMENU button to display the option list
.
1. Play/Pause 4. Picture Mode
2. Repeat 5. Screen Mode
3. Show Info
Press the button on the remote control to select the
E
adjusted item, press ENTER button to confirm.
PLAY/PAUSE
REV
REPEAT
STOPUSB REC
PREV NEXT
67
35
4
121. Play or pause
2 Stop
3. Fast reverse
4. Repeat
5. Fast forward
6. Play previous music
7. Play next music
Press
F EXIT button to return to the previous menu.
Press USB button to exit the USB mode.
Note
Do not remove USB device from the TV until R
you have exited the USB mode otherwise you
may damage the USB device.
Universal Remote Control
Setting Up Your Remote Control
After it has been set up properly, your remote control
can operate in six different modes: TV, DVD, VCR,
SETBOX, CABLE or AUDIO.
Note
The remote control might not be compatible R
with all DVD Players, VCRs and Cable boxes.
Control Operation
Program the Controller to work with your device.A
Changing device mode by pressing the TVB, DVD, STB,
CABLE, VCR, AUD key. When device is set, related
device LED will be on for 1 second and then be off.
Aim the remote at the device.
C
Use the other Controller buttons to operate the D
device. Device LED will blink if user presses any key
(if the key has data in current mode.). If the key has
no data, then LED will not blink.
Default init status: TV/Haier codeset.
E
Manually Programming the ControlY
Check the code no. from the code list.
Choose the device you want to program.
A
While Press and holding BENTER key, press INPUT
key, and device LED will be ON. Keep the status for
about 3 seconds and the LED will blink, indicating
that the Controller is ready for programming, then
release both keys.
Led will blink once when you enter a digit key,
C
indicating the digit key is programmed. If 3 digits are
programmed successfully, device LED will be ON for
about 3 seconds and then blink twice per second.
Then User now can:
Try to operate the device by using power key. A)
If operation can be done, press B) ENTER key to
save current 3-digits code brand to EEPROM and
exiting manually programming mode.
Return to beginning of step 3. Reprogram the C)
control.

Universal Remote Control
Haier LED HDTV EN-28
If user's input is incorrect, LED will blink 6 times D
in 3 seconds (2 HZ). And then keep 2 HZ blink,
user now can return to step 3 and re-program the
device. Within 30 seconds, user should enter the
3-digit brand code corresponding to your device. If
time out or any key other than Power and digits is
pressed, LED will be off and manually programming
process is exit.
Manually scan modeY
With manually scan programming, the Controller tests all
the codes available in the codeset database and assign
the correct one for the selected device. Although this
method is more time consuming, it saves you the trouble
of looking up the brand codes necessary for manual
programming.
To manually-scan program the Controller:
Manually turn OFF the device for manually scan
A
mode. (TV, VCR, DVD, STB, cable box or audio
equipment).
Choose the device you want to program.
B
While Press and holding CENTER key, press INPUT key,
and device LED will be ON. Keep the status for about
3 seconds and the LED will blink, indicating that the
Control is ready for programming, then release both keys.
Press and release the DCH+/CH- key. it will emit the
next or the previous POWER key code. The LED
blinks with 10 HZ freq, indicating that the Remote is
in manually scan mode.
Press
ECH+/CH- key repeatedly until the device
switches ON (CH+ key conducts a upward search
while the CH- key conducts a downward search in
the code set database). When the device turns ON,
press and release the ENTER key to program the
Controller with the new code, saving the code to
EEPROM and exit.
After saving the new code, press
FPOWER key. If
the device responds, no further programming is
required. If the device does not respond, repeat
step 3 through 5. And searching will start from
current code set.
To exit without programming, press any key or no key
was pressed in 30 seconds, manually scan mode will
be automatically exit. The code can not be saved to
EEPROM.
After searching the entire data base, this mode will be
automatically exited and led will blink for 3 times in
1.5 seconds. The code can not be saved to EEPROM.
Automatic Scan Programming the ControllerY
To automatic scan program the Controller:
Manually turn OFF the device you wish to power scan. A
(TV, VCR, DVD,STB, cable box or audio equipment).
Choose the device you wish to program.
B
While Press and holding ENTER key, press the INPUT C
key and device LED will be ON. Keep the status for
about 3 seconds and the LED will blink, indicating
that the Controller is ready for programming, then
release both keys.
Press and release the Mute key to enter automatic
D
scan mode. And the remote will automatically
sending codes to the device per 2 seconds.
When the device turns ON, press
EENTER key to
program the Controller with the new code, saving it
to EEPROM and exit.
Press
FPOWER key, If the device responds, no further
programming is required. If the device does not
respond repeat steps 1 through 5.
After searching the entire data base, this mode will be
G
automatically exited and led will blink for 3 times. The
codeset is not saved to EEPROM.
In automatic scan mode, press any key other than
ENTER key will exit without programming.
Display mode
Choose the device you wish to program.A
To enter display mode, while press and holding B
ENTER key, press the INPUT key and device LED will
be ON, keep the status for about 3 seconds and the
LED will blink, indicating that the Controller is ready
for programming, then release both keys.
Sequence press 9, 8, 0 to enter display mode.
C
Press digit 1 key to get the first digit of current D
codeset. For example, if the first digit of codeset is 1,
so then led will blink once and remains OFF. Digit “0”
in codeset will not be displayed. Blink Freq is 1 HZ.
Press digit 2 key to get the second digit of current
E
codeset. For example, if the second digit of codeset is
3, so then led will blink three times and remains OFF.
Blink Freq is 1 HZ.

Universal Remote Control
EN-29 Haier LED HDTV
Press digit 3 key to get the third digit of current F
codeset. Blink Freq is 1 HZ.
Only digit 1, 2, 3 are valid in this mode. And the
G
sequence is not fixed.
Controller will not send out data in this mode if user
presses any keys other than digit 1, 2, 3, or no key was
pressed in 30 seconds, display mode is ended.
Punch-Through Features
The Controller provides two punch-through features
that allow users to control TV volume and DVD or VCR
operation while the Controller is in another device mode
control certain features of another device.
Volume Punch-ThroughY
The TV Volume/Mute punch-through feature allows
you to control the volume and mute function of your
TV while the Controller is in another device mode. The
feature is applicable for all devices and brands that do
not use the volume control buttons for other purposes.
Transport Key Punch-ThroughY
The DVD or VCR transport key punch through feature
lets you control the PLAY, STOP, PAUSE, REWIND, FF and
RECORD functions of your DVD or VCR while the Control
operates in other modes. The feature is applicable for all
devices and brands that do not use the transport keys
for other purposes.
Fast Programming Haier default TV codeset
Press and holding the ENTER key and then press POWER
key for 3 seconds, the LED will blink 3 times and turn off,
default Haier codeset (001) will be programmed to the
control.
Remote Control Codes
TV
NO. Brand Code
1 Haier 001 002 003 004 005 006 007 008 009 010 240 241 297 307 355
2 Abex 077
3 Acer 267
4 Addison 333
5 Admiral 057 078 334 338
6 Advent 324
7 Adventura 079
8 Aiko 066 333
9 Aiwa 165
10 Akai 038 058 258 271 279 331 350
11 Albatron 321 325
12 Alleron 068
13 America Action 335
14 Ampro 323
15 Amtron 067
16 Anam 335
17 Anam National 059 067
18 AOC 060 061 062 222 331 349 350 353
19 Apex 092 135 151 195 339
NO. Brand Code
20 Archos 308
21 Astar 259
22 Audiovox 067 189 191 207 256 333 335 337
23 Aventura 053
24 Axion 280
25 Bang & Olufsen 345 346
26 Baur 058
27 Belcor 060 349
28 Bell & Howell 057
29 Benq 245 246 284 329
30 Bradford 067 335
31 Brillian 342
32 Brockwood 060 349
33 Broksonic 197 335 338
34 byd:sign 310
35 Candle 060 062 063 079 331 350
36 Carnivale 331 350
37 Carver 055 320
38 CCE 239 351
39 Celebrity 058
40 Celera 339
41 Centurion 064
42 Changhong 339
43 Ching Tai 333
44 Chun Yun 333 335 361 374
45 Chung Hsin 335 364
46 Citizen 060 062 063 066 067 074 076 331 333 350 352 354 380
47 Clarion 335
48 Coby 210
49 Colortyme 060 062
50 Colt 377
51 Commercial Solutions 332
52 Concerto 060 062
53 Contec 335
54 Contec/Cony 065 067
55 Craig 067 335
56 Crosley 055 293 320
57 Crown 067 071 335 352
58 CTX 235
59 Curtis Mathes 038 055 056 060 062 074 076 088 320 331 332 334 337 340 350 352 354
60 CXC 067 335
61 Cytron 238 278
62 Daewoo 060 061 062 066 076 093 117 125 152 333 337 349 352 380
63 Daytron 060 062 076 349
64 Dell 251 285 304
65 Denon 340
66 DiamondVision 311 317 319
67 Dimensia 056 088
68 Disney 132
69 Dumont 031 060 330 349
70 Durabrand 053 097 137 341 335 338
71 Dwin 322 334
72 Electroband 058
73 Electrograph 243
74 Electrohome 058 059 060 062
75 Element 228
76 Emerson 053 060 062 065 067 068 076 093 137 266 292 335 338 349 352 380
77 Emprex 314
78 Envision 060 062 222 331 350
79 Epson 225
80 Erres 347
81 ESA 053
82 Ether 362
83 Firstar 372
84 Fujitsu 068 216
85 Funai 053 067 068 335
86 Furi 368
87 Futuretech 067 335
88 Gateway 243 274 341 360
89 GE 027 056 059 060 062 069 070 085 088 107 116 332 337 378
90 GFM 051 305
91 Gibralter 031 060 330 331 349 350
92 Go Video 328
93 Goldstar 060 061 062 065 076 077 331 349 350 379
94 Gradiente 242
95 Grundig 351
96 Grunpy 067 068 335
97 Hallmark 060 062
98 Hankook 335 362 371
99 Harman/Kardon 055
100 Harvard 067 335

Universal Remote Control
Haier LED HDTV EN-30
NO. Brand Code
101 Havermy 334
102 Hello Kitty 337
103 Hewlett Packard 175 204 219
104 Hisense 250 370 375
105 Hitachi 032 060 062 065 126 127 134 149 150 186 200 340
106 HP 204 219
107 Hyundai 327
108 Ilo 174 254 266 312
109 IMA 067
110 Infinity 055 071 320
111 InFocus 275
112 Initial 277
113 Innova 351
114 Insignia 097 237 298 299 300 306 313
115 Inteq 330
116 Janeil 079
117 JBL 055 071 320
118 JC Penney 056 060 061 062 063 069 070 074 076 077 088
119 JCB 058
120 Jean 333 363 370 372
121 Jensen 060 062 236
122 Jinxing 365 368 370
123 JVC 047 048 049 065 070 114 154 172 199 201
124 Kawasho 058 060 062
125 Kaypani 353
126 KEC 335
127 Kenwood 060 062 331 349 350
128 Kioto 055
129 KLH 339
130 Kloss Novabeam 067 079
131 Kolin 335 369
132 KTV 067 076 331 335 350 352
133 LG 030 060 061 182 224 257 302 321 350
134 Loewe 071
135 Logik 057
136 Luxman 060 062
137 LXI 055 056 062 071 088 151 320 332
138 M & S 055
139 Magnasonic 380
140 Magnavox 052 055 060 062 063 071 090 105 108 110 163 174 176 218 320 331 350
141 Magnin 378
142 Majestic 057
143 Marantz 055 060 062 071 231 272 320 331 350 351
144 Matsushita 336
145 Maxent 243 252 301
146 Mediator 374
147 Megapower 321
148 Megatron 062 340
149 Memorex 057 061 062 137 181 338 376 379
150 MGA 060 061 062 331 349 350 378
151 Midland 031 070 076 077 330 332 352
152 Mintek 174
153 Minutz 069
154 Mitsubishi 060 061 062 119 159 170 334 349
155 Monivision 321 325
156 Montgomery Ward 057
157 Motorola 059 078 334
158 MTC 060 061 062 074 331 349 350 354
159 Multitech 067 335
160 Multivision 072
161 NAD 062 151 351
162 NEC 059 060 061 062 234 268 331 349 350
163 Netsat 351
164 NET-TV 243 247
165 Newave 333 367 371
166 Nikko 062 066 331 333 350
167 Norcent 222
168 Noshi 348
169 NTC 066 333
170 Olevia 138 192 221 357 358
171 Onwa 067 335
172 Oppo 282
173 Optimus 336 376
174 Optoma 276
175 Optonica 073 078 334
176 Orion 097 338
177 Otto Versand 058
178 Panasonic 021 022 023 024 025 026 059 070 071 086 103 122 144 147 155 168 183 185 336 376
179 Penney 151 331 332 348 349 350 352 354 378 379
180 Philco 055 059 060 061 062 063 065 071 181 320 331 349 350
181 Philips 040 041 042 043 044 045 046 055 059 060 063 065 071 089 090 091 096 160 162 164 169
NO. Brand Code
174 177 179 190 208 291 320 347 351
182 Philips Magnavox 042 045 089 090 096
183 Phonola 347
184 Pilot 060 076 331 349 350 352
185 Pioneer 060 062 156 157 205 212
186 Plasmsync 269
187 Polaroid 211 217 220 228 315 339
188 Portland 060 061 062 066 076 333 349 352
189 Price Club 074
190 Prima 281 324
191 Princeton 321
192 Prism 070
193 Proscan 027 056 088 332
194 Proton 060 062 065 353
195 Protron 196 262
196 Proview 263 343
197 Pulsar 031 060 330 349
198 Pye 347
199 Quasar 022 059 070 336 376
200 Quelle 058
201 Radio Shack/Realistic 056 060 062 065 067 073 076 077
202 Radiola 347
203 Radio Shack 088 331 332 335 349 350 352
204 RCA 027 028 029 056 059 060 061 062 082 088 095 098 332 348 349 354 378
205 Realistic 088 331 335 349 350 352
206 Runco 031 330 331 350
207 Sampo 060 062 076 077 243 283 331 350 352 353
208 Samsung 037 038 039 060 061 062 065 074 076 077 129 130 140 143 158 166 178 193 194 209 213
229 232 286 294 295 331 349 350 351 354
209 Samsux 352
210 Sansui 097 338
211 Sanyo 060 249 270 378
212 SBR 347
213 Sceptre 264
214 Scimitsu 349
215 Scotch 062
216 Scott 060 062 065 067 068 255 335 349
217 Sears 053 055 056 060 062 068 080 088 151 244 320 332 379
218 SEI 058
219 Sharp 033 034 035 036 060 062 065 073 076 078 083 112 131 139 142 145 167 171 180 198 202
203 334 352
220 Shen Ying 333
221 Sheng Chia 334 367
222 Shogun 060 349
223 Signature 057
224 Simpson 063
225 Sinudyne 058
226 SKY 351
227 Skygiant 335
228 Sony 011 012 013 014 015 016 058 087 094 101 102 118 124 128 136 148 153 184 206 226 287
288
229 Soundesign 060 062 063 067 068 335
230 Sowa 366 370
231 Squareview 053 080
232 SSS 060 067 335 349
233 Starlite 067 335
234 Studio Experience 325
235 Superscan 052 260 334 356
236 Supre-Macy 079
237 Supreme 058
238 SVA 230 355
239 Sylvania 046 050 051 052 053 054 055 060 062 063 071 137 141 161 289 320 331 350
240 Symphonic 053 067 080 141 335
241 Synco 333 337 361 366 367 371
242 Syntax 138 192 344 357 358
243 Syntax-Brillian 192 244
244 Tacico 333 371
245 Tandy 078 334
246 Tatung 059 253 273 341 360 363 366 370
247 Technics 070 336
248 Techview 326
249 Techwood 060 062 070
250 Teco 363 367 371
251 Teknika 055 057 060 061 062 063 065 066 067 068 074 076 320 333 335 349 352 354
252 Telecaption 075
253 Telefunken 038
254 Thomson 088
255 TMK 060 062
256 TNCi 330
257 Toshiba 017 018 019 020 074 075 099 100 104 106 109 111 113 115 120 123 146 151 173 227 354
258 Totevision 076 352
259 Trutech 248

Universal Remote Control
EN-31 Haier LED HDTV
NO. Brand Code
260 Tuntex 333 362
261 TVS 338
262 Universal 069
263 Vector Research 331 350
264 Victor 065
265 Vidikron 055 320
266 Vidtech 060 061 062 349
267 Viewsonic 133 214 218 223 233 243 316 356
268 Viking 079
269 Viore 254
270 Visco 309
271 Vizio 133 257 261 296 318 341 356 359 360
272 Wards 055 056 057 060 061 062 068 069 071 073 088 320 331 349 350
273 Waycon 151
274 Westinghouse 133 187 188 195 215 290 303 337
275 White Westinghouse 093 338
276 Yamaha 060 061 062 331 349 350
277 Yapshe 373
278 Zenith 030 031 032 057 060 081 084 093 121 330 333 338
DVD
NO. Brand Code
1 Accele Vision 250
2 Accurian 355
3 Advent 330
4 Aiwa 307
5 Akai 280 323 361
6 Alco 328
7 Allegro 349
8 Alpine 257
9
Amphion MediaWorks
258
10 AMW 258
11 Apex 025 026 027 028 078 117 172 192 342 343
12 Apple 319
13 Arrgo 351
14 Aspire 332
15 Astar 252
16 Audiovox 164 167 223 328
17 Axion 281
18 Bang & Olufsen 344
19 Blaupunkt 249 343
20 Blue Parade 340
21 BOSE 062 079
22 BOSS 251
23 Boston Acoustics 381
24 Broksonic 123 323
25 California Audio Labs 325
26
CambridgeSoundWorks
290
27 Changhong 326 375
28 CineVision 196 349 350
29 Clarion 262
30 Classic 236
31 Coby 082 129 143 237 331
32 Curtis 129
33 Curtis Mathes 352
34 CyberHome 029 048 351 368 373 374 377
35 Cytron 279
36 Daewoo 113 349 361
37 Denon 070 182 198 209 299 300 325
38 Desay 268
39 DiamondVision 320 321 322
40 Disney 100 132
41 Dual 312
42 Durabrand 353
43 DVD2000 337
44 Eclipse 227
45 Emerson 063 248 324 345 385
46 Enterprise 345
47 ESA 259 354
48 Fisher 305 346
49 Funai 354 385
50 Gateway 376 378 384
51 GE 101 195 338 343
52 GFM 204
53 Go Video 118 349 382 384
54 Goldstar 120
55 GPX 194
56 Gradiente 270 325
57 Greenhill 343
58 Grundig 339
NO. Brand Code
59 Haier 334
60 Harman/Kardon 224 347
61 Hitachi 014 136 203 244
62 Hiteker 342
63 iLive 293
64 Ilo 213
65 iLuv 314
66 Initial 278 343
67 Insignia 274 289 298 303 354
68 Integra 326 340
69 Irradio 174
70 iSymphony 294
71 Jamo 308
72 JBL 162 347
73 Jensen 311 331
74 JVC 030 031 032 033 034 035 036 037 038 086 087 095 103 122 141 142 161 173 214 218 243 306 341
75 Jwin 309
76 Kawasaki 328
77 Kenwood 325
78 KLH 115 272 328 343
79 Konka 359 360
80 Koss 153 286 327 334
81 Landel 363
82 Lasonic 263 348
83 Lenoxx 333 353
84 Lexicon 357
85 LG 102 151 165 185 189 201 211 242 256 283 345 349
86 Liquid Video 334
87 Liteon 158 219 355 384
88 Loewe 356 365
89 Magnavox 068 071 124 156 179 213 298 324 336 339 354
90 Marantz 245 301 302 339
91 Memorex 100 133 323
92 Microsoft 338
93 Mintek 213 278 343
94 Mitsubishi 106 177 190 337
95 NAD 264
96 Nakamichi 310
97 Nesa 343
98 Next Base 363
99 Nexxtech 271
100 Norcent 129 246
101 Onkyo 145 188 197 206 207 326 336
102 Oppo 273 284
103 Oritron 327 334
104 Panasonic 017 018 019 020 021 022 023 024 051 059 067 070 072 073 077 080 083 091 099 135 138 160 181
183 184 199 205 233 234 235 325 336 387 388
105 Philco 328
106 Philips 007 041 042 071 098 137 144 152 157 168 174 176 178 208 213 336 339 357 385
107 Pioneer 043 044 045 046 047 058 110 150 200 229 247 340 390
108 Polaroid 028 241 277
109 Polk Audio 339
110 Portland 361
111 Presidian 385
112 Prima 282 383
113 Princeton 358
114 Proceed 342
115 Proscan 069 338
116 Pye 276
117 Qwestar 327
118 RCA 039 040 069 090 166 191 328 338 340 343
119 Regent 333
120 Rio 349
121 Rotel 341
122 Rowa 329
123 Sampo 119 265 370 372
124 Samsung 012 013 014 015 016 054 064 066 074 075 085 104 105 108 111 121 125 134 154 193 210 226 325
389
125 Sansui 228 275 323
126 Sanyo 287 323 346
127 Sensory Science 384
128 Sharp 093 119 187 202 220 291 295 296 297
129 Sharper Image 368
130 Sherwood 292 361
131 Shinco 260
132 Shinsonic 213 335
133 Sigma Designs 358
134 Sonic Blue 349
135 Sony 000 001 002 003 004 005 006 049 052 055 056 057 060 061 065 076 081 092 094 097 109 112 114
126 127 128 146 147 148 155 230 231 232 316 317 318 335
136 Sungale 267

Universal Remote Control
Haier LED HDTV EN-32
NO. Brand Code
137 Superscan 124 324
138 SVA 364
139 Sylvania 042 063 124 133 159 204 225 285 324 354 385 386
140 Symphonic 133 159 385
141 Teac 266 328 371 379 380
142 Technics 325
143 Techwood 261
144 Terapin 366
145 Theta Digital 340
146 Toshiba 007 008 009 010 011 050 053 084 088 089 096 107 130 131 140 163 169 170 171 175 186 212 215
216 217 221 238 239 240 254 255 323 336
147 Tredex 362
148 Trutech 296
149 Tview 313
150 Urban Concepts 336
151 US Logic 213
152 Venturer 288 328
153 Vizio 367 369
154 Vocopro 315
155 Westinghouse 222
156 Xbox 338
157 Yamaha 180 253 325 339
158 Zenith 102 116 120 139 149 336 345 349
VCR
NO. Brand Code
1 ABS 111
2 Adventura 008 032
3 Aiwa 008 032 095 112
4 Akai 019
5 Alienware 111
6 American High 031
7 Apex 115
8 Asha 012 029
9 Audio Dynamics 016
10 Audiovox 030 082 112
11 Bang & Olufsen 113
12 Beaumark 012 029
13 Bell & Howell 028
14 Broksonic 074 099 114
15 Calix 030 112
16 Candle 029 030
17 Canon 031
18 CineVision 094
19 Citizen 029 030 112 121
20 Colortyme 016
21 Colt 118
22 Craig 012 029 030 112
23 Curtis Mathes 016 029 031
24 Cybernex 012 029
25 Cyperpower 111
26 Daewoo 018 032 051 093 121
27 Davidson 008
28 DBX 016
29 Dell 111
30 Denon 013
31 DiamondVision 107
32 DIRECTV 110 122 124 125 129 130 134 136
33 Dishpro 133
34 Durabrand 025
35 Dynatech 008 032
36 Echostar 133
37 Electrohome 010 030 112
38 Electrophonic 030 112
39 Emerson 008 010 020 030 031 032 105 112 116 121
40 ESA 101
41 Expressvu 133
42 Fisher 028 073
43 Fuji 031
44 Funai 008 020 032 105 116
45 Garrard 008 032
46 Gateway 111
47 GE 012 029 031 055 119
48 Go Video 012 072
49 GOI 133
50 Goldstar 016 030 106 112 120
51 Gradiente 008 032
52 Harley Davidson 032
53 Harman/Kardon 016
54 Headquarter 028
NO. Brand Code
55 Hewlett Packard 111
56 Hitachi 008 013 048
57 HNS 110
58 Howard Computers 111
59 HP 111
60 HTS 133
61
Hughes Network Systems
013 110 122 124 125 130
62 Humax 110 122
63 Hush 111
64 iBUYPOWER 111
65 Insignia 081
66 Instant Replay 031
67 JC Penney 016 028 029 030 031
68 JCL 031
69 JVC 014 015 016 028 040 059 060 083 084 085 086 122 133
70 KEC 112
71 Kenwood 016 028
72 Kodak 030 031 112
73 LG 030 081 091
74 Linksys 111
75 Lloyd's 008 032
76 LXI 030 112
77 Magnasonic 020 121
78 Magnavox 008 020 021 025 027 031 044
79 Magnin 012 030 119
80 Marantz 016 028 031
81 Marta 030 112
82 Matsushita 031
83 Media Center PC 111
84 MEI 031
85 Memorex 008 012 025 028 029 030 031 032 100 108 112 114 117 120
86 MGA 010 012 119
87 MGN Technology 012 029
88 Microsoft 111
89 Mind 111
90 Minolta 013
91 Mitsubishi 010 041
92 Motorola 031
93 MTC 008 012 029
94 Multitech 008 029 032
95 NEC 016 028
96 Nikko 030 112
97 Niveus Media 111
98 Noblex 012 029
99 Northgate 111
100 Olympus 031
101 Optimus 020 030 112 117
102 Optonica 023
103 Orion 045 108
104 Panasonic 000 001 002 003 031 035 037 056 063 079 089 098 109 117 128
105 Penney 012 013 112 119 120
106 Pentax 013
107 Philco 031
108 Philips 023 031 044 071 087 110 116 122 124 125 126
109 Philips Magnavox 044
110 Pilot 030 112
111 Polaroid 104 115
112 Presidian 116
113 Profitronic 012
114 Proscan 069 070 134
115 Pulsar 025
116 Pye 103
117 Quarter 028
118 Quartz 028
119 Quasar 031 076 117
120 Radio Shack 008 023 030
121 Radio Shack/Realistic 023 028 029 030 031 032
122 Radix 030 112
123 Randex 030 112
124 RCA 011 012 013 029 031 034 058 067 097 110 119 122 124 134 136
125 Realistic 008 023 028 029 030 031 032 112
126 ReplayTV 109 127
127 Ricavision 111
128 Runco 025
129 Samsung 012 017 018 019 029 043 049 050 068 080 110 124
130 Sanky 025
131 Sansui 008 045 102 108 114
132 Sanyo 012 028 029 073 119
133 Scott 010 018
134 Sears 008 013 028 030 031 112 120
135 Sharp 022 023 052 090 096

Universal Remote Control
EN-33 Haier LED HDTV
NO. Brand Code
136 Shogun 012 029
137 Singer 031
138 Sonic Blue 109 127
139 Sony 004 005 006 007 008 033 036 038 039 046 064 065 066 075 111 123 131 135
140 Stack 111
141 STS 013 031
142 Superscan 021
143 Sylvania 008 010 020 021 031 032 048 062 088 116
144 Symphonic 008 020 021 032 105 116
145 Systemax 111
146 Tagar Systems 111
147 Tandy 028
148 Tashiko 030
149 Teac 008 032
150 Technics 031
151 Teknika 008 030 031 032 112
152 Thomas 008
153 Tivo 110 122 123 124 126 130 131 135
154 TMK 012 029
155 Toshiba 009 010 018 042 047 053 054 057 061 077 111 132
156 Totevision 012 029 030 112
157 Touch 111
158 UltimateTV 136
159 Unitech 012 029
160 Vector 018
161 Vector Research 016
162 Video Concepts 016 018
163 Videomagic 112
164 Videosonic 012 029
165 Viewsonic 111
166 Villain 008
167 Voodoo 111
168 Wards 008 012 013 023 029 030 031 032
169 White Westinghouse 105
170 XR-1000 008 031 032
171 Yamaha 016 028
172 Zenith 008 024 025 026 078 092
173 ZT Group 111
SETBOX
NO. Brand Code
1 AccessHD 076
2 Alpha Digital 076
3 Alphastar 036
4 Artec 072
5 CaptiveWorks 067
6 Channel Master 078
7 Chaparral 027
8 Coolsat 066
9 Coship 083
10 Crossdigital 099
11 Digital Stream 077
12 DIRECTV 006 007 008 009 010 011 012 017 022 023 024 025 026 040 043 047 048 049 050 052 053 055 057
085 086 088 091 096 097
13 Dish Network 000 001 002 003 013 014 087 089 092 095
14 Dishpro 087 089 092 095
15 Drake 028
16 Echostar 000 013 014 087 089 092 095 098
17 Expressvu 089 095 098
18 GE 004 005 080
19 General Instrument 029 093
20 GOI 095
21 Goodmind 081
22 Hisense 094
23 Hitachi 023 037
24 HTS 095
25 Hughes Network Systems 008 011 016 017 019 024 040 052 085
26 Humax 068
27 Ilo 094
28 Insignia 075
29 Jerrold 093
30 JVC 000 013 014 095
31 Lasonic 082
32 LG 059 071
33 Magnavox 022 073
34 Memorex 022
35 MicroGem 074
36 Mitsubishi 017 063
37 Motorola 090 093
38 Next Level 093
NO. Brand Code
39 Panasonic 009 057 060 061
40 Pansat 064
41 Paysat 022
42 PCT 078
43 Philco 073
44 Philips 008 016 017 019 021 022 049 050 085
45 Pioneer 008
46 Primestar 035
47 Proscan 004 005 051 088
48 Proton 094
49 Radio Shack 093
50 RCA 004 005 006 019 025 039 041 044 045 046 047 048 051 069
51 Realistic 030
52 Samsung 008010 018 019 020 053 056 058
53 Sharp 062
54 Sony 007 015 042 043 054 055 086
55 Star Choice 090 093
56 STS 038
57 STS1 031
58 STS2 032
59 STS3 033
60 STS4 034
61 Tivax 0776
62 Tivo 008 019
63 Toshiba 011
64 UltimateTV 086
65 Uniden 022
66 US Digital 094
67 Viewsat 065
68 Voom 093
69 Zenith 012 070 079
70 Zentech 084
CABLE
NO. Brand Code
1 ABC 009 010 011 013 031 044
2 Adelphia 007
3 Americast 050
4 Antronix 015 016
5 Archer 016
6 AT&T 003
7 Bell South 050
8 Cable Vision 006
9 Cabletenna 015
10 Cableview 014
11 Clearmaster 049
12 ClearMax 049
13 Colour Voice 018
14 Comcast 000 005
15 Comtronics 019
16 Contec 020
17 Coolmax 049
18 COX 005
19 Daeryung 057
20 Director 043
21 Dumont 056
22 Eastern 021
23 Everquest 045
24 Focus 048
25 GC Electronics 016
26 GE 009 010
27 Gehua 055
28 Gemini 045
29 General Instrument 005 008 010 040 042 043
30 Goldstar 046
31 Hamlin 022
32 Hitachi 010
33 Jasco 045
34 Jerrold 008 010 031 032 040 042 043 045
35 LG 053
36 Magnavox 025
37 MegaCable 005
38 Memorex 024 044
39 Motorola 000 003 005 008 039 040 042 043
40 Movie Time 025
41 Multitech 049
42 NEC 012
43 NET Brazil 036
44 NSC 025
45 Oak 020

Universal Remote Control
Haier LED HDTV EN-34
NO. Brand Code
46 Pace 001 047
47 Panasonic 028 030 044
48 Paragon 044
49 Philips 017 018 023
50 Pioneer 002 026 033 038 046
51 Popular Mechanics 048
52 Proscan 009 010
53 Pulsar 044
54 Quasar 044
55 Radio Shack 045 049
56 RCA 014 030
57 Realistic 016
58 Recoton 048
59 Regal 020
60 Regency 021
61 Rembrandt 010
62 Runco 044
63 Samsung 001 026 035 046
64 Scientific Atlanta 001 002 003 007 013 037 038 041
65 Signal 045
66 Signature 010
67 Sony 006 051
68 Sprucer 030
69 Standard Component 027
70 Starcom 031 045
71 Stargate 045
72 Starquest 045
73 Supercable 040
74 Supermax 049
75 TIME WARNER 004
76 Tocom 011
77 Torx 052
78 Toshiba 044
79 Trans PX 054
80 Tristar 049
81 TS 052
82 Tusa 045
83 Tv86 025
84 Unika 015 016
85 United Cable 031
86 Universal 015 016
87 V2 049
88 View Star 020 023 025
89 Viewmaster 049
90 Vision 049
91 Vortex View 049
92 Zenith 029 034 044 050
93 Zentek 048
AUDIO
NO. Brand Code
1 Accuphase 292
2 Acurus 266
3 ADC 319
4 Adcom 208 219
5 Admiral 308
6 ADS 309
7 Aiwa 118 126 168 318
8 Akai 310
9 Alco 332
10 Altec Lansing 301
11 Amphion Media Works 325
12 AMW 325
13 Anam 321
14 Angstrom 267
15 Apex 195
16 Arcam 294 311
17 AudioSource 268
18 Audiotronic 322
19 Audiovox 190 214 220 332
20 B & K 213 236
21 Bang & Olufsen 336
22 Bel Canto Design 269
23 Biamp 270
24 BOSE 071 088 285
25 Boston Acoustics 305
26 California Audio Labs 271
27 Cambridge Sound Works 241
28 Capetronic 319
29 Carver 318 322
NO. Brand Code
30 Cary Audio Design 272
31 Casio 329
32 Chase Technologies 273
33 Clarinette 329
34 Classe 297
35 Classic 221
36 Coby 147 331
37 Creative 274 302
38 Curtis 207
39 Curtis Mathes 283
40 Dell 312
41 Denon 053 054 055 056 057 133 134 156 157 158 160 161 163 164 165 171 172 176 180 185 187
188 189 206
42 Digital Audio Control 275
43 Dual 258
44 Durabrand 299
45 Eclipse 218
46 Elan 295
47 Emerson 229
48 Fisher 326
49 Fonmix 303
50 Fosgate 276
51 GE 048 282
52 Glory Horse 331
53 Go Video 306
54 GPX 196
55 Gradiente 235 313
56 Harman/Kardon 177 224 286 318
57 Hitachi 326
58 iLive 244
59 Inkel 314
60 Insignia 233 240
61 Integra 317
62 iSymphony 245
63 Jamo 256
64 JBL 186 193
65 Jensen 257
66 JVC 032 033 034 035 036 037 104 121 150 182 211 284 331
67 Kenwood 038 039 040 041 042 073 082 089 095 115 122 130 135 323
68 KLH 332
69 Knoll Systems 277
70 Koss 237 324
71 Krell 225
72 Left Coast 386
73 Lenoxx 299 333
74 LG 175
75 Linn 318
76 Lloyd's 329
77 Logitech 278
78 Luxman 279 288
79 Magnavox 075 191 318 319 322 329
80 Marantz 215 228 260 286 291 318 322 328
81 Mark Levinson 298
82 McIntosh 227
83 MCS 328
84 Memorex 315
85 Midiland 280
86 Mitsubishi 184 194
87 Modulaire 329
88 NAD 261 335
89 Nakamichi 291 334
90 NEC 290
91 Nikko 281
92 Onkyo 043 044 045 046 047 080 018 087 094 097 119 124 127 146 166 167 178 181 203 217
93 Optimus 283 293 319 320 321 330
94 Oritron 324
95 Panasonic 019 020 201 022 023 024 069 076 077 091 098 107 113 144 151 209 328
96 Parasound 230
97 Penney 329
98 Philco 332
99 Philips 183 210 286 294 318 322
100 Pioneer 025 026 027 028 029 030 031 062 068 072 090 100 101 105 123 132 148 149 162 212 246
247 248 249 250 251 252 253 254 283 287 319 320
101 Polaroid 222 226
102 Polk Audio 216 286 318
103 Prima 307
104 Proscan 048
105 Qisheng 304
106 Quasar 328
107 RadioShack 331
108 RCA 048 049 050 051 151 137 234 283 319 320 321 332
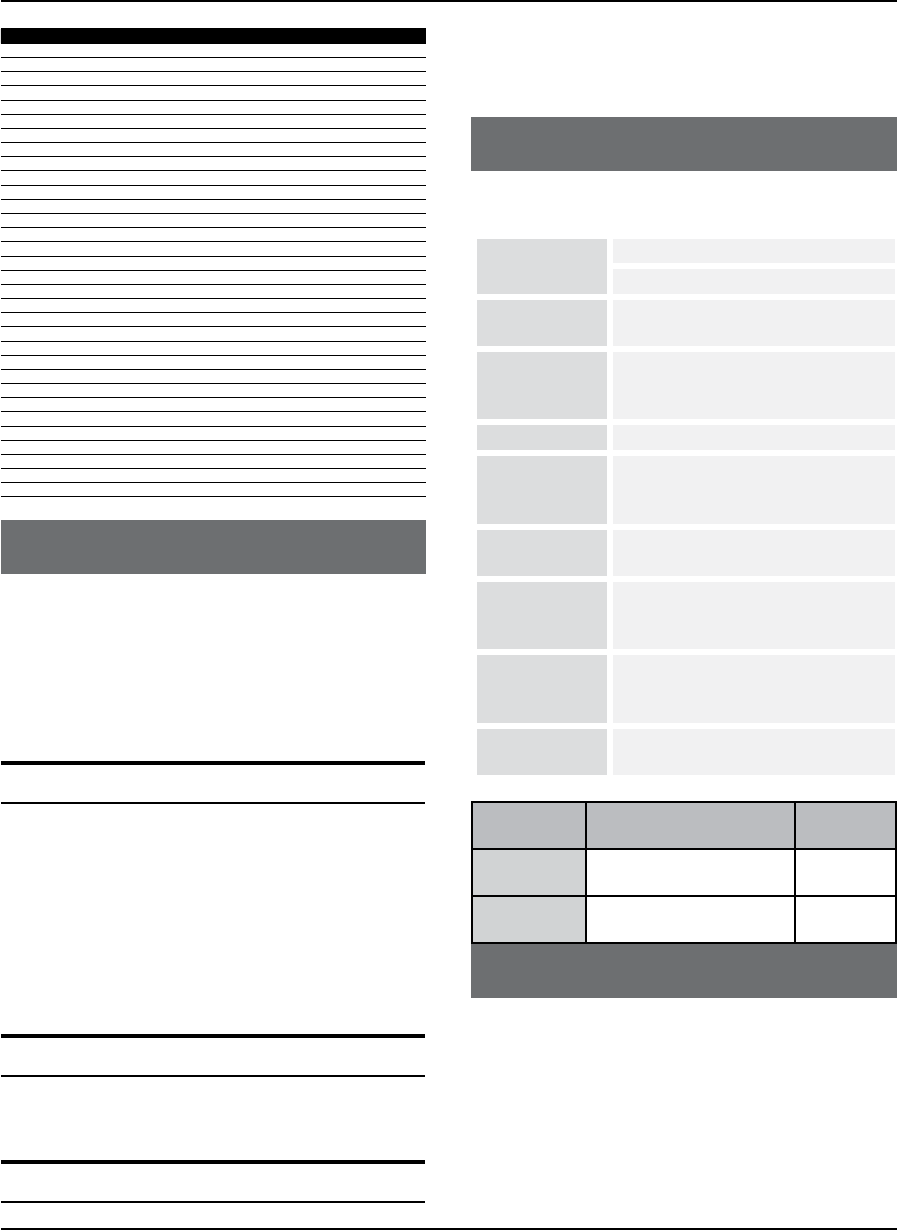
Universal Remote Control
EN-35 Haier LED HDTV
NO. Brand Code
109 Realistic 293 329
110 Regent 333
111 Rio 327
112 Rotel 231
113 Samsung 084 103 138 143
114 Sansui 291 318
115 Sanyo 238 326
116 Sharp 205 242 296
117 Sharper Image 331
118 Sherwood 145 243
119 Shure 290
120 Sonic Blue 327
121 Sony 000 001 002 003 004 005 006 007 058 058 059 060 061 063 064 065 066 067 070 074 079
085 093 108 109 110 111 112 117 125 128 129 131 140 170 262 263 264 265
122 Soundesign 282 289 330
123 Soundmatters 232
124 Soundstream 316
125 Stereophonics 320
126 Sunfire 323
127 Teac 223 321 332
128 Technics 052 086 114 116 141 328
129 Thorens 322
130 Toshiba 152
131 Tview 259
132 Venturer 239 332
133 Victor 284
134 Wards 282 287 289 318
135 Xantech 300
136 Yamaha 008 009 010 011 012 013 014 015 016 017 018 078 083 092 096 099 102 106 120 139 142
153 154 155 169 173 174 179 192 197 198 199 200 201 202 204 255 317
137 Yorx 329
138 Zenith 136 159
Maintenance
Maintenance
Early malfunctions can be prevented. Careful and regular
cleaning can extend the amount of time you will have
your new TV. Be sure to turn the power off and unplug
the power cord before you begin any cleaning.
Cleaning the Screen
Here’s a great way to keep the dust off your screen A
for a while. Wet a soft cloth in a mixture of lukewarm
water and a little fabric softener or dish washing
detergent. Wring the cloth until it’s almost dry, and
then use it to wipe the screen.
Make sure the excess water is off the screen, and
B
then let it air-dry before you turn on your TV.
Cleaning the Cabinet
To remove dirt or dust, wipe the cabinet with a soft, dry,
lint-free cloth. Please be sure not to use a wet cloth.
Extended Absence
If you expect to leave your TV dormant for a long time
(such as a vacation), it’s a good idea to unplug the power
cord to protect against possible damage from lightning
or power surges.
Specification
Product Specification
Resolution 42"46"
1920X1080 (Dot)
Power
requirement
120 V~ , 60 Hz
Stand-by
Consumption
less than 1 W (models - HL26R1/
HL32R1/HL26K1/HL32K1/HL32XK1/
HL32P1)
Color system NTSC, ATSC, Clear QAM
External
Antenna
Impedance
75 ohm
Color 16,770,000 (256 steps of each R, G
and B)
Operating
Temperature
Range
32~104 °F (0~40 °C)
Operating
Humidity
Range
Less than 80%
Maximum
Elevation
6561 feet (2000 m)
MODEL
Dimensen (WXDXH) Unit:inches/
mm (Including stand
)
Weight
(pounds/kg)
42" 26.1X7.9 X19.7 inches
662X200X501 mm 22.0/10.0
46" 26.1X7.9 X19.6 inches
662X200X500 mm 18.1/8.2
Troubleshooting
Troubleshooting
For the sake of time and cost, it is strongly
recommended that you check out the problem by
yourself according to the instructions listed hereunder
before contacting the after-sales service for technical
assistance.

Universal Remote Control / Maintenance / Specication
Haier LED HDTV EN-36
No picture,
no sound
Verify if the television is properly plugged.
Verify if the television is properly
supplied power.
Verify if electricity is available.
Blank screen
Verify if correct signals are input.
Press INPUT button to change signal
input to TV input.
Restart the television of power supply
is interrupted.
No sound
Press Mute button and verify if Mute
mode is set.
Switch to other channel and verify if
the same problem happens.
Press VOL+ button to see if the
problem can be solved.
Poor sound Verify if sound system is correct. Refer
to Page 20 for adjustments.
No picture
in some
channel
Verify if correct channel is selected.
Adjust the antenna.
Make adjustments by Fine Tune and
Manual Scan.
No color
for some
channel
program
(black and
white)
Verify if the same problem exists in
other channels.
Check out of picture and sound
systems.
Refer to relative instructions in the
Manual for color adjust.
Spots with
some or all
pictures
Verify if the antenna is correctly
connected.
Verify if the antenna is in good
condition.
Make fine adjustment of channel.
Horizontal/
vertical bars
or picture
shaking
Check for local interference such as
an electrical appliance or power tool.
Television
out of
control
Disconnect the television from power
supply and, 10 seconds later, connect
the television to the power supply.
If the problem still exists, contact
authorized after-sales service for
technical assistance.
Note
Do not leave the television with static picture in R
an extended period as the image may become
permanently burned.
Note
Production of the LCD screen requires high and R
precision technologies. However, there might be
some dark or bright (red, blue or green) spots,
or some anomalistic stripes or spots. This is not
defect. If the TV set is used in an area 2,400 meters
above the sea level where the air pressure is below
750 hpa, the picture on the LCD screen may be
affected and a muffled sound might be produced.
These phenomena might happen in the area
1,500 meters above the sea level. This is resulted
from difference between air pressures inside and
outside the display. This is not a defect covered by
the limited warranty.
Warranty
Warranty
This Haier brand product, when shipped in its original
container, will be free from defective workmanship and
materials, and agrees that it will, at its option, either repair
the defect or replace the defective product with a new or
remanufactured equivalent at no change to the purchaser,
for parts or labor for the periods set forth below:
This warranty does not apply to the appearance of the
product or the exterior of the product, which has been
damaged or defaced, altered or modified in design
or construction. It does not apply to the additional
excluded items set forth below:
The warranty commences on the date the item was
purchased and the original purchase receipt must
be presented to the authorized service center before
warranty repairs are rendered.
The limited warranty described herein is in addition
to whatever implied warranties may be granted to
purchasers by law. ALL IMPLIED WARRANTIES INCLUDING
THE WARRANTIES OF MERCHANTABILITY AND FITNESS
FOR USE ARE LIMITED TO THE PERIOD(s) FROM THE DATE
OF PURCHASE SET FORTH BELOW. Some states do not
allow limitations on how long an implied warranty lasts,
so the above limitation may not apply to you.
Neither the sales personnel of the seller nor any other
person is authorized to make any warranties other than
those described herein, or to extend the duration of any
warranties beyond the time period described herein on
behalf of Haier.
The warranties described herein shall be the sole and

Troubleshooting / Warranty
EN-37 Haier LED HDTV
exclusive warranties granted by Haier and shall be the
sole and exclusive remedy available to the purchaser.
Correction of defects in the manner and for the period
of time described herein, shall constitute complete
fulfillment of all abilities and
Responsibility of Haier to the purchaser with respect to
the product, and shall constitute full satisfaction of all
claims, whether based on contract, negligence, strict
duality or otherwise. In no event shall Haier be liable,
or in any way responsible for any damages or defects in
the product which were caused by repairs or attempted
repairs performed by anyone other than an authorized
service center or dealer; nor shall Haier be liable, or in
any way responsible for incidental or consequential
economic or property damage. Some states do not allow
the exclusion of incidental or consequential damages, so
that above exclusion may not apply to you.
THIS WARRANTY GIVES YOU SPECIFIC LEGAL RIGHTS.
YOU MAY ALSO HAVE OTHER RIGHTS WHICH VARY FROM
STATE TO STATE.
Warranty period for this product: one year parts and labor.
Additional items excluded from warranty coverage: non-
rechargeable batteries. Where to obtain service: For the
location of the nearest Haier authorized service center
or to obtain product literature, accessories, supplies or
customer assistance, please call 1-877-337-3639.
What to do to obtain service: ship or carry in your
product to an authorized service dealer or center. Be
sure to have proof of purchase.
If you ship the product, be sure it is packaged carefully.
Haier America
New York, NY 10018
5
5
4
4
3
3
2
2
1
1
D D
C C
B B
A A
Title
Size Document Number Rev
Date: Sheet of
MediaTek Inc.
TEL:(03)567-0766 FAX:(03)578-7610
No.1-2, Innovation Rd 1, SBIP, Hsin-Chu City 300
Drawn
MT5305A P1V1
V1
C
115Tuesday, October 13, 2009
GPIO Config/Modify List
MediaTek Confidential
Title
Size Document Number Rev
Date: Sheet of
MediaTek Inc.
TEL:(03)567-0766 FAX:(03)578-7610
No.1-2, Innovation Rd 1, SBIP, Hsin-Chu City 300
Drawn
MT5305A P1V1
V1
C
115Tuesday, October 13, 2009
GPIO Config/Modify List
MediaTek Confidential
Title
Size Document Number Rev
Date: Sheet of
MediaTek Inc.
TEL:(03)567-0766 FAX:(03)578-7610
No.1-2, Innovation Rd 1, SBIP, Hsin-Chu City 300
Drawn
MT5305A P1V1
V1
C
115Tuesday, October 13, 2009
GPIO Config/Modify List
MediaTek Confidential
MT5305A (DDR2)- 2 LAYERS
MODEL NAME:MT5305A P1V1
strap[3] / HDMI_Switch_CTRL1
Function define
VGA/HDMI E2 WP/Tx@VGA control(L : WP)
5305A GPIO Definition
PIN NAME NET NAME
GPIO0GPIO_0
GPIO_1 GPIO1
ADIN3
ADIN4
ADIN5
OPCTRL0
OPCTRL1
OPCTRL2
OPCTRL3
keypad1
strap[4]
jtms/LED_red / System status LED
ADIN0
OPCTRL0
OPCTRL1
OPCTRL2
OPCTRL3
ADIN1
ADIN2
ADIN1
ADIN2
ADIN3
ADIN4
ADIN5
strap[0] / HDMI_Switch_CTRL0
jtdi(I)
strap[1]OPWM0
OPWM1
OPWM2
OPWM0
OPWM1
OPWM2
TP_VPLL TP_VPLL AMP Set:H
HPD2_HDMI HPD_sinkHPD_SINK
OPWRSB
ASPDIF ASPDIF
OPWRSB Power Module ON/OFF(LO = > POWER_ON)
strap[2]
LVDS_PWR_ON
U1RX
U1TX
LVDS_PWR_ON LVDS_PWR_ON(HI = > LVDS POWER ON)
OPWR1_5V--->24C32 WP(L=Write Enable)
OPWR2_5V---->AMP MUTE(Hi=MUTE)
keypad0
BL_on/off(LO = > POWER_ON)
ADIN0
NC
RESERVED FOR EXTEND FUNCTION
Dimming / PWM
LVDS_CTRL2 LVDS_CTRL2 RF_AGC
LVDS_CTRL1 LVDS_CTRL1 PWM AMP_OTW(input,H:OTW)
NC
OPWR0_5V OPWR0_5V OPWR0_5V of HDMI
U1RX
U1TX RESERVED FOR EXTEND FUNCTION
GPIO Modified list: 2009.10.13
=>DELETE OPWR1_5V =>24C32 WP
=>DELETE OPWR2_5V =>AMP MUTE
=>OPITICAL OUT
=>FOR INNER BLUE-RAY COMMUNICATION
=>FOR INNER BLUE-RAY COMMUNICATION
=>NC
=>NC
=>HDMI INT input,(H=normal,L=Int)
=>NC
=>NC
=>NC
=>NC
=>NC
=>NC
A
A
B
B
C
C
D
D
E
E
4 4
3 3
2 2
1 1
Title
Size Document Number Rev
Date: Sheet of
MediaTek Inc.
TEL:(03)567-0766 FAX:(03)578-7610
No.1-2, Innovation Rd 1, SBIP, Hsin-Chu City 300
Drawn
MT5305A P1V1
V1
C
215Tuesday, October 13, 2009
Placement/SYS Flow
MediaTek Confidential
Title
Size Document Number Rev
Date: Sheet of
MediaTek Inc.
TEL:(03)567-0766 FAX:(03)578-7610
No.1-2, Innovation Rd 1, SBIP, Hsin-Chu City 300
Drawn
MT5305A P1V1
V1
C
215Tuesday, October 13, 2009
Placement/SYS Flow
MediaTek Confidential
Title
Size Document Number Rev
Date: Sheet of
MediaTek Inc.
TEL:(03)567-0766 FAX:(03)578-7610
No.1-2, Innovation Rd 1, SBIP, Hsin-Chu City 300
Drawn
MT5305A P1V1
V1
C
215Tuesday, October 13, 2009
Placement/SYS Flow
MediaTek Confidential
By Ray
DELETE S_VIDEO
Audio Mapping
AV1
VGA/DVI
YPBPR#1
I2S
PWM AR/L0
PWM AR/L1
R/L Line out
MT5305A
Tuner MPX/IF+/-
ADC_IN R/L x 4
LM4558
LM4558
Speaker
HeadPhoneTDA1308
NC
I2S
PWM AR/L0
PWM AR/L1
MT5305A R/L Line out
HeadPhone
Tuner MPX/IF+/-
ADC_IN R/L x 5
TDA1308
AV1
LM4558
For 19"/22"/24" model 4×AUDIO IN:
Audio System
Audio Mapping
VGA/DVI
YPBPR#1
For 40"/46" LED model 4×AUDIO IN:
AIN6
AIN3
AIN4
AIN5
YPBPR#2
Source
AIN6
AIN3
Speaker Amp.
TPS5708
AIN4
Speaker
AIN5
INNER_DVD
Source
DC+12V
MOSFET
DC/DC
TCON 12V
VCCK
+5VSB
LDO +3VSB
AV125
7805
LDO
LDO
LDO
MOSFET
AV33
Tuner_5V
USB_5V
DV33
MEM_REF
DDRV
LDO
1/2
VCCK CONTROL
AMP PWR
DC/DC +5V (DELAY 1MS THAN VCCK)
+5VSB
POWER ON POWER ON
POWER FOR BS_LED solution
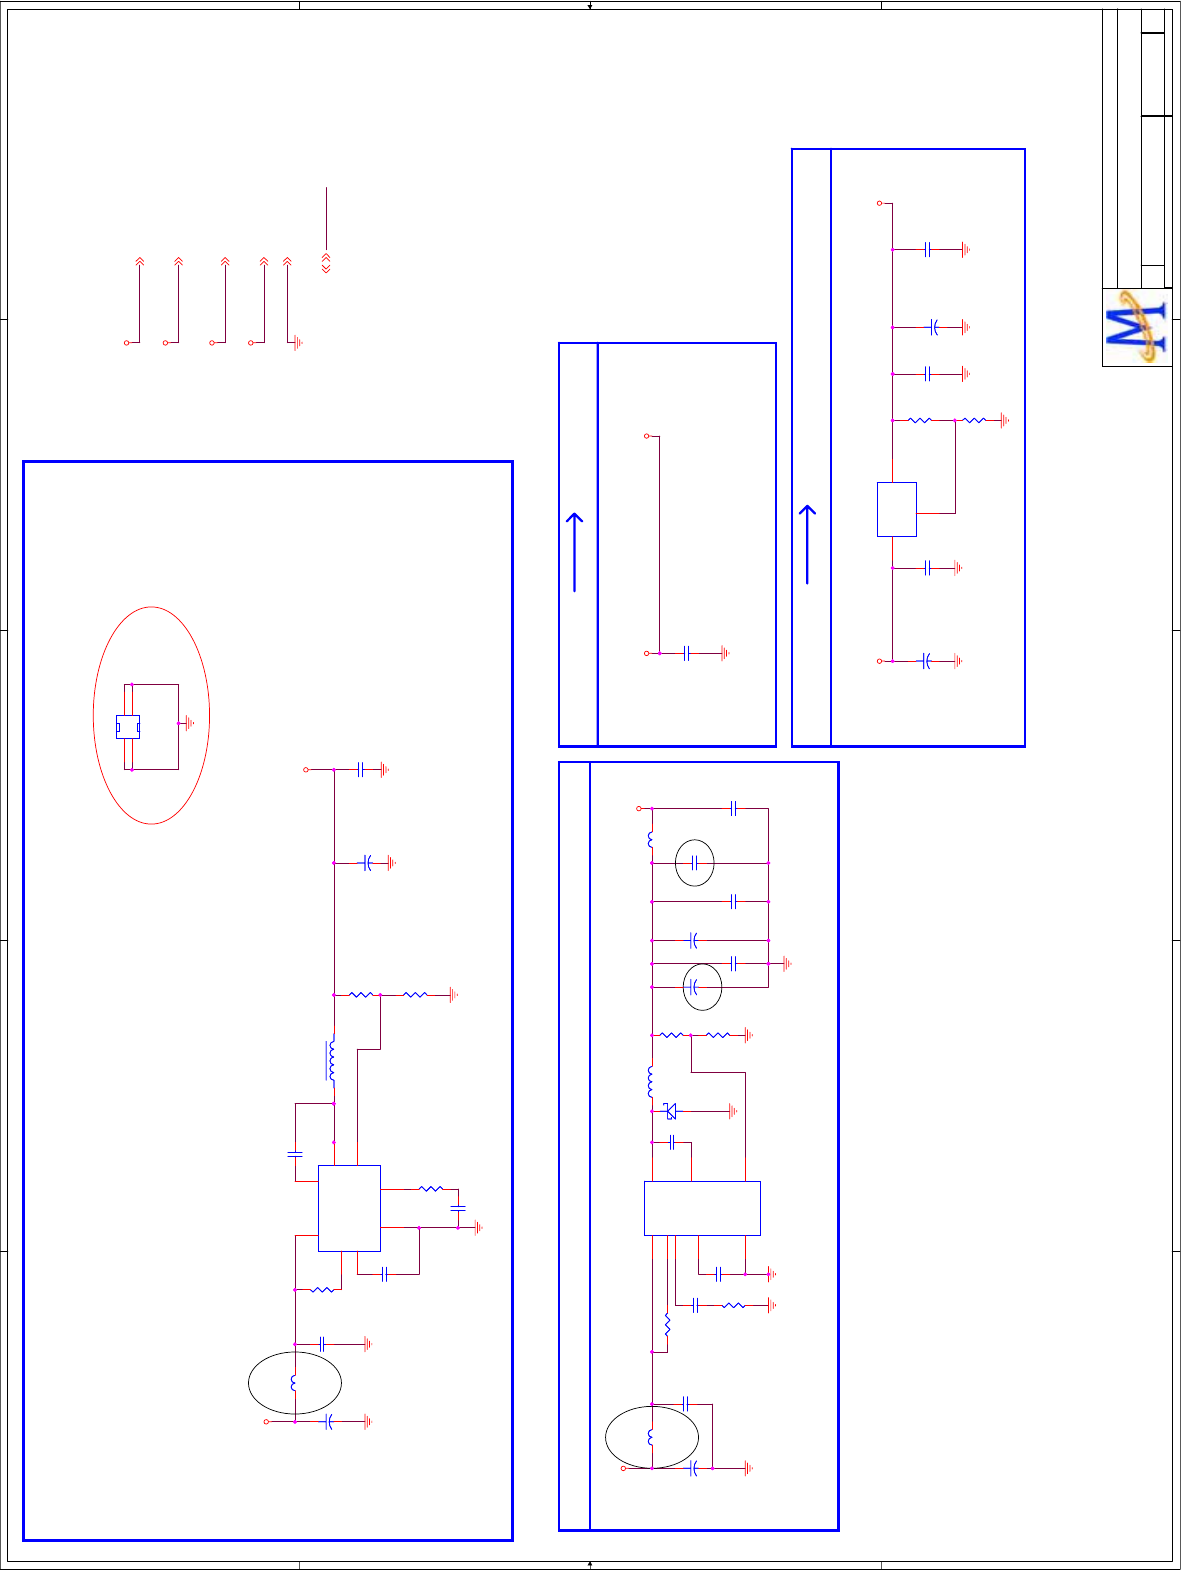
5
5
4
4
3
3
2
2
1
1
D D
C C
B B
A A
AM81_AV12
AM81_DV33
AM81_AV33
GND
AM81_DV10
FB
GND
+12V
AM81_AV33 AM81_AV12
AM81_DV33 AM81_AV33
AM81_DV10
AM81_AV12
AM81_DV33
AM81_AV33
AM81_DV10
AM81_DV33
+12V
+12V
AM81_DV10 3
GND 3,4,5
AM81_AV12 3,4,5
AM81_DV33 3,4
AM81_AV33 3,5
+12V3,10,11,12,13
Title
Size Document Number Rev
Date: Sheet of
MediaTek Inc.
TEL:(03)567-0766 FAX:(03)578-7610
No.1-2, Innovation Rd 1, SBIP, Hsin-Chu City 300
Drawn
MT8281_D2V1
C
25Friday, October 16, 2009
Power
MediaTek Confidential
Title
Size Document Number Rev
Date: Sheet of
MediaTek Inc.
TEL:(03)567-0766 FAX:(03)578-7610
No.1-2, Innovation Rd 1, SBIP, Hsin-Chu City 300
Drawn
MT8281_D2V1
C
25Friday, October 16, 2009
Power
MediaTek Confidential
Title
Size Document Number Rev
Date: Sheet of
MediaTek Inc.
TEL:(03)567-0766 FAX:(03)578-7610
No.1-2, Innovation Rd 1, SBIP, Hsin-Chu City 300
Drawn
MT8281_D2V1
C
25Friday, October 16, 2009
Power
MediaTek Confidential
MT8281 AV33MT8281 DV33
Add 09.03.02
MT8281 AV33 MT8281 AV12
AV33/0.22A
AV12/65mA
Core Power 1.1V
Vout=0.925 x (1+Rup/Rdn) = 1.1V/0.9A
20090713
Vout=0.925 x (1+Rup/Rdn) =3.3V/1.2A
LDO#3 5V to MT5307 DV33
2009071320090713
20090713
AR264
5.1K_1%
R0603/SMD
AR264
5.1K_1%
R0603/SMD
ACB442
0.1uF
ACB442
0.1uF
AU61
AX1212/AP1122
AU61
AX1212/AP1122
GND
1
OUT 2
IN
3
AC222
0.1uF
AC222
0.1uF
AR1830
0
AR1830
0
AC226
10uF/10v
AC226
10uF/10v
AR265
2.2K
AR265
2.2K
AFB86
80 R/100mHz
AFB86
80 R/100mHz
AL28 15uH/3AAL28 15uH/3A
1 2
AC224
10nF
AC224
10nF
AR1867
100K
AR1867
100K
AFB87
80 R/100mHz
AFB87
80 R/100mHz
AFB75
80 R/100mHz
AFB75
80 R/100mHz
AEMC1
EMC/NC
AEMC1
EMC/NC
2
4
1
3
AL29
15uH/3A
AL29
15uH/3A
+
ACE638
100uF/16v
+
ACE638
100uF/16v
AR1869
12K
AR1869
12K
+
ACE84
47uF/16V
+
ACE84
47uF/16V
C26
0.1uF
C26
0.1uF
ACB626
0.1uF
ACB626
0.1uF
AD13
B340/NC
AD13
B340/NC
+
ACE85
100uF/10V Low ESR
+
ACE85
100uF/10V Low ESR
AR1870
4.7K
AR1870
4.7K
+
ACE641
47uF/16v /NC
+
ACE641
47uF/16v /NC
C28
10nF
C28
10nF
AR268
27K_1%
R0603/SMD
AR268
27K_1%
R0603/SMD
AR1868
2.2K
AR1868
2.2K
MPS1482
AU23
MP1482
MPS1482
AU23
MP1482
BS 1
SW 3
FB 5
GND
4
COMP
6
IN 2
EN
7
SS
8
ACB622
0.1uF
ACB622
0.1uF
AR1828
NS/100
AR1828
NS/100
AC993
1uF
AC993
1uF
AU65
MP1482
AU65
MP1482
EN
7
FB 5
VCC
2OUT 3
BST 1
GND
4
SS
8
COMP
6
ACB623
0.1uF
ACB623
0.1uF
ACB625
0.1uF
ACB625
0.1uF
AC220
0.1uF
AC220
0.1uF
+
ACE637
100uF/16v
+
ACE637
100uF/16v
AC989
1uF
AC989
1uF
+
ACE86
47uF/16V
+
ACE86
47uF/16V
AC223
10nF
AC223
10nF
AC992
0.01uF
AC992
0.01uF
AR1833
100K
AR1833
100K
ACB621
0.1uF
ACB621
0.1uF
C27
10nF
C27
10nF
+
ACE639
10uF/10v
+
ACE639
10uF/10v
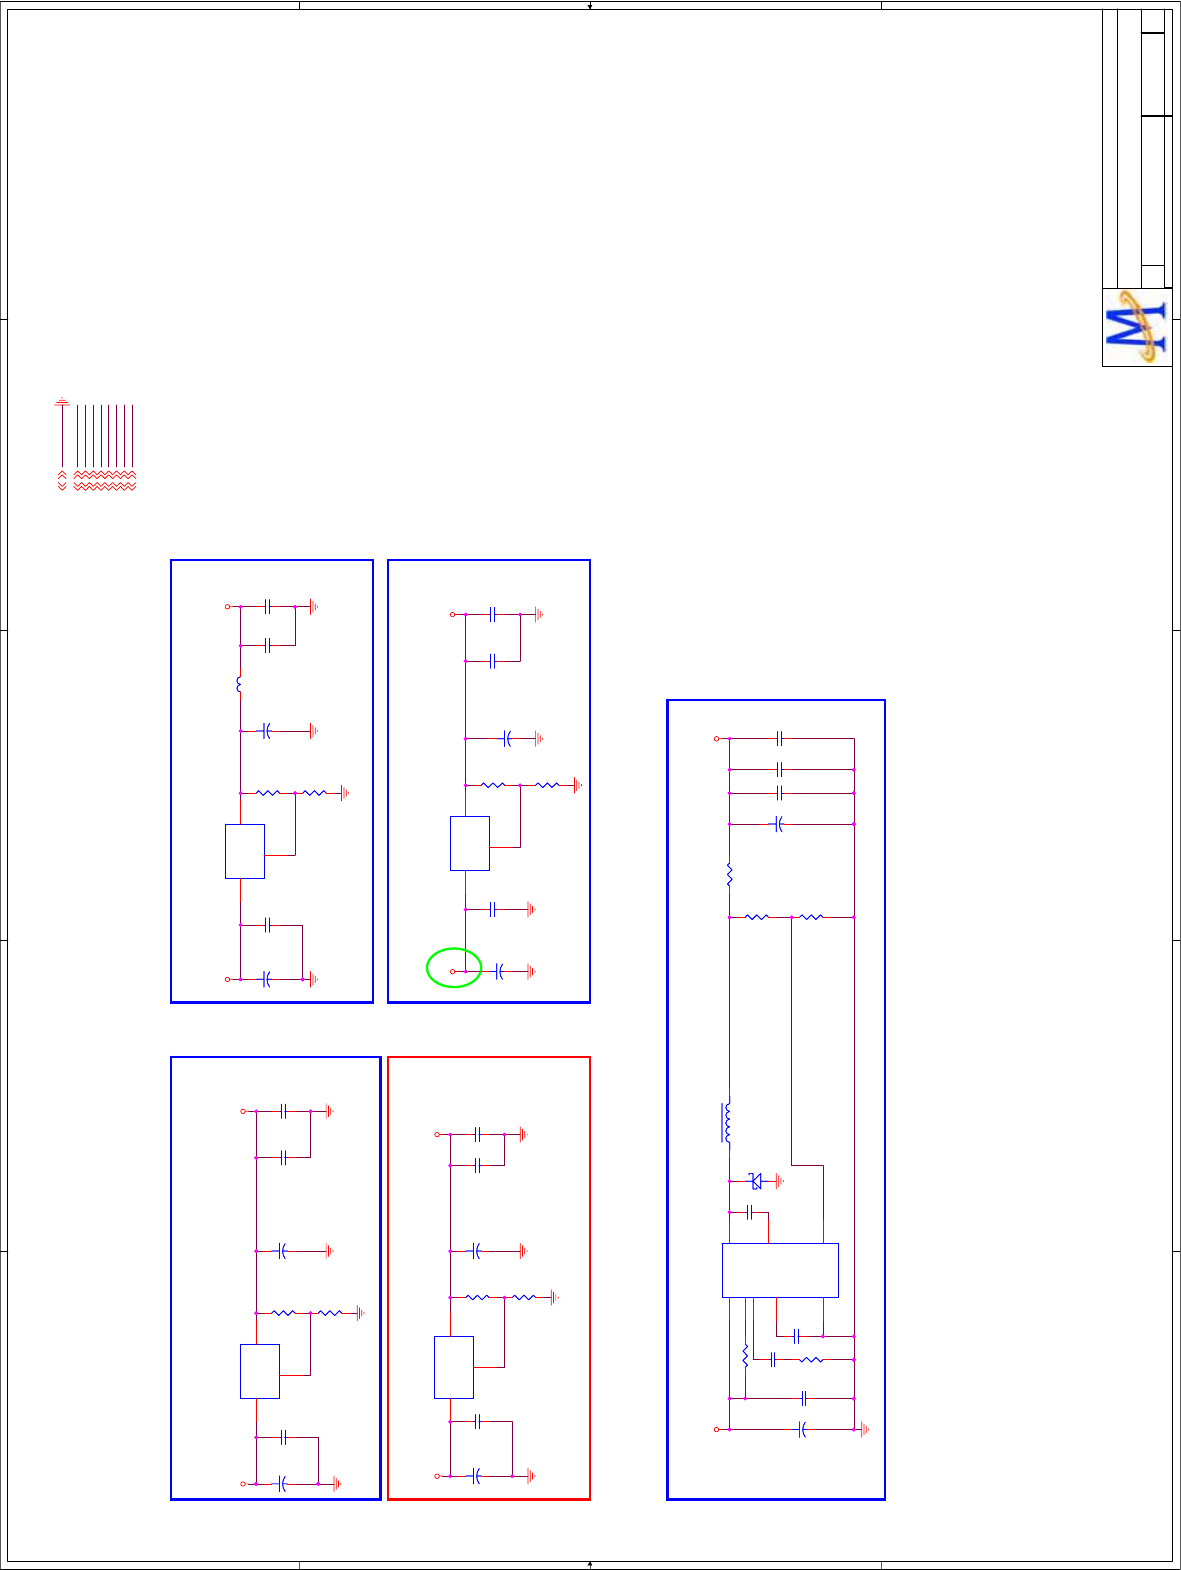
A
A
B
B
C
C
D
D
E
E
4 4
3 3
2 2
1 1
AV33
AV125
+12V
+3V3SB
+5VSB
GND
DV33
+3V3SB
VCCK
DV33
+5V
DV33+5V
AV33 AV125
+3V3SB
+5VSB
AV33+5V
+12V VCCK
+12V10,11,12,13,14
AV334,6,8,9,10,12,13
AV1254,5,8,9,12
+5VSB6,9,14
+3V3SB6,8,9,12
GND4,5,6,7,8,9,10,11,12,13,14
VCCK4
DV334,5,6,7,11,12
+5V6,8,10,12,14
Title
Size Document Number Rev
Date: Sheet of
MediaTek Inc.
TEL:(03)567-0766 FAX:(03)578-7610
No.1-2, Innovation Rd 1, SBIP, Hsin-Chu City 300
Drawn
MT5305A P1V1
V1
C
315Wednesday, October 14, 2009
Digital/Analog POWER
MediaTek Confidential
Title
Size Document Number Rev
Date: Sheet of
MediaTek Inc.
TEL:(03)567-0766 FAX:(03)578-7610
No.1-2, Innovation Rd 1, SBIP, Hsin-Chu City 300
Drawn
MT5305A P1V1
V1
C
315Wednesday, October 14, 2009
Digital/Analog POWER
MediaTek Confidential
Title
Size Document Number Rev
Date: Sheet of
MediaTek Inc.
TEL:(03)567-0766 FAX:(03)578-7610
No.1-2, Innovation Rd 1, SBIP, Hsin-Chu City 300
Drawn
MT5305A P1V1
V1
C
315Wednesday, October 14, 2009
Digital/Analog POWER
MediaTek Confidential
By Ray
Stand By Power
1.25 x (1+180/110) = 3.3V
DIGITAL POWER DV33 ANALOG POWER AV125
1.25 x (1+180/110) = 3.3V
ANALOG POWER AV33
1.25 x (1+180/110) = 3.3V
Modify 09.06.19
shielding of 20-mil GND
2A
0.925 x (1+Rup/Rdn) = 1.1V
CORE POWER
SPR9
0
R0603/SMD
SPR9
0
R0603/SMD
+
SPC1
47uF/16v
+
SPC1
47uF/16v
SPC4
1uF
SPC4
1uF
C6
10nF
C6
10nF
SPC9
1uF
SPC9
1uF
R88 100KR88 100K
SPC21
NS/1uF
SPC21
NS/1uF
C15
0.1uF
C15
0.1uF
+
SPC3
47uF/16v
+
SPC3
47uF/16v
SPR3
180_1%
R0603/SMD
SPR3
180_1%
R0603/SMD
L5 15uH/3A
LCB1212
L5 15uH/3A
LCB1212
1 2
SPC10
0.1uF
SPC10
0.1uF
C22
0.1uF
C22
0.1uF
SPU4
AX1117EJ/adj
SPU4
AX1117EJ/adj
GND
1
OUT 2
IN
3
SPC2
NS/0.1uF
SPC2
NS/0.1uF
SPU1 G1117/adjSPU1 G1117/adj
ADJ/GND
1
OUT 2
IN
3
+
SPC17
47uF/16v/NC
+
SPC17
47uF/16v/NC
SPU3 AP1084-ADJSPU3 AP1084-ADJ
IN
3
ADJ/GND
1
OUT 2
C23
10nF
C23
10nF
+
SPC14
47uF/16v
+
SPC14
47uF/16v
SPFB2 0SPFB2 0
CPC39
0.1uF
CPC39
0.1uF
D10
B340/NC
D10
B340/NC
SPC13
0.1uF
SPC13
0.1uF
+
CPC40
470uF/16v
C470UF16V/D8H12.5W
+
CPC40
470uF/16v
C470UF16V/D8H12.5W
SPR1
110_1%
R0603/SMD
SPR1
110_1%
R0603/SMD
R11
27K_1%
R0603/SMD
R11
27K_1%
R0603/SMD
SPR2
110_1%
R0603/SMD
SPR2
110_1%
R0603/SMD
CPC42
1uF
CPC42
1uF
SPR5
110_1%
R0603/SMD
SPR5
110_1%
R0603/SMD
+
SPC15
47uF/16v
+
SPC15
47uF/16v
SPU2 AX1117EJ/adjSPU2 AX1117EJ/adj
ADJ/GND
1
OUT 2
IN
3
SPC5
NS/0.1uF
SPC5
NS/0.1uF
CPR13 0CPR13 0
SPC20
0.1uF
SPC20
0.1uF
SPC11
0.1uF
SPC11
0.1uF
CPC43
0.01uF
CPC43
0.01uF
SPR7
100_1%/NC
R0603/SMD
SPR7
100_1%/NC
R0603/SMD
+
SPC6
47uF/16v
+
SPC6
47uF/16v
R6
5.1K_1%
R0603/SMD
R6
5.1K_1%
R0603/SMD
SPC7
0.1uF
SPC7
0.1uF
+
XC14
100uF/16v
ECAP_100UF_SMD
+
XC14
100uF/16v
ECAP_100UF_SMD
SPC18
0.1uF
SPC18
0.1uF
SPC12
1uF
SPC12
1uF
+
SPC8
47uF/16v
+
SPC8
47uF/16v
SPR4
180_1%
R0603/SMD
SPR4
180_1%
R0603/SMD
U60
MP1484
U60
MP1484
EN
7
FB 5
VCC
2OUT 3
BST 1
GND
4
SS
8
COMP
6
+
SPC19
47uF/16v
+
SPC19
47uF/16v
R12
2.2K
R12
2.2K
SPR6
180_1%
R0603/SMD
SPR6
180_1%
R0603/SMD
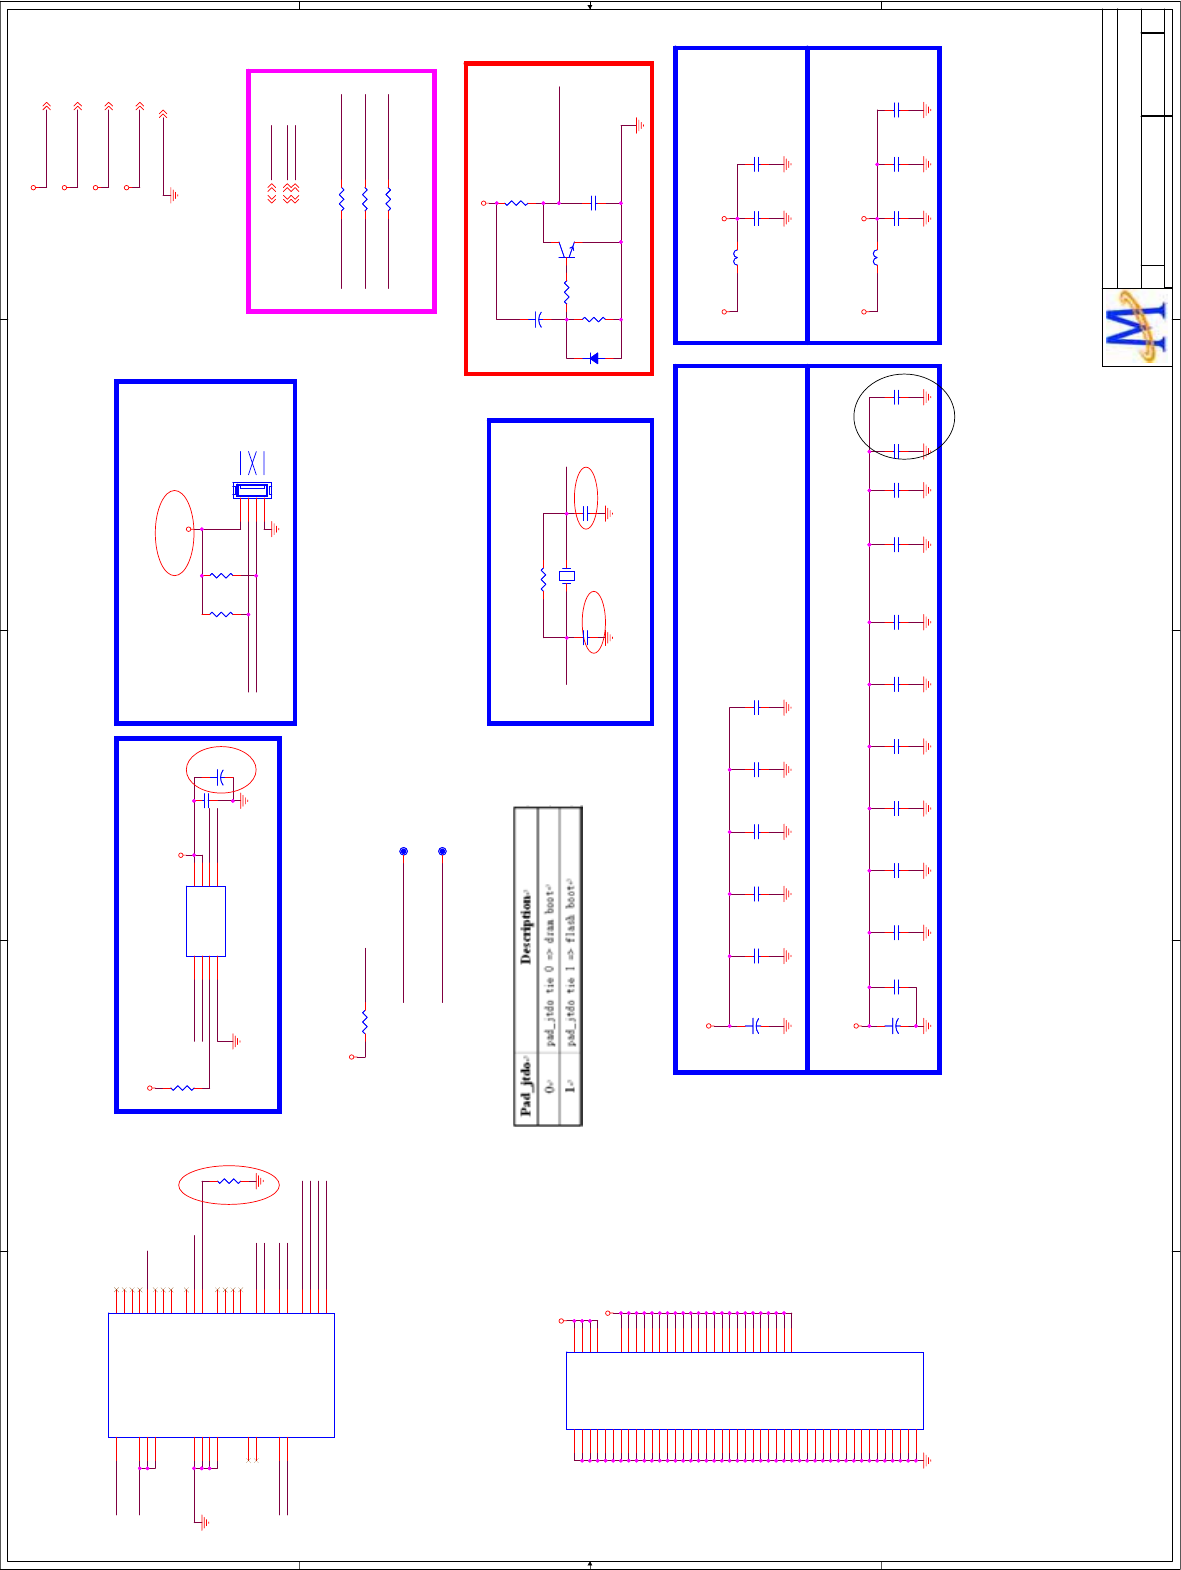
5
5
4
4
3
3
2
2
1
1
D D
C C
B B
A A
M81_JTDO
M81SPI_SCK
XTALI XTALO
M81_SDA
M81_JTDO
M81_RST#
XTALO
XTALI
GND
AV12_PLL
M81SPI_CS#
M81SPI_SCK
M81SPI_SI
M81SPI_SO
AV33_XTAL
M81_U0TX
M81_U0RX
M81_SCL
AM81_DV33
M81_U0RX
M81_U0TX
M81SPI_SO
GND
M81_RST#
AM81_DV10
AM81_AV33
AM81_AV12
WP#
M81SPI_CS#
M81SPI_SI
M81SPI_SO
M81SPI_SCK
OSDA0
OSCL0
LVDS_CTRL2
M81_RST# LVDS_CTRL2
M81_SDA OSDA0
M81_SCL OSCL0
AM81_AV12
AM81_AV33
AV12_PLL
AV33_XTAL
AM81_DV33
AM81_DV10
AM81_DV33
AM81_DV33
AM81_AV33
AM81_DV33
AM81_AV12
AM81_DV10
AM81_DV10
AM81_AV33
AM81_AV33
AM81_DV33
AM81_DV33
AM81_DV33 2,4
GND 2,4,5
AM81_AV33 2,5
AM81_AV12 2,4,5
AM81_DV10 2
OSCL04
OSDA04
LVDS_CTRL2
Title
Size Document Number Rev
Date: Sheet of
MediaTek Inc.
TEL:(03)567-0766 FAX:(03)578-7610
No.1-2, Innovation Rd 1, SBIP, Hsin-Chu City 300
Drawn
MT8281_D2V1
C
35Wednesday, October 14, 2009
Peripheral
MediaTek Confidential
Title
Size Document Number Rev
Date: Sheet of
MediaTek Inc.
TEL:(03)567-0766 FAX:(03)578-7610
No.1-2, Innovation Rd 1, SBIP, Hsin-Chu City 300
Drawn
MT8281_D2V1
C
35Wednesday, October 14, 2009
Peripheral
MediaTek Confidential
Title
Size Document Number Rev
Date: Sheet of
MediaTek Inc.
TEL:(03)567-0766 FAX:(03)578-7610
No.1-2, Innovation Rd 1, SBIP, Hsin-Chu City 300
Drawn
MT8281_D2V1
C
35Wednesday, October 14, 2009
Peripheral
MediaTek Confidential
Max
Add 09.03.05
AV33 XTAL POWER
AV12 PLL POWER
Reserve HW Reset#
Core Powe 1.0V
IO Power 3.3V
Crystal
PIN4. PWR
PIN3. RXD
PIN2. TXD
PIN1. GND
1st UART IF
( For Code download and Debug )
Add res, 09.04.10
DV33 IO POWER
Peripheral components
Modify 09.02.26
Add 09.02.25
DV10 CORE POWER
Modify for accuracy
Trapping :
Default Low when no configuration external
modify net for layout 09/02/20
Serial Flash
Modify 09.09.08
AR1852 1K
AR1852 1K
AC1042
0.01uF
AC1042
0.01uF
AC1040
0.1uF
AC1040
0.1uF
ATP26ATP26
AR1841
4.7K
AR1841
4.7K
AC1043
1.5nF
AC1043
1.5nF
+
ACE643
10uF/10v/NC
+
ACE643
10uF/10v/NC
AC1003
0.1uF
AC1003
0.1uF
AC923
4.7uF/10V
AC923
4.7uF/10V
ARB1 820K->1MARB1 820K->1M
AC996
30pF
AC996
30pF AD1
1N4148/NC
AD1
1N4148/NC
AR1842 0AR1842 0
AC290
0.47uF/NC
AC290
0.47uF/NC
+
ACE645
100uF/10v/NC
+
ACE645
100uF/10v/NC
AC997
30pF
AC997
30pF
AQ1
2N3904/NC
AQ1
2N3904/NC
1
3 2
AC1001
4.7uF/10V
AC1001
4.7uF/10V
AC1035
0.1uF
AC1035
0.1uF
AFB77
0603_Bead
AFB77
0603_Bead
AR1844 100AR1844 100
+
ACE634
100uF/10V
+
ACE634
100uF/10V
AJ30
4x1 W/HOUSING
AJ30
4x1 W/HOUSING
1
2
3
4
AC1039
0.1uF
AC1039
0.1uF
ATP25ATP25
AC998
4.7uF/10V
AC998
4.7uF/10V
ACB624
0.1uF
ACB624
0.1uF
AC1052
1.5nF
AC1052
1.5nF
AY6
Hosonic-27MHz
AY6
Hosonic-27MHz
MT8282_BGA_20081008_Final
AU60A
MT8282_BGA_20081008_Final
AU60A
DVSS
B2
DVSS
C11
DVSS
C12
DVSS
C13
DVSS
C3
DVSS
C4
DVSS
D11
DVSS
D4
DVSS
E10
DVSS
E11
DVSS
E5
DVSS
E6
DVSS
F16
DVSS
H11
DVSS
H13
DVSS
H5
DVSS
H9
DVSS
J10
DVSS
J12
DVSS
J3
DVSS
J5
DVSS
K10
DVSS
K11
DVSS
K12
DVSS
K13
DVSS
K4
DVSS
K5
DVSS
K8
DVSS
K9
DVSS
L10
DVSS
L11
DVSS
L12
DVSS
L3
DVSS
L9
DVSS
M10
DVSS
M11
DVSS
M13
DVSS
M8
DVSS
N11
DVSS
N12
DVSS
N3
DVSS
N9
DVSS
T12
DVSS
U5
DVSS
V5
VCCK A18
VCCK A19
VCCK A20
VCCK B17
VCCK B18
VCCK C16
VCCK C17
VCC3IO_3 C18
VCCK D15
VCCK D16
VCCK E14
VCCK E15
VCCK H10
VCCK H12
VCCK J11
VCCK J13
VCCK J9
VCCK L13
VCCK L8
VCCK M12
VCCK M9
VCCK N10
VCCK N13
VCCK N8
VCC3IO_1 R5
VCC3IO_1 T4
VCC3IO_2 U12
AC922
22uF/10V->10uF
AC922
22uF/10V->10uF
AC1038
4.7nF
AC1038
4.7nF
AR1839
4.7K
AR1839
4.7K
AR21
1K/NC
AR21
1K/NC
AR1843 100AR1843 100
MT8282_BGA_20081008_Final
AU60C
MT8282_BGA_20081008_Final
AU60C
SFD0 B19
SFCK B20
SFCS C19
SFD1 C20
JTDO T5
SDA U11
JRTCK U2
JTMS U3
JTRST U4
JTDI V1
SCL V11
JTCK V2
GPIO0 V3
GPIO3 V4
RXDMA_ACK W1
CLK_IN W16
RXD0 W17
PRST_ W2
GPIO2 W3
CLK_OUT Y16
TXD0 Y17
EFUSE Y2
GPIO1 Y3
AVDD12_SYSPLL
U13
AVDD12_DMPLL
U14
AVDD12_MJCPLL
U15
AVSS12_SYSPLL
V13
AVSS12_DMPLL
V14
AVSS12_MJCPLL
V15
AVDD33_XTAL
V20
TN0
W18
XTALO
W20 XTALI
W19
TP0
Y18
AVSS33_XTAL
Y19
AC1051
1.5nF
AC1051
1.5nF
AFB78
0603_Bead
AFB78
0603_Bead
AC1036
0.1uF
AC1036
0.1uF
AR22
47K/NC
AR22
47K/NC
AR1837
1K
AR1837
1K
AC1044
330pF
AC1044
330pF
AC1002
4.7uF/10V
AC1002
4.7uF/10V
AR1840
0
AR1840
0
AC1037
4.7nF
AC1037
4.7nF
AU63
M25P08
AU63
M25P08
CS#
1
DOUT
2
WP#/VPP
3
VSS
4DIN 5
CLK 6
HOLD# 7
VCC 8
+
ACE37
220uF/16V/NC
+
ACE37
220uF/16V/NC
AC1004
330pF
AC1004
330pF
AC999
0.1uF
AC999
0.1uF
AC921
4.7uF/10V
AC921
4.7uF/10V
AC1045
0.01uF
AC1045
0.01uF
AR1838
4.7K
AR1838
4.7K
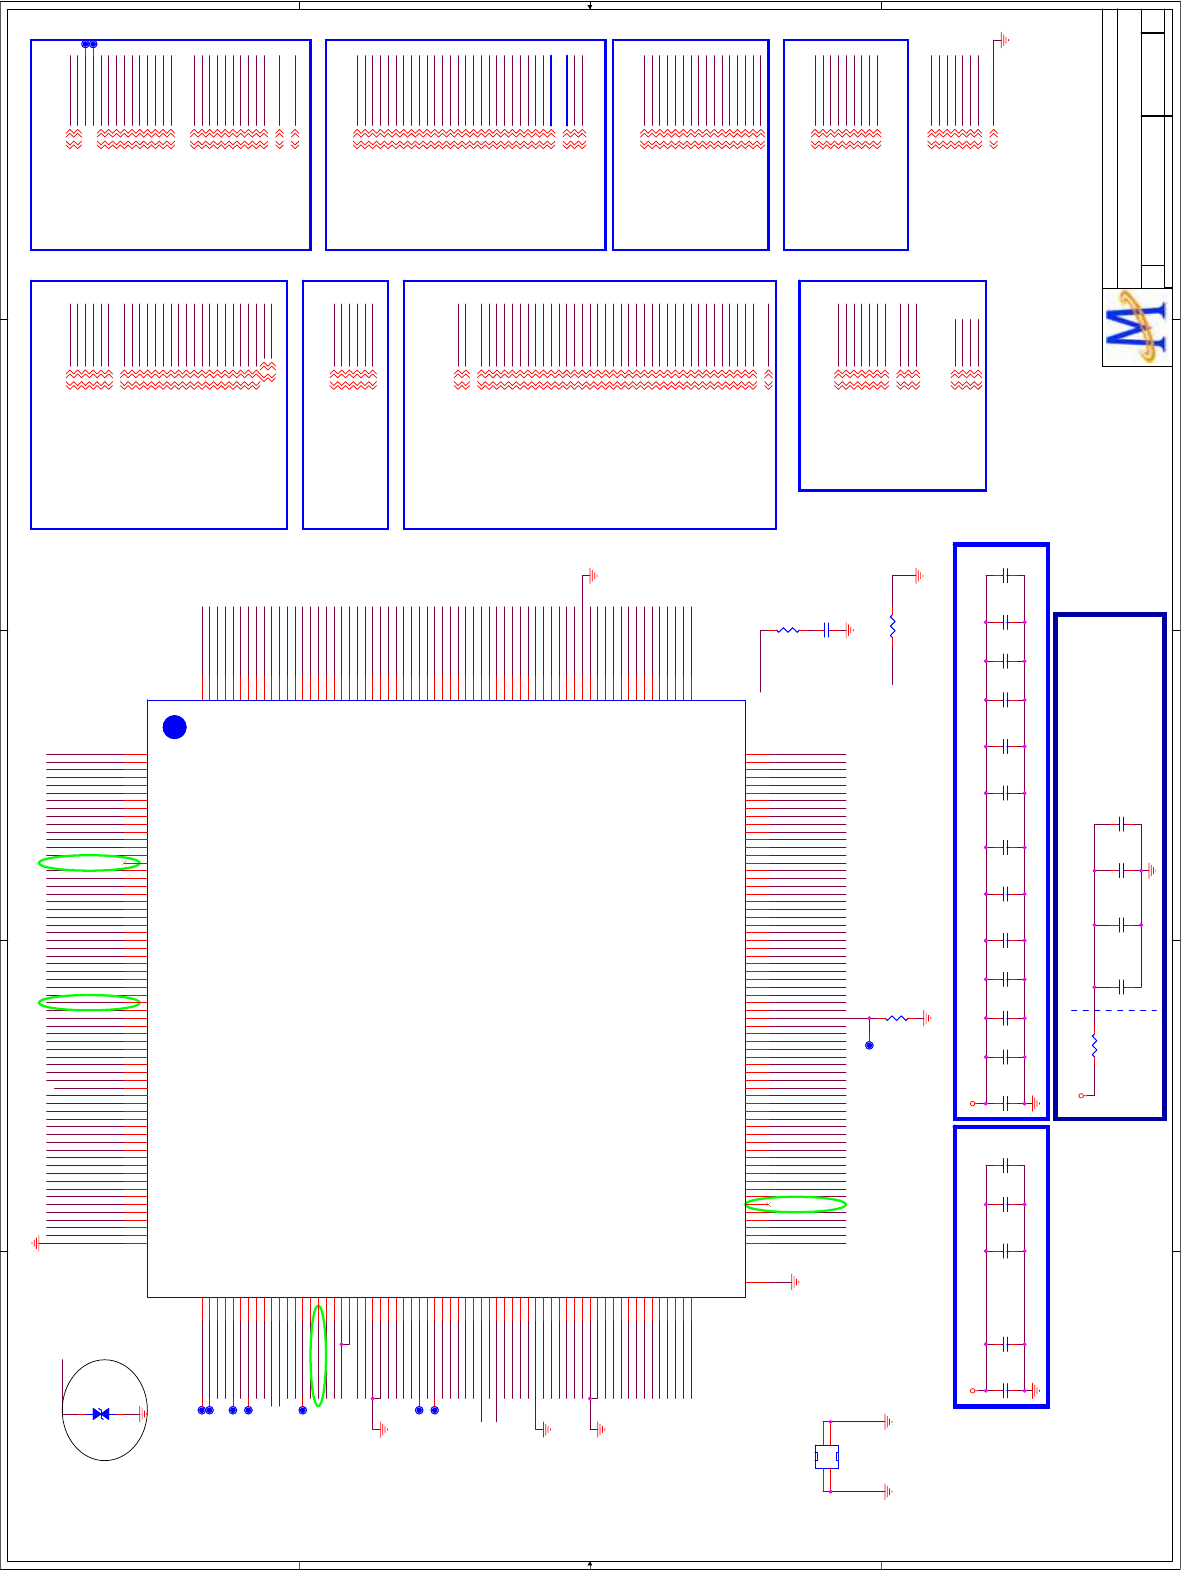
5
5
4
4
3
3
2
2
1
1
D D
C C
B B
A A
E3P
E3N
ECKP
ECKN
E2P
E2N
E1P
E1N
E0P
E0N
O3P
O3N
OCKP
OCKN
O2P
O2N
O1P
O1N
O0P
O0N
TP_VPLL
RDQM1
RDQM0
RDQS0#
RDQS2
RDQM2
RDQM3
RDQS3
RDQS3#
RDQS2#
RWE#
RCAS#
RCS#
RRAS#
RBA0
RBA1
RCLK0#
RCLK0
RODT
RCLK1
RCKE
MEM_VREF3
RCLK1#
RDQS0
RDQS1
RDQS1#
RA[12..0]
RDQ1
RDQ2
RDQ7
RDQ6
RDQ5
RDQ0
RDQ4
RDQ9
RDQ8
RDQ12
RDQ11
RDQ10
RDQM1
RDQM0
RDQS0#
RDQ15
RDQ14
RDQ16
RDQ17
RDQ31
RDQ19
RDQ30
RDQ18
RDQ21
RDQ20
RDQ28
RDQ23
RDQ22
RDQ29
RDQ27
RDQ24
RDQ25
RDQ26
RDQS2
RDQM2
RDQM3
RDQS3
RDQS3#
RDQS2#
RWE#
RCAS#
RCS#
RRAS#
RBA0
RBA1
RCLK0#
RODT
RCKE
MEM_VREF3
RDQS1
RA10
RA1
RA0
RA3
RA2
RA4
RA5
RA6
RA7
RA8
RA11
RA12
RDQS1#
RDQS0
VCCK
VCC2IO
AVDD12_MEMPLL
O3P
O3N
OCKP
OCKN
O2P
O2N
O1P
O1N
O0P
O0N
E3P
E3N
ECKP
ECKN
E2P
E2N
E1P
E1N
E0P
E0N
RCLK1
RCLK1#
LVDS_POWER_ON
LVDS_CTRL2
LVDS_CTRL1
VCCK
OIRI
RDQ13
VCCK
VCC2IO
VCCK
VCC2IO
VCC2IO
VCC2IO
VCCK
VCC2IO
VCC2IO
VCC2IO
VCC2IO
VCC2IO
VCCK
VCC2IO
VCC2IO
AVDD33_LVDS
VCCK
VCC3IO
VCC3IO
VCCK
VCC2IO
VCC3IO
VCC2IO
VCC2IO
RX_CB
RX_C
RX_1
RX_2B
RX_2
RX_0B
RX_0
CEC
HPD_SINK
HDMI_SDA0
HDMI_SCL0
PWR5V_0
U0TX
U0RX
PR0P
COM0
Y0P
PB0P
SOY0
COM1
PR1P
Y1P
PB1P
SOY1
HSYNC
VSYNC
SOG
GP
BP
COM
RP
CVBS0P
CVBS1P
GPIO1
AIN6_R
AIN6_L
AIN5_R
AIN5_L
AIN4_L
AIN4_R
AIN3_R
AIN3_L
CVBS0N
SC0
SY0
JTCK
OPCTRL2
JTDO
JTRST#
ORESET#
OSCL0
OSDA0
OPCTRL0
AR0
AL0
ADIN0
VCCK
VCCK
AVDD33_CVBS
AVDD33_VGA_STB
AVDD12_HDMI
AVDD12_RGB
LVDS_CTRL2
LVDS_CTRL1
AVDD33_LVDS
AVDD12_VPLL
AVDD12_VPLL
TP_VPLL
LVDS_POWER_ON
AOBCK
AOMCLK
AR1
AL1
OPWM1
PWR5V_0
HDMI_SCL0
HPD_SINK
CEC
GPIO1
RX_CB
RX_C
RX_1B
RX_1
RX_2B
RX_0B
RX_2
RX_0
AVDD12_HDMI
HDMI_SDA0
AVDD33_HDMI
GPIO0
AVDD33_SIF
TUNER_DATA
AVDD33_DEMOD1
AVDD33_DIG
VIN_ATV
VIP_ATV
IF_AGCT
TUNER_CLK
TUNER_DATA
TUNER_CLK
IF_AGCT
AVDD33_DIG
VIN_ATV
VIP_ATV
USB_PWR_EN0
USB_PWR_ERR0
AVDD33_USB
USB_DM0
USB_DP0
USB_VRT
USB_PWR_EN0
USB_PWR_ERR0
AVDD33_USB
USB_DM0
USB_DP0
USB_VRT
ASPDIF
ASPDIF
OXTALI
OXTALO
AVDD33_XTAL_STB
U1RX
U1TX
U0TX
U0RX
OXTALI
OXTALO
AVDD33_XTAL_STB
U1RX
U1TX OPCTRL0
OIRI
ORESET#
OSCL0
OSDA0
JTDO
OPCTRL2
JTCK
JTRST#
OPWM1
ASPDIF
POCE0#
PDD0
POOE#
PDD1
POOE#
POCE0#
PDD0
PDD1
OPWRSB
OPWM0
OPWM0
AIN3_R
AIN3_L
AIN6_R
AIN6_L
AIN5_L
AIN5_R
AIN4_R
AIN4_L
CVBS0N
CVBS1P
SC0
AVDD33_CVBS
SY0
AVDD33_VDAC
AVDD33_VDAC
FS_VDAC
DACOUT1
AVDD33_VGA_STB
AVDD12_RGB
FS_VDAC
DACOUT1
COM
BP
RP
GP
HSYNC
VSYNC
PR1P
PB0P
SOY1
Y1P
COM1
SOG
PR0P
Y0P
COM0
SOY0
PB1P
GPIO0
AR1
REFP_AADC
AL1
AVDD33_AADC
AR0
AVDD33_DAC
AL0
AVDD33_DAC
AVDD33_AADC
REFP_AADC
ADIN3
VMID_AADC
OPCTRL1
VMID_AADC
ADIN3
ADIN4
ADIN5
OPCTRL1
OPWRSB
ADIN2
ADIN1
ADIN2
AVDD12_MEMPLL
OPCTRL3
GND
OPCTRL3
VCCK
VCC3IO
AVDD33_VGA_STB
VCC2IO
VCCK
AVDD12_APLL
AVDD12_APLL
AVDD12_APLL
RDQ3
RCLK0
RA9
RX_1B
AV125
AVDD10_LDO
AF
ADIN5
JTRST#
OPWM2
OPWM2
AVDD10_LDO
AVDD12_APLL
AOSDATA0
AOLRCK
AVDD33_DEMOD1
AIN0_R
AIN0_L
AVDD33_HDMI
AOSDATA0
AOMCLK
AOBCK
AOLRCK
ORESET#
ADIN1
ADIN0
AIN0_R
AIN0_L
CVBS0P
DV33 VCCK
AV125
AVDD33_DIG3,6,8,9,10,12,13
IF_AGCT13
TUNER_CLK13
TUNER_DATA13
VIN_ATV13
VIP_ATV13
AVDD33_SIF3,6,8,9,10,12,13
OPWM07
AVDD33_MPX13
USB_PWR_EN06
USB_PWR_ERR06
USB_DM06
USB_DP06
AVDD33_USB3,6,8,9,10,12,13
USB_VRT6
OXTALO6
OXTALI6
AVDD33_XTAL_STB6
ASPDIF6,7
U0RX6,9
U0TX6,9
U1RX6
U1TX6
OIRI6
ORESET#6
OSDA06
OSCL06
OPCTRL06
OPCTRL26
JTDO6
JTCK6
JTRST#6
ASPDIF6,7
POCE0#7
POOE#7
PDD07
PDD17
OPWM17
LVDS_POWER_ON12
O0N12
O0P12
O1N12
O1P12
O2N12
O2P12
OCKN12
OCKP12
O3N12
O3P12
E0N12
E0P12
E1N12
E1P12
E2N12
E2P12
ECKN12
ECKP12
E3N12
E3P12
AVDD33_LVDS3,6,8,9,10,12,13
AVDD12_VPLL12
RCLK1#5
RCLK15
RDQS3#5
RDQS35
RDQS2#5
RDQS25
RDQM25
RDQM35
MEM_VREF35
RCKE5
RWE#5
RBA05
RBA15
RCAS#5
RCS#5
RRAS#5
RODT5
RCLK0#5
RCLK05
RDQS1#5
RDQS15
RDQS0#5
RDQS05
RDQM15
RDQM05
RDQ[31..0]5
RA[12..0]5
AVDD12_HDMI8
CEC8
HDMI_SDA08
HDMI_SCL08
RX_CB8
RX_C8
RX_0B8
RX_08
RX_1B8
RX_18
RX_2B8
RX_28
GPIO17
AIN3_L9
AIN3_R9
AIN4_L9
AIN4_R9
AIN5_L9
AIN5_R9
AIN6_R9
AIN6_L9
CVBS1P9
CVBS0N9
AVDD33_CVBS3,6,8,9,10,12,13
SC0
SY0
AVDD33_VGA_STB9
FS_VDAC9
AVDD33_VDAC3,6,8,9,10,12,13
DACOUT110
AVDD12_RGB3,5,8,9,12
BP9
GP9
COM9
RP9
VSYNC9
HSYNC9
SOG9
SOY19
SOY09
Y0P9
COM09
PB0P9
PR0P9
Y1P9
COM19
PB1P9
PR1P9
GPIO012
REFP_AADC10
AVDD33_DAC10
AVDD33_AADC10
AR110
AR011
AL011
AL110
VMID_AADC9
ADIN312
OPCTRL111
OPWRSB14
ADIN28,9
AVDD12_MEMPLL3,5,8,9,12
OPCTRL37
GND3,5,6,7,8,9,10,11,12,13,14
VCCK3
DV333,5,6,7,11,12
DDRV5
AV1253,5,8,9,12
ADIN59
OPWM26
AVDD33_HDMI8
AOLRCK
AOBCK
AOMCLK
AOSDATA0
ADIN16
ADIN06
AIN0_L
AIN0_R
CVBS0P9
OPWR0_5V8
HPD_SINK8
LVDS_CTRL2
Title
Size Document Number Rev
Date: Sheet of
MediaTek Inc.
TEL:(03)567-0766 FAX:(03)578-7610
No.1-2, Innovation Rd 1, SBIP, Hsin-Chu City 300
Drawn
MT5305A P1V1
V1
C
415Wednesday, October 14, 2009
MT5305A
MediaTek Confidential
Title
Size Document Number Rev
Date: Sheet of
MediaTek Inc.
TEL:(03)567-0766 FAX:(03)578-7610
No.1-2, Innovation Rd 1, SBIP, Hsin-Chu City 300
Drawn
MT5305A P1V1
V1
C
415Wednesday, October 14, 2009
MT5305A
MediaTek Confidential
Title
Size Document Number Rev
Date: Sheet of
MediaTek Inc.
TEL:(03)567-0766 FAX:(03)578-7610
No.1-2, Innovation Rd 1, SBIP, Hsin-Chu City 300
Drawn
MT5305A P1V1
V1
C
415Wednesday, October 14, 2009
MT5305A
MediaTek Confidential
LVDS
DDR2
HDMI
Tuner
PERIPHERAL
FLASH/TRAP/BYPASS
Video/Audio Input
Audio SYS/Output
Bottom SideCORE BYPASS
NEAR IC
Near IC
Modify 09.06.19Modify 09.06.19
Modify 09.06.19
Modify Net name
09.06.19
TP21TP21
CPR7
1->0
CPR7
1->0
TP24TP24
TP44TP44
U1
MT5305A_257
U1
MT5305A_257
PDD0 1
POCE0_ 2
POOE_ 3
GPIO0 4
JTDO 5
JTCK 6
JTRST_ 7
OPWM2 8
USB_PWR_ERR0 9
USB_PWR_EN0 10
USB_DM 11
USB_DP 12
AVDD33_USB 13
USB_VRT 14
NC 15
VCCK 16
RX2_CB 17
RX2_C 18
RX2_0B 19
RX2_0 20
RX2_1B 21
RX2_1 22
RX2_2B 23
RX2_2 24
AVDD33_HDMI 25
AVDD12_HDMI 26
HDMI_CEC 27
HDMI_SCL2 28
VCCK 29
HDMI_SDA2 30
PWR5V_2 31
HDMI_HPD2 32
AVDD33_VGA_STB 33
OPCTRL3 34
VCCK 35
OPCTRL2 36
OPCTRL1 37
OPCTRL0 38
OPWRSB 39
OIRI 40
U0TX 41
U0RX 42
ORESET 43
AVDD10_LDO 44
AVDD33_VGA_STB 45
VSYNC 46
HSYNC 47
BP 48
SOG 49
GP 50
COM 51
RP 52
SOY1 53
Y1P 54
COM1 55
PB1P 56
PR1P 57
SOY0 58
Y0P 59
COM0 60
PB0P 61
PR0P 62
AVDD12_RGB 63
AVSS12_RGB 64
VCC3IO 256
PDD1 255
U1TX 254
U1RX 253
VCCK 252
RCLK1_ 251
RCLK1 250
VCC2IO 249
RDQ21 248
RDQ18 247
VCC2IO 246
RDQ16 245
RDQ23 244
RDQ29 243
RDQ26 242
VCC2IO 241
RDQ24 240
RDQ31 239
RDQS3_ 238
RDQS3 237
VCC2IO 236
RDQS2_ 235
RDQS2 234
RDQM2 233
RDQM3 232
VCC2IO 231
RDQ27 230
RDQ30 229
VCCK 228
RDQ25 227
RDQ28 226
VCC2IO 225
RDQ22 224
RDQ17 223
RDQ19 222
RDQ20 221
VCC2IO 220
MEM_VREF 219
RODT 218
RRAS_ 217
RCS_ 216
RA11 215
RA8 214
RA0 213
VCC2IO 212
RWE_ 211
RA6 210
VCCK 209
RCKE 208
AVSS12_MEMPLL 207
AVDD12_MEMPLL 206
RCAS_ 205
RA4 204
VCC2IO 203
RA2 202
RBA1 201
RBA0 200
RA1 199
RA10 198
RA3 197
RA5 196
RA7 195
RA12 194
RA9 193
SC0
65
SY0
66
CVBS1P
67
CVBS0N
68
AIN5_R
100
AIN6_R
101
AIN5_L
102
CVBS0P
69
AVDD33_CVBS
70
AF
71
AVDD33_DIG
72
VCCK
73
ADIN0
74
ADIN1
75
ADIN2
76
ADIN3
77
ADIN4
78
ADIN5
79
AVDD33_XTAL_STB
80
XTALO
81
XTALI
82
AVDD33_DEMOD1
83
AVDD33_DEMOD1
84
ADCINN_DEMOD
85
ADCINP_DEMOD
86
AVSS33_DEMOD1
87
AVSS33_DEMOD1
88
AVDD12_DTDPLL
89
AVDD12_TVDPLL
90
AVDD12_APLL
91
AVDD33_AADC
92
AIN0_R
93
VMID_AADC
94
AIN0_L
95
AIN3_R
96
AIN4_R
97
AIN3_L
98
AIN4_L
99
AIN6_L
103
AVDD33_REF_AADC
104
LVDS_CTRL1
128 TUNER_CLK
127 TUNER_DATA
126 IF_AGC
125 OSCL0
124 OSDA0
123 GPIO1
122 ASPDIF
121 AOMCLK
120 AOLRCK
119 AOBCK
118 AOSDATA0
117 AVSS33_VDAC
116 AVSS33_VDAC
115 FS_VDAC
114 AVDD33_VDAC
113 VDAC_OUT
112 VCCK
111 AL1
110 AL0
109 AVSS33_DAC
108 AVDD33_DAC
107 AR1
106 AR0
105
VCC2IO
192 RCLK0_
191 RCLK0
190 RDQ5
189 RDQ2
188 VCC2IO
187 RDQ0
186 RDQ7
185 RDQ13
184 RDQ10
183 VCC2IO
182 RDQ8
181 RDQ15
180 RDQS1_
179 RDQS1
178 VCC2IO
177 RDQS0_
176 RDQS0
175 VCCK
174 RDQM0
173 RDQM1
172 VCC2IO
171 RDQ9
170 RDQ14
169 RDQ11
168 RDQ12
167 VCC2IO
166 RDQ6
165 RDQ1
164 RDQ3
163 RDQ4
162 VCCK
161 OPWM1
160 OPWM0
159 FSRC_WR
158 VCC3IO
157 AO0N
156 AO0P
155 AO1N
154 AO1P
153 AO2N
152 AO2P
151 AOCKN
150 AOCKP
149 AO3N
148 AO3P
147 AVDD33_LVDS
146 AE0N
145 AE0P
144 AE1N
143 AE1P
142 AE2N
141 AE2P
140 AECKN
139 AECKP
138 AE3N
137 AE3P
136 TP_VPLL
135 NC
134 AVDD12_VPLL
133 VCCK
132 LVDS_PWR_ON
131 VCC3IO
130 LVDS_CTRL2
129
EPAD_GND
257
CPC49
4.7uF
CPC49
4.7uF
TP20TP20
CPC16
0.1uF
CPC16
0.1uF
AEMC2
EMC/NC
SHIELD-HAIER
AEMC2
EMC/NC
SHIELD-HAIER
2
4
1
3
TP22TP22
CPC17
0.1uF
CPC17
0.1uF
CPR12 0CPR12 0
CPC13
0.1uF
CPC13
0.1uF
CPC18
0.1uF
CPC18
0.1uF
CPC24
0.1uF
CPC24
0.1uF
HD15
ESD_0402_10pF
HD15
ESD_0402_10pF
1 2
TP26TP26
CPC48
0.1uF
CPC48
0.1uF
CPC19
0.1uF
CPC19
0.1uF
CPC22
0.1uF
CPC22
0.1uF
CPC60
0.1uF
CPC60
0.1uF
CPC15
0.1uF
CPC15
0.1uF
CPC21
0.1uF
CPC21
0.1uF
CPC62
NS/4.7uF/10V
CPC62
NS/4.7uF/10V
CPC54
0.1uF
CPC54
0.1uF
TP29TP29
CPC47
4.7uF/10V
CPC47
4.7uF/10V
CPC14
0.1uF
CPC14
0.1uF
CPC51
4.7uF
CPC51
4.7uF
TP23TP23
TP43TP43
CPC63
NS/0.01uF
CPC63
NS/0.01uF
CPC20
0.1uF
CPC20
0.1uF
JR4
10K
JR4
10K
CPC23
0.1uF
CPC23
0.1uF
CPC41
1uF
CPC41
1uF
CPR11
4.7K
CPR11
4.7K
CPC65
NS/3300pF
CPC65
NS/3300pF
TP28TP28
CPC53
0.1uF
CPC53
0.1uF
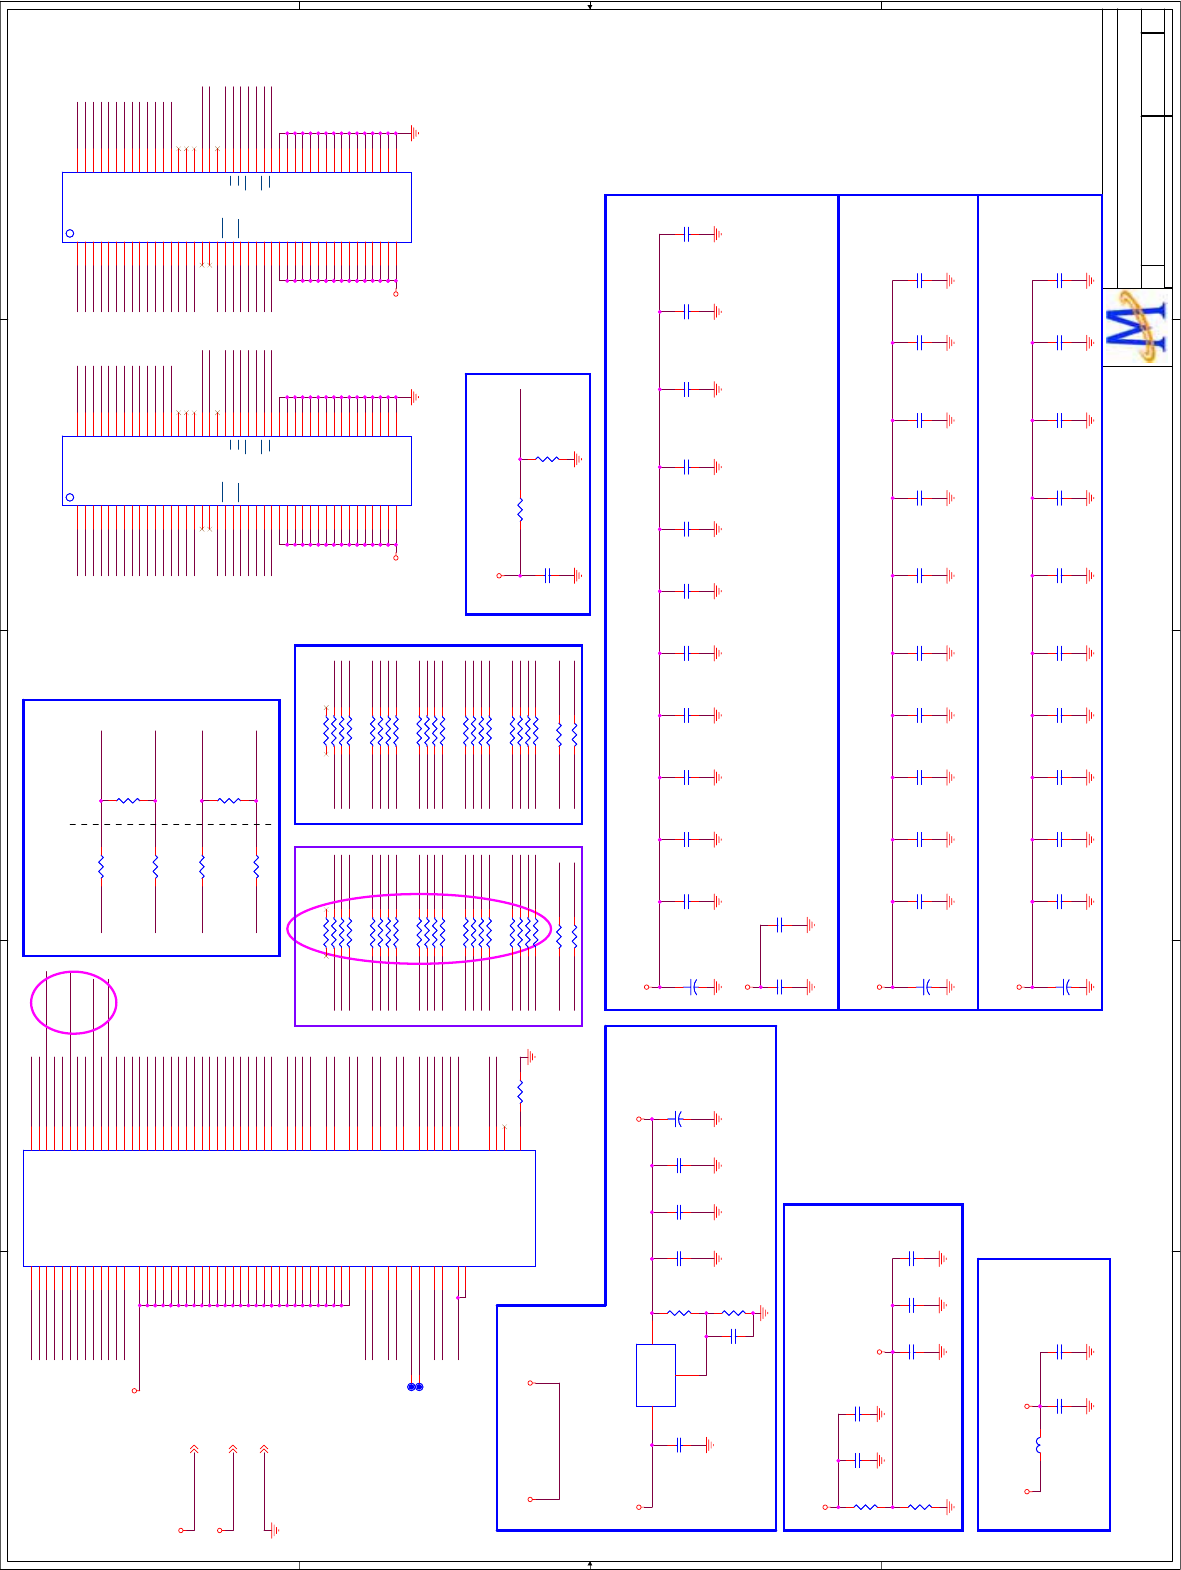
5
5
4
4
3
3
2
2
1
1
D D
C C
B B
A A
ARDQ8
ARDQ10
AM81_AV12
AM81_DV33
ARBA0A2_BA0
GND
ARCKEA2_CKE
VTT_CS
ARWE#
ARDQ2
A1_CKE
ARCS#
A1_A0
A1_A1
ACLK1#
ACLK1
ACLK0#
ACLK0
A1_A2
A1_A3
A1_A4
A1_A5
A1_A6
A1_A7
A2_RAS#
A2_WE#
A2_ODT
A2_CS#
A1_A8
A1_A9
A1_A10
A1_A11
ARDQ16
ARDQ17
A2_CAS#
A1_A12
ARCLK0
ARCLK0#
ARCLK1
ARDQ18
ARDQ19
ARDQ20
ARDQ21
ARDQ22
ARCLK1#
ARDQ23
ARDQ24
ARDQ25
ARDQ26
ARDQ27
ARDQ28
ARDQ29
ARDQ30
ARDQ31
ARCLK0
ARCLK0#
A2_A0
A2_A1
ARCLK1
ARCLK1#
A2_A2
A2_A3
A2_A4
A2_A5
A2_A6
A2_A7
A2_A8
A2_A9
A2_A10
A2_A11
A2_A12
A1_RAS#
A1_WE#
A1_ODT
A1_CS#
A1_CAS#
A1_CKE A2_CKE
ACLK0#
AMEMTP
AMEMTN
ACLK0
ARDQM2
ARDQM3
ARDQM0
ARDQM1
ARDQS1
ARDQS3
ARDQS3#
ARDQS1#
ARDQS0
ARDQS2
ARDQS2#
ARDQS0#
ACLK1#
ARDQ16
ARCAS#
ARA1
ARA5
ARA4
ARA12
ARDQ17
ARDQ31
ARDQ19
ARDQ30
ARA11
ARA9
ARA8
ARCKE
ARODT
ARA2
ARDQ18
ARA0
ARA6
ARA7
ARRAS#
ARCS#
ACLK1
ARDQ21
ARDQ20
ARDQ28
ARDQ23
ARWE#
ARA10
ARA3
ARBA1
ARBA0
ARDQ22
ARDQ29
ARDQ27
ARDQ24
ARDQ25
ARDQ26
ARDQ1
ARDQ2
ARDQ3
ARDQ7
ARDQ6
ARDQ5
ARDQ0
ARDQ4
ARDQS0
ARDQS1
ARDQS2
ARDQM2
ARDQM3
ARDQS3
GND
ARDQ15
ARDQ14
AAV12_MEMPLL
ARDQ0
ARDQ1
ARDQ9
ARDQ3
ARDQ4
ARDQ6
ARDQ13
ARDQ8
ARDQ12
ARDQ11
ARDQ7
AMEM_VREF
ARDQ9
ARDQ11
ARDQ12
ARDQ13
ARDQ14
A1_BA0
ARDQ10
ARDQ15
ARDQM1
ARDQM0
ARDQS3#
ARDQS2#
AMEM_VREF
ARDQS1#
ARDQS0#
AMEM_VREF
A1_BA1
A1_BA0 A2_BA0
A2_BA1
ARDQ5
ARCKE
ARA4
ARA11
ARA0
ARA2
ARA1
ARBA1
ARA12
ARA7
ARA5
ARA8
ARA6
ARA9
A2_A4
A2_A0
A2_CAS#
A2_CS#
A2_RAS#
A2_ODT ARODT
ARA10
ARA3
ARRAS#
ARCAS#
ARCS#
A2_WE#
A2_A10
A2_A3
A2_A7
A2_A12
A2_BA1
A2_A1
A2_A5
A2_A9
A2_A6
A2_A8
A2_A2
A2_A11
A1_WE#
ARA4
ARA8
ARA0
ARA6
A1_A10
A1_A3
ARA5
ARA9
ARA12
ARA7 A1_A7
A1_A12
A1_A9
A1_A5
ARA1
ARA11
ARA2
ARBA1
A1_A1
A1_BA1
A1_A2
A1_A11
A1_A8
A1_A6
A1_A4
A1_A0
A1_CAS#
A1_CS#
A1_RAS#
A1_ODTARODT
ARWE#
ARA10
ARA3
ARRAS#
ARCAS#
ARCS#
ARBA0
AM81_AV12
AM81_DV33
ADR_DV33 AM81_DDRV
AM81_DDRV
AM81_DDRV
AM81_DDRV
AMEM_VREF
AM81_AV12
AM81_DDRV
AM81_DDRV
AM81_DDRV AM81_DDRV
ADR_DV33AM81_DV33
AAV12_MEMPLL
AM81_DDRV
AM81_DDRV
AM81_AV12 2,3,5
AM81_DV33 2,3
GND 2,3,5
Title
Size Document Number Rev
Date: Sheet of
MediaTek Inc.
TEL:(03)567-0766 FAX:(03)578-7610
No.1-2, Innovation Rd 1, SBIP, Hsin-Chu City 300
Drawn
MT8281_D2V1
C
45Wednesday, October 14, 2009
DDR2x2 DRAM
MediaTek Confidential
Title
Size Document Number Rev
Date: Sheet of
MediaTek Inc.
TEL:(03)567-0766 FAX:(03)578-7610
No.1-2, Innovation Rd 1, SBIP, Hsin-Chu City 300
Drawn
MT8281_D2V1
C
45Wednesday, October 14, 2009
DDR2x2 DRAM
MediaTek Confidential
Title
Size Document Number Rev
Date: Sheet of
MediaTek Inc.
TEL:(03)567-0766 FAX:(03)578-7610
No.1-2, Innovation Rd 1, SBIP, Hsin-Chu City 300
Drawn
MT8281_D2V1
C
45Wednesday, October 14, 2009
DDR2x2 DRAM
MediaTek Confidential
Swap for 2 layer PCB layout 02/18/09
For Measurement
Swap for 2 layer PCB layout 02/18/09
CAPs for AV12_MEMPLL
Max
CAPs for DRAM IO Power ( Beneath the DDR#1 )
CAPs for DRAM IO Power ( Beneath the MT8281 )
CAPs for DRAM IO Power ( Beneath the DDR#2 )
Termination For CS#
Close to MT8281
Damping and Termination for CLK
Close to DRAM
800MHz 800MHzDDR#2 MSBDDR#1 LSB
MEM_VREF Circuit
Damping for DDR#2 ADDR/CMDDamping for DDR#1 ADDR/CMD
LDO#2 for DRAM Power
CD33 for improve High Frequecy line rejection
1.25 x (1+121/280)+55uA*121 = 1.8V /0.9A
ATP10ATP10
ACD118
4.7nF
ACD118
4.7nF
+
ACDE4
470uF/10v
+
ACDE4
470uF/10v
ARD57
1K_1%
R0402/SMD
ARD57
1K_1%
R0402/SMD
ACD155
NS/0.1uF
ACD155
NS/0.1uF
ARD64
NS/100
ARD64
NS/100
ACD126
0.1uF
ACD126
0.1uF
ACD140
0.1uF
ACD140
0.1uF
ARD55
121_1%
R0603/SMD
ARD55
121_1%
R0603/SMD
ACD136
NS/0.1uF
ACD136
NS/0.1uF
ACD15
NS/0.1uF
ACD15
NS/0.1uF
ACD149
330pF_C0G_50V
ACD149
330pF_C0G_50V
ACD145
0.1uF
ACD145
0.1uF
ACD116
1.5nF_X7R_50V
ACD116
1.5nF_X7R_50V
ACD138
4.7nF
ACD138
4.7nF
AUD3
32Mx16 DDR2
AUD3
32Mx16 DDR2
VDD
A1
NC
A2
VSS A3
VSSQ A7
UDQS
A8
VDDQ
A9
DQ14
B1
VSSQ B2
UDM
B3
UDQS
B7
VSSQ B8
DQ15
B9
VDDQ
C1
DQ9
C2
VDDQ
C3
VDDQ
C7
DQ8
C8
VDDQ
C9
DQ12
D1
VSSQ D2
DQ11
D3 DQ10
D7
VSSQ D8
DQ13
D9
VDD
E1
NC
E2
VSS E3
VSSQ E7
LDQS
E8
VDDQ
E9
DQ6
F1
VSSQ F2
LDM
F3
LDQS
F7
VSSQ F8
DQ7
F9
VDDQ
G1
DQ1
G2
VDDQ
G7
DQ0
G8
VDDQ
G9
DQ4
H1
VSSQ H2
DQ3
H3 DQ2
H7
VSSQ H8
DQ5
H9
VDDL
J1
VREF
J2
VSS J3
VSSDL J7
CK J8
VDD
J9
CKE
K2 WE K3
RAS K7
CK K8
ODT K9
NC/BA2 L1
BA0 L2
BA1 L3
CAS L7
CS L8
A10/AP M2
A1 M3
A2 M7
A0 M8
VDD
M9 VSS N1
A3 N2
A5 N3
A6 N7
A4 N8
A7 P2
A9 P3
A11 P7
A8 P8
VSS P9
VDD
R1
A12 R2
NC/A14 R3
NC/N15 R7
NC/A13 R8
VDDQ
G3
ACD129
0.01uF
ACD129
0.01uF
ACD133
0.1uF
ACD133
0.1uF
ARND9
56x4
ARND9
56x4
12
34
56
78
ACD134
330pF_C0G_50V
ACD134
330pF_C0G_50V
ARD56
1K_1%
R0402/SMD
ARD56
1K_1%
R0402/SMD
ACD119
330pF_C0G_50V
ACD119
330pF_C0G_50V
ACD127
1uF
ACD127
1uF
CD33
4.7uF/10V
CD33
4.7uF/10V
ARND13
56x4
ARND13
56x4
12
34
56
78
ACD156
1.5nF_X7R_50V
ACD156
1.5nF_X7R_50V
AFB79
0603_Bead
AFB79
0603_Bead
ACD151
4.7nF
ACD151
4.7nF
ARND8
56x4
ARND8
56x4
12
34
56
78
ACD160
0.1uF
ACD160
0.1uF
ACD115
4.7nF
ACD115
4.7nF
ARD6256ARD6256
ARD48
100
ARD48
100
ACD113
NS/0.1uF
ACD113
NS/0.1uF
ACD135
0.1uF
ACD135
0.1uF
ACD120
4.7nF
ACD120
4.7nF
ACD130
0.1uF
ACD130
0.1uF
ACD154
1.5nF_X7R_50V
ACD154
1.5nF_X7R_50V
ARD50
22
ARD50
22
ARD47
22
ARD47
22
ARND7
56x4
ARND7
56x4
12
34
56
78
ACD150
0.1uF
ACD150
0.1uF
ACD128
0.1uF
ACD128
0.1uF
ACD147
4.7nF
ACD147
4.7nF
ACD148
330pF_C0G_50V
ACD148
330pF_C0G_50V
ARND10
56x4
ARND10
56x4
12
34
56
78
ACD152
NS/0.1uF
ACD152
NS/0.1uF
ACD137
1.5nF_X7R_50V
ACD137
1.5nF_X7R_50V
ACD158
4.7uF/10V
ACD158
4.7uF/10V
ACD141
1.5nF_X7R_50V
ACD141
1.5nF_X7R_50V
ARND4
56x4
ARND4
56x4
12
34
56
78
ACD159
4.7uF/10V
ACD159
4.7uF/10V
ACD139
330pF_C0G_50V
ACD139
330pF_C0G_50V
ARD66
NS/100
ARD66
NS/100
ACD123
1.5nF_X7R_50V
ACD123
1.5nF_X7R_50V
ARD6156ARD6156
+
ACDE3
470uF/10v
+
ACDE3
470uF/10v
ARND11
56x4
ARND11
56x4
12
34
56
78
+
ACDE2
Low ESR 470uF/6.3v
+
ACDE2
Low ESR 470uF/6.3v
ARD6056ARD6056
ACD142
NS/0.1uF
ACD142
NS/0.1uF
ACD146
0.1uF
ACD146
0.1uF ACD143
4.7nF
ACD143
4.7nF
MT8282_BGA_20081008_Final
AU60B
MT8282_BGA_20081008_Final
AU60B
RDQ8 A10
RDQS1 A11
RDQS0_ A12
RDQ12 A14
RDQ1 A15
RDQ4 A16
RRAS_ A6
RDQ2 A8
RDQ10 B10
RDQS1_ B11
RDQS0 B12
RDQ9 B13
RDQ11 B14
RDQ3 B15
RCS_ B6
RDQ0 B9
RDQ13 C10
RDQ6 C14
RODT C7
RDQ5 C8
RDQ15 D10
RDQ14 D12
RDQM1 D13
RBA1 D5
RCAS_ D7
RDQ7 D9
RWE_ E1
RDQM0 E12
RBA2 E2
RCKE E3
RBA0 E4
RDQ17 G1
RDQ19 G2
RDQ20 G3
RDQ27 H1
RDQ25 H2
RDQ28 H3
RDQ22 H4
RDQM3 J2
RDQ30 J4
RDQS2_ K1
RDQS2 K2
RDQM2 K3
RDQS3 L1
RDQS3_ L2
RDQ24 L4
RDQ26 M2
RDQ29 M3
RDQ31 M4
RDQ16 M5
RDQ18 N1
RDQ23 N2
RDQ21 N4
REXTDN R1
MEMTN
A1
VCC2IO
A17
MEMTP
A2
RA1
A3
RA2
A4
RCLK0_
A7
RA9
B1
VCC2IO
B16
RA5
B3
RA11
B4
RA6
B5
RCLK0
B7
VCC2IO
B8
RA7
C1
VCC2IO
C15
RA12
C2
RA8
C5
RA0
C6
VCC2IO
C9
VCC2IO
D14
RA10
D2
RA3
D3
RA4
D6
VCC2IO
D8
VCC2IO
E13
VCC2IO
E7
VCC2IO
E8
VCC2IO
E9
VCC2IO
F1
VCC2IO
F2
VCC2IO
F3
RVREF0
F4
RVREF0
F5
VCC2IO
G4
VCC2IO
G5
AVDD12_MEMPLL
H8
AVSS12_MEMPLL
J8
VCC2IO
L5
VCC2IO
N5
RCLK1_
P1 RCLK1
P2
VCC2IO
P3
VCC2IO
P4
VCC2IO
P5
VCC2IO
R2
VCC2IO
R3
VCC2IO
R4
VCC2IO
T1
VCC2IO
T2
VCC2IO
T3
VCC2IO
U1
ARD49
22
ARD49
22
ARND12
56x4
ARND12
56x4
12
34
56
78
ACD131
330pF_C0G_50V
ACD131
330pF_C0G_50V
ARD6356ARD6356
ARD58 300
ARD58 300
ACD125
NS/0.1uF
ACD125
NS/0.1uF
+
ACDE5
470uF/10v
+
ACDE5
470uF/10v
ACD114
4.7nF
ACD114
4.7nF
ACD144
0.1uF
ACD144
0.1uF
ARND6
56x4
ARND6
56x4
12
34
56
78
ACD157
10uF/10V
ACD157
10uF/10V
AUD4
32Mx16 DDR2
AUD4
32Mx16 DDR2
VDD
A1
NC
A2
VSS A3
VSSQ A7
UDQS
A8
VDDQ
A9
DQ14
B1
VSSQ B2
UDM
B3
UDQS
B7
VSSQ B8
DQ15
B9
VDDQ
C1
DQ9
C2
VDDQ
C3
VDDQ
C7
DQ8
C8
VDDQ
C9
DQ12
D1
VSSQ D2
DQ11
D3 DQ10
D7
VSSQ D8
DQ13
D9
VDD
E1
NC
E2
VSS E3
VSSQ E7
LDQS
E8
VDDQ
E9
DQ6
F1
VSSQ F2
LDM
F3
LDQS
F7
VSSQ F8
DQ7
F9
VDDQ
G1
DQ1
G2
VDDQ
G7
DQ0
G8
VDDQ
G9
DQ4
H1
VSSQ H2
DQ3
H3 DQ2
H7
VSSQ H8
DQ5
H9
VDDL
J1
VREF
J2
VSS J3
VSSDL J7
CK J8
VDD
J9
CKE
K2 WE K3
RAS K7
CK K8
ODT K9
NC/BA2 L1
BA0 L2
BA1 L3
CAS L7
CS L8
A10/AP M2
A1 M3
A2 M7
A0 M8
VDD
M9 VSS N1
A3 N2
A5 N3
A6 N7
A4 N8
A7 P2
A9 P3
A11 P7
A8 P8
VSS P9
VDD
R1
A12 R2
NC/A14 R3
NC/N15 R7
NC/A13 R8
VDDQ
G3
AU64
AP1084-ADJ
TO-263-3/SMD
AU64
AP1084-ADJ
TO-263-3/SMD
IN
3
ADJ/GND
1
OUT 2
ACD153
0.1uF
ACD153
0.1uF
ARD51
100
ARD51
100
ACD121
0.1uF
ACD121
0.1uF
ATP11ATP11
ARD54
280_1%
R0603/SMD
ARD54
280_1%
R0603/SMD
ARD52
22
ARD52
22
ARND5
56x4
ARND5
56x4
12
34
56
78
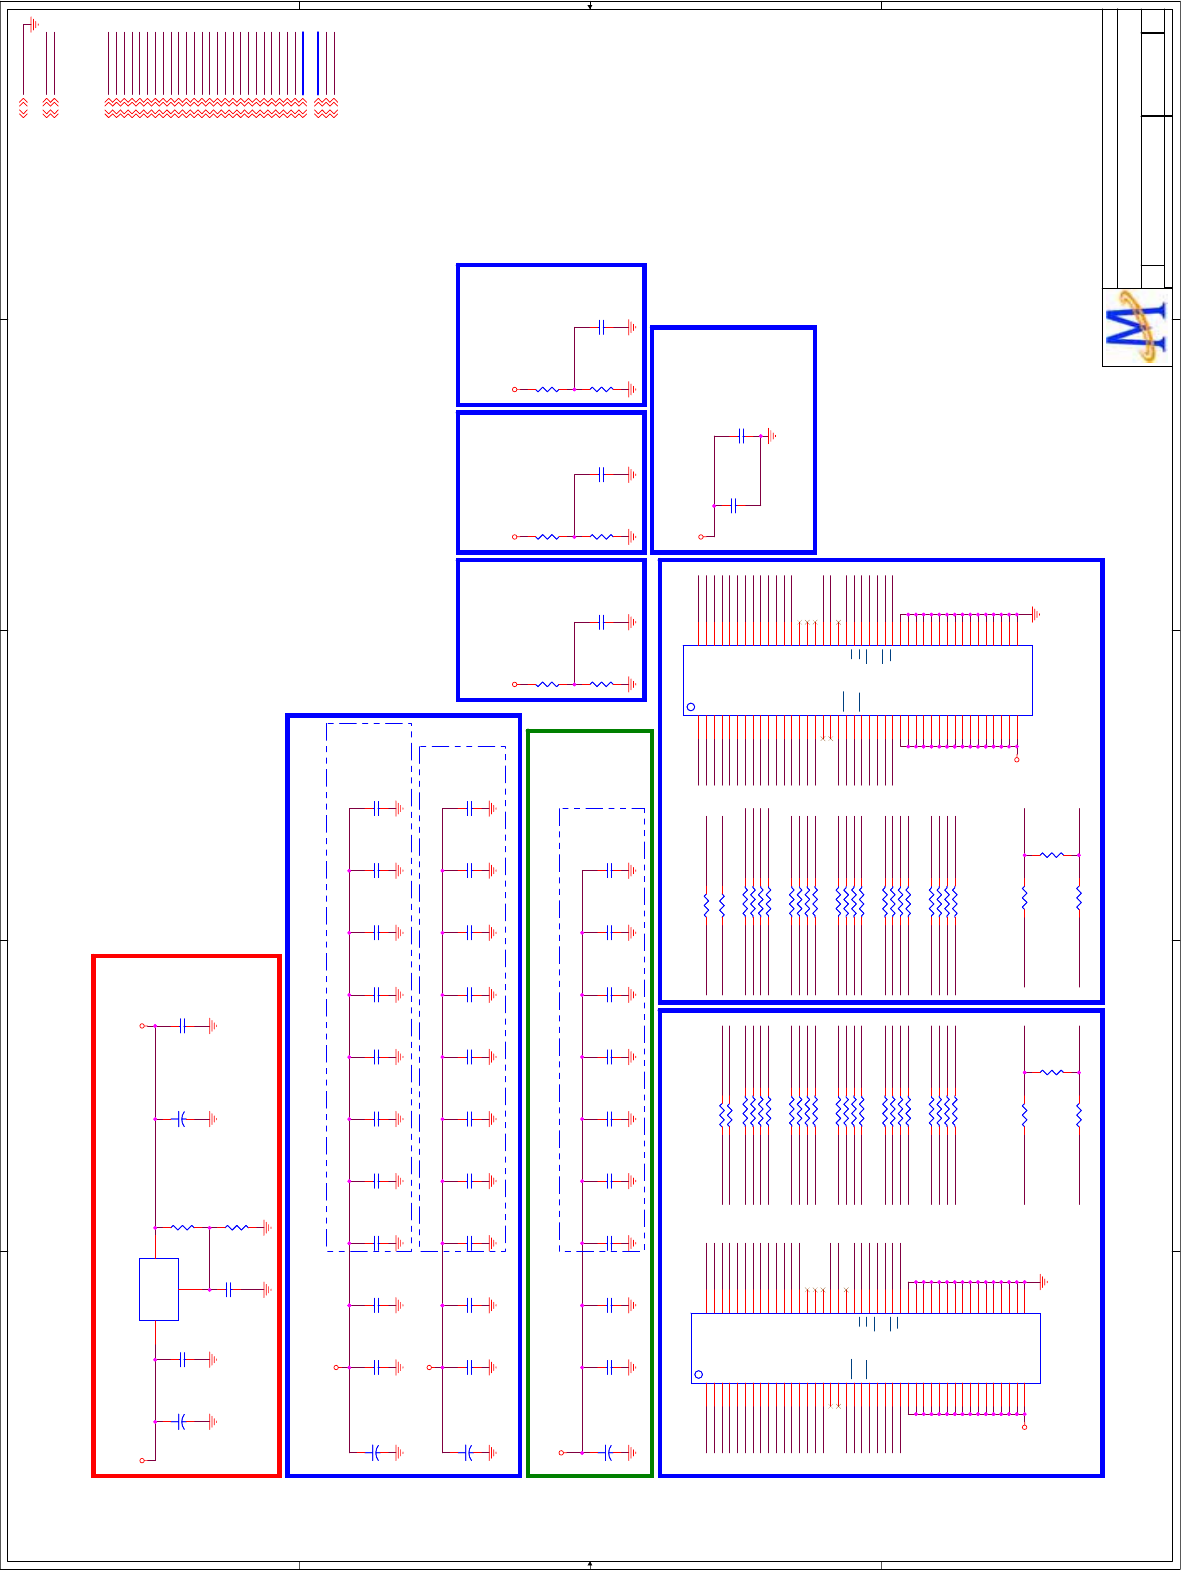
5
5
4
4
3
3
2
2
1
1
D D
C C
B B
A A
GND
VCC2IO
RDQ[31..0]
MRA[12..0]
RDQS0
RDQM1
RDQS0#
RDQS2
RDQM2
RDQM3
RDQS3
RDQS3#
RDQS2#
RDQS1
RDQS1#
RDQM0
RWE#
RCAS#
RCS#
RRAS#
RBA0
RBA1
RCLK0#
RCLK0
RODT
RCLK1
RCKE
RVREF3
RCLK1#
AVDD12_MEMPLL
AVDD12_MEMPLL
AV125
DV33
AVSS12_MEMPLL
RA11
RA2
1_A8
RCKE
2_A9
RA3
1_A9
2_A12
1_BA0
RA8
RA3
RCS#
RA2
2_A7
2_RAS#
2_WE#
RA8
1_A7
RDQS3#
RDQS2#
2_CKE
RVREF2 2_RAS#
2_WE#
2_ODT
2_CS#
2_CAS#
2_A0
2_A1
2_A2
2_A3
2_A4
2_A5
2_A6
2_A7
2_A8
2_A9
2_A10
2_A11
2_A12
CLK1#
CLK1
2_BA0
2_BA1
RBA0
1_RAS#
1_WE#
2_A1
RDQ1
RDQ2
RDQ3
RDQ7
RDQ6
RDQ5
RDQ0
RDQ4
RDQS0
1_CKE
RDQS1
RDQ15
RDQ14
RDQ9
RDQ13
RDQ8
1_A11
RDQ12
RDQ11
RDQ10
RDQM1
RDQM0
RVREF1
RDQS1#
RDQS0#
1_BA0
RCLK0
CLK0#RCLK0#
CLK0
1_A0
1_A6
1_A1
1_A2
1_A3
1_A4
1_A5
1_A6
1_A7
1_A8
1_A9
1_A10
1_A11
1_A12
1_BA1
CLK0
CLK0#
1_CS#
1_CAS#
1_ODT
1_A2
1_A5
2_A4
RWE#
RA9
RA12
RA7
CLK1
CLK1#RCLK1#
RCLK1
RDQ16
1_A1
RDQ17
RDQ31
RDQ19
RDQ30
RDQ18
RDQ21
RDQ20
RDQ28
RDQ23
RDQ22
RDQ29
RDQ27
RDQ24
RDQ25
RDQ26
2_BA1
RDQS2
RDQM2
RDQM3
RDQS3
1_WE#
1_A12
RA1
2_CAS#
RA4
RRAS#
1_BA1
RA0
2_ODT
RA4
RA7
2_A5
2_CKE
2_A0
2_A11
RA1
RBA1
RWE#
2_A10
RCAS#
RA5
2_A6
RA5
RCKE
RA0
RA11
1_A10
RA12
2_BA0
1_A4
1_CKE
2_CS#
1_A0
RODT
1_A3
RA9
1_CAS#
RRAS#
RCAS#
1_ODT
1_CS#
RBA1
RODT
RCS#
1_RAS#
2_A8
RA10
RA6
2_A3
2_A2
RA6
RA10
RBA0
GNDGNDGNDGND
RVREF1 RVREF3RVREF2
DDRV
DDRV
AV125
DDRV
DDRV
DDRV
DDRVDV33
DDRVDDRVDDRV
GND3,4,6,7,8,9,10,11,12,13,14
RCLK14
RODT4
RDQS3#4
RDQS34
RCLK0#4
RDQS2#4
RCLK04
RDQS1#4
RDQS24
RDQS14
RDQM24
DDRV4
RDQM34
RDQS0#4
MEM_VREF34
RDQS04
RDQM14
RCKE4
RDQM04
RWE#4
RBA04
RDQ[31..0]4
RBA14
RA[12..0]4
RCAS#4
RCLK1#4
RCS#4
RRAS#4
AVDD12_MEMPLL3,4,8,9,12
AV1253,4,8,9,12
DV333,4,6,7,11,12
Title
Size Document Number Rev
Date: Sheet of
MediaTek Inc.
TEL:(03)567-0766 FAX:(03)578-7610
No.1-2, Innovation Rd 1, SBIP, Hsin-Chu City 300
Drawn
MT5305A P1V1
V1
C
515Wednesday, October 14, 2009
DDR2 x 2
MediaTek Confidential
Title
Size Document Number Rev
Date: Sheet of
MediaTek Inc.
TEL:(03)567-0766 FAX:(03)578-7610
No.1-2, Innovation Rd 1, SBIP, Hsin-Chu City 300
Drawn
MT5305A P1V1
V1
C
515Wednesday, October 14, 2009
DDR2 x 2
MediaTek Confidential
Title
Size Document Number Rev
Date: Sheet of
MediaTek Inc.
TEL:(03)567-0766 FAX:(03)578-7610
No.1-2, Innovation Rd 1, SBIP, Hsin-Chu City 300
Drawn
MT5305A P1V1
V1
C
515Wednesday, October 14, 2009
DDR2 x 2
MediaTek Confidential
DDR#2 Bottom Side
[ RESERVE ]
DRAM DE-CAP.
[ RESERVE ]
DDR#1 Bottom Side
AV12_MEMPLL
MT5305A DE-CAP.
Main Chip Bottom Side
DDR#2 DDR#1
Damping for DDR#1 ADDR/CMD
Damping and Termination for CLK
NEAR DRAMNEAR IC
NEAR BRANCH
Damping and Termination for CLK
NEAR DRAMNEAR IC
Damping for DDR#2 ADDR/CMD
NEAR BRANCH
DRAM POWER DDRV
1.25 x (1+121/280)+55uA*121 = 1.8V for DDR2
RVREF
MT5305A
RVREF
DDR#1
RVREF
DDR#2
CD32 for improve High Frequecy line rejection
CD18
0.1uF
CD18
0.1uF
RND4 56x4RND4 56x4
1 2
3 4
5 6
7 8
CD15
0.1uF
CD15
0.1uF
CD30
NS/0.1uF
CD30
NS/0.1uF
RD26
1K_1%
RD26
1K_1%
RD19 56RD19 56
CD3
NS/0.1uF
CD3
NS/0.1uF
CD31
0.1uF
CD31
0.1uF
CD25
0.1uF
CD25
0.1uF
CD12
1uF
CD12
1uF
CD32
4.7uF/10V
CD32
4.7uF/10V
RD18
1K_1%
RD18
1K_1%
CM22
0.1uF
CM22
0.1uF
CD14
0.1uF
CD14
0.1uF
CD24
0.1uF
CD24
0.1uF
CD1
0.1uF
CD1
0.1uF
RND7 56x4RND7 56x4
12
34
56
78
CD29
0.1uF
CD29
0.1uF
CM21
0.1uF
CM21
0.1uF
RD14 22RD14 22
RND8 56x4RND8 56x4
1 2
3 4
5 6
7 8
CD4
NS/1uF
CD4
NS/1uF
CM23
0.1uF
CM23
0.1uF
CD19
0.1uF
CD19
0.1uF
RD13
100
RD13
100
RD21 56RD21 56
CM16
1uF
CM16
1uF
UD3
NT5TU32M16CG-25C
UD3
NT5TU32M16CG-25C
VDD
A1
NC
A2
VSS A3
VSSQ A7
UDQS
A8
VDDQ
A9
DQ14
B1
VSSQ B2
UDM
B3
UDQS
B7
VSSQ B8
DQ15
B9
VDDQ
C1
DQ9
C2
VDDQ
C3
VDDQ
C7
DQ8
C8
VDDQ
C9
DQ12
D1
VSSQ D2
DQ11
D3 DQ10
D7
VSSQ D8
DQ13
D9
VDD
E1
NC
E2
VSS E3
VSSQ E7
LDQS
E8
VDDQ
E9
DQ6
F1
VSSQ F2
LDM
F3
LDQS
F7
VSSQ F8
DQ7
F9
VDDQ
G1
DQ1
G2
VDDQ
G7
DQ0
G8
VDDQ
G9
DQ4
H1
VSSQ H2
DQ3
H3 DQ2
H7
VSSQ H8
DQ5
H9
VDDL
J1
VREF
J2
VSS J3
VSSDL J7
CK J8
VDD
J9
CKE
K2 WE K3
RAS K7
CK K8
ODT K9
NC/BA2 L1
BA0 L2
BA1 L3
CAS L7
CS L8
A10/AP M2
A1 M3
A2 M7
A0 M8
VDD
M9 VSS N1
A3 N2
A5 N3
A6 N7
A4 N8
A7 P2
A9 P3
A11 P7
A8 P8
VSS P9
VDD
R1
A12 R2
NC/A14 R3
NC/N15 R7
NC/A13 R8
VDDQ
G3
RD20 56RD20 56
CD41
0.1uF
CD41
0.1uF
+
CED4
NS/47uF/16V
+
CED4
NS/47uF/16V
UD1 AP1084-ADJUD1 AP1084-ADJ
IN
3
ADJ/GND
1
OUT 2
RD12 22RD12 22
CM19
0.1uF
CM19
0.1uF
RND6 56x4RND6 56x4
1 2
3 4
5 6
7 8
RD22 56RD22 56
CD17
0.1uF
CD17
0.1uF
CD20
NS/0.1uF
CD20
NS/0.1uF
+
CED5
NS/47uF/16V
+
CED5
NS/47uF/16V
RND5 56x4RND5 56x4
12
34
56
78
CD42
0.1uF
CD42
0.1uF
RD2
121_1%
R0603/SMD
RD2
121_1%
R0603/SMD
RD23
1K_1%
RD23
1K_1%
RND9 56x4RND9 56x4
1 2
3 4
5 6
7 8
UD2
NT5TU32M16CG-25C
UD2
NT5TU32M16CG-25C
VDD
A1
NC
A2
VSS A3
VSSQ A7
UDQS
A8
VDDQ
A9
DQ14
B1
VSSQ B2
UDM
B3
UDQS
B7
VSSQ B8
DQ15
B9
VDDQ
C1
DQ9
C2
VDDQ
C3
VDDQ
C7
DQ8
C8
VDDQ
C9
DQ12
D1
VSSQ D2
DQ11
D3 DQ10
D7
VSSQ D8
DQ13
D9
VDD
E1
NC
E2
VSS E3
VSSQ E7
LDQS
E8
VDDQ
E9
DQ6
F1
VSSQ F2
LDM
F3
LDQS
F7
VSSQ F8
DQ7
F9
VDDQ
G1
DQ1
G2
VDDQ
G7
DQ0
G8
VDDQ
G9
DQ4
H1
VSSQ H2
DQ3
H3 DQ2
H7
VSSQ H8
DQ5
H9
VDDL
J1
VREF
J2
VSS J3
VSSDL J7
CK J8
VDD
J9
CKE
K2 WE K3
RAS K7
CK K8
ODT K9
NC/BA2 L1
BA0 L2
BA1 L3
CAS L7
CS L8
A10/AP M2
A1 M3
A2 M7
A0 M8
VDD
M9 VSS N1
A3 N2
A5 N3
A6 N7
A4 N8
A7 P2
A9 P3
A11 P7
A8 P8
VSS P9
VDD
R1
A12 R2
NC/A14 R3
NC/N15 R7
NC/A13 R8
VDDQ
G3
CD13
0.1uF
CD13
0.1uF
+
CED1
10uF/16v
+
CED1
10uF/16v
CM15
4.7uF/10V
CM15
4.7uF/10V
CD16
0.1uF
CD16
0.1uF
RND2 56x4RND2 56x4
1 2
3 4
5 6
7 8
CD22
1uF
CD22
1uF
RND3 56x4RND3 56x4
12
34
56
78
RD6 22RD6 22
CD26
0.1uF
CD26
0.1uF
RD7
100
RD7
100
CD11
4.7uF/10V
CD11
4.7uF/10V
CM20
0.1uF
CM20
0.1uF
+
CEM1
47uF/16V
+
CEM1
47uF/16V
RD24
1K_1%
RD24
1K_1%
CD23
0.1uF
CD23
0.1uF
RD17
1K_1%
RD17
1K_1%
RND1 56x4RND1 56x4
1 2
3 4
5 6
7 8
CM17
0.1uF
CM17
0.1uF
RD8 22RD8 22
RND10 56x4RND10 56x4
1 2
3 4
5 6
7 8
CM18
0.1uF
CM18
0.1uF
RD25
1K_1%
RD25
1K_1%
RD1
280_1%
R0603/SMD
RD1
280_1%
R0603/SMD
CD28
0.1uF
CD28
0.1uF
+
CED2
10uF/16v
+
CED2
10uF/16v
CD21
4.7uF/10V
CD21
4.7uF/10V
CD27
0.1uF
CD27
0.1uF
CD40
0.1uF
CD40
0.1uF
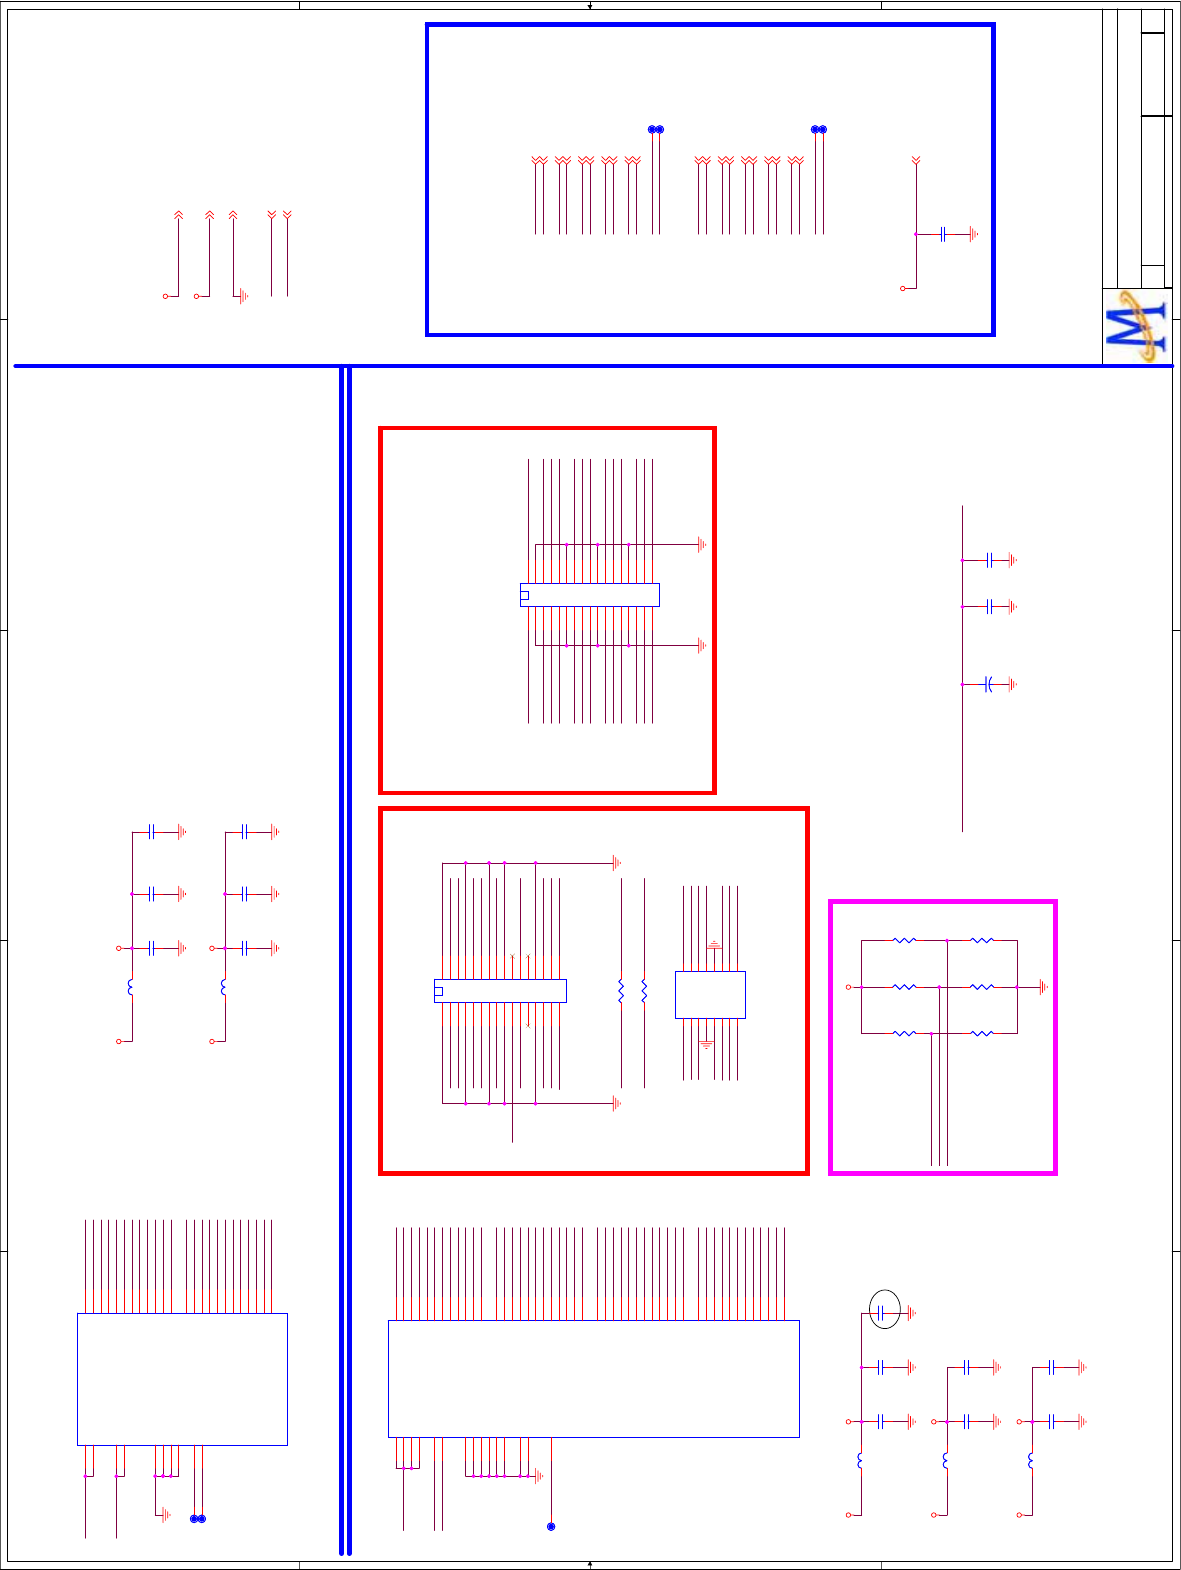
5
5
4
4
3
3
2
2
1
1
D D
C C
B B
A A
TX_BO4P
TX_BO4N
TX_BO3P
TX_BOCKP
TX_BOCKN
TX_BO2P
TX_BO2N
TX_BO1P
TX_BO1N
TX_BO0P
TX_BO0N
TX_BO3N
TX_BE3N
TX_BE3P
TX_BECKN
TX_BECKP
TX_BE4N
TX_BE4P
TX_BE2N
TX_BE2P
TX_BE1N
TX_BE1P
TX_BE0P
TX_BE0N
VPLL_TP
AV12_LVDSTX
AV33_LVDSTX
AV12_LVDSVPLL
TX_AE0N
TX_AO4P
TX_AO4N
TX_AO3P
TX_AO3N
TX_AE4P
TX_AE4N
TX_AE3P
TX_AE3N
TX_AECKP
TX_AECKN
TX_AE2P
TX_AE2N
TX_AE1P
TX_AE1N
TX_AE0P
TX_AOCKN
TX_AOCKP
TX_AO2P
TX_AO2N
TX_AO1P
TX_AO1N
TX_AO0P
TX_AO0N
AV33_LVDSTX
AO4P
AO4N
AO3P
AO3N
AOCKP
AOCKN
AO2P
AO2N
AO1P
AO1N
AO0P
AO0N
AE4P
AE4N
AE3P
AE3N
AECKP
AECKN
AE2P
AE2N
AE1P
AE1N
AE0P
AE0N
PanelVCC
PanelVCC
AV12_LVDSTX
GND
AV33_LVDSRX
AOCKP
AOCKN
AO3P
AO1P
AO1N
AO2P
AO2N
AO3N
AO0P
AO4N
AO0N
AE3P
AE3N
AE4P
AE4N
AE1P
AE1N
AE2P
AE2N
AE0P
AECKP
AECKN
AE0NVIPLL_TN
VIPLL_TP
AV12_LVDSRX
AO4P
AV33_LVDSRX
AV12_LVDSRX
AV12_LVDSVPLL
AM81_AV33
AM81_AV12
PNL0
PNL1
PNL2
TX_BE0N
TX_BE1N
TX_BE2N
TX_BO0N
TX_BE0P
TX_BE1P
TX_BE2P
TX_BECKN
TX_BE3N
TX_BO0P
TX_BE4N
TX_BO1N
TX_BO2N
TX_BO1P
TX_BECKP
TX_BO2P
TX_BE3P
TX_BE4P
TX_BOCKN
TX_BO3N
TX_BO4N
TX_BOCKP
TX_BO3P
TX_BO4P
TX_AO3N
TX_AO2N
TX_AO0N
TX_AOCKN
TX_AO1N
M81_LVDSVDD
M81_LVDSVDD
TX_AO1P
TX_AOCKP
TX_AO2P
TX_AO0P
TX_AO3P
M81_LVDSVDD
M81_LVDSVDD
DIMMING_OUT#BL_PWM#
TX_AO4N TX_AO4P
PNL0
PNL1 PNL2
TX_AE4N
TX_AE0N TX_AE0P
TX_AE1N TX_AE1P
TX_AE2N TX_AE2P
TX_AECKN
TX_AECKP
TX_AE3N TX_AE3P
TX_AE4P
M81_LVDSVDD
DIMMING_OUT
BL_PWM
BL_PWM# BL_PWM
DIMMING_OUT# DIMMING_OUT
M81_LVDSVDD M81_LVDSVDD
PanelVCC
AM81_AV33
AM81_AV12
AM81_AV33
AM81_AV12
AM81_AV12
AM81_AV33
AM81_AV12
AV33_LVDSRX
AV12_LVDSRX
AV33_LVDSTX
AV12_LVDSTX
AV12_LVDSVPLL
AM81_AV33
GND 2,3,4
AM81_AV33 2,3
AM81_AV12 2,3,4
O1N
O1P
O0N
O0P
O2N
O2P
OCKN
OCKP
O3N
O3P
E0N
E0P
E1N
E1P
E2N
E2P
ECKN
ECKP
E3N
E3P
LVDSVDD
DIMMING_OUT
BL_PWM
Title
Size Document Number Rev
Date: Sheet of
MediaTek Inc.
TEL:(03)567-0766 FAX:(03)578-7610
No.1-2, Innovation Rd 1, SBIP, Hsin-Chu City 300
Drawn
MT8281_D2V1
C
55Wednesday, October 14, 2009
LVDS TX / RX
MediaTek Confidential
Title
Size Document Number Rev
Date: Sheet of
MediaTek Inc.
TEL:(03)567-0766 FAX:(03)578-7610
No.1-2, Innovation Rd 1, SBIP, Hsin-Chu City 300
Drawn
MT8281_D2V1
C
55Wednesday, October 14, 2009
LVDS TX / RX
MediaTek Confidential
Title
Size Document Number Rev
Date: Sheet of
MediaTek Inc.
TEL:(03)567-0766 FAX:(03)578-7610
No.1-2, Innovation Rd 1, SBIP, Hsin-Chu City 300
Drawn
MT8281_D2V1
C
55Wednesday, October 14, 2009
LVDS TX / RX
MediaTek Confidential
LVDS Input
LVDS PORT B(HORIZONTAL)LVDS PORT A(HORIZONTAL)
For 1080P 120Hz
LVDS RX Connector
Max
LVDS RX
LVDS TX
20081104 modify by ACD YB Luo
ATP13
TP/SMD/D0.6
ATP13
TP/SMD/D0.6
AC1013
4.7uF/10V
C0805/SMD
AC1013
4.7uF/10V
C0805/SMD
AC160
0.1uF
C0402/SMD/A
AC160
0.1uF
C0402/SMD/A
MT8282_BGA_20081008_Final
AU60E
MT8282/BGA309/P1.0/B0.5
MT8282_BGA_20081008_Final
AU60E
MT8282/BGA309/P1.0/B0.5
AO0P D17
AO0N D18
AE0N D19
AE0P D20
AO1P E17
AO1N E18
AE1N E19
AE1P E20
AO2P F17
AO2N F18
AE2N F19
AE2P F20
AOCKP G17
AOCKN G18
AECKN G19
AECKP G20
AO3P H17
AO3N H18
AE3N H19
AE3P H20
AO4P J17
AO4N J18
AE4N J19
AE4P J20
BE0N M17
BE0P M18
BO0P M19
BO0N M20
BE1N N17
BE1P N18
BO1P N19
BO1N N20
BE2N P17
BE2P P18
BO2P P19
BO2N P20
BECKN R17
BECKP R18
BOCKP R19
BOCKN R20
BE3N T17
BE3P T18
BO3P T19
BO3N T20
BE4N U17
BE4P U18
BO4P U19
BO4N U20
AVSS33_LVDSA
H16
AVSS33_LVDSA
J16
AVDD33_LVDSA
K17
AVDD33_LVDSA
K18
TP_VPLL
K20
AVSS12_VPLL
L17
AVSS12_LVDS
L18
AVDD12_VPLL
L19
AVDD12_LVDS
K19
AVSS33_LVDSB
R16
AVSS33_LVDSB
T16
AVDD33_LVDSB
U16
AVSS33_LVDSB
V16
AVDD33_LVDSB
V17
AVSS33_LVDSB
V19
BR36
0
R0402/SMD
BR36
0
R0402/SMD
AC1026
0.1uF
C0402/SMD/A
AC1026
0.1uF
C0402/SMD/A
AC1012
330pF
C0402/SMD/A
AC1012
330pF
C0402/SMD/A
BR37
4.7K/NC
R0402/SMD
BR37
4.7K/NC
R0402/SMD
MT8282_BGA_20081008_Final
AU60D
MT8282/BGA309/P1.0/B0.5
MT8282_BGA_20081008_Final
AU60D
MT8282/BGA309/P1.0/B0.5
RE0P W10
RE1P W11
RE2P W12
RECLKP W13
RE3P W14
RE4P W15
RO0P W4
RO1P W5
RO2P W6
ROCLKP W7
RO3P W8
RO4P W9
RE0N Y10
RE1N Y11
RE2N Y12
RECLKN Y13
RE3N Y14
RE4N Y15
RO0N Y4
RO1N Y5
RO2N Y6
ROCLKN Y7
RO3N Y8
RO4N Y9
AVDD33_LVDSRXE
U10 AVDD33_LVDSRXO
U6
AVDD12_LVDSRX_CK
U7
AVDD12_LVDSRX
U8
TN_VIPLL
U9
AVSS33_LVDSRX
V10
AVSS33_LVDSRX
V6
AVSS12_LVDSRX_CK
V7
AVSS12_LVDSRX
V8
TP_VIPLL
V9
+
ACE650
220uF/16V/NS
ECAP_100UF_SMD
+
ACE650
220uF/16V/NS
ECAP_100UF_SMD
AC1010
4.7uF/10V
C0805/SMD
AC1010
4.7uF/10V
C0805/SMD
BR38
4.7K/NC
R0402/SMD
BR38
4.7K/NC
R0402/SMD
AFB80
0603_Bead
BEAD/SMD/0603
AFB80
0603_Bead
BEAD/SMD/0603
ATP30
TP/SMD/D0.6
ATP30
TP/SMD/D0.6
AC1015
330pF
C0402/SMD/A
AC1015
330pF
C0402/SMD/A
AC1017
0.1uF
C0402/SMD/A
AC1017
0.1uF
C0402/SMD/A
ATP27
TP/SMD/D0.6
ATP27
TP/SMD/D0.6
ATP29
TP/SMD/D0.6
ATP29
TP/SMD/D0.6
ATP28
TP/SMD/D0.6
ATP28
TP/SMD/D0.6
AC1011
0.1uF
C0402/SMD/A
AC1011
0.1uF
C0402/SMD/A
CND3
LVDS-16X2-P2.0_H
LVDS-16X2-P2.0_H
CND3
LVDS-16X2-P2.0_H
LVDS-16X2-P2.0_H
1 2
3 4
5 6
7 8
9 10
11 12
13 14
15 16
17 18
21
2019
22
23 24
25 26
27 28
29 30
31 32
ATP12
TP/SMD/D0.6
ATP12
TP/SMD/D0.6
AC1021
0.1uF
C0402/SMD/A
AC1021
0.1uF
C0402/SMD/A
CND4
LVDS-8X2-P2.0_H
LVDS-8X2-P2.0_H
CND4
LVDS-8X2-P2.0_H
LVDS-8X2-P2.0_H
1
3
5
7
9
11
13
15
2
4
6
8
10
12
14
16
AC1024
0.1uF
C0402/SMD/A
AC1024
0.1uF
C0402/SMD/A
CND5
LVDS-17X2-P2.0_H
LVDS-17X2-P2.0_H
CND5
LVDS-17X2-P2.0_H
LVDS-17X2-P2.0_H
1 2
3 4
5 6
7 8
9 10
11 12
13 14
15 16
17 18
21
2019
22
23 24
25 26
27 28
29 30
31 32
33 34
BR33
4.7K/NC
R0402/SMD
BR33
4.7K/NC
R0402/SMD
AC1022
0.1UF
C0402/SMD/A
AC1022
0.1UF
C0402/SMD/A
ATP14
TP/SMD/D0.6
ATP14
TP/SMD/D0.6
AC1014
0.1uF
C0402/SMD/A
AC1014
0.1uF
C0402/SMD/A
AFB84
0603_Bead
BEAD/SMD/0603
AFB84
0603_Bead
BEAD/SMD/0603
AFB81
0603_Bead
BEAD/SMD/0603
AFB81
0603_Bead
BEAD/SMD/0603
BR46 0R/NCBR46 0R/NC
BR34
4.7K/NC
R0402/SMD
BR34
4.7K/NC
R0402/SMD
AC1020
4.7uF/10V
C0805/SMD
AC1020
4.7uF/10V
C0805/SMD
AC1025
4.7uF/10V
C0805/SMD
AC1025
4.7uF/10V
C0805/SMD
BR39 0R/NCBR39 0R/NC
AFB82
0603_Bead
BEAD/SMD/0603
AFB82
0603_Bead
BEAD/SMD/0603
AC1016
0.1uF
C0402/SMD/A
AC1016
0.1uF
C0402/SMD/A
AC1023
4.7uF/10V
C0805/SMD
AC1023
4.7uF/10V
C0805/SMD
BR35
4.7K/NC
R0402/SMD
BR35
4.7K/NC
R0402/SMD
AFB83
0603_Bead
BEAD/SMD/0603
AFB83
0603_Bead
BEAD/SMD/0603
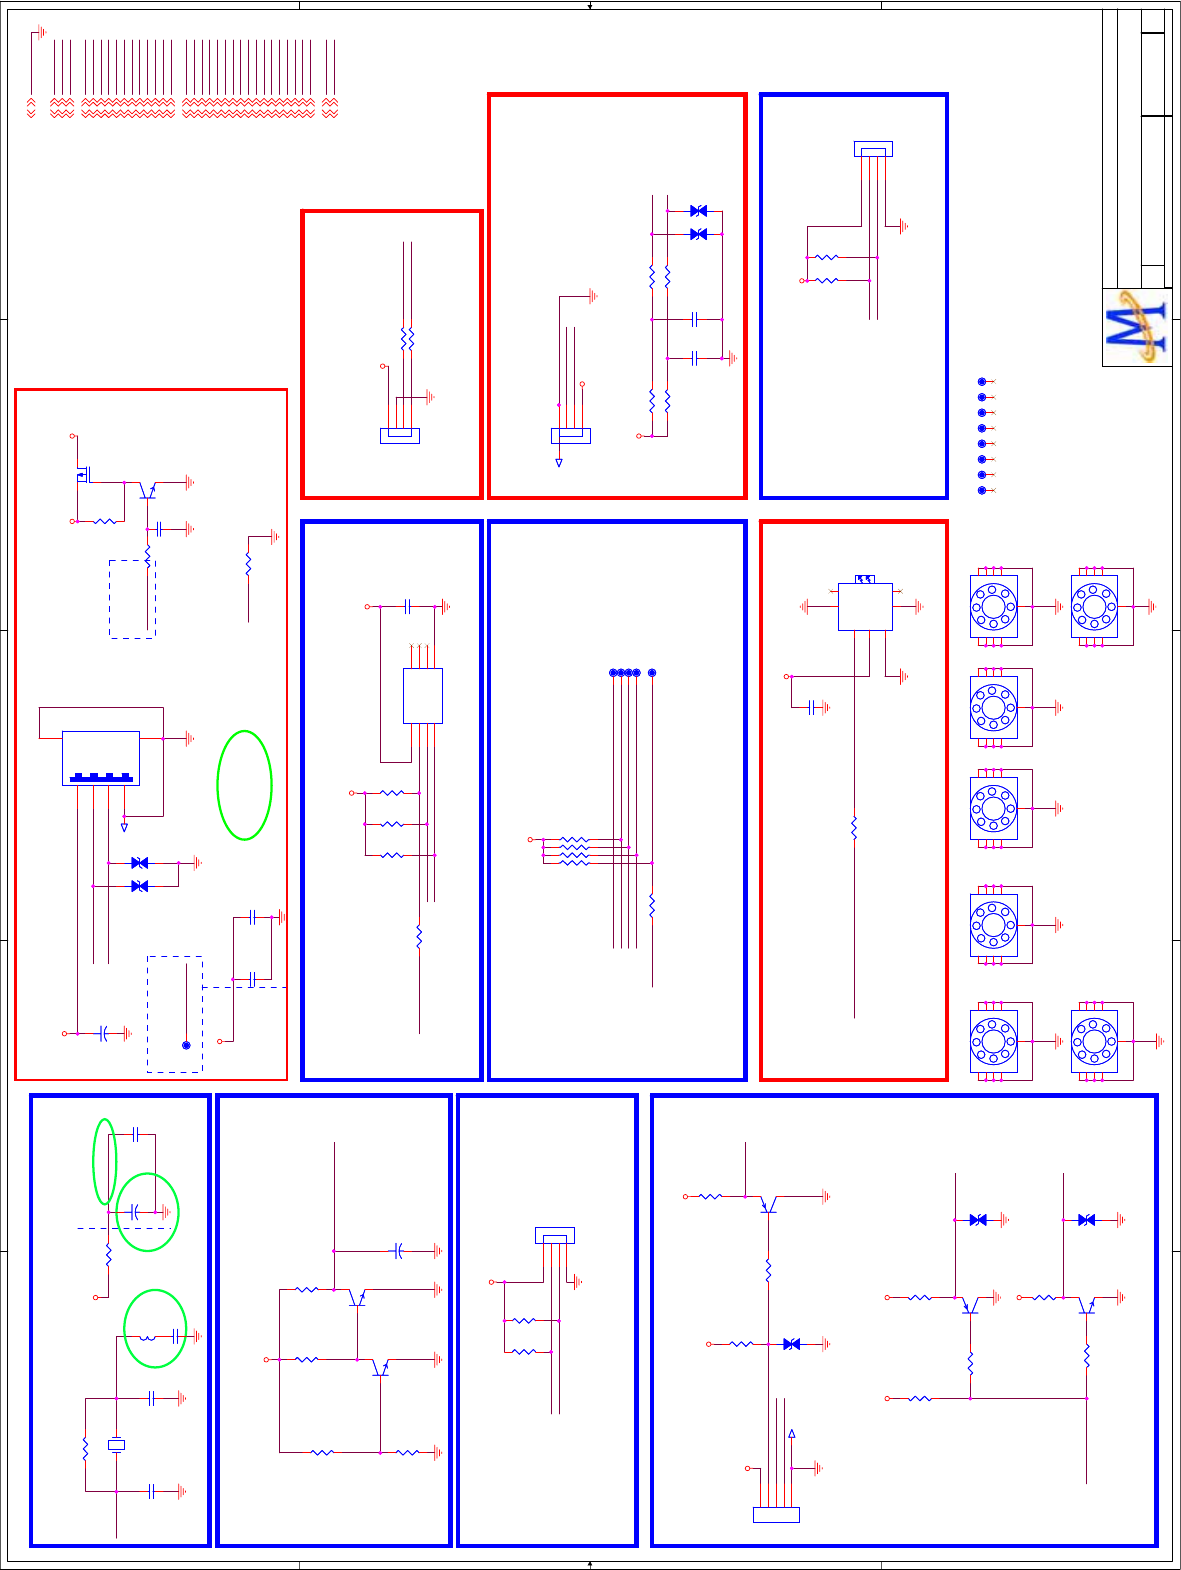
5
5
4
4
3
3
2
2
1
1
D D
C C
B B
A A
+5VSB
AV33
+3V3SB
AV125
DV33
GND
U0TX
U0RX
ASPDIF
+5V
USB_PWR_EN0
USB_VRT
USB_PWR_ERR0
USB_DP0
USB_DM0
U1RX
ORESET#
OXTALO
OSDA0
OSCL0
AVDD33_XTAL_STB
OIRI
OXTALI
JTDO
JTCK
JTRST#
OPCTRL2
AVDD33_USB
OPWM2
U0TX
U0RX
ORESET#
AVSS33_XTAL
OXTALI
JTDO
OPCTRL2
JTCK
OPWM2
OPCTRL0
OSCL0
OSDA0
AVDD33_USB
USB_VRT
AVSS33_USB
OXTALO
AVDD33_XTAL_STB
USB_PWR_EN0
USB_DM0
USB_DP0
USB_PWR_ERR0
LED_GRE#
LED_RED#
OIRIIR_IN
LED_RED#
K0ADIN0
ADIN1
LED_GRE#
OPCTRL2
K1
K0
ADIN1
ADIN0
K1
DVD_IR
LED_GRE#
DVD_IR
ASPDIF
OPCTRL0
U1RX
U1TX
U1TX
U1RX
JTRST#
SPDIF
OSCL0
OSDA0
+3V3SB
+3V3SB
+3V3SB
DV33
DV33
DV33
AV33
+5V +5V_USB
+5V_USB
+5VSB
+3V3SB
+3V3SB
+3V3SB
+3V3SB
+3V3SB
+3V3SB
+3V3SB
+5V
+3V3SB
DV33
GND3,4,5,7,8,9,10,11,12,13,14
U1RX4
USB_PWR_EN04
USB_PWR_ERR04
USB_DM04
USB_DP04
USB_VRT4
+5VSB3,9,14
+3V3SB3,8,9,12
DV333,4,5,7,11,12
AV333,4,8,9,10,12,13
AV1253,4,5,8,9,12
+5V3,8,10,12,14
U0RX4,9
U0TX4,9
ASPDIF4,7
ORESET#4
OXTALO4
OSDA04
OSCL04
AVDD33_XTAL_STB4
OIRI4
OXTALI4
JTDO4
JTCK4
JTRST#4
OPCTRL24
AVDD33_USB3,4,8,9,10,12,13
OPWM24
ADIN14
ADIN04
DVD_IR9
OPCTRL04
U1RX4
U1TX4
Title
Size Document Number Rev
Date: Sheet of
MediaTek Inc.
TEL:(03)567-0766 FAX:(03)578-7610
No.1-2, Innovation Rd 1, SBIP, Hsin-Chu City 300
Drawn
MT5305A P1V1
V1
C
615Thursday, October 15, 2009
PERIPHERAL
MediaTek Confidential
Title
Size Document Number Rev
Date: Sheet of
MediaTek Inc.
TEL:(03)567-0766 FAX:(03)578-7610
No.1-2, Innovation Rd 1, SBIP, Hsin-Chu City 300
Drawn
MT5305A P1V1
V1
C
615Thursday, October 15, 2009
PERIPHERAL
MediaTek Confidential
Title
Size Document Number Rev
Date: Sheet of
MediaTek Inc.
TEL:(03)567-0766 FAX:(03)578-7610
No.1-2, Innovation Rd 1, SBIP, Hsin-Chu City 300
Drawn
MT5305A P1V1
V1
C
615Thursday, October 15, 2009
PERIPHERAL
MediaTek Confidential
By Ray
IR Receiver & LED
UART Port 0
FOR CODE DOWNLOAD AND DEBUGGING
NEAR IC
RESET#
54MHz CRYSTAL
OPTICAL
Near Connector
JTAG Port
Hi = > WP
Lo = > WRITE
IIC ADDRESS "A0"
SYSTEM EEPROM
NEAR IC
USB PORT
LO = > POWER OFF
HI = > POWER ON
LO=> OC
HI = > NORMAL
NEAR IC
20090612
Modify 09.06.19
KEY PANEL
HI = > LED RED
LO=> LED GREEN
FOR DEBUGGING
RESEVED FOR EXTEND FUNCTION
Layout anywhere
FRONT LIGHT SENSOR
TP25TP25
PR1
33
PR1
33
R1774 100R1774 100
Q63
2N3904
Q63
2N3904
1
3 2
CNA2
USB_H
CNA2
USB_H
__VBUS
1
__D-
2
__D+
3
__GND
4
GND
5GND 6
YR6 100YR6 100
R1770 10KR1770 10K
FM1FM1
CNB2
PH3-4A/NC
CNB2
PH3-4A/NC
1
2
3
4
D2
ESD_0402_10pF
D2
ESD_0402_10pF
12
YU1
EEPROM 24C32-W
YU1
EEPROM 24C32-W
NC 1
NC 2
NC 3
GND 4
SDA
5SCL
6WP
7VCC
8
R1776 4.7KR1776 4.7K FM2FM2
R15
4.7K
R15
4.7K
D36
ESD_0402_0.15pF
D36
ESD_0402_0.15pF
12
H5 HOLE/GND
H5 HOLE/GND
22
33
44
55
9
9
8
8
7
7
6
6
1
1
FM8FM8
T14T14
TR6
3.9K
TR6
3.9K
H9 HOLE/GND
H9 HOLE/GND
22
33
44
55
9
9
8
8
7
7
6
6
1
1
D8
ESD_0402_10pF
D8
ESD_0402_10pF
12
Q67
2N3904
Q67
2N3904
1
3 2
C812
0.1uF
C812
0.1uF
C629
0.1uF
C629
0.1uF
D37
ESD_0402_0.15pF
D37
ESD_0402_0.15pF
12
CNE3
SIP-4P-2.0-H
CNE3
SIP-4P-2.0-H
1
2
3
4
XR9 1M/NCXR9 1M/NC
TP51TP51
TP47TP47
R1778 4.7KR1778 4.7K
C628
0.1uF
C628
0.1uF
H8 HOLE/GND
H8 HOLE/GND
22
33
44
55
9
9
8
8
7
7
6
6
1
1
R13
4.7K
R13
4.7K
FM7FM7
TP50TP50
Q62
AO3401
Q62
AO3401
1
23
Q2
2N3906
Q2
2N3906
1
32
YR7 100YR7 100
UC3
NS/1uF
UC3
NS/1uF
R1777
1k
R1777
1k
CNB1
PH3-4A
CNB1
PH3-4A
1
2
3
4
JRN1
10K
JRN1
10K
1 2
3 4
5 6
7 8
R1769
47K
R1769
47K
Q65
2N3904
Q65
2N3904
1
3 2
H1 HOLE/GND
H1 HOLE/GND
22
33
44
55
9
9
8
8
7
7
6
6
1
1
XY1
54MHz
XY1
54MHz
FM6FM6
XC4
10pF
XC4
10pF
Q51
2N3906
Q51
2N3906
1
32
D7
ESD_0402_10pF
D7
ESD_0402_10pF
12
JR3
33
JR3
33
YR5 100YR5 100
UC2
0.1uF
UC2
0.1uF
TR2
4.7K
TR2
4.7K
C744
1uF
C744
1uF
D4
ESD_0402_10pF
D4
ESD_0402_10pF
12
TR1
10K
TR1
10K
YR2
4.7K
YR2
4.7K
+
XC18
10uF/16v
+
XC18
10uF/16v
+
CE15
100uF/16V
+
CE15
100uF/16V
XC3
10pF
XC3
10pF
FM5FM5
J3
GQ-05_H
J3
GQ-05_H
GND
3
VCC
2
IN
1
5
544
7
766
AR7
4.7K
AR7
4.7K
CNE2
SIP-4P-2.0-H
CNE2
SIP-4P-2.0-H
1
2
3
4
YR3
4.7K
YR3
4.7K
Q64
2N3904
Q64
2N3904
1
3 2
H4 HOLE/GND
H4 HOLE/GND
22
33
44
55
9
9
8
8
7
7
6
6
1
1
R1773 1.5KR1773 1.5K
AR8
4.7K
AR8
4.7K
TP46TP46
D5
ESD_0402_10pF
D5
ESD_0402_10pF
12
XC17
1nF
XC17
1nF
TP48TP48
FM4FM4
YR1
4.7K
YR1
4.7K
H3 HOLE/GND
H3 HOLE/GND
22
33
44
55
9
9
8
8
7
7
6
6
1
1
R1771 1.5KR1771 1.5K
T7T7
+
CE643
100uF/16v
+
CE643
100uF/16v YC1
0.1uF
YC1
0.1uF
R1768
47K
R1768
47K
R66
1k
R66
1k
AR6
4.7K
AR6
4.7K
UR5
5.1K_1%
UR5
5.1K_1%
T8T8
FM3FM3
XL3
820nH
XL3
820nH
TR3
12K
TR3
12K
R1772 10KR1772 10K
R1767 0R1767 0
CNE1
TJC2004-5AW
CNE1
TJC2004-5AW
1
2
3
4
5
R1775
10k
R1775
10k
XC2
0.1uF
XC2
0.1uF
H2 HOLE/GND
H2 HOLE/GND
22
33
44
55
9
9
8
8
7
7
6
6
1
1
AR5
4.7K
AR5
4.7K
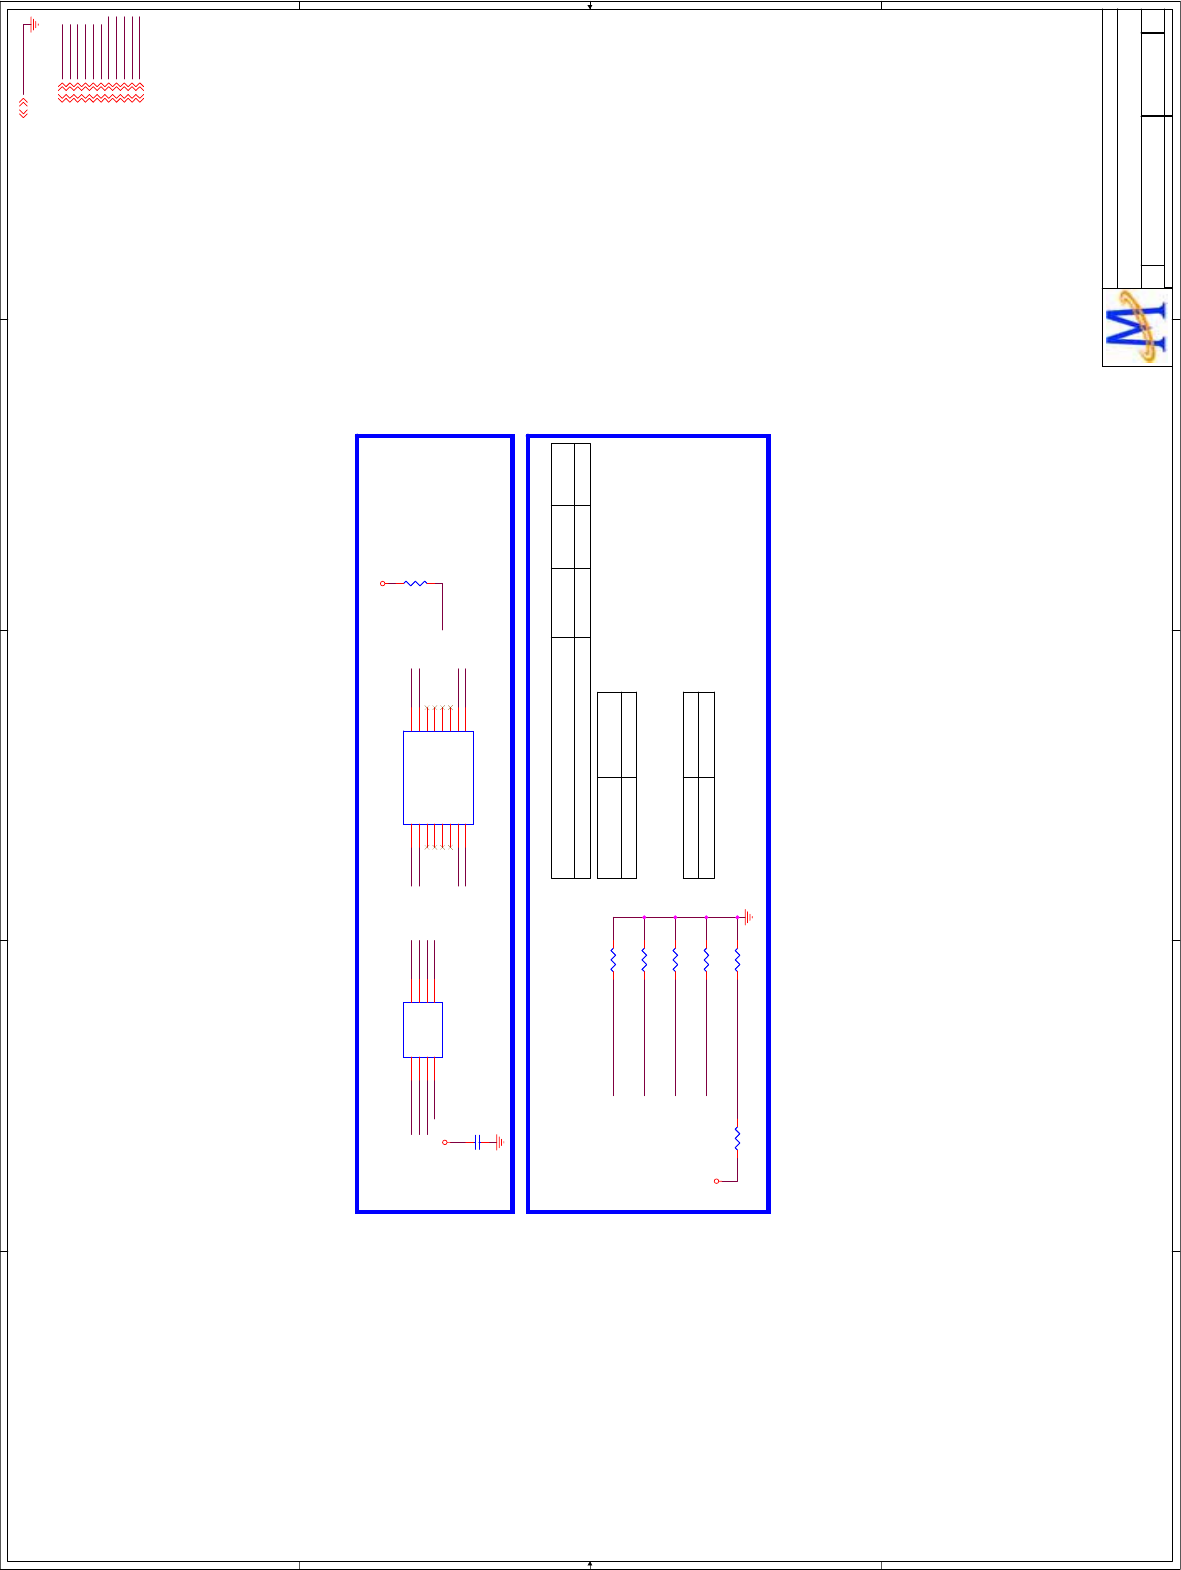
5
5
4
4
3
3
2
2
1
1
D D
C C
B B
A A
GND
DV33
OPWM0
ASPDIF
OPCTRL3
ORESET#
GPIO1
PDD0
POOE#
POCE0#
PDD1
OPWM1
FRESET#
DV33
GND
DV33
PDD1
POOE#
DV33
PDD0
GND
FRESET#PDD0
DV33 POOE#
PDD1
POCE0#
FRESET#
POCE0#
GPIO1
ASPDIF
OPWM1
OPWM0
OPCTRL3
DV33
DV33
DV33
ORESET#4,6
OPCTRL34
ASPDIF4,6
OPWM04
DV333,4,5,6,11,12
GND3,4,5,6,8,9,10,11,12,13,14
GPIO14
POCE0#4
POOE#4
PDD04
PDD14
OPWM14
Title
Size Document Number Rev
Date: Sheet of
MediaTek Inc.
TEL:(03)567-0766 FAX:(03)578-7610
No.1-2, Innovation Rd 1, SBIP, Hsin-Chu City 300
Drawn
MT5305A P1V1
V1
C
715Wednesday, October 14, 2009
FLASH/TRAP/BYPASS/FCI
MediaTek Confidential
Title
Size Document Number Rev
Date: Sheet of
MediaTek Inc.
TEL:(03)567-0766 FAX:(03)578-7610
No.1-2, Innovation Rd 1, SBIP, Hsin-Chu City 300
Drawn
MT5305A P1V1
V1
C
715Wednesday, October 14, 2009
FLASH/TRAP/BYPASS/FCI
MediaTek Confidential
Title
Size Document Number Rev
Date: Sheet of
MediaTek Inc.
TEL:(03)567-0766 FAX:(03)578-7610
No.1-2, Innovation Rd 1, SBIP, Hsin-Chu City 300
Drawn
MT5305A P1V1
V1
C
715Wednesday, October 14, 2009
FLASH/TRAP/BYPASS/FCI
MediaTek Confidential
By Ray
Serial Flash Dual-Layout - 8MB default
XTAL 54M
GPIO1
0
OPWM1(O)OPWM0(O)ASPDIF(O)
ICE mode + Serial boot
Strapping Mode
000
Strapping Mode OPCTRL3(O)
PDWNC Normal
MT5305A STRAPPING MODE
Strapping Mode
1
SR10 4.7K/NCSR10 4.7K/NCSR17 4.7KSR17 4.7K
SR8 4.7KSR8 4.7K
SR2 4.7KSR2 4.7K
SR4 4.7KSR4 4.7K
FR5
4.7K
FR5
4.7K
SR6 4.7KSR6 4.7K
FU2
EN25B64/NC
FU2
EN25B64/NC
S_
1
Q
2
W_/VPP
3
VSS
4D5
C6
HOLD_ 7
VCC 8
FU3
EON25B64
FU3
EON25B64
HOLD#
1
VCC
2
NC
3
PO2
4
PO1
5
PO0
6
CS#
7
SO/PO7
8WP#/ACC 9
GND 10
PO3 11
PO4 12
PO5 13
PO6 14
SI 15
SCLK 16
FC28
0.1uF
FC28
0.1uF
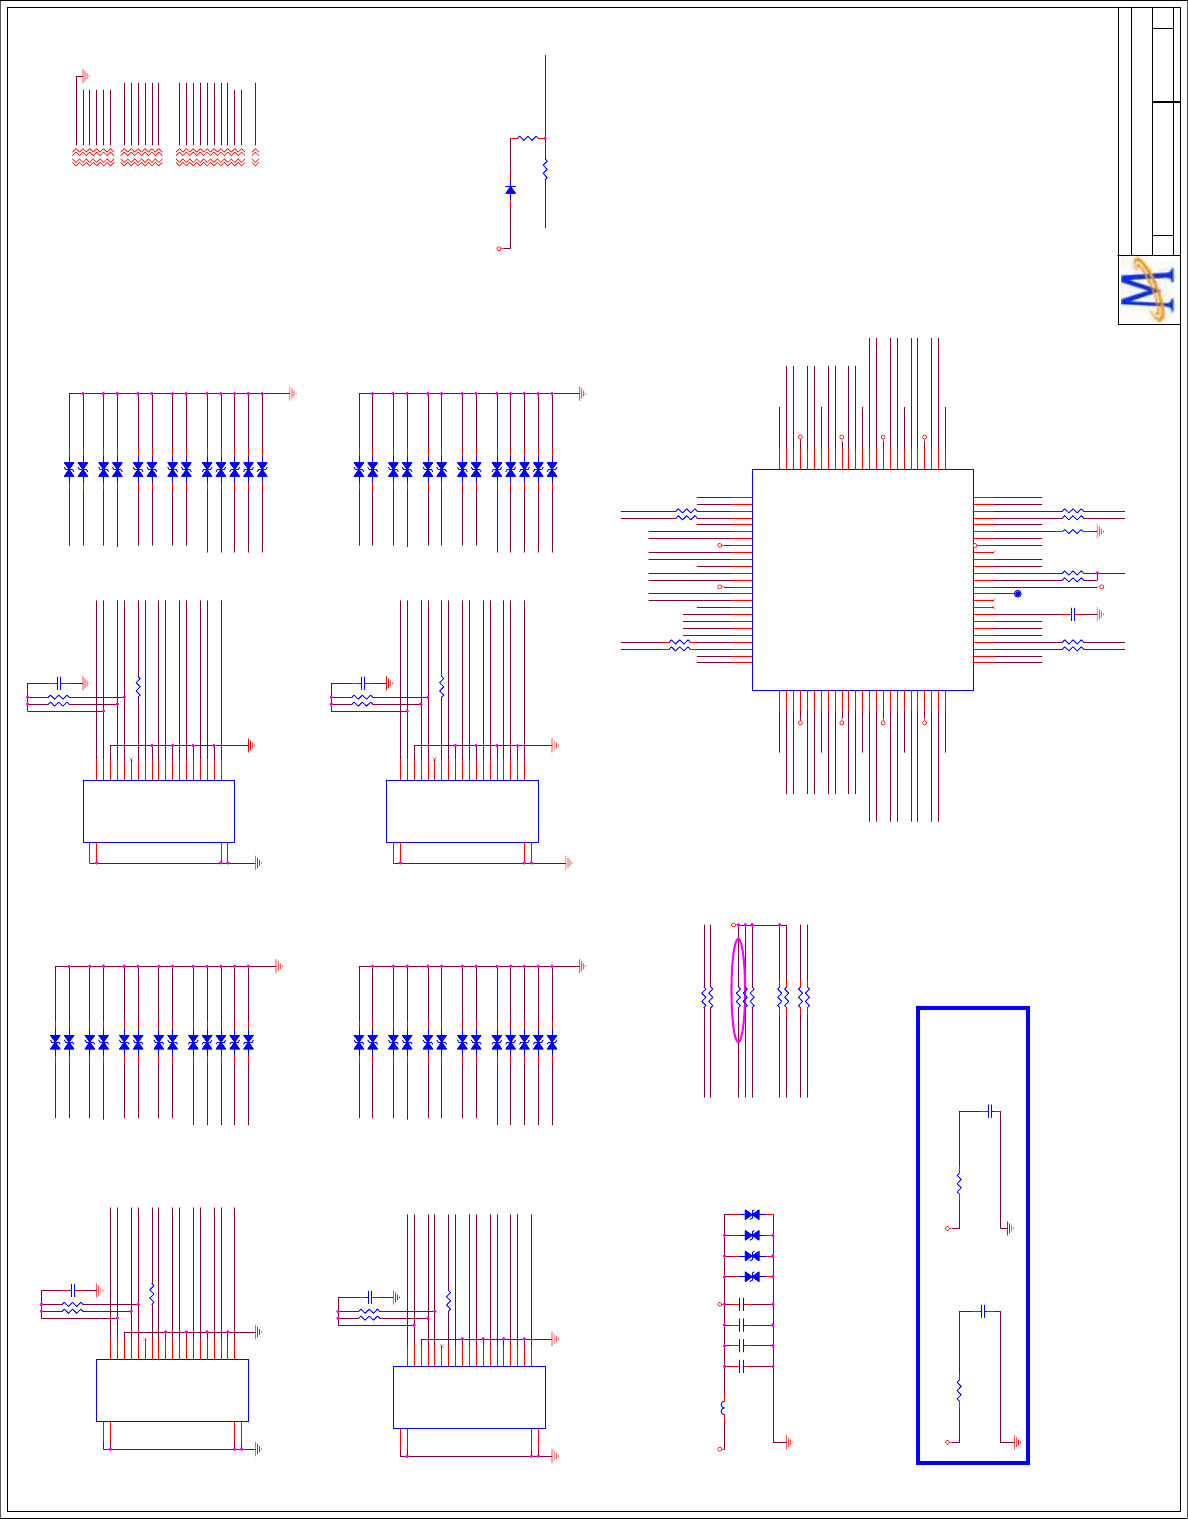
A
A
A A
OPWR0_5V
RX0_2
RX0_2B
RX0_1
RX0_1B
RX0_0
RX0_0B
RX0_C
RX0_CB
OE#/POWDN
I2C_CTL_EN
DDCBUF_EN
OSDA0
HPD_SINK
RX2_5V
RX0_5V
OSCL0
HPD_SINK
DV33
CEC#
RX2_2
RX2_2B
RX2_1
RX2_1B
RX2_0
RX2_0B
RX2_C
RX2_CB
HDMI_SCL0
HDMI_SDA0
RX1_5V
S2/SCL_CTL
POW_SINK
OSDA0
OSCL0
RX_1B
RX_1
RX_2B
RX_2
RX_0B
RX_0
S1/SDA_CTL
RX3_2
RX3_2B
RX3_1
RX3_1B
RX3_0
RX3_0B
RX3_C
RX3_CB
RX_CB
RX_C
RX3_5V
CEC_OUT
OE#/POWDN
SDA_3
HPD2
GND
GND
GND
GND
GND
GND
GND
GND
GND
GND
DDCBUF_EN
SDA_1
SCL_1
HDMI_SCL0
GND
GND
HDMI_SDA0
GND
HPD0
GND
S1/SDA_CTL
S2/SCL_CTL
I2C_CTL_EN
GND
SCL_2 SCL_3
HPD_SINK
SCL_0
POW_SINK
SDA_0
SDA_2
HPD1
CEC#
CEC_IN
RX3_5V
RX3_1B
RX3_CB
SDA_3
RX3_2B
RX3_2
SCL_3
RX3_0
RX3_0B
CEC#
RX3_1
RX3_C
HPD3
AVDD33_HDMI
HPD3
CEC#
AVDD33_HDMI
AVSS33_HDMI
RX2_1B
RX2_CB
SDA_2
RX2_2B
RX2_2
SCL_2
RX2_0
RX2_0B
CEC#
RX2_1
RX2_C
RX2_5V
HPD2
RX0_1B
RX0_CB
HDMI_SCL0
SDA_0
RX0_2B
RX0_2
SCL_0
CEC
RX_CB
RX0_0
RX0_0B
CEC#
RX0_1
CEC
RX_C
RX_1B
RX_1
RX_2B
RX_0B
RX_2
RX0_C
RX_0
GND
+3V3SB
AVDD12_HDMI
AV33
AV125
HDMI_SDA0
RX1_1B
RX1_CB
SDA_1
RX1_2B
+5V
RX1_2
SCL_1
RX1_0
RX1_0B
RX1_2
RX1_2B
CEC#
RX1_1
RX1_C
RX1_1
RX1_1B
RX1_0
RX1_0B
RX1_C
AVDD12_HDMI
RX1_CB
RX1_5V
HPD1
RX0_5V
GND
HPD0
OPWR0_5V
RX1_0
RX1_0B
RX1_2B
RX1_2
RX1_1
RX1_CB
RX1_C
RX1_1B
RX1_5V
SDA_1
SCL_1
HPD1
CEC#
RX0_0
RX0_0B
RX0_2B
RX0_2
RX0_1
RX0_CB
RX0_C
RX0_1B
RX0_5V
SDA_0
SCL_0
HPD0
CEC#
RX3_0
RX3_0B
RX3_2B
RX3_2
RX3_1
RX3_CB
RX3_C
RX3_1B
RX3_5V
SDA_3
SCL_3
HPD3
CEC#
RX2_0
RX2_0B
RX2_2B
RX2_2
RX2_1
RX2_CB
RX2_C
RX2_1B
RX2_5V
SDA_2
SCL_2
HPD2
CEC#
HDMI_3V3
HDMI_3V3
HDMI_3V3
HDMI_3V3
HDMI_3V3
HDMI_3V3
HDMI_3V3
HDMI_3V3
HDMI_3V3
HDMI_3V3
HDMI_3V3
AV33
AV125
HDMI_3V3
HDMI_3V3
+3V3SB
AV33
HPD_SINK4
OPWR0_5V4
DV333,4,5,6,7,11,12
OSDA04,6,11
OSCL04,6,11
AVDD33_HDMI4
HDMI_SDA04
HDMI_SCL04
RX_CB4
RX_C4
RX_0B4
RX_04
RX_1B4
RX_14
RX_2B4
RX_24
GND3,4,5,6,7,9,10,11,12,13,14,15
+3V3SB3,6,9,12
AV333,4,6,9,10,12,13,15
AV1253,4,5,9,12
+5V3,6,10,12,14
AVDD12_HDMI4
CEC4
Title
Size Document Number Rev
Date: Sheet of
MediaTek Inc.
TEL:(03)567-0766 FAX:(03)578-7610
No.1-2, Innovation Rd 1, SBIP, Hsin-Chu City 300
Drawn
MT5305A P1V1
V1
Custom
815Wednesday, October 14, 2009
HDMI
MediaTek Confidential
Title
Size Document Number Rev
Date: Sheet of
MediaTek Inc.
TEL:(03)567-0766 FAX:(03)578-7610
No.1-2, Innovation Rd 1, SBIP, Hsin-Chu City 300
Drawn
MT5305A P1V1
V1
Custom
815Wednesday, October 14, 2009
HDMI
MediaTek Confidential
Title
Size Document Number Rev
Date: Sheet of
MediaTek Inc.
TEL:(03)567-0766 FAX:(03)578-7610
No.1-2, Innovation Rd 1, SBIP, Hsin-Chu City 300
Drawn
MT5305A P1V1
V1
Custom
815Wednesday, October 14, 2009
HDMI
MediaTek Confidential
ESD ARE LAYOUTED UNDER SW(Square).
NEAR MAIN IC
HDMI PORT 4
I2C CONTROL ADDRESS:0x9C/9D
EDID SHADOW ADDRESS:0x9E/9F
NEARLY MAIN IC
NEARLY SW IC
Pulled up to 3.3V on CPU side.
HDMI SWITCH
HDMI PORT 2
HDMI PORT 1
HORIZONTAL MOUNT
HDMI PORT 3
HORIZONTAL MOUNT
D46D46
12
D94 ESD_0402_10pFD94 ESD_0402_10pF
1 2
R26 33kR26 33k
D88D88
12
D107 ESD_0402_10pF/NCD107 ESD_0402_10pF/NC
1 2
D49 ESD_0402_10pFD49 ESD_0402_10pF
1 2
D121 ESD_0402_10pFD121 ESD_0402_10pF
1 2
R35 100/NCR35 100/NC
D41D41
12
D115D115
12
D89D89
12
C747 0.1uFC747 0.1uF
D17
ESD_0402_10pF
D17
ESD_0402_10pF
12
D116D116
12
HC8
8200PF
HC8
8200PF
D42D42
12
D15D15
12
D101
RB520S-30/NC
D101
RB520S-30/NC
2 1
D99D99
12
D90 ESD_0402_10pFD90 ESD_0402_10pF
1 2
D50 ESD_0402_10pFD50 ESD_0402_10pF
1 2
R14 33KR14 33K
HR35
0
HR35
0
D100D100
12
D64 ESD_0402_0.15pFD64 ESD_0402_0.15pF
12
D117 ESD_0402_10pFD117 ESD_0402_10pF
1 2
CN10
HDMI_con
CN10
HDMI_con
SHELL1
20
SHELL2
21
D2+ 1
D2 Shield 2
D2- 3
D1+ 4
D1 Shield 5
D1- 6
D0+ 7
D0 Shield 8
D0- 9
CK+ 10
CK Shield 11
CK- 12
CEC 13
NC 14
DDC CLK 15
DDC DATA 16
GND 17
+5V 18
HP DET 19
SHELL3
22
SHELL4
23
R16 100R16 100
R2002
27K/NC
R2002
27K/NC
R1793 0R1793 0
D91 ESD_0402_10pFD91 ESD_0402_10pF
1 2
D48
ESD_0402_0.15pF
D48
ESD_0402_0.15pF
12
R30 100R30 100
D109
ESD_0402_0.15pF
D109
ESD_0402_0.15pF
12
R1807 47KR1807 47K
CB60
0.1uF
CB60
0.1uF
R1784 0R1784 0
D108 ESD_0402_10pFD108 ESD_0402_10pF
1 2
R23 4.7KR23 4.7K
CB24 2.2uFCB24 2.2uF
D51 ESD_0402_10pFD51 ESD_0402_10pF
1 2
R38 4.7K/NCR38 4.7K/NC
D102D102
12
D65D65
12
D118 ESD_0402_10pFD118 ESD_0402_10pF
1 2
D92 ESD_0402_10pFD92 ESD_0402_10pF
1 2
R22 33KR22 33K
D44D44
12
D103D103
12
FB34 FBFB34 FB
CB61
0.1uF
CB61
0.1uF
D52 ESD_0402_10pFD52 ESD_0402_10pF
1 2
D110D110
12
D66D66
12
D119 ESD_0402_10pFD119 ESD_0402_10pF
1 2
R28 1KR28 1K
R1788 47KR1788 47K
CN12
HDMI_con
CN12
HDMI_con
SHELL1
20
SHELL2
21
D2+ 1
D2 Shield 2
D2- 3
D1+ 4
D1 Shield 5
D1- 6
D0+ 7
D0 Shield 8
D0- 9
CK+ 10
CK Shield 11
CK- 12
CEC 13
NC 14
DDC CLK 15
DDC DATA 16
GND 17
+5V 18
HP DET 19
SHELL3
22
SHELL4
23
D47D47
12
R1804 0R1804 0
R1795 0R1795 0
D111D111
12
TP27TP27
R24 4.7KR24 4.7K
CB62
0.1uF
CB62
0.1uF
R29 33KR29 33K
D104 ESD_0402_10pFD104 ESD_0402_10pF
1 2
R18 1KR18 1K
R1798 0R1798 0
D95
ESD_0402_0.15pF
D95
ESD_0402_0.15pF
12
R1782 47KR1782 47K
CN5
HDMI_con
CN5
HDMI_con
SHELL1
20
SHELL2
21
D2+ 1
D2 Shield 2
D2- 3
D1+ 4
D1 Shield 5
D1- 6
D0+ 7
D0 Shield 8
D0- 9
CK+ 10
CK Shield 11
CK- 12
CEC 13
NC 14
DDC CLK 15
DDC DATA 16
GND 17
+5V 18
HP DET 19
SHELL3
22
SHELL4
23
D67D67
12
R1805 47KR1805 47K
D105 ESD_0402_10pFD105 ESD_0402_10pF
1 2
CB63
0.1uF
CB63
0.1uF D9D9
12
R33 4.7KR33 4.7K
D43D43
12
D112D112
12
D93 ESD_0402_10pF/NCD93 ESD_0402_10pF/NC
1 2
C748 0.1uFC748 0.1uF
D96D96
12
R17 100R17 100
D106 ESD_0402_10pFD106 ESD_0402_10pF
1 2
R31 4.7KR31 4.7K
R34 499_1%R34 499_1%
D53 ESD_0402_10pF/NCD53 ESD_0402_10pF/NC
1 2
CN11
HDMI_con
CN11
HDMI_con
SHELL1
20
SHELL2
21
D2+ 1
D2 Shield 2
D2- 3
D1+ 4
D1 Shield 5
D1- 6
D0+ 7
D0 Shield 8
D0- 9
CK+ 10
CK Shield 11
CK- 12
CEC 13
NC 14
DDC CLK 15
DDC DATA 16
GND 17
+5V 18
HP DET 19
SHELL3
22
SHELL4
23
D120 ESD_0402_10pF/NCD120 ESD_0402_10pF/NC
1 2
D97D97
12
R1801 47KR1801 47K
C746 0.1uFC746 0.1uF
CB58
0.1uF
CB58
0.1uF
R32 10KR32 10K
R1797 47KR1797 47K
C745 0.1uFC745 0.1uF
D86D86
12
R25 100/NCR25 100/NC
R27 1KR27 1K
D45D45
12
D113D113
12
D87D87
12
HR34
0
HR34
0
D98D98
12
R1785 47KR1785 47K
U3
PS421
U3
PS421
SCL1
1
SDA1
2
HPD1
3
POW1
4
CEC
5
DDCBUF_EN
6
GND
7
CEXT
8
PC0/I2C_RST
9
PC1/I2C_ADDR1
10
TEST
11
VCC
12
CEC_IN
13
CEC_OUT
14
S1/SDA_CTL
15
S2/SCL_CTL
16
S3/I2C_ADDR0
17
OE#/POWDN
18
I2C_CTL_EN
19
REXT
20
GND
21
POW4
22
HPD4
23
SDA4
24
SCL4
25
GND 50
IN3D4p 49
IN3D4n 48
VCC 47
IN3D3p 46
IN3D3n 45
GND 44
IN3D2p 43
IN3D2n 42
VCC 41
IN3D1p 40
IN3D1n 39
GND 38
IN4D4p 37
IN4D4n 36
VCC 35
IN4D3p 34
IN4D3n 33
GND 32
IN4D2p 31
IN4D2n 30
VCC 29
IN4D1p 28
IN4D1n 27
GND 26
SCL2 75
SDA2 74
HPD2 73
POW2 72
POW_SINK 71
HPD_SINK 70
SDA_SINK 69
SCL_SINK 68
GND 67
OUT_D1n 66
OUT_D1p 65
VCC 64
OUT_D2n 63
OUT_D2p 62
GND 61
OUT_D3n 60
OUT_D3p 59
VCC 58
OUT_D4n 57
OUT_D4p 56
GND 55
POW3 54
HPD3 53
SDA3 52
SCL3 51
GND
76
IN2D1n
77
IN2D1p
78
VCC
79
IN2D2n
80
IN2D2p
81
GND
82
IN2D3n
83
IN2D3p
84
VCC
85
IN2D4n
86
IN2D4p
87
GND
88
IN1D1n
89
IN1D1p
90
VCC
91
IN1D2n
92
IN1D2p
93
GND
94
IN1D3n
95
IN1D3p
96
VCC
97
IN1D4n
98
IN1D4p
99
GND
100
D16D16
12
R1787 47KR1787 47K
D114D114
12
R19 1KR19 1K
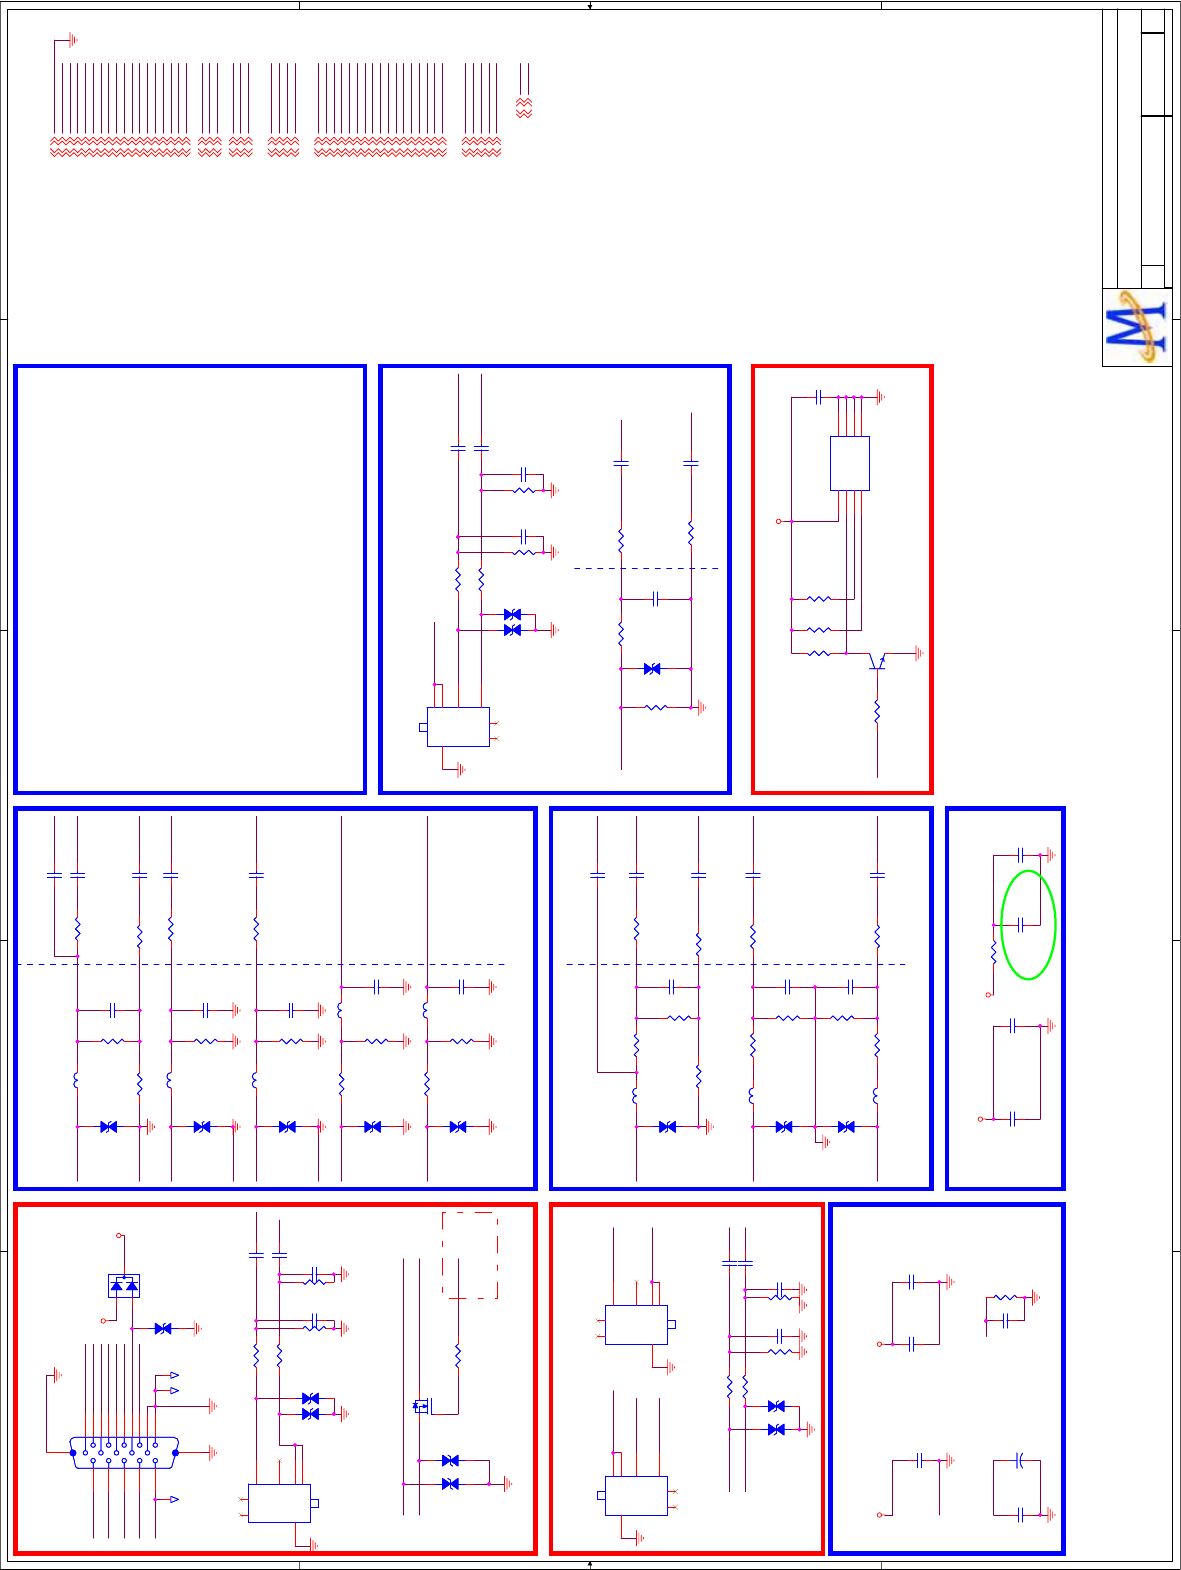
5
5
4
4
3
3
2
2
1
1
D D
C C
B B
A A
GRN
RED_GND
BLU
RED
GP
COM
SOG
GRN_GND
BP
BLU_GND
RP
HSYNC# HSYNC
VSYNC# VSYNC
RED_GND
GRN_GND
RED
GRN
BLU_GND
BLU
VSYNC#
HSYNC#
VGASDA_IN
AIN5_L
VGAR_IN AIN5_R
AVSS12_RGB
AVDD12_RGBAVDD33_VDAC
AVSS33_VDAC
AIN3_R
AIN3_L
YPBPR_R_IN#1
YPBPR_L_IN#1
Y_IN#1 Y0P
COM0
PB0P
PR0P
PB_IN#1
PR_IN#1
SOY0SOY0
AVSS33_CVBS
AVDD33_CVBSVMID_AADC
AIN3_R
AIN3_L
COM
BP
RP
GP
HSYNC
VSYNC
PR1P
PB0P
SOY1
Y1P
COM1
SOG
PR0P
Y0P
COM0
SOY0
PB1P
+3V3SB
AVDD33_VDAC
FS_VDAC
CVBS0N
AIN6_R
AIN6_L
AIN5_L
AIN5_R
+5VSB
AV125
GND
AV33
CVBS1P
AVDD33_VGA_STB
SC0
AVDD33_CVBS
SY0
U0TX
U0RX
AVDD12_RGB
AIN4_R
AIN4_L
VMID_AADC
AVDD33_AADC
DACOUT1
FS_VDAC
ADIN2
U0TX
U0RX
UTX#
URX#
U0TXUTX#
U0RXURX#
AIN0_R
AIN0_L
+5V
ADIN5
VGAL_IN
CVBS1P
CVBS0NAV_CVBSN
AIN6_L
AIN6_R
AV1_IN
CVBS0P
ADIN2
AVDD33_VGA_STB
ADIN2
VGASCL_IN
VGASDA_IN
VGAROMWP
VGASCL_IN
AV1_IN
AV1R_IN
AV1L_IN
PB_IN#1
Y_IN#1
PR_IN#1
YPBPR_R_IN#1
YPBPR_L_IN#1
+5VSB
AV125AV33
AV33
+3V3SB
VGA_5V
VGA_5V
BP4
+3V3SB3,6,8,12
Y1P4
GP4
CVBS1P4
COM14
COM4
CVBS0N4
U0RX4,6
PB1P4
RP4
AVDD33_CVBS3,4,6,8,10,12,13
U0TX4,6
PR1P4
VSYNC4
SC04
AIN3_L4
HSYNC4
SY04
AIN3_R4
SOG4
AVDD33_VGA_STB4
AIN4_L4
SOY14
FS_VDAC4
AIN4_R4
SOY04
AVDD33_VDAC3,4,6,8,10,12,13
GND3,4,5,6,7,8,10,11,12,13,14
AIN5_L4
Y0P4
+5VSB3,6,14
AIN5_R4
COM04
AVDD12_RGB3,4,5,8,12
AV1253,4,5,8,12
AIN6_R4
PB0P4
AV333,4,6,8,10,12,13
AIN6_L4
PR0P4
VMID_AADC4
AVDD33_AADC4,10
DACOUT14,10
U0RX4,6
U0TX4,6
AIN0_L4
AIN0_R4
+5V3,6,8,10,12,14
ADIN54
CVBS0P4
ADIN24
Title
Size Document Number Rev
Date: Sheet of
MediaTek Inc.
TEL:(03)567-0766 FAX:(03)578-7610
No.1-2, Innovation Rd 1, SBIP, Hsin-Chu City 300
Drawn
MT5305A P1V1
V1
C
915Wednesday, October 14, 2009
VGA/YPbPr1/S_Video Input
MediaTek Confidential
Title
Size Document Number Rev
Date: Sheet of
MediaTek Inc.
TEL:(03)567-0766 FAX:(03)578-7610
No.1-2, Innovation Rd 1, SBIP, Hsin-Chu City 300
Drawn
MT5305A P1V1
V1
C
915Wednesday, October 14, 2009
VGA/YPbPr1/S_Video Input
MediaTek Confidential
Title
Size Document Number Rev
Date: Sheet of
MediaTek Inc.
TEL:(03)567-0766 FAX:(03)578-7610
No.1-2, Innovation Rd 1, SBIP, Hsin-Chu City 300
Drawn
MT5305A P1V1
V1
C
915Wednesday, October 14, 2009
VGA/YPbPr1/S_Video Input
MediaTek Confidential
By Ray
NEARLY VGA CON. NEARLY IC
NEAR IC
VGA CONNECTOR
NEARLY CONN.
NEAR IC
Connected to connector GND
VIDEO DAC
Near IC
YPBPR/RL#1 INPUT
Connected to connector GND
NEAR IC NEAR IC
NEARLY CONN.
Modify 09.06.19
UART at VGA PORT
H: PC TX Disable
L: PC TX Enable
NEARLY VGA CON. NEARLY IC
NO AV2 & LR INPUT
NEARLY CONNECTOR
AV1 & LR INPUT(Vertical)
NEARLY ICNEARLY AV/SV CON.
PC/DVI Audio Input
NEARLY VGA CONN.
VGA EEPROM
L : Write
H : WP
BL5
FB 80/100MHz
BL5
FB 80/100MHz
OC16
560pF
OC16
560pF
D57
ESD_0402_10pF
D57
ESD_0402_10pF
12
VP1
D-SUB15 FEMALE
VP1
D-SUB15 FEMALE
1617
1
2
3
4
5
6
7
8
9
10
11
12
13
14
15
D59D59
12
VC210nF VC210nF
QF6
2N7002
QF6
2N7002
1
3 2
VR18
10K
VR18
10K
VR40 VR40
VR22
47K
VR22
47K
VC410nF VC410nF
BC18
15pF
BC18
15pF
VR26
10K
VR26
10K
GR4 0GR4 0
D58
ESD_0402_10pF
D58
ESD_0402_10pF
12
VR120 VR120
VR9 10KVR9 10K
OC14
560pF
OC14
560pF
OC19
560pF
OC19
560pF
BC15
15pF
BC15
15pF
VR19
10K
VR19
10K
D60
ESD_0402_10pF
D60
ESD_0402_10pF
12
GR9
47K
GR9
47K
VC6
5pF
VC6
5pF
VC810nF VC810nF
GC1
47pF
GC1
47pF
D61
ESD_0402_10pF
D61
ESD_0402_10pF
12
BR18
18
BR18
18
BR25
56
BR25
56
BR20
56
BR20
56
VR23
47K
VR23
47K
VFB280/100MHz VFB280/100MHz
R100 10KR100 10K
BR24 68BR24 68
GC3
1uF
GC3
1uF
BR31 10KBR31 10K
D62
ESD_0402_10pF
D62
ESD_0402_10pF
12
VR13
1.33K
VR13
1.33K
BR28 68BR28 68
GR3
75
GR3
75
VR24
47K
VR24
47K
VC10
5pF
VC10
5pF
VC510nF VC510nF
GR16
10K
GR16
10K
GR2
100
GR2
100
OR1
560
OR1
560
BR26
56
BR26
56
BR23 18BR23 18
BL4
FB 80/100MHz
BL4
FB 80/100MHz
BL6
FB 80/100MHz
BL6
FB 80/100MHz
OC10
1uF
OC10
1uF
VR368 VR368
VR7
75
VR7
75
VC3
5pF
VC3
5pF
GR15
10K
GR15
10K
VC11
NS/5pF
VC11
NS/5pF
BC23
2.2uF
BC23
2.2uF
BC14 10nFBC14 10nF
GC4 2.2uFGC4 2.2uF
VC11.5nF VC11.5nF
BR21
0
BR21
0
BC22
2.2uF
BC22
2.2uF
VR10 10KVR10 10K
VR668 VR668
GR1 0GR1 0
VR200 VR200
BR19 68BR19 68
VR5100 VR5100
BR27 18BR27 18
OC11
560pF
OC11
560pF
D56
ESD_0402_10pF
D56
ESD_0402_10pF
12
OC8
0.1uF
OC8
0.1uF
BC21
2.2uF
BC21
2.2uF
VR868 VR868
GC7 2.2uFGC7 2.2uF
BC24
2.2uF
BC24
2.2uF
D75D75
12
D79
ESD_0402_10pF
D79
ESD_0402_10pF
12
BC131.5nF BC131.5nF
D74
ESD_0402_10pF
D74
ESD_0402_10pF
12
BC2010nF BC2010nF
GR10
47K
GR10
47K
OC9
0.1uF
OC9
0.1uF
OC6
0.1uF
OC6
0.1uF
BP4
AUDIO_L/R
BP4
AUDIO_L/R
11
GND
2
NC 3
NC 4
55
66
77
OC12
0.1uF
OC12
0.1uF
D80
ESD_0402_10pF
D80
ESD_0402_10pF
12
D76D76
12
BR22 100BR22 100
BP3
YUV
BP3
YUV
11
GND
2
NC
3
NC
4
55
66
77
T17T17
VFB380/100MHz VFB380/100MHz
OC20
560pF
OC20
560pF
T15T15
D55
ESD_0402_10pF
D55
ESD_0402_10pF
12
BR32 10KBR32 10K
OC3
0.1uF
OC3
0.1uF
D81
ESD_0402_10pF
D81
ESD_0402_10pF
12
D68D68
12
VC12
NS/5pF
VC12
NS/5pF
D77
ESD_0402_10pF
D77
ESD_0402_10pF
12
OC13
0.1uF
OC13
0.1uF
VR25 10KVR25 10K
VL2 FBVL2 FB
BC16 10nFBC16 10nF
+
CE1
NS/4.7uF/16v
+
CE1
NS/4.7uF/16v
VFB180/100MHz VFB180/100MHz
BC19
15pF
BC19
15pF
VQ1
2N3904
VQ1
2N3904
1
3 2
BC17 10nFBC17 10nF
T16T16
VL1 FBVL1 FB
VR2
75
VR2
75
BP5
AV_IN
BP5
AV_IN
11
GND
2
NC
3
NC
4
55
66
77
VR15
1.33K
VR15
1.33K
VC13
0.1uF
VC13
0.1uF
VD1
BAV70L
VD1
BAV70L
1
2
3
VU1
EEPROM 24C02_5V
VU1
EEPROM 24C02_5V
NC 1
NC 2
NC 3
GND 4
SDA
5SCL
6WP
7VCC
8
OC7
NS/1uF
OC7
NS/1uF
VP2
AUDIO_L/R
VP2
AUDIO_L/R
11
GND
2
NC 3
NC 4
55
66
77
OC15
560pF
OC15
560pF
D69
ESD_0402_10pF
D69
ESD_0402_10pF
12
D54
ESD_0402_10pF
D54
ESD_0402_10pF
12
VR140 VR140
VR21
47K
VR21
47K
VR11
75
VR11
75
OC5
0.1uF
OC5
0.1uF
GC2
47nF
GC2
47nF
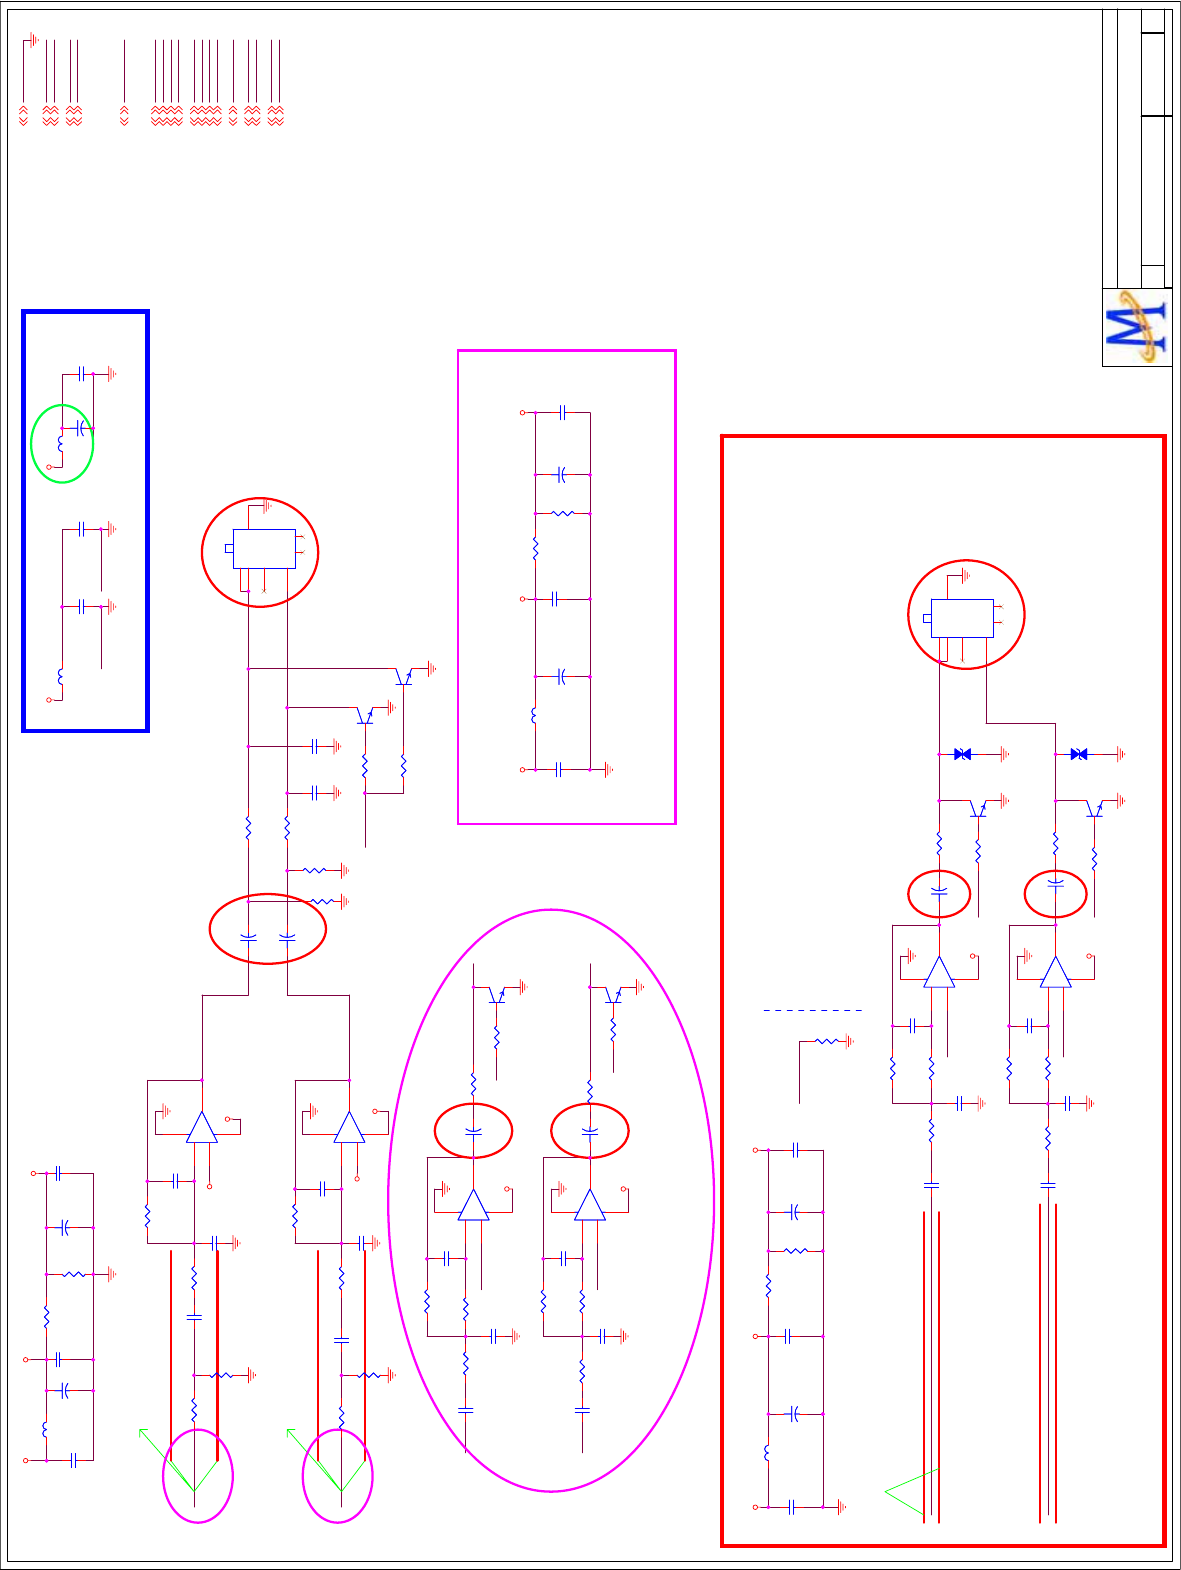
A
A
A A
AVDD33_DAC
GND
REFP_AADC
REFN_AADCAVSS33_AADC
+12V
AV33
AVDD33_AADC
+5V
+5VSB
REFP_AADC
AVDD33_AADC
AVDD33_DAC
ADIN5
AVSS33_DAC
AOSDATA0
AOMCLK
AOBCK
AOLRCK
AR1
AL1
OPAVREF
OPAVREF
MUTE
MUTE
DACOUT1
DACOUT1
HPOL
HPOR
MUTE
AL1
AR1HPOUTL
MUTE
AR0
AL0
AVR1_OUT/AMP
AVL1_OUT/AMP
HPOUTR
AL0
AR0
OPAVREF#
OPAVREF#
MUTE
MUTE
AVR1_OUT/AMP
AVL1_OUT/AMP
Line_AUL_OUT
Line_AUR_OUT
AV33AV33
OPAV120
OPAV120
+12V OPAV120 OPAVREF
VREF_25
HP_PWR
HP_PWR
VREF_25
VREF_25
+5V HP_PWR
OPAV120#
OPAV120#
+12V OPAV120# OPAVREF#
GND3,4,5,6,7,8,9,11,12,13,14
+12V3,11,12,13,14
AV333,4,6,8,9,12,13
+5VSB3,6,9,14
+5V3,6,8,12,14
AVDD33_DAC4
AVDD33_AADC4
REFP_AADC4
ADIN54,9
AOLRCK4
AOBCK4
AOMCLK4
AOSDATA04
DACOUT14
AR14
AL14
MUTE11
AL04,11
AR04,11
Title
Size Document Number Rev
Date: Sheet of
MediaTek Inc.
TEL:(03)567-0766 FAX:(03)578-7610
No.1-2, Innovation Rd 1, SBIP, Hsin-Chu City 300
Drawn
MT5305A P1V1
V1
C
10 15Wednesday, October 14, 2009
Audio SYS/AV Output
MediaTek Confidential
Title
Size Document Number Rev
Date: Sheet of
MediaTek Inc.
TEL:(03)567-0766 FAX:(03)578-7610
No.1-2, Innovation Rd 1, SBIP, Hsin-Chu City 300
Drawn
MT5305A P1V1
V1
C
10 15Wednesday, October 14, 2009
Audio SYS/AV Output
MediaTek Confidential
Title
Size Document Number Rev
Date: Sheet of
MediaTek Inc.
TEL:(03)567-0766 FAX:(03)578-7610
No.1-2, Innovation Rd 1, SBIP, Hsin-Chu City 300
Drawn
MT5305A P1V1
V1
C
10 15Wednesday, October 14, 2009
Audio SYS/AV Output
MediaTek Confidential
Near IC Near IC
NO AV OUT
20090612
Shielding with GND in all path,layout without via
Shielding with GND in all path,layout without via
NEARLY IC
HeadPhone OUTPUT
Near MT5387
Near MT5387
Shielding with GND in all path,layout without via
Shielding with GND in all path,layout without via
NO HP_DETECT
D18D18
1 2
R1755 0->15KR1755 0->15K
ER20
10K->3.9K
ER20
10K->3.9K
R1780 10K->15KR1780 10K->15K
D19D19
1 2
CB997
0.1uF
CB997
0.1uF
EC4
1000pF->NC
EC4
1000pF->NC
EC13
NS/470pF
EC13
NS/470pF
R1766 10KR1766 10K
+
CE3
47uF/16v
+
CE3
47uF/16v
CB2
0.1uF
CB2
0.1uF
R532 8.2KR532 8.2K
ER21
10K->3.9K
ER21
10K->3.9K
+
-
U68A
LM4558
+
-
U68A
LM4558
3
2
1
8 4
STR21
75
STR21
75
+
CE645
47uF/16v
+
CE645
47uF/16v
+
CE629
47uF/16v
+
CE629
47uF/16v
R1781
4.7K
R1781
4.7K C647
1000pF
C647
1000pF
L147
FB
L147
FB
EC2
100pF->NC
EC2
100pF->NC
Q60
2N3904
Q60
2N3904
1
3 2
R1730
10K
R1730
10K
+
EC16
100uF/16v
+
EC16
100uF/16v
+
CE642
47uF/16v
+
CE642
47uF/16v
C645
100pF
C645
100pF
+
C11
10uF/16v
+
C11
10uF/16v
R1799 10KR1799 10K
EC14
NS/470pF
EC14
NS/470pF
C749
0.1uF
C749
0.1uF
R1762 0->15KR1762 0->15K
C643
100pF
C643
100pF
R36
1.8K
R36
1.8K
CB994
0.1uF
CB994
0.1uF
ER22
10K
ER22
10K
R1800
10K
R1800
10K
ER17
1K
ER17
1K
R534 8.2KR534 8.2K
CB999
0.1uF
CB999
0.1uF
+
-
U68B
LM4558
+
-
U68B
LM4558
5
6
7
8 4
C642
1000pF
C642
1000pF
FB70
FB
FB70
FB
VP3
AUDIO_L/R
VP3
AUDIO_L/R
1
1
GND 2
NC
3
NC
4
5
5
6
6
7
7
R1764 10K->9.1KR1764 10K->9.1K
R1753 10K->9.1KR1753 10K->9.1K
CB3
0.1uF
CB3
0.1uF
C669
10uF/10v
C669
10uF/10v
C751
0.1uF
C751
0.1uF
+
-
U55A
LM4558
+
-
U55A
LM4558
3
2
1
8 4
+
EC15
100uF/16v
+
EC15
100uF/16v
C667
2.2uF
C667
2.2uF
EQ4
2N3904
EQ4
2N3904
1
3 2
R1761
10K->5.1K
R1761
10K->5.1K
R1765 22R1765 22
+
CE640
47uF/16v
+
CE640
47uF/16v
R1783 22R1783 22
C648
100pF
C648
100pF
C641
100pF
C641
100pF
+
CE4
47uF/16v
+
CE4
47uF/16v
C668
2.2uF
C668
2.2uF
ER18
1K
ER18
1K
WFB5
FB
WFB5
FB
ER7
10K->3.9K
ER7
10K->3.9K
C670
10uF/10v
C670
10uF/10v
R1759 10KR1759 10K
CB996
0.1uF
CB996
0.1uF
ER24
22
ER24
22
C300
2.2uF
C300
2.2uF
+
CE644
47uF/16v
+
CE644
47uF/16v
R1731
10K
R1731
10K
R1757
4.7K
R1757
4.7K
R37
1.8K
R37
1.8K
ER8
10K->3.9K
ER8
10K->3.9K
X
-
EUA2A
PT2308
X
-
EUA2A
PT2308
3
2
1
8 4
R1790 10KR1790 10K
EQ5
2N3904
EQ5
2N3904
1
3 2
EC8
1000pF->NC
EC8
1000pF->NC
R1760 10K->9.1KR1760 10K->9.1K
R1758 10K->15KR1758 10K->15K
C750
0.1uF
C750
0.1uF
Q71
2N3904
Q71
2N3904
1
3 2
+
CE630
47uF/16v
+
CE630
47uF/16v
R1786 10K->9.1KR1786 10K->9.1K
R1729
10K
R1729
10K
ER19
22
ER19
22
CB4
0.1uF
CB4
0.1uF
+
-
U55B
LM4558
+
-
U55B
LM4558
5
6
7
8 4
R1763 22R1763 22
CB998
0.1uF
CB998
0.1uF
R1779 10KR1779 10K
Q72
2N3904
Q72
2N3904
1
3 2
Q61
2N3904
Q61
2N3904
1
3 2
WFB4
FB
WFB4
FB
C301
2.2uF
C301
2.2uF
X
-
EUA2B
PT2308
X
-
EUA2B
PT2308
5
6
7
8 4
BP7
AUDIO_L/R
BP7
AUDIO_L/R
1
1
GND 2
NC
3
NC
4
5
5
6
6
7
7
FB71
FB
FB71
FB
+
CE641
47uF/16v
+
CE641
47uF/16v
C644
1000pF
C644
1000pF
R1756 22R1756 22
ER15
10K
ER15
10K
R1754
10K->5.1K
R1754
10K->5.1K
C646
1000pF
C646
1000pF
EC6
100pF->NC
EC6
100pF->NC
R1728
10K
R1728
10K
CB995
0.1uF
CB995
0.1uF
+
CE650
47uF/16v
+
CE650
47uF/16v
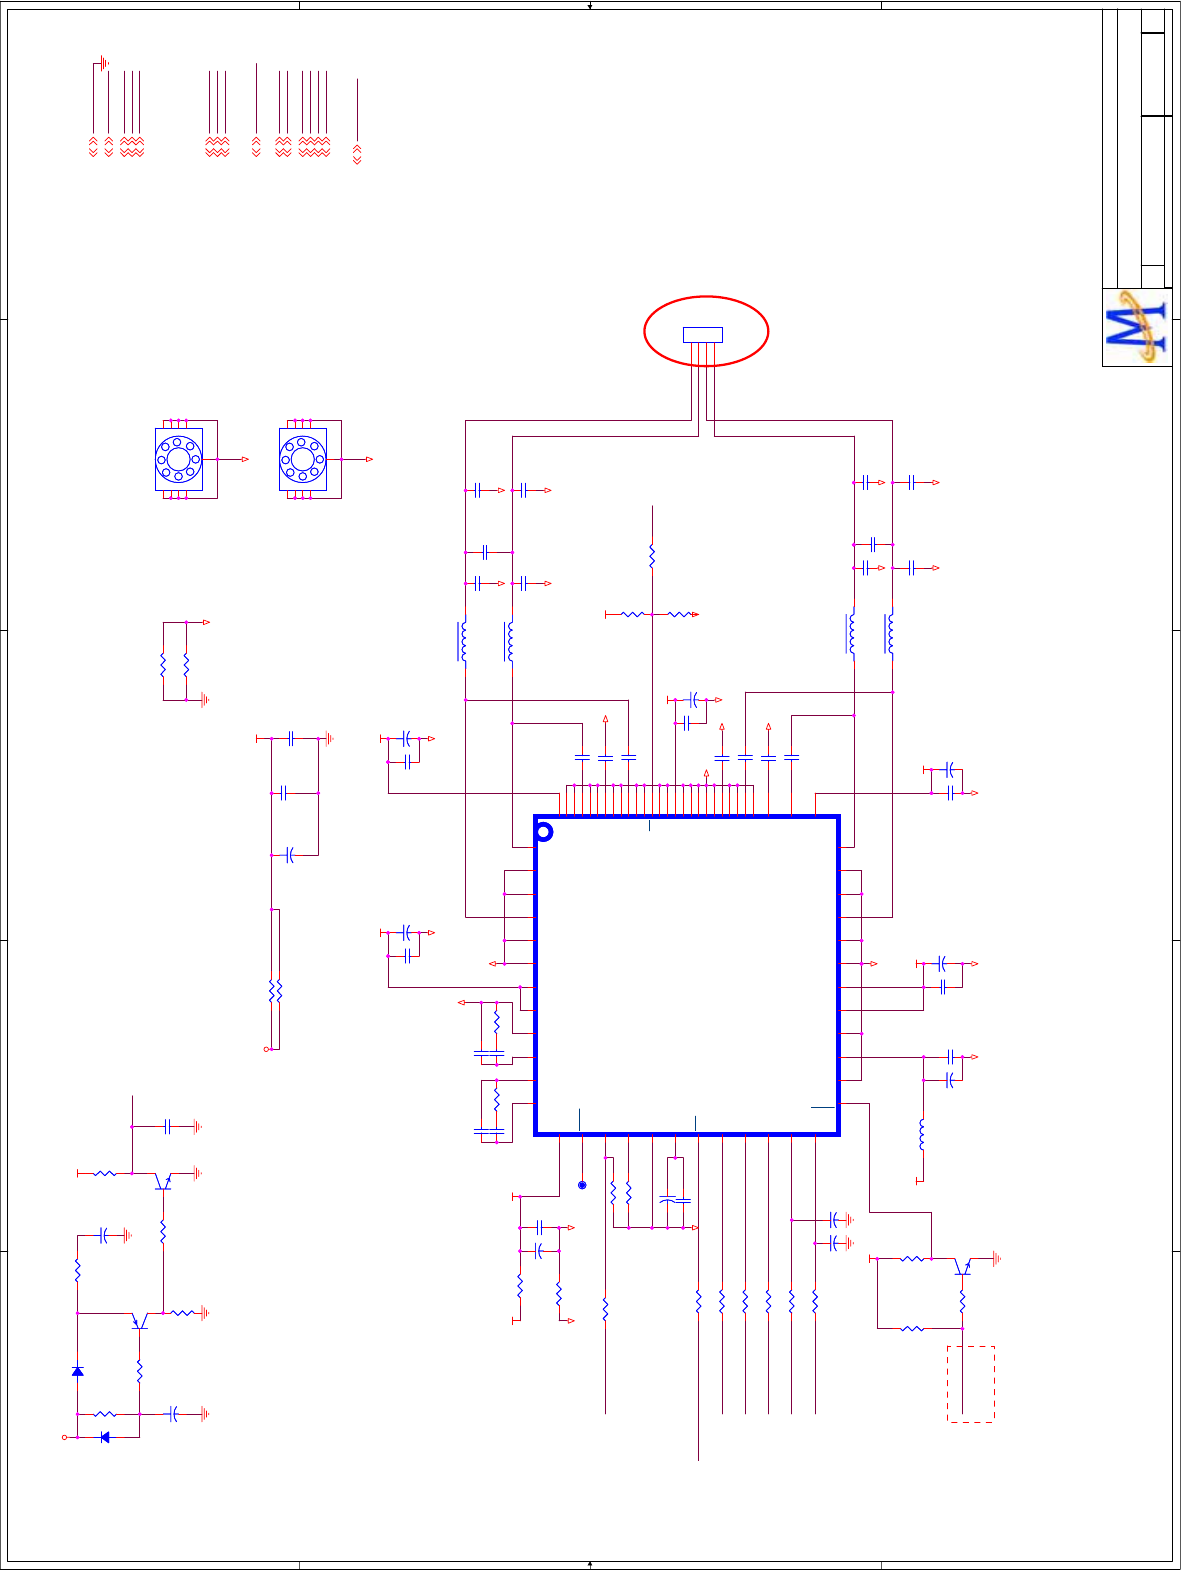
5
5
4
4
3
3
2
2
1
1
D D
C C
B B
A A
MUTE
DV33
AMP_SD
AOLRCK
AOBCK
AOSDATA0
Speaker-R+
Speaker-R-
Speaker-L+
Speaker-L-
OSDA0
OSCL0
OPCTRL1
AOSDATA0
AOMCLK
AOBCK
AOLRCK
AMP_SD
AOMCLK
+5V
AIN4_L
AIN4_R
+12V
AV33
GND
ADIN5
OSDA0
OSCL0
AMP_SD
MUTE
OPCTRL1
+12V
P_GND
P_GND
DV33
P_GND
P_GND
P_GND
P_GND
AMP_PWR
AMP_AV33
P_GND
AMP_PWR
P_GND
AMP_PWR
DV33
P_GND
P_GND
P_GND
P_GND
AVSS
P_GND
P_GNDP_GND
P_GND
P_GND
P_GND
P_GND
P_GND
DV33
P_GND
P_GND
AMP_PWR
AVSS
AMP_PWR
P_GND
AMP_PWR
DV33
P_GND
DV33
P_GND
+12V
P_GND
DV333,4,5,6,7,12,14
AOLRCK4,18
AOBCK4,18
AOMCLK4,18
AOSDATA04,18
+5V3,6,8,10,12,13,14
AIN4_L4,9
AIN4_R4,9
ADIN54
GND3,4,5,6,7,8,9,10,12,13,14
+12V10,12,13,14
AV333,4,6,8,9,10,12,13
OSDA04
OSCL04
MUTE11
OPCTRL14
Title
Size Document Number Rev
Date: Sheet of
MediaTek Inc.
TEL:(03)567-0766 FAX:(03)578-7610
No.1-2, Innovation Rd 1, SBIP, Hsin-Chu City 300
Drawn
MT5305A P1V1
V1
C
11 15Thursday, October 15, 2009
SPEAKER AMP
MediaTek Confidential
Ray Lin
Title
Size Document Number Rev
Date: Sheet of
MediaTek Inc.
TEL:(03)567-0766 FAX:(03)578-7610
No.1-2, Innovation Rd 1, SBIP, Hsin-Chu City 300
Drawn
MT5305A P1V1
V1
C
11 15Thursday, October 15, 2009
SPEAKER AMP
MediaTek Confidential
Ray Lin
Title
Size Document Number Rev
Date: Sheet of
MediaTek Inc.
TEL:(03)567-0766 FAX:(03)578-7610
No.1-2, Innovation Rd 1, SBIP, Hsin-Chu City 300
Drawn
MT5305A P1V1
V1
C
11 15Thursday, October 15, 2009
SPEAKER AMP
MediaTek Confidential
Ray Lin
AMP
կ⬉
Class D SPEAKER OUTPUT
I2C ADDRESS:0x36
Lo = > UN-MUTE
Hi = > MUTE
L151
LI0603G121R
L151
LI0603G121R
C785
0.1uF/50V
C785
0.1uF/50V
C781 0.22uF/25VC781 0.22uF/25V
L148
33uH/2A
L148
33uH/2A
12
R1816 10KR1816 10K
C761 4700pF/50V
C761 4700pF/50V
C771
0.1uF
C771
0.1uF
C779 0.22uF/25VC779 0.22uF/25V
C787
0.1uF/50V
C787
0.1uF/50V
R1825 33R1825 33
R1806 3.3K->10KR1806 3.3K->10K
R1813
10K
R1813
10K
R40 0R40 0
R1812
100K
R1812
100K
C793
0.1uF
C793
0.1uF
R1819 18K_1%R1819 18K_1%
R1831
10K
R1831
10K
C776
0.1uF
C776
0.1uF
+
C770
10uF/10V
+
C770
10uF/10V
U61
TAS5708
U61
TAS5708
OUT_B 1
PGND_B 2
PGND_B 3
OUT_A 4
PGND_A 5
PGND_A 6
PVCC_A 7
PVCC_A 8
AVSS 9
PLL_FLTM 10
PLL_FLTP 11
VR_ANA 12
AVDD
13
FAULT
14
OSC_RES
16
DVSSO
17
VR_DIG
18
PDN
19
LRCLK
20
SCLK
21
SCL
24
RESET
25
STEST
26
DVDD
27
DVSS
28
PVCC_D
29
PVCC_D
30
PGND_D
31
OUT_C
36
OUT_D
33
PGND_C
34
PGND_C
35
PGND_D
32
PVCC_C 37
BST_C 38
VCLAMP_CD 39
BST_D 40
BYPASS 41
AGND 42
AVCC 43
HIZ 44
BST_A 45
VCLAMP_AB 46
BST_B 47
PVCC_B 48
MCLK
15
SDA
23
SDIN
22
PGND 49
PGND 50
PGND 51
PGND 52
PGND 53
PGND 54
PGND 55
PGND 56
PGND 57
PGND 58
PGND 59
PGND 60
PGND 61
PGND 62
PGND 63
PGND 64
PGND 65
D40
1N4148
D40
1N4148
C774 0.22uF/25VC774 0.22uF/25V
R1830
4.7K
R1830
4.7K
+
C777
47uF/16V
+
C777
47uF/16V
C786
0.1uF/50V
C786
0.1uF/50V
C768
0.1uF/50V
C768
0.1uF/50V
+
C789
100uF/16V
+
C789
100uF/16V
R1818 0R1818 0
C756
0.1uF
C756
0.1uF
R1809 10KR1809 10K
R1829
10K
R1829
10K
C766
0.047uF
C766
0.047uF
C772 0.22uF/25VC772 0.22uF/25V
R1822
0/NC
R1822
0/NC
C775
0.1uF
C775
0.1uF
+
C790
10uF/10V
+
C790
10uF/10V
R1833 10KR1833 10K
H7 HOLE/GND
H7 HOLE/GND
22
33
44
55
9
9
8
8
7
7
6
6
1
1
R1827 100R1827 100
C792
0.1uF
C792
0.1uF
+
C760
100uF/16V
+
C760
100uF/16V
Q69
2N3906
Q69
2N3906
1
32
R1808 0R1808 0
+
CE648
100uF/16V
+
CE648
100uF/16V
C788
0.1uF/50V
C788
0.1uF/50V
R1820
47K
R1820
47K
D38
1N4148
D38
1N4148
R1828 100R1828 100
+
C39 4.7uF/16V
+
C39 4.7uF/16V
C759
0.1uF
C759
0.1uF
R1823 33R1823 33
C773 1uF/25VC773 1uF/25V
+
CE646
100uF/16V
+
CE646
100uF/16V
R1811
4.7K
R1811
4.7K
C778 1uF/25VC778 1uF/25V
+
C794
100uF/16V
+
C794
100uF/16V
C757
0.1uF
C757
0.1uF
R1810 0R1810 0
H6 HOLE/GND
H6 HOLE/GND
22
33
44
55
9
9
8
8
7
7
6
6
1
1
R1821 33R1821 33
C791
0.1uF
C791
0.1uF
C765
0.47uF/50V CBB
C765
0.47uF/50V CBB
C784
0.47uF/50V CBB
C784
0.47uF/50V CBB
R1815 0R1815 0
R1817
4.7K
R1817
4.7K
C764
0.1uF/50V
C764
0.1uF/50V
R1832
0/NC
R1832
0/NC
+
CE647
47uF/16V
+
CE647
47uF/16V
R39 0R39 0
L14933uH/2AL14933uH/2A
12
C783
33pF
C783
33pF
+
C758
100uF/16V
+
C758
100uF/16V
C762 4700pF/50V
C762 4700pF/50V
R1824 33R1824 33
TP45TP45
C754
0.01uF
C754
0.01uF
XQ3
2N3904
XQ3
2N3904
1
3 2
C769
0.1uF/50V
C769
0.1uF/50V
L21 33uH/2AL21 33uH/2A
12
C780 1uF/25VC780 1uF/25V
L15033uH/2AL15033uH/2A
12
R1814
4.7K
R1814
4.7K
XQ7
2N3904
XQ7
2N3904
1
3 2
C782
33pF
C782
33pF
C767
0.047uF
C767
0.047uF
C763
0.1uF/50V
C763
0.1uF/50V
C755
0.1uF
C755
0.1uF
CON2
Speaker_CON_H
CON2
Speaker_CON_H
1
2
3
4
R1826 33R1826 33
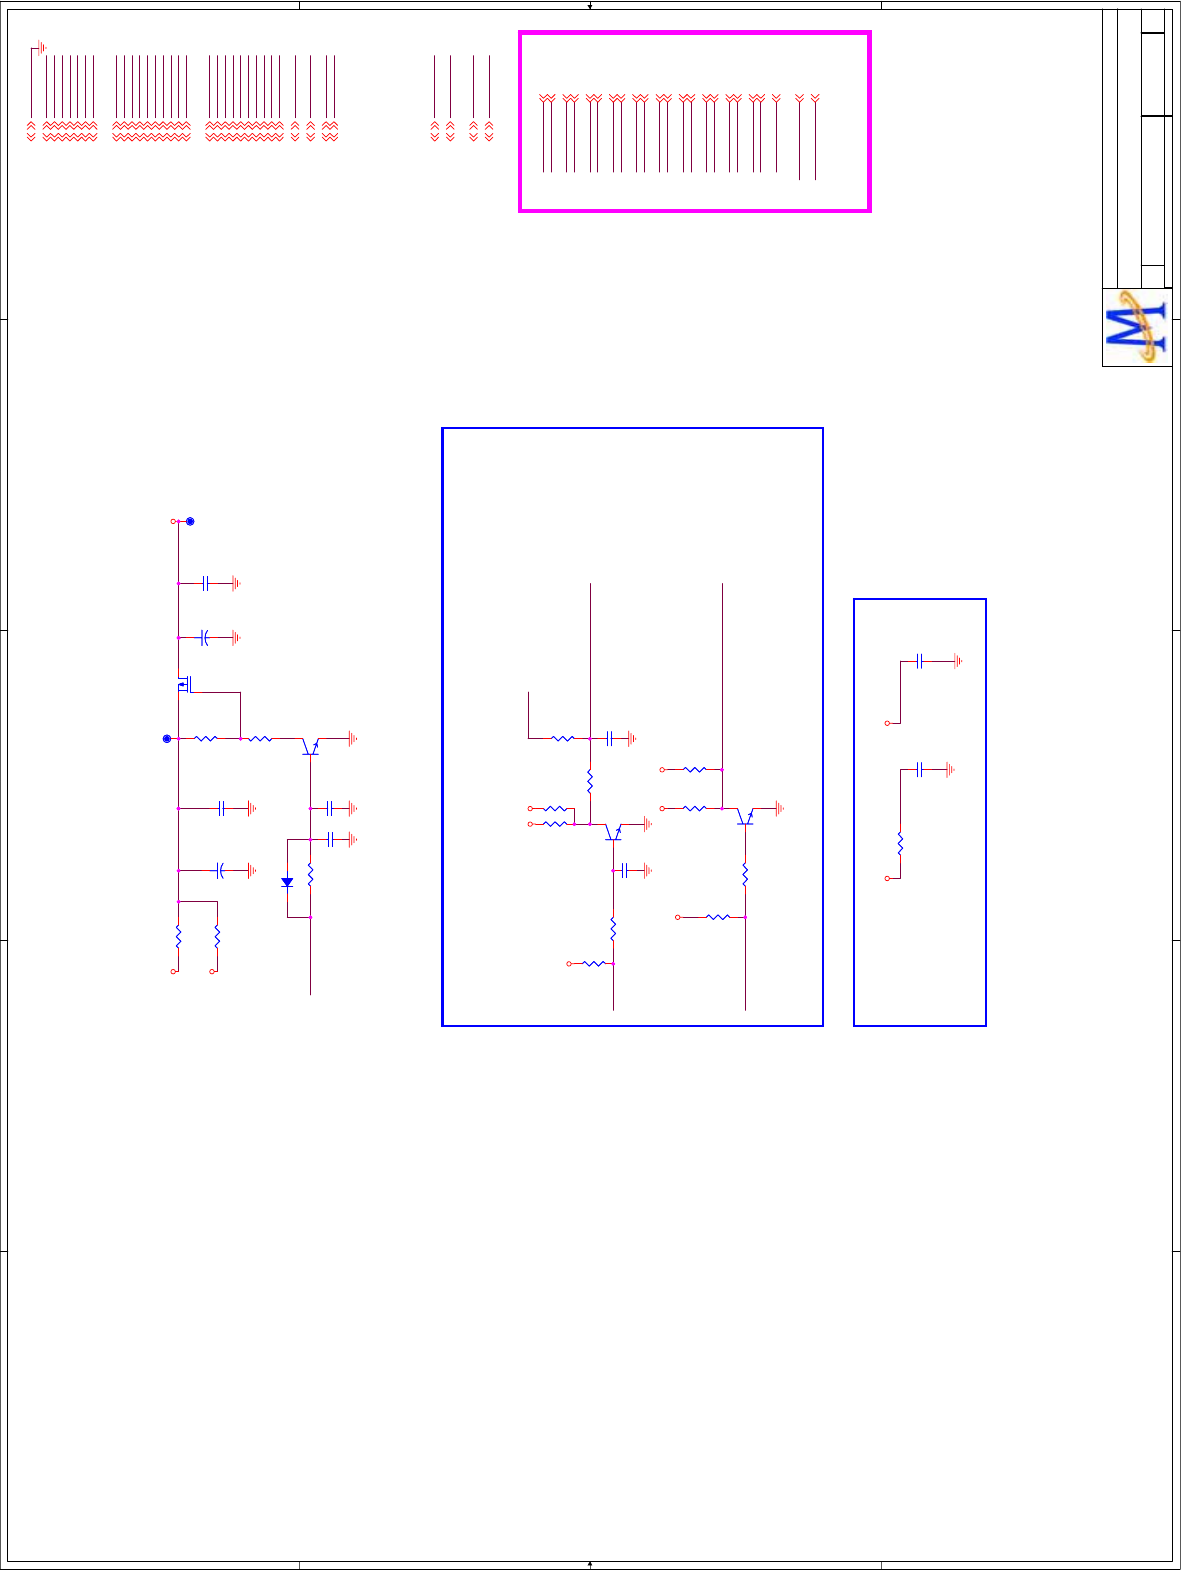
A
A
B
B
C
C
D
D
E
E
4 4
3 3
2 2
1 1
+5V
AV33
+12V
GND
AV125
DV33
AVDD12_VPLL
LVDS_PWR_ON
O2N
O2P
E1N
OCKN
OCKP
ECKP
ECKN
AVDD33_LVDS
AVDD12_VPLL
E2N
E2P
O0N
O1N
O1P
O0P
E3P
E3N
E0P
E0N
O3N
O3P
E1P
USB_PWR_EN0
USB_PWR_ERR0
AVDD33_LVDS
LVDS_PWR_ON
ADIN3
GPIO0
+3V3SB
BL_ON/OFF
DIMMING
BL_ON/OFF
ADIN3
GPIO0
DIMMING_OUT
Dimming
BL_PWM
AO3P
AO3N
AOCKP
AOCKN
AO2P
AO2N
AO1P
AO1N
AO0P
AO0N
AE3P
AE3N
AECKP
AECKN
AE2P
AE2N
AE1P
AE1N
AE0P
AE0N
LVDSVDD
DIMMING_OUT
BL_PWM
AV33AV125
+12V
+5V LVDSVDD
DV33
+3V3SB
+5V
+5V DV33
+3V3SB
GND3,4,5,6,7,8,9,10,11,13,14
+5V3,6,8,10,14
AV333,4,6,8,9,10,13
+12V3,10,11,13,14
AV1253,4,5,8,9
DV333,4,5,6,7,11
E1P4
E1N4
E2P4
E2N4
ECKP4
ECKN4
LVDS_POWER_ON4
E3P4
E3N4
AVDD33_LVDS3,4,6,8,9,10,13
O0N4
O0P4
AVDD12_VPLL4
O1P4
O1N4
O2P4
O2N4
OCKP4
OCKN4
O3P4
O3N4
E0P4
E0N4
USB_PWR_EN04,6
USB_PWR_ERR04,6
ADIN34
GPIO04
+3V3SB3,6,8,9
BL_ON/OFF14
DIMMING14
O1P
O0N
O0P
O2N
O2P
OCKN
OCKP
O3N
O3P
O1N
E1P
E2N
E2P
ECKN
ECKP
E3N
E3P
E0N
E0P
E1N
LVDSVDD
DIMMING_OUT
BL_PWM
Title
Size Document Number Rev
Date: Sheet of
MediaTek Inc.
TEL:(03)567-0766 FAX:(03)578-7610
No.1-2, Innovation Rd 1, SBIP, Hsin-Chu City 300
Drawn
MT5305A P1V1
V1
C
12 15Wednesday, October 14, 2009
LVDS/BACKLIGHT
MediaTek Confidential
Title
Size Document Number Rev
Date: Sheet of
MediaTek Inc.
TEL:(03)567-0766 FAX:(03)578-7610
No.1-2, Innovation Rd 1, SBIP, Hsin-Chu City 300
Drawn
MT5305A P1V1
V1
C
12 15Wednesday, October 14, 2009
LVDS/BACKLIGHT
MediaTek Confidential
Title
Size Document Number Rev
Date: Sheet of
MediaTek Inc.
TEL:(03)567-0766 FAX:(03)578-7610
No.1-2, Innovation Rd 1, SBIP, Hsin-Chu City 300
Drawn
MT5305A P1V1
V1
C
12 15Wednesday, October 14, 2009
LVDS/BACKLIGHT
MediaTek Confidential
By Ray
NEAR ICNEAR IC
HI = > LVDS POWER ON
LO = > LVDS POWER OFF
LO = > POWER_ON
HI = > POWER_OFF
INVERTOR POWER
1K PULL UP to
3V,for 42" lcd.
FOR MT8282
XR23
10K
XR23
10K
XQ4
2N3904
XQ4
2N3904
1
3 2
XC7
1uF
XC7
1uF
R1 0/NCR1 0/NC
NC17
0.1uF
NC17
0.1uF
XR17 4.7kXR17 4.7k
+
CE51
47uF/16v
+
CE51
47uF/16v
R123
47K
R123
47K
R1837
NS/0
R1837
NS/0
XR6
NS/1K
XR6
NS/1K
CB154
0.1uF
CB154
0.1uF
+
CE49
100uF/16v
+
CE49
100uF/16v
XR18
10k
XR18
10k
R124
47K->1K
R124
47K->1K
XR22
1k/NC
XR22
1k/NC
XQ6
2N3904
XQ6
2N3904
1
3 2
XR5
1K
XR5
1K
D6 1N4148D6 1N4148
C657
10uF/10v/NC
C657
10uF/10v/NC
CB152
0.1uF
CB152
0.1uF
NC14
0.1uF
NC14
0.1uF
Q70
AO3401
Q70
AO3401
1
23
XR21
10k/NC
XR21
10k/NC
XR13 4.7kXR13 4.7k
CB993
1uF
CB993
1uF
XR8
47k
XR8
47k
TP38TP38
CB155
0.1uF
CB155
0.1uF
R125 10kR125 10k
TP39TP39
NR4 0
NR4 0
R2 0R2 0
XQ5
2N3904
XQ5
2N3904
1
3 2
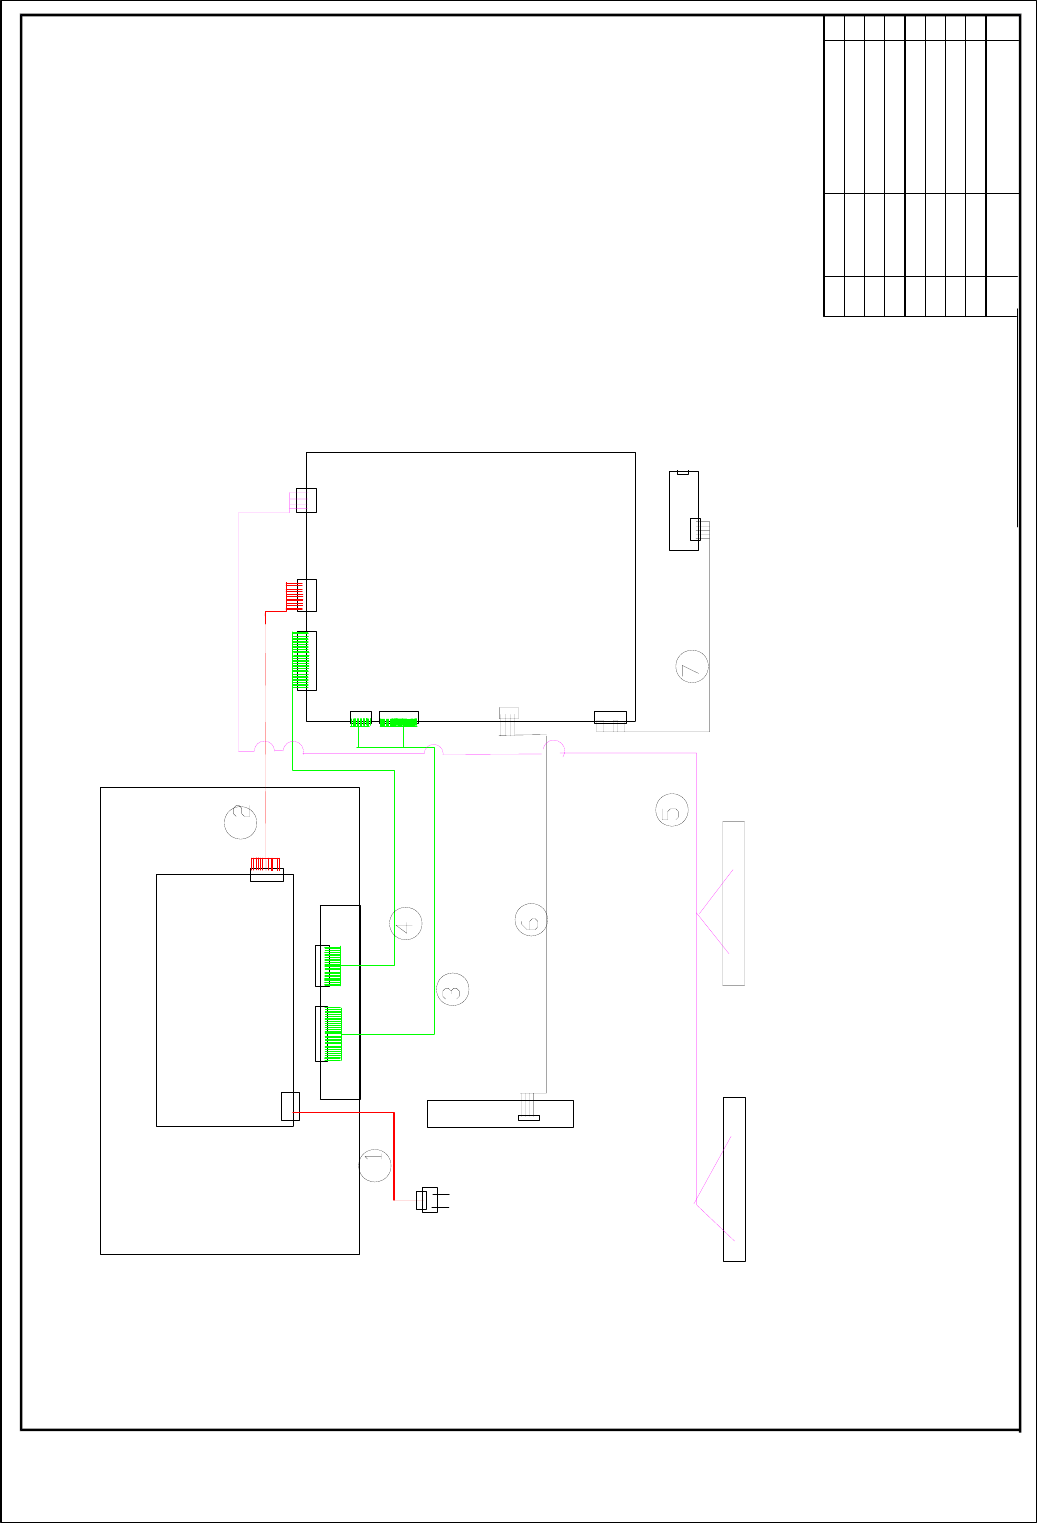
Mainboard
Assembly
Speaker
47<
1$0(
3DUWV
QXPEHU
12
POWER
SUPPLY
PANEL
Keypad Assembly
Power Cord
Connection Wire(Remote˅
Connection Wire˄Control˅
Speaker Wire
LVDS Wire
LVDS Wire
Connection
Wire(12V/5V )
Remote Control Board
Assembly
CND3
CND4
CND5
CNE2
JP1
PD801
CNM801
CN2 CN1
Power Cord
0090401964
Connection Wire(12V/5V )
LVDS Wire
LVDS Wire
Speaker Wire
Connection Wire
˄
Control
˅
Connection Wire(Remote
˅
E
C
0090402848
%
J
0090402846
CNA1
CON2
CNE2
CNE1

Chapter 8. Measurements and Adjustments
8-1. Service Mode
8-1-1.How to enter into Service Mode
The way to the factory mode menu:
1st, press menu,
2en, input 8893,
Finished these operations ,system will be into the factory mode menu.
At the end of the main factory menu, you can see the edition of the software,
like this” L_MSD209_AU32 ”.
8-1-2.How to exit
If you want to exit this factory menu, please press the button ”Exit” on the remote.
system will be out the factory mode menu.
8-2. Measurements and Adjustments
8-2-1. The Main Menu
In factory mode menu,press up/down button to choose the up/down item,press left/right button
to the submenu,press "OK"button to affi rm .press MENU button go to the next page.
MSD209 Factory Menu
In this page, you just consider "RESET
ALL" function.This function you can reset all
date return to factory state.if you encounter
inextricable problem,you can try this function.
Press up/down button to select "RESET
ALL",press "OK" button.It needs a few
secounds.
NOTE : After reset ,please shut off the power.
Be carefully use this function.
Service Manual
46
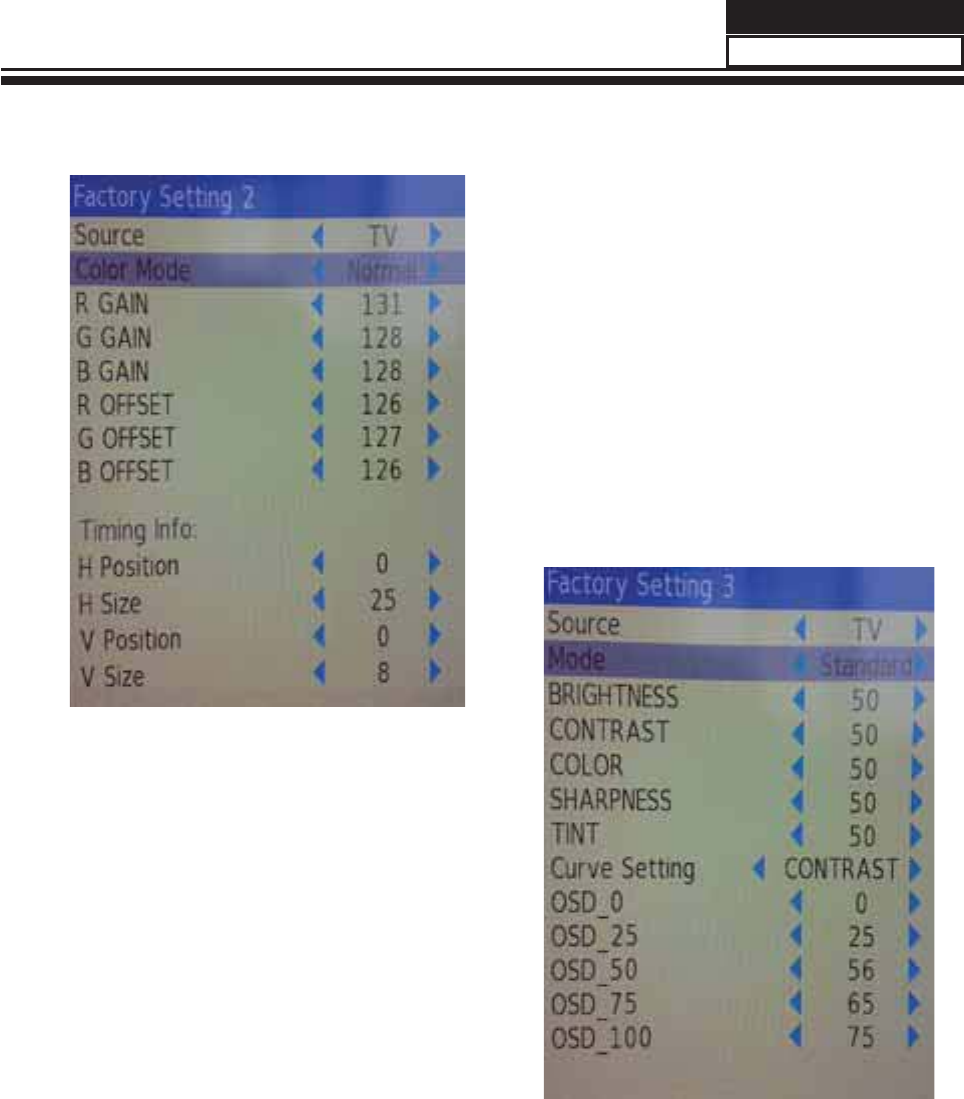
8-2-2. Video
Color Temperature
This page is control the Color Temperature,
and the picture size.
Picture Mode
This page is control the picture effect , like
Brightness,contrast,color,sharpness.
Service Manual
47

8-2-3. Audio
8-2-4. Software UpDate
This page is control the sound effect ,from
100Hz to 10KHz.
In this page , you just consider the software
update function.Plug USB into the 1st USB port
,select "SOFTWARE UPDATE" press "OK", Then
flip the other window,perss "OK",The update is
going work.
NOTE : After software update ,turn to the Factory
Setting 1 page reset all.
Service Manual
48

Chapter 9. Trouble shooting
9-1. Simple check
No picture/ No sound
Verify if the television is properly plugged
Verify if the television is properly supplied power
Verify if electricity is available.
Blank screen
Verify if correct signals are input
Press INPUT button to change signal input to TV input
Restart the television of power supply is interrupted
No sound
Press Mute button and verify if Mute mode is set.
Switch to otger channel and verify if the same problem
happens.
Press VOL+ button to see of he problem can be solved.
Poor sound Verufy if sound system is correct .Refer to some chapter for
adjust.
No picture in some channel
Verify if correct channel is selected.
Adjust the antenna.
Make adjustments by Fine Tune and MANUAL Scan.
No color for some channel program
(black and white)
Verify if the same problem exists in other channels.
check out of picture and sound system.
Refer to relative instructions in the Manual for color adjust.
Spots with some or all pictures
Verify if the antennal is correctly connected.
Verify if the antennal is in good condition.
Make fi ne adjustment of channel.
Horizontal/ vertical bars or picture
shaking
Check for local interference such as an electrical appliance
or power tool.
Television out of control
Disconnect the television from power supply and 10
seconds later, connect the television to the power supply.
If the problem still exists, contact authorized after-sales
service for technical assistance.
Service Manual
49
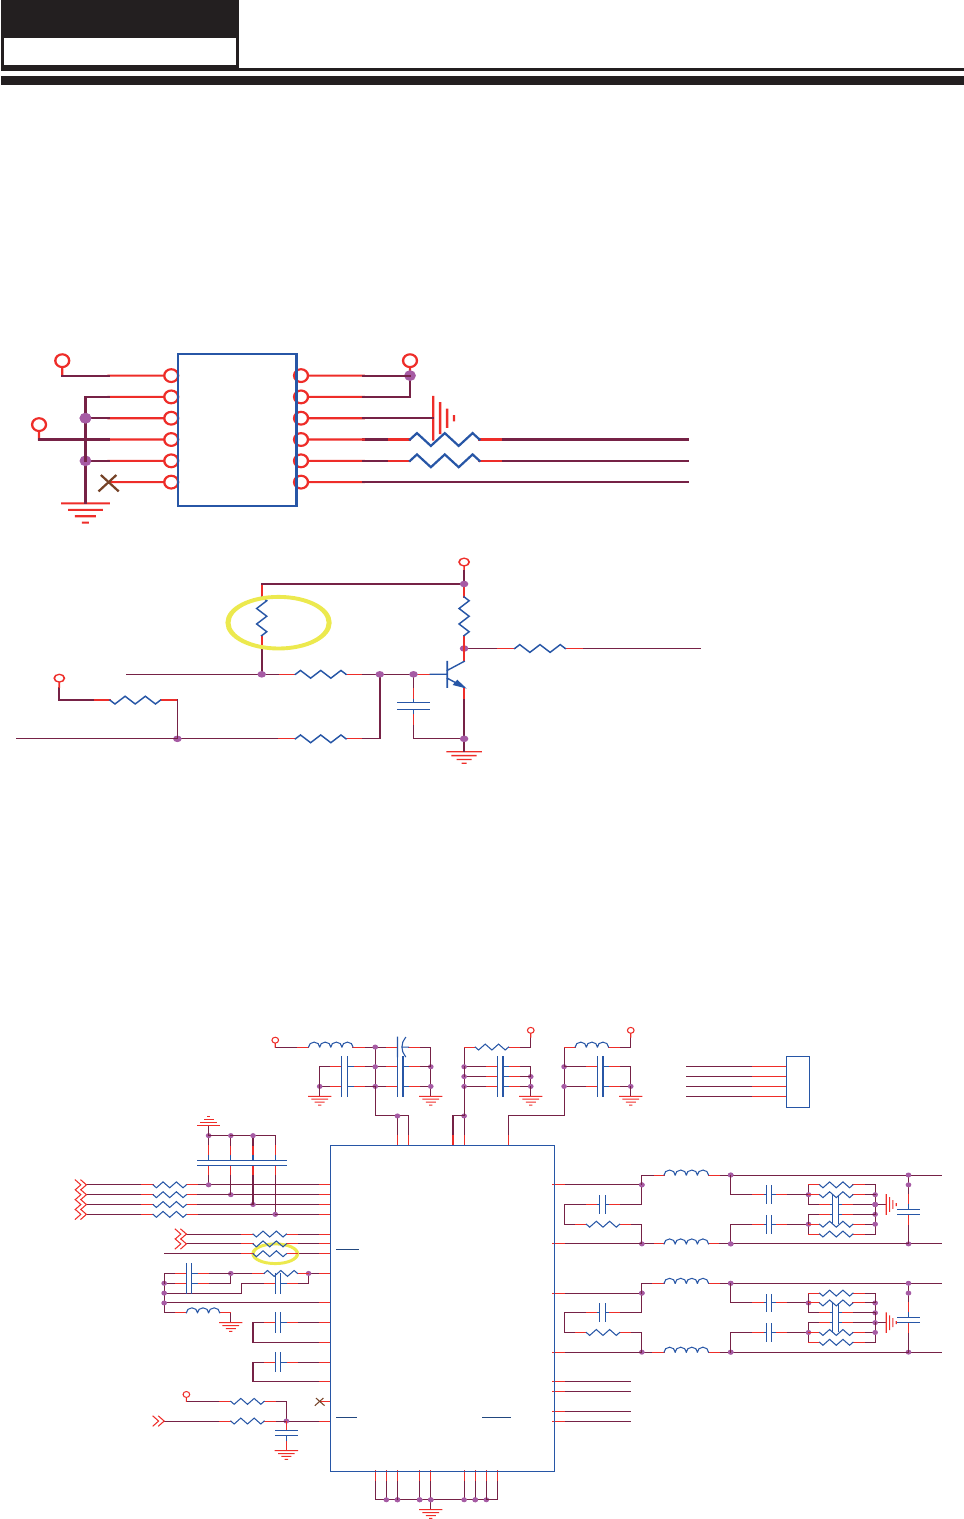
9-2. Power Supply Board Failure Check.
Service Manual
50
State:No picture
First,check cables which connect with PSU,then check as follows
Check input voltage
voltage: +5VSB----POWER ON(2.6V) -----+12V
State:No sound
First,check cables which connect with PSU,then check as follows
1) Check input voltage as NO picture
2) Check speaker output
First,check speaker anode(+) and cathode(-),confi
rm speaker short or not.If short ,replace
speaker.
Second,check CN27 with oscillograph,confi rm wave output or not.
C134
NC
C135
NC
L34 22uH
AMP-Lout+
AMP-Lout-
C136
NC
AMP-Rout+
OUT3A
AMP-Rout+
OUT3B
EAPD
L33 22uH
AMP-Rout-
AMP-Lout+
I2S_SD0
I2S_LRCLK
TW
HP_MUTE_AMP
RST_AMP
I2S_SCLK
I2S_MCLK
AMP-Lout-
L36 22uH
AMP-Rout-
C78 0.1uF
R107 3.3R
R492 12
L74 FB/2A
R534 12
C240 330pF/25V
R493 12
C106 10uF
C161 100nF
R332 22
C116 100pF
L76 FB/2A
1
2
3
4
CN27
Speaker
C262 100nF/25V
C255 100nF
R364 22
R338 22
C131 0.1uF
C107 10uF
C123
470nF
C146 4.7nF
C160 0.1uF
C121
470nF
C140 1uF
C281 330pF/25V
R334 22
C283
100nF/25V
CA84 470uF/35V
C100 0.1uF
C258
100nF/25V
R329 100
R306 10K
C291 100nF/25V
R346 22 C244
100nF/25V
R359 12
R494 12
C79 0.1uF
L31
600(4.5X3.2)
C117 680pF
GND_SUB
1
SA
2
TEST_MODE
3
VSS
4
VCC_REG
5
OUT2B 6
GND2
7
VCC2 8
OUT2A 9
OUT1B 10
VCC1 11
GND1
12
OUT1A 13
GND_REG
14
VDD
15
CONFIG
16
OUT3B/DDX3B 17
OUT3A/DDX3A 18
EAPD/OUT4B 19
TWARN/OUT4A 20
VDD_DIG 21
GND_DIG
22
PDN
23
VDD_PLL 24
PLL_FILTER
25
PLL_GND
26
XTI
27
BICKI
28
LRCKI
29
SDI
30
RST
31
INT_LINE
32
SDA
33 SCL
34
GND_DIG
35
VDD_DIG 36
PAD
37
U54
STA559BW
R362 12
R554 12
R349 22
C284 100nF/25V
R360 22
C118 1uF
R335 22
R253 2.2K
C286 100nF/25V
C254
2.2uF
R558 12
C282
100nF/25V
+12V +3.3AVDD +3.3AVDD
+3.3AVDD
M_SCL1,2,9,14
I2S_MCLK2
M_SDA1,2,9,14
I2S_SD02
I2S_LRCLK2
I2S_SCLK2
RST_AMP2
L35 22uH
C133
NC
R363 NC/0R
R350 100
1
122
3
344
5
566
7
788
9
910 10
11
11 12 12
CN10 Power
R341 100
+12V +12V
5VSTB
PW_ON/OFF-INV
PB-ON/OFF
PB-ADJUST
PWR-ON/OFF-GPIO46
R225 NC/10K
R213
NC/10K
V203
3904
PW_ON/OFF-INV
R215 10K
C209
0.1uF
R214
100
R212
2.2K
5VSTB
+3.3VDD
R232
10K
PWR_ON/OFF
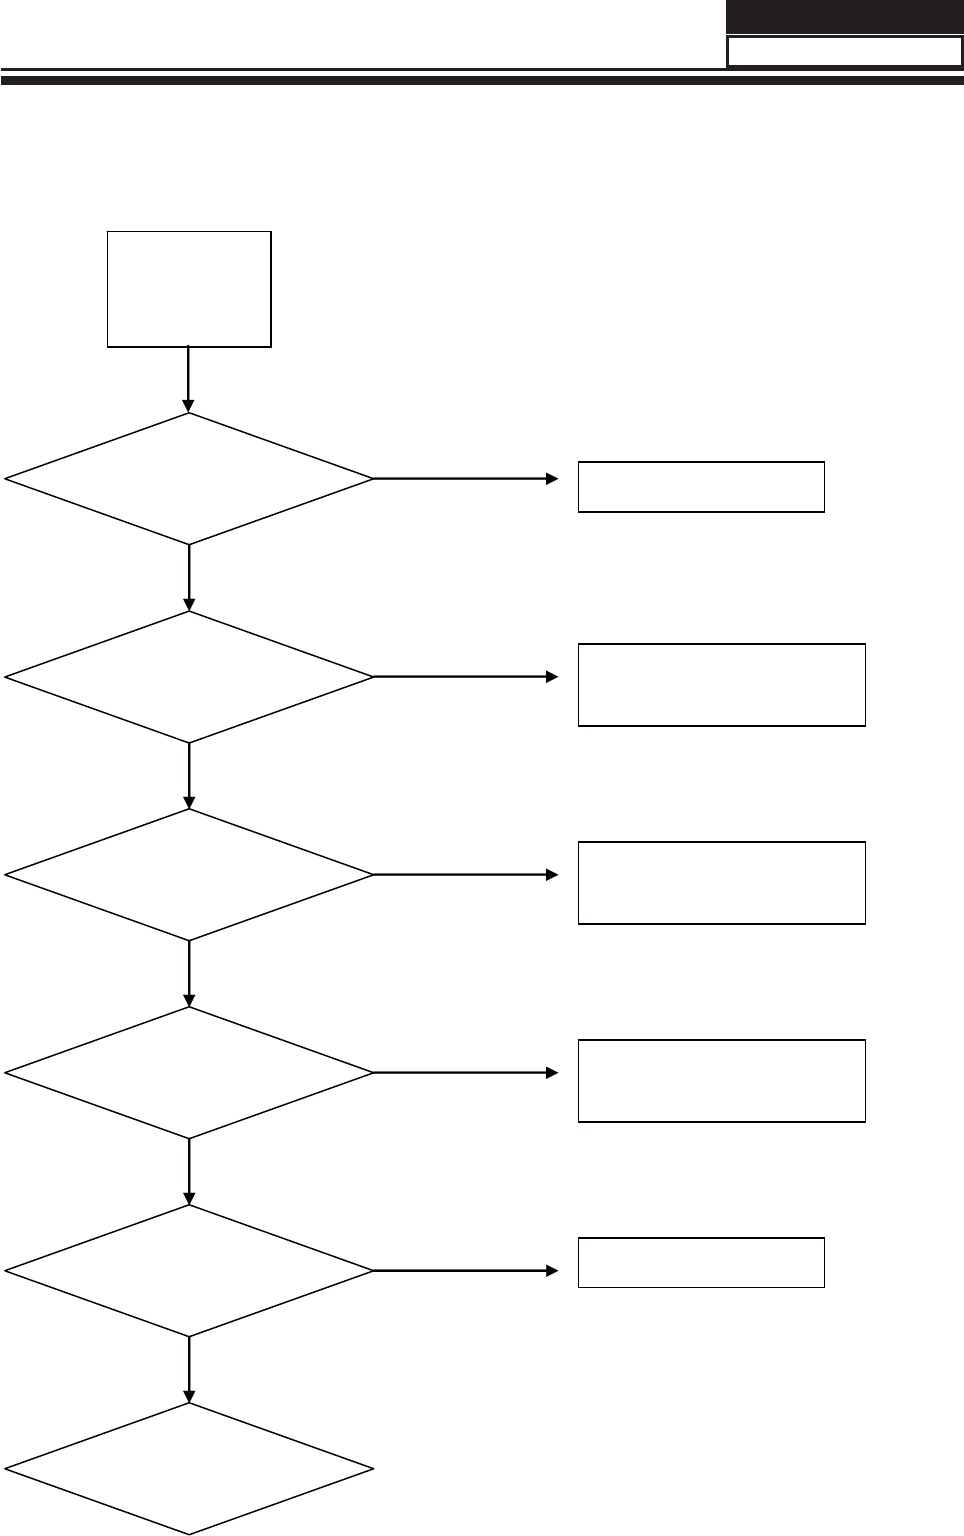
9-3. Mainboard Failure Check
Symptom: No Sound
No Sound
(All Mode)
Check the input
Source Change Source input
Check the
input/output
Re-soldering or change
IC U13
Check the
input/output
Re-soldering or change
IC U55
Check the
input/output
Re-soldering or change
IC U2
Check the
Speaker
Change the Speaker
Check the
Sperker wire
Fail
Pass
Fail
Fail
Fail
Fail
Pass
Pass
Pass
Pass
Service Manual
51
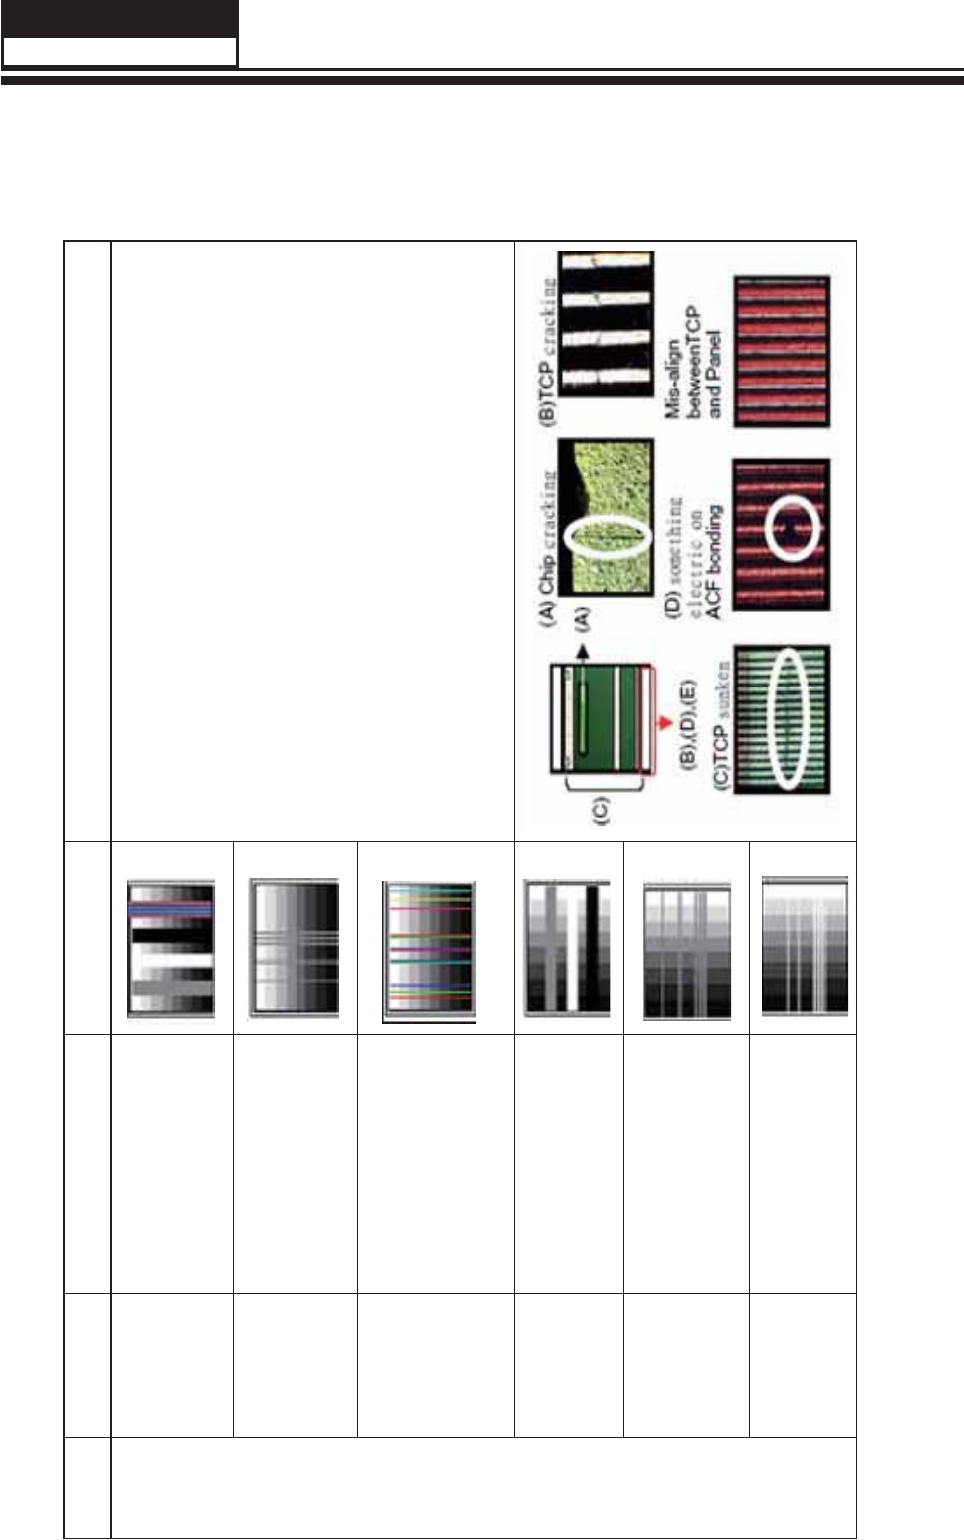
9-4. Pannel Failure
Failure Mode
Part Name Description Phenomena Failure cause
TCP
V B/D Vertical bar
Block Defect :TCP cracking or cracking
Dim or L/D :TCP Sunken
:TCP lead cracking
:ACF bonding short
:Awful environment and
something electric enter
into LCD
:Mis-align between TCP and
Panel
:Panel failure
:TCP failure
V Dim Vertal gray line
V L/D Vertical color line(light or
dark forever)
H B/D Horizontal bar
H Dim Horizontal gary line
H L/D Horizontal line(light or
dark forever)
Service Manual
52
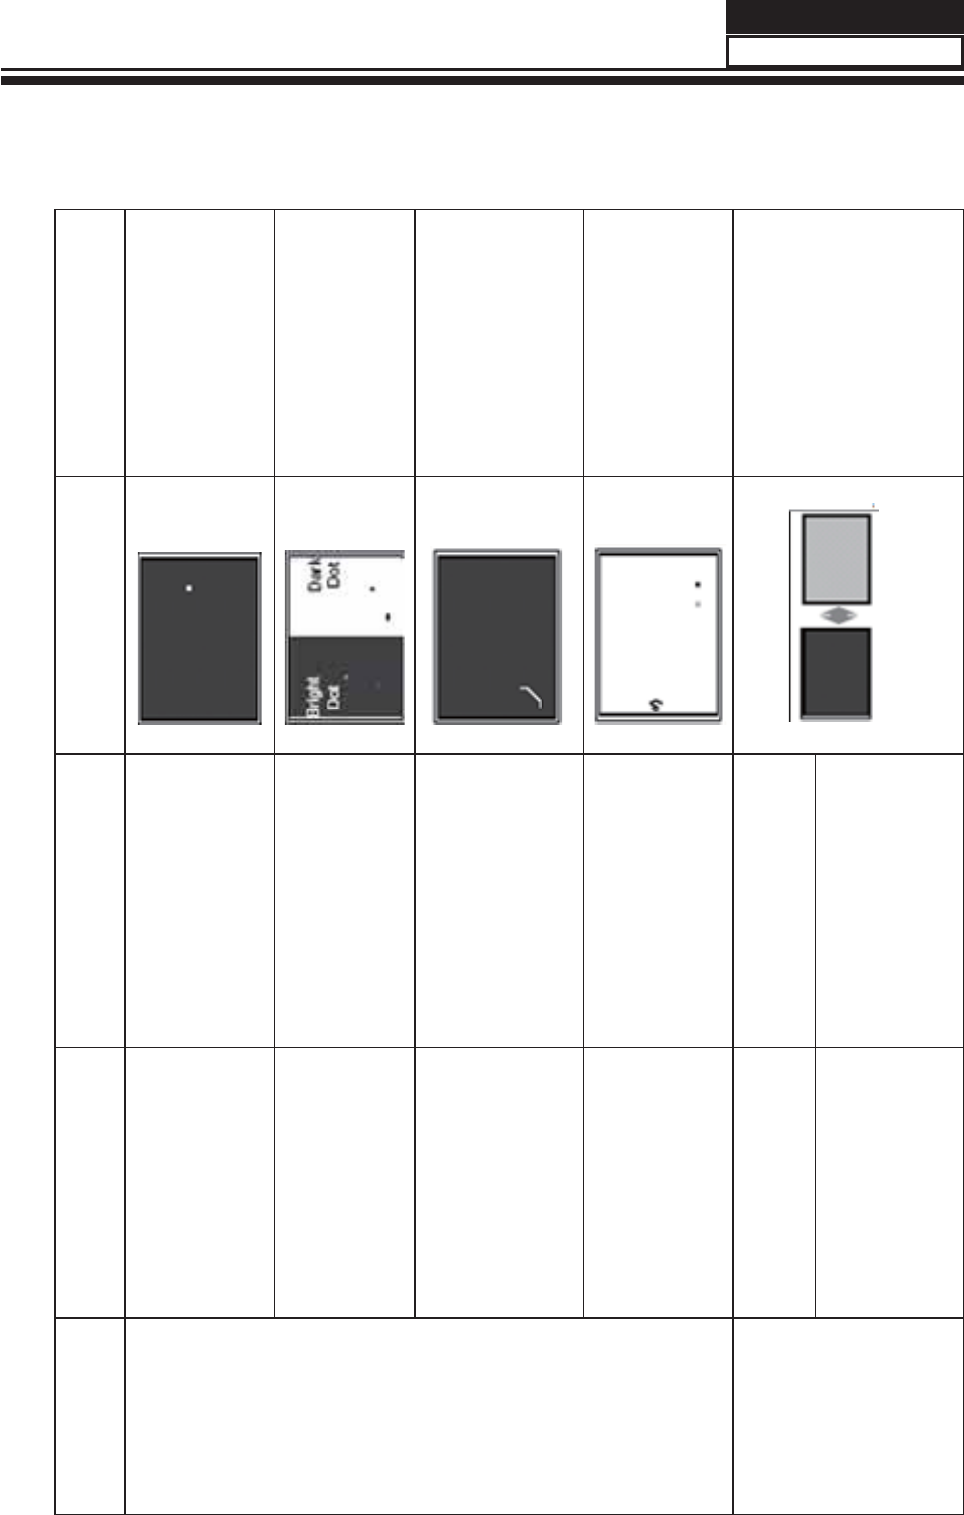
Part Name Description Phenomena Failure Cause
Panel or Polarlzer
Dot Defect Bright dot dark dot in pannel Incoming Inspection Standard
Polarizer Bubble Bladder in Polarizer Bladder between Polarizer and
top glass
Polarizer Scratch Polarizer Scratch Tine or rigidity arose
F/inside Polarizer Eyewinker inside Polarizer Eyewinker inside Polarizer
Circuit
Abnormal Display Abnormal Display
1.Chip lose action
2.IC ahort or jointiog bad
3.Pannel and vsc connect bad
Flashing Bright and dark display alternately
Service Manual
53
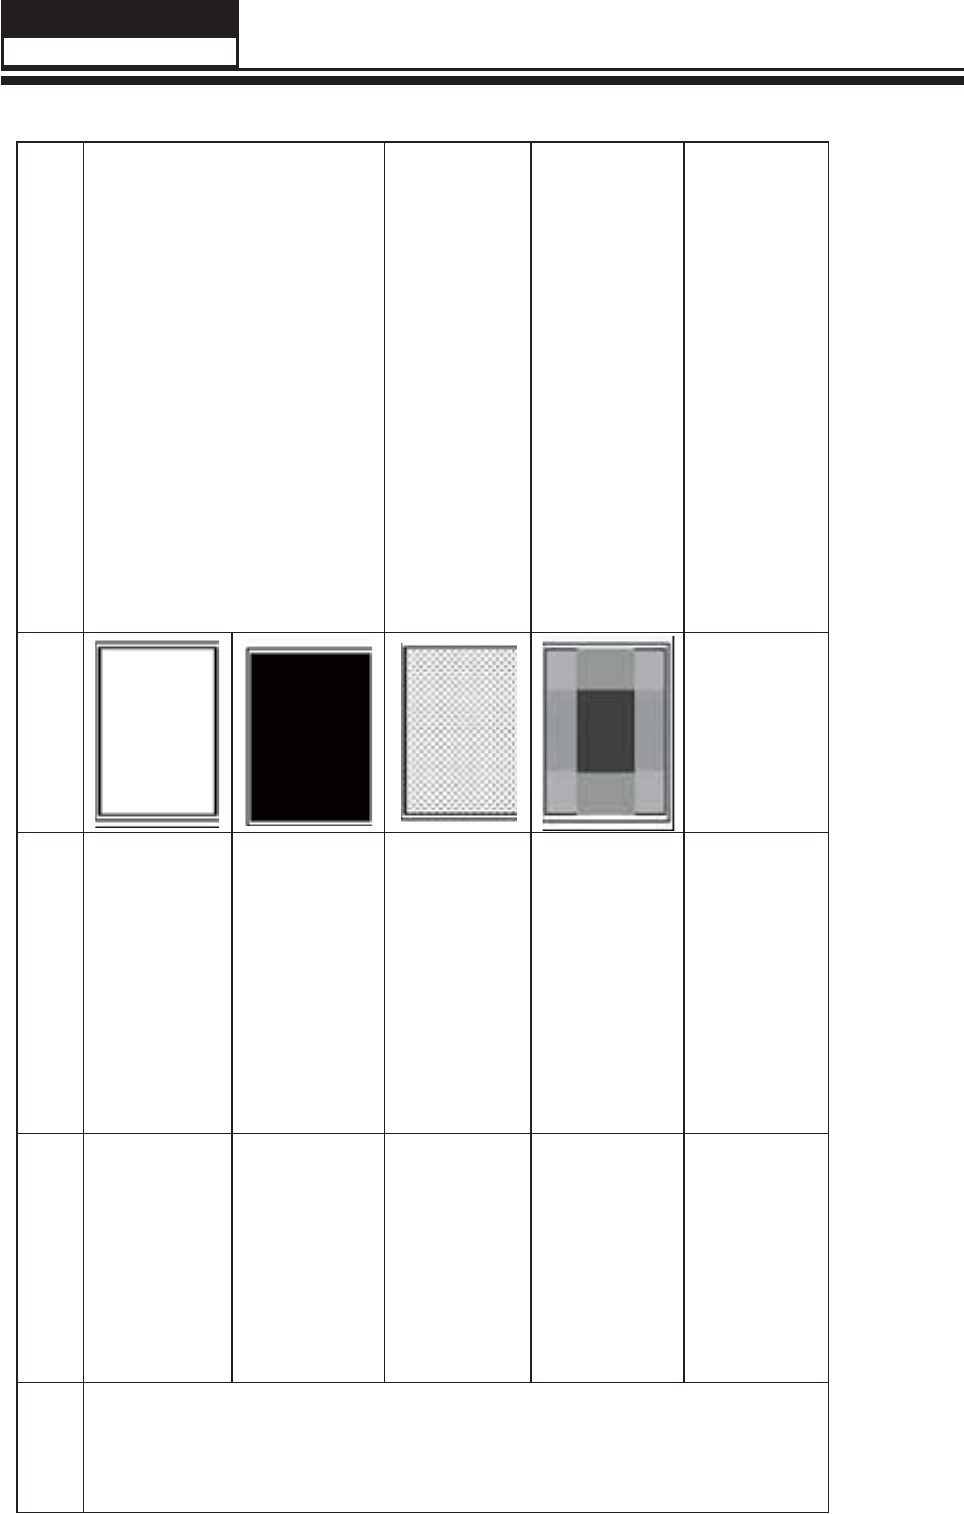
Part Name Description Phenomena Failure Cause
Circuit
White Screen B/L normal,
only white screen display
Maybe caused by surge current and EDS
Black Screen B/L normal,
only Black screen display
FIIcker Crosstalk LCD
Vcom imbalance
Abnormal Color Only
color abormal
Capacitance
improper bring crosstalk inside LCD pannel
Abnormal Color Only
color abnormal
1.Chip
lose action
2.IC short or jointion bad
3.Pannel and vsc connect bad
Service Manual
54
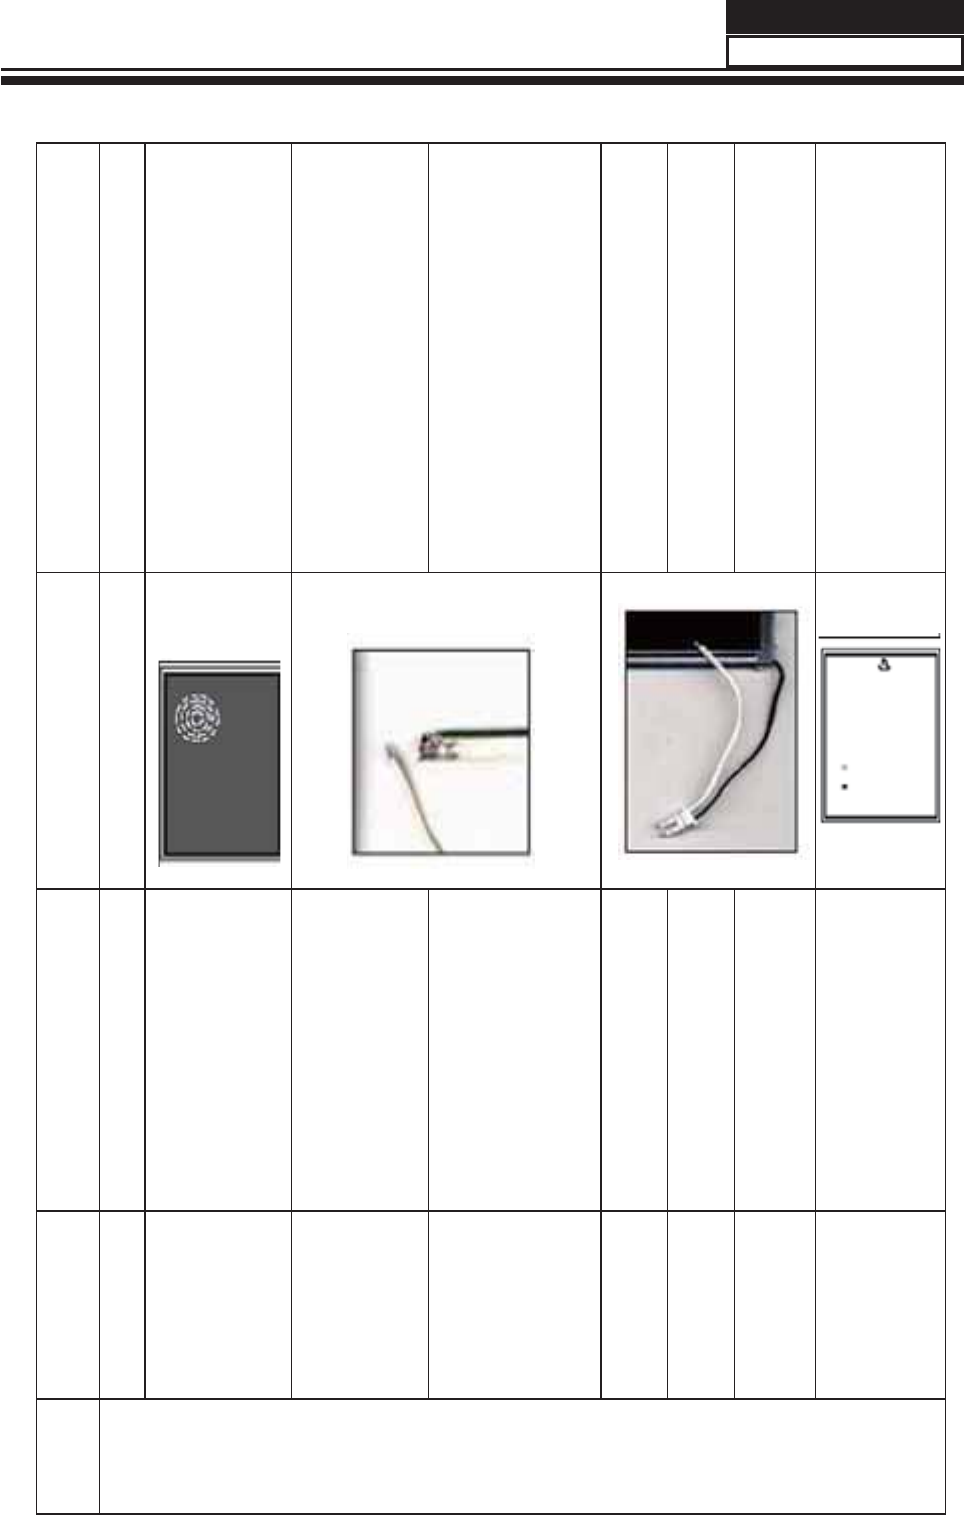
Part Name Description Phenomena Failure cause
Mechanlcal
Nolse
When
turn panel,appear cacophony
Caused
by Mechanica noise of backlight unit
Ripple Connectric circle
Causeed by
between
mechanism and pannel
B/L off B/L lose action
*Connect
badness
between wire and electrode
B/L dark B/L brightness darker than
normal
*Connect
badnessShort between wire and electrode
B/L
wire damaged
B/L
wire damaged
Operation
abnormal
or systemic noise
B/L wire open Without backlight
Operation
abnormal
or systemic noise
B/L shut down B/L shutdown in sometime Short bitween lamp housing and wire, Because
consume power too much
F/M
F/M
inB/L ,white,balck Rotundity
or wirelike
F/M in B/L unit
Service Manual
55
Part Name Description Phenomena Failure Cause
Mechanlcal or B/L
Light leakage
Brightness
at bottom of LCM brighter
than normal
B/L unit badness
Uniformity B/L brightness asymmetric Sheet in B/L unit is uneven
Mount hole Lack screw
or screw damage
*Lack screw
Screw damage
Service Manual
56

Sincere Forever
Haier Group
Haier Industrial Park, No.1, Haier Road
266101, Qingdao, China
http://www.haier.com
Printed in China
