Services Standard Build User Guide
User Manual:
Open the PDF directly: View PDF ![]() .
.
Page Count: 26

Services Standard Build User Guide
SSB/SSD v3, February 2017
This document is intended to be a user-friendly guide explaining how to set-up the Services Standard
Build, as well as its applications.
Services Standard Build User Guide Page 2 of 26
Document Revision History
Revision
Date
Written/Edited By
Comments
February
2013
Blake Bowen
Initial Creation (Current IdentityIQ version: 6.0)
March 2013
Tina Timmerman
1st Revision
April 2013
Brendon Jones
2nd Revision
June 2013
Blake Bowen
Final Revision for SSB 1.2, posted to Compass
August 2013
Blake Bowen
Updated Compass links to new Compass
January
2015
Blake Bowen
Updated with version 1.5 features, new Compass links,
and further clarification.
June 2016
Blake Bowen
Updated Compass link to point to SSD get started page
September
2016
Paul Wheeler
Updated with new features added in v2.
October
2016
Paul Wheeler
Minor corrections for revision 2.0.1.
December
2016
Paul Wheeler
Example custom script file names modified so that they
do not execute unless renamed.
January
2017
Paul Wheeler
Support for environment-specific build.properties files
clarified.
February
2017
Paul Wheeler
Minor restructure and updates for SSD/SSB v3 release
© Copyright 2017 SailPoint Technologies, Inc., All Rights Reserved.
SailPoint Technologies, Inc. makes no warranty of any kind with regard to this manual, including, but not limited to, the implied warranties of
merchantability and fitness for a particular purpose. SailPoint Technologies shall not be liable for errors contained herein or direct, indirect,
special, incidental or consequential damages in connection with the furnishing, performance, or use of this material.
Restricted Rights Legend. All rights are reserved. No part of this document may be photocopied, reproduced, or translated to another
language without the prior written consent of SailPoint Technologies. The information contained in this document is subject to change without
notice.
Use, duplication or disclosure by the U.S. Government is subject to restrictions as set forth in subparagraph (c) (1) (ii) of the Rights in
Technical Data and Computer Software clause at DFARS 252.227-7013 for DOD agencies, and subparagraphs (c) (1) and (c) (2) of the
Commercial Computer Software Restricted Rights clause at FAR 52.227-19 for other agencies.
Regulatory/Export Compliance. The export and reexport of this software is controlled for export purposes by the U.S. Government. By
accepting this software and/or documentation, licensee agrees to comply with all U.S. and foreign export laws and regulations as they relate to
software and related documentation. Licensee will not export or reexport outside the United States software or documentation, whether
directly or indirectly, to any Prohibited Party and will not cause, approve or otherwise intentionally facilitate others in so doing. A Prohibited
Party includes: a party in a U.S. embargoed country or country the United States has named as a supporter of international terrorism; a party
involved in proliferation; a party identified by the U.S. Government as a Denied Party; a party named on the U.S. Government's Entities List; a
party prohibited from participation in export or reexport transactions by a U.S. Government General Order; a party listed by the U.S.
Government's Office of Foreign Assets Control as ineligible to participate in transactions subject to U.S. jurisdiction; or any party that licensee
knows or has reason to know has violated or plans to violate U.S. or foreign export laws or regulations. Licensee shall ensure that each of its
software users complies with U.S. and foreign export laws and regulations as they relate to software and related documentation.
Trademark Notices. Copyright © 2017 SailPoint Technologies, Inc. All rights reserved. SailPoint, the SailPoint logo, SailPoint IdentityIQ, and
SailPoint Identity Analyzer are trademarks of SailPoint Technologies, Inc. and may not be used without the prior express written permission of
SailPoint Technologies, Inc. All other trademarks shown herein are owned by the respective companies or persons indicated.

Services Standard Build User Guide Page 3 of 26
Table of Contents
Services Standard Build Overview ........................................................................................................... 4
Process Overview ................................................................................................................................. 4
Downloading the Services Standard Build ............................................................................................ 5
Folder Structure ................................................................................................................................ 5
Exporting Custom Objects .................................................................................................................... 8
Running the Export Script ................................................................................................................. 9
Build Structure Set-up ......................................................................................................................... 12
Configuration Objects ...................................................................................................................... 12
IdentityIQ Product Files ................................................................................................................... 12
Build Configuration ............................................................................................................................. 13
Configuring the build.properties file ................................................................................................. 13
Supporting multiple platforms (Windows/Linux/Unix) for different environments ........................ 17
Setting up environment-specific properties files .............................................................................. 18
Configuring iiq.properties files ..................................................................................................... 18
Configuring target.properties files ................................................................................................ 19
Configuring ignorefiles.properties files ........................................................................................ 21
Setting the environment name for a build .................................................................................... 22
Using the SPTARGET environment variable to specify the build environemnt ....................... 22
Setting the target variables by editing servers.properties ........................................................ 23
Executing the build ............................................................................................................................. 23
Dev targets explained ..................................................................................................................... 24
No target (just entering “build” into a windows terminal or “./build.sh” into a Linux terminal) ...... 24
clean ............................................................................................................................................ 25
createdb ....................................................................................................................................... 25
cycle ............................................................................................................................................. 25
dropdb ......................................................................................................................................... 25
dist ............................................................................................................................................... 25
deploy .......................................................................................................................................... 25
importcycle ................................................................................................................................... 25
importdynamic ............................................................................................................................. 25
export ........................................................................................................................................... 26
document ..................................................................................................................................... 26
Services Standard Build User Guide Page 4 of 26
Services Standard Build Overview
A build process is critical to the smooth deployment to production of a configured IdentityIQ
environment. A build process helps streamline the process of promoting an IdentityIQ installation’s
configuration objects through the development, test and production environments so that all three
contain the same custom objects like applications, rules, task definitions and identity mappings. It also
allows for new custom objects and custom java code to be integrated into IdentityIQ with a
simple, manageable set of commands that can be easily automated.
The Services Standard Build (SSB) is a set of artifacts developed by the SailPoint Services team to
support the build process for IdentityIQ deployments. These tools were designed with the following
goals in mind:
• Automate effort of generating deployments for various environments such as development,
testing, UAT, and production.
• Reduce time frame for new team members to become familiar with project structure and
customizations.
• Reduce likelihood of errors due to improper deployment of patches, efixes, and configurations.
• Accelerate the software development process with useful methods and tools that make
configuring IdentityIQ more efficient.
• Enable the SailPoint support team to quickly replicate IdentityIQ environments.
• Provide a build structure that is familiar to J2EE and servlet application developers that appeals
to a broad audience.
The SSB tools should be configured directly after installing IdentityIQ in the first development
environment for a project.
The SSB is a subset of what is known as the Services Standard Deployment (SSD). The SSB can be
downloaded as a standalone build tool, but downloading the SSD will incorporate all elements of the
SSB with some additional artifacts to help with deployment, known as the Services Standard
Frameworks (SSF), Services Standard Test (SST) and Services Standard Performance (SSP).
Configuration and use of the larger SSD and these other components is available on Compass but is
outside the scope of this document.
Process Overview
Before beginning, please ensure you have the following:
1. Access to SailPoint’s Compass website. https://community.sailpoint.com/
2. Command line access to your development and/or test servers. These are the servers where
IdentityIQ’s servlet container (web application server) runs. This may be JBoss, Tomcat,
WebSphere, or WebLogic depending on the environment. Command line access to your
production servers is only necessary if you will be installing IdentityIQ and migrating custom
code to your production servers.

Services Standard Build User Guide Page 5 of 26
3. Ability to create a directory in the WEB-INF/bin folder of your Identity IQ installation directory on
your development server.
4. Ability to stop and start your web application server (Tomcat, JBoss, WebLogic, WebSphere,
etc.).
5. Ability to copy a directory from your development server to your test and/or production server.
The steps you will perform to complete this process are as follows:
1. Download the Services Standard Build from Compass.
2. Export the custom objects from your development environment.
3. Set-up the directory structure of the build.
4. Configure the build.
5. Run the build command.
Downloading the Services Standard Build
First, download the latest version of the standalone Services Standard Build or the full Services
Standard Deployment from Compass.
Download the Zip file with the latest version and unzip it into a file directory accessible to the
development environment. This will create the base build structure. Make note of the directory where
you have un-zipped the services standard build files; this directory will be called the “SSB Install
Directory” throughout the remainder of this guide, and you will return to it repeatedly throughout the
build process.
Folder Structure
Services Standard Build User Guide Page 6 of 26
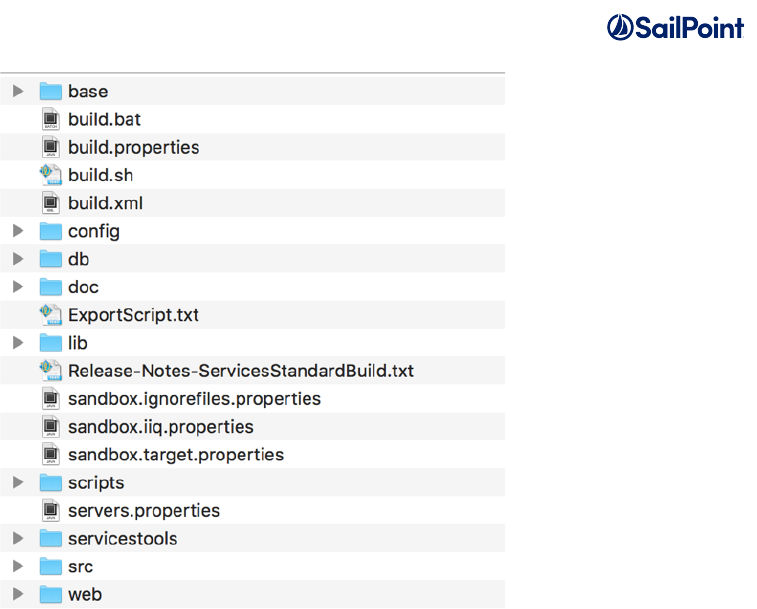
This is the high-level folder structure of the build. The top level directories should not be modified,
though objects will be placed into these folders, either directly or in subfolders, to be used in the build
process.
• base - Contains binaries distributed by SailPoint. You can download these from
community.sailpoint.com
o efix - Contains any efix archives sorted by directory name where the directory name
follows the naming convention <version><patchlevel>. If there is no patch level it will just
have the version number. Because efix solutions only work with the specific product
version they were designed for, you must make a unique directory for each version and
patch level you want to build against. If a properly named efix directory is not found, the
build will generate one. Efix files in .jar and .zip formats are supported.
o ga - Contains the SailPoint GA release binary. You can have as many GA release
binaries as you want to build against and the appropriate one will be selected using the
values you set in the build.properties file.
Example: /base/ga/identityiq-7.1.zip
o patch - Contains the SailPoint patch binaries. You can have as many patch binaries as
you want to build against and the appropriate patch will be selected using the values you
set in the build.properties file.
Example:/base/patch/identityiq-7.1p1.jar
• config - Contains all of your custom XML configuration objects sorted by folders where each
sub directory is named by the type of top level SailPoint object it holds. In the provided example
Application, Rule, TaskDefinition and TaskSchedule directories are shown. In general, as you

Services Standard Build User Guide Page 7 of 26
customize more object types, you should add a directory to contain that object. While writing
code, try to make the separation of object types as granular as possible such that it is easy to
view all objects of a particular type. For example, instead of inserting a rule directly into a
TaskDefinition, a reference to that rule should be created and the Rule itself would live in its
own file in the Rule directory. Separate and encapsulate.
o Note: While we recommend there just be objects in directories named for that object
type (Application, Bundle, etc), there is nothing special about the directory names under
the ‘/config/' directory. All files under ‘/config/' whose names end with a ‘.xml’ suffix will
be transformed through the build and tokenization and prepared for import into Identity
IQ. Files with other kinds of name extensions (.txt, .old, etc.) under '/config/‘ are ignored
by the build process.
• db - Contains customized database scripts.
• lib - Contains libraries used by the build process. It contains java code the ant build script uses,
but it does not get added to your installation of IdentityIQ. Do not put additional jars here. Put
them in the web/WEB-INF/lib directory.
• scripts - With the exception of the master build.xml file in the root directory, all other build files
are contained in this directory. Shipped and supported build files are read-only and follow the
name convention build.*.xml. If you customize the build process you must declare your
customizations in build files that follow the naming convention build.custom.*.xml.
o Two example scripts are provided illustrate how to extend the build process with site-
specific custom scripts.
§ scripts/example.build.custom.Extend-idAttrs.xml
§ scripts/example.build.custom.Modify-WEB-XML.xml
o Custom Ant scripts can inject their own site-specific logic in one of three places:
§ The "clean” target, which allows the custom ant script take whatever actions are
necessary when resetting the builds to a clean or blank state.
§ The “post.expansion.hook” target, which allows the custom ant script to
implement site-specific logic after the build has expanded the stock IdentityIQ
war file into the "/build/extract” directory. This is an opportunity to transform files
or alter what will end up in the finished .war file.
§ The “post.war.hook” target, which allows the custom script to take any action
after the war file has been zipped together into a single file. This is commonly
used for automated copying or deployment of the war file to a file server or
repository.
o The example scripts provide guidance in their comments for readers interested in using
them as templates to create their own site-specific build script functionality. They will not
execute during the build process unless their names are changed to the
build.custom.*.xml format.
o Readers interested in learning more about how Ant works are encouraged to review
Apache documentation: (http://ant.apache.org/manual/).
• servicestools - Contains the source code and an ANT project to build the services-tools.jar
which is placed in the lib directory of the build. Code compiled and placed into the services-
tools.jar is responsible for creating sp.init-custom.xml. Calling “import sp.init-custom.xml” from
Services Standard Build User Guide Page 8 of 26
the iiq console is an additional way to push custom objects from your <SSB Install
Directory>/config folder into your IdentityIQ database.
• src - Contains all of your custom java files. Note this java will be compiled and placed in a jar
file, which will be placed in the main IdentityIQ installation’s WEB-INF/lib directory. It will be
named based on the “customer” property in build.properties. The jar will become
identityiqCustomizations.customer.jar. You should NOT "clone and own" SailPoint shipped
classes in this area. Since they will be placed in the classpath at the same level as the shipped
classes you may get behavior you do not expect. If you absolutely must modify a core class
you will have to define a build.custom.*.xml file to handle layout of these files as you are
effectively defining your own efix. By default the build will not play nice with this practice, and it
is discouraged.
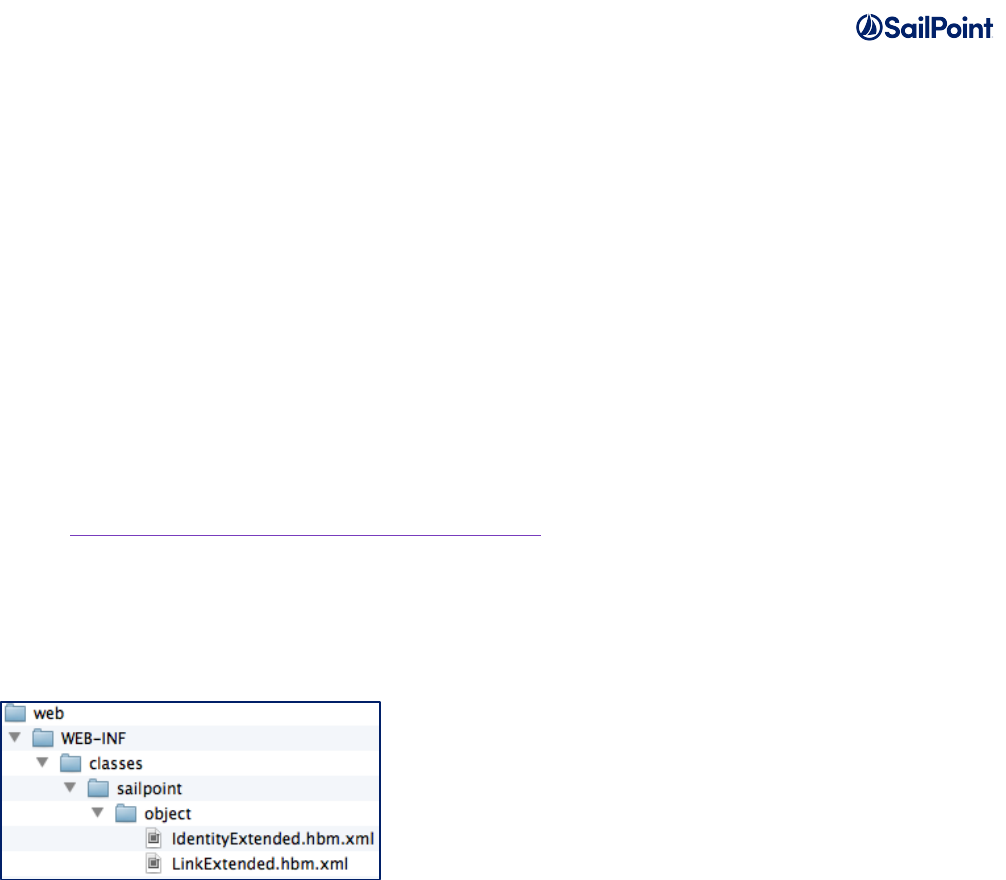
• web - Contains content that will be directly overlaid on the IIQ folder structure. Examples
include custom graphics/branding, xhtml, jsp, custom message catalogs, and additional jar
libraries. Under web you will need to create the folder structure for the location where these files
are normally stored. For information on custom branding for your enterprise, go here:
https://community.sailpoint.com/docs/DOC-7952.
Example: to include custom changes to the Hibernate XML configuration file for identity
extended attributes, put your customized version of IdentityExtended.hbm.xml in this
directory nested in the full directory path:.
web/WEB-INF/classes/sailpoint/object/IdentityExtended.hbm.xml
Exporting Custom Objects
This section assumes that IdentityIQ has been successfully installed into a development environment
and that object definitions (e.g., applications, rules) have been created. If IdentityIQ has not been
installed in at least your development environment, please do this first. If there are no custom object
definitions to export at this time, skip this step and add them to the build’s <SSB install
directory>\config folder as they are created. No out of the box objects need to be added to your
build directory; they are all added to the IIQ database when running “import init.xml”, and if
implementing the Lifecycle Manager functionality of IIQ, “import init-lcm.xml”. However, if you change
an out of the box object (ObjectConfig-“Identity” is an example of a common out of the box object that
changes when configuring identity mappings), this does need to be added to your build’s config folder.
This will ensure those changes migrate from environment to environment.
Services Standard Build User Guide Page 9 of 26
For further information on the object types that should be managed in your build, see the “Best
Practices: Deployment, Migration, Upgrade, and Artifact Management” document on Compass
here: https://community.sailpoint.com/docs/DOC-2264.
Note that there are several ways to export XML objects to the filesystem. The SailPoint Services team
now recommends using the Object Exporter task (available in the SSD or separately on Compass)
and/or the IdentityIQ Deployment Accelerator (also on Compass). However, the information below
covers the Export Script, an older method of exporting XML objects which is detailed here for reference.
Running the Export Script
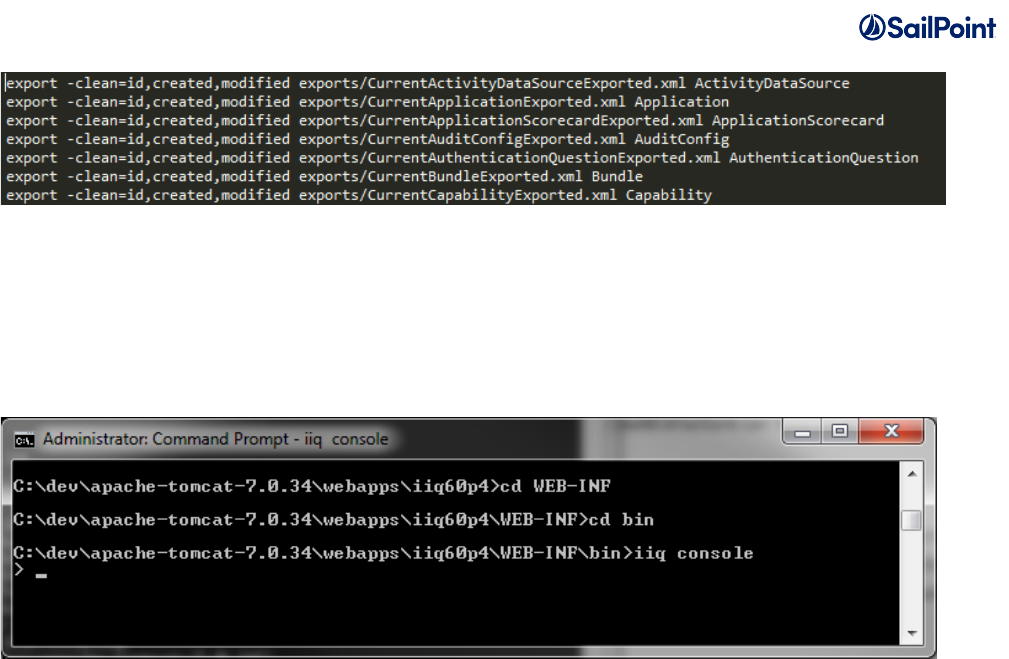
The SSB includes an export script (called Export Script.txt), which tells IdentityIQ to export some of the
most common object classes. It exports all objects of each object type into a separate file per object
type. For example, one line of the export script is “export -clean
exports/CurrentApplicationExported.xml Application”. This line exports all of the Application objects into
a file called “CurrentApplicationExported.xml”. These objects must be exported from the development
environment and included in the build directory tree to be included in the build process. (Note: The “-
clean” argument will tell the exporter to strip the object of all hibernate-generated ids. This is important
for moving objects from environment to environment.)
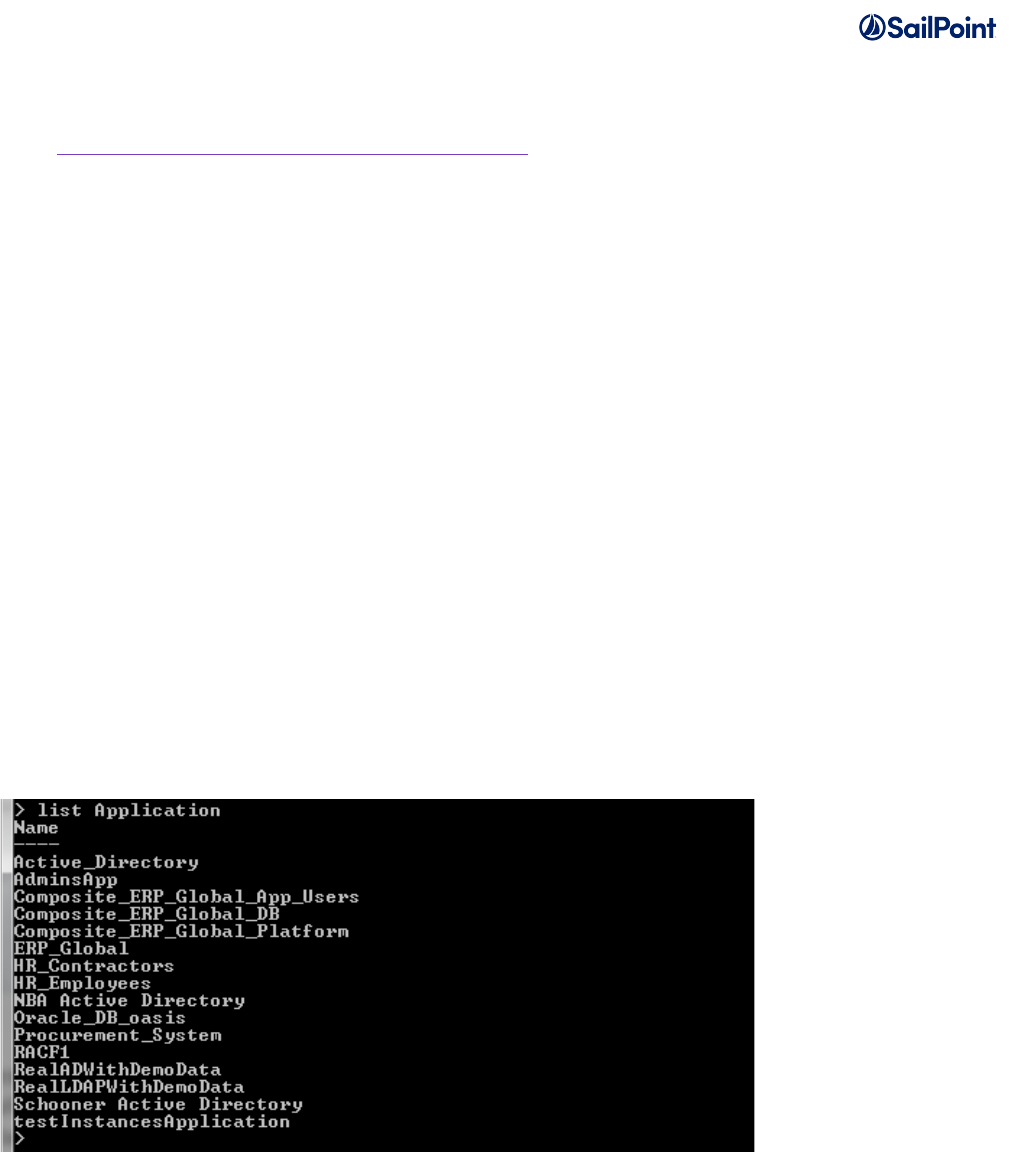
Use the iiq console command line utility to see the configuration objects your environment has by type:
1. Navigate to the WEB-INF\bin folder within your IdentityIQ installation directory from a command
prompt. Enter the command “iiq console” once inside this directory.
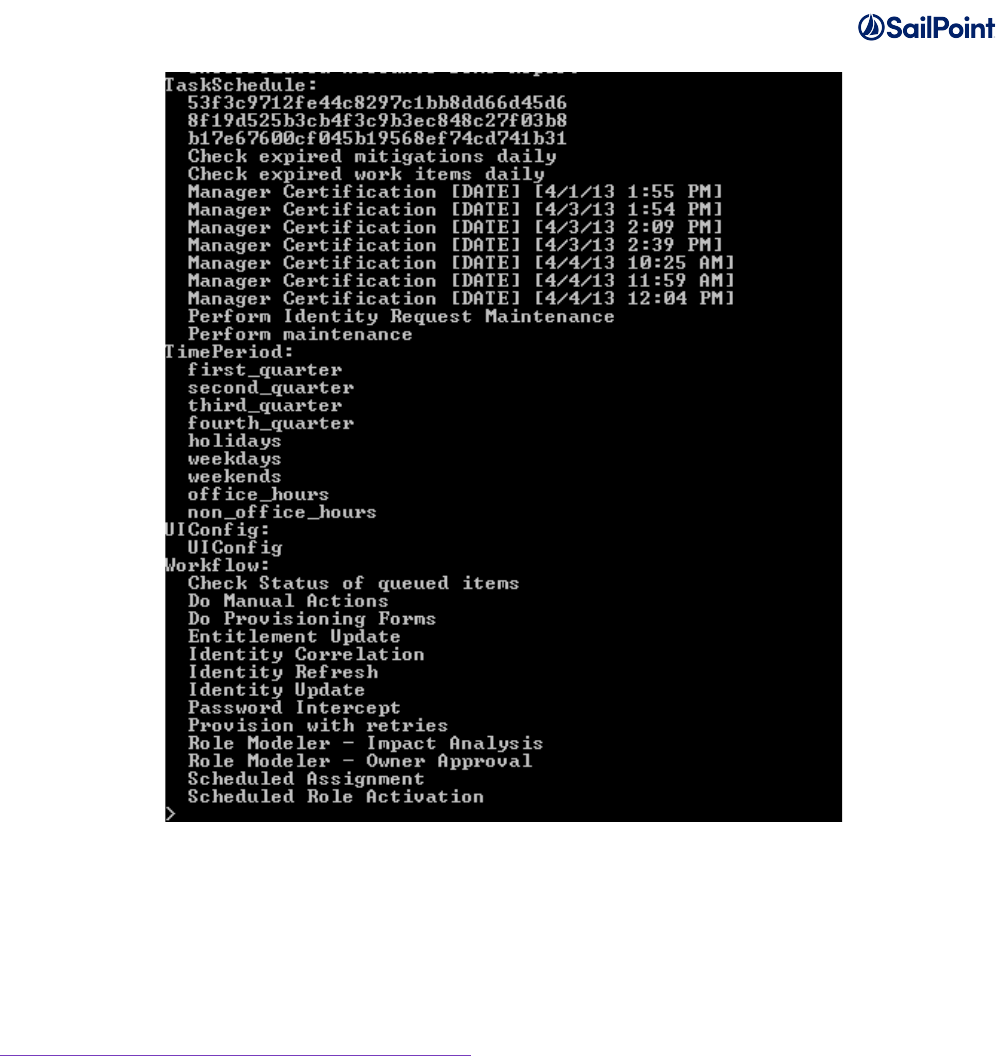
2. Enter the command “list” to see all of the object types or “Classes”.
3. Enter “list objectType” to see all of the objects of that type in your environment.
If your environment has configuration object types not covered in the object classes listed in the export
script, edit the file to add more export commands, following the syntax of the provided lines:
export -clean exports/CurrentObjectClassNameExported.xml ObjectClassName
Services Standard Build User Guide Page 10 of 26
Copy the “ExportScript.txt” from the <SSB install directory> directory you unzipped earlier.
Paste this text file into the WEB-INF\bin folder of your IdentityIQ installation directory. Also, create a
folder called “exports” in the WEB-INF\bin folder.
Navigate back to the WEB-INF\bin folder within your IdentityIQ installation directory from a command
prompt. Launch the console by entering the command “iiq console”.
When you see the “>” prompt, enter the command “source ExportScript.txt”. This will run the export
script and export all of your environment’s configuration objects into the exports folder you just created.
Services Standard Build User Guide Page 11 of 26
Many installations choose to split the export files into multiple files, storing each individual object in its
own XML file. This practice is recommended, but not required. This makes it easier in the future to
track exactly which objects have been changed between releases.
There is a Perl script on Compass that will perform the object separation. It is located here:
https://community.sailpoint.com/docs/DOC-2103.
To split the objects up manually, copy an object’s entire definition into a separate file, wrapped in the
following header, opening, and closing tags:
<?xml version='1.0' encoding='UTF-8'?>
<!DOCTYPE sailpoint PUBLIC "sailpoint.dtd" "sailpoint.dtd">
<sailpoint>
<Put Object Definition Here>
</sailpoint>
Services Standard Build User Guide Page 12 of 26
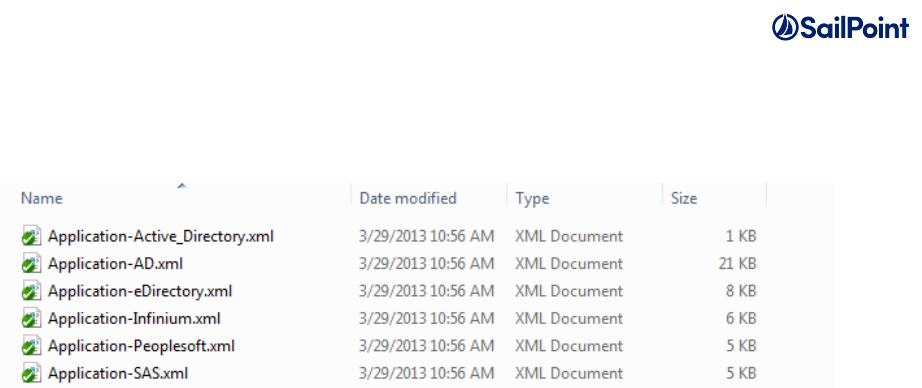
Place each xml object into its respective class folder. The recommended naming convention for each of
these object files is ObjectType-Name.xml. For example, CurrentApplicationExported.xml would be
split into Application-ActiveDirectory.xml and Application-MicrosoftExchange.xml, etc.
Build Structure Set-up
Configuration Objects
For the build process, all your environment’s configuration objects should be placed into the <SSB
install directory>config directory. Inside of this config folder, create a folder for every object
class you exported. Folders for some objects -- Application, LocalizedAttribute, Rule, TaskDefinition,
and TaskSchedule already exist as examples.
Place your exported xml files into their respective folders. For example, place the exported Application
files into the <SSB install directory>\config\Application folder.
IdentityIQ Product Files
The build process will rebuild IdentityIQ for deployment into the target environment, merging the
product zip files, patch jar files, and your custom artifacts. So next, you must put the desired product
version zip files and patch jar files into the build directory tree.
Copy the zip file for the IdentityIQ version you are using into the <SSB install
directory>\base\ga folder. Zip files can be downloaded from Compass if needed. NOTE:
Multiple IdentityIQ zip files can coexist in this directory; a variable in the build.properties file for each
environment determines which .zip file the build process will use.
If you are running a patched version of IdentityIQ, place the patch .jar file for your installation into the
<SSB install directory>\base\patch folder. Again, multiple patch jar files can coexist in this
directory and the build.properties file specifies which to use in the build (with the IIQPatchLevel
variable). All patch .jar files can be downloaded from Compass as well.
If you have any efixes for your current patch, be certain to copy those to an appropriate efix directory
and remember to check them into your revision control system if you are using one on your project.
Services Standard Build User Guide Page 13 of 26
Build Configuration
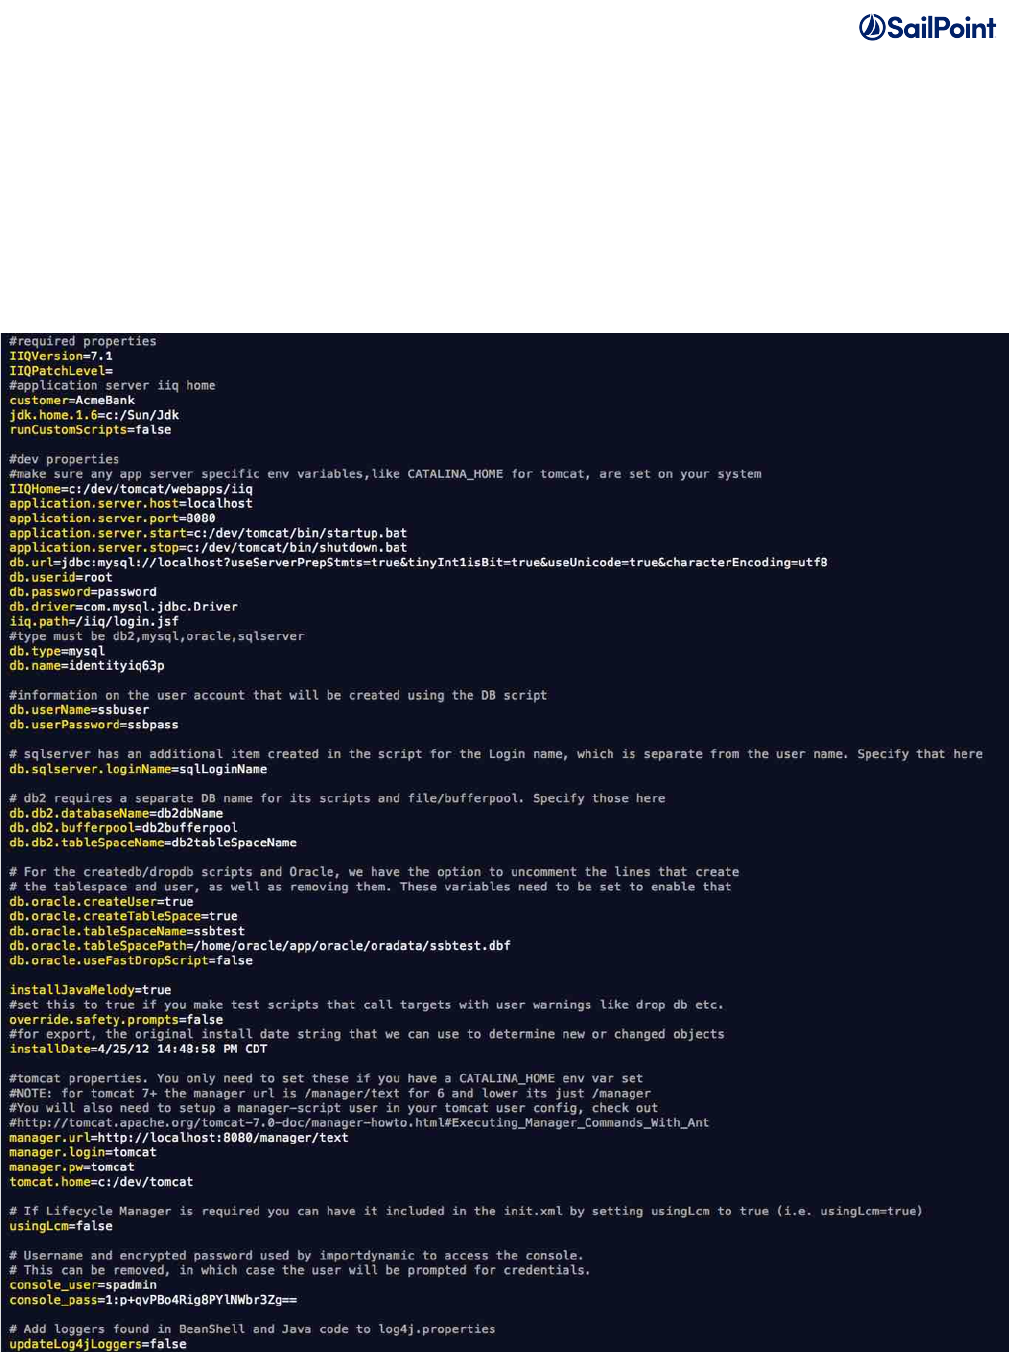
Configuring the build.properties file
The build.properties file is a crucial configuration file that specifies many important configuration
arguments, like the version of IdentityIQ you are running, the Customer name, and the path to your
IdentityIQ installation. Without this information the build cannot run successfully.
Now configure the build.properties file found in the <SSB install directory>. Use your favorite text editor
to edit this file.

Services Standard Build User Guide Page 14 of 26
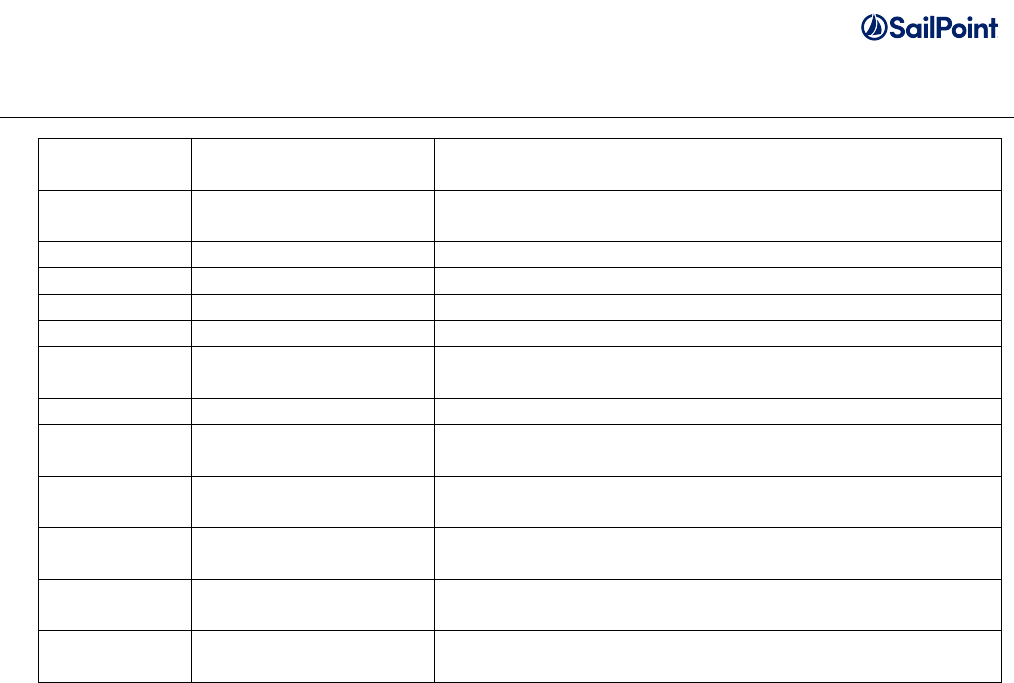
Set properties in the build.properties as described in the table below.
Variable
Description
Required?
IIQVersion
Specify the base version of IdentityIQ that you
are building, e.g. 6.0, 6.1, 6.2, 6.3, 6.4, 7.0, 7.1
Yes
IIQPatchLevel
If you want to deploy a patch version, specify
what level with pX syntax, e.g.. p1 or p6.
If you are deploying only the GA version, leave
this blank.
No, only if deploying
a patch version
IIQHome
The home directory of the IdentityIQ web
application in your sandbox/development
environment. When using the “deploy” build
target, the IIQHome property tells the build
where to deploy your custom IdentityIQ
installation.
No, only when using
“deploy” target
customer
The name of the client or project phase. The
build will create a .jar file, compiling all .java
code in the build’s “src” folder and name that
jar identityIqCustomizations.Customer.jar.
Yes
jdk.home
The path on your system to the Java
Development Kit (jdk) you want to use to
compile any custom Java code you may have
developed as part of your IdentityIQ
configuration. As with all system paths, if there
are spaces in your jdk path, put the entire path
in double quotes.
No
runCustomScripts
(true/false) The build is not meant to be
modified. You will notice the core build files are
set to be read only. The main build has two
hook points after file layout and after war
creation where you can execute customized
build scripts. This flag indicates if these
customizations should be executed.
Yes, leave as false if
unsure
application.server.host
The IP address of your application server in
your sandbox/development environment
No, only when using
“cycle” or
“importcycle” build
targets
application.server.port
The port the application server is running on.
For example, 8080 is the Tomcat default.
No, only when using
“cycle” or
“importcycle” build
targets

Services Standard Build User Guide Page 15 of 26
application.server.start
Script to start the application server.
Since there are so many different application
servers we leave it to you to write a script that
starts and stops the server, sets up JVM
parameters etc. Many application servers
already ship with these but you can specify
which ones you want to use here. This script
(and the stop script below) is used in
development targets that include steps to cycle
the application server for you.
No, only when using
“cycle” or
“importcycle” build
targets
application.server.stop
Script to stop the application server.
No, only when using
“cycle” or
“importcycle” build
targets
db.url
The JDBC URL to your local database.
No, only when using
build targets
“createdb” or
“dropdb”
db.userid
Database user with create and drop schema
privileges.
Ex. root on MySql.
NOTE: Supply these parameters only for the
sandbox/development environment. Test and
Production environments should be managed
in a more secure fashion.
No, only when using
build targets
“createdb” or
“dropdb”
db.password
The password for the root db user.
NOTE: Supply these parameters only for the
sandbox/development environment. Test and
Production environments should be managed
in a more secure fashion.
No, only when using
build targets
“createdb” or
“dropdb”
db.driver
The class of the JDBC driver to use for SQL
connections. This is the same value you would
put in your iiq.properties file, as instructed in
the IdentityIQ Installation Guide.
No, only when using
build targets
“createdb” or
“dropdb”
iiq.path
The installation directory within the application
server directory of the IdentityIQ application.
Usually /iiq or /identityiq
Yes
db.type
One of these values: db2, mysql, oracle,
sqlserver; used to pick which database scripts
to run
No, only when using
build targets
“createdb” or
“dropdb”
db.name
Name of the IdentityIQ database
No, only when using
build targets
“createdb” or
“dropdb”
db.userName
Name of user account that will be created
using the DB script
No, only when using
build targets
“createdb” or

Services Standard Build User Guide Page 16 of 26
“dropdb”
db.userPassword
Password of user account that will be created
using the DB script
No, only when using
build targets
“createdb” or
“dropdb”
db.sqlserver.loginName
SQL Server has an additional item created in
the script for the Login name, which is
separate from the user name. Specify that
here.
No, only when using
build targets
“createdb” or
“dropdb”
db.db2.databaseName
db.db2.bufferpool
db.db2.tableSpaceName
DB2 requires a separate database name and
file/bufferpool for its scripts. Specify those
values here.
No, only when using
build targets
“createdb” or
“dropdb”
db.oracle.createUser
db.oracle.createTableSpace
db.oracle.tableSpaceName
db.oracle.tableSpacePath
db.oracle.useFastDropScript
For the createdb/dropdb scripts for Oracle, we
have the option to uncomment the lines that
create the tablespace and user, as well as
removing them. These variables need to be set
to enable that.
No, only when using
build targets
“createdb” or
“dropdb”
installJavaMelody
If using JavaMelody, set this to true to gather
SQL statistics in Oracle
No, only when using
build targets
“createdb” or
“dropdb”
override.safety.prompts
Certain dangerous build targets like dropdb will
prompt the user for confirmation before
executing. If you are using the build to make
test cases you may want to turn off these
prompts.
Yes, leave as false if
unsure
installDate
For the “export” target, the original install date
string that we can use to determine new or
changed objects.
No, only if using the
“export” target
manager.url
URL to the tomcat manager script interface;
Prior to Tomcat Version 6 the url is usually
/manager but post Version 6 it is
/manager/text.
Only if deploying
using Tomcat
application server
manager.login
A user who has the manager-script role in the
Tomcat manager application. For information
on how to set this up check out:
http://tomcat.apache.org/tomcat-7.0-
doc/manager-
howto.html#Executing_Manager_Commands_
With_Ant
Only if deploying
using Tomcat
application server
manager.pw
The password for the above account.
Only if deploying
using Tomcat
application server
tomcat.home
Set this to the value of CATALINA_HOME you
want to use when starting and stopping
Tomcat
Only if deploying
using Tomcat
application server
usingLcm
If your implementation includes Lifecycle
Manager, you can ensure that it is included in
Yes
Services Standard Build User Guide Page 17 of 26
your project build by setting the “usingLcm”
property to “true”. This will insure that init-
lcm.xml is called immediately after init.xml
(which is renamed to init- default- org.xml by
the Services Standard Build.)
When not specified, users can still call “import
init-lcm.xml” from the IIQ console to import the
required LCM artifacts.
console_user
Username used by importdynamic to access
the console. For more information see the
‘importdynamic’ target in “Executing the build”.
Only if using
importdynamic
console_pass
Encrypted password used by importdynamic to
access the console. For more information see
the ‘importdynamic’ target in “Executing the
build”.
Only if using
importdynamic
updateLog4jLoggers
If set to “true”, the log4j.properties file in WEB-
INF/classes will be updated during the build
process with a line for every logger that is
found in BeanShell code in the XML files or in
custom Java source code. These lines will be
commented out. This helps during
troubleshooting when a logger needs to be
enabled but the name of the logger is not
known without looking it up in the code. To
enable a logger the appropriate line just needs
to be uncommented in log4j.properties and set
to the required log level before refreshing the
logging configuration in IdentityIQ.
No
Note that there are also some variables in the build.properties file that start with “deploy”, such as
deploySSF, deployGenericImporter and deployObjectExporter. These are only used in the full SSD to
define which of the SSD components and tools should be deployed in the build. In the stand-alone
SSB they are not used.
Supporting multiple platforms (Windows/Linux/Unix) for different environments
If your installation uses different operating systems for different stages of IdentityIQ development – for
example, Windows for sandboxes and Linux for Test and Production servers – you must configure
multiple “build.properties” files.
The generic “build.properties” file described above loads the defaults for the build with respect to the
path to Java binaries, IdentityIQ version and other details. These can be overridden on a per-server or
per-environment basis by specifying another properties file with properties that just apply to one server
or one environment. Each server or environment used in development and testing can override the
settings in “build.properties” by using its own “build.properties.<hostname>” or
“build.properties.<environment>” file. For example, if your host is named “sailsandbox” then the
properties file unique to that server would be called “build.properties.sailsandbox”. Or if your

Services Standard Build User Guide Page 18 of 26
environment (SPTARGET) is called “dev” you could have “build.properties.dev”. The server or
environment’s properties file has exactly the same format and fields as the “build.properties” file
described in the previous section and only has to specify the fields that it wants to override with values
that are different from the default build.properties file’s values. If you are running a build on a server
that has its own server-specific version of build.properties for an environment that has its own
environment-specific version, the server-specific values override the environment-specific values, which
in turn override the generic build.properties file. If you have servers or environments with identical
build.properties, do not create server-specific or environment-specific files. Put those values in
“build.properties”. The build will recognize that there is no file specific to the server or environment, and
will use “build.properties” as the default.
Setting up environment-specific properties files
The goal of the build process is to create a uniform Identity IQ distribution process for all environments
(development, test, and production), but each environment will need a number of different parameters
that are specific to that environment, such as login usernames, IP addresses, passwords, database
connection strings etc. It is important that the build process can perform substitution of these values for
each environment, as well as ensuring connection to the right IdentityIQ database and, where
necessary, including or excluding files from an environment-specific build.
Configuring iiq.properties files
The iiq.properties file contains properties used by IdentityIQ for connecting to and interacting with its
own database. Your build environment can specify different iiq.properties files for the build to use for
deploying to each target environment. Create separate <environment>.iiq.properties files for each
environment by copying and editing the product iiq.properties, and place them in the build directory
(wherever you unzipped the SSB).
1. Download the product image
2. Expand the idenitityiq-<version>.zip
3. Expand the identityiq.war
4. Copy the iiq.properties to the SSB <environment>.iiq.properties files. For example Copy WEB-
INF/classes/iiq.properties to sandbox.iiq.properties
For example, if your environments are sandbox, test, UAT and prod, you would have four files each
containing the iiq.properties that know how to connect to the database server in that environment. This
way you can support different properties for different environments, such as having a direct connection
in sandbox and test while having a JNDI named connection in UAT and production. When creating
these <environment>.iiq.properties files, use the iiq.properties file that ships with your IdentityIQ
version’s .zip file and edit as appropriate for the environment.
Example file names:
sandbox.iiq.properties

Services Standard Build User Guide Page 19 of 26
test.iiq.properties
UAT.iiq.properties
prod.iiq.properties
Example test.iiq.properties file:
##### iiq.properties #####
#
# (c) Copyright 2008 SailPoint Technologies, Inc., All Rights Reserved.
#
# This file contains configuration settings for IdentityIQ. For your unique
# environment, you will need to adjust the username and password properties on
# the dataSource below and uncomment the applicable database settings.
#
##### Data Source Properties #####
dataSource.maxWait=10000
dataSource.maxActive=50
dataSource.minIdle=5
#dataSource.minEvictableIdleTimeMillis=300000
#dataSource.maxOpenPreparedStatements=-1
dataSource.username=root
dataSource.password=root
##### MySQL 5 #####
## URL Format:
dataSource.url=jdbc:mysql://<host_name>:<port>/<dbname>?useServerPrepStmts=true&tinyIn
t1isBit=true&useUnicode=true&characterEncoding=utf8
dataSource.url=jdbc:mysql://localhost/identityiq?useServerPrepStmts=true&tinyInt1isBit
=true&useUnicode=true&characterEncoding=utf8
dataSource.driverClassName=com.mysql.jdbc.Driver
sessionFactory.hibernateProperties.hibernate.dialect=org.hibernate.dialect.MySQL5InnoD
BDialect
#
# Setting for the BSFManagerPool set on the ruleRunner
#
bsfManagerFactory.maxManagerReuse=100
bsfManagerPool.maxActive=30
bsfManagerPool.minEvictableIdleTimeMillis=900000
bsfManagerPool.timeBetweenEvictionRunsMillis=600000
##### Debug Settings #####
# Uncomment to send all SQL queries to std out. This provides a lot of output
# and slows down execution, so use it wisely.
#sessionFactory.hibernateProperties.hibernate.show_sql=true
# Hibernate Transaction Isolation Levels
# 1 = Read Uncommitted, 2 = Read Committed, 4 = Repeatable Read, 8 = Serializable
#sessionFactory.hibernateProperties.hibernate.connection.isolation=1
Configuring target.properties files
It is important to configure environment-specific properties files that the SSB can use to do token string
replacements in the objects during the build process. The SSB will automatically look for tokenized
strings in your custom configuration xml and substitute the appropriate values per environment. A
target.properties file should be created for each environment, containing key/value pairs for token

Services Standard Build User Guide Page 20 of 26
substitution during build time. The name of each target.properties file should be in the format
<environment>.target.properties.
Examples:
sandbox.target.properties
test.target.properties
UAT.target.properties
prod.target.properties
Each file is just a list of key/value pairs. The build’s convention is that the keys follow a
%%KEYNAME%% pattern.
For example, you may have an Active Directory application configuration that looks like this:
<?xml version='1.0' encoding='UTF-8'?>
<!DOCTYPE sailpoint PUBLIC "sailpoint.dtd" "sailpoint.dtd">
<sailpoint>
<Application authoritative="true"
connector="sailpoint.connector.ADLDAPConnector"
featuresString="AUTHENTICATE, MANAGER_LOOKUP, SEARCH, UNSTRUCTURED_TARGETS"
name="AD" profileClass="" type="Active Directory">
<Attributes>
<Map>
<entry key="password" value="mySuperSecrectProductionPassword"/>
<entry key="managerCorrelationFilter">
<value>
<Filter operation="EQ" property="DN" value="manager"/>
</value>
</entry>
<entry key="user" value="productionADuser"/>
<entry key="groupHierarchyAttribute" value="memberOf"/>
<entry key="port" value="3379"/>
<entry key="authorizationType" value="simple"/>
...
To support deploying the same XML artifact to multiple environments, you would substitute passwords,
ports, etc. with keys that will go in your <environment>.target.properties file, so your application
configuration file instead looks like this:
<?xml version='1.0' encoding='UTF-8'?>
<!DOCTYPE sailpoint PUBLIC "sailpoint.dtd" "sailpoint.dtd">
<sailpoint>
<Application authoritative="true"
connector="sailpoint.connector.ADLDAPConnector"
featuresString="AUTHENTICATE, MANAGER_LOOKUP, SEARCH, UNSTRUCTURED_TARGETS"
name="AD" profileClass="" type="Active Directory">
<Attributes>
<Map>
<entry key="password" value="%%AD_PROXY_PASSWORD%%"/>
<entry key="managerCorrelationFilter">
<value>

Services Standard Build User Guide Page 21 of 26
<Filter operation="EQ" property="DN" value="manager"/>
</value>
</entry>
<entry key="user" value="%%AD_PROXY_USER%%"/>
<entry key="groupHierarchyAttribute" value="memberOf"/>
<entry key="port" value="%%AD_PORT%%"/>
<entry key="authorizationType" value="simple"/>
...
Then, for example, in the file “prod.target.properties” you would have:
#######################################################
# AD Connectors
#######################################################
%%AD_HOST%%=example.com
%%AD_PORT%%=3379
%%AD_PROXY_USER%%=productionADuser
%%AD_PROXY_PASSWORD%%=mySuperSecrectProductionPassword
… and so on for each of your environments. Note: the password values should be encrypted
using the iiq encrypt utility, and the encrypted strings should be recorded in these properties
files.
If a token exists in an XML artifact but there is no corresponding token in the target.properties file, the
build process will prompt the user for the value that should replace the token. The token will then be
created in the target.properties file and its value replaced in the resulting XML file during the build.
Configuring ignorefiles.properties files
The build process has the ability to define certain XML files that should be skipped during the import for
a specific environment. Implement this by creating a text file for each environment where you want to
skip the import of specific files. A sandbox example file is provided with the build. You can copy and
paste this file for all your environments as a template to get started. See the provided file for an
example of how to populate the list of files that can be ignored in each environment.
The file naming pattern is <environment>.ignorefiles.properties.
Common names of the ignore files are:
sandbox.ignorefiles.properties
dev.ignorefiles.properties
uat.ignorefiles.properties

Services Standard Build User Guide Page 22 of 26
staging.ignorefiles.properties
prod.ignorefiles.properties
This feature has multiple uses. It can be used to configure different Applications with the same name
but containing different underlying XML and connector configurations in your development versus
acceptance and production environments. For example, you could use a JDBC application to simulate
Active Directory in your sandbox environment but use a proper Active Directory application in your UAT
and production environments.
This feature also allows you to load temporary or testing applications in your sandbox or development
environments and not load those applications in your UAT or production environments.
There are other, additional benefits from this: QuickLink objects can he loaded into certain
environments and redacted from others. This allows for different dashboard configurations between
different environments. The system configuration files can now be different across your environment
with this feature by redacting different configuration files from each environment's build. Care should
be taken when choosing which files to ignore in specific environments; a goal of the build is to
synchronize as much as possible the configuration between development, UAT, and production
installations of IdentityIQ.
Setting the environment name for a build
After configuration of the environment-specific properties files, the build process needs to be told which
environment to build for. This can be done by the use of the SPTARGET environment variable or
alternatively by using a mapping in the servers.properties files.
Using the SPTARGET environment variable to specify the build environemnt
The SPTARGET environment variable will dictate which <environment>.iiq.properties file,
<environment>.target.properties file, <environment>.ignorefiles.properties and (where configured)
build.properties.<environment> file to use. Here is an example of using the SPTARGET environment
variable on a Linux system to create a dev, test, and prod war file. See the next section for more
details on executing the build.
./build.sh clean!
export SPTARGET=dev!
./build.sh war!
mv identityiq.war identityiq-dev.war!
export SPTARGET=test!
./build.sh war!
mv identityiq.war identityiq-test.war!
export SPTARGET=prod!
./build.sh war!
mv identityiq.war identityiq-prod.war
Services Standard Build User Guide Page 23 of 26
Setting the target variables by editing servers.properties
If the SPTARGET environment variable is not set, the build process will attempt to find the environment
name by using the servers.properties file, mapping the host where the build is being executed to an
environment name. It is common for deployments to specify each environment’s hostnames in the
servers.properties file to support running the build on every server in the environment. This tells the
build which environment you want to use, which depends on the name of the server running the build.
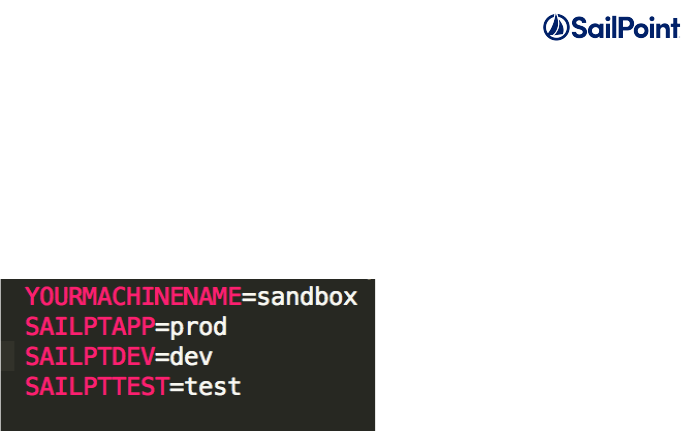
This is an example of a servers.properties file:
Replace “YOURMACHINENAME” with your sandbox hostname, “SAILPTAPP” with your production
hostname, etc. The build will detect the hostname of the machine on which you are running the build
script, and apply sandbox.target.properties if you are running the build on your sandbox.
Note: The hostname used in servers.properties is case-sensitive.
Executing the build
Once you have performed all the steps in the previous sections you are ready to build. If you are using
the servers.properties file to define the build environment name, copy your entire build structure and
add it to your new environment. Otherwise, set the SPTARGET environment variable to the correct
target environment name on the host that will run the build. This helps to ensure that environment-
specific variables defined in <environment>.iiq.properties, <environment>.target.properties and
<environment>.ignorefiles.properties will be added to your war file. Ensure your build.properties is
configured to match the environment.
A common approach to copying the entire build to a new server is to check in the entire build (and all of
the files, directories, and artifacts included with it) into a revision control system like SVN, CVS, Git or
TFS. Tools like these can automate checking out the entire current copies of set of files onto new
target servers. More basic installations sometimes simply "zip up" the entire set of artifacts and transfer
one file to the new target server. As a best practice SailPoint recommends using a revision control
system if one is available.
To create a custom, deployable IdentityIQ war file in the standard J2EE Web Application Archive that
can be deployed to a web application server such as Tomcat, you can perform the following steps.
• Open a Terminal or Command Prompt window
• Navigate to <SSB install directory>\
• Enter build war
• This will generate a deployable war file in your <SSB install directory>\deploy folder
and you will receive a confirmation message similar to the one below:

Services Standard Build User Guide Page 24 of 26
• Deploy this file to the target web application server. You may need to consult your application
server’s deployment guide for details. For Tomcat:
o Copy this custom identityiq.war to a folder under <Tomcat>/webapps (e.g.
<Tomcat>/webapps/identityiq)
o Navigate to that directory and expand the war: jar xvf identityiq.war
o Delete the war file once you have expanded it
If this is a new deployment or if the build is an upgrade of the IdentityIQ version running on that server,
you will need to perform additional actions to create the IIQ database and tables or upgrade the
system; consult the IdentityIQ Installation Guide for details as needed. Otherwise you are ready to use
your customized IdentityIQ application.
If you wish to update any custom objects and redeploy them to IdentityIQ you can perform the following
steps. Open a terminal or command prompt window,
• Navigate to the <SSB install directory>\ folder and enter “build importdynamic”.
This command will import all of the custom xml from your config folder into IdentityIQ. It will
utilize the db connection from <environment>.iiq.properties and push those xml objects into the
IdentityIQ database. It will not cycle the application server, a step required if changes are made
to any class files included in your SSB directory. An alternative to using “build importdynamic”
is to import the sp.init-custom.xml file that was generated during the build, using the command
“import sp.init-custom.xml” inside iiq console.
• Open IdentityIQ in a web browser and you will see the applications, rules, and other custom
objects from your original environment in this new one.
Dev targets explained
Here are the other build targets and their uses.
No target (just entering “build” into a windows terminal or “./build.sh” into a Linux
terminal)
Runs the entire build process, placing a fully expanded war file in the <SSB install
directory>\build\extract folder, and all compiled, custom .class files in <SSB install
directory>\build\classes
war:
[war] Building war:
/home/workspace/SSB/build/deploy/identityiq.war
[echo] A MD5 checksum was generated for this war file
and placed in the war file directory. Keep this checksum to
diagnose potential version issues
BUILD SUCCESSFUL

Services Standard Build User Guide Page 25 of 26
clean
Deletes everything in the <SSB install directory>\build directory.
createdb
Depends on the build.properties file having a database account setup that has schema creation
privileges. The properties “db.url”, “db.password”, and “db.userid” in the build.properties file must be
configured properly to use this build target. This will setup the IIQ schema and apply any patch
updates.
cycle
Depends on the application.server.start and stop properties being set. This will cycle your application
server and reload all web applications. If you are using Tomcat and you have the CATALINA_HOME
environment variable set this target will just reload the IIQ application and not the entire server.
dropdb
Depends on the build.properties file having a database account setup that has drop privileges. The
properties “db.url”, “db.password”, and “db.userid” in the build.properties file must be configured
properly to use this build target. Drops the IIQ database.
dist
Copies the entire expanded war content to your application server webapps directory (wherever the
“IIQHome” property points to).
deploy
Runs entire build process, and deploys the expanded war content to your application server webapps
directory (wherever the “IIQHome” property points to). The equivalent of running the build with no
target, plus running the “dist” target.
importcycle
Runs through the entire build process. Validates and imports all custom xml, compiled java and static
web content. This command also cycles (restarts) the application server. Useful while developing
custom java.
importdynamic
Imports all content that does not require an application reload: custom XML, static web content etc.
Useful for developing rules, workflow and branding. Note that importdynamic calls the IdentityIQ
console and requires a username and password. The default spadmin username and encrypted
password are set using the ‘console_user’ and ‘console_pass’ properties in build.properties:
# Username and encrypted password used by importdynamic to access the console.
# This can be removed, in which case the user will be prompted for credentials.
console_user=spadmin
console_pass=1:p+qvPBo4Rig8PYlNWbr3Zg==
Use the console command ‘iiq encrypt <password>’ to get the encrypted value of your password to use
here. Alternatively, the console_user and console_pass lines can be removed from build.properties,

Services Standard Build User Guide Page 26 of 26
which will force the user to enter them each time importdynamic is run.
export
Exports objects specified within objectsToExport.properties (this will now be generated – edit Rule-
OutputCustomObjectFile.xml in scripts if you need to add more objects to ignore or export – the
variable name of ignored object classes is listOfIgnoredClasses) from your IIQHome repository to
build/export so that you don’t manually have to copy and paste xml from console-exported files to your
build environment. Edit the property file to include all types of objects you want to export, as well as the
names of the objects for each type.
document
Creates Javadoc-style documentation for the configuration of the XML objects in the ‘custom’ folder.
Runs through the main build process first in order to create the objects in that folder, then writes out
html files detailing the configuration of each object to the doc/TechnicalConfig folder in the resulting
build. Open the index.html file in the TechnicalConfig folder to view the generated documentation.
The following object types are currently supported by the ‘document’ target:
Application,!AuditConfig,!Bundle,!Capability,!CertificationDefinition,!CertificationGroup,!Configuration,!
CorrelationConfig,!Custom,!DashboardContent,!Dictionary,!Dynamic!Scope,!EmailTemplate,!Form,!FullTextIndex,!
GroupDefinition,!GroupFactory,!Identity/Workgroup,!IdentityTrigger,!IntegrationConfig,!LocalizedAttribute,!
ObjectConfig,!PasswordPolicy,!Policy,!QuickLink,!QuickLinkOptions,!RequestDefinition,!Rule,!RuleRegistry,!
ServiceDefinition,!SPRight,!TargetSource,!TaskSchedule,!UIConfig,!Workflow!
When using this feature you should ensure that application passwords and other sensitive data are not
being stored in clear text in the source files or in values substituted by tokens to avoid them being
shown in the resulting document.
