How To Set And Troubleshoot Intermatic Sprinkler Timer2 Setting Timer
User Manual: Setting-Intermatic-sprinkler-timer
Open the PDF directly: View PDF ![]() .
.
Page Count: 3

How to Set and Troubleshoot Intermatic sprinkler timer
HOW DO I SET THE TIMER FOR MONDAY, SO THE PUMP WILL START ON WEDNESDAY?
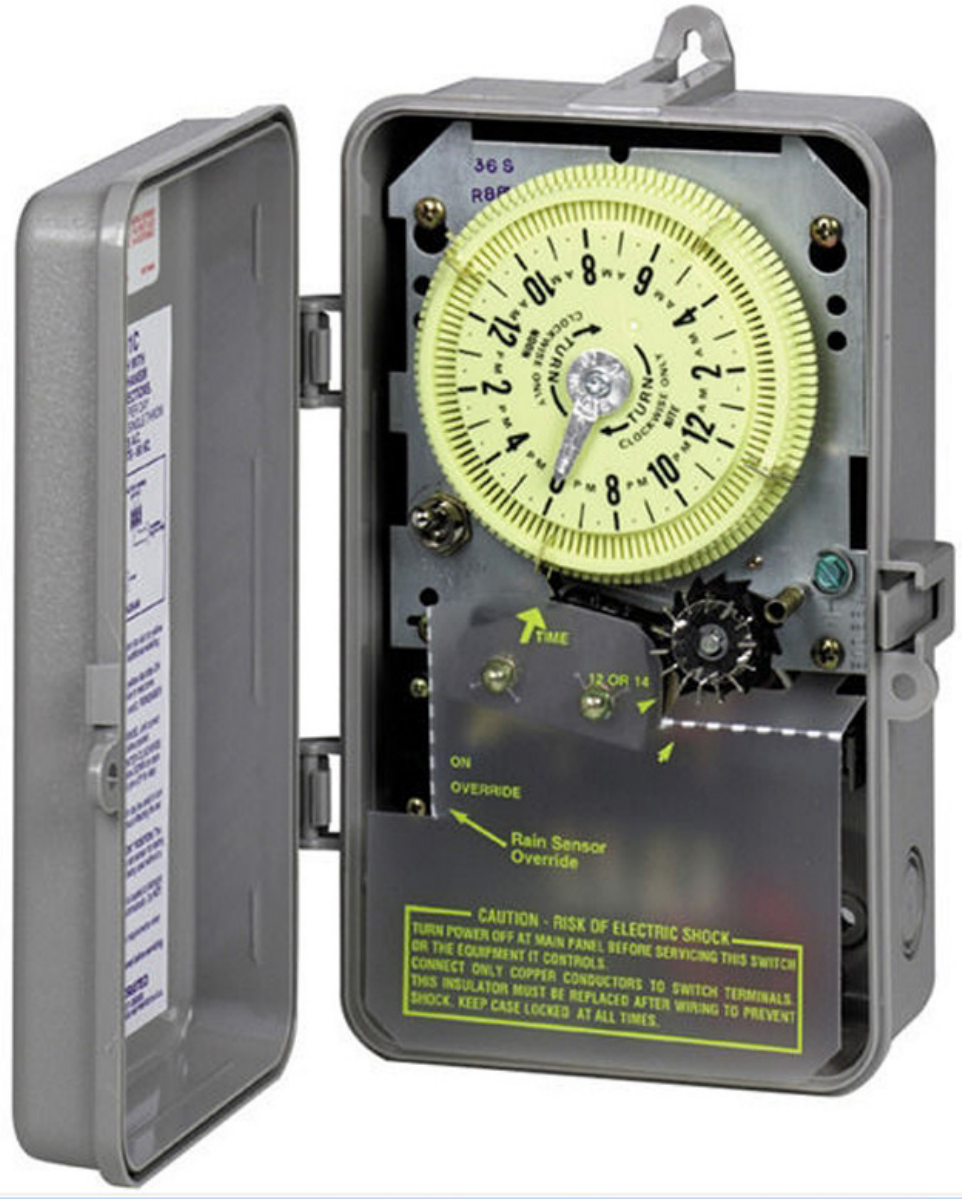
1) The 107T119 silver pin goes at 12 midnight on large yellow dial. This pin advances the 14-day skipper wheel each day. Check for
silver pin and check that it advances the skipper wheel. If pin is worn down, or missing, then buy new pin.
2) Yellow dial rotates once each 24 hours. If dial is slow or not turning, then for power to timer, check that wires are connected
properly and tight under screw, and then replace 120volt WG730 or 240volt WG733 clock motor. To set current time, manually
rotate yellow dial clockwise until current time lines up with stationary silver pointer. The stationary silver pointer is set approximately
at the 7 o’clock position and does not move. (Silver pin mentioned in #1 is not same as stationary silver pointer in #2).
3) Rotate skipper wheel counter-clockwise until today's day (Monday) is in front of 14 arrow. The skipper wheel or day wheel is
marked with days of the week. 14 arrow is printed on 124T2098 plastic insulator. Skipper wheel is smaller wheel located lower right
from large yellow dial.
4) To skip a day of watering, the 107T73 day wheel pin or skipper pin is pushed down for that day. So you want to push down
Monday and Tuesday pins. Leave skipper pin up for Wednesday for watering that day.
To water on a particular day, the skipper pins is up for that day.
5) When planning watering times it is important to understand how the timer works. The timer just turns on-and-off, and each time
the timer turns off, the sprinkler valve automatically advances to next zone. So the sprinkler valve is doing the mechanical job of
advancing through each zone. If sprinkler turns on but zones do not advance, the timer is working correctly. Check sprinkler valve.
6) The 156T1950A brass trippers are inserted on yellow wheel. Push tripper all the way down to set ON time. Each brass tripper
represents 12 minutes of watering. For example, if you want to water for 1/2 hour, then put two consecutive pins on yellow timer
wheel. For 1 hour, put 4 consecutive trippers. If trippers are worn down, buy new trippers. To change zones, leave at least one
tripper out so there is a blank slot. This will cause timer to turn off power to sprinkler valve. When timer turns on with next tripper, the
next watering zone will begin. You can set from 1 to 60 ON operations per 24-hour day.
7) Rain sensor can be added to some models if two connection terminals are present. Rain sensor is not supplied with timer. If timer
works with rain sensor, then there are two additional terminals located to right of power terminals. No voltage is applied to these
terminals. Simply connect rain sensor wires to terminals.
8) Timer comes in NEMA 3R Plastic raintight enclosure case with ½” and ¾” knockouts for electric wiring. Enclosure is not sold
separately except for T8845PV. Wiring shows in each manual.
9) T8845PV timer is different since it has 24 volt 119T86A transformer with 2 yellow wires. Connect the yellow wires to sprinkler
solenoid or sprinkler valve. If sprinkler is not turning on, then test for 24Volts across yellow wires. Test that T8845PV is receiving
120V from breaker box. Replace transformer if it no longer produces 24volts.
156T1950A tripper
120 Volt WG730 & 240 Volt WG733 Clock motor 119T86A 24Volt Transformer
http://waterheatertimer.org/How-to-wire-Intermatic-sprinkler-timers.html
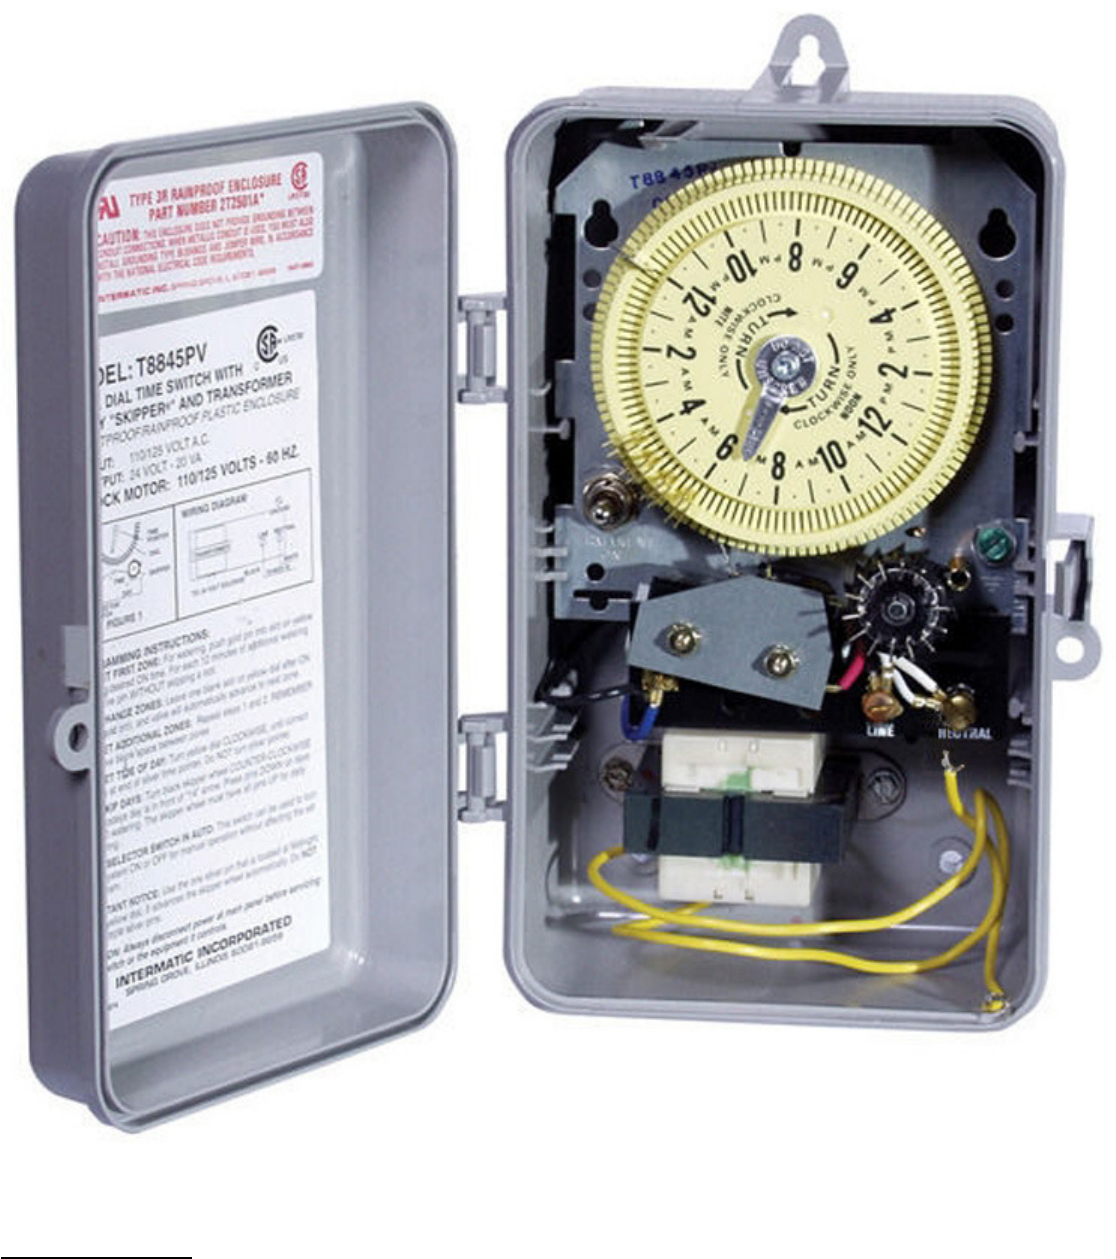
T8845PV with 24Volt transformer
Yellow wires connect to sprinkler valve
Test yellow wires for 24Volts
Test Line and Neutral screw terminals for 120V
Description of Box: Sprinkler timers are inside NEMA 3R enclosure.
NEMA 3R enclosure is raintight
NEMA 1 enclosure is indoor only
