To Whom It May Concern: Shimmer Java Android API User Manual Rev2.6c
Shimmer%20Java%20Android%20API%20User%20Manual%20rev2.6c
User Manual:
Open the PDF directly: View PDF ![]() .
.
Page Count: 54
- 1. Introduction
- 2. Pre-Requisites
- 3. Getting Started
- 4. Shimmer Android API
- 5. Android Design Concepts
- 6. Examples
- 7. ShimmerPCInstrumentDriver
- 8. Usage Considerations
- Troubleshoot
- Sometimes my device fails to connect to the Android device?
- When I try to run the application on Eclipse I see the following error
- When I try to run the application on Eclipse I see the following error
- My device fails to pair with the Android device
- I see the error Conversion to Dalvik format failed with error x.
- How can I retrieve the class files from the jar file
- I see for the following error
- I see for the following error
- Eclipse related errors
- I See the following error

Copyright © Shimmer Research 2014
Realtime Technologies Ltd Shimmer Java/Android API
All rights reserved Rev 2.6c
1
Shimmer Java/Android API
User Manual
Rev. 2.6c

Copyright © Shimmer Research 2014
Realtime Technologies Ltd Shimmer Java/Android API
All rights reserved Rev 2.6c
3
Legal Notices and Disclaimer
Redistribution IS permitted provided that the following conditions are met:
Redistributions must retain the copyright notice, and the following disclaimer. Redistributions in electronic form
must reproduce the above copyright notice, this list of conditions and the following disclaimer in the
documentation and/or other materials provided with the document.
Neither the name of Shimmer Research, or Realtime Technologies Ltd. nor the names of its contributors may be
used to endorse or promote products derived from this document without specific prior written permission.
THIS DOCUMENT IS PROVIDED BY THE COPYRIGHT HOLDERS AND CONTRIBUTORS "AS IS" AND ANY
EXPRESS OR IMPLIED WARRANTIES, INCLUDING, BUT NOT LIMITED TO, THE IMPLIED WARRANTIES
OF MERCHANTABILITY AND FITNESS FOR A PARTICULAR PURPOSE ARE DISCLAIMED. IN NO EVENT
SHALL THE COPYRIGHT OWNER OR CONTRIBUTORS BE LIABLE FOR ANY DIRECT, INDIRECT,
INCIDENTAL, SPECIAL, EXEMPLARY, OR CONSEQUENTIAL DAMAGES (INCLUDING, BUT NOT LIMITED
TO, PROCUREMENT OF SUBSTITUTE GOODS OR SERVICES; LOSS OF USE, DATA, OR PROFITS; OR
BUSINESS INTERRUPTION) HOWEVER CAUSED AND ON ANY THEORY OF LIABILITY, WHETHER IN
CONTRACT, STRICT LIABILITY, OR TORT (INCLUDING NEGLIGENCE OR OTHERWISE) ARISING IN
ANY WAY OUT OF THE USE OF THIS DOCUMENT, EVEN IF ADVISED OF THE POSSIBILITY OF SUCH
DAMAGE.

Copyright © Shimmer Research 2014
Realtime Technologies Ltd Shimmer Java/Android API
All rights reserved Rev 2.6c
4
Table of Contents
1. Introduction ......................................................................................................................... 6
1.1. Scope of this Document .......................................................................................................... 6
2. Pre-Requisites ...................................................................................................................... 6
3. Getting Started ..................................................................................................................... 7
3.1. Running an example application on your Android platform .................................................. 7
4. Shimmer Android API ......................................................................................................... 13
4.1. General Overview ................................................................................................................. 13
4.2. The Shimmer Class ................................................................................................................ 15
4.3. Data Structure ....................................................................................................................... 18
5. Android Design Concepts .................................................................................................... 26
5.1. Activity and Service ............................................................................................................... 26
5.2. The Handler ........................................................................................................................... 28
6. Examples ............................................................................................................................ 30
6.1. ShimmerExample .................................................................................................................. 30
6.2. ShimmerLogExample ............................................................................................................ 30
6.3. MultiShimmerExample ......................................................................................................... 31
6.4. ShimmerGraph ...................................................................................................................... 32
6.5. MultiShimmerGraph ............................................................................................................. 32
6.6. Broadcast Service and Receiver Example ............................................................................. 32
6.7. ShimmerGraphandLogService ............................................................................................... 34
6.8. Shimmer3DOrientationExample ........................................................................................... 36
6.9. MultiShimmerTemplate ........................................................................................................ 38
Control .......................................................................................................................................... 38
Configure ....................................................................................................................................... 39
Plot ................................................................................................................................................ 40
Log ................................................................................................................................................. 40
Heart Rate ..................................................................................................................................... 40
Blank .............................................................................................................................................. 41
7. ShimmerPCInstrumentDriver .............................................................................................. 41

Copyright © Shimmer Research 2014
Realtime Technologies Ltd Shimmer Java/Android API
All rights reserved Rev 2.6c
5
8. Usage Considerations ......................................................................................................... 46
8.1. Differences between Shimmer2r and Shimmer3 .................................................................. 46
8.2. Battery Monitoring ............................................................................................................... 47
8.3. Bluetooth Connectivity ......................................................................................................... 48
8.4. Backward Compatibility ........................................................................................................ 48
8.5. Developers notes .................................................................................................................. 48
Adding Delay ................................................................................................................................. 48
DataProcessing Interface .............................................................................................................. 49
BlueCove ....................................................................................................................................... 50
Troubleshoot ............................................................................................................................. 51

Copyright © Shimmer Research 2014
Realtime Technologies Ltd Shimmer Java/Android API
All rights reserved Rev 2.6c
6
1. Introduction
The current Shimmer Java/Android API is a beta release. Bluetooth communication from the Shimmer
device to the Android device is via the Serial Port Profile (SPP). SPP has been supported on Android
since API level 5 (Android 2.0) was introduced, thus the driver will work with any Bluetooth enabled
Android device which has version of 2.0 and above.
It should be noted that there is sometimes variability between ‘Stock’ firmware, manufacturer
modified firmware, and custom firmware. Users are advised to investigate whether there are any
known issues with their implementation of their Bluetooth stack. For example, Android 4.2 (Stock)
uses a new Bluetooth Stack.
1.1. Scope of this Document
Android Developers provide extensive online documentation
1
for all core Android components. This
documentation limits itself to explaining Shimmer based functionality. While effort has been made to
provide as much information as is required, the user may need to develop some further understanding
through the general study of Android and Java programming respectively.
2. Pre-Requisites
The following are the pre-requisites needed to use the Shimmer Java/Android API library:
JDK installed on your PC.
Android SDK.
Eclipse installed on your PC. (While Eclipse is not compulsory it is highly recommended).
ADT Plugin for Eclipse.
An Android device with Bluetooth.
The Shimmer Java/Android API can be downloaded from our website
2
and includes the
following:
a. ShimmerDriver library and ShimmerAndroidDriver library
b. Shimmer Android Examples
Ensure you are using the latest version of the Shimmer Java/Android API and Shimmer Driver
library by checking the website. Extract the files and follow the installation instructions
outlined in the Getting Started section on the next page.
A Shimmer2/Shimmer2r/Shimmer3 device programmed with the latest version of BtStream
1
http://developer.android.com/index.html
2
http://www.shimmersensing.com/support/wireless-sensor-networks-documentation/category/45
Copyright © Shimmer Research 2014
Realtime Technologies Ltd Shimmer Java/Android API
All rights reserved Rev 2.6c
7
NOTE: All Shimmers are shipped pre-programmed with the BtStream firmware. If for some
reason you need to reprogram your Shimmer device the latest BtStream firmware image is
available for download from http://www.shimmersensing.com/support/wireless-sensor-
networks-download/. These images can be loaded onto the Shimmer devices using the
Shimmer Windows Bootstrap Loader application. See the Shimmer User Manual for details.
Ensure you are using the latest version of the Shimmer Java/Android API and User guide, by
checking http://www.shimmersensing.com/support/wireless-sensor-networks-download/.
3. Getting Started
First install the appropriate BtStream firmware image onto your Shimmer device. These images can
be loaded onto the Shimmer using the Shimmer2/2r Bootstrap Loader or the Shimmer3 Bootstrap
Loader application for Shimmer2/2r and Shimmer3, respectively. See the Shimmer User Manual for
details.
The next step is setting up Eclipse and the Android SDK. To do as such follow the instructions given in
http://developer.android.com/sdk/installing.html.
3.1. Running an example application on your Android platform
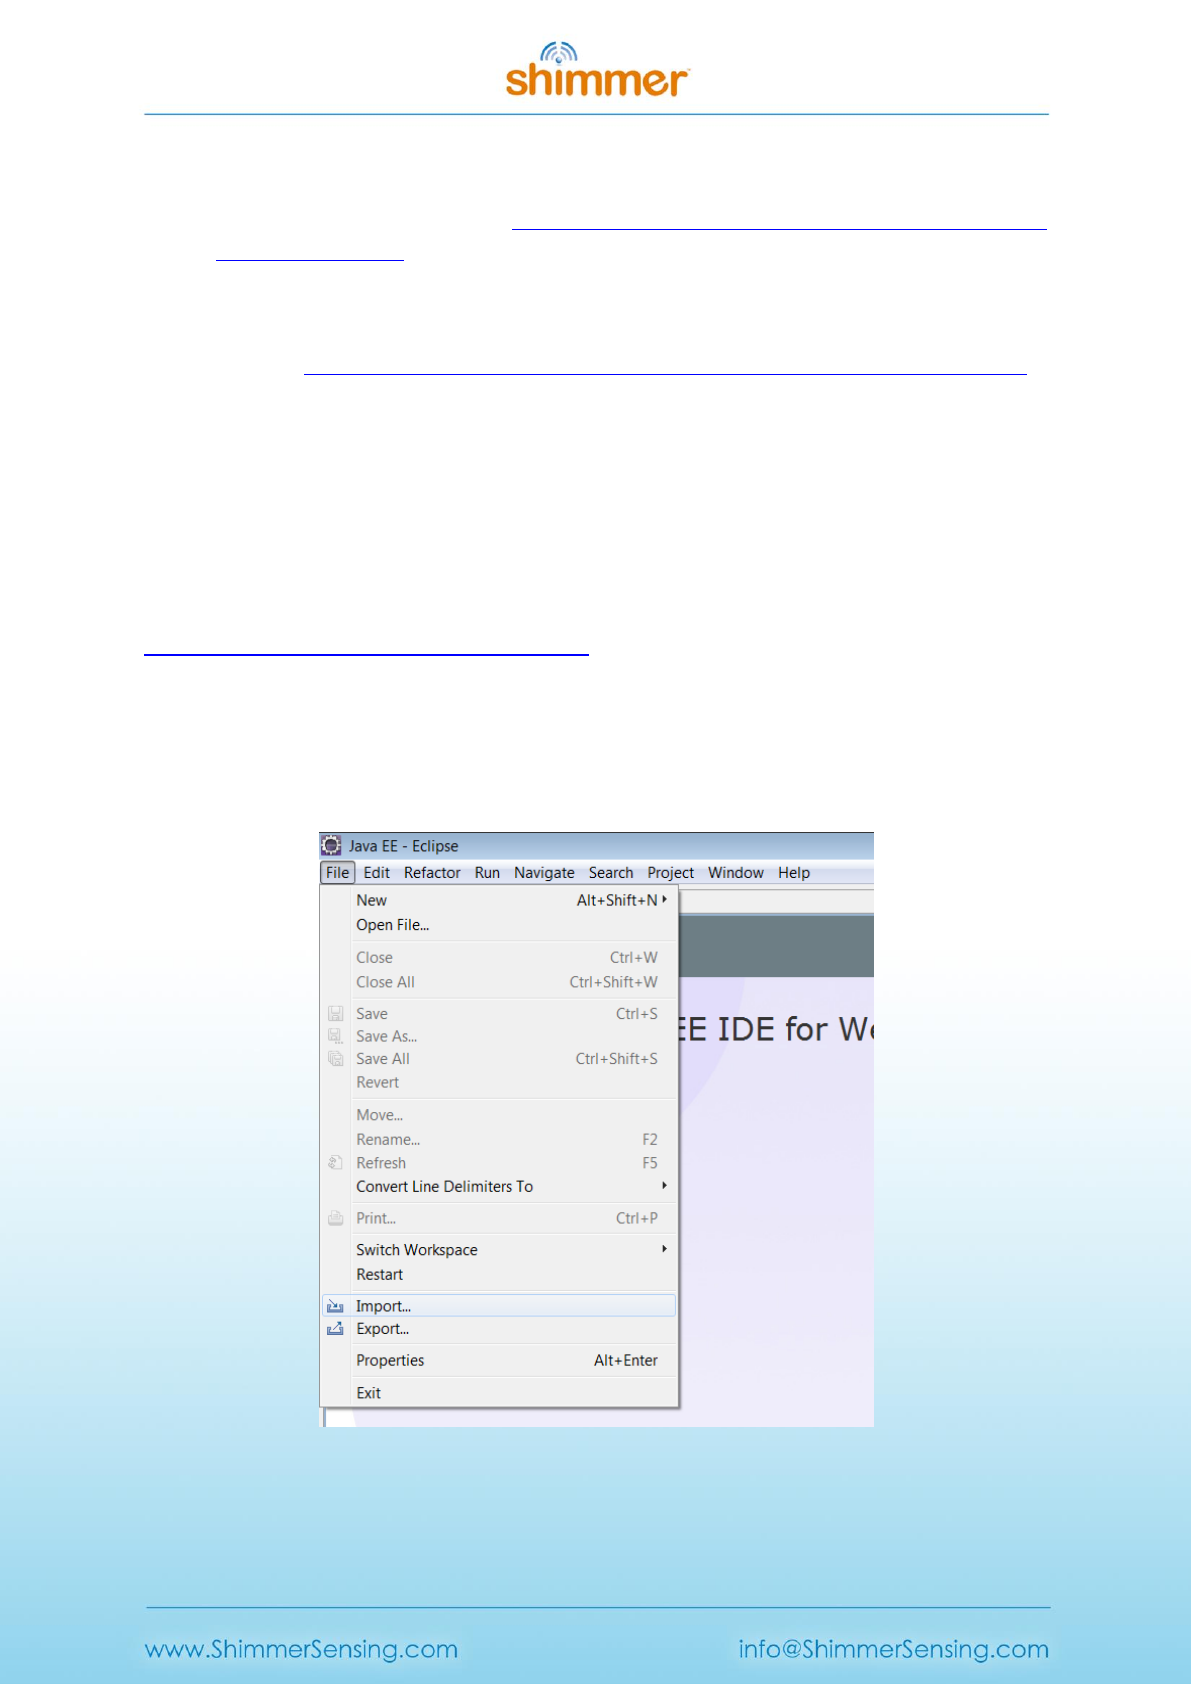
1. Open the Eclipse application and select import.
Figure 1: Import Project

Copyright © Shimmer Research 2014
Realtime Technologies Ltd Shimmer Java/Android API
All rights reserved Rev 2.6c
8
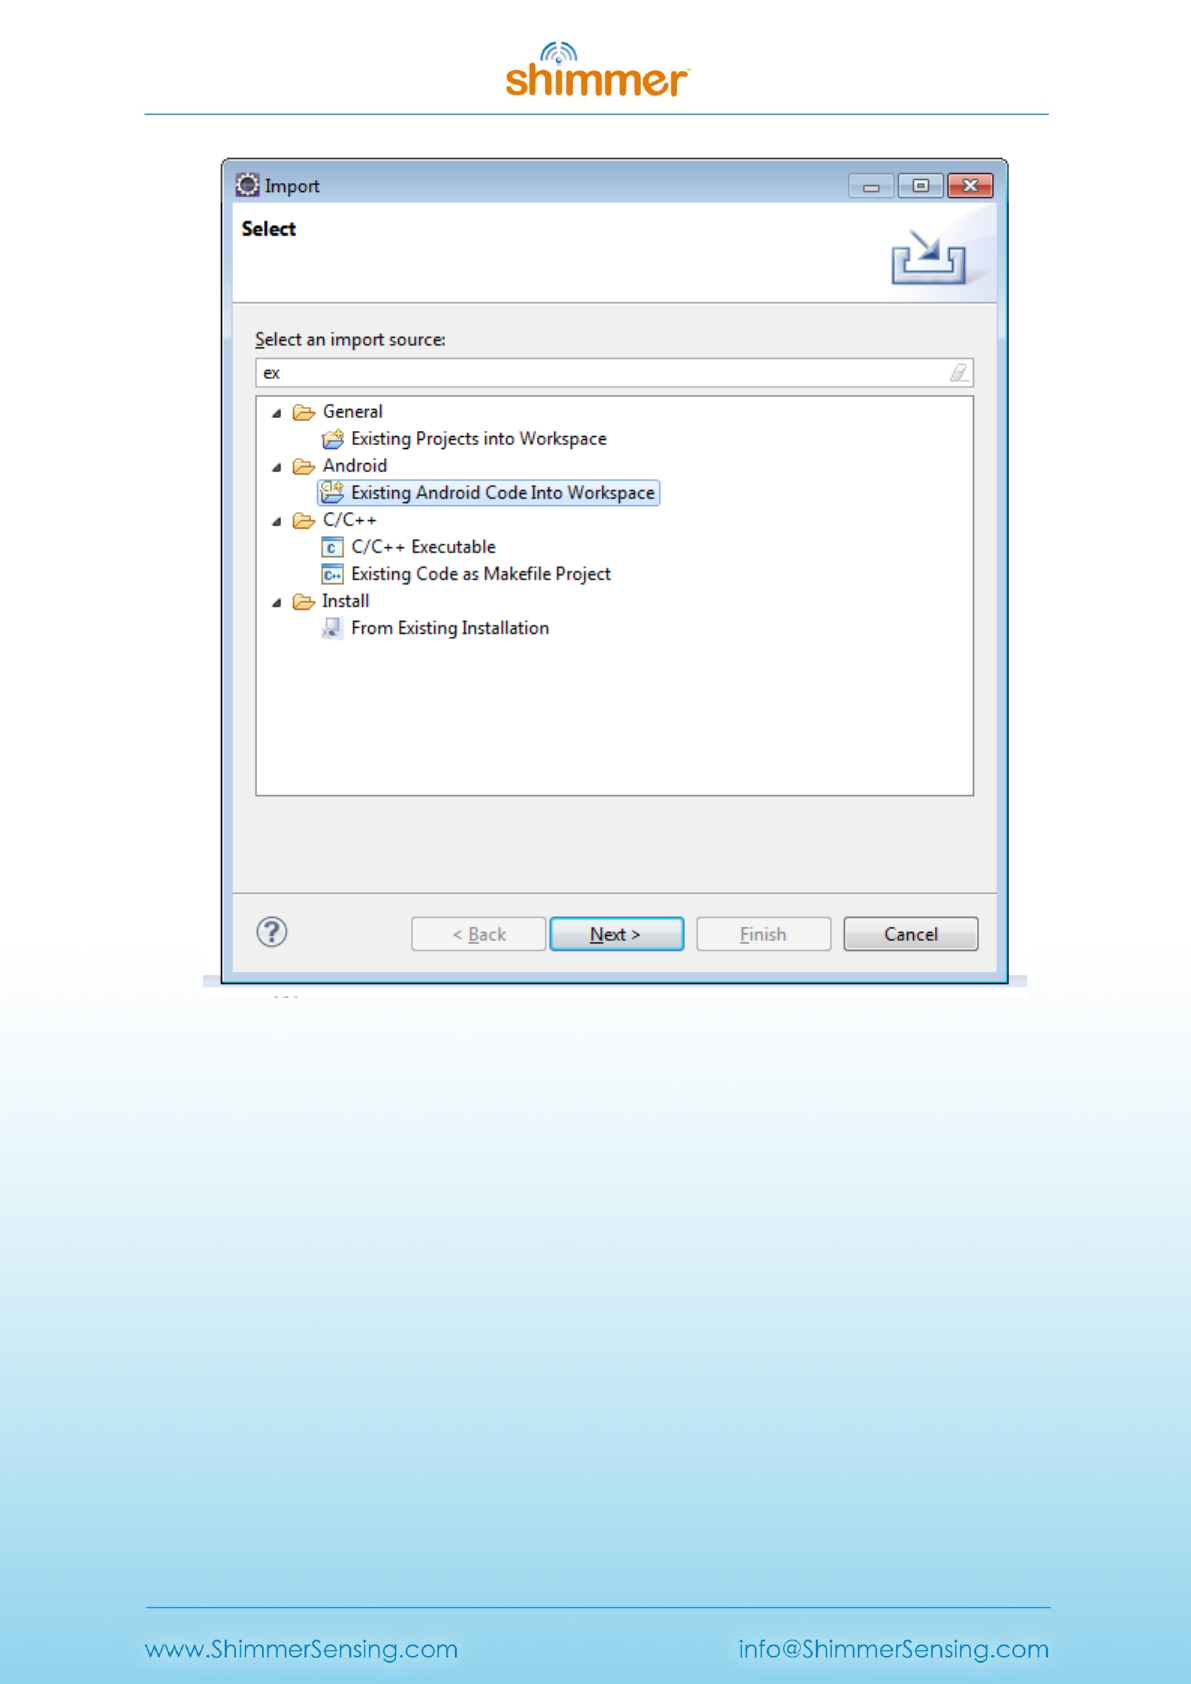
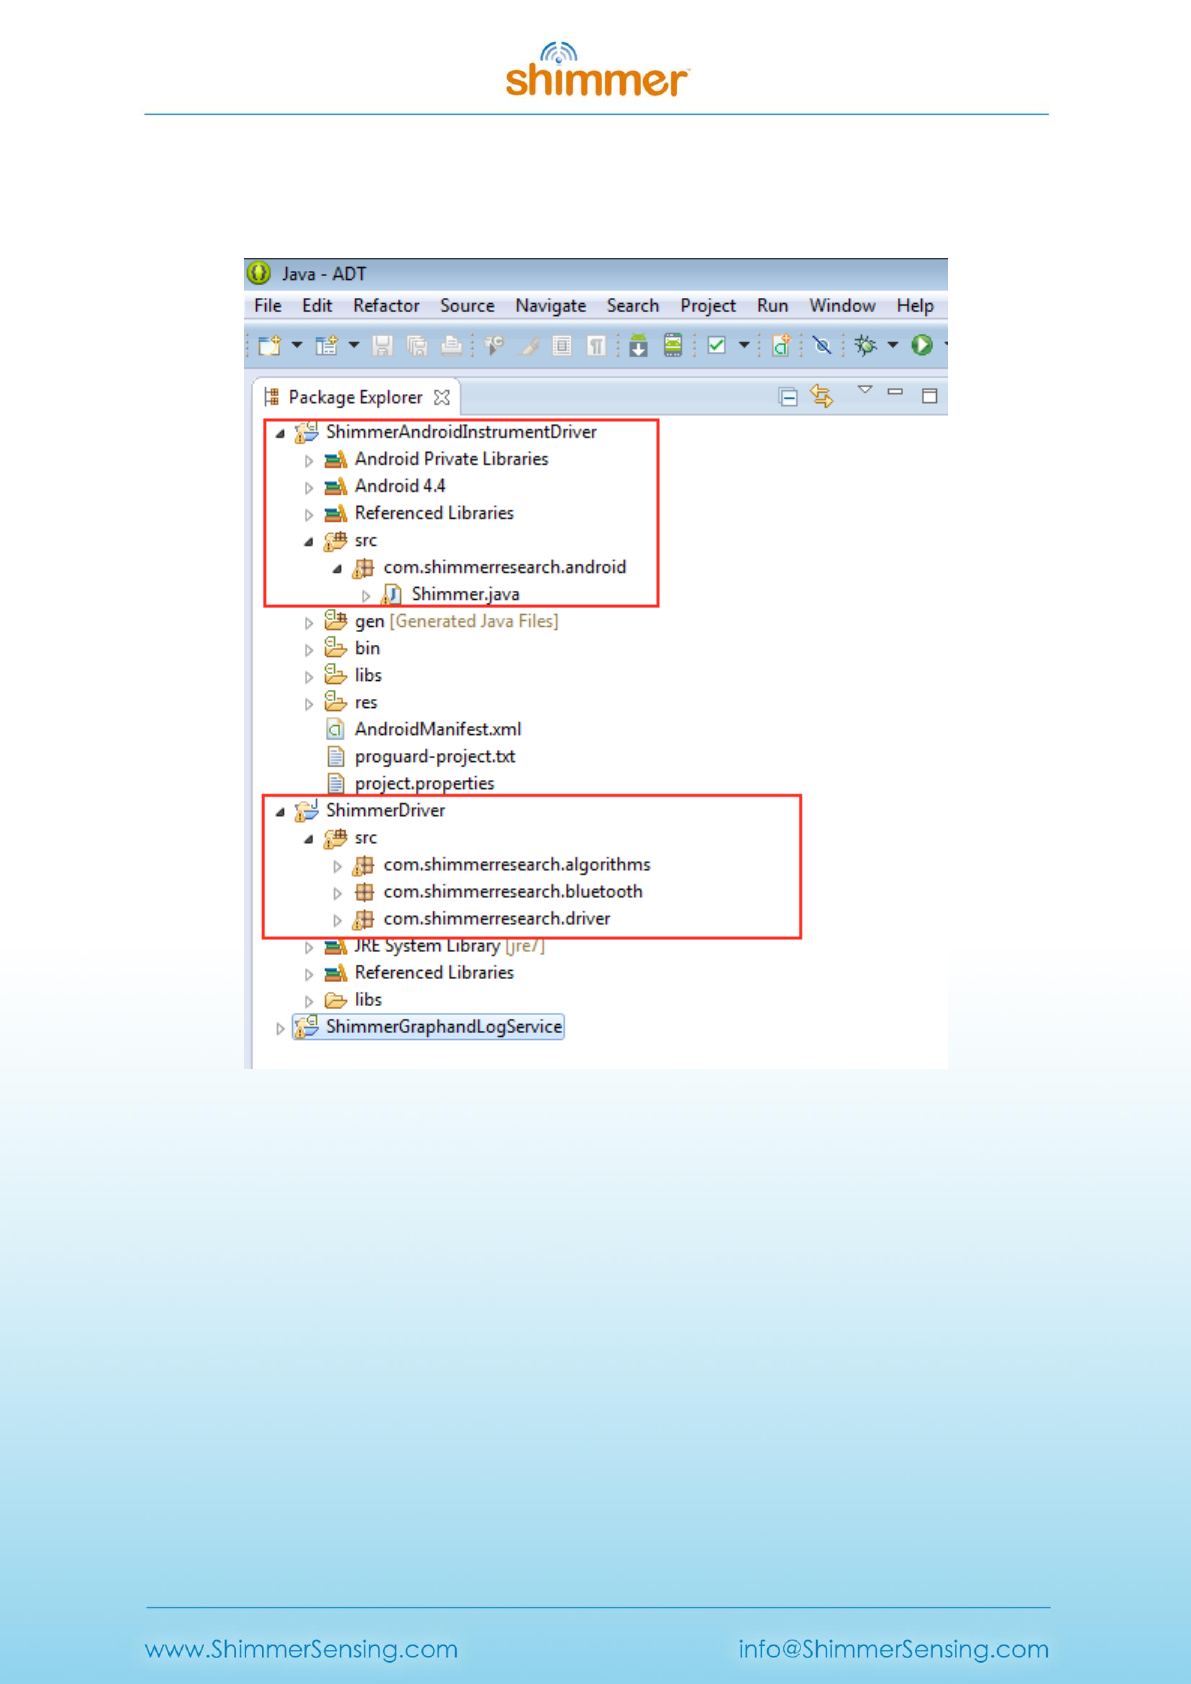
2. Import the generic ShimmerDriver, this can be done by choosing Import -> Existing Projects
into Workspace, and choosing the ShimmerDriver folder.
3. Import the ShimmerAndroidInstrumentDriver. The reason ShimmerAndroidInstrumentDriver
and ShimmerDriver are separate is to allow the ShimmerDriver to be used on a PC
(Windows/Linux/Mac OSx). As an example of its usage on the PC please refer to Section 7.
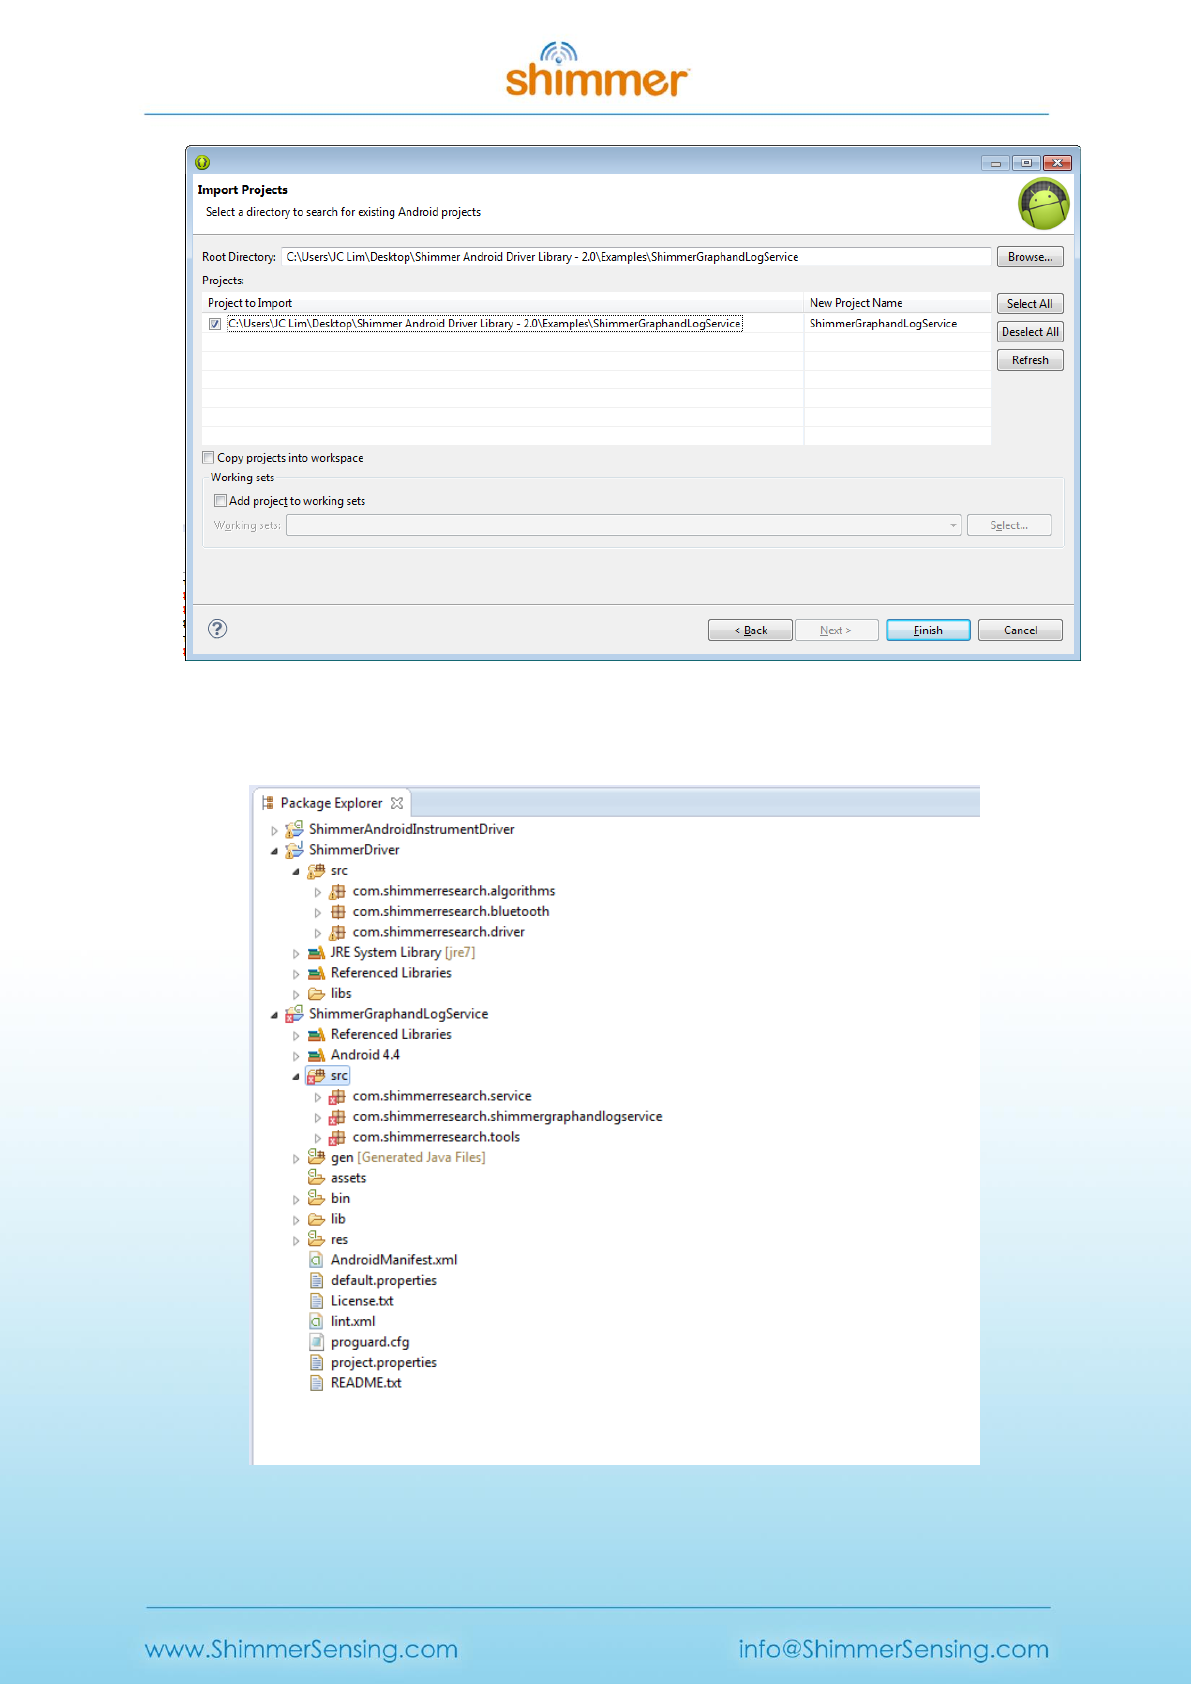
4. Once the ShimmerAndroidInstrumentDriver is imported ensure the project ShimmerDriver
has been added to the Build Path as shown below.
5. Import your first Shimmer Android Project example through import -> Existing Android Code
Into Workspace.
Copyright © Shimmer Research 2014
Realtime Technologies Ltd Shimmer Java/Android API
All rights reserved Rev 2.6c
9
Figure 2: Select Existing Projects
6. Scroll to the example folder and select an example.
Copyright © Shimmer Research 2014
Realtime Technologies Ltd Shimmer Java/Android API
All rights reserved Rev 2.6c
10
Figure 3: Select an Example
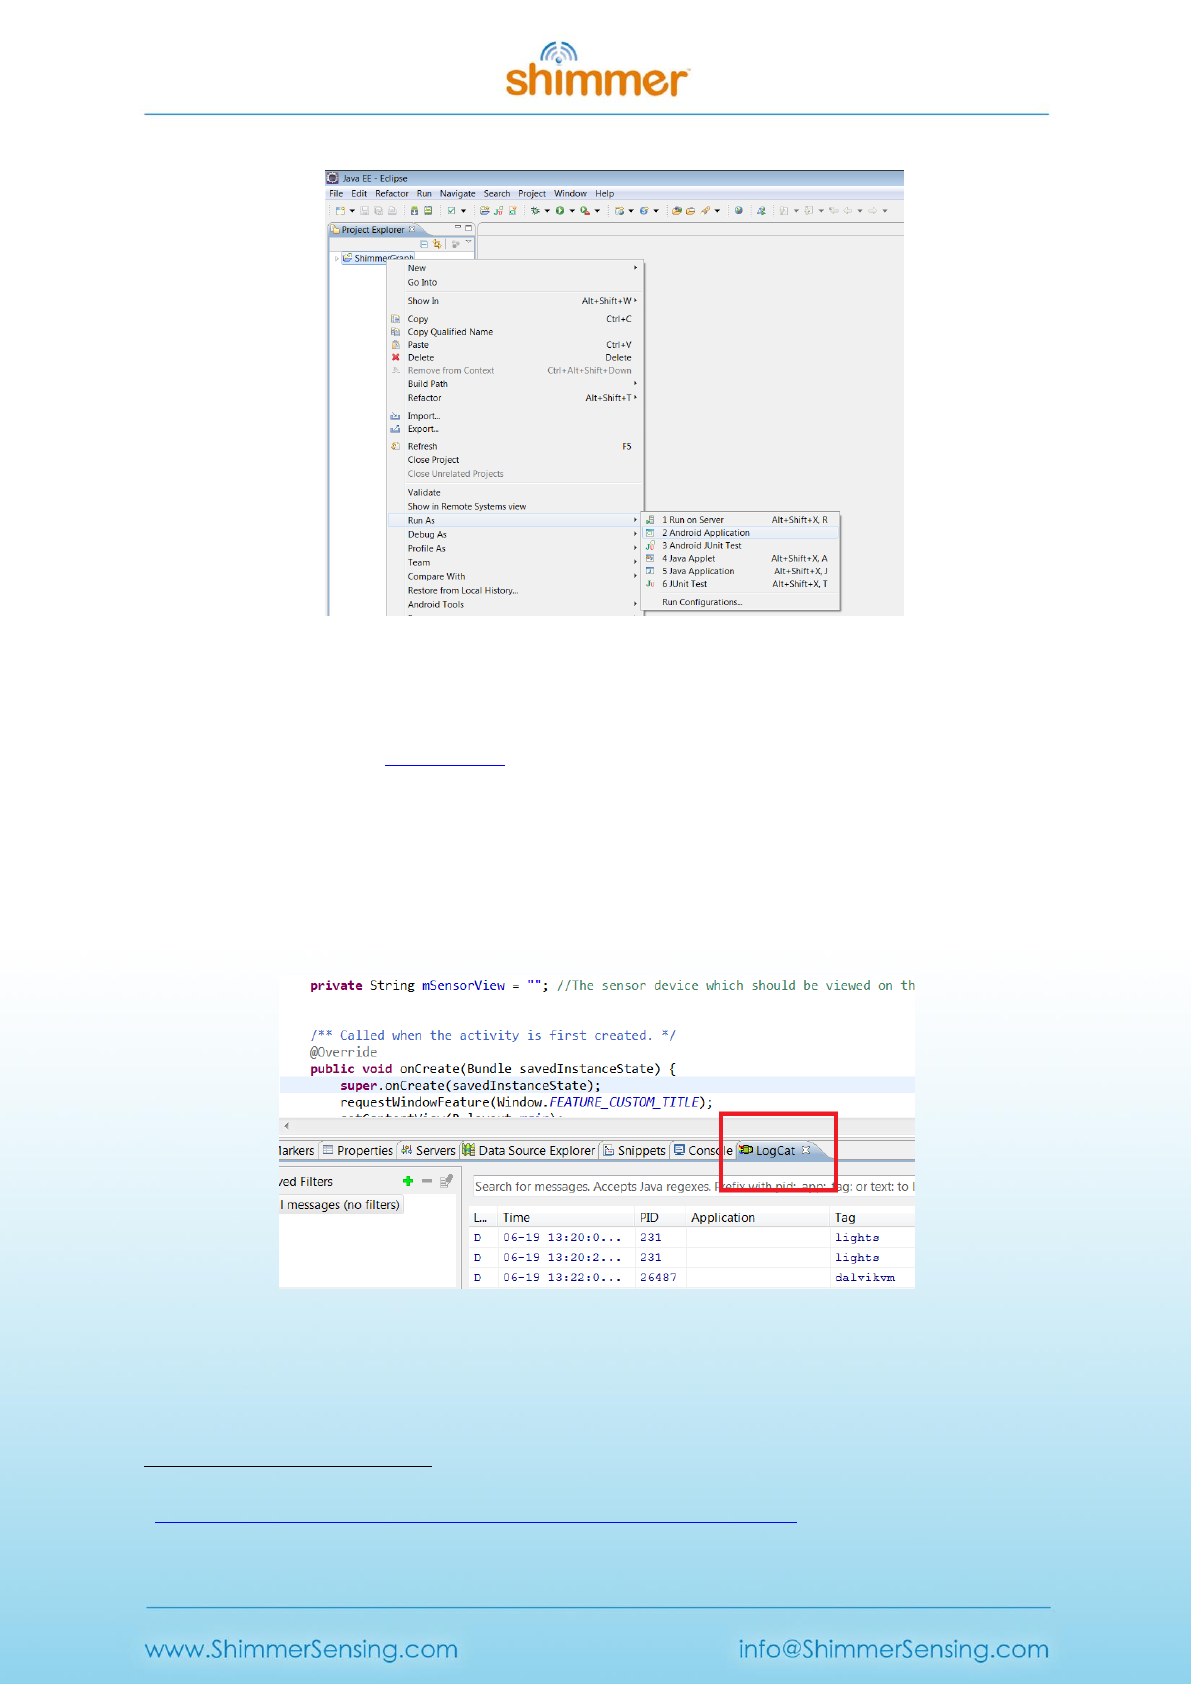
7. Click Finish and go to your workbench.
Figure 4: ShimmerGraphandLogService Project Error
Copyright © Shimmer Research 2014
Realtime Technologies Ltd Shimmer Java/Android API
All rights reserved Rev 2.6c
11
8. If you see the above errors, it is because the path to the referenced library is either incorrect
or has been corrupted. To fix this either, re-point via ConfigureBuildPath-->Android and
reselecting the ShimmerAndroidInstrumentDriver folder in the library view. If that fails,
restart eclipse, and the error should be gone.
9. Next install the application onto your target Android device, readers should note that the
Android emulator does not support Bluetooth. Connect your Android device to your computer
via USB and enable USB debugging on your Android device. This option can be found on your
Android device here:-
Settings-> Developer options -> USB debugging
Also ensure that the drivers for your Android device have been installed on your computer.
On certain Android versions, the developer console tab is hidden, and to uncover it
requires pressing the Build Number seven times.
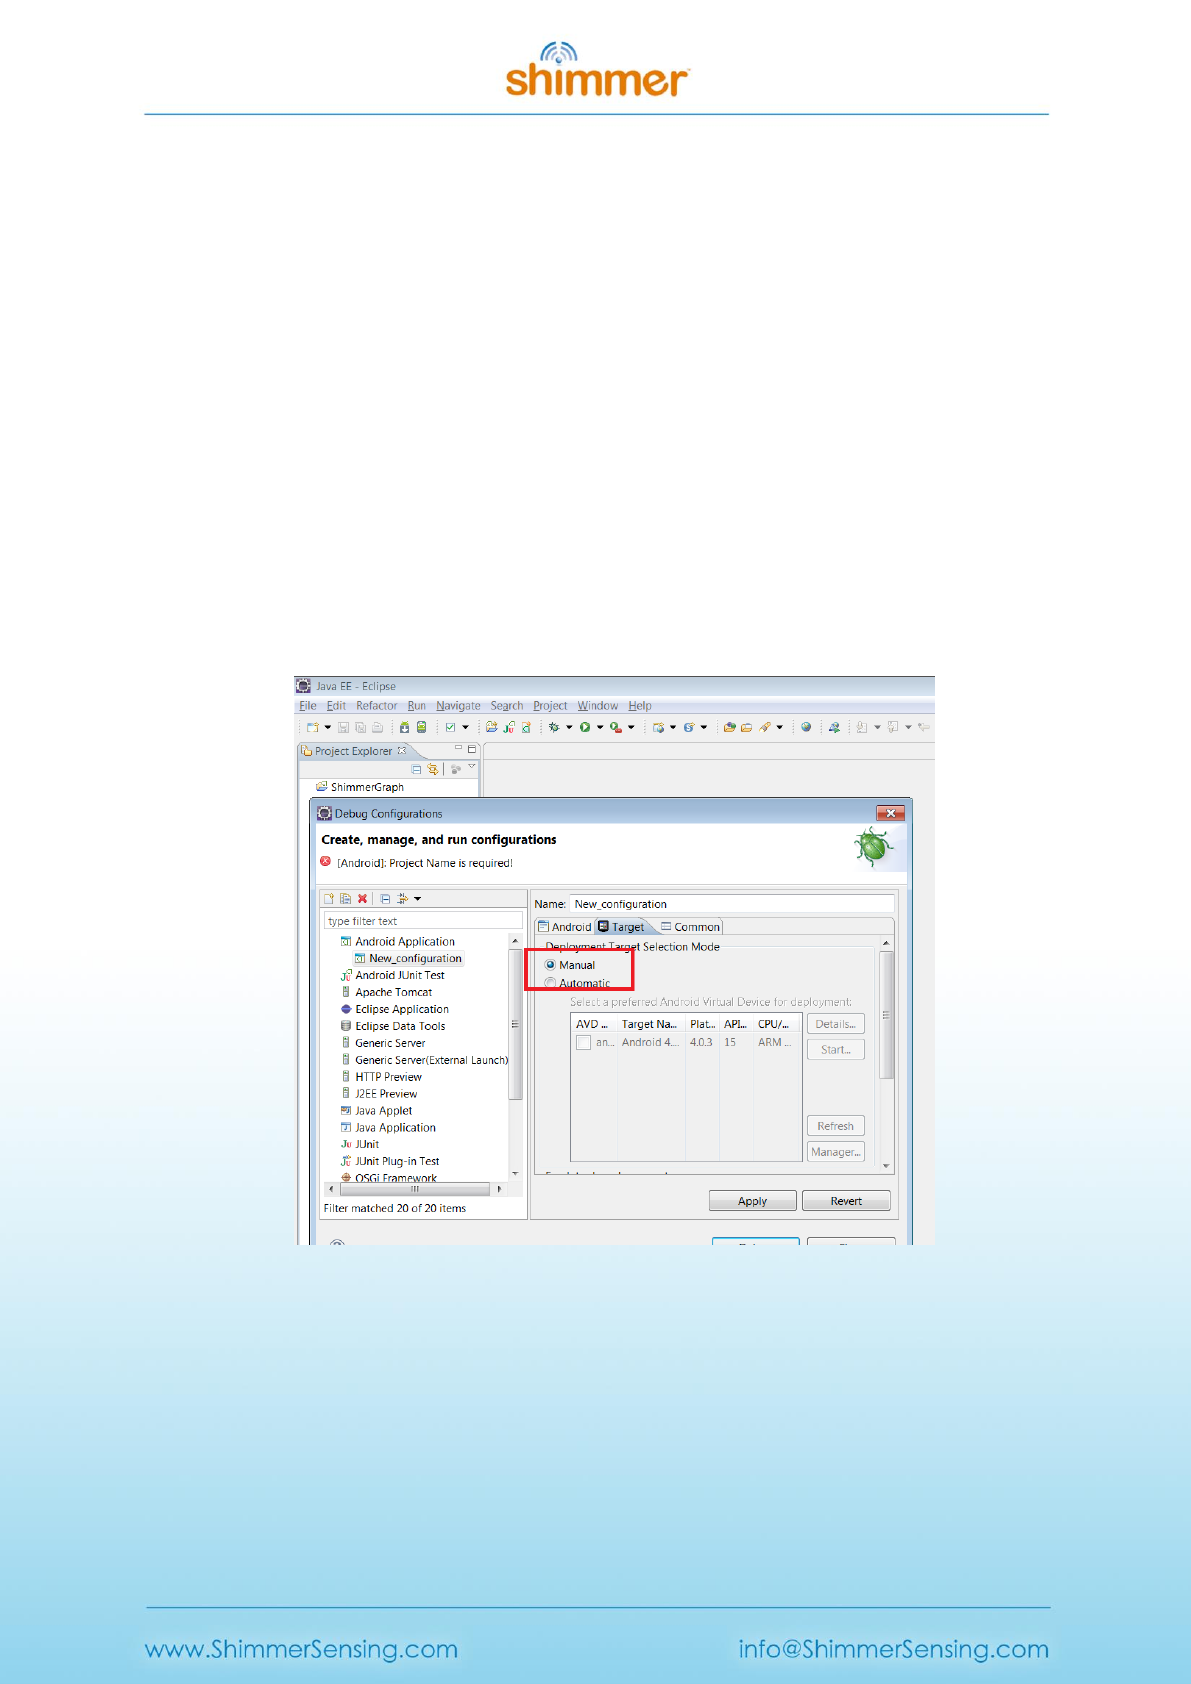
10. Set the Deployment Target Selection Mode to manual. This can be found under Run ->
Debug Configurations -> Target.
Figure 5: Select Manual Deployment Target Selection
Copyright © Shimmer Research 2014
Realtime Technologies Ltd Shimmer Java/Android API
All rights reserved Rev 2.6c
12
11. Next run the application as an Android application as shown below.
Figure 6: Run the Application
You should now see the ShimmerGraphandLogService App loaded onto your Android device.
12. Watch the related tutorial video on YouTube
3
to see an explanation of the application.
13. Next you will want to load LogCat to view messages logged by the Android device. This can
be done by going to:-
Window → Show View → Other… → Android → LogCat
You can use this logging mechanism to debug as you start working on your implementation.
Figure 7: Load LogCat
3
http://www.youtube.com/watch?feature=player_embedded&v=-wf4yq968EM
Copyright © Shimmer Research 2014
Realtime Technologies Ltd Shimmer Java/Android API
All rights reserved Rev 2.6c
13
4. Shimmer Android API
4.1. General Overview
Figure 8: Set of Packages which make up the Shimmer Android Instrument Driver Library
The Shimmer Java/Android API is made up of the ShimmerDriver project and the
ShimmerAndroidInstrumentDriver project. The Shimmer Driver contains the package
com.shimmerresearch.driver which has three main files. The first file, ShimmerObject class, is the main
generic driver file, which allows a Shimmer device to be defined. Depending on the communication
medium other classes should extend this class. An example is given Figure 9, where Bluetooth,
BluetoothLowEnergy and the 802.15.4, all extend the ShimmerObject class. Note that as of only
Bluetooth is supported at the moment. The two files (FormatCluster and ObjectCluster) within the
com.shimmerresearch.driver package defines the data structure.
Copyright © Shimmer Research 2014
Realtime Technologies Ltd Shimmer Java/Android API
All rights reserved Rev 2.6c
14
The ShimmerAndroidInstrumentDriver holds the Shimmer Class. The Shimmer Class (should really be
called ShimmerBTAndroid but for backward compatibility Shimmer is used) extends ShimmerObject
and handles the Android Bluetooth API and provides a number of functions which allows an Android
application to communicate with the Shimmer Device. More information concerning the Android
Bluetooth API can be found on the Android developers website
4
. As can be seen in Figure 9, this
structure (separating native Android calls) allows greater code flexibility and usability of the Bluetooth
interface (Serial Port Profile) thus allowing the code to be used as the basis of a PC based driver. For a
PC example please refer to Section 7. Users should note that in theory, the ShimmerBluetooth class is
also extensible to other radio technologies, as long as the abstract methods (Read, Write..etc..) are
implemented correctly and that the same communication flow as BtStream is used.
The Shimmer Class allows the main Android application to interact with the Shimmer device (e.g.
setting the sampling rate, changing the accelerometer range, enabling/disabling sensors). Multiple
Shimmer devices can be connected simultaneously to an Android device using multiple instances of
the Shimmer Class object.
4
http://developer.android.com/guide/topics/wireless/bluetooth.html
ShimmerObject
ShimmerBluetooth
Shimmer802.15.4
ShimmerBTLE
Shimmer
ShimmerBTPC
ShimmerDriver
Figure 9: Structure
ShimmerAndroidInstrumentDriver
ShimmerPCInstrumentDriver
Copyright © Shimmer Research 2014
Realtime Technologies Ltd Shimmer Java/Android API
All rights reserved Rev 2.6c
15
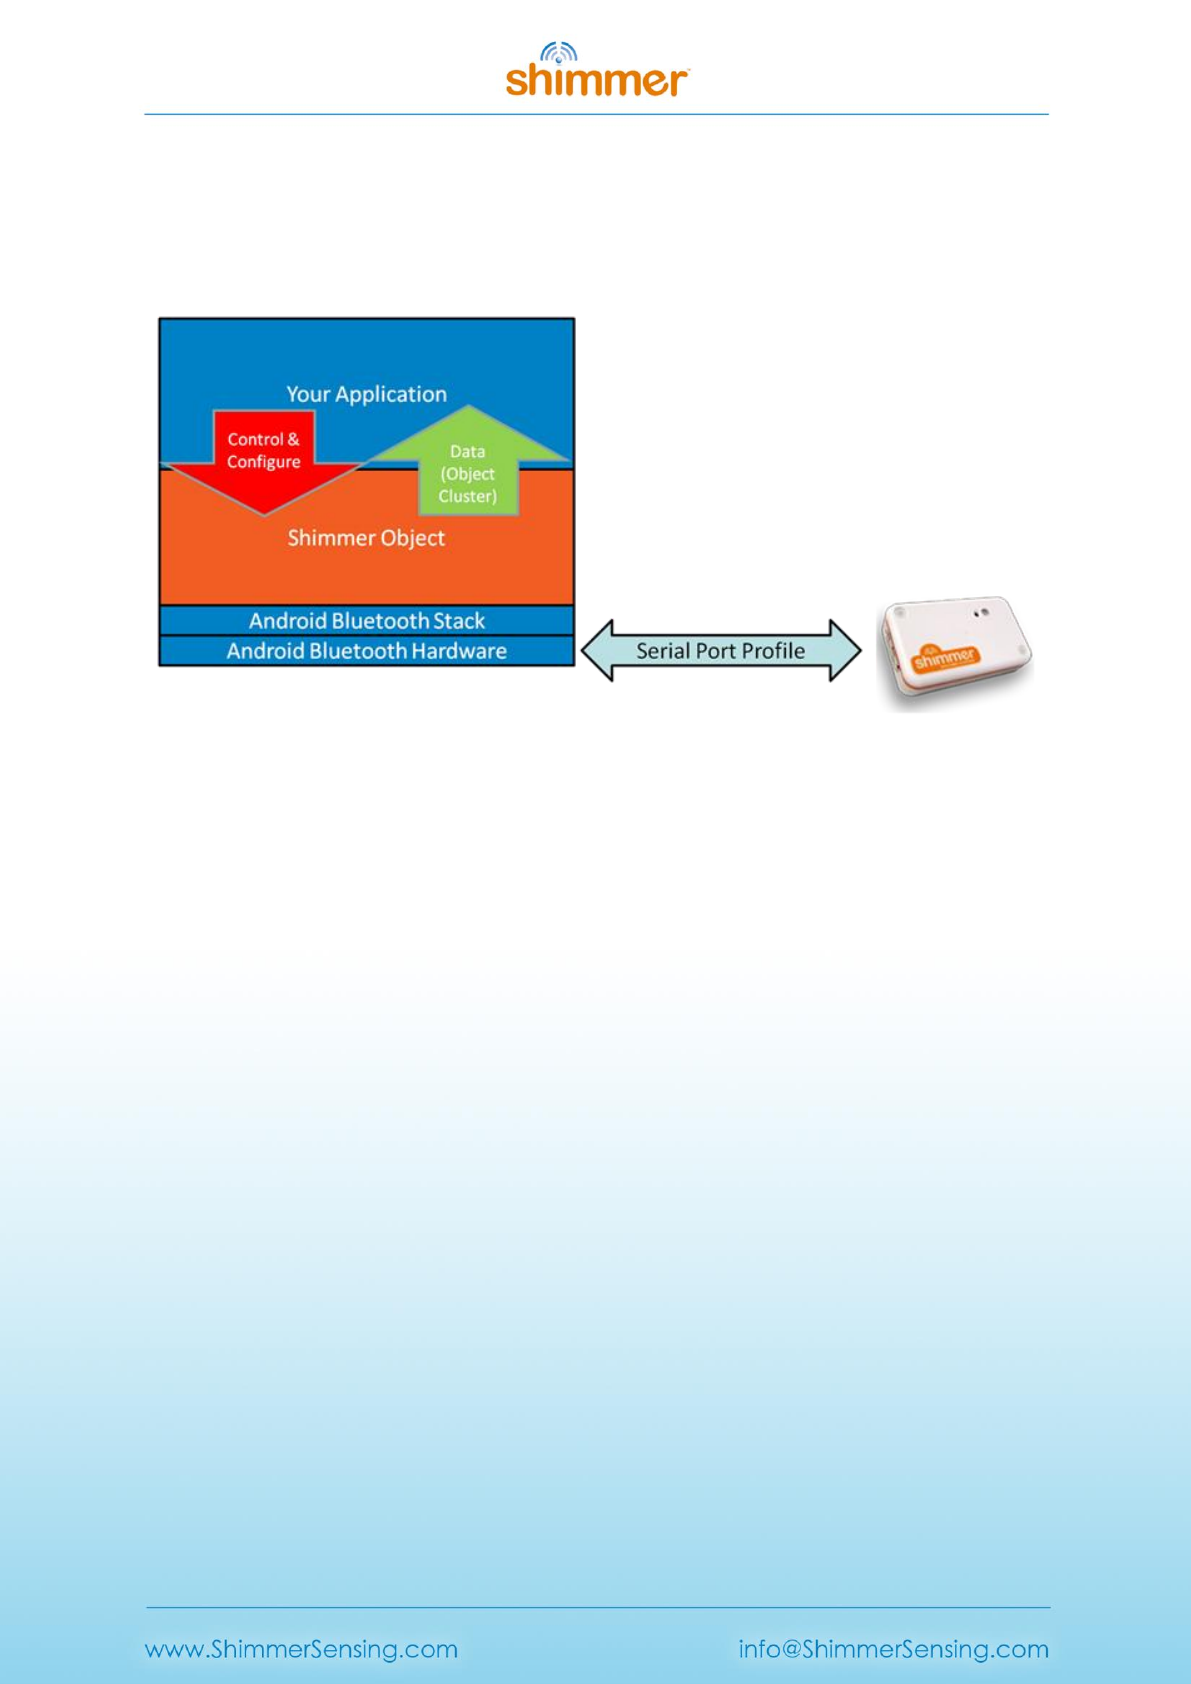
4.2. The Shimmer Class
As mentioned the Shimmer class is an object oriented piece of code which allows your Android
application to interact with a Shimmer device. It is located in the package
com.shimmerresearch.android.
The Shimmer class relies on the Bluetooth stack provided by Android to connect with the Shimmer d
The Shimmer Class relies on the Bluetooth stack provided by Android to connect with the Shimmer
device via the Serial Port Profile (SPP). SPP emulates a serial cable link over Bluetooth wireless
technology. Each Shimmer device connected to the Android Device is represented by a Shimmer
object which is an instance of the Shimmer Class. For example:-
Shimmer mShimmerDevice1 = new Shimmer(this, mHandler,"RightArm",false);
Shimmer mShimmerDevice2 = new Shimmer(this, mHandler,"LeftArm",false);
Figure 10: Shimmer Object

Copyright © Shimmer Research 2014
Realtime Technologies Ltd Shimmer Java/Android API
All rights reserved Rev 2.6c
16
There are other constructors provided for the Shimmer class, which allows you to immediately set the
configuration of the Shimmer device you will be connecting to. Once a connection has been
established, the Shimmer device is configured according to the specifications of the constructor.
The Shimmer Class exposes a number of functions to allow the Android Device to individually control
each Shimmer device. The reader should note that functions that start with either write or read are
direct commands to the Shimmer device, while functions that start with get or set are commands that
only access the Shimmer class object.
The Shimmer device responds with an Acknowledge packet whenever a command is received. In some
cases after sending an Acknowledge packet the Shimmer device proceeds in transmitting a response
packet or data packets. This occurs when a read or streaming command is transmitted.
The following are among the few primary functions provided by the class:-
Connect; e.g. mShimmerDevice1.connect(bluetoothAddress,"default");
o Attempts to connect the Android device to the Shimmer device. There are two
separate library options provided default and gerdavax. Only in cases where the
default library does not meet your expectations should you attempt to use the
gerdavax library.
startStreaming
o Starts streaming of the Shimmer Device
Figure 11: Multiple Shimmer Objects

Copyright © Shimmer Research 2014
Realtime Technologies Ltd Shimmer Java/Android API
All rights reserved Rev 2.6c
17
stopStreaming
o Stops streaming of the Shimmer Device
Inquiry
o An inquiry command allows the Android device to learn the current setup of the
Shimmer device. Upon the reception of an inquiry command the Shimmer device will
transmit an acknowledge packet and an inquiry response packet. The response packet
contains information concerning the current setup of the Shimmer device, such as the
sensors which have been enabled, the data packet size, and the contents of the data
packet. For further information on the inquiry command please refer to the BtStream
on Github for Shimmer2r
5
and Shimmer3
6
.
writeEnabledSensors
o This command is used to enable specified sensors on the Shimmer device. After the
acknowledge packet is received an inquiry command is executed to ensure the packet
format is updated. When enabling multiple sensors on the Shimmer device use the
following format where an Or operator is used. E.g.
mShimmerDevice1.writeEnabledSensors(Shimmer.SENSOR_ACCEL|Shimmer.SENSOR_GYRO);
writeSamplingRate
o Transmits a command to the Shimmer unit, configuring its sampling rate.
writeAccelRange
o Transmits a command setting the range of the accelerometer on the Shimmer device
By default the Shimmer class will retrieve the calibration parameters from the Shimmer device. In the
event calibration parameters are not found. The Shimmer device will use the default calibration
parameters. Sensor data with units ending with * (e.g. m/s2*) means default calibration parameters
were used. Please refer to the Shimmer 9DoF Calibration User Manual for more information on
calibration, available on our website
7
.
Sensor data, commands and status messages are passed on from the Shimmer Class to the Android
application using the Handler Class provided by the Android library. More information concerning the
Handler Class is provided on the Android developer website
8
. In examples it is important to note how
toast messages and data packets are sent from the Shimmer class to the main activity via the Handler.
5
https://github.com/ShimmerResearch/tinyos-shimmer/tree/master/apps/BtStream
6
https://github.com/ShimmerResearch/shimmer3/tree/master/apps/BtStream
7
http://www.shimmersensing.com/support/wireless-sensor-networks-documentation/category/21
8
http://developer.android.com/reference/android/os/Handler.html
Copyright © Shimmer Research 2014
Realtime Technologies Ltd Shimmer Java/Android API
All rights reserved Rev 2.6c
18
4.3. Data Structure
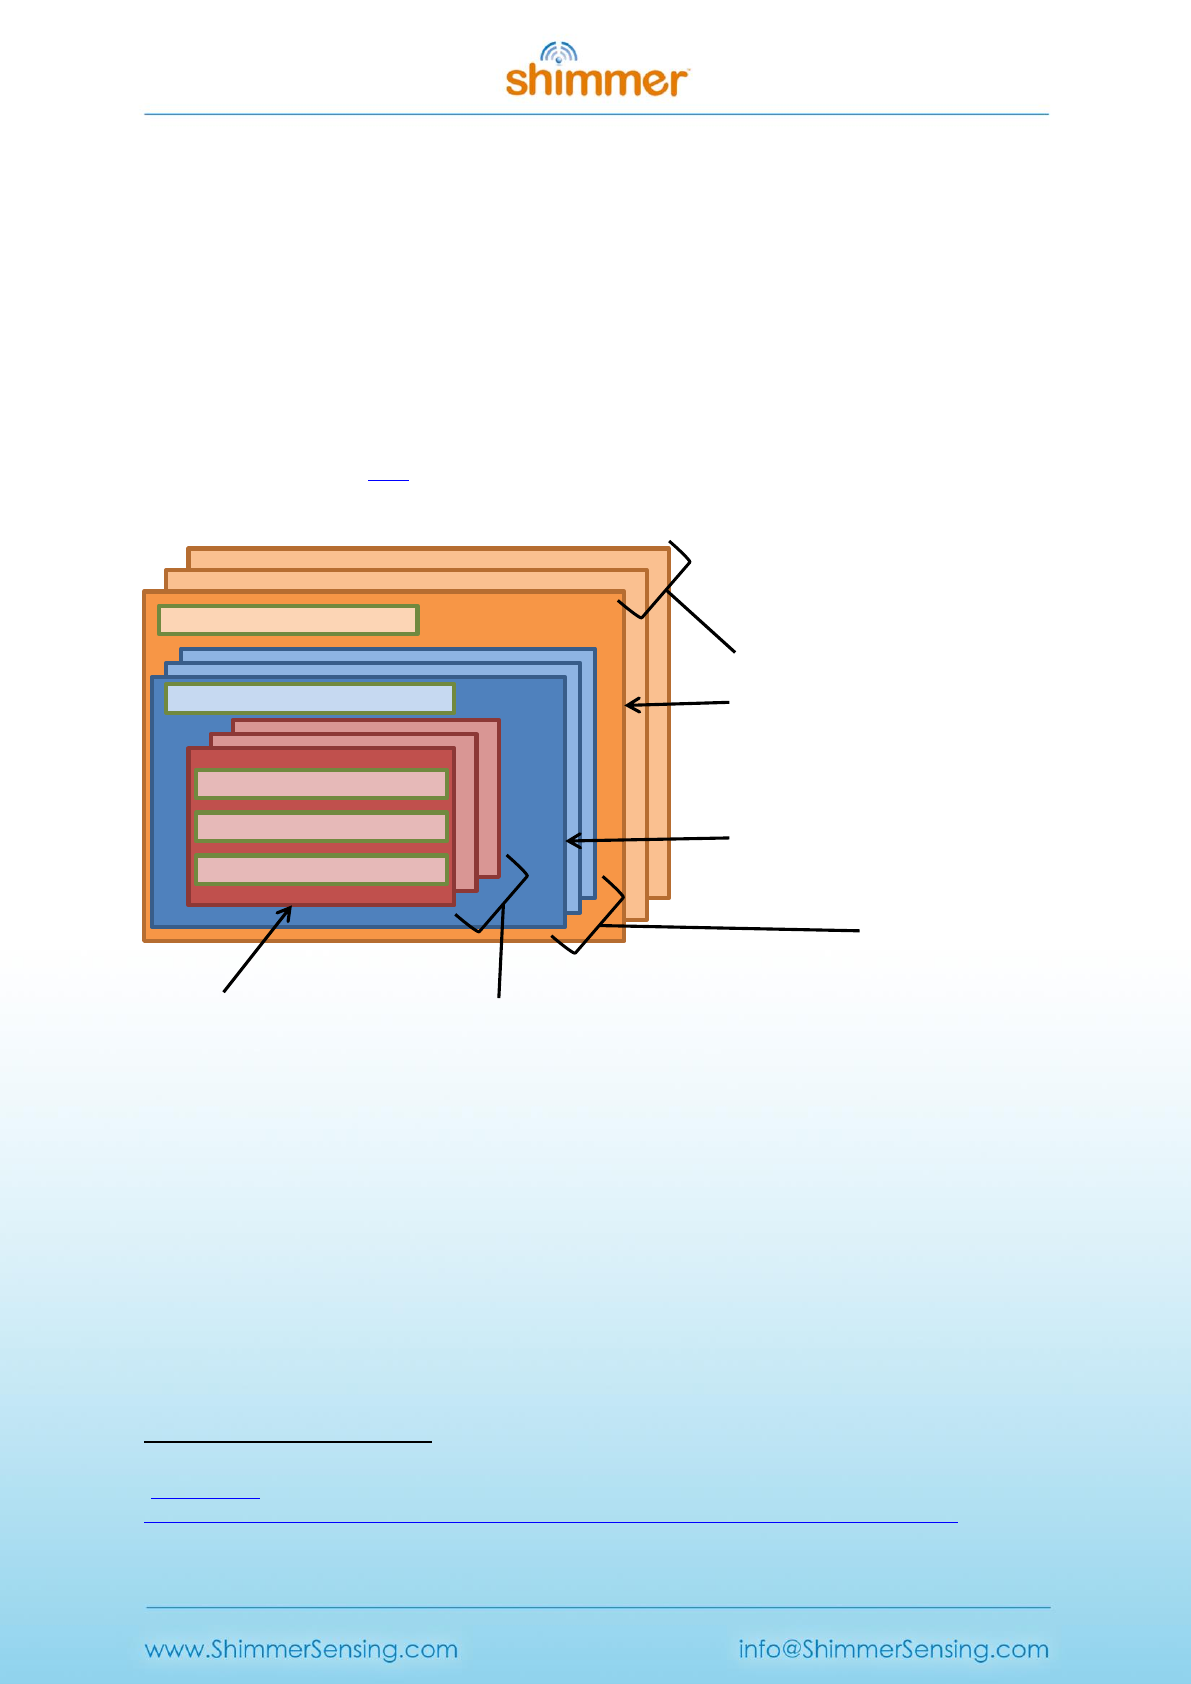
The ObjectCluster and Property Cluster class describes the data structure used within this library. The
data structure is used to encapsulate data from the driver. The ObjectCluster is made up of a MultiMap
(PropertyCluster) where each key represents a Property (e.g. Accelerometer X) and each value the
FormatCluster of that property. The FormatCluster is an object which holds the format (e.g.
Calibrated), units and data of the property. An example of the data structure is shown in Figure 12.
This design was chosen to allow new properties such as Linear Acceleration and orientation to be
included easily in the future along with new formats such as filtered (low pass, high pass, etc). Through
the use of MultiMaps, properties within the data structure can be found easily. More information on
MultiMaps can be found here
9
.
Figure 12: Data Structure
These seven lines of code show the basic operation of the Object Cluster. In the first line a new
ObjectCLuster with the name RightArm is created. Lines 2-5 show how new properties are added to
the object cluster. The resulting object cluster is shown in Figure 12. For better details users should
refer to the buildMsg function within the ShimmerObject class.
1. ObjectCluster objectCluster=new ObjectCluster("RightArm");
2. objectCluster.mPropertyCluster.put("Accelerometer X",new FormatCluster("CAL","m/(sec^2)",0.5));
3. objectCluster.mPropertyCluster.put("Accelerometer X",new FormatCluster("RAW","no units",50));
4. objectCluster.mPropertyCluster.put("Accelerometer Y",new FormatCluster("CAL"," m/(sec^2)",0.5));
5. objectCluster.mPropertyCluster.put("Accelerometer Y",new FormatCluster("RAW","no units",50))
9
http://guava-
libraries.googlecode.com/svn/tags/release03/javadoc/com/google/common/collect/Multimap.html
v
Format Name
Units (String)
Data (3D
Property Name
Object
Format Cluster
Property Cluster
Object Cluster
Format Cluster Array
Property Cluster Array
Object Cluster Array

Copyright © Shimmer Research 2014
Realtime Technologies Ltd Shimmer Java/Android API
All rights reserved Rev 2.6c
19
6. Collection<FormatCluster> accelXFormats = objectCluster.mPropertyCluster.get("Accelerometer X");
// first retrieve all the possible formats for the current sensor device
7. FormatCluster formatCluster =
((FormatCluster)objectCluster.returnFormatCluster(accelXFormats,"CAL")); // retrieve the
calibrated data
8. dataValue = formatCluster.mData;
Line 6 - 8 show how data is retrieved from a data structure. Initially the MultiMap (PropertyCluster) is
searched for the property “Accelerometer X”. The result of this search is a Collection of different
format clusters of Accelerometer X. More information on the Collection class can be found here
10
.
Next in line 7 the returnFormatCluster function is used to return the Calibrated Data of Accelerometer
X. Finally line 8 shows the data being passed to the variable dataValue.
The list of properties within an object cluster is built based on the inquiry response received from the
Shimmer device which specifies what the channel contents will be for a data packet. The lists of
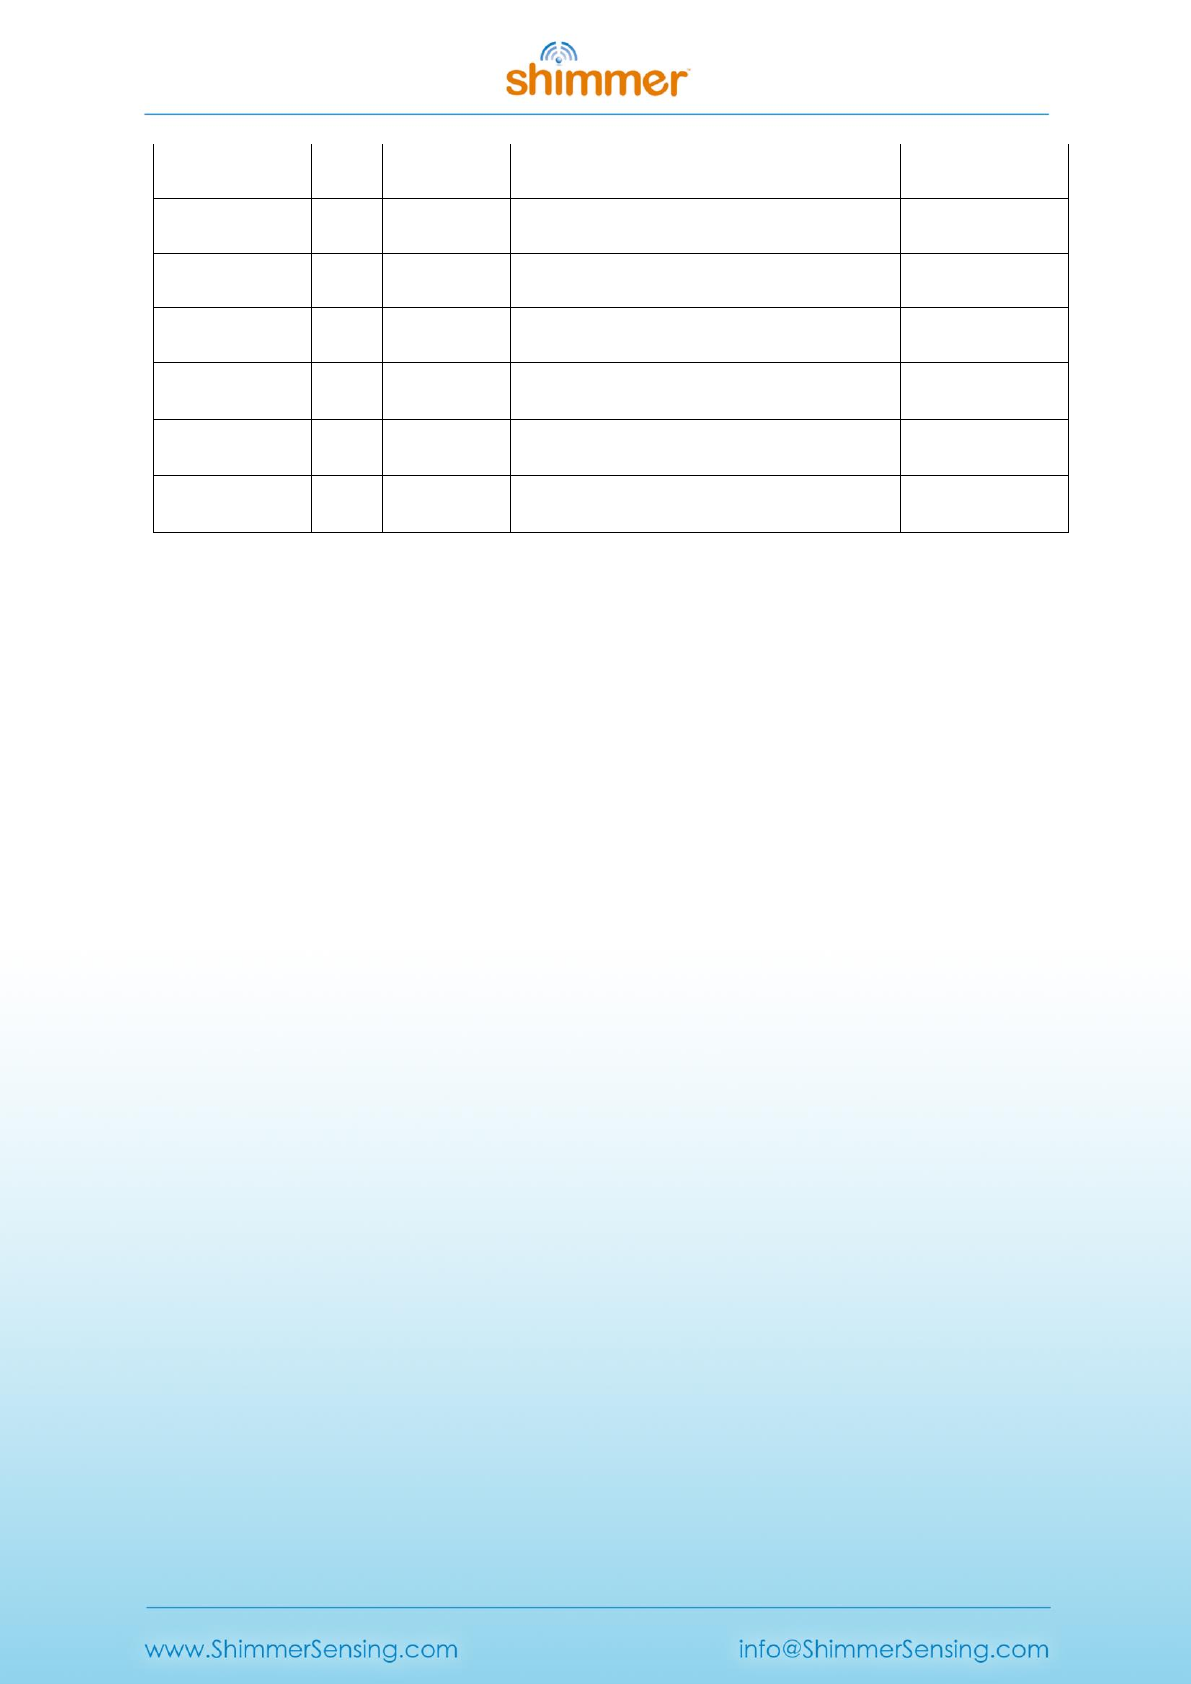
properties currently supported by the Shimmer class are shown below. All calibrated data do not have
a Channel identifier, because calibration is not down on the Shimmer device but within the API.
SHIMMER2
List of
supported
properties
Format
Unit
Description
Inquiry
Response
Channel
Identifier
Timestamp
Raw
No Unit
Raw timestamp data is generated
from the crystal oscillator on the
Shimmer which has a frequency of
32768 Hz. Signal Data Type U12 which
loop around 0 when it exceeds 65536
None
Accelerometer X
Raw
No Unit
Signal Data Type u12
0
Accelerometer Y
Raw
No Unit
Signal Data Type u12
1
Accelerometer Z
Raw
No Unit
Signal Data Type u12
2
Gyroscope X
Raw
No Unit
Signal Data Type u12
3
Gyroscope Y
Raw
No Unit
Signal Data Type u12
4
Gyroscope Z
Raw
No Unit
Signal Data Type u12
5
Magnetometer
X
Raw
No Unit
Signal Data Type i16
6
Magnetometer
Y
Raw
No Unit
Signal Data Type i16
7
Magnetometer
Z
Raw
No Unit
Signal Data Type i16
8
ECG RA-LL
Raw
No Unit
Signal Data Type u12
9
ECG LA-LL
Raw
No Unit
Signal Data Type u12
0A
GSR
Raw
No Unit
Signal Data Type u16, two MSBs
signify the range, 12 bits only contain
data
0B
10
http://docs.oracle.com/javase/1.4.2/docs/api/java/util/Collection.html

Copyright © Shimmer Research 2014
Realtime Technologies Ltd Shimmer Java/Android API
All rights reserved Rev 2.6c
20
EMG
Raw
No Unit
Signal Data Type u12
0D
ExpBoard A0
Raw
No Unit
Signal Data Type u12
0E
ExpBoard A7
Raw
No Unit
Signal Data Type u12
0F
Bridge Amplifier
High
Raw
No Unit
Signal Data Type u12
10
Bridge Amplifier
Low
Raw
No Unit
Signal Data Type u12
11
Heart Rate
Raw
No Unit
Signal Data Type u16, this is not to be
confused with ECG and is not derived
from the ECG module
12
VSenseReg
Raw
No Unit
Pmux must be switched on, which
switches the mux input used for
expboardA0 to the battery
0E
VSenseBatt
Raw
No Unit
Pmux must be switched on, which
switches the mux input used for
expboardA7 to the battery
0F
Timestamp
CAL
mSecs
None
Accelerometer X
CAL
m/(sec^2)
For best performance calibrate using
Shimmer 9DOF Calibration
Application
None
Accelerometer Y
CAL
m/(sec^2)
See Shimmer 9DOF Cal App
None
Accelerometer Z
CAL
m/(sec^2)
See Shimmer 9DOF Cal App
None
Gyroscope X
CAL
deg/sec
See Shimmer 9DOF Cal App
None
Gyroscope Y
CAL
deg/sec
See Shimmer 9DOF Cal App
None
Gyroscope Z
CAL
deg/sec
See Shimmer 9DOF Cal App
None
Magnetometer
X
CAL
local
See Shimmer 9DOF Cal App
None
Magnetometer
Y
CAL
local
See Shimmer 9DOF Cal App
None
Magnetometer
Z
CAL
local
See Shimmer 9DOF Cal App
None
GSR
CAL
kOhms
Conductance is the inverse of this
value
None
ECG RA-LL
CAL
mVolts
None
ECG LA-LL
CAL
mVolts
None
EMG
CAL
mVolts
None
Bridge Amplifier
High
CAL
mVolts
None
Bridge Amplifier
Low
CAL
mVolts
None
Heart Rate
CAL
BPM
Does not work with ECG, requires the
extension radio module, and a polar
heart rate strap
None
ExpBoard A0
CAL
mVolts
None
ExpBoard A7
CAL
mVolts
None
VSenseReg
CAL
mVolts
None

Copyright © Shimmer Research 2014
Realtime Technologies Ltd Shimmer Java/Android API
All rights reserved Rev 2.6c
21
VSenseBatt
CAL
mVolts
None
Quarternion 0
CAL
local
3D Orientation must be enabled using
the following method
enable3DOrientation()
None
Quarternion 1
CAL
local
see enable3dOrientation()
None
Quarternion 2
CAL
local
see enable3dOrientation()
None
Quarternion 3
CAL
local
see enable3dOrientation()
None
Angle Axis A
CAL
local
see enable3dOrientation()
None
Angle Axis X
CAL
local
see enable3dOrientation()
None
Angle Axis Y
CAL
local
see enable3dOrientation()
None
Angle Axis Z
CAL
local
see enable3dOrientation()
None
Shimmer3
List of
supported
properties
Form
at
Unit
Description
Inquiry
Response
Channel
Identifier
Timestamp
RAW
No Unit
Raw timestamp data is generated from
the crystal oscillator on the Shimmer
which has a frequency of 32768 Hz.
Signal Data Type U12 which loop around
0 when it exceeds 65536
None
Low Noise
Accelerometer
X
RAW
No Unit
Signal Data Type u12
0x00
Low Noise
Accelerometer
Y
RAW
No Unit
Signal Data Type u12
0x01
Low Noise
Accelerometer
Z
RAW
No Unit
Signal Data Type u12
0x02
Wide Range
Accelerometer
X
RAW
No Unit
Signal Data Type i16
0x04
Wide Range
Accelerometer
Y
RAW
No Unit
Signal Data Type i16
0x05
Wide Range
Accelerometer
Z
RAW
No Unit
Signal Data Type i16
0x06
Gyroscope X
RAW
No Unit
Signal Data Type i16r
0x0A
Gyroscope Y
RAW
No Unit
Signal Data Type i16r
0x0B
Gyroscope Z
RAW
No Unit
Signal Data Type i16r
0x0C
Magnetometer
X
RAW
No Unit
Signal Data Type i16r
0x07
Magnetometer
Y
RAW
No Unit
Signal Data Type i16r
0x08

Copyright © Shimmer Research 2014
Realtime Technologies Ltd Shimmer Java/Android API
All rights reserved Rev 2.6c
22
Magnetometer
Z
RAW
No Unit
Signal Data Type i16r
0x09
VSenseBatt
RAW
No Unit
Signal Data Type i16
0x03
External ADC
A7
RAW
No Unit
Signal Data Type u12
0x0D
External ADC
A6
RAW
No Unit
Signal Data Type u12
0x0E
External ADC
A15
RAW
No Unit
Signal Data Type u12
0x0F
Internal ADC
A1
RAW
No Unit
Signal Data Type u12
0x10
Internal ADC
A12
RAW
No Unit
Signal Data Type u12
0x11
Internal ADC
A13
RAW
No Unit
Signal Data Type u12
0x12
Internal ADC
A14
RAW
No Unit
Signal Data Type u12
0x13
Pressure
RAW
No Unit
Signal Data Type u24r
0x1B
Temperature
RAW
No Unit
Signal Data Type u16r
0x1A
GSR
RAW
No Unit
Signal Data Type u16
0x1C
EXG1 Status
RAW
No unit
Signal Data Type u8
0x1D
EXG2 Status
RAW
No unit
Signal Data Type u8
0x20
ECG LL-RA
RAW
No unit
When EXG1 and EXG2 is enabled (16/24
bit) and EXG configuration is set to
default ECG, see
enableDefaultECGConfiguration
0x1E
ECG LA-RA
RAW
No unit
When EXG1 and EXG2 is enabled (16/24
bit) and EXG configuration is set to
default ECG, see
enableDefaultECGConfiguration
0x1F
EMG CH1
RAW
No unit
When EXG1 and EXG2 is enabled (16/24
bit) and EXG configuration is set to
default EMG, see
enableDefaultEMGConfiguration
0x1E
EMG CH2
RAW
No unit
When EXG1 and EXG2 is enabled (16/24
bit) and EXG configuration is set to
default EMG, see
enableDefaultEMGConfiguration n
0x1F
EXG1 CH1
RAW
No unit
When EXG1 is enabled, and default
ECG/EMG configuration is not used.
Signal Data Type i24r
0x1E
EXG1 CH2
RAW
No unit
When EXG1 is enabled, and default
ECG/EMG configuration is not used.
Signal Data Type i24r
0x1F
ECG Vx-RL
RAW
No unit
When EXG2 is enabled, and default EXG
configuration is set to ECG, see
enableDefaultECGConfiguration
0x22
EXG2 CH1
RAW
No unit
When EXG2 is enabled.
Signal Data Type i24r
0x21

Copyright © Shimmer Research 2014
Realtime Technologies Ltd Shimmer Java/Android API
All rights reserved Rev 2.6c
23
EXG2 CH2
RAW
No unit
When EXG2 is enabled and default ECG
configuration is not used.
Signal Data Type i24r
0x22
EXG1 CH1 16
Bit
RAW
No unit
When EXG1 16 bit is enabled, and
default ECG/EMG configuration is not
used.
Signal Data Type i16r
0x23
EXG1 CH2
16Bit
RAW
No unit
When EXG1 16 bit is enabled, and
default ECG/EMG configuration is not
used.
Signal Data Type i16r
0x24
EXG2 CH1 16
Bit
RAW
No unit
When EXG2 16 bit is enabled, and
default ECG/EMG configuration is not
used.
Signal Data Type i16r
0x25
EXG2 CH2
16Bit
RAW
No unit
When EXG2 16 bit is enabled, and
default ECG/EMG configuration is not
used.
Signal Data Type i16r
0x26
Bridge
Amplifier High
RAW
No unit
Signal Data Type u12
0x27
Bridge
Amplifier Low
RAW
No unit
Signal Data Type u12
0x28
Timestamp
CAL
mSecs
None
Low Noise
Accelerometer
X
CAL
m/(sec^2)
For best performance calibrate using
Shimmer 9DOF Calibration Application
None
Low Noise
Accelerometer
Y
CAL
m/(sec^2)
See Shimmer 9DOF Cal App
None
Low Noise
Accelerometer
Z
CAL
m/(sec^2)
See Shimmer 9DOF Cal App
None
Wide Range
Accelerometer
X
CAL
m/(sec^2)
See Shimmer 9DOF Cal App
None
Wide Range
Accelerometer
Y
CAL
m/(sec^2)
See Shimmer 9DOF Cal App
None
Wide Range
Accelerometer
Z
CAL
m/(sec^2)
See Shimmer 9DOF Cal App
None
Gyroscope X
CAL
deg/sec
See Shimmer 9DOF Cal App
None
Gyroscope Y
CAL
deg/sec
See Shimmer 9DOF Cal App
None
Gyroscope Z
CAL
deg/sec
See Shimmer 9DOF Cal App
None
Magnetometer
X
CAL
local
See Shimmer 9DOF Cal App
None
Magnetometer
Y
CAL
local
See Shimmer 9DOF Cal App
None

Copyright © Shimmer Research 2014
Realtime Technologies Ltd Shimmer Java/Android API
All rights reserved Rev 2.6c
24
Magnetometer
Z
CAL
local
See Shimmer 9DOF Cal App
None
VSenseBatt
CAL
mVolts
None
External ADC
A7
CAL
mVolts
None
External ADC
A6
CAL
mVolts
None
External ADC
A15
CAL
mVolts
None
Internal ADC
A1
CAL
mVolts
None
Internal ADC
A12
CAL
mVolts
None
Internal ADC
A13
CAL
mVolts
Also used for PPG sensor (GSR+ board)
None
Internal ADC
A14
CAL
mVolts
None
Pressure
CAL
kPa
None
Temperature
CAL
Celcius
None
GSR
CAL
kOhms
Conductance is the inverse of this value
None
Quarternion 0
CAL
local
3D Orientation must be enabled using
the following method
enable3DOrientation()
None
Quarternion 1
CAL
local
see enable3dOrientation()
None
Quarternion 2
CAL
local
see enable3dOrientation()
None
Quarternion 3
CAL
local
see enable3dOrientation()
None
Angle Axis A
CAL
local
see enable3dOrientation()
None
Angle Axis X
CAL
local
see enable3dOrientation()
None
Angle Axis Y
CAL
local
see enable3dOrientation()
None
Angle Axis Z
CAL
local
see enable3dOrientation()
None
EXG1 Status
CAL
mVolts
None
EXG2 Status
CAL
mVolts
None
ECG LL-RA
CAL
mVolts
Depends on EXG register configuration,
see comments on RAW
None
ECG LA-RA
CAL
mVolts
Depends on EXG register configuration,
see comments on RAW
None
EMG CH1
CAL
mVolts
Depends on EXG register configuration,
see comments on RAW
None
EMG CH2
CAL
mVolts
Depends on EXG register configuration,
see comments on RAW
None
EXG1 CH1
CAL
mVolts
Depends on EXG register configuration,
see comments on RAW
None
EXG1 CH2
CAL
mVolts
Depends on EXG register configuration,
see comments on RAW
None
ECG Vx-RL
CAL
mVolts
Depends on EXG register configuration,
see comments on RAW
None
EXG2 CH1
CAL
mVolts
Depends on EXG register configuration,
see comments on RAW
None
Copyright © Shimmer Research 2014
Realtime Technologies Ltd Shimmer Java/Android API
All rights reserved Rev 2.6c
25
EXG2 CH2
CAL
mVolts
Depends on EXG register configuration,
see comments on RAW
None
EXG1 CH1 16
Bit
CAL
mVolts
Depends on EXG register configuration,
see comments on RAW
None
EXG1 CH2
16Bit
CAL
mVolts
Depends on EXG register configuration,
see comments on RAW
None
EXG2 CH1 16
Bit
CAL
mVolts
Depends on EXG register configuration,
see comments on RAW
None
EXG2 CH2
16Bit
CAL
mVolts
Depends on EXG register configuration,
see comments on RAW
None
Bridge
Amplifier High
CAL
mVolts
See ShimmerGraphandLogService app
None
Bridge
Amplifier Low
CAL
mVolts
See ShimmerGraphandLogService app
None

Copyright © Shimmer Research 2014
Realtime Technologies Ltd Shimmer Java/Android API
All rights reserved Rev 2.6c
26
5. Android Design Concepts
In this section we go through some basic Android concepts which readers should take note off. Most
of the information have been taken from http://developer.android.com/develop/index.html and
condensed where possible to suit the needs of this user guide. For a more in depth view the reader
should refer to the source.
5.1. Activity and Service
An Activity is an application component that provides a screen with which users can interact in order
to do something, such as dial the phone, take a photo, send an email, or view a map. Each activity is
given a window in which to draw its user interface. The window typically fills the screen, but may be
smaller than the screen and float on top of other windows.
The Android system attempts to keep application process around for as long as possible, but
eventually will need to remove old processes when memory runs low. As described in Activity
Lifecycle, the decision about which process to remove is intimately tied to the state of the user's
interaction with it. In general, there are four states a process can be in based on the activities running
in it, listed here in order of importance. The system will kill less important processes (the last ones)
before it resorts to killing more important processes (the first ones).
The foreground activity (the activity at the top of the screen that the user is currently interacting with)
is considered the most important. Its process will only be killed as a last resort, if it uses more memory
than is available on the device. Generally at this point the device has reached a memory paging state,
so this is required in order to keep the user interface responsive.
A visible activity (an activity that is visible to the user but not in the foreground, such as one sitting
behind a foreground dialog) is considered extremely important and will not be killed unless that is
required to keep the foreground activity running.
A background activity (an activity that is not visible to the user and has been paused) is no longer
critical, so the system may safely kill its process to reclaim memory for other foreground or visible
processes. If its process needs to be killed, when the user navigates back to the activity (making it
visible on the screen again), its onCreate(Bundle) method will be called with the savedInstanceState
it had previously supplied in onSaveInstanceState(Bundle) so that it can restart itself in the same state
as the user last left it.
An empty process is one hosting no activities or other application components (such
as Service or BroadcastReceiver classes). These are killed very quickly by the system as memory
becomes low. For this reason, any background operation you do outside of an activity must be
executed in the context of an activity BroadcastReceiver or Service to ensure that the system knows
it needs to keep your process around.

Copyright © Shimmer Research 2014
Realtime Technologies Ltd Shimmer Java/Android API
All rights reserved Rev 2.6c
27
Figure 13: Activity lifecycle
11
Figure 13 shows the lifecycle of an activity. From the flowchart it can be seen that an Application
process can be killed when apps with higher priority need memory. Sometimes an Activity may need
to do a long-running operation that exists independently of the activity lifecycle itself. An example is
when you are logging data from a Shimmer device. As logging can take a long time, the application
should allow the user to leave the application while it is executing. To accomplish this, your Activity
should start a Service
12
in which logging takes place. This allows the system to properly prioritize your
process (considering it to be more important than other non-visible applications) for the duration of
the upload, independent of whether the original activity is paused, stopped, or finished.
11
http://developer.android.com/reference/android/app/Activity.html
12
http://developer.android.com/reference/android/app/Service.html

Copyright © Shimmer Research 2014
Realtime Technologies Ltd Shimmer Java/Android API
All rights reserved Rev 2.6c
28
A Service is an application component that can perform long-running operations in the background
and does not provide a user interface.
It is important to understand when to use a service when designing an Android application.
An example of how to use a service in logging context in given in the ShimmerGraphandLogService
example. Note that the example only uses a background service, and that services too have a priority
lifecycle. Users should note the difference between a foreground service and a background service. A
foreground service
13
is defined as
A started service can use the startForeground(int, Notification) API to put the service in a foreground state, where the
system considers it to be something the user is actively aware of and thus not a candidate for killing when low on memory. (It is still
theoretically possible for the service to be killed under extreme memory pressure from the current foreground application, but in
practice this should not be a concern.)
5.2. The Handler
When a process is created for your application, its main thread is dedicated to running a message
queue that takes care of managing the top-level application objects (activities, broadcast receivers,
etc.) and any windows they create. You can create your own threads, and communicate back with the
main application thread through a Handler. This is done by calling the post or sendMessage methods,
from your new thread.
13
http://developer.android.com/reference/android/app/Service.html
Figure 14: Handler

Copyright © Shimmer Research 2014
Realtime Technologies Ltd Shimmer Java/Android API
All rights reserved Rev 2.6c
29
In Section 6.1 an example which shows some of the different types of messages passed on from the
Shimmer thread to the Main UI thread is given. In Section 6.3 an example which shows how to use the
Handler to connect to multiple Shimmer devices sequentially without having to lock the Main UI
thread is given.
Readers should note that while it is safer to use a static handler, for simplicity many of the examples
don't, for an example of a static handler use please refer to the MultiShimmerTemplate example.

Copyright © Shimmer Research 2014
Realtime Technologies Ltd Shimmer Java/Android API
All rights reserved Rev 2.6c
30
6. Examples
There are a number of examples provided with the library. In this section a run through of each
example and some of the important design concepts readers should be aware of is presented. Users
who are using Shimmer3, should pay attention specifically to the examples
ShimmerGraphandLogService and the MultiShimmerTemplate.
6.1. ShimmerExample
The Shimmer example is the most basic example provided. It does not have any UI elements in it. The
purpose of the example is to show how to use the Shimmer driver to connect an Android phone to a
Shimmer unit. Readers should take note of the Handler in ShimmerExampleActivity. As mentioned the
handler is the means of communicating back with the main application thread from your own created
thread.
In the example there are three types of messages sent from the Shimmer thread to the Main UI thread
via the handler. The messages are Shimmer.MESSAGE_READ, Shimmer.MESSAGE_STATE_CHANGE
and Shimmer.MESSAGE_TOAST . Shimmer.MESSAGE_READ is used to send sensor data.
Shimmer.MESSAGE_STATE_CHANGE is used to notify the activity page which state the shimmer is in.
Note that a Shimmer is only deem connected once the Shimmer.MSG_STATE_FULLY_INITIALIZED
message has been received, at which point other commands may be transmitted to the Shimmer
device, such as startStreaming(). Shimmer.MESSAGE_TOAST is used to receive and post toast
messages from the driver onto the screen. Other important things to note is how properties and
formats are retrieved from the object cluster.
When using this example the user should have the LogCat open. Sensor data is printed on the LogCat
via the following command:-
Log.d("CalibratedData","AccelX: " + formatCluster.mData + " "+ formatCluster.mUnits);
Figure 18 shows an example output of the LogCat.
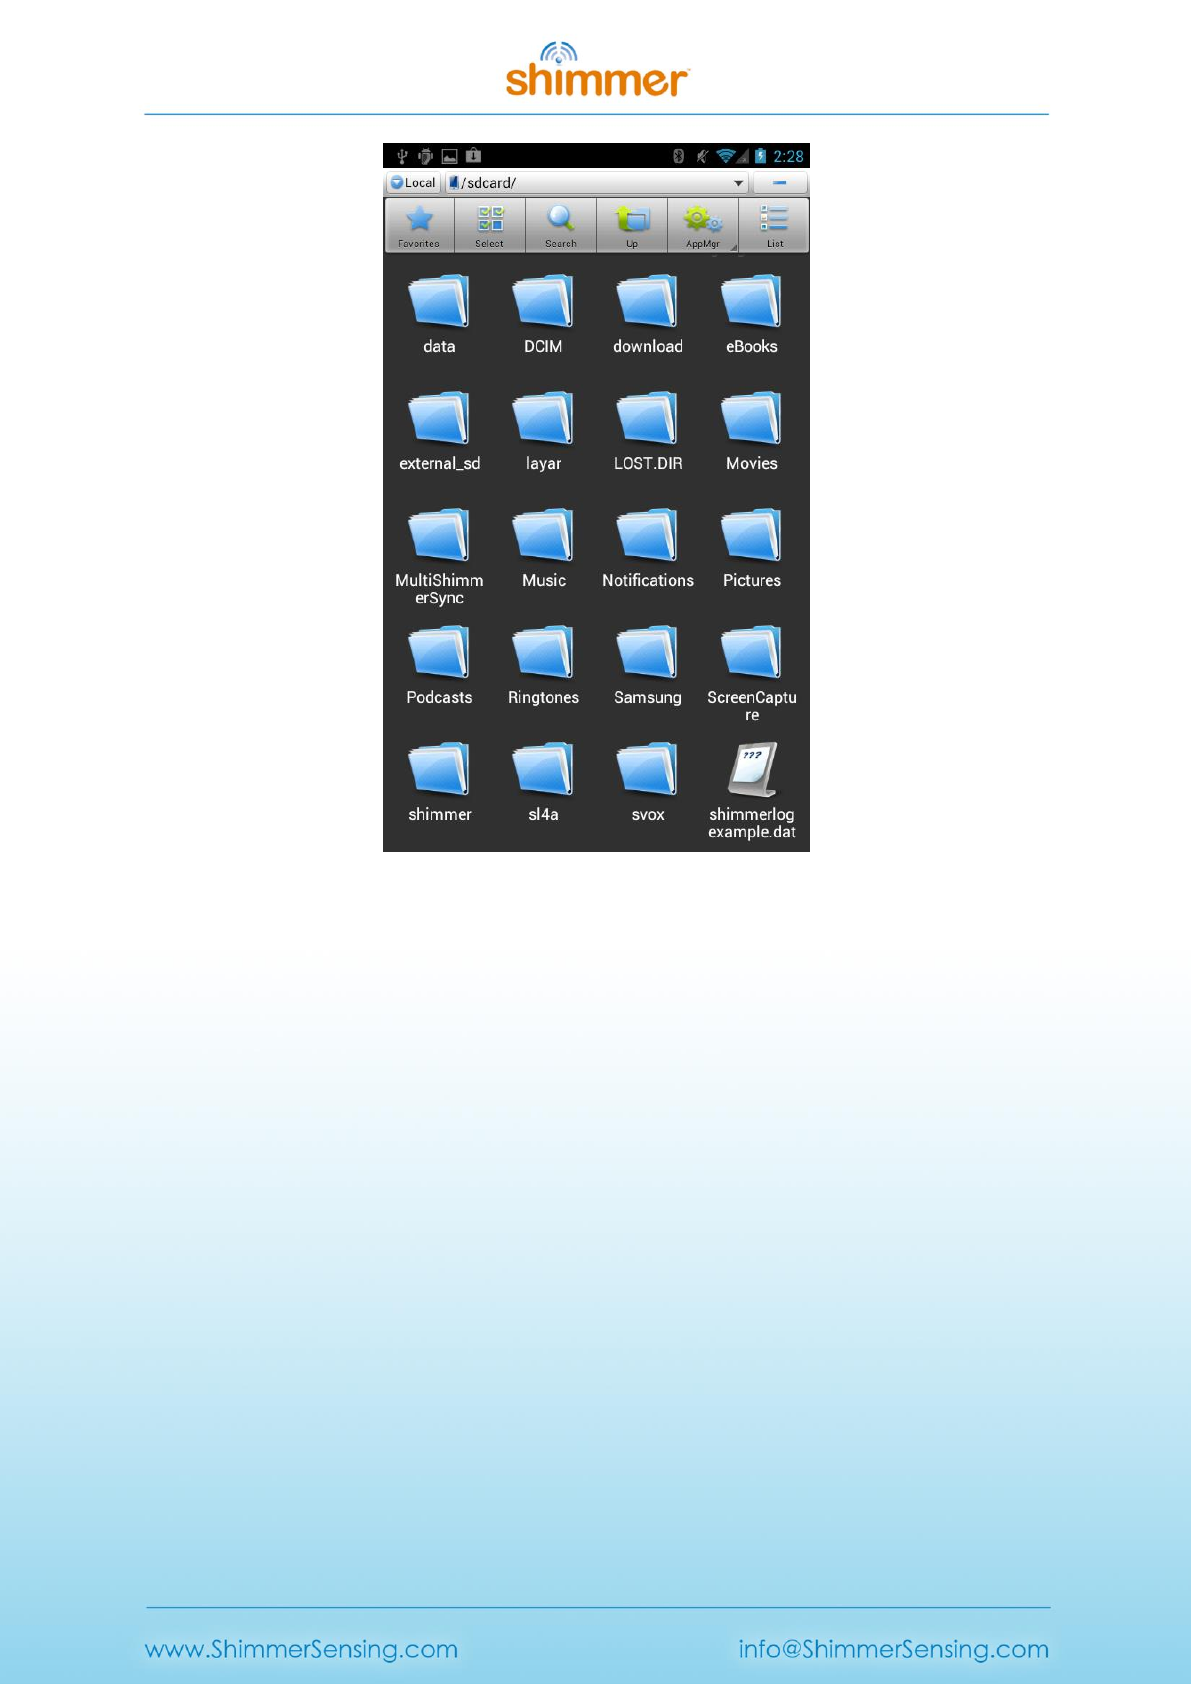
6.2. ShimmerLogExample
This example builds on the ShimmerExample and shows how to log data. Using the Logging class
provided in com.shimmerresearch.tools. In particular should note the following line of code:-
private static String mFileName = "shimmerlogexample";
static Logging log = new Logging(mFileName,"\t"); //insert file name
log.logData(objectCluster);
which logs the data in a tab delimited ("\t") format. The file is saved into the externalstoragedirectory.
See figure below for example of log file, being viewed from an Android device using a file explorer
program.
Copyright © Shimmer Research 2014
Realtime Technologies Ltd Shimmer Java/Android API
All rights reserved Rev 2.6c
31
Figure 15: Screenshot of ShimmerLogExample
Readers should note that this example is just to get users started, and that it is better to have log data
through a service, than from within an activity. An example of how to do this can be found in the
example ShimmerGraphandLogService. Also note that if you are running the example while the
Android device is connected to the PC, the log file will not show up on the PC side unless you reconnect
the USB cable, to force the PC to refresh its view of the Android file system.
6.3. MultiShimmerExample
This example shows how to connect and stream data from two different shimmer devices. In the
example the second connection is only executed after the first has been fully initialized. This is
demonstrated in the figure. First a command to connect to a shimmer device is executed in the main
thread. This creates the Shimmer 1 thread. When the device is connected and initialized, a message
(see Shimmer.MSG_STATE_FULLY_INITIALIZED) is sent to the Main UI thread which then executes the
command to connect to the second Shimmer device. By doing so you can avoid locking up the main
UI thread while waiting for the connection to Shimmer1 to finish.

Copyright © Shimmer Research 2014
Realtime Technologies Ltd Shimmer Java/Android API
All rights reserved Rev 2.6c
32
Readers should also note the two different types of Shimmer class constructors which were used.
6.4. ShimmerGraph
Is a simple UI Legacy example which allows you to connect and stream data from a Shimmer device.
Users looking to build on this example should consider using the ShimmerGraphandLogService
instead.
6.5. MultiShimmerGraph
This legacy example builds on the ShimmerGraph example and extends it for use with multiple
Shimmer devices. Users developing applications with multiple shimmer devices may want to consider
using a service-like approach similar to the example ShimmerGraphandLogService or
MultiShimmerTemplate.
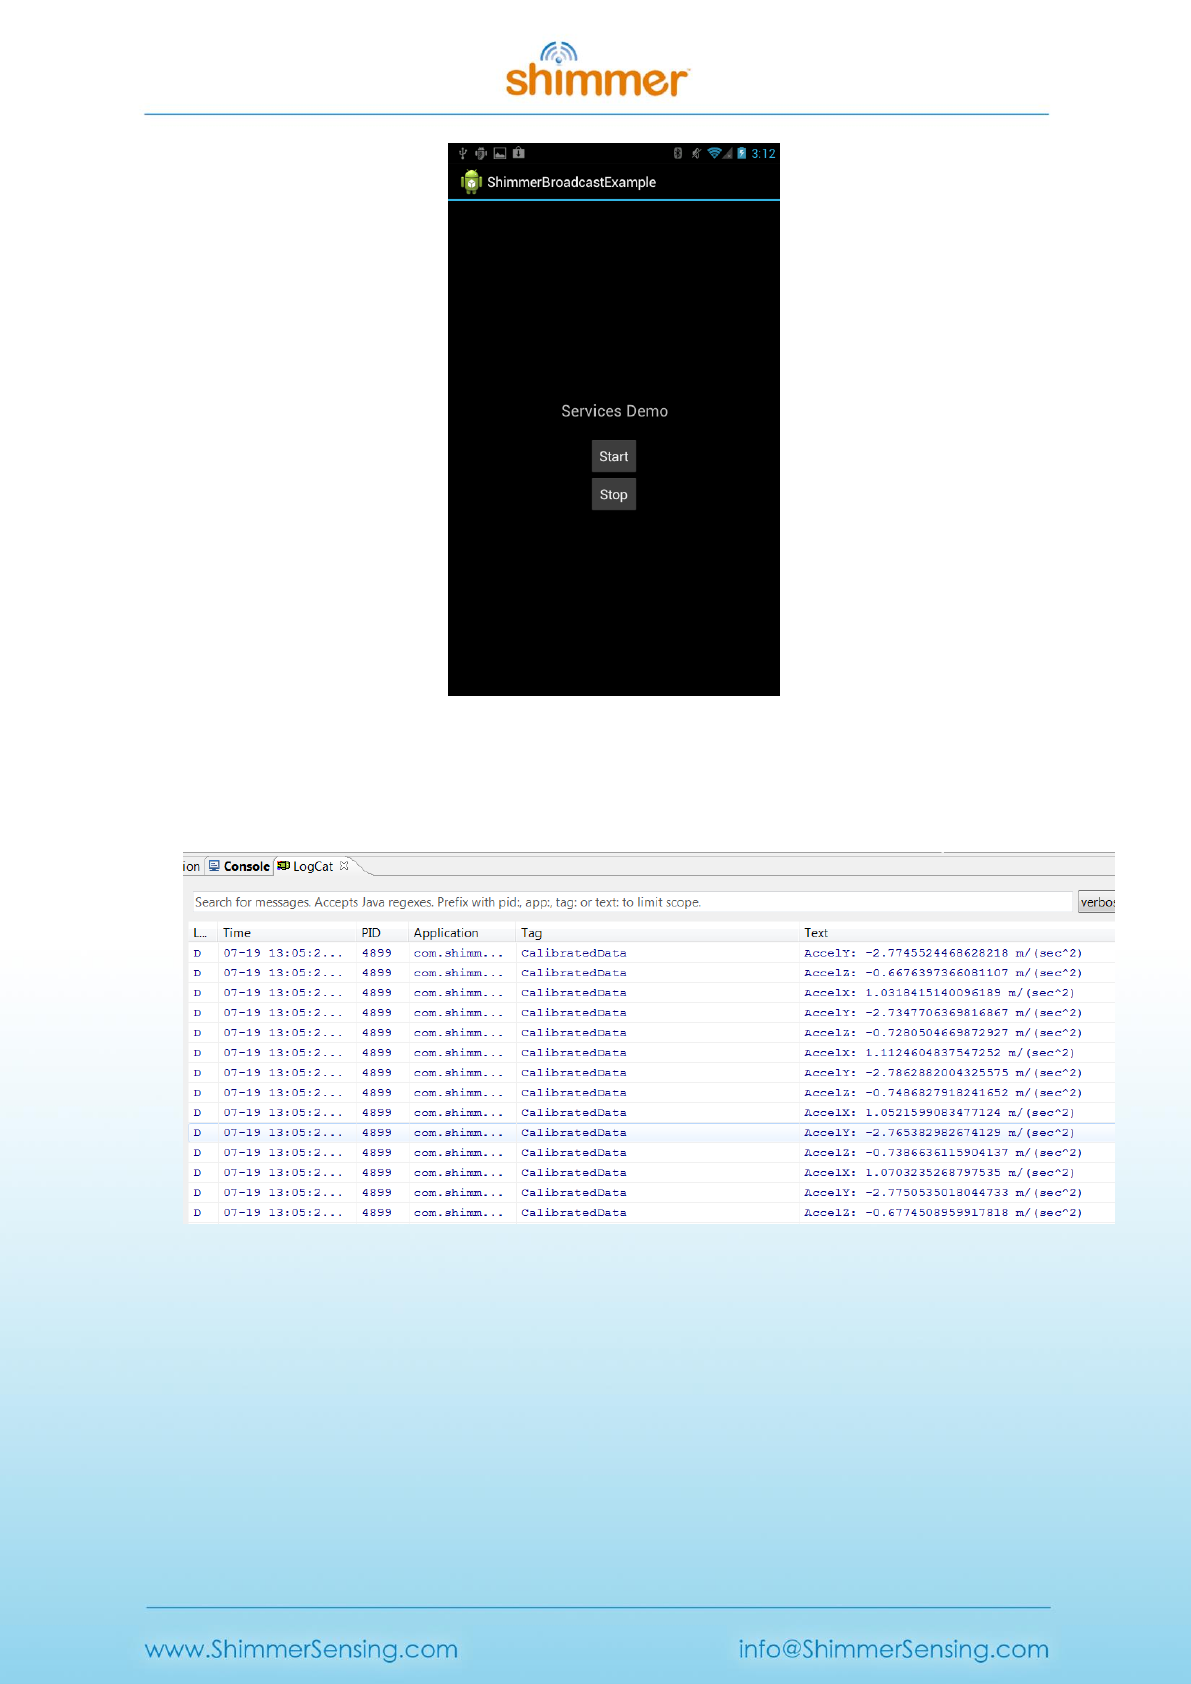
6.6. Broadcast Service and Receiver Example
An example service which can broadcast sensor data from one Android application to another Android
application is provided. The example application on how to receive this broadcast is provided. The
broadcast example is provided in the folder ShimmerBroadcastServiceExample. Example application
of how to receive the broadcast is provided in the folder ShimmerBroadcastReceiverExample. Brief
instructions on how to use both examples follows:-
1. First import ShimmerBroadcastandService into Eclipse
2. Run the example using Eclipse. A screen shot of the app is shown below
Figure 16: Handler, connecting two Shimmer devices sequentially
Copyright © Shimmer Research 2014
Realtime Technologies Ltd Shimmer Java/Android API
All rights reserved Rev 2.6c
33
Figure 17: Screenshot of ShimmerBroadcastServiceExample
3. Once the app has been loaded, press start. Figure 18 shows the LogCat once the Shimmer
device has started streaming.
Figure 18: LogCat of ShimmerBroadcastServiceExample
4. Next import ShimmerBroadcastReceiverExample and run it. Figure 19 shows the LogCat when
this application has been loaded. An additional Tag named Receiver is seen in addition to the
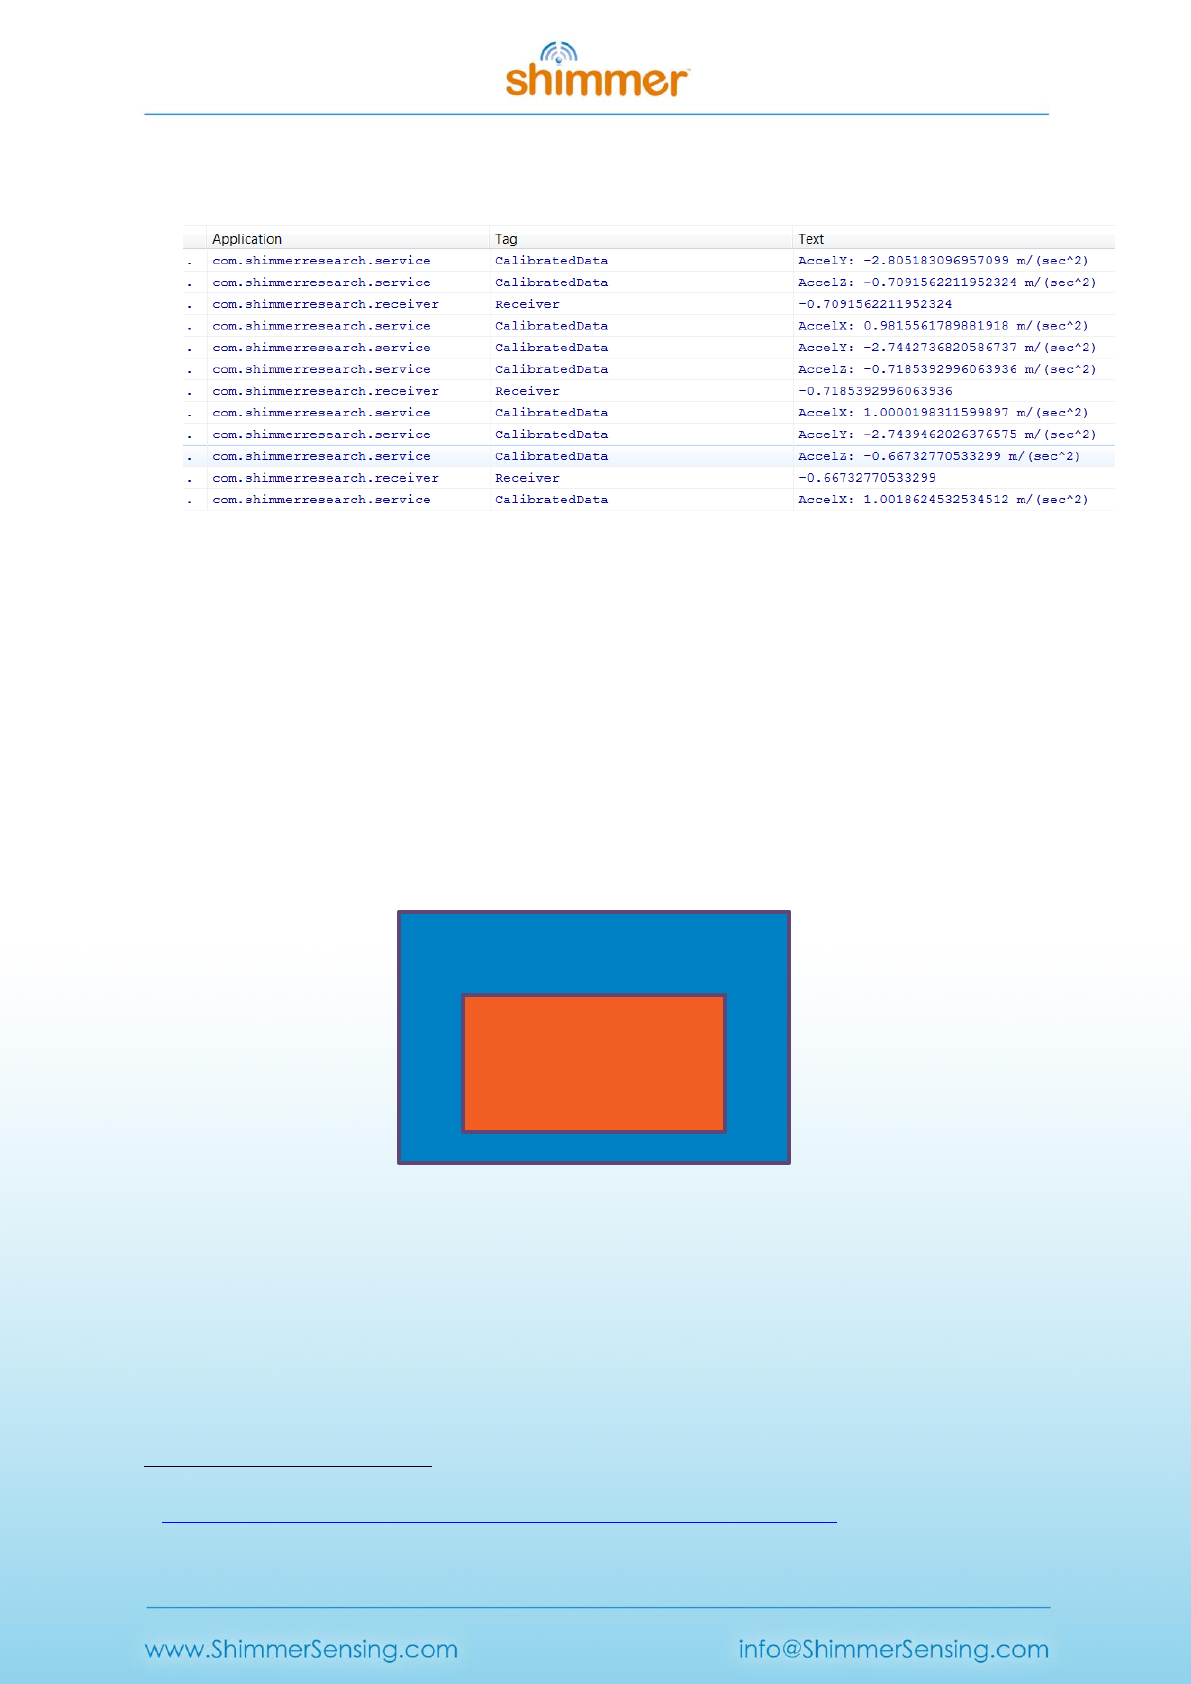
Copyright © Shimmer Research 2014
Realtime Technologies Ltd Shimmer Java/Android API
All rights reserved Rev 2.6c
34
CalibratedData. Data is being passed from the Service to the receiver application via a
broadcast. More information can be found here
14
Figure 19: LogCat of ShimmerBroadcastReceiverExample
5. The service can be stopped by returning to the ShimmerBroadcastServiceExample app and
pressing the stop button.
A more elaborate example of the use of services can be found in the folders
ShimmerGraphandLogService and MultiShimmerTemplate.
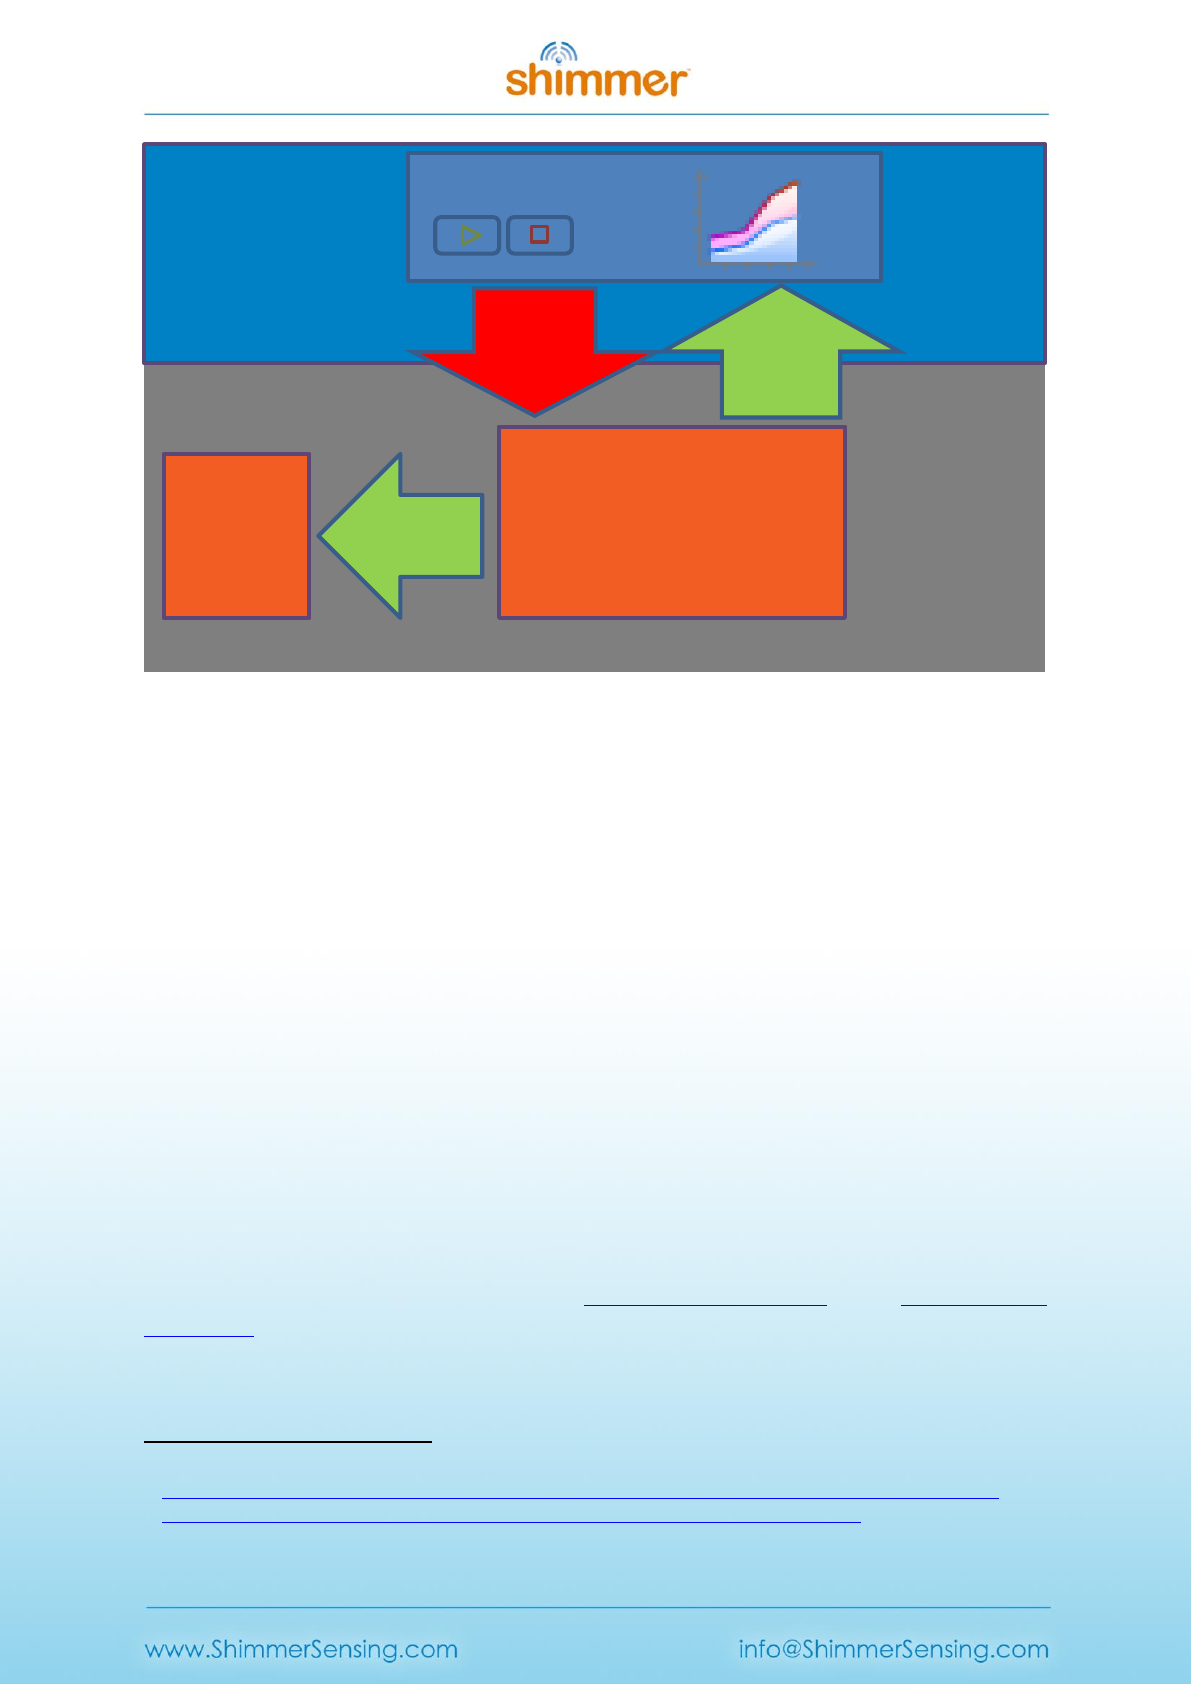
6.7. ShimmerGraphandLogService
The ShimmerGraphandLogService is an example of how to convert an application like Shimmer Graph
into a service. Implementation of the service can be found in the ShimmerService.java file. The
ShimmerGraph example initializes the Shimmer Object within the Activity as such:-
Figure 20: ShimmerGraph
As mentioned in the Section 5, due to the activity lifecycle the activity might be closed thus causing
your connection to the Shimmer device to be lost. This example shows how to use a service to cope
with long term operations of an Android application such as when you are logging data. Figure 21
shows a representative block diagram of the ShimmerGraphandLogService example.
14
http://developer.android.com/reference/android/content/BroadcastReceiver.html
Shimmer Object
Activity
Copyright © Shimmer Research 2014
Realtime Technologies Ltd Shimmer Java/Android API
All rights reserved Rev 2.6c
35
Figure 21: ShimmerGraphandLogService
Compared to Shimmer Graph, this application also has a variety of additional functionalities which are
packet reception rate monitoring, battery monitoring, low battery notification and low power
magnetometer. Low battery notification only works when BtStream (firmware) and Shimmer2r is
used. As mentioned earlier, in order to use both battery monitoring and low battery notification on
the Shimmer device, the battery voltage sensor has to be enabled prior to streaming. The low battery
limit can be set via the Commands tab. By default the limit is set to 3.4 Volts.
ShimmerGraphandLogService plots the uncalibrated data of the Shimmer. Refer to the Shimmer 9DoF
Calibration User Manual for more information on this.
When using Shimmer2 there are six different sampling rates possible for the Magnetometer (0.5 Hz,
1.0 Hz, 2.0 Hz, 5.0 Hz, 10.0 Hz; 5 = 20.0 Hz; 6 = 50.0 Hz). The Magnetometer sampling rate is set to
10Hz when low power magnetometer is enabled, otherwise the sampling rate of the Magnetometer
is set as close as possible to the current sampling rate of the Shimmer device. Enabling low power
mode for Shimmer3 works the same with the sampling frequency of the Accelerometer set to 10Hz,
the Gyroscope to 31.25Hz and the Magnetometer to 15Hz. Otherwise the sampling rate are set as
close as possible to the sampling rate of the Shimmer3. Besides low power modes, Shimmer3 also
allows the setting of different Magnetometer/Gyroscope and Accelerometer range.
Data is logged to the root directory of your external storage directory
15
. The current time in
milliseconds
16
(at which the file was created) is appended to the filename you have specified. The file
can be transferred to your PC via Bluetooth, USB or through the use of an application like DropBox.
15
http://developer.android.com/reference/android/os/Environment.html#getExternalStorageDirectory()
16
http://docs.oracle.com/javase/6/docs/api/java/lang/System.html#currentTimeMillis()
Shimmer Object
Service
Log Data
Data
Control &
Configure
UI
Activity
Data
Copyright © Shimmer Research 2014
Realtime Technologies Ltd Shimmer Java/Android API
All rights reserved Rev 2.6c
36
An important thing to note is that while the example application only is limited to the use of a single
Shimmer device, the service has been designed to be forward compatible for use with multiple
Shimmer devices. Also see the MultiShimmerPlay example located in the Unsupported Examples
folder.
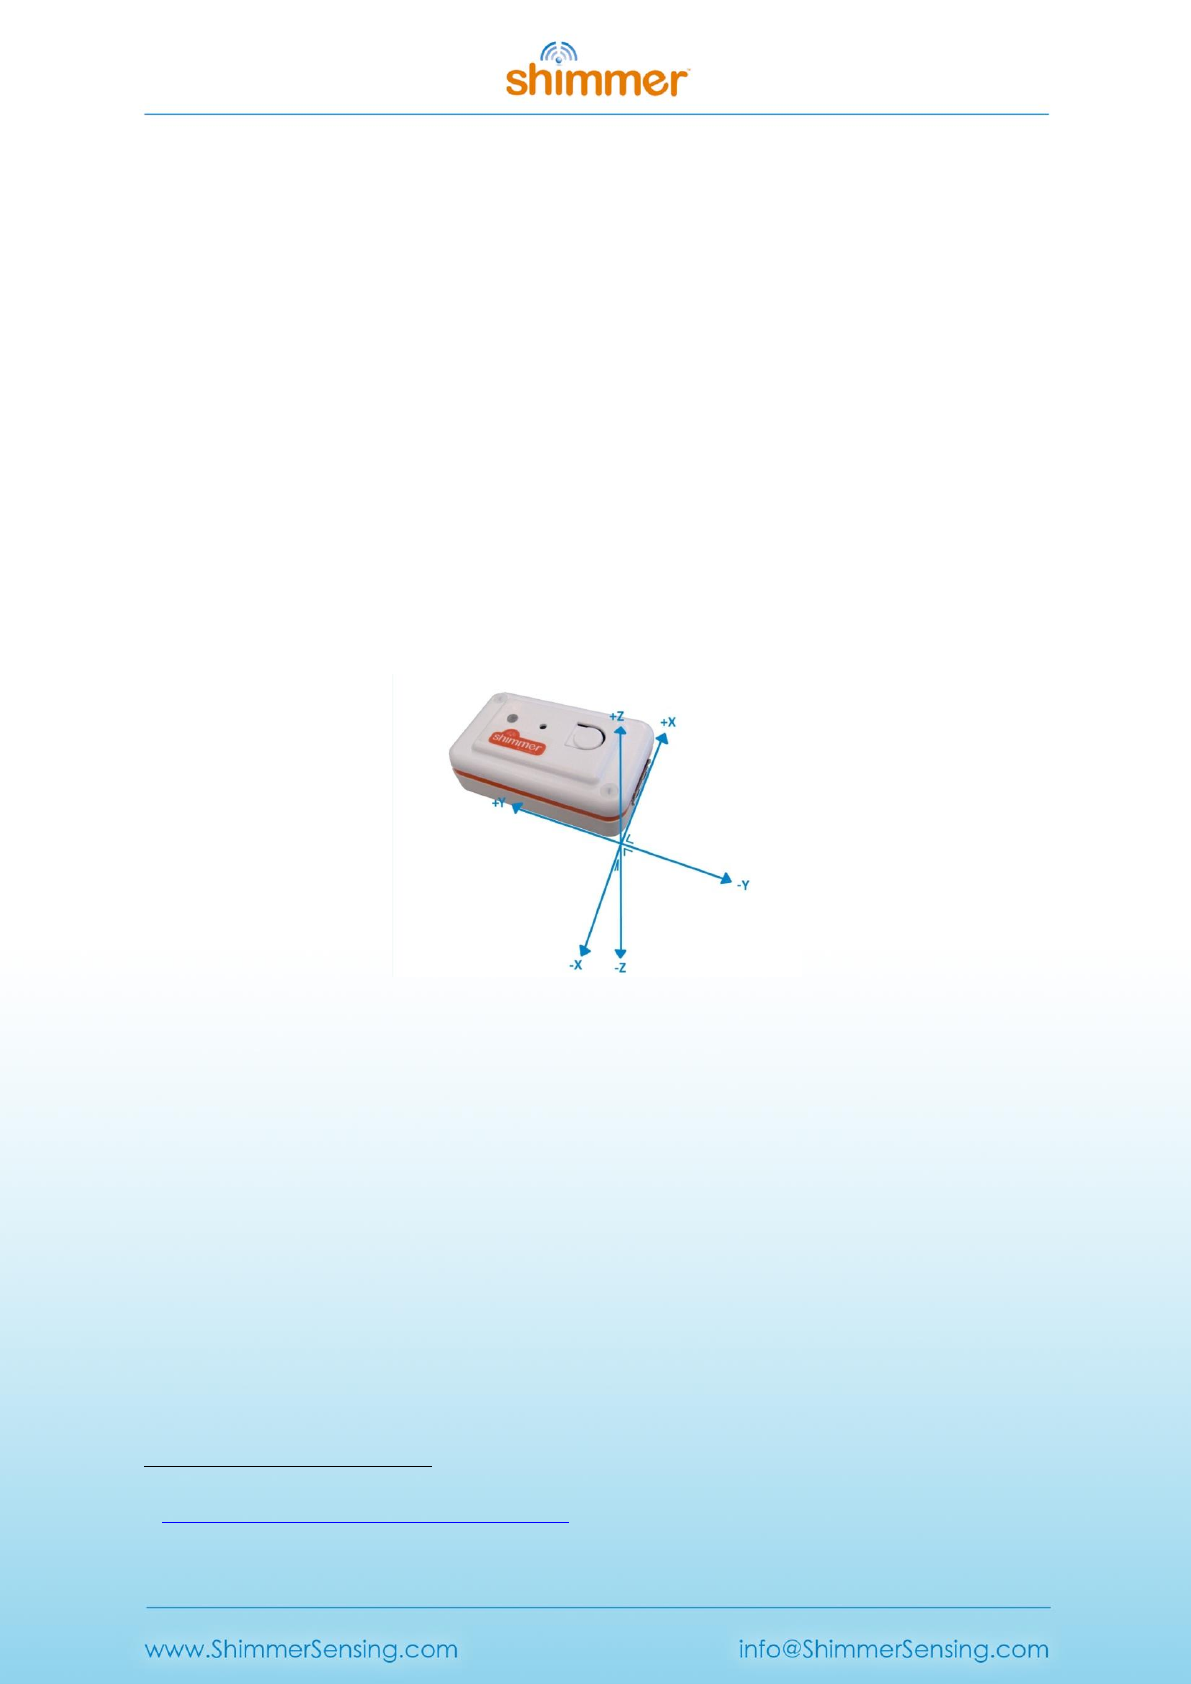
6.8. Shimmer3DOrientationExample
This example shows how to obtain the 3D orientation of the Shimmer device using the Accelerometer,
Gyroscope and Magnetometer. The orientation algorithm used was proposed in the following paper:-
Sebastian OH Madgwick, Andrew JL Harrison, and Ravi Vaidyanathan. "Estimation of imu and marg
orientation using a gradient descent algorithm." Rehabilitation Robotics (ICORR), 2011 IEEE
International Conference on. IEEE, 2011.
In order to use this example users need to calibrate their Shimmer devices, using the Shimmer 9DoF
Calibration application. The Shimmer axis direction used should be the same as what is shown in Figure
22. For further information it is recommended that the user refer to the Shimmer 9DoF Calibration
User Manual and the corresponding Tutorial Video on YouTube
17
.
Figure 22: Shimmer Axis Direction
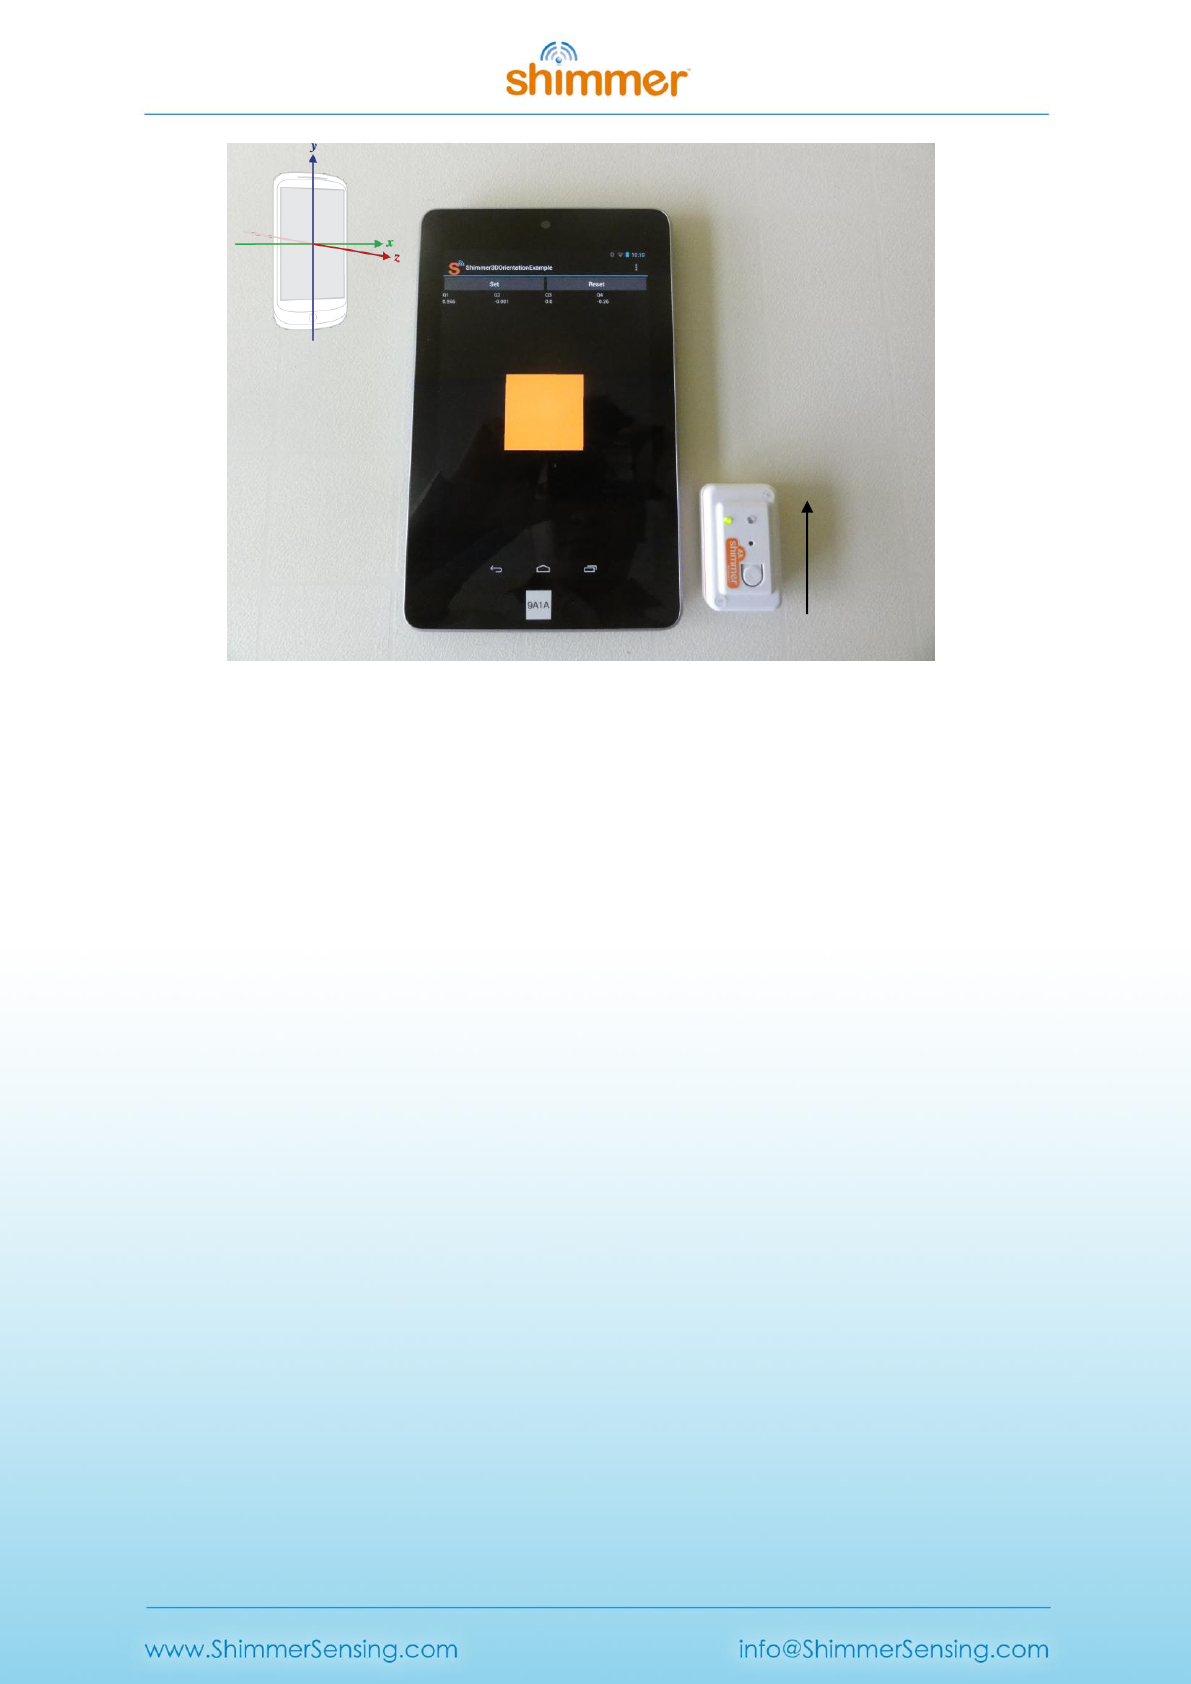
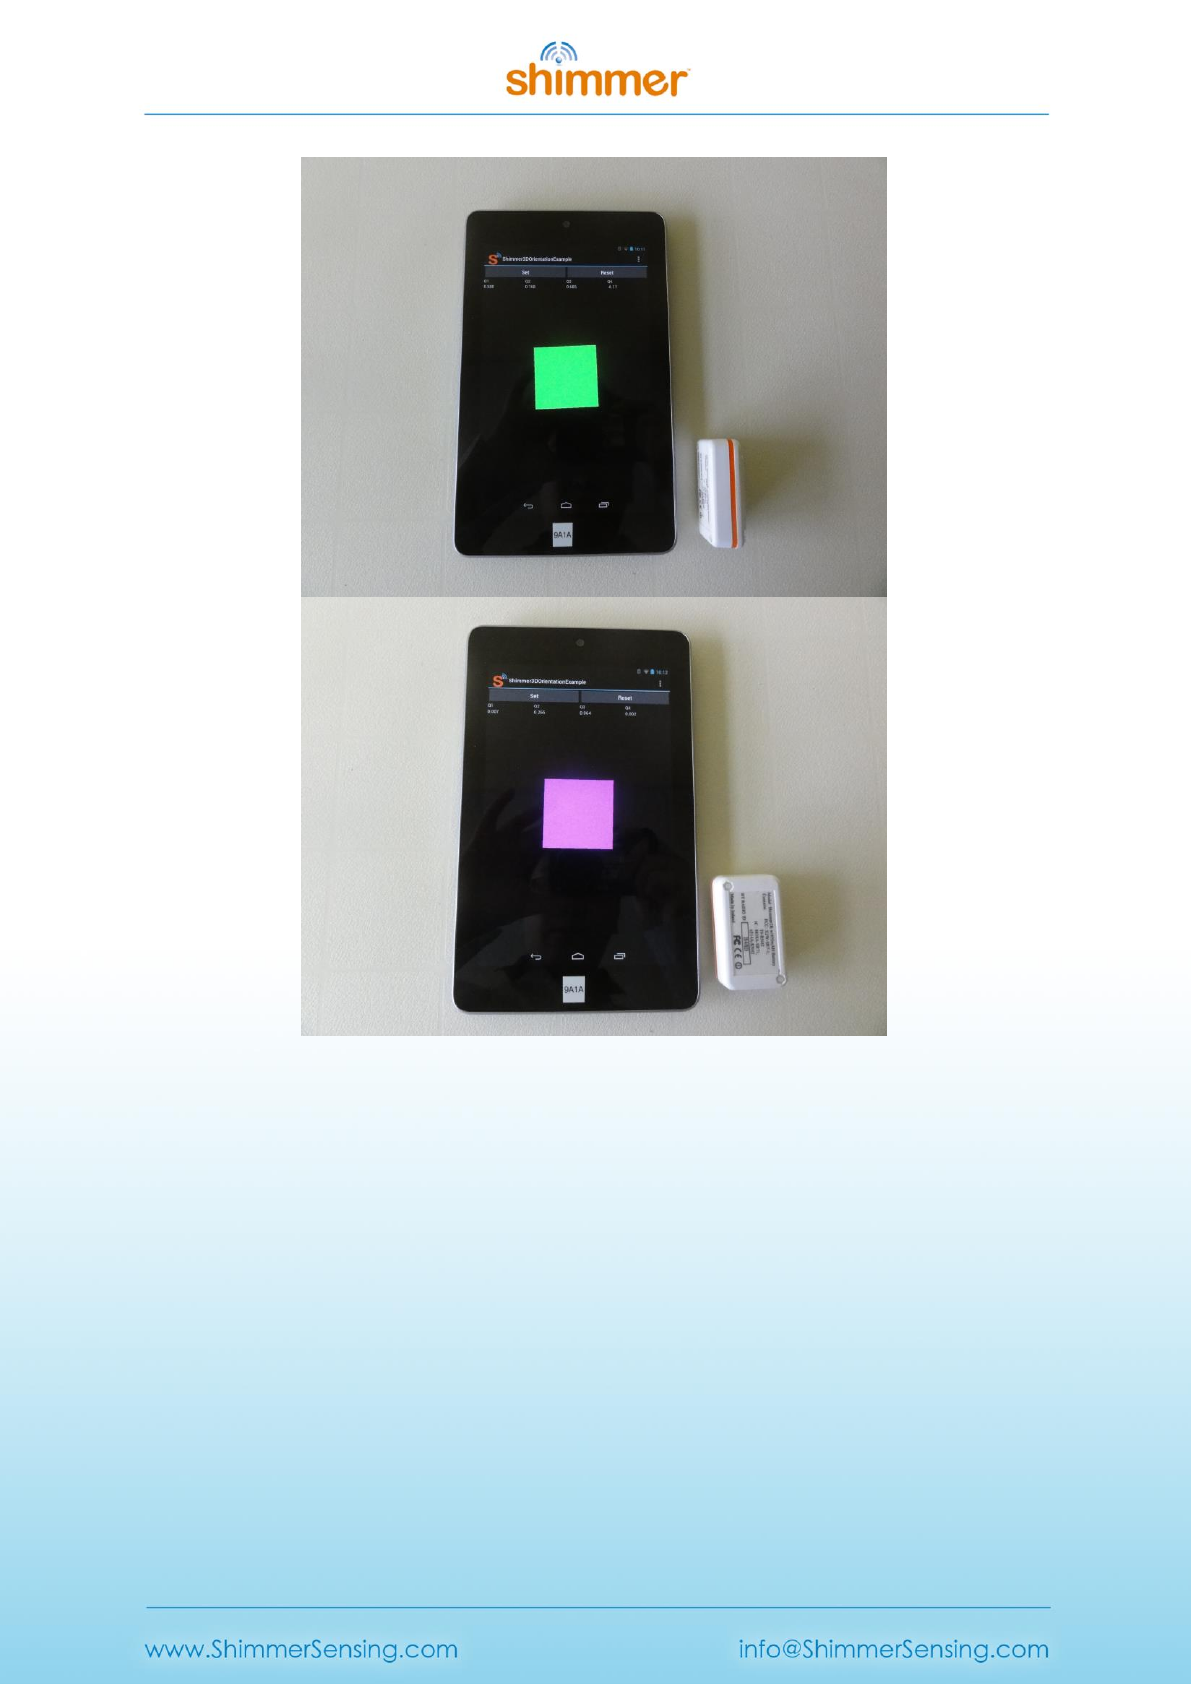
To connect the Shimmer, press the Menu button on the Android device and select Connect. Choose
the Shimmer ID from the list of devices and start streaming. Once the device has started streaming
position the Android device and Shimmer device as shown in the figure where both the y-axis of the
Android and Shimmer device are parallel and are pointing in the same direction. Once the cube
representation of the Shimmer device has become static press the set button. Once pressed you
should now see the orange side of the cube as shown in Figure 23.
17
https://www.youtube.com/watch?v=aI2WDecTtfs
Copyright © Shimmer Research 2014
Realtime Technologies Ltd Shimmer Java/Android API
All rights reserved Rev 2.6c
37
Turning the Shimmer device along the y-axis to the position shown in Figure 24 will result in the cube
showing the green side.
Within this example functionality to enable Gyro On-The-Fly Calibration is provided. When enabled
the offset vector of the gyroscope is recalculated whenever the Shimmer device is stationary.
Implementation details of this can be found in the Shimmer.java file.
+Y
Figure 23: Front Representation of the Shimmer device
Copyright © Shimmer Research 2014
Realtime Technologies Ltd Shimmer Java/Android API
All rights reserved Rev 2.6c
38
6.9. MultiShimmerTemplate
The purpose of this example is to allow users to concentrate more on developing the application
rather than having to worry about controlling and configuring their Shimmer devices. This example is
made up 6 different tabs Control, Configure, Plot, Log, Heart Rate and Blank.
Control
The control tab provides standard Shimmer controls such as connect, disconnect, toggle led, start
streaming and stop streaming. Users should note that prior to connecting to a Shimmer device the
first time, the Bluetooth address of the device should be set via the configuration panel.
Figure 24: Side and Back 3D Representation of the Shimmer device
Copyright © Shimmer Research 2014
Realtime Technologies Ltd Shimmer Java/Android API
All rights reserved Rev 2.6c
39
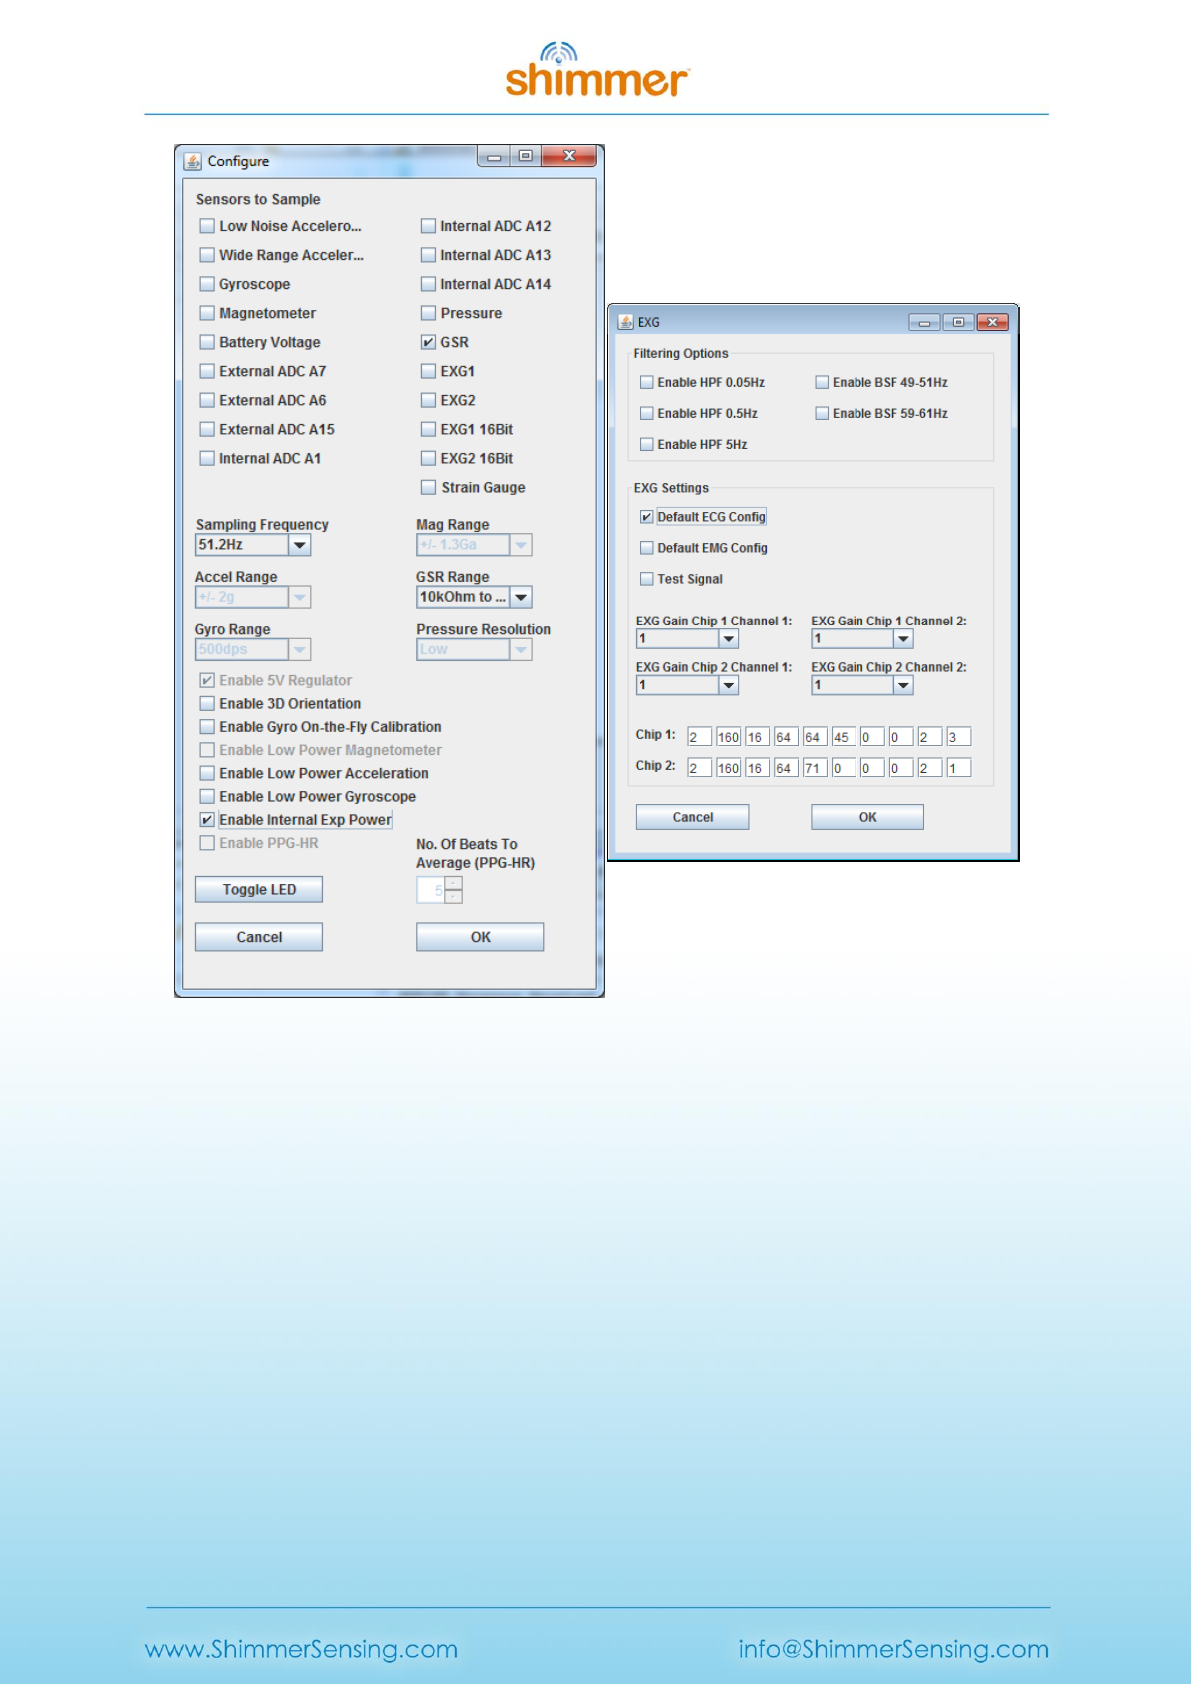
Configure
The configure panel allows users to configure the Shimmer device. The following is a description of
how to use the configuration panel to in order to use the EXG Expansion Board.
EXG (ECG/EMG)
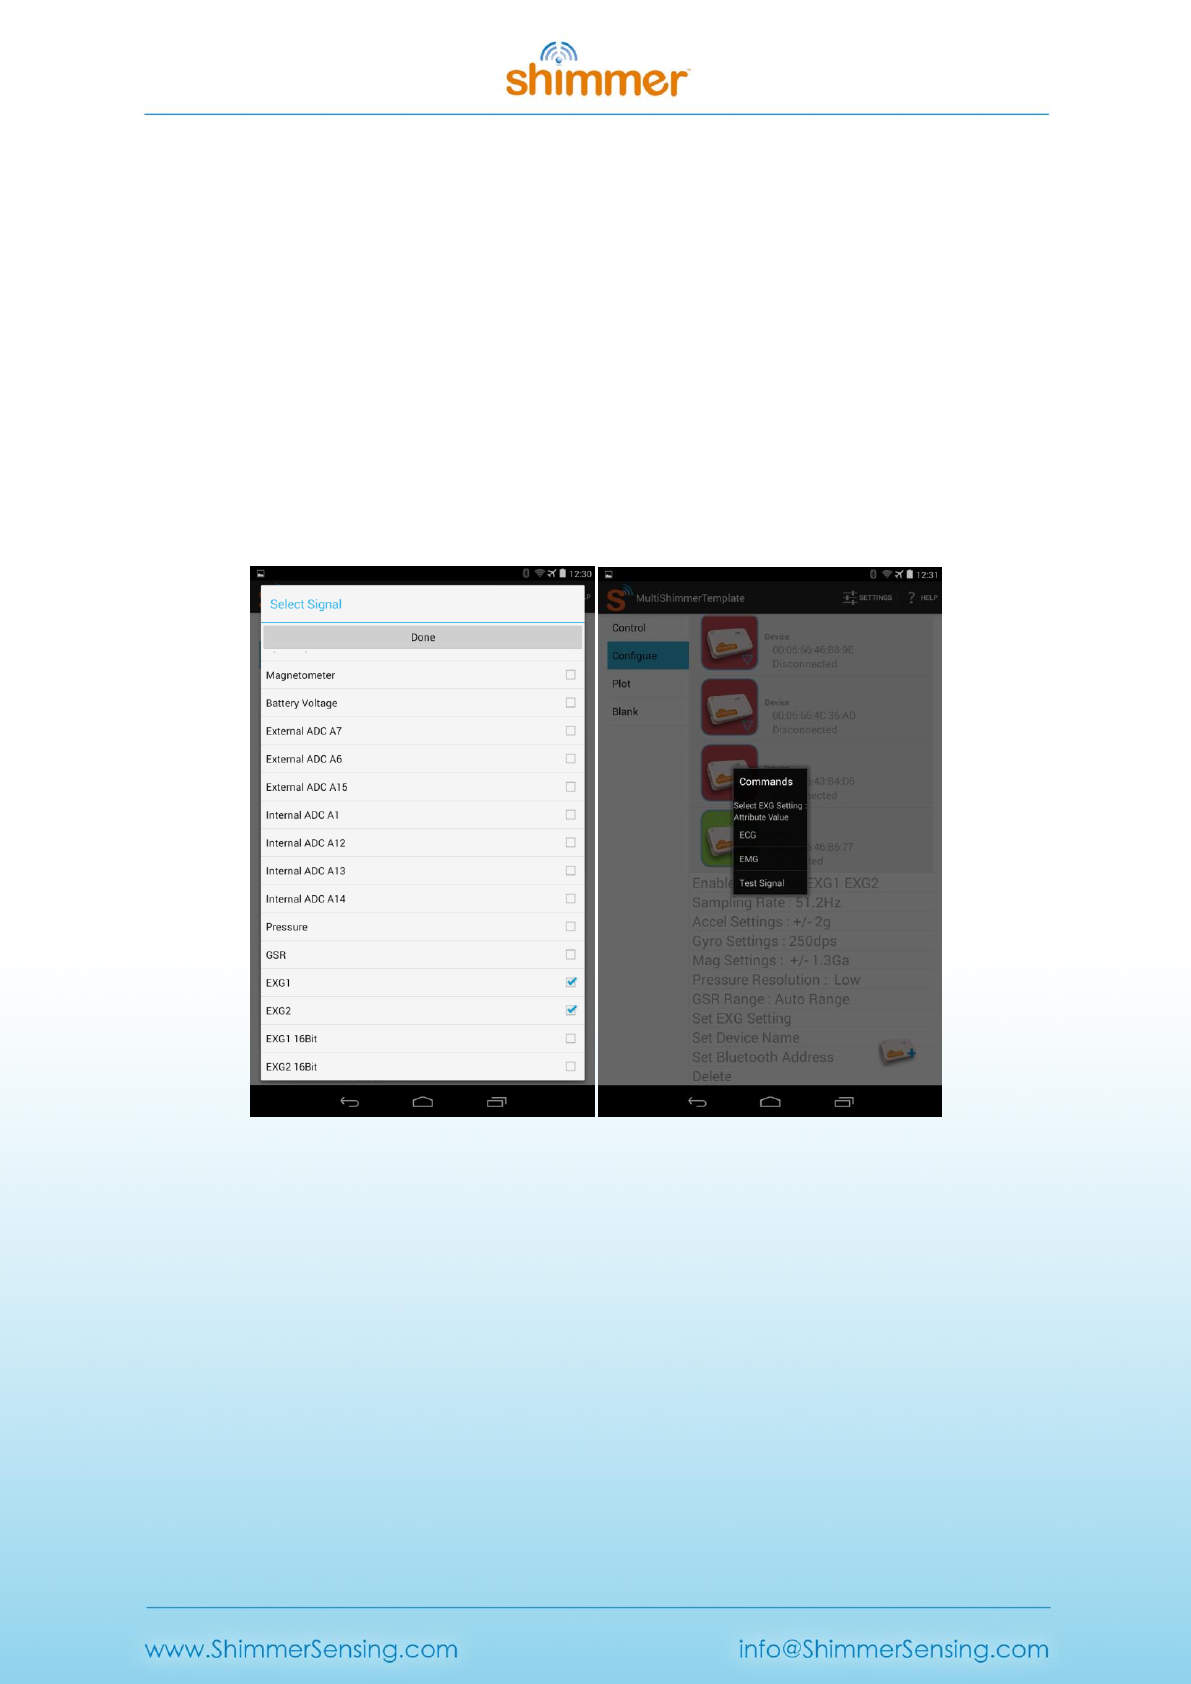
EXG sensors can be enabled under the Configuration tab. Choosing 'Set EXG Setting' will display a pop-
up box as shown in Figure 25. Here, default ECG and EMG configurations can be implemented.
Choosing the default ECG and EMG configurations will change the EXG settings and update signal
names displayed in the Plot tab accordingly, as demonstrated in Figure 26. Note that if EXG1 and EXG2
are enabled (24-Bit), EXG1 16Bit and EXG2 16Bit cannot be enabled and vice-versa. Also, to monitor
ECG signals, both EXG1 and EXG2 need to be enabled while to monitor EMG signals, only EXG1 needs
to be enabled.
Figure 25: EXG Configuration
Copyright © Shimmer Research 2014
Realtime Technologies Ltd Shimmer Java/Android API
All rights reserved Rev 2.6c
40
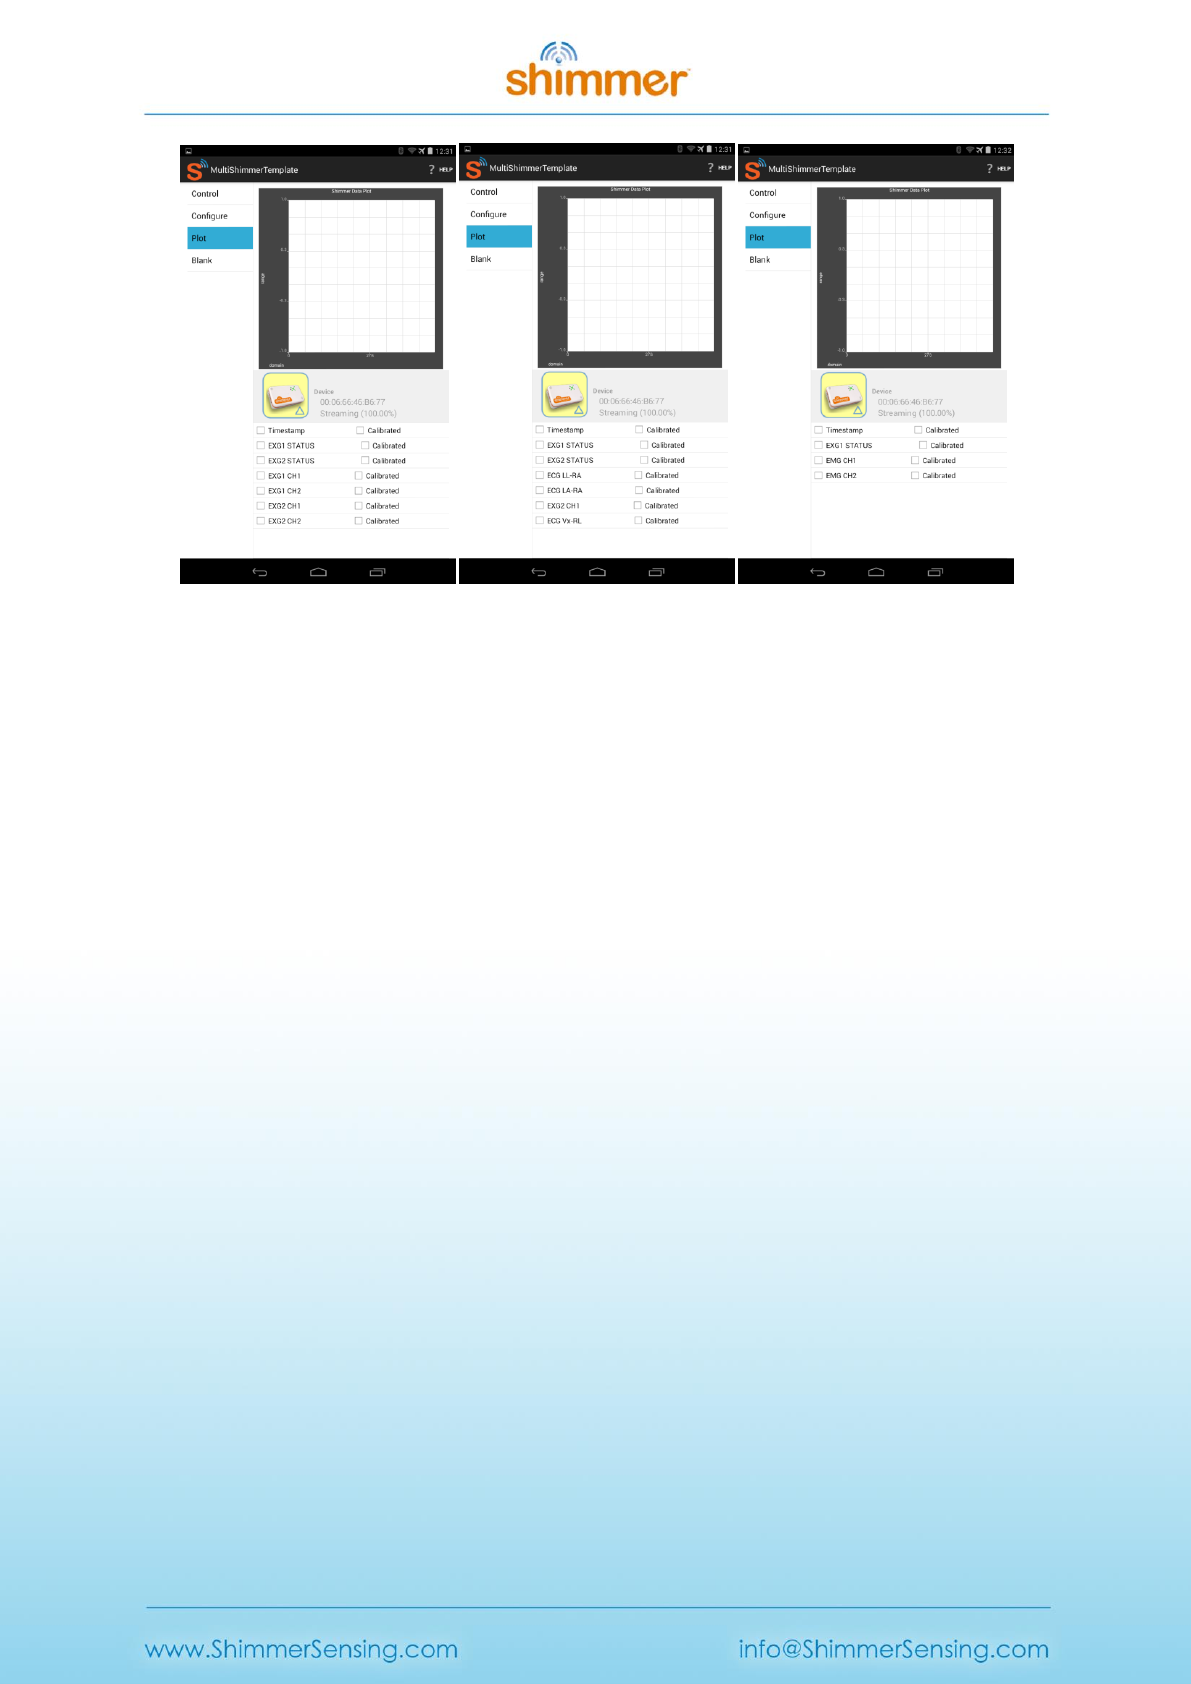
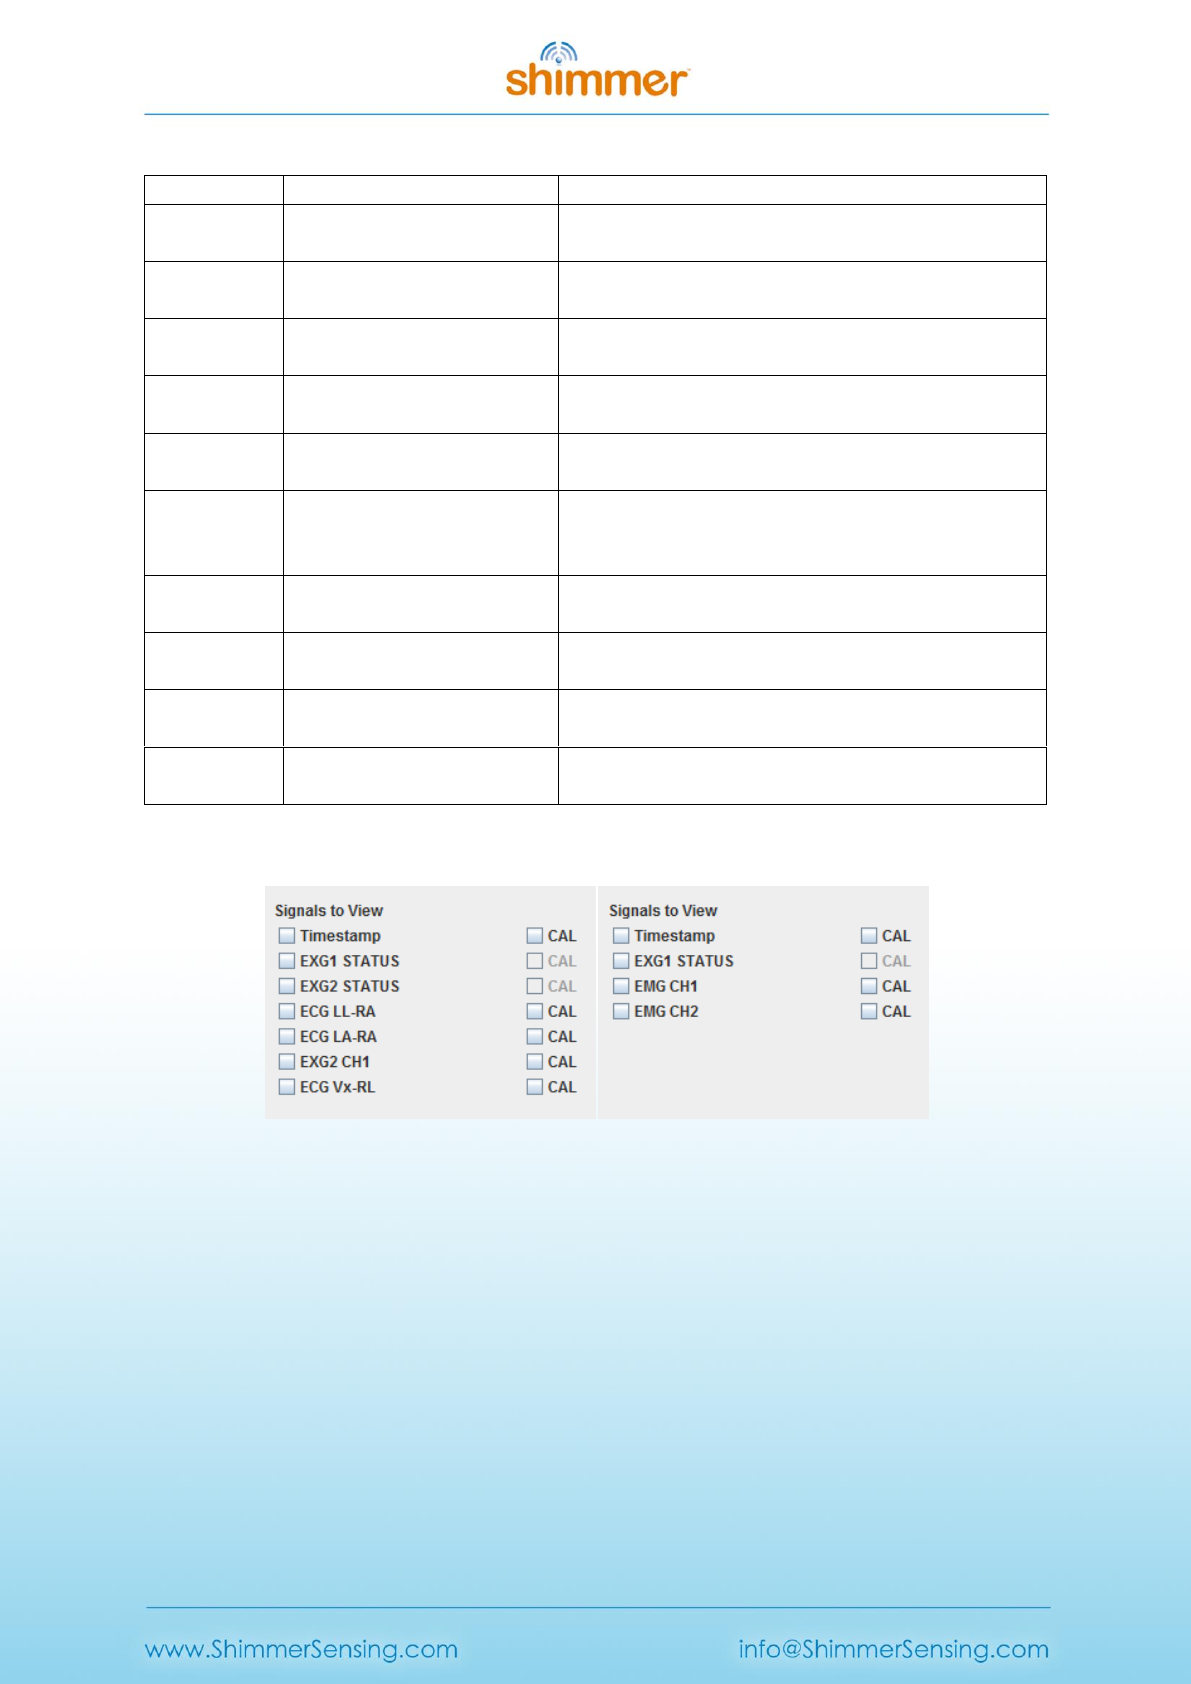
Figure 26: EXG Signal Names. a: EXG1 and EXG2. b: ECG Configuration. c: EMG Configuration.
Users should note that MultiShimmerTemplate does not expose the full functionality of EXG and does
not apply any filtering to the data. To explore the further capabilities of EXG as well as filtering options,
see JavaShimmerConnect, explained in Section 7.
Plot
The plot panel allows users to plot signals. Users can change the colour of plot signals by reselecting
signals.
Log
The log tab allows users to log data from a single Shimmer device. The Shimmer ID of which it will be
logging from is shown in the log panel. Users should note that when logging, not to cause the activity
to restart as this will cause the logging restart as well, thus erasing previously recorded data. The
Activity is restarted, when a screen orientation change happens or when you switch between tabs.
Heart Rate
The heart rate panel allows users to calculate heart rate data from the PPG sensor. The following
sampling rates are recommended for use with the PPG to Heart Rate algorithm, 51.2/102.4/128/256
Hz, for further details see the implementation of the low pass filter as not all frequencies are
supported. Users should note that the following sensors, GSR and PPG (Internal ADC A13), need to be
enabled when using this. In addition Int Exp Power has to be enabled as well. Heart rate calculation
require a 10 second training phase, of which no data will be plotted. Note that we do not provide any
support in terms of the PPG to HR algorithm in itself and only the ShimmerPPGLibrary.jar file is
provided.
NOTE: The PPG Signal takes a couple of seconds before it reaches a steady state where the pulse can
clearly be seen, and as such users should wait a few seconds after they've started streaming before
entering into the Heart Rate panel, as training starts immediately once in the panel.
Copyright © Shimmer Research 2014
Realtime Technologies Ltd Shimmer Java/Android API
All rights reserved Rev 2.6c
41
Blank
The blank fragment is to help users get started.
7. ShimmerPCInstrumentDriver
The ShimmerPCInstrumentDriver is a folder holding the ShimmerPCBT class which extends the
ShimmerBluetooth class. The SPP connection is handled by the open source JSSC library
18
. Changing
the serial port library, is a straight forward process, just by extending the ShimmerBluetooth class, and
implementing the abstract methods such as read and write.
An example below is shown of the JavaShimmerConnect example, using the ShimmerPCBT class. Users
will require pairing the Shimmer devices to their PCs manually, as well as retrieving the appropriate
COM Ports to use. For further information please refer to the Shimmer User Manual.
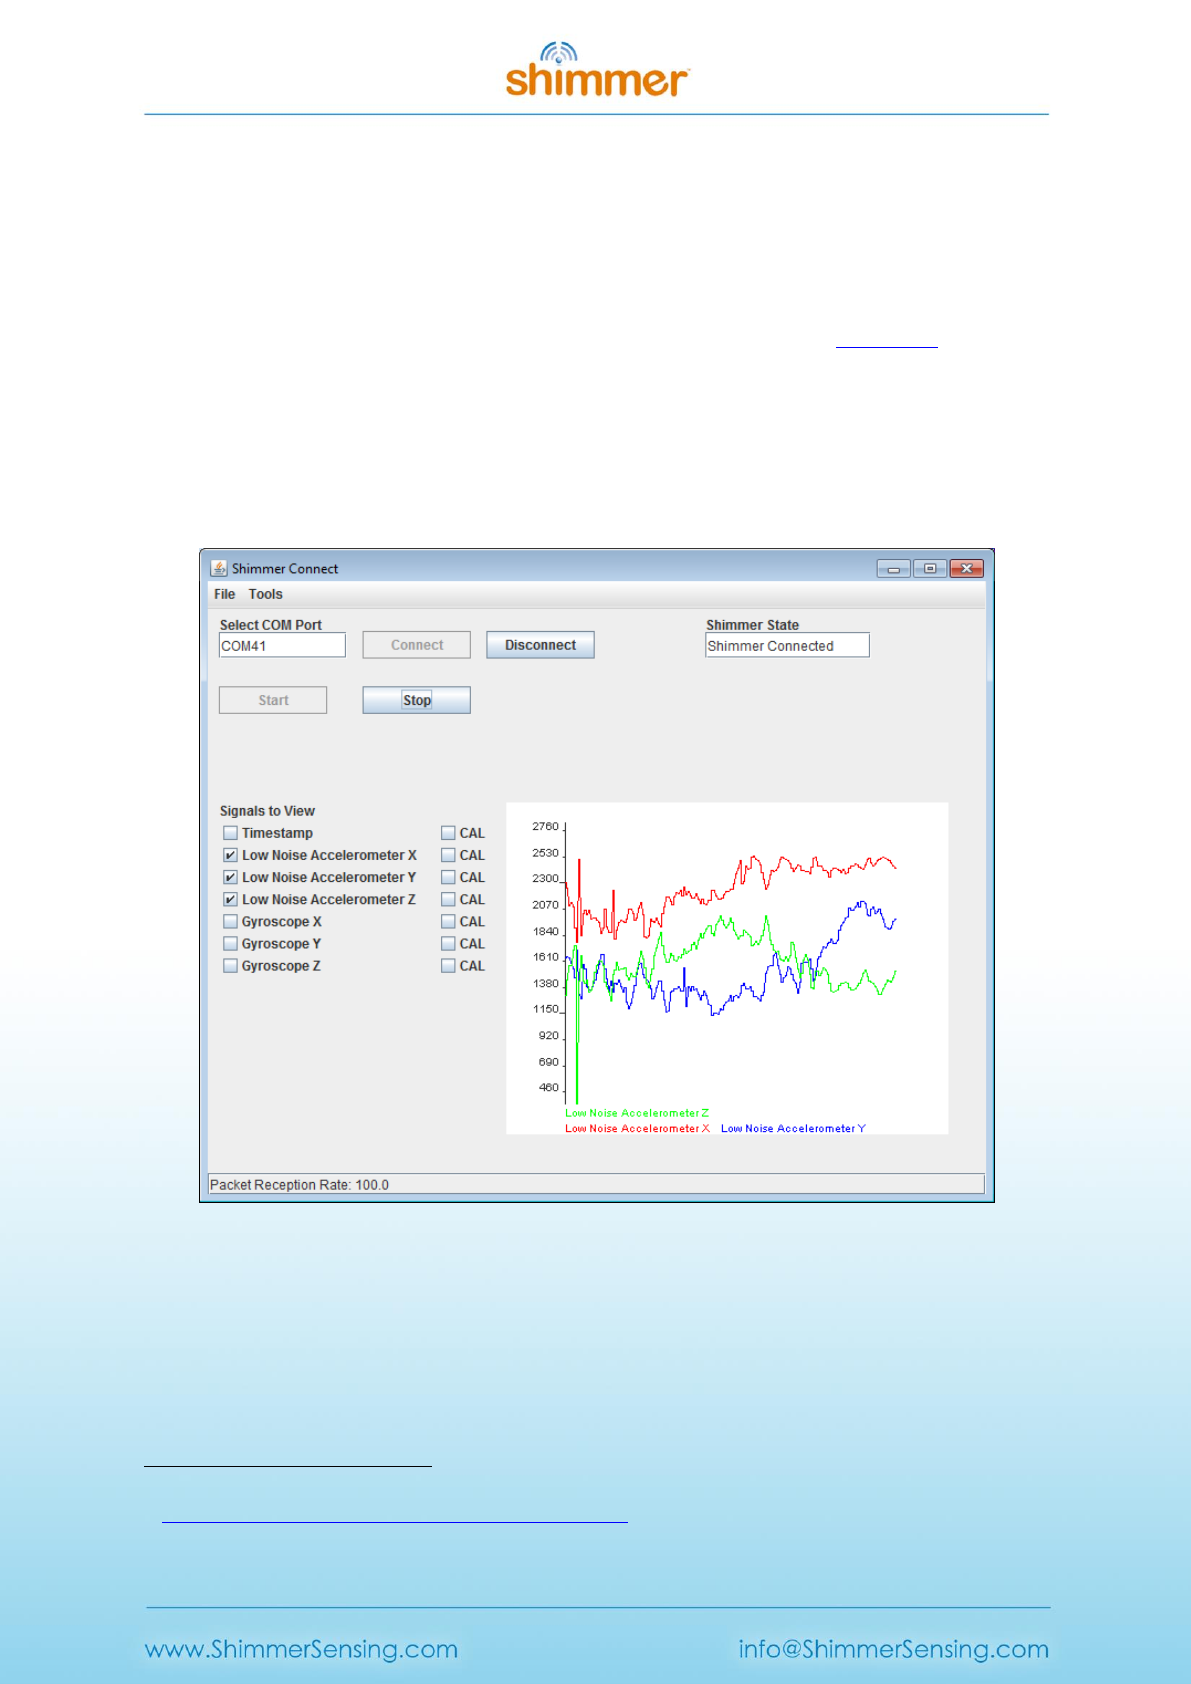
Figure 27: JavaShimmerConnect
Once the Shimmer is connected and ready for streaming the start button will be enabled, as will the
Configuration and EXG panels which can be found under 'Tools' in the menu bar. These panels can
only be accessed when the Shimmer is connected and not streaming. The Shimmer State field in the
main panel displays whether the Shimmer is connected or disconnected.
18
https://code.google.com/p/java-simple-serial-connector/

Copyright © Shimmer Research 2014
Realtime Technologies Ltd Shimmer Java/Android API
All rights reserved Rev 2.6c
42
The ShimmerPCInstrumentDriver interacts with JavaShimmerConnect through call back methods. Two
variables are sent to the UI; the first is an identifier and the second is the data to be transmitted to
the UI. The identifier is an integer and can be used to tell the UI what type of message is being sent,
such as a state change or data packet transfer. The code below shows the API sending a state change
notification message to the UI, with the current Shimmer state in the data field.
myUIThread.callBackMethod(MSG_IDENTIFIER_STATE_CHANGE, mState);
JavaShimmerConnect receives this callBackMethod and uses the indicator to determine how to
process the data. The code snippet below demonstrates how the UI uses the callBackMethod.
public WaitForData(ShimmerPCBT shimmer) {
shimmer.passCallback(this);
}
public void callBackMethod(int ind, Object objectCluster) {
if (ind == ShimmerPCBT.MSG_IDENTIFIER_STATE_CHANGE) {
... }
}
In the configuration panel (Figure 28), the sensors to be enabled can be selected and other Shimmer
settings can be changed. The sensors selected in the configuration panel will be enabled by the
method writeEnabledSensors() in the ShimmerDriver. The method getListOfEnabledSensorSignals() is
then used to display the list of signals in the main panel, as shown in Figure 27. The maximum number
of signals that can be displayed here is twelve. The signals selected from this list will be displayed on
the graph when streaming.
The configuration panel also allows users to calculate heart rate data from the PPG sensor. The
following sampling rates are recommended for use with the PPG to Heart Rate algorithm,
51.2/102.4/128/256 Hz, for further details see the implementation of the low pass filter as not all
frequencies are supported. Users should note that the following sensors, GSR and PPG (Internal ADC
A13), need to be enabled when using this. In addition Int Exp Power has to be enabled as well. Heart
rate calculation require a 10 second training phase, of which no data will be plotted. Note that we do
not provide any support in terms of the PPG to HR algorithm in itself and only the
ShimmerPPGLibrary.jar file is provided.
Copyright © Shimmer Research 2014
Realtime Technologies Ltd Shimmer Java/Android API
All rights reserved Rev 2.6c
43
Figure 28: Configuration Panel and EXG Panel
EXG (ECG/EMG).
For Shimmer3, an EXG Configuration panel is enabled, shown in Figure 28. Configuring the EXG settings
is a two-step process; the sensors need to be enabled in the configuration panel and the EXG settings
can be changed in the EXG panel. If EXG1 and EXG2 (24-Bit) are enabled, EXG1 16Bit and EXG2 16Bit
are disabled, and vice-versa. To monitor ECG, EXG1 and EXG 2 (24-Bit or 16-Bit) need to be enabled
and to monitor EMG, only EXG1 needs to be enabled. At the bottom of the EXG panel are fields for
each EXG chip which display the selected configurations. These settings are stored in a ten byte
register. The function of each byte is explained in Table 1 below. Default ECG configurations, default
EMG configurations and a test signal can be selected. These options will automatically update the
bytes stored in the register. If default ECG or EMG configurations are chosen, the names of the signals
displayed in the main panel will change accordingly, as shown in Figure 29. The configuration options
chosen in this panel will not be written to the Shimmer until the OK button is selected.
Copyright © Shimmer Research 2014
Realtime Technologies Ltd Shimmer Java/Android API
All rights reserved Rev 2.6c
44
Byte Position
Name
Description
Byte 1
CONFIG1:
Configuration Register 1
This register configures each ADC channel sample rate.
Byte 2
CONFIG2:
Configuration Register 2
This register configures the test signal, clock, reference,
and LOFF buffer.
Byte 3
LOFF:
Lead-Off Control Register
This register configures the lead-off detection operation.
Byte 4
CH1SET:
Channel 1 Settings
This register configures the power mode, PGA gain and
multiplexer settings channels.
Byte 5
CH2SET:
Channel 2 Settings
This register configures the power mode, PGA gain and
multiplexer settings channels.
Byte 6
RLD_SENS:
Right Leg Drive Sense Selection
This register configures the selection of the positive and
negative signals from each channel for the right leg drive
derivation.
Byte 7
LOFF_SENS:
Lead-Off Sense Selection
This register selects the positive and negative side from
each channel for lead-off detection.
Byte 8
LOFF_STAT:
Lead-Off Status
The register stores the status of whether the positive or
negative electrode on each channel is on or off.
Byte 9
RESP1:
Respiration Control Register 1
This register controls the respiration functionality.
Byte 10
RESP2:
Respiration Control Register 2
This register controls the respiration and calibration
functionality.
Table 1: EXG Register Contents
Figure 29: Default ECG and EMG Configuration - Signal Names
Within the EXG panel, there are filtering options. There are three Butterworth high-pass filters with
corner frequencies 0.05Hz, 0.5Hz and 5Hz and band-stop filters with stop bands of 49-51Hz and 59-
61Hz. The purpose of the high-pass filters is to eliminate low frequency interference such as motion
artefacts, and the purpose of the band-stop filters is to eliminate mains interference. These filters are
implemented in JavaShimmerConnect and not in the API. Only calibrated EXG signals are filtered and
not RAW. If filtering is enabled the filtered calibrated signal will be logged and not the calibrated
unfiltered signal. Users should note that not all sampling frequencies are supported by the filters. For
unsupported frequencies, with filtering enabling the data remains unfiltered. For the high-pass filters,
frequency rates of 51.2 Hz, 102.4 Hz, 204.8 Hz, 250.1 Hz, 512 Hz and 1024 Hz are supported and for
the band-stop filters, frequency rates of 250.1 Hz, 512 Hz and 1024 Hz are supported.

Copyright © Shimmer Research 2014
Realtime Technologies Ltd Shimmer Java/Android API
All rights reserved Rev 2.6c
45
These filters are 2nd order Butterworth filters, of which coefficients were found online
19
. Users should
note that these filters are used as examples and that depending on use case and application other
filtering options might perform better.
19
http://www-users.cs.york.ac.uk/~fisher/mkfilter/trad.html

Copyright © Shimmer Research 2014
Realtime Technologies Ltd Shimmer Java/Android API
All rights reserved Rev 2.6c
46
8. Usage Considerations
8.1. Differences between Shimmer2r and Shimmer3
When using the Shimmer Android API, readers should take note of some fundamental differences
between Shimmer2r and Shimmer3. The first is that the following two commands are only available
for Shimmer2r hardware:-
SET_5V_REGULATOR_COMMAND (when using an Expansion Board with Shimmer2r)
SET_PMUX_COMMAND (when monitoring battery voltage)
In terms of accelerometers, the Shimmer3 has more than a single Accelerometer. The Analog
accelerometer (KXRB5-2042) has a fixed 2g range while the other has a range of either 2g, 4g , 8g and
16g (LSM303DLHC). Users interested in 2g range, are advised to use the analog accelerometer which
has less noise.
Also readers should note that the data rate of the gyroscope (MPU9150), accelerometer
(LSM303DLHC) and magnetometer (LSM303DLHC) are now configurable. To facilitate this, a low
power mode has been added for the gyroscope and magnetometer sensors as well. When not in low
power mode, the data rate of the sensors are set such as to match the sampling rate of the Shimmer
device as close as possible (but always higher) For further detail it is recommended that the
ShimmerGraphandLogService is studied.
The Shimmer3 also includes a Pressure sensor (BMP180). The pressure sensor's resolution is
configurable (ultra low power, standard, high resolution and ultra high resolution). Users should take
note of the Max Conversion time when selecting the sampling rate and the resolution mode, further
details can be found in the BMP180 data sheet. Currently only the ShimmerGraphandLogService
provides an example usage of the pressure sensor.
There is also an external sensor option when using the GSR+ Expansion Board. Among other things
this can be used to interface a PPG (Photoplethysmography) sensor to a Shimmer3 device. To use PPG,
the following must be enabled
Int ADC A13/PPG - The output of the sensor connected to the GSR+ board is measured by the
internal ADC A13
Internal Exp Power (to power the external sensor e.g. PPG)
PPG data output will be under the category 'Internal ADC A13'. For further functionality of the GSR+
Expansion Board users are encouraged to read the GSR+ Expansion Board User Guide.
An example application using the Shimmer Java/Android API for EXG (ECG/EMG) can be found in
MultiShimmerTemplate. The EXG board consist of two ADS1292R chips of which further details can be
found in the ExG User Guide for ECG / ExG User Guide for EMG.
In summary in order to use it for ECG both EXG1 and EXG2 (24bit/16bit) has to be enabled, and the
EXG chip needs to be set to default ECG configuration.

Copyright © Shimmer Research 2014
Realtime Technologies Ltd Shimmer Java/Android API
All rights reserved Rev 2.6c
47
mShimmer.writeEnabledSensors(ShimmerPCBT.SENSOR_EXG1_24BIT|ShimmerPCBT.SENSOR_EXG1
_24BIT);
mShimmer.enableDefaultECGConfiguration();
To use it for EMG, set the default configuration using:
mShimmer.enableDefaultEMGConfiguration();
And to enable the internal test signal (+/-1mv square wave):
Shimmer.enableEXGTestSignal();
USERS SHOULD NOT enable the ECG/EMG for the Shimmer3!
mShimmer.writeEnabledSensors(ShimmerPCBT.SENSOR_ECG);
mShimmer.writeEnabledSensors(ShimmerPCBT.SENSOR_EMG);
Users should note that writeEnabledSensors(byte[]) will be deprecated in the future, due to
EXG1/EXG2 (Shimmer3) and EMG/ECG (Shimmer2r) having the same sensor bitmap value. To avoid
confusion this will be replaced by writeEnabledSensors(String[]) in the future.
8.2. Battery Monitoring
From Android Beta 0.7 onwards battery monitoring can be done by using the
writeenabledsensors command. Battery monitoring is done via the ADC used by ExpBoard A0
and ExpBoardaA7, thus while monitoring the battery you will be unable to use those ports. There is
also a low battery warning functionality built in, which will cause the green LED of the Shimmer device
to turn yellow when the voltage has dropped below a specified value. This value can be specified via
the command setBattLimitWarning (currently not supported on the Shimmer3). Users should note
that battery monitoring is only supported on Shimmer devices which have the BtStream firmware
installed on it. In order to use both battery monitoring and low battery notification on the Shimmer
device, the battery voltage sensor has to be enabled prior to streaming. The low battery limit can be
set via the Commands tab. By default the limit is set to 3.4 Volts. For an example application which
uses the low battery indicator please refer to ShimmerGraphandLogService.
Users using Shimmer2r/2/1 should note that enabling battery monitoring will cause crosstalk between
the accelerometer/gyroscope sensor channels (z-axis) and one of the voltage measurements
(VSenseBatt). This can influence the battery reading by 5-6% on average and up to 10% in extreme
cases. This occurs because the battery resistor divider which is approximately 300kOhm leading to the
ADC channel is not buffered by a voltage buffer. It is recommended where possible that the said
kinematic sensors be disabled when measuring the battery voltage. When simultaneous streaming of
both Accelerometer/Gyroscope and Battery Voltage is required the following are methods which
might help mitigate the effects of crosstalk
SW averaging (100 to 1000 counts) to the battery measurement as accel. signals are quasi-
periodic assuming the user isn't in an elevator or vehicle
VSenseBatt - n * Zaccel = VSenseBatt_correct where the scaling factor (n) would need to be
determined experimentally

Copyright © Shimmer Research 2014
Realtime Technologies Ltd Shimmer Java/Android API
All rights reserved Rev 2.6c
48
Measuring battery voltage only when the device is in a static position
8.3. Bluetooth Connectivity
The reader should be aware that on occasion it might be difficult to make a successful connection to
the Shimmer unit due to the Bluetooth paging mechanism. This is explained below.
Paging Inquiry
The page (and inquiry) window on the RN42 defaults to 320ms (out of a 2.56s). So the RN42
is only “listening” for a connection 12.5% of the time
When a Bluetooth slave successfully connects or pairs with a BT master they synchronize their
frequency hopping pattern. Using a FHS (frequency hopping synchronization) packet if a
master has not connected to a slave over a long period of time then the frequency hopping
pattern can get severely out of sync (and based on clock drift inside the RN42, this would
explain why certain Shimmers seem worse than others). Combine this the 12.5% duty cycle of
the page window then it can result in needing multiple attempts to make a connection, but
once the connection is made the frequency hopping pattern re-syncs.
8.4. Backward Compatibility
Developers using an older version of the Shimmer Java/Android API (Rev 1.3 and below) can update
their drivers by importing the ShimmerDriver and ShimmerAndroidDriver into their eclipse workspace,
as explained in section 3 . Due to some restructuring users will have to ensure where applicable, that
the following are imported :-
import com.shimmerresearch.android.*;
import com.shimmerresearch.driver.*;
As the Shimmer class has been relocated to the package com.shimmerresearch.android.
Alternatively you can copy the packages over manually to your project as well.
8.5. Developers notes
Adding Delay
Users should note that when executing commands such as readaccelrange(), it does not mean when
the function returns that the command has been executed. It just means that the instruction has been
put on the instruction stack for execution. The implication is that there is no guarantee that if the
following is executed, that the getaccelrange will return the values read from the Shimmer, as it might
not have been executed yet.
shimmer.readaccelrange();
shimmer.getaccelrange();
For the time being the fix for this is to include a delay, as such, to allow time for the instruction to
execute and for the Shimmer device to response.

Copyright © Shimmer Research 2014
Realtime Technologies Ltd Shimmer Java/Android API
All rights reserved Rev 2.6c
49
shimmer.readaccelrange();
try {
Thread.sleep(500);
} catch (InterruptedException e) {
e.printStackTrace();
}
shimmer.getaccelrange();
DataProcessing Interface
The data processing interface is provided to provide more flexibility and usability of the code. This
interface is implemented within the ShimmerBluetooth class and is executed after the BuildMSG()
method. It allow users to easily plug in their own algorithms and codes into the Shimmer Java/Android
API without having to directly modify the API. The method ProcessData is called whenever the
Shimmer class receives and interprets (converts bytes into raw and calibrated sensor data ~
ObjectCluster format) a data packet. The method InitializeProcessData is called whenever a start
streaming command is sent to the Shimmer device. This can be used to initialize an algorithm (e.g. if
it needs to be reset every time the Shimmer device starts streaming).
Shimmer shimmer = new Shimmer(..);
MyOwnAlgorithm mMyAlgorithm;
shimmer.setDataProcessing(new DataProcessing(){
@Override
public ObjectCluster ProcessData(ObjectCluster ojc) {
ojc = mMyAlgorithm(ojc);
return ojc;
}
@Override
public InitializeProcessData() {
mMyAlgorithm = new MyOwnAlgorithm();
}
});

Copyright © Shimmer Research 2014
Realtime Technologies Ltd Shimmer Java/Android API
All rights reserved Rev 2.6c
50
From a development standpoint of extending the class the interface can be used as such
public class ShimmerAdvance extends Shimmer implements DataProcessing{
MyOwnAlgorithm mMyAlgorithm;
…
public ShimmerAdvance(){
setDataProcessing(this);
}
@Override
public ObjectCluster ProcessData(ObjectCluster ojc) {
ojc = mMyAlgorithm(ojc);
return ojc;
}
@Override
public ObjectCluster InitializationforDataProcessing(ObjectCluster ojc) {
mMyAlgorithm = new MyOwnAlgorithm();
}
}
BlueCove
Within the JavaShimmerConnect project there is now a working application called
ShimmerConnectBCove which uses the BlueCove library http://bluecove.org/. This addition will allow
users to connect to their Shimmer device through the specifying of the Bluetooth address. The
bluetooth address of the device should be specified as follows btspp://000666669686:1 , where
000666669686 is the Bluetooth address. In addition BlueCove also has other useful Bluetooth
functions such as Bluetooth Scanning which users might want to explore. Users should note that the
Linux library is licensed under a GPL license. For further details please refer to the BlueCove website.

Copyright © Shimmer Research 2014
Realtime Technologies Ltd Shimmer Java/Android API
All rights reserved Rev 2.6c
51
Troubleshoot
Sometimes my device fails to connect to the Android device?
Please try the following:-
Ensure the Shimmer device is fully charged
Switch off your Shimmer device and the Bluetooth radio on your Android device, and then
restart them.
Unpair your Shimmer device and then pair them again
When I try to run the application on Eclipse I see the following error
[2012-06-15 13:28:28 - Shimmer] Installing Shimmer.apk...
[2012-06-15 13:28:30 - Shimmer] Re-installation failed due to different
application signatures.
[2012-06-15 13:28:30 - Shimmer] You must perform a full uninstall of the
application. WARNING: This will remove the application data!
[2012-06-15 13:28:30 - Shimmer] Please execute 'adb uninstall
shimmer.shimmergraph' in a shell.
[2012-06-15 13:28:30 - Shimmer] Launch canceled!
Launch the windows command prompt. Locate the folder platform-tools. Depending on where you
have installed the SDK the directory will look something like this:-
C:\Program Files (x86)\Android\android-sdk\platform-tools>
Next execute the command which was requested, which in this case is 'adb uninstall
shimmer.shimmergraph'. Alternatively uninstall the application first from the Android device.
When I try to run the application on Eclipse I see the following error
[2012-06-21 09:25:25 - ShimmerExample] ERROR: Application requires API version 10.
Device API version is 8 (Android 2.2).
[2012-06-21 09:25:25 - ShimmerExample] Launch canceled!
Edit AndroidManifest.xml
Change x to the appropriate value which matches your device
<uses-sdk android:minSdkVersion="x" />
My device fails to pair with the Android device
First ensure that you have BtStream installed on your Shimmer device.
If that still fails, change the line:-
tmp = device.createRfcommSocketToServiceRecord(mSPP_UUID);
within the Shimmer class file to :-

Copyright © Shimmer Research 2014
Realtime Technologies Ltd Shimmer Java/Android API
All rights reserved Rev 2.6c
52
tmp = device.createInsecureRfcommSocketToServiceRecord(mSPP_UUID);
Read http://code.google.com/p/android/issues/detail?id=15919 for explanation.
I see the error Conversion to Dalvik format failed with error x.
Ensure you do not have JAR files on your buildpath that include the same package and classes
20
.
How can I retrieve the class files from the jar file
Download an extraction application such as WinRaR and extract the jar file.
I see the following error
[2013-12-04 14:16:57 - Dex Loader] Unable to execute dex: Multiple dex files define
Lcom/google/common/annotations/Beta;
Right click on the Project Name
Select Java Build Path, go to the tab Order and Export
Unchecked your .jar library
I see the following error
[2013-12-05 15:41:10 - MultiShimmerSync] Found 2 versions of android-support-
v4.jar in the dependency list,
[2013-12-05 15:41:10 - MultiShimmerSync] but not all the versions are identical
(check is based on SHA-1 only at this time).
[2013-12-05 15:41:10 - MultiShimmerSync] All versions of the libraries must be the
same at this time.
[2013-12-05 15:41:10 - MultiShimmerSync] Versions found are:
[2013-12-05 15:41:10 - MultiShimmerSync] Path: C:\Users\JC
Lim\GIT\Git\MultiShimmerSync\libs\android-support-v4.jar
[2013-12-05 15:41:10 - MultiShimmerSync] Length: 349252
[2013-12-05 15:41:10 - MultiShimmerSync] SHA-1:
612846c9857077a039b533718f72db3bc041d389
[2013-12-05 15:41:10 - MultiShimmerSync] Path: C:\Users\JC
Lim\GIT\Git\ShimmerAndroidInstrumentDriver\libs\android-support-v4.jar
[2013-12-05 15:41:10 - MultiShimmerSync] Length: 621451
[2013-12-05 15:41:10 - MultiShimmerSync] SHA-1:
5896b0a4e377ac4242eb2bc785220c1c4fc052f4
[2013-12-05 15:41:10 - MultiShimmerSync] Jar mismatch! Fix your dependencies
Got to Properties ->Java Build Path -> Libraries and remove :-
Android Private Libraries
After that Clean your project.
20
http://stackoverflow.com/questions/2680827/conversion-to-dalvik-format-failed-with-error-1-on-external-
jar

Copyright © Shimmer Research 2014
Realtime Technologies Ltd Shimmer Java/Android API
All rights reserved Rev 2.6c
53
Eclipse related errors
Its not uncommon to rectify eclipse related errors, by cleaning your project folder, and even restarting
eclipse
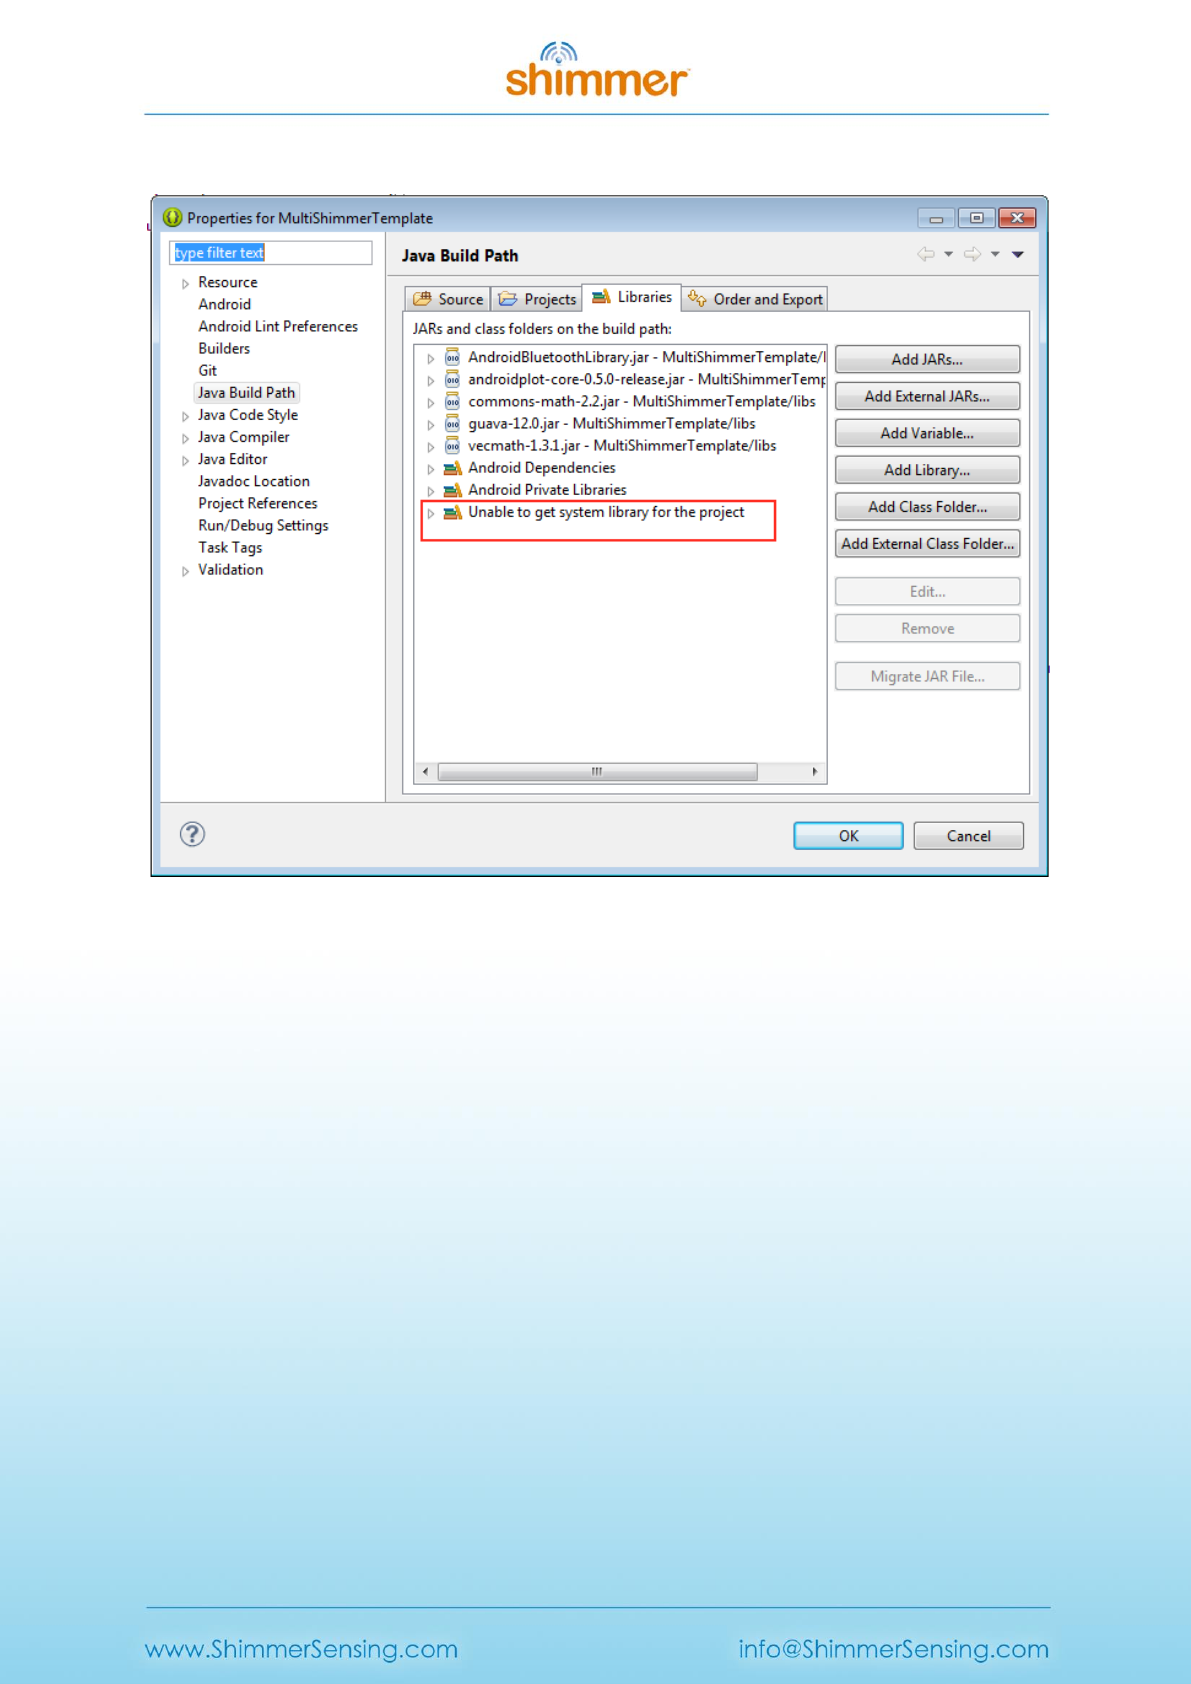
Copyright © Shimmer Research 2014
Realtime Technologies Ltd Shimmer Java/Android API
All rights reserved Rev 2.6c
54
I See the following error
Remove it and use Android Tools --> Fix Project Properties

Copyright © Shimmer Research 2014
Realtime Technologies Ltd Shimmer Java/Android API
All rights reserved Rev 2.6c
55
