Sigma Installation Guide V8.1.0
User Manual:
Open the PDF directly: View PDF ![]() .
.
Page Count: 57

Sigma Installation Guide Version 8.1.0
WI-FI ALLIANCE CONFIDENTIAL TRADE SECRET
FOR USE ONLY BY AUTHORIZED WI-FI ALLIANCE MEMBERS – DO NOT COPY
Page 1 of 57
CONFIDENTIAL TRADE SECRET
FOR USE ONLY BY AUTHORIZED WI-FI ALLIANCE MEMBERS
– DO NOT COPY –
May 3, 2014
Sigma Installation Guide
Version 8.1.0
2012 Wi-Fi Alliance
All Rights Reserved
10900-B Stonelake Boulevard, Suite 126
Austin, TX 78759
Phone: 512.498.9434 • Fax: 512.498.9435 • Email: certifications@wi-fi.org
www.wi-fi.org
This document contains confidential trade secrets intended solely for use by only authorized Wi-Fi
Alliance members. For latest up-to-date information, please refer to the Wi-Fi Alliance website’s
members-only area.
Copyright 2012 Wi-Fi Alliance
All Rights Reserved.
WI-FI ALLIANCE PROPRIETARY AND CONFIDENTIAL – SUBJECT TO CHANGE WITHOUT
NOTICE

Sigma Installation Guide Version 8.1.0
WI-FI ALLIANCE CONFIDENTIAL TRADE SECRET
FOR USE ONLY BY AUTHORIZED WI-FI ALLIANCE MEMBERS – DO NOT COPY
Page 2 of 57
Table of Contents
Sigma Installation Guide _______________________________________________________ 1
1. Introduction ______________________________________________________________ 4
1.1. Overview ___________________________________________________________________ 4
1.2. Acronyms __________________________________________________________________ 4
1.3. Revision History _____________________________________________________________ 5
2. Sigma Installation and Setup ________________________________________________ 7
2.1. Installation Prerequisites ______________________________________________________ 7
2.2. Installation Procedure ________________________________________________________ 7
2.3. IP Address Scheme ___________________________________________________________ 8
3. UCC Console _____________________________________________________________ 12
4. AP Configuration Agent ___________________________________________________ 13
4.1. Uninstall Previous Versions ___________________________________________________ 13
4.2. AP Control Agent Installation _________________________________________________ 13
4.3. AP Control Agent Setup ______________________________________________________ 13
4.4. AP Configuration Agent Sigma Logs _____________________________________________ 14
5. Testbed Stations _________________________________________________________ 15
5.1. Windows 7 ________________________________________________________________ 15
5.2. Windows XP _______________________________________________________________ 17
6. PC Endpoint _____________________________________________________________ 19
7. Sniffer _________________________________________________________________ 21
7.1. Sigma Sniffer Prerequisite ____________________________________________________ 21
7.2. Sigma-TDLS ________________________________________________________________ 22
7.3. Sigma-Miracast _____________________________________________________________ 25
7.4. Sigma-Hotspot 2.0 __________________________________________________________ 30
7.5. Sigma-P2P _________________________________________________________________ 32
7.6. Sigma-11n/WPA2/WMM _____________________________________________________ 33
7.7. Sigma-PMF ________________________________________________________________ 35
7.8. Sigma-Voice Enterprise ______________________________________________________ 37

Sigma Installation Guide Version 8.1.0
WI-FI ALLIANCE CONFIDENTIAL TRADE SECRET
FOR USE ONLY BY AUTHORIZED WI-FI ALLIANCE MEMBERS – DO NOT COPY
Page 3 of 57
7.9. Sigma-VHT ________________________________________________________________ 39
8. Sample DUT _____________________________________________________________ 42
9. Kernel Upgrade Instructions ________________________________________________ 43
9.1. Debian 6.0.3 kernel upgrade instructions ________________________________________ 43
10. Readme First __________________________________________________________ 46
10.1. Test bed Devices __________________________________________________________ 46
10.2. Manual Intervention ______________________________________________________ 46
10.3. General Information _______________________________________________________ 46
10.4. Test bed AP as APUT ______________________________________________________ 47
11. Support ______________________________________________________________ 50
11.1. Sigma General Support ____________________________________________________ 50
11.2. Member Support Portal ____________________________________________________ 50
12. FAQ (Frequently Asked Questions) _________________________________________ 51
12.1. Sigma 11n Sniffer _________________________________________________________ 51
12.2. Generic _________________________________________________________________ 52
13. Appendix A: References _________________________________________________ 53
14. Appendix B: Supplicant Installation Notes ___________________________________ 54
15. Appendix C: Miracast Additional Test Bed Information ________________________ 55

Sigma Installation Guide Version 8.1.0
WI-FI ALLIANCE CONFIDENTIAL TRADE SECRET
FOR USE ONLY BY AUTHORIZED WI-FI ALLIANCE MEMBERS – DO NOT COPY
Page 4 of 57
1. Introduction
1.1. Overview
The primary purpose of this document is to describe the first time installation and configuration of all
Sigma components. This document does not specifically address usage of these components or procedures
for running automated tests using UCC. For information on UCC, please refer to the document –
‘UCC_User_Manual’
Additional details on the overall test environment are found in the following references:
Sigma Control API Specification: “CAPI”
Sigma Test Environment System Architecture
1.2. Acronyms
CAPI Control API
DUT Device Under Test
STAUT Station Under Test
TG Traffic Generator
UCC Unified CAPI Console
WFA Wi-Fi Alliance
WTG Wi-Fi Traffic Generator
WMM Wi-Fi Multi-Media

Sigma Installation Guide Version 8.1.0
WI-FI ALLIANCE CONFIDENTIAL TRADE SECRET
FOR USE ONLY BY AUTHORIZED WI-FI ALLIANCE MEMBERS – DO NOT COPY
Page 5 of 57
1.3. Revision History
Revision
Number
Date
Changes
1.0
08/25/2008
Creation
1.1
10/10/2008
Beta A Release
1.1.1
11/07/2008
Beta B Release
1.1.2
12/05/2008
Beta C Release
1.1.3
12/16/2008
Beta D Release
1.1.4
12/22/2008
Sigma v1.0 Release
1.1.5
01/15/2009
Fixed typo in ‘Installation Prerequisites’
1.1.6
07/20/2009
Updated Sample DUT, Testbed STA, for Windows XP SP3
Updated PCEndpoint – removed control agents of Testbed STAs/DUT
Updated Sigma System Setup - Figure 1
Added Appendix B for supplicant installation notes.
Added Uninstallation steps for AP Agent, Testbed STA, DUT
Added ADEPT and supplicant support steps
1.1.7
10/12/09
Changed IP Scheme as per Sigma-11n
Added CLI section in Testbed STA/Sample DUT for Sigma-11n
Added Sniffer installation steps for 11n
10/14/09
Updated the 11n Ralink Sniffer installation steps
1.1.8
11/04/09
Updated for Lab suggestions
1.1.9
04/30/10
Updated for Sigma 3.1.1 release
4.0.0
09/27/2010
Updates for Sigma release 4.0.0-RC1. Version Numbering – Intermediate
number are skipped to match document versions with Sigma release
version
4.1.0
01/12/2011
Updated for Sigma 4.1.0 release
4.2.0
6/22/2011
Version number updated to 4.2.0
5.0.0
01/24/2012
Added the instructions for Sigma-PMF
6.0.0-RC
4/5/2012
Sigma-VE section added in Sniffer Installation and PC Endpoint
6.0.0-RC3
5/11/2012
Hotspot 2.0 related changes
6.1.0
7/16/2012
TDLS sniffer procedure added
7.0.0
8/24/2012
Miracast changes
7.1.0
2/8/2013
Updated Installation steps as per 7.1.0 packages
8.0.0
09/11/2013
Added clarification for JIRA issues related to Sigma installation guide
Added section 7.10 Sniffer installation for Wi-Fi certified ac (VHT)
Updated section 7.1 table for VHT
Updated section 2.3 IP address scheme for VHT
Updated section 8 Sample DUT for VHT
Removed Section 4.5 (ADEPT Installation)
Merged Sniffer Installation of WPA2 and WMM to Sigma-11n
Updated Section 7.3 with HDCP Check Tool Installation
Updated Section 7.6 for Sigma-11n
Updated Section 12.1 with FAQs. Added Section 12.2
Added Table 5.1 for Win7 package information based on certification
program

Sigma Installation Guide Version 8.1.0
WI-FI ALLIANCE CONFIDENTIAL TRADE SECRET
FOR USE ONLY BY AUTHORIZED WI-FI ALLIANCE MEMBERS – DO NOT COPY
Page 6 of 57
8.1.0
04/18/2014
Updated PCEndpoint Installation section
Updated Sample DUT for 11n/WPA2/WMM - test 5.2.14
Removed Note from section 7.9 for VHT sniffer
Updated package name for Testbed VHT

Sigma Installation Guide Version 8.1.0
WI-FI ALLIANCE CONFIDENTIAL TRADE SECRET
FOR USE ONLY BY AUTHORIZED WI-FI ALLIANCE MEMBERS – DO NOT COPY
Page 7 of 57
2. Sigma Installation and Setup
2.1. Installation Prerequisites
2.1.1. Sigma Components
1 PC with Windows XP or Windows 7 32 or 64-bit for UCC
1 PC with Windows XP for AP Configuration Agent
1 PC with Debian Linux 6.x for PC Endpoint
1 PC with Debian Linux 6.x/ Ubuntu 10.0 or higher for Sniffer
2.1.2. Test bed Components
Depending on the certification program you are setting up, number and type of PCs required for test bed
station differs. For example, Wi-Fi Direct (P2P) test bed requires three PC with Windows7, and two PCs
with Linux for Testbed STAs. Please refer to the technical operations manual or test bed installation guide
of the particular certification program you are setting up.
All test bed software and installation documents are available on WLABS FTP site.
ftp://wlabs.wi-fi.org/
2.2. Installation Procedure
Download the latest Sigma package from the WFA FTP site at http://www.wi-
fi.org/members/certifications-testing/testing-information/sigma-test-environment
Ensure that test bed devices are properly configured to their baseline configurations according to the
appropriate certification program test manual. If a test bed device is later used for another certification
program test bed, the user must ensure that the device is returned to the appropriate baseline
configuration. The Sigma automation suite will not ensure that parameters outside the scope of Sigma
supported programs are correctly configured.
Recommendation: Perform a clean installation of all STA drivers prior to Sigma installation. Only use
Sigma test bed devices for their intended test bed.
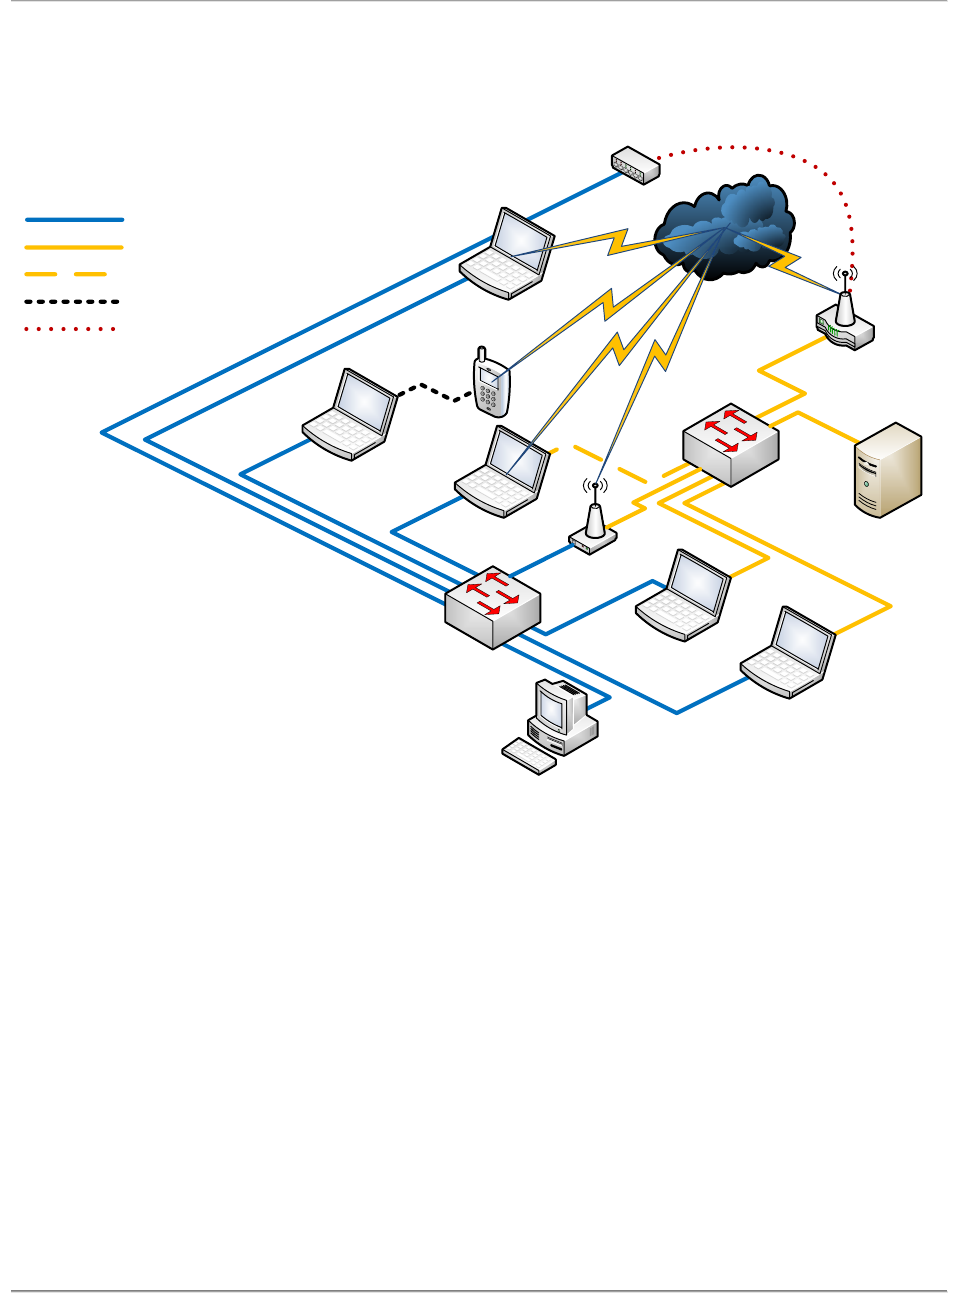
Connect the various Sigma components according to the figure below. Depending on your specific test
bed, not every component included in the figure is necessary.
Sigma Installation Guide Version 8.1.0
WI-FI ALLIANCE CONFIDENTIAL TRADE SECRET
FOR USE ONLY BY AUTHORIZED WI-FI ALLIANCE MEMBERS – DO NOT COPY
Page 8 of 57
DUT
(1)
DUT Control PC
(0..1)
Test Bed STA1
(1..*)
PC Endpoint
(*)
UCC PC
Sniffer
(1..*)
Power
Switch
Test Bed AP2
(1..*)
Control Network
Test Network
Test Network (optional)
Device Control Link
Wired Connections
Power Cord
1. A Test Bed STA may
also be a converged, non-
converged voice, CE, or
other device with or without
a Control PC.
2. The Control PC, if used,
utilizes the Test Network
as a Control Network for
Test Bed APs before and
after testing.
Notes
(*) Zero or More
(0..1) Zero or One
(1) One
(1..*) One or More
Ex. The UCC PC connects
directly to the DUT or
through a Control PC; each
Control PC connects to one
and only one device.
Multiplicity Notation
AP Control PC
(0..1)
RADIUS Server
(1..*)
ADEPT
F Figure 1 –Sigma System Setup
After physical setup of the various Sigma components is complete, unzip the downloaded Sigma package.
Copy the packages to their respective PCs. For example, copy Sigma_TestbedSTA.zip to the Testbed
STAs.
NOTE: For each Installation, you should be logged in as Administrator for Windows PCs and as root for
Linux PCs
2.3. IP Address Scheme
The Sigma installation follows the component IP address scheme below. Please configure the IP Address
of your components according to the following table. Doing so will avoid updating IP addresses in the

Sigma Installation Guide Version 8.1.0
WI-FI ALLIANCE CONFIDENTIAL TRADE SECRET
FOR USE ONLY BY AUTHORIZED WI-FI ALLIANCE MEMBERS – DO NOT COPY
Page 9 of 57
Sigma component configuration files and will allow the Sigma system to work with its out-of-box
settings.
Test Network – 192.165.x.x (net mask 255.255.0.0) Control Network – 192.168.250.x (net mask
255.255.255.0)
The following table shows IP scheme followed by Sigma.
Sigma Component
Control Network IP Address
[Wired]
Test Network IP Address
DUT(STA) Control Agent
192.168.250.40
Assigned by UCC**
PC Endpoint
192.168.250.30
192.165.100.35 [wired]
AP Configuration Agent
192.168.250.20
192.165.100.25 [wired]
Power Management Switch
192.168.250.15
N/A*
UCC PC
192.168.250.10
N/A*
Serial to Ethernet Adapter
192.168.250.7
N/A*
Sniffer
192.168.250.5
N/A*
Testbed APs
VHT Broadcom AP
192.168.250.161 (for Control
agent laptop)
192.165.160.10
VHT Marvell AP
NA
192.165.160.20
VHT Ralink Mediatek AP
NA
192.165.160.30
VHT Realtek AP
NA
192.165.160.40
VHT Qualcomm AP
NA
192.165.160.50
HS2 (Hotspot 2.0) Cisco Controller
NA
192.165.120.10
HS2 BelAir AP
NA
192.165.115.60
HS2 Broadcom AP
NA
192.165.125.130
HS2 Qualcomm AP
NA
192.165.140.16
HS2 Ruckus Controller
NA
192.165.135.120
11n/WPA2/WMM Atheros AP
NA
192.165.112.1
11n/WPA2/WMM Broadcom AP
NA
192.165.122.1
11n/WPA2/WMM Marvell AP
NA
192.165.142.1
11n/WPA2/WMM Ralink AP
NA
192.165.152.1
PMF Broadcom AP
NA
192.165.130.1
PMF Marvell AP
NA
192.165.150.51
PMF Qualcomm Atheros AP
NA
192.165.180.1
PMF Ralink AP
NA
192.165.150.91
Miracast 11n Marvell AP
NA
192.165.100.10

Sigma Installation Guide Version 8.1.0
WI-FI ALLIANCE CONFIDENTIAL TRADE SECRET
FOR USE ONLY BY AUTHORIZED WI-FI ALLIANCE MEMBERS – DO NOT COPY
Page 10 of 57
Testbed STAs
VHT Broadcom STA
192.168.250.151
Assigned by UCC
VHT Intel STA
192.168.250.152
Assigned by UCC
VHT Marvell STA
192.168.250.153
Assigned by UCC
VHT Ralink STA
192.168.250.154
Assigned by UCC
VHT Realtek STA
192.168.250.155
Assigned by UCC
VHT Qualcomm STA
192.168.250.156
Assigned by UCC
Miracast Broadcom Source STA
192.168.250.51
DHCP/192.165.100.51
Miracast Intel Source STA
192.168.250.80
DHCP/192.165.100.80
Miracast Marvell Source STA
192.168.250.120
DHCP/192.165.100.120
Miracast Mediatek Source STA
192.168.250.21
DHCP/192.165.100.21
Miracast Realtek Source STA
192.168.250.31
DHCP/192.165.100.31
Miracast Broadcom Sink STA
192.168.250.110
DHCP/192.165.100.110
Miracast Marvell Sink STA
192.168.250.100
DHCP/192.165.100.100
Miracast Mediatek Sink STA
192.168.250.70
DHCP/192.165.100.70
Miracast Ralink Sink STA
192.168.250.90
DHCP/192.165.100.90
Miracast Realtek Sink STA
192.168.250.41
DHCP/192.165.100.41
HS2 (Hotspot 2.0) Broadcom STA
192.168.250.125
DHCP
HS2 Intel STA
192.168.250.110
DHCP
HS2 MediaTek STA
192.168.250.135
DHCP
HS2 Marvell STA
192.168.250.130
DHCP
HS2 Qualcomm STA
192.168.250.140
DHCP
P2P Atheros STA
192.168.250.93
DHCP
P2P Broadcom STA
192.168.250.83
DHCP
P2P Intel STA
192.168.250.73
DHCP
P2P Ralink STA
192.168.250.63
DHCP
P2P Realtek STA
192.168.250.103
DHCP
11n/WPA2/WMM Atheros STA
192.168.250.92
Assigned by UCC
11n/WPA2/WMM Broadcom STA
192.168.250.82
Assigned by UCC
11n/WPA2/WMM Intel STA
192.168.250.72
Assigned by UCC
11n/WPA2/WMM Ralink STA
192.168.250.62
Assigned by UCC
PMF Broadcom STA
192.168.250.132
Assigned by UCC
PMF Marvell STA
192.168.250.50
Assigned by UCC
PMF Qualcomm Atheros STA
192.168.250.77
Assigned by UCC
PMF Ralink STA
192.168.250.45
Assigned by UCC
Radius Servers

Sigma Installation Guide Version 8.1.0
WI-FI ALLIANCE CONFIDENTIAL TRADE SECRET
FOR USE ONLY BY AUTHORIZED WI-FI ALLIANCE MEMBERS – DO NOT COPY
Page 11 of 57
HostAPD Server
NA
192.165.200.10
Microsoft Server
NA
192.165.200.20
Radiator Server
NA
192.165.200.30
DeviceScape Server
NA
192.165.200.40
Table 1: IP Address Scheme
*Test Network connection is not applicable for this component
** DUT wireless IP address and all Testbed STA IP addresses will be assigned by the UCC scripts at run
time.
In Sigma PMF and Sigma Hotspot 2.0 testing, Sniffer PC will be connected to the test network, and the
connection will require using the Hub (to capture the traffic on wired test network)
If you want to use different IP addresses update the relevant addresses in the component’s configuration
file as per the UCC User Manual.

Sigma Installation Guide Version 8.1.0
WI-FI ALLIANCE CONFIDENTIAL TRADE SECRET
FOR USE ONLY BY AUTHORIZED WI-FI ALLIANCE MEMBERS – DO NOT COPY
Page 12 of 57
3. UCC Console
This PC must be running Windows XP or Windows 7. Unzip the zip file “Sigma_UCC-
Windows_vXXXX.zip” and copy “Sigma_UCC-Windows” to C drive.
For more configuration details, please refer to UCC_User_Manual.doc.
Note: Don’t modify the EAP-Credentials.txt file unless you have other than the Wi-Fi supplied
certificates.
Note: Install the following Microsoft Visual C++ 2008
Redistributable Package from the below link on UCC laptop:
http://www.microsoft.com/en-us/download/details.aspx?id=29

Sigma Installation Guide Version 8.1.0
WI-FI ALLIANCE CONFIDENTIAL TRADE SECRET
FOR USE ONLY BY AUTHORIZED WI-FI ALLIANCE MEMBERS – DO NOT COPY
Page 13 of 57
4. AP Configuration Agent
This PC must be running Windows XP and must have two Ethernet ports: one connected to the Control
Network and one connected to the Test Network.
4.1. Uninstall Previous Versions
If the PC has any previous version of the AP Configuration agent, uninstall it by following the steps
below –
1. Stop the service ‘WFA_APConfigAgent’ (Control Panel Administrative tools Services)
or Start Run… cmd, type in command “services.msc”)
2. Delete the folder of your previous installation.
3. Open the command prompt and type the following command –
a. sc delete WFA_APConfigAgent
4. Reboot the PC
4.2. AP Control Agent Installation
1. Unzip the package ‘Sigma_APConfigurationAgent-Windows_xxxx.zip’ and copy AP_ControlAgent
to C drive.
2. Go to AP Control Agent folder.
3. Install the TCL interpreter (TCL expect-5.21) from the TCL folder
4. Run ‘stopService.bat’
5. Run ‘APService.bat’
6. Step 5 and 6 should be repeated if laptop is rebooted.
4.3. AP Control Agent Setup
After installation, update the ‘PowerSwitchCommands.txt’ file with the appropriate commands for the
power switch used in your test bed. Refer to the sample ‘PowerSwitchCommands.txt’ file shown below.
# Turn on command
# <Command Name> <port number> <command value>
# For example, if the command to turn on the port is - 'pset 5 1' which #sets
the port number 5 to ON state then specify the below line as -
#on_command,pset,N,1
on_command,on,N
# Turn off command
# <Command Name> <port number> <command value>

Sigma Installation Guide Version 8.1.0
WI-FI ALLIANCE CONFIDENTIAL TRADE SECRET
FOR USE ONLY BY AUTHORIZED WI-FI ALLIANCE MEMBERS – DO NOT COPY
Page 14 of 57
# For example, if the command to turn on the port is - 'pset 5 0' which #sets
the port number 5 to OFF state then specify the below line as -
#off_command,pset,N,0
off_command,off,N
The above changes are not applicable for Sigma-PMF testing.
4.4. AP Configuration Agent Sigma Logs
Logs for AP Configuration Agent can be retrieved from C:\AP_ControlAgent\
1. APConfigAgent.log
2. CmdLog
Sigma Installation Guide Version 8.1.0
WI-FI ALLIANCE CONFIDENTIAL TRADE SECRET
FOR USE ONLY BY AUTHORIZED WI-FI ALLIANCE MEMBERS – DO NOT COPY
Page 15 of 57
5. Testbed Stations
NOTE – Following section only describes the installation steps of Sigma Control Agent for Testbed STAs
which uses WFA supplied Sigma control agent. If a test bed station uses its own Sigma control agent (for
example, Broadcom station in P2P test bed) then follow the installation guide of that test bed station.
NOTE: This section applies to only Windows based test bed Stations. Program-specific Testbed
Installation Guide/ Techops Manual will take precedence over this section.
Please install appropriate drivers for all Testbed STAs (as per given instructions in the driver packages for
respective STAs) before installing Sigma.
5.1. Windows 7
This PC must be running Windows 7. The OS and Sigma must be installed on C:\ drive. The Sigma
software will be installed as a Windows system service.
Updating or re-installing a Testbed STA driver requires un-installation and re-installation of the
supplicants and traffic endpoint as noted below.
Program Name
Sigma Win7 Package
P2P (Wi-Fi Direct)
Sigma_TestbedSTA-Win7
Hotspot 2.0 (Passpoint)
Sigma_TestbedSTA-Win7
11n/WPA2/WMM
Sigma_TestbedSTA-Win7-HT
PMF
Sigma_TestbedSTA-Win7
Voice-Enterprise
NA
Display (Miracast)
Sigma_TestbedSTA-Win7
TDLS
Sigma_TestbedSTA-Win7-HT
VHT (CERTIFIED ac)
Sigma_TestbedSTA-Win7_Win8-
VHT

Sigma Installation Guide Version 8.1.0
WI-FI ALLIANCE CONFIDENTIAL TRADE SECRET
FOR USE ONLY BY AUTHORIZED WI-FI ALLIANCE MEMBERS – DO NOT COPY
Page 16 of 57
WMM-AC
NA
Table 5.1: Win 7 DUT Sigma package information
5.1.1. Uninstall Previous Versions
If the PC has any previous version of Testbed STA, uninstall it by following the steps below -
1. Stop the services ‘WfaControlAgent’ and ‘ WfaDutAgent’, (Control Panel Administrative tools
Services or Start Run… cmd, type in command “services.msc”)
2. Delete the folder of your previous installation( C:\WFA).
3. Open the command prompt and type the following command –
a. sc delete WfaControlAgent
b. sc delete WfaDutAgent
4. Reboot the PC
5. Disable any power management features on the Testbed STA host laptop to prevent the system from
entering standby mode or disabling the network card following periods of inactivity.
5.1.2. Installation – Prerequisite
Turn off Win7 User Account Control settings by following the steps below –
1. Click Start, and then click Control Panel.
2. In Control Panel, click User Accounts.
3. In the User Accounts window, click User Accounts.
4. In the User Accounts tasks window, click Change User Account Control settings.
5. If UAC is currently configured in Admin Approval Mode, the User Account Control message
appears. Click Continue.
6. Put the Marker to Never notify , and then click OK.
7. Click Restart Now to apply the change right away, or click Restart Later and close the User
Accounts tasks window.
5.1.3. Installation
1. Make sure that the required test bed STA card is inserted into the PC and the drivers are installed.
Disable all wireless interfaces other than the test bed STA card.
2. Unzip the package ‘Sigma_TestbedSTA-Win7_vXXXX.zip’
3. Make sure WLAN AutoConfig service is running and no other supplicants are active.
4. Go to the folder “WfaEndpoint” and run ‘Install.bat’
5. Perform following steps to install CLIs for the respective STA –
Go to CLIs folder
Run ‘install.bat’ (Double click on that file) from that folder, and then give the name of your
Station following the prompt.
6. Perform a system reboot.
[NOTE – Whenever there is any change in Testbed STA driver or change in STA hardware, re-install the
Sigma service by following all the steps of this section again]

Sigma Installation Guide Version 8.1.0
WI-FI ALLIANCE CONFIDENTIAL TRADE SECRET
FOR USE ONLY BY AUTHORIZED WI-FI ALLIANCE MEMBERS – DO NOT COPY
Page 17 of 57
5.1.4. Windows 7 Sigma Logs
Sigma Logs for Windows 7 can be retrieved from C:\WFA\Logs folder
1. C:\WFA\Logs\WFACA
2. C:\WFA\Logs\WFASTA
5.2. Windows XP
This PC must be running Windows XP – SP2/SP3. The OS and Sigma must be installed on C:\ drive. The
Sigma software will be installed as a Windows system service.
Updating or re-installing a Testbed STA driver requires un-installation and re-installation of the
supplicants and traffic endpoint as noted below.
Install required supplicants for the particular test bed STA as per the test plan. Refer to Appendix B.
5.2.1. Uninstall Previous Versions
If the PC has any previous version of Testbed STA, uninstall it by following the steps below -
1. Stop the service ‘WFASTA_TrafficEndPoint’, (Control Panel Administrative tools Services or
Start Run… cmd, type in command “services.msc”)
2. Uninstall all other WFA_WPAsupplicant, Cisco supplicant, Open 1x. (Refer to Appendix B
Uninstallation section)
3. Delete the folder of your previous installation.
4. Open the command prompt and type the following command –
a. sc delete WFASTA_TrafficEndpoint
5. Reboot the PC
6. Disable any power management features on the Testbed STA host laptop to prevent the system from
entering standby mode or disabling the network card following periods of inactivity.
5.2.2. Installation
NOTE – Since Sigma will be doing GUI automation, it might pop-up several command windows or other
GUI screens during test execution. DO NOT interrupt anything on the Laptop during test execution.
1. Make sure that the required test bed STA card is inserted into the PC and the drivers are installed.
Disable all wireless interfaces other than the test bed STA card.
2. Unzip the package ‘Sigma_TestbedSTA-WinXP_vXXXX.zip’
3. Install the following Windows packages.
a. Run 'msxml6.msi' and follow the wizard instructions.
[NOTE – step ‘b’ and ‘c’ are not required for Windows XP SP3]
b. Run 'WindowsXP-KB893357-v2-x86-ENU.exe' and follow the wizard instructions.
c. Run 'WindowsXP-KB918997-v6-x86-ENU.exe' and follow the wizard instructions.
4. Perform a system reboot. [A system reboot is required if one was not performed in step 3]
5. Make sure Windows zero Config is running and no other supplicants are active.
6. Go to the folder “Sigma_TestbedSTA” and run ‘Install.bat’
7. Perform following steps to install CLIs, if running Sigma-11n –

Sigma Installation Guide Version 8.1.0
WI-FI ALLIANCE CONFIDENTIAL TRADE SECRET
FOR USE ONLY BY AUTHORIZED WI-FI ALLIANCE MEMBERS – DO NOT COPY
Page 18 of 57
Go to ‘11nCLIs’ folder
Run ‘install.bat’(Double click on that file) from that folder, and then give the name of your
Station following the prompt.
8. Perform a system reboot.
[NOTE – Whenever there is any change in Testbed STA driver or change in STA hardware, re-
install the Sigma service by following all the steps of this section again]
[NOTE – If the name of wireless connection (Wireless Network Connection) is changed in
Network Connections, than follow the below mentioned procedure before starting Sigma testing:
1. Go to Interface.txt file in C:\WFA\WfaEndpoint\
2. Make sure the entry in this file matches with the Wireless Connection Name. Remove extra
spaces (if any) at the end of line and save the file
3. Reboot the laptop
Updating Registry Settings for QoS on Windows XP
Add the following registry entries. Go to START RUN REGEDIT ENTER
1. [HKEY_LOCAL_MACHINE\SYSTEM\CurrentControlSet\Services\PSched\Parameters]
"TagFrames"=dword:00000001
2. [HKEY_LOCAL_MACHINE\SYSTEM\CurrentControlSet\Services\Tcpip\Parameters]
"DisableUserTOSSetting"=dword:00000000
5.2.3. Verify Installation
To verify the installation is successfully completed, please perform the steps mentioned below –
Go to the folder “C:\WFA” and check that folder WFA_Endpoint and WPASupplicant
are present
Go to the folder “C:\WFA\CLI” to verify that CLI batch files are properly copied for
each test bed station
Go to the folder “C\WFA\WFA_Endpoint” and verify that SigmaSettings.txt file updated
with correct GUID
5.2.4. Windows XP Sigma Logs
Sigma Logs for Windows XP can be retrieved from C:\ folder
1. C:\WFASTA
2. C:\WFASTA_ControlAgent

Sigma Installation Guide Version 8.1.0
WI-FI ALLIANCE CONFIDENTIAL TRADE SECRET
FOR USE ONLY BY AUTHORIZED WI-FI ALLIANCE MEMBERS – DO NOT COPY
Page 19 of 57
6. PC Endpoint
This PC is recommended to have Debian 6.x and must have two Ethernet ports: one connected to
the Control Network and one connected to the Test Network.
The PC must be connected to the Internet during installation. Once the installation is complete,
the Internet connection is no longer required.
The Sigma software is installed as a Linux daemon. Once installed and configured correctly, it
will run in the background without any manual intervention.
Pre-requisite Packages for PCEndpoint. Install the following:
1. apt-get install make
2. apt-get install gcc
3. apt-get install libncurses5-dev
6.1.1. Installation
1) Make sure you are logged in as root
su
2) Unzip the package ‘Sigma_PCEndpoint-Linux_vXXXX.tar’ and go to the resulting directory.
tar –xvf Sigma_PCEndpoint-Linux_vXXXX.tar
cd Sigma_PCEndpoint-Linux_vxxxx
3) Goto WTGService folder. Run the following command.
sh uninstallSigmaWTG.sh
4) Goto Sigma_PCEndpoint-Linux_vXXXX\ folder and install the essential Linux package
required for the Sigma service.
sh buildEssentials.sh
NOTE – This step might take several minutes depending on your internet speed
5) Compile the WTG with the following commands
NOTE: Uncomment the below line in Makefile.inc and comment out
all other compilation flags (CFLAGS):
VOICE ENTERPRISE:
CFLAGS = -g -O2 -D_REENTRANT -DWFA_WMM_PS_EXT -DWFA_WMM_AC -
DWFA_VOICE_EXT -DWFA_PC_CONSOLE -Wall -I../inc
VHT:
CFLAGS = -g -O2 -D_REENTRANT -DWFA_WMM_PS_EXT -DWFA_WMM_AC -
DWFA_PC_CONSOLE -DWFA_STA_TB -Wall -I../inc
make clean ; make
6) Go to the WTGService directory and install with the following commands

Sigma Installation Guide Version 8.1.0
WI-FI ALLIANCE CONFIDENTIAL TRADE SECRET
FOR USE ONLY BY AUTHORIZED WI-FI ALLIANCE MEMBERS – DO NOT COPY
Page 20 of 57
cd WTGService
make clean ; make
If you are running Voice-Enterprise, then use following line
sh installSigmaWTG.sh VE
For all other programs, use following line
sh installSigmaWTG.sh
7) If you are running Hotspot 2.0, then follow the below steps
Install dependent packages (Internet connection is needed for this step)
i) apt-get install fake - to install send_arp
ii) apt-get install vzctl - to install ndsend
Goto ‘scripts’ folder
i) Run the command “./arp_neigh_loop <test network interface name>”. This program
will send Gratuitous ARP request, Gratuitous ARP reply and Neighbour
Advertisement frames continuously on the test network interface.
Verify these frames using a sniffer on the wired side.
6.1.2. Setup
1) Configure the PC Endpoint parameters in file ‘/etc/SigmaWTG.conf’.
Open the file – vi /etc/SigmaWTG.conf
Update the name of control interface. For example, if the names of the two interface are
‘eth0’ and ‘eth1’ then enter the interface name which is connected to the control network.
2) Add the default interface for Multicast data TX/RX for the Multicast test cases. At the
command prompt, type “route add default <Test Network Interface name>”
3) Restart the Sigma WTG Service with following command
/etc/rc.local restart
6.1.3. PCEndpoint Sigma Logs
Sigma Logs for PC Endpoint can be retrieved from:
1. /SIGMA_WTGv2/WTG_9003.log
2. /var/log/WTG.log

Sigma Installation Guide Version 8.1.0
WI-FI ALLIANCE CONFIDENTIAL TRADE SECRET
FOR USE ONLY BY AUTHORIZED WI-FI ALLIANCE MEMBERS – DO NOT COPY
Page 21 of 57
7. Sniffer
This should be a Linux PC and must be connected to the Internet during installation. Once the
installation is complete, the Internet connection is no longer required.
The Sigma software is installed as a Linux daemon. Once installed and configured correctly, it
will run in the background without any manual intervention.
7.1. Sigma Sniffer Prerequisite
7.1.1. Following table summarizes the required hardware, operation system, and wireshark
version for each program.
Please ensure that you have correct OS, Hardware, Driver and Wireshark version
according to the table below before starting Sniffer installation.
Program Name
Hardware
Driver
Operating
System
Wireshark
Version
Wired
Capture [3]
P2P
Qualcomm
Atheros 3x3
card
ath9k
Ubuntu 11.10
[1]
wireshark-
P2P-1.7.0
No
Hotspot 2.0
Qualcomm
Atheros 3x3
card
ath9k
Ubuntu 11.10
[1]
1.7.0_HS2.
0_
v3_custom
Yes
11n
Ralink 3x3 card
RT3800PD2
2011_1014_RT
3593
STA_1.V2.5.0.0
Debian 6.0.3
Kernel:
2.6.39.4 [4]
1.6.2_WF
Av1
No
PMF
Qualcomm
Atheros
[AR5BXB-
0092DA]
ath9k
Ubuntu 11.10
[1]
1.6.2
Yes

Sigma Installation Guide Version 8.1.0
WI-FI ALLIANCE CONFIDENTIAL TRADE SECRET
FOR USE ONLY BY AUTHORIZED WI-FI ALLIANCE MEMBERS – DO NOT COPY
Page 22 of 57
Voice-
Enterprise
Qualcomm
Atheros
[AR5BXB-
0092DA]
ath9k
Ubuntu 11.10
[1]
1.6.5_WF
A_v2
No
Display
(Miracast)
Qualcomm
Atheros 3x3
card
ath9k
Ubuntu 11.10
[1]
1.7.0-
Miracast
No
TDLS
Qualcomm
Atheros
[AR5BXB-
0092DA]
ath9k
Ubuntu
10.04.2 [2]
1.5.0-
TDLS
No
VHT (Wi-Fi
certified ac)
BCM4360
wireless card
wl.ko
Fedora Core
15 [5]
1.8.1.BRC
M
No
Table 2: Sniffer Requirements
[1] http://old-releases.ubuntu.com/releases/oneiric/
[2] For TDLS, Ubuntu must be downloaded from the WFA FTP site (ftp://wlabs.wi-fi.org/TDLS)
[3] The program that required wired capturing will need two interfaces – 1 – Control Network and 2 –
Test Network (requires hub for wired capture).
[4] Debian version 6.0.3 can be downloaded from ftp://wlabs.wi-fi.org/Debian/6.0.3/
[5] Fedora Core 15 Image can be downloaded from -
ftp://mirrors.nl.eu.kernel.org/fedora/releases/15/Fedora/i386/iso/Fedora-15-i386-DVD.iso
7.2. Sigma-TDLS
NOTE: TDLS program requires 2 sniffer laptops (for tests 5.8 and 5.9), one to sniff in base channel and
other to sniff in off channel. For easy reference, the Base channel Sniffer is referred to as Sniffer1 and off
channel sniffer is referred to as Sniffer2.
7.2.1. Install Driver
Untar the package: tar –jxvf compat-wireless-2.6.39-1.tar.bz2
cd compat-wireless-2.6.39-1
./scripts/driver-select ath9k
make clean

Sigma Installation Guide Version 8.1.0
WI-FI ALLIANCE CONFIDENTIAL TRADE SECRET
FOR USE ONLY BY AUTHORIZED WI-FI ALLIANCE MEMBERS – DO NOT COPY
Page 23 of 57
make
sudo make install
Reboot the laptop to load the driver automatically.
7.2.2. Install Wireshark
Installing dependent packages:
1. sudo apt-get update
2. sudo apt-get install autoconf
3. sudo apt-get install libtool
4. sudo apt-get install bison
5. sudo apt-get install flex
6. sudo apt-get install libgtk2.0-dev
7. sudo apt-get install libpcap-dev
Compiling Wireshark:
8. Download the wireshark package and extract it
sudo tar –zxvf wireshark-custom-tdls-vXX.tgz
9. cd wireshark-custom-tdls-vXX
10. sudo ./autogen.sh
11. sudo ./configure
12. sudo make clean;sudo make
Installing Wireshark:
13. sudo make install
14. cd /etc/ld.so.conf.d
15. sudo ldconfig
Please note : If you have already installed Wireshark in the laptop, please do “sudo make
uninstall” before step 13.
Verifying the installation:
1. Set the wireless card in monitor mode
sudo ifconfig <wireless interface name> down
sudo iwconfig <wireless interface name> mode monitor
sudo ifconfig <wireless interface name> up
2. Select a channel
sudo iwconfig <wireless interface name> channel 6
3. Start wireshark, select interface and check if it can capture packets.
sudo wireshark

Sigma Installation Guide Version 8.1.0
WI-FI ALLIANCE CONFIDENTIAL TRADE SECRET
FOR USE ONLY BY AUTHORIZED WI-FI ALLIANCE MEMBERS – DO NOT COPY
Page 24 of 57
7.2.3. Install Sigma Sniffer
Installing dependent packages:
Sniffer1:
1. sudo apt-get install expect
2. sudo apt-get install iw
Sniffer2:
1. sudo apt-get install ssh
2. sudo apt-get install iw
3. After successful installation of ssh. The following command should give the
process ID of ssh.
pgrep ssh
(eg 1516)
Installing Sigma Sniffer:
Sniffer1:
1. Switch to root user
sudo su
2. Execute
cd SigmaSniffer/sniffer
chmod a+x *
cp * /usr/bin
3. Execute (cd ../.. If current directory is SigmaSniffer/sniffer)
cd Scripts
chmod a+x *
cp * /usr/bin
Sniffer 2:
1. Switch to root user
sudo su
2. Execute
cd SigmaSniffer/sniffer
chmod a+x *
cp * /usr/bin
3. Create a sample.txt file in /tmp

Sigma Installation Guide Version 8.1.0
WI-FI ALLIANCE CONFIDENTIAL TRADE SECRET
FOR USE ONLY BY AUTHORIZED WI-FI ALLIANCE MEMBERS – DO NOT COPY
Page 25 of 57
cd /tmp
echo “1111111111” > sample.txt
Verifying the installation:
Sniffer1:
1. Verify if file transfer is successful
“sudo scp <username>@<Sniffer2 Control IP>:/tmp/sample.txt .”
<username> is the login username of the Sniffer 2 laptop.
When prompted enter password and follow onscreen instructions.
If the file transfer is successful you should see the sample.txt file in the current
directory.
2. Verify the file transfer using script
“/usr/bin/transfile.sh <Sniffer2 Control IP> <Sniffer2 login username> <Sniffer 2
login password> /tmp sample.txt”
If successful you should see the sample.txt file in /tmp folder
Start the sniffer program:
Sniffer1 and Sniffer2:
1. Execute: cd /usr/bin
2. sudo ./wfa_sniffer 9999 <wireless interface name>
7.3. Sigma-Miracast
The Sigma_Sniffer-Miracast-Linux_vXXXX.zip package should have following modules in it –
a. Wireshark tar zxvf wireshark-Miracast-1.7.0.tar.gz
b. Compat Wireless Driver compat-wireless-3.3-rc6-1.tar.bz2
c. SigmaSniffer/injector injector.zip
d. Tools wlantest.tar.gz
e. Tools dvbsnoop-1.4.50_wfd_r2.tar.gz
f. SigmaSniffer/sniffer sniffer software
g. AVCapture_Software YASM and ffmpeg package
h. Tools WFDTest Tool for MPEG2-TS verification wfdtest
i. Tools wfd_hdcp_check.zip
NOTE: For all installation steps you need to login as root. [sudo su ]
OS Installation:
1) Download and install Ubuntu 11.10 32-bit version
Note: Before you install, connect the laptop to internet. Make sure that it can download the
updates while installing (check the box when it prompts)
Wireshark Installation

Sigma Installation Guide Version 8.1.0
WI-FI ALLIANCE CONFIDENTIAL TRADE SECRET
FOR USE ONLY BY AUTHORIZED WI-FI ALLIANCE MEMBERS – DO NOT COPY
Page 26 of 57
1) apt-get install bison
2) apt-get install flex
3) apt-get install libgtk2.0-dev
4) apt-get install libcap-dev
5) apt-get install libpcap-dev
Get Wireshark package from Sniffer package
6) Extract the package [Command tar zxvf wireshark-Miracast-1.7.0.tar.gz ]
7) Go to wireshark-Miracast-1.7.0 directory and run the following commands
a. ./configure
b. make
c. make install
d. ldconfig
8) Execute command to make sure wireshark package is successfully installed and configured
a. wireshark
TFTP Client Installation
TFTP client is required to upload media files generate using capture tool (Camera) to UCC for
additional test validation
1) apt-get install tftp-hpa
Compat Wireless Driver Installation
1) Untar the package compat-wireless-3.3-rc6-1.tar.bz2. [Command tar xvpf compat-wireless-
3.3-rc6-1.tar.bz2]
2) Goto directory, compat-wireless-3.3-rc6-1 [Command cd]
3) Execute: ./scripts/driver-select ath9k
4) Execute: make
5) Execute: make install
6) Reboot the laptop
Injector Installation
1) Install the libnl package [Command apt-get install libnl-dev]
2) Install iw package [Command apt-get install iw]
3) Copy injector.zip to local folder [Command cp injector.zip to /home/<user>]
4) Unzip the file injector.zip [Command unzip injector.zip]
5) Do a make from directory inject [Command make]
6) Copy the inject binary to /usr/local/bin [Command cp inject /usr/local/bin]
7) Change mode of the inject binary [Command chmod 777 /usr/local/bin/inject]
Wlantest Installation
1) Extract the wlantest.tar.gz file into a folder [Command tar zxvf wlantest.tar.gz ]
2) Do make from the directory WLANTEST\GIT_WLANTEST\wlantest [Command make ]
3) Copy the wlantest binary to /usr/local/bin [Command cp wlantest /usr/local/bin ]
4) Change mode of wlantest binary [Command chmod 777 /usr/local/bin/wlantest ]

Sigma Installation Guide Version 8.1.0
WI-FI ALLIANCE CONFIDENTIAL TRADE SECRET
FOR USE ONLY BY AUTHORIZED WI-FI ALLIANCE MEMBERS – DO NOT COPY
Page 27 of 57
Note: To decrypt any trace manually which has 4 way handshake and passphrase use the command
[wlantest -r <in-trace-file> -p <pass-phrase> -w <output-trace-file> ]
You can check for "Derived" keyword from the console log. The output file will have both
encrypted and decrypted packets in sequence.
DVB Snoop Installation
1) Untar the package dvbsnoop-1.4.50_wfd_r2.tar.gz
[Command tar xzvf dvbsnoop-1.4.50_wfd_r2.tar.gz ]
2) Change directory to dvbsnoop-1.4.50_wfd_r2 [Command cd dvbsnoop-1.4.50_wfd_r2 ]
3) Do a configure [Command ./configure ]
4) Do a make [Command make ]
5) Do a make install [Command make install ]
6) Make sure that DVBSnoop is compiled correctly [Command dvbsnoop –help ]
FFMPEG Installation
1) Go to AVCapture_Software folder and copy yasm-1.2.0.tar.gz package to local directory.
2) Untar the package [Command tar xzvf yasm-1.2.0.tar.gz]
3) Install the package [Command ./configure --prefix=/usr && make && sudo make install]
4) Install x264 codec:
a. apt-get install git
b. apt-get remove libx264-dev
c. cd ~
d. git clone git://git.videolan.org/x264
e. cd x264
f. ./configure --enable-static --prefix=/usr
g. make
h. make install
5) Install the below mentioned libraries for FFMPEG compilation:
apt-get install libva-dev libdc1394-22-dev libfaac-dev libgsm1-dev libmp3lame-dev libopencore-
amrwb-dev libopencore-amrnb-dev libschroedinger-dev libspeex-dev libtheora-dev libvorbis-dev
libvpx-dev libxvidcore-dev libasound2-dev
6) Go to AVCapture_Software folder and copy ffmpeg-0.8.12.tar.gz package to local directory.
7) Untar the package [Command tar xzvf ffmpeg-0.8.12.tar.gz]
8) Install ffmpeg package. Command (copy and execute this entire command at once)
a. ./configure --enable-gpl --enable-version3 --enable-nonfree --enable-postproc --enable-
libfaac --enable-libmp3lame --enable-libopencore-amrnb --enable-libopencore-amrwb --
enable-libtheora --enable-libvorbis --enable-libx264 --enable-libxvid --enable-x11grab --
enable-vdpau --enable-bzlib --enable-libgsm --enable-libschroedinger --enable-libspeex -
-enable-libtheora --enable-libvorbis --enable-pthreads --enable-zlib --enable-libvpx --
enable-runtime-cpudetect --enable-vaapi --enable-gpl --enable-postproc --enable-swscale
--enable-x11grab --enable-libdc1394
b. make

Sigma Installation Guide Version 8.1.0
WI-FI ALLIANCE CONFIDENTIAL TRADE SECRET
FOR USE ONLY BY AUTHORIZED WI-FI ALLIANCE MEMBERS – DO NOT COPY
Page 28 of 57
c. make install
d. Copy ffmpeg binary to /usr/local/bin [Command cp ffmpeg /usr/local/bin/]
Sigma Installation Guide Version 8.1.0
WI-FI ALLIANCE CONFIDENTIAL TRADE SECRET
FOR USE ONLY BY AUTHORIZED WI-FI ALLIANCE MEMBERS – DO NOT COPY
Page 29 of 57
9) Connect the Camera device to the Sniffer laptop
10) Get the Video Interface for the connected device
a. Execute: ls /dev <Enter> this will list all the devices connected to the laptop. Look for
“videoX” (X=0 or 1 or 2). Note down the Video interface name of camera device
($videoIF). Refer the picture below.
11) Get the Audio Device ID for the connected device
a. Execute: vi /proc/asound/cards <Enter> this will list down the audio devices
connected to the laptop. Note down the device ID of camera device ($audioIF). Refer the
picture below.
12) Execute the following command to make sure that camera device is able to capture properly using
ffmpeg.
a. For Camera Model c910 (Dual Built-in MIC)
ffmpeg –f alsa –i hw:$audioIF –r 10 –f video4linux2 –video_size hd720 –i
/dev/$videoIF –threads 4 –f mp4 –vcodec libx264 –acodec libmp3lame camera.mp4
–t 10

Sigma Installation Guide Version 8.1.0
WI-FI ALLIANCE CONFIDENTIAL TRADE SECRET
FOR USE ONLY BY AUTHORIZED WI-FI ALLIANCE MEMBERS – DO NOT COPY
Page 30 of 57
b. For Camera Model c525 (Single Built-in MIC)
ffmpeg –f alsa –ac 1 –i hw:$audioIF –r 10 –f video4linux2 –video_size hd720 –i
/dev/$videoIF –threads 4 –f mp4 –vcodec libx264 –acodec libmp3lame camera.mp4
–t 10
13) Once camera.mp4 file is verified, update init_WFD.txt file in UCC with AV Capture Details
(Video Interface, Audio Interface, Built-in MIC details – Single/Dual)
Streamer Installation
1) Execute: apt-get install streamer
WFDTest Tool Installation
1) Copy wfdtest tool binary to /usr/local/bin [Command cp wfdtest /usr/local/bin ]
2) Change mode of wfdtest binary [Command chmod 777 /usr/local/bin/wfdtest ]
Miracast Sniffer Installation
Follow the steps to install and start Miracast Sigma Sniffer Agent on Sniffer laptop
1) Copy binary file wfa_sniffer to /usr/local/bin/ directory on Sniffer laptop
[Command cp wfa_sniffer /usr/local/bin]
2) Change mode of wfa_sniffer [Command chmod 777 /usr/local/bin/wfa_sniffer ]
3) Create directory /SigmaSniffer [Command mkdir ]
4) Copy map.conf file to /SigmaSniffer directory on Sniffer laptop
5) Change mode of all scripts inside Scripts folder [Command chmod 777 Scripts/* ]
6) Copy the files from directory Scripts/* to /usr/local/bin [Command cp ]
7) Start the sniffer application [Command wfa_sniffer 9999 <Interface Name>
Example: wfa_sniffer 9999 wlan1
HDCP Check Test Tool Installation
1) Unzip wfd_hdcp_check package [Command unzip ]
2) Go to wfd_hdcp_check directory [Command cd ]
3) Execute: make
4) Copy wfd_hdcp_check binary to /usr/local/bin [ Command cp wfd_hdcp_check
/usr/local/bin ]
5) Change mode of binary [Command chmod 777 /usr/local/bin/wfd_hdcp_check ]
7.4. Sigma-Hotspot 2.0
Download and untar the Sigma HS2 package: Sigma_Sniffer-HS2-PMF-VE-WPA2-
Ubuntu_vxxxx.tar
Wireshark Installation :
Installing dependent packages
1. sudo apt-get install autoconf
2. sudo apt-get install libtool
3. sudo apt-get install bison

Sigma Installation Guide Version 8.1.0
WI-FI ALLIANCE CONFIDENTIAL TRADE SECRET
FOR USE ONLY BY AUTHORIZED WI-FI ALLIANCE MEMBERS – DO NOT COPY
Page 31 of 57
4. sudo apt-get install flex
5. sudo apt-get install libgtk2.0-dev
6. sudo apt-get install libpcap-dev
Compiling Wireshark:
7. Download the wireshark package and extract it
sudo tar –zxvf wireshark-1.7.0_HS2.0_v3_custom.tgz
8. cd wireshark-1.7.0_HS2.0_v3_custom
9. sudo ./autogen.sh
10. sudo ./configure
11. sudo make clean;sudo make
Installing Wireshark:
12. sudo make install
13. cd /etc/ld.so.conf.d
14. sudo ldconfig
Please note : If you have already installed Wireshark in the laptop, please do “sudo make
uninstall” before step 13.
Verifying the installation:
15. Set the wireless card in monitor mode
sudo ifconfig <wireless interface name> down
sudo iwconfig <wireless interface name> mode monitor
sudo ifconfig <wireless interface name> up
16. Select a channel
sudo iwconfig <wireless interface name> channel 6
17. Start wireshark, select interface and check if it can capture packets.
sudo wireshark
Sigma Installation:
Installing dependent packages
a. sudo apt-get install iw
b. sudo apt-get install expect
Installing Sigma sniffer:
1. Install packet injector
cd SigmaSniffer/injector
make
make install
2. Install HS2 Sniffer
cd SigmaSniffer/sniffer

Sigma Installation Guide Version 8.1.0
WI-FI ALLIANCE CONFIDENTIAL TRADE SECRET
FOR USE ONLY BY AUTHORIZED WI-FI ALLIANCE MEMBERS – DO NOT COPY
Page 32 of 57
sudo sh installhs2.sh <Radius server IP address> <Radius server laptop login username>
Follow the onscreen instructions. When prompted provide the Radius server laptop login
password. If installation is successful it will transfer a file ‘123’ from /tmp folder in
Radius server to current directory.
sudo ./wfa_sniffer 9999 <wireless interface name> <test newtork interface name>
(eg sudo ./wfa_sniffer 9999 wlan0 eth3)
7.5. Sigma-P2P
Installation steps –
The Sigma_Sniffer-P2P-HS2-PMF-VE-Ubuntu_vXXXX.tar package should have following modules in it
1) compat-wireless-3.0-2.tar.bz2
2) wireshark-P2P-1.7.0.tar.gz
3) SigmaSniffer
NOTE: For all installation steps, login as root [sudo su]
Install ath9k driver from compat-wireless-3.0-2.tar.bz2 (or latest) with following commands –
1) untar compat-wireless-3.0-2.tar.bz2
2) ./scripts/driver-select ath9k
3) make
4) make install
5) Reboot and check that the Atheros card is found and ath9k driver is working with ‘iwconfig’
command.
Wireshark Installation
1) Install following packages as given below:
2) apt-get install bison
3) apt-get install flex
4) apt-get install libgtk2.0-dev
5) apt-get install libcap-dev
6) apt-get install libpcap-dev
7) apt-get install libnl-dev
8) Get Wireshark package from Sniffer package
9) Extract the package [Command tar xvzf wireshark-P2P-1.7.0.tar.gz]
10) Go to wireshark- P2P-1.7.0 directory and run the following commands
a. ./configure
b. make
c. make install
d. ldconfig

Sigma Installation Guide Version 8.1.0
WI-FI ALLIANCE CONFIDENTIAL TRADE SECRET
FOR USE ONLY BY AUTHORIZED WI-FI ALLIANCE MEMBERS – DO NOT COPY
Page 33 of 57
Sniffer Installation:
1. Installing dependent packages
1) apt-get install iw
2. Installing Sigma sniffer:
1. Install packet injector
a. cd SigmaSniffer/injector
b. make
c. make install
2. Install P2P Sniffer
a. Create directory /SigmaSniffer [mkdir /SigmaSniffer ]
b. cd SigmaSniffer/sniffer
c. Copy wfa_sniffer to /usr/local/bin [cp wfa_sniffer /usr/local/bin]
d. chmod 777 /usr/local/bin/wfa_sniffer
e. Copy map.conf file to /SigmaSniffer [cp map.conf /SigmaSniffer ]
3. Start wfa_sniffer agent from terminal [wfa_sniffer 9999 wlanX ]
7.6. Sigma-11n/WPA2/WMM
Ensure that you are using Linux Debian version 6.0.3 with kernel version 2.6.39.4. If you
need to update your kernel, please follow the kernel upgrade instructions in section 9.1
[Debian 6.0.3 kernel upgrade instructions]
1) Untar the package ‘Sigma_Sniffer_11n-Linux.tar-vXXX.tar’ by executing
the following commands:
tar –xvf Sigma_Sniffer_11n-Linux-vXXX.tar
2) Un Install Previous Version
Go to Sniffer directory. Run the following commands
cd Sniffer
sh uninstallSigmaSniffer.sh
3) Install Wireshark
NOTE: You must use the wireshark package supplied by WFA. The wireshark
downloaded from open source website will not work for Sigma-11n.
Install required packages for Wireshark: Please use ‘apt-get install <package name>’ to
install the following packages:
1. apt-get install bison
2. apt-get install flex
3. apt-get install libgtk2*

Sigma Installation Guide Version 8.1.0
WI-FI ALLIANCE CONFIDENTIAL TRADE SECRET
FOR USE ONLY BY AUTHORIZED WI-FI ALLIANCE MEMBERS – DO NOT COPY
Page 34 of 57
4. apt-get install libpcap*
Untar the wireshark tar ball
cd ../Wireshark_Packages
tar xvjf wireshark-1.6.2_ralink.tar.bz2
Enter the wireshark_1.6.2 directory and install Wireshark
cd wireshark-1.6.2_ralink
1. ./configure
2. make
3. make install
4. ldconfig
4) Install Sniffer Driver
cd .. (Move up one directory – parent directory)
cd Ralink-Debian-Driver
Untar driver package
tar -xjvf
2011_1014_RT3593_Linux_STA_V2.5.0.0_WirelessSniffer.tar.bz2
Build driver
cd 2011_1014_RT3593_Linux_STA_V2.5.0.0_WirelessSniffer
make
Prepare config file
mkdir /etc/Wireless
mkdir /etc/Wireless/RT2860STA/
cp RT2860STA.dat /etc/Wireless/RT2860STA/Insert driver module into
kernel
cd Sigma_Sniffer_11n_Linux/Ralink-debian-
driver_and_Wireshark_packages/
chmod 777
2011_1014_RT3593_Linux_STA_V2.5.0.0_WirelessSniffer
cd 2011_1014_RT3593_Linux_STA_V2.5.0.0_WirelessSniffer
chmod 777 *
cd os/linux
insmod os/linux/rt3593sta.ko
Check the paramters in /etc/Wireless/RT2860STA/RT2860STA.dat and ensure that their
values match the ones given below
WirelessMode=5
CountryRegion=5
CountryRegionABand=7

Sigma Installation Guide Version 8.1.0
WI-FI ALLIANCE CONFIDENTIAL TRADE SECRET
FOR USE ONLY BY AUTHORIZED WI-FI ALLIANCE MEMBERS – DO NOT COPY
Page 35 of 57
Bring up network interface
ifconfig ra0 up
Set network type to sniffer mode
iwpriv ra0 set NetworkType=Monitor2
Set 2.4GHz or 5 GHz channel for sniffing
iwconfig ra0 channel 52
5) Install Sigma Sniffer
Go to Sniffer directory and install Sigma Sniffer
mkdir /SigmaSniffer
cd Sniffer/
cp wfa_sniffer /usr/local/bin
chmod 777 /usr/local/bin/wfa_sniffer
sh start_sniffer.sh
7.7. Sigma-PMF
Installation steps –
1. The Sigma_Sniffer-P2P-HS2-PMF-VE-Ubuntu_vXXXX.tar package should have
following modules in it –
a. compat-wireless-3.0-2.tar.bz2
b. wireshark1.6.2.tar.gz
c. SigmaSniffer
NOTE – For all installation steps you need to login as root.
2. Install ath9k driver from compat-wireless-3.0-2.tar.bz2 (or latest) with following
commands –
a. untar compat-wireless-3.0-2.tar.bz2
b. ./scripts/driver-select ath9k
c. make
d. make install

Sigma Installation Guide Version 8.1.0
WI-FI ALLIANCE CONFIDENTIAL TRADE SECRET
FOR USE ONLY BY AUTHORIZED WI-FI ALLIANCE MEMBERS – DO NOT COPY
Page 36 of 57
e. Reboot and check that the Atheros card is found and ath9k driver is
working with ‘iwconfig’ command.
NOTE: You can see the README file for more instructions.
3. Download and install libnl package (libnl-1.1 or higher)
a. apt-get install libnl-dev
4. Download and install iw package
a. apt-get install iw
5. Install Wireshark using the commands below:
a. sudo su
b. Enter Password when prompted
c. ./configure
d. make
e. make install
f. ldconfig
NOTE: If you find any errors in starting Wireshark after following the above steps, try
installing through apt-get (Laptop connected to internet)
6. Install Sigma Sniffer using the commands below
a. cd SigmaSniffer/sniffer
b. cp wlantest /usr/local/bin
c. cp sigma_dut /usr/local/bin
d. cp wlantest_cli /usr/local/bin
e. sh installSigmaSniffer.sh
f. chmod 777 /usr/bin/wfa_sniffer
g. chmod 777 /usr/local/bin/wlantest
h. chmod 777 /usr/local/bin/sigma_dut
i. chmod 777 /usr/local/bin/wlantest_cli
7. Reboot the laptop
Sigma Installation Guide Version 8.1.0
WI-FI ALLIANCE CONFIDENTIAL TRADE SECRET
FOR USE ONLY BY AUTHORIZED WI-FI ALLIANCE MEMBERS – DO NOT COPY
Page 37 of 57
8. Sniffer services will start automatically when laptop boots. Open another
terminal, keep the wired interface (connected to the Radius sever via hub) in
promiscuous mode.
a. ifconfig eth1<wired interface> promisc
9. To verify the installation, run following command and you should see the
wireshark GUI.
a. wireshark
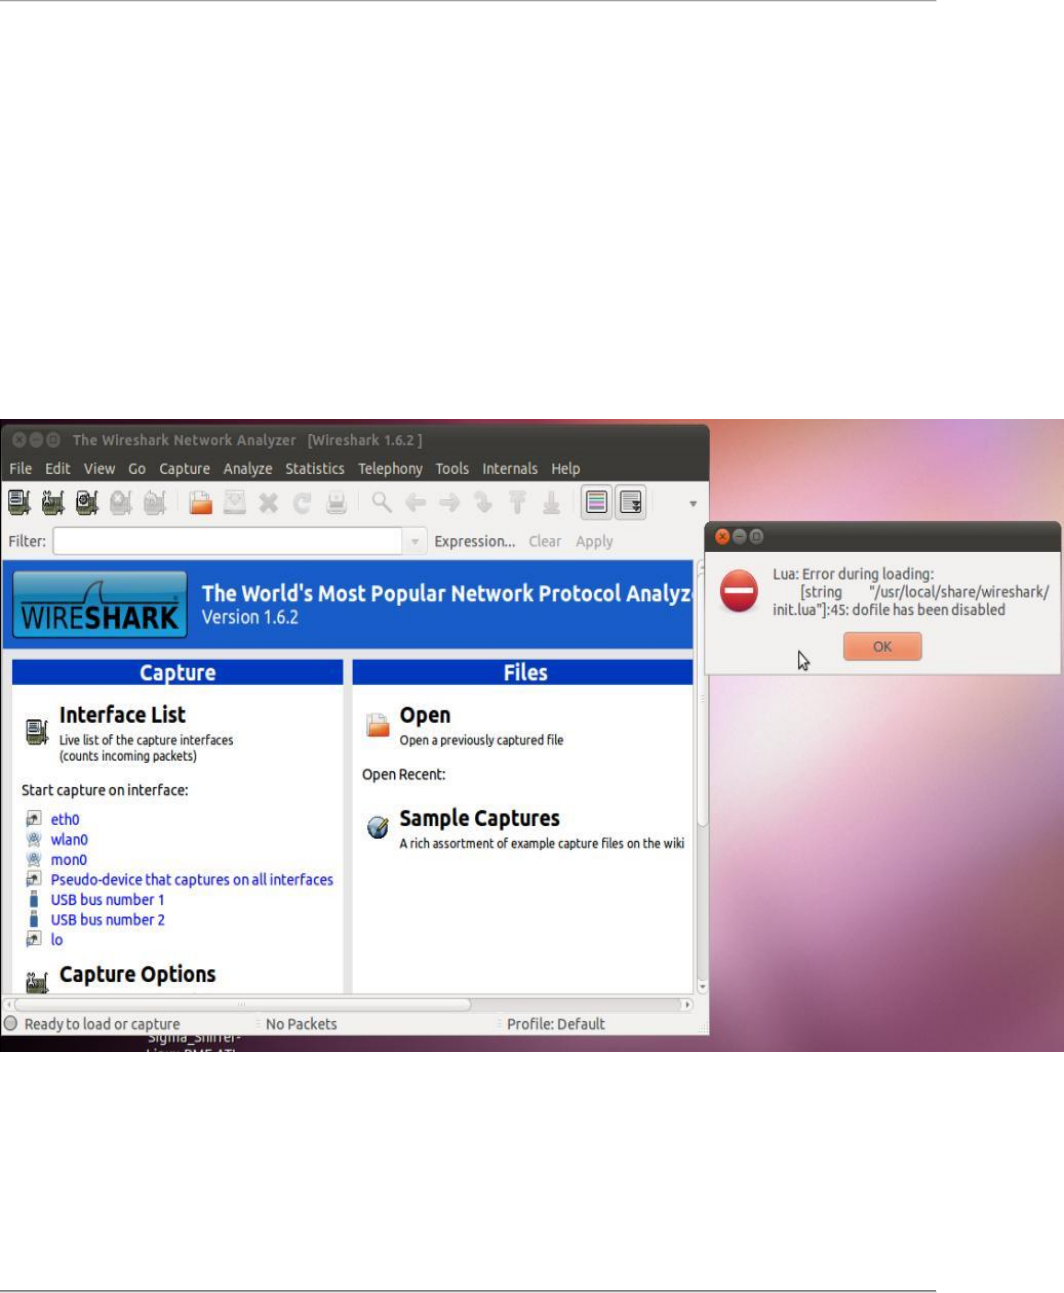
NOTE: You may see the error message as shown in screenshot below. Please click
ok and continue to use Wireshark.
7.8. Sigma-Voice Enterprise
Installation steps –

Sigma Installation Guide Version 8.1.0
WI-FI ALLIANCE CONFIDENTIAL TRADE SECRET
FOR USE ONLY BY AUTHORIZED WI-FI ALLIANCE MEMBERS – DO NOT COPY
Page 38 of 57
1. The Sigma_Sniffer-P2P-HS2-PMF-VE-Ubuntu_vXXXX.tar package should
have following modules in it –
a. compat-wireless-3.0-2.tar.bz2
b. wireshark-1.6.5_WFA_v2.tar.gz
c. SigmaSniffer
NOTE – For all installation steps you need to login as root.
2. Install ath9k driver from compat-wireless-3.0-2.tar.bz2 with following commands
–
a. tar xvpf compat-wireless-3.0-2.tar.bz2
b. ./scripts/driver-select ath9k
c. make
d. make install
e. Reboot and check that the Qualcomm-Atheros card is found and ath9k
driver is working with ‘iwconfig’ command.
NOTE: You can see the README file for more instructions.
4. Download and install following packages (Execute as root – sudo su)
a. apt-get install bison
b. apt-get install flex
c. apt-get install libpcap-dev
d. apt-get install libgtk2.0-dev
e. apt-get install libcap-dev
f. apt-get install autoconf
g. apt-get install libnl-dev
h. apt-get install libwww-perl
5. Download and install iw package
a. apt-get install iw
6. Install Wireshark using the commands below:

Sigma Installation Guide Version 8.1.0
WI-FI ALLIANCE CONFIDENTIAL TRADE SECRET
FOR USE ONLY BY AUTHORIZED WI-FI ALLIANCE MEMBERS – DO NOT COPY
Page 39 of 57
a. sudo su
b. Enter Password when prompted
c. ./configure
d. make
e. make install
f. ldconfig
Note: Start wireshark application and check the version in
Help -> About Wireshark (Version should be Version 1.6.5)
7. Install Sigma Sniffer using the commands below
a. cd SigmaSniffer/sniffer
b. sh installSigmaSniffer.sh
c. chmod 777 /usr/bin/wfa_sniffer
8. Reboot the laptop
7.9. Sigma-VHT
The Sigma_Sniffer-VHT-Fedora_vXXXX.tar package should have following modules in
it –
j. Wireshark package ( wireshark-1.8.1.BRCM.010.i686_20130104.rpm)
k. Wireless Driver ( wl.zip)
l. Sniffer
1. OS Installation:
a. Download Fedora Core 15 Image
b. Burn the Fedora-15-i386-DVD.iso file onto a DVD. Use the DVD to
install Fedora Core 15.
2. Wireshark Installation

Sigma Installation Guide Version 8.1.0
WI-FI ALLIANCE CONFIDENTIAL TRADE SECRET
FOR USE ONLY BY AUTHORIZED WI-FI ALLIANCE MEMBERS – DO NOT COPY
Page 40 of 57
a. Extract the Sniffer package (tar xvf Sigma_Sniffer-VHT-
Fedora_vXXXX.tar)
b. Go to directory Sigma_Sniffer-VHT-Fedora_vXXXX [ cd Sigma_Sniffer-
VHT-Fedora_vXXXX]
c. Go to directory Wireshark_Packages and run the following commands
rpm –e wireshark
rpm –ivh wireshark-1.8.1.BRCM.010.i686_20130104.rpm
d. Execute command ( to make sure wireshark package is successfully
installed and configured)
wireshark -version
3. Wireless Driver Installation
a. Go back to directory Sigma_Sniffer-VHT-Fedora_vXXXX
b. Go to directory Driver
c. Extract wl.zip [unzip wl.zip ]
d. Make sure that wl.ko has execute permissions [chmod 777 wl.ko]
e. Load the wl.ko driver using insmod [insmod wl.ko]
f. Once the driver is loaded, iwconfig command should list the wireless
interface name (eg eth0) [iwconfig]
g. Create directory /SigmaSniffer and /SigmaSniffer/VHT
h. Copy wl utility to /SigmaSniffer/VHT directory [cp wl
/SigmaSniffer/VHT/]
i. Make sure that the wl utility has execute permissions. [chmod 777
/SigmaSniffer/VHT/wl]
Note – If you want to reinstall the driver, make sure you reboot the laptop before
loading the driver.
4. VHT Sniffer Installation
Follow the steps to install and start VHT Sigma Sniffer Agent on Sniffer laptop
a. Go back to directory Sigma_Sniffer-VHT-Fedora_vXXXX

Sigma Installation Guide Version 8.1.0
WI-FI ALLIANCE CONFIDENTIAL TRADE SECRET
FOR USE ONLY BY AUTHORIZED WI-FI ALLIANCE MEMBERS – DO NOT COPY
Page 41 of 57
b. Go to directory Sniffer
c. Copy sniffer binary to /usr/local/bin [cp wfa_sniffer /usr/local/bin ]
d. Make sure that the wfa_sniffer binary has execute permissions. [chmod
777 /usr/local/bin/wfa_sniffer]
e. Copy map.conf to /SigmaSniffer directory [cp map.conf /SigmaSniffer/]
f. Give a control network IP address to the Ethernet interface. For example –
[ ifconfig em1 192.168.250.5 netmask 255.255.255.0 up]
g. Edit the following line in file start_sniffer.sh with Wireless Interface
Name (ex: eth0)
wfa_sniffer –port 9999 –prog VHT –if eth0
h. To start sniffer agent, execute: sh start_sniffer.sh
5. Instructions to capture packets manually.
Load the driver for the sniffer card if it is not already loaded.
a. Go back to directory Sigma_Sniffer-VHT-Fedora_vXXXX
b. Make sure that wl.ko has execute permissions [Command (chmod +x
wl.ko]
c. Load the wl.ko driver using insmod [Command ( insmod wl.ko]
d. Once the driver is loaded, iwconfig command should list the wireless
interface name (eg eth0) [ iwconfig].
e. Give the following commands to configure the sniffer in channel 36,
channel width 80
wl up
wl monitor 3
ifconfig radiotap0 up
wl chanspec 36/80
f. Open Wireshark and select the interface as radiotap0 to capture packets.

Sigma Installation Guide Version 8.1.0
WI-FI ALLIANCE CONFIDENTIAL TRADE SECRET
FOR USE ONLY BY AUTHORIZED WI-FI ALLIANCE MEMBERS – DO NOT COPY
Page 42 of 57
8. Sample DUT
Following table shows the list of test bed device(s) that can be used as sample DUT
Program Name
STAUT
APUT
Hotspot 2.0
Broadcom
Qualcomm Atheros
P2P
Intel
-
11n/WPA2/WMM
Intel
For test 5.2.14 – Ralink
For test 5.3.2 - Ralink
Broadcom
PMF
Qualcomm Atheros
Qualcomm Atheros
Miracast
Mediatek (SoUT)
Marvell (P-SnUT)
-
Voice Enterprise
Marvell
Cisco
TDLS
Marvell/Ralink
-
Wi-Fi certified ac (VHT)
Intel/Broadcom/Qualcomm
Qualcomm/Broadcom

Sigma Installation Guide Version 8.1.0
WI-FI ALLIANCE CONFIDENTIAL TRADE SECRET
FOR USE ONLY BY AUTHORIZED WI-FI ALLIANCE MEMBERS – DO NOT COPY
Page 43 of 57
9. Kernel Upgrade Instructions
9.1. Debian 6.0.3 kernel upgrade instructions
Download the 2.6.39.4 kernel from
http://www.kernel.org/pub/linux/kernel/v2.6/linux-2.6.39.4.tar.bz2
If this isn’t available, please download it from the WLABS FTP web site
ftp://wlabs.wi-fi.org/TestEngine/Debian-6.0.3/
1) Change to the directory where you downloaded the kernel image
cd /home/wifiuser/
2) Untar the kernel image package and copy the directories to /usr/src
tar -xjvf linux-2.6.39.4.tar.bz2 -C /usr/src
3) Change to directory /usr/src
cd /usr/src
4) Install pre-requisite packages if they’re not already installed
apt-get install build-essential
apt-get install ncurses-dev
5) Change directory to linux-2.6.39.4
cd linux-2.6.39.4/
cp /boot/config-2.6.32-5-686 /usr/src/linux-2.6.39.4/.config
6) Configure the kernel
make menuconfig
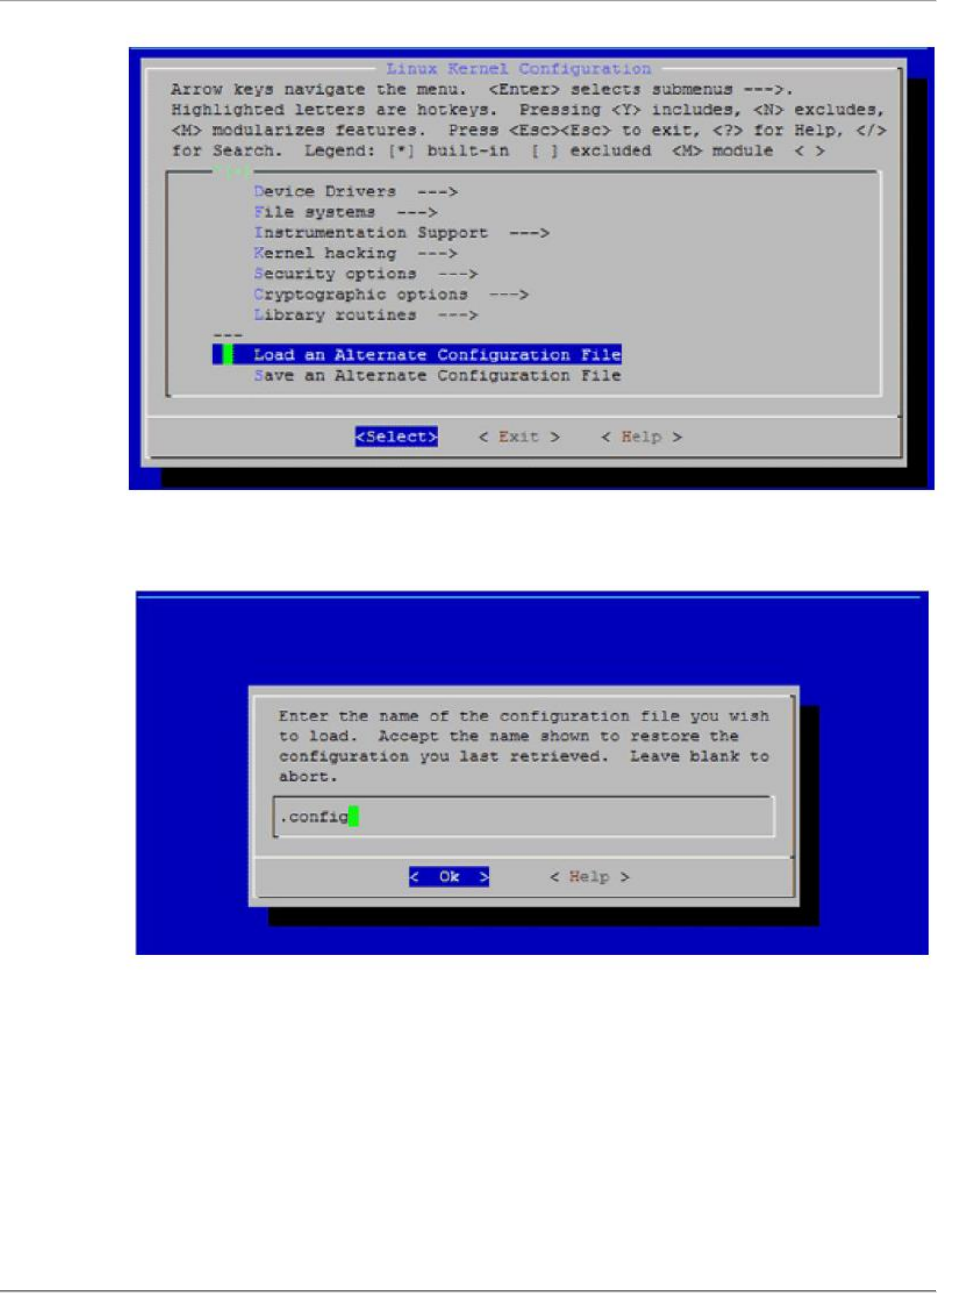
On the first screen, please select ‘Load an Alternate Configuration file’
Sigma Installation Guide Version 8.1.0
WI-FI ALLIANCE CONFIDENTIAL TRADE SECRET
FOR USE ONLY BY AUTHORIZED WI-FI ALLIANCE MEMBERS – DO NOT COPY
Page 44 of 57
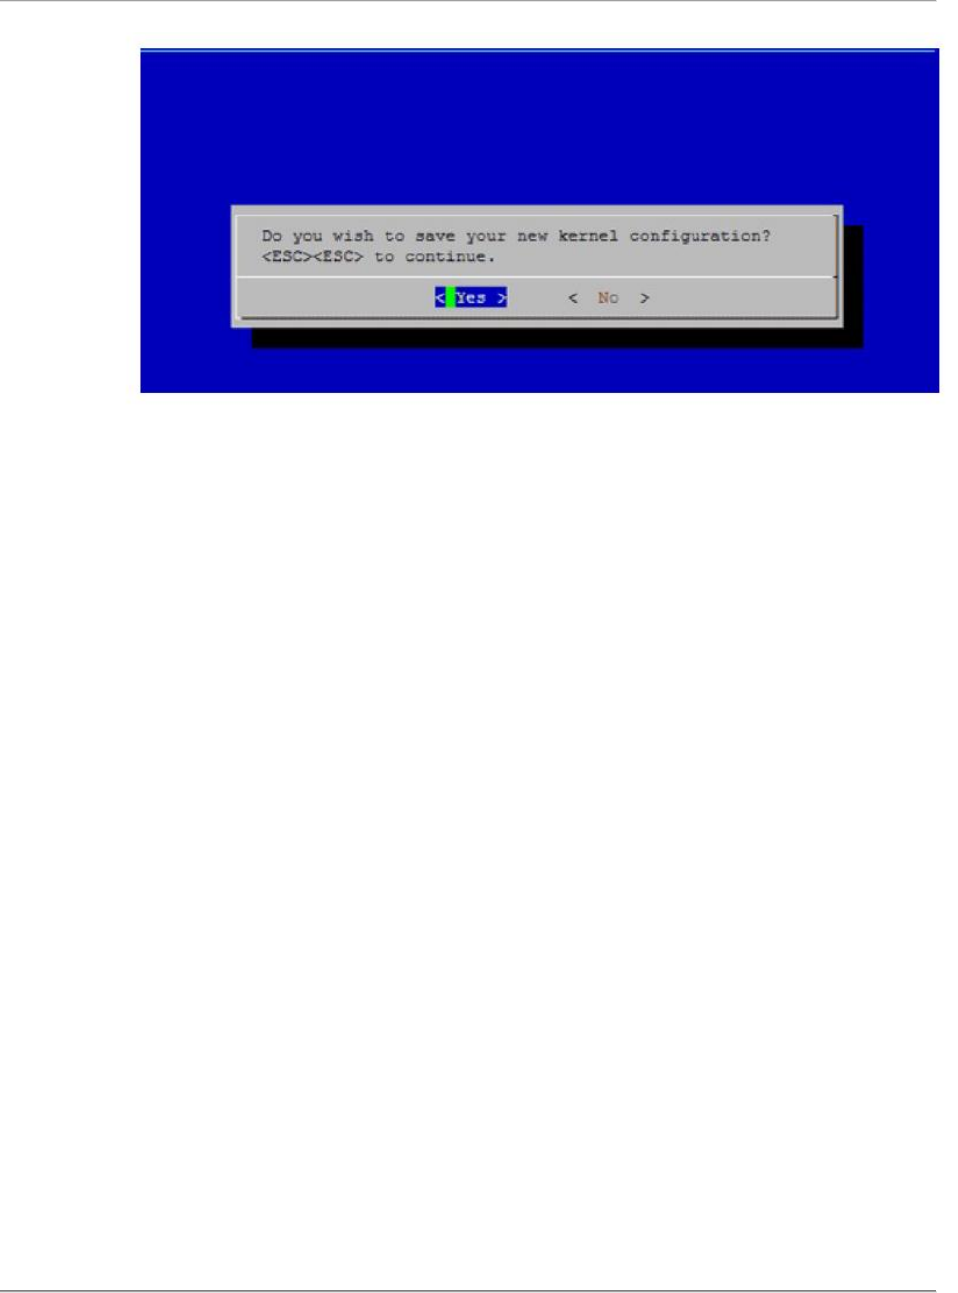
On the next screen, choose ‘.config’ which contains the current configuration for the old
working kernel. Press OK.
Save the configuration and exit by pressing ‘Yes’.
Sigma Installation Guide Version 8.1.0
WI-FI ALLIANCE CONFIDENTIAL TRADE SECRET
FOR USE ONLY BY AUTHORIZED WI-FI ALLIANCE MEMBERS – DO NOT COPY
Page 45 of 57
7) Install the new kernel using,
make
make modules
make modules_install
make install
8) Now, we can generate the initramfs image using
cd /boot
mkinitramfs -o initrd.img-2.6.39.4 2.6.39.4
9) Please use the following commands/guidelines to add a menu entry to grub.cfg
cd /boot/grub
chmod 644 grub.cfg
vi grub.cfg (Open grub configuration file and add menu entry
corresponding to the new kernel)
chmod 444 grub.cfg
update-grub
reboot

Sigma Installation Guide Version 8.1.0
WI-FI ALLIANCE CONFIDENTIAL TRADE SECRET
FOR USE ONLY BY AUTHORIZED WI-FI ALLIANCE MEMBERS – DO NOT COPY
Page 46 of 57
10. Readme First
10.1. Test bed Devices
If you find any issue related to installation of the test bed device, please go through the tech ops
manual of that test bed device or contact the technical support listed in the tech ops manual document.
Please refer the tech ops manual for various programs on ftp://wlabs.wi-fi.org/Tech-
Ops_manual_&_references/
10.2. Manual Intervention
There are some test cases in 11n which requires user intervention during the testing due to test bed
devices or supplicant automation limitations. UCC scripts will pause and show the instruction about
what needs to be performed by the user.
Following list shows such test cases -
N-4.2.11, N-4.2.16, N-4.2.38, N-5.2.15, N-5.2.22, N-5.2.23
o Follow the message on UCC screen
ExA15
o Manually enter the PEAP0 credentials for Microsoft Supplicant (Zero Config for
WindowsXP and WLAN AutoConfig for Windows7)
N- 5.2.45 - If the DUT supports single stream (1x1), modify the file "AP-Config-5.2.45.txt"
in \cmds\Sigma11n\ folder to set supported MCS to 4, else it should be MCS12
10.3. General Information
Please go through the point below if you are using Sigma for the first time –
1. For Sigma 11n, following test case scripts are intended for test lab qualification only and NEVER
be executed for certification:
a. For APUT: 4.2.29_PSK_2SS_*
b. For STAUT: 5.2.37_PSK_2SS_*
2. If Windows ZeroConfig or AutoConfig is used for PEAP0 EAP method, pop-up appears asking
for credential information. This has to be given manually once initially and saved.
3. CAPI command "sta_preset_testparameters" will only be used for "Windows" based category 2
and category 3 DUTs implementation. With Sigma 4.2.0 or higher, category 1 DUTs should
ignore this command with a valid response to UCC.
4. If APUT is connected to Power Switch, then make sure it is assigned a unique port number.
5. If multicast addresses are configured during Sigma installation on STAs and PCEndpoint, then
Pause statement can be commented for test cases 4.2.10 and 5.2.14
Sigma Installation Guide Version 8.1.0
WI-FI ALLIANCE CONFIDENTIAL TRADE SECRET
FOR USE ONLY BY AUTHORIZED WI-FI ALLIANCE MEMBERS – DO NOT COPY
Page 47 of 57
6. When the Test Result on the UCC Console mentions "Completed" instead of "PASS or FAIL",
manually verify the logs for Sniffer checks and Ping Checks.
7. Test case N-4.2.19 and N-4.2.37 are concurrent dual band AP test cases. If the DUT does not
support dual band configuration through Sigma, comment the DUT configuration.
8. Sigma can control the APUT power ON/OFF. This functionality can be used by uncommenting
the APUT command in PowerOnOffAPs.txt in UCC \cmds\Sigma11n\ folder.
9. For WMM testing on Microsoft Windows, registry settings need to updated as below:
a. For TCP to handle DSCP frames, create a new registry entry (if not existing)
REG_DWORD “DisableUserTOSSetting “
b. Set the value to 0
c. Path HKEY_LOCAL_MACHINE\System\CurrentControlSet\Services\Tcpip\Parameters
d. Reboot the machine for modified registry settings to take effect.
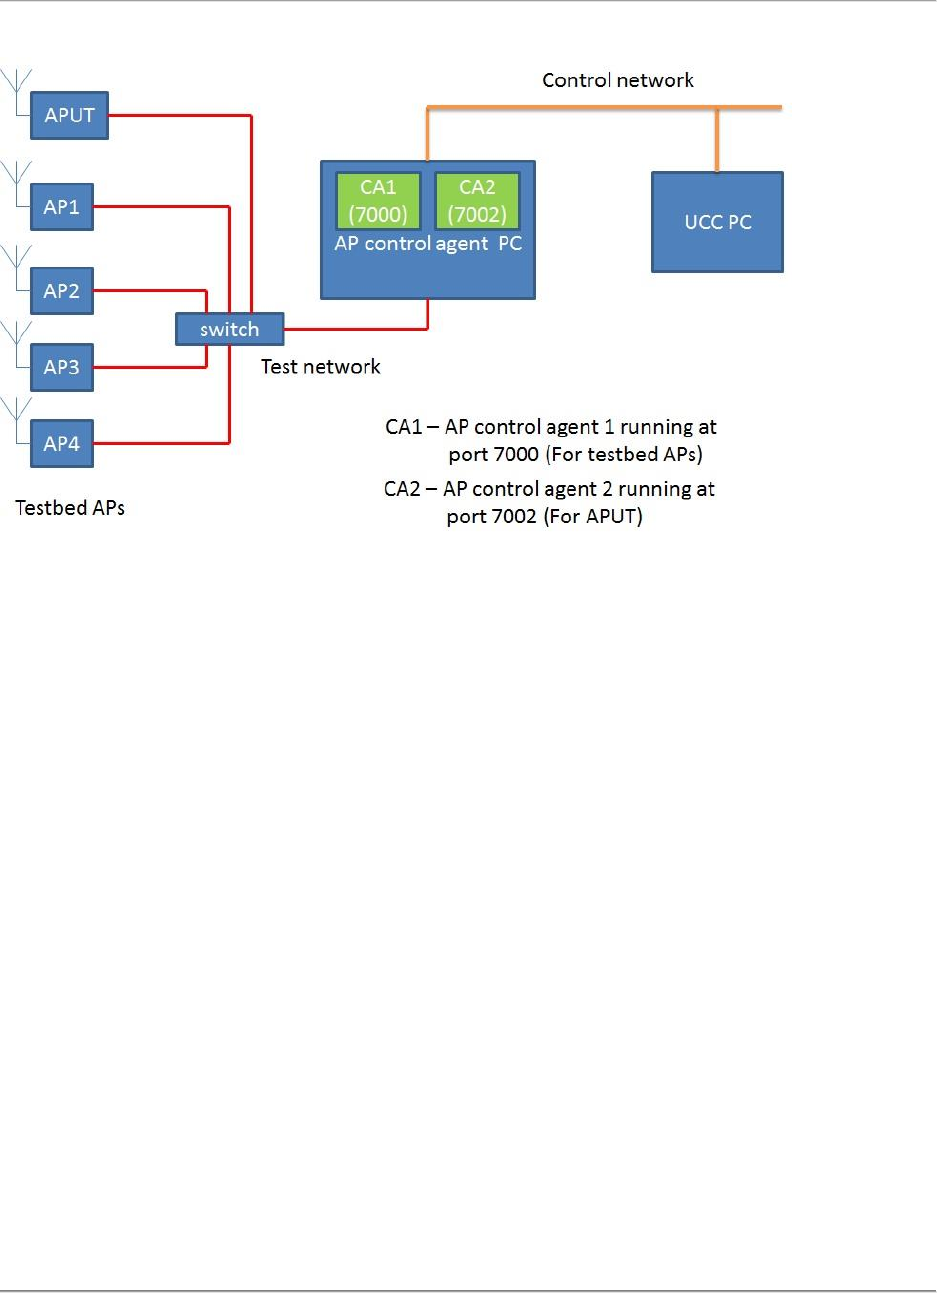
10.4. Test bed AP as APUT
If you want to run APUT testing with one of the test bed APs as APUT then please follow the
instruction below.
Picture below shows the AP control agent setup for STAUT testing. Once Sigma AP Control Agent is
installed, AP Control Agent will listen for test bed AP configuration commands from UCC at port
7000.
AP Control agent setup for STAUT testing
Picture below shows the AP Control agent setup for APUT testing. The APUT is connected to the test
network switch. A second AP control agent is installed in the AP control agent PC for the AP under test.
This control agent is configured to run at port 7002. Once installed, the AP Control agent 2 will listen for
APUT configuration commands from UCC at port 7002.
Sigma Installation Guide Version 8.1.0
WI-FI ALLIANCE CONFIDENTIAL TRADE SECRET
FOR USE ONLY BY AUTHORIZED WI-FI ALLIANCE MEMBERS – DO NOT COPY
Page 48 of 57
AP control agent setup for APUT testing
Procedure to be followed for APUT testing:
1. In the AP control agent PC, copy the Sigma_AP_ConfigurationAgent-windows_XXXX package
to another folder “AP-CA2” (different from the already running AP control agent 1 folder).
2. Goto AP-CA2 AP_ControlAgent/src folder inside the package. Open the UCCTestbed.conf file,
change the ServerPort to 7002 and save the file.
3. Run the APservice.bat in AP-CA2 AP_ControlAgent folder. This should start a APcontrolagent2
for APUT in port 7002.
4. Now in the UCC PC open the file UCC/cmds/Sigma-11n/init_802.11n.txt file, mention the DUT
control agent port number as 7002, IP address is same as APcontrolagent PC.
# DUT Control Agent
wfa_control_agent_dut!ipaddr=192.168.250.20,port=7002!
5. Mention the IP address of APUT.
#Wireless IP of DUT
dut_wireless_ip!192.165.100.40!
6. Mention the name of test bed AP as DUT name. For eg if Atheros11n AP is DUT, mention the
DUT name as
“define!$DUT_Name!Atheros11nAP!”
If Marvell11n AP is the DUT, mention the DUT name as
“define!$DUT_Name!Marvell11nAP!”!

Sigma Installation Guide Version 8.1.0
WI-FI ALLIANCE CONFIDENTIAL TRADE SECRET
FOR USE ONLY BY AUTHORIZED WI-FI ALLIANCE MEMBERS – DO NOT COPY
Page 49 of 57
7. Mention the APUT user name, password and hostname. You can refer to UCC/cmds/Sigma-
11n/802.11n-Testbed-Aps.txt file for this information. For eg if Atheros11n AP is the APUT, the
user name, password and hostname will be as mentioned below.
define!$APUT_uname!root!
define!$APUT_pword!5up!
define!$APUT_hostname!~!
8. Mention the APUT mac address
define!$DutMacAddress!00:03:7f:10:45:4a!
9. Save the init_802.11n.txt file.
10. Open the 'PowerOnOffAPs.txt ' file in UCC/cmds/Sigma-11n folder and make sure the following
line is NOT commented (remove # preceding the line).
TestbedAPConfigServer!AccessPoint,$DUT_Name,IPAddress,dut_wireles
s_ip,UserName,$APUT_uname,Password,$APUT_pword,HostName,$APUT_hos
tname,PowerSwitchPort,$APUTPowerSwitchPort!DEFAULT
Change the above line as mentioned below and save the file
wfa_control_agent_dut!AccessPoint,$DUT_Name,IPAddress,dut_wireles
s_ip,UserName,$APUT_uname,Password,$APUT_pword,HostName,$APUT_hos
tname,PowerSwitchPort,$APUTPowerSwitchPort!DEFAULT
11. Make sure the DUT AP is switched ON.
12. Start the test case.

Sigma Installation Guide Version 8.1.0
WI-FI ALLIANCE CONFIDENTIAL TRADE SECRET
FOR USE ONLY BY AUTHORIZED WI-FI ALLIANCE MEMBERS – DO NOT COPY
Page 50 of 57
11. Support
When contacting the Wi-Fi Alliance for Sigma technical support, include as much information as possible
to assist the development team in responding to your inquiry. Types of information required include:
which certification program, Sigma version number, which Sigma component, etc.
11.1. Sigma General Support
For general Sigma support questions:
sigmasupport@wi-fi.org
11.2. Member Support Portal
The Sigma Member Support Portal allows members to report defects and request new features. The
portal also enables members to view the status of the each individual support case:
https://login.wi-fi.org/login.php > Salesforce
When a new case is created, an e-mail with a unique case identifier is sent to the e-mail address listed
with the portal account. Please provide this case identifier with all communication with the Wi-Fi
Alliance regarding this case.

Sigma Installation Guide Version 8.1.0
WI-FI ALLIANCE CONFIDENTIAL TRADE SECRET
FOR USE ONLY BY AUTHORIZED WI-FI ALLIANCE MEMBERS – DO NOT COPY
Page 51 of 57
12. FAQ (Frequently Asked Questions)
12.1. Sigma 11n Sniffer
12.1.1. Q. What operating system does Sigma support for the 11n sniffer?
Sigma currently supports Debian OS v6.0.3. Please refer to the Sigma 11 section of this guide for
hardware/software requirements and 11n sniffer installation.
12.1.2. Q. How can I find out my OS/kernel version for the 11n
sniffer?
Please execute commands as a root user,
cat /etc/debian_version
uname –r
perl --version
Include the outputs of these commands if need to send a query to WFA. This will assist us.
12.1.3. Q. When I try to bring up the ra0 interface using ‘ifconfig ra0
up’, I receive error ‘SIOCSIFFLAGS: operation not permitted’.
Please check if the Ralink 3X3 sniffer card is properly inserted into the slot on sniffer machine.
Please perform ‘insmod rtXXXXsta.ko’ and then check for any errors using the ‘dmesg’
command. You can also check if Ralink network controller is shown by executing ‘lspci’
command. If any errors occur, please reboot the sniffer machine and then perform ‘insmod’ for
the Ralink driver. Now, check if you can bring up the Ralink ‘ra0’ interface. Also, put the Ralink
card/interface in monitor mode before starting Wireshark capture. Please execute following
command as root user.
iwpriv ra0 set NetworkType=Monitor2
12.1.4. Q. How do I check if Tshark is installed correctly?
Please check if you’re able to run ‘tshark’ from the terminal (as root user) for the ra0 interface. If
you encounter any errors, the tshark package may not have been installed or compiled as per the
installation guide.
tshark -i ra0
If you need to send any additional query to WFA, please include the outputs of the following
commands in the query. As user root, execute the following commands:
which tshark
locate tshark
ps ax | grep wfa

Sigma Installation Guide Version 8.1.0
WI-FI ALLIANCE CONFIDENTIAL TRADE SECRET
FOR USE ONLY BY AUTHORIZED WI-FI ALLIANCE MEMBERS – DO NOT COPY
Page 52 of 57
12.1.5. Q. How do I check if the 11n Sigma sniffer service is running
on the Debian machine?
Please check if the output of the following command shows the ‘wfa_sniffer’ service running on
port# 9999.
ps –ax | grep wfa
Always start/restart ‘wfa_sniffer’ service as root user.
12.1.6. Q. Where can I find the net install images for Debian 6.0.3
OS?
Location: ftp://wlabs.wi-fi.org/Debian/6.0.3/
12.1.7. Q. I understand that Debian 6 OS based 11n sniffer hasn’t
been qualified at WFA. Could you please let me know any potential
issues I can lookout for if we use it in our Sigma setup?
Please refer to the following table that lists a few Wireshark issues we’ve found with the Debian
6.0.3 OS kernel v2.6.39.4 based 11n sniffer.
Test
Case #
Result on Debian 6 Sniffer
Result on manual check (Omnipeek)
N-5.2.16
No Assoc or Ressoc
Works fine
N-5.2.41
MixedModePream,0 => FAIL
N-5.2.51
TKIP_Ad,1 => FAIL
12.1.8. Q. Are the Wireshark and Ralink sniffer card drivers
different for Debian 5.0.2 based and Debian 6.0.3 based 11n
sniffer?
Yes, Debian 6.0.3 OS based sniffer uses Wireshark 1.6.2 whereas the Debian 5.0.2 OS based
sniffer uses Wireshark 1.2.1. The Ralink card drivers required are also different. The drivers and
Wireshark packages are included in the respective sniffer distributions.
12.2. Generic
12.2.1. Q. I cannot install Debian OS v5.0.2 from the net install
image OR No sources are available to install Debian 5.0.2
libraries/packages using ‘apt-get install X’
Debian and other mirror servers have removed support for Debian OS 5.0.2. If you cannot find
suitable sources/mirrors, please consider using Debian 6.0.3
Location: ftp://wlabs.wi-fi.org/Debian/6.0.3/

Sigma Installation Guide Version 8.1.0
WI-FI ALLIANCE CONFIDENTIAL TRADE SECRET
FOR USE ONLY BY AUTHORIZED WI-FI ALLIANCE MEMBERS – DO NOT COPY
Page 53 of 57
13. Appendix A: References
Latest versions of following documents are available at http://www.wi-fi.org/members/certifications-
testing/testing-information/sigma-test-environment
[CAPI] Sigma Control API Specification
[System Architecture] Sigma Test Environment System Architecture
[UCC User Manual] Sigma Installation Guide

Sigma Installation Guide Version 8.1.0
WI-FI ALLIANCE CONFIDENTIAL TRADE SECRET
FOR USE ONLY BY AUTHORIZED WI-FI ALLIANCE MEMBERS – DO NOT COPY
Page 54 of 57
14. Appendix B: Supplicant Installation Notes
NOTE – No explicit Supplicant installation is needed for P2P and Hotspot 2.0 Testbed stations.
Please refer to the test plan for specific program for information about required supplicant for test bed
stations.
WPA Supplicant Installatiton (for Sigma 11n)
1. Install Winpcap.exe from the Sigma Testbed STA (Sigma_TestbedSTA-WinXP_vXXXX.zip) package.
2. Go to the folder “Sigma_WpaSupplicant” and run install.bat
It will install the WpaSupplicant along with the required Wi-Fi user certificates (pem format)
WPA Supplicant Un-installation (for Sigma 11n)
1.Delete the service that was created during the installation by the following command
2. sc delete WFA_WpaSupplicant_Service
3. Delete the folder c:\wfa\WpaSupplicant
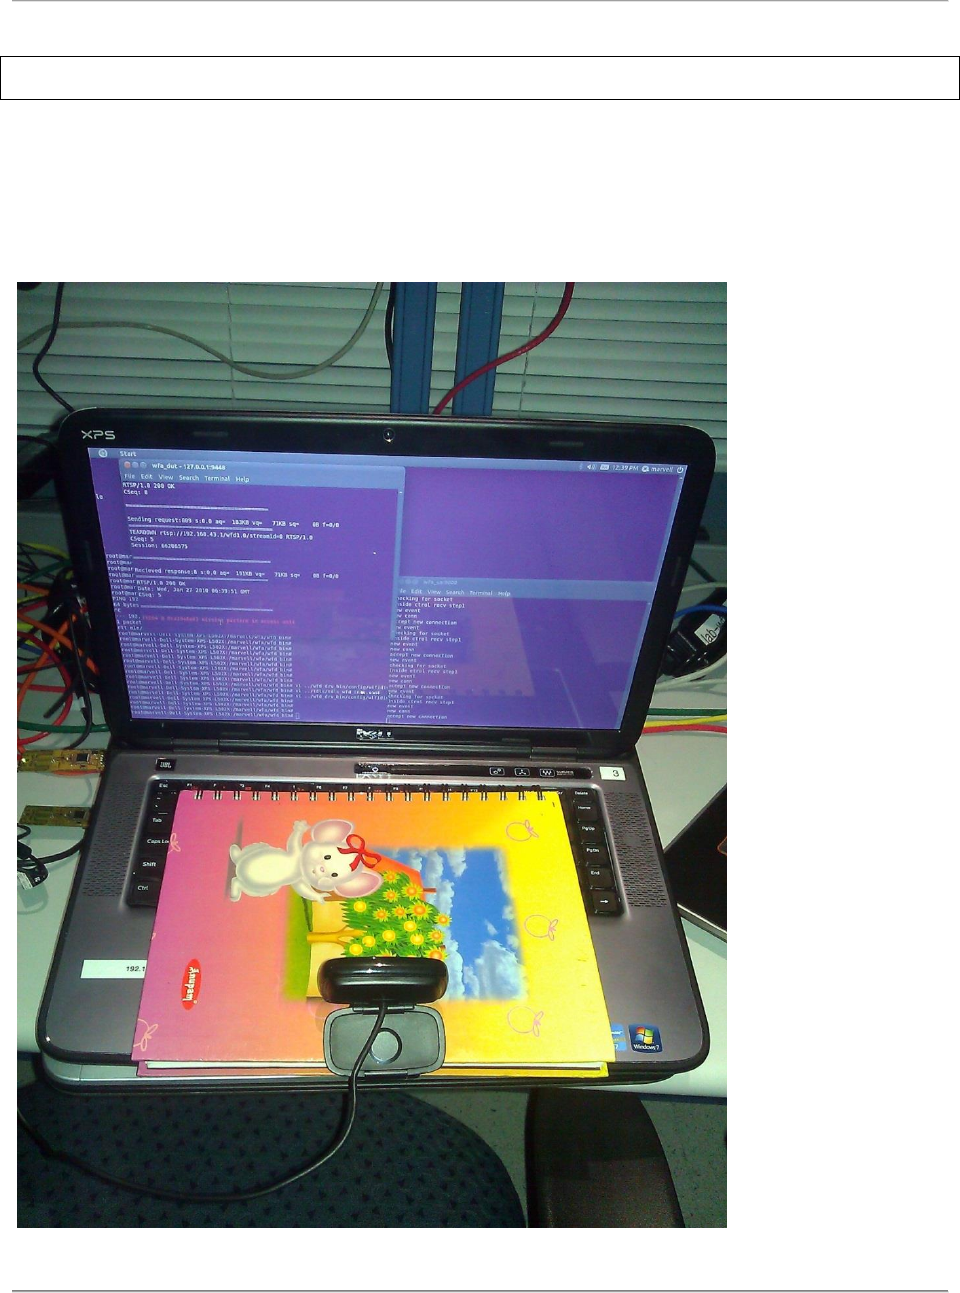
Sigma Installation Guide Version 8.1.0
WI-FI ALLIANCE CONFIDENTIAL TRADE SECRET
FOR USE ONLY BY AUTHORIZED WI-FI ALLIANCE MEMBERS – DO NOT COPY
Page 55 of 57
15. Appendix C: Miracast Additional Test Bed Information
Camera should be placed focused on the Sink Screen to capture the rendering.
Examples with different Sink devices:
Note: High Stand Tri-pod can be used to place the camera on top focused on Sink Screen
Example 1:
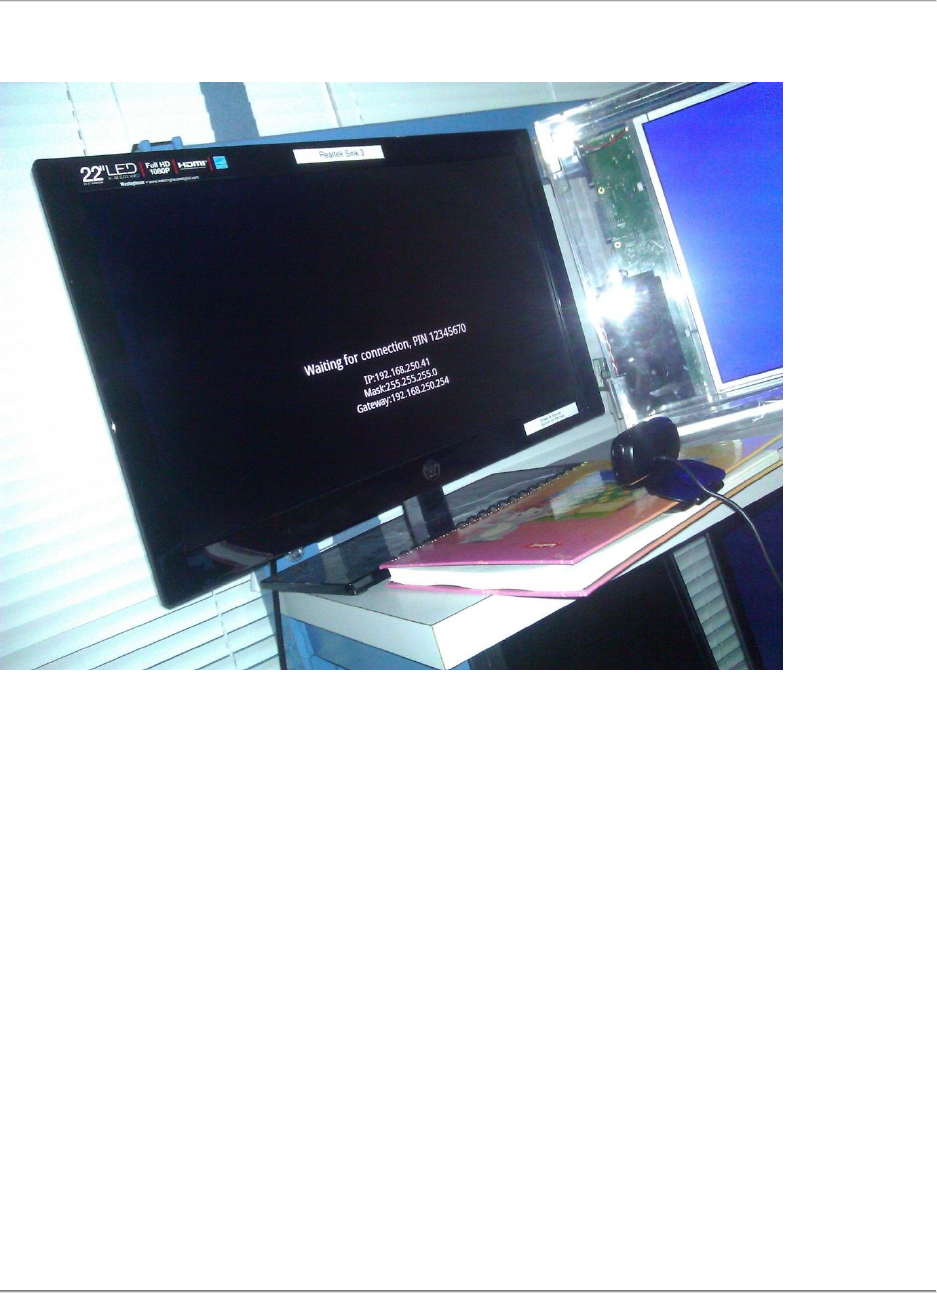
Sigma Installation Guide Version 8.1.0
WI-FI ALLIANCE CONFIDENTIAL TRADE SECRET
FOR USE ONLY BY AUTHORIZED WI-FI ALLIANCE MEMBERS – DO NOT COPY
Page 56 of 57
Example 2:
Sigma Installation Guide Version 8.1.0
WI-FI ALLIANCE CONFIDENTIAL TRADE SECRET
FOR USE ONLY BY AUTHORIZED WI-FI ALLIANCE MEMBERS – DO NOT COPY
Page 57 of 57
Example 3:
