Source Insight 4.0 User Guide Insight4User
User Manual:
Open the PDF directly: View PDF ![]() .
.
Page Count: 434 [warning: Documents this large are best viewed by clicking the View PDF Link!]
- Source Insight 4.0 User Guide
- CHAPTER 1 Getting Started
- CHAPTER 2 User Interface
- CHAPTER 3 Features and Concepts
- Projects
- Project Features
- Inside a Project
- The Current Project
- Project Directories
- Normalized File Names
- Creating a New Project
- Adding Files to a Project
- Removing Files from a Project
- Using a Master File List
- Opening and Closing Projects
- Removing a Project
- Copying a Project
- Read-Only Projects
- Changing Project Settings
- Symbols and Projects
- Synchronizing Project Files
- The Base Project
- Creating a Web Version of Your Project
- Rebuilding Projects
- Project Windows
- Symbols and Language Parsing
- Conditional Parsing and Preprocessor Support
- Name Fragment Matching Symbol Names
- Source Control
- File Types
- Browsing and Analysis
- Syntax Formatting and Styles
- Context window
- Relation Window
- Code Snippets
- Clip Window
- Bookmarks
- Searching and Replacing Text
- Regular Expressions
- Comparing Files and Directories
- Navigation with the Selection History
- Scrolling and Selecting Text
- Outlining and Collapsing Text
- Code Beautifier
- Generating HTML from Project Sources
- File Encodings
- File Buffer Basics
- Recovering From Crashes
- Command Line Syntax
- Specifying File Arguments
- Opening Files
- Opening Workspaces
- Command Line Options
- Suppressing New Program Instances
- Always Starting a New Program Instance
- Running a Source Insight Command
- Specifying a Project to Open
- Closing the Current Project
- Using a Temporary Project
- Finding a Symbol
- Synchronizing Project Files
- Synchronizing Files in Batch Mode
- Suppressing the Splash Screen
- Comparing Files
- Resetting All Settings
- Resetting Configuration Options to Defaults
- Resetting the Display Layout
- User-Level Commands
- Custom Commands
- Customized Settings and Configurations
- Visual Themes
- Saving Window Arrangements with Layouts
- Saving and Restoring Workspaces
- Performance Tuning
- Predefined Path Variables
- Files Created by Source Insight
- Projects
- CHAPTER 4 Command Reference
- Commands Overview
- Commands
- About Source Insight
- Activate Menu Commands
- Activate Clip Window
- Activate FTP Browser
- Activate Project File List
- Activate Project Search Bar
- Activate Project Symbol List
- Activate Project Window
- Activate Relation Window
- Activate Search Bar
- Activate Search Results
- Activate Snippet Window
- Activate Symbol Window
- Activate Window List
- Add and Remove Project Files
- Add File
- Add File List
- Advanced Options
- Arrange Windows
- Arrangement Toolbar
- Back Tab
- Backspace
- Beginning of Line
- Beginning of Selection
- Blank Line Down
- Blank Line Up
- Block Down
- Block Up
- Bookmark
- Bookmark Window
- Bookmark Options
- Bottom of File
- Bottom of Window
- Browse Files
- Browse Project Symbols
- Browse Global Symbols Dialog box
- Browse Local File Symbols
- Browser Mode
- Calculate
- Cascade Windows
- Check for Updates
- Checkpoint
- Checkpoint All
- Clear Highlights
- Clip Properties
- Clip Window
- Clip Window Options
- Close
- Close All
- Close Project
- Close Window
- Color Options
- Command Shell
- Compare Files
- Compare with Backup File
- Complete Snippet
- Complete Symbol
- Conditional Parsing List
- Context Window
- Context Window Options
- Copy
- Copy File Path
- Copy Line
- Copy Line Right
- Copy List
- Copy Project
- Copy Symbol
- Copy To Clip
- Create Key List
- Create Bookmarks from Relation Items
- Create Command List
- Cursor Down
- Cursor Left
- Cursor Right
- Cursor Up
- Custom Commands
- Cut
- Cut Line
- Cut Line Left
- Cut Line Right
- Cut Selection or Paste
- Cut Symbol
- Cut To Clip
- Cut Word
- Cut Word Left
- Deactivate License
- Delete
- Delete All Clips
- Delete Character
- Delete Clip
- Delete File
- Delete Line
- Directory Compare
- Directory Compare Options
- Display Options
- Drag Line Down
- Drag Line Down More
- Drag Line Up
- Drag Line Up More
- Duplicate
- Duplicate Symbol
- Edit Condition
- Enable Event Handlers
- End of Line
- End of Selection
- Exit
- Exit and Suspend
- Expand
- Expand All
- Expand Text Variables
- Expand Special
- Export File as HTML
- Export Project File List
- Export Project To HTML
- File Compare
- File Compare Window Options
- File Options
- File Search Bar
- File Search Bar Options
- File Type Options
- Folder Options
- FTP Browser
- FTP Browser Options
- FTP Site List
- Edit FTP Site Properties
- Full Screen (F11)
- Function Down
- Function Up
- General Options
- Generate Call Tree
- Go Back
- Go Back Toggle
- Go Forward
- Go To First Link
- Go To Line
- Go To Next Change
- Go To Previous Change
- Go To Next Link
- Go To Previous Link
- Go To Next Reference Highlight
- Go To Previous Reference Highlight
- Help
- Help Mode
- Highlight Word
- Incremental Search
- Incremental Search Mode
- Incremental Search Backward
- Horizontal Scroll Bar
- HTML Help
- Import External Symbols
- Import External Symbols for Current Project
- Indent Left
- Indent Right
- Insert ASCII
- Insert File
- Insert GUID
- Insert Line
- Insert Line Before Next
- Insert New Line
- Join Lines
- Jump To Base Type
- Jump To Caller
- Jump To Definition
- Jump To Link
- Jump To Prototype
- Key Assignments
- Language Options
- Language Properties
- Last Window (Ctrl+Tab) or (Ctrl+Shift+Tab)
- Layout Toolbar
- Line Numbers
- Link All Windows
- Link Window
- Load Configuration
- Load File
- Load Layout
- Load Search String
- Lock Context Window
- Lock Relation Window
- Logging Options
- Lookup References
- Make Column Selection
- Manage License
- Manage Visual Themes
- Menu Assignments
- Mono Font View
- New
- New Clip
- New Relation Window
- New Project
- New Window
- Next File
- Next Relation Window View
- Open
- Open As Encoding
- Open Backup File
- Open Project
- Outline Toolbar
- Outlining Options
- Overview Options
- Page Down
- Page Setup
- Page Up
- Paren Left
- Paren Right
- Parse Source Links
- Paste
- Paste From Clip
- Paste Line
- Paste Symbol
- Pick Window
- Play Recording
- Preferences
- Print Relation Window
- Project File Types
- Project File Type List Properties
- Project Folder Browser
- Project Folder Browser Options
- Project File List
- Project File List Options
- Project Search Bar
- Project Rebuild Notice
- Project Symbol Categories
- Project Symbol Category Window Options
- Project Symbol List
- Project Symbol List Options
- Project Settings
- Project Report
- Project Window command
- Rebuild Project
- Redo
- Redo All
- Redraw Screen
- Reform Paragraph
- Reformat Source Code Options
- Refresh Relation Window
- Reload As Encoding
- Relation Window Graph Options
- Relation Window
- Relation Window Options
- Reload File
- Reload Modified Files
- Remove File
- Remove Project
- Remote Options
- Rename
- Renumber
- Repeat Typing
- Replace
- Replace Files
- Restore File
- Restore Lines
- Save
- Save A Copy
- Save All
- Save All Quietly
- Save As
- Save As Encoding
- Save Configuration
- Save Layout
- Save New Backup File
- Save Selection
- Save Settings
- Save Workspace
- Scroll Bar Options
- Scroll Half Page Down
- Scroll Half Page Up
- Scroll Left
- Scroll Line Down
- Scroll Line Up
- Scroll Right
- SDK Help
- Search
- Search Backward
- Search Backward for Selection
- Search Engines
- Search Files
- Search Forward
- Search Forward for Selection
- Search List
- Searching Options
- Search Project
- Search Results Options
- Search Web
- Select All
- Select Block
- Select Char Left
- Select Char Right
- Select Function or Symbol
- Select Line
- Select Line Down
- Select Line Up
- Select Match
- Select Next Window
- Select Sentence
- Select Symbol
- Select To
- Select To End Of File
- Select To Top Of File
- Select Word
- Select Word Left
- Select Word Right
- Selection History
- Setup HTML Help
- Setup WinHelp File
- Show Clipboard
- Show File Status
- Simple Tab
- Smart End of Line
- Smart Beginning of Line
- Smart Rename
- Smart Tab
- Snippet Properties
- Snippet Window
- Snippet Window Options
- Sort Symbol Window
- Sort Symbols By Line
- Sort Symbols by Name
- Sort Symbols By Type
- Source Dynamics on the Web
- Start Recording
- Stop Recording
- Style Properties
- Symbol Info
- Symbol Lookup Options
- Symbol Type Filter
- Symbol Window command
- Symbol Window Options
- Sync File Windows
- Synchronize Files
- Syntax Decorations
- Syntax Formatting
- Syntax Keyword List
- Tab Tray
- Tabs to Spaces
- Tile Horizontal
- Tile One Window
- Tile Two Windows
- Tile Vertical
- Toggle Extend Mode
- Toggle Insert Mode
- Top of File
- Top of Window
- Touch All Files in Relation
- Typing Options
- Undo
- Undo All
- Vertical Scroll Bar
- View Clip
- View Relation Outline
- View Relation Window Horizontal Graph
- View Relation Window Vertical Graph
- View Toolbar
- Visible Tabs
- Visible Tabs and Spaces
- Window List
- Window List Options
- Window Options
- Window Tabs
- Window Tab Options
- Word Fragment Left
- Word Fragment Right
- Word Left
- Word Right
- Zoom Window
- Commands Overview
- CHAPTER 5 Macro Language Guide
- Basic Syntax Overview
- Macro Functions
- Macro Scopes and References
- Running Macros
- Statements
- Variables
- Special Constants
- Operators
- Conditions and Loops: if-else and while
- Naming Conventions
- Standard Record Structures
- Internal Macro Functions
- String Functions
- User Input and Output Functions
- Ask (prompt_string)
- AssignKeyToCmd(key_value, cmd_name)
- Beep ()
- CharFromKey (key_code)
- CmdFromKey(key_value)
- EndMsg ()
- FuncFromKey (key_code)
- GetChar ()
- GetKey ()
- GetSysTime(fLocalTime)
- IsAltKeyDown (key_code)
- IsCtrlKeyDown (key_code)
- IsFuncKey (key_code)
- KeyFromChar(char, fCtrl, fShift, fAlt)
- Msg (s)
- StartMsg (s)
- Buffer List Functions
- File Buffer Functions
- AppendBufLine (hbuf, s)
- ClearBuf (hbuf)
- CloseBuf (hbuf)
- CopyBufLine (hbuf, ln)
- DelBufLine (hbuf, ln)
- GetBufHandle (filename)
- GetBufLine (hbuf, ln)
- GetBufLineCount (hbuf)
- GetBufLineLength (hbuf, ln)
- GetBufLnCur (hbuf)
- GetBufName (hbuf)
- GetBufProps (hbuf)
- GetBufSelText (hbuf)
- GetCurrentBuf ()
- InsBufLine (hbuf, ln, s)
- IsBufDirty (hbuf)
- IsBufRW (hbuf)
- MakeBufClip (hbuf, fClip)
- NewBuf (name)
- OpenBuf (filename)
- OpenMiscFile (filename)
- PasteBufLine (hbuf, ln)
- PrintBuf (hbuf, fUseDialogBox)
- PutBufLine (hbuf, ln, s)
- RenameBuf (hbuf, szNewName)
- SaveBuf (hbuf)
- SaveBufAs (hbuf, filename)
- SetBufDirty (hbuf, fDirty)
- SetBufIns (hbuf, ln, ich)
- SetBufSelText (hbuf, s)
- SetCurrentBuf (hbuf)
- Environment and Process Functions
- Window List Functions
- Window Functions
- CloseWnd (hwnd)
- GetApplicationWnd ()
- GetCurrentWnd ()
- GetNextWnd (hwnd)
- GetWndBuf (hwnd)
- GetWndClientRect (hwnd)
- GetWndDim (hwnd)
- GetWndHandle (hbuf)
- GetWndHorizScroll (hwnd)
- GetWndLineCount (hwnd)
- GetWndLineWidth (hwnd, ln, cch)
- GetWndParent (hwnd)
- GetWndRect (hwnd)
- GetWndSel (hwnd)
- GetWndSelIchFirst (hwnd)
- GetWndSelIchLim (hwnd)
- GetWndSelLnFirst (hwnd)
- GetWndSelLnLast (hwnd)
- GetWndVertScroll (hwnd)
- IchFromXpos (hwnd, ln, xp)
- IsWndMax (hwnd)
- IsWndMin (hwnd)
- IsWndRestored (hwnd)
- LineFromYpos (hwnd, ypos)
- MaximizeWnd (hwnd)
- MinimizeWnd (hwnd)
- NewWnd (hbuf)
- ScrollWndHoriz (hwnd, pixel_count)
- ScrollWndToLine (hwnd, ln)
- ScrollWndVert (hwnd, line_count)
- SetCurrentWnd (hwnd)
- SetWndRect (hwnd, left, top, right, bottom)
- SetWndSel (hwnd, selection_record)
- ToggleWndMax (hwnd)
- XposFromIch (hwnd, ln, ich)
- YposFromLine (hwnd, ln)
- YdimFromLine (hwnd, ln)
- Bookmark Functions
- Symbol List Functions
- Symbol Functions
- Symbol Record
- GetBufSymCount(hbuf)
- GetBufSymLocation(hbuf, isym)
- GetBufSymName(hbuf, isym)
- GetCurSymbol ()
- GetSymbolLine (symbol_name)
- GetSymbolLocation (symbol_name)
- GetSymbolLocationEx (symbol_name, output_buffer, fMatchCase, LocateFiles, fLocateSymbols)
- GetSymbolFromCursor (hbuf, ln, ich)
- GetSymbolLocationFromLn (hbuf, ln)
- JumpToLocation (symbol_record)
- JumpToSymbolDef (symbol_name)
- SymbolChildren (symbol)
- SymbolContainerName (symbol)
- SymbolDeclaredType (symbol)
- SymbolLeafName (symbol)
- SymbolParent (symbol)
- SymbolRootContainer (symbol)
- SymbolStructureType (symbol)
- Searching Functions
- GetSourceLink (hbufSource, lnSource)
- LoadSearchPattern(pattern, fMatchCase, fRegExp, fWholeWordsOnly)
- ReplaceInBuf(hbuf, oldPattern, newPattern, lnStart, lnLim, fMatchCase, fRegExp, fWholeWordsOnly, fConfirm)
- SearchForRefs (hbuf, word, fTouchFiles)
- SearchInBuf (hbuf, pattern, lnStart, ichStart, fMatchCase, fRegExp, fWholeWordsOnly)
- SetSourceLink (hbufSource, lnSource, target_file, lnTarget)
- Project Functions
- AddConditionVariable(hprj, szName, szValue)
- AddFileToProj(hprj, filename)
- CloseProj (hprj)
- DeleteConditionVariable(hprj, szName)
- DeleteProj (proj_name)
- EmptyProj ()
- GetCurrentProj ()
- GetProjDir (hprj)
- GetProjFileCount (hprj)
- GetProjFileName (hprj, ifile)
- GetProjName (hprj)
- GetProjSymCount (hprj)
- GetProjSymLocation (hprj, isym)
- GetProjSymName (hprj, isym)
- NewProj (proj_name)
- OpenProj (proj_name)
- RemoveFileFromProj(hprj, filename)
- SyncProj (hprj)
- SyncProjEx(hprj, fAddNewFiles, fForceAll, fSupressWarnings)
- Miscellaneous Macro Functions
- Other Information about Macros
- Event Handlers
- CHAPTER 6 Macro Event Handlers
- Index

Source Insight 4 User Guide 1
Source Insight 4.0
User Guide
Copyright © 2017 by Source Dynamics, Inc.
2.26.2017

Chapter i
2 Source Insight 4 User Guide

Source Insight 4 User Guide 3
Source Insight - Version 4
Copyright © 1987-2017 by Source Dynamics, Inc.
This documentation and the software described in it are copyrighted with all rights reserved. Under the
copyright laws, neither the documentation nor the software may be copied, photocopied, reproduced, trans-
lated, or reduced to any electronic medium or machine readable form, in whole or in part, without the prior
written consent of Source Dynamics, Inc.
Disclaimer of Warranties and Limitation of Liabilities
This manual and the software described in it were prepared by Source Dynamics, Inc., and are subject to
change without notice. Source Dynamics, Inc. assumes no liability resulting from any inaccuracy or omis-
sions contained herein or from the use of the information or programs contained herewith.
Source Dynamics, Inc. makes no expressed or implied warranty of any kind with regard to these programs or
to the supplemental documentation in this manual. In no event shall Source Dynamics, Inc. be liable for inci-
dental or consequential damages in connection with or arising out of the furnishing, performance, or use of
the program or documentation. This disclaimer includes, but is not limited to, any loss of service, loss of
business, or anticipatory profits, or consequential damages resulting from the use or operation of the
enclosed software.
Source Insight is a trademark of Source Dynamics, Inc.
Other product names are trademarks of their respective manufacturers.
Source Dynamics, Inc.
22525 SE 64th Place, Suite 260
Issaquah, WA 98027
USA
Phone: (425) 557-3630
Fax: (425) 557-3631
Web: sourceinsight.com
Technical Support: support@sourceinsight.com
Sales: sales@sourceinsight.com

Chapter i
4 Source Insight 4 User Guide

Source Insight 4 User Guide 5
CHAPTER 1 GETTING STARTED ...............................................................15
Installing Source Insight ................................................. 15
Activating Source Insight................................................ 16
Compatibility With Old Versions of Source Insight.......... 18
Important Changes From Version 3 ........................................ 19
New Features in Version 4............................................... 20
File Format Changes .............................................................. 21
File Storage ............................................................................ 21
CHAPTER 2 USER INTERFACE..................................................................23
Source File Windows....................................................... 26
The Overview Scroller............................................................. 27
Symbol Windows ........................................................... 30
Panel Windows................................................................ 31
Docking Panel Windows......................................................... 32
Panel Window Controls .......................................................... 34
Grouping Panel Windows ....................................................... 35
Un-Grouping Panel Windows ................................................. 36
Using Semi-Transparent Panel Windows ................................. 36
Toolbars .......................................................................... 37
CHAPTER 3 FEATURES AND CONCEPTS ....................................................39
Projects ........................................................................... 40
Project Features ..................................................................... 40
Inside a Project....................................................................... 40
The Current Project................................................................. 41
Project Directories.................................................................. 41
Normalized File Names........................................................... 42
Creating a New Project........................................................... 42
Adding Files to a Project ......................................................... 45
Removing Files from a Project................................................. 46
Using a Master File List ........................................................... 46
Opening and Closing Projects................................................. 47
Removing a Project ................................................................ 47
Copying a Project ................................................................... 48
Read-Only Projects................................................................. 48
Changing Project Settings ...................................................... 48
Symbols and Projects ............................................................. 48
Synchronizing Project Files ..................................................... 48
The Base Project..................................................................... 49
Creating a Web Version of Your Project.................................... 49
Rebuilding Projects................................................................. 49
Project Windows ............................................................. 50
Project File List ....................................................................... 50
Project Symbol List ................................................................. 51
Project Folder Browser............................................................ 52
Symbols and Language Parsing...................................... 54
Built-In Languages ................................................................. 54
Custom Languages ................................................................ 54

Chapter ii
6 Source Insight 4 User Guide
Symbol Naming..................................................................... 55
Resolving Symbol Definitions ................................................. 55
Common Projects .................................................................. 55
Importing Symbols from Libraries .......................................... 55
The Project Symbol Path......................................................... 56
C/C++ Symbols...................................................................... 57
C# and .NET Framework Symbols ........................................... 57
Java Symbols......................................................................... 57
HTML and Scripts................................................................... 58
PHP Pages ............................................................................. 58
Active Server Page Scripts....................................................... 58
Conditional Parsing and Preprocessor Support .............. 60
Parsing Considerations and Parsing Problems ........................ 62
Fixing "Parse-Too-Complex" ................................................... 63
Preprocessor Token Macros .................................................... 64
Name Fragment Matching Symbol Names ..................... 66
Controlling Name Fragment Matching ................................... 66
Using Name Fragment Matching ........................................... 66
Using Name Fragment Shortcuts............................................ 67
Source Control ................................................................ 68
Source Control Commands .................................................... 68
Using IBM® Rational ClearCase ® Commands .......................... 69
Using Git Commands............................................................. 69
File Types ........................................................................ 72
File-Type-Specific Options ...................................................... 72
Associating Files with File Types.............................................. 72
Associating File Names Without Extensions ............................ 73
Adding New File Types............................................................ 73
Editing the File Types.............................................................. 73
Browsing and Analysis .................................................... 74
Symbolic Parsing ................................................................... 74
Symbol Navigation Commands.............................................. 74
Project Symbol List Window ................................................... 75
Call Trees and Reference Trees ................................................ 75
Context Window.................................................................... 75
Command Line Symbol Access ............................................... 75
Finding References to Symbols ............................................... 75
Reference Highlights .............................................................. 76
Creating a Project Report ....................................................... 76
Smart Renaming ................................................................... 76
Comparing Files and Directories............................................. 77
Syntax Formatting and Styles ......................................... 78
How Styles Apply to Source Code............................................ 80
How a Style Works ................................................................. 80
Formatting Properties ............................................................ 80
Parent Styles .......................................................................... 81
Language Keyword Styles ...................................................... 82
Declaration Styles.................................................................. 82
Reference Styles ..................................................................... 83
Inactive Code Style................................................................. 84
Comment Styles..................................................................... 85
Syntax Decorations................................................................ 87
Controlling Syntax Formatting ............................................... 88
Context window ............................................................. 90

Source Insight 4 User Guide 7
Previewing Files and Source Code ........................................... 91
Showing Declarations and Definitions.................................... 92
Customizing the Context window .......................................... 92
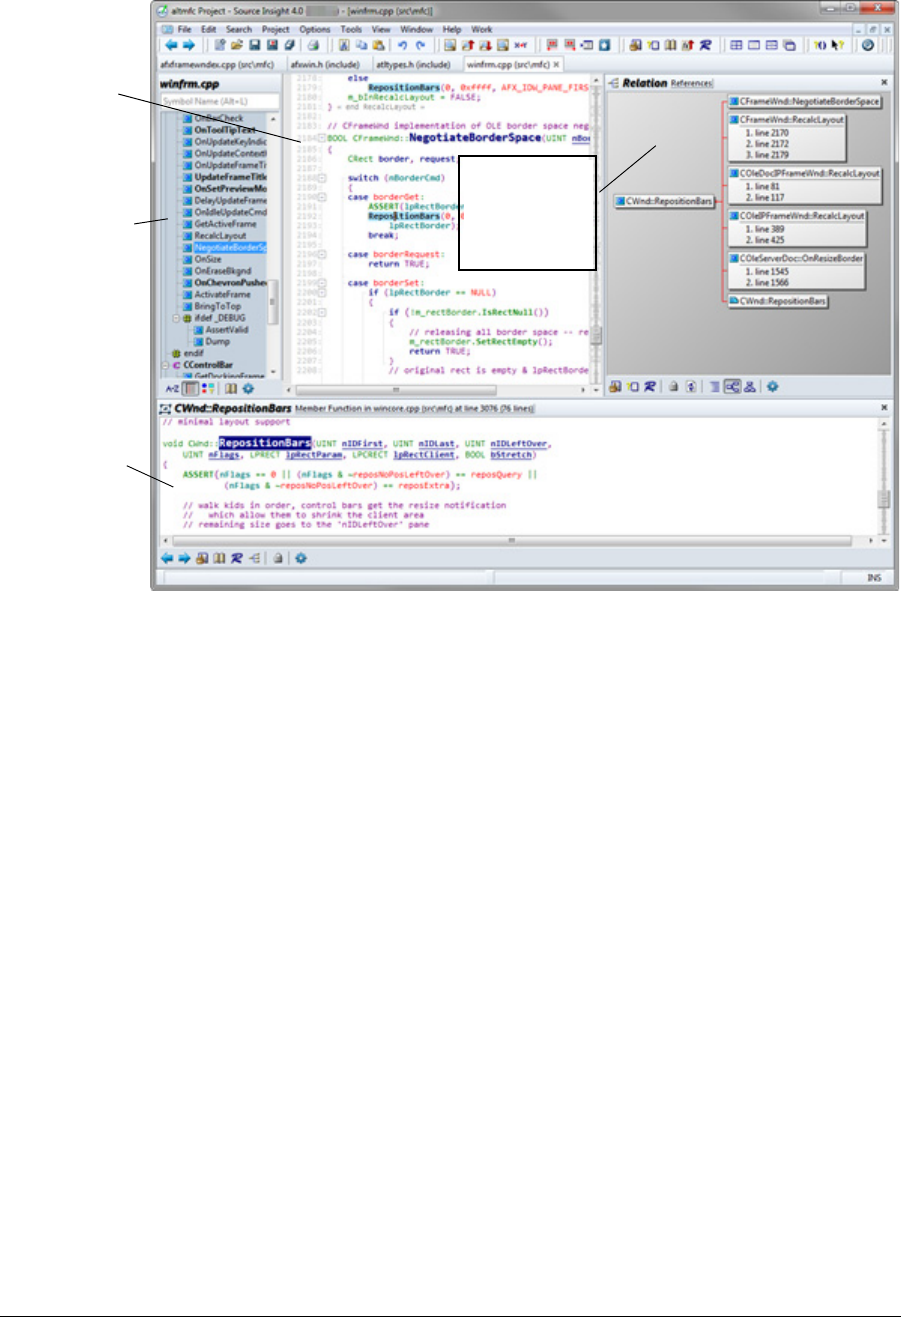
Relation Window............................................................. 93
Outline and Graph Views........................................................ 93
Relationship Rules.................................................................. 96
Call Graphs ............................................................................ 97
Multiple Relation Windows..................................................... 97
Customizing the Relation Window.......................................... 97
Code Snippets................................................................. 98
Inserting Snippets .................................................................. 98
Text Variables ......................................................................... 98
Snippet Options ................................................................... 100
Clip Window.................................................................. 101
What Is A Clip? .....................................................................101
Creating a New Clip..............................................................101
Clip Storage .........................................................................101
Bookmarks .................................................................... 102
Setting a Bookmark..............................................................102
Bookmark Storage ............................................................... 103
FTP Bookmarks ....................................................................103
Searching and Replacing Text....................................... 104
Searching for Symbol References ..........................................104
Searching the Current File ....................................................104
Searching Multiple Files........................................................105
Replacing Text......................................................................105
Search Results Window ........................................................106
Regular Expressions ...................................................... 109
Regular Expression Elements ................................................ 109
Multi-Line Matches .............................................................. 111
Regular Expression Summary ...............................................111
Comparing Files and Directories................................... 112
Navigation with the Selection History .......................... 114
Go Back and Go Forward commands ................................... 114
Scrolling and Selecting Text.......................................... 115
Moving Through a File..........................................................115
Scrolling Commands............................................................115
Selection Commands ...........................................................116
Extending the Selection........................................................117
Selection Shortcuts .............................................................. 118
The Overview Scroller...........................................................120
Outlining and Collapsing Text....................................... 121
Outline Toolbar ....................................................................122
Code Beautifier ............................................................. 123
Generating HTML from Project Sources........................ 124
File Encodings............................................................... 125
File Buffer Basics............................................................ 128
Backup Files .........................................................................128
Checkpointing Files.............................................................. 129
Reloading and Restoring Files...............................................129
Time stamping.....................................................................129
Recovering From Crashes ............................................. 130

Chapter ii
8 Source Insight 4 User Guide
Recovery Procedure.............................................................. 130
Command Line Syntax.................................................. 132
Specifying File Arguments .................................................... 132
Opening Files....................................................................... 132
Opening Workspaces ........................................................... 133
Command Line Options ....................................................... 133
User-Level Commands.................................................. 136
Custom Commands ...................................................... 137
Customized Settings and Configurations ..................... 138
Customizing the Keyboard and Menus ................................. 138
Changing Screen Colors and Appearance Options ................ 138
Changing Various Options ................................................... 139
The Configuration File.......................................................... 139
Configuration Master File..................................................... 140
Loading a Configuration ...................................................... 142
Saving a Configuration ........................................................ 142
Resetting the Configuration to Defaults................................ 143
Visual Themes ............................................................... 144
Saving Window Arrangements with Layouts ................ 146
Saving and Restoring Workspaces ................................ 147
Performance Tuning ..................................................... 148
Factors That Affect Performance .......................................... 148
Speeding Up Program Features ............................................ 149
Predefined Path Variables ............................................. 153
Files Created by Source Insight..................................... 154
Files in the Program Directory .............................................. 154
Per-User Data Folder ............................................................ 154
Files Created for Each User ................................................... 154
Files Created for Each Project................................................ 155
CHAPTER 4 COMMAND REFERENCE ...................................................... 157
Commands Overview ................................................... 157
Commands.......................................................................... 157
CHAPTER 5 MACRO LANGUAGE GUIDE ................................................. 373
...........................................................................Macro Functions374
Macro Scopes and References ...................................... 375
Running Macros............................................................ 375
Macros as Commands.......................................................... 375
Running Inline Macro Statements ........................................ 376
Statements.................................................................... 376
Variables ....................................................................... 378
Declaring a Variable ............................................................ 378
strictvars Mode .................................................................... 378
Variable Initialization........................................................... 379
Global Variables .................................................................. 379
Variable Values .................................................................... 380
Expanding Variables in a String............................................ 380
Variable Arithmetic .............................................................. 381

Source Insight 4 User Guide 9
Indexing Into Strings ............................................................381
Record Variables ..................................................................381
Record Variable Storage .......................................................382
Array Techniques..................................................................382
Special Constants.......................................................... 383
Operators...................................................................... 383
Conditions and Loops: if-else and while ....................... 384
The if Statement...................................................................384
The while statement.............................................................385
Break and Continue..............................................................385
Conditional Evaluation ........................................................385
Naming Conventions .................................................... 386
Standard Record Structures .......................................... 386
Bookmark Record................................................................. 387
Bufprop Record .................................................................... 387
DIM Record ..........................................................................388
Link Record ..........................................................................388
ProgEnvInfo Record..............................................................388
ProgInfo Record ...................................................................389
Rect Record..........................................................................389
Selection Record...................................................................390
Symbol Record .....................................................................390
SYSTIME Record ................................................................... 391
Internal Macro Functions .............................................. 391
String Functions............................................................ 391
AsciiFromChar (ch)...............................................................391
cat (a, b)...............................................................................391
CharFromAscii (ascii_code) .................................................. 391
islower (ch) .......................................................................... 392
IsNumber (s).........................................................................392
isupper (ch)..........................................................................392
strlen (s)...............................................................................392
strmid (s, ichFirst, ichLim) .....................................................392
strtrunc (s, cch).....................................................................392
tolower (s)............................................................................392
toupper (s) ........................................................................... 392
User Input and Output Functions ................................. 392
Ask (prompt_string) .............................................................392
AssignKeyToCmd(key_value, cmd_name) ............................ 392
Beep () .................................................................................393
CharFromKey (key_code) .....................................................393
CmdFromKey(key_value) .....................................................393
EndMsg ().............................................................................393
FuncFromKey (key_code) .....................................................393
GetChar () ............................................................................393
GetKey () ..............................................................................393
GetSysTime(fLocalTime).......................................................393
IsAltKeyDown (key_code) ..................................................... 393
IsCtrlKeyDown (key_code)....................................................394
IsFuncKey (key_code) ...........................................................394
KeyFromChar(char, fCtrl, fShift, fAlt) .....................................394
Msg (s) .................................................................................395
StartMsg (s)..........................................................................395
Buffer List Functions ..................................................... 395
BufListCount () ..................................................................... 395

Chapter ii
10 Source Insight 4 User Guide
BufListItem (index)............................................................... 395
File Buffer Functions ..................................................... 396
AppendBufLine (hbuf, s)....................................................... 396
ClearBuf (hbuf) .................................................................... 396
CloseBuf (hbuf) .................................................................... 396
CopyBufLine (hbuf, ln).......................................................... 396
DelBufLine (hbuf, ln) ............................................................ 396
GetBufHandle (filename)...................................................... 396
GetBufLine (hbuf, ln) ............................................................ 396
GetBufLineCount (hbuf) ....................................................... 396
GetBufLineLength (hbuf, ln) ................................................. 396
GetBufLnCur (hbuf).............................................................. 397
GetBufName (hbuf).............................................................. 397
GetBufProps (hbuf) .............................................................. 397
GetBufSelText (hbuf) ............................................................ 397
GetCurrentBuf ()................................................................... 397
InsBufLine (hbuf, ln, s) .......................................................... 397
IsBufDirty (hbuf) .................................................................. 397
IsBufRW (hbuf)..................................................................... 397
MakeBufClip (hbuf, fClip) ..................................................... 397
NewBuf (name).................................................................... 397
OpenBuf (filename).............................................................. 397
OpenMiscFile (filename) ...................................................... 397
PasteBufLine (hbuf, ln) ......................................................... 398
PrintBuf (hbuf, fUseDialogBox)............................................. 398
PutBufLine (hbuf, ln, s) ......................................................... 398
RenameBuf (hbuf, szNewName)........................................... 398
SaveBuf (hbuf) ..................................................................... 398
SaveBufAs (hbuf, filename) .................................................. 398
SetBufDirty (hbuf, fDirty) ...................................................... 398
SetBufIns (hbuf, ln, ich)......................................................... 398
SetBufSelText (hbuf, s).......................................................... 398
SetCurrentBuf (hbuf)............................................................ 398
Environment and Process Functions............................. 399
GetEnv (env_name) ............................................................. 399
GetReg (reg_key_name)....................................................... 399
IsCmdEnabled (cmd_name)................................................. 399
PutEnv (env_name, value).................................................... 399
RunCmd (cmd_name).......................................................... 399
RunCmdLine (sCmdLine, sWorkingDirectory, fWait).............. 399
SetReg (reg_key_name, value) ............................................. 399
ShellExecute (sVerb, sFile, sExtraParams, sWorkingDirectory, windowstate)399
Window List Functions.................................................. 401
WndListCount ()................................................................... 401
WndListItem (index)............................................................. 401
Window Functions........................................................ 401
CloseWnd (hwnd) ................................................................ 402
GetApplicationWnd () .......................................................... 402
GetCurrentWnd () ................................................................ 402
GetNextWnd (hwnd) ............................................................ 402
GetWndBuf (hwnd).............................................................. 402
GetWndClientRect (hwnd).................................................... 402
GetWndDim (hwnd)............................................................. 402
GetWndHandle (hbuf).......................................................... 402
GetWndHorizScroll (hwnd)................................................... 403
GetWndLineCount (hwnd) ................................................... 403
GetWndLineWidth (hwnd, ln, cch) ........................................ 403
GetWndParent (hwnd)......................................................... 403
GetWndRect (hwnd)............................................................. 403

Source Insight 4 User Guide 11
GetWndSel (hwnd)...............................................................403
GetWndSelIchFirst (hwnd).................................................... 403
GetWndSelIchLim (hwnd).....................................................403
GetWndSelLnFirst (hwnd).....................................................404
GetWndSelLnLast (hwnd).....................................................404
GetWndVertScroll (hwnd).....................................................404
IchFromXpos (hwnd, ln, xp) ..................................................404
IsWndMax (hwnd)................................................................404
IsWndMin (hwnd).................................................................404
IsWndRestored (hwnd) .........................................................404
LineFromYpos (hwnd, ypos) ................................................. 404
MaximizeWnd (hwnd)..........................................................405
MinimizeWnd (hwnd)...........................................................405
NewWnd (hbuf)....................................................................405
ScrollWndHoriz (hwnd, pixel_count).....................................405
ScrollWndToLine (hwnd, ln)..................................................405
ScrollWndVert (hwnd, line_count) ........................................ 405
SetCurrentWnd (hwnd) ........................................................405
SetWndRect (hwnd, left, top, right, bottom) .......................... 405
SetWndSel (hwnd, selection_record)..................................... 405
ToggleWndMax (hwnd)........................................................405
XposFromIch (hwnd, ln, ich) .................................................405
YposFromLine (hwnd, ln)......................................................406
YdimFromLine (hwnd, ln) .....................................................406
Bookmark Functions ..................................................... 406
BookmarksAdd (name, filename, ln, ich) ...............................406
BookmarksCount () ..............................................................407
BookmarksDelete (name).....................................................407
BookmarksItem (index) ........................................................407
BookmarksLookupLine (filename, ln)....................................407
BookmarksLookupName (name).......................................... 407
Symbol List Functions................................................... 407
SymListCount ()....................................................................407
SymListFree (hsyml) ............................................................. 407
SymListInsert (hsyml, isymBefore, symbolNew) .....................408
SymListItem (hsyml, isym) ....................................................408
SymListNew () ......................................................................408
SymListRemove (hsyml, isym)...............................................408
Symbol Functions ......................................................... 408
GetBufSymCount(hbuf)........................................................408
GetBufSymLocation(hbuf, isym) ...........................................408
GetBufSymName(hbuf, isym) ...............................................409
GetCurSymbol ()...................................................................409
GetSymbolLine (symbol_name)............................................409
GetSymbolLocation (symbol_name).....................................409
GetSymbolLocationEx (symbol_name, output_buffer, fMatchCase, LocateFiles, fLocate-
Symbols)..............................................................................410
GetSymbolFromCursor (hbuf, ln, ich) ....................................410
GetSymbolLocationFromLn (hbuf, ln) ................................... 410
JumpToLocation (symbol_record) ........................................410
JumpToSymbolDef (symbol_name)...................................... 411
SymbolChildren (symbol) .....................................................411
SymbolContainerName (symbol)..........................................411
SymbolDeclaredType (symbol) ............................................. 411
SymbolLeafName (symbol) ..................................................411
SymbolParent (symbol) ........................................................411
SymbolRootContainer (symbol)............................................412
SymbolStructureType (symbol).............................................412
Searching Functions ..................................................... 412

Chapter ii
12 Source Insight 4 User Guide
GetSourceLink (hbufSource, lnSource).................................. 412
LoadSearchPattern(pattern, fMatchCase, fRegExp, fWholeWordsOnly)412
ReplaceInBuf(hbuf, oldPattern, newPattern, lnStart, lnLim, fMatchCase, fRegExp, fWhole-
WordsOnly, fConfirm) .......................................................... 412
SearchForRefs (hbuf, word, fTouchFiles) ............................... 413
SearchInBuf (hbuf, pattern, lnStart, ichStart, fMatchCase, fRegExp, fWholeWordsOnly)413
SetSourceLink (hbufSource, lnSource, target_file, lnTarget)... 413
Project Functions .......................................................... 413
AddConditionVariable(hprj, szName, szValue)...................... 413
AddFileToProj(hprj, filename)............................................... 414
CloseProj (hprj) .................................................................... 414
DeleteConditionVariable(hprj, szName) ............................... 414
DeleteProj (proj_name)........................................................ 414
EmptyProj ()......................................................................... 414
GetCurrentProj ().................................................................. 414
GetProjDir (hprj) .................................................................. 414
GetProjFileCount (hprj) ........................................................ 414
GetProjFileName (hprj, ifile) ................................................. 414
GetProjName (hprj).............................................................. 414
GetProjSymCount (hprj)....................................................... 415
GetProjSymLocation (hprj, isym) .......................................... 415
GetProjSymName (hprj, isym)............................................... 415
NewProj (proj_name)........................................................... 415
OpenProj (proj_name) ......................................................... 415
RemoveFileFromProj(hprj, filename) .................................... 415
SyncProj (hprj) ..................................................................... 415
SyncProjEx(hprj, fAddNewFiles, fForceAll, fSupressWarnings) 415
Miscellaneous Macro Functions.................................... 416
DumpMacroState (hbufOutput)........................................... 416
GetProgramEnvironmentInfo ()............................................ 416
GetProgramInfo ()................................................................ 416
Other Information about Macros.................................. 416
Debugging .......................................................................... 416
Persistence........................................................................... 416
No Self-Modifying Macros.................................................... 416
Sample Macros.................................................................... 416
Event Handlers.............................................................. 417
CHAPTER 6 MACRO EVENT HANDLERS ................................................. 419
Macro Event Handlers................................................... 419
Event Handler Uses ....................................................... 420
Adding Event Handlers to Source Insight ..................... 420
Enabling Event Handlers ...................................................... 421
Editing Event Handler Files ................................................... 421
Errors in Event Handlers ....................................................... 421
Synchronous Vs. Asynchronous Events.................................. 421
Helpful Tips for Event Handlers ............................................. 421
Application Events........................................................ 421
event AppStart() .................................................................. 421
event AppShutdown() .......................................................... 422
event AppCommand(sCommand)........................................ 422
Document Events ......................................................... 422
event DocumentNew(sFile) .................................................. 422
event DocumentOpen(sFile)................................................. 422

Source Insight 4 User Guide 13
event DocumentClose(sFile) .................................................422
event DocumentSave(sFile) .................................................. 422
event DocumentSaveComplete(sFile) ................................... 422
event DocumentChanged(sFile) ...........................................422
event DocumentSelectionChanged(sFile) .............................422
Project Events ............................................................... 423
event ProjectOpen(sProject) .................................................423
event ProjectClose(sProject)..................................................423
Statusbar Events ........................................................... 423
event StatusbarUpdate(sMessage) .......................................423

Chapter ii
14 Source Insight 4 User Guide

Source Insight 4 User Guide 15
Installing Source Insight
CHAPTER 1 Getting Started
Welcome to Source Insight.
We hope that using Source Insight will increase your productivity and enjoyment of coding. It was created
out of a need to navigate large code bases, and to help understand complex code while working and plan-
ning.
Source Insight is being used today by important technology companies to develop some of the largest com-
mercial hardware and software products.
Key Benefits
Source Insight’s important benefits are:
•It helps to understand an existing code base.
•You can quickly navigate function calls and callers.
•You can find references to functions, variables, and more - almost instantly.
•You can see call graphs and class tree diagrams.
•It previews function and class definitions without having to open a file.
•It shows live references to variables and other declarations with Syntax Formatting.
•It has powerful editing features, including code snippets, symbolic auto-completion, and smart-
rename.
•Dynamic information panels work together to create a productive workflow.
Installing Source Insight
Once Source Insight is installed on a machine, it is available to any user on that machine, but the licensing
differs depending on whether the operation system is a server or not.
On desktop operating systems, Source Insight is licensed per-machine. There is a license stored for the whole
machine. Once installed and activated, you can run Source Insight from any user account on the machine.
On server operating systems (including Terminal Servers), Source Insight is licensed per-user. It must be acti-
vated separately for each user, and there is a license stored for each user.

Activating Source Insight
16 Source Insight 4 User Guide
Activating Source Insight
Source Insight requires initial activation over the Internet. The activation process is new to version 4 and we
have designed it to have very low impact on users. Please understand that activation secures your license,
validates your serial number, and allows us to continue developing Source Insight.
When you launch Source Insight the first time, the Manage License window will appear. See “Manage
License” on page 258.You will be prompted to either enter a serial number, or start a new Trial license. A Trial
license runs for 30 days. You do not need a serial number to use a Trial license.
When prompted, please enter your name and email address. Your email address is optional but highly rec-
ommended so you will be able to retrieve your license if you should lose it. This also allows us to notify you if
any important updates are available.
Source Insight will then activate your license using our licensing system. After a second or two, your license
will be activated and you won't have to activate again.
When you activate a license, Source Insight sends the information you provided, plus a hardware fingerprint
to our licensing system over a secure SSL connection so we can match the license to the machine. You can
still make most hardware changes without invalidating the installation. We respect your privacy, and we spe-
cifically do not share your information with any third party.
If you have any problems or questions about the activation process, please email us at info@sourcein-
sight.com.
Transferring Your License - Deactivation
If you decide to stop using Source Insight, or want to use your license on a different machine, you should first
deactivate your license on your old machine by selecting Help > Manage License, and selecting "Deactivate
License". This reduces your activation count so that you can activate it on another machine. A single license
gives you up to two machine activations.
If you don’t have access to your old machine anymore (to deactivate it), please try to simply install and acti-
vate on your new machine. There is a good chance it will activate just fine. We allow a certain number of over-
ages over a period of time. If the activation fails because of too many activations, please contact
info@sourceinsight.com
Activation Questions
Q: Can I activate Source Insight more than once?
The Source Insight license allows you to activate Source Insight on up to two machines at the same time, pro-
vided that only a single person is using both installations. For example, you can install it on a desktop
machine at work, plus a laptop, or home machine. Therefore you can have up to two machines activated per
license.
If for some reason you activate it on the same machine more than once, it does not count against your two
activation limit.
Q: What if I want to switch to a new machine?
To transfer a license to a new machine, you should first deactivate Source Insight on the old machine by
selecting Help > Manage License, and selecting "Deactivate License". This reduces your activation count so
that you can activate it on another machine. A single license gives you up to two machine activations.
Q: How do I get a serial number?
When you purchase a license, you will be provided with a valid license serial number. It is usually emailed to
you.

Source Insight 4 User Guide 17
Activating Source Insight
Q: How do I start a Trial license?
Launch Source Insight. When the Manage License window appears, select "Begin a Trial", and click Continue.
Q: Do I need a serial number for a Trial license?
You do not need a serial number to begin a Trial license. When you begin a Trial license, a special Trial serial
number will be assigned to you.
Q: How can I transfer my license to a new machine?
To transfer a license to a new machine, you should first deactivate Source Insight on the old machine by
selecting Help > Manage License, and selecting "Deactivate License". Once you deactivate the old machine,
you can activate it on the new machine. Deactivating reduces your activation count so that you can activate
it on another machine without exceeding your activation limit.
When you activate on the new machine, you will need to provide your license serial number. Use the same
serial number as before.
Q: I want to transfer my license to a new machine, but don't have access to my old machine
anymore to deactivate it.
First, please try to simply install and activate on your new machine. There is a good chance it will activate just
fine. We allow a certain number of overages over a period of time. If the activation fails because of too many
activations, please contact info@sourceinsight.com.
Q: What happens if I change my hardware?
It is very unlikely that changing your hardware will invalidate your license activation. If you replace your main
drive, you will have to re-install and activate Source Insight again. Even then, the licensing system allows a
certain number of changes over a period of time. We absolutely do not want you to be stuck if you have a
valid license.
Q: What if I reformat my drive and re-install Source Insight?
When you re-install and run Source Insight, you will be prompted to activate again. However, that is mainly to
refresh the license on your machine, and won’t count as a new activation.
Q: What if I don’t have an Internet connection?
The activation process will defer for a while until you have Internet connectivity, so you can still work with it.
In the event your machine will never have an Internet connection, please contact support@sourcein-
sight.com.
Q: What network ports does activation use to setup a firewall / proxy?
The activation process uses port 443 (HTTPS) to connect to sls.sourceinsight.com. You can test a con-
nection with a web browser using this URL, which will display "OK":
https://sls.sourceinsight.com/lsstatus/
Note: you must include the trailing slash.
Q: Why does Source Insight require activation?
We have given this long consideration and decided some form of license validation is helpful. Past versions of
Source Insight did not have activation, and that resulted in many illegal licenses being used and even sold to
unsuspecting customers.
In addition, many customers and companies using Source Insight want to know that their licenses are
authentic, and want a way to automatically stay in compliance with the license agreement.

Compatibility With Old Versions of Source Insight
18 Source Insight 4 User Guide
We designed the activation system to be very low impact, and to err on the side of legitimate users. The
licensing system allows a certain number of activation overages over a period of time, so it is unlikely any
valid license will fail to activate. We absolutely do not want anybody to be stuck if they have a valid license.
Compatibility With Old Versions of Source Insight
If you have used older versions of Source Insight, for example version 3.x, you may find the topics in this sec-
tion useful.
You can use both Source Insight version 4 and version 3 together on the same machine. They each use sepa-
rate files and Windows Registry settings, so they will not conflict. The project data file formats are different,
but file extensions are different so they should not conflict.
Opening Projects from Version 3
To open an old version 3.x project, select Project > Open Project... and click the Browse button to locate the
old project .PR file. The old project will be copied into the new format. The original version 3 project will
remain unmodified.
Importing Configuration Settings from Version 3
Source Insight looks for an older version when you first install and run it. If it finds an old configuration file, it
will prompt you to import the settings.
To import version 3 configuration settings at any time, select Options > Load Configuration, and navigate to
your version 3 configuration file. It is usually stored here:
C:\Users\<user-name>\Documents\Source Insight\GLOBAL.CF3\
where C: is your system drive letter, and <user-name> is the account user name.

Source Insight 4 User Guide 19
Compatibility With Old Versions of Source Insight
Important Changes From Version 3
In order to make the program easier to understand, a few things have been moved or renamed.
•What was called "Document Options" in version 3 is now called File Type Options. It contains all file-
type specific options. For example, there is a file type named "C/C++ Files". The "Document Type" term
has been replaced with "File Type". See “File Types” on page 72.
•The C and C++ file types have been merged into just "C/C++ Source File"
•What was called "Draft View" in version 3 is now called "Mono Font View"
•What used to be called "symbol syllables" in version 3 is now called "name fragments".
•Dock-able/Floating windows are now called Panels. Besides the Context and Relation window, there
are a few new panels, such as FTP Browser, Window List, Snippets, Bookmarks, Directory Compare,
and File Compare.
•Project Files - the new extension is .siproj for the main project file. All the data file formats have
changed from version 3. You can still open version 3 projects, but they will be converted to the new for-
mat.
•The Project Symbol Path idea has been replaced with Project > Import External Symbols. This feature
lets you import symbols from external sources, such as header files, .NET assemblies, and Java jar
files. Each time you import something, Source Insight creates a special "import" project for you. It will
automatically search for symbols there. You can still use the project symbol path if you want. See
“Importing Symbols from Libraries” on page 55.
•Project Settings now has a "Backup Directory" option. By default, each project gets its own backup
folder under its project folder.
•All projects share the same configuration settings now. However the configuration file system has
some flexibility when it comes to project-specific configuration parts. See “Customized Settings and
Configurations” on page 138.

New Features in Version 4
20 Source Insight 4 User Guide
New Features in Version 4
Many new features have been added to version 4 of Source Insight. Here are some of the highlights:
•Improved language parsing for C/C++, C#, Java, and other languages.
•Language support now built-in for Objective-C, Python, PHP, XML, and JSON files.
•Imports symbols from external sources, such as .NET assemblies, Java JAR files, and Include files. Use
Project > Import External Symbols to do this. See “Importing Symbols from Libraries” on page 55.
•File Window tabs appear across the top of the main application window. Right-click on them and
select Window Tab Options to change the sort order.
•Collapsible code blocks. You can control the position and appearance by selecting Options > Prefer-
ences: Windows and refer to the Outline and Nesting section. See “Outlining and Collapsing Text” on
page 121.
•File and directory comparing (diff). Invoke them from the Tools menu. See “File Compare” on
page 205. See “Directory Compare” on page 191.
•Code beautifier that works on curly brace languages, such as C/C++ and C#. See “Code Beautifier” on
page 123.
•Unicode support.
•New User Interface with Panels and Visual Themes. See “Visual Themes” on page 144.
•New Overview scroller bar is positioned like a scroll bar, but gives you a bird's eye view of your file. It
works a little different than a scroll bar, but you can use it to scroll. It can show you the boundaries of
the current function and help to orient you within long functions. See “The Overview Scroller” on
page 27.
•New enhanced vertical scroll bar shows more details within the scroll bar. Right-click on it and select
Scroll Bar Options to play with its settings. See “Scroll Bar Options” on page 321.
•Multiple window layouts you can switch quickly. Use either View > Load/Save Layout, or click one of
the layout toolbar buttons to quickly switch between 4 different layout presets. See “Saving Window
Arrangements with Layouts” on page 146.
•Code Snippets - define templates of code to insert. Select Tools > Activate Snippet Window to show the
Snippet panel. Snippets are intended for boiler plate text the you want to insert. You can put text vari-
ables in the snippet text that get expanded when you insert the snippet. For example $date$ gets
replaced with the current date. See “Code Snippets” on page 98.
•Improved bookmarks - book marks are now stored persistently and they are stored as a line offset
from a nearby function or class name. Each project has its own book mark list. See “Bookmarks” on
page 102.
•Improved Relation window - Reference finding is faster. There is also a new relation type for functions:
"calls and callers". This shows both in the same outline or graph. You can also copy the graph view to
the Window clipboard. See “Relation Window” on page 93.
•Maintain backup files per-project, and easily compare with backup versions. Use Tools > Compare with
Backup File to quickly compare the current file with a backup version. You can also use the File > Open
Backup File to open an older version of the current file. See “Backup Files” on page 128.
•Better regular expressions - now supports Perl-compatible and multi-line expressions. Most places
that let you enter a regular expression now have a list where you can select the type of RegEx. There
are regular and "multi-line" versions of the classic Source Insight regex, and Perl compatible regex.
The multi-line regex types basically match a new-line with the dot (.) character. So for example, .*
would match the whole file. And "start.*end" would find everything from "start" to "end" in the file,
even across line breaks.
•Better support for large projects. The virtual memory usage has been improved so that very large proj-
ects can fit better into the memory space. Version 3 could suffer from a file read error on the project
index files for large numbers of symbols, leading to project corruption. This has been eliminated.
•Easier project management with multiple users and machines by using a Master File List. A project can
have a MFL, which can be a part of your source code repository and shared with other people. It is a
simple text file that lists all the files (and/or directories) in your project. See “Using a Master File List”

Source Insight 4 User Guide 21
New Features in Version 4
on page 46.
•Export project source to HTML site. You can use this to export all the files to HTML versions that contain
most of the same syntax formatting you see in Source Insight. This basically builds a web site that can
used to browse the project source code. See “Export Project To HTML” on page 204.
•Browser Mode - Source Insight behaves as a read-only code browser. In this mode you cannot edit your
files. Simply clicking on identifiers will jump to definitions like in a web browser. Press Backspace to Go
Back, and press Space with the cursor in a symbol name to jump to its definition. Hold down CTRL
while clicking to make a regular selection. See “Browser Mode” on page 168.
•Symbol Window pane attached to each source file window now has a collapsible outline view.
•All new configuration system which keeps all your settings in XML files.
•Many improvements all over the program!
File Format Changes
Several data files created and maintained by Source Insight have changed in version 4.
•Project Files - the new extension is .siproj for the main project file. All the project data file formats
have changed from version 3. You can still open version 3 projects, but they will be converted to the
new format.
•Configuration Files - all configuration settings are now saved in XML files. Because the configuration
changed so much, version 3.5 configuration files are not supported.
•Workspace Files - new extension is .siwork. These are not compatible with version 3.
•Recovery Files - the new extension is .si_recovery.
File Storage
Source Insight 4 stores most of its data in <HOMEDRIVE>/users/<user-name>/Documents/Source Insight 4.0
The folders within the "Documents/Source Insight 4.0" folder are as follows:
Table 1.1: Folders & Files In User Document Area
Folder Name Description
Backup
Stores file backups for non-
project files.
Bookmarks
The "global" bookmarks used
in all projects.
Clips
Clip storage. See Clips feature.
Logs
Log files. Controlled by Options
> Preferences: General : Log-
ging...
Projects
Each project has a data folder
inside this folder.
Settings
Your configuration settings,
themes and layouts.
Snippets
Code Snippets
c.tom file
C/C++ preprocessor token mac-
ros.
FileAlias.txt file
Maps file names without exten-
sions to File Types

New Features in Version 4
22 Source Insight 4 User Guide

Source Insight 4 User Guide 23
CHAPTER 2 User Interface
This chapter describes the main Source Insight program window and general information about using differ-
ent windows available in Source Insight.
The user interface of Source Insight consists mainly of:
•The main menu and toolbar area at the top.
•The source file windows that you edit files in.
•Panel windows, which can dock or float.
Source Insight is a Tabbed-MDI (Multiple Document Interface) application. This means that each source file
you open has its own child window contained within the Source Insight application window. In addition, file
window tabs appear across the top just below the toolbar area

24 Source Insight 4 User Guide
In the screen shot below, the main Source Insight application window contains the main toolbar at the top, a
source file window in the middle, and some panel windows docked to the right side. The symbols declared in
the source file appear on the left in a symbol panel.
Below is a typical window layout, showing a source file window, the Relation window, and Context window.
The main Source Insight program window, showing a source file window with a symbol window attached on
Source Insight 4 User Guide 25
the left side, and a Relation Window docked to the right edge. The Context window appears docked at the
bottom edge.
For more information:
See “Relation Window” on page 93.
See “Context window” on page 90.
Source file
window for
editing and
viewing code
Symbol Window:
shows symbols
defined in each
file
Context
Window:
automatically
shows
declarations and
other
information
while you click
on things or type
Relation
Window: shows
references, call
trees, and other
relationships
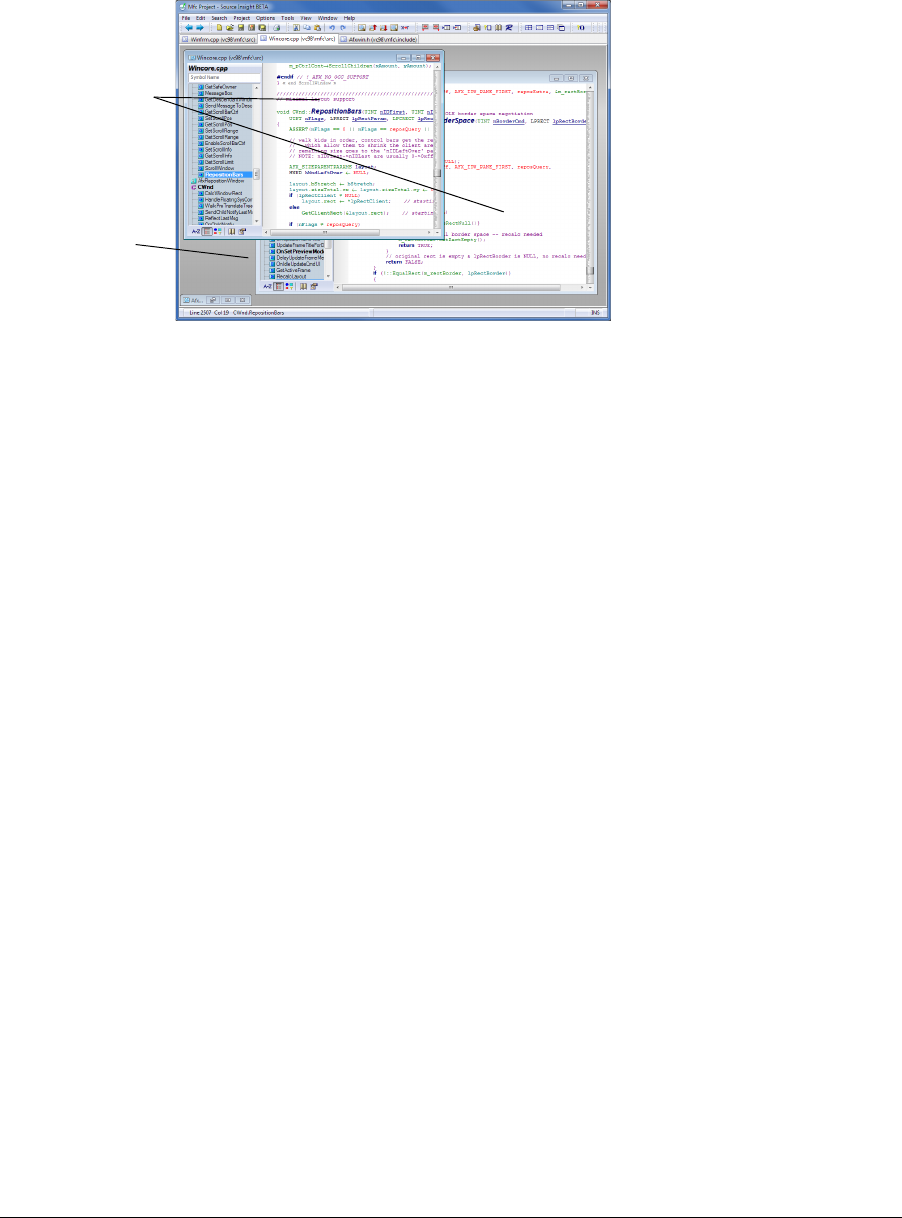
Source File Windows
26 Source Insight 4 User Guide
Source File Windows
Each file you open will display in a separate source file window. Source Insight is a Tabbed Multiple-Docu-
ment-Interface (MDI) application. Each source file window has a symbol window on the left side. You can hide
this window if you like.
When you open a source file, it appears in its own source file window. This window is where you do all of your
regular editing. File window tabs appear above the main source file area.
When you open a file that has a language attached, a Symbol Window will be attached to the left side of the
source file window. You can control whether a Symbol Window is used by selecting File Types And Options
and setting the Use symbol window check box accordingly. See “File Type Options” on page 213.
Source file windows
are arranged inside
the frame of the
application window
Multiple
document frame

Source Insight 4 User Guide 27
Source File Windows
Below is a source file window, which has a symbol window attached to the left side, and the optional Over-
view Scroller control on the right edge of the source window.
The Overview Scroller
The Overview scroller is an optional control which appears at the right edge of source file windows, and it
gives you a bird's eye view of your file. It shows a miniature version of your file, and can help to orient you
within a long function or set of functions. You can use it to scroll too.
Symbol
Window
Text area of source file Overview Scroller
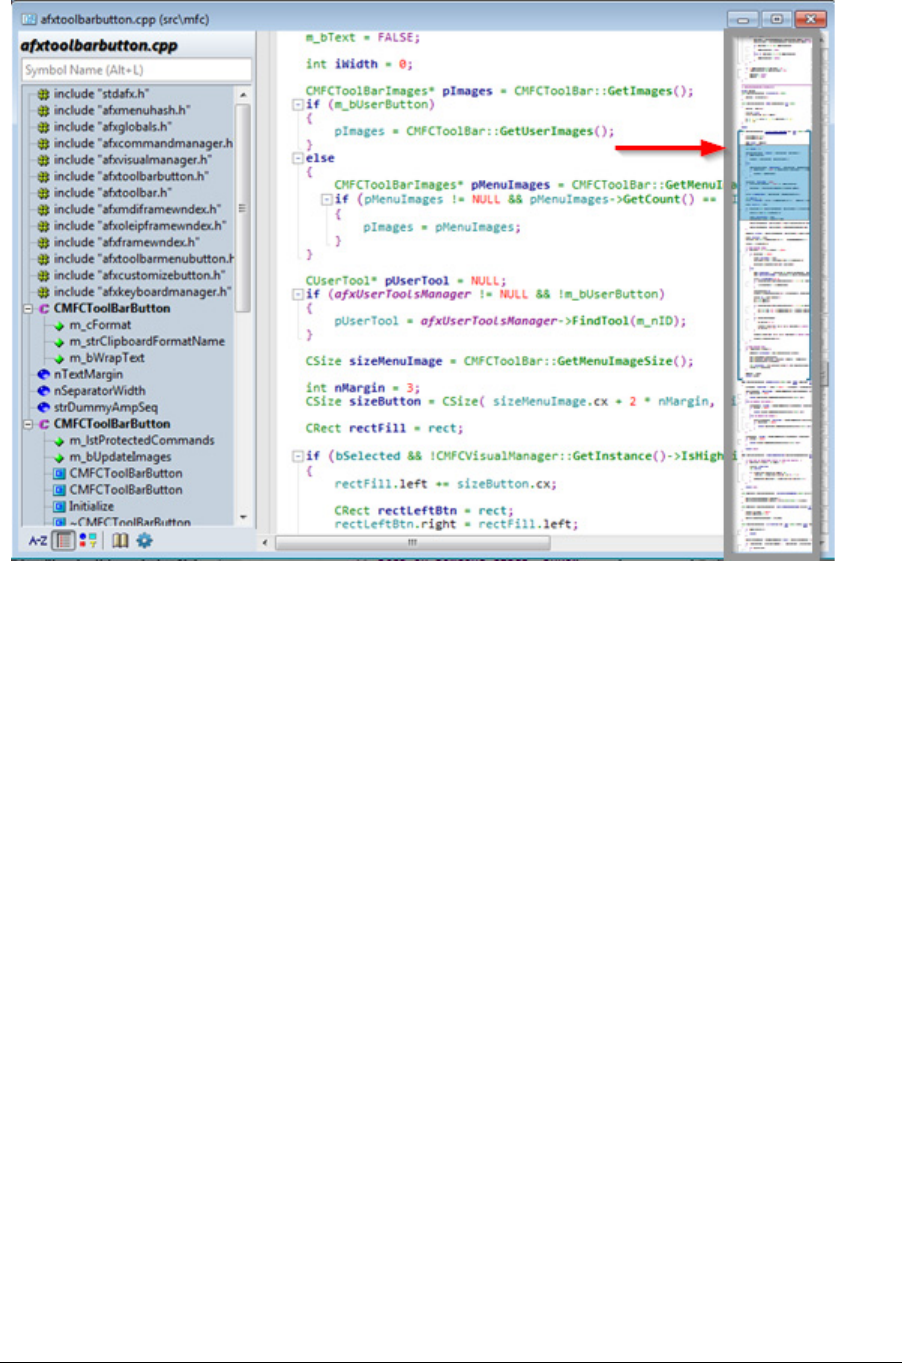
Source File Windows
28 Source Insight 4 User Guide
To show or hide the Overview scroller, select View > Overview.
You can control several settings for the Overview scroller, such as the magnification level, and what display
elements to show. To set the options for the Overview scroller, right-click on it and select Overview Options.
See “Overview Options” on page 268.
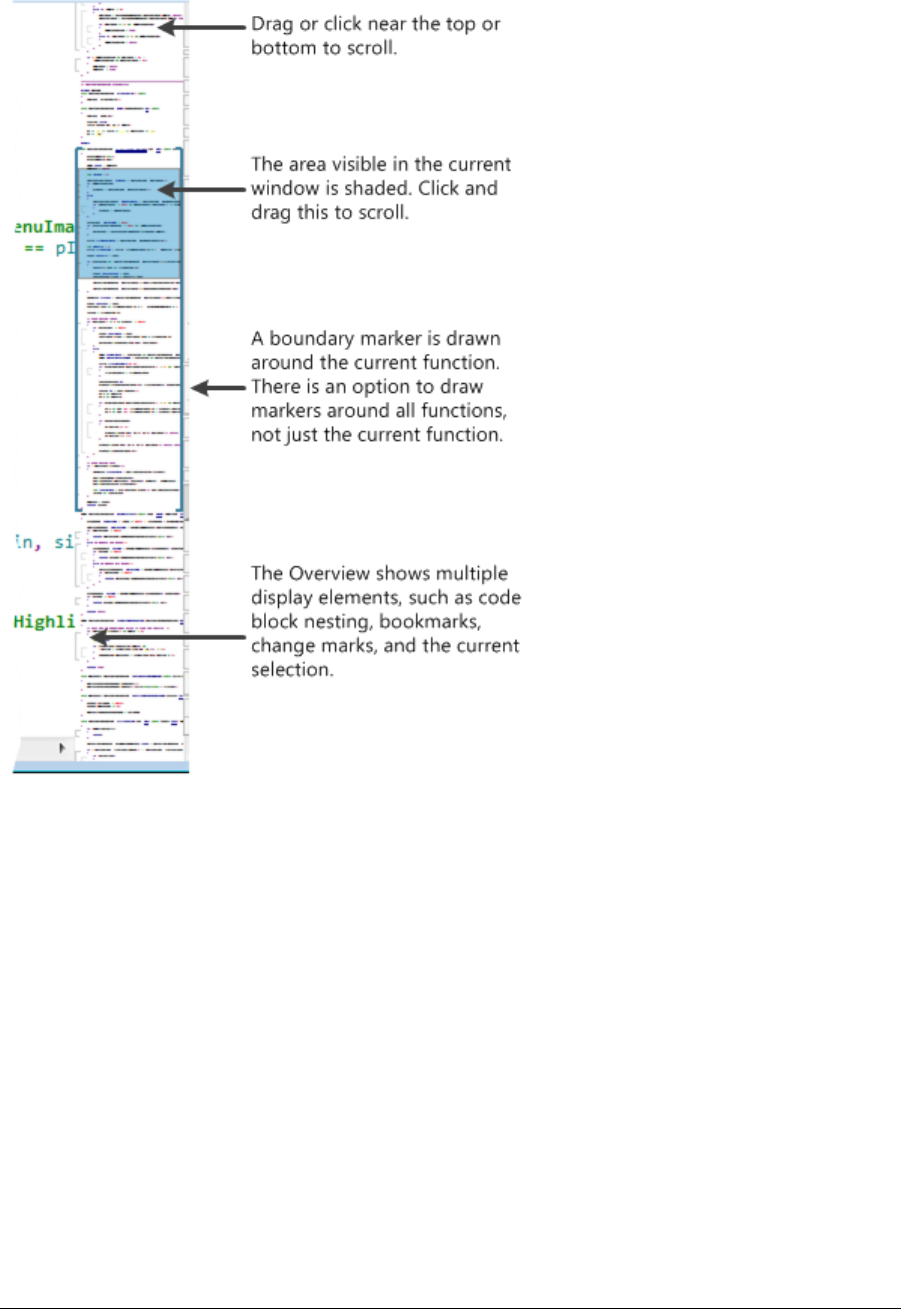
Source Insight 4 User Guide 29
Source File Windows
The Overview scroller shows a boundary marker around the current function that contains the selection or
insertion point. This helps to see where you are within a long function.
As you scroll within a file, the area visible within the source file window is represented by a shaded rectangle
in the Overview scroller. You can click and drag this rectangle to scroll. As you drag it near the top or bottom
of the Overview scroller, the Overview itself will scroll.
Shortcuts
To quickly set the magnification level, put the mouse cursor over the Overview scroller, and hold down the
Ctrl key while rolling the mouse wheel.
To scroll the Overview scroller itself (not the source window), put the mouse cursor over the Overview
scroller and use the mouse wheel. To scroll in bigger increments, hold down the Shift key while using the
mouse wheel.
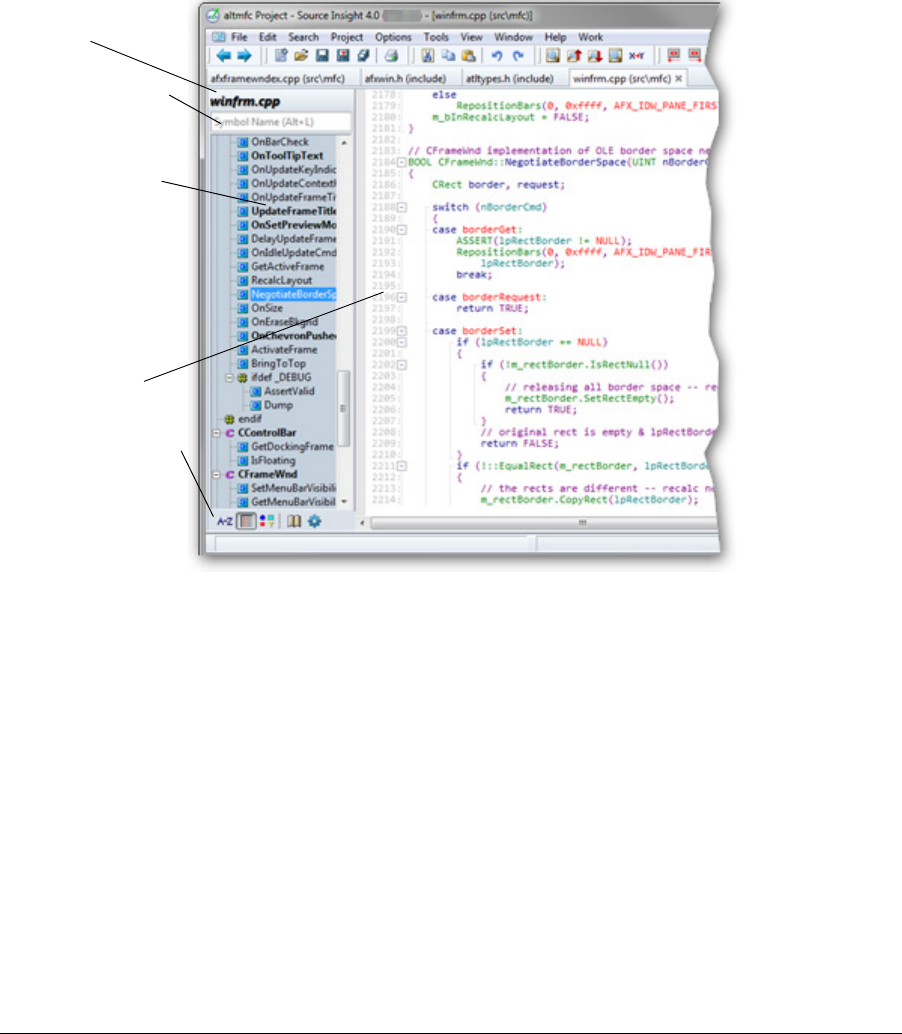
Symbol Windows
30 Source Insight 4 User Guide
Symbol Windows
Symbol Windows appear at the left side of each source file window. The Symbol Window lists all the symbols
declared in the file to allow easy navigation within each file, and to provide a quick overview of the file. For
example, it lists all functions, structs, classes, macros, constants, and so on. There is a small icon to the left of
each item in the Symbol Window list, which describes the type of the symbol. The Symbol Window also dis-
plays #ifdef-#endif nesting levels.
Source Insight dynamically updates the Symbol Window. If you type in a new declaration, the symbol will
appear right away in the Symbol Window.
Data structure symbols, such as classes, display in a bold font. Also, functions whose length is greater than
the average in that file are displayed in bold. The idea being that larger functions may be more important.
You can also drag symbols from one Symbol Window to another, or within the same file.
At the bottom of the Symbol Window is a small toolbar. There are controls for sorting the list. You can right-
click on the Symbol Window to bring up its shortcut menu.
Customizing the Symbol Window
Right click on the Symbol Window and select “Symbol Window Properties” to change its settings. See “Sym-
bol Window Options” on page 350.
Changing the Width of the Symbol Window
To change the width of the Symbol Window, click on the right edge of the window and drag. This will only
resize the current window. If you want to change the size for all other windows, resize it and then right-click
on it and select “Save Settings”
Permanently Changing the Width of the Symbol Window
To permanently change the width of the symbol window, and all future Symbol Windows in other files, resize
the window by dragging the right edge. Then, right-click on the Symbol Window and select “Save Settings”.
File Name
You can type into
this field to quickly
select items in the
list
Symbol Window:
lists all the symbols
declared in the file.
Each symbol has an
icon to identify its
type. You can click
the icon to drag and
drop whole symbols.
Text area of source
window
Symbol window
toolbar
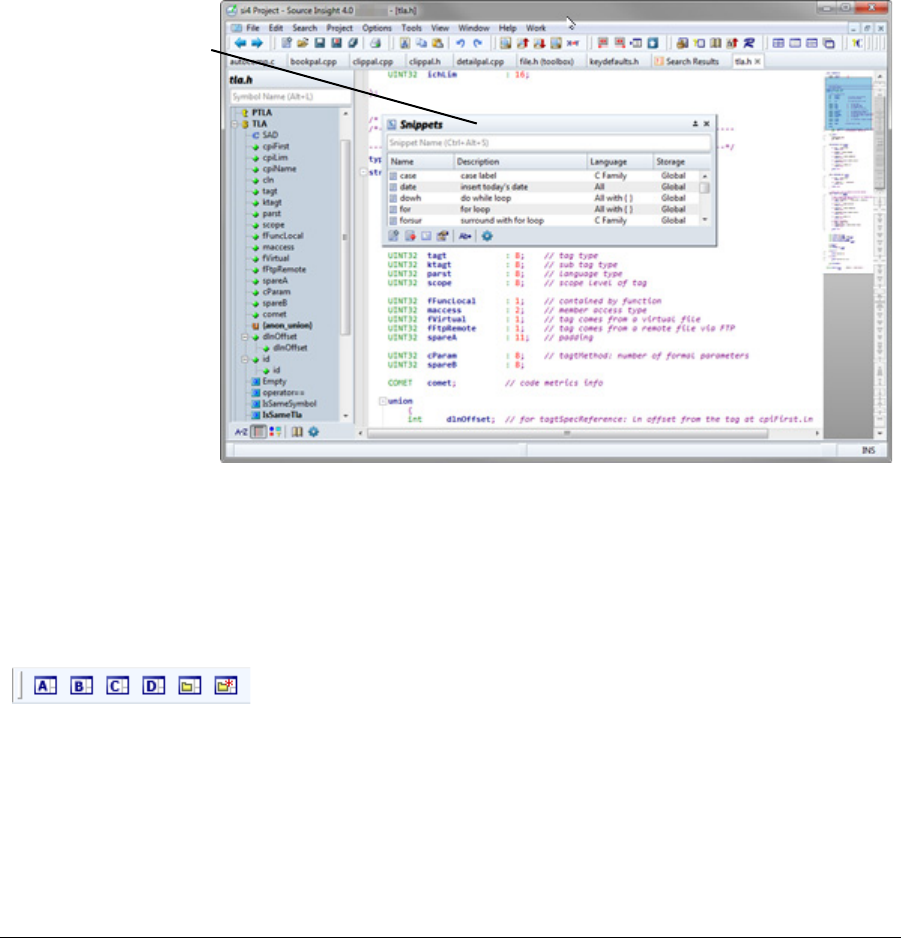
Source Insight 4 User Guide 31
Panel Windows
This records the window’s width, symbol sorting, and symbol type filtering and uses those parameters as the
new default for new windows created from now on.
Panel Windows
Panel windows are tool windows that can float in front of the main application window, and they can be
docked to various places along the main window. By dragging a floating window to an edge of the main win-
dow, you can dock it to the main window. Panel windows can float outside the application window, or even
on another monitor.
Below is an example of the Snippet Window floating in front of the main application window. The Snippet
Window is an example of a floating window that stays in front of the main Source Insight window. You can
also dock it to the edge of the program window.
Panel windows have a sticky behavior when you move them close to each other, or the edge of the Source
Insight application window. They will snap to the edge of a neighboring window, and they will automatically
resize if an adjacent panel window is resized.
The docked and floating layout of all the panel windows is saved in a layout file. You can quickly load differ-
ent panel layouts by selecting View > Load Layout..., or clicking one of the A-D layout buttons in Layout tool-
bar:
A floating panel window
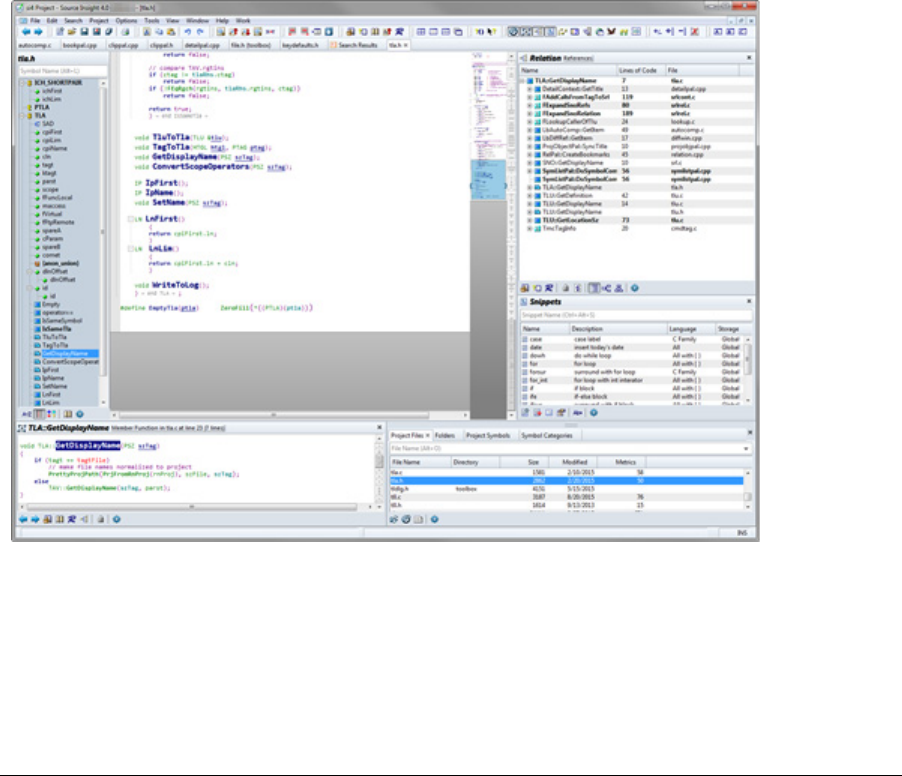
Panel Windows
32 Source Insight 4 User Guide
The panel windows are:
•Project Symbol List - shows all functions, classes, and other symbols in the project.
•Project Files List - shows all files in the project.
•Project File Type List - shows all project files, organized by type.
•Project Folder Browser - shows the disk and directory structure of a project.
•Project Symbol Categories - shows all symbols, organized by symbol type.
•Context window - a context sensitive information window.
•Clips Window - shows clipboard-like clips for easy copying and pasting.
•Bookmark Window - shows a list of bookmarked places.
•Relation Windows - shows call trees, class trees, and other relationships.
•Snippet Window - manages all code snippets.
•Window List - shows all the open file buffer windows.
•FTP Browser - connects to FTP servers.
•File Compare - shows differences between two files.
•Directory Compare - shows differences between two directories.
Docking Panel Windows
Panel windows can be docked to any edge of the main application window. They can be stacked horizontally
or vertically. This example shows several panels docked at the side and bottom.
To dock a panel window:
1. Drag it to the edge of the application window, or to the edge of an existing panel window.
2. You can also drag it over an existing panel window to split the panel area in half.
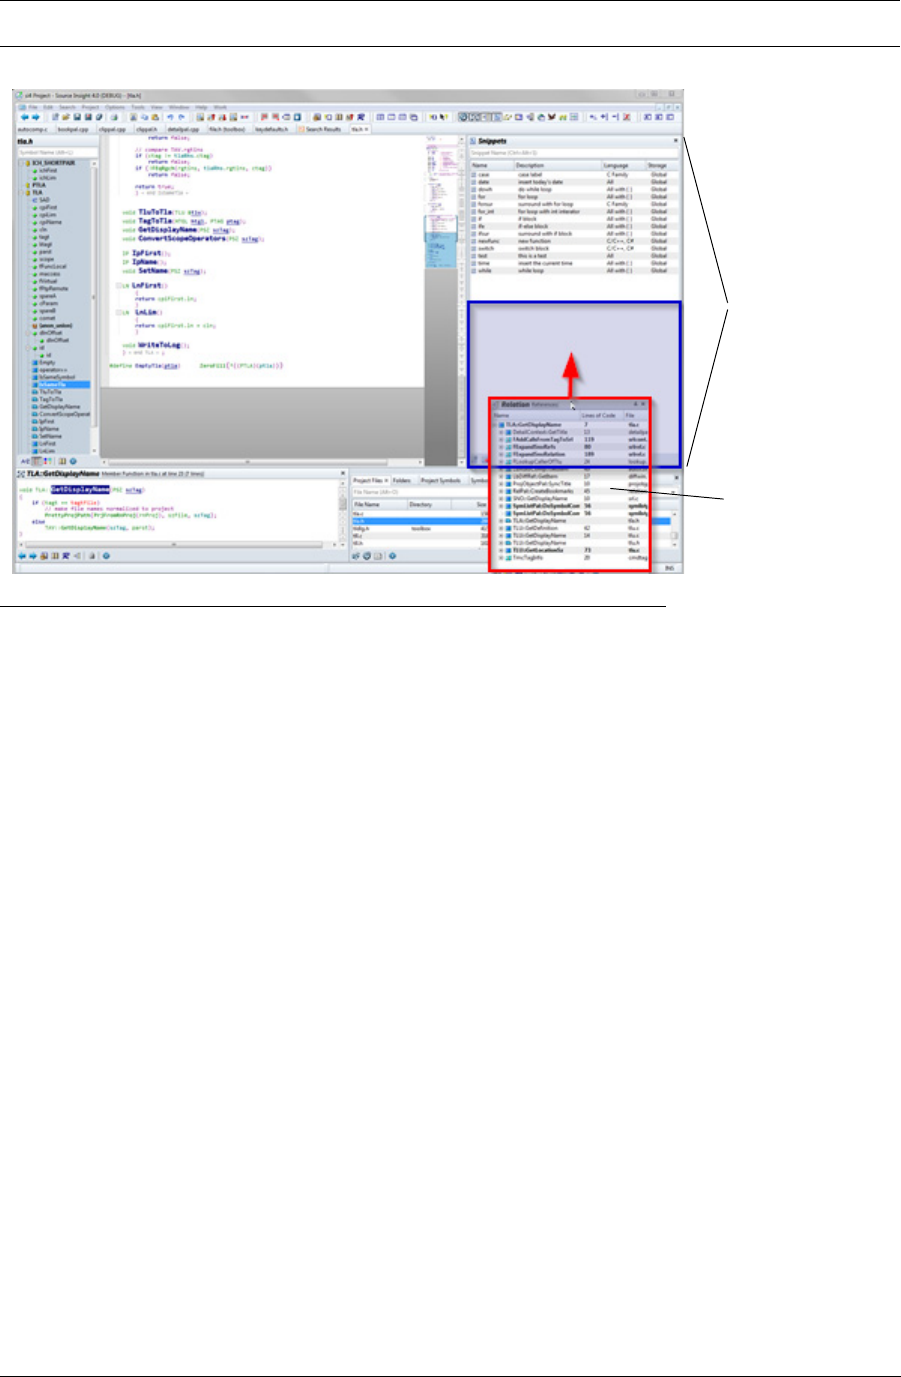
Source Insight 4 User Guide 33
Panel Windows
Note: To get a floating window to dock where you want it, drag it so that the mouse cursor itself is near the edge
where you want to dock the window.
Figure 2.1 Dragging a panel over another docked panel to dock it.
Docking Positions
You can dock a panel window in any of the following locations:
•Any outer edge of the main application window
•Any inner edge of the main window inside other docked panels.
•A split point inside another docked panel. Dragging over a docked panel will show a potential docking
position that is half the size of the existing panel.
•You can also leave the panel floating in front or outside of the main window, or on another monitor.
Drag a panel over an
existing docked
panel to split it in
half. Release the
mouse button to
drop and dock the
panel.
A docked panel will
be split if you drag
another panel over
it.

Panel Windows
34 Source Insight 4 User Guide
In the example below, the possible docking positions are highlighted:
Panel Window Controls
Each panel window has a set of window-control buttons in the upper right of its frame. A floating panel can
be maximized, or minimized to the Tab Tray area at the bottom of the main window.
The transparency control is only shown if the panel is floating and the "Enable transparent panels" option is
enabled inside the Options > Preferences: Display.
Close Panel
Click and drag title bar to move panel.
Double-click to toggle maximize & normal size. Adjust transparency
Minimize to Tab Tray

Source Insight 4 User Guide 35
Panel Windows
Grouping Panel Windows
Panel windows can be grouped together into a single, tabbed window. In the picture below, the Clips panel is
floating by itself on the left, and three other panels are grouped together into a tabbed panel on the right.
To group a panel with another panel:
1. Click on the source panel’s title bar and drag and drop it in the tab area of another panel window.
To group two non-grouped panels:
1. Drag the source panel so it hovers over the title bar area of the destination panel. A ghost tab will
appear. Release the mouse button to group the panels.
Panel Windows
Tab Tray appears at the bottom when you minimize a panel window
Minimize
Grouped Panel Windows - each has a tab
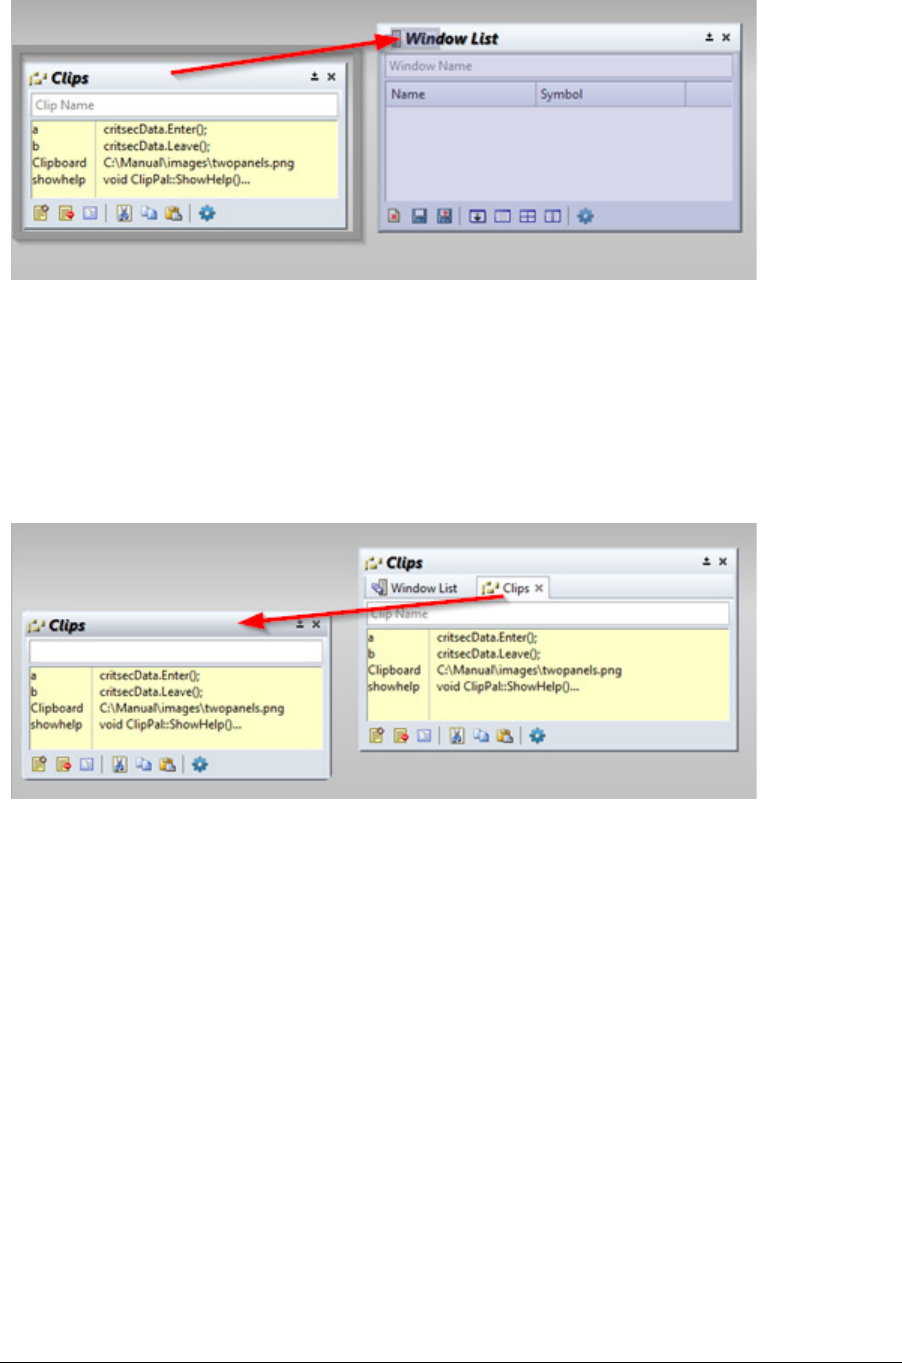
Panel Windows
36 Source Insight 4 User Guide
Un-Grouping Panel Windows
To un-group a panel:
1. Click and drag on its tab at the top.
2. Drag it out onto the desktop or other area. The panel will be placed into its own floating panel win-
dow.
Using Semi-Transparent Panel Windows
Panel window can be semi-transparent when they are floating. This makes the panel windows a little like a
HUD (Head Up Display) in a game.
Panel transparency is only available if the panel is floating and the "Enable transparent panels" option is
enabled inside the Options > Preferences: Display. See “Display Options” on page 195.
When a panel window is transparent, you can click through it to the text below it, as long as you are not click-
ing inside an object within the floating window.
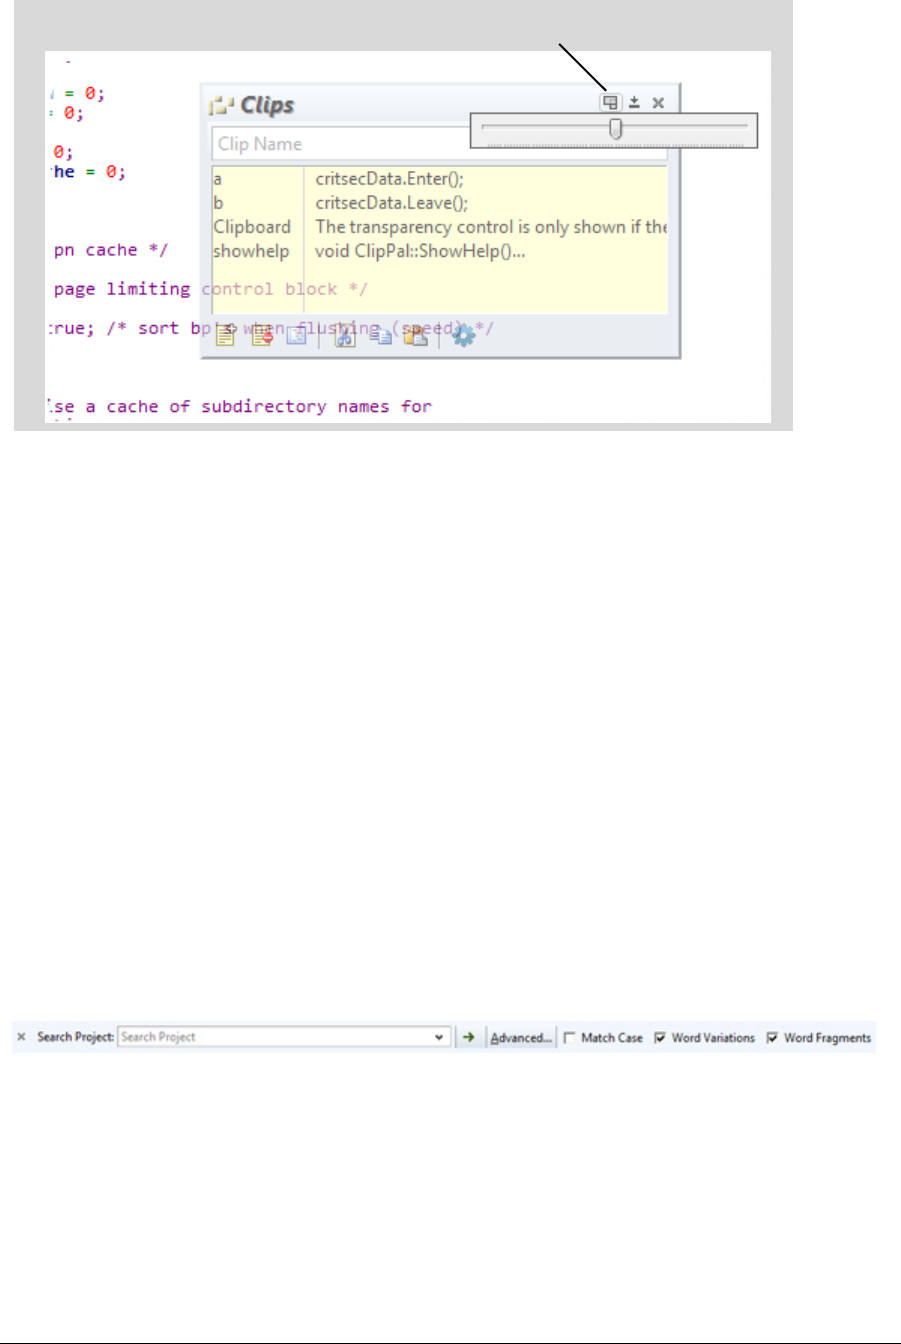
Source Insight 4 User Guide 37
Toolbars
To adjust the transparency amount, click on the transparency button in the panel’s window-control toolbar.
Toolbars
The main toolbar appears at the top of the Source Insight program window. You can toggle the whole main
toolbar on and off with the View > Toolbars > Main Toolbar command.
The main toolbar is made up of smaller sub toolbars. Each sub toolbar can be displayed independently using
the View > Toolbars menu. You can also drag the sub toolbars around within the main toolbar.
The position of each toolbar is saved in the configuration file automatically.
Each toolbar icon corresponds to a Source Insight command. Please refer to the Command Reference chap-
ter for information on each command.
Project Search Bar
The project search bar is used for searching across the whole project. It is a powerful way to perform a key-
word based search to find name or word fragments within a given number of lines of context. To show it,
select View > Project Search Bar.
See “Search Project” on page 328.
Click to adjust transparency
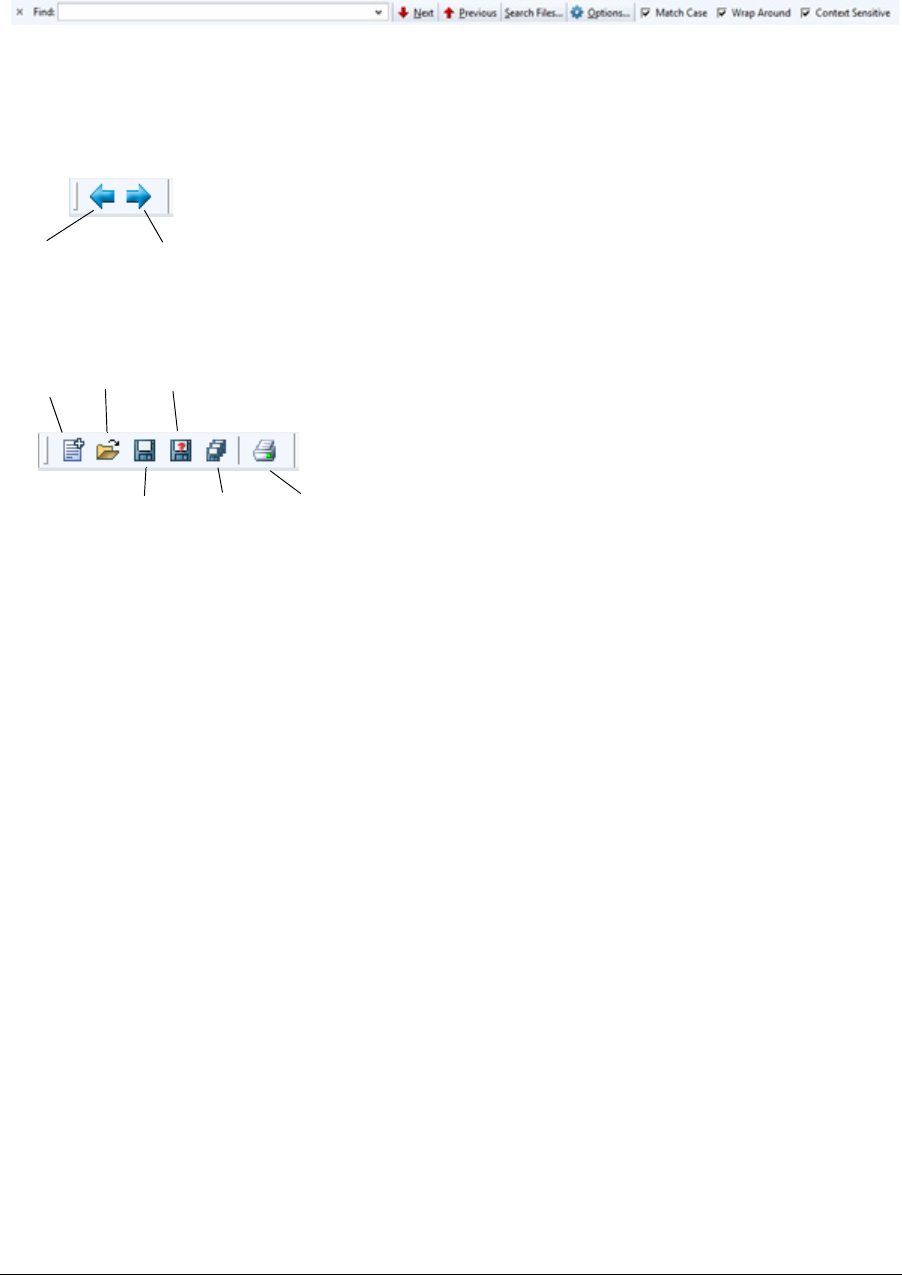
Toolbars
38 Source Insight 4 User Guide
File Search Bar
The File Search Bar is used to search within the current file. To show it, select View > File Search Bar. Alterna-
tively, you can use Activate Search Bar (Alt+Shift+F) to activate it so you can start typing into it.
To set options, click the Options button. See “File Search Bar Options” on page 212.
Browse Toolbar
The Browse toolbar shows the navigation operations, like in a web browser.
Standard Toolbar
The Standard toolbar contains the basic file operations.
Go Back Go Forward
New Open
Save
Save As
Save All Print

Source Insight 4 User Guide 39
CHAPTER 3 Features and Concepts
This chapter contains overviews of Source Insight's important features and concepts.
As you read this chapter, you will become familiar with Source Insight's features. Later, as you explore Source
Insight's commands, you can refer to the Command Reference chapter for information on specific com-
mands. Also, many dialog boxes in Source Insight contain a Help button that opens the help topic for the dia-
log or command in question.
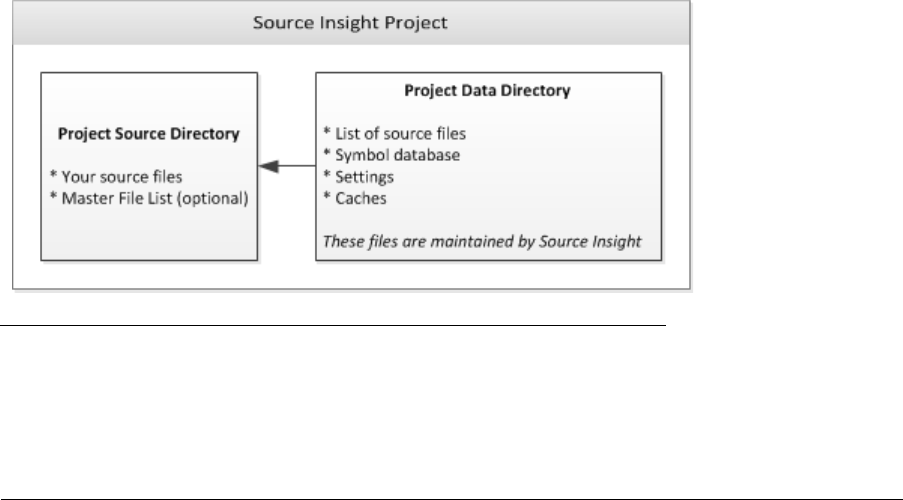
Projects
40 Source Insight 4 User Guide
Projects
The most powerful features of Source Insight are designed around projects. A Source Insight project is a col-
lection of source files, plus associated data files that helps you navigate quickly around your source code.
You can add existing source files, or an entire source tree to a project. You can add files as you create the files
inside Source Insight. If new files appear in your source directory or subdirectories, they can also be added
automatically to your project by running the Project > Synchronize Files command, or by letting Source
Insight synchronize automatically in the background. You can also have Source Insight maintain a Master File
List for a project, which determines what files are in the project.
Project Features
Source Insight projects have several important features:
•A project logically groups related files.
•When you want to open a file, you don't have to specify its drive or directory.
•Source Insight maintains a symbol database, which contains data about all symbols declarations and
references in the project. You can use Source Insight to locate symbols and their references very
quickly. When source files are saved, the symbol database is automatically updated incrementally so
that Source Insight always "knows" where a symbol is. When files are changed externally, for example
by a source control system, Source Insight will automatically synchronize those files with the project
symbol database. See “Symbols and Language Parsing” on page 54.
•Source Insight can show symbol relationships in the project, such as call trees, reference trees, and
class hierarchies.
•Source Insight maintains a reference index, which greatly speeds up project-wide searches for symbol
references. The reference index is updated incrementally as you edit and save your files.
•Each project has its own session workspace. When a project is opened, all the session state is restored.
When a project is closed, all open files are closed and the workspace is saved.
Inside a Project
A project consists of basically two things: Your source files, and the project data files that Source Insight
maintains.
Figure 3.1 The components of a Source Insight project.
Each project contains a list file paths that point to your source files. A project also contains a symbol data-
base, which is maintained by Source Insight. Your source files are parsed by Source Insight and symbol decla-
rations and definitions, and references are recorded in the symbol database. All you have to do is add source

Source Insight 4 User Guide 41
Projects
files to your project; you do not have to generate any other "tag" files. Source Insight does that automati-
cally.
Each project has its own session workspace. The workspace contains session information, such as the list of
files that are open and window positions.
The Current Project
Each Source Insight instance allows only one project open at a time. You can have multiple instances of
Source Insight running - each of which can have a different project open.
Sometimes Source Insight will open other secondary projects to search for symbol declarations. These are
background projects and you will not be aware that they are opened or closed.
Throughout this documentation, most discussions assume that you have a project open, unless otherwise
stated. Whenever there is a difference in the way a command works with and without a project open, it will
be noted.
Project Directories
When you create a project, you must specify two directories for each project:
•Project Data Directory - this is where Source Insight stores its project data files. For example, the
.siproj file is stored here. By default, Source Insight creates a project data directory inside the
Docu-
ments\Source Insight 4.0\Projects
folder when you create a new project.
•Project Source Directory - this is typically the root of your local source repository tree. By maintain-
ing these two separate folder locations, you can store your Source Insight data separate from your
source files. Furthermore, your Source Insight project data files are kept in your own user data area,
and other users on the same machine will not be able to access them. If you want, you may use the
same location for both folder locations.
Here is an example of a typical project setup:
Project Data Directory:
C:\Users\John\Documents\Source Insight 4.0\Projects\MyProj
which contains the file MyProj.siproj - the main project file.
Project Source Directory:
c:\work\proj1\src
which contains your source code, possibly including sub-directories of source code.
To edit the project source directory location, use the Project Settings command. See “Project Settings” on
page 284.
Project Source Directory
The project source directory is what you consider the main location of your source files. The project source
directory is typically the topmost, or root directory of your source repository. You might think of this as the
"home" directory of the project. Source Insight normalizes project file names relative to this directory when
it displays file names. You can actually set the source directory to any location on your disk, after the project
is created, by using the Project Settings command. This affects how the source file paths are displayed,
because they are displayed relative to that directory.
See “Where do you want to store the project data files?” on page 264.
Once a project is created in a given directory, you can add files to it from any directory and any drive, includ-
ing network drives, and UNC paths.
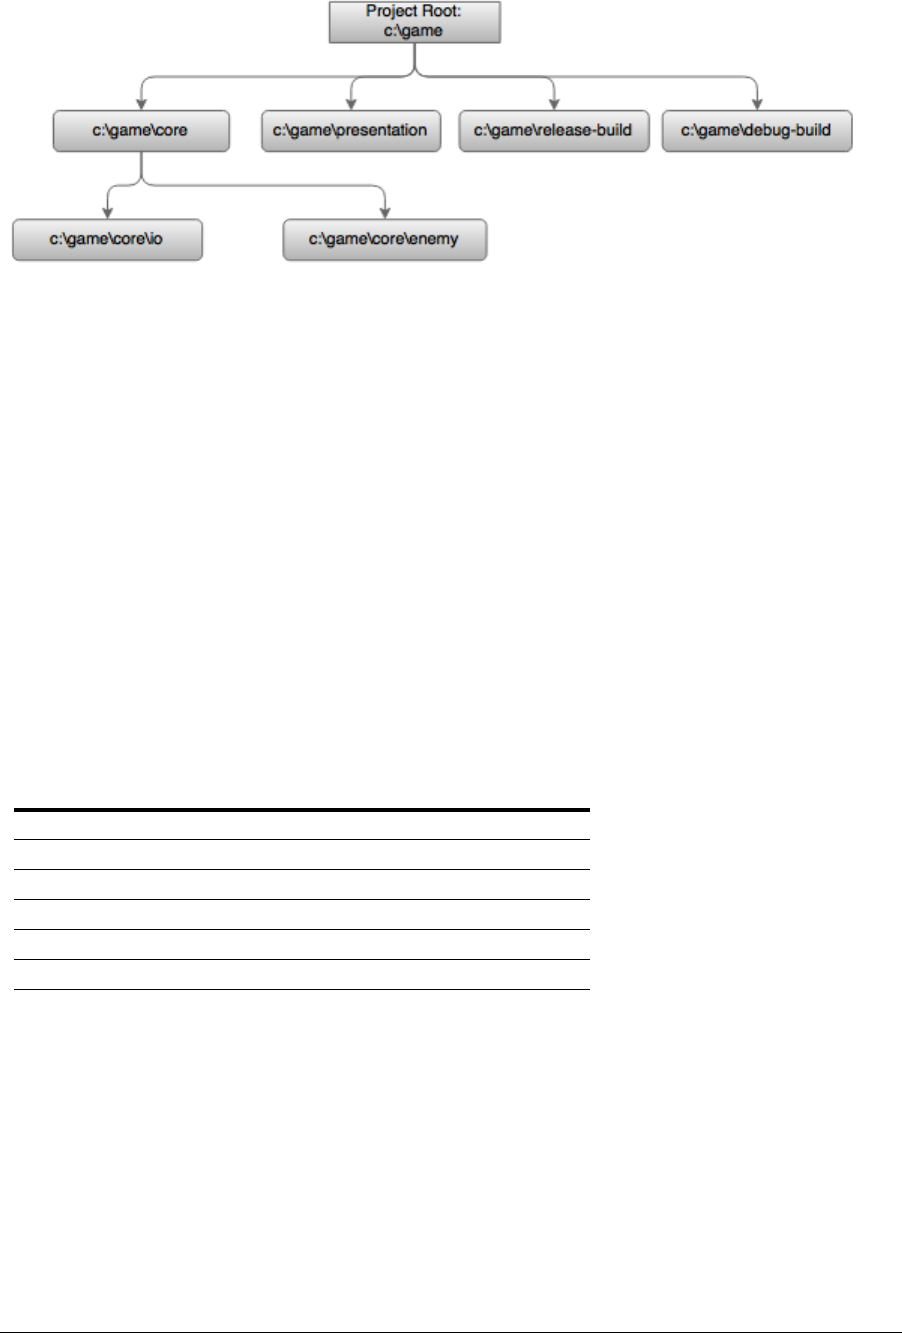
Projects
42 Source Insight 4 User Guide
As an example, let's say we are creating a project for a game program. The source tree looks like this:
We have source code in the "presentation", "core", and "core" subdirectories. Our Source Insight project will
include files from all these directories. We should specify c:\game as the project source directory when we
create the project so that all file paths will look relative to that directory.
Normalized File Names
When Source Insight displays a file name and the file is part of a project, it arranges the name and path to
make it easier to see and select the base file name without all the directory paths getting in the way. This pro-
cess is called normalizing the file name. This is an important feature because many projects have files spread
out across multiple subdirectories; and "flattening" out the directory tree makes it easy to type and select
the most significant part of file names.
A normalized file name always begins with the leaf file name, and it's followed by the directory path in paren-
theses. Furthermore, the directory path shown is relative to the project's source directory, unless the file is on
a different drive. If the file is on a different drive, or not part of the project source directory tree, then the full
path is displayed in parentheses.
If you prefer not to see file names normalized in the Project Window, you can turn it off by using the Project
Window Properties command and checking the File Directory box to add a separate column to the list for the
directory name.
Here are some examples using the game project discussed above:
Creating a New Project
Use the Project > New Project command to create a new project. You must give the project a name and spec-
ify where you want Source Insight to store the project data.
If the file path is: The file name is displayed as:
c:\game\file.c file.c
c:\game\core\file.c file.c (core)
c:\game\core\io\file.c file.c (io)
c:\game\core\enemy\file.c file.c (core\enemy)
c:\game\presentation\file.c file.c (presentation)
c:\SomeDir\file.c file.c (C:\SomeDir)
d:\OtherDir\file.c file.c (D:\OtherDir)

Source Insight 4 User Guide 43
Projects
You will be asked for a project name, where the files should be stored, and what source files you want to add
to the project.
New project name
Enter the name of your project. Source Insight will create several files that start with this name and have dif-
ferent extensions.
Where do you want to store the project data files?
Enter the full path to the folder where you want to save the project data files that are created by Source
Insight. They can either be in the same folder as your source files, or in a separate location. By default, they
are created under your Source Insight user directory in the Projects folder.
We recommend that your data directory be on a local, non-networked drive for reliability and best perfor-
mance.
After you answer these two questions, you will be taken to the Project Settings dialog. See “Project Settings”
on page 284.
Where Should You Create A Project?
If you are creating a project for source files that are stored locally on your machine, there should not be any
problem creating the project data files in the same directory as your source files.
If you are creating a project that refers to files on a shared server, or any other place that you do not have per-
mission to write to, then you should create the project data somewhere on your local machine. When the
Project Settings dialog box appears, enter the location of the your source files into the project source direc-
tory field.
The folder you specified as the project data directory will become the default project source directory. In the
Project Settings dialog box, you can specify a different path for the project source directory. The project
source directory typically is the path of the topmost directory containing your source files. When Source
Insight displays file names, the files are displayed relative to project source directory. If you point the project
source directory to the directory containing most of your source files, then you will not have to look at a lot of
redundant path information.
In addition, the "Add new files automatically" feature (in Options > Preferences: General) only will add new
files automatically to your project if the files are in the project source directory or a descendant of this direc-
tory.
See “Synchronize Files” on page 351., and “Project Settings” on page 284.
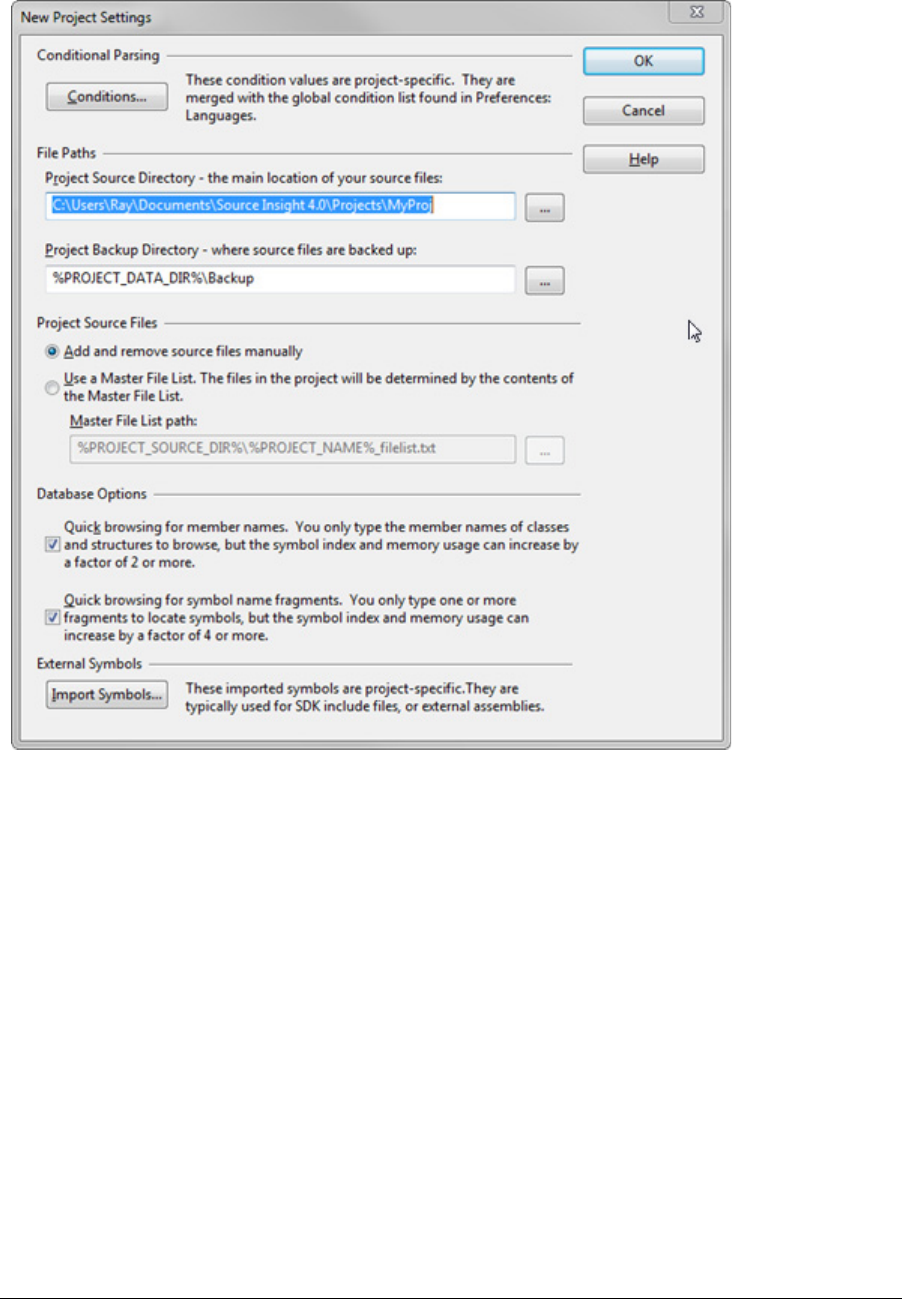
Projects
44 Source Insight 4 User Guide
New Project Settings
When you create a project, the New Project Setting dialog opens. See “Project Settings” on page 284.
Setting Index Options for Projects
Name Fragment and Member indexing takes up index space on disk and in memory. It also slows database
access a little bit. You can control what is indexed in the Project Settings dialog box.
Two check boxes control indexing:
Quick browsing for member names
Select this to allow member name indexing. When this option is enabled, you can simply type the member
names of classes or structures, instead of having the type the class or structure name, followed by a dot (.)
and the member name. De-selecting this will save on disk space and memory.
Quick browsing for symbol name fragments
Select this to allow name fragment indexing. When this option is enabled, you can type partial name frag-
ments and find symbols containing those name fragments. Un-checking this will save on disk space and
memory. If your project is large, then Source Insight may operate slowly when browsing, or synchronizing
files with the symbol database.
If both check boxes are turned off, then the Project Symbol List panel filtering will revert to simple prefix
matching. However, the Symbol Window on the left side of each source window, and the Project Window file
list will still allow name fragment browsing.

Source Insight 4 User Guide 45
Projects
Adding Files to a Project
After you create a project, you next need to add source files to the project. There are several ways to add files.
If you created a new file in Source Insight and save it for the first time, Source Insight will ask you if you want
to add the file to the current project. This will be the most natural way to add a file if you are writing new code
and are creating new source files a lot.
If you already have existing source files and you want to add them to the current project, use the Add and
Remove Project Files command. This command adds any existing files, including whole directory trees, from
anywhere on your disk to the current project. See “Add and Remove Project Files” on page 159., and “Add File
List” on page 162.
You can also add files to the project by dragging files from Windows Explorer and dropping them onto the
Project File List panel. The Project File List panel also allows removing files from the project.
Note: You can also use Master File List to maintain the files in your project. This is useful for maintaining projects on
separate machines and with other team members. See “Using a Master File List” on page 46.
Adding a file to a project has the following effects:
•The file name is stored in the file name database for the project. Whenever Source Insight displays a
list of files, that file name will be in the list. Therefore, for example, when you use the Open command,
the file name will be in the list box.
•The file is parsed based on its language type. Symbol definitions are added to the project's symbol
database. The language parser used for each file is determined by its file type. See “File Types” on
page 72.
•The file's modification date is recorded in the file name database, so that Source Insight will know to
synchronize the project symbol database if the file was modified outside of Source Insight, for exam-
ple by a source control system.
•The way the name of the file is displayed is changed. The file name becomes "normalized" to the proj-
ect's source directory.
•The file will become part of the project code base, which is searched when showing symbol relations,
such as call trees.
What Files Should You Add to a Project?
Source Insight projects should consist of program source files and text files only. It doesn't make any sense to
add a binary format file to a Source Insight project. For example, adding an exe or bitmap file to your project
would have no benefit.
The file types that are defined by default in Options > File Type Options correspond to the types of source
files you probably want to use with Source Insight. Normally, only those types of files should be added to a
project.
Use File Type Options to control what types of files are added to projects
The File Type Options dialog box contains the check box: Include when adding to projects. You can use this
check box to control what file types Source Insight will automatically add to your project, or what file types
will be displayed in the list box in the Add and Remove Project Files dialog box.
Adding Remote Network Files to a Project
For whatever reason, you may want to access your source files directly on a network server, not from local
copies of the files. Of course, you are free to open any file on the network directly. However, keep in mind that
you may be locking other people out of the file by having it open, or otherwise causing contention over the
file. In addition, you won't get the benefit of Source Insight's project features unless the remote file is added
to your project.
One way to have a project that refers directly to files on the server is to create a project locally on your work-
station and add the files from the remote server to your project using the Add and Remove Project Files com-

Projects
46 Source Insight 4 User Guide
mand. This way, the Source Insight symbol database files are stored locally on your machine, but the source
files still reside on the server. See “Add and Remove Project Files” on page 159.
Using the Project Settings command, you should specify the remote source code directory, on the server, as
the project source directory. That way, files will be displayed relative to the main source directory, not rela-
tive to your local project data file directory. See “Project Settings” on page 284.
Project Master File List
Instead of adding and removing files manually through the Add and Remove Project Files command, you can
setup a special file called a Master File List and associate that with the current project. For more information,
See “Using a Master File List” on page 46.
Removing Files from a Project
To remove a file from the current project's file list, use the Project > Add and Remove Project Files command.
When a file is removed from a project, all the symbols found in that file are removed from the project's sym-
bol database. Source Insight will not actually delete the file from the disk. See “Add and Remove Project
Files” on page 159.
Note: You can also use Master File List to maintain the files in your project. This is useful for maintaining projects on
separate machines and with other team members. See “Using a Master File List” on page 46.
Using a Master File List
You can use a Master File List to control what source files are in a project. The Master File List is a text file con-
taining the names of each file or directory in the project. To use it, select Project > Project Settings and
enable the Master File List setting.
Although the Master File List (MFL) controls what files are in your project, you can still add or remove files
manually by using Project > Add and Remove Files. When you add or remove a file from your project, the
change will be saved to the MFL. If the MFL contains a file that is not in your project, then it will get added
automatically to your project. If the MFL does not contain a file that is in your project, then it will be removed
from your project automatically.
The Master File List can be a part of your source code repository and shared with other people. It is a simple
text file that lists all the files (and/or directories) in your project. The MFL is maintained as you add or remove
files from your project. If you add or remove files, the changes are saved to the MFL, and when the MFL is
pushed out or checked in, your team members will get the additions or deletions automatically as their
Source Insight syncs up with the MFL.
Master File List Format
Each line in the Master File List should contain a path relative to your project's source directory. It can be a
simple file name, a wildcard, such as
open*.c
, or a directory name.
If a line item is a directory name, then all the files that match known file types in the directory are included in
the project. Sub-directories and their contents are not included.
Lines that begin with the semi-colon (;) character are comments.

Source Insight 4 User Guide 47
Projects
Here is an example:
; Source Insight Project File List
; Project Name: WorkTest
; Generated by Source Insight 4.00.0048 at 11/19/2015 1:41:06 PM
; Version=4.00.0048
;
; Each line should contain either a file name, a wildcard, or a sub-directory name.
; File paths are relative to the project source root directory.
;
FM15Output\copycss.bat
FM15Output\custom-table.css
FM15Output\custom.css
devices
console\get.c
console\put.c
cmd*.c
cmd*.h
The example above uses a combination of specific file names, wildcards, and a directory name (devices). All
the names are relative to the project source directory root.
Generating a Master File List
If you already have a project built and you would like to use a Master File List, select Project > Export Project
File List to create a new file list. Select Project > Project Settings and specify the file list in the Master File List
Path section.
Editing the Master File List
You can edit the Master File List directly by selecting Project > Open Project Master File List. Normally you
would not need to edit it because Source Insight changes it automatically as you add and remove files from
your project. However, you are free to edit it. When you save the file, Source Insight will resynchronize the
project with the new version of the Master File List.
Synchronizing with the Master File List
Source Insight periodically checks to see if the Master File List has changed on disk. It resynchronizes with it
when a change is detected. This can cause new files to be added to the project, or files to be removed from
the project. This is handy if your Master File List is part of your source code repository. For example, if a col-
league adds a new file to the project, when you get a new version of the repository, the new source file will be
automatically added to your Source Insight project.
Opening and Closing Projects
To open a different project, use the Project > Open Project command (See “Open Project” on page 266.)
Source Insight only allows you to have one project open at a time, so if you already have a project open, it will
ask you if you're sure you want to close the current project and save any changes to files. Assuming you do
close the current project, the Open Project command will display a list box of existing projects from which to
choose.
To close the current project and have no project open, use the Close Project command. Source Insight asks
you if you want to save each file you have opened that you've changed, then it closes all files.
Removing a Project
To remove a project, use the Remove Project command. This command removes all the project data files that
Source Insight creates and associates with the project. Your source files are not deleted. See “Remove Proj-
ect” on page 310.

Projects
48 Source Insight 4 User Guide
Copying a Project
The Project > Copy Project command copies the current project to a new name and location. The new project
is created by cloning the current project data files. Your source files will not be copied. The new project will
point to the same source files. If you delete the original project after copying it, you have effectively renamed
the project. See “Copy Project” on page 182.
Read-Only Projects
Sometimes it makes sense for a project to be read-only, and Source Insight allows for that. A project should
be read-only if it is used only as a import library, or the project only exists on the project symbol path for
auto-completion use. Also, a read-only project can be opened simultaneously by multiple instances of
Source Insight.
When Source Insight opens a project in the background to get symbol information for auto-completion or
other reference-oriented uses, it opens the project as read-only so that other instances of Source Insight can
open the project too.
To make a project always open as read-only, set the read-only file attribute of the project’s
.siproj
file,
which is stored in the project’s data directory.
When you open a read-only project, you will not be able to save any files in the project, or add or remove files
from it.
Changing Project Settings
The Project Settings command sets various options that govern the current project. If no project is currently
open, then the Project Settings command sets the default options inherited by subsequently created proj-
ects.
When you create a new project, the Project Settings dialog box appears.
You may specify whether the project has its own private configuration, or if it uses the global configuration
file. You can also indicate where the project's source directory is, and what types of symbol information
should be indexed.
See “Project Settings” on page 284.
Symbols and Projects
Source Insight parses symbol definitions dynamically out of your source files while you edit. Symbol informa-
tion is stored on disk in an indexed symbol database, which is integral to the project.
The symbol database is updated incrementally as you open and save files. Files that are changed by other
project team members are also automatically synchronized with the symbol database in the background.
You typically do not need to do anything to keep Source Insight’s symbol information current.
Synchronizing Project Files
Source Insight uses a synchronization process to keep files and symbols up to date with respect to its project
databases. This is helpful when files are edited without using Source Insight. For example, you may be using
a source control system that updates files on your machine, or you may have files that are machine gener-
ated by your build process. When that happens, Source Insight has to re-parse those out-of-date files to bring
the Source Insight project up to date. Normally, this is done automatically in the background for you, but you
can do it manually by using the Project > Synchronize Files command.
The synchronize process ensures that the entire project is up to date. It scans each file in the project and
updates the symbol database for each file that has been modified since Source Insight had the file open last.

Source Insight 4 User Guide 49
Projects
The synchronizing process can also optionally add and remove files automatically as new files appear, or dis-
appear from directories. The options are set in Options > Preferences: General Options. See “General
Options” on page 225.
You can also use a Master File List to control what files are in your project. If you use this option, then the syn-
chronization process uses the Master File List to add or remove files as needed. See “Using a Master File List”
on page 46.
To synchronize files in a project:
You can synchronize a project in one of two ways:
•The default: If the "background synchronization" option is enabled in Options > Preferences: General,
then synchronizing the project will happen in the background while you continue to edit in Source
Insight. See “General Options” on page 225. You basically don’t need to do anything.
•You can run the Synchronize Files command, which synchronizes the project on demand. See “Syn-
chronize Files” on page 351.
Normally, if you open a file that has been modified since Source Insight had it open, the symbol database is
updated automatically when you open the file. By automatically synchronizing, the update is transparent to
you. However, if a symbol is moved from one file to another, you may find that Source Insight loses track of
where the symbol is, unless both files are in sync with the project. In addition, if new symbols have been
defined, Source Insight won't know about them until the containing file is synchronized.
The Base Project
Source Insight automatically creates a project named Base. When Source Insight cannot find a symbol defini-
tion anywhere else, it searches the Base project. It is implicitly at the end of the project symbol path.
Note: You do not have to add the Base project to the project symbol path. Source Insight automatically searches it as
though it were in the list.
This gives you a convenient place to save common symbols. Any symbol stored in the Base project is visible
from any other project. The Base project is also a good place to add your favorite Source Insight editor macro
files.
Creating a Web Version of Your Project
You can create a snapshot of your project sources as a set of web pages. You can use any web browser to
browse your source code. The resulting web pages will have syntax formatting close to what is displayed
inside Source Insight.
Use the Project > Export Project to HTML command to save a new set of HTML files. See “Export Project To
HTML” on page 204.
Rebuilding Projects
Sometimes you may need to rebuild a project if you suspect the data files are corrupted or just too far out of
date.
If you can still open your project, use the Project > Rebuild Project command to rebuild it. This rebuilds all
the Source Insight data files. See “Rebuild Project” on page 287.
Source Insight automatically detects if a project is corrupted when you open a project. If corruption is
detected, it will rebuild the project at that time.
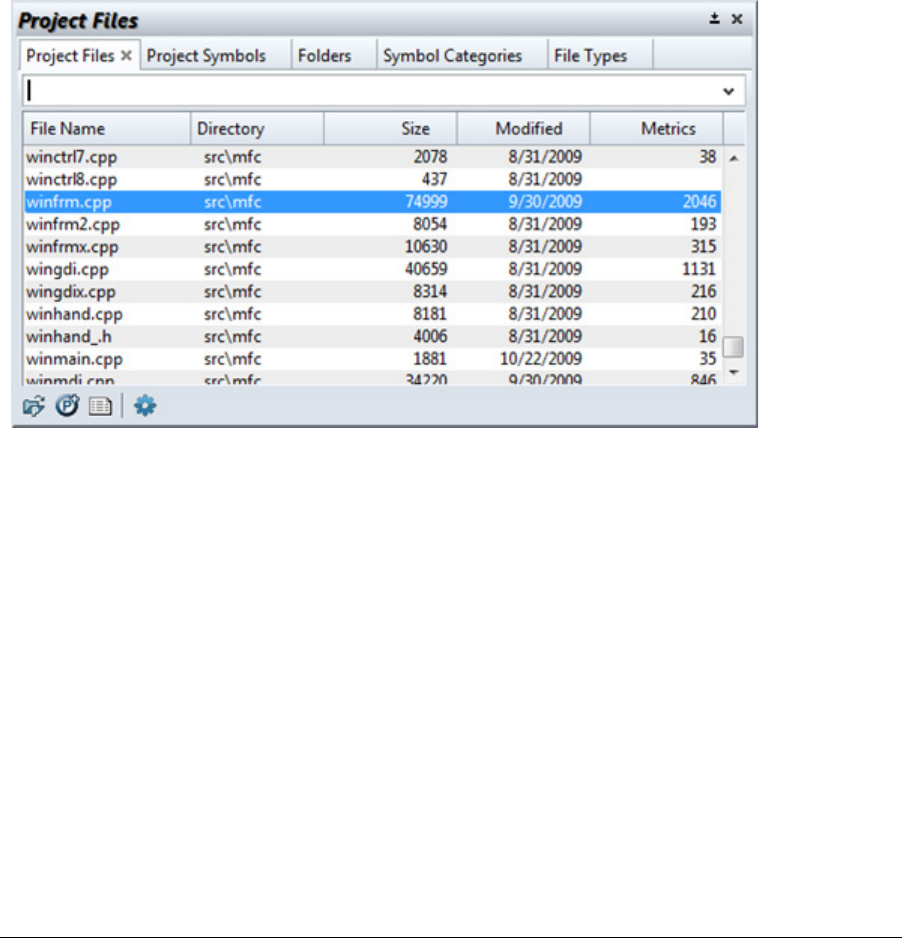
Project Windows
50 Source Insight 4 User Guide
Project Windows
There are several project related panel windows. The main Project Window appears when you View > Panels
> Project Window. The Project Window is set up by default as a tabbed container for all the project-related
panels, such as the Project File List and Project Symbol List. Each project panel has a tab.
The Project Window can be either docked to a side of the Source Insight main application window, or it can
float in front.
As with any grouped panels, you can click on the tab for any project panel and drag it out into its own floating
window, or dock it separately.
Project File List
The Project File List shows all the files in the project. You can type into it to open files quickly; regardless of
what directory they are in. Most files can be opened with just a few keystrokes. You can also type wildcards
and change working directories directly by typing into the text box and pressing Enter.
Using name fragment matching, you can type part of a file name to locate a file, without bothering with the
directory name.
Expanding Wildcards
If you type a wildcard specification and press Enter, then the file list will be filtered down to match that spec-
ification. For example, if you type *.c and press Enter, you will see all *.c files in your project, regardless of
directory. To remove the wildcard, press * (asterisk) and press Enter.
Browsing Non-Project Files
If you want to browse your disk and see files that are not necessarily part of your project, type dot (.) and
press Enter. The current working directory contents will fill the list. To return to the “project-only” view of the
files, type ** (two asterisks) and press Enter. Alternatively, you can switch to the Project Folder Browser panel
to browse directory contents.
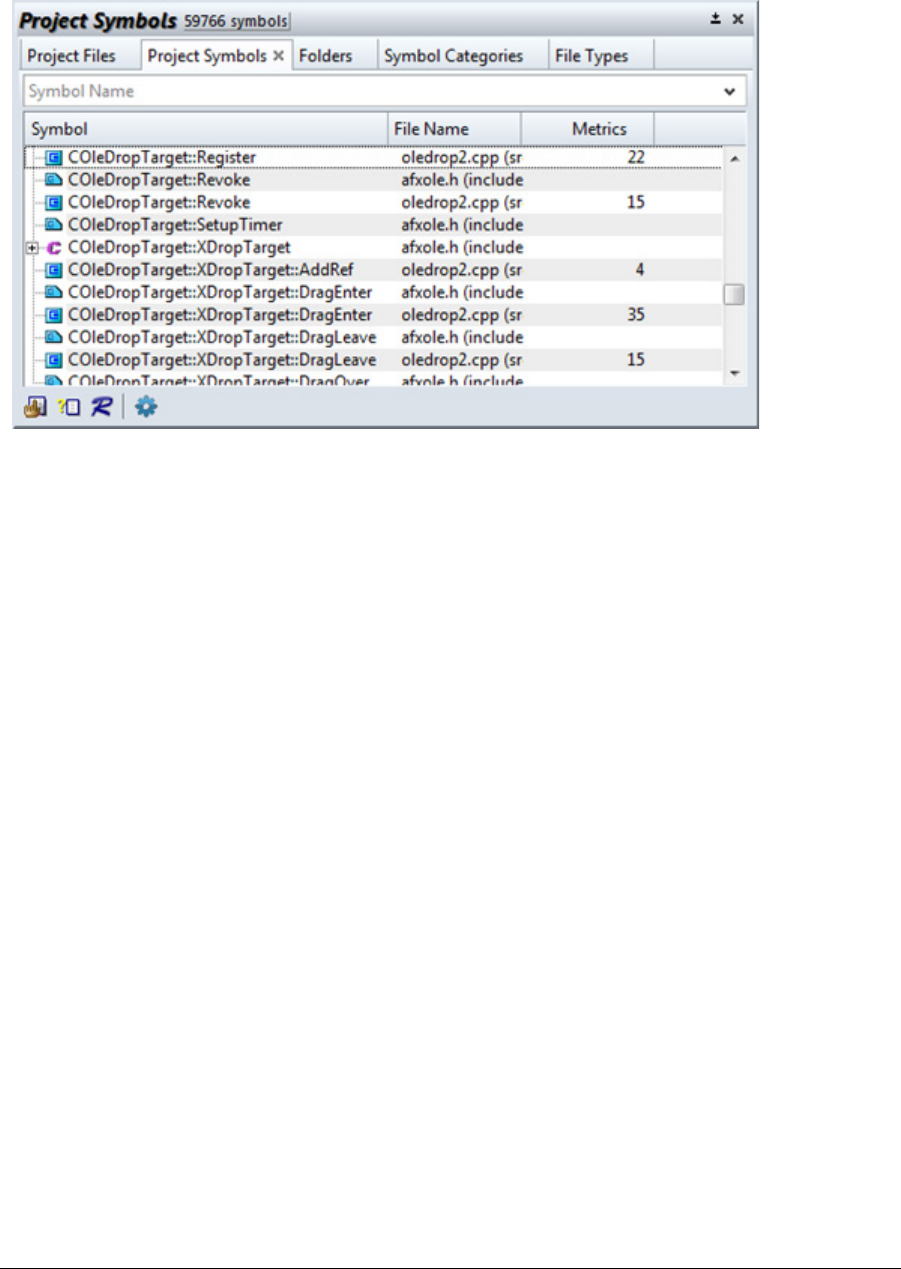
Source Insight 4 User Guide 51
Project Windows
Project Symbol List
The Project Symbol List shows all the symbols in the project. You can quickly type the first few characters of
most files to open them quickly without navigating to any directories.
To locate a symbol quickly, type a part of the symbol name and the list will be filtered down as you type. You
can also use name fragment matching to find parts of symbol names. For example, if you type:
doc write
this will match symbol names such as DocWrite, WriteDoc, WriteOpenDoc, CanWriteAnyDoc, etc. See “Name
Fragment Matching Symbol Names” on page 66.
Regular Expression Searches
You can also perform a regular expression search for symbol name by prefixing the regular expression with a
question mark (?). For example,
?Insert.*Stack
will find all symbols that have “Insert”, followed by zero or more characters, followed by “Stack”.
Finding Only Functions
You can limit search results to only function symbols by adding an open parenthesis at the end of the text.
For example:
Open(
will find only function that contain Open in the name.
Combining With the Context window and Relation Window
Both the Context window and the Relation window track the current selection in the Project Symbol List.
Therefore if you select a function in the Project Symbol List, the Context window will automatically show you
the definition of the function. The Relation window will automatically show the call tree or reference tree for
the function. (The Relation window has options you can set to tell it what you want to see.) See “Relation
Window” on page 93.
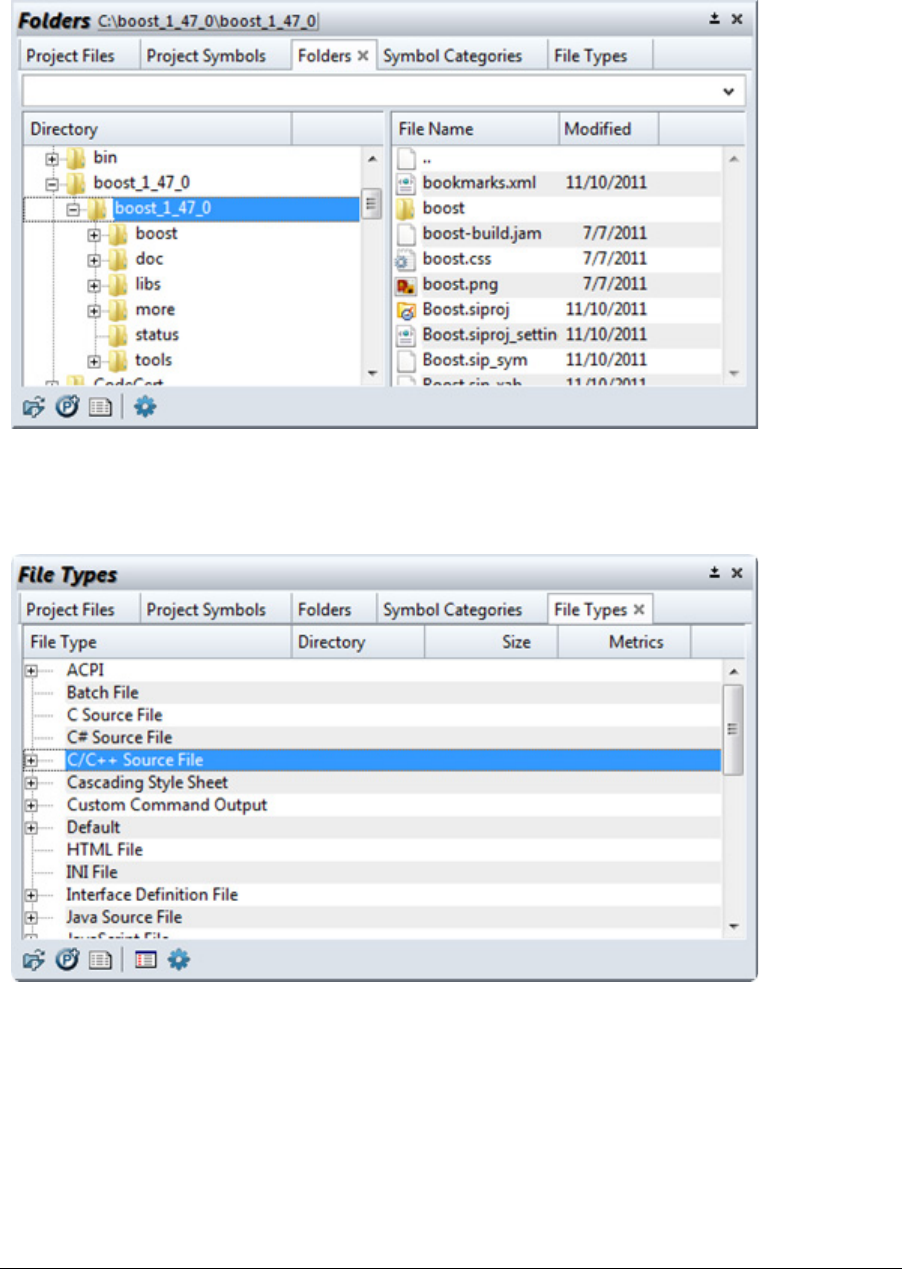
Project Windows
52 Source Insight 4 User Guide
Project Folder Browser
The Project Folder Browser shows disk directories and files. This allows you to perform some basic directory
and file maintenance, and to open non-project files easily.
File Types View
File Type View shows a breakdown of project source files by file type.
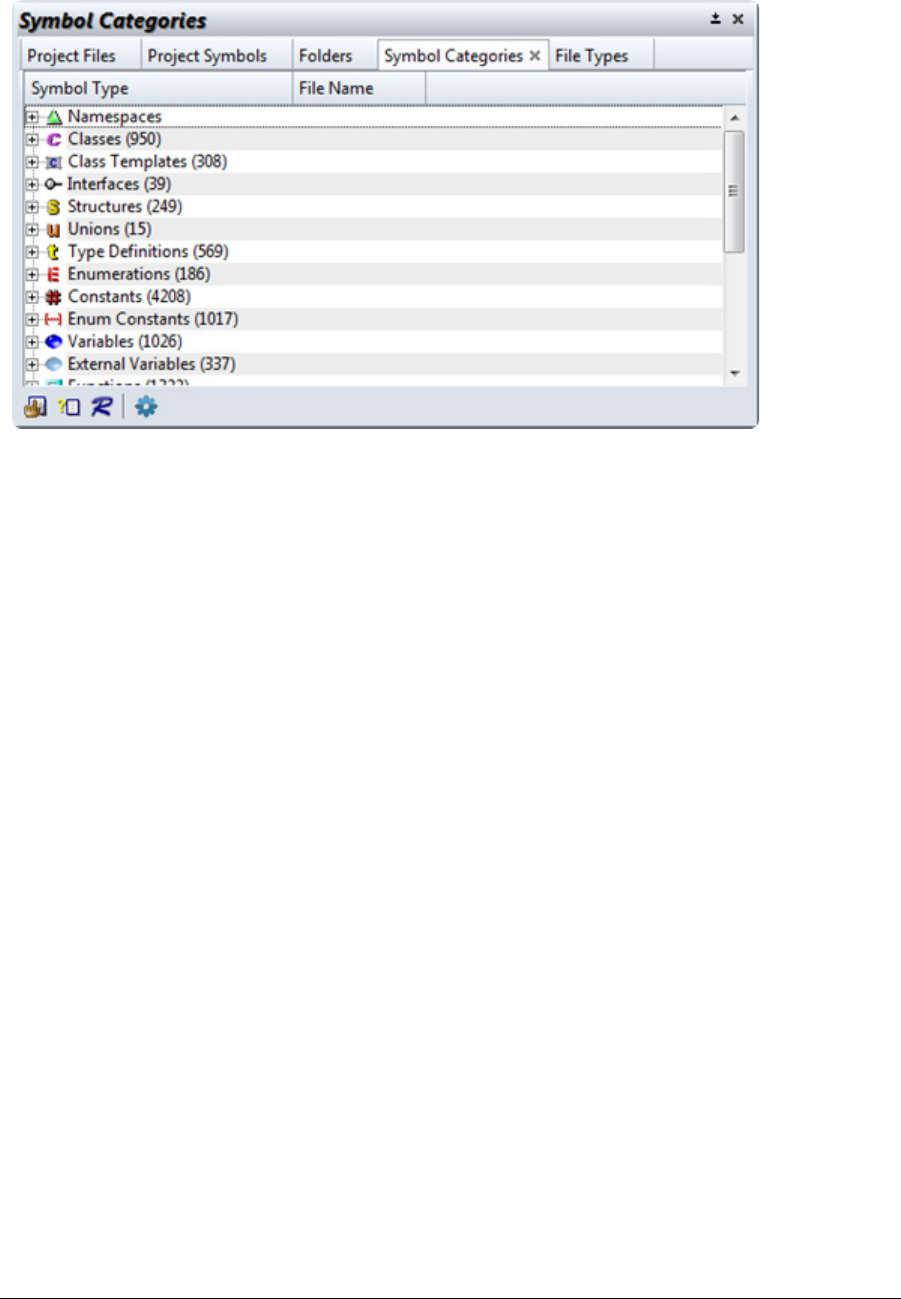
Source Insight 4 User Guide 53
Project Windows
Project Symbol Categories
The Project Symbol Categories panel shows a breakdown of symbols by symbol type.
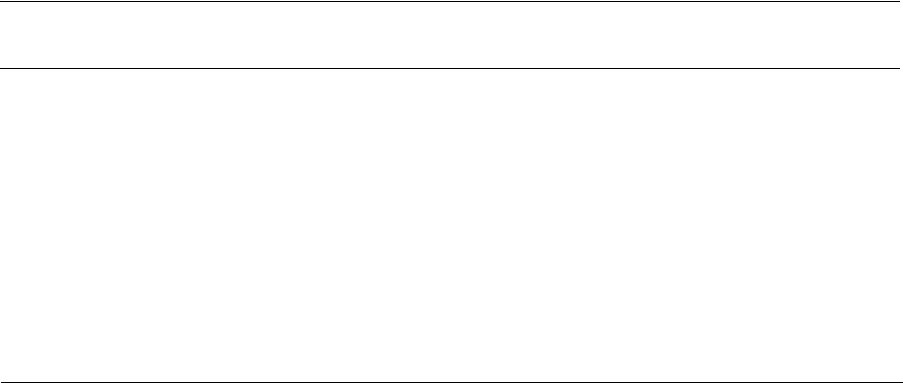
Symbols and Language Parsing
54 Source Insight 4 User Guide
Symbols and Language Parsing
One of Source Insight’s most important strengths is its static analysis of source code while you edit. Its lan-
guage parsers determine where symbols are defined in your project, and where they are used. It displays
source code with syntax formatting based on that analysis.
Languages
Source Insight uses a language abstraction to encapsulate the properties of various programming languages.
For a given file buffer, the file's name determines its file type. The file type determines its language parser.
The Options > File Type Options dialog box is used to associate a file type with a file extension and a lan-
guage. For example, the Java Source File file type uses the
*.java
file filter to associate Java files with that
file type. Further, the Java Source File file type specifies the Java Language parser. See “File Type Options” on
page 213.
To see a list of the currently supported languages, use the Options > Preferences: Languages dialog box.
New languages are added to the list from time to time in program updates. See “Language Options” on
page 241.
Languages in Source Insight are divided into two categories: Built-In, and Custom.
Built-In Languages
Source Insight contains built-in optimized support for several languages, including C/C++, C#, Java, Objec-
tive-C, Python, Perl, ASP, Visual Basic, and others.
Most built-in languages support extra features, like finding references and generating call-trees.
Custom Languages
You can also add your own custom language support to Source Insight using the Options > Preferences: Lan-
guages dialog box. A custom language is a simple generic language that specifies syntax rules, syntax format-
ting keywords, and simple parsing expressions. See “Language Options” on page 241.
Custom languages can also be exported and imported.
To Add a Custom Language
Adding support for a new language is basically a two-step process:
1. Add the language, using Options > Preferences: Languages. See “Language Options” on page 241.
2. Add the File Type that refers to the language, by using Options > File Type Options. See “File Types”
on page 72.
Note: The File Types dialog still allows you to add a custom parsing pattern directly into the file type properties, in
lieu of adding a new language. However, you have more control by adding a new custom language and using
your file type to point to the new language.
The Language Options topic in the Command Reference contains more details on custom language proper-
ties. See “Language Options” on page 241.

Source Insight 4 User Guide 55
Symbols and Language Parsing
Symbol Naming
In Source Insight, symbol names are stored as a "dotted path." The dotted path contains the symbol's con-
tainer name, followed by a dot (.) and the symbol's name. For example, a member of a class may look like:
MyClass.member
All symbols that have their declarations nested inside of another symbol will have a dotted path. If you look
through the symbols listed in the Project Window, you will see the dotted paths. Even in languages like C++,
where the scope resolution operator
::
is used to declare members, the symbol name is stored internally as
a dotted path.
When typing the full name of a symbol, you should use the dot in the symbol name if you want to also specify
its container.
Note: It is possible for a symbol to have an embedded dot (.) character in its name. Source Insight will store the sym-
bol name so that the embedded dot is not confused with the dotted path dot character.
Resolving Symbol Definitions
When Source Insight displays source code, it formats identifiers based on their declaration. For example, is it
a function, or a class, or a struct? Is it a local variable? Is it a class member? And so on. Source Insight uses its
symbol lookup engine to resolve an identifier’s declaration.
When Source Insight looks up a symbol definition, it searches in a particular order to find it.
1. It searches all open files and the symbol database for the current project (if a project is open).
2. It searches the project’s import library list. See “Importing Symbols from Libraries” on page 55.
3. It searches the global import library list.
4. It searches every project in the project symbol path.
5. Finally, the Base project is searched.
Common Projects
Consider the case when you have a set of header files from a library that you often use with multiple projects.
You could add these files to each of your projects, but that would be redundant. A better solution is to create
a single common project for each set of common header files, and let Source Insight search the common
project from any open project.
Common projects enables you to create smaller, self-contained projects, but still have the ability to locate
symbol declarations in other projects. The Base project (See “The Base Project” on page 49.) is the final place
Source Insight looks to find symbols; it is implicitly at the end of the project symbol path.
Common projects are used in two ways:
•You can add the common project as an import library project. There global and project-specific import
library lists. See “Importing Symbols from Libraries” on page 55.
•You can put the common project onto the project symbol path. There is only one project symbol path
that is used regardless of what the current project is. See “The Project Symbol Path” on page 56.
Source Insight will search the import library projects, and the project symbol path whenever it looks up a
symbol and can't find it in your current project, or in an open file.
Importing Symbols from Libraries
You can import symbols from external sources, such as INCLUDE path header files, Java packages, and .NET
assemblies. Source Insight creates a special import library project for imported symbols. You can use the
Project > Import Library Symbols dialog to maintain the list of import library projects. See “Import External
Symbols” on page 233.

Symbols and Language Parsing
56 Source Insight 4 User Guide
An import library is a special Source Insight project, whose symbols come from an external sources. Symbols
can be imported from the following types of files:
•All the source files on the INCLUDE path
•.NET .dll files
•A whole directory tree of .NET .dll files
•Java .jar files
•Java .class files
•A whole directory tree of Java .class files
•A whole directory tree of source files (such as *.h files)
•Another Source Insight project
When you import symbols from one of these sources, a new special Source Insight project is created to hold
the symbols, and Source Insight opens and searches these import projects automatically.
Note: Import projects have an "_import_" prefix in their name. You can open an import project by selecting Project >
Open Project and enabling "Show import projects". The project list will contains all your projects, plus the
import projects.
There is both a global import library list, and a project-specific import library list. Therefore, import libraries
are more flexible than using the project symbol path.
The Global Import Library List
Source Insight maintains a single global import-library list that is used for all projects, or in the case where
you don't have a project open. The import list is searched when a symbol needs to be found. To manage this
list, select Project > Import External Symbols.
The Project-Specific Import Library List
Each project also contains an import-library list, which is only used when that project is the current project.
The import list is searched when a symbol needs to be found. To manage the project-specific list, select Proj-
ect > Import External Symbols for Current Project, or select Project > Project Settings, and click the "Import
Symbols" button.
Only Definitions are Found via the Import Lists
The import libraries are only used to locate symbol definitions. They are not used to locate symbol refer-
ences, or used by Search Files, or Smart Rename. Those operations only work on the files in the current proj-
ect.
The Project Symbol Path
The project symbol path is a delimited list of common projects that Source Insight will search when looking
up a symbol definition. It gets searched after all the open files, the current project, and the import library
projects.
There is only one project symbol path that is searched regardless of what the current project is.
Every project in the project symbol path is searched. If the symbol is still not found, then the Base project is
searched. If more than one symbol is found with the specified name, then Source Insight will ask you to pick
from a list of the matching symbols, their locations, and types.
You can edit the project symbol path using the Options > Preferences: Symbol Lookups command. See “Sym-
bol Lookup Options” on page 346.
You can enable the Always search symbol path option in the Preferences: Symbol Lookups dialog box. When
this option is on, all projects in the symbol path are searched every time Source Insight looks up a symbol,
even if the symbol was already found in an open file or the current project. You may want to turn this option

Source Insight 4 User Guide 57
Symbols and Language Parsing
on if you want to see if there are redundant (or at least like-named) symbols in your project and any others
on the project symbol path.
The project symbol path is only used to locate symbol definitions. It is not used to locate symbol references,
or used by Search Files, or Smart Rename. Those operations only work on the files in the current project.
C/C++ Symbols
When editing C/C++ files, Source Insight can perform symbol completion for the standard libraries, such as
the C-runtime, STL, WinAPI, or any other library such as Boost. This is accomplished by importing symbols
from the C/C++ files and header files on your machine.
To import the C/C++ runtime symbols, use the Project > Import External Symbols command, or use the Pref-
erences: Symbol Lookups dialog box and click the Import Symbols button.
To import C/C++ runtime symbols:
1. In the Options > Preferences: Symbol Lookups dialog box, click the Import Symbols button.
2. In the Import External Symbols dialog box, click on the Add... button. If you already have an
INCLUDE path environment variable, then click on Import from an INCLUDE path. Otherwise, you
can click on Import from a source code tree and navigate to the directory that contains the runtime
library include files.
3. The directories will be scanned and symbol declarations will be extracted into a special project
called an import library. This may take a few minutes depending on the number of file encountered.
Now, auto-complete should work for the symbols that are defined in the header files.
C# and .NET Framework Symbols
When editing C# files, Source Insight can perform symbol completion for the .NET Framework class library
symbols. This is accomplished by importing symbols from the .NET Framework assemblies on your machine.
To import the .NET Framework assemblies, use the Project > Import External Symbols command, or use the
Preferences: Symbol Lookups dialog box and click the Import Symbols button.
To import .NET Framework symbols:
1. In the Options > Preferences: Symbol Lookups dialog box, click the Import Symbols button.
2. In the Import External Symbols dialog box, click on the Add... button. Click next on Import a direc-
tory tree of .NET assemblies. Navigate to the directory that contains the .NET Framework assem-
blies. This is typically in a location like C:\Windows\Microsoft.NET\Framework\v2.0.50727. Select the
directory and click OK.
3. The directory tree containing .NET dlls will be scanned and symbol declarations will be extracted
into a special project called an import library. This may take a few minutes since there are many
.NET Framework assemblies.
Now, auto-complete should work for the packages that have been imported into the C# source file using the
using statement.
Java Symbols
When editing Java files, Source Insight can perform symbol completion for the standard Java runtime librar-
ies. This is accomplished by importing symbols from the Java jar files on your machine.
To import the Java runtime symbols, use the Project > Import External Symbols command, or use the Prefer-
ences: Symbol Lookups dialog box and click the Import Symbols button.

Symbols and Language Parsing
58 Source Insight 4 User Guide
To import Java runtime symbols:
1. In the Options > Preferences: Symbol Lookups dialog box, click the Import Symbols button.
2. In the Import External Symbols dialog box, click on the Add... button. Click next on Import a Java jar
file. Navigate to the jar file that contains the runtime library. This is typically in a location like C:\Pro-
gram Files (x86)\Java\jre6\lib\rt.jar. Select the jar file and click Open.
3. The jar file will be scanned and symbol declarations will be extracted into a special project called an
import library. This may take a few minutes since the jar file is large.
Now, auto-complete should work for the packages that have been imported into the Java source file using
the import statement.
HTML and Scripts
The HTML File Type, which uses the HTML Language parser, parses HTML elements along with client-side
scripts elements. Client-side scripting blocks will appear using the syntax formatting appropriate for what-
ever scripting language is used. Symbols defined in the scripts are also displayed in the symbol window, and
are saved in the symbol database.
Source Insight uses the script language specified in the
SCRIPT
element. You can specify the default scripting
language to use in HTML in the Options > Preferences: Languages dialog box. Click on the Special button and
select the default language where it says "Default script language".
PHP Pages
The PHP File Type, which uses the PHP Page language parser, supports PHP with embedded HTML, plus cli-
ent-side script. PHP scripting blocks will appear using the syntax formatting for PHP, and the appropriate for-
matting for client-side script elements. PHP symbols are also displayed in the symbol window, and are saved
in the symbol database. The Relation Window will show references and call trees for PHP symbols.
Source Insight supports the PHP script start tokens:
<?
and
<?=
and
<?php
. The PHP end script token is
?>
.
The deprecated
<%
and
%>
tokens are not supported. Source Insight parses both the script and the HTML.
To populate the symbol information, Source Insight parses multiple streams from the same file: one for the
server side PHP and one for the client side HTML. In addition, the client side may contain HTML script ele-
ments. Given the way PHP pages are typically written, the HTML elements from a PHP page file usually are
parsed and recognized by Source Insight. However, it is not guaranteed to work, since PHP fragments can
emit conflicting HTML tags, or they can be out of order.
You may notice in Options > Preferences: Languages, that there is a separate PHP Language which is not
bound to a file type. This is responsible for parsing pure PHP code, and does not understand interleaved
HTML at all. A separate language type: The PHP Page parser brokers the HTML and PHP server-side pieces to
either the HTML or PHP Language.
Active Server Page Scripts
The Active Server Page (ASP) File Type, which uses the Active Server Page language parser, supports HTML
with embedded server-side scripts, plus client-side script elements. Script blocks will appear using the syn-
tax formatting appropriate for whatever scripting language is used. Symbols defined in the scripts are also
displayed in the symbol window, and are saved in the symbol database.
You can specify the default scripting language to use in HTML or ASP in the Options > Preferences: Languages
dialog box. Click on the Special button and select the default language where it says "Default script lan-
guage".
Source Insight supports embedded ASP script using the start token
<%
and the end token
%>
. Source Insight
parses both the script and the HTML. Source Insight supports script sections embedded anywhere within the
HTML, just as the web server does.

Source Insight 4 User Guide 59
Symbols and Language Parsing
To populate the symbol information, Source Insight parses multiple streams from the same file: one for the
server side ASP script, and one for the client side HTML. In addition, the client side may contain script ele-
ments. The Active Server Page parser brokers HTML and server-side script to different languages, depending
on the language specified in the ASP file.
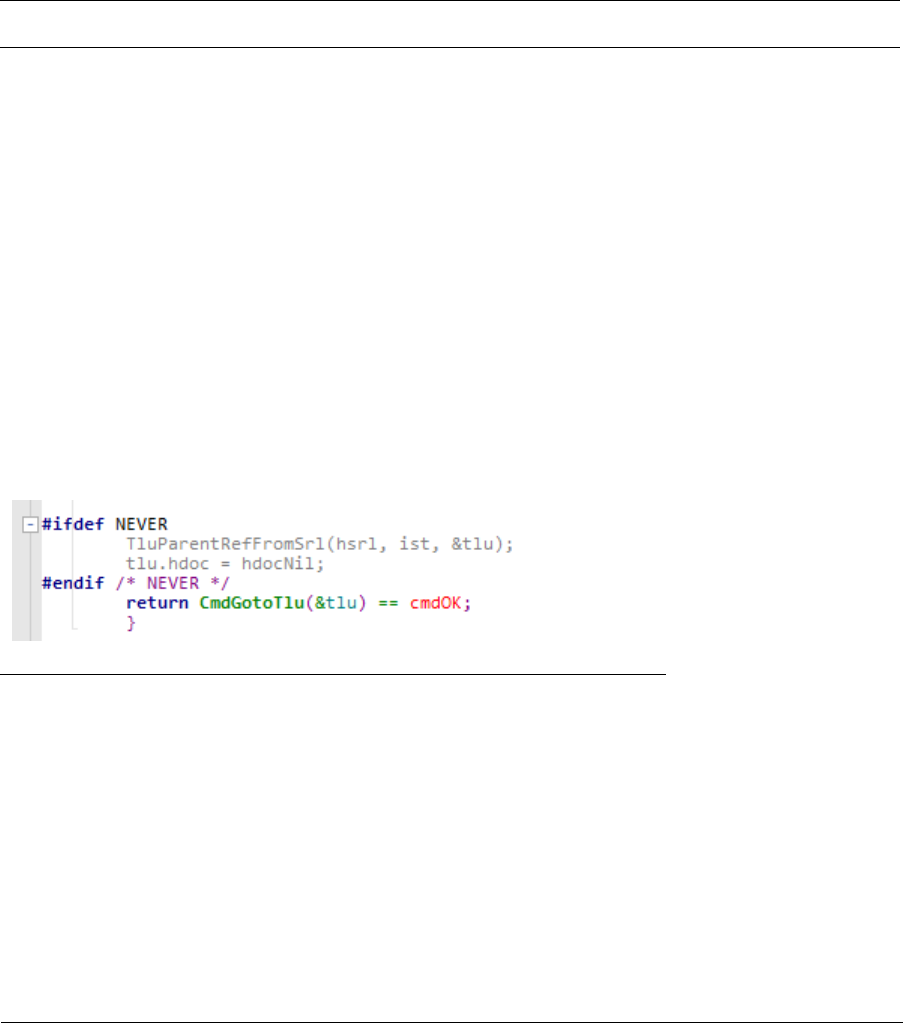
Conditional Parsing and Preprocessor Support
60 Source Insight 4 User Guide
Conditional Parsing and Preprocessor Support
This section discusses features and issues that apply mainly to C/C++ and C# language files that use a prepro-
cessor and have
#if
or
#ifdef
statements.
Working with Inactive Code - ifdef Support
Source Insight can recognize inactive blocks of code that are disabled at compile-time with
#ifdef
,
#if
, and
#elif
directives in languages that support those statements. There are project-specific and global lists of
conditional identifier values. To edit the conditional constant values, select Options > Preferences: Language
and click on either "Project Specific Conditions", or "Global Conditions". See “Conditional Parsing List” on
page 177. You can also edit the conditions using the Edit Condition command on the right-click menu of a
source window. See “Edit Condition” on page 201.
Note: Conditional statements such as
#if
and
#ifdef
are only interpreted when all the condition values are speci-
fied in the Edit Conditions dialog box.
By default, Source Insight ignores the conditional directives altogether. It attempts to make sense of all
branches in a conditional compilation construct. Often, this works well because declarations in the condi-
tional branches do not interfere with each other.
However, sometimes a tricky declaration may be broken in the middle with an
#ifdef
. This will often confuse
Source Insight. For example:
void DoThing(
int param1,
#ifdef ABC
int param2)
#else
int param2, param3)
#endif
If you are not interested in code that is inactive, you can specify condition values. See “Conditional Parsing”
on page 60.
Inactive code is formatted with the Inactive Code style.
Blocks of code that are inactive are displayed in the "Inactive Code" style. For example:
Figure 3.2 The "Inactive Code" style is displayed.
Conditional Parsing
Conditional parsing applies only to languages that support conditional compilation in Source Insight: C/C++,
C#, etc. See “Edit Condition” on page 201.
Source Insight maintains two types of condition variable lists.
•Global condition list. This applies to all projects. This list is saved in the configuration file, which con-
tains your customizations.
•Project-Specific condition list. This list is saved with each project. You can have different condition
variables defined for each individual project. For example, you could have "RELEASE" defined in one
project, and "DEBUG" defined in another.

Source Insight 4 User Guide 61
Conditional Parsing and Preprocessor Support
The two condition lists are combined when Source Insight parses a file. The project-specific conditions take
precedence over the global conditions.
Condition Variables
Condition variables can be used in expressions in #if, #ifdef, #ifndef, and #elif statements. These are typically
constant values defined in a header file, or on the compiler command line. For example:
#if VER < 3 && DEF_OPEN != 0
....
In this example, two condition variables are used: VER and DEF_OPEN. Each variable value can be specified
using the Edit Condition command. See “Edit Condition” on page 201.
Each condition variable can have any textual value. As in C and C++, any numerical value that equals zero is
considered "False", and any non-zero value is "True".
Ignoring Condition Variables
If you do not specify a variable's value, then any preprocessor statement that includes that variable is
skipped and simply ignored. This is the default behavior for any #if-type statement in Source Insight. If the
condition is not defined using the Edit Condition dialog, then Source Insight ignore the conditional and all
branches of the #if-#else block are parsed by Source Insight.
For example:
#if VER < 3 && WINVER >= 5
int a = 1;
#else
int a = 2;
#endif
If both VER and WINVER are defined using Edit Condition, then the expression in the #if statement will be
evaluated, and only one of the branches will be active. However, if either of those variables are not defined in
Source Insight, then both branches will be active.
Editing the Condition Variables
To edit the value of a conditional variable, right-click on it and select Edit Condition. See “Edit Condition” on
page 201. When you edit the condition list, Source Insight will ask you if you want to re-parse your whole
project. You should make all your changes to the condition list first, and then re-parse your whole project.
Until your project is re-parsed, the symbol information stored in Source Insight's symbol database will not
reflect the changes you made.

Conditional Parsing and Preprocessor Support
62 Source Insight 4 User Guide
Parsing Considerations and Parsing Problems
The language parsing in Source Insight is somewhere between a strict grammar parser, and a simple pattern
matcher. This is good because the parser is error-tolerant and works well on code that can be incomplete or
have some syntax errors. However, there are some points to keep in mind:
•The source files can have syntax errors. They don't have to be compiled. That means symbols will be
found in source code that doesn't even compile or is in an intermediate state, which is most of the
time!
•Preprocessor macros are not expanded before Source Insight parses the code. This may sound bad,
but in reality it works quite well. Source Insight parses your program at its most abstract level - at the
same level as it was written. Among other things, this also allows call trees to contain function-like
macros.
•Symbol declarations are parsed from all of the source code, not just what was active at the time of
compilation. For example, C/C++ code inside of #ifdef-#endif clauses are also added to the symbol
database, even if the #ifdef branch is not active when you compile. This can be a great help if you are
working on a multi-state program, and you need to be aware of all cases, not only what the compiler
sees. If you do want to omit inactive code blocks, you can define condition values with the Edit Condi-
tion command, or in Options > Preferences: Languages.
•The text in comments and constants is also indexed for searching. Source Insight is focused on source
level code; not just what the compiler transforms into object code.
•All header files are assumed accessible in all source files. Source Insight does not notice what header
files are included in each particular source file. Therefore, all symbols are known at all points. This is
technically inaccurate with respect to how a compiler will see your program, but in most cases it works
well. This is a trade-off of speed versus complete correctness.
•Some programming styles may cause symbols not to be found by Source Insight. The default parsing
that Source Insight uses works very well with most programming styles. In the event that you have
some declarations types that Source Insight can't recognize, you can add Token Macros, which expand
during a preprocessing phase, or you can add a custom parsing regular expression pattern. See “Pre-
processor Token Macros” on page 64.
Parsing Limitations
Because regular C/C++ preprocessing is not performed by Source Insight's parsers, some coding styles affect
parsing correctness in Source Insight.
Having
#ifdef
blocks break up an individual declaration will confuse Source Insight. If it cannot be avoided,
and Source Insight doesn't parse the code correctly, you will need to define the condition value using Edit
Condition, so that Source Insight will disable the inactive block of code causing the confusion. See “Condi-
tional Parsing” on page 60.
For example:
void MyFunc
#ifdef XYZ
(int param1, int param2)
#else
(long param1, long param2)
#endif
{
...
}
Replacing standard language keywords or combinations with #define'd substitutions will confuse Source
Insight. If you cannot avoid this, then you will need to define Token Macros to support them. See “Preproces-
sor Token Macros” on page 64.

Source Insight 4 User Guide 63
Conditional Parsing and Preprocessor Support
For example:
#define ourpublic public
class D : ourpublic B { … }
This causes a problem because Source Insight doesn't know that the keyword
ourpublic
really means
pub-
lic
.
Fixing "Parse-Too-Complex"
If Source Insight encounters too many problems trying to parse a file, the symbol window at the left side of
the source window will say "Parse Too Complex" instead of listing the symbols in the file.
The Parse-too-complex can often be handled by using the Edit Condition dialog, or defining Source Insight
preprocessor macros (token macros).
The Parse-too-complex usually happens in the following situations.
#ifdef Statements Confuse the Parser
In this situation, you have some
#ifdefs
that confuse the parser, especially when it splits the declaration of
some symbol. This can be handled by using the Edit Condition command to define the state of the
#if
or
#ifdef
condition variable. See “Edit Condition” on page 201.
For example:
#ifdef ABC
typedef struct FOO_V1 {
#else
typedef struct FOO_V2 {
#endif
int x;
} FOO;
In the above example, the declaration of the typedef-struct is split up with
#ifdef
-
#else
-
#endif
. Source
Insight tries to parse this by ignoring the preprocessor statements because the conditional value
ABC
is not
defined using Edit Condition. Source Insight ends up interpreted the code like this:
typedef struct FOO_V1 {
typedef struct FOO_V2 {
int x;
} FOO;
This is obviously not valid code, and therefore Source Insight cannot parse it. However, if you use Edit Condi-
tion to define the value of
ABC
then Source Insight will parse the code.
Declaring Things Using a Preprocessor Macro
In this situation, you are using a preprocessor macro to declare things. An example of this might be some-
thing like this:
#define MyArray(name) char *name[]
MyArray(foo) =
{
"abc",
"xyz",
...
};
In this case, Source Insight thinks
MyArray(foo)
is a function, so it skips ahead and eventually gets confused.
This can be fixed usually by defining a token macro in the c.tom file located in your
Documents\Source
Insight 4.0
folder. See “Preprocessor Token Macros” on page 64. To fix this example, you need to define a
token macro for
MyArray
.

Conditional Parsing and Preprocessor Support
64 Source Insight 4 User Guide
Replacing Keywords, Operators, or Delimiters with Preprocessor Macros
In this situation, a preprocessor macro contains syntax keywords or braces.
#define DeclareMyFunction(name) void name() {
DeclareMyFunction(foo)
..body of function
}
This fails to parse because Source Insight does not expand the macro and fails to see the function name or
the opening brace. Again, this can be fixed by defining a token macro in the c.tom file located in your
Docu-
ments\Source Insight 4.0
folder. See “Preprocessor Token Macros” on page 64. To fix this example, you
need to define a token macro for DeclareMyFunction.
Preprocessor Token Macros
Source Insight contains its own preprocessor, which is used when parsing files. The preprocessor macros are
called Token Macros. They are token substitutions that occur as Source Insight parses a file. They allow
Source Insight to handle any special language keywords not known to Source Insight's parsers, and to handle
special C/C++ preprocessor substitutions that would otherwise confuse it.
Preprocessor macros are normally not expanded by Source Insight
Source Insight does not expand C/C++ preprocessor macros when it parses your files. Because of this, certain
preprocessor macros and constants can fool Source Insight. Therefore, token macros are used to let Source
Insight selectively expand some preprocessor substitutions.
For example, the STDMETHOD(methodname) macro is used to declare a COM method function. Source
Insight ships with a default C/C++ token macro file (c.tom) that has entries for this macro, and many others.
Token Macro Files
The token macros are listed in a file with a
.tom
extension. The global token macro file resides in the Source
Insight program directory. The project-specific token macro file, if any, is stored in project's data directory.
The project token macro file is combined with the global file, with the project macros taking precedence.
Token Macro Syntax
A token macro file consists of token macros, one per line. The format of a token macro is:
macroname
<no text here means macro is a no-op>
macroname substituted text here
macroname(parameter list) substituted text with parameter names
macroname(parameter) text##parameter // concatenates text
; comments begin with a semicolon
Some examples of token macros:
MyStructure(sname) struct sname
NoOperation
BuildName(name1, name2) name1##name2
Each built-in language parser has a corresponding token macro file. The name of the token macro file for
each language is summarized below:
Table 3.1: Token Macro Files for Different Languages
Language File Name
C/C++/Objective-C C.tom – a default copy ships with
Source Insight.
Java Java.tom
Resource Files Rc.tom

Source Insight 4 User Guide 65
Conditional Parsing and Preprocessor Support
Editing Token Macros
If you want to change the token macros, simply open the token macro file, make your changes, and save the
file. Source Insight will recognize that the token macros have changed for the appropriate language. Open
files are automatically re-parsed.
Save a token macro file to get Source Insight to recognize the macros
When you edit a token macro file, you must save it to disk before Source Insight will re-parse your open files.
However, Source Insight will not automatically re-parse your whole project. You should make all your
changes to the token macro file first, then use the Rebuild Project command to re-parse your whole project.
Until your project is re-parsed, the symbol information stored in Source Insight's symbol database will not
reflect the changes you made to your token macros.
Project Specific Token Macros
Each project can have its own set of token macro files. Source Insight does not create them automatically,
but you can yourself. A project token macro file is saved in the project's data directory. When Source Insight
parses a source file, it combines the project token macros with the global set saved in the Source Insight pro-
gram directory. The project token macros take precedence over the global ones. By adding project specific
token macros, you can tailor the token macro expansion for each project individually.
x86 Assembly Language X86.tom
Perl Perl.tom
Table 3.1: Token Macro Files for Different Languages
Language File Name

Name Fragment Matching Symbol Names
66 Source Insight 4 User Guide
Name Fragment Matching Symbol Names
Name Fragment indexing and matching is a feature that helps you find symbols, even if you are not sure what
the symbol's name is. For APIs that maintain consistent naming conventions, you can use name fragment
matching to find all symbols relevant to a particular topic. By typing a meaningful partial name, you will be
able to narrow your search to related items. For example, by just typing "Win", you can see all "Win" related
functions.
Name Fragment matching also works in most type-in boxes that are associated with lists; not just symbol
lists.
A name fragment (or word fragment) in a symbol or file name is a series of two or more characters that start
with a capital letter. It can also be a series of capital letters. Here are some examples:
For example, the symbol name "CreateWindow" has two name fragments: "Create" and "Window". Source
Insight indexes both name fragments so that you can browse for the symbol by typing "Cre" or "Win" or any
combination, and in any order. Each name fragment is prefix matched by what you type.
You can browse symbols this way using the Project Window symbol and file list. This also works in the text
box above the symbol window pane on the left side of each source window.
In addition, all lists in Source Insight that are matched with a text box have this standard ability as well.
Controlling Name Fragment Matching
You can control whether lists are affected by name fragment matching in the Options > Preferences: Typing
dialog box. The check box Match name fragments while typing controls whether name fragment matching is
active or not, regardless of whether the project setting indicate that name fragments are indexed in the sym-
bol database.
Tip:
Type a space character in front of a name fragment to toggle name fragment matching for an individual case.
As a shortcut, you can toggle the use of name fragment matching by prefixing what you type with a space
character. For example, if you turned name fragment matching off in the Options > Preferences: Typing dia-
log box, you can use it selectively by adding a space character in front of the name fragment you type.
Using Name Fragment Matching
Many of the text boxes where you can type a symbol or file name allow you to type a series of name frag-
ments. The list box associated with the text box will be filtered down based on what you type.
Tip:
Type name fragments into any text box associated with a list box. You can type multiple name fragments for filtering.
When you type, begin with the starting two or more characters of a name fragment, and follow that with
another name fragment. For example, "CreWin". You can separate name fragments with a space also. For
example, "Cre Win". For the most part, you can type the name fragments in any order.
Symbol Name Name Fragments
CreateWindow Create and Window
OpenHTML Open and HTML
HTMLOpen HTML and Open
FOpenDoc Open and Doc
Vip32Test Vip32 and Test
open_file open and file

Source Insight 4 User Guide 67
Name Fragment Matching Symbol Names
The name fragment filtering is not case sensitive. However, once the filtered list is displayed, Source Insight
will try to select the item in the list that most closely matches what you typed, including the case.
For example, the following specifications are equivalent:
CreWin
Cre Win
cre win
WinCre
Win Cre
win cre
win_cre
Win.cre
Source Insight will filter the list contents down and sort the results, with best matches near the top. Symbols
that match exactly what you typed, starting with the first character of the symbol, are displayed near the top
of the list.
For example, if you have two symbols: "TopBottom" and "TopAndBottom", and you type "TopBot", then the
"TopBottom" symbol will appear first, even though both symbol names match the specification.
Using Name Fragment Shortcuts
You can use these shortcuts when typing into a symbol name field to specify strict prefix matching, or mem-
ber name matching:
To match strictly prefixes only, prefix the spec with a single space or the caret
^
character.
For example,
^Format
and
<space>Format
will match only symbols that start with "format". (Case insensi-
tively.) It will not match "LineFormat". The prefix actually toggles name fragment matching on and off.
To match strictly prefixes of member names, prefix the spec with a dot
.
character. For example,
.fdirty
will
match only struct or class members that start with "fdirty". This also works with nested class members. For
example,
.draw
will match the method "Class1::Class2::Draw".
Underscores, which are common in program identifier names, are ignored. For example,
_insert
, and
insert
would also appear in the list together.

Source Control
68 Source Insight 4 User Guide
Source Control
Source Insight is designed to work well in team programming situations. As team programmers contribute to
the code base, Source Insight automatically recognizes their contributions and updates its symbolic informa-
tion. Moreover, as large amounts of new code are added to a project, or moved from module to module, you
will appreciate Source Insight's ability to keep track of everything for you.
Using Source Control in Source Insight
Source Insight has a few predefined Custom Commands built-in to handle common source control opera-
tions. You can invoke them by using the source control toolbar. For example, there are "Check Out" and
"Check In" commands. The general meaning of the source control commands is summarized in the next sec-
tion.
Source Insight works best if each team member has their own local copies (or code repositories) of the proj-
ect source files on their own local machine. This provides the best performance and reliability.
Source Control Commands
Source Insight has a few predefined Custom Commands built-in to handle common source control opera-
tions. Use the Tools > Custom Commands dialog box to edit the commands. You can easily change them to
support different source control, or version control systems.
The source control commands appear in the table below. Their exact meanings are really based on how you
choose to set them up in the Custom Commands dialog box. See “Custom Commands” on page 183. Source
Insight defines the following command semantics.
Table 3.2: Source Control Commands
Command Name Action
Check Out Checks the current file out of the Source Control
project, so that you can edit it.
Check In Checks the current file into the Source Control
project. You should use Check In after you are fin-
ished editing a file, and want to put it back into
the main Source Control project for other team
members to access.
Undo Check Out Reverses the action of a Check Out. This does not
check the file back in.
Sync to Source Control
Project
Updates all the files in your local project so they
are current with respect to the Source Control
project.
Sync File to Source Con-
trol Project
Updates the current file so it is current with
respect to the Source Control project.
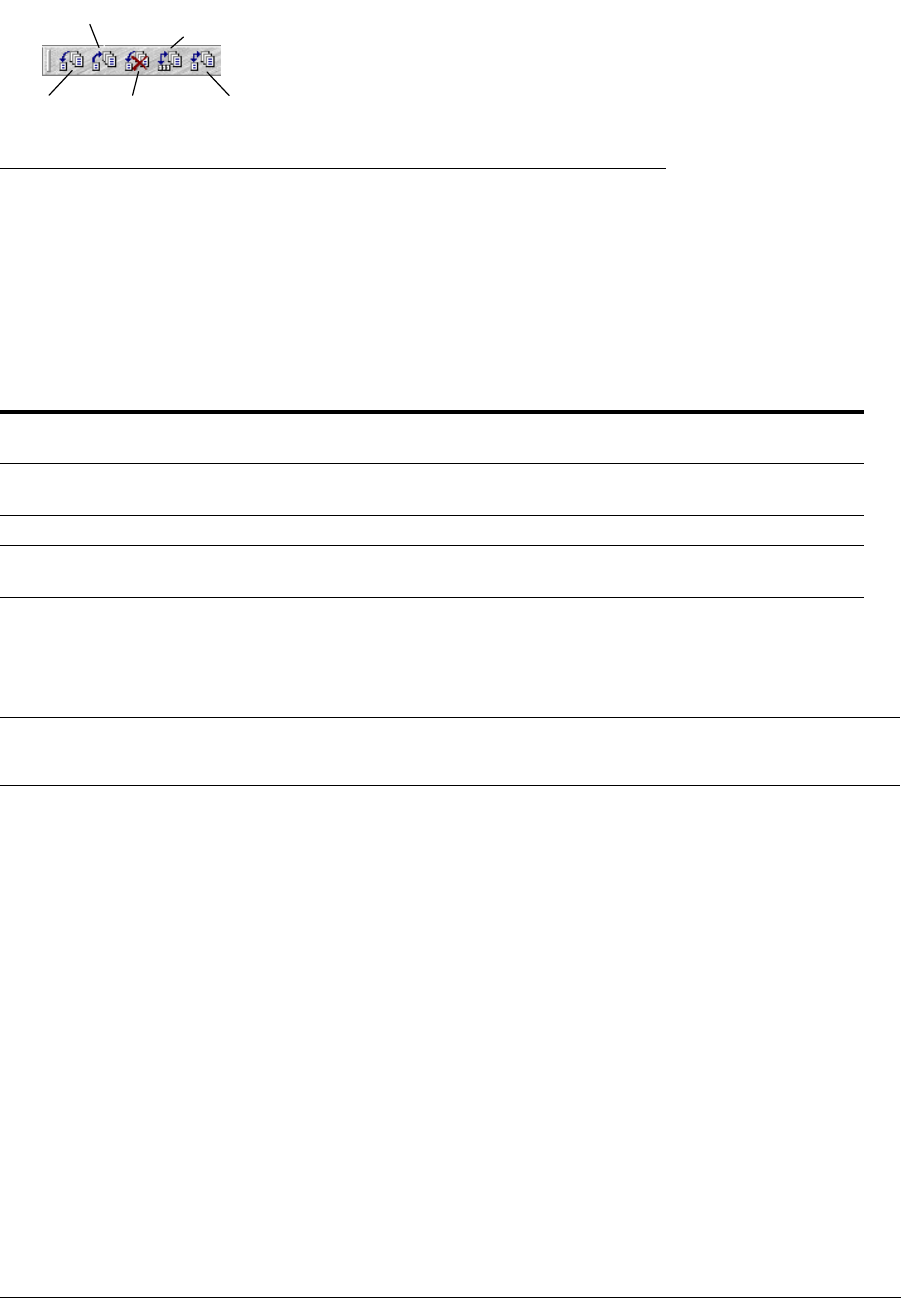
Source Insight 4 User Guide 69
Source Control
Source Control Toolbar
The Source Control toolbar contains buttons for each of the source control commands.
Figure 3.3 The Source Control toolbar
Using IBM® Rational ClearCase ® Commands
IBM® ClearCase® is a version control system that is used by software developers. The following table lists the
Source Control commands in Source Insight, and useful settings for using ClearCase.
Edit each of the above Custom Commands, and set the "Run" string from the above table.
Note: A shortcut to edit a Custom Command is to hold down the Ctrl key while clicking on one of the source control
icons in the toolbar. For example, Ctrl+click on the "Check Out" button. The Custom Command dialog will
appear open to the "Check Out" command.
The cleartool utility must be on your PATH. If not, replace the instances of
cleartool
above with the full path
to the cleartool.exe command on your machine.
The
%f
parameter in the "Run" string of a custom command will be replaced with the full path of the current
file.
You may want to alter some of the options specified above. You can also add more commands for additional
operations. Please refer to ClearCase documentation.
Using Git Commands
Git is a free and open source distributed version control system The following table lists the predefined
Source Control commands in Source Insight, and useful settings for using Git.
Table 3.3: ClearCase Source Control Commands
Custom Command Run String Description
Check Out
cleartool checkout -unr -nc %f
check out current file unreserved
(non-locking), no comment
Check In
cleartool checkin -nc %f
check in current file without com-
ment
Undo Check Out
cleartool uncheckout %f
undo check out of current file
Sync to Source Con-
trol Project
cleartool update
update the view
Sync File to Source
Control Project
cleartool update %f
update the current file in the view
Check Out
Undo
Check Out
Check In
Sync To Source Control
Pro
j
ect
Sync File To Source
Control Pro
j
ect

Source Control
70 Source Insight 4 User Guide
Git has many fine-grained commands and concepts that go beyond the relatively simple source control con-
cept used in Source Insight. The following table is one version that you may find useful. You can always add
more custom commands in Source Insight for addition Git commands.
Edit each of the above Custom Commands, and set the "Run" string from the above table.
Note: A shortcut to edit a Custom Command is to hold down the Ctrl key while clicking on one of the source control
icons in the toolbar. For example, Ctrl+click on the "Check Out" button. The Custom Command dialog will
appear open to the "Check Out" command.
The
%r
parameter in the "Run" string of a custom command will be replaced with the path of the current file
relative to the project’s root source directory.
The
git.exe
and associated executables must be on your PATH.
Additional Git Information
Before you can use the commands above on a given file, the file must be part of the Git repository. To add a
new file to your local repository, use the "add" command:
git add <file>
And follow it by:
git commit -m "here is my comment"
By default, "origin" is the name of the repository you first cloned from. If you have a specific repository you
want to pull from, you should replace "origin" with the name of the repository. In addition, if you need to pull
from a specific branch of the remote, you should specify
origin <branch-name>
in the commands.
Table 3.4: Git Source Control Commands
Custom Command Run String Description
Check Out
n/a
With Git, there really isn’t a need to
check a file out first. Simply modify
your copy of the file as you want.
Use the "Check In" command to
commit your change when you are
done.
Check In
git commit %r -m ""
Commit the current file to your
local repository without comment.
Undo Check Out
git checkout -- %r
This command actually undoes the
modifications to the file since you
last committed the file.
Sync to Source Con-
trol Project
git pull origin
Pulls new changes from the remote
repository and updates all files in
the current branch.
By default, "origin" is the name of
the repository you first cloned
from. If you have a specific reposi-
tory you want to pull from, you
should replace "origin" with the
name of the repository.
Git pull will perform merges as
needed if you have both local
changes, and changes in the
remote version of a file since you
last pulled the file.
Sync File to Source
Control Project
git fetch origin;git checkout FETCH_HEAD
-- %r
Effectively pulls changes for a sin-
gle file from the remote repository.

Source Insight 4 User Guide 71
Source Control
You will need to install Git and initialize your local repository with the
git init
command before using any
of these commands. Furthermore, you can configure Git so that the Git commands automatically work with
your remote repository.
For information on Git, please refer to https://git-scm.com/
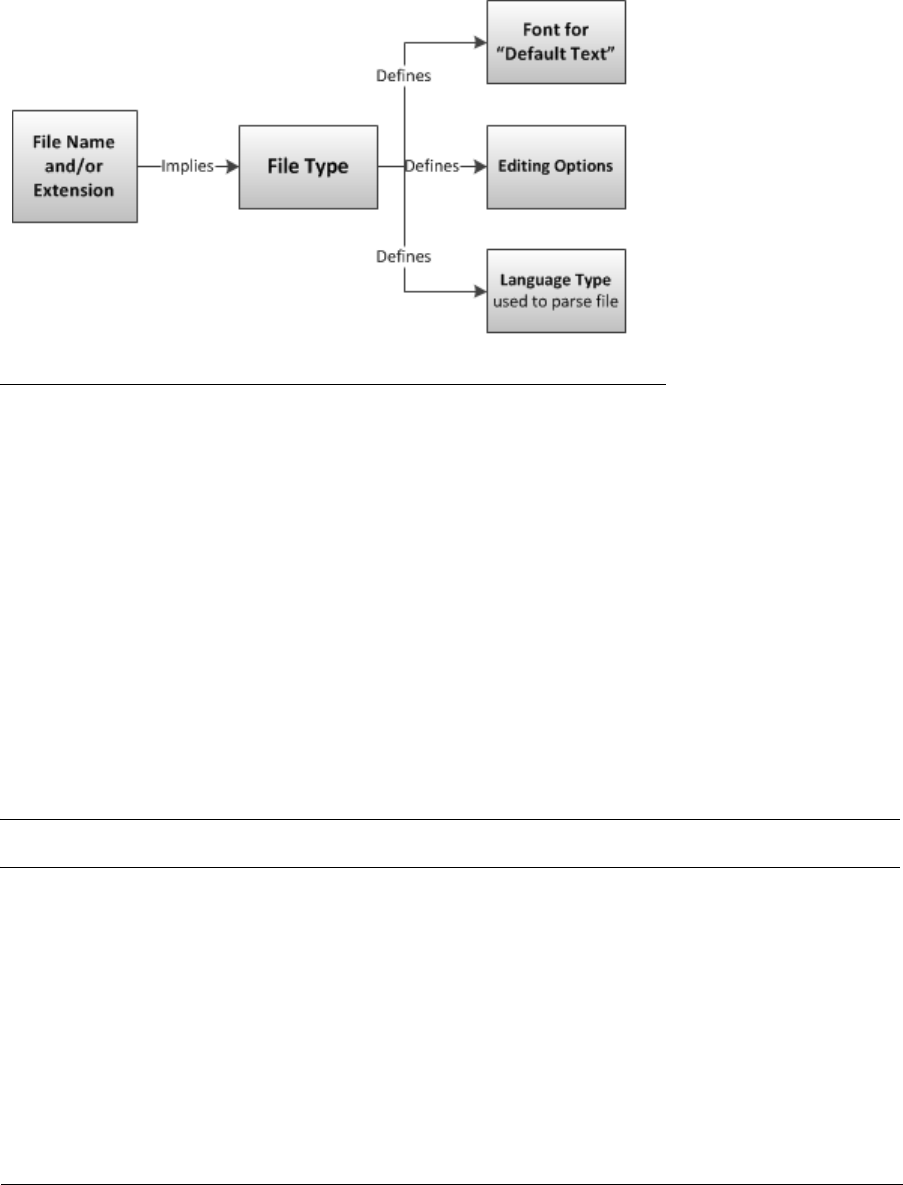
File Types
72 Source Insight 4 User Guide
File Types
A file type is a file classification that is defined with the File Type Options command. There are file types for
"C/C++ Source Files", "Java Source Files", and so on. Source Insight uses each file's name to determine its file
type. For example a file matching the
*.c
wildcard is a "C/C++ Source File". The file type defines parsing, dis-
play, and editing options.
Figure 3.4 The file name determines the file type. The file type determines the font, the language type used to parse the
file and display it with syntax formatting, and other editing options.
The File Type Options command defines new file types or changes the built-in types. See “File Type Options”
on page 213.
Language Types
Source Insight uses a language abstraction to encapsulate the properties of various programming languages.
Each file type specifies a language type in the Parsing section. Therefore the file type and language type are
separate, but connected. For example, there is a file type named "C/C++ Source File", which uses the "C/C++
Language" for parsing.
File-Type-Specific Options
The file type is key to determining how Source Insight treats a file. Most importantly, it controls what pro-
gramming language is associated with each file. A file type also specifies editing and display options, such as
the tab width, word wrap, auto-indentation, display font, and others.
Tip: To see what file type is associated with the current file, right-click on the source file window and select File
Type Options. The file's current file type is automatically selected in the dialog box.
Associating Files with File Types
The File Type Options command associates a file type with a filename wildcard. For any given file, Source
Insight determines the file type by matching its name with the filename wildcards specified in all defined file
types. For example,
*.c
files belong to the "C/C++ Source File" file type, while
*.py
files belong to the
"Python Source File" file type.

Source Insight 4 User Guide 73
File Types
Associating File Names Without Extensions
Some files in your project may not have any file extension. For instance, the standard C++ header files, such
as "complex" do not have file extensions. This situation makes it difficult to use wildcard specifications to
associate a file with a file type. For that reason, Source Insight uses a special file named filealias.txt to create
file name aliases for the purpose determining the file's file type.
The filealias.txt file is stored in your Source Insight program directory. You can edit this file. By default, it con-
tains the names of the standard C++ header files.
The format of filealias.txt is as follows:
oldfilename=newfilename
This maps oldfilename to newfilename before determining the file's file type. For example:
algorithm=algorithm.h
When Source Insight sees the file algorithm, it uses the alias algorithm.h when determining the file type of
the file.
Adding New File Types
Adding new file types makes Source Insight aware of new types of files. All the defined file types become
Source Insight's file “vocabulary”. That is, when Source Insight shows you the files in a directory, it will only
display files that belong to currently defined file types. In addition, when Source Insight automatically adds
files to a project, it will only add files that belong to known file types. Therefore, by adding a new file type,
you are expanding Source Insight's knowledge of file types.
Editing the File Types
The easiest way to edit a file's file type, or to see what file type it belongs to, is to make sure the file’s window
is activated, then select Options > File Type Options. The file type of the current file is automatically selected
in the File Types dialog. See “File Type Options” on page 213.
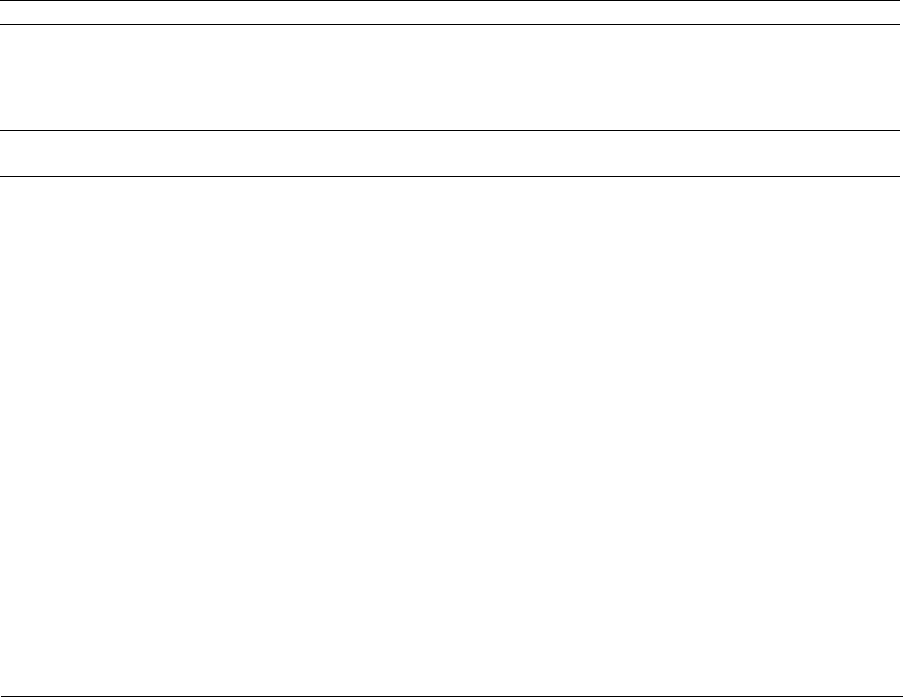
Browsing and Analysis
74 Source Insight 4 User Guide
Browsing and Analysis
Source Insight provides many ways to locate symbols, and review symbolic information in your projects. This
is one of Source Insight's important strengths.
This section describes briefly the Source Insight features that help you access symbol information.
Symbolic Parsing
Source Insight parses your project files while you edit. You can locate classes, methods, functions, and more
without having to compile your files.
Once a file has been added to your project, the names and locations of the symbol definitions in the file are
stored in the project's symbol database. The symbol definition can be found quickly using the several tech-
niques. Remember, you can right-click on many objects in Source Insight to bring up the object's shortcut
menu. Some of the following commands are on the shortcut menus.
Symbol Navigation Commands
These commands are the most commonly used commands to navigate to symbol definitions, or function
callers.
Jump to Definition command
The Jump to Definition command jumps to the declaration of the symbol under the cursor. See “Jump To
Definition” on page 238. Type Alt+equal or Ctrl+click with the left mouse button to invoke the command. You
can also right-click on the symbol and use the shortcut menu to run this command.
Tip:
To jump to a definition, hold down Ctrl and click on its name.
After locating the symbol, the symbol's file is opened, displayed in a window, and the symbol name is
selected. If you have more than one symbol with the same name in your project, Source Insight will ask you
to select the one you want.
Note: Another way to jump to a definition is to have the Context Window open. Let the Context Window show the defi-
nition. If you want to jump there, just double click on the Context Window.
Jump to Caller command
The Jump to Caller command jumps to the caller of the function under the cursor. See “Jump To Caller” on
page 238. You can right-click on the symbol and use the shortcut menu to run this command. This only works
if the object under the cursor is a function name.
Refresh Relation Window command
This command causes the Relation Window to update to reflect the currently selected symbol. For example,
if the Relation Window is setup to show function references and you have the cursor on a function name,
then this command will make the Relation Window show all the references to the function. This command is
useful is you normally keep the Relation Window locked to prevent automatic updates. See “Relation Win-
dow” on page 305.
Browser Mode
The Edit > Browser Mode command toggles Source Insight's Browser-Mode. When Browser-Mode is on, your
source code becomes read-only, and acts like a web browser. For example, single clicking on the name of a
function in a function call will jump to the function's definition. See “Browser Mode” on page 168.

Source Insight 4 User Guide 75
Browsing and Analysis
Project Symbol List Window
The Project Symbol List Window displays a list of all project symbols. You can type into the text box to per-
form prefix and name fragment name matching. The Project Window is a mode-less window. Therefore, as
you select symbols in the Project Window, the Context Window and Relation Window will update and provide
information about the selected symbol. See “Project Windows” on page 50.
The Project Symbol Categories Window is a hierarchical view, where symbols are listed by category. For
example, all global variables are grouped together; all structs are grouped together, and so on. For structured
types, such as classes, structs, and unions, the Project Window can expand them to show their members. See
“Project Symbol Categories” on page 280.
Call Trees and Reference Trees
The Relation Window is another Source Insight innovation that shows the relationship between the currently
selected symbol and other things. The Relation Window can show function call trees, class hierarchies, struc-
ture members, reference trees, and more. It works in the background tracking what you are selecting and
showing relationship information automatically. See “Relation Window” on page 93.
Context Window
The Context Window is a Source Insight innovation that provides symbolic information automatically. It
tracks what you are selecting and typing and shows you relevant symbol declarations automatically, while
you work. See “Context window” on page 90.
Command Line Symbol Access
You can jump to a symbol by using the -f <symbol> option on the Source Insight command line when you
start Source Insight.
For example:
sourceinsight4 -f myfunc
This will position to the symbol named "myfunc".
You can also simply give the name of the symbol on the command line without a special command option, as
though it were a file name. In this case, Source Insight will try to determine whether the symbol you specified
is either a file, or a parsed symbol. You can list as many symbols on the command line as you like, just as with
file names.
For example:
sourceinsight4 myfunc fcb init
This will open all files where the symbols "myfunc", "fcb", and "init" are located. See “Command Line Syn-
tax” on page 132.
Finding References to Symbols
The Search > Lookup References command can be used to quickly find all references to the word in the cur-
rent selection. For example, to find all calls to TextOut, put the insertion point inside of the TextOut identifier
and run the Lookup References command. A Search Results window will be built which will list all references
found. See “Lookup References” on page 255.
The Relation Window can also be used to show references automatically to the word in the current selection.
See “Relation Window” on page 305.
The Project Search Bar and the Search > Search Project command can be used to search across your whole
project, using a powerful keyword and name fragment based search. This is like an Internet search across
your project.
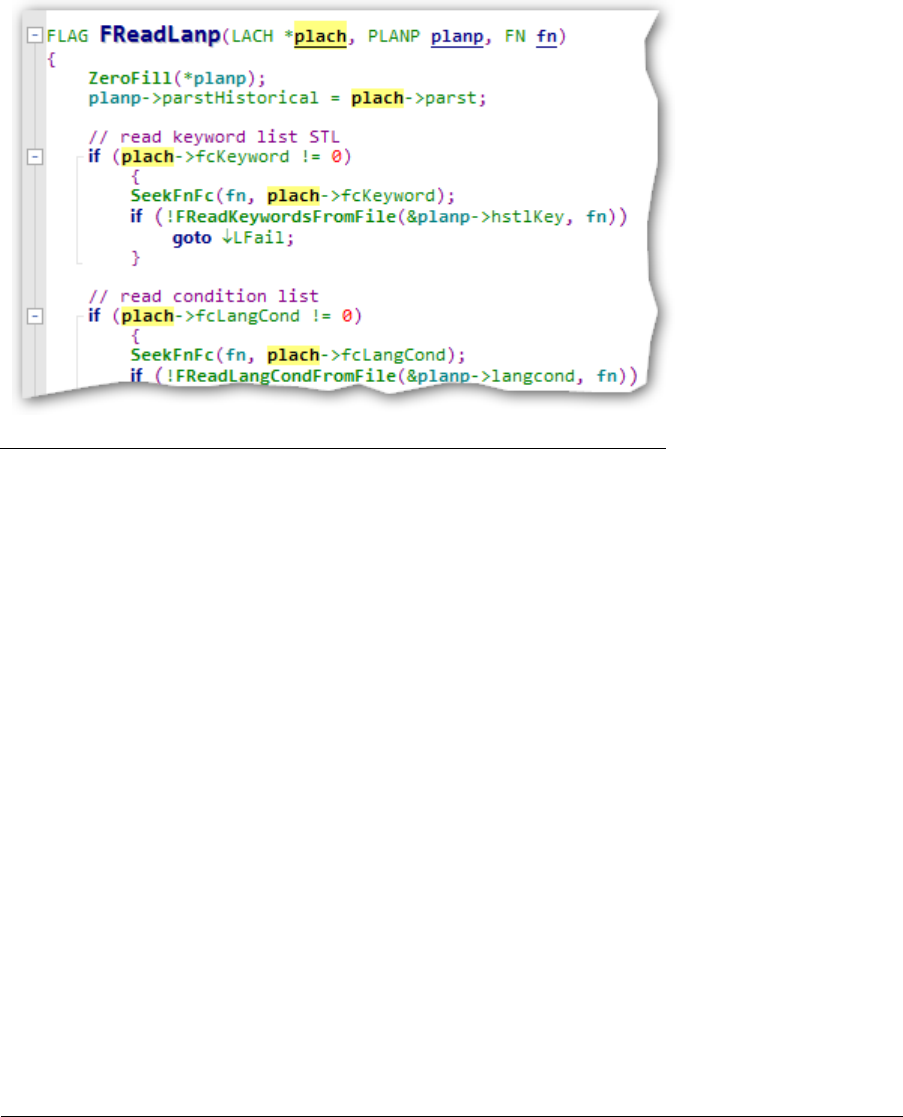
Browsing and Analysis
76 Source Insight 4 User Guide
See “Search Project” on page 328.
See “Project Search Bar” on page 278.
Reference Highlights
Source Insight can automatically highlight references to the symbol at the cursor position. For example, you
can click in a variable name, and all references to the variable will be highlighted. The references are context
sensitive, so a symbol in a different scope will not get highlighted. This works for variables, class members,
functions, and so on.
Figure 3.5 Example of reference highlights
You can enable this feature by selecting Options > File Type Options, then selecting the option "Highlight ref-
erences to selected symbol".
Once enabled, if you click on a symbol name, all references to it in that file are highlighted. The highlight will
only appear if more than one instance appears in the file.
To change the color or format of the highlight, select Options > Style Properties and edit the "Reference
Highlight" style. By default, it only changes the text and background colors.
Creating a Project Report
The Project Report command will create a report file containing a symbol cross-reference, and statistics
about the files in your project. See “Project Report” on page 286.
Smart Renaming
The Smart Rename command is a context-sensitive form of a global search & replace. It renames an identifier
across all project files using a smart context-sensitive method. Source Insight's search index makes the
search very fast. This is the easiest way to replace a single word identifier with a new string. In addition, you
can have Source Insight produce a log of replacements in the Search Results window. Each replacement line
is listed, along with a source link to the location of each line that was changed. See “Smart Rename” on
page 335.

Source Insight 4 User Guide 77
Browsing and Analysis
Comparing Files and Directories
Source Insight can compare two files and show differences. It can also compare two different directories.
Comparing Files
The Tools > Compare File command compares two files to show differences within the files. It shows two files
side by side and highlights the differences. This is a fancy version of the
diff
command. See “Compare Files”
on page 175. See “File Compare” on page 205.
The Tools > Compare with Backup File command compares the current file with a backup version of the same
file. See “Compare with Backup File” on page 176.
Comparing Directories
The Tools > Directory Compare command compares two file directories to show what files are different
between them. See “Directory Compare” on page 191.

Syntax Formatting and Styles
78 Source Insight 4 User Guide
Syntax Formatting and Styles
Syntax Formatting is an important Source Insight feature that renders information in a dense, yet pleasing
and useful way.
Syntax Formatting uses rich text formatting based on program information. Source Insight uses information
gathered from its parsers to format source code. Identifiers can be displayed in different fonts or font sizes,
along with a variety of effects such as bold and italics.
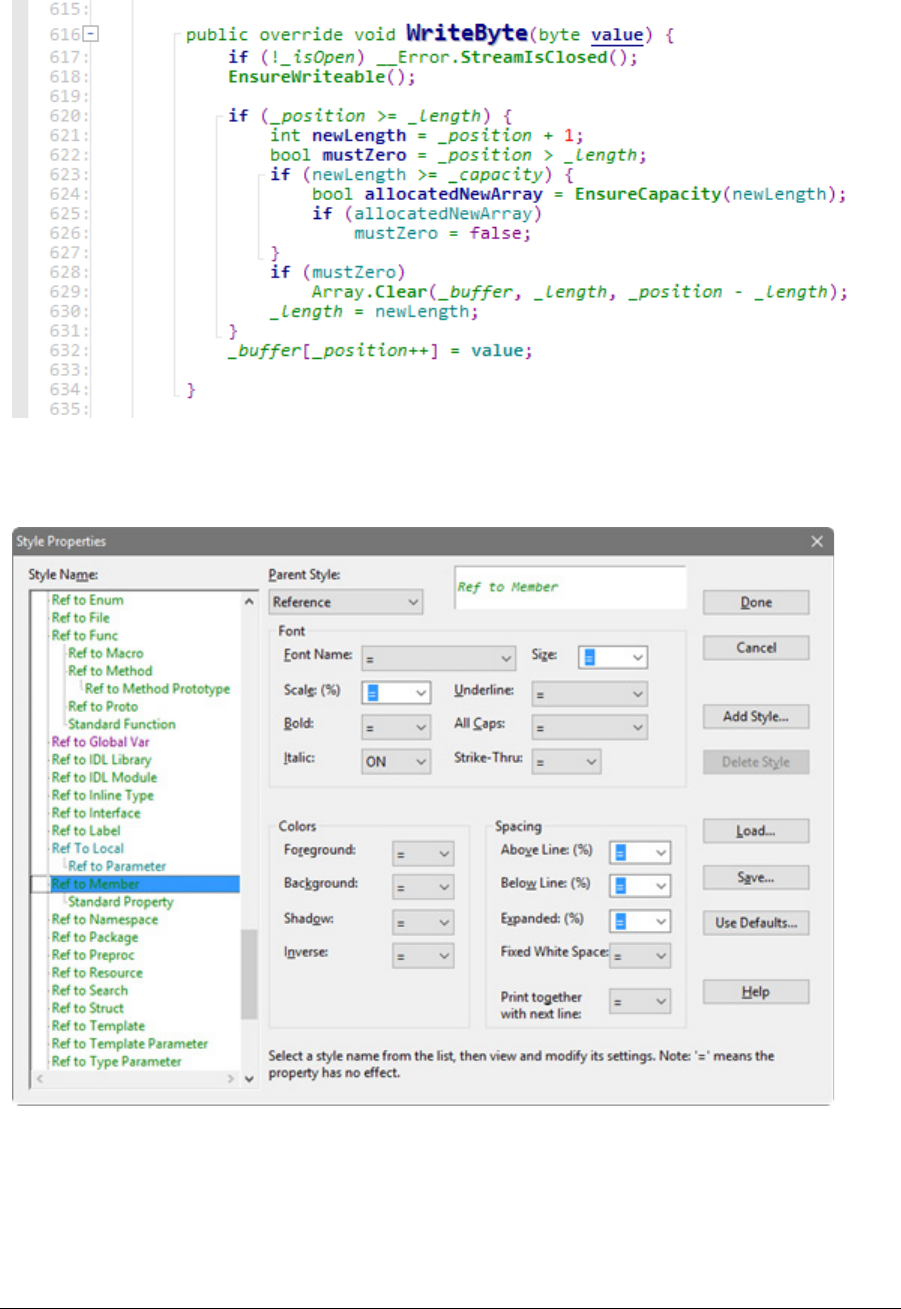
Source Insight 4 User Guide 79
Syntax Formatting and Styles
For example, in the image below, it’s easy to tell the difference between class members and local variables,
because class members are styled in italics.
Formatting is applied with "styles". A style is a set of formatting properties. For example, a style may specify
bold + italic. You can edit each style's formatting properties with the Options > Style Properties command.
See “Style Properties” on page 342.
Formatting styles are applied to source code elements automatically, based on parsing information. There
are many predefined styles that correspond to syntax elements. For example, there is a style for a function
definition, and another style for class definition. You can also add your own styles that you can explicitly
associate with keywords or identifiers.
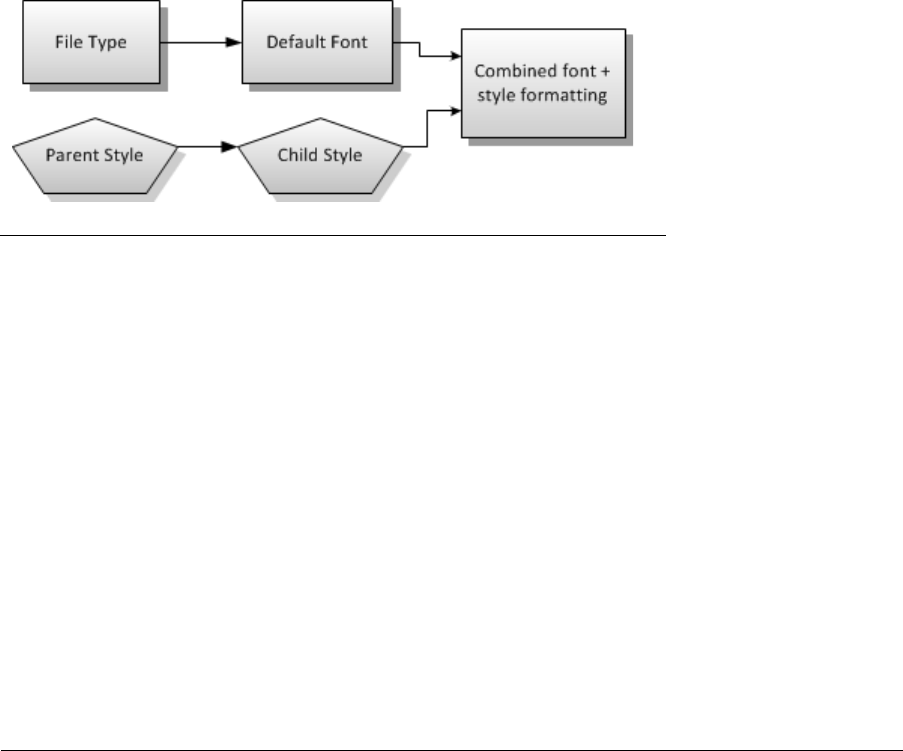
Syntax Formatting and Styles
80 Source Insight 4 User Guide
How Styles Apply to Source Code
Styles are automatically applied to source code text. With the exception of comment styles, you cannot
explicitly apply a style yourself, like in a word processor. The applicable language parser is used to assign
styles based on parsed information.
Styles are used automatically for the following:
•Language keywords, for example C keywords such as
while
, and
void
.
•Delimiters and numbers.
•Comments
•Declarations of symbols - for example a function declaration.
•References to symbols - for example, a call to a function.
•User-defined identifier associations - You can explicitly associate a style with any identifier by editing
the language’s keyword list.
How a Style Works
Styles contain formatting instructions that can be combined with other styles. When a style is applied to text,
it combines with the underlying text properties. The basic text properties are set in each file type's font set-
tings. You can control this with the Options > File Type Options command. Style properties are combined
with the basic text properties. Styles also can inherit properties from other "parent" styles. See “Parent
Styles” on page 81.
The formatting properties of all the applicable styles are combined with the font selected in a given file's
type.
Figure 3.6 Style properties combine with each other, and with the default font set in the File Types dialog box.
Formatting Properties
Each style is like a list of formatting differences from its parent style. For example if a style has the "bold"
property, then "bold" is added to the parent. Each formatting item has the following possible states:
•On The formatting property is added. E.g. Bold-On
•Off The formatting property is removed. E.g. Bold-Off
•A Number This number applies to items like scaling, or font point size. E.g. scaling = 120%.
•Font Name This overrides the font used.
•No Change The style has no effect on the formatting property. It inherits the properties of the parent
style.
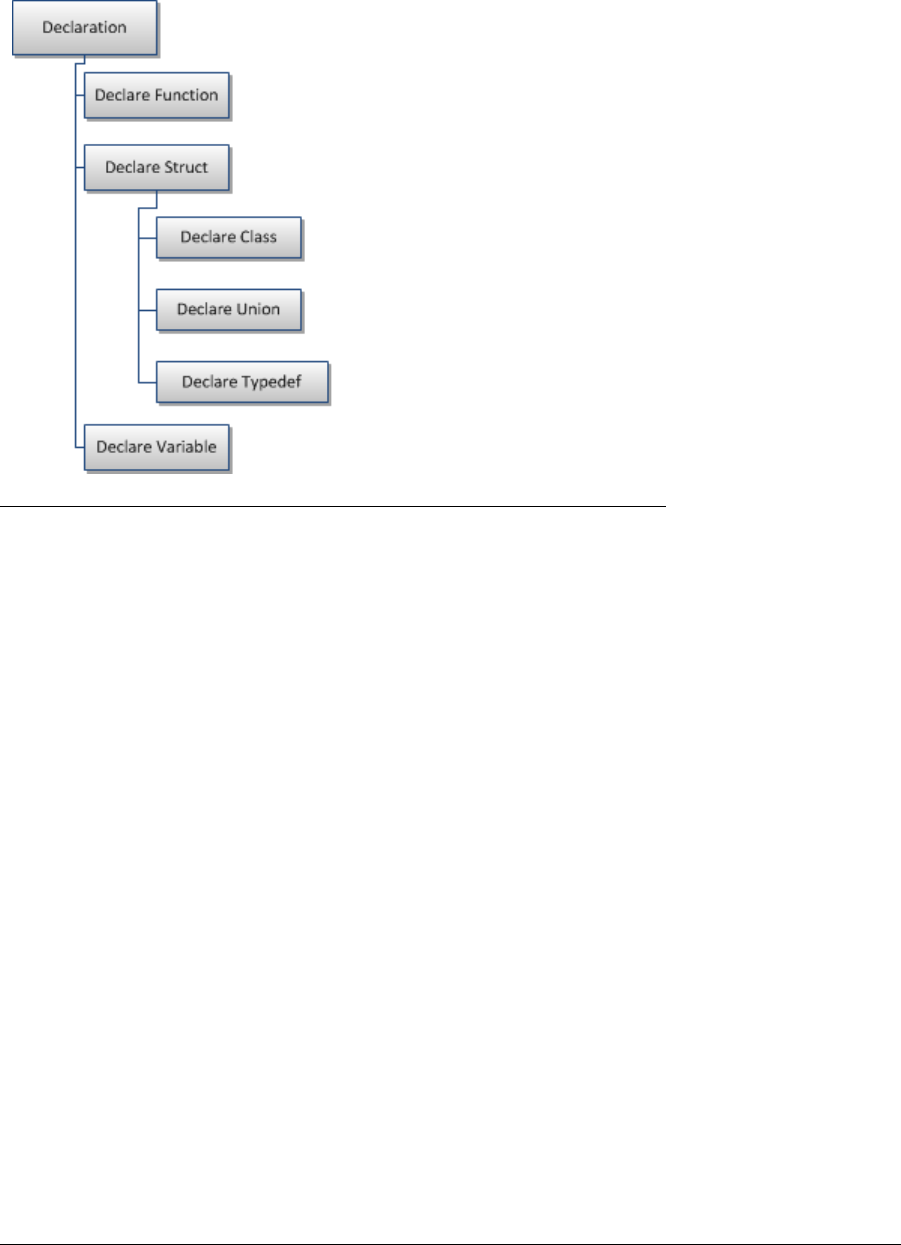
Source Insight 4 User Guide 81
Syntax Formatting and Styles
Parent Styles
Styles inherit formatting properties from parent styles. Each style has a "Parent Style" property. Therefore
the styles form a hierarchy. For example, the built-in styles contain a hierarchy for Declarations, a portion of
which looks like this:
Figure 3.7 An example of a style hierarchy.
In the Style Properties dialog, the style hierarchy is displayed visually. See “Style Properties” on page 342.
Formatting properties in a style are combined with its parent style. Thus, the Declare Struct style inherits the
formatting properties of the Declaration style. You can affect changes to all declaration styles by altering the
single Declaration style.
The topmost parent style is the "Default Text" style. Its formatting properties are determined by the file
type's font settings.
You can change the parent style of any style using the Style Properties command.
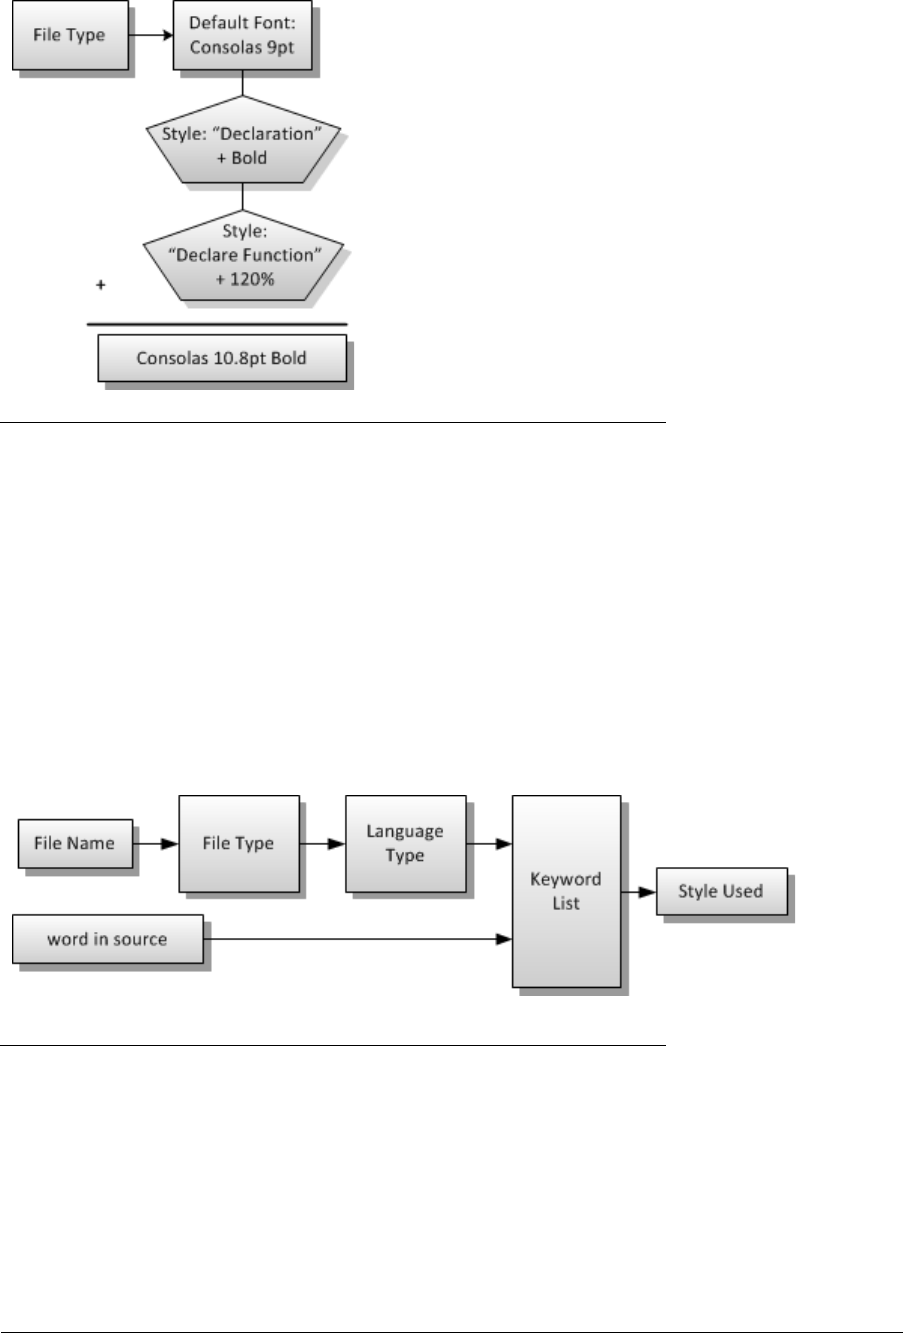
Syntax Formatting and Styles
82 Source Insight 4 User Guide
In the figure below is an example of how styles might combine for a function declaration.
Figure 3.8 Style properties "add up" on top of the default font specified by the file type.
Language Keyword Styles
The simplest application of styles is for formatting language keywords. Each language contains a keyword
list. Each keyword list item associates a keyword, for example
while
, with a style. The keyword list is edit-
able. Source Insight displays the keyword using the associated style. You can edit the language keyword list
in the Preferences: Languages dialog box, or by invoking the Keyword List command directly. See “Language
Options” on page 241.
To determine the formatting of any given word in a window, Source Insight locates the word in the keyword
list of the appropriate language type. The keyword list contains a style name, which in turn implies the for-
matting associated with the style.
Therefore, starting with a file name and a word in the file, Source Insight derives the word's style with this
relationship:
Figure 3.9 The style used for a word in source text is determined by the keyword list of the language of the file type of the
file in question.
Declaration Styles
Wherever a symbol is declared or defined, its name is formatted with an appropriate "Declaration" style.
There are declaration styles for different types of things, like structs, classes, unions, functions, etc.

Source Insight 4 User Guide 83
Syntax Formatting and Styles
For example, a structure might look like this:
The structure name "CLIP" is shown in the "Declare Struct" style. The member fields inside the struct are
shown in the "Declare Member" style. There are several styles named "Declare...something".
If you select Options > Style Properties, you can see all the declaration styles. Their names all start with
"Declare...".
Reference Styles
References to symbols that are not actual declarations are formatted with an appropriate "Reference" style.
There are reference styles for different types of symbols. Reference formatting gives you a lot of information
without having to ask for it. It becomes instantly obvious if you have misspelled a function name, or whether
you are using a constant, or a local variable, or a global variable.
For example, a code fragment might look like:
The call to "SeekTokenLnIch" is formatted with the "Ref to Function" style. The C macro function "Hdo-
cOfTgl" is formatted with the "Ref to Macro" style, which helps you know just by looking at it that it is a
macro. The parameter "hpar" is formatted with the "Ref to Parameter" style, so we know it is a parameter
passed to the current function. The identifier "htglLocal" is formatted with the "Ref to Local Variable" style,
so we know it is a local variable in the current function. The "kswaChangeMark" constant is formatted with
the "Ref to Constant" style, so we know it is either a #define or enum value.
Distinguishing Class and Struct Members
Reference styles are also useful to distinguish member variables and member functions from other variables.
In this example, the function
DoSomething
is referencing both member variables, and a file-scope function
and a global variable. The reference styles make each reference look different. The Ref To Member styles in
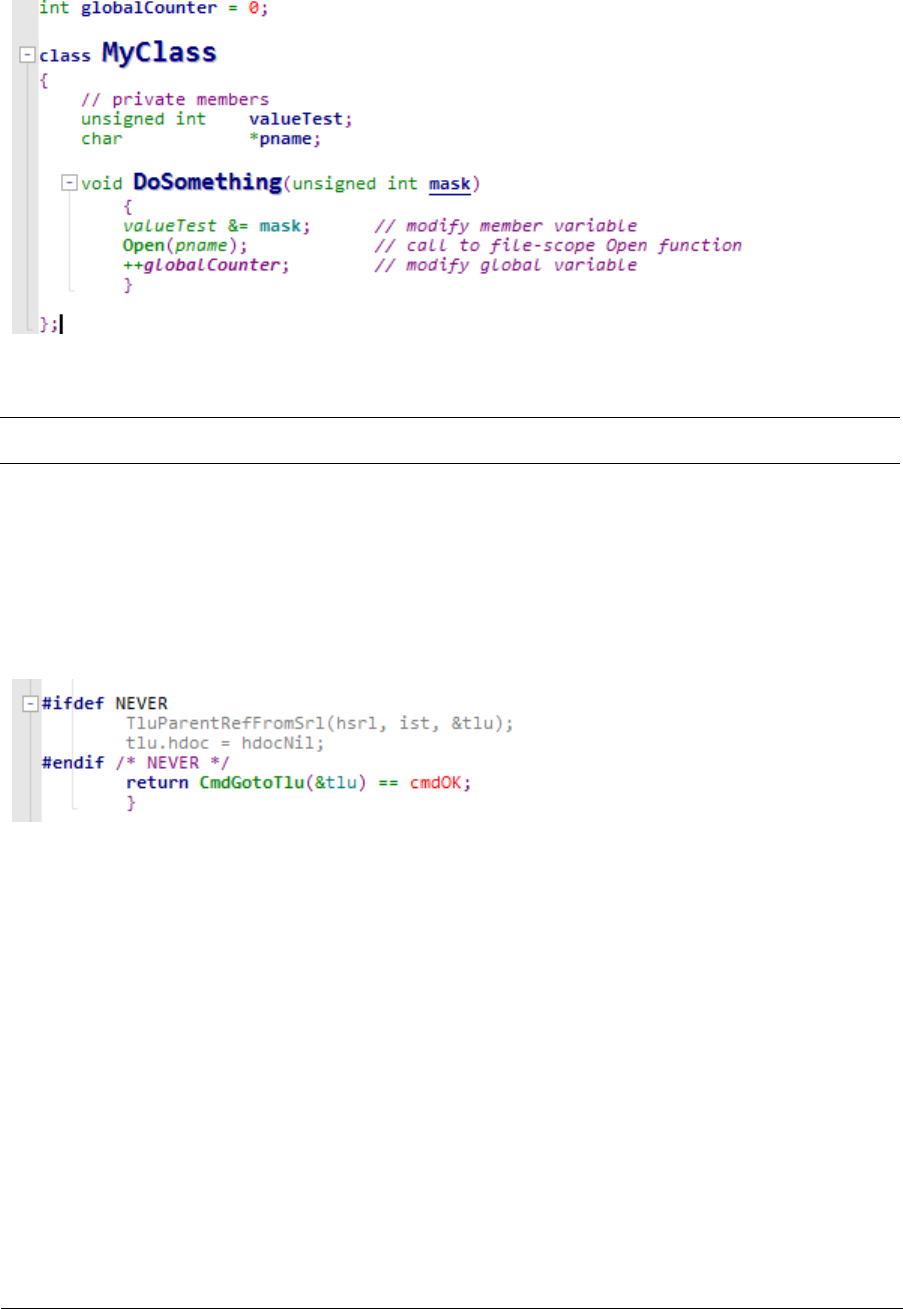
Syntax Formatting and Styles
84 Source Insight 4 User Guide
this example have been given the Italic property. So, for example, the references to
valueTest
inside the
DoSomething
function is shown in italic. This tells you that
valueTest
is a member variable.
If you select Options > Style Properties, you can see all the reference styles. Their names all start with "Ref
to...".
Note: Enabling reference formatting can slow the display down in some cases. Source Insight needs to perform sym-
bol lookup operation each time it encounters a potential symbol reference.
Inactive Code Style
For languages that support #if and #ifdef statements, Source Insight recognizes inactive blocks of code based
on the value of the conditions. You can edit the conditional values by selecting Options > Preferences: Lan-
guage and clicking either "Project Specific Conditions" or "Global Conditions". You can also click inside a
conditional identifier, then rigth-click and select Edit Condition.
Blocks of code that are inactive are given the "Inactive Code" style. For more information, see “Conditional
Parsing” on page 60.
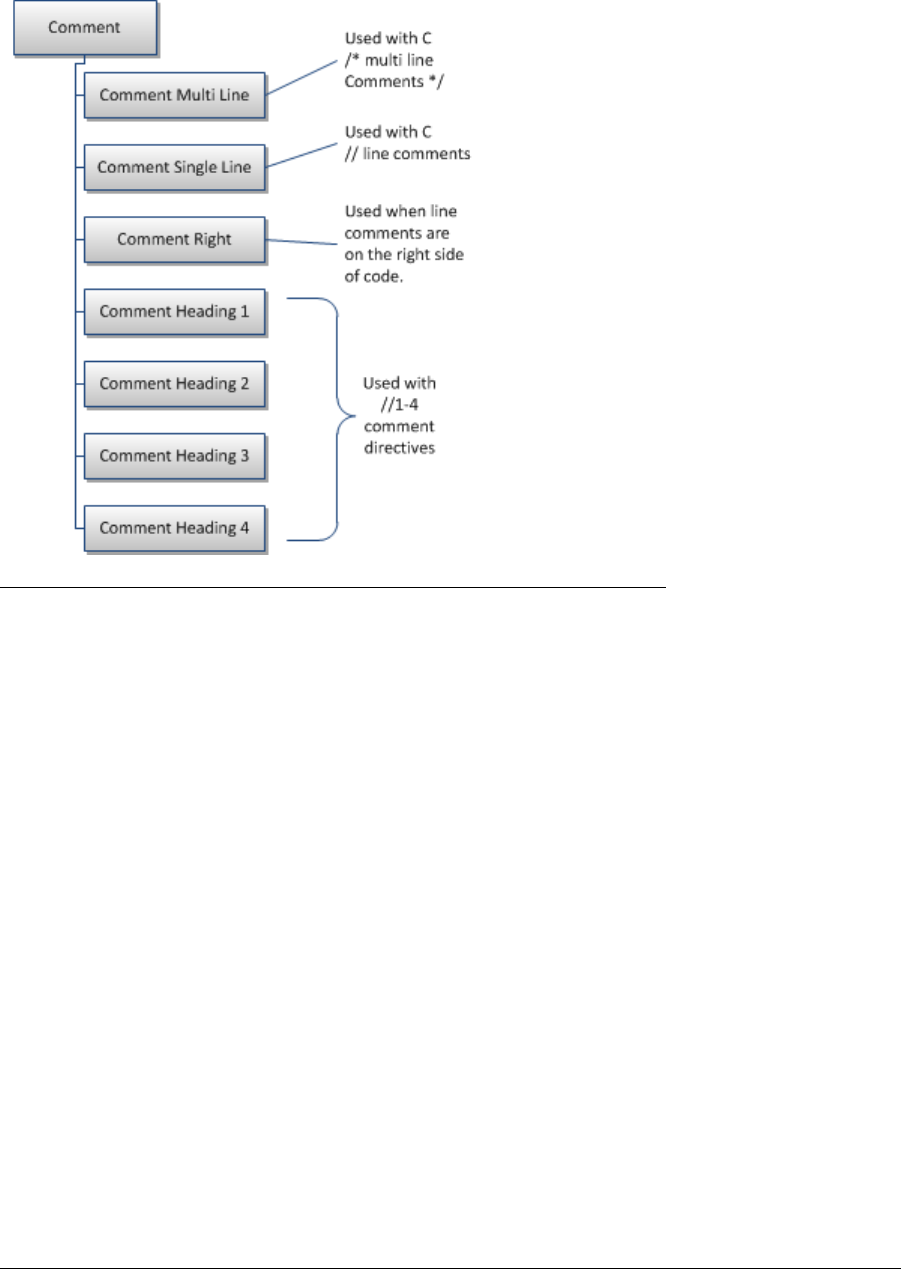
Source Insight 4 User Guide 85
Syntax Formatting and Styles
Comment Styles
Source Insight adds some explicit formatting to comments. All comments inherit from the Comment parent
style. The comment style hierarchy appears below.
Figure 3.10 The comment styles hierarchy.
Comment Heading Styles
Comment heading styles are very useful for breaking up large chunks of code with high-level comments.
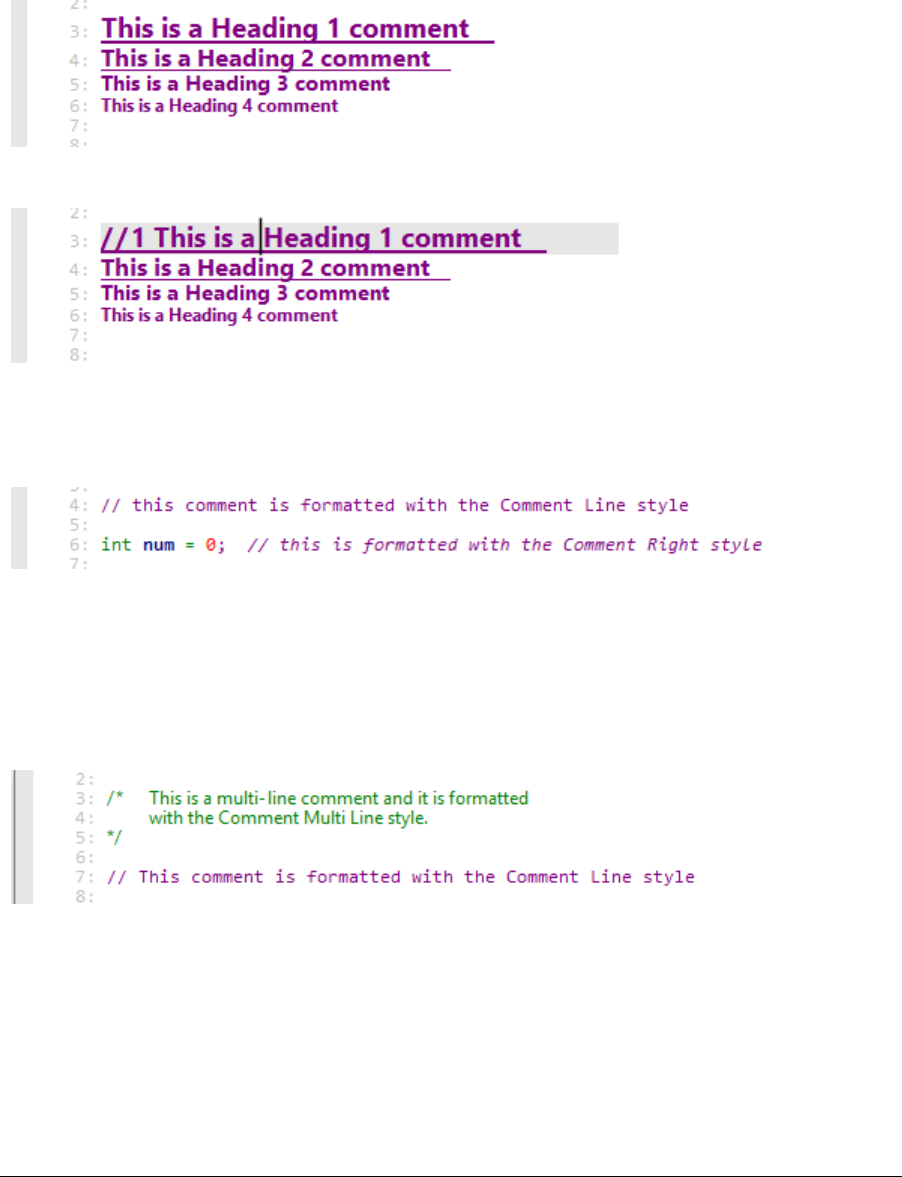
Syntax Formatting and Styles
86 Source Insight 4 User Guide
Comment Heading styles are specified with a
//n
comment prefix, where n is a number between 1 and 4. For
example:
//1 This is a Heading 1 comment
//2 This is a Heading 2 comment
//3 This is a Heading 3 comment
//4 This is a Heading 4 comment
When the comment displays, the
//n
at the beginning of the comment is hidden, unless the cursor is on that
line. The above lines appear like this:
If the cursor is on the line, then the
//n
will appear so that you can edit it.
Comment Right Style
Comments that appear to the right of code are given the "Comment Right" style. For example:
Single and Multi Line Comment Styles
Multi-Line comments are displayed in the Comment Multi Line style. These are any comments using the
/*
and
*/
delimiters in C/C++ and Java.
Single line comments are displayed in the Comment Line style. These include comments that start with
//
delimiters in C/C++ and Java.
Comment Styles and Custom Languages
When you define a custom language, using the Preferences: Languages dialog box, you can specify comment
or text-range types, and associate them with a style. For example, you could create a comment range that
starts with (* and ends with *) and the text is formatted with the "Comment Multi Line" style. You can actually
define any delimited range of text, and associate it with any style (including a non-comment style).See “Sym-
bols and Language Parsing” on page 54. and “Special Language Options” on page 243.
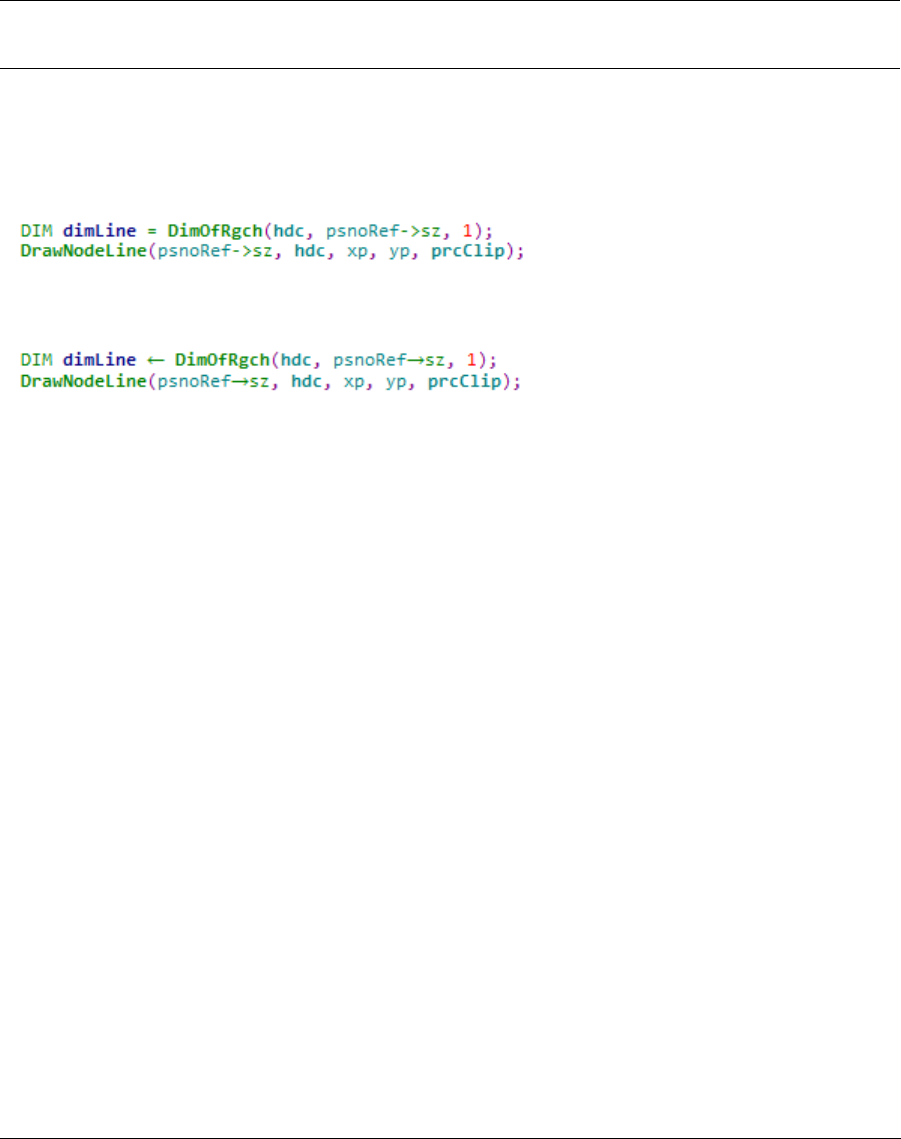
Source Insight 4 User Guide 87
Syntax Formatting and Styles
Syntax Decorations
Syntax Decorations add extra information to your code display.
Source Insight can replace some common operators with more useful symbolic characters. The Preferences:
Syntax Decorations command controls which decorations are used.
The symbolic characters are formatted with the "Symbol Characters" style. If you use the Options > Style
Properties command to look at the Symbol Characters style, you will see that it uses the Symbol font. You
may change the style's properties, such as the color or font size, but if you change the font name to some-
thing other than Symbol, your syntax decoration symbols will probably not show up correctly.
Note: It's important to remember that symbol substitutions do not change the text in the source file; only its repre-
sentation on the screen changes to show the special symbols. You still need to type the operators normally
when editing your code, or when searching for them.
Operator Substitutions
Common operators, such as the pointer dereference right arrow (
->
), or the assignment operator (
=
) can be
replaced with symbolic operators, such as arrows. For example, instead of this:
With decorations on, the
=
and
->
are replaced with arrows:
Boolean, math, and other operators can be substituted with decorative symbols too.
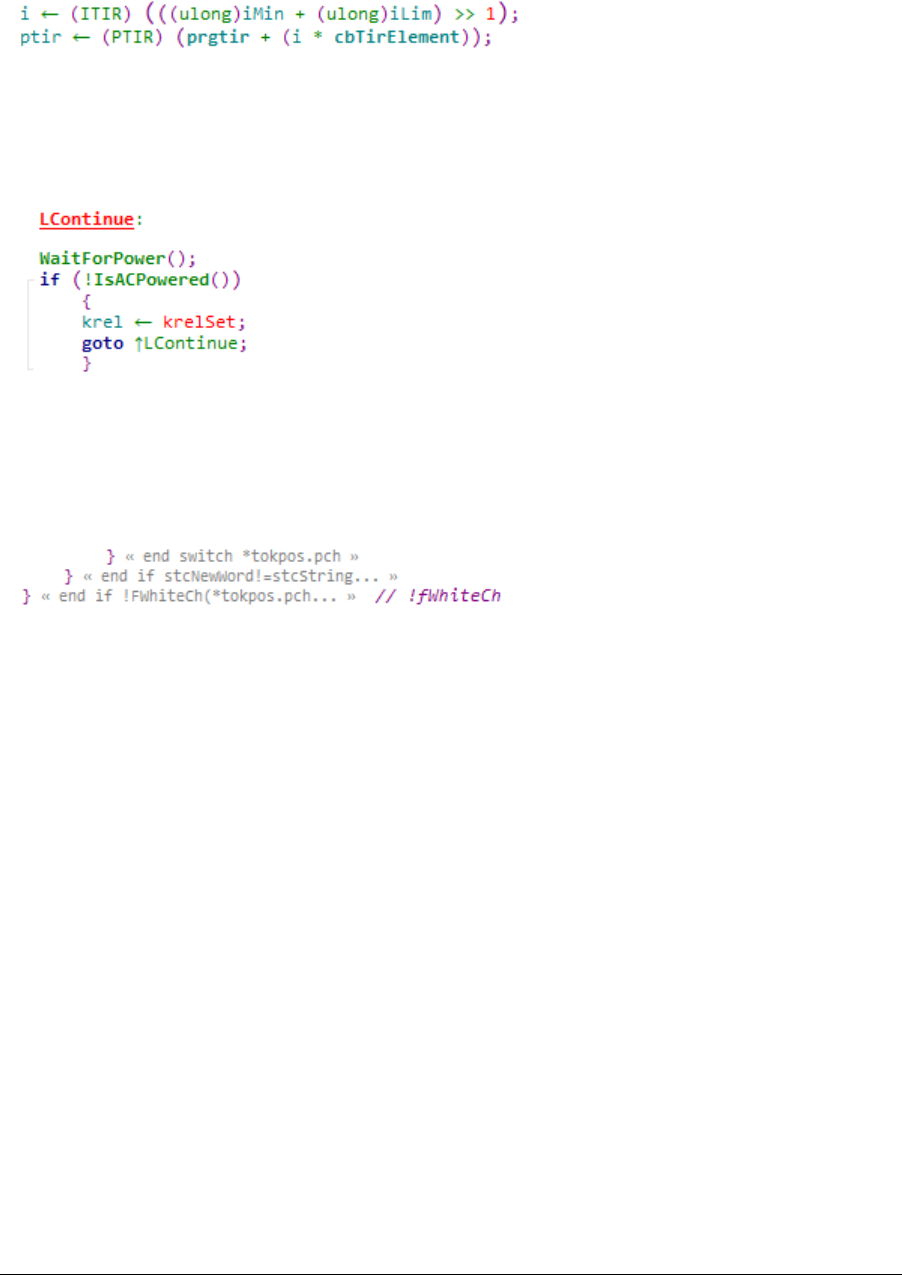
Syntax Formatting and Styles
88 Source Insight 4 User Guide
Scaled Nested Parentheses
Source Insight can display nested parentheses in different sizes to make it easier to identify matching sets.
This even works across multiple lines.
Goto Arrows
Another useful decoration is the "goto arrow". An up or down arrow appears in goto statements which points
in the direction of the target label.
End Brace Annotations
Source Insight can also add automatic "end brace" annotations to the closing curly brace in C/C++/C# and
Java code. This makes it easier to understand nested if, while, switch, and other blocks of code.
Controlling Syntax Formatting
You have control over how Source Insight formats your code.
Changing Style Properties
The Style Properties command controls the formatting properties of each style. You can also add your own
styles, and import and export them.
The Syntax Formatting command
The Preferences: Syntax Formatting command controls how much display formatting is applied. You can
speed up the display by disabling some options here. For more information, see “Syntax Formatting” on
page 355.
The Syntax Decorations command
This Preferences: Syntax Decorations command controls what syntax decorations are performed.
Turning off Syntax Formatting
The Syntax Formatting features of Source Insight are powerful, but sometimes you may want to see how text
will line up in another editor, or in a simple display mode when only a single font is used.
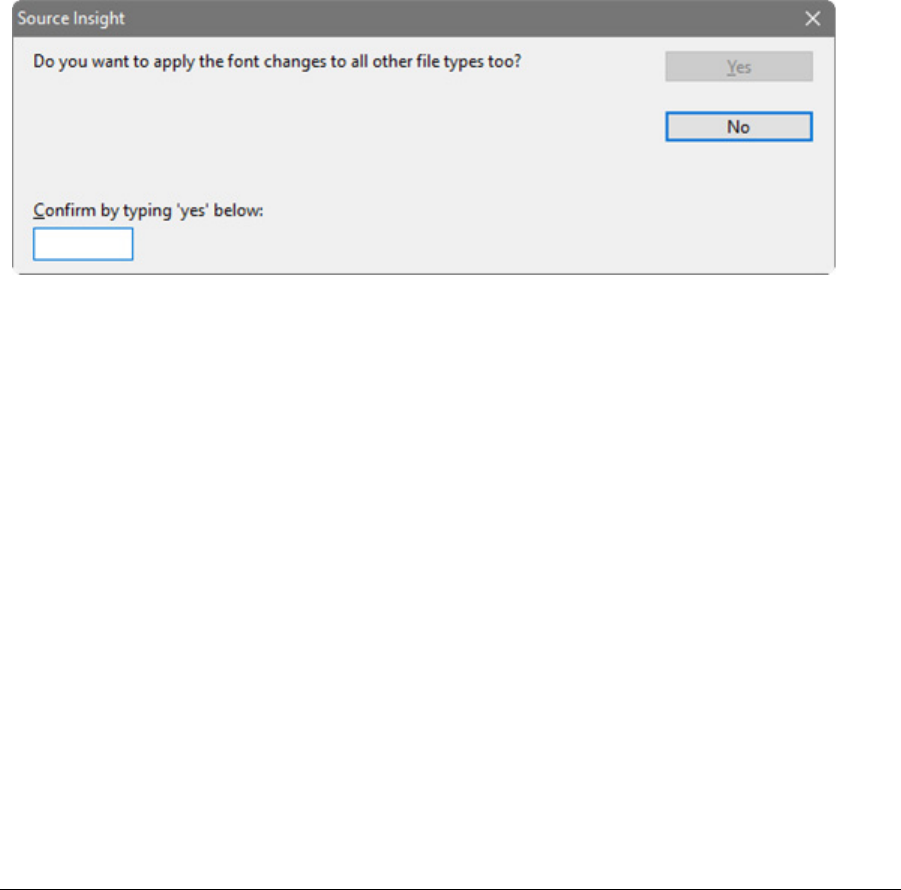
Source Insight 4 User Guide 89
Syntax Formatting and Styles
Switching off Syntax Formatting temporarily
If you want to temporarily see your files without syntax formatting, use the View > Mono Font View command.
Mono Font mode is useful for quickly switching your display to a basic monospaced font display. This is par-
ticularly useful if you are using spaces instead of tab characters to line columns up. When Mono Font mode is
active, it overrides the settings of the Preferences: Syntax Formatting and Syntax Decorations dialog boxes.
Keeping fonts from changing
If you want to just see only color formatting, but no font changes, or font embellishments such as bold and
italic, then use the Options > Preferences: Syntax Formatting dialog box and check the Use only color for-
matting box.
Changing the font used to display source code
To change the base font used to display source code, open a source file, and select Options > File Type
Options. The file type for the current source file will be automatically selected as the active file type. Click the
Screen Fonts button and pick the desired font. This font will become the new base default font for that file
type. For example, a style for declarations might add "bold". Or a style might specify a different font and
override the screen font selection in the file type.
When you click OK in the font selection dialog, you will see this prompt:
To apply the font to ALL the file types, type "yes" in the box and click OK. To only apply it to the current file
type, click No.
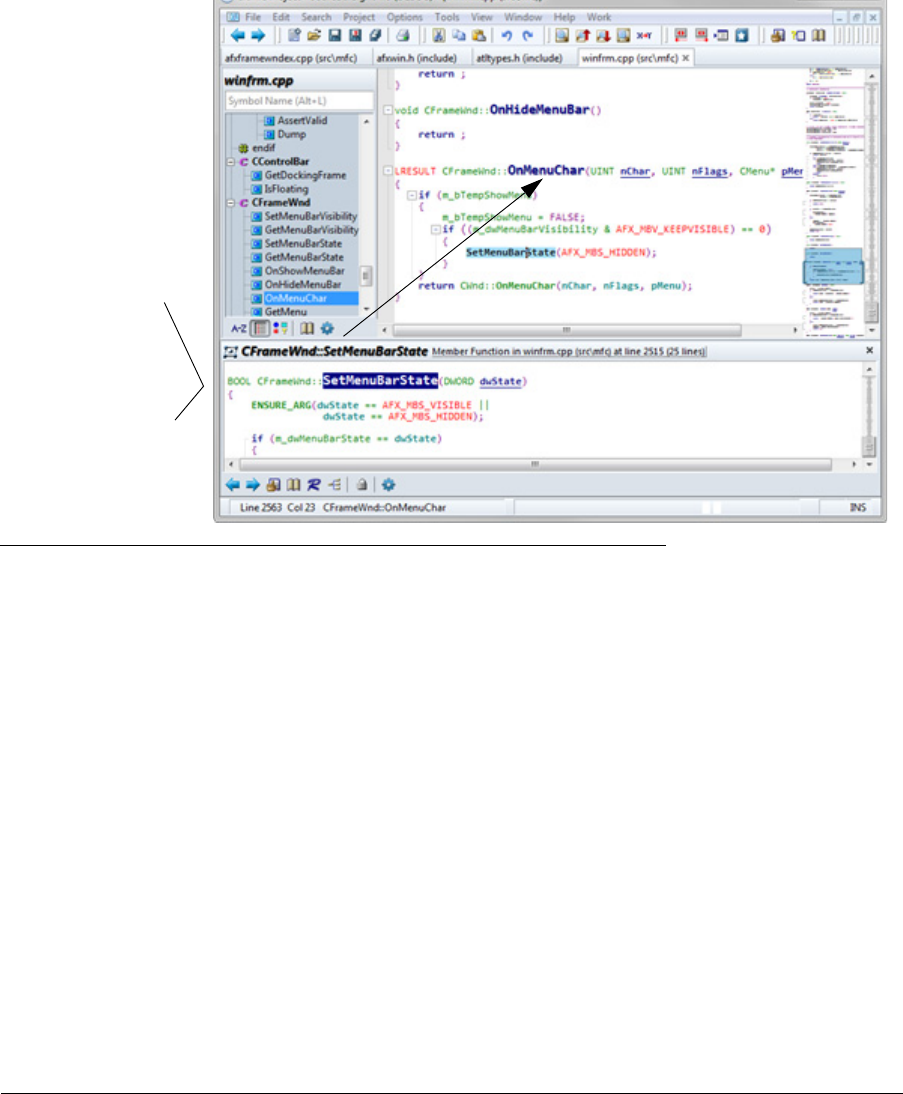
Context window
90 Source Insight 4 User Guide
Context window
The Context window is a Source Insight innovation that automatically provides relevant information while
you are viewing and editing your source code. It is a floating, dock-able panel window that displays contex-
tual information while you type or click on things. For example, if you click on a function call, the Context
window will display the function’s definition. If you click on a variable, the Context window will decode its
declaration to show you its base structure or class type.
The Context window works in conjunction with other panel windows to enhance those windows functional-
ity. For example, the Context window automatically displays files selected in the Project File List, symbols in
the Project Symbol List, and other types of previews.
Figure 3.11 The Context window on the bottom shows the declaration of the selected symbol.
You can toggle the Context window on and off by selecting View > Panels > Context window.
The following sections describe typical use cases for the Context window.
The Context window
shows information
about the selected
identifier in the
source file window. In
this case, it is showing
the definition of the
selected class
member function.
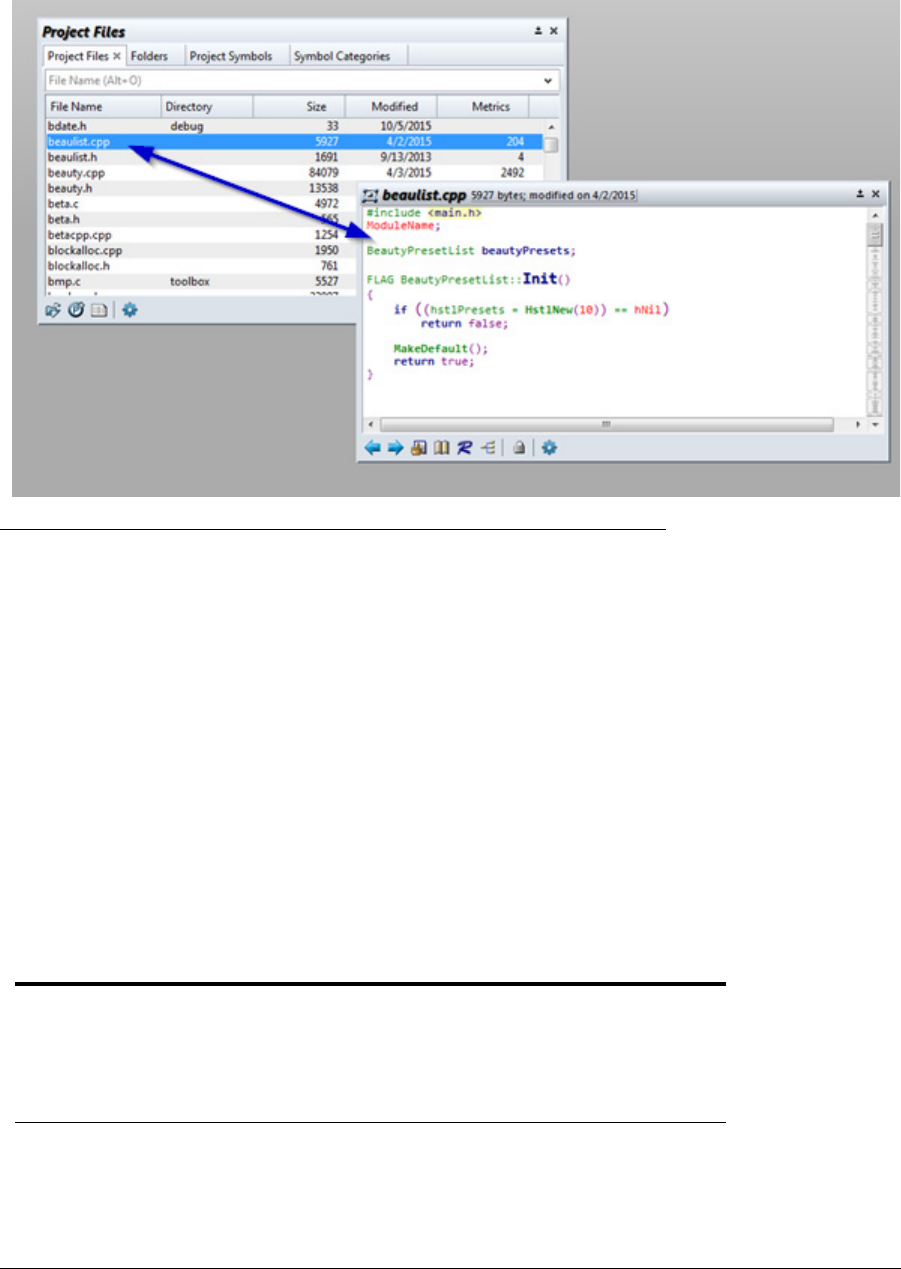
Source Insight 4 User Guide 91
Context window
Previewing Files and Source Code
The Context window is used to quickly preview files and other things without having to open them. For exam-
ple, if the Project File List panel is in front, the Context window previews the currently selected file.
Figure 3.12 The Context window is previewing the file selected in the Project File List panel.
The Context window previews the following types of objects:
•Files selected in the Project File List, Project Folder Browser, and Directory Compare panels
•Symbol definitions in the Project Symbol List panel
•Reference locations in the Relation Window panel.
•Code Snippets in the Snippet panel
•Clips in the Clips panel
•Bookmark locations in the Bookmarks panel
•Symbol selected in the symbol pane in a source file window
•Symbol selected in the auto-completion list.
•Source Window selected in the Window List panel
Context window Results
To summarize, the Context window does the follow:
Your Action Context window Result
Selecting (clicking) on an identi-
fier in a source file window
Shows symbol definition based on context.
If more than one symbol matches, the Context window
will show a list of matches.
If the symbol is an instance of a class or data structure,
then the class or data structure declaration is shown.
Selecting a symbol in the Project
Symbol List
Shows the symbol’s definition.

Context window
92 Source Insight 4 User Guide
Showing Declarations and Definitions
When you click on an identifier name in a source file window, the Context window will show you the symbol’s
declaration automatically. Functions and other symbols show up in the Context window along with their
parameters and other definition information.
The Context window determines what type of symbol you are clicking or typing. For example, if you click on a
variable, it will show you the declaration of the variable. If the variable is a data structure instance or a
pointer to a data structure, then the Context window will show you the structure or class definition.
Decoding Base Types to Show Structures
The Context window will determine the “base” structural type of a symbol by climbing up the type hierarchy.
That is, typedefs are decoded all the way back to the base structure type. For example, if you have code like
this:
struct S { ... };
typedef S T;
typedef T *PT;
PT ptvar;
...
...
ptvar->mem....
If you select the
mem
in
ptvar->mem
, then the Context window will find the declaration of
PT ptvar
, and
decode the type hierarchy until it finds the
struct S
, and it will display the declaration of the field
mem
within
struct S
.
The Context window also decodes class hierarchies dynamically. That is, it will travel up the class derivation
hierarchy looking for members that are in scope.
Customizing the Context window
The Context window Options command allows you to change the Context window settings. You can turn off
the base type decoding mentioned above, and control how the context window tracks the cursor. See “Con-
text Window Options” on page 179.
Selecting an item in the Relation
Window
If the item is a reference to a symbol, then it shows the
place where the reference or call occurs. Otherwise it
shows the definition of the selected symbol.
Typing in a source file window If the auto-completion feature is enabled, then it
shows the declaration of the selected item in the auto-
completion list
Selecting a bookmark in the
Bookmark Window
Shows the location of the bookmark.
Selecting a clip in the Clip Win-
dow
Shows the clip contents
Selecting an item in the Snippet
Window
Shows the body of the selected snippet.
Selecting an item in the Window
List (list of open file windows)
Shows the contents of the file window.
Typing or selecting an item in the
symbol window pane of a source
file window
Shows the symbols definition.
Your Action Context window Result
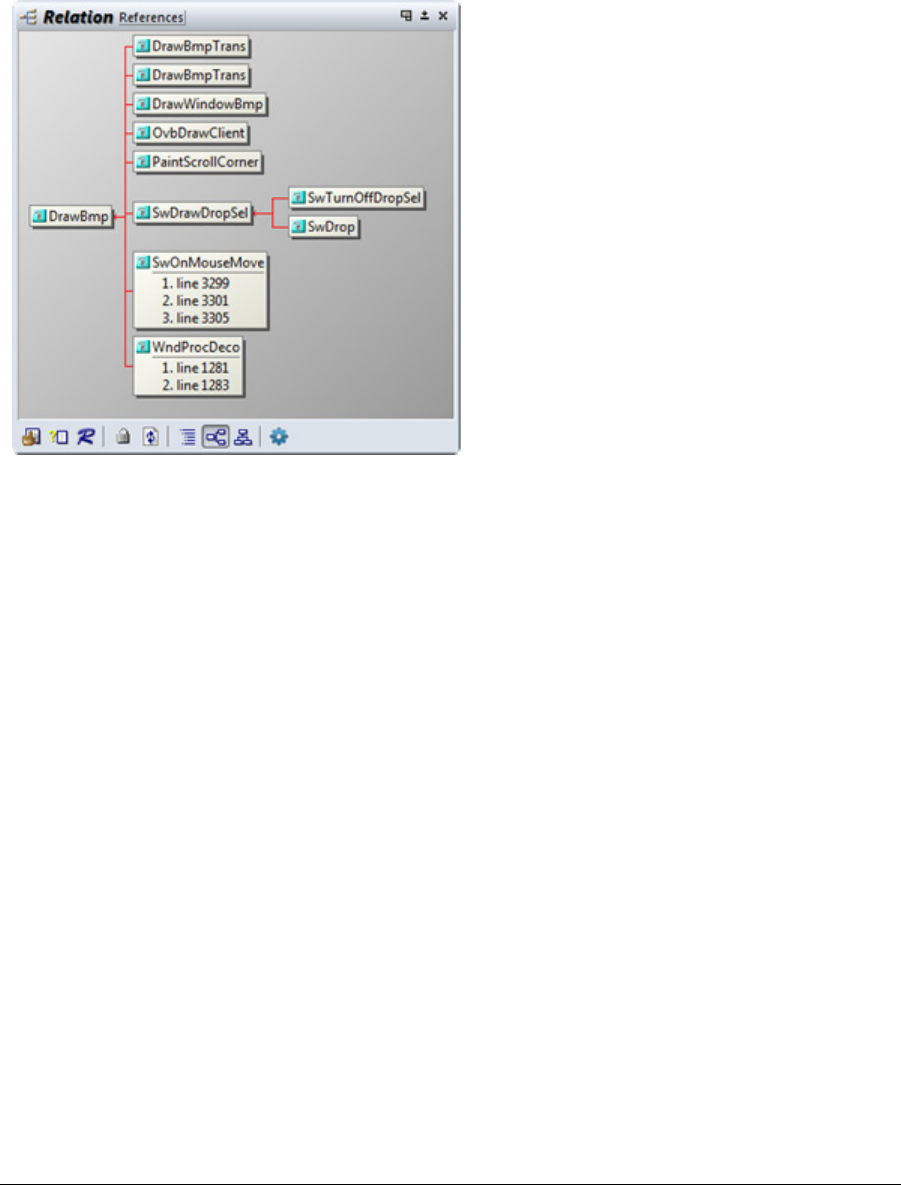
Source Insight 4 User Guide 93
Relation Window
Relation Window
The Relation Window is a Source Insight innovation that shows the relationship between the currently
selected symbol and other things. The Relation Window can show function call trees, class hierarchies, struc-
ture members, reference trees, and more. It can be docked along side your source windows, and it works in
the background tracking what you are selecting and showing relationship information automatically.
To show the Relation Window, select View > Panels > Relation Window.
You can specify the relationship types and many other options in the Relation Window Options dialog. See
“Relation Window Options” on page 305.
The Relation Window runs in the background and tracks what symbols you have selected. The beauty of the
Relation Window is that you don’t have to do anything special. It works in the background while you work,
but you can interact with it when you want to. You can also have several Relation Windows open, each show-
ing different types of information.
Outline and Graph Views
The Relation Window has two types of views: Outline view and Graph view. The Graph view shows symbols as
graph nodes with lines connecting them. The Relation Graph Options command (available on the Relation
Window right-click menu) gives you control over the appearance of the graph view.
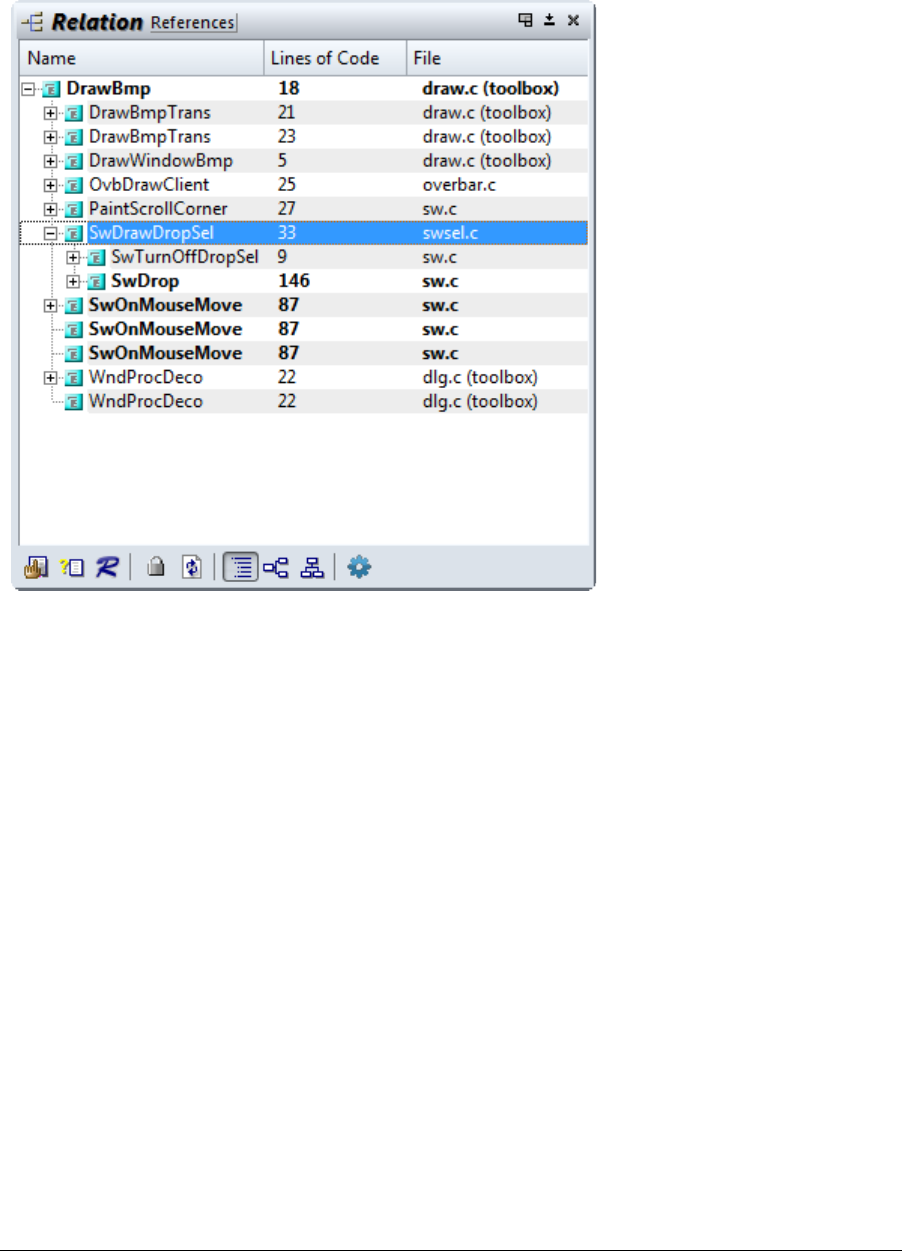
Relation Window
94 Source Insight 4 User Guide
Outline View
The Relation Window outline view is a compact, textual view of the relation hierarchy. You can click to
expand and collapse levels in the outline.
Graph View
The Relation Window graph view is a visual representation of the same relationship as the outline view. You
can expand and collapse nodes in the graph. You can select either a horizontal graph layout, or a vertical
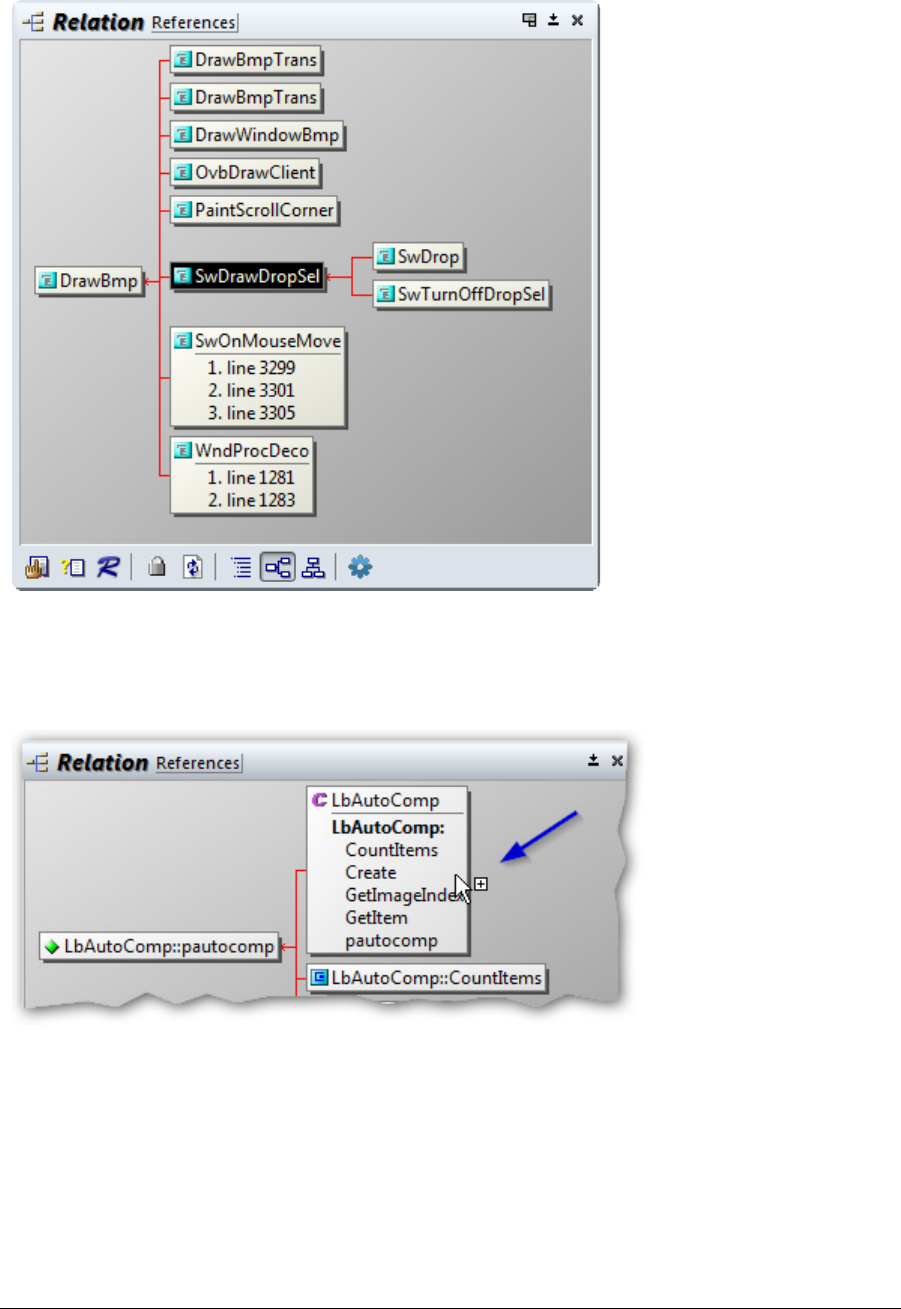
Source Insight 4 User Guide 95
Relation Window
graph layout. You can also print the graph, or copy the graph images to the system clipboard so you can pro-
cess it in another imaging program.
To expand or collapse a node, hover the mouse cursor first over the right or left edge of the node in a horizon-
tal graph (or the top or bottom middle of a node in a vertical graph). The mouse cursor will contain a + or -
symbol. Click to expand or collapse.
You can choose Graph View options by right-clicking on the Relation Window and selecting Relation Window
Graph Options. See “Relation Window Graph Options” on page 304.
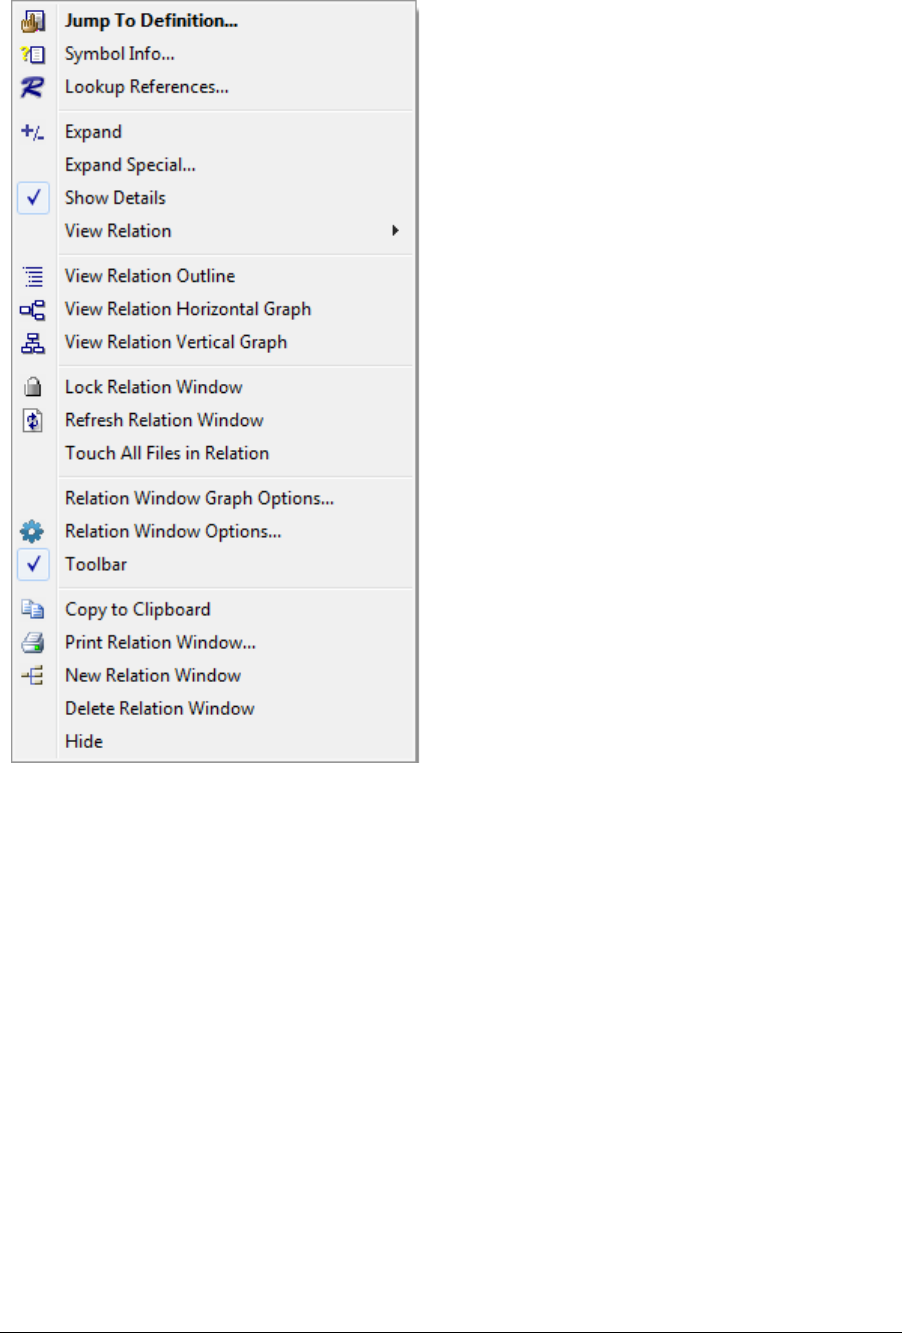
Relation Window
96 Source Insight 4 User Guide
Relation Window Right-Click Menu
Relationship Rules
The relation view that appears when you select a symbol depends on the type of symbol. You have control
over this in the Relation Window Options. For example, you can specify that if you select a function in your
source code, the Relation Window will show references to that function. And, if you select a class name, the
Relation Window will show the classes derived from it.
Each time the Relation Window expands a symbol to show a new level, the relationship represented by the
expansion is based on the type of symbol being expanded. That means each Relation Window can potentially
show multiple relationships. See “Relation Window Options” on page 305.
Relationship Types
The relationships fall into these general categories, listed from computationally the fastest to slowest:
•Contains – show the contents of the current symbol. For example, the members of a struct.
•Calls – show what other symbols are referred to by the current symbol. For example, functions that
are called by the current function.
•Calls and Callers - show a split graph; one side are the functions called by the current function, the
other side is the functions that call the current function.

Source Insight 4 User Guide 97
Relation Window
•References – show what other symbols refer to the current symbol. For example, functions that call
the current function.
Call Graphs
The function call graph relationships can be filtered to show only what you consider the most interesting
paths. The “Call Graph Filtering” button in the Relation Window Properties dialog box takes you to a dialog
box that lets you control the filtering by specifying particular functions you want to exclude. You can also fil-
ter functions out by code metrics constraints.
Note that Source Insight considers C/C++ macros legitimate function-like symbols, and so C/C++ macros may
show up in a call graph. You can filter them out in the Call Graph Filtering dialog box if you want.
Relation Window Performance
The Relation Window requires some processing. Some relationships are slower to compute. For very large
projects, the “References” relationship will be the slowest to compute.
Multiple Relation Windows
You can have multiple Relation Window instances, so you can show multiple relationships at the same time.
Each Relation Window has its own relationship options. For example, one window could show you what func-
tions are called by the selected function, and another window could show you what functions make calls to
the selected function. To create a new Relation Window, right-click on the Relation Window and select New
Relation Window.
Customizing the Relation Window
The Relation Window Options command is accessed from the Relation Window toolbar or shortcut menu.
You control what relationships are shown from this command, and how the window displayed. See “Relation
Window Options” on page 305.
You can also customize the appearance of the Graph View of the Relation Window by using the Relation
Graph Options command. See “Relation Window Graph Options” on page 304.
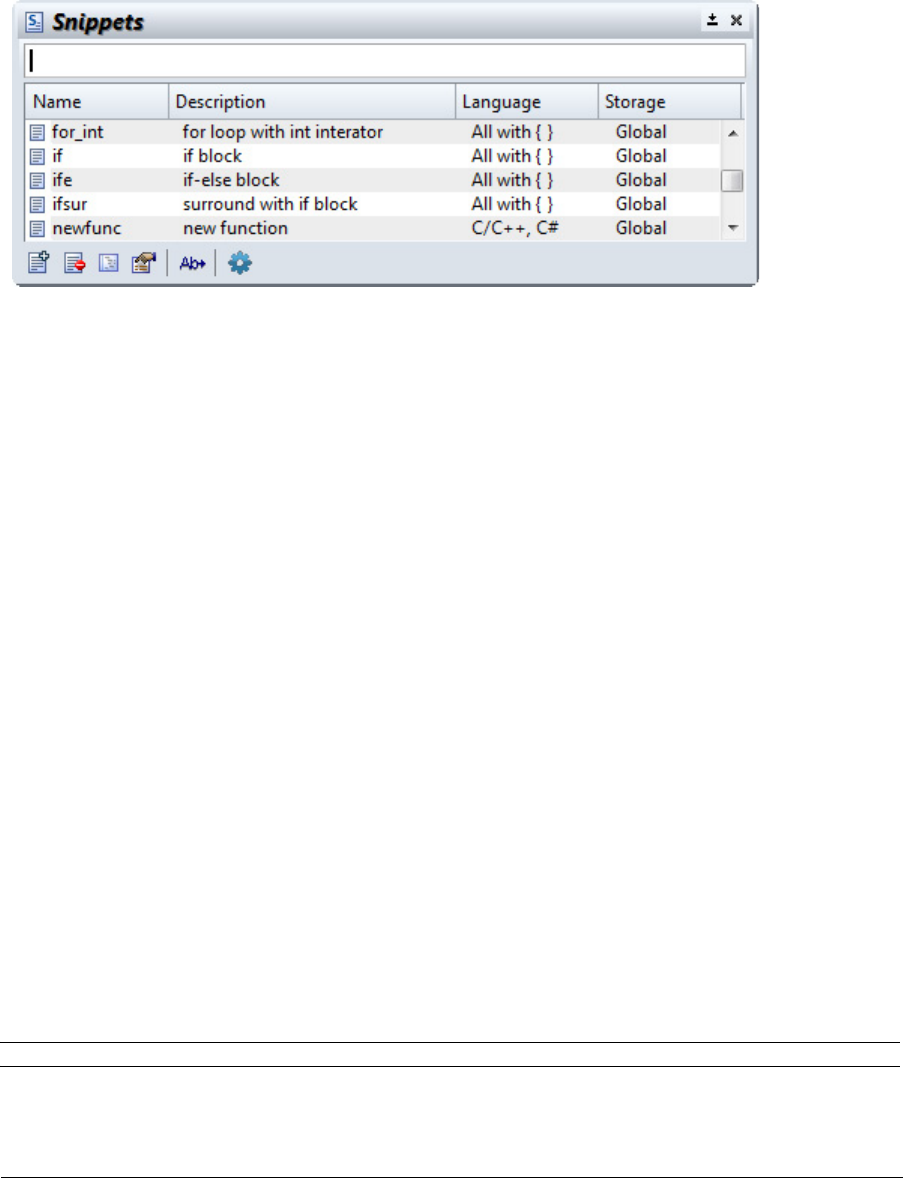
Code Snippets
98 Source Insight 4 User Guide
Code Snippets
Code Snippets are small chunks of commonly used source code that you can insert into your source files. For
example, you can use a snippet to insert a "for" or "while" loop. Snippets are intended for boiler plate text.
The Snippets panel contains all your code snippets and helps to organize them. The Snippets panel lets you
create, edit, delete, and insert code snippets. You can also import and export snippets.
Snippets can also be programming language-specific, or common to all languages, or common to certain
sets of languages. For example, you can have a snippet for C/C++ and another with the same name just for
Java. See “Snippet Window” on page 339.
Inserting Snippets
To insert a snippet, you can do any of the following:
•From the Snippet panel, double-click on a snippet or type the name of snippet and press Enter. You
can activate the Snippet panel first so you can type into it by using the Activate Snippet Window
command (Ctrl+Alt+S).
•From the Edit menu, select Insert Snippet > "snippet name".
•Use the Complete Snippet command (Ctrl+E) to pop up a list of snippets.
•Start typing a snippet name and the auto-completion list will show the snippet. Note that having
snippet names in the auto-completion list is optional.
Text Variables
Snippets may contain text variables (sometimes referred to as placeholders). A text variable is a special iden-
tifier that is replaced with a particular value when the snippet is inserted. For example,
$date$
is a text vari-
able that gets replaced with the current date when you insert a snippet containing that text variable.
A text variable starts and ends with a dollar sign ($). For example
$this$.
When you select anywhere within
it, the whole thing gets selected. Arrow keys move over text variables in one press. To select inside one, hold
down Ctrl and click with the mouse in it.
You can also force Source Insight to process text variables in any selected text by using Expand Text Vari-
ables. See “Expand Text Variables” on page 203.
Note: Text variables can also be used in Clips (see Clips).

Source Insight 4 User Guide 99
Code Snippets
Predefined Text Variables
There are many predefined text variables that are automatically replaced with values when a snippet is
inserted.
Placeholder Text Variables
You can also use your own text variables to represent placeholders that behave similar to form fields after the
snippet is inserted.
Table 3.5: Predefined Text Variables
Name Value
$current_function$
name of the current enclosing function
$current_namespace$
name of the current enclosing namespace
$current_package$
name of the current enclosing package
$current_symbol$
name of symbol declared or enclosing the cursor position
$current_type$
name of the current enclosing struct, class or data type
$current_word$
the current word at the cursor position before the snippet is inserted
$date$
the current local date
$dollar$
the dollar sign ($)
$enclosing_symbol$
name of the function, class, or symbol that encloses the cursor
$file$
current file name with path
$file_in_project$
current file name relative to project source directory (root)
$file_no_path$
current file name without path
$next_function$
name of the function declared after the current line
$next_namespace$
name of the namespace declared after the current line
$next_package$
name of package declared after the current line
$next_symbol$
name of the symbol declared after the current line
$next_type$
name of the type declared after the current line
$prev_function$
name of the function declared before the current line
$prev_namespace$
name of the namespace declared before the current line
$prev_package$
name of the package declared before the current line
$prev_symbol$
name of the symbol declared before the current line
$prev_type$
name of the type declared before the current line
$return_type$
return type of the current function
$selection$
the currently selected text before the snippet is inserted
$time$
the current local time
$username$
the system user name that is logged in
$UTC_date$
the current UTC date
$UTC_time$
the current UTC time
$UTC_year$
the current UTC year
$year$
the current local year

Code Snippets
100 Source Insight 4 User Guide
For example, this snippet insert a "for" statement and has placeholders for the iterator variable, the limit
value, and the final cursor position.
for ($i$ = 0; $i$ < $lim$; ++$i$)
{
$end$
}
When this snippet is inserted, the first text variable is automatically selected. In this example, that would be
the
$i$
variable. You can simply type the name of the variable to replace
$i$
.
Then, you can use the Select Next Snippet Placeholder command (Ctrl+Shift+;) to select the next place-
holder. Alternatively, you can use any other navigation command to move the cursor.
Automatic Text Variable Replacements
When you edit a placeholder, all instances of the same text variable placeholder get replaced automatically
with what you typed. For example, if
$myvar$
appears in 4 places, and you select it and type over it, then all 4
places are replaced with what you typed. This is useful for snippets that refer to the same identifier in multi-
ple places.
In the above example, let's say you type
ioffset
to replace the value of
$i$
. The other instances of
$i$
will
get replaced with
ioffset
.
To select the next text variable in a file, use the Select Next Snippet Placeholder command (CTRL+SHIFT+;).
This selects the next text variable placeholder in the file. If you have the "Smart Tab" feature enabled, then
you can just type Tab in many cases to move to the next placeholder.
In the above example, the
$lim$
placeholder will get selected. Now you can type the limit value of this for
loop.
Pressing Ctrl+Shift+; again will select the
$end$
placeholder. Now you can edit the body of the for loop.
Snippet Options
You can control what file types can use snippets. To enable or disable snippet use for each file type, Select
Options > File Type Options and select or de-select the "Enable code snippets" option. If the code snippets
are disabled, then code snippets will not be proposed in the auto-completion list while you edit, and text
variables will not have any special behavior in those files.
You can control automatic text variable replacements on a per-snippet basis. In the Snippet panel, select a
snippet and click the Edit Snippet button (Ctrl+E). Select or de-select the "Enable text variables when insert-
ing" option as desired.
You can also enable or disable text variables for all snippets in the Snippet Window Options of the Snippet
panel. Select or de-select the "Enable text variables when inserting" option as desired.
See “Snippet Window Options” on page 340.
Project vs Global Snippets
Snippets can be project-specific, or common to all projects. The Storage Location of a snippet specifies if the
snippet is stored with the project, or global. Global means it is common to all projects. The Snippets panel
lists all your snippets, both project and global.
Global snippets which apply to all projects are stored in a file named
global.snippets.xml
in the Source
Insight 4.0 documents folder inside the Snippets folder. For example:
C:\Users\John\Documents\Source Insight 4.0\Snippets\global.snippets.xml
Project-specific snippets are stored in a file named
<project-name>.snippets.xml
in your project data
directory. For example in a project named "myproject" :
C:\Users\John\Documents\Source Insight 4.0\Projects\myproject\myproject.snippets.xml
For more information: See “Snippet Window” on page 339.
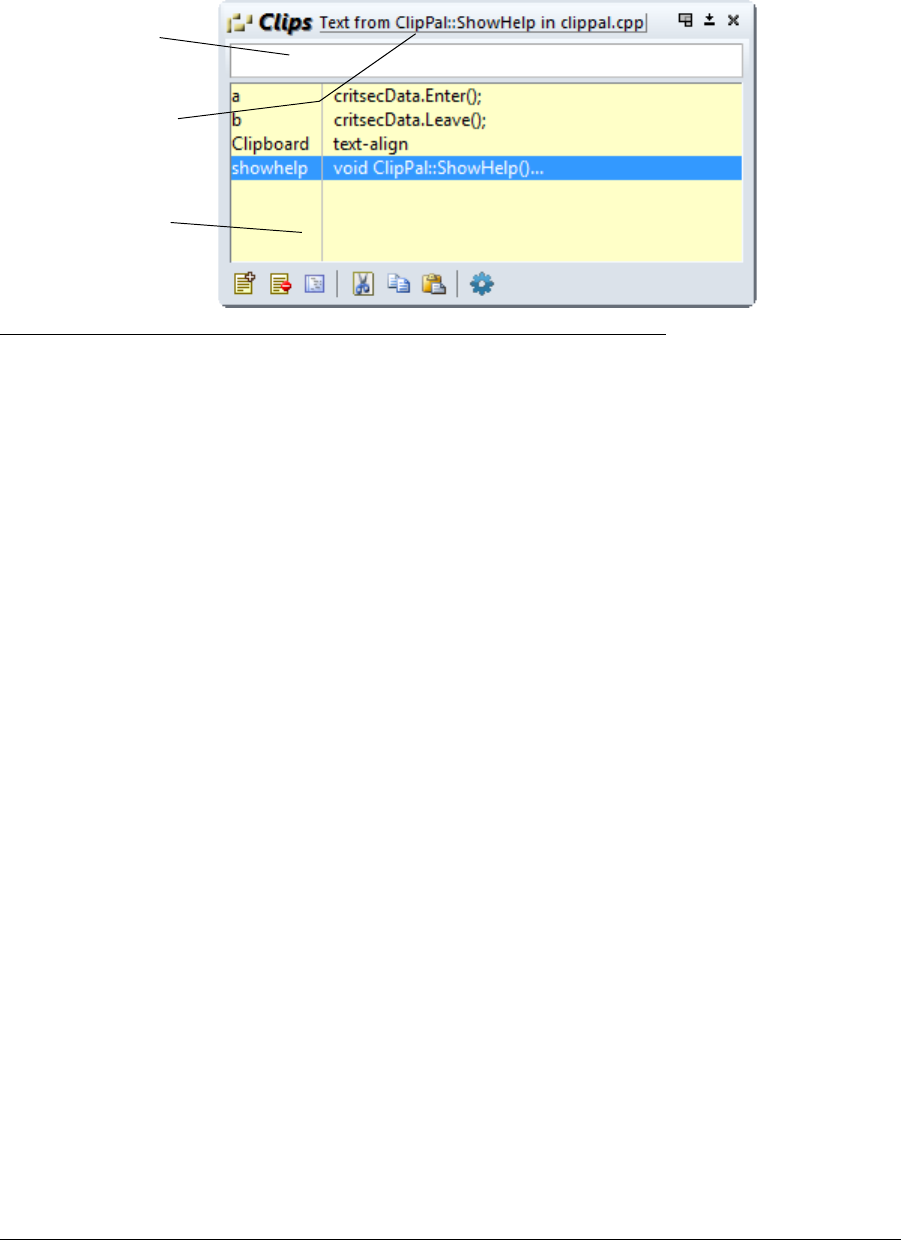
Source Insight 4 User Guide 101
Clip Window
Clip Window
The Clip Window is a floating and dockable window that displays clips. You can drag and drop text onto the
Clip Window and drag text from the Clip Window onto your files.
Figure 3.13 The Clip Window
What Is A Clip?
Clips are clipboard-like documents. In fact, the Clipboard is considered a clip in Source Insight. Instead of
having only one clipboard, Source Insight lets you have many clips. A clip is like any other file. You can edit it
the same as any other file. The difference is that clips are automatically saved between sessions and clips can
be pasted easily with the Paste From Clip command.
Clips are useful for rearranging code, especially between many files. Clips are also useful for boilerplate text
that you often want to insert.
You can toggle the Clip Window on and off by running the Clip Window command, or by running the Activate
Clip Window command, which makes it visible and then sets the focus on the Clip Window text box.
Creating a New Clip
To create a new clip, run the New Clip command (located on the File menu, and on the Clip Window toolbar).
A new source file window will open. You can type and edit this file like any other. When you close it, the clip
will be retained in the Clip Window until you delete it.
You can also create a clip anytime by using the Copy to Clip command, or by dragging and dropping text onto
the Clip window. You can also drag a file from Explorer onto the Clip Window to open a file as a clip.
Clip Storage
Clips are automatically saved to the Clips subdirectory of your Source Insight program directory. Any text file
that you place in that Clips subdirectory will be automatically loaded when Source Insight starts up.
Type into this field to
select a clip. This list is
filtered as you type.
Other clip information
will appear at the top,
telling you where the
clip came from.
This is a list of all open
clips. Each item shows
the first line of text in
the clip.
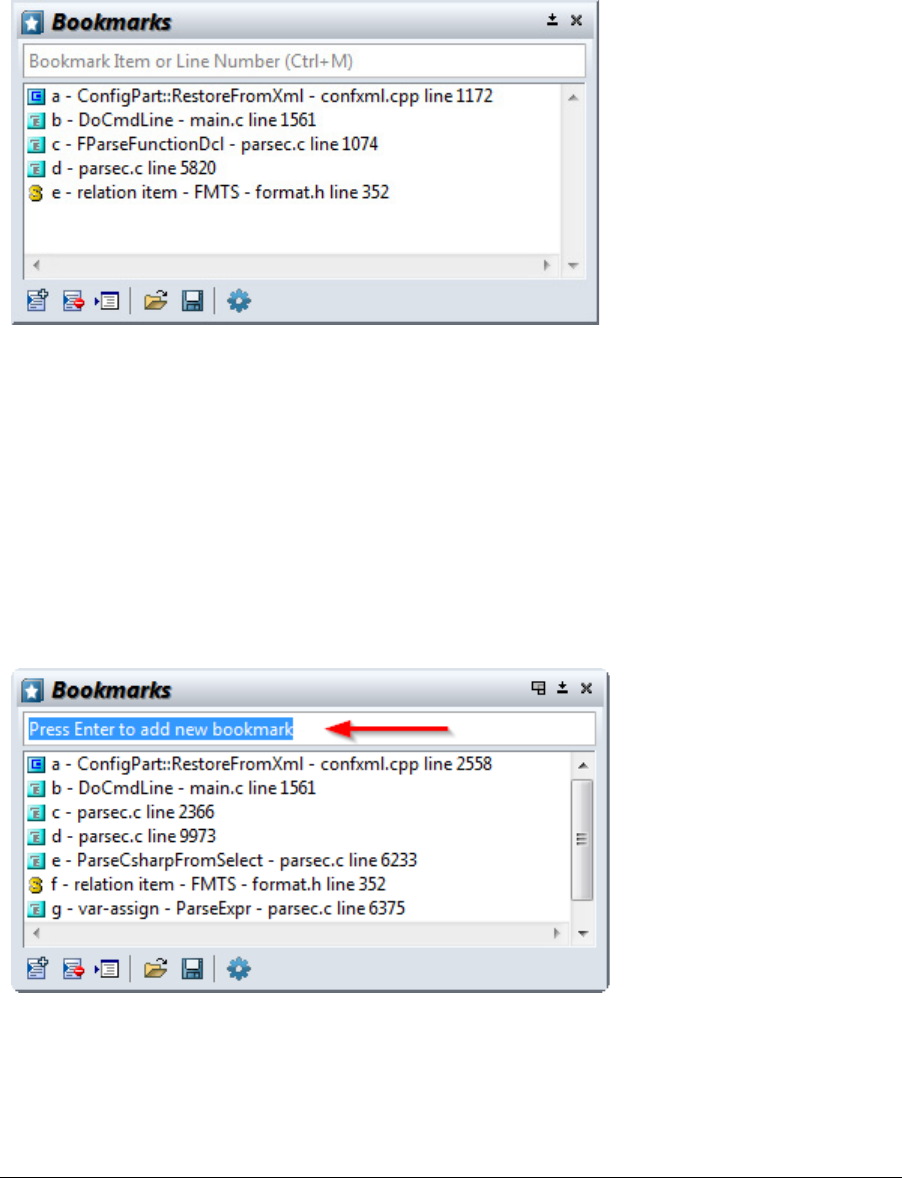
Bookmarks
102 Source Insight 4 User Guide
Bookmarks
Bookmarks are useful for remembering locations of interest in your files. Bookmarks are accessed and man-
aged from the Bookmark Window panel. The vertical scrollbar and Overiew scroller also indicate bookmarks.
The Bookmark Panel is a floating, dock-able window that shows the current list of bookmarks. The Book-
mark command activates the Bookmark Window. See “Bookmark” on page 164.
A bookmark points to a particular line position in a file. Each bookmark has a name, and specifies a file and
line number. The Bookmark window also displays the function or symbol where the mark is located.
The Bookmark Window has functions for adding, deleting, saving, and loading bookmarks. See “Bookmark
Window” on page 164.
Setting a Bookmark
To set a new bookmark, do one of the following:
•Use the Bookmark command (Ctrl+M), or
•Right-click in the selection bar area in the far left margin, and select Bookmark...
The Bookmark Window will open.
You can press Enter and Source Insight will assign a single letter name to the bookmark and add a new book-
mark. Or, you can type a meaningful name and press Enter.
You can also type the name of an existing bookmark and press Enter to jump to that bookmark. There are
other keyboard shortcuts available in the Bookmark Window. See “Bookmark Window” on page 164.

Source Insight 4 User Guide 103
Bookmarks
Bookmark Storage
Bookmarks are saved in a special file named booksmarks.xml, so they are preserved from session to ses-
sion. Each project has its own bookmarks.xml file located in the project data directory. Each bookmark is
saved as a line offset relative to a symbol declaration, such as a function. This helps to maintain the book-
marks if the original file is edited outside of Source Insight.
Bookmarks are maintained as you edit your files. For example, if you set a mark on a particular line, and then
insert lines before that one, the mark will still be on the original line of text, even though the actual line num-
ber may have changed. If the line that the mark is set at is deleted, then the mark is deleted also.
FTP Bookmarks
Bookmarks can also point to a file on an FTP host. If you used the FTP Panel to open a file and set a bookmark
in that file, then the bookmark will remember the FTP Site name and directory so you can open the file again.
However, this requires that the FTP Site is defined in the FTP Panel. If you set a bookmark, and later delete
the FTP Site from the Site List of the FTP Panel, then the bookmark will not work anymore. See “FTP
Browser” on page 221.

Searching and Replacing Text
104 Source Insight 4 User Guide
Searching and Replacing Text
Source Insight provides a number of searching commands, and replacement commands that operate on the
current file as well as across multiple files. When searching multiple files, source links can be used to quickly
link matches.
Searching is an important activity for programmers. As such, Source Insight devotes a lot technology to help
you navigate large code projects quickly. This is one of Source Insight’s important strengths.
Searching for Symbol References
To quickly search the current project for references to the currently selected symbol, use the Lookup Refer-
ences command (Ctrl+/). See “Lookup References” on page 255. For example, click inside an identifier such
as "BeginPaint", then invoke the Lookup References command. Source Insight will open a Search Results
window, which lists all the places you used BeginPaint in your project. Each matching line listed in the Search
Results window will also have a source link to the location of each line containing the word you looked up.
The Lookup References command is context sensitive, so that if finds only the correctly matching references,
given the scoping context.
The Lookup References command and the Relation Window use a special search index for speed.
Relation Window Shows References Automatically
The Relation Window also shows references to the symbol at the cursor position automatically. You don’t
need to use the Lookup References command unless you want to put the results into the Search Results win-
dow. See “Relation Window” on page 93.
Automatically Highlighting References in the Code
You can have Source Insight automatically highlight references to the symbol at the cursor position within
the source code window. This is controlled by on a per-file-type basis using an option in Options > File Type
Options. See “File Type Options” on page 213.
Searching the Current File
The Search command (Alt+F) searches the current file for a search pattern. The search can be forward or
backwards. In addition, the search can be batch style, where the search output results are placed in a Search
Results window. See “Search” on page 323.
The Search Forward (F4) command repeats the last search, allowing you to advance through the file, finding
each occurrence of a pattern.
The Search Forward for Selection command searches for the next occurrence of the first word in the current
selection.
The Incremental Search command (F12) finds matches as you type the characters. See “Incremental Search”
on page 232.
File Search Bar
The File Search Bar is used to search within the current file. To show it, select View > File Search Bar. Alterna-
tively, you can use Activate Search Bar (Alt+Shift+F) to activate it so you can start typing into it.
To set options, click the Options button. See “File Search Bar Options” on page 212.
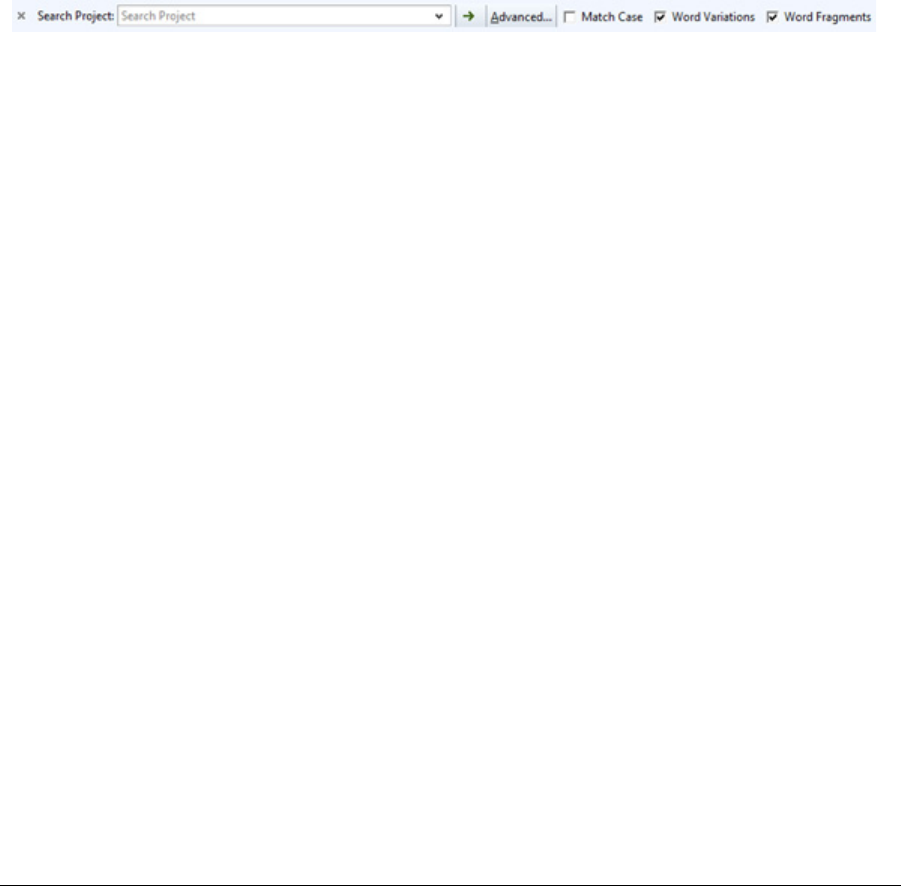
Source Insight 4 User Guide 105
Searching and Replacing Text
Searching Multiple Files
To search for a pattern across all project files, or other non-project files, use the Search Files command. See
“Search Files” on page 325. The Search Files command is similar to the Search command, except you can
specify what files you want to search. The results of the search are placed in the Search Results window. The
search results also contain hidden information called source links.
If you are just looking for single, whole-word references across your whole project, the Lookup References
command is much faster. See “Lookup References” on page 255.
Searching a Project
The Search Project command searches for text or keywords across all project files. This command works the
same as the Lookup References command. The only difference is that each dialog box has its own persistent
state.
Project Search Bar
The project search bar is used for searching across the whole project. It is a powerful way to perform a key-
word based search to find name or word fragments within a given number of lines of context. To show it,
select View > Project Search Bar.
See “Search Project” on page 328.
Searching for Keywords
If you want to search your whole project as though it was a web site, then use the Search Project command.
Using keyword searching, you can find any combination of terms or symbol name fragments that occur
within a specified number of lines of context. See “Search Project” on page 328.
Searching the Web
The Search Web command (Ctrl+Alt+W) searches for the identifier at the cursor position using your web
browser and your preferred web search engine. See “Search Web” on page 331.
Replacing Text
These are the methods for replacing or renaming identifiers in the current file or multiple files.
Replacing in the Current File
The Replace command searches the current file for a search pattern, and replaces the pattern with a new pat-
tern. The range of replacement can be the whole file, or just the current selection. See “Replace” on page 312.
Replacing in Multiple Files
The Replace Files command is similar to the Replace command, except you can specify what files you want to
do the replaces in. See “Replace Files” on page 313.
If you want to rename a symbol across multiple files, the Smart Rename command is usually better, because
it is context sensitive. See “Smart Rename” on page 335.

Searching and Replacing Text
106 Source Insight 4 User Guide
Renaming an Identifier
Use Smart Rename to perform context-sensitive renaming of symbols - global or local.
To rename an identifier across all project files using a smart context-sensitive method, use the Smart
Rename command (Ctrl+Single-Quote). Smart Rename is a context-sensitive form of a global Search and
Replace. See “Smart Rename” on page 335. Source Insight's search index makes the search very fast. This is
the easiest way to replace a single word identifier with a new string. In addition, you can have Source Insight
produce a log of replacements in the Search Results window. Each replacement line is listed, along with a
source link to the location of each line that was changed.
Smart Rename is also excellent for renaming local scope variables.
Search Results Window
The Search Results window is created whenever you use a search feature that searches across multiple files,
such as the Search Project, Search Files, or Lookup References commands. Each line in the Search Results
window corresponds to a match in some file at some line number. Matches listed in the Search Results win-
dow contain source links, which are hypertext-like links to the locations where the matches were found.
The Search Results is a text file buffer that you can also edit.
Navigation Using Source Links
Source Links connect two locations in two different text files. They connect a line of text in a "link source" file
to a location in a "link target" file. Links are associated with individual lines.
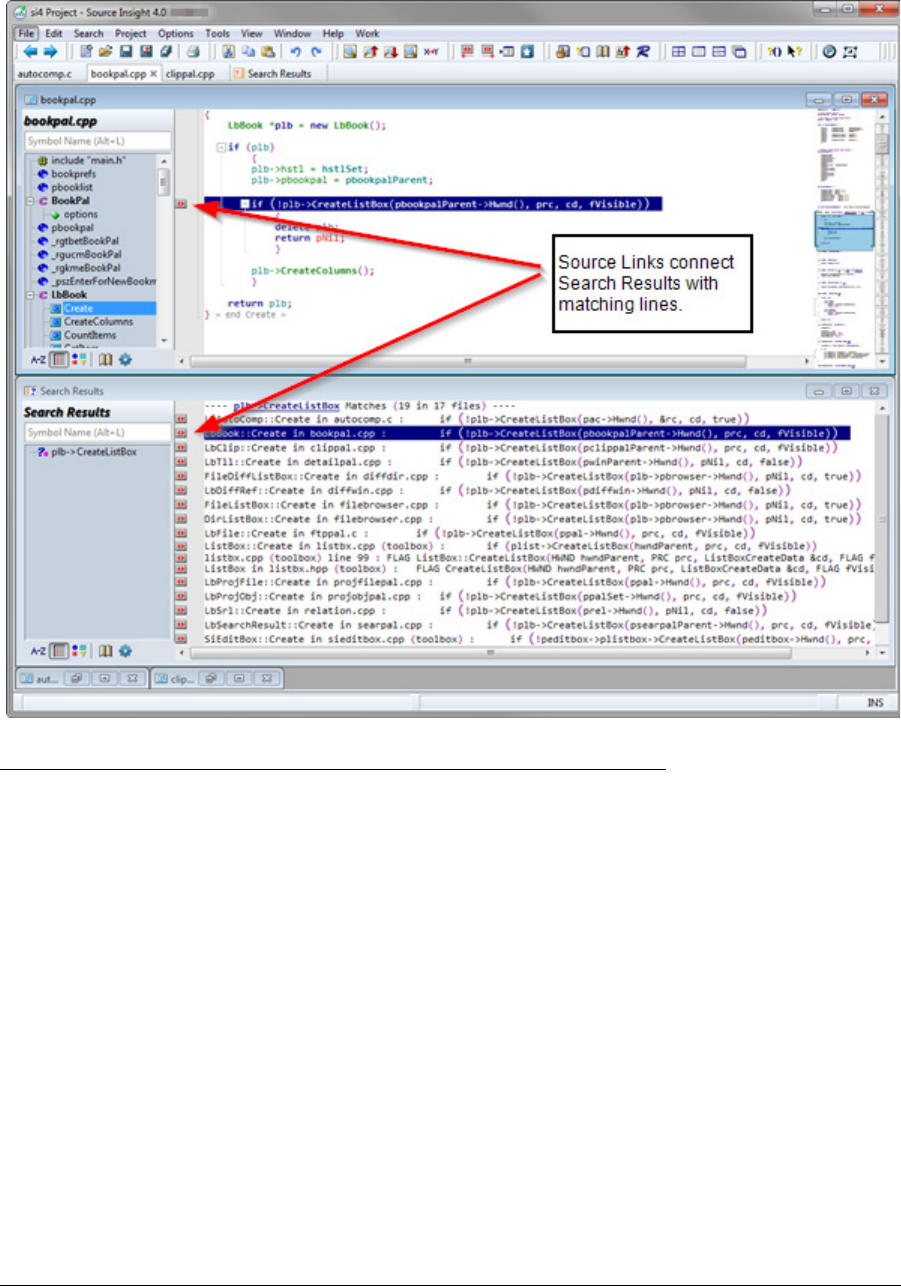
Source Insight 4 User Guide 107
Searching and Replacing Text
To traverse a link, use the Jump To Link command (Ctrl+L), which takes you to the other end of the source
link at the current line. A link can be traversed as long as the link source file is open. If the link target file is not
open, the Jump To Link command will open the file automatically.
Figure 3.14 The Search Results window has a source link on each listed match. Each source link corresponds to a location
in a file at some line number. The window above the Search Results is the target location of one of the source links.
Source Links are bi-directional, so you can use the Jump To Link command to go from the link source to the
target, or from the target back to the source.
In addition, the link information is maintained as you edit your files, just as bookmarks are. A link is only
removed if you delete its link source line, or close the link source file.
Searching and Source Links
The search results placed in the Search Results window by the Search, Search Files, and Lookup References
commands contain Source Links. The link source file is the Search Results temporary file, and the link target
for each link is the location of the matching patterns in the various files that were searched.
Source links are part of the current workspace, which means it is part of the session state. If you save the
Search Results to a new file name, the Source links will be retained in the current workspace. For example,
you could search for one pattern, save the Search Results to S1.OUT, do a second search, and both S1.OUT
and Search Results will have their source links. If you close the Search Results window, the source links are
deleted.

Searching and Replacing Text
108 Source Insight 4 User Guide
Creating Source Links
The Parse Source Links command creates source links in the current file. You specify a search pattern which
is used to parse file names and line numbers from a file. Each time a pattern matches, a new source link is
inserted into the current file.
The Parse Source Links command is useful if you have a "log" or "output" file that contains compiler output
and error messages. You just open the log file, and run the Parse Source Links command. A link will be setup
for each line in the log file containing an error message.
Source Links from Custom Command Output
You can create source links from the output of a custom command. When defining the custom command, the
"Parse Source Links" option should be on in Custom Command dialog. You must specify a search pattern to
be used to parse file names and line numbers. When the command terminates, Source Insight automatically
invokes the Go To First Link command.
This is the recommended way to invoke a compiler or build tool from Source Insight. This runs the compiler,
and Source Insight will position you to at each erroneous source line.
Source Link Commands
Source Insight provides the following commands for moving between link locations.
Search Results Text
Each set of matches in the Search Results window has a search heading that lists the pattern that was used to
search, followed by a match count. The search headings are parsed by Source Insight and each search pat-
tern appears in the symbol window on the left side of the Search Results window to provide an overview.
For example, a typical search heading might look like:
---- GetStockObject (23) -----
meaning that 23 occurrences where found.
The Search Results window is actually just another file buffer that you can edit. You may freely delete lines
from the window to trim down the results. The Search Results buffer is automatically saved when you exit
Source Insight.
Table 3.6: Source Link Commands
Command Key Description
Jump To Link Ctrl+L Moves to the other end of
the source link at the cur-
rent line.
Go To First Link Ctrl+Shift+L Selects the first link line in
the link source file, and
selects the associated link
line in the link target file,
and ensures both files are
visible on the screen in win-
dows.
Go To Next Link Shift+F9 Same as above, except with
the next link in the link
source file.
Go To Previous Link Shift+F8 Jumps to the previous link
in the source file.

Source Insight 4 User Guide 109
Regular Expressions
Regular Expressions
Regular expressions are special search strings that are useful for matching complicated patterns. In a regular
expression string, many characters have special meanings. For example, there is a special character that
means "the beginning of the line".
Optional Syntaxes
Source Insight support two different regular expression syntaxes: "Source Insight" and "Perl Compatible".
Most places that let you enter a regular expression has a down-down list where you can select the regular
expression syntax.
Multi-Line Patterns
There are regular and "multi-line" versions of each regular expression syntax. The multi-line versions basi-
cally match a new-line (end-of-line sequence) with the dot (.) character. So for example,
.*
would match the
whole file. And
"start.*end"
would find everything from "start" to "end" in the file, even across line breaks.
Regular Expression Elements
Wildcard Matching
. (dot)
The dot . matches any character.
Example:
b.g
matches big, beg, and bag, but not bp or baag.
If you use the "multi-line" version of the regular expression syntax, then the dot (.) character also matches
new-lines. For example
.*
matches the whole file.
Matching the Beginning or End of a Line
^ and $
The caret
^
matches the beginning of a line when the caret appears as the first character in the search pat-
tern.
Example:
^Hello
matches only if Hello appears at the beginning of a line.
The
$
matches the end of a line.
Example:
TRUE$
matches only if TRUE appears at the very end of a line.
Matching a Tab or Space
\t
\s
\w
\t
matches a single tab character.
Example:
\tint abc;
matches a tab character followed by int abc;.
\s
matches a single space character.
Example:
\sif
matches a space character followed by if.
\w
matches a single white space character. In other words, \w matches either a tab or space character.
Example:
\wwhile
matches either a tab or space character, followed by while.

Regular Expressions
110 Source Insight 4 User Guide
Matching 0, 1, or More Occurrences
* and +
*
matches zero or more occurrences of the preceding character. The fewest possible occurrences of a pattern
will satisfy the match.
Example:
a*b
will match b, ab, aab, aaab, aaaab, and so on.
+
matches one or more occurrences of the preceding character.
Example:
a+b
will match ab, aab, aaab, aaaab, and so on, but not just b.
Matching Any in a Set of Characters
[ .. ]
When a list of characters are enclosed in square braces [..] then any character in that set will be matched.
Example:
[abc]
matches a, b, and c, but not d.
When a caret ^ appears at the beginning of the set, the match succeeds only if the character is not in the set.
Example:
[^abc]
matches d, e, or f, but not a, b, or c.
Sets can conveniently be described with a range. A range is specified by two characters separated by a dash,
such as
[a-z]
. The beginning character must have a lower ASCII value than the ending character.
Example:
[a-z]
matches any character in the range a through z, but not A or 1 or 2.
Sets can contain multiple ranges.
Example 1:
[a-zA-Z]
matches any alphabetic character.
Example 2:
[^a-zA-Z0-9]
matches any non-alphanumeric character.
Matching a Line Break
\n
This matches a new-line, or line-break. Use this when you want to match an end-of-line within a larger pat-
tern.
Example:
dog\ncat
matches dog, followed by a line break, followed by cat.
Regular Expression Groups
\( and \)
Parts of a regular expression can be isolated by enclosing them with
\(
and
\)
, thereby forming a group.
Groups are useful for extracting part of a match to be used in a replacement pattern. Each group in a pattern
is assigned a number, starting with 1, from left to right.
Example:
abc\(xyz\)
matches abcxyz. xyz is considered group #1.
This is not all that useful, unless we are using the Replace command. The replace string can contain group
characters in the form of \<number>. Each time a group character is encountered in the replacement pattern,
it means "substitute the group value from the matched pattern".
Example 1: replace
\(abc\)\(xyz\)
with
\2\1
. This replaces the matched string abcxyz with the contents of
group #2 xyz, followed by the contents of group #1 abc. So abcxyz is replaced with xyzabc. This is still not too
amazing. See the next example.
Example 2: replace
\(\w+\)\(.*\)ing
with
\1\2ed
. This changes words ending in ing with the same word
ending with ed. Your English teacher would not be too happy.
Overriding Regular Expression Characters
\ (backslash)
A backslash character \ preceding a meta-character overrides its special meaning. The backslash is ignored
from the string.

Source Insight 4 User Guide 111
Regular Expressions
Example:
a\*b
matches a*b literally. The * character does not mean "match 0 or more occurrences".
Multi-Line Matches
Most places in the program where you can specify a regular expression also has a "regular expression syntax"
selection. If you select the "multi-line" version of the syntax, then the dot (.) character matches new-lines. For
example
.*
matches the whole file.
Example:
begin.*end
matches everything from "begin" to "end" across multiple lines. "begin" could be at
line 1 and "end" could be at line 100.
Regular Expression Summary
The following special characters are interpreted in regular expressions
Sets, such as [abc] may be in the following formats.
Table 3.7: Regular Expression Characters
Character Matches
^ (at the beginning only) beginning of line
.
any single character. In multi-line
mode, this also matches the end-
of-line character.
[abc]
any single character that belongs
to the set abc
[^abc]
any single character that does not
belong to the set abc
*
zero or more occurrences of the
preceding character
+
one or more occurrences of the
preceding character
\t
a tab character
\s
a space character
\w
white space (a tab or a space char-
acter)
\n
new-line, or the end-of-line charac-
ter. Use this if you want to match a
line break in the middle of a pat-
tern.
$
the end of the line
Table 3.8: Regular Expression Sets
Set type Meaning
[<character list>]
eg. [abcde]
Matches any character within the
set. The set can be any number of
characters long.
[x-y]
eg. [a-z]
Matches on any character within
the range of x through y, inclu-
sively. The ASCII value of x must be
less than that of y.
combination;
eg. [WXYa-z0-9]
Character lists and ranges may be
combined.
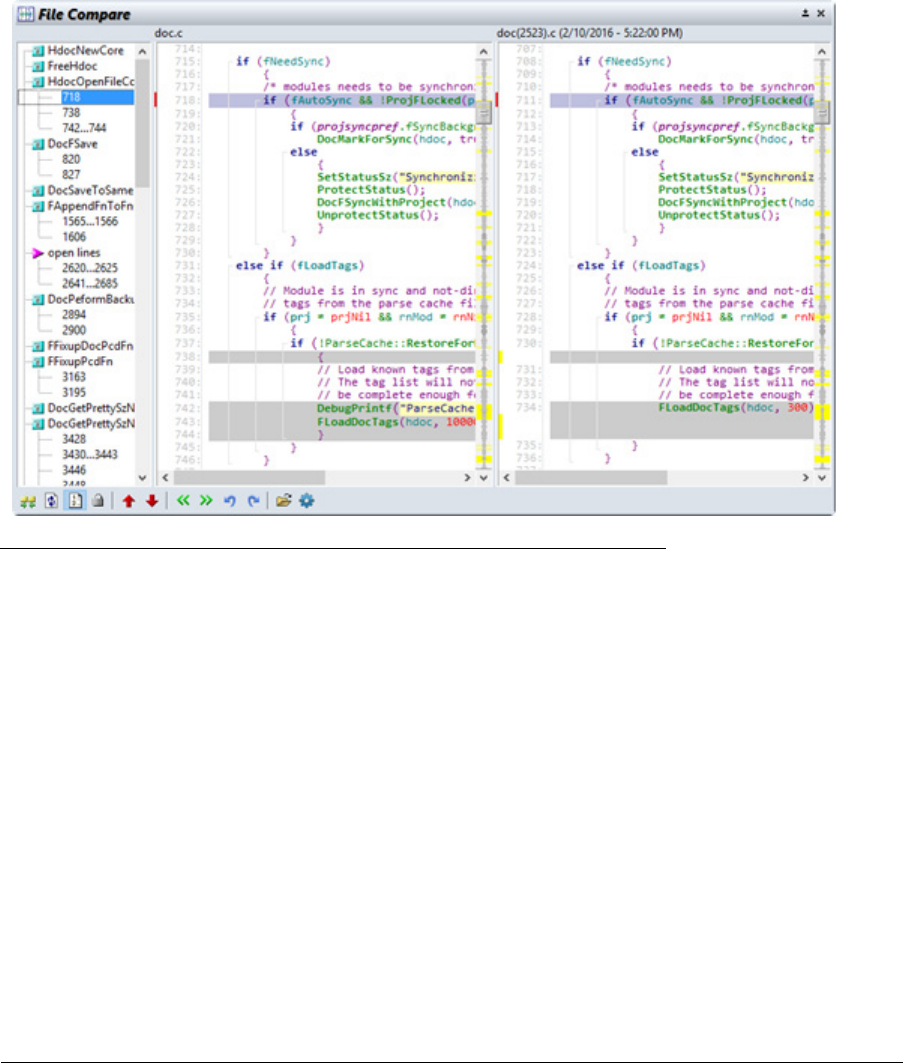
Comparing Files and Directories
112 Source Insight 4 User Guide
Comparing Files and Directories
Source Insight can compare two files and show differences. It can also compare two different directories.
Comparing Files
The Tools > Compare File command compares two files to show differences within the files. It shows two files
side by side and highlights the differences. This is a fancy version of the
diff
command. See “Compare Files”
on page 175. See “File Compare” on page 205.
The Tools > Compare with Backup File command compares the current file with a backup version of the same
file. See “Compare with Backup File” on page 176.
Figure 3.15 The File Compare window panel showing a file being compared to an earlier backup version of the file.
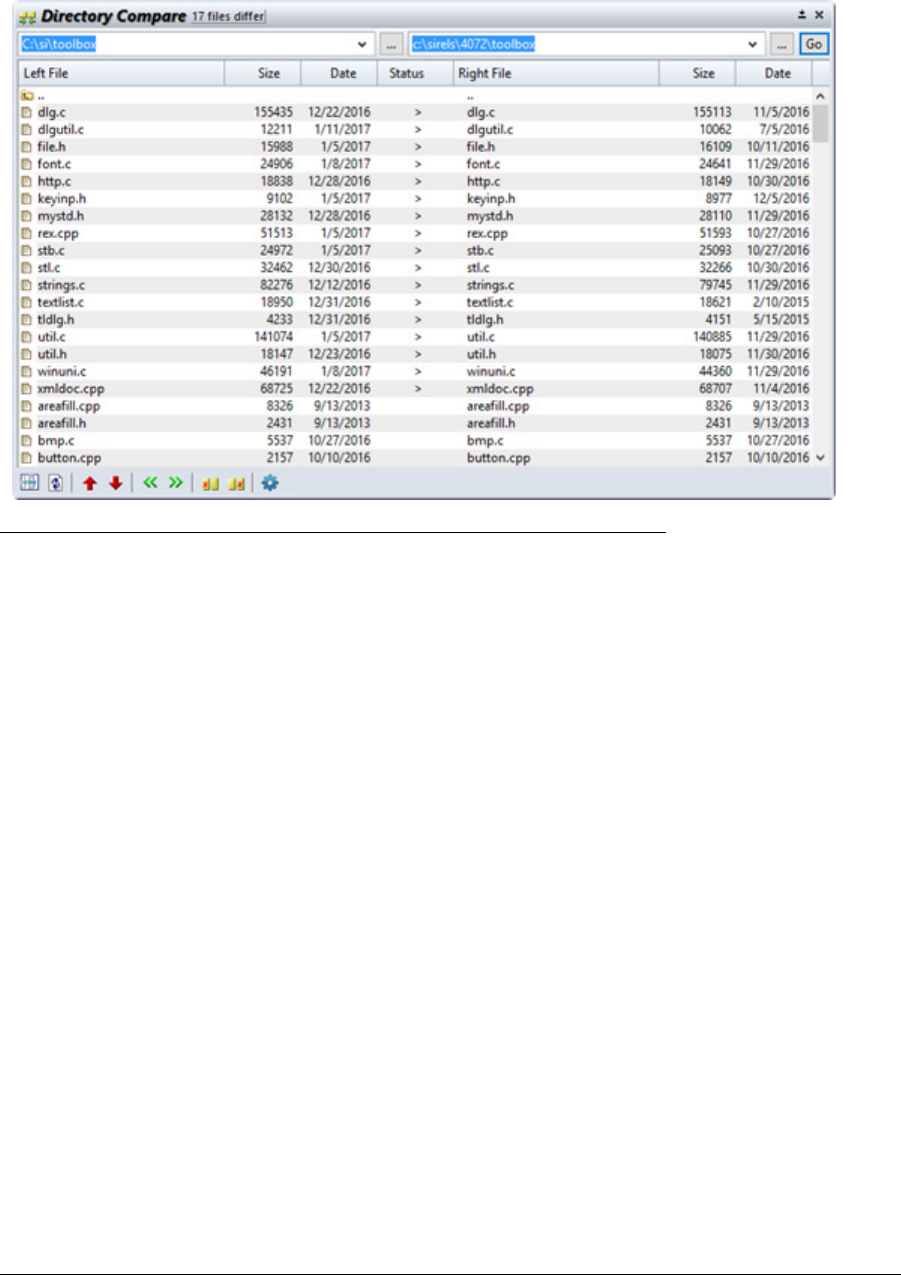
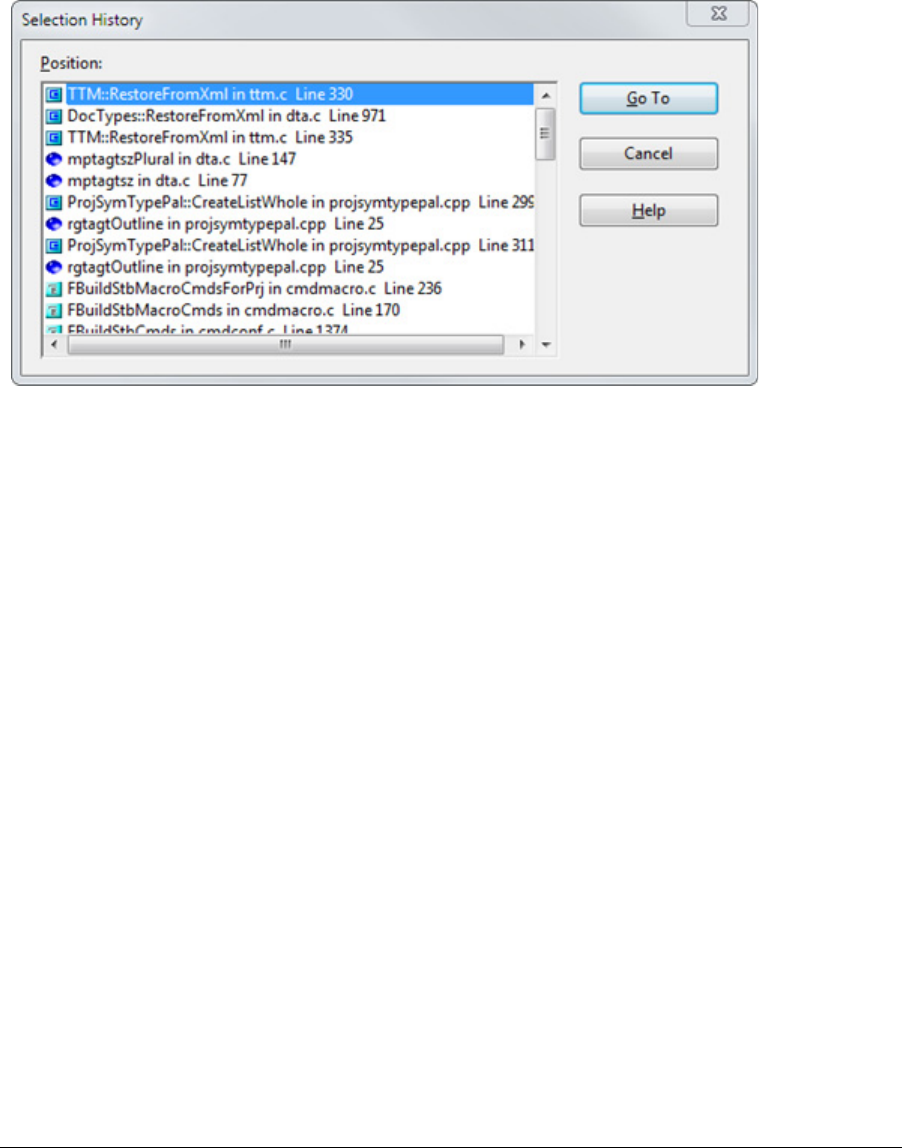
Navigation with the Selection History
114 Source Insight 4 User Guide
Navigation with the Selection History
The selection history is a circular list of your last 100 selection positions in the currently opened files.
You can use the Search > Selection History command to display and jump to positions in the selection his-
tory. The Selection History command also displays the function or symbol where each history item is located,
along with its file and line number.
The Selection History window looks like this:
Go Back and Go Forward commands
The Forward and Back buttons at the top left in the main toolbar work just like in a web browser. They invoke
the Go Forward and Go Back commands.
The Go Back command (Alt+,) jumps to the previous location in the selection history. The Go Forward com-
mand (Alt+.) jumps to the next location in the selection history. The selection history list is circular, so if you
reach the end of the list, the Go Forward and Go Back commands will wrap around to the other end of the list.
The Go Back and Jump To Definition commands make it easy to travel down a function call chain, and "pop"
back up the chain, and then travel down another path with a different function call.

Source Insight 4 User Guide 115
Scrolling and Selecting Text
Scrolling and Selecting Text
Scrolling around the selecting text is a basic operation, and there are a lot of commands for doing some vari-
ation of those things.
In Source Insight, a selection is a range of zero or more characters highlighted in a source file window.
Selected text is highlighted and displayed in the "Selection" style; usually an inverse color. You can change
the look of selected text by editing the Selection style in Options > Style Properties.
Each source file window has its own single selection. Switching between windows leaves the selections in
each window intact. The selection in the current window and current file is referred to as the current selec-
tion.
Selections can be made with the keyboard and the mouse. Commands used for selecting text are listed
below. To select text with the mouse, simply point at the text and drag across it. Double-clicking the left
mouse button selects a whole word.
Scrolling the window will only change the selection if the "Keep cursor in window when paging up and down"
option is turned on in the Options > Preferences: General dialog box. Otherwise, only cursor movement keys,
pointing with the mouse, or editing your file will change the selection.
Moving Through a File
There are many commands to move you around in a file. It's important to know that there are two types of
movement: selecting and scrolling.
Selecting is moving the current selection (usually an insertion point) around in the file.
Scrolling is when the file window is scrolled to reveal new parts of the file. You can scroll a window up, down,
left, and right. Scrolling does not always affect the location of the selection.
Selection commands can cause scrolling to occur if the place you are selecting is not visible in the window.
For example, if the cursor is on the bottom line of a window and use the Cursor Down command, the window
is scrolled to reveal the line below.
Scrolling Commands
The scrolling commands scroll the active window. They do not affect the current selection. They only affect
the window.
Table 3.9: Scrolling Commands
Command Key Description
Scroll Line Up Alt+Up Scrolls up by one line
Scroll Line Down Alt+Down Scrolls down by one line
Page Up PgUp Scrolls up by a window
full
Page Down PgDn Scrolls down by a window
full
Scroll Half Page Up Ctrl+PgUp Scrolls up by half a win-
dow
Scroll Half Page Down Ctrl+PgDn Scrolls down by half a
window
Scroll Left Alt+Left Scrolls left by aprox. 1 tab
stop
Scroll Right Alt+Right Scrolls right by aprox. 1
tab stop

Scrolling and Selecting Text
116 Source Insight 4 User Guide
Selection Commands
The selection commands change the current selection. Usually, if the resulting selection is not visible in the
window, the window is scrolled to show it. These commands change the selection to an insertion point and
move it to a new location in the file.
Table 3.10: Cursor Movement Commands
Command Key Description
Cursor Down Down Arrow Move down by one line.
Cursor Up Up Arrow Move up by one line.
Cursor Left Left Arrow Move left by one character.
Cursor Right Right Arrow Move right by one character.
Beginning of Line Home Move to beginning of line.
End of Line End Move to end of line.
Top of File Ctrl+Home Move to top of file.
Bottom of File Ctrl+End Move to end of file.
Beginning of Selection Ctrl+Alt+[ Move to start of an extended
selection.
End of Selection Ctrl+Alt+] Move to end of an extended
selection.
Top of Window Move to top of window.
Bottom of Window Move to bottom of window.
Word Left Ctrl+Left Move left by one word.
Word Right Ctrl+Right Move right by one word.
Word Fragement Left Move left by a word fragment.
A fragment is a section of
characters bounded by a
change in case or punctua-
tion. You can use this for
camel-case words, such as
"OpenFileCore"
Word Fragment Right Move right by a word frag-
ment.
Function Down Keypad + Move to next function defini-
tion.
Function Up Keypad - Move to previous function
definition.
Blank Line Down Move to next blank line.
Blank Line Up Move to previous blank line.
Paren Left Ctrl+9 Move to previous enclosing
parentheses.
Paren Right Ctrl+0 Move to next enclosing paren-
theses.
Blank Line Up Move to previous blank line.
Blank Line Up Move to previous blank line.
Block Up Ctrl+Shift+{ Move to previous { block level.
Block Down Ctrl+Shift+} Move to next { block level.
Go To Line F5,
Ctrl+G
Move to a specified line num-
ber.

Source Insight 4 User Guide 117
Scrolling and Selecting Text
Extending the Selection
These commands will create an extended selection or extend an existing selection. The keystrokes listed are
the defaults.
Search Ctrl+F Search for occurrence of a
pattern.
Search Forward F4 Search for next occurrence.
Search Backward F3 Search for previous occur-
rence.
Search Forward for
Selection
Shfit+F4 Searches for next occurrence
of the word under the cursor.
Selection History Ctrl+Shift+M Displays a list of your past
selections.
Table 3.11: Selection Commands
Command Key Description
Select All Hold down Ctrl and
click the mouse in the
selection bar at the
left.
Select the whole file.
Select Block Ctrl+- Selects the next small-
est enclosing set of
braces or parentheses.
Select Function Or
Symbol
Double-click in selec-
tion bar at the left of
edge of the window
Select the whole
enclosing symbol defi-
nition.
Select Char Left Shift+Left Extends selection to
the left by one charac-
ter.
Select Char Right Shift+Right Extends selection to
the right by one char-
acter.
Select Line Shift+F6 Selects whole line.
Select Line Down Shift+Down Extends selection
down a line.
Select Line Up Shift+Up Extends selection up
by a line.
Select Match Alt+= Selects up to the
matching brace,
parentheses, or quote
mark.
Select Sentence Shift+F7,
Ctrl+.
Selects whole sen-
tence (up to the next
period).
Select Word Shift+F5,
and
Double-click L. Mouse
Selects whole word.
Table 3.10: Cursor Movement Commands
Command Key Description

Scrolling and Selecting Text
118 Source Insight 4 User Guide
The Toggle Extend Mode command toggles Extend Mode on and off. When Extend Mode is on and you use a
movement command, such as Cursor Left, the current selection is extended in that direction.
See “Browsing and Analysis” on page 74.
Selection Shortcuts
Source Insight provides many short cuts for selecting meaningful objects within your source code.
Source Insight has a "selection bar" area in the left margin of each source file window. Many shortcuts involve
clicking in the selection bar.
Selecting Whole Words
Simply double-click on a word to select the whole word. You can drag out a selection in this mode to select
whole words.
Selecting Whole Functions or Symbols
To select a whole function, struct, or other type of symbol, simply double-click in the selection bar area of a
source file window. If you hold the mouse button down and drag, Source Insight will select whole functions
or symbols as you drag.
You can also use the Select Symbol command to select the symbol that encloses the current text selection.
The Symbol Window (on the left of the source file window) also can be used to select whole symbols. Double-
clicking on any entry in the list will select the symbol.
Select Word Left Ctrl+Shift+Left Extends selection to
include the whole
word on the to the
left.
Select Word Right Ctrl+Shift+Right Extends selection to
include the whole
word on the to the
Right.
Select To Shift+L. Mouse Extends the selection
to the current mouse
location. This is
assigned to the
mouse.
Select To Top Of File Shift+Home Selects up to the
beginning of the file.
Select To End Of File Shift+End Selects up to the end
of the file.
Select To End Of Line Selects up the end of
the current line.
Toggle Extend Mode When on, movement
keys extend the selec-
tion.
Table 3.11: Selection Commands
Command Key Description

Source Insight 4 User Guide 119
Scrolling and Selecting Text
Selecting Matching Parentheses and Blocks
To select to the matching brace or parentheses, double-click on any parentheses, square brace, curly brace,
or double-quote mark. Source Insight selects up to its match. The Select Match command (Alt+equal) also
selects up to the matching brace or parentheses.
Selecting the Enclosing Block
The Select Block command (Ctrl+minus) selects the enclosing block. An enclosing block is one that is sur-
rounded by either a parentheses, square brace, or curly brace. If you repeat this command, it will select the
next outer-most block.
Selecting a Whole Line
To select a whole line of text, simply click in the selection bar. A whole line of text will be selected. If you hold
the mouse button down and drag, whole lines will be selected. The Select Line command (Shift+F6) also
selects a whole line.
Selecting the Whole File
To select the whole file, hold down the Ctrl key and click the mouse in the left margin. Or, use the Select All
(Ctrl+A) command.
Selecting a Paragraph of Text
For files that do not have a language parser attached (See “File Type Options” on page 213), you can double-
click in the selection bar to select a whole paragraph of text.
A paragraph is defined as a group of text lines surrounded by blank lines.
Selecting Between Lines
Source Insight allows you to select in between lines by providing a wedge shaped cursor when the cursor is
near the start of a line and slightly above or below it. When you click at that point with the mouse, Source
Insight selects the space between the lines. If you start typing, Source Insight automatically inserts a line
break first. This is a handy way to insert a new line.

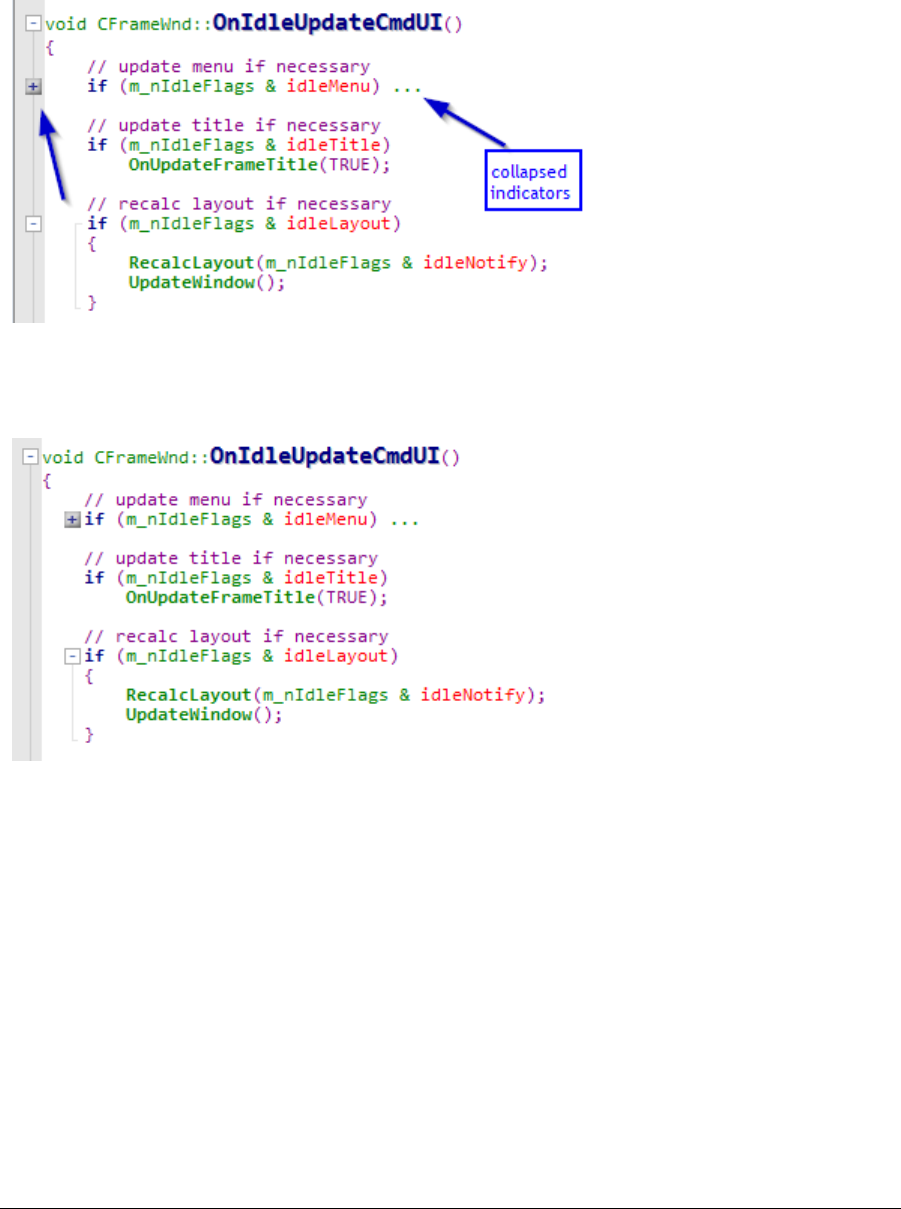
Source Insight 4 User Guide 121
Outlining and Collapsing Text
Outlining and Collapsing Text
Source Insight can collapse blocks of source code using "outline" commands and collapse and expand but-
tons in the left margin or optionally indented with the code. The following shows outline buttons in the left
margin and a collapsed if statement.
You can control whether outline controls are visible, and whether they are in the left margin or indented by
selecting Options > Preferences: Windows and choosing outline options. See “Window Options” on page 369.
Here is the same piece of code with the outline buttons indented with the code:
You can also select any lines and use the Collapse command to collapse them, regardless of the code block
nesting structure. You can invoke Collapse by right-clicking in the left margin and selecting it in the menu.
Potential Outline Points
When Source Insight parses your file, it identifies potential lines that could be collapse. It displays outline
buttons near data structures such as structs and classes, and code blocks such as functions, if statements,
for statement, switch statements, and case labels. It also displays outline buttons near #ifdef and #pragma
region statements.

Outlining and Collapsing Text
122 Source Insight 4 User Guide
Outline Toolbar
Buttons
1. Toggle Expansions - toggles expansion of the selected outline region.
2. Expand All - expands all blocks that can be expanded.
3. Collapse All - collapses all major blocks that can be collapsed, such as functions.
4. Show Outlining - turns outline views on and off in the current file.

Source Insight 4 User Guide 123
Code Beautifier
Code Beautifier
Source Insight has a code beautifier that works with C/C++, C#, Java and other language files that have simi-
lar curly-brace syntax.
There are several different code formatting presets, and you can save additional presets. To access all the
presets, or to use a preset, select Tools > Reformat Source Code Options. The preset you select in this dialog
box becomes the current preset.
To reformat a file using the currently selected preset, select Tools > Reformat Source Code with xxx Preset.
Note: xxx will be changed to the name of the currently selected preset.
To reformat a whole file, select an insertion point anywhere in the file and select Tools > Reformat Source
Code with xxx Preset. To reformat only selected lines, select the lines you want to reformat first.
See “Reformat Source Code Options” on page 288.
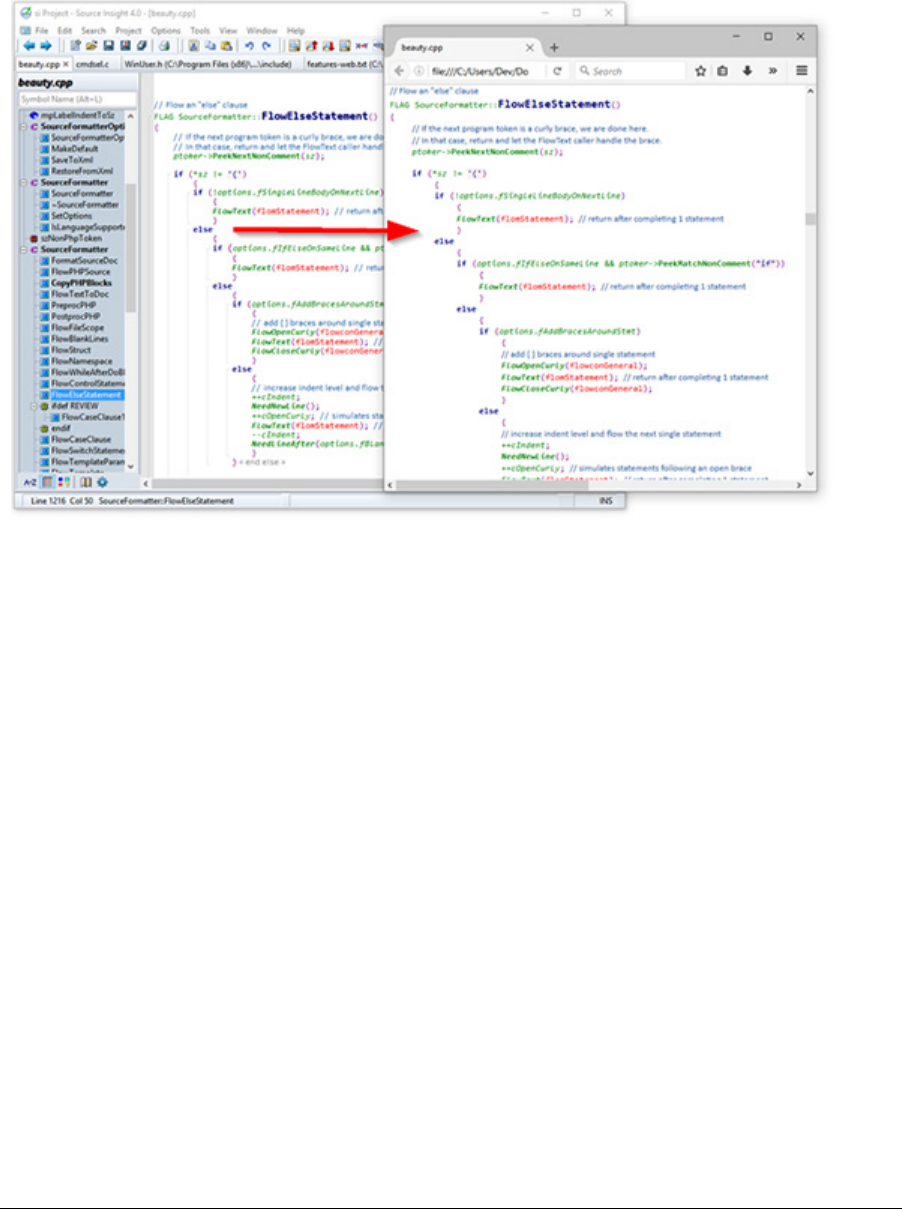
Generating HTML from Project Sources
124 Source Insight 4 User Guide
Generating HTML from Project Sources
The Project > Export Project to HTML command generates HTML versions of your source files. It creates a
snapshot of your source code project that can be viewed with a web browser for online browsing and refer-
ence.
The resulting HTML files will look a lot like the source files displayed inside of Source Insight. The HTML files
will retain most of the syntax formatting. Identifiers that appear in the source code will have hyperlinks to
definitions.
See “Export Project To HTML” on page 204.

Source Insight 4 User Guide 125
File Encodings
File Encodings
Source Insight can load and save files using different character encodings. By default, Source Insight uses
UTF-8 (Unicode) encoding.
Encoding Basics
Characters in files are stored using a character encoding scheme. Examples are:
•ASCII
•Shift-JIS is a character encoding for the Japanese language
•Chinese Big5 is a character encoding for traditional Chinese characters
•Unicode encodings
Non-Unicode encodings use code pages, which are tables containing character sets designed for encoding a
particular set of glyphs.
Unicode was developed as a unifying encoding that could encode all characters. However, Unicode itself can
be encoded in several flavors, such as UTF-8, UTF-16, and UTF-32.
Note: For more information on character encodings, please visit:
https://www.w3.org/International/articles/definitions-characters/
Unfortunately, the code page encoding used in a file is not saved with the file. Therefore, it is possible to open
a file assuming the wrong encoding. If you open a file with the wrong encoding, you will probably observe
some characters are incorrect or look garbled. You can use the File > Reload As Encoding command to reload
the file with the correct encoding.
Another problem with code pages is that characters are not guaranteed to map between code pages, which
could lead to files being corrupted. It is best to use a Unicode encoding to avoid those problems.
Programmers are encouraged now to use UTF-8 encoding. Most web browsers and programming tools sup-
port UTF-8, and UTF-8 supports a super-set of other regional encodings.
Encoding Is Associated with File Buffers
Once you load a file with a specific encoding, that encoding type is associated with the file buffer as long as
Source Insight keeps the file open. The encoding type is also stored in the session workspace so that it is pre-
served between Source Insight sessions. However, if you close a file, and then open it again, the default
encoding will be used.
Changing the Default Encoding
Source Insight uses UTF-8 (Unicode) encoding by default when you first install it. However, if you typically
work with files that use a different encoding, such as Japanese Shift-JIS, or Chinese (Big5), then you should
change the default encoding.
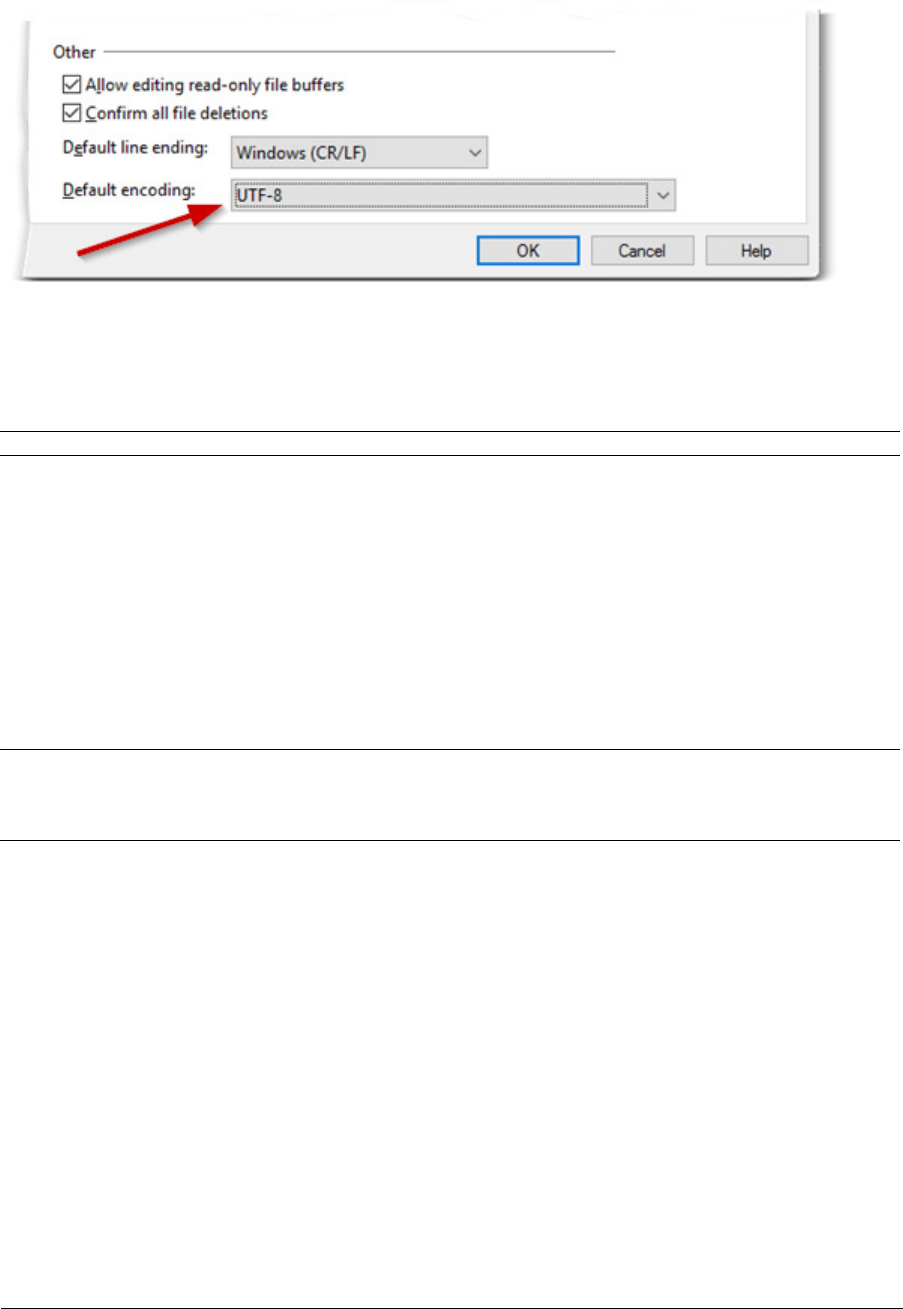
File Encodings
126 Source Insight 4 User Guide
To change the default encoding, select Options > Preferences: File, and change the setting for Default encod-
ing. See “File Options” on page 208.
The default encoding setting from the File Preferences is used to interpret files when you open them. It is also
used when you create a new file buffer (using File > New) and save the buffer the first time.
If you open a file that has an explicit UTF signature, known as a Byte-Order-Mark (BOM), then the UTF format
is used instead of the default. You can override this by using the File > Reload As Encoding command.
Note: Source Insight performs slightly faster if you set the default encoding to "UTF-8" or "UTF-8 with BOM".
Reloading a File With a Different Encoding
If you opened a file and the encoding looks incorrect, then you probably need to reload it with a specific
encoding. This can happen if the default encoding is set to something other than the encoding used by the
file. Unfortunately, the encoding scheme used in a file is usually not saved with the file. Therefore, it is possi-
ble to open a file assuming the wrong encoding.
To reload a file that is already open, and use a different encoding, select File > Reload As Encoding. Select the
encoding and click the Load button. If you edited the file before reloading it, Source Insight will ask you to
save the file first, because reloading the file with a new encoding will wipe out your changes, and it is not
undo-able. See “Reload As Encoding” on page 302.
Note: If you want to reload a file that you made changes to, and you want to keep your changes, do NOT save the file
back over itself, because that will overwrite the file and could corrupt it. Instead, save it to a new file by select-
ing File > Save As Encoding, and pick the UTF-8 format. After you reload the original file, you can compare the
differences between the files and merge your changes back.
Once you load a file with a specific encoding, that encoding type is associated with the file buffer as long as
Source Insight keeps the file open. The encoding type is also stored in the session workspace so that it is pre-
served between Source Insight sessions. However, if you close a file, and then open it again, the default
encoding will be used.
Opening a File With a Different Encoding
If a file is not currently open, and you want to open that file with a specific encoding, select File > Open As
Encoding. Select the encoding and click the Open button to select the file. See “Open As Encoding” on
page 264.
This is used to open a file that is not already open. If the file is already open, you should use File > Reload As
Encoding.

Source Insight 4 User Guide 127
File Encodings
Saving a File With an Encoding
To save a file with a different encoding, select File > Save As Encoding. Select the desired encoding, then click
the Save button. See “Save As Encoding” on page 318.
Saving files using Unicode (such as UTF-8) is the best practice to avoid corruption due to incorrect decoding
or encoding going forward. For example, if you load a file encoded with one code page, and save it using a dif-
ferent code page, that could corrupt your file because some of the characters won’t map to characters in the
new code page. However, if you save using a Unicode encoding, the characters will be mapped correctly.
UTF-8 is the preferred encoding in Source Insight because there is less conversion required to open and save
files.
If you opened a file and it looks like text is garbled and it loaded with the wrong encoding, do NOT save the
file again using Save As Encoding. That will overwrite the file and potentially change it. Instead, select File >
Reload As Encoding. See “Reload As Encoding” on page 302.
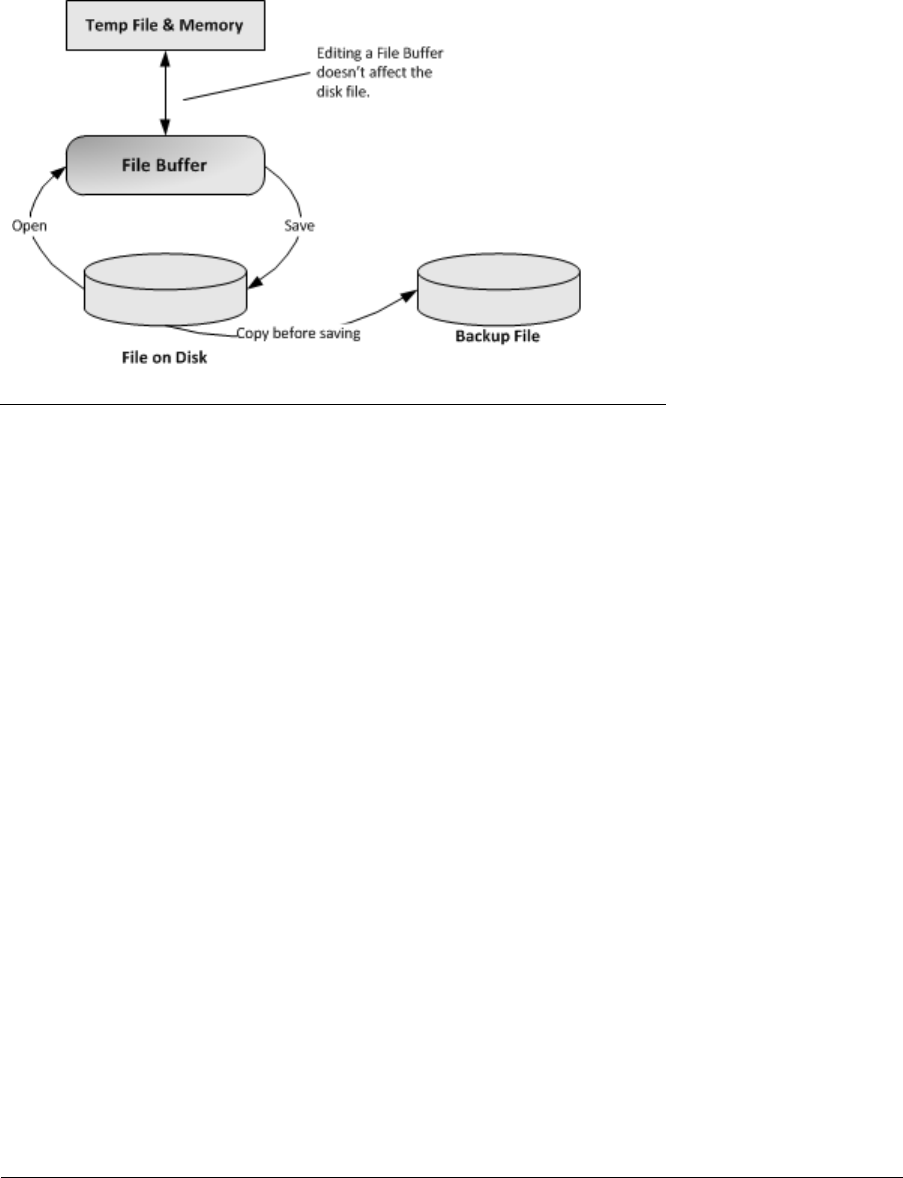
File Buffer Basics
128 Source Insight 4 User Guide
File Buffer Basics
A file buffer is the temporary image of a file that you can edit in a source file window. All edits are recorded in
this temporary file buffer until a file is saved.
The File > Save command writes the file buffer contents back over the original file. This is the only time the
original file is changed.
Figure 3.17 Open and Save operations.
Backup Files
Source Insight makes a backup copy of a file the first time you save the file after opening it. If you open a file
and save it ten times, you will still only get one backup file. If you close and reopen file, or start a new Source
Insight session, a new backup will be saved when you save the file again.
Opening a Backup File
To open a backup version of the current file, select File > Open Backup File. See “Open Backup File” on
page 266.
Saving a New Backup File
Normally you don’t need to save your own backup files because they get created automatically when you
save files. However you can use the Save New Backup File command to take a snapshot of the current file
buffer and save it as a new backup file. The new backup is added to the existing backup files in the Backup
folder.
To open a backup version of the current file, select File > Open Backup File. See “Open Backup File” on
page 266.
Backup Folder Location
Backup files are stored in the Backup folder of the current project. You can edit the Backup folder location by
using Project > Project Settings.
Backup File Names
Backup files are given a unique name based on the original file name. For example if the original file name is
render.c
, then the backup name will be something like
render(1066).c
where the
(1066)
part is a random
value to make the file name unique in the Backup directory.

Source Insight 4 User Guide 129
File Buffer Basics
Comparing a File with a Backup Version
To compare the current file with a backup version of the same file, select Tools > Compare With Backup File.
See “Compare with Backup File” on page 176.
Backup Options
You can set options for backup files by selecting Options > Preferences: Files. See “File Options” on page 208.
The following options control backup files:
Checkpointing Files
The File > Checkpoint command saves the current file to disk and erases its change history and undo history.
You can think of this as a "clean" save operation. It has the same effect as saving the file, closing it, and open-
ing it again.
After using Checkpoint, you will not be able to undo any prior changes. Checkpoint also re-arms the file
backup feature so that when you save it again, a new backup file is made.
Reloading and Restoring Files
To reload a file, use the Reload File command. This loads the file from disk again, losing all undo information.
It’s exactly like closing the file, then opening it again. You cannot use Undo to undo any prior changes.
To restore a file to its original state when you first opened it, use the Restore File command. This loses all
changes you made since you first opened it. It does not reload the file from disk. It returns the file to the way
it looked when you first opened it. You can use Undo to undo the Restore File operation.
To open an older version of your file, use the File > Open Backup File command to pick a backup file and load
it. The backup file will open in a new source file window and won’t alter the current file.
Time stamping
Source Insight records each source file's signature in the project database. The signature is composed of the
file’s modification date, plus the file’s size. If you open a source file later and the file's signature differs from
what is in the project database, then Source Insight will re-synchronize the project symbol database for that
file. By automatically synchronizing, you or others in your development team can use another text editor or a
source control system and still maintain Source Insight's project databases. See “Synchronize Files” on
page 351.

Recovering From Crashes
130 Source Insight 4 User Guide
Recovering From Crashes
Your unsaved edits are saved periodically in the background to a temporary recovery file. This saving process
is very fast and you will usually not notice that anything is being done. You will not be interrupted. Note that
Source Insight does use an automatic-save style of protection, because the recovery file is much more effi-
cient.
The recovery file actually only contains pointers to other files. Therefore, it is small and fast to write out. By
saving edits incrementally to the recovery file, Source Insight insures you against a system failure, power out-
age, or crashes. Source Insight will recognize when a recovery needs to be done the next time you run it.
You can set how often the recovery file is saved in the Options > Preferences: General dialog. The default
value is every 15 seconds. If you make the recovery time smaller, the recovery file is updated more often. If
you make it too long, you will be able to do many changes to your files without the changes being recorded in
the recovery file. The recovery save process is usually quick, so you should the keep the period as short as
possible.
Recovery Procedure
If you have been editing and a crash occurred before you could save your files, then simply run Source Insight
again. Source Insight will know that there were outstanding changes to your files because it will find
orphaned recovery files. A dialog box will come up and indicate that a previous session with Source Insight
did not end normally. At that point, you have three options.
•Click the Recover button. Source Insight will proceed to recover all files previously opened. After
recovery, your session should look the same as it was the last time the recovery file was synchronized.
All unsaved edits should still be present.
(or)
•Click the Continue button. Source Insight will continue to start as though no recovery were done. You
will not be able to recover after continuing.
(or)
•Click the Quit button. Source Insight will quit immediately without attempting recovery. If you run
Source Insight again, it will still be able to do the recovery if you want to.
When a recovery is performed, Source Insight will resume as though you were in the middle of an editing ses-
sion. All the previously opened files will still be open and any edits you made will still be there. After the
recovery, you can continue to edit normally, or you can quit and save each file that had changes. Use File >
Save All to save all recovered files.
Note: Before a recovery can take place, the recovery system requires that the original files you had open previously
must still exist, and be unchanged since Source Insight opened or saved them. If you need to perform a recov-
ery, you should do it right away, before any of the original files are modified.
Warnings
Verify the results of a recovery before saving.
Source Insight's recovery system is very good, however, no recovery system can be foolproof. There are
always windows of vulnerability. If a recovery is needed, it is probably due to unusual circumstances, such as
a hardware failure, a power failure, a bug in a program that you spawned from Source Insight, or a bug in
Source Insight. Whatever the reason, it is still a good idea for you to scroll through each recovered file to see
that everything looks intact before you actually go ahead and save the files. If Source Insight's recovery file
was damaged or not written entirely, or the failure occurred while the recovery file was being updated, then
Source Insight may unwittingly trash your file while it thought it was recovering it.

Source Insight 4 User Guide 131
Recovering From Crashes
If you find that the recovery didn't work correctly, do not save the file. Close the file without saving it. The
original, unsaved file will still be intact, although without your last changes saved. Also, the backup feature
probably made a recent backup of your file in the Backup folder.

Command Line Syntax
132 Source Insight 4 User Guide
Command Line Syntax
Source Insight's command line has the following syntax:
sourceinsight4 [-option] [ [+linenumber file] [+file] [file] [symbolname] ]
Optional parameters are shown here inside […] brackets. Any number of options, files, and symbol names
may be given on the command line.
Each option given on the command line must be preceded by a dash (-) or a forward slash (/).
Specifying File Arguments
Each "file" argument may be one of the following types:
•A regular file name. If more than one file exists with that name, then a list will be shown and you will be
able to pick the exact file.
•A symbol name. Since Source Insight treats file names as symbols, each file argument can be more
generally thought of as a symbol. Source Insight will open the file where the symbol lives and jump to
its location. You may specify any number of symbols. If the symbol name conflicts with file names
(without extensions), or with other symbols, then a list will be shown and you will be able to pick the
exact symbol instance.
•The name of a workspace file, including the .siwork extension. Source Insight will open all the files
contained in the workspace.
Opening Files
On the Source Insight command line, you can specify files following the options. Each file name may be
optionally preceded by a plus sign (+) and a line number. If this is done, the file will be displayed with that line
number visible.
For example:
sourceinsight4 +100 file.c
This will open
file.c
and position the file so that line 100 is visible.
Opening an Additional File
Each file name may be optionally preceded with a plus sign (+) only. In this case, the file is opened along with
the other files in the current workspace.
For example:
sourceinsight4 +file.c
This will open
file.c
along with all the files previously open in the current workspace.
If one or more files are specified on the command line without the plus sign prefix, then the files previously
open in the current workspace are not opened. Instead, only the files specified on the command line are
opened.
For example:
sourceinsight4 file.c other.c
This will open only
file.c
and
other.c
. The previously opened files in the current workspace are not
opened.

Source Insight 4 User Guide 133
Command Line Syntax
Jumping to a Symbol Definition
If you specify a symbol name that does not happen to conflict with a file name, then Source Insight will open
the correct file and jump to the definition. For example:
sourceinsight4 OpenTcpPort
This will open the file containing OpenTcpPort and jump to its definition. You can combine multiple symbols
on the command line.
How a File is Located
When a relative file name path is given on the command line, Source Insight first tries to find the file relative
to the directory that you started Source Insight in. If it can't find the file and a project is open, it looks for the
file in the project's file list.
In other words, you can start Source Insight in any directory and give it a file name, and if the file is in the cur-
rent project, Source Insight should find it. If there happens to be a file with the same name in the startup
directory (or relative to it), then Source Insight will open that file.
Opening Workspaces
In addition to regular text files, you may also specify the name of a workspace file for Source Insight to open.
For example:
sourceinsight4 myset.siwork
This will open all the files in the workspace file myset.siwork.
Any number of workspace file names may also be intermixed with regular file names.
For example:
sourceinsight4 +100 file.c myset.vw print.c myset2.siwork
This will open both the files and the workspace files.
Command Line Options
The following options may be included on the Source Insight command line.
Suppressing New Program Instances
-i <rest of command line>
This option will direct the rest of the command line to an already running instance of Source Insight, if any. If
there are no instances already running, then a new instance is started.
Example:
sourceinsight4 –i myfile.cpp
This will locate an already running instance of Source Insight, and tell it to open myfile.cpp.
Always Starting a New Program Instance
-ni <rest of command line>
This option will start a new instance of Source Insight, even if one is already running.
Example:
sourceinsight4 -ni myfile.cpp
Normally, if you invoke Source Insight with one or more file name on the command line, and another
instance of Source Insight is already running, then the files will open in the existing instance of Source
Insight. A new Source Insight instance is not launched. This option forces a new instance to launch.

Command Line Syntax
134 Source Insight 4 User Guide
Running a Source Insight Command
-c <command-name>
This option will start Source Insight, and run the specified command. The command can be a built-in com-
mand, or a defined custom command, or a macro command.
To invoke a macro command, use the name of the macro function, but do not include parentheses. There is
no way to pass parameters to a macro function from the command line. For example:
sourceinsight4 -c MyMacroFunction
Specifying a Project to Open
-p <project-name>
This option closes the current project, if any, and opens the project given in
project-name
. If the project
does not exist, Source Insight will give an error message.
Example:
sourceinsight4 -p myproj
Closing the Current Project
-pc
This option closes the current project if one is open. No other project is opened.
Example:
sourceinsight4 -pc
Using a Temporary Project
-pt <projectname>
This option closes the current project, if any, and opens the project given in
projectname
. Unlike the
-p
option, the next time you run Source Insight, the old current project is opened. This is useful if you want to
put a Source Insight command in a batch file, but don't want the current project to be changed.
Example:
sourceinsight4 -pt mail
Finding a Symbol
-f <symbol_name>
This option locates the symbol given in
symbol_name
, opens that file, and positions the insertion point on
the symbol. If the symbol can't be found, Source Insight will give an error message. This is unlike specifying
a symbol in place of a file name because this explicitly tells Source Insight that you are looking for a parsed
symbol, not a file.
Example:
sourceinsight4 -f DoIdle
Synchronizing Project Files
-u
This option updates all project files right away when Source Insight starts. It is exactly like using the Synchro-
nize Files command on the Project menu.
Example:
sourceinsight4 -u
Synchronizing Files in Batch Mode
-ub
This option is like -u except that Source Insight quits after the files are updated. This is useful for putting a
command in a batch file to synchronize Source Insight projects.

Source Insight 4 User Guide 135
Command Line Syntax
Example:
sourceinsight4 –ub
Suppressing the Splash Screen
-s
This option turns off the Source Insight splash screen that normally appears when starting up.
Comparing Files
-d <file1> <file2>
This option open the File Compare window and compares the two given files. See “File Compare” on
page 205.
Resetting All Settings
-reset
This option tells Source Insight to reset all optional settings: the configuration, the layout, and any session
information. You will be prompted and asked which things you want to reset.
Resetting Configuration Options to Defaults
-reset-config
This option tells Source Insight to reset all optional settings in the configuration. This includes things like the
color settings, styles, key bindings, and all options set on the Options menu.
Resetting the Display Layout
-reset-layout
This option tells Source Insight to reset the window layout to defaults.

User-Level Commands
136 Source Insight 4 User Guide
User-Level Commands
A command is a user-level operation that Source Insight performs when you select a menu item or type a
keystroke. For example, the File > Open command opens a file, and Ctrl+S invokes the File > Save command.
Each command has a name, and an action.
You can assign commands to menus, keystrokes, and mouse clicks, and those assignments are saved with
the current configuration. You can assign a keystroke to a command with Options > Key Assignments. You
can assign a command to a menu with Options > Menu Assignments. See “Key Assignments” on page 239,
and “Menu Assignments” on page 261.
User-level commands can also be implemented by Source Insight macro functions. See “Macros as Com-
mands” on page 375.
You can also define custom commands, which are useful for launching a compiler and other external tools
from Source Insight. See “Custom Commands” on page 137.

Source Insight 4 User Guide 137
Custom Commands
Custom Commands
A command is a user-level operation that Source Insight performs when you select a menu item or type a
keystroke.
In addition to the commands that are built into Source Insight, you can define custom commands. Custom
commands are similar to shell batch files. They execute external command-line programs and Windows GUI
programs. Source Insight allows custom commands to execute in the background. The output of custom
commands can be captured into a file for editing, or can be pasted into the current selection.
To define or edit custom commands, select Tools > Custom Commands. Once defined, a custom command is
like any other command. It can be assigned to a menu or a keystroke can be assigned to it. Custom com-
mands are saved in the current configuration.
Custom commands are useful for launching a compilation. By having a custom command that runs the com-
piler or make program, you can capture the compiler error messages and have the errors parsed and have
source links pointing to the erroneous source code automatically.
You can also implement a variety of text filters using custom commands. For example, you could define a
Sort custom command that runs a sort filter and pastes the output back over the current selection.
See also: “Custom Commands” on page 183, “Key Assignments” on page 239, and “Menu Assignments” on
page 261.

Customized Settings and Configurations
138 Source Insight 4 User Guide
Customized Settings and Configurations
You can customize many aspects of Source Insight, such as the color of the screen and the assignments of
keystrokes to commands. This collection of options is stored in a configuration file.
Note: Layouts are another type of settings file you can save and load. Layouts contain window arrangements. See
“Saving Window Arrangements with Layouts” on page 146.
The current configuration is loaded and saved automatically, but you can save and load configuration files
directly using the Options > Save Configuration and Options > Load Configuration commands. You can also
save or load individual parts, such as just key assignments.
By default, all your customizations are saved in a file called
config_all.xml
, stored in the Source Insight
user data directory. This is a global configuration file that applies no matter what project is open.
Customizing the Keyboard and Menus
A command is a user-level operation that Source Insight performs when you select a menu item or type a
keystroke. For example, the Open command opens a file; the Save command saves a file. Each command has
a name, and an action.
Commands are resources that can be assigned to menus, keystrokes, and mouse clicks, and those assign-
ments are part of a configuration.
Source Insight also lets you define custom commands, which are useful for launching the compiler and other
external tools from Source Insight.
See “Custom Commands” on page 137.
Assign keys to a command with Options > Key Assignments.
Keystrokes and mouse clicks are assigned to commands. For example, the Ctrl+O keystroke is assigned to the
Open command. More than one keystroke may be assigned to a given command. Use the Options > Key
Assignments command to customize the keyboard. See “Key Assignments” on page 239.
Assign commands to menus with Options > Menu Assignments.
Commands are assigned to menus. For example, the Open command is assigned to the File menu. Use the
Options > Menu Assignments command to customize the contents of the menus. See “Menu Assignments” on
page 261.
Changing Screen Colors and Appearance Options
There are several screen color options in Source Insight, and options that control appearance.
Changing the Visual Theme
To quickly change the visual theme, select Options > Visual Theme and choose a theme. You can also change
and define new themes. See “Visual Themes” on page 144.
Changing Color Settings
To change screen colors for the main application window and various display elements, use the Options >
Preferences: Color command. See “Color Options” on page 172.
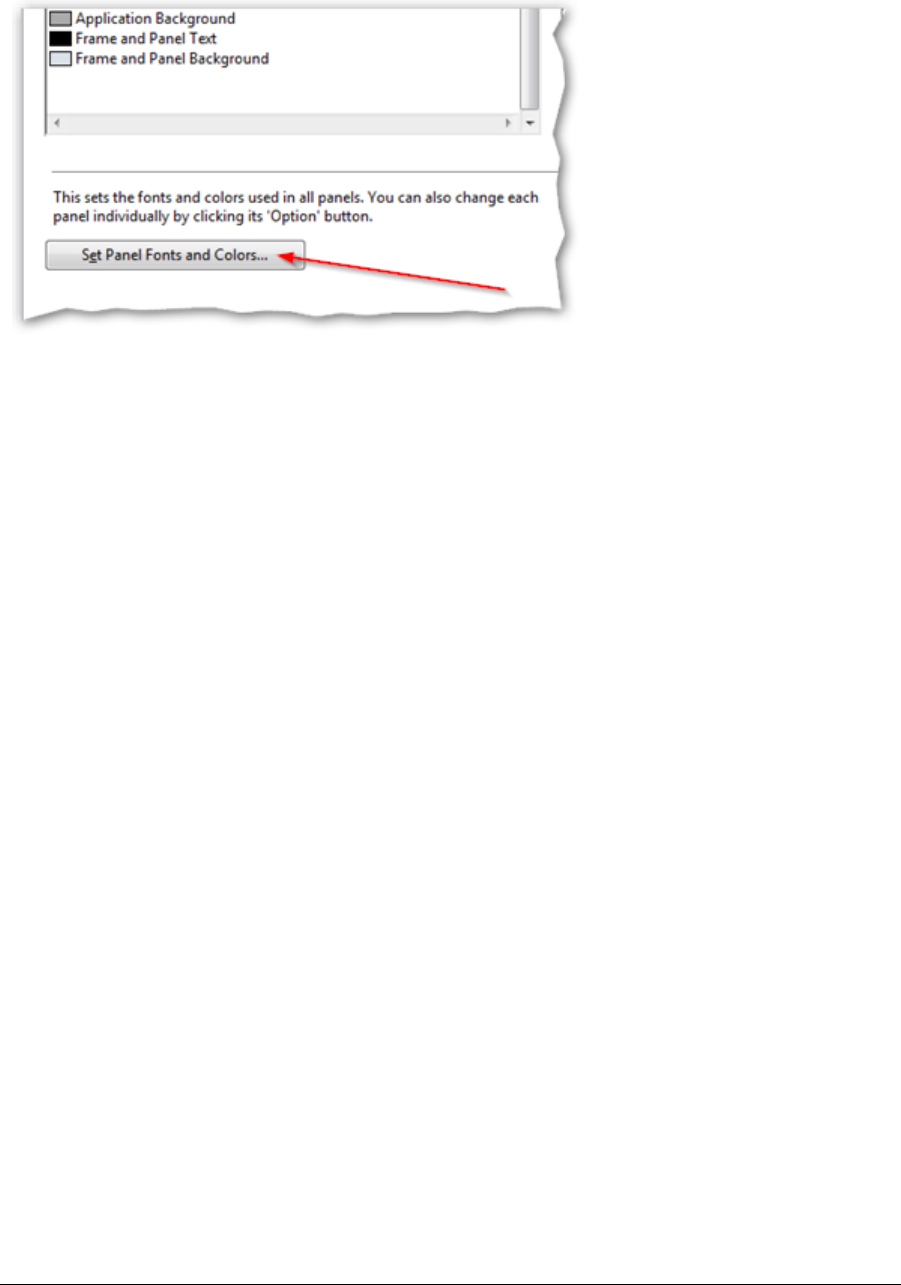
Source Insight 4 User Guide 139
Customized Settings and Configurations
Each panel window has its own font and color settings. Edit the settings and select the desired fonts and col-
ors in all panels. A quick way to set them all at once is to use the Options > Preferences: Color & Fonts tab and
click the Set Panel Fonts and Colors button.
Changing the Appearance of Source Code
Source Insight has many display options for formatting source code.
To fine-tune options about how syntax elements are formatted in general, select Options > Preferences: Syn-
tax Formatting, and Options > Preferences: Syntax Decorations.
See “Syntax Decorations” on page 352.
See “Syntax Formatting” on page 355.
To change the appearance of syntax elements, such as how delimiters are styled, or how declarations appear,
select Options > Style Properties. This controls the colors, fonts, font sizes, and other styling applied to these
elements. See “Style Properties” on page 342.
Changing Various Options
The Options > Preferences dialog specifies many of the program options. This multi-page dialog box contains
several tabs for various types of options, such as Display, Files, and Syntax Formatting. See “Preferences” on
page 273.
The Configuration File
Source Insight maintains a configuration file called
config_all.xml
, stored in the Settings subdirectory of
your Source Insight user directory. (Typically
Documents\Source Insight 4.0\Settings
.) You don't need
to load or save this file yourself. That is done automatically. It is saved whenever you make any change to a
configuration setting.

Customized Settings and Configurations
140 Source Insight 4 User Guide
Configuration files contain multiple parts for different types of options. Here are some of the things stored in
the configuration:
•Preferences - The Preferences command sets a variety of user options, such as file handling, display
options, and language support.
•File Types - The File Type Options command defines and changes file types. File types let you govern
Source Insight's behavior depending on the name or extension of each file.
•Key Assignments - The Key Assignments command remaps the keyboard in Source Insight. Each com-
mand in Source Insight is listed in this dialog box and each command can be given a keystroke or
mouse button shortcut.
•Menu Assignments - The Menu Assignments command customizes the Source Insight menu bar. Each
command in Source Insight is listed in this dialog box and each command can be put on any menu.
When you make changes to your settings via a dialog box setting, or load new configurations, the configura-
tion file on disk is updated too.
The
config_all.xml
file contains sections for each part of the configuration. When you load or save a con-
figuration file, you can specify what parts are loaded or saved.
Each user that logs in and runs Source Insight gets a user data directory inside the
Documents\Source
Insight 4.0
folder. Therefore, each user on a particular machine will have their own preferences stored
separately.
Note: It is wise to keep a backup copy of your global configuration file, which will end up containing all your customi-
zations. Once you use the Load Configuration command, or make a change to the customization settings inside
Source Insight, the configuration file will be changed automatically.
It is also a good idea to make a backup copy if you update your Source Insight software. Often, newer builds of
Source Insight will be compatible with older configuration files, but not the other way around. If you should
wish to revert to an older build of the software, it is best to use an older configuration file.
Configuration Master File
A special file named
config_master.xml
specifies where the various configuration parts come from. It is
stored in your Source Insight user directory in the Settings sub directory. It gets created the first time you run
Source Insight. Normally it does not need to ever change after that.

Source Insight 4 User Guide 141
Customized Settings and Configurations
A typical
config_master.xml
file looks like this:
<?xml version="1.0" ?>
<SourceInsightMasterConfiguration
AppVer="4.00.0010"
AppVerMinReader="4.00.0008"
>
<Options
OverrideWithFile="config_all.xml"
ProjectDir="Projects"
BackupDir="Backup"
ClipsDir="Clips"
/>
<ConfigurationParts>
<GeneralPreferences file="config_general.xml" />
<DisplayPreferences file="config_display.xml" />
<EditingPreferences file="config_editing.xml" />
<SyntaxFormatting file="config_syntaxformatting.xml" />
<SyntaxDecorations file="config_syntaxdecorations.xml" />
<DisplayColors file="config_displaycolors.xml" />
<FilePreferences file="config_fileprefs.xml" />
<LookupPreferences file="config_lookupprefs.xml" />
<Menus file="config_menus.xml" />
<Keymaps file="config_keymaps.xml" />
<CustomCommands file="config_customcommands.xml" />
<DocumentTypes file="config_documenttypes.xml" />
<Styles file="config_styles.xml" />
<Ftp file="config_ftp.xml" />
<RemoteAccess file="config_remoteaccess.xml" />
<ProjectSync file="config_projectsync.xml" />
<ProjectDefaults file="config_projectdefaults.xml" />
<Logging file="config_logging.xml" />
<Languages file="config_languages.xml" />
<Search file="config_search.xml" />
<Toolbars file="config_toolbars.xml" />
<PrintPageSetup file="config_pagesetup.xml" />
<ProjectReport file="config_projectreport.xml" />
<SymbolPane file="config_symbolpane.xml" />
<ImportLibs file="config_importlibs.xml" />
<SourceFormatter file="config_sourceformatter.xml" />
</ConfigurationParts>
</SourceInsightMasterConfiguration>
Storing All Settings in One Configuration File
An important option in config_masterl.xml is in the
Options
section: an attribute named
OverrideWith-
File
. If this value points to a file, then ALL the configuration parts are maintained in that single file. This is
the simplest arrangement, and it is the default setting.
Storing Configuration Parts in Separate Files
If you prefer to store different parts of the configuration in several files, set the
Option
attribute
Override-
WithFile
to an empty string. Then the
ConfigurationParts
XML element is used.
The
ConfigurationParts
element contains elements for each configuration part. In each part, the value of
the
file
attribute is the file that will contain the given configuration part. For example, Menu settings could
be maintained in "config_menus.xml".
Project-Specific Configuration Parts
You may want to have some configuration part be specific to each project. In this case, the configuration part
file is stored along with either your project's source code, or the project's data directory.

Customized Settings and Configurations
142 Source Insight 4 User Guide
Any configuration part file attribute can be prefixed with the following tags:
Grouping Configuration Parts into Files
You can group more than one configuration part in a file by specifying the file in multiple configuration part
file attributes. For example, you could save the Menus and Keymaps configuration parts in a single file
named
config_menu_keymap.xml
with these attributes:
<ConfigurationParts>
....
<Menus file="config_menu_keymap.xml"/>
<Keymaps file="config_menu_keymap.xml"/>
....
</ConfigurationParts>
Loading a Configuration
Use the Options > Load Configuration command and select a new configuration file to be loaded. This com-
mand loads either the entire configuration contents, or only a specified subset of the configuration, such as
just the menu contents. See “Load Configuration” on page 251.
Importing Configuration Settings from Version 3
Source Insight looks for an older version when you first install and run it. If it finds an old configuration file, it
will prompt you to import the settings.
To import version 3 configuration settings at any time, select Options > Load Configuration, and navigate to
your version 3 configuration file. It is usually stored here:
C:\Users\<user-name>\Documents\Source Insight\GLOBAL.CF3\
where C: is your system drive letter, and <user-name> is the account user name.
Saving a Configuration
Use the Options > Save Configuration command to save the contents of the current configuration to any
other configuration file. By saving configuration files, you can create several customized versions of Source
Insight, with each one having different menus, keystroke assignments, screen colors, and more. The Save
Configuration command can also save a specified subset of the current configuration.
Source Insight automatically saves any option changes you make, so you normally would not need to use the
Save Configuration command. See “Save Configuration” on page 319.
Prefix Tag File Location Example
project_source:
Points to the directory where your proj-
ect's source files are. You can see and
edit this path in Project > Project Set-
tings.
project_source:config_keymaps.xml
project_data:
Points to the directory where your proj-
ect's data files are maintained. This is
specified when you first create your
project.
project_data:config_menus.xml

Source Insight 4 User Guide 143
Customized Settings and Configurations
Resetting the Configuration to Defaults
There are a couple ways to reset all the configuration settings to the factory defaults:
•Select Options > Preferences: General and click the Use Defaults button. Or,
•From the command line, use the -reset-config option. For example:
sourceinsight4.exe -reset-config
When you reset the configuration, your previous configuration settings are backed up into another file in the
Setting folder. You can use the Options > Load Configuration command to reload it.

Visual Themes
144 Source Insight 4 User Guide
Visual Themes
A visual theme is a snapshot of user interface color settings and syntax formatting style properties.
You can quickly change the color and look of Source Insight by changing the current visual theme. To select
and apply a new theme, select Options > Visual Theme > theme name.
You can also create new themes. When you define a theme, you are recording the colors and fonts used in
various user-interface items and panels, along with the syntax formatting styles.
Some predefined themes come with Source Insight. For example, there is a theme called "Black" that
switches to light text colors on a black background.
To manage themes, select Options > Visual Theme > Manage Visual Themes. You can define new themes,
redefine themes, as well as import and export themes. See “Manage Visual Themes” on page 258.
Inside a Theme
A visual theme is a collection of font and color settings. It contains:
•Colors of user interface elements (from Options > Preferences: Color & Fonts)
•All panel fonts and colors. Note that each panel can have its own color and font settings.
•Styles properties which are used for syntax formatting in source windows
When you define a theme, you can choose any or all of the above to be saved as part of the theme. Loading a
theme will apply the components contained in the theme and leave the rest alone. So for example you could
define a theme that only changes panel colors.
Color Interactions
It’s important to pick colors and styles that work well together. The color of user interface elements, such as
the Window Background color and Default Text color, can effect the readability of text formatted with some
styles. For example, if you set the Window Background color to black, and you have a style that uses a black
text color, then text in that style will not show up.
Therefore, you need to make sure the colors and style colors work in concert. That is why themes are
designed to bundle style settings with other color settings.
Applying a Theme
To select and apply a new theme, select Options > Visual Theme > theme name. You can also apply a theme
by selecting Options > Visual Theme > Manage Visual Themes, then picking a theme to apply.
When a theme gets applied, the theme properties are simply applied to the various font, color, and style set-
tings in Source Insight. Those settings are all saved in your current configuration, which is typically all saved
in a single configuration file. So loading a theme sets a bunch of settings in the configuration, then the config-
uration file gets saved.
See “Customized Settings and Configurations” on page 138.
Defining a Visual Theme
Once you set all the colors, fonts, and styles they way you like them, use the Manage Visual Themes dialog to
record all the settings into a new theme. Click the Define button and the Define Visual Theme dialog appears.
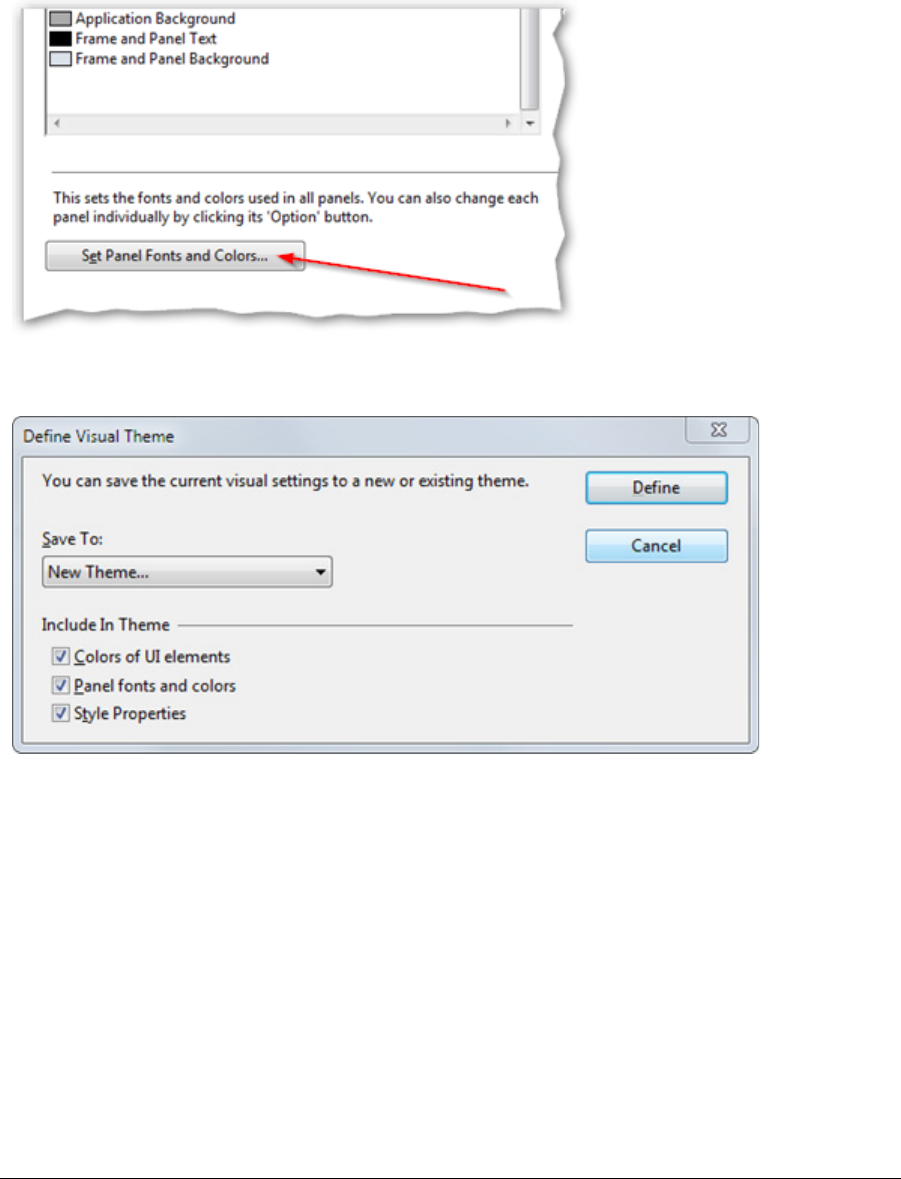
Source Insight 4 User Guide 145
Visual Themes
To define or re-define a theme:
1. First select all the color and font settings you would like to record as theme. Use the Options > Pref-
erences: Color tab to select user interface colors.
2. Use the Options > Style Properties command to define syntax formatting styles.
3. Each panel window has its own font and color settings. Edit the settings and select the desired fonts
and colors in all panels. A quick way to set them all at once is to use the Options > Preferences: Color
& Fonts tab and click the Set Panel Fonts and Colors button.
4. Select Options > Visual Themes > Manage Visual Themes and click the Define button. The Define
Visual Theme dialog will appear.
5. In the Save To item, if you want to create a new theme then select New Theme, or to redefine an
existing theme select the existing theme name. In the section titled "Include In Theme", select the
components you want to be part of the theme. When a theme is applied, only the components that
are part of it have any effect.
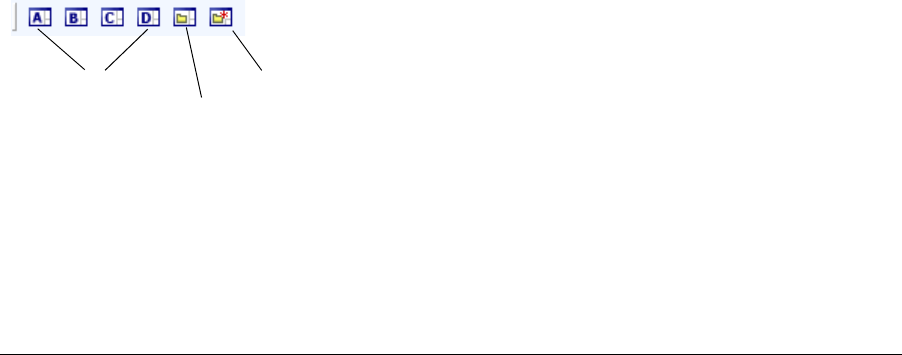
Saving Window Arrangements with Layouts
146 Source Insight 4 User Guide
Saving Window Arrangements with Layouts
You can save and load window arrangements using layouts. This makes it easy to transition between differ-
ent tasks that require different window arrangements.
A layout contains the following:
1. The size and position of the Source Insight application window.
2. The size and position of each panel window. A panel window is either floating or docked.
Saving Layouts
To save a layout, select View > Save Layout. This saves the current layout to a new layout file. You can also
click the Save Layout button on the Layout Toolbar to save the current layout.
Layout Files
Layout files are stored in XML format in the
Documents\Source Insight 4.0\Settings
user folder. You can
save as many different files as you want.
There are four special layout file names:
•layout_a.xml
•layout_b.xml
•layout_c.xml
•layout_d.xml
Each name corresponds to the four "load layout" buttons on the Layout toolbar.
Loading Layouts
To load a layout, select View > Load Layout, or click one of the four "Load Layout" buttons on the Layout tool-
bar.
There are also four Load Layout commands which you can bind a keystroke to. They are:
•Load Layout A
•Load Layout B
•Load Layout C
•Load Layout D
They load one of the four special layout_X.xml files mentioned above.
The Layout Toolbar
The Layout toolbar contains buttons so you can quickly switch between layouts.
Load Layout A-D
Load Other
Create New Layout

Source Insight 4 User Guide 147
Saving and Restoring Workspaces
Saving and Restoring Workspaces
A workspace contains session state that changes from session to session, such as the list of open files. A
workspace contains the following things:
•The names of the files you have open
•Selections in each file
•Selection history (where you have been in each file)
•The size and position of each source file window
•Search and replace strings
•Source links
•Dialog box typing history
•The command recording (see “Start Recording” on page 342.)
When you exit Source Insight, the current workspace is saved in a workspace file. When Source Insight starts,
it restores the previous session's workspace.
If a project is not open, then the name of the current workspace file is Global.siwork. If a project is open, the
name of the current workspace file is <projectname>.siwork and it is stored in the project's data directory.
Loading and Saving Workspaces
To open a workspace, use the File > Load Workspace command.
You can use the File > Save Workspace command to save the contents of the current workspace to any other
workspace file.
Managing Tasks With Workspaces
By using multiple workspaces, you can group your tasks, and save them individually.
For example, let's say you have two different tasks on which you are working. For task 1, you open all the
source files for that task and begin working. When you want to stop working on task 1, you use the Save
Workspace command to save the file "Session1" (or whatever name you want to use). Close all files, and
open the source files to begin working on task 2. When you want to stop working on task 2 and resume work-
ing on task 1, use the Save Workspace command to save the file "Session2", then use the Open Workspace
command to open the task 1 session, "Session1".

Performance Tuning
148 Source Insight 4 User Guide
Performance Tuning
Depending on the size of your project, you may want to tune Source Insight for better performance. The Pref-
erences dialog box, and the Project Settings dialog box both contain options that affect performance.
Factors That Affect Performance
Source Insight was designed to push some of the limits of functionality for a programming editor. As such, it
has features that can stress a system that is too slow or not optimized for it. This section describes factors
that you can control which affect Source Insight's performance.
Project Size
The size of a project has a large effect on the performance of certain features in Source Insight. The project
size can be measured in number of files, and in number of declared symbols.
Tip:
Use Project Report to see project size statistics.
To find out how large your project is, use the Project > Project Report command and note the top lines of the
report. At the top of the project report, Source Insight prints the number of files, the number of symbols, and
the number of symbol index entries in the project. You can also see these same statistics in the Project >
Rebuild Project dialog box at the bottom of the dialog box. (You do not have to rebuild the project to see the
statistics.)
Project Index Settings
The Project Settings dialog box contains options for indexing your project. If you enable all the indexing
options, and your project is large, you may hurt performance.
The symptoms of too large an index are:
•Disk thrashing while building or rebuilding a large project, with little progress is being made. It is nor-
mal for a very large project to require a significant amount of disk access near the end of the rebuilding
phase.
•Opening or closing a project takes a long time.
•Synchronizing individual files is slow.
•The Project Symbol List window (F7) is slow to come up, accompanied by a lot of disk activity. It is nor-
mal for this to pause a second or two the first time you use it.
Tip:
Name Fragment indexing a large project can be slow and memory intensive
If you have a large project (over 500,000 symbols) you should try turning off the symbol name fragment
indexing. You can find out how large the database is by selecting Project > Rebuild Project and looking at the
statistics on the bottom of the dialog box. Just cancel this dialog box when you are done. If the number of
index entries is over 1 million, then things can start to slow down. Adding more memory to your machine will
improve performance.
To remove the name fragment indexing, run the Project > Project Settings command and turn off Quick
browsing for symbol name fragments. Then use the Rebuild Project command to recreate your project from
scratch.
Memory Usage
Source Insight very efficient in its memory use. However, Source Insight uses virtual memory in proportion to
the size of your project. If your projects are large, Source Insight will require more virtual memory. Large proj-
ects can use a lot of virtual memory.

Source Insight 4 User Guide 149
Performance Tuning
Source Insight makes heavy use of memory-mapped files. This is a operating system feature whereby files
can be mapped into virtual address space, so that a file looks like a block of memory to a program. Source
Insight uses memory-mapped files to provide the fastest possible access to source files and database files.
Source Insight uses an efficient way of mapping large project databases and indexes into virtual memory.
The size of a project database is proportional to the number of declared symbols in the project. Therefore, if
your project is very large, the amount of memory used by Source Insight as reported by Task Manager (the
Working Set) can be several hundred megabytes. However, most of the memory represents portions of the
symbol database mapped into virtual memory space. Source Insight does not require this much physical
memory.
Custom Parsing Expressions
You can augment a language with your own custom parsing regular expressions. You can edit these expres-
sions by right clicking on a source file and selecting Language Properties.
Be careful with the custom parsing expressions you define. If you have too many expressions, or you are
using a regular expression that is inherently slow to match, you may notice that it takes a moment or two to
parse your files.
A regular expression can be slow to match if it starts with a pattern that is easily matched, but ends with a
pattern that often does not match. For example:
[a-z]*(\([a-z]+\))
This expression will be slow to match because the pattern starts with [a-z]*, which means, "match any zero
or more alphabetic characters". Most characters in a file will potentially match, cause the pattern matcher to
try and fail to match many times.
Location of Files on a Network
While it is possible to add source files to your project from a remote network drive, that can cause Source
Insight to slow down because access to network drives is slower in general.
In addition, locating the project data folder on a network drive can also result is poor performance. We rec-
ommend locating the Project Data Directory on your local, non-networked drive.
Location of the "Documents" Folder
In Windows, the "Documents" folder is a virtual folder that can exist either locally, or on a remote network
drive. Since Source Insight stores per-user data inside that folder, some operations can become slow if you
locate this folder on a remote drive. In particular, if you used the Import External Symbols feature, the result-
ing import project symbols are stored in the
Documents\Source Insight 4.0\Projects
folder. Therefore
auto-completion while typing can become slow.
If possible, locate your "Documents" folder on your local drive. If you cannot do that, then you can set a reg-
istry entry to force Source Insight to use a local drive for the per-user data folder.
In regedit.exe, find the key:
HKEY_CURRENT_USER\Software\Source Dynamics\Source Insight\4.0\Paths
Add a new string value named "UserDataDir". Set the string value to the full path of the folder you want to
user for per-user data.
Speeding Up Program Features
This section contains recommendations for speeding up different aspects of Source Insight.
Speeding Up Syntax Formatting
Source Insight has many interesting and useful display features for formatting source code. Some of those
features require a significant amount of processing.

Performance Tuning
150 Source Insight 4 User Guide
The display code has been sped up considerably to be able to provide more features with acceptable perfor-
mance. It is possible to reduce the display functionality to speed it up.
The Preferences: Syntax Formatting dialog box lets you specify how detailed you want the display. Each
option has a performance cost. The significant options are listed here, starting with the least costly, to the
slowest and most costly:
1. Apply styles for references to members
2. Apply styles for symbol declarations
3. Apply styles for local symbol declarations
4. Apply styles for references to function-local symbols
5. Apply styles for non-function-local symbols
6. Find references using the Project Symbol Path
7. Qualify member references
Formatting "references" is slower than "declarations".
In general, identifying "references" is slower than "declarations". Identifying references to symbols can be
slower if the project is very large, because each reference has to be resolved with a symbol lookup.
The symbol lookup engine has been heavily optimized to allow formatting references to symbols at "display
speed". A lot of information is cached in the process, so you may notice that the first time you open a file and
start scrolling around in it, it may slow down sometimes. Subsequent viewing of the file will speed up.
Some people want the fastest possible display. However, you may be willing to sacrifice a little of that speed
in turn for more useful information that increases productivity.
Speeding Up Typing in Browse Dialog Boxes
Typing and filtering symbol lists can become slow if you have a large project, and you have the Project Set-
tings: Quick browsing for symbol name fragments turned on. Source Insight is trying to perform name frag-
ment matching on a large name fragment index.
You can address this two different ways. Either you can turn off name fragment indexing in the Project Set-
tings dialog box, or you can change the behavior of the list filtering with the Preferences: Typing dialog box.
The Project Settings options control what is stored and indexed in the symbol database.
The Preferences: Typing options control how the information is used in the lists. You do need the name frag-
ment information in the database to use the symbol name fragment matching features of the lists. (But, not
for file name lists.)
If memory permits, leave Project Settings: Quick browsing for symbol name fragments enabled, and turn off
Preferences: Typing: Match name fragments while typing. Even with name fragment matching while typing
disabled, you can still use it by prefixing what you type with a space. That is, prefixing what you type with a
space toggles the name fragment matching on and off.
If you encounter a lot of disk thrashing while trying to match any name fragments in lists, then your project
may be just too big for the available memory.
In Preferences: Typing, turning off both "Match name fragments" and "Match members" will speed it up
more and return list filtering to version 2.1 functionality.

Source Insight 4 User Guide 151
Performance Tuning
Speeding Up Building and Synchronizing Projects
A very large project will take a while to build or rebuild. To speed it up, you can try the following:
•In Project Settings, turn off Quick browsing for symbol name fragments. This index option uses a lot of
memory and slows the indexing process.
•In Project Settings, turn off Quick browsing for member names. This index option can use a lot of
memory also.
•Reduce the number of file types that are added to your projects. By default, Source Insight comes with
many file types defined, such as Visual Basic files, and ASP files. If you have files like that in your source
tree, but you have no need to work on them, then remove them from your project. You can perma-
nently exclude those file types from your projects by selecting Options > File Type Options and un-
checking the option Include when adding to projects – for each type of file you want to exclude from
your projects.
•Break your project into smaller projects. If you want to still use the Jump To Definition command
between the projects, you can add the "sub-projects" to the project symbol path, which is defined in
the Preferences: Symbol Lookups dialog box.
Speeding Up Relation Windows
The Relation Window shows relationships between symbols. It works like the Context Window in that it
works in the background and automatically shows information about what is selected. For example, if you
select a function call, it can show you the call tree starting at that function.
The Relation Window can require a lot of processing. Some relationships are slower to compute. The rela-
tionships fall into three categories, listed here from fastest to slowest:
•Contains – show the contents of the current symbol. For example, show members of a struct.
•Calls – show what other symbols are referred to by the current symbol. For example, show functions
that are called by the current function.
•References – show what other symbols refer to the current symbol. For example, show functions that
call the current function.
It Takes More Work to Show References
For very large projects, the "References" relationship will be by far the slowest to compute. The performance
seems very acceptable on a Pentium II machine with a moderate sized project (about 200,000 lines of code).
Limiting the relations to non-reference type relations will speed the Relation Window up.
It also works well to lock the Relation Window. To lock the Relation Window, click on the lock button in the
Relation Window toolbar. You can refresh the Relation Window at any time by using the Refresh Relation Win-
dow command, or by clicking on the Refresh button in the Relation Window toolbar.
Speeding Up Auto-Completion
As you type an identifier, the auto-completion window pops up to propose matching identifier names. Every
time you type a character, Source Insight considers the symbol data for that file to be "stale". To give you the
most accurate auto-completion results, Source Insight would need to reparse your file after each character
you type. There is an option that controls this in the Preferences: Symbol Lookups dialog box.
The Parse locally before lookup option causes Source Insight to reparse before the auto-completion window
appears. On a fast machine, or in a small file, the speed will be acceptable. However, turning this option off
will result in a faster response.
Speeding Up Searching Files
Use Lookup References instead of Search Files.
There are several ways to search across multiple files in Source Insight. The commands: Search Files, Lookup
References, and Search Project all perform multi-file searches.

Performance Tuning
152 Source Insight 4 User Guide
The fastest type of search in Source Insight is the Lookup References search. When you search this way,
Source Insight looks for references to a single whole-word item. When you search for a single whole-word,
Source Insight uses a special index file to make the search fast. It's a good idea to get into the habit of using
Lookup References, instead of Search Files, when you can.
Speeding Up Lookup References
The Lookup References command has a few options that affect its speed.
The Smart Reference Matching option means that the search is scope and context-sensitive; the search
results will only contain matches for references to the exact symbol you specify, using the surrounding con-
text. This option slows the process down because each same-string occurrence has to be qualified with a
symbol lookup, which requires some parsing on the fly. If you turn this off, it will work like the Search Files
command; that is, it will search for the string across all the project files.
The Skip Comments and Search Only Comments options also slow the search down a little, but not as much
as the smart reference matching option.

Source Insight 4 User Guide 153
Predefined Path Variables
Predefined Path Variables
Predefined path variables are path variables that set to some of the most commonly used folders. You can
use path variables in several option dialogs, such as the Project Settings dialog. Path variables are not case
sensitive.
Table 3.12: Predefined Path Variables
Variable Value
%APPDATA_DIR%
The current user’s roaming application data folder.
%DESKTOP_DIR%
The Windows desktop folder.
%LOCAL_APPDATA_DIR%
The current user’s non-roaming application data folder.
%MYDOCUMENTS_DIR%
The current user’s documents folder.
%PROGRAM_DIR%
Folder that contains the Source Insight program.
%PROGRAMFILES_DIR%
The Windows Program Files folder. Eg. C:\Program Files
%PROGRAMFILESX86_DIR%
The 32-bit Program Files folder. Eg. C:\Program Files (x86)
%PROJECT_DATA_DIR%
The current project’s data directory, which contains the data
files maintained by Source Insight.
%PROJECT_SOURCE_DIR%
The current project’s source directory root, which is set in Proj-
ect Settings.
%PROJECT_NAM%E
The simple name of the current project, with no extension or
path.
%SHARED_DOCUMENTS_DIR%
The public or shared Windows document folder.
%SOURCEINSIGHT_USER_DIR%
The current user’s Source Insight document folder. This is typi-
cally C:\Users\<user-name>\Documents\Source Insight 4.0
%TEMP_DIR%
The temp file directory where Source Insight creates temp files.
%WINDOWS_DIR%
The Windows directory.

Files Created by Source Insight
154 Source Insight 4 User Guide
Files Created by Source Insight
Source Insight creates the following files and file types on your hard disk.
Files in the Program Directory
The following files are created in the installation directory when Source Insight is installed. The installation
directory is the destination directory you specified when you ran the setup program.
Per-User Data Folder
In Windows, the "Documents" folder is a virtual folder that exists separately for each user. Source Insight
stores per-user data inside
Documents\Source Insight 4.0
.
Your Source Insight project data files are kept in your own user data area, and other users on the same
machine will not be able to access them.
If possible, locate your "Documents" folder on your local drive. If you cannot do that, then you can set a reg-
istry entry to force Source Insight to use a local drive for the per-user data folder.
In regedit.exe, find the key:
HKEY_CURRENT_USER\Software\Source Dynamics\Source Insight\4.0\Paths
Add a new string value named "UserDataDir". Set the string value to the full path of the folder you want to
user for per-user data. You will need to restart Source Insight after that, and you may have to recreate your
projects.
Files Created for Each User
Each user logged into Windows gets their own personal data folder, known as "Documents". Source Insight
creates a "Source Insight 4.0" folder under the "Documents" folder to contain user-specific data.
The user data directory contains the user-specific configuration settings file (config_all.xml) and the work-
space file for the "no project open" mode, and project data.
File Description
sourcein-
sight4.exe
The Source Insight program.
sourcein-
sight4.chm
The Source Insight Help file.
ReadMe.txt Text file containing last-minute notes.
Sihook4.exe Utility program used by Source Insight to launch Cus-
tom Commands.
FileAlias.txt File name alias file, used to override the file type associ-
ated with a given file name. This file is copied to your
user document area when you first run Source Insight.
If you need to edit this file, you should edit your user
copy.
reflector.exe Utility program for importing .NET assemblies.
reflector.class Java utility for importing Java symbols

Source Insight 4 User Guide 155
Files Created by Source Insight
The following folders are created in the current user's Source Insight folder:
Files Created for Each Project
When you create a Source Insight project, a project sub-folder is created inside the "Documents\Source
Insight 4.0\Projects" folder. The project folder is named the same as the project name.
For example, if you create a project name "Abc", then a project folder is created:
C:\Users\<username>\Documents\Source Insight 4.0\Projects\Abc
Within that folder a file name Abc.siproj is created which is the main project file. Additional data files are
stored in that folder.
The following files and folders are created in the project directory. In this list, "Name" is the name of a given
project.
File or Folder Description
Backup Folder containing non-project backup ver-
sions of files that are saved with Source
Insight.
Clips Folder containing clips files, which are listed
in the Clip Window. You can also copy your
own text files to this directory and they will
be included automatically in the Clip Win-
dow.
Projects Folder containing Source Insight projects
created on your machine. Each project gets
its own sub-folder inside this folder.
Projects\project_list.sidb The Project List: contains a list of all projects
opened or create on your machine.
Projects\Base Folder containing project files for the "Base"
project.
Snippets Folder containing code snippets.
Settings Folder containing your configuration settings
files and layout files.
c.tom C/C++ preprocessor token macros.
.si_recovery Crash recovery files, which contains informa-
tion needed to recover unsaved changes
after an abnormal termination. These files
only exist if a earlier session crashed.
Global.siwork Global Workspace: the session state used
when no project is open.
filealias.txt File name alias file, used to override the file
type associated with a given file name. This
is local copy for the current user. The original
version is stored in the Program Files direc-
tory of Source Insight.
File Description
Name.siproj The main project file, which contains a list of
the files in the project. You can open this file
directly from the Project > Open Project >
Browse dialog.
Name.siproj_settings Project settings file.
Name.siwork The project workspace file.

Files Created by Source Insight
156 Source Insight 4 User Guide
Name.snippets.xml Code snippets for the project.
Name.SearchResults Last search results performed.
Name.sip._* Various data files
Backup The project’s backup folder, which contains
backup versions of your source files
cache Various cache files
File Description

Source Insight 4 User Guide 157
Commands Overview
CHAPTER 4 Command Reference
This is an alphabetical listing of all the user-level Source Insight commands. Each command is described in
detail.
For overviews on important concepts, please refer to “Features and Concepts” on page 39.
Commands Overview
A command is a user-level operation that Source Insight performs when you select a menu item or type a key-
stroke. For example, the Open command opens a file; the Save command saves a file. Each command has a
name, and an action.
Commands are resources that can be assigned to menus, keystrokes, and mouse clicks, and those assign-
ments are part of a configuration.
Keystrokes and mouse clicks are assigned to commands. For example, the Ctrl+O keystroke is assigned to the
Open command. More than one keystroke may be assigned to a given command. Use the Key Assignments
command to customize the keyboard.
Commands are assigned to menus. For example, the Open command is assigned to the File menu. Use the
Menu Assignments command to customize the contents of the menus.
Source Insight also allows you to define custom commands, which are useful for launching the compiler and
other external tools from Source Insight. See “Custom Commands” on page 137.
Commands
This is an alphabetical listing of all user-level commands in Source Insight.
About Source Insight
The About Source Insight command brings up a window that contains the copyright message and the version
number of Source Insight. You should refer to this window to get the version number and build date of Source
Insight.

Commands Overview
158 Source Insight 4 User Guide
Activate Menu Commands
•Activate Edit Menu
•Activate File Menu
•Activate Help Menu
•Activate Option Menu
•Activate Project Menu
•Activate Search Menu
•Activate Tools Menu
•Activate View Menu
•Activate Window Menu
•Activate System Menu
•Activate System Doc Menu
The Activate Menu commands activate and drop down the menu from the menu bar.
You can also just press and release the Alt key to activate the Source Insight menu bar, then just type a letter
to activate the corresponding menu. For example, Alt <release> F activates the File menu.
Source Insight does not use Alt+<menu letter> by default to activate a menu. The Alt key can be combined
with any character and assigned to any command by using the Key Assignments command. If you want to
make Alt+F activate the File menu, for example, you can just make that key assignment. If you want to assign
any key combination to activate the File menu, you can do that.
Activate Clip Window
Opens and selects the Clip Window. The Clip Window holds small pieces of text that can be pasted quickly.
See “Copy To Clip” on page 182
Activate FTP Browser
Opens and activates the FTP Browser panel.
Activate Project File List
Opens and activates the Project File List panel so you can start typing in the name of a file to open.
Activate Project Search Bar
Opens and activates the Project Search Bar, which appears near the top of the main application window.
Activate Project Symbol List
This command makes the Project Symbol List panel visible; showing all project symbols in a list, and puts the
cursor in the text box at the top. Once activated, you can type into the text box and the symbol list will be fil-
tered based on what you type. Pressing Enter or Esc will re-activate your source file window again.
This is a quick way to navigate to functions or symbols within your project.
See “Project Symbol List” on page 281.

Source Insight 4 User Guide 159
Commands Overview
Activate Project Window
Opens and activates the Project Window. The Project Window usually contains multiple tabbed panels. The
last tab that was active is made active again.
Activate Relation Window
Opens and selects the Relation Window. The input focus is moved to the Relation Window.
See “Relation Window” on page 305.
Activate Search Bar
Opens and activates the file Search Bar, which appears above the source window area. The Search Bar lets
you search within the current file.
Activate Search Results
This command simply activates the Search Results window and brings it to the front, if it is open. This pro-
vides a quick way to return to the Search Results.
Activate Snippet Window
Opens and activates the Code Snippet panel.
Activate Symbol Window
This command makes the Symbol Window visible and puts the cursor in the text box at the top. Once acti-
vated, you can type into the text box and the symbol list will be filtered based on what you type. Pressing
Enter or Esc will re-activate your source file window again.
See “Symbol Window command” on page 348.
Activate Window List
Opens and activates the Window List panel, which displays all the open source files.
Add and Remove Project Files
This command lets you add source files to the current project, or remove source files from the current proj-
ect.
This is the primary way to add a large number of files to the project. With this command, you can add and
remove single files, groups of files, and whole source directory trees.
Note: You can also add files to the project by dragging files from Windows Explorer and dropping them onto the Proj-
ect File List panel. The Project File List panel also allows removing files from the project.
What Files Should You Add to a Project?
Tip:
Add only text files to your projects.
Source Insight projects should consist of program source files and text files only. It doesn't make any sense to
add a binary format file to a Source Insight project. For example, adding an exe or bitmap file to your project
would have no benefit.
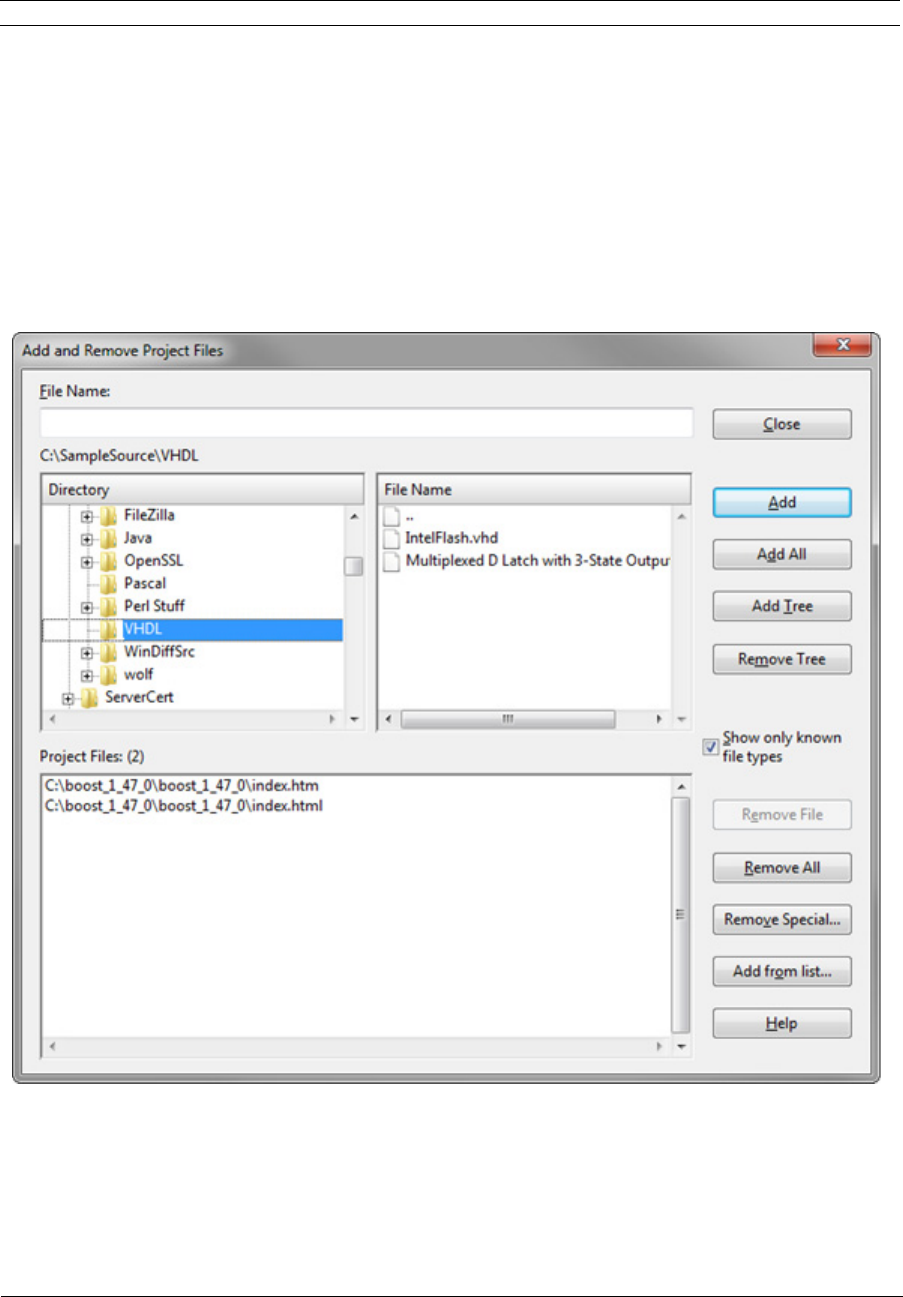
Commands Overview
160 Source Insight 4 User Guide
The file types that are defined by default in Options > File Type Options correspond to the types of source
files you probably want to use with Source Insight. Normally, only those types of files should be added to a
project.
Tip:
Use
Options > File Type Options
to control what types of files are added to projects.
The File Type Options dialog box contains the check box: Include when adding to projects. You can use this
check box to control what file types Source Insight will automatically add to your project, or what file types
will be displayed in the list box in the Add and Remove Project Files dialog box.
Using a Master File List
Instead of adding and removing files manually through the Add and Remove Project Files command, you can
setup a special file called a Master File List and associate that with the current project. For more information,
See “Using a Master File List” on page 46.
Add and Remove Project Files Dialog Box
File Name
Type the name of the file you want to add or remove in this text box. The lists will be matched automatically
with what you type. You can type a wildcard and press Enter to filter the file list to show only those files that
match the wildcard.
You can also type a full directory path, or a drive letter followed by a colon to switch the current directory.

Source Insight 4 User Guide 161
Commands Overview
Directory List
Contains a directory tree of the current drive. If you select a directory name in this list box, the File Name list
will show what is in that directory. The current working directory and wildcard filter, if any, is displayed
above the list box.
File Name List
Contains a list of all files in the currently selected directory. If you select a file from this list box, the file name
is loaded into the File Name text box. This list box will not display files that are already part of the project.
Project Files List
Lists all the files currently added to the project. You can select files from this list and click the Remove… but-
tons to remove the files from the project.
Close
Closes the dialog box, keeping the changes you made.
Add
Adds the selected file(s) to the project. If a directory is selected, then the current directory switches to that
directory.
Add All
Selects all the items in the File Name list and adds them to the project. If any directories are included, then
their contents are added too. Source Insight will prompt you first to see if you want to include the directories.
Add Tree
Click Add Tree to add a whole source tree to your project.
When a directory is selected, this adds the whole directory tree to the project. That is, all the directories in
the sub tree are scanned for files that match known file types, and they are added to the project.
Remove Tree
When a directory is selected, this removes all files found in that directory tree.
Show only known file types
Only files that are defined in Options > File Type Options are included in the file list. Furthermore, only file
types that have the "Include when adding to project" option enabled are included. You can change the
known file types with the File Type Options command.
If not enabled, then all file types are listed in the File Name list. You should only add text files to a project, and
not binary files.
Remove File
Removes the file(s) selected in the Project Files list.
Remove All
Removes all files from the project. The project will be empty.
Remove Special…
Brings up the Remove File dialog box, which allows you to do special remove operations, such as removing
all *.h files.
Add from list…
Brings up the Add File List dialog box. This asks you to specify an input text file that contains a list of files and
directories to be added to the project.

Commands Overview
162 Source Insight 4 User Guide
Add File
The Add File command adds one or more source files to the current project. This command existed in earlier
versions of Source Insight, however the Add and Remove Project Files command is a newer replacement,
which provides a central dialog box from which to add and remove files from your project.
File Name
The name of the file to be added to the project. You may type a file name or a wildcard pattern and press
Enter. If you typed a wildcard, the pattern will be applied to the file list box.
File list box
Contains a list of all files in the current working directory of the current drive that are not already a part of the
current project. If you select a file from this list box, the file name is loaded into the File Name text box. The
current working directory is displayed above the list box. This list box will not display files that are already
part of the project. Also, only files that belong to file types that have the "Include when adding to project"
option turned on are included in the list. See “File Type Options” on page 213.
Add
Click this button to add the file named in the File Name text box to the project and close the dialog box. If the
File Name text box contains wildcard characters, the wildcards will be expanded and displayed in the File list
box, and the dialog box will not be closed. If one or more files are selected in the File list box, then all selected
files are added to the project.
Select All
Click this button to select all the files contained in the File list box.
Add Dir
Click this button to add a whole directory to the project. If the Subdirs Also check box is enabled, then this
will recursively add all files in the whole subdirectory tree.
Show Dirs
Click this button to toggle the list box contents between showing file names, and showing subdirectory
names.
Subdirs Also
If enabled, then Source Insight will recurse through all subdirectories when the Add button is clicked, or
when a single directory is selected and Add is clicked.
If not enabled, then Source Insight will only add the selected files or the files in the selected directory and will
ignore sub-directories.
Browse
Click this button to bring up the standard Windows Open dialog box, which allows you to browse around
your disks. If you select a file in this dialog box, its path will be placed into the File Name text box.
Remove
Click this button to switch to the Remove File dialog box.
Add File List
The Add File List command allows you to add file names and directories specified in an input file to the cur-
rent project.
This is a useful way to let you, or a project administrator, maintain a list of source files and/or source directo-
ries, which can be used to build a Source Insight project. This can be done in lieu of adding the files by hand.

Source Insight 4 User Guide 163
Commands Overview
Advanced Options
This allows you to selectively disable internal optimizations in Source Insight. This can help to narrow down
a possible bug. If you report a bug, you may be asked to make changes in the Advanced Options dialog box to
help troubleshoot a problem. Normally, you should have no need to use this feature.
Arrange Windows
Tiles and arranges source file windows within the Multiple-Document area.
Arrangement Toolbar
Shows or hides the Window Arrangement toolbar.
Back Tab
The Back Tab command moves the cursor to the left by one tab stop.
Backspace
The Backspace command backs over the character to the left of the insertion point. If the selection is
extended, the text in the selection is deleted instead.
Beginning of Line
The Beginning of Line command moves the insertion point to the beginning of the current line.
Beginning of Selection
The Beginning of Selection command moves the insertion point to the beginning of the current selection if it
is extended. If the selection is already an insertion point, then nothing happens.
Blank Line Down
The Blank Line Down command moves the insertion point to the beginning of the next blank line.
Blank Line Up
The Blank Line Up command moves the insertion point to the beginning of the previous blank line.
Block Down
The Block Down command moves the insertion point to the next } brace. This corresponds to the end of the
current code block in languages like C/C++ and Java.
Block Up
The Block Up command moves the insertion point to the previous { brace. This corresponds to the beginning
of the current code block in languages like C/C++ and Java.
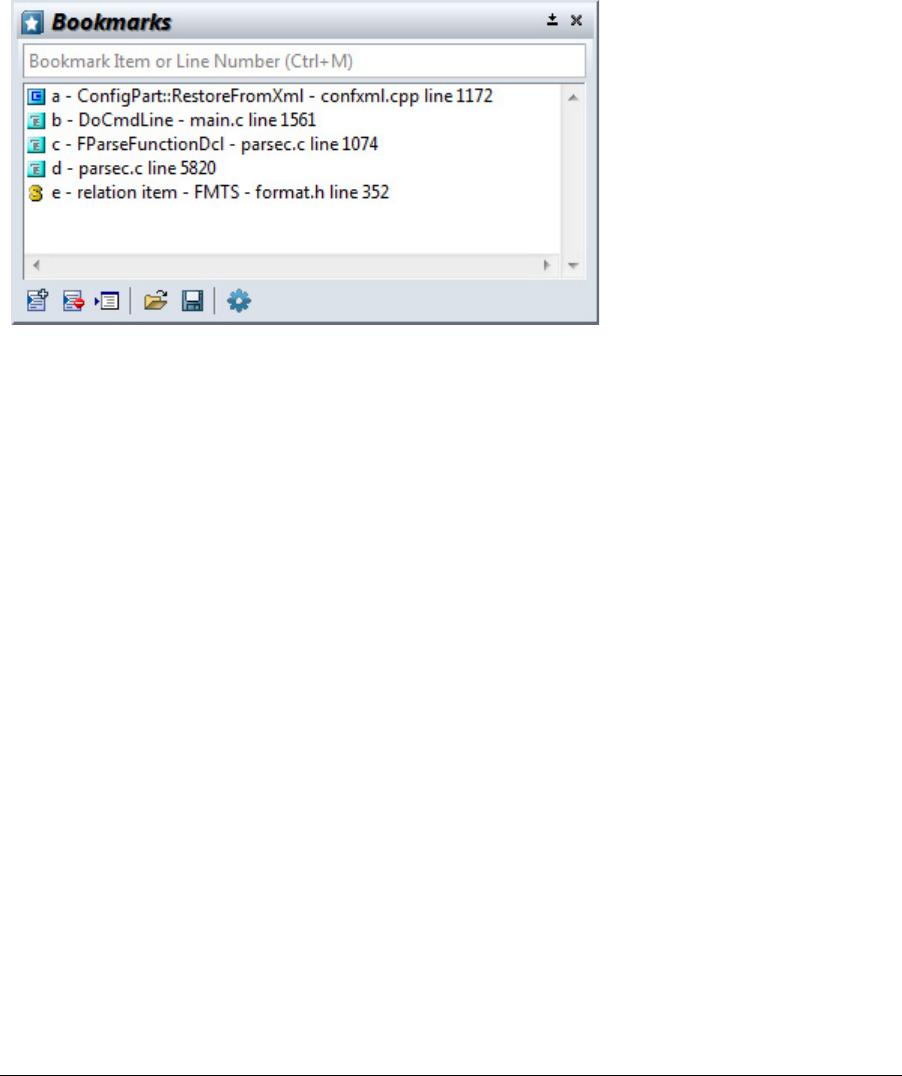
Commands Overview
164 Source Insight 4 User Guide
Bookmark
The Bookmark command activates the Bookmark panel. Bookmarks are useful for storing locations of inter-
est in your files.
See “Bookmarks” on page 102.
Bookmark Window
The Bookmark Window command shows and hides the Bookmark Window panel. The Bookmark Panel is a
floating, dock-able window that shows the current list of bookmarks.
See “Bookmarks” on page 102.
Text Field
Type the partial name of a bookmark, or a line number here. Source Insight checks to see if the mark you
typed matches an existing bookmark name. If it does, then pressing Enter will position you to that mark. If
the bookmark you've just typed does not exist, then pressing Enter will create a new bookmark.
Marks list
Displays a list of all the bookmarks currently set. Each item in the list shows the bookmark's name, the file
it's in, and the line number it's on, and the function that contains the bookmark, if any.
Right-click the mouse on the list to see the bookmark menu.
Add (Ctrl+N)
Click this button to create a new bookmark. The mark's name is taken from the Name text box. If the book-
mark name is already in the list (i.e. it already exists), then its position will be redefined to the current cursor
position.
Delete (Ctrl-X)
Click this button to delete the selected marks. To delete all bookmarks, right-click on the list and select
"Delete All Bookmarks".
Go To (press Enter)
Click this button to jump to the mark that is selected in the Marks list.
Load Bookmarks (Ctrl-O)
Click this to import bookmarks from another bookmark file.
Save Bookmarks (Ctrl-S)
Click this to save the selected bookmarks to a new bookmark file.

Source Insight 4 User Guide 165
Commands Overview
Bookmark Options... (Ctrl-Q)
Click this button to edit the bookmarking options. See: “Bookmark Options” on page 165
Bookmark Options
The Bookmark Options command sets the options for handling bookmarks.
Preserve bookmarks between sessions
If this box is checked, then bookmarks are restored when you exit and restart Source Insight. Otherwise, all
the bookmarks disappear when you quit Source Insight.
Delete bookmarks when file closes
If this box is checked, then all the bookmarks in a file are deleted when you close that file.
Confirm when deleting bookmarks
If enabled, you will be prompted before deleting bookmarks in the Bookmarks panel.
Font & Color...
Click this to pick the font and foreground and background colors used in th Bookmarks panel.
Bottom of File
The Bottom of File command makes an insertion point at the last line in the current file.
Bottom of Window
The Bottom of Window command makes an insertion point at the last visible line in the active window.
Browse Files
The Browse Files command brings up the standard Windows system Open File dialog box so that you can
browse the regular file system and open any file. This is unlike the regular Source Insight Open command,
which brings up the Project Window, which lists only the files in the current project, regardless of directories.

Commands Overview
166 Source Insight 4 User Guide
Browse Project Symbols
Lists all the symbols in the current project. From this dialog box, you can
•Find symbols based on parts of their names.
•Look at symbol definitions.
•Jump to symbol definitions.
•Insert a call to a function into your source file.
•Generate a cross-reference listing.
The Browse Project Symbols command automatically selects the first word in the selection before the dialog
box comes up. The word is also loaded into the symbol name text box of the dialog box. The word is selected
so that you can use the Insert buttons to replace the symbol name.
Tip: Instead of using this dialog box, which is modal, you can use the Project Window's symbol list view. The Project
Window is mode-less; it can float or dock to the side of the application window. Furthermore, the Context Win-
dow shows the declaration of the item you select in the Project Window symbol list.
Browse Global Symbols Dialog box
Symbol List
This list displays a list of all symbols in the project. If a search pattern was given in the Symbol Name text box,
then this is a list of all the symbols that satisfy the search pattern. Below the symbol list, the currently
selected symbol's type and file of origin are displayed.
The types of symbols in the list are controlled by the settings accessed with the Symbol Types button.
As you type, Source Insight will display partial matches in the Symbol List. For example, if you type "Pch",
then the first item in the list (in sorted order) that starts with "Pch" is selected in the list. The match is not
case sensitive and leading underscores are ignored.
If you have symbol name fragment matching enabled (in Preferences: Typing) then the Symbol List will also
show matches on name fragments, which you may type in any order. For example, if you type "cre win" (note
the space between items), the Symbol List will show all symbols that have "Cre" and "Win" somewhere in the
name.
To temporarily toggle name fragment matching on and off, prefix your entry with a space character.
Tip:
You can search for symbols using regular expressions, by prefixing your pattern with a question mark (?).
You can specify a regular expressions style search pattern to search for symbols by typing a question mark (?)
and then the search pattern, and click the Jump button. All the symbols that match the pattern are placed in
the Symbol List. For example, to find all symbols beginning with "Delete" and containing "Foo", you could
type "?^Delete.*Foo".
Jump
Click this to jump to the definition of the currently selected symbol. If an item is selected in the Symbol List,
then that is the current symbol. Otherwise, the symbol typed in the Symbol Name text box is used.
If the symbol name text box starts with a question mark (?), then Source Insight will replace the list with all
the symbols that match the search pattern that follows the question mark; the dialog box will remain open.
Info
Click this button to run the Symbol Info command on the selected symbol.
References
Click this button to search for references to the selected symbol.

Source Insight 4 User Guide 167
Commands Overview
Insert w/Args
Click this button to replace the current selection with the name of the symbol, followed by the parameters as
they appear in the symbol definition, if the symbol is a function.
Insert Name
Click this button to replace the current selection with the name of the symbol.
List
Click this button to create a cross-reference list of the symbols currently listed in the Symbol List. A new file is
created and named Symlist.txt. Each line of the file contains a symbol name, and the file and line number
where it's defined.
Symbol Types
This button is used to specify what types of symbols will be included in the symbol list and what types of
symbols will be searched for when using a regular expression in the symbol name text box.
Making a Cross Reference Listing
You can have Source Insight create an output file that contains a list of symbol names.
To create a symbol cross reference list
1. Run the Browse Project Symbols command.
2. Click the List button. A new file named Symlist.txt will be created containing a list of all the symbols
displayed in the Symbol List, along with the file and line number where the symbol is found.
To create a partial symbol cross reference list
1. Run the Browse Project Symbols command.
2. Click the Symbol Types button to specify the desired types of symbols to appear in the list.
3. Type a search expression in the Symbol Name text box. You must begin the pattern with a ? charac-
ter to indicate that it is a pattern. For example, "?Word" searches for all symbols containing the sub-
string "Word".
4. Click the Jump button to replace the list contents with all the symbols that match the pattern. When
the search is done, all the matching symbols will appear in the Symbol List box.
5. Click the List button to create the symbol list.
6. Fix up the arguments in the function call to be appropriate.
To Search for a Function by Name
Let's say you want to call a function but can't remember its name. You know it has "Insert" and "Char" in its
name. This example assumes you have enabled the symbol name fragment matching when you created the
project.
1. Select the place in your file where you want to insert the function call.
2. Run the Browse Project Symbols command.
3. Type "Insert Char" in the File Name text box and wait a moment. Note the space between the two
words. Source Insight will use the name fragments you typed to filter the Symbol List to show all
symbols with Insert and Char in the name. This technique only works if each word you type starts
with an uppercase letter.
Browse Local File Symbols
The Browse Local File Symbols command lists all the symbols in the current file that are at the file scope.
From this dialog box, you can look at the symbol definition, jump to the symbol, or insert a copy of the sym-
bol definition into the current selection.

Commands Overview
168 Source Insight 4 User Guide
The Browse Local File Symbols command automatically selects the first word in the selection before the dia-
log box comes up. The word is selected so that you can use the Insert buttons to replace the symbol name.
Symbol
The name of the symbol to be looked up. This text box is automatically loaded with the first word in the cur-
rent selection when the dialog box comes up. You can type any symbol name into this text box.
Symbol List
Displays a list of all symbols in the project. If a search pattern was given in the Symbol Name text box, then
this is a list of all the symbols that satisfy the search pattern. Below the symbol list, the currently selected
symbol's type and file of origin are displayed.
The types of symbols shown in the list are controlled by the settings accessed with the Symbol Types button.
As you type, Source Insight will select the symbol in the Symbol List that starts with what you are typing. For
example, if you type "Pch", then the first item in the list (in sorted order) that starts with "Pch" is selected in
the list. The match is not case sensitive and leading underscores are ignored.
You can specify a regular expression style search pattern to search for symbols by typing a question mark (?)
and then the search pattern, and click the Jump button. All the symbols that match the pattern are placed in
the Symbol List. For example, to find all symbols beginning with "Delete" and containing "Foo", you could
type "?^Delete.*Foo".
Jump
Click to jump to the definition of the currently selected symbol. If an item is selected in the Symbol List, then
that is the selected symbol. Otherwise, the symbol typed in the Symbol Name text box is used.
If the symbol name text box starts with a question mark (?), then Source Insight will perform a search, and
the dialog box will remain up.
Info
Click to run the Symbol Info command on the selected symbol.
References
Click to search for references to the selected symbol.
Insert w/Args
Click to replace the current selection with the name of the symbol followed by the parameters as they appear
in the symbol definition.
Insert Name
Click to replace the current selection with the name of the symbol.
List
Click to create a cross-reference list of the symbols currently listed in the Symbol List. A new file is created
and named SYMLIST.TXT. Each line of the file contains a symbol name and the file and line number where it's
defined.
Symbol Types
This button is used to specify what types of symbols will be included in the symbol list and what types of
symbols will be searched for when using a regular expression in the symbol name text box.
Browser Mode
The Browser Mode command toggles Source Insight's Browser-Mode. When Browser-Mode is on, your source
code becomes read-only, and acts like a web browser. For example, single clicking on the name of a function
in a function call will jump to the function's definition.

Source Insight 4 User Guide 169
Commands Overview
You can also toggle Browser-Mode by right-clicking in the small box at the bottom right of the Source Insight
application window. Then select Enable/Disable Browse Mode from the pop-up menu
Calculate
This replaces a selected mathematical expression with its result. To use this command, first select text that is
some kind of mathematical expression. For example 112*14. Invoke the calculate command to solve the
expression and insert the answer. In this case, 1568.
Cascade Windows
The Cascade Windows command rearranges the windows by cascading them down the screen.
Check for Updates
Checks with the Source Insight server to see if there is a newer version available.
Checkpoint
Saves the current file to disk and erases its change history and undo history. You can think of this as a "clean"
save operation. It has the same effect as saving the file, closing it, and opening it again. After using Check-
point, you will not be able to undo any prior changes.
Checkpoint All
Performs the Checkpoint command on all open files. This saves all open files to disk and erases their undo
and change histories. After using Checkpoint All, you will not be able to undo any prior changes in your files.
Clear Highlights
Removes all word highlighting in all source windows. Highlighting is applied by using the Highlight Word
command.
Clip Properties
(On Clip Window toolbar and right-click menu)
The Clip Properties command allows you to edit the name of the clip.
Table 4.1: Browser Mode Keyboard Commands
Key or Mouse click Action
Backspace Navigate back to previous location.
Space Jump to definition of symbol under
cursor.
Hold down CTRL Allows you to drag out a text selec-
tion instead of jumping to a defini-
tion.
Click on a symbol name Jump to definition of symbol.

Commands Overview
170 Source Insight 4 User Guide
Clip Window
This shows or hides the Clip Window. The Clip Window displays a list of clipboard-like clips of text that you
can insert.
A clip is a piece of text that you might want to insert easily into your code. For example, a standard function
heading comment.
New Clip (Ctrl+N)
Creates a new clip in the Clip window.
Delete Clip (Ctrl+X)
Deletes the selected clip from the Clip Window
Edit Clip (Ctrl+E)
Allows you to edit the clip in a source window. When you close the source window the clip contents will be
saved.
Cut To Clip (Ctrl+Shift+X)
Deletes the current selection from the current source window and puts it into a new clip.
Copy To Clip (Ctrl+Shift+Del)
Copies the current selection in the current source window and puts it into a new clip.
Paste From Clip
Pastes the selected clip contents into the current file.
Clip Window Options
Controls the settings of the Clip Window.
Using Clips
To create a clip :
1. Select the text you want to make into a clip.
2. Use the Edit > Copy To Clip command. The Clip Window will appear.
3. Type the name of the new clip and press Enter. The new clip will appear in the Clip Window.
To paste a clip:
1. Select where you want the clip inserted in your file.
2. Use the Edit > Paste From Clip command. The Clip Window will appear. If the Clip Window is already
visible, just double click on the desired clip and it will be inserted.
3. Type the name of the clip, or just double click on it in the Clip Window

Source Insight 4 User Guide 171
Commands Overview
You can set Clip Window options using the Clip Window Properties command, or clicking the properties but-
ton in the Clip Window toolbar. See “Clip Window Options” on page 171.
Clip Window Options
This command brings up the Clip Window Options dialog box and allows you to set options for the Clip Win-
dow.
Preserve clips between sessions
If enabled, then clips are automatically saved to the Clips directory (in the Source Insight program directory)
and will be reloaded the next time you run Source Insight. If not enabled, then clips are thrown away when
Source Insight exits.
Prompt for new clip name when text is dropped
If enabled, then Source Insight prompts you for the name of a clip whenever you drop text on the Clip Win-
dow. If not enabled, then Source Insight will generate a simple name for the clip automatically.
Delete clip after clip is dragged out
If enabled, then when you drag a clip out of the Clip Window, the clip will be deleted from the Clip Window. If
not enabled, then the clip will be retained.
Always paste at the start of the line
If enabled, then the clip will be pasted at the beginning of the current line, instead of exactly where the cursor
is. This does not apply when you drag a clip out of the window to a particular spot.
Process text variables when pasting from clips
If enabled, then text variables in the clip contents will be expanded and replaced when you paste the clip into
your source file. Text variables behave the same as when inserting a code snippet.
Font, Text Color, Back Color
Lets you pick the display options for the Clip Window.
Close
The Close command closes the current file. If the file has been edited, but not saved, then Source Insight will
ask you if you want to save the changes before closing the file by using a dialog box with the following but-
tons.

Commands Overview
172 Source Insight 4 User Guide
Yes
Click to save and close the file.
No
Click to close the file without saving it. Changes you've made will not be saved.
Cancel
Click to cancel the Close command. The file will remain open, and it will not be saved.
Close All
The Close All command performs a Close command on each open file. For any files that you have changed
but not saved, Source Insight will ask if you want to save them.
If you have any captured custom command windows open and the custom command is still running, those
windows are not closed.
Close Project
The Close Project command closes the current project. When the project is closed, all open files are also
closed. Source Insight does this by performing the Close command on each open file. The workspace and
configuration files for the project are also saved.
Close Window
The Close Window command closes the current window. Since a file can appear in more than one window,
closing a window does not necessarily mean you will close the file buffer too. If you close the only window
showing a file, then the file is closed also.
Color Options
Activates the Preferences: Colors & Fonts dialog box, which allows you to specify the colors of user interface
items, and the font and color options of the panel windows.
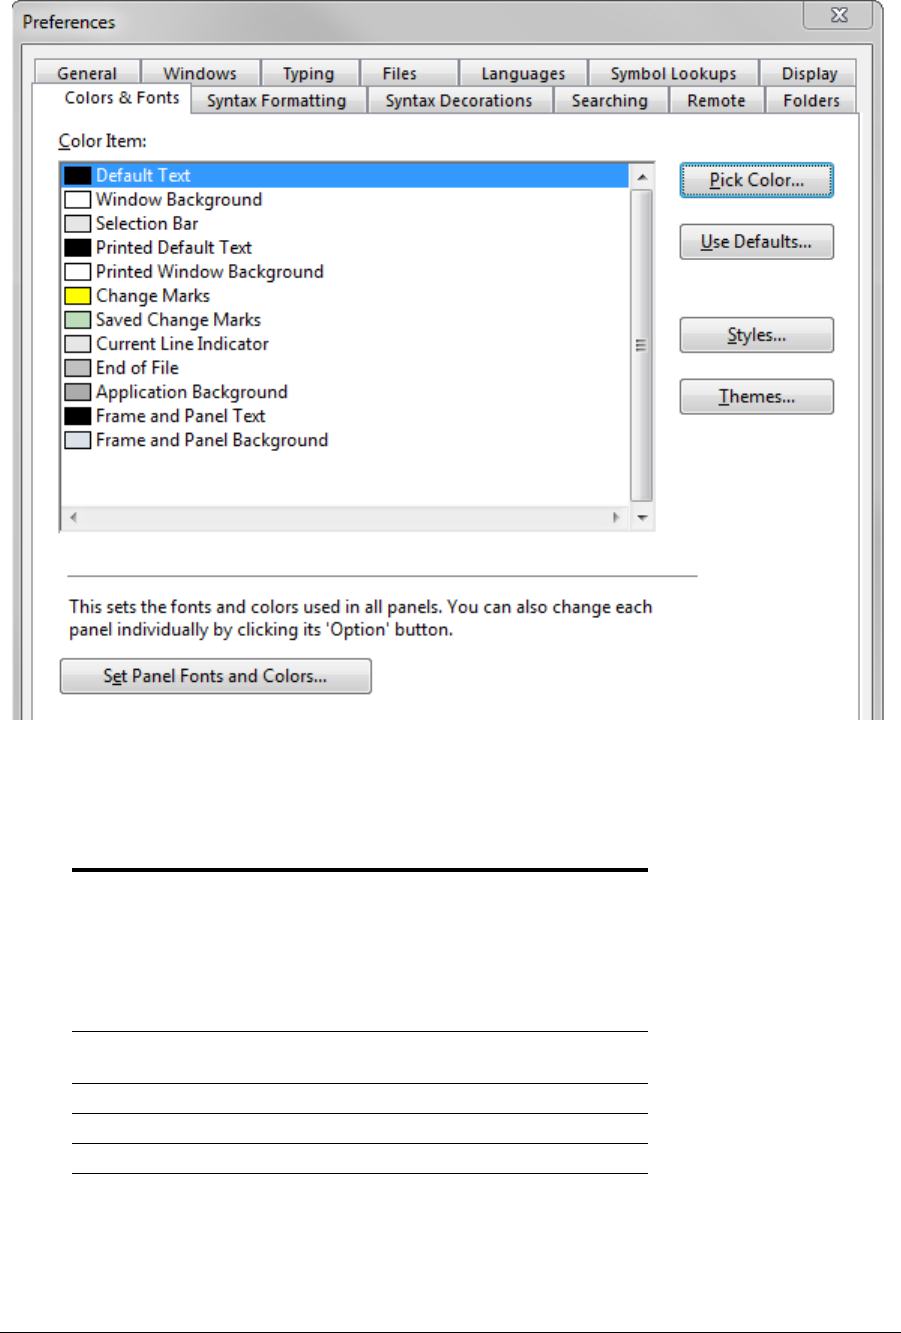
Source Insight 4 User Guide 173
Commands Overview
The color items in this dialog can also be grouped into Visual Themes.
Color Item list
Lists the user interface items that can be colorized. The list contains the following items:
Table 4.2: Color Items
Display Item Description
Default Text Plain text that has no other style
applied. If a file type has no lan-
guage parser, this is the color the
text will appear in. If there is a lan-
guage parser, but an identifier is
unknown, this is the color the iden-
tifier will appear in.
Window Background The color of the source window
background.
Selection Bar The color of the left margin area.
Printed Default Text The printed color of plain text.
Printed Window Background The printed background color.
Change Marks The color of the change marks that
appear in the left margin alongside
lines that have been edited, but not
saved.

Commands Overview
174 Source Insight 4 User Guide
Pick Color...
Click this button to select a new color for the item in the list.
Styles...
Opens the Style Properties dialog to edit the formatting style settings. The styles are applied to text based on
parsing. The colors used in styles should work together with the colors you pick for the items in the list. For
example, the Window Background color should not conflict with the text or background colors you choose
for styles.
Themes...
Opens the Visual Themes manager.
Use Defaults...
Resets the color options to the initial defaults.
Set Panel Fonts and Colors...
Many panels show lists of text, and each panel has optional settings for the font and colors used in those lists.
When clicked, this sets the fonts and colors in all panels to a single setting. Even though each panel has its
own font and color settings, this button sets them all to the same thing. This button is a simple way to change
all the panel fonts and colors at once, instead of selecting the options for each panel individually. However,
this wipes out any differences in their settings.
Note: Applying a Visual Theme will also change all the panel colors en masse to whatever is stored in the theme.
Saved Change Marks The color of the change marks that
appear in the left margin alongside
lines that have been edited, after
the changes have been saved to
disk.
Current Line Indicator The color used to highlight the cur-
rent line containing the selection.
The color is used as the back-
ground color of the whole line. This
is only used if the option to show
the current line indicator is
enabled in Options > Prefer-
ences: Windows.
End of File The color of the area that appears
below the end of files.
Application Background The color of the main application
frame window behind the source
file windows.
Frame and Panel Text The text color used in the main
application window frame, the
window tabs, and the titles of
panel windows. Panel window are
floating and docked windows.
Frame and Panel Background The background color of the main
application window frame, the
window tabs, and the panel win-
dows.
Table 4.2: Color Items
Display Item Description
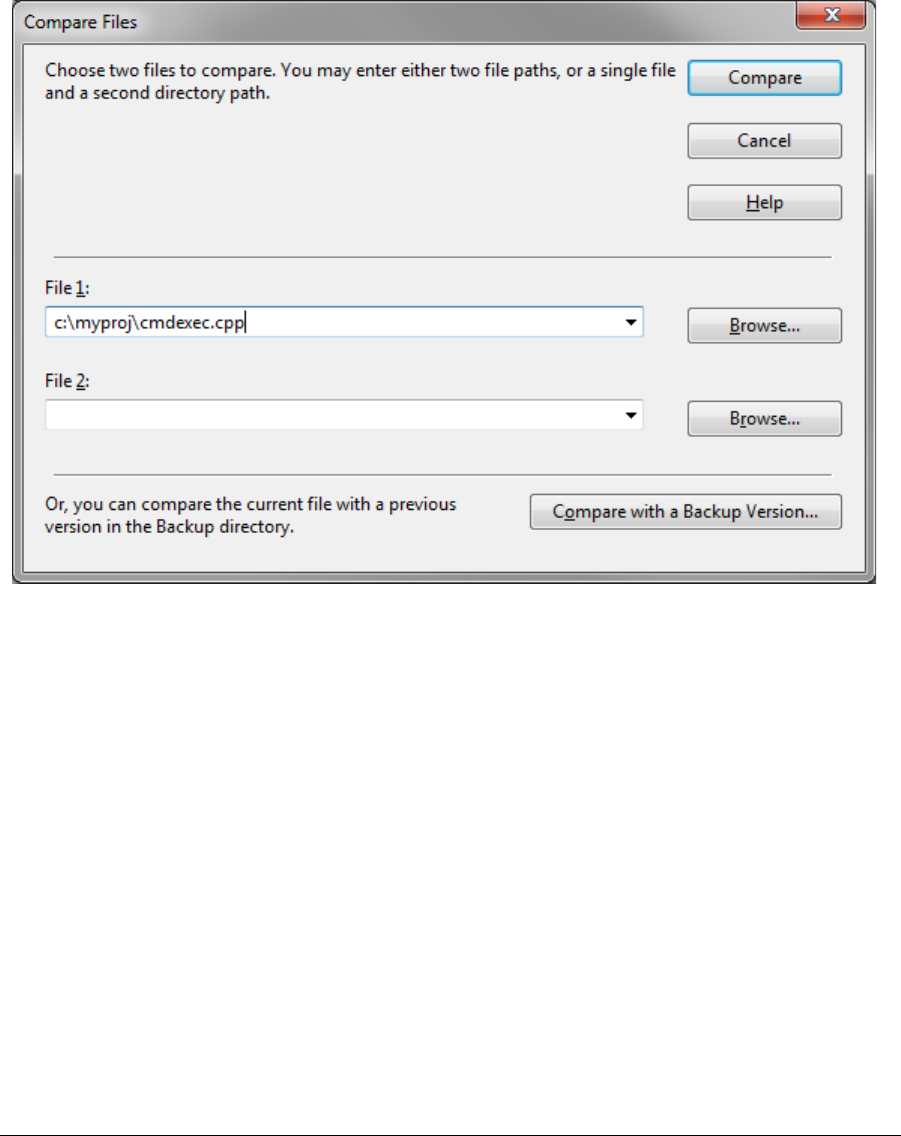
Source Insight 4 User Guide 175
Commands Overview
Command Shell
The Command Shell command is a Custom Command that launches a shell command box from Source
Insight.
Compare Files
The Compare Files command compares two files and shows them in the File Compare window side by side.
See “File Compare” on page 205.
To compare a file:
1. Select Tools > Compare Files
2. In File 1, enter the path of the file. The current file name is preloaded into this field.
3. In File 2, enter the path of the second file. You can enter just a directory path and the file name will
be implied. To load any other open file, click the down-arrow to show recent files and other open
files.
4. Press Enter or click Compare. The File Compare window will open and show the files side-by-side
with differences highlighted.
To compare a file with a previous version
1. Open a source file.
2. Select Tools > Compare with Backup File.
3. The Compare with Backup Version dialog will appear. Select the old version you want to compare
with, and click OK. See “Compare with Backup File” on page 176.
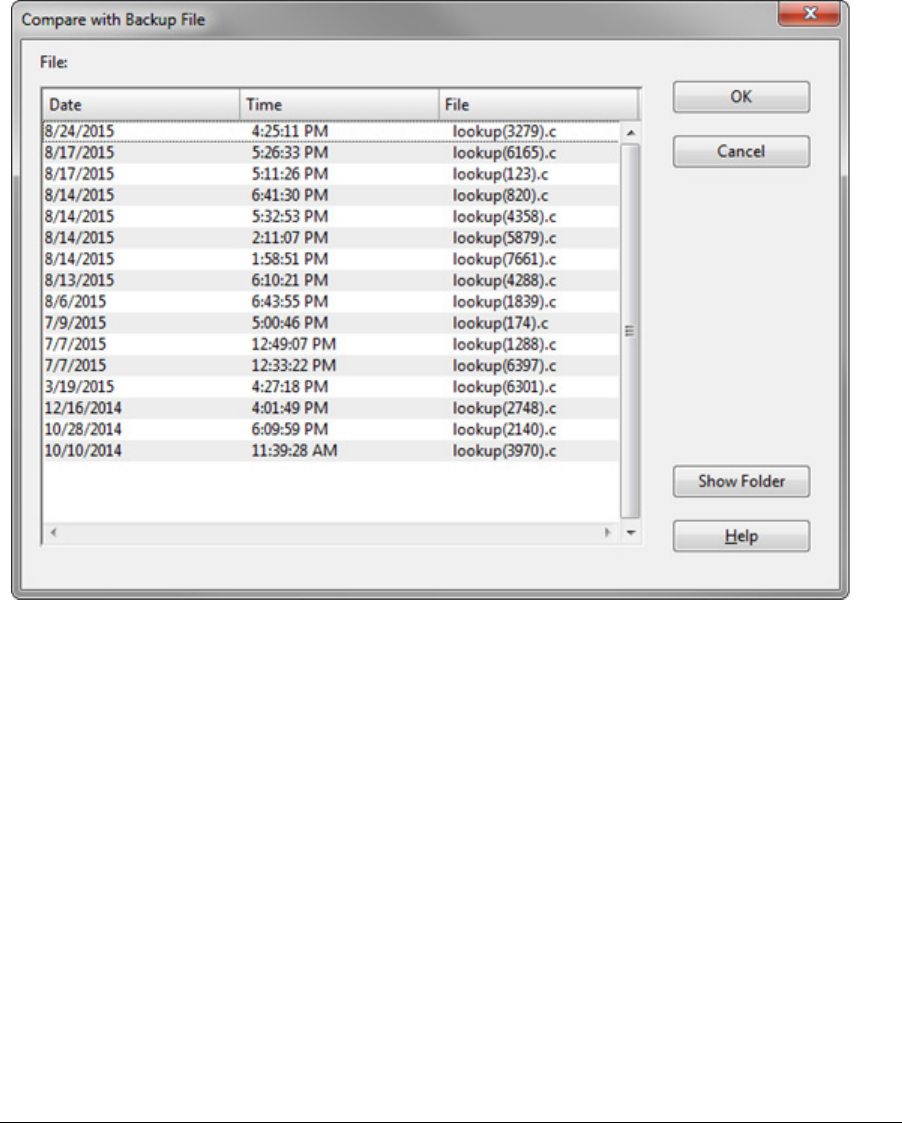
Commands Overview
176 Source Insight 4 User Guide
To compare a files from the command line
1. Invoke Source Insight from the command line like this:
sourceinsight4.exe -d <file1> <file2>
2. The File Compare window will open and show the two given files.
Compare with Backup File
This command compares the current file with a saved backup version of the same file. See “File Compare” on
page 205.
Select the backup file that contains a previously saved version, then click OK to show the differences. The
number of backup files available depends on how many times you saved a file, and how long backup files are
stored. The backup settings are controlled in the File Options dialog. See “File Options” on page 208.
Every time you save a file for the first time in a session, normally Source Insight saves a copy of the original
file in as a backup. A unique number is added to the file name so multiple versions of the file can exist in the
backup directory.
Each project has its own backup directory. You can set it in the Project Settings dialog. See “Project Settings”
on page 284.
Complete Snippet
Completes and expands a code snippet by name. This is similar to the auto-completion list that appears
when you type a symbol name, except only snippet names appear in the list.
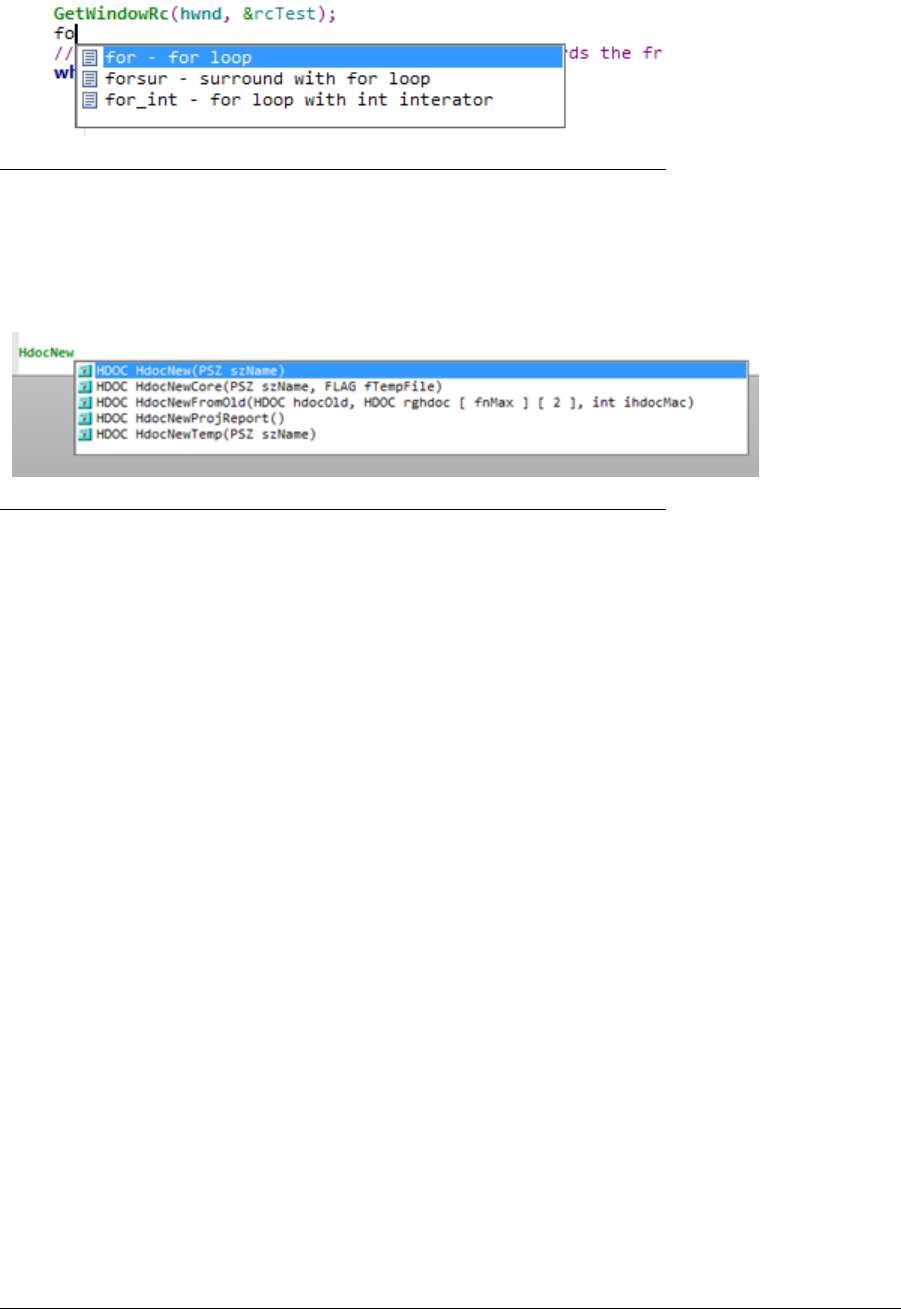
Source Insight 4 User Guide 177
Commands Overview
By default, snippet names also appear in the regular auto-completion list. However you can disable that
option and use Complete Snippet to explicitly show snippets. See “Code Snippets” on page 98.
Figure 4.1 The Compete Snippet window
Complete Symbol
The Complete Symbol command invokes the auto-completion function. The popup auto-completion win-
dow will appear.
Figure 4.2 The Auto-Completion window appearing after typing
By default, code snippet names also appear in the regular auto-completion list. However you can disable
that option and use the Complete Snippet command (Ctrl+E) to explicitly show snippets. See “Code Snip-
pets” on page 98.
The Complete Symbol command replaces the whole word you are typing with the complete name of the
symbol.
For example, let's say that you have a function called InitWindowState. As you type in the letters: "InitWi", the
auto completion window narrows what you've typed down to a unique function (InitWindowState). The
Complete Symbol command will replace what you've just typed with the whole name "InitWindowState".
The auto completion settings affect how the completion function works. You have the option of inserting
function parameters when a function name is inserted. You can change the auto-completion options using
the Preferences command. See: “Typing Options” on page 363
Conditional Parsing List
This is used to define conditional parsing identifiers for a single project, or for all projects. Condition values
are used to interpret #if and #ifdef statements. They are typically defined as constants using #define
statements, or in compiler command line options, or in your IDE settings. See “Conditional Parsing and Pre-
processor Support” on page 60.
Source Insight maintains two sets of conditions: a global list applies to all projects, and the project-specific
list applies only to the current project. The project-specific condition values are stored with each project. To
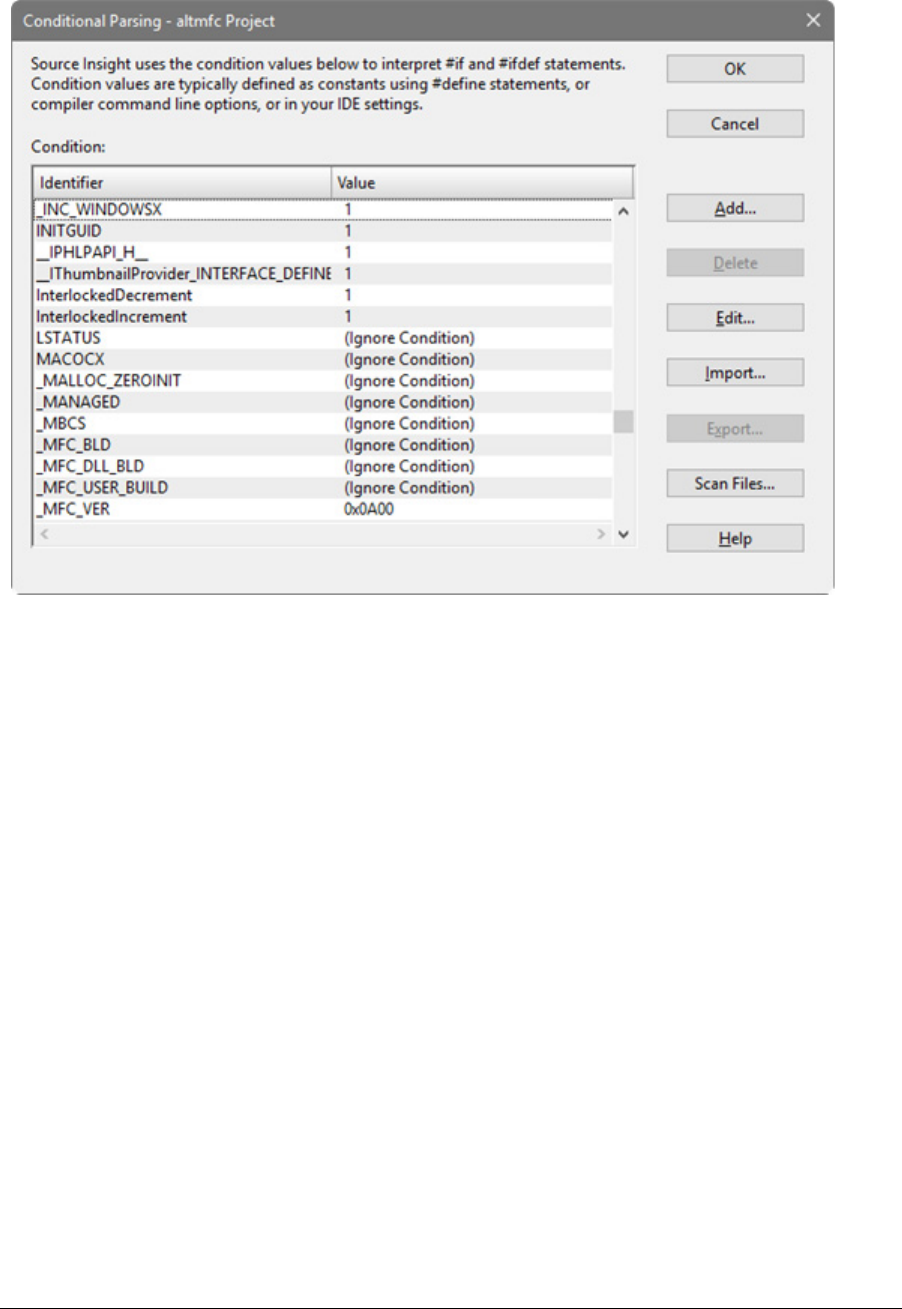
Commands Overview
178 Source Insight 4 User Guide
access this dialog, select Options > Preferences: Languages, then click the corresponding "Conditions" but-
ton.
Add / Delete
Use this to add a new condition identifier and its value, or to delete entries in the list.
Edit...
Use this to edit the value of the selected identifier in the list.
Import / Export...
You can import or export the current condition list.
Scan Files...
This will scan your project’s source files to determine what conditional identifiers are used, and their defined
values, if any. The results are put into the list. Note that the value of "Ignore Condition" means that Source
Insight assumes the value is unknown, and will ignore preprocessor statements that use that condition iden-
tifier.
Context Window
This command toggles the Context Window visibility on and off.
See “Context window” on page 90.
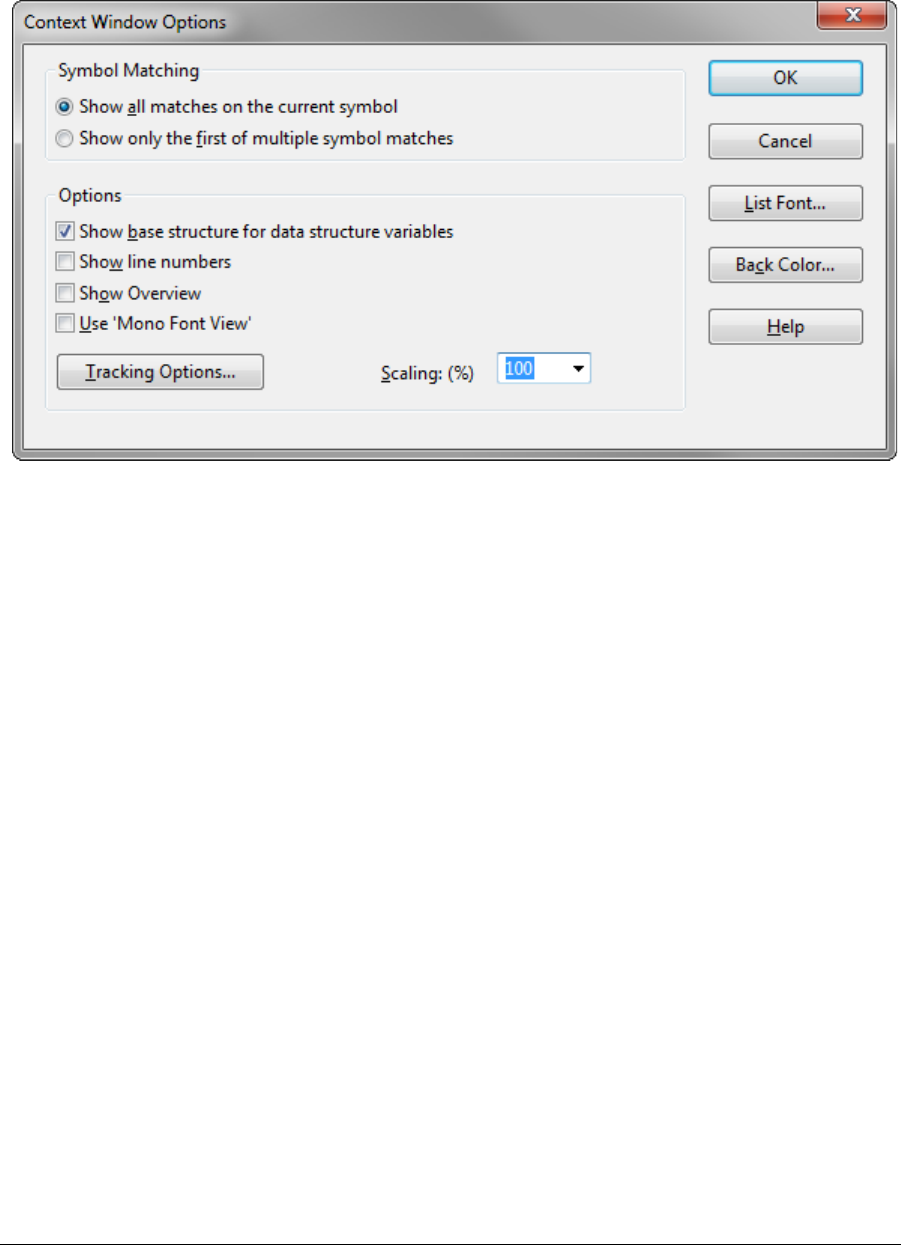
Source Insight 4 User Guide 179
Commands Overview
Context Window Options
This command allows you to specify properties for the Context Window. The Context Window tracks what
you select and type in text windows, as well as what files you select in the Project Window, Relation Window,
and Clip Window. See “Context window” on page 90.
Show all matches on the current symbol
Select this to have the Context Window show a complete list of all symbol matches in its list. If you have mul-
tiple definitions with the same name, then they will all appear in the list.
Show only the first symbol match
Select this to show only first matching symbol's definition. If you often have symbols that are defined in more
than one place but are essentially the same thing, then you might want to turn on this radio button.
Show base types for data structure variables
Select this to have Source Insight decode variable declarations and try to locate base structure-type defini-
tions (i.e. structs, unions, classes, etc.).
For example:
struct S { int x; };
struct S *psvar;
psvar->...
If you select inside of psvar, then Source Insight will look at the declaration of psvar, see that it is a pointer to
struct S, and then show you the declaration of struct S.
Clear this option to simply show the declaration of the each variable, without walking up the declaration
hierarchy.
Show line numbers
Makes line numbers visible in the Context Window.
Use 'Mono Font View'
Displays the Context Window in the Mono Font View style, which uses limited formatting. See “Mono Font
View” on page 262 .
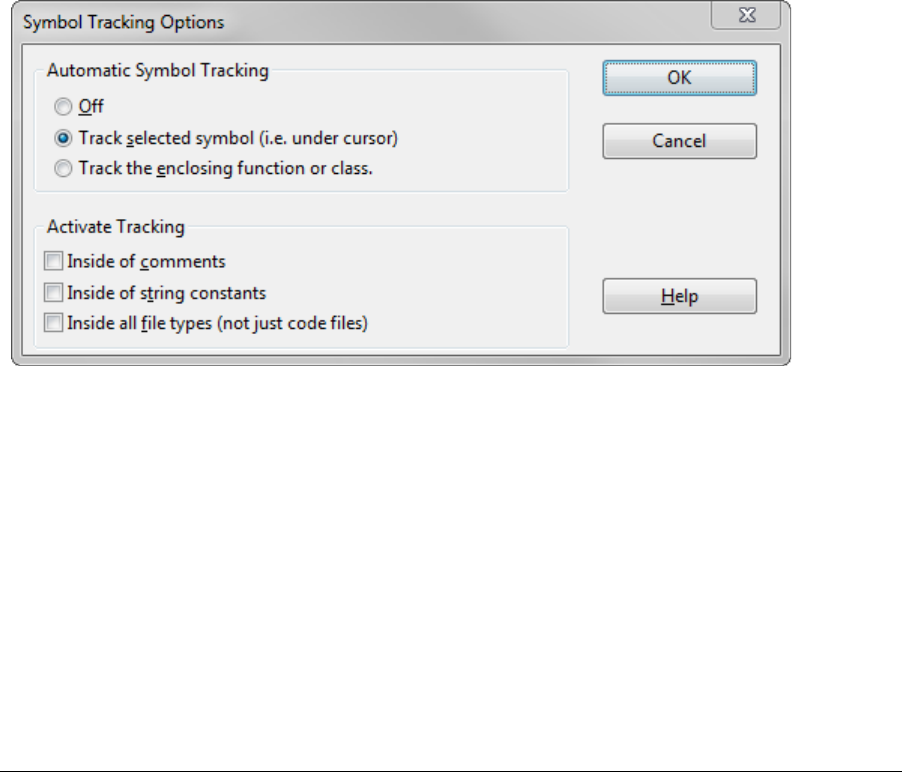
Commands Overview
180 Source Insight 4 User Guide
Scaling (percentage)
Sets the percentage of text size scaling in the Context Window.
Tracking Options…
Click this button to view the Symbol Tracking Options dialog box, which displays options that guide what the
Context Window will pay attention to.
Font…
Specifies the font used to display symbol lists and source code in the Context Window. If the Context Window
is currently showing a list, then this specifies the list font. If the Context Window is currently showing a source
file, then this specifies the source code font.
Text Color…
Specifies the text color of list items in the Context Window. The colors of source code are determined by the
Syntax Formatting options in the Preferences dialog box.
Back Color…
Specifies the background color of list items in the Context Window. The colors of source code are determined
by the Syntax Formatting options in the Preferences dialog box.
Symbol Tracking Options
This dialog box displays options that control what type of symbols or selections the Context Window will
react to.
Automatic Symbol Tracking
As you move your cursor around in a source file, the Context Window "tracks" the symbol under the cursor, or
around the cursor. This group of options tells the Context Window what to track.
Off
Select this to disable automatic symbol tracking.
Track selected symbol (i.e. under cursor)
Select this to have the Context Window look up the definition of the symbol currently under the typing cur-
sor.

Source Insight 4 User Guide 181
Commands Overview
Track the enclosing function or class
Select this to have the Context Window show the definition of the function or class that contains the typing
cursor. This is useful to have a function definition and formal parameters visible in the Context Window while
you edit the function.
Activate Tracking Group
This group controls when the automatic tracking is activated.
Inside of comments
Select this to have the Context Window look up symbols when the cursor is inside of comments.
Inside of string constants
Select this to have the Context Window look up symbols when the cursor is inside of quoted string constants.
Inside all file types
Select this to have the Context Window look up symbols when the cursor is inside any type of file, not just
source code files.
Copy
The Copy command copies the contents of the current selection to the clipboard. Once in the clipboard, it
can be pasted to other locations using the Paste command. This command is only allowed if the current
selection is extended.
Copy File Path
Copies the full file path of the current file to the clipboard.
Copy Line
The Copy Line command extends the current selection to include whole lines and copies that selection to the
clipboard. Each use of Copy Line extends the selection down one more line.
Copy Line Right
The Copy Line Right command copies the text from the insertion point to the end of the current line into the
clipboard.
Copy List
This command appears on the right-click menu when you click on a list. It copies the contents of the list to
the Clipboard. This lets you make a copy of any list, or paste any list into a file and print it.
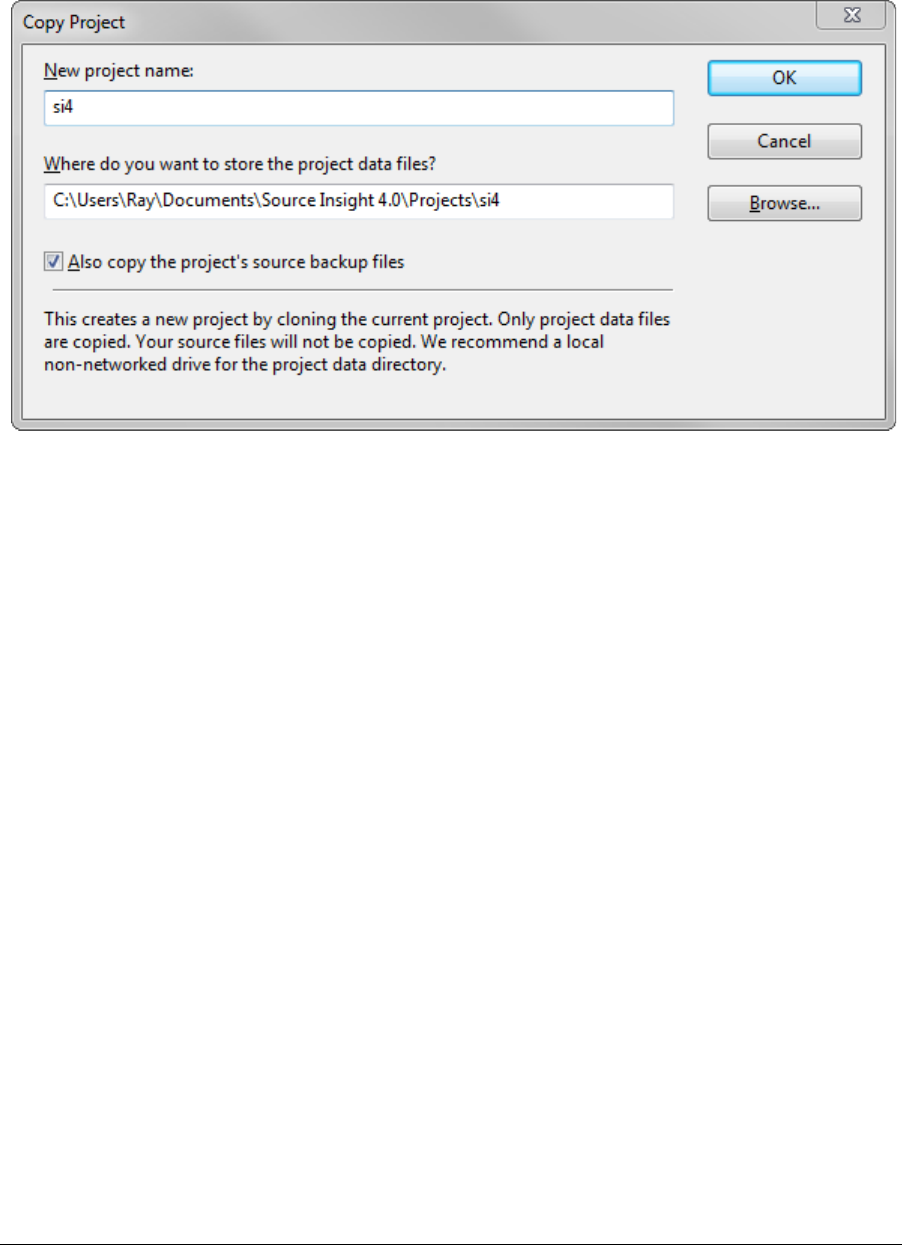
Commands Overview
182 Source Insight 4 User Guide
Copy Project
This copies the current project to a new project. The new project is created by cloning the current project
data files. Your source files will not be copied. The new project will point to the same source files. If you delete
the original project after copying it, you have effectively renamed the project.
New project name
Enter the name of the new project. Do not enter a path name here. This is the name that will appear in the
Open Project dialog.
Where do you want to store the project data files?
Specify the full path to the data file folder here. This is where Source Insight will store all its project data,
independently of your source files. By default, Source Insight creates a sub-folder with the same name as the
project. For more information on the project data location, See “New Project” on page 263.
Also copy the project’s source backup files
If selected, then any files in the current project’s backup folder are also copied to the new project’s backup
folder.
Copy Symbol
This command appears on the Symbol Window right-click menu.
The Copy Symbol command copies the selected symbol, along with its definition body, to the Clipboard. For
example, if you click on a function name and select Copy Symbol, then the whole function is copies to the
Clipboard.
Copy To Clip
The Copy To Clip command copies the contents of the current selection to a clip buffer that you name. The
Clip Window is activated when you use this command so that you can specify the destination clip name.
After either selecting a clip item in the list, or typing a clip name, press the Enter key to complete the copy
operation.

Source Insight 4 User Guide 183
Commands Overview
Create Key List
The Create Key List command generates a new file named Keylist.txt containing a list of all commands and
the keystrokes assigned to each command. The Keylist.txt file is just a regular, unsaved file. You can edit the
file normally. This is useful for creating your own keyboard quick reference guide.
Create Bookmarks from Relation Items
Creates new bookmarks from all the items in the Relation window.
Create Command List
This generates a new file named "Command List", which contains a list of all commands and their descrip-
tions. The output file is just a regular, unsaved file. You can edit the file normally. This is useful for creating
your own command quick reference guide.
Cursor Down
The Cursor Down command moves the insertion point down by one line.
Cursor Left
The Cursor Left command moves the insertion point left by one character.
Cursor Right
The Cursor Right command moves the insertion point right by one character.
Cursor Up
The Cursor Up command moves the insertion point up by one line.
Custom Commands
Custom commands are similar to command shell batch files. They allow Source Insight to spawn any com-
mand line driven tool, and to capture its output. Custom commands can also execute Windows programs.
Customs commands can execute, and then return to Source Insight. The output of shell custom commands
can be captured into a file for editing, or can be pasted into the current selection. Custom commands are
stored as part of the current configuration.
Custom commands can be used to spawn compilers, source control programs, and file filters, such as "sort".
Tip: A shortcut for editing a custom command is to hold down the Ctrl key while selecting the command. The Cus-
tom Commands dialog box will appear for that command.
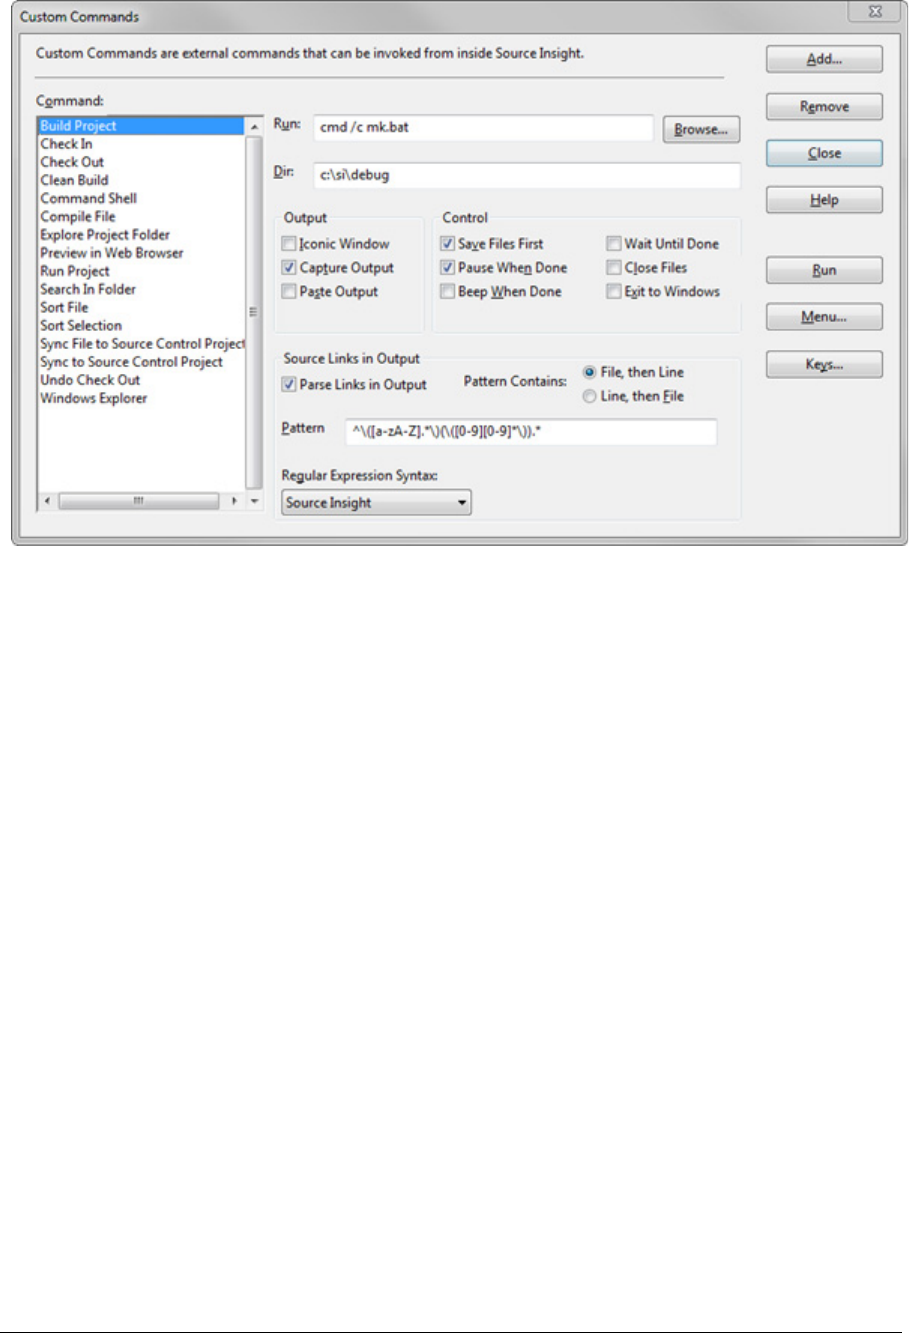
Commands Overview
184 Source Insight 4 User Guide
Custom Command Dialog box
Command
Displays the name of the currently selected command. This pull-down list contains a list of all the custom
commands defined.
Run
This is the command line to be executed when the custom command is invoked. The Run text box can con-
tain special meta-characters. See “The 'Run' Field Format” on page 186.
Dir
The working directory used when executing the script specified in the Run text box. Source Insight sets the
current working directory to this location before running the command. If left blank, then Source Insight sets
the current working directory to the project source directory. This field can also contain special meta-charac-
ters, just as with the Run field. See “The 'Run' Field Format” on page 186.
Output Group
This group of options control what happens to the output of the command.
Iconic Window
If enabled, the spawned program will be put into a minimized window. If not enabled, then the program will
launch normally.
Capture Output
If enabled, the standard output of the command will be captured and will appear in a new command output
window when the command completes. The command output window's title will be the name of the custom
command. If not enabled, the standard output will not be captured.
Paste Output
If enabled, the standard output of the command is pasted to the current selection.

Source Insight 4 User Guide 185
Commands Overview
Control Group
This group of options specifies what Source Insight does before and after the command runs.
Save Files First
If enabled, Source Insight will perform a Save All command prior to executing the command. The Save All
command will prompt you for each file that has been edited to see if you want to save the file.
If not enabled, the command will be executed without saving any changed files. The unsaved changes will be
retained when the command completes and control returns to Source Insight. If the command should cause
a crash, Source Insight will be able to perform a recovery and all changes will be intact. See “Recovering From
Crashes” on page 130.
Pause When Done
If enabled, Source Insight will display this message in a command shell window when the command com-
pletes:
Press any key to return to Source Insight...
If not enabled, the shell window will terminate after the command completes.
Beep When Done
If enabled, Source Insight will beep when the command terminates.
Wait Until Done
If enabled, then Source Insight will suspend itself until the command finishes.
If not enabled, then Source Insight will run the command and continue. You will be able to switch back to the
Source Insight window and continue working while the command runs in the background.
Exit Source Insight
Source Insight will exit after launching the program.
Source Links in Output
These options specify how the output is to be treated after the command finishes. You may tell Source Insight
to parse through the captured output to find specific warning or error messages.
Parse Source Links
The command output will be searched for source link patterns. The patterns typically will match warning and
error messages. If a pattern match is found, Source Insight inserts a source link at that line. The source link is
used to link the warning or error message to its target source line. If Parse Source Links is enabled, you must
have a valid search expression in the Pattern text box.
Pattern contains
File, then Line and Line, then File. This indicates the order of the groups in the pattern expression.
Select File, then Line if the first group in the pattern expression is the file name and the second group is the
line number. With this setting, the second group, (i.e. the line number), is optional.
Select Line, then File if the first group in the pattern expression is the line number and the second group is the
file name.
Pattern
Contains the regular expression used to search the command output for file names and line numbers. This is
ignored if the Parse Source Links option is disabled. If the option is enabled, then this text box must contain a
valid regular expression that contains "groups" for the file name and the line number. See “Regular Expres-
sions” on page 109.

Commands Overview
186 Source Insight 4 User Guide
Regular Expression Syntax
Selects the type of regular expression syntax to use with the pattern.
Define
Click this button to define the command named in the Name text box. If the command already exists, it is
redefined.
Remove
Click this button to delete the command.
Run
Click this button to define and execute the command.
Cancel
Click this button to cancel the dialog box. Any definitions made in the dialog box will be retained.
Menu…
Click this button to define the current command and jump to the Menu Assignments dialog.
Keys…
Click this button to define the current command and jump to the Key Assignments dialog.
The 'Run' Field Format
The Run text box contains the command line to execute when the custom command is invoked. The Run text
box can contain more than one command. Each command should be separated by a semi-colon. For exam-
ple,
cat make.log;echotime
This string causes "cat make.log" to execute, followed by "echotime".
Running the Command Shell
If you want to run a shell command, such as "type", or "dir", or you want to run a batch file, then you have to
run cmd.exe first. For example,
cmd /c mybat.bat or
cmd /c type foo.txt
If the Run string contains more than one command, separated by semi-colons, you don't need to run
cmd.exe because Source Insight creates a batch file from the run string commands and runs cmd.exe auto-
matically in that case. For example,
cat readme.txt;dir
This works fine because it is already running in a batch file inside a shell.
Command Line Substitutions
Both the Run text box, and the Dir text box can contain meta-characters that cause the following items to be
substituted in the string.
Table 4.3: Custom Command Meta-Characters
Character Expands to Example
%f
full path name of the current file
*
c:\myproj\file.c
%r
path name of current file rela-
tive to the project source direc-
tory *
file.c

Source Insight 4 User Guide 187
Commands Overview
You can also postfix any of the above characters marked with * with either of the following modifier charac-
ters.
Path Variables
You can also use Path Variables in Run and Dir text fields. See “Predefined Path Variables” on page 153.
ShellExecute Commands
Tip:
ShellExecute lets you invoke Windows Shell commands.
Custom Commands support the "ShellExecute" function, which lets you tell the Windows shell to perform an
operation on a specified file. The nice thing about ShellExecute is that you don't need to know what specific
application is registered to handle a particular type of file. For technical background information, see the
"ShellExecute" function in the Windows Shell API documentation.
%n
leaf name of the current file * file.c
%d
directory path of the current file c:\myproj
%h
directory path of current file
without the drive letter
\myproj
%b
leaf name of current file w/o
extension *
file
%e
extension of the current file c
%c
drive letter of the current file c:
%p
the current project name c:\myproj\myproj
%j
the source directory of the cur-
rent project
c:\myproj
%J
the data directory of the current
project
C:\Documents and Set-
tings\Jim Smith\Docu-
ments\Source Insight
4.0\Projects\Base
%v
the drive letter of the current
project's source directory
c:
%o
leaf name of the project without
path
myproj
%l
the current line number any number
%w
first word in the selection, or the
word under the cursor
any word
%s
name of a temp file where the
current selection is saved while
the custom command runs.
d:\tmp\vt0004.
%a
the current date 05-12-02
%t
the current time 08:23
%1 - %9
user is prompted for arguments any strings
Character Expands to Example
%o
for all open files
%f%o
%m
for all modified files
%f%m
Table 4.3: Custom Command Meta-Characters
Character Expands to Example

Commands Overview
188 Source Insight 4 User Guide
To use this feature, the Run string in the custom command needs to start with "ShellExecute". The format
should be:
ShellExecute <verb> <filespec> <optional parameters>
For example, to browse a website:
ShellExecute open http://www.somedomain.com
The verb is a single word, which can be one of the following:
•edit Opens an editor for the file.
•explore The function explores the folder specified.
•open The function opens the file specified. The file can be an executable file or a document file. It can
also be a folder.
•print The function prints the document file specified. If filespec is not a document file, the function
will fail.
•properties Displays the file or folder's properties.
•find Launches the Find Files application found on the Start menu.
•"" (empty string) to skip this parameter to ShellExecute.
The filespec parameter can be any valid path. Use double quotes around complex path names with embed-
ded spaces. You can also use a meta-character, such as %f (for the current file). It can also be the name of an
executable file.
The optional parameters list is anything to the right of the filespec. It specifies the parameters to be passed to
the application that ultimately runs. The format is determined by the verb that is to be invoked, and the
application that runs. You can use custom command meta-characters here as well.
The working directory text box of the custom command is applied before the ShellExecute is invoked. How-
ever, output cannot be captured or parsed when using ShellExecute.
ShellExecute Examples
Here are some useful examples showing how to use ShellExecute.
Running Custom Commands in the Background
When Source Insight spawns a Custom Command shell program, it actually runs a program called
Sihook4.exe. Sihook4.exe in turn spawns the command and performs the output capturing. You can run a
custom command and click back on the Source Insight window to continue editing with Source Insight while
the custom command runs in the background.
Creating a Compile and Build command
You can launch a compiler from Source Insight, using a custom command, and have the output captured and
parsed for error messages. Then you can use Go To First Link and Go To Next Link to view each error in your
source files.
Action Custom Command Run String
To browse to a web site: ShellExecute open http://www.someweb-
site.com
To explore your Windows
documents file folder:
ShellExecute explore "C:\Documents and
Settings"
To launch Internet Explorer: ShellExecute "" iexplore
To preview a file in Internet
Explorer:
ShellExecute "" iexplore %f
To search for files in the cur-
rent project folder:
ShellExecute find %j

Source Insight 4 User Guide 189
Commands Overview
To create a simple Compile command
To create a simple Compile command using the Microsoft ® C++ compiler:
1. Select Tools > Custom Command.
2. Type "Compile File" in the Name text box.
3. In the Run text box, type "cl %f". This invokes the compiler on the current file. You could also
invoke a "make" program or a batch file here instead. If you use a batch file, you must run the com-
mand processor first. For example, "cmd /c mybatch.bat".
4. Turn on the Parse Source Links option. The default parse pattern is setup to parse the compiler
error messages from the compiler output.
5. Turn on the Save Files First option so that your file is saved before running the compiler.
6. Click the Define button to save the new command. Alternatively, you can click the Menu or Keys
buttons to define the new command and run the Menu Assignments or Keyboard Assignments com-
mands, which will allow you to put the command on a menu or assign a key to it.
The Parse Source Links option causes Source Insight to search the compiler output and setup source links
for each error message. In this case, the "link sources" are each error message in the compiler output file. The
"link target" for each link is the file and line number given in each error message.
To Build a Project with Microsoft ® Developer Studio
1. Select Tools > Custom Command.
2. Select the Build Project command in the Command drop-down list. The Build Project custom com-
mand is predefined when you install Source Insight.
3. In the Run text box, type the following:
C:\MsDevPath\msdev project.dsp /make /rebuild
Where "MsDevPath" is the path to your msdev.exe program, and "project.dsp" is the name of the Devel-
oper Studio project.
This line invokes msdev.exe to rebuild the given project.
4. Turn on the Parse Source Links option. The default parse pattern is setup to parse the compiler
error messages from the compiler output.
5. Turn on the Save Files First option so that your file is saved before building the project.
Viewing Compiler Errors
To view source lines with errors:
1. Run the Compile File custom command, which is defined as described above.
2. Assuming there are errors, when the compiler finishes the error messages will be in the "Compile
File" window. Source Insight will automatically setup the source links and run the Go To First Link
command. The first error message and the erroneous source line will be selected and made visible.
3. Use the Go To Next Link command (Shift+F9). The next error message in the "Compile File" window
is selected, and the target of that link is shown, as was the first error.
4. Continue to use the Go To Next Link command until all the links (error messages) have been visited.
If there are no more links, then Source Insight beeps and the message, "No links." will appear in the
status bar.
Cut
The Cut command copies the contents of the current selection to the clipboard, and deletes the selection.
Note that although the Cut command deleted the current selection, you still have that text saved in the clip-
board. You could reverse the deletion by following the Cut command with a Paste command.

Commands Overview
190 Source Insight 4 User Guide
Cut Line
The Cut Line command copies the current line to the clipboard and deletes the line. The cursor can be any-
where on the line when you use this command.
Cut Line Left
The Cut Line Left command cuts all the characters to the left of the insertion point on the current line.
Cut Line Right
The Cut Line Right command cuts all the characters to the right of the insertion point on the current line.
Cut Selection or Paste
The Cut Selection or Paste command performs a Cut command if the current selection is extended, or it per-
forms a Paste command if the selection is an insertion point.
If you assign this to a key or mouse button, this command makes moving text around easy because you only
have to press a single key or mouse button.
To use this command:
1. Select the text you want to move by clicking and dragging with the left mouse button.
2. Click the mouse button or press the key to cut the text.
3. Point and click the mouse button to select the new location.
4. Click the mouse button or key to paste the text.
Cut Symbol
(On the Symbol Window right-click menu)
The Cut Symbol command cuts the selected symbol.
Cut To Clip
The Cut To Clip command copies the contents of the current selection to a clip buffer that you name, and
then deletes the text. The Clip Window is activated when you use this command so that you can specify the
destination clip name.
Cut Word
The Cut Word command cuts the word to the right, starting at the insertion point.
Cut Word Left
The Cut Word Left command cuts the word to the left, starting at the insertion point.
Deactivate License
Deactivates and de-authorizes your installation of Source Insight. This frees your license up to be installed
and used on a different machine.

Source Insight 4 User Guide 191
Commands Overview
Delete
The Delete command deletes any file on disk, including the currently open file.
Delete All Clips
This command deletes all user clips from the Clip Window. The Clipboard is a special clip that cannot be
deleted.
Delete Character
The Delete Character command deletes the character at the insertion point. If the current selection is
extended, it deletes the whole selection.
Delete Clip
(On Clip Window tool bar and right-click menu)
The Delete Clip command deletes a clip file from the Clip Window and from disk.
Delete File
The Delete File command deletes a file from the disk and removes it from the current project if it was part of
the project. If you specify the current file, then that file is closed and deleted.
Delete Line
The Delete Line command deletes the current line. Unlike the Cut Line command, the clipboard is not
effected.
Directory Compare
This opens the Directory Compare window, which is used to compare the files in two directories. The Direc-
tory Compare windows shows two lists of files side by side - the left and right directory contents.
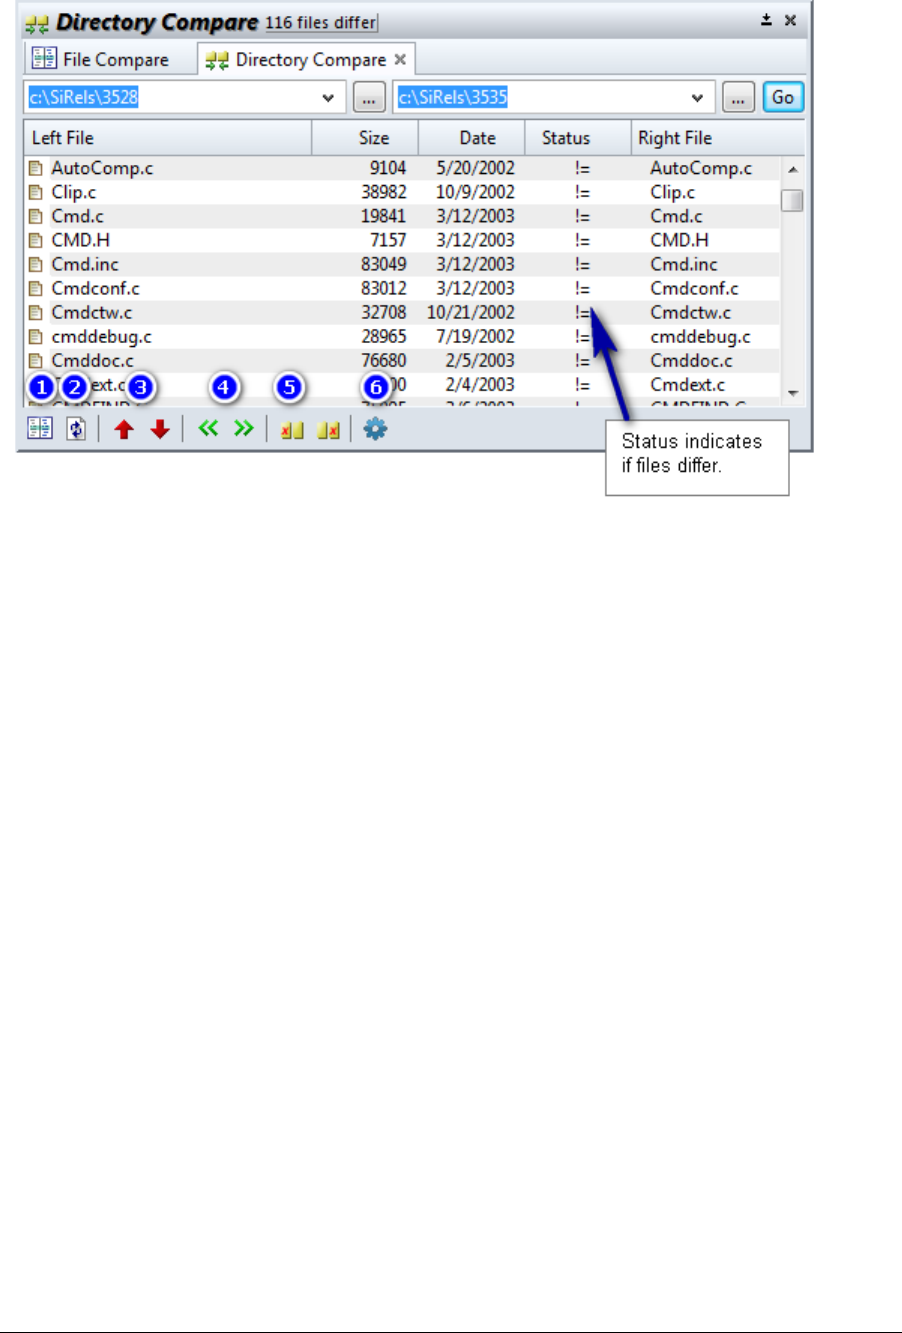
Commands Overview
192 Source Insight 4 User Guide
The File Compare window can be used to compare two versions of a file. See “File Compare” on page 205.
Toolbar
1. Compare Selected File - opens the File Compare window to show differences between the selected
files.
2. Refresh / Rescan Directory and compare again.
3. Go to Previous / Next file that differs.
4. Copy File From Left-to-Right and Right-to-Left directories.
5. Delete the Left / Right file.
6. Open the Directory Compare Options. See “Directory Compare Options” on page 193.
To compare directories:
1. Type the path of the left directory above the left list, or click the ... button to browse.
2. Type the path of the right directory above the right list, or click the ... button to browse.
3. Press Enter or click the Go button.
4. Source Insight will scan the files in both directories and show the results below in a side by side list-
ing.
The Status column in the center of the list indicates if the left-hand file is the same, different, newer, or older
than the right-hand file.
You can control how the files are compared by clicking the properties button. See “Directory Compare
Options” on page 193.
To compare a file within a directory:
1. Using the Directory Compare window, navigate to the directories that contain the file versions.
2. Double-click on a file in the directory listing. The File Compare window will open to show the two
versions of the file side by side. See “File Compare” on page 205.

Source Insight 4 User Guide 193
Commands Overview
Directory Compare Options
This sets the way that the Directory Compare window looks and how it compares files.
Show Columns
Check mark the columns you want to see in the file listing.
Comparison Method
These options determine how each file in the directories is compared.
Only compare file modification dates
Only the modification dates are compared. The contents of the files, and the file size as reported by the oper-
ation system are not compared.
Only compare file sizes and modification dates
Both the modification dates and the file sizes are compared. The contents of the files are not compared.
Compare file contents
The file system date stamps are ignored, and the file contents are scanned for differences. Use this when you
don't trust the time stamps in the file system. However, this method is the slowest.
When Comparing File Contents
These options control how the contents of the files are compared.
Ignore differences in white space
Only non-white space characters in the files are compared. White spaces are ignored.

Commands Overview
194 Source Insight 4 User Guide
Ignore differences in end-of-line characters
Differences in the end-of-line characters are ignored. This is useful if you are comparing files between Unix,
Windows, or Mac environments where the end-of-line characters are different.
Other Options
Show only known file types
Check this box to limit the files to the file types defined using the File Type Options command. The file types
are usually all some kind of text file, so this open prevents Source Insight from attempting to compare any
binary file.
Confirm before copying or deleting files
Check this box to have Source Insight prompt you with a confirmation before you copy or delete a file in the
Directory Compare window.
Font & Color...
Click this to customize the font and background color of the window.

Source Insight 4 User Guide 195
Commands Overview
Display Options
This command brings up the Display page of the Preferences dialog box. These options are part of the current
configuration.
Display Elements
The Display Elements group is used to turn on and off elements of the user interface.
Main Tool Bar
Displays the main toolbar at the top of the Source Insight application window.
Search Bar
Displays the File Search bar that appears below the main toolbar.
Status Bar
Displays the status bar at the bottom of the Source Insight application window.
Popup Toolbar
This enables the popup toolbar that appears when you whole-word select a symbol name. The popup tool-
bar fades into view and lets you quickly jump to a symbol’s definition, a function’s caller, or find references to
a symbol. The popup toolbar is first shown translucent, but it gets more opaque as you move the mouse
closer to it.

Commands Overview
196 Source Insight 4 User Guide
Overviews (based on file type)
This globally enables the use of Overview scrollers in all source windows. See “The Overview Scroller” on
page 27.
When enabled, each file type determines if the Overview scroller is used in that type of file. See “File Type
Options” on page 213.
To disable the use of Overview scrollers in all source windows, disable this option.
Tab Tray
Turns on and off the tab tray at the bottom of the Source Insight application window. Floating windows that
are minimized appear in the Tab Tray.
Reset
Resets the positions of all the auxiliary windows so that they are moved onto the main monitor, and are not
transparent.
Options Group
The items in the Options Group control general options for different display elements in the program.
Page Number in status bar
If enabled, then the current page number that contains the current selection is also displayed in the status
bar. The page number is calculated from the size the printer font selected in the File Type Options command,
plus syntax formatting options, and the settings made in Page Setup.
Show exact case of file names
If enabled, then Source Insight displays file names using the exact upper and lower case of the name as it
appears in the file system. If not enabled, then Source Insight will format the file name to look a little nicer by
converting it to lower case and capitalizing the first letter. Source Insight does not alter the file name if it
already contains a mixture of upper and lower case letters.
This option only affects how Source Insight displays file names. The file names are stored internally and in
the database exactly as the file system reports them.
Show read-only file names with ! mark
If enabled, then Source Insight displays read-only file names in window titles with an exclamation point (!) at
the beginning of the file name. This only affects how the file name is displayed in window titles.
Show current project name in application background
If enabled, then the name of the current project is drawn in the multiple document background area of the
Source Insight application window.
Tile source and destination windows for Source Link commands
If enabled, then Source Insight tiles two windows to show the source and destination source links whenever
you use one of the source link commands, such as Go To First Link, or Go To Next Link. The source link com-
mands are also used when you run a custom command that parses output for source links (such as a "com-
pile" command). If not enabled, then Source Insight will not alter the window arrangement when you used
the source link commands, but it will active the window containing the target of the source link.
Source Insight does not perform tiling if the current window is maximized.
Enable Animations
Enables simple animations to show when input focus changes to a floating tool window, and when floating
windows are "rolled up" or "rolled down". You might want to turn off animations if your video card perfor-
mance is slow.

Source Insight 4 User Guide 197
Commands Overview
Trim long path names with ellipses
Long file path names are shortened and ellipses are inserted. This affects areas such as the title bar of win-
dows.
Panels Group
These options affect floating and docked panel windows. See “Panel Windows” on page 31.
Toolbar position in panels (Top or Bottom)
Each panel has a toolbar. You can select whether it is displayed at the top or bottom of the panel.
Enable transparent panels
If enabled, then floating panel windows will contain a transparency button in the title bar area of the window
so that you can adjust the panel’s transparency.
Other Buttons
Styles…
Edits style properties. See “Style Properties” on page 342.
Spacing...
Click this button to change character spacing options. See “Character Spacing Options” on page 198.
Window Tabs...
Click this button to edit the window tab options.
Scroll Bars...
Click this button to edit the vertical scroll bar options. See “Scroll Bar Options” on page 321.
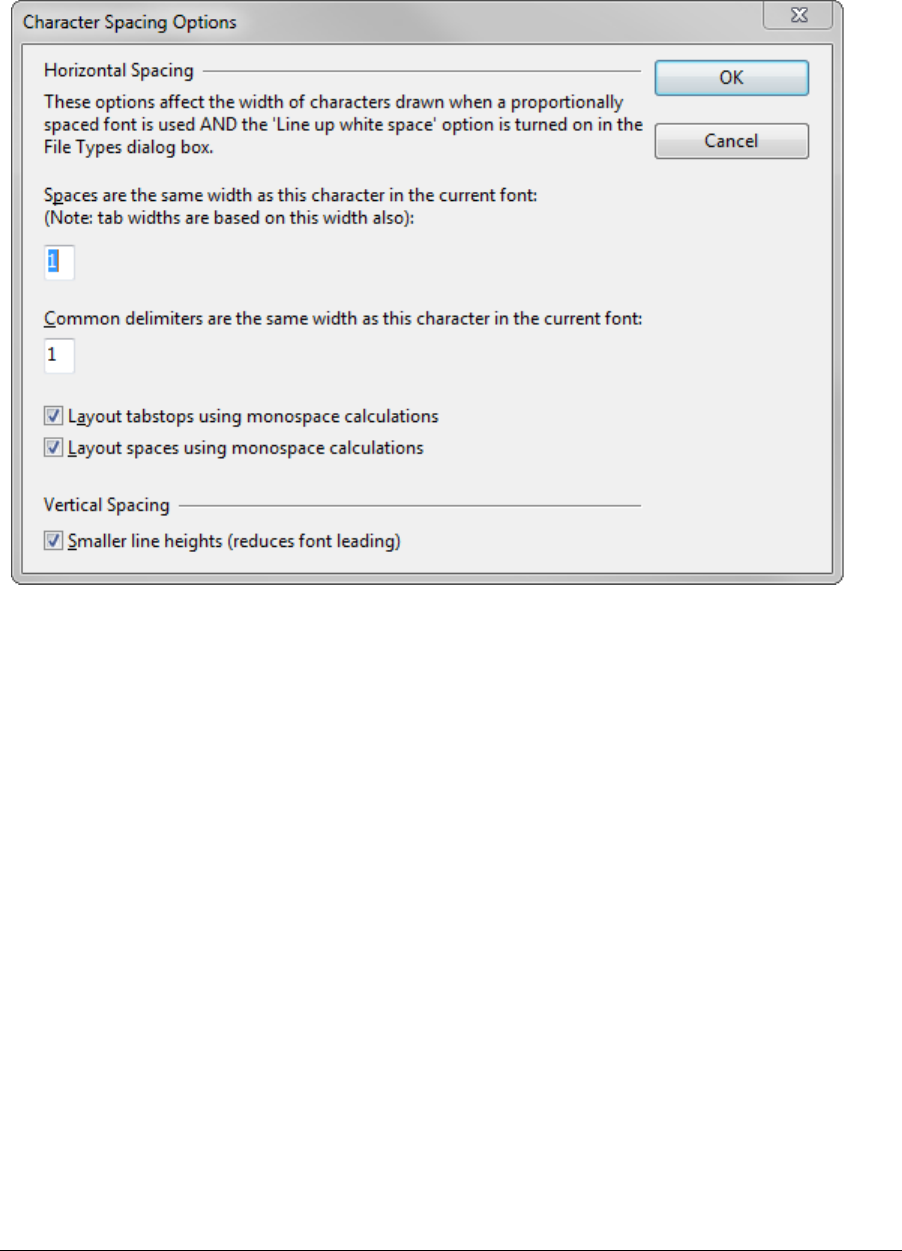
Commands Overview
198 Source Insight 4 User Guide
Character Spacing Options
Character spacing options are used to control the horizontal and vertical spacing of characters. This dialog
box lets you adjust how Source Insight computes the width of spaces, tabs, and common delimiters. The first
two settings have no effect unless Line up white space is enabled in the File Type Options dialog box.
Horizontal Spacing Options
Horizontal spacing options affect the width of characters drawn when a proportionally spaced (variable-
pitch) font is used and the Line up white space option is enabled in the File Type Options dialog box. If
enabled, Source Insight will attempt to use a fixed width for spaces and tabs so that spaces and tabs line up
the same way they do with a fixed pitch font. Programs generally look better with this turned on if you are
using a proportional font.
The Space-Width Character
The space width character controls how wide a single space is, and therefore the displayed width of tab char-
acters (tabs are some number of spaces wide). Source Insight computes a space to be same width as this
character in whatever font is used for displaying. For example, the character "1" specified in this dialog box
means that a space character will have the same width as the character "1". (Do not confuse the character
with its numeric value 1. Source Insight does not interpret the character's numeric value.)
Source Insight computes the width based on the space width character so that spaces will scale correctly,
independent of the font and the font size used.
In a mono-spaced font, such as Courier New, or Consolas, all characters are the same width, including
spaces. However in a proportional font, such as Calibri, a space character is typically narrow, and many char-
acters may be wider than the space character in the font. This option gives you control over how wide a space
character is displayed, and therefore how wide tabs are.

Source Insight 4 User Guide 199
Commands Overview
Working with Wide Fonts
You may want to change this setting if you are working with a font that has unusual character widths, or if
you just want to expand or contract your white space and indentation amounts. A narrower character will
shrink the white space, and a wider character will expand it. This width is independent of the tab width set-
ting specified in the File Type Options dialog box because the tab width is specified as a number of fixed-
width character columns.
The common delimiter character controls the width of delimiters in a way similar to spaces. The delimiters
affected are - | \ / and ! which are typically narrow characters in most fonts.
Layout tabstops using monospaced calculations
This option controls how tab widths are displayed. If enabled, then the width of a given tab will calculated
assuming that you were using a monospaced font. This will generally make tabbed columns of text line up,
even if you are using a variable pitched font for displaying your source code.
Layout spaces using monospaced calculations
This aligns space characters to appear how they would if a monospaced font is used. For example, 4 spaces in
a row would appear the same width as a tab stop (if the tab width was 4 spaces). Source Insight looks at each
line and tries to determine simply when to apply this rule to a space character. If it looks like you meant to
line up columns manually using spaces, then it applies this rule. It only applies the rule for 2 or more consec-
utive spaces. Otherwise, it calculates a space width to be the natural width of a space in the given font. This
option is on by default.
Using this option, space size is natural, unless it looks like you meant to line up columns by using tabs and
spaces. This is not an exact science!
Source Insight should be doing a good job of showing you how text lines up in a simple display, even if you
are using Syntax Formatting. You can also use the View > Mono Font View command to switch to a simple
monospaced font view and see the text alignment.
Vertical Spacing Options
These options control vertical line spacing.
Smaller Line Heights
Check this box to compress the line heights in order to show more lines of text on the screen. This is accom-
plished by reducing the amount of "leading" added to the font by the operating system. Font leading is
added to make vertical line spacing look pleasing in printed documents. However, it is not really necessary
for editing source code.
Why All The Fuss About Spacing?
You may be wondering, "Why go to all this trouble? Can't you make a tab stop be ½ inch or whatever?" The
answer is a little complicated. The problem is, unlike a word processor, Source Insight is trying to maintain a
text file that other people may want to look at in a different editor or viewed in a fixed-pitch font.
A word processing program attempts to show text the way it would be printed on a physical printer. Source
Insight is trying to show you how the text would look if you were looking at it in another editor in a fixed pitch
font.
In a word processing program, text dimensions are measured in physical units, like inches or centimeters. It
makes sense to have a tab stop at say, ½ inch. When the text is printed, the word processor makes sure the
tab stop looks ½ inch wide on the printer too.
In Source Insight, tab stops are measured in fixed-size character columns. Source Insight tries to line up
tabbed columns the same way it does with a fixed-pitch font.
If Source Insight just did the simple thing of moving to the next tab position, based on the horizontal pixel
position, then when you look at the code with a simple fixed-pitch font, there may a different number of tabs
than it appears on the screen.

Commands Overview
200 Source Insight 4 User Guide
Here is an example. Let's say somebody wrote this in Notepad, using Courier New (a fixed-pitch font), with
tabs between columns so that X and Y, and Q and R line up. Both the words "narrow" and "very-wide" fit
within column 0 - one tab stop, as shown below.
Now, in Source Insight, with rich formatting, "narrow" fits within a tab width, but "wide" doesn't. If Source
Insight just pushed Y over by one more tab stop, this is what you get:
Now Y is aligned with Q. The rest of the columns don't line up anymore. In fact, this is exactly what happens if
you turn off Line up white space in File Type Options.
When Line up white space is enabled, Source Insight tries to help the situation by lining up tab positions like
this:
If your code looks like it does above, then you may want to specify a different space width character, such as
"M" or "W", which are wider letters in most fonts. This would have an effect like this, where all tab stops
would be wider:
This also works the other way when the text looks a lot narrower than it would be in a fixed pitch font.
Drag Line Down
Moves selected text down by one line. This is useful for dragging a whole line or lines down below something
else in a file.
Drag Line Down More
Moves selected text down by several lines. This works like the Drag Line Down command, only it moves the
lines further.
Drag Line Up
Moves selected text up by one line. This is useful for dragging a whole line or lines up above something else in
a file.
Drag Line Up More
Moves selected text up by several lines. This works like the Drag Line Up command, only it moves the lines
further.
Tab stop:0 123
Line 1: narrow X Q
Line 2: wide Y R
Tab stop: 0 1 2 3
Line 1: narrow X Q
Line 2: wide YR
Tab stop: 0 1 2 3
Line 1: narrow X Q
Line 2: wide Y R
Tab stop: 0 1 2
Line 1: narrow X Q
Line 2: wide YR

Source Insight 4 User Guide 201
Commands Overview
Duplicate
The Duplicate command creates a duplicate of whatever is selected.
Duplicate Symbol
(On the Symbol Window right-click menu)
The Duplicate Symbol command creates a duplicate of the selected symbol.
Edit Condition
Use this command to edit the value of a selected parsing condition variable. This is used for languages that
support conditional compilation, such as C, C++, and Window Resource files. Conditional code is placed
between #-directives such as #ifdef. See “Conditional Parsing and Preprocessor Support” on page 60.
You can right-click on your source code and select Edit Condition from the menu.
Source Insight can parse those sections of code conditionally depending on the value of condition variables
that you specify. The Edit Condition command lets you edit the value of a condition variable, or edit the list of
condition variables.
To use this command, right-click on an identifier that is a condition variable in your code. Then select Edit
Condition. You will be able to specify that variable's value.
For example, place the cursor inside of MACOBJECTS and select Edit Condition.
#ifdef MACOBJECTS
int jklm;
#endif
Project vs. Global Conditions
There are two condition variable sets. One is project specific and is stored with your project. The second set is
global and applies to all projects. If a condition appears in both lists, the project specific value is used.
Edit Condition Dialog box
Edit Condition Set
Selects which condition set you want to affect. This is either the project-specific, or the global list. Any
changes you make to the condition's value are put into the list you select here.

Commands Overview
202 Source Insight 4 User Guide
Condition
The name of the condition variable.
Value
The value of the condition. Typical values are 0 (zero) to indicate "False", or 1 to indicate "True". However, you
can give the variable any value. If you leave the value empty, then Source Insight will ignore conditional pre-
processor directives that refer to this variable.
Set False
Click this to set the Value field to 0 (zero).
Set True
Click this to set the Value field to 1.
Ignore
Click this to empty the Value field. When the Value field is empty, Source Insight assumes you don't want to
specify the value of the condition variable. If you don't specify a value, then preprocessor statements like #if
are ignored if they refer to this variable. This is the default case for any conditional variables encountered.
Scan Files
Click this button to scan your project files to determine what preprocessor variables are defined, along with
their values. The results are put into either the global, or project condition list, depending on which one is
selected in the Edit Condition Set option.
Edit List
Click this to go to the Conditional Parsing List dialog box, which displays all the defined conditions. The list
you get to edit depends on which one is selected in the Edit Condition Set option. See “Conditional Parsing
List” on page 177.
Enable Event Handlers
This command is a toggle that enables or disables macro event handlers. For more information, see “Macro
Event Handlers” on page 419.
End of Line
The End of Line command moves the insertion point to the end of the current line.
End of Selection
The End of Selection command moves the insertion point to the end of an extended selection. If the current
selection is not extended, this command does nothing.
Exit
The Exit command exits the Source Insight program. Source Insight will ask you if you want to save each file
that has been changed but not saved.
When Source Insight exits, it saves the current workspace file, so you may resume your session when you run
Source Insight the next time.

Source Insight 4 User Guide 203
Commands Overview
Exit and Suspend
The Exit and Suspend command writes a Source Insight recovery file out and then closes Source Insight with-
out saving any files. This allows you to exit Source Insight and save your edits without altering any files. Run
Source Insight again to recover your edits.
Caution: Do not alter the files that Source Insight had open before you run Source Insight a second time to recover your
changes. Source Insight's recovery system relies on the original files being left unchanged.
Expand
Expands the current hidden block of source code.
Expand All
Expands all collapsed source code blocks. Each function and class will show with a corresponding outline
button you can click to collapse them.
Expand Text Variables
Processes and replaces text variables in the selected text.
A text variable is a special identifier that is replaced with a particular value when a snippet is inserted into a
file.
See “Code Snippets” on page 98.
Expand Special
Used inside tree lists, this expands the selected item a specified number of tree levels.
Number of levels to expand
Type the number of levels, beyond the selected node, that you want to expand the tree. For example, if you
type "1", then one level below the selected node is revealed.
Export File as HTML
Exports the current file to an HTML representation. This creates a file that can be viewed in a web browser
that represents your source file.
The resulting HTML file will look a lot like the source file displayed inside of Source Insight. The HTML file will
retain most of the syntax formatting.
You can also export a snapshot of your entire project to a set of HTML files by using the Export Project To
HTML command. See “Export Project To HTML” on page 204.
Export Project File List
Saves a text file containing a list of all the source files in your project.
This is useful for creating a Master File List for the project if you don’t have one already. See “Using a Master
File List” on page 46.
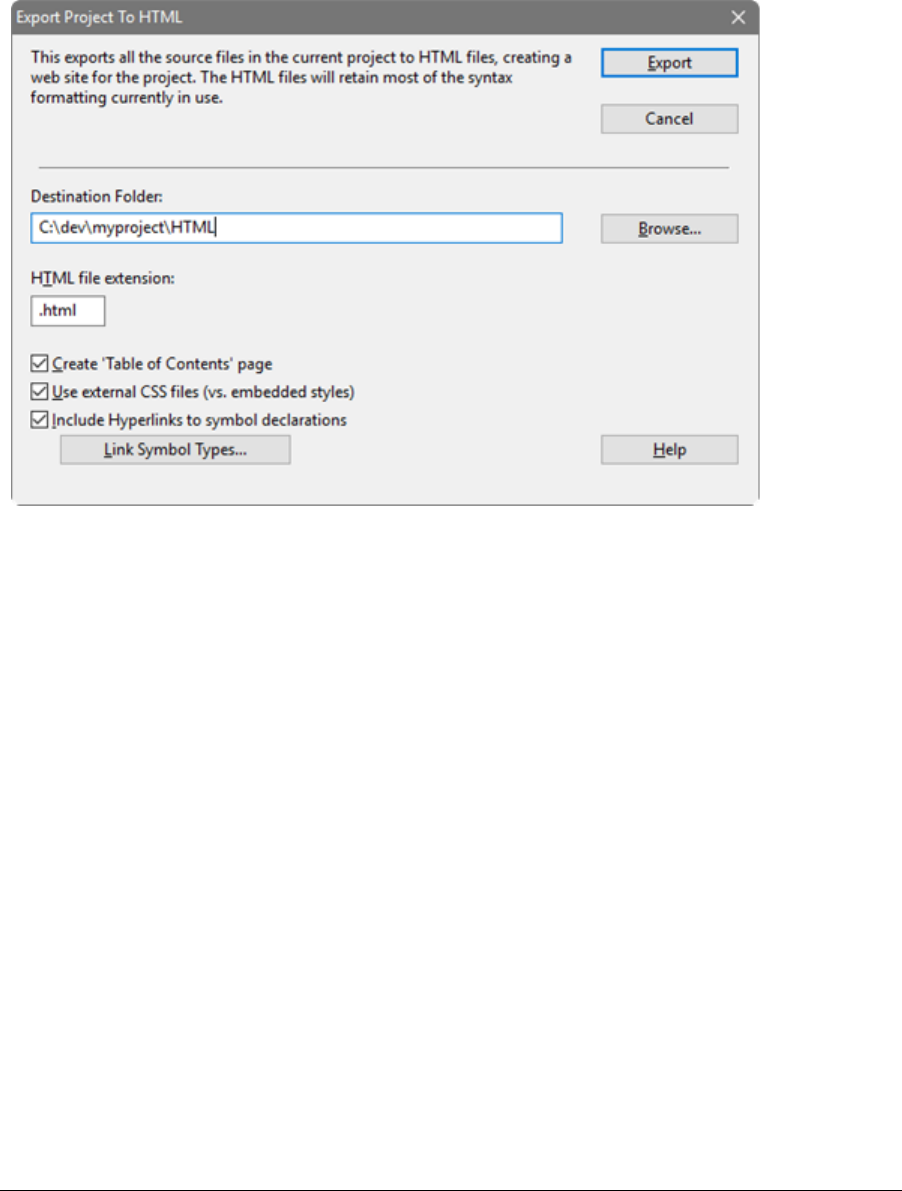
Commands Overview
204 Source Insight 4 User Guide
Export Project To HTML
This command generates HTML versions of your source files. It creates a snapshot of your source code project
that can be viewed with a web browser for online browsing and reference.
The resulting HTML files will look a lot like the source files displayed inside of Source Insight. The HTML files
will retain most of the syntax formatting. Identifiers that appear in the source code will have hyperlinks to
definitions.
Destination Folder
Enter the path to the directory where the HTML files will be output.
HTML file extension
Enter the file extension you want the HTML files to have. This is typically .htm or .html.
Create 'Table of Contents' page
Check this to create a single Table of Contents page with links to all the source files.
Use external CSS files (vs. embedded styles)
Causes a single cascading style sheet (CSS) file to be output that contains formatting definitions. If this box is
not checked, then the style declarations are inlined into each output HTML file.
The style formatting closely matches the formatting as it appears in Source Insight.
Include Hyperlinks to symbol declarations
This causes each identifier reference to have a hyperlink to its definition. For example, you will be able to
click on the function name in a function call, and the browser will jump to the function's definition.
Link Symbol Types...
Click this button to select which types of symbols should have hyperlinks. For example, you can choose to
link function names, class names, class member names, and others.
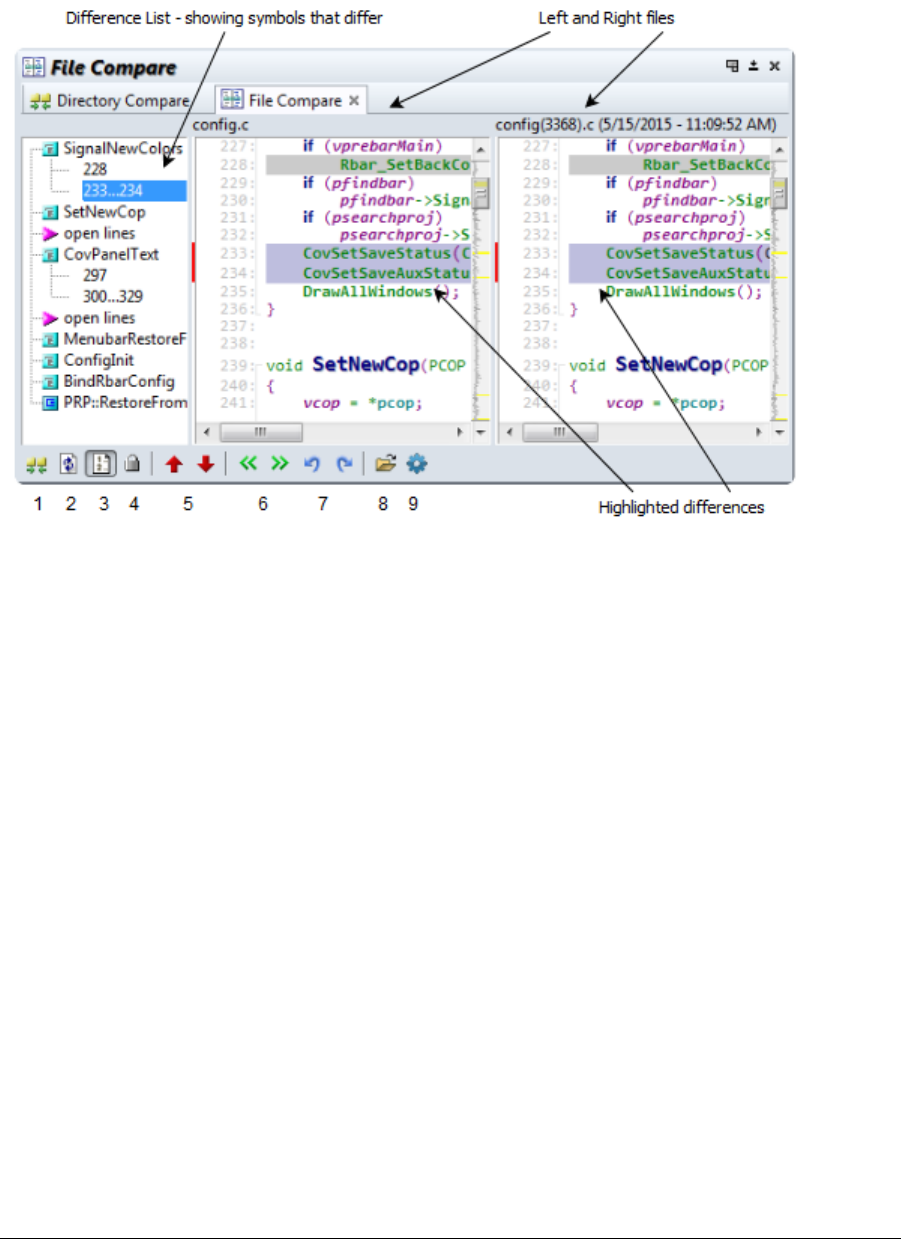
Source Insight 4 User Guide 205
Commands Overview
File Compare
The File Compare window shows differences between two files. This is a fancy version of the diff tool.
The window is divided into three parts: The left and right files, plus a difference list on the left side. By
default, the File Compare window is grouped with the Directory Compare window in a tabbed panel.
Toolbar
1. Compare Directory - switches to the Directory Compare window.
2. Refresh - Re-examines files and refreshes the window.
3. Show line numbers
4. Lock the window
5. Previous Difference (Ctrl+Up) / Next Difference (Ctrl+Down) - selects the previous or next differ-
ence in the files.
6. Copy selected lines left (Alt+Left) or right (Alt+Right) - the selected block of lines will be copied to
the other file. This can be undone. This type of edit is disabled by default for safety, but you will be
prompted to enable it.
7. Undo (Ctrl+Z) and Redo (Ctrl+Shift+Z) the lines that were copied.
8. Open new files to compare (Ctrl+O)
9. File Compare Window Options (Ctrl+Q) - opens the options window. See “File Compare Window
Options” on page 207.

Commands Overview
206 Source Insight 4 User Guide
Right-Click Menu
•Edit File (Ctrl+E) - Opens the file you clicked on in a regular source file window so that you can edit it.
This is also useful to open and jump to the highlighted section in the file so you can use regular brows-
ing and navigation commands of a source file window.
•Search (Ctrl+F) and Search Forward - Searches within the file you clicked on.
•Copy to Clipboard (Ctrl+C) - Copies the selected difference block to the clipboard. You must first
select with the mouse on a highlighted difference block.
•Mono Font View - Switches to mono font view. See “Mono Font View” on page 262.
•Overview- Toggles the Overview scroller.
•Vertical Scrollbar - Toggles the vertical scrollbar.
•Nesting Lines - Toggles showing code block nesting lines.
•Show Difference List - Shows and hides the difference list that appears on the left side of the File
Compare window.
To Compare Two Files
To compare two files, click the toolbar button (8) to open two new files to compare, or select Tools > Com-
pare Files. See “Compare Files” on page 175.
You can also compare the current file with an older backup version by selecting Tools > Compare with Backup
File.
Working in the File Compare Window
The left and right files are displayed side by side and aligned so that similar lines will line up horizontally. If
you are using syntax formatting that uses multiple font sizes, sometimes the alignment can be off a little. You
can right-click and select "Mono Font View" to switch to a monospaced font, which will make it easier to align
the two files.
The left and right files scroll vertically together. However, you can scroll one file independently by holding
down Ctrl while clicking up or down in the vertical scrollbar.
You an control zooming by holding down Ctrl and using the mouse wheel. Alternatively, you can open the File
Compare Window Options and specify the zoom factor.
To jump to the definition of a symbol in the File Compare window, hold down Ctrl and click on the symbol
name. The File Compare Window will minimize and a source file window will open at the symbol definition.
If the file type has the option enabled for "Highlight references to selected symbols", then you can click on
symbol identifiers in the File Compare windows and Source Insight will automatically highlight references to
that symbol. See “File Type Options” on page 213.
Difference List
The Difference List appears on the left side. It shows a list of difference blocks in the file, and shows what
symbols the differences are contained within. The symbols are the ones defined in the left hand file. You can
show or hide the difference list by right-clicking on it and selecting Difference List.
Selecting Difference Blocks
You can click on a highlighted difference block to select it. Once a block is selected, you can copy it to the
clipboard, or copy it to the left or right file.
To move to the next difference, use the Next Difference command (Ctrl+Down). To move to the previous dif-
ference, use the Previous Difference command (Ctrl+Up).
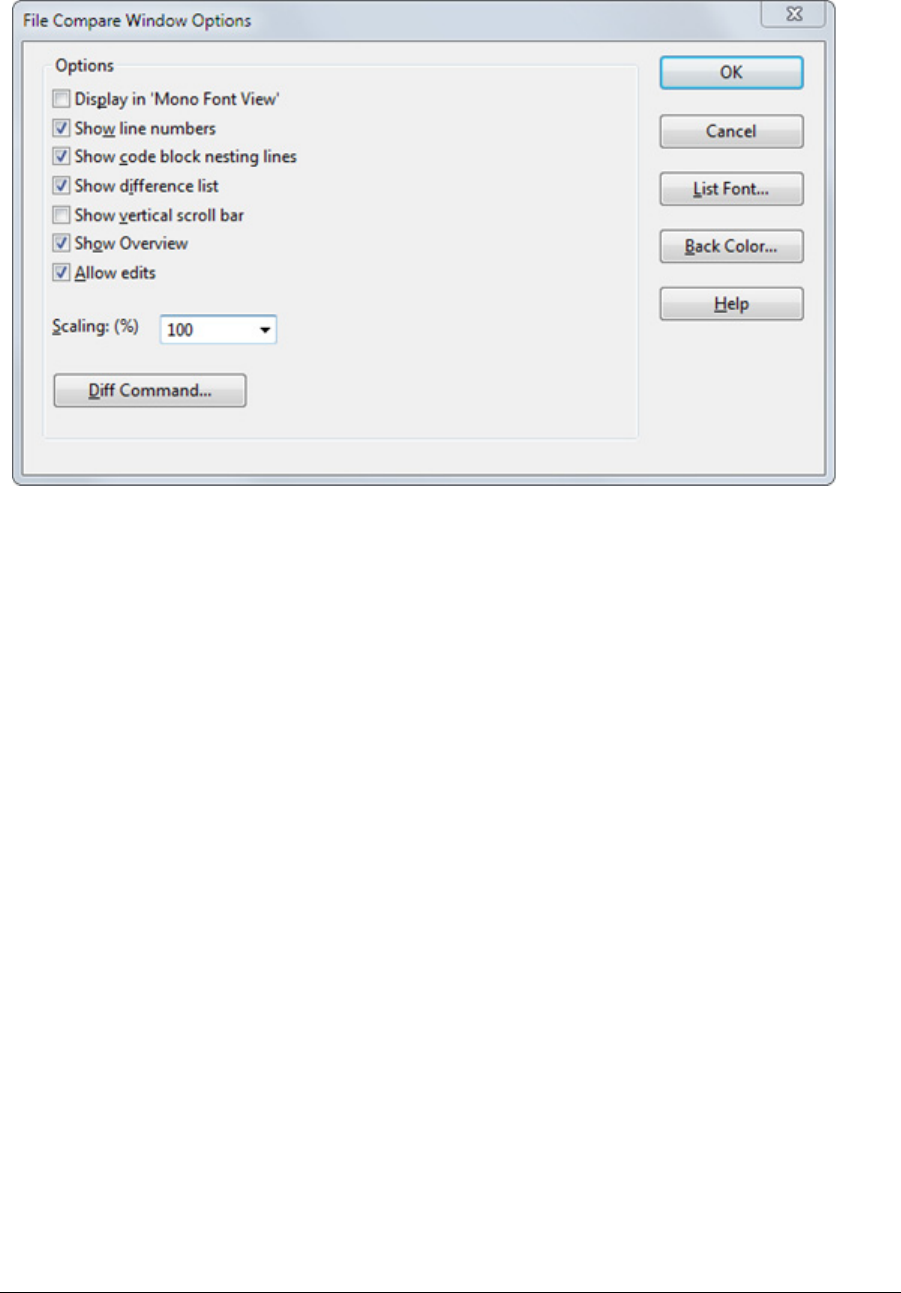
Source Insight 4 User Guide 207
Commands Overview
File Compare Window Options
This sets the options for the File Compare window. See “File Compare” on page 205.
Display in Mono Font View
Displays the source code in mono font view, which uses a mono-spaced font and no other font formatting or
size changes. This helps to align right and left files horizontally.
Show line numbers
Shows line numbers at the left of each line.
Show code block nesting lines
Shows code block nesting lines the same as in regular source windows.
Show difference list
Shows the difference list window on the left size of the File Compare window. The difference list contains the
list of differences in the file, and what symbols the differences are within.
Show vertical scroll bar
Shows the vertical scroll bar for each file window.
Show Overview
Shows the Overview scroller control on the right edge of each file window.
Allow edits
Enables the "Copy Line Left" and "Copy Line Right" commands, which copy whole line difference blocks to
either the left or right file. This option is disabled by default for safety.
Scaling
Sets the display scaling of the File Compare windows. You can also hold down Ctrl and use the mouse wheel
to affect the scaling.

Commands Overview
208 Source Insight 4 User Guide
Diff Command....
Sets the external diff command that performs the diff operation. Source Insight comes with its own sidiff.exe
tool that performs the diff operation. You can substitute your own tool as long as its output is compatible
with Unix diff tools.
File Options
This command activates the File page of the Preferences dialog box. It allows you to set file loading and sav-
ing options.
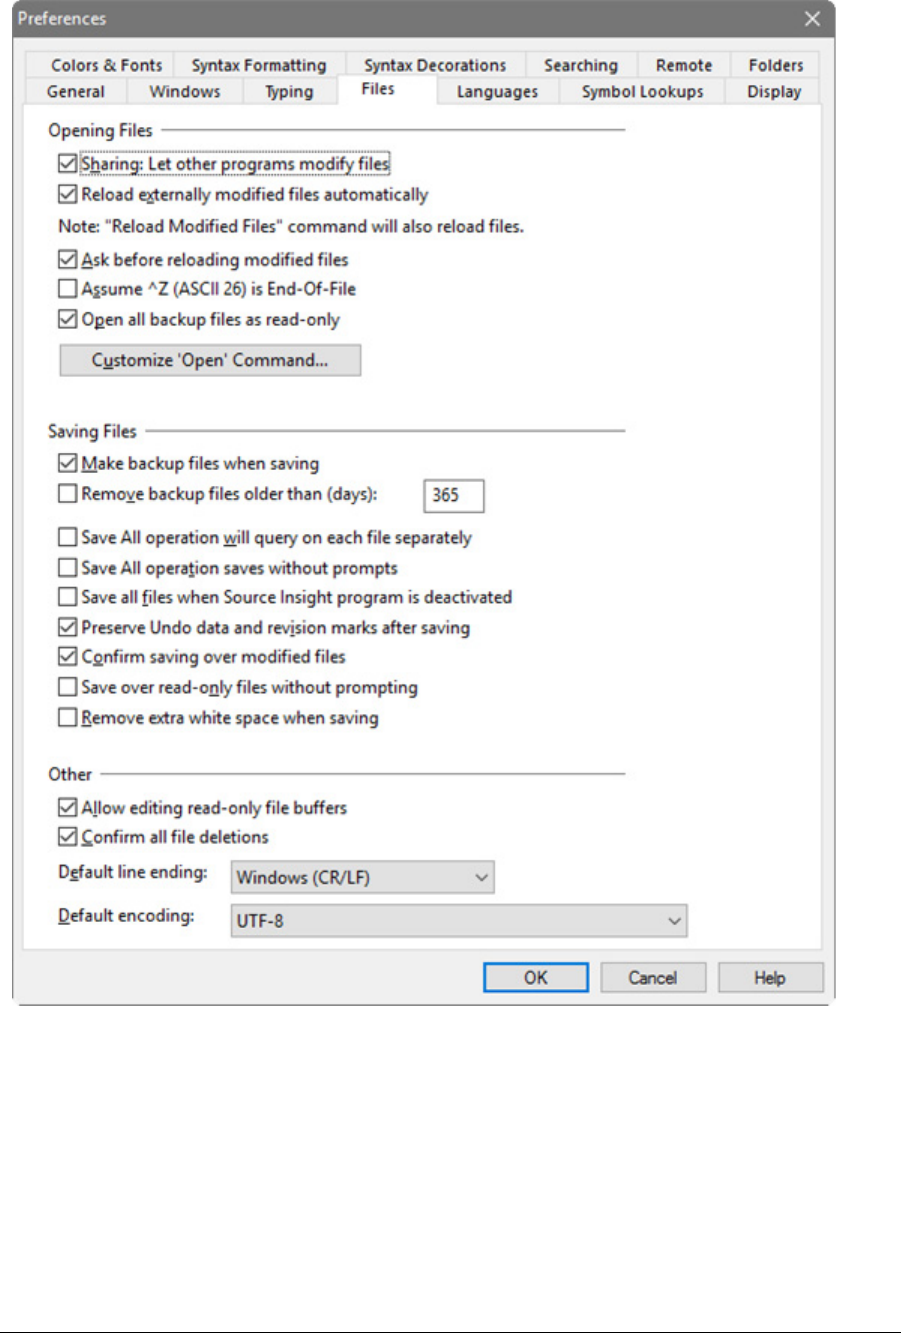
Source Insight 4 User Guide 209
Commands Overview
File Options Dialog box
Options for Opening Files
Sharing
Enable this to allow other programs to modify files while they are open in Source Insight. In other words, a
file that is open in Source Insight can be written over by another program.
Disable this to give Source Insight exclusive write access to the files. Files will still be opened in read-only
mode, except during Save operations. However, other programs will not be able to open the same files for
writing.

Commands Overview
210 Source Insight 4 User Guide
Reload externally modified files automatically
Turn this on to enable Source Insight to detect that files have been modified externally. Files are reloaded
automatically. Files are checked every few seconds and whenever the Source Insight application window
comes to the front. Each modified file is reloaded silently, without any prompting, unless the Ask before
reloading modified files option is on, or you have edited the file in Source Insight.
If disabled, you can still run the Reload Modified Files command to manually force Source Insight to reload
any modified files that are found.
Ask before reloading modified files
If enabled, then Source Insight will prompt you when it detects that a file has been modified externally to see
if you want to reload it.
If disabled, then Source Insight will automatically reload externally modified files silently without any
prompting, unless you have also edited the file in Source Insight. If you have already edited a file, the reload
operation is not performed.
Assume ^Z (ASCII 26) is End-Of-File
If enabled, then Source Insight will stop loading a file when it sees the EOF (ASCII 26) character. When it saves
the file, an EOF character will be appended to the end. If disabled, then Source Insight will continue to read
past the EOF character.
Open all backup files as read-only
When you open a file from the backup directory, it will be opened in read-only mode. You can open a backup
file by selecting File > Open Backup Version. Source Insight maintains previous version in the backup file if
you have the Make backup files when saving option enabled.
Customize the 'Open' Command…
This lets you pick the action performed by the Open command. The Open command is normally assigned to
Ctrl+O, and it has a toolbar button.
The options are:
•Project File List - the list of files in the Project Window.
•Project Directory - the folder browser in the Project Window.
•Load File command - the Load File command dialog box.
•Standard Open dialog - the Windows system Open File dialog box.
Options for Saving Files
Make backup files when saving
If enabled, then Source Insight will move the previous version of a file on disk to the backup directory when-
ever it saves the file. The backup directory is stored in a subdirectory named "Backup" in the Source Insight
program directory.
If not enabled, then Source Insight will save files without preserving the previous version on disk.
Remove backup files older than (days)
Specifies how many days to hold onto backup files before deleting them. Backup files older than this are
deleted. If this is set to zero, then backup files are kept indefinitely.
Save All command will query on each file separately
If enabled, the Save All command will prompt you to save each modified file. You will have an opportunity to
save it, not save it, or cancel the Save operation on each file.
If not enabled, the Save All command will show a list of modified files before saving. You can specify which
files will be saved or not.

Source Insight 4 User Guide 211
Commands Overview
Save All operation saves without prompts
If enabled, the Save All command will ask you if you want to save any modified files.
If not enabled, the Save All command will unconditionally save all files that have been modified since the last
time they were saved.
Save all files when Source Insight program is deactivated
If enabled, Source Insight will automatically perform a "Save All" command when the Source Insight applica-
tion window loses focus (i.e. every time you activate a different application). This enables you to work with
another editor or IDE that has the same files open. For example, if you switch to your IDE application then
Source Insight will automatically save all edited files to disk. If not enabled, Source Insight will not save files
when deactivated.
Confirm saving over modified files
if enabled, Source Insight will prompt you to confirm saving over a file that has been modified outside of
Source Insight while you had it open. This option is enabled by default.
If not enabled, then you can save over a modified file without any confirmation prompt.
Note: We recommend that you enable this option, so that you are aware of possibly overwriting important changes to
files.
Save over read-only files without prompting
If enabled, then Source Insight will save over a read-only file without warning you it is read-only. Actually, you
will be warned the first time you attempt to save over a read-only file in a session.
If not enabled, then Source Insight will prompt you for each read-only file that is saved. You will still have the
option of overwriting a read-only file on a file-by-file basis.
When Source Insight saves over a read-only file, the file is changed to read/write.
Note: This option is not recommended, as you may accidentally write over valuable files that are read-only for a good
reason. This option may be of use if your source control system will respect a read/write file as "checked out".
Thus, you can edit and save files before you check them out.
Preserve Undo and revision marks after saving
If enabled, then you will be able to perform Undo, and see revision marks, even after you save a file.
Remove extra white space when saving
This option will cause any trailing space or tab characters to be stripped off each line when a file gets saved.
Other Options
Allow editing Read-Only file buffers
This option lets you edit a file buffer, even if it is marked read-only. You will not be able to save back to the
file, unless you change its permissions to read/write outside of Source Insight, or you explicitly overwrite the
read-only file by clicking the "Overwrite" button during saves. Depending on your source control system, you
may be able to check out your version of the file, and then return to Source Insight and save the file.
Note that when you edit a file buffer inside Source Insight, you are not changing the file on disk until you use
the Save command, or you cause Source Insight to save the file some other way, such as task switching out of
Source Insight to another program when you have the Save all files when Source Insight is deactivated
option enabled.
Confirm all file deletions
Source Insight will confirm before deleting any source files. Source Insight does not delete source files when
you remove them from a project, or when you delete a project. It only deletes the project data files created by
Source Insight. However, you can select a source file in the Project Window and delete it.
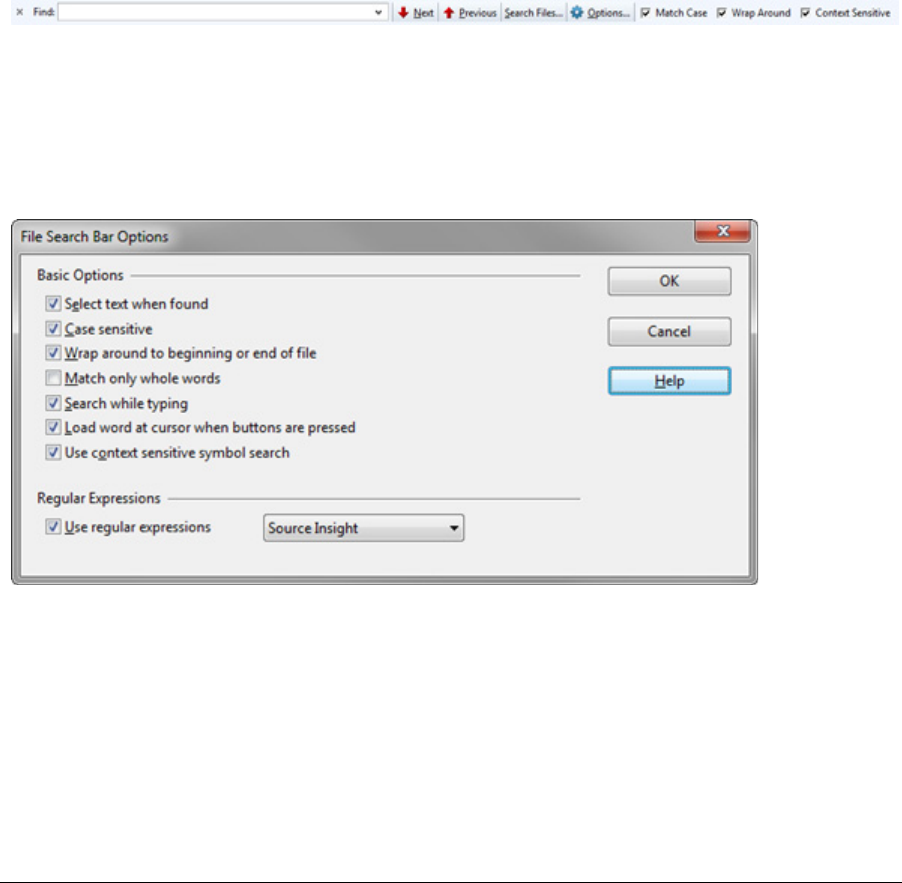
Commands Overview
212 Source Insight 4 User Guide
Default file format
This specifies the default text file format used when Source Insight saves new source files. The formats differ
by their end-of-line characters, which are indicated by CR for Carriage Return and LF for Line Feed. The for-
mats are:
•Window (CR/LF)
•Unix (LF)
•Mac (pre-OS X) (CR)
Note that when Source Insight opens an existing file and saves it, it will preserve the original file's format. You
can save to a different format with the File > Save As command.
Default encoding
Sets the default character encoding Source Insight uses when opening files, and when saving new files. The
default is UTF-8 (Unicode). See “File Encodings” on page 125.
File Search Bar
The File Search Bar is used to search within the current file. To show it, select View > File Search Bar. Alterna-
tively, you can use Activate Search Bar (Alt+Shift+F) to activate it so you can start typing into it.
To set options, click the Options button. See “File Search Bar Options” on page 212.
File Search Bar Options
This sets the options for the File Search Bar, which can be shown at the top below the main toolbar. See “File
Search Bar” on page 212.
Select text when found
If enabled, then the matching text is selected. Otherwise only the caret is moved.
Case sensitive
If enabled, the match is case sensitive.
Wrap around to beginning or end of file
If the end of the file is reached while searching, it wraps around and starts again at the top of the file.

Source Insight 4 User Guide 213
Commands Overview
Match only whole words
Only whole-words are considered for matches.
Search while typing
If enabled, then Source Insight searches for a match after you enter any character.
Load word at cursor when buttons are pressed
If enabled, then the word at the cursor position is loaded into the search field when you click Next or Previous
button in the search bar. If not enabled, then the current text in the search field is not changed.
Use context sensitive symbol search
If enabled, then searching for an identifier uses context and scope sensitive matching. Symbols with the
same textual name, but in different scopes will not be found.
Regular Expressions
Use this to enable regular expression, and to select the regular expression syntax type.
File Type Options
The File Type Options command allows you to define editing and display options based on the file name or
extension of the file you are currently editing.
The file type of the current source file is automatically selected in the File Type Options dialog when it
appears.
File Types
A file type is a file classification that is defined in the File Type Options dialog. Each file's name determines its
file type by using the wildcards in the File Filter field. The file type specifies display options, editing options,
and the language used to parse the file.
For example, the "C/C++ Source File" type applies to files that match the *.cpp wildcard pattern, and the file
type specifies that the "C/C++ Language" is used to parse the file for symbolic information.
See “File Types” on page 72.
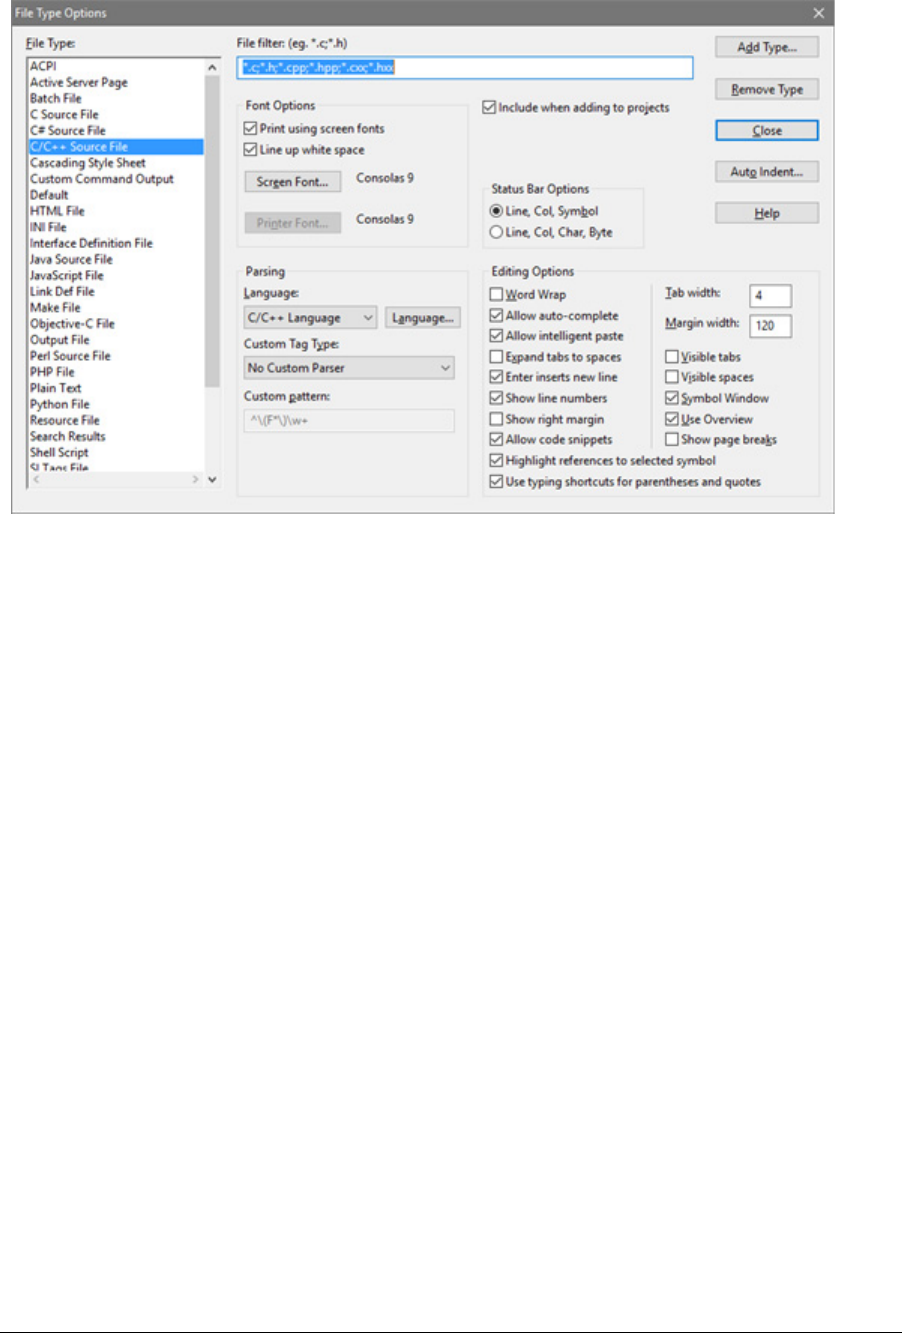
Commands Overview
214 Source Insight 4 User Guide
File Type Options Dialog box
File Type
This pull-down list contains a list of all the file types you have defined so far. When you select a file type from
this list, the other text boxes in the dialog box are updated to reflect the properties of that file type. The first
entry in the list is always the Default file type, which you may modify, but not remove.
When the File Type Options dialog box first comes up, the file type of the current file is automatically selected
here.
Add Type
Click this button to add a new file type. You will be prompted for the file type name.
Remove Type
Deletes the selected file type. This action is not undo-able.
Auto Indent…
Click this to change the Auto Indent settings for this file type. See “Auto Indenting” on page 219.
File Filter
This text box should contain a delimited list of file name specifications. The entries in the list can be delim-
ited with a space, a semi-colon, or a comma. Each entry can be either an unambiguous file name, or an
ambiguous wildcard file specification. The entries should not contain a drive letter or a full path that includes
backslashes.

Source Insight 4 User Guide 215
Commands Overview
For example,
*.c;*.h
Tip:
Files are matched to File Types using wildcard filters.
Given a file name, Source Insight will identify the file's file type by searching all defined file types looking for a
match on a file specification in the File Filter text box. In effect, Source Insight makes two passes through the
entire set file type records to determine a file's file type.
1. First, it tries to find an exact match on the file name in all the File Filter lists.
2. If no exact match is found, it tries to find a wildcard match in all the File Filter lists.
3. If still no match is found, Source Insight assumes the file's type is the Default file type.
This means that you can treat some individual files in a special way. For example, "*.inc" is normally consid-
ered an Assembly File type, but let's say you have a file called "cmd.inc" that you want to have the C Source
File type. In the C Source file type's File Filter text box, you would include "cmd.inc":
*.c;*.h;cmd.inc
If you include a simple * as the file filter for a file type, then it will become the default catchall type, instead of
the "Default" file type. The catchall will only apply if the file does not already match any other file type.
Adding New File Extensions
You can add new entries to the file filter of a standard file type to make Source Insight include those files also.
For example, by default, Source Insight considers C Source Files to be "*.c" and "*.h". If you also have C source
files with .h2 extensions, then you can add "*.h2" to the File Filter list of the C Source File file type.
*.c;*.h;*.h2
Tip:
You can control which file types are added to projects.
Whenever Source Insight displays a list of files, such as in the Add Files dialog box, the list is an expansion of
the union of all File Filter text boxes in all defined file types. In other words, when you add new file types,
those files will also appear in the file lists.
Include when adding to project
If enabled, then the Add File command and the automatic add file feature will include this type of file when
looking for new files to add to the project.
Font Options Group
Emulate screen fonts when printing
If enabled, then Source Insight will attempt to select the same fonts for the printer as you have selected for
the screen. If you are using a TrueType screen font, that should work fine. If not enabled, then the font setting
of the Printer Fonts button is used when printing.
Line up white space
This option only applies if you have selected a proportionally spaced font. Fixed-pitch fonts, such as Courier
New, are not affected.
Tip:
You can use a proportional font and still display indentation correctly.
If enabled, Source Insight will attempt to use a fixed width for spaces and tabs so that tabs line up the same
way they do with a fixed-pitch font. Programs generally look better with this turned on if you are using a pro-
portional font. If you are tired of using Courier New (or some other boring fixed-pitch font) to view your code,
try this!
If disabled, then Source Insight uses the natural widths of characters as reported by the font.
This option is helpful if you have to work with other tools, or people that use tools that display source code
with fixed-pitch fonts. You will be able to use a proportional font, and still keep a valid representation of the
fixed pitch font indentation.
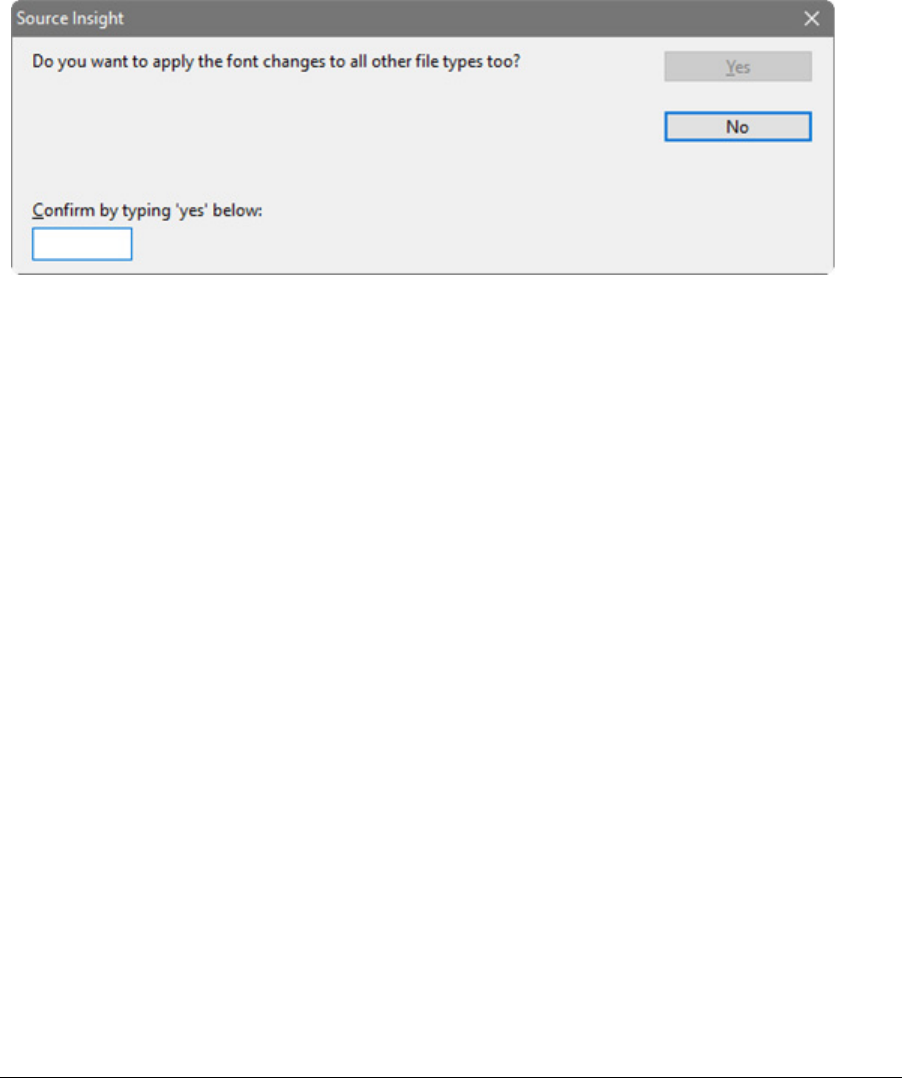
Commands Overview
216 Source Insight 4 User Guide
You can control how Source Insight computes the fixed width of spaces by clicking the Spacing button in the
Preferences: Display dialog box.
For more information, see “Character Spacing Options” on page 198.
Screen Fonts
Click this button to select a font to use for displaying the file on the screen. The name of the currently
selected font is displayed to the right of the button. The screen font selected here becomes the default font
for this file type. Style properties will also apply on top of this font. For example, a style for declarations
might add "bold". Or a style might specify a different font and override the screen font selection in the file
type.
When you click OK in the font selection dialog, you will see this prompt:
To apply the font to ALL the file types, type "yes" in the box and click OK. To only apply it to the current file
type, click No.
Printer Fonts
Click this button to select a font to use for printing the file. The name of the currently selected font is dis-
played to the right of the button. This setting only has an effect if the Emulate screen fonts when printing
option (described above) is turned off.
Parsing Group
Language list
This pull-down list contains a list of all the languages defined in Source Insight. Select from this list to specify
how Source Insight should parse and display the current file type. For example, to parse the document as a
Java source file, select "Java Language" from the list. You can also select "None" to use no parser.
To add a new custom language, select the item <New Language>.
The language selected here determines the syntax formatting, as well as how symbol declarations, such as
functions and classes are parsed in the file.
Language…
Click this button to open the Language Options dialog box. From there, you can add a new language, and edit
the properties of a language. For example, you can edit the syntax formatting keyword list that is associated
with each language. Each language type has its own keyword list. See “Language Options” on page 241.
Custom Tag Type
This pull-down list specifies what type of symbol is found as a result of using the custom parser pattern in the
Custom Pattern text box. The list contains all of the possible symbol types. One of the entries in the list says
"No Custom Parser". If that item is selected, then Source Insight does not use the custom pattern. If any other
item is selected in the list, then the custom pattern should contain a regular expression pattern for parsing
symbol names out of the file.

Source Insight 4 User Guide 217
Commands Overview
Custom Pattern
This text box should contain a valid regular expression with one group in it. The group describes what part of
the matching pattern is assumed the symbol tag. The symbol parsed by using this pattern is given the type
indicated by the Custom Tag Type. If the Custom Tag Type is set to "No Custom Parser", then this text box is
ignored.
Using a custom pattern that allows you to parse some symbols out of files for which Source Insight has no
built-in knowledge. For example, the following string parses sections out of .INI files like WIN.INI.
^\[\(.*\)\]
You can define a new file type named "INI File" that uses this custom parsing pattern. Now, when you open a
file like WIN.INI, you can jump to any of the section names or see them all in the symbol window.
Status Bar Options
This group controls the appearance of the status bar at the bottom of the program window.
Line, Col, Symbol
The status bar shows the line number, the column number, and the name of the symbol that the insertion
point is in.
Line, Col, Char, Byte
The status bar shows the line number, the column position on the line, the character position on the line, and
the byte position in the file.
Editing Options Group
This group of items controls how the file type is edited. All files of the selected file type will have the following
editing options in effect.
Word Wrap
If checked then Source Insight will automatically wrap words onto the next line when the insertion point
moves past the margin width. This only applies while you are typing new text. If not checked then Source
Insight will not do any automatic wrapping of text.
Allow auto-complete
If enabled, then symbolic auto-completion is allowed for the file type if auto-completion is enabled globally
in the Options > Preferences: Typing dialog box.
Allow intelligent paste
If enabled, then intelligent paste is allowed for the file type if intelligent paste is enabled globally in the
Options > Preferences: Typing dialog box.
Tab Width
The width of a tab character in character spaces.
Margin Width
The width of text in characters spaces before automatic word wrapping will occur
Expand tabs to spaces
If checked then Source Insight will expand a tab character to the equivalent number of spaces when you type
a tab. The text will look the same as if a tab was typed, but spaces will be used to fill. If not checked then
Source Insight will simply insert a tab character into the file when you type a tab.

Commands Overview
218 Source Insight 4 User Guide
Enter key inserts new line
If checked then pressing the Return or Enter key while typing will insert a new line. If not checked then press-
ing Return or Enter will move the insertion point to the beginning of the next line.
Show line numbers
Displays line numbers in the left margin.
Show right margin
Displays a light vertical line at the right margin. If you are using proportional fonts, then the right margin
position is only approximate.
Allow code snippets
Allows code snippet expansion in this file type. If enabled, code snippets will appear in the auto-completion
list when you type, and code snippet variables will be displayed in a highlighted color.
Visible Tabs
If checked then Source Insight will display a special symbol where ever a tab characters is, instead of just dis-
playing white space.
Visible Spaces
If checked then Source Insight will display a special symbol where ever a space characters is, instead of just
displaying white space.
Symbol Window
If enabled, then files with this file type will have a Symbol Window attached at the left side of their source
windows. See “Symbol Windows ” on page 30.
The Symbol Window command on the right-click source file menu toggles this setting.
Use Overview
If enabled, then an Overview scroller will be displayed in the file's source window. at the far right edge. See
“The Overview Scroller” on page 27.
The Overview command on the right-click source file menu toggles this setting.
Show page breaks
Source Insight will show light horizontal lines that represent the printed page breaks. The pagination is com-
puted based on syntax formatting, and the printer font that is selected.
Highlight references to selected symbol
References to the symbol at the caret position will be highlighted. For example, you can click in a variable
name, and all references to the variable will be highlighted. The references are context sensitive, so a symbol
in a different scope will not get highlighted.
Once enabled, if you click on a symbol name, all references to it in that file are highlighted. The highlight will
only appear if more than one instance appears in the file.
To change the color or format of the highlight, select Options > Style Properties and edit the "Reference
Highlight" style. By default, it only changes the text and background colors.
Use typing shortcuts for parentheses and quotes
This enables several typing shortcuts related to parentheses, square brackets, angle brackets, and quote
characters. Typing an open parenthesis, bracket, or quote character will automatically insert the correspond-
ing closing character. In HTML and XML files, opening and closing angle brackets (<>) are also inserted auto-
matically.

Source Insight 4 User Guide 219
Commands Overview
For example, to insert (a + b), you would type this:
To insert the quoted string "Hello World", you would type this:
If you just inserted an empty pair of parentheses, brackets, or quotes, and want to delete them, press Back-
space. Both characters will be deleted. For example:
If you type an open parenthesis just before another open parentheses, then the parenthesized block that fol-
lows will be surrounded with parentheses. For example:
Auto Indenting
The auto-indenting feature controls the level of indentation as you type new text. Source Insight supports
Simple and Smart types of auto-indentation. Not all languages support the Smart level.
You can also reformat exiting source code using Tools > Reformat Source Code. See “Reformat Source Code
Options” on page 288.
Auto Indent Type
Specifies the type of auto-indenting. Automatic indenting occurs when you insert new lines.
•None No special indenting occurs. Source Insight will return the insertion point to the very beginning
of the next line when you insert a new line or word wrap.
•Simple Source Insight will automatically indent text to line up with the previous or following line.
•Smart Source Insight will automatically increase or decrease the indentation level when you insert
new lines. Not all languages support smart indenting. If this button is selected, then the Smart Indent
Options are applied.
Smart Indent Options
These check boxes determine how the smart indenting affects open and closing curly braces.
You Type Result - | marks the insertion point
((|)
a + b (a + b|)
) (a + b)|
You Type Result - | marks the insertion point
""|"
Hello World "Hello World|"
" "Hello World"|
You Type Result - | marks the insertion point
((|)
Backspace |
You Type Result - | marks the insertion point
Starting with |(thing)
|(thing)
( (|(thing))
Desired Indent Style Check box setting
if (x)
{
}
Clear both boxes.
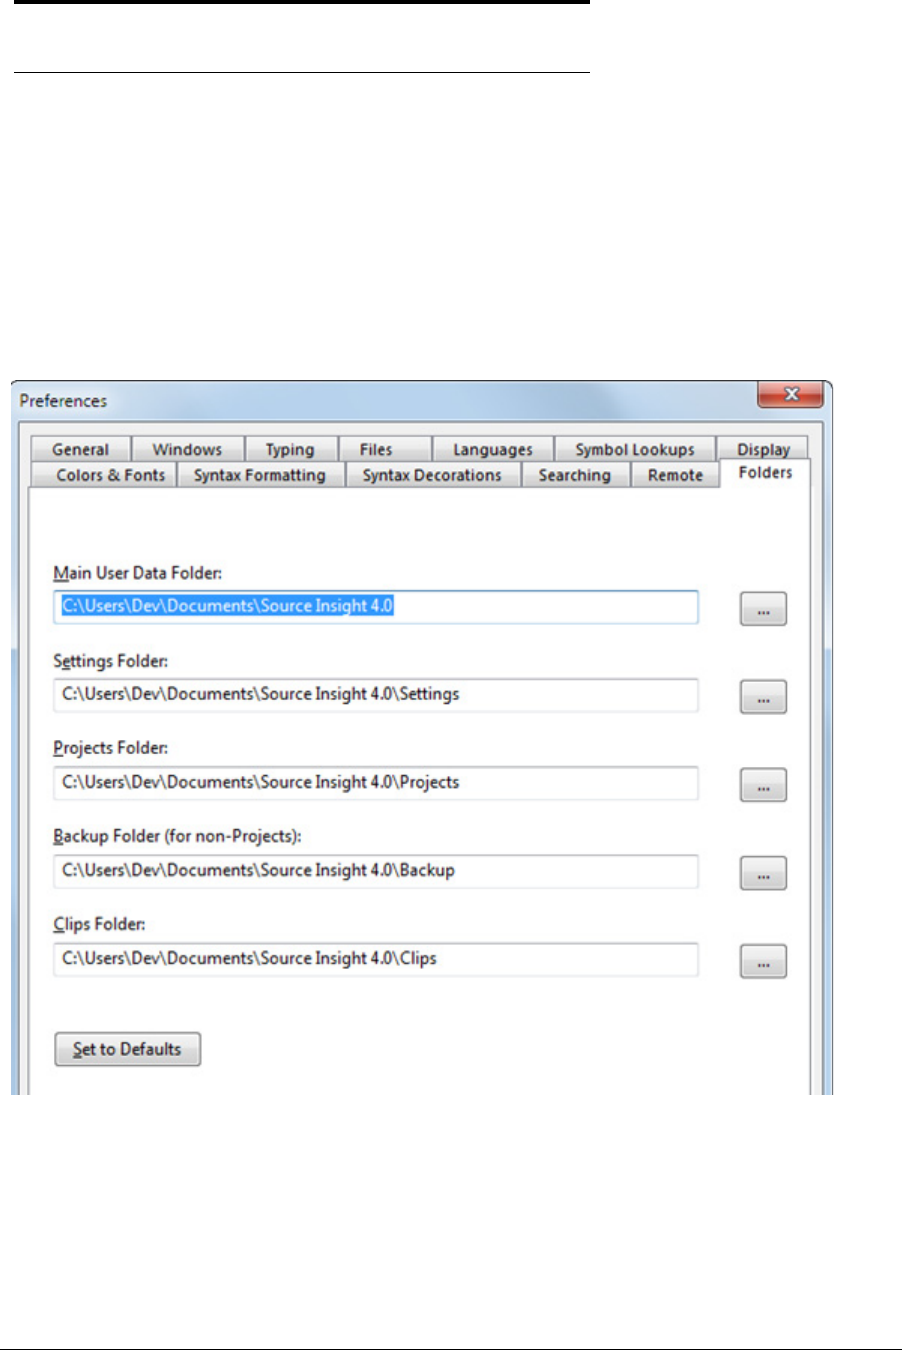
Commands Overview
220 Source Insight 4 User Guide
Folder Options
This command activates the Folders page of the Preferences dialog box. It allows you to specify the location
of various data folders used by Source Insight. These options are saved as part of the current configuration.
Folder Options Dialog box
Main User Data Folder
This is the main folder for storing Source Insight information on your machine. Source Insight creates several
sub folders inside this folder. If you make a change to this, then all the sub folders that appear below it in this
dialog box are automatically updated.
By default, this folder is Documents\Source Insight 4.0. As such, there is a separate folder for each user
on the machine.
if (x)
{
}
Select both boxes
if (x) {
}
Select Indent Open Brace;
Un-select Indent Close Brace
Desired Indent Style Check box setting
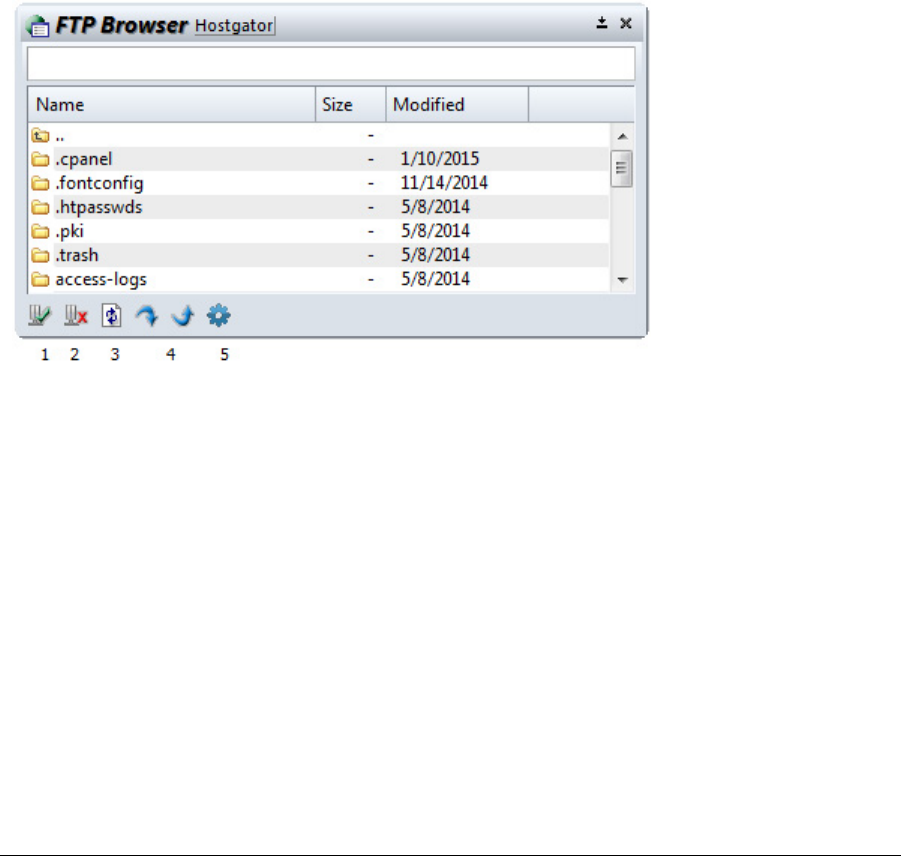
Source Insight 4 User Guide 221
Commands Overview
You may want to change this folder location if you prefer to have your personal "Documents" folder on a net-
work drive. Source Insight can become slow if it has to constantly access data across the network. In that
case, you should change the folder location to a folder somewhere on you local machine.
Settings Folder
This is the folder that will contain you configuration files, which has your customizations.
Projects Folder
This is folder that will contain your project data files. Each project will have a sub folder within this folder.
Backup Folder (for non-Projects)
This is the folder where backup source files are saved when you do not have a project open.
Clips Folder
This is the folder that will contain clips, which are accessed from the Clips Window.
FTP Browser
This is an simple FTP client window that allows you to connect to a remove host, and upload and download
files. You can browse to a file on a remote host, open it, edit it, and save it back to the remote host.
Toolbar
1. Connect to Host - Click this to connect to a host. The FTP Site list window will appear so you can pick
the host to connect to.
2. Disconnect - Disconnects from the host.
3. Refresh List - Refreshes the file list in the FTP Browser.
4. Download File - Downloads the selected file from the remote host to your local machine. A "Save As"
dialog box will appear so you can indicate where to save the file.
5. Upload File - Uploads a file from your machine to the remote host. A dialog box will appear so you
can select the file to upload.
6. FTP Browser Options - Edits the settings for the FTP Browser panel. You can set options and edit the
list of remote hosts. See “FTP Browser Options” on page 222.
Opening a Remote File to Edit
To open a file on the remote host to edit, double click on the file. The file will be downloaded to a temporary
file buffer so you can edit it. When you save the file, it will be uploaded automatically.
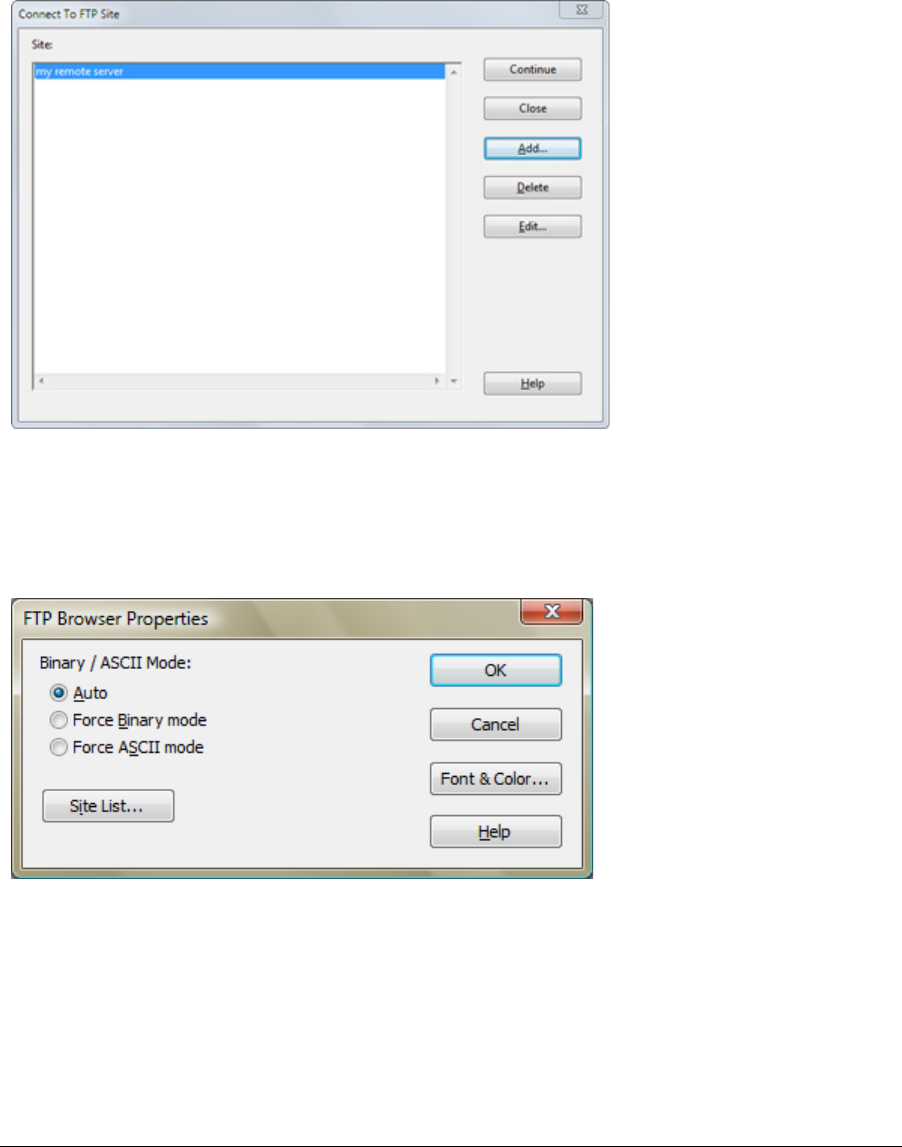
Commands Overview
222 Source Insight 4 User Guide
Defining Remote Sites
To setup the details for connecting to a remote site, click the FTP Browser Options button, then click the Site
List... button. Alternatively, you can click the Connect to Host button and the Site List will appear. If you need
to add the site, click the "Add" button.
Connect to FTP Site
This dialog appears when you click the Connect to Host button in the FTP Browser window. Select the site
you want to connect to and click Continue. For details, See “FTP Site List” on page 223.
FTP Browser Options
This allows you to specify options for the FTP Browser window.
Binary / ASCII Mode
You can force the data transfer to assume binary or ASCII text mode.
•Auto - The mode depends on the file extension. Source Insight can recognize files that are typically
textual and use the ASCII mode.
•Force Binary Mode - the data is transfered byte-by-byte.
•Force ASCII Mode - the data is assumed to be text, and end of line characters are handled correctly.
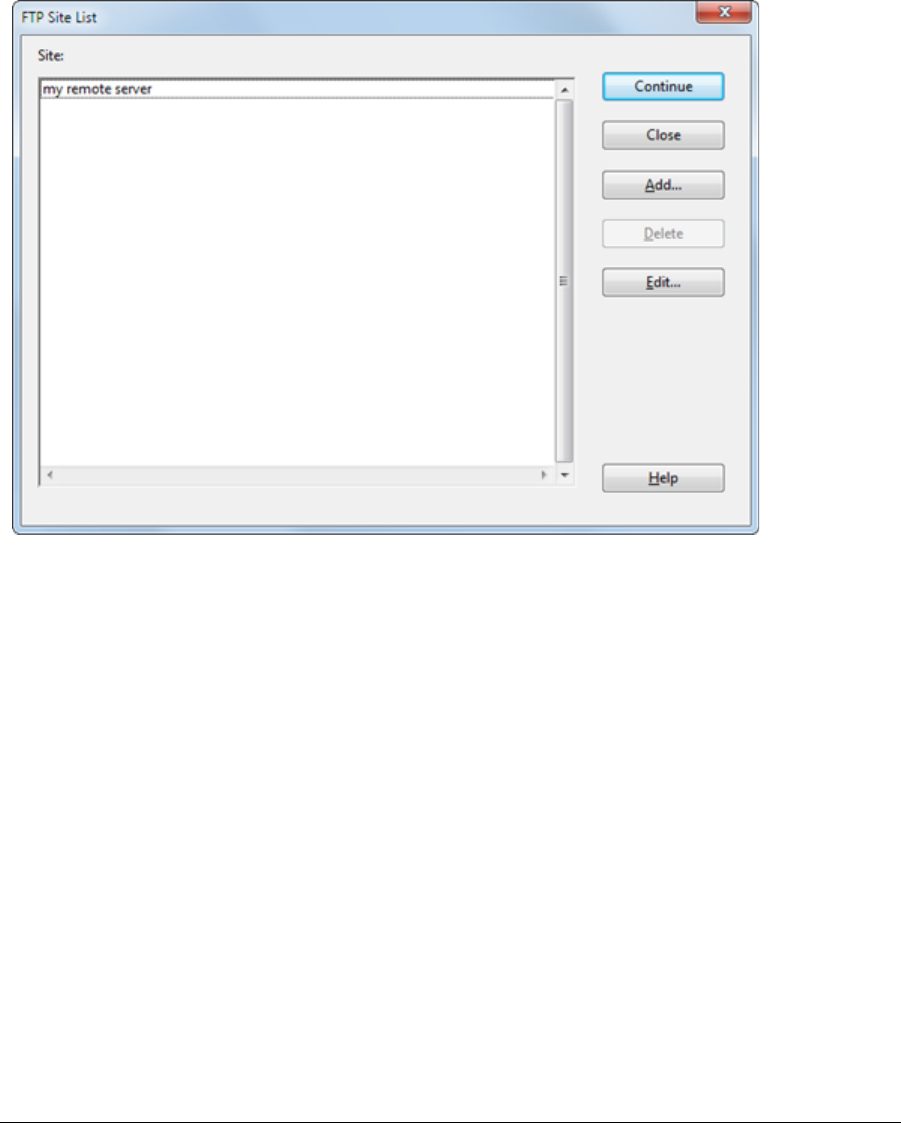
Source Insight 4 User Guide 223
Commands Overview
Site List...
Edits the list of FTP Sites (hosts). See “FTP Site List” on page 223.
Font & Color...
Let's you pick the text font and colors for the FTP Browser window.
FTP Site List
This window lists all the remote FTP sites you defined. You can add or delete sites from the list.
To add a site, click the Add button. To edit an existing site, select the site and click the Edit button. The Edit
FTP Site Properties dialog will appear. See “Edit FTP Site Properties” on page 224.

Commands Overview
224 Source Insight 4 User Guide
Edit FTP Site Properties
This window is used to specify the properties of a remote host site for the FTP Browser.
Site Name
The user-friendly name you can give to the remote site. For example, "Company Server".
Host Name
The FTP host address of the server. Typically something like "ftp.mysite.com", or an IP address.
User name
The FTP user name used to log on to the server.
Password
The FTP password for the user.
Initial directory
The directory on the remote server that will become the current working directory after the connection.
Port number
The TCP port number to use to connect to the remote host. The default is port 21.
Passive mode
If selected, then the Passive mode is used. Passive mode is best used when you are behind a firewall. In Pas-
sive mode, the remote server tells Source Insight what data port to connect to, instead of Source Insight
opening a data port on your machine.
If not selected, then the Active mode is used. In Active mode, Source Insight needs to open a data port for the
remote server to connect to. This is usually not a good practice for security reasons, and will usually not work
with firewalls.
Keep connection alive
If selected, then Source Insight will attempt to keep the connection alive by sending simple FTP commands
at random intervals to keep the remote host from becoming idle and disconnecting.

Source Insight 4 User Guide 225
Commands Overview
Full Screen (F11)
This toggles Full Screen mode. In Full Screen mode, the Source Insight main window is expanded to take over
all of the current monitor.
Function Down
The Function Down command moves the insertion point to the next function or method defined in the cur-
rent file.
Function Up
The Function Up command moves the insertion point to the previous function or method defined in the cur-
rent file.
General Options
This command activates the General page of the Preferences dialog box. It allows you to change miscella-
neous Source Insight options. These options are part of the current configuration.
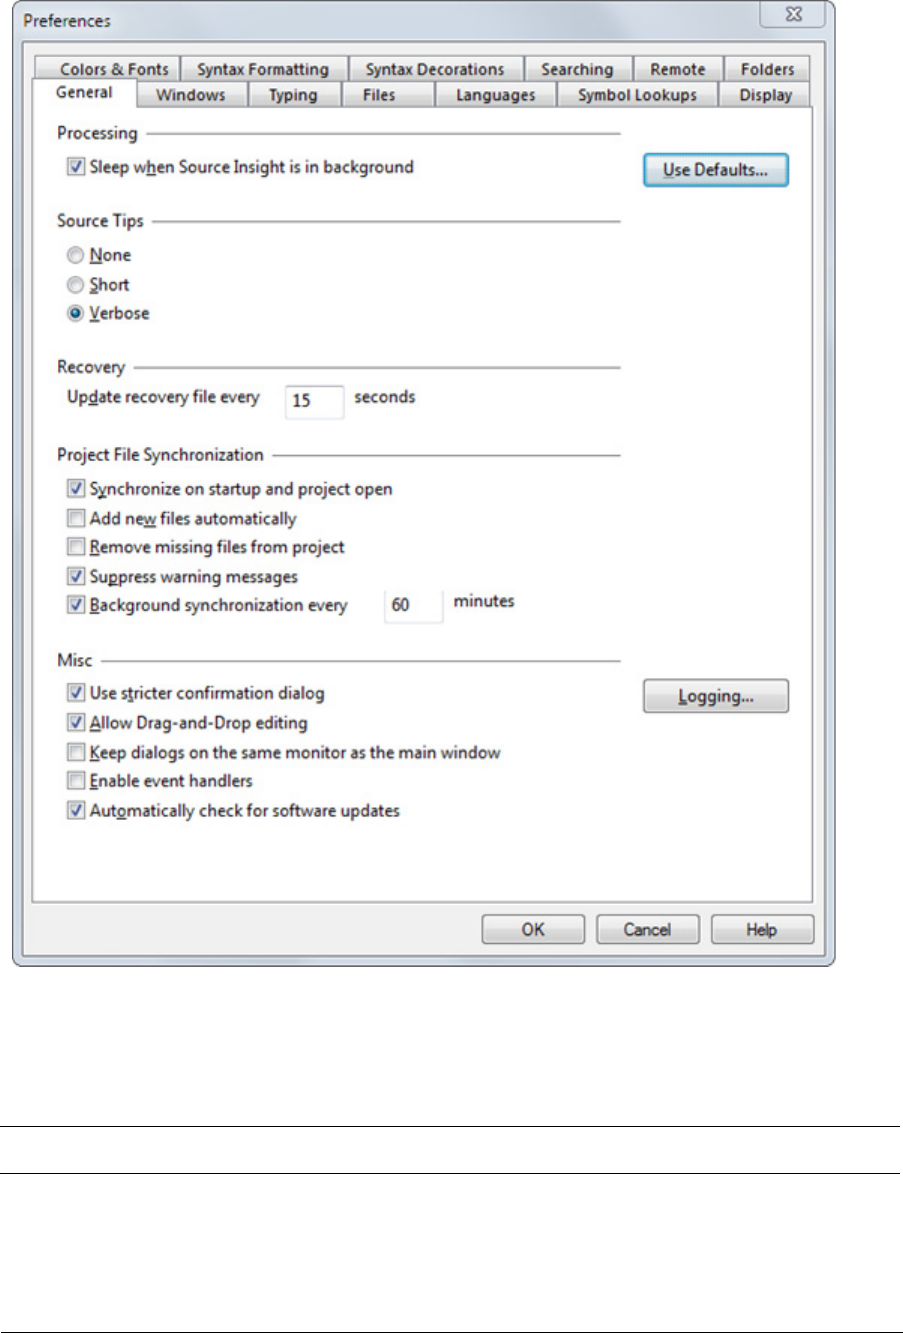
Commands Overview
226 Source Insight 4 User Guide
General Options Dialog box
Sleep when Source Insight is in background
If enabled, Source Insight will not perform any background processing when the Source Insight application is
minimized or not in front (such as when a custom command is in front).
If not enabled, then background processing will occur normally.
Note: If your computer is running on battery power, then Source Insight significantly reduces its background process-
ing after a few seconds of idle time to allow your system to enter a low-power state and use less battery power.

Source Insight 4 User Guide 227
Commands Overview
Background Tasks
Source Insight performs a number of tasks in the background, including the following:
•It parses files and updates the Symbol Window contents for all open source windows.
•It checks for finished Custom Commands.
•If Background Synchronization is enabled, then it synchronizes all the files in the project, possibly add-
ing new ones in the process.
•It synchronizes the Context Window with the current text selection.
•It synchronizes the Relation Windows with the current text selection.
•It updates the File Compare window if one of the files has changed.
•It checks for and reloads open files that are modified outside of Source Insight by other programs.
Usually there is nothing to do, in which case Source Insight sleeps and uses little or no processor cycles.
Source Tips
Sets the level of information provided by pop-up source tip windows. Source tip windows appear when you
hover the mouse cursor over a symbol identifier for a few seconds.
Crash Recovery Options
Recovery: Update recovery file every NNN seconds
Specifies how often Source Insight will update the crash recovery file. The default value is 15 seconds. The
recovery file is only updated when there have been edits since the last time it was updated. The recovery
update is very fast and you probably will not even notice anything being saved. You will never be interrupted
to save the recovery file. You should keep this interval short.
Project File Synchronization
Synchronize on start-up
If enabled and background synchronization is turned on, then Source Insight will check file time-stamps right
away every time you start Source Insight or open a new project. When files are found to be out of date with
respect to the project, Source Insight marks the files for re-synchronizing. Later, the files will be rescanned
and synchronized in the background.
Add new files automatically
If enabled, then before synchronizing all the files, Source Insight will add new files in the project's source
directory and in all subdirectories, recursively. However, only directories that already have project files in
them are scanned. Directories that are not descendants of the project source directory are not scanned. This
feature allows you to simply add new files to your project directories on disk, such as with a source control
system, and then have Source Insight add those new files to your Source Insight project automatically.
An alternative to adding (or removing) files automatically is to use a Master File List. See “Using a Master File
List” on page 46.
Remove missing files from the project
If enabled, then before synchronizing all the files, Source Insight will remove missing files from the project’s
file list. Note this is not recommended if your source files are mostly on networked drives. If the network drive
is disconnected, the files will be removed from your project.
An alternative is to use a Master File List. See “Using a Master File List” on page 46.
Background project synchronization every NNN minutes
If enabled, then Source Insight will perform the actions of the Synchronize File command in the background,
while you edit. You typically will not have to run the Synchronize Files command at all if this option is
enabled.
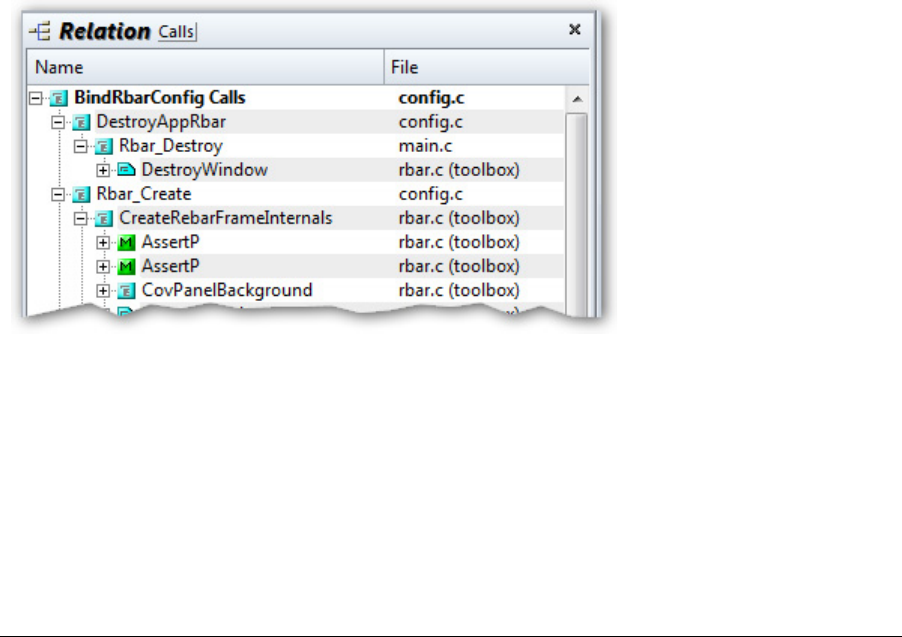
Commands Overview
228 Source Insight 4 User Guide
NNN specifies how often the project files should be examined to determine if files need re-synchronizing.
When this period expires, Source Insight checks the file time-stamps and begins the synchronization process
in background.
Use stricter confirmation dialog
If enabled, then when Source Insight confirms an operation, you will be required to type "yes" to confirm it.
Keep dialogs on the same monitor as the main window
If enabled, then dialog boxes will be forced onto same monitor as the main Source Insight application win-
dow. If not enabled, then Source Insight remembers the positions of dialog boxes, regardless of what monitor
they were on.
Enable event handlers
If enabled, then macro event handlers are enabled. For more, see “Macro Event Handlers” on page 419.
Automatically check for software updates
If selected, then Source Insight will periodically check with the Source Insight website to see if an update is
available. If an update is found, you will be see a notification window.
Logging...
Click this to edit Source Insight's application logging options. See “Logging Options” on page 254.
Use Defaults...
Click this to reset all the configuration settings to factory defaults. Your current settings will be saved in a
backup file. See “Resetting the Configuration to Defaults” on page 143.
Generate Call Tree
Displays direct and indirect calls from the selected identifier in the Relation window.
The Relation window can show call trees, call reference trees, class trees and other things. An alternative to
use the Generate Call Tree command directly is to simply keep the Relation window open and un-locked, and
just put your cursor on a function in your source code. See “Relation Window” on page 305.
Go Back
The Go Back command moves the insertion point to its previous location. Source Insight keeps a selection
history, which is a circular list of the last 100 positions you've visited. The selection history is global to all
open files, not just the current file.

Source Insight 4 User Guide 229
Commands Overview
The Go Back and Go Forward commands function like the navigation buttons in a web browser.
Using Go Back to View a Function Call Chain
The Go Back command works nicely with the Jump To Definition command. If you jump to a function defini-
tion, you can use Go Back to go back to the function caller. This process can recurse many times. You can use
Go Back, and Go Forward to traverse the call chain forward and backward.
The selection history is circular, so eventually you will end up at your starting point.
You can use the Selection History command to show the list. That command shows each position, along with
the function or enclosing symbol at each location.
Go Back Toggle
The Go Back Toggle command toggles between running the Go Back command and the Go Forward com-
mand. Using Go Back Toggle repeatedly will toggle you between your last two positions.
Go Forward
The Go Forward command moves the insertion point to the next location in the selection history, which is a
circular list of the last 100 positions you've visited. See the Go Back command for more details.
The Go Back and Go Forward commands function like the navigation buttons in a web browser.
Go To First Link
The Go To First Link command locates the first source link and does the following:
1. It selects the link line in the link source file.
2. It selects the link line in the link target file.
3. It ensures both files are visible on the screen in windows. If the current window was maximized
when this command was used, then only the link target file will be made visible.
The Go To Next Link and Go To Previous Link commands do the same thing, except with the next and previ-
ous source link, respectively.
First Source Link
The "first source link" is the first link in the link source file with which a Go To Link Location command was
used. For example, if you used the Search Files command to create a Search Results file containing source
links, and then you used the Go To Link Location command on a line in the Search Results window, the first
source link is determined to be the first link in the Search Results window.
The Go To First Link, Go To Next Link, and Go To Previous Link commands are used to quickly skip from link to
link, and are especially useful when the source links are connecting compiler error messages and program
source lines.
Using Links With Compiler Errors
If you spawn the compiler from Source Insight, using a custom command, and the output is captured and
parsed for error messages, then you can use Go To First Link and Go To Next Link to view each error in your
source files.
When you define the "Compile File" custom command, you should have the "Parse Source Links" option on.
Source Insight will then search the compiler output and setup source links for each error message. In this
case, the "link sources" are each error message in the compiler output file. The "link target" for each link is
the file and line number given in each error message.
Commands Overview
230 Source Insight 4 User Guide
To view source lines with errors
To run a build or compile command, and let Source Insight position to each error message:
1. Run the "Compile File" or "Build Project" custom command, which is defined as described at “Creat-
ing a Compile and Build command” on page 188.
2. Assuming there are errors, when the compiler finishes the error messages will be in a command out-
put window. Source Insight will automatically setup the source links and run the Go To First Link
command. The first error message and the erroneous source line will be selected and made visible.
3. Run the Go To Next Link command. The next error message in the command output window is
selected, and the target of that link is shown, as was the first error.
4. Continue to use the Go To Next Link command until all the links (error messages) have been visited.
If there are no more links, then Source Insight beeps and the message, "No links." will appear in the
status bar.
Using Links With Search Output
The Search Files command puts its output into a Search Results window. Along with each line of text in the
Search Results window is a source link. In this case, the "link sources" are each line in the Search Results win-
dow. The "link target" for each link is the file and line where the search pattern was found.
To view each place where a pattern was found:
To perform a search and then visit each place where the pattern was found:
1. Run the Search Files command.
2. Use the Go To First Link command to see the first match.
3. Use the Go To Next Link command to see successive matches.
4. Continue using the Go To Next Link command until the "No Links." message appears.
Go To Line
The Go To Line command allows you to type a line number and position the insertion point on that line.
Note: You can also type a line number into the Bookmark window to go to a line within the current file.
Go to Line
Type the line number here.
OK
Click to go to the line number. If you type a line number beyond the end of the file, Source Insight positions to
the last line in the file.
Cancel
Click to cancel the Go To Line command.

Source Insight 4 User Guide 231
Commands Overview
Go To Next Change
Moves the cursor to the next block of lines that were edited. It moves the cursor to the next set of change
marks.
Go To Previous Change
Moves the cursor to the previous block of lines that were edited. It moves the cursor to the last set of change
marks.
Go To Next Link
The Go To Next Link command behaves the same as the Go To First Link command, except the next link is
used. See Also: Go To First Link command.
Go To Previous Link
The Go To Previous Link command behaves the same as the Go To Next Link command, except the previous
link is used. See Also: Go To First Link command.
Go To Next Reference Highlight
This moves the cursor forward to the next highlighted reference.
To enable reference highlights, select Options > File Type Options , and check the box that says "Highlight ref-
erences to selected symbol". This option is set per-file type.
When enabled, Source Insight highlights all references to the symbol at the cursor position. For example, you
can click in a variable name, and all references to the variable will be highlighted. The references are context
sensitive, so a symbol in a different scope will not get highlighted. The highlight will only appear if more than
one instance appears in the file.
Go To Previous Reference Highlight
This moves the cursor back to the previous highlighted reference.
To enable reference highlights, select Options > File Type Options , and check the box that says "Highlight ref-
erences to selected symbol". This option is set per-file type.
When enabled, Source Insight highlights all references to the symbol at the cursor position. For example, you
can click in a variable name, and all references to the variable will be highlighted. The references are context
sensitive, so a symbol in a different scope will not get highlighted. The highlight will only appear if more than
one instance appears in the file.
Help
The Help command brings up help on Source Insight. You can also press F1 while a dialog box is up and
Source Insight will display help on the current command.
Help Mode
The Help Mode command turns on the help mode. When a command is invoked while the help mode is on,
Source Insight displays help on the command and turns off the help mode, instead of running the command.
You can cancel the help mode by running the Help Mode command again.

Commands Overview
232 Source Insight 4 User Guide
For example, to get help on the File > Open command, type Ctrl+F1 to turn on the help mode. A message will
appear in the status bar to indicate that help mode is active. Now go to the File menu and select the Open
command. A help window will open and display help on the Open command.
You can also press F1 while a dialog box is up and Source Insight will display help on the current command.
Highlight Word
Toggles word-highlighting for the word under the cursor in all source windows. This is like using a highlighter
pen on paper. If you select a word, and use the Highlight Word command, then anywhere that word appears
in your source, it will appear highlighted.
By default, the highlight appears like bold black text with a bright yellow background. However, you can set
the highlight effect yourself by editing the Highlight style. The Style Properties command is used to edit
styles.
Incremental Search
The Increment Search and Incremental Search Backward commands invoke the incremental search mode.
By default, F12 is the Incremental Search command, and Shift+F12 is Incremental Search Backwards.
Once in incremental search mode, Source Insight will start finding matches as you type characters, starting at
the current cursor position. As you type more characters, the search will become more specific. The charac-
ters you type will appear at the bottom in the status bar.
You can exit the incremental search mode with any command key (such as an arrow key) or by pressing Esc. If
you want to search again, just type F12 twice - it will load the old pattern and find again.
Incremental Search Mode
Once you press F12, you enter the incremental search mode. Once in the incremental search mode:
•F12 will search again for the current string, or it will load the current string with the previous one if the
current string is empty.
•Shift+F12 will search backwards.
•Backspace reduces the search string.
•Esc will cancel and return to the initial position.
•Enter will stop and leave the selection at its current position.
•Any key that maps to a command will exit the incremental search mode and leave the selection at its
current position, and then the command will execute.
•Any other simple key is added to the current search pattern, which is displayed at the bottom in the
status bar.
•The search buffer is left with the last successful search pattern.
The incremental search pattern is not case sensitive, unless you type an uppercase character.
Incremental Search Backward
Searches backwards, incrementally, in the current file. See “Incremental Search” on page 232.
Horizontal Scroll Bar
This command toggles the horizontal scroll bar on and off in the current source file window

Source Insight 4 User Guide 233
Commands Overview
HTML Help
Looks up the currently selected word in the HTML Help file. The HTML Help file is the one specified in the
Setup HTML Help command. See “Setup HTML Help” on page 334.
Import External Symbols
The Import External Symbols command lets you import symbol information from external sources, such as
.NET assemblies, Java classes, standard C/C++ header libraries, and other source trees. The symbol informa-
tion is used for symbolic auto-completion while you type, and to show function or class definitions, and sym-
bol syntax formatting.
The imported symbols are put into special "import library projects" to contain the imported symbols. This
replaces the functionality of the "Project Symbol Path" feature from version 3.x. For example, you could use it
to create symbols for SDKs, or the STL, or the C-runtime header files.
The Global Import Library List
Source Insight maintains a single global import-library list that is used for all projects, or in the case where
you don't have a project open. The import list is searched when a symbol needs to be found. The list is
searched in the order it appears in this dialog. To manage this list, select Project > Import External Symbols.
The Project-Specific Import Library List
Each project also contains an import-library list, which is only used when that project is the current project.
The import list is searched when a symbol needs to be found. The list is searched in the order it appears in
this dialog. To manage the project-specific list, select Project > Import External Symbols for Current Project,
or select Project > Project Settings, and click the "Import Symbols" button.
What is an Import Library?
An import library is a special Source Insight project that contains imported symbols - the symbols come from
an external source, such as a .NET assembly or Java class. Symbols can be imported from the following types
of files:
•.NET .dll and .exe files
•A whole diretory tree of .NET .dll and .exe files
•Java .jar files
•Java .class files
•A whole directory tree of Java .class files
•A whole directory tree of source files
•All the source files in a directory path, such as an INCLUDE path
•Another Source Insight project
When you import symbols from one of these sources, a new hidden Source Insight project is created to hold
the symbols, and Source Insight opens and searches these import projects automatically.
Note: Import projects have an "_import_" prefix in their name. You can open an import project by holding down CTRL
and selecting Project > Open Project. The project list will contains all your projects, plus the import projects.
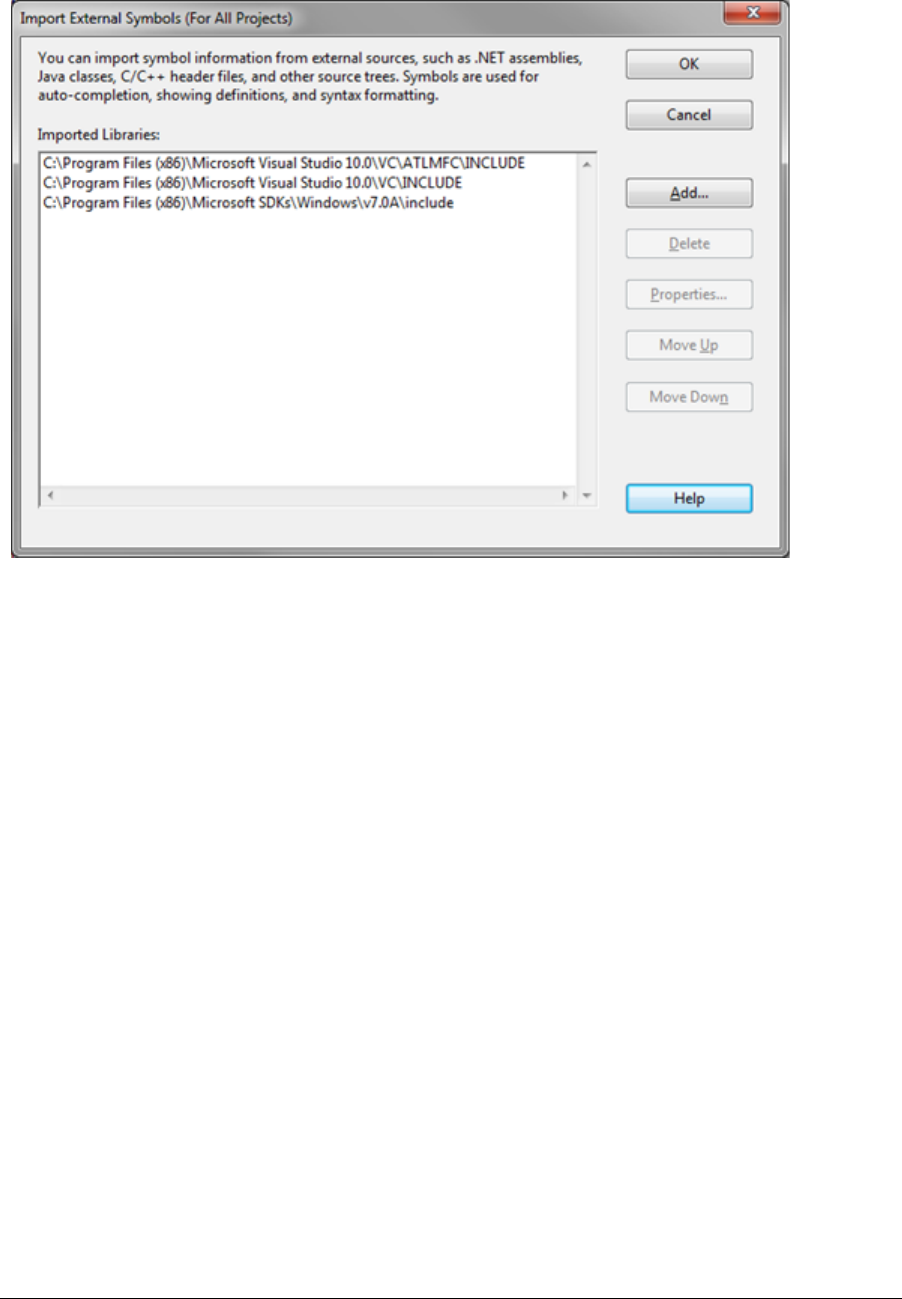
Commands Overview
234 Source Insight 4 User Guide
Import Library Dialog
This dialog is used to edit the import library list.
Library list
This is the import library list. It is a list of the external libraries currently imported. Source Insight searches
libraries in the order they appear in this list. You can use the Move Up or Move Down buttons to rearrange the
list.
Add...
Adds a new external library to the list. The "Add Library Symbols" dialog will appear.
Delete
Deletes the selected library from the import list. You will also be prompted to remove the corresponding
Source Insight project that holds the symbols.
Once you delete a library from the import list, Source Insight will no longer search for symbols in it.
Properties...
Displays information about the selected library, such as what file it was imported from.
Move Up / Move Down...
Moves the selected library up or down in the list. Source Insight searches for symbols in the library list in the
order they appear in this dialog box. Therefore, the listing order may be significant to you.
Add Library Symbols
This dialog is used to import symbols from an external file into a new Source Insight import library.
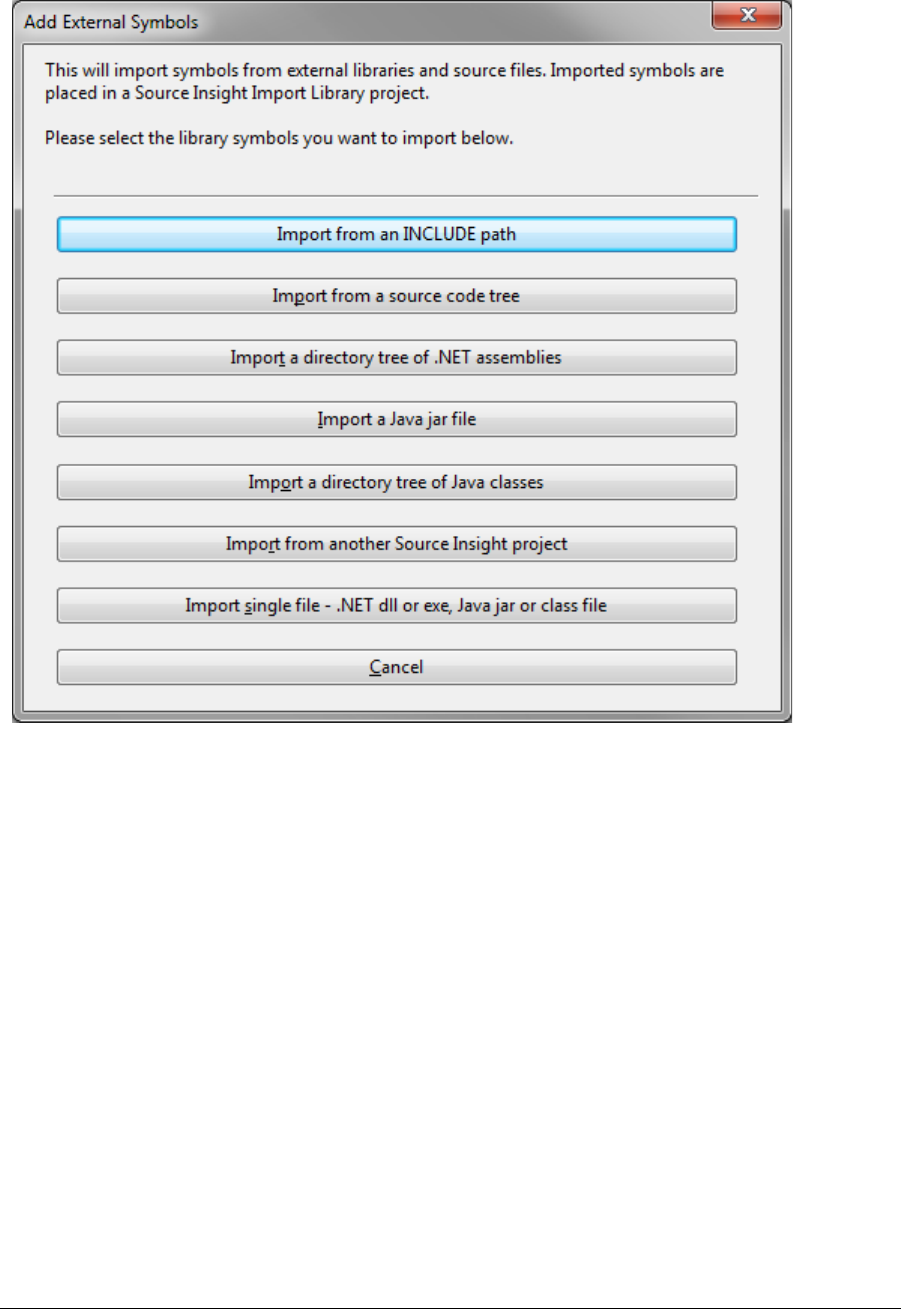
Source Insight 4 User Guide 235
Commands Overview
When you import a file or set of files, a new import project is created to hold the symbols, and the project is
added to the import library list.
Import from an INCLUDE path
This imports symbols from source files found on the INCLUDE environment variable directory path. The
INCLUDE environment variable should be defined in your environment. If not, you can enter any directory
path. All the directories in the path will be scanned for source files and added to the import library.
Use this to import the standard C and C++ header files, and/or the standard Windows headers files, or any
header library or source code library that is not already part of your Source Insight project.
Import from a source code tree
The specified directory tree will be scanned for source files and added to the import library.
This is useful for importing symbols from an external source code library that is not already a part of your
Source Insight project. For example, you can refer to symbols in a third-party runtime library, or a third-party
library's header files.
.Import a directory tree of .NET assemblies
This imports an entire directory tree of .NET assembly files.
You can use this to import an entire version of the .NET Framework. This allows auto-complete to work for
the packages that have been imported into a C# source file using the using statement.
Import a Java jar file
This imports a single Java .jar file.

Commands Overview
236 Source Insight 4 User Guide
Import a directory tree of Java classes
This imports an entire directory tree of Java .class files. For example, you can import an entire Java package
hierarchy.
Import from a another Source Insight project
Click this to import symbols from another existing Source Insight project. This doesn't actually create the
project. It just adds the project to the import list.
Import single file
Click this to import a single .dll, jar, or .class file.
Import External Symbols for Current Project
This command imports external symbol definitions for use with the current project only. Other projects are
not affected. See “Import External Symbols” on page 233.
Indent Left
The Indent Left command out-dents the lines intersecting with the current selection to the left by the size of
one tab stop. Lines that begin with # are not indented.
Indent Right
The Indent Right command indents the lines intersecting with the current selection to the right by the size of
one tab stop. Lines that begin with # are not indented. Source Insight indents lines to the right by inserting a
tab character. If you have the "Expand tabs to spaces" option on for the current file type, then spaces equiva-
lent to a tab stop are inserted instead of a tab character.
Insert ASCII
The Insert ASCII command inserts a character that you specify with its ASCII code.
Radix
Selects the input radix of the character code you typed. If Auto is selected, then the input radix is determined
from the text you type. For example, if you type 0x20, then the radix is assumed to be Hex, and ASCII 32 is
inserted.
Character Code
This is the ASCII code of the character you want to insert.
Insert File
The Insert File command pastes the text of another file into the current selection.
File Name
The name of the file to insert. You may also type a series of wildcard specifications and click the Insert button
and Source Insight will replace the file List contents with the results of wildcard expansion. The wildcards are
expanded in the current directory.

Source Insight 4 User Guide 237
Commands Overview
File list
If the Project Wide option is enabled, then this list displays all files in the current project. If disabled, then this
list displays all the files in the current working directory. The current directory path is displayed at the top of
the list box.
Insert
Click Insert to insert the contents of the file in the File Name text box. If the File Name text box contains one or
more wildcard specifications, then Source Insight will replace the File List contents with the results of the
expansion. The wildcards are expanded in the current directory.
Show Dirs
Click this button to toggle the list box contents between showing file names, and showing only subdirectory
names.
Browse
Click this button to bring up the standard Windows Open dialog box, which allows you to browse around
your disks.
Project Wide
If enabled, the file List will show all the files that have been added to the current project. If not enabled, the
file List will show files in the current directory only. This option is always unchecked if no project is open.
Insert GUID
Generates a new GUID (Globally-Unique-Identifier) and inserts it into the source file.
Insert Line
The Insert Line command inserts a new, empty line before the line the selection is on. The cursor does not
have to be at the beginning or end of the line.
If Auto Indent is turned on, then the new line will be indented even with the line below it.
Insert Line Before Next
The Insert Line Before Next command inserts a new, empty line after the line the current selection is on. If
Auto Indent is turned on, then the new line will be indented even with the line above it.
Insert New Line
The Insert New Line command inserts a new line starting at the insertion point. This is just like pressing Enter,
except the cursor does not move to the next line.
Insert Snippet
Join Lines
The Join Lines command joins the line the insertion point is on, and the next line, so that it forms one single
line. If the selection is extended, then all the lines intersecting with the selection are joined.

Commands Overview
238 Source Insight 4 User Guide
Jump To Base Type
Moves the cursor to the most base structure type of the selected variable or type. For example, consider the
following code:
struct MyStruc
{
int afield;
int anotherfield;
};
// MS type is defined as struct MyStruct
typedef struct MyStruct MS;
MS ms; // declare ms with a type of "MS"
x = ms.afield;
If you put the cursor in ms in the assignment statement (or anywhere the ms variable appears), the Jump To
Base Type command will jump to the definition of struct MyStruc, because that is the most base structure
type of the variable. It won't stop at the typedef of MS.
Jump To Caller
Jumps to the caller of the selected function, if any. For example, if you put the cursor on a function name and
use Jump To Caller, then you will jump to the function that calls it. If more then one function calls it, you will
see a list from which you may pick.
Jump To Definition
The Jump To Definition command takes the symbol from the first word in the current selection and jumps to
its definition. The Go Back and Go Forward commands are useful for navigating back and forth between all
your jumping spots.
To use this command:
1. Select within the symbol name as it appears in a source file.
2. Type Alt+= to jump to the actual symbol definition.
Mouse Shortcut
Hold down Ctrl and left click with the mouse on a symbol name to jump to its definition.
Opening Header Files
You can also use the Jump To Definition command when the cursor is in a file name in an #include statement
to open the file.
Jump To Link
Moves to the other end of the source link at the current line. See “Go To First Link” on page 229.
Jump To Prototype
Jumps to the declaration of the selected function's prototype. This only works if the selected symbol is a
function.
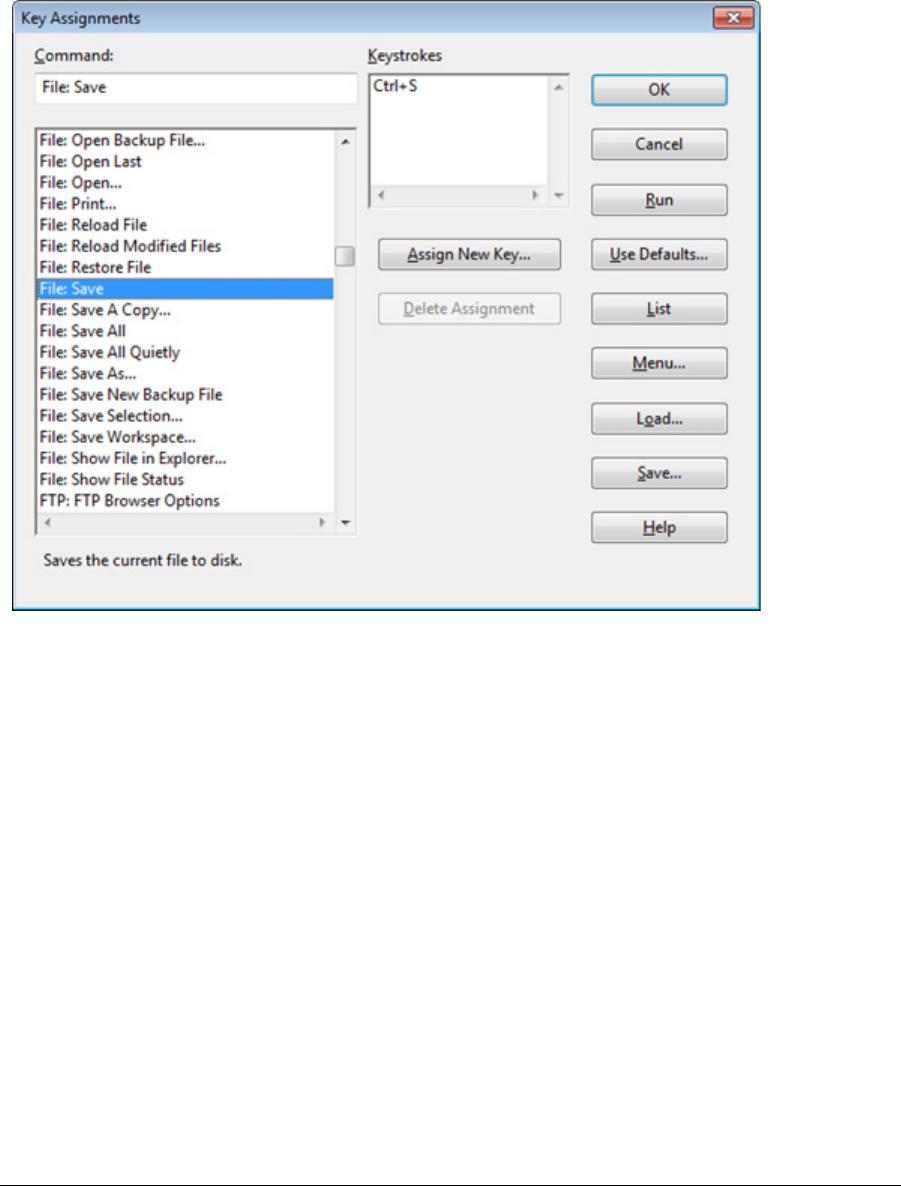
Source Insight 4 User Guide 239
Commands Overview
Key Assignments
The Key Assignments command allows you to assign or reassign keystroke combinations to commands. The
mouse buttons can also be assigned to commands. The key assignments are part of the current configura-
tion.
Key Assignments Dialog box
Command
You can type into this text box to narrow down the command list, so that you can find the command you
want easily. With name fragment matching, you can simply type a word contained within any command
name.
Command list
Lists all the Source Insight commands, including macros and custom commands that you've defined. When
you select a command here, the keystrokes list is loaded with all the keystrokes currently assigned to the
selected command.
Keystrokes list
Lists all the keystrokes assigned to the selected command. Select a keystroke here before clicking the Delete
button when deleting it.
OK
Click this to record the new key assignments in the current configuration.
Cancel
Click this to cancel the command. The current configuration will not be affected by any changes in the dialog
box so far.

Commands Overview
240 Source Insight 4 User Guide
Assign New Key…
Click to add a new keystroke or mouse click to the command selected in the Command list. A window will
pop up prompting you to type a key combination.
Delete Assignment
Click to remove the assignment of the keystroke selected in the Keystrokes list from the command selected
in the Command List.
Run
Click to run the selected command. This also records any changes you have made.
Reset
Click to reset the key assignments to their default, factory settings. Source Insight will ask you if you are sure
you want to do this.
List
Click to create a key assignments list file. This also records any changes you have made. The list file is just a
text file that contains a list of commands, and their key assignments.
Menu
Click Menu to record the new key assignments in the current configuration, and then run the Menu Assign-
ments command. See “Menu Assignments” on page 261.
Numeric Keypad Keys
The numeric keypad keys / * - + are bound to these commands by default:
If you want those keys to function normally by just inserting the character on the key top, then you need to
un-assign those keys from the commands.
Use the Options > Key Assignments dialog box to find those commands and delete the key assignments for
each of them. When the key assignments are removed from those keys, they will function normally.
Assigning Keys and Mouse Clicks
The procedures for assigning keys and mouse clicks are described below.
To Assign Keystrokes
You can add any combination of Alt, Ctrl, and Shift key modifiers with any other key, including mouse but-
tons.
To assign a new keystroke combination to a command:
1. Select the command in the Command list.
2. Click the Assign New Key button.
3. Type the keystroke(s) that you want to assign. Pressing Esc cancels the assign procedure. If the key-
stroke you typed is already assigned to a different command, Source Insight will ask you if you want
to re-assign it.
Key Command
/
Scroll Half Page Up
*
Scroll Half Page Down
-
Function Up
+
Function Down

Source Insight 4 User Guide 241
Commands Overview
To Assign Mouse Clicks
To assign a mouse click to a command:
1. Select the command in the Command list.
2. Click the Assign New Key button.
3. Click the mouse button that you want to assign. If you want a modifier key, such as Alt, Shift, or Ctrl,
to be included, press the modifier key before clicking the mouse button. You can even use the Left
mouse button to modify the right button. Pressing Esc cancels the assign procedure.
To Delete a Key Assignment
To delete a keystroke assignment from a command:
1. Select the command in the Command list.
2. Select the keystroke to be deleted in the Keystroke list.
3. Click the Delete button.
Language Options
This command activates the Languages page of the Preferences dialog box. It allows you to edit language-
specific options, such as the language keyword list.
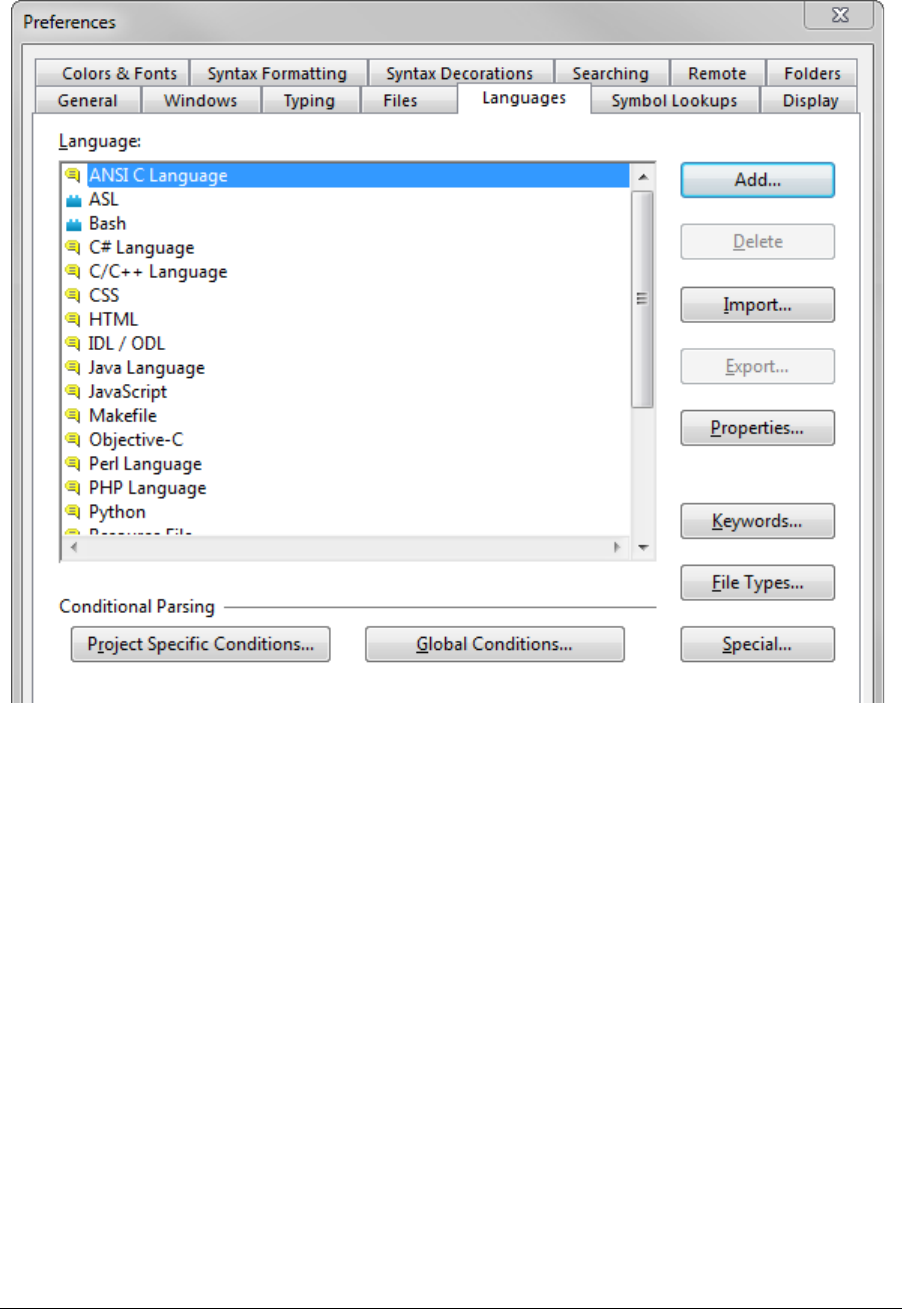
Commands Overview
242 Source Insight 4 User Guide
Source Insight supports two types of languages: Built-in and Custom. You can alter a few options for built-in
languages. For custom languages, you can control all the parameters for a generic language.
Language
This list contains all the installed languages. Custom Languages are marked with a red asterisk in the icon.
You associate a language with a particular file type with the File Type Options command. See “File Type
Options” on page 213.
Add…
Click this button to add a new custom language. See “Language Properties” on page 244.
Delete…
Click this to delete the selected custom language. Only custom languages can be deleted. The built-in lan-
guages cannot be deleted.
Import…
Click this to import a custom language into the list from a custom language file. A custom language file (.CLF)
contains all the properties of a single custom language.
Export…
Click this to export the selected custom language to a custom language file (.CLF). A custom language file
contains all the properties of a single custom language. You can export a custom language so that other peo-
ple can import the language into their Source Insight configurations.

Source Insight 4 User Guide 243
Commands Overview
Properties…
Click this button to open the Language Properties dialog box. Use this to control custom languages proper-
ties. See “Language Properties” on page 244.
Keywords
Click this button to edit the keyword list associated with the selected language type. The Language Keywords
dialog box will appear.
File Types…
Opens the File Type Options dialog box.
Special…
Displays options that are specific to the selected language. Not all languages have special options.
Conditional Parsing Options
Project Specific Conditions…
Click to edit the conditions defined that are specific to the current project only. These conditions are only in
effect when the current project is open, and only for files that belong to the project.
Global Conditions…
Click to edit the global condition set. Global conditions are defined for all projects. The total set of conditions
defined for any given project is a combination of both the project-specific, and the global condition sets. The
project-specific conditions will override global conditions with the same name. See “Edit Condition” on
page 201.
Special Language Options
When you click the Special button in the Preferences: Languages dialog box, the Special Language Options
dialog box appears. This dialog box controls special options for built-in languages.
C/C++ Options
Ignore namespace declarations
If enabled, then namespace declarations are simply ignored in C++ code. All symbols declared within the
namespaces are considered at the file scope, as though you did not write the namespace declaration.
If not checked (the default), then symbols declared within namespaces are considered in the namespace
scope.
Parse standard COM macros
If enabled, then the standard COM helper preprocessor macros, such as STDMETHOD, are recognized and
parsed. Note that if you already have entries for these macros in your c.tom token macro file, then this
option has no effect.
Java Options
Ignore package declarations
If enabled, then package declarations in your Java files are ignored. Any symbols declared after the package
statement are considered in the "global" package scope. That is, they are all in the same virtual package.
If not checked (the default), then any symbols declared after a package statement are considered in that
package scope.

Commands Overview
244 Source Insight 4 User Guide
HTML and Scripts Options
Default script language
You can specify the default script language to use in HTML and ASP files with this control. The default script
language is only used if another language is not specified in the script.
Language Properties
This command displays the properties of the currently selected language. The Language Properties dialog
box appears when you click the Properties button in the Preferences: Language dialog box.
Source Insight supports two types of languages: Built-in and Custom. You can alter a few options for built-in
languages. For custom languages, you can control all the parameters for a generic language.
Language Info
The Info page is used to edit the name of the language, and a comment. Clicking the Keywords… button
opens the Language Keywords dialog box.
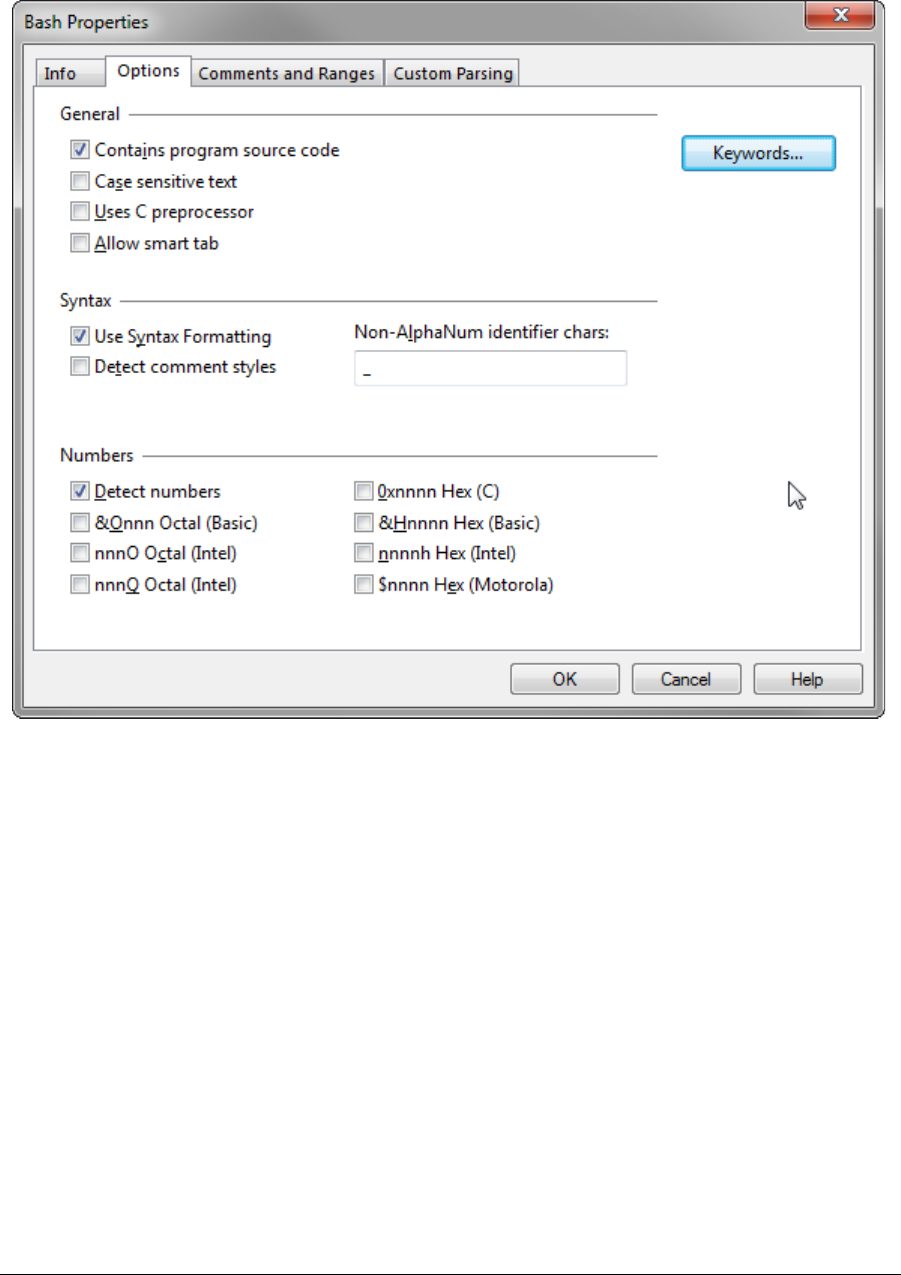
Source Insight 4 User Guide 245
Commands Overview
Basic Language Options
Each language has basic options that govern how Source Insight treats files with this language. Built-in lan-
guages, such as C/C++ have fewer options in this page than do custom languages.
Contains program source code
If enabled, then Source Insight will consider this a programming language. Certain features are altered when
a programming language is used, as opposed to a simple textual language. For instance, references to
declared symbols are displayed in the "Ref to …" styles.
Case sensitive text
This indicates whether the language is case sensitive or not. This affects how keywords are matched, as well
as how symbols names are resolved in the symbol lookup engine.
Uses C preprocessor
If enabled, then Source Insight will recognize #if and #ifdef preprocessor directives.
Allow smart tab
If enabled, then the Smart Tab feature will be enabled when editing this type of language. If not enabled,
then Smart Tab will perform like a simple tab.
Use Syntax Formatting
If enabled, then Syntax Formatting will be used when displaying files in this language.
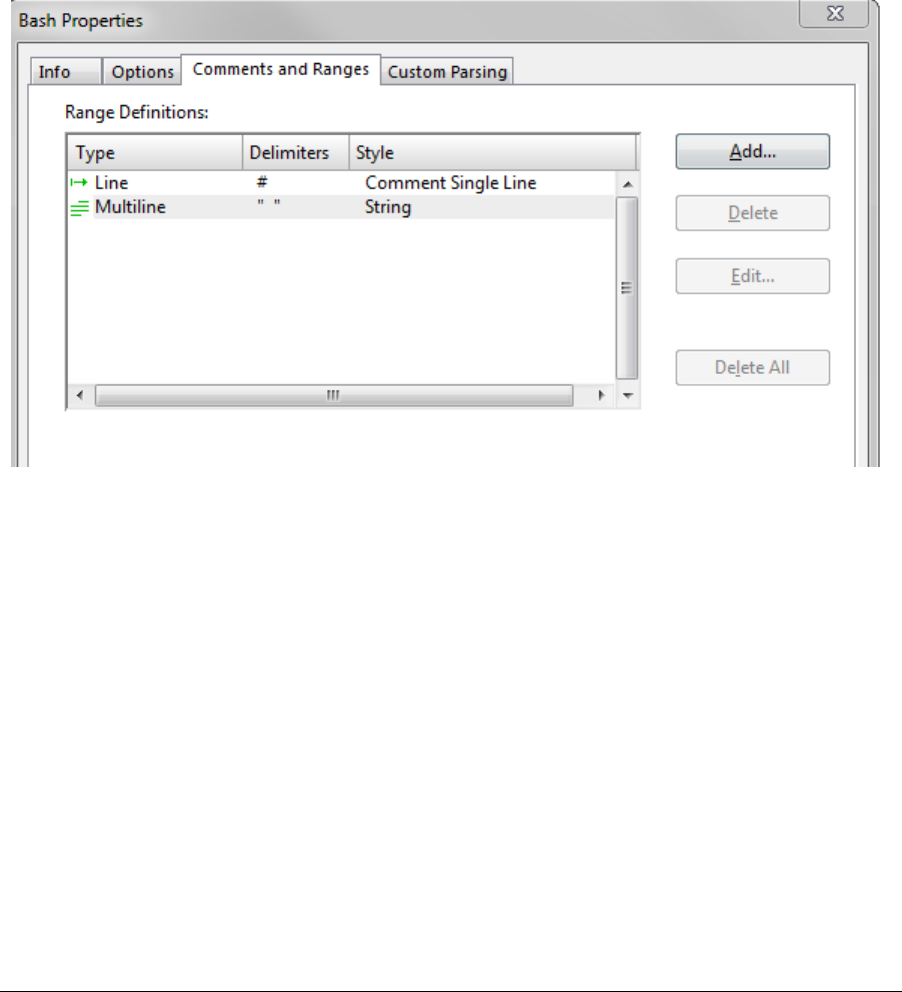
Commands Overview
246 Source Insight 4 User Guide
Detect comment styles
If enabled, then special comment styles will be detected. See “Comment Styles” on page 85.
Non-AlphaNum identifier chars
This text box contains the set of all valid non-alpha-numeric identifier characters. Alpha-numeric strings are
always considered identifiers.
Detect numbers
If enabled, then numbers found in the text are formatted with the "Number" style. The check boxes following
this enable special number formats for hex and octal numbers.
Comments and Ranges
The Comments and Ranges page is where you specify how comments and other multi-line range elements
are parsed. A quoted string is an example of a non-comment multi-line range element.
Add…
Click this button to add a new range element. The Range Definition dialog box will appear. See “Range Defini-
tion” on page 246.
Delete
Deletes the selected range element.
Edit…
Opens the Range Definition dialog box so that you can edit the range element's properties. See “Range Defi-
nition” on page 246.
Delete All
Deletes all range elements.
Range Definition
The Range Definition dialog box appears when you add a new range element, or edit a range element in the
Language Properties: Comments and Ranges dialog box. It controls all the properties of a range. A range defi-
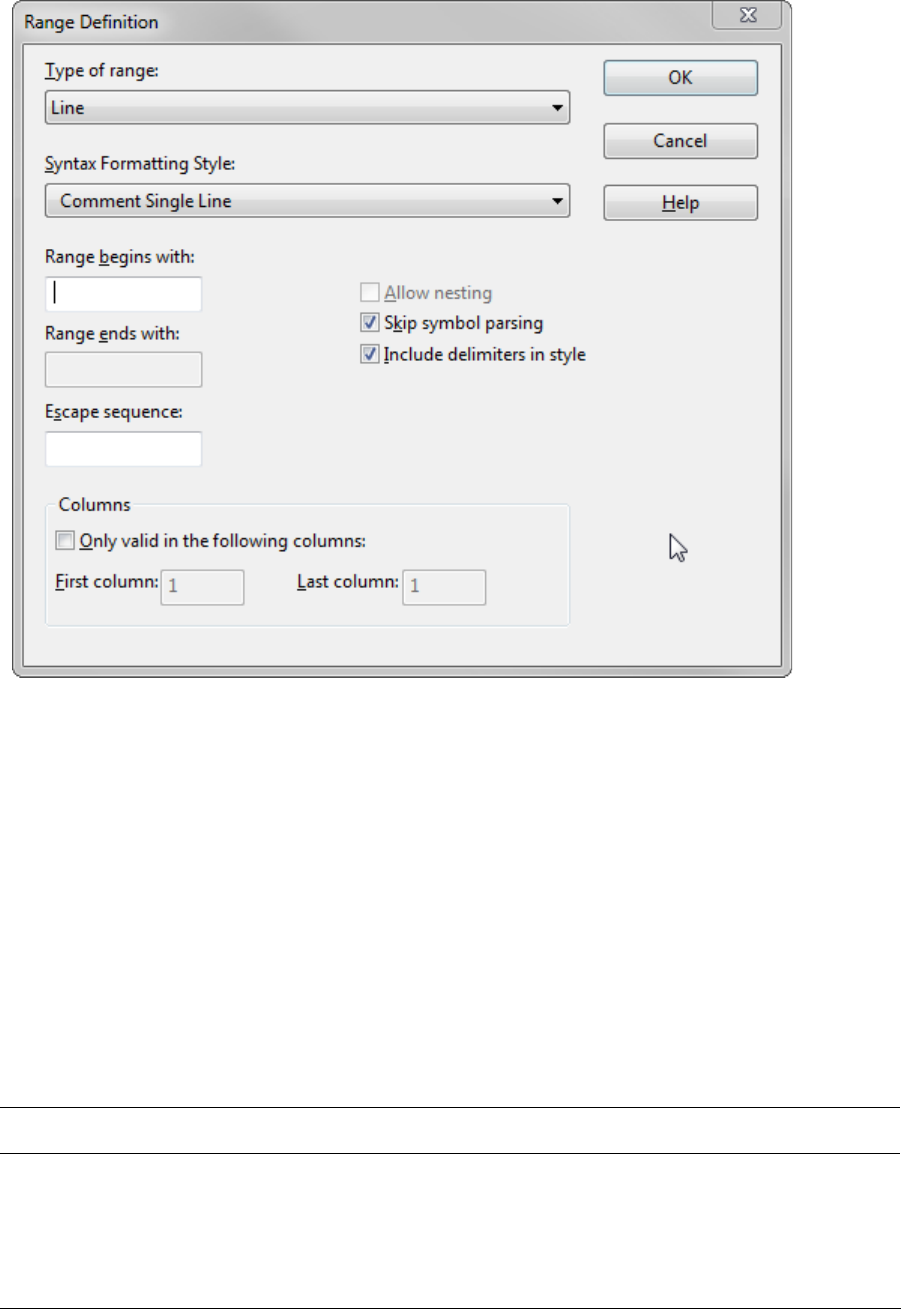
Source Insight 4 User Guide 247
Commands Overview
nition specifies how comments and other multi-line range elements are parsed. A quoted string is an exam-
ple of a non-comment multi-line range element.
Type of range
Select the type of range element from this list. There are two types of range elements:
•Line The range starts with a delimiter, and extends to the end of the line. It cannot span more than a
single line.
•Multiline The range starts with a delimiter, and ends with another delimiter. The range can span more
than single line, but it can also be contained within a single line. The starting and ending delimiter can
be the same (such as a quote).
The list also contains presets for single and double quoted string ranges, and some comment styles. When
you select one of the presets, the parameters for the preset are loaded into the other text boxes in the dialog
box.
Syntax Formatting Style
This specifies the syntax formatting style to apply to the range. Normally, you would select a comment style.
However, you are free to select any style. If the range element describes a quoted string, you would probably
want to select the "String" style. See “Style Properties” on page 342.
Note: The style is applied to the whole range. The style overrides any other automatically applied style, such as "Ref-
erence To…" styles.
Range begins/ends with
These two text boxes specify the delimiter tokens that start and end the range. The tokens can be up to 15
characters long. If a Line range type is specified, then there is only one delimiter text box enabled. If you are

Commands Overview
248 Source Insight 4 User Guide
specifying a Multiline range, the beginning and ending delimiters can be the same. This would be the case for
a quoted string.
Escape sequence
If either the Begin or End delimiter is preceded by this escape sequence, then the delimiter is ignored. For
example, you might specify backslash \ as an escape character in a quoted string so that you can embed
quote characters inside the string like this: "a string with \"embedded\" quotes".
Allow nesting
This applies only if a Multiline range is specified. If this option is turned on, then the range can be nested. If
the Begin and End delimiters are the same, nesting is not allowed because it doesn't make any sense.
Skip symbol parsing
The contents of the range will be ignored when the file is parsed for symbol definitions.
Include delimiters in style
The Begin and End delimiters are also formatted with the selected style. If this is unchecked, then the delim-
iters are formatted in the "Delimiter" style.
Columns Group
The columns group allows you to control if the range element should be sensitive to where on the line it
occurs.
Only valid in the following columns
If enabled, then the range is only recognized if its Begin delimiter occurs in the range starting at the First col-
umn and up to and including the Last column. If this check box is unchecked, then the column is ignored.

Source Insight 4 User Guide 249
Commands Overview
Custom Parsing
The Custom Parsing page is where you can type a set of regular expressions to perform simple parsing opera-
tions on the language source files.
Use regular expressions for parsing
This enables the custom parsing expressions. Uncheck this to disable the use of custom parsing.
Expressions
This lists each parsing expression and the type of symbol it yields. When Source Insight parses a file, all the
expressions are applied to the whole file.
Add…
Click this button to add a new parsing expression to the list. See “Custom Parsing Expression” on page 250.
Delete
Click this to delete the selected expression.
Edit…
Click this to edit the expression. See “Custom Parsing Expression” on page 250.
Delete All
Click this to delete all the expressions from the list.
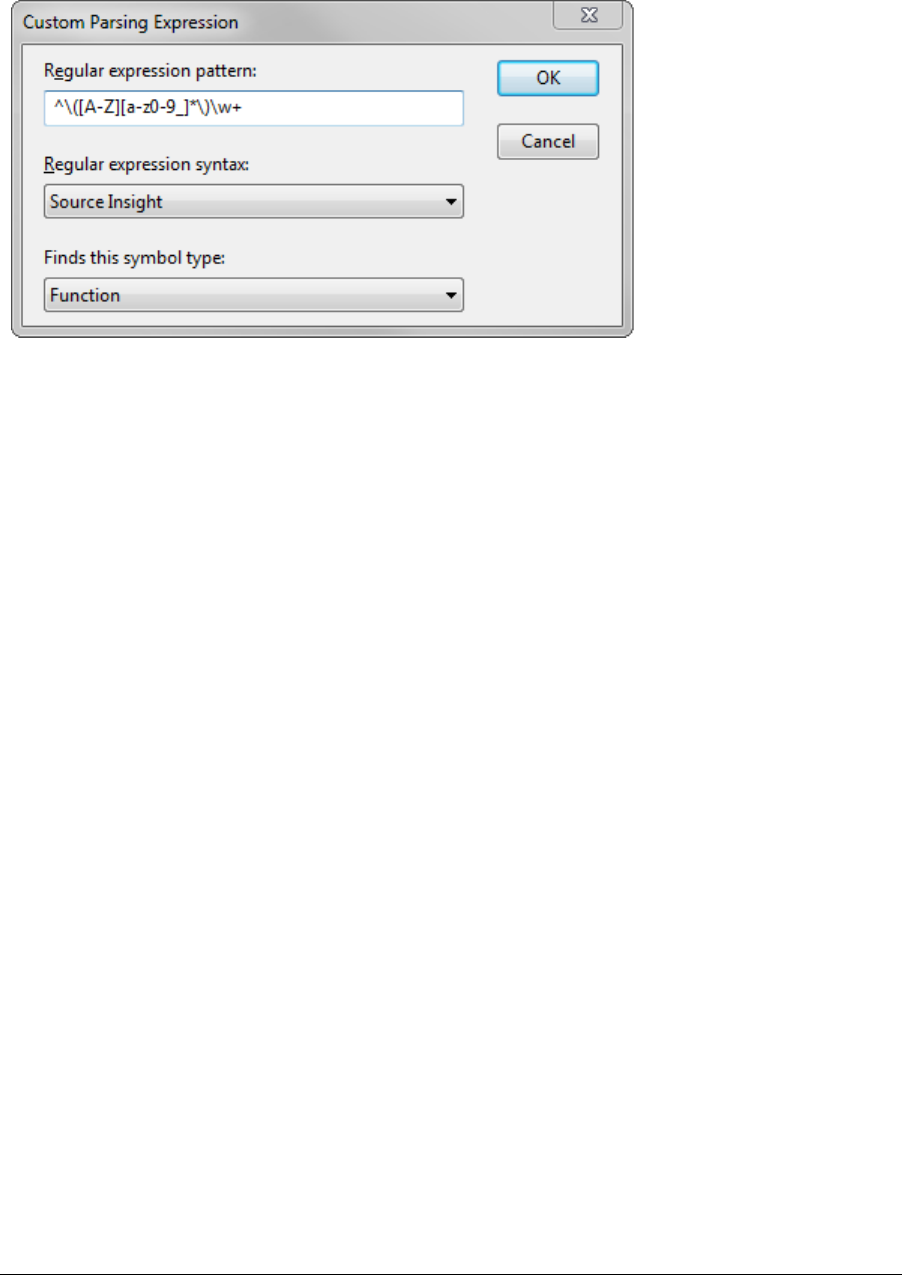
Commands Overview
250 Source Insight 4 User Guide
Custom Parsing Expression
When you click the Add or Edit button in the Custom Parsing dialog box, the Custom Parsing Expression dia-
log box appears.
Regular expression pattern:
This text box contains the regular expression used to parse a symbol definition out of a file. The expression
should contain one group. The group describes what part of the matching pattern is the symbol name. Using
a custom pattern allows you to parse symbols out of files for which Source Insight has no built-in knowledge.
For example, the following string parses sections out of .INI files like WIN.INI.
^\[\(.*\)\]
For more information, see “Regular Expressions” on page 109.
Finds this symbol type:
This pull-down list specifies what type of symbol is found by the parsing pattern. The list contains all of the
possible symbol types. The symbol types are fixed and cannot be extended. The symbol type also determines
the syntax formatting style used to display the symbol.
Styles for Custom Parsing Symbols
The symbol type specified for the custom parsing expression determines the style that will be used to display
the symbol's declaration and references. Each symbol type X has a corresponding "Ref to X" and "Declare X"
style.
When a symbol definition is parsed, the corresponding "Declare…" style is used when displaying the symbol
name. For example, if the symbol definition is a Function, then the function name will be displayed in the
"Declare Function" style. See “Style Properties” on page 342.
Last Window (Ctrl+Tab) or (Ctrl+Shift+Tab)
Activates the previous current window. You can hold down CTRL while repeating the Tab key to select each
successive window. This works like Alt+Tab in the Window’s user interface.
Layout Toolbar
Shows and hides the Layout toolbar within the main toolbar.

Source Insight 4 User Guide 251
Commands Overview
Line Numbers
This command toggles the display of line numbers. The line numbers appear at the left of each line. They are
displayed in the Line Number style. You can edit the style using the Style Properties command.
Link All Windows
The Link All Windows command toggles the Link All Windows mode. When the Link All Windows mode is on,
then scrolling any window will scroll all the other windows. The Link All Windows mode overrides the normal
window links that are setup by the Link Window command.
Link Window
The Link Window command links the current window to another window so that they scroll together. This
command lets you specify what window is linked.
Once you link the current window to another window, scrolling the current window will scroll the linked win-
dow.
If the Two Way check box is on, then the windows are linked together so that scrolling either of them will
scroll the other. However, if the check box is off, then this is a one-way link. Scrolling the linked window will
not scroll the other one.
Window links can even be circular. In other words, a window may be indirectly linked to itself. This is some-
times useful to get all the linked windows to scroll; regardless of what window you actually caused to scroll.
Another way to get all windows to scroll is to use the Link All Windows command to turn on the Link All Win-
dows mode, or just turn on the Two Way check box.
Line Window To
This list contains all windows, other than the current window. Select the window you want to link to here.
Select <none> if you want to unlink the window.
Two Way
Turn this on to link both windows so that scrolling either of them will scroll the other. Turn this off to only
perform a one-way link.
Load Configuration
The Load Configuration command loads a new group of program settings from a configuration file. A configu-
ration file contains your customizations and optional settings. You can load the whole configuration file, or
just part of it.
See “Customized Settings and Configurations” on page 138.
Linkage Result
Link A to B. Window A has a link to window B. Scrolling win-
dow A will cause windows A and B to scroll, but
not the other way around.
Link A to B to C Windows may be linked to windows that are in
turn linked to other windows. Scrolling window
A, will cause all windows to scroll. Scrolling win-
dow B will scroll B and C.
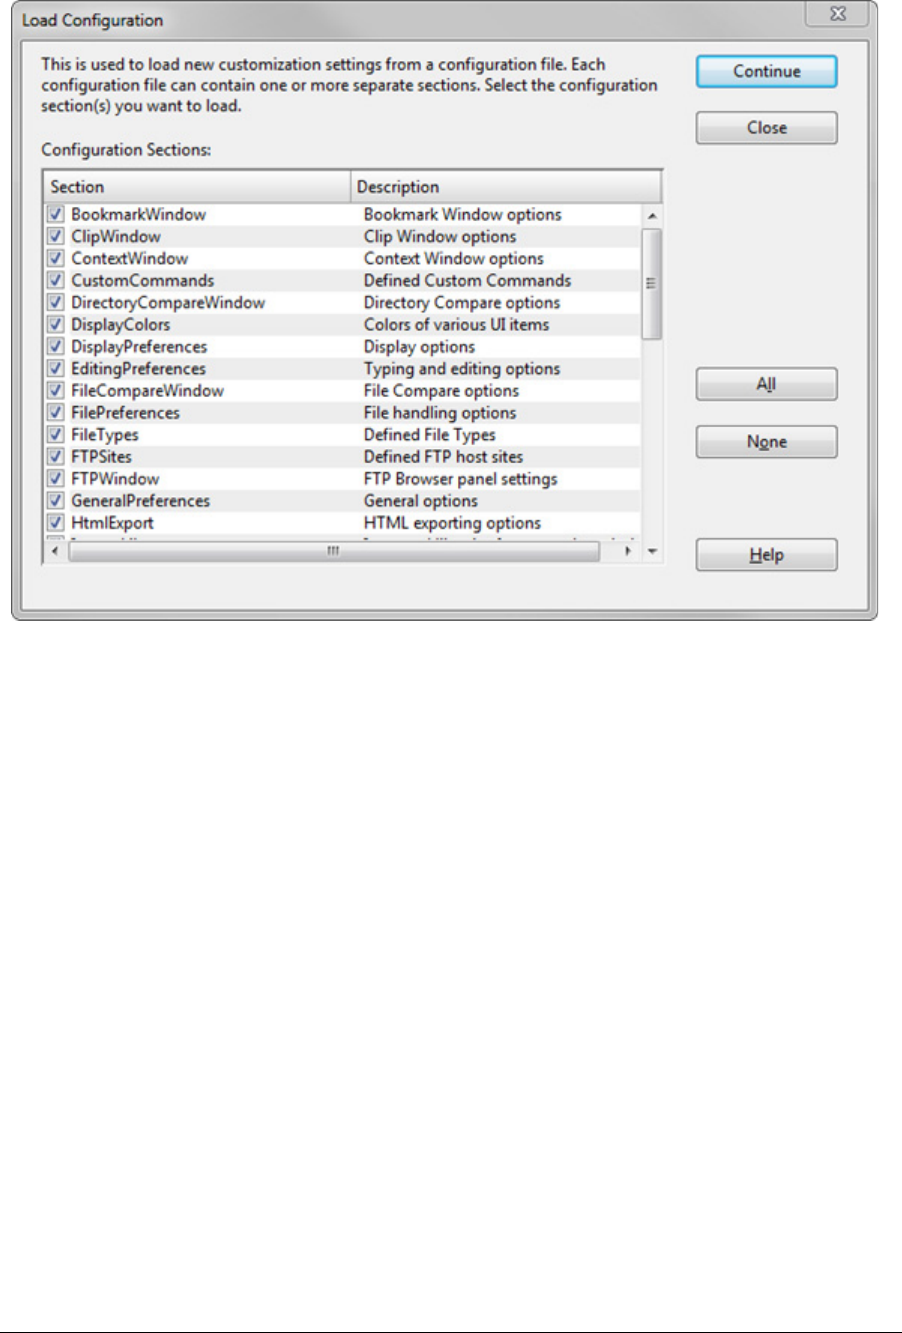
Commands Overview
252 Source Insight 4 User Guide
Load Configuration Dialog
The Load Configuration command will open a configuration file and load the settings. The configuration file
may only contain certain parts. Before it loads the settings, you will see a list of the parts contained in the file.
Check mark the items you want to load.
You can save a partial configuration file using the Options > Save Configuration command. For instance, you
can save just the key maps. When you load a configuration file that contains a partial configuration, only the
parts that exist in the file are loaded. The rest is unchanged. By loading and saving partial configurations, you
can mix and match some of the configuration parts. See: “Save Configuration” on page 319.
Importing Configuration Settings from Version 3
To import version 3 configuration settings, select Options > Load Configuration, and navigate to your version
3 configuration file. It is usually stored here:
C:\Users\<user-name>\Documents\Source Insight\GLOBAL.CF3\
where C: is your system drive letter, and <user-name> is the account user name.
Load File
The Load File command opens a file to edit. It opens a dialog box containing a list of all files in the project,
regardless of directory.
You can also open files by using the Open command, or by dragging files from Windows Explorer and drop-
ping them on the Source Insight window.
File Name
Type part of the name of the file you want to open. You may also type a series of wildcard specifications and
click the Open button, and Source Insight will replace the File list contents with the results of wildcard expan-
sion. The wildcards are expanded in the current directory.

Source Insight 4 User Guide 253
Commands Overview
As you type in this text box, partial matching occurs in the file list.
File list
If the Project Wide option is on, then this list displays all files in the current project, regardless of directory.
If the Project Wide option is off, then this list displays all the files in the current working directory. The current
directory path is displayed above the list box. The files shown in the current directory are expanded from the
wildcard strings specified in the File Type Options dialog box for all file types.
Open
Click this to open the file selected in the file list. If nothing is currently selected in the file list, then Source
Insight opens the file named in the File Name text box. If the File Name text box contains one or more wild-
card specifications, then Source Insight will replace the file list with the results of the expansion. If the Project
Wide option is on, the wildcards are expanded over the whole list of files in the current project; otherwise,
the wildcards are expanded in the current directory. If the file specified does not exist, Source Insight will
allow you to create a new file with that name.
Select All
Click this to select all the files listed in the file list.
Show Dirs
Click this button to toggle the list box contents between showing file names, and showing subdirectory
names.
Project Wide
If enabled, the file list will show all the files that have been added to the current project, regardless of direc-
tory. If not enabled, the file list will show files in the current directory only. This option is always disabled if
no project is open.
Browse
Click this button to bring up the standard system Open dialog box, which allows you to browse around your
disks.
Load Layout
This command loads a layout file, which contains window arrangements. This makes it easy to transition
between different tasks that require different window arrangements.
A layout contains the following:
1. The size and position of the Source Insight application window.
2. The size and position of each panel window. A panel window is either floating or docked.
3. The properties and settings for each panel window.
See “Saving Window Arrangements with Layouts” on page 146.
Special Load Layout Commands
There are also four Load Layout commands which are on toolbar buttons, and which you can bind a key-
stroke to. They are:
•Load Layout A
•Load Layout B
•Load Layout C
•Load Layout D

Commands Overview
254 Source Insight 4 User Guide
Each of the above commands loads from a layout file named "layout_a.xml", "layout_b.xml", etc. These are
the layout files created when you use the Save Layout command and select the quick layouts A through D.
See “Save Layout” on page 320.
Load Search String
The Load Search String command loads the contents of the current selection into the current search pattern.
The search pattern is what is in the Find text box of the Search and Replace commands.
Lock Context Window
This command locks the Context Window so that its contents don't change. When the Context Window is
locked, it does not track your actions.
Lock Relation Window
Toggles Relation Window locking. When locked, it will not automatically update. You can still use the "Show
Relation" command to manually update the Relation Window. You can also click on the Refresh Relation Win-
dow button in the Relation Window toolbar.
Logging Options
This dialog sets options for Source Insight's application logging. Source Insight can maintain a log file that is
useful for debugging issues with Source Insight.
Checking Level
This option is only available in special "debugging" builds of Source Insight. This specifies the amount of
internal checking that is performed.
Log user commands
Every time you issue a command in Source Insight, the command is logged to the file.
Log file names
When you open or save perform some operation on a file, the file name is logged to the log file. If you are con-
cerned with the secrecy of your file names, then you should not check this box.
Show Assertion Failure messages
If a debugging check fails, an "assertion failed" message box will appear with some debugging information.
Even if this is not checked, the assertion failure information is still logged to the file.
Output to log file
Enables logging to the log file. If this is not checked, then no logging is performed. The name of the current
log file is displayed to the right. It is typically named SI.LOG, or SI2.LOG etc. Multiple the number is incre-
mented if more than one instance of Source Insight is running.
Open log file in notepad
Click this to open the current log file in Notepad.
Empty the log file
Click this to empty the log file to start over.
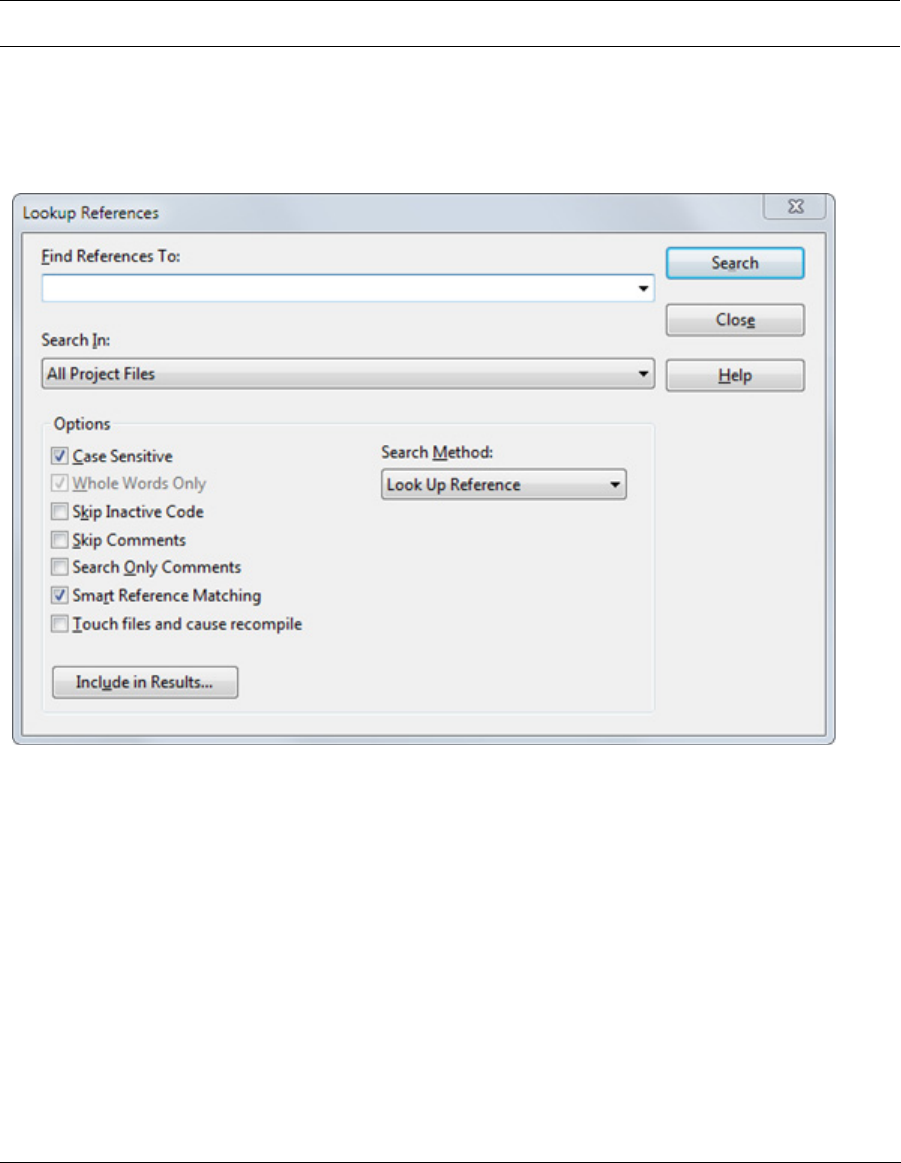
Source Insight 4 User Guide 255
Commands Overview
Lookup References
The Lookup References command searches the current project for references to a selected symbol. For exam-
ple, click inside "BeginPaint", run the Lookup References command, and Source Insight will open a Search
Results window, which lists all the places that reference "BeginPaint" in your project.
Source Insight uses its symbol indexes to make the searching fast.
References can be found in all source code text, including comments, and potentially inactive #ifdef
branches. However, you can control whether these places are searched or not.
Note: The Search Project command is the same as Lookup References, but with different option state. See “Search
Project” on page 328.
Lookup References Dialog box
The Lookup References command is very similar to the Search Project command. In fact, each dialog box is
identical. However, each dialog box has its own persistent state.
Find References To
Type the symbol name you want to locate. The word under the cursor is automatically loaded into this text
box. Source Insight will use the context of the cursor position to determine the exact symbol instance you
want. If you invoked Lookup References from a symbol dialog box or window, then Source Insight keeps the
exact symbol references along with this text box.
Typically, you would type the name of an identifier in your program, however you can type any string here
and a project-wide search will be performed. The search is very fast if you type a single word only.
Search In
This drop-down list contains a list of file types. You can use this list to restrict the search to only a particular
type of file, or just the current file. If the Project Window is visible, then you can also use this list to specify the
files selected in the Project Window.
Commands Overview
256 Source Insight 4 User Guide
Search Method
You can pick the search method to use from this list. There are four different searching methods available:
•Simple String
•Regular Expression interprets the pattern as a regular expression.
•Keyword Expression similar to an Internet search query.
•Lookup Reference searches for symbol references.
Lines of Context
This only applies if you selected the Keyword Expression search method. This specifies how closely, in num-
ber of lines, the keywords must occur in order to qualify as a match. See “Keyword Expressions” on page 257.
Find word variations
If enabled, Source Insight will also find different ending forms of the keywords you specified. For example, if
you specified the keyword "open", Source Insight will also find "opens", or "opened", or "opening". This
option is only available for the Keyword Expression search method.
Include in Results...
Click this button to specify what information is included in the Search Results.
Search Options
Case Sensitive
Specifies whether the search is case sensitive or not.
Whole Words Only
For the Lookup References mode, this option is always on. If you choose a different search method, this will
restrict matches to only whole words.
Skip Inactive Code
If enabled, then only code that is active under conditional compilation is searched. You must first specify
known conditions in the Preferences: Languages dialog box, in order for Source Insight to know what condi-
tions are active or not. Conditional compilation only applies to some languages.
Skip Comments
If enabled, then comments will not be searched.
Search Only Comments
If enabled, then only comments will be searched. This is mutually exclusive with the Skip Comments option.
The comment options slow the search down a little.
Smart Reference Matching
This enables Source Insight's smart reference matching feature. Source Insight will determine whether each
reference found is actually referring to the symbol you are looking for.
Tip:
Matching exact references slows the reference finding process.
The Smart Reference Matching option means that the search results will only contain references strictly to
the exact symbol you specified. For example, if you select a member of a struct and look up its references, the
search results will only contain references to that particular member of that particular struct – not just any
string that is equivalent. Note that this option slows the process down because each same-string occurrence
has to be qualified with a symbol lookup.
Touch files and cause recompile. Turn this on to cause each file's "last modified" time stamp to be set to the
current time. This is useful if you have a compile time dependency on an identifier usage. Just turn this on
and search for references with this command. The places where the identifier is referenced will be "touched"

Source Insight 4 User Guide 257
Commands Overview
and your make program or development system will recompile those files the next time you build your pro-
gram.
Keyword Expressions
A keyword expression search is similar to an Internet search engine query. Source Insight searches the proj-
ect for occurrences of a set of keywords that appear within a specified number of lines. The Lines of Context
text box indicates the maximum distance the keyword terms can be from each other to qualify as a match.
For example, if you typed "cat food", then Source Insight will search for occurrences of "cat" and "food"
within X lines of each other.
There is an implicit logical-AND operator between keywords. That is, if you type more than one keyword, the
both keywords must be present to qualify as a match. You can include other Boolean operations as well. The
following table lists the operators available:
You can also group expressions using parentheses. For example:
(cat or kitty) and food
(file or buffer) and (save or write) and !error
Keyword Variations
If you enabled the Find word variations option, then Source Insight will also find different ending forms of the
keywords you specified. For example, if you specified the keyword "open", Source Insight will also find
"opens", "opened", and "opening". This has the same effect as typing this expression:
(open or opens or opening)
Word variations are applied to each keyword term. For example, if you specified:
save write
Which implies "save" and "write" must be present. With word variations enabled, this search would be equiv-
alent to:
(save or saves or saving) and (write or writes or writing)
Keyword Search Results
When you perform a keyword search, the Search Results will list blocks of lines that include the keywords
together. This gives you a little bit of context around the matches.
Make Column Selection
The Make Column Selection is used with the mouse. Alt+Left Click and drag creates a rectangular selection.
The column selection can be Cut, Copied, or Pasted.
Table 4.4: Keyword Search Operators
Operator Example Action
AND or + cat and dog
Both terms must be present.
OR cat or dog
Either term must be present
NOT
or –
or !
-cat
The term must not be present
= =Betty
Case sensitive match
? "regexp" ? "^Ich"
Term is a regular expression

Commands Overview
258 Source Insight 4 User Guide
Manage License
The Manage License dialog allows you to view your license information, enter a new serial number and acti-
vate your license, or deactivate your license. The options available in this dialog depends on the current sta-
tus of your license and whether it is a Trial or Regular license.
To Begin a Trial
Choose "Begin a Trial". After you finish filling out some basic information, Source Insight will connect to the
Source Insight licensing system and issue you a trial license. You can continue to use Source Insight for 30
days.
To Begin Using a Purchased License
Choose "Enter a purchased serial number" to enter your license serial number. Source Insight will connect to
the Source Insight licensing system to validate the license and activate it on your machine. You will not have
to activate it again.
To Deactivate a License
If you no longer want to run Source Insight on your machine, or would rather use it on a different machine,
we recommend deactivating your license. If your license is deactivated, you can activate it again with the
same serial number on a new machine. Deactivating reduces your activation count so that you can activate it
on another machine.
License Activation General Information
Source Insight requires activation over the Internet to run. Once you install and launch Source Insight, you
will be prompted to either enter a serial number or start a new Trial license.
When prompted, please enter your name and email address. This information is optional but highly recom-
mended so you will be able to retrieve your license if you should lose it. This also allows us to notify you if any
important updates are available.
See “Activating Source Insight” on page 16.
If you have any problems or questions about the activation process, please email us at info@sourcein-
sight.com.
Manage Visual Themes
This is used to define and apply visual themes. A visual theme is a collection of font and color settings, plus
style settings used in source code windows. From here you can apply a theme, define and delete themes,
rename themes, and also import and export themes from external theme files.
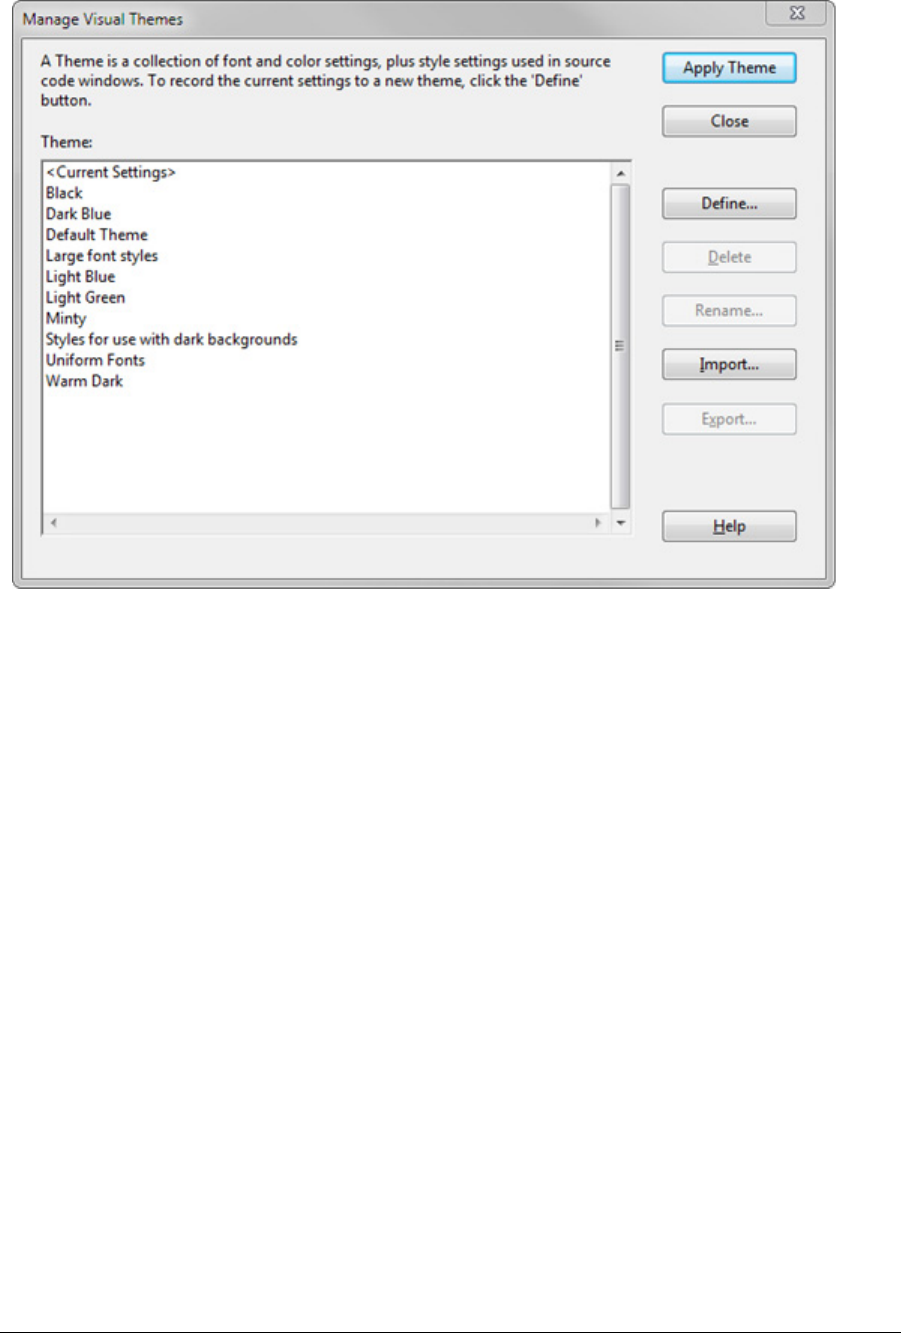
Source Insight 4 User Guide 259
Commands Overview
See “Visual Themes” on page 144.
Apply Theme
Applies the currently selected theme to the program. You can also double click the theme name to apply it.
Note that once you apply it, the <Current Settings> items becomes <Previous Settings>. You can still apply
the <Previous Settings> theme from the list to return to the settings that where in effect when you invoked
this dialog box.
Define
Defines a new theme by recording all the current color, font, and style settings. Once you set all the colors,
fonts, and styles they way you like them, use the Visual Themes dialog to record all the settings into a new
theme.
The Define Visual Theme dialog allows you to define a new theme, or redefine an existing theme. You can also
specify what should be included in the theme.
Delete
Deletes the selected theme.
Rename
Renames the selected theme.
Import
Imports themes from a previously saved themes file. A themes file can have any number of themes in it. Since
theme files may contain multiple themes, the Import Theme dialog allows you to pick and choose which
themes to import.
The new themes are added to the existing list. Themes with the same names will be replaced with the
imported themes.
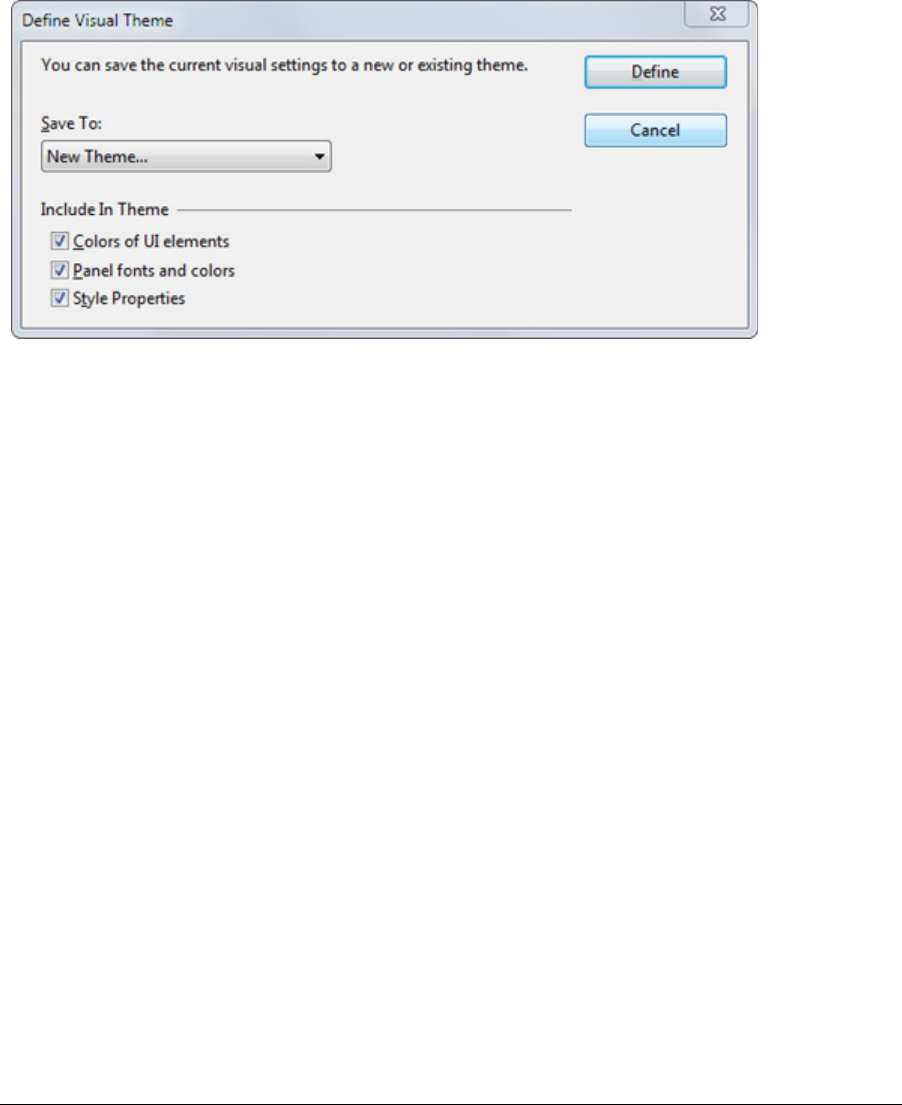
Commands Overview
260 Source Insight 4 User Guide
Export
Exports the selected themes to a new themes file. You can use this to share themes with other people, or to
load into a different configuration you have saved separately.
Define Visual Theme
This appears when you click Define in the Manage Visual Themes dialog.
Once you set all the colors, fonts, and styles they way you like them, use the Visual Themes dialog to record
all the settings into a new theme. Click the Define button and the Define Visual Theme dialog appears.
See “Visual Themes” on page 144.
Save To
Select the theme you want to save to. You can select an existing theme to re-define it. Or select "New Theme"
to define a new theme. If you select "New Theme" from the list, you will be prompted for a theme name.
Include In Theme
Select the components you that want to be part of the theme. When a theme is applied, only the components
that are part of it have any effect. For example, you can include just the color of the main window, but not the
styles. Or you can include only styles.
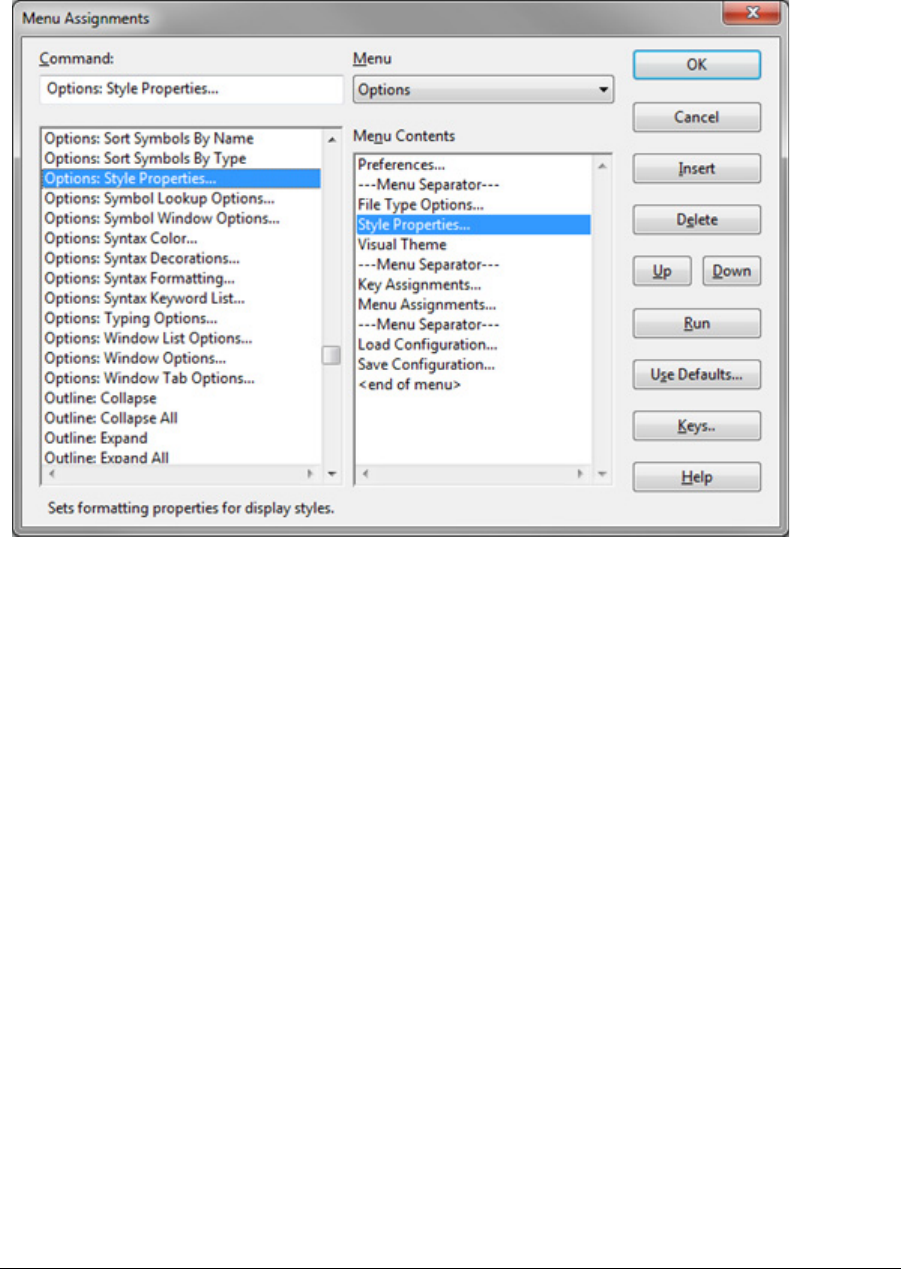
Source Insight 4 User Guide 261
Commands Overview
Menu Assignments
The Menu Assignments command allows you to assign or reassign commands to the menus. The menu
assignments are part of the current configuration.
Command
You can type into this text box to narrow down the command list, so that you can find the command you
want easily.
Command list
This lists all the Source Insight commands, including macros and custom commands that you've defined.
The commands are listed by category. When you select a command here, the menu it appears on, if any, is
selected in the Menu list, and the contents of that menu are loaded into the Menu Contents.
Note that there is a special command in the list called "--Menu Separator--". Insert this item on the menu to
create a separator line in the menu.
Menu list
This pull-down list contains the titles of all the top level menus. When you select a menu from here, the con-
tents of the menu are loaded into the Menu Contents. There is a menu in this listed named "Work", which
only appear on the application menu bar if you add a command to it.
Menu Contents
This lists the menu items of the menu selected in the Menu list. Select a menu item here to indicate what item
should be deleted, and where to insert new items.
OK
Click to record your menu assignment changes in the current configuration.
Cancel
Click to cancel the command. None of your changes up to this point will be saved in the current configura-
tion.

Commands Overview
262 Source Insight 4 User Guide
Insert
Click to insert the selected command onto the selected menu. The command is inserted just before the
selected menu item. You must select a command, a menu, and a menu item before clicking Insert.
Delete
Click to delete the selected menu item. You must select a menu item in Menu Contents before clicking Delete.
Up
Moves the selected menu item up, towards the top of the menu.
Down
Moves the selected menu item down, towards the bottom of the menu.
Run
Click to record your menu assignment changes in the current configuration, and run the selected command.
Reset
Click to reset the menus assignments to their default, factory settings. Source Insight will ask you if you are
sure you want to do this.
Keys…
Click to record the new menu assignments in the current configuration, and then switch to the Key Assign-
ments command. See “Key Assignments” on page 239.
Mono Font View
The Mono Font View command on the View menu toggles the Mono Font View mode on and off. When this
mode is on, all syntax formatting is suppressed, except for color changes, and a mono-spaced font is used.
Tip:
Use Mono Font View to quickly see how text columns lines up. You can edit the Mono Font View font in Style Properties
All text is displayed using the "Mono Font View" style, which can be edited with the Style Properties dialog
box. The "Mono Font View" style is preset to use a mono-spaced font. See “Style Properties” on page 342.
The Syntax Formatting features of Source Insight are powerful, and allow you to use a variable pitch font if
you want, but sometimes you need to see how text will line up in another editor or in a simple display mode
when only a single font is used. Mono Font mode is useful for quickly switching your display to a basic mono-
spaced font display. This is particularly useful if you are using spaces instead of tab characters to line col-
umns up.
When Mono Font mode is active, it overrides the settings of the Preferences: Syntax Formatting and Syntax
Decorations dialog boxes.
New
The New command creates a new, unsaved file buffer. The file is not created on disk until you save it using
the Save or Save As commands.
The New command will prompt you for a file name. By default, the new file is given a name of the form
New0001.ext. The next time you use the New command, the new file name will be New0002.ext, and so on.
The extension used will be the same as the current file. The name and extension you type will determine
what file types will be in effect for that file.
When you save new files for the first time, Source Insight allows you to change their names, and asks if you
want to add them to the current project.
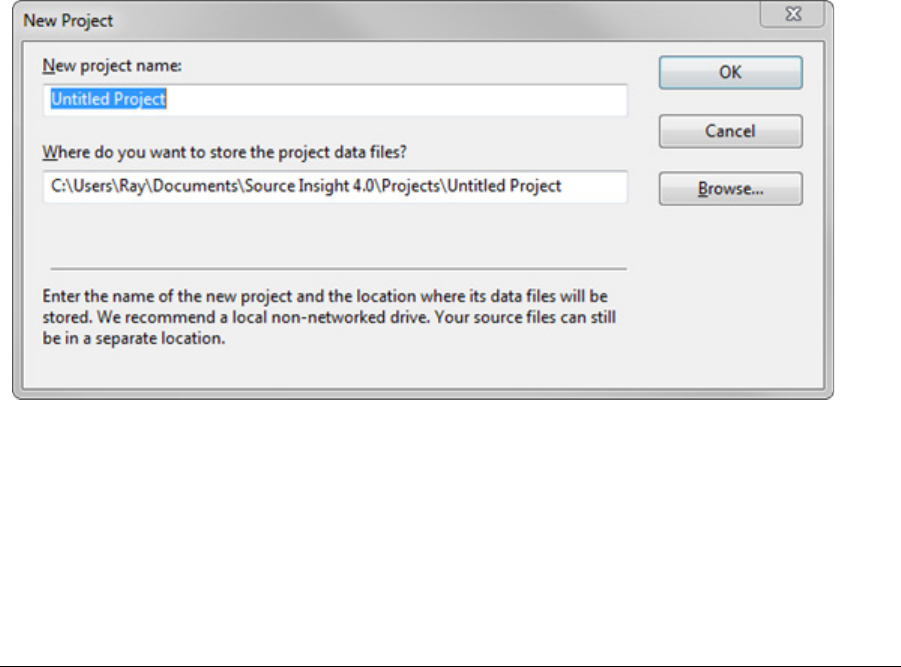
Source Insight 4 User Guide 263
Commands Overview
Another way to create a new file is to use the Open command and specify a file name that does not exist.
Source Insight will ask you if you want to create the file. Assuming you do, Source Insight will create a new
unsaved file with the name you specified.
New Clip
The New Clip command creates a new clip buffer. You will be prompted for a clip name. You should not add
extensions to the clip name. See “Clip Window” on page 170.
New Relation Window
This creates a new Relation Window. You can have as many Relation Windows as you like. Each window has
its own set of options.
For example, you could select a function name, and have one Relation Window showing what other functions
it calls, and another Relation Window showing who calls the selected function.
Alternatively, you could have one Relation Window tracking the current selection, and another tracking the
enclosing function.
See “Relation Window” on page 305.
New Project
The New Project command creates and opens a new project. See “Projects” on page 40.
Since Source Insight allows only one project open at a time, Source Insight will ask you if it's okay to close the
current project, before proceeding.
You will be asked for a project name, where the files should be stored, and what source files you want to add
to the project.
New project name
Enter the name of your project. Enter a simple user-friendly name; do not enter a path name here. This is the
name that will appear in the Open Project dialog. In the data folder (specified below this) Source Insight will
create several data files that start with this name and have different extensions.

Commands Overview
264 Source Insight 4 User Guide
Where do you want to store the project data files?
Specify the full path of the project data file folder here. Source Insight will store all its project data in this
folder, independently of your source files. You can specify the same folder as your source files, or use a sepa-
rate location.
By default, Source Insight creates a sub-folder with the same name as the project inside your user document
directory in the Projects folder. This is the recommended location.
For best performance and reliability, we recommend a local, non-networked drive for the project data direc-
tory.
If you are creating a project that refers to source files on a shared server, or any other place that you do not
have permission to write to, then you should create the project data on your local machine, preferably in the
default proposed location.
After you answer these two questions, you will be taken to the Project Settings dialog. When the Project Set-
tings dialog box appears, enter the location of the your source files into the project source directory
field.See “Project Settings” on page 284.
New Window
The New Window command opens a new window on the screen. The file appearing in the current window
will appear in the new window as well.
Next File
The Next File command runs the Close command, and then runs the Open command. You will have an oppor-
tunity to save the current file if you've modified it, unless you have the Save Quietly option turned on in the
Preferences: General dialog.
Next Relation Window View
Cycles through the view modes of the Relation Window. This includes the outline view, and graphical views.
Open
The File > Open command activates the Project Window and sets the focus on the text box of the Project Win-
dow. If the Project Window was not visible, it is made visible, and then hidden after you select a file to open.
You can customize what the Open command does in the Options > Preferences: Files dialog box. Instead of
activating the Project Window, you could have it bring up other dialog boxes or windows instead.
If you do not have a project open, then this command will bring up the system Open dialog box, which is a
standard system dialog box.
You can also open a file by dragging a file and dropping it onto the Source Insight application window.
Open As Encoding
This opens a new file using a specific character encoding. To use this select File > Open As Encoding. Select
the desired encoding, then click the Open button.
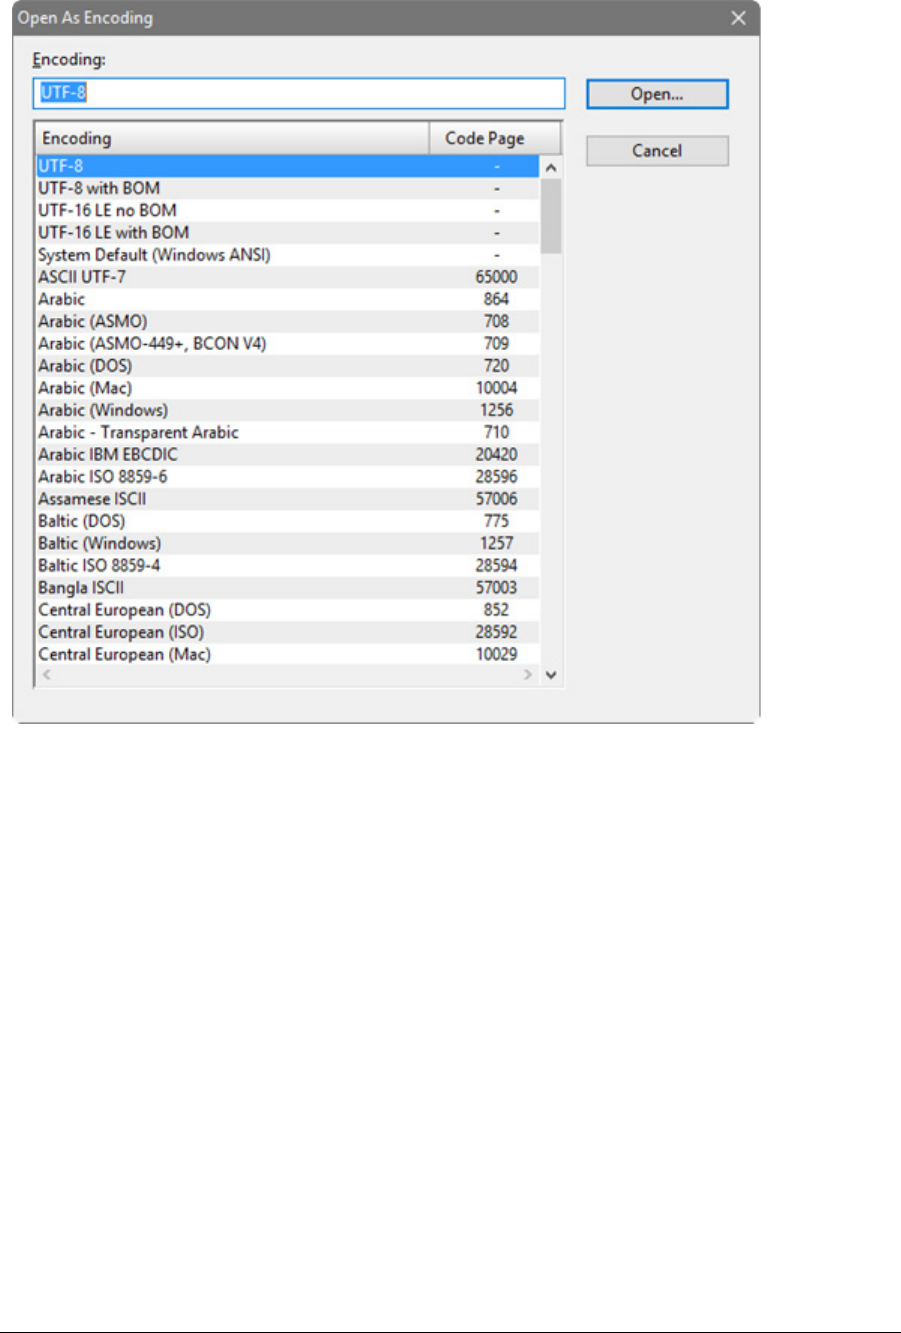
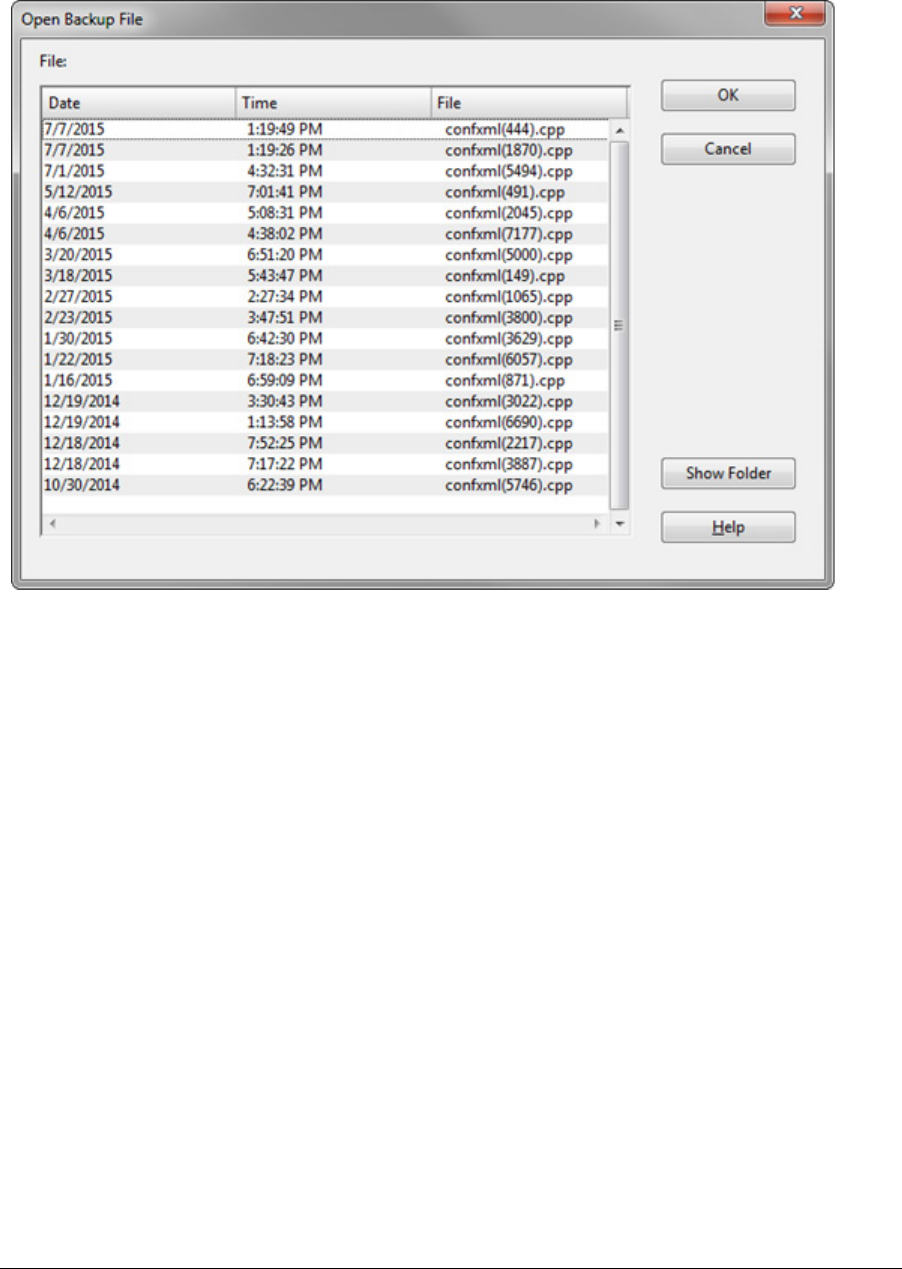
Commands Overview
266 Source Insight 4 User Guide
Open Backup File
This command opens a backup version of the current file. Depending on your backup settings, you may have
many or few backup copies of your file.
Backup files are given a unique name based on the original file name. For example if the original file name is
render.c, then the backup name will be something like render(1066).c where the (1066) part is a ran-
dom value to make the file name unique in the Backup directory.
To open the Backup folder in Window Explorer, click the Show Folder button.
See “Backup Files” on page 128.
Open Project
The Open Project command allows you to open a new current project. It first closes the current project, if
any, since a Source Insight instance only allows one project open at a time. See “Projects” on page 40.
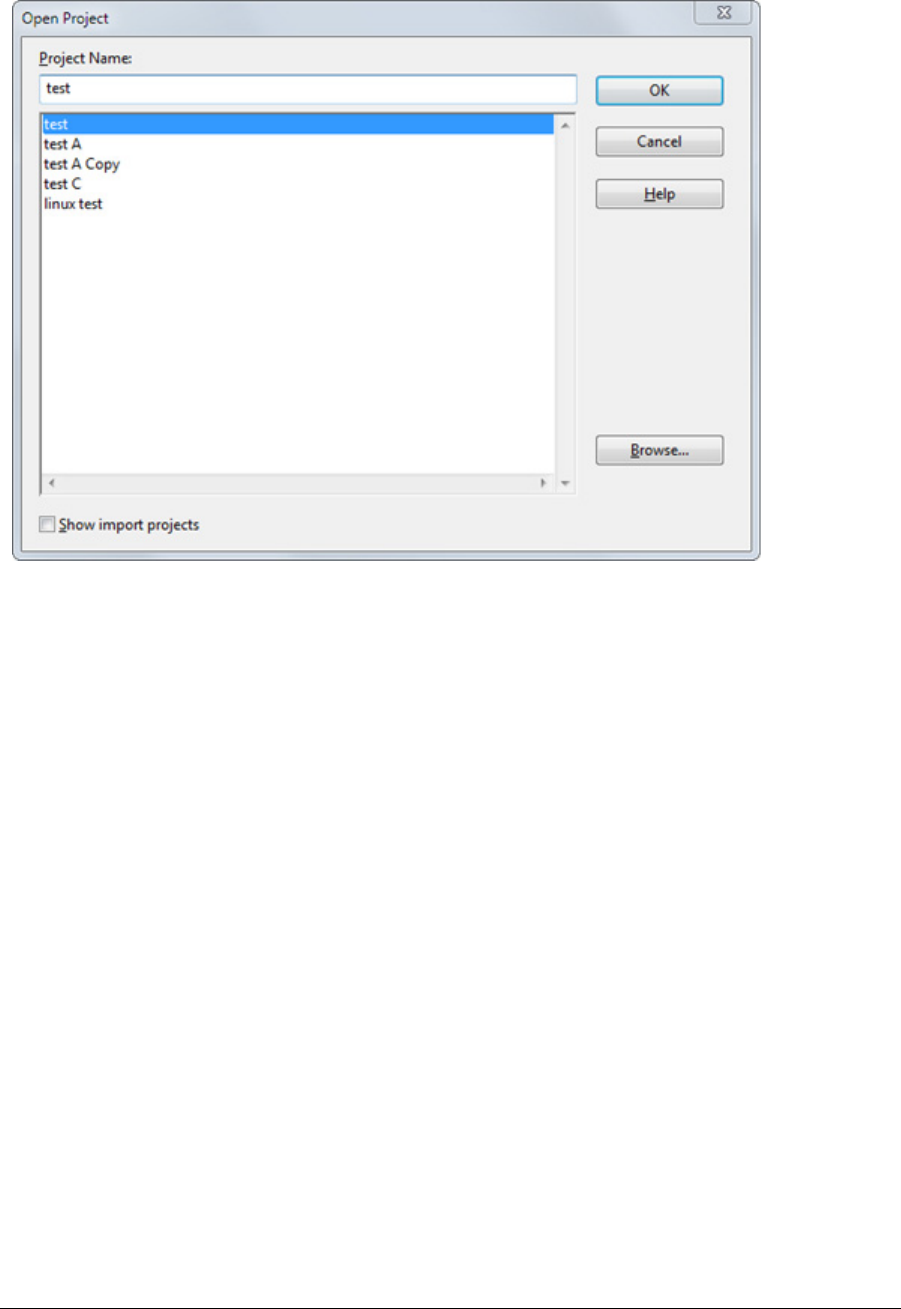
Source Insight 4 User Guide 267
Commands Overview
You can also open a project by dragging a project file (.siproj) from Windows Explorer onto the Source Insight
window, or specifying a project file in the Open dialog.
Project Name
Type the name, or part of the name, of the project you would like to select.
Project list
Displays a list of all the projects you have created or opened on your machine. Select the project you want to
open here. This list is simply a recording of known projects. You may have other projects that are not listed
here. To open those, click the Browse button and locate the project file.
Browse
Click this button to bring up the standard Open dialog box, which allows you to browse around your disks.
Locate a project file with a .siproj extension. Once you select a file and close the Open dialog box, the file you
selected will be loaded into the Project Name text box. Then click OK to open it.
Show import projects
If selected, then import projects will also appear in the project list. Import project names begin with "_im-
port_".
An import project is a special Source Insight project that contains imported symbols - the symbols come from
an external source, such as library headers, a .NET assembly or Java class.
See “Import External Symbols” on page 233.
Outline Toolbar
Shows and hides the Outlining toolbar.
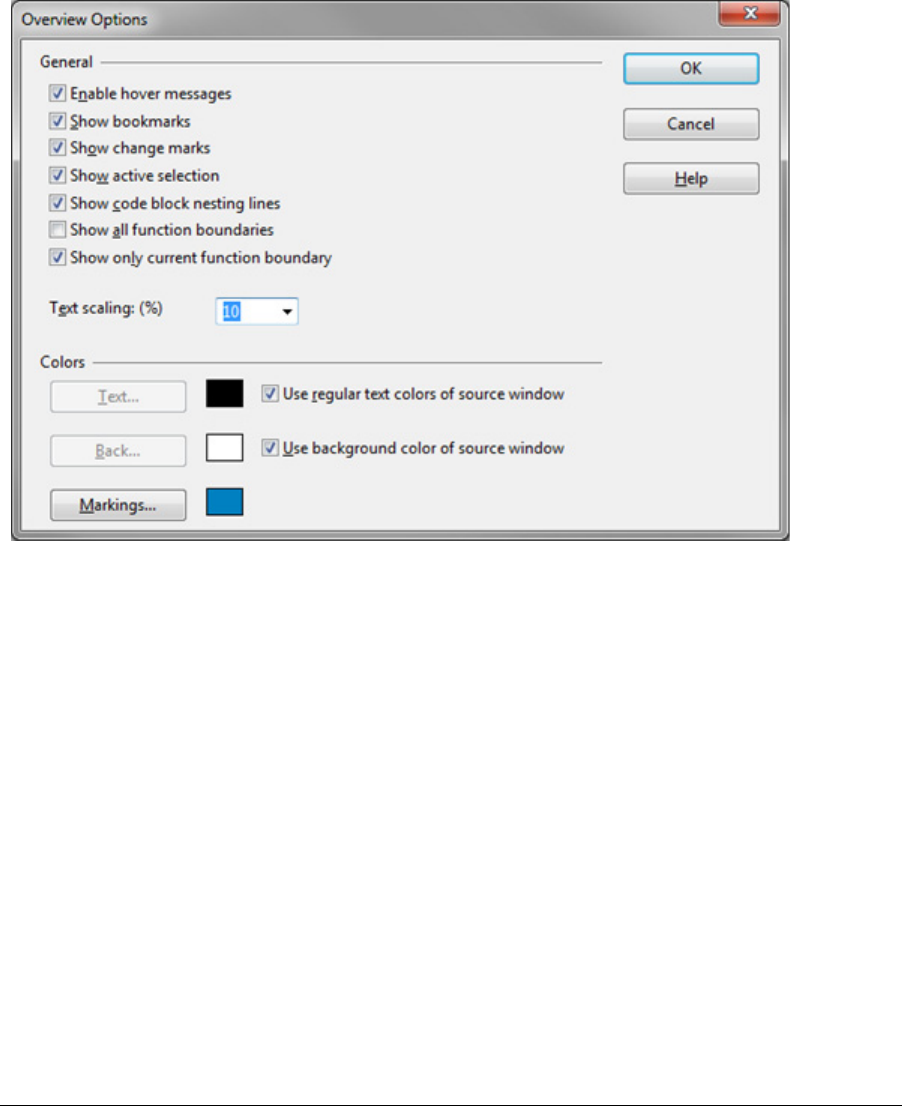
Commands Overview
268 Source Insight 4 User Guide
Outlining Options
These options control the outlining features, which allow you to collapse and expand blocks of code.
The outlining options are displayed inside the Window Options dialog. See “Window Options” on page 369.
Overview Options
This shows or hides the Overview scroller. The Overview shows a "bird's eye" view of your source file. It's a
miniature version of your file that helps to orient you within a source file, or even within a long function. The
Overview attaches to the side of a source window, like a scroll bar.
General Options
Displays the optional settings for the Overview scroller.
Enable hover messages
Enables popup source tips when the mouse hovers over the Overview.
Show bookmarks
Draws marks that represent the position of bookmarks in the text.
Show change marks
Draws marks that represent areas that have been edited in the text.
Show active selection
Shows highlighted text when you make a text selection in the source window.
Show code block nesting lines
Draws nesting lines around nested functions and code blocks.

Source Insight 4 User Guide 269
Commands Overview
Show all function boundaries
Draws boundaries marks around function bodies to show where functions are.
Show only current function boundary
Draws boundary marks around only the currently viewed function in the source window.
Text Scaling %
Sets the scaling percentage of the Overview text. It is typically something small, such as 10%. A settings of
100% would show the text full size as it appears in the source window.
Note: the width of the Overview can be adjusted by dragging its border with the mouse.
Colors
These set the colors of items in the Overview.
Use regular text colors of source window
Uses whatever text color is set for the source windows, instead of picking a custom color.
Use background color of source window
Uses whatever background color is set for the source windows, instead of picking a custom color.
Page Down
The Page Down command scrolls the active window down by one window full, with one line of continuity.
Page Setup
The Page Setup command allows you to control the layout of text on printed pages that are printed with the
Print command.
Columns
Specifies the number of columns to print per sheet of paper. Each column will get its own page number. For
example, if you have two columns, then each sheet of paper will get two pages of source code printed on it.
This is more useful if you print in landscape mode (where the paper is wider than tall).
Borders around page
If enabled, then a single line border will be drawn around the text on the page.
More…
Click this button to open the standard system Page Setup dialog box. This dialog box allows you to set paper
size, margins, and orientation (i.e. Portrait vs. Landscape). You can also change the current printer settings
from this dialog box.
Title Strings Options
The items in this group affect the titles printed on the cover page, the top of the page (header), and the bot-
tom of the page (footer).
Cover, Header, Footer
These text boxes specify the formatting codes to be used for the cover page, and the header and footer on
each page. See “Header and Footer Codes” on page 270 for details on the format of the strings.

Commands Overview
270 Source Insight 4 User Guide
Include cover page
If enabled, then a single cover page will be printed before all other pages. Typically, you would put your name
in the Cover string text box so that someone at the printer could identify the source of your print job. If not
enabled, then no cover page is printed.
Header per column
If enabled, then a header will be printed above each column. This only has an effect if the number of columns
is set to two or more. If not enabled, then a single header is printed at the top of the page.
Footer per column
If enabled, then a footer will be printed below each column. This only has an effect if the number of columns
is set to two or more. If not enabled, then a single footer is printed at the bottom of the page.
Formatting Options
The formatting options control how syntax formatting is output to the printer. These options work inde-
pendently of the screen settings, which you control in the Preferences: Syntax Formatting dialog box.
Print Syntax Formatting
If enabled, all syntax formatting effects will be printed, as well as displayed on the screen.
Print in color
If enabled, then color is used for printing. If your printer is not a color printer, then colors will be displayed in
shades of gray. If you disable this option, then all text, regardless of on-screen color, is printed in full black or
white. However, text that is colored near a neutral gray is printed in gray.
Header and Footer Codes
A header is a title printed at the top of the page. A footer is a title printed at the bottom of the page.
You can customize headers and footers for printed pages with the Page Setup command. You do this by using
the following codes in the Header and Footer text boxes:
Table 4.5: Header and Footer Codes
Code Result
&L
Left-align characters that follow. This is the default.
&C
Center characters that follow.
&R
Right-align characters that follow.
&/
Move to the next line.
&B
Print the characters that follow in Bold.
&I
Print the characters that follow in Italic.
&U
Print the characters that follow in Underline style.
&D
Print the current Date.
&T
Print the current Time.
&F
Print the File name.
&P
Print the Page number.
&N
Print the total Number (N) of pages in the document. For exam-
ple, in a file 12 pages in length, you would type Page &P of &N to
have Page 1 of 12, Page 2 of 12, Page 3 of 12, etc., printed on the
pages.
&&
Print a single ampersand (&) as a literal character rather than as
an instruction.

Source Insight 4 User Guide 271
Commands Overview
For example, to print "Confidential" at the left margin, center the page number, and print current date at the
right margin, type:
&LConfidential&C&P&R&D
Page Up
The Page Up command scrolls the active window up by one window full, with one line of continuity.
Paren Left
The Paren Left command moves the insertion point left to the next enclosing parentheses.
Paren Right
The Paren Right command moves the insertion point right to the next enclosing parentheses.
Parse Source Links
The Parse Source Links command searches the current file for a specified pattern. Whenever it finds a match,
it creates a source link at that location. The source link links the source line in the current file to the file and
line number that was parsed using the pattern.
File, then Line
and Line, then File. Select File, then Line if the first group in the pattern expression is the file name, and the
second group is the line number. With this setting, the second group, (i.e. the line number), is optional.
Select Line, then File if the first group in the pattern expression is the line number, and the second group is
the file name.
Pattern
Contains the regular expression used to search the command output for file names and line numbers. This
text box must contain a valid regular expression that contains "groups" for the file name and the line number.
The contents of this text box are saved in the current workspace.
The Parse Source Links command is useful if you have some kind of log file that contains compiler output and
error messages. You just open the log file, and run the Parse Source Links command. A link will be setup for
each line in the log file containing an error message. “Searching and Source Links” on page 107.
Maintaining Multiple Parse Patterns
If you often have more than one type of parse pattern that you want to use, you can use Custom Commands
to define a custom command for each type that simply echoes the file and parses source links from the out-
put. Each custom command can have its own parse pattern, so you can save many parse patterns this way.
For example,
1. From the Options menu, select Custom Commands.
2. Click the Add button, and type "Parse Type 1" in the Name text box.
3. In the Run text box, type "command /c type %f". This command line will type out the contents of
the current source file.
4. Check the Parse Link in Output box.
5. Type the parse pattern you want in the Pattern text box.
When you run this command, the current file will be typed out, captured by Source Insight, and parsed for
source links using the parse pattern stored with the custom command.

Commands Overview
272 Source Insight 4 User Guide
Paste
The Paste command copies the contents of the clipboard to the current selection. If the current selection is
already extended, it is deleted before pasting.
Paste From Clip
The Paste From Clip command copies the contents of a clip buffer to the current selection. The Clip Window
is activated when you use this command so that you can specify the source clip name.
Double-clicking on a clip in the Clip Window also runs this command.
See “Clip Window” on page 170.
Paste Line
The Paste Line command moves the insertion point to the beginning of the current line and executes the
Paste command. Cut Line, Copy Line, and Paste Line can be used together to quickly move whole lines
around in a file.
Paste Symbol
(On the Symbol Window right-click menu)
The Paste Symbol command pastes the text in the Clipboard just before the selected symbol in the Symbol
Window.
Pick Window
Manages the list of open source windows and file buffers. It also lists file buffers that are not visible in any
window.
Note: You can use the Window List panel instead of this dialog. It is a mode-less version of this dialog.
Window list
Contains a list of all open source windows, and file buffers that may be open in the "background" that do not
appear in a window. You can sort the window list by name or by recently-used order. To sort the list, click on
the header titles at the top of the list.
Activate
Brings the selected window to the front.
Close Window
Closes the selected windows.
Save
Saves the selected files.
Save As
Performs a Save As command on each selected file.
Minimize
Minimizes the selected windows.

Source Insight 4 User Guide 273
Commands Overview
Restore
Restores the selected windows.
Tile Horiz
Tiles the selected windows horizontally so they are generally wider than they are tall
Tile Vert
Tiles the selected windows vertically so they are generally taller than they are wide.
Play Recording
The Play Recording command plays back a command recording. Commands are recorded by using the Start
Recording command. If the recorder is on when you use the Play Recording command, then recorder is auto-
matically turned off first.
Preferences
The Preferences dialog specifies many of the program options. This multi-page dialog box contains several
tabs for various types of options, such as Display, Files, and Syntax Formatting. The settings are stored in a
configuration file.
For more specific information:
See “General Options” on page 225.
See “Typing Options” on page 363.
See “File Options” on page 208.
See “Folder Options” on page 220.
See “Language Options” on page 241.
See “Symbol Lookup Options” on page 346.
See “Display Options” on page 195.
See “Color Options” on page 172.
See “Syntax Decorations” on page 352.
See “Syntax Formatting” on page 355.
See “Searching Options” on page 328.
See “Remote Options” on page 311.
Print
The Print command prints the current file. The standard Windows Print dialog box will appear.
You can control what font is used for printing files with the File Type Options command. The File Type
Options command lets you specify what font should be used for printing and what font should be used for
the screen. Alternatively, you can tell Source Insight to emulate the screen font when printing. If you have a
TrueType font selected, then emulating that font on the printer should work just fine. If you have a raster font
selected, such as "MS San Serif" or "Courier", then printing that font on the printer may look blocky, or the
printer driver may just substitute that font with something similar.
Color Printing
If you want to print your files with syntax formatting and color, you need to make sure you have enabled
those options in the Page Setup dialog box.
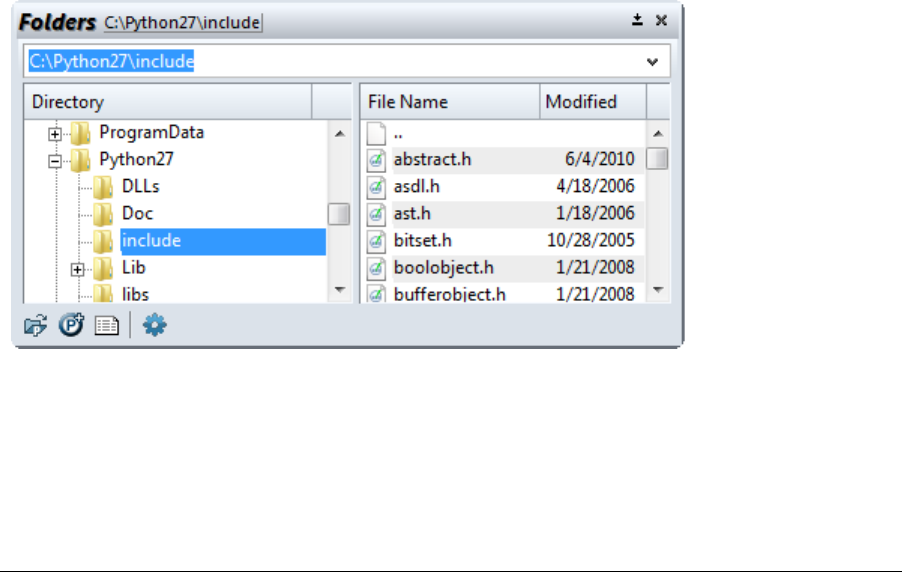
Commands Overview
274 Source Insight 4 User Guide
Print Relation Window
This command prints the graphic contents of the Relation Window. You can access this command by right-
clicking on the Relation Window.
Source Insight can print a multiple page graph. Each page will indicate its page coordinate at the bottom. For
example, if a graph spans a 4 x 3 page output, the bottom of the first page printed will contain "Cell 1,1 of 4 x
3 square".
Project File Types
Displays a list of project files, categorized by file type, in the Project Window. The Context Window tracks the
selection in this list.
Project File Type List Properties
This dialog shows the options for the Project File Types List window.
Show Columns
Check the box next to the columns you would like to appear in the list.
Code Metrics
Select the type of code metrics to show in the column. The drop-down list to the right selects which code
metric value to display in the column.
Font & Color
Click this button to edit the font, and foreground and background color of the list.
Project Folder Browser
Displays the Folder Browser view of the current project. This view allows you to browse around directories on
your disk.
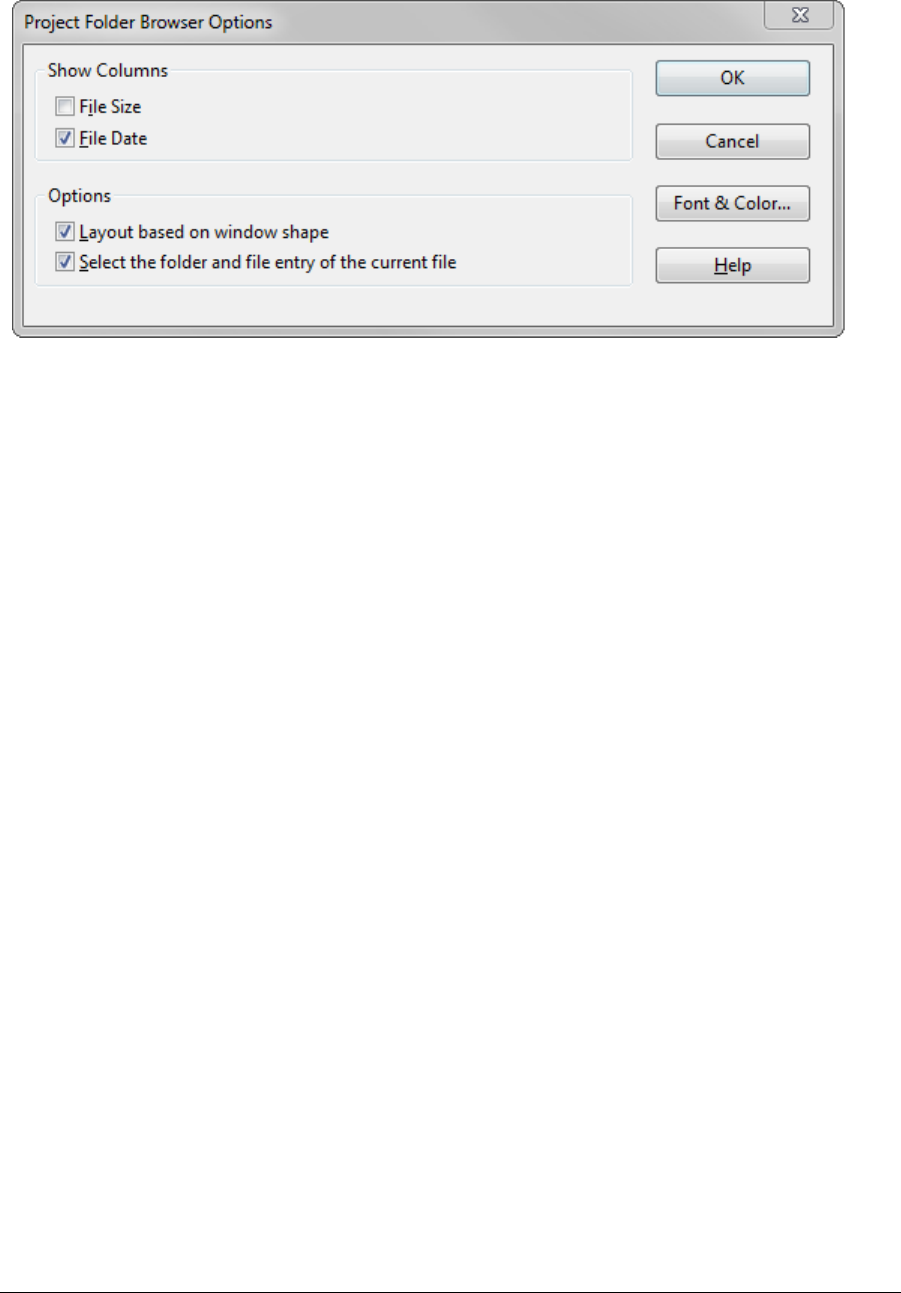
Source Insight 4 User Guide 275
Commands Overview
Project Folder Browser Options
Displays the Folder Browser options.
Show Columns
Check the box next to the columns you would like to appear in the list.
Layout based on window shape
Check this box to let the window change its layout based on the shape of the window. If the window is tall,
the lists will be stacked vertically. If the window is wide, the lists will be side by side.
Select the folder and file entry of the current file
If enabled, then the folder browser will automatically select and display the current file that you are editing.
The directory structure containing the file is expanded so you can see the file’s location.
Font & Color
Click this button to edit the font, and foreground and background color of the list.
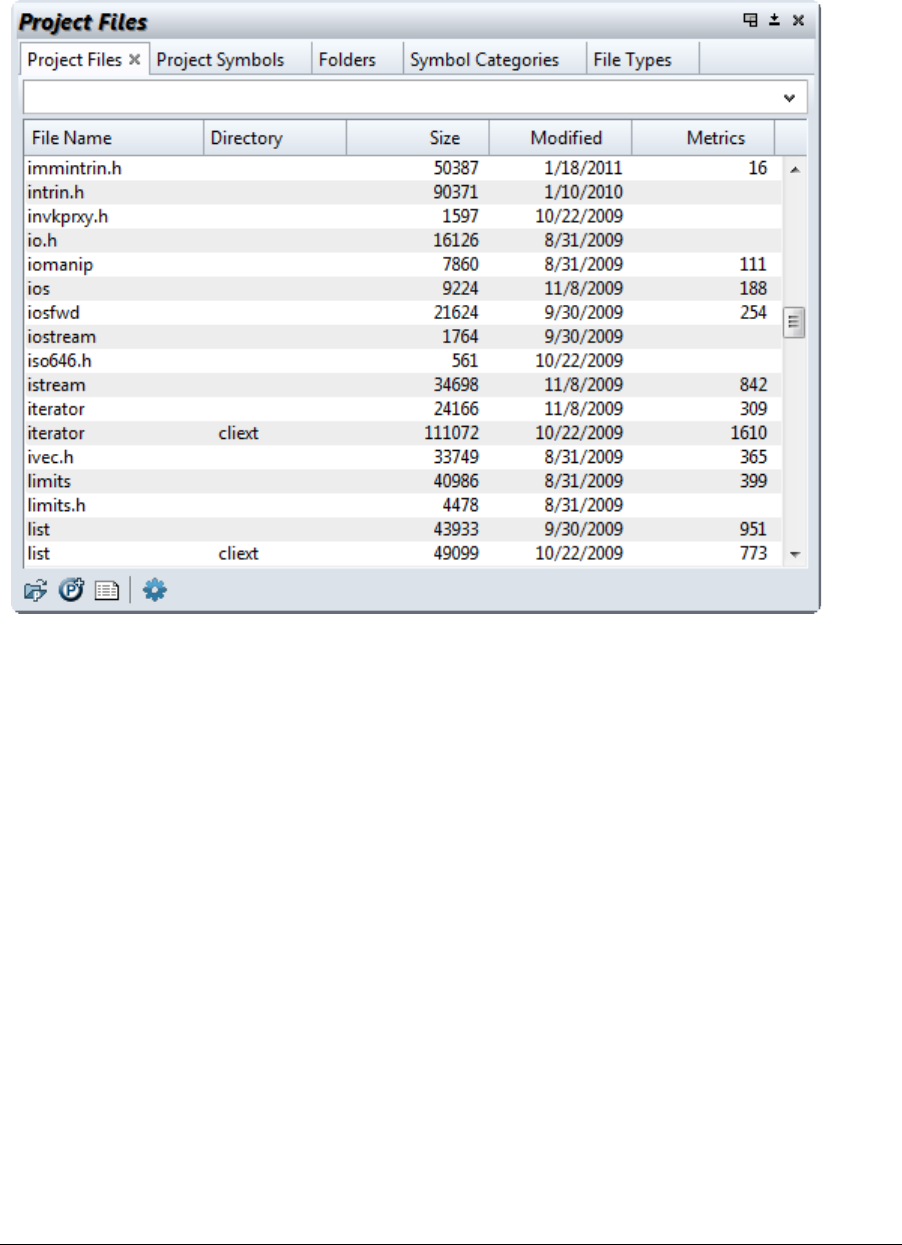
Commands Overview
276 Source Insight 4 User Guide
Project File List
Displays a list of the files in the current project. This is a "flattened" list of all the files in the current project,
regardless of directory. When a project is open, then the File > Open command activates the Project File List
window.
To open a file, double click on a file in the list, or start typing the name into the text field.
To add a file to the project, you can drag files from Window Explorer onto the Project File List.
The Context Window previews the file selected in this list without needing to open the file.
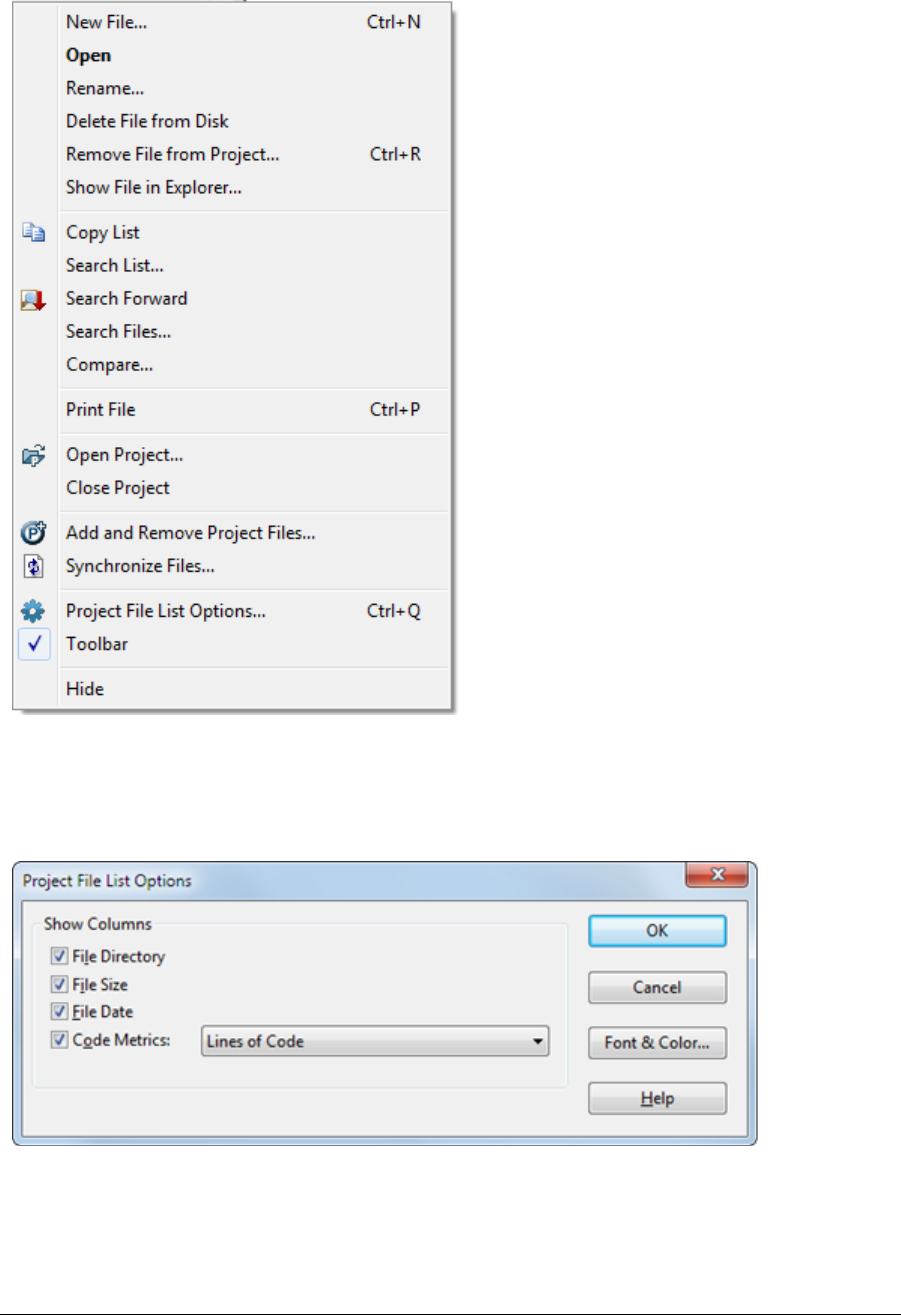
Source Insight 4 User Guide 277
Commands Overview
Right-Click Menu
Project File List Options
This dialog shows the options for the Project File List.
Show Columns
Check the box next to the columns you would like to appear in the list.

Commands Overview
278 Source Insight 4 User Guide
Code Metrics
Select the type of code metrics to show in the column. The drop-down list to the right selects which code
metric value to display in the column.
Font & Color
Click this button to edit the font, and foreground and background color of the list.
Project Search Bar
The project search bar is used for searching across the whole project. It is a powerful way to perform a key-
word based search to find name or word fragments within a given number of lines of context.
To view the Project Search Bar, select View > Project Search Bar.
To activate it so you can start typing, use Activate Project Search Bar (Alt+Shift+P)
See “Search Project” on page 328.
Project Rebuild Notice
This window appears if Source Insight tried to open a project in the background, but noticed that the project
needed rebuilding or reindexing.
If you cancel or do not rebuild the projects, then Source Insight will ignore those projects and will not notify
you again for the rest of the session. If you exit Source Insight and restart it, the notice will appear again.
Why Do Projects Need Rebuilding?
A project needs to be rebuilt if wasn’t closed correctly and is corrupted. It may also need to be rebuilt or rein-
dexed if the Source Insight version used to create it was older and there has been a change in Source Insight.
For example, if the data or index format changed.

Source Insight 4 User Guide 279
Commands Overview
If you try to open a project that needs rebuilding by using Project > Open Project, Source Insight will ask if
you want to rebuild it. However, projects that are opened in the background do not cause such a user
prompt. Therefore this notice window appears when Source Insight is idle.
Background Projects
You normally have a current project open. However, Source Insight opens other projects in the background in
order to provide auto-completion, and to use syntax formatting for externally defined symbols, and to locate
user macro commands. Source Insight opens Import library projects, projects on the Project Symbol Path,
and the Base project in the background.
See “Importing Symbols from Libraries” on page 55.
See “Import External Symbols” on page 233.
See “The Project Symbol Path” on page 56.
See “The Base Project” on page 49.
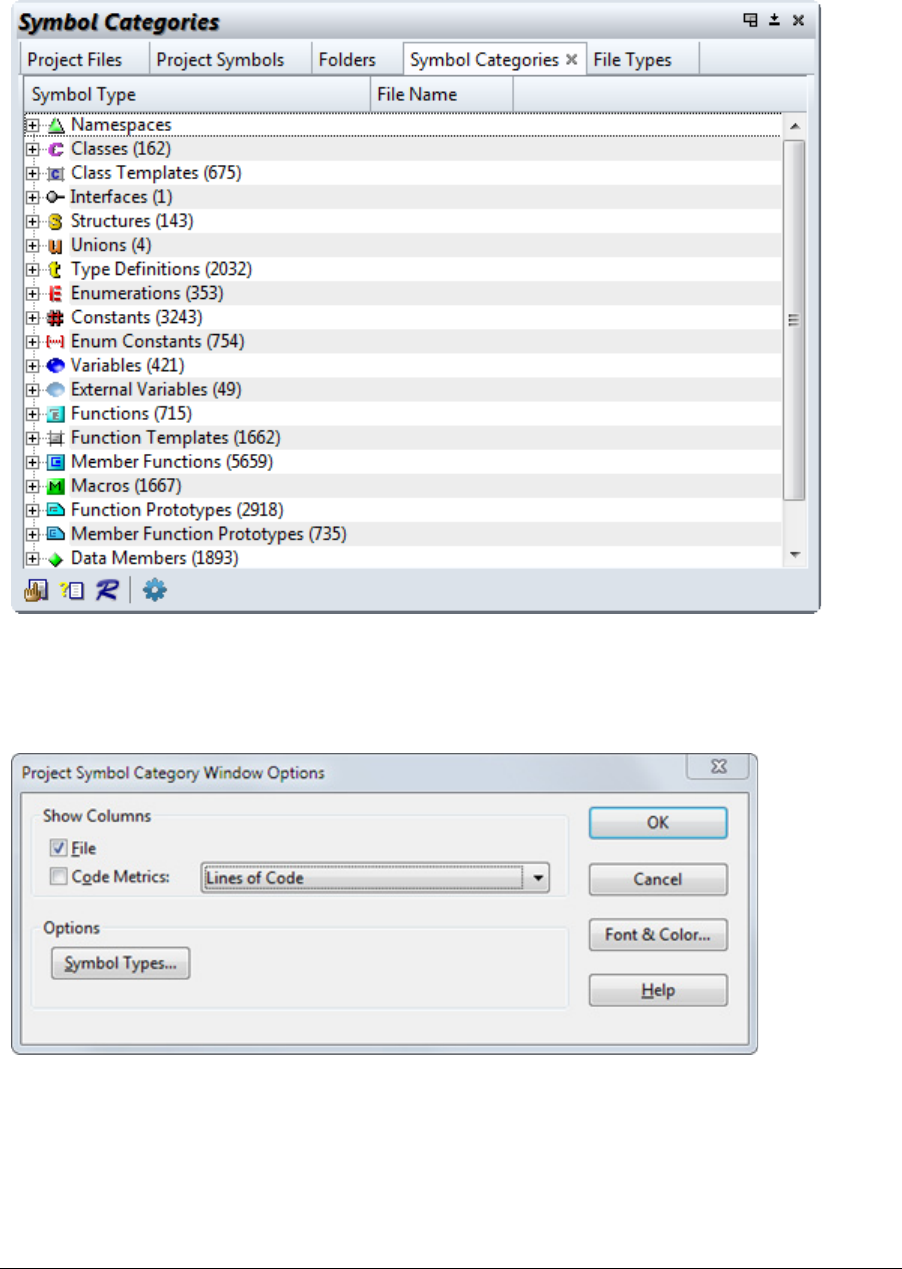
Commands Overview
280 Source Insight 4 User Guide
Project Symbol Categories
Displays a list of project symbols by category. The Context Window and the Relation Windows track the selec-
tion in this list.
Project Symbol Category Window Options
This dialog shows the options for the Project Symbol Category List window.
Show Columns
Check the box next to the columns you would like to appear in the list.
Symbol Types
Click this button to choose or filter the types of symbols that appear in the list.
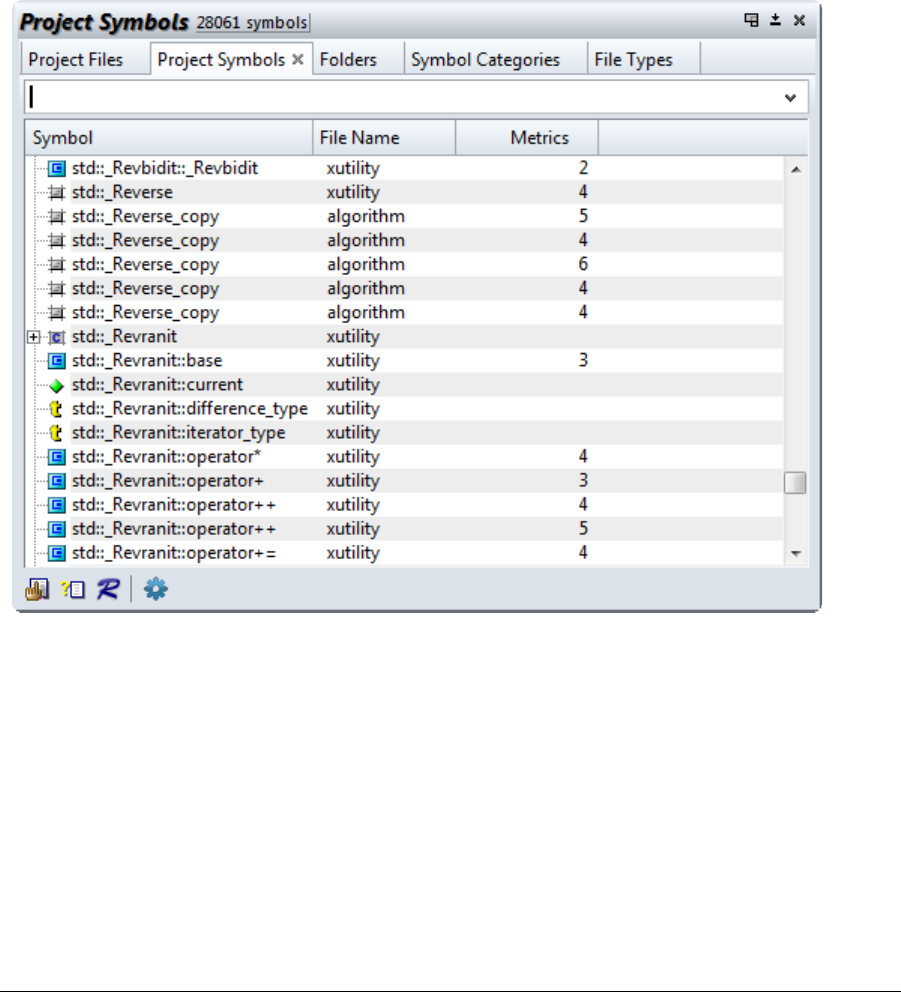
Source Insight 4 User Guide 281
Commands Overview
Font & Color
Click this button to edit the font, and foreground and background color of the list.
Project Symbol List
This panel lists all the symbols in the current project. This is a very handy way to quickly jump to functions or
other symbol definitions if you know part of the name.
From this panel, you can
•Find symbols based on parts of their names.
•Look at symbol definition in the Context window.
•Look at references to symbols in the Relation window.
•Jump to symbol definitions.
See “Project Symbol List Options” on page 283.
To locate a symbol quickly, type a part of the symbol name and the list will be filtered down as you type. You
can also use name fragment matching to find parts of symbol names. For example, if you type:
doc write
this will match symbol names such as DocWrite, WriteDoc, Doc::DoWrite, WriteOpenDoc, CanWriteAnyDoc,
etc. See “Name Fragment Matching Symbol Names” on page 66.
Regular Expression Searches
You can also perform a regular expression search for symbol name by prefixing the regular expression with a
question mark (?). For example,
?Insert.*Stack
will find all symbols that have “Insert”, followed by zero or more characters, followed by “Stack”.

Commands Overview
282 Source Insight 4 User Guide
Finding Only Functions
You can limit search results to only function symbols by adding an open parenthesis at the end of the text.
For example:
Open(
will find only function that contain Open in the name.
Combining With the Context Window and Relation Window
Both the Context window and the Relation window track the current selection in the Project Symbol List.
Therefore if you select a function in the Project Symbol List, the Context window will automatically show you
the definition of the function. The Relation window will automatically show the call tree or reference tree for
the function. (The Relation window has options you can set to tell it what you want to see.) See “Relation
Window” on page 305.

Source Insight 4 User Guide 283
Commands Overview
Right-Click Menu
Project Symbol List Options
This dialog shows the options for the Project Symbol List window. See “Project Symbol List” on page 281.
Show Columns
Check the box next to the columns you would like to appear in the list.
Symbol Types
Click this button to choose or filter the types of symbols that appear in the list.

Commands Overview
284 Source Insight 4 User Guide
Font & Color
Click this button to edit the font, and foreground and background color of the list.
Project Settings
The Project Settings command allows you to set various options that govern the current project. If no project
is currently open, then the Project Settings command allows you to set the default options inherited by sub-
sequently created new projects.
The Project Settings are saved with the project data file. These settings are independent of the configuration
file.
Conditional Parsing
This controls the settings of condition compilation values.

Source Insight 4 User Guide 285
Commands Overview
Conditions…
Click to edit the conditions defined that are specific to the current project only. The conditions are only in
effect when the current project is open, and only for files that belong to the project. Another quick way to edit
the conditions is to use the Edit Condition command.
Project Source Directory
This is the directory you consider to be the "root" of your project’s source tree. When Source Insight displays
file names, it will show them relative to this directory. If you leave this text box blank, then Source Insight will
use the project data directory where you created the main project file, with the .siproj extension. See “New
Project” on page 263.
The project data files are stored in the project data directory - which you specified when you created the proj-
ect. Typically source files reside somewhere else. For example, you could create a project stored locally on
your workstation, and add files from a remote network drive to the project. The file names will not contain
extra path information if you specify the network drive path to the source files as the project source directory.
Using different data vs source directories is helpful when you are not allowed, or unable, to create project
data files in the same directory as the source files. Some project administrators will allow you read-only
access to the source code share point, and do not want you to put any Source Insight files there.
You can change the project source directory setting in the Project Settings dialog at any time after the project
is created.
The project source directory path is stored with the project data in a relative format. The path is relative to
the directory with the .siproj file. That allows projects that were created on one machine to be opened
remotely from another without confusing the logical drives. It also allows copying whole project directory
trees to new locations.
Some Custom Command string meta-character substitutions are also affected by this path setting. The %j
(project source directory) and %v (project source directory volume letter) refer to this path value, and not
where the .siproj file is.
See “Project Directories” on page 41.
Project Backup Directory
Specified where you want to keep backups of your source files. By default, a Backup folder is created within
your project folder. You can use Path Variables in this field. See “Predefined Path Variables” on page 153.
Project Source Files
Add and remove source files manually
The project will contain only the files that you added using Project > Add and Remove Files.
Use a Master File List
The project will contain whatever is listed in the Master File List. You can still use add and remove files from
the project manually. The changes you make will be saved to the MFL. If the MFL contains a file name that is
not in your project, then it will get added automatically to your project. If the MFL does not contain a file that
is in the project, then it will be removed from the project. See “Using a Master File List” on page 46.
You can use Path Variables in this field. See “Predefined Path Variables” on page 153.
Symbol Database Options
These options affect what is stored in the project's symbol database. You should choose these options before
you add a bunch of files to your project. If you change these options after the project is already built, then the
project will need to be rebuilt. Source Insight will rebuild it for you.
Quick browsing for member names
If enabled, you only need to type the structure and class member names in order to perform partial matches
on their names. However, the symbol index size and memory usage can increase by a factor of two or more.

Commands Overview
286 Source Insight 4 User Guide
This option is recommended if you are using an object-oriented language primarily, so that you can find
member functions and variables without having to type in the class name too.
Quick browsing for symbol name fragments
If enabled, you only need to type one or two name fragments of symbol names in order to perform partial
matching on their names. However, the symbol index size and memory usage can increase by a factor of four
or more. By indexing name fragments, you can use name fragment matching to quickly find symbols, even if
you don't know what letters the symbol names begin with.
This option is not recommended for external common projects that you intend to only refer to via the project
symbol path or the Import External Symbols feature. In that case, name fragment indexing offers no benefit
and just uses extra disk space.
If your project is very large (over several thousand files, or hundreds of thousands of symbols), turning off
this option can improve performance by using less memory and speeding up the Project Symbol List win-
dow.
If both check boxes are turned off, then the list filtering in the Project Symbol List panel will revert to simple
prefix matching. However, the Symbol Window on the left side of each source window, and the Project Win-
dow file list will still allow name fragment browsing.
Index Performance
Name Fragment matching is such a useful feature, that we recommend enabling it, unless you think perfor-
mance is affected. The symptoms of too large an index are:
•Disk thrashing while building or rebuilding a large project, while little progress is being made.
•Opening or closing a project takes a long time.
•Synchronizing individual files is slow.
•The Project Symbol List (F7) is slow to come up, accompanied by a lot of disk activity. Some delay is
normal the first time you use it.
•Your project has over 2 or 3 million index entries. Obviously, this limit depends on the amount of RAM
you have.
•Your hard drive light never seems to go off, or your system pauses for a long time while the disk is
flushed.
If you experience slow-downs and you have a large project, (say over 300,000 symbols,) you should try turn-
ing off Quick browsing for symbol name fragments.
You can find out how large the database is by selecting Project > Rebuild Project and looking at the statistics
on the bottom of the dialog box. Just cancel this dialog box when you are done. If the index entries are in the
millions, then things can start to slow down. However, most modern machines should handle this size proj-
ect well.
Project Report
The Project Report command generates an output report file called <project>.RPT, which contains a list of
files and symbols in the current project.
Files
Turn on these check boxes to include the corresponding information.
Include Symbols
If enabled, then symbols will be listed under each file. If not enabled, then no symbol information will be
listed in the project report.

Source Insight 4 User Guide 287
Commands Overview
Line Numbers
If enabled, then the line number where the symbol is defined is listed by the symbol name.
Sort by
If Occurrence is selected, then symbols will by listed by line number. If Name is selected, then symbols will be
listed by symbol name.
Symbol Types
Click this button to indicate what types of symbols will be included.
Project Window command
The Project Window can be toggled on and off by running the Project Window command. You can activate
and set the focus to the Project Window by running the Activate Project Window command.
The Project Window is a floating/dock-able window. By default it contains all the Project-List sub-window
panels:
•Project Symbol List - quick access to all symbols in the project. See “Project Symbol List” on page 281.
•Project File List - quick access to all files in the project. See “Project File List” on page 276.
•Project Symbol Categories - See “Project Symbol Categories” on page 280.
•Project Folder Browser - See “Project Folder Browser” on page 274.
•Project File Types - See “Project File Types” on page 274.
If the Context Window is open, then it will display the contents of any file or symbol selected in the Project
Window.
Rebuild Project
The Rebuild Project command rebuilds the project data files. Source Insight creates the data files.
You may want to rebuild the project to get all the files re-parsed after a large change, or if you suspect the
project data is not correct.
A project may become corrupted if Source Insight was abnormally aborted without closing the project.
The Rebuild Project dialog box also lists some statistics about your project. The number of symbol database
records, symbol index entries, and files is displayed. This information is also output by the Project Report
command.
There are three methods of rebuilding the project. The last method is recommended.
Re-Parse all source files
This simply scans all the files in the project, and re-parses them to update the symbol database. This is the
slowest method. However, if you cancel the operation, the symbol database will be left intact, although it
may be slightly out of date. If you cancel, you can continue to edit normally and the re-parsing will continue
in the background. The symbol database will be at least as current as it was when you began the rebuild pro-
cess.
Fix database file corruption, if any
This option scans the databases and ensures that the databases are in a legal, self-consistent state. However,
some files or symbols may be missing from the databases after the rebuild is complete if you recently added
or removed files from your project. This is the fast method. You should use this command if you suspect that
your project is corrupted. Normally, Source Insight can detect if a project was not closed properly when it
tries to open the project. If Source Insight detects that the project is corrupt, it will ask you if you want to
rebuild the project. Source Insight will not knowingly allow you to open a corrupted project.

Commands Overview
288 Source Insight 4 User Guide
Re-Create the whole project from scratch (recommended)
This is the most thorough method of rebuilding the project, and it is the recommended method. This deletes
all symbolic information about the project, and rescans all the source files to regenerate the symbol data-
base from scratch. It may take more time than the Fix database file corruption method. If you cancel it, the
symbol database will be only partly complete. Source Insight will only have knowledge of symbols in the files
that have been scanned. The background synchronization will complete the parsing. Alternatively, you can
complete the process by using the Project > Synchronize Files command.
Redo
The Redo command reverses the effect of the Undo command. In effect, as you edit, Source Insight makes a
list of the changes you've made to each file. The Undo command backs up through that list and the Redo
command advances through the list.
You can also use the Redo All command to reverse all the Undo actions.
Source Insight keeps Undo/Redo history for each open file independently.
Redo All
Reverse the effect of all Undo actions. This brings the file all the way back up to date with your last change. It
is equivalent to running the Redo command repeatedly until there is nothing left to Redo.
Redraw Screen
The Redraw Screen command redisplays the whole Source Insight screen.
Reform Paragraph
The Reform Paragraph command re-formats the selected paragraph of text so that all the lines in the para-
graph are as wide as possible, within the margin width for the current file type.
If you have an insertion point selection, then the enclosing paragraph is reformed. If more than one para-
graph is selected, then all the paragraphs in the selection are reformed.
If the first line of the paragraph is indented, then all subsequent lines in each paragraph will be indented by
the same amount.
A paragraph of text is assumed a series of lines, bounded by blank lines.
You can specify the margin width in the File Type Options command under the current file's file type.
For example, before running Reform Paragraph:
The quick brown
fox jumped
over the
lazy dog,
and other
mysterious sentences.
After running Reform Paragraph, the lines are made as wide a possible within the margin.
The quick brown fox jumped over the lazy dog, and other mysterious sentences.
Reformat Source Code Options
This is a code-beautifier feature that reformats source code.
Source Insight’s code formatter works with C/C++, C#, Java and other language files that have similar curly-
brace syntax.
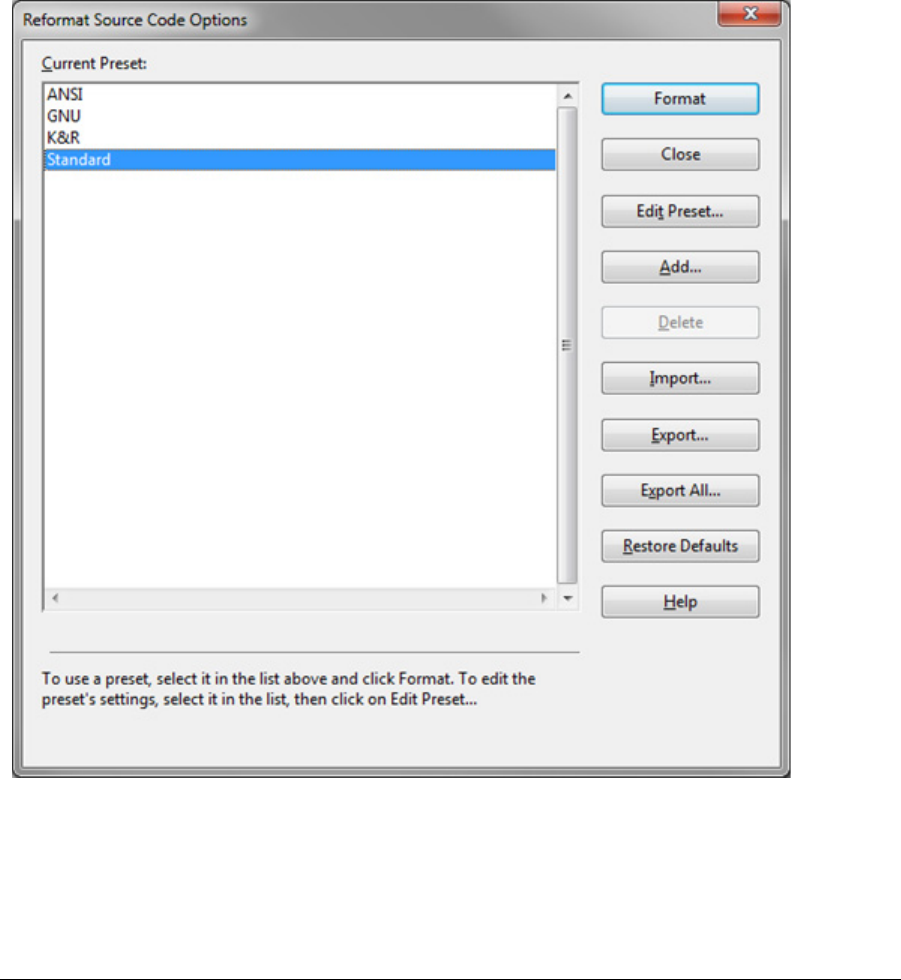
Source Insight 4 User Guide 289
Commands Overview
There are several different code formatting presets, and you can save additional presets. A preset is a group
of formatting options. For example, there is a K&R preset, and a GNU preset.
To reformat your source code:
1. Either select a block of code, or leave an insertion point in your file to format the whole file.
2. Select Tools > Reformat Source Code Options
3. The Reformat Source Code Options dialog will appear. Select your desired preset and click the For-
mat button.
The preset you select will become the "current preset". Once selected, you can use the Tools > Reformat
Source Code with xxx Preset command to reformat your code in one step.
Reformat Source Code Dialog Box
This dialog lists the formatting presets that are defined. To use a preset to format your source code, select the
preset and click the Format button. You can also add, delete, import, and export presets.
Format
Click this button to format your source code using the selected preset.
Add / Delete
Click these to add or delete your own presets. The presets that are installed by default cannot be deleted.

Commands Overview
290 Source Insight 4 User Guide
Edit Preset...
Edits the code formatting options for the selected preset.
Import
Imports a single preset from a preset XML file.
Export
Exports the selected preset to a preset XML file.
Export All
Exports the list of presets to a preset XML file.
Restore Defaults
Restores the default presets that are installed with Source Insight.
Format Preset Properties
Each formatting preset contains a group of formatting options. To view and edit a preset's formatting
options, click the Properties button in the Reformat Source Code dialog box. The Preset Properties dialog will
open.
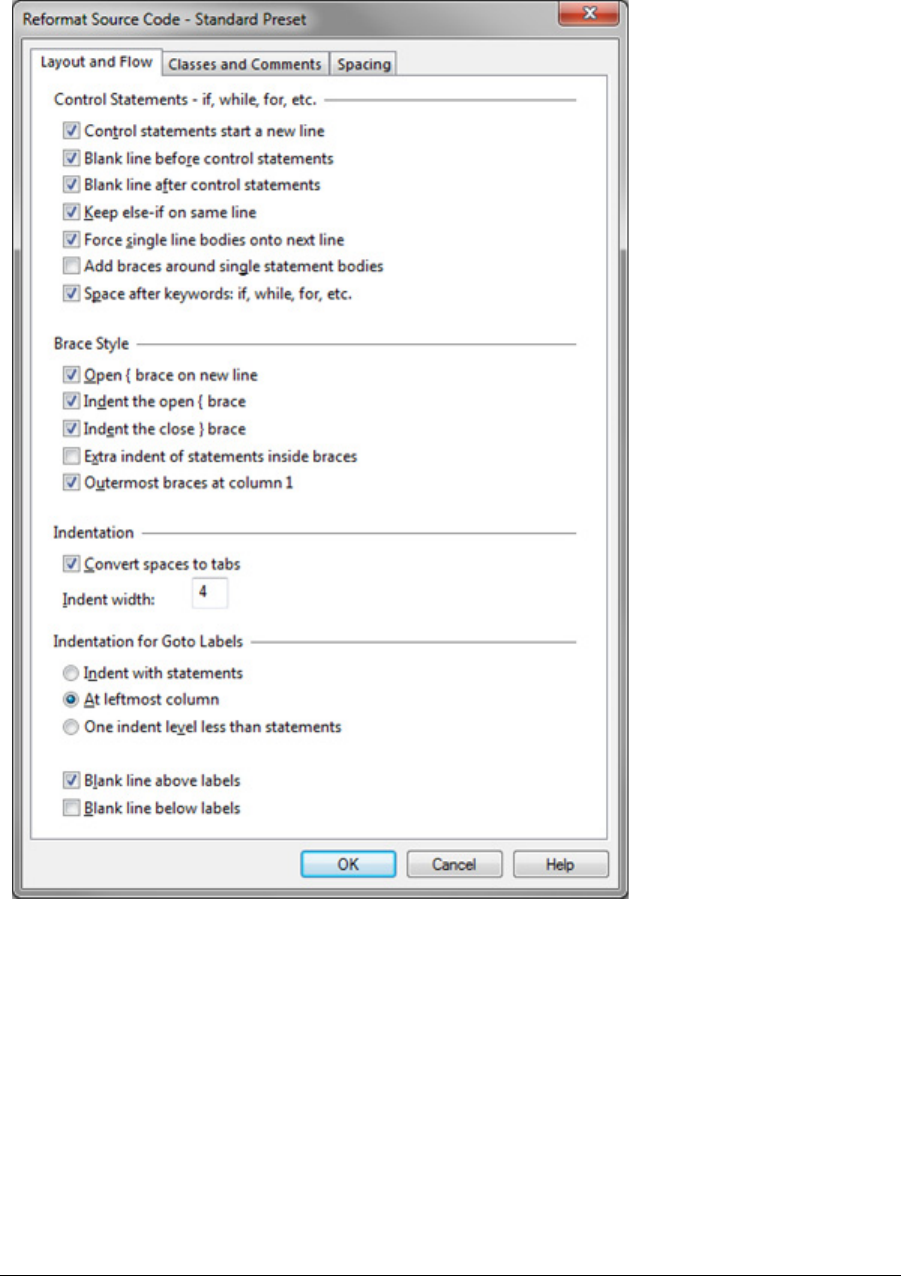
Source Insight 4 User Guide 291
Commands Overview
Layout and Flow Tab
This tab contains options that control the general flow of source code around control statements and curly
braces.
Control Statements Options
Control statements start a new line
Each control statement (i.e. if, while, for, etc.) will start on its own line.

Commands Overview
292 Source Insight 4 User Guide
For example:
x = 0; while (x < limit)
would be converted to:
x = 0;
while (x < limit)
Blank line before control statements
A blank line is inserted just above the control statement.
Blank line after control statements
A blank line is inserted after the control statement's block of code.
Keep else-if on same line
The "if" following an "else" will appear on the same line as the "else", instead of breaking the "if" statement
onto its own line.
Force single line bodies onto next line
This forces the statement body onto a new line. For example:
if (abc) x = 0;
would be converted to:
if (abc)
x = 0;
Add braces around single statement bodies
A single statement body would be converted to a brace block. For example:
if (abc)
x = 0;
would be converted to:
if (abc)
{
x = 0;
}
Space after keywords: if, while, for, etc.
Control keywords such as if, while, for, etc. are followed by a single space.

Source Insight 4 User Guide 293
Commands Overview
Brace Style Options
Open { brace on new line
The open brace will start on its own line. For example:
if (abc)
{
If this box is not checked, the output looks like the code below. This is used by the K&R style preset:
if (abc) {
Indent the open { brace
Indents the open brace by one indent level (if the open brace is the first character on the line). For example:
if (abc)
{
If this box is not checked, the output will look like this:
if (abc)
{
Indent the close } brace
Indents the closing } brace by one level. For example:
if (abc)
{
x = 0;
} // closing brace is indented
If this box is not checked, then the output will look like this:
if (abc)
{
x = 0;
} // closing brace is not indented
Extra indent of statements inside of braces
Adds one more level of indentation to the block of statements inside of the curly braces. For example:
if (abc)
{
x = 0; // indented 1 more level inside of braces
y = 1;
}
Outermost braces at column 1
The outer-most open and close curly braces are placed at the far left (column 1). This is used typically for the
braces around function or class bodies, even when the inside braces follow different indent rules. For exam-
ple:
void MyFunction()
{ // open brace at column 1
if (abc)
{ // inner braces are still indented according to other options
}
}
Indentation Options
Convert spaces to tabs
Spaces are converted to the equivalent number of tabs, or tabs plus spaces.
Indent width
This is the width in character positions of each indent level. For example, entering 4 would mean that an
indent is equivalent to 4 spaces, or 1 tab is the tab width is set to 4.

Commands Overview
294 Source Insight 4 User Guide
Label Indentation Options
Indent with statements
Labels are indented at the same level as the surrounding statements. For example:
label1:
if (abc)
{
label2:
x = 0;
}
At far left edge
Labels are indented all the way to left, regardless of the indentation level of the surrounding statements. For
example:
label1:
if (abc)
{
label2: // both labels are at column 1
x = 0;
}
Hanging indent
Labels are indented 1 level less than the surrounding code. For example:
if (abc)
{
label1:
if (xyz)
{
label2:
x = 0;
}
}
Blank line above labels
Adds a blank line above each label statement. For example:
x = 0;
L1: // label has blank line above it
y = 1;
Blank line below labels
Adds a blank line below each label statement.
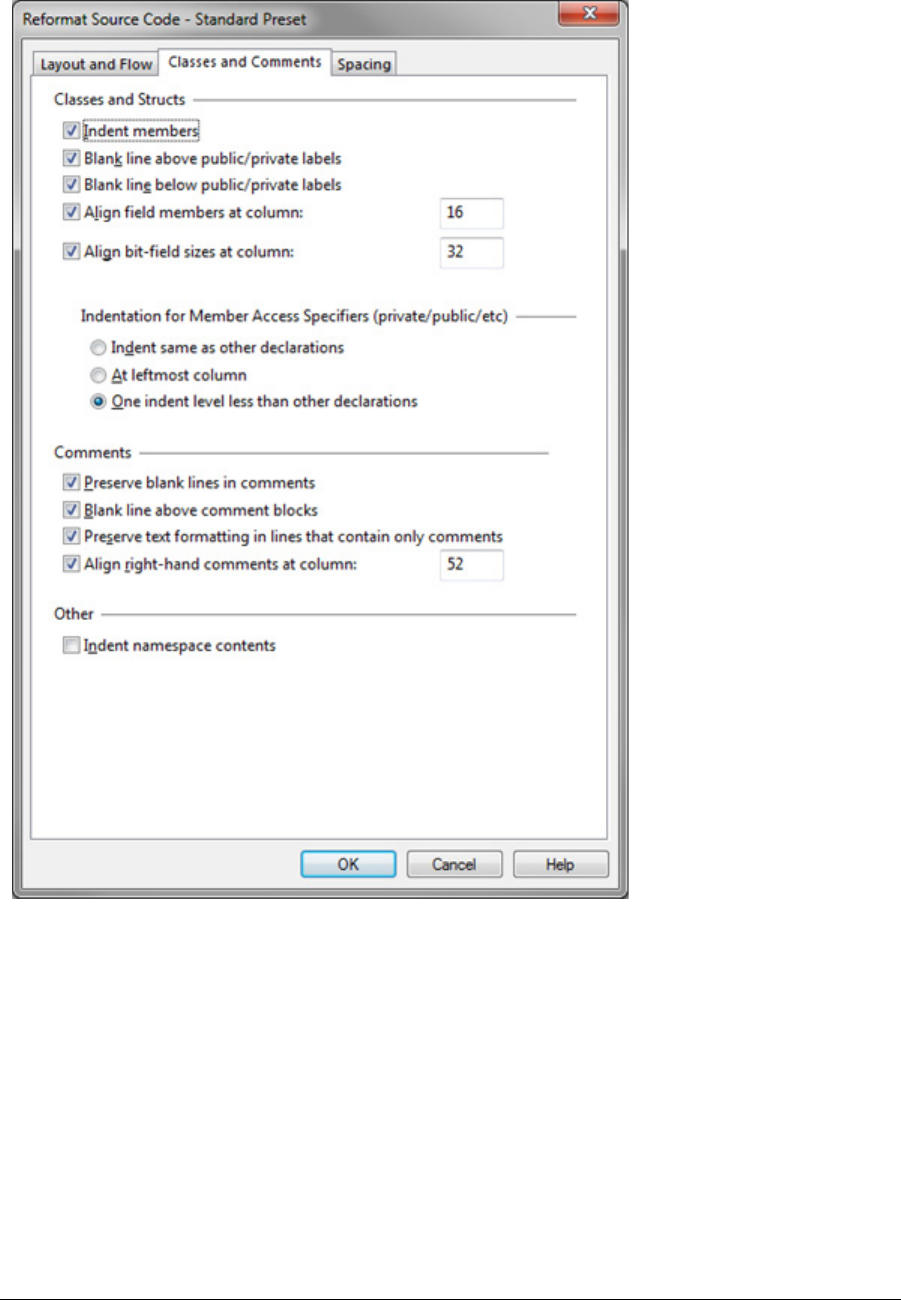
Source Insight 4 User Guide 295
Commands Overview
Classes and Comments Tab
This tab contains options that control how classes, structures and comments are formatted.
Classes and Structs Options
Indent members
The members, or the contents of the body of the class or struct is indented by one level. This applies to class,
struct, enum, and unions. For example:
class MyClass
{
void func1(); // member declaration is indented 1 level
}
Blank line above public/private labels
Labels inside the class declaration, such as private, public, protected, etc. will have a blank line above them.

Commands Overview
296 Source Insight 4 User Guide
Blank line below public/private labels
Labels inside the class declaration, such as private, public, protected, etc. will have a blank line below them.

Source Insight 4 User Guide 297
Commands Overview
Align field members at column #
This aligns the declared names of data members at a particular column. For example:
class MyClass
{
alignment here---> <-----
int m1; // m1 and m2 are aligned
int m2;
}
Align bit-field sizes at column #
This aligns the bit field sizes of data members at a particular column. For example:
class MyClass
{
alignment here---> <----
int bitfield1 : 8 ; // bit field : are aligned
int bitfield2 : 24;
}
Indent labels for public/private
Indent with statements
Labels are indented at the same level as the surrounding statements. For example:
class MyClass
{
public:
int func1();
private:
int func2();
}
At far left edge
Labels are indented all the way to left, regardless of the indentation level of the surrounding statements. For
example:
class MyClass
{
public:
int func1();
private: // label is always at column 1 even if members are indented
int special_function();
int another_special_function();
int func2();
}
Hanging indent
Labels are indented 1 level less than the surrounding code. For example:
class MyClass
{
public:
int func1();
private:
int func2();
class InnerClass
{
public:
int func3();
}
}
Comment Options

Commands Overview
298 Source Insight 4 User Guide
Preserve blank lines in comments
Blank lines completely inside of multi-line comments are preserved. For example:
/*
Description:
The blank line above this line is preserved.
*/
Blank line above comment blocks
This inserts a blank line above a block of statements following comments. This attempts to identify a block of
statements that follows one or more comment lines. This presumes the comments are referring to the block
of statements that follow it. For example:
a = 0;
// Initialize block - some comment before a "block" of statements
// (The blank line above this block is inserted by this formatting option.)
s.x = 1;
s.y = 14;
Wrap comment line at right margin
Multiline comments are word-wrapped at the right margin. The right margin value is defined by the file type.
See “File Type Options” on page 213.

Source Insight 4 User Guide 299
Commands Overview
For example:
right margin ---------------------------->|
/* some really long long long long long
long wordy wordy wordy comment that is
word wrapped at the right margin*/
Preserve text formatting in lines that contain only comments
This preserves extra spaces and tabs inside of comments if the comment is the only thing on the line. This
typically preserves the author's intentional formatting of the comment. For example:
/*
Field1 Description
------- -----------
something something else in table format
*/
Align right-hand comments at column #
Aligns comments at the end of a line to a specific column. For example:
alignment here ---> <---
x = 0; // right hand comment
y = 1; // another right hand comment
Other Options
Indent namespace contents
Indents the contents of a C++ or C# namespace. Everything inside the namespace is nested by one level, so
this affects whether that nesting affects the indentation. For example:
namespace N1
{
int n1_x;
void n1_func();
}
If this box is not checked, then the formatting would look like this:
namespace N1
{
int n1_x;
void n1_func();
}
Spacing Options Tab
This tab contains options that control how white space and line space is handled, as well as preprocessor
macros.
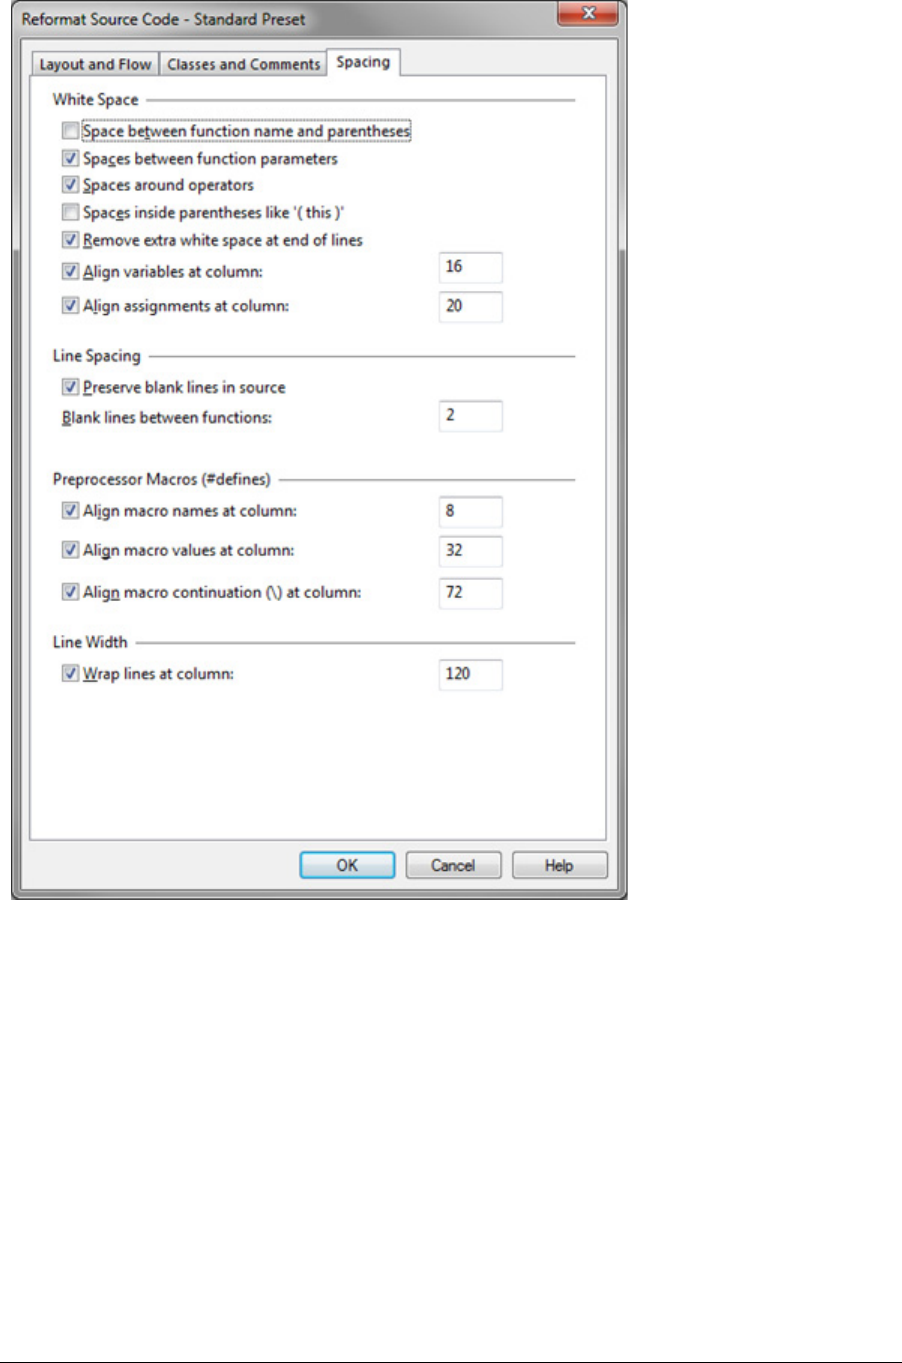
Commands Overview
300 Source Insight 4 User Guide
White Space Options
Space between function name and parentheses
Adds a space between function names and the open parentheses that follows. For example:
myfunction (x) // note the space before the parameter list.
Spaces between function parameters
Adds a space between function parameters. For example:
myfunction(x, y, z) // note spaces after commas
Spaces around operators
Adds spaces around binary operators in expressions, such as + and -. Some examples:
a + b * c
a < b
a += b

Source Insight 4 User Guide 301
Commands Overview
If this box is not checked, then the above code would be formatted like this:
a+b*c
a<b
a+=b
Spaces inside parentheses like "( this )"
Adds spaces after the open parentheses, and before the closing parentheses in expressions and function
parameter lists. For example:
myfunction( a )
if ( x > 0 )
If this box is not checked, then the above code would be formatted like this:
myfunction(a)
if (x > 0)
Remove extra white space at end of lines
All extra spaces and tabs at the end of lines are stripped.
Align variables at column #
This aligns the declared names of variables at a particular column. For example:
alignment here---> <-----
int x1; // x1 and x2 are aligned
int x2;
Align assignments at column #
This aligns assignment operators at a particular column. For example:
alignment here---> <-----
int x1 = 0; // x1 and xyz are aligned
int xyz = 0;
Line Spacing Options
Preserve blank lines in source
This preserves any completely blank line in the original source. If this box is not checked, then unnecessary
blank lines are removed. Some blank lines are automatically inserted by some formatting options.
Blank lines between functions #
Inserts the specified number of blank lines just above function declarations.

Commands Overview
302 Source Insight 4 User Guide
Preprocessor Macros (#defines) Options
Align macro names at column #
This aligns the declared names of preprocessor macros at a particular column. For example:
alignment here---> <-----
#define SUM(a, b) ((a) + (b))
#define ABCD(x) (x)
Align macro values at column #
This aligns the substitution value of preprocessor macros at a particular column. For example:
alignment here---> <-----
#define SUM(a, b) ((a) + (b))
#define ABCD(x) (x)
Align macro continuation \ at column #
This aligns the line-continuation character of preprocessor macros at a particular column. For example:
alignment here---> <-----
#define SUM(a, b) \
((a) + \
(b))
Refresh Relation Window
This command refreshes the Relation Window re-computing its contents.
Normally, the Relation Window updates automatically based on your selection.
If you prefer that the Relation Window not automatically update, you can either lock it with Lock Relation
Window command, or use the Relation Window Properties command to set the "Automatic Symbol Tracking"
to "None". Then you can use the Refresh Relation Window command to manually calculate the Relation Win-
dow contents.
Reload As Encoding
This command reloads the current file using a specific character encoding. If you opened a file and the
encoding looks incorrect or text is garbled, then you probably need to reload it with the correct encoding.
You should do this before you make any changes to the file.
Caution: The current file is reloaded from scratch and wipes out any changes you may have made. If the file has unsaved
changes, Source Insight will confirm you want to reload it and lose your changes. If you want to keep your changes, do
NOT save the file back over itself, because that could overwrite the file with the wrong encoding and corrupt the file.
Instead, save it to a new file by selecting File > Save As Encoding, and pick the UTF-8 format. After you reload the origi-
nal file, you can compare the differences between the files and merge your changes back.
To use this command, select the desired encoding, then press the Load button reload the current file.

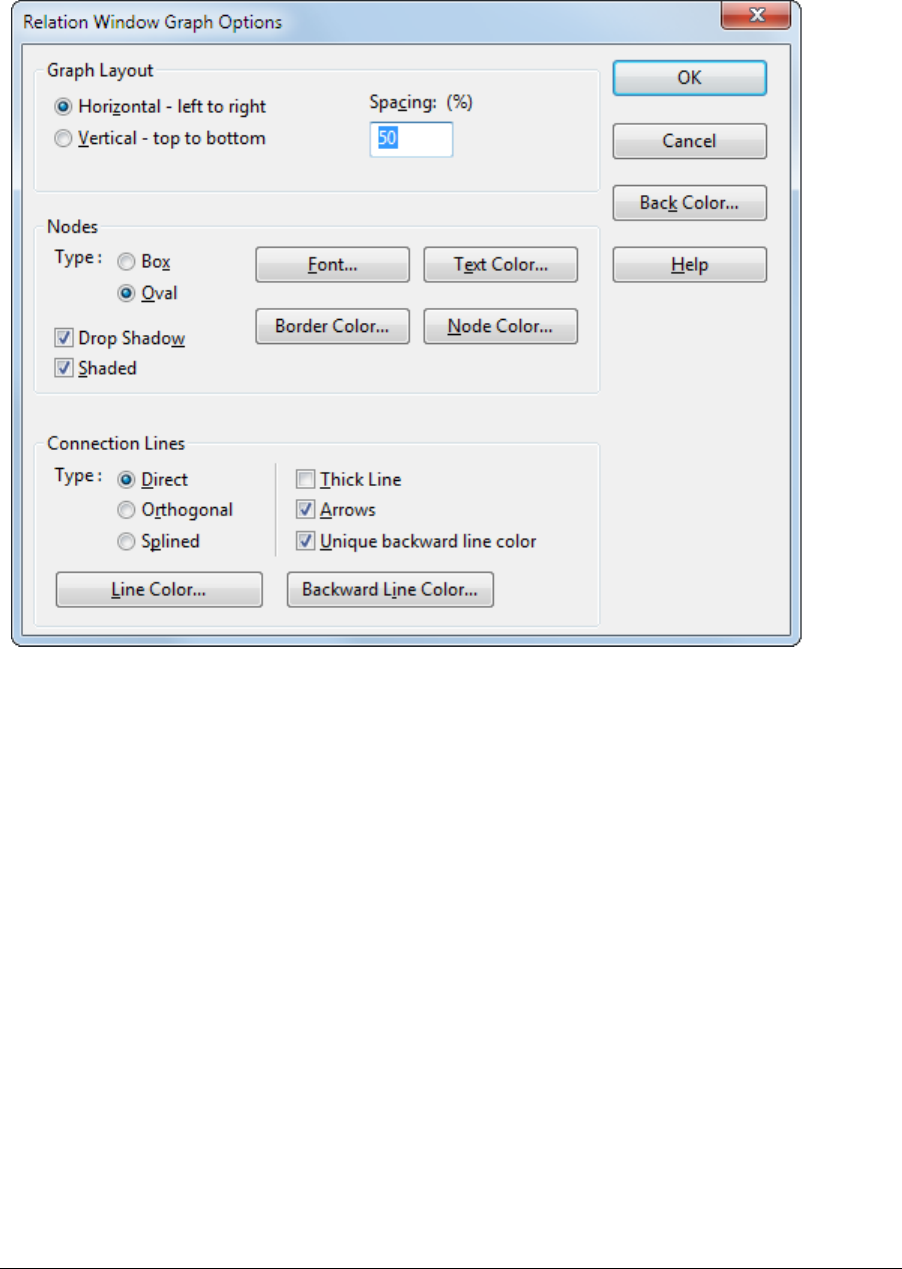
Commands Overview
304 Source Insight 4 User Guide
Relation Window Graph Options
Displays the graphing properties of the Relation Window. The graphing properties apply when the Relation
Window is in a graph mode, not the outline mode.
Back Color
Click this to select a background color for the graph window.
Graph Layout
Selects the layout mode for the graph. You can choose either top to bottom, or left to right.
Spacing
Type a percentage that represents the scale factor of the inter-node graph spacing. A large percentage value
will make the nodes spread out more.
Node Options
Node options control the appearance of node elements in the graph.
Type
Selects the shape of nodes.
Font
Selects the font used inside of each node.
Border, Text, Back Color
Selects the colors used for the node borders, text, and background fill.

Source Insight 4 User Guide 305
Commands Overview
Drop Shadow
Enable this to put a drop shadow on each node.
Shaded
Uses a gradient shading effect to draw the graph nodes.
Connection Line Options
Connection Line options control the way the lines that connect nodes appear.
Type
Selects the style of lines that connect nodes.
•Direct Lines are drawn straight between nodes.
•Orthogonal Lines are drawn with right angle bends.
•Splined Lines are drawn as curves.
Line Color
Selects the color used for connection lines.
Thick Line
Enable this to make connection lines thicker.
Arrows
Enable this to put arrowheads on the connection lines. If the Spacing percentage is small, the arrowheads are
omitted due to the lack of inter-node space.
Unique backward line color
Enable this to have reverse flowing lines drawn in a separate color. Use the Backward Line Color button to
select the color.
Backward Line Color
Selects the color used for reverse flowing lines.
Relation Window
The Relation Window command shows or hides the Relation Window.
The Relation Window shows the relationship between the currently selected symbol and other things. The
Relation Window can show function call trees, class hierarchies, structure members, reference trees, and
more. It can be docked along side your source windows, and it works in the background tracking what you
are selecting and showing relationship information automatically.
See “Relation Window” on page 93.
Relation Window Options
The Relation Window Options command is accessed from the Relation Window toolbar or shortcut menu.
You control what relationships are shown from this dialog box, and how the window is displayed.
See “Relation Window” on page 93.
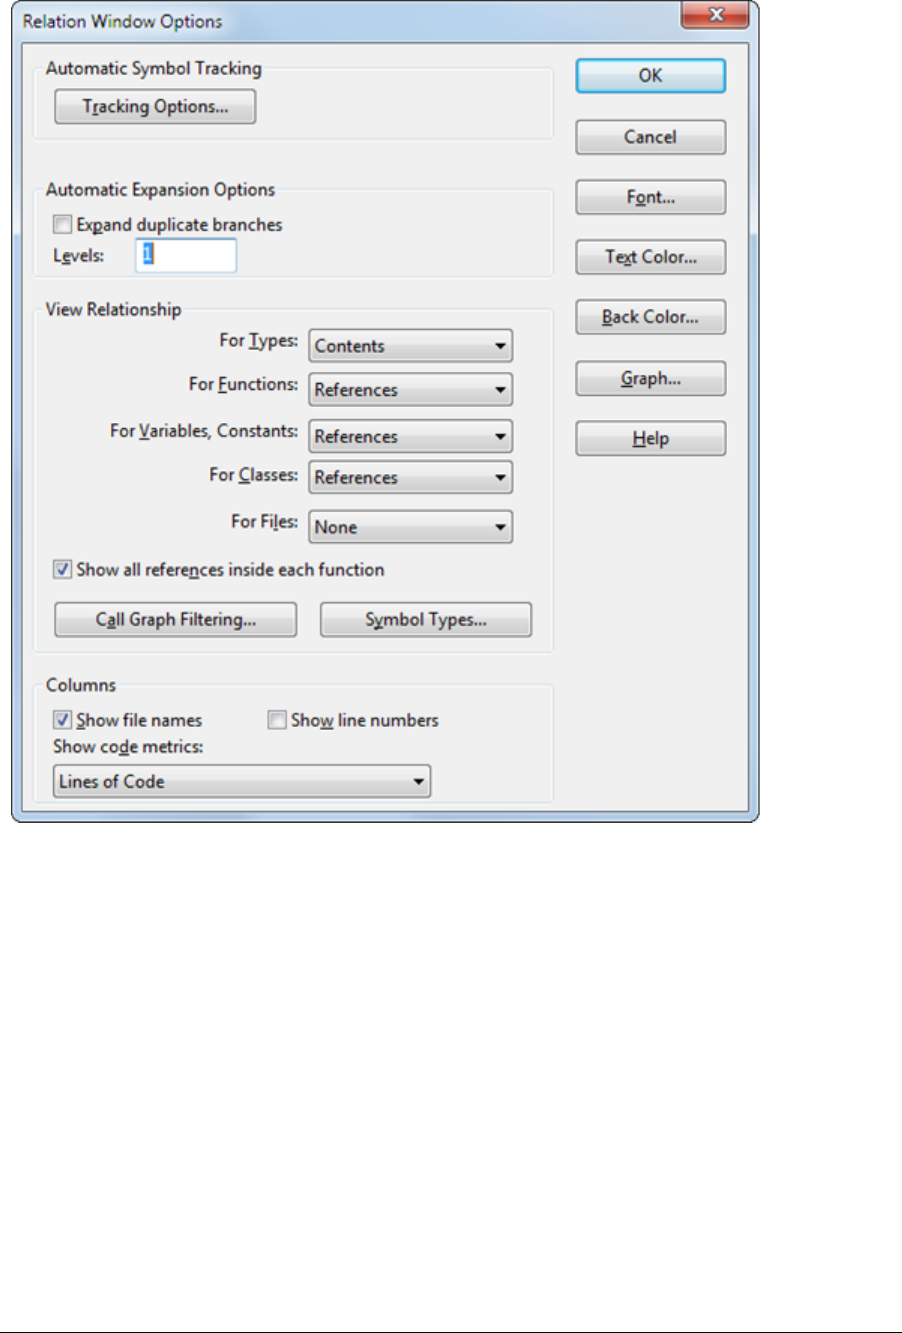
Commands Overview
306 Source Insight 4 User Guide
Relation Window Options Dialog Box
Font…, Text Color…, Back Color…
Click on these to select the font, text color, and background color, respectively, of the Relation Window.
These apply to the outline view only.
Graph…
Click on this button to open the Relation Graph Properties dialog box. From there, you can adjust the options
for the graph view of the Relation Window.
Automatic Symbol Tracking
Click the Tracking Options button to control what the Relation Window tracks. It can track the symbol that
appears under the cursor, or it can track the enclosing function or data structure where the selection is
located.
Automatic Expansion Options
This section specifies how deep the Relation Window should expand automatically. You can override this on
an individual basis by right-clicking on a node in the Relation Window and selecting Expand Special.

Source Insight 4 User Guide 307
Commands Overview
Levels
The number of levels to expand below the root node.
Expand duplicate branches
Enable this to expand duplicate child branches, even if they have already been expanded earlier. If this is dis-
abled, then duplicate children are inserted in a collapsed state.
View Relationship Group
This group specifies the relationship expanding rules the Relation Window uses when it tracks symbols of dif-
ferent types.
View Relationship
The relationship shown depends on the type of symbol. You can specify what relationship is shown for differ-
ent symbol types. For example, you could set the relationship viewed for functions to "Calls", and the rela-
tionship viewed for classes to “Inheritance”. Thus, when you select a function, the Relation Window shows a
call tree, and when you select a class name, the Relation Window shows the class inheritance hierarchy. See
“Relationship Rules” on page 307.
Show all references inside each function
In the graph view, when the Relation Window is showing a “references” type of relationship, this option
groups multiple references from within the same symbol into a single node. For example, if function B is
called three times from inside of function A, then the node for function A will contain three items drawn
inside of it to represent the three calls to function B.
Call Graph Filtering
Click this button to use the Call Graph Filter dialog box. This allows you to control what symbols participate
in the call tree calculation. See “Call Graph Filter” on page 308.
Symbol Types
Click this button to view the Symbol Type Filter dialog box. This allows you to filter out specific types of sym-
bols from the Relation Window output. See “Symbol Type Filter” on page 309.
Columns Group
This group specifies what columns should appear in the outline list view. The Relation Window can be sorted
by clicking on any column header.
Show file names
Shows the file name column.
Show line numbers
Shows the line number column. In most cases, the line number is where the given symbol is referred to.
Show code metrics
Shows the selected code metrics column. Only one code metrics column is allowed.
Relationship Rules
The relationship shown in the Relation Window depends on the type of symbol. You can specify what rela-
tionship is shown for different symbol types. For example, you could set the relationship viewed for functions
to "Calls", and the relationship viewed for classes to "Inheritance". Thus, when you select a function, the
Relation Window shows a call tree, and when you select a class name, the Relation Window shows the class
inheritance hierarchy.
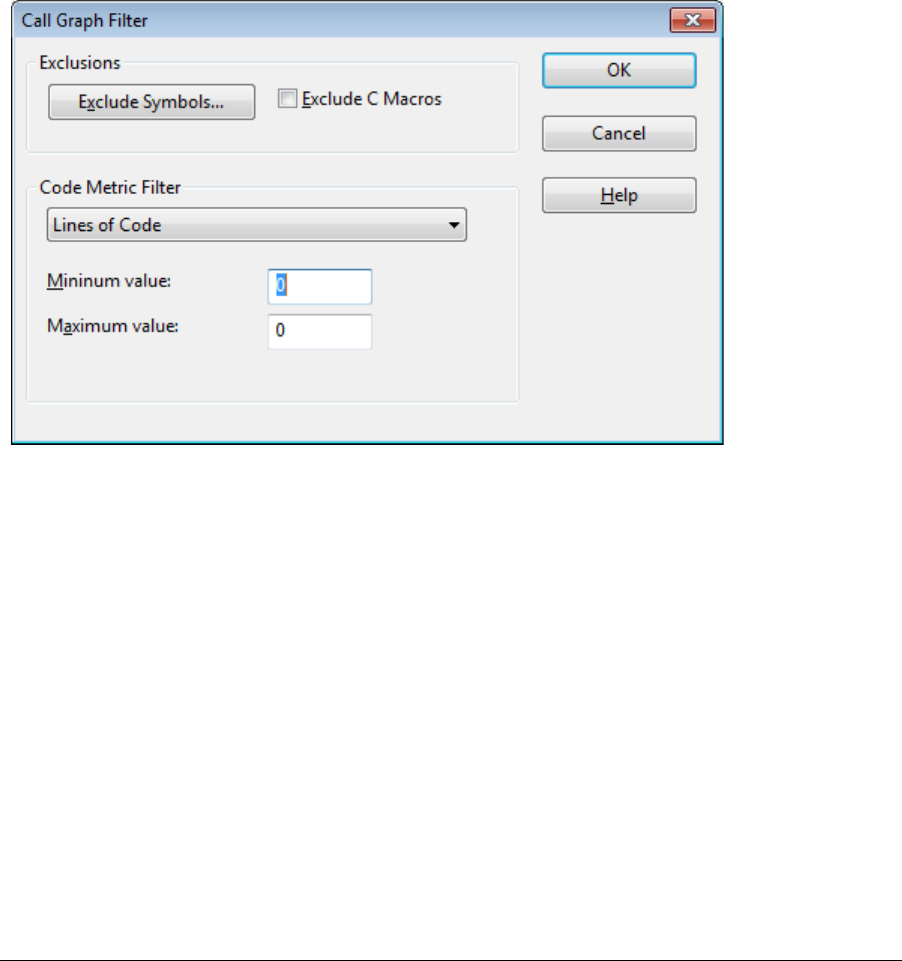
Commands Overview
308 Source Insight 4 User Guide
Each time the Relation Window expands a symbol to show a new level, the relationship represented by the
expansion is based on the type of symbol being expanded. That means each Relation Window has the poten-
tial to show multiple relationships. For example, a class might show its contents, which consists of member
functions. Each member function might show its references.
The "Type of" Relationship
There is a relationship in the list for Variables that is named "Type of". The "Type of" relationship yields the
type of the variable. Then, the relationship rule for Types is applied. It is a kind of indirect relationship.
For example, let's say you set the Variable relationship to "Type of", and the Type relationship to "Refer-
ences". Now when you select a variable of a particular structure or class type, the Relation Window will
decode the variable's type, then apply the "References" relationship rule and show the references to the vari-
able's type.
Call Graph Filter
The Call Graph Filtering dialog box allows you to control what symbols participate in the call tree calculation.
Exclusions
This section controls what symbols are filtered out of the call tree.
Exclude Symbols…
Click this button bring up the Exclude Call Graph Symbols list. You can add specific symbols to this list. If a
symbol is in the exclusion list, then Source Insight will not expand the symbol in the call graph display.
Exclude C Macros
Check this to omit C function-like macros from the call graph. If this option is off, then function-like macros
are expanded in the call graph as though they were an actual function.
Code Metric Filter
This section specifies the code metrics criteria for filtering out symbols. If enabled, symbols will only be
included in the call graph is the symbols code metric value is within an acceptable range.
From the Code Metric Filter drop-down list, select the code metric that you want to use as the criteria, or
select "None" if you don't want to use this option.

Source Insight 4 User Guide 309
Commands Overview
Minimum value
A symbol must have a code metric value of this or greater to be included.
Maximum value
A symbol must have a code metric value of this or less to be included. If the value is set to –1, then there is no
maximum.
Symbol Type Filter
The Symbol Type Filter dialog box appears whenever you ask to specify symbol types to be used to filter an
operation or listing.
Symbol Tracking Options
This dialog box displays options that guide what the Relation window will pay attention to.
Automatic Symbol Tracking
As you move your cursor around in a source file, the Relation Window "tracks" the symbol under the cursor,
or around the cursor. This group of options tells the Relation Window what to track.
Off
Select this to disable automatic symbol tracking.
Track selected symbol (i.e. under cursor)
Select this to have the Relation Window look up the definition of the symbol currently under the typing cur-
sor.
Track the enclosing function or class
Select this to have the Relation Window show the definition of the function or class that contains the typing
cursor. This is useful to have a function definition and formal parameters visible in the Relation Window while
you edit the function.
Activate Tracking Group
This group controls when the automatic tracking is activated.
Inside of comments
Select this to have the Relation Window look up symbols when the cursor is inside of comments.
Inside of string constants
Select this to have the Relation Window look up symbols when the cursor is inside of quoted string con-
stants.
Inside all file types
Select this to have the Relation Window look up symbols when the cursor is inside any type of file, not just
source code files.
Reload File
Reloads the current file from disk, losing all changes since saving. This has the same effect as closing the file
without saving, and then opening the file again. The change history and undo history are also lost.

Commands Overview
310 Source Insight 4 User Guide
Reload Modified Files
This command will check the time stamps on each open file and reload those that have been changed out-
side of the editor. This only applies to files that were opened with the "Sharing..." option turned on in the
Preferences: Files dialog box.
You can have this work performed automatically in the background by selecting an option in the Prefer-
ences: Files dialog box.
Remove File
The Remove File command removes one or more source files from the current project. Note that the actual
files are not deleted from the disk, but only removed from the project.
Note: You can also remove files by using the Project File List window. Select the files in the list, right-click, and select
"Remove File from Project".
File Name
Contains the name of the file to be removed from the project. You can also add a wildcard and press Enter to
expand the wildcard into the file list.
File List
Contains a list of all project files in the current working directory. If you select a file from this list box, the file
name is loaded into the File Name text box.
Remove
Click this button to remove the selected file from the project. If the File Name text box contains wildcard
characters, the wildcards will be expanded and displayed in the File list box, and the dialog box will not be
closed.
Select All
Click this button to select all the files contained in the file list.
Remove Dir
Click this button to remove the selected directory contents from the project.
Show Dirs
Click this button to toggle the list contents between showing file names, and showing subdirectory names.
When the subdirectories are shown, this button changes to "Show Files".
Browse
Click this button to bring up the standard Open dialog box, which allows you to browse around your disks.
Add
Click this to go to the Add Files dialog box.
Remove Project
The Remove Project command removes an existing project. When a project is removed, all project data files
created by Source Insight are deleted. The Remove Project command will not delete your source files.
Project Name
Add the name of the project you want to remove.

Source Insight 4 User Guide 311
Commands Overview
Project list
Displays a list of all projects opened or created on your computer. Select the project you want to remove
here.
Since the process of creating and adding source files to a large project can be somewhat time consuming,
Source Insight confirms that you indeed want to remove the project.
Click No to cancel the Remove Project command. The project will not be removed. If the project you selected
to be removed was previously open, then it will be closed at this point.
Click Yes to confirm that you want to remove the project.
Remote Options
The Remote Options dialog box allows you to set options for how Source Insight behaves when used in a Ter-
minal Server or Remote Desktop session. In a Terminal Server session, Source Insight runs on a remote
machine, but the desktop is displayed on a local machine.
The settings you make in this dialog box only apply when you run in a Terminal Server or Remote Desktop
session.
Remote Session Options
These check boxes disable display behaviors that can be slow if your remote connection is not very fast.
Font Scaling
Sets the percent of overall text scaling in the program. Most text, including source code and lists, are scaled
by this percentage.
Rename
The Rename command renames the current file. The file does not have to be saved on disk. If the file is part
of the current project, the project is adjusted to reflect the new name. You may also move the file to a new
directory with this command, but you cannot move the file to a different drive.
The Rename command does not save the file.
Renumber
The Renumber command reorders numbers found in the current file, or just the current selection. If the
selection is extended when the Renumber command is used, then only the selection is processed. If the cur-
rent selection is an insertion point, then the whole file is processed. Renumber also works on a column selec-
tion.
Radix
Select a radio button in this group to specify the radix of the numbers generated by the Renumber command.
Auto
Use the radix of the original number, as determined by Source Insight.
Decimal
Use base 10.
Hex
Use base 16.

Commands Overview
312 Source Insight 4 User Guide
Octal
Use base 8.
Numbers
Specifies what action is to be performed on numbers found in the file. You can add values into the Start at
and Offset text boxes in base 10, 8, or 16.
Auto
Replace numbers in ascending order, beginning with the value of the first number found.
Start at
Replace numbers in ascending order, beginning with this value.
Offset
Replace numbers with the same number, plus this value.
Radix Determination
Source Insight determines the radix of a number as follows.
•If the number begins with 0x then it is assumed hexadecimal.
•If the number begins with zero and a digit, it is assumed octal.
•Otherwise, the number is assumed decimal.
Repeat Typing
The Repeat Typing command repeats the last characters you typed. For example, if you select somewhere
and type abc, then run Repeat Typing, another abc will be inserted automatically.
Replace
The Replace command performs a search & replace operation on the current file. The search & replace can be
done over the whole file, or just the current selection.
Old
Add the old pattern you want to replace in this text box. The pattern can be a regular expression.
New
Add the new pattern that should replace the old one in this text box.
Replace
Click this to begin the replacing operation.
Files
Click this button to transfer to the Replace Files command, where you can perform replacements in multiple
files.
Options Group
Case Sensitive
If enabled, Source Insight will only find matches if the case matches exactly.

Source Insight 4 User Guide 313
Commands Overview
Use Regular Expressions
If enabled, the Old and New patterns are assumed to be regular expressions.
Wrap Around
If enabled, the search continues at the beginning of the file when it reaches the end of the file. The search will
wrap around only once. If not enabled, the search stops when it reaches the end of the file.
One Occurrence / Line
If enabled, only the first occurrence of the Old pattern on each line is replaced. If not enabled, then all occur-
rences of the Old pattern on each line are replaced.
Whole Words Only
If enabled, then Source Insight only finds matches that are whole words. If not enabled, then Source Insight
will also find matches that are embedded in words.
Preserve Old Case
If enabled, then Source Insight will replace text but retain the upper and lower case of the original text. If not
enabled, then Source Insight will replace text using the case exactly as it appears in the New text box. This
option is most useful when Case Sensitive is off.
This feature lets you replace all occurrences of a word, regardless of case, and still maintain the original case.
For example, let's say you want to replace all "abc" and "ABC" with "xyz" and "XYZ" respectively. Add "abc" in
the Old text box, add "xyz" in the New text box. Disable Case Sensitive, and enable Preserve Old Case.
Confirm Replacements
If enabled, Source Insight will confirm each replacement by prompting you.
Search Group
The Search group of options specifies the scope of the search.
Selection
Searches only the currently selected text. This check box is automatically checked if the current selection is
extended when the Replace command is invoked.
Whole File
Searches the whole file, from the first line to the last. This check box is automatically checked if the current
selection is an insertion point when the Replace command is invoked.
Nothing checked in this group means to start searching at the current selection, and continue to the end of
the file.
Replace Files
The Replace Files command searches for a specified pattern in multiple files and replaces each occurrence
with a new pattern.
Replace
Click this button to begin the replace operation.
Select All
Click this to select all the files in the file list.
Show Dirs
Click this button to toggle the file list contents between showing file names, and showing only subdirectory
names. When the subdirectories are shown, this button changes to "Show Files".

Commands Overview
314 Source Insight 4 User Guide
Old
Add the old pattern to be found and replaced in this text box. The pattern can be a regular expression.
New
Add the new pattern that should replace the old one in this text box.
File Name
The name of the file to search. You may also add a series of wildcard specifications and click the Replace but-
ton (or press Enter) and Source Insight will replace the file list with the results of the wildcard expansion. If
the Project Wide option is on, the wildcards are expanded over the whole list of files in the current project;
otherwise, the wildcards are expanded in the current directory.
If the Project Wide option is on, Source Insight will search the project symbol for file names added in the File
Name text box, so you don't have to include a directory specification for those files.
File list
If the Project Wide option is on, then this list displays all files in the current project.
If the Project Wide option is off, then this list displays all the files in the current working directory. The current
directory path is displayed above the file list. Source Insight shows only files for known file types in the cur-
rent directory. The file types are specified with the File Type Options command.
Options Group
Project Wide
This check box controls whether the File list shows all the files in the project, or just the files in the current
working directory.
Include Subdirectories
If this check box is checked, then any selected directories are recursively searched. This option and the Proj-
ect Wide option are mutually exclusive.
To recursively search a set of directories:
1. Uncheck the Project Wide check box.
2. Check the Include Subdirectories check box.
3. Select one or more directories in the file list.
You can also type a file wildcard specification in the File Name text box to limit the search to particular file
extensions or names.
Case Sensitive
If enabled, Source Insight will only find matches if the case matches exactly
Use Regular Expressions
If enabled, the Old and New patterns are assumed to be regular expressions.
One Occurrence / Line
If enabled, only the first occurrence of the Old pattern on each line is replaced. If not enabled, then all occur-
rences of the Old pattern on each line are replaced.
Whole Words Only
If enabled, then Source Insight only finds matches that are whole words. If not enabled, then Source Insight
will also find matches that are embedded in words.

Source Insight 4 User Guide 315
Commands Overview
Skip Inactive Code
If enabled, then only code that is active under conditional compilation is searched. You must first specify
known conditions in the Preferences: Languages dialog box, in order for Source Insight to know what condi-
tions are active or not. Conditional compilation only applies to some languages.
Skip Comments
If enabled, then comments will not be searched.
Search Only Comments
If enabled, then only comments will be searched. This is mutually exclusive with the Skip Comments option.
The comment options slow the search down a little.
Preserve Old Case
If enabled, then Source Insight will replace text but retain the upper and lower case of the original text. If not
enabled, then Source Insight will replace text using the case exactly as it appears in the New text box. This
option is most useful when Case Sensitive is off.
This feature lets you replace all occurrences of a word, regardless of case, and still maintain the original case.
For example, let's say you want to replace all "abc" and "ABC" with "xyz" and "XYZ" respectively. Add "abc" in
the Old text box, add "xyz" in the New text box. Disable Case Sensitive, and enable Preserve Old Case.
Confirm Each Replacement
If enabled, Source Insight will confirm each replacement by prompting you.
Confirm Each File
If enabled, Source Insight will confirm each modified file by prompting you.
Include Read-Only Files (keep buffers open)
If enabled, then replacements will be made inside of read-only file buffers. Source Insight will not attempt to
save the file as the replacement operation progresses. The files will be left open and modified, allowing you
to save the files yourself. If not enabled, then read-only files will be skipped. Note that this options works
independently from the Preferences: Files option Allow editing read-only file buffers.
You can make Source Insight automatically save over read-only files while replacing if you enable the Prefer-
ences: Files option: Save over read-only files without prompting.
Restore File
The Restore File command restores the current file to its original contents, as it was when it was first opened.
Reverting will lose all changes you made since it was first opened, even if you saved the file. The file that is
saved on disk is not altered. Only the open file buffer is restored.
You should use caution with this command, since it effectively undoes any saving you performed on the file.
Note that you can use the Undo command to undo the Restore File operation.

Commands Overview
316 Source Insight 4 User Guide
Restore Lines
The Restore Lines command restores a block of edited lines back to their original contents. The lines will be
as they were when you first opened the file.
Restoring lines will lose those changes you made since it was first opened, even if you saved the file. The file
that is saved on disk is not altered. Only the lines in the open file buffer are restored.
The Restore Line command is undo-able. This gives you a powerful, out-of-order undo capability.
You can access the Restore Lines command quickly by right-clicking in the selection bar (left margin) area
next to a block of modified lines and choosing it from the right-click menu. You can see what lines are modi-
fied by turning on line revision marks. (See Preferences: Display command.)
Save
The Save command saves the current file to disk. The file is saved to its current name. Prior to saving, any
changes you made to the current file were only present in the unsaved version you were editing. The file on
disk never is changed until you save the file by using the Save, Save As, or Save All commands.
A file can also be saved by answering "Yes" to the "Save changes to file?" message when you try to close a
changed file.
If the file is new and has never been saved before, or the file is read-only, then the Save command runs the
Save As command instead. The Save As command allows you to specify the name of the file to be saved.
Save A Copy
Saves the current file to a new file, but does not replace or affect the current file. The newly saved file is left
open as just another file buffer. This is a handy way to duplicate a file.

Source Insight 4 User Guide 317
Commands Overview
Save All
The Save All command saves all files that are open and have changed since they were saved last.
Save Modified Files Dialog Box
All files that require saving will appear in the Save Modified Files dialog box. Select the files to be saved here
and click OK. This dialog box also appears if you use the Close All command, or exit Source Insight when files
require saving.
Saving Without Prompts
If you want Source Insight to just save all files without showing the Save Modified Files dialog box, then select
Options > Preferences: Files and select the check box that says "Save All operation saves without prompts".
Saving When You Switch to Another Program
To make Source Insight automatically saving modified files when you switch to a different program, select
Options > Preferences: Files dialog box and select the check box that says "Save all files when Source Insight
program is deactivated".
Prompting for Each File Separately
If you want Source Insight to prompt for each file using a separate "Yes, No, Cancel" message, then select
Options > Preferences: Files dialog box and select the check box that says "Save All operation will query on
each file separately".
For each file that has changed and requires saving, a dialog box is presented.
Yes
Click this button to save the file.
No
Click this button to not save the file, and to continue
Cancel
Click this button to stop the Save All command.
Save All Quietly
The Save All Quietly command saves all files that are open and have changed since they were saved last.
Source Insight will not ask you if want to save each file; they will be saved automatically.
Save As
The Save As command saves the current file to disk as the name that you specify.
Adding a New File to the Current Project
If the file being saved is a new file that hasn't been saved before and you have a project open, then Source
Insight will ask if you if you want to add the file to the current project.
Yes
Click to add the file to the current project.
No
Click to not add the file to the current project. The file will still be saved.
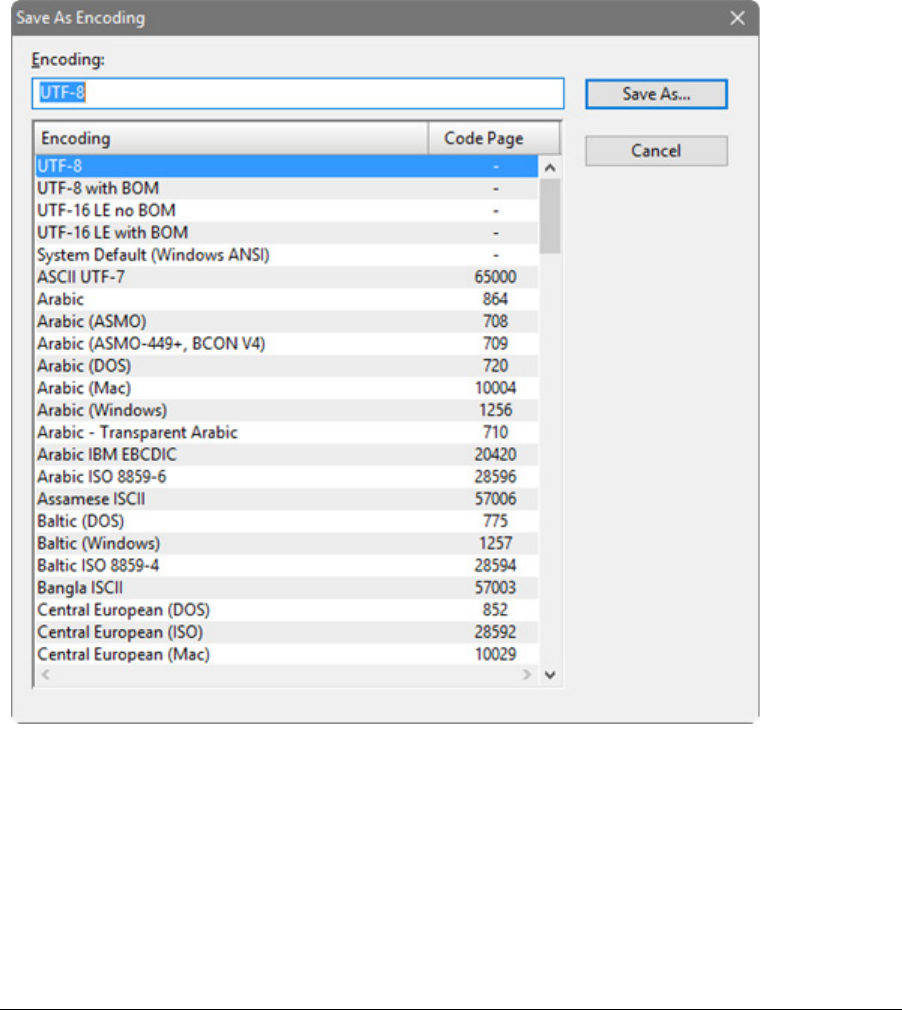
Commands Overview
318 Source Insight 4 User Guide
Save As Encoding
This command saves the current file with a specified character encoding. To use this command, select the
desired encoding, then click the Save button to save the file.
If you just opened a file and it looks like text is garbled, and it loaded with the wrong encoding, do NOT save
the file. That will overwrite the file and potentially change it incorrectly. Instead, select File > Reload As
Encoding. See “Reload As Encoding” on page 302.
Saving files using Unicode (such as UTF-8) is the best practice to avoid corruption due to incorrect decoding
or encoding going forward. For example, if you load a file encoded with one code page, and save it using a dif-
ferent code page, that could corrupt your file because some of the characters won’t map to characters in the
new code page. However, if you save using a Unicode encoding, the characters will be mapped correctly.
UTF-8 is the preferred encoding in Source Insight because there is less conversion required to open and save
files.
See “File Encodings” on page 125.
Encoding
You can type part of the encoding name to find it in the list. If you select a UTF-8 based encoding, your file will
be saved in the best format to avoid incorrect encoding or re-encoding problems. In addition, UTF-8 files load
and save faster in Source Insight.
Encoding List
This is a list of encodings supported by Source Insight. The non-Unicode encodings also list the Windows sys-
tem code page used.
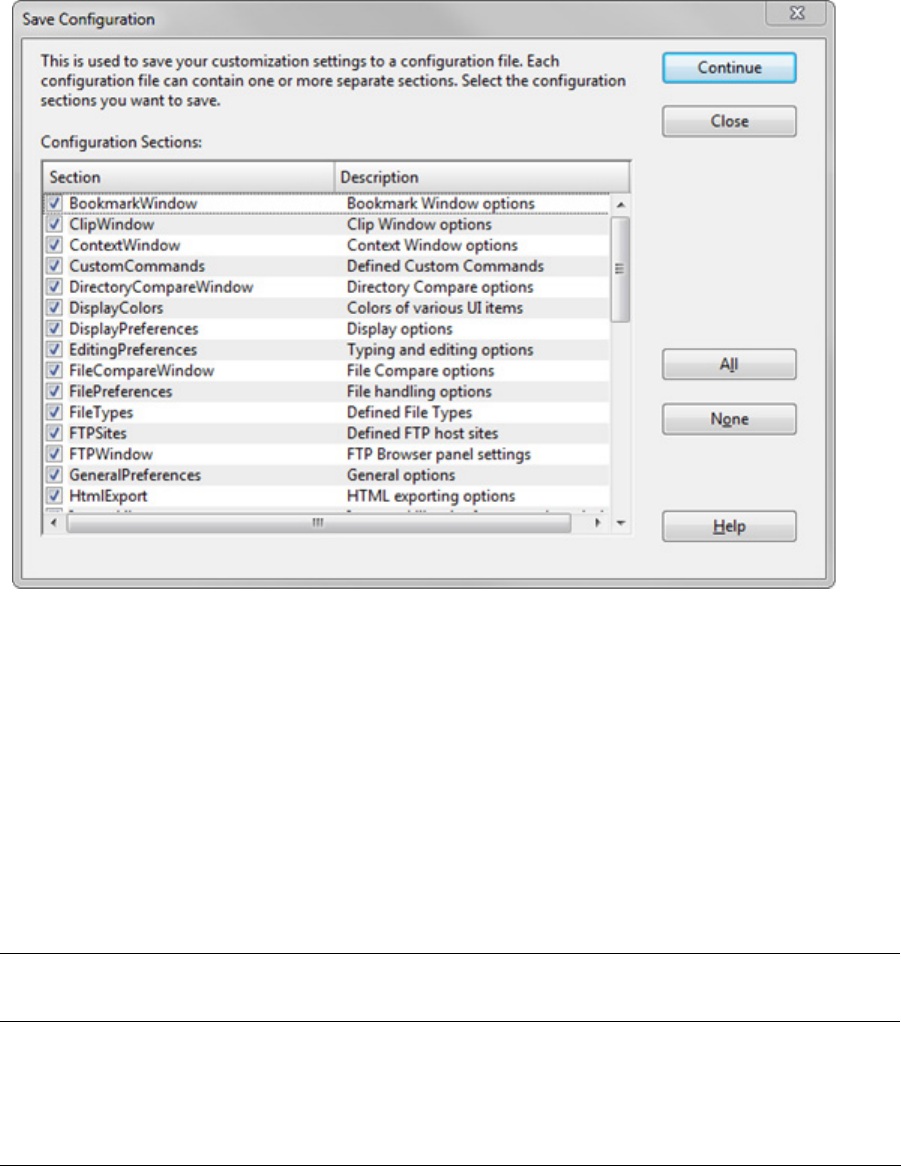
Source Insight 4 User Guide 319
Commands Overview
Save Configuration
The Save Configuration command saves your current program customizations and settings to a new configu-
ration file. You can save the entire current configuration to a file, or just a subset of it. See “Customized Set-
tings and Configurations” on page 138.
When a configuration file is loaded that contains a configuration subset, it only affects the settings it con-
tains. For example, you could save only keyboard settings to a configuration file and name it "MyKeyboard".
When "MyKeyboard" is loaded, it will only affect the keyboard.
Configuration Sections
Check the sections of the configuration you want to save. Click the All button to check all the sections.
OK
Displays the standard Save dialog box. You can select the configuration file you want to save to with this dia-
log box.
Having Multiple Configurations
You can keep several favorite configurations. After setting up the current configuration the way you like it in
Source Insight, use the Save Configuration command to save each configuration to a different file. When you
want to change configurations, use the Load Configuration command and specify the name of the configura-
tion file you want to open. When the configuration file is opened, it replaces the current configuration.
Note: Once you load a configuration file, it will be automatically saved to the current configuration file. By default,
that file is config_all.xml in your Source Insight\Settings user directory. Make sure you make a backup of con-
fig_all.xml if you want to keep it!
See “Load Configuration” on page 251.

Commands Overview
320 Source Insight 4 User Guide
Save Layout
This saves the current window panel arrangement to a layout file. There are four buttons to quickly save to
layouts A - D. These save into files named "layout_a.xml", "layout_b.xml", etc..
To save to more than the four special layout slots, click the Other button.
You load the layouts by using the Load Layout command, or the corresponding Load Layout buttons on the
layout toolbar. See “Load Layout” on page 253.
Save New Backup File
Normally you don’t need to save your own backup files because they get created automatically when you
save files. However you can use the Save New Backup File command to take a snapshot of the current file
buffer and save it as a new backup file. The new backup is added to the existing backup files in the Backup
folder.
To open a backup version of the current file, select File > Open Backup File. See “Open Backup File” on
page 266.
Save Selection
The Save Selection command saves the currently selected text to a new file. The new file will remain open.
The file may be a new file, or an already existing file. The file may also be a file that is already open in Source
Insight. If the file is already open, then Source Insight will ask if you want to replace the file with the new text,
or append the new text to the file.
Save Settings
(On the Symbol Window right-click menu.)
This makes the current settings of the window become the new Default settings for new windows.
For the Symbol Window, this records the window's width, symbol sorting, and symbol type filtering and uses
those parameters as the new default for new windows created subsequently.
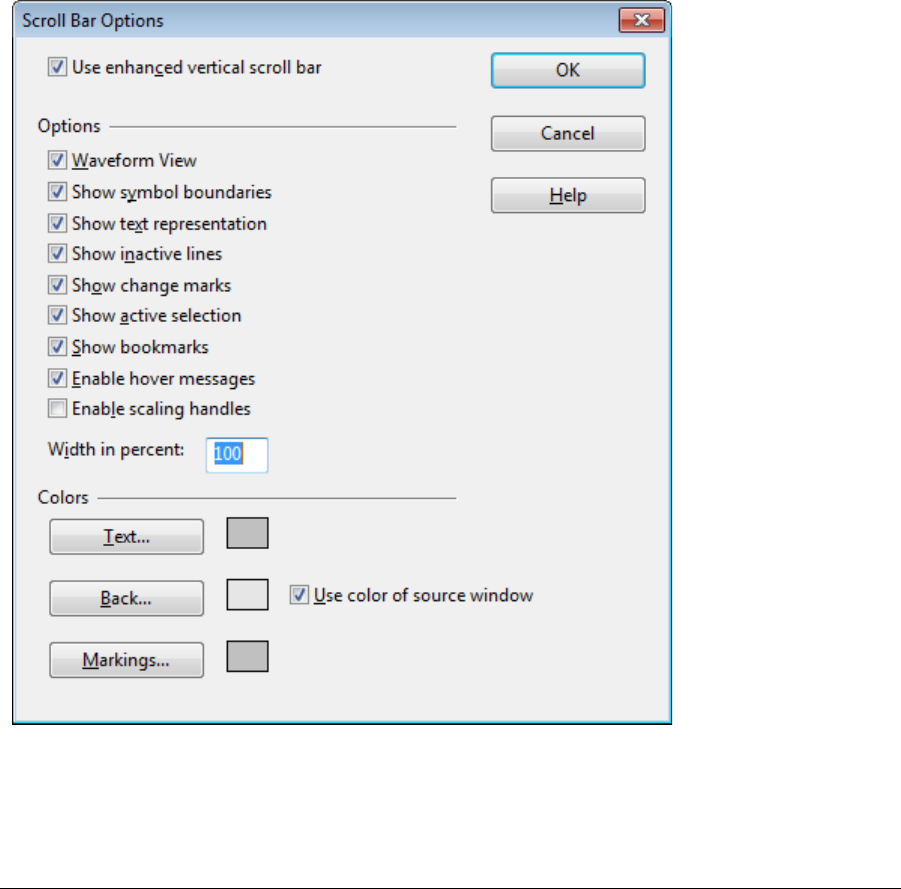
Source Insight 4 User Guide 321
Commands Overview
Save Workspace
The Save Workspace command saves the current workspace to a new workspace file.
The workspace contains your session information, such as the names of the files and file windows you have
open.
The current workspace is automatically saved for you when you exit Source Insight, and reloaded the next
time you run Source Insight.
Working With Multiple Workspaces
If you find that you work with sets of files, rather than individual files, you can save each set of files to a differ-
ent workspace file. When you want to change to another set of files, use the Open command and specify the
name of the workspace file you want to open. When the workspace file is opened, it replaces the current
workspace. In other words, all files are closed, and the files in the new workspace are opened.
Scroll Bar Options
This dialog sets the scroll bar options. The scroll bar can displays information about the file content inside
the scroll bar.
Use enhanced vertical scroll bar
When selected, the vertical scroll bar has additional features. The options below apply only if this option is
selected.

Commands Overview
322 Source Insight 4 User Guide
Options
Waveform View
If the Show text contents option is enabled, then the file's contents are displayed symmetrically mirrored
around the vertical center of the bar. This sometimes makes the shape of the contents stand out more.
Show symbol boundaries
Shows markers around the boundaries of functions, classes, and other declared blocks.
Show text contents
Shows a miniature version of the file's content inside the scroll bar. The scroll bar shows a "bird's eye" view of
the whole file.
Show inactive lines
Inactive code is displayed in gray. Inactive is code is source code that is shown in the Inactive style because it
resides inside an inactive preprocessor block, such as inside of a C or C++ #ifdef block.
Show change marks
Highlights the areas of edited text in the scroll bar. The miniature text appears in yellow.
Show active selection
Repeats the source window's selection inside the scroll bar.
Show bookmarks
Bookmark indicators appear in the scroll bar.
Enable hover messages
When you hover the mouse over the scroll bar, messages will appear to say what function or declared thing is
at the mouse position. Also, dragging the "thumb" of the scroll bar will display the function at that current
position of the thumb.
Enable scaling handles
Small handles at the top and bottom of the scroll bar thumb will appear. You can scale the window text by
dragging the scaling handles up or down. Each source window has its own scaling factor.
Width in percent
This is the width of the scroll bar, expressed as a percentage of the standard scroll bar width. For example, if a
standard Windows scroll bar appears 30 pixels wide, then setting this to 100% will make the Source Insight
vertical scroll bar the same 30 pixels. Setting this to 200% will make it 60 pixels wide, and so on.
Color Options
This section affects the colors of the scroll bar parts.
Text...
The color of the miniature "text" inside the scroll bar.
Back...
The background color of the scroll bar. If the Color based on window box is checked, then the scroll bar's
background color is based on the background color of the source file window.
Markings...
The color of the symbol boundary markings.

Source Insight 4 User Guide 323
Commands Overview
Scroll Half Page Down
The Scroll Half Page Down command scrolls the active window down by half a window in distance.
Scroll Half Page Up
The Scroll Half Page Up command scrolls the active window up by half a window in distance.
Scroll Left
The Scroll Left command scrolls the active window to the left by one tab size.
Scroll Line Down
The Scroll Line Down command scrolls the current window down in the file by one line.
Scroll Line Up
The Scroll Line Up command scrolls the current window up in the file by one line.
Scroll Right
The Scroll Right command scrolls the active window to the right by one tab size.
SDK Help
The SDK Help command takes the word in the current selection and looks it up in the Windows Software
Development Kit help file. For example, if you selected "TextOut" in your program and ran the SDK Help com-
mand, a Help window for the TextOut Windows function would open.
You must have a Windows SDK help file installed on your computer to use this.
Any help file for WinHelp 3.1 or greater may be used; it does not have to be an SDK help file. If you often want
to perform help lookups from Source Insight using a different help file, that will work just fine.
You can tell Source Insight what WinHelp file to run for the SDK Help command by running the Change the
SDK Help File command.
Search
The Search command searches the current file or selection for a specified pattern.
Find
Add the pattern you want to search for in this text box.
Search
Click this to begin searching.
Cancel
Click this to cancel the command.
Whole File
Click this button to search the whole file, from top to bottom, and place the search results in the Search
Results window.

Commands Overview
324 Source Insight 4 User Guide
Files
Click this button to open the Search Files dialog box, which lets you search across files.
Case Sensitive
Search will only find matches if the case matches exactly.
Use Regular Expressions
The Find pattern is assumed a regular expression. See “Regular Expressions” on page 109.
Wrap Around
If enabled, the search continues at the beginning of the file when it reaches the end of the file. The search will
wrap around only once. If not enabled, the search stops when it reaches the end of the file.
Select When Found
If enabled, Source Insight will select any characters that match when a match is found. If not enabled, Source
Insight will put the insertion point before the first character of the matching text.
Whole Words Only
If enabled, then Source Insight only finds matches that are whole words. If not enabled, then Source Insight
will also find matches that are embedded in words.
Search Scope
This group of options specifies the scope and the direction of the search.
Forward
Searches forward starting at the current selection. The search is always forward if Selection or Whole File is
checked.
Backward
Searches backwards starting at the current selection.
Selection
Searches only the current selection, in the forward direction.
Whole File
Searches the whole file, in the forward direction.
If neither Selection nor Whole File is checked, then the search continues from the current selection point,
either forward or backwards through the file.
Search Backward
The Search Backward command searches backward in the current file for the pattern previously searched
for. The search pattern is initially added using the Search command dialog box. The search begins at the cur-
rent insertion point.
Search Backward for Selection
This command searches for the previous occurrence of the first word in the current selection. To use this
command, put the insertion point within the word you want to search for and invoke this command. Source
Insight will find the previous occurrence of that word.
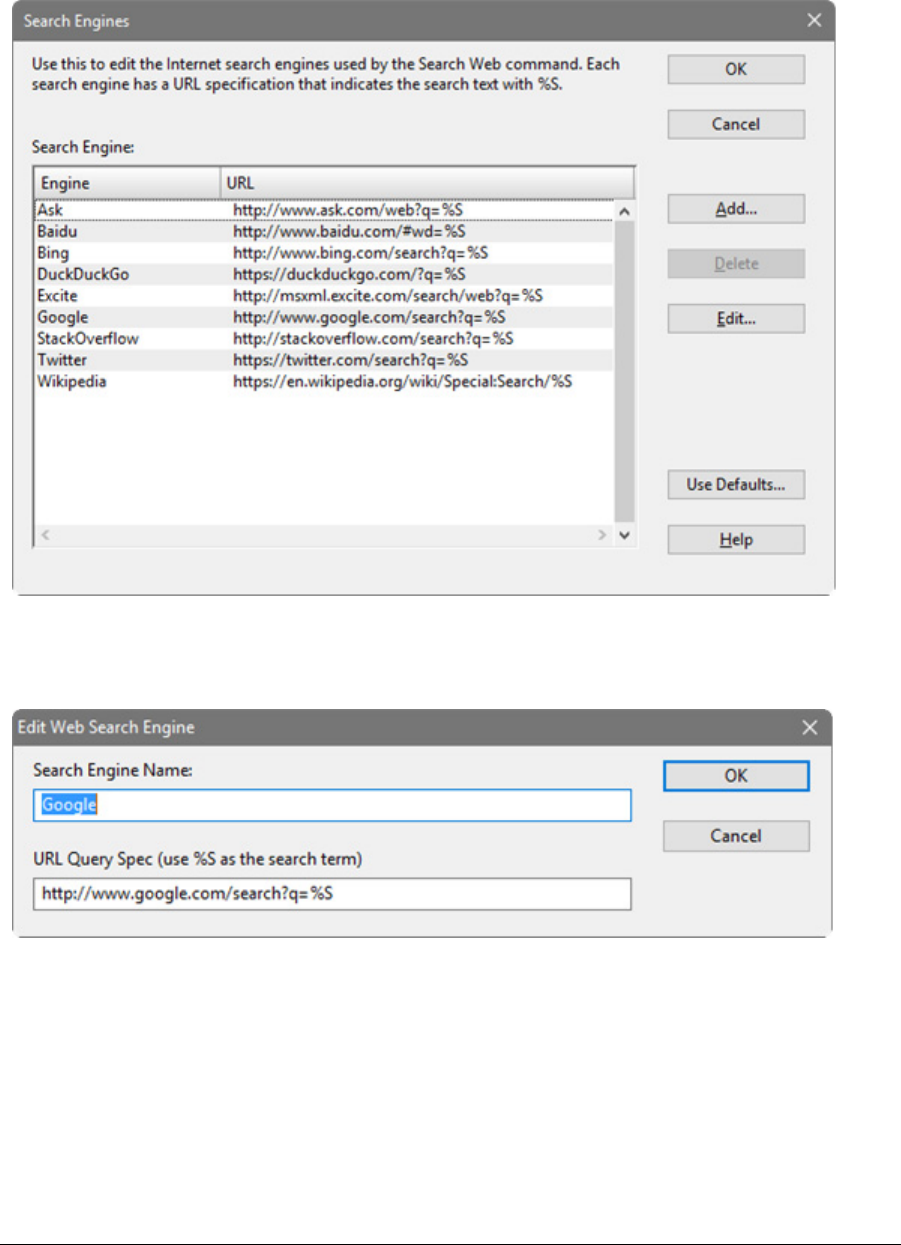
Source Insight 4 User Guide 325
Commands Overview
Search Engines
Use this to edit the Internet search engine options used by the Search Web command. Each search engine
entry has a web query URL specification that is used to invoke the search. Source Insight substitutes %S in the
web URL with the search term.
Adding or Editing a Search Engine
Pressing the Add or Edit button opens the property dialog.
The URL query specification should contain a %S, which gets substituted with the search term.
Search Files
The Search Files command searches through multiple files. A new Search Results output window is created.
Each time Source Insight finds a matching line in a file, it appends an entry to the Search Results. Each line in
the Search Results file can have source links that link the line with the location of the matching text in
another file.

Commands Overview
326 Source Insight 4 User Guide
Search
Click this button to begin the searching in the selected files, or the file named in the File Name text box.
Select All
Click to select all the files in the file list.
Browse
Click this button to show the Open File dialog box, so that you can browse your disks to locate a file to be
searched. When you select a file in the Open File dialog box, its full path will be placed in the File Name text
box.
Find
Type the pattern to be found in this text box. The pattern can be a regular expression.
File Name
The name of the file to search. You may also add a series of wildcard specifications and click the Search but-
ton and Source Insight will replace the file list with the results of the wildcard expansion. If the Project Wide
option is on, the wildcards are expanded over the whole list of files in the current project; otherwise, the
wildcards are expanded in the current directory.
If the Project Wide option is on, Source Insight will search the project symbol for file names added in the File
Name text box, so you don't have to include a directory specification for those files.
File list
If the Project Wide option is on, then this list displays all files in the current project.
If the Project Wide option is off, then this list displays all the files in the current working directory. The current
directory path is displayed above the file list. Source Insight shows only files for known file types in the cur-
rent directory. The file types are specified with the File Type Options command.
Show Dirs
Click this button to toggle the file list contents between showing file names, and showing only subdirectory
names. When the subdirectories are shown, this button changes to "Show Files".
Options Group
Project Wide
This check box controls whether the File list shows all the files in the project, or just the files in the current
working directory.
Include Subdirectories
If this check box is checked, then any selected directories are recursively searched. This option and the Proj-
ect Wide option are mutually exclusive.
To recursively search a set of directories:
1. Uncheck the Project Wide check box.
2. Check the Include Subdirectories check box.
3. Select one or more directories in the file list.
You can also type a file wildcard specification in the File Name text box to limit the search to particular file
extensions or names.
Case Sensitive
If enabled, Source Insight will only find matches if the case matches exactly.

Source Insight 4 User Guide 327
Commands Overview
Use Regular Expressions
If enabled, the Find pattern is assumed a regular expression. See “Regular Expressions” on page 109.
Find Non-Matching
If enabled, Source Insight will find all lines where the pattern did not match.
Whole Words Only
If enabled, then Source Insight only finds matches that are whole words. If not enabled, then Source Insight
will also find matches that are embedded in words.
Skip Inactive Code
If enabled, then only code that is active under conditional compilation is searched. You must first specify
known conditions in the Preferences: Languages dialog box, in order for Source Insight to know what condi-
tions are active or not. Conditional compilation only applies to some languages.
Skip Comments
If enabled, then comments will not be searched.
Search Only Comments
If enabled, then only comments will be searched. This is mutually exclusive with the Skip Comments option.
The comment options slow the search down a little.
Search Results
These options affect what appears in the Search Results after the search is completed.
Include in Results...
Click this button to specify what information is included in the Search Results.
To Search a Set of Files
If you add file name wildcards into the File Name text box and click the Search button, the wildcard list will be
expanded, and all the files in the file list will be selected automatically. If the Project Wide check box is on,
then the wildcards will be expanded over all files in the project.
So, for example, if you wanted to search all .h files in your project, you would add *.h into the File Name text
box, press Enter to click the Search button, and click the Search button again to search all the files in the file
list. If the Project Wide option is on, Source Insight will fill the file list with all .h files in the project, regardless
of what directory they are in.
See “Replace Files” on page 313.
Search Forward
The Search Forward command searches forward in the current file for the pattern previously searched for.
The search pattern is initially added using the Search command or the Search Forward for Selection com-
mand. The search begins at the current insertion point.
Search Forward for Selection
This command searches for the next occurrence of the first word in the current selection. To use this com-
mand, put the insertion point within the word you want to search for and invoke this command. Source
Insight will find the next occurrence of that word.

Commands Overview
328 Source Insight 4 User Guide
Search List
The Search List command appears on most right-click menus when you click on a list. This allows you to
search the list for a string or regular expression.
Tip: Once the input focus is on a list, you can press F4 to search for the next occurrence.
String to find in the list
Add the string pattern to search for.
Start at beginning
If enabled, then the search starts at the first item in the list. If not enabled, then the search starts just after the
selected item in the list.
Match Case
Turn this on to perform a case-sensitive search.
Use Regular Expressions
Turn this on to interpret the search string as a regular expression. See “Regular Expressions” on page 109.
Searching Options
Specifies options for the Search commands.
Ask before replacing old Search Results
You are always prompted as to whether you want to replace or append to the existing Search Results, or to
create a new Search Results file.
Always replace old Search Results
Any existing Search Results are thrown out and replaced with the new results.
Always append to old Search Results
The new search results are appended to the end of the current Search Results file as a new results set.
Automatically jump to first result.
When the searching is complete, Source Insight jumps to the first matching result. If disabled, then the first
matching result in the Search Results window will be selected.
Automatically load selection into Find pattern.
The word under the cursor is automatically loaded into the Find pattern of the Search dialog boxes. If dis-
abled, then the previous search pattern is preserved.
Reselect original lines after Replace operation.
The original whole-line selection is selected again after the Replace operation completes.
Search Project
Searches for text or keywords across all project files. This command works the same as the Lookup Refer-
ences command. The only difference is that each dialog box has its own persistent state. See “Lookup Refer-
ences” on page 255.
You can also use the Project Search Bar to perform the same type of search. See “Project Search Bar” on
page 278.
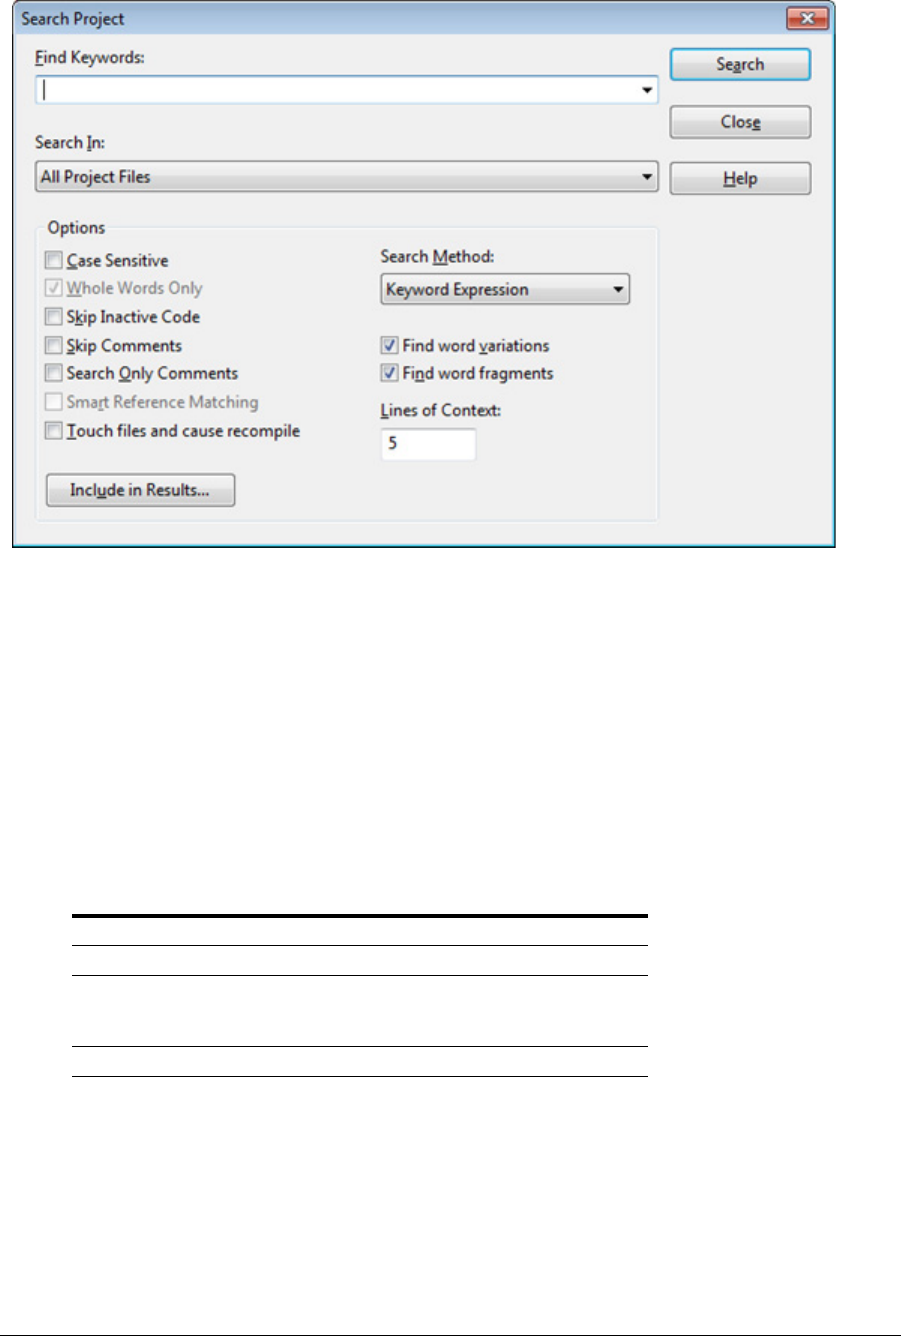
Source Insight 4 User Guide 329
Commands Overview
Search Project Dialog
For details on the basic options in this dialog, See “Lookup References” on page 255.
Keyword Expressions
A keyword expression search is similar to an Internet search engine query. Source Insight searches the proj-
ect for occurrences of a set of keywords that appear within a specified number of lines. The Lines of Context
text box indicates the maximum distance the keyword terms can be from each other to qualify as a match.
For example, if you typed "cat food", then Source Insight will search for occurrences of "cat" and "food"
within X lines of each other.
There is an implicit logical-AND operator between keywords. That is, if you type more than one keyword, the
both keywords must be present to qualify as a match. You can include other Boolean operations as well. The
following table lists the operators available:
Table 4.6: Keyword Search Operators
Operator Example Action
AND or + cat and dog
Both terms must be present.
OR cat or dog
Either term must be present
NOT
or –
or !
-cat
The term must not be present
= =Betty
Case sensitive match
? "regexp" ? "^Ich"
Term is a regular expression

Commands Overview
330 Source Insight 4 User Guide
You can also group expressions using parentheses. For example:
(cat or kitty) and food
(file or buffer) and (save or write) and !error
Word Variations
If you enabled the Find word variations option, then Source Insight will also find different ending forms of
the keywords you specified. For example, if you specified the keyword "open", Source Insight will also find
"opens", "opened", and "opening". This has the same effect as typing this expression:
(open or opens or opening)
Word variations are applied to each keyword term. For example, if you specified:
save write
Which implies "save" and "write" must be present. With word variations enabled, this search would be equiv-
alent to:
(save or saves or saving) and (write or writes or writing)
Find Word Fragments
If you enabled the Find word fragments option, then Source Insight will search for name or word fragments.
For example, if you specified the keywords "open doc", Source Insight will match occurrences of identifiers
such as OpenDoc, DocumentOpen, IsDocthingOpened, etc.
This is very powerful type of search. If your project uses fairly consistent naming conventions, you can search
for combined references to multiple subsystems.
Some examples:
Keyword Search Results
When you perform a keyword search, the Search Results will list blocks of lines that include the keywords
together. This gives you a little bit of context around the matches.
Search Results Options
This controls what information is included in the Search Results created by the Search Files, Lookup Refer-
ences, and Search Project commands. Each of those dialog boxes have a button that brings this dialog box
up, and each of those dialog boxes have their own separate settings for these options.
Include name of container function or class
The enclosing function or class name of the match is included in the search results.
Include file names
If enabled, then the file name where the match was found is inserted in the search results. If this option is on,
and Include line numbers and Include line text are both off, then a file name is inserted in the search
results only once if any matches were found in the file. That is, only one match per file is listed in the search
results.
Include line numbers
The line number in the file where the match was found is listed in the search results.
Include line text
The source text of the line where the match was found is listed in the search results.
Find String Typical Matches
open DocOpen, HTMLOpen, FileOpenReadWrite
ip open IpOpen, OpenIp, OpeningIp, IpsecOpen
doc save remote SaveDocToRemote, IsDocSavedOnRemote

Source Insight 4 User Guide 331
Commands Overview
Create Source Links
If enabled, then source links are also created for each line appended to the search results. Source links allow
you to jump between the line in the search results and the line in the file where the match was found. Source
Links are adjusted automatically while you edit, so they maintain their linkage.
If not enabled, then only text is appended to the search results. You may want to turn off this option if you
think you will find thousands of matches, since source links take up memory.
Normalize file names
If enabled, then the file names listed in the search results will be normalized. If not enabled, then the file
names listed will be full paths. See “Normalized File Names” on page 42.
Search Web
This command launches your web browser to search for the identifier at the cursor position. You can specify
which search engine site to use. The Search Web is on the Search menu, and on the right-click menu. There is
also a toolbar button.
Find
Enter the text to find here. The identifier symbol under the cursor is automatically loaded for you.
Search Engine
Choose which search engine to use. The engine you pick is remembered for the next time you use the Search
Web command.
Edit
Press this button to add or change the list of search engines. See “Search Engines” on page 325.
Select All
The Select All command selects all the text in the current file.
Select Block
The Select Block command selects the smallest C block that encloses the current selection. Each time the
Select Block command is used, it selects the next larger C block.
Select Char Left
The Select Char Left command extends the current selection left by one character.

Commands Overview
332 Source Insight 4 User Guide
Select Char Right
The Select Char Right command extends the current selection right by one character.
Select Function or Symbol
The Select Function or Symbol command attempts to select the whole enclosing symbol, such as the enclos-
ing function. You can also invoke this command by double clicking the mouse in the left margin.
Select Line
The Select Line command selects all of the current line.
Select Line Down
The Select Line Down command extends the current selection down by one line.
Select Line Up
The Select Line Up command extends the current selection up by one line.
Select Match
The Select Match command selects up to the matching brace, parentheses, or quote mark. For example, if
the insertion point is just before an open brace, this command selects up to and including the closing brace.
Select Next Window
The Select Next Window command changes the active window focus to the next window. This command
cycles through all open windows.
If the active window is maximized when this command is used, the next window is shown as maximized also.
Select Paragraph
The Select Paragraph command selects the entire enclosing paragraph. A paragraph of text is assumed to be
a series of lines, bounded by blank lines.
Select Sentence
The Select Sentence command selects up to the next period.
Select Symbol
The Select Symbol command selects the entire enclosing symbol. For example, if the current selection is
inside of a function, the Select Symbol command selects the whole function, including the lines that precede
the function, up to the bottom of the previous symbol.
Select To
The Select To command is used with the mouse to extend an existing selection up to a new point.

Source Insight 4 User Guide 333
Commands Overview
To use this command, point and click the left mouse button while holding down the Shift key. The selection
will be extended up to the place you pointed at. If you pointed to a position already within the selection, then
the selection will be shrunk to that location.
Select To End Of File
The Select To End Of File command extends the selection from the insertion point to the end of the file.
Select To Top Of File
The Select To Top Of File command extends the selection from the insertion point to the beginning of the file.
Select Word
The Select Word command selects the whole word at the insertion point.
To use this command with the mouse:
Point and click the left mouse button at a word while holding the Ctrl+key down.
The whole word gets selected. Now, while still holding the left button down, you can drag and extend the
selection in whole word increments.
Select Word Left
The Select Word Left command extends the selection from the insertion point to the beginning of the current
word.
Select Word Right
The Select Word Right command extends the selection from the insertion point to the end of the current
word.
Selection History
The Selection History displays a list of places that you have been in the currently open files. The list is sorted
such that the first item is the most recent place you have been.
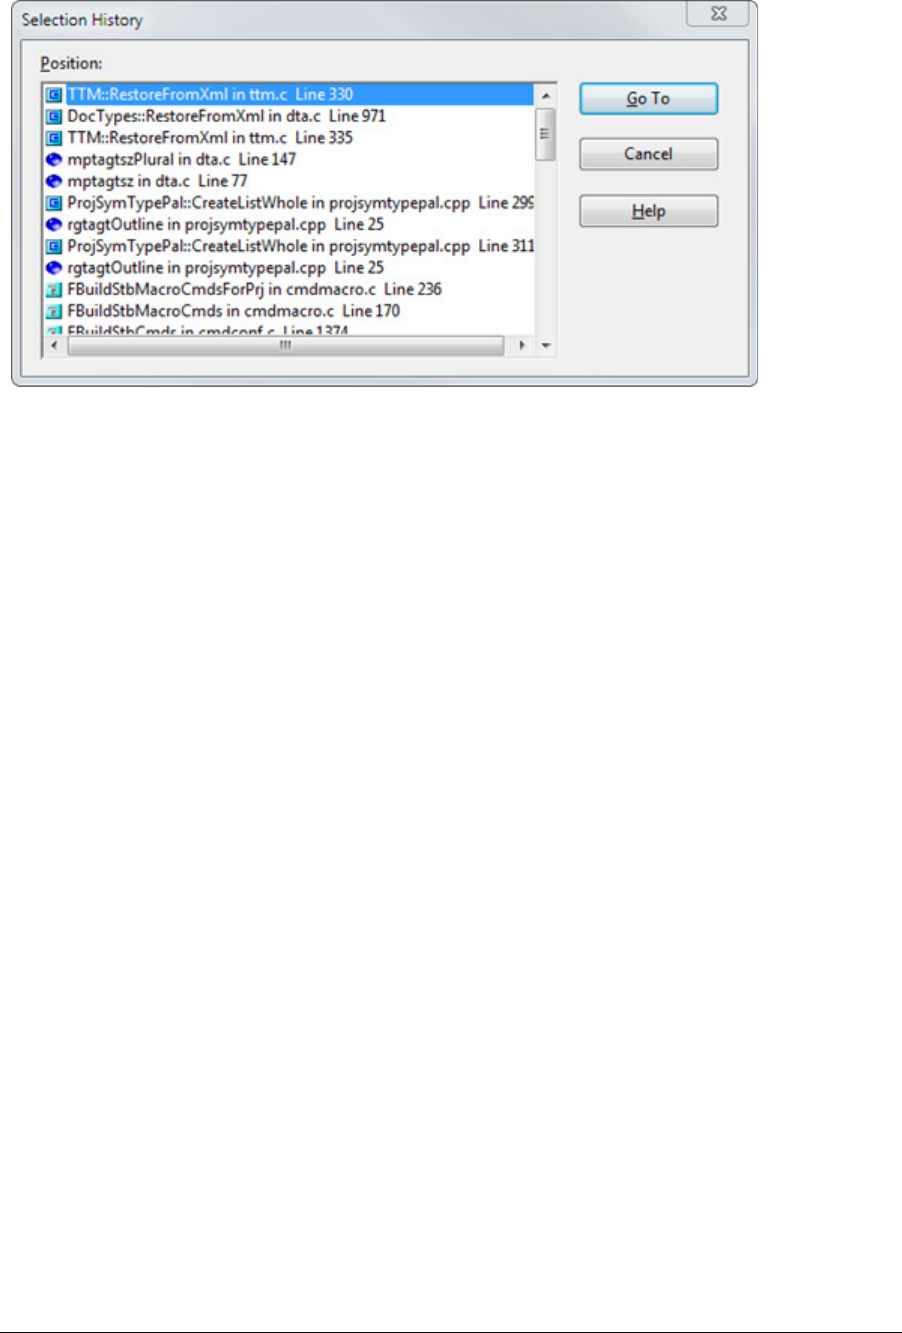
Commands Overview
334 Source Insight 4 User Guide
You can also use the Go Back (Alt+,) and Go Forward (Alt+.) to navigate back and forth like in a web browser.
Position
Displays a list of all selection history positions. Each item in the list shows the file and line number. If the
position is within a symbol, the symbol is also shown. For example, if you were inside of a function, then the
function name is in the list too.
Go To
Click this button to jump to the selected position.
Setup HTML Help
Use this command to locate the HTML Help file on your disk that will be used by the HTML Help command. If
you have Microsoft® MSDN™ or Microsoft® Developer Studio™ tools installed, you will probably want to select
the compiled HTML help "collection" file that is the main help file for the developer tools. The file has a .col
extension. That will allow you to invoke HTML Help on Windows development APIs from within Source
Insight.
Setup WinHelp File
This command allows you to locate the WinHelp help file on your disk to be used for the SDK Help command.
A system Open File dialog box will appear and allow you to pick the .HLP file to be used.
Show Clipboard
The Show Clipboard command opens a window, which displays the clipboard. You cannot edit or select in
the clipboard.
Show File Status
The Show File Status command shows the current file's size in lines and bytes in the status bar. It also shows
whether the file has been changed since it was saved last, and if it is read-only.

Source Insight 4 User Guide 335
Commands Overview
Simple Tab
Simple Tab Inserts a regular tab, overriding the Smart Tab mode. This is useful if you have the Smart Tab
option enabled. The Smart Tab mode alters the behavior of the regular Tab key. Sometimes, the Smart Tab
results in unwanted results. Use the Simple Tab command to just insert a regular tab, without any special
effects.
Smart End of Line
Moves the cursor generally to the end of the line. It does one of the following:
•If the cursor is in the middle of a line, move it to just after the last non-white space character on the
line.
•If the cursor is after the last non-white space character, move it to the actual end of the line.
•If the cursor is already at the end of the line, move to the end of the file.
Smart Beginning of Line
Moves the cursor generally to the beginning of the current line. It does one of the following:
•If the cursor is in the middle of a line, move it to just before the first non-white space character on the
line.
•If the cursor is before the first non- white space character on the line, move it to the actual start of the
line.
•If the cursor is already at the start of the line, move to the start of the file.
Smart Rename
Smart Rename will rename a symbol, including its definition and usages, across all project files or within a
local function. If the Smart Reference Matching option is enabled, then Smart Rename will rename the sym-
bol only in the correct contexts. It can be used to rename function local variables, class or struct member,
and functions.
Smart Rename is a specialized form of a global search & replace. Source Insight uses its symbol database
index to make it very fast.
Old Name
Add the name of the identifier to be renamed. The word under the cursor is automatically loaded for you. The
position of the cursor is significant because Source Insight will determine exactly which symbol you want to
rename, based on the local scope context.
You can add any string into this text box; however, the rename operation is optimized and much faster for
single-word strings. Also, if you type anything into this text box, Source Insight will have to re-establish
exactly what symbol you are trying to rename, based on the initial cursor position.
If you are renaming a member variable, or a local variable, you will notice that the Old Name text box con-
tains the full symbol name, including the container symbols. For example, it might say "DocDraw.paintStruc",
where "DocDraw" is a function name, and "paintStruc" is a local variable. In a sense, "paintStruc" is a mem-
ber of the "DocDraw" function.
New Name
Add the new name here. For members, you should only add the new member name, and omit the symbol
container qualifiers.

Commands Overview
336 Source Insight 4 User Guide
Output Search Results
If enabled, then the results of the search will be output to the Search Results window. This provides you with
a log of changes made to each occurrence. The Search Results window will list the text the way it was before
the replacement with the New Name string.
Confirm Each Replacement
If enabled, Source Insight will confirm each replacement by prompting you.
Confirm Each File
If enabled, Source Insight will confirm each modified file by prompting you.
Smart Reference Matching
This tells Source Insight to use its language information, and the scope context to determine exactly what
symbol is being renamed, and to make sure it only renames strict references to it.
Skip Inactive Code
If enabled, then only code that is active under conditional compilation is searched. You must first specify
known conditions in the Preferences: Languages dialog box, in order for Source Insight to know what condi-
tions are active or not. Conditional compilation only applies to some languages.
Skip Comments
If enabled, then symbol references inside comments will not be renamed.
Include Read-Only Files (keep buffers open)
If enabled, then replacements will be made inside of read-only file buffers. Source Insight will not attempt to
save the file as the replacement operation progresses. The files will be left open and modified, allowing you
to save the files yourself. If not enabled, then read-only files will be skipped. Note that this options works
independently from the Preferences: Files option Allow editing read-only file buffers.
You can make Source Insight automatically save over read-only files while renaming if you enable the Prefer-
ences: Files option: Save over read-only files without prompting.
Smart Tab
When the Smart Tab command is used at various positions in your source code, Source Insight moves the
selection to the next "field". A field is an interesting position, depending on the current context. Smart Tab
lets you move the cursor around easily, especially when typing new function calls.
When the Smart Tab option is on (Preferences: Typing), then pressing the regular Tab key will invoke the
Smart Tab command. The Simple Tab command simply inserts a tab, and avoids the Smart Tab behavior.
Therefore, if you have the Smart Tab option turned on, you can use the Simple Tab command to occasionally
override the Smart Tab behavior.
Smart Tab Examples
Here are some examples, starting with step 1 as the initial selection state, and steps 2 and later are the new
selections after using Smart Tab. The current insertion point is marked by ^ and a selected range of text is
underlined like this:

Source Insight 4 User Guide 337
Commands Overview
Example 1:
1. Beg^inPaint(hwnd, pps);
2. BeginPaint(hwnd, pps);
Example 2:
1. BeginPaint^(hwnd, pps);
2. BeginPaint(hwnd, pps);
3. BeginPaint(hwnd, pps);
4. BeginPaint(hwnd, pps^);
5. BeginPaint(hwnd, pps)^;
Example 3:
1. ResetAbc(^)
2. ResetAbc()^
Smart Tab works like a regular tab when you use it at the beginning or end of line text, or on a line that
doesn't have a function call.
The Smart Tab works well with auto-completion of function calls. When you insert a function call via the
popup auto-completion window, the function's parameter types and names are also inserted, and the first
parameter is selected. You only have to start typing over the first parameter, then press Smart Tab to select
the next parameter.
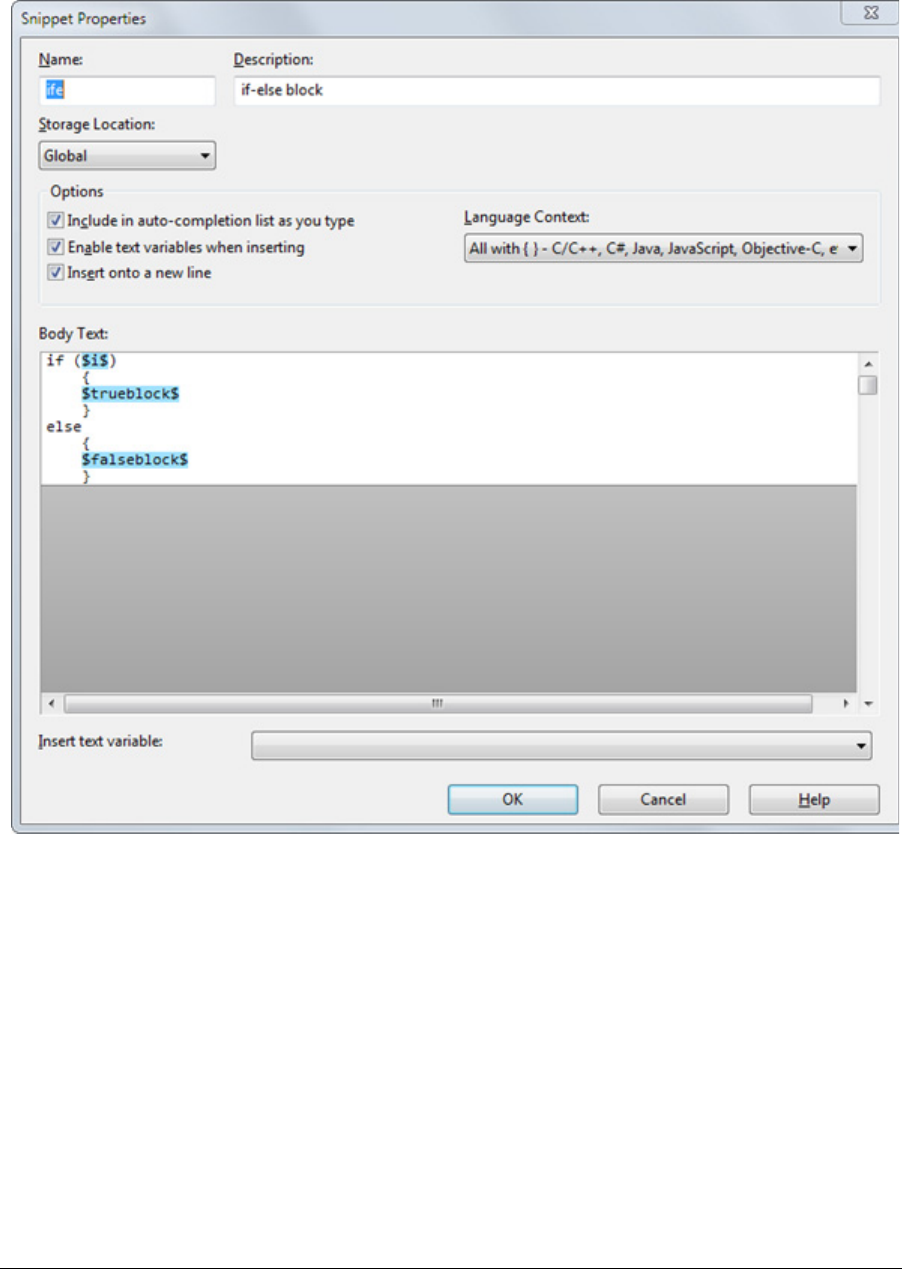
Commands Overview
338 Source Insight 4 User Guide
Snippet Properties
This window is used to edit the contents of a code snippet located in the Snippet Window. See “Code Snip-
pets” on page 98.
Name
The name of the snippet. This is the name that will appear in the auto-completion list as you type.
Description
This should contain a short description of the snippet. If you leave this blank, Source Insight will use a por-
tion of the snippet’s body text as the description.
Storage Location
This determines whether the snippet belongs to the current project, or is common to all projects (Global).
Note that changing this setting will cause the snippet to be saved to the new location, and removed from the
old location.
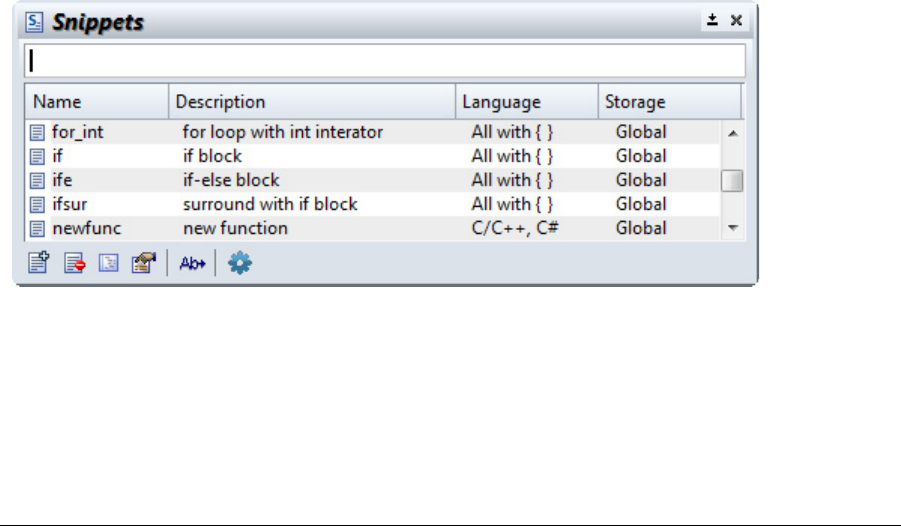
Source Insight 4 User Guide 339
Commands Overview
Include in auto-completion list as you type
Select this to include this particular snippet in the auto-completion list as you type in the editor.
Enable text variables when inserting
Select this to enable text variables to be automatically replaced with their values when you insert this partic-
ular snippet.
Insert onto a new line
Select this to cause the snippet to be inserted onto a new line, instead of in-line. This is appropriate for many
statement snippets, such as "while" or "for". The current auto-indenting mode will apply when inserting onto
a new line.
Language Context
Specifies from what programming language files this snippet should be available. For example, you can have
a snippet that is only applicable in Java. The auto-completion list will only include snippets that are applica-
ble to the language type of the current file.
Body Text
This is the contents of the snippet. This is a mini-editor window where you can type and edit the snippet text.
The snippet is inserted just as you enter it here.
You can use text variables within the snippet body. The Insert Text Variable list contains all the predefined
text variables you can enter.
You can also simply type any text variable in, including any variable you want to use as a placeholder when
inserting the snippet.
Insert Text Variable
This is a list of all the predefined text variables. Select an item from this list to insert the text variable into the
body text of the snippet.
Snippet Window
The Snippet Window lists all code snippets. From this window, you can create, edit, delete, and insert code
snippets. See “Code Snippets” on page 98.
To insert a snippet into the current file, type the name of the snippet and press Enter. You can activate the
Snippet Window first by using the Activate Snippet Window command (Ctrl+Alt+S).
New Snippet (Ctrl+N)
Creates a new snippet. The Snippet Properties window will open so you can edit the new snippet.

Commands Overview
340 Source Insight 4 User Guide
Delete Snippet (Ctrl+X)
Delete the selected snippets.
Edit Snippet Text in Editor
Opens the selected snippet in a source file window so that you can edit it. To save it back into the Snippet
Window, use File > Save. To stop editing the snippet, use File > Close.
Edit Snippet (Ctrl+E)
Opens the Snippet Properties window so that you can edit the snippet. See “Snippet Properties” on
page 338.
Load Snippets (Ctrl+O)
Imports snippets from a snippet file. The snippets are merged with the current list. If a loaded snippet
matches the name of an existing snippet, the existing snippet is replaced with the loaded version.
Save Snippets (Ctrl+S)
Saves the selected snippets to a new snippet file.
Snippet Window Options (Ctrl+Q)
Edits the options for the Snippet Window, and also for snippets in general. See “Snippet Window Options” on
page 340.
Snippet Window Options
This is used to edit the options for the Snippet Window, and for snippets in general. See “Code Snippets” on
page 98.

Source Insight 4 User Guide 341
Commands Overview
List Columns
Select the columns you want to include in the Snippet Window.
List Contents
Select the type of snippets you want to include in the Snippet Window.
Snippet Options
Confirm when deleting snippets
Select this to be prompted before deleting any snippets in the Snippet Window.
Propose snippets in auto-completion as you type
Select this to include snippets in the auto-completion list as you type in the editor. If you disable this option,
you can explicitly complete snippets using the Complete Snippets command (Ctrl+E)
Note you can also set this option on a per-snippet basis in the Snippet Properties window. See “Snippet
Properties” on page 338.
Enable text variables when inserting snippet
Select this to enable text variables to be automatically replaced with their values when you insert snippets.
Note you can also set this option on a per-snippet basis in the Snippet Properties window. See “Snippet
Properties” on page 338.
Sort Symbol Window
The Sort Symbol Window command cycles the sorting state of the symbol window in the current file window.
You can sort it by:
•Name.
•Line number (the default).
•Type + Name.
Sort Symbols By Line
Sorts the symbol entries listed in the Symbol Window by line number. Each symbol in the file will appear in
the list in the order of occurrence.
By default, the Symbol Window is sorted by line number (occurrence).
If you want all Symbol Windows to be sorted this way by default, then right-click on the Symbol Window and
select Save Settings on the Symbol Window's right-click shortcut menu.
Sort Symbols by Name
Sorts the symbol entries listed in the Symbol Window alphabetically by symbol name.
By default, the Symbol Window is sorted by line number (occurrence).
If you want all Symbol Windows to be sorted this way by default, then right-click on the Symbol Window and
select Save Settings on the Symbol Window's right-click shortcut menu.
Sort Symbols By Type
Sorts the symbol entries listed in the Symbol Window by symbol type. For example, all structs will appear
together, followed by all functions, etc.
By default, the Symbol Window is sorted by line number (occurrence).

Commands Overview
342 Source Insight 4 User Guide
If you want all Symbol Windows to be sorted this way by default, then right-click on the Symbol Window and
select Save Settings on the Symbol Window's right-click shortcut menu.
Source Dynamics on the Web
This command opens your web browser and goes to the Source Dynamics web site.
Start Recording
The Start Recording command turns on the command recorder. While recording, any command you run will
also be recorded. This allows you to record a single series of commands, which can be played back with the
Play Recording command.
To stop recording, use the Stop Recording command, or just play the recording back with the Play Recording
command.
You can keep only one recording at a time. The recording is saved with the workspace.
Stop Recording
The Stop Recording commands turns off the command recorder. The Start Recording command is used to
start the recorder. The command recorder allows you to record a single series of commands, which can be
played back with the Play Recording command.
Style Properties
This command allows you to set formatting properties for display styles. For more information about how
styles work, see “Syntax Formatting and Styles” on page 78.
Formatting Properties
Each style has a number of formatting properties. Because styles exist in a hierarchy, each formatting prop-
erty is combined with the parent style to yield a final result.
For example, if bold = "ON", then bold formatting is added. If bold = "OFF", then bold formatted is subtracted
from the parent style properties.
Many formatting controls in this dialog box show one of these values:
•On – the property is added to the parent style formatting.
•Off – the property is deleted from the parent style formatting.
•A Number – the value replaces the parent style property.
•= (equal) - the property has no effect, and it inherits the exact same value as in the parent style.
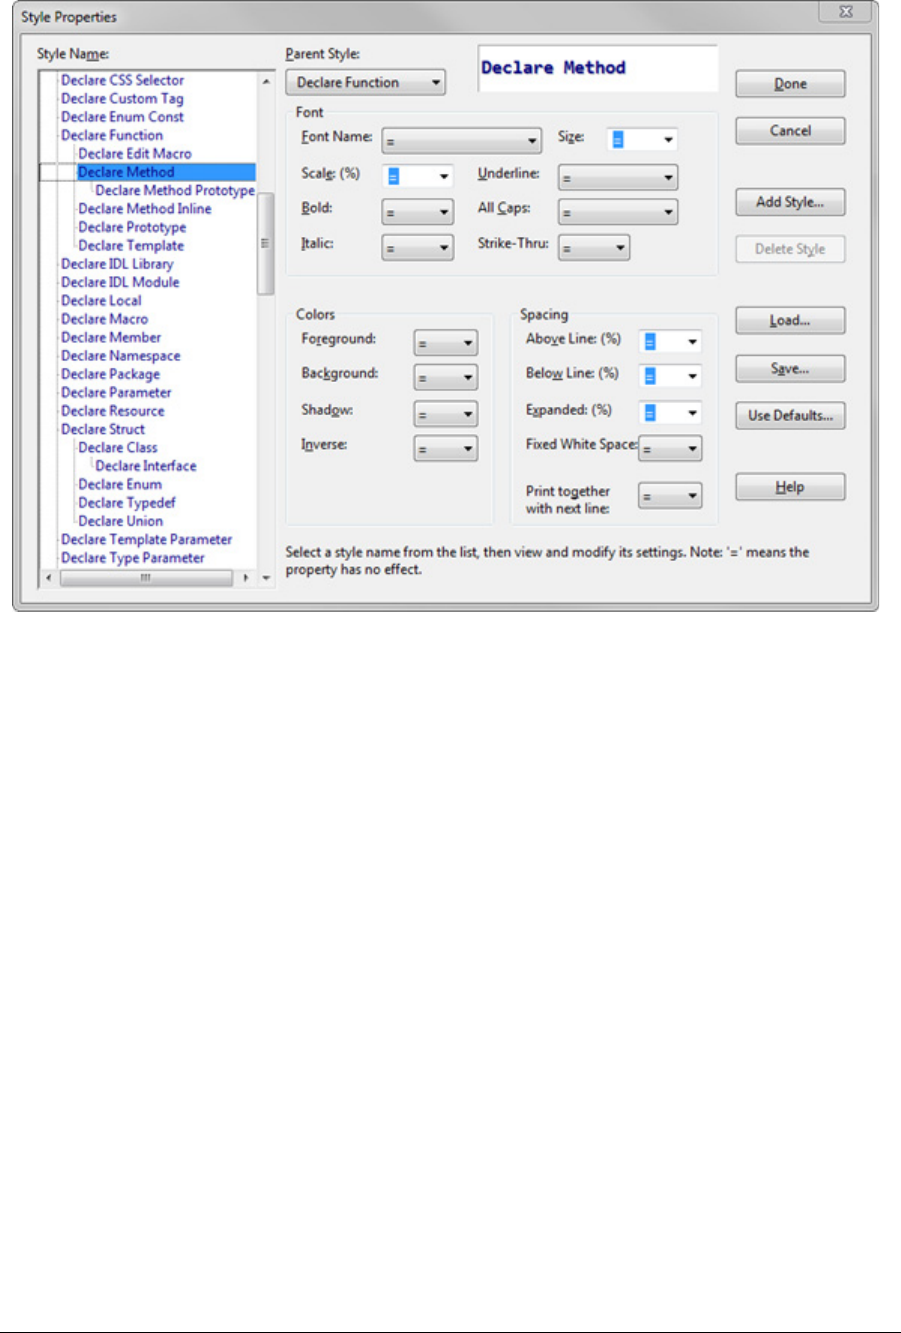
Source Insight 4 User Guide 343
Commands Overview
Style Properties Dialog Box
Style Name list
Lists all the syntax formatting styles. When you select a style in this list, its properties are loaded into the con-
trols to the right. A sample of the style is also displayed in the sample box. The list depicts the style hierarchy.
Each style has a parent style and inherits its properties from the parent.
Parent Style
This is the parent style in the style hierarchy. The current style inherits its formatting from the parent style.
The style list depicts the style hierarchy. Any property that is other than "equal" (meaning "the same") is
combined with the parent style formatting.
Add Style
Click this button to add a new user-defined style.
Delete Style
Click this button to delete a user-defined style. The standard built-in styles cannot be deleted.
Load…
Click this button to load a new style sheet from a configuration file.
Save
Click this button to save the current style sheet settings to a new style configuration file. The file will contain
only style properties, and won't contain other elements that can be stored in a configuration file. If you load
this configuration file, only the style properties are loaded.

Commands Overview
344 Source Insight 4 User Guide
Reset…
Click this button to reset all the styles to the factory defaults. This loses all your changes since installing
Source Insight.
Font Options
Font Name
Indicates the font currently selected.
Size
Selects the font size, specifically as a point size. You may find the relative Scale property more useful, since it
is relative, and works well regardless of changes to the parent styles.
Scale
Specifies the font size scaling as a percentage of the parent style's font size. For example, if the scale is 50%,
then it will be half the size of whatever the parent style font size is.
Bold
Selects the bold property of the style, if any.
Italic
Selects the italic property of the style, if any.
Underline
Selects the underline property of the style, if any.
All Caps
Selects the All Caps (capitalization) property of the style.
Strike-Thru
Selects the Strike-Thru property of the current style.
Colors Options
Foreground
Selects the foreground color of the current style.
Background
Selects the background color of the current style.
Shadow
Selects the color of the drop-shadow of the current style.
Inverse
Selects the Inverse property of the current style. Inverse means that the foreground and background colors
are reversed.
Spacing Options
Above Line
This selects the percentage of vertical spacing to add above the line.

Source Insight 4 User Guide 345
Commands Overview
Below Line
This selects the percentage of vertical spacing to add below the line.
Expanded
This selects the percentage of horizontal spacing to add to characters.
Fixed White Space
This option only applies if you have selected a proportionally spaced font. Fixed-pitch fonts, such as Courier
New, are not affected. If enabled, Source Insight will attempt to use a fixed width for spaces and tabs so that
tabs line up the same way they do with a fixed-pitch font. Programs generally look better with this turned on
if you are using a proportional font. See “Character Spacing Options” on page 198.
Print together with next line
If enabled, Source Insight will try to keep the text on the same page as the following line, when printing.
Symbol Info
The Symbol Info command displays a pop-up window showing the definition of the symbol under the cursor.
This is a quick way to check the definition of an identifier.
Symbol Name, Type, and Location
The symbol's name, type, and location are displayed at the top of the window.
Source File
The source file name and line number where the symbol is defined are displayed at the top left of the dialog
box below the symbol name. If known, the symbol's size in lines is displayed also.
Text Window
This scrollable window contains the contents of the source file where the symbol is defined.
Close
Click this to close the window.
Jump
Click this to close the Symbol Info window and jump to the symbol definition directly.
References
Click this button to search for references in the whole project to the symbol.
Leave File Open
Click this button to leave the file displayed in the list box open. This button is disabled if the file is already
open. If you leave the file open, you can select the file name from Window menu after the window closes.

Commands Overview
346 Source Insight 4 User Guide
Symbol Lookup Options
Sets options for the way Source Insight looks up symbol definitions. This command activates the Symbol
Lookups page of the Preferences dialog box.
Parse locally before lookup
Source Insight will ensure that the symbolic information for the current file is completely up-to-date before
trying to lookup a symbol. This option comes into play when you are editing. Every time you type a character,
Source Insight considers the symbol data for the file to be stale. If this option is enabled, then the file will be
parsed after you type anything. If the option is disabled, then Source Insight will use the possibly stale sym-
bol data for the current file. Enabling this option will make the symbol lookups more accurate, but it is
slower. It will also cause the auto-completion window to appear slower. Most of the time, lookups work fine
when this option is turned off.

Source Insight 4 User Guide 347
Commands Overview
Find symbols across different language types
If enabled, then Source Insight will lookup symbol definitions in any language, regardless of the source lan-
guage. If unchecked (the default) then only symbols that are defined in the same language will be found.
Find symbols in open files not part of the current project
Symbols will be found in both the current project, and in any open files. It will find symbols in open files that
are not part of the project. If this box is not checked, then only the current project and its files are searched.
Search symbol path if symbol is not found
If a symbol cannot be found in the current project, or any open file, then Source Insight will search the proj-
ects listed in the project symbol path. If it does search the symbol path, then it searches through all projects
in the symbol path.
Search symbol path, even if symbol is found in current project
When enabled, all projects in the symbol path are searched every time Source Insight looks up a symbol,
even if the symbol was already found in either an open file or the current project. This is sometimes useful if
you are working on an alternate version of a project, with many of the same symbol names. Looking up a par-
ticular symbol in the current project will also show matches in the other projects on the symbol path.
If disabled, then Source Insight will only search the symbol path if a symbol was not already found in either
an open file or the current project.
Project symbol path
The project symbol path is a delimited list of projects that Source Insight will search through when looking
up a symbol. The project symbol path enables you to create smaller, self-contained projects, but still have
the ability to locate symbols in other projects.
Each item in this list should be a full path name of a project. Project paths should be separated by a semi-
colon. Remember to include the name of the project file in addition to the directory it is in.
Example:
c:\include\include;c:\windev\include\include
The project symbol path is only used for locating the definitions of symbols external to the current project. It
is not used for finding references to symbols, or for searching across multiple projects.
Note: The Project > Import External Symbols command is a more powerful way to refer to symbols in external
sources, such as assemblies, header file libraries, and other Source Insight projects. See “Import External Sym-
bols” on page 233.
Add to Project Path…
Click this button to pick a project to append to the exiting project symbol path.
Import Symbols for All Projects
Click this to import symbol information from external files and projects. The imported symbols are used by
all projects. See “Import External Symbols” on page 233.
Import Symbols in Current Project
Click this to import symbol information into the current project from external files and projects . See “Import
External Symbols for Current Project” on page 236.
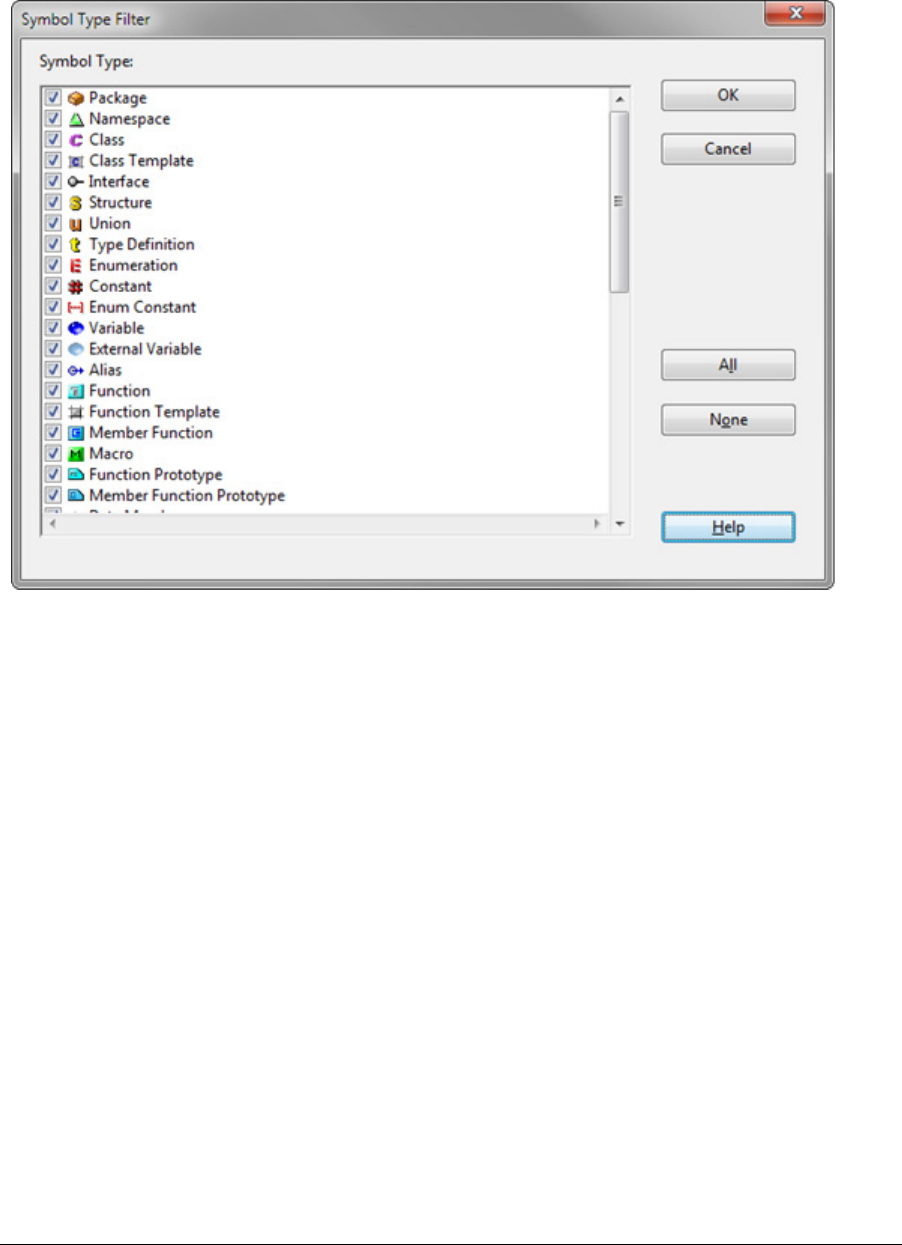
Commands Overview
348 Source Insight 4 User Guide
Symbol Type Filter
This allows you edit the filter used to filter out symbol types. Various option settings in Source Insight allow
filtering by symbol type. This dialog is used to set the filtering. Check mark the symbol types you want to
include in the filter.
Symbol Window command
The Symbol Window command opens and closes the symbol window pane at the left of the current file win-
dow.
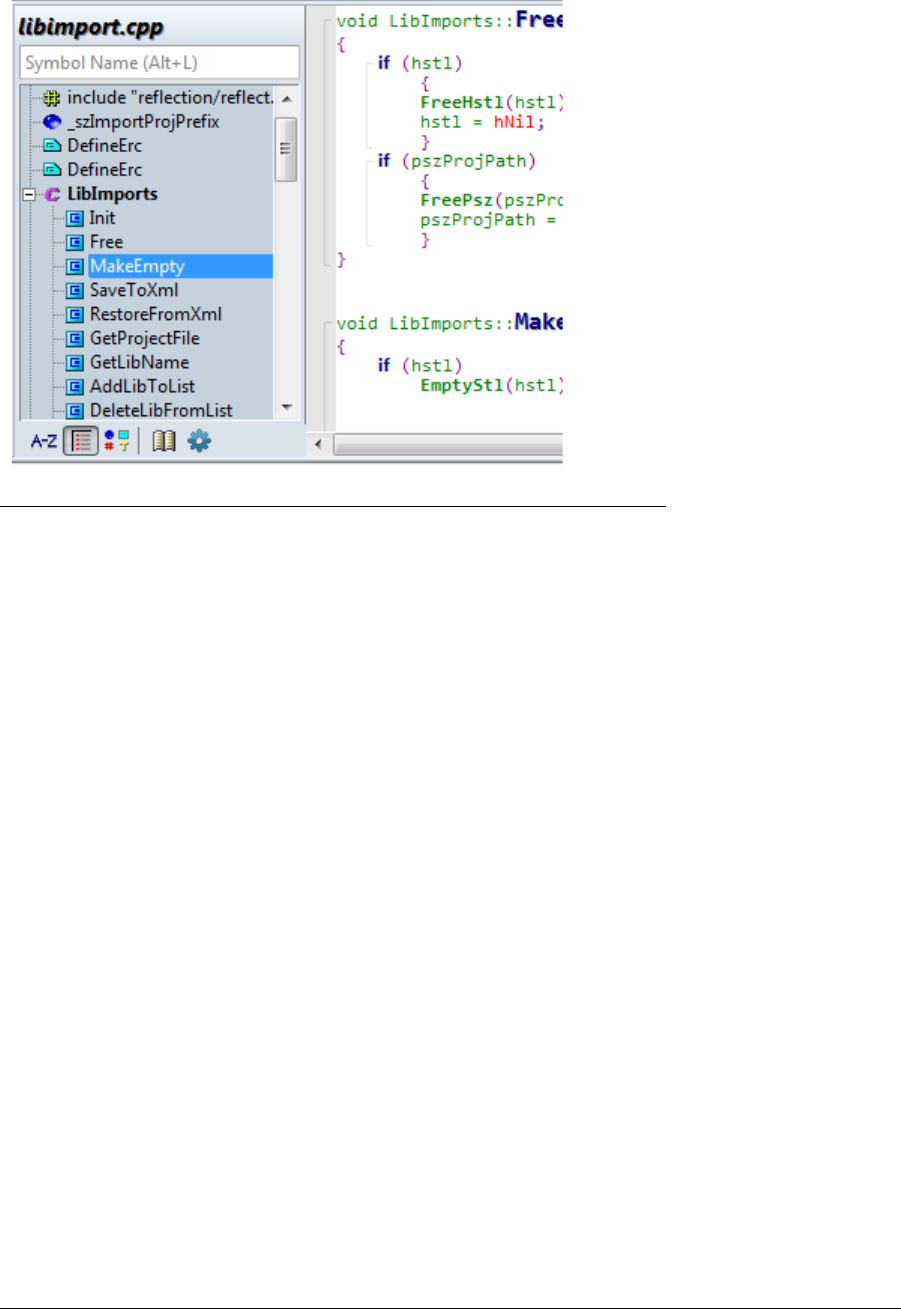
Source Insight 4 User Guide 349
Commands Overview
The symbol window shows a list of symbols defined in the file. The symbol window is only available if the file
type has a parsed language selected. See “Symbol Windows ” on page 30.
Figure 4.3 The Symbol Window pane appears at the left of each source window and lists all the declarations in that file.
The symbol window can be sorted by using the Sort Symbol Window command, or by clicking the three sort-
ing buttons in the toolbar at the bottom of the window.
Click the gear button to select the Symbol Window options. You can also invoke the Symbol Window Options
command directly by mapping a key to it. See “Symbol Window Options” on page 350.
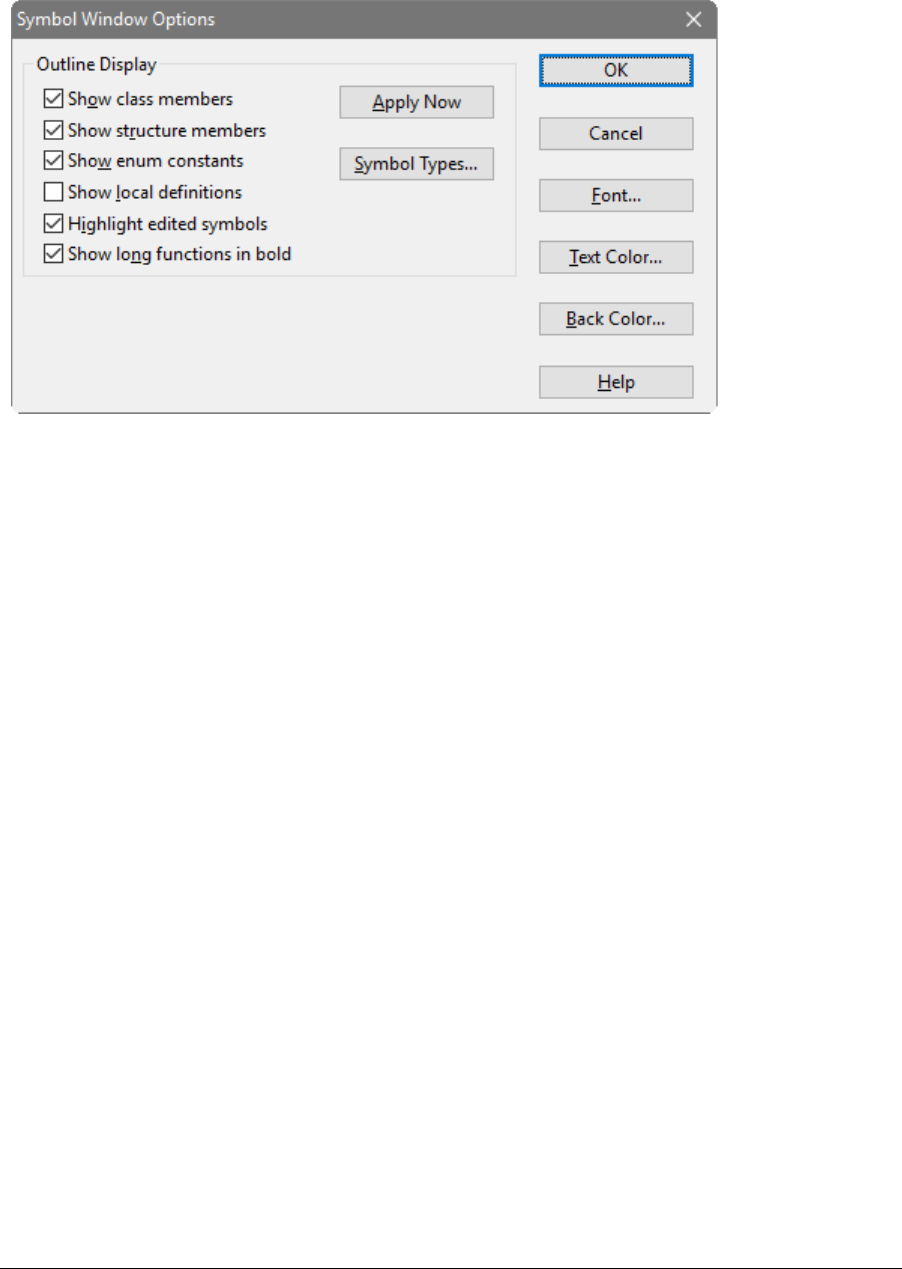
Commands Overview
350 Source Insight 4 User Guide
Symbol Window Options
Displays the properties of the Symbol Window, which appears on the left of each source window. See “Sym-
bol Window Options” on page 350.
Show class members
If enabled, the member contents of classes are included in the Symbol Window. If unchecked, then only the
class name is included in the list.
Show structure members
If enabled, then the structure field members are included in the Symbol Window. If not enabled, then only
the structure name is included in the list.
Show enum constants
Includes enum constants in the Symbol Window. If not enabled, then only the enum type name will appear in
the list.
Show local definitions
If enabled, then function local declarations are also shown in the Symbol Window under each function.
Highlight edited symbols
Function names and other symbol names will appear highlighted if you made any edits in them.
Show long functions in bold
Function names are displayed in bold font if the function is longer than the average length in each file. This
makes functions that are probably more important or complex stand out in the list.
Apply Now
Applies the changes you made in this dialog box to the Symbol Window.
Symbol Types…
Click this button to open the Symbol Type dialog box, where you can filter out different types of symbols
from the Symbol Window.
Font…
Click this button to pick the font used to draw the Symbol Window.

Source Insight 4 User Guide 351
Commands Overview
Text Color…
Click this button to pick the color of the text in the Symbol Window.
Back Color…
Click this button to pick the background color of the Symbol Window.
Sync File Windows
The Sync File Windows command scrolls all windows showing the current file to same location as the current
window.
Synchronize Files
The Synchronize Files command synchronizes the current project with all the source files in the project. The
command scans each file in the project and updates the symbol database for each file that has been modi-
fied since Source Insight parsed the file last. In addition, files that were part of the project that don't exist
anymore are removed from the project.
You normally do not need to run this command because Source Insight scans your source files in the back-
ground by default. You can control the background synchronization by selecting Options > Preferences: Gen-
eral.
Force all files to be re-parsed
If enabled, then Source Insight will ignore file time-stamps and consider all files in the project to be out of
date. It will update the symbol database for all files. This provides an easy and relatively quick way to com-
pletely rebuild Source Insight's project data files.
If not enabled, then only those files in the project that are considered out of date are updated.
Synchronize the current source file only
Only the currently active source file is synchronized with the symbol database. This has the effect of replac-
ing all symbol database information known for the current source file.
Add new files automatically
Before synchronizing all the files, Source Insight will add new files in the project's source directory and in all
subdirectories, recursively. However, only directories that already have project files in them are scanned.
Directories that are not descendants of the project source directory are not scanned. This feature allows you
to add new files to your project directories, and then run the Synchronize Files to add those new files to your
Source Insight project automatically.

Commands Overview
352 Source Insight 4 User Guide
You can also use a Master File List in your project to control which files are in your project. Use the Project >
Project Settings command to specify the Master File List. See “Using a Master File List” on page 46.
Remove missing files from project
Any files that are now missing are removed from the project.
You can also use a Master File List in your project to control which files are in your project. Use the Project >
Project Settings command to specify the Master File List. See “Using a Master File List” on page 46.
Syntax Decorations
This command specifies syntax decoration options for displaying source files. It activates the Syntax Decora-
tions page of the Options > Preferences dialog box.
Source Insight can replace some common operators with more useful symbolic characters. The Syntax Deco-
rations command lets you control which decorations are used. See “Syntax Decorations” on page 87.
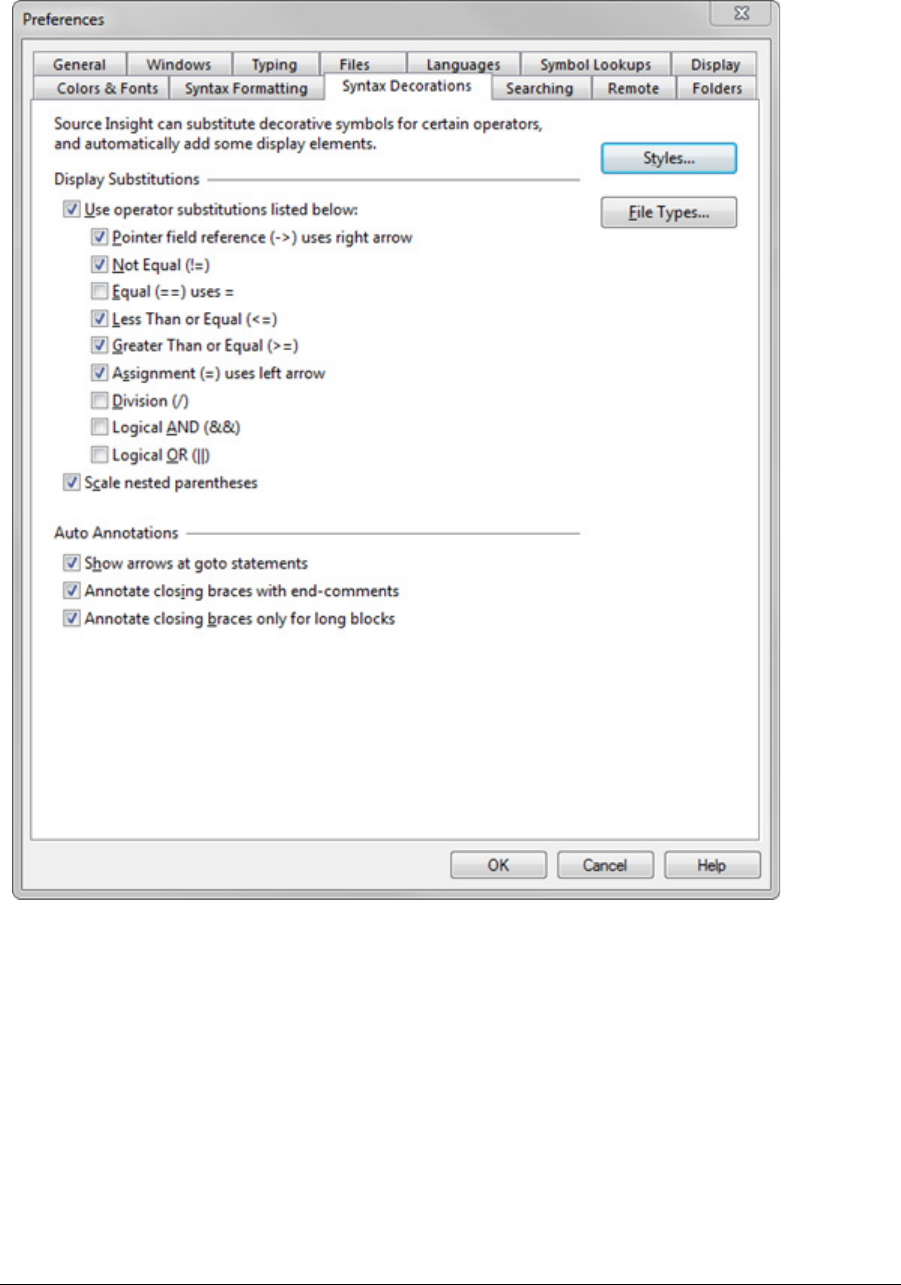
Source Insight 4 User Guide 353
Commands Overview
It's important to remember that symbol decorations and substitutions do not change the text in the source
file; only its representation on the screen changes to show the special symbols. You still need to type the
operators normally when editing your code, or when searching for them.
Display Substitutions
This group of options controls which operators are substituted with special symbols.
User special operator symbol substitutions
This enables or disables the whole group of operator substitutions that appear below.
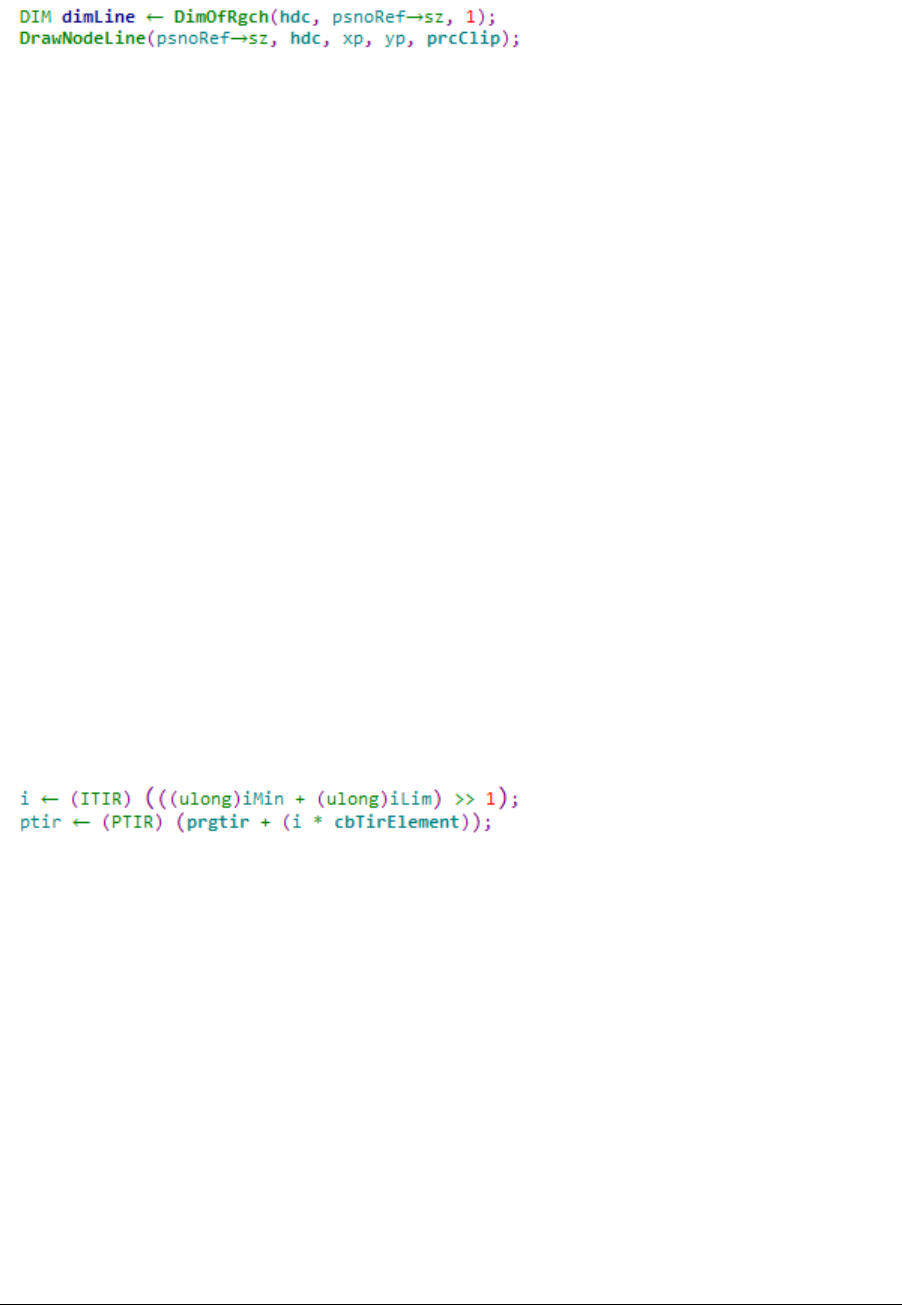
Commands Overview
354 Source Insight 4 User Guide
Pointer field reference uses right arrow
This replaces the -> pointer operator with an actual arrow like this . For example:
Not Equal
This replaces the != not equal operator with .
Equal
This replaces the == equal operator with a mathematic EQUIVALENT character.
Less Than or Equal
This replaces the <= operator with .
Greater Than or Equal
This replaces the >= operator with .
Assignment uses left arrow
This replaces the = assignment operator with .
Division
This replaces the / division operator with .
Logical AND
This replaces the && logical And with .
Logical OR
This replaces the || logical Or with .
Scale nested parentheses
Nested parentheses are shown so that outer levels are larger than inner levels. This makes it easier to visually
identify matching parentheses.
Auto Annotations
Source Insight can automatically add certain annotations to your source code display. The following options
control which annotations appear.
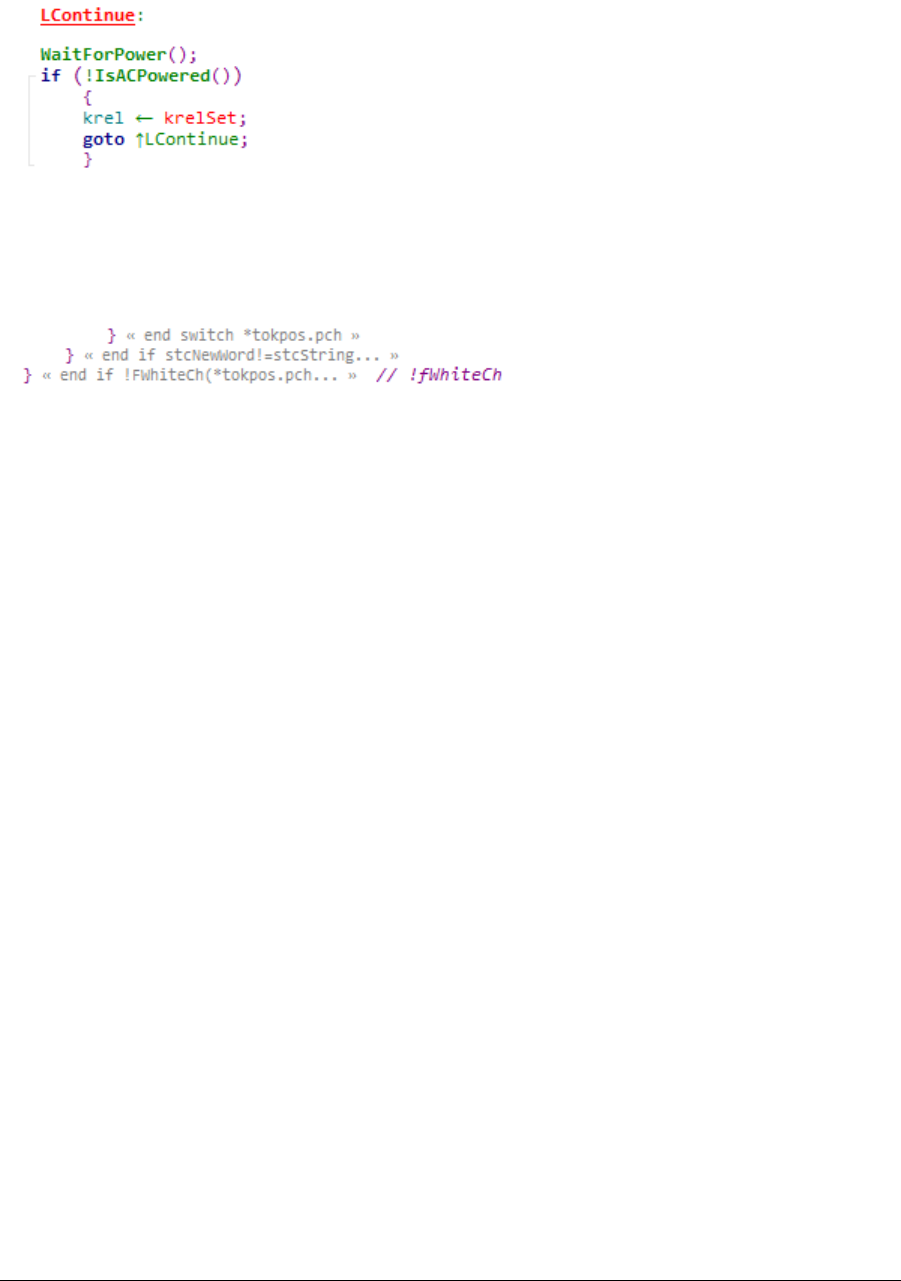
Source Insight 4 User Guide 355
Commands Overview
Show arrows at goto statements
This causes either an up or down arrow symbol to appear in goto statements next to the label name. The
arrow indicates whether the indicated label is above or below the goto statement line.
Annotate closing braces with end-comments
This causes end-comment annotations to appear after closing curly braces. The end-comment contains a
show description of the start of the block. For example:
Annotate closing braces only for long blocks
This suppresses the auto-annotated end-comments for blocks less than 20 lines tall.
Syntax Formatting
This command specifies syntax formatting options for displaying source files. It activates the Syntax Format-
ting page of the Options > Preferences dialog box.
Source Insight uses information gathered from its language parsers to format source code. Identifiers can be
displayed in different fonts or font sizes, along with a variety of effects such as bold and italics. See “Syntax
Formatting and Styles” on page 78.
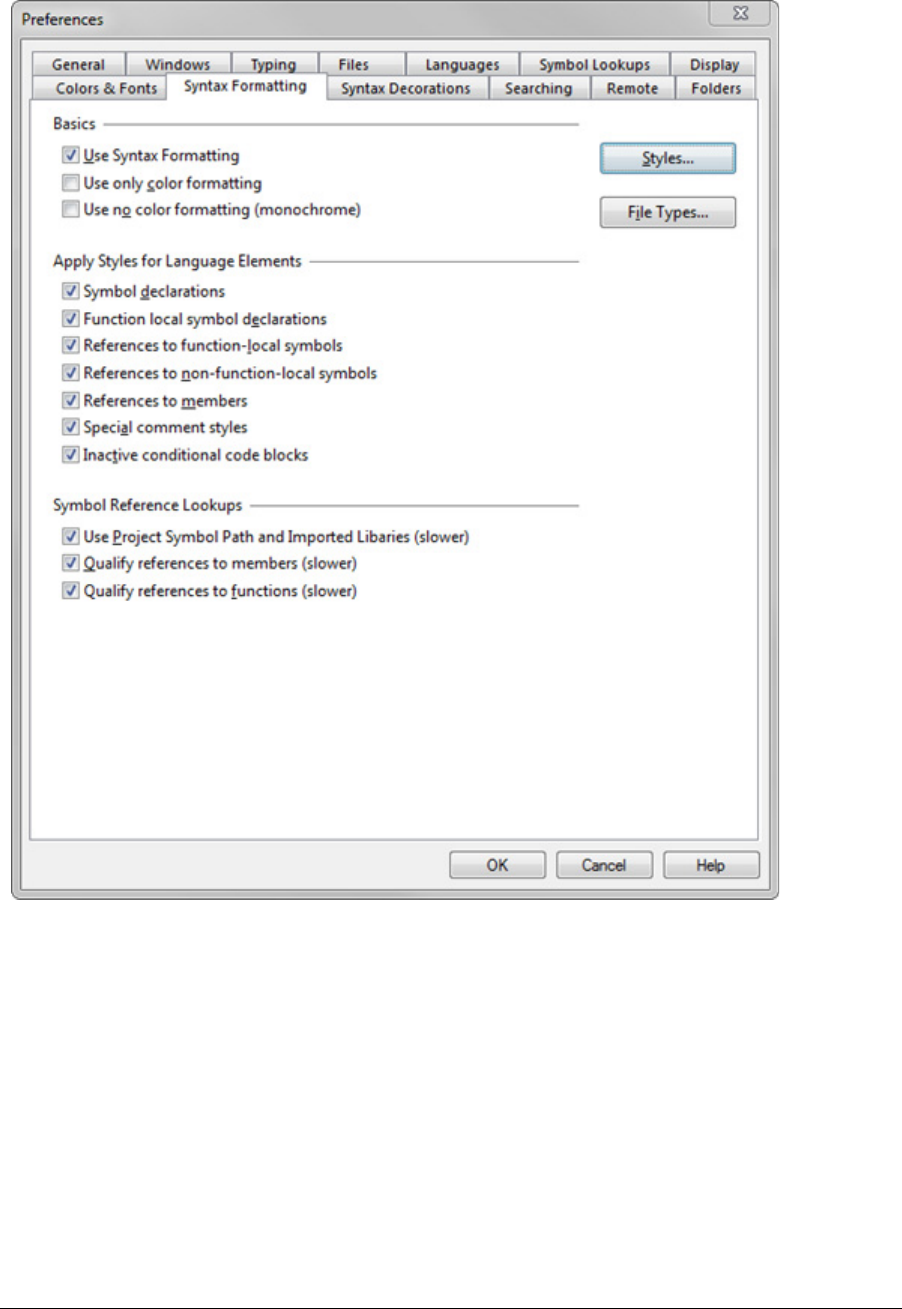
Commands Overview
356 Source Insight 4 User Guide
Formatting is applied using "styles". A style is a set of formatting properties. For example, a style may specify
bold + italic. You can edit each style's formatting properties with the Style Properties command.
Styles…
Click to edit the style properties.
File Types…
Click to edit the file types.
Basic Options
Basic option are:
Use Syntax Formatting
Enable this to have Source Insight display source code with syntax formatting. If disabled, then source code
will display with no coloring or font changes.

Source Insight 4 User Guide 357
Commands Overview
Use only color formatting
All non-color formatting properties, such as font size changes, or bold and italics, will be suppressed. Display
tokens will only contain color changes. This is similar to how earlier versions of Source Insight displayed text.
Use no color formatting (monochrome)
If enabled, then Source Insight will suppress all color changes. Text will be displayed in black and white and
gray.
Apply Styles for Language Elements
Source Insight will apply styles to display tokens based on their lexical and contextual meaning. Each option
in this group enables successively more elaborate formatting.
Symbol declarations
Declarations of symbols are formatted with the appropriate "Declare…" styles. For example, a function name
will appear in the "Declare Function" style where it is declared.
Function-local symbol declarations
Declarations of local function scope variables and other symbols will be formatted with the appropriate
"Declare…" styles. This includes local variables, and function parameters.
References to function-local symbols
References to local function scope variables and symbols are formatted with the appropriate "Ref to…" refer-
ence styles. For example, references to (i.e. usages of) a local variable will have the "Ref to Local" style.
References to non-function-local symbols
References to symbols declared outside of function scopes, such as class scopes and the global scope, are
formatted with the appropriate "Ref to…" reference styles. This option requires more work, and it will slow
down the display somewhat. The reference information is cached, so once a piece of code is rendered, it usu-
ally will display quickly afterwards.
References to members
References to structure and class members are formatted with the "Ref to Member" style. The veracity of the
member reference can be controlled with the Qualify references to members option.
Special comment styles
Source Insight supports special comment styles that are controlled by special //1-4 comment heading
tokens, and the placement of comments. If this option is enabled, then Source Insight will apply the appro-
priate comment style to those special comments

Commands Overview
358 Source Insight 4 User Guide
Comment Headings
Comment heading styles are comments that begin with a single digit in the range 1 to 4. For example:
//1 This is heading one.
//2 This is heading two.
When the comment styles are used, the //x at the beginning of the comment is hidden, and the heading style
formatting is applied to the rest of the line. The result looks like this:
Inactive conditional code blocks
Code contained in inactive conditional code blocks are formatted with the "Inactive Code" style. An inactive
code block is one contained in an inactive #ifdef, #if, #elif, or #else branch. You control the state of the condi-
tions with the Edit Condition command.
Symbol Reference Lookups
When a potential reference is encountered, Source Insight must verify that the symbol is declared some-
where. This section controls how Source Insight resolves references to symbols declared in the project, as it
renders source code.
Search in the Project Symbol Path
Source Insight will search not only the current project for a declaration, but also all the projects in the Project
Symbol Path.
Qualify references to members
If enabled, Source Insight will verify that the member declaration exists before formatting it with the "Ref to
Member" styles.
If disabled, then Source Insight will format tokens with the "Ref to Member" style if the tokens look syntacti-
cally like a member reference. There is no guarantee that the member actually exists. For example:
PtrFoo->somemember // looks like a member reference
FooThing.somemember // looks like a member reference
Qualify references to functions
If enabled, Source Insight will verify that the function declaration exists before formatting it with the "Ref to
Function" or "Ref to Method" styles.
If disabled, then Source Insight will format tokens with the reference styles if the tokens look syntactically
like a function call. There is no guarantee that the function actually exists. For example:
SomeFunction(x) // looks like a function reference
Syntax Keyword List
Brings up the Language Keywords dialog box, which lets you edit the language keywords used for syntax for-
matting in the current language. See “Syntax Formatting and Styles” on page 78.
The Language Keywords dialog box lists keywords and styles. The title of the dialog box will specify which
language type you are working with. Source Insight uses a very fast hashing technique to maintain large key-
word lists and still have outstanding performance.
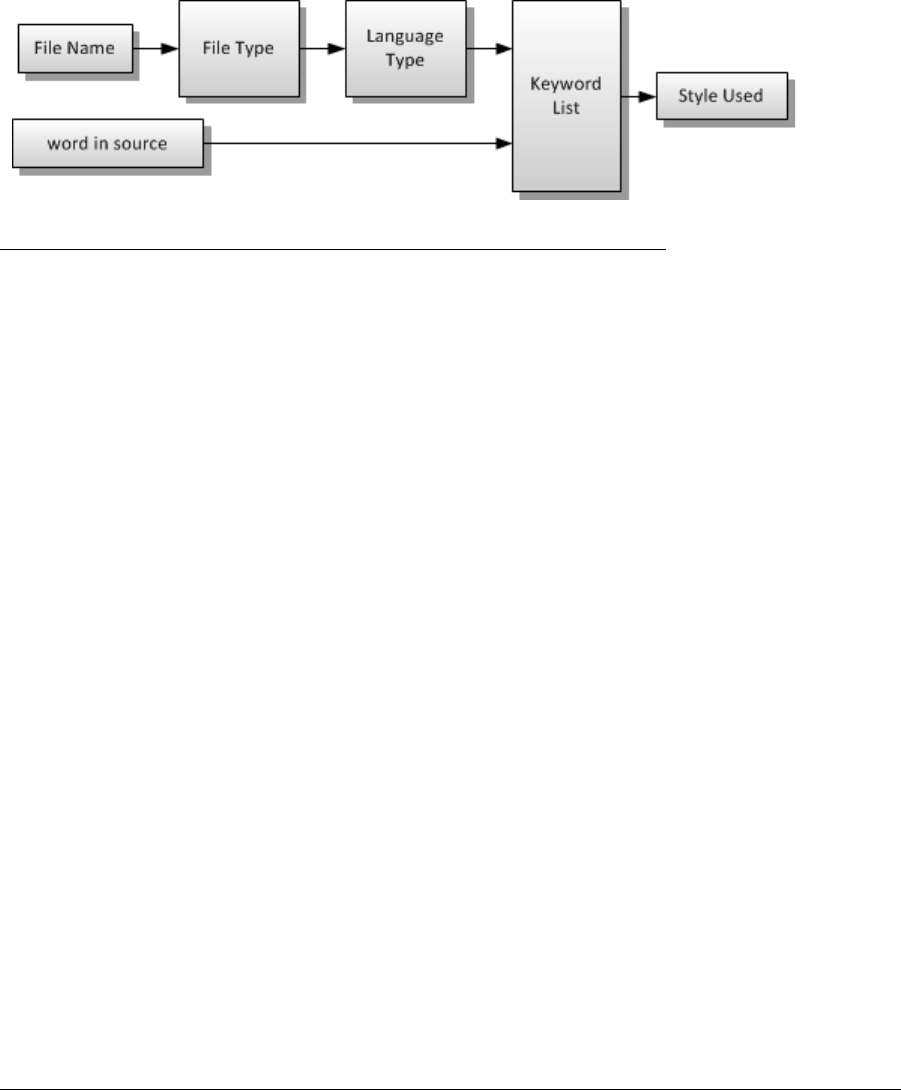
Source Insight 4 User Guide 359
Commands Overview
Keywords and Styles
The keyword list contains all the language keywords that can be highlighted with syntax formatting. Each
keyword in the list is associated with a style name. The Style Properties command is used to set the format-
ting options of each style.
For example, in the C Language keyword list, the word "NULL" is associated with the "Null Value" style.
To determine the formatting of any given word in a window, Source Insight locates the word in the keyword
list of the appropriate language type. The keyword list contains a style name, which in turn implies the for-
matting associated with the style.
Therefore, starting with a file name and a word in the file, Source Insight derives the word's style with this
relationship:
Figure 4.4 The style used for a word in source text is determined by the keyword list of the language of the file type of the
file in question.
By having keywords assigned to formatting styles, you are able to change the syntax formatting quickly by
simply changing the style with the Style Properties command. Then all language keywords associated with
that style reflect the new style formatting.

Commands Overview
360 Source Insight 4 User Guide
Language Keywords Dialog box
Keyword
The keyword list for the language. When you select a keyword from the list, the keyword's associated style is
selected in the Style list.
Style
The list of all syntax formatting styles. When you select a style from this list, you are changing the style asso-
ciated with the keyword selected in the keyword list. You can also double-click on a style name to edit the
style.
OK
Click OK to record your changes.
Cancel
Aborts the command and ignores your changes.
Add Word
Click this button to add a new word to the keyword list. You can type any single word that does not include
spaces. Source Insight will add the word to the keyword list. After adding the word, make sure you select the
style you want it to have.
Delete Word
Click this button to delete the word currently selected in the keyword list.
Import
Click this button to import new keyword list entries from an external text file. See below for more informa-
tion.

Source Insight 4 User Guide 361
Commands Overview
Export
Click this button to export the keyword list to a text file.
Reset
Click this button to return the language keyword list to the factory default settings.
Importing and Exporting Keyword Lists
The Import and Export buttons in the Language Keyword dialog box allow you to import and export key-
word-style associations from and to text files.
The text file should contain keyword, style name pairs; one per line:
<keyword> , <style-name> or
"<keyword>", "<style-name>"
Each keyword should be a single word without white space. The style name should be one of the defined
style names that are listed in the Language Keywords style list, or the Style Properties style list. You may
enclose the keyword or style name in double quotes.
When importing, duplicate keywords are ignored.
Import Options
When you click the Import button in the Language Keywords dialog box, you will be given the option of either
replacing or merging the keyword list.
Replace current keyword list with imported list
Select this if you want to completely replace the keyword list currently loaded with the imported list. even
after importing a list, you can still click the Cancel button in the Language Keywords dialog box to ignore the
changes you made to the keyword list.
Merge current keyword list with imported list
Select this if you want to merge the imported list with the currently loaded list. Merging means that the
imported list will be added to the existing list, and imported keywords will replace like-named keywords in
the current list.
Tab Tray
Shows and hides the Tab Tray at the bottom of the main window. The tab tray contains floating panels that
have been minimized.
Tabs to Spaces
Converts tabs to the equivalent numbers of space characters.
Tile Horizontal
The Tile Horizontal command arranges all windows so they are not overlapping. The tiling algorithm will
attempt to make windows wider than they are tall. This is useful for viewing 2 or more files on top of each
other.
Tile One Window
The Tile One Window command minimizes all but the current window. The current window is grown to fill
most of the Source Insight window's workspace area.

Commands Overview
362 Source Insight 4 User Guide
Tile Two Windows
The Tile Two Windows command splits the screen into two windows; the first window will contain the current
file. The other window will contain the previous current file (i.e. the last file you were viewing). This com-
mand is only allowed if two or more windows are open.
Tile Vertical
The Tile Vertical command arranges all windows so they are not overlapping. The tiling algorithm will
attempt to make windows taller than they are wide. This is useful for viewing 2 or more files side by side.
Toggle Extend Mode
The Toggle Extend Mode command toggles extend mode on and off. If extend mode is on, then movement
commands, such as Cursor Up, Cursor Down, Top of Window, and Go To Line (to name a few), will cause the
current selection to be extended to the new location. If extend mode is off, then the movement commands
simply put an insertion point at their destination.
Toggle Insert Mode
The Toggle Insert Mode toggles between insertion and overstrike mode. In insertion mode, characters typed
will be inserted before the insertion point. In overstrike mode, characters typed will replace characters at the
insertion point.
Top of File
The Top of File command moves the insertion point to the first line in the current file.
Top of Window
The Top of Window command moves the insertion point to the first line in the active window.
Touch All Files in Relation
This command is available from the right-click menu of the Relation Window. It touches (i.e. updates the last-
write timestamp) on all the files currently shown in the Relation Window.
This is useful if you want to cause re-compilation of all the files containing the symbols shown in the Relation
Window. This is especially handy if the Relation Window is showing references.
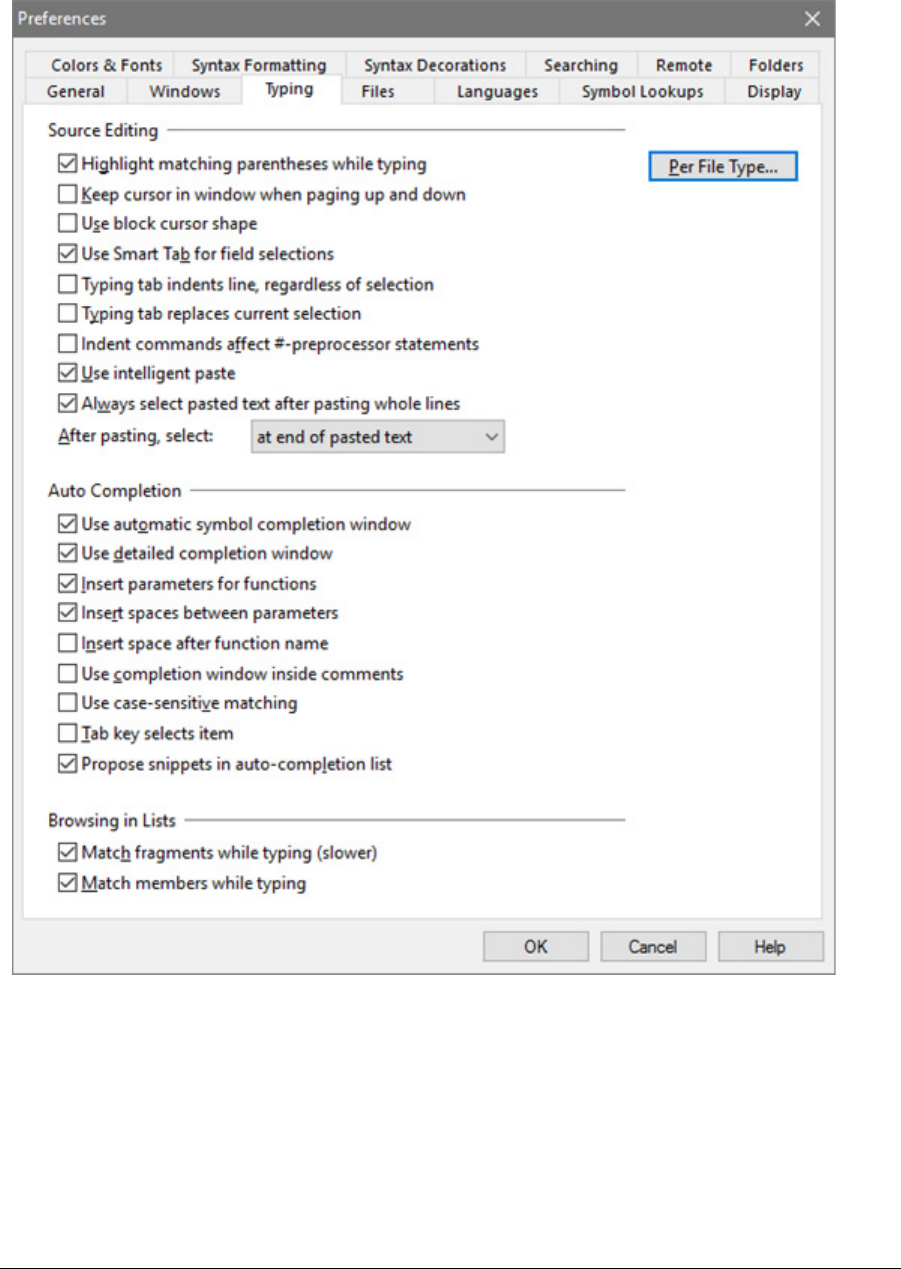
Source Insight 4 User Guide 363
Commands Overview
Typing Options
This command specifies typing and editing options. It activates the Typing page of the Preferences dialog
box.
Source Editing Options
Per File Type...
Opens the File Type Options dialog, which contains more file-type-specific typing and editing options. The
File Type Options for the current source file is automatically selected.

Commands Overview
364 Source Insight 4 User Guide
Highlight matching parentheses while typing
Source Insight will momentarily highlight up to the matching parentheses or brace when you type a closing
parentheses or brace. This is useful for seeing that you are matching up your braces and parentheses while
typing new source code.
Always use Symbol Windows
Source Insight will automatically attach a symbol window to each new window it opens, if the file is setup to
be parsed for symbols in the File Type Options dialog box. Each file type can also control whether it uses a
symbol window.
Keep cursor in window when paging up and down
If enabled, then the insertion point cursor will stay visible in the window as you page up and down. If dis-
abled, then the insertion point will remain at its position in the text regardless of how you scroll.
Use block cursor shape
If enabled, then the insertion point cursor will be block shaped instead of an I-beam.
Use Smart Tab for field selections
Causes the regular Tab key to invoke the Smart Tab command. See Smart Tab.
Typing tab indents line, regardless of selection
If enabled, then typing a tab will indent the whole line. Also, the Back Tab command reverses the indent. If
not enabled, then typing a tab inserts a tab stop.
Typing tab replaces current selection
If enabled, then inserting a tab will replace any selected text. For example, if you select a word, then type a
tab, the tab replaces the word. If not enabled, then the tab is inserted just to the left of the selection. In any
case, if one or more whole lines are selected, then the tab key indents the whole lines.
Indent commands effect #-preprocessor statements
If enabled, then the Indent Right and Indent Left commands will indent and outdent lines that start with C
preprocessor statements, such as #ifdef. If this is not checked, then indenting has no effect on those lines.
Use intelligent paste
This modifies paste behavior in two ways when you are pasting whole lines of text:
•If you have an insertion point anywhere on a line, then the pasted whole-lines are inserted above the
current line. If the insertion point is at the end of a line, then the new lines are pasted below the cur-
rent line.
•The pasted text is automatically indented to match the destination. This works with Paste, Paste Line,
Drag Line Up/Down commands, the Clip Window, and drag and drop.
You also can enable intelligent paste on a per-file type basis in the File Type Options dialog box. See “File
Type Options” on page 213.
Always select pasted text after pasting whole lines
If enabled, then when you paste whole-lines, they are selected after pasting.
After pasting, select:
This indicates where the selection should end up after using a paste command.
Auto Completion Options
This section customizes the way the auto completion feature works.
The auto completion window appears after you type a character. Its purpose is to reduce the number of char-
acters you have to type by automatically providing a list of possible identifiers to insert. The symbols that

Source Insight 4 User Guide 365
Commands Overview
appear in the completion window depend on the context, such as the cursor position, or the type of variable
being referred to.
Use automatic symbol completion window
Enables the auto completion window. If this option is disabled, then you can still use auto completion by
invoking it manually with the Complete Symbol command.
Use detailed completion window
The auto completion window shows details about functions, such as their parameter lists.
Insert parameters for functions
The parameter list for a function is inserted along with the name of the function. This only happens if there
isn't a parenthesized list of parameters already to the right of the insertion point.
Insert spaces between parameters
A space character is inserted between function parameters. If not enabled, then parameters are inserted with
no intervening spaces.
Insert space after function name
A space character is inserted after the function name and before the open parentheses.
Use completion window inside comments
Enables the auto completion feature while you are typing into a comment. If this option is disabled, then you
can still use auto completion by invoking it manually with the Complete Symbol command.
Use case-sensitive matching
The auto completion window will list only symbol names that match the case as you have typed it. If this
option is disabled, then all symbols that match your input, regardless of case, are listed. However, Source
Insight will attempt to select the item that matches the case you typed.
Tab key selects item
If enabled, then pressing the Tab key while the completion window is showing will insert the selected item in
the list. If this option is disabled, then a Tab key just inserts a tab. In any case, the Enter key can also be used
to insert the selected item.
Propose snippets in auto-completion list
As you type, code snippet names will be proposed in the auto-completion list along with other possible sym-
bol matches.
Browsing in Lists
This section customizes the way that auto completion works while typing in symbol and file lists.
Match name fragments while typing
Enables name fragment matching by default. If this option is disabled, you can still match name fragments
by inserting a space character first, followed by your input.
Match members while typing
Class and struct members are matched according to your input. A full symbol name is like a path that starts
with the symbol's top-most container. For example, a class member might be named MyClass.member.

Commands Overview
366 Source Insight 4 User Guide
Enabling this option will allow you to just type "member". If disabled, then only full symbol names are
matched. You can still use this feature, even if disabled, by prefixing your input with a dot ('.'), like this:
.member
Undo
The Undo command reverses the action of the last editing command in the current file. For example, if you
type some new text and perform Undo, the text you typed is removed. Alternatively, if you delete a line and
perform Undo, the line reappears.
In effect, as you edit, Source Insight makes a list of the changes you've made to each file. The Undo command
backs up through that list and the Redo command advances through the list.
Undo information is saved for each open file independently.
Undoing Cursor Movement
The Undo command does not undo cursor movements, as with some other editors. In Source Insight, the
best way to "back up" through the history of cursor movements is to use the Go Back command (and con-
versely, the Go Forward command).
Undoing All Changes
You can use the Undo command several times in a row to undo several changes. In addition, you can use the
Undo All command to undo all changes made to the current file since the last time it was opened.
The Undo History
The undo history is maintained after you save a file, as long as the file is open. Undo history is lost when the
file is closed, or if you use the Checkpoint command to perform a final save. You can control whether undo is
normally available after saving by using the Options > Preferences: Files dialog box.
It is possible to save a file, and then undo the few last edits. After that, the file saved on disk represents a
state that has more edits than the current file buffer. This can become confusing. To help, Source Insight dis-
plays the file name with an asterisk whenever the loaded buffer differs from the file saved on disk. If you try
to undo to a point before the file was saved, you will prompted to confirm you want to do that.
Restoring Lines
An alternative to Undo is the Restore Lines command. This command restores the selected lines to their orig-
inal contents when the file was first opened. Furthermore, the Restore Lines command can be undone with
the Undo command. Mixing both Undo and Restore Lines can be very useful.
Undo All
The Undo All command undoes all the editing changes to the current file since the last time it was opened.
See Also: Undo, Redo, Redo All commands.
Vertical Scroll Bar
This command toggles the vertical scroll bar in the current on and off.
If you want all windows to have a vertical scroll bar or not, you should use the Preferences: Display Options
dialog box option: Vertical Scroll Bar for each new window.
View Clip
(On Clip Window toolbar and right-click menu)

Source Insight 4 User Guide 367
Commands Overview
The View Clip command displays the selected clip in a source file window. If you close the window, you will be
asked if you want to retain the clip in the Clip Window.
View Relation Outline
This command changes the Relation Window so it displays its tree data in a textual outline format. See “Rela-
tion Window” on page 305.
View Relation Window Horizontal Graph
This command changes the Relation Window so it displays a tree graph view that grows horizontally, from
left to right. See “Relation Window” on page 305.
View Relation Window Vertical Graph
This command changes the Relation Window so it displays a tree graph view that grows vertically, from top
to bottom. See “Relation Window” on page 305.
View Toolbar
Shows or hides the View toolbar.
Visible Tabs
This toggles the display of visible tab characters. Source Insight displays symbols in place of tabs.
Visible Tabs and Spaces
This toggles the display of visible tab and space characters. Source Insight displays symbols in place of
spaces and tabs.
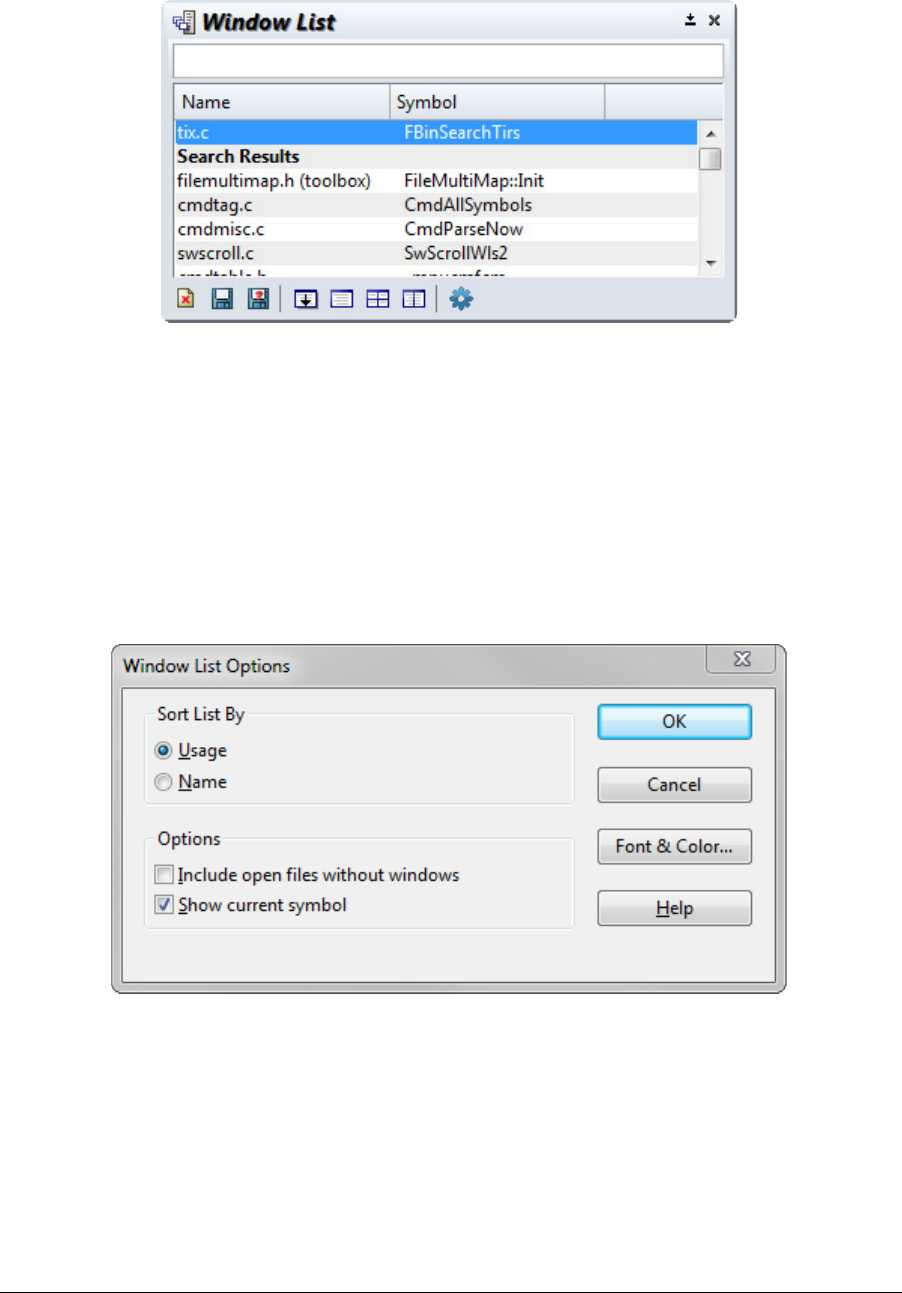
Commands Overview
368 Source Insight 4 User Guide
Window List
The Window List is a floating/dock able panel window that shows all the open windows.
Window list
Contains a list of all open source windows, and file buffers that may be open in the "background" that do not
appear in a window. You can sort the window list by name or by recently-used order. To sort the list, click on
the header titles at the top of the list.
To activate a window, double-click the window in the list.
To edit the Window List Options, click the option button. See “Window List Options” on page 368.
Window List Options
Use this window to change the settings of the Window List panel. See “Window List” on page 368.
Sort List By
Sorts the window list by either most recently usage, or by name.
Include open files without windows
This will include files that are open, but not visible in a window. Sometimes Source Insight open files in the
background for symbol resolution or other reasons. For example, a file might be open and visible in the Con-
text window, even though you didn't explicitly open it.
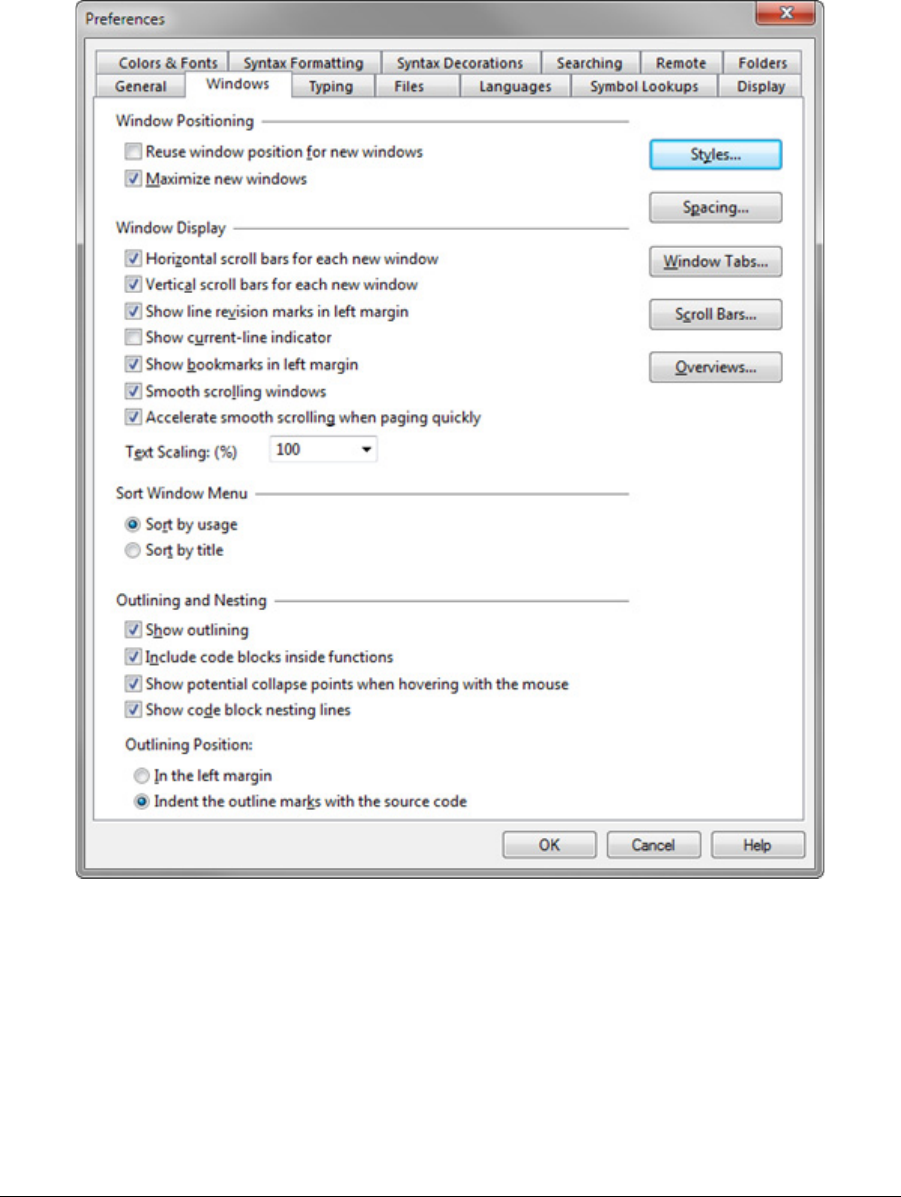
Source Insight 4 User Guide 369
Commands Overview
Show current symbol
This will show the nearest symbol at the cursor position in each window.
Window Options
This command specifies options for handling and displaying source file windows.
Window Positioning
Reuse window position for new windows
If enabled, Source Insight will position new windows exactly at the same location as the current window. The
new window will cover the old window.
If not enabled, Source Insight will cascade new windows down the screen in the conventional Windows way.

Commands Overview
370 Source Insight 4 User Guide
Maximize new windows
If enabled, then Source Insight will automatically maximize newly opened windows. If not enabled, then
Source Insight will open the windows according to the option above.
Window Display
Horizontal scroll bars for each new window
If enabled, then each new source file window created will get a horizontal scroll bar.
Vertical scroll bars for each new window
If enabled, then each new source file window created will get a vertical scroll bar.
Show line revision marks in left margin
If enabled, then Source Insight displays a highlight in the left margin selection bar area next to each line that
has been edited, or where lines have been deleted since the file was saved or opened. This makes it easy to
see what lines you have edited. The Go To Next Change and Go To Previous Change commands (ALT+Keypad
+ and ALT+Keypad -) will jump forward and backward through the changes in the current file.
Show current-line indicator
If enabled, then a horizontal indicator highlight is drawn at the line that contains the cursor position. The
indicator is not drawn if you select more than one line.
Show bookmarks in left margin
If enabled, then Source Insight displays a bookmark icon in the left margin selection bar area next to each
line that has a mark added with the Bookmarks command.
Smooth scrolling windows
If enabled, then windows will scroll more smoothly, instead of jumping one line at a time. Smooth scrolling
only takes place if you are not scrolling continuously, but rather one or two lines at a time. If you start editing
or scrolling quickly then smooth scrolling speeds up too. If not enabled, then windows scroll one whole line
at a time.
Accelerate smooth scrolling when paging quickly
If enabled, then the smooth window scrolling will not happen if you page up or down quickly.
Text Scaling (%)
Select the percentage of over-all text scaling used in source windows. A scaling of 100% means 'No Scaling'.
Each source window has its own scaling factor. Selecting a scaling factor here applies it to all source file win-
dows, and any new windows that open.
Sort Window Menu
Select the order in which file names appear on the Window menu in the main menu bar.
Outlining Options
Outline options relate to collapsible code blocks.
Show outlining
If enabled, then all source windows will show outline buttons for collapsing and expanding all the time. If this
is not selected, the outline buttons and markings only show if you used one of the outlining commands to
collapse a section.
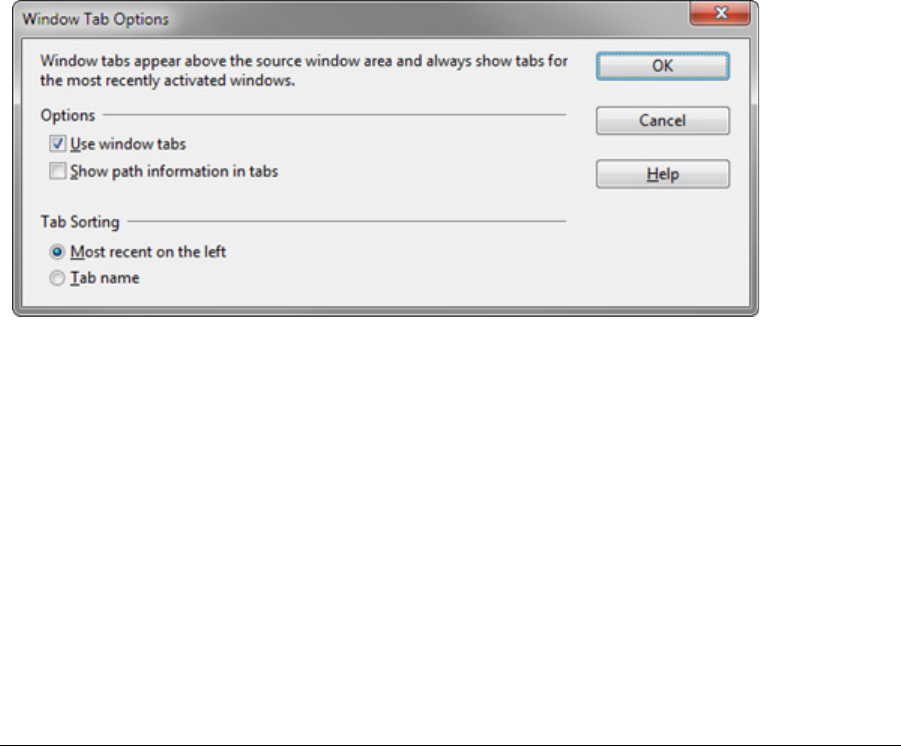
Source Insight 4 User Guide 371
Commands Overview
Include code blocks inside functions
If enabled, the code blocks inside functions, such as for and while statements, will get outline buttons. Oth-
erwise only function and class level items will display outline buttons.
Show potential collapse points when hovering with the mouse
If the outline handles are hidden, then they will appear when the mouse overs over the area just to the left of
a statement that can be collapsed. This option only applies if the above option is not checked.
Show code block nesting lines
If enabled, then nesting lines are drawn by code blocks to make it easier to see the nesting of blocks. You can
enable this option independently of showing outlining. That is, you can show nesting lines without having
outline buttons appearing.
Outlining Position:
Controls whether the outline buttons appear at the far left, or indented along with the source code.
Window Tabs
The Window Tabs command shows or hides the source file window tabs that appear above the source file
windows. You can control tab options with the Window Tab Options. See “Window Tab Options” on page 371.
Window Tab Options
This controls options for the window tabs that appear above the source file windows.
Use window tabs
Select this to display the window tabs.
Show path information in tabs
When enabled, tabs shows directory path information for any file not in the project source root directory. For
example, if file.c is a file in the util\fileman subdirectory of the project source root, then the tab will
show file.c (util\fileman)
If not enabled, then tabs only show a simple file name without directory information. This allows more tabs
to fit in the same space.
Tab Sorting
This controls the order of tabs from left to right.

Commands Overview
372 Source Insight 4 User Guide
Most recent on left
Select this to keep the tabs for files you have visited recently on the left side. Every time you select a different
file window, that new "current window" tab will be moved to the left-most tab position.
Tab name
Select this to sort the tabs alphabetically by file name. Depending on the width of the main window, only so
many tabs will fit. Therefore, only tabs for files you have visited recently are shown in the tab bar, and they
are sorted alphabetically.
Word Fragment Left
The Word Left command moves the insertion point to left by one word fragment. See “Name Fragment
Matching Symbol Names” on page 66.
Word Fragment Right
The Word Right command moves the insertion point to the right by one word fragment. See “Name Fragment
Matching Symbol Names” on page 66.
Word Left
The Word Left command moves the insertion point to left by one word.
Word Right
The Word Right command moves the insertion point to the right by one word.
Zoom Window
If the current window is not already maximized, the Zoom Window command maximizes it. If the current win-
dow is already maximized, the Zoom Window command restores the window to its un-maximized size.

Source Insight 4 User Guide 373
CHAPTER 5 Macro Language Guide
Source Insight provides an interpreted C-like macro language, which is useful for scripting commands, insert-
ing specially formatted text, and automating editing operations.
Here is an example of a macro function that shows a message box.
macro HelloWorld()
{
msg("Hello World!") // message box appears with "Hello World"
}
Macros are saved in a text file with a .em extension. The macro source files can be added to your project, or to
any project on the Project Symbol Path, or to the Base project. Once a macro file is part of the project, the
macro functions in the file become available as user-level commands in the Key Assignments or Menu Assign-
ments dialog boxes.
There is a library of built-in macro functions for accessing Source Insight objects, such as file buffers, or win-
dows. You can call these built-in functions from your own macro functions.
Basic Syntax Overview
Source Insight’s macro language is designed to be easy to write and require minimal housekeeping. The syn-
tax has been kept fairly simple.
Identifier Names
Identifier names are used to identify variables and functions.
•Identifier names are not case sensitive. For example, Open and open are the same.
•Identifier names must begin with a letter A to Z or a to z or an underscore (_), followed by zero or more
letters, underscores and digits. Examples are isOpen, MyThing2, and open_file.
•Identifier names cannot contain punctuation characters such as @ or % or dot(.).
Indentation and White Space
White space means a tab or a space character. White space is generally ignored, except when it is used to
delimit identifiers and operators. Lines are that completely blank are ignored. You can use any indentation
style you like, as Source Insight ignores it.

Macro Functions
374 Source Insight 4 User Guide
Comments
Two types of comments are supported:
•A comment begins with /* and ends with */. The comment can span any number of lines.
•A single line comment begins with // and extends to the end of the line.
For example:
/* this is a comment */
var a
/* this comment
spans
multiple lines */
a = 0 // this is a comment to the end of the line
Strings
Strings must be enclosed in double-quote marks. Single quotes are not used. For example:
a = "this is a literal string"
To embed a double-quote character in a string, you must escape it with a backslash character. For example:
a = "Open the file \"test.txt\" to begin the test."
Semi-Colons at the End of Statements
Semi-colons are not required at the end of statements, but they are allowed and ignored.
Macro Functions
A macro function is declared in a format that looks like a C function. White space is ignored, and function and
variable names are not case sensitive. A macro function begins with either the macro or function keyword,
followed by the name of the function. Here is a most basic function:
macro HelloWorld()
{
msg("Hello World!") // message box appears with "Hello World"
}
Macro functions can have parameters and can call other macros. You can return a value from a macro by
using "return n" where n is the return value. For example:
function add2(n)
{
return n + 2
}
User-Level Macros vs Functions
There are three flavors of macro functions:
•User-level commands you can assign to a key or menu. These must be declared with the macro key-
word, and have no function parameters. The name of the command is the same as the macro function
name.
•Functions that are used as subroutines that you can call from other macro functions. These should be
declared with the function keyword.
•Event functions that are used to hook into events. These are declared with the event keyword. See
“Macro Event Handlers” on page 419.

Source Insight 4 User Guide 375
Macro Scopes and References
For example, this function becomes a user-level command, and it can be assigned to a keystroke:
macro SaveCurrentFileNow ()
{
perform_save()
}
You can use Options > Key Assignments to locate the SaveCurrentFileNow command and assign a keystroke
to it.
However this function can only be called from another macro function, because it is declared with the func-
tion keyword:
function perform_save ()
{
var hbuf
hbuf = GetCurrentBuf()
if (hbuf != nil)
SaveBuf(hbuf)
}
Macro Scopes and References
All macro functions live in the same global namespace. All macros declared in any open file, stored in a proj-
ect, or in a project on the project symbol path are in scope. That is, you can have forward references to mac-
ros. You do not have to declare them before calling them.
Source Insight uses its symbol lookup engine to resolve references to macro functions when macros are exe-
cuted and when the user invokes a macro command. Therefore, symbol lookup rules apply to macro name
binding. See “Symbols and Projects” on page 48.
You can also use the various symbol lookup techniques to locate macro functions while you edit. See “Sym-
bol Navigation Commands” on page 74. For example, you can type the name of a macro function in the
Browse Project Symbols dialog box and jump to its definition.
Running Macros
You can run macros by invoking the macro command directly with a keystroke or menu item, or by using the
Run Macro command to begin running macro statements at the current cursor position. You can also run a
macro by selecting the macro command inside the Options > Key Assignments, or Options > Menu Assign-
ments dialog, then clicking the Run button.
Macros as Commands
If a macro function is declared with the macro keyword, and has no parameters, then Source Insight consid-
ers it to be a user-level command. User-level macro commands appear in the command lists of the Key
Assignments and Menu Assignments dialog boxes. This allows you to place macro commands on the menu or
in the keymap. You can also run commands directly from those dialog boxes. If a macro function has parame-
ters, it will not appear as a command in the command lists, and you wont be able to assign a keystroke to it
or put it on a menu.

Statements
376 Source Insight 4 User Guide
Tip: A shortcut for editing a user level macro command is to hold down the Ctrl key while selecting the command.
The macro function source code will appear for that command.
If you create a new macro command function in a macro file, you must save the macro file and allow Source
Insight to synchronize it with the project database files before the macro command will appear in menu and
key assignments command lists.
You can also store macros in the Base project, or any other project on the project symbol path. Source Insight
will search those projects when resolving macro names.
Note: Source Insight will not add macro functions to the user-level command list unless they are saved in Source
Insight macro files using a .em extension.
Running Inline Macro Statements
The Run Macro command starts executing macro statements starting at the line the cursor is on. This allows
you to run open coded macro statements in any type of file. This is very useful for testing and debugging
macro code.
Running inline macro statements is also useful for running short utility macro scripts stored inside of a pro-
gram comment. Remember to use the stop statement at the end, or the macro interpreter will attempt to
run past the end of the comment.
For example, this inline macro inside a C file comment searches for references to the identifier ucmMax and
causes recompilation of all the files that refer to it. To use it, the user places the cursor on the first line of the
macro and invokes the Run Macro command.
#define ucmMax 120
/* Macro: touch all ucmMax references:
// to run, place cursor on next line and invoke "Run Macro"
hbuf = NewBuf("TouchRefs") // create output buffer
if (hbuf == 0)
stop
SearchForRefs(hbuf, "ucmMax", TRUE)
SetCurrentBuf(hbuf) // put search results in a window
SetBufDirty(hbuf, FALSE); // don't bother asking to save
Stop
*/
Statements
Macros are composed of individual statements. Compound statements consisting of two or more statements
are enclosed with curly braces { }.

Source Insight 4 User Guide 377
Statements
A statement can be one of the following:
•A macro language statement element, such as an if or while statement. These statements are
described later.
•A call to a user-defined macro function. You define and save macro functions in a macro source file.
•A call to an internal macro function, such as GetCurrentBuf. Source Insight provides many built-in
functions. They are described in a later section.
•An invocation of a Source Insight user command, such as Line_Up or Copy. All user-level commands in
Source Insight are available to the macro language. To call a user command, use the name of the com-
mand by itself, without parameters. Parentheses are not used. If the command contains embedded
spaces in the command name, you must replace the spaces with underscore (_) characters. For exam-
ple, to call the "Select All" command, the statement should look like Select_All.
You can stop execution using the stop statement.
If you run a Source Insight command with a dialog box from a macro, the dialog box appears.
Function and variable names are not case sensitive.
Statement syntax is generally the same as in C or Java, except that semi-colons are not required, and are
ignored.
Statement Examples
Here are a few example statements:
hbuf = OpenBuf("file.c") // call internal function OpenBuf
SaveBufAs(hbuf, "filenew.c") // call internal function SaveBufAs
Select_All // call user-level command "Select All"
Copy // call user-level command "Copy"
Line_Up // call user-level command "Line Up"
x = add2(n) // call user-defined macro function add2.
Statement Elements
The following table summarizes the macro language statements.
Table 5.1: Macro Statements
Statement Description
break
Exits a while loop.
if (cond)… else
Tests a condition.
continue
Continues a while loop at the top.
global
Declares a global variable.
return n
<or>
return;
Returns n from a function. If a semi-
colon follows return, then the nil
string is returned.
stop
Stops executing the macro.
strictvars true/false
Turns on or off strict variable decla-
rations mode.
var
Declares a function-local variable.
while (cond)
Loops while cond is true.

Variables
378 Source Insight 4 User Guide
Variables
Variables are defined by simply assigning a value to them for the first time. Using the default settings, vari-
ables do not need to be declared before using them. However, you can use the var statement to explicitly
declare a variable. Further, you can require variable declarations by using the strictvars statement.
You can create a variable by assigning a value to it for the first time. For example:
i = 0 // creates new variable i with value 0
If the strictvars mode is on, then the above statement will cause an error because the variable is used before
being declared.
You can declare a variable by using the var statement. For example:
var i // declares new variable i
Variable names are not case sensitive. Variable names must begin with a letter or underscore, not a digit.
Variables act like strings most of the time. There are no types like in C, and no need to declare variables. This
makes working with variables very easy. There is no need to do conversions or casts. In addition, there is no
need for string memory management.
Declaring a Variable
The var statement declares a local variable, and sets it value to the empty string (nil).
var variable_name
You can declare more than one variable by separating the variables with a comma. For example:
var a, b, c // declares three variables
A local variable cannot be accessed outside of its function.
You don't have to declare variables if strictvars mode is off (default), but there are a couple of benefits if you
do:
•Syntax formatting works in the display for references to it.
•Variables are initialized to the empty string value, nil, so they are not confused with literal values when
used without being initialized.
For example:
macro SomeFunction()
{
var localx
// "localx" is displayed with "Ref to Local" style
localx = 0
}
You can use the strictvars statement to require variable declarations.
strictvars Mode
The strictvars statement turns on or off strictvars mode. If strictvars mode is on, then variables must be
declared before you use them. By default, strictvars mode is off.
The strictvars statement syntax is:
strictvars <value>
where <value> is true or "1' to enable the mode, or false or "0' to disable the mode.

Source Insight 4 User Guide 379
Variables
For example:
strictvars true
i = 0 // error: the variable i has not been declared
If you refer to a variable that has not been declared, and strictvars mode is enabled, then you will get an
error. For example:
var s
s = somestring // error if variable "somestring' is not declared
If the strictvars mode is enabled, then identifiers must be defined variables, and the identifier name will
never be used as a literal string.
Note that the strictvars statement is an executed statement, and must be in the path of execution. If the
program never runs the strictvars statement, then the mode is not changed. Further, you can use the
strictvars statement more than once turn the mode on or off.
Variable Initialization
Variables are initialized by simply assigning a value to them (unless strictvars mode is enabled). It may be
useful to initialize a variable to the empty string. A special constant, named nil is used for that.
For example:
S = nil // s is set to the empty string
S = "" // same thing
You can also use the var statement to declare a new variable and set it equal to nil. For example:
var s // s is created and set to the empty string
Global Variables
A variable that is declared with the var statement, or created by assignment is considered local to the func-
tion that contains the statement. You cannot access the local variable outside of the function that defines it.
A local variable ceases to exist after the function returns. However, a global variable has a global scope
instead of local. That means you can access it from multiple functions, and its value exists after a function
returns, or the whole macro stops running.
Once a global variable is defined, its value will be retained as long as the Source Insight session lasts. That is,
they can contain information between invocations of macros or event functions. They are lost when you exit
Source Insight.

Variables
380 Source Insight 4 User Guide
The global statement is used to declare global variables. For example:
global a
You can declare more than one global variable by separating the variables with a comma. For example:
global a, b, c // declares three global variables
The global statement should appear inside a function, and must be in the execution path of your code. For
example:
macro SomeFunction()
{
global last_count
...
}
When the global statement is encountered, the variable is entered into the global-scope variable table. The
variable is initialized to nil. This example shows how you might declare and use a global counter variable:
macro SomeFunction()
{
global last_count
// this initializes it the first time through
if last_count == nil last_count = 0
last_count++ // increment our global counter
...
}
Note: Global variables hold their values for the whole Source Insight session.
Global variables are useful for adding counters, and other persistent state. They cannot hold any kind of han-
dle, because all handles are destroyed when a macro finishes. So, for example, this will not work:
global hbuf
hbuf = OpenBuf("abc.txt")
In the above example, the hbuf variable will contain a bogus handle as soon as this macro finishes because
handles only exist while a macro is running.
Variable Values
If an identifier is the name of a defined variable, then it yields the variable value. Otherwise, the identifier
name is used as a literal string. For example:
s = abc // same as s = "abc" if abc is not defined
..or..
abc = Hello
s = abc // same as s = "Hello" (if Hello is not defined!)
s = "abc" // s equals "abc"
If the strictvars mode is enabled, then identifiers must be the names of defined variables, and the identi-
fier name will never be used as a literal string.
To avoid unintentionally using the name of variable as a literal value, you should get into the habit of declar-
ing your variables with the var statement. Or, you can use the strictvars statement to require variable
declarations. See also “strictvars Mode” on page 378.
Expanding Variables in a String
You can insert a variable into another string by using the special @ character. When a variable name appears
inside a literal string, and the variable name is surrounded by @ characters, then Source Insight replaces the
@variable@ with the variable value.

Source Insight 4 User Guide 381
Variables
For example:
s = "Hey, @username@, don't break the build again!"
This example replaces @username@ with the value of the variable username in the string.
You can escape the @ character with a backslash \ or by using two @ characters together. For example:
s = "Mail info@@company.com for information."
Variable Arithmetic
Even though variables are represented as strings, you can perform arithmetic on them. E.g.
s = "1"
x = s + 2 // x now contains the string "3"
y = 2 * x + 5 // x now contains "11"
Note: Variables are converted to numbers before arithmetic.
Using variables numerically is very natural and normally you don't have to even think about how they are
stored. The only time you need to be careful is if a variable might contain a string that does not evaluate to a
number. In that case, an error is generated. For example:
s = "hello"
x = s + 1 // error
You can tell if a string is numeric by calling the IsNumber function.
if (IsNumber(x))
x = x / 4 // okay to do arithmetic
Floating-point numbers are not supported.
Indexing Into Strings
You can index into variables as though they are character arrays. Indices are zero-based. For example:
s = "abc"
x = s[0] // x now contains the string "a"
Indexing into a variable yields a new string containing a single character.
The string that is returned by indexing one past the last character is an empty string. This is similar to zero-
terminated strings in C, only the zero "character" is an empty string.
s = "abc"
length = strlen(s)
ch = s[length] // ch now contains the empty string
if (ch == "")
msg "End of string."
Record Variables
While data structures such as classes are not supported, Source Insight supports record variables. A record
variable is actually a delimited list of "name=value" pairs. There is no predefined order of fields in a record
variable, and they don’t have to be declared before using them.
Record variables are used in the same way that a "struct" would be used in C. Record fields are referred to
with the dot (.) operator using a <recordvar>.<fieldname> format.

Variables
382 Source Insight 4 User Guide
For example, this reads the name of a symbol's file location from a symbol lookup record variable.
Filename = slr.file // get file field of slr
LineNumber = slr.lnFirst // get lnFirst field of slr
You assign values to a record variable in a similar way:
userinfo.name = myname; // set "name" field of userinfo
You can initialize an empty record by assigning nil to it:
userinfo = nil // make a new empty record
userinfo.name = "Jeff" // begin adding fields
You can create your own record variables whenever you want this way.
Record variables are a convenient way to return multiple values from a function. Several built-in functions
return record variables.
An example of a standard record is the Selection Record. See “Selection Record” on page 390.
Record Variable Storage
Record variables are stored simply as strings. Each field is stored as a "fieldname=value" pair, delimited with
semi-colons.
For example,
name="Joe Smith";age="34";experience="guru"
If you wanted to construct a whole record variable string from scratch, you would have to surround it in dou-
ble quotes and escape each embedded quote mark with the backslash character, like this: (C programmers
should be used to this.)
rec = "name=\"Joe Smith\";age=\"34\";experience=\"guru\""
However, it is just easier to assign a field at a time to it. For example:
Rec = nil // initializes as an empty string
Rec.name = "Joe Smith"
Rec.age = "34"
Rec.experience = "guru"
The fields in the record do not have to be in any particular order. There is no predeclared structure associated
with record variables, so you are free to attach new fields whenever you want by simply assigning a value to
them.
For example:
Location = GetSymbolLocation(symname)
Location.myOwnField = xyz // append a field when you feel like it!
Array Techniques
The Source Insight macro language does not support array variables. However, file buffers can be used as
dynamic arrays. Each line in a buffer can represent an array element. Furthermore, record variables can be
stored in each line to give you record arrays.
Buffer functions are described in a following section. Some useful functions are NewBuf and CloseBuf for cre-
ating and destroying buffers; and the buffer line functions: GetBufLine, PutBufLine, InsBufLine, AppendBu-
fLine, DelBufLine, and GetBufLineCount. You can also call NewWnd to put the array buffer in a window so you
can see the array contents.

Source Insight 4 User Guide 383
Special Constants
This example creates a buffer array of records.
hbuf = NewBuf()
rec = "name=\"Joe Smith\";age=\"34\";experience=\"guru\""
AppendBufLine(hbuf, rec)
rec = "name=\"Mary X"\";age=\"31\";experience=\"intern\""
AppendBufLine(hbuf, rec)
// hbuf now has 2 records in it
...
rec = GetBufLine(hbuf, 0) // retrieve element at index 0
PutBufLine(hbuf, 1, rec) // store element at index 1
CloseBuf(hbuf)
See “File Buffer Functions” on page 396.
Special Constants
Some constant values are always defined while a macro is running. As with all other identifiers, the constant
names are not case sensitive.
Operators
Most binary operators are the same as in C. Operator precedence is the same as C. You can also use parenthe-
ses to group expressions.
Table 5.2: Runtime Constants
Constant Value
True
"1"
False
"0"
Nil
"" – the empty string.
hNil
"0" – an invalid handle value.
invalid
"-1" – an invalid index value.
Table 5.3: Operators
Operator Meaning
+ and -
add and subtract
* and /
multiply and divide
!
Invert or "Not". E.g. !True equals False.
++i and i++
pre and post increment
--i and i--
pre and post decrement
||
logical OR operation
&&
logical AND operation
!=
logical NOT EQUAL operation
==
logical EQUAL operation
<
less than

Conditions and Loops: if-else and while
384 Source Insight 4 User Guide
Since variables may contain non-numeric values, relational operators are treated thus:
Conditions and Loops: if-else and while
The Source Insight macro language supports if and while statements for conditional tests and looping.
The if Statement
The if statement is used to test a condition and execute a statement or statements based on the condition.
The if statement has the following syntax:
if (condition)
statement // condition is true
In the above example, if condition is true, then statement is executed. You can use {} brackets to group more
than one statement. For example:
if (condition)
{
statement1
statement2
}
An else clause can be added to the if statement:
if (condition)
statement1 // condition is true
else
statement2 // condition is false
Note: Source Insight evaluates the whole condition expression, unlike C/C++ which performs partial evaluation. See
“Conditional Evaluation” on page 385.
>
greater than
<=
less than or equal to
>=
greater than or equal to
#
infix string concatenation - eg: "dog" # "cat"
"@var@"
variable expansion - used inside of quoted strings to
expand a variable in the string.
Table 5.4: Relational Operators for Strings
Operator Meaning
==
strings must be equal (case sensitive)
!=
strings must not be equal (case sensitive)
<
>
<=
>=
strings are converted to numbers and then compared.
Empty strings or strings that are non-numeric result in
a runtime error.
Table 5.3: Operators
Operator Meaning

Source Insight 4 User Guide 385
Conditions and Loops: if-else and while
The while statement
The while statement loops while a condition is true. The while statement has the following syntax:
while (condition)
statement // keeps executing statement until condition is false
In the above example, the statement in the while block is executed as long as the condition is true. The condi-
tion is tested at the top of the loop each time. You can use {} brackets to group more than one statement. For
example:
while (condition)
{
statement1
statement2
}
Note: Source Insight evaluates the whole condition expression, unlike C/C++ which performs partial evaluation. See
“Conditional Evaluation” on page 385.
Break and Continue
The break statement is used to exit out of a while loop. If more then one while loop is nested, the break
statement breaks out of the innermost loop.
while (condition)
{
if (should_exit)
break // exit the while loop
…
}
The continue statement continues again at the top of the loop, just before condition expression is evalu-
ated.
while (condition)
{
if (skip_rest_loop)
continue // continue at the top of the while loop
…
}
Conditional Evaluation
Source Insight evaluates the whole conditional expression each time. Expressions are not short-circuited.
This is an important difference from the way that C conditional expressions are evaluated. In C, the expres-
sion may be partially evaluated. Consider the following conditional expression:
if (hbuf != hNil && GetBufLineCount(hbuf) > x)
This conditional expression would lead to an error in Source Insight if hbuf is equal to hNil. In C, the evalua-
tion would be terminated after determining that hbuf != hNil. In Source Insight, the whole expression is
evaluated. In this case, causing an error since hNil would be passed as the buffer handle to GetBufLine-
Count.

Naming Conventions
386 Source Insight 4 User Guide
In Source Insight, this statement would have to written like this:
if (hbuf != hNil)
if (GetBufLineCount(hbuf) > x)
Naming Conventions
Variables and function parameters described in this macro guide are named using the following conventions.
Standard Record Structures
Record structures are similar to C data structures. A record variable is actually a delimited list of
"name=value" pairs. Record variables are used in the same way that a "struct" would be used in C. See
“Record Variables” on page 381.
Record variables are returned by some internal macro functions because it is a convenient way to return mul-
tiple values.
Table 5.5: Identifier Naming Conventions
Name Meaning
s and sz a string
ch single character string. If more than one character is
in a string, only the first character is used.
ich zero-based index to a character in a string or charac-
ter in a line
ichFirst first index in a range of characters
ichLast last index in a range of characters (inclusively)
ichLim limit index - one past the last index in a range
cch count of characters
fThing "f" means flag or boolean. fThing means "Thing" is
True.
TRUE a non-zero value, e.g. "1"
FALSE a zero value, i.e. "0"
ln zero-based line number
lnFirst first line number in a range
lnLast last line number in a range (inclusively)
lnLim limit - one past the last line number in a range
hbuf handle to a file buffer
hwnd handle to a window
hprj handle to a project
hsyml Handle to a symbol list
Any other names general string variables

Source Insight 4 User Guide 387
Standard Record Structures
This section describes the record structures used by the internal macro functions in Source Insight.
Bookmark Record
A bookmark points to a position in a file. The Bookmark record has the following fields:
Bufprop Record
A Bufprop record contains file buffer properties. It is returned by GetBufProps. The Bufprop record has the
following fields:
Field Description
Name The bookmark name.
File The file name of the bookmark position.
ln The line number position.
ich The character index on the line (zero based).
Symbol A nearby symbol definition to which the bookmark is
anchored. This is usually the enclosing function or class.
lnOffset The line number offset (distance) from Symbol.
SymbolType The type of Symbol.
FtpSiteName If the bookmark points to a file hosted on an FTP host,
this is the "Site Name" used in the FTP Panel. If the book-
mark points to a local file, then this field is empty.
FtpRemoteDir If the bookmark points to a file hosted on an FTP host,
this is the remote directory name on the host. If the
bookmark points to a local file, then this field is empty.
Field Description
Name The buffer name (i.e. file name)
fNew True if buffer is a new, unsaved buffer.
fDirty True if the buffer has been edited since it was saved or
opened.
fReadOnly True if the buffer is read-only.
fClip True if the buffer is a clip that appears in the Clip Win-
dow.
fMacro True if the buffer is a macro file.
fRunningMacro True if the buffer is a currently running macro file.
fCaptureResults True if the buffer contains captured custom command
output.
fSearchResults True if the buffer contains search results.
fProtected True if the buffer protected and reserved for internal
use.
lnCount The line count of the buffer.
Language The programming language of the buffer. The lan-
guage is determined by the file's document type.
DocumentType The document type of the buffer.

Standard Record Structures
388 Source Insight 4 User Guide
DIM Record
The DIM record describes horizontal and vertical pixel dimensions.
Link Record
A Link record describes a location in a file, which is pointed to by a source link. The Link record has the follow-
ing fields:
ProgEnvInfo Record
The ProgEnvInfo record contains information about the environment where Source Insight is running.
Field Description
Cxp Count of X-pixels (horizontal size)
Cyp Count of Y-pixels (vertical size)
Field Description
File The file name
ln The line number - this is only valid for as long as the file is
unchanged. If lines are inserted or deleted from the file, the
line number is going to be off. However, you can call Get-
SourceLink again to get an updated line number.
Field Description
ProgramDir The Source Insight program directory, where the
program file is stored.
TempDir The temporary files directory.
BackupDir The backup directory, where Source Insight stores
backups of files that you save.
ClipDir The directory where clips are persisted.
ProjectDirectoryFile The name of the project directory file. The project
directory file contains a list of all the projects that
have been opened.
ConfigurationFile The name of the currently active single configura-
tion file. This entry will be empty if the master
configuration file uses separate files for separate
parts.
MasterConfigurationFile The name of the master configuration file.
ShellCommand The name of the command shell. The command
shell depends on the operating system version
you are running.
UserName The registered user's name.
UserOrganization The registered user's organization.
SerialNumber The registered license serial number.

Source Insight 4 User Guide 389
Standard Record Structures
ProgInfo Record
The ProgInfo record describes the version of Source Insight that is running. It has the following fields:
Rect Record
A Rect record describes the coordinates of a rectangle. The Rect records has the following fields:
Field Description
ProgramName The name of the program (i.e. "Source Insight")
versionMajor The major version number. If the version number
is 1.02.0003, then the major version is 1.
versionMinor The minor version number. If the version number
is 1.02.0003, then the major version is 2.
versionBuild The build number of the version. If the version
number is 1.02.0003, then the build number is 3.
CopyrightMsg The Source Dynamics copyright message.
fTrialVersion True if the program is a Trial version.
fBetaVersion True if the program is a Beta version.
ExeFileName The name of the executable file.
cchLineMax The maximum number of characters allowed in a
source file line.
cchPathMax The maximum number of characters supported in
a path name.
cchSymbolMax The maximum number of characters allowed in a
symbol's full name.
cchCmdMax The maximum number of characters allowed in a
command, custom command, or macro com-
mand name.
cchBookmarkMax The maximum number of characters allowed in a
bookmark name.
cchInputMax The maximum number of characters allowed in a
dialog box text input field.
cchMacroStringMax The maximum number of characters allowed in a
macro string variable.
lnMax The maximum number of lines supported in a
source file.
integerMax The maximum integer value supported.
integerMin The minimum integer value supported (a negative
number).
Field Description
Left The left pixel coordinate of the rectangle
Top The top pixel coordinate of the rectangle
Right The right pixel coordinate of the rectangle
Bottom The bottom pixel coordinate of the rectangle

Standard Record Structures
390 Source Insight 4 User Guide
Selection Record
A Selection record describes the state of a text selection in a window. The Selection record has the following
fields:
Symbol Record
The Symbol record describes a symbol declaration. It specifies the location and type of a symbol. It is used to
uniquely describe a symbol in a project, or in an open file buffer.
Symbol records are returned by several functions, and Symbol records are used as input to several functions.
The Symbol record has the following fields:
Field Description
lnFirst the first line number
ichFirst the index of the first character on the line lnFirst
lnLast the last line number
ichLim the limit index (one past the last) of the last character on
the line given in lnLast
fExtended TRUE if the selection is extended to include more than
one character. FALSE if the selection is a simple insertion
point.
this is the same as the following expression:
(sel.fRect || sel.lnFirst != sel.lnLast || sel.ichFirst != sel.ich-
Lim)
fRect TRUE if selection is rectangular (block style).
FALSE if the selection is a linear range of characters.
The following fields only apply if fRect is TRUE:
xLeft the left pixel position of the rectangle in window coordi-
nates.
xRight the pixel position of the right edge of the rectangle in
window coordinates.
Field Description
Symbol The full symbol name. A symbol name is actually a path.
Every symbol name is divided into path components,
which are separated by dot (.) characters. For example, a
symbol name might be "myclass.member1". In this
example, "member1" is contained by "myclass".
Type The symbol's type (e.g. "Function", "Class", etc.)
Project The full path of the project where the symbol was found
File The full path of the file where the symbol was found
lnFirst The first line number of the symbol declaration
lnLim The limit line number of the symbol declaration
lnName The line number where the symbol's name appears in
the declaration.
ichName The character index of the symbol's name in the declara-
tion at the line lnName.
Instance The instance number path of the symbol within File. For
example, the first occurrence of a symbol is instance 0,
the second is instance 1, and so on.

Source Insight 4 User Guide 391
Internal Macro Functions
SYSTIME Record
The SYSTIME record describes the system time. It is returned by the GetSysTime function.
Internal Macro Functions
Source Insight provides many built-in internal macro functions. There are functions for manipulating strings,
file buffers, windows, projects, and symbol information.
The syntax for calling an internal macro function is the same as for calling a user-defined macro function. For
example:
hbuf = GetCurrentBuf() // call GetCurrentBuf function
String Functions
String functions are provided to allow string manipulation. You don't have to worry about memory manage-
ment of strings, or declaring buffers to hold strings.
AsciiFromChar (ch)
Returns the ASCII value of the given character ch. If ch is a string with more than one character, only the first
character is tested.
cat (a, b)
Concatenates strings a and b together and returns the result.
Alternatively, you can use the infix string concatenation operator (#) within an expression. For example:
full_name = first_name # " " # last_name
CharFromAscii (ascii_code)
Returns a string containing a single character that corresponds to the ASCII code in ascii_code.
Field Description
time the time of day in string format.
date the day of week, day, month, and year as a string.
Year current year.
Month current month number. January is 1.
DayOfWeek day of week number. Sunday is 0, Monday is 1, etc.
Day day of month.
Hour current hour.
Minute current minute.
Second current second
Milliseconds current milliseconds

User Input and Output Functions
392 Source Insight 4 User Guide
islower (ch)
Returns TRUE if the given character ch is lowercase. If ch is a string with more than one character, only the
first character is tested.
IsNumber (s)
Returns TRUE if the string s contains a numeric string. Non numeric strings cause a run-time error when used
in arithmetic expressions.
isupper (ch)
Returns TRUE if the given character ch is uppercase. If ch is a string with more than one character, only the
first character is tested.
strlen (s)
Returns the length of the string.
strmid (s, ichFirst, ichLim)
Returns the middle string of s in the range from ichFirst up to, but not including ichLim. That is, s[ichFirst]
through s[ichLim - 1]. If ichFirst equals ichLim, then an empty string range is specified.
strtrunc (s, cch)
Returns string s truncated to cch count of characters.
tolower (s)
Returns the lowercase version of the given string.
toupper (s)
Returns the uppercase version of the given string.
User Input and Output Functions
User input and output functions allow you to get input from a user, or display output in a message window.
Ask (prompt_string)
Prompts the user with a message box window displaying the string prompt_string. The Ask message box has
an OK button, and a Cancel button. Clicking the Cancel button stops the macro.
AssignKeyToCmd(key_value, cmd_name)
Assigns the key_value to command named by cmd_name. Subsequently, when the user presses the
key_value, the command is invoked.
key_value is a numeric keyboard value that is returned by GetKey and KeyFromChar. You can use CharFrom-
Key to convert a key_value into a character.
cmd_name is the string name of the command.

Source Insight 4 User Guide 393
User Input and Output Functions
Example:
key = GetKey();
AssignKeyToCmd(key, "Open Project");
Beep ()
Gives a single beep.
CharFromKey (key_code)
Returns the character associated with the given key code. Returns zero if the key_code is not a regular char-
acter key code.
key_code is a numeric keyboard value that is returned by GetKey and KeyFromChar. You can use CharFrom-
Key to convert a key_code into a character.
CmdFromKey(key_value)
Returns the string name of the Source Insight command currently mapped to key_value. The command
returned is the name of the command that gets invoked when the user presses key_value.
key_value is a numeric keyboard value that is returned by GetKey and KeyFromChar.
You can use CharFromKey to convert a key_value into a character.
Example:
key = GetKey();
cmd_name = CmdFromKey(key);
msg("That key will invoke the @cmd@ command.");
EndMsg ()
Takes down the message box started by StartMsg.
FuncFromKey (key_code)
Return the function key number (1 - 12 for F1 - F12) from a function key code. Returns zero if key_code is not a
function key code.
key_code is a numeric keyboard value that is returned by GetKey and KeyFromChar. You can use CharFrom-
Key to convert a key_code into a character.
GetChar ()
Waits for the user to press a key and returns a single character.
GetKey ()
Waits for the user to press a key and returns the key code. The key code is a special numeric value that Source
Insight associates with each key. You can use the CharFromKey function to map a key code into a character.
GetSysTime(fLocalTime)
Returns a SYSTIME record, which contain string representations of the time and date. See “SYSTIME Record”
on page 391.
If fLocalTime is non-zero, then the local time is returned, otherwise the system time (expressed in Coordi-
nated Universal Time (UTC)) is returned.
IsAltKeyDown (key_code)
Returns TRUE if the ALT key is down for key_code. key codes contain the CTRL and ALT key state.
key_code is a numeric keyboard value that is returned by GetKey and KeyFromChar. You can use CharFrom-
Key to convert a key_code into a character.

User Input and Output Functions
394 Source Insight 4 User Guide
IsCtrlKeyDown (key_code)
Returns TRUE if the CTRL key is down for key_code. key codes contain the CTRL and ALT key state.
key_code is a numeric keyboard value that is returned by GetKey and KeyFromChar. You can use CharFrom-
Key to convert a key_code into a character.
IsFuncKey (key_code)
Returns TRUE if key_code is a function key, or FALSE if not.
key_code is a numeric keyboard value that is returned by GetKey and KeyFromChar. You can use CharFrom-
Key to convert a key_code into a character.
KeyFromChar(char, fCtrl, fShift, fAlt)
Returns a key value, given a character and modifier key states. A key value is a numeric keyboard value that is
returned by GetKey. You can use CharFromKey to convert a key value into a character.
Inputs:
char - the character part of the keystroke. It is not case sensitive.
fCtrl - non-zero if the CTRL key is included.
fShift - non-zero if the Shift key is included.
fAlt - non-zero if the ALT key is included.
The char parameter can have some special values:
Examples of Key Assignments:
// assign Ctrl+C to Page Down command:
key = KeyFromChar("c", 1, 0, 0); // Ctrl+C
AssignKeyToCmd(key, "Page Down");
// assign F9 to Close Project command:
key = KeyFromChar("F9", 0, 0, 1); // Alt+F9
AssignKeyToCmd(key, "Close Project");
Table 5.6: "char' Parameter Values and Their Meanings
Char Value Meaning
a-z Simple alpha characters
Fx Function Key number x; e.g. F10
Nx Numeric keypad character x; e.g. N+ for "+" key
Up, Down, Left, Right Arrow keys
Page Up, Page Down
Insert, Delete
Home, End,
Tab, Enter
Other special keys

Source Insight 4 User Guide 395
Buffer List Functions
Examples of input functions:
// input a keypress and decode it
key = GetKey()
if (IsFuncKey(key))
Msg cat("Function key = ", FuncFromKey(key))
if (IsAltKeyDown(key))
Msg "Alt key down"
if (IsCtrlKeyDown(key))
Msg "Ctrl key down"
ch = CharFromKey(key)
if (Ascii(ch) == 13)
Msg "You pressed Enter!"
else if (toupper(ch) == 'S')
Search_Files
...
Msg (s)
Display a message window showing the string s. The message box has a Cancel button that the user can click
to stop the macro.
StartMsg (s)
Display a message window showing the string s. The message box has a Cancel button that the user can click
to stop the macro. The message window stays up after returning.
Buffer List Functions
A buffer list is a collection of file buffer handles. There is only one buffer list in the Source Insight application.
It contains the file buffer handles for all open source files. You can use the buffer list functions to enumerate
through all file buffers.
BufListCount ()
This function returns the number of buffers in the buffer list. Use BufListItem to access the buffer handle at a
particular index position.
BufListItem (index)
This function returns the buffer handle at the given index. The size of the buffer list is returned by BufList-
Count. Index values start at zero, and continue up to one less than the value returned by BufListCount.

File Buffer Functions
396 Source Insight 4 User Guide
This example enumerates all the open buffer handles:
cbuf = BufListCount()
ibuf = 0
while (ibuf < cbuf)
{
hbuf = BufListItem(ibuf)
// ... do something with buffer hbuf
ibuf = ibuf + 1
}
File Buffer Functions
File buffer functions are used to create and manipulate file buffers and the text within them. A file buffer is
the loaded image of a text file. File buffers are edited by the user and then saved back to disk with the Save
command.
Many of the file buffer functions use buffer handles (hbuf). These are handles to open file buffers. An hbuf is
typically a small integer value. An hbuf value of hNil (zero) indicates an error.
AppendBufLine (hbuf, s)
Appends a new line of text s to the file buffer hbuf.
ClearBuf (hbuf)
Empties the buffer hbuf so that it contains no lines.
CloseBuf (hbuf)
Closes a file buffer. Hbuf is the buffer handle.
CopyBufLine (hbuf, ln)
Copies the line ln from the file buffer hbuf to the clipboard.
DelBufLine (hbuf, ln)
Deletes the line ln from the file buffer hbuf.
GetBufHandle (filename)
Returns the handle of the open file buffer whose name is filename. This function searches all open file buffers
to find the one that matches the given filename parameter. GetBufHandle returns hNil if no buffer can be
found with the given file name.
GetBufLine (hbuf, ln)
Returns the text of the line ln in the given file buffer hbuf.
GetBufLineCount (hbuf)
Returns the number of lines of text in a file buffer. Hbuf is the file buffer handle.
GetBufLineLength (hbuf, ln)
Returns the number of characters on the line ln in the given file buffer hbuf.

Source Insight 4 User Guide 397
File Buffer Functions
GetBufLnCur (hbuf)
Returns the current line number of the user's selection inside of the file buffer hbuf. A macro error is gener-
ated if the given file buffer is not already displayed in a source file window.
GetBufName (hbuf)
Returns the name of the file associated with a file buffer. Hbuf is the file buffer handle.
GetBufProps (hbuf)
Returns a Bufprop record, which contains properties for the given buffer. See “Bufprop Record” on page 387.
GetBufSelText (hbuf)
Returns the selected characters in the file buffer hbuf as a string. A maximum of one line of text is returned.
This is useful for getting the text of a word selection. A macro error is generated if the given file buffer is not
already displayed in a source file window.
GetCurrentBuf ()
Returns a handle to the current buffer. The current buffer is the file buffer that appears in the front-most
source file window. Returns hNil if there is no current buffer (i.e. no open source file windows).
InsBufLine (hbuf, ln, s)
Inserts a new line of text s for line number ln in the file buffer hbuf.
IsBufDirty (hbuf)
Returns True if the buffer is dirty. A dirty buffer is one that has been edited since it was opened or saved. A
dirty buffer contains changes that have not been saved.
IsBufRW (hbuf)
Return True if the given buffer is read-write-able. This function returns False if the buffer is read-only.
MakeBufClip (hbuf, fClip)
If fClip is True, this turns the file buffer hbuf into a Clip buffer. Following this, the buffer will appear as a regu-
lar clip in the Clip Window.
If fClip is False, this turns the buffer into a regular, non-clip file buffer.
Clip buffers are automatically saved to the Clips subdirectory of the Source Insight program directory when
Source Insight exits.
NewBuf (name)
Creates a new empty file buffer and returns a handle to the file buffer (an hbuf). The name of the new buffer is
specified by the name parameter. NewBuf returns hNil if the buffer could not be created due to errors.
OpenBuf (filename)
Opens a file named filename into a file buffer and returns a handle to the file buffer. OpenBuf returns hNil if
the file could not be opened.
OpenMiscFile (filename)
Opens a file named filename. The action taken depends on the type of files opened. For example, opening a
file with a .CF3 extension will load a new configuration file. Opening a project file (.PR extension) will open
that project. OpenMiscFile returns TRUE if it was successful, or FALSE if not.

File Buffer Functions
398 Source Insight 4 User Guide
PasteBufLine (hbuf, ln)
Pastes the clipboad contents just before the line ln in the file buffer hbuf.
PrintBuf (hbuf, fUseDialogBox)
Prints the given file buffer on the printer. If fUseDialogBox is True, then the Print dialog box appears first.
Otherwise, the file prints with no user interaction on the default printer.
PutBufLine (hbuf, ln, s)
Replaces the line of text for line number ln in the file buffer hbuf with the string in s.
RenameBuf (hbuf, szNewName)
Renames the given buffer to szNewName. The file on disk is also renamed. If the buffer is a member of an
open project, then the file is renamed in the project.
SaveBuf (hbuf)
Saves a file buffer to disk. Hbuf is the buffer handle.
SaveBufAs (hbuf, filename)
Saves a file buffer a different file name. Hbuf is the buffer handle. Filename is the name of the new file.
SetBufDirty (hbuf, fDirty)
Sets the dirty state of the given buffer to fDirty. A dirty buffer is one that has been edited since is was opened
or saved. A dirty buffer contains changes that have not been saved.
When the user closes a dirty buffer, Source Insight prompts to save the file. You can use this function to un-
dirty a buffer so that the user is not prompted to save it.
SetBufIns (hbuf, ln, ich)
Sets the cursor position insertion point to line number ln at character index ich in file buffer hbuf. A macro
error is generated if the given file buffer is not already displayed in a source file window.
SetBufSelText (hbuf, s)
Replaces the currently selected characters in the file buffer hbuf with the string s. This is useful for replacing
the text of a word selection. A macro error is generated if the given file buffer is not already displayed in a
source file window.
This is the simplest way to insert new text into a buffer. For example, this code inserts "new text" into the cur-
rent buffer at the current insertion position:
hbuf = GetCurrentBuf()
SetBufSelText(hbuf, "new text")
SetCurrentBuf (hbuf)
Sets the active file buffer to the buffer whose handle is hbuf. The current buffer is the file buffer that appears
in the front-most source file window.

Source Insight 4 User Guide 399
Environment and Process Functions
Environment and Process Functions
Environment and process functions allow you to get and set registry and environment values; and also to run
internal and external commands.
GetEnv (env_name)
Returns the value of the environment variable given in env_name. Returns an empty string if the environ-
ment variable does not exist.
GetReg (reg_key_name)
Returns the value associated with the registry key named reg_key_name. The key value is stored under the
key path: HKEY_CURRENT_USER/Software/Source Dynamics/Source Insight/4.0. Returns an empty string if
the key does not exist.
The SetReg and GetReg functions give you a way to store your own Source Insight related information
between sessions.
IsCmdEnabled (cmd_name)
Returns TRUE if the command specified in cmd_name is currently enabled. A command would not be
enabled if Source Insight cannot run it due the state of the program. For example, the Save command is not
enabled if there are no open source file windows.
PutEnv (env_name, value)
Sets the environment variable named env_name to value.
RunCmd (cmd_name)
Runs the command specified by cmd_name. This allows you to run special commands, namely custom com-
mands, which are defined with the Custom Commands command.
RunCmdLine (sCmdLine, sWorkingDirectory, fWait)
Spawns the given command line string in sCmdLine. This returns non-zero if successful, or zero if errors.
If sWorkingDirectory is not Nil, then the working directory is used. If sWorkingDirectory is Nil, then the current
project home directory iis used.
If fWait is non-zero, then the function will not return until the process is finished. Otherwise, it returns imme-
diately. If the process is another windows application, it returns immediately regardless of fWait.
SetReg (reg_key_name, value)
Sets the value associated with the registry key named reg_key_name. The key value is stored under the key
path: HKEY_CURRENT_USER/Software/Source Dynamics/Source Insight/4.0. The key is created if it doesn't
exist already.
The SetReg and GetReg functions give you a way to store your own Source Insight related information
between sessions.
ShellExecute (sVerb, sFile, sExtraParams, sWorkingDirectory, windowstate)
Performs a "ShellExecute" function on the given file. This lets you tell the Windows shell to perform an opera-
tion on a specified file.
The nice thing about ShellExecute is that you don't need to know what specific application is registered to
handle a particular type of file. For technical background information, see the "ShellExecute" function in the
Windows Shell API documentation.

Environment and Process Functions
400 Source Insight 4 User Guide
ShellExecute Parameters
sVerb Values
The sVerb parameter is a single word string that specifies the action to be taken by Shell Execute.
Table 5.7: ShellExecute Parameters
Parameter Meaning
sVerb A single word that specifies the action to be taken.
See the table below for possible values.
sFile The filespec parameter can be any valid path. Use
double quotes around complex path names with
embedded spaces. It can also be the name of an exe-
cutable file.
sExtraParams Optional parameters: It specifies the parameters to
be passed to the application that ultimately runs . The
format is determined by the verb that is to be invoked,
and the application that runs.
sWorkingDir The working directory when the command runs. If
empty, then the project home directory is used.
windowstate An integer that specifies the size and state of the win-
dow that opens. Valid values are: 1 = normal, 2 = mini-
mized, 3 = maximized.
Table 5.8: Values for sVerb Parameter
sVerb Value Meaning
edit
Opens an editor for the file.
explore
The function explores the folder specified.
open
The function opens the file specified. The file can be
an executable file or a document file. It can also be a
folder.
print
The function prints the document file specified. If
filespec is not a document file, the function will fail.
properties
Displays the file or folder's properties.
find
Launches the Find Files application found on the Start
menu.
"" (empty string) Ships this parameter to ShellExecute.

Source Insight 4 User Guide 401
Window List Functions
Examples:
To browse a web site:
ShellExecute("open", "http://www.somedomain.com", "", "", 1)
To open a document file:
ShellExecute("open", "somefile.doc", "", "", 1)
To explore your Windows documents file folder:
ShellExecute("explore", "C :\Documents and Settings", "", "", 1)
To launch Internet Explorer:
ShellExecute("", "iexplore", "", "", 1)
To preview a file in Internet Explorer:
ShellExecute("", "iexplore somefile.htm", "", "", 1)
To search for files in the current project folder:
ShellExecute("find", filespec, "", "", 1)
Window List Functions
A window list is a collection of source file window handles. There is only one window list in the Source Insight
application. It contains all the source window handles. You can use the window list to enumerate through all
source file windows.
WndListCount ()
This function returns the number of windows in the window list. Use WndListItem to access the window han-
dle at a particular index in the list.
WndListItem (index)
This function returns the window handle at the given index. The size of the window list is returned by
WndListCount. Index values start at zero, and continue up to one less than the value returned by WndList-
Count.
This example enumerates all the open window handles:
cwnd = WndListCount()
iwnd = 0
while (iwnd < cwnd)
{
hwnd = WndListItem(iwnd)
// … do something with window hwnd
iwnd = iwnd + 1
}
Window Functions
Window functions allow manipulation of source file windows. File buffers are displayed in source windows.
An hwnd is typically a small integer value. An hwnd of hNil indicates an error.

Window Functions
402 Source Insight 4 User Guide
The functions use window handle (hwnd) parameters. These are macro-level handles to open source file win-
dows. Note that a macro hwnd is similar in concept, but is not exactly the same as a window handle HWND in
the Microsoft Windows API.
Each source window has a selection in it, which describes what characters are selected. See “GetWndSel
(hwnd)” on page 403 for more information.
In some functions, a window handle (hwnd) can also represent a handle to a system level window, such as
the application window. System level windows do not contain a file buffer, or a selection. The GetApplica-
tionWnd function returns a handle to the Source Insight application window.
CloseWnd (hwnd)
Closes the window hwnd. Closing a window does not close the file buffer displayed in the window.
GetApplicationWnd ()
Returns a window handle to the Source Insight application window.
Note: This is not the same as a system-level window handle. It is a Source Insight macro-level handle value.
The returned handle can be passed to functions that do not assume a file buffer or selection, such as
GetWndDim and IsWndMax.
GetCurrentWnd ()
Returns the handle of the active, front-most source file window, or returns hNil if no windows are open.
GetNextWnd (hwnd)
Returns the next window handle in the window Z order after hwnd. This is usually the previous window that
was active. GetNextWnd returns hNil if there are no other windows.
For example, if hwnd is the top-most window, then GetNextWnd(hwnd) will return the next window down.
Note that if you are using SetCurrentWnd to set the front-most active window, subsequent calls to GetNex-
tWnd are affected.
GetWndBuf (hwnd)
Returns the handle of the file buffer displayed in the window hwnd.
GetWndClientRect (hwnd)
Returns a Rect record, which contains the client rectangle of the given window. The coordinates are given in
the window's local coordinate system. The client rectangle does not include the window's frame or other
non-client areas. See “Rect Record” on page 389.
GetWndDim (hwnd)
Returns a DIM record, which describes the pixel dimension of the given window hwnd. See “DIM Record” on
page 388.
The horizontal dimension returned is the width of the text area of the window only. It does not include the
left margin or the symbol window attached to the source window.
GetWndHandle (hbuf)
Returns a window handle for the front-most window that displays the file buffer specified by hbuf. GetWnd-
Handle returns hNil if the file buffer is not in a window.
Since a file buffer may appear in more than one window, GetWndHandle searches through all windows in
front-to-back order. So if the specified file buffer is the current buffer in the active window, the handle for
that window is always returned.

Source Insight 4 User Guide 403
Window Functions
GetWndHorizScroll (hwnd)
Returns the horizontal scroll state of the window hwnd. The horizontal scroll state is the pixel count of the
scroll.
GetWndLineCount (hwnd)
Returns the vertical size of the window hwnd in lines. This is the maximum number of lines potentially visible
in the window. If the file buffer does not fill the entire window, GetWndLineCount will still return the maxi-
mum number of lines.
GetWndLineWidth (hwnd, ln, cch)
Returns the width of a specified line of text in the given window.
Inputs:
This function allows you to measure the width of characters in a given window. Since the font used by each
window is determined by the file's document type, the width of text can vary from window to window. Syntax
formatting also affects the width of text.
This function can be used along with ScrollWndHoriz to scroll a window to show a particular character.
Examples
To find the width of the whole line at line 100:
dim = GetWndLineWidth(hwnd, 100, -1)
Msg ("Line 100 is " # dim.cxp # " pixels wide.")
To find the width of the first 3 characters on line 200:
Dim = GetWndLineWidth(hwnd, 200, 3)
GetWndParent (hwnd)
Returns the handle to the window's parent window. Returns hNil if there is no parent.
GetWndRect (hwnd)
Returns a Rect record, which contains the screen rectangle coordinates of the given window. The rectangle
includes the window frame and non-client areas. See “Rect Record” on page 389.
GetWndSel (hwnd)
Returns the selection state of the window specified by hwnd. The selection state is returned in a Selection
record. See “Selection Record” on page 390.
GetWndSelIchFirst (hwnd)
Returns the index of the first character in the selection in the window hwnd.
GetWndSelIchLim (hwnd)
Returns the index of one past the last character in the selection in the window hwnd.
Parameter Description
hwnd The window.
ln The line number that contains the text to be mea-
sured. If ln is out of range, then –1 is returned.
cch The count of characters to measure on the line. If cch
is set to –1, then the whole line length is measured.

Window Functions
404 Source Insight 4 User Guide
GetWndSelLnFirst (hwnd)
Returns the first line number of the selection in the window hwnd.
GetWndSelLnLast (hwnd)
Returns the last line number of the selection in the window hwnd.
GetWndVertScroll (hwnd)
Returns the vertical scroll state of the window hwnd. The vertical scroll state is the line number that appears
at the top of the window.
IchFromXpos (hwnd, ln, xp)
Returns the character index given a pixel x-position (xp) on the line number (ln) in the given window. The
character index is the zero based index of a character on the specified line. The line does not actually have to
be displayed in the window at the time this function is called. See “XposFromIch (hwnd, ln, ich)” on
page 405.
Inputs:
Note: You can use the XposFromIch function to perform the reverse mapping.
IsWndMax (hwnd)
Returns TRUE if the window hwnd is currently maximized.
IsWndMin (hwnd)
Returns TRUE if the window hwnd is currently minimized.
IsWndRestored (hwnd)
Returns TRUE if the window hwnd is currently not maximized and not minimized.
LineFromYpos (hwnd, ypos)
Returns the line number located at the given y-pixel position in the given window. The y-position is relative to
the top edge of the window. If the line number is not visible in the window, then -1 is returned. See “Ypos-
FromLine (hwnd, ln)” on page 406.
Inputs:
Parameter Description
hwnd The window.
ln The line number that contains the text to be mea-
sured. If ln is out of range, then –1 is returned.
xp The x-position, which is relative to the left edge of
the whole window. If xp exceeds the width of the
line, then the total number of characters on the line
is returned.
Parameter Description
hwnd The window.
ypos The y-pixel position relative to the top of the win-
dow. Ypos values are zero at the top of the window,
and a positive value at the bottom of the window. If
ypos is not inside the window, then -1 is returned.

Source Insight 4 User Guide 405
Window Functions
Note: You can use the YposFromLine function to perform the reverse mapping.
MaximizeWnd (hwnd)
Maximizes (or "zooms") the window specified by hwnd.
MinimizeWnd (hwnd)
Minimizes (or "iconizes") the window specified by hwnd.
NewWnd (hbuf)
Creates a new window and displays the file buffer hbuf in the window. NewWnd returns a window handle, or
hNil if errors.
ScrollWndHoriz (hwnd, pixel_count)
Scrolls the window hwnd horizontally by an amount given in pixel_count.
If pixel_count is less than zero, then the scroll is backward in the line (screen contents scrolls right).
If pixel_count is greater than zero, then the scroll is forward in the line (screen contents scrolls left).
ScrollWndToLine (hwnd, ln)
Scrolls the window hwnd to show the line number ln at the top of the window.
ScrollWndVert (hwnd, line_count)
Scrolls the window hwnd vertically by an amount given in line_count.
If line_count is less than zero, then the scroll is backward in the file (screen contents scrolls down).
If line_count is greater than zero, then the scroll is forward in the file (screen contents scrolls up).
SetCurrentWnd (hwnd)
Sets the front-most active window. Hwnd is the window handle to activate.
SetWndRect (hwnd, left, top, right, bottom)
Sets the new position of the given window. The Z-order is not affected. The coordinates given are in the local
pixel coordinate system of the window's parent window. If the window is the application window, then the
coordinate system is the global screen pixel coordinate system.
SetWndSel (hwnd, selection_record)
Sets the selection state for the window specified by hwnd to the Selection record given in selection_record.
See also “GetWndSel (hwnd)” on page 403.. See “Selection Record” on page 390.
ToggleWndMax (hwnd)
Toggles the window hwnd between maximized and restored sizes.
XposFromIch (hwnd, ln, ich)
Returns the pixel x-position number given character position (ich) on the line number (ln) in the given win-
dow. The x-position is relative to the left edge of the whole window. The line does not actually have to be dis-
played in the window at the time this function is called. See “IchFromXpos (hwnd, ln, xp)” on page 404.

Bookmark Functions
406 Source Insight 4 User Guide
Inputs:
Note: You can use the IchFromXpos function to perform the reverse mapping.
YposFromLine (hwnd, ln)
Returns the pixel y-position of the given line number (ln) in the given window. The y-position is relative to the
top edge of the window. If the line number is not visible in the window, then -1 is returned. See also “LineFro-
mYpos (hwnd, ypos)” on page 404.
Inputs:
Note: You can use the LineFromYpos function to perform the reverse mapping.
YdimFromLine (hwnd, ln)
Returns the pixel height dimension of the given line number (ln) in the given window. If the line number is not
visible in the window, then -1 is returned. See also “YposFromLine (hwnd, ln)” on page 406.
Inputs:
Bookmark Functions
All bookmarks are kept in a single bookmark list. You can use the bookmark functions to enumerate through
all bookmarks, and to add and remove bookmarks. The bookmark list is persisted in the workspace file.
BookmarksAdd (name, filename, ln, ich)
Adds a new bookmark. The new bookmark name is in name. The bookmark position is in the file filename at
line number ln at character index ich.
Returns True if successful, or False if errors.
Parameter Description
hwnd The window.
ln The line number that contains the text to be mea-
sured. If ln is out of range, then –1 is returned.
ich The character index, which is the zero based index of
a character on the specified line. If ich exceeds the
number of characters on the line, then the x position
of the end of the line is returned.
Parameter Description
hwnd The window.
ln The line number that contains the text to be mea-
sured. If ln is out of range in the file, or not visible in
the window, then –1 is returned.
Parameter Description
hwnd The window.
ln The line number that contains the text to be mea-
sured. If ln is out of range in the file, or not visible
inthe window, then –1 is returned.

Source Insight 4 User Guide 407
Symbol List Functions
BookmarksCount ()
This function returns the number of bookmarks in the bookmark list. Use BookmarksItem to access the
bookmark at a particular index in the list.
BookmarksDelete (name)
Deletes the bookname named name.
BookmarksItem (index)
This function returns the bookmark at the given index. The size of the bookmark list is returned by Book-
marksCount. Index values start at zero, and continue up to one less than the value returned by Bookmarks-
Count.
This example enumerates all the bookmarks:
cmark = BookmarksCount()
imark = 0
while (imark < cmark)
{
bookmark = BookmarksItem(imark)
// … do something with bookmark
imark = imark + 1
}
See “Bookmark Record” on page 387.
BookmarksLookupLine (filename, ln)
Searches for the bookmark at the given position. The file is in filename and the line number is ln.
Returns a Bookmark record, or nil if the bookmark is not found. See “Bookmark Record” on page 387.
BookmarksLookupName (name)
Searches for the bookmark named name.
Returns a Bookmark record or nil if the bookmark is not found. See “Bookmark Record” on page 387.
Symbol List Functions
A symbol list is a zero-based indexed collection of Symbol records. See “Symbol Record” on page 390.
Some of the symbol access functions return symbol list handles.
Symbol lists are allocated resources that should be freed using SymListFree when you are finished accessing
them. Source Insight automatically cleans up dynamically allocated resources when a macro terminates.
However, Source Insight may run out of resources if you allocated many handles without freeing unused han-
dles.
SymListCount ()
This function returns the number of symbols in the symbol list. Use SymListItem to access the symbol record
at a particular zero-based index in the list. See “Symbol Record” on page 390.
SymListFree (hsyml)
This function deallocates the given symbol list.

Symbol Functions
408 Source Insight 4 User Guide
SymListInsert (hsyml, isymBefore, symbolNew)
This function inserts a symbol record into the symbol list hsyml. The symbol is inserted just before isymBe-
fore. If isymBefore is –1, then the symbol is appended to the end of the list. The symbol record is given in sym-
bolNew. See “Symbol Record” on page 390.
SymListItem (hsyml, isym)
This function returns the Symbol record at the zero-based index isym in the symbol list hsyml. The size of the
symbol list is returned by SymListCount. See “Symbol Record” on page 390.
Index values start at zero, and continue up to one less than the value returned by SymListCount.
This example enumerates all symbols in the symbol list:
csym = SymListCount(hsyml)
isym = 0
while (isym < csym)
{
symbol = SymListItem(isym)
// … do something with symbol
Msg ("symbol name = " # symbol.name)
isym = isym + 1
}
SymListNew ()
Allocates a new, empty symbol list. Returns the new symbol list handle, or hNil if errors. You should call Sym-
ListFree when you are finished with the symbol list.
SymListRemove (hsyml, isym)
Removes an element from the symbol list hsyml. The symbol element at isym is deleted.
Symbol Functions
Symbol functions allow you to access Source Insight's symbol lookup engine. Source Insight maintains sym-
bolic information about your project in a symbol database. These symbol functions make use of the symbol
database and Source Insight's built-in language parsers to locate symbols in your source files.
You may want to review the section "Symbols and Projects" in the "Projects" chapter for a description of how
Source Insight maintains symbolic information and what the lookup rules are.
Symbol Record
The Symbol record describes a symbol declaration. It specifies the location and type of a symbol. It is used to
uniquely describe a symbol in a project, or in an open file buffer.
Symbol records are returned by several functions, and Symbol records are used as input to several functions.
See “Symbol Record” on page 390.
GetBufSymCount(hbuf)
Returns the number of symbols declared in the buffer hbuf. Returns zero if no symbols are declared, or if the
file could not be processed, or if the document type for the file does not specify a language parser.
GetBufSymLocation(hbuf, isym)
Returns the Symbol record of the symbol indexed by isym in the buffer hbuf. Each parsed file buffer main-
tains an index of symbols defined in it. The index is sorted by symbol name. Symbol index values start at zero

Source Insight 4 User Guide 409
Symbol Functions
and go up to the count returned by GetBufSymCount minus one. This function maps a symbol index (isym)
into a symbol Symbol record.
See “Symbol Record” on page 390.
GetBufSymName(hbuf, isym)
Returns the name of the symbol indexed by isym in the buffer hbuf. Each parsed file buffer maintains an
index of symbols defined in it. The index is sorted by symbol name. Symbol index values start at zero and go
up to the count returned by GetBufSymCount minus one. This function maps a symbol index (isym) into a
symbol name.
This example iterates through all file buffer symbols:
isymMax = GetBufSymCount (hbuf)
isym = 0
while (isym < isymMax)
{
symname = GetBufSymName (hbuf, isym)
...
isym = isym + 1
}
GetCurSymbol ()
Returns the name of the symbol where the current selection is. The current selection is the selection (or cur-
sor position) in the active window. GetCurSymbol returns an empty string if no symbol is found.
GetSymbolLine (symbol_name)
Returns the line number of the symbol named symbol_name. If multiple symbols are defined with the same
name, then the user will be able to select the appropriate one.
GetSymbolLocation (symbol_name)
Returns the location of the symbol name specified in symbol_name. The location is returned in a Symbol
record. An empty string is returned if the symbol is not found. See “Symbol Record” on page 390.
This function performs a look up operation the same way that Source Insight looks up symbols when you use
the Jump To Definition command. If the symbol is not found in the current project, or any open file, then all
the projects on the project symbol path are searched as well. If more than one declaration is found for
symbol_name, then the user is presented with a multiple-definition list to select from.
You can also call GetSymbolLocationEx for more control over how the lookup operation is performed, and to
locate multiple definitions of the same symbol name.
This example looks up the definition of a symbol and displays its source file and line number.
symbol = Ask("What symbol do you want to locate?")
loc = GetSymbolLocation(symbol)
if (loc == "")
Msg (symbol # " was not found")
elseMsg (symbol # " was found in " # loc.file #
" at line " # loc.lnFirst)
Locating File Names
GetSymbolLocation can also look up file names. By giving a simple file name as the symbol_name parameter,
GetSymbolLocation can look up the file in the project, or on the project symbol path, and return the fully
qualified path to the file in the location.file field. This can be useful for expanding a simple file name into its
full path.

Symbol Functions
410 Source Insight 4 User Guide
For example:
loc = GetSymbolLocation("simple.c")
fullfilename = loc.file
// fullfilename could be something like "d:\proj\simple.c"
GetSymbolLocationEx (symbol_name, output_buffer, fMatchCase, LocateFiles, fLocateSymbols)
Finds all the declarations for the symbol specified in symbol_name. Each declaration location is appended
as a line to the given buffer output_buffer as a Symbol record. If fMatchCase, then the symbol name case
must match exactly. If fLocateFiles, then file names in the project or on the project symbol path are located.
File extensions don't have to be specified. If fLocateSymbols, then symbol definitions are located. Both fLo-
cateFiles and fLocateSymbols may be set to True.
See “Symbol Record” on page 390.
Since record variables can be expressed as a string, a Symbol record can be written as a line of text in a buffer.
To read a Symbol record from the output buffer, use the GetBufLine function to return the entire line text; in
this case a Symbol record. See GetSymbolLocation for a description of the Symbol record.
GetSymbolLocationEx returns the number of matching declarations, or zero if none were found.
Unlike the GetSymbolLocation function, this function will find multiple declarations that match on symbol-
_name. You can use this function to enumerate through each location by scanning each line of the output
buffer.
This example looks up a symbol and enumerates through each declaration found:
symbol = Ask("What symbol do you want to locate?")
hbuf = NewBuf("output")
count = GetSymbolLocationEx(symbol, hbuf, 1, 1, 1)
ln = 0
while (ln < count)
{
loc = GetBufLine(hbuf, ln)
msg (loc.file # " at line " # loc.lnFirst)
ln = ln + 1
}
CloseBuf(hbuf)
Locating File Names
GetSymbolLocationEx can also look up file names. By giving a simple file name as the symbol_name param-
eter, GetSymbolLocationEx can look up the file in the project, or on the project symbol path, and return the
fully qualified path to the file in the location.file field. See GetSymbolLocation for an example.
If fLocateFiles is TRUE, and a symbol name is given without an extension, GetSymbolLocationEx will locate
files that have this base name, regardless of extension. For example, if you specify "dlg" in symbol_name,
GetSymbolLocationEx may return matches on "dlg.c" (a file), and "dlg.h" (another file). Furthermore, if fLo-
cateSymbols is also TRUE, then "DLG" (a data type) may also be returned.
GetSymbolFromCursor (hbuf, ln, ich)
Returns the Symbol record of the symbol name that appears at the given cursor position. hbuf is the buffer
handle. ln is the line number. ich is the zero-based character index on the line.
This works in a similar way to the Jump To Definition command, except it returns the Symbol record, instead
of jumping. See “Symbol Record” on page 390.
GetSymbolLocationFromLn (hbuf, ln)
Returns the Symbol record of the symbol that exists at line number ln within the buffer hbuf. The symbol at ln
is a symbol whose declaration includes the given line number ln. See “Symbol Record” on page 390.
JumpToLocation (symbol_record)
Jumps to the location given in symbol_record. This opens the file in the Symbol record and moves the cursor
to the symbol defined there. This works the same way as the Jump To Definition command.

Source Insight 4 User Guide 411
Symbol Functions
The Symbol record is returned by the GetSymbolLocation function. See “Symbol Record” on page 390.
JumpToSymbolDef (symbol_name)
Jumps to the definition of the symbol named symbol_name. This opens a file and moves the cursor to the
symbol defined there. This works the same way as the Jump To Definition command.
SymbolChildren (symbol)
Returns a new symbol list handle containing the children of the given symbol. The children of a symbol are
the symbols declared within the body of the symbol. For example, the children of a class are the class mem-
bers.
symbol contains a Symbol record. See “Symbol Record” on page 390.
You should call SymListFree to free the symbol list handle returned by SymbolChildren.
You can use the Symbol List functions to access the symbol list returned by this function.
Example
This example looks up the definition of a symbol and displays its children:
symbolname = Ask("What symbol do you want to locate?")
symbol = GetSymbolLocation(symbolname)
if (symbol == nil)
Msg (symbolname # " was not found")
else{
hsyml = SymbolChildren(symbol)
cchild = SymListCount(hsyml)
ichild = 0
while (ichild < cchild)
{
childsym = SymListItem(hsyml, ichild)
Msg (childsym.symbol # " was found in "
# childsym.file # " at line " # childsym.lnFirst)
ichild = ichild + 1
}
SymListFree(hsyml)
}
SymbolContainerName (symbol)
Returns the container component of the symbol's name.
symbol contains a Symbol record. See “Symbol Record” on page 390.
Every symbol name is divided into path components, which are separated by dot (.) characters. For example,
a symbol name might be "myclass.member1". In this example, "member1" is contained by "myclass".
SymbolDeclaredType (symbol)
Returns a Symbol record of the declared type of the given symbol.
symbol contains a Symbol record. See “Symbol Record” on page 390.
SymbolLeafName (symbol)
Returns the "leaf", or right-most component of the symbol's name.
symbol contains a Symbol record. See “Symbol Record” on page 390.
Every symbol name is divided into path components, which are separated by dot (.) characters. For example,
a symbol name might be "myclass.member1". In this example, "member1" is contained by "myclass".
SymbolParent (symbol)
Returns a Symbol record of the parent of the given symbol. The parent of a symbol is the symbol that con-
tains it.

Searching Functions
412 Source Insight 4 User Guide
symbol contains a Symbol record. See “Symbol Record” on page 390.
SymbolRootContainer (symbol)
Returns the root, or left-most component of the symbol's name.
symbol contains a Symbol record. See “Symbol Record” on page 390.
Every symbol name is divided into path components, which are separated by dot (.) characters. For example,
a symbol name might be "myclass.member1". In this example, "member1" is contained by "myclass".
SymbolStructureType (symbol)
Returns a Symbol record of the structural type of the given symbol. The structural type is the struct or class
type of the symbol, which may be indirectly referenced through typedefs.
symbol contains a Symbol record. See “Symbol Record” on page 390.
Searching Functions
These functions search for references to words and patterns.
GetSourceLink (hbufSource, lnSource)
Returns the destination of a source link in a Link record. The source buffer is hbufSource and the source line
number is lnSource. If the given line does not contain a source link, then an empty string is returned. See
“Link Record” on page 388.
The destination link points to a location in some file at some line number. This source link information links
two arbitrary locations. For example, the Search Results buffer contains source links for each line that
matches the search pattern.
LoadSearchPattern(pattern, fMatchCase, fRegExp, fWholeWordsOnly)
Loads the search pattern used for the Search, Search Forward, and Search Backward commands.
The search pattern string is given in pattern.
If fMatchCase, then the search is case sensitive.
If fRegExpr, then the pattern contains a regular expression. Otherwise, the pattern is a simple string.
If fWholeWordsOnly then only whole words will cause a match.
ReplaceInBuf(hbuf, oldPattern, newPattern, lnStart, lnLim, fMatchCase, fRegExp, fWholeWordsOnly,
fConfirm)
Performs a search and replace operation in the given buffer.
The search pattern string is given in oldPattern.
The replacement pattern string is given in newPattern.
The line range is specified by lnSart to lnLim. The replacements only take place on lines lnStart up to lnLim -
1.
If fMatchCase, then the search is case sensitive.
If fRegExpr, then the pattern contains a regular expression. Otherwise, the pattern is a simple string.
If fWholeWordsOnly then only whole words will cause a match.
If fConfirm then the user will be prompted before each replacement.

Source Insight 4 User Guide 413
Project Functions
SearchForRefs (hbuf, word, fTouchFiles)
Searches for references to the word string in word throughout the whole project. Each line that contains
word is appended to the buffer hbuf. If fTouchFiles is TRUE, then each file that contains word will have its
last-modified time stamp set to the current time.
This function is similar to the "Lookup References" command. Word can contain more than one word, but
this function is much faster if it is a single word.
This example creates a new search results file and searches for references.
macro LookupRefs (symbol)
{hbuf = NewBuf("Results") // create output buffer
if (hbuf == 0)
stop
SearchForRefs(hbuf, symbol, 0)
SetCurrentBuf(hbuf) // put buffer in a window
}
SearchInBuf (hbuf, pattern, lnStart, ichStart, fMatchCase, fRegExp, fWholeWordsOnly)
Searches for pattern in the buffer hbuf. The search starts at line number lnStart and character index ichFirst.
SearchInBuf returns a Sel record which spans the matching text. If nothing is found, then an empty string is
returned. See GetWndSel for a description of the Sel record.
If fMatchCase, then the search is case sensitive.
If fRegExpr, then the pattern contains a regular expression. Otherwise, the pattern is a simple string.
If fWholeWordsOnly then only whole words will cause a match.
SetSourceLink (hbufSource, lnSource, target_file, lnTarget)
Creates a new source link. The link source buffer is hbufSource. The link source line number is lnSource. The
link target file is given as a path string in target_file. The link target line number is lnTarget.
Returns True if successful, or False if not. Target_file does not have to exist. The operation will not fail just
because target_file does not exist. Also, target_file does not need to be open.
For consistent results, target_file should contain a fully qualified path name for a file. However, you may pass
a simple file spec to this function and it will expand target_file based on what files are included in the current
project and on the project symbol path.
Source Links are destroyed when the source buffer closes, or when the source line is deleted.
Project Functions
Project functions allow you to open and close projects, and get project information.
AddConditionVariable(hprj, szName, szValue)
Adds a new conditional parsing variable used to evaluation conditional statements such as #if while parsing
code.
Hprj is a handle to the project. If hprj is hNil, then the new variable is added to the global condition list.
The name of the variable is given in szName, and the value is given in szValue
There are two condition lists: the global list and the project-specific list. When you open a project, the two
lists are merged, with the project-specific list taking precedence over entries in the global list.
See also “DeleteConditionVariable(hprj, szName)” on page 414.. See “Conditional Parsing” on page 60.

Project Functions
414 Source Insight 4 User Guide
AddFileToProj(hprj, filename)
Adds the given filename to the project hprj.
CloseProj (hprj)
Closes the project hprj.
DeleteConditionVariable(hprj, szName)
Deletes a new conditional parsing variable used to evaluation conditional statements such as #if while pars-
ing code.
Hprj is a handle to the project. If hprj is hNil, then the variable is deleted from the global condition list.
The name of the variable is given in szName.
There are two condition lists: the global list and the project-specific list. When you open a project, the two
lists are merged, with the project-specific list taking precedence over entries in the global list.
See also “AddConditionVariable(hprj, szName, szValue)” on page 413.. See “Conditional Parsing” on page 60.
DeleteProj (proj_name)
Delete the project named in proj_name. If that project is currently open, then the user is asked if they want to
close it first. If the user does not close the project, then the project is not deleted.
EmptyProj ()
Empties the project by removing all files from the project. The actual files themselves are not affected.
Returns True if successful, or False if errors.
GetCurrentProj ()
Returns the handle (hprj) of the currently open project. Source Insight only allows the user to open a single
project at a time; however from the macro language, more than one project can be open.
GetProjDir (hprj)
Returns the source directory path of the project hprj.
GetProjFileCount (hprj)
Returns the number of files added to the project hprj.
GetProjFileName (hprj, ifile)
Returns the name of the project file associated with index ifile in the project hprj.
Each project has an index of project files, sorted by file name. GetProjFileName maps an index to a file name.
File index values start at zero and go up to the count returned by GetProjFileCount.
This example interates through all project files:
ifileMax = GetProjFileCount (hprj)
ifile = 0
while (ifile < ifileMax)
{
filename = GetProjFileName (hprj, ifile)
..
ifile = ifile + 1
}
GetProjName (hprj)
Returns the name of the project hprj. The name contains the full path of the project file.

Source Insight 4 User Guide 415
Project Functions
GetProjSymCount (hprj)
Returns the number of symbols in the project hprj.
GetProjSymLocation (hprj, isym)
Returns symbol location information in a Symbol record for the symbol associated with index isym in the
project hprj. See “Symbol Record” on page 390.
Each project has an index of symbols, sorted by symbol name. GetProjSymLocation maps an index to a sym-
bol Symbol record. Symbol index values start at zero and go up to the count returned by GetProjSymCount.
You can call JumpToLocation to move to the Symbol record returned by GetProjSymLocation.
See GetSymbolLocation for more information on Symbol records.
GetProjSymName (hprj, isym)
Returns the name of the symbol associated with index isym in the project hprj.
Each project has an index of symbols, sorted by symbol name. GetProjSymName maps an index to a symbol
name. Symbol index values start at zero and go up to the count returned by GetProjSymCount minus one.
This example interates through all project symbols:
isymMax = GetProjSymCount (hprj)
isym = 0
while (isym < isymMax)
{
symname = GetProjSymName (hprj, isym)
..
isym = isym + 1
}
NewProj (proj_name)
Creates a new project and returns a project handle (hprj), or returns hNil if errors.
OpenProj (proj_name)
Opens the project named proj_name and returns a project handle (hprj), or hNil if errors.
RemoveFileFromProj(hprj, filename)
Removes the given filename from the project hprj. The file on disk is not altered or deleted.
SyncProj (hprj)
Synchronizes the project hprj. All files in the project are checked for external changes and Source Insight's
symbol database is updated incrementally for files that have changed.
SyncProjEx(hprj, fAddNewFiles, fForceAll, fSupressWarnings)
Synchronizes the project hprj. All files in the project are checked for external changes and Source Insight's
symbol database is updated incrementally for files that have changed.
New files are automatically added to the project if fAddNewFiles is True. Only file names that match docu-
ment types defined in the Document Options command are added.
If fForceAll, then each file in the project is re-synchronized, regardless of its time stamp.
If fSuppressWarnings, then Source Insight will not issue warnings if it has errors opening files.

Miscellaneous Macro Functions
416 Source Insight 4 User Guide
Miscellaneous Macro Functions
These function don't fit neatly into other categories, but are useful.
DumpMacroState (hbufOutput)
This function appends text describing the current state of the running macro to the buffer hbufOutput. The
macro state consists of the values of all variables, and the execution stack. This function is useful when
debugging macros.
GetProgramEnvironmentInfo ()
Returns a ProgEnvInfo record, which contains information about the environment where Source Insight is
running. See “ProgEnvInfo Record” on page 388.
GetProgramInfo ()
Returns a ProgInfo structure, which contains information about Source Insight. See “ProgInfo Record” on
page 389.
Other Information about Macros
Debugging
Source Insight does not contain a debugger for macros. However, since macros are interpreted, you can eas-
ily figure out what's going on by using the "Msg" function at strategic points in your code to output strings
and variable values. See “Msg (s)” on page 395.
To begin executing a macro statement at the current cursor position, use the Run Macro. Just put the inser-
tion point on the line you want to start running at and invoke the Run Macro command.
You can dump the execution stack and variable state of a running macro by calling the DumpMacroState
function. See “DumpMacroState (hbufOutput)” on page 416.
Persistence
Global variables are preserved between runs, but not between sessions. Local variables are not preserved
between runs or sessions. However, you can preserve values by storing them in a file, or writing and reading
registry keys.
No Self-Modifying Macros
Make sure that a macro is not modifying itself while running. Source Insight will abort any macro that
attempts to edit a file containing a running macro.
Sample Macros
A macro file is in included with Source Insight called "utils.em". This file contains some useful functions and
you may want to look at it to see some examples.


Event Handlers
418 Source Insight 4 User Guide

Source Insight 4 User Guide 419
Macro Event Handlers
CHAPTER 6 Macro Event Handlers
This chapter describes event handler functions that are written in the Source Insight macro language. An
event handler is a function that gets called when specific events occur. This chapter assumes you are familiar
with the macro language rules and syntax.
Macro Event Handlers
An event handler is a function written in Source Insight's macro language that gets called when specific
events occur. Instead of using the macro or function keyword to define a function, you use the event key-
word. For example:
event ProjectOpen(sFile)
{
}
Event handler functions do not return a value. They cannot be used to abort the event, or to return a value to
the program. Also take note of the spelling of the event function parameters. They must be spelled correctly.
Event Handler Names
Event handler names and their function parameters are predefined. Your event handlers must use the exact
spelling of the function names and parameters.
The following are events supported by Source Insight:

Event Handler Uses
420 Source Insight 4 User Guide
Application Events
event AppStart()
event AppShutdown()
event AppCommand(sCommand)
Document Events
event DocumentNew(sFile)
event DocumentOpen(sFile)
event DocumentClose(sFile)
event DocumentSave(sFile)
event DocumentSaveComplete(sFile)
event DocumentChanged(sFile)
event DocumentSelectionChanged(sFile)
Project Events
event ProjectOpen(sProject)
event ProjectClose(sProject)
Statusbar Events
event StatusbarUpdate(sMessage)
Event Handler Uses
You can use event handlers for many things, but a few ideas are:
•Monitor and log activity. For example, you can log actions to a log file, and later use that information
to analyze what parts of a project have been edited.
•Synchronize another program or file with actions inside Source Insight.
•Alter the way that Source Insight works.
•Perform post-processing of files before saving them.
•Perform preprocessing of new files.
Adding Event Handlers to Source Insight
Event handlers are stored in macro source files. That is, they have the .em extension. You can mix event and
macro functions in the same file. Once you write an event handler, you should add it to the current project.
You can add it to the Base project if you want the events to be handled regardless of the project. If Source
Insight cannot find a given event handler, it is ignored. Source Insight searches in your project, the project
symbol path, and the Base project.
It's important to remember that you must add the .em file to a project, or Source Insight will not invoke the
event handlers in that file. This is to prevent event handlers from accidentally running just by opening a .em
file with an event function in it.

Source Insight 4 User Guide 421
Application Events
Enabling Event Handlers
You must enable event handlers before using them. For security reasons, they are disabled by default. To
enable event handlers, select Options > Preferences and click the General tab. Then, check the box that says
"Enable event handlers". Once you enable event handlers, that option is saved so you don't have to do it
again.
There is also a user-level command named Enable Event Handlers that can be assigned to a menu, or a key-
stroke.
Note: For security reasons, you cannot run the Enable Event Handlers command from a macro.
Editing Event Handler Files
Source Insight will ignore event handlers in any file that is modified and unsaved. Therefore, if you are editing
an event handler source file, Source Insight will not try to execute the handler while you are editing it! Once
you are done with the editing, save the file. Source Insight will once again execute the handlers when the file
is saved.
Errors in Event Handlers
If an event handler causes a syntax error or runtime error, then all event handlers are disabled for the rest of
the Source Insight session. You will see a "Macro Error" warning message. To enable event handlers again,
you must restart Source Insight.
Synchronous Vs. Asynchronous Events
Some event handlers are called immediately when the event occurs. These are called "synchronous' events.
An example is DocumentNew. It gets called as soon as the user creates a new document (file buffer).
However, some events are called shortly after the event occurs, usually after a short amount of idle time.
These are called "asynchronous' events. They are asynchronous because it would destabilize Source Insight
if a user-written macro were to be called at the exact time the event occurred.
Helpful Tips for Event Handlers
It is best to put all event handlers in one file, or a small number of files with names like "event-some-
thing.em". That way, you can easily remove those files from the project to effectively turn off the handlers.
Global variables are useful for adding counters, and maintaining state between events. See “Global Vari-
ables” on page 379.
Application Events
Application events apply to the Source Insight application as a whole.
event AppStart()
Called after the Source Insight application loads and initializes. The current project and workspace session is
already loaded.

Document Events
422 Source Insight 4 User Guide
event AppShutdown()
Called just before the Source Insight application exits.
event AppCommand(sCommand)
Called just after the given user-level command has executed.
Document Events
Document events apply to when file buffers are opened, closed, saved, or modified.
event DocumentNew(sFile)
Called just after the given file buffer is created. The file name is sFile.
event DocumentOpen(sFile)
Called just after the file buffer is opened. The file name is sFile.
event DocumentClose(sFile)
Called just after the file buffer is closed. The file name is sFile.
event DocumentSave(sFile)
Called just before the file buffer is saved. The file name is sFile. You can make edits to the file buffer at this
point just before it gets saved. If you want to do something after the file is saved, then you can use the Docu-
mentSaveComplete event.
event DocumentSaveComplete(sFile)
Called just after the file buffer is saved. The file name is sFile. If you want to get control before the file is
saved, then you can use the DocumentSave event.
event DocumentChanged(sFile)
Called when the file buffer is edited by the user. The file name is sFile. This event is handled asynchro-
nously. That is, it is not called as the user is typing. It is called after a moment of idleness. This allows you edit
the file inside this event handler. Note because this function is called asynchronously, it is possible the sFile
file may not be open, so you need to test the return value of GetBufHandle(sFile) to make sure it is not
hNil.
event DocumentSelectionChanged(sFile)
Called when the user selects text, or moves the cursor in the current file. The file name is sFile. This event is
handled asynchronously. That is, it is not called as the user moves the cursor. It is called after a moment of
idleness. Note because this function is called asynchronously, it is possible the sFile file may not be open,
so you need to test the return value of GetBufHandle(sFile) to make sure it is not hNil.

Source Insight 4 User Guide 423
Project Events
Project Events
Project Events apply to opening and closing Source Insight projects.
event ProjectOpen(sProject)
Called after the project is opened.
event ProjectClose(sProject)
Called before the project is closed.
Statusbar Events
Statusbar events occur when the statusbar text changes.
event StatusbarUpdate(sMessage)
Called when the contents of the statusbar changes. This event is handled asynchronously. That is, it is not
called at the exact moment the statusbar changes. It is called after a moment of idleness. This allows you
edit the file inside this event handler.

Statusbar Events
424 Source Insight 4 User Guide

Source Insight 4 User Guide 425
Index C
Index
A
About Source Insight 157
Activate Clip Window 158
Activate FTP Browser 158
Activate Menu Commands 158
Activate Project File List 158
Activate Project Search Bar 158
Activate Project Symbol List 158
Activate Project Window 159
Activate Relation Window 159
Activate Search Bar 159
Activate Search Results 159
Activate Snippet Window 159
Activate Symbol Window 159
Activate Window List 159
Activating Source Insight 16
activation 258
Activation Questions 16
Active Server Page 58
Add and Remove Project Files 159
Add and Remove Project Files Dialog Box 46, 160
Add File 162
Add File List 162
Add Library Symbols 234
AddConditionVariable function 413
AddFileToProj function 414
Adding a New File to the Current Project 317
Adding Files to a Project 45
adding files, to a project 45, 159
Adding New File Extensions 215
Adding New File Types 73
Adding Remote Files to a Project 45
Advanced Options 163
Allow code snippets in file types 218
AppendBufLine function 396
Arrange Windows 163
Arrangement Toolbar 163
ASCII
inserting codes 236
AsciiFromChar function 391
Ask function 392
ASP 58
Assigning Keys and Mouse Clicks 240
AssignKeyToCmd function 392
Associating Files with Document Types 72
Associating Special File Names 73
Auto Indenting 219
auto-completion, enabling in a document type 217
Auto-Completion, speeding up 151
B
Back Tab 163
Background Tasks 227
Backspace 163
Backup Files 128
Backup Folder 221
Base Project 49, 155
base type
jump to 238
Beep function 393
Beginning of Line 163
Beginning of Selection 163
Blank Line Down 163
Blank Line Up 163
Block Down 163
Block Up 163
Bookmark 164
Bookmark Options 165
Bookmark Record 387
Bookmark Storage 103
Bookmark Window 164
activating 164
showing and hiding 164
Bookmarks
activating the Bookmark Window 164
FTP locations 103
options 165
overview 102
setting 164
storage 103
using the Bookmark Window 164
BookmarksAdd function 406
BookmarksCount function 407
BookmarksDelete function 407
BookmarksItem function 407
BookmarksLookupLine function 407
BookmarksLookupName function 407
Bottom of File 165
Bottom of Window 165
Browse Files 165
Browse Global Symbols Dialog box 166
Browse Local File Symbols 167
Browse Project Symbols 166
Browser Mode 168
Browsing and Analysis 74
Browsing Non-Project Files 50
BufListCount function 395
BufListItem function 395
Bufprop Record 387
Built-In Languages 54
C
C/C++ Language Features 64
C# and .NET Framework Symbols 57
Call Graphs 97
Call Trees and Reference Trees 75
caller
jump to 238
Cascade Windows 169
cat function 391
Changing the Width of the Symbol Window 30
Character Spacing Options 198
CharFromAscii function 391
CharFromKey function 393
Checkpoint 169
Checkpoint All 169
Clear Highlights 169
ClearBuf function 396
ClearCase 69
Clip Properties 169
Clip Storage 101
Clip Window 170
activating the window 158
font 171
options 171
overview 101
showing and hiding 170
Clip Window Options 171
Clips
defined 101
in Clip Window 101
new clip command 263
Close 171
Close All 172
Close Project 172
Close Window 172
CloseBuf function 396
CloseProj function 414
CloseWnd function 402
Closing the Current Project 134

DIndex
426 Source Insight 4 User Guide
CmdFromKey function 393
code pages 125
Code Snippets
overview 98
code snippets 218
Color Options 172
Color Printing, Printing
color 273
Command Line
symbol access 75
syntax 132
Command Reference 157
Command Shell 175
Commands Overview 157
commands, defined 136
Comment Heading Styles 85
Comment Headings 358
Comment Right Style 86
Comment Styles 85
Comment Styles and Custom Languages 86
Comments and Ranges 246
comments, styles for 86
Compare Files 175
Compare with Backup File 176
Compatibility With Old Versions of Source Insight 18
Compile Command, creating a custom command 188
Complete Snippet 176
Complete Symbol 177
Condition Variables 61
Condition Variables, editing 61
Condition Variables, ignoring 61
Conditional Parsing 60, 201
Conditional Parsing and Preprocessor Support 60
Conditional Parsing List 177
Conditions
editing 201
config_all.xml 139
Configuration Master File 140
Configurations 138
file 139
importing from version 3.x 18, 142, 252
loading 142, 251
master configuration file 140
resetting to defaults 135, 143
saving 142
Context Window 178
customizing 92
font 180
for analysis 75
locking 254
options 179
overview of 90
showing and hiding window 178
Context Window Options 179
Copy 181
Copy File Path 181
Copy Line 181
Copy Line Right 181
Copy List 181
Copy Project 182
Copy Symbol 182
Copy To Clip 182
CopyBufLine function 396
Copying a Project 48
Crash Recovery
options 227
Crash, recovery 130
Crashes
recovery procedure 130
Create A Project, where to store 43, 264
Create Bookmarks from Relation Items 183
Create Command List 183
Create Key List 183
Creating a New Clip 101
Creating a Project 42
Creating a Project Report 76
Creating Source Links 108
Current Project 41
Cursor Down 183
Cursor Left 183
Cursor Right 183
Cursor Up 183
Custom Commands 183
command line substitutions 186
creating a compile command 188
dialog box 184
Overview 137
Path Variables 187
running in the background 188
running the command shell 186
shellexecute 187
shellexecute examples 188
the 'run' field format 186
Custom Languages 54
comments and ranges 246
custom parsing 249
properties 244
range definition 246
Custom Parsing 249
styles for 250
Custom Parsing Expression 250
Custom Parsing Expressions, speeding up 149
Customizing
keyboard 239
Customizing menus 261
Customizing the Context Window 92
Customizing the Relation Window 97
Customizing the Symbol Window 30
Customizing with the Preferences command 273
Cut 189
Cut Line 190
Cut Line Left 190
Cut Line Right 190
Cut Selection or Paste 190
Cut Symbol 190
Cut To Clip 190
Cut Word 190
Cut Word Left 190
D
Deactivate License 190
Deactivation 16
Debugging Macros 416
Declaration Styles 82
Decoding Base Types to Show Structures 92
Define Visual Theme 260
Defining a Visual Theme 144
definition
jump to 238
DelBufLine function 396
Delete 191
Delete All Clips 191
Delete Character 191
Delete Clip 191
Delete File 191
Delete Line 191
DeleteConditionVariable function 414
DeleteProj function 414
diff
File Compare command 205
DIM Record 388
Directory Compare Options 193
Display Options 195
Document Types
adding 73
associate with file name 73
dotted path 55

Source Insight 4 User Guide 427
Index G
Drag Line Down 200
Drag Line Down More 200
Drag Line Up 200
Drag Line Up More 200
DumpMacroState function 416
Duplicate 201
Duplicate Symbol 201
E
Edit Condition 201
Edit Condition Dialog box 201
Edit FTP Site Properties 224
Editing the Condition Variables 61
Editing the Document Options 73
Editing Token Macros 65
EmptyProj function 414
encoding characters and files 125
End Brace Annotations 88
End of Line 202
End of Selection 202
EndMsg function 393
Event 419
event AppCommand 422
event AppShutdown 422
event AppStart 421
event DocumentChanged 422
event DocumentClose 422
event DocumentNew 422
event DocumentOpen 422
event DocumentSave 422
event DocumentSaveComplete 422
event DocumentSelectionChanged 422
event handler 202, 228, 419
adding 420
enabling 202, 228, 421
uses of 420
event ProjectClose 423
event ProjectOpen 423
event StatusbarUpdate 423
events
application 421
document 422
project 423
statusbar 423
Exit 202
Exit and Suspend 203
Expand 203
Expand All 203
Expand Special 203
Expand tabs 217
Expand Text Variables 203
Export File as HTML 203
Export Project File List 203
Export Project To HTML 204
Export Project to HTML 124
Extending the Selection 117
F
Factors That Affect Performance 148
File Buffer Basics 128
File Compare 205
File Compare Window Options 207
File Encodings 125
File Format Changes 21
File Options 208
File Options Dialog box 209
File Search Bar 212
File Search Bar Options 212
File Type Options 213
File Type Options Dialog box 214
File Types 72, 213
File Types View 52
Files
how they are located 133
files
adding to project 45
associating with document type 72, 73
built for each project 155
checkpointing 129
file types 72
loading 252
new 262
normalized names 42
opening 132
what to add to a project 45, 159
Files Created by Source Insight 154
Files Created for Each Project 155
Files Created for Each User 154
Files in the Program Directory 154
Finding a Symbol 134
Finding References to Symbols 75
First Source Link 229
Folder Options 220
folders
for Base project 155
for settings 155
My Documents 154
program 154
project 155
fonts
Clip Window 171
Context Window 180
for Draft View 262
for printing 216, 273
horizontal spacing options 198
in style properties 344
lining up white space 215
Relation Window graph nodes 304
Relation Window outline 306
scaling in remote sessions 311
setting per source file type 216
spacing 199
Symbol Window 350
used by syntax formatting 355
working with wide fonts 199
Formatting Properties 80, 342
FTP 221
FTP Bookmarks 103
FTP Browser 221
FTP Browser Options 222
FTP Site List 223
Full Screen 225
FuncFromKey function 393
Function Down 225
Function Up 225
G
General Options 225
General Options Dialog box 226
Generating HTML from Project Sources 124
GetApplicationWnd function 402
GetBufHandle function 396
GetBufLine function 396
GetBufLineCount function 396
GetBufLineLength function 396
GetBufLnCur function 397
GetBufName function 397
GetBufProps function 397
GetBufSelText function 397
GetBufSymCount function 408
GetBufSymLocation function 408
GetBufSymName function 409
GetChar function 393
GetCurrentBuf function 397
GetCurrentProj function 414

HIndex
428 Source Insight 4 User Guide
GetCurrentWnd function 402
GetCurSymbol function 409
GetEnv function 399
GetKey function 393
GetNextWnd function 402
GetProgramEnvironmentInfo function 416
GetProgramInfo function 416
GetProjDir function 414
GetProjFileCount function 414
GetProjFileName function 414
GetProjName function 414
GetProjSymCount function 415
GetProjSymLocation function 415
GetProjSymName function 415
GetReg function 399
GetSourceLink function 412
GetSymbolFromCursor function 410
GetSymbolLine function 409
GetSymbolLocation function 409
GetSymbolLocationEx function 410
GetSymbolLocationFromLn function 410
GetSysTime function 393
Getting Started 15
GetWndBuf function 402
GetWndClientRect function 402
GetWndDim function 402
GetWndHandle function 402
GetWndHorizScroll function 403
GetWndLineCount function 403
GetWndLineWidth function 403
GetWndParent function 403
GetWndRect function 403
GetWndSel function 403
GetWndSelIchFirst function 403
GetWndSelIchLim function 403
GetWndSelLnFirst function 404
GetWndSelLnLast function 404
GetWndVertScroll function 404
Git 69
Go Back 228
Go Back and Go Forward commands 114
Go Back to View a Function Call Chain 229
Go Back Toggle 229
Go Forward 229
Go To First Link 229
Go To Line 230
Go To Next Change 231
Go To Next Link 231
Go To Next Reference Highlight 231
Go To Previous Change 231
Go To Previous Link 231
Go To Previous Reference Highlight 231
Goto Arrows 88
Grouping Panel Windows 35
H
Having Multiple Configurations 319
Header and Footer Codes 270
header files, opening 238
Help 231
Help Mode 231
Highlight Word 232
Horizontal Scroll Bar 232
Horizontal Spacing Options 198
HTML 58
Active Server Pages 58
generating from sources 124
PHP Scripts 58
Scripts 58
HTML Help 233
I
IchFromXpos function 404
if statement in macro language 384
ifdefs 60
Import External Symbols 233
Import External Symbols for Current Project 236
import library 56, 233
Importing and Exporting Keyword Lists 361
Importing Symbols from Libraries 55
Inactive Code - ifdef Support 60
Inactive Code Style 84
Incremental Search 232
Incremental Search Backward 232
Incremental Search Mode 232
Indent Left 236
Indent Right 236
Indenting Automatically 219
Indenting Options 219
Index options for projects 44
Index Performance 286
InsBufLine function 397
Insert ASCII 236
Insert File 236
Insert GUID 237
Insert Line 237
Insert Line Before Next 237
Insert New Line 237
Inserting Snippets 98
Installing Source Insight 15
intelligent paste 217, 364
Internal Macro Functions 391
Internet-style searching 105
IsAltKeyDown function 393
IsBufDirty function 397
IsBufRW function 397
IsCmdEnabled function 399
IsCtrlKeyDown function 394
IsFuncKey function 394
islower function 392
IsNumber function 392
isupper function 392
IsWndMax function 404
IsWndMin function 404
IsWndRestored function 404
J
Java Symbols 57
Join Lines 237
Jump To Base Type 238
Jump To Caller 238
Jump to Caller command 74
Jump To Definition 238
Jump to Definition command 74
Jump To Definition, Mouse Shortcut 238
Jump To Link 238
Jump To Prototype 238
JumpToLocation function 410
JumpToSymbolDef function 411
K
Key Assignments 239
Key Assignments Dialog box 239
Key Benefits 15
Keyboard
customizing 138
KeyFromChar function 394
Keypad, numeric 240
Keyword Expressions 257, 329
Keyword List 241
Keyword Search Results 257, 330
Keyword Variations 257
Keywords and Styles 359

Source Insight 4 User Guide 429
Index N
Keyword-style searching 105, 257, 329
L
Language
selecting for a file type 216
Language Info 244
Language Keyword Styles 82
Language Keywords Dialog box 360
Language Options 241
for file types 216
special options 243
Language Properties 244
basic options 245
comments and ranges 246
custom parsing 249
range definition 246
Language support
C/C++ 64
Language Types 72
Last Window 250
Layout Toolbar 250
Layouts 146
resetting to defaults 135
License 258
license
activation 16
activation common questions 16
deactivation 16
transferring to new machine 16
License Activation 258
License Deactivation 16
Line Numbers 251
Link
jump to 238
Link All Windows 251
Link Record 388
Link Window 251
Listing Key Assignments 241
Load Configuration 251
Load File 252
Load Layout 253
Load Search String 254
Loading a Configuration 142
Loading and Saving Workspaces 147
LoadSearchPattern function 412
Lock Context Window 254
Lock Relation Window 254
Logging Options 254
Lookup References 255
Lookup References Dialog box 255
Lookup References, speeding up 152
M
Macro Functions 374
Macro Language Guide 373
Macros
Array Techniques 382
Basic Syntax Overview 373
Bookmark Functions 406
Break and Continue 385
Buffer List Functions 395
built-in functions 391
Conditional Expression Evaluation 385
Conditions and Loops 384
Debugging 416
Declaring a Variable 378
Environment and Process Functions 399
event handlers 419
Expanding Variables in a String 380
File Buffer Functions 396
functions 374
Global variable persistence 416
Global Variables 379
Identifier Names 373
if statement 384
Indentation and White Space 373
Indexing Into Strings 381
Miscellaneous Functions 416
Operators 383
Project Functions 413
Record Variables 381
running 375
Running Inline Macro Statements 376
Scopes and References 375
Searching Functions 412
Special Constants 383
Standard Record Structures 386
Statements 376
strictvars mode 378
String Functions 391
Symbol Functions 408
Symbol List Functions 407
Symbol Record 390
User Input and Output Functions 392
user-level commands 375
User-Level Macros vs Functions 374
Variable Arithmetic 381
Variable Initialization 379
Variable Values 380
variables 378
while statement 385
Window Functions 401
Window List Functions 401
Macros as Commands 375
Maintaining Multiple Parse Patterns 271
Make Column Selection 257
MakeBufClip function 397
Manage License 258
Manage Visual Themes 258
Managing Tasks With Workspaces 147
Master File List 46, 160
MaximizeWnd function 405
Memory Usage 148
Menu Assignments 261
Menus
customizing 138
MinimizeWnd function 405
Mono Font View 262
Moving Through a File 115
Msg function 395
Multiple Relation Windows 97
My Documents 41, 154
N
Name Fragments 66
Navigation
scrolling and selecting text 115
selection history 114
source links 108, 115
Net Framework 149
New 262
New Clip 263
New Features in Version 4 20
New Project 263
overview of creating a project 42
New Relation Window 263
New Window 264
NewBuf function 397
NewProj function 415
NewWnd function 405
Next File 264
Next Relation Window View 264
Normalized File Names 42
Numeric Keypad Keys 240

OIndex
430 Source Insight 4 User Guide
O
Open 264
Open As Encoding 264
Open Backup File 266
Open Project 266
OpenBuf function 397
Opening and Closing Projects 47
Opening Files 132
Opening Header Files 238
Opening Projects 47
Opening Workspaces 133
OpenMiscFile function 397
OpenProj function 415
Operator Substitutions, syntax decorations 87
outline
expand 203
expand all blocks 203
Outline Toolbar 122, 267
Outlining and Collapsing Text 121
Outlining Options 268
Overview Options 268
Overview Scroller 27
P
Page Down 269
Page Setup 269
Page Up 271
Panel Window Controls 34
Panel Windows 31
Paren Left 271
Paren Right 271
Parent Styles, syntax formatting 81
Parse Source Links 271
Parse-Too-Complex 63
Parsing Considerations 62
Parsing Problems 62
Paste 272
Paste From Clip 272
Paste Line 272
Paste Symbol 272
PasteBufLine function 398
Path Variables 153
Performance Factors 148
Performance Tuning 148
PHP and Server-Side Scripts 58
Pick Window 272
Placeholder Text Variables 99
Play Recording 273
Predefined Path Variables 153
Predefined Text Variables 99
Preferences 273
Files 208
Preprocessor Token Macros 64
Previewing Files 91
Print 273
Print Relation Window 274
PrintBuf function 398
ProgEnvInfo Record 388
ProgInfo Record 389
Project
adding files 45
adding remote files 45
changing settings 48
closing current project 134
directories 41
features 40
generating HTML from 124
index settings 148
size 148
token macros 65
Project Data Directory 41
Project File List 276
Project File List Options 277
Project File Type List Options 274
Project File Types 274
Project Folder Browser 274
Project Folder Browser Options 275
Project Master File List 46
Project Rebuild Notice 278
Project Report 286
Project Search Bar 278
activating 158
showing and hiding 278
Project Settings 284
Project Source Directory 41
Project Symbol Categories 280
Project Symbol Category Window Options 280
Project Symbol List 281
Project Symbol List Options 283
Project Symbol Path 56
Project vs Global Snippets 100
Project vs. Global Conditions 201
Project Window 50
file list view 276
file type view 274
folder browser options 275
folder browser view 274
symbol category view 280
Project Window command 287
Project Window Symbol List 75
Projects 40
Base 155
creating 42
folder 155
index performance 286
new 263
opening and closing 47
opening version 3.x projects 18
removing a project 47
removing files from 46
renaming and identifier 106
report 76
searching for references 104
setting index options 44
settings 284
synchronizing files 48, 351
the current project 41
where to store data file 43, 264
projects
copying a project 48
Creating a Web Version 49
Master File List 46
rebuilding 49
Projects Folder 221
Project-Specific Configuration Parts 141
Prompting for Each File Separately 317
Prototype
jump to 238
PutBufLine function 398
PutEnv function 399
R
Range Definition 246
Read-Only Projects
projects
read-only 48
Rebuild Project 287
Rebuilding Projects 49
Record Variables in macros 381
Recovering From Crashes 130
Recovery
procedure 130
warnings 130
Rect Record 389
Redo 288

Source Insight 4 User Guide 431
Index S
Redo All 288
Redraw Screen 288
Reference Styles 83
Reform Paragraph 288
Reformat Source Code Options 288
Refresh Relation Window 302
Refresh Relation Window command 74
Regular Expressions 109
characters, overriding 110
groups 110
Multi-Line Patterns 109
Optional Syntaxes 109
summary 111
Relation Window 305
activating the window 159
call graph filter 308
call graph symbol-type filter 309
call graphs 97
call trees 75
creating a new window 263
customizing 97
cycling through windows 264
fonts 304
graph views 367
locking 254
Outline and Graph views 93
overview of 93
performance 97, 151
printing 274
refreshing 74, 302
relationship rules 96
relationship types 96
setting fonts in outline view 306
setting options 305
showing and hiding 305
showing outline view 367
speeding up 151
the “type of” relationship 308
using multiple windows 97
Relation Window Graph Options 304
Relation Window Options 305
Relation Window Options Dialog Box 306
Relationship Rules 96, 307
Relationship Types 96
Reload As Encoding 302
Reload File 309
Reload Modified Files 310
remote files
adding to a project 45
Remote Options 311
Remove File 310
Remove Project 310
RemoveFileFromProj function 415
Removing a Project 47
Removing Files from a Project 46
Rename 311
RenameBuf function 398
Renaming 76
Renaming an Identifier 106
Renumber 311
Repeat Typing 312
Replace 312
Replace Files 313
ReplaceInBuf function 412
Replacing in Multiple Files 105
Replacing in the Current File 105
Resetting Configuration Options 135
Resetting the Configuration to Defaults 143
Resetting the Display Layout 135
Restore File 315
Restore Lines 316
Restoring Lines 366
RunCmd function 399
RunCmdLine function 399
Running a Command, from command line 134
Running Macros 375
S
Save 316
Save A Copy 316
Save All 317
Save All Quietly 317
Save As 317
Save As Encoding 318
Save Configuration 319
Save Layout 320
Save Modified Files Dialog Box 317
Save New Backup File 320
Save Selection 320
Save Settings 320
Save Workspace 320
SaveBuf function 398
SaveBufAs function 398
Saving a Configuration 142
Saving and Restoring Workspaces 147
Saving When You Switch to Another Program 317
Saving Window Arrangements with Layouts 146
Saving Without Prompts 317
Scroll Bar Options 321
scroll bars 232, 366
Scroll Half Page Down 323
Scroll Half Page Up 323
Scroll Left 323
Scroll Line Down 323
Scroll Line Up 323
Scroll Right 323
Scrolling and Selecting Text 115
Scrolling Commands 115
ScrollWndHoriz function 405
ScrollWndToLine function 405
ScrollWndVert function 405
SDK Help 323
Search 323
Search Backward 324
Search Backward for Selection 324
Search Engine
used by Search Web 331
Search Engines 325
Search Files 325
Search Forward 327
Search Forward for Selection 327
Search List 328
Search Project 328
using Project Search Bar 105
Search Results Options 330
Search Results Window 37, 106
Search Web 331
search engines 325
SearchForRefs function 413
SearchInBuf function 413
Searching
File Search Bar 104
for keywords 105
for symbol references 104
incremental mode 232
keyword-style searches 257, 329
load search string command 254
matching 0, 1, or more occurrences 110
matching a tab or space 109
matching any in a set of characters 110
matching the beginning or end of a line 109
multiple files 105
Project Search Bar 105
searching the web 331
source links 107
the current file 104
using regular expressions 109

SIndex
432 Source Insight 4 User Guide
using Search Results window 106
using source links 106
Searching and Replacing Text 104
Searching Options 328
Searching, wildcards 109
See "File Type Options" on page 152. 73
See “Document Options” on page 152. 73
Select All 331
Select Block 331
Select Char Left 331
Select Char Right 332
Select Function or Symbol 332
Select Line 332
Select Line Down 332
Select Line Up 332
Select Match 332
Select Next Window 332
Select Sentence 332
Select Symbol 332
Select To 332
Select To End Of File 333
Select To Top Of File 333
Select Word 333
Select Word Left 333
Select Word Right 333
Selecting
a paragraph of text 119
a whole line 119
between lines 119
matching parentheses and blocks 119
the enclosing block 119
the whole file 119
whole functions or symbols 118
whole words 118
Selection Commands 116
Selection History 333
Selection Record 390
Selection Shortcuts 118
Selections
extending 117
SetBufDirty function 398
SetBufIns function 398
SetBufSelText function 398
SetCurrentBuf function 398
SetCurrentWnd function 405
SetReg function 399
SetSourceLink function 413
Settings Folder 221
Settings folder 155
Setup HTML Help 334
Setup WinHelp File 334
SetWndRect function 405
SetWndSel function 405
ShellExecute Commands 187
ShellExecute function 399
Show Clipboard 334
Show File Status 334
Showing Declarations and Definitions 92
Simple Tab 335
Smart Beginning of Line 335
Smart End of Line 335
Smart Indent Options 219
Smart Rename 335
Smart Renaming 76, 106
Smart Tab 336
Smart Tab Examples 336
Snippet Properties 338
Snippet Window 339
Snippet Window Options 340
Snippets
allow in auto-completion list 339
allow in file type options 218
complete when typing 176
editing 338
expanding text variables in text 203
files 156
folder for storing 155
in auto-completion list while typing 177
in clips 171
inserting when typing 176
managing list of 339
overview 98
project vs global 100
setting options 100
text variables 98
Sort Symbol Window 341
Sort Symbols By Line 341
Sort Symbols by Name 341
Sort Symbols By Type 341
Source Control Commands 68
Source Control Toolbar 69
Source Dynamics on the Web 342
Source File Windows 26
Source Insight Concepts 39
Source Links 106, 108
creating 108
parsing 271
with compiler errors 229
with search output 230
Source Links from Custom Command Output 108
spaces
lining up with mono font view 262
making visible 218
Spacing, the Space-Width Character 198
Special Language Options 243
Specifying a Project to Open 134
Specifying File Arguments 132
Speeding Up
auto-completion 151
building and synchronizing projects 151
lookup references 152
program features 149
relation windows 151
searching files 151
syntax formatting 149
typing in browse dialog boxes 150
splash screen, suppressing 135
Start Recording 342
StartMsg function 395
Stop Recording 342
Storing Configuration Parts in Separate Files 141
strictvars mode 378
strlen function 392
strmid function 392
strtrunc function 392
Style Properties 342
Style Properties Dialog Box 343
Styles
and syntax formatting 78
applied to source code 80
changing properties 88
comment headings 85, 358
defining with Style Properties 342
for declarations 82
for inactive code 84
for language elements 357
for mono font view 262
for references 83
formatting properties 342
how they work 80
mapped from language keywords 82
parent styles 81
single and multi line comment styles 86
Styles for Custom Parsing Symbols 250
Suppressing New Program Instances 133
Suppressing the Splash Screen 135
Switching Off Syntax Formatting Temporarily 89
Syllable Matching 66

Source Insight 4 User Guide 433
Index W
Syllable Matching, controlling 66
Syllable Shortcuts 67
Symbol Database
updating when saving files 48
Symbol Info 345
Symbol Lookup Options 346
Symbol Naming 55
Symbol Navigation Commands 74
Symbol Record 390, 408
Symbol Reference Lookups 358
Symbol Tracking Options 180, 309
Symbol Type Filter 348
Symbol Window command 348
Symbol Window Options 350
Symbol Window, Permanently Changing Width 30
Symbol Windows 30
SymbolChildren function 411
SymbolContainerName function 411
SymbolDeclaredType function 411
SymbolLeafName function 411
SymbolParent function 411
SymbolRootContainer function 412
symbols
dotted path 55
importing from libraries 55
in Project Symbol List panel 281
SymbolStructureType function 412
SymListCount function 407
SymListFree function 407
SymListInsert function 408
SymListItem function 408
SymListNew function 408
SymListRemove function 408
Sync File Windows 351
Synchronize Files 351
Synchronizing Files in Batch Mode 134
Synchronizing Project Files 48
SyncProj function 415
SyncProjEx function 415
Syntax Decorations 87, 352
end brace annotations 88
scaled nested parentheses 88
Syntax Decorations Command 88
Syntax Formatting 355
basic options 356
controlling 88
parent styles 81
speeding up 149
turning off 88
Syntax Formatting and Styles 78
Syntax Formatting Command 88
Syntax Keyword List 241
SYSTIME Record 391
T
Tab Tray 361
Tab Width 217
tabs
expanding 217
making visible 218
setting width 217
Tabs to Spaces 361
Temporary Project, specified on command line 134
Text Variable Replacements 100
Text Variables 98
expanding in text 203
placeholders 99
predefined 99
The Configuration File 139
The Undo History 366
Tile Horizontal 361
Tile One Window 361
Tile Two Windows 362
Tile Vertical 362
Time stamping 129
To Search a Set of Files 327
Toggle Extend Mode 362
Toggle Insert Mode 362
ToggleWndMax function 405
Token Macro Files 64
Token Macro Syntax 64
Token Macros 64, 65
tolower function 392
Toolbars 37
File Search Bar 38
Project Search Bar 37
Top of File 362
Top of Window 362
Touch All Files in Relation 362
toupper function 392
Typing Options 363
U
Undo 366
Undo All 366
Undoing All Changes 366
Undoing Cursor Movement 366
Un-Grouping Panel Windows 36
Unicode 125
Updating the Symbol Database 48
User Data Folder 220
User Interface 23
user-level commands, defined 136
V
Version 3
what has changed? 19
Version 3 compatibility 18
Vertical Scroll Bar 366
Vertical Spacing Options 199
View Clip 366
View Mono Font 262
View Relation Outline 367
View Relation Window Horizontal Graph 367
View Relation Window Vertical Graph 367
View Toolbar 367
Visible Spaces 218
Visible Tabs 367
in file type options 218
showing and hiding 367
Visible Tabs and Spaces 367
Visual Themes
defining 144, 258, 260
exporting 258
importing 258
managing 258
overview of 144
W
while statement in macro language 385
wide fonts
working with 199
Wildcard Matching 109
Window List 368
Window List Options 368
Window Options 369
Window Tab Options 371
Window Tabs 371
WndListCount function 401
WndListItem function 401
Word Fragment Left 372
Word Fragment Right 372
Word Left 372
Word Right 372
Workspaces