Specialdocs Email Signature Instructions
Specialdocs_Email_Signature_Instructions
Specialdocs_Email_Signature_Instructions
Specialdocs_Email_Signature_Instructions
Specialdocs_Email_Signature_Instructions
Specialdocs_Email_Signature_Instructions
User Manual:
Open the PDF directly: View PDF ![]() .
.
Page Count: 44

March 2018 Specialdocs eSignature Installation Instructions 1
Specialdocs eSignature
Installation Instructions

Table of Contents
2
Step 1: Configure Your Signature................................................................................ 3
Step 2: Installing Your Signature.................................................................................. 6
Installing on Microsoft Office 365................................................................................. 8
Installing on Microsoft Outlook................................................................................... 13
Installing on Mac Mail…............................................................................................. 26
Installing on iOS Mail….............................................................................................. 30
Installing on Gmail...................................................................................................... 37
Installing on Android Mail Apps ................................................................................. 42
March 2018 Specialdocs eSignature Installation Instructions

3 March 2018 Specialdocs eSignature Installation Instructions
Step 1: Configure Your Signature
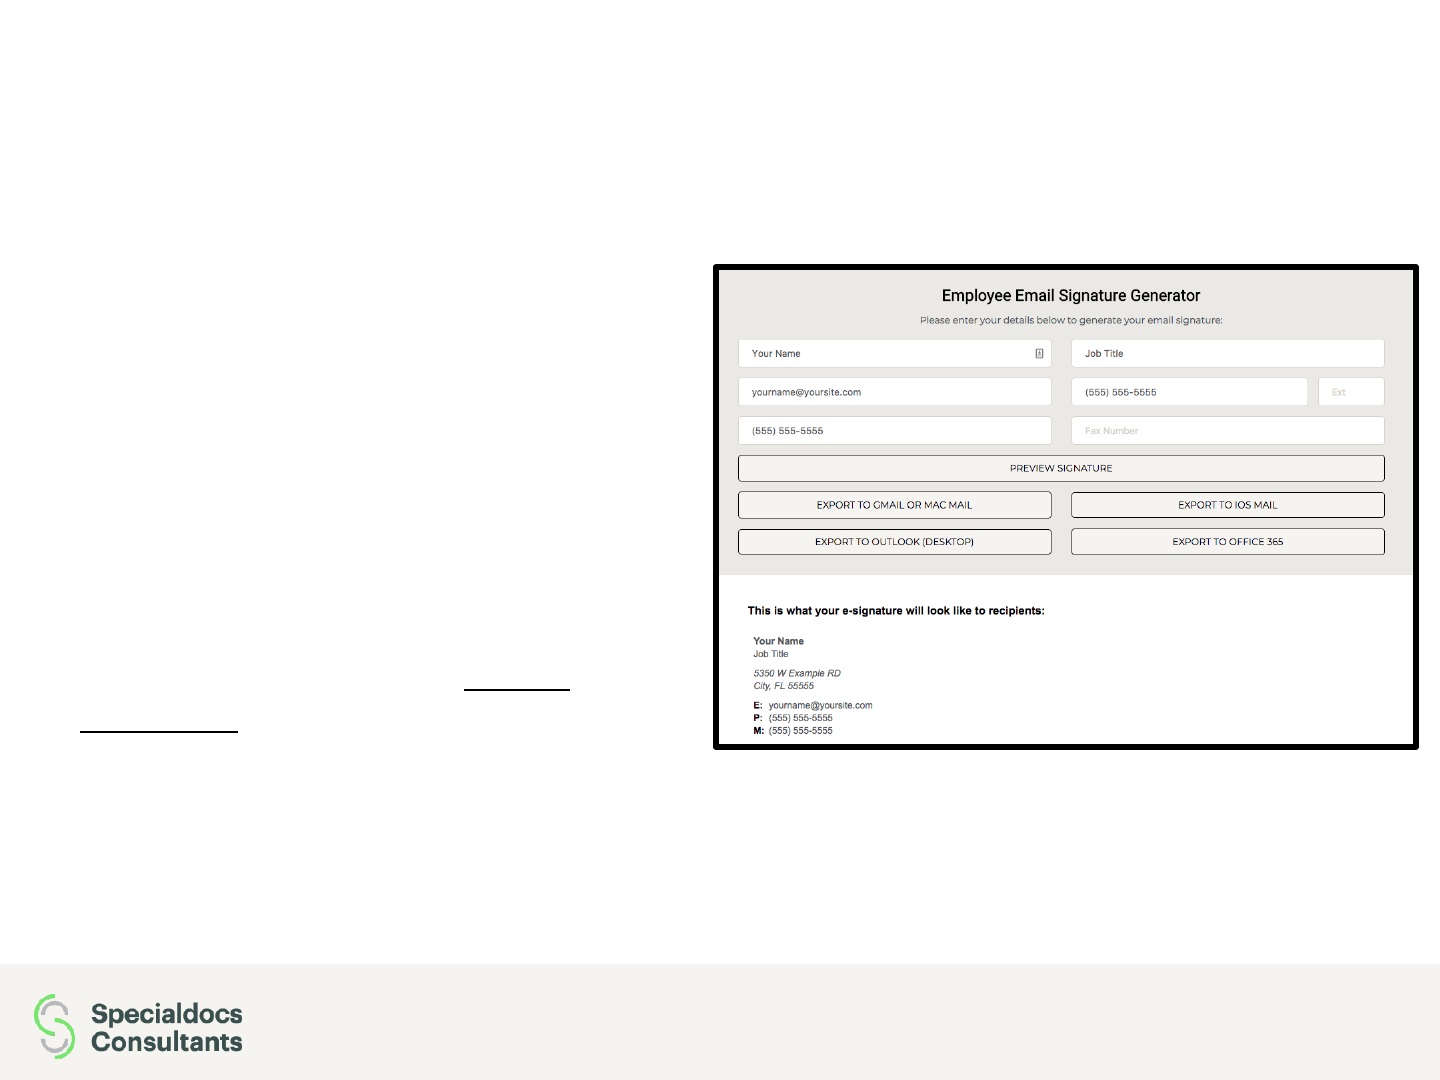
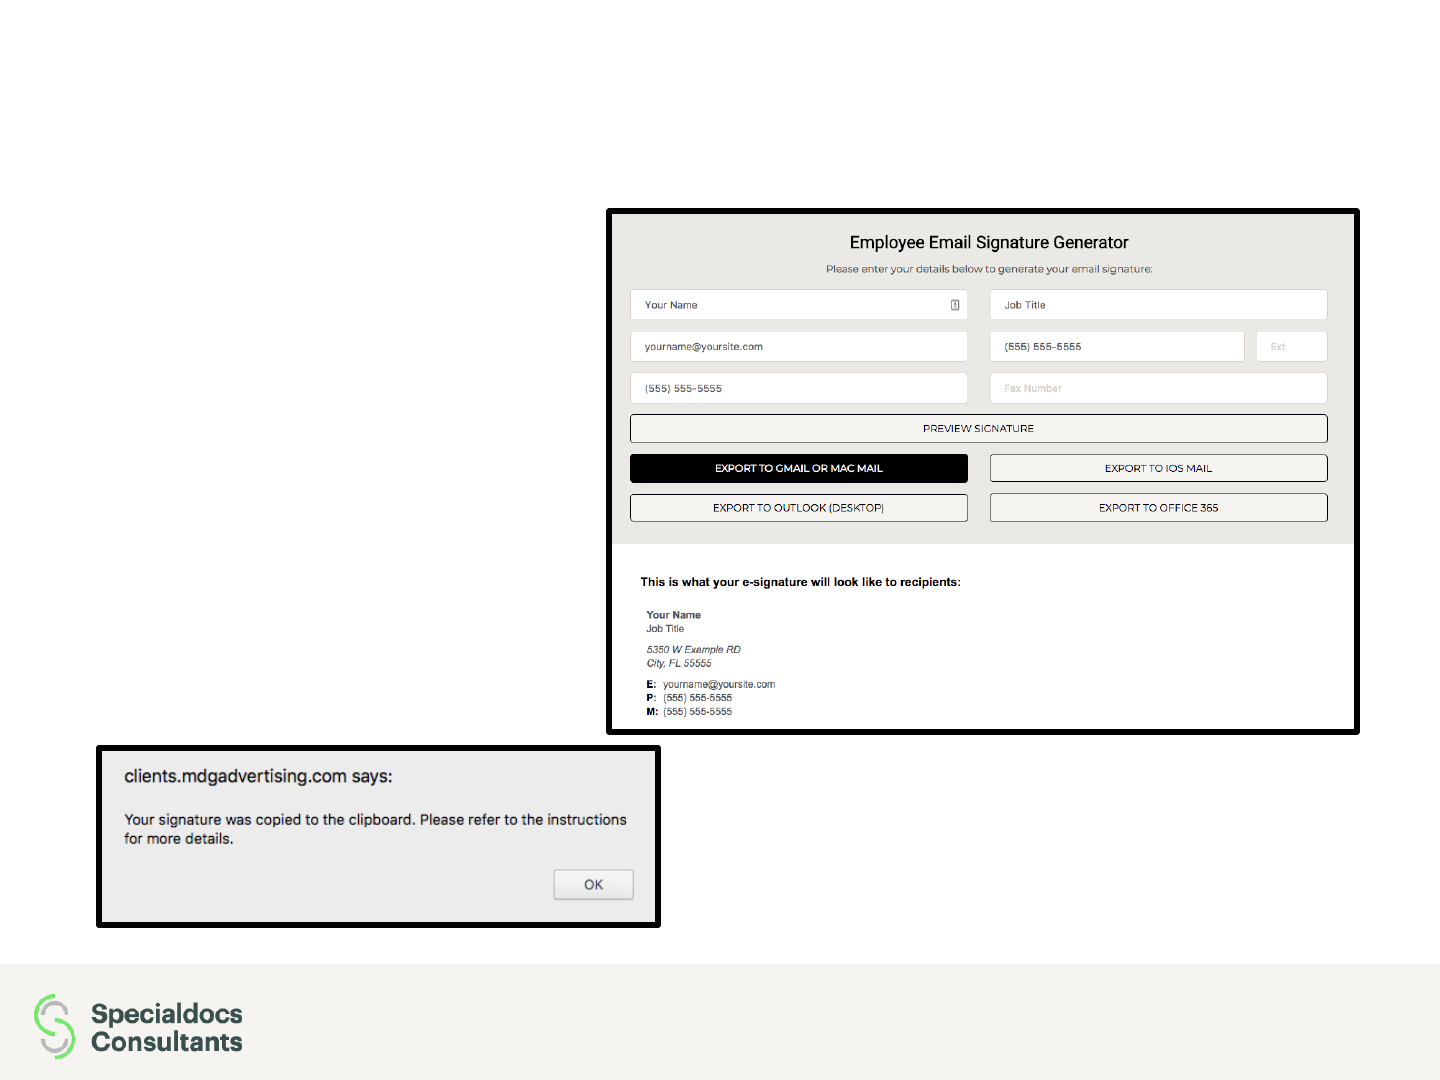
Email Signature Generator
4
We created an online tool to make it
easy for you to generate, preview, and
install your employee signature, with
only a few steps!
Please visit our Signature Generator
Tool here to get started:
March 2018 Specialdocs eSignature Installation Instructions
https://specialdocs.com//email/
signature/
Email Signature Generator
5 Specialdocs eSignature Installation Instructions March 2018
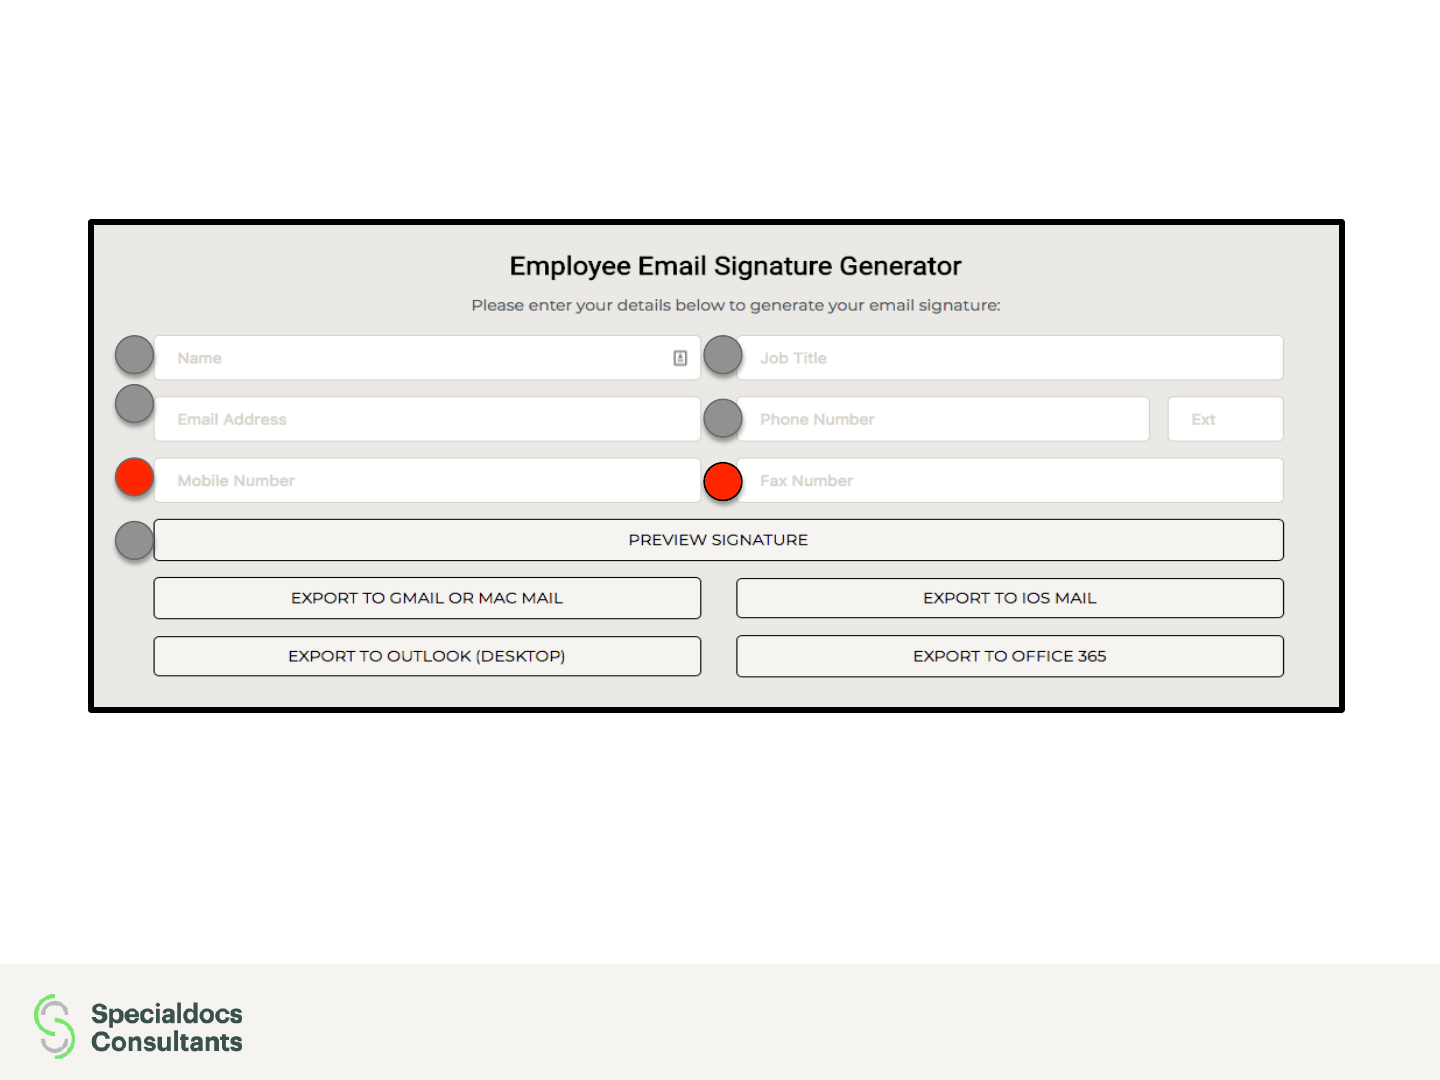
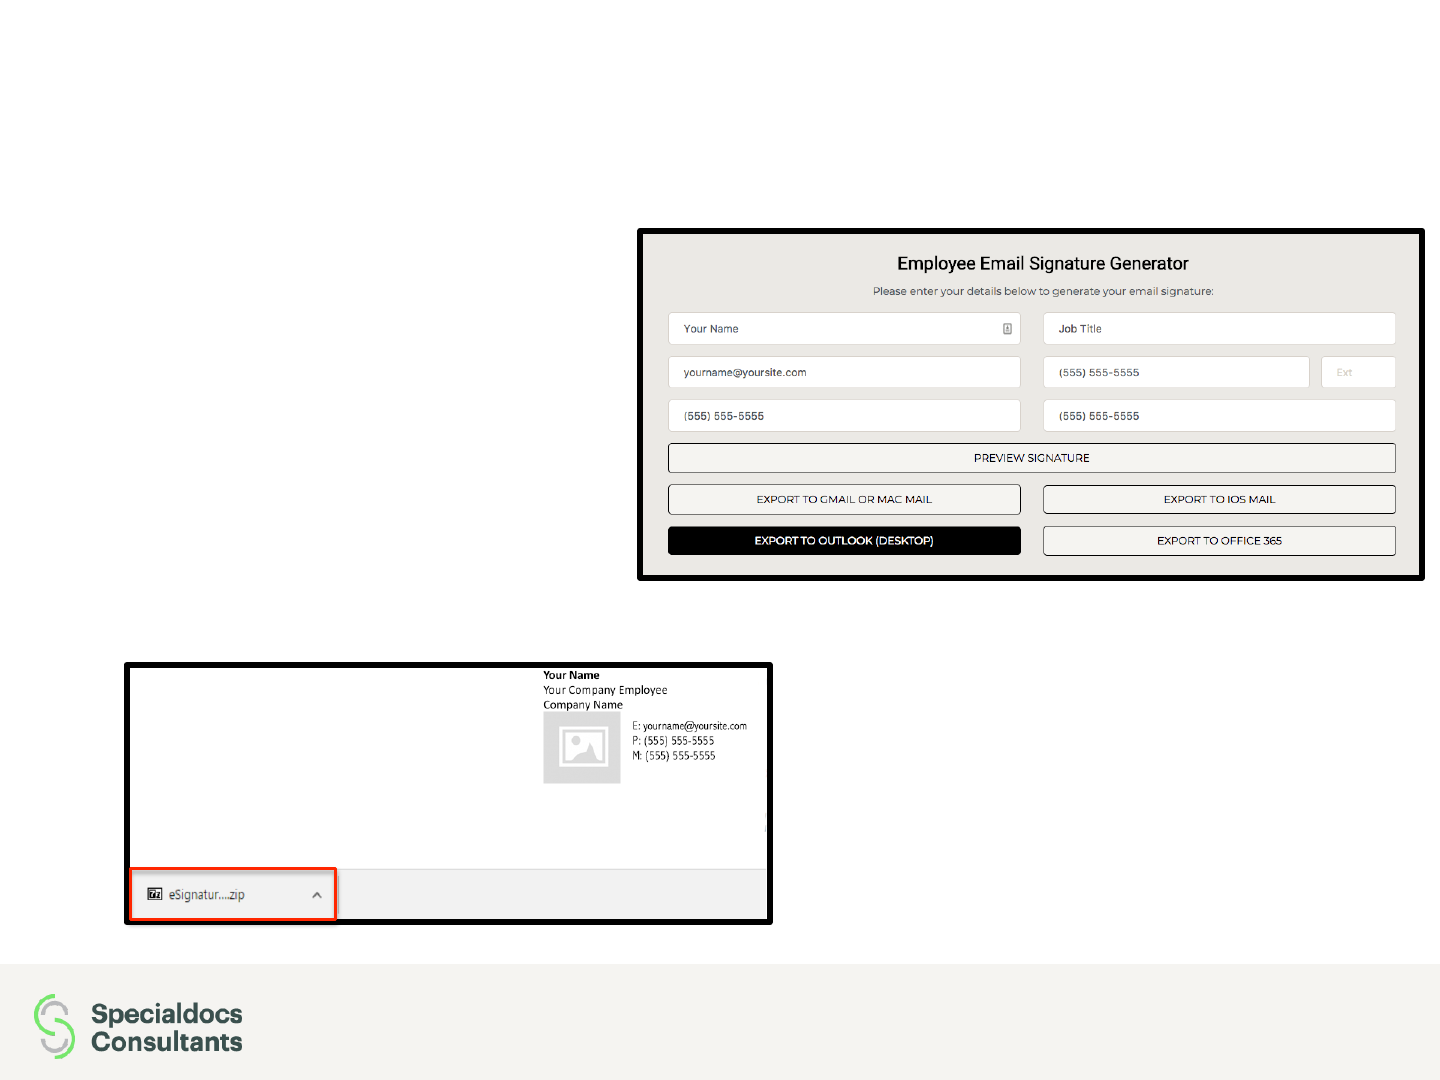
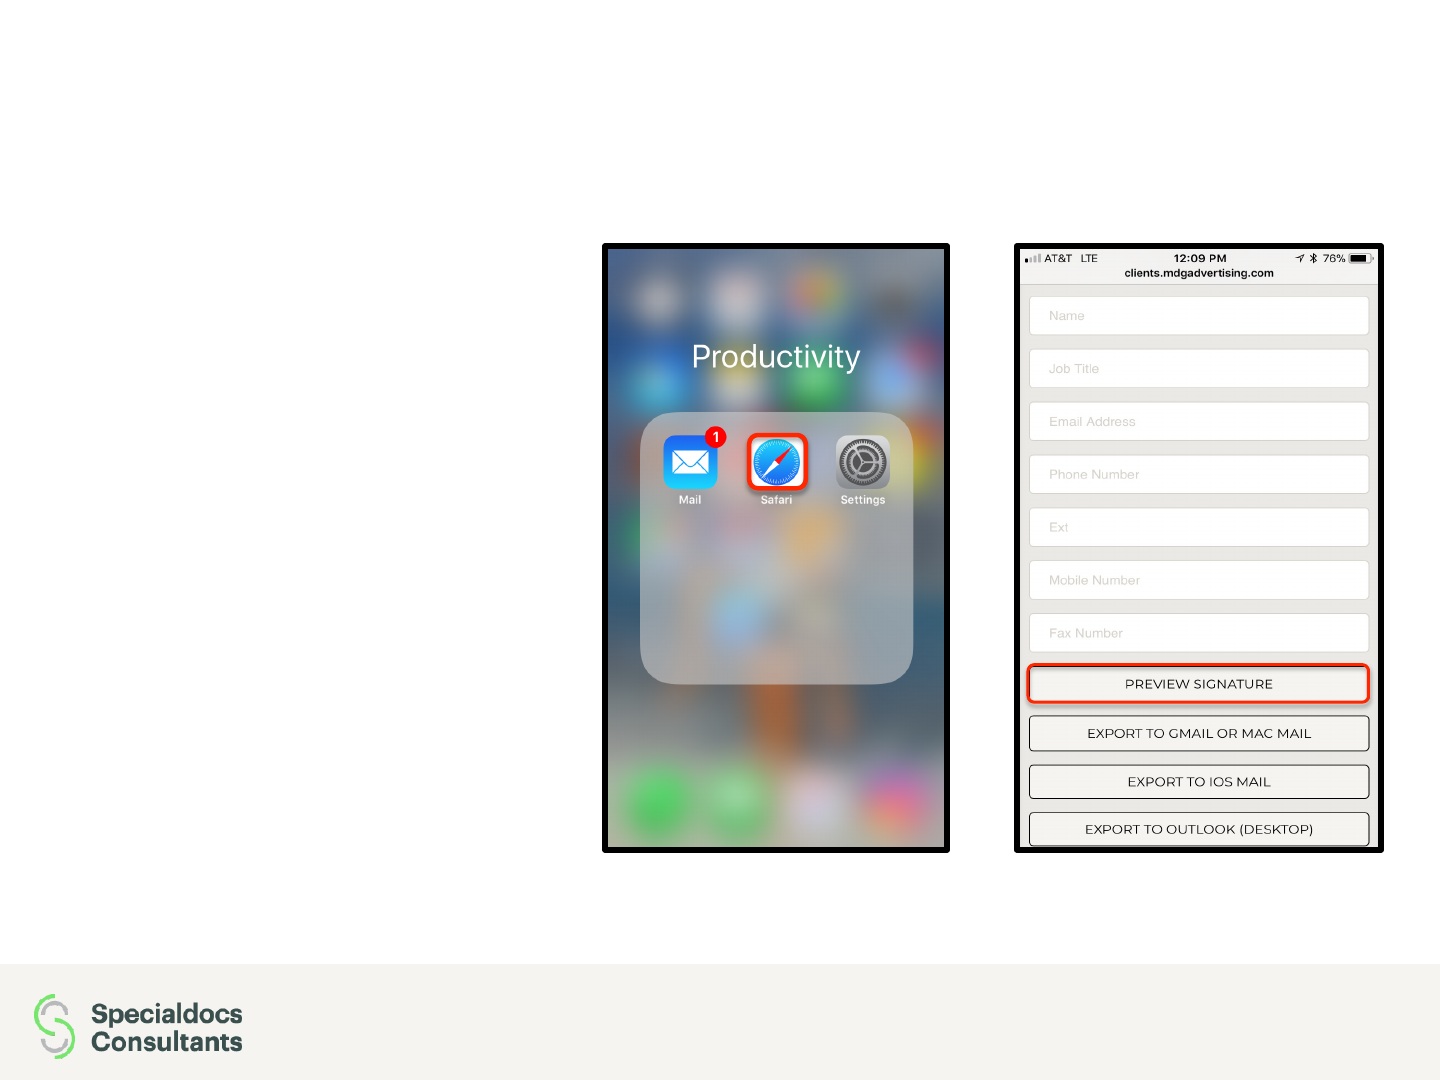
• Enter your name, job title, email address, and phone number.
• Note: The fields with a Red dot in the image above are optional.
• Then, click “Preview Signature” to preview your signature and make
sure everything was entered correctly.
5
4
3
12

6 March 2018 Specialdocs eSignature Installation Instructions
Step 2: Installing Your Signature
After generating your signature, use our Signature Generator Tool to export to the email
client which you are currently using:
• Microsoft Office 365 (online):
• Microsoft Outlook (desktop; versions 2010, 2013, and 2016):
• Mac Mail (desktop):
• iOS Mail (mobile):
• Android Mail Apps (mobile):
• Gmail (desktop):
Please refer to the following pages for instructions on how to install on your email client.
Note: If you are using a mobile device, you need to open the Signature Generator Tool
on that device in a web browser (Safari, Google Chrome, etc.) Detailed instructions on
how to do this will be described in the following pages.
Installing Your Signature: Overview
7 March 2018 Specialdocs eSignature Installation Instructions

8 March 2018 Specialdocs eSignature Installation Instructions
Installing on Microsoft Office 365
Installing On Microsoft Office 365
9 March 2018 Specialdocs eSignature Installation Instructions
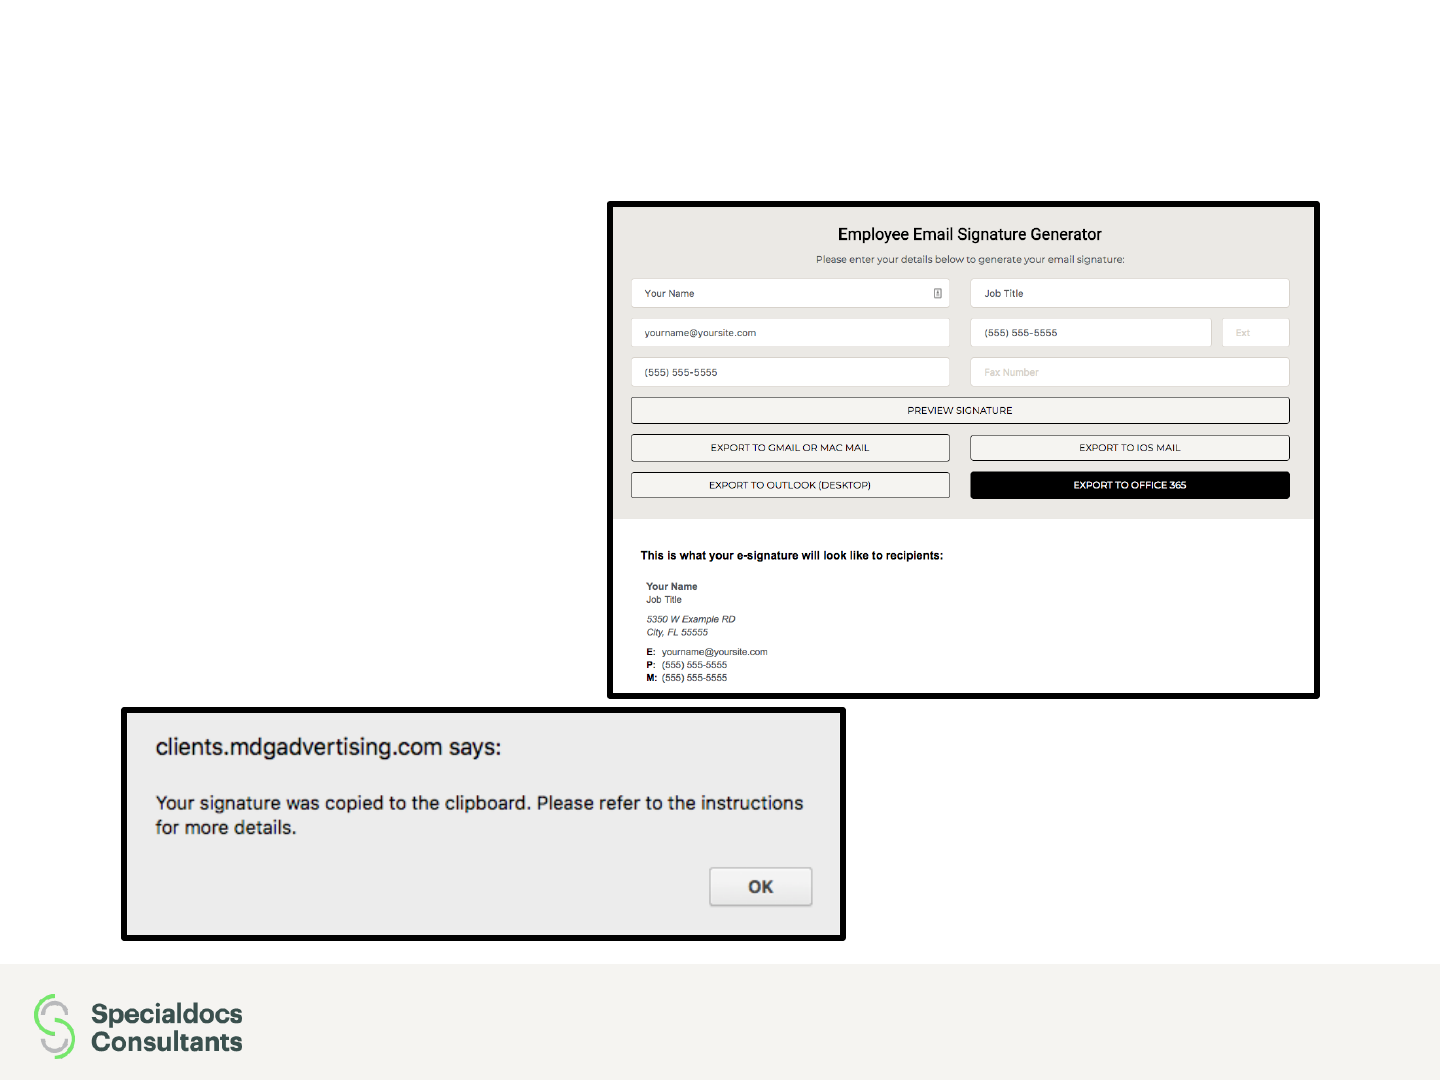
• Please click the “Export To
Office 365” button as shown
to the right.
• When you click the button, a
dialog box like to the one
below will notify you that the
signature was copied to
your clipboard. Click okay
and continue with the
instructions.
• Next, you need to to log into your Microsoft Office 365 account at:
https://login.microsoftonline.com/
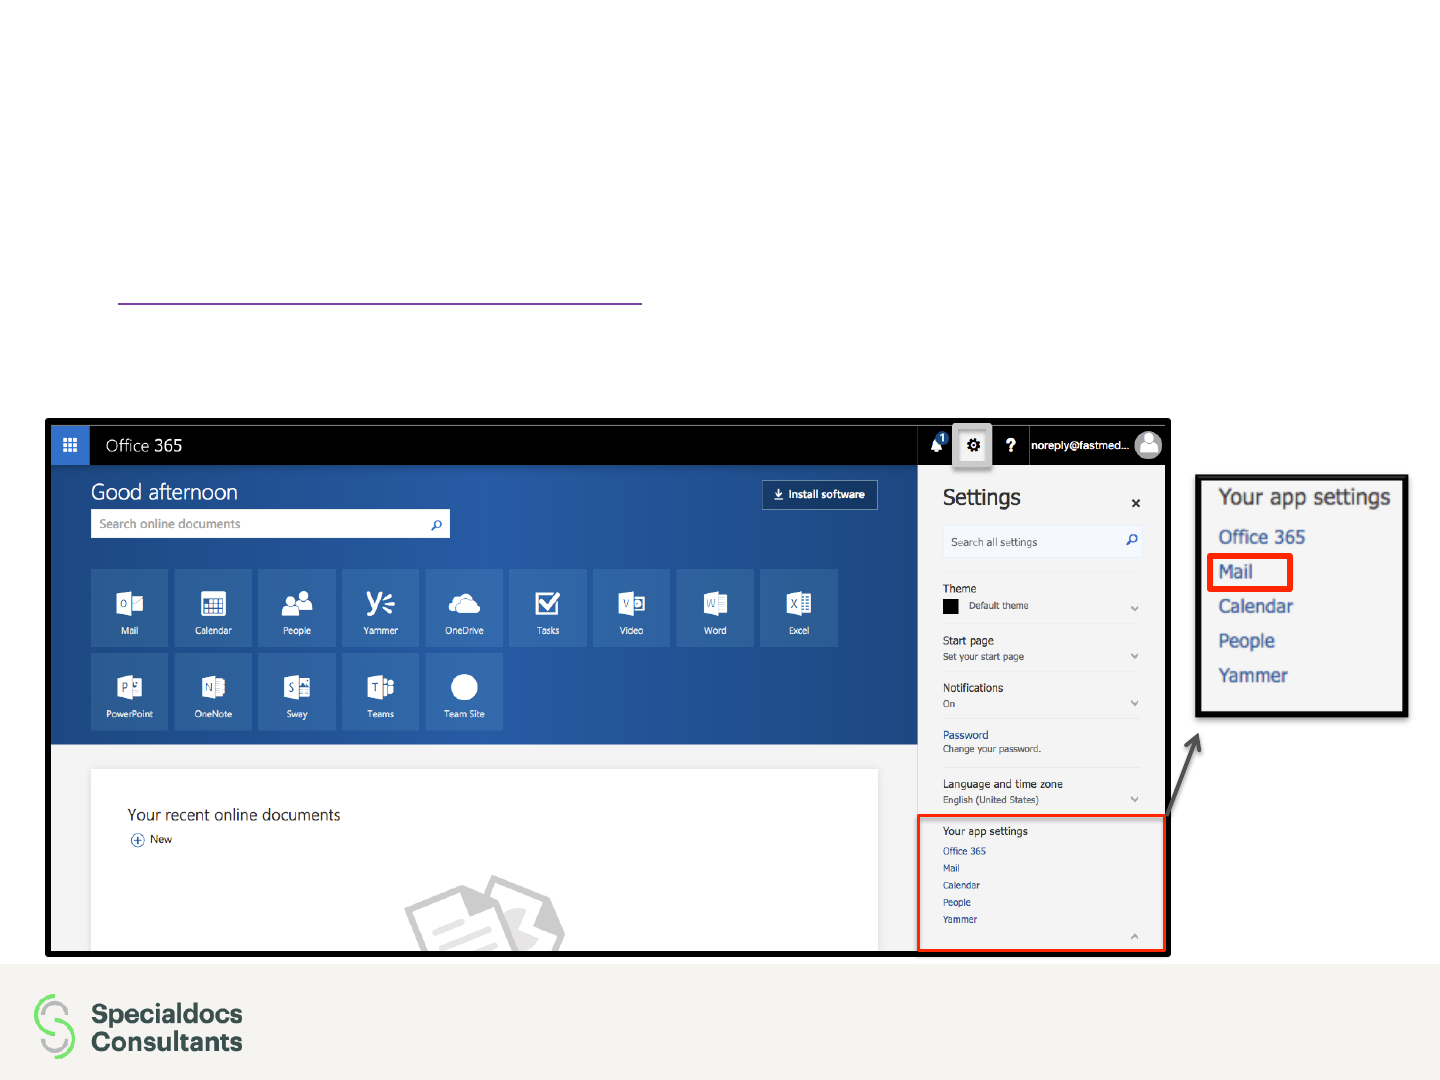
• Once you’ve logged in, look for the settings icon (cog wheel) located on the
top right, and click on “Mail” located under “Your app settings”.
Installing on Microsoft Office 365
10 March 2018 Specialdocs eSignature Installation Instructions
• A sidebar will then show up on the left side of your
page as shown to the left. You want to click on
“Email Signature” which is located under “Layout”.
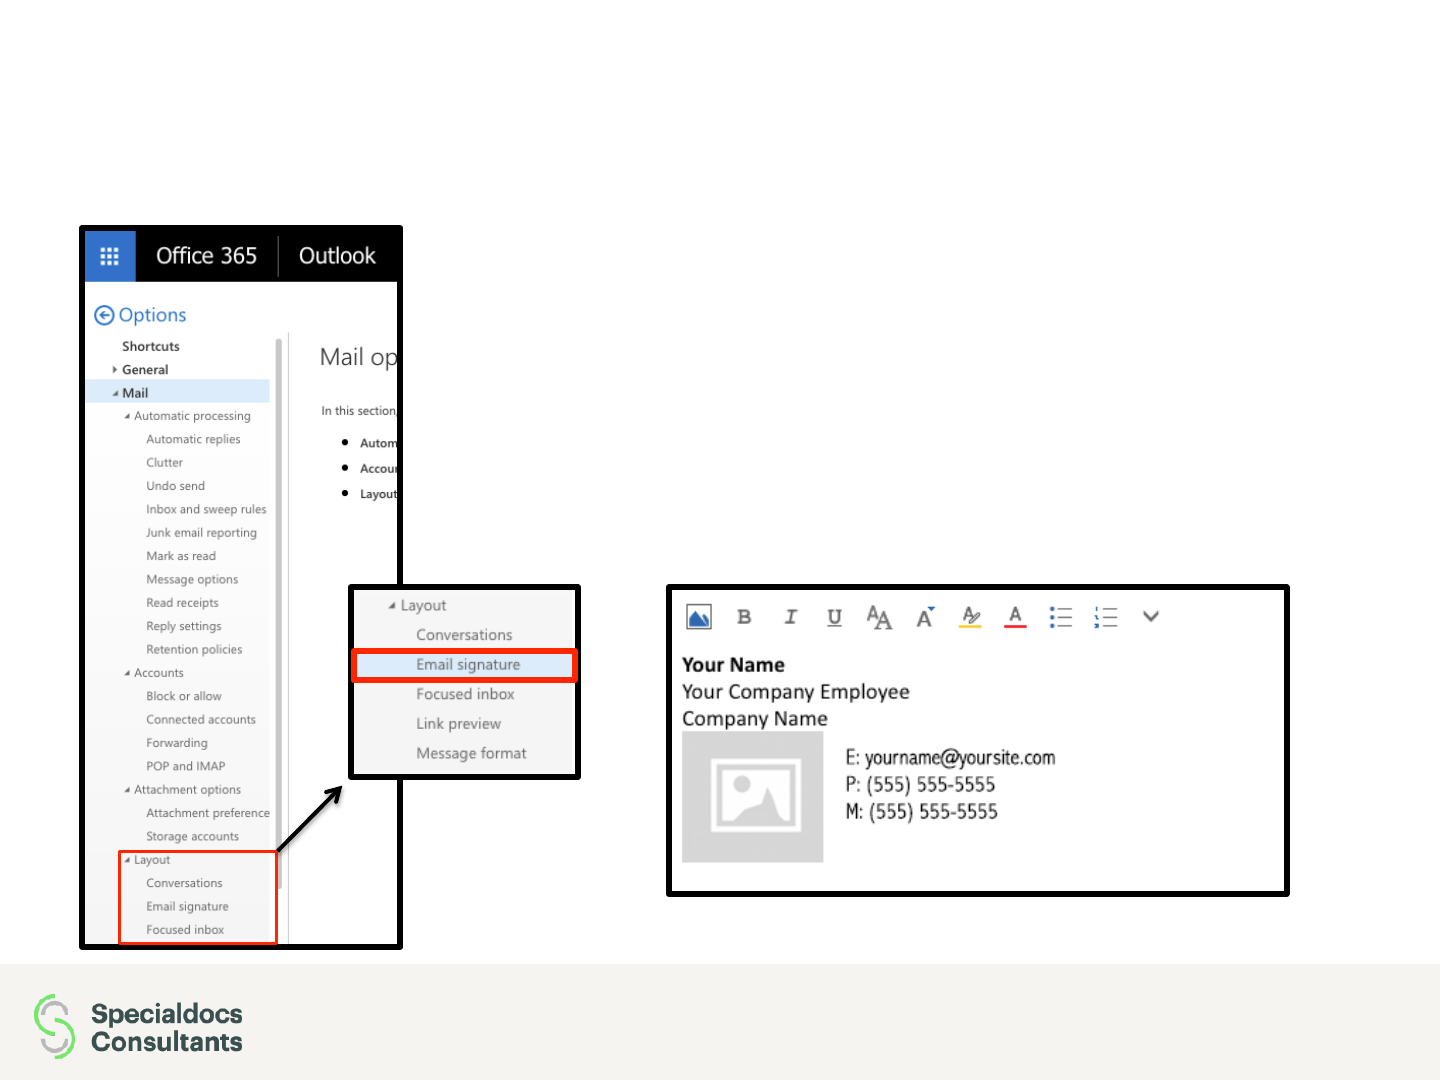
• You will then need to paste the signature into the
text box and make sure both of the checkboxes are
checked as shown below. Proceed by clicking the
save button.
Installing on Microsoft Office 365
11 March 2018 Specialdocs eSignature Installation Instructions
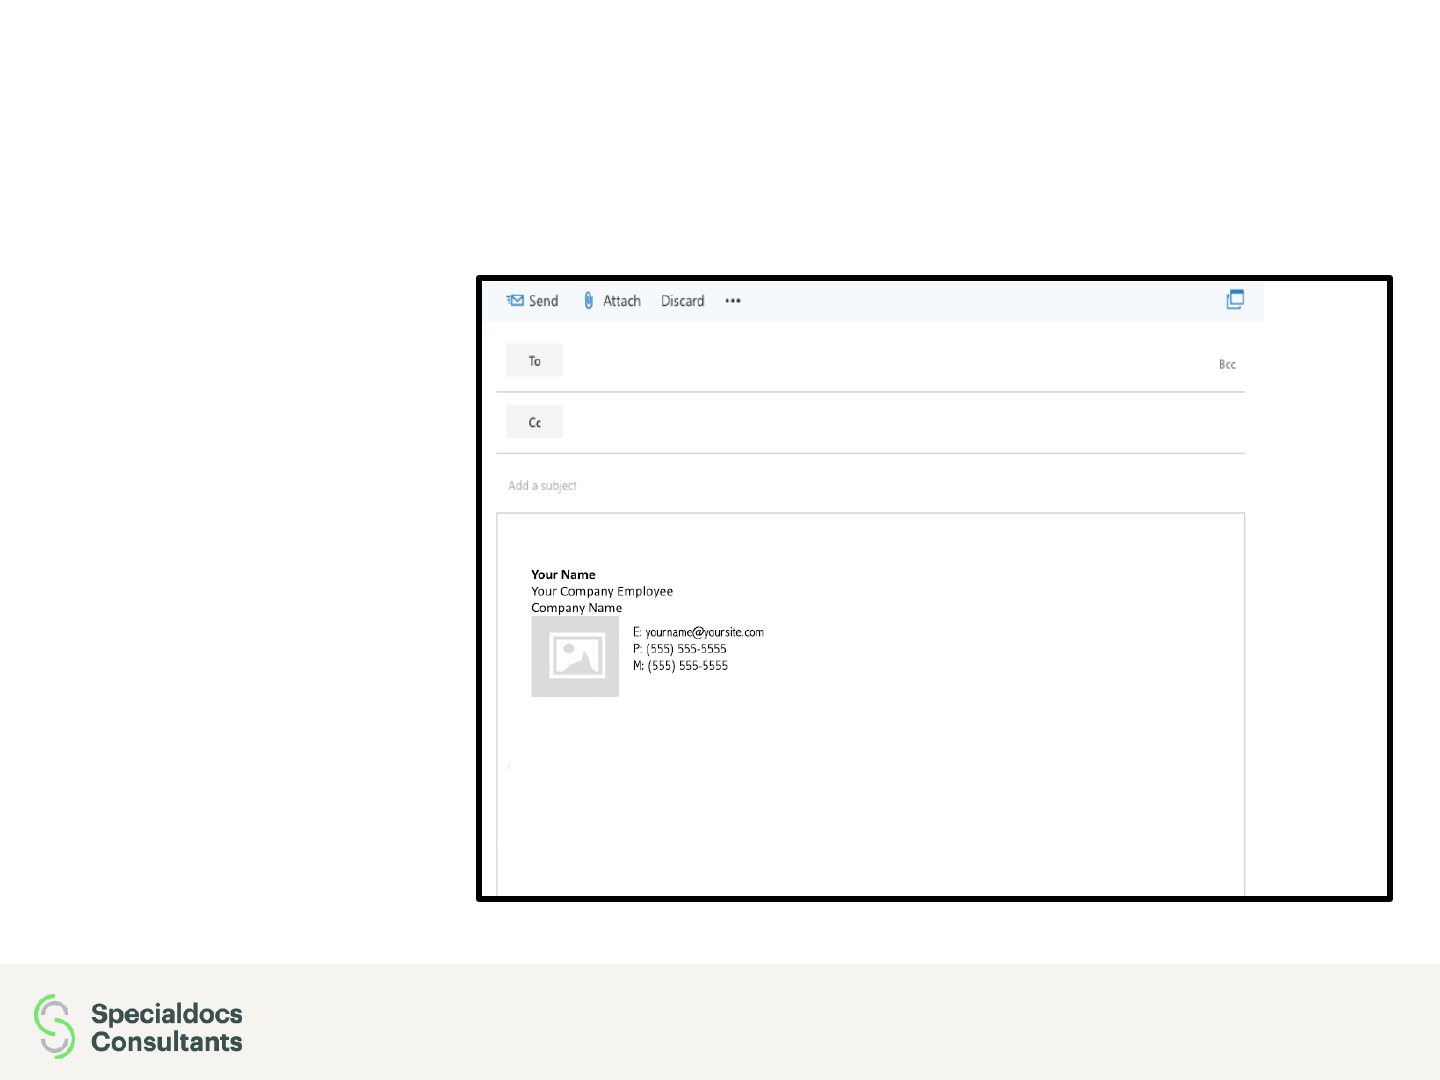
• To test your email
signature, return
back to Outlook and
create a new email.
In the new email,
your new signature
should be displayed
as shown in the
image to the right.
Installing on Microsoft Office 365
12 March 2018 Specialdocs eSignature Installation Instructions

13 March 2018 Specialdocs eSignature Installation Instructions
Installing on Microsoft Outlook
Versions: Microsoft Outlook 2010, 2013, and 2016
Installing On Microsoft Outlook
14
• Please click the “Export To
Outlook (Desktop)” button as
shown to the right.
• When you click the button, your
browser will start to download a
file named “*Company Name*
eSignature.zip” as shown in the
image below.
March 2018 Specialdocs eSignature Installation Instructions

Installing On Microsoft Outlook
15
• Double-click the .ZIP file that was downloaded.
• After opening the .ZIP file , a window like the one below will open. Click the
“Extract All” button circled in the image below.
March 2018 Specialdocs eSignature Installation Instructions
Installing On Microsoft Outlook
16
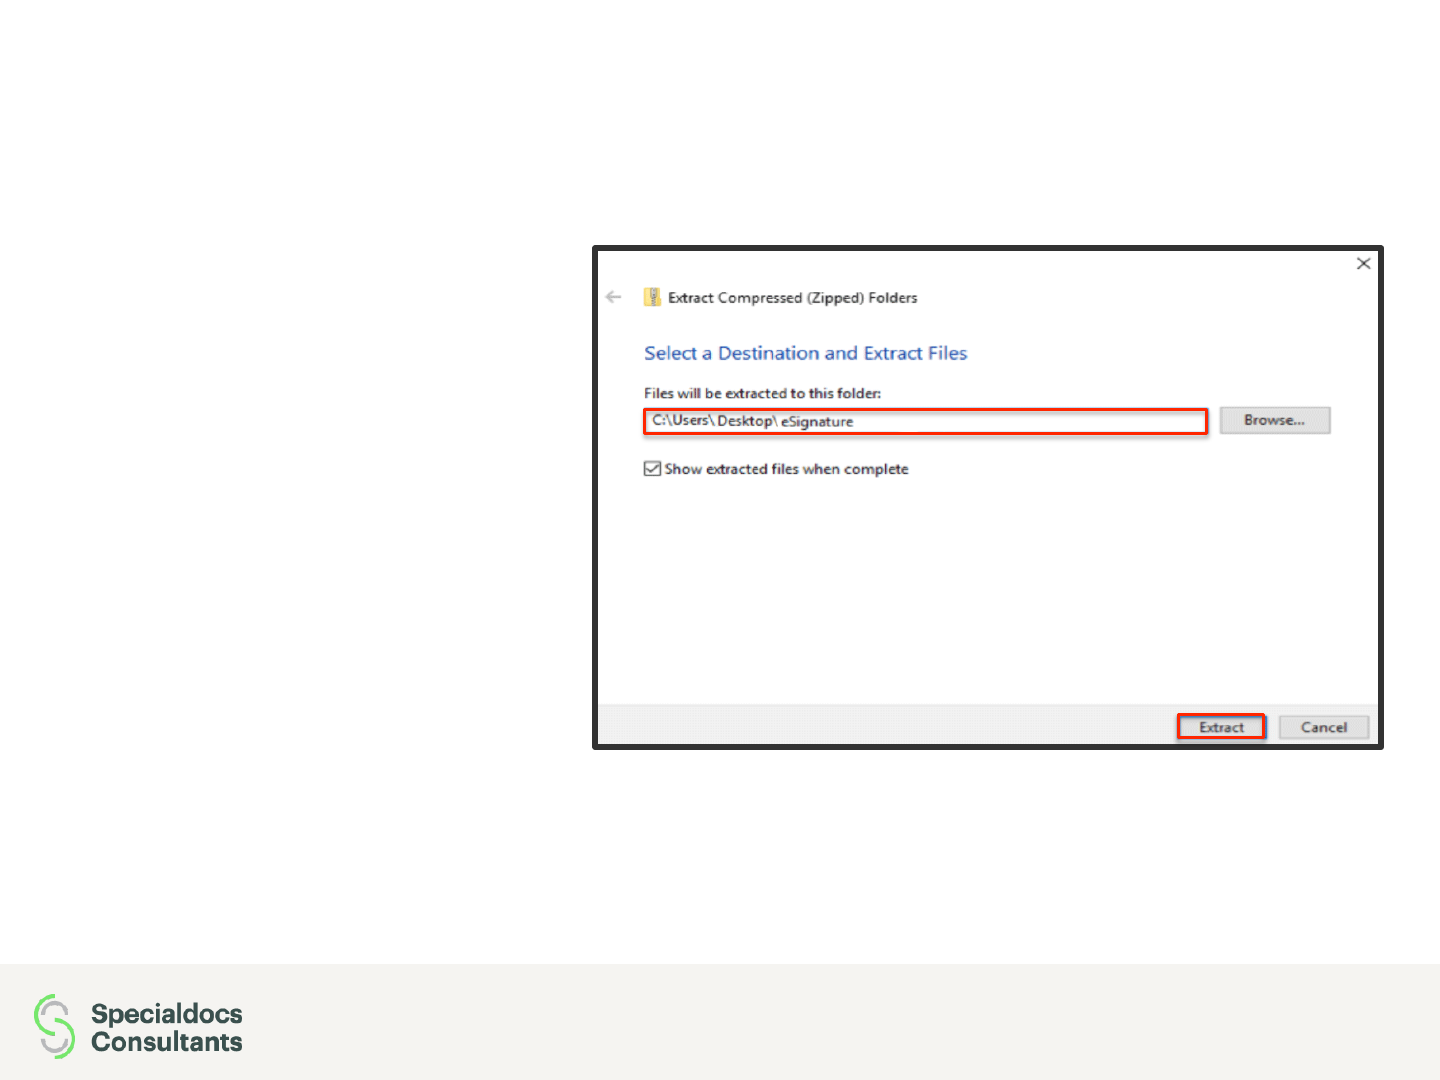
• In the dialog that pops up, you
can browse for a folder, or
leave the default folder in the
“Files will be extracted to this
folder:” field.
• Make sure “Show extracted
files when complete” is
checked, then click on the
“Extract” button. This ensures
that after extraction a window
will open showing the files you
just extracted, which contain
the signature.
March 2018 Specialdocs eSignature Installation Instructions
Installing On Microsoft Outlook
17
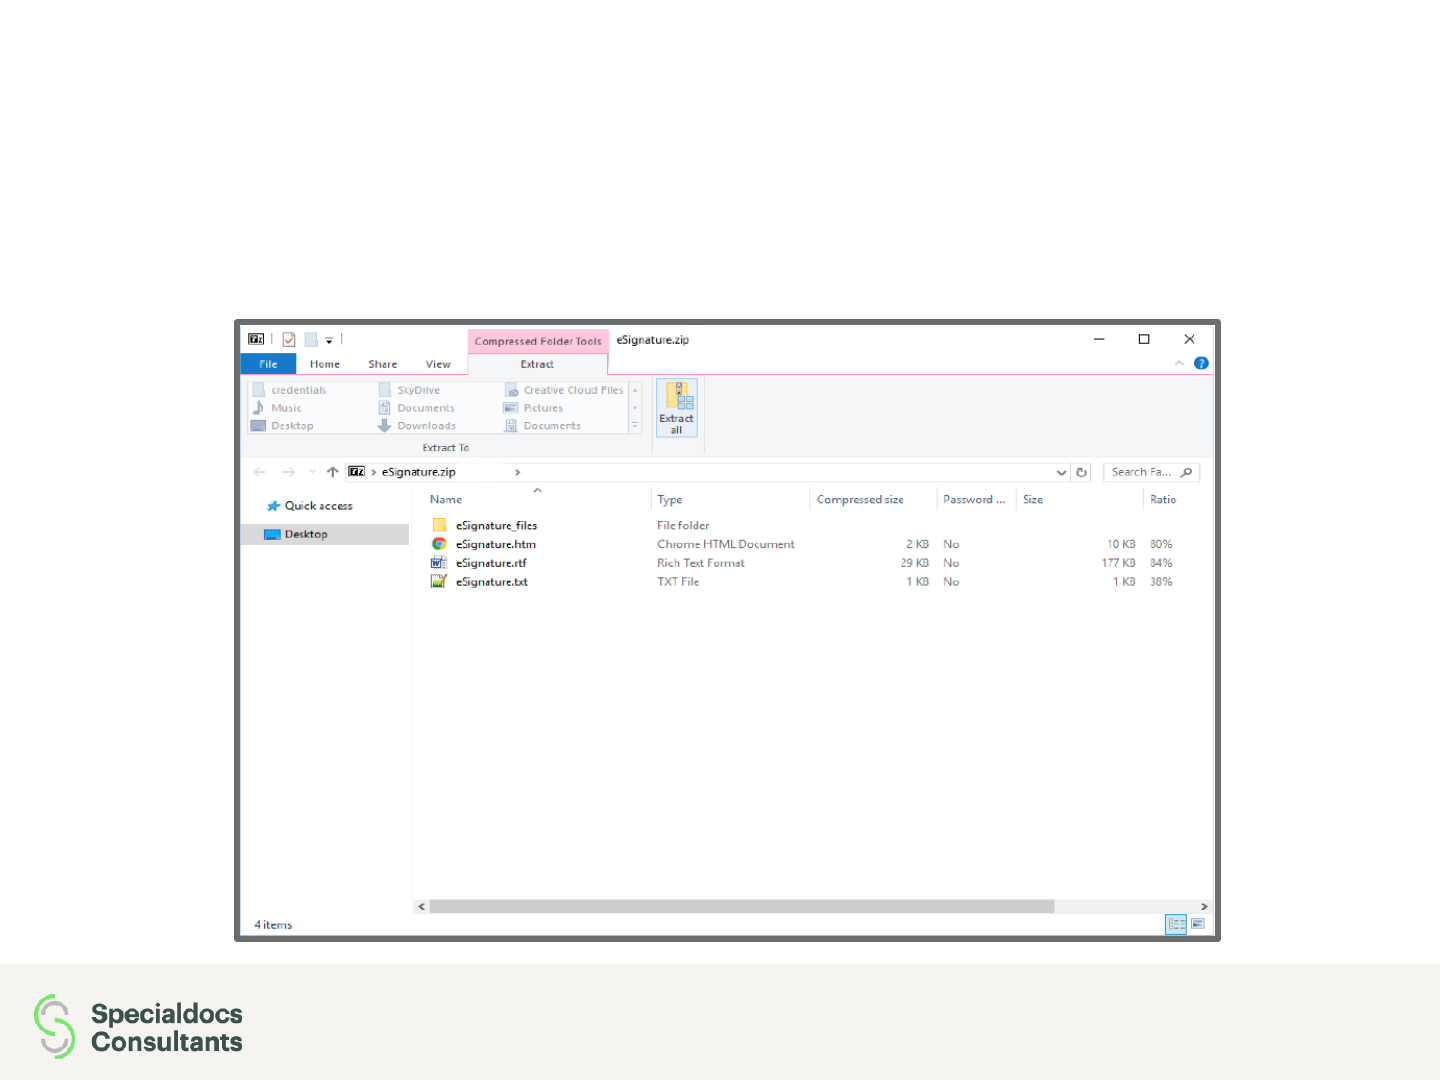
• Keep the window that contains the newly extracted files open so that you don’t
misplace them.
March 2018 Specialdocs eSignature Installation Instructions
Installing On Microsoft Outlook
18
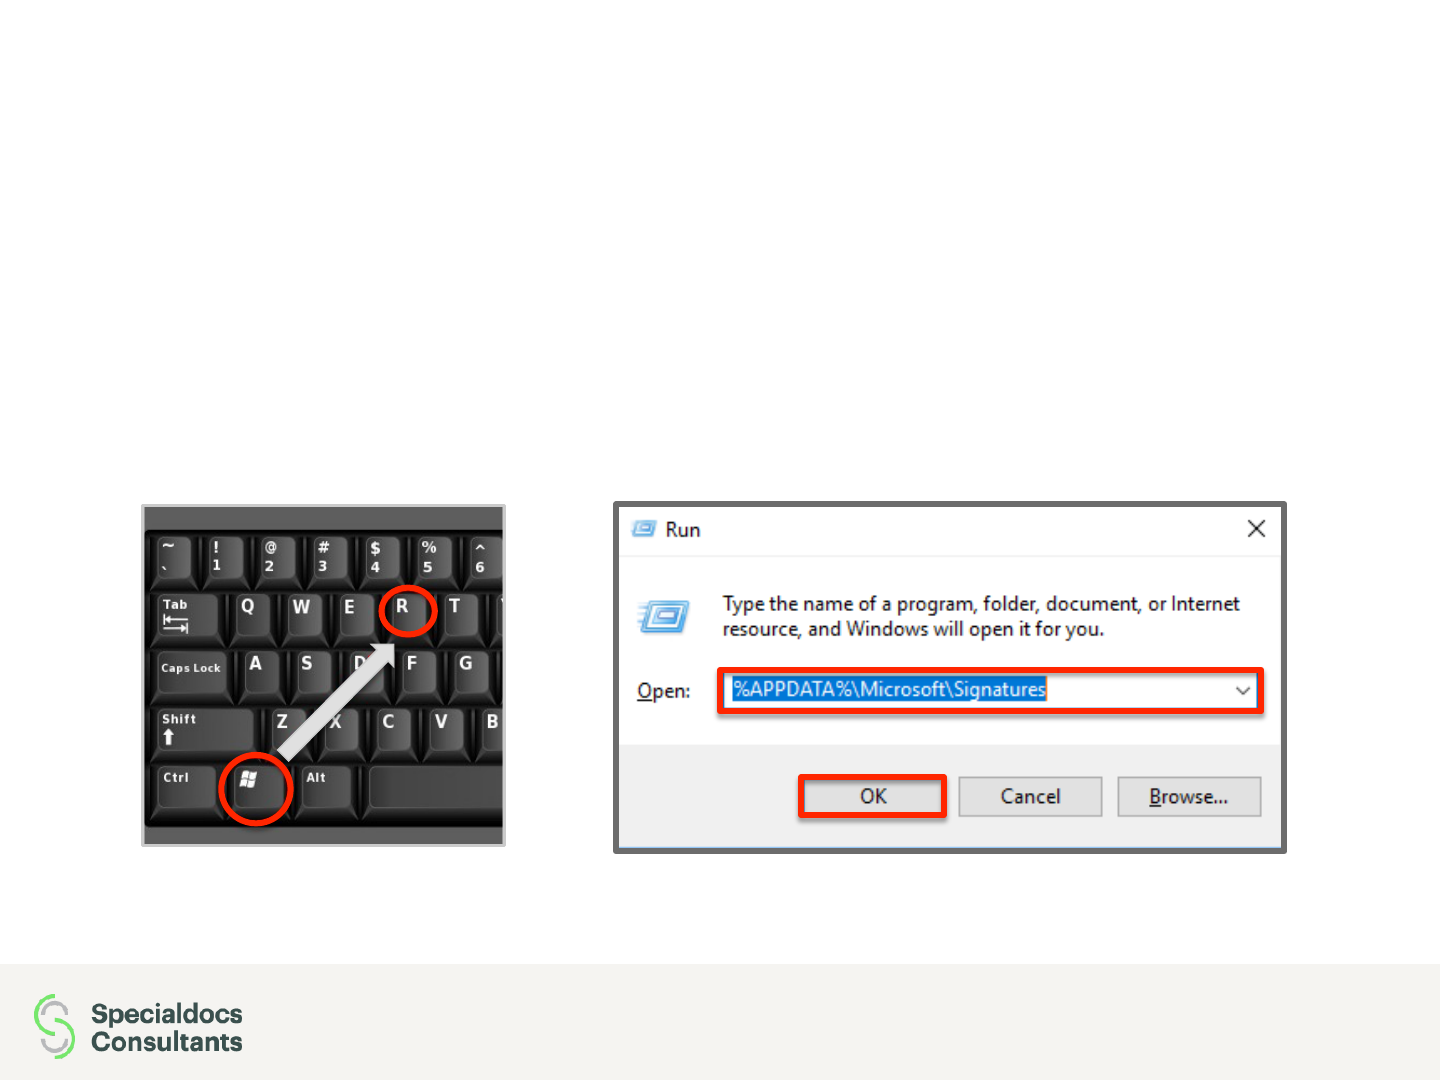
• Press and hold the WINDOWS key and “R” key at the same time on your
keyboard. This will bring up a “Run” dialog box. Next to where it says “Open”,
enter the following (as shown in the image below): %APPDATA%
\Microsoft\Signatures
March 2018 Specialdocs eSignature Installation Instructions

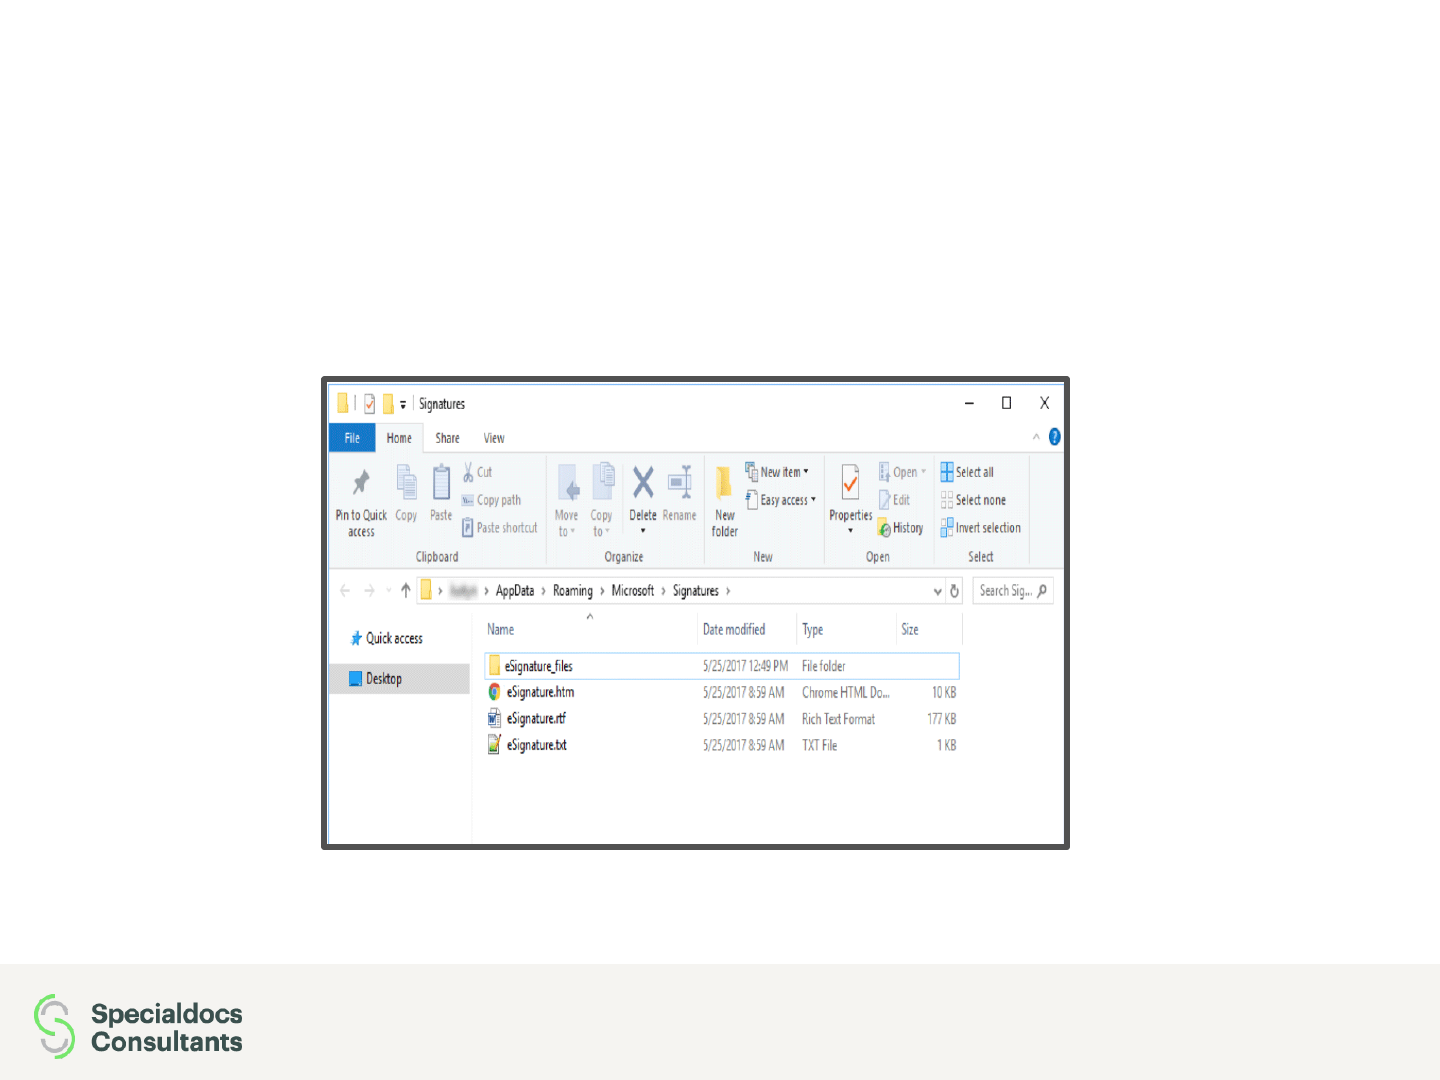
Installing On Microsoft Outlook
19
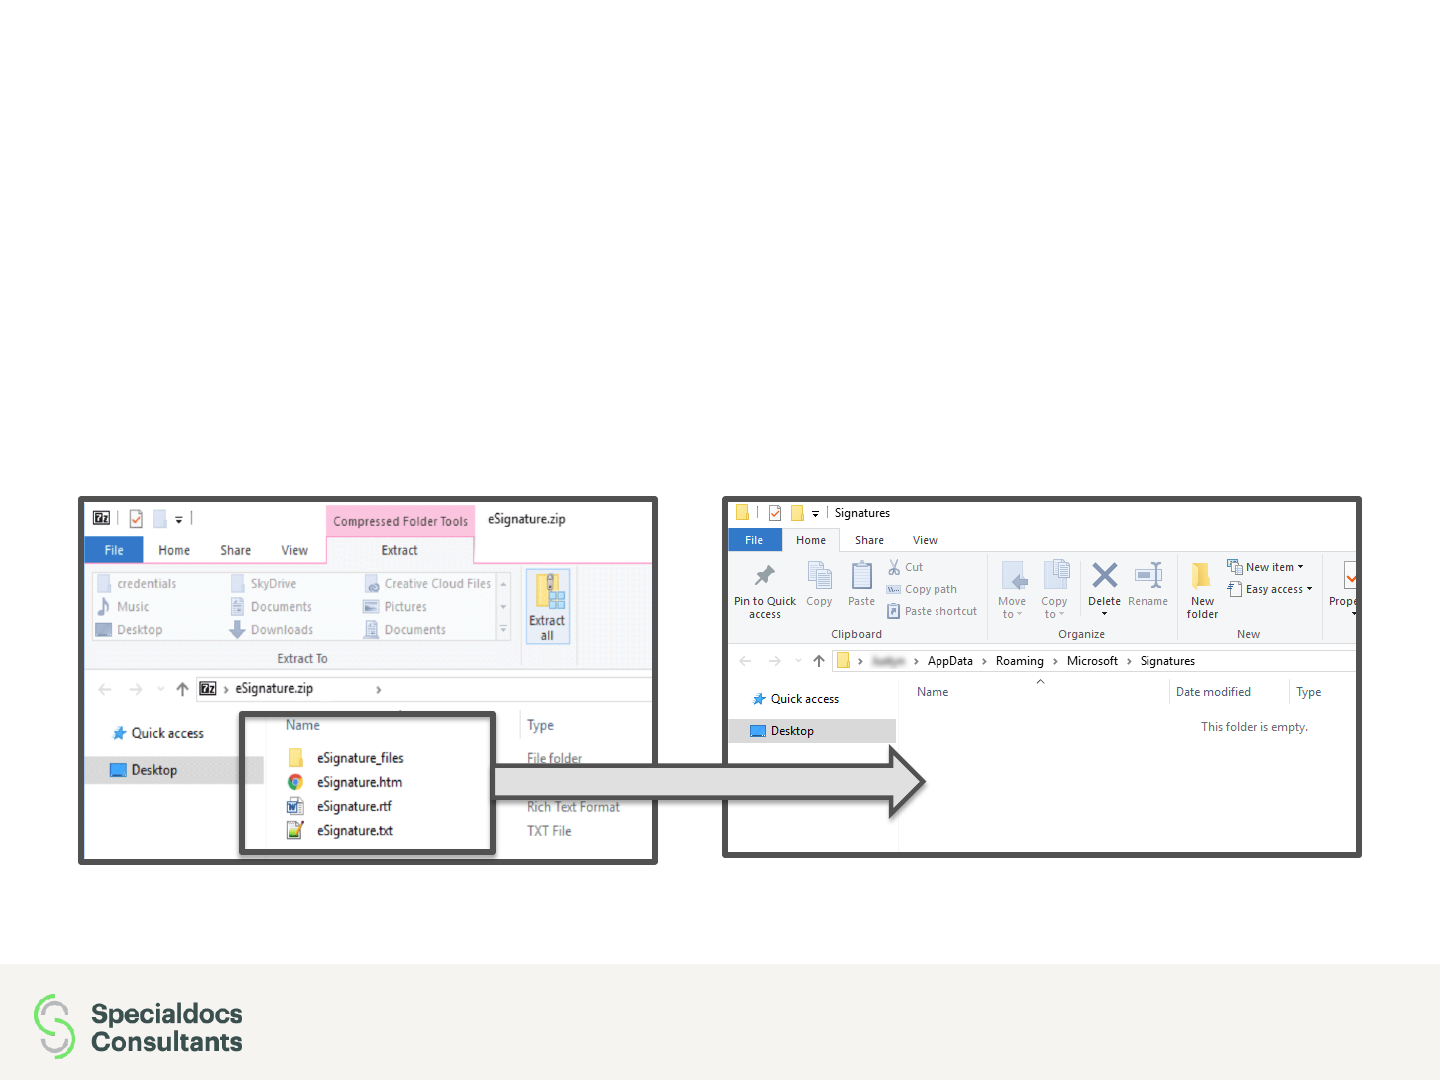
• Another folder, named “Signatures” should now be open in a new window, as shown
below. This folder stores all of your Microsoft Outlook signatures.
March 2018 Specialdocs eSignature Installation Instructions
Installing On Microsoft Outlook
20 March 2018 Specialdocs eSignature Installation Instructions
• Next, you need to copy the extracted files in the window you kept open
before (refer to page 17) to the “Signatures” window. This easiest way
to do this is to highlight the 4 files and drag them into the “Signatures”
window, as demonstrated below.
Installing On Microsoft Outlook
21 March 2018 Specialdocs eSignature Installation Instructions
• The “Signatures” folder should now look like the image below.
You can now close this window and open up Outlook.

Installing On Microsoft Outlook
• After opening Microsoft
Outlook, compose a
new message
( + N)
• Make sure that the
“Message” tab is
selected (located
between “File” and
“Insert” on the blue bar
at the top of the
window).
• Click on “Signature”,
and then click on
“Signatures…” in the
drop-down menu as
shown in the image to
the left.
Specialdocs eSignature Installation Instructions 22 March 2018
Installing On Microsoft Outlook
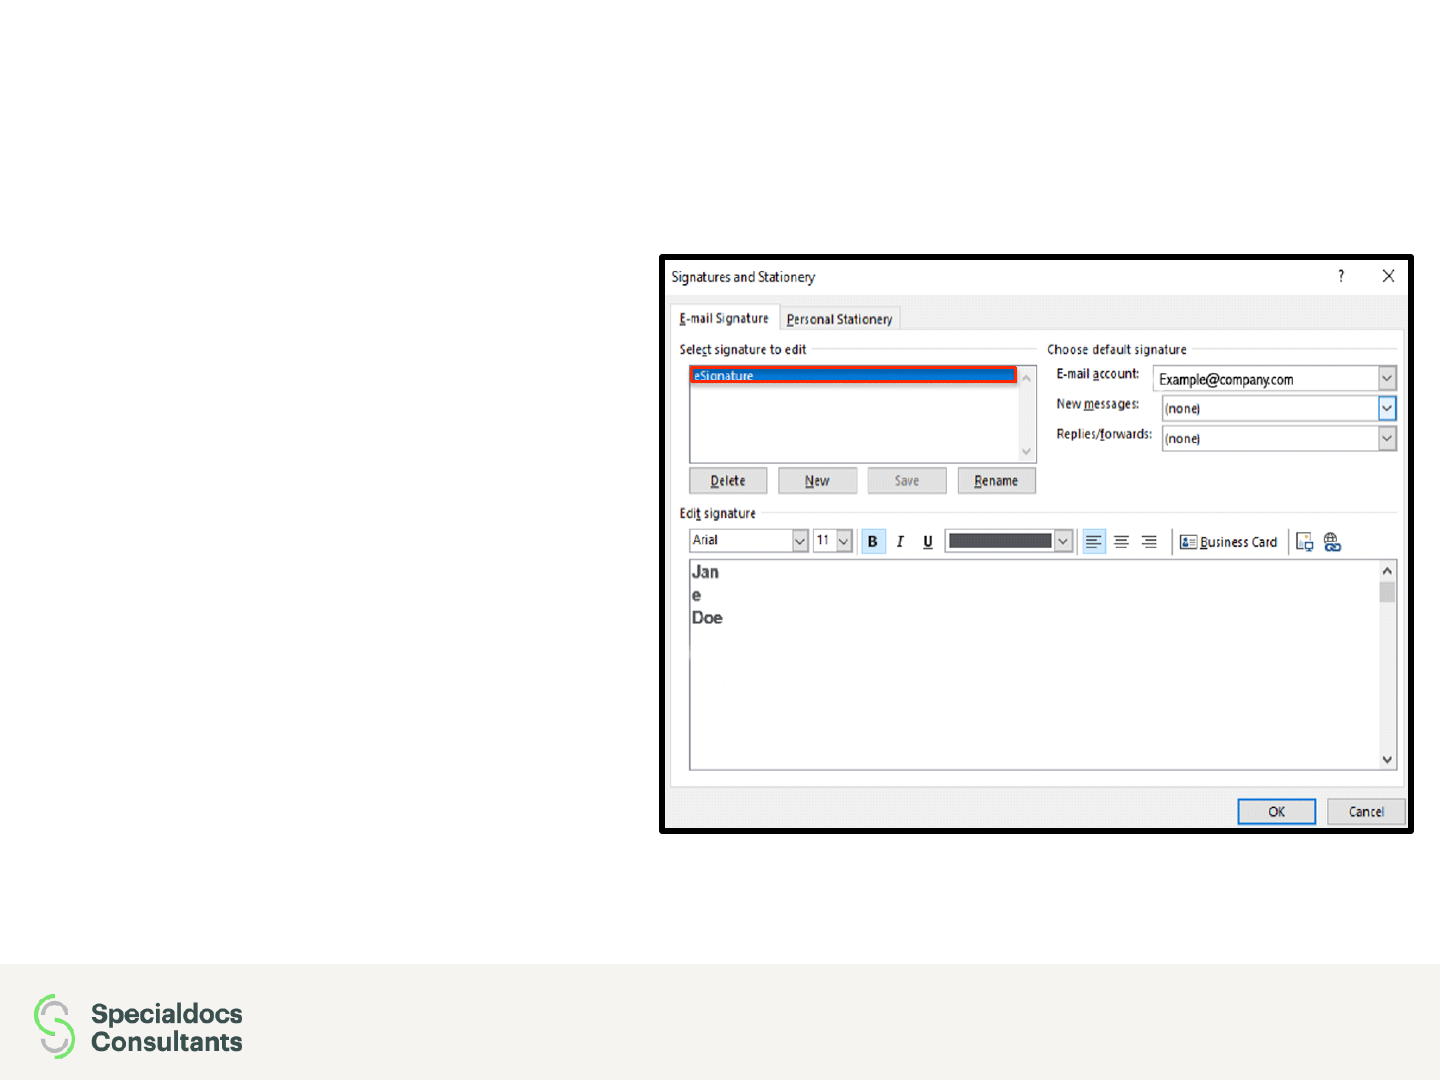
• Under “Select signature to edit”, you
should see “*Company Name*
eSignature” in the list. Make sure this is
highlighted in blue, like in the
screenshot to the right. If not, click on
“*Company Name* eSignature.”
• Note: Do not worry if the signature
preview in “Edit signature” does not
look correct – your signature will not
display like this in an email.
• Additionally, please do not make
modifications in the “Edit signature”
window. All edits to your signature
should be made directly through our
Signature Generator tool.
Specialdocs eSignature Installation Instructions 23 March 2018
Installing On Microsoft Outlook
24
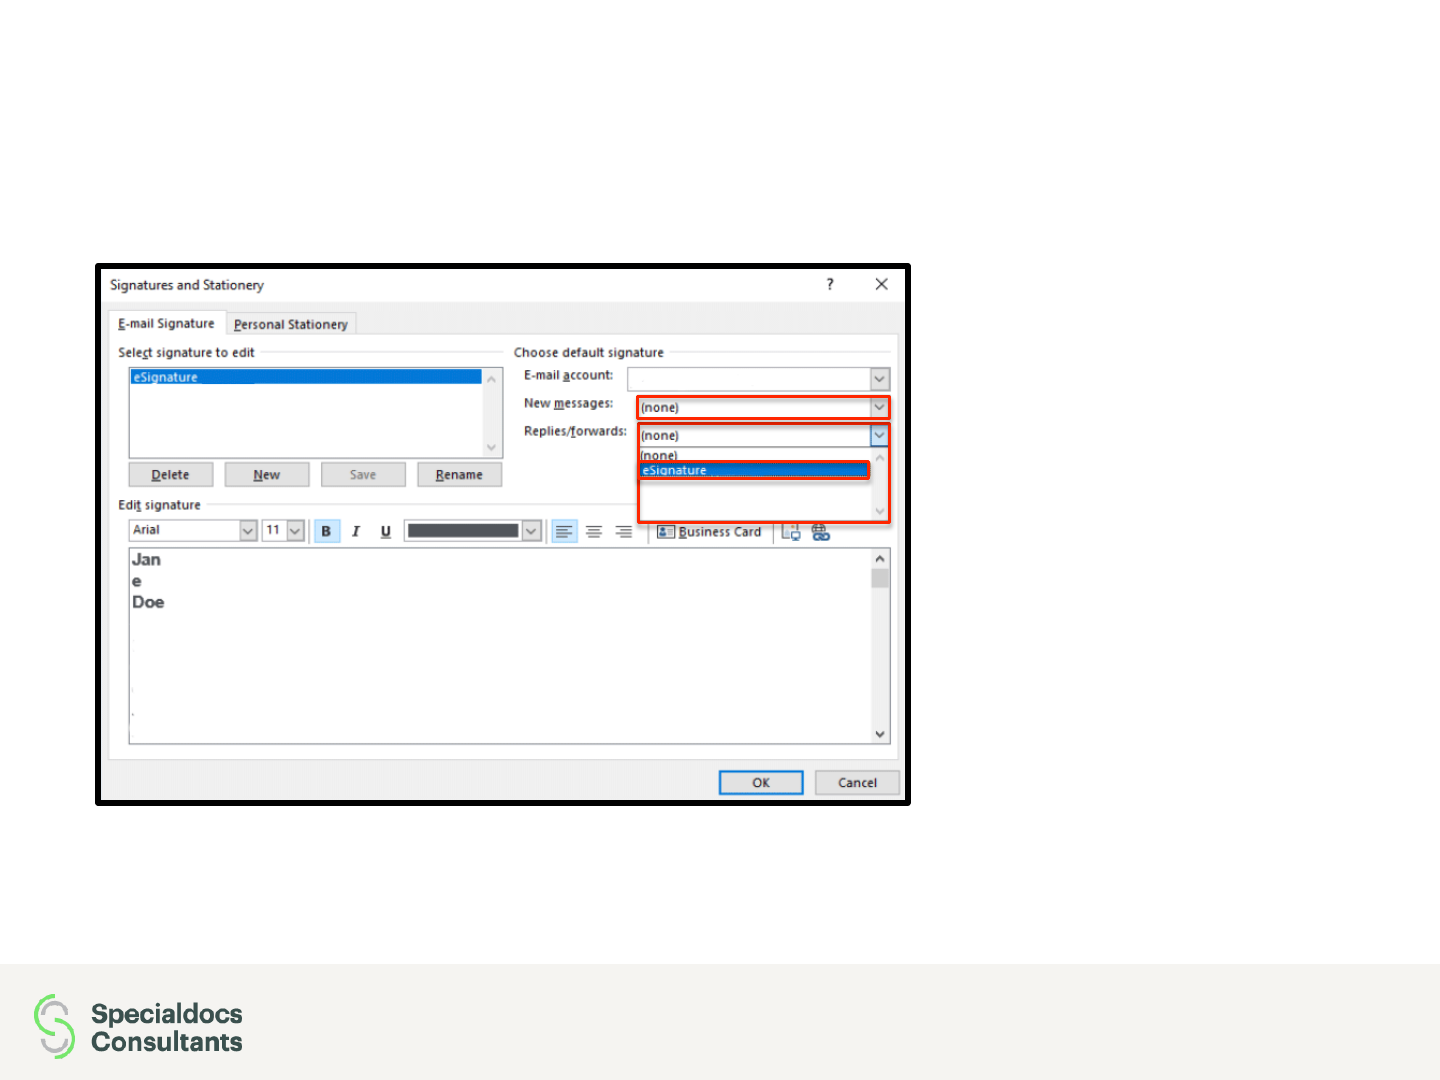
• Click on the boxes
labeled “New messages”
and “Replies/forwards”
and select “*Company
Name* eSignature” from
the drop-downs shown to
the left. This ensures that
any new messages or
replies to messages will
automatically insert your
signature.
• Click “OK” when done.
Specialdocs eSignature Installation Instructions March 2018
Installing On Microsoft Outlook
25
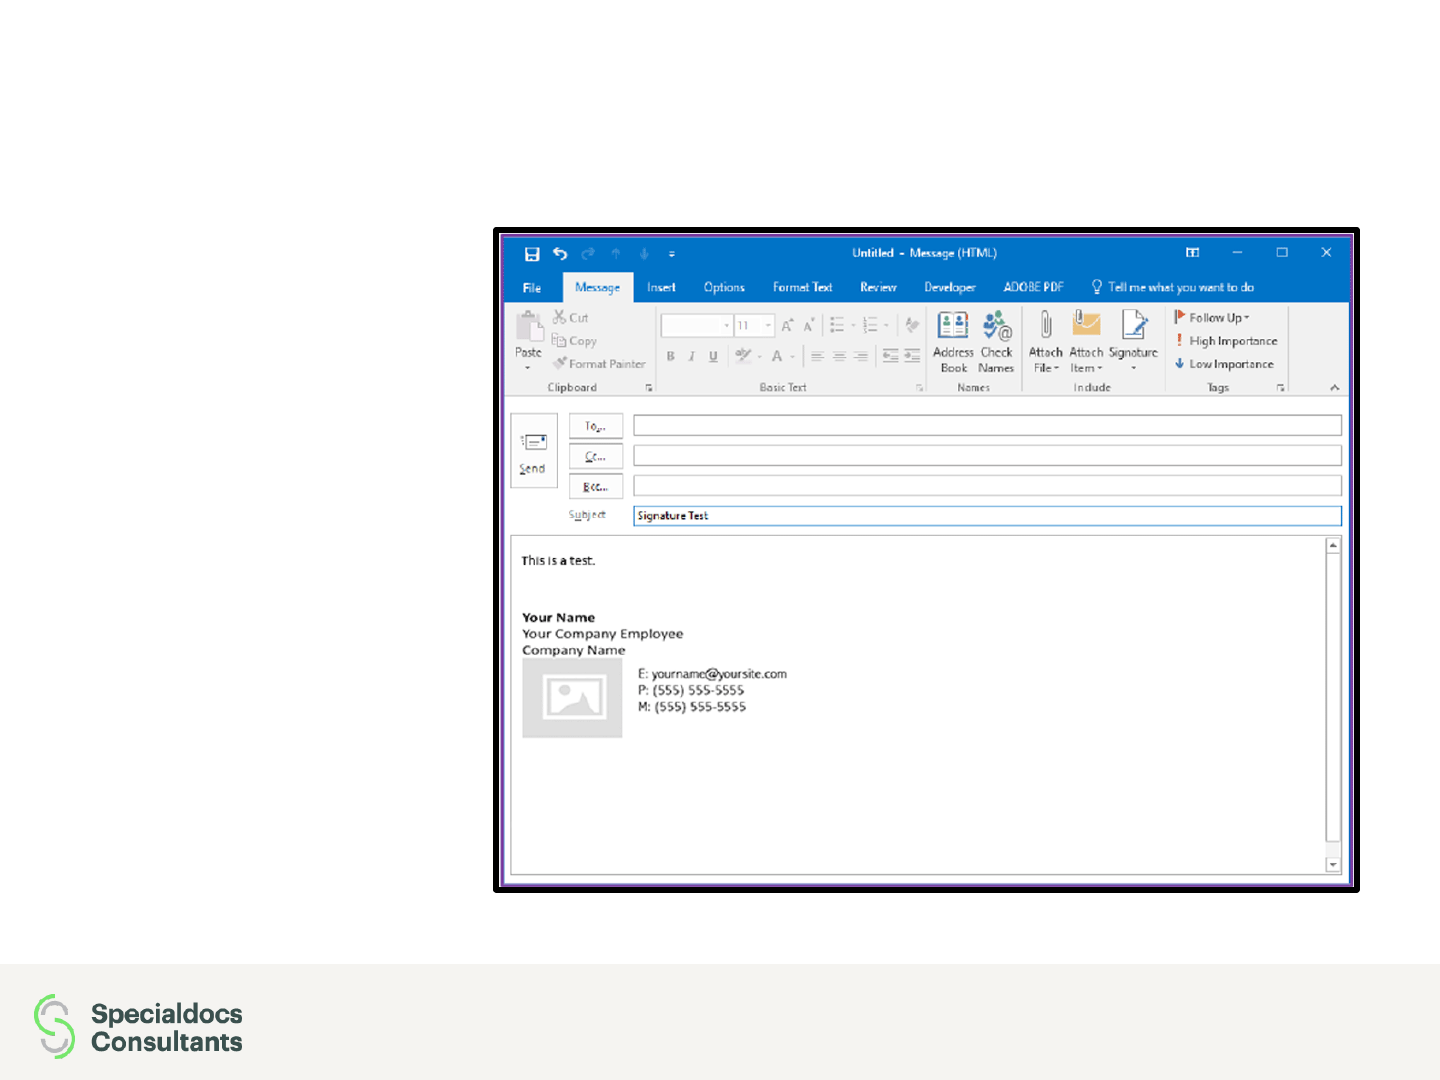
• When you
compose a new
message again,
you should notice
your signature is
now displayed in
the message body
as shown to the
right.
Specialdocs eSignature Installation Instructions March 2018

26 Specialdocs eSignature Installation Instructions March 2018
Installing on Mac Mail
Installing On Mac Mail
27 March 2018 Specialdocs eSignature Installation Instructions
• Please click the “Export To
Mac Mail” button as shown
to the right.
• When you click the button, a
dialog box like to the one
below will notify you that the
signature was copied to
your clipboard. Click okay
and continue with the
instructions.
Installing On Mac Mail
28 March 2018 Specialdocs eSignature Installation Instructions
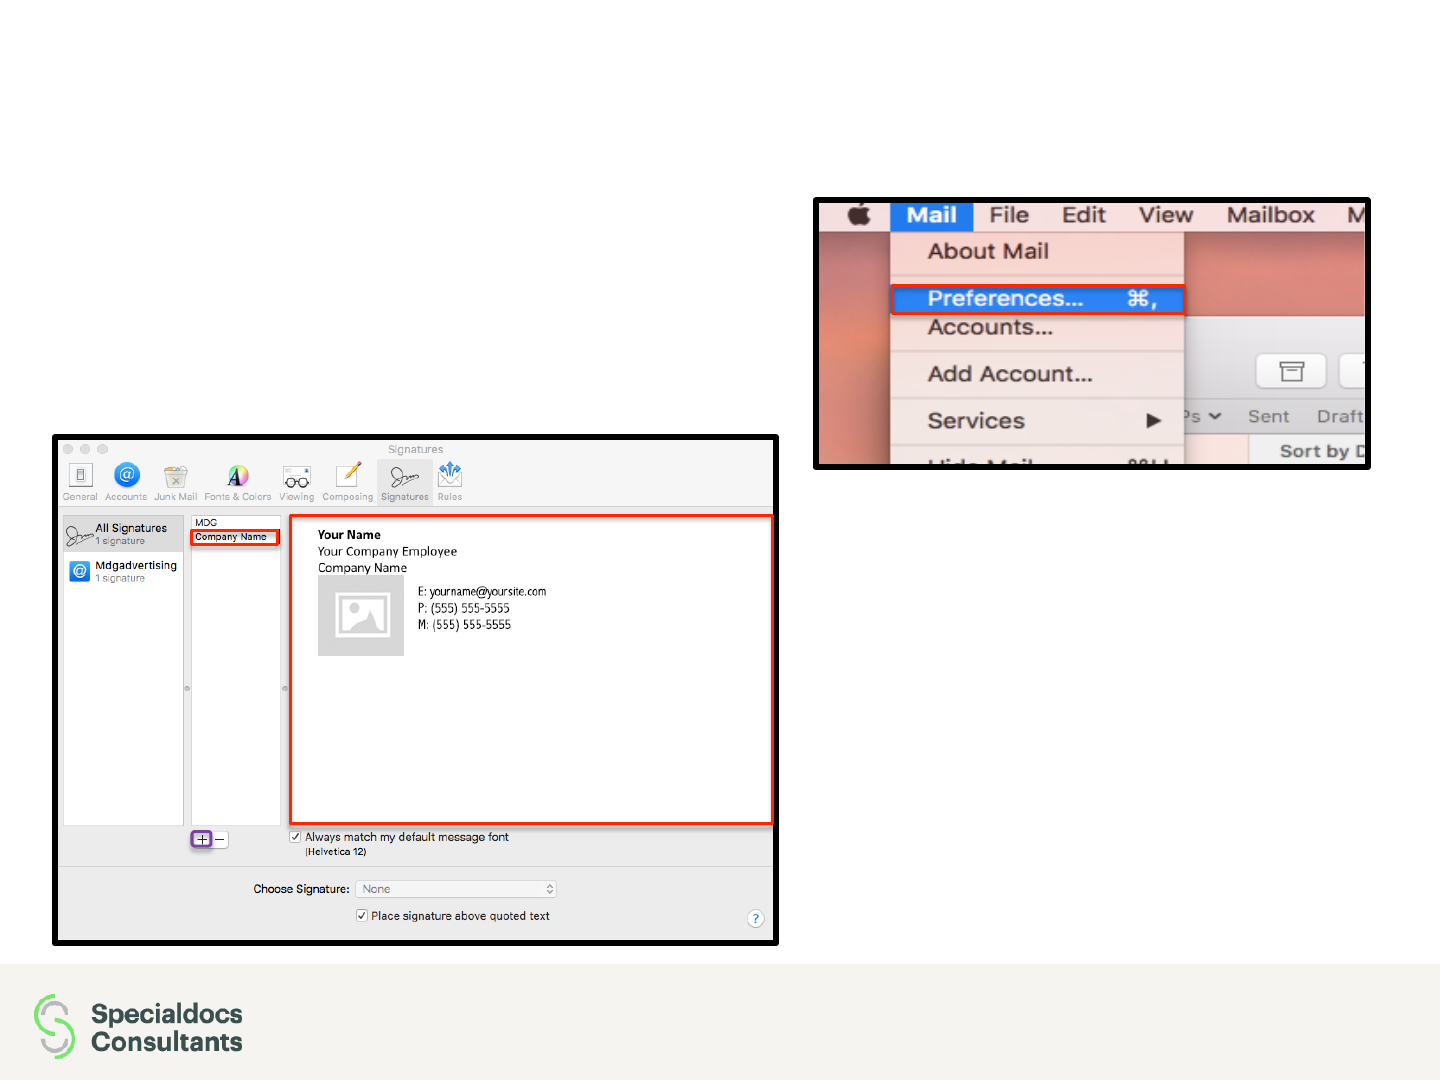
• After opening Mac Mail on your
device, click on Mail on the top left of
your screen and go to “Preferences”
as shown in the image to the right.
• Navigate to the “Signatures”
tab and click on the plus sign
as shown in the image to the
left to add a new signature.
• Next, type in a name for your
signature (i.e., Company
Name), and paste your new
signature in the far right box
and close the window.
Installing On Mac Mail
29 March 2018 Specialdocs eSignature Installation Instructions
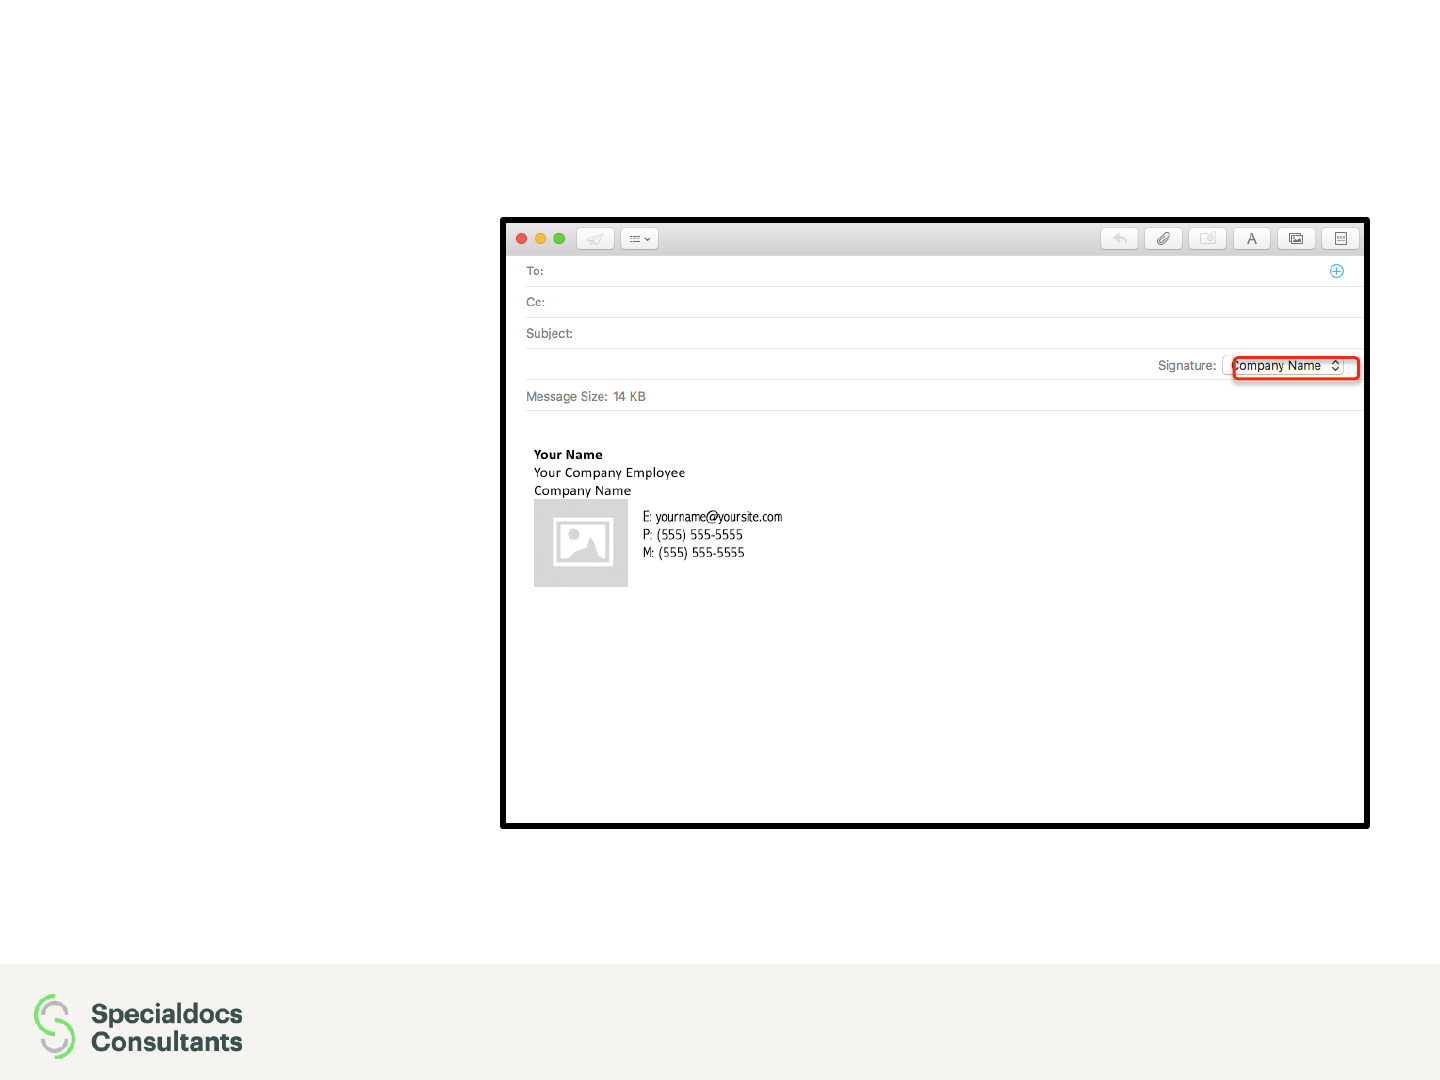
• To test your signature,
compose a new email.
• If the new signature
doesn’t automatically
show up in the body of
the email, use the
signature drop-down
shown in the image to
the right and select the
signature you just
created.
• Your signature will now be displayed in all future emails.

30 Specialdocs eSignature Installation Instructions March 2018
Installing on iOS Mail
Installing On iOS Mail
31 Specialdocs eSignature Installation Instructions March 2018
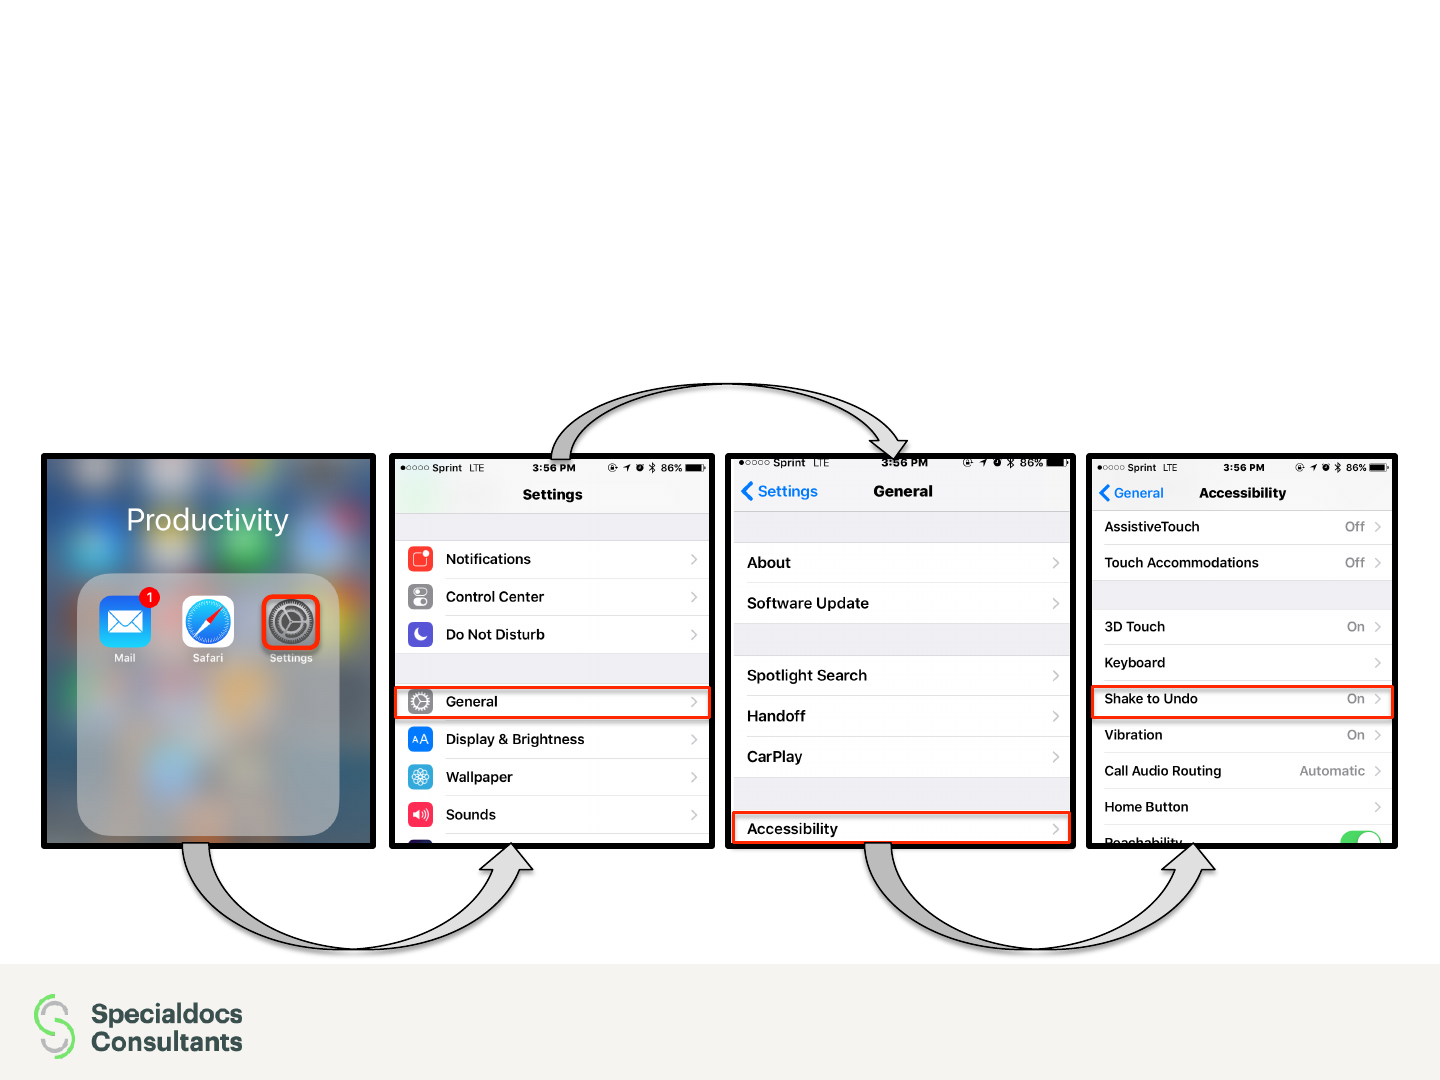
• First, check to make sure the “Shake to Undo” capability is on. To do this, go to
your settings, scroll down to “General”, scroll down to “Accessibility”, and then
scroll down to “Shake to Undo”. If it is off, you need to select it and turn it on.
Installing On iOS Mail
32 Specialdocs eSignature Installation Instructions March 2018
• If you are using iOS Mail,
first you need to go to the
signature generator tool
website on your device in
a web browser as shown
to the right.
• Add your information as
shown and click “Preview
Signature” to make sure
you added your
information correctly.
Installing On iOS Mail
33 Specialdocs eSignature Installation Instructions March 2018
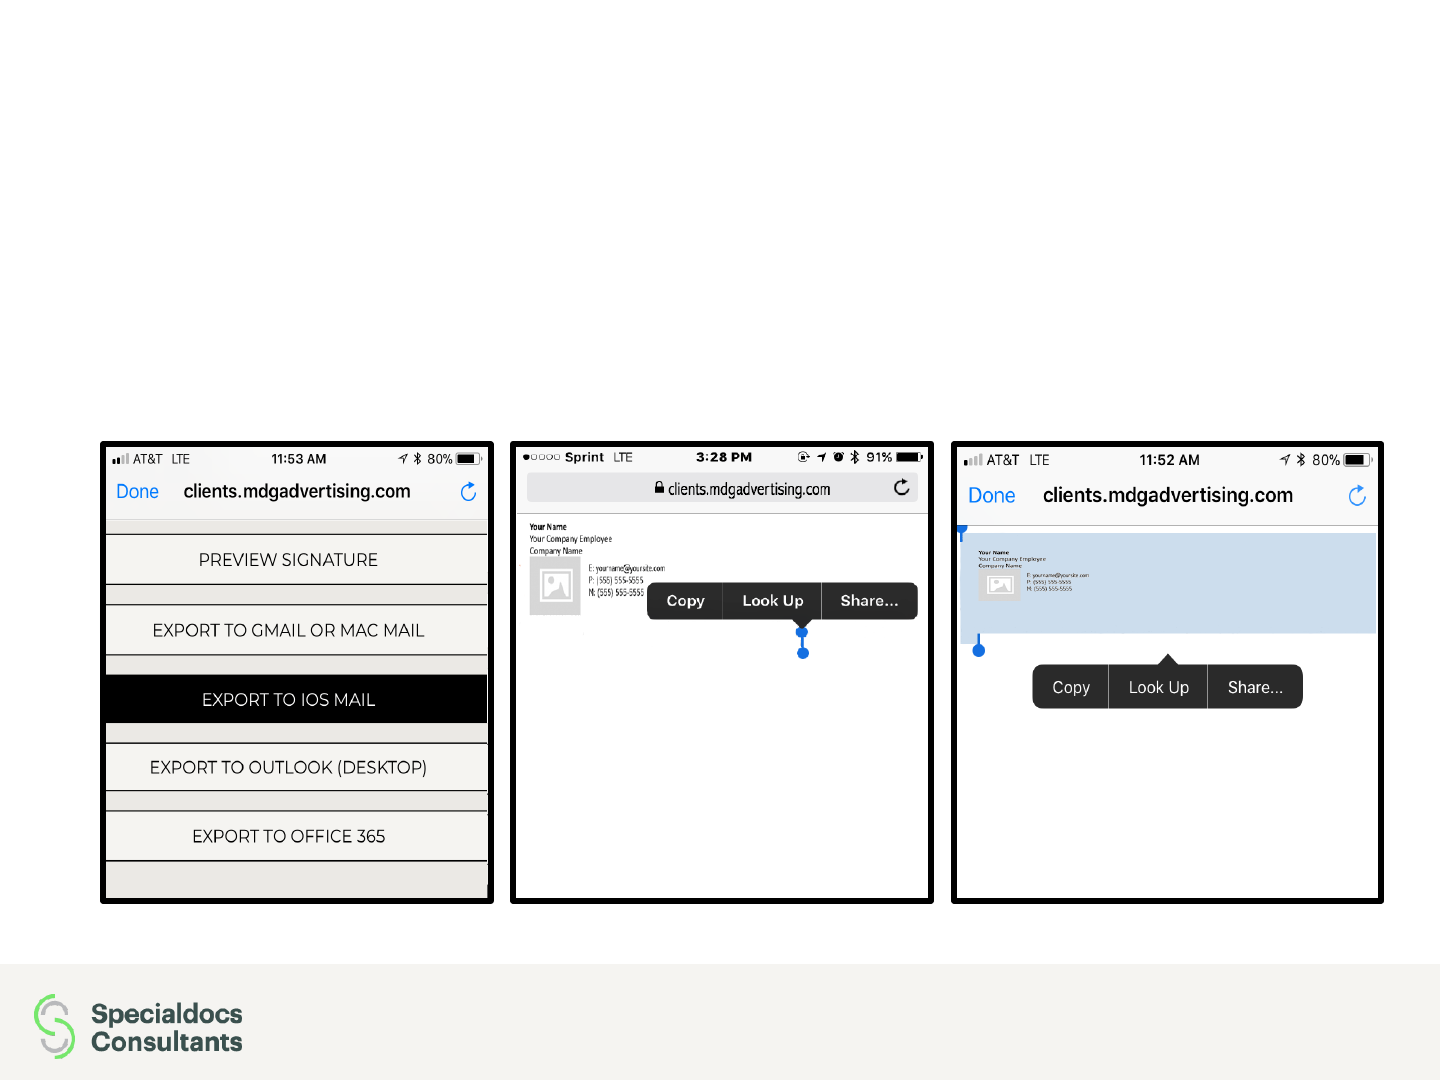
• Next, click on “Export to iOS Mail”, which will open up a new tab in your
web browser that contains the new signature. You need to long press
(touch and hold) the screen with your finger at the bottom of the signature
until it looks like the 2nd image below. Then, drag the blue line until it covers
the entire signature, as show in the 3rd image. Finally, tap “Copy”.

Installing On iOS Mail
34 Specialdocs eSignature Installation Instructions March 2018
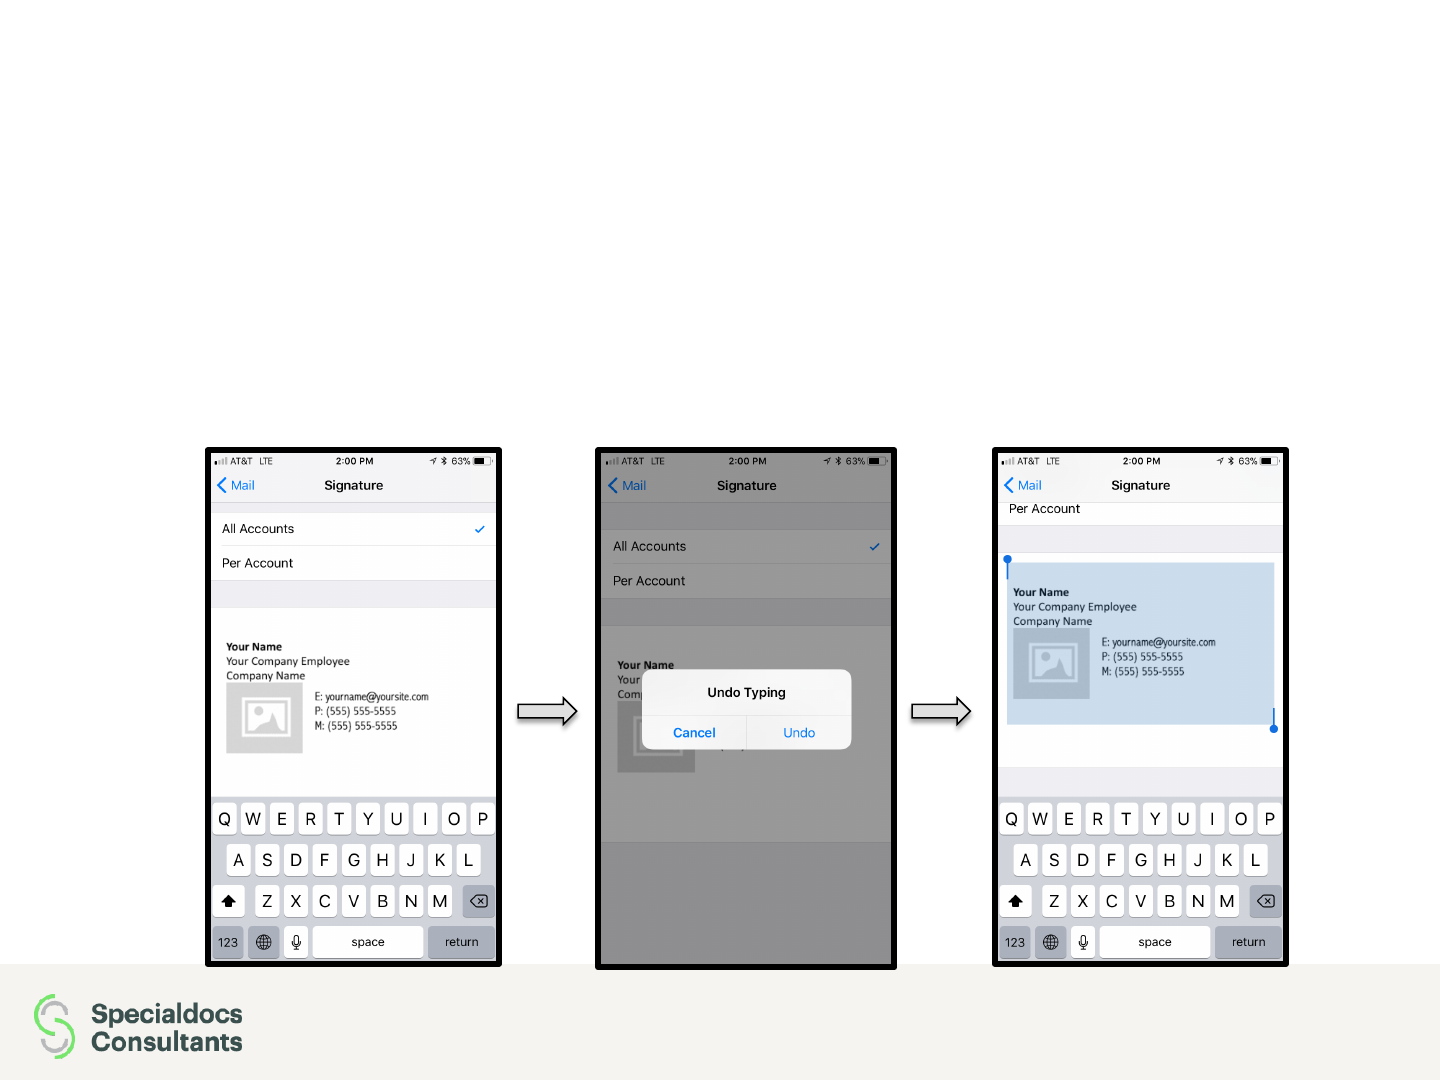
• Now, you need to go to your device’s settings and
navigate to “Mail”. Inside the Mail settings, scroll down to
“Signature”.
• Inside the signature settings, you can select an
email account to add the signature to, or apply it to
all of them, depending on your needs. Long press
(touch and hold) your finger down in the empty
box and select “Paste”.
Installing On iOS Mail
35 Specialdocs eSignature Installation Instructions March 2018
• After you paste the signature in the empty box, you might notice that some of
the colors and text fonts were changed, compared to the preview. To fix this,
you need to slightly shake your phone until a box pops up on your screen that
says “Undo Change Attributes,” as shown below. When this box pops up, you
need to tap “Undo”. You should notice the colors and fonts are fixed.
Installing On iOS Mail
36 Specialdocs eSignature Installation Instructions March 2018
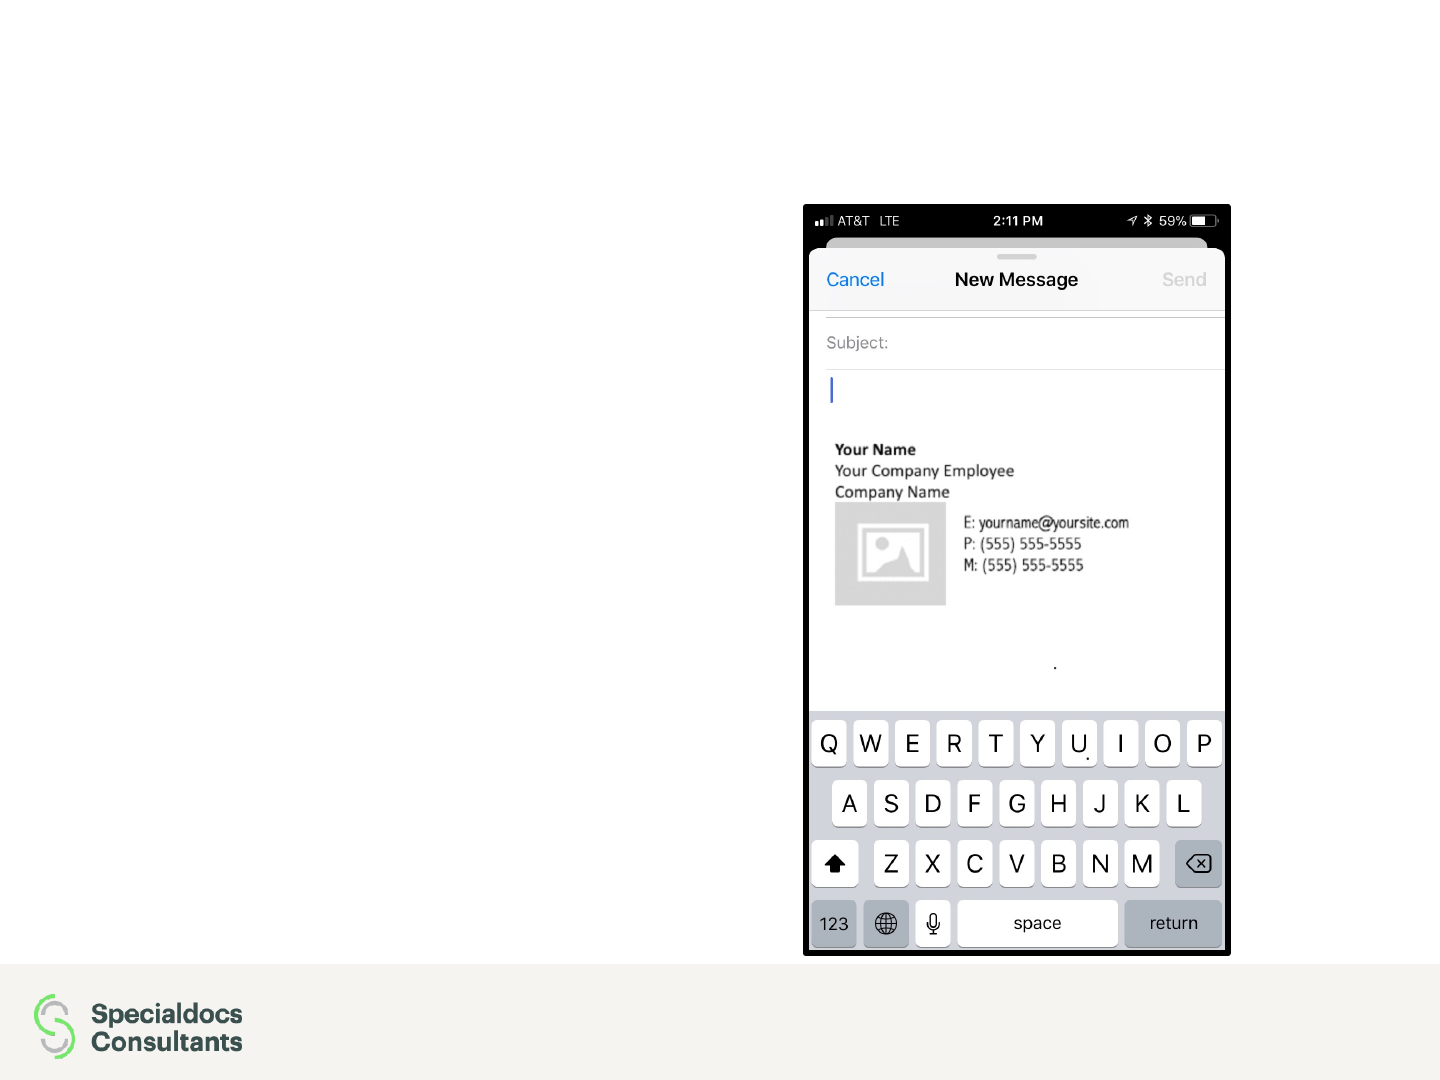
• Finally, when you return to your email
app and compose a new message,
your new signature is now the bottom
of your message.

Installing On Gmail
March 2018 Specialdocs eSignature Installation Instructions 37

March 2018 Specialdocs eSignature Installation Instructions 38
Installing On Gmail
• Please click the “Export To
Gmail or Mac Mail” button
as shown to the right.
• When you click the button, a
dialog box like to the one
below will notify you that the
signature was copied to
your clipboard. Click okay
and continue with the
instructions.
Installing On Gmail
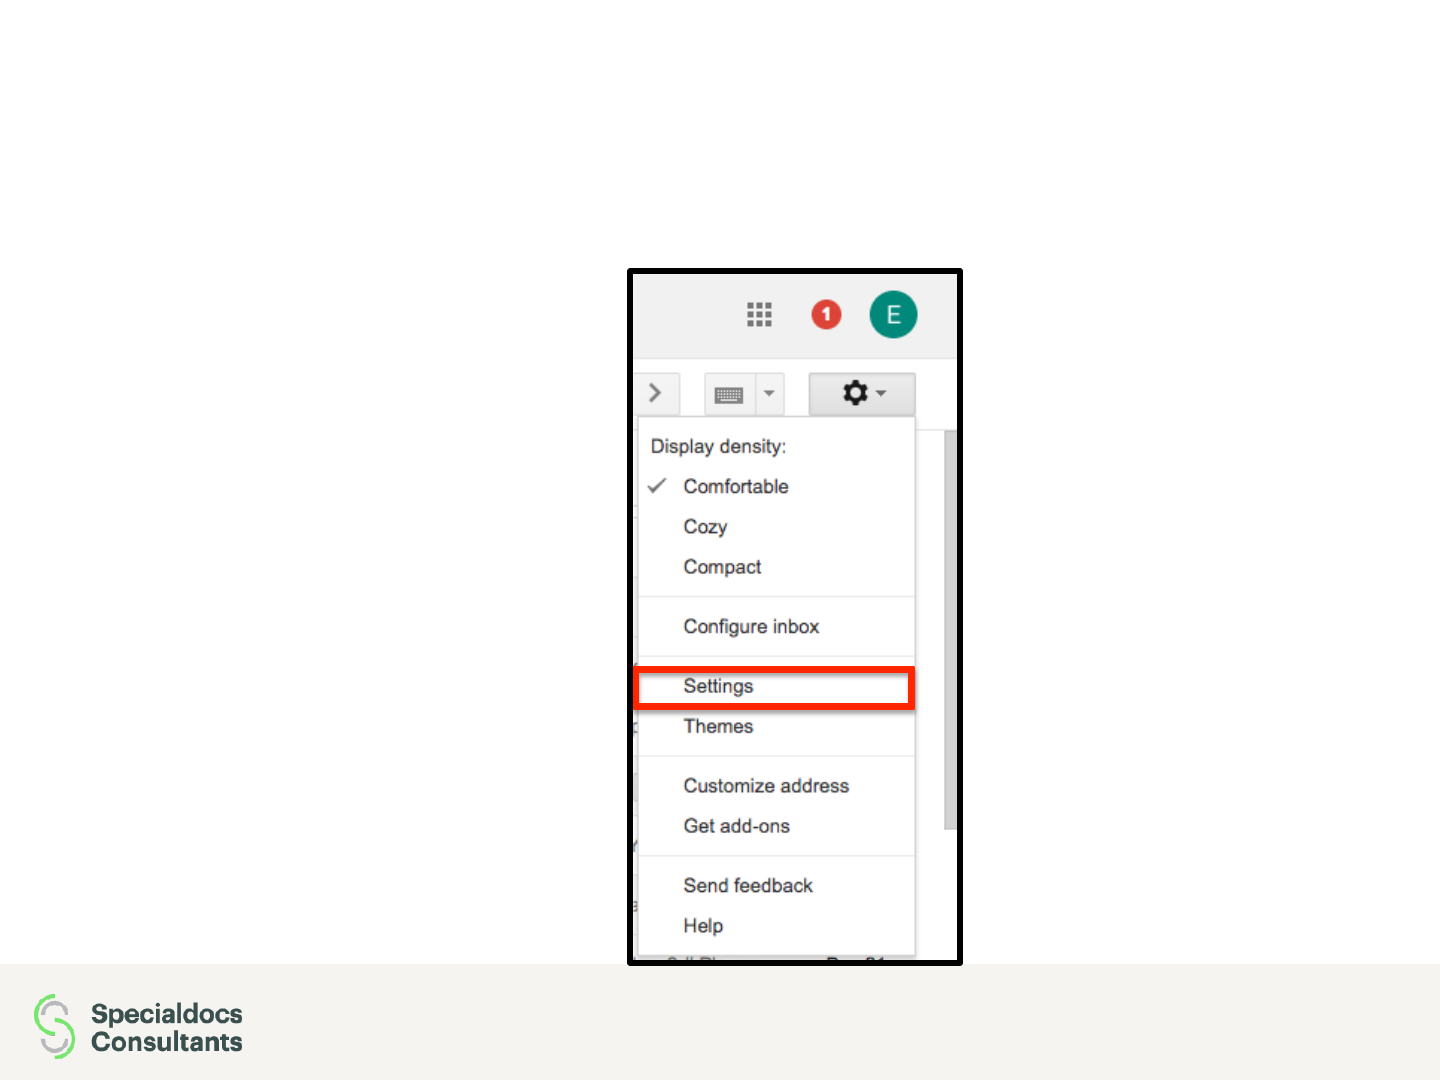
• In the to right, click the Settings
tab in the settings gear drop
down menu.
March 2018 Specialdocs eSignature Installation Instructions 39
Installing On Gmail
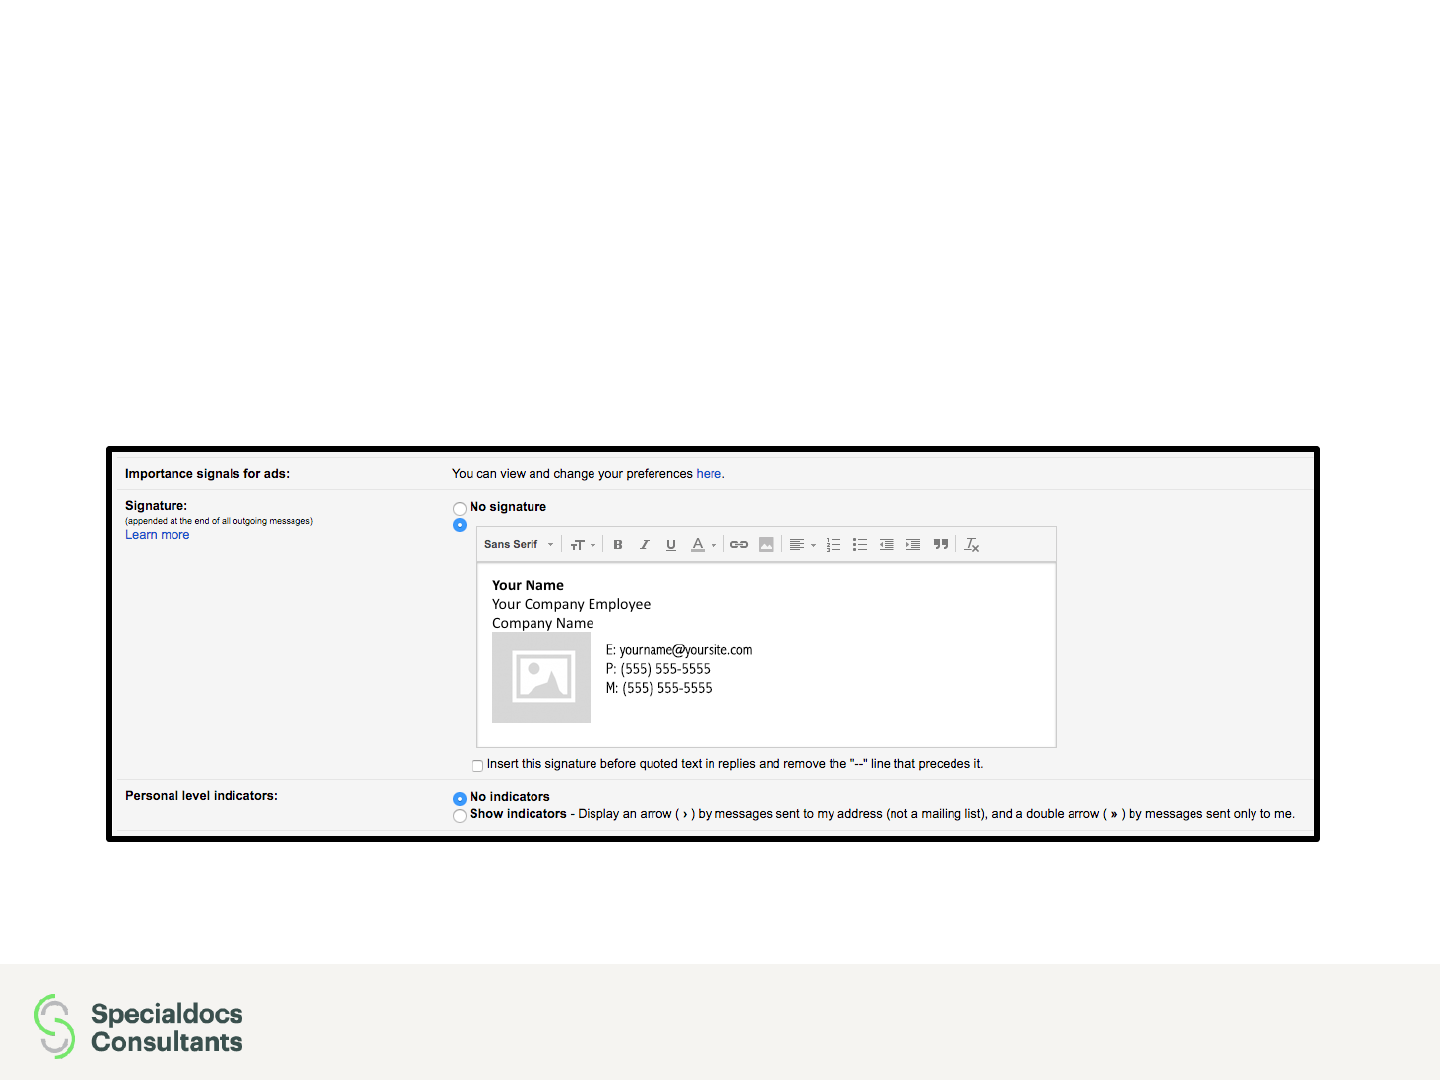
• In the “Signature” section, add your signature text in the box. If you want, you can
format your message by adding an image or changing the text style.
March 2018 Specialdocs eSignature Installation Instructions 40
Installing On Gmail
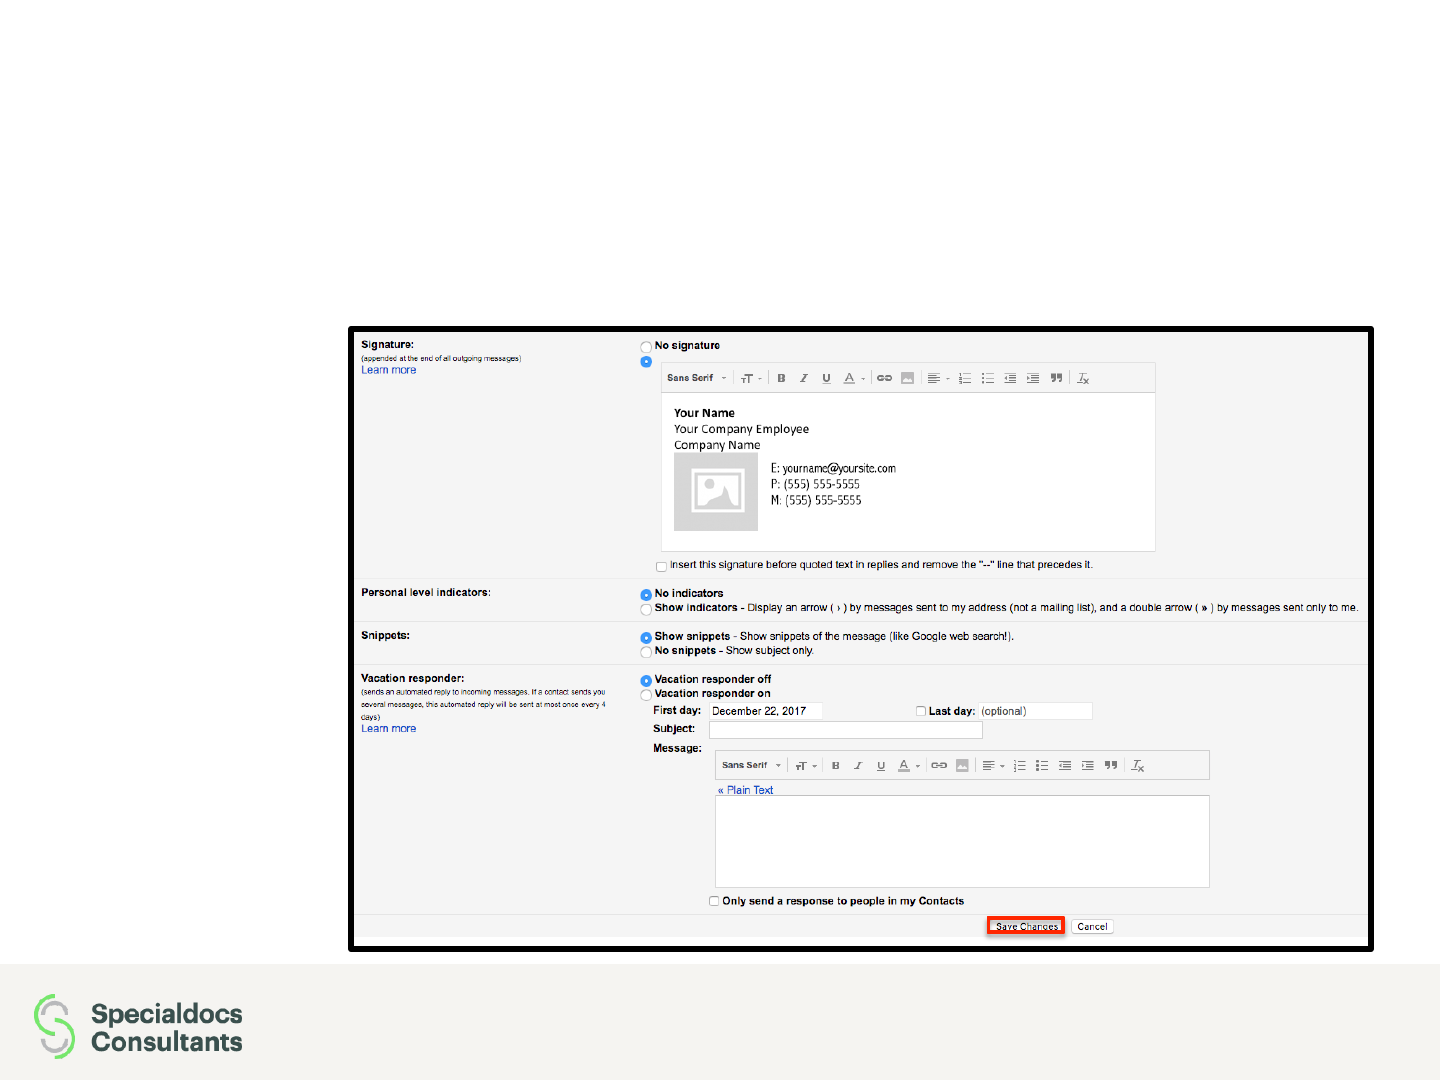
• At the bottom of the page, Click “Save Changes” to commit the changes.
March 2018 Specialdocs eSignature Installation Instructions 41
Installing On Gmail
March 2018 Specialdocs eSignature Installation Instructions 42
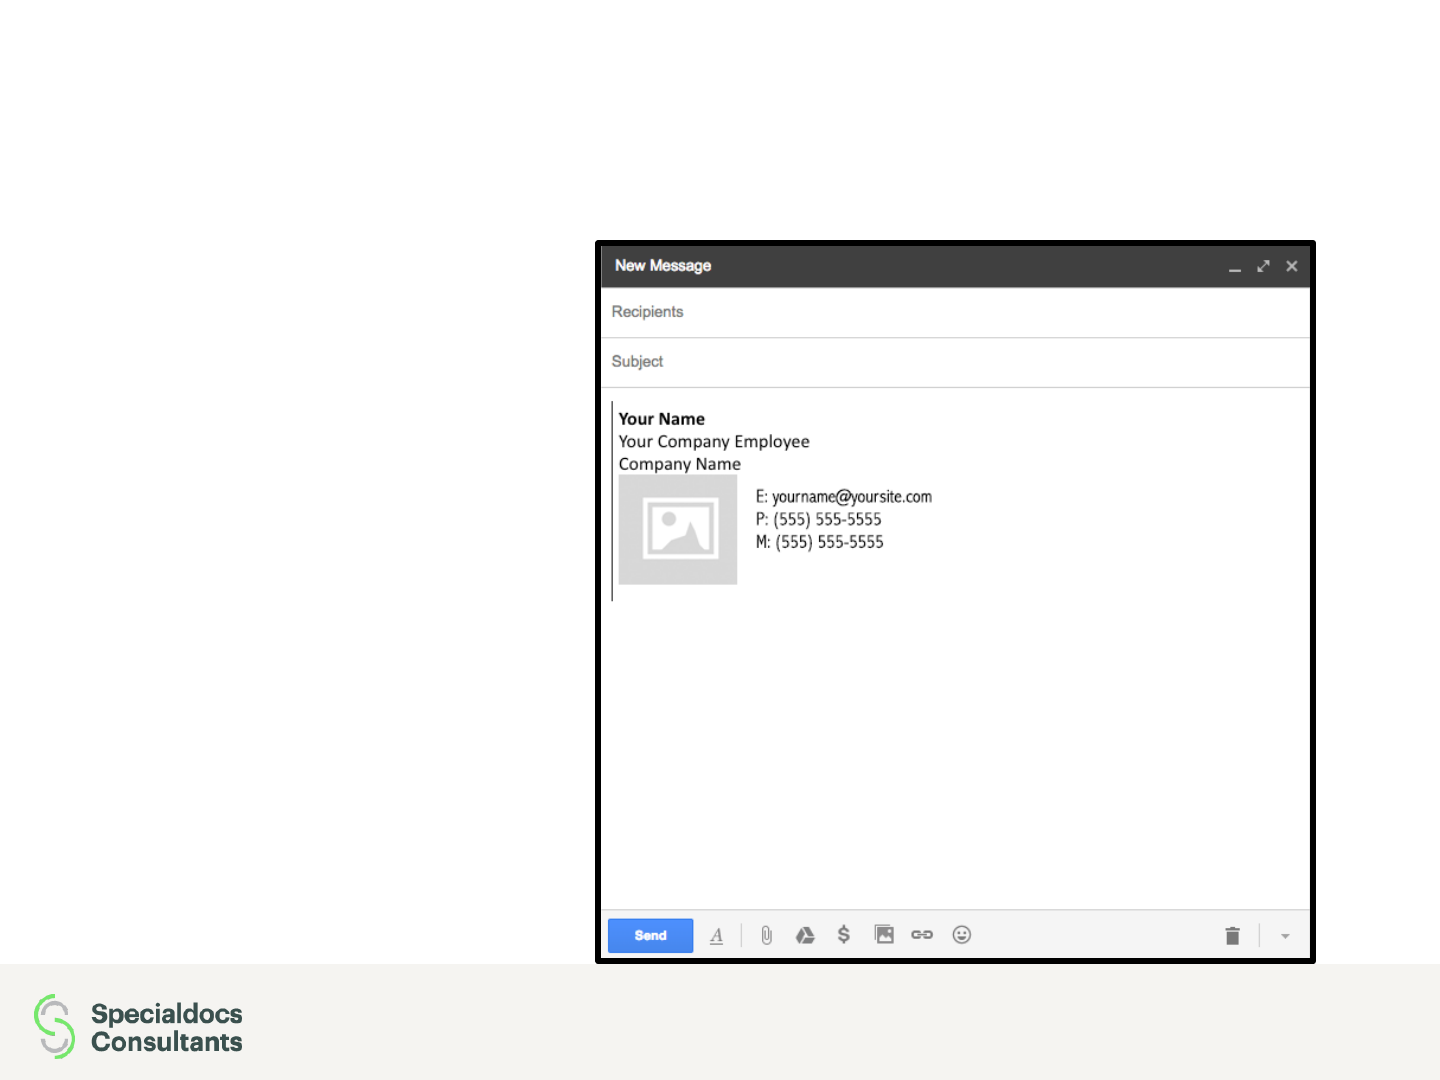
• When complete, verify that your
signature appears in the email
body text area.

43 Specialdocs eSignature Installation Instructions March 2018
Installing on Android Mail Apps

Installing On Android Mail Apps
44 Specialdocs eSignature Installation Instructions March 2018
• Unfortunately, most Android mail apps (including Gmail) do not support
HTML email signatures. Please refer to documentation from your
Android mail app to see if it supports HTML signatures and instructions
on installing HTML signatures.
